Spect Developer Guide
User Manual:
Open the PDF directly: View PDF ![]() .
.
Page Count: 9

Developer guide
Spect Game Project
Hello! This is instructions for Spect sources!
0. Content
1. How start working?
2. Let`s re-skin game!
3. Gameplay settings
4. How add a new enemy
5. Creating new bullets or missiles.
6. Share button
7. AdMob Ads for IntelXDK (Monetization)
8. Export to Mobile Platforms
9. Export to HTML 5
0. Content
Project archive has next folders:
a. Source:
Spect.capx (Construct 2 project)
Share.php (using for share score)
b. Media:
Sound files
c. Graphics:
Graphic sources in PNG, icons and splash screen
d. HTML5:
Exported Game
e. Docs:
Spect_Developer_Guide.pdf
1. How start working?
This game created using game constructor Construct 2.
a. You need personal license for Construct 2!
b. You need latest version Construct 2.
You can find program here: https://www.scirra.com/
And buy here: https://www.scirra.com/store/construct-2
Full manual is here: https://www.scirra.com/manual/1/construct-2
After install and run program, you can open Spect.capx file with project!
Project resolution is 1024x768, but game support multiply screen sizes, and good
looking on any popular sizes of tablets or other devices.
Also game support touch, mouse and keyboard controllers.
Project has 2 layouts (game and loader) and 2 code pages (game and loader).
Loader using only in HTML or Desktop exported game.
2. Let`s re-skin game!
Game contains only one animation for main ship, and several animation of explosions.
So it is easy re-skinning).
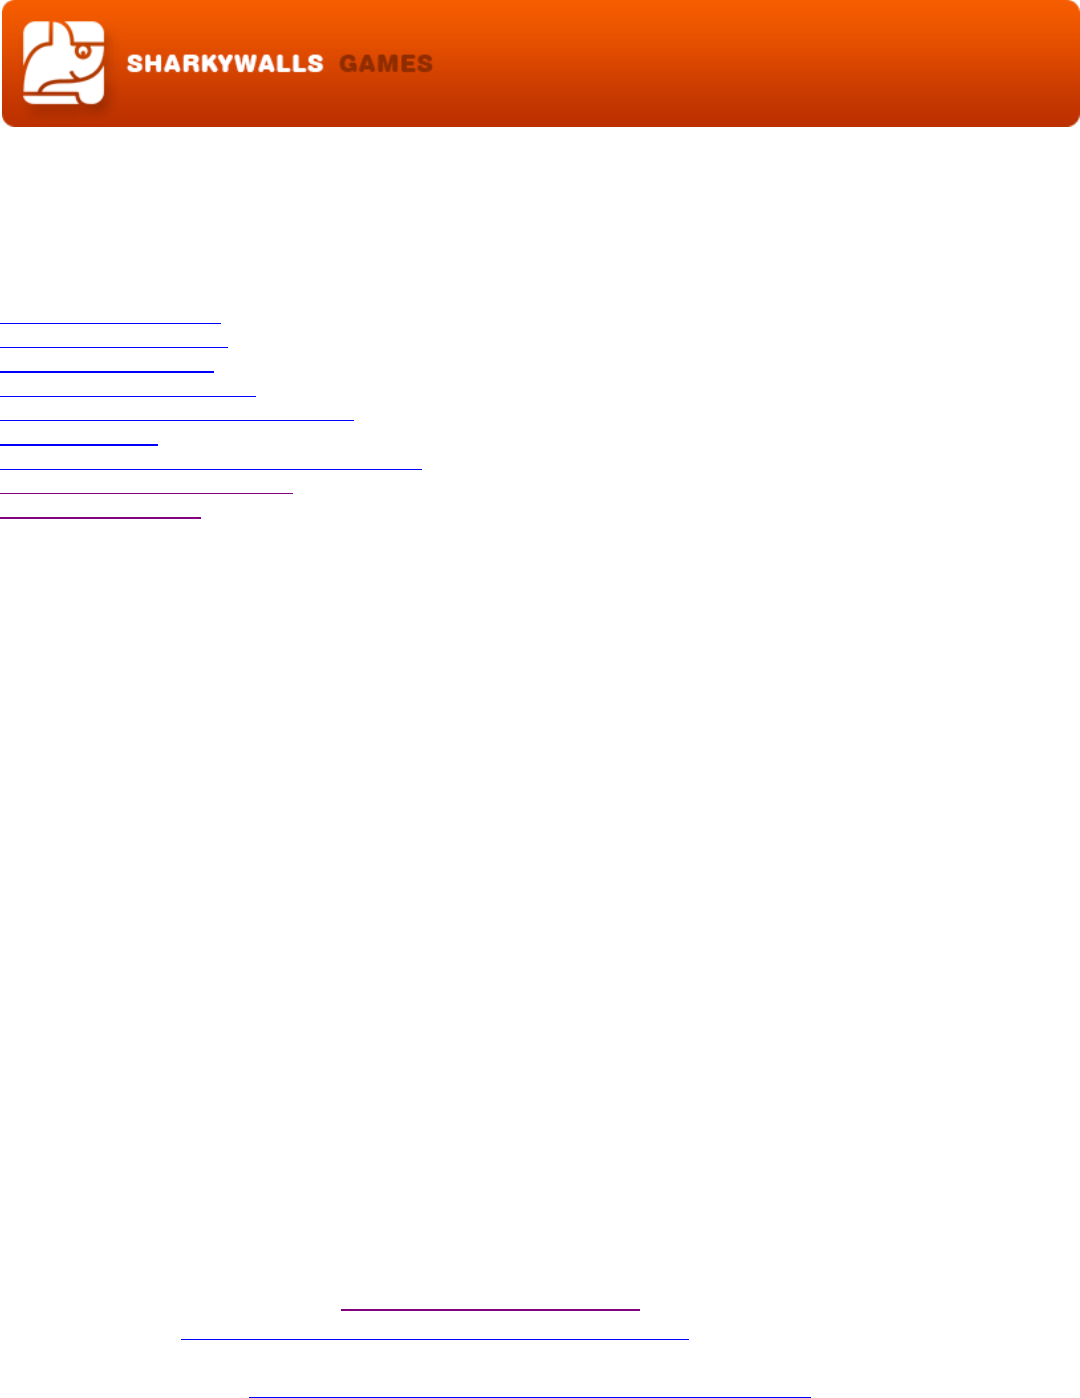
For re-skin find object in project
bar and double click on him.
Objects for re-skin placed in
thematic folders.
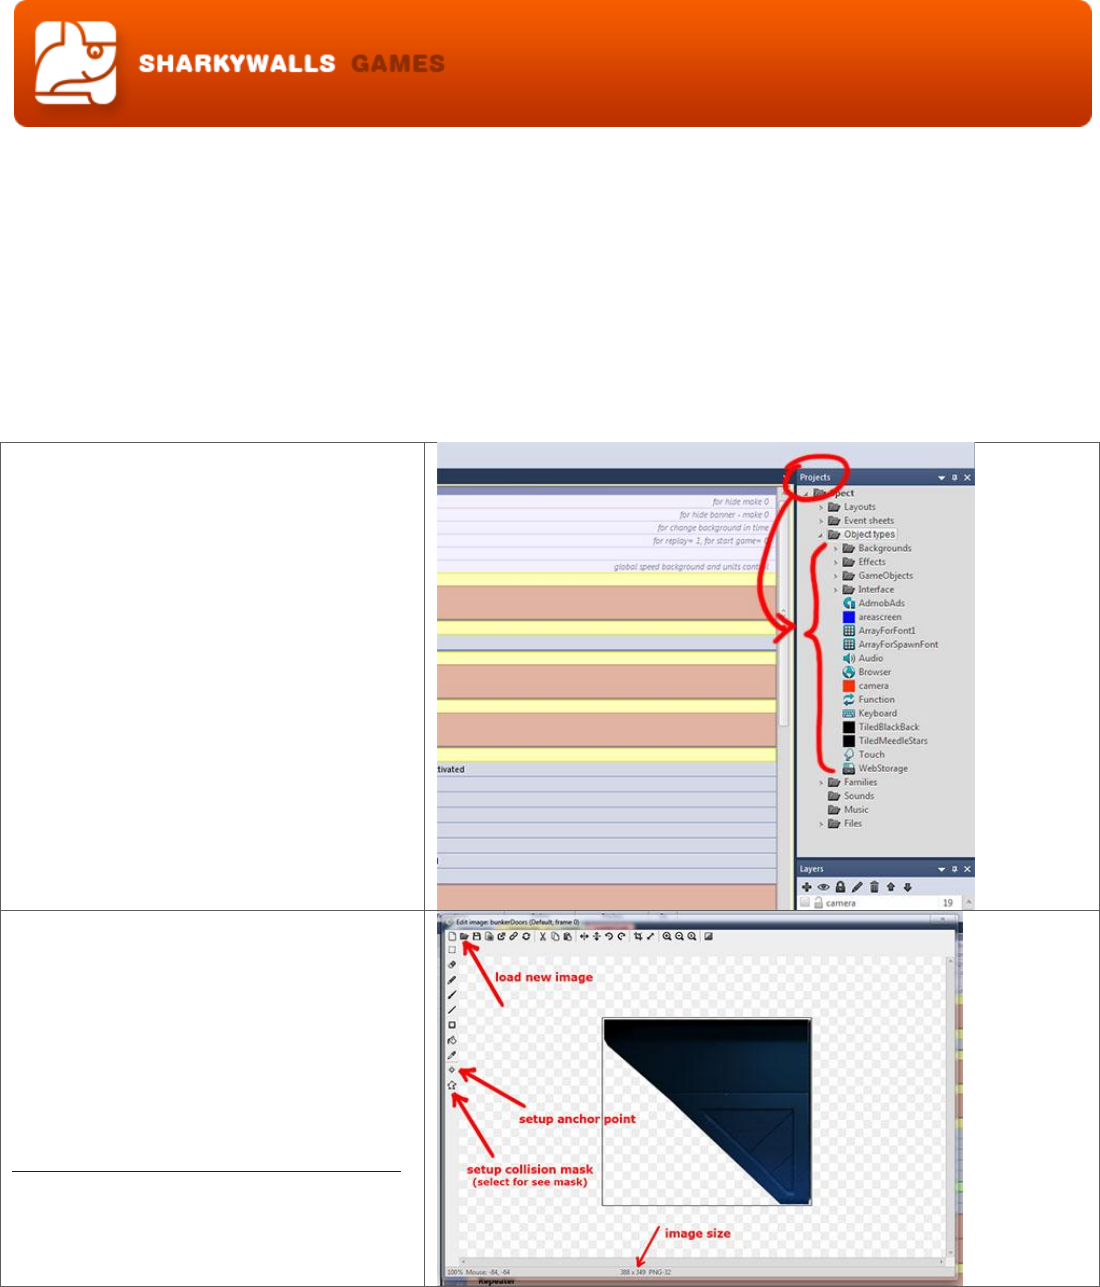
double click open image editor,
here you can replace image,
press button and choose new
image in same size (optionally).
If object have collision mask or
anchor point re setup them for
correct work! Check them before
replacing image!
More info about image editor>>
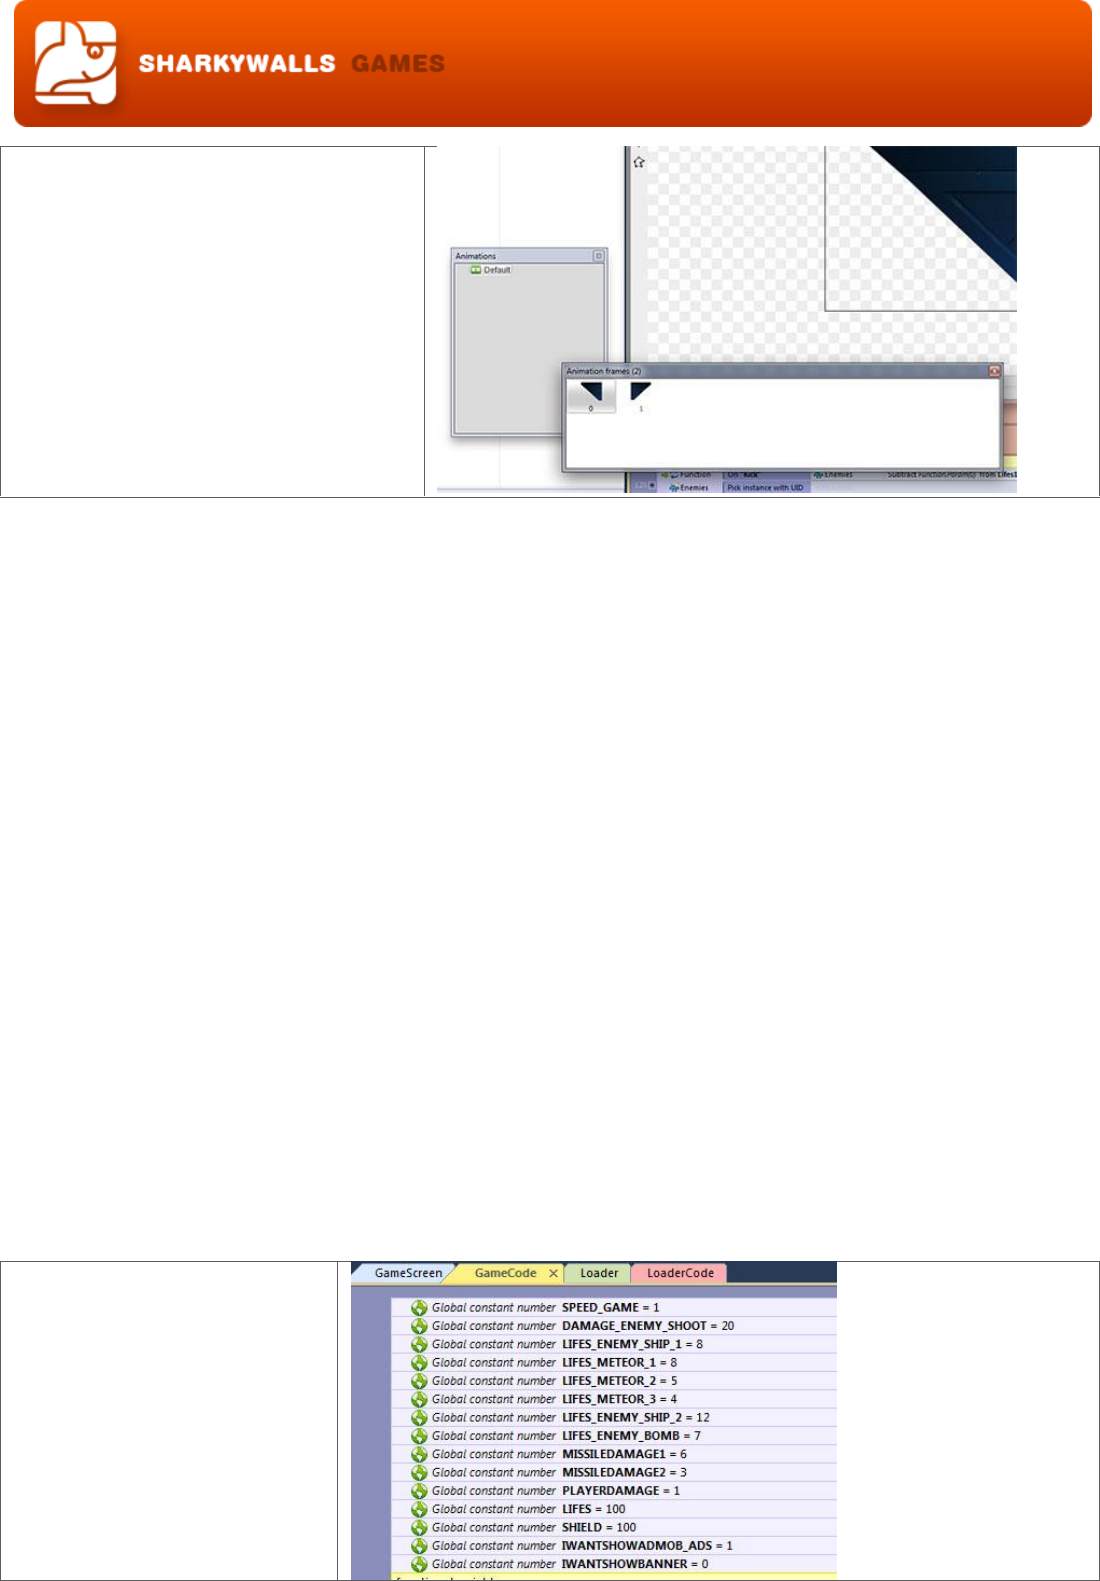
If object have animation frames
you can replace them too, just
choose frame in animation
panel, which opened with image
editor.
Some objects have animations
frame not for animations, but for
changing their own state.
So this animation have speed =
0, and change frames directly
from events.
Elements for re-skin you can find inside in project folder, in folder “object type”:
a. Backgrounds: here placed backgrounds, they not need collision mask make it
box, anchor point must be in center image. Some objects must be tiled. Some
objects have several static frames for optimize working, check it.
b. Effects: here placed simple effects as explodes, glows and so on. They have
animation but not all, they not need collision mask, make it box. And you can use
it as is without re-skin.
c. Game objects: important objects, enemies, and functional effects with collisions
masks. Try change them on images with same sizes. Check and setup anchor
points and masks before and after re-skining.
1. Enemy ships use advanced points for pining motor flame and shooting
effects!
2. Main Ship use it too! Also he has turn-animation. And central frame is 6!
This frame used when ship in static! Anchor points need setup for every
frame.
d. Interface: all interface items, including tiled animated indicators for reloading
missiles and shield. They have masks and points (masks only for buttons).
Also indicators based on tiled objects for easy animate them. So try use same
size images for it.
Note: We have a plan create and add on graphicriver.net special re-skin packs
for this game, check it!
3. Gameplay settings
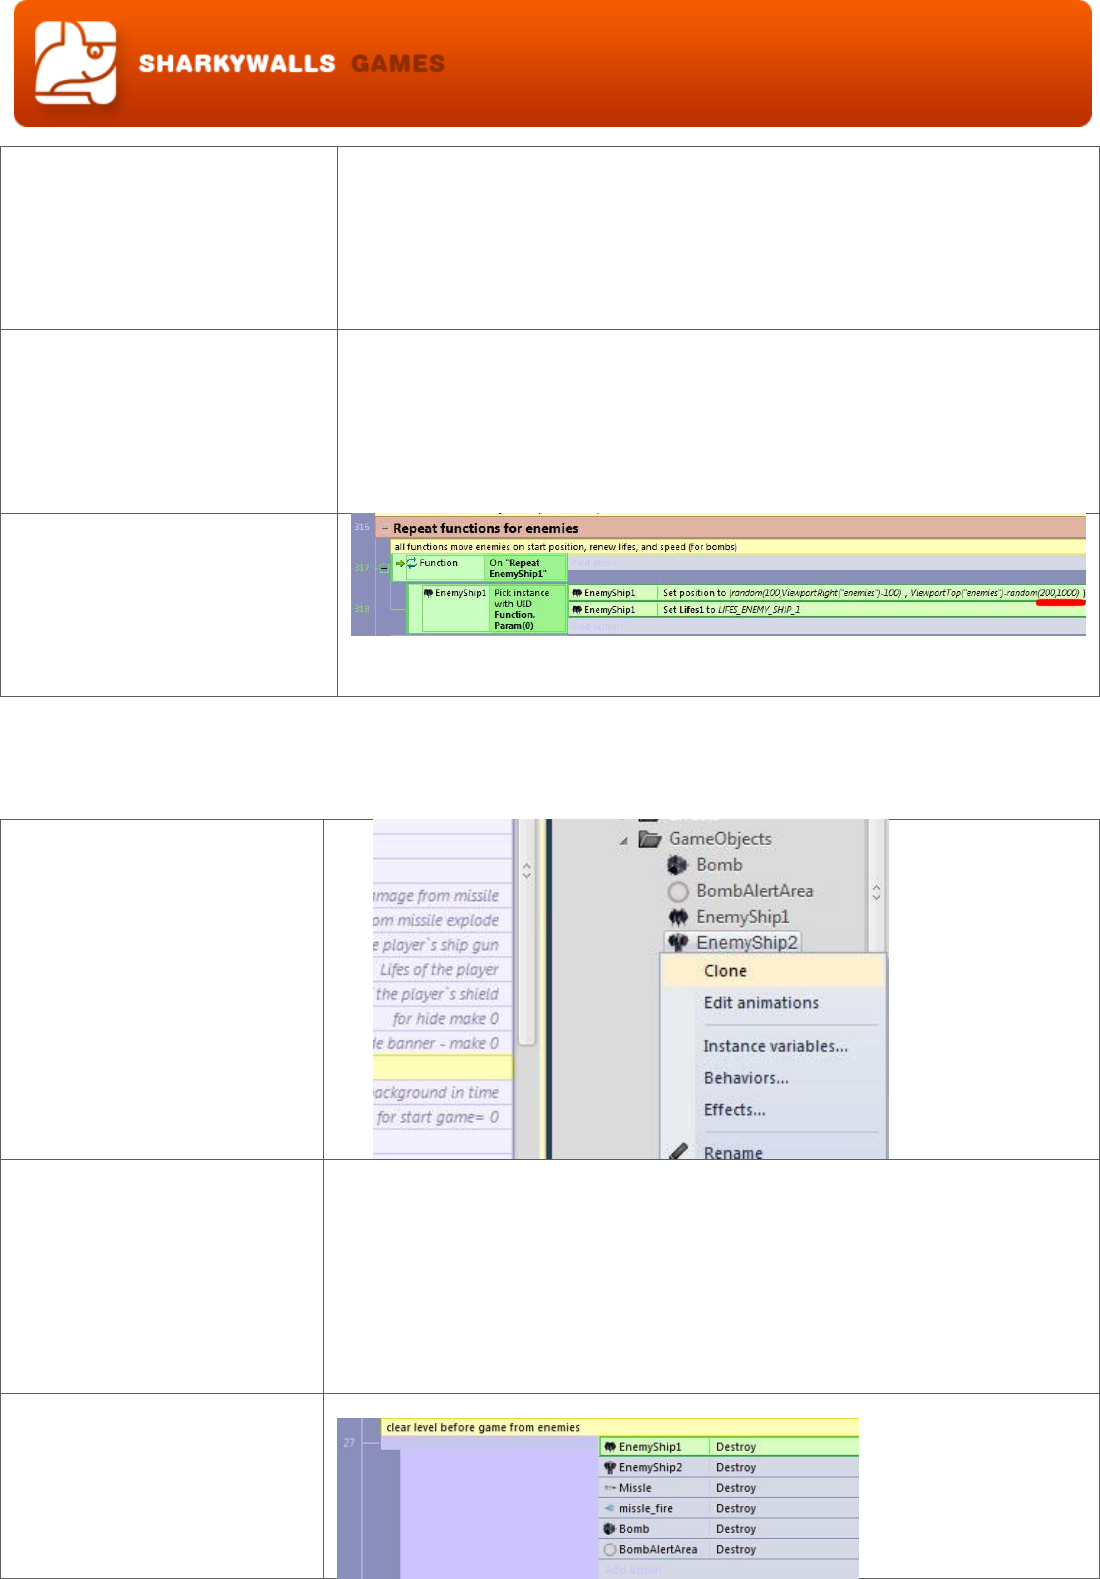
Simple changes for
damage, lifes, speed and
so on with global static
variables, just change
them:
More changes you can
make with individual
settings for objects. Just
select object in project
bar and have a look at
properties bar.
1. Speed of bullets: Object – Shoot1, Bullet settings
2. Speed of Enemy Bullets: Object – Shoot_Enemy
3. Meteor trash lifes: > Object – Meteor_Trash > Variable
Life1.
And so on. Not change objects settings with global
variable; it will overwrite on start game from variable.
For spawn new enemies
see “hardness increaser”
group events.
This group working simple. First, timer is, working per
second. And three events are, creating new enemies
using this timer.
For increase interval
between appearances
same enemy. You can
increase Y-coordinate in
repeater function.
4. How add a new enemy?
1. Select
EnemyShip1
object in project
bar > then right
click > clone
2. Setup individual
properties for him!
3. And re-skin him!
Not forgot setup
for anchors and
mask!
Individual variables:
Power – damage for sollision with main ship
Lifes1 – first lifes for enemy
Score –poins, which you can get from him.
Behavior Sine - make horizontal movement for enemy!
Custom movement – not need setup here.
4. Go to GameCode!
5. Find events with
EnemyShip1, and
copy-paste them!
6. Select and make
“replace object”
27 event / source for clone enemy event(ex. EnemyShip1)

for new pasted
events, and
choose new
enemy which you
created.
(Select pasted
events with sub-
events, make right
click and choose
replace object,
then select new
object or
EnemyShip1, if
objects in events
are few, and then
new enemy)
130 event with sub-events (131,132) (it`s death enemy)
168 event with sub-events (169,170) (build motor and shooting effects
for enemy) make sure for correct names of anchor points here and in your
sprite.
188 event (189,190) – shooting enemy, here you can adjust speed
shooting, count of shoots and angle. Make sure for correct names of
anchor points here and in your sprite.
197 call repeat function for your enemy
317 (+318) event,
After copy-paste, not forget past name of new function to 197 event!
Make new global variable with lives of enemy and past her to 318 event.
7. Add creating event
for your new
enemy to
“Hardness
increaser” group
for spawn in time.
Note: If you create you enemy without cloning. Not forgot
add him to enemy`s family. Select family in project bar right
click and choose edit. Then add new enemy.
8. Drag your enemy
from project bar
to “enemies” layer
on game screen.
5. Creating new bullets or missiles.
If you created new bullets make sure that they call “kick” function on collision with
enemy family. And set to function damage and “enemy.UID”.
6. Sounds
If you change sound – you should change global variable with name of this sound,
because calling is by name of sound.
For add new sound, right click at folder “sounds” and choose import sounds.
Two formats of sounds made for support ios and android, not delete them.
7. Share Button
For re-setup share button you can use php script in your hosting.
It`s working on mobile devices too.
Lesson is here: https://www.scirra.com/tutorials/908/facebook-share-button-php
Script is here: Source / Share.php
Event placed in Share Button group.
8. AdMob Adds for IntelXDK
You can simplify monetize this game. Because project have adds from Admob.
You need only registration in Admob, and get banners ID.
And use it in plug-in settings in project. Just select plug-in object in project bar.
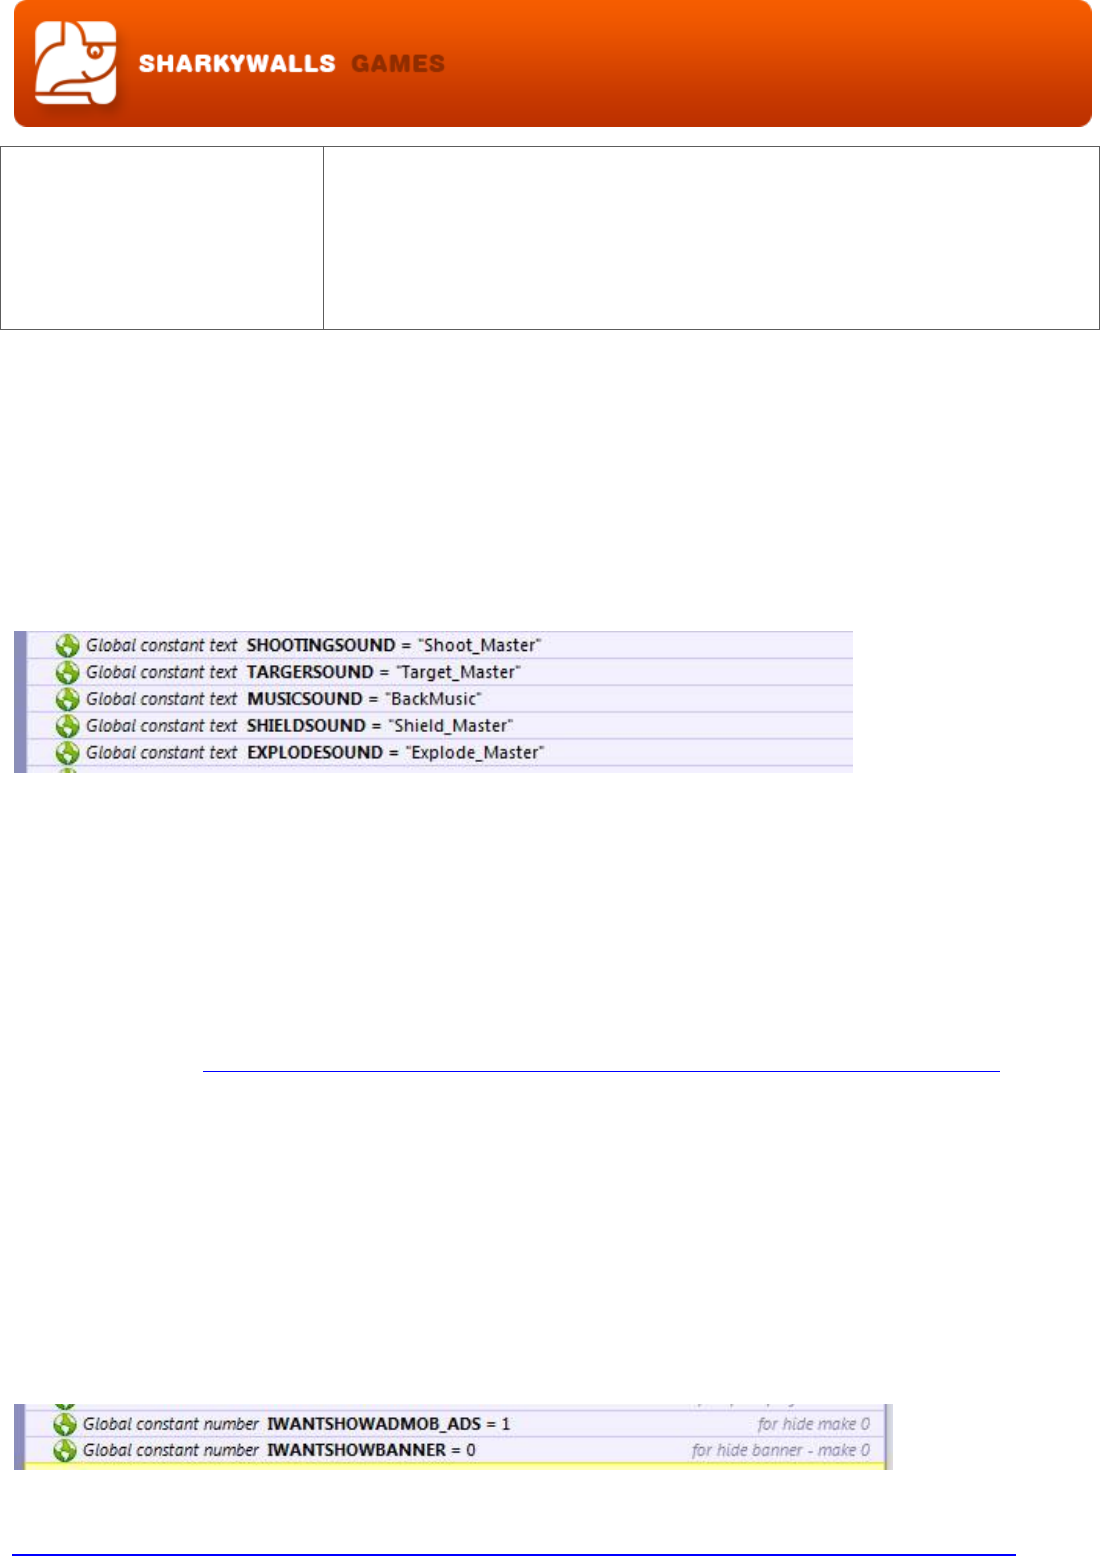
For adjusting showing banners use global variables:
More info is here:
https://software.intel.com/en-us/html5/articles/ads-for-crosswalk-and-construct-2
9. Export to Mobile platforms
You can use game export to mobile platforms in two ways.
a. Cordova export with IntelXDK compiller. (AdMob will working)
b. CocoonJS export from Ludei (you need premium account for monetization, and
you have to install and adjust cocoon plug-in for construct 2)
Both ways is free.
Cordova export
Register and download Intel XDK, here:
https://software.intel.com/en-us/html5/tools
Read lesson here:
https://www.scirra.com/tutorials/809/how-to-export-to-android-with-crosswalk
And not forgot about AdMob:
https://software.intel.com/en-us/html5/articles/ads-for-crosswalk-and-construct-2
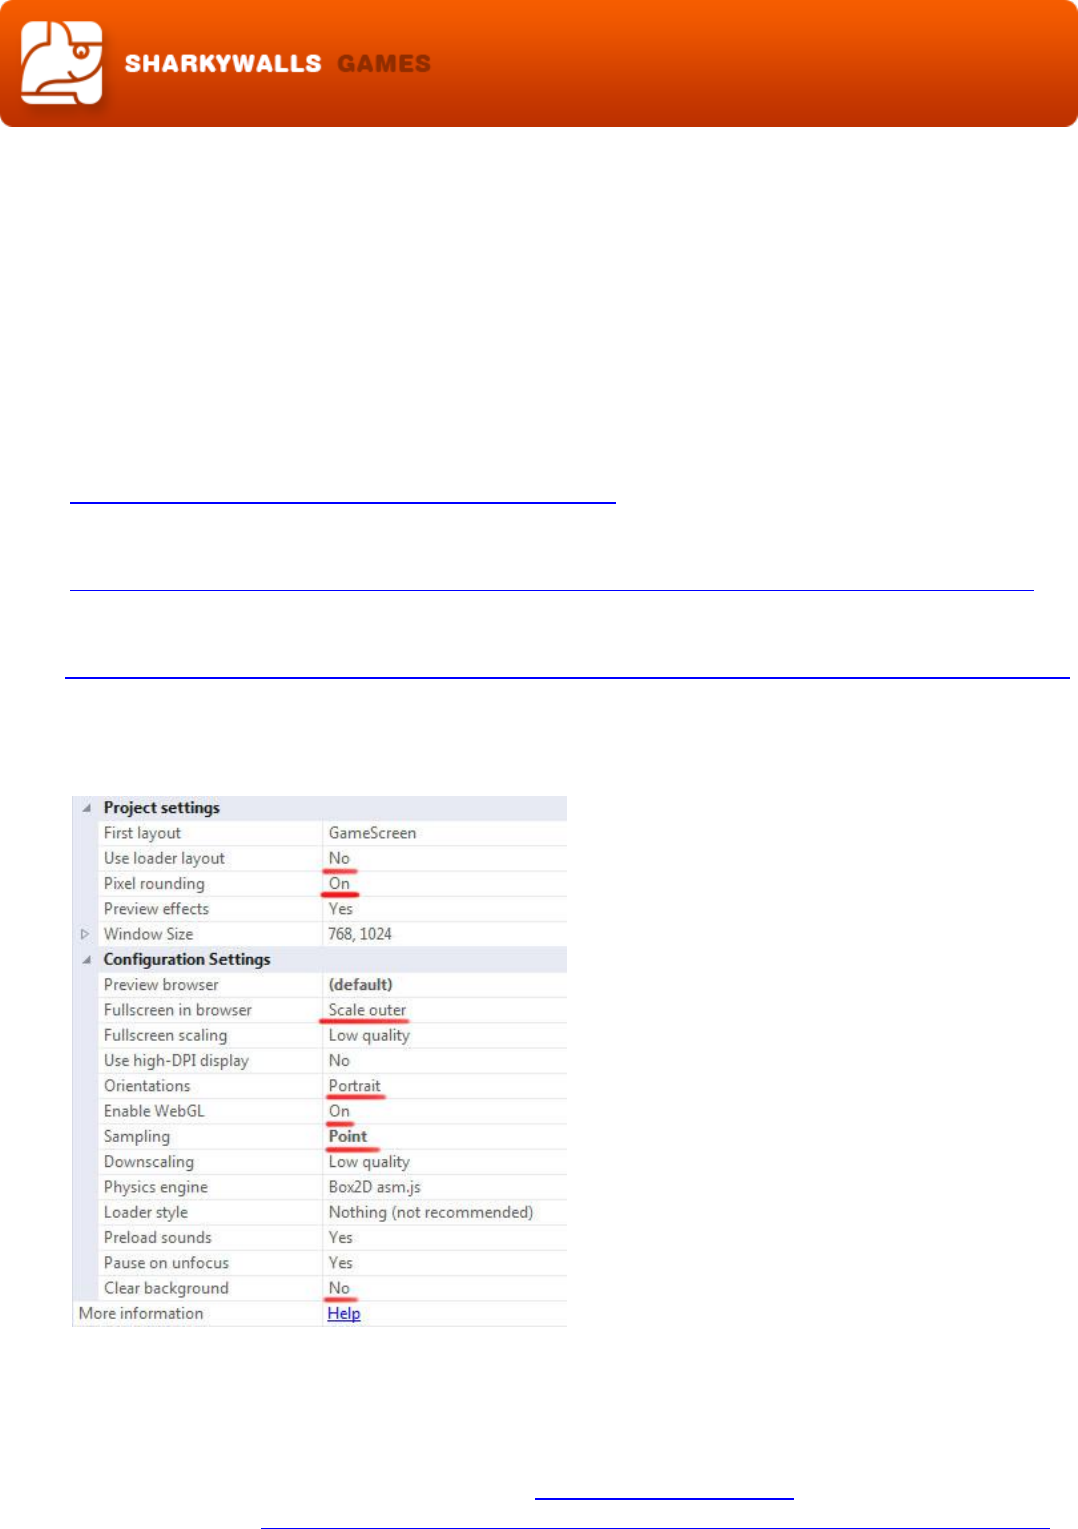
Also, before export, you must adjust next project settings for export (for this
choose project in project bar):
Crosswalk version working stable on many platforms, but can freezes on weakly
devices, and need really good optimization.
Ludei export
Register and create new project here: https://sso.ludei.com
More info here: https://www.scirra.com/tutorials/303/how-to-export-to-cocoonjs
About monetization with Cocoon JS you can read here:
https://www.scirra.com/tutorials/1024/mopub-integrate-admob-in-your-cocoonjs-
games
Also you have to delete Admob object from project, before export to Cocoon!
Ludei has own plug-in which using for monetization.
Settings of the project can be same as for export to Cordova.
Test game after compilation on different devices! Cocoon JS is high performance
but unstable compilation service.
10.Export to HTML5
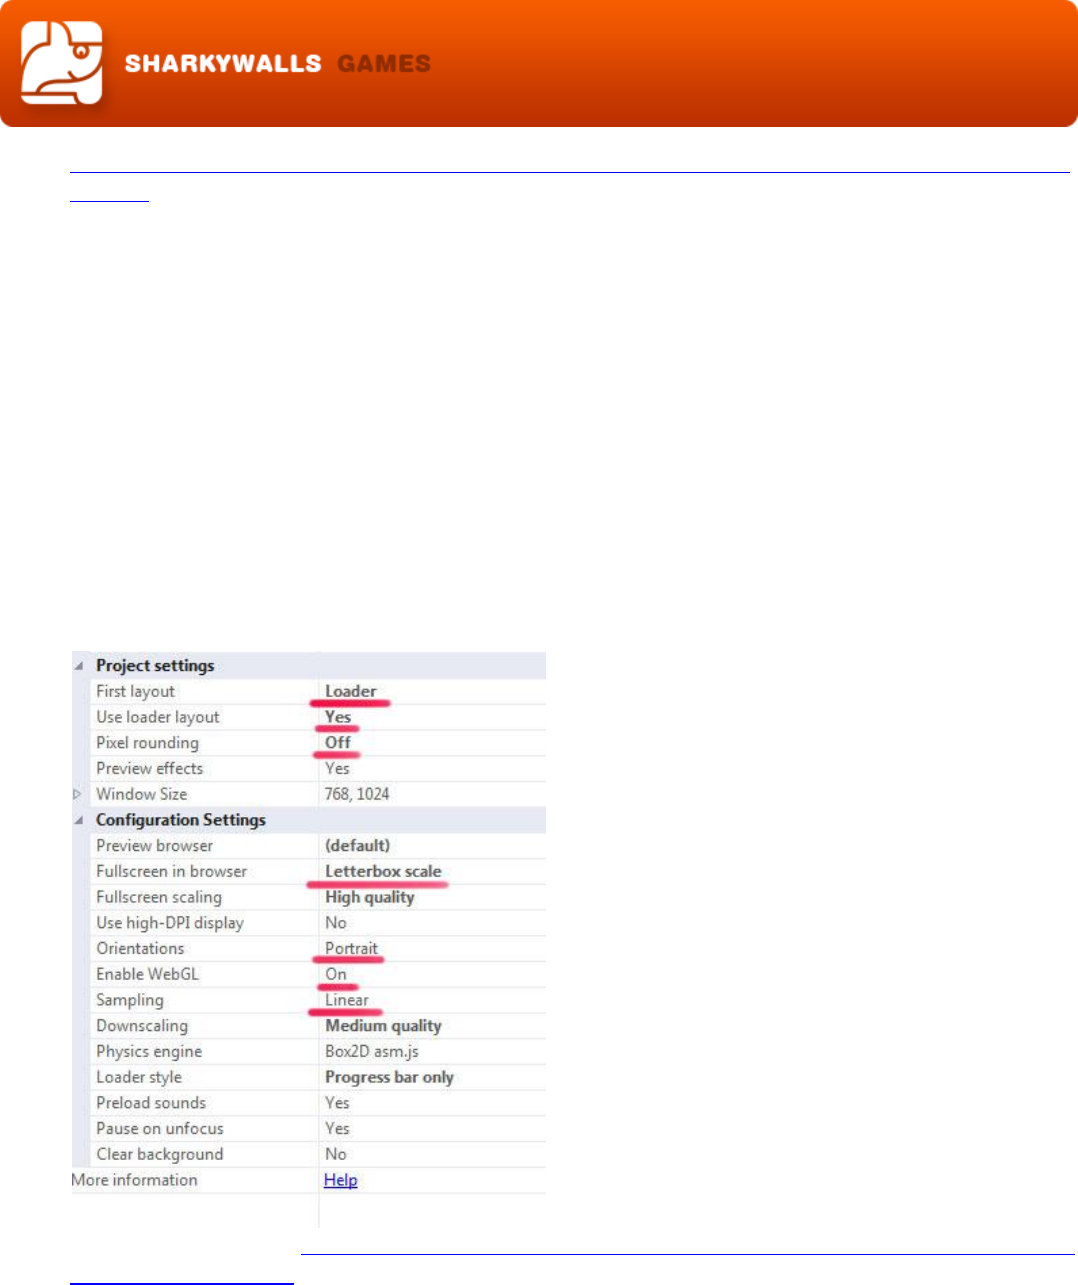
Very simple export for game!
Make project settings like:
And read here: https://www.scirra.com/tutorials/655/tips-on-publishing-html5-
games-to-the-web
Choose in export window HTML 5 export.
That`s all! Good luck!
