BTW BTServer Spy User's Guide Spylite User
User Manual: SpyliteUserGuide
Open the PDF directly: View PDF ![]() .
.
Page Count: 15

SpyLite User’s Guide
for
BTW
General Release
April 18, 2003
Document Number: 110300-1048
Version: 2.5

SpyLite User’s Guide for BTW
LICENSED SOFTWARE
© Copyright 1999 - 2003, WIDCOMM, Inc. ("WIDCOMM"). All rights reserved.
WARNING: copyright law and international treaties protect this software and accompanying
documentation. Unauthorized reproduction or distribution of this software, or any portion of it, may result
in severe civil and criminal penalties, and will be prosecuted to the maximum extent possible under the
law.
Use of this software is governed by the terms of the end user license agreement that accompanies or is
included with such software. Unless otherwise noted in the end user license agreement, or herein, no part
of the documentation accompanying this software, whether provided in printed or electronic form may be
reproduced in any form, or stored in a database or retrieval system, or transmitted in any form or by any
means, or used to make any derivative work (such as translation, transformation, or adaptation) without the
express, prior written consent of WIDCOMM.
Trademark(s) TM and Registered Trademark(s) ®
WIDCOMM and the WIDCOMM logo are trademarks of WIDCOMM, Inc.
Bluetooth is a trademark owned by the Bluetooth SIG, Inc., and used by WIDCOMM under license.
Microsoft and Windows are registered trademarks of Microsoft Corporation. Other brand and product
names may be registered trademarks or trademarks of their respective holders.
April 18, 2003 WIDCOMMinc i

SpyLite User’s Guide
Table of Contents
1 INTRODUCTION ........................................................................................................ 1
1.1 OPEN THE PROGRAM ................................................................................................. 1
2 THE SPYLITE TRACE WINDOW................................................................................ 2
3 MENUS & TOOLBAR ................................................................................................. 3
3.1 FILE MENU ............................................................................................................. 4
3.2 EDIT MENU ............................................................................................................. 5
3.3 TOOLS MENU .......................................................................................................... 6
3.3.1 Format.......................................................................................................... 6
3.3.2 File Logging Options... .................................................................................... 8
3.3.2.1 Saving log files for trace ...................................................................... 9
3.3.3 Set Protocol Trace ........................................................................................ 11
3.3.4 Clear Trace ................................................................................................. 11
Table of Figures
Figure 1: The SpyLite interface. ..................................................................................................... 2
Figure 2: SpyLite menus and toolbar options. .................................................................................. 3
Figure 3: File menu. ...................................................................................................................... 4
Figure 4: Find in Trace option ........................................................................................................ 5
Figure 5: The Find in Trace dialog box ........................................................................................... 5
Figure 6: Tools menu..................................................................................................................... 6
Figure 7: Tools menu > Format... > Trace Color tab......................................................................... 7
Figure 8: Tools menu > Format… > Set Font tab ............................................................................. 7
Figure 9: Tools menu > Format... > Trace background and text color pickers. .................................... 8
Figure 10: Tools menu > File Logging Options... dialog box. ............................................................. 9
Figure 11: The effects of the Append and Prepend options. .............................................................. 10
Figure 12: Tools menu > Set Protocol Trace options dialog box........................................................ 12
April 18, 2003 WIDCOMMinc ii

SpyLite User’s Guide
1 Introduction
The BTServer SpyLite (SpyLite) application is part of WIDCOMM’s BTW software.
The application allows the user to monitor Bluetooth trace information based on BTW
software version dependent profiles. You will have received the SpyLite application that
matches your selection of profiles in BTW
SpyLite monitors Bluetooth activity; when the application is open, the current activity is
displayed in the trace window in the sequence that the Bluetooth devices send and
respond to each other.
Some knowledge of the sequence of Bluetooth events is necessary to understand the
information that is displayed.
Data throughput analysis and data integrity check-functions are incorporated into the
displayed results
1.1 OPEN THE PROGRAM
Double-click SpyLite.exe in the BTW installation folder to run the program.
April 18, 2003 WIDCOMMinc 1

SpyLite User’s Guide
2 The SpyLite Trace Window
Bluetooth commands and the responses to those commands are displayed in this window
in the sequence that they are executed, depending on user configuration (Figure 1).
The trace information that is displayed is configurable; the options are described later in
this document.
Figure 1: The SpyLite interface.
April 18, 2003 WIDCOMMinc 2
SpyLite User’s Guide
3 Menus & Toolbar
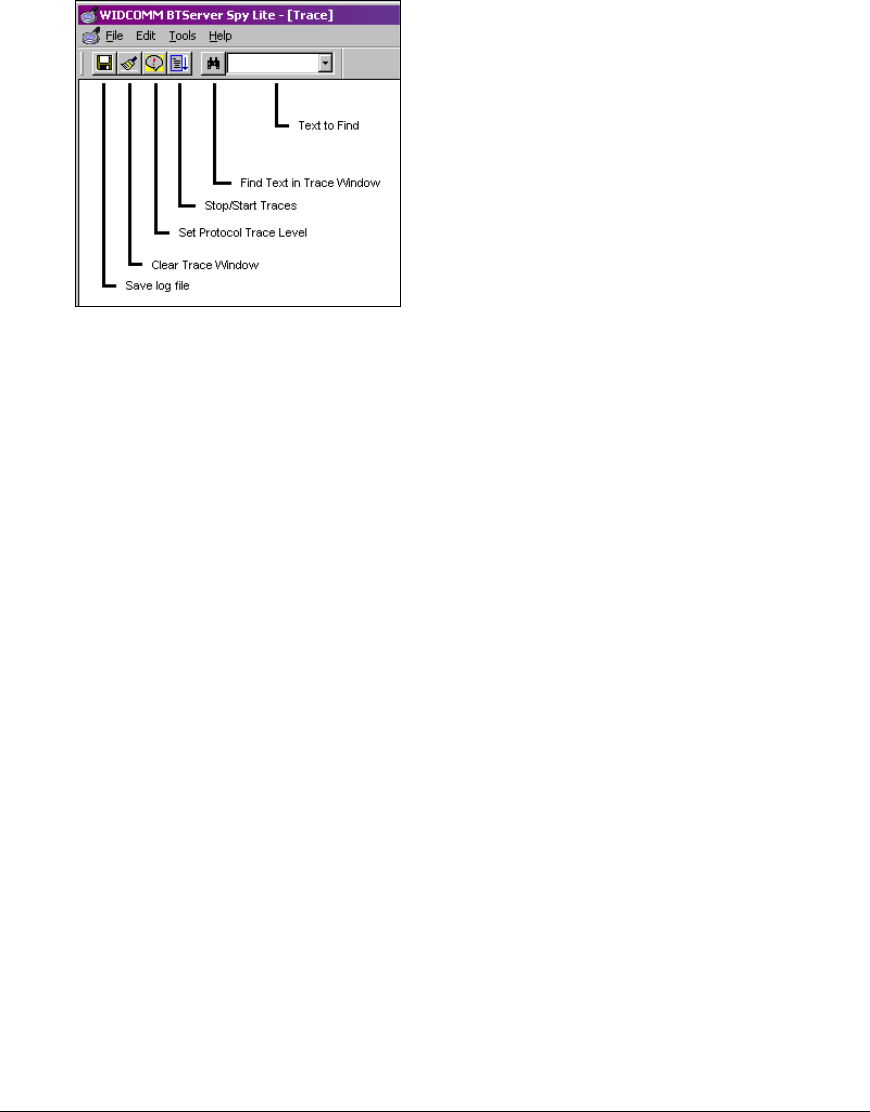
Figure 2 shows the Menu items and Icon shortcuts of the SpyLite interface.
Each icon displays a ToolTip (ScreenTip) when the cursor is over it.
The remainder of this section describes the individual menu items and the selections
within each.
Figure 2: SpyLite menus and toolbar options.
April 18, 2003 WIDCOMMinc 3

SpyLite User’s Guide
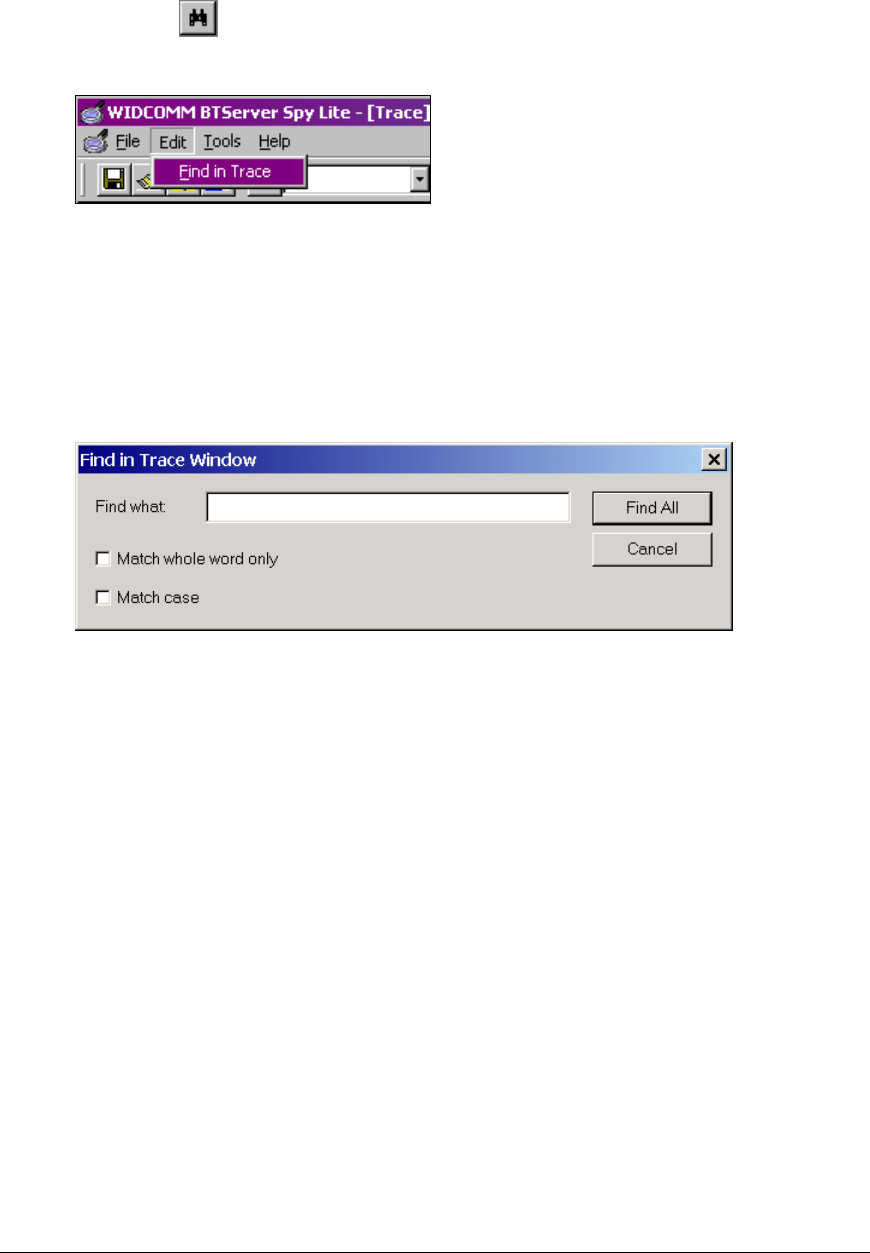
3.2 EDIT MENU
The Edit menu (Figure 4) has one option: Find in Trace.
This icon – — will also access Find in Trace dialog box (Figure 5).
Figure 4: Find in Trace option
Find in Trace allows the user to locate a word or group of words in the trace window.
• Type the text string to be found in the Find what: field.
• Check the “Match whole word only” and/or “Match case” options, as
appropriate, and click Find All to execute the search.
The Trace window must be the active window, i.e., it must have the “focus.”
Each instance of the search string will be highlighted in the trace window.
Figure 5: The Find in Trace dialog box
April 18, 2003 WIDCOMMinc 5
SpyLite User’s Guide
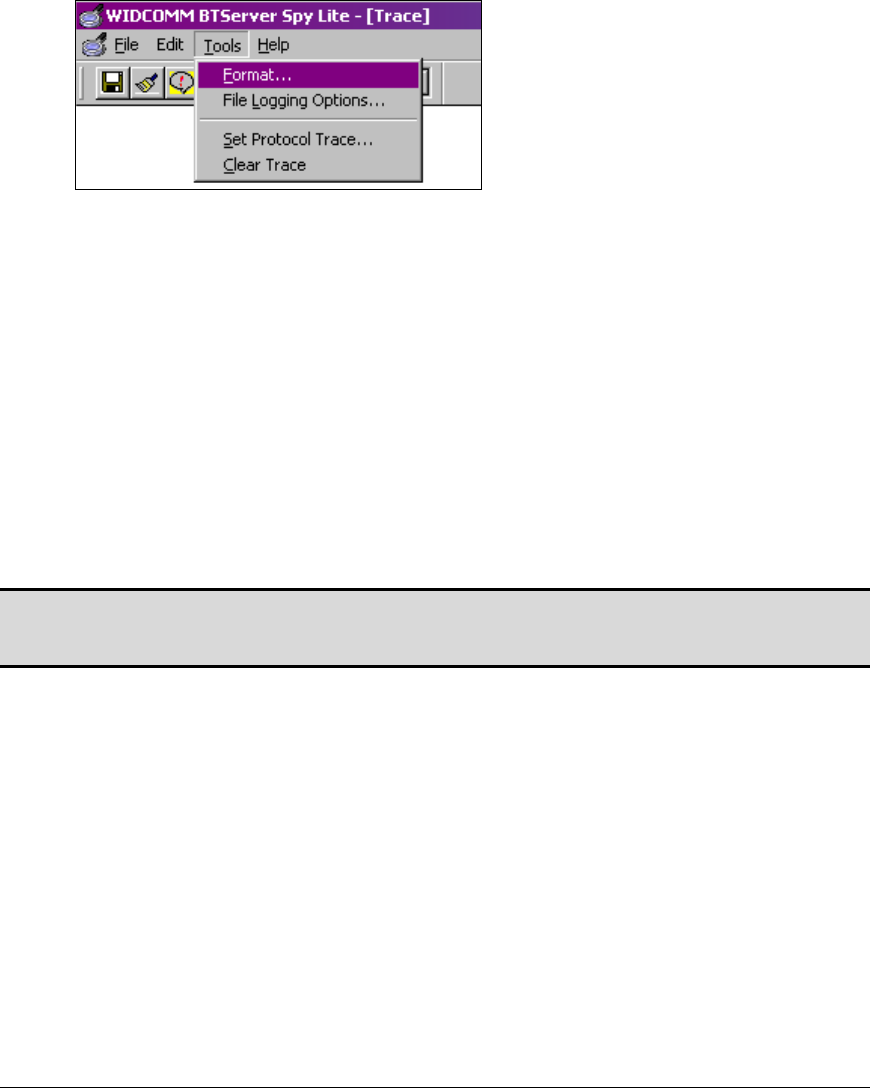
3.3 TOOLS MENU
The Tools menu (Figure 6) contains two groups of functions:
• Format/File Logging Options...—sets text and background colors; sets the font
and font size; sets log file options.
• Set Trace/Clear Trace Options—controls the display and level of trace messages;
clears the trace window
Figure 6: Tools menu.
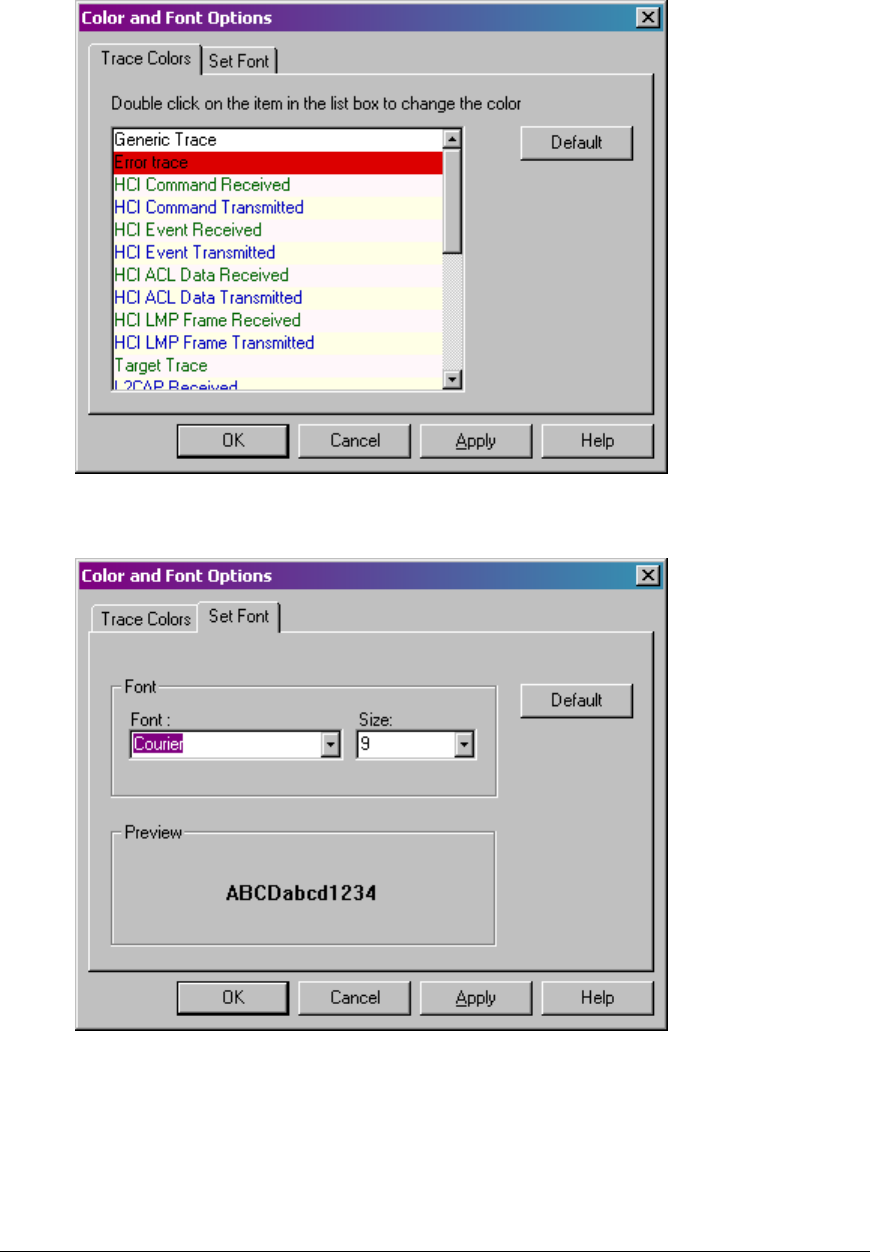
3.3.1 Format...
Displays a dialog box with two tabs (Figure 7):
• Trace Colors (Figure 7)—displays a list of trace items for which custom text
colors and background colors can be set using the Windows color-picker.
To set the trace colors:
a) Click Tools > Format… and the Trace Colors tab.
b) Double-click an item, e.g., “Error trace,” in the list (Figure 7) to change its
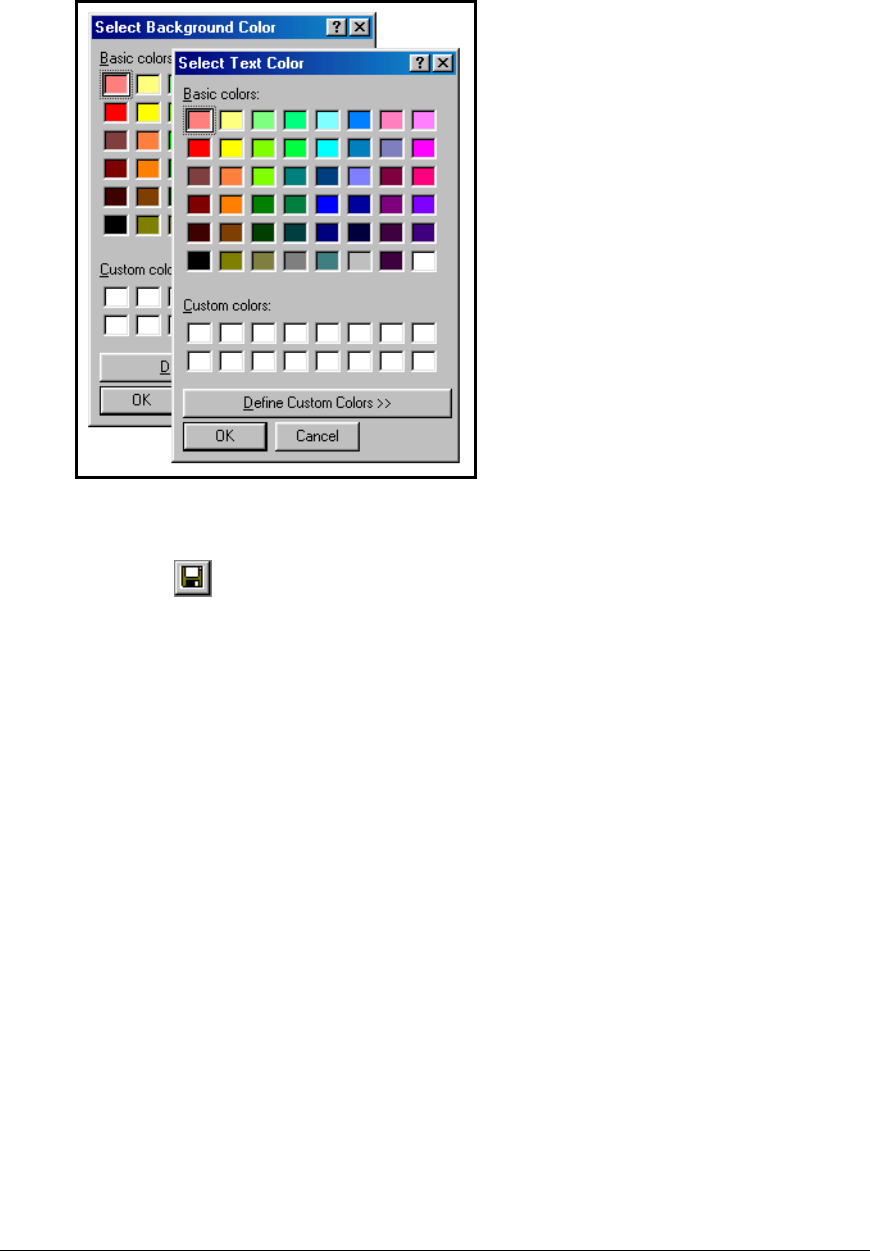
color properties. The background color picker (Figure 9) appears.
c) Choose a background color from the color picker and click OK.
d) A second color picker appears to allow the selection of the text color.
Choose a text color and click OK.
The “Default” button on the Trace Colors tab resets the background and text
colors to their original settings.
NOTE: The Select Text Color picker appears in exactly the same location on the screen as the
Select Background Color picker. The only way to tell them apart is to read the
menu title bar.
• Set Font (Figure 8)—provides a means to select the font and font size of the text
in the Trace window.
To change the font and font size:
a) Select Tools > Format… and the Set Font tab
b) Choose a font from the drop-down menu. A sample of the font style appears
in the Preview section of the dialog box.
c) Choose a font size from the drop-down menu.
d) Click OK to apply the choices and close the Color and Font Options dialog
box.
The Default button resets the text font style and size in the Trace window to the
default, Courier New, nine points.
April 18, 2003 WIDCOMMinc 6
SpyLite User’s Guide
Figure 7: Tools menu > Format... > Trace Color tab.
Figure 8: Tools menu > Format… > Set Font tab
April 18, 2003 WIDCOMMinc 7
SpyLite User’s Guide
Figure 9: Tools menu > Format... > Trace background and text color pickers.
3.3.2 File Logging Options...
This icon – — will also access the File Logging Options… (Figure 10).
Trace window output may be saved as log files in a user-specified directory and file
names.
The “Append to File” option adds log information to the end of existing log file,
specified in the “Log File Name.” This option must be selected to create a single ongoing
log; if it is not checked, the existing log file will be overwritten each time a trace is
started by clicking the Start Logging button. If a trace is in process and “Append to file”
is then checked, the log file will only contain trace information from that point forward.
The “Prepend trace window contents” option adds the entire contents of the Trace
window to the existing log file. This specifically includes trace information that was
generated before the point when the “Start Logging” button was clicked. If the trace
information can be seen using the scrollbars in the Trace window, then that information
will be added to the log file.
Regardless of the state of the “Prepend trace window contents” check box, whether the
trace information is appended to, or overwrites the existing log file is still determined by
the state of the “Append to file” check box
See Figure 11 for the effects of the Append and Prepend options.
Click Start Logging to begin writing data to the log file.
Click Stop Logging to terminate the logging process. No further data will be written to
the log file.
Click OK close the File Logging Options window.
Click Cancel to nullify any changes that have been made and to close the window.
April 18, 2003 WIDCOMMinc 8

SpyLite User’s Guide
Figure 10: Tools menu > File Logging Options... dialog box.
3.3.2.1 Saving log files for trace
Trace information is logged to a user specified HTML file (.*htm) or a text file (*.txt) for
each trace, each time it is executed.
The file name extension “htm” (e.g., Log.htm) will cause the created log file to open in
the default web browser when the log file is double-clicked.
The file name extension “txt” (e.g., Log.txt) will cause the created log file to open in the
default text editor when the log file is double-clicked.
The root directory of the log file may be entered directly into the Log file Folder: field or
selected using the Browse button.
To create a log file:
1. Click Tools > File Logging Options...
2. Enter the root logging directory:
a) Type the directory name directly into the Log file Folder: field
OR
Click Browse (Figure 10) to navigate to the desired directory.
3. Click Start Logging and then click OK to close the dialog box.
To stop logging:
1. Click Tools > File Logging Options...
2. Click the Stop Logging and then click OK to close the dialog box.
April 18, 2003 WIDCOMMinc 9
SpyLite User’s Guide
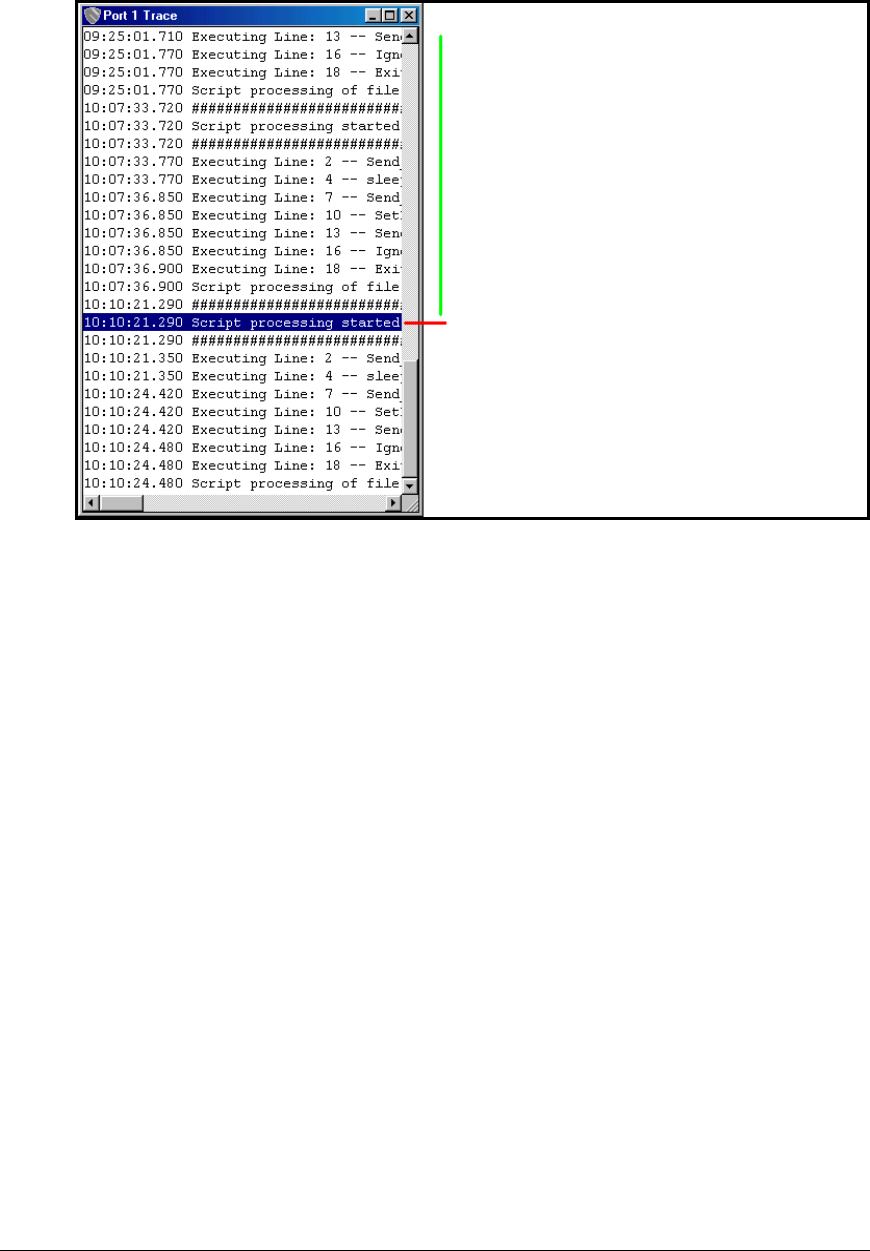
Figure 11: The effects of the Append and Prepend options.
Select Prepend trace window contents to include everything
from the Trace window in the existing trace log file, even if
the data occurred before the Start Logging button was
clicked.
Start Logging with the Append to file option checked was
initiated when the trace was at this point in its execution.
All trace information from this point forward will be
appended to the existing log file.
If Start Logging is clicked without Append to file checked,
the existing log file would be overwritten with the trace
information from this point forward.
April 18, 2003 WIDCOMMinc 10
SpyLite User’s Guide
3.3.3 Set Protocol Trace
This icon – — will also access the Set Protocol Trace dialog box (Figure 12).
The “Trace Setting” section of the dialog box (labeled “Set Verbose Level”) controls the
display of messages created by the protocol analyzer feature of the SpyLite. The decoded
air-interface messages show up as colored text in the Trace window.
When the check box associated with a protocol layer is checked, messages for that
protocol layer are displayed.
The “Trace Level Setting” section of the dialog box controls the display of trace
messages that exist throughout the software. In the Trace window, the default settings
are: nine point black Courier New text on a white background.
The trace messages are assigned a level corresponding to the amount of information to
display. Select a level of information for each of the available items.
The Trace Level Setting options, from least to most verbose, are:
• Error—displays only error messages.
• Warning—displays warnings and error messages.
• API—displays API-related information, warnings, and error messages.
• Event—displays Event and API-related information, warnings, and error
messages.
• Debug—displays all messages (this is the default option).
If a check box associated with an item is un-checked, no information for that item is
displayed in the Trace window.
The protocol and level settings can be set individually for maximum control.
Click Select All to check all boxes in the Set Protocol Trace Flag and Trace Level Setting
sections and set the Trace Level Settings to the Debug option. (This is the default
condition.
Click ClearAll to uncheck all selection boxes in the Set Protocol Trace Flag and Trace
Level Setting sections.
3.3.4 Clear Trace
This icon – — will also clear the trace window.
April 18, 2003 WIDCOMMinc 11

SpyLite User’s Guide
Figure 12: Tools menu > Set Protocol Trace options dialog box.
April 18, 2003 WIDCOMMinc 12
