Business Guide: Marketing Plan Start Up Guide RTL8710AF V1.01
User Manual:
Open the PDF directly: View PDF ![]() .
.
Page Count: 20

1
RTL8710AF Quick Start Guide
v1.01 - 25 June 2018
2
Table of Contents
Realtek Ameba RTL8710AF board ......................................................................................... 3
1. About Ameba RTL8710AF .................................................................................................. 3
2. Quick overview of Ameba RTL8710AF .............................................................................. 4
3. Pre-Preparation .................................................................................................................... 6
3.1 Software Preparation ..................................................................................................... 6
The following are the software installation required: ...................................................... 6
3.2 Hardware Preparation: .................................................................................................. 8
4. Start Up ................................................................................................................................. 9
4.1 Connect the RTL8710AF board .................................................................................... 9
4.2 Install mbed driver for Ameba ..................................................................................... 9
4.3 Arduino IDE .................................................................................................................. 10
4.4 Using module RTL-00 independently ....................................................................... 19
5. Shortcut on list of items to download ............................................................................. 20
6. Ameba further references ................................................................................................. 20
3
Realtek Ameba RTL8710AF board
1. About Ameba RTL8710AF
Ameba RTL8710AF is a highly integrated single-chip with low power
consumption mechanism for IoT (Internet of Things). It combines an
ARM®Cortex™-M3 MCU, Wi-Fi and provide a bunch of configurable GPIOs
which are configured as digital peripherals for different applications and
control usage.
RTL8710AF also integrates internal memory and flash to minimize IoT end-
product size and reduce your development cost.
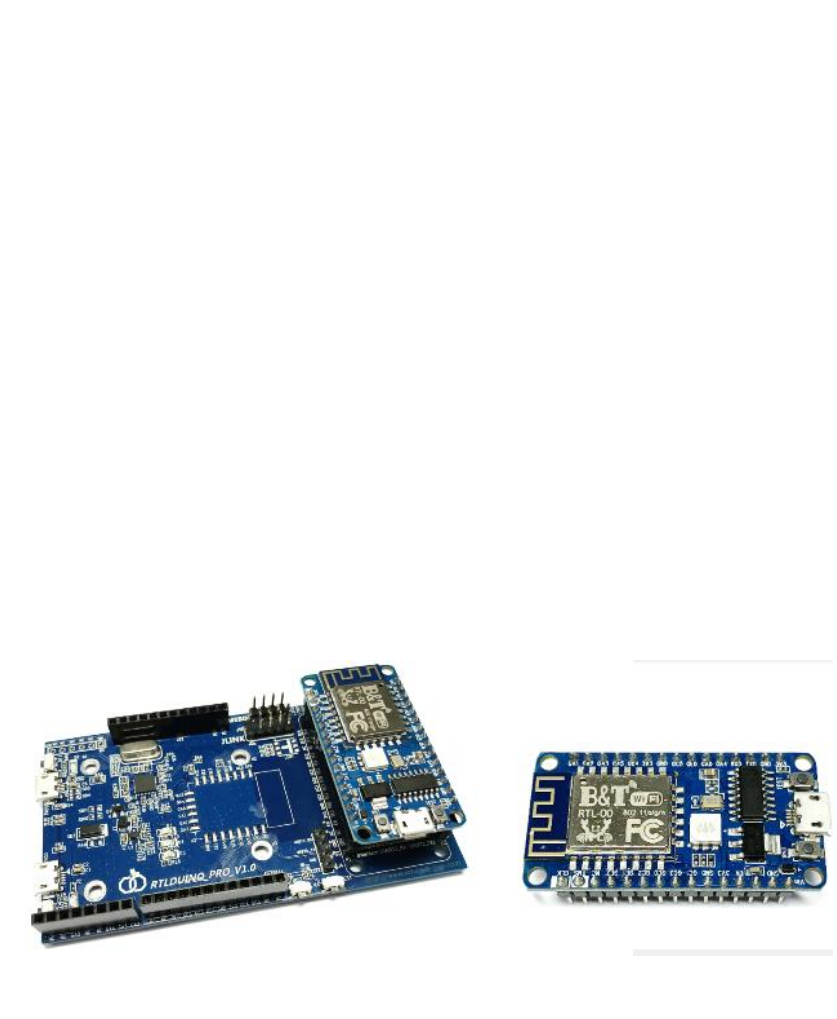
Ameba RTL8710AF Wireless Development Board is a convenient
development kit for makers. It separate into 2 boards, RTL8710AF WiFi base
Board is the main mother board with all functions included, and the other
RTL-00 module is a smaller form factor, which if user wishes to go to
development mode- there is a CMSIS-DAP mode and J-LINK debugger
mode development interface provided. Otherwise, RTL-00 module can be
used independently from the main board, and the occupied space is smaller.
When the RTL-00 module is charge via the Micro USB interface, the result
should be the same with the result that it is connected to the main board.
RTL8710AF Wireless Development board RTL-00 module

4
2. Quick overview of Ameba RTL8710AF
- CPU : 32-bit ARM Cortex M3, up to 83MHz
- Memory : 1MB ROM, 512KB SRAM and 1MB flash
- Integrated with 802.11 b/g/n 1x1 Wi-Fi
- Hardware SSL engine
- Maximum 17 GPIOs
- 1 SPI Interfaces and support both master and slave mode
- 3 UART Interfaces including two HS-UART and one log UART
- 2 I2C Interfaces and support both master and slave mode
- 4 PWM interfaces
5
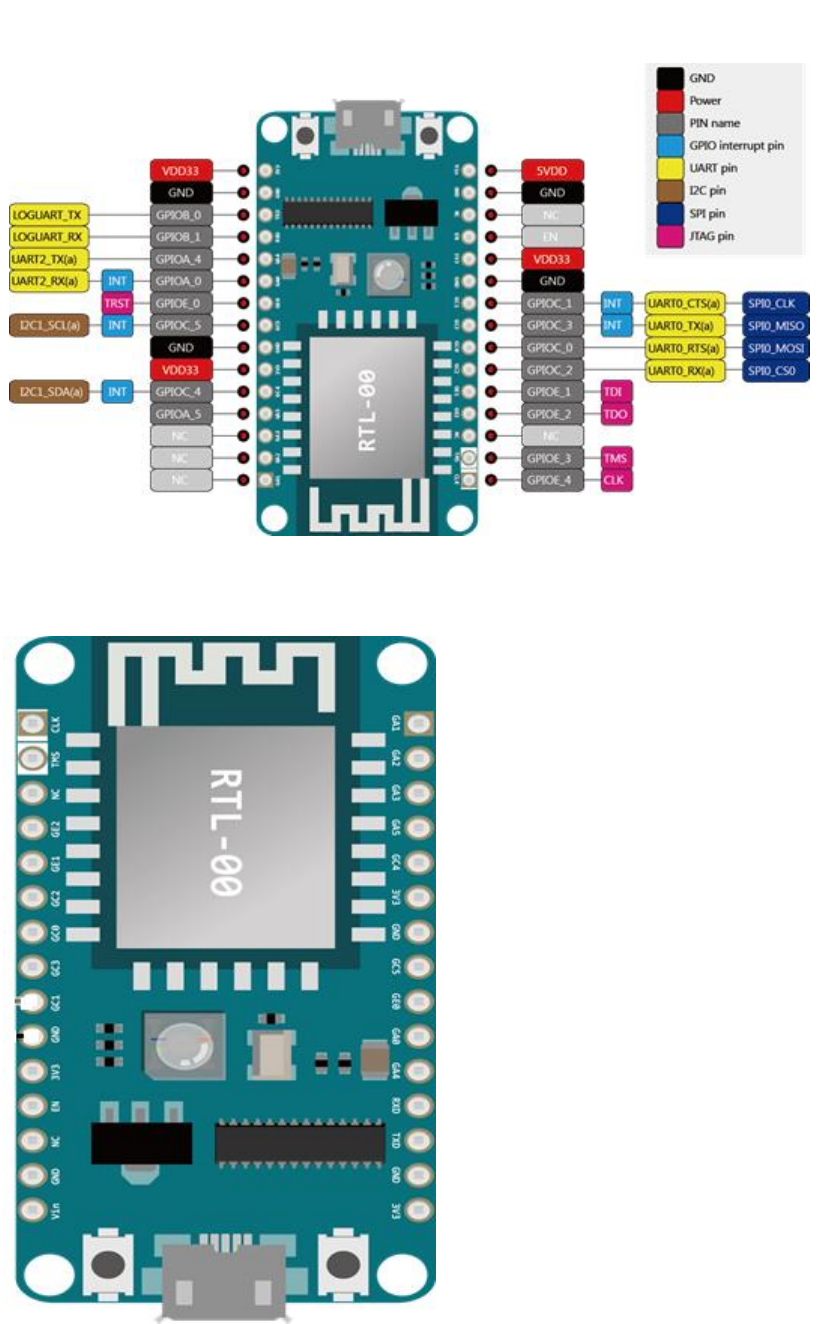
RTL-00 module (small board) pinout:
Close up view of RTL-00
6
3. Pre-Preparation
3.1 Software Preparation
The following are the software installation required:
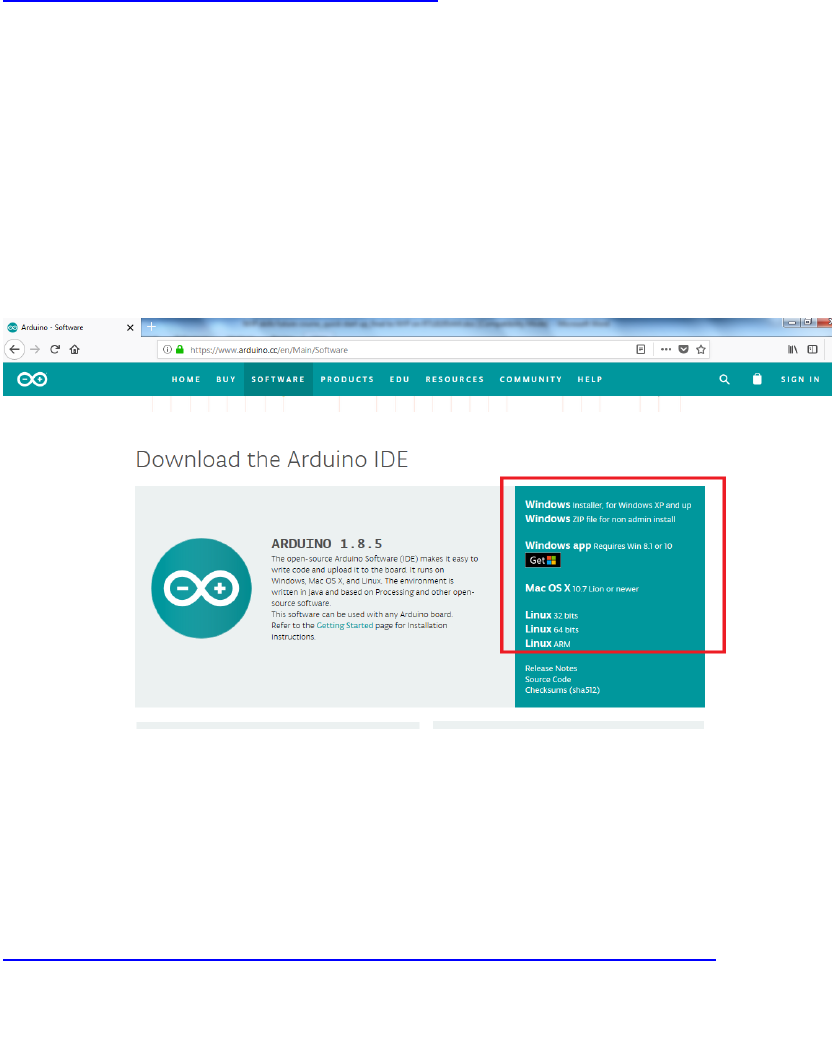
1. Arduino IDE
Arduino IDE can be downloaded on the Arduino website:
https://www.arduino.cc/en/Main/Software
Please use Arduino IDE with version 1.6.5 or later. (From version 1.6.5,
Arduino IDE supports third-party hardware. Therefore, we can use
Arduino IDE to develop applications on Ameba, and the examples of
Arduino can run on Ameba too.)
For new users, we will recommend to install the latest IDE version
version 1.8.5 (accurate as of June 2018) as directed in the above URL
link.
On the right side of the webpage as shown on the Arduino website,
select the appropriate OS to suit your laptop/computer.
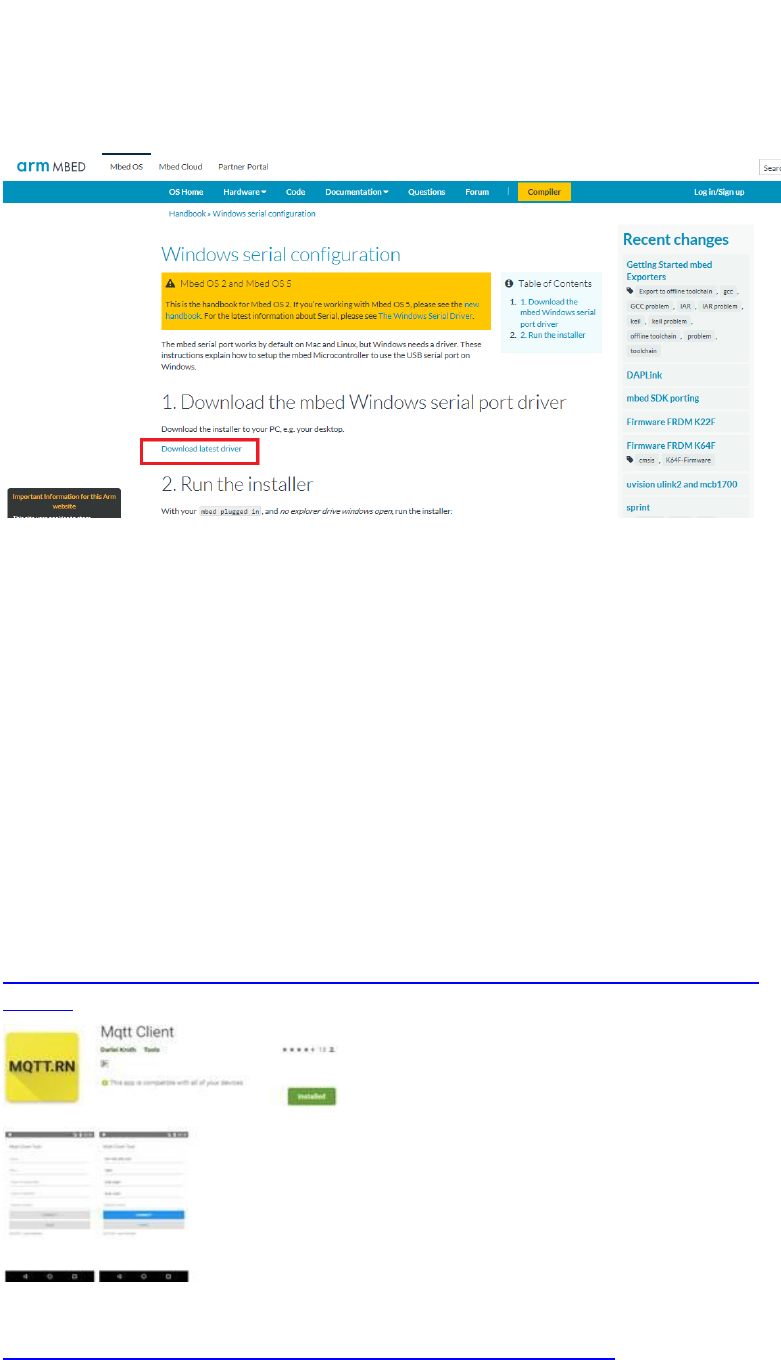
2. Mbed driver
If this is the first time you are connecting Ameba to your
laptop/computer, USB driver for Ameba needs to be installed.
Ameba uses the standard Arm BED CMIS DAP driver. Go to
https://developer.mbed.org/handbook/Windows-serial-configuration
Download the driver "mbedWinSerial_16466.exe" in "Download latest
driver" from MBED website.
7
Kindly download the driver, and wait for the board that will be given
during the workshop for installation. You will need the Ameba board to
install the driver.
3. Serial Monitor(Terminal Emulator) Program
You may choose to use Arduino IDE serial monitor or your own
preferred serial monitor. Eg: Tera Term, Coolterm etc.
4. MQTT Client
Mobile phone app -This is for running of MQTT examples via a mobile
MQTT client app. For this workshop purpose, you may like to install the
below to experience the example that we will be using for the workshop
For Andriod users – at google playstore -> search for mqtt client ->
select Mqtt Client app by Dariel Kroth:
https://play.google.com/store/apps/details?id=br.com.bintechnology.mq
ttclient
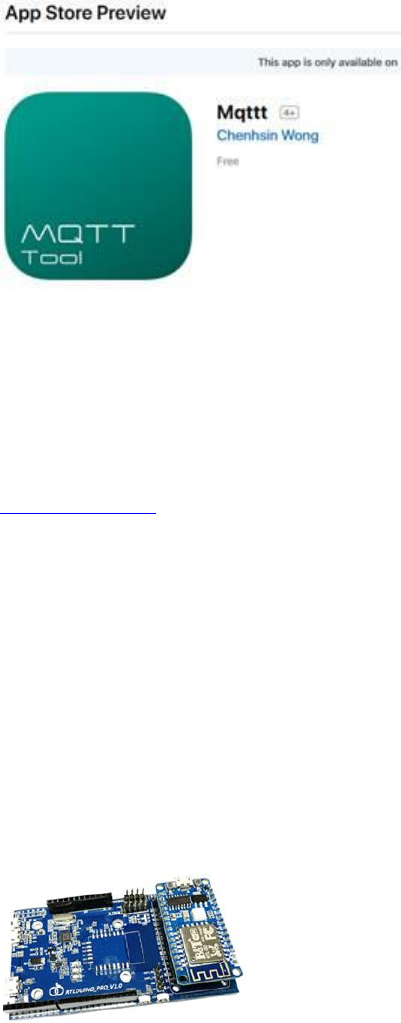
For iphone users – please download Mqttt app:
https://itunes.apple.com/in/app/mqttt/id1217080708?mt=8
8
5. IFTTT
This is required for running of IFTTT examples. If you have not set up
an IFTTT account, kindly create an account with IFTTT. Go to
https://ifttt.com to signup for an account.
3.2 Hardware Preparation:
1. 1 x Laptop/Computer: Windows XP/7/8/10 or MAC OS
2. WiFi
3. 1 x Ameba RTL8710AF Wireless Development Board
4. 1x Micro USB Cable
5. Your mobile phone to download the mobile app to test the example
6. For the DHT11 sensor example – you will need 1x DHT11 sensor,
connectors and 3x connecting wires
9
4. Start Up
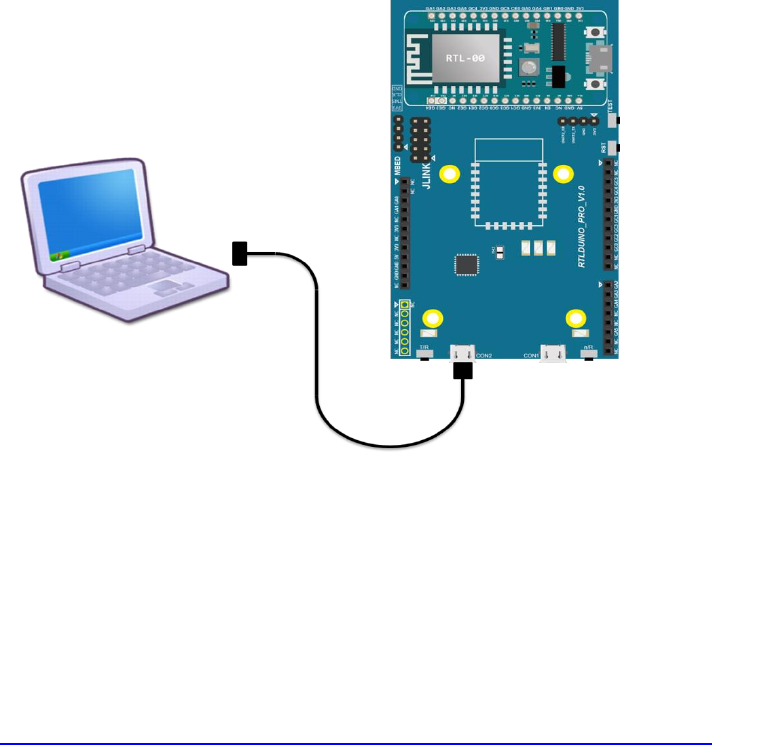
4.1 Connect the RTL8710AF board
1. Ensure the orientation for the RTL-00module small board is correct
as shown below.
2. Connect RTL8710AF to the computer via Micro USB (on the board:
locate CON2 and connect this to USB of your PC/laptop.
4.2 Install mbed driver for Ameba
Ameba uses the standard Arm MBED CMSIS DAP driver.
1. As described in section 3.1, if this is the first time that you are using
Ameba, you will need to install the USB driver for Ameba. You can get
the installation file and related information at the following website:
https://developer.mbed.org/handbook/Windows-serial-configuration
Download and install "mbedWinSerial_16466.exe" in "Download latest
driver".
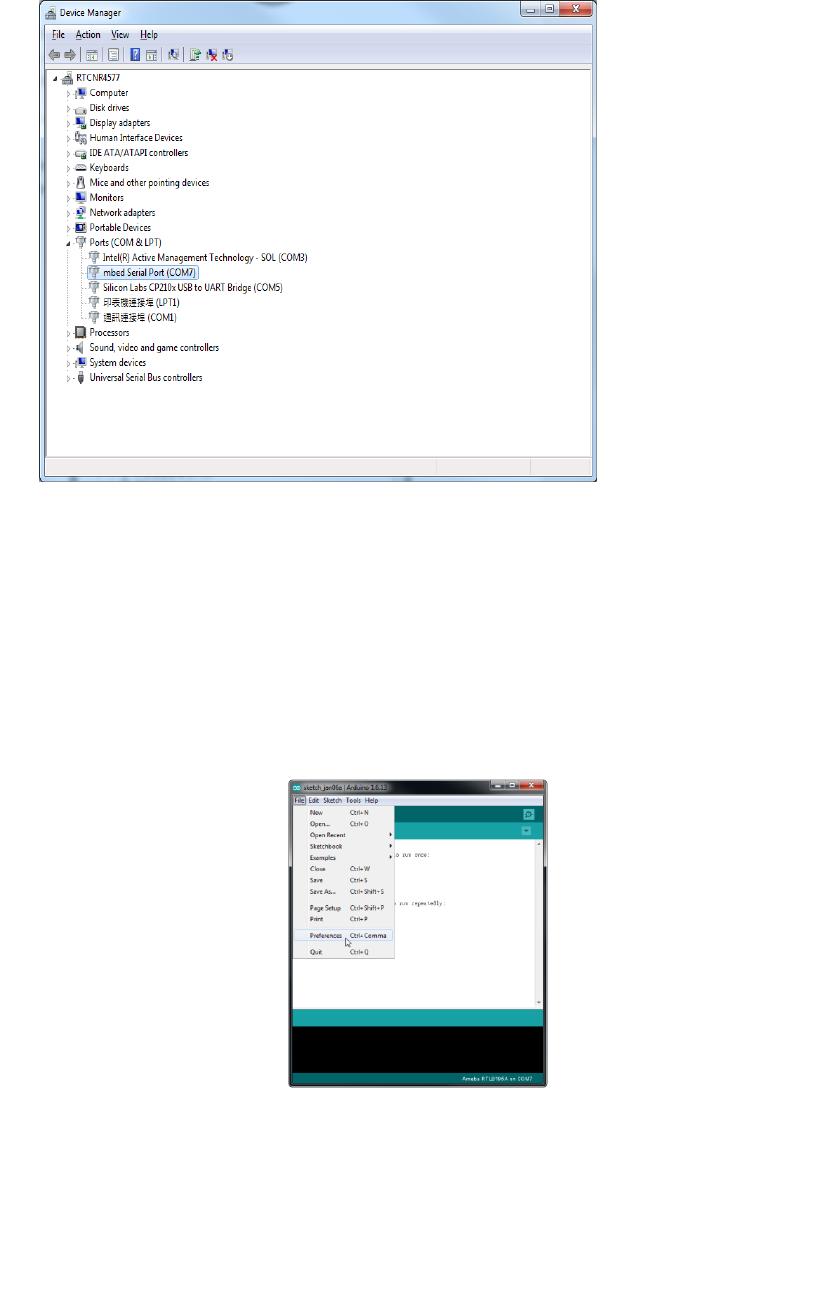
2. When installation is completed, "mbed Serial Port" will be seen under
“Device Manager” -> “Ports” in your laptop/computer.
10
4.3 Arduino IDE
1. Open Arduino IDE which has been installed in your laptop/computer.
2. To set up Ameba correctly in Arduino IDE, go to “File” ->
“Preferences”
3. Setting up Ameba
3.1 Paste the following URL into "Additional Boards Manager URLs"
field:
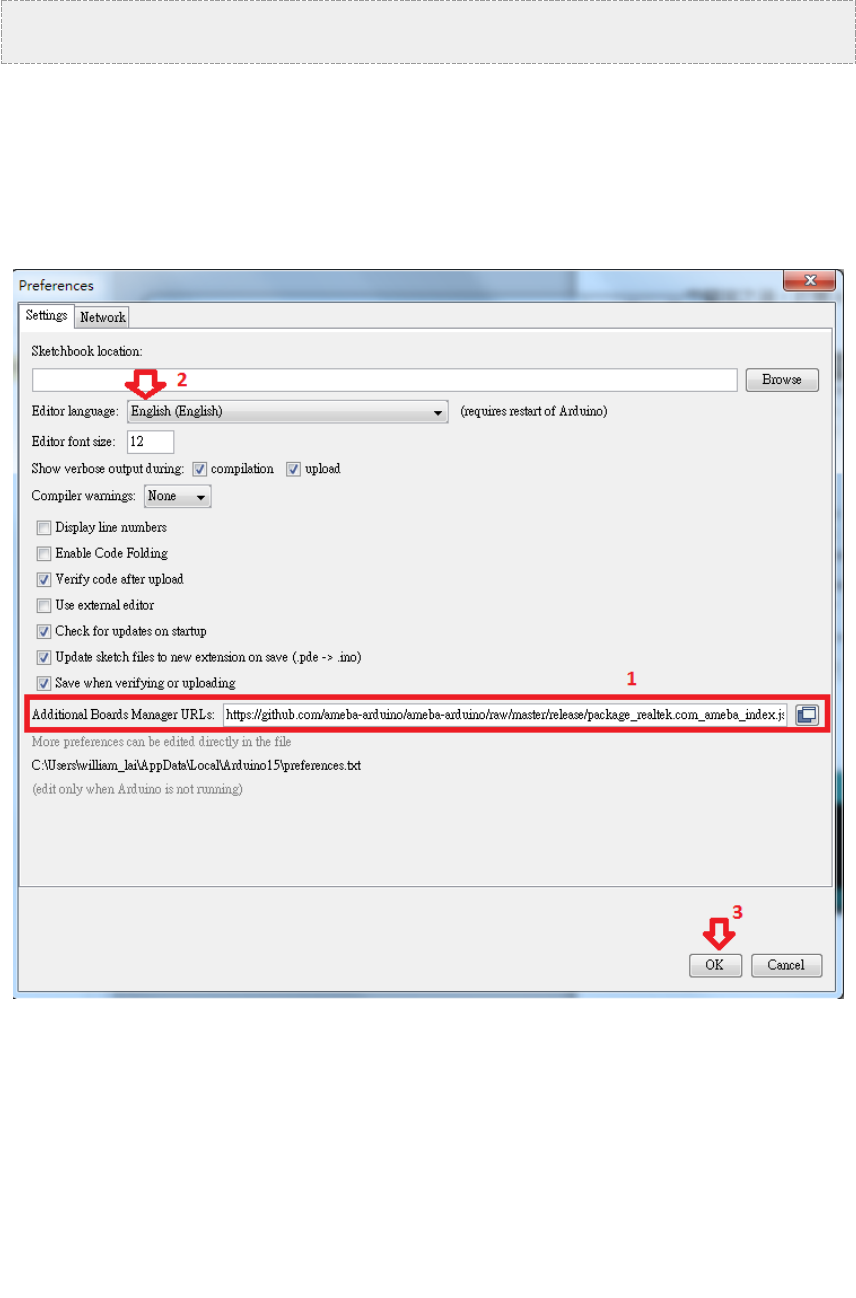
11
https://github.com/Ameba8195/Arduino/raw/master/release/package_realt
ek.com_ameba_index.json
3.2 Moreover, if you use IDE version earlier than 1.6.7, please make
sure the IDE language is set to English to avoid problem.
In version 1.6.7, Arduino has resolved the language problem.
3.3 Click “OK”
3.4. If you have changed the language setting, please restart the
Arduino IDE to activate the setting.
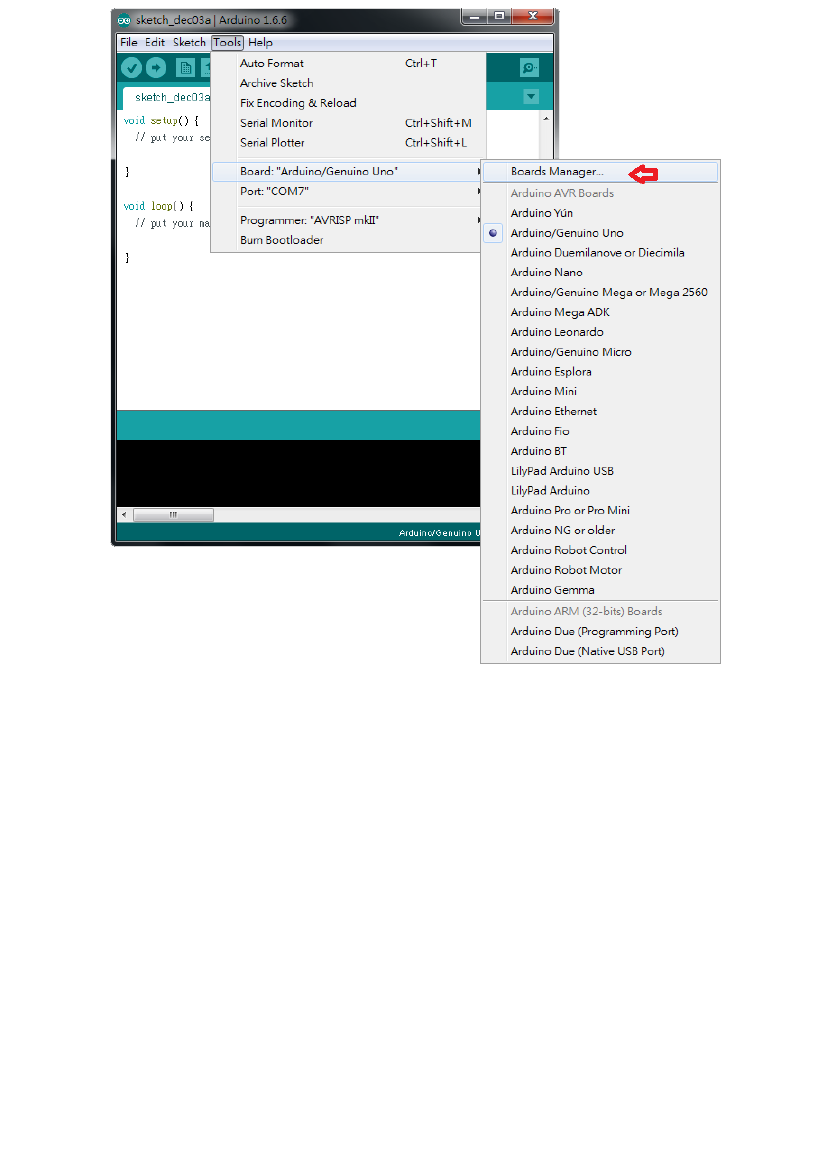
3.5. Next, go to "Tools" -> "Board" -> "Boards Manager". Click on the
“Boards Manager”
12
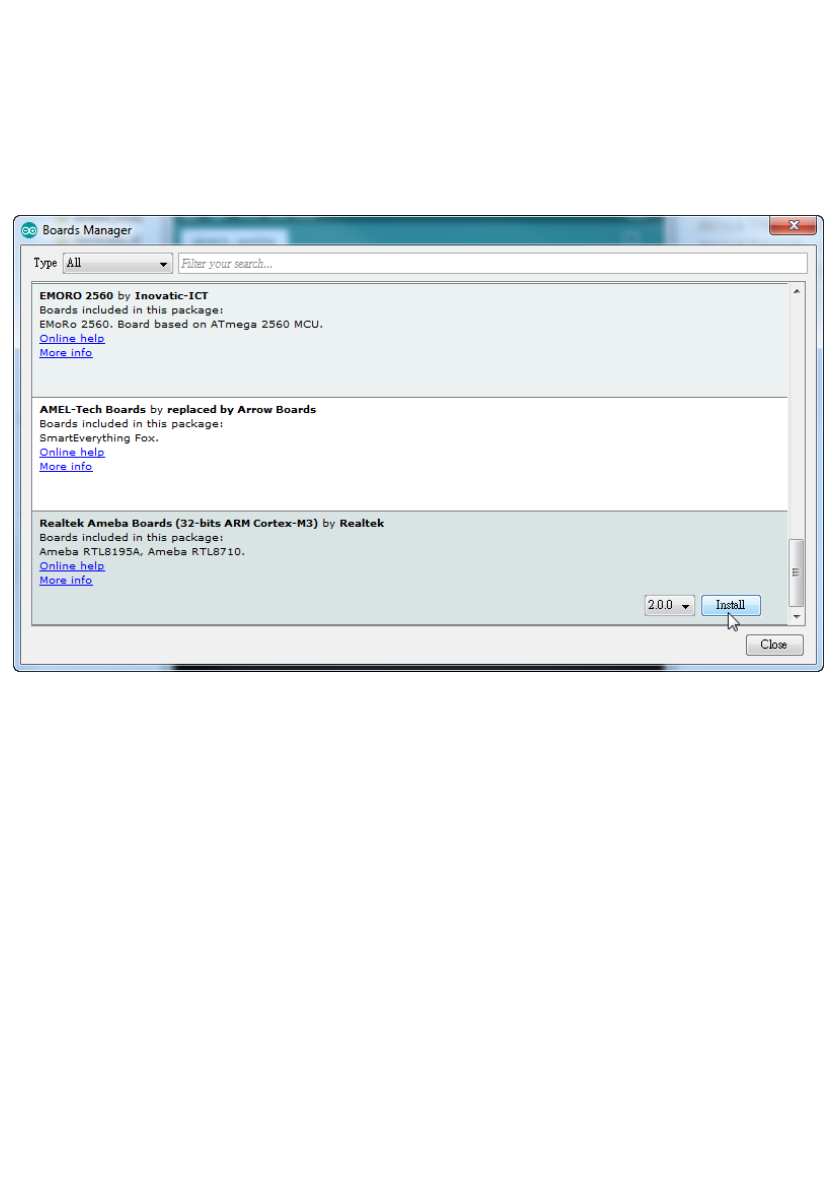
The "Boards Manager" requires about 10~20 seconds to refresh all
hardware files (if the network is in bad condition, it may take longer).
3.6 Find "Realtek Ameba Boards" in the list, click on it.
13
3.7 “Install” icon will appear.
3.8 Select the latest Arduino version from the drop down list (v2.0.4- the
latest as of June 2018)
3.9 click "Install".
After install button is clicked, the Arduino IDE starts installation and
download the required files for Ameba.
3.10 Close the pop up screen when the installation is completed.
(Note: Every time the new hardware is connected, we need to reopen the
Board Manager. So, we close the Boards Manager, and then open it again for
such a case)
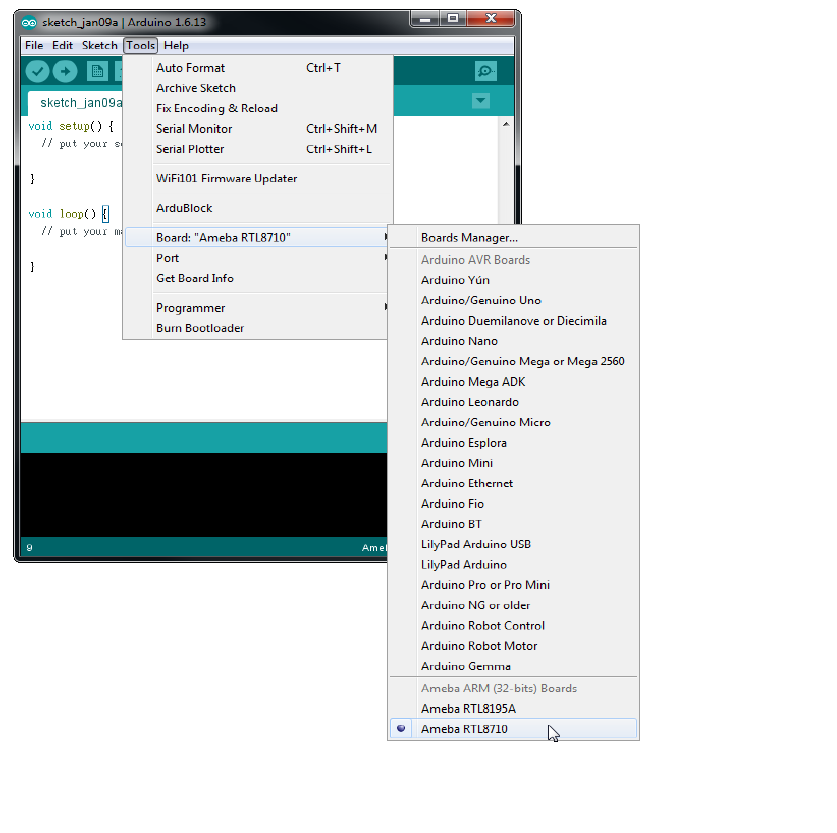
3.11 Finally, we select Ameba as current connected board in "tools" ->
"Board" -> "Ameba RTL8710":
14
4 The development environment setting is completed and you are
ready to compile, upload and run the examples.
15
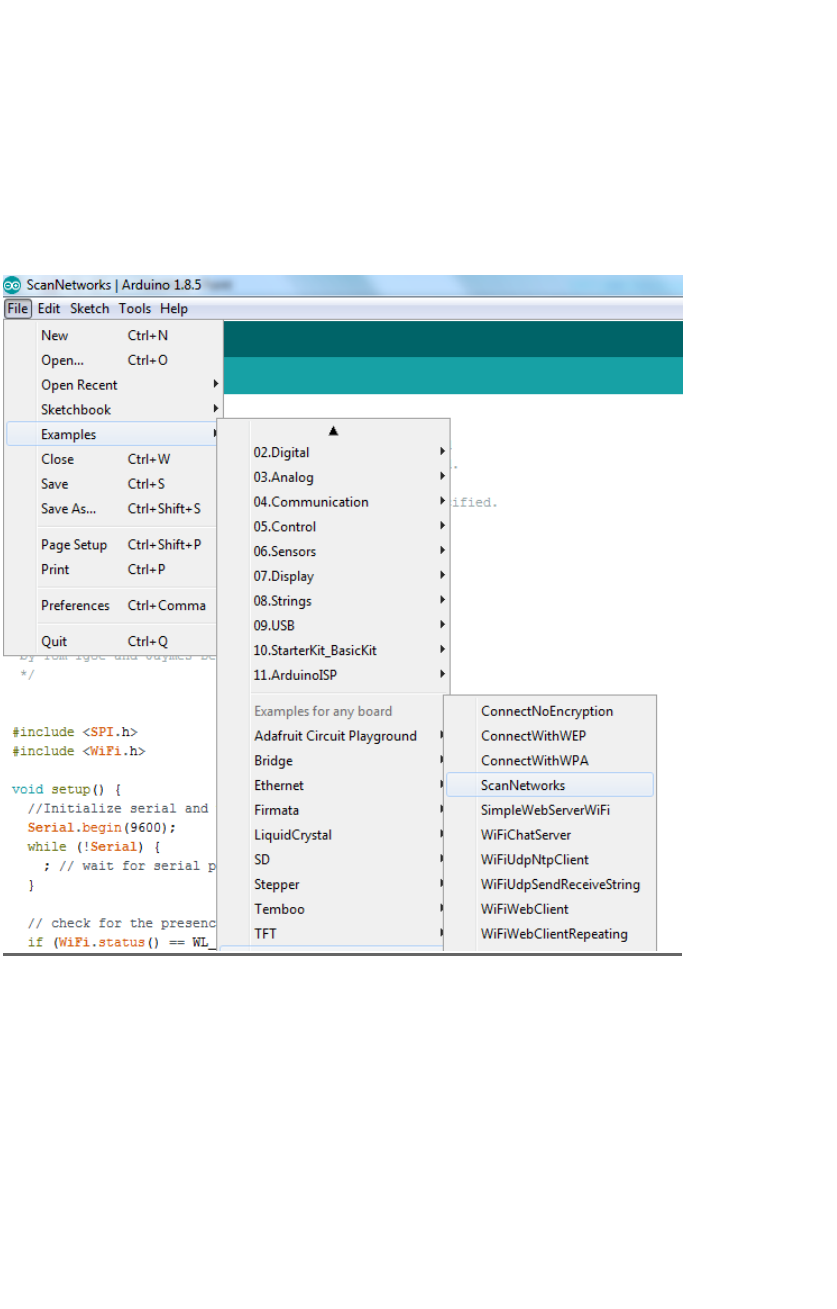
4.3.1 Ready to go: Compile and Build
Arduino IDE provides many built-in examples, which can be compiled,
uploaded and run directly on the boards. Here, we take the "ScanNetworks"
example as the first example.
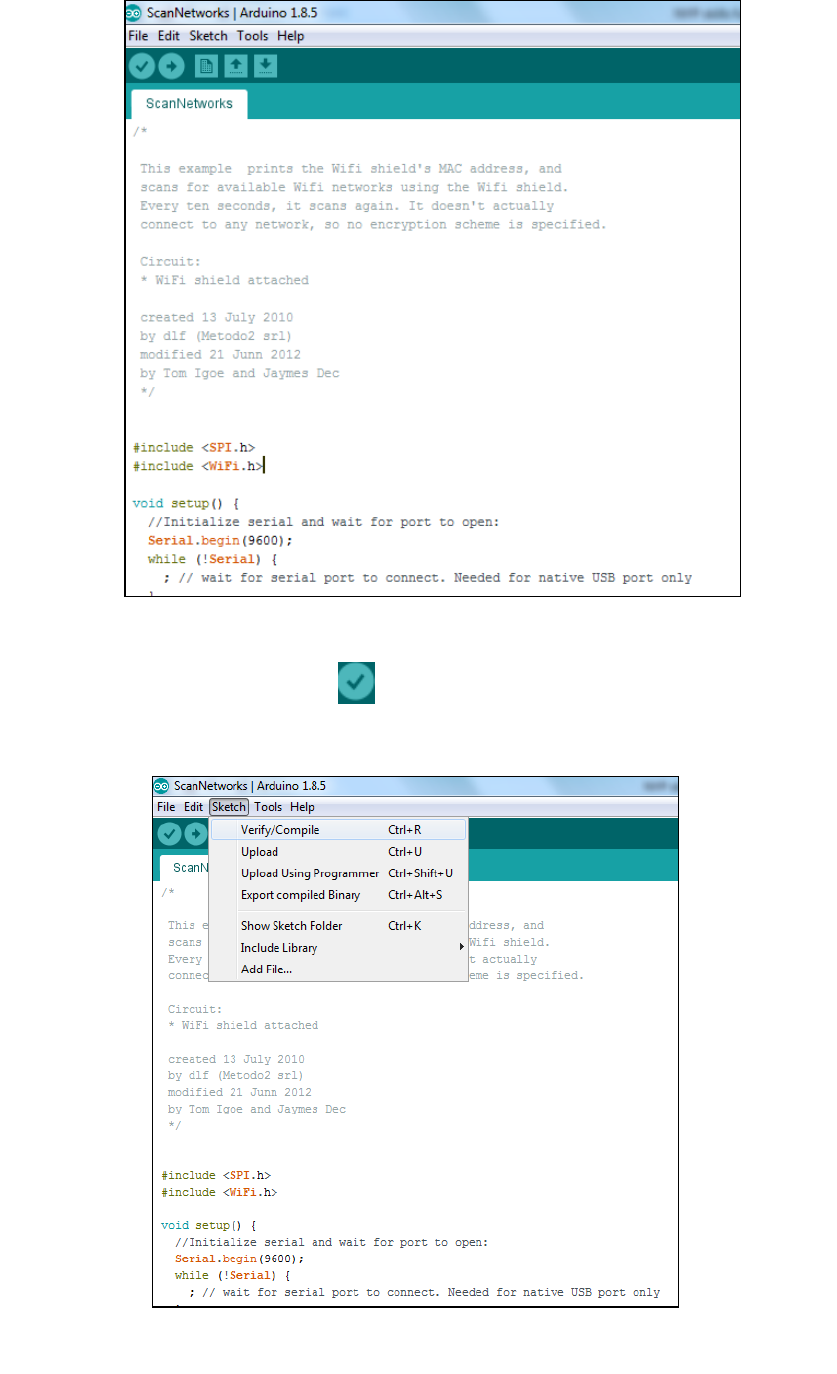
1. Under "File" -> "Examples" -> WiFi -> "ScanNetworks”.
Arduino IDE opens a new window with the complete sample code.
This example prints the Wifi shield's MAC address, and scans for
available Wifi networks using the Wifi shield. Every ten seconds, it
scans again. It doesn't actually connect to any network, so no
encryption scheme is specified.
16
2. Next, compile the sample code. click "Sketch" -> "Verify/Compile" or
you can also select the icon on the top left as a shortcut icon to
compile the code.
Arduino IDE prints the compiling messages in the bottom area of the
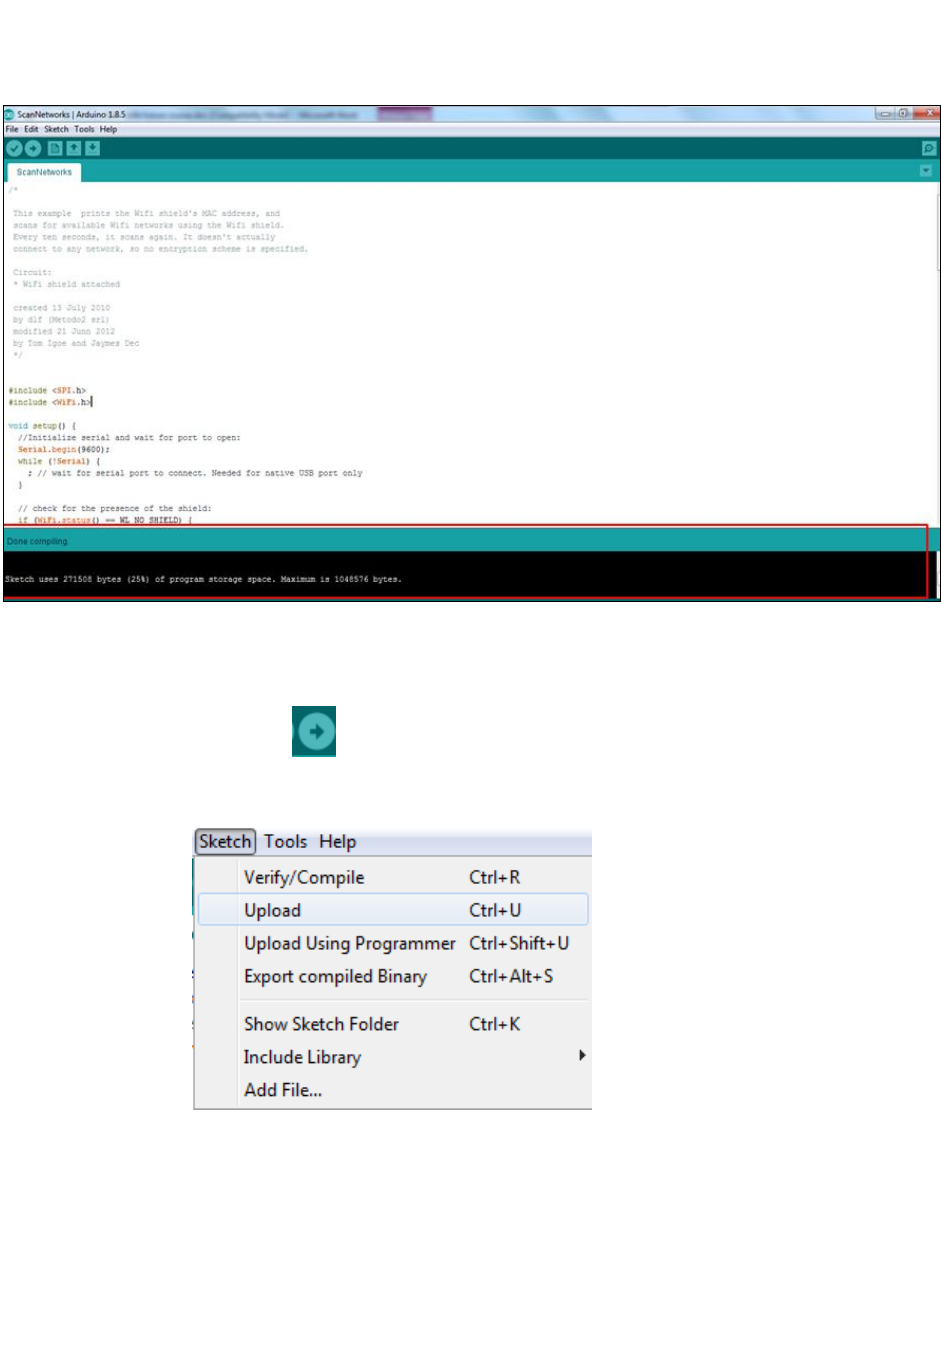
17
IDE window. When the compilation is finished, you will get the similar
messages shown below, stating “Done compiling”.
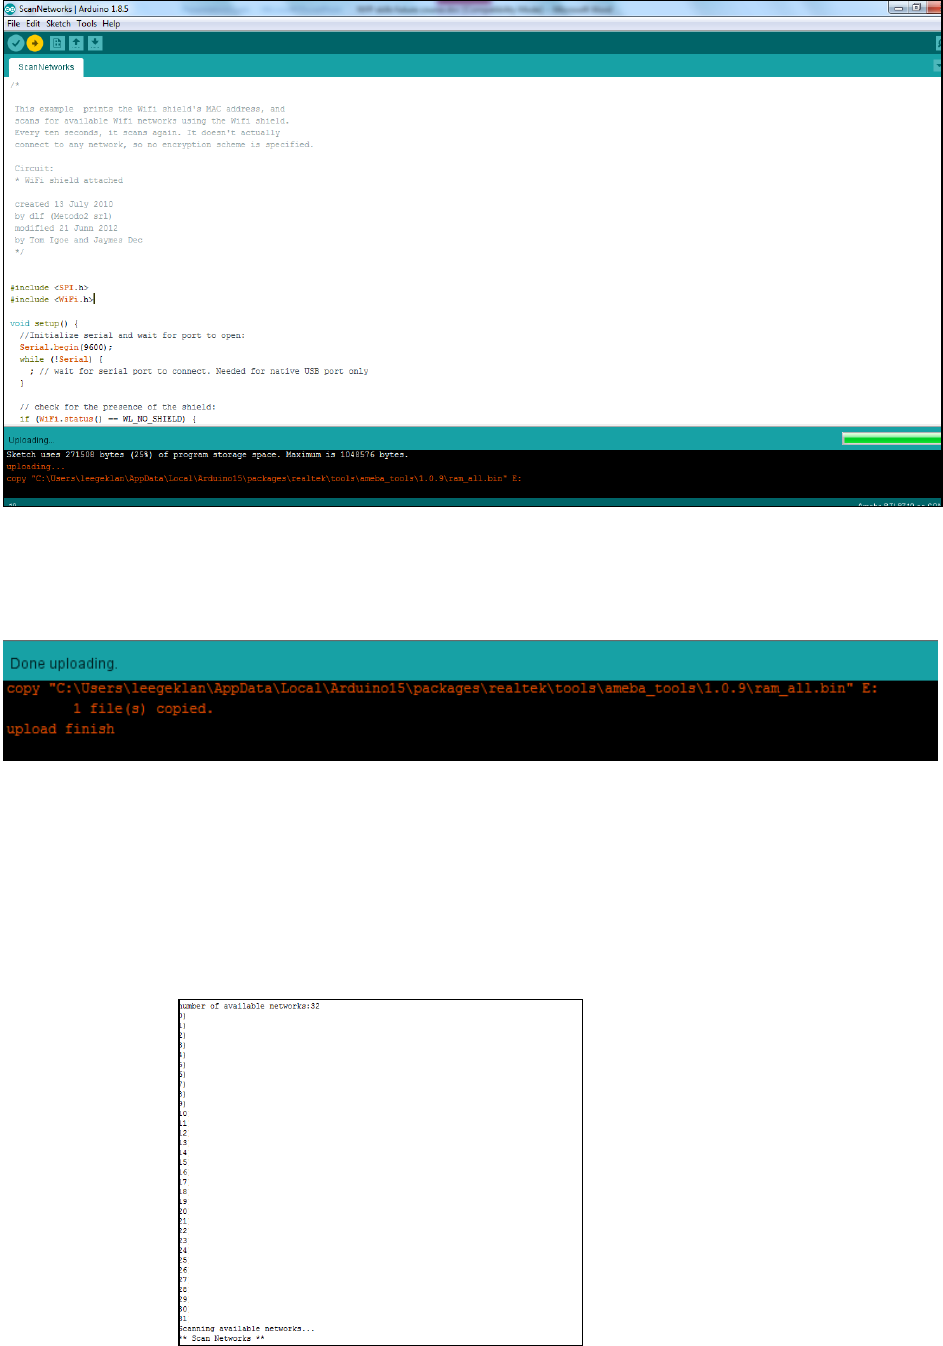
3. After the compilation is done, upload the compiled code to Ameba.
With Ameba still connected to your computer, click "Sketch" ->
"Upload" or select icon on the top left as a shortcut icon for
compilation.
Again, during the uploading procedure the IDE prints messages at the
bottom area of the IDE window. The uploading procedure requires a
slightly longer time (about 30 seconds to 1 minute).
During the uploading process, D3 on the base board will be
blinking/flashing in green.
18
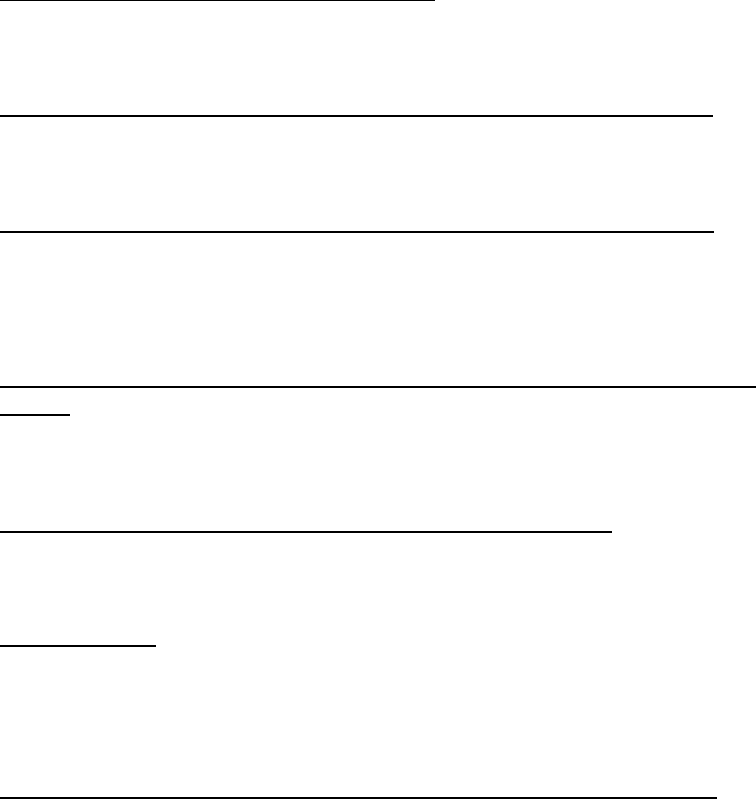
4. When upload completed, D3 reverts to the original non flashing state.
The "upload finish" message is printed.
5. Open the serial monitor to view the logs. Reset the board, a list of
network will be seen on the serial monitor log files. (list of networks has
been purposely ommited in this picture)

19
4.4 Using module RTL-00 independently
RTL-00 module can be used independently from the main board. The
detachable module also uses micro usb to charge and the pins on it are
compatible with the board.
When you unplug this module and charges it via the Micro USB, the
result seen on the serial monitor should be the same as what is seen when
connecting to the main board.
To view the log files on RTL-00 module – select baud rate as 38400.
You will see the same logs on the serial monitor/emulator terminal as what
you have seen on the RTL8710AF Wireless Development board
Note: For RTL-00 module - If you are unable to view the serial logs with the RTL-00 module,
check that USB-SERIAL CH340 driver has been installed in your Operating System
20
5. Shortcut on list of items to download
1. Arduino IDE
https://www.arduino.cc/en/Main/Software
2. Mbed driver
https://developer.mbed.org/handbook/Windows-serial-configuration
3. Teraterm
https://download.cnet.com/Tera-Term/3000-2094_4-75766675.html
4. MQTT Client – Phone app
Android user
https://play.google.com/store/apps/details?id=br.com.bintechnology.mq
ttclient
Iphone user:
https://itunes.apple.com/in/app/mqttt/id1217080708?mt=8
5. Set up IFTTT account
https://ifttt.com
6. Examples for the workshop
Clone or download from the Github repository below:
https://github.com/prashantrar/RTL8195AM-RTL8710AF-ARDUINO
You can find the Examples for the workshop in the “Examples” folder
(Disclaimer: Above links of items 1-5 are for reference. Realtek is not responsible for the
contents of the website.)
6. Ameba further references
Website: https://www.amebaiot.com/en/
Facebook: https://www.facebook.com/groups/AmebaIoTWW/
Forum: https://www.amebaiot.com/en/questions/
