Stm32 Blue Pill Arduino Guide
User Manual:
Open the PDF directly: View PDF ![]() .
.
Page Count: 5
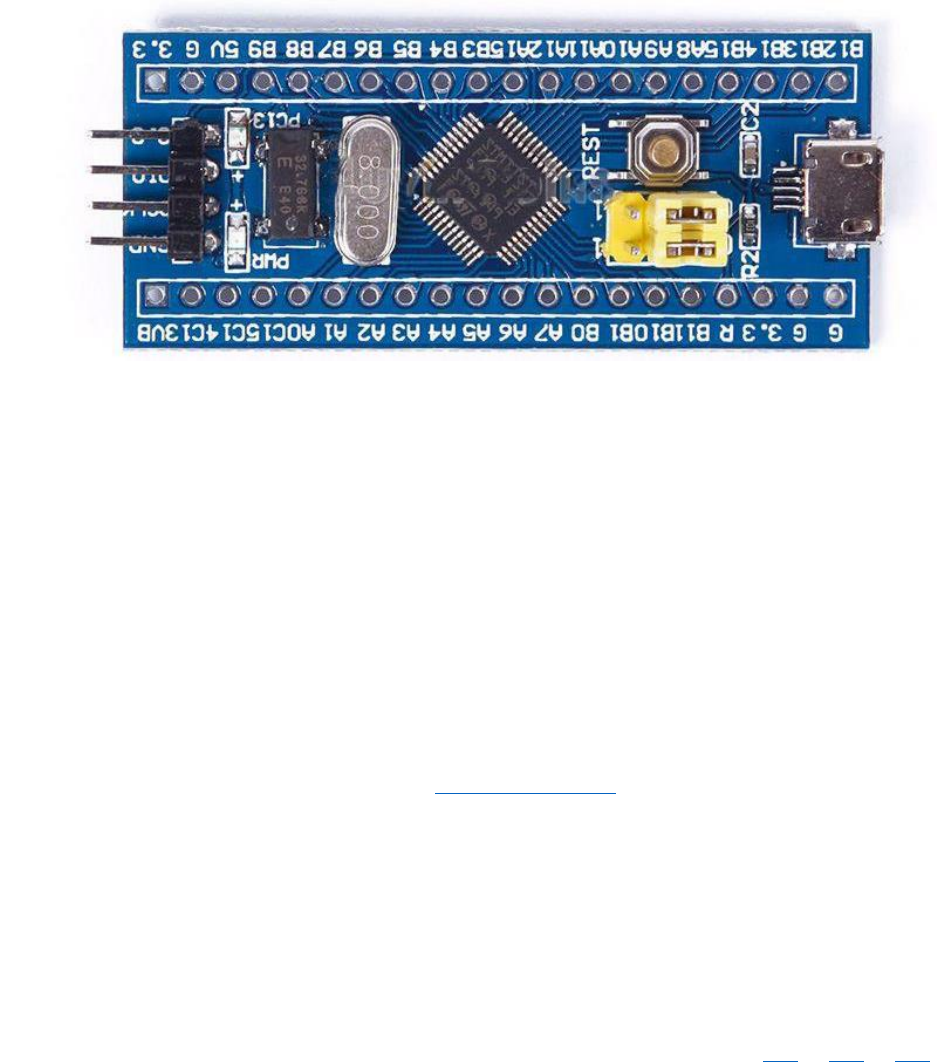
STM32F103C8T6 Blue pill Arduino guide
For beginners it might be difficult to use the popular and cheap blue pill board based on
STM32F103C8T6. It’s because using an embedded development tools like KEIL isn’t easy for
beginners. This 32 bit microcontroller based on ARM Cortex-M3 architecture is far better than
your traditional arduino board.
You can compare it to Arduino DUE but it has got a very small size like the arduino Nano. There’s
lack of proper documentation on it and everything available in the internet is quite scattered. So,
here’s something to get you started easily.
STEPS:
1. First download all the resources from this mediafire link. The password for extracting data
from the zip file is: techshopbd.
2. Open resource STM32 bluepill folder. Copy the Arduino_STM32 folder to your
sketchbook folder/hardware. Go to arduino IDEs file>preferences and you’ll find the
location of your sketchbook folder. If there’s no hardware folder, create one named as
“hardware” (all lowercase letter).Your arduino IDE is now ready for Blue pill.
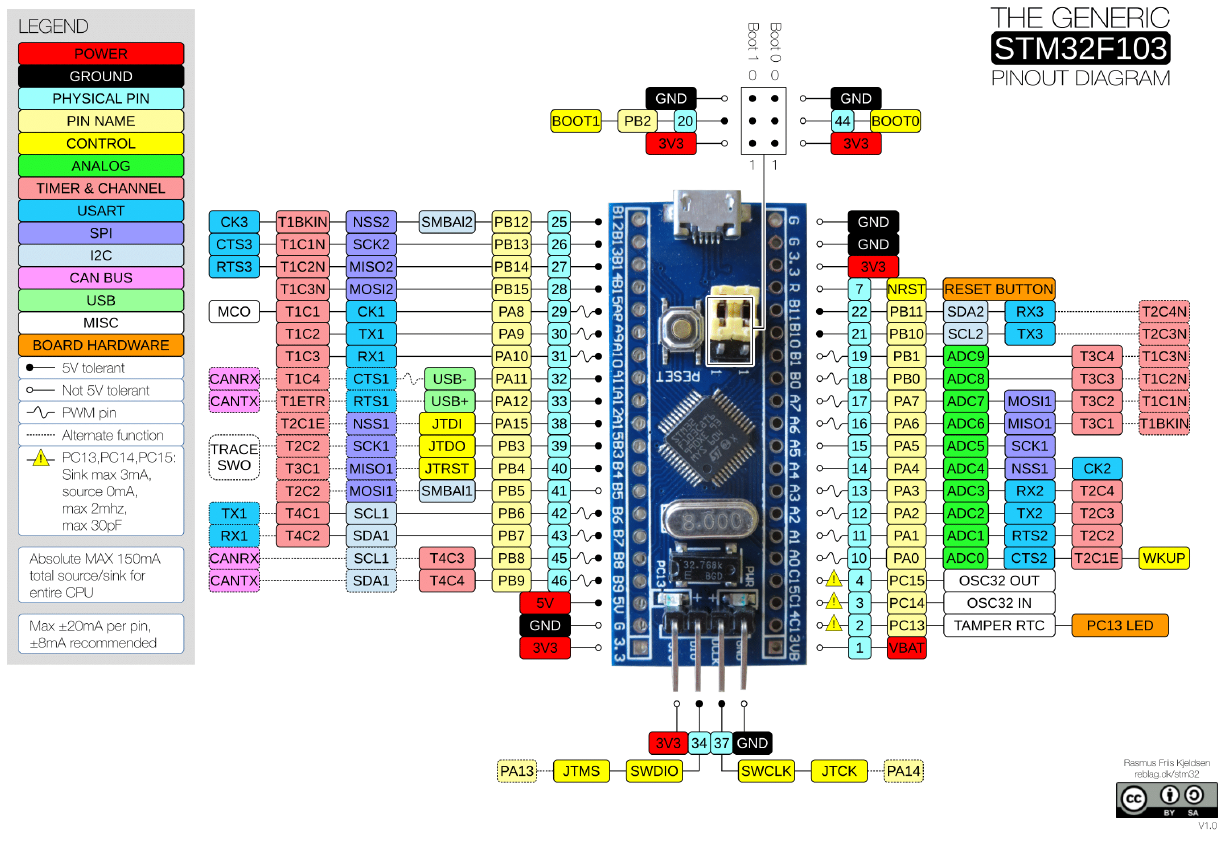
3. Have a look on the pinout diagram on the next page. There are 2 yellow colored jumpers
beside the usb port. They are boot options. Connect boot0 pin to 3V3 and boot1 pin to
GND to start the board in SPI mode when it’s powered up or the reset button is pressed.
4. Now connect a FTDI board (FT232RL) to blue pill. You can use any of this or this or this.
Connect FTDI TX to blue pill RX1 (PA10) and FTDI RX to blue pill TX1(PA9).
5. Connect GND. If your FTDI power pin is 5V, connect it to the 5v pin of Blue pill board.
If it’s 3.3 volt, connect to the pin marked as 3.3. Connecting 5v to any 3.3v pin of Blue
pill board will permanently damage it.
6. Connect the FTDI board to your PC using USB port. You must install the FTDI driver to
your PC to use the FTDI board. You’ll find enough resources on the internet on this. FYI,
it’s the driver for arduino Nano.
7. Close arduino IDE if it’s open. Then open it. Go to Tools>board> Generic STM32F103C
Series. Then go to Tools>Variant>STM32F103C8T6(20k ram, 64k flash). These new
options for STM32 will be automatically added to arduino if you’ve performed everything
described it step 2 successfully.
8. Go to tools> upload method>serial. Then tools>port and select the port of the FTDI.
9. Go to tools>board> Boards manager and check if “Arduino SAM Boards (32 bit ARM
Cortex M3)” is installed or not. If not, select more info and an install button will appear.
Install the board definitions. It’s necessary because codes for the Blue pill board uses some
files written for Arduino Duo for successful compilation.
10. Now open the blink code from File>Examples>Basic>blink. Press the reset button on the
Blue pill board and hit upload button on the Arduino IDE. (board built-in LED is on PC13)
11. Note that you have to reset the Blue pill board every time you are about to upload code.
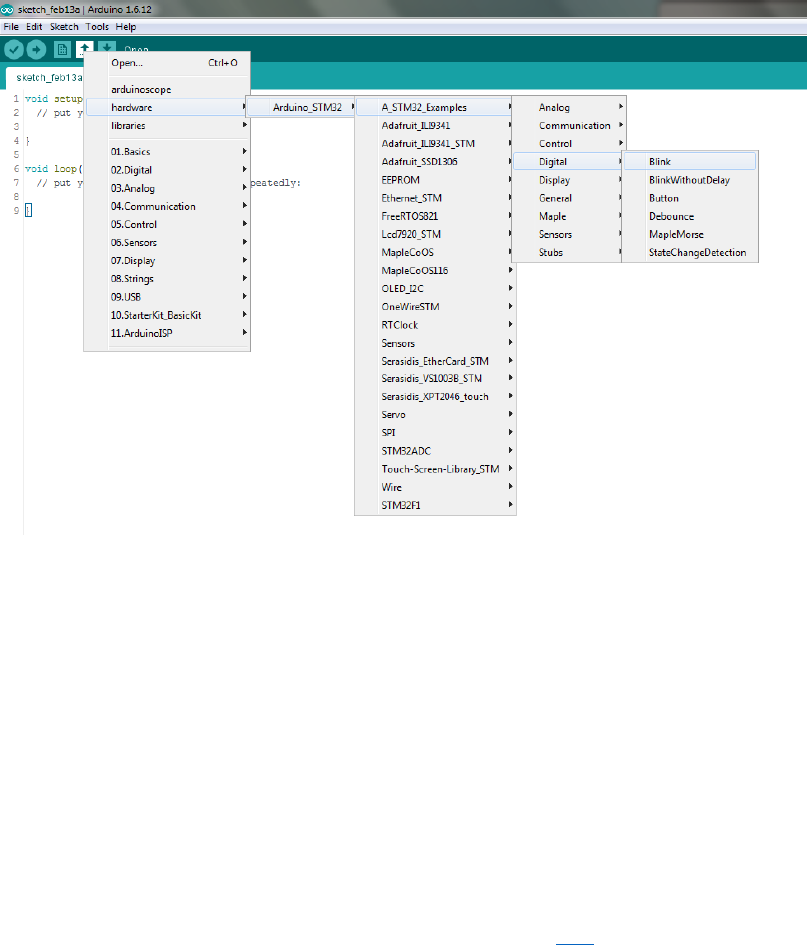
12. You will find all other Examples for the Blue pill board under Up button beneath tools
option>hardware>Arduino_STM32.
Note that, your code will stop working as soon as you restart or reset the blue pill board. You have
to connect boot0 pin to GND using the jumper after uploading code to watch your code working.
But you cannot upload code using USAR1 when boot0 is connected to GND. So,
1. Every time before uploading code, connect boot0 to 3V3 and press the reset button
2. When done with code uploading, connect boot0 to GND.
Uploading program directly to flash:
If you don’t want to use FTDI to upload code and use the microusb port of the blue Pill board
instead, you have to flash a bootloader inside the STM32F103C8T6. By doing so, you don’t have
to connect boot0 pin to 3v3 for uploading code. And there will be no need to press the RESET
button every time before uploading a code.
1. Download demonstrator gui (STM32 flasher) from this link. You have to create a free
account to download. Install the software when downloaded.
2. Keep your blue Pill board connected to PC via the FTDI and keep boot0 pin connected to
3V3. Press the RESET button.
3. Open STMFlashLoader Demo (demonstrator gui) executable file. Select 115200 Baud rate
and select the FTDI COM port. Leave all other settings as default.
4. Press NEXT and It will automatically detect the blue pill.
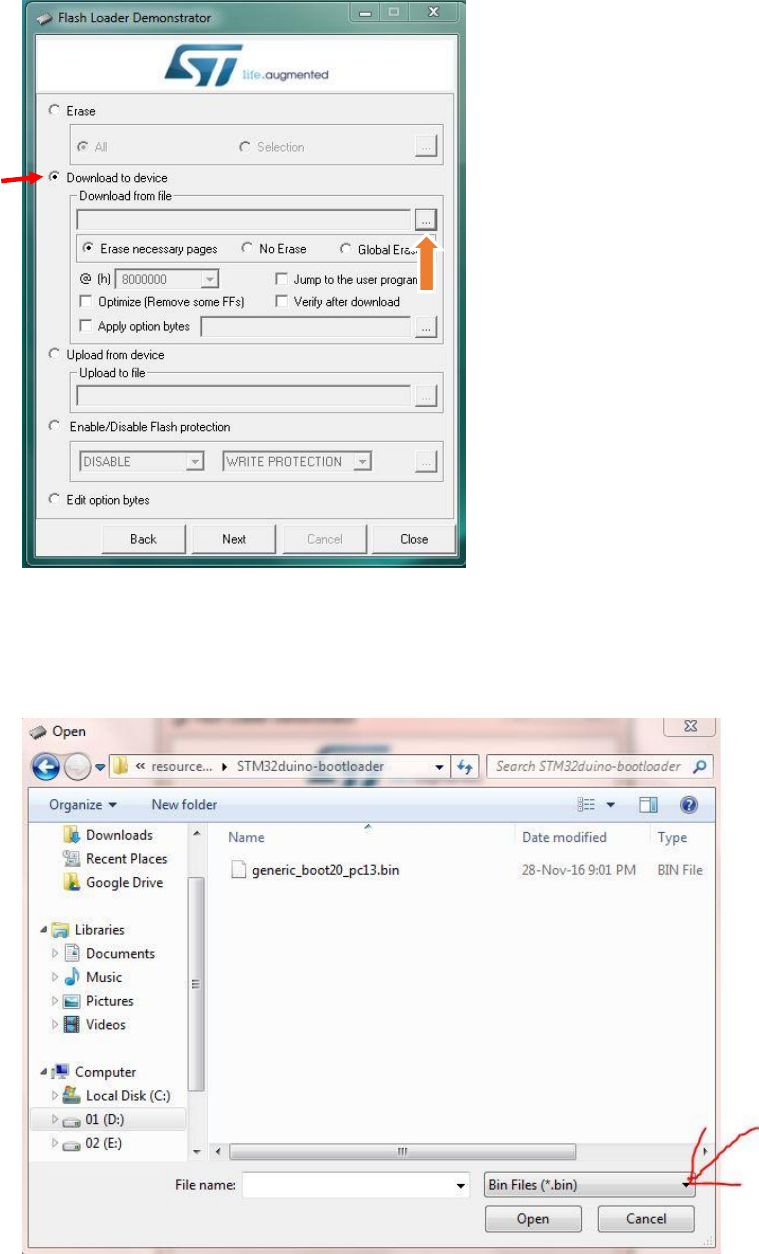
5. Press NEXT twice and you be at the following window.
6. Select download to device and browse (orange arrow) to select generic_boot20_pc13.bin
file. You will find it under the STM32duino_bootloader folder that you downloaded from
mediafire.

7. Select Bin Files (red arrow) if the bootloader file doesn’t show up. Press Open.
8. Press NEXT when the bootloader file is loaded and the file will be downloaded to Blue
pill board. Close demonstrator gui (STM32 flasher) when done.
9. Open your arduino sketchbook folder. Then open Arduino_STM32 folder>drivers>win
and run “install_drivers.bat” as administrator (right click on file, then select run as
administrator). Press any key to close when done.
Then run “install_STM_COM_drivers.bat” as administrator, too.
10. Connect boot0 to GND, disconnect FTDI board and connect a microUSB cable (android
data cable) to Blue pill. Press the RESET button before connecting to PC.
11. You’ll find windows installing driver for the Blue pill when you connect it to PC using the
on board microUSB. Eventually a driver named as “maple DFU” will be installed. You can
find it inside windows Device Manager>libusb>maple DFU. Note that there will be no
COM port assigned to Blue pill board. That’s normal.
12. Open arduino IDE. Go to Tools>board> Generic STM32F103C Series. Then go to
Tools>Variant>STM32F103C8T6 (20k ram, 64k flash). Go to tools> upload
method>STM32duino bootloader. Now open the blink code from
File>Examples>Basic>blink.
13. Go to tools>port and make sure no port is selected or the port option is deactivated.
14. Hit the upload button. As soon as “uploading” message appears at the bottom of arduino
IDE, press the RESET button of Blue pill board.
15. If your code uploads successfully, you’ll find that windows is installing a new driver and
this time it will assign a COM port for your Blue pill board.
16. Go to tools>port and select the correct COM port for Blue pill. The COM port can be found
on windows Device Manager> ports (COM & LPT)> Maple Serial (correct port).
17. You have to make sure that the correct COM port is selected to ensure code uploading
from now on.
The STM32duino bootloader is called perpetual bootloader. It works on DFU mode at
first without using any COM port. After the first program is uploaded, it assigns COM
port for the computer.
18. You are now ready to use Blue pill board as normal arduino board by using the on board
microUSB. Keep Boot0 and Boot1 pin always connected to GND. You don’t have to
press RESET button while uploading code anymore.
Video Resources:
www.youtube.com/watch?v=Ze6q6NidS5w
www.youtube.com/watch?v=0jdJp3TQuJY
