Struts Survival Guide
User Manual:
Open the PDF directly: View PDF ![]() .
.
Page Count: 227 [warning: Documents this large are best viewed by clicking the View PDF Link!]

S
St
tr
ru
ut
ts
s
S
Su
ur
rv
vi
iv
va
al
l
G
Gu
ui
id
de
e
B
Ba
as
si
ic
cs
s
t
to
o
B
Be
es
st
t
P
Pr
ra
ac
ct
ti
ic
ce
es
s
C
Co
ov
ve
er
rs
s
S
St
tr
ru
ut
ts
s
1
1.
.1
1
Srikanth Shenoy
Austin

2
ObjectSource LLC books are available for bulk purchases for corporations and other organizations.
The publisher offers discounts when ordered in bulk. For more information please contact:
Sales Department
ObjectSource LLC.
2811 La Frontera Blvd., Suite 517
Austin, TX 78728
Email: sales@objectsource.com
First corrected reprint Copyright ©2004,2005 ObjectSource LLC. All rights reserved.
All rights reserved. No part of this publication may be reproduced, stored in a retrieval system or
transmitted in any form or by any means electronic, mechanical, photocopying, recording or
otherwise, without the prior written permission of the publisher.
Many of the designations used by manufacturers and sellers to distinguish their products are claimed
as trademarks. Where those designations appear in this book, and ObjectSource LLC, was aware of
a trademark claim, the designations have been printed in initial capital letters.
The author and the publisher have taken care in preparation of this book, but make no express or
implied warranty of any kind and assume no responsibility for errors or omissions. In no event shall
the ObjectSource LLC or the authors be liable for any direct, indirect, incidental, special, exemplary or
consequential damages (including, but not limited to, procurement of substitute goods or services;
loss of use, data, or profits; or business interruption) however caused and on any theory of liability,
whether in contract, strict liability, or tort (including negligence or otherwise) arising in any way out of
use of the information or programs contained herein.
Published by
ObjectSource LLC
2811 La Frontera Blvd., Suite 517,
Austin TX 78728
Printing
RJ Communications
51 East 42
nd
Street, Suite 1202,
NewYork NY 10017
Cover Design
Matt Pramschufer
Budget Media Design
Pleasantville, New York
Library of Congress Catalog Number: 2004100026
ISBN: 0-9748488-0-8 (paperback)
Printed in the United States of America

3

4

5
Table of Contents
Chapter 1. Getting Started ..........................................................................................15
J2EE Platform 15
J2EE web application 16
JSPs Error! Bookmark not defined.
1.1 Model 1 Architecture 20
Problems with Model 1 Architecture 20
1.2 Model 2 Architecture - MVC 21
Advantages of Model 2 Architecture 22
Controller gone bad – Fat Controller 23
1.3 MVC with configurable controller 23
1.4 First look at Struts 25
1.5 Tomcat and Struts installation 28
1.6 Summary 28
Chapter 2. Struts Framework Components...............................................................30
2.1 Struts request lifecycle 31
ActionServlet 31
RequestProcessor and ActionMapping 33
ActionForm 34
Action 35
ActionForward 36
ActionErrors and ActionError 37
2.2 Struts Configuration File – struts-config.xml 39
2.3 View Components 42
How FormTag works 43
How ErrorsTag works 45
2.4 Summary 47
Chapter 3. Your first Struts application ....................................................................48
3.1 Introduction 48
3.2 Hello World – step by step 49
3.3 Lights, Camera, Action! 61
3.4 Handling multiple buttons in HTML Form 63
3.5 Value replacement in Message Resource Bundle 65
3.6 Summary 67
Chapter 4. All about Actions .......................................................................................68
4.1 ForwardAction 68
MVC compliant usage of LinkTag 69
Using LinkTag’s action attribute 70
Using LinkTag’s forward attribute 70
Using ForwardAction for Integration 71
ForwardAction Hands-on 72
4.2 Protecting JSPs from direct access 72
4.3 IncludeAction 75
4.4 DispatchAction 76
4.5 LookupDispatchAction 80
4.6 Configuring multiple application modules 82
4.7 Roll your own Base Action and Form 85
4.8 Handling Duplicate Form Submissions 88
4.9 What goes into Action (and what doesn’t) 91
4.10 When to use Action chaining (and when not to) 93

6
4.11 Actions for complex transitions 94
Wiring the handlers 94
State aware Forms 95
4.12 Managing struts-config.xml 96
Struts-GUI 96
Struts Console 96
XDoclet 97
4.13 Guidelines for Struts Application Development 98
4.14 Summary 99
Chapter 5. Form Validation ......................................................................................101
5.1 Using Commons Validator with Struts 102
The twin XML files 102
validation-rules.xml – The global rules file 103
validation.xml – The application specific rules file 104
More validation.xml features 106
Using the ValidationForm 108
Configuring the Validator 108
Steps to use Commons Validator in Struts 109
5.2 DynaActionForm – The Dynamic ActionForm 109
DynaValidatorForm 113
5.3 Validating multi-page forms 113
5.4 Validating form hierarchy 116
5.5 Summary 117
Chapter 6. Struts Tag Libraries................................................................................119
6.1 Struts HTML Tags 120
Modifying the Base Tag 120
Form Tag 122
FileTag 122
Smart Checkbox – The state aware checkbox 123
Using CSS with Struts HTML Tags 125
Enhancing the error display with customized TextTag 125
The recommended way to use ImgTag 129
6.2 Using Images for Form submissions 130
ImageButton and JavaScript 133
6.3 Struts Bean Tags 134
Message Tag and Multiple Resource Bundles 134
Write Tag 135
6.4 Struts Logic Tags 135
Nested Logic Tags 136
Iterate Tag 137
6.5 A crash course on JSTL 138
JSTL Binaries – Who’s who 141
6.6 Struts-EL 141
Struts-EL hands-on 142
Practical uses for Struts-EL 143
6.7 List based Forms 143
6.8 Multi-page Lists and Page Traversal frameworks 147
Pager Taglib 148
DisplayTag and HtmlTable frameworks 149
Creating the Model for iteration 150

7
6.9 Summary 153
Chapter 7. Struts and Tiles........................................................................................154
7.1 What is Tiles 154
7.2 Your first Tiles application 157
Step 1: Creating the Layout 158
Step 2: Creating the XML Tile definition file 159
Step 3: Modifying the forwards in struts-config.xml 160
Step 4: Using TilesRequestProcessor 161
Step 5: Configuring the TilesPlugIn 161
7.3 Tiles and multiple modules 163
7.4 Summary 163
Chapter 8. Struts and I18N........................................................................................164
Terminology 164
What can be localized? 165
8.1 The Java I18N and L10N API 166
Accessing Locale in Servlet Container 167
8.2 Internationalizing Struts Applications 171
8.3 Internationalizing Tiles Applications 173
8.4 Processing Localized Input 174
8.5 Character encodings 175
Struts and character encoding 177
native2ascii conversion 178
8.6 Summary 179
Chapter 9. Struts and Exception Handling ..............................................................181
9.1 Exception Handling Basics 182
9.2 Log4J crash course 183
9.3 Principles of Exception Handling 184
9.4 The cost of exception handling 187
9.5 JDK 1.4 and exception handling 188
9.6 Exception handling in Servlet and JSP specifications 189
9.7 Exception handling – Struts way 191
Declarative exception handling 191
Using the ExceptionHandler 193
When not to use declarative exception handling 194
Exception handling and I18N 196
9.8 Logging Exceptions 196
9.9 Strategies for centralized logging 202
9.10 Reporting exceptions 206
9.11 Summary 208
Chapter 10. Effectively extending Struts..................................................................209
Customizing the action mapping 211
10.1 A rudimentary page flow controller 213
10.2 Controlling the validation 215
10.3 Controlling duplicate form submissions 218
10.4 DispatchAction for Image Button form submissions 222
10.5 Summary 224

8
Preface
I started using Struts in late 2000. I was immediately drawn to its power and ease
of use. In early 2001, I landed in a multi-year J2EE project, a large project by any
measures. Struts 1.0 was chosen as the framework for the web tier in that project.
Recently that project upgraded to Struts 1.1. I did the upgrade over a day. It
cannot get any easier!
This book makes no assumptions about your Struts knowledge. It starts with
the basics of Struts, teaches you what is important in Struts from a usage
perspective and covers a lot of practical issues all in a short 200-page book. No
unnecessary explanations. Concise, Clear and straight to the topic.
I am a consultant, not an author by profession. Hence my writing also tends
to reflect my mindset that got shaped by the various assignments I have
undertaken in the past. Large projects and their inbuilt complexities excite me. In
large projects, decoupling layers is a big thing. Also minor decisions during
architecting and designing (probably without the complete knowledge of the
framework used) can impact the project in a big way down the line. Clearly
understanding the strengths and shortcomings of a framework and minor
customizations to the framework go a long way in making the applications
cleaner. In that perspective, I have attempted to give a practical face to this book
based on my experience. Chapters 4, 5, 6, 9 and 10 will be extremely valuable to
all those wishing to use Struts effectively in J2EE projects.
Chapter 9 is based on my article originally published in IBM
developerWorks in May 2002 on Best practices in EJB Exception handling
(http://www-106.ibm.com/developerworks/java/library/j-ejbexcept.html). This
chapter borrows some of the core concepts from that article and extends and
improvises them to specifically suit the needs of a Struts web application.
I have enjoyed a lot writing this book. Even though I knew Struts well, there
were some crevices that I had not explored and have made me that much better.
If you are a beginner, this book is your fastest track to master Struts. There are a
lot of best practices and strategies related to Struts that makes this book valuable
to even experienced developers and architects.
Srikanth Shenoy
January 2004

9

10
Acknowledgements
A good book is the end result of the efforts of many. For the first edition,
Sandeep Nayak helped by agreeing to be a beta reader and pointing out the
problems in the initial two chapters. The first edition also owes debt to Fulco
Houkes from Neuchâtel, Switzerland who reviewed the book and tried parts of
the source code to ensure it is working.
Likewise I am indebted to booksjustbooks.com, for making their book on
Publishing basics available freely online without which this book wouldn’t have
been a reality. Thanks to RJ Communications for printing this book. Many
thanks to Matt Pramschufer from Budget Media Design for the cover design.
I would like to thank Amazon.com for being a small publisher friendly
retailer. It is impossible to sell the books without having the reach as Amazon
does. This books comes from a independent small publisher lacking the
distribution network that big publishers possess. Hadn't it for Amazon, the first
edition of this book would still be lying in my warehouse and I would not have
been able to offer this ebook free of cost.
I owe thanks to my wife for patiently putting up with me when I was
working evenings and weekends on the book and also editing the book. I also
owe thanks and gratitude to my parents who showed the right path as I was
growing up and instilled in me the passion for perfection, courage to achieve
anything and never give up.
Finally thanks to God through whom all things are made possible.
Srikanth Shenoy
March 2005

11

12
W
Wh
he
er
re
e
t
to
o
g
ge
et
t
t
th
he
e
S
So
ou
ur
rc
ce
e
C
Co
od
de
e
f
fo
or
r
t
th
he
e
b
bo
oo
ok
k
The source code for this book can be downloaded from the website
http://www.objectsource.com.
Specifically the link for the examples is http://www.objectsource.com/struts-
survival-guide-examples.zip, which also includes a companion workbook for this
Survival Guide. The workbook illustrates the concepts with step by step
instructions.
Also don’t forget to download the PDF slides used in a short Struts Training.
It is located at http://www.objectsource.com/Struts_for_J2EE_Developers-
ObjectSource_Training_Material.zip.

13
Author Profile
Srikanth Shenoy is the co-founder and chief mentor at ObjectSource LLC.
ObjectSource is a Austin, TX based company providing J2EE training and
consulting that also publishes great technical books. Srikanth has over 10 years
of experience in the software industry. Previously he worked as J2EE Consultant
and Architect for J2EE and CORBA product vendors and large system
integrators. He has helped clients in the manufacturing, logistics, and financial
sectors to realize the Java's "write once, run anywhere" dream. He has written
articles and papers for IBM developerWorks, The SerververSide and so on
ranging from topics such as EJBs to JavaServer Faces and Maven. Most recently
he created the OTOM framework (http://otom.dev.java.net) - a Java Tool that
allows graphical mapping of one object to another and subsequent code
generation. He also contributes to several other Open Source projects. He can be
reached at shenoy@objectsource.com.
ObjectSource LLC, provides solutions and services including architecture &
design, strategic architecture review, consulting in areas such as J2EE
applications, O-R Mapping (specifically TopLink and Hibernate) and training on
topics such as J2EE, Struts, Hibernate, TopLink, JavaServer Faces and Spring.

Struts Survival Guide – Basics to Best Practices
14
Chapter 1. Getting Started
15
C
Ch
ha
ap
pt
te
er
r
1
1
Getting Started
In this chapter:
1. You will learn about Model 1 and Model 2 (MVC) and their differences.
2. You will understand the shortcomings of Model 1.
3. You will understand the problems with Model 2 – The Fat Controller Anti-
pattern.
4. You will learn how to overcome the problems in Model 2 by using Model
2 with a configurable controller.
5. You will see how Struts fill the gap by providing the configurable
controller and much more to boost developer productivity.
6. You will look at installing Tomcat and Struts on your computer.
What is Struts?
Struts is a Java MVC framework for building web applications on the J2EE
platform.
That’s it! As you can see, whole lot of buzzwords appear in the above sentence.
This chapter analyzes the above definition word-by-word and presents a big
picture of Struts. It also shows how Struts makes it easy to develop web
applications for the J2EE platform. But first, I will start with a quick overview of
the J2EE platform followed by basics of J2EE web application development
before looking at various strategies and frameworks that are available today for
developing the J2EE presentation tier.
J2EE Platform
As you might be already knowing, J2EE is a platform for executing server
side Java applications. Before J2EE was born, server side Java applications were
written using vendor specific APIs. Each vendor had unique APIs and
architectures. This resulted in a huge learning curve for Java developers and
architects to learn and program with each of these API sets and higher costs for
the companies. Development community could not reuse the lessons learnt in the

Struts Survival Guide – Basics to Best Practices
16
trenches. Consequently the entire Java developer community was fragmented,
isolated and stunted thus making very difficult to build serious enterprise
applications in Java.
Fortunately the introduction of J2EE and its adoption by the vendors has
resulted in standardization of its APIs. This in turn reduced the learning curve for
server side Java developers. J2EE specification defines a whole lot of interfaces
and a few classes. Vendors (like BEA and IBM for instance) have provided
implementations for these interfaces adhering to the J2EE specifications. These
implementations are called J2EE Application Servers.
The J2EE application servers provide the infrastructure services such as
threading, pooling and transaction management out of the box. The application
developers can thus concentrate on implementing business logic. Consider a
J2EE stack from a developer perspective. At the bottom of the stack is Java 2
Standard Edition (J2SE). J2EE Application Servers run in the Java Virutal
Machine (JVM) sandbox. They expose the standard J2EE interfaces to the
application developers. Two types
1
of applications can be developed and
deployed on J2EE application servers – Web applications and EJB applications.
These applications are deployed and executed in “container”s. J2EE specification
defines containers for managing the lifecycle of server side components. There
are two types of containers - Servlet containers and EJB containers. Servlet
containers manage the lifecycle of web applications and EJB containers manage
the lifecycle of EJBs. Only Servlet containers are relevant to our discussion as
Struts, the theme of this book, is a web application framework.
J2EE web application
Any web application that runs in the servlet container is called a J2EE web
application. The servlet container implements the Servlet and JSP specification.
It provides various entry points for handling the request originating from a web
browser. There are three entry points for the browser into the J2EE web
application - Servlet, JSP and Filter. You can create your own Servlets by
extending the
javax.servlet.http.HttpServlet
class and implementing
the
doGet()
and
doPost()
method. You can create JSPs simply by creating a
text file containing JSP markup tags. You can create Filters by implementing the
javax.servlet.Filter
interface.
The servlet container becomes aware of Servlets and Filters when they are
declared in a special file called web.xml
2
. A J2EE web application has exactly
1
There are actually three types of applications that can be developed and deployed on
J2EE app servers. The third one is a application conforming to J2EE Connector
Architecture (J2CA). However I will leave this out for simplicity.
2
There are various kinds of Listeners that you can declare in web.xml. You can also
declare Tag Library Definitions (TLD) in web.xml. More details can be found in the
Servlet Specification. Again, I am leaving this out for simplicity.
Chapter 1. Getting Started
17
one web.xml file. The web application is deployed into the servlet container by
bundling it in zipped archive called Web ARchive – commonly referred to as
WAR file.
Listing 1.1 Sample doGet() method in a Servlet handling HttpRequest
public class MyServlet extends HttpServlet {
public void doGet(HttpServletRequest httpRequest,
HttpServletResponse httpResponse)
throws ServletException, IOException {
//Extract data from Http Request Parameters
//Business Logic goes here
//Now write output HTML
OutputStream os = httpResponse.getOutputStream();
os.println(“<html><body>”);
//Write formatted data to output stream
os.println(“</body></html>”);
os.flush();
os.close();
}
}
A servlet is the most basic J2EE web component. It is managed by the servlet
container. All servlets implement the Servlet interface directly or indirectly. In
general terms, a servlet is the endpoint for requests adhering to a protocol.
However, the Servlet specification mandates implementation for servlets that
handle HTTP requests only. But you should know that it is possible to implement
the servlet and the container to handle other protocols such as FTP too. When
writing Servlets for handling HTTP requests, you generally subclass HttpServlet
class. HTTP has six methods of request submission – GET, POST, PUT, HEAD
and DELETE. Of these, GET and POST are the only forms of request submission
relevant to application developers. Hence your subclass of HttpServlet should
implement two methods – doGet() and doPost() to handle GET and POST
respectively. Listing 1.1 shows a doGet() method from a typical Servlet.
With this background, let us now dive straight into presentation tier
strategies. This coverage of presentation tier strategies will kick start your
thought process on how and where Struts fits in the big picture.
1.1 Presentation Tier Strategies
Technologies used for the presentation tier can be roughly classified into three
categories:
Struts Survival Guide – Basics to Best Practices
18
Markup based Rendering (e.g. JSPs)
Template based Transformation (e.g. Velocity, XSLT)
Rich content (e.g. Macromedia Flash, Flex, Laszlo)
Markup based Rendering
JSPs are perfect examples of markup based presentation tiers. In markup based
presentation, variety of tags are defined (just like HTML tags). The tag
definitions may be purely for presentation or they can contain business logic.
They are mostly client tier specific. E.g. JSP tags producing HTML content. A
typical JSP is interpreted in the web container and the consequent generation of
HTML. This HTML is then rendered in the web browser. The next few
paragraphs cover the role played by JSPs in comparison to Servlets in J2EE web
application.
In the last section, you saw how Servlets produced output HTML in addition
to executing business logic. So why aren’t Servlets used for presentation tier?
The answer lies in the separation of concerns essential in real world J2EE
projects. Back in the days when JSPs didn’t exist, servlets were all that you had
to build J2EE web applications. They handled requests from the browser,
invoked middle tier business logic and rendered responses in HTML to the
browser. Now that’s a problem. A Servlet is a Java class coded by Java
programmers. It is okay to handle browser requests and have business and
presentation logic in the servlets since that is where they belong. HTML
formatting and rendering is the concern of page author who most likely does not
know Java. So, the question arises, how to separate these two concerns
intermingled in Servlets? JSPs are the answer to this dilemma. JSPs are servlets
in disguise!
The philosophy behind JSP is that the page authors know HTML. HTML is a
markup language. Hence learning a few more markup tags will not cause a
paradigm shift for the page authors. At least it is much easier than learning Java
and OO! JSP provides some standard tags and java programmers can provide
custom tags. Page authors can write server side pages by mixing HTML markup
and JSP tags. Such server side pages are called JSPs. JSPs are called server side
pages because it is the servlet container that interprets them to generate HTML.
The generated HTML is sent to the client browser.
Presentation Logic and Business Logic – What’s the difference?
The term Business Logic refers to the middle tier logic – the core of the system
usually implemented as Session EJBs. The code that controls the JSP
navigation, handles user inputs and invokes appropriate business logic is
referred to as Pre
sentation Logic
. The actual JSP
–
the front end to the user
Chapter 1. Getting Started
19
contains html and custom tags to render the page and as less logic as possible.
A rule of thumb is the dumber the JSP gets, the easier it is to maintain. In
reality however, some of the presentation logic percolates to the actual JSP
making it tough to draw a line between the two.
We just said JSPs are server side pages. Server side pages in other languages
are parsed every time they are accessed and hence expensive. In J2EE, the
expensive parsing is replaced by generating Java class from the JSP. The first
time a JSP is accessed, its contents are parsed and equivalent Java class is
generated and subsequent accesses are fast as a snap. Here is some twist to the
story. The Java classes that are generated by parsing JSPs are nothing but
Servlets! In other words, every JSP is parsed at runtime (or precompiled) to
generate Servlet classes.
Template based Transformation
In Template based transformation, a template engine uses a pre-defined template
to transform a given data model into desired output.
XSLT is a perfect example for template based transformation. XSLT stands
for XML Stylesheet Language Transformation. XSLT is used to transform an
XML document in one format into another XML document in another format.
Since HTML is a type of XML, XSLT can be used for generating HTML from
XML. In a J2EE application, J2EE components can generate XML that
represents the data. Then the XML is transformed into HTML
(presentation/view) by using a stylesheet written using the XML Stylesheet
Language (XSL).
Velocity is another fantastic example of template based transformation
mechanism to generate the view. In fact Velocity is a general purpose Templating
framework that can be used to generate almost anything, not just a replacement
for JSPs. For more information on Velocity check out
http://jakarta.apache.org/velocity. Velocity with Struts is not covered in this
edition of the book.
Rich Content in Rich Internet Applications (RIA)
Rich content delivery over the internet to the good old browser is not an entirely
new paradigm, but something that’s drawing a lot of attention lately. The
traditional browser’s presentation capabilities are fairly limited even with the
addition of DHTML and JavaScript. In addition, the browser incompatibilities
cause a lot of headache for developing rich application with just DHTML and
JavaScript.
Enter, Macromedia Flash, a freely available plugin for all the popular
browsers that can render the rich content uniformly across all browsers and
operating systems. This strategy can be of interest to Struts developers because

Struts Survival Guide – Basics to Best Practices
20
Macromedia has also released Flex – a presentation tier solution to deliver
internet applications with rich content using Struts.
Laszlo is another platform to deliver rich internet applications. Laszlo
renders contents using the same flash player, but it is open source. It can be
integrated with Struts too.
NOTE: Struts can be used as the controller framework for any of the view
generation strategies described above. Struts can be combined with JSPs – the
most popular option among developers. Struts can also be combined with
Velocity templating or XSLT. Struts is also an integral part of Macromedia
Flex. Lazlo and Struts can be combined to deliver rich internet applications.
So far, we have looked at various strategies that can be applied in the
presentation tier to generate the view. We also saw that Struts can play an
effective role in each of these strategies as a controller. Well, I didn’t explain
exactly how it plays the role of a controller. It is the topic of next few sections.
We will start by introducing the two modes of designing JSPs - Model 1 and
Model 2 architectures in the next two sections and then arrive at Struts as an
improvement over the Model 2 architecture.
1.2 Model 1 Architecture
Model 1 architecture is the easiest way of developing JSP based web
applications. It cannot get any easier. In Model 1, the browser directly accesses
JSP pages. In other words, user requests are handled directly by the JSP.
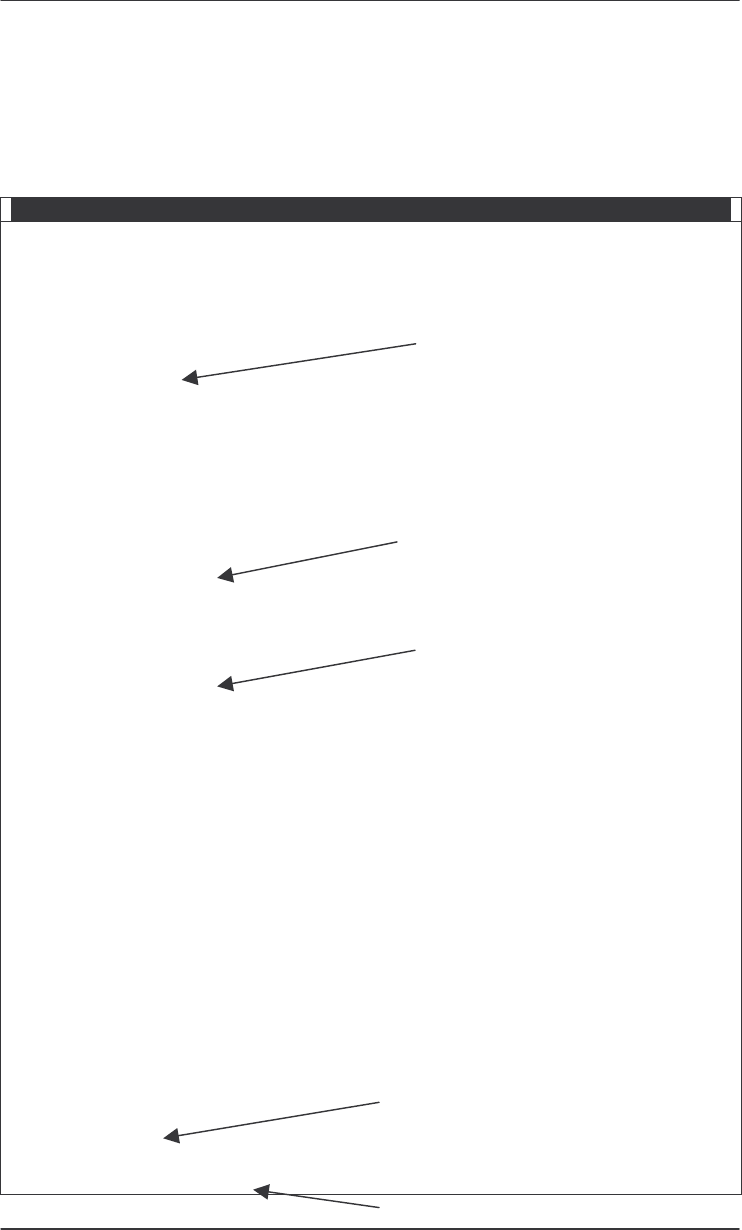
Let us illustrate the operation of Model 1 architecture with an example.
Consider a HTML page with a hyperlink to a JSP. When user clicks on the
hyperlink, the JSP is directly invoked. This is shown in Figure 1.1. The servlet
container parses the JSP and executes the resulting Java servlet. The JSP contains
embedded code and tags to access the Model JavaBeans. The Model JavaBeans
contains attributes for holding the HTTP request parameters from the query
string. In addition it contains logic to connect to the middle tier or directly to the
database using JDBC to get the additional data needed to display the page. The
JSP is then rendered as HTML using the data in the Model JavaBeans and other
Helper classes and tags.
Problems with Model 1 Architecture
Model 1 architecture is easy. There is some separation between content
(Model JavaBeans) and presentation (JSP). This separation is good enough for
smaller applications. Larger applications have a lot of presentation logic. In
Model 1 architecture, the presentation logic usually leads to a significant amount
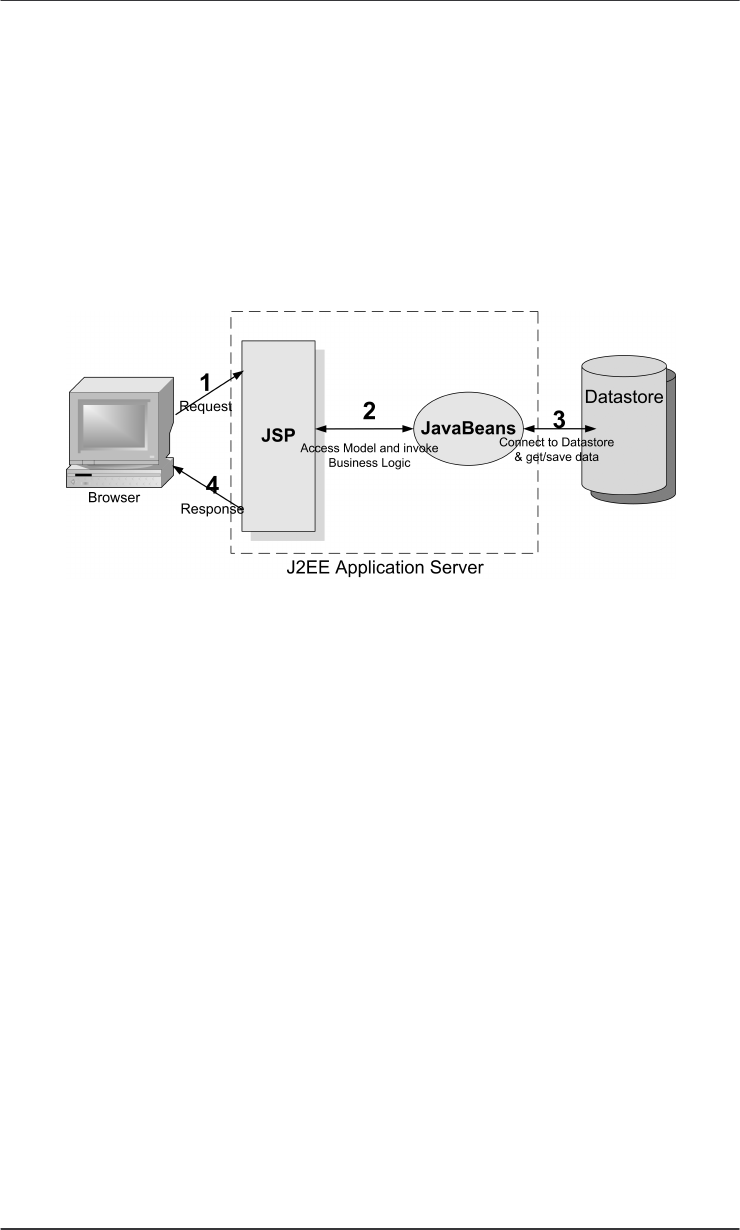
Chapter 1. Getting Started
21
of Java code embedded in the JSP in the form of scriptlets. This is ugly and
maintenance nightmare even for experienced Java developers. In large
applications, JSPs are developed and maintained by page authors. The
intermingled scriptlets and markup results in unclear definition of roles and is
very problematic.
Application control is decentralized in Model 1 architecture since the next
page to be displayed is determined by the logic embedded in the current page.
Decentralized navigation control can cause headaches. All this leads us to Model
2 architecture of designing JSP pages.
Figure 1.1 Model 1 Architecture.
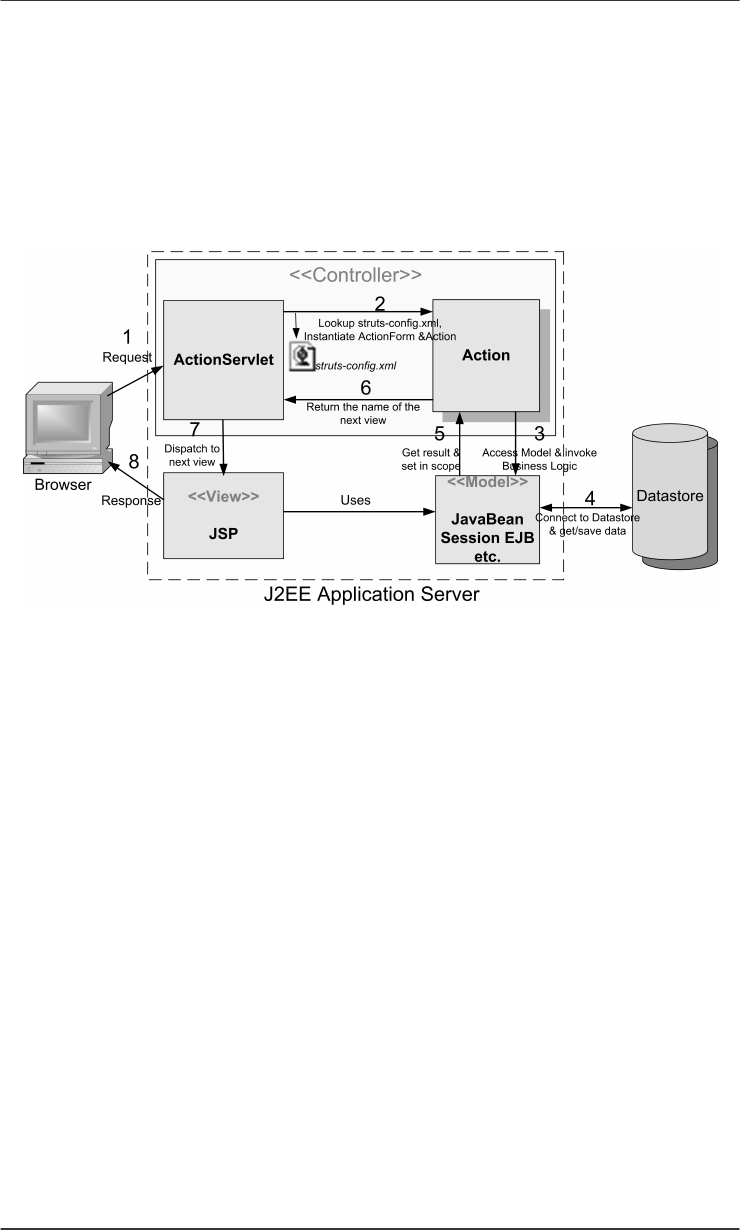
1.3 Model 2 Architecture - MVC
The Model 2 architecture for designing JSP pages is in reality, Model View
Controller (MVC) applied to web applications. Hence the two terms can be used
interchangeably in the web world. MVC originated in SmallTalk and has since
made its way into Java community. Model 2 architecure and its derivatives are
the cornerstones for all serious and industrial strength web applications designed
in the real world. Hence it is essential for you understand this paradigm
thoroughly. Figure 1.2 shows the Model 2 (MVC) architecture.
The main difference between Model 1 and Model 2 is that in Model 2, a
controller handles the user request instead of another JSP. The controller is
implemented as a Servlet. The following steps are executed when the user
submits the request.
1. The Controller Servlet handles the user’s request. (This means the hyperlink
in the JSP should point to the controller servlet).
2. The Controller Servlet then instantiates appropriate JavaBeans based on the
request parameters (and optionally also based on session attributes).
3. The Controller Servlet then by itself or through a controller helper
Struts Survival Guide – Basics to Best Practices
22
communicates with the middle tier or directly to the database to fetch the
required data.
4. The Controller sets the resultant JavaBeans (either same or a new one) in one
of the following contexts – request, session or application.
5. The controller then dispatches the request to the next view based on the
request URL.
6. The View uses the resultant JavaBeans from Step 4 to display data.
Note that there is no presentation logic in the JSP. The sole function of the
JSP in Model 2 architecture is to display the data from the JavaBeans set in the
request, session or application scopes.
Figure 1.2 Model 2 Architecture.
Advantages of Model 2 Architecture
Since there is no presentation logic in JSP, there are no scriptlets. This means
lesser nightmares. [Note that although Model 2 is directed towards elimination of
scriptlets, it does not architecturally prevent you from adding scriptlets. This has
led to widespread misuse of Model 2 architecture.]
With MVC you can have as many controller servlets in your web application.
In fact you can have one Controller Servlet per module. However there are
several advantages of having a single controller servlet for the entire web
application. In a typical web application, there are several tasks that you want to
do for every incoming request. For instance, you have to check if the user
requesting an operation is authorized to do so. You also want to log the user’s
entry and exit from the web application for every request. You might like to
centralize the logic for dispatching requests to other views. The list goes on. If
you have several controller servlets, chances are that you have to duplicate the

Chapter 1. Getting Started
23
logic for all the above tasks in all those places. A single controller servlet for the
web application lets you centralize all the tasks in a single place. Elegant code
and easier to maintain.
Web applications based on Model 2 architecture are easier to maintain and
extend since the views do not refer to each other and there is no presentation
logic in the views. It also allows you to clearly define the roles and
responsibilities in large projects thus allowing better coordination among team
members.
Controller gone bad – Fat Controller
If MVC is all that great, why do we need Struts after all? The answer lies in
the difficulties associated in applying bare bone MVC to real world complexities.
In medium to large applications, centralized control and processing logic in the
servlet – the greatest plus of MVC is also its weakness. Consider a mediocre
application with 15 JSPs. Assume that each page has five hyperlinks (or five
form submissions). The total number of user requests to be handled in the
application is 75. Since we are using MVC framework, a centralized controller
servlet handles every user request. For each type of incoming request there is “if”
block in the
doGet
method of the controller Servlet to process the request and
dispatch to the next view. For this mediocre application of ours, the controller
Servlet has 75 if blocks. Even if you assume that each if block delegates the
request handling to helper classes it is still no good. You can only imagine how
bad it gets for a complex enterprise web application. So, we have a problem at
hand. The Controller Servlet that started out as the greatest thing next to sliced
bread has gone bad. It has put on a lot of weight to become a Fat Controller.
1.4 MVC with configurable controller
You must be wondering what went wrong with MVC. When application gets
large you cannot stick to bare bone MVC. You have to extend it somehow to deal
with these complexities. One mechanism of extending MVC that has found
widespread adoption is based on a configurable controller Servlet. The MVC
with configurable controller servlet is shown in Figure 1.3.
When the HTTP request arrives from the client, the Controller Servlet looks
up in a properties file to decide on the right Handler class for the HTTP request.
This Handler class is referred to as the Request Handler. The Request Handler
contains the presentation logic for that HTTP request including business logic
invocation. In other words, the Request Handler does everything that is needed to
handle the HTTP request. The only difference so far from the bare bone MVC is
that the controller servlet looks up in a properties file to instantiate the Handler
instead of calling it directly.
Struts Survival Guide – Basics to Best Practices
24
Figure 1.3 MVC with configurable controller Servlet.
Listing 1.1 Configurable Controller Servlet Implementation
public class MyControllerServlet extends HttpServlet {
private Properties props;
public init(ServletConfig config) throws ServletException {
try {
props = new Properties();
props.load(new FileInputStream("C:/file.properties"));
} catch (IOException ioe) {
throw new ServletException(ioe);
}
}
public void doGet(HttpServletRequest httpRequest,
HttpServletResponse httpResponse)
throws ServletException, IOException {
String urlPath = httpRequest.getPathInfo();
String reqhandlerClassName = (String) props.get(urlPath);
HandlerInterface handlerInterface = (HandlerInterface)
Class.forName(reqhandlerClassName).newInstance();
String nextView = handlerInterface.execute(httpRequest);
..
..
RequestDispatcher rd = getServletContext().
getRequestDispatcher(nextView);
rd.forward(httpRequest, httpResponse);
}
Chapter 1. Getting Started
25
}
At this point you might be wondering how the controller servlet would know
to instantiate the appropriate Handler. The answer is simple. Two different HTTP
requests cannot have the same URL. Hence you can be certain that the URL
uniquely identifies each HTTP request on the server side and hence each URL
needs a unique Handler. In simpler terms, there is a one-to-one mapping between
the URL and the Handler class. This information is stored as key-value pairs in
the properties file. The Controller Servlet loads the properties file on startup to
find the appropriate Request Handler for each incoming URL request.
The controller servlet uses Java Reflection to instantiate the Request Handler.
However there must be some sort of commonality between the Request Handlers
for the servlet to generically instantiate the Request Handler. The commonality is
that all Request Handler classes implement a common interface. Let us call this
common interface as Handler Interface. In its simplest form, the Handler
Interface has one method say, execute(). The controller servlet reads the
properties file to instantiate the Request Handler as shown in Listing 1.1.
The Controller Servlet instantiates the Request Handler in the
doGet()
method and invokes the
execute()
method on it using Java Reflection. The
execute()
method invokes appropriate business logic from the middle tier and
then selects the next view to be presented to the user. The controller servlet
forwards the request to the selected JSP view. All this happens in the
doGet()
method of the controller servlet. The
doGet()
method lifecycle never changes.
What changes is the Request Handler’s execute() method. You may not have
realized it, but you just saw how Struts works in a nutshell! Struts is a controller
servlet based configurable MVC framework that executes predefined methods in
the handler objects. Instead of using a properties file like we did in this example,
Struts uses XML to store more useful information.
1.4 First look at Struts
In the last section, you have seen the underlying principle behind Struts
framework. Now let us look closely at the Struts terminology for controller
servlet and Handler objects that we mentioned and understand Figure 1.4. Figure
1.4 is a rehash of Figure 1.3 by using Struts terminology. Since this is your first
look at Struts, we will not get into every detail of the HTTP request handling
lifecycle in Struts framework. Chapter 2 will get you there. For now, let us
concentrate on the basics.
Listing 1.2 Sample ActionForm
public class MyForm extends ActionForm {
private String firstName;
Struts Survival Guide – Basics to Best Practices
26
private String lastName;
public MyForm() {
firstName = “”; lastName = “”;
}
public String getFirstName() {
return firstName;
}
public void setFirstName(String s) {
this.firstName = s;
}
public String getLastName() {
return lastName;
}
public void setLastName(String s) {
this.lastName = s;
}
}
In Struts, there is only one controller servlet for the entire web application.
This controller servlet is called
ActionServlet
and resides in the package
org.apache.struts.action
. It intercepts every client request and populates
an ActionForm from the HTTP request parameters. ActionForm is a normal
JavaBeans class. It has several attributes corresponding to the HTTP request
parameters and getter, setter methods for those attributes. You have to create
your own ActionForm for every HTTP request handled through the Struts
framework by extending the
org.apache.struts.action.ActionForm
class. Consider the following HTTP request for App1 web application –
http://localhost:8080/App1/create.do?firstName=John&lastName=Doe. The
ActionForm class for this HTTP request is shown in Listing 1.2. The class
MyForm
extends the
org.apache.struts.action.ActionForm
class and
contains two attributes –
firstName
and
lastName
. It also has getter and setter
methods for these attributes. For the lack of better terminology, let us coin a term
to describe the classes such as ActionForm – View Data Transfer Object. View
Data Transfer Object is an object that holds the data from html page and
transfers it around in the web tier framework and application classes.
The
ActionServlet
then instantiates a Handler. The Handler class name is
obtained from an XML file based on the URL path information. This XML file is
referred to as Struts configuration file and by default named as struts-config.xml.
Chapter 1. Getting Started
27
The Handler is called Action in the Struts terminology. And you guessed it right!
This class is created by extending the
Action
class in
org.apache.struts.action
package. The Action class is abstract and
defines a single method called
execute()
. You override this method in your
own Actions and invoke the business logic in this method. The
execute()
method returns the name of next view (JSP) to be shown to the user. The
ActionServlet forwards to the selected view.
Figure 1.4 A first look at Struts architecture.
Now, that was Struts in a nutshell. Struts is of-course more than just this. It is
a full-fledged presentation framework. Throughout the development of the
application, both the page author and the developer need to coordinate and ensure
that any changes to one area are appropriately handled in the other. It aids in
rapid development of web applications by separating the concerns in projects.
For instance, it has custom tags for JSPs. The page author can concentrate on
developing the JSPs using custom tags that are specified by the framework. The
application developer works on creating the server side representation of the data
and its interaction with a back end data repository. Further it offers a consistent
way of handling user input and processing it. It also has extension points for
customizing the framework and much more. In this section, you got a bird’s eye
view of how Struts works. More details await you in the chapters ahead. But you
have to install Tomcat and Struts on your machine to better understand the
chapters ahead. Hence we will cover Tomcat and Struts installation briefly in the
next section.

Struts Survival Guide – Basics to Best Practices
28
1.5 Tomcat and Struts installation
We will use Windows environment to develop Struts application and Tomcat
servlet container to deploy and test Struts applications. Precisely we will use
Tomcat-5.0.14 Beta, the latest milestone release of Tomcat. You can download
Tomcat 5.0.14 from http://jakarta.apache.org/tomcat and follow the link to
download. There are several binaries available – several variations of tar, exe and
zip files. Choose the 5.0.14.zip file and unzip it. A folder called jakarta-tomcat-
5.0.14 is created automatically. This is the TOMCAT_HOME directory. Under
the TOMCAT_HOME, there are a lot of folders of which two are important – bin
and webapps folders. The bin folder contains two batch files - startup.bat, used
to start the Tomcat and shutdown.bat, used to stop the Tomcat. All the WAR files
are dropped in the webapps directory and get deployed automatically.
Installing Struts is very easy. In the Struts web site,
http://jakarta.apache.org/struts, go to download section and select the 1.1 Release
Build. This is the latest production quality build available. Once you download
the zipped archive of Struts 1.1 release, unzip the file to a convenient location. It
automatically creates a folder named “jakarta-struts-1.1”. It has three sub-
folders. The lib sub-folder contains the struts.jar – the core library that you want
to use and other jars on which the Struts depends. You would normally copy
most of these jars into the WEB-INF/lib of your web application. The webapps
sub-folder contains a lot of WAR files that can just dropped into any J2EE
application server and tested.
You can test your Tomcat installation and also study Struts at the same time.
Start Tomcat using startup.bat and then drop the struts-documentation.war from
your Struts webapps folder into Tomcat’s webapps folder. The WAR is
immediately deployed. You can access the Struts documentation at the URL
http://localhost:8080/struts-documentation. You should also download the Struts
1.1 source and refer to it and probably study it to get more insights about its
internals. However be sure to read through this book before you dive into the
Struts source code.
1.6 Summary
In this chapter, we refreshed your memory on Model 1 and Model 2 architectures
for JSPs and pointed out the problems with the bare bone MVC in real life –
about how it gets big and ugly. You understood how MVC with configurable
controller could solve the real life problem. You also took a first look at the high
level Struts architecture and saw how it matched the configurable MVC
controller. You also briefly looked at Struts and Tomcat installation and warmed
up for the forthcoming chapters.

Chapter 2. Struts Framework Components
29
Struts Survival Guide – Basics to Best Practices
30
C
Ch
ha
ap
pt
te
er
r
2
2
Struts Framework Components
In this chapter:
1. You will learn more about Struts components and their categories –
Controller and View
2. You will understand the sequence of events in Struts request handling
lifecycle
3. You will understand the role of the following controller classes -
ActionServlet, RequestProcessor, ActionForm, Action, ActionMapping and
ActionForward in the request handling lifecycle
4. You will also learn about the role of Struts Tags as View components in
rendering the response
5. You will understand the various elements of Struts configuration file –
struts-config.xml
In the last chapter, you had a cursory glance at the Struts framework. In this
chapter you will dive deeper and cover various Struts Framework Components.
Here is something to remember all the time.
1. All the core components of Struts framework belong to Controller
category.
2. Struts has no components in the Model category.
3. Struts has only auxiliary components in View category. A collection of
custom tags making it easy to interact with the controller. The View
category is neither the core of Struts framework nor is it necessary.
However it is a helpful library for using Struts effectively in JSP based
rendering.
Controller Category: The
ActionServlet
and the collaborating classes
form the controller and is the core of the framework. The collaborating classes
are
RequestProcessor
,
ActionForm
,
Action
,
ActionMapping
and
ActionForward
.

Chapter 2. Struts Framework Components
31
View Category: The View category contains utility classes – variety of
custom tags making it easy to interact with the controller. It is not mandatory to
use these utility classes. You can replace it with classes of your own. However
when using Struts Framework with JSP, you will be reinventing the wheel by
writing custom tags that mimic Struts view components. If you are using Struts
with Cocoon or Velocity, then have to roll out your own classes for the View
category.
Model Category: Struts does not offer any components in the Model
Category. You are on you own in this turf. This is probably how it should be.
Many component models (CORBA, EJB) are available to implement the business
tier. Your model components are as unique as your business and should not have
any dependency on a presentation framework like Struts. This philosophy of
limiting the framework to what is absolutely essential and helpful and nothing
more has prevented bloating and made the Struts framework generic and
reusable.
NOTE: Some people argue that
ActionForm
is the model component.
However ActionForm is really part of the controller. The Struts documentation
also speaks along similar lines. It is just View Data Transfer Object – a regular
JavaBeans that has dependencies on the Struts classes and used for transferring
the data to various classes within the controller.
2.1 Struts request lifecycle
In this section you will learn about the Struts controller classes –
ActionServlet, RequestProcessor, ActionForm, Action,
ActionMapping and ActionForward – all residing in
org.apache.struts.action
package and struts-config.xml – the Struts
Configuration file. Instead of the traditional “Here is the class – go use it”
approach, you will study the function of each component in the context of HTTP
request handling lifecycle in Struts.
ActionServlet
The central component of the Struts Controller is the
ActionServlet
. It is
a concrete class and extends the
javax.servlet.HttpServlet
. It performs
two important things.
1. On startup, its reads the Struts Configuration file and loads it into memory in
the
init()
method.
2. In the
doGet()
and
doPost()
methods, it intercepts HTTP request and
handles it appropriately.

Struts Survival Guide – Basics to Best Practices
32
The name of the Struts Config file is not cast in stone. It is a convention
followed since the early days of Struts to call this file as struts-config.xml and
place it under the WEB-INF directory of the web application. In fact you can
name the file anyway you like and place it anywhere in WEB-INF or its sub-
directories. The name of the Struts Config file can be configured in web.xml. The
web.xml entry for configuring the
ActionServlet
and Struts Config file is as
follows.
<servlet>
<servlet-name>action</servlet-name>
<servlet-class>org.apache.struts.action.ActionServlet
</servlet-class>
<init-param>
<param-name>config</param-name>
<param-value>/WEB-INF/config/myconfig.xml</param-value>
</init-param>
<load-on-startup>1</load-on-startup>
</servlet>
In the above snippet, the Struts Config file is present in the WEB-INF/config
directory and is named myconfig.xml. The ActionServlet takes the Struts
Config file name as an init-param. At startup, in the
init()
method, the
ActionServlet
reads the Struts Config file and creates appropriate Struts
configuration objects (data structures) into memory. You will learn more about
the Struts configuration objects in Chapter 7. For now, assume that the Struts
Config file is loaded into a set of objects in memory, much like a properties file
loaded into a
java.util.Properties
class.
Like any other servlet,
ActionServlet
invokes the
init()
method when
it receives the first HTTP request from the caller. Loading Struts Config file into
configuration objects is a time consuming task. If the Struts configuration objects
were to be created on the first call from the caller, it will adversely affect
performance by delaying the response for the first user. The alternative is to
specify load-on-startup in web.xml as shown above. By specifying load-on-
startup to be 1, you are telling the servlet container to call the
init()
method
immediately on startup of the servlet container.
The second task that the ActionServlet performs is to intercept HTTP
requests based on the URL pattern and handles them appropriately. The URL
pattern can be either path or suffix. This is specified using the servlet-mapping in
web.xml. An example of suffix mapping is as follows.
<servlet-mapping>
<servlet-name>action</servlet-name>
<url-pattern>*.do</url-pattern>
</servlet-mapping>

Chapter 2. Struts Framework Components
33
If the user types http://localhost:8080/App1/submitCustomerForm.do in the
browser URL bar, the URL will be intercepted and processed by the
ActionServlet
since the URL has a pattern *.do, with a suffix of "do”.
Once the ActionServlet intercepts the HTTP request, it doesn’t do
much. It delegates the request handling to another class called
RequestProcessor
by invoking its
process()
method. Figure 2.1 shows a
flowchart with Struts controller components collaborating to handle a HTTP
request within the RequestProcessor’s process() method. The next sub
sections describe the flowchart in detail. It is very important that you understand
and even memorize this flowchart. Most of the Struts Controller functionality is
embedded in the
process()
method of RequestProcessor class. Mastery
over this flowchart will determine how fast you will debug problems in real life
Struts applications. Let us understand the request handling in the
process()
method step by step with an example covered in the next several sub sections.
Figure 2.1 Flowchart for the RequestProcessor process method.
RequestProcessor and ActionMapping
The RequestProcessor does the following in its
process()
method:
Step 1:
The RequestProcessor first retrieves appropriate XML block for
the URL from struts-config.xml. This XML block is referred to as
Struts Survival Guide – Basics to Best Practices
34
ActionMapping in Struts terminology. In fact there is a class called
ActionMapping in
org.apache.struts.action
package.
ActionMapping
is the class that does what its name says – it holds the mapping
between a URL and Action. A sample ActionMapping from the Struts
configuration file looks as follows.
Listing 2.1 A sample ActionMapping from struts-config.xml
<action path="/submitDetailForm"
type="mybank.example.CustomerAction"
name="CustomerForm"
scope="request"
validate="true"
input="CustomerDetailForm.jsp">
<forward name="success"
path="ThankYou.jsp"
redirect=”true”/>
<forward name="failure" path="Failure.jsp" />
</action>
Step 2:
The RequestProcessor looks up the configuration file for the URL
pattern /submitDetailForm. (i.e. URL path without the suffix do) and finds the
XML block (ActionMapping) shown above. The type attribute tells Struts which
Action class has to be instantiated. The XML block also contains several other
attributes. Together these constitute the JavaBeans properties of the
ActionMapping instance for the path /submitDetailForm. The above
ActionMapping tells Struts to map the URL request with the path
/submitDetailForm to the class
mybank.example.CustomerAction
. The
Action class is explained in the steps ahead. For now think of the Action as your
own class containing the business logic and invoked by Struts. This also tells us
one more important thing.
Since each HTTP request is distinguished from the other only by the path,
there should be one and only one ActionMapping for every path attribute.
Otherwise Struts overwrites the former ActionMapping with the latter.
ActionForm
Another attribute in the ActionMapping that you should know right away is
name. It is the logical name of the ActionForm to be populated by the
RequestProcessor. After selecting the ActionMapping, the
RequestProcessor instantiates the ActionForm. However it has to know the
fully qualified class name of the ActionForm to do so. This is where the name
attribute of ActionMapping comes in handy. The name attribute is the logical

Chapter 2. Struts Framework Components
35
name of the ActionForm. Somewhere else in struts-config.xml, you will find a
declaration like this:
<form-bean name="CustomerForm"
type="mybank.example.CustomerForm"/>
This form-bean declaration associates a logical name CustomerForm with the
actual class
mybank.example.CustomerForm
.
Step 3: The RequestProcessor instantiates the CustomerForm and puts
it in appropriate scope – either session or request. The RequestProcessor
determines the appropriate scope by looking at the scope attribute in the same
ActionMapping.
Step 4: Next,
RequestProcessor
iterates through the HTTP request parameters
and populates the CustomerForm properties of the same name as the HTTP
request parameters using Java Introspection. (Java Introspection is a special form
of Reflection using the JavaBeans properties. Instead of directly using the
reflection to set the field values, it uses the setter method to set the field value
and getter method to retrieve the field value.)
Step 5:
Next, the RequestProcessor checks for the validate attribute in the
ActionMapping. If the validate is set to true, the RequestProcessor invokes
the validate() method on the CustomerForm instance. This is the method
where you can put all the html form data validations. For now, let us pretend that
there were no errors in the validate() method and continue. We will come
back later and revisit the scenario when there are errors in the validate()
method.
Action
Step 6:
The RequestProcessor instantiates the Action class specified in the
ActionMapping (CustomerAction) and invokes the execute() method on
the CustomerAction instance. The signature of the execute method is as
follows.
public ActionForward execute(ActionMapping mapping,
ActionForm form,
HttpServletRequest request,
HttpServletResponse response) throws Exception
Apart from the HttpServletRequest and HttpServletResponse, the
ActionForm is also available in the Action instance. This is what the
ActionForm was meant for; as a convenient container to hold and transfer data
from the http request parameter to other components of the controller, instead of
having to look for them every time in the http request.
The execute() method itself should not contain the core business logic
irrespective of whether or not you use EJBs or any fancy middle tier. The first
and foremost reason for this is that business logic classes should not have any
dependencies on the Servlet packages. By putting the business logic in the Action

Struts Survival Guide – Basics to Best Practices
36
class, you are letting the javax.servlet.* classes proliferate into your
business logic. This limits the reuse of the business logic, say for a pure Java
client. The second reason is that if you ever decide to replace the Struts
framework with some other presentation framework (although we know this will
not happen), you don’t have to go through the pain of modifying the business
logic. The execute() method should preferably contain only the presentation
logic and be the starting point in the web tier to invoke the business logic. The
business logic can be present either in protocol independent Java classes or the
Session EJBs.
The RequestProcessor creates an instance of the Action
(CustomerAction), if one does not exist already. There is only one instance
of Action class in the application. Because of this you must ensure that the
Action class and its attributes if any are thread-safe. General rules that apply to
Servlets hold good. The Action class should not have any writable attributes
that can be changed by the users in the execute() method.
ActionForward
The execute() method returns the next view shown to the user. If you are
wondering what ActionForward is, you just have found the answer.
ActionForward is the class that encapsulates the next view information.
Struts, being the good framework it is, encourages you not to hardcode the JSP
names for the next view. Rather you should associate a logical name for the next
JSP page. This association of the logical name and the physical JSP page is
encapsulated in the
ActionForward
instance returned from the execute method.
The ActionForward can be local or global. Look again at the good old
ActionMapping XML block in Listing 2.1. It contained sub elements called
forwards with three attributes – name, path and redirect as shown below.
The name attribute is the logical name of the physical JSP as specified in the
path attribute. These forward elements are local to the ActionMapping in Listing
2.1. Hence they can be accessed only from this ActionMapping argument in
the
CustomerAction
’s
execute()
method and nowhere else. On the other
hand, when the forwards are declared in the global forwards section of the struts-
config.xml, they are accessible from any ActionMapping. (In the next section,
you will look closely at Struts Config file.) Either ways, the findForward()
method on the ActionMapping instance retrieves the ActionForward as
follows.
ActionForward forward = mapping.findForward(“success”);
The logical name of the page (success) is passed as the keyword to the
findForward() method. The findForward() method searches for the
forward with the name “success”, first within the ActionMapping and then in the
global-forwards section. The
CustomerAction
’s
execute()
method returns
the ActionForward and the RequestProcessor returns the physical JSP
Chapter 2. Struts Framework Components
37
to the user. In J2EE terms, this is referred to as dispatching the view to the user.
The dispatch can be either HTTP Forward or HTTP Redirect. For instance, the
dispatch to the success is a HTTP Redirect whereas the dispatch to “failure” is a
HTTP Redirect.
Difference between HTTP Forward and HTTP Redirect
HTTP Forward is the process of simply displaying a page when requested
by the user. The user asks for a resource (page) by clicking on a hyperlink or
submitting a form and the next page is rendered as the response. In Servlet
Container, HTTP Forward is achieved by invoking the following.
RequestDispatcher dispatcher =
httpServletRequest.getRequestDispatcher(url);
Dispatcher.forward(httpServletRequest, httpServletResponse);
HTTP Redirect is a bit more sophisticated. When a user requests a
resource, a response is first sent to the user. This is not the requested resource.
Instead this is a response with HTTP code “302” and contains the URL of the
requested resource. This URL could be the same or different from original
requested URL. The client browser automatically makes the request for the
resource again with the new URL. And this time, the actual resource is sent to
the user. In the web tier you can use HTTP redirect by using the simple API,
sendRedirect()
on the
HttpServletResponse
instance. The rest of the
magic is done by HTTP. HTTP Redirect has an extra round trip to the client
and is used only in special cases. Later in this book, we will show a scenario
where HTTP redirect can be useful.
ActionErrors and ActionError
So far, we have covered Struts request handling lifecycle as a happy day
scenario – from the point the user submits an html form till the user sees the next
page. In reality, users of your web application may submit incorrect data or
sometimes no data at all. You have to catch these as close to the user interface as
possible, rather than waiting for the middle tier or the database to tell you that a
column cannot be inserted in the database because it was expecting a non-null
value. There are two consequences of such programming practice.
1. Server time and resources are precious since they are shared. Spending too
much of server’s time and resources on a request, that we know is going to
fail eventually is a waste of server resources.
2. It has a negative impact on the code quality. Since one has to prepare for the
possibility of having null data, appropriate checks have to be put (or
Struts Survival Guide – Basics to Best Practices
38
NumberFormatException
s have to be caught) everywhere in the code.
Generally business logic is the toughest code of the system and contains
enough if-else blocks as such. More if-else blocks for null checks can only
mean two things – bad code and maintenance nightmare. Not an elegant
programming to say the least. If only you could verify the validity of the user
data as close to the user, then the rest of the code only has to deal with
business logic and not invalid data.
Listing 2.2 validate() method in the CustomerForm
public ActionErrors validate(ActionMapping mapping,
HttpServletRequest request)
{
// Perform validator framework validations
ActionErrors errors = super.validate(mapping, request);
// Only need crossfield validations here
if (parent == null) {
errors.add(GLOBAL_ERROR,
new ActionError("error.custform"));
}
if (firstName == null) {
errors.add("firstName",
new ActionError("error.firstName.null"));
}
return errors;
}
Struts provides validate() method in the ActionForm to deal with
user input validations. Let us now look at how you can validate the user input
and report errors to the framework. We will postpone the discussion of how
Struts reports the errors to the end user when we discuss View Components later
in this chapter. As shown in the flowchart (Figure 2.1), the validate()
method is called after the ActionForm instance is populated with the form
data. A sample validate() method is shown in Listing 2.2.
In the validate() method, you will notice an object called
ActionErrors is instantiated. All error checks are performed with the usual
if-else blocks. If there are errors, then an individual ActionError object is
created for the culprit field and added to the ActionErrors. Think of
ActionErrors as a Map for the individual ActionError objects. You can
associate one or more ActionError objects for each key. The form field name
is generally chosen as the key and can have multiple ActionError objects
associated with it. The ActionError is either specific to a field in the

Chapter 2. Struts Framework Components
39
ActionForm or it is global to the entire form. When the error is specific to a
form field, the field name is used as the key in the ActionErrors. When the
error is global to the form, the key name is always GLOBAL_ERRORS. Both of
the cases are shown in the Listing 2.2.
You might also notice that the ActionError constructor takes a rather
cryptic key as the argument. This key is declared in a properties file whose value
is the actual error message. The properties file is selected based on the user
chosen Locale. The technical term for this properties file where the messages are
externalized is Message Resource Bundle. It is based on the Java’s concept of
Localization using the java.util.ResourceBundle and has a whole lot of
bells and whistles. We will cover Message Resource Bundle in depth in
Chapter10 on Internationalization and Localization. For now it suffices to know
that the properties file also serves another purpose apart from Localization. It lets
you change the messages without recompiling the code, and is quite handy while
maintaining the code. An entry in the Message Resource Bundle properties file
looks like:
error.firstName.null=First Name cannot be null
The RequestProcessor stops any further processing when it gets the
ActionErrors object with ActionError objects. The Action instance
never gets the control (and never gets a chance to return ActionForward).
Hence the RequestProcessor consults the ActionMapping object to find
the page to be displayed. Notice that the ActionMapping has an attribute
named “input”. This attribute specifies the physical page to which the request has
to be forwarded on error. Generally this page is the original page where user
entered the data since it is natural that user would want to reenter the data in the
same page on error and resubmit.
That completes our overview of the working of Struts Controller
components. Now, let us formally look at the Struts configuration file in detail.
2.2 Struts Configuration File – struts-config.xml
As you learnt in Chapter 1, the configurable controller is the answer to the Fat
controller problem. In a Fat Controller, the programmers can code “if” blocks on
need basis. Not so with the configurable controllers. The expressive and
configuration capability is limited to what the built-in controller can support. In
Struts, the built-in controller supports a variety of cases that can arise while
developing web applications. It even provides points to extend the configuration
capabilities. These points known as Extension points, take the configuration
capability to the next dimension. We will deal with extending Struts in Chapter 7.
In this section, we will just look at the normal facilities offered by the struts-
config.xml.
Struts Survival Guide – Basics to Best Practices
40
The Struts configuration file adheres to the struts-config_1_1.dtd. The struts
config dtd can be found in the Struts distribution in the lib directory. It shows
every possible element, their attributes and their description. Covering all of
them at once would only result in information overload. Hence we will only look
at the five important sections of this file relevant to our discussion and their
important attributes. In fact we have already covered most of these in the
lifecycle discussion earlier, but are summarizing them again to refresh your mind.
The five important sections are:
1. Form bean definition section
2. Global forward definition section
3. Action mapping definition section
4. Controller configuration section
5. Application Resources definition section
Listing 2.3 shows a sample Struts Config file showing all the five sections.
The form bean definition section contains one or more entries for each
ActionForm. Each form bean is identified by a unique logical name. The type is
the fully qualified class name of the ActionForm. An interesting to note is that
you can declare the same ActionForm class any number of times provided each
entry has a unique name associated with it. This feature is useful if you want to
store multiple forms of the same type in the servlet session.
Table 2.1 Important attributes and elements of ActionMapping entry in struts-config.xml
Attribute/Element
name
Description
Path The URL path (either path mapping or suffix mapping) for which this
Action Mapping is used. The path should be unique
Type The fully qualified class name of the Action
Name The logical name of the Form bean. The actual ActionForm associated
with this Action Mapping is found by looking in the Form-bean definition
section for a form-bean with the matching name. This informs the
Struts application which action mappings should use which
ActionForms.
Scope Scope of the Form bean – Can be session or request
Validate Can be true or false. When true, the Form bean is validated on
submission. If false, the validation is skipped.
Input The physical page (or another ActionMapping) to which control should
be forwarded when validation errors exist in the form bean.
Forward The physical page (or another ActionMapping) to which the control
should be forwarded when the ActionForward with this name is
selected in the execute method of the Action class.
The ActionMapping section contains the mapping from URL path to an Action
class (and also associates a Form bean with the path). The type attribute is the
fully qualified class name of the associated Action. Each action entry in the
action-mappings should have a unique path. This follows from the fact that each
Chapter 2. Struts Framework Components
41
URL path needs a unique handler. There is no facility to associate multiple
Actions with the same path. The name attribute is the name of the Form bean
associated with this Action. The actual form bean is defined in Form bean
definition section. Table 2.1 shows all the relevant attributes discussed so far for
the action entry in action-mappings section.
Listing 2.3 Sample struts-config.xml
<?xml version="1.0" encoding="ISO-8859-1" ?>
<!DOCTYPE struts-config PUBLIC
"-//Apache Software Foundation//DTD Struts Configuration 1.1//EN"
"http://jakarta.apache.org/struts/dtds/struts-config_1_1.dtd">
<struts-config> Form bean Definitions
<form-beans>
<form-bean name="CustomerForm"
type="mybank.example.CustomerForm"/>
<form-bean name="LogonForm"
type="mybank.example.LogonForm"/>
</form-beans> Global Forward Definitions
<global-forwards>
<forward name="logon" path="/logon.jsp"/>
<forward name="logoff" path="/logoff.do"/>
</global-forwards> Action Mappings
<action-mappings>
<action path="/submitDetailForm"
type="mybank.example.CustomerAction"
name="CustomerForm"
scope="request"
validate="true"
input="/CustomerDetailForm.jsp">
<forward name="success"
path="/ThankYou.jsp"
redirect=”true” />
<forward name="failure"
path="/Failure.jsp" />
</action>
<action path=”/logoff” parameter=”/logoff.jsp”
type=”org.apache.struts.action.ForwardAction” />
</action-mappings> Controller Configuration
<controller
processorClass="org.apache.struts.action.RequestProcessor" />
<message-resources parameter="mybank.ApplicationResources"/>

Struts Survival Guide – Basics to Best Practices
42
</struts-config> Message Resource Definition
In the ActionMapping there are two forwards. Those forwards are local
forwards – which means those forwards can be accessed only within the
ActionMapping. On the other hand, the forwards defined in the Global Forward
section are accessible from any ActionMapping. As you have seen earlier, a
forward has a name and a path. The name attribute is the logical name assigned.
The path attribute is the resource to which the control is to be forwarded. This
resource can be an actual page name as in
<forward name="logon" path="/logon.jsp"/>
or it can be another ActionMapping as in
<forward name="logoff" path="/logoff.do "/>
The /logoff (notice the absence of “.do”) would be another ActionMapping in
the struts-config.xml. The forward – either global or local are used in the
execute()
method of the Action class to forward the control to another
physical page or ActionMapping.
The next section in the config file is the controller. The controller is optional.
Unless otherwise specified, the default controller is always the
org.apache.struts.action.RequestProcessor
. There are cases when
you want to replace or extend this to have your own specialized processor. For
instance, when using Tiles (a JSP page template framework) in conjunction with
Struts, you would use
TilesRequestProcessor
.
The last section of immediate interest is the Message Resource definition. In
the ActionErrors discussion, you saw a code snippet that used a cryptic key as the
argument for the ActionError. We stated that this key maps to a value in a
properties file. Well, we declare that properties file in the struts-config.xml in the
Message Resources definition section. The declaration in Listing 2.1 states that
the Message Resources Bundle for the application is called
ApplicationResources.properties and the file is located in the java package
mybank.
If you are wondering how (and why) can a properties file be located in a java
package, recall that any file (including class file) is a resource and is loaded by
the class loader by specifying the package. An example in the next chapter will
really make things clearer.
2.3 View Components
In Struts, View components are nothing but six custom tag libraries for JSP
views – HTML, Bean, Logic, Template, Nested, and Tiles tag libraries. Each one
caters to a different purpose and can be used individually or in combination with
others. For other kinds of views (For instance, Template based presentation) you
Chapter 2. Struts Framework Components
43
are on your own. As it turns out, majority of the developers using Struts tend to
use JSPs. You can extend the Struts tags and also build your own tags and mix
and match them.
You already know that the ActionForm is populated on its way in by the
RequestProcessor class using Java Introspection. In this section you will
learn how Struts tags interact with the controller and its helper classes to display
the JSP using two simple scenarios – how FormTag displays the data on the
way out and how the ErrorsTag displays the error messages. We will not
cover every tag in Struts though. That is done in Chapter 6.
What is a custom tag?
Custom Tags are Java classes written by Java developers and can be used
in the JSP using XML markup. Think of them as view helper beans that can be
used without the need for scriptlets. Scriptlets are Java code snippets
intermingled with JSP markup. You need a Java developer to write such
scriptlets. JSP pages are normally developed and tweaked by page authors,
They cannot interpret the scriptlets. Moreover this blurs the separation of
duties in a project. Custom Tags are the answer to this problem. They are
XML based and like any markup language and can be easily mastered by the
page authors. You can get more information on Custom Tags in Chapter 6.
There are also numerous books written about JSP fundamentals that cover this
topic very well.
Listing 2.4 CustomerDetails JSP
<html>
<head>
<html:base/>
</head>
<body>
<html:form action="/submitDetailForm">
<html:text property="firstName" />
<html:text property="lastName" />
<html:submit>Continue</html:submit>
</html:form>
</body>
</html>
How FormTag works
Consider a case when the user requests a page CustomerDetails.jsp. The
CustomerDetails JSP page has a form in it. The form is constructed using the
Struts Survival Guide – Basics to Best Practices
44
Struts html tags and shown in Listing 2.4. The
<html:form>
represents the
org.apache.struts.taglib.html.FormTag
class, a body tag. The
<html:text>
represents the
org.apache.struts.taglib.html.TextTag
class, a normal tag. The resulting HTML is shown in Listing 2.5.
The FormTag can contain other tags in its body. SubmitTag generates the
Submit button at runtime. The TextTag <html:text> generates html textbox at
runtime as follows.
<input name=”firstName” type=”text” value=”” />
The FormTag has an attribute called action. Notice that the value of the
action
attribute is
/submitDetailForm
in the JSP snippet shown above. This
represents the ActionMapping. The generated HTML
<form>
has
action=”/submitDetailForm.do”
in its place. The servlet container parses
the JSP and renders the HTML.
Listing 2.5 Generated HTML from CustomerDetails JSP
<html>
<head>
<html:base/>
</head>
<body>
<form name=”CustomerForm” action=”/submitDetailForm.do”>
<input type=”text” name=”firstName” value=”” />
<input type=”text” name=”lastName” value=”” />
<input type=”submit” name=”Submit” value=”” />
</form>
</body>
</html>
When the container encounters the FormTag, it invokes the
doStartTag() method. The doStartTag() method in the FormTag class
does exactly what the RequestProcessor does in the
execute()
method.
1. The FormTag checks for an ActionMapping with /submitDetailForm in its
path attribute.
2. When it finds the ActionMapping, it looks for an ActionForm with the
name CustomerForm, (which it gets from the ActionMapping) in the
request or session scope (which it gets from ActionMapping).
3. If it does not find one, it creates a new one and puts it in the specified
context. Otherwise it uses the existing one. It also makes the Form name
available in the page context.
4. The form field tags (e.g. TextTag) access the ActionForm by its name
from the PageContext and retrieve values from the ActionForm
Chapter 2. Struts Framework Components
45
attributes with matching names. For instance, the TextTag <html:text
property=”firstName /> retrieves the value of the attribute firstName
from the mybank.example.CustomerForm and substitutes as the
value. If the CustomerForm existed in the request or session and the
firstName field in the CustomerForm had a value “John”, then the
TextTag will generate HTML that looks like this:
<input name=firstName” type=”text” value=”John” />
If the firstName field was null or empty in the CustomerForm instance,
the TextTag will generate HTML that looks like this
<input name=firstName” type=”text” value=”” />
And thus the ActionForm is displayed as a HTML Form.
The moral of the story is that ActionForms should be made available in
advance in the appropriate scope if you are editing existing form data. Otherwise
the FormTag creates the ActionForm in the appropriate scope with no data.
The latter is suited for creating fresh data. The FormTag reads the same old
ActionMapping while looking for the ActionForm in the appropriate scope. It
then displays the data from that ActionForm if available.
How ErrorsTag works
When dealing with ActionErrors, you learnt that the validation errors in an
ActionForm
are reported to the framework through the
ActionErrors
container. Let us now see what facilities the framework provides to display those
errors in the JSP. Struts provides the
ErrorsTag
to display the errors in the JSP.
When the
ActionForm
returns the
ActionErrors
, the
RequestProcessor
sets it in the request scope with a pre-defined and well-known name (within the
Struts framework) and then renders the input page. The
ErrorsTag
iterates over
the
ActionErrors
in the request scope and writes out each raw error text to the
HTML output.
You can put the
ErrorsTag
by adding <html:errors /> in the JSP. The tag
does not have any attributes. Neither does it have a body. It displays the errors
exactly in the location where you put the tag. The
ErrorsTag
prints three
elements to the HTML output – header, body and footer. The error body consists
of the list of raw error text written out to by the tag. A sample error display from
struts-example.war (available with Struts 1.1 download) is shown in Figure 2.2.
You can configure the error header and footer through the Message Resource
Bundle. The
ErrorsTag
looks for predefined keys named errors.header and
errors.footer in the default (or specified) Message Resource Bundle and their
values are also written out AS IS. In the struts-example.war, these are set as
follows:
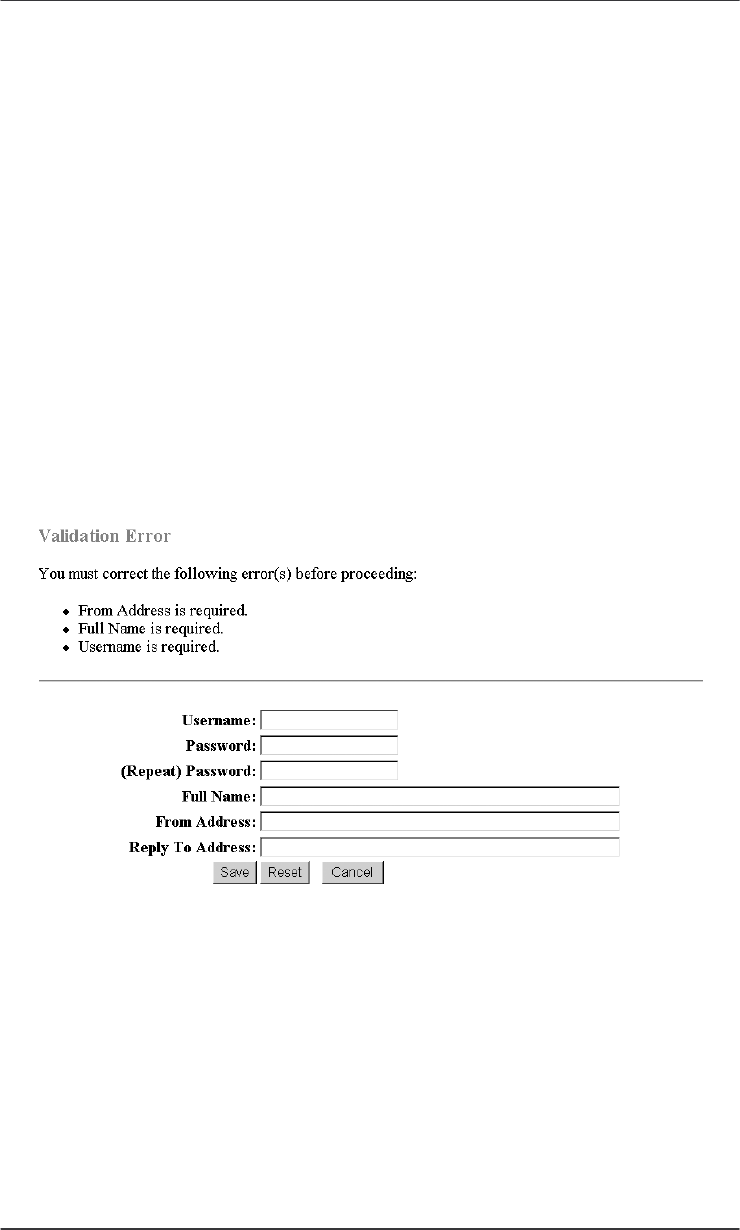
Struts Survival Guide – Basics to Best Practices
46
errors.header=<h3><font color="red">Validation Error</font></h3>
You must correct the following error(s) before proceeding:<ul>
errors.footer=</ul><hr>
For each
ActionError
, the
ErrorsTag
also looks for predefined keys
errors.prefix
and
errors.suffix
in the default (or specified) Message
Resource Bundle. By setting
errors.prefix=<li>
and
errors.suffix =
</li>
, the generated HTML looks like follows and appears in the browser as
shown in Figure 2.2.
<h3><font color="red">Validation Error</font></h3>
You must correct the following error(s) before proceeding:
<ul>
<li>From Address is required.</li>
<li>Full Name is required.</li>
<li>Username is required</li>
</ul>
Figure 2.2 Struts error display.
Note that all the formatting information is added as html markup into these
values. The bold red header, the line breaks and the horizontal rule is the result of
html markup in the errors.header and errors.footer respectively.
Tip: A common problem while developing Struts applications is that
<html:errors/>
does not seem to display the error messages This generally
means one of the following:
The properties file could not be located or the key is not found. Set the

Chapter 2. Struts Framework Components
47
<message-resources
null="false"
...>
for debugging.
Another reason for not seeing the error messages has got to do with the
positioning of the tag itself. If you added the tag itself in the
<tr>
instead of a
<td>
, the html browser cannot display the messages even
though the tag worked properly by writing out the errors to the response
stream.
The View Components was the last piece of the puzzle to be sorted out. As it
turns out, all the work is performed in the controller part of the framework. The
View Tags look for information in the request or session scope and render it as
HTML. Now, that is how a view should be – as simple as possible and yet
elegant. Struts lets you do that, easy and fast.
2.4 Summary
In this chapter you learnt the Struts request lifecycle in quite a bit of detail. You
also got a good picture of Struts framework components when we covered the
controller and view components. You also got to know relevant sections of
struts-config.xml – the Struts configuration file. Armed with this knowledge we
will build a Hello World web application using Struts framework in the next
chapter.
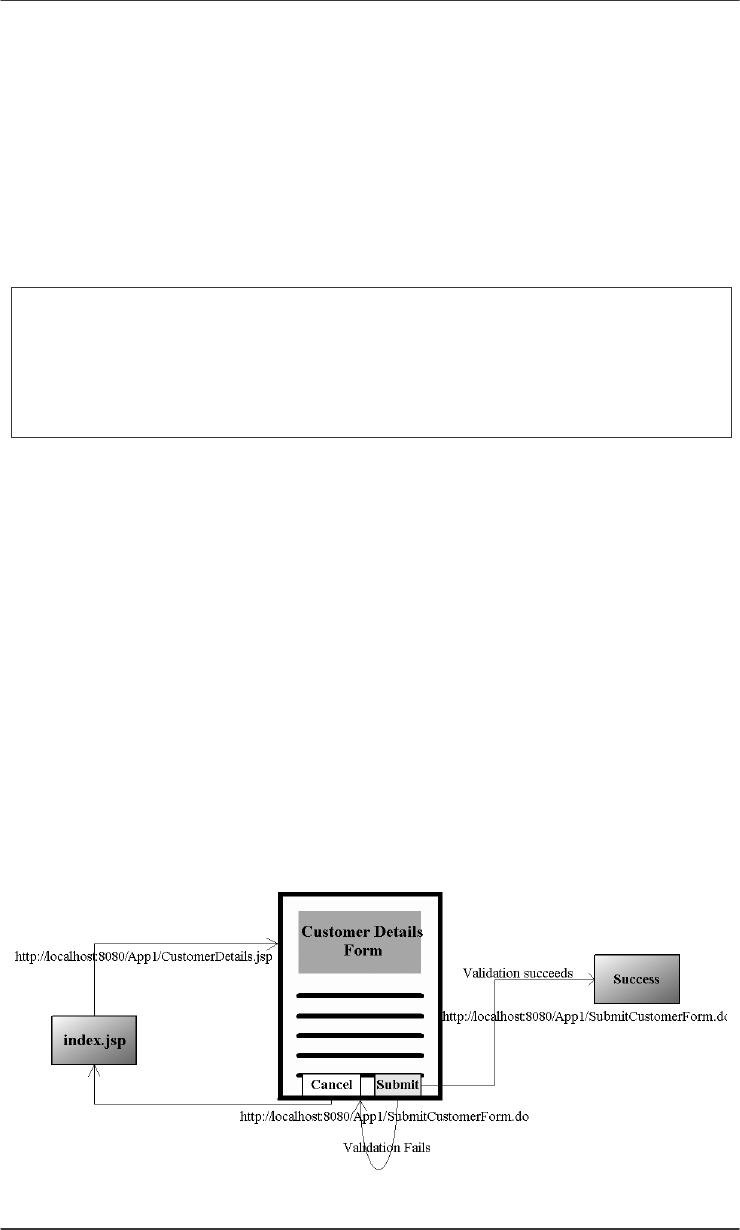
Struts Survival Guide – Basics to Best Practices
48
C
Ch
ha
ap
pt
te
er
r
3
3
Your first Struts application
In this chapter:
1. You will build your first Struts web application step by step
2. You will build a Web ARchive (WAR) and deploy the web application in
Tomcat
In the last two chapters you have learnt a lot about Struts. In this chapter will take
you step by step in building your first Struts application and deploying it onto
Tomcat.
3.1 Introduction
You can access the sample application by typing
http://localhost:8080/App1/index.jsp in the browser. The index.jsp contains a
single hyperlink. The link is http://localhost:8080/App1/CustomerDetails.jsp. On
clicking the link, CustomerDetails.jsp is displayed. CustomerDetails.jsp contains
an HTML Form with two buttons – Submit and Cancel. When the user submits
the Form by clicking Submit, Success.jsp is shown if the form validations go
through. If the validations fail, the same page is shown back to the user with the
errors. If the user clicks Cancel on the form, the index.jsp is shown to the user.
Figure 3.1 The JSP flow diagram for the Hello World Struts application.
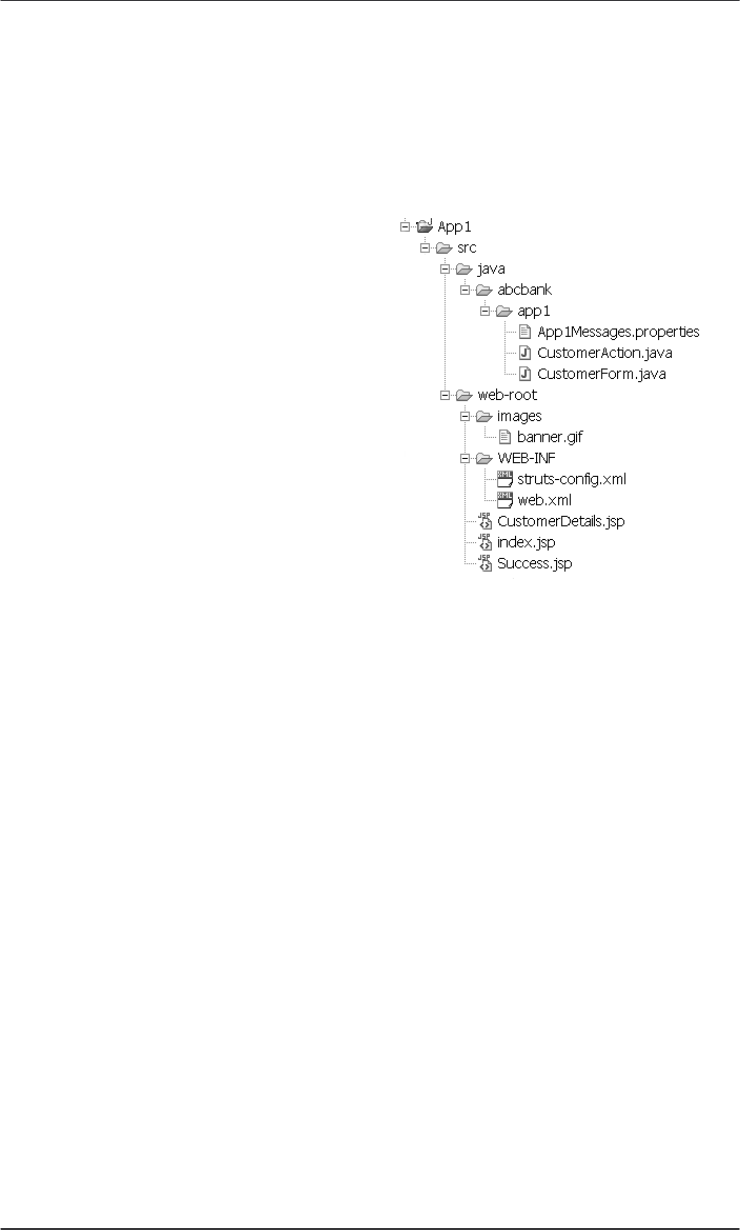
Chapter 3. Your First Struts Application
49
Directory Structure overview
This is the first time you are building a sample application in this book.
Hence we will introduce you to a standard directory structure followed
throughout the book when developing applications. Then we will move on to the
actual steps involved. Figure 3.2 shows the directory structure.
The structure is very logical. The top-
level directory for every sample
application is named after the
application itself. In this case all the
files are located under the directory
named App1. The directory src/java
beneath App1 contains the Java
source files (CustomerForm.java and
CustomerAction.java) and also the
application’s Message Resource
Bundle (App1Messages.properties).
Another directory called web-root
beneath App1 contains all the JSPs
(index.jsp, CustomerDetails.jsp and
Success.jsp) and images (banner.gif).
The web-root contains a WEB-INF
sub directory with files web.xml and
struts-config.xml.
Figure 3.2 The directory structure used
throughout the book for sample Struts
applications.
3.2 Hello World – step by step
Here are the steps involved in creating the Struts application.
1. Add relevant entries into the web.xml
a. Add ActionServlet Configuration with initialization parameters
b. Add ActionServlet Mapping
c. Add relevant taglib declaration
2. Start with a blank template for the struts-config.xml. In the struts-config.xml,
add the following
a. Declare the RequestProcessor
b. Create a properties file and declare it as Message Resource Bundle
c. Declare the Message Resource Bundle
d. Declare the Form-bean

Struts Survival Guide – Basics to Best Practices
50
e. Declare the ActionMapping for the Form-bean
f. Add the forwards in the ActionMapping
3. Create the Form-bean class
4. Create the Action class
5. Create the JSP with Struts tags
6. For every
<bean:message>
tag in the JSP, add key value pairs to the
Message Resource Bundle (properties file) created in Step 3b
7. Add Validation in the Form-bean
8. Define the error messages in the Message Resource Bundle
9. Create the rest of the JSPs.
Listing 3.1 web.xml for the Struts Application
<?xml version="1.0" encoding="ISO-8859-1"?>
<!DOCTYPE web-app
PUBLIC "-//Sun Microsystems, Inc.//DTD Web Application 2.3//EN"
"http://java.sun.com/dtd/web-app_2_3.dtd">
<web-app>
<display-name>Hello World Struts Application</display-name>
<servlet>
<servlet-name>action</servlet-name>
<servlet-class>
org.apache.struts.action.ActionServlet
</servlet-class>
<init-param>
<param-name>config</param-name>
<param-value>/WEB-INF/struts-config.xml</param-value>
</init-param>
<init-param>
<param-name>debug</param-name>
<param-value>3</param-value>
</init-param>
<init-param>
<param-name>detail</param-name>
<param-value>3</param-value>
</init-param>
<load-on-startup>1</load-on-startup>
</servlet> (continued..)
Chapter 3. Your First Struts Application
51
Listing 3.1 web.xml for the Struts Application (Continued)
<servlet-mapping>
<servlet-name>action</servlet-name>
<url-pattern>*.do</url-pattern>
</servlet-mapping>
<welcome-file-list>
<welcome-file>index.jsp</welcome-file>
</welcome-file-list>
<taglib>
<taglib-uri>/WEB-INF/struts-html.tld</taglib-uri>
<taglib-location>/WEB-INF/struts-html.tld</taglib-location>
</taglib>
<taglib>
<taglib-uri>/WEB-INF/struts-bean.tld</taglib-uri>
<taglib-location>/WEB-INF/struts-bean.tld</taglib-location>
</taglib>
</web-app>
Step 1.
As you already know from Chapter 2, the first step in writing a Struts
application is to add the
ActionServlet
entry in web.xml and also map the
servlet to the url-pattern *.do. This is shown in Listing 3.1. You already know the
meaning of the initialization parameter named config. Here we will introduce two
more initialization parameters. They are debug and detail.
The debug initialization parameter lets you set the level of detail in the debug
log. A lower number means lesser details and a higher number implies detailed
logging. It is absolutely essential that you use this logging feature especially in
the beginning and also while setting up Struts application for the first time. The
debug messages give you enough insight to resolve any configuration related
issues. Use them to their fullest capability. In Listing 3.1, we have set the value
of debug to 3.
The detail initialization parameter lets you set the level of detail in the
digester log. Digester is the component that parses the Struts Config file and
loads them into Java objects. Some of the errors can be traced by looking at the
log created by the Digester as it parses the XML file.
Later in this chapter, you will also use two of the Struts Tag libraries to
construct the JSP. Hence the relevant tag library definition files – struts-html.tld
and struts-bean.tld are also declared in web.xml.

Struts Survival Guide – Basics to Best Practices
52
Another setting of interest in web.xml is the <welcome-file-list>.
Typically you would want to type http://localhost:8080/App1 in the browser
URL bar and go to index.jsp automatically. This goal is achieved by declaring
index.jsp as one of the welcome files.
Step 2.
Select a blank template for struts-config.xml and add the following
Listing 3.2 struts-config.xml with all entries for App1
<?xml version="1.0" encoding="ISO-8859-1" ?>
<!DOCTYPE struts-config PUBLIC
"-//Apache Software Foundation//DTD Struts Configuration 1.1//EN"
"http://jakarta.apache.org/struts/dtds/struts-config_1_1.dtd">
<struts-config>
<form-beans>
<form-bean name="CustomerForm"
type="mybank.app1.CustomerForm"/>
</form-beans>
<global-forwards>
<forward name="mainpage" path="index.jsp" />
</global-forwards>
<action-mappings>
<action path="/submitCustomerForm"
type="mybank.app1.CustomerAction"
name="CustomerForm"
scope="request"
validate="true"
input="CustomerDetails.jsp">
<forward name="success" path="Success.jsp" />
<forward name="failure" path="Failure.jsp" />
</action>
</action-mappings>
<controller
processorClass="org.apache.struts.action.RequestProcessor"/>
<message-resources parameter="mybank.app1.App1Messages"/>
</struts-config>
Step 2a.
Declare the controller element in Struts Config file. The
<controller>
element tells the Struts framework to use
org.apache.struts.action.RequestProcessor
for this application. For

Chapter 3. Your First Struts Application
53
a simple Struts application like App1, this RequestProcessor will suffice. You
will use specialized sub classes of
RequestProcessor
as controllers later in
this book. The struts-config.xml is shown in Listing 3.2
<controller processorClass=
"org.apache.struts.action.RequestProcessor" />
Step 2b.
Create a properties file under
mybank.app1
java package and name it
as App1Messages.properties. You will later add key value pairs into this file.
Instead of hard coding field names in the JSP, you will use key names from this
file to access them. In this way, the actual name can be changed outside the JSP.
For now, add the following entry into the Struts Config file.
<message-resources parameter="mybank.app1.App1Messages"/>
This is the instruction to the Struts controller to use the App1Message.properties
file as the Message Resource Bundle.
Step 2c.
Define the form bean by adding a form-bean entry in the form-beans
section.
<form-bean name="CustomerForm"
type="mybank.app1.CustomerForm"/>
Step 2d.
Define an ActionMapping by adding the following to the action-
mappings
<action path="/submitCustomerForm"
type="mybank.app1.CustomerAction"
name="CustomerForm"
scope="request"
validate="true"
input="CustomerDetails.jsp">
</action>
Step 2e.
Add the local forwards to the ActionMapping
<forward name="success" path="Success.jsp" />
<forward name="failure" path="Failure.jsp" />
At this point, the struts-config.xml looks as shown in Listing 3.3. All entries
in bold are added for App1.
Step 3.
Create the Form-bean by extending
ActionForm
in
org.apache.struts.action
package. Listing 3.3 shows the Form bean. For
every field in the HTML Form, there is an instance variable with getter and setter
methods in the Form bean. The Struts controller populates the HTML Form by
calling the getter methods on the Form bean. When the user submits the HTML
Struts Survival Guide – Basics to Best Practices
54
Form, the Struts controller populates the Form bean with data from HTML Form
by calling setter method on the Form bean instance.
Step 4.
Next, create the Action bean by extending the
org.apache.struts.action.Action
class. Let us call it
CustomerAction
.
Every class that extends
Action
implements the
execute()
method. As you
saw earlier in Chapter 2, the
RequestProcessor
calls the
execute()
method
after populating and validating the ActionForm. In this method you typically
implement logic to access middle-tier and return the next page to be displayed to
the user. Listing 3.4 shows the execute() method in
CustomerAction
. In this
method, an operation is performed to check is the Cancel button was pressed. If
so, the “mainpage” (Global Forward for index.jsp) is shown to the user. The
isCancelled()
method is defined in the parent
Action
class. If the operation
requested is not Cancel, then the normal flow commences and the user sees
Success.jsp.
Listing 3.3 CustomerForm – Form Bean for App1
public class CustomerForm extends ActionForm {
private String firstName;
private String lastName;
public CustomerForm() {
firstName = “”;
lastName = “”;
}
public String getFirstName() {
return firstName;
}
public void setFirstName(String s) {
this.firstName = s;
}
public String getLastName() {
return lastName;
}
public void setLastName(String s) {
this.lastName = s;
}
}
Step 5.
Create the JSP using Struts html and bean tags.
Chapter 3. Your First Struts Application
55
All Struts html tags including the
FormTag
are defined in struts-html.tld.
These tags generate appropriate html at runtime. The TLD file struts-html.tld and
struts-bean.tld are declared at the top of JSP and associated with logical names
“html” and “bean” respectively. The JSP then uses the tags with the prefix of
“html:” and “bean:” instead of the actual tag class name. Listing 3.5 shows the
CustomerDetails.jsp. Let us start from the top of this Listing.
Listing 3.4 CustomerAction – Action Bean for App1
public class CustomerAction extends Action {
public ActionForward execute(ActionMapping mapping,
ActionForm form, HttpServletRequest request,
HttpServletResponse response) throws Exception
{
if (isCancelled(request)) {
System.out.println(Cancel Operation Performed”);
return mapping.findForward(“mainpage”);
}
CustomerForm custForm = (CustomerForm) form;
String firstName = custForm.getFirstName();
String lastName = custForm.getLastName();
System.out.println(“Customer First name is “ + firstName);
System.out.println(“Customer Last name is “ + lastName);
ActionForward forward = mapping.findForward(“success”);
return forward;
}
}
<html:html>
: Under normal circumstances, this JSP tag just generates
opening and closing html tags for the page i.e.
<html>
and
</html>
. However
the real advantage of this tag is when the browser has to render the HTML based
on the locale. For instance, when the user’s locale is set to Russia, the tag
generates
<html lang=”ru”>
instead of the plain old
<html>
, so that the
browser can attempt to render the Russian characters (if any) in the best possible
manner. Setting
<html:html locale="true">
tells Struts to look for the
locale specific resource bundle (More on this later).
<html:base>
: As you might be already aware of, one of the best practices
in authoring pages is to use relative URLs instead of absolute ones. In order to
use relative URLs in HTML, you need to declare the page context root with the
declaration
<base href=”…”>
tag. All URLs (not starting with “/”) are

Struts Survival Guide – Basics to Best Practices
56
assumed to be relative to the base href. This is exactly what the
<html:base/>
tag generates.
Listing 3.5 CustomerDetails.jsp
<%@ page contentType="text/html;charset=UTF-8" language="java" %>
<%@ taglib uri="/WEB-INF/struts-html.tld" prefix="html" %>
<%@ taglib uri="/WEB-INF/struts-bean.tld" prefix="bean" %>
<html:html>
<head>
<html:base/>
</head>
<body>
<html:errors/>
<html:form action="/submitCustomerForm">
<bean:message key="prompt.customer.firstname"/>:
<html:text property="firstName" size="16" maxlength="16"/>
<BR>
<bean:message key="prompt.customer.lastname"/>:
<html:text property="lastName" size="16" maxlength="16"/>
<BR>
<html:submit>
<bean:message key="button.save"/>
</html:submit>
<html:cancel>
<bean:message key="button.cancel"/>
</html:cancel>
</html:form>
</body>
</html:html>
<html:form>
: The FormTag represented by
<html:form>
generates the
HTML representation of the Form as follows:
<form name=..” action=”..” method=”GET”>)
It has one mandatory attribute – action. The action attribute represents the
ActionMapping for this form. For instance, the action attribute in Listing 3.5 is
/submitCustomerForm. Note that the FormTag converts this into a HTML
equivalent as follows:
<form name=”CustomerForm” action=”/App1/submitCustomerForm.do”>

Chapter 3. Your First Struts Application
57
The corresponding ActionMapping in Struts Config file is associated with
CustomerForm. Before displaying the page to the user, the FormTag searches
the request scope for an attribute named CustomerForm. In this case, it does not
find one and hence it instantiates a new one. All attributes are initialized to zero
length string in the constructor. The embedded tags use the attributes of the
CustomerForm
in the request scope to display their respective values.
<html:text>
: The
<html:text>
tag generates the HTML representation
for the text box. It has one mandatory attribute named property. The value of this
XML attribute is the name of the JavaBeans property from the Form bean that is
being represented. For instance, the
<html:text property=”firstname”/>
represents the JavaBeans property
firstName
from the
CustomerForm
. The
<html:text>
tag will get the value of the JavaBeans property as indicated by
the property attribute. Since the
CustomerForm
was newly instantiated, all its
fields have a value of zero length string. Hence the
<html:text
property=”firstName” />
generates a html textbox tag of
<input
type=”text” name=”firstName” value=”” />
. Listing 3.6 shows the
generated HTML.
<html:submit>
: This tag generates the HTML representation for the
Submit button as
<input type=”submit” value=”Save Me”>
.
<html:cancel>
: This tag generates the HTML representation for the
Cancel button. This must have started a though process in your mind now. Why
do I need a
<html:cancel>
when I already have
<html:submit>
? Well, this
is because of the special meaning of Cancel in everyday form processing.
Pressing a Cancel button also results in Form submission. You already know that
when validate is set to true, the form submission results in a validation. However
it is absurd to validate the form when form processing is cancelled. Struts
addresses this problem by assigning a unique name to the Cancel button itself.
Accordingly, a JSP tag
<html:cancel>Cancel Me</html:cancel>
will
generate equivalent HTML as follows:
<input type="submit"
name="org.apache.struts.taglib.html.CANCEL"
value="Cancel Me">
Just before the RequestProcessor begins the Form validation, it checks if the
button name was
org.apache.struts.taglib.html.CANCEL
. If so, it
abandons the validation and proceeds further. And that’s why
<html:cancel>
is different from
<html:submit>
.
<html:errors>
: This tag displays the errors from the ActionForm
validation method. You already looked at its working in the last chapter.

Struts Survival Guide – Basics to Best Practices
58
In the generated html, you might notice that the <html:errors/> tag did
not translate into any meaningful HTML. When the form is displayed for the first
time, the validate() method in CustomerForm hasn’t been executed yet
and hence there are no errors. Consequently the <html:errors/> tag does
not output HTML response.
There is another tag used in Listing 3.5 called <bean:message> for which
we did not provide any explanation yet. The <bean:message> tags in the JSP
generate regular text output in the HTML (See Listing 3.6). The
<bean:message> tag has one attribute named “key”. This is the key to the
Message Resource Bundle. Using the key, the <bean:message> looks up the
properties file for appropriate values. Hence our next task is to add some key
value pairs to the properties file created in Step 3b.
Listing 3.6 Generated HTML for CustomerDetails.jsp
<html lang=”en”>
<head>
<base
href=”http://localhost:8080/App1/CustomerDetails.jsp” />
</head>
<body>
<form name=”CustomerForm”
action=”/App1/submitCustomerForm.do”>
First Name:
<input type=”text” name=”firstName” value=”” />
<BR>
Last Name:
<input type=”text” name=”lastName” value=”” />
<BR>
<input type=”submit” value=”Save Me”/>
<input type="submit"
name="org.apache.struts.taglib.html.CANCEL"
value="Cancel Me">
</form>
<body>
</html>
Step 6.
For every <bean:message> tag in the JSP, add key value pairs to the
Message Resource Bundle (App1Messages.properties) created in Step 3b. This is
pretty straightforward. Listing 3.7 shows the App1Messages.properties. We will
add more contents into this file in Step 9. But for now, this is all we have in the
Message Resource Bundle.
Chapter 3. Your First Struts Application
59
Step 7
.
Now that the CustomerForm is displayed to the user, what if user
enters wrong data and submits the form? What if the user does not enter any
data? These boundary conditions have to be handled as close to the user interface
as possible for reasons discussed in Chapter 2. That’s why the validate()
method is coded in every Form bean. You have seen the validate() method
before in Chapter 2. It is repeated in Listing 3.8.
Listing 3.7 App1Messages.properties
prompt.customer.firstname=First Name
prompt.customer.lastname=Last Name
button.save=Save Me
button.cancel=Cancel Me
According to the business requirements set for this application, first name has
to exist all the time. Hence the
validate()
method checks to see if the first
name is null or if the first name is all spaces. If either of this condition is met,
then it is an error and according an ActionError object is created and added to the
ActionErrors. Think of the ActionErrors as a container for holding individual
ActionError objects. In Listing 3.8, the
ActionError
instance is created by
supplying a key “
error.cust.firstname.null
” to the
ActionError
constructor. This key is used to look up the Message Resource Bundle. In the
next step, the keys used for error messages are added to the Message Resource
Bundle.
Listing 3.8 validate() method in CustomerForm
public ActionErrors validate(ActionMapping mapping,
HttpServletRequest request) {
ActionErrors errors = new ActionErrors();
if (firstName == null || firstName.trim().equals(“”)) {
errors.add("firstName",
new ActionError("error.cust.firstname.null"));
}
return errors;
}
Step 8.
In Step 7, validate() method was provided with the error messages
identified by keys. In this step, the error message keys are added to the same old
App1Messages.properties. The modified App1Messages.properties is shown in
Listing 3.9. The new entry is shown in bold. Note that we have used a prefix
“error” for the error message entries, a prefix of “button” for button labels and a
prefix of “prompt” for regular HTML text. There is no hard and fast rule and it is
only a matter of preference. You can name the keys anyway you want.

Struts Survival Guide – Basics to Best Practices
60
Step 9.
In the previous steps, you created most of the artifacts needed for the
Struts application. There are two more left. They are index.jsp and Success.jsp.
These two JSPs are pretty simple and are shown in Listing 3.10 and Listing 3.11
respectively.
Listing 3.9 Updated App1Messages.properties
prompt.customer.firstname=First Name
prompt.customer.lastname=Last Name
button.save=Save Me
button.cancel=Cancel Me
error.cust.firstname.null=First Name is required
Here we are introducing a new tag –
<html:link>
. This generates a
hyperlink in the HTML. You must be wondering why would you need another
tag when
<a href=”…”>
might as well do the job. There are many advantages
of using the
<html:link>
tag. We will explain one advantage relevant to our
discussion – URL rewriting. We will look at other uses of the
<html:link>
tag
in Chapter 4.
Since HTTP is stateless, J2EE web applications maintain data in a special
object called
HTTPSession
. A key on the server side uniquely identifies every
user’s
HTTPSession
. You can think as if the Servlet container is storing all the
active sessions in a big Hash Map. A per-session cookie is created when the user
accesses the web application for the first time. There after the browser sends the
per-session cookie to the server for every hit. The cookie serves as the key into
the Servlet container’s global Hash Map to retrieve the user’s
HTTPSession
.
Under normal circumstances this works fine. But when the user has disabled
cookies, the Servlet container uses a mechanism called URL rewriting as a work
around. In URL rewriting, the Servlet container encodes the per-session cookie
information into the URL itself. However the container does not do this unless
you ask it to do so explicitly. You should make this provision to support users
with cookie-disabled browsers since you can never anticipate the user behavior in
advance. Therefore, when using the regular
<a href=”…”>
for the hyperlinks,
you have to manually encode the URL by using the API
HttpServletResponse.encodeURL()
method to maintain the session as
follows:
<a href=”<%= response.encodeURL(“CustomerDetails.jsp”) %>” >
Customer Form</a>
Now, that’s a painful and laborious thing to do for every link in your
application. In addition, you are unnecessarily introducing a scriptlet for every
encoding. The good news is that the <html:link> does that automatically. For
instance,
Chapter 3. Your First Struts Application
61
<html:link page=”CustomerDetails.jsp”>Customer Form</a>
generates a HTML as follows by rewriting the URL by including the jsessionid.
<a
href=”http://localhost:7001/App1/CustomerDetails.jsp;jsessionid=1O
s1Ame91Z5XCe3l648VNohduUlhA69urqOL1C2mT1EXzsQyw2Ex!-
824689399”>Customer Form</a>
Listing 3.10 index.jsp
<%@ page contentType="text/html;charset=UTF-8" language="java" %>
<html:html>
<head>
<html:base/>
</head>
<body>
<html:link page=”CustomerDetails.jsp”>Customer Form</a>
</body>
</html:html>
Listing 3.11 Success.jsp
<%@ page contentType="text/html;charset=UTF-8" language="java" %>
<%@ taglib uri="/WEB-INF/struts-html.tld" prefix="html" %>
<html:html>
<head>
<html:base/>
</head>
<body>
<h1>My First Struts Applications is a Success.</h1>
</body>
</html:html>
3.3 Lights, Camera, Action!
In the previous steps, you completed all the coding that was required. Now you
should compile the Java classes, create the WAR artifact and deploy onto
Tomcat. Compiling the classes is a no-brainer. Just set the right classpath and
invoke
javac
. The classpath should consist of the servlet-api.jar from Tomcat
(This jar can be found in <TOMCAT_HOME>/common/lib, where
TOMCAT_HOME is the Tomcat installation directory.) and all the JAR files
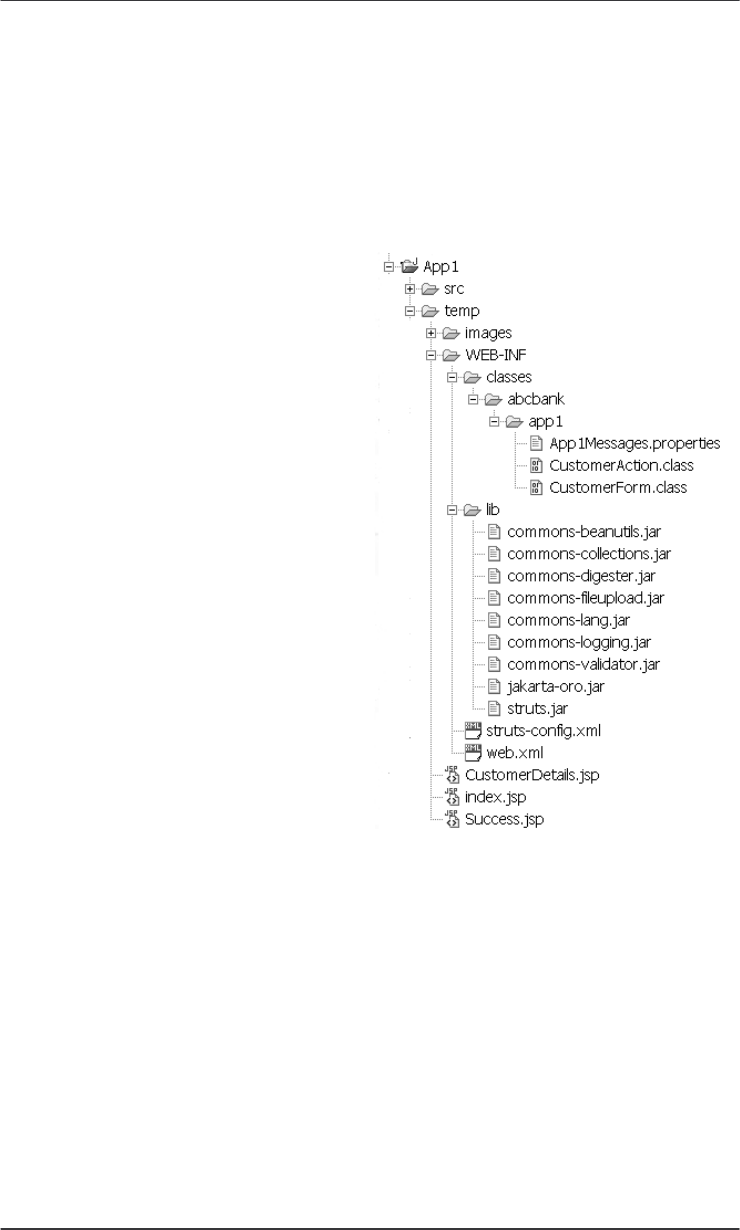
Struts Survival Guide – Basics to Best Practices
62
from Struts distribution. They are found under jakarta-struts-1.1/lib directory.
After compiling, you have to construct the WAR. Ant, Java community’s de-
facto build tool, can be used to perform these tasks. However we have chosen to
create the WAR manually to illustrate which component goes where in the WAR.
A clear understanding of the structure of Struts web applications is key to writing
effective Ant scripts.
In Figure 3.2, you saw the
directory structure of the Struts
application. Now let us follow these
steps to create the WAR that will look
as shown in Figure 3.3 upon
completion.
1. Create a directory called temp under
the App1 directory.
2. Copy all the contents of App1/web-
root AS IS into the temp directory.
3. Create a subdirectory called classes
under temp/WEB-INF
4. Copy the compiled classes into the
directory WEB-INF/classes. Retain the
package structure while doing this)
5. Copy the App1Messages.properties
into the directory WEB-INF/classes.
Copy the file according to the java
package structure. See Figure 3.3 for
the final structure of the WAR.
Figure 3.3 The structure of the WAR file.
6. Create a directory lib under WEB-INF and copy all the JAR files from Struts
distribution into the lib folder. These JAR files are required by your web
application at runtime.
7. Copy struts-bean.tld and struts-html.tld from Struts distribution into the WEB-
INF directory.
8. Zip (or jar) the temp directory into a file named App1.war. You WAR is ready
now. Drop it into the webapps sub-directory in Tomcat. Start Tomcat and test it
out!

Chapter 3. Your First Struts Application
63
Congratulations! You have successfully developed and deployed your first Struts
application. However we are not done yet. Let us look at some practical issues
that need to be addressed.
3.4 Handling multiple buttons in HTML Form
In the example application, we used the
<html:submit>
tag to submit the
HTML form. Our usage of the tag was as follows:
<html:submit><bean:message key=”button.save”/></html:submit>
This generated a HTML as follows.
<input type="submit" value="Save Me">
This worked okay for us since there was only one button with “real” Form
submission (The other one was a Cancel button). Hence it sufficed for us to
straight away process the request in
CustomerAction
. You will frequently face
situations where there are more than one or two buttons submitting the form. You
would want to execute different code based on the buttons clicked. If you are
thinking, “No problem. I will have different ActionMapping (and hence different
Actions) for different buttons”, you are out of luck! Clicking any of the buttons
in a HTML Form always submits the same Form, with the same URL. The Form
submission URL is found in the action attribute of the form tag as:
<formname=”CustomForm”action=”/App1/submitCustomerForm.do”/>
and is unique to the Form. You have to use a variation of the
<html:submit>
as shown below to tackle this problem.
<html:submit property=”step”>
<bean:message key=”button.save”/>
</html:submit>
The above SubmitTag, has an additional attribute named property whose value is
step. The meaning of the property attribute is similar to that in
<html:text>
- It
represents a JavaBeans property in the ActionForm and generates the name of the
Form input element. This tag generates a HTML as follows
<input type="submit" name=”step” value="Save Me">
The generated HTML submit button has a name associated with it. You have
to now add a JavaBeans property to your ActionForm whose name matches the

Struts Survival Guide – Basics to Best Practices
64
submit button name. In other words an instance variable with a getter and setter
are required. If you were to make this change in the application just developed,
you have to add a variable named “
step
” in the
CustomerForm
and then add
two methods
getStep()
and
setStep()
. The Struts Framework sets the value
of the step by Introspection, just like it does on the other fields. In the
CustomerAction
, the logic corresponding to the Save Me button is executed
after performing a check for the Save Me button. Listing 3.12 shows the
modified
execute()
method from
CustomerAction
. The changes are shown
in bold. When the Save Me button is pressed, the
custForm.getStep()
method returns a value of “Save Me” and the corresponding code block is
executed.
Listing 3.12 CustomerAction modified for mutltiple button Forms
public class CustomerAction extends Action
{
public ActionForward execute(ActionMapping mapping,
ActionForm form, HttpServletRequest request,
HttpServletResponse response) throws Exception
{
if (isCancelled(request)) {
System.out.println(Cancel Operation Performed”);
return mapping.findForward(“mainpage”);
}
CustomerForm custForm = (CustomerForm) form;
ActionForward forward = null;
if ( “Save Me”.equals(custForm.getStep()) ) {
System.out.println(“Save Me Button Clicked”);
String firstName = custForm.getFirstName();
String lastName = custForm.getLastName();
System.out.println(“Customer First name is “ +
firstName);
System.out.println(“Customer Last name is “ +
lastName);
forward = mapping.findForward(“success”);
}
return forward;
}
}

Chapter 3. Your First Struts Application
65
In Struts applications, when using regular buttons, it is customary for all
submit buttons to have the same name (except Cancel and Reset buttons). This is
for convenience purposes. In HTML, when a form is submitted, only one of the
submit buttons is pressed and hence only the value of that button is submitted.
The ActionForm can thus have a single instance variable for all the submit
buttons in its Form. This makes the
if-else
check in the Action class easier.
Suppose that the HTML Customer Form that we show to the users has another
button with label “Spike Me”. The submit button can still have the name “step”
(same as the “Save Me” button). This means the
CustomerForm
class has a
single JavaBeans property “
step
” for the submit buttons. In the
CustomerAction
you can have check if the
custForm.getStep()
is “Save
Me” or “Spike Me”. If each of the buttons had different names like button1,
button2 etc. then the
CustomerAction
would have to perform checks as
follows:
if (“Save Me”.equals(custForm.getButton1()) {
// Save Me Button pressed
} else if (“Spike Me”.equals(customForm.getButton2()) {
// Spike Me button pressed
}
Using the HTML Button Label to distinguish the buttons works for most of
the cases except when you have a internationalized Struts web application.
Consider the HTML rendered for a Spanish user. By virtue of the Message
Resource Bundles (
<bean:message>
tag), the Spanish user will see a label of
“Excepto Mí” instead of “Save Me”. However the
CustomerAction
class is still
looking for the hard coded “Save Me”. Consequently the code block meant for
“Save Me” button never gets executed. In Chapter 4, you will see how a
specialized subclass of the
Action
called
LookupDispatchAction
solves this
problem.
3.5 Value replacement in Message Resource Bundle
When you constructed the web application, earlier in this chapter, you used static
messages in the Resource Bundle. However consider this: You have a dozen
fields in the form. The only validation rule is that all fields are required. Hence
the error messages for each field differs from another only by the field name.
First name is required, Last name is required, Age is required and so on. It
would be ideal if there were a field name replacement mechanism into a fixed
error message template. The good news is that it already exists. In the resource
bundle file, you can define a template for the above error message as:
errors.required={0} is required.

Struts Survival Guide – Basics to Best Practices
66
In the
validate()
method, the
ActionError
is then constructed using
one of the following overloaded constructors.
public ActionError(String key, Object value0);
public ActionError(String key, Object value0, Object value1)
. . .
public ActionError(String key, Object[] values);
The first overloaded constructor accepts the key and one replacement value.
The second overloaded constructor accepts a key and two replacement values.
The last constructor accepts a key and an array of objects for replacement. You
can now construct an
ActionError
for the first name as follows:
String[] strArray = {“First name”};
ActionError err = new ActionError(“errors.required” strArray);
This will result in an error message:
First name is required.
Beautiful isn’t it! Now you can make this even better. Notice that in the above
example, we hard coded the field name in the replacement value array in the
process of reducing the set of error messages to a single error message template.
Now, let us go one step further and get the field name from the resource bundle
too. The following code shows how to do it.
MessageResources msgRes =
(MessageResources) request.getAttribute(Globals.MESSAGES_KEY);
String firstName =
msgRes.getMessage(“prompt.customer.firstname”);
ActionError err = new ActionError(“errors.required” firstName);
First, a
MessageResources
for the current module is obtained.
Next, the display value of the first name field is obtained from the
MessageResources
(resource bundle) in the
getMessage()
method by
using the key for the first name –
prompt.customer.firstName
.
Finally, the display value of the first name field is used as a replacement
parameter in the
ActionError
using the first of the overloaded
constructors.
This is generally the preferred way of constructing reusable error messages when
the
validate()
method is coded manually.
TIP: Using the struts-blank.war as a template
In this application we put together everything from scratch to construct the
application. You can use the template so constructed for future use or you can
use the ready-made template available in the Struts distribution. The ready-made
template is called
struts
-
blank.war
is something that you can unwar and use as

Chapter 3. Your First Struts Application
67
template for your applications. It has all the tlds and jars included in the WAR.
Plus it provides the web.xml and struts-config.xml ready to be used as
placeholders with default values.
3.6 Summary
In this chapter you applied all that you have learnt so far and built a Hello World
Struts application. This application although simple, illustrates the basic steps in
building a Struts application. In the coming chapters we will go beyond the
basics and learn other features in Struts and effectively apply them to tackle real
life scenarios.
Struts Survival Guide – Basics to Best Practices
68
C
Ch
ha
ap
pt
te
er
r
4
4
All about Actions
In this chapter:
1. You will learn about all the built-in Struts Actions – ForwardAction,
IncludeAction, DispatchAction, LookupDispatchAction and SwitchAction
2. You will learn about multiple sub application support in Struts and using
SwitchAction to transparently navigate between them
3. You will see examples of effectively using the built-in Actions
4. You will learn of ways to prevent direct JSP access by the users
In Chapter 2, you understood the basics of the Struts framework. In Chapter 3,
you applied those basics to build a simple web application using Struts and got a
clear picture of the basics. In this chapter we take you beyond the basics as you
explore Struts Controller components that are interesting and timesaving that
prepare you to handle realistic scenarios.
Action classes are where your presentation logic resides. In Chapter 2, you
saw how to write your own Action. Struts 1.1 provides some types of Action out-
of-the-box, so you don’t have to build them from the scratch. The Actions
provided by Struts are
ForwardAction
,
IncludeAction
,
DispatchAction
,
LookupDispatchAction
and
SwitchAction
. All these classes are defined in
org.apache.struts.actions
package. These built-in actions are very
helpful to address some problems faced in day to day programming.
Understanding them is the key to using them effectively. All of these the Actions
are frequently used, except for
IncludeAction
.
4.1 ForwardAction
ForwardAction
is the one of the most frequently used built-in Action classes.
The primary reason behind this is that
ForwardAction
allows you to adhere to
MVC paradigm when designing JSP navigation. Most of the times you will
perform some processing when you navigate from one page to another. In Struts,

Chapter 4. All about Actions
69
this processing is encapsulated in the
Action
instances. There are times however
when all you want to do is navigate from one page to another without performing
any processing. You would be tempted to add a hyperlink on the first page for
direct navigation to the second. Watch out! In Model 2 paradigm, a straight JSP
invocation from another JSP is discouraged, although not prohibited. For
instance, suppose you want to go from PageA.jsp to PageB.jsp in your Struts
application. The easy way of achieving this is to add a hyperlink in PageA.jsp as
follows:
<a href=”PageB.jsp”>Go to Page B</a>
or even better, as follows:
<html:link page=”/PageB.jsp”>Go to Page B</html:link>
This is what we did in Chapter 3 when navigating from index.jsp to the
CustomerDetails.jsp. However this violates the MVC spirit by directly accessing
the JSP. In Model 2 applications, it is the responsibility of the Controller to select
and dispatch to the next view. In Struts,
ActionServlet
and
Action
classes
together form the controller. They are supposed to select and dispatch to the next
view. Moreover the
ActionServlet
is responsible for intercepting your request
and providing appropriate attributes such as Message Resource Bundles. If you
bypass this step, then the behavior of the Struts tags may become unpredictable.
MVC compliant usage of LinkTag
Struts provides a built-in Action class called
ForwardAction
to address this
issue. With
ForwardAction
, the Struts Controller is still in the loop while
navigating from PageA to PageB. There are two steps involved in using the
ForwardAction
. They are:
First, declare the PageA hyperlink that takes you to PageB as follows:
<html:link page=”/gotoPageB.do”>Go to Page B</html:link>
Next, add an ActionMapping in the Struts Config file as follows:
<action path=”/gotoPageB”
parameter=”/PageB.jsp”
type=”org.apache.struts.actions.ForwardAction” />
The PageA.jsp hyperlink now points to “/gotoPageB.do” instead of
“PageB.jsp”. This ensures that the controller is still in the loop. The three
attributes shown above are mandatory in a ForwardAction. The type attribute
is always
org.apache.struts.actions.ForwardAction
instead of a
custom Action of yours. The path attribute identifies the URL path, as any other
ActionMapping. The parameter attribute in the above definition is the URL for
the next JSP.

Struts Survival Guide – Basics to Best Practices
70
In the above ActionMapping you might have noticed there is no ActionForm.
The Struts Config file DTD specifies that the Form bean is optional in an
ActionMapping. Logically speaking ActionForm makes sense only where is data
to be collected from the HTML request. In situations like this where there is no
HTML data involved in the navigation, there is no need for ActionForm.
Using LinkTag’s action attribute
The
LinkTag
(
<html:link>
) has several variations. It can be used in a
variety of ways in conjunction with
ForwardAction
. You just saw one usage of
the
LinkTag
. A second way of using the this tag is as follows:
First, declare the PageA hyperlink that takes you to PageB as follows:
<html:link action=”gotoPageB”>Go to Page B</html:link>
Next, add the ActionMapping for
/gotoPageB
in the Struts Config file
same way as before:
<action path=”/gotoPageB”
parameter=”/PageB.jsp”
type=”org.apache.struts.actions.ForwardAction” />
When you use the action attribute instead of the page attribute in
<html:link>
, you need not specify the “.do” explicitly.
Using LinkTag’s forward attribute
There is yet another way to use
<html:link>
. In this approach you use the
forward attribute of the
<html:link>
tag instead of the action. There are two
steps involved in this approach.
First, declare the PageA hyperlink that takes you to PageB as follows:
<html:link forward=”pageBForward”>Go to Page B</html:link>
Add a Global Forward for “pageBForward” as follows in the global-
forwards section:
<global-forwards>
<forward name=”pageBForward” path=”/PageB.jsp” />
</global-forwards>
When used in this manner, the
<html:link>
gets transformed into the
following HTML Link.
<a href=”App1/PageB.jsp”>Go to Page B</a>
Oops, that doesn’t seem right. The HTML Link is now displaying the actual
JSP name directly in the browser. Ideally you would love to hide the JSP name

Chapter 4. All about Actions
71
from the user. And with a slight twist you can! First, define an ActionMapping as
follows:
<action path=”/gotoPageB”
parameter=”/PageB.jsp”
type=”org.apache.struts.actions.ForwardAction” />
Next, modify the global forward itself to point to the above ActionMapping.
<global-forwards>
<forward name=”pageBForward” path=”/gotoPageB.do” />
</global-forwards>
When used in this manner, the
<html:link>
gets transformed into the
following HTML Link.
<a href=”App1/gotoPageB.do”>Go to Page B</a>
There you go! The generated HTML is not displaying the JSP name anymore.
From a design perspective this seems to be the best way of using the
<html:link>
tag since the link is completely decoupled from the associated
ActionMapping, thanks to the global-forward.
The
<html:link>
points to the global-forward and the global-forward
points to the
ForwardAction
. The extra level of indirection, although looks
confusing in the beginning, is a good design decision due to the following
reason:
As is true with any application, requirements change and it might just
become necessary to do some processing during the navigation from PageA to
PageB. A conversion from
ForwardAction
to a custom Action will be easier to
manage with the extra level of indirection.
Using ForwardAction for Integration
In general, the
ForwardAction
’s parameter attribute specifies the resource
to be forwarded to. It can be the physical page like PageB.jsp or it can be a URL
pattern handled by another controller, maybe somewhere outside Struts. For
instance, consider the following ForwardAction.
<action path=”/gotoPageB”
parameter=”/xoom/AppB”
type=”org.apache.struts.actions.ForwardAction” />
In the snippet above, the value of the parameter is not a physical page. It is a
logical resource that might be mapped to another Servlet totally outside the
control of Struts. Yet from PageA’s perspective, you are still dealing with a
Struts URL. This is the second use of ForwardAction. You can integrate
Struts applications transparently with already existing non-Struts applications.
NOTE: Even with the
ForwardAction
, you cannot prevent a nosy user
from accessing the JSP directly. See the section Protecting JSPs from direct
access for techniques to protect your JSPs from direct access.

Struts Survival Guide – Basics to Best Practices
72
ForwardAction Hands-on
In the last chapter, we modeled the navigation from index.jsp to
CustomerDetails.jsp with a direct link. Let us correct the mistake we made by
applying the knowledge we have gained so far. Think of index.jsp as PageA and
CustomerDetails.jsp as PageB. The
<html:link>
in index.jsp will look as
follows: <html:link forward=”CustomerDetailsPage”>Customer Form</a>
The following Global Forward and ForwardAction are added to the Struts
Config file.
<global-forwards>
..
<forward name="CustomerDetailsPage"
path="/gotoCustomerDetails.do" />
</global-forwards>
<action-mappings>
..
<action path=”/gotoCustomerDetails”
parameter=”/CustomerDetails.jsp”
type=”org.apache.struts.actions.ForwardAction” />
</action-mappings>
And now, we have an application that strictly adheres to MVC. What a relief!
4.2 Protecting JSPs from direct access
According to the Model 2 paradigm, the view is always served by the controller
and should not be requested explicitly from any other view. In reality a JSP can
always navigate to another JSP when the JSPs are placed anywhere in a WAR
other than the WEB-INF directory (or its sub-directories). Similarly a user can
type in the name of the JSP in the URL bar and invoke the JSP. The web
application specification does not disallow such access. Actually this makes
sense. The specification should not prevent anybody from coding using the
Model 1 paradigm. Consequently your JSPs are exposed to the external world for
nosy users to cause unnecessary problems, for hackers to exploit any
vulnerability in the system. If you are wondering what the problem is with
allowing direct access to JSPs, well, here are some.
A nosy user might attempt to guess the JSP name by the operation performed in
that page or request parameters or worse – if the page author used html comment
tag for SCM and code comments instead of the JSP comments. Armed with this
information, the user attempts to access the JSPs directly. A JSP as you know is a
view and it displays information based on model objects stored in one of the four
scopes – page, request, session or application, the first three being the most

Chapter 4. All about Actions
73
common. These objects are created by the back end presentation and business
logic and made available for the JSP to act upon. When the JSP is accessed out of
context or out of order, the required model objects may not exist in the
appropriate scope and consequently almost always leads to the exceptional
situations in the JSP code.
It is not common to perform null checks in every bit of code in the JSP tags,
scriptlets and other helper classes. These checks are generally limited to
interfaces and boundaries between modules and not later on. For instance, in a
typical Model 2 scenario, when the model object cannot be created for some
reason, the controller instead takes alternate route and displays an alternate view
corresponding to the null model object. This assumption of model objects being
not null in the main path of the presentation logic and view highly simplifies the
coding. In fact when the system is accessed as intended, everything works
smoothly. However whenever somebody tries to access the views out of order, all
hell breaks lose. Every view starts throwing
NullPointerException
s,
IllegalArgumentException
s and other unchecked and checked exceptions
depending on how the JSP page and its tags and scriptlets are authored. This is
exactly what a nosy user is trying out.
The implications are even more serious when a malicious user tries to find weak
points in the design to bring the system down to its knees. The first thing that
might occur is to put checks for nulls and unintended access in the system.
Invariably, this is nothing but a collection of if-else blocks in every part of the
JSP page making it messy and buggy to maintain.
Two prominent alternatives exist. Let us look the easiest one first. As we
glossed over earlier, the servlet specification explicitly states that contents
located in the WEB-INF and its sub-directories are protected from outside access.
Let us take a simple example to illustrate this. All contents located in a WAR
belong to the same protection domain. A protection domain is a set of entities
known (or assumed) to trust each other. Consequently any resource within a
WAR can access resources located under WEB-INF directory without
restrictions. JSP is also a resource and thus any class within the same WAR can
forward to a JSP under WEB-INF. (This part is not explicitly stated in the
specification) However when the request originates outside the container, it does
not belong to the protection domain (at least not until it is authenticated) and
hence cannot access the protected resource under WEB-INF. Thus putting all
JSPs under the WEB-INF directly or as sub-directories if needed is the easiest
and also the best way of protecting direct access to JSPs. What if the hyperlink in
one of your page wants to really just forward to another JSP? Is that disallowed
as well? Yeah! You cannot have different rules in your system right? However
there is a way around.

Struts Survival Guide – Basics to Best Practices
74
Consider the case when a hyperlink in page A needs to forward request to
page B. Instead of directly forwarding to page B, which is disallowed, you can
put the following entry in the struts-config.xml
<action path=”/gotoPageB”
parameter=”/WEB-INF/pageB.jsp”
type=”org.apache.struts.actions.ForwardAction” />
On the pageA, the hyperlink can point to “pageB.do” is suffix mapping is
used or some other path is path mapping is used. Either ways, the
ActionMapping shown above is picked up and as its type indicates, the action is
just a
ForwardAction
, which as the name suggest is a forward. However since
the forward is occurring from within the container, (in the protection domain) it
is allowed.
A question might be popping up in your mind. The technique just highlighted
is the easiest and also supposedly the best. Why do I need anything lesser than
best? The answer is not all containers support the behavior just mentioned. As we
stated earlier, since the specification is clear about not letting direct access to
resources under WEB-INF, all J2EE compliant application servers implement it.
However, the second part is not stated in the specification and consequently it is
the vendor’s prerogative to implement it or not. Certain providers do (For e.g.
Tomcat) and others don’t (For e.g. WebLogic). Hence we have to have an
alternate mechanism for the less fortunate ones. This one is not difficult either.
Instead of putting the JSPs underneath WEB-INF, they can stay wherever they
are. The following entries are added to the web.xml.
<security-constraint>
<web-resource-collection>
<web-resource-name>Deny Direct Access</web-resource-name>
<description>
Deny direct access to JSPs by associating
them with denied role
</description>
<url-pattern>*.jsp</url-pattern>
</web-resource-collection>
<auth-constraint>
<role-name>Denied</role-name>
</auth-constraint>
</security-constraint>
<security-role>
<role-name>Denied</role-name>
</security-role>

Chapter 4. All about Actions
75
First, all the url patterns ending with suffix “.jsp” are associated with a Role
named “Denied”. Any user who wants to access the JSP pages directly should be
in that role. We further ensure that no user of the system is in that Role. Role and
user association is done depending on your implementation of authentication and
authorization. For instance, if you are using LDAP as the user persistence
mechanism, then the users, their passwords and Roles are stored in LDAP. If you
ensure nobody gets the Denied role, then you have effectively prevented
everyone from directly accessing the JSPs. You will still have to have the
ForwardAction
as shown earlier in this section if you have situation when page
A needs to just navigate to page B. The internal forwards to other JSPs using
RequestDispatcher
are okay because the container does not intercept and
cross check internal forwards even though the url-pattern matches the ones in
web.xml.
NOTE: The default
pagePattern
and
forwardPattern
values for
<controller>
element in struts-config.xml are
$M$P
, where
$M
is replaced
with the module prefix and the
$P
is replaced with the path attribute of the
selected forward. If you place your JSP files under WEB-INF for access
protection, you have to set the
pagePattern
and
forwardPattern
attributes
of the
<controller>
element in the struts-config.xml to
/WEB-INF/$M$P
to
tell Struts to construct the paths correctly.
4.3 IncludeAction
IncludeAction
is much like
ForwardAction
except that the resulting
resource is included in the HTTP response instead of being forwarded to. It is
rarely used. Its only significant use is to integrate legacy applications with Struts
transparently. Consider a web site that aggregates information from disparate
sources – some of which are non-Struts. The JSP for such a web site consists of
<jsp:include>
s to include different resources. One of such
<jsp:include>
that might be as follows:
<jsp:include page=”/xoom/LegacyServletA” />
It is very clear from the value of the page attribute that it is a non-Struts
resource. Wouldn’t it be better to have a
<jsp:include>
that pretends as if the
resource exists in the current Struts application? It would be ideal if the page
include looked as follows:
<jsp:include page=”/App1/legacyA.do” />
The /legacyA.do cannot be a
ForwardAction
because it would perform a
HTTP Forward to the above resource instead of including the resource in the
HTTP response. Since the HTTP Response OutputStream closes (The J2EE
jargon for this is the response has been committed) after HTTP Forward, the

Struts Survival Guide – Basics to Best Practices
76
servlet container cannot process the rest of the JSP and include its response in the
OutputStream. Consequently it throws a
IllegalStateException
with a
message that “Response is already committed”.
IncludeAction
addresses this
problem. Instead of forwarding to the specified resource, it includes the resource
in the current response. Consequently the output of the LegacyServletA is
displayed in the same HTML as that of the Struts application. You have to add
the following ActionMapping in the Struts Config file:
<action path=”/legacyA”
parameter=”/xoom/LegacyServletA”
type=”org.apache.struts.actions.IncludeAction” />
The parameter attribute indicates the actual resource that has to be included
in the response.
As mentioned earlier, the use of
IncludeAction
is limited to including
responses from existing Servlet in the current page. This requires the use of
<jsp:include>
in the page. If you web application is aggregating response
from legacy servlet applications, portlets seems to be the way to go. Portlet API –
JSR 168 has been finalized and it is matter of time before you can develop
standardized portals aggregating contents from disparate web applications. Tiles
framework is the way to go if you are on a short-term project that wants to
aggregate information now (From different applications or may be from various
Actions in the same Struts application). Tiles provides a robust alternative to the
primitive
<jsp:include>
. Chapter 7 provides an in-depth coverage of Tiles in
conjunction with Struts.
4.4 DispatchAction
DispatchAction
is another useful built-in Struts Action. However you cannot
use it as is. You will have to extend it to provide your own implementation. An
example will make things clear. Consider an online credit card application.
Customers fill the credit card application online. The bank personnel get a List
screen as shown in Figure 4.1 and they can act in one of four ways - Approve,
Reject or Add Comment. Consequently there are three images each being a
<html:link>
.
One way of dealing with this situation is to create three different Actions –
ApproveAction
,
RejectAction
and
AddCommentAction
. This is a valid
approach, although not elegant since there might be duplication of code across
the Actions since they are related.
DispatchAction
is the answer to this
problem. With
DispatchAction
, you can combine all three Actions into one.
The
DispatchAction
provides the implementation for the
execute()
method, but still is declared as abstract class. You start by sub-classing
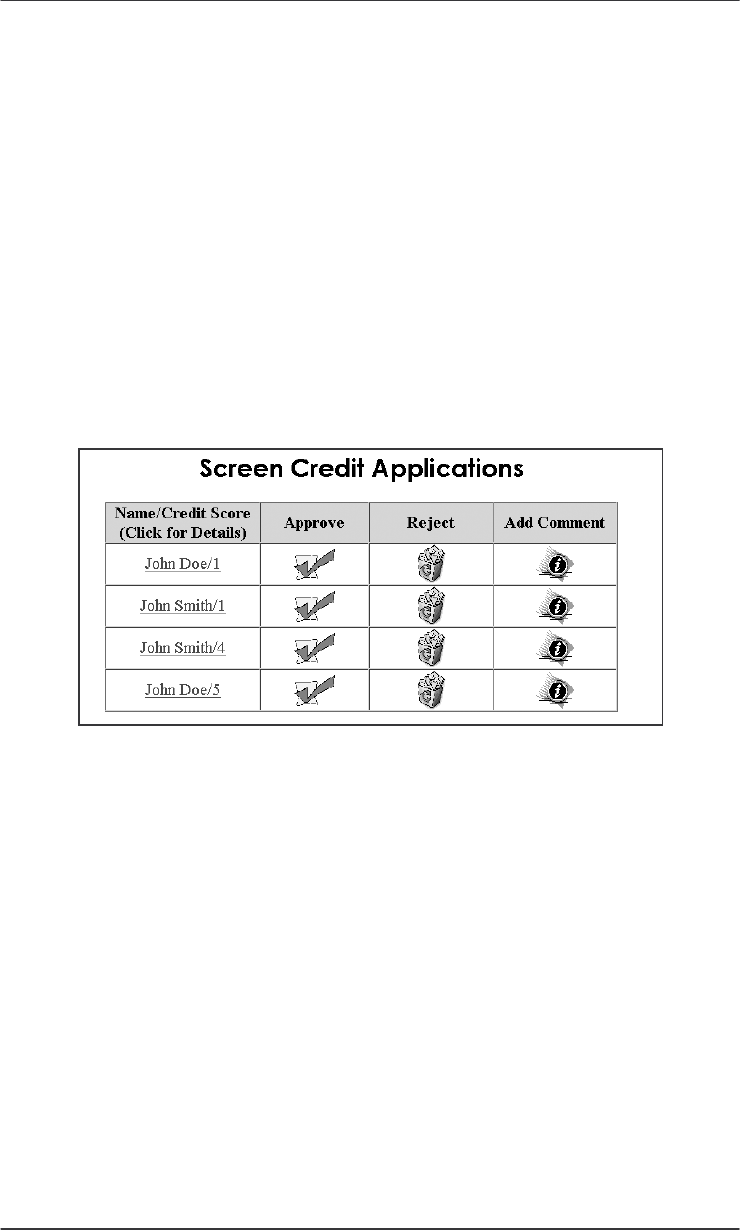
Chapter 4. All about Actions
77
DispatchAction
. Let us assume that
CreditAppAction
, a sub-class of
DispatchAction
is used to implement the above-mentioned presentation logic.
It has four methods –
reject()
,
approve()
and
addComment()
. The
CreditAppAction
class definition is shown in Listing 4.1.
You might be wondering why all the three methods take the same four
arguments –
ActionMapping
,
ActionForm
,
HttpServletRequest
,
HttpServletResponse
. Don’t worry, you will find the answer soon.
For a moment, look at the four URLs submitted when the bank staff perform
the three actions as mentioned before. They would look something like this.
http://localhost:8080/bank/screen-credit-app.do?step=reject&id=2
http://localhost:8080/ bank/screen-credit-app.do?step=approve&id=2
http://localhost:8080/bank/screen-credit-app.do?step=addComment&id=2
Figure 4.1 Screen Credit Applications page as seen by the bank staff.
An interesting thing to notice is that the value of the HTTP request parameter
named step is same as the four method names in
CreditAppAction
. This is no
coincidence.
DispatchAction
(the parent class of
CreditAppAction
) uses
the value of the HTTP request parameter step to determine which method in
CreditAppAction
has to be invoked. In the
execute()
method,
DispatchAction
uses reflection to invoke the appropriate method in
CreditAppAction
. For this reason, the arguments on all the three methods in
CreditAppAction
are fixed and have to be –
ActionMapping
,
ActionForm
,
HttpServletRequest
, and
HttpServletResponse
in that order. Otherwise
the method invocation by Reflection fails.
Okay, so part of the puzzle is solved. But how does
DispatchAction
know
to look for the HTTP request parameter specifically named step in the URL? The
simple answer is that it doesn’t. You will have to tell it explicitly. And this is
done in the ActionMapping for /screen-credit-app.do. The ActionMapping for
Struts Survival Guide – Basics to Best Practices
78
the URL path “/screen-credit-app.do” is declared in struts-config.xml as shown
in Listing 4.2.
The section highlighted in bold is what makes this Action different from the
rest. The type is declared as
mybank.example.list.CreditAppAction
–
you already knew that. Now, let us look at the second attribute in bold. This
attribute, named parameter has the value “step”. Notice that one of the HTTP
request parameter in the four URLs is also named “step”. Now, it is all coming
together.
DispatchAction
knows what parameter to look for in the incoming
URL request through this attribute named parameter in struts-config.xml. From
the value of parameter attribute, it knows the method to be invoked on the
subclass. Since the arguments and their order in these methods is fixed by
DispatchAction
, the method invocation by reflection at runtime is successful.
If for any reason, the arguments on these methods are different; the method
invocation fails at runtime.
Listing 4.1 Example DispatchAction
public class CreditAppAction extends DispatchAction {
public ActionForward reject(ActionMapping mapping,
ActionForm form, HttpServletRequest request,
HttpServletResponse response) throws Exception
{
String id = request.getParameter(“id”);
// Logic to reject the application with the above id
... ... ...
mapping.findForward(“reject-success”);
}
public ActionForward approve(ActionMapping mapping,
ActionForm form, HttpServletRequest request,
HttpServletResponse response) throws Exception
{
String id = request.getParameter(“id”);
// Logic to approve the application with the above id
... ... ...
mapping.findForward(“approve-success”);
}
public ActionForward addComment(ActionMapping mapping,
ActionForm form, HttpServletRequest request,
HttpServletResponse response) throws Exception
{
String id = request.getParameter(“id”);
Chapter 4. All about Actions
79
// Logic to view application details for the above id
... ... ...
mapping.findForward(“viewDetails”);
}
...
...
}
DispatchAction
can be confusing in the beginning. But don’t worry.
Follow these steps to setup the
DispatchAction
and familiarize yourself with
the steps.
1. Create a subclass of
DispatchAction
.
2. Identify the related actions and create a method for each of the logical
actions. Verify that the methods have the fixed method signature shown
earlier.
3. Identify the request parameter that will uniquely identify all actions.
4. Define an ActionMapping for this subclass of
DispatchAction
and assign
the previously identified request parameter as the value of the parameter
attribute.
5. Set your JSP so that the previously identified request parameter (Step 3)
takes on
DispatchAction
subclass method names as its values.
Listing 4.2 ActionMapping for the DispatchAction
<action path="/screen-credit-app"
input="/ListCreditApplications.jsp"
type="mybank.example.list.CreditAppAction"
parameter="step"
scope="request"
validate="false">
<forward name="reject-success"
path="RejectAppSuccess.jsp"
redirect="true"/>
..
</action>
Design Tip: Use
DispatchAction
when a set of actions is closely related and
separating them into multiple Actions would result in duplication of code or
usage of external helper classes to refactor the duplicated code. In the above
example
DispatchAction
was used handle hyperlinks.
DispatchAction
is
a good choice when there are form submissions using the regular buttons (not
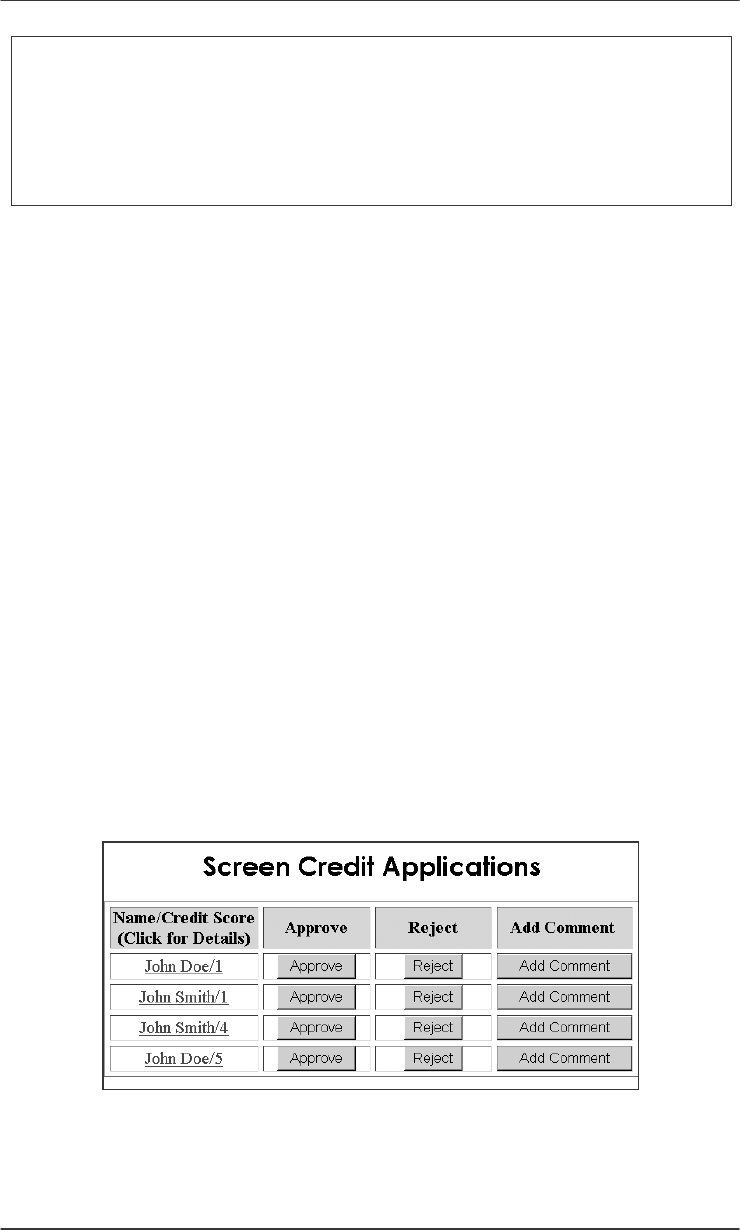
Struts Survival Guide – Basics to Best Practices
80
the image buttons). Just name all the buttons same. For instance,
<html:submit property=”step”>Update</html:submit>
<html:submit property=”step”>Delete</html:submit>
and so on. Image buttons is a different ball game. Image button usage for form
submission and
DispatchAction
are exclusive. You have to choose one. See
Chapter 6 on Struts tags for details on Image buttons.
In the above example we used the
DispatchAction
and used methods that
has ActionForm as one of its arguments. As you learnt in the last chapter, an
ActionForm always existed in conjunction with the Action. Earlier in this
chapter, we dealt with
ForwardAction
and we neither developed our Action or
ActionForm. In that context we stated that having an ActionForm was optional.
That holds true even if the Action is a custom coded one like the
CreditAppAction
. If the ActionMapping does not specify a form bean, then
the ActionForm argument has a null value. In the Listing 4.1, all the four
methods got a null ActionForm. But that did not matter since the HTTP request
parameters were used directly in the Action. You can have a Form bean if there
are a lot of HTTP parameters (and perhaps also require validation). The HTTP
parameters can then be accessed through the Form bean.
4.5 LookupDispatchAction
In Chapter 3 you were introduced to a Localization problem with the Action class
when the form has multiple buttons. Using
LookupDispatchAction
is one
way of addressing the problem when regular buttons are used. Chapter 6 presents
another alternative that works irrespective of whether an Image or a grey button
is used to submit the Form. One has to choose the most appropriate solution
under the given circumstances.
Figure 4.2 Modified Screen Credit Applications page as seen by the bank staff.
LookupDispatchAction
is a subclass of
DispatchAction
as its name
suggests. We will use a slightly modified example to illustrate the use of
Chapter 4. All about Actions
81
LookupDispatchAction
. We will still use the list of credit applications as
before, but with one twist. Each row in the list is a HTML Form and the images
are now replaced with grey buttons to submit the Form. Figure 4.2 shows the
modified application list as seen by the bank personnel.
A
LookupDispatchAction
for this example is created by following these
steps.
1. Create a subclass of
LookupDispatchAction.
2. Identify the related actions and create a method for each of the logical
actions. Verify that the methods have the fixed method signature as similar to
DispatchAction
methods in Listing 4.1.
3. Identify the request parameter that will uniquely identify all actions.
4. Define an ActionMapping in struts-config.xml in the same way as
DispatchAction
(Listing 4.2). Assign the previously identified request
parameter as the value of the parameter attribute in the ActionMapping. All
the steps up until this point are the same as what you did before with
DispatchAction
. From here on, they will differ.
5. Implement a method named
getKeyMethodMap()
in the subclass of the
LookupDispatchAction
. The method returns a
java.util.Map
. The
keys used in the Map should be also used as keys in Message Resource
Bundle. The values of the keys in the Resource Bundle should be the method
names from the step 2 above. If the
CreditAppAction
from the bank
example were to be implemented as a
LookupDispatchAction
it would
look like Listing 4.3.
Listing 4.3 Example LookupDispatchAction
public class CreditAppAction extends LookupDispatchAction
{
public ActionForward reject(ActionMapping mapping,
ActionForm form,
HttpServletRequest request,
HttpServletResponse response)
throws Exception
{
... ... ...
}
//Other methods go here
public Map getKeyMethodMap()
{
Map map = new HashMap();

Struts Survival Guide – Basics to Best Practices
82
map.put(“button.approve”, “approve”);
map.put(“button.reject”, “reject”);
map.put(“button.comment”, “addComment”);
}
}
6. Next, create the buttons in the JSP by using
<bean:message>
for their
names. This is very important. If you hardcode the button names you will not
get benefit of the
LookupDispatchAction
. For instance, the JSP snippet
for Approve and Add Comment button are:
<html:submit property=”step”>
<bean:message key=”button.approve”/>
</html:submit>
<html:submit property=”step”>
<bean:message key=”button.comment”/>
</html:submit>
The
<bean:message>
keys point to the messages in the Resource Bundle.
button.approve=Approve
button.reject=Reject
button.comment=Add Comment
In summary, for every form submission,
LookupDispatchAction
does the
reverse lookup on the resource bundle to get the key and then gets the method
whose name is associated with the key into the Resource Bundle (from
getKeyMethodmap()
). That was quite a bit of work just to execute the method.
DispatchAction
was much easier!
But the implications of
LookupDispatchAction
are significant. The
method name in the Action is not driven by its name in the front end, but by the
Locale independent key into the resource bundle. Since the key is always the
same, the
LookupDispatchAction
shields your application from the side
effects of I18N.
4.6 Configuring multiple application modules
So far we have covered several important built-in Actions with examples. There
is one more feature that is very important and useful addition in 1.1 – Multiple
Application module support. In Struts1.0 (and earlier), a single config file was
supported. This file, normally called struts-config.xml, was specified in web.xml
as an initialization parameter for the ActionServlet as follows:
Chapter 4. All about Actions
83
<servlet>
<servlet-name>mybank</servlet-name>
<servlet-class>org.apache.struts.action.ActionServlet
</servlet-class>
<init-param>
<param-name>config</param-name>
<param-value>/WEB-INF/struts-config.xml</param-value>
</init-param>
</servlet>
The single configuration file is bottleneck in large projects as all developers
had to contend to modify this resource. In addition managing a monolithic file is
painful and error prone. With Struts1.1 this problem has been resolved by the
addition of multiple sub application support better known as application modules.
You can now have multiple configuration files, one for each module or logical
group of forms. The configuration files are specified in web.xml file using
multiple
<init-param>
- initialization parameters as shown in Listing 4.4.
Listing 4.4 web.xml setting for Multiple Application module Support
<servlet>
<servlet-name>mybank</servlet-name>
<servlet-class>org.apache.struts.action.ActionServlet
</servlet-class>
<init-param>
<param-name>config</param-name>
<param-value>/WEB-INF/struts-config.xml</param-value>
</init-param>
<init-param>
<param-name>config/module1</param-name>
<param-value>
/WEB-INF/struts-module1-config.xml
</param-value>
</init-param>
</servlet>
The newly added application module is shown in bold. The default
application module based on struts-config.xml can still continue to exist. The new
module is defined by adding an initialization parameter config/module1. In fact
any init-param prefixed with “config/” is interpreted as configuration for a
separate module. Its corresponding value – /WEB-INF/struts-module1-config.xml
is the struts configuration file containing Form bean definitions and
ActionMappings for the module module1. If the URLs in the default struts-

Struts Survival Guide – Basics to Best Practices
84
config.xml were accessed as http://localhost:8080/App1/start.do, and the
corresponding ActionMapping were moved to struts-module1-config.xml then the
URL would be accessed as http://localhost:8080/App1/module1/start.do where
App1 is the web application context. Notice that the application URL contains the
module name after the web application context as if it is a sub directory name.
Even though each application module has a separate struts configuration file
and a sub-directory like url pattern while accessing through the browser, the
physical organization need not necessarily be the same although that is
generally the route taken since the application module was after all created for
logical division (driven by functional requirements) and there are less
headaches if the physical organization matches the logical division as much as
possible.
The benefits of application modules are immediately obvious. You can now
split your monolithic struts application into logical modules thus making
maintenance easier. It will cause less contention during development time as
developers working on different modules get to work on their own struts
configuration files. Each Struts Configuration file and hence each application
module can choose its own
RequestProcessor
,
MessageResources
and
PlugIn
. You can now choose to implement one or more modules with Tiles. If
you find this convenient and useful then you can migrate your application to
Tiles or JSF or plug in any other Struts extensions for one module at a time.
Here is a tip: Generally web applications are organized so that navigation
occurs from generic to specific. For instance, you start from the initial welcome
page for the web application and then navigate to a specific module. You can
organize you struts modules so that the initial welcome page and other top-level
pages are defined in the default application module (struts-config.xml). The pages
correspond to individual use cases are defined in different application modules
(struts-config-xxx.xml). You can then navigate from the default application
module to the use case specific module.
That brings up the question: How do you move between application
modules? It is quite simple actually. Struts 1.1 provides a specialized Action
called
SwitchAction
. We will illustrate its usage with an example.
Consider a Struts banking application with a default module (with top level
pages) and another module named loanModule. The JSPs of the loan module are
present in a directory called loanModule and its action mappings are defined in
struts-config-loan.xml.
The top-level page defined in the default application module provides
hyperlink to navigate to the loan module as shown below. This hyperlink
indicates points to a global-forward named
goto-loanModule
in the
default struts-config.xml.

Chapter 4. All about Actions
85
<html:link forward="goto-loanModule">
Go to Loan Module
</html:link>
Add the action mapping for
SwitchAction
to the default struts-config.xml
as follows:
<action path="/switch"
type="org.apache.struts.actions.SwitchAction"/>
Now, add a global-forward named
goto-loanModule
to the default
struts-config.xml as follows:
<forward name="goto-loanModule"
path="/switch.do?page=/listloans.do&prefix=/loanModule" />
This global-forward turn points to an action mapping called
switch.do
and
also adds two request parameters. The
switch.do
is the ActionMapping for
the
SwitchAction
. The two request parameters –
prefix
and
page
stand
for the module and the action mapping within that module. In this case, the
module is loanModule (identified by the struts-config-loan.xml) and the
listloans.do
stands for an action mapping within the struts-config-
loan.xml – the Struts Config file for Loan module.
In the struts-config-loan.xml, add the action mapping for
listloans.do
as follows:
<action path="/listloans"
type="mybank.app1.ListLoanAction">
</action>
The
ListLoanAction
is a normal Struts Action that decides the next
resource to forwards in its
execute()
method. If you don’t have additional
processing to do, you can use a
ForwardAction
too.
If you want to go from the Loan module to the default module, repeat the
same process, by setting the
prefix
attribute to a zero length string.
4.7 Roll your own Base Action and Form
You have looked at different types of Actions offered by Struts. Now, let us look
at some recommended practices in using Action. When it comes to using
Actions, the brute force approach is to extend the actions directly from the
org.apache.struts.action.Action
. But a careful look at your web
application will certainly reveal behavior that needs to be centralized. Sooner or
later you will discover functionality common to all the actions. While it is

Struts Survival Guide – Basics to Best Practices
86
impossible to predict the exact purposes of why you might need the base Action,
here are some samples:
You might like to perform logging in Action classes for debugging purposes
or otherwise to track the user behavior or for security audit purposes.
You might want to retrieve the user’s profile from application specific
database to check if the user has access to your application and act
appropriately.
Whatever the purpose, there is always something done always in web
applications warranting a parent Action class. Start with a common parent Action
class. Let us call it
MybankBaseAction
. Depending on the complexities of the
web application, you can further create child classes for specific purposes. For
instance, an Action subclass for dealing with form submissions and another for
dealing with hyperlink-based navigation is a logical choice if the Action classes
handling hyperlink don’t need an ActionForm. You might want to filter out some
words typed in the form fields.
In conjunction with the base Action, you can also roll a base Form extending
the
org.apache.struts.action.ActionForm
. Let us call this class
MybankBaseForm
. The base form fits well into the base action strategy. In
chapter 2, we introduced the term View Data Transfer Object to refer an
ActionForm. This isn’t without a reason. Data Transfer Object is a Core J2EE
pattern name. It is typically used between tiers to exchange data. The
ActionForm serves similar purpose in a Struts application and you use to its very
best. Typical uses of a base form would be:
Add attributes to the base form that are needed frequently in the web
application. Consider a case when every Action in your web application
needs to reference an attribute in the request or session. Instead of adding the
code to access this attribute as
request.getAttribute(“attribName”)
everywhere, you can set this as an ActionForm attribute and access it in a
type-safe manner in the application.
Retrieving the user’s profile from application specific database and then set
it as a form attribute on every call to
MybankBaseAction
’s
execute()
method.
Listing 4.5 shows the
MybankBaseAction
using the
MybankBaseForm
. It
implemented the
execute()
method and adds audit logging for entry and exit
points. Further down the line, it retrieves the application specific profile for the
user. This is helpful if you have a portal with a single sign-on and the user rights
and profiles differ from one application to another. Then it casts the
ActionForm
to
MybankBaseForm
and assigns its variables with the values of
commonly accessed request and session attributes.
MybankBaseAction
defines
three abstract methods –
preprocess()
,
process()
and
postprocess()
.
These methods when implemented by the subclasses respectively perform pre-
Chapter 4. All about Actions
87
processing, processing and post-processing activities. Their signatures as as
follows:
protected abstract void preprocess(ActionMapping mapping,
MybankBaseForm form, HttpServletRequest request,
HttpServletResponse response) throws Exception;
protected abstract ActionForward process(ActionMapping mapping,
MybankBaseForm form, HttpServletRequest request,
HttpServletResponse response) throws Exception;
protected abstract void postprocess(ActionMapping mapping,
MybankBaseForm form, HttpServletRequest request,
HttpServletResponse response) throws Exception;
Pre-processing activities involve validating the form (Validations requiring
access to backend resources to are typically performed in the Action instead of
ActionForm, where the validations are limited to trivial checking and inter-
depdendent fields), checking for duplicate form submissions (In the next section
you will look at the facilities in Struts to handle duplicate form submissions. In
Chapter 10 we will develop the generalized strategy for duplicate form handling
– not just repeating synchronizer token in the Action classes.), checking if the
action (page) was invoked in the right order (if a strict wizard like behavior is
desired) etc.
Processing activities are the meat of the application and do not need any
more explanation. Validation errors can be discovered in this stage too.
Post-processing activities may involve setting the sync token (for checking
duplicate form submission), cleaning up unnecessary objects from request and
session scopes and so on. The bottom line is that all applications have recurring
tasks that need to be refactored into the parent class and hence a base Form and
Action are a must for every serious application. In Chapter we will add a lot of
functionality into the base Action giving you that many reasons to create the base
Action.
Listing 4.5 The Base Action class
public class MybankBaseAction extends Action {
public ActionForward execute(ActionMapping mapping,
ActionForm form, HttpServletRequest request,
HttpServletResponse response) throws Exception
{
// Add centralized logging here (Entry point audit)
// Check here if the user has rights to this application
Struts Survival Guide – Basics to Best Practices
88
// or retrieve app specific profile for the user
MybankBaseForm myForm = (MybankBaseForm) form;
// Set common MybankBaseForm variables using request &
// session attributes for type-safe access in subclasses.
// For e.g. myForm.setUserProfile(
// request.getAttribute(“profile”));
preprocess(mapping, myForm, request, response);
ActionForward forward =
process(mapping, myForm, request, response);
postprocess(mapping, myForm, request, response);
// More code to be added later.
// Add centralized logging here (Exit point audit)
return forward;
}
}
4.8 Handling Duplicate Form Submissions
Duplicate form submissions can occur in many ways
Using Refresh button
Using the browser back button to traverse back and resubmit form
Using Browser history feature and re-submit form.
Malicious submissions to adversely impact the server or personal gains
Clicking more than once on a transaction that take longer than usual
Duplicate form submissions are acceptable in some cases. Such scenarios are
called idempotent transitions. When multiple submissions of data are not critical
enough to impact the behavior of the application, duplicate form submissions do
not pose a threat.
They can cause a lot of grief if for instance you are buying from an online
store and accidentally press refresh on the page where you are charged. If
storefront is smart enough, it will recognize duplicate submissions and handle it
graciously without charging you twice.
Why is the form submitted again after all, when the refresh button is pressed?
The answer lies in the URL seen in the URL bar of your browser after the form
submission. Consider a form as:
<form name=CustomerForm”

Chapter 4. All about Actions
89
action=”/App1/submitCustomerForm.do”>
. The above form is submitted
with the URL
/App1/submitCustomerForm.do
and the same URL is shown
in the URL bar. On the back end, Struts selects the action mapping associated
with submitCustomerForm and executes the action instance. When you press
refresh, the same URL is submitted and the same action instance is executed
again. The easy solution to this problem is to use HTTP redirect after the form
submission. Suppose that the CustomerForm submission results in showing a
page called Success.jsp. When HTTP redirect is used, the URL in the URL bar
becomes
/App1/Success.jsp
instead of
/App1/submitCustomerForm.do
.
When the page refreshed, it is the Success.jsp that is loaded again instead of
/App1/submitCustomerForm.do
. Hence the form is not submitted again. To
use the HTTP redirect feature, the forward is set as follows:
<forward name=”success” path=”/Success.jsp” redirect=”true” />
However there is one catch. With the above setting, the actual JSP name is
shown in the URL. Whenever the JSP name appears in the URL bar, it is a
candidate for ForwardAction. Hence change the above forward to be as follows:
<forward name=”success” path=”/GotoSuccess.do” redirect=”true” />
where GotoSuccess.do is another action mapping using ForwardAction as
follows:
<action path=”/GotoSuccess”
type=”org.apache.struts.actions.ForwardAction”
parameter=”/Success.jsp”
validate=”false” />
Now, you have now addressed the duplicate submission due to accidental
refreshing by the customer. It does not prevent you from intentionally going back
in the browser history and submitting the form again. Malicious users might
attempt this if the form submissions benefit them or adversely impact the server.
Struts provides you with the next level of defense: Synchronizer Token.
To understand how the Synchronizer Token works, some background about
built-in functionalities in the
Action
class is required. The
Action
class has a
method called
saveToken()
whose logic is as follows:
HttpSession session = request.getSession();
String token = generateToken(request);
if (token != null) {
session.setAttribute(Globals.TRANSACTION_TOKEN_KEY, token);
}
Struts Survival Guide – Basics to Best Practices
90
The method generates a random token using session id, current time and a
MessageDigest and stores it in the session using a key name
org.apache.struts.action.TOKEN
(This is the value of the static variable
TRANSACTION_TOKEN_KEY in
org.apache.struts.Globals
class.
The Action class that renders the form invokes the
saveToken()
method to
create a session attribute with the above name. In the JSP, you have to use the
token as a hidden form field as follows:
<input type="hidden"
name="<%=org.apache.struts.taglib.html.Constants.TOKEN_KEY%>"
value="<bean:write name="<%=Globals.TRANSACTION_TOKEN_KEY%>"/>">
The embedded
<bean:write>
tag shown above, looks for a bean named
org.apache.struts.action.TOKEN
(which is the the value of Globals.
TRANSACTION_TOKEN_KEY ) in session scope and renders its value as the
value
attribute of the hidden input variable. The name of the hidden input
variable is
org.apache.struts.taglib.html.TOKEN
(This is nothing but
the value of the static variable TOKEN_KEY in the class
org.apache.struts.taglib.html.Constants
).
When the client submits the form, the hidden field is also submitted. In the
Action that handles the form submission (which most likely is different from the
Action that rendered the form), the token in the form submission is compared
with the token in the session by using the
isTokenValid()
method. The
method compares the two tokens and returns a true if both are same. Be sure to
pass
reset=”true”
in the
isTokenValid()
method to clear the token from
session after comparison. If the two tokens are equal, the form was submitted for
the first time. However, if the two tokens do not match or if there is no token in
the session, then it is a duplicate submission and handle it in the manner
acceptable to your users.
NOTE: We could also have chosen to have the synchronizer token as an
ActionForm attribute. In that case, the
<html:hidden>
tag could have been
used instead of the above
<input type=”hidden”>
tag (which looks
complicated at the first sight). However we have not chosen to go down this
path since protection from duplicate submission is not a characteristic of the
form and it does not logically fit there very well.
Although the above approach is good, it requires you as a application
developer to add the token checking method pair –
saveToken()
and
isTokenValid()
in methods rendering and submitting the sensitive forms
respectively. Since the two tasks are generally performed by two different
Actions, you have to identify the pairs and add them manually. In chapter 10, we
will look at an approach to declaratively turn on the synchronizer token.

Chapter 4. All about Actions
91
You can use the same approach for sensitive hyperlink navigations. Just set
the tranaction attribute in
<html:link>
to true and use the same logic in the
Action classes to track the duplicate hyperlink navigations.
The
reset
argument of the
isTokenValid()
is useful for multi-page form
scenario. Consider a form that spans across multiple pages. The form is
submitted every time the user traverses from one page to another. You definitely
want to validate token on every page submission. However you also want to
allow the user to traverse back and forth using the browser back button until the
point of final submission. If the token is reset on every page submission, the
possibility of back and forth traversal using the browser button is ruled out. The
solution is not disabling back button (using JavaScript hacks) but to handle the
token intelligently. This is where the
reset
argument is useful. The token is
initially set before showing the first page of the form. The
reset
argument is
false for all the
isTokenValid()
invocations except in the Action for the last
page. The last page uses a true value for the
reset
argument and hence the token
is reset in the
isTokenValid()
method. From this point onwards you cannot
use back button to traverse to the earlier form pages and successfully submit the
form.
4.9 What goes into Action (and what doesn’t)
Don’t even think twice – Action classes should contain only the presentation
logic. If it is business logic it does not belong here. What qualifies as
presentation logic? The following do – analyzing request parameters and creating
data transfer objects (for server side processing), invoking business logic
(preferably through business delegates), creating view-models – the model
JavaBeans for the JSPs, selecting the next view and converting exceptions into
appropriate action errors. That’s probably it.
The common mistake while coding the Action is stuffing the
execute()
with a lot of things that don’t belong there. By the time it is noticed, the
execute()
method has intermingled request handling and business logic
beyond the point of separation without considerable effort. The separation is
tough because, when there is no architectural separation, the
HttpServletRequest
and
HttpSession
attributes will be used all over the
place and hence the code cannot be moved enmasse to the server side to “extract
a class”. The first resolution you have to make for a cleaner and better design is
to avoid this temptation.
A preferred way of splitting the code in Action’s
execute()
method (or
rather
MybankBaseAction
’s
process()
method is by layering. The
functionality in
process()
method can be divided into three distinctive steps.

Struts Survival Guide – Basics to Best Practices
92
1. User Action Identification
2. Transfer Object Assembly
3. Business Logic invocation using Business Delegates
The
postprocess()
method is suitable for forwarding the user to the
chosen view based on the output from business tier. Let us start looking in detail
at the above three steps in
process()
.
User Action Identification: The first step in
process()
is to check what action
the user performed. You don’t have to do this if DispatchAction or
LookupDispatchAction is used. The framework itself calls the appropriate
method.
if (user pressed save button) {
//Do something
} else if (user pressed delete button) {
//Do something else
}
Transfer Object Assembly: The next step is creating serializable data transfer
objects (DTO) that are independent of the HttpServletRequest and
HttpServletResponse (and the entire javax.servlet.http package). This involves
copying the ActionForm attributes into a regular serializable JavaBeans. The
formal term used to describe this copying process is Transfer Object Assembly.
The class that assembles the transfer object is called Transfer Object Assembler.
Every tier uses object assemblers when transferring objects across the tier
boundary. In general, the object assemblers used to send data from business tier
to presentation tier have some intelligence. However the object assemblers used
to send data from presentation tier to business tier are straightforward. They are
monotonous and dumb (It better be dumb. Otherwise you are coding business
logic here). You can take advantage of their straightforward nature and easily
develop a framework using Java Reflection API to perform the object assembly.
The framework thus developed takes the ActionForm-to-DTO mapping
information in a XML file and creates the DTOs.
To make life a bit easier, you can offload some of the conversions to the
BeanUtils
class in Commons BeanUtils. This jar is packaged along with Struts.
You can use the
BeanUtils.copyProperties(dest, orig)
method to
copy the properties with same names between the form bean and the DTO. It also
does the required data type conversions in the process.
Business Logic Invocation: The DTOs thus created are transferred to the business
tier as arguments while invoking the busiess logic methods. Consider how a Loan
Session EJB containing the business logic for loan management is invoked using
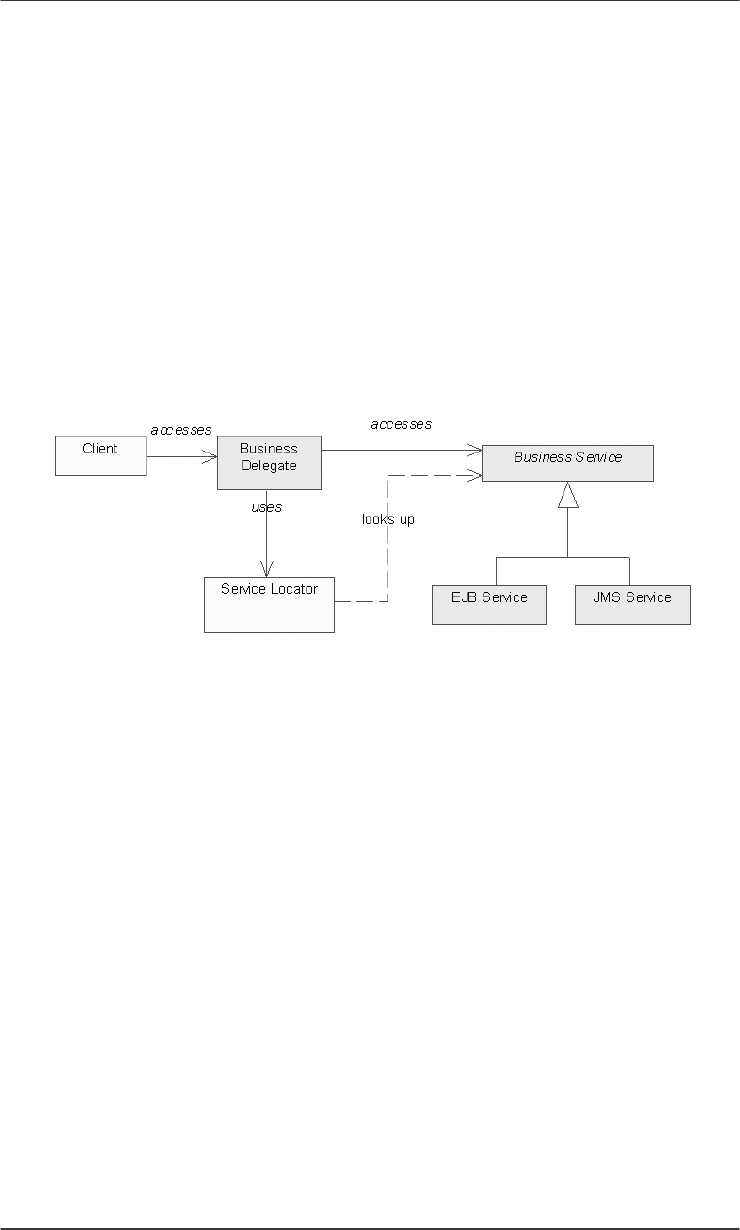
Chapter 4. All about Actions
93
the standard Service Locator pattern. Service Locator is a core J2EE pattern that
is used widely to locate the business service – in this case used to locate the EJB.
LoanMgmt loanmgmt = (LoanMgmt)
ServiceLocator.getInstance().lookup(“LoanMgmtEJB”);
The above method call can throw
RemoteException
,
CreateException
.
If the same business service is implemented using CORBA, a different Exception
might be thrown. At times you will certainly have a lethal combination of EJB
and mainframe serving as the business tier. Whatever be the case, you should
isolate the web tier from these dependencies that are a direct result of the choice
of implementation for the business logic tier. This is exactly where the Business
Delegate comes in.
Figure 4.3 Business Delegate.
The Business Delegate is another Core J2EE Pattern and decouples the web
tier from dependencies on the choice of business logic implementation. Typically
business delegate is a class with implementation for all the business methods.
Figure 4.3 shows the Business Delegate class. The client invokes the methods on
business delegate. The delegate, true to its name delegates the client calls to the
actual implementation. It uses the ServiceLocator to lookup the Service, invoke
methods on it and convert the implementation exceptions into application
exceptions thus reducing coupling.
4.10 When to use Action chaining (and when not to)
The process of forwarding to another action mapping from an action is called
Action Chaining. Let’s say that the
execute()
method from an Action forwards
to an ActionForward called
pageB
. Assume that the forward is as follows:
<forward name=”pageB” path=”/pageBAction.do” />

Struts Survival Guide – Basics to Best Practices
94
The forward itself points to another action mapping called
pageBAction
.
Accordingly the Action instance associated with
pageBAction
is invoked. This
can continue until an actual JSP is shown to the user.
There are scenarios where the action chaining is a good idea. Consider the
example used earlier in the chapter: A page shows a list of loans with option to
delete loans one at a time. After deletion, the same loan list is shown again. If the
user is forwarded directly to the List JSP after deletion, then the task of creating
the loan list is left to the JSP. That is a bad design. Action chaining saves the day
here. In the Action for the delete, just forward to the listLoan.do after a
successful deletion. The Action corresponding to listLoan.do then creates the List
of Loans to display.
Using the action mapping of self as the
input
attribute is a preferred than
using a JSP name. This is a special case of action chaining and comes handy
when a lot or preprocessing is needed to show a page, irrespective of whether
page is shown for the first time in the normal way or because of validation errors.
Then there are scenarios where action chaining is a bad idea. If the chaining
is used for linking several units of business logic one after the other, it is better to
do this in the business tier. If this is one of your goals, then use a session ejb
method as a façade to hide the execution of fine-grained business logic snippets
as one unit instead of chaining actions. Use the Transfer Object Assembly from
the last section to create a DTO from the form bean and pass it to the business
tier. Also, avoid having more than two actions in the chain. If you are having
more than two actions in the chain, chances are that you are trying to do business
logic by chaining Actions. A strict no-no. Nada.
4.11 Actions for complex transitions
Perfectly reusable Actions are not a reality yet. Suppose that you have a common
page accessed from two different pages and what the page shows where the page
goes next depends on where you came from. You can never create totally
reusable Actions and chain them in this scenario.
Wiring the handlers
If the web application you are designing is entirely of the format “where you
came from drives what to do and where to go next”, then consider using a
different approach. Split the current request handling and presenting next page
into two different handler classes. Write atomic piece of “do”s as Commands for
each. In a separate XML, wire them up together as you would like. The Action
class serves very little purpose here other than to figure out which handlers are
wired together. In fact a single Action for the whole application suffices. All that
this Action does is to look up in the XML for commands to be executed in a
Chapter 4. All about Actions
95
pipeline. Similarly if your web application provides personalization features, then
you have to create atomic handlers and wire them together dynamically.
State aware Forms
Consider a scenario when you can enter a page from N different places and exit
in N different ways. Figure 4.4 shows the scenario. There is a common page. It
can be accessed from Page1 and Page2. After executing the common action in
common page, the user is forwarded to Page3 and Page4 respectively on success.
On pressing Cancel, Page1 and Page2 are shown respectively.
Figure 4.4 Complex Page transition example.
An easy way to achieve this is to track where the user came from in session
and then accordingly act in the common action. This however makes the common
action less reusable. If a lot of your pages behave in this manner you should
consider developing a framework to abstract the complexities of the transition. A
simple approach is illustrated here. Start with an interface with two methods as
shown below:
public interface StateAware {
public String getPreviousState();
public String getNextState();
}
The ActionForms involved in the complex transitions implement this
interface. Consider that ActionForm1 is associated with Page1. The ActionForm1
implements the StateAware interface. The getPreviousState() returns the forward
for Page1 and the getNextState() returns the forward for Page3. The Common
Action now becomes really reusable.
public class CommonAction extends Action {
public ActionForward execute(ActionMapping mapping,
ActionForm form, HttpServletRequest request,
HttpServletResponse response) throws Exception {
StateAware sw = (StateAware) form;

Struts Survival Guide – Basics to Best Practices
96
if (isCancelled(request)) {
return mapping.findForward(sw.getpreviousState());
}
//do common action here
//success
return mapping.findForward(sw.getNextState());
}
}
Refer to http://www.livinglogic.de/Struts/ for more about Struts based
workflow approach to solve similar problems.
For multi page forms, use multiple Action classes; one Action per page
submission. Multi-page forms generally have buttons with same names: Prev,
Next etc. This will result in confusion when forwarding to appropriate page if a
single Action class is used to handle buttons with the same names in multiple
pages.
4.12 Managing struts-config.xml
When the development begins, the struts-config.xml is always small and
manageable. But as time passes and features are added, the file continues to grow
to become a monster. Splitting the application into modules definitely helps, but
modules can be relatively large too. There are better ways to mange the struts-
config.xml than simply editing by hand or even an XML editor. Some of the
popular tools to manage struts-config.xml are described below.
Struts-GUI
Struts-GUI is a Visio Stencil from Alien Factory
(http://www.alienfactory.co.uk/strutsgui/). It lets you visually edit the struts
config.xml as a Visio diagram and generate the xml file from it. One of the
biggest challenges in maintaining the struts-config.xml is understanding the flow
and tracking down what is going on. With Struts-GUI, you can follow the
visually trace the actions, their forwards and the web pages they lead to. You can
even trace action chaining. You can add documentation in the Visio diagram
reducing the maintenance hurdle even further. Struts-GUI is a commercial tool.
Struts Console
Struts Console is a Swing based editor to manage the struts-config.xml from
James Holmes (http://www.jamesholmes.com/struts/console/). It is not visually
driven as Struts GUI, but very intuitive. It has tree like navigation to traverse the

Chapter 4. All about Actions
97
individual elements. It is much more flexible than Struts GUI in that it can be
used to maintain customized struts-config.xml (More about Struts customization
in Chapter 10). Wizards and drop downs are provided to add inidividual
elements, thus eliminating the chances of typo.
XDoclet
XDoclet based management of struts-config.xml is a entirely different concept.
The two tools cited earlier are based on maintaining the struts-config.xml, while
in XDoclet approach, there is no struts-config.xml at all! In the XDoclet
approach, there is no struts-config.xml at all! All the requisite information linked
to the
<form-bean>
and
<action>
are specified in the Action and Form
classes using special XDoclet tags as follows:
* @struts.action name="custForm" path="/editCustomer"
* scope="request" validate="false"
* parameter="action" input="mainpage"
*
* @struts.action-forward name="showCustForm"
* path="/ShowCustomerForm.jsp"
The above tags generate the Struts action mapping as follows in the struts-
config.xml at build time.
<action path="/editCustomer"
type="mybank.app1.ShowCustomerAction"
name="custForm"
scope="request"
input="mainpage"
unknown="false" validate="false">
<forward name="showCustForm"
path="/ShowCustomerForm.jsp"
redirect="false"/>
</action>
XDoclet is project on sourceforge that started off with auto-generating home
interface, remote interface, ejb-jar.xml from special tags in the EJB
implementation class. It was a good idea with EJBs since the EJB
implementation class would drive everything else - home, remote and the ejb-
jar.xml.
With struts-config.xml, none of the individual classes drive the flow in
entirety. Everything works always in relation to another. You always want to
track what is going on, how various pieces interact together and how the flow
works. You always want to see which action takes you where and get the whole

Struts Survival Guide – Basics to Best Practices
98
big picture as you develop. Hence the struts-config.xml serves much like
whiteboarding - visualizing whats going on in its entirety. Providing this
information via piecemeal approach in different files using XDoclet tags defeats
the purpose. Providing this information via piecemeal approach in different files
using XDoclet tags defeats the purpose. Hence our advice is not to use the
XDoclet approach for auto-generating struts-config.xml.
4.13 Guidelines for Struts Application Development
Struts application development in enterprise applications requires desicipline. We
are not referring to any particular methodology; just some guidelines for Struts
based application development for enterprise applications. In this section a step-
by-step approach for Struts application development cycle is provided.
1. First design your flow at a usecase level on a whiteboard. A JAD session
with business expert, page author and developer is recommended. JAD
stands for Joint Application development. Judging by its name, you might
think that this technique only applies to developing software, but that’s not
the case. The JAD technique can be applied to a wide variety of areas where
consensus is needed.
2. Decide how many forms are involved in the flow. Which comes when and so
on. This will tell you which form should be in request and session scope. (If
possible, try to maintain as many forms in request scope).
3. Forms in a web application have aspects related to it – Creating and
populating a form and setting in the right scope before display and handling
the submitted form. Decide when each of this would happen.
4. The JAD session will give following inputs:
Page author knows which form to create and navigation using
DynaActionForm (Refer to Chapter 5 for more on DynaActionForm) and
navigation using
ForwardAction
with
<html:link>
Application developer knows what inputs are availble for the business
logic invocation methods (Session EJB methods)
5. Application developer designs the business logic for each page (not the
Action class) and unit tests them and page author develops and formats the
pages. Both tasks can occur in parallel.
6. Application developer creates Form and Action using the DynaActionForm
and updates the struts-config.xml and invokes the already tested business
logic from Action classes.
7. Page author and developer integrate the pieces and unit test them with

Chapter 4. All about Actions
99
StrutsTestCase (http://strutstestcase.sourceforge.net/).
4.14 Summary
Make the best use of the built-in Actions. Review the systems you build and see
how you can use
ForwardAction
to stick to MVC, how to use
DispatchAction
and
LookupDispatchAction
to simplify things and
perhaps even internationalize your application. Split your application into
modules and create separate struts config files. Smaller files are easier to
comprehend and manage. Doing so will benefit you in the long run. Define a
base Form and Action in your application. You will be glad you did. Handle
duplicate form submissions using redirects and synchronizer tokens. Use a tool to
manage the Struts Config files and strictly follow the guidelines about what goes
into Action and what does not.
Author’s note: Struts Action Forms tend to get really huge in big projects. The
data in Struts Forms need to be transferred to the middle tier and persisted to the
database. This problem of copying (mapping) data from ActionForms to
ValueObjects (which carry to the middle tier) has been traditionally done by
BeanUtils. When the structure of Value Objects and Action Forms differ
significantly, it is tough to use BeanUtils. Object To Object mapping (OTOM)
framework (h
ht
tt
tp
p:
:/
//
/o
ot
to
om
m.
.d
de
ev
v.
.j
ja
av
va
a.
.n
ne
et
t) is designed to solve this problem. With
OTOM, any Java Object can be mapped to another via a GUI. Then, the mapping
Java code can be generated from the GUI or Ant Task.

Struts Survival Guide – Basics to Best Practices
100
Chapter 5. Form Validation
101
C
Ch
ha
ap
pt
te
er
r
5
5
Form Validation
In this chapter:
1. You will learn how to use Commons Validator with Struts via ValidatorForm
and ValidatorActionForm
2. You will learn about DynaActionForm and DynaActionValidatorForm
Validation is a beast that needs to be addressed at various levels using different
strategies for different complexity levels in the validation itself.
1. It is commonly accepted principle that the user input validation should
happen as close to the presentation tier as possible. If there are only a bunch
of HTML forms with trivial checks and the validation is limited to the UI,
you can afford to implement validations using JavaScript.
2. Getting too close with JavaScript is one extreme and is not pragmatic in
everyday projects. On the other hand, postponing the validation until it
manifests as a business logic exception, runtime exception or a database
exception is unacceptable too. Another option is to programmatically
validate the HTML Form data using helper classes in the web tier or code the
validation right in the
validate()
method of the ActionForm itself – which
is what we did in Chapter 3.
3. The third option is to externalize the validation into a XML file that confirms
to the Commons Validator syntax and integrate it into Struts. This approach
works very well for trivial checks, which is a case in approximately 50% of
the projects. Examples of trivial checks are: Null Checks - Checking if a field
is null, Number Check – checking if the field value is numeric or not, Range
Check – checking if a numeric values lies within a range. These validations
depend just on the fields being validated and nothing else.
Validator is a part of the Jakarta Commons project and depends on the
following Commons Projects - BeanUtils, Logging, Collections, Digester and
also on Jakarta ORO library. All of these are shipped with the Struts 1.1. You can
find them in the lib directory of the Struts distribution.

Struts Survival Guide – Basics to Best Practices
102
Struts is bundled with Commons Validator 1.0. Commons Validator 1.1.1
has support for validating interdependent fields. It can be downloaded from the
Jakarta Commons website and used instead of the validator bundled with Struts.
5.1 Using Commons Validator with Struts
The interoperation of Commons Validator and Struts is like a jigsaw puzzle with
several pieces. It is not possible to explain one piece in entirety and move on to
the next since they are all interconnected. Hence our approach is to explain part
of a puzzle before moving on to the next. And then several half-baked pieces are
joined together. You might have read through this section twice to get a clear
picture.
The twin XML files
In Struts, the XML based validations are located in two files – validation-
rules.xml and validation.xml. The validation-rules.xml file contains the global set
of rules that are ready to use (Henceforth referred to as global rules file). It is
shipped along with the Struts distribution in the lib directory. The second file –
validation.xml is application specific. It associates the rules from the global rules
file with individual fields of your ActionForm. Suppose there is a generic rule
named
required
in the global rules file that checks if a field is empty. You can
use this rule to check if any field is empty including the
firstName
field in the
CustomerForm
by adding the following declaration in validation.xml:
<form name="CustomerForm">
<field property="firstName" depends="required">
..
..
</field>
<field .. ..
..
</field>
..
</form>
The above xml contains a XML block with a
<form>
element, which stands
for an ActionForm named
CustomerForm
. All the rules associations for the
CustomerForm
fields exist inside this
<form>
block. One such validation – the
validation for the
firstName
field is also shown in a
<field>
element. The
<field>
has an attribute named depends that lists the set of rules (comma
separated) on which the field is dependent upon. In other words, the
Chapter 5. Form Validation
103
validation.xml is just an association of the actual rules with the application
specific forms. The actual rules are defined in the validation-rules.xml.
validation-rules.xml – The global rules file
For a while, let us go back to validation-rules.xml – the global rules file where all
the rules are actually defined. Listing 5.1 shows a sample file. Each
<validator>
element defines one validation rule. The Listing shows a required
rule validator. The required rule validator uses a class called
org.apache.struts.validator.FieldChecks
. Where did this come from?
Well, that requires some background too.
Listing 5.1 Required rule in validation-rules.xml
<form-validation>
<global>
<validator name="required"
classname="org.apache.struts.validator.FieldChecks"
method="validateRequired"
methodParams="java.lang.Object,
org.apache.commons.validator.ValidatorAction,
org.apache.commons.validator.Field,
org.apache.struts.action.ActionErrors,
javax.servlet.http.HttpServletRequest"
msg="errors.required">
</validator>
<validator name=”…”>
… …
… …
</validator>
<!- More validators defined here -->
</global>
</form-validation>
The basic validator class in Commons Validator is
org.apache.commons.validator.GenericValidator
. It contains atomic
and fine-grained validation routines such as
isBlankOrNull()
,
isFloat()
,
isInRange()
etc. Struts provides the
FieldChecks
that uses the
GenericValidator
but has coarse grained methods such as
validateRequired()
,
validateDate()
,
validateCreditCard()
etc.
Each of these methods accept four arguments of type
java.lang.Object
,
org.apache.commons.validator.ValidatorAction
,
org.apache.commons.validator.Field
,

Struts Survival Guide – Basics to Best Practices
104
ActionErrors
and
HttpServletRequest
in that order. Notice that the same arguments are listed under the
methodParams
attribute in Listing 5.1.
NOTE: The
FieldChecks
couples the ActionForm validations to the Struts
framework by adding dependency on Struts specific classes in the XML, but
makes it easy to use the Commons Validator with Struts.
With this background info, the required validator in Listing 5.1 translates
into plain English as: “The rule named “required” is defined in method
validateRequired
within a class named
FieldChecks
that accepts the above
listed four arguments in that order. On error, an error message identified by the
key
errors.required
is displayed. The
errors.required
is a key to the
Resource Bundle”. Quite a mouthful indeed!
The next step is to add the message for
errors.required
to the Resource
Bundle. The key-value pair added is:
errors.required={0} is required
.
By default, the rules in global rules file use the following keys for the error
messages -
errors.required
,
errors.minlength
,
errors.maxlength
,
errors.date
and so on. To use different error keys, make appropriate changes
in validation-rules.xml.
A rule in the global rules file can itself depend on another rule. For example,
consider the
minlength
rule. It checks if a field is less than a specified length.
However it doesn’t make sense to check the length of an empty field is less than
a specified length. In other words,
minlength
rule depends on required rule. If
the required rule fails, the
minlength
rule is not executed. This depends
relationship among rules is shown below.
<validator name="minlength"
classname="org.apache.struts.validator.FieldChecks"
method="validateMinLength"
methodParams="java.lang.Object,
org.apache.commons.validator.ValidatorAction,
org.apache.commons.validator.Field,
org.apache.struts.action.ActionErrors,
javax.servlet.http.HttpServletRequest"
depends="required"
msg="errors.minlength">
</validator>
validation.xml – The application specific rules file
Now, let us get back to the validation.xml. A sample is shown in Listing 5.2. The
xml consists of a
<formset>
block with multiple
<form>
blocks, one for each
form.

Chapter 5. Form Validation
105
Listing 5.2 Application specific validations for CustomerForm
<form-validation>
<formset>
<form name="CustomerForm">
<field property="firstName"
depends="required,minlength ">
<arg0 key="customerform.firstname"/>
<arg1 name="len" key="1" resource="false"/>
</field>
</form>
</formset>
</form-validation>
In Listing 5.2, the topmost xml block is
<form-validation>
. It contains a
single
<formset>
element, which in turn can contain a collection of
<form>
s.
Each
<form>
corresponds to the Struts Form. The
<form>
contains a set of
<field>
s to be validated. The
firstName
field depends on two rules –
required
and
minLength
. The
required
and
minLength
are defined in the
validation-rules.xml.
Then comes the
arg0
and
arg1
. The
<field>
element accepts up to four
args –
arg0
,
arg1
,
arg2
and
arg3
. These argNs are the keys for replacement
values in
ActionError
. Sure Sounds confusing. Here is an example to make
things clear. Assume that the
required
rule has failed. An
ActionError
with
key
errors.required
needs to be created. The error message for this key is
defined in the resource bundle as “
{0} is required
”. This message needs a
literal value to replace
{0}
. That replacement value itself is obtained by first
looking up the resource bundle with key attribute of
<arg0>
element. In Listing
5.2, the key attribute of
<arg0>
is
customer.firstname
. The key is used to
lookup the resource bundle and obtain the replacement value. Suppose that the
resource bundle defines these messages.
customer.firstname=First Name
errors.required={0} is required
Then, the replacement value for
{0}
is First Name. This value is used to
replace
{0}
and the resulting error message is First Name is required. Notice that
the Resource bundle is looked up twice – once using the
arg0
key and then
during the rendering of the
ActionError
itself.
You might be wondering why
arg1
is needed. The answer is when the
minlength
rule fails; it looks for an error message with a predefined key called
errors.minlength
. The
errors.minlength
requires two replacement
values –
arg0
and
arg1
.
arg0
was also used by the
errors.required
key.
The
errors.minlength
needs
arg1
in addition to
arg0
. I can hear you are
saying – “All that is fine. But how will I know what predefined error keys should

Struts Survival Guide – Basics to Best Practices
106
be added to the resource bundle”. It is simple actually. Just open the validation-
rules.xml and you will find all the error message keys are provided. They are:
errors.required={0} is required.
errors.minlength={0} can not be less than {1} characters.
errors.maxlength={0} can not be greater than {1} characters.
errors.invalid={0} is invalid.
errors.byte={0} must be a byte.
errors.short={0} must be a short.
errors.integer={0} must be an integer.
errors.long={0} must be a long.
errors.float={0} must be a float.
errors.double={0} must be a double.
errors.date={0} is not a date.
errors.range={0} is not in the range {1} through {2}.
errors.creditcard={0} is an invalid credit card number.
errors.email={0} is an invalid e-mail address.
As you can see, every error message key needs
arg0
. The
errors.minlength
,
errors.maxlength
and
errors.range
need
arg1
. In
addition, the
errors.range
also needs
arg2
.
In Listing 5.2, the
arg1
has an attribute called
resource
and it set to
false
. The
resource=”false”
implies that there is no need to lookup the
message resource bundle for
arg1
(as was done with
arg0
key –
customerform.firstname
).
More validation.xml features
Let us investigate some more interesting validator features. Listing 5.3 shows the
same
CustomerForm
validation rules with some additions and modifications.
Those are highlighted in bold.
The first addition is the
<global>
block to
<form-validation>
. The
<global>
can hold as many
<constant>
s. A
<constant>
is much like a Java
constant. Declare it once and use wherever needed. In this case, a constant called
nameMask
is declared and a regular expression
^[A-Za-z]*$
is assigned to it.
This regular expression is interpreted as: “The field can have any number of
characters as long as each of them is between A-Z and a-z”. This constant is used
to define the
mask
rule for
CustomerForm
in two steps as follows:
1. First, a variable
<var>
called
mask
is created and the value of
nameMask
is
assigned to it. This is done by setting the
<var-value>
to be
${nameMask}
. [Any variable within the
${
and
}
blocks is evaluated. You
will find the same convention in JSTL too.] The
<var>
scope is limited to
Chapter 5. Form Validation
107
the
<field>
where it is declared.
2. Next, a rule called
mask
is added to the
CustomerForm
’s
depends
attribute. The
mask
rule is defined in the validation-rules.xml. It checks if the
current field value confirms to the regular expression in a predefined variable
called
mask
(This is the reason why we created a variable called
mask
in the
firstName
<field>
and assigned it the
nameMask
value. Doing so, lets us
reuse the
nameMask
expression for all the forms in validation.xml if
necessary and at the same time satisfy the constraint imposed by the
mask
rule that the regular expression is always available in a
<var>
called
mask
.
Listing 5.3 Application specific validations for CustomerForm
<form-validation>
<global>
<constant>
<constant-name>nameMask</constant-name>
<constant-value>^[A-Za-z]*$</constant-value>
</constant>
</global>
<formset>
<form name="CustomerForm">
<field property="firstName"
depends="required,minlength,
mask
">
<arg0 key="customerform.firstname"/>
<arg1 name="len"
key="${var:minlen}"
resource="false"/>
<var>
<var-name>minlen</var-name>
<var-value>1</var-value>
</var>
<var>
<var-name>mask</var-name>
<var-value>${nameMask}</var-value>
</var>
</field>
</form>
</formset>
</form-validation>
The second new feature in Listing 5.3 is the use of variable for
arg1
.
arg1
as you know, represents the minimum length of the first name. In Listing 5.2, the
arg1
key was hard coded. A bit of flexibility is added this time round by

Struts Survival Guide – Basics to Best Practices
108
declaring it as a field scoped variable and then accessing it through the shell
syntax
${..}
.
Using the ValidationForm
There is one last piece pending in the puzzle. How does the validation failure
become
ActionError
and get displayed to the user? We will answer it right
away. Struts has a class called
ValidatorForm
in
org.apache.struts.validator
package. This is a subclass of
ActionForm
and implements the
validate()
method. The
validate()
method invokes the
Commons Validator, executes the rules using the two xml files and generates
ActionErrors
using the Message Resources defined in the struts-config.xml.
All you have to do is extend your form from
ValidatorForm
and write your
rules in XML. The framework does the rest. More details on the validator are
covered later in this chapter. For now, let us see how the Validator is configured.
Configuring the Validator
Starting from 1.1, Struts provides a facility to integrate third party utilities
seamlessly through what is called as a PlugIn. A PlugIn is simply a configuration
wrapper for a module-specific resource or service that needs to be notified about
application startup and application shutdown events (through the methods
init
and
destroy
). A PlugIn is a class that implements
org.apache.struts.action.PlugIn
interface. This interface defines two
methods:
public void init(ActionServlet servlet, ModuleConfig config)
public void destroy()
You can respectively implement logic to initialize and destroy custom
objects in these methods. PlugIns are configured in the struts-config.xml file,
without the need to subclass
ActionServlet
simply to perform application
lifecycle activities. For instance the following XML snippet (from the struts-
config.xml) configures the validator plugin:
<plug-in className="org.apache.struts.validator.ValidatorPlugIn">
<set-property property="pathnames"
value="/WEB-INF/validator-rules.xml,
/WEB-INF/validation.xml"/>
</plug-in>
The
ValidatorPlugIn
is a class that implements the
PlugIn
interface. It
has an attribute called
pathnames
. The two input rule XML file names are
specified using this attribute. As you know already, Struts reads the struts-
Chapter 5. Form Validation
109
config.xml file during initialization – during which it also reads the Validator
plugin and accordingly initializes it. Consequently the rules are loaded and
available to the
ValidatorForm
class when the time comes to execute the
validate()
method.
Steps to use Commons Validator in Struts
Now, let us summarize the steps involved in using Commons Validator with
Struts. They are:
1. Create the application specific ActionForm by extending the ValidatorForm
2. Add the corresponding <form> element with <field> sub-element for every
form field that needs validation.
3. List the rules to execute in the <field>’s depends attribute.
4. For every rule, add the error message with predefined name to the message
bundle.
5. For every rule, supply the argNs either as inline keys or keys to the resource
bundle.
6. If the rules in validation-rules.xml do not meet your needs, add new rules and
follow the steps above for the new rules. Be sure to have the classes
executing the rules are available in the appropriate class path.
5.2 DynaActionForm – The Dynamic ActionForm
Struts 1.0 mandated that every HTML form in the JSPs have an associated
ActionForm. Struts 1.1 changed all that with the introduction of
DynaActionForm
– dynamic ActionForm as the name suggests.
DynaActionForm
is defined in the struts-config.xml as a form-bean. A sample
DynaActionForm
is shown in Listing 5.4.
Listing 5.4 Sample DynaActionForm
<form-bean name="CustomerForm"
type="org.apache.struts.action.DynaActionForm">
<form-property name="firstName" type="java.lang.String "/>
<form-property name="lastName" type="java.lang.String
initial="Doe"/>
</form-bean>
There are two major differences between a regular
ActionForm
and a
DynaActionForm
.
Struts Survival Guide – Basics to Best Practices
110
1. For a
DynaActionForm
, the type attribute of the form-bean is always
org.apache.struts.action.DynaActionForm
.
2. A regular ActionForm is developed in Java and declared in the struts-
config.xml. The JavaBeans properties of a regular ActionForm are created by
first defining the instance variable and then adding a getter and setter for that
instance variable. A DynaActionForm has no associated Java class. Its
JavaBeans properties are created by adding the <form-property> tag in
Struts Config file (and also declaring its Java type). In Listing 5.4,
CustomerForm is declared as a DynaActionForm with two JavaBeans
properties – firstName and lastName. The type attribute of the <form-
property> is the fully qualified Java class name for that JavaBeans
property; it cannot be a primitive. For instance
int
is not allowed. Instead
you should use
java.lang.Integer
. You can also initialize the form-
property, so that the html form shows up with an initial value.
Listing 5.5 CustomerAction – Action Bean for App1
public class CustomerAction extends Action {
public ActionForward execute(ActionMapping mapping,
ActionForm form,
HttpServletRequest request,
HttpServletResponse response)
throws Exception
{
if (isCancelled(request)) {
System.out.println(Cancel Operation Performed”);
return mapping.findForward(“mainpage”);
}
DynaActionForm custForm = (DynaActionForm) form;
String firstName = (String) custForm.get(“firstName”);
String lastName = (String) custForm.get(“lastName”);
System.out.println(“Customer First name is “ +
firstName);
System.out.println(“Customer Last name is “ +
lastName);
ActionForward forward = mapping.findForward(“success”);
return forward;
}
}

Chapter 5. Form Validation
111
How about an example of using DynaActionForm? Remember, the Hello
World application from Chapter 3. Well, now let us rewrite that example using
DynaActionForm. You will be surprised how easy it is.
The first step obviously is to develop the DynaActionForm itself. Listing 5.4
is the DynaActionForm version of the
CustomerForm
from Chapter 3. The
<form-property> tags are the equivalent of the JavaBeans properties of the
ActionForm.
What about the
validate()
method? In Chapter 3, you were able to code
the
validate()
method since you had the
CustomerForm
as a Java class.
What about the DynaActionForm? With DynaActionForm, unfortunately this is
not possible. Don’t be disappointed. You can use the
DynaValidatorForm
(a
subclass of
DynaActionForm
) in concert with Validator Plugin. We will cover
this topic in the next section.
Rearranging the
execute()
method in
CustomerAction
is the second and
the final step in ActionForm to DynaActionForm conversion. Listing 5.5 shows
the
CustomerAction
. Compare this with the
CustomerAction
in Chapter 3
(Listing 3.5). Instead of using compile time checked getters and setters, the
JavaBeans properties in
DynaActionForm
as accessed just like
HashMap
.
One thing is obvious. The
DynaActionForm
is quick and easy. It is very
convenient for rapid prototyping. Imagine a Struts 1.0 world where an
ActionForm was absolutely needed to prototype an HTML form in JSP using
Struts custom tags. Things were good until the separation of concern came into
picture. In real life projects, different people play different roles. Application
developers have the responsibility of developing Java code and page authors
would exclusively prototype the page and its navigation using JSP markup tags.
Since the Java code being developed is constantly changing, the developer does
local builds on his machine. Similarly the page author would certainly like to add
or remove fields from the prototype during the page design. Since the HTML
forms map to ActionForms, the above scenario implies one of two things.
1. The page author constantly pesters the Java application developer to modify
the ActionForm.
2. The page author develops the ActionForm all by himself.
While the former hampers the developer productivity, the latter leads to
overlap of responsibilities and headaches. Both options are not ideal. Struts 1.1
has solved this problem by introducing DynaActionForm. Although originally
designed for developer’s ease of use, it has been serving the purpose of role
separation in a project very well. One can envision an ideal project development
as follows.
A page author can be isolated from the Java application development by
having a application server environment available for page design. He develops

Struts Survival Guide – Basics to Best Practices
112
the JSPs as JSPs using the Struts (and other) custom tags, not just HTML
prototypes. He also creates DynaActionForms using XML instead of relying
on the application developer to create the Java ActionForms. In other words,
the page author is isolated from the nitty-gritty’s of the build, deploy and all that
chaos accompanying it – at least in the prototype phase.
The page author designs the page Navigation as plain forwards instead of
Form submissions; In other words he uses <html:link> to prototype
navigation instead of
<html:submit>
s. In case you are wondering why
anybody would go this route, here is the answer: In Struts framework, the
presentation logic resides in the Action classes. It is highly unlikely that the
presentation logic (Action) for the ActionForm will be ready even before the
prototype is ready. Hence the page author uses the
<html:link>
and
ForwardAction
to model the navigation. Once the prototype is approved, the
application developer works on the presentation logic by developing the Action
classes. When doing so, the application developer creates equivalent
ActionForms for the existing DynaActionForms, one form at a time. The
application developer also replaces the forwards in the JSP with form
submissions and adds the glue code in Action classes to handle the form
submissions.
Okay, so DynaActionForms are great, why replace them with ActionForms
anyway? In my opinion, DynaActionForms are good only in the prototyping
stage. Once past that stage, it is always better to have strongly typed
ActionForms. Here are some more downsides of using DynaActionForms
1. The DynaActionForm bloats up the Struts config file with the xml based
definition. This gets annoying as the Struts Config file grow larger.
2. The DynaActionForm is not strongly typed as the ActionForm. This means
there is no compile time checking for the form fields. Detecting them at
runtime is painful and makes you go through redeployment.
3. ActionForm can be cleanly organized in packages as against the flat
organization in the Struts Config file.
4. ActionForm were designed to act as a Firewall between HTTP and the
Action classes, i.e. isolate and encapsulate the HTTP request parameters from
direct use in Actions. With DynaActionForm, the property access is no
different than using request.getParameter(“..”).
5. DynaActionForm construction at runtime requires a lot of Java Reflection
machinery that can be expensive.
6. Time savings from DynaActionForm is insignificant. It doesn’t take long for
today’s IDEs to generate getters and setters for the ActionForm attributes.
(Let us say that you made a silly typo in accessing the DynaActionForm
properties in the Action instance. It takes less time to generate the getters and

Chapter 5. Form Validation
113
setters in the IDE than fixing your Action code and redeploying your web
application)
That said, DynaActionForms have an important role to play in the project
lifecycle as described earlier, which they do best and let us limit them to just that.
Use them with caution, only when you absolutely need them.
DynaValidatorForm
An application specific form can take advantage of XML based validation by
virtue of sub classing the ValidatorForm. The XML based dynamic forms can
also avail this feature by specifying the type of the form to be
DynaValidatorForm as follows:
<form-bean name="CustomerForm"
type="org.apache.struts.validator.DynaValidatorForm">
<form-property name="firstName" type="java.lang.String "/>
<form-property name="lastName" type="java.lang.String
initial="Doe"/>
</form-bean>
DynaValidatorForm is actually a subclass of DynaActionForm. It implements the
validate() method much like the ValidatorForm and invokes the Commons
Validator. DynaValidatorForm brings the capability of writing XML based
validation rules for dynamic forms too.
5.3 Validating multi-page forms
When large amount of data is collected from the user, it is customary to split the
form into multiple pages. The pages follow a wizard like fashion. However the
ActionForm would still exists as a single Java class. Moreover at any point, the
data validation should be limited to only those pages that have been submitted.
Fortunately, this feature is already built into the Validator. However it requires
some setup from your side. There are two alternatives – the first uses a single
action mapping and the second uses multiple action mappings. The struts-
validator.war provided with the Struts distribution adopts the first approach,
while we recommend the latter.
Both approaches require the use of an optional hidden variable called
page
.
Consider an html form split into two JSPs – PageA.jsp and PageB.jsp. Since both
JSPs will have the hidden variable mentioned earlier, it is sent as a request
parameter from both form submissions. The hidden variable is assigned the value
of 1 in PageA and 2 in PageB. The
ValidatorForm
already has a JavaBeans
property named page of type
int
. All validation for any field on a page less than

Struts Survival Guide – Basics to Best Practices
114
or equal to the current page is performed on the server side. This will of course
require that each rule defined for the field in the validation.xml should have a
page attribute as follows:
<form name="CustomerForm">
<field property="firstName"
page=”1”
depends="required">
<arg0 key="customerform.firstname"/>
</field>
<field property="fieldX"
page=”2”
depends="required">
<arg0 key="customerform.fieldX"/>
</field>
</form>
With this background, we will first explain the single action mapping
approach. The html forms in both pages have the same action -
<html:form
action=”/submitForm”>
.
In the struts config file, set validate=false for the
/submitForm
action
mapping and add forwards for each of the pages as follows:
<action path="/submitForm"
type="mybank.example.CustomerAction"
name="CustomerForm"
scope="request"
validate="false"
>
<forward name="success" path="/Success.jsp"/>
<forward name="cancel" path="/Cancelled.jsp"/>
<forward name="input1" path="/PageA.jsp"/>
<forward name="input2" path="/PageB.jsp"/>
</action>
Since validate is set to false, the
execute()
method in Action gets control
immediately after the
RequestProcessor
populates the form. You have to now
explicitly call the
form.validate()
in the
execute()
method (Since the
CustomerForm
extends from
ValidatorForm
, the
validate()
is already
implemented). After that you have to forward to the appropriate page depending
on the current page and whether there are ActionErrors in the current page. For
instance, if PageA is submitted and there are no ActionErrors, then PageB is
displayed to the user. However if there were ActionErrors in PageA, then it is
displayed back to the user. The code is shown below.
public ActionForward execute(.. ..) throws Exception {
CustomerForm info = (CustomerForm)form;

Chapter 5. Form Validation
115
// Was this transaction cancelled?
if (isCancelled(request)) {
// Add code here to remove Form Bean from appropriate scope
return (mapping.findForward("cancel"));
}
ActionErrors errors = info.validate(mapping, request);
if (errors != null && errors.isEmpty()) {
if (info.getPage() == 1)
return mapping.findForward("input2");
if (info.getPage() == 2){
//Data collection completed. Invoke Business Logic here
return mapping.findForward("success");
}
} else {
saveErrors(request, errors);
return mapping.findForward("input" + info.getPage());
}
}
This approach is counter-intuitive. After all,
validate()
method was
supposed to be invoked automatically by the framework, not manually in the
execute()
method. The second approach eliminates the need to manually
invoke the
validate()
. In this method, the two forms in two pages have
different actions as follows:
Page A Form submission -
<html:form action=”/submitPageA”>
Page B Form submission -
<html:form action=”/submitPageB”>
Two action mappings are added to the Struts Config file for the above form
submissions. Note that both of the action mappings use the same Action class.
Moreover there is no need to set
validate=false
. The action mapping for
PageA form submission is as follows:
<action
path="/submitPageA"
type="mybank.example.CustomerAction"
name="CustomerForm"
scope="request"
validate="true"
input=”/PageA.jsp”
>
<forward name="success" path="/PageB.jsp"/>
<forward name="cancel" path="/Cancelled.jsp"/>
</action>
Similarly, the action mapping for PageB form submission is as follows:

Struts Survival Guide – Basics to Best Practices
116
<action
path="/submitPageB"
type="mybank.example.CustomerAction"
name="CustomerForm"
scope="request"
validate="true"
input=”/PageB.jsp”
>
<forward name="success" path="/Success.jsp"/>
<forward name="cancel" path="/Cancelled.jsp"/>
</action>
Both action mappings define an input value. When the form is validated by
the RequestProcessor and there are errors, the
mapping.getInput()
page is
shown to the user. Similarly the
mapping.findForward(“success”)
page is
shown when there are no ActionErrors. Any business logic invocation happens
only after the PageB data is collected. The code below shows the
execute()
method.
public ActionForward execute(.. ..) throws Exception {
CustomerForm info = (CustomerForm)form;
// Was this transaction cancelled?
if (isCancelled(request)) {
// Add code here to remove Form Bean from appropriate scope
return (mapping.findForward("cancel"));
}
if (info.getPage() == 2) {
//Data collection completed. Invoke Business Logic here
}
return mapping.findForward("success");
}
With the second approach, the
execute()
method in Action is simplified.
While you may not see much difference between the two
execute()
methods
shown earlier, it will be much pronounced as the number of pages increase and
the last thing you want is page navigation logic intermingled with business logic
invocation.
5.4 Validating form hierarchy
There are still two more validation related Form classes –
ValidatorActionForm
and
DynaValidatorActionForm
. A class diagram
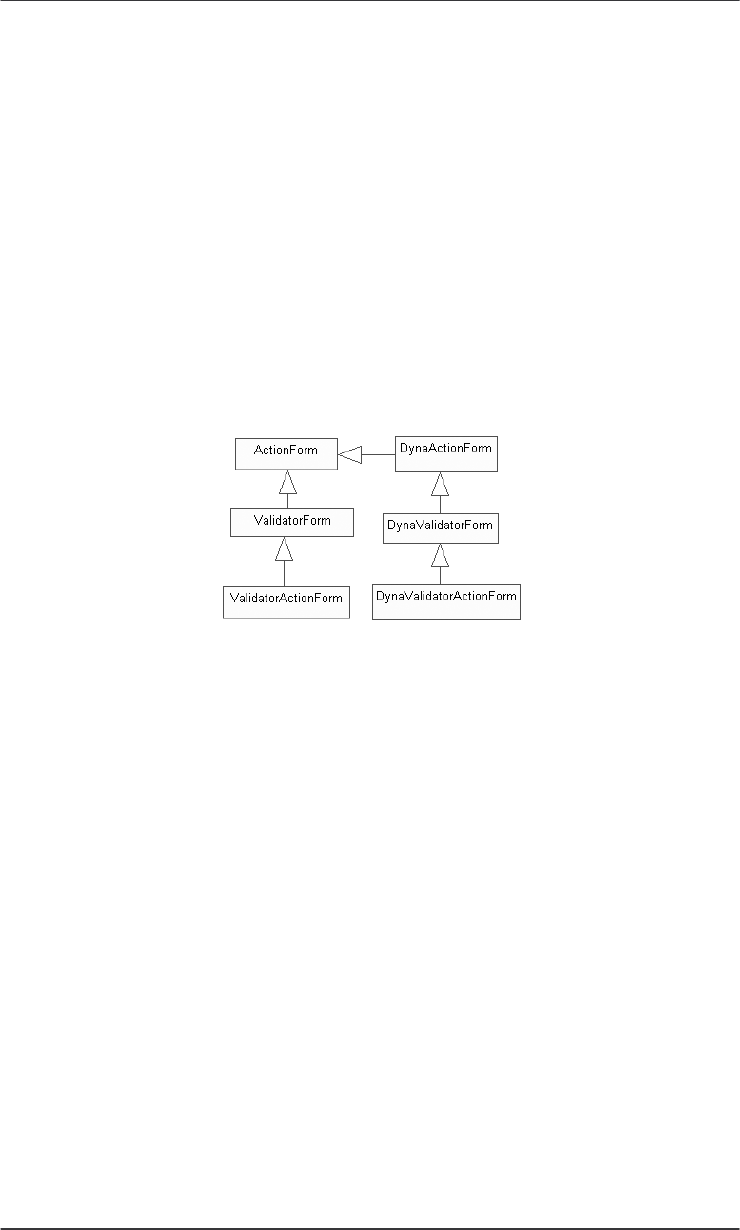
Chapter 5. Form Validation
117
will resolve some of the confusion arising out of plethora of Form classes. Figure
5.1 shows the relationship between these classes.
ActionForm
and
DynaActionForm
reside at the top of the figure as the root class for two
branches.
ValidatorForm
and
DynaValidatorForm
are their immediate
siblings. Each of them has a subclass –
ValidatorActionForm
and
DynaValidatorActionForm
. The last two classes deserve some explanation.
Suppose that you have a Form and want to reuse it in various scenarios. Each
scenario has its own validation. However with the XML based validation, a set of
rules are associated with the form name, not where it is invoked from. Both the
ValidatorActionForm
and
DynaValidatorActionForm
match the action
mapping instead of the form name. The name attribute is used to match the action
mapping and thus multiple rules can be defined for the same form based on the
action mapping.
Figure 5.1 Relationship hierarchy among Validating Forms.
5.5 Summary
In this chapter, you learnt about using Commons Validator with Struts – this is
probably the approach you will adopt in your project too. You also understood
the importance of DynaActionForm and its role in projects. You also learnt the
best approach to handle validation in multi page forms.

Struts Survival Guide – Basics to Best Practices
118
Chapter 6. Struts Tag Libraries
119
C
Ch
ha
ap
pt
te
er
r
6
6
Struts Tag Libraries
In this chapter:
1. You will learn about frequently used Html, Bean and Logic tags
2. We will customize these Html tags – base, text, checkbox, errors & image
3. You will learn about JSTL and Expression Language
4. You will understand how to use Struts-EL Tags and which of the Struts
tags should be replaced with JSTL and Struts-EL
5. You will see how various Struts tags, their derivatives and other related
tags can work together to create multi-page lists and editable lists.
Custom Tags were introduced in JSP 1.1 specification. They are elegant
replacement for the scriptlets. Without the custom tags, the “edge of the system”
where the decisions in presentation logic based on middle tier models would be
exposed to the JSP page author as Java scriptlets. While not only causing
confusions and headaches to the page author, scriptlets also required the
involvement of the Java developer in the page authoring. Custom Tags changed
all that. The application developer now provides the custom tags written as a Java
class with a pre-defined structure and hierarchy. The page author independently
designs the pages and decides on the contents using the custom tags and their
formatting using general HTML and CSS.
Struts ships with these Tag libraries – Html, Bean, Logic, Template, Nested,
Tiles. We will deal with the first three tag libraries in this chapter. The TLD file
for each of these libraries is included in the Struts distribution. For instance, the
Html Tags are defined in struts-html.tld. The Bean tags are defined in struts-
bean.tld and so on. These tags are like any other custom tags. You have to
include the TLD declarations in the web.xml and also the JSP. For e.g., you have
to add the following lines in the web.xml to use the Html Tag library:
<taglib>
<taglib-uri>/WEB-INF/struts-html.tld</taglib-uri>
<taglib-location>/WEB-INF/struts-html.tld</taglib-location>
</taglib>
and the following line in the JSP:
Struts Survival Guide – Basics to Best Practices
120
<%@ taglib uri="/WEB-INF/struts-html.tld" prefix="html" %>
Excellent documentation is available with the Struts distribution for each of
the custom tags and their attributes. It will be merely a repetition of going over
each of those attributes and tags here. Instead we will gloss over the categories
and characteristics of the Struts Tags and more importantly cover tags that need
to be customized for use in serious applications.
Here is how to access the tag documentation in Struts distribution:
Deploy the struts-documentation.war from Struts webapps in Tomcat. Use the
URL http://localhost:8080/struts-documentation/ to access the documentation
in the browser. Click on the link named “Learning” on the left hand side. Click
on “User and Developer Guides” on the resulting page. The page that you see
at this point is loaded with information and links including links for Struts tag
documentation. The direct link for Struts HTML Tag documentation is:
http://localhost:8080/struts-documentation/userGuide/dev_html.html. The
direct link for Struts Bean Tag documentation is: http://localhost:8080/struts-
documentation/userGuide/dev_bean.html.
6.1 Struts HTML Tags
Struts HTML tags are useful for generating HTML markup. The Struts HTML
tag library defines tags for generating HTML forms, textboxes, check boxes,
drop downs, radio buttons, submit buttons and so on. You have already used
some of these in Chapter 3. We will look at other important html tags not covered
there.
Modifying the Base Tag
This tag renders the
<base href=…”>
html tag pointing to the absolute location
of the JSP containing the tag as follows:
<base href=”http://localhost:8080/App1/abc/CustomerDetail.jsp”/>
This can be problematic at times. Assume that the JSP itself is present
somewhere down in a hierarchy of directories. Also the images directory will be
generally at the top level in a web application (See the WAR structure in Figure
3.3). Since the base href is referring to the absolute location of the JSP, the URL
for the images might look like “../../images/banner.jsp”. Three reasons why this
is not a good idea:
1. Referring to a same image with different URLs depending on from which
JSP it is called is error prone and creates a lot of confusion.
2. If the JSP is moved from one folder to another (which is not uncommon),
Chapter 6. Struts Tag Libraries
121
every URL in the page should be inspected and changed if needed. Not a
great idea.
3. Even though the Servlet specification encourages the idea of bundling the
images JavaScript and other static resource along with the WAR, it is not a
good idea in practice. It is a norm to deploy the static resources separately so
that the web server serves these documents instead of the servlet container.
4. When using frameworks such as Tiles (Chapter 7), there is no concept of a
single JSP. There is a single layout that aggregates the JSPs
The solution is to modify the Base Tag itself so that the output is:
<base href=”http://localhost:8080/App1” />
Listing 6.1 MybankBaseTag – Customized BaseTag
public class MybankBaseTag extends BaseTag {
public int doStartTag() throws JspException {
HttpServletRequest request =
(HttpServletRequest) pageContext.getRequest();
String baseTag = renderBaseElement(
request.getScheme(), request.getServerName(),
request.getServerPort(),request.getContextPath());
JspWriter out = pageContext.getOut();
try {
out.write(baseTag);
} catch (IOException e) {
pageContext.setAttribute(Globals.EXCEPTION_KEY, e,
PageContext.REQUEST_SCOPE);
throw new JspException(e.toString());
}
return EVAL_BODY_INCLUDE;
}
..
}
Now, the URL of the image is always a constant no matter which JSP it is
used in. Another advantage of this arrangement is that a directory named App1
can be created on the web server to contain the static resources and the images
with no impact on the image URLs. With this background let us get started on
modifying the
BaseTag
.
Consider a URL http://localhost:8080/App1/cust/CustomerDetail.jsp. This is
generated as the output of the
BaseTag
. It can be dissected into:
Struts Survival Guide – Basics to Best Practices
122
request.getScheme()
(http://),
request.getServerName()
(localhost),
request.getServerPort()
(8080) and
request.getRequestURI()
(App1/customer/CustomerDetails.jsp).
The desired output for the
BaseTag
is http://localhost:8080/App1. This can be
dissected into
request.getScheme()
(http://),
request.getServerName()
(localhost),
request.getServerPort()
(8080) and
request.getContextPath()
(App1).
There you go! This is what we want to output from our version of
BaseTag
. Let
us call this
MyBaseTag
. Listing 6.1 shows
doStartTag()
method from
MyBaseTag
.
Form Tag
Another Tag that deserves extra attention is the
FormTag
. You have learnt about
the working of this tag in Chapter 2 and used it in Chapter 3. At that point, we
looked at only one attribute of this tag – the
action
attribute.
It also has a set of attributes based on JavaScript events. For instance, the
onreset
and
onsubmit
attributes do exactly what their JavaScript equivalents
do; they invoke the corresponding JavaScript event handler functions. The
JavaScript event based attributes is not limited to just the
FormTag
. In fact all the
tags in HTML Tag library have similar features.
Another attribute of interest is the
enctype
. Normally you don’t have to set
the
enctype
. When you are uploading files however, the value of
enctype
should be set to
multipart/form-data
. More details await you in the section
on
FileTag
.
FileTag
FileTag
lets you select file to upload from the HTML page. When you are
uploading files, the value of
enctype
(on the
FormTag
) should be set to
multipart/form-data
. The
FileTag
in its simplest format, generates an
output of
<input type=”file” name=”xyz” value”abc” />
. This results
in the rendering of a text field for entering the file name and a Browse button as
shown in the figure below.
On clicking the browse button a file selection dialog box appears. The
selected file is uploaded when the form is submitted. In the JSP, the
FileTag
is
used as
<html:file property=”uploadFile”/>
. The
uploadFile
is a

Chapter 6. Struts Tag Libraries
123
JavaBeans property in the ActionForm. Struts mandates the type of this property
to be
org.apache.struts.upload.FormFile
.
FormFile
is an interface
with methods to get the
InputStream
for the uploaded file. For more details
refer to the example web application named struts-upload.war in the webapps
directory of wherever you installed Struts.
Smart Checkbox – The state aware checkbox
Consider a HTML form containing a checkbox in a JSP as follows:
<html:form action="/submitCustomerForm">
<html:text property="firstName" />
<html:checkbox property="agree" />
<html:submit>Submit</html:submit>
</html:form>
In addition to the usual text field, it has a checkbox that Customer checks to
indicate he agrees with the terms and conditions. Assume that the associated
ActionForm has
validate()
method checking if the
firstName
is not null. If
the first name is not present, then the user gets the same page back with the error
displayed. The user can then submit the form again by correcting the errors.
Further assume that the associated ActionForm is stored in session scope. Now
starts the fun.
1. First, submit the form by checking the checkbox but leaving the
firstName
blank. The form submission request looks like this:
http://localhost:8080/App1/submitCustomer.do?
firstName=””&agree=”true”
The ActionForm is created in the session with blank
firstName
and
agree
attribute set to true (Checkbox is mapped to Boolean attributes in
ActionForm).
2. Since the
firstName
is blank, the user gets the same page back. Now fill in
the
firstName
but uncheck the
agree
checkbox. The form submission
request looks like this:
http://localhost:8080/App1/submitCustomer.do?firstName=”John”
Note that the agree request parameter is missing. This is nothing unusual.
According to the HTTP specification, if a checkbox is unchecked, then it is
not submitted as request parameter. However since the ActionForm is stored
in the Session scope, we have landed in a problem. In our case, Struts
retrieves the ActionForm from Session and sets the
firstName
to “John”.
Now the ActionForm has the
firstName=John
and
agree=true
, although
you intended to set the
agree
to be false.

Struts Survival Guide – Basics to Best Practices
124
The Smart Checkbox we are about to present is the solution to this problem. This
solution uses JavaScript and it works as expected only if your target audience
enables JavaScript in their browser. The solution is as follows:
Define the ActionForm as usual with the Boolean property for checkbox.
Define a new class
SmartCheckboxTag
by extending the
CheckboxTag
in
org.apache.struts.taglib.html
package and override the
doStartTag()
. In the
doStartTag()
, do the following:
Render a checkbox with name “
agreeProxy
”, where agree is the name
of the boolean property in ActionForm.
Render a hidden field with the name agree.
Define an inline JavaScript within the <script> block as follows.
Substitute appropriate values into [property] and [formName].
<script>
function handle" + [property] + "Click(obj) {
if ( obj.checked == true) {
document.form.[formName]."
+ [property] + ".value = 'true';
} else {
document.form.[formName]."
+ [property] + ".value = 'false';
}
}
</script>
Invoke the above JavaScript function for the onclick event of the
checkbox.
The crux of this solution is to invoke a JavaScript function on clicking
(check or uncheck) the checkbox to appropriately set the value of a hidden field.
The hidden field is then mapped to the actual property in ActionForm. If you can
ensure that your target audience has JavaScript enabled, this solution works like a
charm!
Many might classify this solution as a hack, but the truth is there is no
elegant solution for this problem. Where applicable and feasible you can adopt
this solution. If you are unsure about your target audience or deploying the
application into the public domain, never use this solution. It is impossible to
predict the environment and behavior of an Internet user.
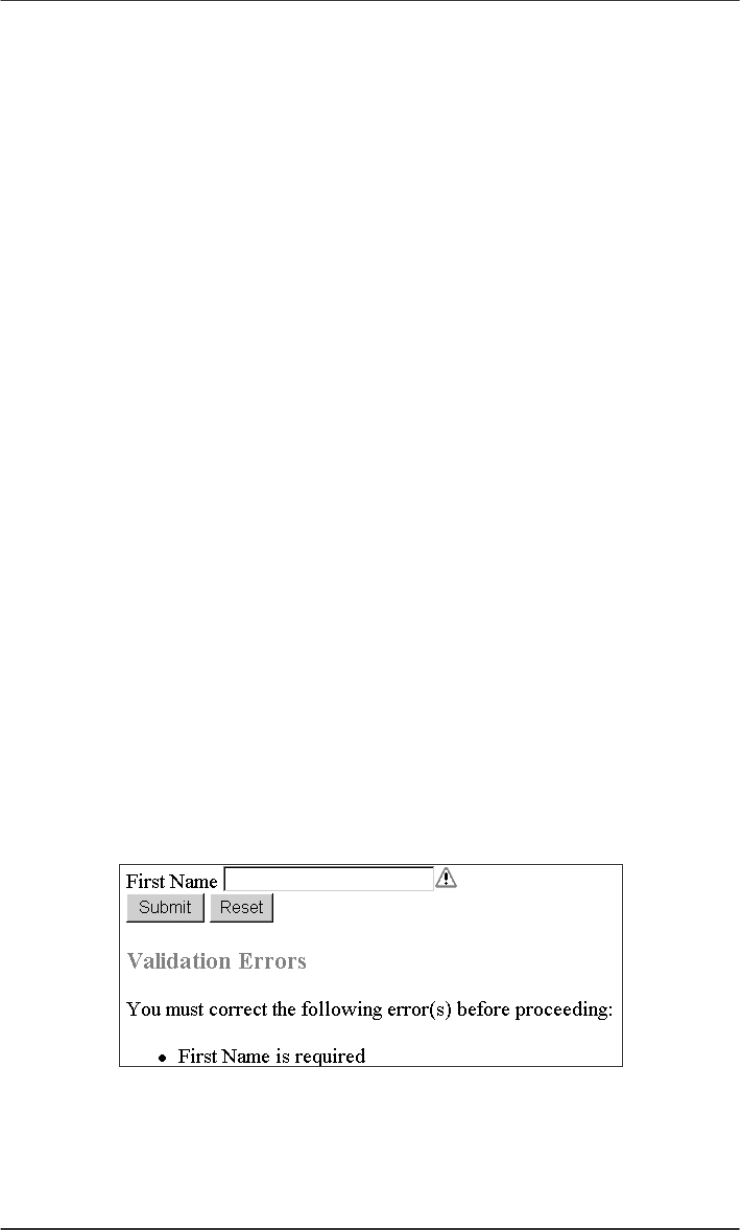
Chapter 6. Struts Tag Libraries
125
Using CSS with Struts HTML Tags
Cascading Style Sheets (CSS) is the mechanism used by page authors to
centralize and control the appearance of a HTML page. Some of the uses of CSS
are:
Text formatting, indentation and fonts
Add background color to text, links and other HTML tags
Setting table characteristics such as styled borders, widths and cell spacing.
CSS allows the page author to make changes to formatting information in one
location and those changes immediately reflect on all pages using that stylesheet
thus resulting in application with consistent appearance with the least amount of
work – in other words a highly maintainable application.
The developers of Struts tags had this in mind and thus most of the HTML
tags support the usage of stylesheet in the form of styleClass and style attributes.
The styleClass refers to the CSS stylesheet class to be applied to the HTML
element and the style attribute refers to the inline CSS styles in the HTML page.
You can use either but styleClass is most frequently used.
Enhancing the error display with customized TextTag
You already know how to validate an ActionForm and display the error messages
to the user. This approach works great so long as the forms are small enough and
the resulting error display fits into the viewable area without scrolling. If the
forms are larger, it is a hassle for the user to scroll down and check for the
messages. We address this usability challenge with an error indicator next to the
field as shown in the figure below. In addition to the quick visual impact, the
error indicator can also provide more information such as displaying a popup box
with errors for that field in a JavaScript enabled browser thus enriching the user
experience.
There are many ways to implement this. One simple way is to extend the
TextTag
class and override the
doStartTag()
method. The
doStartTag()
from the Struts
TextTag
generates the
<input type=”text” name=”..” >
.
The subclass of the Struts
TextTag
has to then add an image next to it when
Struts Survival Guide – Basics to Best Practices
126
there is
ActionError
(s) associated with the input field. Listing 6.2 shows the
implementation with the above approach. The new tag called
MyTextTag
is used
in the JSP as follows:
<mytags:mytext property=”….” errorImageKey=”img.error.alert” />
The
errorImageKey
is the key to get the name of the error image from the
resource bundle. In the
doStartTag()
method, a check is performed if the text
field has any associated errors. If there are no errors, no extra processing is done.
However if there are errors, the
errorImageKey
is used to retrieve the image
source and a
<img src=”…” >
markup is constructed alongside the text tag.
There are other ways of implementing this feature. One of them is to develop a
separate custom tag to generate the error indicator.
Listing 6.2 TextTag with built-in error indicator
public class MyTextTag extends TextTag {
private String errorImageKey;
public int doStartTag() throws JspException {
int returnValue = super.doStartTag();
ActionErrors errors = RequestUtils.getActionErrors(
pageContext, this.property);
if ((errors != null) && ! errors.isEmpty()) {
String imageSrc = RequestUtils.message(pageContext,
getBundle(),
getLocale(),
this.errorImageKey);
if (imageSrc != null) {
StringBuffer imageResults = new StringBuffer();
imageResults.append("<img src=\"");
imageResults.append(imageSrc);
imageResults.append("\"");
// Print the image to the output writer
ResponseUtils.write(pageContext,
imageResults.toString());
}
}
return returnValue;
}
...
Chapter 6. Struts Tag Libraries
127
...
public void release() {
super.release();
errorImageKey = null;
}
}
Further customizations can also be performed to pop up Java Script alerts to
show the error, if needed. This requires communication between Java and
JavaScript. Sounds complex right. It is easier than you think! You can achieve
this in three steps. All you need is a basic understanding of JavaScript.
First, create a JavaScript function as shown in Listing 6.3. This function
simply creates a JavaScript data structure and adds individual ActionError to a
JavaScript object called
errorMessageArray
. An array is created for every for
form field to hold multiple error messages.
Listing 6.3 JavaScript function to add ActionError into a JavaScript data
structure
function addActionError(window, formFieldName, errorMessage) {
if (! window.errorMessageArray) {
window.errorMessageArray = new Object();
}
var value = window.errorMessageArray[formFieldName];
if ( typeof(value) == "undefined") {
window.errorMessageArray[field] = new Array();
window.errorMessageArray[formFieldName][0] = errorMessage ;
}
else {
var length =
window.errorMessageArray[formFieldName].length;
window.errorMessageArray[formFieldName][length] =
errorMessage;
}
}
Second, create your own Errors tag by extending the
ErrorsTag
from
Struts. This JavaScript function is invoked repetitively from the
ErrorsTag
’s
doStartTag()
method for every
ActionError
in
ActionErrors
. Listing
6.4 shows the
doStartTag()
method for the
MyErrorsTag
. As usual the
method first invokes the
super.doStartTag()
to write the ActionErrors as
locale specific error messages to the output stream. It then invokes the JavaScript
function
addActionError()
inline with the rest of HTML for every

Struts Survival Guide – Basics to Best Practices
128
ActionError
. The JavaScript invocation is made inline by using
<script>
and
</script>
demarcations. At the end of this method, every
ActionError
associated with the form fields is added to the JavaScript data structure
(
errorMessageArray
). Any JavaScript code in the page can now access the
data structure to do whatever it likes.
Finally the error messages in the JavaScript data structure (added by
MyErrorsTag
) have to be displayed when clicking on the error indicator. This
can be done with a simple JavaScript function as shown in Listing 6.5. The
displayAlert()
function iterates over the error messages for the given form
field. This function has to be invoked on the
onclick
JavaScript event of the
error indicator image.
Listing 6.4 MyErrorsTag invoking the JavaScript functions
public class MyErrorsTag extends ErrorTag {
public int doStartTag() throws JspException {
int returnValue = super.doStartTag();
//Retrieve the ActionErrors
ActionErrors errors = RequestUtils.getActionErrors(
pageContext, Globals.ERROR_KEY);
StringBuffer results = new StringBuffer();
results.append("<script>");
//Retrieve all the form field names having ActionError
Iterator properties = errors.properties();
String formFieldName = null;
while (properties.hasNext()) {
formFieldName = (String) properties.next();
if (formFieldName.equals(ActionMessages.GLOBAL_MESSAGE))
continue;
//Retrieve all ActionError per form field
Iterator reports = errors.get(formFieldName);
String message = null;
while (reports.hasNext()) {
ActionError report = (ActionError) reports.next();
message = RequestUtils.message(pageContext, bundle,
locale, report.getKey(), report.getValues());
//Invoke the JavaScript function for every ActionError
Chapter 6. Struts Tag Libraries
129
results.append("addActionError(window,\"" +
formFieldName + "\",\"" +
message + "\");\n");
}
}
results.append("</script>");
ResponseUtils.write(pageContext, results.toString());
return returnValue;
}
...
}
Listing 6.5 JavaScript function to display alert with ActionError
messages
function displayAlert(window, formFieldName) {
var length = window.errorMessageArray[formFieldName].length;
var aggregateErrMsg = "";
for(var i = 0; i < length; i++) {
aggregateErrMsg = aggregateErrMsg +
window.errorMessageArray[formFieldName][i];
}
alert(aggregateErrMsg);
}
The recommended way to use ImgTag
The
ImgTag
is used to render a HTML
<img>
element such as follows:
<img src=”images/main.gif” alt=”The Main Image”/>
If you are wondering why you need a Struts tag for such a simple HTML tag,
consider this. Sometimes, the images actually spell out the actual English word.
Users worldwide access your application. You want to localize the images
displayed to them. You also want the alt text on your images to be
internationalized. How do you do this without adding the big and ugly if-else
block in your JSPs? The answer is to use the
ImgTag
. With
ImgTag
, the actual
image (
src
) and the alternate text (
alt
) can be picked from the Message
Resources. You can easily setup different Resource Bundles for different Locales
and there you have it. Your images are internationalized without any extra effort.
Even if you are not internationalizing the effort is well worth it. JSPs can remain
untouched when the image is changed. The usage of the
ImgTag
is as follows:
<html:img srcKey=”image.main” altKey=”image.main.alttext” />
There are many more attributes in
ImgTag
and you can find them in the
Struts documentation.

Struts Survival Guide – Basics to Best Practices
130
6.2 Using Images for Form submissions
All along, you have submitted HTML forms with the grey lackluster buttons.
Life requires a bit more color and these days most of the web sites use images for
Form submission. The images add aesthetic feeling to the page well. Struts
provides
<html:image>
tag for Image based Form submission. Although the
ImageTag
belongs to the HTML Tag library, it requires an in-depth treatment
and deserves a section by itself. Let us look at the
ImageTag
and how it fits into
the scheme of things. Consider an
HtmlTag
used in a JSP as follows:
<html:image src=”images/createButton.gif”
property=”createButton” />
This gets translated to:
<input type=”image” name=”createButton”
src=”images/createButton.gif” />.
When the Form is submitted by clicking on the image, the name is added to
the X and Y coordinates and sent to the server. In this case, two request
parameters
createButton.x
and
createButton.y
are sent. Suppose that the
HTML form has two or more images each with a different name. How do you
capture this information in the ActionForm and convey it to the Action? The
answer to this is
ImageButtonBean
in
org.apache.struts.util
package.
The
ImageButtonBean
has five methods –
getX()
,
setX()
,
getY()
,
setY()
and
isSelected()
. All you have to do is add JavaBeans property of
type
ImageButtonBean
to the ActionForm (Listing 6.6). For instance, if the
JSP has image buttons named and
createButton
and
updateButton
, you
have to add two
ImageButtonBean
properties to the ActionForm with the same
name. When the
createButton
image is clicked, two request parameters
createButton.x
and
createButton.y
are sent to the server. Struts interprets
the dot separated names as nested JavaBeans properties. For example, the
property reference:
<.. property=”address.city”/>
is translated into
getAddress().getCity()
while getting the property. The setters are called for setting the property as
follows:
getAddress().setCity()
For
createButton.x
and
createButton.y
, Struts invokes
getCreateButton()
on the ActionForm and then
setX()
and
setY()
on

Chapter 6. Struts Tag Libraries
131
createButton
. Since
createButton
is an
ImageButtonBean
, its
x
and
y
are set to non-null values, when the button is clicked. The
isSelected()
method returns true if at least one of
x
or
y
is non-null.
Listing 6.6 shows the ActionForm with
createButton
and
updateButton
. It is pretty straightforward. In the Action instance, you can find
which of the buttons is pressed by using the
isSelected()
method as follows:
public ActionForward execute(ActionMapping mapping,
ActionForm form, HttpServletRequest request,
HttpServletResponse response) throws Exception
{
CustomerForm custForm = (CustomerForm) form;
if (custForm.getCreateButton().isSelected()) {
System.out.prinitln(“Create Image Button is pressed”);
} else if (custForm.getUpdateButton().isSelected()) {
System.out.prinitln(“Update Image Button is pressed”);
}
}
Listing 6.6 CustomerForm using ImageButtonBean
public class CustomerForm extends ActionForm {
private String firstName;
..
..
private ImageButtonBean createButton;
private ImageButtonBean updateButton;
public CustomerForm() {
firstName = “”;
lastName = “”;
createButton = new ImageButtonBean();
updateButton = new ImageButtonBean();
}
…
…
public ImageButtonBean getCreateButton() {
return createButton;
}
public void setCreateButton(ImageButtonBean imgButton) {
this.createButton = imgButton;
}
public ImageButtonBean getUpdateButton() {
Struts Survival Guide – Basics to Best Practices
132
return updateButton;
}
public void setUpdateButton(ImageButtonBean imgButton) {
this.updateButton = imgButton;
}
}
Compare this with the Action using grey buttons. It would look like:
custForm.getCreateButton().equals(“Create”)
. Obviously, changing
the grey button to image button on the JSP is not gone unnoticed in the Action.
The Action class has changed accordingly. The ActionForm has changed too.
Previously a String held on to the submit button’s name. Now an
ImageButtonBean
has taken its place. You might be wondering if it is possible
to eliminate this coupling between the Action and the JSP? The good news is that
this can be achieved quite easily. Listing 6.7 shows
HtmlButton
that extends
the
ImageButtonBean
, but overrides the
isSelected()
method.
ImageButtonBean
has basically taken care of handling the image button in
isSelected()
method. The extra functionality in
HtmlButton
takes care of
grey button submission. The attribute called
name
is the name of the grey button
submitting the form. The
isSelected()
method now checks if the
name
is not
null in addition to invoking the
super.isSelected()
. Now you can use the
HtmlButton
for whatever mode of JSP submission – grey button or image
button. The
ActionForm
will use
HtmlButton
in both cases and never change
when the JSP changes. Neither does the Action change. Decoupling Nirvana
indeed!
The Image button in JSP will look like:
<html:image property=”createButton”
src=”images/createButton.gif” />
If grey button were used in the JSP, it would look like:
<html:submit property=”createButton.name”>
<bean:message key=”button.create.name” />
<html:submit>
Notice that the grey button is called “
createButton.name
”. The dot
separated naming is essential to maintain the ActionForm and Action unchanged.
Moreover, the suffix of the property – “
.name
” is fixed since the
HtmlButton
has the JavaBeans property called
name
(Listing 6.7).
Large projects need a simple and systematic way of handling Form
submissions and deciding on the back end. Minor innovations like
HtmlButton
go a long way in making your application cleaner and better.
Chapter 6. Struts Tag Libraries
133
The alt text and the image source for
ImageTag
can also be externalized into
the Message Resource Bundle much like the
ImgTag
. As it turns out the names
of the attribute for externalizing these are also the same.
<html:image>
has
srcKey
to externalize the name of the image
src
and
altKey
to externalize the
alternate text (
alt
). In Chapter 10, we will develop a DispatchAction-like
capability for
HtmlButton
by exploiting the Struts customization facility.
ImageButton and JavaScript
ImageButton
is all cool and dandy as long as you don’t have to execute
JavaScript and support multiple browser versions. Microsoft Internet Explorer 4
(and above) and Netscape 6 (and above) provide support for JavaScript event
handlers in the
<input type=”image”>
. If the JavaScript execution is critical
to the application logic, you might want to switch between the image buttons and
grey buttons depending on the browser version. This is another instance where
HtmlButton
saves the say. Irrespective of whether the front end uses Image
button or grey button, the presentation logic in the ActionForm and Action
doesn’t change.
Listing 6.7 HtmlButton
public class HtmlButton extends ImageButtonBean {
private String name;
public String getName() {
return name;
}
public void setName(String aName) {
this.name = aName;
}
public boolean isSelected() {
boolean returnValue = super.isSelected();
if (returnValue == false) {
returnValue = (name != null && name.trim().length() > 0);
}
return returnValue;
}
}
In Chapter 4, you looked at the goodies offered by
DispatchAction
and
LookDispatchAction
. In particular with
LookupDispatchAction
, you
Struts Survival Guide – Basics to Best Practices
134
were able to assign methods in Action instance based on the button names in a
locale independent manner. The only pre-requisite was that, all the form
submission buttons have the same name. With the
HtmlButton
(or
ImageButtonBean
for that matter), we started with different names for
different buttons from the outset. For this reason,
DispatchAction
and
LookupDispatchAction
cannot be used in conjunction with image based
form submissions. They can be however used with html links using images.
6.3 Struts Bean Tags
Struts Bean tag library contains tags to access JavaBeans and resource bundles
among others. Two frequently used tags are MessageTag (bean:message) and
WriteTag (bean:write).
Message Tag and Multiple Resource Bundles
You have already used the message Tag for accessing externalized messages in
resource bundles using locale independent keys. In this section, we will go
further and investigate the applicability of multiple resource bundles. When the
application is small, a single resource bundle suffices. When the application gets
larger, the single properties file gets cluttered much like a single struts-
config.xml getting cluttered.
It is advisable to have multiple resource bundles based on the message category
from the outset. This saves the pain involved in splitting the single bundle into
pieces and updating all the resources accessing it.
The first step in using multiple resource bundles is to declare them in the struts-
config.xml first. The semantic for declaring multiple resource bundle is as
follows:
<message-resources parameter="mybank.example.DefaultMsgResource"
null="false"/>
<message-resources parameter="mybank.example.AltMsgResource"
null="false" key="bundle.alt" />
<message-resources parameter="mybank.example.ErrorMsgResource"
null="false" key="bundle.error" />
The above snippet declares three resource bundles identified by a key. The
default resource bundle does not have a key. As the key suggests, the
AltMsgResource contains alternate messages and the ErrorMsgResource contains
error messages. The message tag accesses the default resource bundle as follows:
<bean:message key=”msg.key” />
Chapter 6. Struts Tag Libraries
135
The key specified in the
<bean:message>
tag is the key used in the
properties file to identify the message.
The non-default resource bundles are accessed by specifying the bundle key
as declared in struts-config.xml (
key=”bundle.alt”
,
key=”bundle.error”
etc.). For instance, a
message
tag accesses a message in AltMsgResource as
follows:
<bean:message key=”msg.key” bundle=”bundle.alt” />
Similarly a
errors
tag access the messages in the non-default bundle by
using the bundle attribute as follows:
<html:errors bundle=”bundle.error” />
You can also specify alternate bundles to the following tags in HTML Tag
library –
messages
,
image
,
img
and
option
.
Write Tag
Write Tag is another frequently used tag. The usage of this tag is as follows:
<bean:write name=”customer” property=”firstName” />
It accesses the bean named customer in the page, request, session and
application scopes in that order (unless a
scope
attribute is specified) and then
retrieves the property named firstName and renders it to the current JspWriter. If
format
attribute is specified, the value is formatted accordingly. The format can
be externalized to the resource bundle by using the
formatKey
attribute instead.
Alternate resource bundle can also be specified. This is handy when the display
format is locale specific.
Going further, <
c:out>
and other JSTL formatting tags are preferred over
write
tag for formatting and output.
6.4 Struts Logic Tags
The frequently used tags in the Logic tag library are for logical comparison
between values and for iteration over collection. The important logical
comparison tags are:
equal
,
notEqual
,
greaterEqual
,
greaterThan
,
lessEqual
and
lessThan
. The following are the important attributes are
common to these tags.
value
– The constant value against which comparison is made.

Struts Survival Guide – Basics to Best Practices
136
name
– The name of the bean in one of the 4 scopes
property
– The property of the bean that is compred with the value.
A sample usage of the tags is as follows:
<logic:equal name=”customer” property=”firstName” value=”John”>
//do whatever when the customer first name is John
</logic:equal>
The above tag searches for a bean named customer in the 4 scopes and
checks if its
firstName
property is equal to John. You can also specify the
scope to restrict the search scope by using the scope attribute on these tags.
Another tag attribute is
parameter
. You have to specify only one:
parameter
or (
name
and
property
). As the name suggests, the
parameter
attribute looks for the specified request parameter and compares it with the
value
attribute. In the example below, the request parameter named
firstName
is compared with a value of John.
<logic:equal parameter=”firstName” value=”John”>
//do whatever when the request parameter firstName
//is equal to John
</logic:equal>
There are more comparison tags of interest:
empty
,
notEmpty
,
present
and
notPresent
. These tags do not compare against a given value, but check if
an entity (bean property or request parameter) is empty or present respectively.
Hence they don’t need the
value
attribute. The following snippet checks if a
request parameter named firstName is present.
<logic:present parameter=”firstName” >
//do whatever when the request parameter firstName is present
//(Irrespective of its value)
</logic:equal>
Nested Logic Tags
Consider how you would write the following logical condition using Logic tags:
if (customer.firstName == “John” && customer.lastName == “Doe”
&& customer.age == 28)
{
do something.….
}
This can be done by nesting the
logic:equal
tags as follows:

Chapter 6. Struts Tag Libraries
137
<logic:equal name=”customer” property=”firstName” value=”John”>
<logic:equal name=”customer” property=”lastName” value=”Doe”>
<logic:equal name=”customer” property=”age” value=”28”>
//do something….
</logic:equal>
</logic:equal>
</logic:equal>
Nesting of
<logic:xxx>
tags always results in logical ANDing. There is no
convenient way to do an “OR” test however; that's where the expression
language in JSTL comes in handy (introduced in next section). With JSTL, the
above AND condition can be written as follows:
<c:if test=’${customer.firstName == “John” &&
customer.lastName == “Doe” && customer.age == 28}’>
//do something ...
</c:if>
Writing the OR condition is also no different
<c:if test=’${customer.firstName == “John” ||
customer.lastName == “Doe” || customer.age == 28}’>
//do something ...
</c:if>
The
c
in the
c:if
stands for JSTL’s core tag library TLD. There are other
tag libraries in JSTL such as formatting. Refer to the section “A crash course on
JSTL” for details.
Iterate Tag
The iterate tag is used to iterate over a collection (or a bean containing collection)
in any of the four scopes (page, request, session and application) and execute the
body content for every element in the collection. For instance, the following tag
iterates over the collection named
customers
.
<logic:iterate name=”customers”>
//execute for every element in the collection
</logic:iterate>
Another alternative is to use a bean and iterate over its property identified by the
attribute
property
. The following tag accesses the
company
bean from one of
the scope and then invokes
getCustomers()
on it to retrieves a collection and
iterates over it.
Struts Survival Guide – Basics to Best Practices
138
<logic:iterate name=”company” property=”customers”>
// Execute for every element in the customers
// collection in company bean
</logic:iterate>
Most of the times a collection is iterated over to display the contents of that
collection, perhaps in the table format. This requires the individual element of the
collection is exposed as a scripting variable to the inner tags and scriptlets. This
is done using the
id
attribute as follows:
<logic:iterate id=”customer” name=”company” name=”customers”>
// Execute for every element in the customers
// collection in company bean.
// Use the scripting variable named customer
<bean:write name=”customer” property=”firstName” />
</logic:iterate>
NOTE: The JSTL tag
<c:forEach>
performs similar functionality. It is
recommended that you switch to these new tags where applicable.
6.5 A crash course on JSTL
JSTL stands for JSP Standard Template Library. It is one of the new
specifications from Sun for standardizing common tags. Due to the lack of
standard tags for most of the common tasks such as iterating over a collection
and displaying it as a table, custom tags from different vendors have sprung up
(including Struts Logic tags), thus presenting a formidable learning curve for the
developers every time a new vendor is chosen. JSTL has standardized the set of
tags. This standardization lets you learn a single tag and use it across the board.
Table 6.1 shows the JSTL tag categories. Core and Formatting tags are most
relevant to the discussion on Struts.
Table 6.1 JSTL Libraries
Library Description
Core Contains Core tags for if/then, output, iterating collections,
Formatting Contains I18N and formatting tags. Localizing text, Setting Resource
Bundles, Formatting and parsing number, currency, date
SQL Database Access tags
XML Tags for XML Parsing and Transforming with Xpath
JSTL also introduced a new expression language (called EL henceforth) as
an alternative for using full-blown JSP expressions. For e.g. consider the
following scriptlet. It checks for the “user” in page, request, session and
application scopes and if it is not null, prints out the roles of that user.
<%
Chapter 6. Struts Tag Libraries
139
User user = (User) (pageContext.findAttribute(“user”);
if (user != null) {
Role[] roles = user.getRoles();
%>
<ul>
<% for (int i=0;i<roles.length;i++) { %>
<li>Role Name is <%= roles[i].getName() %></li>
<% }%>
<% }%>
</ul>
This can be easily written using JSTL and EL as follows:
<ul>
<c:forEach items=”${user.roles}” var=”role”>
<li><c:out value=${role.name}/></li>
</c:forEach>
</ul>
Any value to be evaluated in a JSTL tag lies in
${
and
}
blocks. EL defines
several implicit objects much like JSP defines its implicit objects. Table 6.2 gives
a complete list of implicit objects. If the name of the variable in the
${
and
}
block does not match one of the implicit objects, then EL searches the page,
request, session application scopes in that order for the variable name specified.
In the above code snippet, “user” is the name of an attribute in one of these
scopes. Once the
<c:forEach>
tag gets the value, it iterates over the specified
collection. In this case it iterates over the array of roles and provides a scripting
variable called
role
(
var=”role”
) for the embedded tags. The
<c:out>
tag
access the name property of the Role object (obtained from the
role
scripting
variable) and renders it. The
c
in the
<c:out>
represents the Core JSTL tag
library.
Table 6.2 Implicit objects in EL
Category Identifier Description
JSP pageContext PageContext for the current page
pageScope Map holding page scoped attributes
requestScope Map holding request scoped attributes
sessionScope Map holding session scoped attributes
Scope
ApplicationScope Map holding application scoped attributes
Param Map holding request parameter names Request
Parameters ParamValues Map holding request parameter values as arrays
Header Map holding header names Request headers
HeaderValues Map holding header values
Cookies Cookie Map holding cookies by name
Initialization
Parameters
InitParams Map holding web application context initialization
parameters by name

Struts Survival Guide – Basics to Best Practices
140
NOTE: JSTL 1.0 works with JSP 1.2 containers only, such as Tomcat 4.x.
JSTL 1.1 works only with JSP 2.0 containers such as Tomcat 5.x. With JSP 1.2,
the expression language can be used only within JSTL tags. JSP 2.0 specification
defines a portable expression language. With JSP 2.0, the expression language
will become part of the specification and can be used even outside the JSTL.
You have already seen an example of using JSTL Core library earlier in
conjunction with EL. Now, let us look at an example of formatting library tags.
Consider the case when you want to display the currency 12.37 in the user’s
Locale. You can use the
formatNumber
tag for this purpose. In the following
example the currency is formatted and displayed in a variable called “money”.
For the U.S. Locale, money will contain the value “$12.37”.
<fmt:formatNumber value="12.367" type="currency" var="money"/>
This is somewhat similar to the
<bean:write>
tag in terms of formatting
the currency. Similarly there is a JSTL equivalent for
<bean:message>
tag.
<fmt:message key="firstName">
In JSTL, the Resource Bundle for the above tag can be specified in a number of
ways. Unless specified otherwise, JSTL looks for a servlet context parameter
named
javax.servlet.jsp.jstl.fmt.localizationContext
and uses
its value as the bundle name. You can also use the tag
<fmt:setBundle
baseName=”mybank.MyMessages”>
in JSP and the rest of the JSP uses the
specified bundle. You can scope a bundle by wrapping other tags with
<fmt:bundle>
tag as follows:
<fmt:bundle baseName=”mybank.MySecondMessages”>
<fmt:message key="firstName">
<fmt:message key="lastName">
</fmt:bundle>
In the above snippet, all the inner tags use
mybank.MySecondMessages
as
their resource bundle. The resource bundle lookup is similar to Struts. In the
above scenario for instance, the servlet container looks for
MySecondMessages.properties
in WEB-INF/classes/mybank and then in the
system classpath.
Design Tip
Since, Struts allows you to specify resource bundles on a tag basis, it seems
easier (and logical) to use separate bundles per category. For instance, all the
errors can reside in one bundle and all the messages of one type can reside in
one bundle and so on.

Chapter 6. Struts Tag Libraries
141
JSTL on the other hand seems to encourage the practice of using resource
bundle per module. This is evident from the way you specify the bundles at a
JSP level, scope it and so on. It is easier this way to use a resource bundle for a
set of JSPs belonging to one module.
JSTL Binaries – Who’s who
If you download JSTL Reference Implementation from Sun, it has two important
jar files – jstl.jar and standard.jar. The former contains the classes from
javax.servlet.jsp.jstl
package and the latter contains Sun’s JSTL
Reference Implementation.
From a perspective of this book, we will be using Struts-EL, the JSTL
compliant port of Struts tags. Struts-EL is shipped with Struts 1.1 release as a
contributed library and can be found under the contrib folder. Struts-EL uses the
same jstl.jar containing
javax.servlet.jsp.jstl
package – it is the vendor
independent JSTL standard. However it uses the implementation from Jakarta
TagLibs as the underlying expression evaluation engine (This implementation is
also named standard.jar and found under Struts-EL/lib). If you explode the
standard.jar, you will find classes belonging to
org.apache.taglibs
package.
6.6 Struts-EL
As you might know already, Struts-EL is a port of Struts tags to JSTL. This
provides a migration path for the existing Struts applications to the expression
language syntax in a non-intrusive manner. Normal Struts tags rely on runtime
scriptlet expressions to evaluate dynamic attribute values. For example, the key
of the
bean:message
below is dependent on some business logic.
<bean:message key=”<%= stringVar %>” />
This assumes that
stringVar
exists as a JSP scripting variable. This tag can
be rewritten with the Struts-EL version of the message tag as follows:
<bean-el:message key=”${stringVar}” />
Although, not much exciting is going on in the above tag, it shows how easy
it is to port the existing Struts tags to Struts-EL. The real power of Struts-EL
comes to the fore especially when the scriptlet deciding the attribute value starts
becoming complex.
Not all tags from Struts are ported to Struts-EL. In areas where there is
already a JSTL tag available, porting of the Struts tags will only cause

Struts Survival Guide – Basics to Best Practices
142
redundancy. Hence those Struts tags are not ported. For e.g., the
bean:write
tag can be implemented with the
c:out
JSTL tag. Similarly most of the logic
tags (such as
equal
,
notEqual
,
lessThan
etc.) are not ported since the JSTL
tag
c:if
can take any expression and evaluate it (with the
test=”${….}”
option). You have already seen how a
logic:equal
tag can be replaced with
c:if
in the earlier section on Nested Logic Tags.
Struts-EL hands-on
Enough theory. Let’s get down to business and use some Struts-EL tags to get the
feel. Here is the step-by-step process to do so.
You will need new jar files to use the Struts-EL in your application. Copy
the following jars from the Struts contrib folder into the WEB-INF/lib folder
of the web application – jstl.jar, standard.jar (remember to use the Jakarta
Taglibs version, not the Sun reference implementation jar), struts-el.jar.
These jars are needed in addition to the already existing jars from regular
Struts.
From the Struts-EL/lib folder copy the following tlds to the WEB-INF of
your web application – c.tld, struts-bean-el.tld, struts-html-el.tld and struts-
logic-el.tld.
Add the
<taglib>
declaration for all the new tlds in web.xml as follows:
<taglib>
<taglib-uri>/WEB-INF/struts-bean-el</taglib-uri>
<taglib-location>/WEB-INF/struts-bean-el.tld</taglib-location>
</taglib>
<taglib>
<taglib-uri>/WEB-INF/struts-html-el</taglib-uri>
<taglib-location>/WEB-INF/struts-html-el.tld</taglib-location>
</taglib>
<taglib>
<taglib-uri>/WEB-INF/struts-logic-el</taglib-uri>
<taglib-location>/WEB-INF/struts-logic-el.tld</taglib-location>
</taglib>
<taglib>
<taglib-uri>/WEB-INF/c</taglib-uri>
<taglib-location>/WEB-INF/c.tld</taglib-location>
</taglib>
In the JSPs, add the declaration for these TLDs as follows:
<%@ taglib uri="/WEB-INF/struts-bean-el" prefix="bean-el" %>
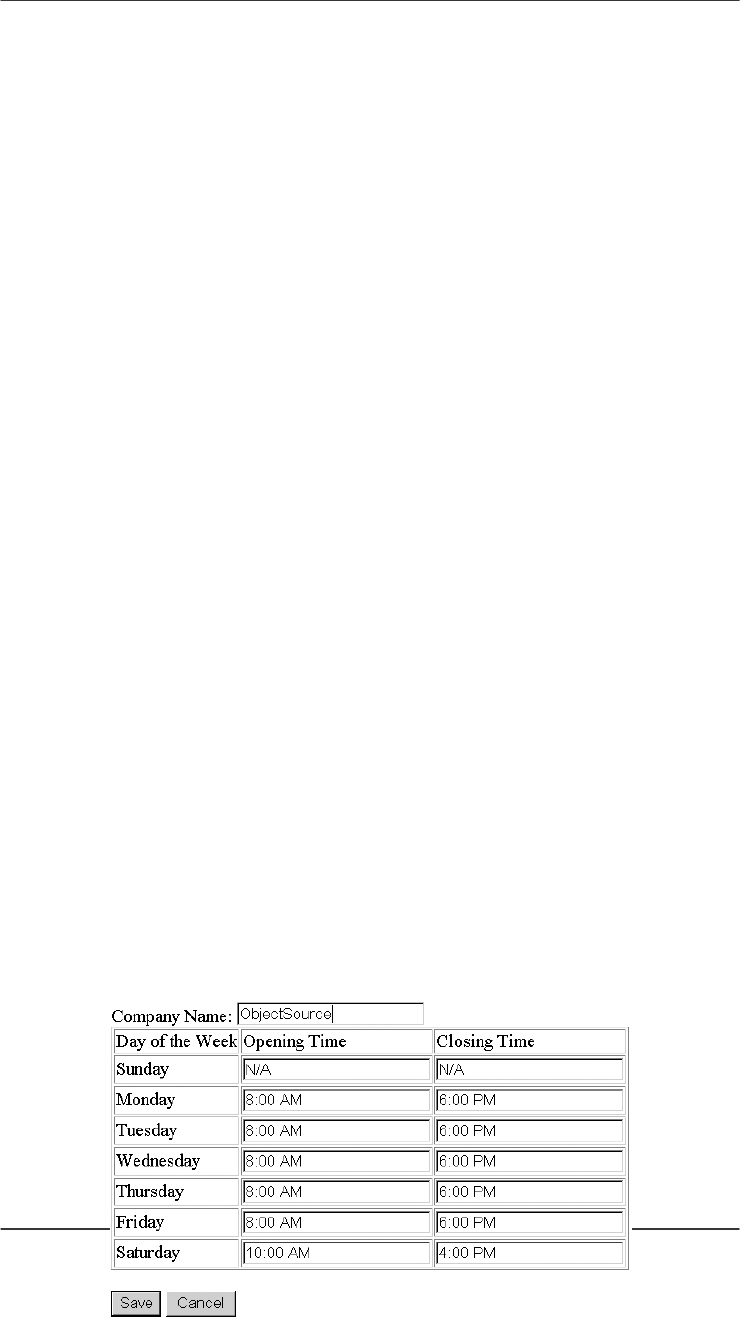
Chapter 6. Struts Tag Libraries
143
<%@ taglib uri="/WEB-INF/struts-html-el" prefix="html-el" %>
<%@ taglib uri="/WEB-INF/struts-logic-el" prefix="logic-el" %>
<%@ taglib uri="/WEB-INF/c" prefix="c" %>
That’s it! Now you are ready to use the Struts-EL tags in conjunction with
JSTL tags to reap the benefits of expression language and make your applications
a little bit simpler and cleaner.
Practical uses for Struts-EL
When was the last time you wrestled to use a custom tag as the attribute value of
another tag and failed? Something like this:
<html:radio name=”anotherbean”
value=”<bean:write name=”mybean” property=”myattrib”/>” />
Nesting custom tag within a tag element is illegal by taglib standards. The
alternatives are no good. Thankfully now, with JSTL, you can solve this problem
in a clean way. In Struts tags, JSTL can be combined only with Struts-EL and the
problem can be solved as follows:
<html-el:radio name=”anotherbean” value=”${mybean.myattrib}” />
Beautiful isn’t it! Struts-EL provides you the best of both worlds, the
elegance of JSTL and the power of Struts.
6.7 List based Forms
All along you have seen how to handle regular Forms. Now let us see how to
handle list-based forms. List based forms are used for editing collections of
objects. Examples include weekly hours-of-operation, contacts etc. Such
collections may be limited to a single page or span across multiple pages. We
will deal with a collection limited to single page first. Techniques for dealing
with multi page lists are illustrated later.

Struts Survival Guide – Basics to Best Practices
144
Figure 6.1 Current and Future page layout for the banking application
Indexed struts-html tags are used to display editable collections of objects.
Consider a HTML form used to collect information about the weekly hours of
operation for a company and send the data back to an Action as shown in Figure
6.1. The brute force approach is to create 7 pair of text fields to collect the
opening and closing time for each day of the week. An elegant approach is to use
indexed
<html:...>
tags.
The ActionForm for the above HTML in Figure 6.1 is shown in Listing 6.8.
The
ListForm
has a
java.util.List
named
hourOfOperationList
. It is a
list containing hours of operation. The
HourOfOperation
itself is a Serializable
Java class with three JavaBeans properties –
day
,
openingTime
and
closingTime
. The zeroth day is a Sunday and sixth day is a Saturday. Back to
the
ListForm
. The
ListForm
has a getter method for the hours of operation
List, but no setter method. The
reset()
method initializes the List with exactly
seven
HourOfOperation
objects. In reality, you would populate this list from
database. Also there is an odd method called
getTiming()
that takes an integer
index as argument and returns the corresponding
HourOfOperation
object
from the List. This method replaces the setter method and is the key for the Struts
framework when populating the list using form data. The details will become
clear once you look at the JSP code in Listing 6.9 and the generated HTML in
Listing 6.10.
Listing 6.8 ListForm
public class ListForm extends ActionForm {
private List hourOfOperationList;
public ListForm() {
reset();
}
public void reset() {
hourOfOperationList = new ArrayList(7);
hourOfOperationList.add(new HourOfOperation(0));
hourOfOperationList.add(new HourOfOperation(1));
hourOfOperationList.add(new HourOfOperation(2));
hourOfOperationList.add(new HourOfOperation(3));
hourOfOperationList.add(new HourOfOperation(4));
hourOfOperationList.add(new HourOfOperation(5));
Chapter 6. Struts Tag Libraries
145
hourOfOperationList.add(new HourOfOperation(6));
}
public List getHourOfOperationList() {
return hourOfOperationList;
}
public HourOfOperation getTiming(int index) {
return (HourOfOperation) hourOfOperationList.get(index);
}
}
In Listing 6.9, the JSP displays a form containing the company name and the
hours of operation List. The
<logic:iterate>
is used inside the
<html:form>
tag to iterate over the
hoursOfOperationList
property in the
ListForm
bean. Each hour of operation is exposed as a scripting variable named
timing
. You may be able to relate now between the
getTiming()
method in
the
ListForm
and this scripting variable. The
indexed=true
setting on each of
the html tags makes the array index to be part of the text field name. For instance,
the following tag
<html:text name="timing" property="openingTime" indexed="true"/>
generates the HTML as follows in the second iteration (
i=1
):
<input type=”text” name="timing[1].openingTime" .. />
Listing 6.9 JSP for the ListForm
<html:form action="/submitListForm">
Company Name: <html:text property="companyName" /><BR>
<table border=1 cellpadding=1>
<tr><td>Day</td><td>Opening Time</td><td>Closing Time</td></tr>
<logic:iterate id="timing" name="ListForm"
property="hourOfOperationList">
<tr>
<td><bean:write name="timing" property="dayName"/></td>
<td><html:text name="timing" property="openingTime"
indexed="true"/></td>
<td><html:text name="timing" property="closingTime"
indexed="true"/></td>
</tr>
</logic:iterate>
</table>
Struts Survival Guide – Basics to Best Practices
146
<BR>
<html:submit>Save</html:submit>
<html:cancel>Cancel</html:cancel>
</html:form>
Notice the relation between the Struts text tag and the generated input tag.
Each text field now has a unique name as the name is partly driven the array
index. This magic was done
indexed=”true”
setting. When the form is edited
and is submitted via POST, the request parameter names are unique
(
timing[0].openingTime
,
timing[1].openingTime
etc.), thanks to the
array index being part of the text field names. The HTML is shown in Listing
6.10.
Upon form submission, when Struts sees the request parameter named
timing[1].openingTime
, it calls the following method:
listForm.getTiming(1).setOpeningTime(...)
and so on for every request parameter. This is exactly where the
getTiming()
method in
ListForm
comes in handy. Without it, Struts can
never access the individual items in the list. Thanks to
getTiming()
, individual
HourOfOperation
are accessed and their attributes are set using the
corresponding request parameters.
List based form editing is frequently a necessity in day-to-day Struts usage.
The above approach is perhaps the only clean way to achieve this.
Listing 6.10 Generated HTML from JSP in Listing 6.9
<form name="ListForm" action="/mouse/submitListForm.do">
Company Name:
<input type="text" name="companyName" value="ObjectSource"><BR>
<table border=1 cellpadding=1>
<tr><td>Day</td><td>Opening Time</td><td>Closing Time</td></tr>
<tr>
<td>Sunday</td>
<td><input type="text" name="timing[0].openingTime"
value="N/A"></td>
<td><input type="text" name="timing[0].closingTime"
value="N/A"></td>
</tr>
<tr>
<td>Monday</td>
<td><input type="text" name="timing[1].openingTime"
value="8:00 AM"></td>

Chapter 6. Struts Tag Libraries
147
<td><input type="text" name="timing[1].closingTime"
value="6:00 PM"></td>
</tr>
.. .. ..
</table>
<BR><input type="submit" value="Save">
<input type="submit" name="org.apache.struts.taglib.html.CANCEL"
value="Cancel" onclick="bCancel=true;">
</html:form>
6.8 Multi-page Lists and Page Traversal frameworks
As seen in the last section,
<logic:iterate>
can be used in conjunction with
indexed html tags to display and edit list forms. However read-only tabular
displays are more common than editable list forms in enterprise applications.
Such read-only tables span multiple pages with data ranging from ten rows to
thousands. The
IterateTag
can also be used for displaying read-only data by
iterating over a collection and rendering the data using
<bean:write>
. For
multi-page lists, the attributes
offset
and
length
are useful. The
offset
indicates the index from where to start the iteration in the page relative to the first
element (index = 0). The
length
indicates the maximum number of entries from
the collection to be displayed in the page. Using these two attributes it is possible
to build a multi-page list.
But the task is more daunting than you can imagine. Believe us. Multi-page
list display will not be your only worry. You will be asked to provide a browsing
mechanism – previous, next, first and last to traverse the collection. You will
have to sort the data for the chosen column (and still do a previous, next etc.).
You will be asked to group the data, aggregate and sum columns and format
them. In addition you will have to make it easier to the page author to apply
different display styles to the list. Before you know it, the seemingly trivial task
has turned into a Frankenstein!
The plain vanilla
IterateTag
simply cannot be stretched too far. A robust
framework exclusively to perform the above tasks is needed. Fortunately such
frameworks are available at no charge. Why reinvent the wheel unless you have a
unique and stringent requirement not satisfied by one of these frameworks?
Three such frameworks are reviewed below. One is free, the other two are open
source Let us examine what is available and what is missing in these frameworks
and how they fit into the Struts way of building applications. The three
frameworks are:
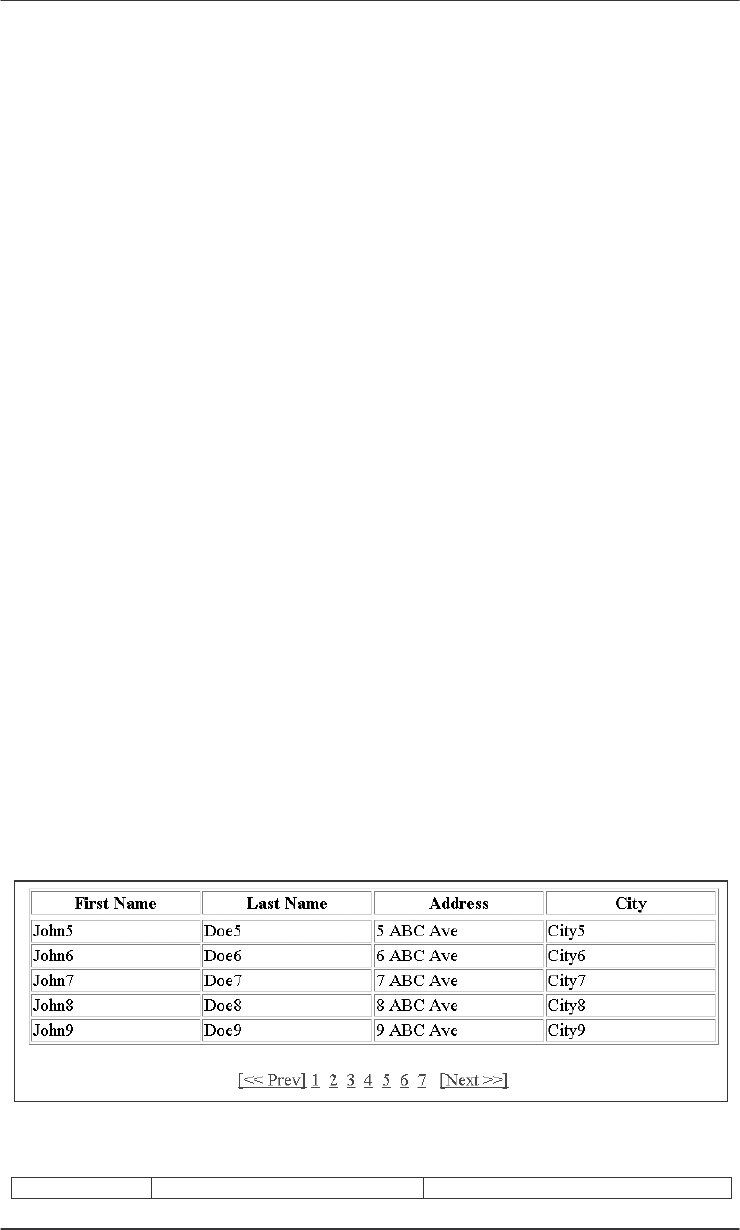
Struts Survival Guide – Basics to Best Practices
148
1. Pager Taglib (http://jsptags.com/tags/navigation/pager/)
2. displayTag (http://displaytag.sourceforge.net/)
3. HtmlTable (http://sourceforge.net/projects/htmltable/)
Pager Taglib
Pager Taglib covers the display aspects of list traversal very well. Provide it the
minimal information such as rows per page and URL and it will control the entire
paging logic. You are in complete control of the iterating logic and table display.
(If using the IterateTag, offset and length attributes are not needed). Hence you
can completely customize the look and feel of the table using CSS. The Pager
taglib does not provide any assistance for the table display. Neither does it handle
editable list forms, sorting or grouping. If all you need is an easy and elegant way
to traverse list data, you should definitely consider using the Pager taglib and you
will be glad you did. Below we cover a short note on how to use the Pager Taglib
with Struts.
Start with an
Action
that creates the collection to iterate and put it in
HttpSession
using results as the key name. Then forward to the JSP that uses
the Pager taglib. This JSP is shown in Listing 6.11. The resulting HTML is
shown in Figure 6.2. The
pg:pager
tag has two important attributes –
url
and
maxPageItems
. They specify the destination URL when any of the navigation
links are clicked and the number of items per page respectively. In Listing 6.11,
the
url
is traverse.do – a simple ForwardAction that forwards to the same JSP.
The JSP uses the
iterate
tag to iterate the collection. Th
pg:item
defines each
displayable row. The
pg:index
,
pg:prev
,
pg:pages
and
pg:next
together
display the page numbers, previous and next links. These tags even provide you
the flexibility of using your own images instead of plain old hyperlinks. Using
pg:param
(not shown in the listing), additional request parameters can also be
submitted with the url.
Figure 6.2 Traversing the multi page list using Pager Taglib from jsptags.com
Table 6.3 Feature Comparison between DisplayTag and HtmlTable
Feature DisplayTag HtmlTable
Chapter 6. Struts Tag Libraries
149
Display
Formatting
Very rich and customizable using
CSS.
Limited features. Formatting is based on
a back end XML file and hence not
directly under page author’s control.
Column
Grouping
Yes Yes
Nested Tables Yes No
Coding Style The display model should be
created in advance, but the
formatting can be invoked from the
JSP using hooks called decorators
Does not require controller (such
as Struts or its Action). The JSP
itself can control the paging.
The display model and its formatting
should be performed in advance (in a
Action). The paging is tied to Struts.
Needs a predefined Action called
ServeTableAction. Strictly MVC based.
Paging Customizable auto paging Fixed style auto paging
Sorting Yes Yes
I18N No. Messages can be externalized
to a properties file but cannot be
localized as of 1.0b2. Full support
is expected soon.
Yes. Can use Struts resource bundle
Editable column No Yes, but form is submitted to a
predefined Action. Action chaining for
custom processing can be setup with
minor customization.
Documentation
and examples
Good Limited
User community Relatively high Less
DisplayTag and HtmlTable frameworks
The pager taglib does paging through a table and nothing more. If sorting and
grouping are one of your requirements, you can use one of DisplayTag or
HtmlTable frameworks. Each of them has their own paging logic and should not
be used in conjunction with the Pager Taglib. Covering these frameworks is
beyond the scope of this book. Please check their respective web sites for
documentation and user guide. Table 6.3 provides a comprehensive feature
comparison between the two. DisplayTag shines in many categories but lacks the
table based editing features. DisplayTag is not tied to Struts in any way. Neither
does it enforce MVC. HtmlTable on the other hand mandates strict adherence to
MVC. All the pagination, sort requests are handled by a pre-defined Action class
(ServeTableAction) provided with the library. Further customization is needed to
chain it to your own business processing before/after ServeTableAction does its
job.
Listing 6.11 Using Pager taglib with Struts
<pg:pager url="traverse.do" maxIndexPages="10"
maxPageItems="5">
<TABLE width="100%">
<TR>
<TD align="center">
Struts Survival Guide – Basics to Best Practices
150
<TABLE width="80%" border="1">
<TR>
<TH width="20%">Name</TH>
<TH width="20%">Address</TH>
<TH width="20%">City</TH>
</TR>
<logic:iterate id="row" name="results" scope="session"
type="mybank.app1.CustomerData">
<pg:item>
<TR>
<TD><bean:write name="row" property="name"/></TD>
<TD><bean:write name="row" property="address"/></TD>
<TD><bean:write name="row" property="city"/></TD>
</TR>
</pg:item>
</logic:iterate>
</TABLE>
<TABLE width="80%" border="0">
<TR><TD> </TD></TR>
<TR align="center">
<TD>
<pg:index>
<pg:prev><a href="<%=pageUrl%>">[<< Prev]</a></pg:prev>
<pg:pages>
<a href="<%= pageUrl %>"><%= pageNumber %></a>
</pg:pages>
<pg:next><a href="<%= pageUrl%>">[Next >>]</a></pg:next>
</pg:index>
</TD>
</TR>
</TABLE>
</TD>
</TR>
</TABLE>
</pg:pager>
Creating the Model for iteration
In the last two sections, you looked at three options for traversing and displaying
the collection. For limited amount of data, creating the collection is a no-brainer.
The size of the result set is managable and you can tolerate the database returning
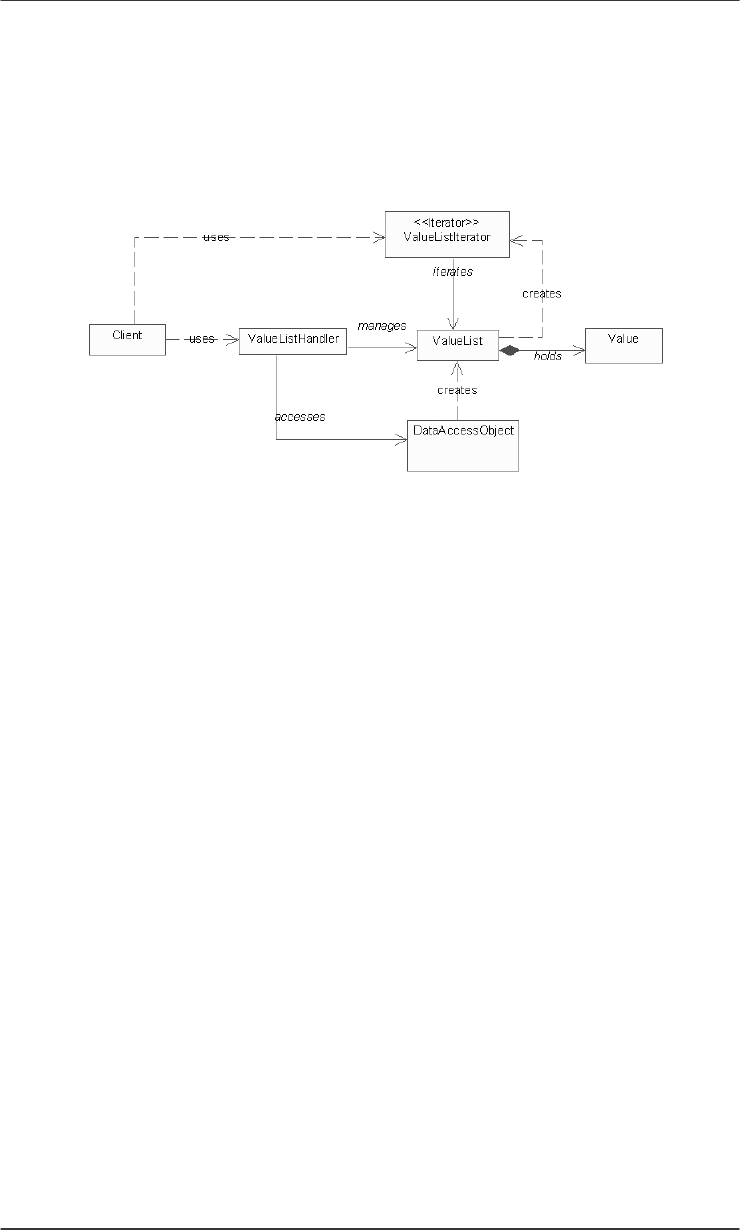
Chapter 6. Struts Tag Libraries
151
it at one shot. As the collection gets larger, it consumes a significant amount of
memory and absolutely does not make sense to waste the precious runtime
resources. Instead of maintaining the entire collection in memory, you can use
the
Value List Handler
pattern (Core J2EE Patterns). Figure 6.3 shows the
class diagram for Value List Handler.
Figure 6.3 Value List Handler pattern
ValueListHandler
can be thought of as a façade for the underlying
collection.
ValueList
- the data object collection is traversed using the
ValueListIterator
. The
Data Access Object
encapsulates the logic to
access the database in the specified format – read-only EJB, direct JDBC or O/R
mapper, the latter two approaches being preferred. We recommend designing the
Value List Handler intelligently so that it fetches data in bulk using read-ahead
(a.k.a pre-fetch) mechanism – i.e. data to serve two to three pages is retrieved and
in advance if needed so that the delay in retrieval is minimized. The beauty of
this pattern is that you can expose the
ValueListIterator
to the
IterateTag
and the tag will believe that it is traversing the original Iterator,
while you can intelligently serve the requested rows and keep fetching in the
background.
In this context it is advantageous to combine an O/R mapping framework
that allows you use SQLs to search the database. Most of the O/R mapping
frameworks provide caching mechanisms. Hence the overhead of object creation
after retrieval is eliminated since the object in already in the cache. Moreover you
can take advantage of the features provided in the RDBMS. For instance, DB2
provides a feature called ROW_NEXT.
Suppose that the requirement is to display 10 rows per page. Here is strategy
for devising a responsive system while working with large data set. When the
query is first made, data for three pages (30 rows) is prefetched and maintained
in the HttpSession. When the user requests the third page, the ValueListHandler
realizes that the end of the cache is reached. It goes ahead and serves the third

Struts Survival Guide – Basics to Best Practices
152
page (21-30 rows). After that it initiates an asynchronous request to fetch another
30 rows from the database (This will need a scheduling mechanism to which
individual valueListHandlers submit their pre-fetch requests). When the next 30
rows are retrieved, it caches them along with the original 30 rows. Hence a cache
of 60 rows is maintained per user. (This is to prevent a “cache-fault” if the user
decides to go to previous page while on third page). Depdending on the size of
the displayed objects, you have to choose an optimal cache within the Value List
Handler. If the objects are 1K each, 60 objects means 60K of memory consumed
by the corresponding HttpSession. This is absolutely not recommended. A rule of
thumb is that HttpSession size should not exceed 20K per user. [Another reason
to make the display objects only as big as needed and no bigger. Overcome the
tendency to reuse bloated value objects and data transfer objects from elsewhere.]
Coming back to the database features for large result sets. The following
SQL can be used to fetch the first 30 rows:
SELECT FIRST_NAME, LAST_NAME, ADDRESS
FROM CUSTOMER, … …
WHERE … … …
ORDER BY FIRST_NAME
FETCH FIRST 30 ROWS ONLY
OPTIMIZED FOR READ ONLY
When the user reaches the third page, the ValueListHandler makes a prefetch
request for the next 30 rows (Rows 31 to 60). The following SQL can be used to
fetch them:
SELECT * FROM
(
SELECT FIRST_NAME, LAST_NAME, ADDRESS
FROM CUSTOMER, … …
WHERE … … …
ORDER BY FIRST_NAME
)
AS CUST_TEMP WHERE
ROW_NEXT BETWEEN 31 AND 60
OPTIMIZED FOR READ ONLY
This SQL consists of two parts. The inner SQL is exactly the same as the
SQL issued earlier and can be thought to be fetching the data into a temporary
table. The ROW_NEXT in the outer SQL identifies the exact rows to be returned
from the retrieved result set. The values 31 and 60 can be substituted
dynamically. The proprietary SQL no doubt impacts the portability, but almost

Chapter 6. Struts Tag Libraries
153
every database used in the enterprise today has this feature. The Java code still is
portable.
6.9 Summary
In this chapter you got an overview of Struts tags and more importantly learnt to
customize these tags for your projects. In addition you looked at JSTL and
Struts-EL. Hopefully this chapter has prepared you to use Struts tags better.
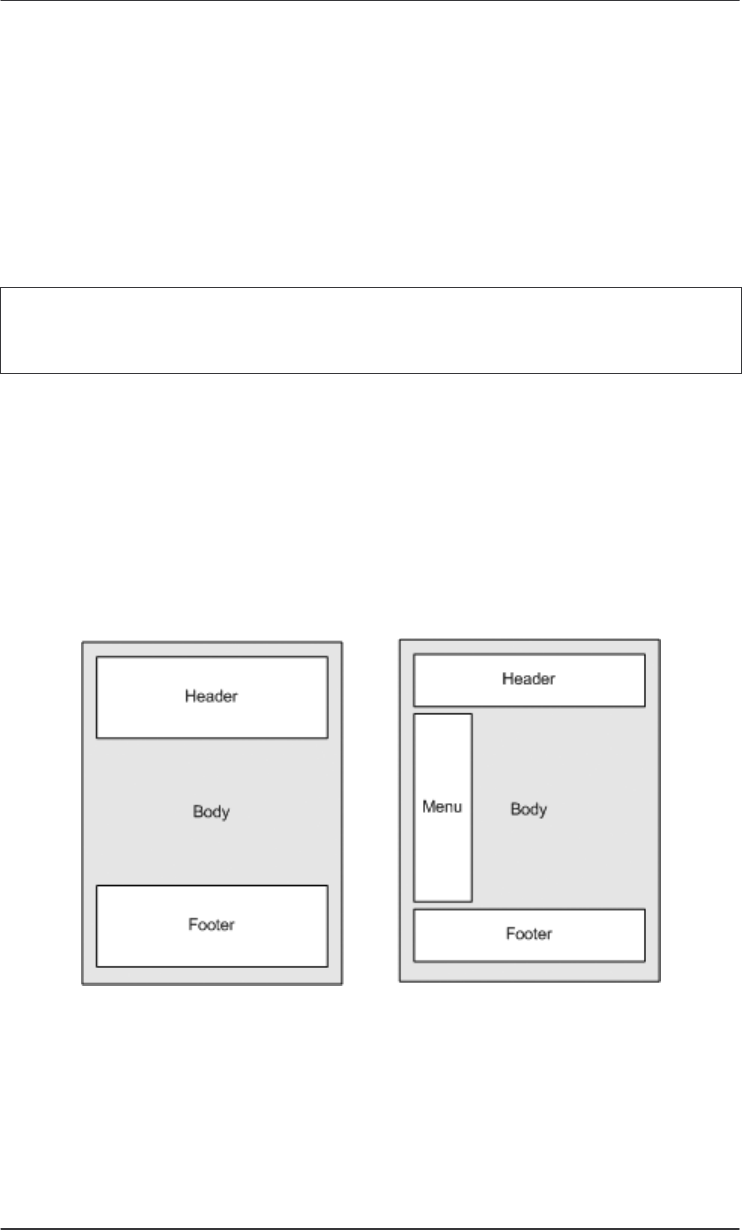
Struts Survival Guide – Basics to Best Practices
154
C
Ch
ha
ap
pt
te
er
r
7
7
Struts and Tiles
In this chapter:
You will learn to use Tiles with Struts for web page design using Layouts
7.1 What is Tiles
Consider a banking application whose current web page layout has a header,
body and footer as shown by the first layout in Figure 7.1. The management
recently decided that all pages in the application should confirm to the corporate
look and feel as shown in the second layout in Figure 7.1. The new layout has a
header, footer, a varying body and a navigation sidebar.
Figure 7.1 Current and Future page layout for the banking application
When the application was first designed, the development team had two
alternatives.
Use “JSP based” approach. In this approach each JSP page is coded
separately. Although the header and footer are common to every page, the
common JSP markup for header and footer was added into each JSP by direct
copy and paste. This quick and dirty solution is unacceptable even for the
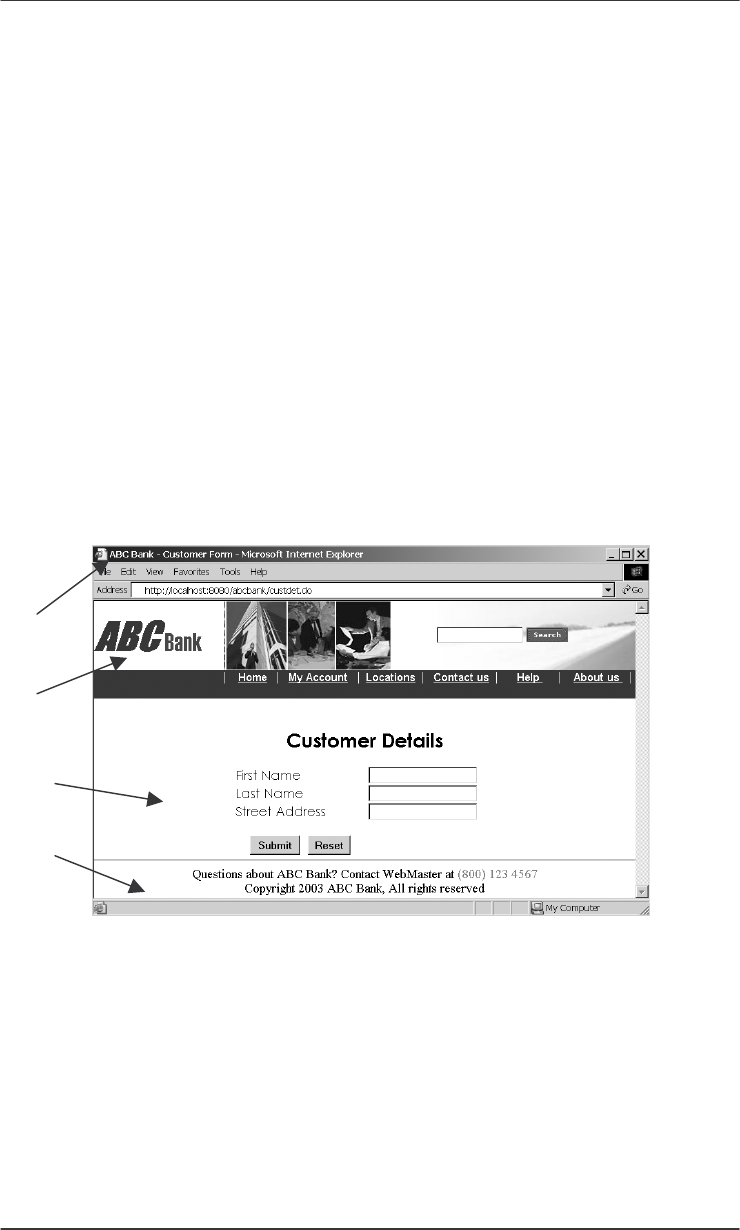
Chapter 7. Struts and Tiles
155
smallest of the web applications and poses a maintenance hurdle. Anytime
the header and footer changes, it has to be manually applied to every page.
Further, any changes to the page layout will have to be made in every page.
Use
<jsp:include>
approach. This approach is better than the previous
one since it avoids repetition of common markup. The common markup
related to header and footer is moved into JSPs of their own. The header and
footer JSPs are added to the main JSP by using the standard
<jsp:include>
directive. Whenever header or footer changes, it affects
only one or two files. However, if at any point in time, the layout of the
pages itself changes (as it has happened for the banking application now),
every JSP page with this structure has to be updated accordingly.
The team chose the second option at the time of development. However the
new management directive is now posing a challenge. It is a tedious task to
change every page of the system and there are chances that the current system
might break in the process. Had they had Tiles framework at their disposal at the
time of development, this change would have been a breeze!
Title
Header
Body
Footer
Figure 7.2 Current Customer Details Page for My Bank
Figure 7.2 shows a sample HTML page from the banking application. Listing
7.1 shows the (simplified) JSP for that page. The JSP contains the
<jsp:include>
for the common header and footer, but has the entire layout
written in terms of html
table
with various
tr
and
td
. All JSPs in the
application also might have the same layout copied over and over. This is “copy
and paste technology” taken to the next dimension and exactly where Tiles
comes into picture.
Struts Survival Guide – Basics to Best Practices
156
Listing 7.1 CustomerDetail JSP using <jsp:include>
<%@ taglib uri="/WEB-INF/struts-html.tld" prefix="html" %>
<html:html locale="true">
<head>
<html:base/>
<title><bean:message key="title.customerform"/></title>
</head>
<body>
<TABLE border="0" width="100%" cellspacing="5">
<tr><td><jsp:include page="/common/header.jsp"/></td></tr>
<tr>
<td>
<html:form action=”/submitCustomerForm”>
<table>
<tr>
<td>
<bean:message key="prompt.customer.firstname"/>
</td>
<td><html:input property=”firstName”/></td>
<tr>
<tr>
<td>
<bean:message key="prompt.customer.lastname"/>
</td>
<td><html:input property=”lastName”/></td>
<tr>
<tr>
<td><html:submit>Save Me</html:submit></td>
<td><html:cancel>Cancel</html:cancel></td>
<tr>
</table>
</td>
</tr>
<tr><td><hr></td></tr>
<tr><td><jsp:include page="/common/footer.jsp"/></td></tr>
</TABLE>
</body>
</html:html>
The basic principle behind Tiles is to refactor the common layout out of
the individual JSPs to a higher level and then reuse it across JSPs.

Chapter 7. Struts and Tiles
157
If the management wants a new look and feel, so be it; you can change the
common layout JSP and the whole web application has the new look and feel!
Redundancy is out and Reuse is in. In OO parlance this is similar to refactoring
common functions from a set of classes into their parent class.
In Tiles, layouts represent the structure of the entire page. Layout is simply a
JSP. Think of it as a template with placeholders (or slots). You can place other
JSPs in these slots declaratively. For instance, you can create a layout with slots
for header, body and footer. In a separate XML file (called XML tile definition
file), you specify what JSPs go into these slots. At runtime, Tiles framework
composes the aggregate page by using the layout JSP and filling its slots with
individual JSPs.
In essence, Tiles is a document assembly framework that builds on the
"include" feature provided by the JSP specification for assembling presentation
pages from component parts. Each part (also called a tile, which is also a JSP)
can be reused as often as needed throughout the application. This reduces the
amount of markup that needs to be maintained and makes it easier to change the
look and feel of a website. Tiles framework uses a custom tag library to
implement the templates.
Comparing this approach with
<jsp:include>
will help you to understand
the Tiles better. In the
<jsp:include>
approach, all included JSPs (header,
footer etc.) become part of the core JSP before being rendered. In Tiles, all the
JSPs – header, footer and the core become part of the Layout JSP before being
rendered. The outermost JSP rendered to the user is always the same; it is the
layout JSP. This approach reduces redundancy of HTML and makes maximum
reuse of formatting logic. The entire chapter deals with using Tiles for effective
design in conjunction with Struts. In the next section, you will see how the
banking application can be converted into a Tiles oriented design.
7.2 Your first Tiles application
In this section, you will learn how to assemble a Tiles application. We will start
with the CustomerDetails.jsp in Listing 7.1 and change it to use Tiles. The
Customer Details page is first shown to the user. When the submit button in the
Customer Form is pressed, a Success page is shown. Note that we are not
referring to “.jsp” files any more. Instead they are being referred to as “pages”.
There is a reason for this. Strictly speaking, the only JSP file that the user gets
every time is the Layout JSP – the aggregate page. Hence the several incarnations
of Layout.jsp that the user sees are distinguished by their core contents –
Customer Details information, Success information and so on.
Struts Survival Guide – Basics to Best Practices
158
Step 1: Creating the Layout
To start with, let us concentrate on Tiles enabling the Customer Details Page.
The first step is to create the Layout JSP with placeholders for header, footer,
body and anything else you want by using Tiles
insert
tags. The
insert
tag is
defined in struts-tiles.tld, the TLD file that is part of Struts distribution. The
Layout JSP factors out most of the formatting markups. Typical things performed
in a layout are:
Defining the outer structure of the page with html tables with defined
widths.
Creating placeholders for pages relative to one another in the overall
presentation scheme.
The first tag used in the listing above is
getAsString
. This tag retrieves the
title as a string. The
insert
tags are used to insert different JSPs into the
SiteLayout.jsp. For example the header of the page is inserted as:
<tiles:insert attribute="header" />
. The layout we have used is
simple. In reality however, nested tables with bells and whistles are used for
professional looking pages. Although required, they result in indentation and
hence error prone and visually displeasing. With the layout taking care of these
two things, the individual pages don’t have to deal it. That makes the design of
included page simpler and cleaner.
Listing 7.2 SiteLayout.jsp – The layout used by Tiles in the banking app
<%@ taglib uri="/WEB-INF/struts-tiles.tld" prefix="tiles" %>
<html:html locale="true">
<head>
<html:base/>
<title><tiles:getAsString name="title"/></title>
</head>
<body>
<TABLE border="0" width="100%" cellspacing="5">
<tr><td><tiles:insert attribute="header"/></td></tr>
<tr><td><tiles:insert attribute="body"/></td></tr>
<tr><td><hr></td></tr>
<tr><td><tiles:insert attribute="footer"/></td></tr>
</TABLE>
</body>
</html:html>

Chapter 7. Struts and Tiles
159
Step 2: Creating the XML Tile definition file
The SiteLayout.jsp created in the previous step uses the
insert
tag to insert the
individual JSPs. The
insert
tags however do not specify the JSPs directly.
They contain an attribute named
attribute
. The value of
attribute
is the
reference to the actual JSP. The actual JSP name is specified in a XML based file
called tiles definition. A sample definition is shown below.
<definition name="/customer.page" path="/Sitelayout.jsp">
<put name="title" value="My Bank – Customer Form”/>
<put name="header" value="/common/header.jsp" />
<put name="footer" value="/common/footer.jsp" />
<put name="body" value="/CustomerDetail.jsp" />
</definition>
The Tiles definition shown above defines the JSPs that go into each of the
insert
tag placeholders in the SiteLayout.jsp for the Customer Details page and
identify it them a unique
name
. Note that the
name
of each
put
in the definition
is same as the value of
attribute
in the
insert
tag. Similarly a XML
definition for the Success page is added as follows:
<definition name="/success.page" path="/Sitelayout.jsp">
<put name="title" value="MyBank – Success”/>
<put name="header" value="/common/header.jsp" />
<put name="footer" value="/common/footer.jsp" />
<put name="body" value="/Success.jsp" />
</definition>
Compare the above definition for the Customer Details Page definition
shown earlier. You will see that only the title and body differ between the two.
The header and footer remain the same. Tiles allows you to factor out these
common elements in the definition and create a base definition. Individual
definitions can then extend from the base definition, much like concrete classes
extend from an abstract base class. Factoring out, the common elements of the
two page definitions results in a base definition as:
<definition name="base.definition" path="/Sitelayout.jsp">
<put name="title" value="MyBank”/>
<put name="header" value="/common/header.jsp" />
<put name="footer" value="/common/footer.jsp" />
<put name="body" value="" />
</definition>

Struts Survival Guide – Basics to Best Practices
160
The individual definitions are created by extending the above definition.
Accordingly, the new definitions for Customer Detail and Success pages are as
follows:
<definition name="/customer.page" extends="base.definition">
<put name="title" value="MyBank – Customer Form”/>
<put name="body" value="/CustomerDetails.jsp" />
</definition>
<definition name="/success.page" extends="base.definition">
<put name="title" value="MyBank – Success”/>
<put name="body" value="/Success.jsp" />
</definition>
Each of the definition extends from the
base.definition
and overrides
the settings for title and body. They will however reuse the header and footer
settings from the
base.definition
. Notice that we have left the
body
section
blank in the base definition but provided a default
title
. Individual page
definitions must provide the
body
JSP. If
title
is not provided, then the default
title
from the base definition is used.
The definitions thus created are stored in a file called tiles-defs.xml.
Generally this file is placed under WEB-INF and is loaded at Struts startup. The
file contains the definitions for each aggregate page (combination of several jsps)
accessed by the user.
Step 3: Modifying the forwards in struts-config.xml
Suppose that you had the following action mapping in the struts-config.xml for
the Customer form submission prior to using Tiles.
<action path="/submitCustomerForm"
type="mybank.app1.CustomerAction"
name="CustomerForm"
scope="request"
validate="true"
input="CustomerDetails.jsp">
<forward name="success" path="Success.jsp" />
</action>
The above action mapping uses the JSP name directly. With Tiles, you have
to replace the JSP name with the tiles definition name. The resulting action
mapping is shown below. The changes are highlighted in bold.
<action path="/submitCustomerForm"

Chapter 7. Struts and Tiles
161
type="mybank.app1.CustomerAction"
name="CustomerForm"
scope="request"
validate="true"
input="customer.page"
>
<forward name="success" path="success.page" />
</action>
Step 4: Using TilesRequestProcessor
You have so far used
org.apache.struts.action.RequestProcessor
as
the request processor with regular Struts pages. This request processor forwards
to a specified JSP and commits the response stream. This does not work with
Tiles as individual JSPs have to be included in the response stream even after the
stream data is flushed and data is committed. Moreover, the regular Struts
RequestProcessor
can only interpret forwards pointing to direct physical
resource such as a JSP name or another action mapping. It is unable to interpret
“
/customer.page
” – a Tiles definition. Hence Tiles provides a specialized
request processor called
TilesRequestProcessor
to handle this scenario. For
a given Struts module, only one request processor is used. A Tiles enabled
module uses the
TilesRequestProcessor
, even if the module has regular
Struts pages. Since
TilesRequestProcessor
extends from the regular Struts
RequestProcessor
, it inherits all its features and can handle regular Struts
pages as well.
TilesRequestProcessor
is declared in the struts-config.xml as
follows:
<controller
processorClass=
"org.apache.struts.tiles.TilesRequestProcessor"/>
The
TilesRequestProcessor
contains the logic to process includes and
forwards. It checks if the specified URI is a Tiles definition name. If so, then the
definition is retrieved and included. Otherwise the original URI is included or
forwarded as usual.
Step 5: Configuring the TilesPlugIn
As you know, TilesRequestProcessor needs the XML Tiles definition at runtime
to interpret Tiles specific forwards. This information created in Step 2 is stored in
a file called tiles-defs.xml. Generally this file is placed under WEB-INF. At
startup this file is loaded by using the Tiles PlugIn. The
TilesPlugIn
initializes
Tiles specific configuration data. The plugin is added to the struts-config.xml as
shown below.
<plug-in className="org.apache.struts.tiles.TilesPlugin" >

Struts Survival Guide – Basics to Best Practices
162
<set-property property="definitions-config"
value="/WEB-INF/tiles-defs.xml" />
<set-property property="moduleAware" value="true"/>
</plug-in>
The
classname
attribute refers to the plugin class that will be used. In this
case
org.apache.struts.tiles.TilesPlugin
class is used.
NOTE: CSS or Cascading Style Sheets is a way to add formatting rules and
layout to existing HTML tags. CSS greatly simplifies changes to page
appearance by only having to make edits to the stylesheets. Tiles, as we saw in
the previous section deals with the organization of different parts of the JSP page
as against enhancing the look and feel of individual components. CSS deals more
with enhancing individual features of the components in each tile or area of the
page. Tiles and CSS are complementary and can be used together to improve the
look and feel of a JSP page.
In this section, you converted the Struts based Customer page and the
subsequent page to use Tiles. The complete working application can be
downloaded from the website (http://www.objectsource.com).
Rules of thumb
1. Although Tiles provides several ways to construct a page, some of them
don’t provide much advantage over the
<jsp:include>
approach at all.
The approach we have illustrated above is usually the one used most. It is
in this approach the real strength of Tiles get expressed.
2. Thanks to the multiple application module support in Struts 1.1, you don’t
have to Tiles enable your entire application and watch it collapse. Start by
breaking the application into multiple modules. Test if the modules are
working as expected. Also test inter-module navigation. Then Tiles-enable
the modules one at a time. This provides you a rollback mechanism, if
something goes wrong.
3. Never use the Tiles definition as the URL on the browser. This will not
work. Struts can forward to a Tiles definition only when the control is
within the
TilesRequestProcessor
, not when an external request
arrives. If you want to display an aggregate Tiles page on clicking a link,
define an action mapping for the URL (You can also use a global-forward
instead). Then create an action mapping for a ForwardAction and set the
parameter attribute to be the Tiles definition.
4. In the application shown earlier, JSPs were used as Tiles. You can also use
action mappings as page names.
<definition name="/customer.page" extends="base.definition">
<put name="body" value="/custdet.do" />

Chapter 7. Struts and Tiles
163
</definition>
7.3 Tiles and multiple modules
The application seen earlier used Tiles in a single application module. In this
section you will see Tiles works across modules. Tiles provides two modes of
operation: Non-module-aware and module-aware modes. They are distinguished
by the setting moduleAware attribute on the Tiles PlugIn. The definition file is
specified by the definitions-config attribute on the Tiles PlugIn.
In non-module-aware mode, all modules use the same tiles definition file
specified in the struts-config.xml for the default module. If there is no default
module, all modules use the tiles definition file specified in the struts-config.xml
for the first module listed in web.xml.
In module-aware mode, each module has its own tiles definition file. A
module cannot see definitions in a tiles definition file belonging to another
module unless it uses that file itself.
7.4 Summary
In this chapter you saw how to use Tiles along with Struts to build a maintainable
and cleaner page layout. By transitioning your Struts modules to Tiles, you will
see a boost in productivity for both developers and page authors.
Struts Survival Guide – Basics to Best Practices
164
C
Ch
ha
ap
pt
te
er
r
8
8
Struts and I18N
In this chapter:
1. You will understand the basics of I18N
2. You will learn the basics of Java I18N API
3. You will review the features in Struts for I18N
4. You will look how Tiles application is I18N enabled
5. You will understand how localized input is processed
The Internet has no boundaries and neither should your web application. People
all over the world access the net to browse web pages that are written in different
languages. A user in Japan can access the web and check her Yahoo! Email in
Japanese. How does Yahoo do it? Is it because the user’s machine has a
Japanese operating system or do web-based applications automatically adjust
according to the users’ region? This chapter answers these questions and shows
you how to internationalize and localize your Struts web applications.
Terminology
Before diving deep into the bliss of Internationalization and Localization,
coverage of some basic terminology is essential. That’s what we are doing in this
section.
Internationalization or I18n is the process of enabling your application to
cater to users from different countries and supporting different languages. With
I18n, software is made portable between languages or regions. For example, the
Yahoo! Web site supports users from English, Japanese and Korean speaking
countries, to name a few.
Localization or L10n on the other hand, is the process of customizing your
application to support a specific location. When you customize your web
application to a specific country say, Germany, you are localizing your
application. Localization involves establishing on-line information to support a
specific language or region.
A Locale is a term that is used to describe a certain region and possibly a
language for that region. In software terms, we generally refer to applications as

Chapter 8. Struts and I18N
165
supporting certain locales. For example, a web application that supports a locale
of “fr_FR” is enabling French-speaking users in France to navigate it. Similarly a
locale of “en_US” indicates an application supporting English-speaking users in
the US.
A ResourceBundle is a class that is used to hold locale specific information.
In Java applications, the developer creates an instance of a
ResourceBundle
and populates it with information specific to each locale such as text messages,
labels, and also objects. There will be one
ResourceBundle
object per Locale.
What can be localized?
When your application runs anywhere in the US, everyone, well almost everyone
speaks English and hence, they won’t have any trouble trying to figure out what
your application is trying to say. Now, consider the same application being
accessed by a user in a country say Japan where English is not the mainstream
language. There is a good chance that the very same message might not make
much sense to a Japanese user. The point in context is very simple: Present your
web application to foreign users in a way they can comprehend it and navigate
freely without facing any language barriers.
Great, now you know where this is leading, right? That’s right, localization!
In order to localize your web application, you have to identify the key areas that
will have to change. There are three such key areas. From a Struts perspective,
you only have to deal with the first two.
a. The visible part of your application – the User Interface. The user interface
specific changes could mean changes to text, date formats, currency formats
etc.
b. Glue Layer – Presentation Logic that links the UI to the business logic.
c. The invisible parts of your application – Database support for different
character encoding formats and your back-end logic that processes this data.
Here is a list of the commonly localized areas in a web application. We will
de dealing only with the highlighted ones in this chapter.
1. Messages and Labels on GUI components – labels, button names
2. Dates and Times
3. Numbers and Currencies
4. Personal titles, Phone numbers and Addresses
5. Graphics – Images specific for every locale and cater to each region’s
cultural tastes.
6. Colors – Colors play a very important role in different countries. For
example, death is represented by the color white in China.
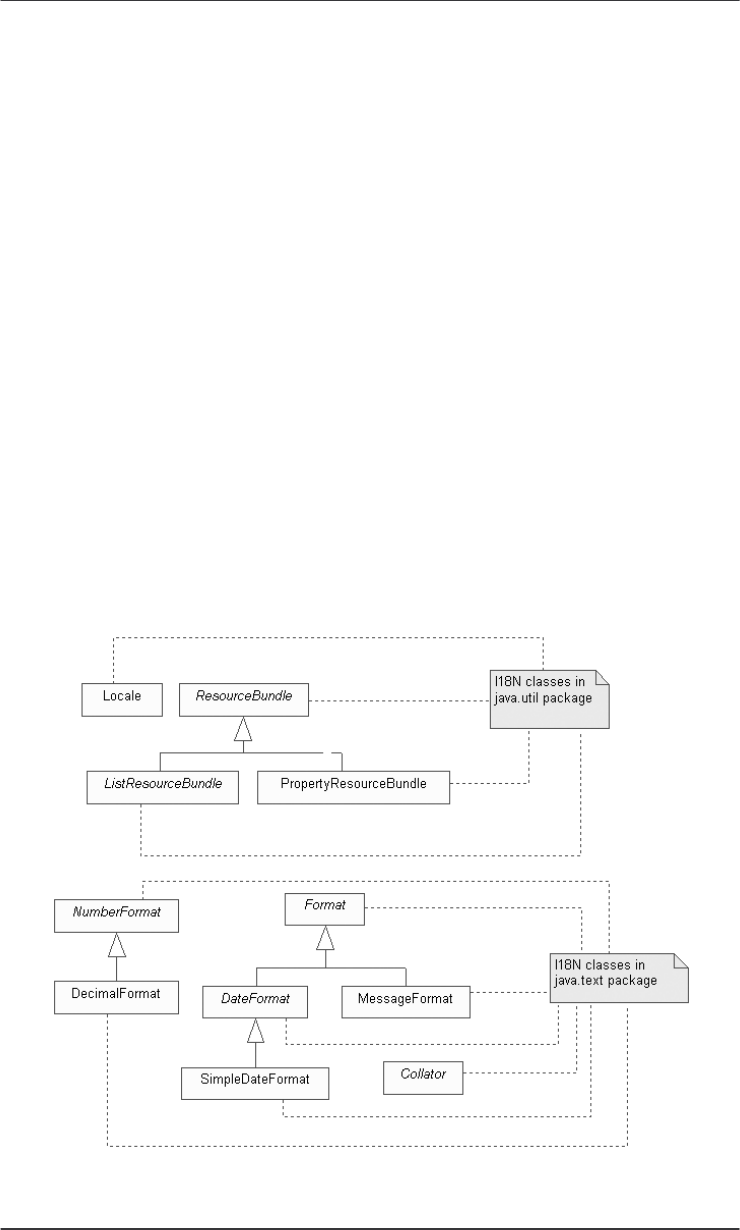
Struts Survival Guide – Basics to Best Practices
166
7. Sounds
8. Page layouts – that’s right. Just like colors, page layouts can vary from
locale to locale based on the country’s cultural preferences.
9. Presentation Logic in Struts Action classes.
There are other properties that you might require to be localized, but the ones
mentioned are the commonly used ones. Struts provides mechanisms to address
some of these, but the actual I18N and L10N capabilities lie in the Java API
itself. You will see in the next section, a brief overview of the Java
Internationalization API and some examples on how to update some of these
fields dynamically based on Locale information.
8.1 The Java I18N and L10N API
The primary I18N and L10N Java APIs can be found in the
java.util
and
java.text
packages. This section shows some of the commonly used classes
and their functions. Figure 8.1 shows the classes in the Java I18n API. If you are
already familiar with the Java Internationalization API, you can skip this section
and proceed to the next section.
Figure 8.1 TheI18n classes provided by the Java Internationalization API

Chapter 8. Struts and I18N
167
java.util.Locale
The
Locale
class represents a specific geographical or cultural region. It
contains information about the region and its language and sometimes a variant
specific to the user’s system. The variant is vendor specific and can be WIN for a
Windows system, MAC for a Macintosh etc. The following examples show you
how to create a Locale object for different cases:
A Locale object that describes only a language (French):
Locale frenchSpeakingLocale = new Locale("fr", "");
A Locale object that describes both the spoken language and the country (French
Canada):
Locale canadaLocale = new Locale("fr", "CA");
A Locale object that describes the spoken language, country and a variant
representing the user’s operating system (French Canada and Windows
Operating system):
Locale canadaLocaleWithVariant = new Locale("fr", "CA", "WIN");
Accessing Locale in Servlet Container
On every request the client’s locale preference is sent to the web server as part of
the HTTP Header. The “Accept-Language” header contains the preferred Locale
or Locales. This information is also available to the servlet container and hence
in your web tier through the
HttpServletRequest
.
ServletRequest
, the
interface that
HttpServletRequest
extends defines the following two
methods to retrieve Locale
public java.util.Locale getLocale();
public java.util.Enumeration getLocales();
The second method contains a set of Locales in the descending order of
preference. You can set the request’s Locale preference in the browser. For
instance in Internet Explorer, you can add, remove or change the Locales using
Tools Internet Options Languages.
The
<controller>
(
RequestProcessor
) setup in the Struts Config file
has a
locale
attribute. If this is set to true, then Struts retrieves the Locale
information from the request only the first time and stores it in the
HttpSession
with the key
org.apache.struts.action.LOCALE
(Don’t
get confused. This is not a class name. It is the actual String used as the Session
key.) The default value of the locale attribute is false for which Struts does not
store the Locale information in the
HttpSession
.
Struts Survival Guide – Basics to Best Practices
168
A tip from usability perspective: Although it is possible to change the Locale
preference from the browser, I18N usability experts suggest that it might still be
valuable to explicitly provide the choice to the users and let them decide. Every
web site has a navigation bar or menu or something of that sort. You can provide
a HTML choice or drop down to let the user’s choose the Locale that shall
override all other settings. This is easy from a Struts perspective because the
Locale from the
HttpServletRequest
can be overridden with the setting in
the
HttpSession
and Struts will never bother about the request header.
java.util.ResourceBundle
ResourceBundle
is an abstract base class that represents a container of
resources. It has two subclasses:
ListResourceBundle
and
PropertiesResourceBundle
. When you are localizing your application, all
the locale specific resources like text-messages, icons and labels are stored in
subclasses of the ResourceBundle. There will be one instance of the
ResourceBundle
per locale. The
getBundle()
method in this class retrieves
the appropriate
ResourceBundle
instance for a given locale. The location of
the right bundle is implemented using an algorithm explained later.
Listing 8.1 Extracting data from a ResourceBundle
Locale myLocale = new Locale("fr","FR");
// Get the resource bundle for myLocale
ResourceBundle mybankBundle = ResourceBundle.getBundle(
"MybankResources",
myLocale);
// Get the localized strings from this resource bundle
String myHeader = mybankBundle.getString("header.title");
System.out.println(myHeader);
Let us see how a resource bundle instance is retrieved with a simple example.
Consider a custom
ResourceBundle
subclass called
MybankResources
that
will contain data specific to your application. In this example, you will see how
to use
PropertyResourceBundles
assuming that all the resources to be
localized are strings. In order to use
PropertyResourceBundle
, you will have
to create Java Properties files that will hold the data in key = value format. The
file name itself identifies the Locale. For instance, if
MybankResources.properties contains strings to be localized for the language
English in the United States (en_US), then MybankResources_fr_FR..properties
contains strings to be localized for the language “fr” (French) and region of “FR”
(France). In order to use the data in these files, you have to get the
ResourceBundle instance as shown in Listing 8.1.
In order to understand Listing 8.1, assume that the English properties file,
MybankResources.properties contains a key value pair:
header.title=My

Chapter 8. Struts and I18N
169
Bank
. Next assume that the French properties file,
MybankResources_fr_FR.properties also contains a key value pair:
header.title= Ma Banque
. The code snippet in Listing 8.1 produces an
output “Ma Banque”. What happens if the MybankResources_fr_FR.properties
file was missing? Just to see what happens, rename the file to something else and
run the program again. This time the output will be My Bank. But the locale was
“fr_FR”!
Here’s what happened. Because the locale was “fr_FR”, the getBundle()
method looked up MybankResources_fr_FR.properties. When it did not find this
file, it looked for the “next best match” MybankResources_fr.properties. But this
file doesn’t exist either. Finally the getBundle() found the
MybankResources.properties file and returned an instance of
PropertiesResourceBundle for this file. Accordingly the String
myHeader is looked up using the header.title key from the
MybankResources.properties file and returned to the user. In general, the
algorithm for looking up a Properties file is:
MybankResources_language_country_variant.properties
MybankResources_language_country.properties
MybankResources_language.properties
MybankResources.properties
Java Properties files are commonly used for web tier localization in Struts
web applications. Hence we have shown you how to use them for localizing
string data. If your requirement involves extracting locale specific resources
besides strings, you might want to use the
ListResourceBundle
class.
NOTE: When the above program runs from the command line, the properties
file is located and loaded by the default command line class loader – the System
Classpath Class Loader. Similarly in a web application, the properties file should
be located where the web application class loader can find it.
java.text.NumberFormat
NumberFormat is an abstract base class that is used to format and parse
numeric data specific to a locale. This class is used primarily to format numbers
and currencies. A sample example that formats currencies is shown in listing 8.2.
A currency format for French Locale is first obtained. Then a double is formatted
and printed using the currency format for French Locale. The output is: Salary
is: 5 124,75 €
In the above example, the double amount was hard coded as a decimal in
en_US format and printed as in the French format. Sometime you will have to do
the reverse while processing user input in your web applications. For instance, a
user in France enters a currency in the French format into a text field in the web
application and you have to get the double amount for the business logic to
Struts Survival Guide – Basics to Best Practices
170
process it. The NumberFormat class has the parse() method to do this.
Listing 8.3 shows this. The output of the program is: Salary is:
5124.75
Listing 8.2 Formatting currencies using NumberFormat
Locale frLocale = new Locale ("fr","FR");
// get instance of NumberFormat
NumberFormat currencyFormat =
NumberFormat.getCurrencyInstance(frLocale);
double salaryAmount = 5124.75;
// Format the amount for the French locale
String salaryInFrench = currencyFormat.format(salaryAmount);
System.out.println ("Salary is: " + salaryInFrench);
There is a subclass of the
NumberFormat
called
DecimalFormat
that can
be used to format locale specific decimal numbers with the additional capability
of providing patterns and symbols for formatting. The symbols are stored in a
DecimalFormatSymbols
. When using the
NumberFormat
factory methods,
the patterns and symbols are read from localized resource bundles.
Listing 8.3 Formatting currencies using NumberFormat
// get the amount from a text field (5 124,75 €)
String salaryInFrench = salaryField.getText();
// Print it back into a regular number
System.out.println("Salary is: " +
CurrencyFormat.parse(salaryInFrench);
java.text.DateFormat
DateFormat
is an abstract class that is used to format dates and times. When a
locale is specified it formats the dates accordingly. The following code formats a
date independent of locale
Date now = new Date();
String dateString = DateFormat.getDateInstance().format(now);
To format a date for a given locale:
DateFormat dateFormat =
DateFormat.getDateInstance(Locale.GERMANY);
dateFormat.format(now);
java.text.MessageFormat
MessageFormat
is used to create concatenated messages in a language neutral
way. It takes a set of input objects, formats them and inserts the formatted strings

Chapter 8. Struts and I18N
171
into specific places in a given pattern. Listing 8.4 shows how to create a
meaningful message by inserting string objects into specific locations in the
already existing message. When you run the program, you will get the following
output:
John Doe logged in at 8/28/03 2:57 PM
Listing 8.4 Using MessageFormat to create message
Object[] myObjects = { "John",
"Doe",
new java.util.Date(System.currentTimeMillis())
};
String messageToBeDisplayed = "{0} {1} logged in at {2}";
String message =
java.text.MessageFormat.format(messageToBeDisplayed, myObjects);
System.out.println(message);
8.2 Internationalizing Struts Applications
The I18N features of Struts framework build upon the Java I18N features. The
I18N support in Struts applications is limited to the presentation of text and
images.
I18N features of Struts Resource Bundle
The Struts Resource Bundle is very similar to the Java ResourceBundle. Struts
has an abstract class called
org.apache.struts.util.MessageResources
and a subclass
org.apache.struts.util.PropertyMessageResources
which as the name suggests is based on property files. In spite of the similar
functionalities, the above Struts classes (surprisingly) do not inherit from their
java.util
counterparts. However if you understand the working of the
java.util.ResourceBundle
, you have more or less understood how the
Struts Resource Bundles work. In general, Struts applications deal with
internationalization in the following way:
1. The application developer creates several properties files (one per Locale)
that contain the localized text for messages, labels and image file names to be
displayed to the user. The naming convention for the Locale specific
properties files is same as that of
java.util.ResourceBundle
. The base
properties file name (corresponding to the
en_US
) is configured in the Struts
Config file (Refer to Chapter 3). For other Locales, Struts figures out the
names of the properties file by the standard naming conventions.
2. The properties file should be placed so that the web application class loader
can locate it. The classes in the WEB-INF/classes folder are loaded by the
web application class loader and is an ideal place to put the properties file.

Struts Survival Guide – Basics to Best Practices
172
Naming conventions of Java classes applies to the properties files too.
Suppose that the classes in an application are packaged in mybank.app1
package. If the App1Messages.properties is placed in mybank/app1 folder it
finally ends up in WEB-INF/classes/mybank/app1 directory in the WAR.
Accordingly the Message Resource Bundle is configured as follows (from
Chapter 3):
<message-resources parameter="mybank.app1.App1Messages"/>
The Struts Controller Servlet is configured to look up information from these
properties files (Actually the Message Resource Bundle is loaded at startup
and is stored in the ServletContext and is available within the entire web
application if needed).
3. When the Struts Controller Servlet receives a request, it checks the user’s
Locale (by looking up the HttpSession for the key
org.apache.struts.action.LOCALE
) and then looks up a resource
bundle confirming to that locale and makes it available. Interested parties
(read your application logic) can then lookup Locale specific messages using
the Locale independent keys.
For instance, an ActionError can be constructed in the ActionsForm’s
validate()
method as follows:
ActionError error1 = new ActionError(“error.firstname.required”);
The actual ActionError constructed has the Locale dependent message for the
key
error.firstname.required
. Some of the commonly used constructors
are:
ActionError(String key)
ActionError(String key, Object value)
ActionError(String key, Object values[])
The second and the third constructor are used if any parameters need to be
passed in dynamically. These constructors take the key and an array of strings
containing the replacement parameters to be used in the validation error
messages. This is similar to the behavior of
java.text.MessageFormat
.
E.g.: The properties file contains a key value pair as
validation.range.message={0} cannot be less than {1} characters
The ActionError to access this message is:
String[] strArray = {“First Name”, “35”};
new ActionError(“validation.range.message”, strArray);
I18N features of MessageTag

Chapter 8. Struts and I18N
173
You have already used the
MessageTag
(
<bean:message>
), not in the context
of I18N but for externalizing the messages. We used this tag to retrieve messages
from the external properties file. Now that the same properties files are put to use
in internationalizing the web application, the
MessageTag
has donned the role
of providing Locale specific text in the JSP. This is one of the most frequently
used tags whether you are localizing the application or not. Since you already the
workings of this tag, we will not bore you with more verbosity. Instead we will
compare this Struts tag with the JSTL equivalents. As has been stated earlier in
Chapter 6, the word on the street is that the Struts tags should be preferably
replaced with JSTL equivalents.
I18N features of HTML Tag Library
Struts HTML tag library is the key to rendering JSPs as HTML and is filled with
tags offering I18N features. Look for the tag attributes whose name ends with
key. For instance, the
<html:img>
tag offers
srcKey
to look up the
src
of the
image and
altKey
to look up the
alt
text from message resource bundle.
I18N features of LookupDispatchAction
As you already know,
LookupDispatchAction
offers excellent capability to
handle the business logic in a locale independent manner. Certain restrictions
apply in that it can be used only with grey buttons or html links and not with
image buttons. More details are in Chapter 4.
8.3 Internationalizing Tiles Applications
In Chapter 7 you saw how to use Tiles to organize your JSP pages. The Tiles
framework provides an easy way to add tiles or templates to a JSP page to
present content in a dynamic fashion. The Tiles framework, just like Struts can
be localized to provide different tiles based on a user’s preferred locale. For
example, the header tile in Chapter 7 could be replaced with a different header
that corresponds to a specific locale. It could contain an area-specific flag for
instance or simply a different background color.
A Tiles application has a Tiles definition file (e.g.:/WEB-INF/tiles-defs.xml)
that defines the structure of a JSP page using various tiles, for the header, menu,
body, footer etc. In the case of a localized Tiles application, there will one such
file per locale along with the default tiles-defs.xml file. For example, if your
application supports US English and French, there will be two definition files,
one for each locale as well as a default one – tiles-defs_fr.xml, tiles-defs_en.xml
and tiles-defs.xml
The naming conventions for the Tiles definition files are the same as for a
java.util.ResourceBundle
class as explained earlier in the chapter. Again,
just as in a localized Struts application, the session attribute

Struts Survival Guide – Basics to Best Practices
174
Action.LOCALE_KEY
is looked up for a user’s preferred or default locale and
the appropriate definition file are loaded. For instance, if the default file tiles-
defs.xml is:
<tiles-definitions>
<definition name="foo.bar" path="MybankLayout.jsp">
<put name="title" value="My Bank example" />
<put name="header" value="/header.jsp" />
<put name="menu" value="/menu.jsp" />
<put name="footer" value="/footer.jsp" />
<put name="body" value="/body.jsp" />
</definition>
</tiles-definitions>
Then the localized Tiles definition file for French is:
<tiles-definitions>
<definition name="foo.bar" path="MybankLayout.jsp">
<put name="title" value="Mon exemple de ma banque"/>
<put name="header" value="/header.jsp" />
<put name="menu" value="/menu.jsp" />
<put name="footer" value="/footer.jsp" />
<put name="body" value="/body.jsp" />
</definition>
</tiles-definitions>
This approach is justified if you use different JSPs per locale. However if the
JSPs themselves are fully I18N capable, meaning the single JSP can adapt itself
to render local sensitive UI, then the only difference between the two tiles
definition for the two locales, is the title. The need for different definition files in
that case could be eliminated if there was a mechanism to specify the key to the
message resource bundle in the
<put>
element above. Unfortunately such a
mechanism doesn’t seem to exist at the time of writing and hence you are left
with creating definitions for each locale.
8.4 Processing Localized Input
Localized input is data input in a native language using locale specific formats.
How does your back-end Java code process data input in a native language? Let
us consider a simple form with two fields,
fullName
and
monthlySalary
as
shown below.

Chapter 8. Struts and I18N
175
public class CustomerForm extends ActionForm {
private String fullName = null;
private double monthlySalary = 0.0;
...
}
John Doe enters his monthly salary as 5431.52 and submits the form. That’s
it, the form fields are populated nicely and the application works without a hitch.
The conversion of the monthly salary from a String to a double is automatically
taken care of by Struts and John Doe won’t have any problems with the
application.
What happens if the same application is viewed by a user in France and he
decides to enter the same amount in the French format as 5 431,52? When the
French user submits the application, the
monthlySalary
attribute in
CustomerForm
ends up being populated with 0.0 instead of 5431.52. Why so?
When the form is submitted, the RequestProcessor populates the JavaBeans
properties of the ActionForm with the request parameters by using the
RequestUtils
and
BeanUtils
classes. The actual population is done by the
BeanUtils.populate()
method. That method tries to parse the String “5
431,52” and assign it to
monthlySalary
– a double field without caring much
for the Locale of the user. This obviously throws an exception on which the
default action is to set 0.0 in the
monthlySalary
field.
What is the solution then? How can you make the Struts applications process
localized input? Since the
BeanUtils
class does not check the locale at the time
of populating the form, the only way out of this situation is to make the
monthlySalary
field a
String
instead of a
double
. Now, the
BeanUtils
does not try to parse a double from the String. Instead the value is assigned AS
IS. A customized routine has to be written to convert the String into a double in a
Locale dependent manner.
8.5 Character encodings
Earlier, when applications were built, they were built for one language. Those
were the days of “code pages”. Code pages described how binary values mapped
to human readable characters. A currently executing program was considered to
be in a single code page. These approaches were fine until Internationalization
came along. Then came the issue of how to represent multiple character sets and
encodings for an application. Hence came character sets and encodings.
Character sets are sets of text and graphic symbols mapped to positive
integers. ASCII was one of the first character sets to be used. ASCII though
efficient, was good at representing only US English.

Struts Survival Guide – Basics to Best Practices
176
A Character encoding, as mentioned earlier, maps a character to fixed width
units. It also defines ordering rules and byte serializing guidelines. Different
character sets have multiple encodings. For example, Java programs represent
Cyrillic character sets using KO18-R or KO18-U encodings. Unicode enables us
to write multilingual applications.
Other examples of encodings include ISO 8859, UTF-8 etc. UTF or Unicode
Transformation Format is used to encode 16 bit Unicode characters as one to four
bytes. A UTF byte is equivalent to 7-bit ASCII if its higher order bit is zero. You
might have come across many JSP pages, which have a line that looks like:
<%@ page contentType="text/html;charset=UTF-8" language="java" %>
Here, charset=UTF-8 indicates that the page uses a response encoding of
UTF-8. When internationalizing the web tier, you need to consider three types of
encodings:
• Request encoding
• Page encoding
• Response encoding
Request encoding deals with the encoding used to encode request parameters.
Browsers typically send the request encoding with the Content-type header. If
this is not present, the Servlet container will use ISO-8859-1 as the default
encoding.
Page encoding is used in JSP pages to indicate the character encoding for
that file. You can find the page encoding from:
• The Page Encoding value of a JSP property group whose URL pattern
matches the page. To see how JSP property groups work, you can go to the
following URL:
http://java.sun.com/j2ee/1.4/docs/tutorial/doc/JSPIntro13.html#wp72193
• The pageEncoding attribute in a JSP page specified along with the page
directive. If the value pageEncoding attribute differs from the value
specified in the JSP property group, a translation error can occur.
• The CHARSET value of the contentType attribute in the page directive.
If none of these encodings are mentioned, then the default encoding of ISO-
8859-1 is used.
Response encoding is the encoding of the text response sent by a Servlet or a
JSP page. This encoding governs the way the output is rendered on a client’s
browser and based on the client’s locale. The web container sets a response
encoding from one of the following:

Chapter 8. Struts and I18N
177
• The CHARSET value of the contentType attribute in the page directive.
• The encoding in the pageEncoding attribute of the page directive
• The Page Encoding value of a JSP property group whose URL pattern
matches the page
If none of these encodings are mentioned, then the default encoding of ISO-
8859-1 is used.
Early on, when internationalization of computer applications became
popular, there was a boom in the number of encodings available to the user.
Unfortunately these encodings were unable to cover multiple languages. For
instance, the European Union was not able to cover all the European languages in
one encoding, resulting in having to create multiple encodings to cover them.
This further worsened the problem as multiple encodings could use the same
number to represent different characters in different languages. The result:
higher chances of data corruption.
A big company had its applications working great with a default locale of US
English, until it decided to go global. One of the requirements was to support
Chinese characters. The application code was modified accordingly but each time
the application ran, it was just not able to produce meaningful output, as the text
seemed to be distorted. The culprit was the database encoding.
Chinese characters, just like Korean and Japanese, have writing schemes that
cannot be represented by single byte code formats such as ASCII and EBCDIC.
These languages need at least a Double Byte Character Set (DBCS) encoding to
handle their characters. Once the database was updated to support DBCS
encoding, the applications worked fine. These problems led to the creation of a
universal character-encoding format called Unicode.
Unicode is a 16 bit character encoding that assigns a unique number to each
character in the major languages of the world. Though it can officially support up
to 65,536 characters, it also has reserved some code points for mapping into
additional 16-bit planes with the potential to cope with over a million unique
characters. Unicode is more efficient as it defines a standardized character set
that represents most of the commonly used languages. In addition, it can be
extended to accommodate any additions. Unicode characters are represented as
escape sequences of type \uXXXX where XXXX is a character’s 16 bit
representation in hexadecimal in cases where a Java program’s source encoding
is not Unicode compliant.
Struts and character encoding
Setting the character encoding in the web application requires the following
steps:

Struts Survival Guide – Basics to Best Practices
178
1. Configure the servlet container to support the desired encoding. For instance,
you have to set the servlet container to interpret the input as UTF-8 for
Unicode. This configuration is vendor dependent.
2. Set the response content type to the required encoding (e.g. UTF-8). In Struts
1.1, this information is specified in the <
controller>
element in struts-
config.xml using the
contentType
attribute.
3. This can also be set in the JSPs with the
@page
directive as follows:
<%@ page contentType="text/html; charset=UTF-8" %>.
4. Next add the following line in the HTML
<head>
:
<meta http-equiv="content-type"
content="text/html; charset=UTF-8">
5. Make sure you are using the I18N version rather than the US version of the
JRE. (If you are using JDK, this problem may ot arise)
6. Make sure that the database encoding is also set to Unicode.
NOTE: Setting
<html:html locale="true">
doesn't set the encoding
stream. It is only a signal to Struts to use the locale-specific resource bundle
native2ascii conversion
Java programs can process only those files that are encoded in Latin-1 (ISO
8859-1) encoding or files in Unicode encoding. Any other files containing
different encodings besides these two will not be processed. The
native2ascii tool is used to convert such non Latin-1 or non-Unicode files
into a Unicode encoded file. Any characters that are not in ISO 8859-1 will be
encoded using Unicode escapes. For example, if you have a file encoded in a
different language, say myCyrillicFile in Cyrillic, you can use the native2ascii
tool to convert it into a Unicode encoded file as follows:
native2ascii –encoding UTF-8 myCyrillicFile myUnicodeFile
You can use other encodings besides UTF-8 too. Use the above tool on the
Struts prorperties files (message resource bundles) containing non Latin-1
encoding. Without this conversion, the Struts application (or java for that matter)
will not be able to interpret the encoded text. Consequently the
<bean:message>
and
<html:errors/>
will display garbage.

Chapter 8. Struts and I18N
179
8.6 Summary
In this chapter you started with what I18N and L10N are, their need and their
advantages. You also got a quick overview of the Java and Struts
Internationalization API. Then you looked at the various ways to internationalize
the web tier using the features in Struts and Tiles. You also saw how to process
localized input using Struts applications.

Struts Survival Guide – Basics to Best Practices
180
Chapter 9. Struts and Exception Handling
181
C
Ch
ha
ap
pt
te
er
r
9
9
Struts and Exception Handling
In this chapter:
1. You will learn about basics of Exception Handling
2. You will understand the exception handling from servlet specification
perspective
3. You will understand exception handling facilities in Struts1.1
4. We will develop a simple yet robust utility to log exceptions
5. We will cover strategies to centralize logging in production environments
Exception handling is very crucial part often overlooked in web application
development that has ramifications far beyond deployment. You know how to
handle exceptions using the built-in Java construct to catch one and handle it
appropriately. But what is appropriate? The basic rationale behind exception
handling is to catch errors and report them. What is the level of detail needed in
reporting the exception? How should the user be notified of the exception? How
should customer support handle problem reports and track and trace the
exception from the logs? As a developer where do you handle the exceptions?
These are some of the major questions we will answer in this chapter first from a
generic way and then as applicable to Struts applications.
Under normal circumstances when you catch the exception in a method, you
print the stack trace using the
printStacktrace()
method or declare the
method to throw the exception. In a production system, when an exception is
thrown it's likely that the system is unable to process end user’s request. When
such an exception occurs, the end user normally expects the following:
A message indicating that an error has occurred
A unique error identifier that he can use while reporting it to customer
support.
Quick resolution of the problem.
The customer support should have access to back-end mechanisms to resolve
the problem. The customer service team should, for example, receive immediate
error notification, so that the service representative is aware of the problem

Struts Survival Guide – Basics to Best Practices
182
before the customer calls for resolution. Furthermore, the service representative
should be able to use the unique error identifier (reported by the user) to lookup
the production log files for quick identification of the problem – preferably up to
the exact line number (or at least the exact method). In order to provide both the
end user and the support team with the tools and services they need, you as a
developer must have a clear picture, as you are building a system, of everything
that can go wrong with it once it is deployed.
9.1 Exception Handling Basics
It is common usage by the developers to put
System.out.println()
to track
the exception and flow through the code. While they come in handy, they have to
be avoided due to the following reasons:
1.
System.out.println
is expensive. These calls are synchronized for the
duration of disk I/O, which significantly slows throughput.
2. By default, stack traces are logged to the console. But browsing the console
for an exception trace isn't feasible in a production system.
3. In addition, they aren't guaranteed to show up in the production system,
because system administrators can map
System.out
and
System.errs
to
' ' [
>nul
] on NT and
dev/nul
on UNIX. Moreover, if you're running the
J2EE app server as an NT service, you won't even have a console.
4. Even if you redirect the console log to an output file, chances are that the file
will be overwritten when the production J2EE app servers are restarted.
5. Using
System.out.println
during testing and then removing them before
production isn't an elegant solution either, because doing so means your
production code will not function the same as your test code.
What you need is a mechanism to declaratively control logging so that your test
code and your production code are the same, and performance overhead incurred
in production is minimal when logging is declaratively turned off. The obvious
solution here is to use a logging utility. It is pretty customary these days to use a
utility like Log4J (http://jakarta.apache.org/log4j) for logging. With the right
coding conventions in place, a logging utility will pretty much take care of
recording any type of messages, whether a system error or some warning.
However it is up to you as a developer to make the best use of the utilities. It
requires a lot of forethought to handle exceptions effectively. In this chapter we
will use Log4J to log exceptions effectively. Hence we will review Log4J before
proceeding to look at some commonly accepted principles of Exception handling
in Java.

Chapter 9. Struts and Exception Handling
183
9.2 Log4J crash course
Log4J is the logging implementation available from Apache’s Jakarta project and
has been around long before JDK Logging appeared and quite naturally has a
larger developer base. Lot of material is freely available online if you want to dig
deeper into Log4J and we have held back from such a detailed treatment here. As
with any Logging mechanisms, this library provides powerful capabilities to
declaratively control logging and the level of logging.
In Log4J, all the logging occurs through the
Logger
class in
org.apache.log4j
package. The
Logger
class supports five levels for
logging. They are FATAL, ERROR, WARNING, INFO, DEBUG. Without
Log4J, you would perhaps use a Boolean flag to control the logging. With such a
boolean flag, there are only two states – logging or no logging. In Log4J the
levels are defined to fine tune the amount of logging. Here is how you would
user the Log4J.
Logger logger = Logger.getLogger (“foo.bar”);
logger.debug (“This is a debug message”);
The code above first obtains the Logger instance named foo.bar and logs a
message at DEBUG level. You can declaratively turn off the logging for
messages at lower level than WARNING. This means the messages logged at
INFO and DEBUG level will not be logged.
Logged messages always end up in a destination like file, database table etc.
The destination of the log message is specified using the Appender. The
Appender
can represent a file, console, email address or as exotic as a JMS
channel. If you need a destination that is not supported by the classes out of the
box you can write a new class that implements the
Appender
interface.
Appenders can be configured at startup in a variety of ways. One way to
configure them is through an XML file. A XML file is shown below.
<appender name="Mybank-Warn"
class="org.apache.log4j.FileAppender">
<param name="Threshold" value="WARN" />
<param name="File" value="./logs/mybank-warnings.log" />
<param name="Append" value="false" />
<layout class="org.apache.log4j.PatternLayout">
<param name="ConversionPattern"
value="%d [%x][%t] %-5p %c{2} - %m%n"/>
</layout>
</appender>

Struts Survival Guide – Basics to Best Practices
184
<category name="foo.bar" additivity="false">
<appender-ref ref="Mybank-Warn" />
<appender-ref ref="Developer-Console" />
</category>
The above XML when translated to simple English reads as follows: The
Appender named Mybank-Warn logs the messages to a file mybank-
warnings.log. Only messages with a threshold of WARN or higher are logged.
The format of the message is as specified by the PatternLayout.
The format of the output message is specified using
Layout
. Standard
classes for specifying the layout like PatternLayout are used most of the times
and the format is declaratively specified using symbols like %d which instructs
Log4J to include date time in the log and %m – the actual message itself and so
on.
As you saw earlier, the logging is performed through a named
Logger
instance. If you are wondering how the
Logger
would know which
Appender
to log to, it is the
<category>
element in the above XML that provides the link
between the two. The
Logger
uses the
<category>
setting in the XML to get
this information. The
<category>
in the above XML is called foo.bar. Recall
that we tried to log using a Logger named foo.bar. The foo.bar Logger gets the
FileAppender Mybank-Warn appender through the foo.bar category setting in
the XML. And then the messages end up in the file mybank-warnings.log.
There can be more than one appenders associated with a category. This
implies that the messages logged with a Logger can potentially end up in
multiple locations if needed.
9.3 Principles of Exception Handling
The following are some of the generally accepted principles of exception
handling:
1. If you can't handle an exception, don't catch it.
2. Catch an exception as close as possible to its source.
3. If you catch an exception, don't swallow it.
4. Log an exception where you catch it, unless you plan to re-throw it.
5. Preserve the stack trace when you re-throw the exception by wrapping the
original exception in the new one.
6. Use as many typed exceptions as you need, particularly for application
exceptions. Do not just use
java.lang.Exception
every time you need to declare
a throws clause. By fine graining the throws clause, it is self-documenting
and becomes evident to the caller that different exceptions have to be

Chapter 9. Struts and Exception Handling
185
handled.
7. If you programming application logic, use unchecked exceptions to indicate
an error from which the user cannot recover. If you are creating third party
libraries to be used by other developers, use checked exceptions for
unrecoverable errors too.
8. Never throw unchecked exceptions in your methods just because it clutters
the method signature. There are some scenarios where this is good (For e.g.
EJB Interface/Implementations, where unchecked exceptions alter the bean
behavior in terms of transaction commit and rollback), but otherwise this is
not a good practice.
9. Throw Application Exceptions as Unchecked Exceptions and Unrecoverable
System exceptions as unchecked exceptions.
10. Structure your methods according to how fine-grained your exception
handling must be.
Principle 1 is obviously in conflict with 2. The practical solution is a trade-
off between how close to the source you catch an exception and how far you let it
fall before you've completely lost the intent or content of the original exception.
Principles 3, 4, and 5 is a problems developers face when they catch an
exception, but do not know how to handle it and hence throw a new exception of
same or different type. When this happens, the original exception’s stack trace is
lost. Listing 9.1 shows such a scenario. The
SQLException
is caught on Line 15
and re-thrown as a application specific
UpdateException
on Line 16. In the
process, the stacktrace with valuable info about the
SQLException
is lost. Thus
the developer can only trace back to Line 16 where the
UpdateException
is
thrown and not beyond that (This is the best case scenario with compiler debug
flags turned on. If hotspot compiler was used, the stacktrace would only have the
method name without any line number). Listing 9.2 shows almost similar
scenario, but the actual exception is logged to the console. This is not good
choice and sometimes not feasible because of reasons cited earlier in this section.
Listing 9.1 Losing Exception stack trace
10 public void updateDetails(CustomerInfo info)
throws UpdateException
11 {
12 try {
13 CustomerDAO custDAO = CustDAOFactory.getCustDAO();
14 custDAO.update(info);
15 } catch (SQLException e) {
16 throw new UpdateException(“Details cannot be updated”);
17 }
18 }
Struts Survival Guide – Basics to Best Practices
186
Listing 9.2 Losing Exception stack trace
public void updateDetails(CustomerInfo info)
throws UpdateException
{
try {
CustomerDAO custDAO = CustDAOFactory.getCustDAO();
custDAO.update(info);
} catch (SQLException e) {
e.printStackTrace();
throw new UpdateException(“Details cannot be updated”);
}
}
Listing 9.3 Preserving Exception stack trace
public void updateDetails(CustomerInfo info)
throws UpdateException
{
try {
CustomerDAO custDAO = CustDAOFactory.getCustDAO();
custDAO.update(info);
} catch (SQLException e) {
throw new UpdateException(e);
}
}
A better approach is shown in Listing 9.3. Here, the
SQLException
is
wrapped in the
UpdateException
. The caller of the
updateDetails
can
catch the
UpdateException
, and get the knowledge of the embedded
SQLException
.
Principles 7, 8 and 9 in the above list pertain to the discussion of using
checked v/s unchecked exceptions. Checked Exceptions are those that extend
java.lang.Exception
. If your method throws checked exceptions, then the
caller is forced to catch these exceptions at compile time or declare in the throws
clause of the method. On the other hand, unchecked exceptions are those that
extend
java.lang.RuntimeException
, generally referred to as runtime
exceptions. If your method throws a runtime exception, the caller of the method
is not forced to catch the exception or add it to the method signature at compile
time.

Chapter 9. Struts and Exception Handling
187
A rule of thumb is to model application exceptions as checked exceptions
and system exceptions as unchecked exceptions. The code below is an example
of application exception.
if (withDrawalAmt > accountBalance)
{
throw new NotEnoughBalanceException(
“Your account does not have enough balance”);
}
When the account does not have enough balance for requested withdrawal
amount, the user gets a
NotEnoughBalanceException
. The user can decide to
withdraw lesser amount. Notice that the application exception is not logged. In
case of the application exceptions, the developer explicitly throws them in the
code and the intent is very clear. Hence there is no need for content (log or stack
trace).
Principle 10 is about the use of debug flags with compilation. At compile
time it is possible to tell the JVM to ignore line number information. The byte
code without the line information are optimized for hotspot or server mode and
the recommended way of deployment for production systems. In such cases, the
exception stack traces do not provide the line number information. You can
overcome this handicap by refactoring your code during development time and
creating smaller and modular methods, so that guessing the line numbers for the
exceptions is relatively easier.
9.4 The cost of exception handling
In the example used earlier to illustrate application exceptions, we are checking if
withdrawal amount is greater than balance to throw the exception. This is not
something you should be doing every time. Exceptions are expensive and should
be used exceptionally. In order top understand some of the issues involved; let us
look at the mechanism used by the Java Virtual Machine (JVM) to handle the
exceptions. The JVM maintains a method invocation stack containing all the
methods that have been invoked by the current thread in the reverse order of
invocation. In other words, the first method invoked by the thread is at the
bottom of the stack and the current method is at the top. Actually it is not the
actual method that is present in the stack. Instead a stack frame representing the
method is added to the stack. The stack frame contains the method’s parameters,
return value, local variables and JVM specific information. When the exception
is thrown in a method at the top of the stack, code execution stops and the JVM
takes over. The JVM searches the current method for a catch clause for the
exception thrown or one of the parent classes of the thrown exception. If one is

Struts Survival Guide – Basics to Best Practices
188
not found, then the JVM pops the current stack frame and inspects the calling
method (the next method in the stack), for the catch clause for the exception or its
parents. The process continues until the bottom of the stack is reached. In
summary, it requires a lot of time and effort on the part of JVM.
Exceptions should be thrown only when there is no meaningful way of
handling the situation. If these situations (conditions) can be handled
programmatically in a meaningful manner, then throwing exceptions should be
avoided. For instance if it is possible to handle the problem of withdrawal
amount exceeding the balance in some other way, it has to chosen over throwing
an application exception.
Examples of SystemException can be a
ConfigurationException
, which
might indicate that the data load during start up failed. There is really nothing a
user or even the customer support could do about it, except to correct the
problem and restart the server. Hence it qualifies as a System exception and can
be modeled as runtime exception.
Certain exceptions like
SQLException
might indicate a system error or
application problem depending on the case. In either case, it makes a lot of sense
to model
SQLException
as a checked exception because that is not thrown from
your application logic. Rather it is thrown in the third party library and the
library developer wants you to explicitly handle such a scenario.
9.5 JDK 1.4 and exception handling
If you are modeling the
UpdateException
as a unchecked exception, you will
have to extend from
RuntimeException
. In addition if you are using JDK1.3.x
and lower, you will also provide the wrapped exception attribute in your own
exception. JDK1.4 onwards, you can wrap the “causative exception” in the parent
class
RuntimeException
as a
java.lang.Throwable
attribute thus
allowing you to carry around the “causative exception”. For e.g.
SQLException
is the “causative exception” in Listing 9.3. In the
Throwable
class there is a new
method getCause to get the cause of any exception which returns the wrapped
exception if exists. This can result in an exception chain since the cause itself can
have a cause. Prior to 1.4 Exception classes had their own non-standard
exception chaining mechanisms. For instance,
RemoteException
was used to
carry the actual exception across different JVMs or from EJB tier to web tier. As
of 1.4, all of these classes have been retrofitted to use the standard exception
chaining mechanism.
Additional exception handling features in JDK1.4 include programmatic
access to stack trace. This is a boon for real time error monitoring and alert
facilities. Often these systems need to manually parse the stack dump for
keywords. This is been made much easier. One can invoke
getStackTrace

Chapter 9. Struts and Exception Handling
189
method on the
Exception
(or
Throwable
) and get an array of
StackTraceElement
s returned. Each
StackTraceElement
provides the
following methods.
getClassName
getFileName
getLineNumber
getMethodName
isNativeMethod
By calling the above methods, you can display the stack trace in any format
you like. In addition, elegant error monitoring systems can be written. For
instance, the error monitoring system should alert the appropriate support team
for the sub system by intelligently analyzing the stack trace. This has been made
easier. The following code snippet can be used with JDK 1.4
StackTraceElement elements[] = e.getStackTrace();
for (int i=0, n=elements.length; i<n; i++) {
if ( elements[i].getClassName.equals("LegacyAccessEJB”)
&& elements[i].getMethodName().equals(“invokeCOBOL”)
{
//Alert the COBOL support team
}
}
This code snippet checks if the exception originated in
LegacyAccessEJB
during invoking a method named “
invokeCOBOL
”, it will alert the COBOL
support team. Obviously the decision tree is not as simple as shown, but at least it
removes the headache of parsing the trace for the same information.
9.6 Exception handling in Servlet and JSP
specifications
In the previous section, you looked at the general principles in exception
handling without a J2EE tilt. In this section, we will cover what servlet
specification has to say about exception handling. Consider the
doGet()
method
signature in a
HttpServlet
.
public void doGet(HttpServletRequest request,
HttpServletResponse response) throws
ServletException, IOException
The above method signature implies that a Servlet or a JSP (and finally a
web application) is only allowed to throw

Struts Survival Guide – Basics to Best Practices
190
ServletException
or its subclasses
IOException
or its subclasses
RuntimeExceptions
All other checked exceptions have to be handled in the Servlet/JSP code in
one of the following manner:
Catch the checked exception and log the error message and (or) take any
business related action.
Wrap the exception in a
ServletException
and throw the
ServletException
. (
ServletException
has overloaded
constructors to wrap the actual exception.)
Servlet specification provides exception-handling support through web.xml.
In web.xml, you can declare
<error-page>
to handle exceptions that are
thrown but not caught.
<error-page>
<exception-type>UnhandledException</exception-type>
<location>UnhandledException.jsp</location>
</error-page>
What this means is that if an exception of type
UnhandledException
is
thrown from your web application but not caught anywhere, then the user gets to
see the UnhandledException.jsp. This works well for
ServletException
,
IOException
,
RuntimeException
and their subclasses.
If the
UnhandledException
is a subclass of
ServletException
and
none of the error-page declaration containing exception-type fit the class
hierarchy of the thrown exception, then the Servlet container gets the wrapped
exception using the
ServletException.getRootCause
method. Then the
container attempts again to match the error-page declaration. This approach
works well if the
UnhandledException
is not a subclass of
ServletException
or
IOException
(but is a checked exception). You have
to throw a
ServletException
or its subclass by wrapping the
UnhandledException
in it and the servlet container does rest of the magic.
There are times when the user cannot see a page due to incorrect access
rights or the page simply does not exist. The Servlet sends an error response with
an appropriate HTTP error code. For instance, 404 corresponds to Page not
found, 500 corresponds to Internal Server Error and so on. You can also assign
JSPs for default HTTP error code as follows.
<error-page>
<error-code>404</error-code>

Chapter 9. Struts and Exception Handling
191
<location>exceptions/Page404.jsp</location>
</error-page>
Similarly, exceptions can occur in the JSPs in scriptlets and custom tags.
These can throw runtime exceptions. In addition scriptlets can throw
ServletException
and
IOException
since a JSP gets translated into the
body of
_jspService()
method and the signature of the
_jspService()
method is same as
doGet()
.
public void _jspService(HttpServletRequest request,
HttpServletResponse response) throws
ServletException, IOException
Tags however throw
JspException
in their tag callback methods
(
doStartTag()
,
doEndTag()
and so on).
JspException
is a direct subclass
of
java.lang.Exception
and has no relationship with
ServletException
or
IOException
. The
_jspService()
method is container dependent but its
contract is to catch all those exceptions and forward the request to the
errorPage
specified by the JSP. Hence it is a best practice to assign error pages
in JSPs with the declarative:
<%@ page errorPage="/error.jsp" %>
When forwarding to the exception page as specified by
errorPage
setting
shown above, the exception describing the error is stored as request attribute with
the key “
javax.servlet.jsp.JspException
”. If the JSP assigned to handle
the exceptions has the directive
<%@ page isErrorPage="true" %>
at the
top of their page, then the exception is provided as the implicit scripting variable
named
exception
.
9.7 Exception handling – Struts way
ServletException
,
IOException
,
RuntimeException
and their sub
classes can be declaratively mapped to appropriate JSP files through the web.xml
settings. What about the other Exceptions? Fortunately since Struts1.1, you can
assign JSP files for other checked exceptions too. Let us start by examining the
features in Struts 1.1 for exception handling.
Declarative exception handling
Consider the method signature for the execute method in the Struts Action class.
public ActionForward execute(ActionMapping mapping,
ActionForm form,
HttpServletRequest request,

Struts Survival Guide – Basics to Best Practices
192
HttpServletResponse response)
throws java.lang.Exception
The
execute()
method has
java.lang.Exception
in its throws clause.
Hence you don’t have to handle the exceptions explicitly in Action. You can let
them fall through. Consider the
execute()
method from an Action class.
public ActionForward execute(...) throws java.lang.Exception {
ActionForward nextPage = null;
..
userControllerEJB.createUser(UserInfo info);
..
mapping.findForward(“success”);
}
The
execute()
method invokes the
createUser()
method on
UserControllerEJB
– a Session EJB that is responsible for creating the users.
The
createUser()
method throws two Exceptions –
RemoteException
and
DuplicateUserException
. If the user cannot be created because another user
with same id exists, then the Session EJB throws
DuplicateUserException
.
A
RemoteException
is thrown if the user cannot be created because of
problems in looking up or creating the Session EJB. If everything goes fine, then
the user is forwarded to the
ActionForward
identified by success. However we
have made no attempt to catch them and handle. Instead we have deferred their
handling to Struts through the declarative exception handling facility.
Listing 9.5 Declarative Exception Handling in Struts
<struts-config>
<action-mappings>
<action
path="/submitCustomerForm"
type="mybank.example.CustomerAction"
name="customerForm"
scope="request"
input="/CustomerDetails.jsp">
<exception
key="database.error.duplicate"
path="/UserExists.jsp"
type="mybank.account.DuplicateUserException"/>
<exception
key="rmi.error"
Chapter 9. Struts and Exception Handling
193
type="java.rmi.RemoteException"
path="/rmierror.jsp"/>
</action>
</action-mappings>
</struts-config>
Listing 9.5 shows the Struts Config file with declarative exception handling
for the two exceptions –
DuplicateUserexception
and
RemoteException
.
For each exception, an
<exception>
element is defined in the action mapping.
The
path
attribute in the
<exception>
element specifies the page shown to the
user upon that exception. For instance, if a
DuplicateUserException
is
thrown when submitting the modified user profile, the controller will forward
control to the UserExists.jsp page. The
key
attribute is used to retrieve the error
message template from the associated resource bundle. Since the
<exception>
is local to the action mapping, it applies only for that action invocation. As you
might have already notice the J2EE and Struts way of declaratively handling
exceptions are complementary to one another.
In the Listing 9.5, the declarative exception handling was local to the
CustomerAction
. You can add global declarative exception handling too. For
instance, if you want to handle the
RemoteException
in the same way across
the board, use the following approach:
<struts-config>
<global-exceptions>
<exception
key="rmi.error"
type="java.rmi.RemoteException"
path="/rmierror.jsp"/>
</global-exceptions>
</struts-config>
Before forwarding to the page indicated in the
<exception>
element, Struts
sets the exception as a request attribute with name
org.apache.struts.action.EXCEPTION
. (This is the value of
Globals.EXCEPTION_KEY
.
Globals
is a Java class in
org.apache.struts
package). The exception can be retrieved in the error page by using the method:
request.getAttribute(Globals.EXCEPTION_KEY)
.
Using the ExceptionHandler
Apart from
key
,
type
and
path
, the
<exception>
element also takes several
optional attributes of which
handler
is a significant one. It is the fully qualified
class name of the exception handler for that exception. By default
org.apache.struts.action.ExceptionHandler
is the class used. You

Struts Survival Guide – Basics to Best Practices
194
can create a custom handler by extending the
ExceptionHandler
and
overriding the
execute()
method. The
execute()
method has the following
signature:
public ActionForward execute(Exception ex, ExceptionConfig ae,
ActionMapping mapping, ActionForm formInstance,
HttpServletRequest request,
HttpServletResponse response) throws ServletException
To understand the
ExceptionHandler
, you have to understand the
RequestProcessor
workings on exception. As it does everything else,
RequestProcessor
invokes the
execute()
method on the Action instance.
Hence it is natural that the exception thrown in the
execute()
is caught by the
RequestProcessor
. On receiving the exception, here is what the
RequestProcessor
does:
It checks to see if the exception has an associated
<exception>
declaration either in local or global scope.
If none exists, then the exception is:
Thrown AS IS if it is
ServletException
,
IOException
or their
subclasses.
Wrapped in a
ServletException
and thrown if the above criteria is not
satisfied.
If there is a
<exception>
element declared then it retrieves the handler
class, instantiates it and invokes
execute()
method in it. The default
exception handler returns the path attribute of the
<exception>
element as
an ActionForward.
As you will see later in this section, you can use a custom Exception Handler
to centralize exception logging in the web tier.
When not to use declarative exception handling
Very frequently you would like to generate an ActionError and display it to the
user instead of an exception. Let us look back at Listing 9.5 again for a moment.
When
RemoteException
is thrown, the user sees rmierror.jsp. This makes
sense since
RemoteException
is tantamount to a system exception and the only
thing you can do is to ask the user to start all over again. However, it does not
make sense to ask the user to start all over when
DuplicateUserException
is
thrown since this is an application exception from which the user has a recovery
path. A better option is to show this as an ActionError and give the user a chance
to change the user id. For situations like this, you have to resort to programmatic
exception handling.

Chapter 9. Struts and Exception Handling
195
Listing 9.6 shows the
execute()
method with programmatic exception
handling. It catches the
DuplicateUserException
and creates an
ActionErrors
object to hold the error. The
ActionErrors
is set into the
HTTP request as an attribute and then the same Form is shown back. The last
part of showing the same page is achieved by the line
mapping.getInput()
.
In this case you have to remove the declarative exception handling from Struts
config file since it is being explicitly handled in the code.
If you use declarative exception handling, the default
ExceptionHandler
will still generate an
ActionErrors
object. However, the
ActionErrors
is
associated with the page rather than a particular field. If you don’t have this
requirement, declarative exception handling is preferred over programmatic
exception handling. Just set the initial JSP as the path for the
<exception>
and
use
<html:errors/>
on the JSP and you get the exception as if it was an
ActionError
without any effort from your side.
Listing 9.6 Alternative to declarative exception handling
public ActionForward execute(... ...) throws java.lang.Exception {
ActionForward nextPage = null;
try {
..
..
userControllerEJB.createUser(UserInfo info);
..
mapping.findForward(“success”);
}
catch (DuplicateUserException due)
{
ActionErrors errors = new ActionErrors();
ActionError error = new ActionError(“userid.taken”,
due.getUserId());
errors.add(“userid”, error);
// This saves the ActionErrors in the request attribute
// with the key Action.ERROR_KEY
saveErrors(request, errors);
nextPage = mapping.getInput();
}
return nextPage;
}

Struts Survival Guide – Basics to Best Practices
196
Exception handling and I18N
Another important matter of concern with exception handling is I18N. Even
though the exception logging can occur in the language of your operating system,
the messages should still be displayed in the language of the user’s choice. This
is not much of a concern is the message is generic. For instance, in Listing 9.5,
the message shown to the user on
RemoteException
is identified by the key
rmi.error
. The key can have a generic message in the resource bundle.
However the problem starts when the message has to get specific or the message
requires replacement values. There are two possible solutions to this problem
neither of which is ideal.
Here is the first approach: If you want to keep the internationalization in the
web tier, then the specific exceptions from the server side should encapsulate the
resource bundle keys and some (if not all) replacement values in them. The key
and the replacement values can be exposed through getter methods on the
exception class. This approach makes the server side code dependent on the web
tier resource bundle. This also requires a programmatic exception handling since
you have to pass appropriate replacement values to the ActionError.
The second approach is to send the user’s Locale as one of the arguments to
the server side and let the server side generate the entire message. This removes
the server’s dependency on the web tier code, but requires the Locale to be sent
as a argument on every method call to the server.
9.8 Logging Exceptions
It is common knowledge that exceptions can occur anywhere – web-tier, ejb-tier,
database. Wherever they occur, they must be caught and logged with appropriate
context. It makes more sense to handle a lot, if not all of the exceptions
originating in the ejb tier and database tier on the client side in the web tier. Why
should exception logging take place on the client side?
Listing 9.7 Enumeration class for Exception Category
public class ExceptionCategory implements java.io.Serializable {
public static final ExceptionCategory INFO =
new ExceptionCategory(0);
public static final ExceptionCategory WARNING =
new ExceptionCategory(1);
public static final ExceptionCategory GENERAL_PROBLEM =
new ExceptionCategory(2);
public static final ExceptionCategory DATA_PROBLEM =
new ExceptionCategory(3);

Chapter 9. Struts and Exception Handling
197
public static final ExceptionCategory CONFIG_PROBLEM =
new ExceptionCategory(4);
public static final ExceptionCategory FATAL =
new ExceptionCategory(5);
private int type;
private ExceptionCategory(int aType) {
this.type = aType;
}
}
First, the control hasn't passed outside of the application server yet.
(Assuming both the web tier and ejb tier do not belong to disparate entities). The
so-called client tier, which is composed of JSP pages, servlets and their helper
classes, runs on the J2EE application server itself. Second, the classes in a well-
designed web tier have a hierarchy (for example, hierarchy in the Business
Delegate classes, Intercepting Filter classes, JSP base class, or in the Struts
Action classes) or single point of invocation in the form of a FrontController
servlet (Business Delegate, Intercepting Filter and Front Controller are Core
J2EE Patterns. Refer to Sun blueprints for more details). The base classes of
these hierarchies or the central point in FrontController classes can contain the
exception logging code. In the case of session EJB-based logging, each of the
methods in the EJB component must have logging code. As the business logic
grows, so will the number of session EJB methods, and so will the amount of
logging code. A web tier system will require less logging code. You should
consider this option if you have co-located web tier and EJB tiers and you don't
have a requirement to support any other type of client.
To develop a full fledged exception handling strategy let us start with a
simple class shown in Listing 9.7. This class,
ExceptionCategory
categorizes
the exceptions into INFO, WARNING, ERROR and FATAL. This identification
helps us when the notification of Support personnel depends on the severity of
the exception.
Listing 9.8 Exception Info class
public class ExceptionInfo implements java.io.Serializable {
private ExceptionCategory exceptionCategory;
private String errorCode;
private String exceptionID;
private boolean logged;
public ExceptionInfo(ExceptionCategory aCategory,
String aErrorCode) {
Struts Survival Guide – Basics to Best Practices
198
this.exceptionCategory = aCategory;
this.errorCode = aErrorCode;
this.logged = false;
this.exceptionID =
UniqueIDGeneratorFactory.
getUniqueIDGenerator().getUniqueID();
}
}
The next class to look at is the
ExceptionInfo
class as shown in Listing 9.8
This class provides information about the Exception as the name indicates. Apart
from the
ExceptionCategory
, this class also holds a unique id associated with
the Exception and a boolean indicating if the exception has been already logged.
The
UniqueIDGeneratorFactory
is a factory class that returns a
UniqueIDGenerator. UniqueIDGenerator is represented by an interface
IUniqueIDGenerator
. This interface has just one method –
getUniqueID()
.
Listing 9.9 shows a simple Unique ID Generator implementation IP Address and
time.
Listing 9.9 Simple Unique ID Generator
public class UniqueIDGeneratorDefaultImpl
implements IUniqueIDGenerator
{
private static IUniqueIDGenerator instance =
new UniqueIDGeneratorDefaultImpl();
private long counter = 0;
public String getUniqueID() throws UniqueIDGeneratorException
{
String exceptionID = null;
try {
exceptionID = InetAddress.getLocalHost().getHostName();
} catch(UnknownHostException ue) {
throw new UniqueIDGeneratorException(ue);
}
exceptionID = exceptionID +
System.currentTimeMillis() +
counter++;
return exceptionID;
Chapter 9. Struts and Exception Handling
199
}
}
Listing 9.10 MybankException class
public abstract class MybankException extends Exception {
private ExceptionInfo exceptionInfo;
public MybankException(ExceptionInfo aInfo) {
super();
this.exceptionInfo = aInfo;
}
}
And finally Listing 9.10 shows the actual Exception class. This is the base
class for all the checked exceptions originating in MyBank. It is always better to
have a base class for all exceptions originating in a system and then create new
types as required. In this way, you can decide how much fine grained you want
the catch exception blocks to be. Similarly you can have a base class for all
unchecked exceptions thrown from system. Listing 9.11 shows such a class.
Listing 9.11 MybankRuntimeException class
public abstract class MybankRuntimeException extends Exception {
private ExceptionInfo exceptionInfo;
private Throwable wrappedException;
public MybankException(ExceptionInfo aInfo,
Throwable aWrappedException) {
super();
this.exceptionInfo = aInfo;
this.wrappedException = aWrappedException;
}
}
Notice that
MybankRuntimeException
has only one constructor that takes
both
ExceptionInfo
and a
Throwable
. This is because if someone is
explicitly throwing a runtime exception from his or her code, it is probably
because a system error or serious unrecoverable problem has occurred. We want
to get hold of the actual cause of the problem and log it. By enforcing
development time disciplines like this, one can decrease the chances of
exceptions in the system without a context.

Struts Survival Guide – Basics to Best Practices
200
Finally we also need to look at the actual Logging utility – a stack trace
printing utility shown in Listing 9.12. The default
printStackTrace()
method
in
java.lang.Throwable
logs an error message to the System.err.
Throwable
also has an overloaded
printStackTrace()
method to log to a
PrintWriter
or a
PrintStream
. The above method in
StackTraceUtil
wraps the
StringWriter
within a
PrintWriter
. When the
PrintWriter
contains the stack trace, it simply calls
toString()
on the
StringWriter
to
get a String representation of the stack trace.
The
StackTraceUtil
class has two overloaded methods –
getStackTraceAsString()
– One of them takes the
MybankException
as
the parameter, the other takes
Throwable
as the parameter. All exceptions of
type
MybankException
already have the unique id in-built. For other
exceptions, to be logged the unique id has to be explicitly generated.
MybankException
also has the flag indicating whether the exception has been
logged making it easier to prevent multiple logging, as you will see very soon.
Other Exceptions don’t have this capability and it is up to the caller program and
called to collaborate and ensure that duplicate logging does not happen.
Listing 9.12 Stack Trace printing utility.
public final class StackTraceTool {
private StackTraceTool() {}
public static String getStackTraceAsString(
MybankException exception)
{
String message = " Exception ID : " +
exception.getExceptionInfo().getExceptionID()
+ "\n " + "Message :" + exception.getMessage();
return getStackMessage(message, exception);
}
public static String getStackTraceAsString(Throwable throwable)
{
String message = " Exception ID : " +
UniqueIDGeneratorFactory.getUniqueIDGenerator().getUniqueID()
+ "\n " + "Message :" + exception.getMessage();
return getStackMessage(message, exception);
}
private static String getStackMessage(String message,
Throwable exception)
{
StringWriter sw = new StringWriter();
Chapter 9. Struts and Exception Handling
201
PrintWriter pw = new PrintWriter(sw);
pw.print(" [ " );
pw.print(exception.getClass().getName());
pw.print(" ] ");
pw.print(message);
exception.printStackTrace(pw);
return sw.toString();
}
}
Armed with these knowledge let us look at a scenario that will lead to
duplicate logging in the system when an exception occurs. Consider a case when
a method,
foo()
, in an entity EJB component is accessed in a session EJB
method, called
bar()
. A web-tier client invokes the method
bar()
on the
session EJB component, and also logs the exceptions. If an exception occurs in
the entity EJB method
foo()
when the session EJB method
bar()
is invoked
from the web-tier, the exception will have been logged in three places: first in the
entity EJB component, then in the session EJB component, and finally in the web
tier.
Fortunately, addressing these problems is fairly easy to do in a generic way.
All you need is a mechanism for the caller to:
Access the unique ID
Find out if the exception has already been logged
If the exception has been already logged don’t log it again.
We have already developed the
MybankException
and
ExceptionInfo
class that let us check if the exception is already logged. If not logged already,
log the exception and set the logged flag to be true. These classes also generate a
unique id for every exception. Listing 9.13 shows a sample.
Listing 9.13 Sample Exception Logging
try {
CustomerDAO cDao = CustomerDAOFactory.getDAO();
cDao.createCustomer(CustomerValue);
} catch (CreateException ce) {
//Assume CreateException is a subclass of MybankException
if (! ce.isLogged() ) {
String traceStr = StackTraceTool.getStackTraceAsString(ce);
LogFactory.getLog(getClass().getName()).error(
ce.getUniqueID() + ":" + traceStr);
ce.setLogged(true);
}

Struts Survival Guide – Basics to Best Practices
202
throw ce;
}
Listing 9.13 shows the logging scenario when the exception caught is of type
MybankException
. It is very much a fact that not all of the exceptions thrown
by your application are in this hierarchy. Under such conditions it is even more
important that the logging is centralized in one place since there is no mechanism
to prevent duplicate logging for exceptions outside the
MybankException
hierarchy. That brings us to the idea of centralized logging. In the beginning of
this section we said that it is easy and convenient to log exceptions on web-tier
since most of the web-tier classes have a hierarchy. Let us examine this claim in
more detail.
9.9 Strategies for centralized logging
In the previous section, we saw how to avoid duplicate logging. But when it
comes to the entire application, you also learnt that logging should not only be
done once but also centralized for disparate modules of the system if possible.
There are various strategies to achieve centralized logging in the web tier. This
section will cover those strategies.
Consider the web-tier for MyBank. After the Struts Forms are populated the
RequestProcessor
invokes the execute method on Action classes. Typically,
in the execute method you access enterprise data and business logic in session
ejbs and legacy systems. Since you want to decouple your web tier from the
business logic implementation technology (EJB for example – which forces you
to catch
RemoteException
) or the legacy systems, you are most likely to
introduce Business Delegates. (Business Delegate is a Core J2EE Pattern). The
Business Delegates might throw a variety of exceptions, most of which you want
to handle by using the Struts declarative exception handling. When using the
declarative exception handling you are most likely to log the exceptions in the
JSPs since the control passes out of your code at the end of the execute method.
Instead of adding the exception logging code to every JSP declared in Struts
Config file, you can create a parent of all the error JSPs and put the logging code
in there. Listing 9.14 shows a sample base JSP class.
There is quite a bit going on in Listing 9.14. First the class implements the
javax.servlet.jsp.HttpJspPage
interface. All the methods in this
interface except the
_jspService()
have concrete implementations. These
methods represent the various methods called during the JSP life cycle. In
particular you will recognize the service method that is similar to the servlet’s
service method. In the course of this method execution, the
_jspService()
method is also executed.
_jspService()
method is not implemented by the

Chapter 9. Struts and Exception Handling
203
page author or the developer. Instead it is auto generated by the servlet container
during JSP pre-compilation or run time. All the markup, tags and scriptlets
contained in the JSP get transformed into Java code and form the gist of the
_jspService()
method. The page author indicates that the jsp extends from
this java class by adding the directive
<%@ page extends="mybank.webtier.MybankBaseErrorJsp" %>
If all of the Error-JSPs extend from this abstract JSP class, centralized
logging is achieved. Before you celebrate for having nailed down the problem,
shall we remind you that this solution may not work in all servlet containers. The
reason for this is
JspFactory
and
PageContext
implementations are vendor
dependent. Normally the calls for
JspFactory.getDefaultFactory()
and
factory.getPageContext()
occur in the auto generated
_jspService()
method. It is possible that some of the implementations may not initialize these
objects we accessed in the
service()
method until they reach the
_jspService()
method !
Listing 9.14 Base JSP class for error pages
public abstract class MybankBaseErrorJsp implements HttpJspPage {
private ServletConfig servletConfig;
public ServletConfig getServletConfig() {
return servletConfig;
}
public String getServletInfo() {
return "Base JSP Class for My Bank Error Pages";
}
public void init(ServletConfig config)
throws ServletException {
this.servletConfig = config;
jspInit();
}
public void jspInit() {}
public void jspDestroy() {}
public void service(ServletRequest req, ServletResponse res)
throws ServletException, IOException {
HttpServletRequest request = (HttpServletRequest)req;
Struts Survival Guide – Basics to Best Practices
204
HttpServletResponse response = (HttpServletResponse)res;
JspFactory factory = JspFactory.getDefaultFactory();
PageContext pageContext = factory.getPageContext(
this, request, response,
null, // errorPageURL
false, // needsSession
JspWriter.DEFAULT_BUFFER,
true // autoFlush
);
Exception exc = pageContext.getException();
String trace =StackTraceTool.getStackTraceAsString(exc);
Logger.getLogger(getClass().getName()).error(trace);
//proceed with container generated code from here
_jspService(request,response);
}
public abstract void _jspService(HttpServletRequest request,
HttpServletResponse response)
throws ServletException, IOException;
}
Don’t panic. We have an alternate solution, which is less elegant but is
guaranteed to work across vendor implementations. Let us create a custom tag to
be invoked from all of the Error-JSPs. Listing 9.15 shows the logic for
doStartTag()
method of this custom tag. You will notice that it is very much
similar to the
service()
method in Listing 9.14. After obtaining the exception
object, it is logged by obtaining the
Logger
from Log4J. Since this tag is
invoked within the
_jspService()
method for the JSP, it is guaranteed to have
access to all of the implicit objects including
pagecontext
and
exception
in
every vendor implementation.
Listing 9.15 Custom Tag for exception logging
public class ExceptionLoggingTag extends TagSupport
{
public int doStartTag() throws ServletException, IOException
{
Exception exc = pageContext.getException();
String trace =StackTraceTool.getStackTraceAsString(exc);
LogFactory.getLog(getClass().getName()).error(trace);

Chapter 9. Struts and Exception Handling
205
return EVAL_BODY_INCLUDE;
}
}
For those of you who are visualizing the big picture, you will realize that
logging from the JSP is not the right way. However there is no ideal way to
achieve centralized logging without taking this approach. Each mechanism has
its drawbacks and tradeoffs. This is something you will experience whenever
design abstractions meet reality.
Until now you have seen a JSP based approach of exception handling and
logging. What if you have a requirement to handle the exceptions originating
from your application differently? Let us consider the application exceptions
from our very own MyBank. The exceptions originating from the MyBank are
subclasses of
MybankException
and
MybankRuntimeException
. When
using Struts as the framework in your web applications, then you will most likely
have a base Action class with trivial functionality common to all of the Actions
factored out. The base Action class is the ideal location to centralize the special
processing for the application exceptions. Listing 9.16 shows a sample base
Action,
MybankBaseAction
for the special processing just mentioned.
Listing 9.16 Mybank Base Action
public class MybankBaseAction extends Action {
public ActionForward execute(ActionMapping mapping,
ActionForm form, HttpServletRequest request,
HttpServletResponse response) throws Exception
{
ActionForward aForward = null;
MybankBaseForm aForm = (MybankBaseForm)form;
try {
preprocess(mapping, aForm, request, response);
aForward = process(mapping, aForm, request, response);
postprocess(mapping, aForm, request, response);
}
catch(MybankException ae) {
//Any Special Processing for Mybank goes here
if (ae.isLogged()) {
String trace = StackTraceTool.getStackMessage(ae);
LogFactory.getLog(getClass().getName()).error(
ae.getUniqueID() + ":" + trace);
ae.setLogged(true);
}

Struts Survival Guide – Basics to Best Practices
206
aForward = errorPage;
}
return aForward;
}
protected abstract void preprocess(ActionMapping mapping,
MybankBaseForm form, HttpServletRequest request,
HttpServletResponse response) throws Exception;
protected abstract void process(ActionMapping mapping,
MybankBaseForm form, HttpServletRequest request,
HttpServletResponse response) throws Exception;
protected abstract void postprocess(ActionMapping mapping,
MybankBaseForm form, HttpServletRequest request,
HttpServletResponse response) throws Exception;
}
This class implements the execute method, but defines three abstract methods
preprocess()
,
process()
and
postprocess()
which take the same
arguments as the
execute()
method but are invoked before, during and after
the actual processing of the request. In the execute method, the
MybankException is caught and any special processing required is done and
then re-throw the exception for the declarative exception handling to work or
programmatically forward to the relevant error page.
Note that you can achieve the same result by creating a custom exception
handler for the
MybankException
. The custom exception handler’s
execute()
method will do exactly what the catch block in Listing 9.16 is doing.
9.10 Reporting exceptions
Until now, you have looked at various exception logging strategies. After the
exception is logged, there is also a need to report the fatal and serious ones by
sending out emails and pager messages to the support team. Several approaches
exist and the choices are numerous, but in this chapter we would like to
consolidate the logging and error reporting for better coordination and control.
For this, let us look at what Log4J has to offer.
Listing 9.17 SMTP Appender setup
<appender name="Mybank-Mail"
class="org.apache.log4j.net.SMTPAppender">
<param name="Threshold" value="ERROR" />

Chapter 9. Struts and Exception Handling
207
<param name="Subject" value="Mybank Online has problems" />
<param name="From" value="prod-monitor@mybank.com" />
<!-- use commas in value to separate multiple recipients -->
<param name="To" value="prod-support@mybank.com " />
<param name="SMTPHost" value="mail.mybank.com" />
<layout class="org.apache.log4j.PatternLayout">
<param name="ConversionPattern" value="%m" />
</layout>
</appender>
As you already know, Log4J has three main components: Layout, Appender,
and Category (also known as Logger). Layout represents the format of the
message to be logged. Appender is an alias for the physical location at which the
message will be logged. And category is the named entity; you can think of it as
a handle for logging. Layouts and Appenders are declared in an XML
configuration file. Every category comes with its own layout and Appender
definitions. When you get a category and log to it, the message ends up in all the
appenders associated with that category, and all those messages will be
represented in the layout format specified in the XML configuration file.
Log4J comes with several standard appenders and one of them is called
SMTPAppender. By using the
SMTPAppender
, you can declaratively send
email messages when the errors occur in your system. You can configure the
SMTPAppender
like any other Appender – in the Log4J configuration file.
Listing 9.17 shows a sample setup for
SMTPAppender
. It takes a Threshold,
beyond which the Appender is operational, a subject for the email, the From and
To addresses, SMTP server name and the pattern for the email message body.
You can set up the category for the above
SMTPAppender
as
<category name=”com.mybank.webtier.action” additivity=”false”>
<priority value=”ERROR”/>
<appender-ref ref=”Mybank-Mail”/>
<appender-ref ref=”Mybank-ErrorLog”/>
</category>
With this setup all the exceptions that are caught in the base Struts Action –
MybankBaseAction
are reported to email address prod-support@mybank.com.
This is because the category name is identified by the package name for
MybankBaseAction
and while logging in Listing 9.16, we used the category
whose name is same as the fully qualified class name for
MybankBaseAction
which happens to be
com.mybank.webtier.action.MybankBaseAction
.
The email address prod-support@mybank.com is generally an email group
configured in the enterprise mail server to include several individual recipients.

Struts Survival Guide – Basics to Best Practices
208
Alternatively, you can explicitly specify multiple recipients in the To param in
Listing 9.17 with commas separating the recipients. You can take a similar
approach if you are logging in the Base JSP class of Listing 9.14 or the custom
tag class of 9.15. But what if you are logging the exception using a scriptlet in
the JSP. Although this approach is not recommended, suppose that you already
have it in place and want to retrofit the Log4J email feature. In this case, you still
can setup the appender as in Listing 9.17. But what about the jsp? What is the
fully qualified class name for the JSP? This depends on the vendor. For instance,
in weblogic a JSP in a directory called mortgage will reside in package named
jsp_servlet.mortgage
. Accordingly, for WebLogic, you can setup the
category as follows
<category name=”
jsp_servlet.mortgage
” additivity=”false”>
<priority value=”ERROR”/>
<appender-ref ref=”Mybank-Mail”/>
<appender-ref ref=”Mybank-ErrorLog”/>
</category>
Note that this setting is vendor specific and may not be portable to other
application servers. But this is a minor change and should not be a problem if
you decide to port to another application server say JBoss.
If you are wondering, “Email messages are all fine. How do I send pager
beeps?” The quick answer is “No problem”. Pagers have email addresses too.
You can ask your service provider to associate the email address with the pager.
Telecommunications companies and providers can use JavaMail API to
implement a PAGER transport protocol that sends email messages to
alphanumeric pagers. Similar approach works for Short Message Service (SMS)
too since you can email a SMS device.
9.11 Summary
In development environments, the developer can go back, fix the root cause of
the exception and move on. Not so in production systems. Exception handling is
a very crucial part of enterprise applications. It is the key to quick response from
the support team and resolution of the problems in working systems. A delayed
or no resolution can leave the customer frustrated. In the internet world, where
the competitor is just a click away, the importance of exception handling,
logging, reporting and resolving cannot be stressed enough. This chapter gave
you the insights into various gotchas on your way, common mistakes and
strategies to address them from a web tier perspective.
Chapter 10. Effectively extending Struts
209
C
Ch
ha
ap
pt
te
er
r
1
10
0
Effectively extending Struts
In this chapter:
1. You will learn how to extend Struts using PlugIn as an example
2. You will see how to construct a rudimentary page flow controller by
customizing ActionMapping
3. You will develop a mechanism for controlling validation for image button
form submission
4. You will see how to handle sensitive resubmissions in a generic way
rather than handling in every form
5. You will devise a strategy to avail DispatchAction-like functionality for
image button form submission
Struts is a generic framework. It works fine without modification. But there are
times when it has to be customized. And we are not talking about straightforward
customizations like extending the Form, Action and custom tags. We are
referring to the “hooks” that Struts provides to extend the framework. In this
chapter you will see several practical uses of these hooks.
A word of caution though: The customization features are probably going to
be around without modification until Struts 2.0. The main candidates for
overhaul are
ActionMapping
and
RequestProcessor
. The replacements
would be designed using Command, interceptor and chain of responsibility
patterns. However, since the above classes is part of public API, an alternative
strategy will definitely emerge to seamlessly migrate the customizations
discussed in this chapter so that none of the application code is affected and only
the customization code might change. Of course this is just a speculation.
To understand the hooks, consider a Struts Plugin for say, a slick menu
utility (Such a utility indeed exists. Check out http://struts-
menu.sourceforge.net). The menu utility needs to read the configuration data
from an external file. If the PlugIn were instead implemented as a servlet, it
would read the file name from an
<init-param>
in web.xml. The
<set-
property>
can do the same task for the PlugIn. The file name is set in the
struts-config.xml by using
<set-property>
.

Struts Survival Guide – Basics to Best Practices
210
<plug-in className=”mybank.example.MyMenuPlugIn”>
<set-property
property=”fileName”
value=”/WEB-INF/menudata.xml”/>
</plug-in>
A JavaBeans property with the same name (
fileName
) is then added to the
PlugIn class. The
<set-property>
tells the Struts framework to set the
corresponding JavaBeans property in the plugin class (or any class associated
with the configuration) with the
value
attribute of the
<set-property>
element. In addition, the Struts PlugIn implements the
PlugIn
interface from
org.apache.struts.action
package. Accordingly, the
MyMenuPlugIn
class is defined as:
public class MyMenuPlugIn implements PlugIn {
private String fileName;
public String getFileName() {
return fileName;
}
public void setFileName(String name) {
this.fileName = name;
}
public void init(ActionServlet servlet,
ModuleConfig config) throws ServletException {
.. ..
}
public void destroy() {
.. ..
}
}
During startup, Struts sets the
fileName
property using the corresponding
setter method (and other properties if exist) and finally calls the
init()
method.
Since PlugIns are the last ones to be configured by Struts, all other data from the
struts-config.xml is guaranteed to be loaded before the
init()
method is
invoked. The
init()
method is an opportunity to override and change any other
settings including the RequestProcessor! Frameworks like SAIF (stands for
Struts Action Invocation Framework. Available at http://struts.sourceforge.net)
utilize this to change the RequestProcessor to one of its own.
Chapter 10. Effectively extending Struts
211
Back to
<set-property>
. The
<set-property>
is the cornerstone of
hook-based customization. Its DTD entry is as follows:
<!ATTLIST set-property id ID #IMPLIED
property CDATA #REQUIRED
value CDATA #REQUIRED>
Both
property
and
value
are mandatory and
ID
is never set explicitly.
The following elements in struts-config.xml can be customized using
<set-
property>
: Form-bean, Exception, DataSource, PlugIn, RequestProcessor,
MessageResources, ActionForward and ActionMapping.
Customizing the action mapping
The
<action mapping>
is the most frequently customized element. One way
to customize action mapping is by setting the
className
in struts-config.xml as
shown in Listing 10.1.
Listing 10.1 struts-config.xml for custom action mapping
<action path="/submitCustomerForm"
className=
”mybank.struts.MyActionMapping”
type="mybank.app1.CustomerAction"
name="CustomerForm"
scope="request"
validate="true"
input="CustomerDetails.jsp">
<set-property property="buttons"
value="nextButton,saveButton,cancelButton" />
<set-property property="forwards"
value="page2,success,cancel" />
<forward name="page2" path="Page2.jsp" />
<forward name="success" path="success.jsp" />
<forward name="success" path="cancel.jsp" />
</action>
The
className
attribute tells Struts to use the specified class
(
mybank.struts.MyActionMapping
) for storing the action-mapping
configuration.
MyActionMapping
extends
ActionMapping
in the package
org.apache.struts.action.
In addition it has a JavaBeans property for
each of the
<set-property>
elements.
MyActionMapping
class is shown
below:
public class MyActionMapping extends ActionMapping {
private String buttons;

Struts Survival Guide – Basics to Best Practices
212
private String forwards;
//getters and setters for actions and forwards
public MyActionMapping() { }
}
The custom action mapping is now ready to use. During startup, Struts
instantiates the subclass of ActionMapping (instead of ActionMapping itself) and
sets its JavaBeans properties to the values specified in the corresponding
<set-
property>
element. As you know, the
execute()
method in the Action
accepts
ActionMapping
as one of the arguments. When the
execute()
method in the
CustomerAction
is invoked at runtime,
MyActionMapping
is
passed as the
ActionMapping
argument due to the setting in Listing 10.1. It can
then be cast to
MyActionMapping
to access its JavaBeans properties as follows:
public ActionForward execute(ActionMapping mapping,
ActionForm form, HttpServletRequest request,
HttpServletResponse response) throws Exception {
MyActionMapping customMapping =
(MyActionMapping) mapping;
String actions = customMapping.getButtons();
..
..
}
Listing 10.2 struts-config.xml with global custom action mapping
<action-mappings
type=”mybank.struts.MyActionMapping”
>
<action path="/submitCustomerForm"
type="mybank.app1.CustomerAction"
name="CustomerForm"
scope="request"
validate="true"
input="CustomerDetails.jsp">
<set-property property="buttons"
value="nextButton,saveButton,cancelButton" />
<set-property property="forwards"
value="page2,success,cancel" />
<forward name="page2" path="Page2.jsp" />
<forward name="success" path="success.jsp" />
<forward name="success" path="cancel.jsp" />
</action>

Chapter 10. Effectively extending Struts
213
</action-mappings>
There are several uses of simple customizations like this. As you will see
later in this chapter, a lot of code that needs to be often repeated everywhere can
be eliminated by simple customizations. While doing so, a single customized
ActionMapping will be used for all the action mappings in the application.
Setting the
className
for individual action mapping as shown in Listing 10.1 is
painful. The alternative is to specify the
type
attribute on the
<action-
mappings>
element as shown in Listing 10.2. This tells Struts to use the
corresponding ActionMapping class for all the
<action>
elements. Listing 10.2
forms the basis for some of the utilities we develop in this chapter – a
rudimentary page flow controller, auto-validation feature for image based form
submissions, a generic mechanism to handle sensitive form resubmissions and a
DispatchAction-like facility for image based form submissions. All of these will
use the base Action class and base form conceived in Chapter 4 in conjunction
with the HtmlButton described in Chapter 6 for form submission.
10.1 A rudimentary page flow controller
In the last section you have seen how ActionMapping can be customized. Let us
use the customized action mapping to build a rudimentary page flow controller.
Every Action has to render the next view to the user after successful business
logic invocation. This would mean that a standard
mapping.findForward()
in every method of yours. The rudimentary page flow controller eliminates this
by providing this information in a declarative manner in struts-config.xml
utilizing
MyActionMapping
. That information is used at runtime to
automatically decide which page to forward to. The reason why the page flow
controller is called rudimentary is because it has a serious limitation. If the page
transitions are dynamic, then it cannot work. The controller serves as an example
for customized action mapping usage. Some of the groundwork for the page flow
controller is already done in Listing 10.2, in case you didn’t know it already!). In
particular pay attention to the two lines:
<set-property property="buttons"
value="nextButton,saveButton,cancelButton" />
<set-property property="forwards"
value="page2,success,cancel" />
This first property (
buttons
) is a comma-separated name of all the buttons
in the form. The second property (
forwards
) is a comma-separated name of the
views rendered to the user when the corresponding buttons are selected. The
view names refer to the forwards instead of the actual JSPs. Since the
forwards
Struts Survival Guide – Basics to Best Practices
214
is provided declaratively, the task of deciding the next view can be refactored
into the base Action. This functionality has been added to the
MybankBaseAction
from Chapter 4. The code is shown in Listing 10.3 with the
changes highlighted in bold.
Listing 10.3 The new and modified methods in MybankBaseAction
public MybankBaseAction extends Action {
public ActionForward execute(ActionMapping mapping,
ActionForm form, HttpServletRequest request,
HttpServletResponse response) throws Exception {
...
MybankBaseForm myForm = (MybankBaseForm) form;
MyActionMapping myMapping = (MyActionMapping) mapping;
String selectedButton =
getSelectedButton(myForm, myMapping);
preprocess(myMapping, myForm, request, response);
// Returns a null forward if the page controller is used.
ActionForward forward =
process(myMapping, myForm, request, response);
postprocess(myMapping, myForm, request, response);
...
if (forward == null) { // For page controller only
String forwardStr = mapping.getForward(selectedButton);
forward = mapping.findForward(forwardStr);
}
return forward;
}
protected String getSelectedButton(MyActionForm form,
MyActionMapping mapping) {
String selectedButton = null;
String[] buttons = mapping.getButtons();
for (int i=0;i<buttons.length;i++) {
HtmlButton button = (HtmlButton)
PropertyUtils.getProperty(form, buttons[i]);
if (button.isSelected()) {
selectedButton = buttons[i];
break;
}
}
return selectedButton;
}

Chapter 10. Effectively extending Struts
215
}
First notice that the
ActionMapping
is cast to
MyActionMapping
. Also
notice that the signature of the three abstract methods –
process()
,
preprocess()
and
postprocess()
have been changed to accept
MyActionMapping
as the argument instead of
ActionMapping
. The page flow
controller logic is implemented at the end of
execute()
method. The logic is
simple: The code first checks which button has been selected. This is done in the
getSelectedButton()
method. It then retrieves the corresponding
ActionForward and returns it. The RequestProcessor subsequently renders the
view as usual. Since the code has been refactored into the base Action class, the
child classes need not worry about
mapping.findFoward()
. They can simply
return null.
MybankBaseAction
is now capable of automatically selecting the
appropriate ActionForward.
10.2 Controlling the validation
The default mechanism in Struts to skip validations when a button is pressed is
by using
<html:cancel>
in the JSP. Behind the scenes, this tag creates a button
with a name –
org.apache.struts.taglib.html.CANCEL
. When the page
is finally submitted, one of the first things RequestProcessor does is to check if
the request has a parameter with the name
org.apache.struts.taglib.html.CANCEL
. If so, the validation is
cancelled and the processing continues. While this may be acceptable for grey
buttons (even those pages with multiple buttons), image buttons cannot be named
as
org.apache.struts.taglib.html.CANCEL
due to their peculiar
behavior. When images are used for form submission, the browsers do not submit
the name and value, but the X and Y coordinates of the image. This is in
accordance with the W3C specification. Even though an image corresponding to
Cancel was pressed, the RequestProcessor is oblivious to this fact. It innocently
requests the page validation and the end user is only but surprised to see the
validation pop up! This is an area where some minor customization goes a long
way. Let us start by customizing the action mapping in the struts-config.xml.
Listing 10.4 shows the new addition in bold.
In addition to the existing
<set-property>
elements, a new
<set-
property>
is added for a property called
validationFlags
. This is a comma-
separated list of
true
and
false
telling Struts if validation needs to be
performed when corresponding
buttons
(also comma-separated values) are
selected on the browser. The
validationFlags
in the Listing are interpreted
as: “When next and cancel buttons are selected, no validation is necessary. When
save button is selected, validation is required”. In addition another interesting

Struts Survival Guide – Basics to Best Practices
216
change you will find in Listing 10.4 is that the validation is turned off by setting
validate=false
. With this setting, the validation in RequestProcessor is
completely turned off for all buttons. The validation will be explicitly invoked in
the base Action’s
execute()
method. Listing 10.5 shows the
execute()
method. The changes are shown in bold.
Listing 10.4 struts-config.xml with global custom action mapping
<action-mappings type=”mybank.struts.MyActionMapping”>
<action path="/submitCustomerForm"
type="mybank.app1.CustomerAction"
name="CustomerForm"
scope="request"
validate="false"
input="CustomerDetails.jsp">
<set-property property="buttons"
value="nextButton,saveButton,cancelButton" />
<set-property property="validationFlags"
value="false,true,false" />
<forward name="page2" path="Page2.jsp" />
<forward name="success" path="success.jsp" />
<forward name="success" path="cancel.jsp" />
</action>
</action-mappings>
The new
validationFlags
setting requires some minor code changes to
the in
MyBankBaseAction
. The changes involve explicitly running the form
validation and saving the ActionErrors. The key logic deciding if the validation is
required for the selected button is in
MyActionMapping
class in
isValidationRequired()
method. The method requires the selected button
name as an argument. A sample implementation for the
isValidationRequired()
method is as follows:
public boolean isValidationRequired(String selectedButton) {
String validationStr = validationFlagMap.get(selectedButton);
return Boolean.valueOf(validationStr);
}
The above method uses the selected button name to lookup a
HashMap
named
validationFlagMap
. As you know, the JavaBeans properties –
buttons
and
validationFlags
were provided as comma separated values.
Parsing through the comma separated values at runtime for every user is a sheer
waste of time and resources. Hence the comma-separated values are parsed in
Chapter 10. Effectively extending Struts
217
their corresponding setters to create a
HashMap
with the button name as the key.
This ensures a fast retrieval of the values.
Listing 10.5 execute() method for controlling validation
Public MybankBaseAction extends Action {
public ActionForward execute(ActionMapping mapping,
ActionForm form, HttpServletRequest request,
HttpServletResponse response) throws Exception {
...
MybankBaseForm myForm = (MybankBaseForm) form;
...
MyActionMapping myMapping = (MyActionMapping) mapping;
String selectedButton =
getSelectedButton(myForm, myMapping);
boolean validationReqd =
myMapping.isValidationRequired(buttons[i]);
if (validationReqd) {
ActionErrors errors =
myForm.validate(myMapping, request);
if (errors != null && ! errors.isEmpty()) {
saveErrors(request, errors);
return myMapping.getInput();
}
}
preprocess(myMapping, myForm, request, response);
ActionForward forward =
process(myMapping, myForm, request, response);
postprocess(myMapping, myForm, request, response);
...
return forward;
}
}
A sample implementation of the setters and the
resolve()
method is shown
below:
public void setButtons(String buttonNames) {
this.buttons = buttonNames;
resolve();
}

Struts Survival Guide – Basics to Best Practices
218
public void setValidationFlags(String flags) {
this.validationFlags = flags;
resolve();
}
public void resolve() {
if (buttons != null && validationFlags != null) {
validationFlagMap = new HashMap();
StringTokenizer stButtons = new StringTokenizer(buttons ",");
StringTokenizer stFlags =
new StringTokenizer(validationFlags, ",");
while (stButtons.hasMoreTokens()) {
String buttonName = stbuttons.nextToken();
String flagValue = stFlags.nextToken();
validationFlagMap.put(buttonName, flagValue);
}
}
}
As seen above, every setter invokes the
resolve()
method. When the final
setter is invoked, all the attributes are non-null and the
if
block in
resolve()
is entered. At this point every instance variable is guaranteed to be set by the
Struts start up process. The
resolve()
method creates a
StringTokenizer
and parses the comma-delimited values to create a
HashMap
with button name as
the key and the validation flag as the value. This
HashMap
thus created is utilized
at runtime for a faster retrieval of flag values in the
isValidationRequired()
method.
10.3 Controlling duplicate form submissions
In chapter 4, you looked at how duplicate form submission can be handled
effectively at individual form level. Here is a recap.
The
isTokenValid()
is invoked in the
execute()
method (or one its
derivatives).
If the page is the last in a multi-page form, the token is reset.
After processing, the user is forwarded or redirected to the next page.
If the next page thus shown also has a form with sensitive submission, the
saveToken()
is called to set the token in session just before forwarding
to the page.
Chapter 10. Effectively extending Struts
219
Page after page, the logic remains the same as above with two blanks to be filled.
They are:
1. Should the
execute()
(or any equivalent method in Action) method check
if the submission was valid for the current page? (through the
isTokenValid()
method)?
2. Does the page rendered after processing (in
execute()
or any equivalent
method in Action) has sensitive submissions needs?
Two approaches emerge to fill in the blanks. The first is to use Template
Method pattern and encapsulate the logic of handling sensitive resubmissions in
the base class and delegate the task of filling the two blanks to the child classes
by declaring two abstract methods in the base Action. While this sounds as the
logical thing to do, there is an even better way. You got it – customizing Struts.
For a moment consider what would the two methods do if you chose the
former option? The first method would simply provide a boolean value (without
any logic) indicating whether the page should handle duplicate submission or
not. The second method would decide (a simple if logic) whether the next view
rendered needs the token in session. This information is best provided as
configuration information and that is exactly what the forthcoming customization
does.
Listing 10.6 struts-config.xml for duplicate form submission handling
<action-mappings
type=”mybank.struts.MyActionMapping”
>
<action path="/submitCustomerForm"
type="mybank.app1.CustomerAction"
name="CustomerForm"
scope="request"
validate="true"
input="CustomerDetails.jsp">
<set-property property="validateToken" value="true" />
<set-property property="resetToken" value="true" />
<forward name="success"
className="mybank.struts.MyActionForward"
path="success.jsp">
<set-property property="setToken" value="true" />
/forward>
<forward name="success" path="cancel.jsp" />
</action>
</action-mappings>
Struts Survival Guide – Basics to Best Practices
220
Listing 10.6 shows all the customizations needed to achieve what is needed.
The application flow that is used is the same flow as before:
CustomerForm
is a
single page form. On submit, a success page is shown. On Cancel, cancel.jsp is
shown. However the only twist is that success.jsp is treated as a JSP with a form
that needs to avoid duplicate submission (For simplicity purposes, we are not
showing the
redirect=true
setting).
The action mapping in listing 10.6 provides all the information needed for
sensitive resubmission logic to be retrieved in a generic manner in the base
Action class. Before looking at the actual code in
MybankBaseAction
, let us
look at what Listing 10.6 conveys. It has two new
<set-property>
elements.
The first setting,
validateToken
is used to determine if token validation is
necessary on entering the
execute()
. The second setting,
resetToken
is
useful for the multi-page form scenario when the token has to be reset only on
the final page (See chapter 4 for more information). These two settings fill in the
first blank.
Next, there is a new kind of
ActionForward
called
mybank.struts.MyActionForward
. This is an example of extending the
ActionForward
class to add custom settings. The
<forward>
itself now
contains a
<set-property>
for a JavaBeans property called
setToken
on
MyActionForward
. This setting fills the second blank.
Now, let us look at the actual code that handles form submission. This code
goes into the base Action class and is shown in Listing 10.7. The new code is
shown in bold. In addition, the listing includes all the useful code discussed so
far that should make into the base Action (except page flow Controller). You can
use this Listing as the template base Action for real world applications.
The
getValidateToken()
method retrieves the
validateToken
(
<set-
property>
) from
MyActionMapping
. This setting tells the framework whether
to check for sensitive resubmissions on the current page. After the check is done,
duplicate form submissions need to be handled as prescribed by your business.
For regular submissions, retrieve the ActionForward for the next page. If the next
page happens to be one of those requiring a token in the Http Session,
saveToken()
is invoked and then the ActionForward is returned.
Listing 10.7 The complete base Action class
public class MybankBaseAction extends Action {
public ActionForward execute(ActionMapping mapping,
ActionForm form, HttpServletRequest request,
HttpServletResponse response) throws Exception {
// Add centralized logging here (Entry point audit)
// Check here if the user has r
ights to this application
// or retrieve app specific profile for the user

Chapter 10. Effectively extending Struts
221
ActionForward forward = null;
MybankBaseForm myForm = (MybankBaseForm) form;
// Set common MybankBaseForm variables using request &
// session attributes for type-
safe access in subclasses.
// For e.g. myForm.setUserProfile(
// request.getAttribute("profile"));
MyActionMapping myMapping = (MyActionMapping) mapping;
String selectedButton =
getSelectedButton(myForm, myMapping);
boolean validationReqd =
myMapping.isValidationRequired(buttons[i]);
if (validationReqd) {
ActionErrors errors = myForm.validate(myMapping, request);
if (errors != null && ! errors.isEmpty()) {
saveErrors(request, errors);
return myMapping.getInput();
}
} //if there are errors through form validation,
//return immediately
//Check if token is valid, but dont reset token
boolean tokenIsValid = true;
if (myMapping.getValidateToken()) { // validate token
tokenIsValid = isTokenValid(request);
}
if (tokenIsValid) {
preprocess(myMapping, myForm, request, response);
forward = process(myMapping, myForm, request, response);
postprocess(myMapping, myForm, request, response);
}
else { //duplicate submission
//Adopt a strategy to handle duplicate submissions
//This is up to you and unique to your business
}
if (forward.getClass().equals(
mybank.struts.MyActionForward.class) {
MyActionForward myForward = (MyActionForward) forward;
Struts Survival Guide – Basics to Best Practices
222
/* Reset the token if there are no errors and
resetToken atteibute in ActionMapping is true
Note that in multipage scenarios, resetToken is
false in the ActionMapping
*/
if (!hasErrors(request) && myMapping.getResetToken())
{
resetToken(request);
}
/* If there are no errors and next page requires
a new token, set it
The setToken is false in the ActionForwards
for that ActionMapping. Hence a multipage
form flow has a single token – a unique identifier
for the business transaction
*/
if(myForward.getSetToken() && !hasErrors(request)) {
// next page is a form with sensitive resubmission
saveToken(request);
}
}
// Add centralized logging here (Exit point audit)
return forward;
}
}
10.4 DispatchAction for Image Button form
submissions
DispatchAction
and
LookupDispatchAction
work by invoking a method
on the Action whose name matches a predefined request parameter. This works
fine for form submissions when all the buttons have the same name but does not
work for image button form submissions. In this section, we will further
customize the ActionMapping to support a DispatchAction like feature for image
based form submissions. This can be used in an enterprise application without a
second thought. It will definitely prove useful timesaver.
Chapter 10. Effectively extending Struts
223
As before, a new
<set-property>
needs to be added to the struts-
config.xml as follows:
<set-property property="methods"
value="doNext,saveCustInfo,cancelTx" />
This setting works in conjunction with the
<set-property>
for
buttons
property in
MyActionMapping
. The
methods
is a comma-separated list of
method names to be invoked for every button name defined in the comma-
separated
buttons
<set-property>
. A subclass of
MybankBaseAction
called
MyDispatchAction
is created to provide the DispatchAction-like
features. This class has concrete implementation for
MybankBaseAction
’s
process()
method. To use this class, you should subclass the
MyDispatchAction
. At runtime, the
MyDispatchAction
invokes appropriate
method from your subclass via reflection. The
process()
method is shown in
Listing 10.8.
The underlying logic is almost similar to previous utilities. In the
process()
method, the method to be invoked for the currently selected button
is retrieved from
MyActionMapping
. Then, using the
MethodUtils
(another
helper class from BeanUtils package), the actual method is invoked. The actual
method name to be invoked is specified in the action mapping. These methods
are similar to any method you would write had it been a regular DispatchAction.
The methods have the fixed signature:
public ActionForward methodName(MyActionMapping mapping,
MybankBaseForm form, HttpServletRequest request,
HttpServletResponse response) throws Exception
Listing 10.8 Base Action class with DispatchAction like features
public class MyDispatchAction extends MybankBaseAction {
protected ActionForward process(MyActionMapping mapping,
MybankBaseForm form, HttpServletRequest request,
HttpServletResponse response) throws Exception
{
ActionForward forward = null;
String selectedButton =
getSelectedButton(myForm, mapping)
String methodName = mapping.getMethod(button);
Object[] args = {mapping, form, request, response};
// this invokes the appropriate method in subclass
Struts Survival Guide – Basics to Best Practices
224
forward = (ActionForward)
MethodUtils.invokeMethod(this, ,methodName, args);
return forward;
}
}
10.5 Summary
In this chapter you looked at how to effectively customize Struts to reap
maximum benefit and minimize the burdens while developing web applications.
Hopefully you were able to realize the strengths of extending Struts and its
hidden potential for making your application cleaner and better.

Struts Survival Guide – Basics to Best Practices
225
I
IN
ND
DE
EX
X
Action, 24, 28, 29, 32, 33, 34, 37, 38,
39, 40, 48, 52, 53, 59, 62, 63, 66, 67,
69, 74, 76, 78, 80, 82, 83, 84, 85, 87,
88, 89, 90, 92, 93, 94, 97, 108, 110,
112, 113, 114, 128, 129, 130, 131,
142, 146, 148, 164, 172, 189, 190,
192, 193, 195, 200, 203, 205, 207,
208, 210, 211, 212, 213, 214, 215,
217, 218, 220, 221
ActionError, 35, 36, 37, 40, 44, 57, 64,
103, 106, 123, 125, 126, 127, 170,
192, 193, 194
ActionErrors, 35, 36, 37, 40, 43, 57,
101, 102, 106, 112, 113, 114, 124,
125, 126, 193, 214, 215, 218
ActionForm, 23, 28, 29, 32, 33, 36, 37,
38, 41, 42, 43, 51, 52, 53, 55, 61, 62,
63, 68, 75, 76, 78, 79, 84, 85, 90, 94,
99, 100, 102, 106, 107, 108, 109,
110, 111, 115, 120, 121, 122, 123,
128, 129, 130, 131, 142, 173, 189,
192, 203, 210, 212, 215, 218
ActionForward, 28, 29, 33, 34, 37, 38,
53, 62, 76, 79, 85, 92, 94, 108, 112,
114, 129, 189, 190, 192, 193, 203,
209, 210, 212, 213, 215, 218, 221
ActionMapping, 28, 29, 31, 32, 33, 34,
36, 37, 38, 40, 42, 43, 48, 51, 53, 54,
55, 57, 61, 62, 67, 68, 69, 72, 74, 75,
76, 77, 78, 79, 82, 83, 85, 94, 108,
129, 189, 192, 203, 207, 209, 210,
211, 212, 213, 215, 218, 220
ActionServlet, 23, 24, 28, 29, 30, 31,
47, 48, 49, 67, 80, 81, 106, 208
Bean Tags
MessageTag, 48, 54, 56, 61, 63, 80,
130, 132, 133, 138, 139, 154, 171,
176
WriteTag, 132, 133, 138, 139, 141,
143, 145, 147
Business Logic, 17, 90, 91, 113, 114
Character encoding, 173, 174
Checkbox, Smart, 121
Commons Validator, 99, 100, 101, 102,
106, 107, 111, 115
Configurable Controller, 21
CORBA, 29, 91
Core J2EE Patterns, 148, 195
Business Delegate, 90, 91, 195, 200
Front Controller, 195
Intercepting Filter, 195
ValueListHandler, 149, 150
CSS, 117, 122, 123, 146, 148, 160
Custom Tag, 41, 117, 202
Data Transfer Object, 23, 84, 90, 92
DispatchAction, 66, 74, 75, 76, 77, 78,
79, 80, 90, 97, 131, 207, 211, 220,
221
displayTag, 146, 148
DynaActionForm, 96, 97, 99, 107, 108,
109, 110, 111, 115
DynaValidatorActionForm, 114
DynaValidatorForm, 109, 111, 115
EJB, 16, 29, 91, 96, 97, 149, 183, 186,
190, 195, 199, 200
Errors.footer, 43, 44
Errors.header, 43, 44
Exception Handling, 179, 180, 182, 190
ExceptionConfig, 192
ExceptionHandler, 191, 192, 193
Extension point, 37
Fat Controller, 15, 20, 37
Form-bean, 38, 39, 47, 48, 51, 55, 57,
68, 78, 81, 209
ForwardAction, 39, 66, 67, 68, 69, 70,
72, 73, 78, 83, 87, 97, 110, 146, 160
Handler, 21, 22, 23, 24, 148, 149, 150,
192
Html Tags
BaseTag, 41, 42, 53, 54, 59, 154, 156
CancelTag, 54, 55, 143, 154, 213
ErrorsTag, 41, 43, 44, 125
FileTag, 120
FormTag, 41, 42, 43, 53, 54, 55, 120
HtmlTag, 53, 54, 59, 154, 156, 176
ImageTag, 128, 130
LinkTag, 58, 59, 67, 68, 69, 70, 74,
83, 89, 97, 110
SubmitTag, 41, 54, 55, 61, 77, 80,
110, 121, 130, 143, 154
TextTag, 41, 42, 43, 54, 55, 61, 121,
143
HtmlTable, 145, 146, 148
HTTP Forward, 35, 73

Struts Survival Guide – Basics to Best Practices
226
HTTP Redirect, 35
HttpSession, 87, 89, 146, 149, 165, 166,
170
I18N, 80, 136, 148, 162, 164, 165, 169,
170, 171, 172, 176, 177, 193
DateFormat, 168
Locale, 37, 80, 138, 162, 163, 164,
165, 166, 167, 168, 169, 170, 171,
173, 194
MessageFormat, 168, 169, 170
NumberFormat, 167, 168
PropertiesResourceBundle, 166, 167
ResourceBundle, 37, 163, 166, 169,
171
ImageButtonBean, 128, 129, 130, 131
IncludeAction, 66, 73, 74
jsp
include, 73, 74, 153, 154, 155, 160
JSTL, 104, 117, 133, 135, 136, 137,
138, 139, 141, 151, 171
EL, 117, 136, 137, 138, 139
List based Forms, 141
Logic Tags, 134, 140
EqualTag, 134, 135, 140
IterateTag, 135, 136, 143, 145, 147
LookupDispatchAction, 63, 66, 78, 79,
80, 90, 97, 131, 171, 220
Message Resource Bundle, 37, 40, 43,
44, 47, 48, 51, 56, 57, 63, 67, 79,
106, 127, 130, 170
Multiple, 132
MessageResources, 64, 82, 169, 209
Model 1 Architecture, 17, 18
Model 2 Architecture, 18, 19
Multi-page Lists, 145
MVC, 15, 18, 19, 20, 21, 22, 26, 66, 67,
70, 97, 148
MybankBaseAction, 84, 85, 90, 203,
205, 212, 213, 215, 218, 220, 221
MybankBaseForm, 84, 85, 203, 212,
215, 218, 221
MybankException, 196, 197, 198, 199,
203, 204
MybankRuntimeException, 197, 203
native2ascii, 176
Pager Taglib, 145, 146
Presentation Logic, 17, 163, 164
Request Handler, 21, 22
RequestProcessor, 28, 29, 31, 32, 33,
34, 37, 39, 40, 41, 42, 43, 47, 50, 51,
52, 55, 82, 112, 114, 159, 165, 173,
192, 200, 207, 208, 209, 213
StackTraceUtil, 197, 198
Struts Configuration File, 37
Struts Console, 95
Struts-EL, 117, 139, 140, 141, 151
Struts-GUI, 94
SwitchAction, 66, 82, 83
Tiles, 40, 74, 82, 117, 119, 152, 153,
154, 155, 156, 157, 158, 159, 160,
161, 162, 171, 172, 177
TilesRequestProcessor, 40, 159, 160
Tomcat, 15, 25, 26, 46, 59, 60, 72, 118,
137
UniqueIDGenerator, 196
URL rewriting, 58
validation.xml, 100, 101, 102, 104, 105,
106, 112
validation-rules.xml, 100, 101, 102,
103, 104, 105, 107
ValidatorActionForm, 99, 114
ValidatorForm, 99, 106, 107, 111, 112,
115
View Data Transfer Object, 23, 29, 84
XDoclet, 95

