TOPEX Multiaccess
User Manual: TOPEX Multiaccess Alloy Computer Products - Australia - s
Open the PDF directly: View PDF ![]() .
.
Page Count: 239 [warning: Documents this large are best viewed by clicking the View PDF Link!]

PDF generated using the open source mwlib toolkit. See http://code.pediapress.com/ for more information.
PDF generated at: Mon, 06 Aug 2012 22:48:26 UTC
Multiaccess
Contents
About topex 1
Compatible Cards 2
Multiaccess Structure 2
Power Card 3
Processor Card 4
ISDN Card 7
Voip Card 9
GSM Card 10
Main Software 12
About centrala 12
SIP features 12
H323 apc 15
Mspd 16
Rtprx pool 21
Rtptx pool 21
Recmail 22
Smtpmail 23
Sendsms 24
Mysql client 25
Radius billing 25
Pgsql sip pool 26
Pgsql pcodedel 26
Pgsql pcode 27
Pgsql pcodeerror 27
Pgsql sms 28
Administration 29
Default Passwords 29
Operating Sistem Structure 30
Telnet commands 32
OAM 48
Connecting with OAM 48
OAM / Card Map 50
OAM / Installing a GSM card 51
OAM / Installing a PRI card 55
OAM / Installing a VOIP card 58
OAM / Installing a MPAI card 67
OAM / E1R2 67
OAM / Call Flow 72
OAM / Create a Trunk 74
OAM / Access IN 75
OAM / Call Directions 77
OAM / Routing Table 85
OAM / Access Out 106
OAM / Max Call duration 107
OAM / Overflow 108
OAM / Monitor calls 111
OAM / SIM Management 116
OAM / DTMF 118
OAM / DISA 120
OAM / Forward Incoming GSM Calls 121
OAM / Send SMS 123
OAM / Check Credit 124
OAM / ALARMS 125
OAM / Check GSM Signal 126
OAM / Download Billing 127
OAM / Download ASR 133
How To's 134
Connect to Multiaccess or Qutex 134
Change IP Address 136
Change Date and Time 138
Check harddisk for problems 139
Clean restart/shutdown 140
Stop/Start Logs 141
Reroute on cause X 142
Upgrade Software 143
Call Control 147
CCTL features 147
CCTL flow 148
AccessIn 152
Users and Classes 152
Routing table 153
AccessOut 155
Configuration Files 156
Exec.cfg 156
Trafic.cfg 168
Dirname.cfg 170
Card.cfg 171
Port.cfg 172
Dir.cfg 174
Voip.cfg 181
Diripin.cfg 182
Diripout.cfg 183
Group.cfg 185
Sip pbx.cfg 187
Sip redirect.cfg 190
Prepaid.cfg 190
SIPusers.cfg 191
Voice mail.cfg 196
Simindex.cfg 197
Register users.cfg 197
Extended Port Config 199
Extended port config 199
VCSS files for Wavecom 200
Billing 203
Billing generic (PGSQL, MySQL, MSSQL) 203
PgSQL Billing 204
Mysql Billing 205
Dd-mm-yy.tax 208
Aplications 216
Voicemail2Email 216
Multiaccess Config for Simserver 219
Clean hdd.sh script 221
GSM Cell Selection 222
Voicemail 222
Glossary 227
References
Article Sources and Contributors 230
Image Sources, Licenses and Contributors 232

About topex 1
About topex
TOPEX is among the most innovative, fast growing European manufacturer of telecommunication equipment,
providing a wide range of telecommunication applications. The company has over 18 years of experience in
research, development and manufacture of both civil and military telecommunication devices.Our company acts like
a bridge between analog, digital, IP telephony systems in wired and wireless environments.
TOPEX philosophy is built around the syntagm "everything connects".This is the expression of our credence, vehicle
for the internal evolution of the company and interface for external contacts.
TOPEX's leveraged expertise includes: Next Generation Network solutions {Softswitch, Media Gateways for TDM,
VoIP, GSM and CDMA (2G,3G), Signaling Gateways (SS7, ISDN, R2, SIP, H323)}, Broadband Wi-Fi Mobile
Routers, Fixed-Mobile Terminals (2G, 3G) and ATC Voice Communication Systems.
TOPEX products address the needs of business today that demand communication convergence at lower costs and
the ability to exploit the Internet and existing data networks with VoIP for cheaper cost calling.
All the products are developed by TOPEX own Research & Development Department which has as its main goal the
provision of future-ready telecommunications equipments.
Our company offers you profitable and practical solutions: the entire range of equipments is very easy to customize
and enhance (flexible, upgradeable configurations). In order to achieve effective and flawless manufacturing of its
products.
TOPEX has organized complete production facility in Europe. The company has proven the quality of its resources
being permanently present in the most important markets on Europe. It delivers its products worldwide through a
global distributor network.
2
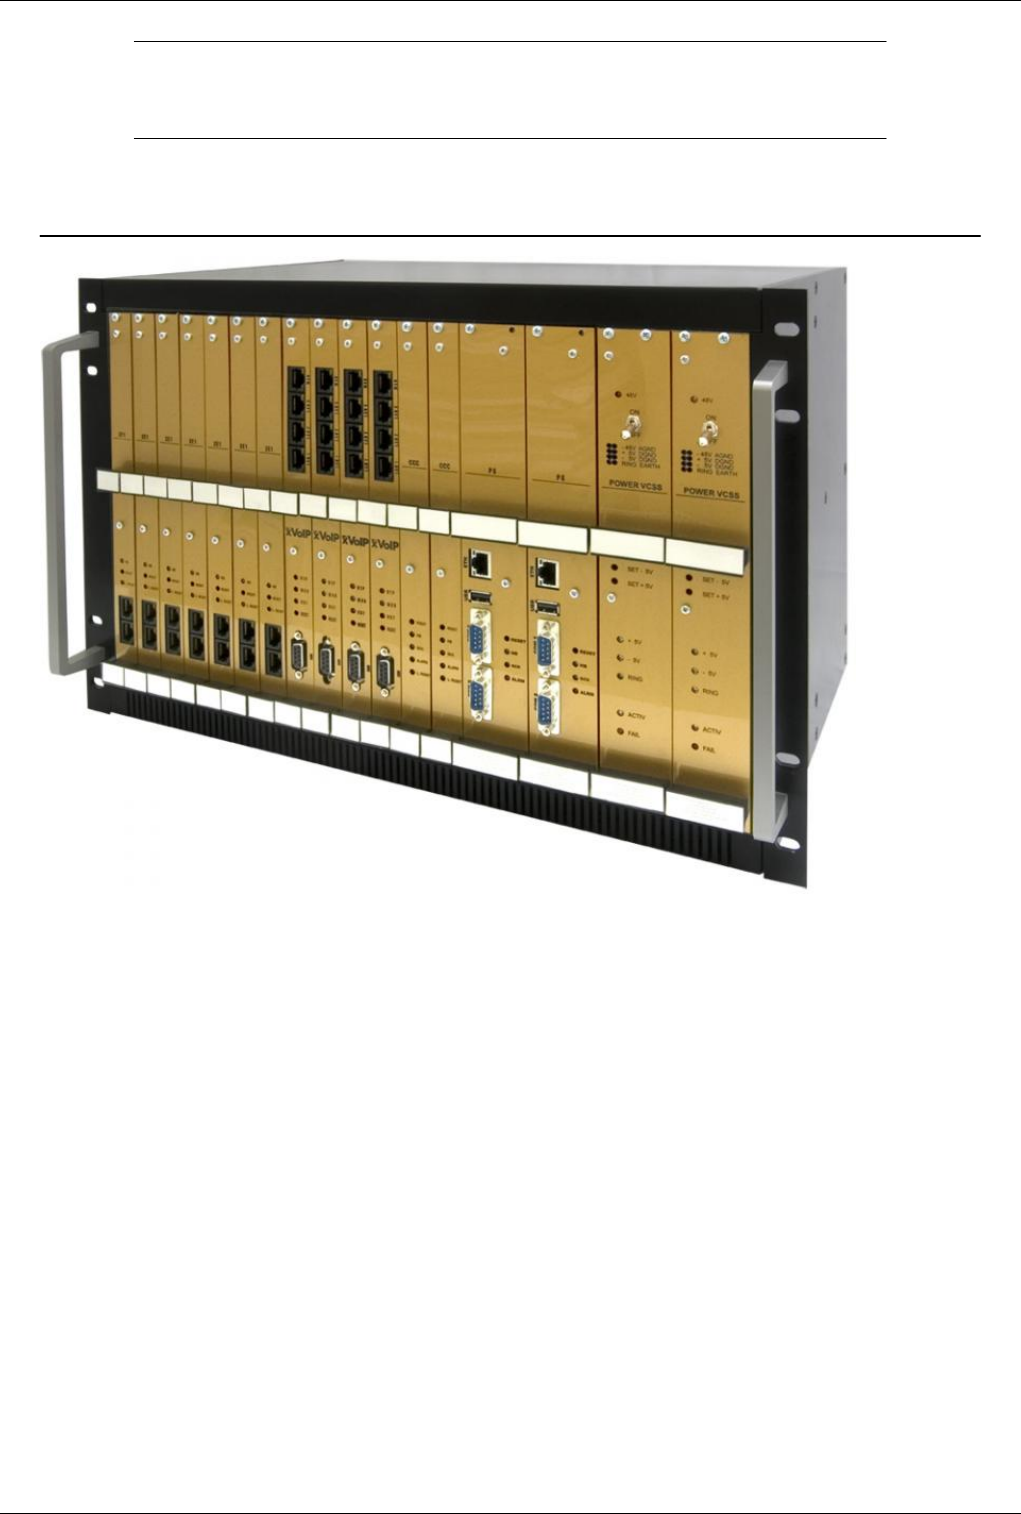
Compatible Cards
Multiaccess Structure
Hardware Structure
€ 19" 6U cabinet rack
* One power supply card
* E1 digital trunk card
* Main processor (PG) card
* Up to 16 cards that may be:
••••••• - Cards with two mobile modules each
••••••• - FXO cards with 8 interfaces each
••••••• - E&M cards with 4 junctions each
••••••• - FXS cards with 8 junctions each
••••••• - ISDN cards
••••••• - VoIP cards, etc.
* Antennas for the mobile network, which can be:
••••••• - Individual antenna for each GSM, CDMA or UMTS channel (various external stick antennas with magnetic
base and RF cable)
••••••• - 1:16 or 1:32 concentrator (splitter) for use with high-gain, directional Yagi antennas
Multiaccess Structure 3
Cabinet rack description
€ The multiAccess system is integrated in a 19’’ rack. The height of the equipment is 6U and the depth is 30 cm.
€€ The cabinet rack is made of aluminum.
€€ The front panel of the rack is open, equipped with guides for the plug-in cards.
€€ When not all interface cards are plugged in, the free sections of the front panel must be covered with a lid (cover
panels).
€€ The bottom and upper sides of the cabinet are covered with perforated sheet.
€ The proprietary backplane (system bus) of the equipment is designed as a printed circuit card (PCB)
with two rows of connectors and fitted to the inner rack carrier profiles.
Basic Dimensions
Overall dimensions (except protrusions) are: 490 mm x 300 mm x 265 mm
Front Side
* On the front, the TOPEX rack is has 19 slots for plug-in cards.
* The first slots from the right are dedicated, for mandatory or optional cards. The power supply card, E1 trunk
cards, and main processor card must be included in any case. The VoIP card may be used or not , but it must be
inserted in a dedicated slot.
* The remaining 16 slots may be fitted with mobile interface cards (GSM, CDMA, UMTS) or different analog or
digital junction cards.
GoTo >Main Page > Multiacces&Qutex
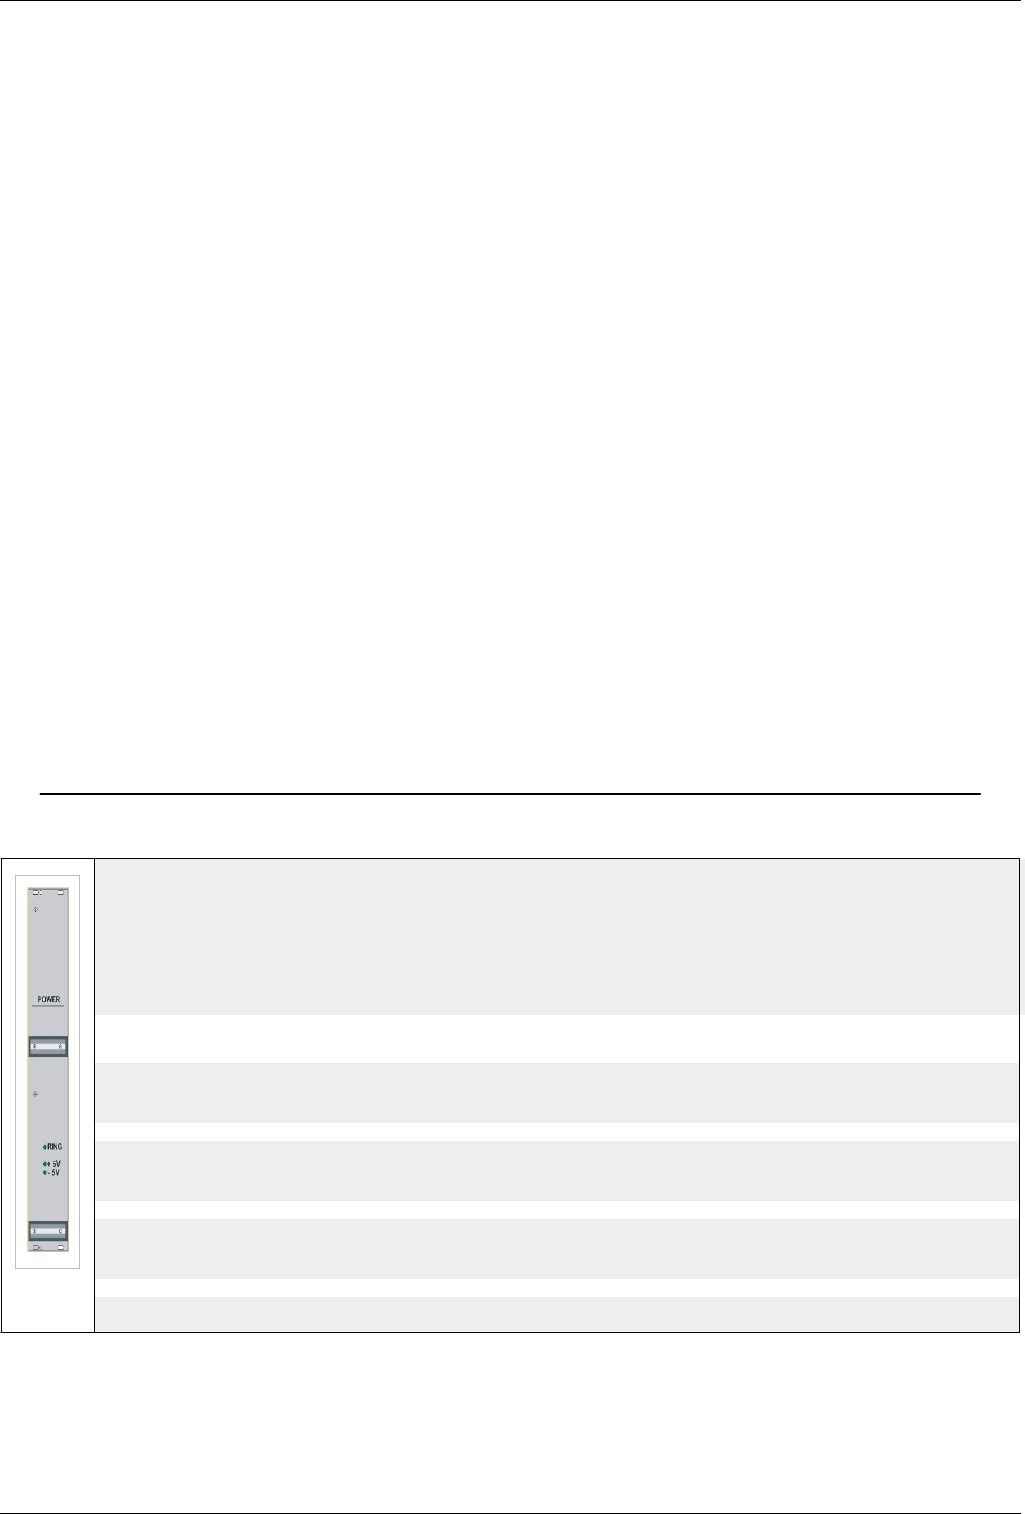
Power Card
GoTo >Main Page > Multiacces&Qutex
This card is a double-width one, 40mm wide. It includes a power supply and optionally a call voltage
generator and ensures the supply of the cabinet rack with +5V and –5V voltages. It draws its power
from the regulated +24VD.C. voltage of the rack power supply. The power supply card must deliver these
two voltages:
* +5V 2% with maximum output current of 7 A
* -5V 5% with maximum output current of 0,5 A
Significance of LED indicators
- 5V
Lights up green when -5V voltage is on
+ 5V
Lights up green when +5V voltage is on
RING
It holds significance only for the equipment version fitted with ringer generator.
If the equipment has ringer generator this LED will blink green with 25 Hz frequency.
Install: The card is inserted into the rack on top (the first wide slot).

Power Card 4
Warning: Do not remove or insert power card while the equipment is ON
Processor Card
GoTo >Main Page > Multiacces&Qutex
Warning: Both processor cards use a hard disk to store files. It is very important to power
off the equipment correctly using the power off button in OAM and then pressing the
ON/OFF switch on the back of the equipment
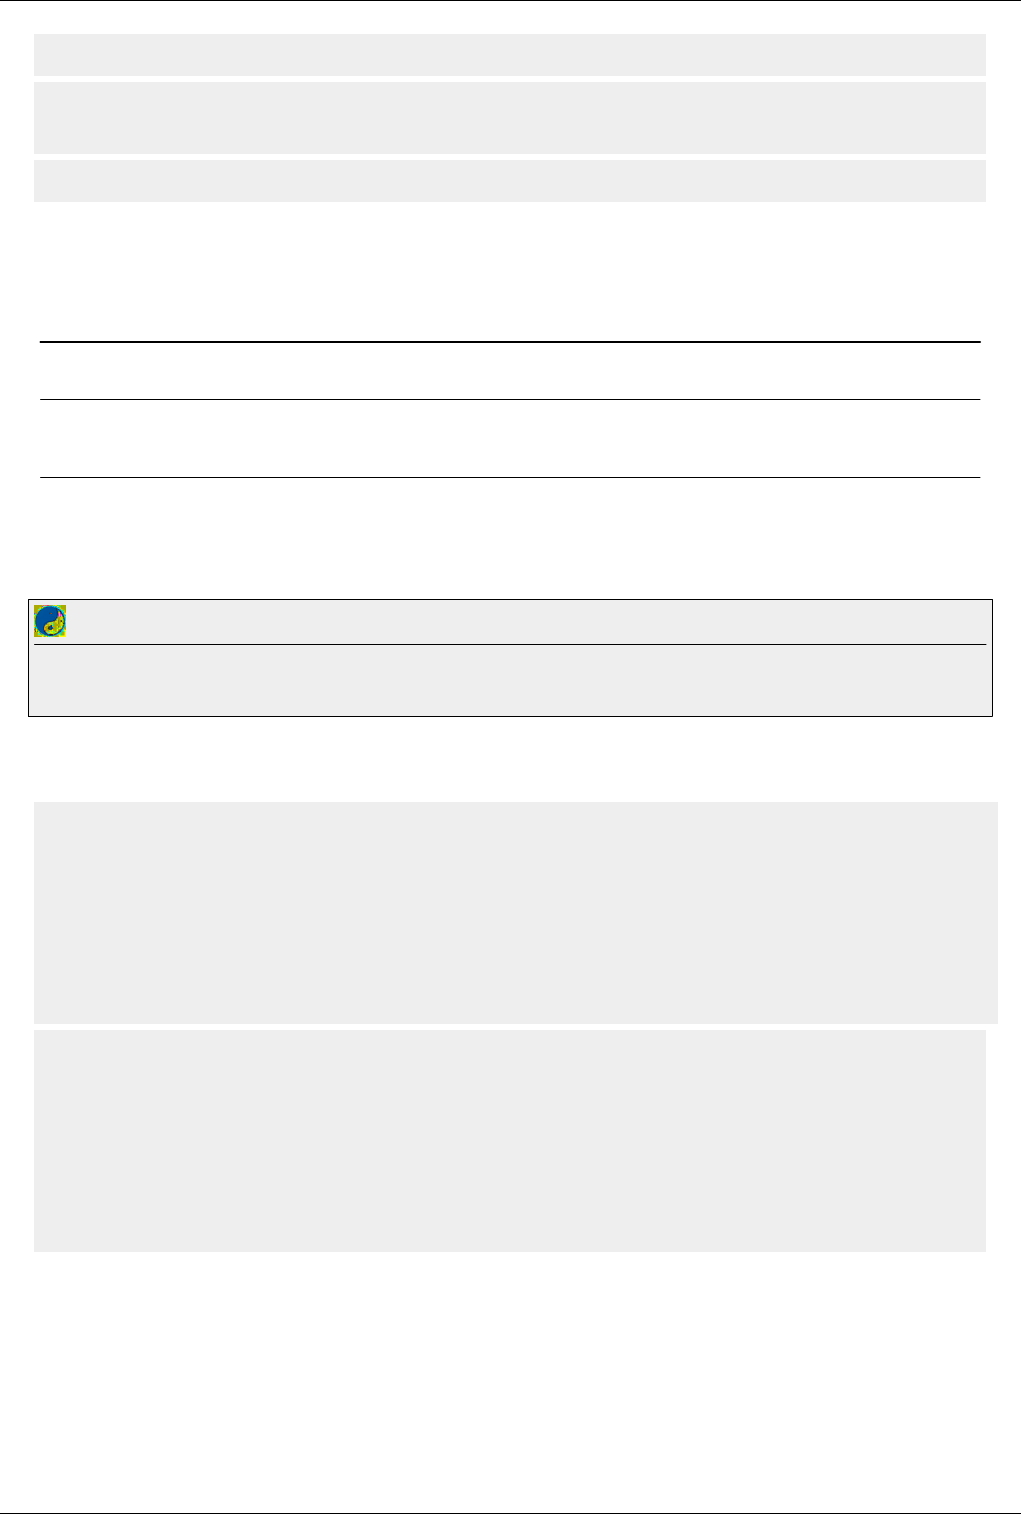
Main processor card
The Main processor (PG) card is a double-width (40mm) card. It contains a powerful processor controlling the whole system.
The card includes multiple printed circuit cards and the harddisk for operating system, application programs and storage. It features
on the front panel two serial interfaces (COM1, COM2) and one Ethernet connector (10Base-T). These interfaces are used to
connect the TOPEX multiAccess system to a computer or to the Internet, for installation and servicing or for permanent operation.
Through these ports you may perform the configuration, administration and maintenance operation for the equipment .
Note:This card is called PGRUC
Significance of indicators and controls
RESET
Hidden (recessed) button for reset
HB
Heartbeat LED, blinks green steadily during normal operation
GCK
Clock generation LED, lights green to indicate that the local clock generator on the PG card is active. Normally it is inactive, the
clock signal is received from the E1 card.
ALRM
Alarm LED, lights up red to show an error
DEFAULT PASSWORDS
tpxadm / u53rp455
root / 5y5t3mp455 - root login is not allowed over ssh
Warning: Do not remove or insert processor card while the equipment is ON
Install: The card is inserted into the rack in position 3 of the (second slot wide).
Connectors card processor - the front COM1 - serial port to connect the OAM Serial port (RS-232) is located in the
front of the card and PG can be used to connect to the computer which has installed the OAM
COM2 - serial port for console system LINUX The serial port is located on the front of the card and PG can be used
to connect to a computer to access the console LINUX. DB9 connector is a father with the following standard
configuration:
Level operating system (on older models) processors can not tell just by the amount of memory. This give the
command more / proc/meminfo.Pentium will have 128M RAM and 8M RAM for 386
For Pentium

Processor Card 5
Mem: 129773568 12115968 117657600 6438912 630784 5251072
Swap: 134692864 0 134692864
MemTotal: 126732 kB
MemFree: 114900 kB
MemShared: 6288 kB
Buffers: 616 kB
Cached: 5128 kB
BigTotal: 0 kB
BigFree: 0 kB
SwapTotal: 131536 kB
SwapFree: 131536 kB
For Procesor 386
total: used: free: shared: buffers: cached:
Mem: 6864896 6639616 225280 3813376 163840 1957888
Swap: 134692864 1069056 133623808
MemTotal: 6704 kB
MemFree: 220 kB
MemShared: 3724 kB
Buffers: 160 kB
Cached: 1912 kB
BigTotal: 0 kB
BigFree: 0 kB
SwapTotal: 131536 kB
SwapFree: 130492 kB
IRQ - reserved sites are 5,7,9,11 and 15. If you reset the BIOS IRQ of your network card can jump on 11. (as below)
more /proc/pci
PCI devices found:
Bus 0, device 0, function 0:
Host bridge: Cyrix PCI Master (rev 0).
Medium devsel. Fast back-to-back capable. Master Capable. No bursts.
Bus 0, device 13, function 0:
Ethernet controller: Realtek 8139 (rev 32).
Medium devsel. Fast back-to-back capable. IRQ 11. Master Capable. Latency=32. Min Gnt=32.Max Lat=64.
I/O at 0xe000 [0xe001].
Non-prefetchable 32 bit memory at 0xd0000000 [0xd0000000].
more /proc/interrupts
CPU0
0: 24247558 XT-PIC timer
1: 8 XT-PIC keyboard
2: 0 XT-PIC cascade
3: 25 XT-PIC serial
4: 126477 XT-PIC serial
5: 102629 XT-PIC irq2ms
7: 0 XT-PIC DSP-ISR handler
Processor Card 6
9: 175197 XT-PIC ser0 RS485 handler
11: 0 XT-PIC eth0, ser1 RS485 handler (IRQ sharing-> am pus sercom.o nou)
13: 0 XT-PIC fpu
14: 336661 XT-PIC ide0
15: 0 XT-PIC HeartBeat ISR
NMI: 0
For more then 150 simultaneous calls a memory upgrade is necessary
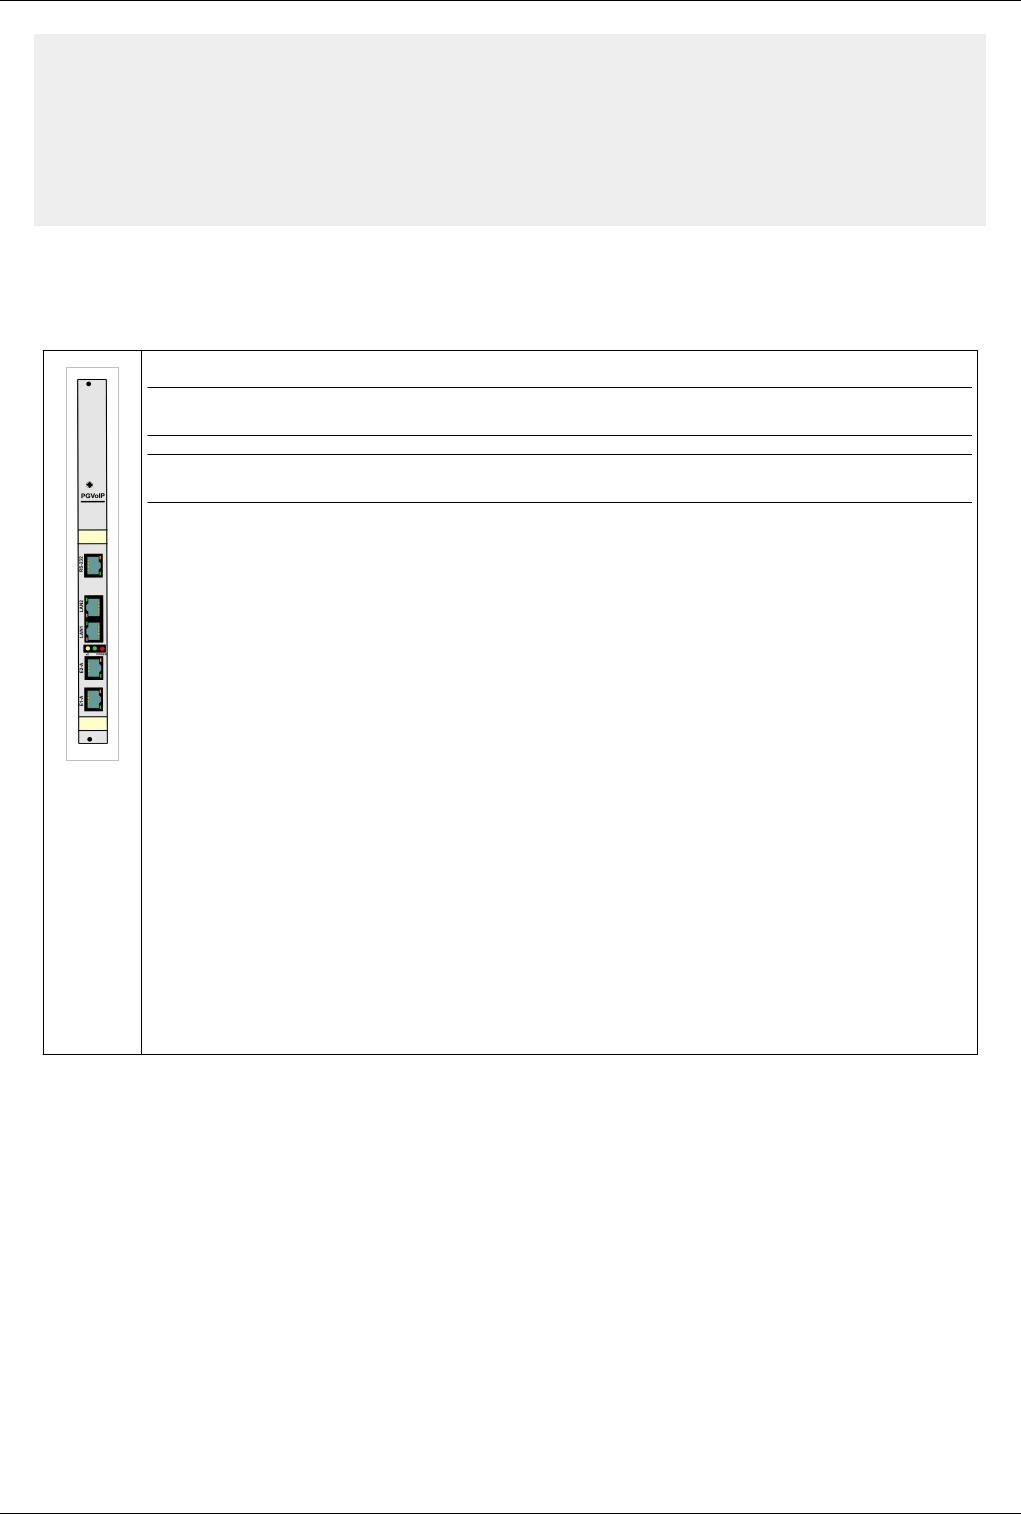
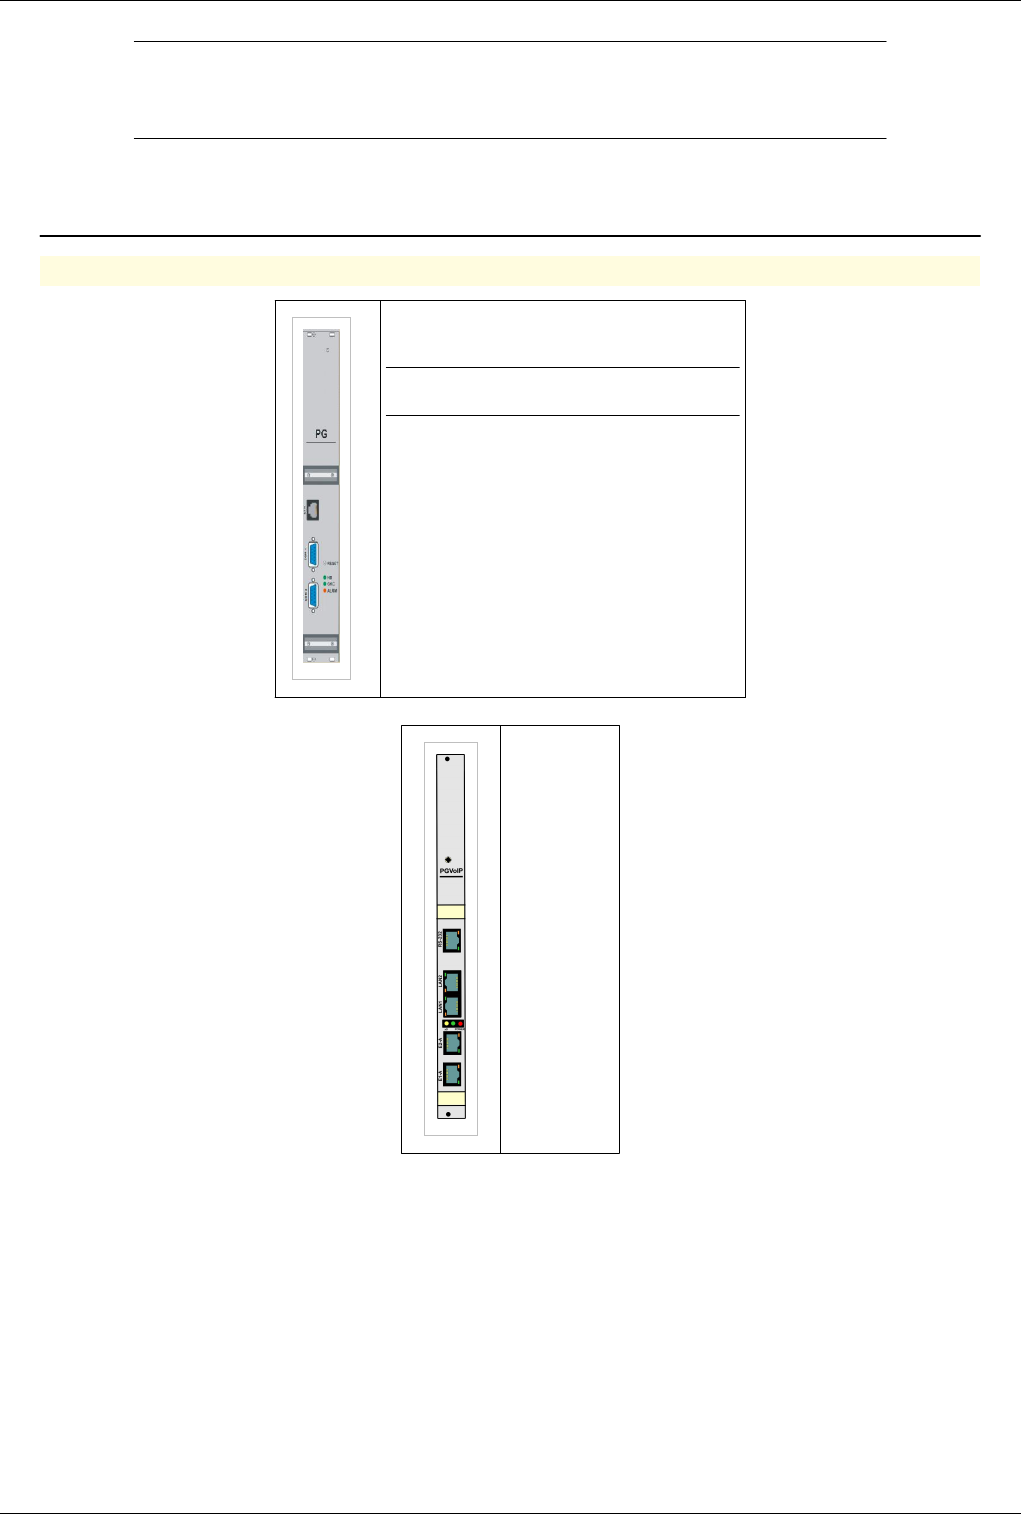
Processor / E1 / VoiP card - PGVOIPD
* Identification
Note:Card is marked PGVoIP on the front panel.
Warning: Do not remove or insert processor card while the equipment is ON
This card shall perform the following functions:
€€ Card processor provides the basic functions of the systems that included namely:
€€ Ensuring internal connection between interfaces
€€ Ensuring BITE function on the module which it operates
€€ Ensure the VoIP connection interface between VoIP module managed and internal interfaces
€€ Link to the internal LAN system of TOPEX IP VCS can be redundant - using 2 Ethernet ports configured in bounding mode.
€€ Card PG VoIP can be equipped with 2xE1 interfaces
€€ configuration.
€€ Connectors, buttons
On the card's front panel connectors are 5 x RJ-45 note from top to bottom as follows:
RS232 – used for PC serial connection,
LAN (LAN2 in figure) – used for LAN connection,
WAN (LAN1 in figure)– used for WAN connection,
E1/A, E1/B –used for E1 lines connection,
DEFAULT PASSWORDS
gsmgw / 5tgb4rf
root / 91qwerty19 - root login is not allowed over ssh

ISDN Card 7
ISDN Card
The E1 trunk card is a single width card, 20mm wide.
It features one or two E1 interfaces that conform to G. 703 and has a frame structure according to ITU-T (CCITT) standard G. 704.
Supported signaling includes R2 generic CAS (Channel Associated Signaling - in accordance both with ITU-T Q.421/Q.422 and
with Q.411/Q.412), ISDN DSS1, and SS7.
The encoding follows the A Law and the bit rate is the standard 2,048 Kbps.
Nominal impedance is 120 ohm standard
Significance of indicators and controls:
HB
Heartbeat green LED, it pulses steadily when everything is OK, frequency depending of type of signalization used
LOS
Lights up red to show Loss of Incoming Signal
R
Reset button, that is recessed (can’t be pressed accidentally)
LR
Reset LED, lights up red during card initialization (reset) or on error
Connecting E1 cable
Description of E1 trunk connections
The E1 trunks must connected to the RJ45 inputs located either on the back of multiAccess, near the power switch
(ON/OFF) or at the front (two connectors for each 2xE1 card). The first E1 trunk is connected to the first pair of
RJ45 connectors (from bottom up):
€€ first (lower) connector in straight connection (=): Rx on the wire pair 1,2 orange color and Tx on the wire pair 4,5
blue color
€€ second connector (on top of the previous) in cross connection (x): Tx on the wire pair 1,2 orange color and Rx on
the wire pair 4,5 blue color
This allows easy connection by using universal straight cable (shipped with the equipment) to any equipment that
has a standard output for the E1 trunk (RJ45 connectors with connections 1,2 respectively 4,5).
The dual-E1 card features the two E1 connectors on the front panel of TOPEX multiAccess equipment.
Correspondence of pins of the connector of the UTP straight (=) cable
Pin Color Significance of wire pairs Color Pin
1 Orange-White Rx pair, reception Orange-White 1
2 Orange Orange 2
3 Green-White Pair not used Green-White 3
6 Green Green 6
5 Blue-White Tx pair, reception Blue-White 4
4 Blue Blue 4
7 Brown-White Pair not used Brown-White 7
8 Brown Brown 8
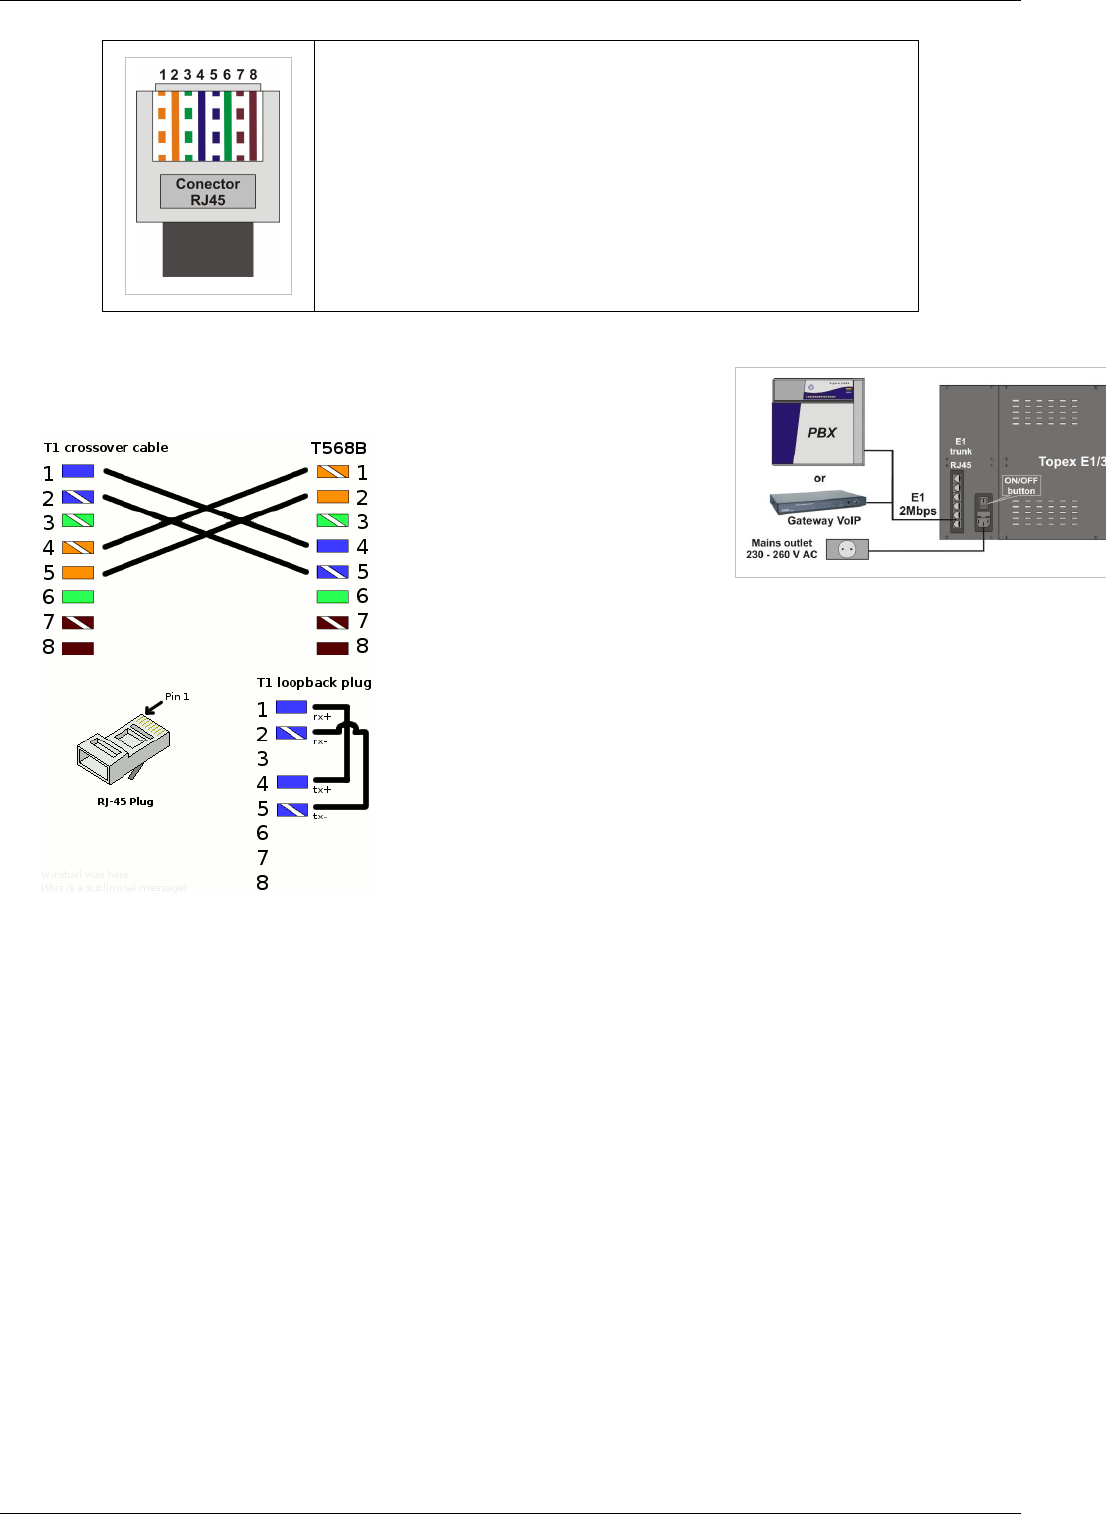
ISDN Card 8
The pinout for the male connector of the straight UTP cable is shown n the image to the left:
Figure 5.: RJ45 connector of the straight UTP cable
After you wire the cable, you can plug this cable into corresponding E1 connector, as shown in figure 4.
Figure 4: Connecting the cables – rear panel (backside
of unit)
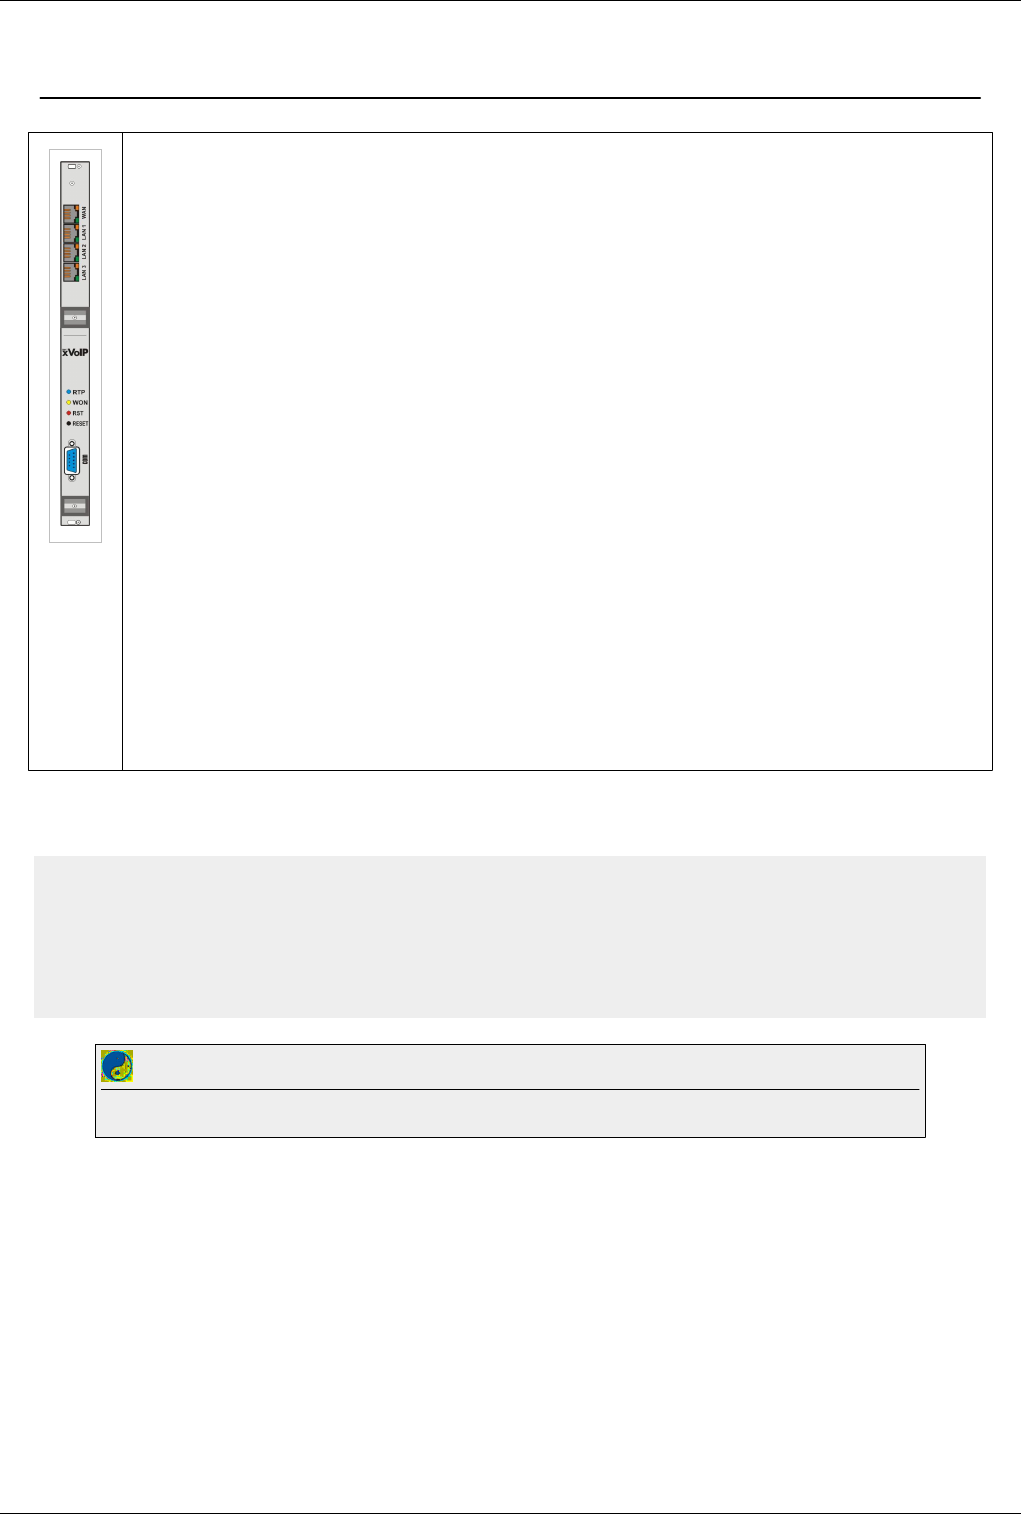
Voip Card 9
Voip Card
The VoIP card (Voice over IP) is used to transmit voice packets through the Internet. It is a single width card, 20mm wide.
The card features on the front panel a serial interface (COM) and four Ethernet connectors (10/100 BASE-T). The serial interface is
used to debug the processor card. The Ethernet connectors perform the followings functions:
€ Upper ETH, labeled “WAN” is used to connect the TOPEX VoIP card to the IP network (Internet). The name WAN suggests it is
intended for connection to the outside world!
€ Middle connectors LAN2 and LAN1 can connect other devices to the TOPEX equipment (Laptop, notebook, PC, etc.). They are
part of a switch for the local network.
€ Lower LAN3 is used to perform the connection between the VoIP card and the processor card (PG) of the TOPEX equipment.
Significance of indicators
RTP – RTP Activity
Blue LED, It signals RTP activity (voice packets are coming or going) of the VoIP card.
WON - WAN Active
Yellow LED, lights up to indicate activity on the WAN (remote network).
RST – Reset indicator
Red LED, lights up briefly to show that a reset has occurred.
RESET- The reset button of the card.
When the equipment starts (implicit when the VoIP card is supplied) these three indicators and the LEDs (green and yellow) from the
Ethernet connectors turn on sequential. If not that means that the VoIP card is not working.
The voltage supply is 5V and the current intensity is 1.4 A.
Install: The card is inserted into the rack in position 2, the position immediately following the card supply (narrow
first slot).
Supported codecs:
0 = G711u
4 = G723.1
8 = G711a
18 = G729
Best Practice
Don't connect any cables in the voip card until voip configuration is not complete.Check this page before connecting any cables

GSM Card 10
GSM Card
GoTo >Main Page > Multiacces&Qutex
The mobile interface card, UABxxx, assures the connection to a mobile network (GSM / CDMA /UMTS). It contains two modules
(wireless modems) on the printed circuit card. There are three types of cards, for GSM, CDMA or UMTS networks. Furthermore, the
mobile interface card can be equipped with modules for different frequency bands, such as GSM 900/1800 MHz, GSM 850 MHz,
GSM 800/1800/1900 MHz, CDMA 450/800/1900 MHz respectively UMTS 2100 MHz.
In this picture you can see a drawing of the UABGSM card, with GSM modules. The CDMA/ GSM/UMTS cards are very similar in
aspect, and the cards with mobile modules for different frequency bands look exactly the same!
On the front panel the code card is different, thus is listed hereunder:
UABGSM – is labeled the card that includes GSM modules
UACDMA – is labeled the card that includes CDMA modules
UABUMTS – is labeled the card that includes UMTS modules
Inside each mobile module, there is a 4-slot adapter (holder) for the SIM or RUIM cards, if your network operator uses subscriber
cards.
Also, each mobile module features a connector for its external antenna. The SMA connector is located on the front panel. On the
connector you may thread directly the discreet antenna or a cable to connect to external antennas, directly or through a splitter /
concentrator.
On the front panel there are also nine optic indicators for the mobile modules card (four LED’s per each mobile module and one
general).
The significance of these LED indicators is shown in detail in the tables below. Note: If there is no serial communication between
the main processor card and the module card, after a delay of about 15 seconds the reset of this card will be triggered.
Significance of LED indicators:
LED Status Description
MODE (green) Blinking, frequency 1Hz The wireless module is in standby and is
logged on with the mobile network
Off The wireless module is NOT logged on to the mobile network
Lights continuously Voice connection initiating or establishing; if the wireless module is not
logged on to network or is initializing then the STAT LED will blink.
STAT. (red) Lights continuously The wireless module is off
Blinking, frequency
2 Hz
The wireless module is initializing
Blinking, frequency
0,5 Hz
The wireless module was initialized but is not logged on to the mobile network
Off The wireless module is logged on to the mobile network

GSM Card 11
SIM/RUIM # (green) Selected SIM or RUIM card
Off Off 1
Off On 2
On Off 3
On On 4

12
Main Software
About centrala
GoTo >Main Page > centrala
Centrala is the main application that is running on the following Topex products:
€€ Softswitch
€€ Multiaccess, Qutex, Eones
€€ VoiBridge, VoxiPlus, VoisTel
€€ Radio gateway
€€ VCS
Features:
€€ written from scratch in C language
€€ built in state machine mechanism
€€ incorporate ISDN, SIP, TETRA, TETRAPOL, R2, R1.5 stacks
€ can manage via socket SS7 apc, H323 apc, Mspd applications
Note:See also CCTL features and SIP features
SIP features
GoTo >Main Page > centrala
SIP User Agent, SIP Registrar, SIP Proxy, SIP Redirect
€€ Events supported: presence, dialog, timer, replaces, keep-alive, message-summary, refer
€€ Methods: REGISTER, OPTIONS, INVITE, ACK, CANCEL, BYE, INFO, UPDATE, REFER, SUBSCRIBE,
NOTIFY, PUBLISH, MESSAGE
€€ UDP/TCP/TLS used as transport protocol
€€ SIP stack written from scratch in C language
€€ Transaction Stateful Proxy
€€ Call Stateful Proxy
€€ Forking proxy
€€ MD5 register authentication
€€ Access list based on public/private IP class with max limit for simultaneous calls
€€ Signaling/Media NAT traversal
€€ Media transcoding
€€ SIP Proxy redundancy
€€ IP centrex
€€ Presence and basic IM server
€€ Multiple user name aliases
€€ ANI/DNIS restriction rules

SIP features 13
€€ Do not disturb
€€ Reject anonymous calls
€€ Caller ID Presentation/Restriction
€€ Call hold
€€ Call parking
€€ Call waiting
€€ Call forward (busy, no answer, offline, always, only for a specific list of numbers)
€€ Voicemail (busy, no answer, offline, always)
€€ Voicemail to e-mail
€€ Missed call to e-mail
€€ Missed call to SMS
€€ Call transfer Attended/Unattended
€€ Call pickup, directed pickup
€€ Call hunting
€€ Call waiting
€€ Call forking
€€ Fax: T38 udptl, pass through(G711U, G711A)
€€ Web address book, web callback
€€ Prepaid sip users
€€ Call center features
€€ User-Agent/Server REGISTER regexp access list
€€ Asymmetric User-Agent/Server regexp checking list
€€ Multiple network interfaces binding
Performance
Max calls per second
€€ hardware machine: Intel(R) Xeon(R) CPU 5140 @ 2.33GHz
€€ software test tool: SIPP
€ 5500 calls per seconds on UDP
debug off
calls are sent to Serv AUTOANSWER
€ 200 calls per seconds on TLS
debug off
calls are sent to Serv AUTOANSWER
€ 7000 REGISTER per second on UDP
debug off
Memory configuration loading
€€ hardware machine: Intel(R) Xeon(R) CPU 5140 @ 2.33GHz
€ 50000 sip users generated with web SIP User Generator loaded in memory in less than 60 seconds
file debug activated
€ 500 sip users loaded from text file in about 60 seconds
debug activated
Max life working capacity
€€ 100000 SIP users supported with 600 seconds registration refresh interval

SIP features 14
RFC:
- RFC 2069 [1] - MD5 Digest Access Authentication
- RFC 2327 [2] - SDP
- RFC 2617 [3] - HTTP Authentication: Basic and Digest Access Authentication
- RFC 2976 [4] - INFO method
- RFC 3261 [5] - SIP (version 2)
- RFC 3265 [6] - Event notification, SUBSCRIBE/NOTIFY mechanism
- RFC 3325 [7] - SIP Asserted Identity
- RFC 3326 [8] - Reason header
- RFC 3398 [9] - ISDN/ISUP to SIP mapping
- RFC 3515 [10] - REFER method
- RFC 3581 [11] - rport parameter for Via header
- RFC 3842 [12] - SIP Message Waiting
- RFC 3856 [13] - SIP presence
- RFC 3863 [14] - PIDF XML format
- RFC 3891 [15] - Replace header
- RFC 3892 [16] - SIP Referred-By mechanism
- RFC 3903 [17] - PUBLISH method
- RFC 4028 [18] - Session timer
- RFC 4235 [19] - Dialog-info XML format
- RFC 4497 [20] - Interworking between SIP and QSIG
- RFC 5589 [21] - SIP call transfer
Drafts:
- draft-ietf-sip-privacy-04
- draft-levy-sip-diversion-08
ITU-T:
Rec. T.38 (09/2005) - Annex D

H323 apc 15
H323 apc
GoTo >Main Page
h323_apc
Note: h323_apc is started by centrala and is configured in /mnt/app/cfg/voip.cfg the options
below can be added to voip.cfg
/mnt/app/bin/h323_apc --help
options:
--user <username> - Name of the user. This will be used as display name for outbound calls
--productid <id> - Product id
--callerid <callerid> - Caller id
--user-number <number> - Caller number
--gk-discover - Discover gatekeeper
--gk <ip:port> - Use specific gatekeeper
--auto-answer - Enables auto answer mode
--h323id <h323id> - H323ID to be used for this endpoint
--log <file> - log file to be used for this endpoint
--logmaxfile <max> - max log file length(kB)
--e164 <number> - E164 number used as callerid for this endpoint
--use-ip <ip> - Ip address for the endpoint (default - uses gethostbyname)
--use-port <port> Port number to use for listening to incoming calls.(default-1720)
-p <cctlport> Port number to use for cctl data (default-9010)
--version - Version
--ignore-termcap - Ignore termcap received
-t - Trace. Use multiple times to increase trace level
--help - Prints this usage message
voip.cfg example of h323 maximum log file of 1000000=1GB
h323 127.0.0.1 9010
forkh323 /mnt/app/bin/h323_apc -p 9010 --logmaxfile 1000000 --logfile /mnt/app/out/
- fast start and tunneling can be on the class - Sign2 ( H323 No Tunnel H245, H323 No Fast Start )
Client_Classes#H323_No_Tunnel_H245
Note: Configuring a limit for logmaxfile will not stop logging after the limit is reached.H323
will simply create another log file
Rx DTMF method: H.245 alphanumeric, H.245 signal, Q.931 keypad
Tx DTMF method: H.245 alphanumeric only
See also H323 GK

Mspd 16
Mspd
GoTo >Main Page
Definition: Multimedia Streaming Processor Daemon
It is an interface between Mindspeed M82xxx chips (Topex PGVoIP or Topex xVoip cards) and a client software
(usually centrala).
As client software can also be "tunelohtdm", "telnet" or any other software knowing the mspd protocol.
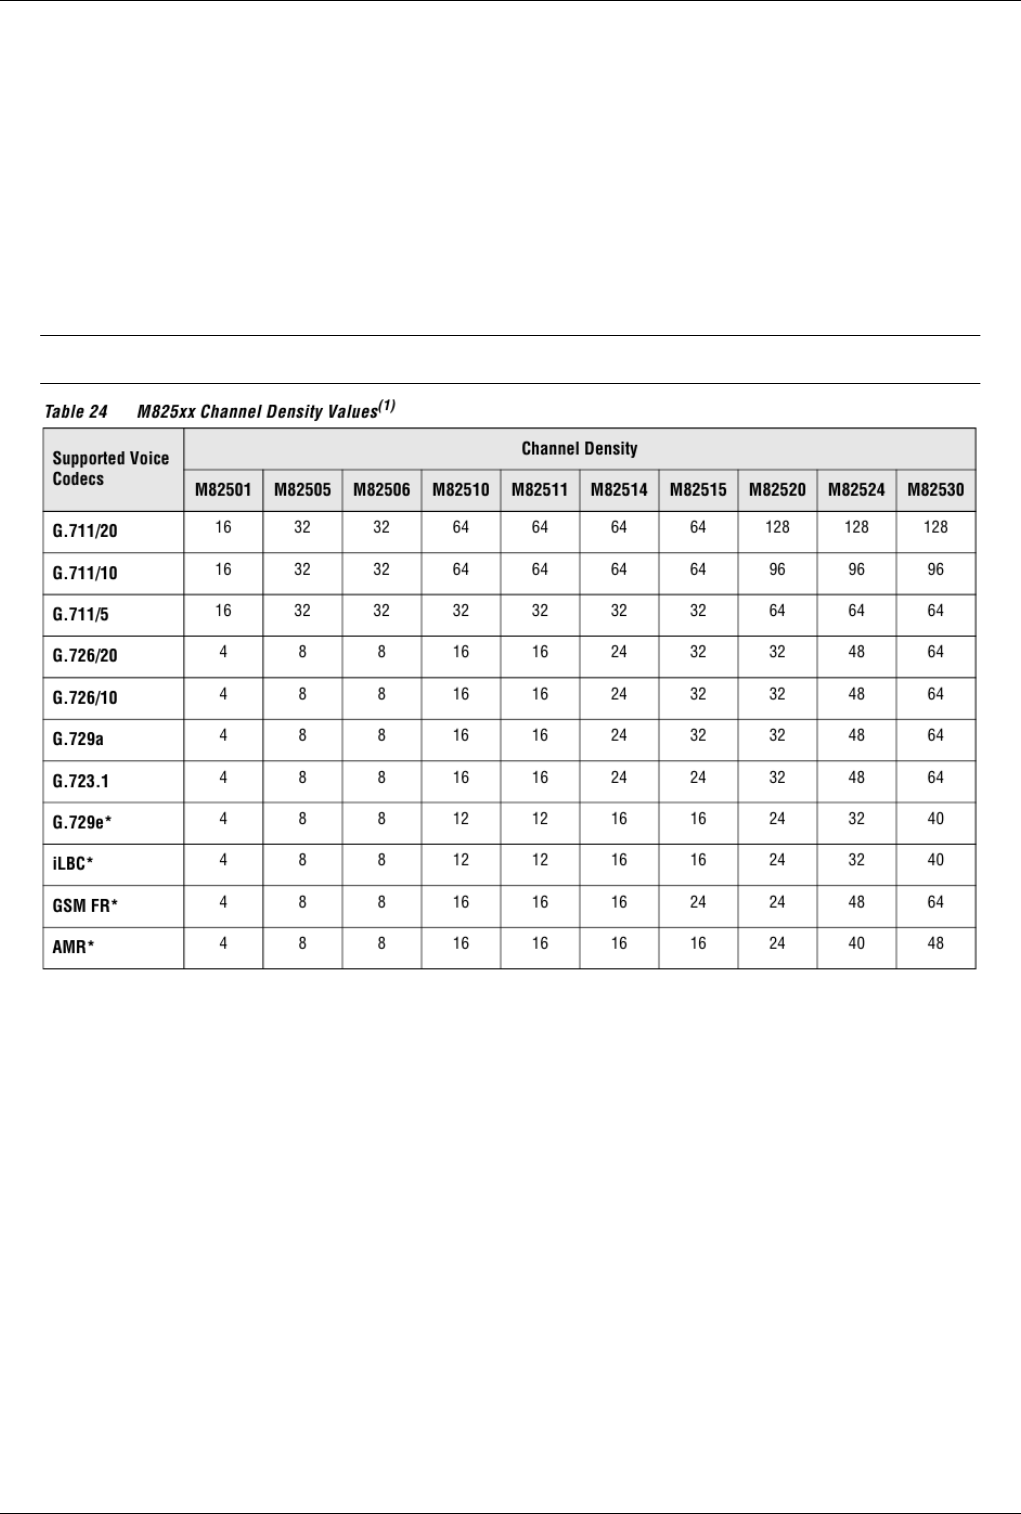
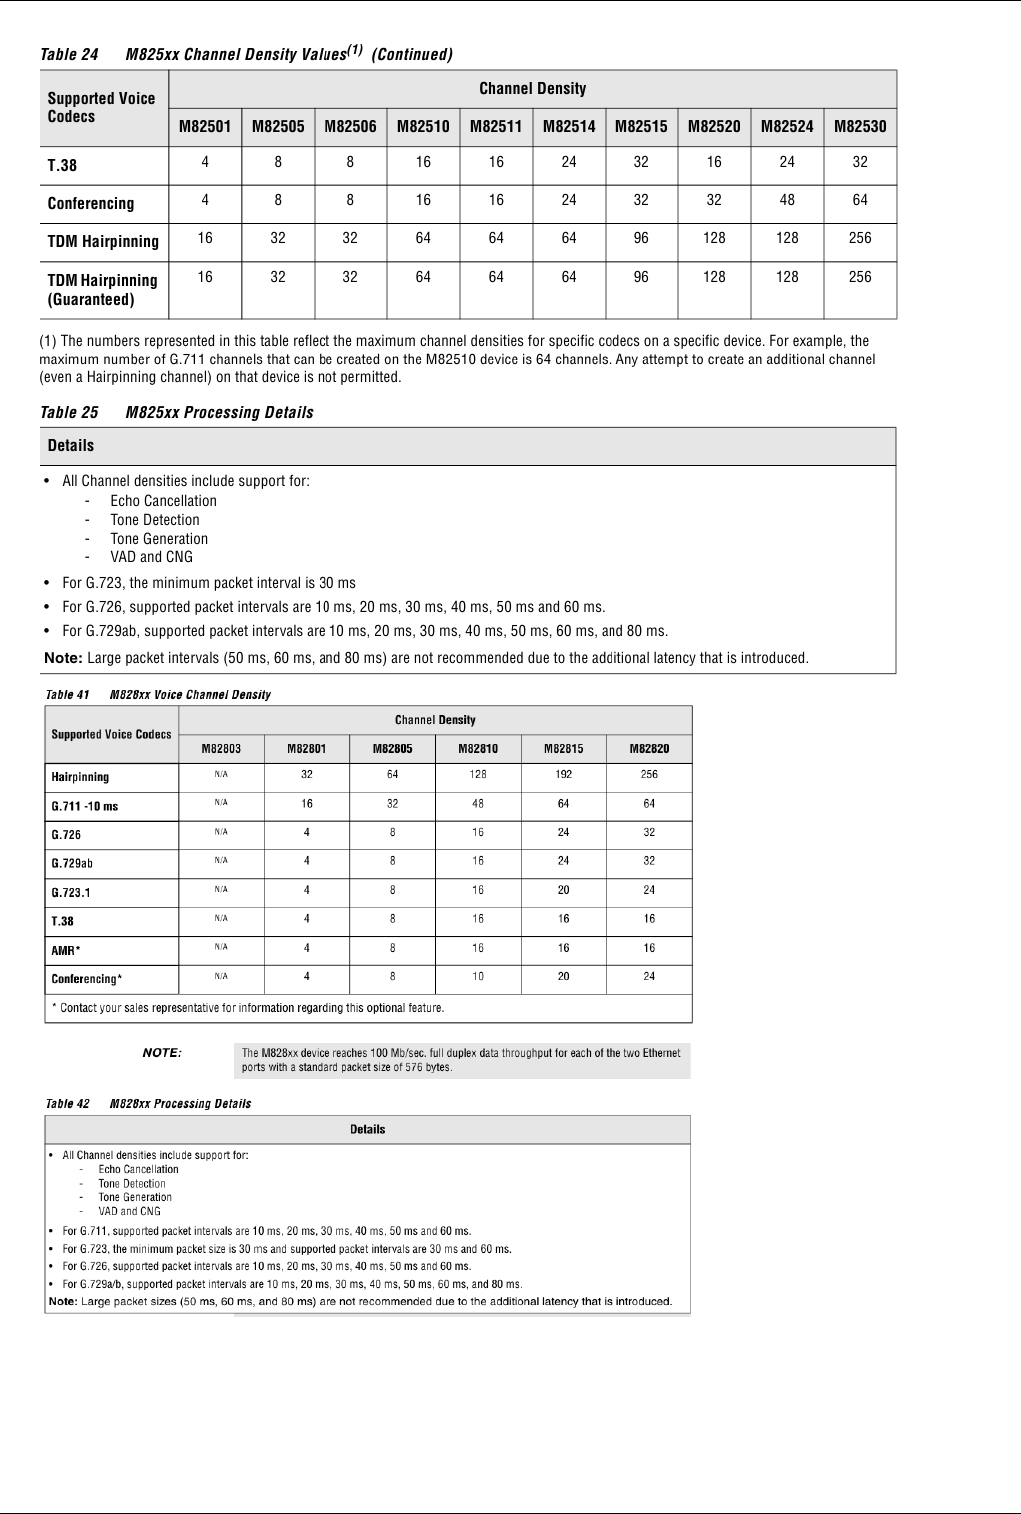
Mspd provides an easier to use and debug interface to M82xxx chips.M82xxx reprezents IP_PABX chips.
Topex devices uses 2 of the M82xxx's interfaces : TDM and Ethernet.
Payload Types supported by M82xxx :
G.711:G.711 A-law and u-law (default) coding.
G.726:(IETF or ITU bit packing format) 16, 24, 32, 40 Kbps.
G.723.1 and G.723.1 A:5.3Kbps/6.3Kbps.
G.729 Annex A & B:Annex A and B are supported at 8Kbps.
Clear Channel: passes packet-to-PCM and PCM-to-packet data with no conversion
(Tone detection and asymmetrical packet sizes are not supported in clear channel mode)
G.728*
G.729eg*
G.729.1*
iLBC*
-----------------------------------------------------------------------------------
* => Optional features
This are Packetization intervals (packetization times) for different codecs on M82XXX:
G.711 u-law PCM (0): 5, 10, 20, 30, 40, 50, 60
G.711 A-law PCM (8): 5, 10, 20, 30, 40, 50, 60
G.723.1 (4): 20, 40, 60
G.728 (15): 30, 60, 90
G.729a (18): 5, 10, 20, 30, 40, 50, 60
G.726-32 (2): 5, 10, 20, 30, 40, 50, 60
Usually centrala requests mspd to:
€€ Open an RTP channel with codec p, packetazion time m to ip xxx.xxx.xxx.xxx remote_port rp local_port lp from
a tdm_timeslot;
€€ Generate a tone on a tdm_timeslot
€€ Open a tdm_timeslot.(for receiving Tone detected indications)
€€ Interconnect 2 tdm_timeslots (as in a TDM SWitch)
Some sample mspd protocol commands:
Rslot 5
Open timeslot 5
rslot 5
Close timeslot 5

Mspd 17
Rrtp 4 -p 8 -m 40 31004 192.168.1.2 32222
Create RTP stream (codec 8, packetization_time 40, local_port 31004) to 192.168.1.2:32222 from TDM timeslot 4
Rtone 7 -r 255 450 -100 0 -100 1500 3500
Generate Ring-Back tone (repeat forever (255), freq1=450,power1=-100, freq2=0,power2=-100, cadence={1500 on,3500 off})
Rhtdm 64
Open HDLCoverTDM chanel on timeslot 64
Rhtdm 64 -frm 3 aabb11
Send 3 bytes HDLC frame {0xAA,0xBB,0x11} on TDM timeslot 64
Ihtdm 64 -frm 3 aabb11
3 bytes HDLC frame {0xAA,0xBB,0x11} received from TDM timeslot 64(indication to all clients)
Itone 130 3 435 134276143 -96
"DTMF tone 3" detected on TDM timeslot 130
Rstat 7
print in mspd_log the number of RX and TX IP packets on tdm_timeslot 7
Rxtdm 5 129
connect tdm_timeslot 5 with tdm_timeslot 129 (TDM SWitch)
mspd.cfg
The default configuration file for mspd is /mnt/app/cfg/mspd.cfg . A different configuration file can be specified
with command line argument "--cfg".
File format is:
# lines starting with '#' are commented lines
# parameter value
# Some defaults values are changed depending on the system type or other configuration parameters.
# To be sure about a parameter value please check it in the log file at the mspd start.
daemonize 1 # Daemonize the server,otherwise starts a session on standard input. restart required after change
verbosity 1 # Verbosity level 0..5; restart required after change
port 9677 # Server port (to communicate with centrala); restart required after change
msp_ip 0.0.0.0 # Voip Card IP (!!Only set this params on XVoip cards); restart required after change
msp_mac 0:0:0:0:0:0 # Voip Card MAC (!!Only set this params on XVoip cards), restart required after change
mem 16 # SDRAM installed on MSP, restart required after change
tdm-clk 2:2:0:0 # TDM clock rates; default 2:2:0:0; restart required after change
log %d-%m-%y_mspd.log # Log file; default_value /dev/null
tstamp-freq 1000L*15*60 ms # A time stamp is printed every 15 minutes (or the number of seconds specified tstamp-freq)
axf miro_hdvoice.axf # Firmware file to load(only for XVoip)
pkt-dly 0 # miro boot packet delay in ms; restart required after change
nowait-con 0 # do not wait for client to connect,otherwise mspd waits the first connection; restart required after change
trace-cmd 0 # Trace messages between mspd and client applications
vlan 0 # Vlan TAG
ip_tos 0 # TOS
diag_ip 0.0.0.0 # diagnostics ip

Mspd 18
diag_port 9699 # diagnostics port
t2p_gain 0 # tdm to packet gain in 0.1dB units; restart required after change
p2t_gain 0 # packet to tdm gain in 0.1dB units; restart required after change
bonding 0 # /0/1/bond3 enable bonding, 1=bond0
close_ssrcv 1 # Close channel on 3 SSRC Violations: ; 0=do not close; 1=close;restart required after change
mrst 0 # MSP reset mode: 0 = do not reload MSP, 3 = reload firmware from file specified in "axf" parameter,
# 2 = reload firmware from NOR fash,10= execute /mnt/app/bin/msp_reset script;
# restart required after change
rc_cmd # execute command specified as value at the beginning # default_value ""
reg_2833 0 # regenerate received rfc2833 digit to TDM , default 1.
inband_dtmf 0 # do not suppress detected (on TDM) dtmf digit, play it inband,default 1.
tdm_to_2833 0 # detected (on TDM) dtmf digit, send as rfc2833,default 1.
syslog 1 # Activate syslog,default 0
skip_miro_init # 0/1 defaults depends on systruct
sysstruct # 0 => xVoIP, 1 => PGVoIP, 2 => PGetx+PCIVOIP
iptonedet 0 # detect some IP-side tones, default 1
bindir /mnt/app/bin/ # /path/to/bin/directory/
datadir /mnt/app/data/ # /path/to/data/directory/
cfgdir /mnt/app/cfg/ # /path/to/cfg/directory/
outdir /mnt/app/out/ # /path/to/out/directory/
devdir /mnt/app/dev/ # /path/to/dev/directory/
libdir /mnt/app/lib/ # /path/to/lib/directory/
report_csme 0 # activates csme tracing
ec 0x8007 # echo cancelation bitmap (see CRM ECHOCAN); to disable EC = 0x0000, RGW_arad = 0x8012;
ecctrl 0x0005 # echo canceller features bitmap (see CRM EC_CONTROL); RGW_arad = 0x000B
dump_tdm 0 # activate TDM trace bitmap 0x1:tx 0x2:rx
csme_if "" # <tcp_port|/mnt/app/dev/msppci_0|eth4> custom CSME interface
tdmXpar # SETUP_TDM_PARAMS bitmap=(par0<<16)|par1 (see CRM SETUP_TDM_PARAMS) ;defaults depends on systruct
arpd_ifs # <eth0 eth2> for custom arpd interfaces;defaults depends on systruct
emac_mii 0 # 0/1 to select mii mod for EMACS
rtp_dmac 0:0:0:0:0:0 # to overwrite destination mac address for all rtp streams
debug_htdm 0 # 0/1 debug htdm mesages
ulaw 0 # 0/1 ulaw
ascii_proto 0 # 0/1 ascii_proto
record_bmp 0 # record tdm level bitmap 0x1:tx.raw 0x2:rx.raw 0x10:tx.npipe 0x20:rx.npipe
record_dir /mnt/app/rec # /path/to/dir/for/record
jitterbuff 0xffff # jitter_buffer in ms (0..200);
mspd_log
Some important info in mspd log file:
€First column reprezents timestamp in format hh:mm:ss.ms
€First symbol in the second column reprezents the messages priority (D diagnostic, I info,! important, W
warning, E error, F fatal )
€Rest of the second column reprezents the sender thread (Mgr,SL,Msg,ARPD,RX,TX,CmdEx).
On first Mspd log line you can see:
€€ main thread pid
€€ MSPD release
Mspd 19
€€ Build time stamp
€€ Start time stamp
Follows lines:
€Firmware version: test_bug36516_03_v2_04_1, checksum: 36B0,bond 0
€Device Type : M82820
All command received from clients (centrala) begins with msgrx and all indications sent to clients(centrala) begins
with msgtx.
When mspd has made its initialization and is ready to receiving commands from clients, the program broadcasts
Imsp 65535 to all connected clients.
Note: To find out the device type use command cat /proc/msp as root
Rtprx pool 21
Rtprx pool
GoTo >Main Page
Rtptx pool
GoTo >Main Page
Definition: Build and send RTP packets. Payload content of RTP packets is taken from one or
more files given as a parameter. Can receive maximum three files as parameters to play Used to
play voice messages, see Serv Play File or Serv Play Release
Best Practice
Before they can be used rtprx_pool and rtptx_pool must be activated in file exec.cfg. Check the file for more details
./rtptx_pool -h
Usage: bin/rtptx_pool [OPTIONS]
OPTIONS:
-c, --path_cfg PATH_CFG path to the configuration file, default ../cfg/
-p, --pid PID PID of parent process
-h, --help Display usage informations
-v, --version Display version
Default binary file path: /mnt/app/bin/rtptx_pool
Default configuration file path: /mnt/app/cfg/rtptx_pool.cfg
# debug is the only parameter
# default 2
# 0 = NO debug
# 1 = ERROR debug
# 2 = ERROR + WARN debug
# 3 = ERROR + WARN + INFO debug
# 4 = ERROR + WARN + INFO + FULL debug
# 5 = ERROR + WARN + INFO + FULL + VERBOSE debug
debug 2
Accept ascii commands from stdin and send the response and debug on stdout.
Rx:
start
localport: 15001
remote: 10.0.0.10:11008
codec: pt=0;size=160;ms=20;ssrc=1948547190
file: ../raw//ivr/ivr_00.en
file2: ../raw//ivr/ivr2_00.en
Rtptx pool 22
file3: ../raw//ivr/ivr3_00.en
Rx:
stop - stop playing the files
Tx:
stop_ack - acknowledge sent to stop command
Recmail
GoTo >Main Page
Definition: This application is used to connect on an email account and retreve mails which have
as SUBJECT a phone number and send mail body• as a SMS.
The application name is "recmail" and is
located in "/mnt/app/bin". To be able to send sms messages recmail works with centrala and sendsms
In order to be run at startup, you have to add a line in /mnt/app/bin/start_app: the line format will be "./recmail &".
Best Practice
When adding applications to start_app make sure they are added before centrala.Also don't forget to add & at the end of the application or centrala
won't start
This application has a configuration file in /mnt/app/cfg/mail2sms.cfg. This file describes the IP (or the name) of the
EMAIL• server (POP3 mail server). The format of that line is "<username> <password> <IP/name server>".
This application is running correctly is "sendsms" application is located in "/mnt/app/bin" folder.
There are few limitations involving this application:
- the email with number declared in subject - which are the email for which body will be sent - has to be PlainText; other
emails will be ignored (but deleted);
- one of the declared directions (trunks) from the TOPEX box has to be SENDSMS;
- one route has to be available for the number present in the mail subject;
- the length of the number from the subject has to be 10 digits;
To check the connectivity with the POP3 server, please try:
-> telnet <IP/name server> 110
+OK mail.ro POP3 server
-> user <username>
+OK
-> pass <password>
+OK
-> quit

Smtpmail 23
Smtpmail
GoTo >Main Page
Definition: Command line SMTP client Used to send e-mails from centrala and heartbeat
applications.
Starting with version 1.3.5 command line option have priority vs configuration file options
Starting with version 1.3.7 configuration file path can be given as command line argument, default ../cfg/
./smtpmail -h
Usage: ./smtpmail [options] recipients ...
Message Header Options:
-i, --ipaddress=STR ip adress of my host
-s, --subject=STR subject line of message
-f, --from=ADDR address of the sender
-r, --reply-to=ADDR address of the sender for replies
-e, --errors-to=ADDR address to send delivery errors to
-c, --carbon-copy=ADDR address to send copy of message to
-b, --body=FILE message body file
-a, --attach=FILE attach file
-D, --delete delete body file on exit
-R, --remove delete attach file on exit
Processing Options:
-S, --smtp-host=HOST host where MTA can be contacted via SMTP
-P, --smtp-port=NUM port where MTA can be contacted via SMTP
-M, --mime-encode use MIME-style translation to quoted-printable
Giving Feedback:
-v, --verbose enable verbose logging messages
-V, --version display version string
-h, --help display this page
-x, --path_cfg path to the configuration file
Default binary file path: /mnt/app/bin/smtpmail
Default configuration file path: /mnt/app/cfg/smtpmail.cfg
# IP address of SMTP server used to send e-mail
smtp_server_ip 69.77.184.28
# IP port of SMTP server
smtp_server_port 25
# name of from header filled in e-mail
from_name VoiceMail

Smtpmail 24
# this field (IP or hostname) will be shown in the From field of the e-mail
# this value has higher priority then the value of the ipaddress given from the command line
# smtpmail -h see all command line options
from_ip topex.ro
Sendsms
GoTo >Main Page
SMS can be send directly from TOPEX gateway based on 'sendsms' application. This application must be present in
'/mnt/app/web/bin' in case when SMS is sent from web page or in /mnt/app/bin/ in case when recmail application is
used.
You can send SMS directly to a GSM number with the following command:
./sendsms <number> <text> SendSms localhost
€€ number is the destination GSM number
€€ text is the SMS text (has to be urlencoded). When using sendsms from command line, use "+" instead of " " for
formatting or put the entire text between quotation marks (for example: "Hi, how are you?").
If you want to send SMS to a group of numbers - you have to create in /mnt/app/cfg/ the file sms_groups.cfg. Here
you can use the 'grup' keyword to define names of groups. Following such a line are the GSM numbers belonging to
that grup.
For example:
File: /mnt/app/cfg/sms_groups.cfg
grup test2
338732875435
32654326463
324762364234
2346327462346
grup test
07233378777
07212227878
07422211223
The name of the group in last sample was 'test2'.
The list of numbers continued until an empty line is present of another group is starting.
To send sms to a group of numbers try: smsgrp <group> <text> SendSms localhost where group is the name of the
group of GSM numbers. (smsgrp is present in /mnt/app/web/bin or in /mnt/app/bin/smsgrp).
To send a sms from a specific port use the following command. The port number should have 3 digits
(ex:001,032,120) and on the gateway you should have a route with incoming direction SENDSMS, prefix – “**”,
action – SERV, destination – 11 (SELECT PORT), ignore =2. The port number can be seen on the port : G000,
G032,G120. ./sendsms **<port_number><number> <text> SendSms localhost

Mysql client 25
Mysql client
GoTo >Main Page
Radius billing
GoTo >Main Page
Topex Radius AAA (Authentication, Authorization and Accounting) client
Used to send radius requests to the server.
Implemented requests:
- Access Request - for authentication and authorization
- Accounting Request - for accounting
Standards compliant:
- RFC 2865 - RADIUS
- RFC 2866 - RADIUS Accounting
Default binary path: /mnt/app/bin/radius_billing
Default configuration path: /mnt/app/cfg/radius_billing.cfg
# 0= no debug, 1=minimum debug, 2=full debug
debug 2
# radius server IP address
radius_server 192.168.1.11
# radius dictionary used by radius_billing client; 0=Topex; 1=Quintum; 2=Mind; default 0
# same value must be also in exec.cfg at radius_dictionary line
dictionary 0
# UDP port for authentication radius packets
auth_port 1812
# UDP port for accounting radius packets
acct_port 1813
# shared secret between NAS and RADIUS server
# in radius server the same value of secret must be configured for this client
secret 99SeCrET11
# value in seconds for waiting response from RADIUS server
timeout 4
# the maximum number of repeated requests before to give up
retries 3

Radius billing 26
# on SSW the IP of network interface used for sending radius packet
# on multiaccess, qutex, e-ones PG card IP must be used
NAS_IP 192.168.1.50
Pgsql sip pool
GoTo >Main Page
Pgsql pcodedel
GoTo >Main Page
Location: /mnt/app/bin/pgsql_pcodedel
Definition: Used by centrala to erase a recharging code from simserver database after successful
recharge
Note: pgsql_pcodedel connects directly to postgresql server running on simserver. IP of the
equipment must be added in postgresql access list
Config file:/mnt/app/cfg/pgsql_pcodedel.cfg
server 1
first_conn_string dbname=prepaid host=84.22.50.108 user=gsmgw password=db@prepaid
host=ip of simserver

Pgsql pcode 27
Pgsql pcode
GoTo >Main Page
Location: /mnt/app/bin/pgsql_pcode
Definition: Used for recharging feature of simserver.Used by centrala to download a recharging
code from simserver database
Note: pgsql_pcode connects directly to postgresql server running on simserver. IP of the
equipment must be added in postgresql access list
Config file:/mnt/app/cfg/pgsql_pcode.cfg
server 1
first_conn_string dbname=prepaid host=84.22.50.108 user=gsmgw password=db@prepaid
host=ip of simserver
Pgsql pcodeerror
GoTo >Main Page
Location: /mnt/app/bin/pgsql_pcodeerror Used for recharging feature of simserver.
Definition: Used by centrala to signal that a error has been received when trying to use a
recharging code from simserver database
Note: pgsql_pcodeerror connects directly to postgresql server running on simserver. IP of
the equipment must be added in postgresql access list
Config file:/mnt/app/cfg/pgsql_pcodeerror.cfg
server 1
first_conn_string dbname=prepaid host=84.22.50.108 user=gsmgw password=db@prepaid
host=ip of simserver

Pgsql sms 28
Pgsql sms
GoTo >Main Page
Location: /mnt/app/bin/pgsql_sms
Definition: Used by centrala to insert received sms messages in to simserver database
Note: pgsql_sms connects directly to postgresql server running on simserver. IP of the
equipment must be added in postgresql access list
Config file:/mnt/app/cfg/pgsql_sms.cfg
server 1
first_conn_string dbname=prepaid host=84.22.50.108 user=gsmgw password=db@prepay
host=ip of simserver

Operating Sistem Structure 30
Operating Sistem Structure
As you may have noticed, Linux organizes its files differently from Windows. First the directory structure may seem
unlogical and strange and you have no idea where all the programs, icons, config files, and others are. This is by no
means a complete list of all the directories on Linux, but it shows you the most interesting places in your file system.
The root directory. The starting point of your directory structure. This is where the Linux system begins. Every other
file and directory on your system is under the root directory. Usually the root directory contains only subdirectories,
so it's a bad idea to store single files directly under root.
Don't confuse the root directory with the root user account, root password (which obviously is the root user's
password) or root user's home directory.
/boot
As the name suggests, this is the place where Linux keeps information that it needs when booting up. For example,
this is where the Linux kernel is kept. If you list the contents of /boot, you'll see a file called vmlinuz - that's the
kernel.
/etc
The configuration files for the Linux system. Most of these files are text files and can be edited by hand. Some
interesting stuff in this directory:
/etc/inittab A text file that describes what processes are started at system bootup and during normal operation.
/etc/fstab This file contains descriptive information about the various file systems and their mount points
/etc/passwd A file that contains various pieces of information for each user account. This is where the users are
defined.
/bin, /usr/bin These two directories contain a lot of programs (binaries, hence the directory's name) for the system.
The /bin directory contains the most important programs that the system needs to operate, such as the shells, ls, grep,
and other essential things. /usr/bin in turn contains applications for the system's users. However, in some cases it
really doesn't make much difference if you put the program in /bin or /usr/bin.
/sbin, /usr/sbin• Most system administration programs are stored in these directories. In many cases you must run
these programs as the root user.
/usr• This directory contains user applications and a variety of other things for them, like their source codes, and
pictures, docs, or config files they use. /usr is the largest directory on a Linux system, and some people like to have it
on a separate partition.• This is where you install apps and other files for use on the local machine. If your machine is
a part of a network, the /usr directory may physically be on another machine and can be shared by many networked
Linux workstations. On this kind of a network, the /usr/local directory contains only stuff that is not supposed to be
used on many machines and is intended for use at the local machine only.
/lib The shared libraries for programs that are dynamically linked. The shared libraries are similar to DLL's on
Winblows.
/home This is where users keep their personal files. Every user has their own directory under /home, and usually it's
the only place where normal users are allowed to write files. This is where gsmgw and tpxadm user home is located
/root• The superuser's (root's) home directory. Don't confuse this with the root directory (/) of a Linux system.
/var•• This directory contains variable data that changes constantly when the system is running.
Some interesting subdirectories:
/var/log•• A directory that contains system log files. They're updated when the system runs, and checking them out
can give you valuable info about the health of your system. If something in your system suddenly goes wrong, the
log files may contain some info about the situation.• Programs can write their temporary files here.

Operating Sistem Structure 31
/dev The devices that are available to a Linux system. Remember that in Linux, devices are treated like files and you
can read and write devices like they were files. For example, /dev/fd0 is your first floppy drive, /dev/cdrom is your
CD drive, /dev/hda is the first IDE hard drive, and so on. All the devices that a Linux kernel can understand are
located under /dev, and that's why it contains hundreds of entries.
/mnt€ This directory is used for mount points. This attaching is called mounting, and the directory where the device
is attached is called the mount point. This is where the partition containing Topex software and configurations is
mounted
/mnt/app/bin
Folder containing binary files and modules. This is the folder that houses main applications like centrala, h323_apc, mspd. SS7_apc ...
/mnt/app/cfg
Folder containing configuration files.
/mnt/app/out
This folder contains all the files generated by centrala and other apps installed on the equipment.Cdr and log files are stored here
/mnt/app/dev
Similar to /dev/ this folder contains devices used by Topex software
/mnt/app/lib
Similar to /lib/ this folder contains libraries used by Topex software
/mnt/app/raw
Contains raw audio files that are used for apps sutch as voicemail, music on hold, ivr. These files are coded with G711 and G729 codec
/proc•• This is a special directory. Well, actually /proc is just a virtual directory, because it doesn't exist at all! It
contains some info about the kernel itself. There's a bunch of numbered entries that correspond to all processes
running on the system, and there are also named entries that permit access to the current configuration of the system.
Many of these entries can be viewed.

Telnet commands 32
Telnet commands
GoTo >Main Page > centrala
To view the telnet commands you have to check the telnet port in exec.cfg, see bellow line:
telnet 23 // it can be another port
Then you have to use the telnet command:
telnet localhost 23
Trying 127.0.0.1...
Connected to localhost.
Escape character is '^]'.
COMMAND
help
help
topexsw>help
show all the commands that can be executed from command line and description
accessin
accessin
show the loaded accessin configuration
Example:
topexsw>accessin
Access IN:
Id Classid Resellerid IP Mask Port PortStart PortEnd Proto Prefix NrDig EndCause IgnANI InsANI IgnDNIS InsDNIS
14 16 1 192.168.52.2 32 0 0 0 H323 0 34 0 0
13 15 1 192.168.52.2 32 0 0 0 SIP 0 34 0 0
12 10 1 192.168.52.221 32 0 0 0 H323 0 34 0 0
11 12 1 192.168.52.23 32 0 0 0 SIP 0 34 0 0
Total: 4
accessout
accessout
show the loaded accessout configuration
Example:
topexsw>accessout
Access OUT:
Id Classid Resellerid IP Port Proto Transport MediaParam
4 7 1 192.168.52.60 0 SIP UDP
7 13 1 192.168.52.23 0 H323 DEFAULT
1 2 1 0.0.0.0 0 SIP UDP

Telnet commands 33
13 21 1 192.168.102.200 1722 H323 DEFAULT
Total: 4
add_to_credit [clientid] [add_credit]
increment/decrement credit of specified prepaid client id
in order to decrement credit put with '-' before add_credit paramater
starting with 09 Julie 2009; not included in version 4.3.30; see centrala version
all queue
show the calls that are waiting in the call center queue
ani users
show ANI users loaded in memory
starting with 19 August 2009, on versions >= 4.3.88
billing fields number
show the value of the billing fields number set in exec.cfg file
billing price [billing profile id] [billing price id]
€€ show billing price id linked to specified billing profile id
€ implemented starting with 4.3.97, see centrala version
€€ starting with 07 Ian 09 billing profile id must not be passed as argument, only billing price id is needed
billing profile [profile id]
show specified profile id
billing profiles
show all billing profiles
cards
€€ show all cards loaded in memory
€€ starting with version 4.3.103
class translations [class id]
show translations for specified class id
connect2 [arg1 arg2]
connect two channels via local matrix, arg1 and arg2 is hexa format of channel|(flow<<5)
calls connect2(arg1, arg2) function

Telnet commands 34
count all online users
count of all sip online users, include also forked online users
count billing prices
€€ count all billing prices loaded in memory
€ starting with 5 Jan 09 on versions >= 4.3.88
clear all dialog states [sip user name]
clear all dialog states for specified user name
count offline users
count of all off line users
count online users
count of all online users
count prepaid users
€€ count of all prepaid users loaded in memory
€ starting with 07 Ian 09 on versions >= 4.3.88
count sip users
count of all created users
class translations
show translations for specified class id
classes
show softswitch classes loaded into memory
debug on
enable the console debugging
debug off
disable the console debugging
dialog states
show call state for each dialog
destination groups
€€ show destination routing groups loaded in memory

Telnet commands 35
€€ starting with version 4.3.117
equipments
show equipments list
starting with version 4.3.97, see centrala version
fdwatch connections
show all fdwacth connections (telnet, httpd etc.)
forking group [group number]
show sip users from specified forking group
fw subscriptions
show all event subscriptions forwarded by SIP proxy
global rules
show global admin rules list
global translation
show global translation list
hunting group [group number]
show sip users from specified hunting group
interface ip
show the interface ip configuration loaded from sip_pbx.cfg file
print also the file descriptor created on each interface
ivr [filename]
€€ show IVR (Interactive Voice Response) scrip file
€€ starting with version 4.3.117 if the IVR file is not specified command will list all IVR files configured on routes
kill all calls
kill all calls
kill all current calls connected; it kills both trunk and proxy calls, the calls that are in ringing, proceeding state will not be killed
Example:
topexsw>view calls
call port=65535 dir=SIP_USERS type=in state=connected proto=SIP ani=0317100027 dnis=0717100021 ips=192.168.144.148 iprtps=192.168.144.148
duration=2 sid=20ae5201 pid=1 hld_rq=65535
call port=65535 dir=OUT_H323_A_102_200 type=out state=connected proto=H323 ani=0317100027 dnis=0717100021 ips=192.168.102.200
iprtps=192.168.102.200 duration=2 sid=20ae5201 pid=2 hld_rq=65535

Telnet commands 36
topexsw>kill all calls
Tx M_KILL to 1 connected calls
topexsw>view calls
NRCALLS 0
kill call [port]
kill call [port]
kill call from specified port
Note: if the call is made without transcoding you will see the 65535 port alocated to all the calls thees call can be killed with
kill pidcall [pid] command
Example:
topexsw>view calls
call port=65535 dir=SIP_USERS type=in state=connected proto=SIP ani=0317100027 dnis=0717100021 ips=192.168.144.148 iprtps=192.168.144.148
duration=6 sid=6fbf0b6b pid=19 hld_rq=65535
call port=65535 dir=OUT_H323_A_102_200 type=out state=connected proto=H323 ani=0317100027 dnis=0717100021 ips=192.168.102.200
iprtps=192.168.102.200 duration=6 sid=6fbf0b6b pid=20 hld_rq=65535
call port=1580 dir=SIP_USERS type=in state=connected proto=SIP ani=0317100033 dnis=0717100021 ips=192.168.52.21 iprtps=192.168.52.21
duration=3 sid=5daf55b5 pid=21 hld_rq=0
call port=1583 dir=OUT_H323_A_102_200 type=out state=connected proto=H323 ani=0317100033 dnis=0717100021 ips=192.168.102.200
iprtps=192.168.102.200 duration=3 sid=5daf55b5 pid=22 hld_rq=0
NRCALLS 4
topexsw>kill call 1580
kill call on port 1580 -> Tx M_KILL to pid 21
topexsw>view calls
call port=65535 dir=SIP_USERS type=in state=connected proto=SIP ani=0317100027 dnis=0717100021 ips=192.168.144.148 iprtps=192.168.144.148
duration=18 sid=6fbf0b6b pid=19 hld_rq=65535
call port=65535 dir=OUT_H323_A_102_200 type=out state=connected proto=H323 ani=0317100027 dnis=0717100021 ips=192.168.102.200
iprtps=192.168.102.200 duration=18 sid=6fbf0b6b pid=20 hld_rq=65535
NRCALLS 2
kill class calls [class id]
€€ kill all current (incoming and outgoing) calls on specified class id
kill pidcall [pid]
kill pidcall [pid]
kill cctl call with specified pid
Example:
topexsw>view calls
call port=65535 dir=SIP_USERS type=in state=connected proto=SIP ani=0317100027 dnis=0717100021 ips=192.168.144.148 iprtps=192.168.144.148
duration=8 sid=79cce832 pid=29 hld_rq=65535

Telnet commands 37
call port=65535 dir=OUT_H323_A_102_200 type=out state=connected proto=H323 ani=0317100027 dnis=0717100021 ips=192.168.102.200
iprtps=192.168.102.200 duration=8 sid=79cce832 pid=30 hld_rq=65535
call port=1597 dir=SIP_USERS type=in state=connected proto=SIP ani=0317100033 dnis=0717100021 ips=192.168.52.21 iprtps=192.168.52.21
duration=5 sid=072d9439 pid=31 hld_rq=0
call port=1539 dir=OUT_H323_A_102_200 type=out state=connected proto=H323 ani=0317100033 dnis=0717100021 ips=192.168.102.200
iprtps=192.168.102.200 duration=5 sid=072d9439 pid=32 hld_rq=0
NRCALLS 4
topexsw>kill pidcall 29
send M_KILL to pid 29
topexsw>view calls
call port=1597 dir=SIP_USERS type=in state=connected proto=SIP ani=0317100033 dnis=0717100021 ips=192.168.52.21 iprtps=192.168.52.21
duration=19 sid=072d9439 pid=31 hld_rq=0
call port=1539 dir=OUT_H323_A_102_200 type=out state=connected proto=H323 ani=0317100033 dnis=0717100021 ips=192.168.102.200
iprtps=192.168.102.200 duration=19 sid=072d9439 pid=32 hld_rq=0
NRCALLS 2
kill proxypidcall [pid]
kill proxypidcall [pid]
kill proxy call with specified pid
licence
show license info
make offline [sip user name]
make offline all instances of the specified sip user
Example:
topexsw>sip online
SIP ON-LINE USERS:
clientid classid username contact expire nat_bind nat cseq transport
46 2 0317100027 0317100027@192.168.144.148:5060 56 192.168.144.148:5060 0 17206 UDP
40 2 0317100021 0317100021@192.168.52.221:5063 51 192.168.52.221:5063 0 3626 UDP
48 2 0317100033 0317100033@192.168.52.21:5060 20 192.168.52.21:50787 0 13107 UDP
9 2 0317100022 0317100022@192.168.144.144:2051 63 192.168.144.144:2051 0 4711 UDP
topexsw>make offline 0317100021
DELETE online user '0317100021' contact '0317100021@192.168.52.221:5063' expire 1234514389
topexsw>sip online
SIP ON-LINE USERS:
clientid classid username contact expire nat_bind nat cseq transport
46 2 0317100027 0317100027@192.168.144.148:5060 38 192.168.144.148:5060 0 17206 UDP
48 2 0317100033 0317100033@192.168.52.21:5060 57 192.168.52.21:50787 0 13109 UDP
9 2 0317100022 0317100022@192.168.144.144:2051 45 192.168.144.144:2051 0 4711 UDP

Telnet commands 38
Total: 3
malloc counters
show some memory allocated counters from sip queues
monitored users
show monitored user (lawful intercepted)
starting with version 4.3.101, see centrala version
pickup group [group number]
show sip users from specified pickup group
port subscriptions
show all port event subscriptions
prepaid users
show all prepaid users loaded in memory
reject all calls
All incoming calls are rejected from now on!.
You need to restart the application in order to receive new calls!
queue [queue number]
show details from specified call center queue
quit
exit from telnet
register users
show memory SIP register users list
res block
unblock one cic or more cic's on a SS7 connection
res moni
release current monitored port from direct monitoring
reseller rules [reseller id]
show rules list for specified reseller id
reseller translate prefix [reseller id]

Telnet commands 39
show translate prefix list for specified reseller id
resellers
show softswitch resellers loaded in memory
restrictions
€€ show restriction classes loaded in memory
€€ starting with version 4.3.116
ring state remote
show ring state remote queue
save billing queues
write SQL CDRs from billing pool queues to text files see Billing generic (apply to PGSQL, MySQL, MSSQL)
you can check after the status of billing pools with command: view pools
search online [pattern]
search pattern in online sip users list
matching is done with strstr function
search user [pattern]
search pattern in sip users list
sendmes
send a specific message to a card
sendmeseones
send a specific message to a card on a EONES equipment
sendmesseones <card> 2 0001
send messeones <card> 2 22001
set block
block one or more cics on a SS7 connection
set mind server
allow you to set manually the active mind radius server
accepted values: 1=first server; 2=second server
Example:
topexsw>view mind server
Active mind server is 1
topexsw>set mind server 2

Telnet commands 40
topexsw>view mind server
Active mind server is 2
set moni [port]
set one port for direct monitoring
show ani user [ANI] [classid]
€€ show all user details for specified ANI linked to specified class id; for global ANI users you can skip the class id
parameter or you can put 65535
€€ Example:
€ topexsw>show ani user 111111111
€ starting with date 16 November 2009 on versions >= 4.3.88
show cpc
€€ show calling party category map list
show accessin [id] [prefix]
€€ show access in details for specified id and prefix
€€ Starting with version 4.3.111
show prepaid user [client id]
€€ show all prepaid user details for specified client id
€ Starting with 30 September 2009 on versions >= 4.3.88
show sip online [user name]
show all online details for specified username
Example:
topexsw>show sip online 0317100027
SIP ON-LINE USER:
Username: '0317100027'
IP: '192.168.52.119'
Contact: '0317100027@192.168.144.148:5060'
Call-ID: '8db5ec8e6c8ecd31@192.168.144.148'
Cseq: 17212
Expire: 1234514664
Expire2: 65
NAT bind: '192.168.144.148:5060'
Dialog_event: 0

Telnet commands 41
show sip user [user name]
show all user details for specified user name
Example:
topexsw>show sip user 0317100027
SIP USER:
Account_state: 0
ClientID: 46
ClassID: 2
PrepaidID: 0
BillingProfileID: 0
Username: '0317100027'
GSM number:
Alias: none
Password: '0317100027'
RTP proxy: 2
Transcoding: 0
Public: '0.0.0.0/0'
Private: '0.0.0.0/0'
Display_name:
Privacy_display: 0
CLI_proxy: '0317100027'
Privacy_proxy: 0
CLI_UA: '0317100027'
Privacy_UA: 0
CLI_centrex 'Anonymous'
Privacy_centrex: 0
Centrex_gr 0
Centrex_alias: none
Description:
Callstate: idle
CallForward: 0
CallForwardState: 0
ForwardSelective: 0
ForwardNr_offline:
ForwardNr_busy:
ForwardNr_noasnwer:
ForwardNr_always:
CallWait: 0
CallWaitState: 0
VoiceMail: 0
VoiceMailState: 0
VoiceMailNumber:
VoiceMail2emailState: 0
VoiceMail2email:
Missed2email: 0
Missed2emailState: 0

Telnet commands 42
Missed2emailemail:
Reject_no_ANI: 0
Do_not_disturb: 0
CallPickUpGroup: 0
CallHuntingGroup: 0
CallHuntingPriority: 0
Forking_group: 0
Rules_in: 0
Rules_out: 0
Rule: none
Publish_presence: 0
Multiple_contacts: 1
Queue[00]: 0
Queue[01]: 0
Queue[02]: 0
Queue[03]: 0
Queue[04]: 0
CC queue [00]: NULL
CC queue [01]: NULL
CC queue [02]: NULL
CC queue [03]: NULL
CC queue [04]: NULL
sip pp
show SIP public/private IP class access list
sip publish
show all published events for specified online user
sip offline
show offline sip users list
sip online
show online sip users list
sip online forked
show forked online sip users list

Telnet commands 43
sip subscriptions
show all sip users event subscriptions
sip users
show sip users list
sip vm notify
show SIP Voice mail notify list
subscriber [port]
show fxs subscriber settings on specified port
subscribers
show all fxs subscribers list
tetrapol
Show info about tetrapol ports installed.
This command is available only when centrala is built with TETRAPOL define, see centrala version
Example:
Tetrapol Ports Info:
Port Coordcom_port Address STCP_version RSW_id BS_id ST_init
24 9 008400806 5 0 0 1
Local OG/COV 616/200 619/200
National OG/COV
25 10 008400805 5 0 1 0
Local OG/COV 616/200 619/200
National OG/COV
26 11 008400802 5 0 0 0
Local OG/COV 616/200 619/200
National OG/COV
27 12 000000000 0 0 0 0
Local OG/COV
National OG/COV
Total: 4
Port = port number from Topex numbering plan.
Coordcom_port = port number from CoordCom numbering plan.
Address = is the number of tetrapol station.
STCP_version = System Terminal Control Protocol version

Telnet commands 44
RSW_id = Radio Switch Id
BS_id = Base Station Id
ST_init = indicate if the station is registered or not to the network
0 = not registered
1 = registered
transactions client
show number of free/busy SIP client transactions
tls sock [file descriptor]
show details for specified TCP/TLS socket
ts sock busy
show TCP/TCP sockets from busy queue
ts sock free
show TCP/TLS sockets from free queue
ts sock wait
show TCP/TLS sockets from time wait queue
unreject all calls
€€ The reverse of command 'reject all calls'
€€ Starting with version 4.3.106
update config
update (reload) configuration from database into memory
view allports
show all ports
view calls
show all the calls that are in/out on a trunk
Example:
topexsw>view calls
call port=65535 dir=SIP_USERS type=in state=connected proto=SIP ani=0317100027 dnis=0717100021 ips=192.168.144.148 iprtps=192.168.144.148
duration=2 sid=20ae5201 pid=1 hld_rq=65535
call port=65535 dir=OUT_H323_A_102_200 type=out state=connected proto=H323 ani=0317100027 dnis=0717100021 ips=192.168.102.200
iprtps=192.168.102.200 duration=2 sid=20ae5201 pid=2 hld_rq=65535
NRCALLS 2

Telnet commands 45
view cicstate
show the status of each cic if the command returns a empty list the the cic is in the OK state
view class [classid]
view details for specified class id
view classes
view classes list
view cardstate
show the status of the cards loaded into memory
view dirasr
show a statistical asr/acd on each class
view dircounters
show a statistical cost/speach on each class
view groups
view groups info
view linkstate
show the status of the psychical link on each E1 port
view mind server
show the active mind radius server, see also Radius AAA
Note: if you have more than one mind server you can see the active one
Example:
topexsw>view mind server
Active mind server is 1
Stop the first MIND server and check again the active mind server:
topexsw>view mind server
Active mind server is 2

Telnet commands 46
view pools
show client pools info
view ports
show installed ports with state != FREE
view port [port_number]
show specified port
view portsoncard [card_number]
show all ports on specified card
view portsonequipment [equipment_id]
show all MGCP/MEGACO ports on specified equipment id
Starting with version 4.3.100 see centrala version
view portstate
Show a list of ports and the state of each port (ERROR,BLOCKED,BUSY...) if the port it is not in the list that means
that the port is OK and it is not used.
Field1=PORT allways
Field2=port state
Field3=physical port number
Example:
topexsw>view portstate
PORT STATE
PORT BUSY 13
PORT BUSY 131
PORT BLOCK 132
PORT BUSY 133
PORT ERROR 1342

Telnet commands 47
view proxycalls
show all proxy calls (between sip users)
view route [routeid]
view details for specified route id
view routes
view memory routes list
view simstate
view the state of SIM cards
web callback [A username] [B username] [A class id]
call A then call B and connect both
xconnect port1 port2
connect two ports via local Eones
calls connect2EONES(port1, port2) function
Back to centrala

48
OAM
Connecting with OAM
Back to Main Page > OAM
Connecting With OAM
Note:Connection with OAM is possible only if centrala is running on the target machine. If
connection with OAM is not established connect with serial or putty and check if centrala is
running
Options for the OAM program
In order to allow additional facilities, the “gwconfig.exe” application may also be started at the command line prompt
with the following parameters:
1) “-D”
The OAM software includes a protection against starting more than one instance of it. If it is necessary to start the
software more than one time, you should use the following command to start the application: "gwconfig.exe -d" or
"gwconfig.exe -D". The “D” parameter allows simultaneous administration of several TOPEX gateways.
2) "-C"
The parameter "-c" or "-C" allows automated connection of the administration program to a TOPEX gateway. The
“c” parameter must be followed by a space delimiter and these three fields: identification name for the remote
system, user name and password (to allow automated log-in).
For example: "gwconfig.exe -c TEST,<username>,<password>".
3) "-S"
Parameter "-s" or "-S" allows saving of several types of data. The information saved concerns the status of activation
of monitoring, live monitoring and interrogation about mobile network information (cell IDs and signal levels).
For instance "gwconfig.exe -s" or "gwconfig.exe -S"
All these parameters can be combined and added to the command line.
4) -Z€
Parameter "-Z" archives configuration and cdr files before downloading them with OAM. It will greatly increase the
speed of OAM
Best Practice
Always use parameters "-z" and "-d"
The Systems menu contains two options: Add and Remove
SYSTEMS => ADD
Add a new TOPEX system to the structure. When you click the “Add” command, the window “Add system on
position n” is displayed.
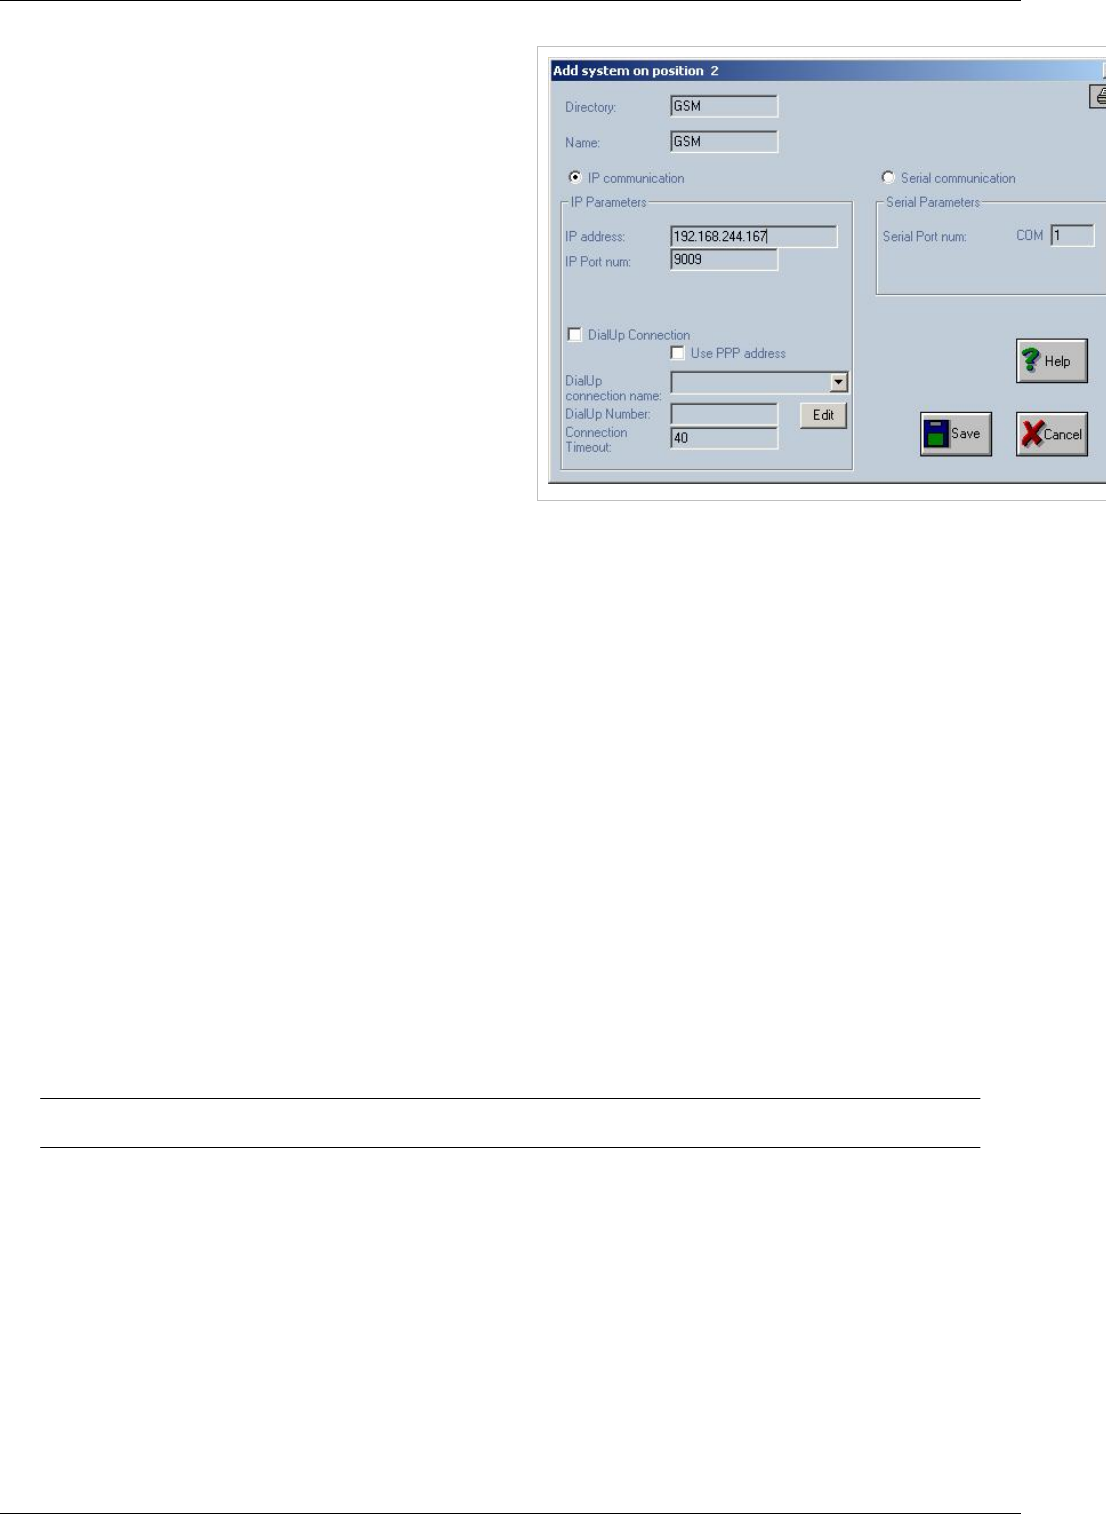
Connecting with OAM 49
In the “Add system on position n”
window you must specify:
€Directory – enter a name for the
folder where the files downloaded
from the TOPEX multiAccess
system will be stored. On the
computer hard disk it will be made
a directory in the following shape
"cfg_xxxxxxx" where xxxxxxx is
the name typed in the "Directory"
field. The folder will be created on
hard disk in the directory where the
executable 'gwconfig.exe' is located.
In the picture above, the directory
name is “GSM”.
€Name – enter a name for the connection to the system. It will be concatenated with "cfg_" and show up in the
tree-like structure as “cfg_GSM”. These concatenated names are text used from now on in the tree structure for
identifying the system.
€Serial communication / IP communication – here you specify the type of link between OAM computer and
E1/30 Mobile gateway.
There are two exclusive options for the communication with TOPEX equipment: IP or serial link.
A) IP Parametersif you choose IP communication, you must fill the next two fields:
IP address - enter the IP address of the system. It can be a numeric IP address or a text address (in that case a DNS
request will be made by software).
IP Port num. - enter the number of the port through which the communication with the system is achieved. The
default value is 9009. This value is also established into the gateway system and should not be changed.
Dial-Up Connection field
€ In case of IP communication, if this box is checkedit allows you toestablish adial-up connection. The Dial-up
connection must be created from Windows (from Control Panel "Dial-Up Networking") and the connection name
must not contain the space character inside the text.
€ Option “Use PPP address” is used to indicate to the “gwconfig” application that it must connect to the address of
the dialup server, after a successful connection. If this option is NOT checked, then the “Gwconfig” program will
try to connect to the address specified in the field “IP address” field.
SEO: Connecting with OAM, OAM, Topex Management Software,

OAM / Card Map 50
OAM / Card Map
Back to Main Page > OAM
Multiaccess OAM card map
Power
First card in equipment is Power Card. This card is not numbered and it will not appear in OAM
PRI or VOIP
Positions 32-33 (as represented in OAM) are reserved for VOIP or ISDN card. The card is located between
POWER and PROCESSOR and uses second slot
€€ VOIP card is installed on port 32 and uses 60 channels. For this reason it will use positions 32 and 33 in OAM
€€ ISDN card has 2 ports with 30 channels each. Upper port will use position 33 and lower port position 32
PROCESSOR
Installed in third slot PROCESSOR is not represented in OAM.
Special Position
Slot number 4 (right after PROCESSOR) is used by default for GSM,FXS,FXO,BRI,RADIO cards (position 0 in
OAM). On special configurations this slot can be used for VOIP or ISDN cards. In this case VOIP or ISDN cards
will use position 16 and 17 (as represented in OAM). Slot number 4 can't be adapted on site to be used for VOIP or
ISDN equipment must be returned to Topex for backplane mod
€€ VOIP card is installed on port 16 and uses 60 channels. For this reason it will use positions 16 and 17 in OAM
€€ ISDN card has 2 ports with 30 channels each. Upper port will use position 17 and lower port position 16
GSM,FXS,FXO,BRI,RADIO
Note: Card 0 is the card closest to Processor
In slots 0 to 15 the following cards can be installed
€ GSM check GSM Card for more info on gsm cards
€€ FXS
€€ FXO
€€ MPAI
€€ BRI
€€ RADIO
Warning: FXS FXO MPAI BRI cards require a 48V converter that is not installed by
default on Multiaccess units.These cards can't be added to the equipment at a later time if
this converter is not installed on the equipment
OAM / Installing a GSM card 51
OAM / Installing a GSM card
Back to Main Page > OAM
Installing a GSM Card
€€ Insert the GSM board in the equipment
Note: GSM cards can be inserted while the equipment is running
€€ Right click on a empty position and select Add Card
Note: A password Box will pop-up. Password is topex
€€ Select as card type GSM
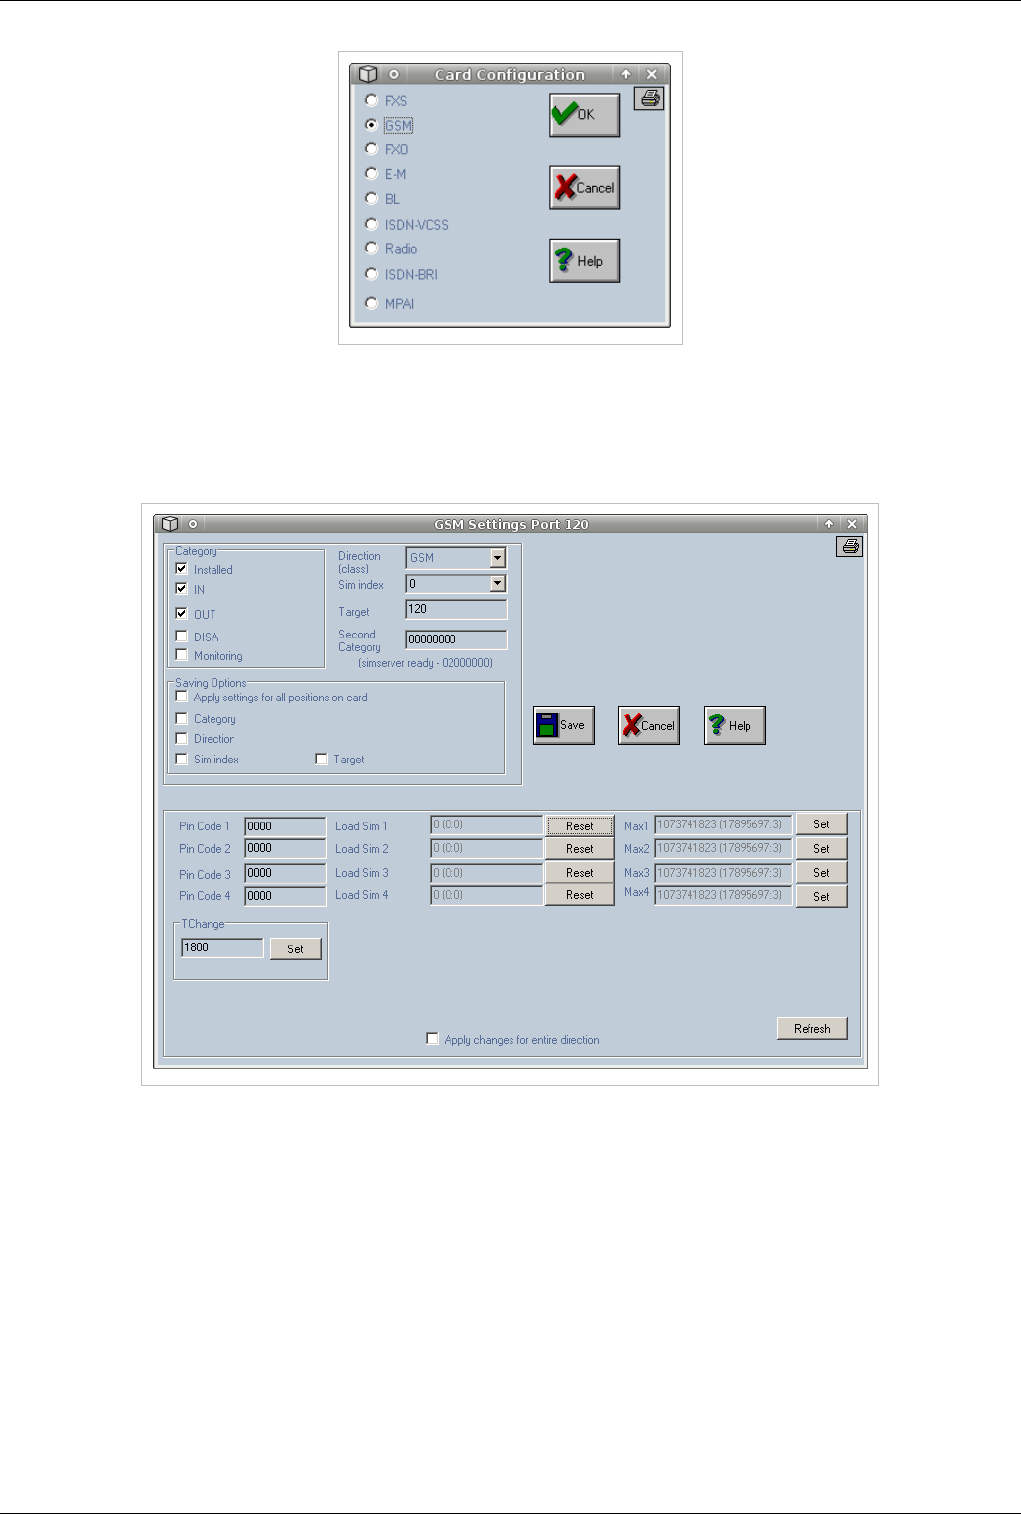
OAM / Installing a GSM card 52
GSM Settings
€€ Card has been added to equipment configuration
€€ Click on one of the 2 gsm ports of the card to setup card settings
€ Check Installed , IN, OUT, select a valid trunk (in this case GSM) and a Sim index
The “Category” area contains the following items:
€Installed – allow activation of that port; if that option is not selected it means the port cannot make calls or
receive calls;
€IN – input, port used only for incoming calls;
€OUT – output, port used only for outgoing calls;
€DISA – activates the DISA service on that port;
€Monitoring - the system collects additional information for this port in activity (monitoring) files.
“Direction”– the direction to which this port has been assigned. “Direction” must be one of the directions specified in
“Define directions names”. It can be a number from 0 to 19. If the port number is not assigned to any direction, then
enter 255.

OAM / Installing a GSM card 53
“SIM index”– an index (0-3) from the allocation table of the SIM cards that instructs the port what SIM to use. The
list contains values from 0 to 7 and the 255 value to indicate an unallocated index.
“Target”– the number of the local extension to which the input junction should ring. If you enter “---” the calls that
come in through this port will ring continuously.
“Second Category” - a category (8 digits) that can be assigned to the specified port. This value will be used in
further developments.
“SIM area” (this area is situated on the bottom side of GSM configuration card)
The settings in this zone are about SIM cards: their PIN code, the loading for each SIM and the maximum time of
usage for each SIM:
Pin Code 1 - PIN code of the SIM no. 1 (4 digits);
Pin Code 3 - PIN code of the SIM no. 2 (4 digits);
Pin Code 2 - PIN code of the SIM no. 3 (4 digits);
Pin Code 4 - PIN code of the SIM no. 4 (4 digits).
When option "Apply changes for entire direction" is set then the values for all four PIN codes are send to all GSM
ports that are allocated on the same direction.
Note: Load Time is total talk time on current sim.Value must be reseted to 0 when SIM
card is changed in order to have accurate readings
Note: Load Time on a SIM is not updated in real-time. The value is read only once when
connecting with OAM. To update the value disconnect and connect OAM
Load Sim 1 - loading in seconds (minutes) for SIM no 1;
Load Sim 2 - loading in seconds (minutes) for SIM no 2;
Load Sim 3 - loading in seconds (minutes) for SIM no 3;
Load Sim 4 - loading in seconds (minutes) for SIM no 4.
You can reset each loading value by clicking the "Reset" button to the right of the “Load Sim” field; when option
"Apply changes for entire direction" is set then a reset of a loading on a Sim x (x=1,2,3,4) will be send for Sim x on
all GSM ports which are allocated on the same direction. In case of "load balancing algorithm" the next set of values
are useful.
The next values are useful because each of them is establishing a maximum value of using time for a SIM; after the
specified value the SIM will become blocked. If the actual values get over the Max value then the SIM becomes
blocked.
Note: With Max Value sim in current position will be limited to a certain number of
minutes of talk time
Max SIM1 - maximum time to use in seconds (minutes) for first SIM;
Max SIM2 - maximum time to use in seconds (minutes) for second SIM;
Max SIM3 - maximum time to use in seconds (minutes) for third SIM;
Max SIM4 - maximum time to use in seconds (minutes) for fourth SIM.
You can set each value by clicking the "Set" button to the right of the “Max 1…4” field. Here also, when option
"Apply changes for entire direction" is selected, then a set of a maximum time on a Sim x (x=1, 2, 3, 4) will be send
for Sim x on all GSM ports which are allocated on the same direction.
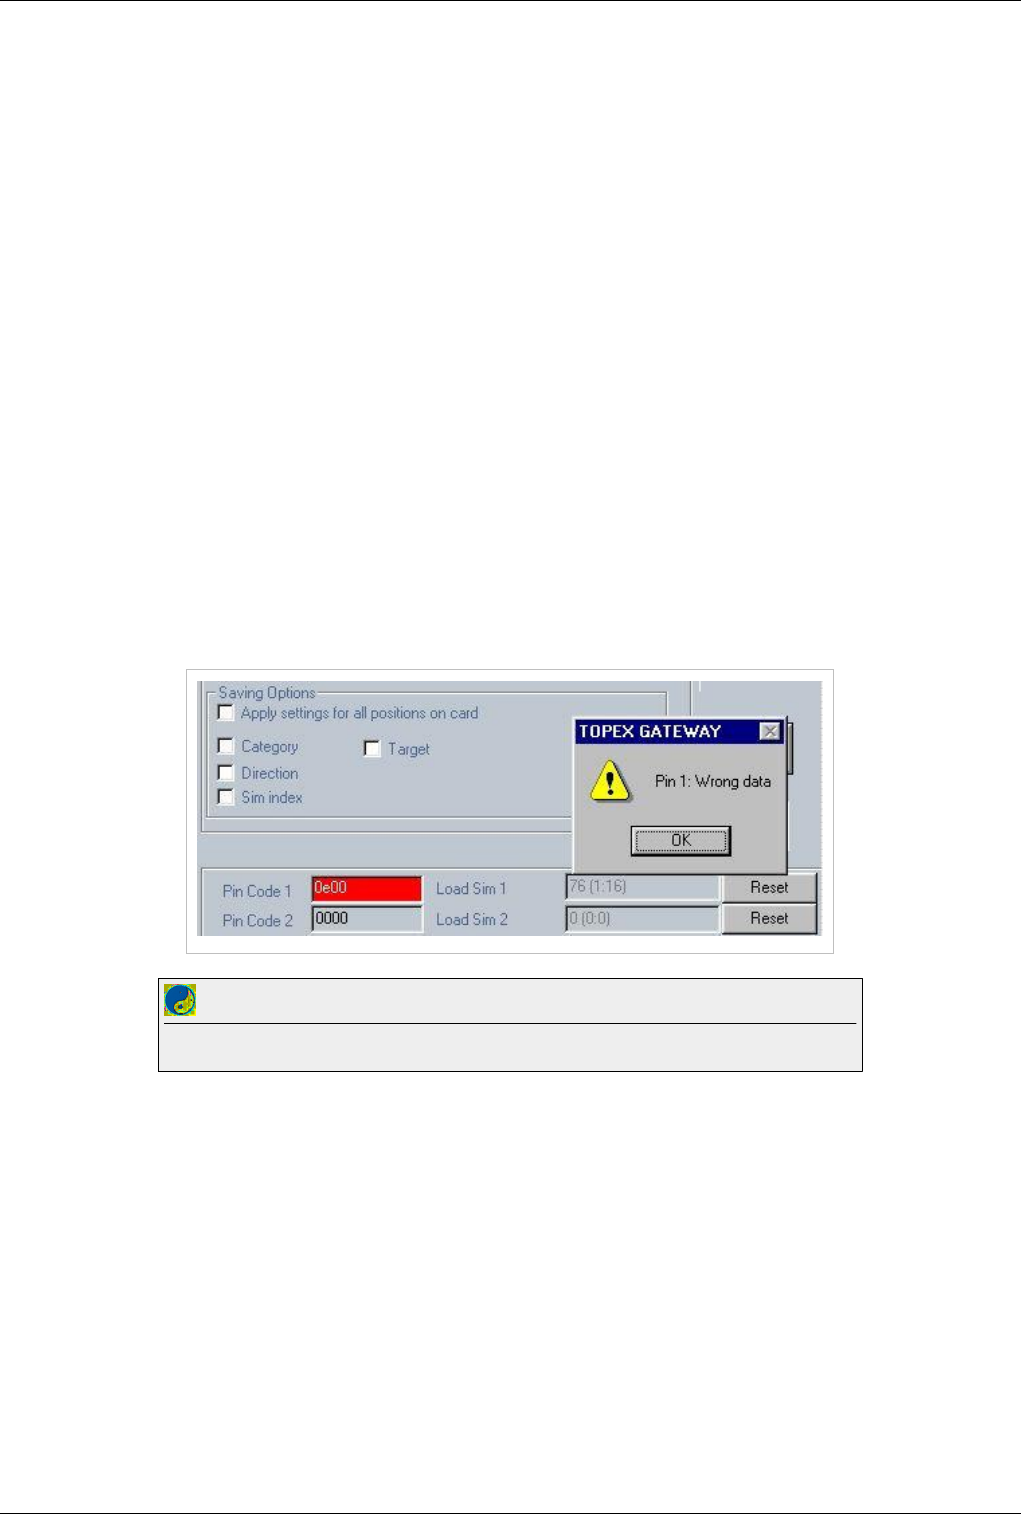
OAM / Installing a GSM card 54
Apply changes for the entire direction - if it is selected, the values for PIN code, loading (Load) and maximum
time (Max) will be automatically applied to all the mobile modules for that direction.
Save – saves the changes you performed;
Cancel – cancel the changes, closes the window without saving;
Help - shows a help window with help information about configuring the GSM board (this paragraph of the
Operating Manual in online electronic format).
Refresh - if this option is selected, then the OAM software will request the current values for SIM loading from the
gateway.
TChange - speaking time period in seconds following which the active SIM is changed (the gateway looks for the
SIM card with the lowest load for the same GSM module). Usual values are 1800 or 3600 seconds. This parameter is
the same for all GSM modules and can be viewed and changed in any GSM settings window. This parameter can be
changed by using the "Set" button. Another command which is changing the same parameter is the command "set
tchange xxx" - command which can be completed by choosing "Facilities - Commands".
Note1: The difference between GSM/UMTS modules and the CDMA modules is the special option
DIRMODULECDMA allocated to the CDMA direction.
Note 2: Several of the fields have length limits: for target is 3, for second category is 8 and for pin codes it is 4.
Note 3: Also, verifications are performed for the fields PIN codes and target. For PIN codes digits can have values
from 0 to 9 or characters "---" and for target it may be a number from 0 to 127 or characters "---". If a bad value is
inserted an error message is shown and the specified field turns red.
Best Practice
Input Pin code before inserting sim cards in the equipment. Otherwise sim card will be blocked in about 10s
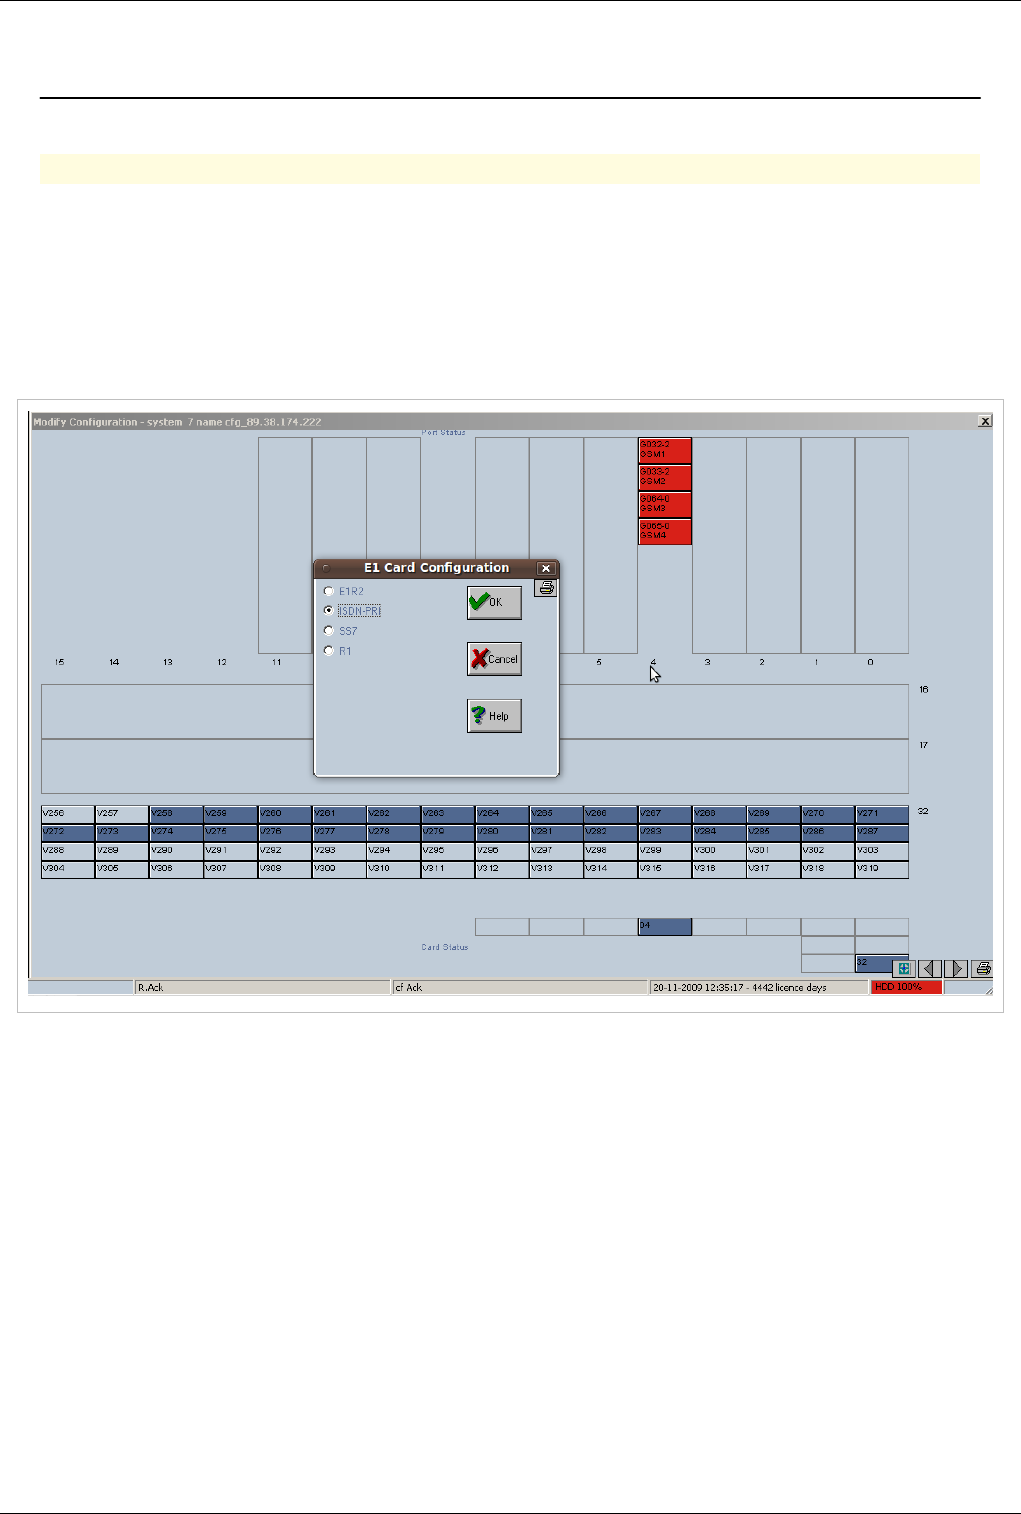
OAM / Installing a PRI card 55
OAM / Installing a PRI card
Back to Main Page > OAM
Installing a PRI Card
Connect with OAM
€€ Add the card in positions 16 or 17: Right click on position and select Add Card 17
NOTE: Position 16 correspods to E1/B slot on the equipment, position 17 coresponds to slot E1/A
€ Enter the password topex and select the Isdn signaling you need(Supported signaling includes R2 generic CAS
(Channel Associated Signaling - in accordance both with ITU-T Q.421/Q.422 and with Q.411/Q.412), ISDN
DSS1, and SS7), for this example we will add the card as ISDN-PRI.
€€ Select the Layer 1 Network/ User interface.
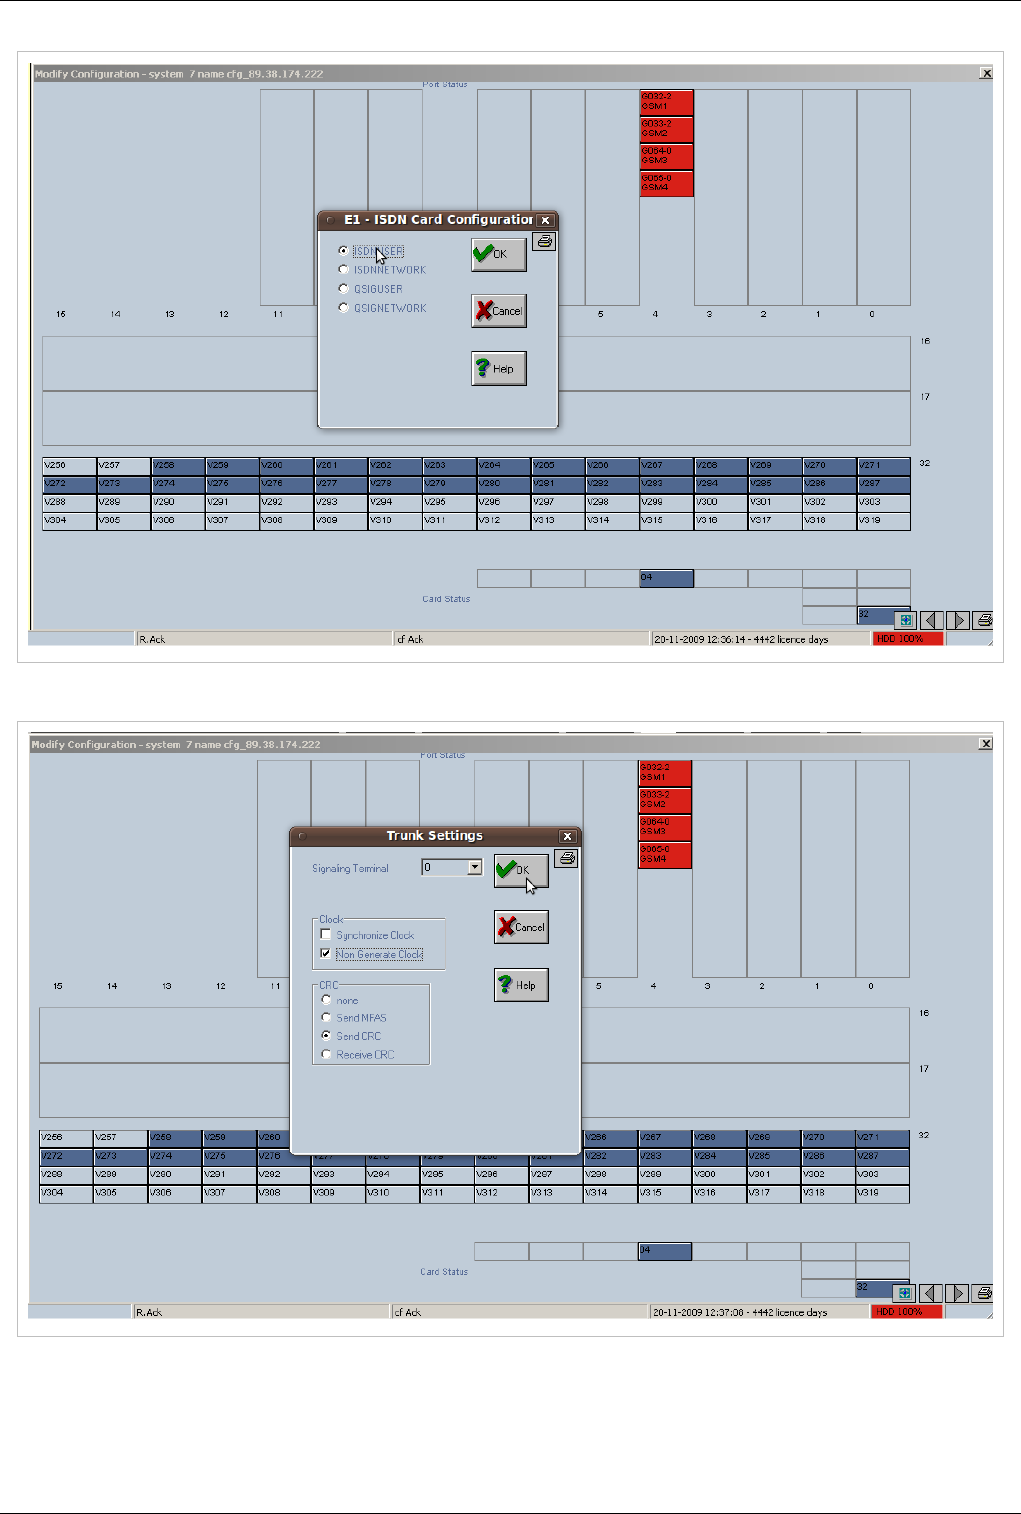
OAM / Installing a PRI card 56
€€ Select the the Trunk Settings you need.
NOTE: the trunk settings are explained at E1 settings
€€ Click the second port on the card (129 for position 16 or 161 for position 17), check the boxes INSTALLED,
IN,OUT, Apply settings for all positions on card, CATEGORY, DIRECTION and select an Direction
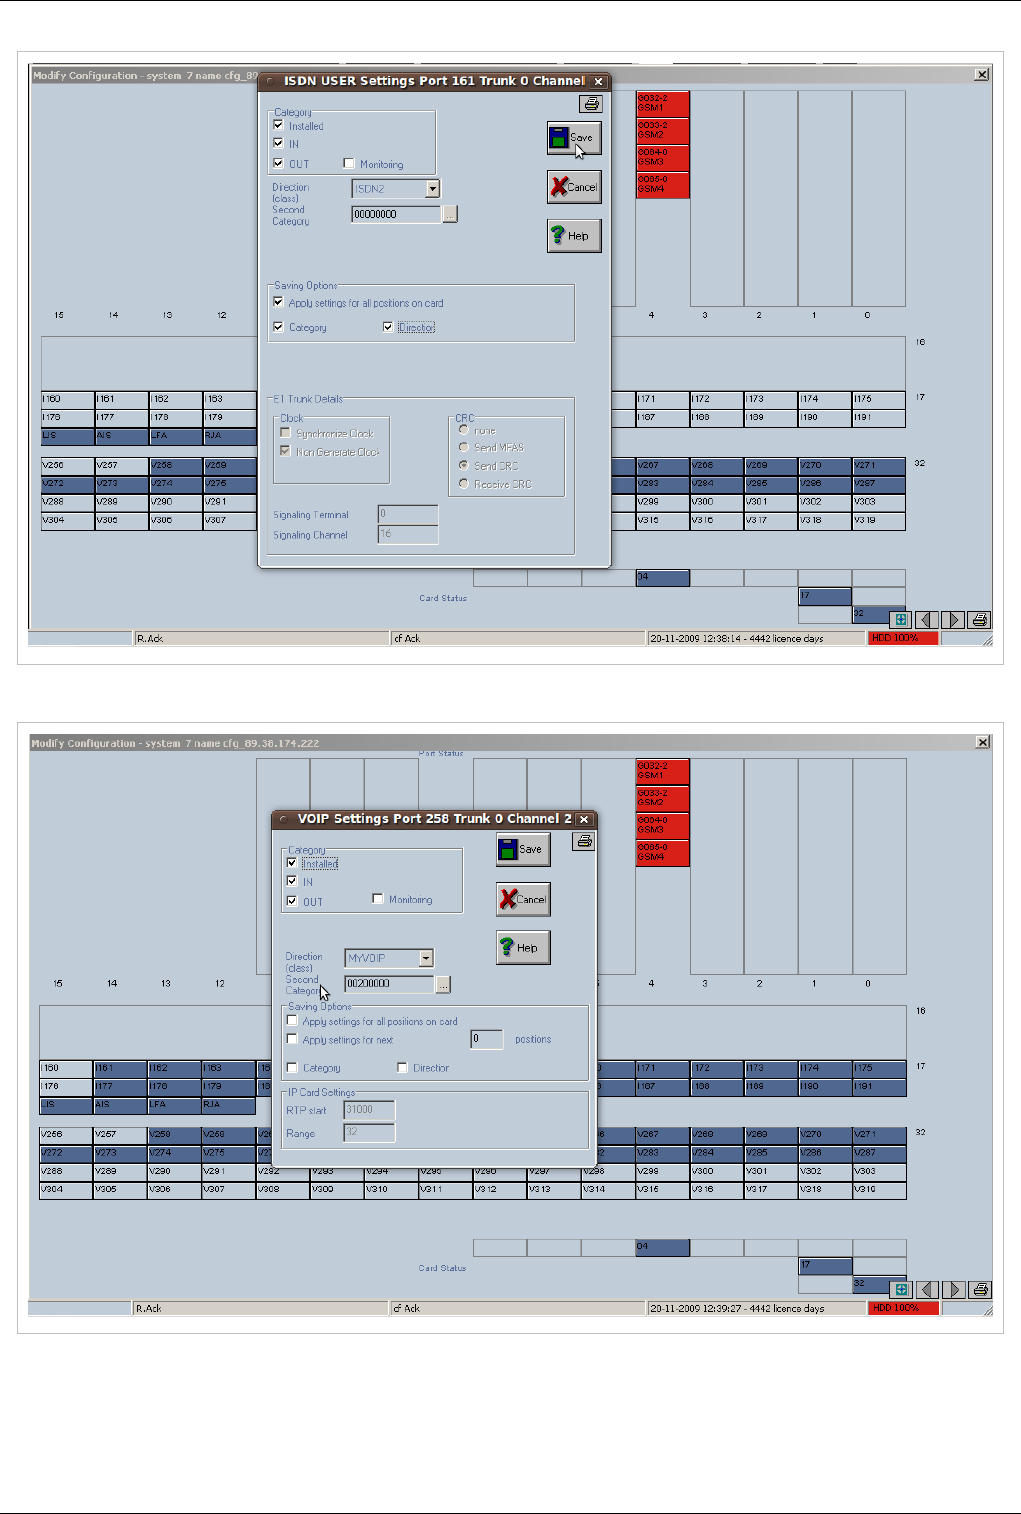

OAM / Installing a VOIP card 58
OAM / Installing a VOIP card
Back to Main Page > OAM
Installing a VOIP card
Configuration for PGRUC Processor
Note:When Voip card is initialized a firmware is loaded from the processor into the card.
For the firmware to be loaded correctly the Wan port located on the voip card must be
disabled. This will cause a temporary loss of connection to the equipment. If all voip
settings are correct the card will boot and connection will be re-established. If errors are
present the link will not be re-established and connection to the equipment will be lost. To
restore connection connect the main cable directly in the Ethernet port of the processor
Best Practice
Make sure that main Ethernet cable is connected directly to Processor card
€€ Connect with OAM
€€ Add the voip card in position 32:Right click on position 32 and select Add Card 32 (password is: topex)
€€ Select IP and press OK button
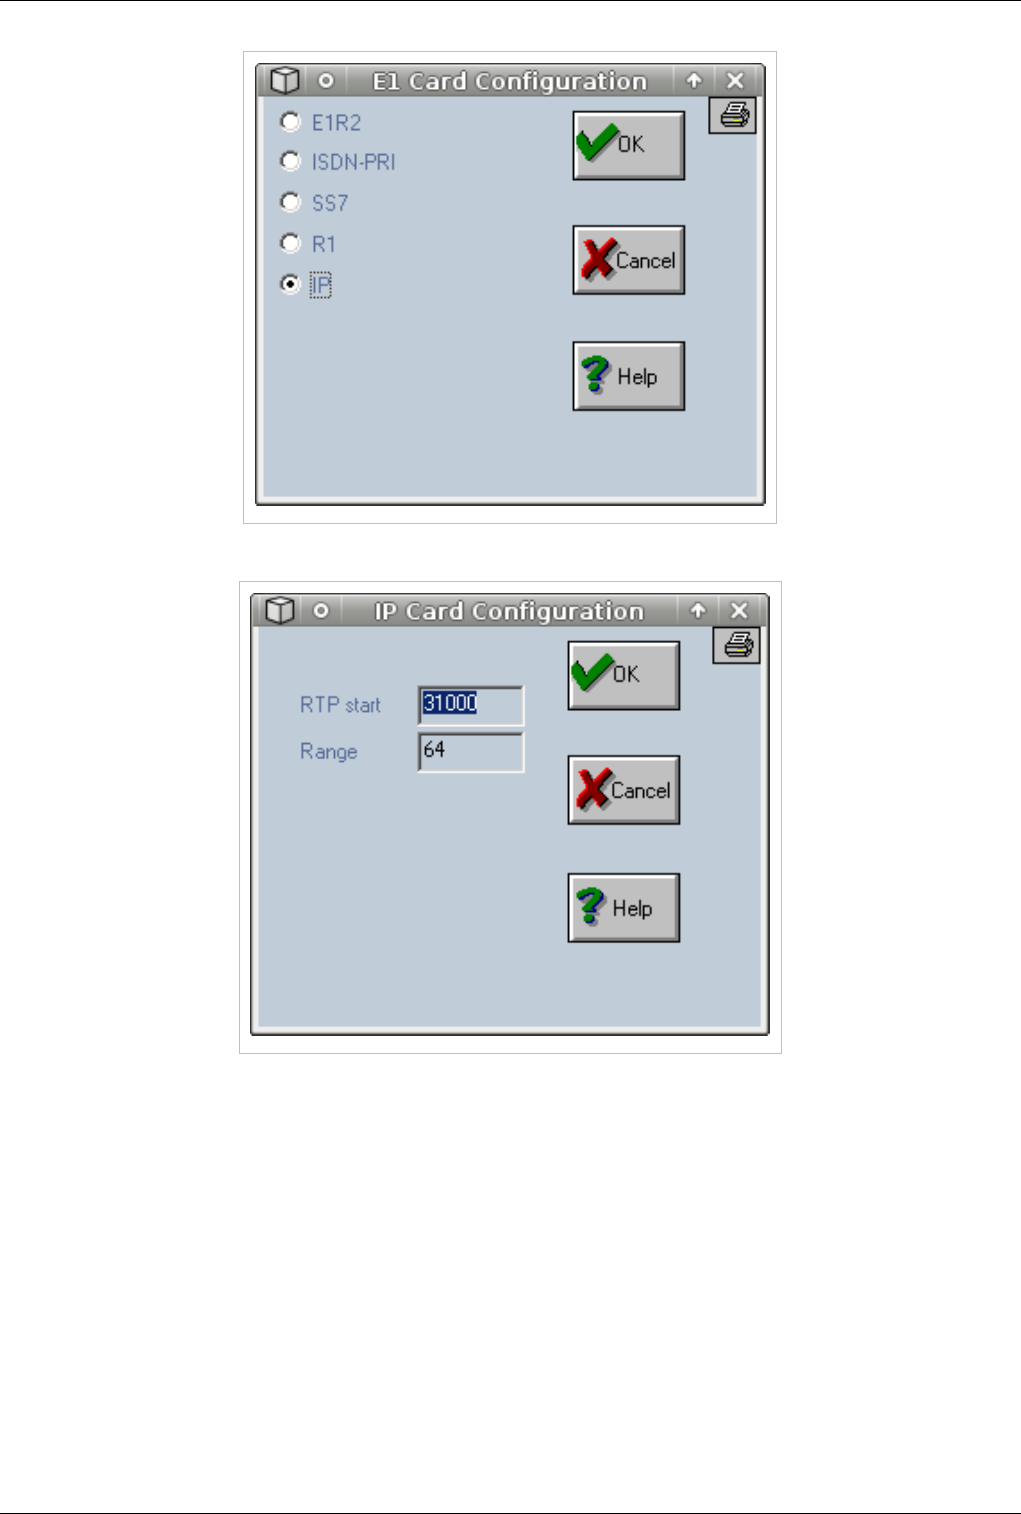
OAM / Installing a VOIP card 59
€€ Leave RTP and Range settings to default and press OK
€ Click on third port of the VOIP card and assign trunk (direction) MYVOIP, check INSTALLED,IN and OUT.
To apply these settings on all ports on card check Apply settings for all positions on the card, Category and
Direction. Press OK button
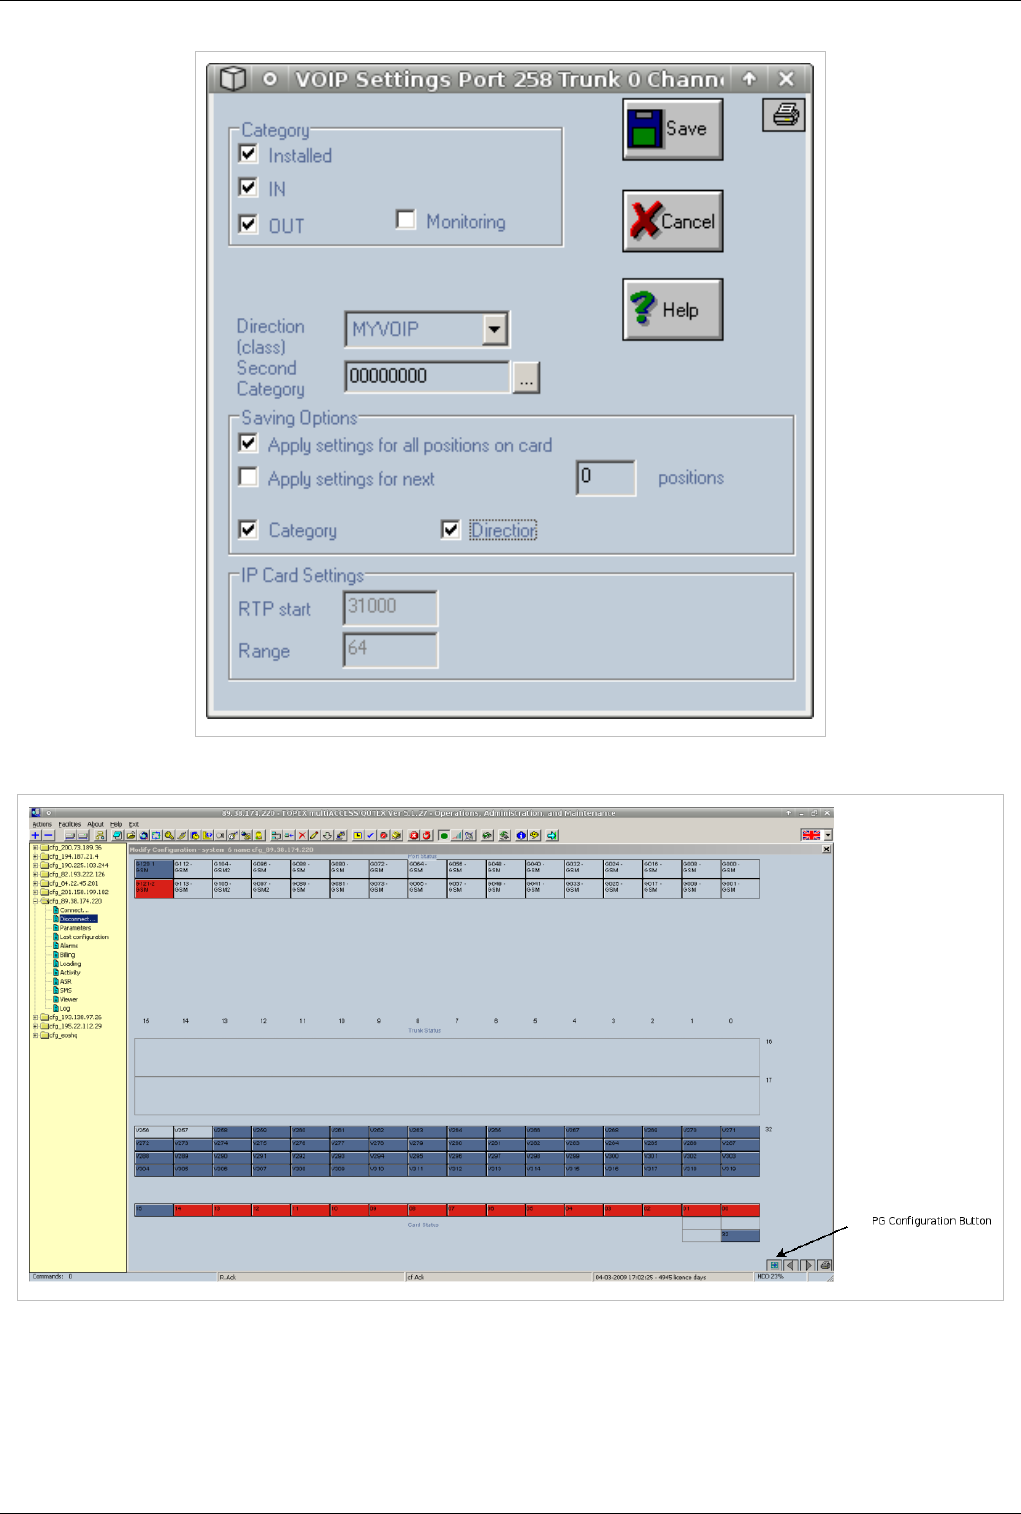
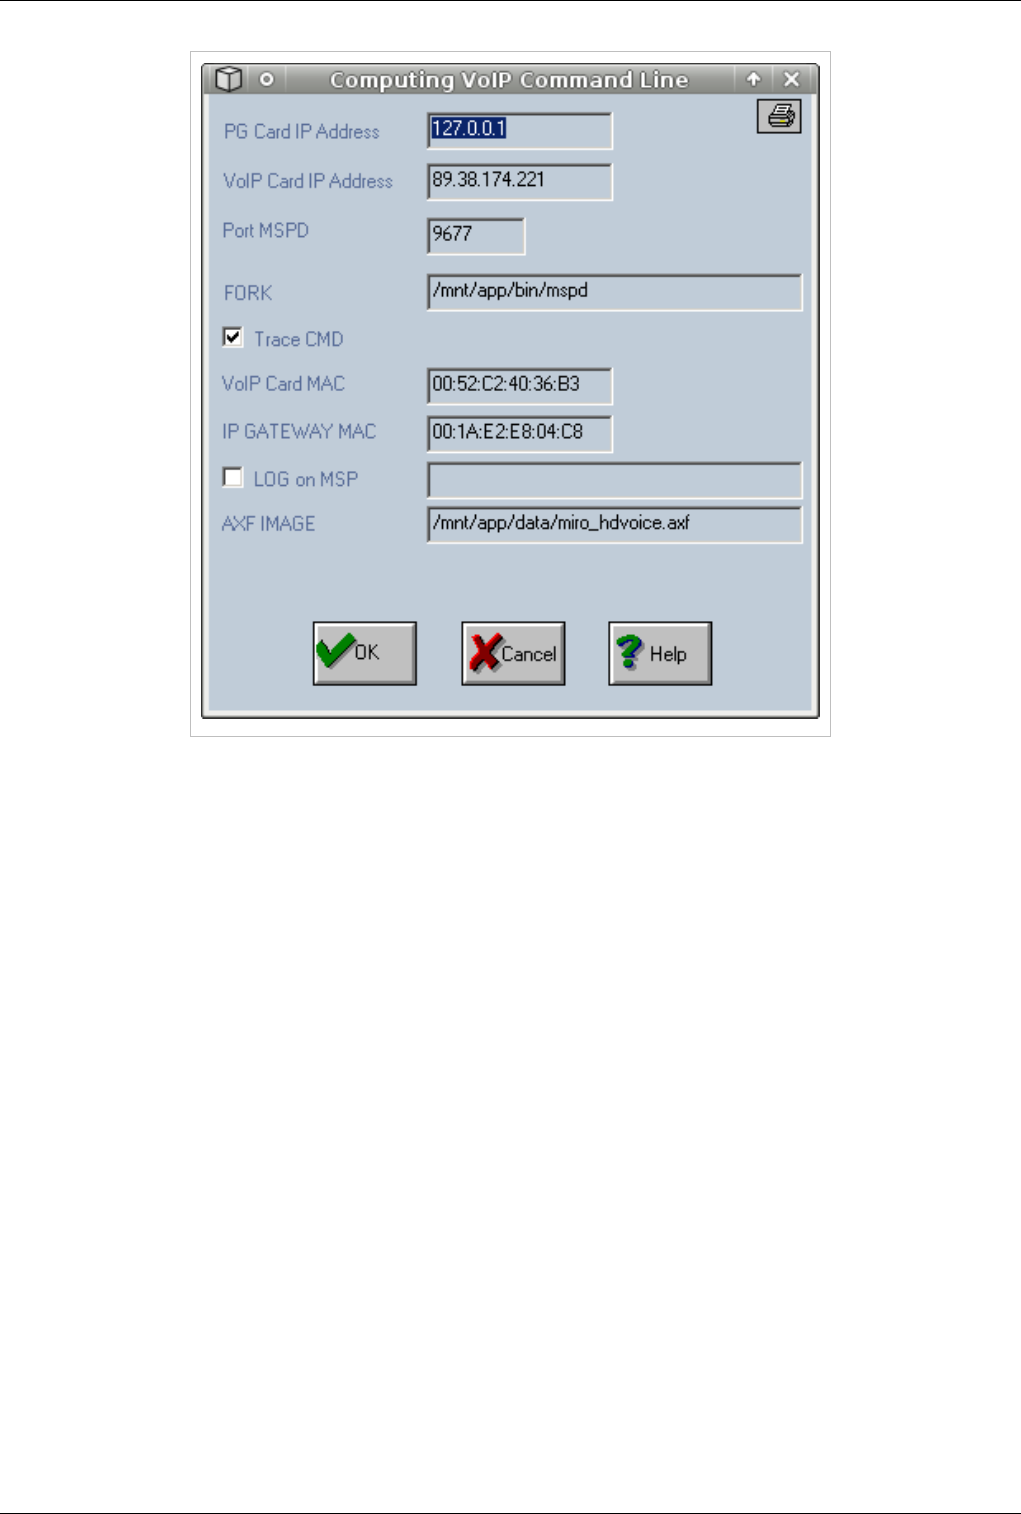
OAM / Installing a VOIP card 61
€PG Card IP Address -- Ip used to receive commands from call controller. Always use 127.0.0.1
€Port MSPD --Port used to receive commands from call controller. Always use 9677
€VOIP CARD IP Address --Ip address used by the VOIP card. This ip address must be in the same subnet with
the ip address of the Processor card
€FORK --Path to voip manager. Always use /mnt/app/bin/mspd
€VOIP Card MAC -- MAC address of the VOIP card. This MAC is issued by Topex. Contact one of our
engineers in the support team to issue a MAC address if MAC is not already configured
€IP GATEWAY MAC -- MAC address of the default gateway for the subnet in witch the equipment resides.This
MAC is needed in order to be able to route RTP packets. Voip card is unable to route RTP so all packets are sent
to the network gateway to be routed from there.
€AXF IMAGE --Firmware to be loaded in VOIP card at boot. Always use /mnt/app/data/miro_hdvoice.axf
€€ Press OK button after you configured all parameters
€€ Press RTP IP Button to edit RTP parameters
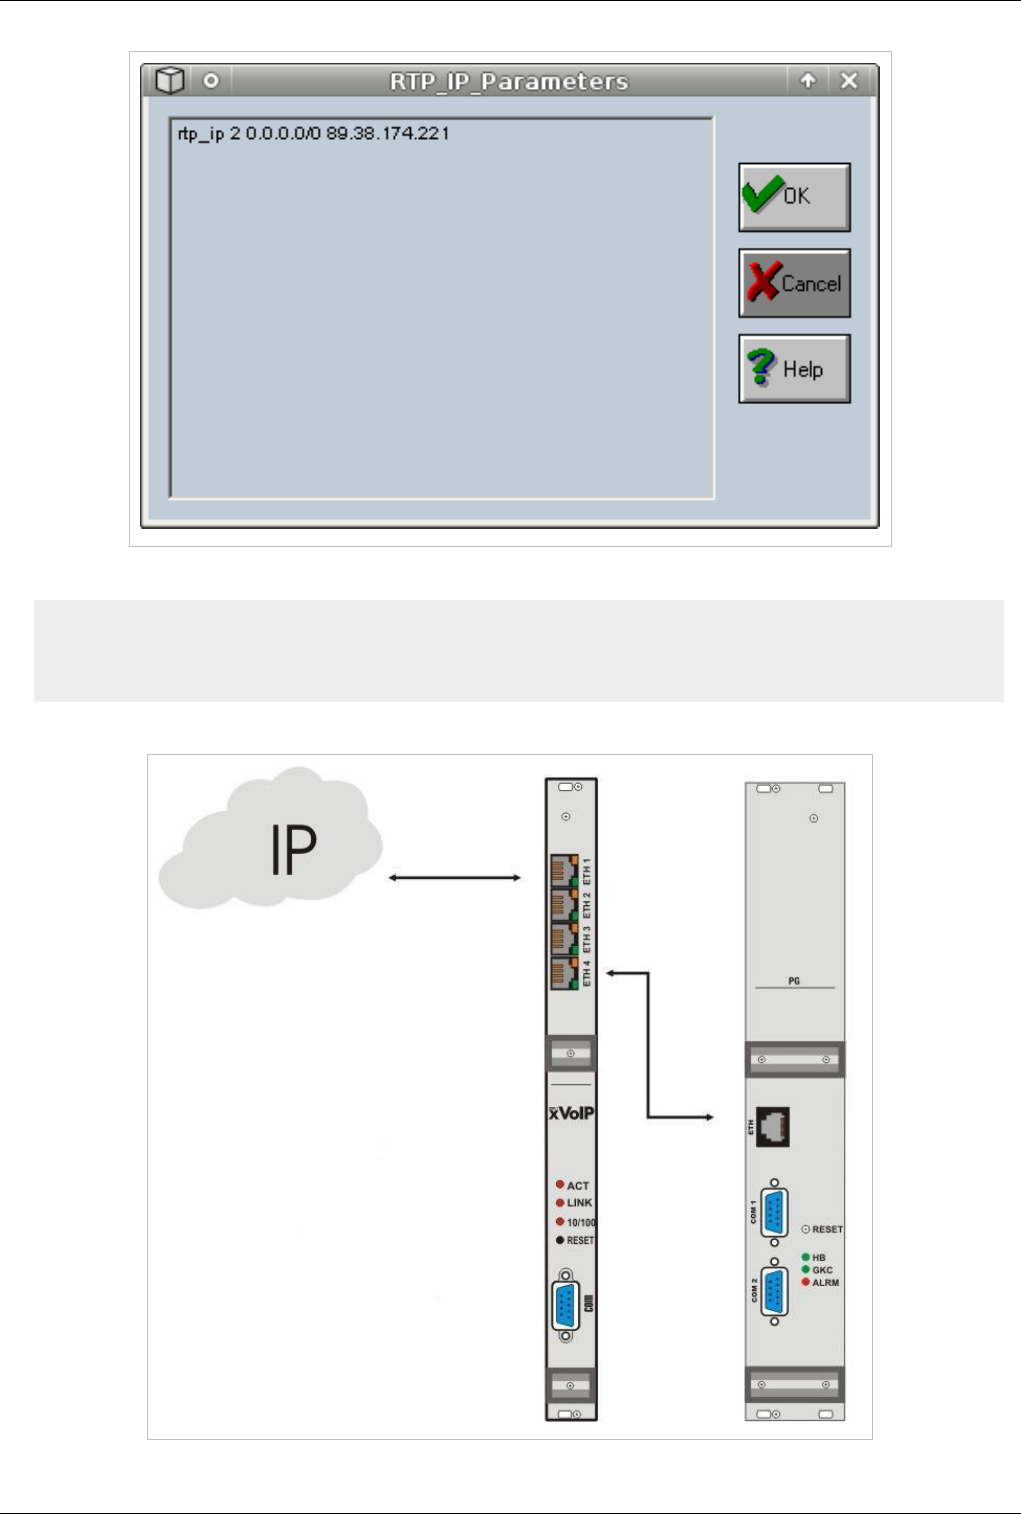
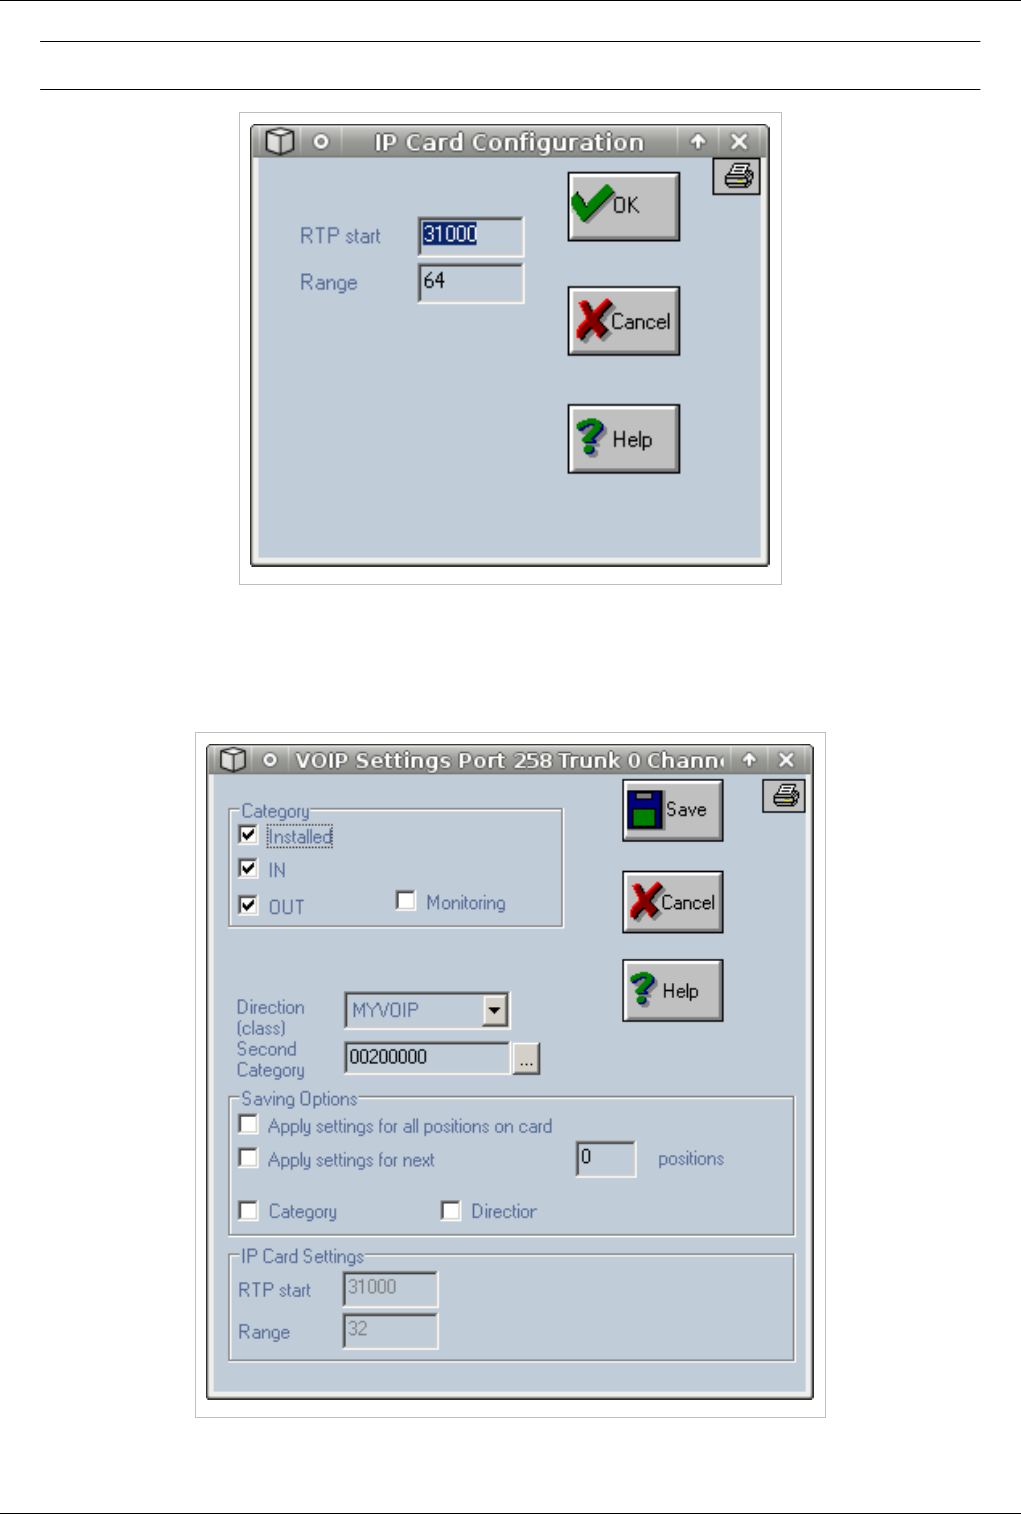
OAM / Installing a VOIP card 64
Warning: Changing RTP Start below 31000 will cause voice problems
€ Click on third port of the VOIP card and assign trunk (direction) MYVOIP, check INSTALLED,IN and OUT.
To apply these settings on all ports on card check Apply settings for all positions on the card, Category and
Direction. Press OK button
€ On ports 258 and 259 make sure Second Category is set to 00200000
€€ Go to PG Configuration to start configuring the voip card
OAM / Installing a VOIP card 65
€€ Press Voip2 button to edit Voip Parameters
€PG Card IP Address -- Ip used to receive commands from call controller. Always use 127.0.0.1
€Port MSPD --Port used to receive commands from call controller. Always use 9677
€VOIP CARD IP Address Leave empty
€FORK --Path to voip manager. Always use /mnt/app/bin/mspd
€VOIP Card MAC --Leave empty
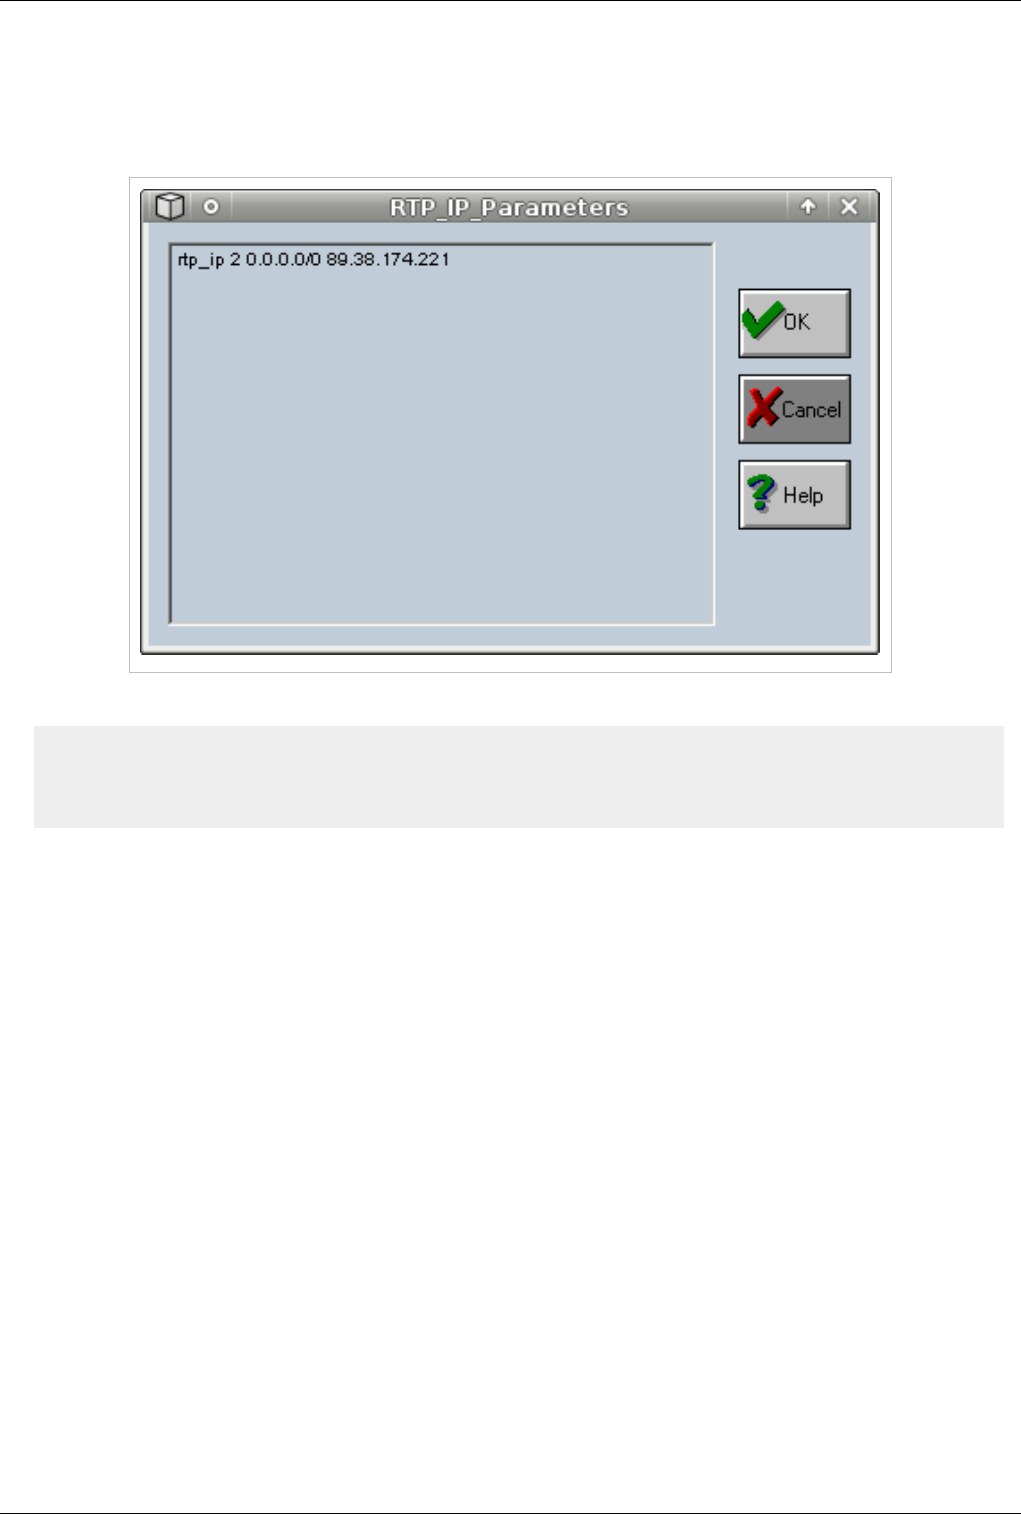
OAM / Installing a VOIP card 66
€IP GATEWAY MAC -- Leave empty
€AXF IMAGE --Leave empty
€€ Press OK button after you configured all parameters
€€ Press RTP IP Button to edit RTP parameters
€€ Edit the ip address and press OK
rtp_ip 2 0.0.0.0/0 89.38.174.221
| |------This is the ip address that must be edited
|-----------------Subnet for witch to use this ip address.Use 0.0.0.0/0
€€ Go to Action Menu and select Save Current Configuration
€€ Wait 10 sec fot the configuration to be saved and reboot equipment
OAM / Installing a MPAI card 67
OAM / Installing a MPAI card
Back to Main Page > OAM
Installing a MPAI card
With the "MPAI" card, each port can be configured (depend on the physical module connected to the port) as
FXS,FXO,BL or E&M port. In such a case the port settings will be changed (through the left mouse button) like in
the case of FXS,FXO,BL or E&M card by passing first through the MPAI Settings: here the category of the port can
be changed; the port settings can be changed thourgh the "Edit" button.
OAM / E1R2
Back to Main Page > OAM
OAM / E1R2
Best Practice
In order to change settings on the card (CRC and Clock )you have to remove the card and add it agin with the new settings.Make sure you reboot
the equipment after the settings are altered
In order to install R2 chose what port will you use. On Topex equipments E1 card has two E1 ports•: E1 A and E1 B.
In OAM software correspondance is like this•:
Card 16 – is for E1 B port
Card 17 – is for E1 A port
In our example we choose to install Card 17 (in OAM software), meaning port E1 A on the equipment board (fig. 1).
OAM / E1R2 68
Fig. 1
For this make right-click in the rectungle corresponding to card 17 and then click on “Add card 17” button. A new
window will pop up wich will require a password (fig.2). Type the password “topex” and then click OK.
A second window will pop up – Confirmation(“Add card 17€?”), click OK (fig. 3).
fig. 2•••••••••••••••••••••••••••••••••••••••••••••• fig. 3•••••••••••••••••••••••••••••••••••••••••••••••••••••••••••••••••••• fig. 4
In the next window you will chose the type of E1 card configuration – E1R2 and click OK (fig. 4).
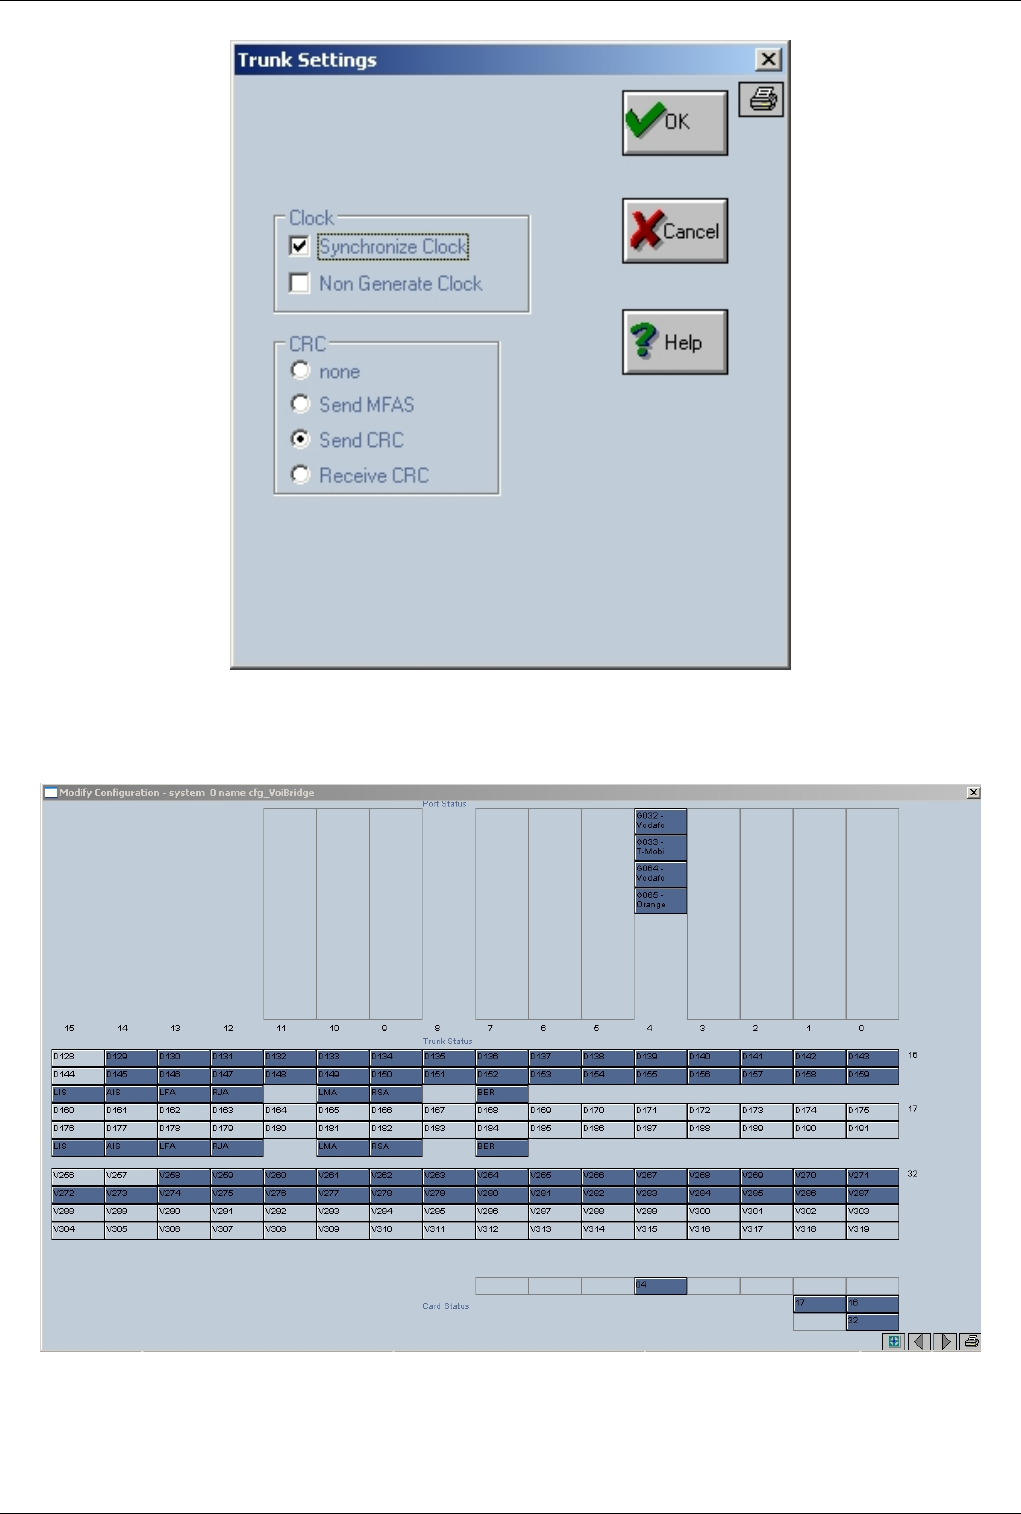
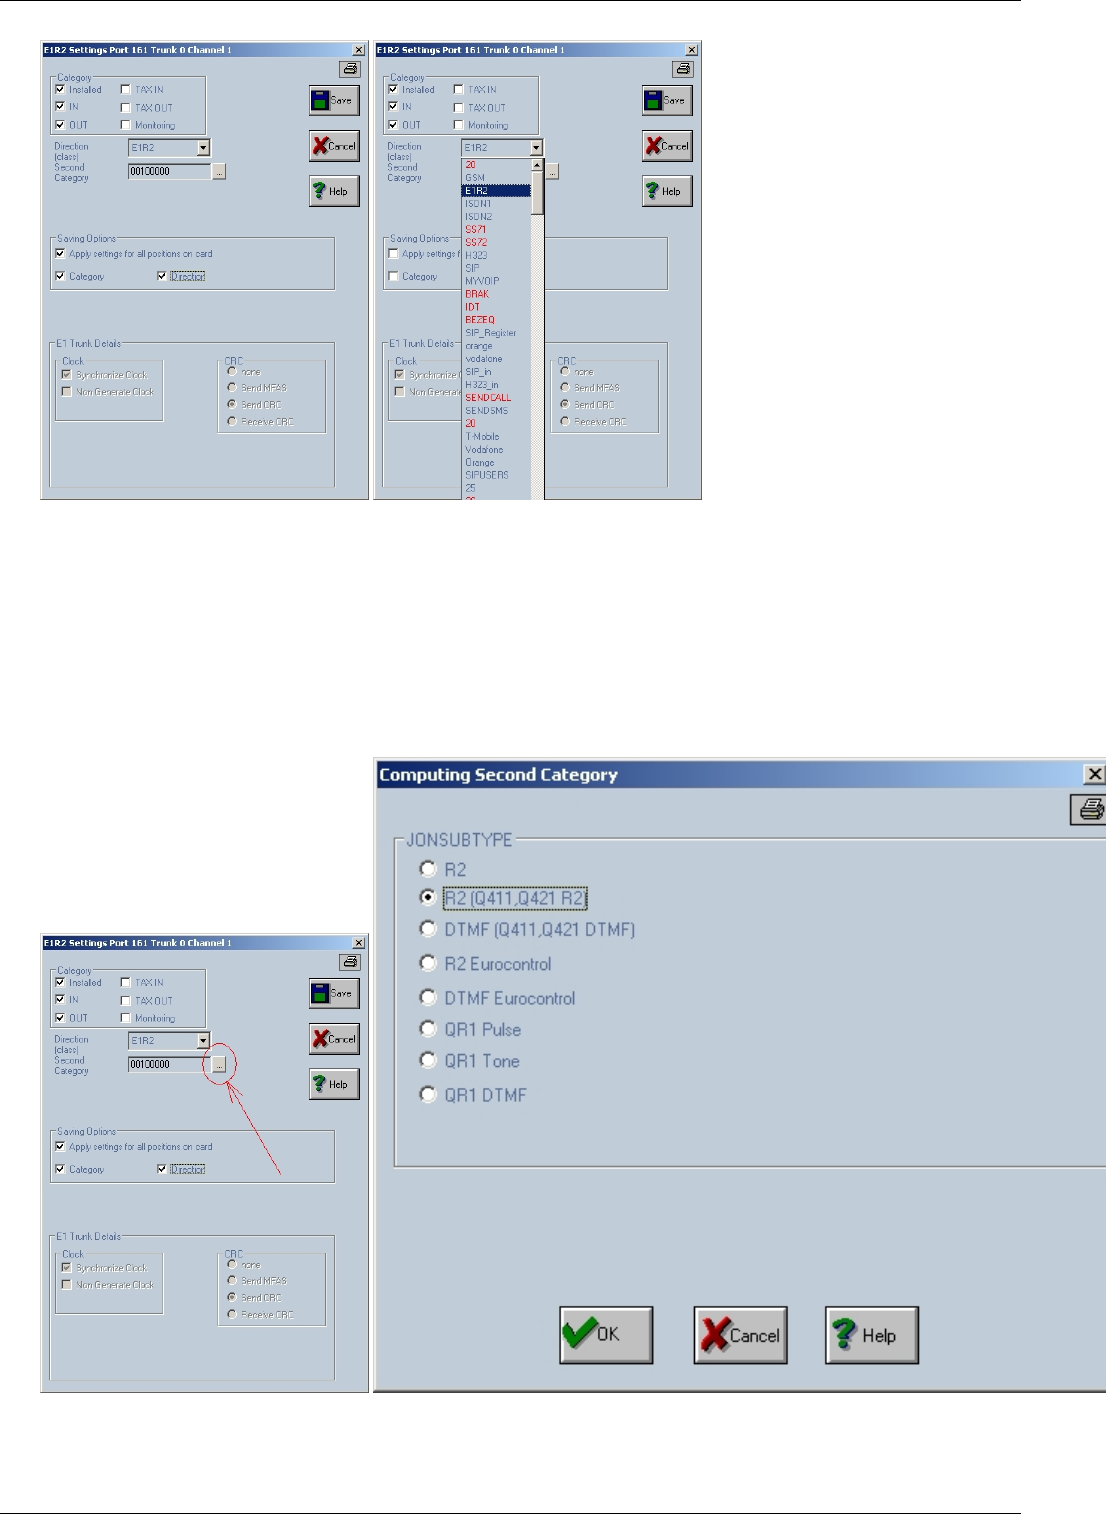
OAM / E1R2 70
fig. 7 a•••••••••••••••••••••••••••••••••••••••••••••••••••••••••••••••••••••••••••••••••••••••••••••••••••••••••••••••••••••• fig . 7 b
In Category area, check “Installed”, “IN”, “OUT”
Choose the direction assigned to the channels (fig. 7 b)
In Saving Oprtions area check “Apply settings for all positions on card”, “Category” and “Direction”.
To set the “Second Category” field click on the grey square in it’s right side (fig. 7d).
A new window will pop up “Computing Second Category” (fig. 8) where you will select option
“R2(Q411, Q421 R2)” then click OK button.
fig. 7 d•••••••••••••••••••••••••••••••••••••••••••••••••••••••••••••••••••••••••••••••••••••••••••••••••••••••••••••••• fig. 8


OAM / Call Flow 72
OAM / Call Flow
Back to Main Page > OAM
Call flow in OAM
ISDN 2 GSM Case
Call Directions(incoming ISDN Trunk) > Routing Table > outgoing GSM trunk
€€ ISDN1 - incoming trunk
€€ GSM - outgoing trunk
ISDN 2 VOIP Case
Call Directions(incoming ISDN Trunk) > Routing Table > DIRIP OUT (outgoing VOIP trunk)
€€ ISDN1 - incoming trunk
€€ SIP_OUT - outgoing trunk
ISDN 2 ISDN Case
Call Directions(incoming ISDN Trunk) > Routing Table > outgoing ISDN trunk
€€ ISDN1 - incoming trunk
€€ ISDN2 - outgoing trunk
GSM 2 ISDN Case
Call directions(incoming GSM trunk) > Routing Table > outgoing ISDN trunk
€€ GSM - incoming trunk
€€ ISDN1 - outgoing trunk

OAM / Call Flow 73
GSM 2 VOIP Case
Call Directions(incoming GSM trunk) > Routing Table > DIRIP OUT (outgoing VOIP trunk)
€€ GSM - incoming trunk
€€ SIP_OUT - outgoing trunk
GSM 2 GSM Case
Call Directions(incoming GSM trunk) > Routing Table > DIRIP OUT (outgoing GSM trunk)
€€ GSM - incoming trunk
€€ GSM - outgoing trunk
Voip 2 GSM Case
DIRIP IN (incoming VOIP trunk) > Call Directions > Routing Table > outgoing GSM trunk
€€ SIP_IN - incoming trunk
€€ GSM - outgoing trunk
Voip 2 ISDN Case
DIRIP IN (incoming VOIP trunk) > Call Directions > Routing Table > outgoing ISDN trunk
€€ SIP_IN - incoming trunk
€€ ISDN1 - outgoing trunk
VOIP 2 VOIP Case
DIRIP IN (incoming VOIP trunk) > Call Directions > Routing Table > DIRIP OUT (outgoing VOIP trunk)
€€ SIP_IN - incoming trunk
€€ SIP_OUT - outgoing trunk
SEO: Topex Call Flow, Call Flow, Path of a call, Topex
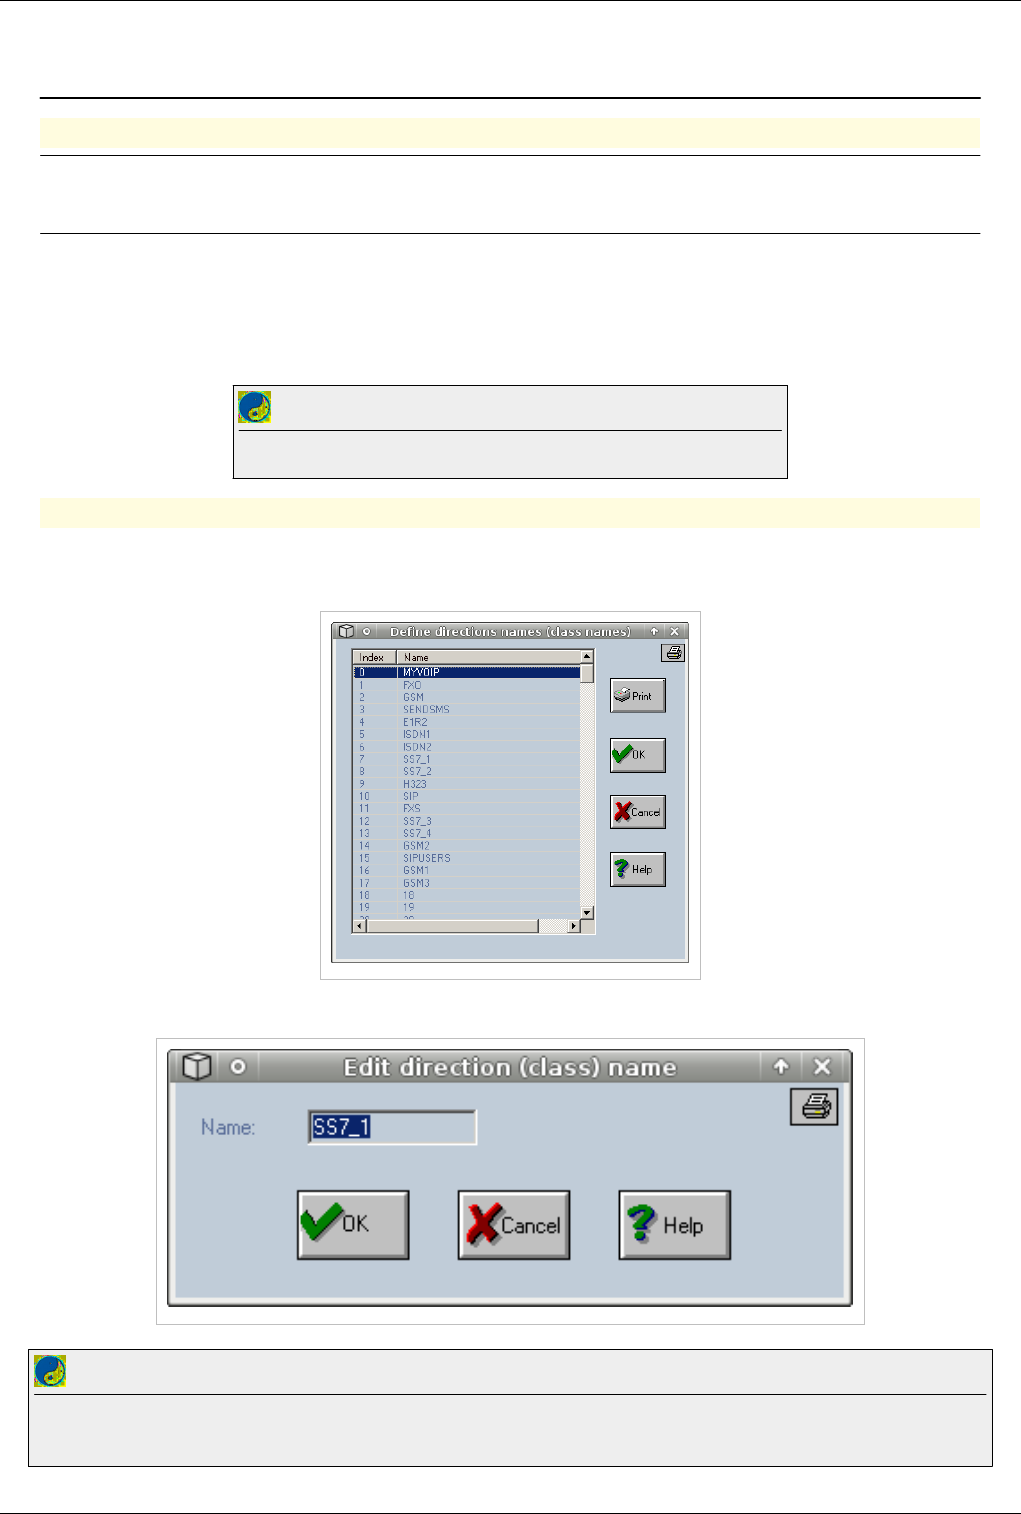
OAM / Create a Trunk 74
OAM / Create a Trunk
Creating a trunk (also called a direction)
Note: Trunks cannot be created. A predefined list of 251 trunks already exist on the
equipment. Rename one of the available trunks to use it
€€ Special trunks
€€ MYVOIP (used for voip calls. This trunk must be always assigned to the VOIP Card)
€€ SENDSMS (used for sendsms aplications)
€€ SENDCALL (used by the call generator, callback)
Best Practice
Do not rename or disable Special Trunks it will affect functionality of the equipment
Renaming a trunk
€ From the Actions Menu Select Direction Names
A pop-up window will appear with the predefined trunks
Double click on one on the trunks that you are not using to rename it
Best Practice
After renaming a trunk always check Call Direction to see if the trunk it is enabled. All trunks must have Type DIR exept trunks assigned to FXS
ports which must have Type PORT
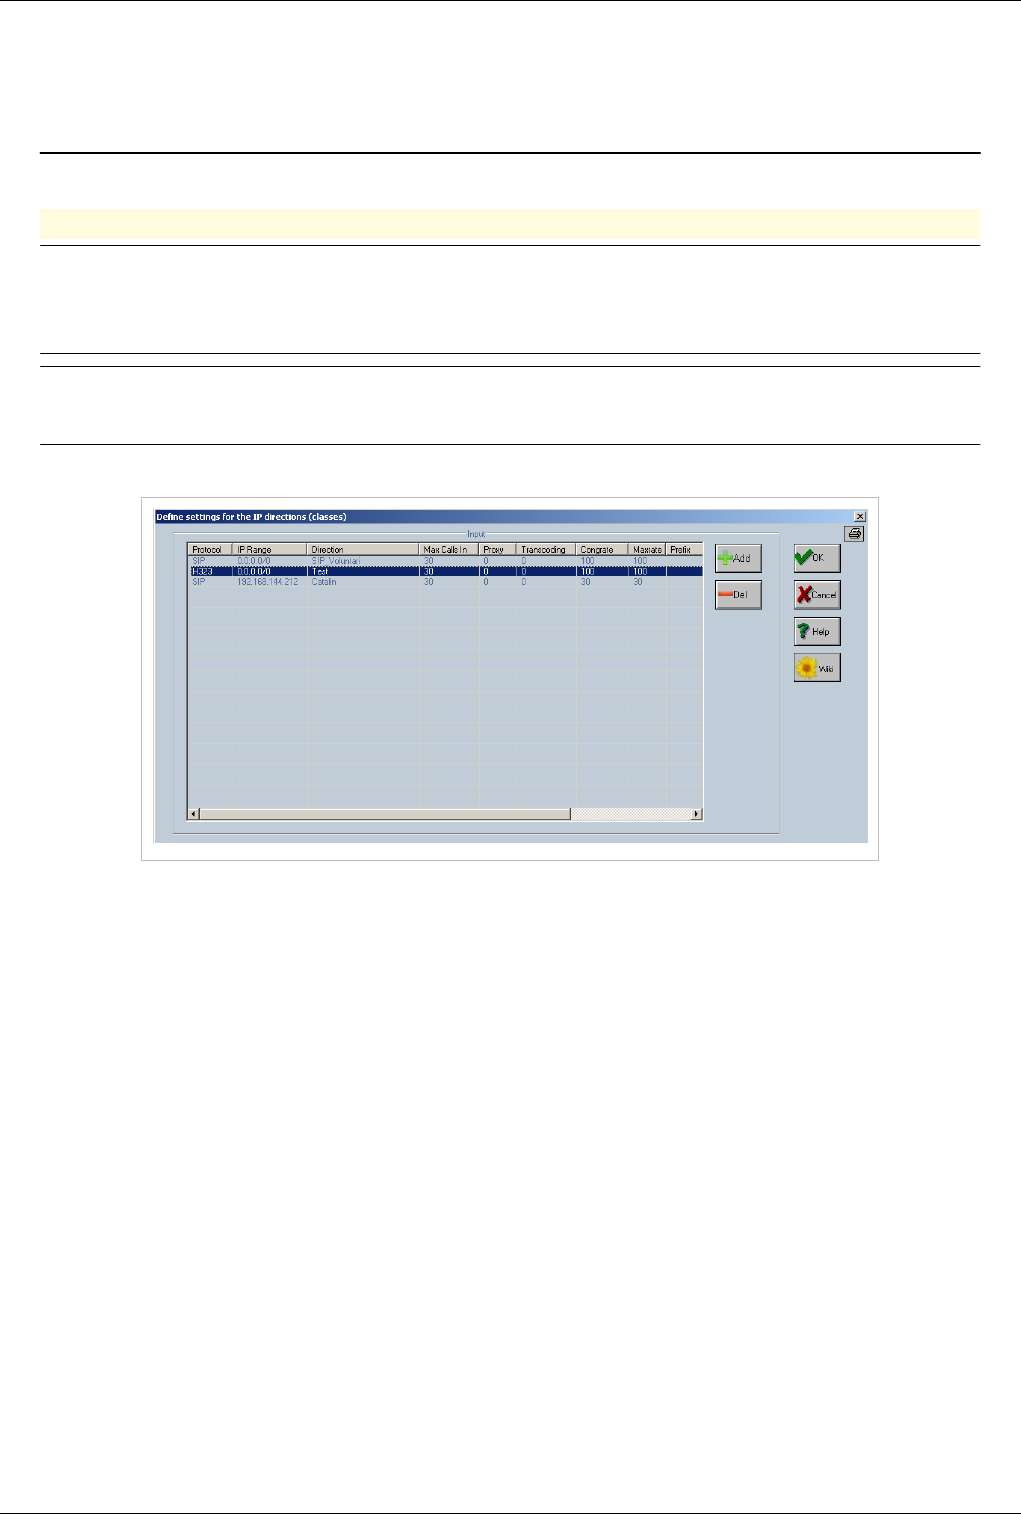
OAM / Create a Trunk 75
OAM / Access IN
Back to Main Page > OAM
Access IN or DIRIPIN
Warning: Type of trunk is very important especially when using VOIP. A trunk that is
used to receive VOIP calls cannot be used to send calls out. Also OAM / Call Flow only
applies to incoming calls
Note:Access IN is used to as a filtering mechanism for VOIP calls.Ip addresses of all clients
who are sending traffic into the box must be added here
DIRIP IN is located at Call directions
In Access IN calls can be filtered by
€€ Source IP or Subnet
€€ Protocol (H323 or SIP)
€€ Number of Digits
€€ Prefix
Double click on one of the settings at DIRIP IN to edit
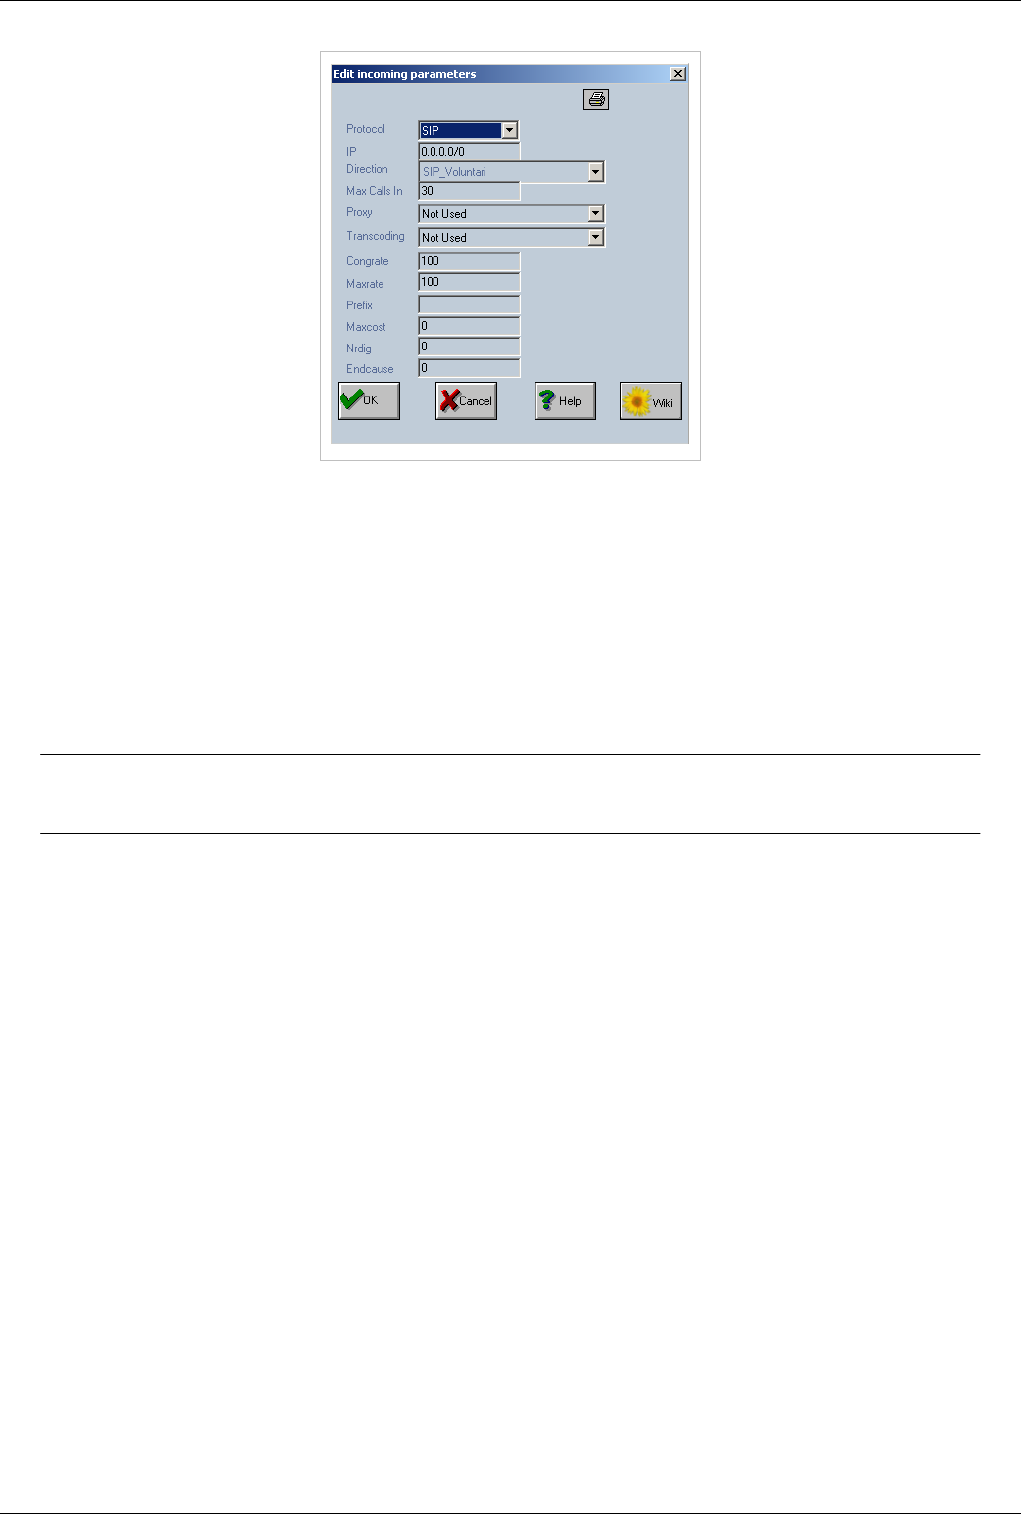
OAM / Access IN 76
€Protocol – the protocol used for the respective direction. You can select SIP or H.323.
€IP – the IP range for the incoming direction. Here you can complete either a single IP (such as 192.168.144.57)
or a range of IP values (for example "192.168.1.0/24"). If you use an IP without specifying the range, then calls
are accepted just from that IP. It is the same as using range /32; The name of the direction can be one of the
already defined directions, so it can be “MYVOIP” - the generic direction used for group the VoIP channels or
another direction if you want to use ignore / insert features. If you use the generic MYVOIP name, all VoIp calls
will be treated in the same way, but if you use specific direction names, you can define different rules for different
incoming IPs. This allows you to perform operations such ignoring / inserting digits on the incoming number or
identity (see "Calls direction") like for ordinary calls.
Warning:Never use the default settings for DIRIPIN (0.0.0.0/0). They will allow access from
any IP address
€Direction – the direction name. It is chosen from the list with defined directions;
€Max Calls In – the maximum number of simultaneosly calls accepted from the specified IP range. In the anterior
example the maximum number of calls is 30. If you enter 0 (zero) in the field “Max Calls In”, this means no
restrictions are placed upon the number of incoming calls.
€Proxy - must be enabled if the source IP is behind a NAT.
€Transcoding - must be enabled when the source and the destination have different codecs. This feature works
only on the Topex equipments supplied with a VoIP card (or there is a TOPEX slave machine with VoIP card).
€Cong Rate this is the congestion rate. It should not be 0. The default value is 1000.
€Max Rate this parameter represents the total number of setup calls on a second. It should not be 0. The default
value is 1000.
€Prefix Used to check incoming prefix. If prefix is not matched the call is rejected with End Cause In case of two
such prefixes - the user can assign two different directions for the same IP source.
€Max Cost this parameter will be used in further developments.
€Nr Dig Used to check number of digits. If number of digits is not exacty the same, then the call is rejected with
End Cause
€End Cause this field is the release code used when the received number has a different number of digits then the
expected ones - "NrDig" value. The default value is 34.
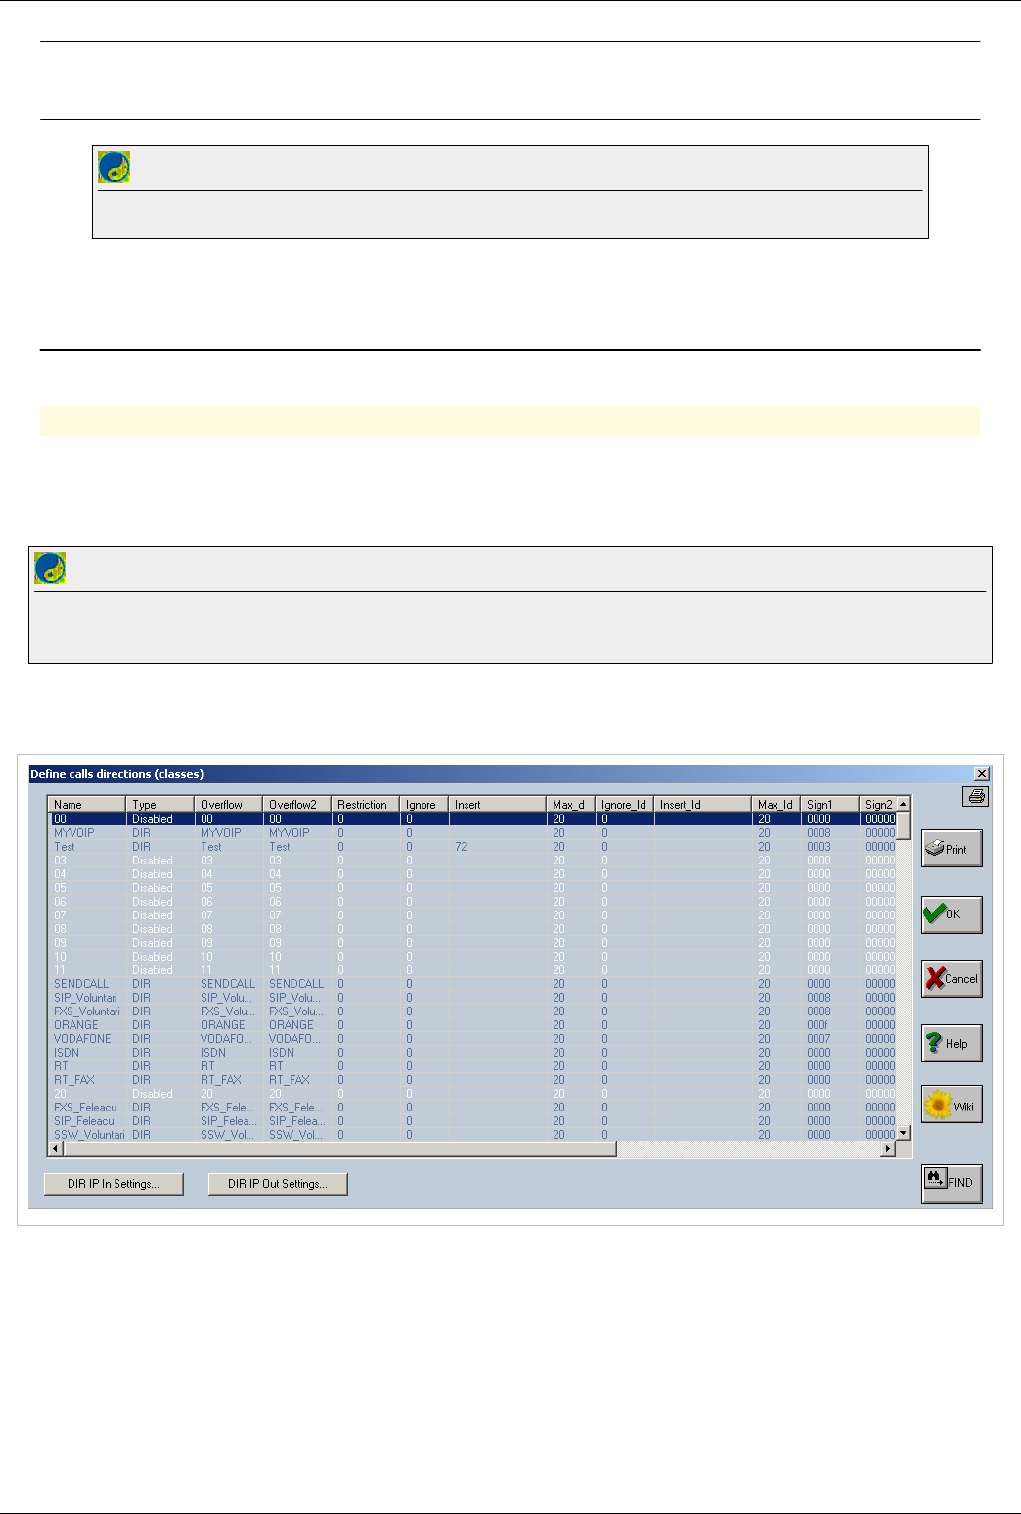
OAM / Access IN 77
Note: In Access IN calls from a specific ip or range are assigned a trunk (direction). This
trunk can be used as a identifier for the party from witch you receive voip calls
Best Practice
Don't use MYVOIP to accept all calls in DIRIPIN. Create a trunk (direction) for each subnet or ip that is added to the access list.
OAM / Call Directions
Back to Main Page > OAM
Call directions
Description:
••••••••••••• Call directions is the second step in call flow and is used for digit manipulation and trunk (direction)
properties
Best Practice
Before changing settings at Call Directions please check OAM / Call Flow and identify if the trunk is Incoming or Outgoingin your call flow.
Some settings will apply only for Incoming trunks and some for Outgoing trunks.
€€ Connect with OAM
€ Select Actions > Call Directions
€€ Double click on a trunk to edit his properties.
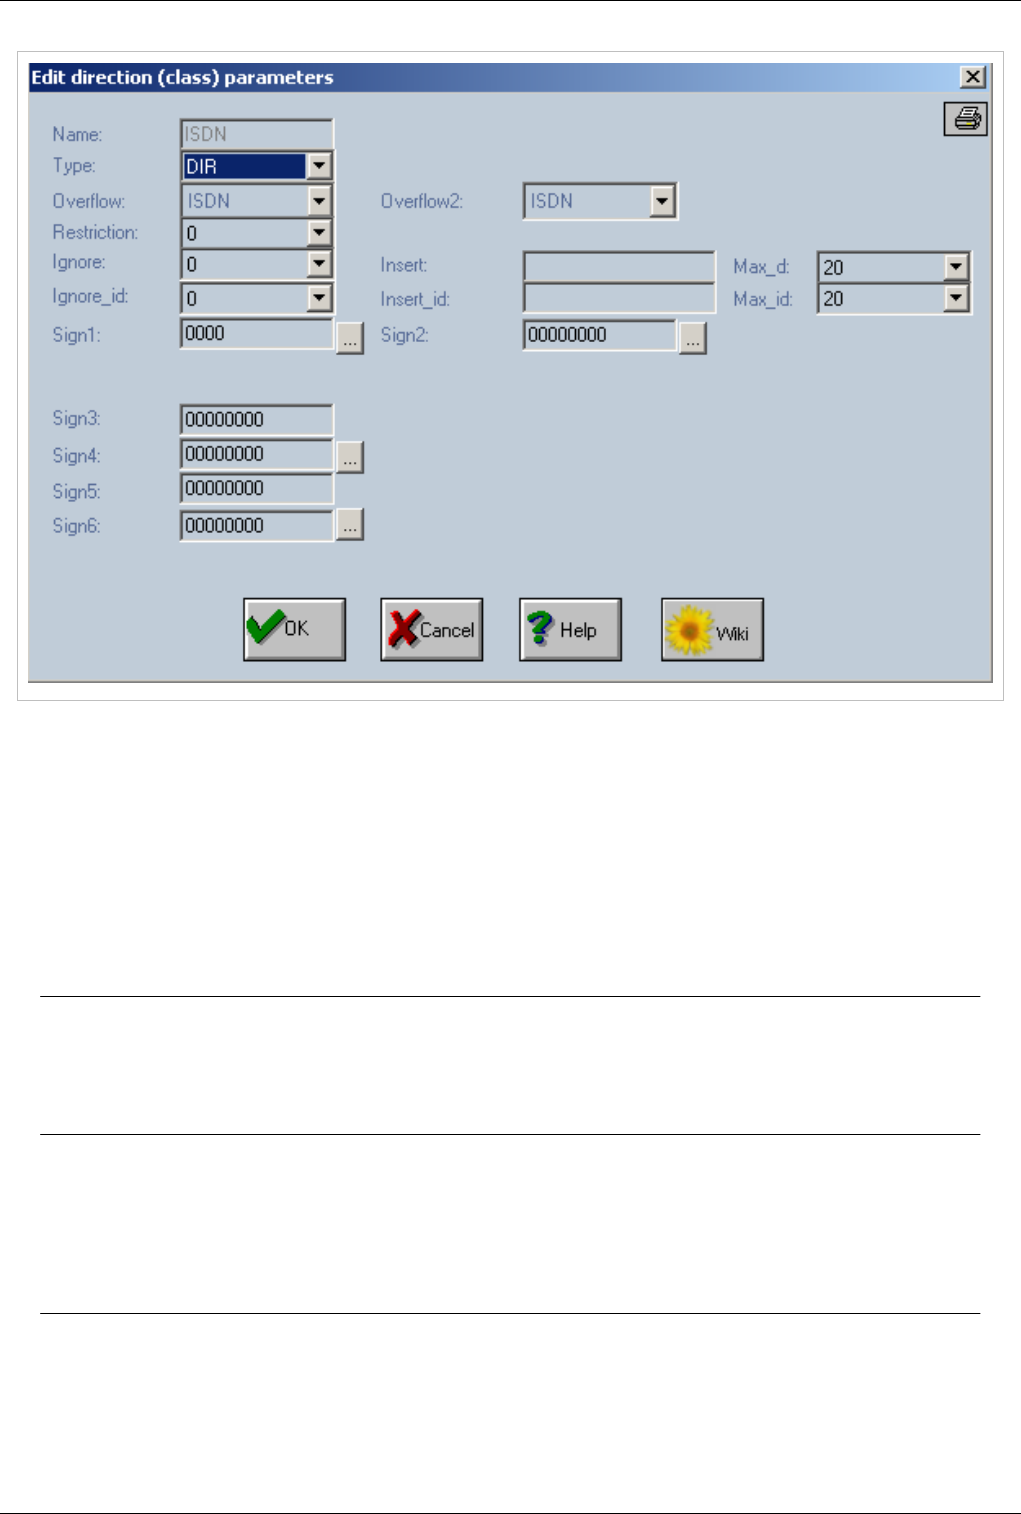
OAM / Call Directions 78
Name
The name of the direction(trunk).This name is defined at Direction Names and it can't be changed here.
Type
€€ Applies for incoming and outgoing trunks
can be PORT or DIR and specifies how that direction is addressed. The associated list contains two strings
"PORT"=local and "DIR"=junction (trunk).
Warning: A value of "Disabled" indicates that the direction is disabled; the entire line will
be coloured in white. The name of the direction which has "Disabled" assigned to "Type"
field will be displayed in red colour in the list used to assign a direction for each kind of
port and also in all places in which the destination will be a direction name.
Overflow
€€ Applies only for outgoing trunks
Overflow direction for the current direction. The calls will be re-routed to this overflow direction when the current
direction is unavailable you choose a name of a defined direction from the corresponding list;
Note:Overflow sends calls to another trunk only when current trunk is OUT OF SERVICE
or OUT OF AVAILABLE CHANNELS Overflow works only for outgoing trunks not for
incoming.

OAM / Call Directions 79
Overflow 2
€€ Applies only for outgoing trunks
Second overflow direction for the current direction. The calls will be re-routed to this second overflow direction
when the first overflow direction becomes unavailable; you choose a name of a defined direction from the
corresponding list;
Note:Overflow2 sends calls to another trunk only when trunk specified at Overflow is OUT
OF SERVICE or OUT OF AVAILABLE CHANNELS Overflow works only for outgoing
trunks not for incoming.
Restriction
€€ Applies only for outgoing trunks
The class of restriction applied to that direction; from the list a number from 0 to 19 can be selected; Restrictions
work only for trunks of type PORT
Ignore
€€ Applies only for incoming trunks
Specifies how many digits are ignored from the numbers received on that direction; the first x digits of the received
number will be ignored. The list contains a range of values from 0 to 20 digits;
Insert
€€ Applies only for incoming trunks
Specifies what digits will be inserted in the number received to that direction. The maximum allowed is 16 digits. If
you don't want any digit to be inserted you must enter “---” for this field.
Max_d
€€ Applies for incoming and outgoing trunks
Maximum number of digits that may be dialled on that direction. When the maximum number is reached the system
will automatically send out the call to routing analysis, without waiting to see if the caller part still sends digits. This
option is especially useful when you define directions for which the number of figures to be dialed is well known
(for example the numbers for certain GSM networks). The list contains a range of values from 0 to 20 digits;

OAM / Call Directions 80
Ignore_id
€€ Applies only for incoming trunks
Ignores from the identity of the caller (Caller ID) the number of digits you have specified; The maximum allowed is
20 figures. The Ignore command is performed before the Insert command. The list contains a range of values from 0
to 20 digits;
Insert_id
€€ Applies only for incoming trunks
Adds to the Caller ID the specified figures; The maximum allowed is 16 digits;
Max_id
€€ Applies for incoming and outgoing trunks
The maximum number of digits from the Caller ID to be sent to the subscriber who has been called. The list contains
a range of values from 0 to 20 digits.
Sign1
Receive Identity
Used to receive identity of a call on the current trunk
Send Identity
Used to send identity of a call on the current trunk
Load Balancing Algorithm
Note: Load Balancing is used only for trunks that have GSM ports assigned.
Load balancing will automatically select a sim from the 4 slots that belong to a GSM port and try to even up
consumption on all sims on the same port. Load balancing will always select sim with lowest value at Load Sim and
use this sim in order to terminate calls. There is a programmable time frame on which a SIM is used, after which the
sim with lowest value for speaking time is selected.
Coupling of ring-back tone
By setting it, you allow coupling of a false ring-back tone while dialing on the next link, before the called party
answers.
Verify CLIR
Note: Verify CLIR is used only for trunks that have GSM ports assigned.
CLIR setting is verified each time after the CLIR setting is sent to a GSM module
DIRCATCALL
When this bit is set then all calls will be cut (stopped) on the GSM modules for which a reprogramming is necessary
(for example when a SIM must be changed because of an used algorithm)
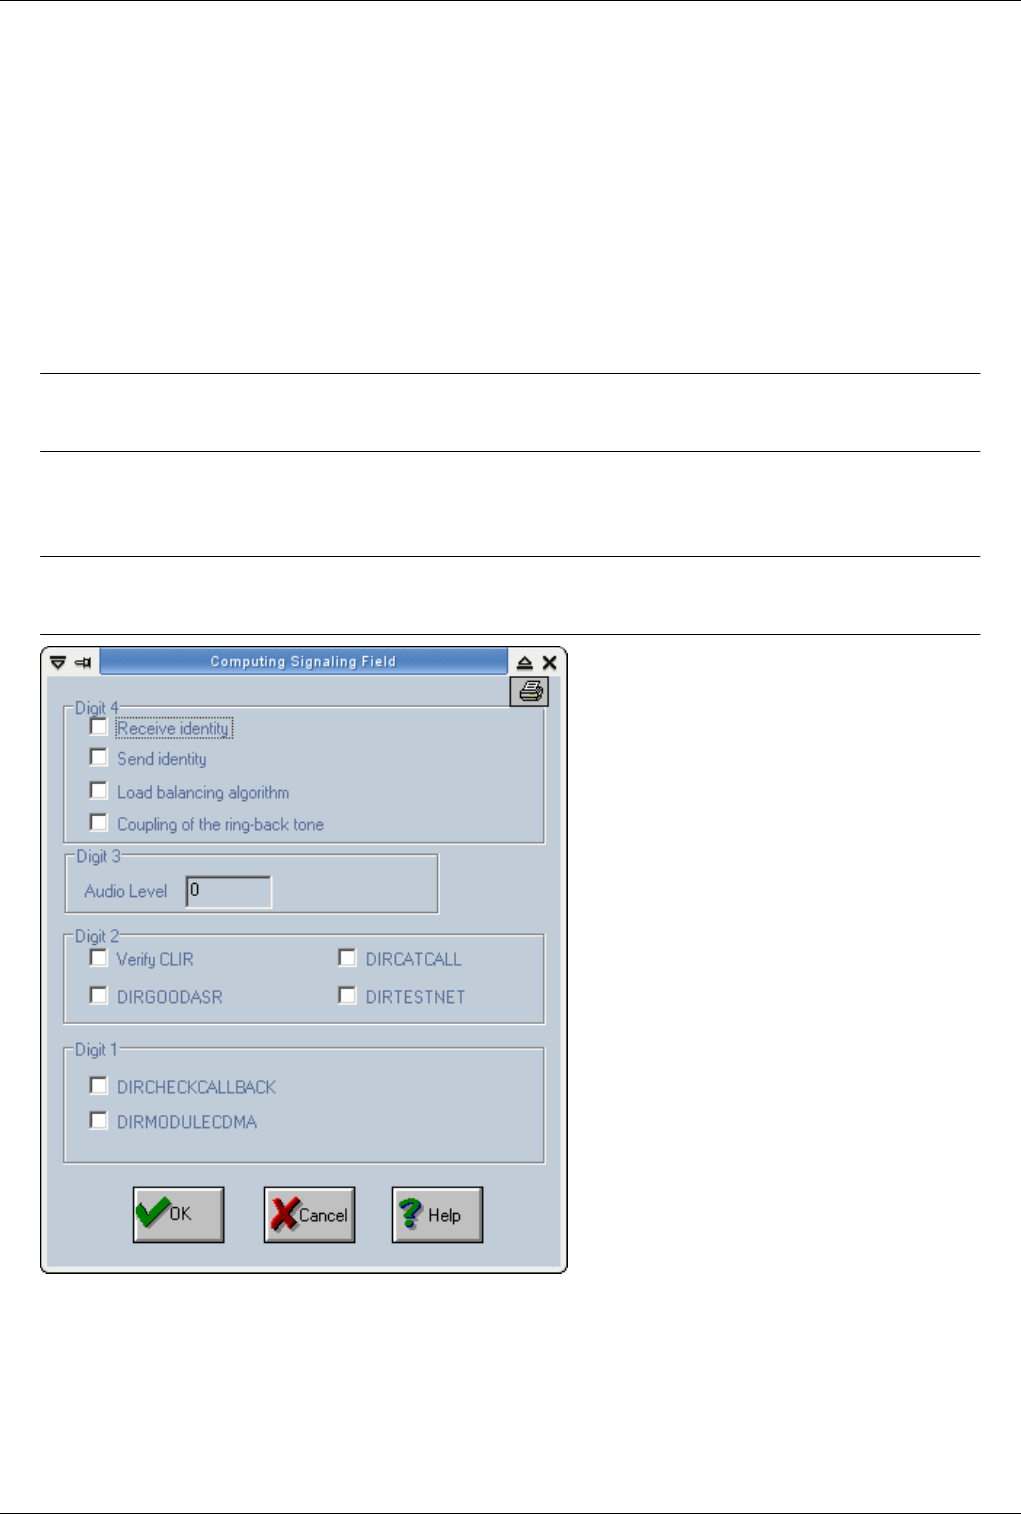
OAM / Call Directions 81
DIRGOODASR
DIRGOODASR - when this bit is set then a RELEASE message is sent on ISDN with a delay of 5 seconds when a
congestion situation is encountered on GSM part. The call will wait on the specified time for a free GSM resource.
DIRTESTNET
DIRTESTNET (used in case of a direction which contains GSM modules) - when this bit is enabled, then the
outgoing GSM module will be tested if it has a SIM registered
DIRCHECKCALLBACK
All incoming call on this direction will be checked (on received identity) against the 'Callback Table'.
Warning: Activating this option without configuring Callback Table will cause all incoming
calls to fail
DIRMODULECDMA
When this bit is set all GSM ports placed on the selected direction will be treated as CDMA modules.
Warning:Activating DIRMODULECDMA on GSM ports will stop all ports assigned to this
trunk

OAM / Call Directions 82
Sign2
Transmit Q850
"Transit Q.850" - is used to transfer the Q.850 termination code from the GSM link back on the E1-ISDN link.
Those Q.850 codes are available only for the Siemens mobile modules. For Voxson modules and when the "Transit
Q.850" option is not checked the main application sends a congestion message in case of NO DIALTONE message
and for a NO CARRIER received in under two seconds (since the beginning of the call in the mobile network). The
BUSY message is also received from GSM network and is sent as it is. A NO CARRIER message received for a
delay value greater than two seconds will be treated as a release from the GSM network.
Load Balancing Algorithm on SIM index
is used to enable the load-balancing algorithm ("equal load") on the SIM/RUIM cards that are already selected by
SIM index algorithm.
Calculate Tax Pulses
"Calculate Tax Pulses" - for each direction (group of trunks) for incoming calls, you can establish the computing
(and sending out) of the tax (billing) pulses (main box application must have 'TAX' licence). These pulses for billing
will be generated according to rules you specify and will accumulate in the billing files. In any case, the calculated
billing pulses are saved in the files. In the case of an ISDN connection (E1-ISDN trunk) these pulses are also sent
out, using ISDN - AOC messages. You must remember that the mask must be applied to the direction to which the
E1-ISDN channels belong.
Note:You can establish the prefixes that will be charged with billing pulses in “Routing
Table”.
Search UP
Selects how channels are selected.From lowest to highest.
Note: it is important on E1 trunk to avoid double seizing of the same channel
Search DOWN
Selects how channels are selected.From highest to lowest
Note: it is important on E1 trunk to avoid double seizing of the same channel
Priority
Selects priority for this trunk. Only works for outgoing trunks
For example - when a TOPEX softswitch is used to route calls to several TOPEX gateways - then each outgoing
direction will have assigned a priority. The customer can assign higher priority to the machines with higher traffic
capabilities and performances. The lowest priority is 0 and the higher is 9.

OAM / Call Directions 83
Sign4
Forward Call without Answer
In order to accept an incoming call on a GSM module, the IN and DISA option must be activated in the gsm port
settings. The call can be forwarded directly to a destination if digits are inserted in the definition of the direction to
which the GSM port belongs. If the "Forward Call Without Answer" option is activated then the call will be
forwarded to destination and the answer to the GSM side will be committed when the destination will answer.
Otherwise the incoming GSM call will be answered before the answer from the destination.
Don't play Announcement
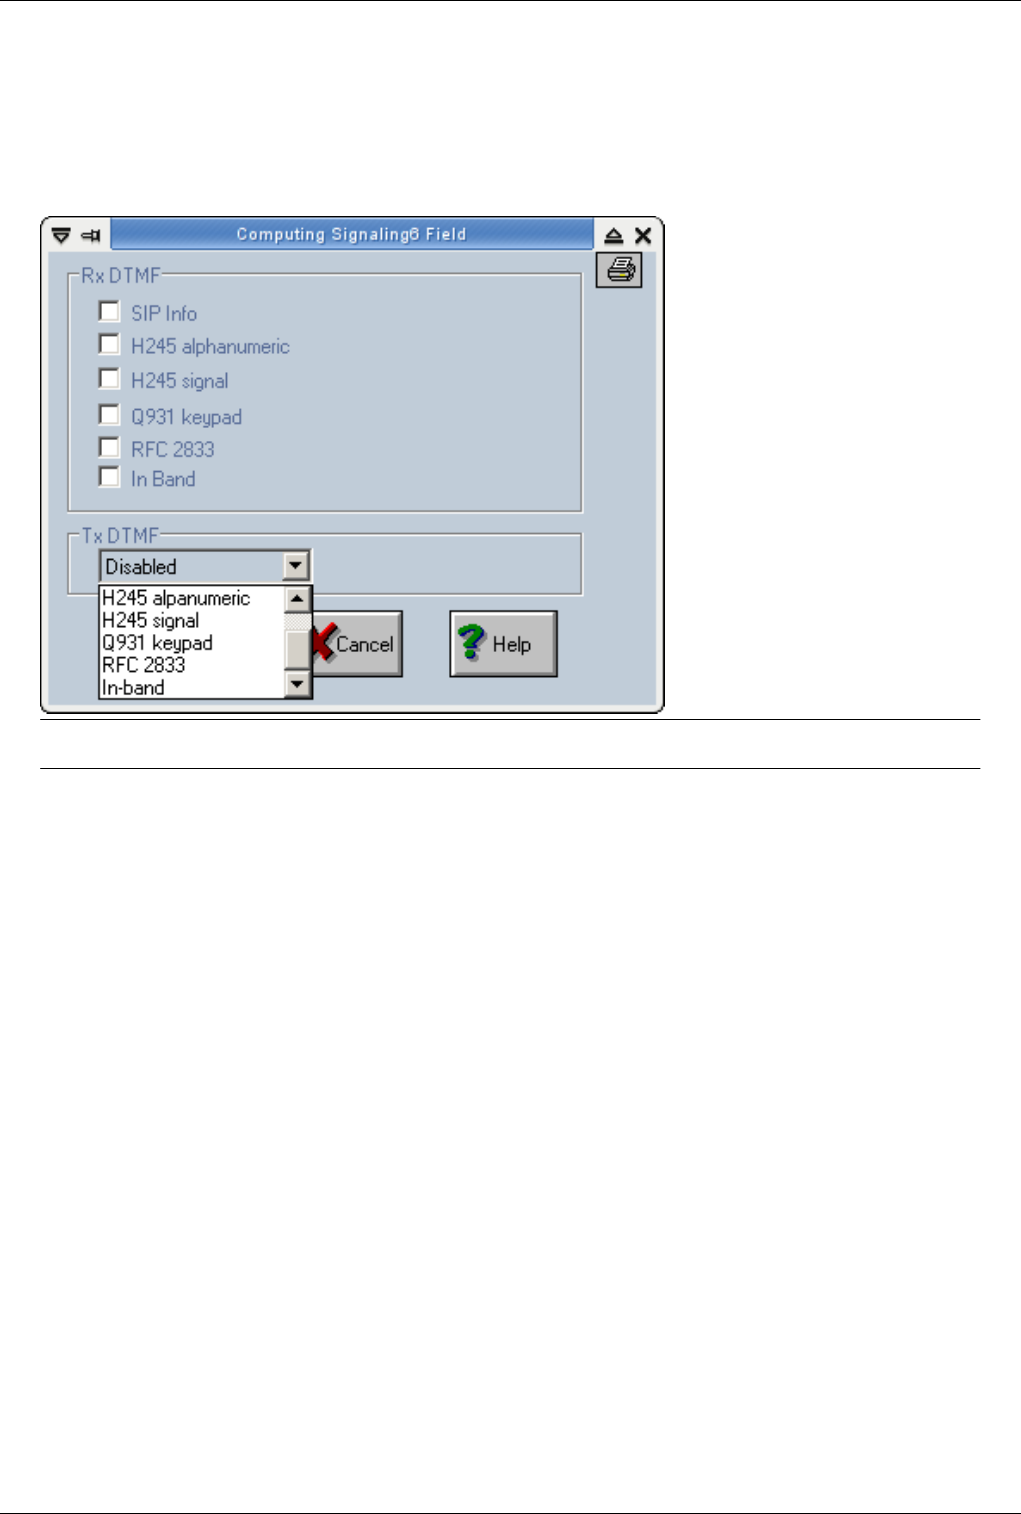
OAM / Call Directions 84
Sign6
Used for Dtmf check OAM / DTMF
€RxDTMF - DTMF that will be received. Multiple types of DTMF can be selected by enabling the possibility to
receive the DTMF codes.
€TxDTMF - DTMF that will be sent. Only one can be selected.
SEO: Call Directions, OAM Call direction, Trunk properties
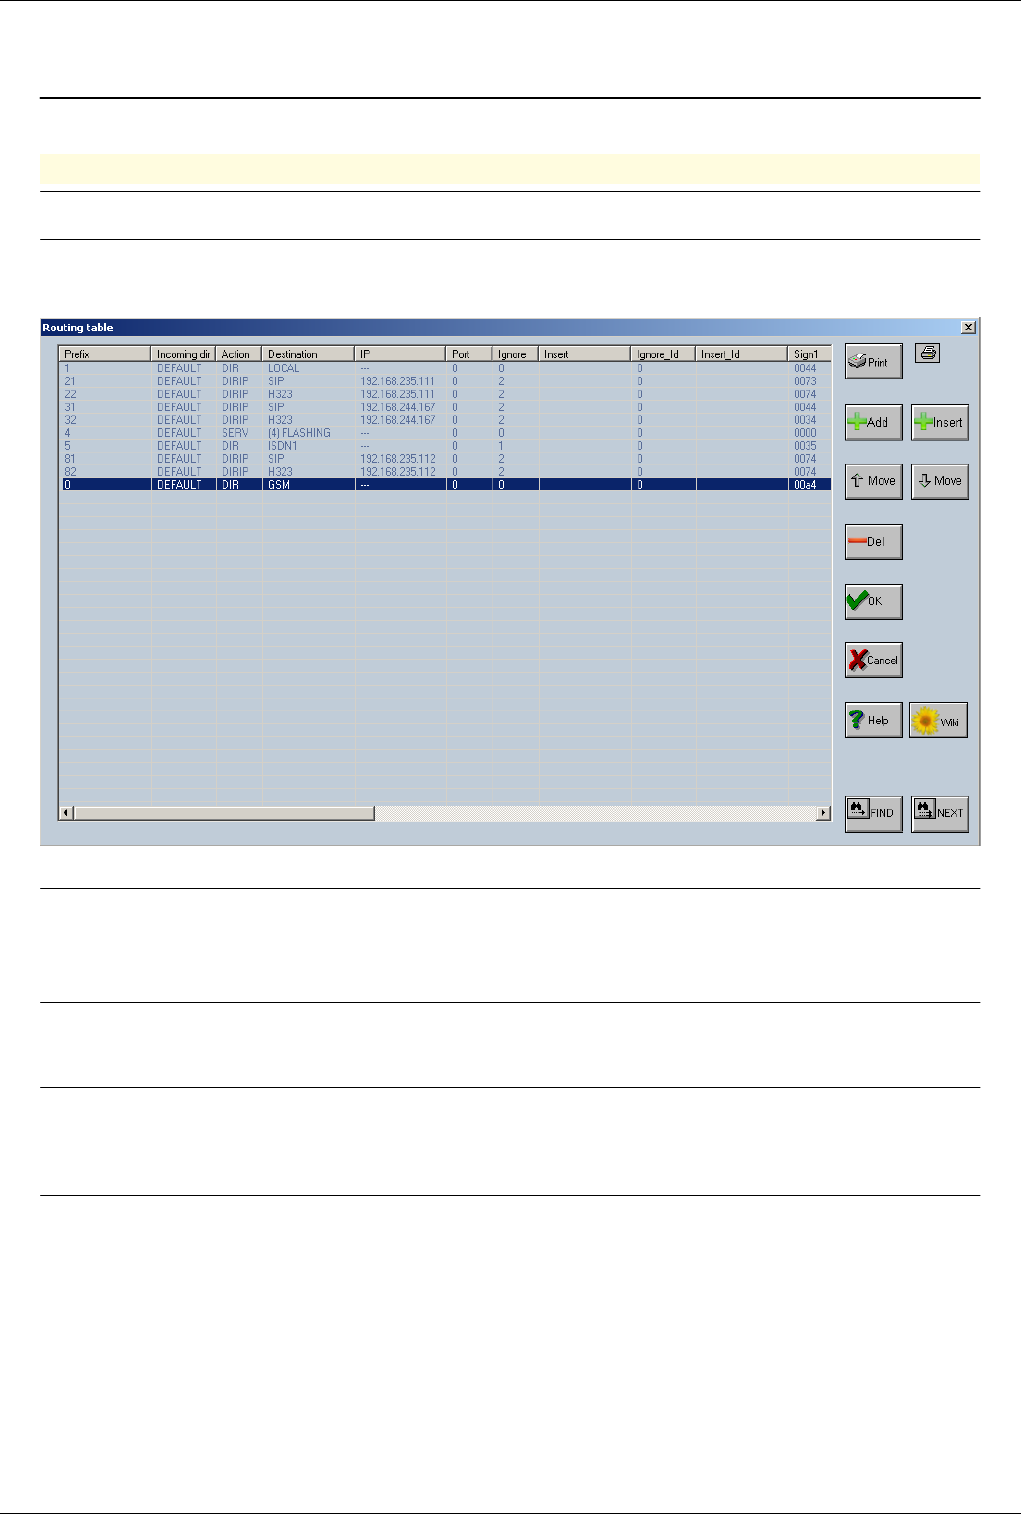
OAM / Routing Table 85
OAM / Routing Table
Back to Main Page > OAM
Routing Table
Note:Routing table is responsible with finding a outgoing direction to a call.
€€ Connect with OAM
€ Select Actions > Routing table
Add
-add a routing rule to the table. A new record will be added at the bottom of the list (the new line will have an empty
"Prefix" field);
Insert
-insert a new record over the selected record from the table (the new line will have an empty "Prefix" field);
Del
-delete a rule for routing. First select it from the list and then click the "Del" button (the deleted line will have an
empty "Prefix" field); You can have the same prefix more then once - case in which you can use "Move" buttons to
change the prefix order - for the same prefix - the upper line will have a greater priority than the lower one.
Note: Move up and Move down buttons can be used for the same prefix in order to alter the
route priority - the first rank route will have a greater priority than the next one.
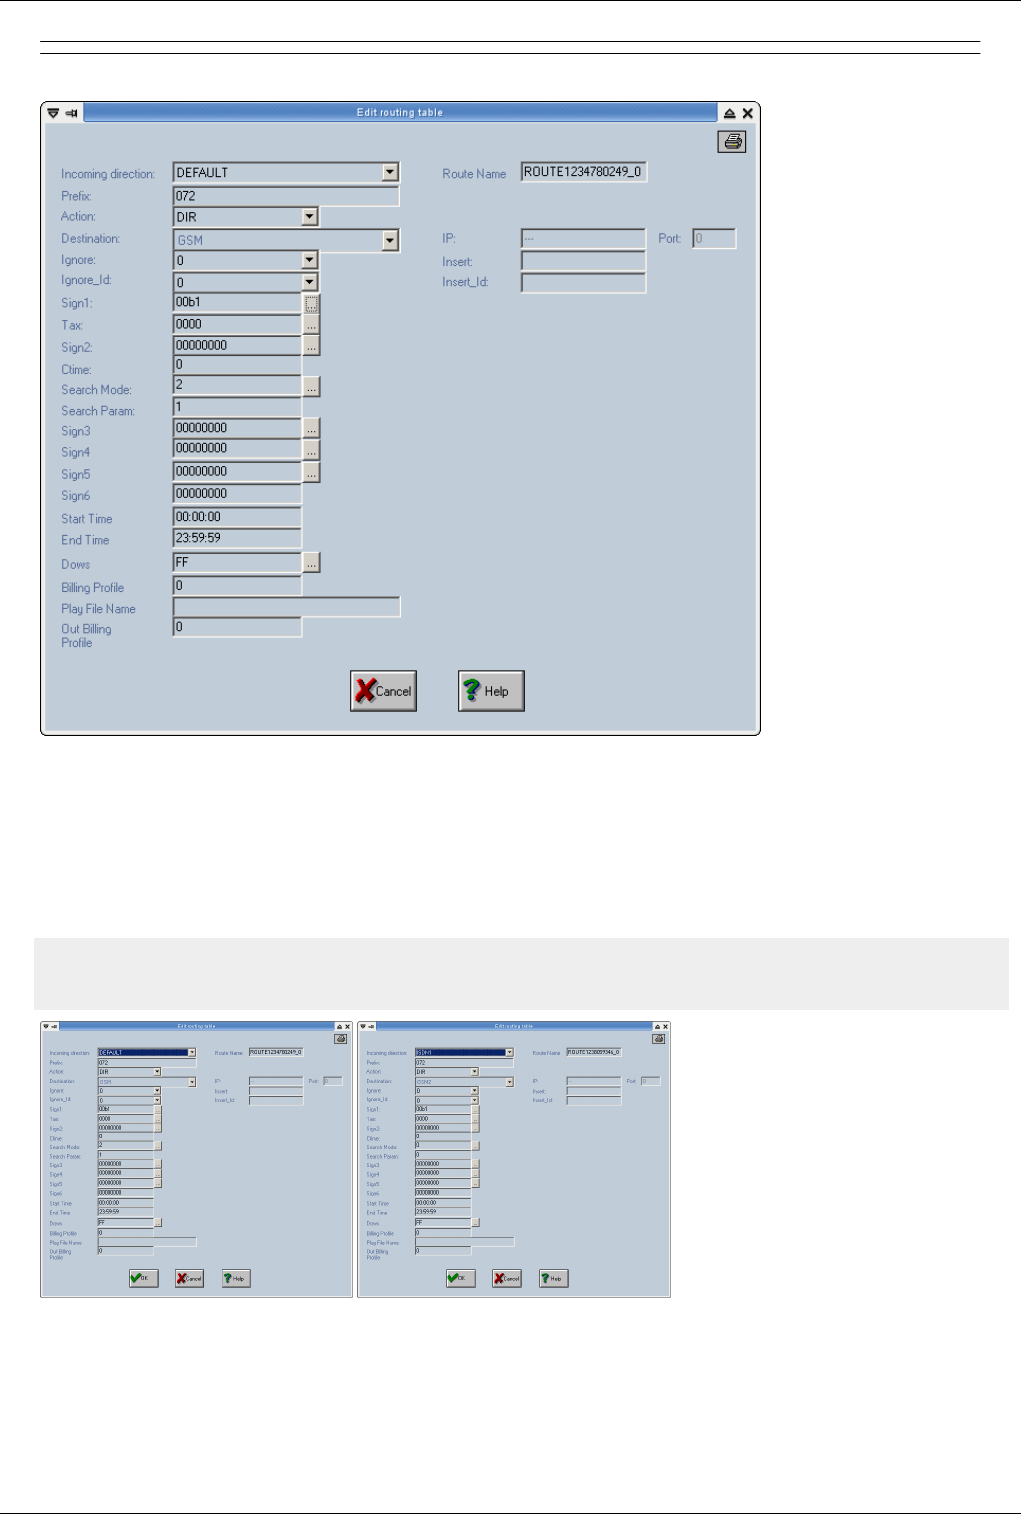
OAM / Routing Table 86
€€ Double click on a route to edit.
Incoming Direction
Used to create routing rules based on source of the call. If a trunk is specified at Incoming Direction then this rule
will be valid only for calls received for that trunk. Also routing rules with specific Incoming Direction will have
higher priority over rules with Default Incoming Direction for the same prefix.
Example of dir.cfg:
r DEFAULT 072 DIR GSM 0 0 00 c 00 c 00b1 0000 0 0 2 1 0 0 0 0 00:00:00 23:59:59 255 0 ROUTE1234780249_0 c 0
r ISDN1 072 DIR GSM2 0 0 00 c 00 c 00b1 0000 0 0 0 0 0 0 0 0 00:00:00 23:59:59 255 0 ROUTE1238059346_0 c 0
Default route for prefix 072 will send calls to DIR GSM except calls originating from trunk ISDN1 which be sent to
trunk GSM2
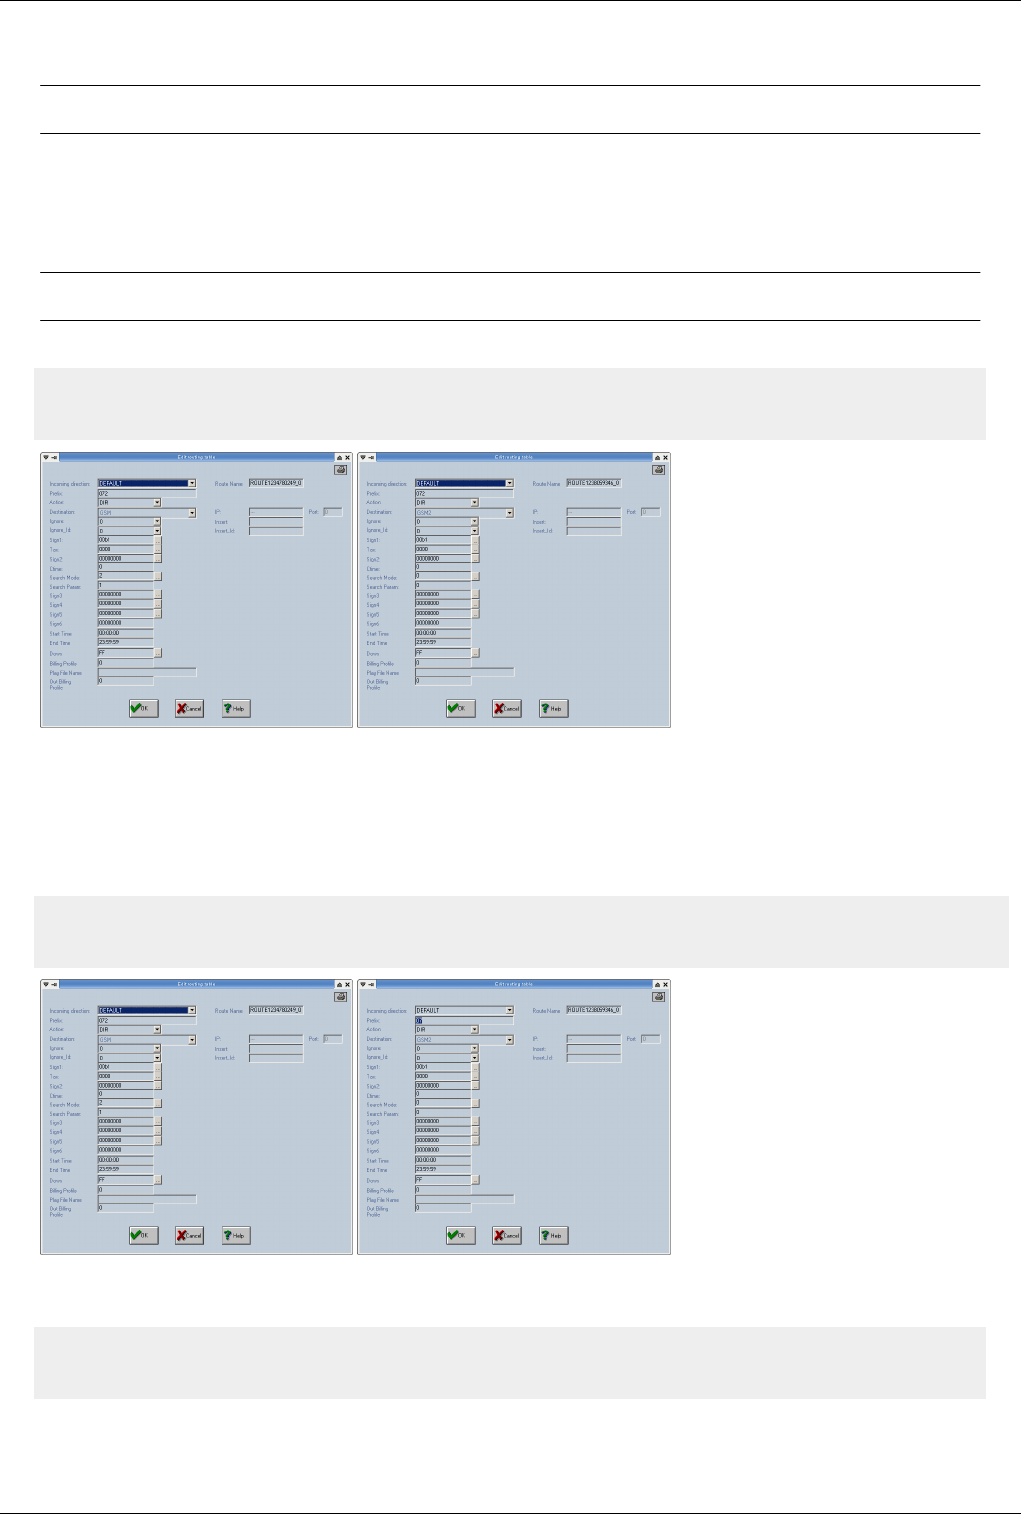
OAM / Routing Table 87
Prefix
Note:'f' can be used as a wild-card. It will represent 1 digit from 0-9
For example "1f2" means all prefixes from "102", "112" until "192". This feature is very useful because it allows to
reduce the number of records in the routing table. The first digits of the number, these are the digits received from
the originating party after processing in Call Direction. Number of digits added here are very important it will
indicate how many digits equipment will analyse to find a outgoing direction.
Warning:Routes that have a common prefix must have the same number of digits at prefix.
Correct Example:
r DEFAULT 072 DIR GSM 0 0 00 c 00 c 00b1 0000 0 0 2 1 0 0 0 0 00:00:00 23:59:59 255 0 ROUTE1234780249_0 c 0
r DEFAULT 072 DIR GSM2 0 0 00 c 00 c 00b1 0000 0 0 0 0 0 0 0 0 00:00:00 23:59:59 255 0 ROUTE1238059346_0 c 0
If a call is received with prefix 072 then the equipment will analyse 3 digits and will find 2 routes available. When
multiple routes are found equipment will look at route Search Algorithms Search Mode and Search Param (digits
in bold) to determine which one of the routes will use. Fist route has a higher priority and will always be selected
first. In case GSM trunk is full calls will be sent to GSM2 (this is also a example of overflow)
Incorrect Example
r DEFAULT 072 DIR GSM 0 0 00 c 00 c 00b1 0000 0 0 0 0 0 0 0 0 00:00:00 23:59:59 255 0 ROUTE1234780249_0 c 0
r DEFAULT 07 DIR GSM2 0 0 00 c 00 c 00b1 0000 0 0 0 0 0 0 0 0 00:00:00 23:59:59 255 0 ROUTE1238059346_0 c 0
In this case only 2 digits will be analysed and equipment will always use second route to terminate calls. To correct
this error a wild-card f must be added to the second route.
r DEFAULT 072 DIR GSM 0 0 00 c 00 c 00b1 0000 0 0 0 0 0 0 0 0 00:00:00 23:59:59 255 0 ROUTE1234780249_0 c 0
r DEFAULT 07f DIR GSM2 0 0 00 c 00 c 00b1 0000 0 0 0 0 0 0 0 0 00:00:00 23:59:59 255 0 ROUTE1238059346_0 c 0

OAM / Routing Table 88
In this case 3 digits will be analysed and equipment will send calls starting with 072 to trunk GSM and calls starting
with 070,071,073,074,075,076,078,079 to trunk GSM2
Action
Specifies the action to be taken for the call. It is a list of six strings: “PORT”, “DIR”, “SERV”, “HUNT”, “DIRIP” and
“LCR”.
€€ PORT - the call will get out through the port specified in the "Destination" list (routing by port);
€€ DIR - the call will get out by the trunk you have specified in the "Destination" list (routing by trunk);
€€ SERV - the call will get out through the service that was specified in the "Destination" list (send call to a service
like voicemail, flashing,....);
€€ HUNT - the call will get out through the hunting group that you have specified in the "Destination" list (send call
to a hunting group);
€€ DIRIP - in such a case the "Destination" field will be interpreted as VoIP protocol - SIP or H323. The user must
provide destinations IP address and port (in case when the default values of 1720 for H323 and 5060 for SIP are
not used) (send call to a ip destination);
€€ LCR - the call will get out by analysing the LCR table for the index specified in the "Destination" field. This field
can take a value from 0 to 6. Each value represents a rule to be applied in order to find a direction at the specified
moment. (depricated)
Destination
Destination of the call which may be:
€ A port number (in the range 0-127); when Action Port is selected
€ A direction name specified in “Define directions names” (from the list); when Action Dir is selected; it indicates
an error allocation by red color when the allocated direction is declared as 'Disabled' in 'Calls Directions'.
€€ A service number (from 0 to 19);
€€ A number for a group of hunting (from 0 to 19);
€€ An index to the LCR table. (depricated)

OAM / Routing Table 89
Ignore
The number of digits that will be ignored (omitted) from the numbering sent out through “Destination”. There is a list
with values from 0 to 20.
Ignore_id
The number of digits that will be ignored from the Caller ID sent out through “Destination”. There is a list with
values from 0 to 20;
Insert
Digits inserted at Insert field will be inserted in front of the number
Insert_id
Digits inserted at Insert_id field will be inserted in front of the identity received
Note:Ignore and Insert are always done from the front of the number. Ignore is done first
and then Insert
IP and PORT
This option is enabled only when calls are sent to a ip destination (DIRIP must be selected at Action). Protocol must
be selected at Destination and remote ip and port must be inserted here.
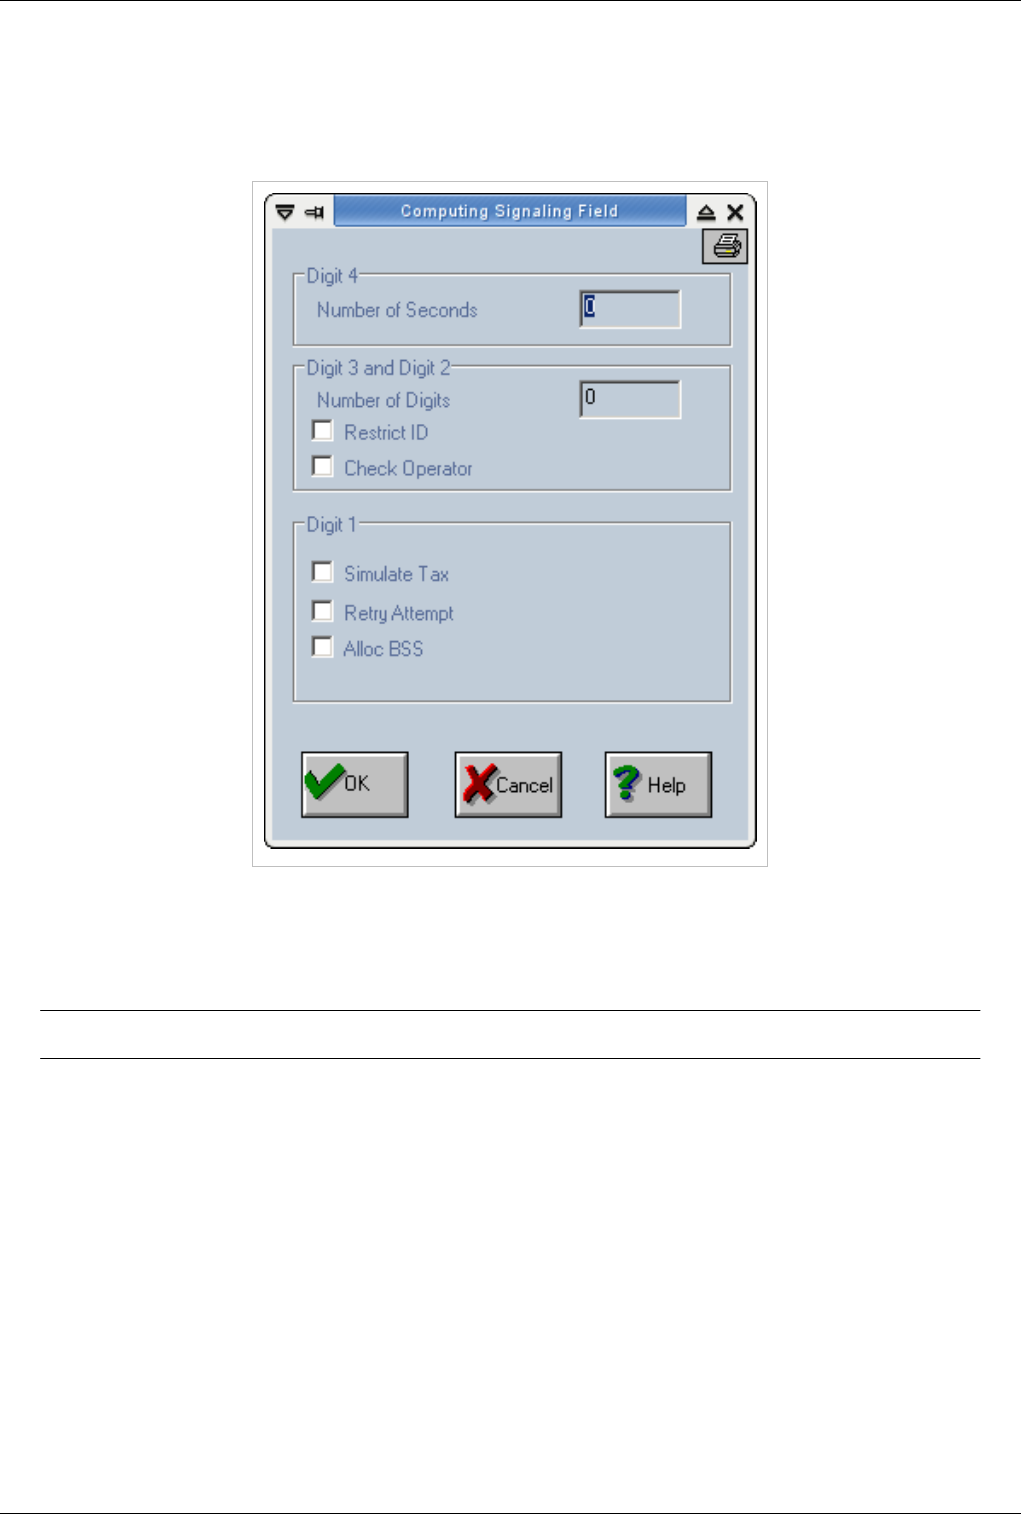
OAM / Routing Table 90
Sign1
Action='DIR'
If selected action is 'DIR' or 'DIRIP' then the Sign1 window is displayed as follows:
€Alloc BSS - this option is used in the situations when the ring-back tone must be identified in order to declare the
call as answered. This option is useful in cases when the gateway application must make the difference between a
call answered without ring-back tone and a call answered after a ring-back tone. Additional software must be
installed on the gateway.
Note:Alloc BSS feature is not supported anymore.
€Simulate Tax - is used in case of FXO junction - in which the answer at destination can't be recognized. In such a
situation this option has to be validated. The call is considered as answered as soon as the call is made on output
link.
€Retry Attempt - when this bit is 1 one retry attempt will be made in case of a first failure on this direction; when
this bit is 0 no retry attempts will be made.
This option is used to reroute calls. In order to have a reroute on cause "X" scenario you have to define 2 routes with
the same prefixes and with different priorities. The "Retry Attempt" option will be set for both routing records. In
"/mnt/app/cfg/trafic.cfg" a line has to be added indicating the rerouting on cause option. Line format is as follows:
"rerouteoncause X 1".
€Check Operator (mask 0x0800) - is used when portability facility is desired. For each call, a database
interrogation is performed. The portability database can be located on the same gateway or on another PC.
Additional software must be installed on the gateway.
€Restrict ID (mask 0x0400) - is used for SS7 direction in order to indicate that the identity is restricted.
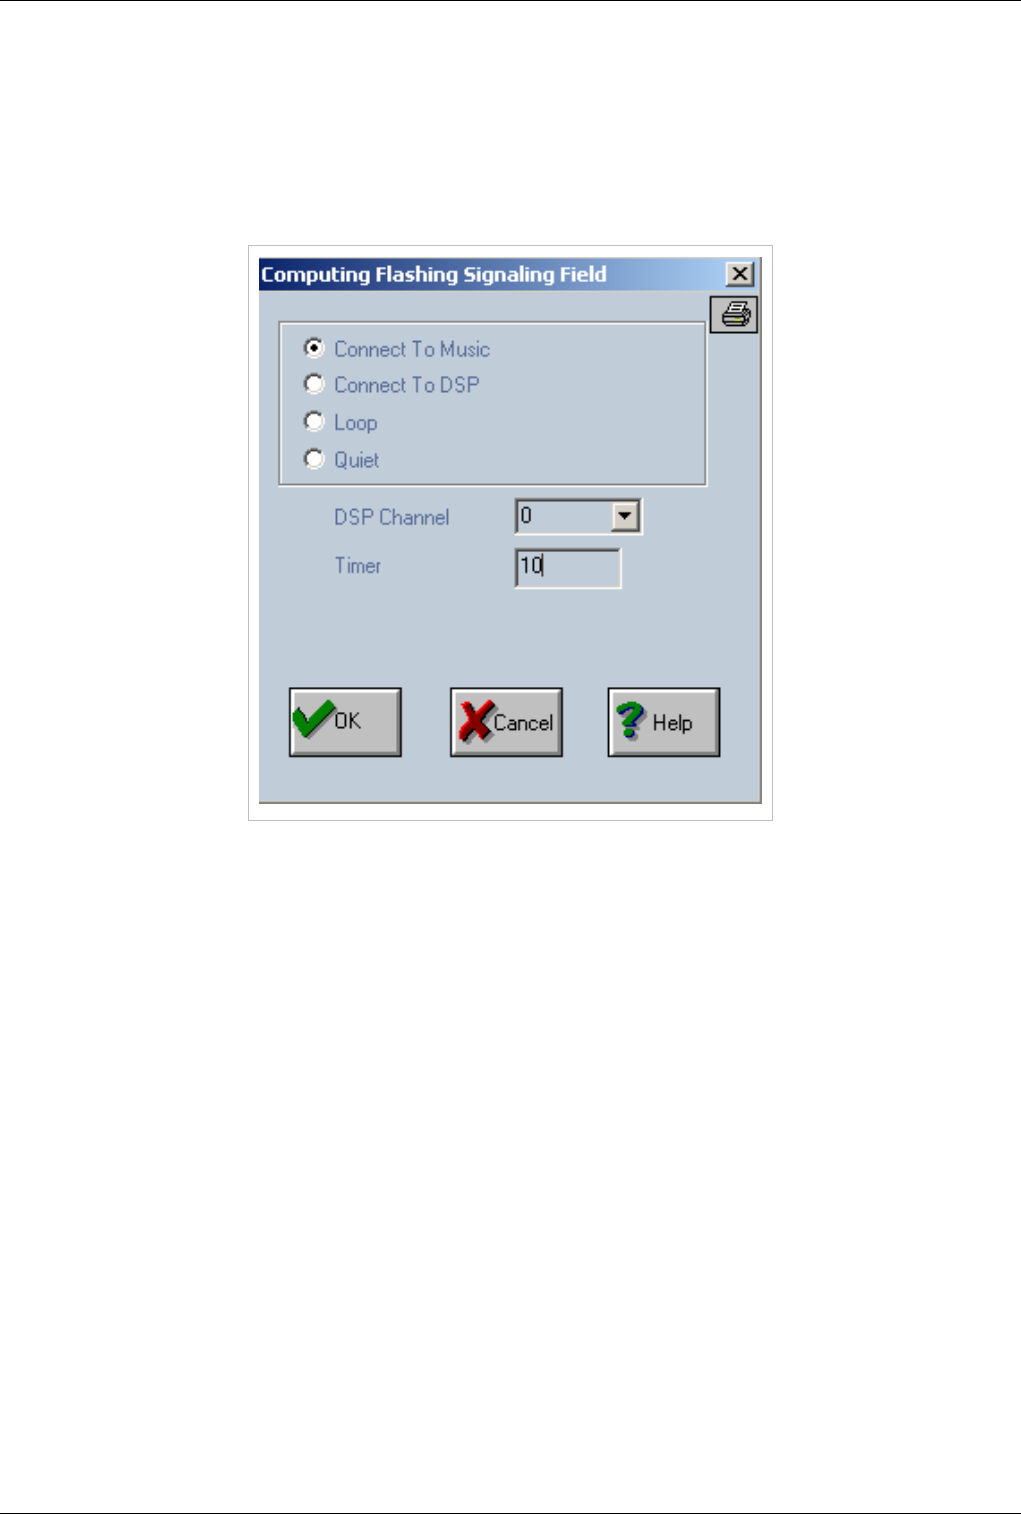
OAM / Routing Table 91
The identity can be hidden if in the routing record - the ignore identity field is put to maximum digit allowed - 20.
€Number of Digits - number of digits which are waiting to take the action specified in the field "Action"
€Number of Seconds - time delay between two digits after which the selected action is chosen.
Action='SERV',Destination='FLASHING'
If selected action is 'SERV' and destination is 'FLASHING' then the Sign1 window is displayed as follows:
€Connect To Music - the gateway flashing tonality is provided to the incoming call;
€Connect To DSP - the tonality will be obtained from a DSP (with possible values from 0 to 63);
€Loop - the "Tx" and "Rx" sense are looped together;
€Quiet - no tonality will be provided to the incoming call; the user will not hear anything;
The "Timer" field is used as follows: if a "0" value is used then the tonality will be heard continously; otherwise the
value will specify the amount of time on which the tonality will be played to the incoming call.
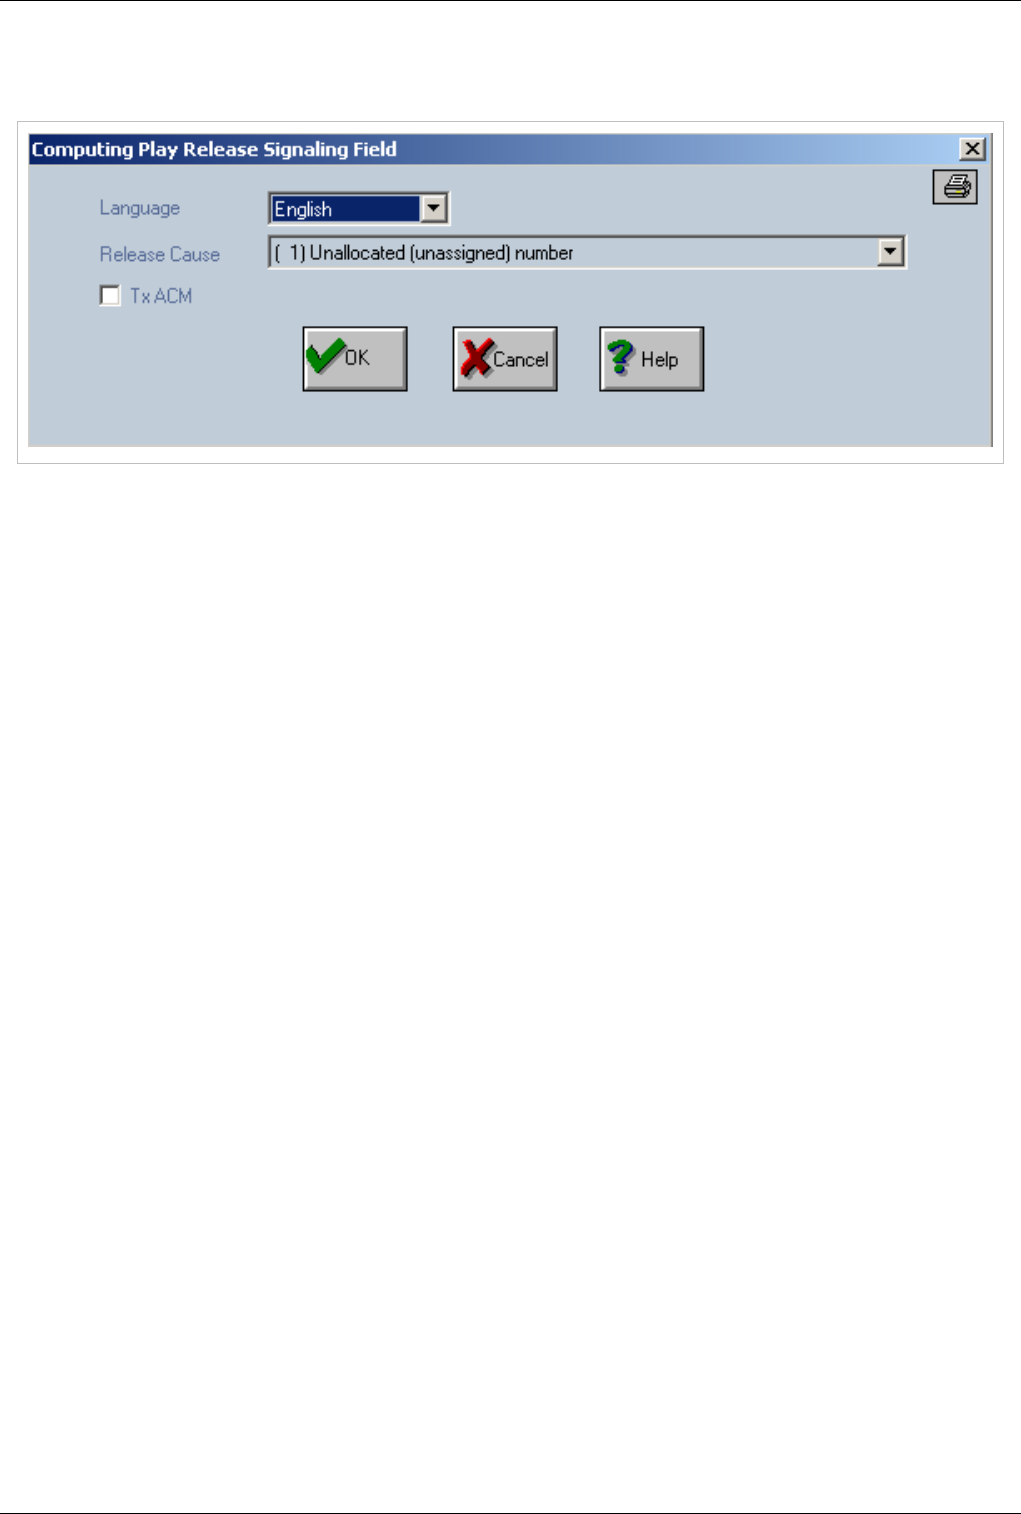
OAM / Routing Table 92
Action='SERV',Destination='PLAY RELEASE'
If selected action is 'SERV' and destination is 'PLAY RELEASE' then the Sign1 window is displayed as follows:
This service is used to release calls (with cause specified in *Release Cause field) with a specified Q850 code and
optionaly to play a file before release. In routing table you need to route a prefix to service PLAY_RELEASE.
In case of playing files, then the files are stored on HDD then the path will be "/mnt/app/raw/q850/".
File format is the following: <file name>_<codec(2 digits)>.<language(2 characters)> Example: inex_00.ro,
user_busy_08.en, no_answer_18.en etc.
€Language is specified in "Language" field.
File name is hard coded and and is directly related with Q850 code. File name list:
€€ 1 = inex
€€ 3 = no_route_to_destination
€€ 16 = normal_call_clearing
€€ 17 = user_busy
€€ 18 = no_user_responding
€€ 19 = no_answer
€€ 21 = call_rejected
€€ 23 = redirect_to_new_destination
€€ 27 = destination_out_of_order
€€ 28 = invalid_number_format
€€ 31 = normal_unspecified
€€ 34 = congestion
€€ 38 = network_out_of_order
€€ 41 = temporary_failure
€€ 65 = bearer_capability_not_implemented
€€ 127 = interworking_unspecified
anything else = protocol_error
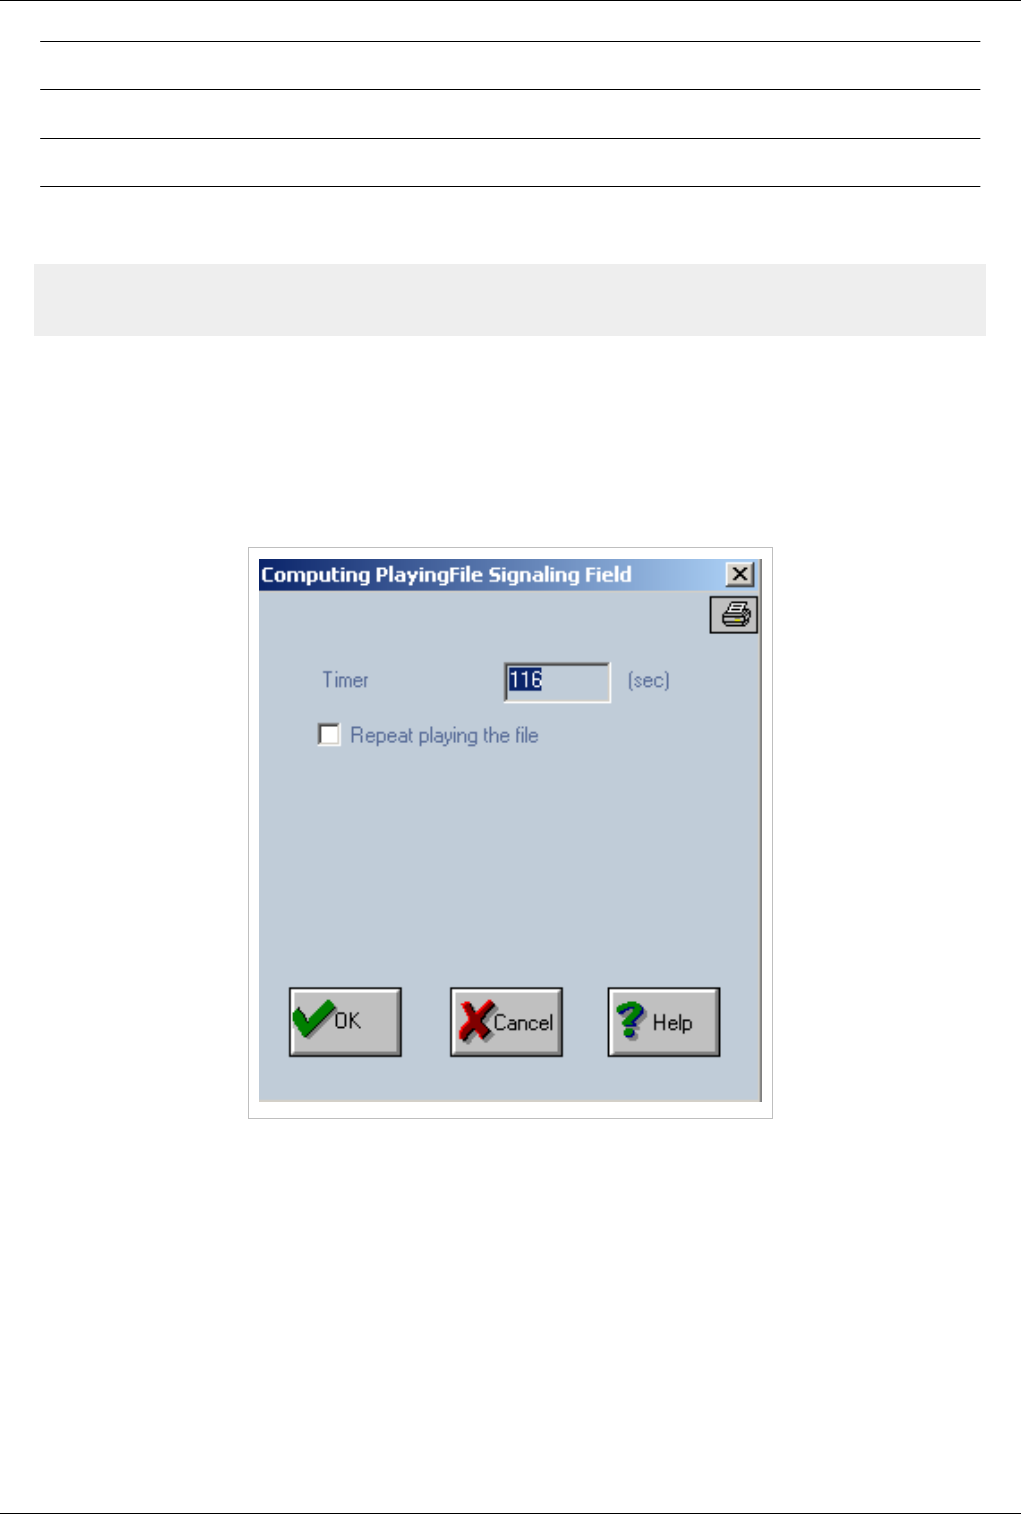
OAM / Routing Table 93
Note:Codec will be matched according to the source codecs of call
. Default language from /mnt/app/cfg/prepaid.cfg wil be used.
Note:Requirements: rtptx pool must be activated, see 'exec.cfg'
On PGVoIP (MGU) for FXS calls must be added in group.cfg the following line: (Order is important, bellow line
must be the first rtp_ip line from specified group):
# rtp_ip nr_grup pg_ip/32 10.0.0.10
rtp_ip 2 192.168.110.18/32 10.0.0.10
€TxACM - is used on SS7 (Address Complete Message) - it is a signalling message sent to indicate that a switched
circuit has been established to the requested endpoint. This message is an acknowledgement to the IAM
message(Initial Address Message).
Action='SERV',Destination='PLAY FILE'
If selected action is 'SERV' and destination is 'PLAY FILE' then the Sign1 window is displayed as follows:
This service is used for playing files to source of calls routed to this service. In routing table you need to route a
prefix to service PLAY_FILE. If routing Play File Name field is empty, default will play the file named "music".
HDD files path: /mnt/app/raw/flashing/
File format: <file name>_<codec(2 digits)>.<language(2 characters)> Example: play_00.ro, test_08.en,
test_play_18.en etc.
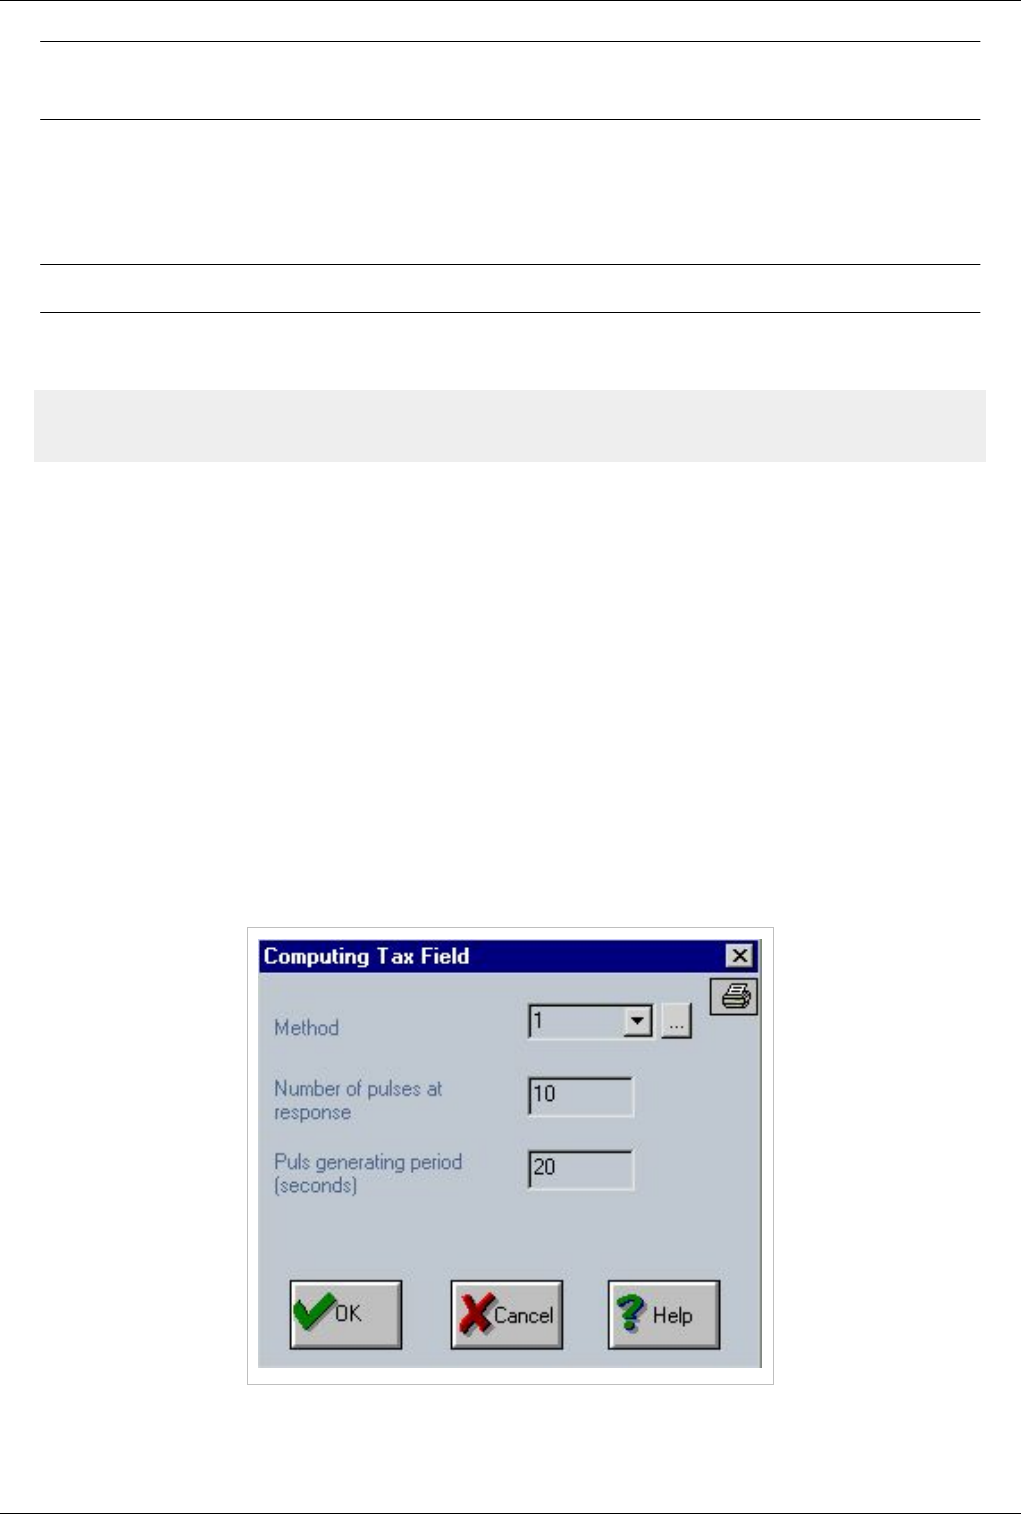
OAM / Routing Table 94
Note:Play_file field from route will contain only file_name, without codec and language
extensions.
Codec will be matched according to the source codecs of call. Default language is configured from prepaid.cfg.
€Timer - specify the number of second after wich it will stop play file; if is 0 it play until the file is finished.
€Repeat Playing the File - it enables/disables infinite loop play file; if activated will play the file from beginning
when end is reached
Note:Requirements: rtptx pool must be activated, see 'exec.cfg'
On PGVoIP (MGU) for FXS calls must be added in group.cfg the following line: (Order is important, bellow line
must be the first rtp_ip line from specified group):
# rtp_ip nr_grup pg_ip/32 10.0.0.10
rtp_ip 2 192.168.110.18/32 10.0.0.10
Tax
You can establish the prefixes that will be charged with billing pulses in “Routing Table”. To can handle charging
issues you must change the field “Tax”.
There are three methods (rules) for configuring calculation of tax pulse. The first digit (the leftmost of the four) of
“Tax” field is used to differentiate between those methods. Allowed values for the method are:
€ 0 – no method,
€ 1 – method 1,
€ 2 – method 2,
€ 3 – method 3.
€Method 1:
“1xyy” – upon answering the call is charged with “x” pulses. During the state of conversation the call is charged with
one pulses every “yy” seconds. So if you select “1” you must specify the number of pulses at response (10 in the
example below) and the time period for pulse generation (20 seconds in the example below).
€Method 2:
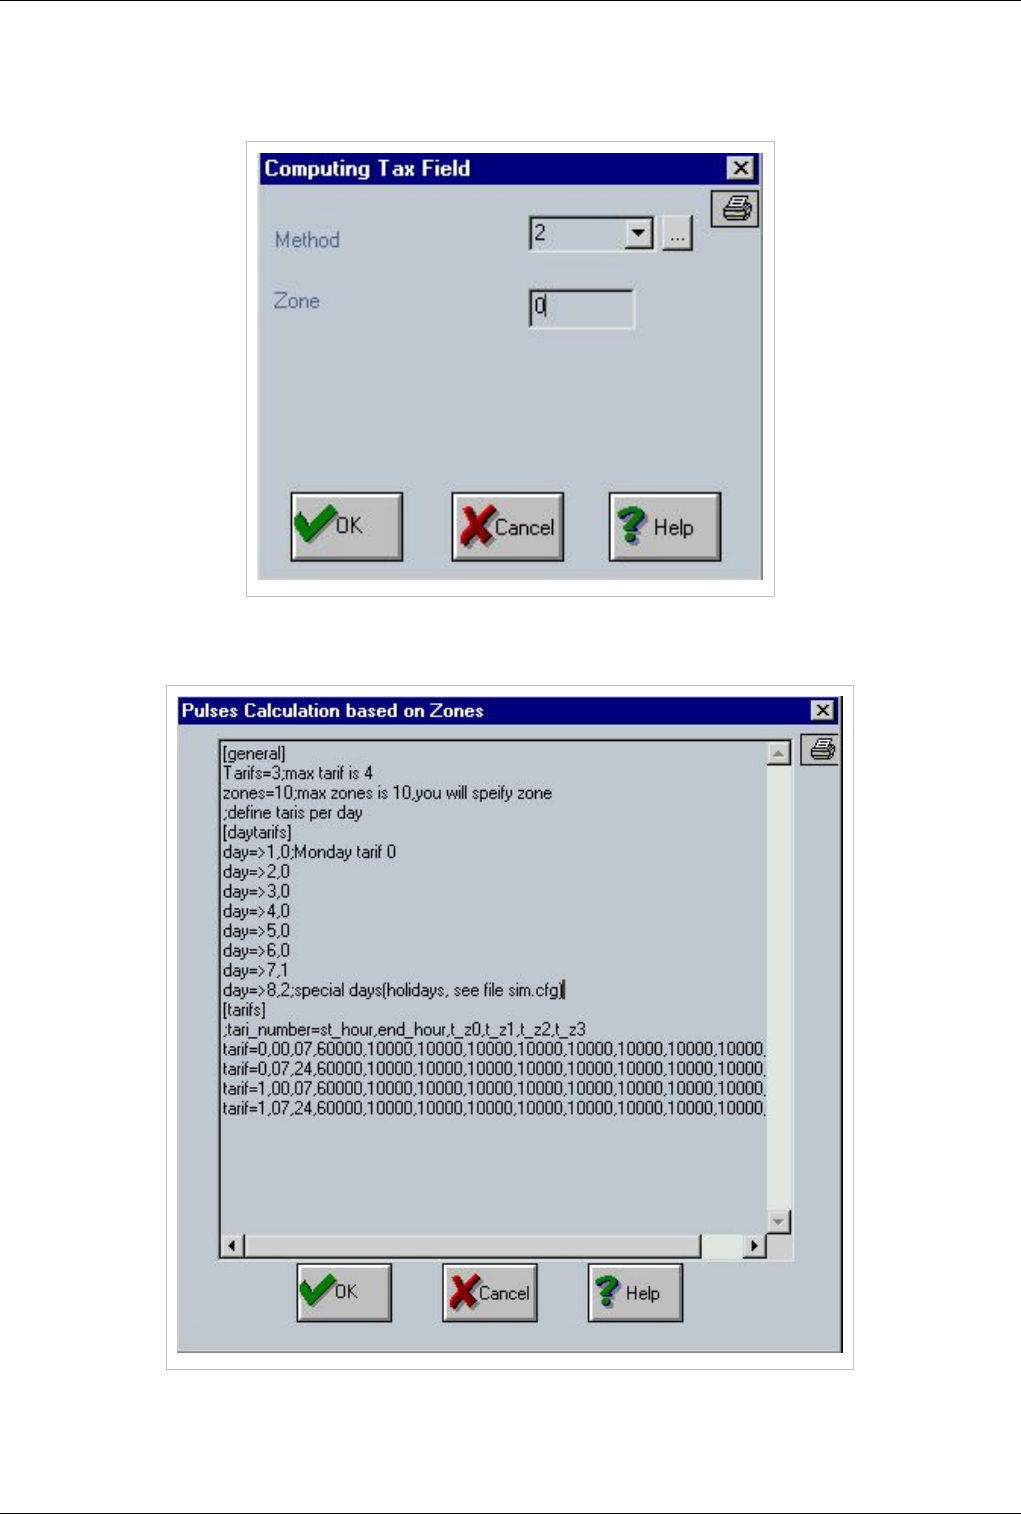
OAM / Routing Table 95
“200x” – the calls are charged according to several zones and tariffs. The zones are geographical areas where the
tariff is the same. This kind of taxation is performed by several fixed telephony (PSTN) operators. If you select
Method 2 you may change only the “Tariff Index” value.
The list of all zones and tariffs is defined in the next window, “Pulse calculation based on Zones” that is displayed by
pressing “…” button.
You can easily handle zones and tariffs. A maximum number of ten zones and four tariffs can be defined. In the
image above you can notice the tariff allocation on each day of the week. First, you have the day-tariff assignment.
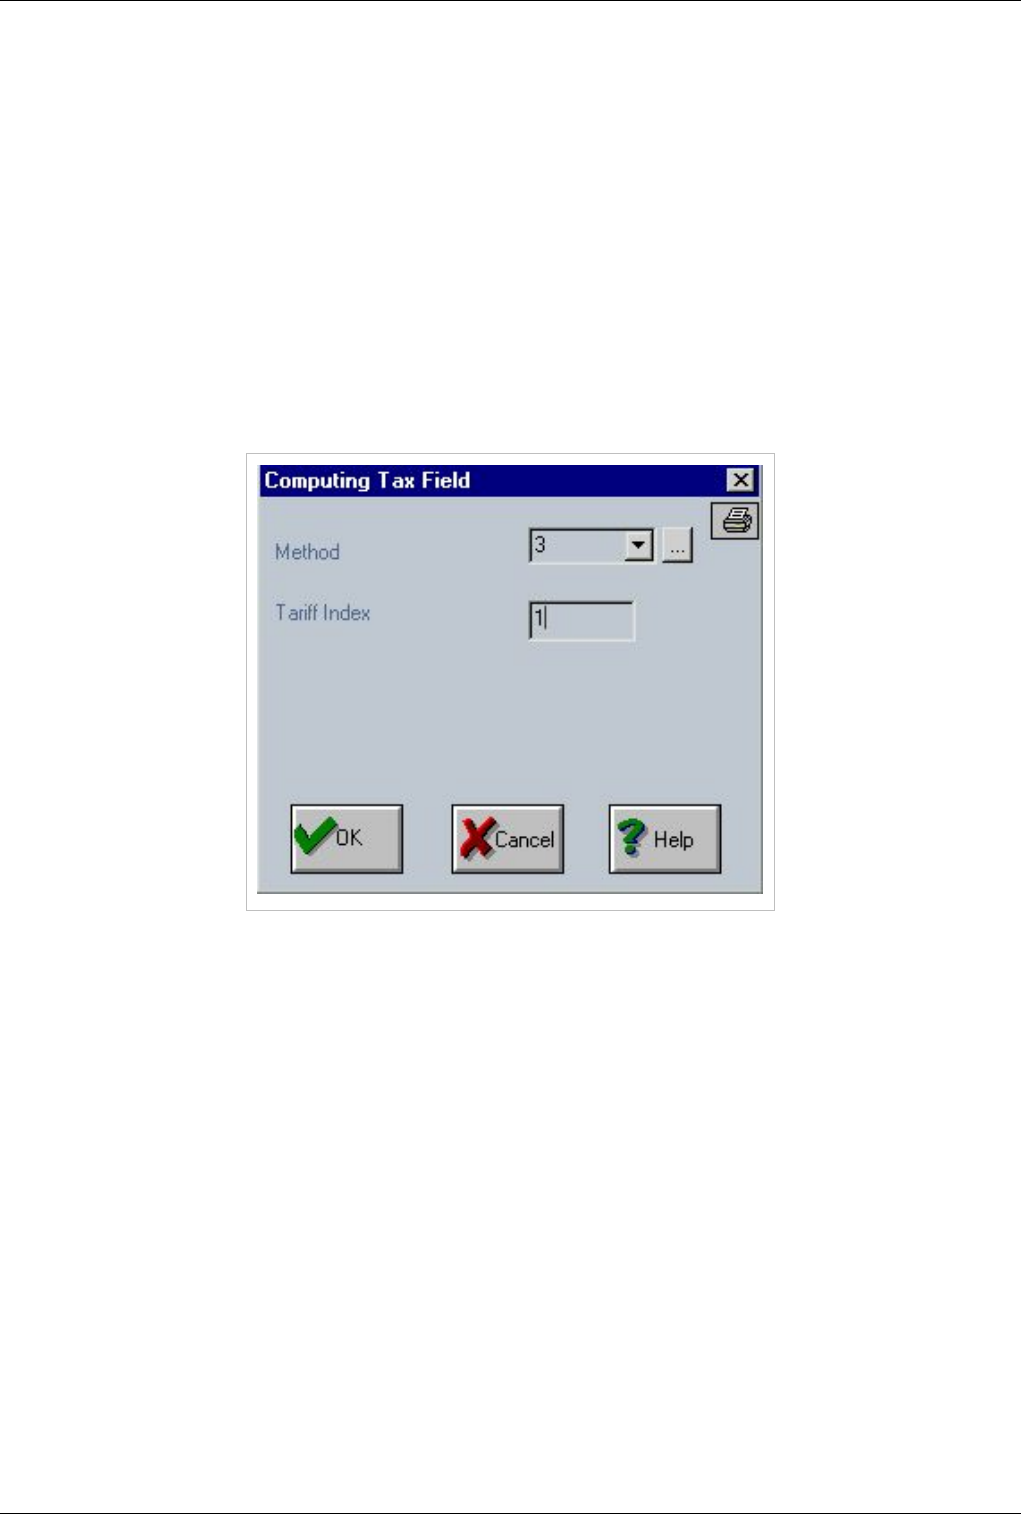
OAM / Routing Table 96
“day=>1,0” means that the tariff 0 is applied on each “Monday”. The days of the week are allocated beginning with
Monday – 1 up to Sunday – 7. There is also an 8th day of the week, the holidays the first value is 8. These special
days that begin with 8 are defined in “Define Holidays” After day – tariff allocation the tariff – zone correspondence
follows: - each line starts with a triplet “tariff=x,yy,zz”, where “x” is the number of the tariff and “yy-zz” is the time
interval when the settings that follow are applied. - After the characters “tariff=x,yy,zz” come the ten columns, the
zones showing time period when a pulse is generated. The temporization values are in msec, so if a value is “60000”
this means 60 seconds
€Method 3:
“ 3xxx” – the calls are charged according with a tariff. This is an extension (refinement) of Method1. Besides the
number of pulses upon answering and the period for generating pulses, now you can specify also a period without
tax pulses and the number of pulses per taxing period. This kind of billing is used by several mobile telephony
carriers. If you select method 3, you may change only the “Tariff Index” value. There are maximum 10 tariffs, so
values for “Tariff Index” can be value from 0 to 9.
The list of all tariffs is defined in the window “Pulse Calculation based on Tariffs”, which is displayed by pressing
the button “…”.
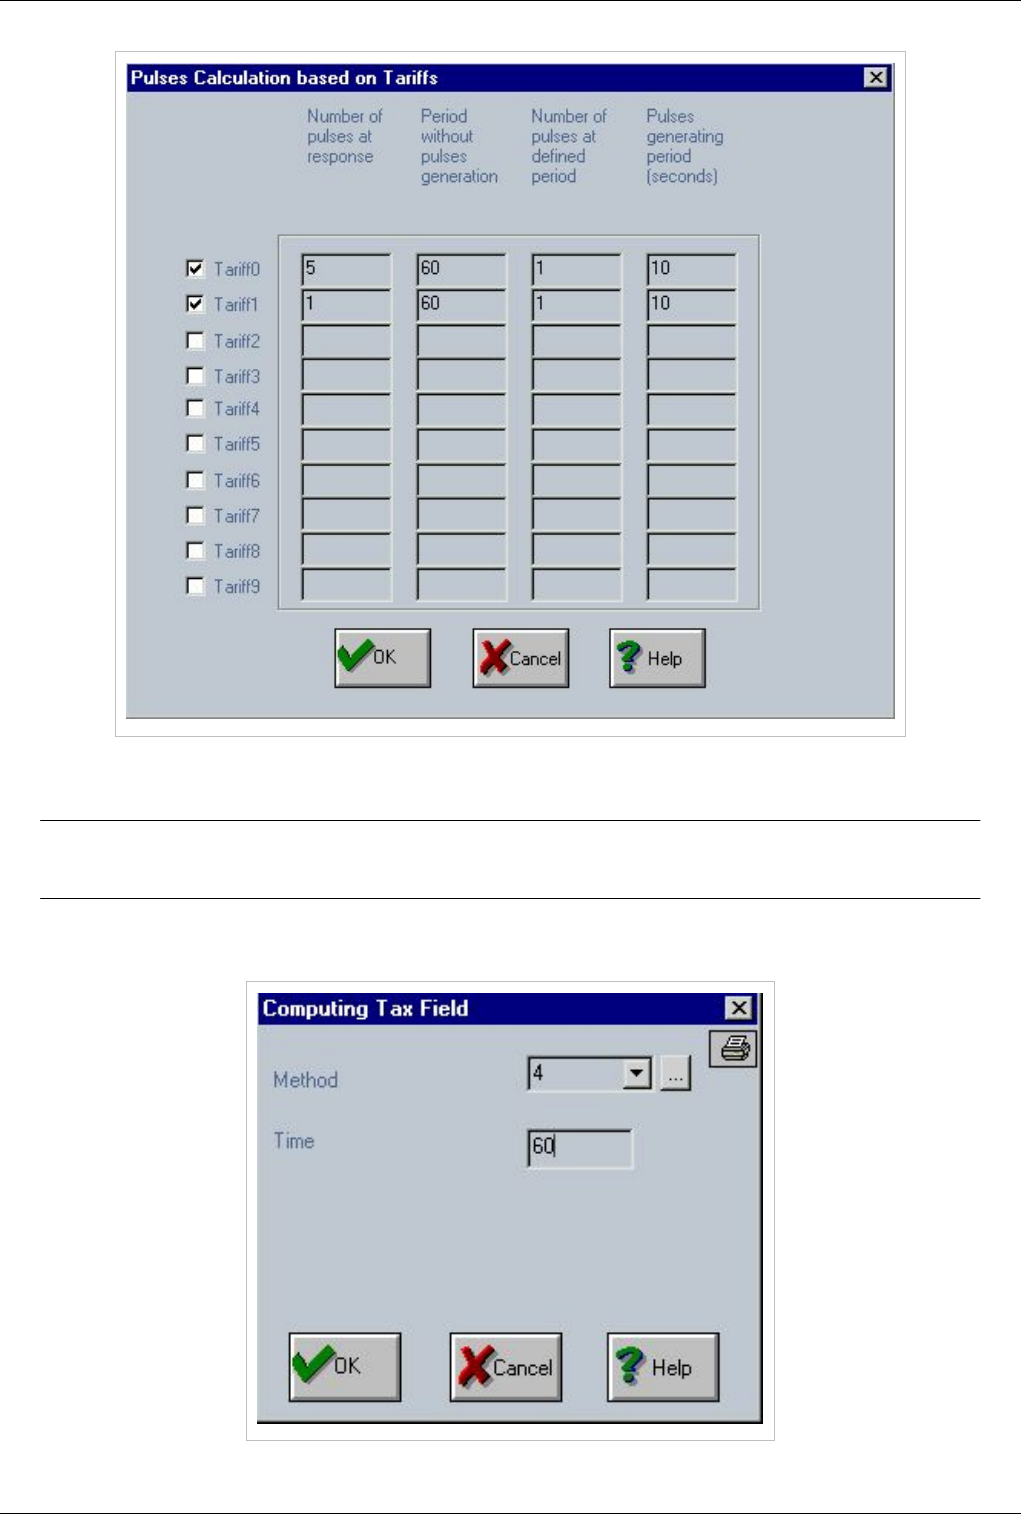
OAM / Routing Table 97
In the picture above, “Tariff1” is defined as follows: - one pulse is sent upon answering - then follows a one minute
pause, for 60 seconds no pulses are sent - after 60 seconds one pulse is sent every 10 seconds.
Note:In the “Tax” field, there is also a facility for limiting the maximum duration of a call
limit.
For this, you select “4” for the value of the field “Method”. This is NOT really a method for calculating the charge for
a call!

OAM / Routing Table 98
With this, you may impose a time limit for the call. The value for “Time” is in minutes, so the example above means
that no calls longer that one hour will be allowed.
Sign2
Action='DIR' - for SS7
Here the user can specify in case of a SS7 route some translations parameters as follows:
€Nature of Address - the first zone is related to 'Nature of Address' information.
We can allow the route to be available just for a specific "NAI" field by selecting the 'Check Called Party NAI'
checkbox and value from "Called Party NAI" list. We offer the posibillity to override the 'Called Party' nature of
address and 'Calling Party' nature of address. The 'Called Party' nature of address is changed by enabling the first
two options 'Check Called Party NAI' and 'Override Called Party NAI'. The original 'Called Party NAI' -
Subscriber,Unknown,National,International and UK Specific - can be changed to 'Override Called Party NAI'
which contains the same list as the first one.
Moreover the 'Calling Party NAI' can be override by selecting a value from 'Override Calling Party NAI' and
enabling the 'Override Calling Party NAI' option.
€Type of Media Required - the route will be available just for the specified type of media.
Possible values are 'speech', '64k_unrestr' and '3K1Hz_audio'.
€Translation Occured - is used to indicate for SS7 that a translation of number has occured
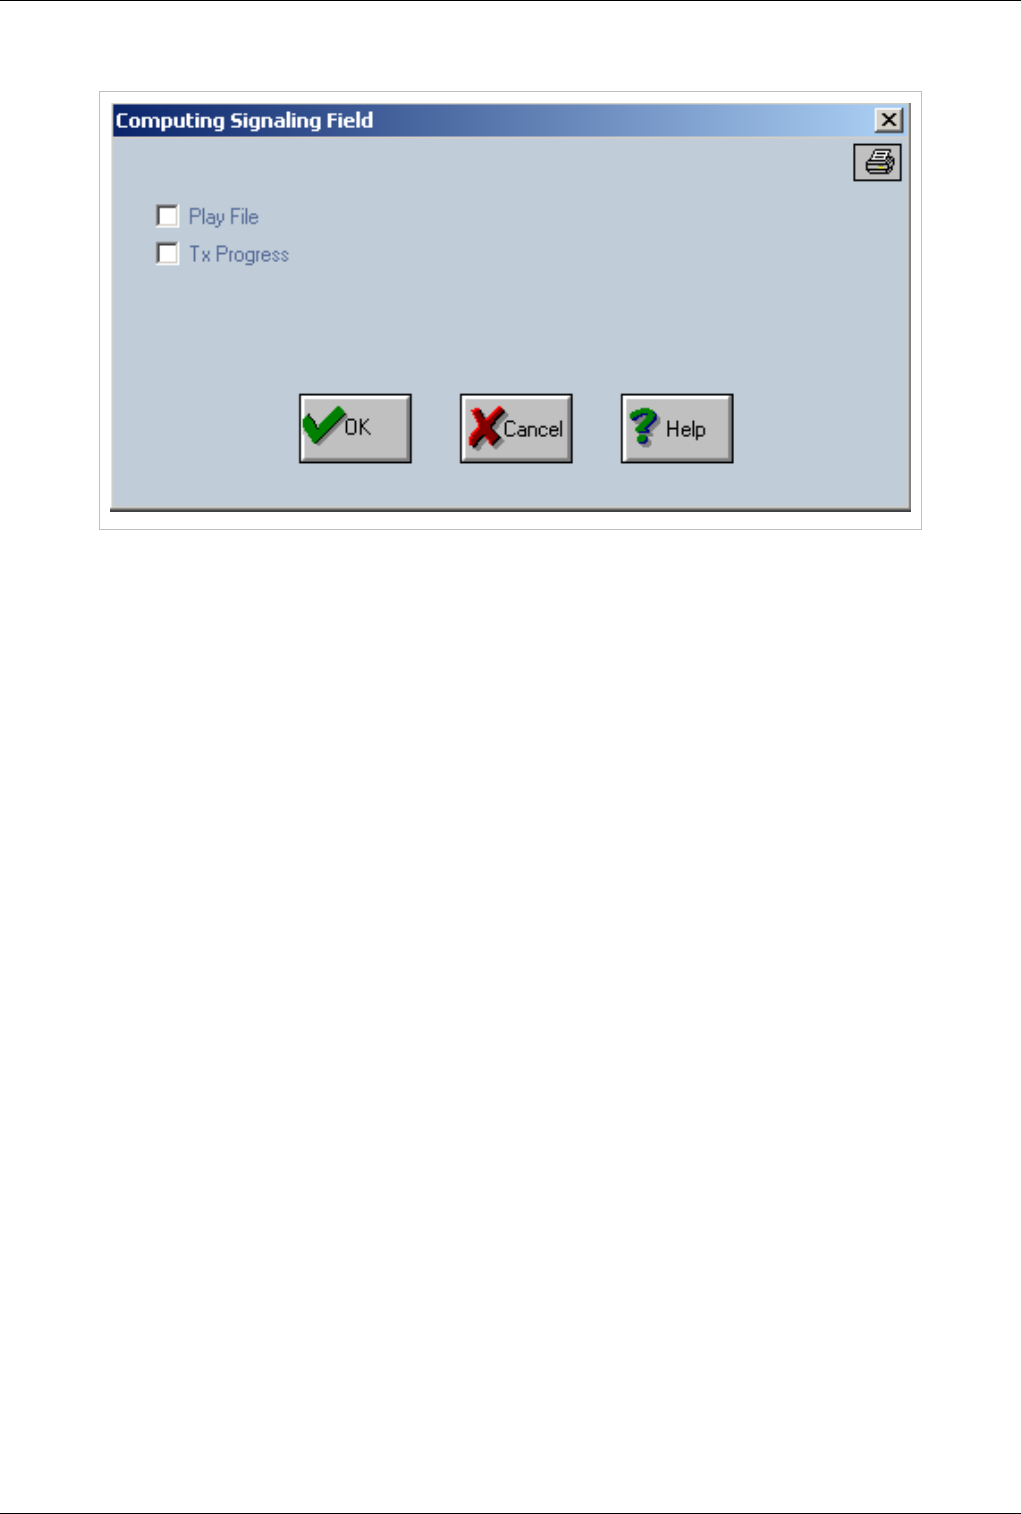
OAM / Routing Table 99
Action='SERV',Destination='PLAY RELEASE'
First option is used to enable/disable playing the appropriate file. The second option is used to enable/disable "Tx
Progress".
Ctime
This parameter establish the maximum call duration (in minutes). It is similar to "Tax" method 4. If this value is set
here (not 0) the "Tax" method 4 will be ignored.
Search Mode/Search Param
This parameter is used for routing in case of using routes with the same prefix. In such a case a method for
overflowing and dividing the traffic between several routes must be provided. Each routes from such a group must
have "Retry Atempt" option in "Sign1 field" (0x1000).
Overflow is performed if one of the following situations occurs: - when the call is routed on VoIP - the main
application is checking if the number of simultaneously calls is greater then the maximum number of output calls
established in diripout settings (see DIRIPOUT section). - when the call is dropped from the remote side with a
release cause which is set for rerouting in "trafic.cfg". For example to reroute on congestion message the line
"rerouteoncause 34 1" must be added in "trafic.cfg".
We assume this premise in the following explanations. This parameter is used in conjunction with "Search Param"
parameters:
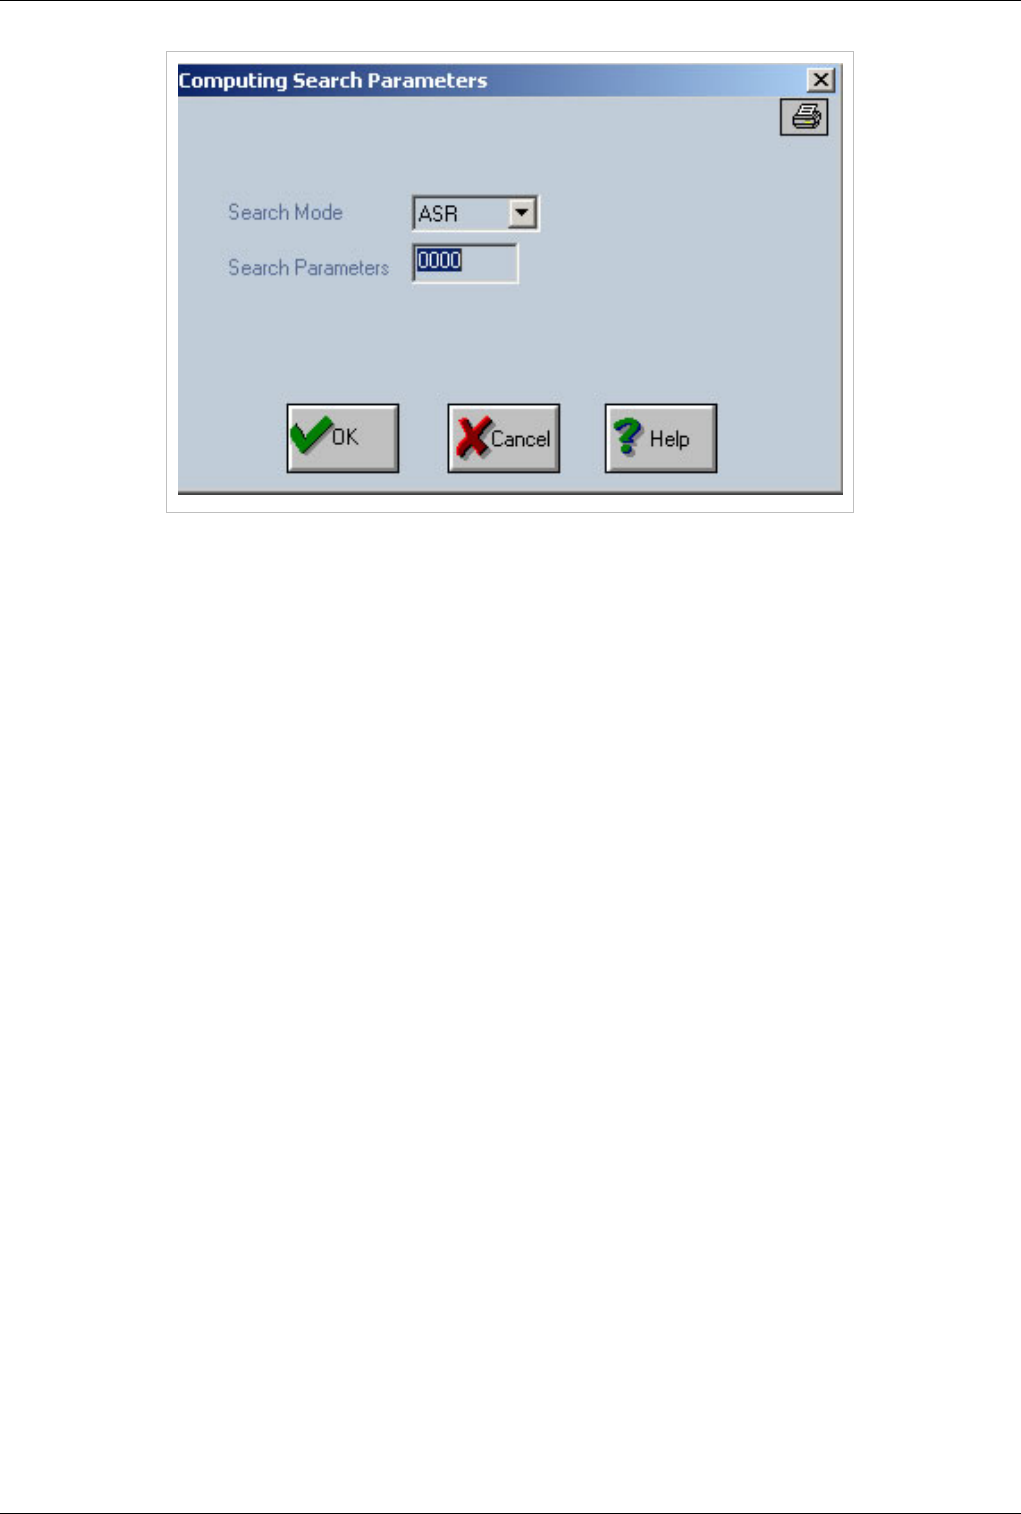
OAM / Routing Table 100
Search Mode:
€ASR - Search Param is not used; the route will be choosen based on ASR value
€ACD - Search Param is not used; the route will be choosen based on ACD value
€Priority - Search Param is not used; the call will be routed based on direction priority (direction specified in
"dest" field). Calls from the routing group (with the same prefix) will go mostly on the direction with the highest
priority. If the maximum number of calls is reached (for example for a direction specified in "DIR IP OUT"
settings when "Max Calls Out" value is passed
€Down - Search Param is not used; the route will be choosen from the first to the last one. Depending on the
position in routing table the first route from the group will have the highest priority.
€Up - Search Param is not used; the route will be choosen from the last to the first one. Depending on the position
in routing table the last route from the group will have the highest priority.
€Circular - Search Param is not used; the route will be choosen circulary.
€Percent - Search Param specifies the percent Calls will be routed based on percentage. The application running
on TOPEX machine knows the number of calls on each machine.
Sign3
Action='SERV',Destination is a QUEUE service
When 'Action' field is 'SERV" and "Destination' field is 'SERV_QUEUE','LOGIN_QUEUE','LOGOUT_QUEUE' or
'SERV_GET_FROM_QUEUE' - those services are used to implement the call center feature. It allows incomming
calls to be queued until an operator is available to answer. Operators are normal SIP users registered to the system
(in case when the box allows SIP registration). For the operators it is not allowed to register multiple sip phones wth
the same username and password.
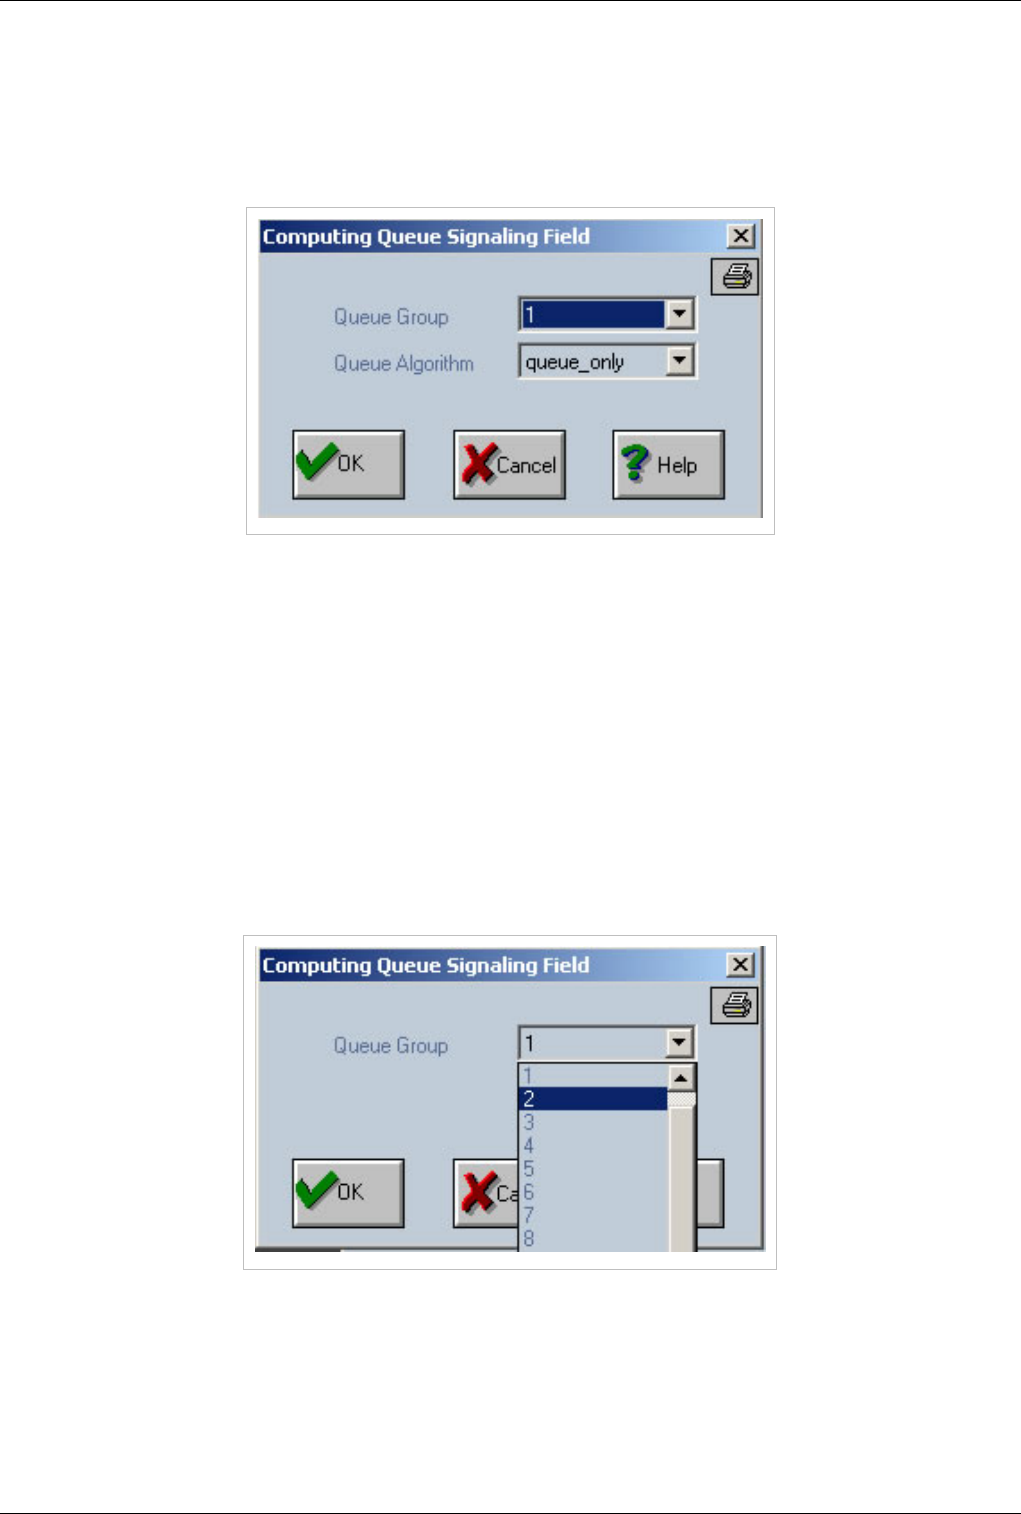
OAM / Routing Table 101
SERV_QUEUE
In order to put a call in queue it must be routed to the 'SERV_QUEUE'. The 'Sign3' field contains information about
the number of the queue group (possible values are "- Not Used -" or a value from 1 to 50) and about the chosen
queue algorithm. Those values can be easily changed by pressing the "..." button located in the rigth side of the
'Sign3' field.
The "Queue Algorithm" can be selected from the following list:
€€ 0=queue_only - just put the call on queue until sombody will pick it up
€€ 1=circular - send calls to each operator logged in in circular mode
€€ 2=priority - priority can be set from sip user settings for each allowed queue
€€ 3=min time speech - send calls always to the operator with lowest time speech
€€ 4=min calls - send calls always to the operator with lowest numbers of calls
LOGIN_QUEUE
To login into a queue, the operator must dial the prefix routed to 'LOGIN_QUEUE'.
The 'Sign3' field contains information about the number of the queue group (possible values are '- Not Used -' or a
value from 1 to 50). These value can be easily changed by pressing the "..." button located in the rigth side of the
'Sign3' field.
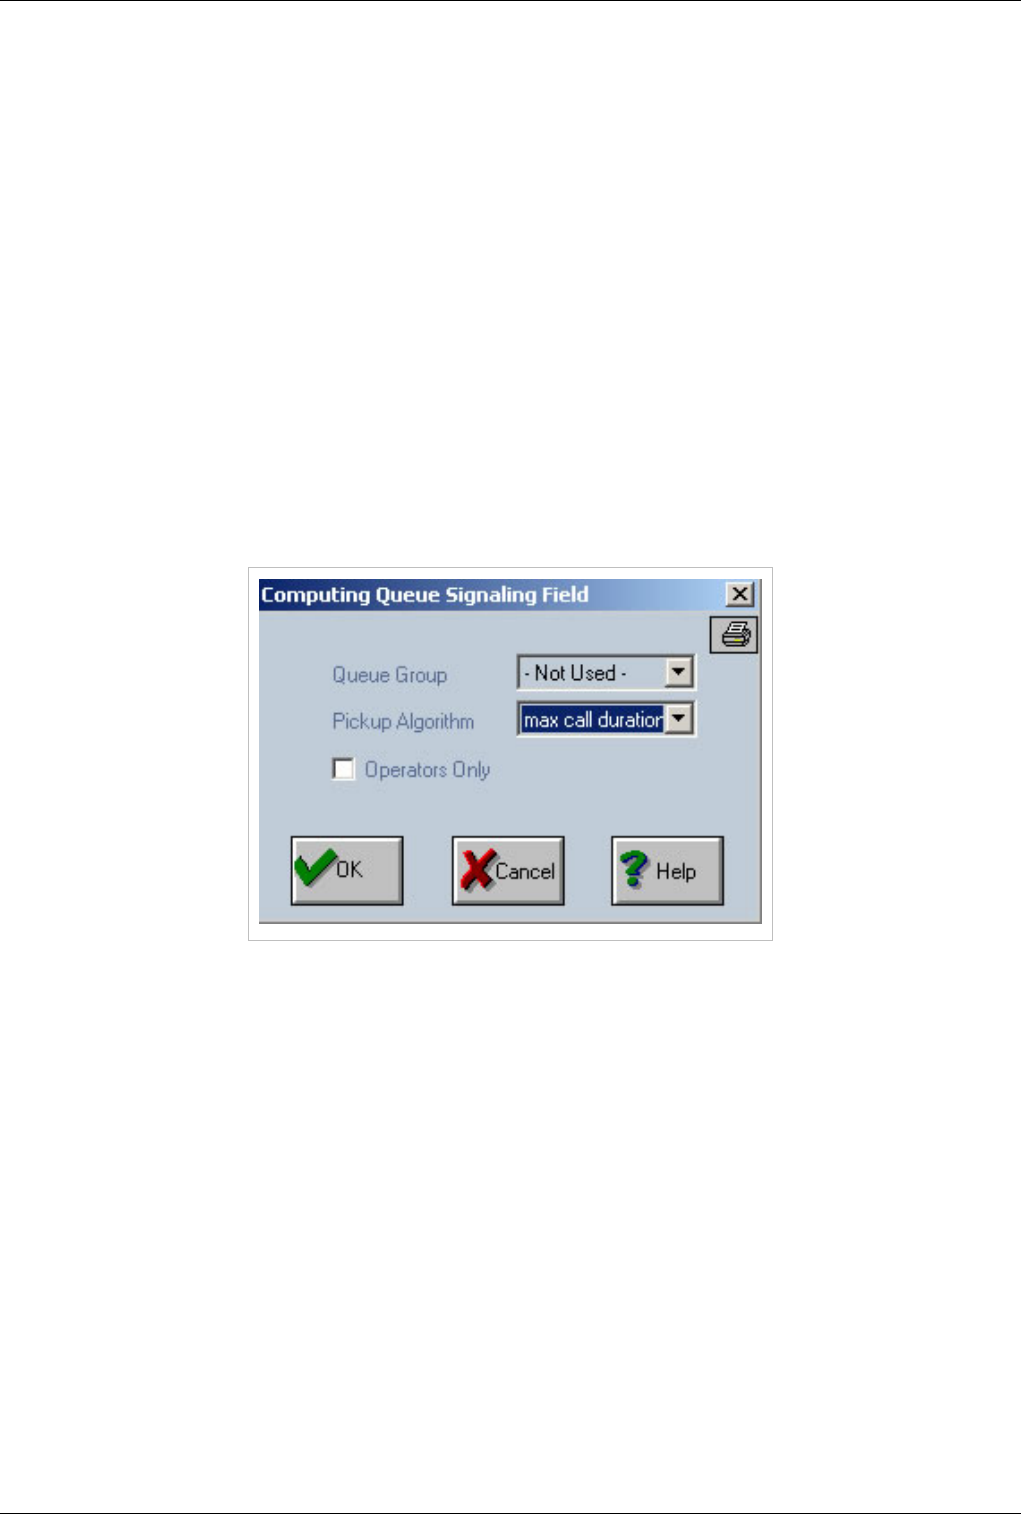
OAM / Routing Table 102
LOGOUT_QUEUE
To logout from a queue operator must dial the prefix routed to 'LOGOUT_QUEUE'.
The "Sign3" field contains information about the number of the queue group (possible values are "- Not Used -" or a
value from 1 to 50). These value can be easily changed by pressing the "..." button located in the rigth side of the
"Sign3" field. The "Computing Queue Signaling Field" window which is displayed is the same with the one used for
"LOGIN_QUEUE".
SERV_GET_FROM_QUEUE
Allow an operator to pickup a call from queue by dialing "SERV_GET_FROM_QUEUE" prefix and optional
followed by id or ani. The "Sign3" field contains information about:
€ the queue number (possible values are "- Not Used -" or a value from 1 to 50)
Pickup algorithms:
€€ 0=max call duration; pickup the call with max duration
€€ 1=ANI; pickup the call with specified ANI
€€ 2=Id; pickup the call with specified Id
€ the third option is 'Operators Only' indicating that the service is used just by the operators.
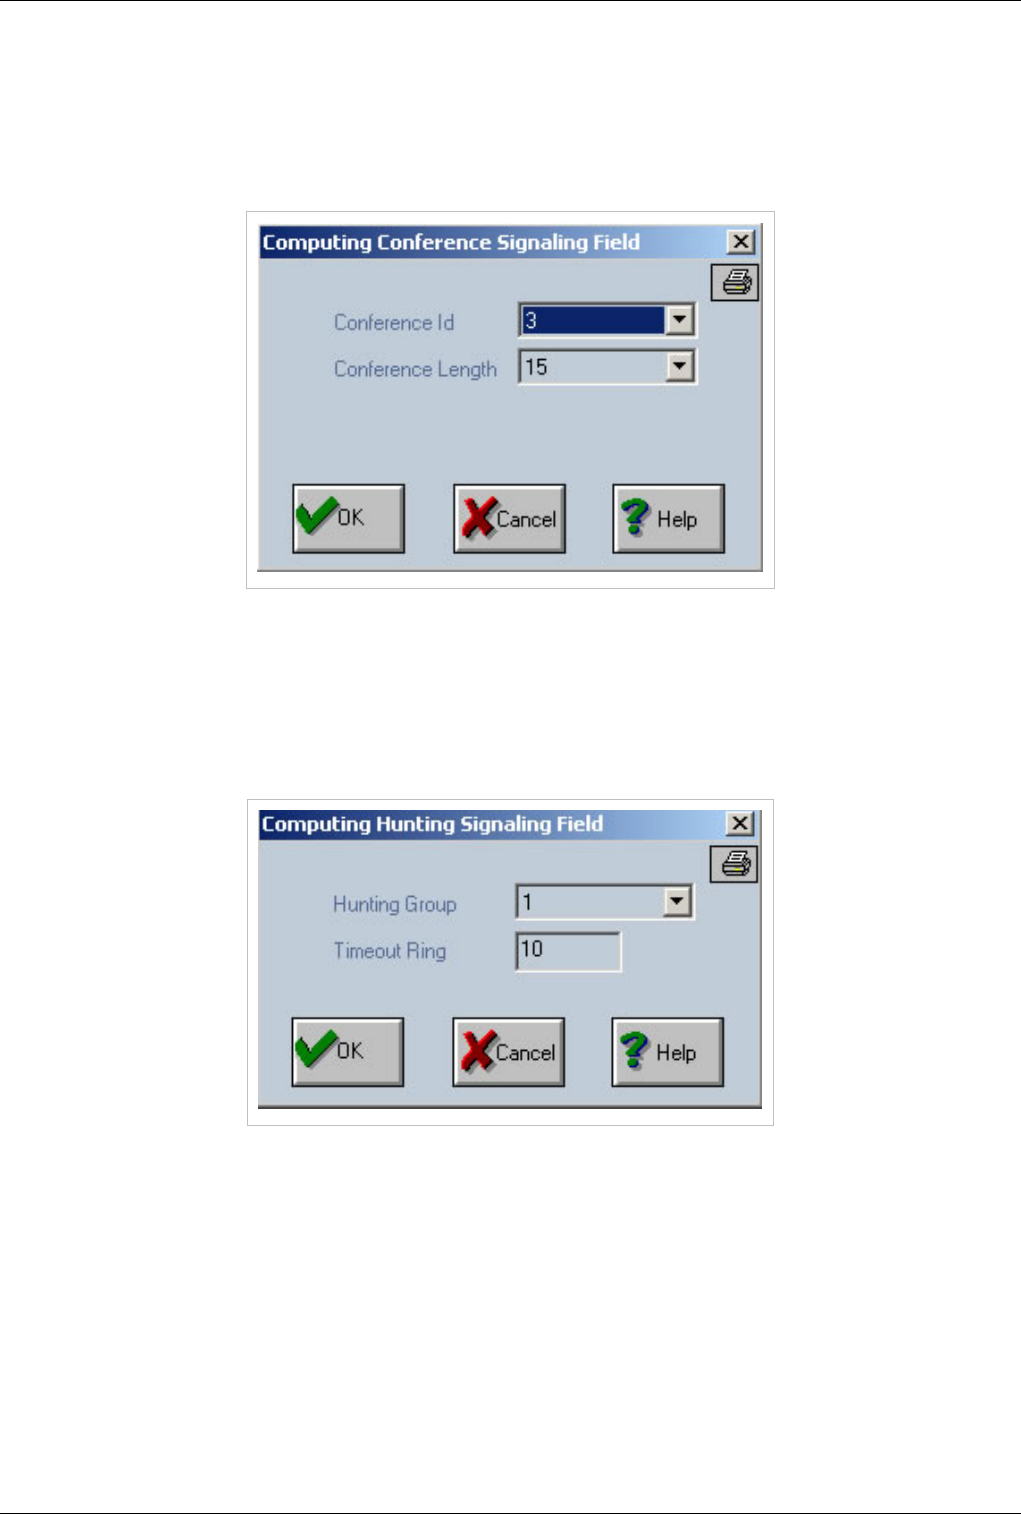
OAM / Routing Table 103
Action='SERV',Destination='CONFERENCE'
€Conference_id: represents the number of the conference, the conference room.
€Conference Length : represents the dimension of the conference (how many users(ports) will be allocated for
this conference room) if the conference has one call then the main application will reserve in advanced the
number of voip ports present in the dimension field for the conference.
Action='SERV',Destination='HUNTING'
The pair of settings "SERV" and "Dest=HUNTING" is used for hunting in case of SIP users. There is a setting in SIP
user's window definition regarding the membership into a hunting group (a value from 1 to 50). An incoming call
routed on SERV and HUNTING will ring to all SIP users belonging to the same hunting group. You can define a
timeout for this action. Those two fields are stored in Sign3 field and can be edited through the "..." button.
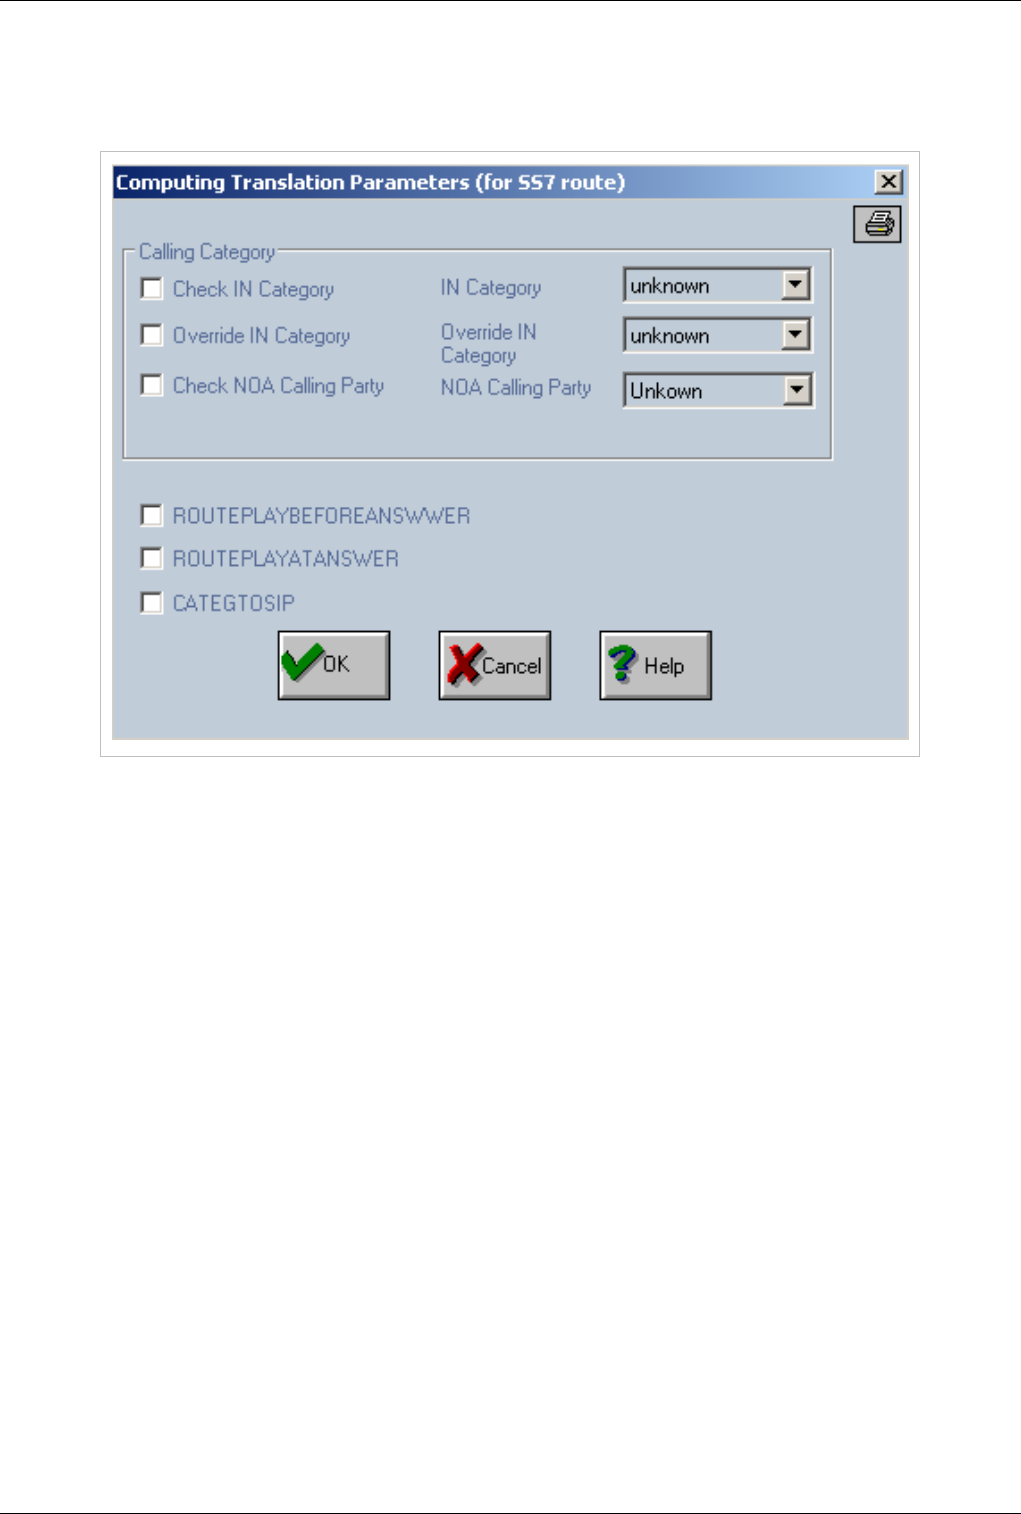
OAM / Routing Table 104
Sign4
Action='DIR' - contains settings for SS7
We can allow the route to be available just for a specific 'IN Category' field by selecting the 'Check IN Category'
checkbox and value from "IN Category" list.
To override the incoming category - the 'Check IN Category' and 'Override IN Category' must be selected. In the
'IN Catgory' list - you select the incoming category which will be replaced with 'Override IN Category'. The
possible values are:
€€ "unknown"
€€ "op_french"
€€ "op_english"
€€ "op_german"
€€ "op_russian"
€€ "op_spain"
€€ "op_rsrv1"
€€ "op_rsrv2"
€€ "op_rsrv3"
€€ "notused"
€€ "ord_subscr"
€€ "prio_subscr"
€€ "data_call"
€€ "test_call"
€€ "payphone"
€€ "uk_oper_call"
€€ "uk_admin_diverted"
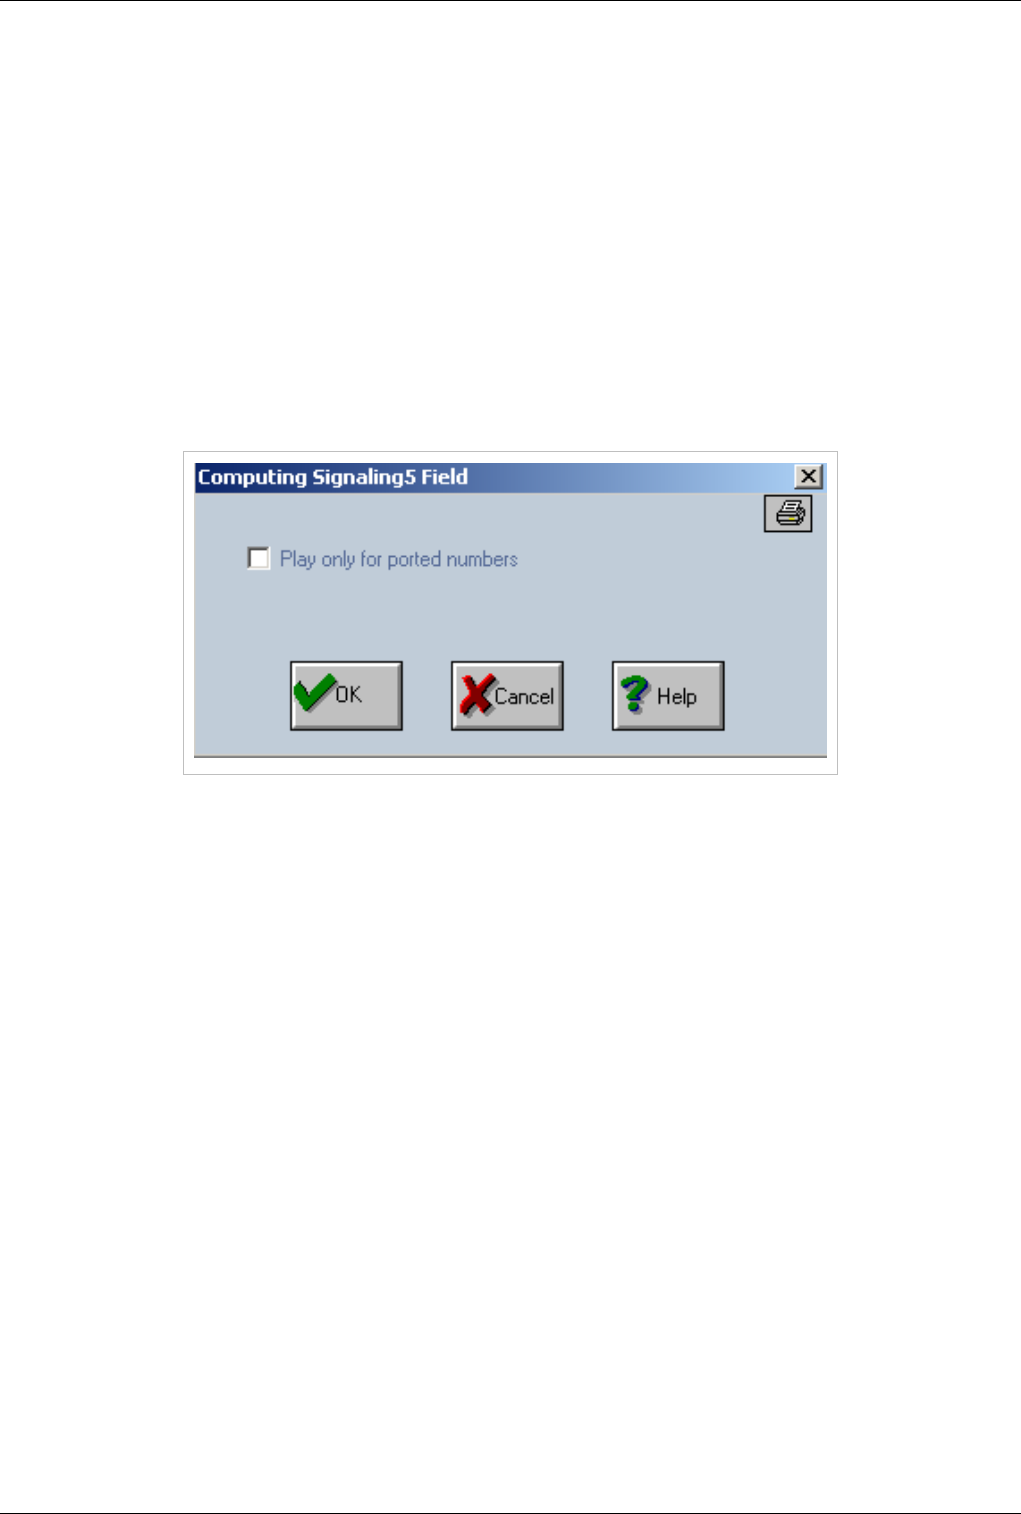
OAM / Routing Table 105
The 'NOA' field can be checked in order to validate the route record. This is performed based on the 'Check NOA
Calling Party' checbox and 'NOA Calling Party' list - with the following values
€€ "Subscriber"
€€ "Unknown"
€€ "National"
€€ "International"
€€ "UK Specific"
€€ ROUTEPLAYBEFOREANSWER
€€ ROUTEPLAYATANSWER
€CATEGTOSIP - it enables to forward the calling party category to SIP
Sign5
€Play only for Ported Numbers - If is set then will play routing announcement only to ported numbers
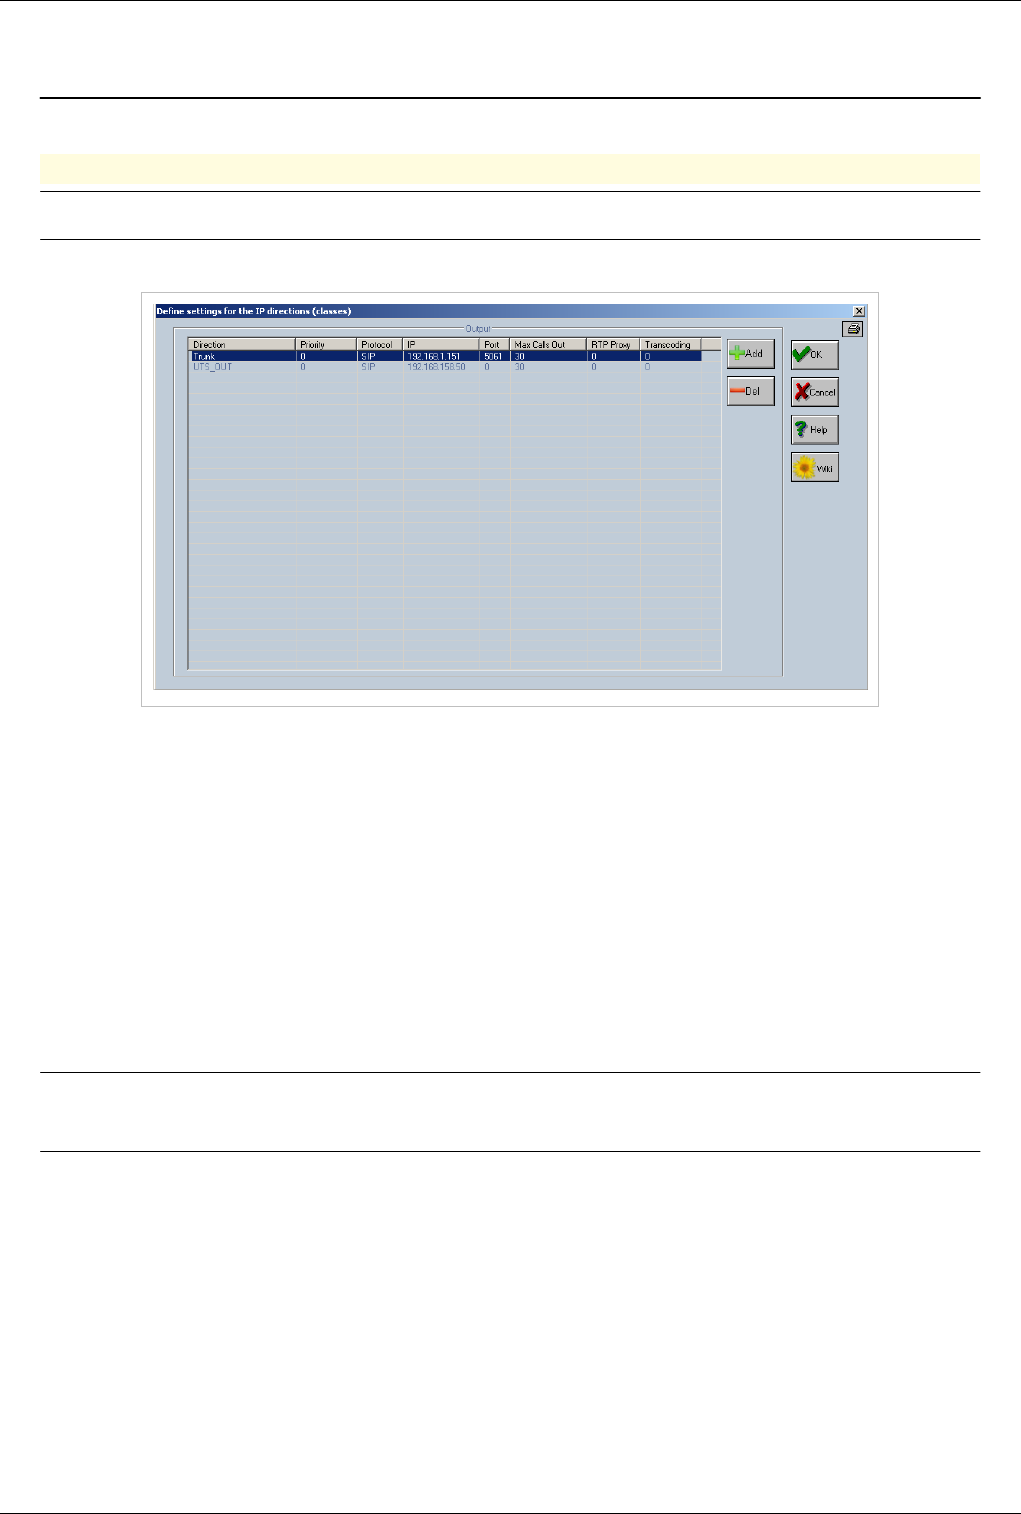
OAM / Access Out 106
OAM / Access Out
Back to Main Page > OAM
Access OUT
Note:Access OUT is used to establish the destination for VOIP calls
DIRIP OUT is located at Call directions
In Access OUT user defines for each direction name (class):
€Protocol – a protocol (SIP or H323)
€IP - a destination IP
€Port - a port used for signaling for example 1720 for H323 and 5060 for SIP (or 0 for default value for both
protocols)
€MaxCallsOut - the maximum number of outgoing calls.
€RTPProxy - must be enabled if the destination IP is behind a NAT.
€Transcoding - must be enabled when the source and the destination has different codecs. The codec may be
changed if, for instance if the destination IP does “know” just one codec, so we must perform a transcoding;
€Priority - this parameter represents the priority of the direction. This parameter can be also set in "Sign2" field in
the direction definition ("Define calls direction")
Note:Based on "MaxCallsOut" the gateway application offer the possibility to allow
overflow over an IP direction
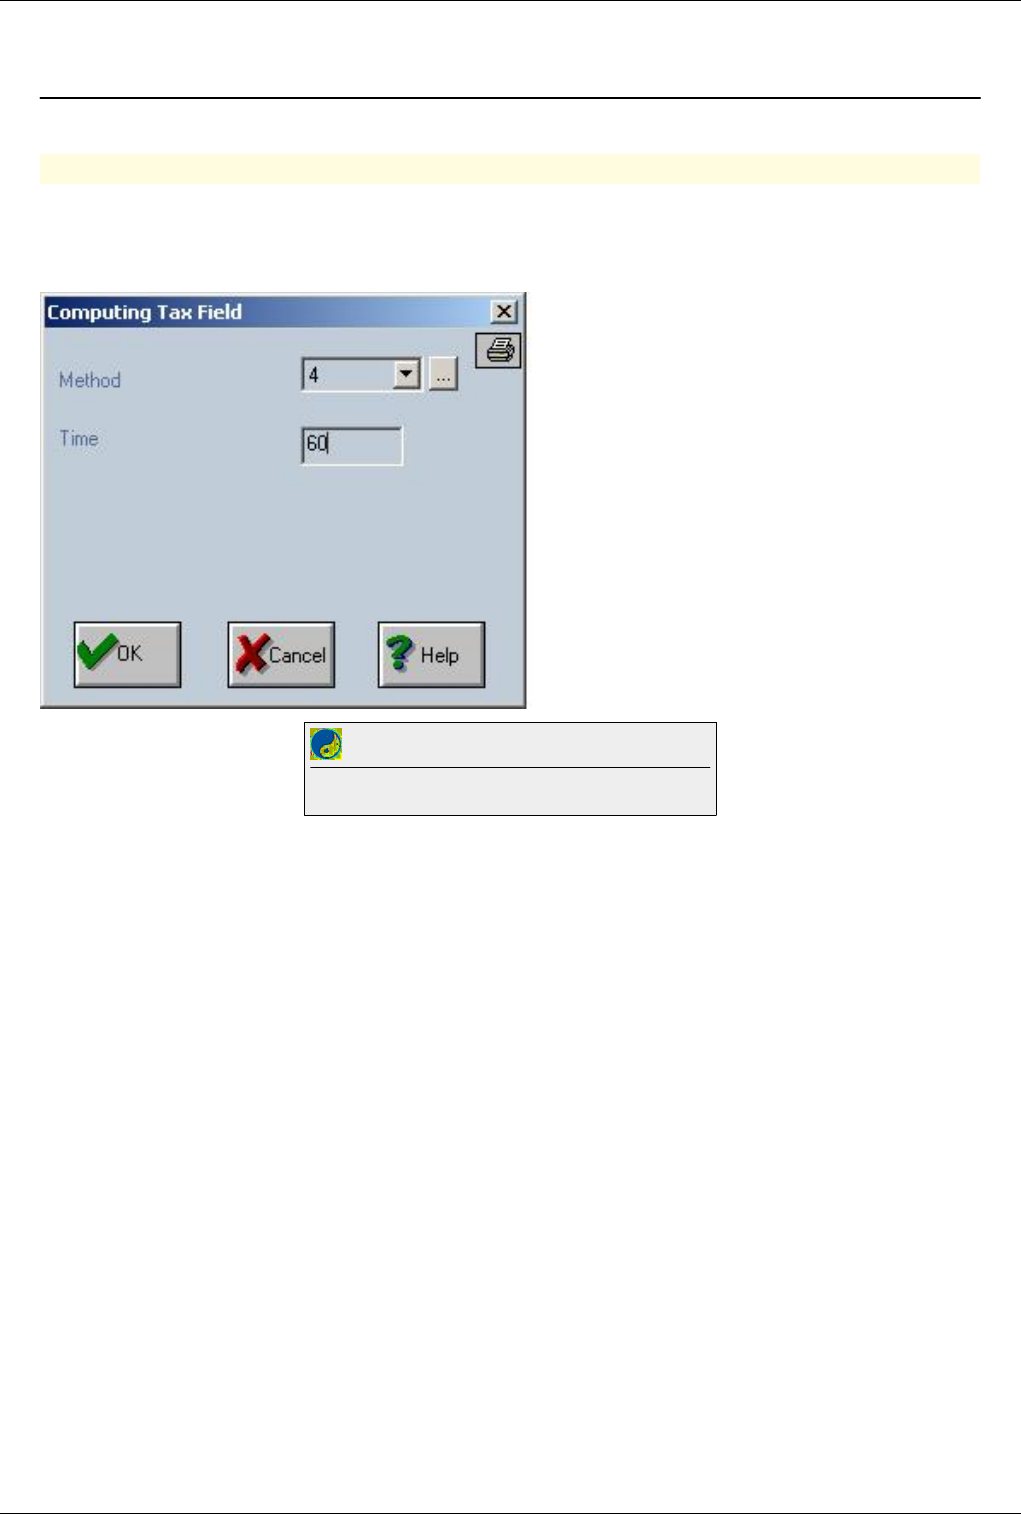
OAM / Max Call duration 107
OAM / Max Call duration
Back to Main Page > OAM
Max call duration
€€ Connect with OAM
€€ Go to routing table
Double click on the route you want to limit and at Tax select method 4 and input time in minutes.
Best Practice
To avoid problems always setup a max talk time for your calls
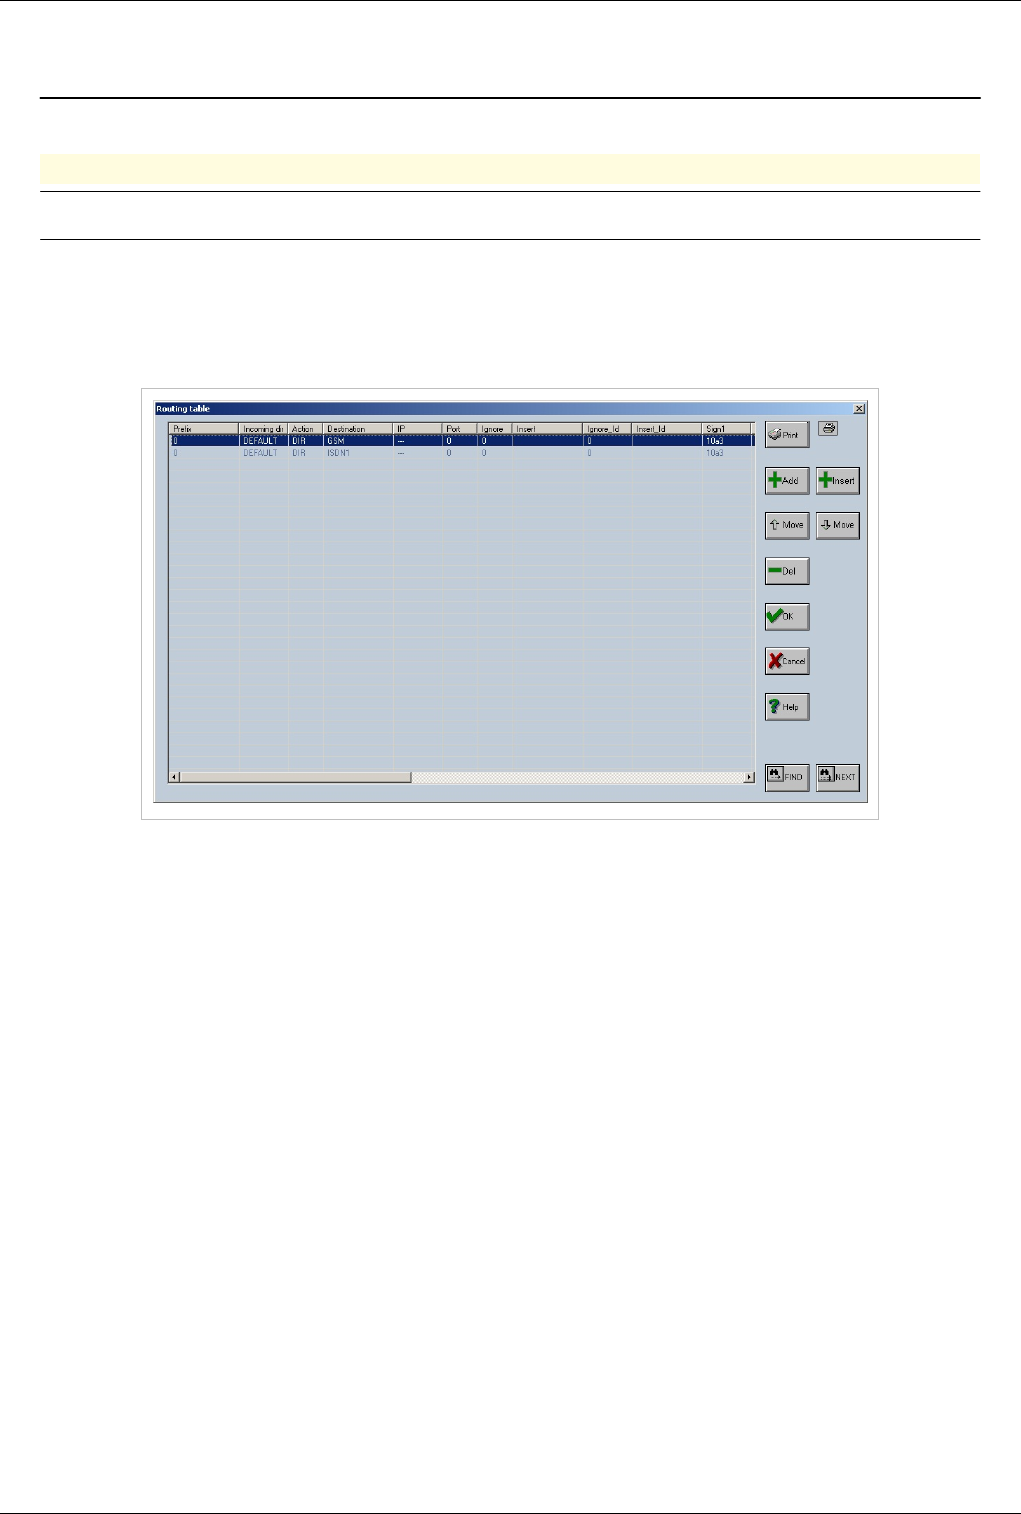
OAM / Overflow 108
OAM / Overflow
Back to Main Page > OAM
Overflow
Warning:Work in progress. This article may be incomplete. Come back in a few days.
Overflow can be easily configured using Routing Table. In the example below i will overflow calls from GSM to
ISDN. Calls will first attempt to use a GSM port and if none is available they will use the ISDN trunk to get out
€€ Connect with OAM
€€ Open Routing Table
€€ There are 2 routes present both with prefix 0 One has destination GSM and one ISDN1
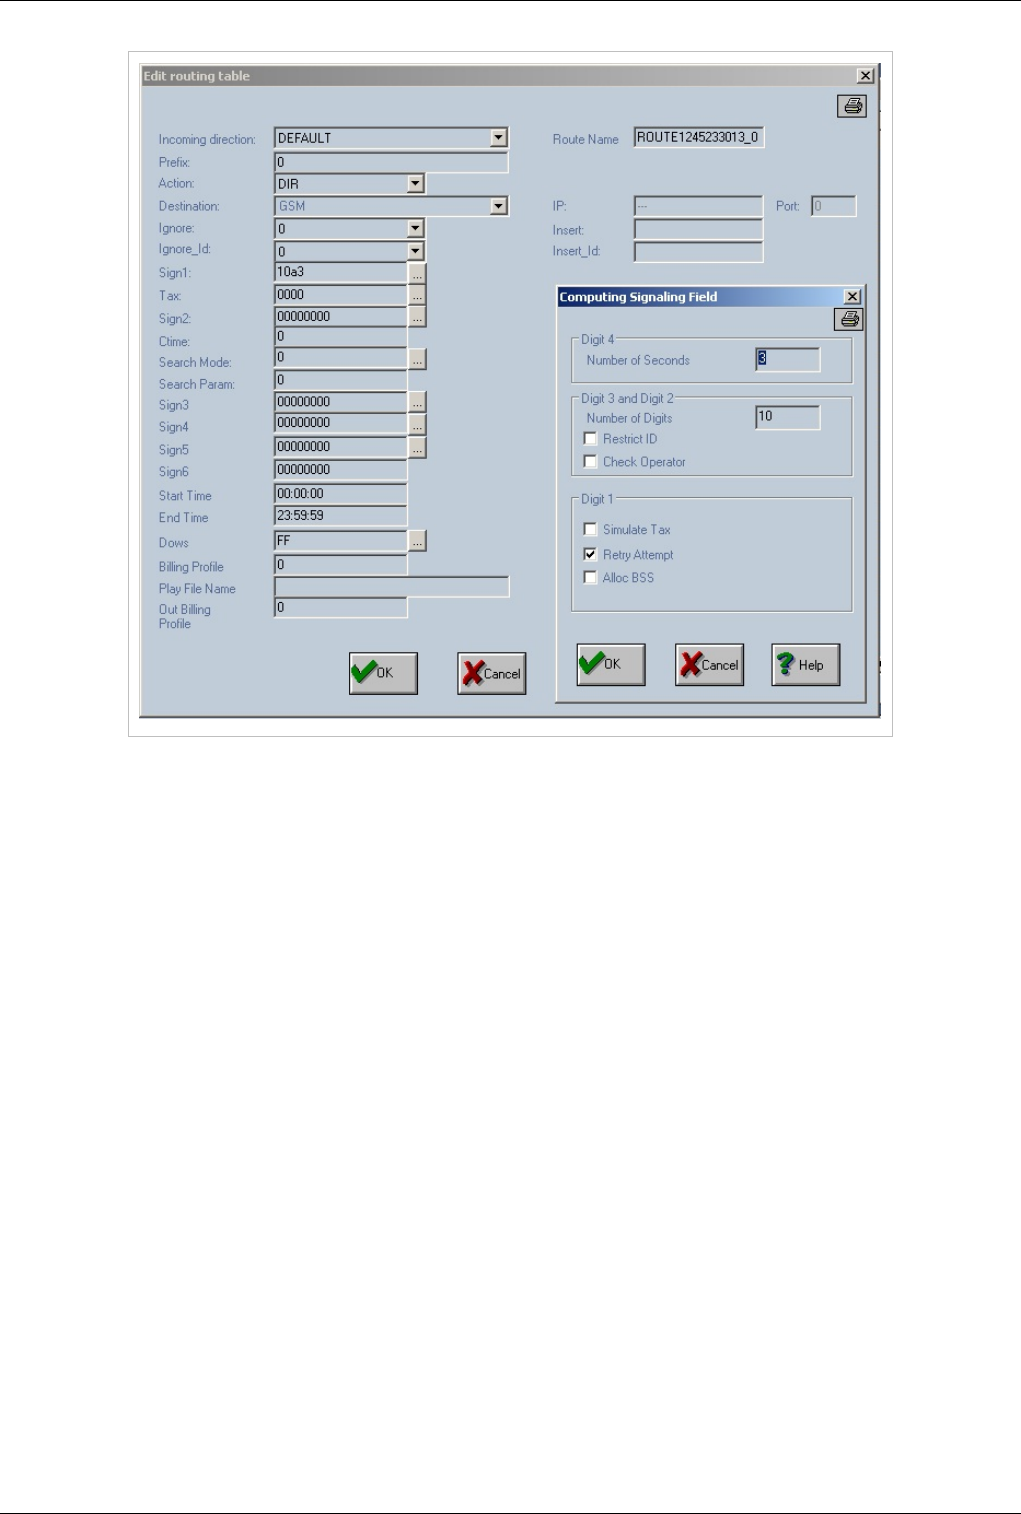

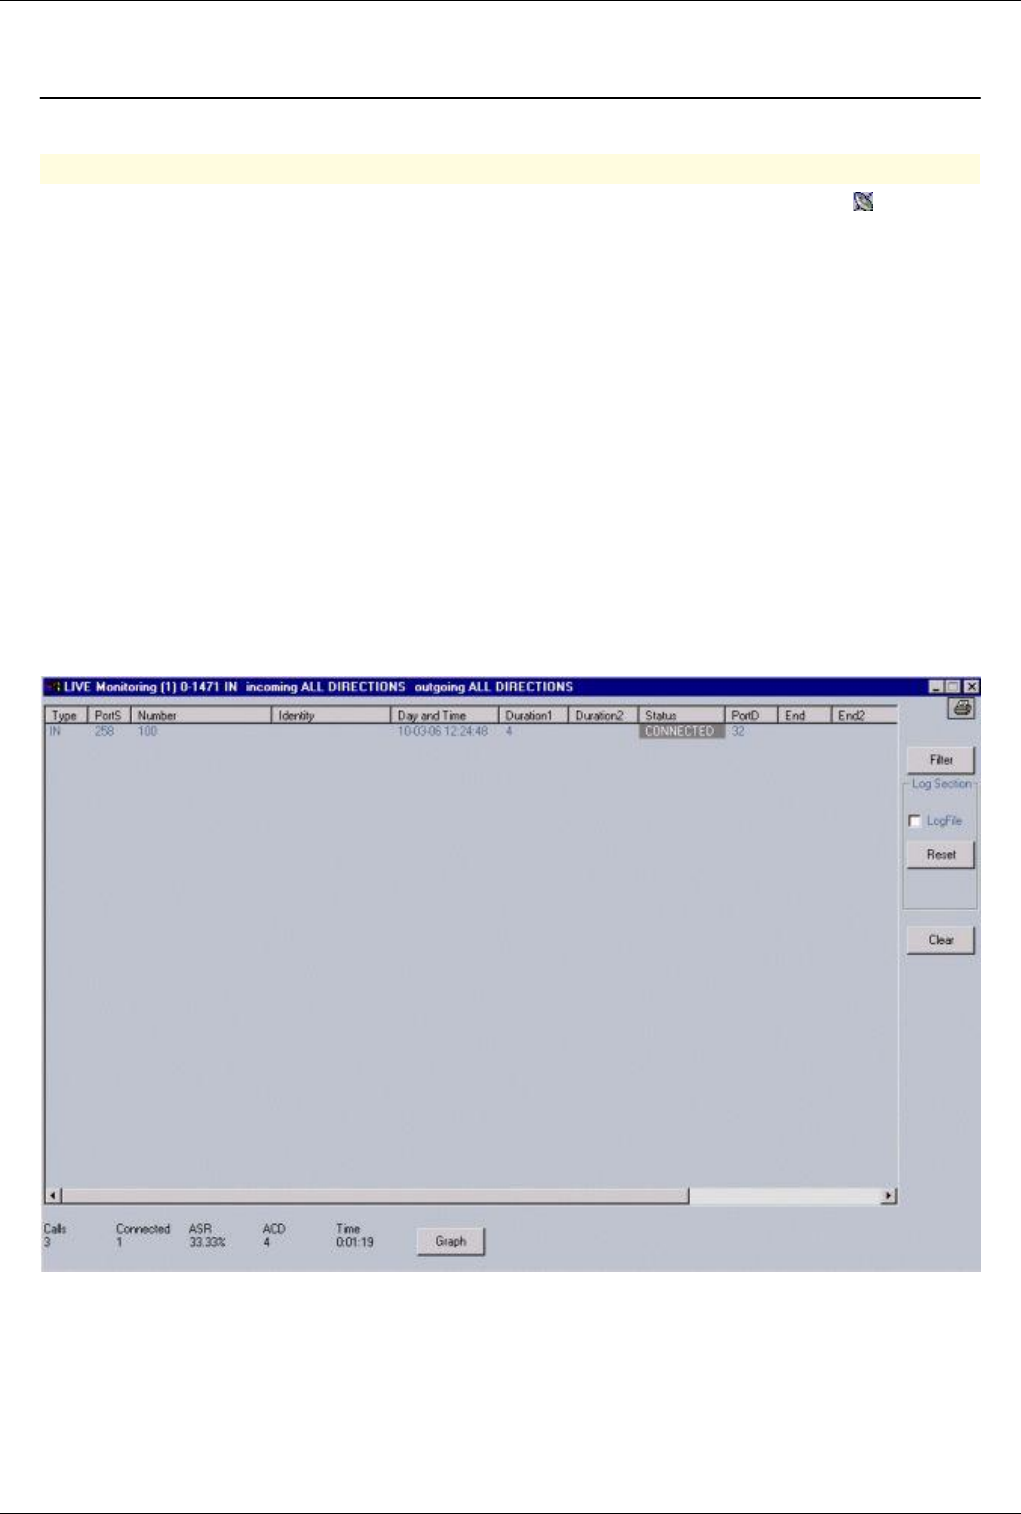
OAM / Monitor calls 111
OAM / Monitor calls
Back to Main Page > OAM
Monitor calls with OAM
For viewing online calls on the gateway equipment - you can choose icon to start call monitoring (" "). If the call
monitoring process is started then the icon will be displayed in a gray rectangle. The call monitoring can be stopped
at any time by pressing one more time the same icon or the window closing box. Following the validation of the
icon, several types of monitoring windows can be displayed:
a) LIVE Monitoring (n), where n may be from 1 to 4
b) LIVE Monitoring – Report on DIRECTIONS
c) LIVE Monitoring – IP signaling
a) The first type of window, “LIVE Monitoring (n)”, is used to see on line the calls passing all the range of ports
of the gateway. The range is defined from 0 to 1471, for all directions on incoming and outgoing sides. The user has
the possibility to open up to 4 (four) windows of that type. The tooltip displayed for the live monitoring icon is
“Calls monitoring – new window”. When all the four windows are opened the icon tooltip will show “Calls
monitoring – no window available”.Through those four windows you have the possibility to filter calls from
different directions on both incoming or outgoing ways.
The digit “n” shown between the round brackets (and ) represents the index of the window - it can be a value from
one to four. In this example you see the window (1):
Each call in progress is displayed with following parameters:
€type (IN / OUT),
€the port source ("PortS"),-number made ("Number"),-identity of the call ("Identity"),-day and time, -the field
"Duration1" is filled with the time of selection. -the field "Duration2" is filled with the conversation time. -the
status of a call can take the following values:"SETUP", "PROCEED","ALERTING","CONNECTED" and
"RELEASED" (the background color is different for each type of status).-the destination port ("PortD") - can

OAM / Monitor calls 112
take a value of "65535" until the incoming call is routed through an destination port.-"End" - finalization call
mode - possible values are AOK, BOK, ARELS, BRELS, AINEX, BINEX, ACONG, BCONG, ASERR, BSERR,
ANERR, BNERR, ANANS, BNANS, ABUSY, BBUSY, ATOUT and BTOUT. It indicates the mode of ending
the call:
€€ first character indicates who has released the call: A=caller party or B=called party
€€ next characters are keywords detailing how the call was ended: OK - ANSWER (response in the destination part),
RELS - RELEASE (release in other situation then ring-back tone or busy), INEX - INEX (non-existent from
equipment point of view - no defined route), CONG - CONG (congestion from equipment point of view - no
available resources), SERR - SERR (Signaling error), NERR - NERR (Network error), NANS - NO ANSWER
(release on ring-back tone), BUSY - BUSY (release on busy situation) and TOUT - TIMEOUT (timer expiration)
€"End2" - finalization call mode on ISDN calls - possible values are ' 31' (normal call) for non ISDN calls or
values from ISDN standard for release code-“IP:Port (sign)” – the IP signaling port – filled in case of incoming
voip calls and viewing IN records or in case of outgoing calls and viewing OUT records (IN, OUT settings are
performed through the “Filer” option).-“IP:Port (RTP)” – the IP signaling RTP– filled in case of incoming voip
calls and viewing IN records or in case of outgoing calls and viewing OUT records (IN, OUT settings are
performed through the “Filer” option).
Note1: The fields "Duration2", "End" and "End2" are filled only when the status field takes the value
"RELEASED".
Note2: Initially the LIVE MONITORING window displays the IN records (the incoming side of each call; not the
output side of the call. This is performed in order not to have the same call into two records. Because for an
incoming call will have in case of routing succes another correspondent line in which the source port is the
destination port from the other record.)
The Filter option displays a window “Live Monitoring Filter” in which you can select as you wish the range of ports
to be monitorized through the live monitoring process.
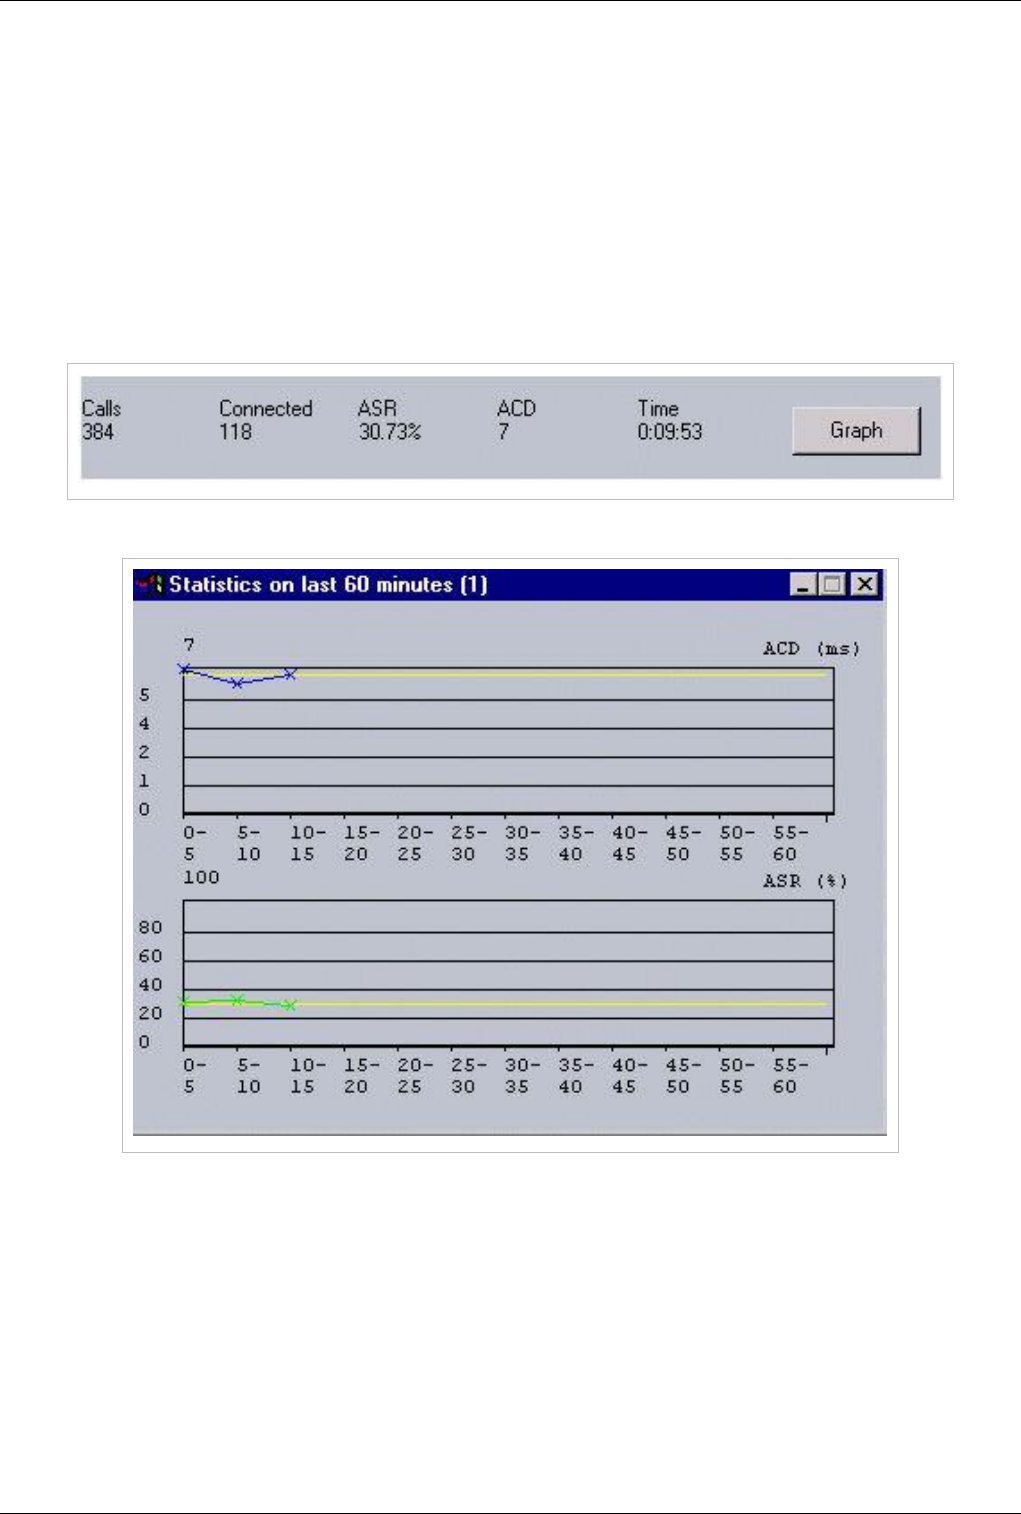
OAM / Monitor calls 113
You can select a range of ports for which to display the "LIVE Monitoring". The format to be used is "xx-yy" for a
range of port or simple ‘x’ for just a port. The separation character is a comma “,”. The monitoring will be displayed
for the selected ports (the cumulation for the range of ports and ports). The default range which is used is from 0 to
1471. Also you can select a direction for viewing incoming or outgoing calls (Direction – port source or port
destination).
The name of log file is always "livex.txt" (where ‘x’ is 1,2,3 or 4 depending of the “LIVE Monitoring” window rank).
The content of the file can be reset with the option "Reset".
On the bottom of “LIVE Monitoring” window there is a statistic (which can be restarted through the ”Clear” button),
which contains the live number of total calls and connected calls, the ASR and ACD values and the time since the
supervision was started.
The “Graph” button is used to display a statistic on the last 60 minutes upon the values of ASR and ACD.
In the upper part of the previous picture you can see a statistic on the ACD (Average call duration). The color which
is used for ACD is blue, and for the average ACD is yellow.
On the bottom half of the last picture there is a statistic on the ASR. The color which is used for ASR is green, and
for the average ACD is yellow.
The calculated values for both ASR and ACD are highlighted in blue color. Tooltips with the calculated values are
displayed if the user put the mouse over those points.
b) LIVE Monitoring – Report on Directions
This live monitoring window show an online statistic on each direction (input and output) and a total. Only the
directions for which at least a port is installed on the gateway will be displayed. There is an indication on each
OAM / Monitor calls 114
direction about the number of connected calls (displayed with blue color), number of attempted calls (displayed with
red color) and online ASR. By pressing on a column (IN or OUT) for a direction a new window will be displayed
("Type of call end" window).
Here you can obtain detailed information regarding the end of a call attempt. The information is structured in three
columns:
- first column "Side A" contains all calls released from caller party.- second column "Side B" contains all calls
released from called party. - third column "Total" contains all calls.
For each zone, when you clikc over a column, the causes for calls releasing are detailed as shown:
c) LIVE Monitoring – IP Signaling
A single window which provides access to the calls which are passing through our equipment. This happens when
the gateway is performing just the VoIP signaling and when the RTP is made without using the resources of gateway
OAM / Monitor calls 115
VoIP channels, or in case of incoming VoIP calls. The first type of calls are not using the VoIP ports of EONES and
therefore cannot be displayed in one normal windows of the LIVE MONITORING feature. Thus you need the “IP
signaling” window to be able to monitor the calls that are bypassing the equipment:
Those are temporary records. For the first type of windows – the records are preserved after disconnection until a
new records is coming on the same input or output port. In this second case the records are deleted after 20 seconds.
To close live monitoring windows – you should close down all windows of the first type.Then Live monitoring
windows for directions and IP signaling will be also closed, automatically.
Note1: the fields "Duration2", "End" and "End2" are filled only when the status field is takes the value
"RELEASED".
Note2: You can select a range of ports for which to display the "LIVE Monitoring". The format to be used is
"xx-yy". The calls monitoring will be displayed for the ports in range from "xx" to "yy". Those two values must be
separated by the minus character "-". The option "Set" must be used to validate the new port range. The default range
which is used is ports from 0 to 319.
Note3: You can select the option "IN" or "OUT". Those two options are about the type of the call (from the point of
view of the TOPEX gateway): incoming or outgoing calls. The default option is “IN”, it is automatically selected at
startup of live monitoring.
Note4: You may also save all online messages regarding the progress of the calls into a log file The name of this log
file is always "live.txt". The content of the file can be reset with the option "Reset".

OAM / SIM Management 116
OAM / SIM Management
Back to Main Page > OAM
SIM Management
There are 2 way of managing sims.
Load balancing
Load Balancing
Load balancing will attempt to equalize the talk time on the sims installed for a GSM port (where multiple
sims are present)
It is algorithm that will automatically select first available sim for a GSM port. It is activated at Call Directions
Load Balancing will always select SIM with the lowest Load.
If multiple SIMS are present the equipment will switch to another SIM every TChange seconds or every 30 min if
Tchange is not present
Note:4 ports GSM boards have only 1 sim slot.Don't activate Load Balancing use Sim Index
instead
Best Practice
If you have only one sim per GSM port use Sim Index to select the sim. Load balancing will increase SIM registration time
OAM / SIM Management 117
Load Balancing over SIM Index
Is used to enable the load-balancing algorithm ("equal load") on the SIM/RUIM cards that are already selected by
SIM index algorithm. Load Balancing over SIM Index will spread the calls over all the ports available in the same
direction.
Sim Index
Sim Index is a predefined list specifying what sim to be active (from the 4 sims per port) at a certain time.
€€ SIM INDEX 0 -- will use first sim
€€ SIM INDEX 1 -- will use second sim
€€ SIM INDEX 2 -- will use third sim
€€ SIM INDEX 3 -- will use third sim
All list can be customized at SIM Table
In the list are displayed the periods (intervals) that specify the SIM/RUIM card (1, 2, 3 or 4) to be used. The time
periods are structured in hours and minutes separated by the colon character ":".
When the user changes the selection in the list, the fields which are located at the bottom of the window are
automatically filled with the line information: period "From" to "Until" and the active SIM card. These values can be
modified and validated by option "Mod". If user selects "Add" option a new line will be added in the list. The "Del"
option is used to delete a record from the list.
The periods are checked before adding or modifying operation. An error message is generated if the character ":" is
not preserved or the values used are wrong (hours or minutes).
The lines that are containing "255" instead of an active SIM card are not saved in the "simindex" file. The format of
the "simindex" file is compacted in order to have a smaller size.
OAM / DTMF 118
OAM / DTMF
Using DTMF
Dual-tone multi-frequency (DTMF) signaling is used for telephone signalling over the line in the voice-frequency
band to the call switching center. ...
http:/ / en. wikipedia. org/ wiki/ DTMF
Note:By default DTMF is not activated. DTMF reception and transmission must be
activated on each trunk at Call Directions
€€ Connect with OAM
€ Go to Call Directions
€€ Double click on the trunk on which you need to activate DTMF
€€ Go to Signaling6 and select the type of DTMF that will be used
€€ Press OK button
RxDTMF - DTMF that will be received. Select only one type
Note:In case of GSM select "IN BAND". In order to send DTMF over GSM you must have
a good GSM signal over 24/31
TxDTMF - DTMF that will be sent. Only one can be selected
Types of DTMF
Sip Info - http:/ / www. faqs. org/ rfcs/ rfc2976. html
H245 Alphanumeric - http:/ / www. itu. int/ rec/ T-REC-H. 245/ e
H245 Signal - http:/ / www. itu. int/ rec/ T-REC-H. 245/ e
Q931 Keypad - http:/ / www. ttc. or. jp/ j/ document_list/ sum/ sumE_JT-Q931v9. pdf
RFC2833 - http:/ / www. faqs. org/ rfcs/ rfc2833. html

OAM / DTMF 119
In Band - http:/ / www. rfc-editor. org/ rfc/ rfc4733. txt
NOTE
For dtmf over gsm it might be necessary to set the modems to use full rate codecs. To do this you must edit the vcss
files of the equipment and add the file bellow:
For more details see: VCSS files for Wavecom
[general]
typeport=GSM
name=000
[configAT]
cmd=>0,cmd,AT&F
cmd=>0,answer,OK
cmd=>0,timeout,1000
cmd=>1,cmd,AT+CFUN=1
cmd=>1,timeout,30000
cmd=>2,cmd,AT+SPEAKER=0
cmd=>2,timeout,1000
cmd=>3,cmd,AT+WSVG=1
cmd=>3,timeout,3000
cmd=>4,cmd,AT+VGR=144
cmd=>4,timeout,3000
cmd=>5,cmd,AT+VGT=0
cmd=>5,timeout,3000
cmd=>6,cmd,AT+WVR=0,0
cmd=>6,timeout,2000
cmd=>7,cmd,AT+CMGF=1
cmd=>7,answer,OK
cmd=>7,timeout,3000
cmd=>8,cmd,AT+CNMI=2,2,0,0,1
cmd=>8,answer,OK
cmd=>8,timeout,1000
cmd=>9,cmd,AT+CLIP=1
cmd=>9,timeout,2000
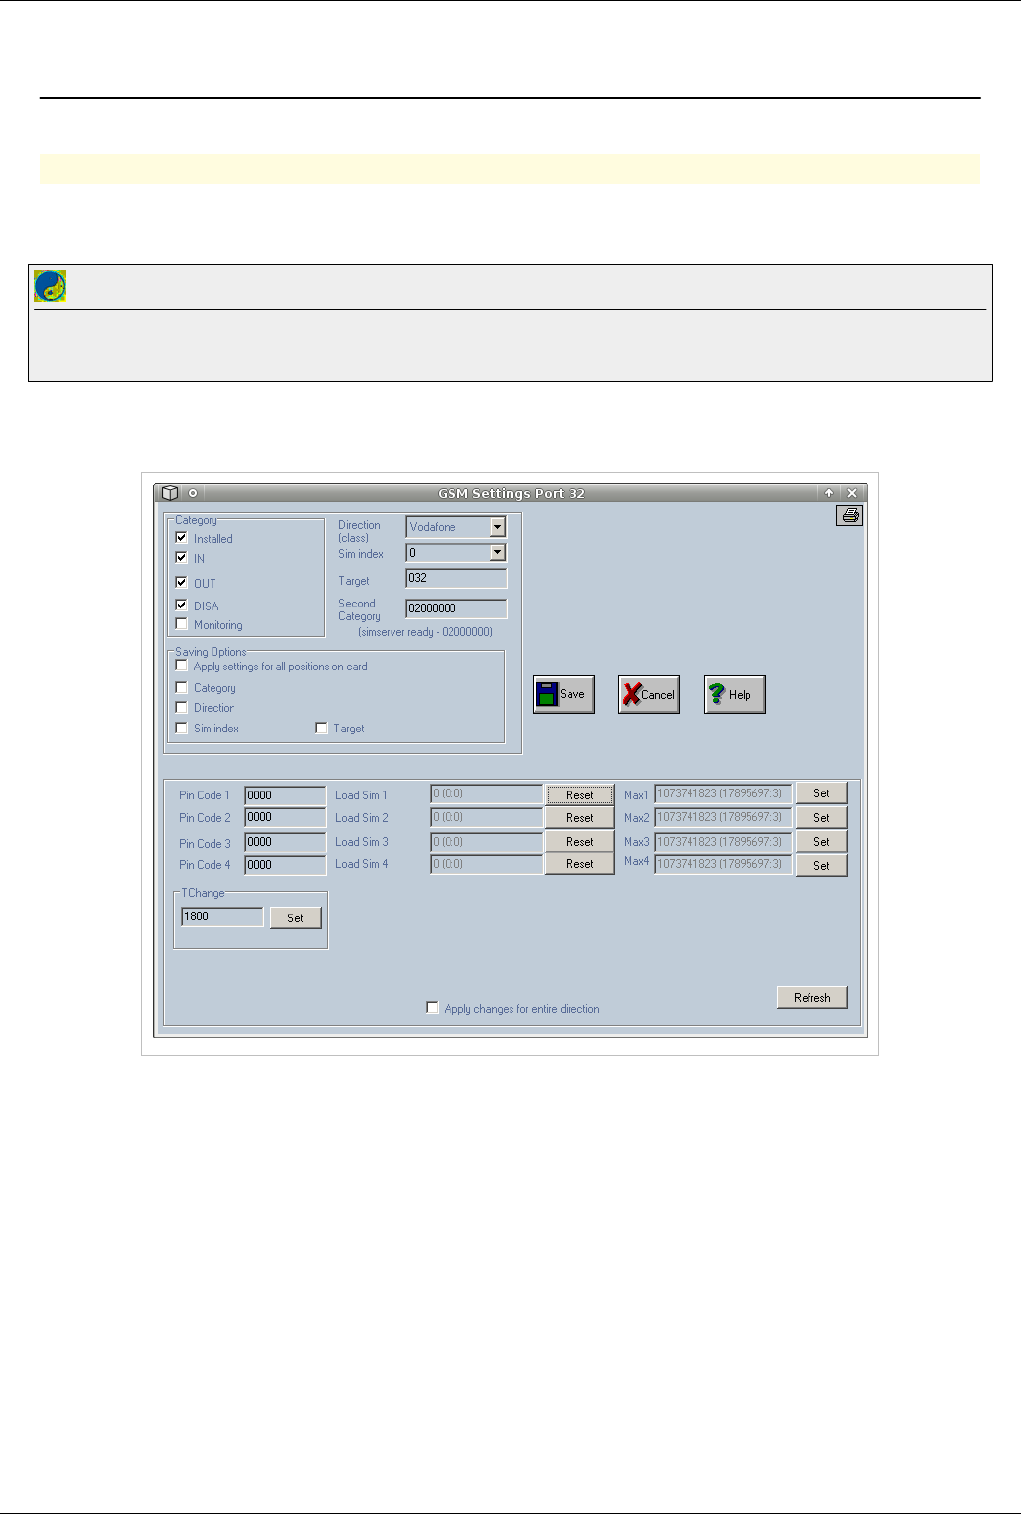
OAM / DISA 120
OAM / DISA
Back to Main Page > OAM
DISA
DISA will allow incoming calls from gsm. Callers will be connected to a DISA tone allowing them to dial into the
equipment.
Best Practice
In order to use DISA to dial-in a valid route must be present in the routing table. That route must have a larger timer at Number of seconds to allow
the caller to dial the entire number. Check Routing table for more details about Number of Seconds
€€ Connect with OAM
€€ Click on a gsm port
€ Activate DTMF on the gsm trunk.
€ Make sure that DISA and IN box are checked and press SAVE button

OAM / Forward Incoming GSM Calls 121
OAM / Forward Incoming GSM Calls
Back to Main Page > OAM
Forward Incoming calls from GSM
Best Practice
Check OAM / Call Flow to find out the path of a incoming GSM call
€ Activate DISA on all gsm ports that you want to use to receive incoming calls.
€ Go to Call Directions
€€ Double click on the gsm trunk
€€ At Insert Field input the number to witch you want to forward all calls.
Note: If no number is inserted at Call Directions call will be connected to a DISA tone that
will allow the caller to dial the number.DTMF must be activated on the GSM trunk
otherwise number dialled will not be recognised. Check DTMF for more details
€€ Check "Forward call without answer" at Sign4.
€ Go to Routing Table and make sure there is a valid prefix for the number that you inserted at Call Directions

OAM / Check Credit 124
OAM / Check Credit
Back to Main Page > OAM
Checking credit from OAM
Warning: Checking Credit or Recharging only works if there are no calls on the equipment
at that time
Check credit works by maching a pattern just before the string with the credit value. If the OAM matches the pattern
then he assumes that right after the pattern the next digits are the credit value The file below must be edited and the
correct number to check credit must be inputed and the correct pattern.
1.Create a txt file in OAM folder (in the folder where OAM exe file resides) and add the folowing text. Save the fille
as check_credit.txt (remove the comments before)
Warning: Make shure that no spaces exist at the end of all the commands or the scipt will
fail to execute
at+cmgf=1
OK
20
0
at+cnmi=2,2,0,0,1
OK
20
0
atd*123# //this is the number where you check credit. Do not leave default !
apeluri: //this is the pattern that the OAM will try to match. Do not leave default !
40
3
2. Connect with OAM to the equipment
3. From OAM select Facilities and then Commands
4. Write command:
execute -f check_credit.txt -d GSM
Note:GSM is the name of the trunk on witch you whant to check credit
or
execute -f check_credit.txt -p 121
Note:121 is the port number on witch you whant to check credit
A file called atresp.txt, will be created in OAM folder containig credit received from the operator.
Recharging from OAM
To recharge simcards from OAM you need to create 2 txt files in the OAM folder.One file will contain the
commands used to recharge credit the other will contain the recharge codes

OAM / Check Credit 125
1.Create a txt file in OAM folder (in the folder where OAM exe file resides) and add the folowing text. Save the fille
as load_credit.txt (remove the comments before)
at+cmgf=1
OK
25
0
at+cnmi=2,2,0,0,1
OK
25
0
atd*525*$# //this is the number where you rechrge credit. Do not leave default !
apeluri: //this is the pattern that the OAM will try to match. Do not leave default !
50
5
2. Create a second file called coduri.txt . This file will contain the recharge code and the port on witch that recharge
code will be used
0609143178918 120
1234567890123 121
3. Connect with OAM to the equipment
4. From OAM select Facilities and then Commands
5. Write command: execute -f load_credit.txt -i coduri.txt
OAM / ALARMS
Back to Main Page > OAM
Alarms
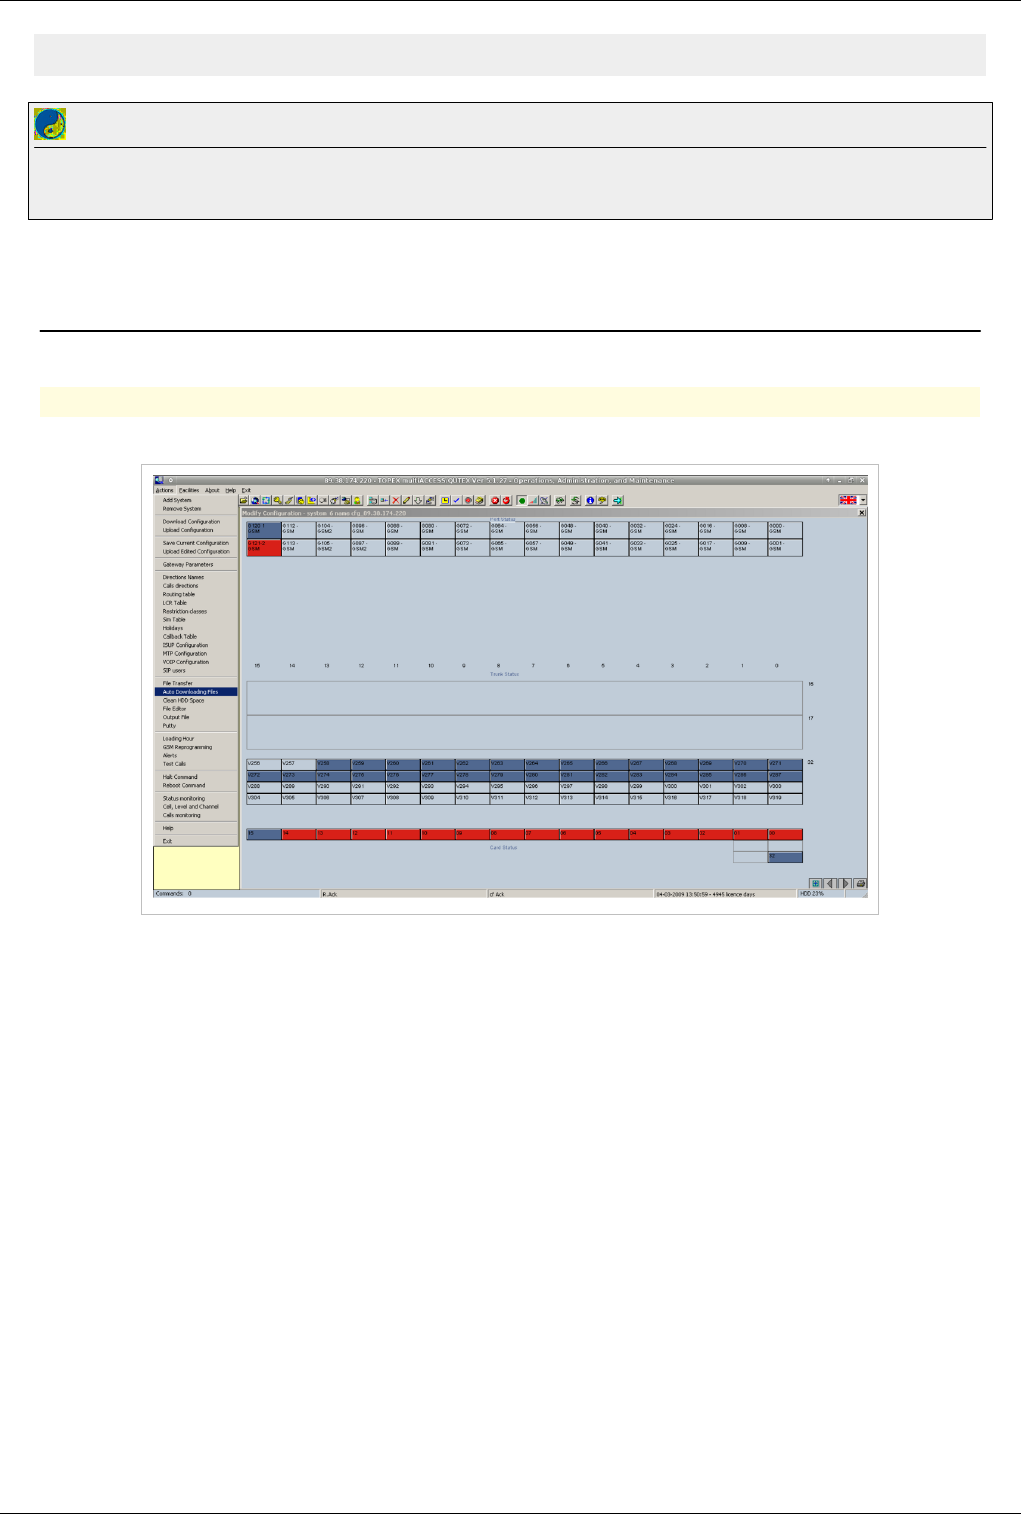
OAM / Check GSM Signal 127
99 not known or not detectable
Best Practice
Make sure you have a good gsm signal before starting calls on the equipment. A low signal will influence the quality of the calls and ASR and ACD
of the equipment. Use a outdoor antenna when possible to get the best signal available
OAM / Download Billing
Back to Main Page > OAM
Downloading CDR Files
€€ Connect with OAM. From Actions select Auto Downloading Files
€€ Select the time period and the type of file

OAM / Download Billing 128
€ Click on billing to show downloaded files. Files are also downloaded to the OAM folder, in the Billing folder of
the equipment. The downloaded files have the .tax extension, they have to be renamed to .csv in order to be
opened with a spread-sheet program. The format of the file can be found at: [1]
- go to the billing file you want to see, and by double clicking the left mouse button a dialog window will pop up,
allowing you to build a filter for selective display of the billing information. This filter for billing (taxation) files
permits the setting of options and values for searching records inside the subdirectory for billing.
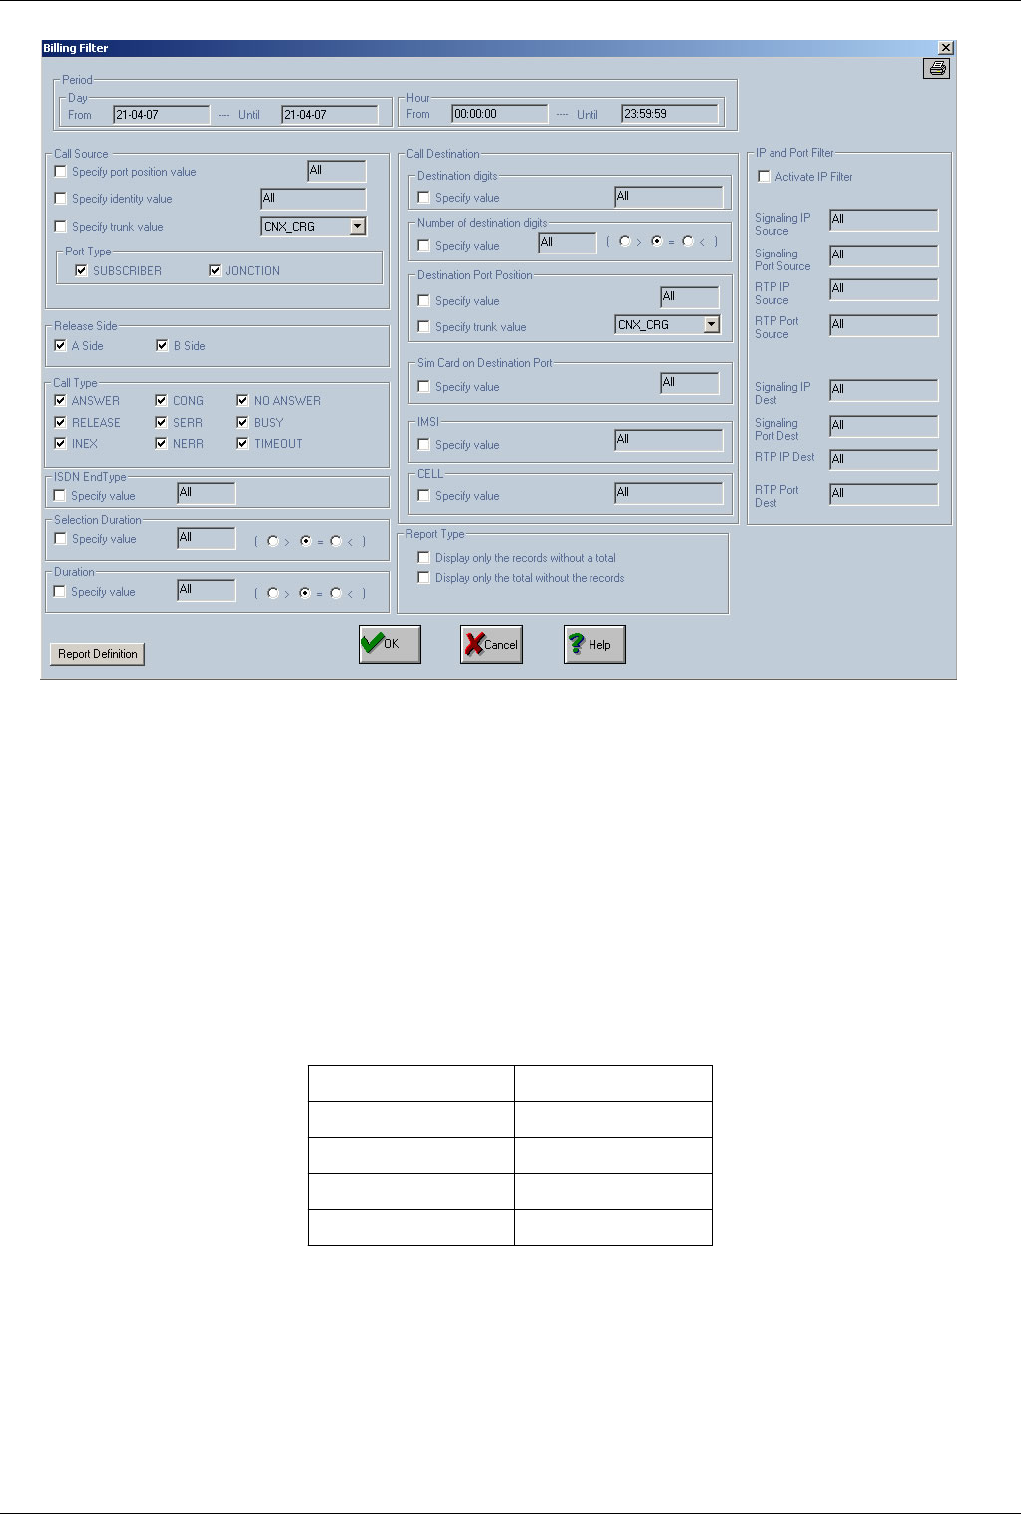
OAM / Download Billing 129
The first field, "Period", indicates the time period corresponding by default to the name of the billing that you have
selected. You may change this default period to extend the time interval that is analyzed. For each of the "From" and
"Until" limits, subfields are "Day" and "Hour". The program will look for records in the billing files whose name
falls inside the selected time period.
From the source point of view you may specify these options: - physical position of the source port- port number
(for an exchange subscriber call) or caller identity- a direction - a name of a direction defined in "Directions
Names"- the source port type: local or junction (trunk)From the call destination (called part) point of view you
may specify these options:- digits from the destination digits. You can choose to select only records with the number
of destination digits less, equal or greater than the value typed.- physical position of destination port- a direction- a
name of a direction defined in "Directions Names"- a value for SIM card (1,2,3,4 or 255)(when the destination port
is a GSM port)- a value for IMSI code - a value for CELL codeThe section "IP and Port Filter" contains several
options to select:
From the incoming call side: From the ougoing call side:
- signaling IP - signaling IP
- signaling port - signaling port
- RTP IP - RTP IP
- RTP port - RTP port
You may specify a filter on the finalization call mode. All calls and also the billing records have a caller and a
called party. For an incoming call on E1 trunk the source party will be a channel on the trunk and the call will be
routed over a GSM interface (the destination port). Caller party will be represented by 'A' and called party by 'B'
(field "Release Side"). Depending by the side which ends the call a letter ( 'A' or 'B') will be shown and the
finalization mode will contain one of the following strings:

OAM / Download Billing 130
OK - ANSWER, RELS - RELEASE, INEX - INEX, CONG - CONG, SERR - SERR, NERR - NERR, NANS - NO
ANSWER, BUSY - BUSY, TOUT - TIMEOUT.
"Call Type" lets you to specify the mode of ending of the call.
Note: physical port position on a E1 trunk is computed in the following procedure: for E1 trunk installed on card 32
(trunk 6) the port will be 256 + channel number on E1 trunk, for E1 trunk installed on card 33 (trunk 7) the port will
be 288 + channel number on E1 trunk, for E1 trunk installed on card 16 (trunk 2) the port will be 128 + channel
number on E1 trunk and for E1 trunk installed on card 17 (trunk 3) the port will be 160 + channel number on E1
trunk.
You may set a value for "ISDN EndType" which represents call release code for ISDN calls. Other types of calls
will display a value of ' 31' in the billing records.
You may also set the option to select the records with the conversation duration and the selection duration (in
seconds) less, equal or greater than the value typed.
The maximum size of the fields is 8 for the periods (date and hour), 2 for the number of digits, 3 for the source port
position, sim index and ISDN EndType, 5 for destination port position, 6 for duration, 3 for selection duration, 16 for
specifying IMSI code and 20 for specifying destination digits.
Certain values from the billing filter are checked before validation (by pressing the button "OK"). The program
checks correctness of the following:
- period definition (day and hour - day less or equal to 31, month less or equal to 12, year less or equal to 36, hour
less or equal to 23, minute less or equal to 59 and second less or equal to 59);- port position of the call source (in
range 0 to 319);- sim index (in range 1 to 4 or 255);- destination port position (65535 or a value in the range from
0 to 319);- duration and selection duration (a value greater or equal to zero);- number of digits (a value greater or
equal to zero); - ISDN EndType (a value greater or equal to zero);
If something is wrong, an error message will be shown to the user and the field that has caused the error will be
colored in red (while the text color becomes white). When the user goes back to the incorrect field in order to correct
the wrong data, then the red color will disappear. In the following example an error message "Wrong port value" is
displayed because of an error field on port position (a value "342" which is greater than the maximum number of
319)
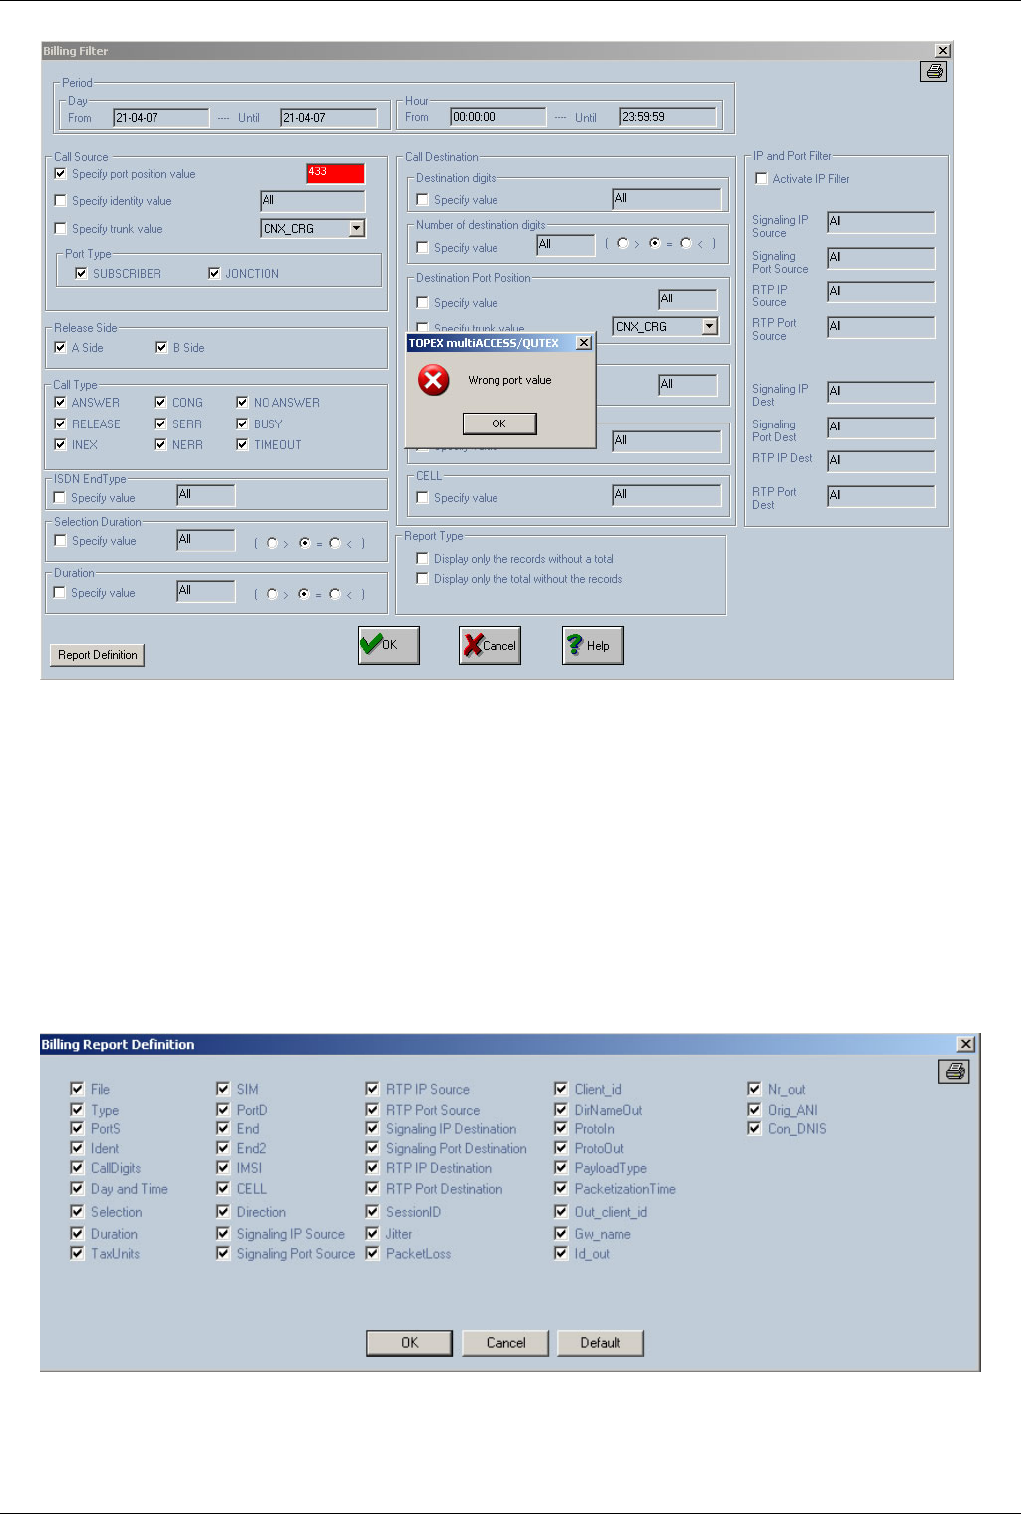
OAM / Download Billing 131
Finally, you can set the option for viewing only the totals of the recording (option "Display only the total without
the records") that corresponds to the selected criteria or you can choose to display the values without totals (option
"Display only the records without a total").
The option "Display only the records without a total" is useful for filtering out the records in a certain time interval
for the purpose of post-processing of the stored billing information (post-processing is done for cost analysis). For
these applications, you need a text file with values only (that may be imported into a spreadsheet like Excel) but
without totals interspread in it.
The option "Report Definition" is used to define the columns to be displayed in the "Billing Report". These columns
will be explained later in this chapter. The information regarding the billing columns to be displayed is stored in the
file "tax_rep.dat" on the harddisk in the same directory from where "gwconfig" software is running. In this file it is
also saved the information about the size of the columns presented in the billing report.
By pressing "OK" button all Billing records corresponding to the filter criteria will be seen.
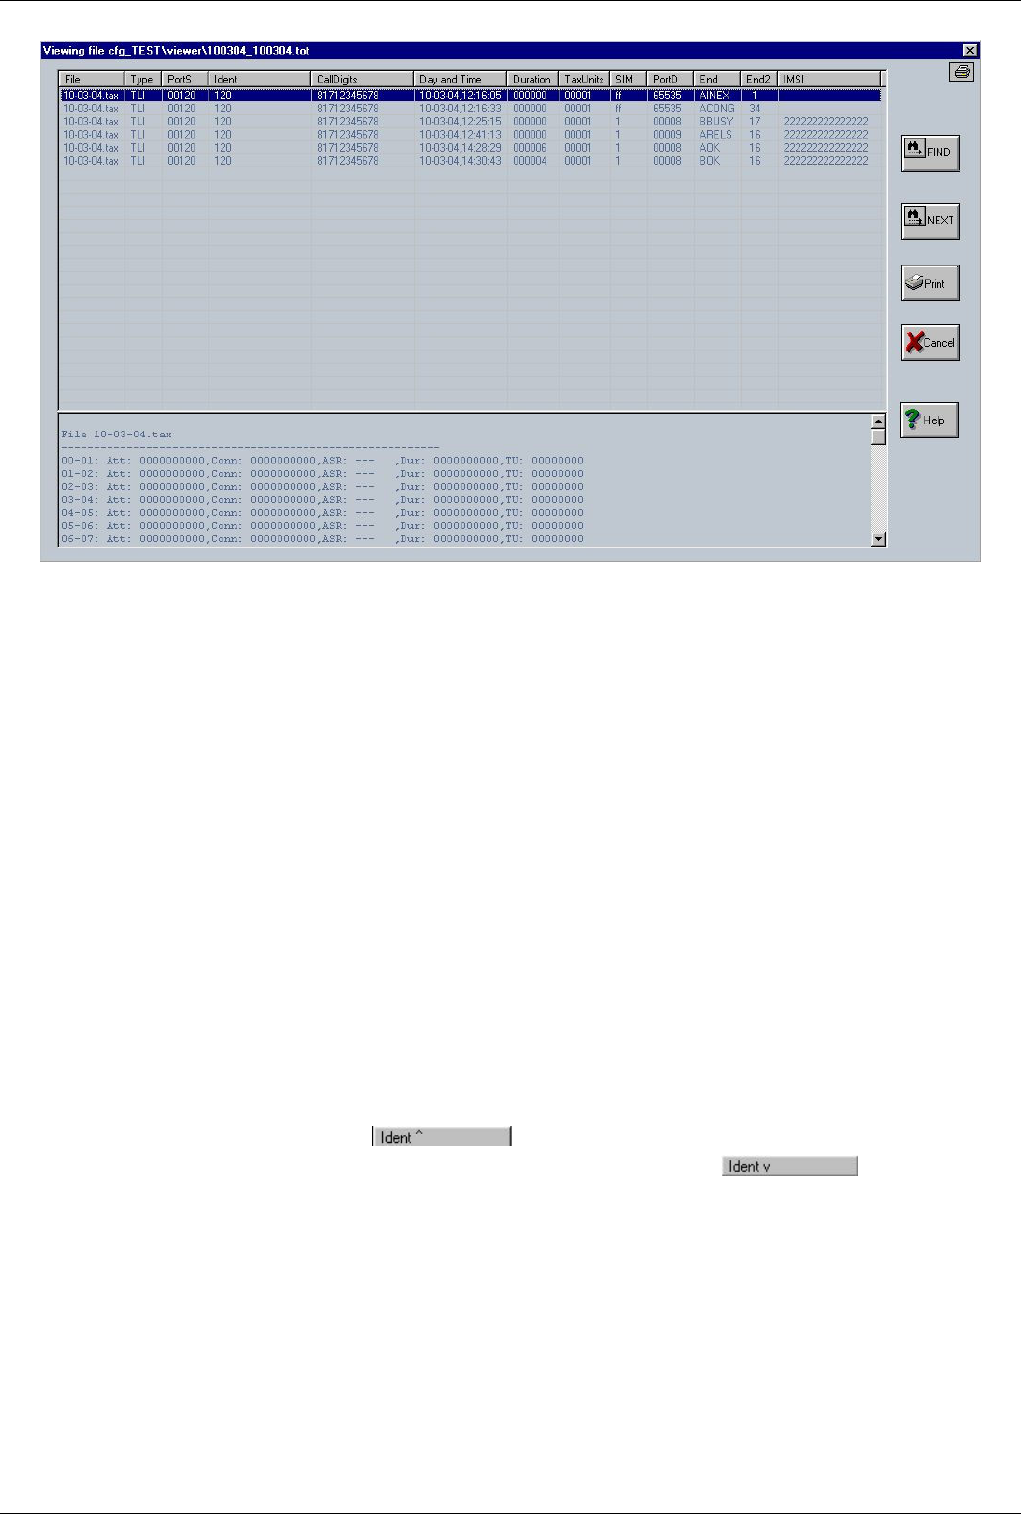
OAM / Download Billing 132
In the dialog window that shows up you can see a total for each day (from the selected interval) and time intervals
that include: total number of attempts (field "Attempts"), total number of connected calls (field "Connected"),
ASR (field "ASR"), total duration of calls (conversation part-field "Duration"), associated billing units (field
"TaxUnits"), and at the end a total for all of the intervals - total number of attempts, total number of connected calls,
ASR, total duration and billing units.
Note1: All the recordings, together with the totals, are saved in the "Viewer" subdirectory for the chosen system in a
file with the "tot" extension and the name corresponding to the selected time interval. This way you may get both the
total of calls for several days and also a general total.
Note2: Once you have defined a filter for the billing files, some of its settings will be saved, so you can apply the
same filter to several billing files. The settings established in the billing filter are saved in the file "tax_fl.dat" on the
harddisk in the directory where "gwconfig" software is running. These settings are:"Port Type" (section "Call
Source") - subscriber part and junction part, "Release Side" ("A Side" or "B Side"), "Call Type" ("ANSWER",
"RELEASE", "INEX", "CONG", "SERR", "NERR", "NO ANSWER", "BUSY" and "TIMEOUT") and the options
regarding the viewing of totals and billing records ("Display only the total without the records" and "Display only
the records without a total"). These settings are loaded before the showing of the billing filter in order to be
pre-established.
Note3: a sorting operation can be performed on all fields (except "Type" field). The sorting operation is activated by
clicking the desired column. The first operation on a field is an ascending sort. The indication will be the character
"^" which is added to the column name. A second click on the same field will give an descending
sort. The indication will be the character "v" which is added to the column name. An example of
sorting the column "Ident" is provided for both ascending and descending sort.Depending of the number of records
the sorting operation can take a significant amount of time.

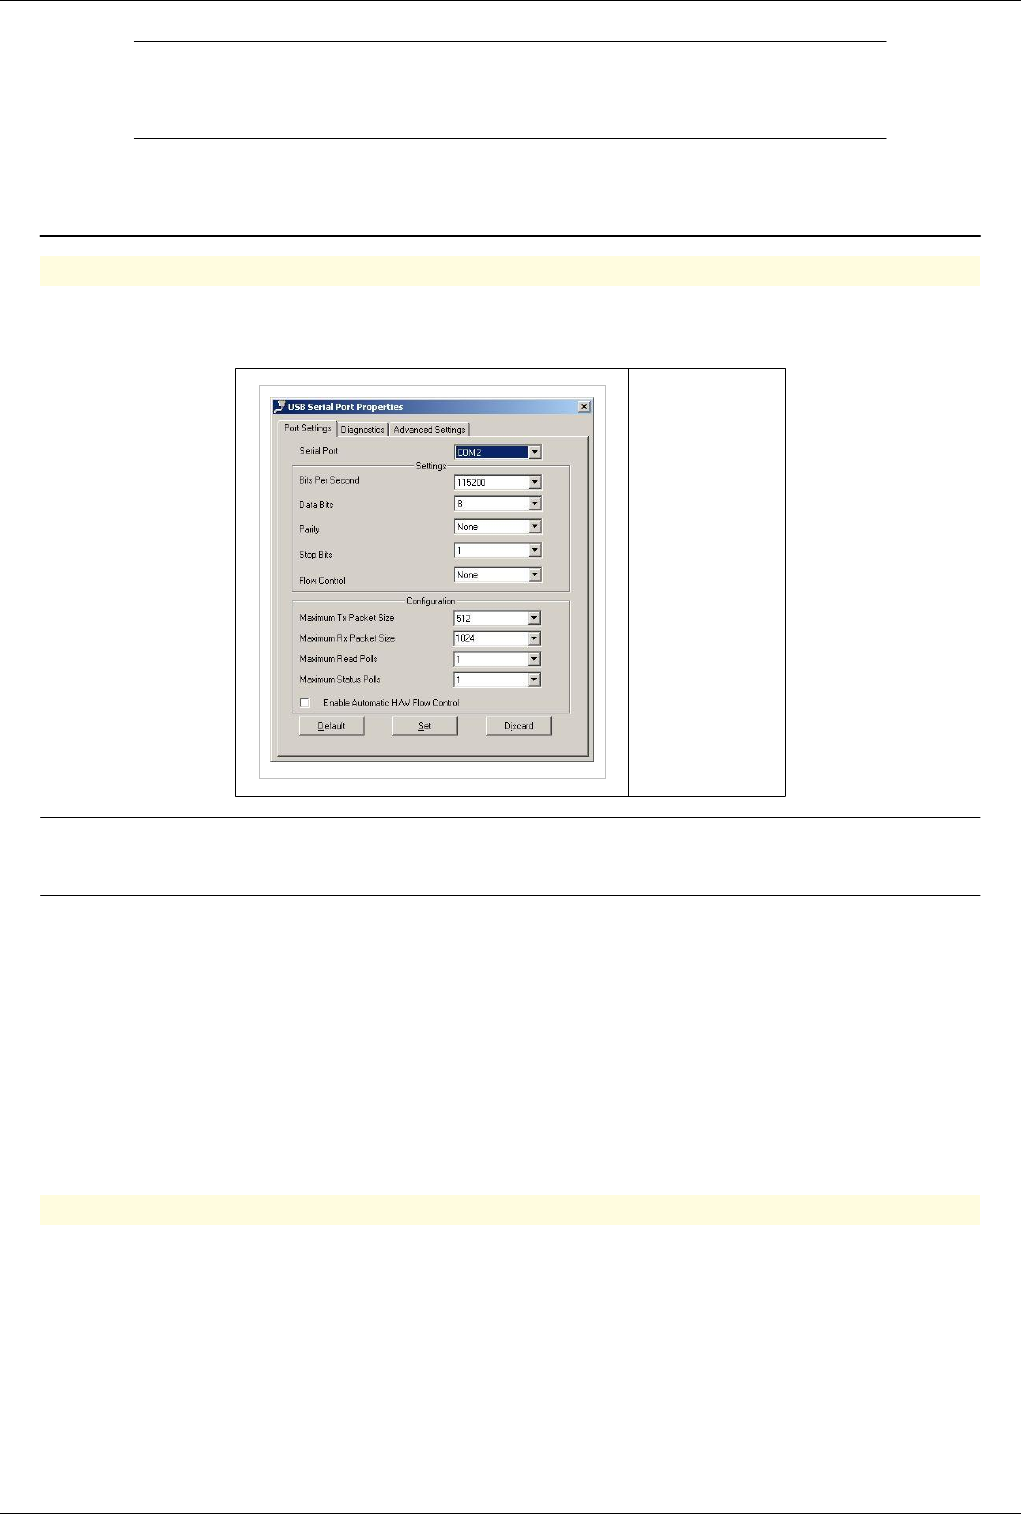
134
How To's
Connect to Multiaccess or Qutex
Connecting using serial cable
Serial
Baud rate: 115200 bps
Data bits: 8
Parity: none
Stop bits: 1
Flow control: none
Note:Username and password depend on the type of processor card installed in the
equipment check this page for default passwords of your equipment
Important warning: It is highly recommended that you change the default password, in order to prevent
unauthorized accesses to the TOPEX multiAccess! So as soon as you finished performing the settings, please change
the default initial password with one of your own choosing. Use the command change_passwd to change the log-in
password.
If the connection was successful, the window below shows up with the message “Logon OK!”. If you do not see the
"login" cursor, you must wait until it will show up again (usually the delay is of maximum 60 seconds) to repeat the
login procedure.
After connecting to the TOPEX system, you may use Linux commands for navigating through the directory structure
of the TOPEX system,
Connecting using SSH

Connect to Multiaccess or Qutex 135
SSH
Note:User name and password depend on the type of processor card installed in the
equipment check this page for default passwords of your equipment
In case of using an Ethernet connection, you can use a remote connection to the TOPEX equipment. This is done
by “ssh” from Linux or using a program that performs ssh under another operating system (for instance Putty).
[Secure Shell (SSH), also known as Secure Socket Shell, is a command interface and protocol for getting secure
access to a remote computer. To ensure this secure access ssh commands are encrypted and secure in several ways:
both ends of the client/server connection are authenticated using a digital certificate, and passwords are protected by
being encrypted.]
Note: Default ssh port is 2222
In Linux, you enter the following command to connect to the multiAccess gateway:
ssh –p 2222 tpxadm@<IP address of TOPEX EoneS>
When using Putty the connection is done as shown in the window below:
On the screen will appear a window which asks for the user name (login
name) and the password.
Note: For security reasons, the direct login as „root” can be performed only from those
terminals that are included in the list of „secure” (trusted) terminals. From terminals that
are not included in this list log-in can be done only indirectly, by log-in as a non-privileged
user and going into root mode with the command su - followed by the root password.
[On a Linux system, privileged user is the system or network administrator, who has access right above those of an
ordinary, non-privileged user. Direct access to root is available only for privileged users].
Remember that the terminal on COM2 serial port is included in the list of trusted terminals, while the
pseudo-terminals used by ssh are not on this list.
Change IP Address 136
Change IP Address
Changing Ip Address
Changing ip for PGRUC board
Warning:To change ip address you need root access
€ The equipment is configured with a default ip address. The ip is 192.168.1.21. To change ip address you must
connect to equipment first.
rw
€€ You have to edit 2 files
vi /etc/sysconfig/eth0
€€ Used to change ip address and netmask
€€ To setup default gatewy edit /etc/sysconfig/gw
vi /etc/sysconfig/gw
Note:Reboot equipment to use the new settings
/sbin/reboot
Best Practice
If you have a Voip Board in the equipment is is necessary to configure the voip before rebooting equipment
Changing ip for PGVOIP board
€ The equipment is configured with a default ip address. The ip is 192.168.1.21. To change ip address you must
connect to equipment first.
Note:All equipments that are using PGVOIP card have a read only operating system. To
put the system in read-write use the folowing command:
rw
€€ Edit file /etc/network/interfaces
vi /etc/network/interfaces
Warning: Do not change ip on interface eth1
Note: Interface eth0 is labelled LAN interface eth2 is labelled WAN
File: /etc/network/interfaces

Change IP Address 137
# eth0: LAN_interface:
# eth1: CSP<-->MSP comunication interface (DO NOT CHANGE OR REMOVE!! THE SYSTEM WILL NOT START PROPERLY!!)
# eth2: WAN_interface:
#auto bond0
#iface bond0 inet static
# address 192.168.110.15
# netmask 255.255.0.0
# gateway 192.168.1.2
# broadcast 192.168.255.255
# post-up ifenslave bond0 eth0
# post-up ifenslave bond0 eth2
# pre-down ifenslave -d bond0 eth0 eth2
auto lo
iface lo inet loopback
auto eth0
iface eth0 inet static
address 89.28.22.129
network 89.28.22.0
netmask 255.255.254.0
broadcast 89.28.23.255
gateway 89.28.22.1
auto eth2
iface eth2 inet static
address 10.10.10.1
network 10.10.0.0
netmask 255.255.0.0
broadcast 10.10.255.255
auto eth1
iface eth1 inet static
address 10.0.0.9
network 10.0.0.0
netmask 255.255.255.255
broadcast 10.0.0.255
€€ Reboot system with command:
/sbin/reboot

Change Date and Time 138
Change Date and Time
Changing Date on Multiaccess, Qutex and Voibridge
€ Root access is needed in order to change date on equipments. Please check this page for more information
Warning: In order to change date all topex software running on the machine must be
stopped. Check this page for informations regarding the correct stop procedure
€€ Stop centrala (main application)
killall centrala
or
ps -e f
kill -2 <pid centrala>
€€ Run /mnt/app/delmod
/mnt/app/bin/delmod
€€ Change date (type date --help in a linux console for more information about date command)
date MMDDHHMMYY
€€ Make disk read-write:
rw
€€ Write Date in BIOS
/sbin/hwclock --systohc --utc
€€ Reboot Equipment
/sbin/reboot
Using a NTP Server
€€ Configure correct timezone
ln -s /usr/share/zoneinfo/"timezone" /etc/localtime
€€ Edit /mnt/app/bin/start_app and input the ip of the NTP server
Note: Ping pool.ntp.org from your computer if you don't have your own NTP server, and
use the ip discovered
ntpdate 91.121.92.90 &
Note: For Voibridge you must first make the partition read-write with the rw command
and after you modify start_app, save the modifications with saveconfig

Change Date and Time 139
€€ Reboot System
/sbin/reboot
SEO: Change date Multiaccess, Change date Qutex, Change date Topex
Check harddisk for problems
Checking Hard disk for Problems
Note: From the hardware point of view hard disk is the most sensitive part of the
equipment. Stopping equipments that use a hard disk directly from the power button will
damage the hard disk. We strongly recommend using a UPS if the power grid is unreliable
€ Gain root access to the equipment. Check this page for more informations
€€ Change working folder to /mnt/app/bin
cd /mnt/app/bin
€€ Rename start_app to start_app.bak
mv start_app start_app.bak
€€ Reboot the system
/sbin/reboot
€€ After reboot reconnect to equipment and unmount /mnt partition
Warning: On older boxes /dev/hda2 is the correct partition. On newer boxes you must
unmount /dev/hda3. Unmounting the partition by his mount point will always unmount the
correct partition
umount /mnt
€€ Run fsck on the unmounted partition until no errors are reported
Warning: Running fsck.ext3 on a mounted partition will cause damage to the partition.
Always check if the partition is still mounted with command mount
fsck.ext3 -f /dev/hda3
€€ Remount partition
mount /mnt
€€ Rename start_app.bak to start_app
cd /mnt/app/bin
mv start_app.bak start_app
€€ Reboot the system
/sbin/reboot

Clean restart/shutdown 140
Clean restart/shutdown
GoTo >Main Page > centrala
Bellow commands are useful for centrala upgrade or clean shutdown.
Telnet commands:
€reject all calls
All incoming calls are rejected from now on!. You need to restart the application in order to receive new calls!
€kill all calls
Kill all connected calls; you can check after this command if you still have calls with commands: view calls or
view proxy calls
€save billing queues
write SQL CDRs from billing pool queues to text files, see Billing generic (apply to PGSQL, MySQL, MSSQL).
You can check after the status of billing pools with command: view pools
Starting with version 4.3.51 (see centrala version) it will kill also calls in ringing states.
Command flow example:
1.1. telnet 127.0.0.1
2.2. reject all calls
3.3. kill all calls
4.4. view calls
5. view proxycalls
Repeat step 3 until you have 0 calls on step 4 and 5.
6. save billing queue
Repeat step 6 until you have queue value 0 at pools: pgsql_bill_pool, pgsql_bill_pool2, mysql_bill_pool,
mssql_bill_pool.
7.7. quit
8.8. /etc/ini.d/softswitch stop/restart or killall centrala
Stop/Start Logs 141
Stop/Start Logs
GoTo >Main Page > centrala
Note:All log files will be generated in folder /mnt/app/out/
Start Logging
Best Practice
Activating full logging can generate more then 100M of log files per hour. Don't forget logging activated or it will fill-up the hard disk in 12-14h
€ Edit /mnt/app/cfg/exec.cfg to activate logging and change db_cons and db_file to 1 like below
# SerSpeed(0-OFF) COM IPport(0-OFF) db_cons db_file db_alarms db_cfg db_gsm s_txt s_bin bin/txt outfile outmnt www_chg
o 115200 1 9009 1 1 1 1 1 1 1 0 1 1 1
Note: There are multiple files in /mnt/app/cfg that need to be edited in order to start
logging
exec.cfg --Here main log file can be enabled and also some logging levels can be defined
sip_pbx.cfg -- Sip logs can be enabled here
trafic.cfg -- Port monitoring can be enabled here (what ports activity will be included in logging)
mspd.cfg -- Voip logging
Stop Logging
€ All log files can be stopped by editing file /mnt/app/cfg/exec.cfg. In order to stop logs change db_cons and
db_file to 0 like below
# SerSpeed(0-OFF) COM IPport(0-OFF) db_cons db_file db_alarms db_cfg db_gsm s_txt s_bin bin/txt outfile outmnt www_chg
o 115200 1 9009 0 0 1 1 1 1 1 0 1 1 1
Note:changing db_cons and db_file to 0 will stop all logging regardless of the configuration
in other cfg files

Reroute on cause X 142
Reroute on cause X
GoTo >Main Page > centrala
Reroute on cause allows the called to be retried on another destination if it fails on the default destination with a
predefined cause
Note:In order to have a reroute on cause X scenario you have to define 2 routes with the
same prefix and with different priorities:
Ex: dir.cfg (2 routes with the same prefix pointing to 2 directions)
r DEFAULT 1820019 DIR RT 0 0 00 c 00 c 0091 1000 131300 0 0 0 0 0 0 0 00:00:00 23:59:59 255 0 ROUTE1232373180_0 c
r DEFAULT 1820019 DIR RT2 0 0 00 c 00 c 0091 1000 131300 0 0 0 0 0 0 0 00:00:00 23:59:59 255 0 ROUTE1233318595_0 c
Note: On both routes you have to set the retry attempt for each route in Sign 1 ( value:
1000) (check routing in OAM)
In this example traffic will be rerouted to RT2 if it fails on first route (RT) with cause 34 or 24 In trafic.cfg you have
to add the lines:
rerouteoncause 34 1
rerouteoncause 27 1
| | |---1=ON 0=OFF
| |-----Q931 Cause
|---------------keyword for rerouting function
Upgrade Software 143
Upgrade Software
GoTo >Main Page > centrala
Warning:You need root access to be able to upgrade software on the equipments
Automatic Update
€€ Login to the equipment using SSH and gain root access
Warning:Do not use this update process on VoxyPlus Advanced or on Multiaccess with
PGVOIP card
€€ Issue command
rw
€€ Edit file "/etc/resolv.conf" and add a namserver
nameserver 8.8.8.8
€€ Move to folder /home/gsmgw/
cd /home/gsmgw/
€€ Download latest software
wget http:/ / update. pabx. ro/ PGVOIP_updates/ _current-app. img
€€ Begin update by issuing command
upgrade /home/gsmgw/_current-app.img
€€ Reboot equipment once the update is done
reboot
Manual Update
Best Practice
Execute the upgrades in the order described here
Main software:
* centrala is the main application software.
* h323_apc is implementation of h323 protocol.
* mspd = Multimedia Streaming Protocol Daemon, is an interface between Mindspeed M82xxx
chip set (Topex PGVoIP or Topex xVoip cards) and a and centrala.
Upgrade centrala
* Software Version
/mnt/app/bin/centrala -v |grep Ver
Ver 4.1.34
€€ Upload new version of software to the machine (use WinSCP or scp to upload software). Upload the new file to
tpxadm or gsmgw home folder

Upgrade Software 144
Note:Newer processors use the hardisk in read only mode. In order to upload new software
you need to put the hardisk in read-write mode with command rw
€€ Centrala software is sometimes archived as tar.bz2. Unpack the software before moving to the next step
tar jxvfp name_of_archive.tar.bz2
€€ Find the centrala pid in order to stop it. Use command:
ps -e f
PID TTY STAT TIME COMMAND
1 ? S 0:00 init
2 ? SN 0:00 [ksoftirqd/0]
3 ? S< 0:03 [events/0]
4 ? S< 0:00 \_ [khelper]
5 ? S< 0:24 \_ [kblockd/0]
8 ? S 0:00 \_ [pdflush]
9 ? S 0:49 \_ [pdflush]
11 ? S< 0:00 \_ [aio/0]
84 ? S< 0:00 \_ [sercom kthread]
89 ? S< 0:04 \_ [mfvs engine]
94 ? S< 0:01 \_ [mtp3engine]
95 ? S< 0:00 \_ [netmanag]
5402 ? S< 0:16 \_ [xdsp_sgtrm_engi]
6 ? S 0:00 [khubd]
7 ? S 0:00 [kapmd]
10 ? S 0:00 [kswapd0]
12 ? S 0:00 [kseriod]
13 ? S 0:04 [kjournald]
54 ? S 11:23 [kjournald]
61 ? Ss 0:00 /bin/sh /mnt/app/bin/start_app
102 ? S 0:01 \_ /bin/sh /mnt/app/bin//run_clean.sh
6096 ? S 0:00 | \_ sleep 3200
104 ? S 642:49 \_ /mnt/app/bin//centrala -c /mnt/app/cfg/ -d /mnt/a
108 ? S 5:22 \_ /mnt/app/bin/h323_apc_new -p9010
111 ? S 0:01 \_ /mnt/app/bin/mspd - -v --mem 16 --no-gw -m 00
112 ? S 0:00 \_ /mnt/app/bin/mspd - -v --mem 16 --no-gw -
113 ? S 0:00 \_ /mnt/app/bin/mspd - -v --mem 16 --no-
115 ? S 1:59 \_ /mnt/app/bin/mspd - -v --mem 16 --no-
116 ? S 0:00 \_ /mnt/app/bin/mspd - -v --mem 16 --no-
117 ? S 0:15 \_ /mnt/app/bin/mspd - -v --mem 16 --no-
118 ? S 0:00 \_ /mnt/app/bin/mspd - -v --mem 16 --no-
127 ? S 0:00 \_ /mnt/app/bin/mspd - -v --mem 16 --no-
128 ? S 0:00 \_ /mnt/app/bin/mspd - -v --mem 16 --no-
63 ? Ss 0:00 /sbin/syslogd -f /etc/syslog.conf
64 tty2 Ss+ 0:00 /sbin/agetty tty2 19200
65 tty3 Ss+ 0:00 /sbin/agetty tty3 19200
66 ttyS1 Ss+ 0:00 /sbin/agetty ttyS1 19200 ansi
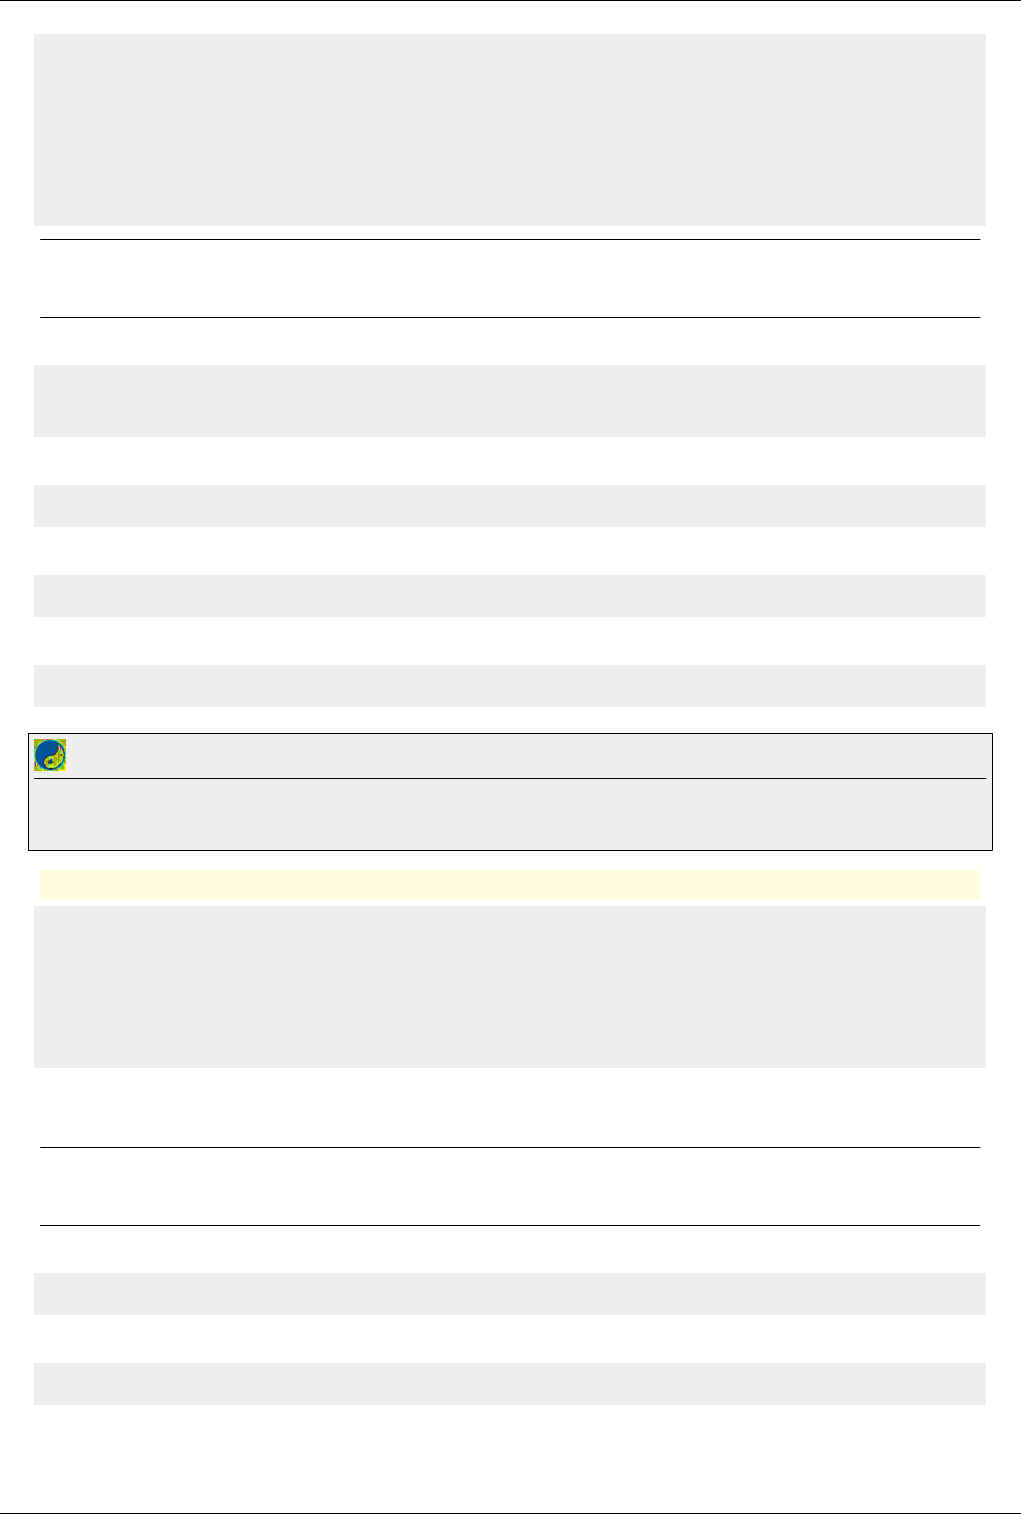
Upgrade Software 145
81 ? Ss 0:02 /usr/sbin/sshd
6097 ? Ss 0:00 \_ sshd: gsmgw [priv]
6099 ? S 0:00 \_ sshd: gsmgw@pts/0
6100 pts/0 Ss 0:00 \_ -bash
6101 pts/0 S 0:00 \_ -bash
6102 pts/0 R+ 0:00 \_ ps -e f -e f
Warning: Stopping centrala will stop all calls on the equipment check Clean
restart/shutdown for instructions on how to stop all calls before upgrade
€€ To stop centrala use command:
kill -2 104
104 is centrala PID . If centrala is stopped with -2 (SIGINT) he will then stop all slave applications such as MSPD, SS7, H323.
€ Move to centrala folder/mnt/app/bin/
cd /mnt/app/bin/
€ Copy centrala from user folder to /mnt/app/bin/
cp /home/tpxadm/centrala_4.2.27 ./
€€ Create a new symlink to point to new centrala
ln -sf centrala_4.2.27 centrala
Best Practice
Don't delete or overwrite old software. Use ln to create a symlink. This will allow you to revert to the previous version is something goes wrong
during update
Upgrade H323
*H323 is located in /mnt/app/bin and is managed by centrala
Software Version
/mnt/app/bin/h323_apc -v
h323 version 2.5
€€ Upload new version of software to the machine (use WinSCP or scp to upload software). Upload the new file to
tpxadm or gsmgw home folder
Note:Newer processors use the hardisk in read only mode. In order to upload new software
you need to put the hardisk in read-write mode with command rw
€ Move to h323_apc folder/mnt/app/bin/
cd /mnt/app/bin/
€ Copy h323_apc from user folder to /mnt/app/bin/
cp /home/tpxadm/h323_apc-2.5 ./
€€ Create a new symlink to point to new h323_apc

Upgrade Software 146
ln -sf h323_apc-2.5 h323_apc
€€ Restart h323_apc
killall -9 h323_apc
Update MSPD
MSPD is the voip manager
It is located in /mnt/app/bin and it is managed by centrala
€€ Upload new version of software to the machine (use WinSCP or scp to upload software). Upload the new file to
tpxadm or gsmgw home folder
Note:Newer processors use the hardisk in read only mode. In order to upload new software
you need to put the hardisk in read-write mode with command rw
€€ Move to mspd folder
cd /mnt/app/bin/
€€ Copy mspd from user folder
cp /home/gsmgw/mspd-mg-2.5.175 ./
€€ Create a new symlink
ln -sf mspd-mg-2.5.175 mspd
€€ Reboot the equipment
/sbin/reboot

147
Call Control
CCTL features
GoTo >Main Page > centrala
Call Control Core Features
€ CCTL Interfaces: SIP, H323, SS7, ISDN, R2, R1.5, Tetra, Tetrapol, GSM, CDMA, FXS, FXO,uiuiyu
€€ Extensible asci headers communication protocol between CCTL and adjacent signaling interfaces
€€ Master/Slave architecture: one master can manage multiple slaves (ex. Media Gateways controlled by Soft
switch)
€€ Text/PostgreSQLDatabase configuration loaded into memory
€€ High Availability redundancy for PostgreSQL database (configuration and billing)
€€ CCTL call state replication for SIP connected calls
€€ Advanced routing based on regular expressions
€€ Forked child pool process used for CPU consuming and locking operation tasks
€€ Least Cost Routing - End cause rerouting
€€ Routing algorithms: ASR, ACD, priority, up/down, circular, percent, fork answer, fork ring
€€ E164 routing and billing
€€ Audio/Video RTP Proxy
€€ Audio Codec/DTMF Transcoding
€ Supported DTMF types: SIP INFO, H245 alphanumeric (Rx only), H245 signal (Rx only), Q931 keypad, RFC
2833 [1], In-band (bypass, codec G711)
€€ CDR: CSV, PostgresSQL, MySQL, MsSQL
€€ Script configurable IVR states
€€ AccessIn list based on: IP/Netmask, IP Port, Protocol
€€ Number portability
€€ Users: SIP, FXS, Prepaid, ANI
€€ Call center features
€€ T38 fall back on pass through
€€ Billing profiles/prices for prepaid/postpaid and time/cost restrictions
€€ Radius AAA; Interconnect with: Mind, Quintum and FreeRadius
€€ Telnet interface
€€ Dynamic CLIP Routing
€€ Transfer from GSM
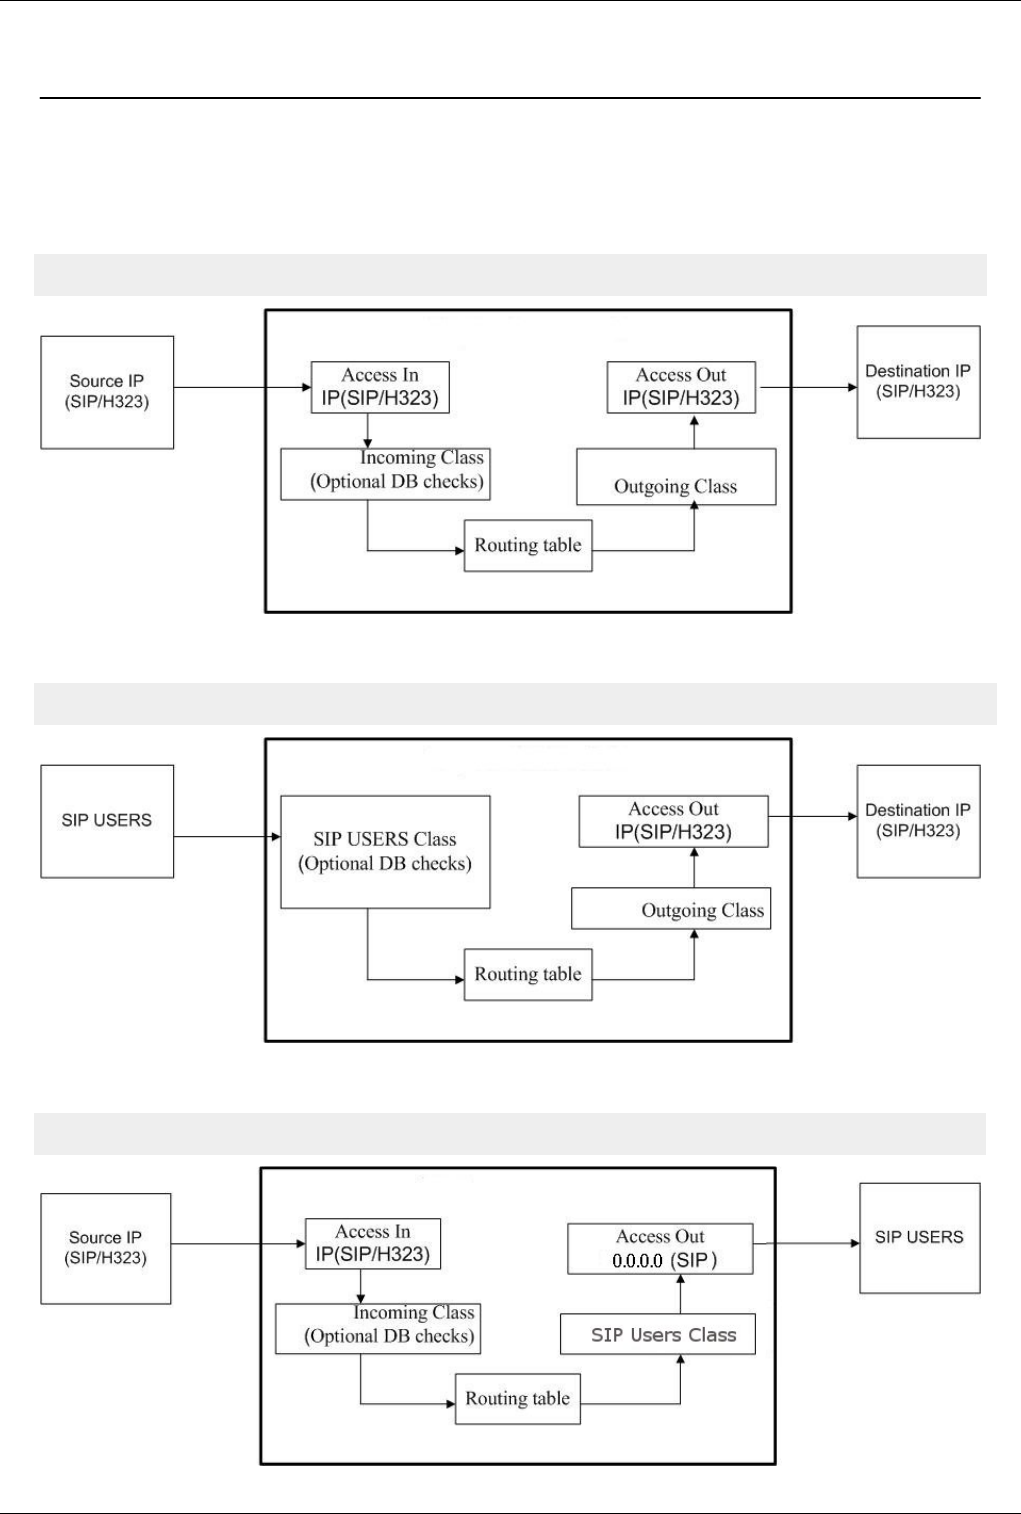
CCTL flow 148
CCTL flow
GoTo >Main Page > centrala
Call control flow
IP to IP case
Access In -> Incoming Class -> Optional DB checks -> Routing table -> Outgoing class -> Access Out
SIP Users to IP case
SIP Users -> SIP Users Class -> Optional DB checks -> Routing table -> Outgoing class -> Access Out
IP to SIP Users case
Access In -> Incoming Class -> Optional DB checks -> Routing table -> Outgoing class(SIP Users Class) -> Access Out (0.0.0.0)
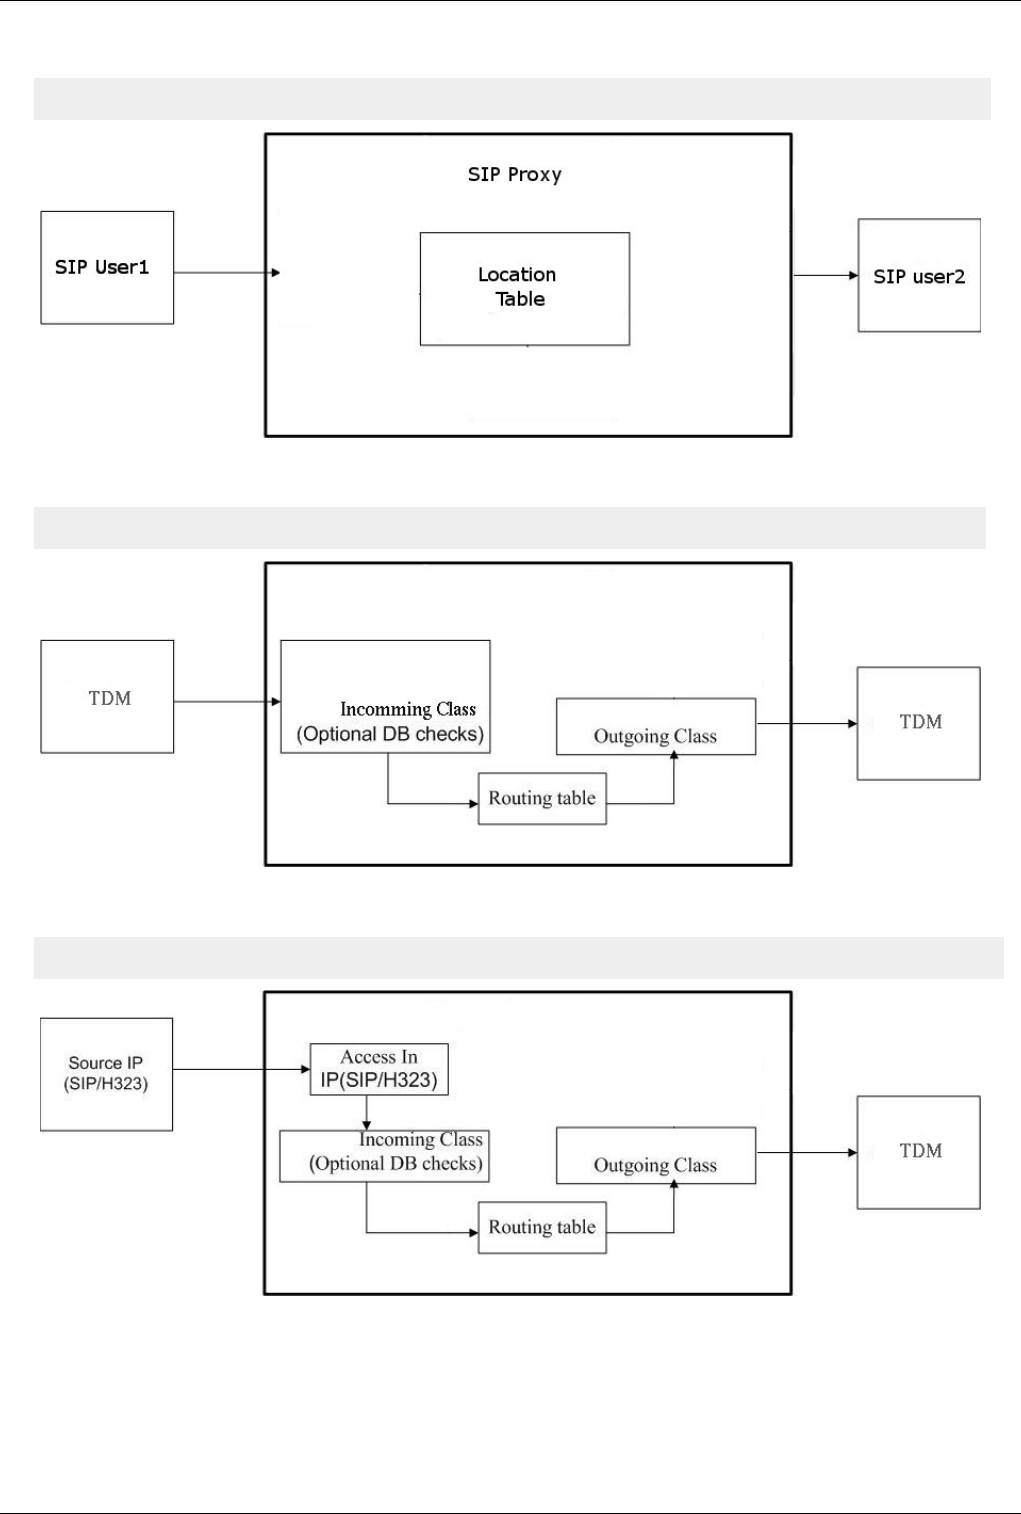
CCTL flow 149
SIP Users to SIP Users case
SIP Users -> SIP Users Class -> Location Table -> Outgoing class(SIP Users Class) -> Access Out (0.0.0.0)
TDM to TDM case
Incoming Class -> Optional DB checks -> Routing table -> Outgoing class
IP to TDM case
Access In -> Incoming Class -> Optional DB checks -> Routing table -> Outgoing class
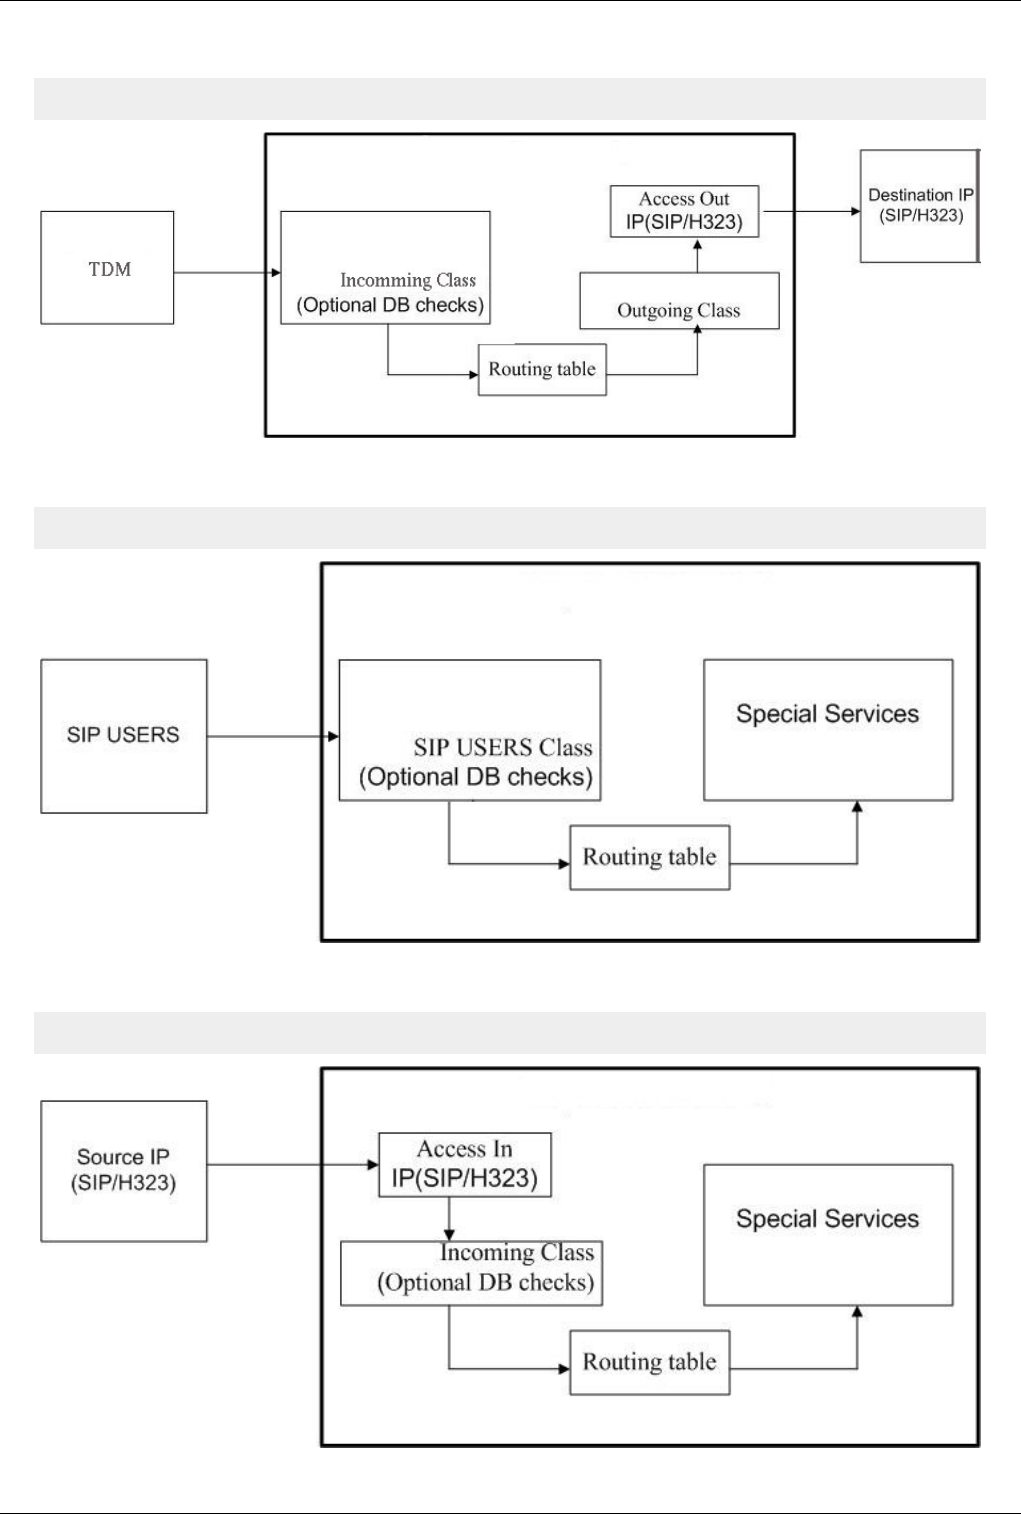
CCTL flow 150
TDM to IP
Incoming Class -> Optional DB checks -> Routing table -> Outgoing class -> Access Out
SIP Users to Special Services
SIP Users -> SIP Users Class -> Optional DB checks -> Routing table -> Special Services
IP to Special Services
Access In -> Incoming Class -> Optional DB checks -> Routing table -> Special Services
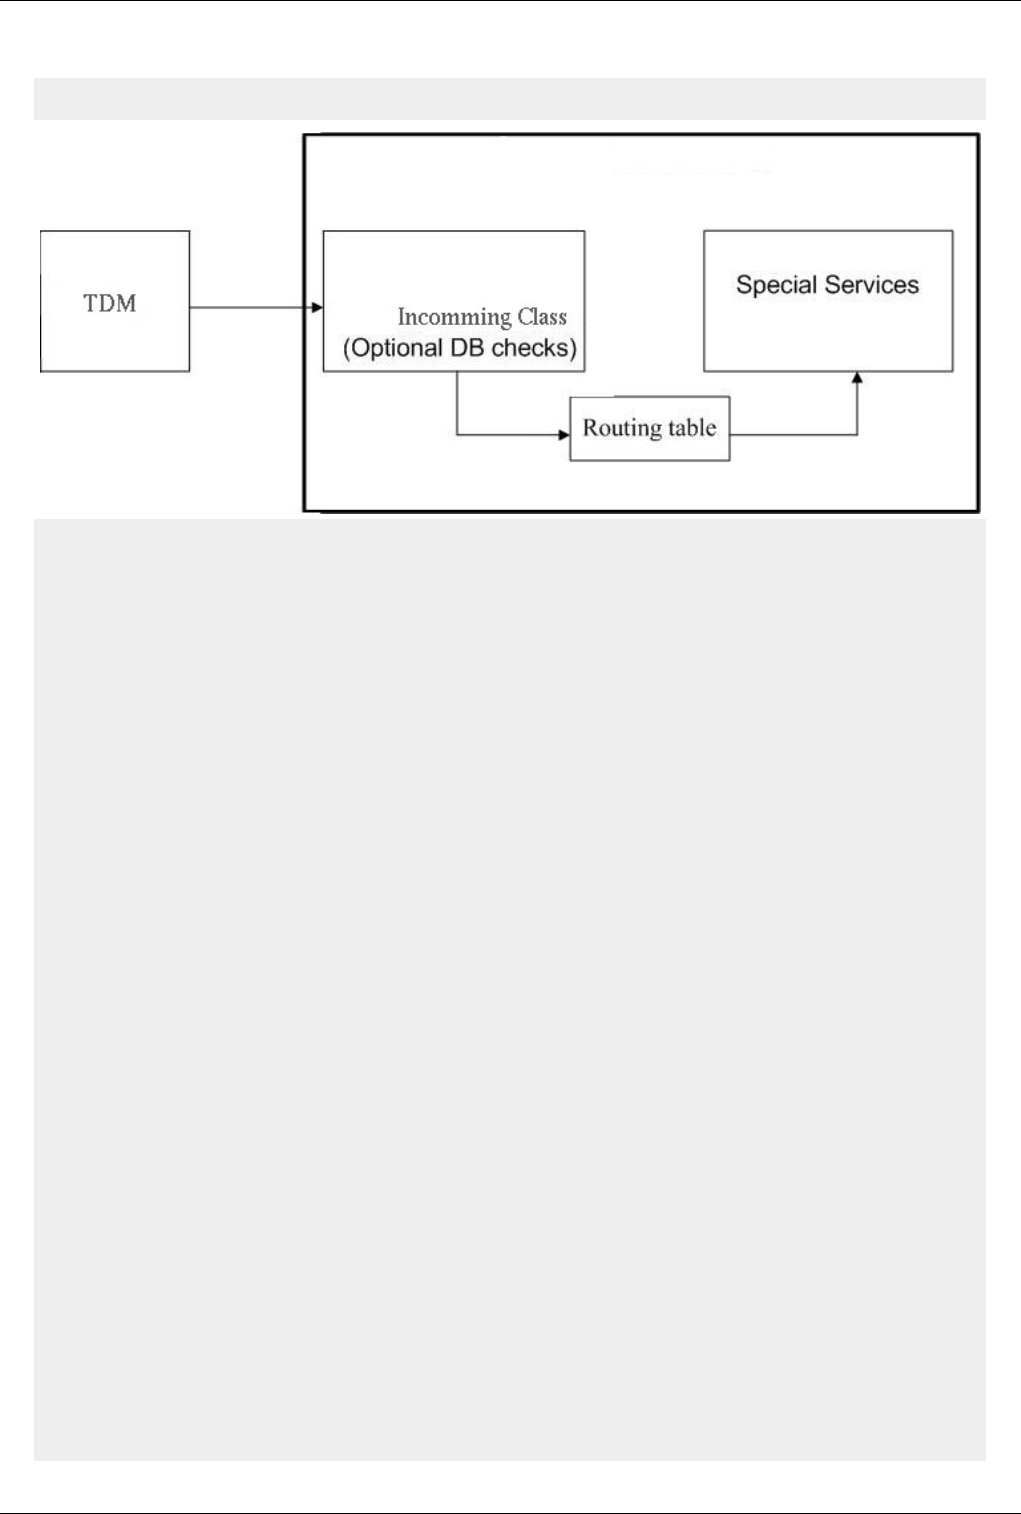
CCTL flow 151
TDM to special service
Incoming Class -> Optional DB checks -> Routing table -> Service | Hunting | Port
Access In
Is used only for IP call (SIP/H323).
For TDM calls port is directly assigned to incoming class.
It assign an incoming class for each call according to:
- IP/netmask
- TCP/UDP port
- protocol (SIP/H323)
- Prefix
- Number of digits from DNIS
Incoming class
Each call has an incoming class
Settings from incoming class will be applied to the calls assigned to it.
Here you can activate some optional database checks see bellow.
Optional DB checks:
- translate ANI
- translate DNIS
- portability
- ANI users
Routing table
It route calls to one of the following:
- outgoing class
- special service
- hunting service
- directly to a specific TDM port
Outgoing class
Settings from outgoing class will be applied to the calls routed to it.

CCTL flow 152
Access Out
Is used only for IP call (SIP/H323).
For TDM calls port is directly assigned to outgoing class.
Specify the IP:Port, Protocol (SIP/H323) and Transport(UDP/TCP/TLS) where the calls are sent.
Relation between Outgoing Class and Access Out is one to one
AccessIn
GoTo >Main Page > centrala
Filtering mechanism for VOIP calls
Assigns an incoming class based on source ip/netmask, protocol, prefix.
Configuration:
€ Via SSH edit file diripin.cfg
€ WEB PGSQL Interface > Access In
€€ WEB CGI Interface
Users and Classes
GoTo >Main Page > centrala
The following type of users are supported:
€€ SIP users
€€ prepaid users
€€ ANI users
€€ FXS users
SIP users configuration:
€ via SSH edit file SIPusers.cfg (text config mode)
€ WEB PGSQL Interface > User Management > SIP (db config mode)
€ WEB CGI Interface (text config mode)
Prepaid users configuration:
€ via SSH edit file prepaid_users.cfg (text config mode)
€ WEB PGSQL Interface > User Management > Prepaid (db config mode)
ANI users configuration:
€ via SSH edit file callback.cfg (text config mode)
€ WEB PGSQL Interface > User Management > ANI (db config mode)
€ OAM > Callback table (text config mode)
FXS users configuration:
€ via SSH edit files port.cfg, subscribers.cfg (text config mode)
€ WEB PGSQL Interface > User Management > FXS (db config mode)
A class is a group of users or TDM ports.
Call that arrive in access_in are also assigned to a class.
Class is also known as direction in OAM interface.
Reserved class names:

Users and Classes 153
€MYVOIP - is a reserved class name and must be configured when you have VoIP/RTPproxy cards. All ports
from this cards must be assigned to class MYVOIP.
WARNING: If you have VoIP/RTPProxy cards installed without MYVOIP defined, centrala application may
crash.
€SENDSMS - Used to send SMS from recmail or WEB CGI Interface.
€SENDCALL - Used to send calls from web interface
€DEFAULT - is a reserved name and must never be used as a class name; it is equivalent with Any value on
source class filed from database config
Class configuration:
€ via SSH edit file dir.cfg (text config mode)
€ WEB PGSQL Interface > Server Management > Client Classes (db config mode)
€ WEB CGI Interface (text config mode)
Classes are also used in routing table, see Routing table
Routing table
GoTo >Main Page > centrala
Definition
The routing table routes calls to an OutgoingClass|Service|Port according to the prefix and Incoming class
Routing algorithm takes digits from left to right one by one and try to find a match.
If a matching is done digit by digit until the end of an prefix call is routed on outgoing class assigned.
'f' - is a special character used in prefix field and means any digit.
If more that one prefix is matched used route is selected according to the search_mode algorithm. See search_mode
field bellow.
If source class is specified it take precedence over other routes with "Any" as source class. I mean it first try to match
source class and if no match is found it search on routes with "Any".
Caution
If you want to route calls to FXS or BRI (NT mode) destination class must have type: Port.
Reg exp prefix
Regular expression prefix are available.
Regular expression prefix must be preceded with special character 'r'.
Example: r^07[2-3]*
Prefix priority
Additional in case of reg exp prefixes, prefix priority can be specified directly into prefix field preceded by special
character 'p'. Prefix priority is different than routing priority. Routing priority specify destination order for a group of
matched routes with same priority prefix. In case that is not directly specified, prefix priority is given by the prefix
matching length. Prefix priority must always be putted in front of the reg exp prefix. It cannot be used for normal
prefixes.
Example:
DNIS: 0723235888

Routing table 154
p12r^07[0-9]* = prefix priority is 12
072f235f = prefix priority is 6, (character f is excluded)
r0723* = prefix priority is 10
r0723 = prefix priority is 4
Caution:
DO NOT USE "f" inside a regexp expresion, f has different meaning in reg exp.
Examples
€€ If you have for example a prefix with 3 digits 072 and one with the same first three and extra 6 digits 072333555
routing decision will be taken according to the most specific route, and that is 072333555.
€€ If you have a prefix with 3 digits 072 and another route with 3 digits ending with an 'f' symbol 07f, routing
decision will be taken according to the most specific route, and that is 072.
Example 1:
Call info: DNIS=0723286299
Routing:
Incoming class -> Prefix -> Outgoing class
Any -> 072 -> Test_Out_1
Any -> 0723286299 -> Test_Out_2
Call will be routed on class Test_Out_2
Example 2:
Call info: DNIS=0723286299
Routing:
Incoming class -> Prefix -> Outgoing class
Any -> 072f -> Test_Out_1
Any -> 0723286299 -> Test_Out_2
Call will be routed on class Test_Out_2
Example 3:
Call info: DNIS=0723286299
Routing:
Incoming class -> Prefix -> Outgoing class
Any -> 072fffffff -> Test_Out_1
Any -> 0723286299 -> Test_Out_2
Call will be routed on class Test_Out_2
Example 4:
Call info: Incoming class=Test_In_1; DNIS=0723286299
Routing:
Incoming class -> Prefix -> Outgoing class
Test_In_1 -> 072fffffff -> Test_Out_1
Any -> 0723286299 -> Test_Out_2
Call will be routed on class Test_Out_1
Example 5:
Call info: Incoming class=Test_In_1; DNIS=0723286299
Routing:
Incoming class -> Prefix -> Outgoing class
Test_In_1 -> 072 -> Test_Out_1

Routing table 155
Test_In_1 -> 073 -> Test_Out_2
Any ->••••••••• 0723 -> Test_Out_3
Call will be routed on class Test_Out_1 because the incomming class is Test_In_1 and this is more specific.
Configuration
€ via SSH edit file Dir.cfg
€ OAM > Routing table
€ WEB PGSQL Interface > Routes
€€ WEB CGI Interface
AccessOut
GoTo >Main Page > centrala
Allow you to specify destination class settings for outgoing VoIP calls.
You can see this as an extension of class settings.
Classes defined in AccessOut are mapped 1 to 1 with classes from ClientClasses.
Configuration:
€ Via SSH edit file diripout.cfg
€ WEB PGSQL Interface > Access Out
€€ WEB CGI Interface
156
Configuration Files
Exec.cfg
GoTo >Main Page > centrala
Warning: If you changed a value from/to 0(disable) to/from 1(enable) and you want to
change it back, DO NOT comment the line, change the value back to 0 or 1. If you comment
the line the value will remain unchanged
Debug Settings
# SerSpeed - serial speed used to open serial port (by centrala) in order to connect with OAM on it
# - this speed must not be changed because in OAM this speed is hard codded
# - 0 = disable open the serial port for OAM connection
#
# COM - Serial COM used for OAM connection
#
# IPport - IP port used for OAM connection
# - 0 = disable open IP port for OAM connection
#
# db_cons - 1=enable/0=disable console debug
#
# db_file - 1=enable/0=disable console debug
# - Important: if both db_cons and db_file are 0, debug is disabled also in SIP log file
#
# www_chg - 1=enable/0=disable reading automatically of config files when are changed
# - if enabled checking is done at every 5 seconds
# - the following files are watched: card.cfg, port.cfg, dir.cfg, restr.cfg, simindex.cfg
# sim.cfg, dirname.cfg, trafic.cfg, lcr.cfg, exec.cfg, callback.cfg, bss.cfg, voice_mail.cfg
# voip.cfg, group.cfg
#
# SerSpeed(0-OFF) COM IPport(0-OFF) db_cons db_file db_alarms db_cfg db_gsm s_txt s_bin bin/txt outfile outmnt www_chg
o 115200 1 9009 1 1 1 1 1 1 1 0 1 1 1
Best Practice
Don't change outfile and outmnt to 0. This will prevent creation of any output files including CDR
# Debug type configuration
# Accepted values are between 0-5 interval
# 0 = NO debug
# 1 = ERROR debug
# 2 = ERROR + WARN debug
# 3 = ERROR + WARN + INFO debug

Exec.cfg 157
# 4 = ERROR + WARN + INFO + FULL debug
# 5 = ERROR + WARN + INFO + FULL + VERBOSE debug
Configuration Debug
# configuration; default 5
set_cfg_debug 5
Telnet Debug
# telnet; default 2
set_telnet_debug 2
Call Control Debug
# call control; default 5
set_cctl_debug 5
Application Debug
# application; default 5
set_app_debug 5
Alarms
# alarms; default 5
set_alr_debug 5
OAM Debug
# OAM; default 2
set_oam_debug 2
Database Debug
# db forked clients; default 5
set_db_debug 5
Database pool clients
# db pool clients; default 5
set_dbp_debug 5
Voicemail Debug
# voice mail; default 5
set_vm_debug 5

Exec.cfg 158
PBX Services Debug
# pbx services; default 5
set_srv_debug 5
GSM debug
# gsm; default 5
set_gsm_debug 5
File descriptor debug
# file descriptors watching; default 2
set_fdw_debug 2
# matrix connections; default 5
set_connect_debug 5
# SS7 ACC; default 0
set_acc_debug 0
# serial communication; default 2
set_serial_debug 2
# ISDN Q921; default 5;
set_q921_debug 5
# ISDN Q931; default 5;
set_q931_debug 5
# database configuration loading; default 5
set_db_config_debug 5
# H323 debug from H323 log
set_debug_h323 5
# obsolete
# set_h323_debug 5
# H323 communication debug from centrala log; default 2
set_debug_pbx_h323 2
# R2S; default 5
set_r2s_debug 5

Exec.cfg 159
Process Activation
# process poll activation/deactivation
# format: pool_name enable/disable pool_configuration_file
# 1=enable; 0=disable; default 0
# number of process from each pool is hard codded and can be viewed by running ./centrala -v
# used for reading configuration (sip users, prepaid users, classes, ports etc) from database
# for this pool enable/disable field is not used
# you can only set the configuration file used by this pool
# pool activation is done by setting the register 4 in sip_pbx.cfg
# when register•!= 4 pgsql sip pool is deactivated
pgsql_sip_pool 0 pgsql_sip_pool.cfg
# used to send CDRs into Postgresql database table
pgsql_billing 0 pgsql_billing.cfg
# used to send CDRs into a second postgresql database table
# it is mostly used for redundancy reasons, in case that one database server is down
pgsql_billing_alt 0 pgsql_billing_alt.cfg
# used to send CDRs into MySQL database table
mysql_billing 0
# used to send CDRs into Microsoft SQL Server database table
mssql_billing 0
# not used, reserved for future developments
pgsql_prepaid_pool 0
# used for running in real time (during the call) pgsql queries for ANI checking
# it is also used for saving alarms to pgsql
pgsql_ani_pool 0
# used for getting info from simserver
pgsql_simserver_pool 0
# used to play rtp files
rtptx_pool 0
# used to record rtp streams
rtprx_pool 0
# used to make dns queries
dns_pool 0

Exec.cfg 160
Radius Settings
# Radius AAA
# enable/disable first radius pool;
# 0=disable;1=enable;default 0
# default configuration file: radius_billing.cfg
radius_billing 0 radius_billing.cfg
# enable/disable second radius pool
# this pool is used for redundancy purposes, see also Radius AAA
# 0=disable;1=enable;default 0
# default configuration file: radius_billing.cfg
radius_billing_alt 0 radius_billing_alt.cfg
# 0=Topex; 1=Quintum; default 0
# same dictionary must be configured also in pool configuration file, see Radius billing
radius_dictionary 0
# enable/disable sending radius access request for authentication
# 0=disable;1=enable;default 1
tx_access_request 1
# enable/disable sending radius access request for authorization
# 0=disable;1=enable;default 1
# starting with date 24 Sept 09 on version >= 4.3.88
tx_authorization 1
# enable/disable sending radius accounting start
# 0=disable;1=enable;default 1
# accounting can be done also without sending access request by sending only accounting stop
# anyway some special application requires also sending accounting start
tx_accounting_start 1
# specify value sent in username field from access request at incoming trunk calls
# possible values: cli/ip/class_name
# cli = caller id, ANI
# ip = source IP of the call
# class_name = source class (direction) of the call
# default empty string
radius_auth cli
# specify value sent in username field from access request at incoming calls initiated by sip users
# possible values: cli/ip
# cli = caller id, ANI
# ip = source IPof the call
# default empty string
radius_sip_user_auth ip
# enable/disable writing CDRs in mind format
# 0=disable;1=enable;default 0
mind_cdr 0

Exec.cfg 161
# default 0
# 0=send to radius number from routing
# 1=send to radius initial incoming number
radius_dnis 0
RTPPROXY Settings
# RTP Proxy from centrala
# number of rtpproxy ports from centrala
rtp_proxy_range 10
# number of first rtpproxy port
rtp_proxy_port 15000
# rtp ip used for calls through rtpproxy from centrala
# not used yet
rtp_ip 192.168.0.0/16 192.168.1.107
rtp_ip 0.0.0.0/0 89.38.123.34
# script executed when centrala is master
script_master script_master_name.sh
# script executed when centrala is slave
script_slave script_slave_name.sh
# 0=send DTMF at tone ON
# 1=send DTMF at tone OFF
dtmf_off 0/1
# 1=enable/0=disable t38 fax
# if you enable t38 and receive a bypass (inband G711) fax the gw will automatically switch to bypass mode
t38 0/1
# 1=block console at write on STDOUT|STDERR
# put 1 for debug only, otherwise let 0
block_cons 0/1
# if 1 put connect time of calls in billing
# if 0 put end time of calls in billing
taxstarttime 0/1
# 1=enable/0=disable voice mail
voice_mail 0/1
# 1=enable - DTMF tones are read by voip board
# 0=disable - DTMF tones are read by DSP
voip_dtmf 0/1
# telnet port

Exec.cfg 162
telnet 23
# 1=accept/0=reject remote telnet access
remote_telnet 0/1
# gw name
# if set this name precede the name of cdr, log and alr files from /mnt/app/out/
name topex
# timeout in milliseconds for waiting a provisional response from destination
# default is 1000 ms (1 sec)
sip_trying_timeout 1000
# 1=enable, 0=disable; default 0
# if enabled it will play the content of /mnt/app/raw/acl_reject_<codec>.<language>
# in case that the call is rejected from accessin mismatch
play_accessin 0
# comma separated dnis list
# max 10 numbers
# First use
# If call from a SIP user belonging to a centrex group does not found a destination
# user in the same centrex group and it match one of the numbers from emergency
# list, call is routed via UA instead of being rejected with inex code
# keep in mind that destination user is searched first, so it is not recommended to have
# centrex aliases the same as emergency numbers
#
# Second use
# For trunk calls that are checked in ANI table if call identity is found (with callbackstate: Allow In)
# and match an emergency dnis it will be rejected after playing file /mnt/app/raw/cli/emergency_<codec>.<language>
emergency_dnis 112,911,961
# default 1GB=1000000KB
# Staring with 14 May 2009 (check build date from centrala version) default is 200 MB
# value is in kilobytes
# it is recommended to not put a higher value than default because removing old large files
# from hdd could lock the main application centrala
set_length_log_file 1000000
Database Configuration Settings
# loading configuration from database
# read cards config from db
# default 0
db_card 1
#read routes config from db
# default 0

Exec.cfg 163
db_route 1
# db_type must be always 2
db_type 2
# read config pupitre from db
# default 0
db_pup 0
Others
voicecallwithoutsemicolon 1 ## Don't add ; at the end of ATD string
voicecallwithoutsemicolon 0 (default)
# specify the maximum number of simultaneous IVR calls
# if a new calls is sent to the IVR while this limit is reached that will be kept in ringing
# state until an connected IVR calls is finished or it leaves the IVR state
# default 0=unlimited
max_ivr_calls 4
# default 15
gsm_callback_timeout_ring 15
# default 60000
timer_refresh_op_clock 60000
# default 15000
timerwaitloadcreditgsm 15000
# default 1500
timerwaitfornextcallgsm 1500
# default 0
set_tranzit_ss7 0/1
# default 0
set_keepalive_h323 0
# default 0
# 0 - master PG / 1 - slave PG, the slave PG will wait a period of time until it will load the cards.
backplaneaddr 0
# default 2
save_asr_dir 2
# maximum simultaneous incoming calls supported by the system
# default 10000
maxsysincallrate 10000

Exec.cfg 164
# maximum simultaneous outgoing calls supported by the system
# default 10000
maxsysoutcallrate 10000
# default 10000
consysincallrate 10000
# default 10000
consysoutcallrate 10000
# default 0
save_mon_file 0
# 1=enable/0=disable;default 0
# if enabled the application will cut the call when
# max cost/time in/out counters are reached
use_class_counters 0
my_pg_ip 192.168.1.23
# default 0
# if set mspd will put virtual_ip in RTP packets
use_rtp_local 0
# virtual_ip virtual_mask gw_ip
virtualIP 192.168.158.51 255.255.0.0 192.168.1.2
# default 0
slave_on_link_down 0
# default 0
use_vad_vcss 0
# ASCII protocol
# 0=disable; 1=enable; default 1
# enable ascii protocol on SIP interface
# starting with version 4.3.79 this parameter is not used anymore
set_asci_sip 1
# enable ascii protocol on H323 interface
set_asci_h323 1
# enable ascii protocol on ISDN interface
set_asci_isdn 1
# enable ascii protocol on SS7 interface
set_asci_ss7 1

Exec.cfg 165
# specify the number fields written in billing
# default value is 43
# 255 means to write all the fields available
# you can see the range of configurable fields on telnet with command "billing fields number"
# see also Billing generic (apply to PGSQL, MySQL, MSSQL
billing_fields_number 255
# Folosit Pentru schimbarea comunicatiei cu cartele gsm.
use_8_bit_ser_gsm 1
# size of of callback list
# default value 100
# valid range between [10 ... 5000]
# Staring with 19 August 2009 on versions >= 4.3.88 this parameter has been removed
# From that point ANI users are loaded in memory using linked list so the only limitation that
# can occur is the memory available on system
max_callback 100
# 1=enable/0=disable; default 0
dual_processor 0
# 1=enable/0=disable; default 0
# on MGU if dual_processor is activated dual_processor_new must be also activated
dual_processor_new 0
# enable=1/disable=0; default=1
# if enabled DTMF will be read by the kernel mfc module and sent to the centrala
# if disabled DTMF will be read by the app centrala directly
# put 0 on MGU to be able to send DTMF on FXO
kernel_mfc 1
# 1=enable/0=disable; default 0
# must be enabled when radio gateway is used with Coordcom
# if enabled calls to the radio ports (analogue, tetra, tetrapol)
# must be sent with the value from name field
# ex. if name=10 uri must be r109.rt3.f1.c1.d0010900821.dt1@192.168.104.14
# instead of r9.rt3.f1.c1.d0010900821.dt1@192.168.104.14
use_radiogw_name 0
# 1=enable/0=disable; default 0
# must be enabled when radio gateway is used with Coordcom
# if enabled radio ports will numbered in module of 4 instead of 8 as it is in topex
radiogw_coordcom 0
# 1=centrala does NOT send AT+COPS=0 command at module initialization
# 0=centrala does send AT+COPS=0 command at module initialization
# available for centrala version newer than 4.3.30.r4250
# does not block the module if the sim is cut-off by the operator
gsm_NO_COPS 1

Exec.cfg 166
#1=enable, 0=disable; default 0
#specifies whether or not to add succesfull calls to Dynamic CLIP Routing
add_DCR_on_answer 1
#represents the time the call will be stored in DCR table
#time given in miliseconds
timeout_DCR 3600000
# 1=enable/0=disable; default 1
# if enabled it will accept REFER messages on trunk
trunk_REFER 1
# 1=enable/0=disable; default 0
proxy_media_transfer 0
#For 1xE1.
wait_cfg2_e1 0
# 1=enable, 0=disable; default 0
# if enabled centrala will also play a disconnect message before releasing the call
# if enabled it will play the content of /mnt/app/raw/q850/q850_<release cause>_<codec>.<language>
# If calling party is behind NAT, call will be released without play
# this feature is still under development
play_disconnect_msg 0
# default 5
# specify how many times a call can be forwarded
# max value 9
max_forward 5
# Max limit for test calls from simserver
# Time is in milliseconds
digits_timeout 300000
# default 1; 0=disable; 1=enable
# if enabled will check user name and password on OAM socket connection
# It has been introduced starting with version 4.3.94 and it replaces define NOLOGIN
oam_check_credentials 1
# default 0; 0=disable; 1=enable
# if enabled will use 1 voip slot for HDLC communication for each E1 flow
# It has been introduced starting with version 4.3.94 and it replaces define HDLCFROMVOIP
# on change restart is required
hdlc_from_voip 0
# default 0; 0=disable; 1=enable
# if enabled centrala will fork a child that will heat the heartbeat device
# otherwise centrala itself will heat the heartbeat device
# It has been introduced starting with version 4.3.94 and it replaces define CHILDHIT
# on change restart is required

Exec.cfg 167
child_hit_hb 0
# default 1; 0=disable; 1=enable
# if enabled centrala will fork an internal child process for each outgoing process resulted from routing
# this applies only to forked (until ring/answer) prefixes on multiple destinations.
# if enabled involves extra CPU load, according to the number of calls forked.
# It has been introduced starting with version 4.3.94 and it replaces define MULTIROUTESCALL
fork_childs_in 1
# default 0; 0=disable; 1=enable
# It has been introduced starting with version 4.3.94 and it replaces define CALLREC
# on change restart is required
call_record 0
# default 0; 0=disable; 1=enable
# CFD=Concentrator Digital Feroviar (Digital railway multiplexer)
# It has been introduced starting with version 4.3.94 and it replaces define CFD
# on change restart is required
CFD 0
# default 0; 0=disable; 1=enable
# It has been introduced starting with version 4.3.94 and it replaces define VCSS_DB
# on change restart is required
vcss_db_config 0
# default 0; 0=disable; 1=enable
# It has been introduced starting with version 4.3.94 and it replaces define NEWVOTING
# on change restart is required
new_voting 0
# default 0; 0=disable; 1=enable
# It has been introduced starting with version 4.3.94 and it replaces define PUPI_INTERFON
# on change restart is required
pupi_interfon 0
# default 0; 0=disable; 1=enable
# It has been introduced starting with version 4.3.94 and it replaces define USEDSP4FORRADIO
# on change restart is required
use_dsp4_for_radio 0
# default 0; 0=disable; 1=enable
STCR 0
# default 0.10
tax_unit 0.10
# default 180000 seconds, 3 minutes
# timeout until the call is still up after receiving of SUSPEND message from SS7
# this timer is configurable starting with date 02 June 2009, see build date from centrala version
timeout_suspend 180000

Exec.cfg 168
# enable set control command
control_gsm_from_telnet 1
# timeout in milliseconds for query a provider
# default 300000 ms
timer_gqueryprovider 300000
#insert IMSI in *.sms file
#default is disabled
gsm_sms_CIMI_2_db 1
#sms cache available from centrala_snr_15708
#default value is 1
#if disabled the sms will be droped if no channel available or no exists for that destination
no_sms_cache 1
GoTo >Main Page > centrala
Trafic.cfg
GoTo >Main Page > centrala
Warning: If you changed a value from/to 0(disable) to/from 1(enable) and you want to
change it back, DO NOT comment the line, change the value back to 0 or 1. If you comment
the line the value will remain unchanged
# time interval for calculating instantaneous ASR
# default 30 seconds
asr 30
# param1: 1=enable/0=disable port debug
# param2: port start
# param3: port end
# param4: 1=enable/0=disable write to file
debug 1 0 2000 1
#param1: 1=Alerts Activated/0=Disabled
#param2: ASR Alert Limit(minutes)
#param3: Time period for checking (minutes)
#param4: Minimum calls number
#param5: Alarms for alerting
#param6: timer for testing alerts(minutes)
wake 0 80 60 100 00 0
# 00=deactivated; 18=full debug
q921_debug 00
# 00=deactivated; 18=full debug
q931_debug 00

Trafic.cfg 169
#send ATD command without semicolon, used in conjucture with DIRSENDDATAATD. For centrala 4.3.88_rev10000 or newer
#0 = deactivated 1=activated
voicecallwithoutsemicolon 1
# 1=enable; 0=disable; default=1
# If enabled will generate PROGRESS message for calls terminated on FXS/GSM/CDMA ports
# For SIP calls 183 Session Progress message will be sent
# It is useful if the caller want to hear the ring back or voice announcement from destination
tx_progress 1
Send ANI in fsck format for FXS ports
# default 0
tx_fsck 0
# after 20 subsequent calls not connected ring back GSM module is reseted
maxgsmfailure 20
# after 20 subsequent calls without ring back GSM module is reseted
maxgsmnoringback 20
# param1=Q850 cause received from destination
# param2=enable/disable reroute call on cause specified
rerouteoncause 34 1/0
# param1=Q850 cause received from destination
# param2=Q850 cause sent to the source of the call
translatecause 133 34
# param1= E1 card number on which you want to enable translate id
# param2=common prefix
# param3=start range
# param4=end range
translate_id_out 16 23204 00 99
#simserver
#simserver ip address
#simserver communication port
#gateway name (must be identical in simserver web interface)
simserver 192.168.1.18 13001 Voibridge
# enable/disable test calls generator
run 0
pause 10
#connex time
con 30

Trafic.cfg 170
# in order to work SENDCALL class (direction) must be created
777 98 98 0
traffic_run 0 4 test
traffic_idle 15 1
traffic_sel 4 5
traffic_con 1 5
traffic_call 777 100
traffic_call 777 100
traffic_call 777 100
traffic_call 777 100
#resetare contori de timp pe toate modulele gsm
initcountersgsm hh mm dd
Dirname.cfg
GoTo >Main Page > centrala
This file contains only correspondence between id and name.
Class settings are made in dir.cfg file.
This file is used only in text configuration mode.
Important:
Starting with version 4.3.92 (see centrala version) this file is not used anymore
Default path: /mnt/app/cfg/dirname.cfg
:m Lines starting with ':m' character represent comments and are ignored
:m Lines starting with ':n' represent valid lines
:m Format: :n class_id class_name(direction name)
:m class_id: - integer value between >= 0 and < NR_DIR_PBX,
:m - NR_DIR_PBX is hard coded, run centrala -v to see the value for NR_DIR_PBX
:m - must be unique across all classes
:m class_name: max 19 characters
:n 00 MYVOIP
:n 01 FXO
:n 02 GSM
:n 03 SENDSMS
:n 04 E1R2
:n 05 ISDN1

Card.cfg 171
Card.cfg
GoTo >Main Page > centrala
File card.cfg stores card configuration
Example of a card.cfg file with 16 GSM cards and 1 VOIP card
File: /mnt/app/cfg/card.cfg
#---CARD FILE---
#c nrcard type(SUB,GSM,JPABX,E&M,BL,E1R2,E1ISDNU,E1ISDNN,E1SS7,E1R1)
#c nrcard IPH323 RTPSTART(%d) NRPORTS(%d)
c 00 GSM
c 01 GSM
c 02 GSM
c 03 GSM
c 04 GSM
c 05 GSM
c 06 GSM
c 07 GSM
c 08 GSM
c 09 GSM
c 10 GSM
c 11 GSM
c 12 GSM
c 13 GSM
c 14 GSM
c 15 GSM
c 32 IPH323 31000 64
For ISDN Card: Even number ISDN•cards have priority in establishing the system clock (It is recommended to use
these ports for connecting to the PSTN. When dealing with an equipment with 4 E1 links, from which 2 E1 links are
with PSTN, it is recommended to plug one PSTN link in each card, and activate Synchronize Clock on them, as E1
card activation may differ from one boot up to another.
c 16 E1ISDNU 2 10
c 17 E1ISDNN 6 30
#c nrcard type(E1ISDNU,E1ISDNN) [aa] [bb]
aa - bitmap:
0x01 - Send MFAS
0x02 - Send CRC (one side send and the other receive)
0x03 - Receive CRC (one side send and the other receive)
0x04 - Synchronize Clock - Network ( one side with sync and the other with no sync); This E1 link
will synchronize the system clock
0x20 - Non Generate Clock - delays the clock generation on bus giving priority to other cards
(It refers to whole 2E1 card not only one E1 link )
bb:
terminalul de semnalizare 0
terminalul de semnalizare 1
bit.no. 8 7 6 5 | 4 | 3 2 1 0
0 0 0 0 | 1 | 0 0 0 0 (10)

Card.cfg 172
0 0 0 1 | 1 | 0 0 0 0 (30)
8 4 2 | 1 | 8 4 2 1
Port.cfg
GoTo >Main Page > centrala
File port.cfg stores port configuration.
FXS cat bit values:
- MSKINST 0x0001
- MSKLOC 0x0002
- MSKBC 0x0004
- MSKDTMFALARM 0x0004
- MSKOPPRG 0x0004
- MSKDTMF 0x0010 // Can dial in DTMF mode
- MSKAPE 0x0020 // Can make calls
- MSKBL 0x0040 // BL
- MSKIPO 0x0080 // Busy Intrusion
- MSKPUPI 0x0100
- ISDNTYPE 0x0c00
- ISDNTYPEVCSS 0x0000
- ISDNTYPEBRI 0x0400
- ISDNTYPERG 0x0800
- ISDNTYPEFREE 0x0c00
- MSKELIBBL 0x0800
- MSKURCALL 0x0800
- MSKPLTEST 0x1000
- MSKCONF 0x2000
FXO cat values:
- MSKINST 0x0001
- MSKJON 0x0002
- MSKJI 0x0004
- MSKJO 0x0008
- MSKDISA 0x0010
- MSKTON 0x0020
- MSKCROSS MSKTON
- MSKRXSQ 0x0010 // Rx on SQ(not VOTING)
- MSKTXSQ 0x0020 // Activate SQ on Tx
- MSKEM 0x0040
- MSKEMR 0x0080
- MSKGSM 0x0080
- MSKPAG 0x0800
- MSKB1 0x0400
- MSKB2 0x0800
- MSKTAXIN 0x1000
- MSKTAXOUT 0x2000

Port.cfg 173
- MSKIP 0x0200
- MSKE1 0x4000
- MSKJ 0x000c
- MSKTAX 0x3000
MYVOIP cat1 bit values:
- TRANSCODINGVOIPPORT 0x00000000
- RTPPROXYVOIPPORT 0x00100000
- HDLCVOIPPORT 0x00200000
GSM cat bit values
-NODISA 0x019f // No DISA tone
-DISA 0x018f // DISA tone
Example
#---PORT FILE---
#p port card cat(%x) cat1(%x) dir number restr target (FXS)
#p port card cat(%x) cat1(%x) dir sim target (GSM/CDMA)
#p port card cat(%x) cat1(%x) dir target (FXO)
#p port card cat(%x) cat1(%x) dir (E1/VoIP)
p 1 1 0031 00000037 FXS 285 0 0
p 2 1 0031 00000037 FXS --- 0 0
p 0 14 19bf 00000000 ORANGE 0 0
p 1 14 19bf 00000000 ORANGE 0 0
p 20 16 440f 00000000 ISDN
p 2 32 020f 00000000 MYVOIP
p 2 32 020f 00100000 MYVOIP

Dir.cfg 174
Dir.cfg
GoTo >Main Page > centrala
Intro
Configuration file for classes (directions) and routes.
This file is used only in text configuration mode.
See also Users and Classes and Routing table.
On save diripin.cfg and diripout.cfg are also reloaded into memory.
Route prefix order is important, must be sorted ascending from up to down.
Default path: /mnt/app/cfg/dir.cfg
Example
# Lines starting with '#' character represent comments and are ignored
# Lines starting with 'd' represent class settings
# Lines starting with 'r' represent routing settings
# Class settings must always be defined before routes settings
# d class type overflow_class overflow_class2 restr ign ins maxd ignid insid maxid sign1 sign2 sign3
# sign4 sign5 sign6 time_in cost_in max_time_in max_cost_in
d xxx DIR xxx xxx 00 00 c 20 00 c 20 0000 00000000 00000000 00000000 00000000 00000000
d MYVOIP DIR MYVOIP MYVOIP 00 00 c 20 00 c 20 0000 00000000 00000000 00000000 00000000 00000000
d SIPusers DIR SIPusers SIPusers 00 00 c 20 00 c 20 0000 00000000 00000000 00000000 00000000 00000000
d MYVOIP2 DIR MYVOIP2 MYVOIP2 00 00 c 20 00 c 20 0000 00000000 00000000 00000000 00000000 00000000
d SIPusers2 DIR SIPusers2 SIPusers2 00 00 c 20 00 c 20 0000 00000000 00000000 00000000 00000000 00000000
# ---ROUTE---
# r in_class prefix action destination IP Port ign ins ignid insid sign1 tax sign2 max_con_time search_mode search_data
# sign3 sign4 sign5 sign6 start_time end_time dows billing_profile_id_in route_name play_file billing_profile_id_out
r DEFAULT 1ff DIRIP SIP 192.168.192.40 0 00 c 00 c 0035 0000 0 0 0 0 0 0 0 0 00:00:00 23:59:59 127 0 rucu ceeee
r DEFAULT 2 SERV 00020 0 0 00 c 00 c 0000 0000 0 0 0 0 0 0 0 0 00:00:00 23:59:59 127 0 r1121 c
r DEFAULT 3ff DIR SIPusers 0 0 00 c 00 c 0035 0000 0 0 0 0 0 0 0 0 00:00:00 23:59:59 255 0 ROUTE1224991520_2 c
r DEFAULT 4 SERV 00004 0 0 00 c 00 c 0000 160a 0 0 0 0 0 0 0 0 00:00:00 23:59:59 255 0 ROUTE1224991520_3 c
Class fields description
Field 0: 'd'
Must be always 'd', comes from direction (class)
Indicate that current line is a class line
Field 1: Class name
Must be one the class names defined in dirname.cfg
Field 2: Class type
Accepted values: PORT and DIR
Field 3: Overflow class name
Overflow class name used in old style rerouting, not recommended anymore.
Field 4: Second overflow class name
Second overflow class name used in old style rerouting, not recommended anymore.
Field 5: Restriction index

Dir.cfg 175
Specify an restriction index defined in restr.cfg file.
Field 6: Ignore from DNIS
Specify how many digits to ignore from the beginning of DNIS.
Field 7: Insert into DNIS
Specify digits that will be inserted at the beginning of DNIS.
Field 8: Max DNIS
Specify maximum length of DNIS.
Field 9: Ignore from ANI
Specify how many digits to ignore from the beginning of ANI.
Field 10: Insert into ANI
Specify digits that will be inserted at the beginning of ANI.
Field 11: Max ANI
Specify maximum length of ANI.
Field 12: Signaling 1
Two octets bit mask.
Values:
€ DIRRXID 0x0001
Receive identity
€ DIRTXID 0x0002
Send identity
€ DIRLOADBALANCED 0x0004
Load balancing algorithm for GSM/CDMA SIM cards
€ DIRPREANSWERREVTONE 0x0008
Coupling of ring back tone
€ DIRLEVEL 0x00f0
Audio level (used for GSM/CDMA modules)
€ DIRTESTNET 0x0100
Test network before sending the call on GSM/CDMA
€ DIRGOODASR 0x0200
In case that first call to GSM/CDMA fails it try to send call on a second module in order to have a good ASR
€ DIRCATCALL 0x0400
It will cat the call when max time speech is reached used only for SIM cards; max time is set in GSM/CDMA
settings
€ DIRCHECKTXID 0x0800
Check if the identity is set corectly (according to DIRRXID/DIRRXID) before sending each call on GSM/CDMA
module
€ DIRCHECKCALLBACK 0x1000
Activate ANI checking for callback or ani users matching; see ANI users
€€ DIRCALCULATECOST 0x2000
€ DIRBALANCEDCOST 0x4000
If this bit is not set => balanced on time
€ DIRMODULECDMA 0x8000
For CDMA modules
Field 13: Signaling 2
For octets bit mask.
Values:
€€ DIR1TRANZITQ850 0x00000001

Dir.cfg 176
€€ DIR1BALANCEDSIMINDEX 0x00000002
€€ DIRSENDTAX 0x00000004
€€ DIRGETTAX 0x00000008
€€ DIRCHECKCREDIT 0x00000010 // check credit
€€ DIRNOPOWEROFF 0x00000020
€€ DIRLOADCREDIT 0x00000040 // load credit
€€ DIRPLAYTONE 0x00000080
€€ DIR1JPABXWAITDIALTONE 0x00000700 // cate 500ms asteapta venire ton pe jonctiune PABX
€€ DIRDELAYCDMA 0x00000f00
€€ DIRRINGBACKDETECT 0x00001000 // for CDMA
€€ DIRDELAYRESETSS7 0x00002000
€€ DIRTYPESEARCH 0x0000c000
€€ DIRTYPESEARCHUP 0x00004000
€€ DIRTYPESEARCHDOWN 0x00008000
€€ DIRCHECKCREDITFIRST 0x00010000
€€ DIRPRIORITY 0x0ff00000
€€ DIRH323NOTUNNELH245 0x10000000
€€ DIRH323NOFASTSTART 0x20000000
€€ DIRPLAYCLIERROR 0x40000000
€€ DIRANSWERCLIERROR 0x80000000
Field 14: Signaling 3
For octets bit mask.
€€ DIRTXCHANNELISDNUSER 0x00000001
€€ DIRCHECKDNIS 0x00000002
€€ DIRCHECKANI 0x00000004
€€ DIRTRANSLATEDNIS 0x00000008
€ DIRLIMITONTIME 0x00000010
Enable max time (in seconds) checking on this class, use_class_counters from exec.cfg must be on
€€ DIRCUTONERRORDB 0x00000020
€ DIRLIMITONCOST 0x00000040
Enable max cost checking on this class, use_class_counters from exec.cfg must be on and a billing profile to be
set
€€ DIRCHECKSUFIX 0x00000080
€€ DIRSENDLRQ 0x00000100
Field 15: Signaling 4 For octets bit mask. Values:
€ DIRDELAYANSWER 0x00000001
Used for calls from GSM modules. If set it will not answer to the call until the destination answer. In order to
work DISA must be checked also in GSM port category
€€ DIRNUMBERNORM 0x00000002
€ DO_NOT_PLAY_ANN 0x00000004
If set will not play routing announcement for calls received on this class
€€ DIRSENDDATAATD 0x00000008
€ SET_ALL_DNIS 0x00000010
If set will mark ALLDIGITBIT for all calls received on this class
€ DIRATDNETWORKID 0x00000020
If set call will use the gsm networks CLI settings, gsm modifiers i or I will not be used. Used only for physical

Dir.cfg 177
sims.
Field 16: Signaling 5
Not used yet, reserved for future developments.
Field 17: Signaling 6
€ RX_SIP_INFO 0x00000001
Accept/Ignore incoming DTMF via INFO method on SIP signaling
€ RX_H245_ALPHA 0x00000002
Accept/Ignore incoming DTMF via H245_Alphanumeric method on H323 signaling
€ RX_H245_SIGNAL 0x00000004
Accept/Ignore incoming DTMF via H245_Signal method on H323 signaling
€ RX_Q931_KEYPAD 0x00000008
Accept/Ignore incoming DTMF via Q931_Keypad method on H323 signaling
€ RX_RFC2833 0x00000010
Accept/Ignore incoming DTMF via RTP with RFC 2833
€ RX_INBAND 0x00000020
Accept/Ignore incoming DTMF via RTP inband (bypass). Should be used only with G711 codecs
€ TX_SIP_INFO 0x00000100
Only one of the bellow values must be set at a time. Tx outgoing DTMF via INFO method on SIP signaling
€ TX_H245_ALPHA 0x00000200
Tx outgoing DTMF via H245_Alphanumeric method on H323 signaling
€ TX_H245_SIGNAL 0x00000400
Tx outgoing DTMF via H245_Signal method on H323 signaling. Not supported yet
€ TX_Q931_KEYPAD 0x00000800
Tx outgoing DTMF via Q931_Keypad method on H323 signaling. Not supported yet
€ TX_RFC2833 0x00001000
Tx outgoing DTMF via RTP with RFC 2833
€ TX_INBAND 0x00002000
Tx outgoing DTMF via RTP inband (bypass). Should be used only with G711 codecs
Field 18: Time in
Represents current time (in seconds) speech on this class.
Field 19: Cost in
Represents current cost (in default currency) charged on this class.
Field 20: Max time in
Max time (in seconds) allowed to speech on this class.
Field 21: Max cost in
Max cost (in default currency) allowed on this class.
Route fields description
Field 0: 'r'
Must be always 'r', comes from route
Indicate that current line is a route line
Field 1: Incoming class name
Incoming class name according to which will be routed the call.
DEFAULT is a reserved name and means any class. Must not be defined as class name in Dirname.cfg.
Field 2: Prefix
Prefix from call DNIS that match this route.

Dir.cfg 178
Special characters:
f = any digit; allowed anywhere into the prefix field once or more times (ex: 07f23f56f).
r = indicates a regular expression prefix
p = specify the priority for this prefix; allowed only before the prefix a reg exp prefix.
Field 3: Action
Specify type of destination, which can be:
€DIR(Class):
Indicate that destination field contains a class id. For VoIP calls IP and port of outgoing class must be configured
in AccessOut (Dir IP Out Settings from OAM Define calls directions window)
€DIRIP:
Indicate that destination field contains VoIP protocol (SIP/H323). Allow you to specify in routing rule the IP and
port of destination. This action is deprecated because some of the routing features will not be supported, action
Class (DIR) must be used instead.
€LCR
Indicate that destination field will contain a LCR (Leas Cost Routing) index. On LCR index you specify
according to the time interval different destination class
€SERV(Service)
Indicate that destination will contain the special service number. Used to route the call on a special service.
€HUNT(Hunting)
Indicate that destination will contain the number of FXS hunting group. Allow you to route a call on a FXS
hunting group. For SIP hunting groups SERV_HUNTING must be used.
€PORT
Indicate that destination will contain a port number. Used when you route a call directly to a FXS or BRI (NT
mode) port
Field 4: Destination
Specify outgoing ClassId/Protocol/LCRindex/ServiceCode/HuntingGroup/PortNumber for the call. Destination type
is directly related with value of Action field.
Field 5: IP
Used only when action is DIRIP.
Specify the remote IP where the call will be sent.
Field 6: Port
Used only when action is DIRIP.
Specify the remote port where the call will be sent.
Field 7: Ignore from DNIS
Specify how many digits to ignore from the beginning of DNIS.
When action is DIR and class type is PORT changed DNIS must match an ANI assigned to a port from destination
class.
Ex: If FXS/BRI user numbering pool is between [100 an 199] and you have the prefix 6661ff routed to FXS/BRI
class you will have to ignore 3 digits (666) from DNIS in routing, otherwise you will receive INEX.
Field 8: Insert into DNIS
Specify digits that will be inserted at the beginning of DNIS.
When action is DIR and class type is PORT changed DNIS must match an ANI assigned to a port from destination
class.
Ex: If FXS/BRI user numbering pool is between [110 an 119] and you have the prefix 1f routed to FXS/BRI class
you will have to insert digit '1' in front of from DNIS in routing, otherwise you will receive INEX.
Field 9: Ignore from ANI
Specify how many digits to ignore from the beginning of ANI.

Dir.cfg 179
Field 10: Insert into ANI
Specify digits that will be inserted at the beginning of ANI.
Field 11: Signaling 1
Two octets hexa bit mask.
- DIRCALLTOUT 0x000f - DIRCALLMAXDIG 0x01f0 - DIRREZERVE 0x0600 - DIRSIMULATECONNECT
0x0200 - ROUTERESTRICTID 0x0400 - DIRCHECKOPERATOR 0x0800 - DIRCALLRETRY 0x1000 -
CLEARDIRCALLRETRY 0xefff - DIRSIMULATETAX 0x2000 - DIRTRANZIT 0x4000 - DIRALLOCBSS
0x8000
Field 12: Tax units
Field 13: Signaling 2
Four octets hexa bit mask.
€€ NOACALLEDPARTY 0x0000000f
€€ CHECKNOACALLEDPARTY 0x00000010
€€ NEWNOACALLEDPARTY 0x00000f00
€€ OVERRIDENOACALLEDPARTY 0x00001000
€€ NEWNOACALLINGPARTY 0x000f0000
€€ OVERRIDENOACALLINGPARTY 0x00100000
€€ INTMR 0x0f000000
€€ CHECKINTMR 0x10000000
€€ ROUTEPRIORITY 0x20000000
€€ ROUTETRANSLATENR 0x40000000
Field 14: Max connection time
Allow you to configure a max duration (in seconds) for calls on that route.
Field 15: Search_mode
Specify routing algorithm used in case you have more routes with the same prefix.
Algorithms list:
€€ ASR (Average Seizure Rate)
€€ ACD (Average Call Duration)
€€ Priority
€€ Down
€€ Up
€€ Circular
€€ Percent
€€ Fork Answer
€€ Fork Ringing
Field 16: Search_data
Specify values for selected algorithm in Search Mode field.
In case of Priority algorithm range value is from 0 to 9; Higher value (9) indicate higher priority.
Field 17: Signaling 3
Four octets hexa bit mask.
Specific to each special service selected.
Field 18: Signaling 4
Four octets hexa bit mask.
€€ INCATEGORY 0x0000000f
€€ CHECKINCATEGORY 0x00000010
€€ NEWINCATEGORY 0x00000f00

Dir.cfg 180
€€ OVERRIDEINCATEGORY 0x00001000
€€ ROUTEPLAYBEFOREANSWWER 0x00002000
€€ ROUTEPLAYATANSWER 0x00004000
€€ CATEGTOSIP 0x00008000 // Tx calling party category to SIP
€€ CALLINGNOA 0x00f00000 //national 3,subscriber 1,international 4,unknown 2,UK_specific 5
€€ CHECKCALLINGNOA 0x01000000 //set this bit to 1 if you want that this route to be valid only for specified
NOA in CALLINGNOA
Field 19: Signaling 5 Four octets hexa bit mask.
€ PLAY_PORTED_ONLY 0x00000001
If set will play routing announcement only to ported numbers
Field 20: Signaling 6
Four octets hexa bit mask.
Not used yet, reserved for future developments.
Field 21: Start time
Specify start time of day since when the route is enabled.
Format: hh-mm-ss (hour-minutes-seconds)
Example: 00:00:00
Field 22: End time
Specify end time of day after which the route is disabled.
Format: hh-mm-ss (hour-minutes-seconds)
Example: 23:59:59
Field 23: Dows
Bit mask field.
Values: Mon=0x01 Tue=0x02 Wen=0x04 Thu=0x08 Fri=0x10 Sat=0x20 Sun=0x40 Holiday=0x80
Specify days of week when the route is enabled.
You can specify also if route is valid during holidays.
Holidays are defined in Simindex.cfg file and have higher priority vs normal days.
For example if today is a defined holiday (let say 01 January) routes will be enabled/disabled according to the
holiday value set ignoring the value for current day (let say Tuesday).
Field 24: Billing profile id in
Field 25: Route name
Field 26: Play file name
It is used to:
- play announcement to call source before sending the call to destination.
In this case rtp proxy is activated automatically for all calls on this route.
File path: /mnt/app/raw/
File format: <file name>_<codec(2 digits)>.<language(2 characters)>
Example: play_00.ro, test_08.en, test_play_18.en etc.
Important: play_file field from route will contain only file_name, without codec and language extensions.
Codec will be matched according to the source codecs of call.
Default language from /mnt/app/cfg/prepaid.cfg wil be used.
- assign the name of IVR script that will be processed for that prefix.
In this case action=service and destination=IVR.
File path: /mnt/app/raw/ivr/
Field 27: Billing profile id out

Voip.cfg 181
Voip.cfg
GoTo >Main Page > centrala
Default path: /mnt/app/cfg/voip.cfg
# 0/1/2
# on VERSION 1 transcoding is done for all calls
# starting with version 4.3.79 this parameter is not used anymore
VERSION 2
# 0/1 dtmf INFO disabled/enabled
# deprecated, not used anymore
dtmfINFO 1
# dtmf rfc 2833
# dtmfRTP pt redundant_pt redundancy_scheme (0=IETF/1=AAL2)
# rfc2833 is disabled if this line is missing
dtmfRTP 101 100 1
# voice active detection
vad 0
# codec/ptime format
# Codec can have the folowing values:
# 0 PCMU
# 2 G726-32
# 4 G723
# 8 PCMA
# 18 G729a
audio_codecs 18 20 8 20 4 20 0 20
voipgw 192.168.1.2 (VOIP card IP address)
# public voip card ip
publicvoipgw 192.168.1.2
# ip of the host where the mspd application runs, usually local ip
msp 192.168.1.1
forkmspd /mnt/app/bin/mspd - -v --mem 16 --gw-mac 00:54:C2:40:7B:70 -m 00:54:C2:40:7B:71 192.168.1.2 --log /mnt/app/out/%d-%m-%y_mspd.log
h323 192.168.1.1 9010
forkh323 /mnt/app/bin/h323_apc -p9010
ss7 /tmp/ccs_sock2
forkss7 /mnt/app/bin/SS7_apc -l0 -sccs_sock2 -d../dev/

Voip.cfg 182
Warning: If /mnt/app/cfg/group.cfg exists then voipgw, publicvoipgw, msp, forkmspd
settings are taken from group.cfg
Diripin.cfg
GoTo >Main Page > centrala
Changes made on diripin.cfg file are loaded into memory only after saving dir.cfg file. From OAM diripin.cfg can
edited in window "Calls directions > DIR IP In Settings". If you made any changes you need to click OK twice: first
in DIR IP In Settings window then in "Calls directions" window.
This file is used only in text configuration mode. AccessIn is the correspondence of diripin.cfg when database
configuration mode is used.
Important:
If you have more than one line with same class name, last line will override some of the previous lines fields. The
following fields value will be overwritten: maxcall, rtpproxy, transcoding, congrate, maxrate.
Default path: /mnt/app/cfg/diripin.cfg
# Lines starting with '#' means comments and are ignored
# Lines starting with 'i' means valid lines and are loaded into memory
# i protocol ip/netmask class_name maxcalls rtpproxy transcoding congrate maxrate prefix maxcost nrdig endcause
i SIP 0.0.0.0/0 MYVOIP 1000 0 0 1000 1000 p 0 0 0
i H323 89.38.23.78/32 GW_IN 100 1 0 100 100 p0723 0 0 0
Fields descriptions:
€Field0: 'i'
Always character 'i'
€Field1: Protocol
Incoming call signaling protocol;Values: SIP or H323
€Field2: IP/Netmask
Signaling source IP class
Examples:
€€ 192.168.0.0/16
€€ 89.38.23.144/32
€Field3: Class name
Class id assigned for calls matching this line.
€Field4: MaxCalls
Maximum number of simultaneous incoming calls for class assigned
€Field5: RTPProxy
RTP proxy on assigned class
Values: 0=Not Used; 1=Used except same NAT; 2=Always
€Field6: Transcoding
Transcoding on assigned class;
Values: 0=Not Used; 1=Different Codec; 2=Different DTMF RTP; 3=Different Codec/Different DTMF RTP;
4=Always;
€Field7: CongRate
Congestion rate

Diripin.cfg 183
€€ Field8: MaxRate
€Field9: Prefix
Incoming prefix of call. Must always have character 'p' in front.
€€ Field10: MaxCost
€Field11: NrDig
Number of digits received in DNIS. In number of digits received don't match the value specified here, call will be
rejected with cause specified in End Cause field. 0 = disable checking the number of digits received
€Field12: EndCause
Q850 end code.
Diripout.cfg
GoTo >Main Page > centrala
Definition: Allows you to specify destination class settings for outgoing VoIP calls.
You can see this as an extension of class settings.
Classes defined in diripout.cfg are mapped 1 to 1 with classes from dir.cfg.
Default path: /mnt/app/cfg/diripout.cfg
Changes made on diripout.cfg file are loaded into memory only after saving dir.cfg file. From OAM diripout.cfg can
edited in window "Calls directions > DIR IP Out Settings". If you made any changes you need to click OK twice:
first in "DIR IP Out Settings" window then in "Calls directions" window.
This file is used only in text configuration mode. AccessOut is the correspondence of diripout.cfg when database
configuration mode is used.
Important:
If you have more than one line with same class name, last line will override some of the previous lines fields. The
following fields value will be overwritten: maxcalls, rtpproxy, transcoding, congrate, maxrate, acctimer, accstep,
accm, acc2timer, accproc.
# Lines starting with '#' means comments and are ignored
# Lines starting with 'o' means valid lines and are loaded into memory
# o class_name protocol ip port maxcalls rtpproxy transcoding congrate maxrate acctimer accstep accm acc2timer accproc transport mediaparam
o SIPusers SIP 0.0.0.0 0 30 0 0
o OUT SIP 172.18.254.254 0 30 0 0
Fields description:
€Field 0: 'o'
Always character 'i'
€Field 1: ClassName
Outgoing class name to which the settings from this line apply
€Field2: Protocol
Outgoing call signaling protocol; Values: SIP or H323.
€Field3: IP
Signaling destination IP.
€Field4: Port
Signaling destination port; 0 means default protocol value, 5060 for SIP, 1720 for H323.

Diripout.cfg 184
€Field5: MaxCalls
Maximum number of simultaneous outgoing calls for this class.
€Field6: RTPProxy
RTP proxy on assigned class
Values: 0=Not Used; 1=Used except same NAT; 2=Always
€Field7: Transcoding
Transcoding on this class
Values: 0=Not Used; 1=Different Codec; 2=Different DTMF RTP; 3=Different Codec/Different DTMF RTP;
4=Always;
€Field8: Congrate
Congestion rate
default 1000
€€ Field9: MaxRate
default 1000
€€ Field10: ACCTimer
default 0
€€ Field11: ACCStep
default 0
€€ Field12: ACCM
default 0
€€ Field13: ACC2Timer
default 0
€€ Field14: ACCproc
default 0
€Field15: Transport
Transport layer used for IP call
€€ 0 = UDP
€€ 1 = TCP
€€ 2 = TLS
€Field16: MediaParameters
Format: pt=<codec_value>;ms=<ms_value>...
ms is optional and if is missing default value is 20
Example: pt=0;ms=20;pt=18;ms=20

Group.cfg 185
Group.cfg
GoTo >Main Page > centrala
Warning: If file group.cfg exits Voip settings will be read from here. group.cfg has
precedence over voip.cfg file
Warning: Starting Topex Ver 4.3.30 Rev: 5489, on old equipments, group 0 hast to be:
g 0 0 0 0 0 0
Telnet command
€€ view groups - show groups configuration loaded in memory
# master line
# 1=master, 0=slave
m 1
# group line
# field 1: g = group line indicator;
#
# field 2: group number; on versions over 4.1.90 you can see the number of groups with
# wich centrala was builded by running centrala -v and look for NRGROUP value
#
# field 3: group type:
# - 0=FXS, FXO, BRI, GSM, CDMA, BL, E&M, MPAI, RADIO, ISDN-VCSS
# - 1=E1
# - 2=VoIP|RTPproxy
#
# field 4: remote IP
# This field must be filled the same for all groups assigned to an equipment
# Master case
# - this is the IP where the master will try connect on TCP socket
# - if IP is different than 0.0.0.0 or 0 means that the master will try to connect
# to this IP and port from next field; so in this case you don't need a second line
# starting with voip; this line will appear in slave group.cfg
# - keep in mind that always the master is trying to connect to slaves defined here
# in this file
# Slave case:
# - this is the bind IP of TCP server
# - if set to 0.0.0.0 or or it will bind on all network interfaces
#
# field 5: remote Port
# This field must be filled the same for all groups assigned to an equipment
# Master case: this is the port where the master will try connect on TCP socket
# Slave case: this the port on wich the server will listen for TCP connections
#
# field 6: Slave (equipment) type:
# - 0 = Multiacces/Qutex; max 3 groups

Group.cfg 186
# - 1 = Eones; max 12 groups
# - 2 = MGU(VoiBridge, VoxiPlus, VoxiTel); max 3 groups
#
# field 7: reserved for future development
g 0 2 195.114.116.235 9000 1 0
# voip line
# bellow line appear when type of group is 2
# filed 1: voip - voip line indicator
# field 2: group number to which this line refer
# field 3: group type, always 2
# field 4: connection IP to rtpproxy/mspd
# field 5: connection port to rtpproxy/mspd
# field 6: fork always
# field 7: path to rtpproxy/mspd and command line arguments
# next fields are are option passed to rtpproxy/mspd application
voip 2 2 127.0.0.1 9081 fork /mnt/app/bin/rtpproxy -p 9081
voip 2 2 195.114.116.235 9671 fork /mnt/app/bin/mspd -p 9671
--trace-cmd -v --mem 16 --gw-mac 00:19:AA:D2:3C:25 -m 00:52:C2:40:3E:43
195.114.116.239 --log /mnt/app/out/%d-%m-%y_mspd.log -
# rtp_ip line
# rtp_ip <group_nr> <ip_class(format: ip/netmask_len)> <rtp ip used for this class>
rtp_ip 2 192.168.0.0/16 192.168.1.193
rtp_ip 2 0.0.0.0/0 89.38.173.23
# Starting with date 25 mai 2009 (see centrala version build date) on MGU platform centrala
# will fill by default rtp_ip array for each voip group with bellow two lines
# my_pg_ip is a global variable filled by default with the IP from eth0. If eth0 is missing eth1 IP is taken and so one
# until eth4. This value can be also overwritten from exec.cfg see my_pg_ip.
rtp_ip 2 my_pg_ip/32 10.0.0.10
rtp_ip 2 0.0.0.0/0 my_pg_ip
RTP Proxy with Transcoding
Following configuration rule must be applied:
For each RTP proxy group, show IP (from rtp_ip) must be configured in all transcoding groups as rtp_ip pattern with mask 32.
Example of group.cfg
File: /mnt/app/cfg/group.cfg

Group.cfg 187
m 1
#group number type location ip_remote port_remote rez1 rez2
g 0 0 0 0 0 0
g 1 1 0 0 0 0
g 2 2 0 0 0 0
rtp_ip 2 0.0.0.0/0 89.38.174.221
voip 2 2 127.0.0.1 9677 fork /mnt/app/bin/mspd -p 9677 --trace-cmd
--axf /mnt/app/data/miro_hdvoice.axf - -v --gw-mac 00:1A:E2:E8:04:C8
--mem 16 -m 00:52:C2:40:36:B3 89.38.174.221
Sip pbx.cfg
WARNING: Article could not be rendered - ouputting plain text.
Potential causes of the problem are: (a) a bug in the pdf-writer software (b) problematic Mediawiki markup (c) table
is too wide
GoTo >Main Page > centralaExample File: /mnt/app/cfg/sip_pbx.cfg # all debug values are between 0 and 5 # 0=no
debug # 1=ERROR only # 2=ERROR+WARN # 3=ERROR+WARN+INFO # 4=ERROR+WARN+INFO+DEBUG
# 5=ERROR+WARN+INFO+DEBUG+VERBOSE # values higher that 5 are reserved for developers only # general
debug #default 5 debug 5 # user agent calls # default 5 agent_debug 5 # sip users registration to ssw # default 2
register_server_debug 2 # ssw registration to other proxy # default 5 register_client_debug 5 # loading configuration
from database # default 5 database_config_debug 5 # SUBSCRIBE/NOTIFY/PUBLISH debug # default 5
notify_debug 5 # proxy calls debug # default 5 proxy_debug 5 # OPTIONS requests # default 2 options_debug 2 #
internal queues # default 2 queue_debug 2 # call state redundancy messages # default 5 redundancy_debug 5 #
0=disable, 1=enable, default 1 console_debug 1 # 0=disable, 1=enable, default 1 file_debug 1 # in kilobytes, default
1GB # Staring with 14 May 2009 (check build date from [[centrala version]]) default is 200 MB # make sure to put it
under 2GB, which is default max file size on many Linux systems # it is recommended to not put a higher value than
default because removing old large files # from hdd could lock the main application centrala max_log_size 200000 #
0=disable, 1=enable, default 0 tcp 0 # 0=disable, 1=enable, default 0 tls 0 #udp sip port, default 5060 sip_udp_port
5060 #tcp sip port, default 5060 sip_tcp_port 5060 #tls sip port, default 5061 sip_tls_port 5061 # 0=not used, default
value # 1=postgresql database, fork precess for each request; deprecated # 2=load user settings to memory from text
file # 3=postgresql database process poll; deprecated # 4=load user settings to memory from database register 0 #
Keep database registration history for sip users # Specify start/end time interval within a sip user is online #
0=disable, 1=enable, default 0 register_history 0 # Update online users memory status to database table siplocation #
0=disable, 1=enable, default 1 update_location 1 # Must be always enabled # 0=disable, 1=enable, default 1 proxy 1
# Must be always enabled # if enabled all dialog messages will go through the SIP proxy # 0=disable, 1=enable,
default 1 record_route 1 # Register authentication # 0=disable, 1=enable, default 0 register_auth 0 # authenticate
incoming invite request on UA from sip users # 0=disable, 1=enable, default 0 users_invite_auth 1 # try to match
INVITE contact with REGISTER contact of a sip user # if no match is found the call is rejected with 403 sip code #
it applies only to sip users # 0=disable, 1=enable, default 1 check_invite_contact 1 # 0=disable, 1=enable, default 0 #
restrict transfer on trunk restrict_trunk_transfer 0 # default empty string # if not empty this prefix will be inserted
before dnis to all calls from sip users that are linked # to prepaid accounts with pin field set; this prefix must be
routed to Serv IVR # On Serv IVR you need to create a script that will will prompt the user to enter # PIN code and
it will check it against PIN code from linked prepaid account. check_pin_prefix *121# # timer in seconds; default

Sip pbx.cfg 188
600 # used if the incoming REGISTER/SUBSCRIBE/PUBLISH don't have an expire header/parameter in request
default_register_expire 600 default_subscribe_expire 600 default_publish_expire 600 # timer in seconds; default 200
# force the expire refresh interval to value configured here # it has higher priority than default_xxx_expire
forced_register_expire 600 forced_subscribe_expire 600 forced_publish_expire 600 # Type Of Service, integer
value, default 0 tos 10 # default 16 # accepted values 4, 8, 16, 32, 64 # transaction timeout, real value in seconds is
N64/2 # ex if N64=16, transaction timeout is 8 seconds N64 16 # enable=1/disable=0 music on hold; default 0; # if
enabled it will play file /mnt/app/raw/flashing/music_on_hold_**.** # rtptx_pool must be activated, see exec.cfg
music_on_hold 1 # default empty string # if set will play the announcement file for each proxy call before
forwarding INVITE on called sip user play_announcement announcement_file # Regular expressions that match
'User-Agent' or 'Server' fields from clients that are asymmetric # regarding SIP signaling. Needed to detect when a
client is asymmetric regarding SIP signaling. # A UA is asymmetric from SIP signaling point of view when it send
requests from one UDP port # and expects responses on other UDP port specified in Via header. Most UA are
symmetric. # First is looking after User-Agent and then on Server header. # If both of them are missing client is
supposed to be SIP symmetric. # Asymmetric checking applies only when UDP is used and not for TCP and TLS. #
On TCP and TLS source port is usually different than the Via port. # Determining the type of UA asymmetric or
symmetric is important when checking if a UA is behind NAT. # When symmetric ip and port from Via headers is
checked with source ip and port of received. # When asymmetric ip only from Via headers is checked with source ip
of received request. # Keep in mind that asymmetric clients don't work behind NAT # Max 50 lines are allowed #
default empty list asymmetric_ua Grandstream HT496 1.0.3.* asymmetric_ua Linksys/SPA922* # Regular
expressions that try match 'User-Agent' or 'Server' fields from REGISTER requests # First is looking after
User-Agent and then on Server header. # If both of them are missing will try to match empty string. # Max 50 lines
are allowed # default empty list; that means also ua_acl checking is disabled # when enable only user agent that
match bellow list will be allowed to REGISTER on proxy # introduced starting with version 4.3.96 see centrala
version ua_acl Cisco-SIPGateway/IOS* ua_acl snom370/7.1.* # remote heartbeat udp port where the KEEP_ALIVE
messages are sent # 0=disable sending of KEEP_ALIVE messages # default 0 # same port must be configured also
in heartbeat application at app_port or second_app_port # centrala will bind this port minus 1, in this case 9000, so
KEEP_ALIVE messages will have source port 9000 and destination port 9001 # heartbeat application will check
source port in order to match KEEP_ALIVE with a specific centrala heartbeat 9001 # configure the ip:port of server
redundant equipment # one equipment must be client and the other one must be server # a TCP socket is used; one
equipment is server and the other one is client # this IP is the server IP and it is has to be the same on both
equipments redundancy client/server 192.168.1.193:8001 # Enable a SIP user to redirect (forward) a call from SIP
phone instead using call forward setting from SSW # 0=disable, 1=enable, default 1 user_redirect 0 # 0=disable,
1=enable, default 0 # Used in conjunction with [[register_users.cfg]] # Specify how the REGISTER requests (for
each user from register_users.cfg) are sent to the proxy # If disabled will all REGISTER requests to SIP proxy at
once. # If enabled will send REGISTER requests to SIP proxy at a random interval # in range [0 ... 120] seconds. # If
enabled it can be used also as testing tool to simulate real behavior when a proxy receives # REGISTER requests
randomly. register_client_random 0 # Number of database records read once from a database table (ex. sipusers,
sipuseralias etc.) # interval between 10 and 500, default 50 database_row_chunk 50 # string value, default version of
centrala application (run centrala -v to see version) user_agent "Topex" # Max call time for proxy calls # if this value
is reached the proxy will cut the current call # time in seconds # 0=disable; default 0 max_call_time 3600 # time in
seconds # interval between 90 and 7200, default 1800 session_expires 1800 # time in seconds # interval between 90
and 7200, default 90 min_session_expires 90 # Used for testing purposes on multiaccess/qutex # if enabled the rtp ip
from SIP SDP content will contain the PG IP instead of VoIP IP # 0=disable, 1=enable, default 0 test_rtp 0 #
add_country_code classid <regular expression pattern> <ignore from dnis> <country code prefix added for that
pattern> # this line it useful for example if you want to add a country code for calls initiated # by the SIP users to
destinations on UA (other that SIP users) # each line applies to the specified class id of sip user # you can add max
20 lines # in this way you can keep in routing table only prefixes with country code (E164 format) # this change is

Sip pbx.cfg 189
also called E164 format number conversion # you can add multiple lines for the same class id # matching is done
from up to down, if one line is matched subsequent lines are ignored and search is finished # country code reg exp is
also used to build E164 billing number # For calls through SIP proxy B user name is used to match country code reg
exp # That is because on SIP proxy you can also call B party dialing his alias (ex: alice) instead of user name (ex:
031233497) add_country_code 20 0[1-9][0-9]{4,} 1 004 add_country_code 20 [1-9][0-9]{5,} 0 0040 #
enable=1/disable=0; default 1 # if enabled ani info received from CCTL will replace presentation info # it is enabled
by default because most of the carriers don't send this info, except British Telecom ani_override_display 1 #
enable=1/disable=0; default 0 # bind ani to sip register users (see register_users.cfg) # if enabled for each outgoing
UA call wil try to match the ANI with the username of register user # if a match is found will fill the Contact, To,
From SIP headers with register users info bind_ani_to_sipusers 0 #0=disabled; 1=enabled;default 0 #if enabled dnis
will be taken from SIP To header URI instead of request URI #starting with date 28 March 2011 on version 4.3.88
to_header2dnis 0 # SECTION CONFIGURATIONS STARTS FROM HERE # section names are enclosed between
[ ]; ex [interface_ip] # Only section parameters are allowed from now one until end of file # allowed sections are
detailed bellow # Credentials used for outgoing INVITE authorization on User Agent # realm(ip/dns_name)
user_name password [credentials] 192.168.1.100 306 306 # IP/Netmask Signaling_IP Bind_IP DNS_name # This
feature is useful on SSW with more than one network card # (ex. one for local class 192.168.0.0/16 and one for
public class) # can be configured different IP/DNS_name for each source/destination IP class # It is also useful for
equipments behind NAT; in this case you put signaling IP the IP of NAT and # bindIP the IP of network interface
used in that NAT # # Important: always last rule must have class 0.0.0.0/0, application is searching from up to #
down and must always must one class ip_class/netmask signaling_ip_used dns_name_used # Restart required if you
add/remove lines in this section. # Starting with date 12 August 2009 (see centrala version) restart is required only if
you add lines (in this section) # with bind_ip that match ip of a new added network card (physical). # # if you don't
have a dns name for a specific ip address you can omit dns name from config # you can use "interface ip" telnet
command to check the values read by centrala # from the file into the memory and see also the fd created for each
interface # in case of redundancy only the master will create sip udp sockets when virtual ip is up # if centrala is
slave the sip udp sockets will be closed [interface_ip] # bellow line is for calls from private class 192.168.0.0/16
received on local network card 192.168.0.0/16 192.168.1.1 192.168.1.1 local.turu.ro # bellow line is for calls from
public class 80.27.127.0/24 received on local network card (NAT case) 80.27.127.0/24 80.27.127.10 192.168.1.1
public.turu.ro # for each trunk that use dns you need to add a line as bellow # this line will be used to match
signaling interface (in case there are more than one) based on remote DNS # <Invalid_IP/32> Signaling_IP Bind_IP
Remote_DNS_name 127.0.0.2/32 89.249.83.193 89.249.83.193 hsbc.com # bellow line is for calls from class
0.0.0.0/0 received on public network card 0.0.0.0/0 89.249.83.193 89.249.83.193 public.turu.ro # cpc_code
cpc_cause # cpc_code interval: 0-255 # cpc_cause len: max 32 characters # route sign4&0x00008000 must be set in
order to receive category from cctl # bellow values are just some examples [cpc_category] 0 unknown 1 op_french 2
op_english 3 op_german 4 op_russian 5 op_spain 6 op_rsrv1 7 op_rsrv2 8 op_rsrv3 9 notused 10 ord_subscr 11
prio_subscr 12 data_call 13 test_call 15 payphone 252 uk_oper_call 254 uk_admin_diverted GoTo >Main Page >
centrala

Sip redirect.cfg 190
Sip redirect.cfg
GoTo >Main Page > centrala
Used to redirect sip calls
When an INVITE is received SIP server check the request user name against sip redirect table.
If a match is found the call is redirected with code 302 to the contact header composed from username@address fields.
Also a billing record will be written in CDRs.
Sip redirect list is loaded in memory from configuration file.
Changes to the file are loaded in maximum 5 seconds.
Memory list loaded can be viewed on telnet with command "sip redirect"
File path: /mnt/app/cfg/sip_redirect.cfg
# user name address(ip:port)
333 192.168.1.190:5060
555 89.34.33.22:5061
Prepaid.cfg
GoTo >Main Page > centrala
# file path: /mnt/app/cfg/prepaid.cfg
# first language is default language
# numbering is done starting from 1
define_language
1 ro
2 en
3 fr
Note:
if you change prepaid.cfg language settings restart centrala

SIPusers.cfg 191
SIPusers.cfg
GoTo >Main Page > centrala
; lines that begin with ';' are commented lines
; user name must be enclosed between square brackets
; all next streak lines are setting of this user
[301000]
; default empty string
password=1234
; must be unique across al the sip users
; start from 1
; default 0
clientid=1
; default 0xffff, which means an invalid class
classid=10
;the prepaid id of the account configured in prepaid_users.cfg
prepaid_id=0
; a user can have multiple aliases
; user aliasses must be global unique across all the sip users
; there is no max number of aliases supported
; the only limitations comes from file size or memory available, wich quite huge
alias=gogu
alias=boss
alias=0212329988
; a user can have multiple centrex aliases
; centrex aliases must be less than 5 digits
; if centrex alias contain also characters it can be higher than 5 characters
; centrex aliases must be unique across all the sip users from the same centrex group
; there is no max number of centrex aliases supported
; the only limitations comes from file size or memory available, which quite huge
; Important: centrex_group line must be defined before centrex_alias line for each user settings
centrex_alias=100
centrex_alias=testing123
; gsm number of sip user; default empty string
; if this field is set every time the user is called o sip phone, the call will be forked and will call also this number
; gsm is not a proper name for this field because it can contain all king of numbers (ex PSTN), not only gsm
; anyway this is the syntax and must followed in order to work
gsm=0723287999
; 0=enabled; 1=receive only; 2=suspended; 128=disabled;
; default=0
account_state=0

SIPusers.cfg 192
; 0=not used; 1=used, except for users in same nat; 2=used always;
; default 0
rtp_proxy=0
; 0=not used; 1=used on different codec; 2=used on dtmf in rtp(inband or rfc2933); 3=used on diff codec/dtmf rtp; 4=used always
; default=0
transcoding=0
; default empty string
display_name=funny alice
; default 0
privacy_display=0
; default empty string
; must always contain user name or one of the user aliases
cli_proxy=301000
; default 0
privacy_proxy=0
; default empty string
cli_ua=0212329988
; default 0
privacy_ua=0
; must always contain one of the user centrex aliases
cli_centrex=100
; default 0
privacy_centrex=0
; ip/netmask
; default 0.0.0.0/0
public=86.38.12.8/32
; ip/netmask
; default 0.0.0.0/0
private=192.168.0.0/16
; default 1
multiple_contacts=1
; default empty string
description=Topex Romania
; default 0
publish_presence=0
; default 60
; value in seconds
; specify no answer timeout for calls sent to a sip user

SIPusers.cfg 193
noanswer_timeout=60
; default 0
callforward=0
; default 0
callforwardstate=0
; default 0
callforward_selective=0
; default empty string
callforwardnumber_offline=888
; default empty string
callforwardnumber_busy=999
; default empty string
callforwardnumber_noanswer=777
; default empty string
callforwardnumber_always=666
; default 0
callwait=0
; default 0
callwaitstate=0
; default 0
voicemail=0
; default 0
voicemailstate=0
; default empty string
voicemailnumber=77301000
; default 0
voicemail2emailstate=0
; default empty string
voicemail2email=gogu@example.com
; default 0
missed2email=0
; default 0
missed2emailstate=0
; default empty string
missed2emailemail=gogu@example.com

SIPusers.cfg 194
; default 0
missed2sms=0
; default 0
missed2smsstate=0
; default empty string
missed2smsnumber=0734555666
; default 0
reject_no_ani=0
; default 0
do_not_disturb=0
; 0=not used
; default 0
callpickupgroup=0
; 0=not used
; default 0
callhuntinggroup=0
; default 0
callhuntingpriority=0
; 0=not used
; default 0
forking_group=0
; 0=disabled; 1=enabled; default 0
; if enabled a sip user will be able to call other sip user via proxy (see Trunk/Proxy mode)
; only if the called user is in the same class
proxy_class_only=0
; default 0
rules_in=0
; default 0
rules_out=0
; rule name mode ani dnis
; mode values: a=allow, r=restrict; f=forward
rule allow_123 a 123 -
rule reject_00 r - 00
rule forward_777 f 777 -
; 0=not used
; default 0
queue1=0
; 0=not used
; default 0

SIPusers.cfg 195
queue2=0
; 0=not used
; default 0
queue3=0
; 0=not used
; default 0
queue4=0
; 0=not used
; default 0
queue5=0
; 0=not used
; default 0
queue1_value=0
; 0=not used
; default 0
queue2_value=0
; 0=not used
; default 0
queue3_value=0
; 0=not used
; default 0
queue4_value=0
; 0=not used
; default 0
queue5_value=0

Voice mail.cfg 196
Voice mail.cfg
GoTo >Main Page > centrala
# /mnt/app/cfg/voice_mail.cfg - configuration file for voice_mail
# Lines starting with '#' character represent comments and are ignored
# in miliseconds
# default 180000
ring_timeout 180000
# max number of messages that can be receive by one subscriber
# default 15
max_msg 15
# max duration of one message received (in seconds)
# default 30
max_time 30
# range UDP ports used for playing and recording voice messages
# default 15000
begin_rtp_port 15000
# default 20000
end_rtp_port 20000
# 1=enable; 0=diable; default 0
# if enabled voice mail will be done without transcoding;
# it useful in case of ssw that do not have a transcoding machine or for MGU without internal matrix
# in this case SIP phones must use same codec
# in case that you want to use voice mail also from TDM you have to set in voip.cfg only one codec in the list of codecs
# (audio_codecs)
same_codec 0

Simindex.cfg 197
Simindex.cfg
GoTo >Main Page > centrala
Define SIM indexes and holidays.
Holidays are used in routing table when valid days is specified for a route.
Default path: /mnt/app/cfg/simindex.cfg
# ---SIM INDEX FILE---
# Day type Mon=0x01 Tue=0x02 Wen=0x04 Thu=0x08 Fri=0x10 Sat=0x20 Sun=0x40 Holiday=0x80
# s index_sim day_type_bitmap(%x) start_hour:min end_hour:min sim(%x)
s 00 ff 00:00 24:00 0
s 01 ff 00:00 24:00 1
s 02 ff 00:00 24:00 2
s 03 ff 00:00 24:00 3
# ---HOLIDAYS---
# h day month
h 01 01
h 25 12
Register users.cfg
GoTo >Main Page > centrala
Allow you to configure informations needed to register to a SIP registrar.
The number of users defined in this file is limited only by the max Linux size of file.
Allow registration to one or more SIP registrar servers; one server for each user defined.
It can be used also as a testing tool for SIP registrar.
Default file path: /mnt/app/cfg/register_users.cfg
Telnet command:
- register users - show users loaded in memory from configuration file
; commented lines begin with ';'
[301]
; authentication password
; default empty string
password=301
; authentication user name
; by default is filled with user name
; this field has been added starting with revision 10733 on version 4.3.88
auth_name=302@sip.mypbx.net
; ip/dns_name of first server to which the client try to register
; will appear in sip request uri of REGISTER request

Register users.cfg 198
first_proxy=sip.mypbx.net
; ip/dns domain of first server to which the client try to register
; will appear in sip From/To header of REGISTER request
; if is not defined first proxy will be used
first_domain=mypbx.net
; ip/dns_name of second server to which the client try to register
; will appear in sip request uri of REGISTER request
; in case it does not succeed to the first one
second_proxy=192.168.244.167
; ip/dns domain of second server to which the client try to register
; will appear in sip From/To header of REGISTER request
; if is not defined first proxy will be used
second_domain=mydomain.net
; registration time (in seconds) offered in REGISTER message to the server
; registration time used is the one received from server
; depending of the server configuration regsitartion time can be
; the one sent in REGISTER or any other value
expires=200
; time interval in seconds at which the client send keep alive messages
; to the server in order to keep NAT connection open
; recommended value is between 20 and 60 seconds
nat_refresh=30
[302]
password=302
auth_name=302@sip.mypx.ro
first_proxy=sip.mypbx.ro
first_domain=mypbx.ro
second_proxy=89.38.11.22
second_domain=mydomain.ro
expires=120
nat_refresh=50

199
Extended Port Config
Extended port config
GoTo >Main Page > centrala
Note: Extended port config files are used to pass parameters at port start-up. They can be
used for setting permanent volume levels, check credit,gsm cell selection
Extended port configuration can be found in /mnt/app/cfg/vcss/ directory. For each port one configuration file is
created. Settings from this files are complementary to the setting from port.cfg
File name format: <port number(4 digits)>.cfg
Example: 0008.cfg
Example of a vcss file for Radio Cards
[general]
# Available types: RADIOANALOG, RADIOTETRA, RADIOTETRAPOL, TRUNK, E&MRADIO, ALARMDTMF, R2S, RTP&UDPSGN
typeport=RADIOTETRAPOL
name=0011
[parameters]
activechannel=1
# 0=2400; 1=4800; 2=9600;
serialspeed=1
timechannelscan=5000
timechannellock=30000
group=8
# Used only on TETRAPOL ports connected to TCP stations
# Specify the IP:Port of the station
remote_ip=10.111.2.105:2500
delayaftertx=
crosscouplinggroup=
votinggroup=
alarmDTMF=
activechannel=
UDPsettings=
Target=
RTPsettings=
RTPlocalport=
VAD=
Extended port config 200
backup=
interfon=
[channels]
1=>408
2=>403
3=>650
4=>651
VCSS files for Wavecom
Vcss files for Wavecom module
Best Practice
Vcss files can be imported in simserver at ussd file
Definition: Vccs files work like autoexec.bat file in windows. They are a series of commands
that are passed to the port when port is initialized
Note: This is a example of a vcss file for setting audio level for Wavecom module. Check AT
commands for Wavecom modules [1] for more details on audio levels
VCSS files must be created in folder /mnt/app/cfg/vcss/.
Note: If the folder doesen't exist create it with command mkdir /mnt/app/cfg/vcss
Note: For Voibridge it is necessary to give the command rw before you edit the file and
saveconfig after.
Name of the file must be number of the GSM port and it must have 4 digits
Ex:
0008.cfg
0009.cfg
0120.cfg
0121.cfg
File: /mnt/app/cfg/vcss/0000.cfg

VCSS files for Wavecom 201
[general]
typeport=GSM
name=000
[configAT]
cmd=>0,cmd,AT+CUSD=1
cmd=>0,answer,OK
cmd=>0,timeout,1000
cmd=>1,cmd,AT+CREG=1
cmd=>1,timeout,1000
cmd=>2,cmd,AT+VGR=96
cmd=>2,timeout,1000
cmd=>3,cmd,AT+VGT=12
cmd=>3,timeout,1000
Warning: After a vcss file is edited the port must be reinitialized for the settings to be
applied.
cmd=>0,cmd,AT+CUSD=1 // First AT command
cmd=>0,answer,OK // Answer for AT command
cmd=>0,timeout,1000 // Time-out
Warning: In total a series of 10 commands (numbered from 0 to 9) can be passed to a port
Note: Example of vcss file used for checking credit.This is used to enable receiving of USSD
messages
File: /mnt/app/cfg/vcss/0000.cfg
[general]
typeport=GSM
name=000
[configAT]
cmd=>0,cmd,at+cmgf=1
cmd=>0,timeout,1000
cmd=>0,answer,OK
cmd=>1,cmd,at+cusd=1
cmd=>1,timeout,1000
cmd=>1,answer,OK
cmd=>2,cmd,at+cnmi=2,2,0,0,1
cmd=>2,timeout,1000
Note: Example of vcss file used for volume, echo cancellation, dtmf and USSD. The below
vcss file is also used if all the calls are released with BRELS 31
[general]
typeport=GSM
name=000
[configAT]
cmd=>0,cmd,AT&F
cmd=>0,timeout,1000
cmd=>1,cmd,AT+CFUN=1
cmd=>1,timeout,30000
cmd=>2,cmd,AT+SPEAKER=0

VCSS files for Wavecom 202
cmd=>2,timeout,1000
cmd=>3,cmd,AT+WSVG=1
cmd=>3,timeout,3000
cmd=>4,cmd,AT+VGR=144
cmd=>4,timeout,3000
cmd=>5,cmd,AT+VGT=0
cmd=>5,timeout,3000
cmd=>6,cmd,AT+ECHO=1,1,0,3,31,0
cmd=>6,timeout,2000
cmd=>7,cmd,AT+CMGF=1;+WVR=0,0
cmd=>7,timeout,3000
cmd=>8,cmd,AT+CNMI=2,2,0,0,1
cmd=>8,timeout,1000
cmd=>9,cmd,AT+CUSD=1;+CLIP=1
cmd=>9,timeout,2000

203
Billing
Billing generic (PGSQL, MySQL, MSSQL)
GoTo >Main Page > centrala
Default CSV CDRs path: /mnt/app/out/dd-mm-yy.tax
Note:Starting with version 4.1.306 in case of insert error or pool process overflow CDR
SQL queries are written in the following files:
- /mnt/app/out/dd-mm-yy_pg.sql (for PostgreSQL, first pool)
- /mnt/app/out/dd-mm-yy_pg2.sql (for PostgreSQL, redundant pool)
- /mnt/app/out/dd-mm-yy_my.sql (for MySQL)
- /mnt/app/out/dd-mm-yy_ms.sql (for MicrosoftSQL)
In this way this files can be executed directly into database without loosing billing records.
centrala -v show the number of client process from each pool.
€€ Starting with version 4.1.314 number of billing fields sent in billing is configurable.
Edit /mnt/app/cfg/exec.cfg
# default 43, first 43 fields will be sent in billing
# specified value must be in range shown on telnet with command "billing fields number"
# 255 means to sent all the fields available in billing
billing_fields_number xxx
€€ Important:
1. Before adding more fields in billing by changing the value in exec.cfg, make sure that you
have already created this fields into the database.
2. Make sure that you use a clean_hdd.sh version higher that 1.0.25, otherwise lower version will
delete .sql files when the HDD is reaching max limit set in clean_hdd.sh scipt.
€Billing fields order: dd-mm-yy.tax
PgSQL Billing 204
PgSQL Billing
GoTo >Main Page > centrala
Postgresql Billing
Best Practice
Configure postgresql server first. Make sure that equipment has access to database before starting configuration. Please read this [1]
To use postgresql billing you need the folowing
•- /mnt/app/bin/pgsql_sip_pool
•- /mnt/app/cfg/pgsql_sip_pool.cfg
€€ Connect with putty to equipment and gain root access
€€ Activate postgresql billing from file exec.cfg Starting with version• 4.1.306 pgsql_billing can use 2 databases
vi/mnt/app/cfg/exec.cfg
# enable/disale pgsql billing pool
# configuration file name is optional;
# default is pgsql_sip_pool.cfg
pgsql_billing 1/0 [configuration file name]
# enable/disable pgsql_billing pool redundancy
# configuration file name is optional;
# default is pgsql_sip_pool.cfg
pgsql_billing_alt 1/0 [configuration file name]
€€ Edit /mnt/app/cfg/pgsql_sip_pool and add correct connection information
vi /mnt/app/cfg/pgsql_sip_pool.cfg
# pgsql_sip.cfg - configuration file for pgsql_sip
# Lines starting with '#' character represent comments and are ignored
# Changes made on this file are loaded automatically by pgsql_status app
# 0=no debug, 1=min debug, 2=full debug
debug 0
# connection string for connection to postgresql database
conn_string dbname=softswitch host=192.168.192.111 user=softswitch password=99softswitch11
€€ Change working directory to /mnt/app/bin
€€ Run pgsql_sip_pool to make sure that database connection is OK
./pgsq_sip_pool
€€ Reboot equipment
/sbin/reboot

PgSQL Billing 205
Equipment will create the database and tables needed to dump billing. Tables fore next 2 months will also be created.
Tables used will have format• billing_yyyy_mm.
Note:If software is updated and new software has more billing fields those fields must be
added manually for current month and next 2 months
Ex: ALTER TABLE billing_2008_06 add column in_billing_profileid INT NOT NULL DEFAULT 0;
Mysql Billing
GoTo >Main Page > centrala
Best Practice
Configure mysql server first. Make sure that equipment has access to database before starting configuration. Please check http:/ / dev. mysql. com/
doc/
Starting with version 4.3.111 centrala will create in advance (at startup) billing tables: one for current month and
another two tables for next two months. Make sure that the user has th rights to create tables. Billing fields and order
are the same as the same as in defined here Dd-mm-yy.tax. For each month one billing table will be created.
If you have a version prior to 4.3.111 follow the steps bellow:
€€ Connect to server and create a database (ex:billing)
€€ Use this structure for the database
CREATE TABLE billing(
id INT NOT NULL AUTO_INCREMENT, PRIMARY KEY (id),
tip CHAR(3),
port_src MEDIUMINT,
identity VARCHAR(32),
number VARCHAR(32),
date date,
time time,
duration INT,
units SMALLINT,
SIM CHAR(2),
port_dest MEDIUMINT,
`release` VARCHAR(15),
rel_Q850 SMALLINT,
CIMI VARCHAR(30),
selection SMALLINT,
GSM_cell VARCHAR(10),
direction VARCHAR(20),
IP_s VARCHAR(20),
PORT_s INT,
IP_RTP_s VARCHAR(20),
PORT_RTP_s INT,
IP_d VARCHAR(20),
PORT_d VARCHAR(20),

Mysql Billing 206
IP_RTP_d VARCHAR(20),
PORT_RTP_d INT,
session_id VARCHAR(20),
jitter INT,
packet_loss INT,
client_id INT,
direction_out VARCHAR(20),
proto_in VARCHAR(20),
proto_out VARCHAR(20),
codec VARCHAR(10),
ptime INT,
out_clientid INT,
gw_name VARCHAR(30),
id_out VARCHAR(32),
nr_out VARCHAR(32),
orig_ani VARCHAR(32),
con_dnis VARCHAR(32),
in_billing_profileid INT,
out_billing_profileid INT,
in_classid INT,
out_classid INT,
billing_prefix VARCHAR(32),
price_in NUMERIC(65,5),
currency_in VARCHAR(10),
call_type VARCHAR(32)
);
Starting with date 17 August 2009 (see centrala version built date), 5 new fields have been added, see bellow:
ani_ton_in INT
ani_ton_out INT
dnis_ton_in INT
dnis_ton_out INT
centrex_group INT
Starting with date 28 Sept 2009 on versions >= 4.3.88, price_out field have been added, see bellow:
price_out NUMERIC(99,5)
currency_out VARCHAR(10)
To use mysql billing you need
€€ /mnt/app/bin/mysql_client
€€ /mnt/app/cfg/mysql_client.cfg
€€ Connect with putty to equipment and gain root passwords
€€ Edit file /mnt/app/cfg/exec.cfg and add bellow line
mysql_billing 1
€€ Edit /mnt/app/cfg/mysql_client.cfg and add relevant information

Mysql Billing 207
# 0 = NO debug
# 1 = ERROR debug
# 2 = ERROR + WARN debug
# 3 = ERROR + WARN + INFO debug
# 4 = ERROR + WARN + INFO + FULL debug
# default 3
debug 3
# 0=disable; 1=enable; default 0
# If enabled log will be written in ../out/dd-mm-yy_bmysql.log
file_debug 0
# mysql server ip
host 89.38.8.19
# username used to login into mysql server
user topex
# password used to login into mysql server
password 99topex11
# server database name to which the client will connect
database billing
Test connection with database
€€ Change working directory to /mnt/app/bin/
cd /mnt/app/bin
€€ Run mysql client to make sure that connection with mysql server is ok
./mysql_client
Answer shoud be
Connection with Server OK
€€ Reboot equipment
/sbin/reboot

Dd-mm-yy.tax 208
Dd-mm-yy.tax
Description Default path: /mnt/app/out/dd-mm-yy.tax
This file contains the complete call record (CDR's) CDR is in CSV (comma separated fields) format.
Type
€€ Three characters combination of the following letters:
€€ T = Terminated
€€ J = Junction (FXO)
€€ L = Local (FXS)
€€ I = Incoming call leg
€€ O= Outgoing call leg Examples: TLI, TJ0
Source transcoding port
€€ Physical position of the source port (5 digits).
This values indicates the physical port position (ex: 00263) In case that transcoding port is not allocated value is
65535.
Incoming ANI
€€ Automatic Number Identification = Calling Party Maximum 32 digits Example: 0817100002
Incoming DNIS
€€ Dialed Number Identification Service = Called party
€€ Maximum 32 digits
€€ Example: 0617100000
Date
€€ Day of the call in the following shape dd-mm-yy (day-month-year), (end date) (ex: 26-01-09)
Time
€€ Time of the call in the following shape hh:mm:ss (hour:minute:second) (end time) (ex: 17:57:20)
Call duration
€€ Speaking duration of the call in seconds (6 digits) (ex: 000034)
If the real call duration is for example 10 seconds and 1 milisecond (or more) it will appear in CDR with duration of
11 seconds.

Dd-mm-yy.tax 209
Billing units
€€ Billing Units for the call (5 digits) (ex: 00000)
€€ This field is usually filled with 0 for non-answered calls and with 1 for answered calls.
€€ However if tax pulses calculation is set on incoming direction (see "Signaling2" settings in "Define Calls
Direction") then this value will be filled according with the number of pulses charged at response and on time
bases (see "Tax" field in "Routing Table").
SIM number
€€ The SIM number used on called GSM module (ex: ff)
€€ When the destination port is a GSM port it specifies a value for SIM from the next list: (0,1,2,3 or ff).
€€ The OAM application is adding a unit to the SIM value - this approach is used for simplicity - this rule is applied
when billing records are displayed. The same rule is applied for the "SIM index" case whenthe SIM card to be
used (1,2,3,4) is chosen.
Destination transcoding port
€€ Physical position of the destination port (5 digits) (when the call is unfinished a value of 65535 will be found in
this field (5 digits) (ex: 65535)
€€ In case of a TOPEX multiswitch - calls terminated with success will have also 65535 in this field.
End cause
Centrala internal release cause. Here is the list of available release causes:
€€ AOK - Call connected and disconnected by calling party
€€ BOK - Call connected and disconnected by called party
€€ OK - Call connected and disconnected by centrala
€€ ARELS - Call released before connect by calling party before connect
€€ BRELS - Call released before connect by called party before connect
€€ AINEX - Call released before connect by calling party with cause 1 (inex)
€€ BINEX - Call released before connect by called party with cause 1 (inex)
€€ ACONG - Call released before connect by calling party with cause 34 (congestion)
€€ BCONG - Call released before connect by called party with cause 34 (congestion)
€€ ASERR - Call released before connect by calling party with cause 111 (protocol error)
€€ BSERR - Call released before connect by called party with cause 111 (protocol error)
€€ ANERR
€€ BNERR
€€ ANOANS - Call released before connect by calling party with cause 19 (no answer)
€€ BNOANS - Call released before connect by called party with cause 1trc9 (no answer)
€€ ABUSY - Call released before connect by calling party with cause 17 (user busy)
€€ BBUSY - Call released before connect by called party with cause 17 (user busy)
€€ ATOUT - Timeout on calling party leg; call not connected
€€ BTOUT - Timeout on called party leg; call not connected
€€ ERRAUTH - Authentication error; used on prepaid
€€ NOCREDIT - No credit available; used on prepaid
€€ FINCRED - Credit finished; used on prepaid
€€ AVMAIL - Call connected to calling party voice mail
€€ BVMAIL - Call connected to called party voice mail

Dd-mm-yy.tax 210
€€ NOVOIPCH - No voip channel available (voip congestion)
€€ CODECERR - Codec error; codec mismatch between calling and called party
€€ NOLICENCE - License expired
€€ ACLREJECT - Access list reject; source of call is not added in access in table
€€ ANI_RESTRICTED - ANI is not allowed to complete the call
€€ DNIS_RESTRICTED - DNIS is not allowed to complete the call
€€ NORTPPROC - No RTP pool process available
€€ MOREDIG - Need more digits in order to take a routing decision
€€ RELEASE - Call released by centrala
€€ ENDOK - Call connected and disconnected by centrala
€€ SERR - Signaling error, call released by centrala before connect
€€ INEX - DNIS does not exist
€€ A_CONGRES -
€€ NOPRICE - No price found; Call released by centrala
€€ ENDCONG - Congestion; Call released by centrala
€€ NOROUTE - No route found
€€ DNIS REJECTED - Call rejected (not allowed) by centrala
€€ REDIRECTED - Call redirected by centrala
€€ REROUTED - Call rerouted on other route
€€ TIMEOUT - Centrala internal timeout; call not connected
€€ PRICE_ERROR - Error in definition of billing price
€€ BREDIRECT - Call redirected by called party
€€ PREPAID_NOT_FOUND - Prepaid user not found
€€ ACCT_DISABLED - Account is disabled
€€ USER_OFFLINE - SIP user is offline
€€ CONTACT_ERROR - Contact checking error; SIP user is not registered and is trying to make calls, but is not
allowed on current configuration, see check_invite_contact line from Sip pbx.cfg
€€ CLASS_DISABLED - Incoming class assigned to the call is disabled
€€ INVALID_CLASSID - Incoming class id assigned to the call is invalid
€€ CLASS_RESTRICT - Incoming class restricted due to max time, max cost, max calls, max rate limits
€€ KILLED - Call killed before connect; Call can be killed from telnet see kill all calls or kill call from Telnet
commands Call can also be killed due to some card errors or physical layer alarms (ex LIS, RJA, AIS)
€€ OK_KILLED - Connected call killed; see the above cases
€€ OK_SERR - Connected call released due to some signaling errors

Dd-mm-yy.tax 211
End code
€ Q850 release code, see Q850 Release codes
IMSI
International Mobile Subscriber Identity. Filled when the destination port is a GSM port.
Call selection time
Time in seconds passed since the call setup arrived until call is connected. xxx - three digits; exmaple: 012
GSM CELL
For a call routed through a GSM port it represents the cell id from mobile network where the SIM was registered.
Incoming class name
Class assigned to incoming call leg, see also Users and Classes
Source signaling IP
Filled only for SIP/H323 calls Example: 85.67.52.221
Source signaling port
Filled only for SIP/H323 calls Example: 31166
Source RTP IP
Filled only for SIP/H323 calls Example: 192.168.52.221
Source RTP port
Filled only for SIP/H323 calls Example: 13224
Destination signaling IP
Filled only for SIP/H323 calls Example: 192.168.52.200

Dd-mm-yy.tax 212
Destination signaling port
Filled only for SIP/H323 calls Example: 5060
Destination RTP IP
Filled only for SIP/H323 calls Example: 192.168.52.200
Destination RTP port
Filled only for SIP/H323 calls Example: 30010
Call session id
This is an unique identifier of a call inside the equipment software. It is useful for a call debugging inside the
equipment log files. (ex: 0ae1bfb6)
Packet loss
VoIP packet loss occurs when a large amount of traffic on the network causes dropped packets. This results in
dropped conversations, a delay in receiving the voice communication, or extraneous noise on the call. (ex: 0)
Jitter
Jitter is a variation in packet transit delay caused by queuing, contention and serialization effects on the path through
the network(ex: 0)
Incoming client id
Integer value
Outgoing class name
Class assigned to incoming call leg, see also Users and Classes
Incoming protocol
Protocol used on incoming call leg Possible values: CAS, H323, SIP, ISDN, SS7, R2S, UNKNOWN
Outgoing protocol
Protocol used on outgoing call leg Possible values: CAS, H323, SIP, ISDN, SS7, R2S, UNKNOWN
Codec
Payload Type of the call. In case of media changes during the call last negotiated codec is written Integer value of
the codec Example: 0 for G711, 18 for G729 etc.

Dd-mm-yy.tax 213
Packetization time
Value in milliseconds (ex: 20) Packetization time is the length of the digital voice segment that each packet holds. Selecting
10 millisecond packets enhances the voice quality, as less information is lost due to packet loss, but doubles the load on the
network traffic.
Outgoing client id
Integer value
Gateway name
Name of the gateway Default: empty string In OAM can be set in "Gateway Parameters" window See also name line
in Exec.cfg
Outgoing ANI
ANI send on the outgoing call leg ANI can be changed based on the settings involving the identity from "Calls
Directions" and/or "Routing Table"
Outgoing DNIS
DNIS sent on outgoing call leg DNIS which can be changed based on the settings involving the dialed number from
"Calls Directions" and/or "Routing Table"
Original ANI
Original ANI of the call; this field is usually the same as incoming ANI. In case of call forward original ANI will
store the identity of the first party that has initiated the call.
Connected DNIS
Connected DNIS of the call; this field is usually the same as outgoing dnis. In case of a call forwarding connected
DNIS will store the number of the party that has answered to the call.
Incoming billing profile id
Integer value
Outgoing billing profile id
Integer value
Incoming class id
Integer value

Dd-mm-yy.tax 214
Outgoing class id
Integer value
Billing DNIS
E164 format Used for billing Example: 40723222333
Incoming price
Example: 0.20000
Incoming currency
Example: EUR
Call type
Field under development. Extensible ascii character type list:
€€ 0 = U/0 User Agent/Proxy
€€ 1 = P/0 RTP proxy
€€ 2 = S/0 Service
€€ 3,4 = XX/00 XX=Reroute counter
€€ 5 = F/0 Forking
€€ 6 = C/0 Centrex
€€ 7 = H/0 Hunting
€€ 8 = f/0 Forward
€€ 9 = V/0 Voice mail
€€ 10 = p/0 Pickup
€€ 11 = T/0 Transfer
€€ 12 = $/0 Prepaid
€€ 13 = S/A/P/F/B/0 SIP/ANI/Prepaid/FXS/BRI
Incoming ANI Nature of Address Indicator
ANI Type of Number IN (Nature of address) Starting with 17 August 2009
Incoming DNIS Nature of Address Indicator
DNIS Type of Number IN (Nature of address) Starting with 17 August 2009
Outgoing ANI Nature of Address Indicator
ANI Type of Number OUT (Nature of address) Starting with 17 August 2009
Outgoing DNIS Nature of Address Indicator
DNIS Type of Number OUT (Nature of address) Starting with 17 August 2009
Centrex group
Id of centrex group in case of centrex call Starting with 17 August 2009

Dd-mm-yy.tax 215
Outgoing price
Example: 0.20000 Starting with 29 September 2009 on versions >= 4.3.88
Outgoing currency
Example: EUR Starting with 29 September 2009 on versions >= 4.3.88

216
Aplications
Voicemail2Email
GoTo >Main Page > centrala
Requirements:
To be able to use the service Voicemail to Email you have to configure Voicemail first. Please follow the steps from the
Voicemail configuration page
The files needed to be able to send e-mails are:
- /mnt/app/bin/smtpmail - this program is used for sending the e-mails
- /mnt/app/cfg/smtpmail.cfg - the configuration file for the smtpmail program
To be able to send e-mails with the voicemail files(.wav) attached you have to configure the sending server
/mnt/app/cfg/smtpmail.cfg
# the IP address of the SMTP server that is used by the smtpmail program to send e-mails
smtp_server_ip 192.168.52.200
# the port on witch the SMPT server listens for requests
smtp_server_port 25
# the user shown in the From field of the e-mails
from_user voicemail
# this field (IP or host name) will be shown in the From field of the e-mail
# this value has higher priority then the value of the ipaddress given from the command line
# smtpmail -h see all command line options
from_ip topex.ro
Voice Mail 2 Email Activation:
To activate Voicemail2Email on a sip user you have to check VoiceMail to Email State and in the VoiceMail 2 eMail field write the
e-mail address where the user wishes to receive the voicemail:
- Voicemail to Email State - activate/deactivate the voicemail to email service
- the option can be changed by user and/or administrator
- VoiceMail 2 eMail - the e-mail address where the user will receive the voicemail messages
- the option can be changed by user and/or administrator
Once activated the voicemail2email service the SIP user will receive the voicemail messages on the e-mail.
The message it is converted automatically by the centrala application in wav format to be played by any player
ex. winamp, windows media player etc.)
The e-mail send to the client will contain the date and hour when the voicemail message has been received and the identity(the

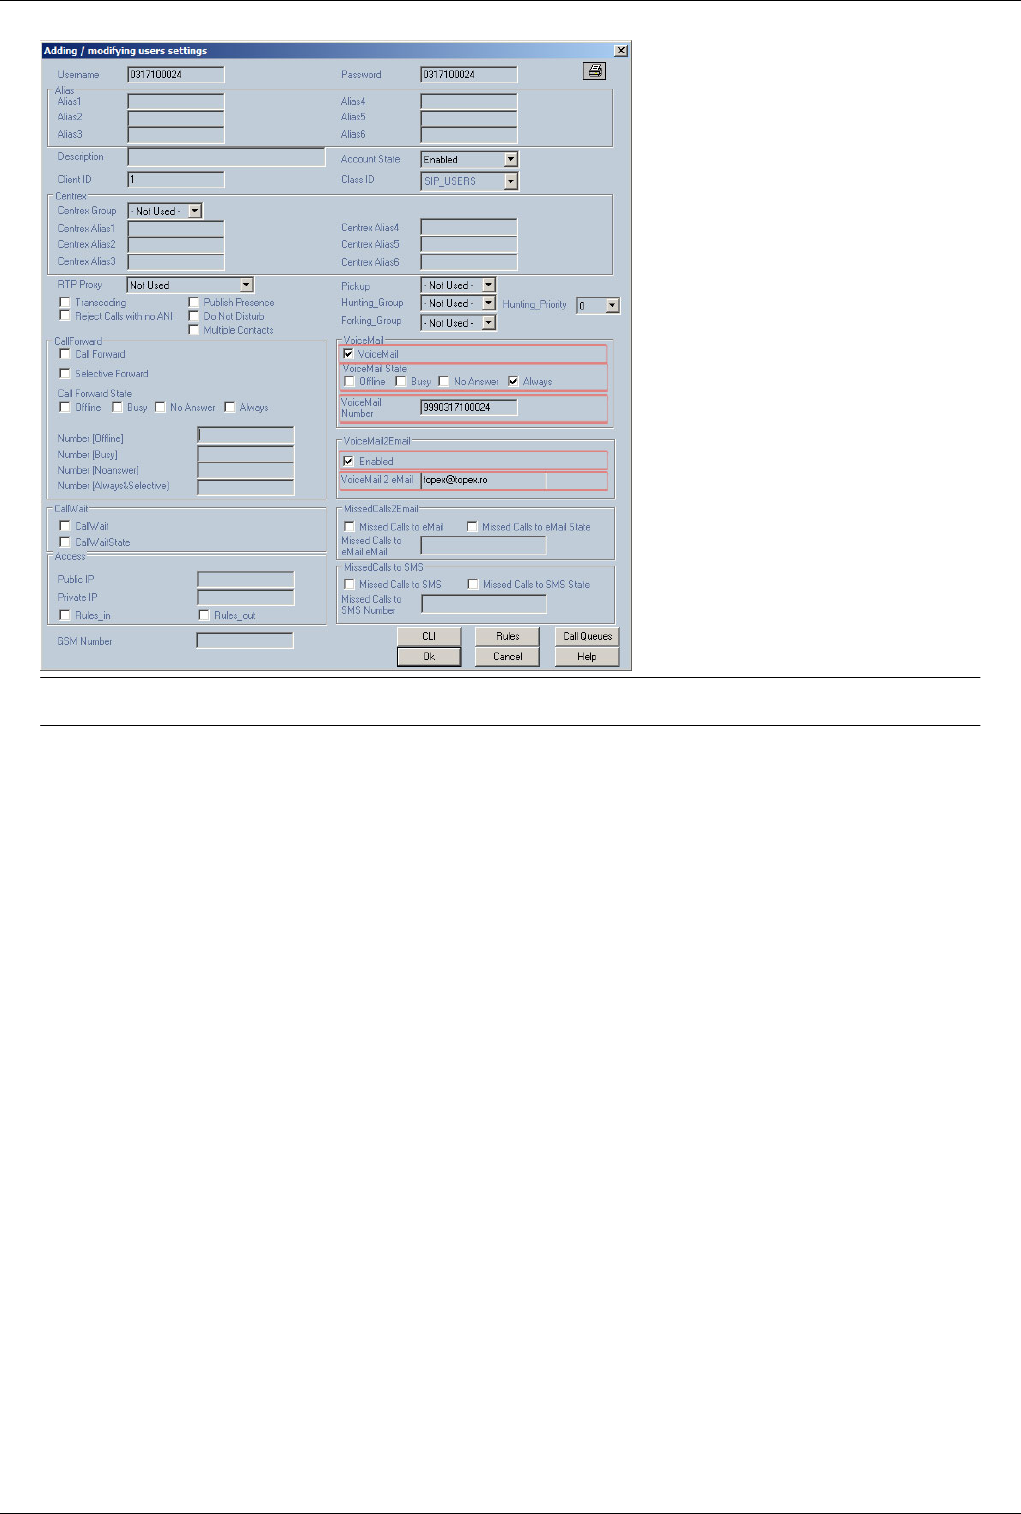

Multiaccess Config for Simserver 219
Multiaccess Config for Simserver
Back to Multiacces si Qutex or Back to Simserver & Simbox
Note:Apelurile cu atd din OAM nu functioneaza cand macces-ul foloseste simuri virtuale
Se verfica 4 lucruri.
1* Firewall /etc/iptables.conf
more /etc/iptables.conf
# Generated by iptables-save v1.2.9 on Mon Jun 7 19:40:31 2004
*nat
:PREROUTING ACCEPT [0:0]
:POSTROUTING ACCEPT [0:0]
:OUTPUT ACCEPT [0:0]
COMMIT
# Completed on Mon Jun 7 19:40:31 2004
# Generated by iptables-save v1.2.9 on Mon Jun 7 19:40:31 2004
*filter
:INPUT DROP [0:0]
:FORWARD DROP [0:0]
:OUTPUT ACCEPT [0:0]
-A INPUT -i lo -j ACCEPT
-A INPUT -m state --state RELATED,ESTABLISHED -j ACCEPT
-A INPUT -p icmp -m icmp --icmp-type 8 -j ACCEPT
-A INPUT -p tcp -m tcp --dport 2222 -j ACCEPT ##Portul SSH
-A INPUT -p tcp -m tcp --dport 9009 -j ACCEPT ##Portul de OAM
-A INPUT -p udp -m udp --dport 5060 -j ACCEPT ##Portul de SIP
-A INPUT -p tcp -m tcp --dport 1720 -j ACCEPT ##Portul de H323
-A INPUT -p tcp -m tcp --dport 9200 -j ACCEPT ##SIMSERVER
-A INPUT -p tcp -m tcp --dport 9201 -j ACCEPT ##SIMSERVER
COMMIT
# Completed on Mon Jun 7 19:40:31 2004
2* Versiunea Centralei
/mnt/app/bin# /mnt/app/bin/centrala -v |grep SIM
Raspunsul comenzi ar trebui sa fie:
with SIMSERVERCLIENT
Compilata fara aceasta optiune centrala nu va cere sim virtual.
3* Adaugarea Simserver-ului la configuratia Maccess
Se adauga linia urmatoare la trafic.cfg
simserver <IP SIMSERVER> 13001 nume_multiaccess
Numele adaugat trebuie sa fie identic cu cel adaugat in configuratia SIMSERVER-ului altfel Maccess-ul nu va fi
vazut on-line

Multiaccess Config for Simserver 220
4* Modificarea fiserului /mnt/app/cfg/port.cfg Se modifia cat1 din 00000000 in 02000000. Astfel se seteaza porturile
care vor folosi simuri virtuale
#---PORT FILE---
#p port card cat(%x) cat1(%x) dir number restr target(local port)
#p port card cat(%x) cat1(%x) dir sim target(gsm trunk port)
#p port card cat(%x) cat1(%x) dir target(trunk port)
#p port card cat(%x) cat1(%x) dir (E1 trunk port)
p 0 0 018f 02000000 GSM 0 0
p 1 0 018f 02000000 GSM 0 0
p 0 1 018f 02000000 GSM 0 8
p 1 1 018f 02000000 GSM 0 9
p 0 2 018f 02000000 GSM 0 0
p 1 2 018f 02000000 GSM 0 0
p 0 3 018f 02000000 GSM 0 0
p 1 3 018f 02000000 GSM 0 25
p 0 4 018f 02000000 GSM 0 32
p 1 4 018f 02000000 GSM 0 33
p 0 5 018f 02000000 GSM 0 40
p 1 5 018f 02000000 GSM 0 41
p 0 6 018f 02000000 GSM 0 48
p 1 6 018f 02000000 GSM 0 49
p 0 7 018f 02000000 GSM 0 0
p 1 7 018f 02000000 GSM 0 57
p 0 8 018f 02000000 GSM 0 64
p 1 8 018f 02000000 GSM 0 65
p 0 9 018f 02000000 GSM 0 72
p 1 9 018f 02000000 GSM 0 73
p 0 10 018f 02000000 GSM 0 80
p 1 10 018f 02000000 GSM 0 80
p 0 11 018f 02000000 GSM 0 0
p 1 11 018f 02000000 GSM 0 0
p 0 12 018f 02000000 GSM 0 96
p 1 12 018f 02000000 GSM 0 96
p 0 13 018f 02000000 GSM 0 0
p 1 13 018f 02000000 GSM 0 0
p 0 14 018f 02000000 GSM 0 0
p 1 14 018f 02000000 GSM 0 0
p 0 15 018f 02000000 GSM 0 0
p 1 15 018f 02000000 GSM 0 0
Back to Multiacces si Qutex or Back to Simserver & Simbox

Clean hdd.sh script 221
Clean hdd.sh script
GoTo >Main Page
Clean_hdd.sh
This is a shell script who is checking the size of directory given as parameter to clean_hdd.sh script, default /mnt and
if it is over than $max he start to delete files from /mnt/app/out/ directory keeping only the *.tax, *.sql, *.mind and
some *.log files (in limit of $max_log). After this, he is checking again the size of param1 directory and if the size is
still over $max he start to delete the oldest 5 *.tax, *.sql, *.mind files. He is running this step until the level is under
$max MB.
The cleand_hdd.sh script is started by /mnt/app/bin/run_clean.sh script or it can be run from crontab (where is
available). In oder to change starting parameters you should edit run_clean.sh file or the line you added in crontab.
run_clean.sh should be added to start_app file to be automatically started after reboot he will run in background and
at every sleep interval (configured in run_clean or in crontab) will start the clean_hdd.sh script.
USAGE
./clean_hdd.sh [OPTIONS] directory_name
OPTIONS:
-v show script version; in this case directory_name should not be provided
-d force the script to write debug information in file /mnt/app/bin/clean_hdd.log
instead of printing them in console
-h show the usage parameters; in this case directory_name should not be provided
directory_name is /mnt default
Check if the script is running
run ps -ef command on Linux system on multiACCESS/Qutex/Eones. If the script is running you should see the
process [run_clean.sh] and [sleep] running. This is valid only if you use run_clean.sh. On machines where crontab
exists you don't see above processes.
To run clean_hdd.sh from crontab add bellow line in /etc/crontab. This will run clean_hdd.sh at every 10 minutes.
*/10 * * * * root /mnt/app/bin/clean_hdd.sh /mnt/
Note: Clean Hdd must be configured according to size of disks in the equipment
Configuring clean_hdd.sh
Configuration can be done by changing bellow variables values using a text editor (ex. vi or mc). Bellow variables
can be found at the beginning of the script.
# the log file path where clean_hdd.sh writes his logs
log_file=/mnt/app/bin/clean_hdd.log
# the max value of counted files param1 directory
# du -sm is used to check the size of param1 directory
# specified value is in megabytes
# settings in clean_hdd.sh depend on the size of the partitions.
max=1500
# the max value of counted log files from the $out_path directory
# specified value is in megabytes

Clean hdd.sh script 222
max_log=1800
# directory path of out directory
# default /mnt/app/out
# It is useful in case you have more that one app directory structure on the same machine
# For example Master with slave on the same machine
out_path=/mnt/app/out
GSM Cell Selection
GSM cell Selection
Warning:Use only for Wavecom modules
To select a specific gsm cell use command
AT+CCELL =<freq>
<freq> is the freq of the cell on witch you whant to register the gsm module . (you can obtain information about gsm
cells using command AT+ CCED).
Check AT commands for Wavecom modules [1] for more informations about AT+CCED
Voicemail
GoTo >Main Page > centrala
General
VM_NOANSWER_BUSY service code: 21
READ_VOICE_MAIL ••••• service code: 17
Requirements:
- In /mnt/app/cfg/exec.cfg you have to configure
voice_mail 1
rtptx_pool 1
rtprx_pool 1
- You have to copy the raw directory from distrib root@192.168.1.100:/home/dbica/distrib/raw in /mnt/app/
- check if you have the last versions of rtptx_pool si rtprx_pool from distrib distrib(192.168.1.100)
- create the directory /mnt/app/msg/
- configure the default language in /mnt/app/cfg/prepaid.cfg, see Prepaid.cfg
Voice Mail Activation:
€€ To be able to activate the Voicemail on a sip user you have to create a route, Action=SERV to
Destination=VM_NOANSWER_BUSY
€€ If a user has enabled voicemail the calls will be redirected to the prefix of the VM_NOANSWER_BUSY route.
This prefix can have any value, this value has to be in the settings of the sip user voicemail number
To activate voice mail you have to check Voicemail and VoicemailState

Voicemail 223
€€ Voicemail - can be changed by administrator only (enable/disable service)
€€ VoicemailState - can be changed by user and/or administrator (activate/deactivate service):
€€ Offline - forwarded to voicemail only if the number is offline.
€€ Busy - forwarded to voicemail only if the number is busy.
€ No Answer - forwarded to voicemail only if the number does no answer in. In case you have activated this
option, in voicemail.cfg file you have to configure the ring_timeout value, see Voice mail.cfg
€€ Always - forwarded to voicemail all the calls Always
Example:
If the voicemail prefix is 999 then the SIP user 0317100025 voicemail configuration in the Voice Mail Number will
be: 9990317100025
Reading the messages:
€€ to read a message you have to create a route, Action=SERV to Destination=READ_VOICE_MAIL
€€ the prefix is the number that sip users will call to listen to their messages
€€ the message numbering is made from 2 digits, this means if you want to select the first message you have to dial
01 instead of 1, and so on till 09
€€ if you enter 1 digit instead of 2 digits to select the message, the user will be disconnected with time out
Limitations:
The default files for voicemail are recorded in Romanian and English languages, and only for 0(G711u) and
18(G729) codecs. The user can record his own files in the wanted codec and language.
Note:
In the file Voice mail.cfg the value of same_codec variable depends if you can do transcoding on not: The vaules
that same_codec can have: same_codec 1=enable; 0=disabled default 0
€ 1 = enabled - voice mail will be done without transcoding, it useful in case of a softswitch that do not have a
transcoding machine or for MGU without internal matrix. In this case SIP phones must use the same codec. In
case that you want to use voice mail also from TDM you have to set in Voip.cfg only one codec in the list of
codecs (audio_codecs variable)
€€ 0 = disabled - voice mail will be done with transcoding; this means that your machine supports transcoding
WEB PGSQL Interface configuration
Voice Mail Activation:
To create the voicemail route go to: Home -> Routes and click on New Route
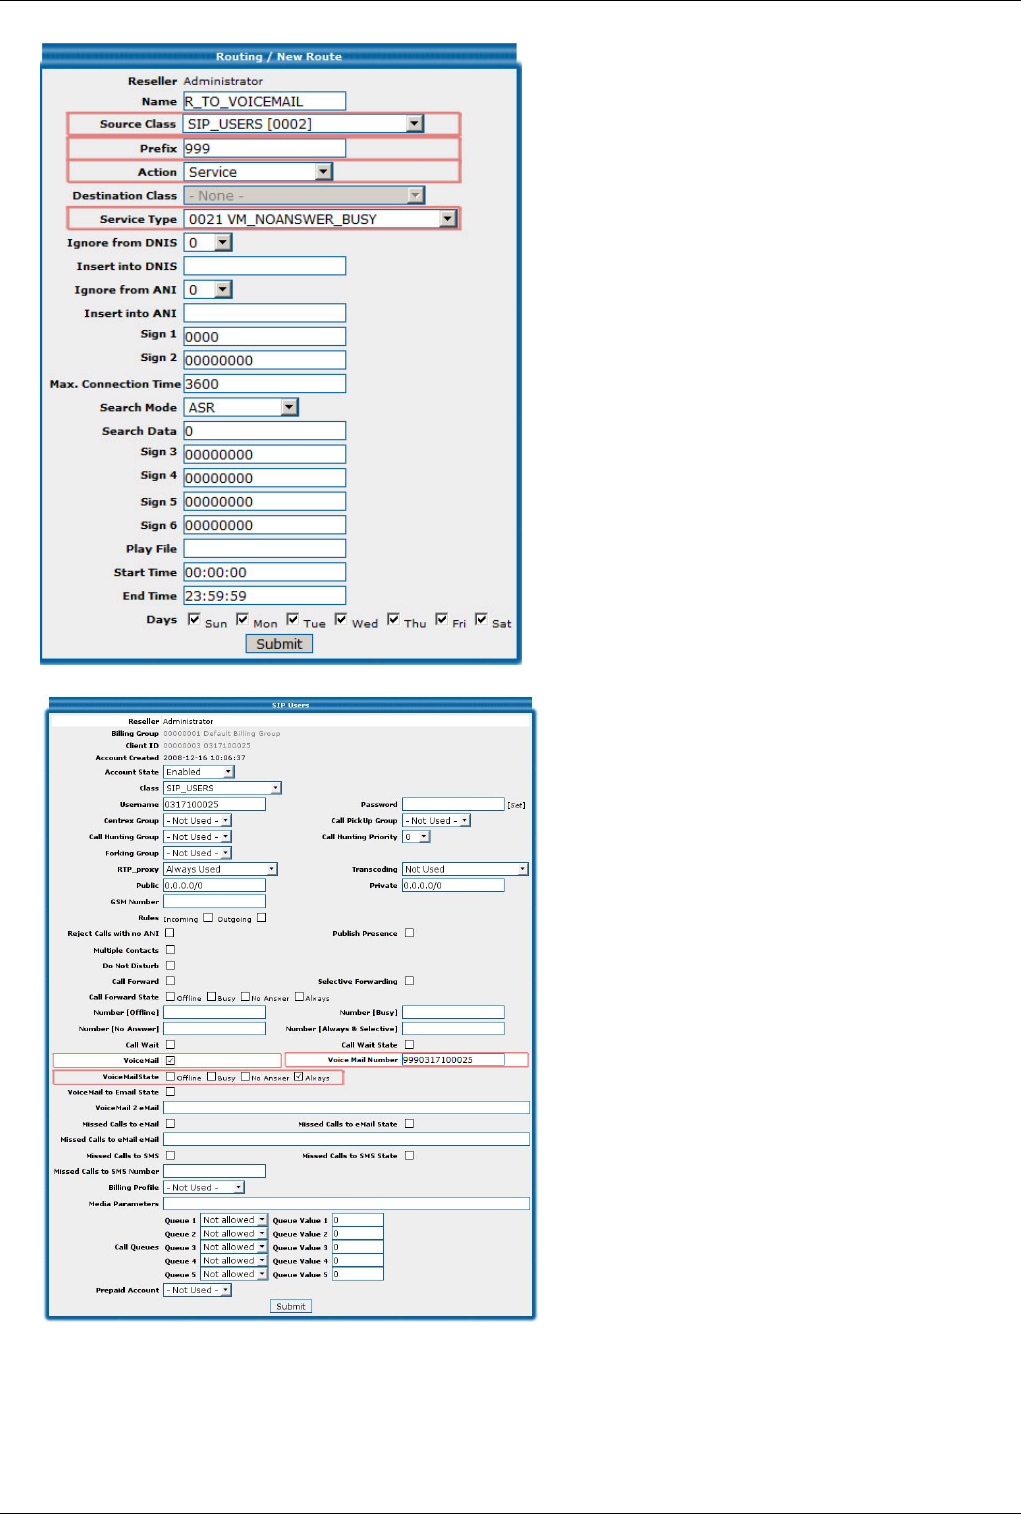
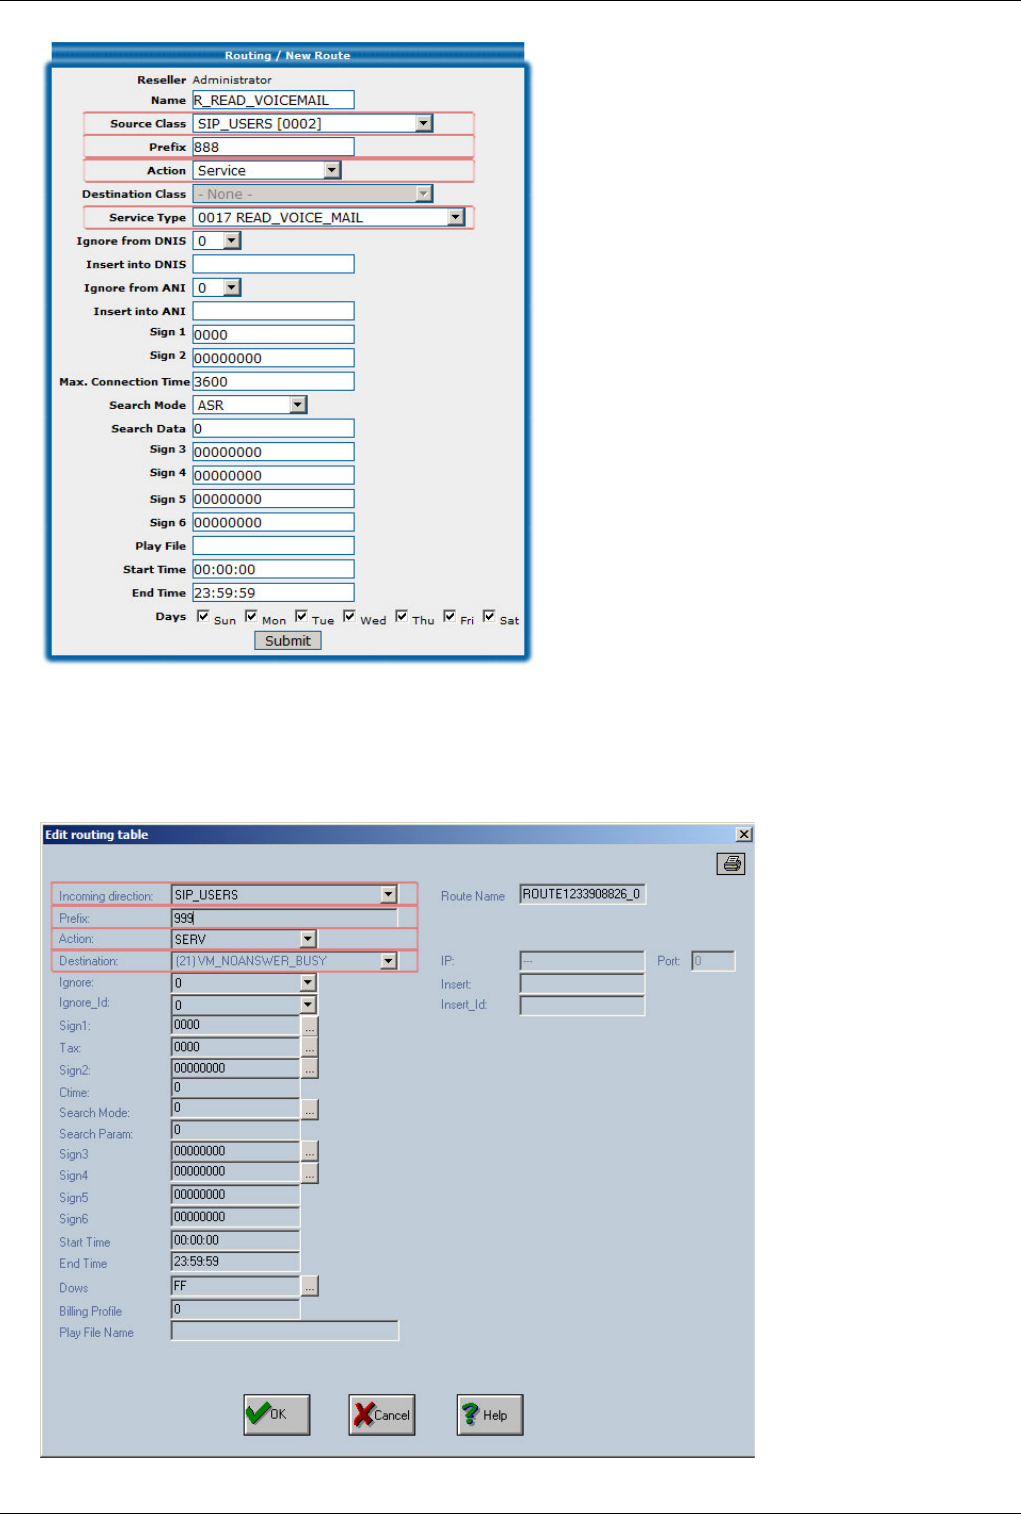
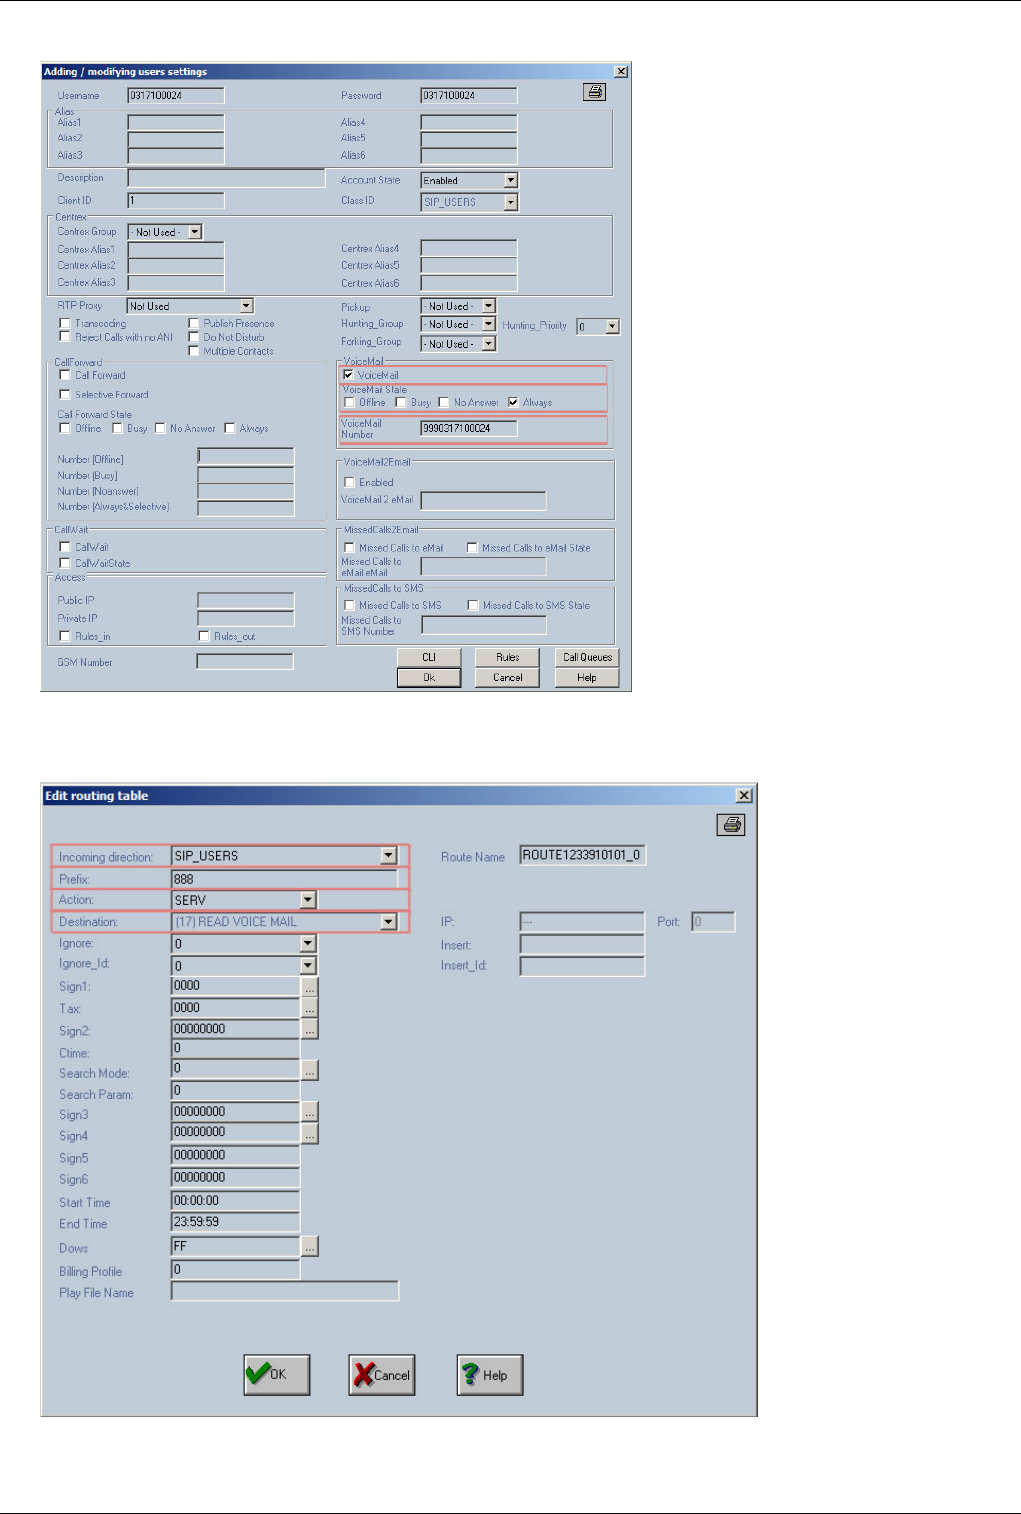
Voicemail 226
on a sip user go to: Actions -> SIP Users and double click for edit the SIP User you wish to activate voice mail
Reading the messages:
To create the read voicemail route go to: Actions -> Routing Table and click on Add, in the routing table you will
see the new route, double click for edit the new created route
GoTo >Main Page > centrala

Glossary 227
Glossary
GoTo >Main Page
CAS - Acronym for Channel-Associated Signaling. A type of signaling in which the signals needed to switch a
given telephone circuit are transmitted via the voice circuit itself (the same channel that will afterwards be used for
the call). Also, the signaling information can be sent through a signaling channel permanently associated with the
voice channel.
CCS - Acronym for Common-Channel Signaling. Another type of signaling in which one data channel in each link
is dedicated for signaling needed to control, account for, and manage traffic on all the voice or data channels of the
link. Unlike CAS, in CCS the transmission of signaling information is performed out of the voice band. The link is a
collection of junction channels that have the same properties.
DISA – Acronym for Direct Inward System Access. This function allows an outside caller to directly access a local
subscriber by using DTMF codes (for example when you call directly a local subscriber without need for a human
operator at the phone exchange).
Directions – groups of phone lines through which the calls are routed, depending upon the routing rules and the
numbering that was dialed. In TOPEX equipment, “Directions” are groups of local lines, inbound or outbound trunks
that have common routing characteristics. To ensure adequate routing of calls, you assign one or more trunks to each
direction.
Direction for overflow calls – the direction used as alternative for the “overflow” calls. Overflow calls are calls that
get redirected to another direction when the primary direction is not available. This way, no incoming calls are lost,
even if the initial direction is busy.
DTMF - Acronym for Dual Tone Multi Frequency, also known as "touch tone". Advanced method for dialing a
number, instead of the older Pulse mode. When you press a key on the keypad a combination of two audio
frequencies is sent on the line. DTMF capability is important because it allows access to a wide range of interactive
voice applications.
DSS1 - Acronym for Digital Subscriber Signaling System No 1. Common channel signaling specific to the
connection between PBX and terminal or between two PBX. DSS1 encompasses the entire suite of signaling
protocols used across the ISDN Basic Rate and Primary Rate user-network interfaces. It is defined by ITU-T
Recommendations Q.920, Q.921, and Q.922 for the suite's data link layer protocol (LAPD) and by ITU-T’s
recommendations Q.930, Q.931 and Q.933 for the suite's basic control procedures for calls and access connections.
E1 digital trunk – PCM communication system with 30 voice channels and data rate of 2,048kbit/s. E1 is mainly
used in Europe. The T1 version (not currently supported by the TOPEX gateway) is used in North America.
Encoding law – compression scheme used in the PCM system, for 64 kbit/s 8kHz encoding of 8-bit PCM audio
(voice) data. There are two variants of encoding widely used:A Law (Encoding Law A as per ITU G.711standard) is
used as a telephony standard in Europe, Asia, South America, Africa, etc. u-law is a similar encoding commonly
used in North America and Japan for digital telephony. The official definition is of these non – linear schemes for
compression / decompression of voice signal is the ITU-T standard G.711 (formally CCITT G.711).
G.703 - Electrical specifications for the E1 trunk. Described in the ITU-T Recommendation G.703,
"Physical/Electrical Characteristics of Hierarchical Digital Interfaces".
G.704 - frame structure specs for the E1 trunk, described by the ITU-T Recommendation G.704, "Synchronous
Frame Structures Used at Primary and Secondary Hierarchy Levels".
HDB3 – Acronym for High Density Bipolar 3 Code (ITU-T). A line code used in the E1 digital multiplex trunk.
The “3” stands for a maximum of three zeroes.

Glossary 228
ISDN - Acronym for Integrated Services Digital Network. ISDN is a•worldwide digital network providing
high-speed connection between the•terminal devices (telephone, fax machines, computers) for•a•wide range
of•telecommunication services, using the existing telephony infrastructure. ISDN is based upon two types of
communication channels: a B channel that carries data at a rate of 64Kbps and a D channel that carries control
information at the rate of 16 or 64Kbps.
ISDN also represents an effort to standardize subscriber services, user / network interfaces, and network and
internetwork capabilities: the computers and other terminal devices can connect to ISDN through simple, standard
interfaces.
ISUP – Acronym for ISDN User Part is the protocol that supports ISDN in the PSTN. It provides the signalling
required for circuit-mode bearer services of basic ISDN as well as supplementary services that have end-to-end
meaning.
ITU-T - Acronym for International Telecommunication Union Standardization, Section Telecommunications.
Since 2001 TOPEX is a sector member of I.T.U.
PCM trunk – digital multiplex of phone channels where analog signal are sampled, digitized and compressed. The
telephone channels are separated by time using a new type of transmission method known as Pulse Code
Modulation (PCM). The compression (encoding) of the analog signal can be performed according to two different
encoding laws, A-law or ‚-law.
PT – Payload Type (7 bits), identifies the format of the RTP payload and determines its interpretation by the
application. A profile specifies a default static mapping of payload type codes to payload formats. Additional
payload type codes may be defined dynamically through non-RTP means. An RTP sender emits a single RTP
payload type at any given time; this field is not intended for multiplexing separate media streams.
MTP – Acronym for Message Transfer Part - is the part of the SS7 used for communication in Public Switched
Telephone Network. MTP is responsible for the correct and reliable end-to-end data transport of SS7 messages
between communication partners.
Q411/412 and Q421/422 – ITU Recommendations for digital line signal codes to be used with the Signaling system
R2. ITU Q411/412 is for R2 analog line signaling while Q421/422 is for the digital version. By making use of the
increased signaling capacity in PCM systems, simplification of the outgoing and incoming switching equipment can
be achieved since the timing conditions necessary for the System R2 line signaling, analogue version, are not
required. The digital version of System R2 line signaling uses two signaling channels in each direction of
transmission per speech circuit.
QSIG - Acronym for Q-Signaling protocol (by the European Association for Standardizing and Communication
Systems). Another common channel signaling protocol, based on ISDN. It enables signaling between nodes (PBX)
and is widely deployed for the interoperability of different voice communications platforms and equipment in a
multi-vendor environment.
R2 – regional system no. 2 for CAS signaling, used in Romania.
Restriction classes – the classes of restrictions are groups of prefixes that can NOT called through certain external
(outgoing) phone lines. For example in order to restrict the access of a local subscriber to international calls he must
belong to a class of restrictions for which the 00 prefix is forbidden. Within each class you may define a maximum
of 20 restrictions.
RTCP – Acronym for RTP Control Protocol - is used for control and diagnostic on RTP sessions. Like RTP,
RTCP typically runs on top of UDP and is defined in the IETF RFC1889. RTCP is a companion protocol to RTP that
is used to maintain Quality of Service. RTP nodes analyze network conditions and periodically send each other
RTCP packets that report on network congestion.
Signaling – the totality of information exchanges between the phone central and the terminal device or between two
phone exchanges. This information is required in order to establish, maintain, and clear switched telephony

Glossary 229
connections. The signaling can be type CAS or CCS.
SS7 – Signaling System no. 7. Signaling system used for signaling between PBX, in ISDN. In order to be able to
establish and disconnect 64 Kbit/s connections with circuit switching, the ISDN phone exchanges must be able to
exchange signaling information. The signaling used in ISDN phone centrals is Signaling System No. 7 (SS7)
according to CCITT.
System 7 with ISUP – The ISUP (ISDN User Part) software layer provides the interface for applications to
establish, maintain and clear telephony connections via the SS7 network, in accordance with the recommendations
CCITT Q.761-Q.764 and ANSI T1.113 (from 1988 and respectively 1992). The ISUP layer is also responsible for
circuit (group) management, such as blocking, unblocking, and resetting of circuits and circuit groups.
VAD - Voice Activity Detection detects whether or not speech is present. A VAD-device can reduce the bandwidth
of a call by not transmitting “silent packets” when you are not speaking. Moreover, a VAD-device often generates
“comfort noise” or artificial ambient sound when the other party is not speaking. This lets you know that the line is
still connected as total silence could easily be mistaken for a lost connection.

Article Sources and Contributors 230
Article Sources and Contributors
About topex •Source: http://www.embedded.ro/index.php?oldid=28533 •Contributors: Admin
Multiaccess Structure •Source: http://www.embedded.ro/index.php?oldid=13733 •Contributors: Admin
Power Card •Source: http://www.embedded.ro/index.php?oldid=13529 •Contributors: Admin
Processor Card •Source: http://www.embedded.ro/index.php?oldid=17344 •Contributors: Admin
ISDN Card •Source: http://www.embedded.ro/index.php?oldid=78518 •Contributors: Alexandra
Voip Card •Source: http://www.embedded.ro/index.php?oldid=6549 •Contributors: Admin
GSM Card •Source: http://www.embedded.ro/index.php?oldid=13531 •Contributors: Admin
About centrala •Source: http://www.embedded.ro/index.php?oldid=17530 •Contributors: Jenuc
SIP features •Source: http://www.embedded.ro/index.php?oldid=15090 •Contributors: Jenuc
H323 apc •Source: http://www.embedded.ro/index.php?oldid=14974 •Contributors: Jenuc
Mspd •Source: http://www.embedded.ro/index.php?oldid=85930 •Contributors: Alexandra, Igor
Rtprx pool •Source: http://www.embedded.ro/index.php?oldid=64391 •Contributors: Jenuc
Rtptx pool •Source: http://www.embedded.ro/index.php?oldid=13512 •Contributors: Admin
Recmail •Source: http://www.embedded.ro/index.php?oldid=13501 •Contributors: Admin
Smtpmail •Source: http://www.embedded.ro/index.php?oldid=13503 •Contributors: Admin
Sendsms •Source: http://www.embedded.ro/index.php?oldid=85878 •Contributors: Alexandra
Mysql client •Source: http://www.embedded.ro/index.php?oldid=64405 •Contributors: Jenuc
Radius billing •Source: http://www.embedded.ro/index.php?oldid=70479 •Contributors: Jenuc
Pgsql sip pool •Source: http://www.embedded.ro/index.php?oldid=64398 •Contributors: Jenuc
Pgsql pcodedel •Source: http://www.embedded.ro/index.php?oldid=13518 •Contributors: Admin
Pgsql pcode •Source: http://www.embedded.ro/index.php?oldid=13517 •Contributors: Admin
Pgsql pcodeerror •Source: http://www.embedded.ro/index.php?oldid=13519 •Contributors: Admin
Pgsql sms •Source: http://www.embedded.ro/index.php?oldid=14914 •Contributors: Ioana
Default Passwords •Source: http://www.embedded.ro/index.php?oldid=7298 •Contributors: Admin
Operating Sistem Structure •Source: http://www.embedded.ro/index.php?oldid=13848 •Contributors: Admin
Telnet commands •Source: http://www.embedded.ro/index.php?oldid=85626 •Contributors: Jenuc
Connecting with OAM •Source: http://www.embedded.ro/index.php?oldid=12685 •Contributors: Admin
OAM / Card Map •Source: http://www.embedded.ro/index.php?oldid=10838 •Contributors: Suceveanu
OAM / Installing a GSM card •Source: http://www.embedded.ro/index.php?oldid=28060 •Contributors: Admin
OAM / Installing a PRI card •Source: http://www.embedded.ro/index.php?oldid=7355 •Contributors: Admin
OAM / Installing a VOIP card •Source: http://www.embedded.ro/index.php?oldid=10835 •Contributors: Suceveanu
OAM / Installing a MPAI card •Source: http://www.embedded.ro/index.php?oldid=11888 •Contributors: Suceveanu
OAM / E1R2 •Source: http://www.embedded.ro/index.php?oldid=10849 •Contributors: Suceveanu
OAM / Call Flow •Source: http://www.embedded.ro/index.php?oldid=12683 •Contributors: Admin
OAM / Create a Trunk •Source: http://www.embedded.ro/index.php?oldid=7641 •Contributors: Admin
OAM / Access IN •Source: http://www.embedded.ro/index.php?oldid=12044 •Contributors: Admin
OAM / Call Directions •Source: http://www.embedded.ro/index.php?oldid=12687 •Contributors: Admin
OAM / Routing Table •Source: http://www.embedded.ro/index.php?oldid=85635 •Contributors: Alexandra, Suceveanu
OAM / Access Out •Source: http://www.embedded.ro/index.php?oldid=10827 •Contributors: Suceveanu
OAM / Max Call duration •Source: http://www.embedded.ro/index.php?oldid=13043 •Contributors: Admin
OAM / Overflow •Source: http://www.embedded.ro/index.php?oldid=13051 •Contributors: Admin
OAM / Monitor calls •Source: http://www.embedded.ro/index.php?oldid=10832 •Contributors: Suceveanu
OAM / SIM Management •Source: http://www.embedded.ro/index.php?oldid=12883 •Contributors: Admin
OAM / DTMF •Source: http://www.embedded.ro/index.php?oldid=17308 •Contributors: Admin
OAM / DISA •Source: http://www.embedded.ro/index.php?oldid=10845 •Contributors: Suceveanu
OAM / Forward Incoming GSM Calls •Source: http://www.embedded.ro/index.php?oldid=17410 •Contributors: Admin
OAM / Send SMS •Source: http://www.embedded.ro/index.php?oldid=10831 •Contributors: Suceveanu
OAM / Check Credit •Source: http://www.embedded.ro/index.php?oldid=14978 •Contributors: Alexandra
OAM / ALARMS •Source: http://www.embedded.ro/index.php?oldid=10852 •Contributors: Suceveanu

Article Sources and Contributors 231
OAM / Check GSM Signal •Source: http://www.embedded.ro/index.php?oldid=10847 •Contributors: Suceveanu
OAM / Download Billing •Source: http://www.embedded.ro/index.php?oldid=17583 •Contributors: Admin
OAM / Download ASR •Source: http://www.embedded.ro/index.php?oldid=10854 •Contributors: Suceveanu
Connect to Multiaccess or Qutex •Source: http://www.embedded.ro/index.php?oldid=5681 •Contributors: Admin
Change IP Address •Source: http://www.embedded.ro/index.php?oldid=14350 •Contributors: Alexandra
Change Date and Time •Source: http://www.embedded.ro/index.php?oldid=85917 •Contributors: Admin, Alexandra, Victor
Check harddisk for problems •Source: http://www.embedded.ro/index.php?oldid=5696 •Contributors: Admin
Clean restart/shutdown •Source: http://www.embedded.ro/index.php?oldid=7720 •Contributors: Jenuc
Stop/Start Logs •Source: http://www.embedded.ro/index.php?oldid=14167 •Contributors: Admin
Reroute on cause X •Source: http://www.embedded.ro/index.php?oldid=6701 •Contributors: Admin
Upgrade Software •Source: http://www.embedded.ro/index.php?oldid=85516 •Contributors: Admin
CCTL features •Source: http://www.embedded.ro/index.php?oldid=10816 •Contributors: Jenuc
CCTL flow •Source: http://www.embedded.ro/index.php?oldid=12782 •Contributors: Admin
AccessIn •Source: http://www.embedded.ro/index.php?oldid=12780 •Contributors: Admin
Users and Classes •Source: http://www.embedded.ro/index.php?oldid=7492 •Contributors: Jenuc
Routing table •Source: http://www.embedded.ro/index.php?oldid=8058 •Contributors: Teo
AccessOut •Source: http://www.embedded.ro/index.php?oldid=12781 •Contributors: Admin
Exec.cfg •Source: http://www.embedded.ro/index.php?oldid=86020 •Contributors: Alexandra, Jenuc
Trafic.cfg •Source: http://www.embedded.ro/index.php?oldid=85585 •Contributors: Admin, Victor
Dirname.cfg •Source: http://www.embedded.ro/index.php?oldid=8514 •Contributors: Jenuc
Card.cfg •Source: http://www.embedded.ro/index.php?oldid=7890 •Contributors: Jenuc
Port.cfg •Source: http://www.embedded.ro/index.php?oldid=7891 •Contributors: Jenuc
Dir.cfg •Source: http://www.embedded.ro/index.php?oldid=77039 •Contributors: Admin
Voip.cfg •Source: http://www.embedded.ro/index.php?oldid=85706 •Contributors: Jenuc, Victor
Diripin.cfg •Source: http://www.embedded.ro/index.php?oldid=8084 •Contributors: Jenuc
Diripout.cfg •Source: http://www.embedded.ro/index.php?oldid=13330 •Contributors: Admin
Group.cfg •Source: http://www.embedded.ro/index.php?oldid=85865 •Contributors: Alexandra, Teo
Sip pbx.cfg •Source: http://www.embedded.ro/index.php?oldid=64324 •Contributors: Jenuc
Sip redirect.cfg •Source: http://www.embedded.ro/index.php?oldid=6140 •Contributors: Jenuc
Prepaid.cfg •Source: http://www.embedded.ro/index.php?oldid=12447 •Contributors: Teo
SIPusers.cfg •Source: http://www.embedded.ro/index.php?oldid=13917 •Contributors: Jenuc
Voice mail.cfg •Source: http://www.embedded.ro/index.php?oldid=6159 •Contributors: Jenuc
Simindex.cfg •Source: http://www.embedded.ro/index.php?oldid=7895 •Contributors: Jenuc
Register users.cfg •Source: http://www.embedded.ro/index.php?oldid=78486 •Contributors: Jenuc
Extended port config •Source: http://www.embedded.ro/index.php?oldid=85921 •Contributors: Admin, Jenuc
VCSS files for Wavecom •Source: http://www.embedded.ro/index.php?oldid=85718 •Contributors: Admin, Alexandra
Billing generic (PGSQL, MySQL, MSSQL) •Source: http://www.embedded.ro/index.php?oldid=14102 •Contributors: Admin
PgSQL Billing •Source: http://www.embedded.ro/index.php?oldid=6826 •Contributors: Admin
Mysql Billing •Source: http://www.embedded.ro/index.php?oldid=85620 •Contributors: Admin, Victor
Dd-mm-yy.tax •Source: http://www.embedded.ro/index.php?oldid=14351 •Contributors: Ioana
Voicemail2Email •Source: http://www.embedded.ro/index.php?oldid=12777 •Contributors: Admin
Multiaccess Config for Simserver •Source: http://www.embedded.ro/index.php?oldid=7879 •Contributors: Ioana
Clean hdd.sh script •Source: http://www.embedded.ro/index.php?oldid=13509 •Contributors: Admin
GSM Cell Selection •Source: http://www.embedded.ro/index.php?oldid=13839 •Contributors: Admin
Voicemail •Source: http://www.embedded.ro/index.php?oldid=7549 •Contributors: Jenuc
Glossary •Source: http://www.embedded.ro/index.php?oldid=17978 •Contributors: Mihai.cretu

Image Sources, Licenses and Contributors 232
Image Sources, Licenses and Contributors
Image:Maccess.jpeg •Source: http://www.embedded.ro/index.php?title=File:Maccess.jpeg •License: unknown •Contributors: Admin
Image:salga.jpg •Source: http://www.embedded.ro/index.php?title=File:Salga.jpg •License: unknown •Contributors: Admin
Image:pgruc.jpg •Source: http://www.embedded.ro/index.php?title=File:Pgruc.jpg •License: unknown •Contributors: Admin
Image:pgvoip.jpg •Source: http://www.embedded.ro/index.php?title=File:Pgvoip.jpg •License: unknown •Contributors: Admin
Image:fux.jpg •Source: http://www.embedded.ro/index.php?title=File:Fux.jpg •License: unknown •Contributors: Admin
Image:rj45_e1.jpg •Source: http://www.embedded.ro/index.php?title=File:Rj45_e1.jpg •License: unknown •Contributors: Admin
Image:connectin_pri.jpg •Source: http://www.embedded.ro/index.php?title=File:Connectin_pri.jpg •License: unknown •Contributors: Admin
File:T1_crossover.png •Source: http://www.embedded.ro/index.php?title=File:T1_crossover.png •License: unknown •Contributors: Alexandra
Image:xvoip.jpg •Source: http://www.embedded.ro/index.php?title=File:Xvoip.jpg •License: unknown •Contributors: Admin
Image:best_practice.png •Source: http://www.embedded.ro/index.php?title=File:Best_practice.png •License: unknown •Contributors: Admin
Image:Gsm.jpg •Source: http://www.embedded.ro/index.php?title=File:Gsm.jpg •License: unknown •Contributors: Admin
File:825_ch_dens_and_ptime_1.png •Source: http://www.embedded.ro/index.php?title=File:825_ch_dens_and_ptime_1.png •License: unknown •Contributors: Alexandra
File:825_ch_dens_and_ptime_2.png •Source: http://www.embedded.ro/index.php?title=File:825_ch_dens_and_ptime_2.png •License: unknown •Contributors: Alexandra
File:828_ch_dens_and_ptime.png •Source: http://www.embedded.ro/index.php?title=File:828_ch_dens_and_ptime.png •License: unknown •Contributors: Alexandra
Image:New connection.jpg •Source: http://www.embedded.ro/index.php?title=File:New_connection.jpg •License: unknown •Contributors: Admin
Image:Add gsm.png •Source: http://www.embedded.ro/index.php?title=File:Add_gsm.png •License: unknown •Contributors: Admin
Image:Passwd window.png •Source: http://www.embedded.ro/index.php?title=File:Passwd_window.png •License: unknown •Contributors: Admin
Image:Card type gsm.png •Source: http://www.embedded.ro/index.php?title=File:Card_type_gsm.png •License: unknown •Contributors: Admin
Image:Port gsm.png •Source: http://www.embedded.ro/index.php?title=File:Port_gsm.png •License: unknown •Contributors: Admin
Image:Pin oam.jpg •Source: http://www.embedded.ro/index.php?title=File:Pin_oam.jpg •License: unknown •Contributors: Admin
File:addcard.png •Source: http://www.embedded.ro/index.php?title=File:Addcard.png •License: unknown •Contributors: Admin
File:isdnpri.png •Source: http://www.embedded.ro/index.php?title=File:Isdnpri.png •License: unknown •Contributors: Admin
File:layer1.png •Source: http://www.embedded.ro/index.php?title=File:Layer1.png •License: unknown •Contributors: Admin
File:trunksettings.png •Source: http://www.embedded.ro/index.php?title=File:Trunksettings.png •License: unknown •Contributors: Admin
File:installports.png •Source: http://www.embedded.ro/index.php?title=File:Installports.png •License: unknown •Contributors: Admin
File:Hdlc.png •Source: http://www.embedded.ro/index.php?title=File:Hdlc.png •License: unknown •Contributors: Admin
image:add_voip_card.png •Source: http://www.embedded.ro/index.php?title=File:Add_voip_card.png •License: unknown •Contributors: Admin
image:select_ip.png •Source: http://www.embedded.ro/index.php?title=File:Select_ip.png •License: unknown •Contributors: Admin
image:rtp_and_range.png •Source: http://www.embedded.ro/index.php?title=File:Rtp_and_range.png •License: unknown •Contributors: Admin
image:voip_port.png •Source: http://www.embedded.ro/index.php?title=File:Voip_port.png •License: unknown •Contributors: Admin
image:pg_config.png •Source: http://www.embedded.ro/index.php?title=File:Pg_config.png •License: unknown •Contributors: Admin
image:pg_voip.png •Source: http://www.embedded.ro/index.php?title=File:Pg_voip.png •License: unknown •Contributors: Admin
image:rtp_ip.png •Source: http://www.embedded.ro/index.php?title=File:Rtp_ip.png •License: unknown •Contributors: Admin
image:voip_cables.jpg •Source: http://www.embedded.ro/index.php?title=File:Voip_cables.jpg •License: unknown •Contributors: Admin
image:voip_port2.png •Source: http://www.embedded.ro/index.php?title=File:Voip_port2.png •License: unknown •Contributors: Admin
image:pgvoip_voip.png •Source: http://www.embedded.ro/index.php?title=File:Pgvoip_voip.png •License: unknown •Contributors: Admin
image:OAMmpai.png •Source: http://www.embedded.ro/index.php?title=File:OAMmpai.png •License: unknown •Contributors: Suceveanu
Image:Oam r2 1.png •Source: http://www.embedded.ro/index.php?title=File:Oam_r2_1.png •License: unknown •Contributors: Admin
Image:Oamr22.png •Source: http://www.embedded.ro/index.php?title=File:Oamr22.png •License: unknown •Contributors: Admin
Image:Amr23.png •Source: http://www.embedded.ro/index.php?title=File:Amr23.png •License: unknown •Contributors: Admin
Image:Oamr24.png •Source: http://www.embedded.ro/index.php?title=File:Oamr24.png •License: unknown •Contributors: Admin
Image:Oamr25.png •Source: http://www.embedded.ro/index.php?title=File:Oamr25.png •License: unknown •Contributors: Admin
Image:Oamr26.png •Source: http://www.embedded.ro/index.php?title=File:Oamr26.png •License: unknown •Contributors: Admin
Image:Oamr27.png •Source: http://www.embedded.ro/index.php?title=File:Oamr27.png •License: unknown •Contributors: Admin
Image:Oamr28.png •Source: http://www.embedded.ro/index.php?title=File:Oamr28.png •License: unknown •Contributors: Admin
Image:Oamr29.png •Source: http://www.embedded.ro/index.php?title=File:Oamr29.png •License: unknown •Contributors: Admin
Image:Oamr210.png •Source: http://www.embedded.ro/index.php?title=File:Oamr210.png •License: unknown •Contributors: Admin
Image:Oamr211.png •Source: http://www.embedded.ro/index.php?title=File:Oamr211.png •License: unknown •Contributors: Admin
image:call_flow.png •Source: http://www.embedded.ro/index.php?title=File:Call_flow.png •License: unknown •Contributors: Admin
Image:Direction names.png •Source: http://www.embedded.ro/index.php?title=File:Direction_names.png •License: unknown •Contributors: Admin
Image:Rename trunk.png •Source: http://www.embedded.ro/index.php?title=File:Rename_trunk.png •License: unknown •Contributors: Admin
Image:diripin.png •Source: http://www.embedded.ro/index.php?title=File:Diripin.png •License: unknown •Contributors: Suceveanu
Image:diripin_settings.png •Source: http://www.embedded.ro/index.php?title=File:Diripin_settings.png •License: unknown •Contributors: Suceveanu
Image:Call directions1.png •Source: http://www.embedded.ro/index.php?title=File:Call_directions1.png •License: unknown •Contributors: Suceveanu
Image:Call directions2.png •Source: http://www.embedded.ro/index.php?title=File:Call_directions2.png •License: unknown •Contributors: Suceveanu
image:sign1_oam.png •Source: http://www.embedded.ro/index.php?title=File:Sign1_oam.png •License: unknown •Contributors: Admin
image:sign2_oam.png •Source: http://www.embedded.ro/index.php?title=File:Sign2_oam.png •License: unknown •Contributors: Admin
image:sign4_oam.png •Source: http://www.embedded.ro/index.php?title=File:Sign4_oam.png •License: unknown •Contributors: Admin
image:sign6_oam.png •Source: http://www.embedded.ro/index.php?title=File:Sign6_oam.png •License: unknown •Contributors: Admin
image:oamrouting1.png •Source: http://www.embedded.ro/index.php?title=File:Oamrouting1.png •License: unknown •Contributors: Suceveanu
image:oamrouting2.png •Source: http://www.embedded.ro/index.php?title=File:Oamrouting2.png •License: unknown •Contributors: Admin
image:oam072gsm.png •Source: http://www.embedded.ro/index.php?title=File:Oam072gsm.png •License: unknown •Contributors: Admin
image:oam072gsm2.png •Source: http://www.embedded.ro/index.php?title=File:Oam072gsm2.png •License: unknown •Contributors: Admin
image:072over1.png •Source: http://www.embedded.ro/index.php?title=File:072over1.png •License: unknown •Contributors: Admin
image:072over2.png •Source: http://www.embedded.ro/index.php?title=File:072over2.png •License: unknown •Contributors: Admin
image:072wrong.png •Source: http://www.embedded.ro/index.php?title=File:072wrong.png •License: unknown •Contributors: Admin
image:07fcorrect.png •Source: http://www.embedded.ro/index.php?title=File:07fcorrect.png •License: unknown •Contributors: Admin
image:routingsig1.png •Source: http://www.embedded.ro/index.php?title=File:Routingsig1.png •License: unknown •Contributors: Admin

Image Sources, Licenses and Contributors 233
image:oamroutingsign1.png •Source: http://www.embedded.ro/index.php?title=File:Oamroutingsign1.png •License: unknown •Contributors: Suceveanu
image:oamroutingsign1_2.png •Source: http://www.embedded.ro/index.php?title=File:Oamroutingsign1_2.png •License: unknown •Contributors: Suceveanu
image:oamroutingsign1_3.png •Source: http://www.embedded.ro/index.php?title=File:Oamroutingsign1_3.png •License: unknown •Contributors: Suceveanu
Image:OAMroutingtax.png •Source: http://www.embedded.ro/index.php?title=File:OAMroutingtax.png •License: unknown •Contributors: Suceveanu
Image:OAMroutingtax_1.png •Source: http://www.embedded.ro/index.php?title=File:OAMroutingtax_1.png •License: unknown •Contributors: Suceveanu
Image:OAMroutingtax_2.png •Source: http://www.embedded.ro/index.php?title=File:OAMroutingtax_2.png •License: unknown •Contributors: Suceveanu
Image:OAMroutingtax_3.png •Source: http://www.embedded.ro/index.php?title=File:OAMroutingtax_3.png •License: unknown •Contributors: Suceveanu
Image:OAMroutingtax_4.png •Source: http://www.embedded.ro/index.php?title=File:OAMroutingtax_4.png •License: unknown •Contributors: Suceveanu
Image:OAMroutingtax_5.png •Source: http://www.embedded.ro/index.php?title=File:OAMroutingtax_5.png •License: unknown •Contributors: Suceveanu
Image:Oamroutingsign2.png •Source: http://www.embedded.ro/index.php?title=File:Oamroutingsign2.png •License: unknown •Contributors: Suceveanu
Image:Oamroutingsign2_1.png •Source: http://www.embedded.ro/index.php?title=File:Oamroutingsign2_1.png •License: unknown •Contributors: Suceveanu
Image:Oamroutingsearchmode.png •Source: http://www.embedded.ro/index.php?title=File:Oamroutingsearchmode.png •License: unknown •Contributors: Suceveanu
Image:Oamroutingsign3.png •Source: http://www.embedded.ro/index.php?title=File:Oamroutingsign3.png •License: unknown •Contributors: Suceveanu
Image:Oamroutingsign3_1.png •Source: http://www.embedded.ro/index.php?title=File:Oamroutingsign3_1.png •License: unknown •Contributors: Suceveanu
Image:Oamroutingsign3_2.png •Source: http://www.embedded.ro/index.php?title=File:Oamroutingsign3_2.png •License: unknown •Contributors: Suceveanu
Image:Oamroutingsign3_3.png •Source: http://www.embedded.ro/index.php?title=File:Oamroutingsign3_3.png •License: unknown •Contributors: Suceveanu
Image:Oamroutingsign3_4.png •Source: http://www.embedded.ro/index.php?title=File:Oamroutingsign3_4.png •License: unknown •Contributors: Suceveanu
Image:Oamroutingsign4.png •Source: http://www.embedded.ro/index.php?title=File:Oamroutingsign4.png •License: unknown •Contributors: Suceveanu
Image:Oamroutingsign5.png •Source: http://www.embedded.ro/index.php?title=File:Oamroutingsign5.png •License: unknown •Contributors: Suceveanu
Image:diripout.png •Source: http://www.embedded.ro/index.php?title=File:Diripout.png •License: unknown •Contributors: Suceveanu
Image:tlimit.jpg •Source: http://www.embedded.ro/index.php?title=File:Tlimit.jpg •License: unknown •Contributors: Admin
image:routing_over1.jpg •Source: http://www.embedded.ro/index.php?title=File:Routing_over1.jpg •License: unknown •Contributors: Admin
image:routing_over2.jpg •Source: http://www.embedded.ro/index.php?title=File:Routing_over2.jpg •License: unknown •Contributors: Admin
image:routing_over3.jpg •Source: http://www.embedded.ro/index.php?title=File:Routing_over3.jpg •License: unknown •Contributors: Admin
Image:calls_moni.jpg •Source: http://www.embedded.ro/index.php?title=File:Calls_moni.jpg •License: unknown •Contributors: Admin
Image:Live monitoring.jpg •Source: http://www.embedded.ro/index.php?title=File:Live_monitoring.jpg •License: unknown •Contributors: Admin
Image:Live monitoring2.jpg •Source: http://www.embedded.ro/index.php?title=File:Live_monitoring2.jpg •License: unknown •Contributors: Admin
Image:Live monitoring3.jpg •Source: http://www.embedded.ro/index.php?title=File:Live_monitoring3.jpg •License: unknown •Contributors: Admin
Image:Live monitoring4.jpg •Source: http://www.embedded.ro/index.php?title=File:Live_monitoring4.jpg •License: unknown •Contributors: Admin
Image:Live monitoring5.jpg •Source: http://www.embedded.ro/index.php?title=File:Live_monitoring5.jpg •License: unknown •Contributors: Admin
Image:Live monitoring6.jpg •Source: http://www.embedded.ro/index.php?title=File:Live_monitoring6.jpg •License: unknown •Contributors: Admin
Image:Live monitoring7.jpg •Source: http://www.embedded.ro/index.php?title=File:Live_monitoring7.jpg •License: unknown •Contributors: Admin
Image:Live monitoring8.jpg •Source: http://www.embedded.ro/index.php?title=File:Live_monitoring8.jpg •License: unknown •Contributors: Admin
image:gsmport.jpg •Source: http://www.embedded.ro/index.php?title=File:Gsmport.jpg •License: unknown •Contributors: Admin
image:simindex.jpg •Source: http://www.embedded.ro/index.php?title=File:Simindex.jpg •License: unknown •Contributors: Admin
Image:Signaling6.png •Source: http://www.embedded.ro/index.php?title=File:Signaling6.png •License: unknown •Contributors: Admin
image:gsm_disa.png •Source: http://www.embedded.ro/index.php?title=File:Gsm_disa.png •License: unknown •Contributors: Admin
image:forward_insert.png •Source: http://www.embedded.ro/index.php?title=File:Forward_insert.png •License: unknown •Contributors: Admin
image:forward_routing.png •Source: http://www.embedded.ro/index.php?title=File:Forward_routing.png •License: unknown •Contributors: Admin
Image:Send sms.png •Source: http://www.embedded.ro/index.php?title=File:Send_sms.png •License: unknown •Contributors: Admin
Image:Send sms box.png •Source: http://www.embedded.ro/index.php?title=File:Send_sms_box.png •License: unknown •Contributors: Admin
image:cell_info.png •Source: http://www.embedded.ro/index.php?title=File:Cell_info.png •License: unknown •Contributors: Admin
image:cell_info_wavecom.png •Source: http://www.embedded.ro/index.php?title=File:Cell_info_wavecom.png •License: unknown •Contributors: Admin
image:auto_download.png •Source: http://www.embedded.ro/index.php?title=File:Auto_download.png •License: unknown •Contributors: Admin
image:billing_auto.png •Source: http://www.embedded.ro/index.php?title=File:Billing_auto.png •License: unknown •Contributors: Admin
image:show_billing.png •Source: http://www.embedded.ro/index.php?title=File:Show_billing.png •License: unknown •Contributors: Admin
Image:bill1.png •Source: http://www.embedded.ro/index.php?title=File:Bill1.png •License: unknown •Contributors: Admin
Image:bill2.png •Source: http://www.embedded.ro/index.php?title=File:Bill2.png •License: unknown •Contributors: Admin
Image:bill3.png •Source: http://www.embedded.ro/index.php?title=File:Bill3.png •License: unknown •Contributors: Admin
Image:bill4.png •Source: http://www.embedded.ro/index.php?title=File:Bill4.png •License: unknown •Contributors: Admin
Image:bill5.png •Source: http://www.embedded.ro/index.php?title=File:Bill5.png •License: unknown •Contributors: Admin
Image:bill6.png •Source: http://www.embedded.ro/index.php?title=File:Bill6.png •License: unknown •Contributors: Admin
Image:teraterm.jpg •Source: http://www.embedded.ro/index.php?title=File:Teraterm.jpg •License: unknown •Contributors: Admin
Image:putty.jpg •Source: http://www.embedded.ro/index.php?title=File:Putty.jpg •License: unknown •Contributors: Admin
Image:Ip to ip.jpg •Source: http://www.embedded.ro/index.php?title=File:Ip_to_ip.jpg •License: unknown •Contributors: Teo
Image:Sipusers to ip.jpg •Source: http://www.embedded.ro/index.php?title=File:Sipusers_to_ip.jpg •License: unknown •Contributors: Teo
Image:Ip to sipusers.jpg •Source: http://www.embedded.ro/index.php?title=File:Ip_to_sipusers.jpg •License: unknown •Contributors: Teo
Image:Su to su.jpg •Source: http://www.embedded.ro/index.php?title=File:Su_to_su.jpg •License: unknown •Contributors: Teo
Image:Tdm to tdm.jpg •Source: http://www.embedded.ro/index.php?title=File:Tdm_to_tdm.jpg •License: unknown •Contributors: Teo
Image:Ip to tdm.jpg •Source: http://www.embedded.ro/index.php?title=File:Ip_to_tdm.jpg •License: unknown •Contributors: Teo
Image:Tdm to ip.jpg •Source: http://www.embedded.ro/index.php?title=File:Tdm_to_ip.jpg •License: unknown •Contributors: Teo
Image:Su to ss.jpg •Source: http://www.embedded.ro/index.php?title=File:Su_to_ss.jpg •License: unknown •Contributors: Teo
Image:Ip to ss.jpg •Source: http://www.embedded.ro/index.php?title=File:Ip_to_ss.jpg •License: unknown •Contributors: Teo
Image:Tdm to ss.jpg •Source: http://www.embedded.ro/index.php?title=File:Tdm_to_ss.jpg •License: unknown •Contributors: Teo
Image:vm_to_email1_pgsql.jpg •Source: http://www.embedded.ro/index.php?title=File:Vm_to_email1_pgsql.jpg •License: unknown •Contributors: Teo
Image:vm_to_email1_oam.jpg •Source: http://www.embedded.ro/index.php?title=File:Vm_to_email1_oam.jpg •License: unknown •Contributors: Teo
Image:Voicemail1.jpg •Source: http://www.embedded.ro/index.php?title=File:Voicemail1.jpg •License: unknown •Contributors: Teo
Image:Voicemail2.jpg •Source: http://www.embedded.ro/index.php?title=File:Voicemail2.jpg •License: unknown •Contributors: Teo
Image:Readvm pgsql.jpg •Source: http://www.embedded.ro/index.php?title=File:Readvm_pgsql.jpg •License: unknown •Contributors: Teo
Image:Voicemail1 oam.jpg •Source: http://www.embedded.ro/index.php?title=File:Voicemail1_oam.jpg •License: unknown •Contributors: Teo
Image:Voicemail2 oam.jpg •Source: http://www.embedded.ro/index.php?title=File:Voicemail2_oam.jpg •License: unknown •Contributors: Teo

Image Sources, Licenses and Contributors 234
Image:Readvm oam.jpg •Source: http://www.embedded.ro/index.php?title=File:Readvm_oam.jpg •License: unknown •Contributors: Teo
