TRM CLM User Guide
User Manual:
Open the PDF directly: View PDF ![]() .
.
Page Count: 172 [warning: Documents this large are best viewed by clicking the View PDF Link!]
- Contents
- Preface
- Chapter 1 Overview
- 1.1 CLM
- 1.1.1 Defining contracts in CLM
- 1.1.2 Arranging credit in CLM
- 1.1.3 Structuring of loan products in CLM
- 1.1.4 Capturing and processing drawdowns in CLM
- 1.1.5 Processing loan events in CLM
- 1.1.6 Monitoring credit and debt situations in CLM
- 1.1.7 Receivables management in CLM
- 1.1.8 Managing messages in CLM
- 1.1.9 Information used in CLM
- 1.2 Applications of CLM
- 1.3 Setting up and using CLM
- 1.1 CLM
- Chapter 2 Managing static data
- 2.1 Setting up static data for CLM
- 2.2 Schedule templates
- 2.3 Instrument groups
- 2.4 Instrument types
- 2.5 Instruments
- 2.6 Transaction templates
- 2.7 Facility types
- 2.8 Facility templates
- 2.9 Facilities
- 2.9.1 Defining the main attributes
- 2.9.2 Defining contract details
- 2.9.2.1 Defining credit amount details
- 2.9.2.2 Defining drawdown currency details
- 2.9.2.3 Defining counterparty details
- 2.9.2.4 Defining payback FX rate details
- 2.9.2.5 Defining location details
- 2.9.2.6 Defining owner details
- 2.9.2.7 Defining instrument and event details
- 2.9.2.8 Defining funding type details
- 2.9.2.9 Defining tranche details
- 2.9.2.10 Defining transaction template details
- 2.9.2.11 Defining beneficiary details (optional)
- 2.9.2.12 Defining guarantor details (optional)
- 2.9.2.13 Defining sublimits (optional)
- 2.9.2.14 Defining drawdown condition details (optional)
- 2.9.2.15 Defining collateral agreement details (optional)
- 2.9.2.16 Defining drawdown parameter details (optional)
- 2.9.2.17 Defining mandate details
- 2.9.2.18 Defining switches details
- 2.9.2.19 Defining properties details
- 2.9.2.20 Defining links details
- 2.9.2.21 Defining ad hoc message client details
- 2.9.2.22 Defining contact rule details
- 2.9.3 Approving facilities
- 2.9.4 Modifying facilities
- 2.9.5 Mirroring facilities
- 2.10 Tranches
- 2.11 Approvals (optional)
- 2.12 Funding types (optional)
- 2.13 Mandates (optional)
- 2.14 Cashflow groups (optional)
- Chapter 3 Managing amount events
- Chapter 4 Managing drawdowns
- Chapter 5 Managing loan events
- 5.1 Setting up loan events
- 5.2 Processing loan event actions
- 5.3 Editing loan events
- Chapter 6 Managing equity
- Chapter 7 Managing issued guarantees
- Chapter 8 Monitoring loan activity
- Chapter 9 Managing payment advices
- Chapter 10 Managing payment allocations
- Appendix A Features
- A.1 Categories of features
- A.2 List of features
- A.2.1 Add Facility Guarantees
- A.2.2 Allow Drawdown FX Freeze
- A.2.3 Allow Funding Call
- A.2.4 Allow Guarantee
- A.2.5 Allow Revision
- A.2.6 Allow Subsidy Call
- A.2.7 Cancel Provisional Settlements
- A.2.8 Commercial Loan
- A.2.9 Conditional Remuneration
- A.2.10 Continuation Aggregated Rate Function
- A.2.11 Payment Amount Extraction
- A.2.12 Deferment Commission (Setup)
- A.2.13 Drawdown Amendment
- A.2.14 Drawdown Cancellation
- A.2.15 Drawdown Classification
- A.2.16 Drawdown Fee
- A.2.17 Drawdown Fixing
- A.2.18 Drawdown Prepayment
- A.2.19 Drawdown Rescheduling
- A.2.20 Due Amount Carry Forward
- A.2.21 Edit Commitment Fee
- A.2.22 Guarantee Call
- A.2.23 Guarantee Refund
- A.2.24 Guarantee Valuation
- A.2.25 Insert Default Guarantees
- A.2.26 Late Payment Penalty
- A.2.27 Late Payment Penalty Realization
- A.2.28 Loan Pricing
- A.2.29 Off Balance Sheet Accounting (Facility)
- A.2.30 Risk Venture Capital
- A.2.31 Write Off
- Appendix B Loan event parameters
- B.1 Commitment Fee
- B.2 Conditional Remuneration
- B.3 Deferment Commission
- B.4 Drawdown Amendment
- B.5 Drawdown Cancellation
- B.6 Drawdown Classification
- B.7 Drawdown Fee
- B.8 Due Amount Carry Forward
- B.9 Facility Fee
- B.10 Funding Call
- B.11 Guarantee Call
- B.12 Guarantee Refund
- B.13 Late Payment Penalty
- B.14 Prepayment
- B.15 Rate Condition
- B.16 Write-Off
- Appendix C Activity parameters

2
Information in this document is subject to change without notice and does not represent a commitment on the part
of Wall Street Systems. The software and documentation, which includes information contained in any databases,
described in this document is furnished under a license agreement or nondisclosure agreement and may only be
used or copied in accordance with the terms of the agreement. It is against the law to copy the software or
documentation except as specially allowed in the license or nondisclosure agreement. No part of this publication
may be reproduced, stored in a retrieval system, or transmitted, in any form or by any means, electronic, mechanical,
photocopying, recording, or otherwise, without the prior written permission of Wall Street Systems.
Although Wall Street Systems has tested the software and reviewed the documentation, Wall Street Systems
makes herein no warranty or representation, either expressed or implied, with respect to software or
documentation, its quality, performance, marketability, or fitness for a particular purpose. As a result, this
software is provided "as is", and in no event will Wall Street Systems be liable for direct, indirect, special,
incidental, or consequential damages from any defect in the software or by virtue of providing this
documentation, even if advised of the possibility of such damages. The documentation may contain technical
inaccuracies and omissions.
The mention of an activity or instrument in this publication does not imply that all matters relating to that activity or
instrument are supported by Wallstreet Suite, nor does it imply that processing of or by that activity or instrument is
carried out in any particular way, even if such processing is customary in some or all parts of the industry.
The windows and screen images shown herein were obtained from prototypes during software development. The
actual windows and screen images in the software may differ.
Wall Street Systems, WSS, WALLSTREET, WALLSTREET SUITE and the Wall Street Systems logos are
trademarks of Wall Street Systems Delaware, Inc.
Finance KIT, Trema and Trema logo are trademarks of Wall Street Systems Sweden AB.
Microsoft and Windows are either registered trademarks or trademarks of Microsoft Corporation in the United States
and/or other countries.
Adobe, Acrobat, and Acrobat Reader are either registered trademarks or trademarks of Adobe Systems
Incorporated in the United States and/or other countries.
All other products mentioned in this book may be trademarks or service marks of their respective companies or
organizations.
Company names, people names, and data used in examples are fictitious unless otherwise noted.
This edition applies to Wallstreet Suite version 7.3.14 and to all later releases and versions until indicated in new
editions or Wall Street Systems communications. Make sure you are using the latest edition for the release level of
the Wall Street Systems product.
© Copyright 2011 Wall Street Systems IPH AB. All rights reserved.
First Edition (April 2011)
Commercial Loans Module (CLM) User Guide 3
Contents
Preface ...........................................................................................................................11
Intended audience and prerequisites ......................................................................................... 11
Associated documents ................................................................................................................ 11
Change history: ............................................................................................................................ 11
1 Overview ....................................................................................................................13
1.1 CLM ........................................................................................................................................ 13
1.1.1 Defining contracts in CLM ............................................................................................... 13
1.1.2 Arranging credit in CLM .................................................................................................. 13
1.1.3 Structuring of loan products in CLM ................................................................................ 13
1.1.4 Capturing and processing drawdowns in CLM ............................................................... 14
1.1.5 Processing loan events in CLM ...................................................................................... 14
1.1.6 Monitoring credit and debt situations in CLM .................................................................. 14
1.1.7 Receivables management in CLM .................................................................................. 14
1.1.8 Managing messages in CLM .......................................................................................... 14
1.1.9 Information used in CLM ................................................................................................. 15
1.2 Applications of CLM ............................................................................................................. 15
1.2.1 Editors ............................................................................................................................. 15
1.2.2 Managers and Boards ..................................................................................................... 15
1.2.3 Monitors .......................................................................................................................... 15
1.2.4 Reports ........................................................................................................................... 16
1.2.5 Activities .......................................................................................................................... 16
1.3 Setting up and using CLM ....................................................................................................16
2 Managing static data .................................................................................................19
2.1 Setting up static data for CLM ............................................................................................. 19
2.2 Schedule templates .............................................................................................................. 19
2.3 Instrument groups ................................................................................................................ 20
2.4 Instrument types ................................................................................................................... 21
2.5 Instruments ............................................................................................................................ 21
2.6 Transaction templates .......................................................................................................... 22
2.7 Facility types ......................................................................................................................... 23
2.8 Facility templates .................................................................................................................. 24
2.9 Facilities ................................................................................................................................. 24
2.9.1 Defining the main attributes ............................................................................................ 25
4 © Wall Street Systems IPH AB - Confidential
2.9.2 Defining contract details .................................................................................................. 26
2.9.2.1 Defining credit amount details .............................................................................. 27
2.9.2.2 Defining drawdown currency details ..................................................................... 28
2.9.2.3 Defining counterparty details ................................................................................ 28
2.9.2.4 Defining payback FX rate details .......................................................................... 29
2.9.2.5 Defining location details ........................................................................................ 29
2.9.2.6 Defining owner details .......................................................................................... 29
2.9.2.7 Defining instrument and event details .................................................................. 30
2.9.2.8 Defining funding type details ................................................................................ 30
2.9.2.9 Defining tranche details ........................................................................................ 30
2.9.2.10 Defining transaction template details .................................................................. 31
2.9.2.11 Defining beneficiary details (optional) ................................................................. 32
2.9.2.12 Defining guarantor details (optional) ................................................................... 32
2.9.2.13 Defining sublimits (optional) ............................................................................... 32
2.9.2.14 Defining drawdown condition details (optional) .................................................. 33
2.9.2.15 Defining collateral agreement details (optional) ................................................. 34
2.9.2.16 Defining drawdown parameter details (optional) ................................................ 34
2.9.2.17 Defining mandate details .................................................................................... 35
2.9.2.18 Defining switches details .................................................................................... 35
2.9.2.19 Defining properties details .................................................................................. 35
2.9.2.20 Defining links details ........................................................................................... 36
2.9.2.21 Defining ad hoc message client details .............................................................. 36
2.9.2.22 Defining contact rule details ............................................................................... 36
2.9.3 Approving facilities .......................................................................................................... 36
2.9.4 Modifying facilities ........................................................................................................... 37
2.9.5 Mirroring facilities ............................................................................................................ 37
2.9.5.1 Setting up facility mirroring ................................................................................... 37
2.9.5.2 Approving mirror facilities ..................................................................................... 39
2.9.5.3 Modifying mirror facilities ...................................................................................... 39
2.10 Tranches .............................................................................................................................. 39
2.10.1 Defining the main attributes .......................................................................................... 40
2.10.1.1 Single tranches ................................................................................................... 40
2.10.1.2 Multiple tranches ................................................................................................ 40
2.10.2 Defining the tranche values .......................................................................................... 40
2.11 Approvals (optional) ........................................................................................................... 41
2.12 Funding types (optional) .................................................................................................... 42
2.13 Mandates (optional) ............................................................................................................ 43
2.13.1 Defining the main attributes .......................................................................................... 43
2.13.2 Defining mandate participant details ............................................................................. 44
2.13.3 Defining mandate funding details .................................................................................. 45
2.14 Cashflow groups (optional) ................................................................................................ 46
3 Managing amount events .........................................................................................49
3.1 Amount Event Manager ........................................................................................................49
3.1.1 Amount Event Manager menus ...................................................................................... 49
3.1.1.1 View ...................................................................................................................... 49
Commercial Loans Module (CLM) User Guide 5
3.1.1.2 Command ............................................................................................................. 50
3.1.1.3 New ...................................................................................................................... 50
3.1.2 Start-up parameters ........................................................................................................ 50
3.1.3 Customizing Amount Event Manager ............................................................................. 50
3.2 Processing amount events .................................................................................................. 50
3.2.1 New subsidy estimation .................................................................................................. 50
3.2.2 New credit amendment ................................................................................................... 53
3.2.3 New credit transfer .......................................................................................................... 55
4 Managing drawdowns ...............................................................................................59
4.1 Drawdown Manager .............................................................................................................. 59
4.1.1 Drawdown Manager menus ............................................................................................ 60
4.1.1.1 View ...................................................................................................................... 60
4.1.1.2 New ...................................................................................................................... 60
4.1.2 Start-up parameters ........................................................................................................ 60
4.1.3 Customizing Drawdown Manager ................................................................................... 60
4.2 Processing drawdowns ........................................................................................................61
4.2.1 Entering drawdown transactions ..................................................................................... 61
4.2.2 Approving drawdown transactions .................................................................................. 64
4.2.3 Pricing drawdown transactions ....................................................................................... 65
4.2.3.1 Pricing rate renewal or indexation ........................................................................ 66
4.2.3.2 Loan pricing simulation ......................................................................................... 67
4.2.4 Cancelling drawdown transactions ................................................................................. 67
4.3 Drawdown mirroring ............................................................................................................. 67
4.3.1 Setting up static data for drawdown mirroring ................................................................. 67
4.3.2 Processing drawdown mirroring ...................................................................................... 67
4.3.2.1 Generating drawdown mirroring ........................................................................... 68
4.3.2.2 Executing loan events on mirrored drawdowns .................................................... 68
4.3.2.3 Rejecting mirrored drawdowns ............................................................................. 68
5 Managing loan events ...............................................................................................69
5.1 Setting up loan events .......................................................................................................... 69
5.1.1 Action rule types ............................................................................................................. 70
5.1.1.1 Types of loan events ............................................................................................ 71
5.1.2 Action rules ..................................................................................................................... 72
5.1.2.1 Setting up action rule conditions ........................................................................... 73
5.1.2.2 Defining the action rule actions ............................................................................ 74
5.1.3 Enabling loan events on transactions ............................................................................. 75
5.2 Processing loan event actions ............................................................................................ 75
5.2.1 Commitment fees ............................................................................................................ 76
5.2.1.1 Setup .................................................................................................................... 76
5.2.1.2 Execution .............................................................................................................. 76
5.2.1.3 Generated data ..................................................................................................... 77
5.2.1.4 Updating commitment fees ................................................................................... 77
5.2.2 Conditional remunerations .............................................................................................. 78
5.2.2.1 Setup .................................................................................................................... 78
6 © Wall Street Systems IPH AB - Confidential
5.2.2.2 Execution .............................................................................................................. 78
5.2.2.3 Generated data ..................................................................................................... 79
5.2.3 Deferment commission ................................................................................................... 79
5.2.3.1 Setup .................................................................................................................... 79
5.2.4 Drawdown amendment ................................................................................................... 79
5.2.4.1 Setup .................................................................................................................... 80
5.2.4.2 Execution .............................................................................................................. 80
5.2.4.3 Generated data ..................................................................................................... 86
5.2.5 Drawdown classification .................................................................................................. 87
5.2.5.1 Setup .................................................................................................................... 87
5.2.5.2 Execution .............................................................................................................. 87
5.2.5.3 Generated data ..................................................................................................... 88
5.2.6 Due amount carry forward .............................................................................................. 88
5.2.6.1 Setup .................................................................................................................... 88
5.2.6.2 Execution .............................................................................................................. 88
5.2.6.3 Generated data ..................................................................................................... 89
5.2.7 Facility fees ..................................................................................................................... 89
5.2.7.1 Setup .................................................................................................................... 90
5.2.7.2 Execution .............................................................................................................. 90
5.2.7.3 Generated data ..................................................................................................... 90
5.2.8 Prepayments ................................................................................................................... 91
5.2.8.1 Setup .................................................................................................................... 91
5.2.8.2 Execution .............................................................................................................. 91
5.2.8.3 Generated data ..................................................................................................... 94
5.2.9 Late Payment Penalties .................................................................................................. 95
5.2.9.1 Setup .................................................................................................................... 96
5.2.9.2 Execution .............................................................................................................. 98
5.2.9.3 Generated data ..................................................................................................... 98
5.2.10 Loan pricing .................................................................................................................. 98
5.2.10.1 Setup ..................................................................................................................99
5.2.10.2 Execution ............................................................................................................ 99
5.2.10.3 Generated data ................................................................................................... 99
5.2.11 Write off ......................................................................................................................... 99
5.2.11.1 Setup ..................................................................................................................99
5.2.11.2 Execution ............................................................................................................ 99
5.2.11.3 Generated data ................................................................................................. 100
5.2.12 Rate Renewal ............................................................................................................. 101
5.2.12.1 Setup ................................................................................................................ 101
5.2.12.2 Execution .......................................................................................................... 101
5.2.12.3 Generated data ................................................................................................. 102
5.3 Editing loan events ............................................................................................................. 102
6 Managing equity ......................................................................................................103
6.1 Setting up equity in the facility .......................................................................................... 103
6.2 Processing equity investments ......................................................................................... 104
6.2.1 Entering new equity investments .................................................................................. 104
6.2.2 Entering equity divestments .......................................................................................... 104
Commercial Loans Module (CLM) User Guide 7
6.2.3 Capturing dividend events ............................................................................................ 104
6.2.4 Capturing other corporate actions ................................................................................. 105
7 Managing issued guarantees .................................................................................107
7.1 Setting up issued guarantees ............................................................................................ 109
7.2 Processing issued guarantees .......................................................................................... 110
7.3 Processing guarantee calls ................................................................................................ 110
7.4 Processing guarantee refunds .......................................................................................... 111
7.5 Processing actions on issued guarantees ....................................................................... 113
8 Monitoring loan activity ..........................................................................................115
8.1 Monitoring debt positions .................................................................................................. 115
8.1.1 Debt Monitor ................................................................................................................. 115
8.1.1.1 Debt Monitor menus ........................................................................................... 116
8.1.1.2 Start-up parameters ............................................................................................ 116
8.1.2 Monitoring debt flows .................................................................................................... 116
8.1.2.1 Defining position parameters .............................................................................. 117
8.1.2.2 Selecting axis (column and row) groupings ........................................................ 119
8.1.2.3 Configuring axis values ...................................................................................... 120
8.1.2.4 Selecting key-figures in Debt Monitor ................................................................. 120
8.2 Monitoring credit positions ................................................................................................ 121
8.2.1 Loan Monitor ................................................................................................................. 121
8.2.1.1 Loan Monitor menus ........................................................................................... 121
8.2.1.2 Start-up parameters ............................................................................................ 122
8.2.2 Monitoring credit flows .................................................................................................. 122
8.2.2.1 Defining query parameters ................................................................................. 122
8.2.2.2 Configuring Loan Monitor ................................................................................... 123
8.3 Querying loan activity ......................................................................................................... 123
8.3.1 Loan Manager ............................................................................................................... 123
8.3.1.1 Loan Manager menus ......................................................................................... 124
8.3.1.2 Start-up parameters ............................................................................................ 124
8.3.1.3 Customizing Loan Manager ................................................................................ 125
8.3.1.4 Configuring default settings ................................................................................ 125
8.3.2 Initiating loan activities from Loan Manager .................................................................. 125
8.4 Managing payment reminders ........................................................................................... 127
8.4.1 Payment Reminder Manager ........................................................................................ 127
8.4.1.1 Payment Reminder Manager menus .................................................................. 127
8.4.2 Processing payment reminders .................................................................................... 128
8.4.2.1 Retrieving payment reminders ............................................................................ 128
9 Managing payment advices ...................................................................................129
9.1 Payment Advice Manager ................................................................................................... 129
9.1.1 Payment Advice Manager menus ................................................................................. 129
9.1.1.1 View .................................................................................................................... 129
8 © Wall Street Systems IPH AB - Confidential
9.1.1.2 Command ........................................................................................................... 130
9.1.1.3 New .................................................................................................................... 130
9.1.2 Start-up parameters ...................................................................................................... 130
9.1.3 Customizing Payment Advice Manager ........................................................................ 130
9.2 Processing payment advices ............................................................................................. 130
9.2.1 Entering payment advices ............................................................................................. 130
9.2.2 Approving payment advices .......................................................................................... 131
9.2.3 Editing imported SWIFT payment advices .................................................................... 131
10 Managing payment allocations ............................................................................133
10.1 Payment Allocation Manager ........................................................................................... 133
10.1.1 Payment Allocation Manager menus .......................................................................... 133
10.1.1.1 View .................................................................................................................. 133
10.1.1.2 Command ......................................................................................................... 134
10.1.1.3 New .................................................................................................................. 134
10.1.1.4 Options ............................................................................................................. 134
10.1.2 Start-up parameters .................................................................................................... 135
10.1.3 Customizing Payment Allocation Manager ................................................................. 135
10.1.4 Configuring payment allocation ................................................................................... 135
10.1.4.1 Auto match criteria ............................................................................................ 136
10.1.4.2 Auto match amount tolerances ......................................................................... 136
10.1.4.3 Auto match tolerances ...................................................................................... 137
10.1.4.4 Cashflow group priorities .................................................................................. 137
10.1.4.5 Default query offsets ......................................................................................... 138
10.2 Processing payment allocations ..................................................................................... 138
10.2.1 Retrieving cashflows and payment advices ................................................................ 139
10.2.2 Grouping cashflows and payment advices ................................................................. 139
10.2.3 Automatic payment allocation ..................................................................................... 139
10.2.4 Approving payment allocations ................................................................................... 140
10.2.5 Manual payment allocation ......................................................................................... 140
10.2.6 Retrieving payment allocations ................................................................................... 141
10.2.7 Unallocating payment allocations ............................................................................... 141
10.3 Processing underpayments and overpayments ............................................................ 141
10.3.1 Processing underpayments ........................................................................................ 142
10.3.1.1 Carry forward .................................................................................................... 142
10.3.1.2 Leave unallocated ............................................................................................ 143
10.3.1.3 Accept as Profit/Loss ........................................................................................ 144
10.3.1.4 Unallocate Cashflows ....................................................................................... 145
10.3.2 Processing overpayments ........................................................................................... 145
10.3.2.1 Offset future cashflows ..................................................................................... 145
10.3.2.2 Leave unallocated ............................................................................................ 146
10.3.2.3 Refund payment ............................................................................................... 147
10.3.2.4 Accept as Profit/Loss ........................................................................................ 147
Appendix A: Features ............................................................................................................149
A.1 Categories of features ........................................................................................................ 149
Commercial Loans Module (CLM) User Guide 9
A.2 List of features .................................................................................................................... 149
A.2.1 Add Facility Guarantees ............................................................................................... 149
A.2.2 Allow Drawdown FX Freeze ......................................................................................... 150
A.2.3 Allow Funding Call ........................................................................................................ 150
A.2.4 Allow Guarantee ........................................................................................................... 150
A.2.5 Allow Revision .............................................................................................................. 150
A.2.6 Allow Subsidy Call ........................................................................................................ 151
A.2.7 Cancel Provisional Settlements .................................................................................... 151
A.2.8 Commercial Loan ......................................................................................................... 151
A.2.9 Conditional Remuneration ............................................................................................ 151
A.2.10 Continuation Aggregated Rate Function .................................................................... 152
A.2.11 Payment Amount Extraction ....................................................................................... 152
A.2.12 Deferment Commission (Setup) ................................................................................. 152
A.2.13 Drawdown Amendment .............................................................................................. 152
A.2.14 Drawdown Cancellation .............................................................................................. 153
A.2.15 Drawdown Classification ............................................................................................ 153
A.2.16 Drawdown Fee ........................................................................................................... 153
A.2.17 Drawdown Fixing ........................................................................................................ 154
A.2.18 Drawdown Prepayment .............................................................................................. 154
A.2.19 Drawdown Rescheduling ............................................................................................ 154
A.2.20 Due Amount Carry Forward ........................................................................................ 154
A.2.21 Edit Commitment Fee ................................................................................................. 155
A.2.22 Guarantee Call ........................................................................................................... 155
A.2.23 Guarantee Refund ...................................................................................................... 155
A.2.24 Guarantee Valuation ................................................................................................... 155
A.2.25 Insert Default Guarantees .......................................................................................... 156
A.2.26 Late Payment Penalty ................................................................................................ 156
A.2.27 Late Payment Penalty Realization .............................................................................. 156
A.2.28 Loan Pricing ................................................................................................................ 156
A.2.29 Off Balance Sheet Accounting (Facility) ..................................................................... 156
A.2.30 Risk Venture Capital ................................................................................................... 157
A.2.31 Write Off ..................................................................................................................... 157
Appendix B: Loan event parameters....................................................................................159
B.1 Commitment Fee ................................................................................................................ 159
B.2 Conditional Remuneration ................................................................................................. 159
B.3 Deferment Commission ..................................................................................................... 160
B.4 Drawdown Amendment ...................................................................................................... 160
B.5 Drawdown Cancellation ..................................................................................................... 161
B.6 Drawdown Classification ................................................................................................... 162
B.7 Drawdown Fee .................................................................................................................... 162
B.8 Due Amount Carry Forward ............................................................................................... 162
B.9 Facility Fee .......................................................................................................................... 163
B.10 Funding Call ...................................................................................................................... 163
B.11 Guarantee Call .................................................................................................................. 163
10 © Wall Street Systems IPH AB - Confidential
B.12 Guarantee Refund ............................................................................................................ 164
B.13 Late Payment Penalty ...................................................................................................... 164
B.14 Prepayment ....................................................................................................................... 164
B.15 Rate Condition .................................................................................................................. 166
B.16 Write-Off ............................................................................................................................ 168
Appendix C: Activity parameters..........................................................................................169
C.1 CLM Bulk Drawdown Amendment .................................................................................... 169
C.2 CLM Fixing Drawdown Cashflow ...................................................................................... 170
C.3 CLM Late Payment Penalty Generation ............................................................................ 170
C.4 CLM Late Payment Penalty Realization ............................................................................ 170
C.5 CLM Late Payment Reminder Generation ........................................................................ 171
C.6 CLM Payment FX Rate Generation ................................................................................... 171
C.7 CLM Payment Reminder Generation ................................................................................ 172
C.8 CLM Subsidy Call Follow-up Generation ......................................................................... 172

Commercial Loans Module (CLM) User Guide 11
Preface
This guide describes how to use the Wallstreet Suite Commercial Loans Module (CLM): it provides
information that applies solely to commercial loans and using CLM.
It explains how to use CLM to set up, manage, and process commercial loans, monitor loan
positions, manage loan events, and so on.
CLM is used in conjunction with the Wallstreet Suite Transaction & Risk Management Module (TRM).
Therefore, this guide does not describe setting up procedures or management processes that are
also found in TRM. For this information, refer to the TRM end-user documentation.
Intended audience and prerequisites
This guide is intended for CLM users responsible for one or more of the following tasks:
•Setting up and managing CLM-related static data
•Capturing and processing drawdowns on commercial loans
•Monitoring credit and debt situations
•Managing and reconciling loan receivables.
Before reading this guide, some prior knowledge and experience of TRM is beneficial.
Associated documents
This guide is supported by the following TRM end-user documentation:
•TRM User Guide
•TRM Instruments: Processing and Calculations.
Other associated documents can be accessed from the Help menu of the Wallstreet Suite’s
applications.
Change history:
Edition Date Changes Updated By
0.1 April 2011 Initial release 7.3.14 TRM Dev Team
12 © Wall Street Systems IPH AB - Confidential
Commercial Loans Module (CLM) User Guide 13
Chapter 1 Overview
This chapter introduces you to CLM and the tasks required to set up and use the module.
1.1 CLM
CLM enables financial institutions and corporate treasuries to manage the whole life cycle of
commercial lending in the same system as their borrowing and treasury activities.
1.1.1 Defining contracts in CLM
In CLM, it is possible to enter the key attributes of a loan contract under a facility agreement.
You can define contractual conditions in the facility. These conditions can then be used to validate a
loan at the time of disbursal, thereby reducing operational risk and making the process more
efficient.
It is also possible to define whether the credit is sanctioned as being of a revolving or non-revolving
nature.
The Loan Officer can also record the decision of the Credit Committee in an approval, and record the
details of any subsidy limits in a mandate. These details can then be checked when entering the
facility agreement.
1.1.2 Arranging credit in CLM
In CLM, it is possible to arrange a credit line under a facility agreement in multiple ways: the credit
line can be disbursed using a combination of tranches and sublimits within each facility. This allows
you to control and monitor the available credit very effectively.
Amendments made to the facility (for example, cancellation of the credit line, a change in the
available credit, a credit transfer, a new borrower, or changes to the type of interest rate), can also
be processed and monitored in CLM.
1.1.3 Structuring of loan products in CLM
CLM caters to a whole range of loan structures – from simple fixed and floating rate loans, to
extremely complex structures, as follows:
•Fixed, floating, annuity, revisable, and structured complex loans
•Collateralized loans and asset-backed loans
•Issued guarantees and subsidized loans
•Private equity
•Parallel and sequential amortization and interest schedules.
The system provides unlimited drawdown structuring to allow sophisticated inter-company and
external lending activity.
1 Overview
1.1 CLM
14 © Wall Street Systems IPH AB - Confidential
1.1.4 Capturing and processing drawdowns in CLM
A drawdown transaction is used to transfer funds between the lender and borrower.
A drawdown has the following characteristics: it is always entered under a facility and a tranche; it
uses a transaction template to default the schedule structure; and it has a process flow (from
contract setup, to the processing of transactions, and finally to payment reconciliation) that allows
the organization to validate the entries through a chain of departments or users.
The predefined transaction and schedule templates are used to automatically enter common
disbursal information at drawdown entry. CLM then retrieves data from the facility or tranche and
completes all of the contractual fields that it can using the predefined information from the
templates. In the simplest case, only a small amount of data, such as the drawdown’s amount,
value date, and maturity date, remains to be entered.
CLM verifies the information and immediately issues an appropriate warning or error message if the
facility’s credit limit, sublimit, or any of its drawdown conditions are violated.
Drawdowns then pass through a user-configurable transaction flow where the data can be checked
by additional users, and other details added (such as, settlement instructions).
1.1.5 Processing loan events in CLM
Facilities and drawdowns can be long term, and CLM helps control and manage events that may
occur during the life-time of the loan contract.
The events managed in the system include such events as the following: the ability to add a variety
of fees (such as commitment, late penalty, or cancellation fees); early repayment of the debt, either
fully or partially; amendments to the drawdown (for example, change in currency, interest rate
type, borrower, or loan structure); automatic pricing of the drawdown; automatic or manual fixing
of rates; and re-classification, or even a total write-off, of the remaining debt.
1.1.6 Monitoring credit and debt situations in CLM
In CLM, the credit situation for a loan agreement can be monitored using a configurable Loan
Monitor application in order to view limit utilizations and cashflows grouped by borrower, facility, or
drawdown.
For example, in this monitor, you can view the following figures: total credit sanctioned under the
agreement; utilized credit under a contract, and the remaining available credit. Additionally, you can
view the use of the sublimits set up under the facility.
The debt situation, for example, the amounts due from a borrower or for a contract, can also be
monitored in CLM in another type of monitor application.
These due amounts may be the result, for example, of the normal repayment of loans, the interest
due on loans, or they may arise from the payment of fees, commissions, and so on, that are due to
various events that occur during the life-cycle of the loan.
In these monitors, the information is updated in real-time and takes into account the other CLM
operations.
1.1.7 Receivables management in CLM
Payment reconciliation in CLM allows you to track, monitor, and reconcile payments against loan
receivables.
Furthermore, the system will automatically generate payment reminders to borrowers before each
payment date: these are both printable and transmissible, for example, by E-mail, Fax, or Telex.
1.1.8 Managing messages in CLM
Commercial lending operations involve extensive communications between lenders and borrowers.

1 Overview
1.2 Applications of CLM
Commercial Loans Module (CLM) User Guide 15
CLM supports the generation of standard loans documents, such as, Billings, Rate Renewals, and
Statements of Commissions. These documents or messages can be produced either as part of the
transaction flow or on a nightly basis.
Note: Managing messages is described in the TRM User Guide.
1.1.9 Information used in CLM
CLM uses the same types of information found in TRM:
•Static data information
•Market data information
•Transaction management information
•Calculated information.
See the TRM User Guide for more information.
1.2 Applications of CLM
This section gives an overview of the different types of CLM applications, and how you use them
depending on your position in the organization.
All types of application are described in detail in the TRM User Guide.
1.2.1 Editors
Editors are used to define the static data information (for example, facility and tranche entities) that
needs to be set up before CLM can be used.
Editors for CLM are defined from a layout based on the Static Data Editor application. Each editor
layout is available as an individual application in CLM.
1.2.2 Managers and Boards
In CLM, there are a number of manager applications (based on the same layout as TRM’s
Transaction Manager) that are used to manage the flow and acceptance process of different types of
information in the system.
Different modes of each manager can be configured to be used for a particular purpose or to display
information in a particular state in its process flow. Each manager mode is available as an individual
application in CLM. Permissions are set up and applied to users to limit their access to different
manager modes according to their responsibilities within the organization.
Drawdown Manager (used to capture and process drawdown transactions) and Drawdown Action
Manager (designed specifically for loan events on drawdown transactions) are examples of these
types of manager applications.
In CLM, there are also several types of Board applications: for example, Enter Board, which is
available in the Drawdown mode of the manager application, offers a simplified alternative for
entering drawdown transactions.
1.2.3 Monitors
Monitors consist of pages, often grouped into books, which display information in grids and charts.
In Loan Monitor, you can view limit utilizations grouped by facility, tranche, or sublimit.

1 Overview
1.3 Setting up and using CLM
16 © Wall Street Systems IPH AB - Confidential
Debt Monitor is a version of TRM’s Treasury Monitor that is designed specifically for monitoring the
debt situation, for example, the amounts due from a counterparty, under a facility or for an
individual drawdown.
1.2.4 Reports
Reports display information which is generated from the information provided by other applications.
You can create different types of reports: such as reports listing your data and position-related
reports.
You can also perform a variety of calculations on the data in a report, such as calculations that are
not available in other applications. You can add, multiply, subtract and divide totals, calculate
averages, produce subtotals at any grouping level, produce running totals, combine the output of
different columns, and create sophisticated “if” conditions for displaying and calculating data.
You can create as many different report layouts as you need (either completely new ones, or ones
based on existing layouts).
Reports are set up and managed in an application called Report Generator.
1.2.5 Activities
Some calculations and batch processes must be run on certain dates or at certain time intervals (for
example, daily or monthly). These calculations and batch processes are called activities and you can
set them up to run automatically.
You can use activities to perform a variety of tasks, such as running batches and generating log
reports, fixing cashflows, creating messages such as payment reminders, updating modified data in
the system automatically, and various other calculations and realizing of key-figures.
Activities are managed and launched from an application called Activity Manager.
1.3 Setting up and using CLM
As a user, you are responsible for one or more of the following tasks:
Task More information
Set up the module:
• Set up loan data.
Chapter 2 Managing static data on page 19
Monitor changes to the credit amount: Chapter 3 Managing amount events on page 49
Capture activity:
• Use the module to process and manage
drawdowns.
• Managing equity in drawdowns
• Managing late payment penalties
Chapter 4 Managing drawdowns on page 59
Chapter 5 Managing loan events on page 69
Chapter 6 Managing equity on page 103
Monitoring activity:
• Monitor debt flows
• Monitor credit positions
• Querying loan activity.
• Managing late payments
Chapter 8 Monitoring loan activity on page 115
Receivables management. Chapter 9 Managing payment advices on page 129
Chapter 10 Managing payment allocations on page 133

1 Overview
1.3 Setting up and using CLM
18 © Wall Street Systems IPH AB - Confidential

Commercial Loans Module (CLM) User Guide 19
Chapter 2 Managing static data
In addition to the static data that is common to other modules (such as, currencies and portfolios),
you also need to set up the static data required for the management of commercial loan
agreements.
This chapter describes the procedures for setting up and managing the static data required for a
loan agreement in CLM.
Note: For more information about setting up and managing both CLM-related and other types of
static data, refer to the associated TRM end-user documentation: see Associated
documents on page 11.
2.1 Setting up static data for CLM
The order for setting up static data for CLM is dependent on the restrictions of assigning one entity
to another and the interdependencies between them. For this reason, the order in which you create
static data is very important: in some cases, you may need to create static data in parallel.
The order in which static data entities are described in this chapter reflects the order you need to set
them up: for example, setting up a transaction template is described before setting up a facility,
since you need to define the transaction template before you can assign it to the facility.
2.2 Schedule templates
A schedule can drive the generation of the cashflow structure of a drawdown (for example, the
interest flows) and also the generation of transaction events (such as fixing rates for dual-currency
structures) which may be required throughout the life of a commercial loan.
Schedules contain a number of values that determine how the cashflows or events of these
instruments are generated.
There are two types of schedule template: Primary and Secondary.
•Primary templates consist of the primary schedules. They define the main cashflow structure of
the drawdown. It is possible to supplement the primary template using secondary templates.
•Secondary templates consist of add-on schedules. They can be attached to one of the primary
schedules and are then dependent on that primary schedule.
CLM is delivered with a set of Primary and Secondary system-defined templates: the available
schedules are listed in the guide TRM Instruments: Processing and Calculations.
Once you have identified the primary schedule you need, you can attach one or more secondary
schedules to the template and store it with its own ID.
Schedules are defined in Schedule Template Editor.
Schedule templates can be organized into groups according to their category or function in Schedule
Template Group Editor.

2 Managing static data
2.3 Instrument groups
20 © Wall Street Systems IPH AB - Confidential
Schedules can be used together with transaction templates (see 2.6 Transaction templates on page
22) to propagate key values into a transaction at drawdown entry. In Drawdown Manager, it is also
possible to dynamically add schedules directly to a drawdown transaction.
To define a schedule template:
1. In Schedule Template Editor, select the system template on which you want to base your own
schedule from the left part of the editor.
2. Define the main attributes of your own schedule template in the upper part of the editor.
3. In the Schedule Template Item page, define the parameters for the schedule.
For information about the parameters that can be entered to define a schedule, see the guide
TRM Instruments: Processing and Calculations.
4. In the Groups page, select and add the schedule template group or groups to which you want this
schedule template to belong.
Schedule template groups are described in the TRM User Guide.
5. Save the whole schedule template using File - Save As New.
2.3 Instrument groups
Each instrument is assigned to an instrument group during the setup process. Groups are used as a
means of identifying instruments and can be used in CLM to restrict the availability of instruments in
drawdown entry using transaction templates.
Instrument groups are arranged into a simple hierarchy, where each group is assigned one parent.
Instruments can only be assigned to a single instrument group in the hierarchy.
The first level of the instrument group hierarchy is predefined in the system, but can be modified at
implementation according to your organization’s requirements. You then create further instrument
groups for the lower levels of the hierarchy to reflect the requirements of your organization.
Instrument groups are defined in Instrument Group Editor: see the TRM User Guide for more
information.
Information Description
ID & Name Unique ID and name for the schedule template.
User / System Identifies the template as system-defined or user-defined.
Note: System-defined templates provide a starting point for creating user-defined
templates.
Primary /
Secondary
Identifies the template as primary or secondary.
Primary user-defined templates can be used in transaction templates and
transactions, while secondary templates can be attached to one or more of the
schedules in either a primary or a secondary template.
Note: Secondary templates cannot be used independently with transaction templates
or transactions.
Payment Adjust
Method
Defines whether the schedule template can be seen and used in the Payment Adjust
Method field in the transaction schedules.
2 Managing static data
2.4 Instrument types
Commercial Loans Module (CLM) User Guide 21
2.4 Instrument types
Instrument classes denote the different categories of instruments which are supported by the
system. They are predefined in the system and cannot be changed by the user.
Classes are used as a basis on which to define instrument types. Once instrument types have been
defined, the instrument classes are no longer used.
An instrument type inherits all the features contained in the instrument class automatically.
Features are system-defined attributes used to give instruments their distinctive functionality and
enable drawdown entry, amount and event processing, and position monitoring.
Commercial loan instruments must be based on an instrument type derived from the class
COMMERCIAL-LOAN.
Instrument types are defined in Instrument Type Editor: see the TRM User Guide for more
information.
2.5 Instruments
All instruments share several main characteristics and are set up in a similar way in Instrument
Editor.
The specific instrument setup required for a particular category of instrument is explained in more
detail in the relevant section of the guide TRM Instruments: Processing and Calculations.
To set up an instrument:
1. In Instrument Editor, define the main characteristics of the instrument in the upper part of the
editor.
2. In the Features page, add or remove the features you need for this instrument.
Note: Some of the features assigned to an instrument need to be configured further, either in the
instrument setup itself, or in the configuration of action rules. For more information, see
Information Description
ID & Name Unique ID and name for the instrument.
Instrument Type Instrument type on which the instrument is based. This is a mandatory field.
Commercial loan instruments must be based on an instrument type derived from the
class COMMERCIAL-LOAN.
Exceptions to this are:
• Funding Call instruments: Instrument Class = CASH
• Facility Collateral instruments: Instrument Class = COLLATERAL TRANSFER.
Instrument Group Instrument group to which the instrument belongs (defined in Instrument Group
Editor).
Active From
Active To
Active period (From/To dates inclusive) to restrict the period in which the instrument
can be traded (optional).
Buy Label
Sell Label
Labeling for Buy/Sell transactions (optional) to override the default settings.
Result Type Result type to use for this instrument (defined in Result Type Editor). This is a
mandatory field.
Domain Domain in which the instrument is available.
2 Managing static data
2.6 Transaction templates
22 © Wall Street Systems IPH AB - Confidential
Appendix A Features on page 149 and Chapter 5 Managing loan events on page 69.
The values you need to enter to define a particular category of instrument are explained in
the guide TRM Instruments: Processing & Calculations.
3. In the Links page, you can add a link to any file stored on your network (for example, a link to a
document which contains information related to trading a specific instrument) or a hyperlink to
an Internet URL (such as, an issuer’s web site).
4. In the Properties page, you can add miscellaneous pieces of information to the instrument
definition for which there is no specific field or switch in the editor.
The properties you will need are added at implementation according to your organization’s
requirements. When you assign a property to an entity, you also need to assign the
corresponding value. Note that it is possible to create more properties using Property Editor.
5. Save the whole instrument definition using File - Save As New.
2.6 Transaction templates
A loan agreement includes financial clauses which specify the drawdown components, along with
data such as interest periods, interest calculation methods, and principal repayment schedules.
A transaction template captures the component values of a particular instrument in which the loan is
to be disbursed and allows you to add the specific clauses of a loan contract into it or to directly
attach the template to a transaction.
Transaction templates allow all the attributes of a transaction and its schedules (principal, interest,
events, and so on) to be predefined and later used to create drawdowns.
The schedules included in a transaction template are defined by the attached schedule template:
therefore, you need to set up at least one schedule template, see 2.2 Schedule templates on page
19.
A transaction template can then be attached to a facility, or it can remain independent so that it is
available for use with all facilities with the relevant instrument.
Transaction templates are defined in Transaction Template Editor.
To define a transaction template:
1. In Transaction Template Editor, enter the main attributes of the template in the upper part of
the editor.
Information Description
ID & Name Unique ID and name for the transaction template.
User ID of the authorized user (or user group) of the template.
Owner User ID of the owner of the template.
Instrument Group Instrument group to which the template belongs.
Instrument Instrument to which the template is applied.
Facility Facility for which the template is defined.
Facilities are defined in Facility Editor: see 2.9 Facilities on page 24 for more
information.
Note: If a facility is specified in this field, the transaction template cannot be used for
any other facility.
Schedule
Templ a te
Schedule template you want to apply to the transaction template.
2 Managing static data
2.7 Facility types
Commercial Loans Module (CLM) User Guide 23
2. Save the transaction template definition using File - Save As New.
3. In Transaction Template Editor’s Transaction Column page, specify the default values for each
transaction column you want to define in the template.
4. In Transaction Template Editor’s Schedule Column page, specify the default values for each
schedule column you want to define in the template.
5. Save the transaction template definition using File - Save.
2.7 Facility types
Facility types can be created as a way of organizing facilities in the system and are assigned to the
facility definitions. For example, a facility created for a standard loan could be divided further into
such types as: Syndicated, Direct, or Global. Facility types are created in Facility Type Editor.
Comment Descriptive text giving further information.
Switches • Fixed Schedule - if this switch is on, only schedules defined in the template are
available in the drawdown transaction using this template. This means that no
other schedules can be added at drawdown entry.
Information Description
Information Description
Column Name of the transaction column for which you want to define a value.
Value Default or fixed value for the specified Column.
Comment Descriptive text giving further information.
Switches • Default - if this switch is on, the corresponding Value is the default for the Column,
but it can be modified at drawdown entry (if Frozen is not set).
• Frozen - if this switch is on, the specified Value cannot be modified.
• Mandatory - if this switch is on, the Column must contain a value before the
transaction can be saved at drawdown entry.
Information Description
ID & Description Part of the schedule for which you want to define a value.
The schedules available for selection are determined by the Schedule Template that you
selected in the upper part of the editor.
Column Name of the schedule column for which you want to define a value.
Value Default or fixed value for the specified Column.
Comment Descriptive text giving further information.
Switches • Default - if this switch is on, the corresponding Value is the default for the Column,
but it can be modified at drawdown entry (if Frozen is not set).
• Frozen - if this switch is on, the specified Value cannot be modified.
• Mandatory - if this switch is on, the Column must contain a value before the
transaction can be saved at drawdown entry.

2 Managing static data
2.8 Facility templates
24 © Wall Street Systems IPH AB - Confidential
To define a facility type:
1. In Facility Type Editor, enter the main attributes of the facility type.
2. Save the facility type definition using File - Save As New.
2.8 Facility templates
You set up Facilities with the aid of a template. In the template, you can define a set of data which
you then use to set up a facility with the same attributes.
A facility template contains all the fields and switches that are available in Facility Editor. In the
template, you can activate or disable the fields and switches and specify which attributes need to be
editable, available, or mandatory in Facility Editor. You can also use the template to restrict the
values displayed in Facility Editor’s selection lists.
When you assign a template in Facility Editor, the template automatically fills in some of the
information, so that you only have to provide a limited set of values when you create the facility
itself.
To define a facility template:
1. In Facility Template Editor, enter an ID and name for the template in the upper part of the
editor.
2. Customize the fields and switches as necessary: the fields and switches are explained in 2.9
Facilities on page 24.
There are three settings which you can apply to fields:
–Mandatory - you must provide values for mandatory attributes.
–Editable - you have access to the field and can provide a value. All mandatory fields are
editable by default.
–Ignore Template List - you will not override a value which was defined before you applied the
template. This means, that if a field is blank in the template, if you apply the template to a
facility for which a value already exists for that field, the existing value is not replaced.
3. Save the facility template using File - Save As New.
2.9 Facilities
When a loan contract has been agreed, the details of the agreement are set up in CLM as a facility.
Facilities store all of the key data from the loan agreement that is needed by the Back Office during
the daily processing of the lending business.
This section describes the steps required to set up a facility.
Information Description
ID & Name Unique ID and name for the facility type.
Domain Domain in which the facility type is available.

2 Managing static data
2.9 Facilities
Commercial Loans Module (CLM) User Guide 25
2.9.1 Defining the main attributes
To define a facility:
1. In Facility Editor, enter the main attributes of the facility in the upper part of the editor.
Information Description
Template Facility template to be used to set up the facility. (Mandatory.)
ID & Name Unique ID and name for the facility. The system automatically generates the ID when
you save the definition.
Short Name Short name for the facility.
Description Description of the facility.
Type Facility type to which the facility belongs.
Sign Sign of the facility: Borrowing or Lending.
Currency Currency of the facility.
Approval
Approval Currency
Approval under which the facility is given: see 2.11 Approvals (optional) on page 41.
Approval Currency defaults to the currency specified in the approval and cannot be
modified.
FX Rate FX rate between Approval Currency and the Currency defined for the facility when the
two currencies are different.
This rate is used to determine the loan amounts affecting the approval generated from
this facility.
Portfolio Portfolio of the facility.
Loan Officer User ID of the Loan Officer responsible for the facility.
State State of acceptance of the facility definition: see 2.9.3 Approving facilities on page 36.
Language Default language of the facility. Messages will be created in this language if no other
language is specified for the recipient in the message configuration.
Reference Facility ID of another facility if you want to create a link between this facility and another.
For example, this field allows a link to be maintained between a maturing facility and
its replacement, or in the case of a loan conversion, a new contract set up with new
terms and conditions and the original facility.
Original Facility If you specify a Reference Facility, this field displays the original facility of the reference
facility.
If you do not specify a Reference Facility, this field displays the ID of the current facility
after the record is saved.
Signature Date Date on which the facility is signed.
Next Review Date Date on which the facility is next to be reviewed.
Active From Date
Active To Date
Period within which the facility is active.
Domain Domain in which this facility is available.
Action Action available to accept or reject the facility definition to move it forward or
backwards in the process flow according to the system configuration: see 2.9.3
Approving facilities on page 36.
Mirror Parent Switch on to identify this facility as a parent facility.
This switch is only available on new (that is, unsaved) facilities.
Once the parent facility is saved, the mirror child facility is automatically created.
See 2.9.5 Mirroring facilities on page 37.
2 Managing static data
2.9 Facilities
26 © Wall Street Systems IPH AB - Confidential
2. Save the facility definition using File - Save As New.
3. Complete the facility definition using the information in 2.9.2 Defining contract details on page
26.
4. Send the facility through the process flow using the information in 2.9.3 Approving facilities on
page 36.
2.9.2 Defining contract details
A facility is composed of several elements that define the details of the contract. These are specified
in the pages in the lower part of Facility Editor.
The contract details that you can specify for the facility are listed in the below table. Further
information about how you define these contract details are found in the subsequent sections.
Mirror Child (Information only.)
If this switch is on, it identifies the facility as a mirror child.
The mirror child is created automatically when the parent facility definition is saved.
See 2.9.5 Mirroring facilities on page 37.
Save as New Switch on to create a new facility by copying the existing one. If switched on, any
changes are saved to a new facility and not to the selected facility.
Information Description
Contract detail Description
Credit Amount Credit amount authorized under the contract.
See 2.9.2.1 Defining credit amount details on page 27.
Drawdown Currency Details of the acceptable drawdown currencies in the facility.
See 2.9.2.2 Defining drawdown currency details on page 28.
Counterparty Borrowers/lenders who are participants under the contract and against whom the
exposure limits are calculated.
See 2.9.2.3 Defining counterparty details on page 28.
Payback FX Rates FX rates used to convert repayment amounts when repayment is made in a different
currency.
See 2.9.2.4 Defining payback FX rate details on page 29.
Location Locations allowed under the contract.
See 2.9.2.5 Defining location details on page 29.
Owner Owner of the contract.
See 2.9.2.6 Defining owner details on page 29.
Instrument Type of loan (for example, Fixed Rate, Floating Rate, Annuity, Guarantee-Backed,
Collateralized, and so on); and type of event (for example, Prepayments, Currency
Conversion, Interest Rate Type Conversion, Drawdown Restructuring, Debt
Suspension, Write-Off, and so on), that are permitted under the contract.
See 2.9.2.7 Defining instrument and event details on page 30.
Funding Types Various types of funding for the facility.
See 2.9.2.8 Defining funding type details on page 30.
Tranche A facility can be single- or multi-tranche, and must always contains at least one
tranche. Additional tranches can be created to add restrictions under the facility, or to
add different tranches with separate limits and conditions as in the loan agreement.
See 2.9.2.9 Defining tranche details on page 30.
2 Managing static data
2.9 Facilities
Commercial Loans Module (CLM) User Guide 27
2.9.2.1 Defining credit amount details
When a facility is set up, the initial credit amount is stored in the definition. The credit amount is the
total amount authorized under the contract, that is, the maximum amount that can be borrowed
under the facility agreement. It is defined in Facility Editor’s Credit Amount page.
It is also possible to set up sublimits on the amount that can be drawn against individual
components of the facility: see 2.9.2.13 Defining sublimits (optional) on page 32.
Transaction Templates Transaction templates that store the financial clause details (by instrument), such as
acceptable interest periods, method of principal repayment, date bases, fixing rates,
and so on.
See 2.9.2.10 Defining transaction template details on page 31.
Beneficiary Clients against whom the actual settlements would take place, when the counterparty
is not the settlement counterparty.
See 2.9.2.11 Defining beneficiary details (optional) on page 32.
Guarantor Details of guarantor(s) that are the approved guarantors under the contract.
See 2.9.2.12 Defining guarantor details (optional) on page 32.
Sublimits Sub-set of the credit amount that can defined by counterparty, instrument, or
currency, or some other relevant attribute of the contract.
See 2.9.2.13 Defining sublimits (optional) on page 32.
Drawdown Conditions Conditions specified in the contract: for example, the minimum and maximum values
allowed for disbursal amounts, interest rates, or tenor of a loan.
See 2.9.2.14 Defining drawdown condition details (optional) on page 33.
Collateral Agreement Details of credit lines backed by collateral provided by either the borrower or by
guarantors.
See 2.9.2.15 Defining collateral agreement details (optional) on page 34.
Drawdown Parameters User-defined parameters and values assigned to the facility.
See 2.9.2.16 Defining drawdown parameter details (optional) on page 34.
Mandate Details of a mandate if the loan is subsidized.
See 2.9.2.17 Defining mandate details on page 35.
Switches A series of switches to control the way in which the Facility works.
2.9.2.18 Defining switches details on page 35.
Properties User defined properties and values assigned to the facility.
2.9.2.19 Defining properties details on page 35.
Links User defined links to documentation stored in a network directory.
2.9.2.20 Defining links details on page 36.
Ad hoc Message
Clients
These are clients to whom it may be necessary to send messages to, but who have no
role in any Drawdown or Drawdown Action. Such as Parents, Administrators, Lawyers,
etc. See 2.9.2.21 Defining ad hoc message client details on page 36
Contact Rules These are the rules under which messages will be sent to contacts in Counterparties,
Owners, Ad hoc Message Clients, etc. See 2.9.2.22 Defining contact rule details on
page 36.
Contract detail Description
Information Description
Amount Amount of credit. This field is mandatory and cannot be modified once it is attached to
an active transaction or if the facility to which it is attached has reached Final state.
2 Managing static data
2.9 Facilities
28 © Wall Street Systems IPH AB - Confidential
Note: Once the facility has been approved and it has reached the final state, the credit amount of
the facility can no longer be updated using Facility Editor: Amount Event Manager must be
used instead: see Chapter 3 Managing amount events on page 49.
2.9.2.2 Defining drawdown currency details
The details of the acceptable or excluded drawdown currencies in the facility can be defined in
Facility Editor’s Drawdown Currency page.
When the drawdown currency is not the same as the credit currency, the conditions for the FX rate
that is used to convert the amount of the drawdown from the drawdown currency to the credit
currency (and vice versa) can be defined here.
Additionally, specific denomination conditions can be attached to each drawdown currency.
2.9.2.3 Defining counterparty details
The contract’s counterparty details are defined in Facility Editor’s Counterparty page. These details
include information about the borrower(s) or lender(s) who are participants under the contract and
against whom the exposure limits are calculated.
Effective Date Date on which the credit amount takes effect.
The effective date of the credit amount must fall on or between the dates defined for
Active From Date and Active To Date (if these dates are specified).
Information Description
Information Description
Exclude (Read-only.) If this switch is off, then currencies selected in this page are included. If
this switch is on, when Include All Currencies is set in the Switches page, then the
selected currencies are excluded.
Drawdown Currency Currency in which the drawdown is made.
FX Rate Method FX Rate Method: Fixed or Not Fixed.
FX Rate FX rate used when FX Rate Method = Fixed.
Fixing Offset Number of days’ offset allowed, that is, the difference in days between the fixing date
and the payment date when FX Rate Method = Not Fixed.
Scenario Scenario from which you want to retrieve the FX rates when FX Rate Method = Not
Fixed.
Denomination
Currency
Denomination currency. Choices are: Credit Currency or Drawdown Currency. The loan
agreement may specify that drawdowns must be in the multiples defined in the
Denomination Multiple field, i.e. Credit Currency or Drawdown Currency.
Denomination Multiple Denomination multiple that cannot be a negative number and cannot be more than
the facility amount.
Comment Descriptive text giving further information.
Information Description
Exclude (Read-only.) If this switch is off, then counterparties selected in this page are
included. If this switch is on, when Include All Counterparties is set in the Switches page,
then the selected counterparties are excluded.
Counterparty
Counterparty Name
ID and name of the counterparty of the contract.
2 Managing static data
2.9 Facilities
Commercial Loans Module (CLM) User Guide 29
2.9.2.4 Defining payback FX rate details
When the borrower makes a repayment in a currency that is different to the drawdown currency,
you need to define which FX rates are used to allocate the cashflows against the payments for the
facility. This is done in Facility Editor’s Payback FX Rates page.
2.9.2.5 Defining location details
In the Location page, you can define the acceptable locations in the facility.
2.9.2.6 Defining owner details
The owner of the facility is defined in the Owner page.
Preferred Beneficiary
Preferred Beneficiary
Name
ID and name of the preferred beneficiary of this counterparty.
Comment Descriptive text giving further information.
Information Description
Information Description
Exclude Switch on to exclude this currency.
Settlement Currency Currency in which settlement is made.
FX Rate Method FX Rate Method: Fixed or Not Fixed.
FX Rate FX rate used when FX Rate Method = Fixed.
Fixing Offset Number of days’ offset allowed, that is, the difference in days between the fixing date
and the payment date when FX Rate Method = Not Fixed.
Scenario
Subscenario
Scenario and subscenario from which you want to retrieve the FX rates when FX Rate
Method = Not Fixed.
Comment Descriptive text giving further information.
Field Enter or select
Exclude (Read-only.) If this switch is off, then locations selected in this page are included. If
this switch is on, when Include All Locations is set in the Switches page, then the
selected locations are excluded.
Location Select the location you want from the list of available locations.
Note: Locations are defined in Country Editor.
Comment Descriptive text giving further information.
Information Description
Exclude (Read-only.) If this switch is off, then owners selected in this page are included. If this
switch is on, when Include All Owners is set in the Switches page, then the selected
owners are excluded.
Owner
Owner Name
ID and name of the portfolio owner of the facility.
Comment Descriptive text giving further information.
2 Managing static data
2.9 Facilities
30 © Wall Street Systems IPH AB - Confidential
2.9.2.7 Defining instrument and event details
In Facility Editor’s Instrument page, you can define the types of loan and types of event that are
permitted under the contract.
2.9.2.8 Defining funding type details
The various types of funding available under the contract must be defined in the Funding Types page.
2.9.2.9 Defining tranche details
At least one tranche must be set up for each facility. A tranche cannot exist without a parent facility.
Before you can set up the tranche details, you need to define the main attributes of the tranche in
Facility Editor’s Tranche page.
Information Description
Exclude (Read-only.) If this switch is off, then instruments selected in this page are included. If
this switch is on, when Include All Instruments is set in the Switches page, then the
selected instruments are excluded.
Event Type Type of event. For example, Commitment Fee, Drawdown, Drawdown Collateral,
Drawdown Fee, Equity, Facility Collateral, Facility Fee, Guarantee Call, Guarantee
Refund, Late Payment Penalty, and so on, permitted under the contract. Event types
are defined in the Action Rule Type Editor, see 5.1.1 Action rule types on page 70.
Note: When the field refers to an entity that is created in another editor, you can
right-click the field to launch the editor.
Instrument Class (Information only.) The system populates the instrument class according to the
selected event type.
Top Instrument Group
Instrument Group
Instrument
Instrument group and instrument allowed under the contract.
Note: When setting up the instruments, you must respect the order of these fields.
Available options in each of these fields are determined by the selected value in
the preceding field. For example, Top Instrument Group is linked to the Event Type;
Instrument Group is linked to the Top Instrument Group and so on.
Preferred Transaction
Tem p lat e
Preferred transaction template for the instrument or event. This will be the default
template when entering a new drawdown in Drawdown Manager. The list of available
templates is automatically updated according to the selected instrument.
Fixed Transaction
Tem p lat e
Switch on to fix the template so it cannot be changed at drawdown.
Facility Templates
Only
Switch on to limit the choice of transaction templates to those selected for this facility.
Credit Linked Switch on so that a drawdown entered using this instrument affects the credit
utilization.
Note: This switch is automatically set if you have switched on the Credit Linked Default
switch in the Action Rule Type Editor. See 5.1.1 Action rule types on page 70.
Comment Descriptive text giving further information.
Information Description
Exclude (Read-only.) If this switch is off, then funding types selected in this page are included.
If this switch is on, when Include All Funding Types is set in the Switches page, then the
selected funding types are excluded.
Funding Type Type of funding: for example, Own Funds. Funding types are defined in the Funding
Type Editor, s e e 2.12 Funding types (optional) on page 42.
Comment Descriptive text giving further information.
2 Managing static data
2.9 Facilities
Commercial Loans Module (CLM) User Guide 31
Once the facility definition has been saved, you can enter the remaining details of the tranche in
Tranche Editor: see 2.10 Tranches on page 39.
2.9.2.10 Defining transaction template details
The loan agreement contains clauses specifying drawdown components: for example, the interest
periods, methods used to calculate interest, and the repayment schedule of the principal amounts.
This predefined data is stored in transaction templates as financial clauses. Transaction templates
allow all the attributes of a transaction and its schedules to be captured and later used in creating
drawdowns.
In Facility Editor’s Transaction Templates page, you can define the templates for each instrument in the
facility.
Information Description
Facility ID
Facility Description
(Information only.)
Facility ID and description defined in the upper part of the editor.
ID (Information only.)
Unique numeric ID of the tranche. This number is automatically assigned by the
system.
Note: When the field refers to an entity that is created in another editor, you can
right-click the field to launch the editor.
Name Name of the new tranche.
Description Descriptive text giving further information.
Revolving Switch on if the tranche is of a revolving nature.
Committed Switch on if the tranche amount is committed.
Repaid When
Allocated
Switch on if repayments under the tranche are only to affect the figures in Limit
Monitor once they have been allocated in Payment Allocation Manager.
Revolving End Date Enter the revolving end date when the Revolving switch is on and when the revolving
end date you want to enter is before the Active To Date of the Facility or when there is
no Active To Date.
Tranche Calendar Calendar to be used for the tranche.
Drawdown Period
Start
Drawdown Period End
Period during which the tranche is active.
Last Repayment Date Last date allowed for repayment.
Offer Expiry Date Date on which the offer expires.
Own Owners
Own Counterparties
Own Beneficiaries
Own Credit Amounts
and so on.
Each switch corresponds to a parameter (page, field, or switch) in Tranche Editor.
Switch on one or more of these switches to activate the corresponding page in
Tranche Editor if you are defining multiple tranches.
If you are defining a single tranche under this facility, do not activate any of the
switches.
• If a switch is on, you define the details in the corresponding page of Tranche
Editor.
• If a switch is off, the attributes defined in the facility are applied to the tranche and
the corresponding page in Tranche Editor is not available.
Information Description
Exclude (Read-only.) If this switch is off, then transaction templates selected in this page are
included. If this switch is on, when Include All Transaction Templates is set in the Switches
page, then the selected transaction templates are excluded.
2 Managing static data
2.9 Facilities
32 © Wall Street Systems IPH AB - Confidential
2.9.2.11 Defining beneficiary details (optional)
Beneficiaries are the clients against whom the actual settlements would take place when the
counterparty is not the settlement counterparty.
One counterparty can have more than one beneficiary. Beneficiary details are defined in Facility
Editor’s Beneficiary page.
2.9.2.12 Defining guarantor details (optional)
In Facility Editor’s Guarantor page, you define the details of guarantor(s) that are the approved
guarantors under the contract.
2.9.2.13 Defining sublimits (optional)
Facility sublimits are restrictions on the amount that can be drawn against individual components of
the facility.
For example, a facility may have multiple borrowers, but a specified borrower is allowed to borrow
only a small part of the facility’s overall credit limit.
Preferred Transaction
Tem p lat e
This switch is set automatically when the Transaction Template has been added as the
Preferred Transaction Template for an Instrument in the Instrument page, see 2.9.2.7
Defining instrument and event details on page 30.
Instrument Instrument used with the transaction template defined in the Transaction Template field.
Transaction Template Transaction template for the instrument specified in the Instrument field.
Comment Descriptive text giving further information.
Information Description
Information Description
Exclude (Read-only.) If this switch is off, then beneficiaries selected in this page are included.
If this switch is on, when Include All Beneficiaries is set in the Switches page, then the
selected beneficiaries are excluded.
Preferred Beneficiary This switch is set automatically when the beneficiary has been added as the Preferred
Beneficiary for a counterparty in the Counterparty page, see 2.9.2.3 Defining
counterparty details on page 28
Counterparty
Counterparty Name
ID and name of the counterparty.
Beneficiary
Beneficiary Name
ID and name of the beneficiary.
Comment Descriptive text giving further information.
Information Description
Exclude (Read-only.) If this switch is off, then guarantors selected in this page are included. If
this switch is on, when Include All Guarantors is set in the Switches page, then the
selected guarantors are excluded.
Counterparty
Counterparty Name
ID and name of the counterparty.
Guarantor
Guarantor Name
ID and name of the guarantor. There can be more than one guarantor per
counterparty.
Comment Descriptive text giving further information.
2 Managing static data
2.9 Facilities
Commercial Loans Module (CLM) User Guide 33
In this case, a sublimit can be set up within the facility definition. A sublimit is set up for a
combination of up to three static data components within the facility. These sublimits are verified
and the credit utilization is updated when a drawdown is entered against the facility agreement.
Use the Sublimits page to apply a sublimit to a single static data component (for example,
counterparty, instrument, or currency), or a combination of two or three static data entities.
Note: Each static data entity defined in the sublimit must already be set up in the facility.
2.9.2.14 Defining drawdown condition details (optional)
Some conditions of a drawdown defined in the loan agreement can be stored in Facility Editor’s
Drawdown Conditions page. These conditions control some of the content of individual drawdowns
under this facility and are checked during the processing of the drawdown.
The conditions that can be set up in this page include: dates, rates, and amounts.
A drawdown condition can be set up to be either inflexible or flexible: an inflexible condition
prevents a drawdown from being processed further; a flexible condition generates a warning
message that can be overridden to allow the drawdown to continue in the process flow.
Information Description
Sublimit ID (Information only)
Unique numeric ID of the sublimit. This number is automatically assigned by CLM.
Sublimit Name Name for the sublimit.
Active From Date
Active To Date
Date range within which this sublimit is active.
These dates must fall on or between the dates defined for the Active From Date and
Active To Date of the facility.
Comment Descriptive text giving further information.
Pre-Conditions Key
(1, 2, 3)
Pre-Conditions Value
(1, 2, 3)
Pre-condition (for example, Counterparty, Currency, and so on) and a value for the
pre-condition.
You cannot select the same key more than once under the same sublimit.
Sublimit Expression Sublimit expression for condition setting. Choose from: % of Credit Amount,
Maximum Credit Amount, Number of Drawdowns, Number of Drawdown Currencies.
Maximum Value Maximum value for the selected sublimit expression.
Information Description
Disallow Switch on to disable the drawdown conditions fields. Drawdowns entered meeting
these conditions will be disallowed.
If this switch is on, only pre-conditions can be defined.
Condition (Information only.)
Unique numeric ID of an amount entry in the facility. This number is automatically
assigned by CLM.
Condition Name Enter a name that clearly identifies the drawdown condition.
Validation Method Validation to be performed on this condition. A validation method is a combination of
state and action type. Concretely, this defines at which point in the drawdown entry
process the drawdown condition is checked.
Block Transactions Switch on to prevent the drawdown transaction from being saved if the conditions are
not met, in which case an error message is displayed. Otherwise, a warning message
is displayed.
Comment Descriptive text giving further information.
2 Managing static data
2.9 Facilities
34 © Wall Street Systems IPH AB - Confidential
Note: If you need to change an inflexible condition in an existing facility definition to a flexible
one, then the facility must be amended and sent back through the process flow in order to
be re-authorized: see 2.9.4 Modifying facilities on page 37.
2.9.2.15 Defining collateral agreement details (optional)
Facilities can be set up for credit lines backed by collateral provided by either the borrower or by
guarantors. A drawdown under a facility can only be secured using one of the collateral agreements
defined as eligible under the contract.
Collateral can only be accepted when it is defined under a collateral agreement (as defined in
Collateral Agreement Editor).
2.9.2.16 Defining drawdown parameter details (optional)
Drawdown parameters can be defined for a facility in Facility Editor’s Drawdown Parameters page as a
way to configure user-specific data.
You use parameters to meet any extra specification needs your organization may have: each
parameter can contain a set of your own custom values. You can use these parameters in rule
definitions for selecting transactions, or as grouping criteria in reports and monitors. Parameters are
set up in Parameter Editor.
Pre-Conditions Key
(1, 2, 3)
Pre-Conditions Value
(1, 2, 3)
Pre-condition (for example, Counterparty, Currency, and so on) and a value for the
pre-condition.
You cannot select the same key more than once under the same condition.
Drawdown Attribute Drawdown attributes that can be used for condition setting.
For example, choose from: Schedule Rate, Opening Date, Drawdown Maturity Date,
Credit Amount, and so on.
Reference Attribute Attribute for more specific condition setting that refers to the attribute selected in the
Drawdown Attribute field.
For example, if Drawdown Attribute = Schedule Rate, choose from: Drawdown
Aggregated Rate or Schedule Base Rate.
Schedule Type
Ref. Schedule Type
If Drawdown Attribute = Schedule Rate, select a schedule type and, if required, a
different reference schedule type, for the condition.
Minimum Value
Maximum Value
Minimum and maximum value for the selected attribute.
These fields are available only when the Drawdown Attribute field contains a value.
Minimum Deviation
Maximum Deviation
Minimum and maximum value against which deviation is calculated.
These fields are available only when both the Drawdown Attribute and Reference Attribute
fields contain a value.
Information Description
Information Description
Exclude Switch on to exclude this collateral agreement.
Collateral Agreement ID of the collateral agreement eligible under this contract.
Owner Portfolio owner: only the portfolio owners defined under the facility are available for
selection: see 2.9.2.6 Defining owner details on page 29.
Collateral
Counterparty
(Information only)
Counterparty for the collateral agreement.

2 Managing static data
2.9 Facilities
Commercial Loans Module (CLM) User Guide 35
2.9.2.17 Defining mandate details
Mandates are used when a loan is subsidized. Details of the mandate for the facility are defined in
Facility Editor’s Mandate page.
2.9.2.18 Defining switches details
Switches are used to enable certain functionality within the facility.
2.9.2.19 Defining properties details
Properties can be defined for a facility in Facility Editor's Properties page as a way to configure
user-specific data.
You use properties to meet any extra specification needs your organization may have: each property
can contain a set of your own custom values. You can use these properties in reports. Properties are
set up in Property Editor.
Information Description
Exclude (Read-only.) If this switch is off, then mandates selected in this page are included. If
this switch is on, when Include All Mandates is set in the Switches page, then the selected
mandates are excluded.
Mandate Mandate for this facility.
Mandates are defined in Mandate Editor: see 2.13 Mandates (optional) on page 43.
Mandate Name
Subsidy Currency
Default Subsidy Rate
Default Subsidy
AddOn %
(Information only)
Details of the mandate taken from the definition of the selected mandate.
Comment Descriptive text giving further information.
Information Description
Fixed Guarantees Switch on to ensure that details of the guarantee cannot be changed during entry.
Facility Guarantees Only Switch on to ensure that only guarantees that have specifically been set up for
this facility can be used. See 2.9.2.12 Defining guarantor details (optional) on
page 32.
Validate Against Mandate Switch on so that only the instrument and funding types defined under a mandate
are valid in this facility. See 2.13 Mandates (optional) on page 43.
Allow Commitment Fee
Rollover
Switch on to allow rollover of commitment fees.
Technical Delay from
Location
Switch on to use the Technical Delay from the Country Group setup corresponding
to Location
Include All Currencies
Include All Locations
Include All Owners
Include All Counterparties
Include All Mandates
Include All Instruments
Include All Transaction
Tem p lat es
Include All Beneficiaries
Include All Guarantors
Include All Funding Types
Switch on for each entity to allow all values under the Facility. If the switch is on,
the related page is only used to exclude values.
For example, you can include all counterparties except 'COUNTERPARTY-A' by
selecting Include All Counterparties in this page and then selecting
COUNTERPARTY-A' in the Counterparty page. (You will notice in the Counterparty
page that the Exclude switch is on and cannot be modified.)
2 Managing static data
2.9 Facilities
36 © Wall Street Systems IPH AB - Confidential
2.9.2.20 Defining links details
Links are used to provide direct links from the Facility to network directories holding facility related
documentation such as Loan Agreements, Signatory Lists, etc.
2.9.2.21 Defining ad hoc message client details
Ad hoc Message Clients allows you to add additional clients to the facility who may also receive
messages when any processing takes place i.e. for Drawdown Confirmations, Rate Fixings, Payment
Reminders, etc.
2.9.2.22 Defining contact rule details
Contact Rules can be defined at the tranche or facility level to determine when particular messages
should be sent to contacts at the recipients (Counterparties, Owners, Ad hoc Clients).
2.9.3 Approving facilities
When a new facility agreement is defined and saved in Facility Editor, the system automatically sets
the facility’s initial state according to a value configured by the System Administrator in the
application’s setup. In most cases, a facility flow consisting of two or more states is configured. If a
facility process flow has not been defined, then there will only be one facility state.
Information Description
Name Name of the document.
Address Path to the network directory and file.
Comment Optionally, add any additional comments.
Information Description
Client Select from the full list of clients available in the system.
Information Description
Client Name of the client for which the rule applies.
Contact Name Name of the contact for which the rule applies.
Priority Used to determine the matching contact rule. If more than one matching contact
rule is found with the same priority, then the relevant message will be sent to all
of those contacts.
Message Group Message Group for which the rule applies.
Message Type Message Type for which the rule applies.
Message Subtype Message Subtype for which the rule applies.
Rule The rule used in matching.
Not Rule The not rule used in matching.
Preferred Language The Preferred Language of the contact The preferred language for CLM Messages
is selected according to the following priority:
• From the Message Rule
• From the Contact Rule on Tranche/Fa c i lity/Client
• From the Facility Header
•Defaults to en_US.
Preferred Medium The Preferred Medium of the contact.

2 Managing static data
2.9 Facilities
Commercial Loans Module (CLM) User Guide 37
When a process flow has been configured, Facility Editor can be used to accept the facility definition
to move it forward to the next stage of the flow by a user that has the required permissions.
User permissions set up in the portfolio of the facility are used to validate whether a specific user
has the necessary permission to accept (or reject) a facility in its current state.
Note: See the TRM System Administration Guide for more information about configuring the
facility process flow.
To accept (or reject) an existing facility definition:
1. In Facility Editor, select the facility definition you want to approve from the list on the left side of
the editor.
The current state of the facility (for example, Provisional) is displayed in the State field in the
upper part of the editor.
2. Verify the parameters of the facility definition.
3. In the Action field, in the upper part of the editor, select one of the following:
–Accept - to approve the definition and move the facility forward in the process flow
–Reject - to reject the definition and move the facility backwards in the process flow.
When saving, the facility progresses to the next (or previous) state in the process flow: the
value displayed in the State field is updated according to the system’s process flow configuration.
When the facility reaches the final state (for example, Signed), the Accept value in the Action
field is automatically de-activated.
Note: It is possible to process some other static data entities used in CLM (for example, approval
and mandate definitions) in the same way.
2.9.4 Modifying facilities
Once a facility definition has been set up, fully validated and approved, and has reached the final
state, it is still possible to modify the facility’s attributes, as follows:
•To modify any of the facility’s values (apart from the credit amount), the facility must go through
the same approval process described in 2.9.3 Approving facilities on page 36.
•If the amount of available credit under the facility needs to be modified (either increased,
decreased, or transferred), a credit amendment must be done in Amount Event Manager.
See Chapter 3 Managing amount events on page 49 for more information.
2.9.5 Mirroring facilities
CLM enables you to mirror facilities by generating a "child" facility automatically when a "parent"
facility is defined correctly and saved in the system.
When you enter a drawdown under a parent or child facility in Drawdown Manager, the
corresponding reversed drawdown is created automatically under the mirror child or parent facility.
Note: Drawdown mirroring works in a similar way to internal deal mirroring in TRM: see 4.3
Drawdown mirroring on page 67 for more information.
2.9.5.1 Setting up facility mirroring
This section describes the additional values or specific configuration needed for facilities used in
facility mirroring.
A facility must be set up in a certain way and adhere to certain conditions for it to be eligible for use
as a mirror parent.
2 Managing static data
2.9 Facilities
38 © Wall Street Systems IPH AB - Confidential
If the parent is set up correctly, the mirror child facility is created automatically when the parent
facility definition is saved.
Note: For information about the values or configuration needed for deal mirroring in general in
TRM (for example, portfolios, clients, permissions, and so on), see the TRM User Guide.
To set up a facility as a mirror parent:
1. In Facility Editor, set up a facility using the following information.
The following pages in Facility Editor must not contain values:
Note that the same conditions must also be met on the related tranche.
See 2.9 Facilities on page 24 for information about setting up facilities in general.
2. Switch on Mirror Parent in the upper part of the editor when you have finished defining the facility.
Note that this switch is only available on new (that is, unsaved) facilities.
3. Save the facility definition using File – Save As New.
The mirror child facility is generated automatically, with the following attributes:
–Facility ID = generated automatically by the system
–Name = Name of the mirror parent prefixed by "M-"
–Property = MIRROR-ID and Value = Facility ID of the mirror parent is set on Facility Editor’s
Property page (the same property is set on the parent facility but with Value = Facility ID of
the mirror child)
–Sign = Lending (if Sign = Borrowing for the mirror parent and vice versa)
–Counterparty of the mirror child = Owner of the mirror parent
–Owner of the mirror child = Counterparty of the mirror parent
–Mirror Child switch is activated.
Information Description
Approval
Approval
Currency
These fields in the upper part of the editor must not contain values: see 2.9.1 Defining
the main attributes on page 25.
Owner Only one portfolio owner can be added in Facility Editor’s Owners page: see 2.9.2.6
Defining owner details on page 29.
Counterparty Only one counterparty can be added in Facility Editor’s Counterparty page: see 2.9.2.3
Defining counterparty details on page 28.
Location If you define a location, only one location can be added in Facility Editor’s Location
page: see 2.9.2.5 Defining location details on page 29.
Tranche Only one tranche can be added in Facility Editor’s Tranche page: see 2.9.2.9 Defining
tranche details on page 30
Transaction
Templ a te
Transaction templates must not be facility-specific: it must be possible to apply the
template to both the mirror parent and the mirror child facility: see 2.9.2.10 Defining
transaction template details on page 31.
–Beneficiary
–Guarantor
–Collateral Agreement
–Payback FX Rates
–Funding Types
–Mandate
2 Managing static data
2.10 Tranches
Commercial Loans Module (CLM) User Guide 39
4. Complete the mirror child facility definition. The following fields can be defined independently
from the parent facility:
5. Send the mirror facilities through the process flow using the information in 2.9.5.2 Approving
mirror facilities on page 39.
2.9.5.2 Approving mirror facilities
When a parent facility is defined and the mirror child is generated, the system automatically sets the
initial state of both facilities as with a normal facility definition (see 2.9.3 Approving facilities on
page 36).
You must execute the Accept (or Reject) actions on the parent facility in order to move both facilities
to the next stage of the facility process flow: the actions carried out on the parent are mirrored on
the child facility.
2.9.5.3 Modifying mirror facilities
Once the mirror facilities have been set up, fully validated and approved, and have reached the final
state, it is still possible to modify them, as follows:
•To modify the mirror facilities’ values (apart from the credit amount), the parent facility must be
reopened, modified, and resent through the approval process back to the final state (that is,
Signed). The change is mirrored to the child facility.
•If the amount of available credit under the mirror facilities needs to be either increased or
decreased, the credit amendment must be done in Amount Event Manager on the parent facility.
The credit amendment is mirrored to the child facility.
See Chapter 3 Managing amount events on page 49 for more information.
2.10 Tranches
Tranches are used to manage the boundary conditions that are a part of the loan agreement or loan
covenants that define the constraining factors linked to the loan.
A tranche cannot exist in isolation and can be created only after a facility (the loan agreement) has
been set up. A tranche is an important link between a facility and the drawdown under the facility. It
is not possible to make a drawdown directly under the facility: drawdowns can only be made against
a tranche.
A tranche is set up based on the definition of the facility and every facility must have at least one
tranche. Each tranche can have a specific set of conditions for lending, but all the conditions of the
tranche must comply with the overall facility conditions: a tranche is at least as restrictive as its
facility.
For example, the credit amount of a single tranche cannot exceed the overall credit amount of the
facility, the tranche’s expiry date cannot be later than the expiry date of the facility, and the
currencies permitted in the tranche cannot be outside the range of currencies permitted within the
facility.
However, when multiple tranches exist for a facility, the aggregated tranche conditions may exceed
the overall facility conditions.
–Name
–Short Name
–Description
–FX Rate
–Portfolio
–Loan Officer
–Domain
–Location
2 Managing static data
2.10 Tranches
40 © Wall Street Systems IPH AB - Confidential
For example, the overall aggregate credit amount allocated to multiple tranches is allowed to exceed
the total facility credit amount, as long as the actual drawdown amount under multiple tranches
does not exceed the facility’s credit limit.
The main attributes of a tranche are defined in Facility Editor. Only the attributes of the tranche that
differ from the overall conditions defined in the facility are set up in Tranche Editor.
Therefore, if all drawdowns are managed within the same set of conditions, only one single tranche
is required: it is not necessary to define differences between the tranche attributes and the overall
facility attributes.
2.10.1 Defining the main attributes
The main attributes of a tranche are defined under the facility in Facility Editor. Once a tranche has
been defined and saved in the facility, you can view it in Tranche Editor. Further attributes relating
to the tranche, such as any conditions that differ from the facility, as well as drawdown conditions
and sublimits, can be defined for a tranche in Tranche Editor.
The following sections describe the procedure for setting up tranches under a facility.
2.10.1.1 Single tranches
To define the main attributes of a single tranche in a facility:
1. Enter the main attributes of the tranche in Facility Editor’s Tranche page: see 2.9.2.9 Defining
tranche details on page 30.
2. Do not activate any of the Own switches.
When a single tranche is used, the conditions of the tranche are the same as the conditions
defined for the facility.
3. Click Add to add the tranche to the facility.
4. Save the facility definition using File - Save.
The system automatically assigns an ID to the tranche.
2.10.1.2 Multiple tranches
To define the main attributes of multiple tranches in a facility:
1. Enter the main attributes of the first tranche in Facility Editor’s Tranche page: see 2.9.2.9
Defining tranche details on page 30.
2. Activate one or more of the Own switches which correspond to the conditions of the tranche that
differ from those of the facility.
–If a switch is on, the corresponding page in Tranche Editor is activated.
3. Click Add to add the tranche to the facility.
4. Save the facility definition using File - Save.
The system automatically assigns an ID to the tranche.
5. Repeat the procedure to add further tranches to the facility.
6. Complete each tranche definition in Tranche Editor using the information in the following
sections.
2.10.2 Defining the tranche values
If you are setting up multiple tranches under a facility, when you activate one of the Own switches in
Facility Editor’s Tranche page, the corresponding page in Tranche Editor becomes available to enable
you to specify these values for the tranche.

2 Managing static data
2.11 Approvals (optional)
Commercial Loans Module (CLM) User Guide 41
To complete the definition of a tranche:
1. In Tranche Editor, define the values for the tranche in each page you have activated using the
Own switches: the available options in each page are restricted to those values permitted under
the facility.
Note that the only exception to this involves the selection of transaction templates in the
Transaction Templates page: if the Facility Templates Only switch in Facility Editor’s Instrument page is
off, you are able to select transaction templates in the tranche that are not defined under the
facility.
2. Complete the tranche definition in Tranche Editor’s Drawdown Conditions and Sublimits pages.
This is an optional step: the values defined in these pages are independent of the facility
attributes.
3. Save the tranche definition using File - Save.
Note: The information you can enter in Tranche Editor’s pages is the same as the information
required to define a facility’s contract details: see 2.9.2 Defining contract details on page
26.
2.11 Approvals (optional)
In CLM, the initial step in the lending process can be managed using an approval entity.
Typically, an approval is used by the Loan Officer to record the decision of the Credit Committee on
how much can be lent to a borrower or group of borrowers.
In the approval, it is possible to record the following details:
•Total value of the facility or facilities that can be offered under the approval
•Loan Officer or other official who was involved in the approval process.
An approval needs to be in place before a facility is signed.
Approvals are defined in Approval Editor.
To define an approval:
1. In Approval Editor, enter the main attributes of the approval in the upper part of the editor.
Information Details
ID Unique numeric ID of the approval. This number is automatically assigned by CLM
when you enter a new approval.
Name Name of the approval.
Description Descriptive text giving further information.
Portfolio Loan portfolio of the approval.
Loan Officer User ID of the Loan Officer responsible for the approval.
Approval Date Date of the approval. This cannot be later than the Active To Date.
Approved By ID of the user that has approved the approval.
Active From Date
Active To Date
Period that the approval is active.
Domain Domain in which this approval is available.

2 Managing static data
2.12 Funding types (optional)
42 © Wall Street Systems IPH AB - Confidential
2. In Approval Editor’s Credit Amount page, specify the credit data that applies to this approval.
In this page, you define the initial maximum credit amount of the approval. When facilities are
set up under the approval, they reduce the available approval Amount from the Active From Date of
the Credit Amount of the facility.
3. Repeat the above procedure for any other credit data you want to define for the approval.
4. Save the approval definition using File - Save As New.
Note: If the amount of available credit under the approval needs to be modified (either
increased, decreased, or transferred), the amendment must be done in Amount Event
Manager: see Chapter 3 Managing amount events on page 49 for more information.
2.12 Funding types (optional)
Funding types are used to identify the source of the funds being disbursed under a facility, such as,
Own funds, Group funds, or Third Party funds.
To define a funding type:
1. In Funding Type Editor, enter the main attributes of the funding type in the upper part of the
editor.
2. Save the funding type definition using File - Save As New.
State
Action
State of acceptance of the approval definition and the actions available to accept or
reject the approval definition to move it forward or backwards in the process flow
according to the system configuration.
Approval entities can be managed using a process flow in the same way as a facility
definition: see 2.9.3 Approving facilities on page 36.
Information Description
Amount Credit amount specified in the Approval Currency.This field is mandatory and cannot be
modified once it is attached to an active transaction or if the facility to which it is
attached has reached Final state.
Effective Date Date on which the amount takes effect.
The effective date of the credit amount must fall on or between the dates defined for
Active From Date and Active To Date (if these dates are specified).
Information Details
Information Description
ID & Name Unique ID and name of the funding type.
Instrument Class (Information only)
By default, Instrument Class = CASH.
Top In s trument
Group
Instrument Group
Instrument group used for the funding type.
Funding Call
Instrument
ID of the instrument set up as a Funding Call instrument. This would normally be used
with third party funds where a funding call is required before finalizing the drawdown.
2 Managing static data
2.13 Mandates (optional)
Commercial Loans Module (CLM) User Guide 43
3. In Funding Type Editor’s Donor page, select and add the ID of the donor client for this funding
type.
Only client entities that have been defined with the role Donor in Client Editor are available for
selection in this field.
4. In Funding Type Editor’s Currency page, select and add the currency for this funding type.
5. Save the funding type definition using File - Save.
2.13 Mandates (optional)
Mandates are used only by organizations that require mandates in the setup of their loan
agreements.
A mandate can be defined as a source of funds used to subsidize a loan. The funds are made
available to the lending organization by a donor or guarantor and are to be distributed among
borrowers that meet the terms and conditions set out in the mandate.
The terms set out in a mandate can either be very specific (where the donor or guarantor explicitly
mentions the type of project or borrower that can benefit from the subsidy); or the terms of the
mandate may be more general (where the funds can be disbursed at the discretion of the lending
organization).
A mandate contains the following information:
•Total authorized amount and used amount of the subsidy
•Amount of subsidy still available
•Details of the donor.
Each mandate is linked to a facility: see 2.9.2.17 Defining mandate details on page 35.
The following sections describe the procedure for setting up mandates.
2.13.1 Defining the main attributes
To define the main attributes of a mandate:
1. In Mandate Editor, enter the main attributes of the mandate in the upper part of the editor.
Information Description
ID & Name Unique ID and name for the mandate.
Description Descriptive text giving further information.
Portfolio Loan portfolio of the mandate.
Loan Officer User ID of the Loan Officer responsible for the mandate.
Subsidy Currency Currency to be used in setting the overall subsidy amount for the mandate.
This currency is used in all subsidy calls under the mandate.
Subsidy Call
Instrument
Instrument from which subsidy call transactions are created from drawdowns under
this mandate.
Default Subsidy
Rate
(Information only.) Subsidy rate to be defaulted to all drawdowns made under the
mandate.
Default Subsidy
Add On %
Add-on percentage used by default in facility subsidy estimations run under this
mandate.
This add-on can be manually modified in the Subsidy Estimation amount event: see
3.2.1 New subsidy estimation on page 50.
2 Managing static data
2.13 Mandates (optional)
44 © Wall Street Systems IPH AB - Confidential
2. Save the mandate definition using File - Save As New.
3. Complete the mandate definition using the information in the following sections.
Note: If the amount of available credit under the mandate needs to be modified (either
increased, decreased, or transferred), the amendment must be done in Amount Event
Manager: see Chapter 3 Managing amount events on page 49 for more information.
2.13.2 Defining mandate participant details
To define the participant details of a mandate:
1. In Mandate Editor’s Mandate Owners page, add the client or clients you want to define as the
participant.
2. In Mandate Editor’s Mandate Donors page, specify the values for the participants defined with the
role Donor.
Subsidy Call Delay Number of days used as the subsidy call delay.
Signature Date Date when the mandate is signed.
Active From Date
Active To Date
Period during which the mandate is active.
Domain Domain in which the mandate is available.
Mandate Estimate Switch on to define that a mandate level estimation is required before facility level
estimations can be made under the mandate.
• If this switch is on, facility estimations made within an approved mandate
estimation do not need to be approved by the donor separately.
• If this switch is off, facility estimations can be made as soon as a mandate with a
subsidy amount has been set up: each of them must be separately approved by
the donor.
State
Action
State of acceptance of the mandate definition and the actions available to accept or
reject the mandate definition to move it forward or backwards in the process flow
according to the system configuration.
Mandate entities can be managed using a process flow in the same way as a facility
definition: see 2.9.3 Approving facilities on page 36.
Information Description
Information Description
Participant Client ID of the owner participant in the mandate.
Typically, this would be the lending organization that is distributing the subsidy on
behalf of the donor or guarantor.
Comment Descriptive text giving further information.
Information Description
Participant Client ID of the donor participant in the mandate.
Donor Settlement
Client
Settlement client used in subsidy call transactions based on this mandate.
When a Subsidy Call transaction is entered against a donor (counterparty of the
transaction) where a Donor Settlement Client has been given, this is propagated into the
Counterparty Beneficiary field in the Subsidy Call and settlement instructions are
generated accordingly.
Participation % Percentage of the total subsidy amount of the mandate accounted for by the
participant when there is more than one donor.
2 Managing static data
2.13 Mandates (optional)
Commercial Loans Module (CLM) User Guide 45
3. In Mandate Editor’s Mandate Guarantors page, specify the values for the participants defined with
the role Guarantor.
4. Save the mandate definition using File - Save.
5. Complete the mandate definition using the information in the following sections.
2.13.3 Defining mandate funding details
To define the funding types for the mandate:
1. In Mandate Editor’s Funding Types page, add the type of funding used for lending under the
mandate.
Funding types are defined in Funding Type Editor: see 2.12 Funding types (optional) on page 42.
2. In Mandate Editor’s Instrument Groups page, define the available events under the mandate.
3. In Mandate Editor’s Subsidy Amount page, enter the maximum subsidy amount of the mandate.
4. In Mandate Editor’s Drawdown Conditions page, specify any conditions associated with the
mandate.
Comment Descriptive text giving further information.
Information Description
Participant Client ID of the guarantor participant in the mandate.
Participation % Percentage of the total subsidy amount of the mandate accounted for by the
participant when there is more than one guarantor.
Comment Descriptive text giving further information.
Information Description
Information Description
Event Type Select the event type: for example, Drawdown.
Event types are defined in Action Rule Editor: see Chapter 5 Managing loan events on
page 69.
Instrument Class (Information only)
Instrument class of the specified Event Type.
Top In s trument
Group
Instrument Group
Instrument group of the event type.
Comment Descriptive text giving further information.
Information Description
Amount Subsidy amount denominated in the mandate’s Subsidy Currency. This field is
mandatory and cannot be modified once it is attached to an active transaction or if the
facility to which it is attached has reached Final state.
Effective Date Date on which the amount takes effect.
Information Description
Disallow Switch on to disable the drawdown conditions fields.
If this switch is on, only pre-conditions can be defined.

2 Managing static data
2.14 Cashflow groups (optional)
46 © Wall Street Systems IPH AB - Confidential
5. Save the mandate definition using File - Save.
2.14 Cashflow groups (optional)
Cashflows can be grouped together to be used for reporting or analysis purposes, for example, in
Report Generator and Debt Monitor, respectively. They are also used to define the order of cashflow
allocation in Payment Allocation Manager.
For example, by specifying a cashflow group when monitoring portfolios in Debt Monitor, a global
amount can be broken down into its different components (such as Principal, Fee, and Interest).
These cashflows can then be broken down even further. Fees, for example, could be broken down
into Issuer Fee and Tax.
Each type of cashflow needs to be defined individually in the main cashflow group, with a priority.
The priority defines the order in which the rule matching is done.
Group rules are set up for the cashflow group to define how the cashflows are identified. You can
define more than one rule within a group and specify different criteria that the cashflow should or
should not meet. All criteria need to be matched in order to include the cashflow within the group.
When all excluding criteria is matched, the cashflow is excluded from the group. Inclusive or
Condition ID (Information only)
Unique numeric ID of an amount entry in the mandate. This number is automatically
assigned by CLM.
Validation Method Validation to be performed on this condition. A validation method is a combination of
state and action type.
Block Transactions Switch on to prevent the drawdown transaction from being saved if the conditions are
not met.
Comment Descriptive text giving further information.
Pre-Conditions
Key (1, 2, 3)
Pre-Conditions
Value (1, 2, 3)
Pre-condition (for example, Counterparty, Currency, and so on) and a value for the
pre-condition.
You cannot select the same key more than once under the same condition.
Drawdown
Attribute
Drawdown attributes that can be used for condition setting.
For example, choose from: Schedule Rate, Opening Date, Drawdown Maturity Date,
Credit Amount, and so on.
Reference
Attribute
Attribute for more specific condition setting that refers to the attribute selected in the
Drawdown Attribute field.
For example, if Drawdown Attribute = Schedule Rate, choose from: Drawdown
Aggregated Rate or Schedule Base Rate.
Schedule Type
Ref. Schedule
Type
If Drawdown Attribute = Schedule Rate, select a schedule type and, if required, a
different reference schedule type, for the condition.
Minimum Value
Maximum Value
Minimum and maximum value for the selected attribute.
These fields are available only when the Drawdown Attribute field contains a value.
Minimum
Deviation
Maximum
Deviation
Minimum and maximum value against which deviation is calculated.
These fields are available only when both the Drawdown Attribute and Reference Attribute
fields contain a value.
Information Description
2 Managing static data
2.14 Cashflow groups (optional)
Commercial Loans Module (CLM) User Guide 47
exclusive criteria can be used in the same rule. You can also set up a miscellaneous group rule for all
other cashflows. This rule would have the lowest priority and be completely open.
Cashflow groups are defined in Cashflow Group Editor.
To define a cashflow group:
1. In Cashflow Group Editor, define the main attributes of the cashflow group in the upper part of
the editor.
2. In the Groups page, define the main group using the information in the following table:
3. In the Group Rules page, define the criteria that each cashflow should meet to match the group
rule, using the information in the following table:
4. Save the cashflow group using File - Save As New.
Information Description
ID & Name Unique ID and name for the cashflow group.
Domain Domain in which this cashflow group is available.
Switches Payment Reminder Grouping: switch on so that this cashflow group is used for
grouping the cashflows in the Payment Reminder entities. Only one cashflow group
can be used at a time for grouping cashflows. To use a different cashflow group, the
switch must set to off for this cashflow group.
Information Description
Group
Group Name
ID and name of the main cashflow group.
Priority Number used to determine the priority if two or more cashflow groups meet the
conditions for the selected rules.
Information Description
Group
Group Name
ID and name of the main group you created in the Groups page.
Main Type Main type of cashflow, such as Principal or Fee/Tax.
Type Cashflow type as defined in Cashflow Type Editor.
Attributes
Attributes 2nd
Kinds
Different attributes that the cashflow must have to meet the rule criteria.
Sign Sign that the cashflow must have to meet the rule criteria.
2 Managing static data
2.14 Cashflow groups (optional)
48 © Wall Street Systems IPH AB - Confidential

Commercial Loans Module (CLM) User Guide 49
Chapter 3 Managing amount events
Amount Event Manager is used for processing amount events on loan entities (for example, facilities
or tranches). Amount events are used to amend the available credit or subsidy amount under a loan
agreement.
In Amount Event Manager, it is possible to carry out the following:
•Mandate subsidy estimation
–Facility subsidy estimation which reduces the available mandate subsidy amount
–Facility or tranche credit amendment (or cancellation) arising from a change in the contract
conditions associated with the loan
•Credit transfers (between two facilities or between tranches in one facility).
All amount events are controlled by a mandatory Active From Date and an optional Active To Date,
defining their useful life.
3.1 Amount Event Manager
Amount Event Manager is an application which is based on the Transaction Manager application
layout.
In Amount Event Manager, you can manipulate certain aspects of loan agreement related events
that have implications on the overall availability of credit or subsidy amounts.
Amount events can be managed in a similar way to transactions using similar state and mode
concepts as those in Transaction Manager’s process flow.
3.1.1 Amount Event Manager menus
The following tables describe the menu items which are specific to Amount Event Manager and any
layout or mode which is based on the application.
Other menu items which are common to all manager applications are described in the TRM User
Guide.
3.1.1.1 View
Menu item Description
Amount Event Query Displays the Query view.
This view is used to retrieve amount events that are already in the system for further
processing.
Amount Entity Displays the Amount Entity view.
This view displays the amount entities that result from amount events.

3 Managing amount events
3.2 Processing amount events
50 © Wall Street Systems IPH AB - Confidential
3.1.1.2 Command
3.1.1.3 New
3.1.2 Start-up parameters
Amount Event Manager is a special Transaction Manager layout, designed specifically for processing
amount entity events through the process flow.
The start-up parameter used to open the Amount Event Manager layout is:
FKTransactionManager.exe -c AE.xml --view amount-event
See the TRM User Guide for information about the options available.
3.1.3 Customizing Amount Event Manager
You can customize Amount Event Manager according to your personal preferences by selecting the
views you want to be displayed from the View menu, selecting the columns you want to see in each
view, and moving and rearranging the selected views in the window.
You can save the current display by saving it as a layout in the Layout menu using Layout - Save. You
can create and save multiple layouts either for your own personal use, or to be shared by other
users.
When you start the application, the default layout is automatically displayed. You can create as
many layouts as you require and tailor each view according to the amount event you are capturing.
The views in the layout are displayed as individual windows: you can detach and reposition the
views in Amount Event Manager in the same way as you can reposition the sub-windows in
Transaction Manager: see the TRM User Guide for more information.
3.2 Processing amount events
The following sections describe the amount events that can be carried out on entities in Amount
Event Manager.
3.2.1 New subsidy estimation
The funds made available under a mandate are distributed among borrowers that meet the terms
and conditions set out in the mandate by the donor or guarantor.
Menu item Description
Apply
Accept
Reject
Cancel
Allows you to carry out different types of commands on amount events to move them
forwards or backwards in the process flow.
Menu item Description
New Subsidy
Estimation
New Credit
Amendment
New Credit Transfer
Allows you to carry out amount events on facilities and tranches (and also on
mandates or approvals, if these are used in your commercial lending operations):
•3.2.1 New subsidy estimation on page 50
•3.2.2 New credit amendment on page 53
•3.2.3 New credit transfer on page 55.

3 Managing amount events
3.2 Processing amount events
Commercial Loans Module (CLM) User Guide 51
A facility subsidy estimation reduces the available mandate amount. When the terms set out in a
mandate are very specific (where it is explicitly mentioned the type of project or borrower that can
benefit from the subsidy) it is important that any changes to the available subsidy are authorized by
the contributor of the funds.
Authorization of a subsidy estimation is done in Amount Event Manager.
To create an amount event for subsidy estimation:
1. In Amount Event Manager, select New Subsidy Estimation.
2. In the resulting dialog, enter the data for the subsidy estimation.
Note that some of the values in the dialog may be automatically filled with data relevant to the
selected Entity Type or Sub-Entity Type.
3. Click OK.
Information Description
Opening Date Opening date of the subsidy estimation. By default, this is today’s date.
Active From Date Date from when the estimation is active: it cannot be before the Active From Date
defined in the entity’s definition. By default, this is today’s date.
Event Type Subsidy Estimation.
Entity Type Facility (or Mandate).
Entity ID ID of the entity defined as the Entity Type.
Sub-Entity Type Type of sub-entity (for example, Mandate).
Sub-Entity ID ID of the sub-entity.
Estimation
Method
Manual or Simulated Drawdown.
Simulation
Portfolio
Simulation portfolio if Estimation Method = Simulated Drawdown.
Simulation
Package Type
Simulation package type if Estimation Method = Simulated Drawdown.
Simulation
Package
Simulation package if Estimation Method = Simulated Drawdown.
Currency Displays the currency of the relevant Entity ID selected above.
Currency 2 Displays the currency of the relevant Sub-Entity ID selected above.
FX Rate Displays the FX rate between Currency and Currency 2 when different currencies are
involved.
Old Amount Displays the latest open subsidy amount.
Used Amount Displays the latest used subsidy amount.
Estimate Amount Enter the estimate amount if Estimation Method = Manual.
Estimate Add-On
%
Value is taken from the value specified in the mandate.
See 2.13 Mandates (optional) on page 43.
Event Amount Enter the amount if Estimation Method = Manual.
New Amount This field does not display a value.
3 Managing amount events
3.2 Processing amount events
52 © Wall Street Systems IPH AB - Confidential
A new row is created in the Amount Event view and displays the following data.
The following data displays in the Amount Entity view.
4. Select the new amount event and one of the following actions from the Command menu:
–Apply to save the amount event and set its state to Open or Register
–Validate to save the amount event and move its state forward in the process flow.
Information Description
Event ID Event ID generated automatically by the system after the amount event is saved.
Event Type Displays the value Subsidy Amount.
State Displays the current state of the amount event.
Old Amount The system calculates the Open Subsidy and displays the value.
Used Amount The system calculates the Used Amount and displays the value.
Estimate Amount This defaults from the value entered in the dialog if entered manually.
If Estimation Method = Simulated Drawdown, this figure is calculated.
Estimate Add-On
%
This defaults from the value entered in the dialog.
Event Amount Event Amount =
(Estimate Amount * (1 + Estimate Add-on%) + Used Amount – Old Amount)
New Amount New Amount = Event Amount + Old Amount
Information Description
Amount Entity ID Unique ID of the resulting amount entity.
Event Defaulted from the amount event.
Affect Entity
Affect Entity ID
Displayed by the system: for example, Facility.
Affect Sub-Entity
Affect Sub-Entity
Id
Displayed by the system: for example, Mandate.
Causing Entity
Causing Entity Id
Displayed by the system: loan entity causing this event.
Amount Type
Amount Subtype
Amount type and subtype related to the Affect Entity.
Flags Flags the amount entity as Committed if it is from a Committed Amount; or Pseudo if
it originates from a simulated drawdown.
Effective Date Date from which the amount entity is effective.
Subsidy Rate Subsidy rate applicable to the Affect Entity.
Subsidy IRR Subsidy IRR rate, where applicable.
Subsidy Pricing
Date
Date from which the quote was taken to calculate the Subsidy IRR in the simulated
drawdown.
3 Managing amount events
3.2 Processing amount events
Commercial Loans Module (CLM) User Guide 53
3.2.2 New credit amendment
Facility credit amounts represent the amount that can be borrowed under a given facility. During the
lifetime of a facility, the credit amount can go up or down. A cancellation of a credit amount can be
for all or part of the unutilized amount.
Once a facility definition has been set up and fully validated and approved, it is still possible to
modify some of the facility’s attributes in Facility Editor (apart from the credit amount): see 2.9.4
Modifying facilities on page 37.
If the amount of available credit under the facility needs to be modified (either increased,
decreased, or canceled), the amendment must be done in Amount Event Manager.
To be able to amend the facility’s credit amount, the facility must meet the following conditions:
•The facility definition must have reached the final state in the facility process flow
•The facility must have no related events (for example, a drawdown transaction), that are in a
state that is less than the final state.
To amend a credit amount:
1. In Amount Event Manager, select New Credit Amendment.
2. In the resulting dialog, enter the data for the credit amendment.
Note that some of the values in the dialog may be automatically filled with data relevant to the
selected Entity Type or Sub-Entity Type.
Information Description
Opening Date Opening date of the credit amendment. By default, this is today’s date.
Active From Date Date from when the amendment is active: it cannot be before the Active From Date
defined in the entity’s definition. By default, this is today’s date.
Event Type Credit Amendment.
Event Subtype Choose from: Increase, Manual Revolving, or Cancel.
Entity Type Automatically populated based on the Event Type and Event Subtype.
Entity ID ID of the entity to be affected by the amendment.
Sub-Entity Type Automatically populated based on the Event Type and Event Subtype.
Sub-Entity ID ID of the sub-entity to be affected by the amendment, for example, an approval that
is linked to the facility, or a tranche.
Note: Only the tranches of the selected facility are available when Own Credit Amounts
is switched on for the facility.
Currency Automatically populated based on the currency of the amount event's entity.
Currency 2 Automatically populated based on the currency of the approval.
FX Rate Automatically populated based on the FX rate of the facility: the conversion rate
between the entity currency and the sub-entity currency.
Old Amount Automatically calculated by CLM: sum of all amounts from the amount entity with an
existing Used Amount before this amendment.
Used Amount Automatically calculated by CLM: sum of all amounts from the amount entity with an
existing Used Amount before this amendment.
Available Amount Available Amount = Old Amount - Used Amount

3 Managing amount events
3.2 Processing amount events
54 © Wall Street Systems IPH AB - Confidential
3. Click OK.
A new row is created in the Amount Event view and displays the following data.
The following data displays in the Amount Entity view.
Event Amount Automatically calculated by CLM as:
•If
Event Subtype = Increase, then Event Amount = 0
•If Event Subtype = Cancel, then Event Amount = Available Amount * -1
This value can be modified.
Note: You can enter any one of the following three values and the other two values
will be calculated automatically:
- Event Amount
- Entity New Amount
-New Available Amount.
New Amount New Amount = Old Amount + Event Amount
New Available
Amount
New Available Amount = New Amount - Used Amount
Information Description
Event ID Event ID generated after saving the amount event.
Event Type Displays the value Credit Amendment.
State Displays the state of the loan amount event.
Old Amount
Used Amount
Event Amount
New Amount
Amounts automatically calculated by CLM.
Information Description
Amount Entity ID Unique ID of the resulting amount entity.
A second entity is created if an approval is present.
Event Unique ID of the amount event from which the amount entity is created.
Affect Entity
Affect Entity ID
Displayed by the system, for example, Facility.
Affect Sub-Entity
Affect Sub-Entity
Id
Displayed by the system, for example, Mandate.
Causing Entity
Causing Entity Id
Displayed by the system: loan entity causing this amount event.
Currency Currency of the amount entity.
Note: Currency 2 displays the currency of the approval, if one is present.
Amount Amount of the event.
For an amount entity resulting from an approval: Amount = FX Rate * Event Amount
Amount Type Credit Amount
Information Description

3 Managing amount events
3.2 Processing amount events
Commercial Loans Module (CLM) User Guide 55
4. Select the new amount event and one of the following actions from the Command menu:
–Apply to save the amount event and set its state to Open or Register
–Validate to save the amount event and move its state forward in the process flow.
3.2.3 New credit transfer
Each tranche in a facility can have its own specific credit amount. A credit amount can be transferred
from one tranche to another within the same facility, or from one facility to another.
If a credit is transferred between two facilities, a link is created between them.
To transfer a credit amount:
1. In Amount Event Manager, select New Credit Transfer.
2. In the resulting dialog, enter the event data for the credit transfer.
Note that some of the values in the dialog may be automatically filled with data relevant to the
selected Entity Type or Sub-Entity Type.
Amount Subtype Open Amount (or Used Amount for an approval).
Effective Date Active from date of the amount event.
Information Description
Information Description
Opening Date Opening date of the credit transfer. By default, this is today’s date.
Active From Date Effective date of the amount entities generated by this event: it cannot be before the
Active From Date defined in the entity’s definition. By default, this is today’s date.
Event Type Credit Transfer.
Event Subtype Choose from: Increase or Decrease.
Note: The increase/decrease applies to the Entity ID and the opposite applies to the
Target Entity ID.
Entity Type Facility: automatically populated by CLM.
Entity ID ID of the facility that is the object of the credit transfer.
Sub-Entity Type Automatically populated by CLM: for example, Approval, if the facility is linked to an
approval, or Tranche, if the object of the credit transfer is a tranche.
Sub-Entity ID ID of an approval (in a facility) or tranche:
• For a facility, this value is automatically populated by the ID of the approval to
which the facility is linked.
• For a tranche, select the ID of the target tranche to be affected by the credit
transfer from the list of tranches linked to the same facility (when the Own Credit
Amounts switch is on).
Target Entity ID ID of the target entity (facility or tranche):
• For a facility, ID of the target facility to be affected by the transfer.
• For a tranche, ID of the target tranche to be affected by the credit transfer from
the list of tranches linked to the same facility (when the Own Credit Amounts switch
is on).
Currency Currency of the facility: automatically populated by CLM.
Currency 2 Currency of the approval, if the facility is linked to an approval.
Fx Rate FX rate between the facility currency and the approval currency, if the facility is linked
to an approval.

3 Managing amount events
3.2 Processing amount events
56 © Wall Street Systems IPH AB - Confidential
A new row is created in the Amount Event view and displays the following data.
Target Currency Currency of the target facility.
Target FX Rate Conversion rate between the entity currency and the sub-entity currency.
This defaults to the FX spot rate of the currency pair (Currency/Target Currency) but can
be modified.
Old Amount Automatically calculated by CLM: sum of all amounts from the amount entity with an
existing Open Amount before this transfer.
Used Amount Automatically calculated by CLM: sum of all amounts from the amount entity with an
existing Used Amount before this transfer.
Available Amount Available Amount = Old Amount - Used Amount
Target Old
Amount
Automatically calculated by CLM: sum of all amounts from the amount entity with an
existing Open Amount of the target entity before this transfer.
Target Used
Amount
Automatically calculated by CLM: sum of all amounts from the amount entity with an
existing Used Amount of the target entity before this transfer.
Target Available
Amount
Target Available Amount = Target Open Amount - Target Used Amount
Event Amount Automatically calculated by CLM as:
•If
Event Subtype = Increase, then Event Amount = Target Available Amount / Transfer
FX Rate
•If
Event Subtype = Decrease, then Event Amount = Available Amount * -1
This value can be modified.
Note: You can enter any one of the following four values and the other two values will
be calculated automatically:
- Event Amount
- Target Event Amount
-New Amount
- New Available Amount.
Target Event
Amount
Target Event Amount = Event Type * Transfer FX Rate * -1
New Amount New Amount = Old Amount + Event Amount
New Available
Amount
New Available Amount = New Amount - Used Amount
Target New
Amount
Target New Amount = Target Old Amount + Target Event Amount
Target New
Available Amount
Target New Available Amount = Target New Amount - Target Used Amount
Information Description
Event ID Event ID generated after saving the amount event.
Event Type Displays the value Credit Transfer.
State Displays the state of the loan amount event.
Information Description
3 Managing amount events
3.2 Processing amount events
Commercial Loans Module (CLM) User Guide 57
Amount entities are created both for source and target entities, showing details of the effects on
the entities (in this case, facility or tranche) which are affected by the new amount event.
3. Select the new amount event and one of the following actions from the Command menu:
–Apply to save the amount event and set its state to Open or Register
–Validate to save the amount event and move its state forward in the process flow.
Old Amount
Used Amount
Event Amount
New Amount
Automatically calculated by CLM.
Information Description
ID Unique IDs of the amount entities.
Event ID Unique IDs of the amount event from which the amount entities were generated.
Causing Entity
Causing Entity ID
Details of the causing amount event.
Affect Entity
Affect Entity ID
Details of the facility to which the tranches belong.
Affect Subentity
Affect Subentity
ID
Details of the source tranche and target tranche.
Currency Currency of the facility.
Amount Event Amount and Target Event Amount.
Amount Type Credit Amount.
Amount Sub-type Open.
Effective Date Active from date.
Information Description
3 Managing amount events
3.2 Processing amount events
58 © Wall Street Systems IPH AB - Confidential
Commercial Loans Module (CLM) User Guide 59
Chapter 4 Managing drawdowns
Drawdown Manager is used to initiate, process, and query on drawdown transactions in a similar
way to normal TRM transactions in Transaction Manager.
Drawdowns pass through a configurable transaction flow where the data can be verified by
additional users, and other details can be added such as settlement instructions (if there are no
existing standard instructions).
Drawdowns are always entered under a facility and a tranche. Most of the drawdown information is
predefined in the facility or tranche definition using transaction templates. Any remaining
information is entered at the time of drawdown entry.
A schedule is part of the drawdown transaction. The method of using schedules for commercial loans
is slightly different from the way they are used to define the cashflow structures of normal TRM
transactions: the first set of schedule definitions is always inherited from the transaction template
attached to the drawdown. However, under certain circumstances you can delete the schedules that
are defaulted from the transaction template and/or add new secondary schedules.
Cashflows are generated as soon as the data has been entered into the drawdown transaction and
schedules. In the pre-configured setup of CLM, you cannot change the values in the cashflows for
drawdowns on commercial loans. You can only view the details of individual cashflows in Drawdown
Manager’s Cashflow view.
4.1 Drawdown Manager
Drawdown Manager is an application which is based on the Transaction Manager application layout.
In Drawdown Manager, you can enter the details of a drawdown: CLM retrieves the data from the
facility setup and completes all of the contractual fields that it can. In the simplest case, you only
need to enter a small amount of data at drawdown entry, such as, the amount of the drawdown, and
the value and maturity dates.
CLM verifies that the values you entered correspond to the loan agreement and issues warning or
error messages when appropriate, for example, if credit limits, sublimits or drawdown conditions are
violated.
Drawdowns can be managed in a similar way to transactions using similar state and mode concepts
as those in Transaction Manager’s process flow.
4 Managing drawdowns
4.1 Drawdown Manager
60 © Wall Street Systems IPH AB - Confidential
4.1.1 Drawdown Manager menus
The following tables describe the menu items which are specific to Drawdown Manager and any
layout or mode which is based on the application.
Other menu items which are common to all manager applications are described in the TRM User
Guide.
4.1.1.1 View
4.1.1.2 New
4.1.2 Start-up parameters
Drawdown Manager is a special Transaction Manager layout, designed specifically for processing
drawdowns through the process flow.
The start-up parameter used to open Transaction Manager’s Drawdown Manager layout is:
FKTransactionManager.exe -c DM.xml
Note: The Drawdown Action mode of Drawdown Manager is designed specifically for processing
loan events on drawdown transactions.
4.1.3 Customizing Drawdown Manager
You can customize Drawdown Manager according to your personal preferences by selecting the
views you want to be displayed from the View menu, selecting the columns you want to see in each
view, and moving and rearranging the selected views in the window.
You can save the current display by saving it as a layout in the Layout menu using Layout - Save. You
can create and save multiple layouts either for your own personal use, or to be shared by other
users.
When you start the application, the default layout is automatically displayed. You can create as
many layouts as you require and tailor each view according to the type of drawdown you are
capturing.
The views in the layout are displayed as individual windows: you can detach and reposition the
views in Drawdown Manager in the same way as you can reposition the sub-windows in Transaction
Manager: see the TRM User Guide for more information.
Menu item Description
Loan Pricing
Parameter
Displays the Loan Pricing Parameter view.
This view is used to display information relating to the pricing of the drawdown and is
read-only.
See 4.2.3 Pricing drawdown transactions on page 65.
Menu item Description
Drawdown Allows you to enter a drawdown transaction.
See 4.2.1 Entering drawdown transactions on page 61.
Equity Allows you to enter an equity investment on a drawdown.
See 6.2.1 Entering new equity investments on page 104.
4 Managing drawdowns
4.2 Processing drawdowns
Commercial Loans Module (CLM) User Guide 61
4.2 Processing drawdowns
A drawdown transaction is used in CLM to transfer funds between the lender and borrower.
A drawdown has the following characteristics:
•A drawdown is always entered under a facility and a tranche
•A drawdown uses a transaction template to default the schedule structure
•A drawdown has a process flow that is different from that of a normal TRM transaction.
This section describes the steps you need to take to enter new drawdown transactions in Drawdown
Manager, and to save them and move them forward in the process flow.
4.2.1 Entering drawdown transactions
To enter a new drawdown transaction:
1. In Drawdown Manager, select New - Drawdown.
2. Enter the drawdown information in the new transaction row in the Transaction view.
The following table describes the information required to enter a drawdown. Note that most of
the values are populated automatically according to the definition of the facility or tranche you
select.
Column Description
Facility Facility to use in the drawdown.
Tranche One of the tranches belonging to the facility that you want to use in the drawdown. If
there is only one tranche, this is used by default.
Counterparty Counterparty for the drawdown.
Instrument Instrument to be used for the drawdown.
Transaction
Templ a te
Transaction template used to default the schedule structure for the drawdown.
The template is linked to the following:
• The selected instrument to be used for the drawdown, if the Facility Templates Only
switch is off in the Instrument page definition of the facility
• Facility, tranche, and instrument to be used for the drawdown, if the Facility
Templates Only switch is on in the Instrument page definition of the facility.
Currency Currency of the drawdown.
•If the
Include All Currencies switch is on in the facility definition, all currencies are
available for selection
• Only the currencies defined for the facility (or tranche) in the Drawdown Currency
page are available for selection, if the Include All Currencies switch is off in the
facility definition.
Nominal Amount Nominal value of the drawdown.
Credit Currency Currency of the facility as defined in the facility definition.
Credit Amount Nominal amount of the drawdown expressed in the Credit Currency.
FX Rate Method Fx rate method as defined in the Drawdown Currency page definition of the facility.
If the Include All Currencies switch is on in the facility definition, CLM sets the FX Rate
Method with the following logic:
• If Drawdown Currency = Credit Currency, FX Rate Method = Fixed (the column is
frozen)
• If Drawdown Currency is different from the Credit Currency, FX Rate Method = Not
Fixed.

4 Managing drawdowns
4.2 Processing drawdowns
62 © Wall Street Systems IPH AB - Confidential
FX Rate Status FX Rate Status defined by the system.
• If FX Rate Method = Fixed, then FX Rate Status = Final
• If FX Rate Method = Not Fixed, then FX Rate Status = Provisional (until the rate is
fixed).
FX Fixing Offset Number of days before the value date of the drawdown used to fetch the FX rate.
FX Fixing Date FX Fixing Date = Value Date – FX Fixing Offset
FX Rate Exchange rate between the Credit Currency and the Drawdown Currency.
If the currencies are the same, then the rate is set to 1 and frozen.
Deal Price Price at which the current drawdown is being entered:
• If Deal Price = 100, then Book Value = Nominal Amount
• If Deal Price is less than 100, then Book Value is less than the Nominal Amount
• If Deal Price is greater than 100, then Book Value is greater than the Nominal
Amount.
Opening Date First date the drawdown transaction is taken into account in calculations. By default,
this is today’s date.
Value Date Date on which the drawdown transaction is settled: this is on or after the opening
date.
If this date does not fall on a business day, the system warns you by changing the
color of the display, and adjusting the date based upon the Convention supplied in the
schedule.
The value date should be equal to or later than the facility’s Active From Date and the
tranche’s Drawdown Period Start values, otherwise the system will not allow the
transaction to be saved.
Maturity Date Date for the maturity of the drawdown that can be any date later than the value date.
The maturity date should be equal to or earlier than the facility’s Active To Date and the
tranche’s Last Repayment Date values, otherwise the system will not allow the
transaction to be saved.
Portfolio Portfolio into which the drawdown is entered.
Owner Owner of the facility and tranche.
Date Basis Date basis used to calculate cashflows.
This value can be provided either at transaction level; in which case it would apply to
all schedules and cashflows of the drawdown; or alternatively, a different date basis
can be selected for each schedule at schedule level.
Location (Optional)
Project location taken from the facility or tranche definition. This value can be used to
control the automatic setting of Minimum Payment Stub Length for schedules.
Mandate (Optional)
Mandate taken from the facility or tranche definition (only used for treating subsidized
drawdowns).
Funding Type (Optional)
Funding type taken from the facility or tranche definition (only used to identify the
source of the funds being disbursed).
Column Description

4 Managing drawdowns
4.2 Processing drawdowns
Commercial Loans Module (CLM) User Guide 63
3. For a simple drawdown transaction, a minimum of information must be defined in the schedules,
either predefined in the transaction template or specified at drawdown entry.
The following information needs to be defined at schedule level:
Counterparty
Beneficiary
(Optional)
Counterparty beneficiary for the counterparty selected from the facility or tranche
definition.
If the counterparty of the drawdown is not the intended recipient of the disbursement
amount, then the Counterparty Beneficiary field is used.
Note: This represents the client in favor of whom the drawdown is being undertaken:
all the cashflows from the drawdown would use the Counterparty Beneficiary as
the payment client.
Column Description
Rate
Rate Type
Rate to be used for calculating the cashflows generated by the schedule.
Rate and Rate Type are interpreted together by the system.
Frequency
Method
Calculation
Method
Frequency and methods used for the calculation/payment of cashflows resulting from
the schedule.
The values defined for Frequency, Method, and Calculation Method are interpreted
together by the system to determine the number of cashflows to be produced for a
particular schedule during the life-time of the drawdown and the amount of each
cashflow.
For example:
• If Schedule = Interest
- Frequency = 2, Method = Times/Year, and Calculation Method = Null
- The system interprets this information as a semi-annual calculation of
interest.
• If Schedule = Amortization
- Frequency = 2, Method = Times/Year, and Calculation Method = Linear
- The system interprets this as semi-annual linear-amortization.
• If Schedule = Amortization
- Frequency = Null, Method = Bullet, and Calculation Method = Null
- This will create one single amortization payment.
• If Schedule = Interest
- Frequency = 1, Method = ISDA Date Q, and Calculation Method = Null
- The system interprets this as a quarterly calculation of interest on 15th March,
15th June, 15th September, and 15th December of each year.
Convention Convention to use to determine how payment dates are adjusted if the value date falls
on a non-business day or how the value date is adjusted if Adjust Value Date = Yes.
Choices are: None, Backward, Following, Modified Backward, or Modified Following.
Spread Additional spread to add on top of the rate.
Fixed Roll Date Cashflows are generated with this date as an anchor.
Start Date Normally, this date is set automatically using the value date of the drawdown.
However, if you want the schedule’s cashflows to start from any other date, enter the
date in this field.
First Date This date is used if the first cashflow for the schedule has to be generated from a
specific date.
Column Description
4 Managing drawdowns
4.2 Processing drawdowns
64 © Wall Street Systems IPH AB - Confidential
Some pricing information can be given after the new drawdown has been entered, but before it
has been applied or committed: see 4.2.3 Pricing drawdown transactions on page 65 for
information about loan pricing at drawdown entry.
4.2.2 Approving drawdown transactions
When you are satisfied with the drawdown transaction, select one of the following actions from the
Command menu:
•Apply to save the drawdown and not change the state
•Commit to save the drawdown and move its state forward in the transaction flow.
Once a drawdown transaction has been applied or committed, some information is automatically set
by the system:
•Transaction Number: identifies the drawdown transaction in the system.
•State: shows the transaction’s position in the workflow
•Status: gives additional information about the status of the deal
•Transaction Type: defines the transaction as a drawdown transaction (or a loan event transaction
if the new transaction results from a loan event).
If you need to cancel the drawdown transaction: see 4.2.4 Cancelling drawdown transactions on
page 67.
End Date Normally, this date is set automatically using the maturity date of the drawdown.
However, you can set this date to any other date prior to the maturity date.
Payment Adjust
Method
If the payment dates of the cashflows generated from a schedule need to be adjusted,
select the appropriate Payment Adjust schedule.
Penultimate Date Value date of the last-but-one cashflow generated from this schedule.
Expression Expression used to determine the calculation of cashflows.
See the guide TRM Instruments: Processing and Calculations for more information.
Roll from Start Yes or No to determine whether the system generates cashflows from the value date
downwards to the maturity date, pushing any stubs towards the end of the calculation
period.
Fixing Calendar
Fixing Convention
Fixing Rate
Fixing Period
Parameters used to calculate the rates and dates used to fix cashflows generated by
the schedule.
Payment Client Payment client of the schedule if it is different from the payment client of the
drawdown.
Adjust Value Date Determines whether a value date falling on a non-business day will be adjusted
according to the selected convention (Backward, Following, Modified Following, and so
on). Adjusting the value date will affect the calculation of the interest amount.
• Select Yes if you want the value date to be adjusted.
• Select Yes, Except First/Last if you want the value date to be adjusted except for the
first and/or last interest periods.
• Select Yes, Except First or Yes, Except Last, if you want the value date to be adjusted
except for the start date of the first or the end date of the last interest period. For
example, if you selected Yes, Except Last then the end date of the last interest
period will not be adjusted.
Column Description
4 Managing drawdowns
4.2 Processing drawdowns
Commercial Loans Module (CLM) User Guide 65
4.2.3 Pricing drawdown transactions
All transactions including new drawdowns and various types of transactions created from drawdown
events are priced in an identical manner. The only difference is that these transactions carry
different schedules, and different rate conditions have been set up for them. Consequently, different
rates are found for the transactions.
Pricing can be launched either for the whole transaction or for a single schedule. Typically, however,
the Pricing action is launched for the whole transaction.
In both cases, pricing is done at the schedule level of the transaction. Each schedule is priced
separately and with its own pricing logic. As a result of one execution of the Pricing action for the
whole transaction, you may (for example, for a new drawdown) do one of the following:
•Execute a theoretical zero-coupon curve based valuation for the base interest schedule
•Identify a direct quote rate for the mark-up component from a yield curve selected based on the
location of the transaction
•Identify a fixed rate for the subsidy component based on the mandate (or facility or tranche)
setup of the drawdown.
Pricing is executed as part of the process flow of the transaction it targets (new drawdown, Rate
Revision, and so on).
Note: Before the Pricing action can be performed on a drawdown, the Loan Pricing loan event
needs to be set up: see 5.2.10 Loan pricing on page 98.
To price a drawdown transaction:
1. Select the drawdown transaction you want to price.
Some pricing information can be given after the new drawdown has been entered, but before it
has been applied or committed.
Note that this information is only required if "real" pricing against yield curve quotes is used.
When only fixed rates are set up as global rate conditions, or entity-specific rate conditions are
used, these fields are not required.
2. Right-click the transaction (either on an individual schedule or on the actual transaction) and
select Pricing.
The system propagates the pricing-related data (rates or market references needed for finding
the rates) to the schedule being processed based on the matching Rate Condition loan event.
–If no Pricing Date is given, the date automatically defaults to the current date.
–If no Pricing Subscenario is given, this automatically defaults to the scenario named Default.
After all values have been propagated based on the selected Rate Condition loan event, CLM
automatically triggers the second step of the pricing to identify the final value for the Rate field in
the Schedule view if Pricing Method = Direct Quote or Zero Pricing.
Information Description
Pricing Date Identifies the date as of which all market rates needed in pricing (yield curve quotes)
are taken from the database.
• In a new transaction or an existing transaction which has not been priced before,
this field is blank.
• If an existing transaction has already been priced before this field contains the
Pricing Date that was used at that time and that is saved with the transaction.
Pricing
Subscenario
Identifies the rate scenario from which all market rates needed in pricing (yield curve
quotes) are taken from the database.
• The scenario may be initially set up (for example, in the schedule template) but
can be manually modified if the transaction template setup allows.
4 Managing drawdowns
4.2 Processing drawdowns
66 © Wall Street Systems IPH AB - Confidential
See 5.2.10 Loan pricing on page 98 for more information about the loan event.
4.2.3.1 Pricing rate renewal or indexation
Pricing of a Rate Renewal transaction or an indexation is a special case of pricing, since it is done in
an existing transaction after the value date as an event which does not create a new transaction.
Instead, pricing the transaction simply updates a value to the Nominal Rate field of one or several
existing cashflows in the transaction and calculates the cashflow amount accordingly.
This type of pricing is actually done in two steps at different times in the transaction’s life cycle. The
conditions for future rate renewal and indexation are stored in each cashflow based on the following
Schedule fields:
These values may be provided at drawdown entry by one of the following: the transaction template,
a matching Rate Condition loan event, or those manually given by the user entering the transaction.
When a rate renewal or indexation of a transaction is launched, CLM identifies the following:
•Cashflows affected by the fixing based on the Fixing Date.
•Market rates required for calculating the Fixing Quote for the cashflow (for example, from the
Fixing Rate and Fixing Period).
•Expression used in calculating the Nominal Rate from the market rates.
For example:
–A typical expression for a rate renewal would be:
"ir+spread%"
–A typical expression for an indexation (of an interest schedule) would be:
"factor * ((ix / divider)-1)"
where:
“factor” = fixed interest rate of base interest schedule
“ix” = current index value (at the time of indexation)
“divider” = index base value (at the time of creating the transaction)
CLM uses the expression to calculate the nominal rate, then calculates the cashflow amount
(next interest or indexation adjustment) using the nominal rate.
See TRM Instruments: Processing and Calculations for more information about expressions.
Note: Rate Revision is not covered by this treatment, but is modeled as a separate transaction
with a fixed interest rate schedule, with the schedule’s Start Date and End Date corresponding
to the respective revision period dates. Consequently, the new revision period in the Rate
Revision transaction is priced with the same logic as any other fixed rate schedule.
Information Description
Fixing Offset Controls the Fixing To Date of the cashflow.
Maximum Fixing
Offset
Controls the Fixing From Date of the cashflow.
Fixing Rate Identifies the market reference (for example, a yield curve or an index), from which
the rates used in rate renewal are taken.
Fixing Period Identifies the period (for example, 3 months - 3M), from which rates on a yield curve
are taken.
Expression Identifies the calculation used in producing the rate based on market rates.

4 Managing drawdowns
4.3 Drawdown mirroring
Commercial Loans Module (CLM) User Guide 67
4.2.3.2 Loan pricing simulation
Ad-hoc pricing, not related to real drawdowns, is best done in a separate application used for
entering simulated drawdowns or event transactions. The Simulation mode of Drawdown Manager is
used for this purpose.
Drawdown Manager’s Simulation mode allows you to save the transactions in the database in case
the simulated structure used in the pricing needs to be kept for future reference. This also ensures
that a drawdown used in ad-hoc pricing is not entered by mistake into the real drawdown process
flow. You can set up a single simulation facility to enter these simulation drawdowns.
4.2.4 Cancelling drawdown transactions
To cancel a validated drawdown (or loan event) transaction:
1. Retrieve and select the drawdown transaction you want to cancel.
2. Add a comment justifying the cancellation of the transaction in one of the Comment fields.
3. Select Command - Cancel or Reject to cancel the drawdown transaction and move it back in the
process flow.
Note: If you cancel a Prepayment event transaction, CLM verifies if a payment allocation
containing the prepayment flows of the prepayment exists. If there is no existing payment
allocation, CLM assigns the Prepayment transaction into the next process state.
4.3 Drawdown mirroring
CLM enables you to mirror facilities and their related drawdowns using internal deal mirroring (IDM).
The mirror child facility is generated automatically when the parent facility is defined: see 2.9.5
Mirroring facilities on page 37 for more information.
When you enter a drawdown under a parent facility in Drawdown Manager, the corresponding
reversed drawdown is created automatically under the mirror child facility, if the necessary IDM
configuration is in place in Portfolios, Clients and Instruments.
The drawdown and its mirror can be entered (and modified) from the either perspective. The same
can be said for certain key loan events such as Prepayments and Transaction Condition Conversion.
Note: As is the case for TRM’s internal deal mirroring, facility and drawdown mirroring also
require some additional transaction flow configuration. See the TRM User Guide and the
TRM System Administration Guide for more information.
4.3.1 Setting up static data for drawdown mirroring
The mirror child facility is generated automatically when the parent facility is defined: see 2.9.5
Mirroring facilities on page 37 for more information.
Note: For information about the values or configuration needed for internal deal mirroring in
general in TRM (for example, portfolios, clients, instruments, permissions, and so on), see
the TRM User Guide.
4.3.2 Processing drawdown mirroring
This section describes the processing procedures for drawdown mirroring.

4 Managing drawdowns
4.3 Drawdown mirroring
68 © Wall Street Systems IPH AB - Confidential
4.3.2.1 Generating drawdown mirroring
Drawdown mirroring in CLM works in a similar way to internal deal mirroring in TRM.
To mirror a drawdown transaction:
1. Enter the drawdown information for the parent or child facility (as described in 4.2.1 Entering
drawdown transactions on page 61).
2. Save the drawdown transaction and move it forward in the transaction flow using the options in
the Command menu.
When the drawdown entered under the mirror parent or child reaches the appropriate state in
the deal mirroring flow, the reverse drawdown under the mirror child or parent facility is
generated.
3. Save either drawdown transaction using the options in the Command menu.
When the drawdown entered under the mirror parent or child is saved, the mirror child or parent
drawdown is also automatically saved.
You can also move both drawdown transactions back in the process flow by selecting the
appropriate command on the parent drawdown.
4. Before the mirrored drawdowns reach the final state, make any changes to the parent: the
change is automatically reflected on the mirror child.
5. Confirm the transactions using the options in the Command menu.
6. When the transactions have reached the final state in the deal mirroring process flow, you can
execute some loan events (for example, Fixing) on the drawdowns: see the following section for
more information.
Note: For information about configuring the deal mirroring process flow: see the TRM System
Administration Guide.
4.3.2.2 Executing loan events on mirrored drawdowns
Once the mirrored drawdowns have reached the final state in the deal mirroring process flow, you
can perform some loan events on the mirror parent (for example, Fixing).
When a loan event action is executed on the drawdown for the mirror parent, the same action is
mirrored on the child drawdown and vice versa.
Note that when a loan event is executed, only a limited number of fields in the action dialog can be
updated.
Note: It is important that any loan events enabled on a mirrored drawdown are not
facility-specific: it must be possible to apply the loan event to both sides of the mirror: see
Chapter 5 Managing loan events on page 69 for more information.
4.3.2.3 Rejecting mirrored drawdowns
When the drawdowns under the mirror facilities reach a certain state in the flow, you can no longer
modify data or move them back in the process flow: they can only be rejected.
Only an administrator possessing the appropriate permissions can cancel them and remove them
definitively from the system.

Commercial Loans Module (CLM) User Guide 69
Chapter 5 Managing loan events
Facilities and drawdowns can be long term, and CLM helps control and manage events that may
occur during the life-time of the loan contract.
The events managed in the system include such events as the following: the ability to add a variety
of fees (such as commitment, late penalty, or cancellation fees); early repayment of the debt, either
fully or partially; amendments to the drawdown (for example, change in currency, interest rate
type, borrower, or loan structure); automatic pricing of the drawdown; automatic or manual fixing
of rates; and re-classification, or even a total write-off, of the remaining debt.
5.1 Setting up loan events
Action rules are used to manage these loan events. They determine the conditions under which an
action can be undertaken by the user and the resulting outcome upon invoking the action.
Action rule types can be used to set up event sub-types and to link specific instrument groups to an
event type.
Some action rules are used together with features, applied to an instrument definition, to allow you
to carry out the corresponding action.
You can define more than one rule for the same event and you can set up a hierarchy of action rules
where each type of action rule is defined individually with a priority. The priority defines the order in
which the rule matching is done. It is also possible to prevent an action, by setting up a disabling
action rule.
To set up loan events, the following steps are required:
1. Create the action rule types and action rules to determine the conditions under which the action
can be undertaken, and the outcome resulting from the action.
–Action rule types are defined in Action Rule Type Editor: see 5.1.1 Action rule types on page
70
–Action rules are defined in Action Rule Editor: see 5.1.2 Action rules on page 72.
2. Add the necessary features to the commercial lending instruments.
When a feature is attached to the instrument, the corresponding action event is enabled on
transactions using that instrument.
–See 5.1.3 Enabling loan events on transactions on page 75.
Note: For information about carrying out loan events on drawdown transactions: see 5.2
Processing loan event actions on page 75.

5 Managing loan events
5.1 Setting up loan events
70 © Wall Street Systems IPH AB - Confidential
5.1.1 Action rule types
In Action Rule Type Editor, it is possible to set up event sub-types and to link specific instrument
groups to an event type.
To define an action rule type:
1. In Action Rule Type Editor, enter the main attributes in the upper part of the editor.
2. Save the action rule type definition using File - Save As New.
3. In Action Rule Type Editor’s Action Rule Subtype page, enter the event subtype you want to add to
the Event Type.
4. In Action Rule Type Editor’s Instrument Groups page, specify the Instrument Group that you want to
link to the Event Type.
Note: The following Event Types need to have at least one Instrument Group attached to them in
order to link instrument groups to facility instruments:
5. Save the whole action rule type definition using File - Save.
Information Description
Event Type (Information only)
Type of loan event. These are predefined in CLM and listed on the left side of the
editor: see 5.1.1.1 Types of loan events on page 71.
Instrument Class (Information only)
When you need to define an instrument for the selected Event Type, this field specifies
the instrument class on which you need to base the instrument definition.
For example, the COMMERCIAL-LOAN instrument class is used to set up Commitment
Fee and Late Payment Penalty instruments, whereas the CASH instrument class is
used to set up Funding Call instruments.
Hidden in
Action Rule Editor
Hidden in
Mandate/Facility
Editor
Switch on Hidden in Action Rule Editor and/or Hidden in Mandate/Facility Editor to hide the
selected event type in the corresponding editor or editors.
Need Instrument
Groups
Switch on to link specific instrument groups to an event type. The instrument group
can be selected in the Instrument Groups page of the Mandate Editor and in the
Instrument page of the Facility Editor.
Credit Linked
Default
Switch on to automatically set the Credit Linked switch in the Instrument page of the
Facility (Facility Editor). For example, for drawdowns, this switch must be on in order
for drawdowns to be set as credit linked at the facility level. See 2.9.2.7 Defining
instrument and event details on page 30.
•Commitment Fee
•Drawdown
•Drawdown Fee
•Equity
•Facility Collateral
•Facility Fee
•Funding Call
•Guarantee Call
•Guarantee Refund
•Late Payment Penalty

5 Managing loan events
5.1 Setting up loan events
Commercial Loans Module (CLM) User Guide 71
5.1.1.1 Types of loan events
The following event types are available:
Event type Description
Commitment Fee The borrower may agree to pay the lender a recurring fee against the facility provided
by the lender.
This action enables the user to register the Commitment Fee transactions.
See 5.2.1 Commitment fees on page 76.
Conditional
Remuneration
In some cases, the borrower and lender may agree to exchange an ad-hoc sum of
money as governed by the terms of the facility.
This action enables the user to maintain a record of this exchange as a separate
transaction related to a specific drawdown.
See 5.2.2 Conditional remunerations on page 78.
Deferment
Commission
If the borrower wishes to defer the value date of the drawdown, the lender may wish
to charge a deferment commission upon the agreed drawdown amount.
This action helps the user to create a Deferment Commission transaction, which is
used to calculate such penalties as required.
See 5.2.3 Deferment commission on page 79.
Drawdown This is the initial action of entering a Drawdown transaction.
Drawdown
Amendment
The borrower and lender may agree to change the terms and conditions of a
drawdown during it’s active life.
This action allows the user to amend some attributes of the drawdown, such as,
instrument, borrower, currency, transaction template, and so on.
See 5.2.4 Drawdown amendment on page 79.
Drawdown
Cancellation
The lender may wish to charge a penalty to the borrower when the borrower cancels a
drawdown after requesting it, but before the actual disbursal of cash.
This action allows the user to capture a penalty transaction for cancellation of the
drawdown.
Drawdown
Classification
If the borrower’s ability to repay the interest and principal starts to deteriorate, the
lender may be forced to classify the outstanding amounts against the borrower as
doubtful assets.
The Classification action allows the Lender Organization to classify deteriorating loans
as doubtful assets, or to reclassify doubtful assets as recovered assets.
See 5.2.5 Drawdown classification on page 87.
Drawdown Fee This action allows the user to attach fees to a specific drawdown.
Drawdown
Rescheduling
The borrower and lender may agree to reschedule the value date of a drawdown to
one or more future date(s)
The Drawdown Rescheduling action allows the user to perform such rescheduling.
Due Amount Carry
Forward
When the borrower is not able to repay either the interest or principal (or both) upon
a scheduled payment date, the lender may agree to shift the payment date to a future
date, with or without any penalties.
The Due Amount Carry Forward action allows the user to undertake such rescheduling
of the cashflows.
See 5.2.6 Due amount carry forward on page 88.
Equity The Risk Venture Capital action controls the possibility of equity-related drawdowns:
to invest (or divest) in equity holdings through the facilities framework.
See Chapter 6 Managing equity on page 103.
Facility Collateral This action is used for creating a Collateral transaction in Drawdown Action Admin
which covers the whole Facility.

5 Managing loan events
5.1 Setting up loan events
72 © Wall Street Systems IPH AB - Confidential
5.1.2 Action rules
All action rules are composed of two parts: the rules to determine the conditions under which the
action can be undertaken, and then the outcome that results from the action.
In the upper part of Action Rule Editor, you define the conditions (the "if" part of the action rule), for
example, loan attributes and values, facility attributes and values, and the period within which the
action rule is active.
Facility Fee This action allows a user to create Facility Fee transactions that calculate the fees that
can be charged against a facility.
The fees can be interest-like regularly accruing fees, or they can be a one time lump
sum payment.
See 5.2.7 Facility fees on page 89.
Funding Call This action is used when an organization is lending on behalf of a single third-party.
After the drawdown has been entered in the system, the user can issue a funding call
to this third-party.
Guarantee Call The Guarantee Call records the demands from a lender to the user organization, when
the borrower has defaulted on a loan where the user organization stood as Guarantor.
(This is a Guarantee Call on an Issued Guarantee).
Guarantee Refund This action allows the user to enter a drawdown against the defaulting borrower,
against whom they had stood as Guarantor.
Late Payment Penalty When the borrower fails to repay the due amounts on the specific payment dates, the
system creates a set of Late Payment Penalty transactions using an activity (CLM Late
Payment Penalty).
These Late Payment Penalty transactions then keep calculating the penalty interest on
overdue amounts.
Late Payment Penalty
Realize
When the borrower repays the overdue amounts, and these amounts are allocated via
the Payment Allocation process, the system closes the Late Payment Penalty
transactions (either partially or fully, depending upon the extent of payment received)
and realizes the Late Payment Penalties.
The realization is undertaken via an activity (CLM Late Payment Penalty Realize).
Prepayment The borrower and lender may wish to bring forward the principal repayment date,
either for the full amount of the principal or a partial amount.
The Prepayment action allows the user to record such foreclosures, along with the
possibility of calculating and recording any penalty fees or interest due from the
borrower.
See 5.2.8 Prepayments on page 91.
Rate Condition This action allows the user to price fixed-rate loans using the zero-coupon method. It
also allows the defaulting of data used in calculating floating rates, including yield
curves, spreads and expressions.
See 5.2.10 Loan pricing on page 98.
Rate Renewal This action allows the user to fix (that is, to set) the rates for floating-rate loans.
The rate fixing can be achieved either manually, one cashflow at a time, or using an
activity (CLM Drawdown Fixing).
Rate Revision This action allows the user to revise the interest rate on a revisable rate loan.
Write Off If the borrower is considered to be incapable of repaying the debt, then the lender
can use this action to write-off the outstanding debt, either fully or partially.
See 5.2.11 Write off on page 99.
Event type Description
5 Managing loan events
5.1 Setting up loan events
Commercial Loans Module (CLM) User Guide 73
When you start to action an event on a loan, the loan attributes’ values are matched against the
condition of the action rule. A rule is selected if the values of the specified attributes match those of
an action rule (either an exact match or where the values are null in the action rule).
CLM selects one or more rules to process the event as follows:
•If only one matching action rule is found, it is used by default
•If multiple matching action rules are found, the system uses the one defined with the highest
priority.
In the lower part of Action Rule Editor, you define the action (the "then" part of the rule), that is, the
outcome of the event.
When a loan event is executed, and the system is able to match an action rule with an event, CLM
processes the "then" part of the enabling action rule as follows:
•If the values are defined in the action rule, these are used by default and cannot be modified
•If the values are not defined in the action rule (that is, the values are null), the values must be
entered on execution of the event.
Note: If an action rule is required but has not been set up for a loan event, or it has not been set
up correctly, the system will not allow the event to take place and will terminate the
action.
5.1.2.1 Setting up action rule conditions
To set up the conditions of an action rule:
1. In Action Rule Editor, enter the main attributes of the action rule in the upper part of the editor.
These are the "if" conditions that define the action rule.
Information Description
ID Unique numerical ID generated automatically by the system.
Disallow Switch on to set up a disabling action rule.
If this switch is on, the action is prevented from taking place whenever the action rule
is selected by the system.
Save as New Switch on to create a new action rule by copying the existing one.
Event Type List of event types: see 5.1.1.1 Types of loan events on page 71.
Event Sub Type List of event sub-types relevant for the selected Event Type.
Entity Entity to which the action rule applies. Choose from: Approval, Facility, Mandate, or
Tranche.
Entity ID Unique ID of the selected Entity.
Signature Date
From
Signature Date To
These dates are compared to the signature date defined for the facility when
transactions belonging to the facility are being assessed against this action rule.
If the facility’s signature date values do not correspond to the dates defined for the
rule, then the event cannot take place.
Priority Number defining the priority of the action rule: the lowest number has the highest
priority.
As a rule, you should give a high number (hence, low priority) to more global
conditions (that are not linked to specific entities, attributes, or values); and give a
low number (hence, high priority) to more specific conditions (those defined with
more detailed attributes and values).
Event Client Counterparty or Owner.
This indicates whether the counterparty or the transaction owner has initiated the
request for the action.

5 Managing loan events
5.1 Setting up loan events
74 © Wall Street Systems IPH AB - Confidential
2. Save the action rule definition using File - Save As New.
5.1.2.2 Defining the action rule actions
To set up the actions resulting from an action rule:
1. In the lower part of Action Rule Editor, enter the parameters to define the outcome of the event:
this is the "then" part of the action rule.
The parameters you need to define vary according to the Event Type you selected in the upper
part of the editor:
–It is not mandatory to enter a value for each parameter
–If you enter a value for a parameter, this is used as the default value at the Event/Action
level and cannot be changed
–If you do not enter a value for a parameter, you can manually select or insert a value at the
Event/Action level.
See Appendix B Loan event parameters on page 159 for more information.
Event Date
Method
Method used to determine the value date of the transaction that results from the
action being performed. The most common methods would be: Any or Value Date.
Choose from:
• Any - any date in the calendar on or after the Action Date
• Non-Due-Date - any date that is not the value date of the parent transaction or
any of its cashflows
• Payment Date - any date on or after the Action Date that coincides with one of the
payment dates of the transaction being processed (or any of its cashflows)
• Revision Date - the next revision date of the parent transaction (only valid for
actions on revisable drawdowns)
• Signature Date - the signature date of the facility of the transaction being
processed
• Transaction Value Date - the value date of the parent transaction
• Value Date - any date on or after the Action Date that coincides with the value
date of the transaction being processed (or any of its cashflows).
Note: Not all date methods are compatible with all event types: you must exercise
due care in selecting the correct method.
Key 1, 2, 3
Value 1, 2, 3
Specific attributes of the transaction and their corresponding values.
You can select Key 1 only, Key 1 in conjunction with Key 2, or all three keys to define
the condition.
Note: If all keys are selected, then the conditions operate as "and" conditions.
Schedule Type List of available schedule types.
The action works specifically if the selected schedule type is one of the schedules
attached to the transaction.
Schedule
Currency
List of available currencies.
The action works specifically if the selected currency is the currency of the selected
schedule type.
Schedule Date
Basis
List of available date bases.
Action Date From
Action Date To
The action rule applies to all eligible actions which fall within the active period.
Fee Rule Used if a specific amount or percentage fee is to be generated when processing the
event.
Information Description

5 Managing loan events
5.2 Processing loan event actions
Commercial Loans Module (CLM) User Guide 75
2. Save the action rule definition using File - Save.
5.1.3 Enabling loan events on transactions
Some actions or events only become available on transactions when a feature is present in the
instrument definition.
When you have defined the action rules for an event or action, you need to add the corresponding
feature to the instrument in Instrument Editor’s Features page: see Appendix A Features on page 149
and 2.5 Instruments on page 21 for more information.
Note: For information about setting up specific types of instruments used in commercial lending:
see the guide TRM Instruments: Processing and Calculations.
5.2 Processing loan event actions
Drawdown Manager, or one of the modes based on the Drawdown Manager application (for
example, the Drawdown Action mode) is designed specifically for processing loan events on
drawdown transactions.
Note: The Drawdown Manager mode in which a loan event is available depends on the
configuration of CLM for your organization: see the TRM System Administration Guide for
more information.
To process a loan event on a drawdown transaction:
1. Launch the loan event in Drawdown Manager by doing one of the following:
–Select the corresponding command from the menu (for example, New - Commitment Fee)
–Right-click an existing drawdown transaction and select the action you want (for example,
Write-Off).
Note that the drawdown transaction must have reached the final state, and it must not have
any outstanding loan events against it that are still in a provisional state (that is, they have
not yet reached the final state).
2. In the resulting event dialog, enter the main attributes of the event.
These parameters correspond to the action rule’s "if" conditions that are used to find a matching
rule that will then define the outcome of the event (the "then" part of the action rule).
The parameters in each dialog vary according to the action or command you are performing, but
many are common to all event types: see 5.1.2.1 Setting up action rule conditions on page 73.
3. Click Next to enable the action rule: the system searches for a matching event.
4. In the resulting event dialog, enter the remaining values using the information in the following
sections and in Appendix B Loan event parameters on page 159.
Note that some of the values are automatically filled, either using the values you specified in the
first dialog, or using the parameters defined in the matching event condition. These values are
displayed for information purposes only and cannot be modified: see 5.1.2.2 Defining the action
rule actions on page 74.
5. Click Finish to generate the corresponding loan event and transaction, if relevant.
5 Managing loan events
5.2 Processing loan event actions
76 © Wall Street Systems IPH AB - Confidential
6. Save and process any resulting transactions using one of the menu items from the Command
menu.
New loan event transactions are generated with the following attributes:
–Drawdown Number = Transaction Number of the original drawdown
–State = DDA Open
See 4.2.2 Approving drawdown transactions on page 64.
5.2.1 Commitment fees
When a borrower and a lender sign a contract (a facility), the borrower may agree to pay a
commitment fee to the lender. This fee can be calculated based on the following:
•Total credit sanctioned by the lender
•Total used credit
•Total unused credit.
5.2.1.1 Setup
Before the Commitment Fee transaction can be entered, you need to set up the following:
•The Commitment Fee instrument must be defined and assigned with the Edit Commitment Fee
feature: see A.2.21 Edit Commitment Fee on page 155
•The action rule for the Commitment Fee event must be set up correctly: see B.1 Commitment
Fee on page 159
5.2.1.2 Execution
In the initial Commitment Fee dialog, enter the following values and then click Next:
In the second Commitment Fee dialog, the following information is required:
Information Description
Action Date Date of the event. By default, this is today’s date but it can be modified.
Event Date Method Method used to determine the Event Date. Any or Signature Date ('Any' can be any day
on or after the Facility Signature Date.
Facility ID of the facility.
Tranche ID of the tranche.
Information Description
Action Date
Event Date Method
Facility
Tranche
Default to the values defined in the initial Commitment Fee dialog.
Event Condition ID ID of the matching action rule/event condition.
If any of the parameters used to determine the outcome of the event have been
defined in the matching event/action, these are used by default and cannot be
modified.
See B.1 Commitment Fee on page 159 for more information.
Location You must enter a location if it is to be used with the Technical Delay associated with
the Country Group.
5 Managing loan events
5.2 Processing loan event actions
Commercial Loans Module (CLM) User Guide 77
5.2.1.3 Generated data
•Transaction
The following new transaction is generated:
–A Commitment Fee transaction with its own schedule structure (based upon the transaction
template) and cashflows.
5.2.1.4 Updating commitment fees
Commitment fee transactions are updated in real time when amount entities (i.e. drawdowns and
amount events) are in a Final state. Commitment fee transactions are constantly updated to ensure
that the base amount used to calculate the amount of the commitment fee is correct. The following
events can have an effect on the base amount:
Commitment
Counterparty
Counterparty to be used for the Commitment Fee transaction.
Opening Date Opening date of the Commitment Fee transaction.
Commitment Value
Date
Value date of the Commitment Fee transaction.
•If
Event Date Method = Signature Date, then this is automatically set to the
signature date of the facility being processed.
•If
Event Date Method = Any, you can enter any date on or after the Opening Date.
Commitment Maturity
Date
By default, this is the Active To Date of the facility, but it can be changed to any date
after the Commitment Value Date.
Commitment Type Defines the basis for the calculation of a Commitment Fee transaction on one of the
following: Total Credit, Unutilized Credit, or Utilized Credit.
Commitment Amount Amount of the Commitment Fee transaction.
This amount is automatically calculated based on the facility or facility/tranche
combination, the Commitment Value Date, and the Commitment Type.
Commitment Portfolio Portfolio to be used for the Commitment Fee transaction.
Commitment
Instrument
Instrument to be used for the Commitment Fee transaction.
Commitment Template Transaction template to be used for the Commitment Fee transaction.
Information Description
Event
Commitment Type
Total
credit
Total
used
credit
Total
unused
credit
Credit Amendment: any changes to the Credit Amount (credit increase,
cancellation or transfer)
Yes Yes
A Drawdown Yes Yes
Drawdown Prepayment/Amortization (in a revolving context only) Yes Yes
5 Managing loan events
5.2 Processing loan event actions
78 © Wall Street Systems IPH AB - Confidential
When you set an amount event or a drawdown to the Final state, a new schedule with corresponding
cashflows is created. The following two fields, that can be added to the Schedule view, explain which
entity has caused the change in the commitment fee transaction:
Note: When you reject an amount event or drawdown, schedules and corresponding cashflows
are removed.
5.2.2 Conditional remunerations
A Conditional Remuneration is the loan event that is created when the lender and borrower agree to
an exchange of funds that is not explicitly envisaged in the drawdown. However, the ad-hoc
inflows/outflows are permitted for the facility under which the drawdown is being entered. The
additional inflow of funds can arise from several factors such as:
•Receipt of dividends, when the drawdown is made as an equity participation
•Receipt of additional remuneration, by way of higher interest payout, for a conditional loan
drawdown
•Fluctuations in exchange rates between the repayment currency and the credit currency of a
drawdown.
The Conditional Remuneration transaction simply adds extra cashflows to the original drawdown
transaction.
5.2.2.1 Setup
Before the Conditional Remuneration action can be performed on a drawdown, you need to set up
the following:
•The instrument associated with the drawdown must be assigned with the feature Conditional
Remuneration: see A.2.9 Conditional Remuneration on page 151.
•The action rule for the Conditional Remuneration event must be set up correctly: see B.2
Conditional Remuneration on page 159.
5.2.2.2 Execution
In the initial Conditional Remuneration dialog, enter the following values.
Information Description
Causing Entity For information only. The entity that has caused the change in the commitment
fee transaction. Values are: Drawdown, Equity, AmountEvent, or AmountEntity.
Causing Entity ID The ID of the entity:
•For
Drawdown and Equity it is the transaction number
•For AmountEvent it is the ID of an amount event
•For
AmountEntity it is the ID of an amount entity
Information Description
Action Date Date of the event. By default, this is today’s date but it can be modified.
Event Subtype Event subtype according to the source of the Conditional Remuneration cashflow, that
is, whether the cashflow comes from dividends, or adjustments in one of the
following: interest rates (IR); FX rates (FX); or the value of an index (IX).
Event Date Method Method used to determine the Event Date.
5 Managing loan events
5.2 Processing loan event actions
Commercial Loans Module (CLM) User Guide 79
In the second Conditional Remuneration dialog, the following information is required:
5.2.2.3 Generated data
•Transaction
A new Conditional Remuneration transaction is generated
•Cashflows
The Conditional Remuneration transaction has the following cashflow:
–The transaction has one cashflow of the type specified in the loan event.
5.2.3 Deferment commission
If the borrower wishes to defer the value date of the drawdown, the lender may wish to charge a
deferment commission upon the agreed drawdown amount.
This action helps the user to create a Deferment Commission transaction, which is used to calculate
such penalties as required.
5.2.3.1 Setup
Before a Deferment Commission event can be performed on a drawdown transaction, you need to
set up the following:
•The instrument associated with the drawdown must be assigned with the feature Deferment
Commission: see A.2.12 Deferment Commission (Setup) on page 152.
•The action rule for the Deferment Commission event must be set up correctly: see B.3
Deferment Commission on page 160.
5.2.4 Drawdown amendment
The Drawdown Amendment event is modeled as a transaction with schedules and cashflows.
Drawdown Amendment events are normally created and managed in a specially configured mode
(for example, the Admin mode) of Drawdown Manager.
Information Description
Action Rule ID ID of the action rule used to match the event condition.
If any of the parameters used to determine the outcome of the event have been
defined in the matching event/action, these are used by default and cannot be
modified.
See B.2 Conditional Remuneration on page 159 for more information.
Action Date
Event Subtype
Event Date Method
Default to the values defined in the initial dialog.
Facility Facility associated with the drawdown.
Borrower Counterparty associated with the drawdown.
Tranche Tranche associated with the facility of the drawdown.
Currency Currency associated with the drawdown.
Drawdown Drawdown Number.
Transaction Value Date Next valid due date according to the selected Event Date Method. This can be changed to
any valid due date that is on or later than the Action Date.
Event Amount Amount of the Conditional Remuneration transaction.
5 Managing loan events
5.2 Processing loan event actions
80 © Wall Street Systems IPH AB - Confidential
A Drawdown Amendment event partly or fully closes the cashflows outstanding in the original
drawdown transaction as at the Amendment Date, and then a new transaction is created from the
Amendment Date onwards. There is no settlement of Principal for this type of event.
The new Drawdown Amendment transaction maintains some attributes of the original transaction,
as well as a series of additional attributes specific to the Drawdown Amendment event.
Some of these new attributes are inherited from and validated against the facility/tranche definition
of the drawdown being amended. Other attributes are entered manually for each Drawdown
Amendment event or matched against an event condition.
Note: It is also possible to amend a limited number of attributes of all drawdown transactions
under a facility/tranche combination simultaneously using an activity: see C.1 CLM Bulk
Drawdown Amendment on page 169.
5.2.4.1 Setup
Before a Drawdown Amendment event can be performed on a drawdown transaction, you need to
set up the following:
•The instrument associated with the drawdown must be assigned with the feature
Drawdown-Amendment: see A.2.13 Drawdown Amendment on page 152.
•The action rule for the Drawdown Amendment event must be set up correctly: see B.4
Drawdown Amendment on page 160.
•If Event Type = Transaction Condition Conversion, and you want to amend one or more attributes
for all drawdown transactions under a facility/tranche, you need to set up the CLM Bulk
Drawdown Amendment activity: see C.1 CLM Bulk Drawdown Amendment on page 169.
5.2.4.2 Execution
The procedure to perform a Drawdown Amendment event on a drawdown transaction is the same
for all Drawdown Amendment event types.
In the initial Amendment dialog, enter the following values.
Information Description
Action Date Date when the event takes place. By default, this is today’s date but it can be
changed.
Action Date is used as the Opening Date of the Drawdown Amendment transaction. This
may be the same as, or different from, the actual drawdown Amendment Date.
Event Client Initiator of the amendment. Choose from: Owner or Counterparty.
Event Subtype Type of Drawdown Amendment event. Choose from:
• Counterparty Conversion: see 5.2.4.2.1 Counterparty conversion on page 82.
• Currency Conversion: see 5.2.4.2.2 Currency conversion on page 82.
• Transaction Condition Conversion: see 5.2.4.2.3 Transaction condition conversion
on page 83.
• Transaction Template Conversion: see 5.2.4.2.4 Transaction template conversion
on page 84.
• Instrument Conversion: see 5.2.4.2.5 Instrument conversion on page 85.
• General Amendment: see 5.2.4.2.6 General amendments on page 85.
Event Date Method Method used to determine the Event Date.

5 Managing loan events
5.2 Processing loan event actions
Commercial Loans Module (CLM) User Guide 81
In the second Drawdown Amendment dialog, the following information is required:
Information Description
Action Date
Event Client
Event Date Method
Default to the values defined in the initial dialog.
Event Condition ID ID of the matching action rule / event condition.
If any of the parameters used to determine the outcome of the event have been
defined in the matching event /action, these are used by default and cannot be
modified.
See B.4 Drawdown Amendment on page 160 for more information.
Opening Date By default, this is the Action Date, but it can be changed to any date on or before the
Amendment Date.
Allow Past Period
Amendment
If this switch is on, the transaction can be amended with retrospective effect
(Amendment Date is before the Action Date).
Payment Date Method Method used to determine the payment date. The payment date can be on the
Amendment Date or the Next Due Date. If accrued interest is to be paid as a result of
the amendment, you must select one of the options.
Amendment Date Effective date of the Drawdown Amendment event.
On this date, the original cashflow is fully or partially closed and the new one, with the
new characteristics, begins.
Amendment Date = Value Date of the drawdown amendment transaction
This can be on a scheduled due date (either the previous or the next) or on a non-due
date. Note, that in all cases the given Amendment Date is validated against the last
due date of the drawdown transaction before the Action Date as follows:
•If
Allow Past Period Amendment is off, the Amendment Date is not accepted by the
system.
•If
Allow Past Period Amendment is on, the Amendment Date is accepted and special
cashflows compensating for the past period cashflows between Amendment Date and
Action Date are created.
Payment Date Date used for any payable amount as of the Amendment Date. It is calculated based
on the specified Amendment Date and Payment Date Method.
• If Payment Date Method = Amendment Date: Payment Date = Amendment Date
and cannot be changed.
• If Payment Date Method = Next Due Date: Payment Date = Until When Date (that
is, the due date) of the first cashflow in the drawdown where:
- Until When Date is later than or equal to the Action Date, and
- Until When Date is later than or equal to the Amendment Date, and
- The value cannot be changed.
If a Drawdown Amendment event occurs on a non-due date it can be settled as
follows:
• On the Amendment Date
• On the next scheduled due date following the Amendment Date
• On the due date following the next scheduled due date (if the number of days
between the Amendment Date and the next scheduled due date is less than the
Minimum Payment Stub Length (Material Delay).
Partial Amount Determines whether the transaction can be partially amended.
Note: In case of a partial drawdown amendment, additional drawdown amendments
can still be created from the same drawdown up to the new Outstanding Amount
after the previous drawdown amendment.
Keep Guarantees Determines whether the amendment transaction inherits the original transactions
guarantees.
5 Managing loan events
5.2 Processing loan event actions
82 © Wall Street Systems IPH AB - Confidential
For the remaining values for each Drawdown Amendment event type, see the following sections.
5.2.4.2.1 Counterparty conversion
Counterparty Conversion event allows you to change the current counterparty of the drawdown
transaction to any other eligible counterparty defined in the drawdown’s facility/tranche setup, but
does not allow any other changes to be made in the transaction.
The Drawdown Amendment transaction carries all the attributes of the original transaction except
for the following: Counterparty and Value Date.
See also 5.2.4.3 Generated data on page 86.
5.2.4.2.2 Currency conversion
Currency Conversion event allows you to change the current currency of the transaction to any
other eligible currency defined in the drawdown’s facility/tranche setup, but does not allow any
other changes to be made in the transaction.
Outstanding Amount (Information only)
By default, this is the outstanding total amount of principal as of the Amendment Date
that can be amended by this event.
This amount takes into account any other amendments that have previously taken
place and affected the total principal amount.
Amendment Amount By default, Amendment Amount = Outstanding Amount.
•If the
Partial Amount is off, Amendment Amount is frozen and cannot be changed.
•If the Partial Amount is on, Amendment Amount can be changed to any amount that is
less than the Outstanding Amount.
Remaining Amount (Information only)
Remaining total of principal repayments of the drawdown as of the Amendment Date
following this amendment, calculated as:
Remaining Amount = Outstanding Amount – Amendment Amount
Information Description
Counterparty
Conversion
Type of drawdown amendment according to the specified Event Subtype.
Current Counterparty ID of the counterparty on the drawdown on the Amendment Date.
Target Counterparty ID of the new counterparty.
Only valid counterparties for the facility/tranche of the drawdown are accepted by the
system. If the amendment is made against a completely new counterparty, that is not
identified in the facility, the facility must be amended and processed before the
amendment on the drawdown can be made.
Information Description
Currency Conversion Type of drawdown amendment according to the specified Event Subtype
Current Currency ID of the currency of the drawdown on the Amendment Date.
Target Currency ID of the new currency.
Only valid currencies for the facility/tranche of the drawdown are accepted by the
system. If the amendment is made against a completely new currency, that is not
identified in the facility, the facility must be amended and processed before the
amendment on the drawdown can be made.
Information Description

5 Managing loan events
5.2 Processing loan event actions
Commercial Loans Module (CLM) User Guide 83
The Drawdown Amendment transaction carries all the attributes of the original transaction with the
following exceptions: Currency and Value Date.
The cashflows of the new transaction are created in the Target Currency, and based on the Nominal
Amount (that is, the Target Amount), of the Drawdown Amendment transaction.
See also 5.2.4.3 Generated data on page 86.
5.2.4.2.3 Transaction condition conversion
Transaction Condition Conversion event allows you to change any transaction and schedule data
that is modifiable in the current transaction template of the drawdown transaction, but does not
allow any other changes to be made in the transaction.
This event may be used when the rates that were initially agreed for the transaction are changed by
agreement (Rate Renegotiation). It may also be used, for example, for restructuring of loan
repayments, if changes to a repayment schedule are agreed on between parties and allowed under
the current transaction template of the transaction.
With the Transaction Condition Conversion event, it is also possible to create some amendments in
bulk, that is, to amend certain attributes of all drawdown transactions under a particular
facility/tranche simultaneously.
•To do so, use the CLM Bulk Drawdown Amendment activity: see C.1 CLM Bulk Drawdown
Amendment on page 169 for details of the activity’s parameters.
The activity applies the amendments to all drawdown transactions in the specified
facility/tranche combination and generates the subsequent Drawdown Amendment transactions
accordingly.
The activity can be used to amend the drawdowns’ fixing rate, fixing period, and spread values.
Note: Activities are set up and managed in Activity Manager: see the TRM User Guide for more
information.
Reference FX Date By default, this is the Reference FX Date on the Opening Date of the event, but it can
be modified to any date before the Amendment Date.
Reference FX Scenario Scenario to be used to fetch the rates.
Reference FX Rate FX rate for the current/target currency pair on the Reference FX Date in the given
Reference FX Scenario.
This rate is used to give a default value for the Amend FX Rate as well as to assess the
reasonability of the Amend FX Rate, if manually modified.
Amend FX Rate By default, this is the Reference FX Rate, but it can be modified.
Target Amount Target Amount = Amendment Amount * Amend FX Rate
Information Description
Breakage Cost Method Method used to calculate the breakage cost. Choose from:
•Net Amount – Breakage cost is entered manually as a fixed amount.
• Indemnity Interest – Breakage cost is calculated in a similar manner as a
Prepayment Indemnity in a Prepayment.
•Valuation
• None – No breakage cost is created.
For example, there may be some costs if the spread is reduced.
Information Description
5 Managing loan events
5.2 Processing loan event actions
84 © Wall Street Systems IPH AB - Confidential
A Drawdown Amendment transaction carries all the attributes of the original transaction except for
the following:
•In a Rate Component Renegotiation event, the modified data would be the rate(s) of one or
several interest schedules present in the transaction
•In a Loan Restructuring event, the modified data would be the amortization schedule attributes
affecting calculation of amortization amounts as well as setting the amortization dates in the
transaction.
The new transaction (or its schedules) can be modified as long as the current transaction template
and the facility/tranche setup allow it.
If the current transaction template does not allow the changes necessary to accomplish the
amendment, the Transaction Condition Conversion event cannot be used for the purpose. Instead, a
Transaction Template Conversion event must be created after a new transaction template has been
set up in such a manner that the new transaction reflects the preferred outcome of the amendment.
The cashflows of the new transactions are created according to the attributes given in the Drawdown
Amendment transaction, as in a new drawdown.
See also 5.2.4.3 Generated data on page 86.
5.2.4.2.4 Transaction template conversion
Transaction Template Conversion event allows you to add a completely new transaction template to
the drawdown.
Breakage Cost Amount Amount of the Breakage Cost cashflow.
• If Breakage Cost Method = None or Indemnity Interest, this field is empty and
cannot be modified.
• If Breakage Cost Method = Net Amount, enter an amount in the field.
Breakage Rate Interest rate used to calculate the future value Breakage Cost Amount.
• If Breakage Cost Method = None or Net Amount, this field is empty and cannot be
modified.
• If Breakage Cost Method = Indemnity Interest, enter the interest rate used to
calculate the Breakage Cost Amount (as in a prepayment indemnity calculation).
Discount Rate Interest rate used in discounting the future value Breakage Cost Amount to the
Amendment Date.
• If Breakage Cost Method = None or Net Amount, this field is empty and cannot be
modified.
• If Breakage Cost Method = Indemnity Interest, enter the interest rate used to
discount the Breakage Cost Amount from the Value Date to the Amendment Date
(as in a prepayment indemnity calculation).
Information Description
Current Instrument Instrument of the drawdown transaction.
Current Transaction
Tem p lat e
Transaction template of the drawdown transaction.
Target Transaction
Tem p lat e
One of the eligible transaction templates for the current instrument as defined in the
facility/tranche setup.
Only valid transaction templates for the facility/tranche of the drawdown are accepted
by the system. If the amendment is made against a completely new transaction
template, that is not identified in the facility, the facility must be amended and
processed before the amendment on the drawdown can be made.
Information Description
5 Managing loan events
5.2 Processing loan event actions
Commercial Loans Module (CLM) User Guide 85
The Drawdown Amendment transaction carries all the attributes of the original transaction except
for the following: Transaction Template.
See also 5.2.4.3 Generated data on page 86.
5.2.4.2.5 Instrument conversion
Instrument Conversion event allows you to change the current instrument of the drawdown
transaction to any other valid instrument of the same class defined for the facility/tranche setup of
the drawdown and a new transaction template for the Drawdown Amendment transaction.
It is also possible to modify any of the transaction or schedule data that is allowed to be modified by
the new transaction template.
The Drawdown Amendment transaction carries the same attributes as those described in 5.2.4.2.3
Transaction condition conversion on page 83.
See also 5.2.4.3 Generated data on page 86.
5.2.4.2.6 General amendments
General Amendment event allows you to do all of the previously described amendment events in
one single amendment event.
Information Description
Current Instrument Instrument of the drawdown transaction.
Target Instrument One of the eligible instruments as defined in the facility/tranche setup.
Only valid instruments for the facility/tranche of the drawdown are accepted by the
system. If the amendment is made against a completely new instrument, that is not
identified in the facility, the facility must be amended and processed before the
amendment on the drawdown can be made.
Target Transaction
Tem p lat e
One of the eligible transaction templates for the current instrument as defined in the
facility/tranche setup.
Only valid transaction templates for the facility/tranche of the drawdown are accepted
by the system. If the amendment is made against a completely new transaction
template, that is not identified in the facility, the facility must be amended and
processed before the amendment on the drawdown can be made.
Information Description
Current Counterparty Counterparty of the drawdown transaction on the Amendment Date.
Target Counterparty New counterparty for the Drawdown Amendment transaction.
Current Instrument Instrument of the drawdown transaction on the Amendment Date.
Target Instrument New instrument for the Drawdown Amendment transaction.
Current Transaction
Tem p lat e
Transaction template of the drawdown transaction on the Amendment Date.
Target Transaction
Tem p lat e
New transaction template for the Drawdown Amendment transaction.
Current Currency Currency of the drawdown transaction on the Amendment Date.
Target Currency New currency for the Drawdown Amendment transaction.
Reference FX Date Date as of which the Reference FX Rate (see below) is identified by the system.
• If Current Currency = Target Currency, this field cannot be modified.
• Otherwise, Reference FX Date = Opening Date of the event, but this can be
modified to any date before the Amendment Date.

5 Managing loan events
5.2 Processing loan event actions
86 © Wall Street Systems IPH AB - Confidential
The Drawdown Amendment transaction has the same generic characteristics as those described
previously.
5.2.4.3 Generated data
•Transaction
A Drawdown Amendment event generates a new transaction with the following attributes:
–Reference Number = Transaction Number of the initial drawdown transaction.
This is used to maintain a reference between the Drawdown Amendment event transaction
and the initial drawdown.
–Continuation Number = Continuation Number of the drawdown.
This is used to keep a reference from the Drawdown Amendment event to the drawdown
being amended (if the original drawdown has been previously amended.
The transaction’s remaining attributes are inherited either from the drawdown, or those
specified for the Drawdown Amendment event.
Note: If the Keep Guarantees switch was not activated in the Amendment dialog, you must now
attach new guarantees to the created transactions, if new guarantees are needed.
•Cashflows
The transaction is generated with the following cashflows:
–Cashflows (Principal and Interest) closing fully or partially the cashflows in the underlying
drawdown, including a not payable (but bookable) settlement cashflow for the Amendment
Amount, where Value Date = Amendment Date.
–Cashflows (Principal and Interest) for the new amended drawdown, including a not payable
(but bookable) settlement cashflow for the Amendment Amount, where Value Date =
Amendment Date.
–Accrued Interest flows (if the drawdown’s Amendment Date is not an interest due date) on
the drawdown’s Amendment Date (and with the Payment Date set according to the Payment
Date of the Drawdown Amendment event).
–Adjustment cashflows inside the period between the Amendment Date and Action Date, if
the Amendment Date is before the last due date before the Amendment Date.
Note: If the original drawdown is subsidized, the cashflows under the Subsidy schedule must be
left untouched. Subsidy amounts are never adjusted after a Subsidy Call has taken place.
If adjustments are required, then you should do them manually.
Reference FX Scenario Scenario to be used to fetch the rates.
• If Current Currency = Target Currency, or if the scenario is specified in the event
condition, this field cannot be modified.
Reference FX Rate FX rate for the current/target currency pair on the Reference FX Date in the given
Reference FX Scenario.
• If Current Currency = Target Currency, this field cannot be modified
Amend FX Rate Actual FX rate used to convert the Amendment Amount into the Nominal Amount of
the new transaction.
Target Amount Amount in the Target Currency used as the Nominal Amount of the Amendment
transaction.
Information Description

5 Managing loan events
5.2 Processing loan event actions
Commercial Loans Module (CLM) User Guide 87
5.2.5 Drawdown classification
When a borrower is seen as being in danger of defaulting on payments due under a drawdown, a
Drawdown Classification event can be created to identify the debt as belonging to a specific
classification and to create accounting entries corresponding to this classification.
A Drawdown Classification is treated as an independent transaction, like a Prepayment or a Funding
Call, where the whole or a part of an existing drawdown is separated into different classes of debt.
Classifications reflect the possible financial situations that the borrower can be in. Possible values
include: Normal, In Distress, In Quasi-Liquidation, In Liquidation, Liquidated.
5.2.5.1 Setup
Before the Drawdown Classification action can be performed on a drawdown, you need to set up the
following:
•The commercial lending instrument must be defined and assigned with the Drawdown
Classification feature: see A.2.15 Drawdown Classification on page 153
•The action rule for the drawdown classification event must be set up correctly: see B.6
Drawdown Classification on page 162.
5.2.5.2 Execution
In the initial Drawdown Classification dialog, enter the following values:
In the second Drawdown Classification dialog, the following information is required:
Information Description
Action Date Date when the event takes place. By default, this is today’s date but it can be
changed.
Event Subtype Type of drawdown classification. Choose from: Debt Recovery, Debt Suspension, Due
Date Debt Recovery, or Due Date Debt Suspension.
Information Description
Event Condition ID
Action Rule ID
ID of the event/action rule used to match the event condition.
If any of the parameters used to determine the outcome of the event have been
defined in the matching event/action, these are used by default and cannot be
modified.
See B.6 Drawdown Classification on page 162 for more information.
Action Date
Event Subtype
Default to the values defined in the initial dialog.
New Classification One of the following: Normal, In Distress, Quasi-Liquidation, Liquidation, or
Liquidated.
Opening Date By default, this is the Action Date, but it can be changed to any date on or before the
Classification Date (see below).
Classification Date Date when the classification takes effect.
By default, this is the Action Date but it can be changed to any date on or after the
Opening Date.
Outstanding Amount Full outstanding Nominal Amount of the drawdown.
This is calculated by the system as of the Classification Date.
Classified Amount Actual amount of debt to be classified.
By default, this is the Outstanding Amount, but it can be changed to a smaller amount.
5 Managing loan events
5.2 Processing loan event actions
88 © Wall Street Systems IPH AB - Confidential
5.2.5.3 Generated data
•Transaction
A new transaction is generated with the following attributes:
–Reference Number = Transaction Number of the drawdown transaction.
This is used to maintain a reference between the drawdown classification event transaction
to the drawdown or earlier classification event being classified.
–Continuation Number = Continuation Number of the drawdown.
This is used to keep a reference from any later events to the drawdown from which they
originate (for example, as a result of a currency conversion or an earlier classification).
The transaction’s remaining attributes are inherited either from the drawdown, or the drawdown
classification event.
•Cashflows
The transaction is generated with the following cashflows:
–Cashflows of the original transaction closing part or all of the original transaction which was
classified
–Cashflows of the drawdown classification transaction
The following cashflows trigger the necessary accounting events:
–Accrued Interest flow as of the Classification Date
–A pseudo (that is, Not Payable) Principal Settlement cashflow that corresponds to the
Nominal Amount of the drawdown classification transaction.
5.2.6 Due amount carry forward
Due Amount Carry Forward (DACF) is a loan event that can be used to carry forward due amounts
from one value date to a future value date. The amounts can be carried forward either with or
without remuneration (interest).
5.2.6.1 Setup
Before the DACF action can be performed on a drawdown, you need to set up the following:
•The instrument associated with the drawdown must be assigned with the feature Due Amount
Carry Forward: see A.2.20 Due Amount Carry Forward on page 154.
•The action rule for the Due Amount Carry Forward event must be set up correctly: see B.8 Due
Amount Carry Forward on page 162.
5.2.6.2 Execution
In the initial Due Amount Carry Forward dialog, enter the following values:
Classified % Classified Amount expressed as a percentage of the full Outstanding Amount, calculated
as follows:
Classified % = (Classification Amount / Outstanding Amount) * 100
Information Description
Information Description
Action Date Date when the event takes place. By default, this is today’s date but it can be
modified to the value date of the cashflows which are to be carried forward.
Event Client Initiator of the event: Owner or Counterparty.

5 Managing loan events
5.2 Processing loan event actions
Commercial Loans Module (CLM) User Guide 89
In the second Due Amount Carry Forward dialog, the following information is required:
5.2.6.3 Generated data
•Transaction
A new DACF transaction is generated which fully or partially closes the cashflows on the original
due date.
•Cashflows
The DACF transaction creates new cashflows on the date to which they have been carried
forward.
5.2.7 Facility fees
This action allows you to create Facility Fee transactions that calculate the fees that can be charged
against a facility.
Information Description
Action Date
Event Client
Default to the values defined in the previous dialog.
Event Condition ID
Action Rule ID
ID of the event/action rule used to match the event condition.
If any of the parameters used to determine the outcome of the event have been
defined in the matching event/action, these are used by default and cannot be
modified.
See B.8 Due Amount Carry Forward on page 162 for more information.
Opening Date By default, this is the same as the Carry Forward Start Date. You can select any date on
or after the Active Date.
Carry Forward
Instrument
Instrument to be used in the DACF.
Carry Forward
Tem p lat e
Transaction template to be used in the DACF.
Carry Forward End
Date Method
Method used to determine the Carry Forward End Date. Choose from: Any, Client Value
Date, Facility Value Date, or Transaction Value Date.
Carry Forward Start
Date
This is the original cashflow value date from which the system finds the cashflows to
be carried forward.
This date must be on or later than the Action Date.
Carry Forward End
Date
By default, the date in this field depends on the value selected as the Carry Forward End
Date Method, but can be changed to another of the available valid dates.
Carry Forward
Currency
Currency of the unpaid cashflow amount.
Past Due Amount Total unpaid amount due on the original due date.
Carry Forward Amount By default, this is the Past Due Amount, but can be changed to a lower value if you want
to carry forward only part of the due amount.
Keep Original
Cashflow Types
This switch is activated according to the action rule matched to the event.
• If this switch is on, the system keeps the original cashflow types while generating
additional cashflows for settlement on the Carry Forward End Date. These cashflows
are flagged as External.
Note that you must remember to set the cashflow attributes Nominal Amount and
Pseudo for the amortization schedule of the DACF template.
• If this switch is not on, the system treats all carried forward cashflows as
capitalized, and the settlement cashflows are generated in the normal manner.
5 Managing loan events
5.2 Processing loan event actions
90 © Wall Street Systems IPH AB - Confidential
A Facility Fee transaction can be an interest-like regularly accruing fee, or a one time lump sum fee.
5.2.7.1 Setup
Before the Facility Fee transaction can be entered, you need to set up the following:
•The Facility Fee instrument must be defined
•The action rule for the Facility Fee event must be set up correctly: see B.9 Facility Fee on page
163.
5.2.7.2 Execution
In the initial Facility Fee dialog, enter the following values:
In the second Facility Fee dialog, the following information is required:
5.2.7.3 Generated data
•Transaction
The following new transaction is generated:
Information Description
Action Date Date of the action. This defaults to today’s date but can be changed.
Event Subtype Choose from: Appraisal Fee, Other Fee, or Sundry Fee.
Facility ID of the facility.
Tranche ID of the tranche.
Event Date Method Method used to determine the Event Date. Choose from: Any, Payment Date, or
Signature Date.
Information Description
Action Date
Event Subtype
Facility
Tranche
Default to the values defined in the previous dialog.
Event Condition ID
Action Rule ID
ID of the event/action rule used to match the event condition.
If any of the parameters used to determine the outcome of the event have been
defined in the matching event/action, these are used by default and cannot be
modified.
See B.9 Facility Fee on page 163 for more information.
Opening Date Opening date of the Facility Fee transaction.
Fee Counterparty Counterparty of the Facility Fee transaction.
Portfolio Portfolio of the Facility Fee transaction.
Fee Instrument Instrument used for the Facility Fee transaction.
Fee Template Transaction template for the Facility Fee transaction.
Fee Currency Currency of the Facility Fee transaction.
Fee Amount Amount of the Facility Fee transaction.
Fee Value Date Value date of the Facility Fee transaction.
Fee Maturity Date Maturity date of the Facility Fee transaction.
5 Managing loan events
5.2 Processing loan event actions
Commercial Loans Module (CLM) User Guide 91
–A Facility Fee transaction with its own schedule structure (based upon the transaction
template) and cashflows.
5.2.8 Prepayments
The borrower or lender may wish to bring forward the principal repayment date, either for the full
amount of the principal or a partial amount.
The Prepayment action allows the user to record such foreclosures, along with the possibility of
calculating and recording any penalty fees or interest due from the borrower.
5.2.8.1 Setup
Before the Prepayment action can be performed on a drawdown, you need to set up the following:
•The instrument associated with the drawdown must be assigned with the feature Drawdown
Prepayment: see A.2.18 Drawdown Prepayment on page 154.
•The action rule for the Prepayment event must be set up correctly: see B.14 Prepayment on
page 164.
5.2.8.2 Execution
To process a Prepayment event on a drawdown transaction, the transaction must have the following
attribute: the drawdown must have an outstanding repayment later than the Action Date.
In the initial Prepayment dialog, enter the following values:
Information Description
Action Date Date of the action. This defaults to today’s date but can be changed.
This is the opening date of the Prepayment, that is, the date when the Prepayment is
created. This date may differ from the value date of the Prepayment event depending
on contractual conditions.
This is a mandatory field.
Event Subtype Choose from: Contractual, Non-Contractual.
• Contractual - Prepayment is done under conditions agreed in the facility
• Non-Contractual - Prepayment is not done under the conditions agreed in the
facility but the Event Client has agreed to accept the Prepayment.
Event Client Initiator of the event. Choose from: Owner or Counterparty.
Event Date Method Method used to determine the Event Date.
The most common selections for this type of event would be: Any, where you can
select any date to repay the loan; or Value Date, where only valid due dates are
proposed by the system.
Indemnity Payment
Date Method
Method used to determine the date on which the indemnity is paid. Choose from:
Prepayment Date or Due Date.
• Prepayment Date – any indemnity payable as of the Prepayment Date is settled on
the Prepayment Date.
• Next Due Date - any indemnity payable as of the Prepayment Date is settled on
the next due date.

5 Managing loan events
5.2 Processing loan event actions
92 © Wall Street Systems IPH AB - Confidential
In the second Prepayment dialog, the following information is required:
Information Description
Action Date
Event Subtype
Event Client
Event Date Method
Default to the values defined in the previous dialog.
Event Type Prepayment.
Event Condition ID
Action Rule ID
ID of the event/action rule used to match the event condition.
If any of the parameters used to determine the outcome of the event have been
defined in the matching event/action, these are used by default and cannot be
modified.
See B.14 Prepayment on page 164 for more information.
Opening Date By default, this is the Action Date, but it can be modified to any date on or before the
Prepayment Date.
Request Date By default, this is the Action Date, but it can be modified to any date on or before
Prepayment Date.
Prepayment Date Value date of the Prepayment.
The system calculates the Prepayment Date based on the Action Date and the Event Date
Method as follows:
•If
Event Date Method = Any, then Prepayment Date = Action Date but can be
changed to any date on or after Opening Date.
•If
Event Date Method = Due Date, then Prepayment Date = Until When Date (that is,
the Due Date) of the first cashflow in drawdown where the Until When Date is later
than or equal to the Action Date but can be changed to any other due date after
the Opening Date.
•If
Event Date Method = Non-Due Date, then Prepayment Date = Action Date unless
that day is a scheduled due date. If this happens then the Prepayment Date is set
to Action Date +1 but can be changed to any other non-due date after the Opening
Date.
•If
Event Date Method = Revision Date, then Prepayment Date = End Date of the
current (as of Opening Date) revision period but can be changed to any later end
date of the known revision periods.
Indemnity Payment
Date Method
Method used to determine the payment date of the indemnity transaction:
Prepayment Date or Due Date.
Indemnity Payment
Date
Payment date of the indemnity transaction according to the specified Indemnity Payment
Date Method.
Revolving
Manual Revolving
Switch on to make the Prepayment revolving.
• If this switch is on, the Prepayment event creates an Amount Entity that decreases
the credit utilization in the facility/tranche of the drawdown on the Prepayment Date
of the Prepayment.
• If this switch is off, the Prepayment event does not have any effect on the credit
utilization.
Partial Amount Allows the drawdown to be repaid partially.
Note: If this switch is not on, the drawdown can only be repaid in full.
Remaining Amount Remaining total amount of the principal repayments as of the Prepayment Date.
This amount displays the amount of the drawdown that can be prepaid (it may be that
earlier scheduled repayments or partial prepayments have already taken place).
Prepayment Amount By default, Prepayment Amount = Remaining Amount.
If the drawdown can be repaid partially (see Partial Amount), this amount can be
changed to any amount less than the Remaining Amount.

5 Managing loan events
5.2 Processing loan event actions
Commercial Loans Module (CLM) User Guide 93
Allocation Method Not currently used.
Indemnity Method Method used to calculate the Prepayment Indemnity transaction: None, Net Amount,
Valuation, or Indemnity Interest.
Indemnity Amount If Indemnity Method = Net Amount, enter the amount of the indemnity.
A Prepayment Indemnity cashflow is created on the Prepayment Date: you do not need
to enter any other indemnity-related information.
Indemnity Pricing
Scenario
Rate scenario from which all required market rates for indemnity pricing are taken.
Indemnity Pricing
Date Method
Method used to interpret the Indemnity Pricing Offset: Days, Business Days, Weeks,
Months, or Years.
Indemnity Pricing
Offset
Number of units (days, months, and so on, as defined as the Indemnity Pricing Date
Method) to be subtracted from the Prepayment Date when calculating the Indemnity Pricing
Date for the Prepayment.
Indemnity Pricing
Date Convention
Convention used to calculate the Indemnity Pricing Date: None, Backward, Modified
Backward, Following, or Modified Following.
Indemnity Pricing
Date
Date used to identify correct rate information, calculated as follows:
Indemnity Pricing Date = Prepayment Date - Indemnity Pricing Offset (in the number
of units identified by the Indemnity Pricing Date Method).
•If
Indemnity Method = Valuation, enter the date used to identify the correct rate
information to be used in revaluation.
•If
Indemnity Method = Indemnity Interest, enter the date used to calculate
indemnity-related interest rates.
•If
Indemnity Method = None or Net Amount, this field is empty and cannot be
modified.
New Rate Reference
Usage
Usage defined for the yield curve (in IR Quote and Yield Curve Editor’s Usage page)
you want to use to retrieve the rates. This field filters the available yield curves in the
New Rate Reference field.
New Rate Reference If Indemnity Method = Indemnity Interest, the ID of the yield curve from which the
required market rates for calculating the new rate are taken.
New Rate Reference
Date
Date on which the market rates used to calculate the new rate are taken.
Indemnity Margin
Reference Usage
Usage defined for the yield curve (in IR Quote and Yield Curve Editor’s Usage page)
you want to use to retrieve the rates. This field filters the available yield curves in the
Indemnity Margin Reference field.
Indemnity Margin
Reference
If Indemnity Method = Indemnity Interest, the ID of the yield curve from which the
required market rates for calculating the Indemnity Margin Rate are taken.
Indemnity Margin
Reference Date
Date on which the market rates used to calculate the Indemnity Margin Rate are
taken.
Discount Base Rate
Reference Usage
Usage defined for the yield curve (in IR Quote and Yield Curve Editor’s Usage page)
you want to use to retrieve the rates. This field filters the available yield curves in the
Discount Base Rate Reference field.
Discount Base Rate
Reference
If Indemnity Method = Indemnity Interest or Valuation, the ID of the yield curve from
which the required market rates for calculating the Discount Base Rate are taken.
Discount Base Rate
Reference Date
Date on which the market rates used to calculate the Discount Base Rate are taken.
Discount Margin
Reference Usage
Usage defined for the yield curve (in IR Quote and Yield Curve Editor’s Usage page)
you want to use to retrieve the rates. This field filters the available yield curves in the
Discount Margin Reference field.
Information Description

5 Managing loan events
5.2 Processing loan event actions
94 © Wall Street Systems IPH AB - Confidential
5.2.8.3 Generated data
•Transaction
The Prepayment event creates a Prepayment transaction with the following attributes:
Discount Margin
Reference
If Indemnity Method = Indemnity Interest or Valuation, the ID of the yield curve from
which the required market rates for calculating the Discount Margin are taken.
Discount Margin
Reference Date
Date on which the market rates used to calculate the Discount Margin are taken.
Indemnity Base Rate
Method
Method used to determine the Indemnity Base Rate: None, New Rate, Current Rate,
or Net Rate.
New Rate Pricing
Method
Method used to determine the rate pricing: Direct Quote or Zero Pricing.
New Rate Pricing Mode Choose from: Bid, Ask, Bid/Ask, Average, or Reverse Bid/Ask.
Discount Rate Pricing
Method
Method used to determine the discount rate pricing: Direct Quote or Zero Pricing.
Discount Rate Pricing
Mode
Choose from: Bid, Ask, Bid/Ask, Average, or Reverse Bid/Ask.
Current Rate If Indemnity Method = Indemnity Interest, the system calculates the current rate, as
follows:
Current Rate = Aggregated Rate of all interest cashflows of the drawdown flagged as a
Prepayment Rate as of the Prepayment Date.
New Rate If Indemnity Method = Indemnity Interest, the system identifies the new rate from the
yield curve given in the New Rate Reference field and the pricing method given in the
New Rate Pricing Method field.
Indemnity Base Rate Rate used for the indemnity base rate.
If Indemnity Method = Indemnity Interest, this is calculated based on the specified
Indemnity Base Rate Method.
Indemnity Margin Rate used for the indemnity margin.
If Indemnity Method = Indemnity Interest, this is calculated based on the specified
Indemnity Margin Reference values.
Discount Base Rate Rate used for the discount base rate.
If Indemnity Method = Indemnity Interest, this is calculated based on the specified
Discount Rate Reference values.
The Discount Base Rate calculated by the system is always an Annually Compounded
rate regardless of the interest payment frequency of the drawdown being prepaid.
Discount Margin Rate used for the discount margin.
If Indemnity Method = Indemnity Interest, this is calculated based on the specified
Discount Margin Reference values.
Indemnity Rate Rate used for the indemnity rate.
If Indemnity Method = Indemnity Interest, then Indemnity Rate = Indemnity Base Rate
+ Indemnity Margin.
Discount Rate Rate used for the discount rate.
If Indemnity Method = Indemnity Interest, then Discount Rate = Discount Base Rate +
Discount Margin.
Indemnity Pricing
Factor
If Indemnity Method = Indemnity Interest, percentage by which each calculated
Prepayment Indemnity Amount is adjusted when setting the final Prepayment
Indemnity Amount to be paid on the Prepayment Date.
Information Description
5 Managing loan events
5.2 Processing loan event actions
Commercial Loans Module (CLM) User Guide 95
–Reference Number = Transaction Number of the drawdown transaction.
This is used to maintain a reference between the Prepayment event transaction to the
drawdown which was prepaid.
–Continuation Number = Continuation Number of the drawdown.
This is used to keep a reference from the Prepayment event to the drawdown from which the
prepaid drawdown originates (for example, as a result of a Currency Conversion event).
The transaction’s remaining attributes are inherited either from the drawdown transaction, or
the Prepayment event.
•Cashflows
The Prepayment transaction is generated with the following cashflows:
–Principal and Interest flows that close the fully or partially repaid cashflows in the underlying
drawdown
–Principal repayment and Accrued Interest flows on the Prepayment Date (if it is not an interest
due date).
–If the Prepayment Date does not match an existing due date in the drawdown, one additional
Accrued Interest flow for each interest cashflow (where the From When Date is before the
Prepayment Date, and the Prepayment Date is before the Until When Date) and calculates
the accrued interest amount according to the relevant attributes in the transaction template
of the prepaid drawdown.
–Prepayment Indemnity cashflow(s) (including the prepayment margin) on the Prepayment
Date, if applicable: see 5.2.8.3.1 Generated data - prepayment indemnity flows on page 95.
5.2.8.3.1 Generated data - prepayment indemnity flows
CLM calculates one or several Prepayment Indemnity amounts and creates the corresponding
cashflows on the Prepayment Date based on the selected Indemnity Method.
•Indemnity Method = None
–No Prepayment Indemnity cashflow is created.
•Indemnity Method = Net Amount
–One Prepayment Indemnity cashflow with the amount equal to the Prepayment Indemnity
Amount entered in the Prepayment dialog is created.
•Indemnity Method = Valuation
–One Prepayment Indemnity cashflow with the amount equal to the difference between the
calculated market value of the remaining prepayments and all future interest amounts
(marked with the flag Prepayment Base Rate), and the outstanding principal of the
drawdown, adjusted by the Indemnity Pricing Factor of the prepayment is created.
•Indemnity Method = Indemnity Interest
–One (or two) Prepayment Indemnity cashflows (depending on whether a separate discount
adjustment is calculated, that is, if Discount Rate is not 0), with a total amount equal to the
actualized future values of the calculated Indemnity Interest, adjusted by the Indemnity Pricing
Factor of the prepayment are created.
5.2.9 Late Payment Penalties
Late Payment Penalties (LPP) are contractual charges made when a due amount is paid late. In CLM
these are typically set up as Facility specific action rules because each Facility's penalty clause may
be different. Although, if an organization has a standard tariff for charging Late Payment Penalties
the action rules could be set up globally i.e. not referring to any specific Facility.
Late Payment Penalties can only be used when the Payment Allocation functionality has also been
deployed. That is, the Late Payment Penalty process is dependent on identifying the actual Payment

5 Managing loan events
5.2 Processing loan event actions
96 © Wall Street Systems IPH AB - Confidential
Date of allocated cashflows in order to realize the Late Payment Penalty amount. This Payment Date
can only be found in a Payment Allocation record.
The Late Payment Penalty processing in CLM is handled as follows:
•All necessary Instruments, Transaction Templates and action rules are correctly set up.
•Amounts become overdue on CLM transactions.
•The CLM Late Payment Penalty Generation activity finds the relevant Facility specific or global
action rules and determines the type of Late Payment Penalty transaction that needs to be
generated for the overdue amounts.
•A Late Payment Penalty transaction with its own Instrument and Transaction Template (defined
at the facility level or in the action rule) is created and starts to accrue LPP interest.
•Overdue amount is paid late and allocated using Payment Allocation. See Chapter 10 Managing
payment allocations on page 133.
•CLM Late Payment Penalty Realization activity detects allocated overdue amounts, stops the
accrual of the Late Payment Penalty as of the actual Payment Date, leaving the Late Payment
Penalty amount due to be paid.
5.2.9.1 Setup
Before the Late Payment Penalties can be processed on a drawdown, you need to set up the
following:
•The instrument associated with the drawdown must be assigned with the features Late Payment
Penalty and Late Payment Penalty Realization: see A.2.26 Late Payment Penalty on page 156
and A.2.27 Late Payment Penalty Realization on page 156.
•To calculate Late Payment Penalties, you need to set up an action rule of type Late Payment Penalty
with the selected subtype and an action rule of type Rate Condition. These two rules determine
how the penalties of the late payments are calculated, see 5.2.9.1.1 Setting up Late Payment
Penalty action rule on page 96 and 5.2.9.1.2 Setting up Rate Condition action rule for LPP on
page 97 respectively.
For more general information about action rule parameters, see Appendix B Loan event
parameters on page 159.
5.2.9.1.1 Setting up Late Payment Penalty action rule
There are four subtypes that you can define for Late Payment Penalties which correspond to four
different ways of calculating Late Payment Penalties. These are explained further on.
CLM Late Payment
Penalty Realization
activity
Set up Static Data and
LPP Action Rules
Amounts are
overdue
Overdue
Amounts paid
late
Allocate payments in
Payment Allocation
Run CLM Late Payment
Penalty Generation
activity
Detect allocated overdue
amounts
Find action rules and
determine LPP
transaction for
overdue amounts
Dedicated LPP
Transaction is
created
5 Managing loan events
5.2 Processing loan event actions
Commercial Loans Module (CLM) User Guide 97
To set up a Late Payment Penalty action rule:
1. In the Action Rule Editor, select the following conditions:
2. In the Late Payment Penalty page, select the instrument and transaction template you want to be
used to capture the accrued LPP interest, and specify a date when you want this penalty rule to
end. See B.13 Late Payment Penalty on page 164 for more information.
3. If required, select other conditions according to your needs.
4. Click Save As to save the new definition.
Note: If you used an existing definition as a basis for creating the new definition, select the
switch Save as New to avoid overwriting the existing one. Selecting this switch disables the
Save icon so you cannot inadvertently overwrite the existing definition.
5.2.9.1.2 Setting up Rate Condition action rule for LPP
When a LPP transaction is created, the aforementioned action rule is used with the expression
defined in a Rate Condition action rule to calculate the LPP interest. Expressions are stored in an
action rule of type Rate Condition.
To set up a Rate Condition action rule for Late Payment Penalties:
1. In the Action Rule Editor, select the following conditions:
Information Description
Event Type Select Late Payment Penalty.
Event Sub Type Select the subtype according to how you want to calculate the penalty.
Choices are:
•None: When you want the Late Payment Penalty to be a fixed rate, for
example, 10%.
•Maximum: When you want to compare two rates and use the higher one.
•Adding-Benchmark-Rate: When you want to add a fixed spread to a market
rate.
•Adding-Aggregated-Rate: When you want to add a fixed spread to the
existing all in rate on the Drawdown.
Entity
Entity ID
Select Facility and a facility ID or leave the Entity field empty:
• If you want this action rule to apply to one specific facility, select Facility
and then select the facility ID to which you want it to apply.
• If your organization has a standard tariff that applies to all late payment
penalties, leave this field empty to create a global Late Payment Penalty
rule that applies to all facilities.
Information Description
Event Type Select Rate Condition.
Key 1
Value 1
Select Event Type and Late Payment Penalty respectively.
Key 2
Value 2
To define this rate condition to be used for late payment penalties, select Event
Subtype and the subtype that you want to use as described previously. Choices
are: None, Maximum, Adding-Benchmark-Rate or Adding-Aggregated-Rate.
5 Managing loan events
5.2 Processing loan event actions
98 © Wall Street Systems IPH AB - Confidential
2. In the Loan Pricing page, select the pricing information (see B.15 Rate Condition on page 166)
and enter the relevant expression.
The following examples show some typical expressions:
3. Click Save As to save the new definition.
5.2.9.2 Execution
There are two activities that must be run to process Late Payment Penalties:
•CLM Late Payment Penalty Generation: This activity is run nightly to identify all overdue amounts that
should be accruing Late Payment Penalties. The Late Payment Penalty and Rate Condition action
rules are used to capture the transaction details.
•CLM Late Payment Penalty Realization: This activity is run nightly to identify where a Payment has
been made of an overdue amount.
See Appendix C Activity parameters on page 169, For more information about the activity
parameters.
5.2.9.3 Generated data
The Late Payment Penalty activities, generate the following transactions respectively:
•CLM Late Payment Penalty Generation: Transaction Kind = Late Payment Penalty
•CLM Late Payment Penalty Realization: Transaction Kind = Late Payment Penalty Realization
These transactions are visible in Drawdown Action Admin.
5.2.10 Loan pricing
All transactions including new drawdowns and various types of transactions created from drawdown
events are priced in an identical manner. The only difference is that these transactions carry
different schedules, and different rate conditions have been set up for them. Consequently, different
rates are found for the transactions.
Pricing can be launched either for the whole transaction or for a single schedule. Typically, however,
the Pricing action is launched for the whole transaction.
Entity
Entity ID
Select Facility or leave this field empty:
• If you want this action rule to apply to one specific facility, select Facility
and then select the facility ID to which you want it to apply.
• If your organization has a standard tariff that applies to all late payment
penalties, leave this field empty to create a global rule that applies to all
facilities.
Information Description
To... Subtype Expression
Define the LPP rate as 10% None and set the rate to
0.10
Get the maximum of the all in rate
on the drawdown plus a spread and
the one month Euribor rate plus a
different spread
Maximum max(cntaggrt+spread%,ir('EURIBO
R','1M')+factor%)
Get a three month Euribor rate plus a
spread
Adding-Benchmark-Rate ir('EURIBOR','3M')+spread%
Get the all in rate on the drawdown
plus a spread
Adding-Aggregated-Rate cntaggrt+spread%

5 Managing loan events
5.2 Processing loan event actions
Commercial Loans Module (CLM) User Guide 99
5.2.10.1 Setup
Before the Pricing action can be performed on a drawdown, you need to set up the following:
•The instrument associated with the drawdown must be assigned with the feature Loan Pricing:
see A.2.28 Loan Pricing on page 156.
•The action rule for the Rate Condition event must be set up correctly: see B.15 Rate Condition
on page 166.
•The yield curves used to store the rates used for pricing: see the TRM User Guide for more
information.
•The rates must have been published or accepted in the rate scenario used for pricing: see the
TRM User Guide for more information.
5.2.10.2 Execution
Pricing is executed as part of the process flow of the transaction it targets (new drawdown, Rate
Revision, and so on).
Right-click the transaction or schedule (depending on whether you want to price the whole
transaction or just one schedule) and select Pricing:
To price a drawdown transaction: see 4.2.3 Pricing drawdown transactions on page 65.
5.2.10.3 Generated data
All of the fields such as Rate, Fixing Rate, Spread, and so on, that can be deduced from the rate
condition action rules are populated in the schedules.
5.2.11 Write off
When a borrower is seen as permanently unable to make payments due under a drawdown, a Write
Off event can be created to remove the debt from outstanding normal or, more likely, from earlier
suspended debt and to create accounting entries corresponding to writing off the debt.
A Write Off is treated as a transaction (like a Drawdown Classification transaction), where all or part
of an existing drawdown or earlier Drawdown Classification event is written off.
5.2.11.1 Setup
Before the Write Off action can be performed on a drawdown, you need to set up the following:
•The instrument associated with the drawdown must be assigned with the feature Write Off: see
A.2.31 Write Off on page 157.
•The action rule for the Write Off event must be set up correctly: see B.16 Write-Off on page 168.
5.2.11.2 Execution
In the initial Write Off dialog, enter the following values:
Information Description
Action Date Date of the event. By default, this is today’s date but it can be modified.
Event Subtype Method used to identify the debt to be written off. Choose from: Past Due Payment or
Outstanding Debt.
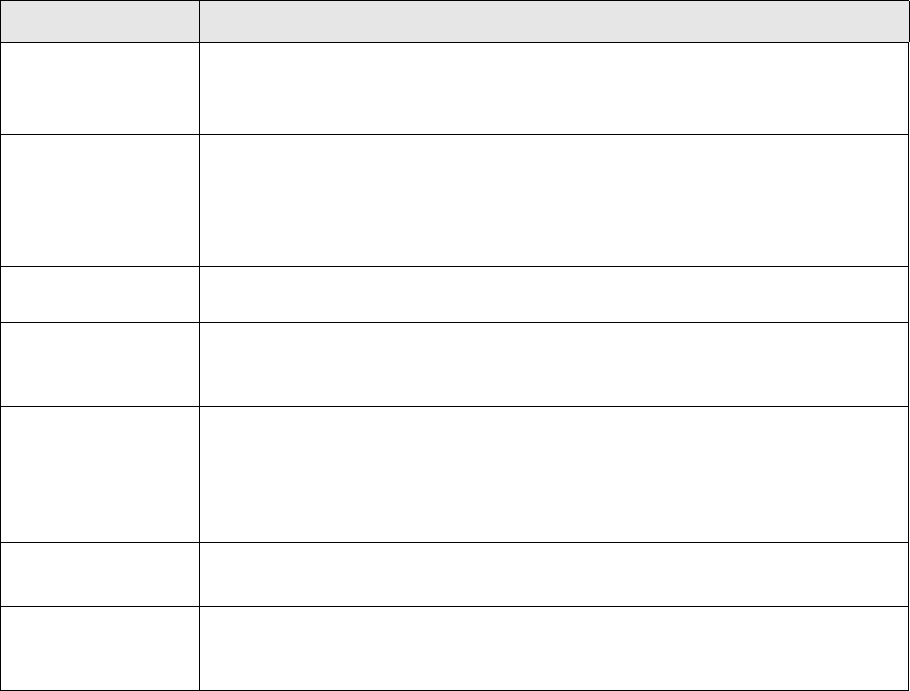
5 Managing loan events
5.2 Processing loan event actions
100 © Wall Street Systems IPH AB - Confidential
In the second Write Off dialog, the following information is required:
5.2.11.3 Generated data
•Transaction
A new transaction is generated with the following attributes:
–Reference Number = Transaction Number of the drawdown transaction.
This is used to maintain a reference between the Write Off event transaction to the
drawdown or earlier classification event being written off.
–Continuation Number = Continuation Number of the drawdown.
This is used to keep a reference from any later events to the drawdown from which they
originate (for example, as a result of a currency conversion or a drawdown classification).
The transaction’s remaining attributes are inherited either from the drawdown, or the Write Off
event.
•Cashflows
The transaction is generated with the following cashflows:
–Cashflows of the original transaction closing part or all of the original transaction which was
written off.
–Cashflows of the Write Off transaction.
The following cashflows of the Write Off transaction trigger the necessary accounting events:
–If Write-Off Type = Past Due Payment: a separate pseudo (that is, Not Payable) cashflow
corresponding to each cashflow underlying the past due payment written off.
Information Description
Action Date
Event Subtype
Write Off Type
Default to the values defined in the previous dialog.
Event Condition ID
Action Rule ID
ID of the event/action rule used to match the event condition.
If any of the parameters used to determine the outcome of the event have been
defined in the matching event/action rule, these are used by default and cannot be
modified.
See B.16 Write-Off on page 168 for more information.
Opening Date By default, this is the Action Date, but it can be changed to any date on or before the
Write-Off Date.
Write-Off Date Date when the Write Off takes effect.
By default this is the Action Date, but it can be changed to any date on or after the
Opening Date.
Outstanding Amount Full outstanding amount available for write off.
•If
Write-Off Type = Past Due Payment: Outstanding Amount = sum of all payments
due on the Write-Off Date.
•If
Write-Off Type = Outstanding Debt: Outstanding Amount = full outstanding
Nominal Amount as of the Write-Off Date.
Write-Off Amount Amount to be written off.
By default, this is the Outstanding Amount, but it can be changed to a smaller amount.
Write-Off % Write-off amount expressed as a percentage of the available outstanding amount,
calculated as follows:
Write-Off % = (Write-Off Amount / Outstanding Amount) * 100
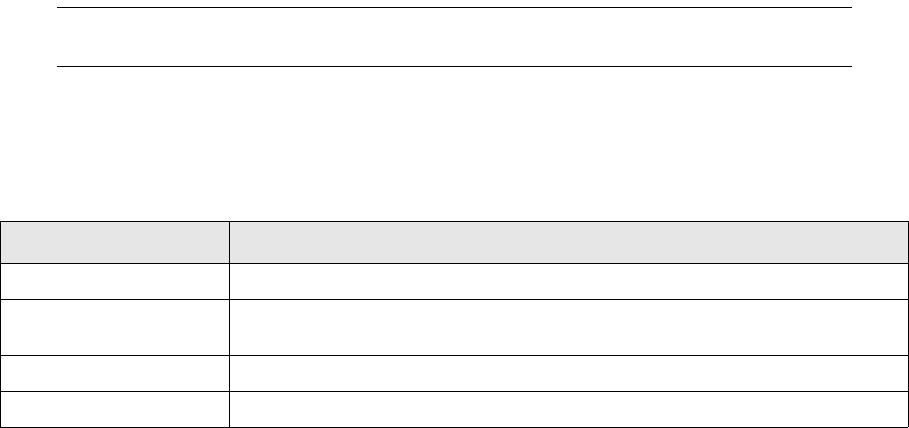
5 Managing loan events
5.2 Processing loan event actions
Commercial Loans Module (CLM) User Guide 101
–If Write-Off Type = Outstanding Debt: an Accrued Interest cashflow as of the Write-Off Date.
–A pseudo Principal Settlement cashflow that corresponds to the Nominal Amount of the Write
Off transaction.
5.2.12 Rate Renewal
Floating interest rates on drawdowns can be fixed in two ways:
•Automatically using an activity of type CLM Fixing Drawdown Cashflow.
•Manually on the cashflow using the action Rate Renewal in Drawdown Admin. The drawdown
transaction must be in a Final state.
In both cases, drawdown fixing creates a drawdown fixing record which can be seen in Drawdown
Fixing Admin. Drawdown fixing entries are grouped by:
•Transaction fields: Counterparty, Counterparty Client, Facility.
•Cashflow fields: Currency, Fixing Rate, Fixing Period, Fixing Subscenario, Value Date, Since
When, Until When.
If the fixing fails because the rate does not exist, or if the cashflow is marked as a stub, the fixing is
created in state Failed, otherwise it is created in state Provisional and can be accepted through to a
Final state.
5.2.12.1 Setup
Before the rate renewal transaction can be entered, you need to ensure the following:
•The drawdown instrument that you are using must have the Drawdown Fixing feature: see
A.2.17 Drawdown Fixing on page 154
•The activity used to automatically fix rates must be set up: see C.2 CLM Fixing Drawdown
Cashflow on page 170.
5.2.12.2 Execution
5.2.12.2.1 Automatic fixing
To automatically fix rates you use the CLM Fixing Drawdown Cashflow activity: see C.2 CLM Fixing
Drawdown Cashflow on page 170 for details of the activity's parameters. The activity searches for all
cashflows that match the parameters in the activity and have a Fixing From date equal to the Due Date
specified on the activity. The activity then looks for the rate in the prices table and fixes it.
Note: Activities are set up and managed in Activity Manager: see the TRM User Guide for more
information.
5.2.12.2.2 Manual fixing
To manually fix rates you need to right-click directly on an individual cashflow in the Cashflow view,
select Rate Renewal from the right-click menu, and enter the following parameters in the Rate Renewal
dialog. These values are defaulted if the rate exists:
Information Description
Fixing Date Date of the fixing.
Fixing Quote Fixing quote is the market variable quote taken from Rate Monitor, and is used to
calculate the cashflow fixing price and amount.
Nominal Rate Nominal rate used in the fixing calculations.
Amount Amount of the cashflow.

5 Managing loan events
5.3 Editing loan events
102 © Wall Street Systems IPH AB - Confidential
5.2.12.3 Generated data
It is possible to modify the fixing values. When the fixing quote is modified, this updates both the
nominal rate and the amount accordingly. Similarly, if the nominal rate is modified, the amount is
affected (but not the fixing quote).
Executing the fixing modifies the cashflow as follows:
•Removes the Not Fixed attribute to show that it is fixed.
•Sets the fixing date
•Stores the rate of the market reference used for fixing
•Stores the effective interest rate (nominal rate) on the cashflow
•Sets the amount of the cashflow
It is possible to cancel the fixing by rejecting the fixing record in Drawdown Fixing Admin.
5.3 Editing loan events
It is not possible to modify loan event values directly in the generated transaction. However, it is
possible to edit the loan event.
To edit the loan event:
1. Retrieve the loan event transaction you want to modify.
2. Right-click the transaction and select Edit Event.
3. The loan event dialog reopens to allow you to modify the values you entered during the initial
capture.
4. Click OK to regenerate the loan event transaction when you have made your modifications.
Note: You may modify transaction attributes which are not logically linked to generating the loan
event directly in the generated transaction, for example, one or more free-text comments
in any of the Comment fields.
Commercial Loans Module (CLM) User Guide 103
Chapter 6 Managing equity
Investing in and managing equity transactions in CLM includes support for:
•Inserting purchases of equity (new holdings)
•Free or DVP (delivery versus payment) settlement of both money and security (with the related
SWIFT message or other messages)
•Valuation and monitoring of holdings in different equities
•Various corporate actions including dividends
•Inserting sell of equity (divestment) including an automatic matching against current holdings
and calculation of realized capital gain.
Both ordinary interest-bearing drawdowns and direct equity investments can be executed under the
same facility. Both types of instruments can be entered under the relevant facility or tranche.
When the initial purchase of equity is made, it is possible to use a different settlement currency
other than the currency of the equity itself. This means that even if the equity is denominated in
another currency, you can disburse the money in Euros, for example.
6.1 Setting up equity in the facility
To allow direct equity investment (or divestment) in a facility:
1. Set up the equity instrument in Instrument Editor.
–Each equity is defined as a separate instrument in TRM, therefore, before an equity
instrument can be attached to a facility, it must be set up as an instrument.
See the guide TRM Instruments: Processing and Calculations for information about setting
up equity instruments.
–The equity instrument must have the Risk-Venture-Capital feature present in the instrument
setup. This action feature allows you to use the instrument to invest/divest the equity
holdings in a drawdown.
See A.2.30 Risk Venture Capital on page 157.
2. In Facility Editor’s Instrument page, select Equity in the Event Type field.
The Instrument Class field is automatically populated with Equity and cannot be modified.
3. Specify the Instrument Group of the equity instrument.
4. Complete the facility’s Instrument page setup using the information in 2.9.2.7 Defining instrument
and event details on page 30.

6 Managing equity
6.2 Processing equity investments
104 © Wall Street Systems IPH AB - Confidential
6.2 Processing equity investments
6.2.1 Entering new equity investments
Capturing an equity drawdown in a facility is done in Drawdown Manager in the same way as for a
normal drawdown transaction.
To enter an equity investment (buy):
1. In Drawdown Manager, select New - Equity.
2. Select the facility and tranche that you want to use in the equity investment in the new
transaction row in the Transaction view.
3. Ensure that the transaction sign is set to Buy.
4. Complete the remaining details in the same way as for a normal drawdown except for the
Nominal Amount.
Note: For Equities, it is important to enter the Units and Deal Price for the system to calculate the
Book Value.
See 4.2.1 Entering drawdown transactions on page 61 for information about the values you need
to specify.
6.2.2 Entering equity divestments
Divestments of individual equity investments are simply done as ’Sell’ transactions in Drawdown
Manager. Direct equity investments must already have been made under the facility.
When you decide to divest, a separate event is created.
To enter an equity divestment (sell):
1. In Drawdown Manager, select New - Equity
2. Select the facility and tranche that you want to use in the equity investment in the new
transaction row in the Transaction view.
3. Ensure that the transaction sign is set to Sell.
4. Complete the remaining details in the same way as for a Equity Investments.
Note: To ensure that there is no short selling of any Equity under a Facility/Tranche the result
defined at the instrument level must have the switch Matching by Facility set on in the Selling
page.
6.2.3 Capturing dividend events
Dividends are supported as one of the standard activity-based corporate actions in TRM. A Dividend
event is created as follows:
1. When the information about the dividend is declared by the issuer of the security, the equity
instrument definition needs to be updated with the dividend information using the feature
Equity-Cash-Dividend.
See the guide TRM Instruments: Processing and Calculations for more information.
2. On the ex-dividend date, the equity is quoted without the dividend and the market price drops
approximately by the amount of the dividend. The exact amount of the dividend is known at the
end of the previous business day. It is calculated from the position at the close of business prior
to the ex-dividend date.

6 Managing equity
6.2 Processing equity investments
Commercial Loans Module (CLM) User Guide 105
The Dividend activity that creates the dividend transaction(s) needs to be run at the beginning of
the ex-dividend date (or at the end of the previous day).
Note: See the TRM User Guide for general information on running activities, and also specific
information on the Dividend activity parameters.
3. After the activity has run and the dividend transactions are created, verify and accept the
transactions.
6.2.4 Capturing other corporate actions
There are also some other corporate actions that can be performed on Equities within the CLM
framework. These are:
•Equity Split
•Equity Conversion
•Equity Detachment
•Equity Return of Capital
As for dividends, the corresponding feature should be attached to the Equity instrument. For more
details on these corporate actions, see the TRM Instruments: Processing and Calculations Guide.
6 Managing equity
6.2 Processing equity investments
106 © Wall Street Systems IPH AB - Confidential
Commercial Loans Module (CLM) User Guide 107
Chapter 7 Managing issued guarantees
In CLM, it is possible to manage the lifecycle of issued guarantees by processing guarantee fees,
guarantee calls and guarantee refunds.
An issued guarantee is provided to the lender by an insurer (called the owner) to guarantee that
loan principal and interest payments will be made. The owner issues a guarantee to the lender (the
beneficiary) on behalf of a counterparty. The counterparty pays a fee to the owner for the service of
providing a guarantee.
The following diagram provides an example of the issued guarantee process. The counterparty
requests a loan from the lender and the owner issues a guarantee to the lender (the beneficiary)
who provides the counterparty with a loan. The counterparty pays a fee to the owner, and, in
theory, pays back the loan to the lender.
OwnerBeneficiary
(Lender)
Counterparty
Issues Loan
Pays Loan?
Guarantees Loan
Receives Loan
Requests Guarantee
Receives Loan
Payment
Requests Loan
Pays Fee Receives Fee
Payment
Receives Guarantee
Yes
No
Issued
Guarantee
7 Managing issued guarantees
108 © Wall Street Systems IPH AB - Confidential
If the counterparty cannot pay all or part of the guaranteed loan back to the beneficiary, the
guarantee is called by the beneficiary and the owner has to pay the called amount to the beneficiary.
The following diagram provides an example of the guarantee call process:
If the called amount cannot be settled by the counterparty, the amount is converted into a loan by
the owner, and the counterparty must pay interest to the owner. This process is called a guarantee
refund and is shown in the following example:
OwnerBeneficiary
(Lender)
Counterparty
Pays Loan?
Makes Guarantee Call Pays Beneficiary
No
Pays Loan? Receives Loan
Payment
Yes Receives
Guarantee
Payment
Receives Guarantee
Payment
No
Guarantee
Call
Guarantee
Refund
OwnerBeneficiary
(Lender)
Counterparty
Pays Loan?
Issues Loan
Receives Loan
No
7 Managing issued guarantees
7.1 Setting up issued guarantees
Commercial Loans Module (CLM) User Guide 109
7.1 Setting up issued guarantees
An issued guarantee transaction is entered to represent the guarantee that is being provided by the
owner, on behalf of the counterparty, to the beneficiary. This transaction typically has contingent
principal and interest schedules which represent the loan being guaranteed (the real loan is
recorded in the beneficiary’s/counterparty’s systems), and a fee schedule representing the fee to be
received from the counterparty.
To set up the issued guarantee structure:
1. In Schedule Template Editor, select the system template on which you want to base your own
schedule from the left part of the editor. There are pre-configured schedule templates for a
simple issued guarantee structure. For example, there is the schedule template
GUARANTEE-ON-FIXED for issued guarantees of fixed rate loans. The structure is as follows:
2. Save the schedule template using File - Save As New.
Note: For more information on creating schedule templates, see 2.2 Schedule templates on page
19.
3. In Instrument Editor, configure the Guarantee Call and Guarantee Refund instruments. These
instruments are of type COMMERCIAL-LOAN (see TRM Instruments: Processing and Calculations
Guide for more information).
Note: It is possible to re-use a normal drawdown instrument for the guarantee refund.
4. Create transaction templates in Transaction Template Editor for the issued guarantee and the
guarantee refund transactions (see 2.6 Transaction templates on page 22 for more information).
Note: A guarantee call does not need a transaction template since it is basically an outgoing
payment to the beneficiary.
5. Create a facility template in Facility Template Editor. You need to ensure that both Counterparty
and Beneficiary are mandatory.
6. Create a facility to control any limits and conditions in Facility Editor. You need to configure all
necessary instruments in the Instruments page.
7. You can define global action rules for the guarantee calls and refunds, or facility specific action
rules if a set of unique conditions are required according to the contract (see 5.1.2 Action rules
on page 72 for more information).
Schedule Description
Fixed Interest Keeps a record of the interest amounts due to be paid by the counterparty to
the beneficiary. It is for information only purposes (marked with the attributes
Not Payable, Not Booked) unless a guarantee call is made. This is marked with the
cashflow attribute Guaranteed.
Amortization Keeps a record of the principal amounts due to be paid back by the
counterparty to the beneficiary. It is for information only purposes unless a
guarantee call is made. This is marked with the attribute Guaranteed.
Guarantee Amortization Used to represent the amounts and dates that are to be used in calculating the
guarantee fee. The dates can be offset and therefore different to the underlying
loan between the counterparty and the beneficiary. This is a pseudo cashflow.
Guarantee Fee Holds details of the rate used to pay the fee and the dates on which it should
be paid. This is the only schedule on an issued guarantee transaction which
creates payable cashflows.
7 Managing issued guarantees
7.2 Processing issued guarantees
110 © Wall Street Systems IPH AB - Confidential
7.2 Processing issued guarantees
Issued guarantees are entered in a similar way to loan drawdowns using Drawdown Admin and the
command New - Issued Guarantee (see 4.2 Processing drawdowns on page 61 for more information).
The transaction structure is created in accordance with the transaction template and you need to
complete all mandatory fields (such as Rates). An issued guarantee specific field called Guarantee
Delay can be used to adjust the dates for the guarantee amortization and guarantee fee cashflows.
This is done by propagating values in the Offset and Payment Offset fields in the schedules.
7.3 Processing guarantee calls
Guarantee calls are processed in Drawdown Admin. You generate a transaction of kind Guarantee Call
between the owner and the beneficiary (the lender): the owner pays the called amount to the
beneficiary. The transaction has closing cashflows targeting the issued guarantee transaction for the
amounts that are being called and an outgoing cashflow for the amount to be paid.
To process a guarantee call:
1. Query for and then select the relevant issued guarantee transaction.
2. Right-click on the issued guarantee transaction and select the action Guarantee Call. Enter details
in the following dialogue box:
3. Click Next. Using the values that you have entered, the system will search for a matching action
rule for the event type Guarantee Call. If it does not find one, you need to configure a matching
action rule in Action Rule Editor (see 5.1.2 Action rules on page 72). If the system finds a
matching action rule, a second dialogue box will be displayed. Enter the necessary information:
Information Description
Action Date (Mandatory) The Call Date of the event. The default value is the current date.
This value can be modified.
Event Subtype (Mandatory) You identify an Event Subtype as one of the available values for the
Event Type Guarantee Call. The values are the following:
•Specific Due Date: The guarantee call is made for any amounts due on the
Call Value Date.
•Full: The guarantee call is made for the outstanding nominal amount as of
the Call Value Date.
Information Description
Action Date (Read-only) The dialog is populated with the Action Date provided earlier.
Event Subtype (Read-only)
If you provided an Event Subtype:
- The dialog is populated with the value.
If you did not provide an Event Subtype:
- The value is the one in the field Event Subtype of the selected condition.
Event Condition ID (Read-only) The default is the ID of the selected action rule. This condition is
used to control some of the subsequent fields in the dialog.
Call Method (Mandatory) The default is based on the selected action rule as follows:
•Outstanding Nominal - Used when the Event Subtype= Full.
•Past Due Payment - Used when the Event Subtype = Specific Due Date.

7 Managing issued guarantees
7.4 Processing guarantee refunds
Commercial Loans Module (CLM) User Guide 111
7.4 Processing guarantee refunds
Guarantee refunds are processed in Drawdown Admin. You generate a loan transaction of the kind
Guarantee Refund between the owner and the counterparty, converting the called amount that the
owner has paid to the beneficiary into a loan for the counterparty.
Call Delay (Mandatory) The default is based on the selected action rule. The number
represents the offset days between the Call Value Date and the Call Date.
Call Payment Delay (Mandatory) The default is based on the selected action rule. The number
represents the offset days between the Call Date and the Call Payment Date.
Opening Date The default is the Action Date. This is either the date you provided earlier or the
current date. You can change this to any date on or before the Call Value Date.
Call Value Date The default is the Opening Date. You can manually change this to any later
date.
Call Date The default is the Call Date and is calculated as follows:
•Call Date = Call Value Date + Call Delay.
You can change this to any earlier date on or after the Call Value Date.
Call Payment Date The default is the Call Payment Date and is calculated as follows:
•Call Payment Date = Call Date + Call Payment Delay.
You can manually change this to any earlier date after the Call Date.
Call Currency (Read-only) The default is the Call Currency which is the currency of the
drawdown.
Guaranteed Amount (Read-only) The Guaranteed Amount is calculated according to the selected Call
Method and Call Value Date as follows:
If Call Method = Past Due Payment:
- Sum of all payment amounts of cashflows identified as Guaranteed
where:
Cashflow Payment Date = Call Value Date, and
Cashflow does not have status Called.
If Call Method = Outstanding Nominal:
- Outstanding guaranteed nominal amount of the transaction as of the
Call Value Date.
Called Amount The default is the full Guaranteed Amount calculated above. You can change this
to any other amount.
Call % (Read-only) The Call % is calculated as follows:
-Call % = (Called Amount / Guaranteed Amount) * 100.
Information Description

7 Managing issued guarantees
7.4 Processing guarantee refunds
112 © Wall Street Systems IPH AB - Confidential
To process a guarantee refund:
1. Query for and then select the relevant guarantee call transaction.
2. Right-click on the guarantee call transaction and select the action Guarantee Refund. Enter details
in the following dialogue box:
Note: It is important that the Refund instrument has the features GUARANTEE-REFUND and
GUARANTEE-REFUND-TRADING, so that the cashflows are generated with the correct sign.
3. Click Next.
Information Description
Action Date (Mandatory) The default is the current date. You can change this to any date.
The Action Date is used as the Opening Date of the event.
Event Subtype You identify Event Subtype as one of the available values for Event Type Guarantee
Refund. Not currently used.
Event Date Method (Mandatory) You can set the Event Date Method to one of the following:
•Any:
-Refund Value Date can be set to any date.
•Value Date:
-Refund Value Date is equal to the value date of the underlying
(guarantee call) transaction.
Information Description
Action Date (Read-only) The dialog is populated with the Action Date provided earlier.
Event Subtype Not currently used
Event Date Method (Read-only) Value given in the previous dialogue box.
Event Condition ID (Read-only) The default is the ID of the selected action rule. This condition is
used to control some of the subsequent fields in the dialog.
Refund Instrument (Mandatory) The default value is based on the selected facility and action rule
set up as follows:
If Refund Instrument is blank (i.e. no value is given in the set up):
- You must specify an instrument in the action rule or in the Instrument
page of the facility.
If Refund Instrument is not blank (i.e. a value is given in the set up):
- The value is the one given in the action rule.
Refund Template (Mandatory) The default value is based on the selected facility and action rule
set up as follows:
If Refund Template is blank (i.e. no value is given in the condition):
- You must specify an instrument in the action rule or in the Instrument
page of the facility.
If Refund Template is not blank (i.e. a value is given in the condition):
- The value is the one given in the action rule.
Opening Date The default is the Action Date you entered earlier or the current date. You can
change this to any date on or before the Value Date.

7 Managing issued guarantees
7.5 Processing actions on issued guarantees
Commercial Loans Module (CLM) User Guide 113
7.5 Processing actions on issued guarantees
It is important for the owner to keep track of any events that occur on the underlying loan between
the counterparty and the beneficiary. This ensures that correct fees are paid and correct amounts
are called. Therefore, loan events such as prepayments and rate renewals can be processed against
issued guarantee transactions in the normal way (see 5.2 Processing loan event actions on page 75
for more information).
Refund Value Date (Read-only) The default Refund Value Date is based on the Action Date and the
Event Date Method as follows:
If Event Date Method = Any:
-Refund Value Date = Refund Value Date can be set to any date.
You can change the Refund Value Date to any date on or after the Opening Date.
If Event Date Method = Value Date:
-Value Date = Value date of the guarantee call transaction.
Call Currency (Read-only) The default is the currency of the guarantee call.
Called Amount (Read-only) The default is the total Nominal Amount of the guarantee call and
any Accrued Fee cashflow(s) as of the Value Date of the guarantee call.
Refund Currency The default is the Call Currency. You can change this to any other currency.
Refund FX Rate If Call Currency = Refund Currency:
- The field is read-only
If Call Currency != Refund Currency:
- The field can be edited.
Note: You must provide an FX rate to convert Called Amount from Call Currency
to Refund Currency.
Refund Amount The default is calculated as follows:
-Refund Amount = Called Amount converted with Refund FX Rate.
You can change this to any other amount.
Refund % The default is calculated as follows:
-Refund % = (Refund Amount / Called Amount converted with Refund FX
Rate) * 100.
This field is read-only.
Information Description
7 Managing issued guarantees
7.5 Processing actions on issued guarantees
114 © Wall Street Systems IPH AB - Confidential

Commercial Loans Module (CLM) User Guide 115
Chapter 8 Monitoring loan activity
This chapter describes the different tools that are available in CLM for monitoring loan activity.
8.1 Monitoring debt positions
Monitoring debt positions in CLM is based on the concept of identifying cashflow types and
aggregating cashflow types into groups.
All payments taking place under loan operations in CLM, for example, the amounts due from a
borrower or for a contract, originate from cashflows of drawdowns or event transactions.
Each individual cashflow is identified by a specific Cashflow Type.
Cashflow Type is an attribute of a schedule which is assigned during the definition of the schedule
structure; for example, an interest rate component in a drawdown would typically be represented by
separate schedules, each with its respective Cashflow Type (such as, Base Interest, Spread Interest,
Mark-Up Interest, and so on). Similarly, various event transactions will create specific types of
cashflows; for example, a Late Payment event may result in a Late Payment interest flow or a Late
Payment penalty.
Cashflow types are then associated with a Cashflow Group.
Each group is organized into a logical hierarchy, with each cashflow type belonging to a specific
group in the hierarchy. For example, a global amount due can be broken down into its different
components (such as Principal, Fee, and Interest). These different types of cashflow can then be
categorized into groups. Prepayment indemnities and cancellation fees, for example, could both
belong to a Fee cashflow group.
Using cashflow types and groups, cashflows can be identified and aggregated to enable you to
analyze each component of the debt position in detail.
Note: This chapter only describes the information specific to monitoring the debt position in CLM.
For information about the values or configuration needed for monitoring positions in TRM
in general, see the TRM User Guide.
8.1.1 Debt Monitor
Debt Monitor is a version of TRM’s Treasury Monitor that is designed specifically for monitoring the
debt situation in CLM.
In Debt Monitor, you can aggregate cashflow amounts into a logical grouping by configuring the
axes values and selecting the appropriate key-figures for analysis as in other monitor applications.
When Debt Monitor is initialized by a query against a given counterparty and for a given period, all
matching cashflows are returned in the analysis.
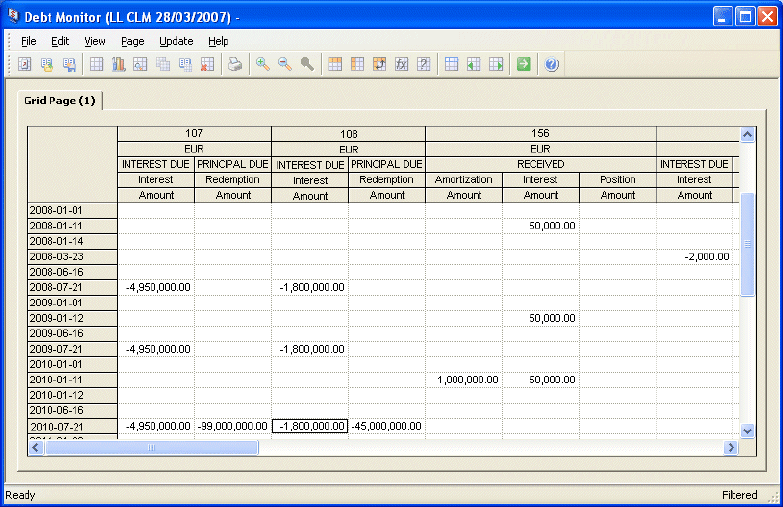
8 Monitoring loan activity
8.1 Monitoring debt positions
116 © Wall Street Systems IPH AB - Confidential
The below example shows a debt analysis with the axes configured as follows:
•Column configuration: Facility Id, Currency, Cashflow Group, Cashflow Type, and Key-Figure =
Amount
•Row configuration: Payment Date (Historical)
8.1.1.1 Debt Monitor menus
The menu items in Debt Monitor are the same as the menu items in Treasury Monitor.
8.1.1.2 Start-up parameters
The start-up parameter used to open Treasury Monitor’s Debt Monitor mode is:
FKTreasuryMonitor.exe --mode debt-flows
8.1.2 Monitoring debt flows
Debt analysis in Debt Monitor is based on the concept of aggregating cashflows originating from
drawdown or event transactions based on a cashflow’s type, group, or other attribute.
Debt Monitor in CLM works in basically the same way as TRM’s Treasury Monitor, but differs in the
following respects:
•Position queries
Queries on the position are only made against drawdown or event transactions, so your debt
positions cannot include any other type of transaction.
See 8.1.2.1 Defining position parameters on page 117.
•Axis values
Monitoring debt in Debt Monitor is based on the concept of aggregating cashflows originating
from drawdown or event transactions based on a cashflow’s type, group, or other attribute.
Therefore, the Cashflow grouping plays an important part in debt analysis.
Most of the axis values used for grouping the data in Debt Monitor are the same as the axis
values in Treasury Monitor. However, there is one additional grouping that is specific to
monitoring debt positions: Loans.

8 Monitoring loan activity
8.1 Monitoring debt positions
Commercial Loans Module (CLM) User Guide 117
See 8.1.2.2 Selecting axis (column and row) groupings on page 119.
•Key-figures
Debt Monitor has a number of key-figures unique to the debt situation.
See 8.1.2.4 Selecting key-figures in Debt Monitor on page 120.
8.1.2.1 Defining position parameters
To define position parameters:
1. Start Debt Monitor or select File - Position Parameters to open the Position Parameters dialog.
2. Do one of the following:
–If you want to select a position you have previously saved, enter the following information
and click OK:
–If you want to enter new position parameters, click Details to display the lower part of the
dialog and fill in the parameters as described in the following steps.
If you click Details again, the lower part of the dialog is hidden.
3. In the Selection page, enter the parameters you want to monitor:
Information Description
Position Position you want to monitor by selecting one of the views available in the
selection list.
This field is available if you have launched Debt Monitor in pre-configured
mode. Once you have selected a position, the other parameters for the position
are populated as read-only information.
Book Book you want to monitor.
Information Description
Portfolio Portfolio you want to monitor.
When you specify a portfolio, all cashflows from transactions in the given portfolio or
any of its subportfolios within that portfolio’s hierarchy structure are included in the
query.
Note: The selection list shows only those portfolios (and their subportfolios) to which
you have been given access. Portfolio permissions are set using Portfolio
Editor’s Allowed Users page (see the TRM User Guide).
Transaction State Minimum state that the transactions must have reached to be included in the analysis.
All cashflows from transactions in the given transaction state or any later state are
included in the query.
Note: The various states that transactions can have are configurable to your
organization.
Period Start First date of the period you want to monitor.
All outstanding cashflows as of this date (that is, cashflows with Payment Date later
than or equal to Period Start) from transactions where:
•Opening Date is before Period Start
•Closing Date is later than or equal to Period Start.
Period Start is the first (past) date included in the analysis.
8 Monitoring loan activity
8.1 Monitoring debt positions
118 © Wall Street Systems IPH AB - Confidential
4. In the Selection 2 page, enter any additional parameters if you want to monitor the debt position
based on more specific loan-related criteria.
5. Enter the parameters you want to use for calculation and result purposes in the Calculation page
(see the TRM User Guide for more details).
6. If you do not want to update the analysis in real-time, turn off the Update in Real Time switch (it is
turned on by default).
As the system calculates all transaction-related cashflows that are active for the selected period
and portfolio, you may wish to turn off the switch for large portfolio structures. You can revert to
real-time mode by selecting Update - Realtime.
Period End Last date of the period you want to monitor.
All outstanding cashflows as of this date (that is, cashflows with Payment Date later
than or equal to Period End) from transactions where:
•Opening Date is before Period End
•Closing Date is later than or equal to Period End.
Period End is the current date of the analysis.
Note: If you enter a date in the past, all cashflows from drawdowns or event
transactions that are entered in the system after Period End are excluded from
the analysis.
Result Mode Result mode (accounting standard): FO/MO, FAS, IFRS, or Local.
State Context Value specifying whether certain transaction types are to be included in the analysis.
Information Description
Counterparty Counterparty you want to monitor.
All cashflows from transactions against the given counterparty are included in the
analysis.
Approval Approval you want to monitor.
All cashflows from transactions in facilities under the given approval are included in
the analysis.
Mandate Mandate you want to monitor.
All cashflows from transactions in the given mandate are included in the analysis.
Facility Facility you want to monitor.
All cashflows from transactions in the given facility are included in the analysis.
Tranche Tranche you want to monitor.
All cashflows from transactions in the given tranche are included in the analysis.
Drawdown
Number
Number of the drawdown transaction you want to monitor.
All cashflows from transactions belonging to the given drawdown are included in the
analysis.
Note: The system actually searches on the Continuation Number and therefore gives
a net position of a drawdown, including the original cashflows plus any
cashflows from subsequent loan events (such as, Prepayments or
Amendments).
Information Description
8 Monitoring loan activity
8.1 Monitoring debt positions
Commercial Loans Module (CLM) User Guide 119
7. Save the position parameters you have defined in the Saving page:
Note: If you save the position parameters with the current day, they are interpreted as "today"
whenever they are used in the future.
8. Click OK.
Debt Monitor opens.
Note: The application does not contain any data if you have not saved a page configuration for
the portfolio you selected.
8.1.2.2 Selecting axis (column and row) groupings
Using the View - Select Columns and View - Select Rows menu options, you can open the multi-selection
lists that enable you to select the axis values according to how you want to group the information
displayed in the monitor’s page.
You can configure the values of some axes and also select the same axis as many times as you
want. This allows you to display information for multiple instances of the same axis grouping.
The axis groupings that are used to analyze debt positions in Debt Monitor are similar to those
available in Treasury Monitor.
The following sections describe the groupings that are specific to analyzing debt positions.
8.1.2.2.1 Cashflow
8.1.2.2.2 Loans
Information Description
Position Name Name for the position.
Position Owner User or user group who can modify the position.
Position User User or user group who can use the position.
Value Groups information according to...
Cashflow Group Cashflow Group is assigned from the selected cashflow hierarchy based on the type
and status of the payment cashflow.
It is also possible to use a cashflow group from a lower level in the hierarchy as the
top group:
1. Right-click this field in the axis values list and select Configure Values.
2. Specify the level you want from the selection list.
See 8.1.2.3 Configuring axis values on page 120.
Cashflow Type Cashflow type, namely: Principal; Redemption; Expiration; Interest; Coupon; FX
settlement; Balance; Fixing; Fee.
Cashflow Main Type Main type of cashflow, such as Principal or Fee/Tax.
Value Groups information according to...
Payment Date
(Historical)
Date when the loan’s payment or payments were made.
Approval
Approval Name
Approval under which the loan’s drawdown transactions were made.
8 Monitoring loan activity
8.1 Monitoring debt positions
120 © Wall Street Systems IPH AB - Confidential
8.1.2.3 Configuring axis values
Some axis groupings can be defined further by configuring their values. It is also possible to select
the same axis more than once. For example, you could select multiple instances of the Cashflow
Group grouping and configure each one to display a specific level in the cashflow hierarchy.
To configure the axis values:
1. Select View - Select Columns or View - Select Rows to open the corresponding configuration dialog.
2. In the resulting dialog, select the grouping value you want to configure from the Selected list on
the right side of the dialog.
3. Right-click the grouping value and select Configure Values.
The values available for this axis are displayed. Note that this menu item is only available for
axes that can be configured further.
4. In the resulting dialog, select the value you want to assign to the axis.
5. Click OK.
6. Repeat the procedure for each axis grouping you want to configure.
8.1.2.4 Selecting key-figures in Debt Monitor
The key-figures available for selection in Debt Monitor are the same as those available in TRM’s
Treasury Monitor. However, as debt analysis is essentially just a consolidated analysis of past and
future payments, only a limited number of these key-figures are actually of interest.
The following table describes the key-figures that are specific to analyzing debt positions.
Mandate
Mandate Name
Mandate under which the loan’s drawdown transactions were made.
Facility
Facility Name
Facility under which the loan’s drawdown transactions were made.
Tranche
Tranche Nam e
Tranche under which the loan’s drawdown transactions were made.
Funding Type Funding type used to fund the loan’s drawdown transactions.
Location Location under which the loan’s drawdown transactions were made.
Cashflow From When
Date
The From When date field at the cashflow level.
State Status State or status of the payment cashflow.
Every cashflow selected for analysis is assigned a payment status based on the
Payment Allocation process: None, Past Due, or Allocated.
Value Groups information according to...
Information Description
Payment Amount This key-figure displays the available amount of the cashflow in the Payment Currency of
the cashflow.
For floating-rate cashflows, the Payment Amount used in the analysis is as follows:
• If the cashflow is in the future (Payment Date is later than or equal to Period End),
Payment Amount can be either fixed or estimated
• If the cashflow is in the past (Payment Date is before Period End), Payment Amount is
the fixed payment amount.
Base Payment
Amount
The converted equivalent of the Payment Amount figure in Figure Currency or Base
Currency using the FX spot rate on the Period End date.
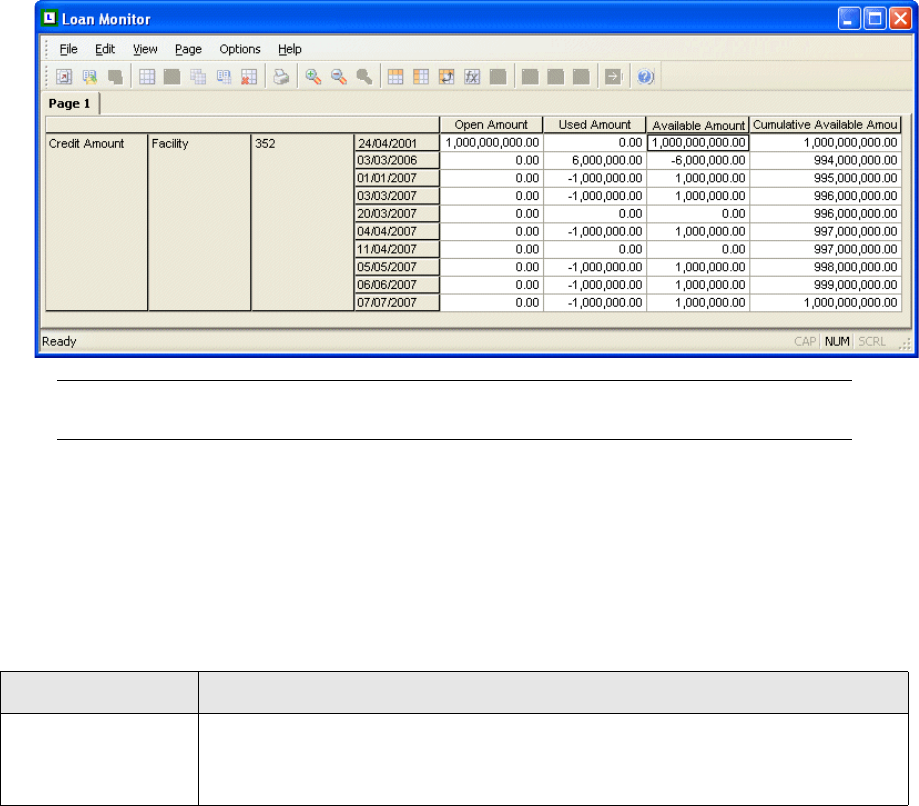
8 Monitoring loan activity
8.2 Monitoring credit positions
Commercial Loans Module (CLM) User Guide 121
All key-figures show results for the period you define in the Position Parameters dialog.
•To open the list of key-figures, select View - Select Key Figures.
For any of the key-figures to be displayed, either your columns or rows must contain the
Key-Figure axis grouping (see 8.1.2.2 Selecting axis (column and row) groupings on page 119).
8.2 Monitoring credit positions
In CLM, you can analyze both the availability and utilization of credit according to principal cashflows
in either the facility currency or the base currency.
The application you use to monitor credit flows is called Loan Monitor.
8.2.1 Loan Monitor
Loan Monitor is a simple type of monitor, similar to TRM’s Treasury Monitor.
Loan Monitor displays the credit movements on a facility and enables you to monitor current
utilization and the remaining available credit amount under the agreement.
Note: Loan Monitor is not a real-time application. You must repeat the query to update the
position to take into account any events that update the credit limits.
8.2.1.1 Loan Monitor menus
The following tables describe the menu items which are specific to Loan Monitor and any layout or
mode which is based on the application.
Other menu items which are common to all monitor applications are described in the TRM User
Guide.
8.2.1.1.1 File
Menu item Description
Query Parameters Opens the Query Parameters dialog which allows you to specify the query parameters.
The Query Parameters dialog opens automatically when you start Loan Monitor.
See 8.1.2.1 Defining position parameters on page 117.
8 Monitoring loan activity
8.2 Monitoring credit positions
122 © Wall Street Systems IPH AB - Confidential
8.2.1.1.2 Options
8.2.1.2 Start-up parameters
It is possible to alter Loan Monitor’s start-up parameters so that the application appears in a
different mode or layout.
The available options listed in the following table can be viewed using the command:
FKLoanMonitor.exe --help
Note: See the TRM User Guide and the TRM System Administration Guide for more information
about start-up parameters.
8.2.2 Monitoring credit flows
You use Loan Monitor to analyze both the availability of credit and utilization of credit under a
facility.
8.2.2.1 Defining query parameters
To define query parameters:
1. Start Loan Monitor or select File - Query Parameters to open the Query Parameters dialog.
2. Enter the query parameters using the information in the following table:
Menu item Description
Base Currency Opens the Base Currency dialog to enable you to define the base currency (or any other
currency) and specify the scenario from which the FX rates are retrieved.
Command Description
--monitoring-entity arg Monitoring entity.
--monitoring-entity-id arg Monitoring entity ID.
--amount-type arg Amount type.
--status arg Status.
--book-name arg Startup book name.
--book-owner arg Startup book’s owner.
--book-user arg Startup book’s user.
--skip Skip the startup dialog.
Information Description
Portfolio ID ID of the portfolio you want to monitor.
Monitoring Entity Entity you want to monitor, for example, Facility.
Monitoring Entity
ID
ID of the entity you want to monitor.
Amount Type Type of amount you want to monitor: Credit.
Related Entity Related entity, such as, an Approval entity, if you want to monitor the credit in further
detail.
Related Entity ID ID of the related entity.
8 Monitoring loan activity
8.3 Querying loan activity
Commercial Loans Module (CLM) User Guide 123
3. Click OK to open Loan Monitor.
Loan Monitor will not contain any data if you have not selected any axis groupings or key-figures
for the page. All key-figures show results for the period you define in the Query Parameters dialog.
Note: For any of the key-figures to be displayed, either your columns or rows must contain the
Key-Figure axis grouping.
8.2.2.2 Configuring Loan Monitor
In the same way as you can configure TRM’s Treasury Monitor, you can configure Loan Monitor
according to your personal preferences by creating pages or groups of pages in books, by selecting
the rows and columns you want to be displayed in each page, and by selecting the values or
key-figures you want to monitor.
You insert a new page using Page - New Grid Page and you select the values you want to display in a
page using View - Select Columns, View - Select Rows, and View - Select Key-Figures.
You can create and save the pages in multiple books either for your own personal use, or to be
shared by other users using File - Save Book As.
8.3 Querying loan activity
CLM provides you with an enhanced query capability which enables you to query different
components of a loan using search criteria, and retrieve the matching entities into a central
application.
This central application, called Loan Manager, facilitates the initiation of further lending activity on a
retrieved entity as follows:
•Acts as a single point of entry to access the main processing applications in CLM
•Uses the values of the entity retrieved into Loan Manager to provide the required data for a new
action or event on that entity in another application.
8.3.1 Loan Manager
Loan Manager is the central application that makes it easier for you to carry out additional
commercial lending activities on an existing loan.
The query parameters you specify in Loan Manager to retrieve a loan entity are used to populate the
parameters in the application you subsequently launch to carry out further actions on that entity.
For example, from Loan Manager, you can query the available credit on an existing loan, then
launch the Drawdown Manager application from Loan Manager to enter a new drawdown on the
same facility/tranche. The facility/tranche details are automatically identified from the query
Status Status the entity must have to be included in the analysis.
Query Date Date of the query. By default, this is today but it can be changed.
Period Start Start date of the query period. By default, this is today but it can be changed.
Period End End date of the query period.
Show Tranches Switch on if you want to display the credit analysis according to tranche.
Include Sublimits Switch on if you want to display sublimits in the credit analysis.
Information Description
8 Monitoring loan activity
8.3 Querying loan activity
124 © Wall Street Systems IPH AB - Confidential
parameters you specified in Loan Manager, leaving you only needing to enter values for the Value
Date and Nominal Amount for the new drawdown.
Note: Loan Manager is solely used for querying purposes and launching other applications. No
actual processing of loan entities is performed in the Loan Manager application itself.
8.3.1.1 Loan Manager menus
The following tables describe the menu items which are specific to Loan Manager and any layout or
mode which is based on the application.
Other menu items which are common to all manager applications are described in the TRM User
Guide.
8.3.1.1.1 View
8.3.1.1.2 Options
8.3.1.2 Start-up parameters
Loan Manager is a special Transaction Manager layout, designed specifically for querying activities
on existing loans and their components.
The start-up parameter used to open the Loan Manager layout is:
FKTransactionManager.exe -c lm.xml --view loan-manager
See the TRM User Guide for information about the options available.
Menu item Description
Counterparty Query Displays the Counterparty Query view.
You enter your search criteria in the Counterparty Query view to initiate the search
according to a counterparty’s attributes.
The results of the search are displayed in the Counterparty view.
Facility Query
Facility
Displays the Facility Query and Facility views.
You enter your search criteria in the Facility Query view to initiate the search
according to a facility’s attributes.
The results of the search are displayed in the Facility and Tranche views.
Transaction Query
Transaction
Displays the Transaction Query and Transaction views.
You enter your search criteria in the Transaction Query view to initiate the search
according to a drawdown transaction’s attributes.
The results of the search are displayed in the Transaction view.
Approval Query
Approval
Mandate Query
Mandate
Displays the Approval/Mandate Query and Approval/Mandate views.
You enter your search criteria in the Approval/Mandate Query view to initiate the
search according to the attributes of an approval or mandate.
The results of the search are displayed in the Approval/Mandate view.
Menu item Description
Configure Loan
Monitor Defaults
Configure Debt
Monitor Defaults
Opens a configuration dialog to enable you to specify the default settings you want to
use when launching either Loan Monitor or Debt Monitor from Loan Manager.
See 8.3.1.4 Configuring default settings on page 125.
8 Monitoring loan activity
8.3 Querying loan activity
Commercial Loans Module (CLM) User Guide 125
8.3.1.3 Customizing Loan Manager
You can customize Loan Manager according to your personal preferences by selecting the views you
want to be displayed from the View menu, selecting the columns you want to see in each view, and
moving and rearranging the selected views in the window.
You can save the current display by saving it as a layout in the Layout menu using Layout - Save. You
can create and save multiple layouts either for your own personal use, or to be shared by other
users.
When you start the application, the default layout is automatically displayed. You can create as
many layouts as you require and tailor each view according to your requirements.
The views in the layout are displayed as individual windows: you can detach and reposition the
views in Loan Manager in the same way as you can reposition the sub-windows in Transaction
Manager: see the TRM User Guide for more information.
8.3.1.4 Configuring default settings
From Loan Manager’s Options menu option, it is possible to configure the default settings to be used
for Loan Monitor and Debt Monitor when these applications are launched from Loan Manager.
To configure Loan Monitor’s default settings:
•Select Options - Configure Loan Monitor Defaults and fill in the fields in the resulting dialog, as
follows:
To configure Debt Monitor’s default settings:
•Select Options - Configure Debt Monitor Defaults and fill in the fields in the resulting dialog, as follows:
8.3.2 Initiating loan activities from Loan Manager
To be able to initiate further activity on an existing loan from Loan Manager, you first need to
retrieve the related loan entity into the application. To locate the specific entity you want, you can
Information Description
Loan Monitor Book Loan Monitor book you want to open when Loan Monitor is launched from Loan
Manager.
Loan Monitor Status Status of the entities (Provisional or Final) that you want to be displayed when
Loan Monitor is launched from Loan Manager.
Information Description
Debt Monitor
Top Portfolio
Top Portfolio to display when Debt Monitor is launched from Loan Manager.
Debt Monitor Book
from Counterparty
Debt Monitor book you want to open when Debt Monitor is launched following a
search by Counterparty in Loan Manager.
Debt Monitor Minimum
State from Counterparty
Minimum state the transactions must have reached that are displayed when
Debt Monitor is launched following a search by Counterparty in Loan Manager.
Debt Monitor
Book from Facility
Debt Monitor book you want to open when Debt Monitor is launched following a
search by Facility in Loan Manager.
Debt Monitor Minimum
State from Facility
Minimum state the transactions must have reached that are displayed when
Debt Monitor is launched following a search by Facility in Loan Manager.
Debt Monitor
Book from Drawdown
Debt Monitor book you want to open when Debt Monitor is launched following a
search by Drawdown in Loan Manager.
Debt Monitor
State from Drawdown
Minimum state the transactions must have reached that are displayed when
Debt Monitor is launched following a search by Drawdown in Loan Manager.
8 Monitoring loan activity
8.3 Querying loan activity
126 © Wall Street Systems IPH AB - Confidential
base your search on the following entity types: Clients, Facilities, Drawdown transactions, and
Approvals or Mandates.
Note: Retrieving loan entities in Loan Manager is done in the same way as retrieving normal TRM
transactions into Transaction Manager: see the TRM User Guide for more information.
The activities which can be initiated on existing loan components from Loan Manager vary according
to the type of loan entity you retrieve into the application.
For example, some of the applications and associated loan activities that can be launched from Loan
Manager for an entity are as follows:
To initiate a loan activity on an entity, and launch the associated application from Loan Manager:
1. In the appropriate Query view, enter the query criteria for your search.
2. Right-click the query row and select Execute to run the query.
Only the loan entities which match all the criteria are retrieved and displayed in the appropriate
Loan Manager view. A message is displayed if no entities are found.
3. Select and right-click the loan entity for which you want to initiate loan-related activity.
Note that you cannot initiate any action or event from a Query view. When you have located the
loan entity you want, you need to move to the appropriate non-Query view.
4. From the resulting right-click menu, select the action or event you want to perform on the loan
entity.
The associated application launches automatically and uses the values of the retrieved entity as
parameters for the new action or event.
For example, to increase the available credit on a facility agreement, you would do the following:
–In the Facility Query view, enter search criteria to retrieve a facility.
–Right-click the facility you want in the Facility view and select New Credit Amendment.
Amount Event Manager’s Capture mode launches automatically and displays the New Credit
Amendment dialog.
Entity Application Loan activity
Facility
Tranche
Amount Event Manager -
Capture mode
New Credit Amendment
New Subsidy Estimation
New Credit Transfer
Counterparty
Facility
Tranche
Static Data Editor View/Amend Entity
New Entity
Drawdown transaction
Tranche
Drawdown Manager -
Capture mode
New Drawdown
Facility
Tranche
Action Rule Editor List Action Rules
Drawdown transaction Drawdown Manager -
Drawdown Action mode
New Drawdown Action
Facility Loan Monitor
Debt Monitor
Open Loan Monitor
Open Debt Monitor
Facility
Counterparty
Debt Monitor Open Debt Monitor

8 Monitoring loan activity
8.4 Managing payment reminders
Commercial Loans Module (CLM) User Guide 127
–The dialog already contains some values which are inherited automatically from the facility
definition. The only values you need to enter to action the amount event are as follows:
Event Amount = the amount of the credit increase
Event Subtype = Increase.
Note that, if necessary, you can override some of the defaulted values (such as, Opening
Date).
8.4 Managing payment reminders
CLM can generate four types of reminders that can be sent to your counterparty or other recipients
depending on the configuration of Message Manager. They are:
•CLM Payment Reminder: This reminder is generated ’n’ number of days before an amount is
due for payment. By running the CLM Payment Reminder Generation activity, a Payment
Reminder of the type Payment Reminder is generated.
Note: It is possible to send payment reminders to facility adhoc client contacts if the payment
reminder has been generated by a facility. When you have configured the message type
and the rule (by adding the Payment Reminder Message Object to the message type and the
Recipient Role Facility/Tranche Adhoc to the message type and rule), and when the payment
reminder has a facility in the Facility Input field, the CLM Payment Reminder Generation activity
looks at the adhoc clients on the facility and generates the messages accordingly.
•CLM Late Payment Reminder: This reminder is generated ’n’ number of days after an amount
was due for payment. By running the CLM Late Payment Reminder Generation activity, a
Payment Reminder of the type Late Payment Reminder is generated.
•CLM Payment FX Rate: In some circumstances, it may be necessary to give the counterparty
the option to pay the due amount in a different currency from the one in which the payment is
due. In this case, the reminder is generated ’n’ number of days before an amount is due for
payment. The activity finds the relevant Facility for the retrieved cashflows and determines the
FX rate based on the Payback FX Rates page. By running the CLM Payment FX Rate Generation
activity, a Payment Reminder of the type FX Rate Notification is generated using the configured
Payback FX rates.
•CLM Subsidy Call Follow Up: This reminder is generated ’n’ number of days after a Subsidy
Call was due for payment. By running the CLM Subsidy Call Follow Up Generation activity a
Payment Reminder of the type Subsidy Call Follow-up is generated.
All of these reminders are generated using activities, see Appendix C Activity parameters on page
169.
You can view and accept these reminders in Payment Reminder Admin. Accepting a reminder
generates a message request, which you can process in Message Manager to produce a document.
8.4.1 Payment Reminder Manager
Payment Reminder Manager is an application which is based on the Transaction Manager application
layout. It is used to view and process reminders which are generated through activities.
8.4.1.1 Payment Reminder Manager menus
The following tables describe the menu items which are specific to Payment Reminder Manager and
any layout or mode which is based on the application.
Other menu items which are common to all manager applications are described in the TRM User
Guide.
8 Monitoring loan activity
8.4 Managing payment reminders
128 © Wall Street Systems IPH AB - Confidential
8.4.1.1.1 View
8.4.1.1.2 Command
Note: Start-up parameters
Payment Reminder Manager is a special Transaction Manager layout, designed specifically for
processing payment reminders.
The start-up parameter used to open Transaction Manager’s Payment Reminder Manager layout is:
FKTransactionManager.exe -c pr.xml --view payment-reminder
8.4.2 Processing payment reminders
8.4.2.1 Retrieving payment reminders
You retrieve payment reminders much in the same way as you retrieve transactions in Transaction
Manager. You use the Payment Reminder Query view to retrieve reminders that were previously
generated by any of four activities mentioned previously. Here are some examples of the types of
queries you can do:
Menu Item Description
Payment Reminder This is the main view of Payment Reminder Manager. Unlike the other views, this
view is always visible. The fields in this view mainly relate to the input parameters
from the activity that created the Payment Reminder. Other fields include Number,
State and Payment Reminder Type.
When you run a query the resulting items are displayed in this view. You do most
of the payment reminder management in this view.
Payment Reminder Query Displays the Payment Reminder Query view.
This view is used to retrieve the four types of reminders described previously that
are already in the system for monitoring or further processing.
Entry Displays the Entry view.
This view is used to list outstanding entries. Each Payment Reminder has at least
one entry. There may be multiple entries if the previous amounts are still
outstanding. These are flagged as overdue (Overdue column = Yes).
Cashflow Displays the Cashflow view.
This view is used to list all of the cashflows included in the Payment Reminder.
Each cashflow refers to the entry in which it is included.
Amount Left Displays the Amount Left view.
This view shows the outstanding Nominal Amount of the Drawdowns included in
the Payment Reminder.
Menu Item Description
Accept / Cancel / Reject /
Validate
Allows you to carry out different types of commands on payment reminders.
How to query... Action
One particular reminder type In the Type column, select the reminder type you want to retrieve.
For example, to retrieve only payment reminders, select Payment
Reminder
.
All reminders generated within a period In the Date From and Date To columns, enter the start and end
date of the period respectively.

Commercial Loans Module (CLM) User Guide 129
Chapter 9 Managing payment advices
Payment advices are details of payments that are going to be made. They can be received directly
from the SWIFT network, or can be manually input, for example, following notification by fax of an
incoming payment.
It is then possible to match the incoming payments detailed in the payment advice with the
cashflows you expect to receive from either one or several borrowers. This process is called
payment allocation: see Chapter 10 Managing payment allocations on page 133 for more
information.
The management and processing of payment advices is performed in Payment Advice Manager (a
manager application based on the Transaction Manager layout).
Payment Advice Manager is also used to enter payment advices manually and to view imported
SWIFT advices.
Payment advices can be managed in CLM in a similar way to drawdown transactions. At each stage
in the processing, they can be viewed, modified, and moved forwards (or backwards) in the flow.
9.1 Payment Advice Manager
Payment Advice Manager is an application which is based on the Transaction Manager application
layout. It is used to manage, monitor, and process payment advices, which have either been
entered manually, or received automatically as imported SWIFT advices.
Different modes of Payment Advice Manager can be configured to be used for a particular purpose or
to display payment advices in a particular state in the process flow. These modes are configured at
implementation to meet the requirements of your organization.
9.1.1 Payment Advice Manager menus
The following tables describe the menu items which are specific to Payment Advice Manager and any
layout or mode which is based on the application.
Other menu items which are common to all manager applications are described in the TRM User
Guide.
9.1.1.1 View
Menu Item Description
Payment Advice Query Displays the Payment Advice Query view.
This view is used to retrieve all payment advices that are already in the system
(either allocated or unallocated) for monitoring or further processing.
9 Managing payment advices
9.2 Processing payment advices
130 © Wall Street Systems IPH AB - Confidential
9.1.1.2 Command
9.1.1.3 New
9.1.2 Start-up parameters
Payment Advice Manager is a special Transaction Manager layout, designed specifically for
processing payment advices.
The start-up parameter used to open Transaction Manager’s Payment Advice Manager layout is:
FKTransactionManager.exe -c pm.xml --view payment-advice
9.1.3 Customizing Payment Advice Manager
Payment Advice Manager consists of two views in which the payment advice information is displayed
or processed:
•Payment Advice Query view is opened from the View menu and is used to retrieve payment
advices that are already in the system for further processing.
•Enter Payment Advice view is always present in the display. It is used to view and process the
retrieved payment advices, or to enter new ones.
You can select the information you want to see in each view, by selecting View - Select Columns.
It is possible to save the current display by saving it as a layout in the Layout menu using Layout -
Save.
9.2 Processing payment advices
9.2.1 Entering payment advices
It is possible to manually enter the details of any non-SWIFT payment advices (for example, an
E-mail notification or telephone call) in the Enter Payment Advice view of Payment Advice Manager.
To enter details of a payment advice:
1. Select New - Payment Advice.
2. Enter the payment advice information in the new row in the Enter Payment Advice view.
Menu Item Description
Apply / Accept /
Validate / Refund /
Reject / Cancel
Allows you to carry out different types of commands on payment advices.
See 9.2 Processing payment advices on page 130.
Menu Item Description
Payment Advice Inserts a new row in the Enter Payment Advice view to allow you to manually enter a
payment advice.
See 9.2.1 Entering payment advices on page 130.
Information Description
Advice Format Format in which information about the incoming payment was received, such as Fax,
E-mail, or telephone.
Date Date on which the payment will be received.

9 Managing payment advices
9.2 Processing payment advices
Commercial Loans Module (CLM) User Guide 131
9.2.2 Approving payment advices
When you have entered a payment advice, select one of the following actions from the Command
menu:
•Apply to save the payment advice details and not change its state
•Accept or Validate to save the payment advice and move its state forward in the process flow.
After a payment advice has been applied or validated, some information is automatically set by the
system:
•Payment Advice ID: identifies the payment advice in the system
•State: shows the payment advice’s position in the workflow.
You can also cancel or reject payment advices using the corresponding menu option.
Note: Allocated payment advices can no longer be modified. To modify an allocated payment
advice, you must first unallocate it. See 10.2.7 Unallocating payment allocations on page
141.
9.2.3 Editing imported SWIFT payment advices
If the system has been configured to import SWIFT payment advices, they are automatically
displayed in Payment Advice Manager. You can edit them by entering comments or additional data
in some of the columns as with manually entered payment advices.
Amount Amount of the payment which will be sent.
Currency Currency in which the payment will be sent.
Our Client details Client ID and banking details.
Counterparty
Client details
Counterparty ID and banking details.
Comments or
further
information
Any comments or further information relating to the payment advice you wish to add
in the remaining available columns.
Information Description
9 Managing payment advices
9.2 Processing payment advices
132 © Wall Street Systems IPH AB - Confidential

Commercial Loans Module (CLM) User Guide 133
Chapter 10 Managing payment allocations
In CLM, it is possible to match any incoming payments detailed in a payment advice with the
cashflows you expect to receive from either one or several borrowers. The individuals or
organizations that make the payments may be those that owe money, or a third party making the
payments on the borrower’s behalf.
This process is called payment allocation. Payments received are matched, either manually, or using
the automatch process, against cashflows generated from transactions.
When payments are fully allocated (or matched), CLM generates accounting events. If there are
differences between expected cashflows due and actual payments received, CLM enables the
identification of any discrepancy (such as an early payment, late payment, underpayment, or
overpayment), and enables authorized users to process these accordingly.
It is also possible to automatically generate payment reminders and even late payment reminders.
This helps to monitor whether all expected amounts (cashflows) arising out of transactions
(including capital repayments, interest, fees, penalty interest, and carried forward amounts) are
paid in full and on time by the payer.
Payment allocations can be managed in CLM in a similar way to drawdown transactions. At each
stage in the processing, they can be viewed, modified, and moved forwards (or backwards) in the
flow.
10.1 Payment Allocation Manager
Payment Allocation Manager is an application which is based on the Transaction Manager layout. It is
used to perform payment allocation, that is, the matching of payment advices with expected
cashflows, and the processing of any over or under payments.
Different modes of Payment Allocation Manager can be configured to be used for a particular
purpose or to display payment allocations in a particular state in the process flow. These modes are
configured at implementation to meet the requirements of your organization.
10.1.1 Payment Allocation Manager menus
The menu items in Payment Allocation Manager are basically the same as the menu items in
Transaction Manager.
Other menu items which are common to all applications are described in the TRM User Guide.
The following tables describe the menu items which are specific to Payment Allocation Manager and
any layout or mode which is based on the application.
10.1.1.1 View
Menu Item Description
Cashflow Query This view is used to retrieve the expected cashflows that need to be allocated. The
retrieved cashflows are displayed in the Cashflow view.
Cashflow This view displays the unallocated expected cashflows fetched by the query carried
out in the Cashflow Query view.

10 Managing payment allocations
10.1 Payment Allocation Manager
134 © Wall Street Systems IPH AB - Confidential
10.1.1.2 Command
10.1.1.3 New
10.1.1.4 Options
Allocated Cashflow This view displays the expected cashflows allocated to the selected payment
allocation.
Allocated Cashflow
Summary
Displays the Allocated Cashflow Summary view.
Payment Advice Query This view is used to retrieve payment advices that need to be allocated. The retrieved
payment advices are displayed in the Payment Advice view.
Note: When you query for payment advices in Payment Allocation Manager, the query
only fetches unallocated payment advices which meet the criteria. However,
when you perform the same query in Payment Advice Manager, both allocated
and unallocated payment advices are fetched.
Payment Advice This view displays the unallocated payment advices fetched by the query carried out
in the Payment Advice Query view.
Allocated Payment
Advice
This view displays the payment advice allocated to the selected payment allocation.
Note: When a payment advice is split between two payment allocations (due to
partial allocation), the system generates two payment advices and assigns
each one with the same Group ID.
Payment Allocation
Query
Displays the Payment Allocation Query view.
This view is used to retrieve payment allocations that are already in the system for
monitoring or further processing.
Matching Cashflow
Groups
This view is populated with cashflows when the Check for multiple matches switch is on
in the automatch processing options and when the system has found more than one
group of cashflows that meet the matching criteria. Each matching set of cashflows
are allotted to a group using the Group ID.
Menu Item Description
Accept / Apply /
Reject / Cancel /
and so on.
Allows you to carry out different types of commands on payment allocations: see 10.2
Processing payment allocations on page 138.
Menu Item Description
Payment Allocation Inserts a new row to in the Payment Allocation view to allow you to manually enter a
payment allocation: see 10.2.5 Manual payment allocation on page 140.
Auto Match
Performs the automatching of payment advices and cashflows due according to the
criteria defined: see 10.2.3 Automatic payment allocation on page 139
Auto Match with
Amount Tolerance
Auto Match with
Tol eranc es
Menu Item Description
Configure Auto Match
Criteria
Allows the definition of the rules that determine which values in payments and
cashflows due have to be equal in order to propose an automatch to the user.
See 10.1.4.1 Auto match criteria on page 136.
Menu Item Description

10 Managing payment allocations
10.1 Payment Allocation Manager
Commercial Loans Module (CLM) User Guide 135
10.1.2 Start-up parameters
Payment Allocation Manager is a special Transaction Manager mode, designed specifically for
processing payment allocations in CLM.
The start-up parameter used to open Transaction Manager’s Payment Allocation Manager mode is:
FKTransactionManager.exe -c pam.xml --view payment-allocation
See C.11 Transaction Manager on page 387 for information about the options available.
10.1.3 Customizing Payment Allocation Manager
Payment Allocation Manager consists of several views in which the payment allocation information is
displayed or processed. Each view is opened from the View menu except for the Payment Allocation
view which is always present in the display. The Payment Allocation view is used to view and process
the retrieved payment allocations, or to enter new ones.
You can select the information you want to see in each view, by selecting View - Select Columns.
It is possible to save the current display by saving it as a layout in the Layout menu using Layout -
Save.
10.1.4 Configuring payment allocation
In payment allocation, incoming payments defined in a payment advice can be matched against
expected cashflows generated from transactions using the automatch process.
In most cases, the automatching process will result in a zero balance. However, it is possible to
define any tolerated deviations if an exact match between incoming payments and expected
cashflows is not achieved in the automatching process.
If the due amount is equal to the payment amount and the currency is the same, all components of
the due amount can be allocated.
When automatic payment allocation cannot be achieved - for example: with an underpayment
(when the total payment amount received from the borrower is less than the total cashflow amounts
due); or with an overpayment (when the total payment amount received from the borrower is
Configure Auto Match
Amount Tolerance
Allows the definition of the rules that determine which values in payments and
cashflows due have to be equal, and the maximum outstanding balance amount that
is tolerated, in order to propose an automatch to the user.
See 10.1.4.2 Auto match amount tolerances on page 136.
Configure Auto Match
Tol eranc es
Allows the definition of the rules that determine which values in payments and
cashflows due have to be equal, the maximum allowed deviation in payment amount,
and the maximum allowed difference between the cashflow due date and the payment
date in order to propose an automatch to the user.
See 10.1.4.3 Auto match tolerances on page 137.
Configure Cashflow
Group Priorities
Allows the definition of the rules that determine how received monies are distributed
between the different types of cashflows due if the expected amount is not received
(for example, in the case of an underpayment).
See 10.1.4.4 Cashflow group priorities on page 137.
Configure Default
Query Offset
Allows the definition of a default number of days for which the system will perform a
query if the Date From and Date To values are not specified in the query criteria.
See 10.1.4.5 Default query offsets on page 138.
Configure Query Limit The default number of cashflows or payment advices that can be fetched at one time
is 1000. You can configure this limit according to your needs. To change this limit,
click Configure Query Limit, enter a new limit in the displayed dialog, and then click OK.
Menu Item Description
10 Managing payment allocations
10.1 Payment Allocation Manager
136 © Wall Street Systems IPH AB - Confidential
greater than the total cashflow amounts due) - you can perform manual payment allocation: see
10.2.5 Manual payment allocation on page 140.
Each user can configure their own default settings to use as criteria in payment allocation. The
configuration dialogs are accessed from the Options menu item.
Note: Options are not saved as part of the layout, so if you wish to change the criteria before
processing a payment allocation, you must ensure that you reset the criteria for the next
time you process a payment allocation.
10.1.4.1 Auto match criteria
The Auto Match Criteria Configuration dialog, accessed using Options - Configure Auto Match Criteria, allows
you to define the rules that determine which values in payments received and cashflows due must
be equal in order to propose a match in the automatching process.
The criteria defined in the dialog govern the automatching of payments and cashflows when the
menu option Command - Auto Match is selected.
10.1.4.2 Auto match amount tolerances
The Configure Auto Match Amount Tolerance dialog, accessed using Options - Configure Auto Match Amount
Tolerance, allows you to define the rules that determine which values in payments and cashflows due
must be equal, and the maximum outstanding balance amount that is tolerated in order to propose
a match in the automatching process.
Information Description
Payment Date Switch on so that only payment advices and incoming cashflows with the same
Payment Date are matched.
Currency Switch on so that only payment advices and cashflows in the same Currency are
matched.
Amount Switch on so that only payment advices and cashflows with the same Amount are
matched.
Counterparty Client Switch on so that only payment advices and cashflows with the same Counterparty
Client are matched.
Owner Switch on so that only payment advices and cashflows with the same Owner are
matched.
Facility Switch on so that only payment advices and cashflows with the same Facility are
matched.
Our Bank Switch on so that only payment advices and cashflows with the same Our Bank are
matched.
Our Account Switch on so that only payment advices and cashflows with the same Our Account are
matched.
Check for multiple
matches
Switch on if you want the system to look for multiple matches of cashflows that can
be allocated to a payment advice. If there are multiple matches no automatching will
take place. Instead, the matching groups of cashflows will be displayed in the
Matching Cashflow Groups view. From here they can be allocated manually.
Maximum Aggregated
Cashflows/Allocation
The number of aggregated cashflow rows that should be considered when the system
starts the automatching process.
This number should be reasonably small so that the system does not have to check
for too many combinations.
Payment Allocation
State
The initial state of the payment allocations created by the automatching process.
10 Managing payment allocations
10.1 Payment Allocation Manager
Commercial Loans Module (CLM) User Guide 137
Note that when a single payment is matched to multiple cashflows (or multiple payments are
matched to multiple cashflows) in the allocation process, the maximum difference refers to the net
total amount.
The criteria defined in the dialog govern the automatching of payment advices and cashflows when
the menu option Command - Auto Match with Amount Tolerances is selected. The criteria are the same as
the Auto match criteria with the exception of Payment Allocation State (see 10.1.4.2 Auto match
amount tolerances on page 136) and with the following additional fields:
10.1.4.3 Auto match tolerances
Inconsistencies in payment amount may be caused by currency conversions when payments are
received in a different currency to the one expected. Any underpayments or overpayments that are
inside the allowed tolerances generate an accounting event in the currency of the payment.
If there is a difference between the cashflow due date and the payment date, it is possible to define
the maximum allowable difference in days. For example, if the Payment Date Offset = 3, and
Payment Date = 15/6/2006, the system will propose due dates falling between 12/6/2006 and
18/6/2006 in the automatching process.
The Auto Match Tolerance Configuration dialog, accessed using Options - Configure Auto Match Tolerances,
allows you to define the maximum tolerated deviation that may occur in payment amount; or the
maximum tolerated difference in days when the cashflow due date and the payment date are not the
same.
The criteria defined in the dialog govern the automatching of payment advices and cashflows when
the menu option Command - Auto Match with Tolerances is selected. The criteria are the same as the
Auto match criteria with the exception of Payment Allocation State (see 10.1.4.2 Auto match amount
tolerances on page 136) and with the following additional fields:.
10.1.4.4 Cashflow group priorities
The Cashflow Group Priorities Configuration dialog, accessed using Options - Configure Cashflow Group
Priorities, allows you to define the rules that determine how received monies are distributed between
the different types of cashflows due if the expected amount is not received (for example, in the case
of an underpayment).
Information Description
Open Balance Amount The maximum tolerated outstanding balance between the payments and cashflows as
a result of the automatching process, expressed as an absolute value.
Note that the maximum difference refers to the net total amount of payments
received.
Open Balance
Currency
Currency in which the Open Balance Amount is calculated and expressed.
Information Description
Date Offset (+/-) Number of days offset considered during the automatching process.
If the Payment Date switch is not turned on, this field is not available.
Open Balance Amount The absolute numerical value of an outstanding balance that is tolerated as a result of
the automatching process.
Note that the maximum difference refers to the net total amount of payments
received.
Open Balance
Currency
Currency in which the Open Balance Amount is calculated and expressed.
10 Managing payment allocations
10.2 Processing payment allocations
138 © Wall Street Systems IPH AB - Confidential
To configure the cashflow group priorities:
1. In the Cashflow Group Priorities Configuration dialog, select the Main Group for which you want to
configure priorities.
2. Establish the group priorities by filling in fields Group 1 to Group 5 (higher to lower priority).
These groups are used to determine the order in which payments are allocated against
cashflows in the case of an underpayment. They are also used to determine how overpayments
should be offset against future cashflows.
3. Select a cashflow type to be used for carrying over any unallocated cashflow amounts in the
event of a carry-forward action on an underpayment.
For example, suppose the configuration is as follows:
It is necessary to allocate a 1M payment to expected cashflows consisting of: 100K fee, 500K
interest, and 500K principal.
–If an underpayment of 100K is received, according to the above configuration, the missing
sum is to be taken off the 500K principal.
–If this amount is carried forward to the next payment date for that transaction, the system
creates an offsetting -100K Allocation Difference (Principal) amount to balance the current
allocation and a future-dated 100K Carried Forward Principal flow.
10.1.4.5 Default query offsets
The Default Query Offset Configuration dialog, accessed using Options - Configure Default Query Offset, allows
you to define the default number of days for which the system will perform a query for cashflows,
payments, and payment allocations, if the Date From and Date To values are not specified in the query
criteria.
For example, if Default Number Query Offset (days) = 20, and the Date From and Date To values are not
specified in the query criteria, the system automatically sets Date To to today’s date, and Date From to
today – 20 days.
10.2 Processing payment allocations
The following sections describe the procedures for processing payment allocations in CLM.
1. Retrieve the unallocated cashflows and payment advices and match them in a payment
allocation:
–Create payment allocations by automatically matching the payment advices and cashflows
based on the configured criteria.
–Create payment allocations by automatically matching the payment advices and cashflow
even when the amounts of payment advices and cashflows are slightly different (within the
allowed tolerance) based on the configured criteria.
–Create payment allocations using manual allocation.
See 10.2 Processing payment allocations on page 138.
2. Processing any errors or exceptions, such as underpayments or overpayments, in the payment
allocation. See 10.3 Processing underpayments and overpayments on page 141.
Group 1 Fee Cashflow Type 1 Fee
Group 2 Interest Cashflow Type 2 Interest
Group 3 Principal Cashflow Type 3 Principal
10 Managing payment allocations
10.2 Processing payment allocations
Commercial Loans Module (CLM) User Guide 139
10.2.1 Retrieving cashflows and payment advices
The first step in payment allocation processing is to retrieve the unallocated expected cashflows and
payment advices, using Payment Allocation Manager’s Cashflow Query view and Payment Advice
Query view, respectively.
Retrieving cashflows and payment advices is done in the same way as if you were retrieving normal
TRM transactions: see the TRM User Guide for more information.
10.2.2 Grouping cashflows and payment advices
Cashflows due and payment advices can either be viewed as individual entities in their respective
views, or several can be grouped together based on the view selected in the layout (using View -
Select Columns).
•A grouping of cashflows or payment advices produces as many rows as distinct values exist for
them within the query.
•A sum produces only a total for all underlying entries to a given grouped row.
For example, suppose you have retrieved the following:
If you select Currency (Grouping) and Amount (Sum), the retrieved entities will be grouped together by
currency and amount, and only two rows will be displayed:
If you also select Payment Date (Grouping), the retrieved entities will also be grouped by date, and the
display will then show four rows:
If you select ID (Grouping), then all retrieved entities will be displayed.
10.2.3 Automatic payment allocation
There are several methods available to automatically allocate cashflows to payment advices. Each
method carries out the payment allocation according to the corresponding configured criteria (see
10.1.4 Configuring payment allocation on page 135).
When you launch one of the automatic allocation processes, if the corresponding criteria are met,
the matching advices and cashflows are then displayed in the Allocated Payment Advice view or
Allocated Cashflow view, respectively.
In most cases, automatic payment allocation results in a zero balance. However, if there are any
remaining payment advices or cashflows which do not meet the criteria, they can be processed
manually: see 10.2.5 Manual payment allocation on page 140.
15-December 1000 EUR
16-December 2000 EUR
15-December 3000 EUR
15-December 4000 USD
16-December 5000 USD
6000 EUR
9000 USD
15-December 4000 EUR
16-December 2000 EUR
15-December 4000 USD
16-December 5000 USD
10 Managing payment allocations
10.2 Processing payment allocations
140 © Wall Street Systems IPH AB - Confidential
To carry out automatic payment allocation:
1. Retrieve the cashflows and payment advices as described in 10.2.1 Retrieving cashflows and
payment advices on page 139.
2. Select the automatic payment allocation method you want to use.
The new payment allocation is displayed in the Payment Allocation view.
3. Enter any information relating to the payment allocation in the Comment field.
4. Save the payment allocation using the information in 10.2.4 Approving payment allocations on
page 140.
5. Process any remaining advices and cashflows and any discrepancies in the payment allocation as
described in 10.2.5 Manual payment allocation on page 140, and 10.3 Processing
underpayments and overpayments on page 141. Also, if the switch Check for multiple matches
switch is on and there are multiple matches, you must select the correct group from the Matching
Cashflow Groups to manually complete the payment allocation.
Note: Automatching finds cashflow matches against one payment advice. There will never be
more than one payment advice in a payment allocation created by an automatch process.
10.2.4 Approving payment allocations
When the payment allocation is displayed, save it by selecting one of the following actions from the
Command menu:
•Apply to save the payment allocation and not change its state.
•Validate to save the payment allocation and move its state forward in the process flow.
Once a payment allocation has been applied or committed, some information is automatically set by
the system:
•Payment Allocation Number: identifies the payment allocation in the system.
•State: shows the payment allocation’s position in the process flow.
You can also cancel or reject a payment allocation using the corresponding menu option.
Note: It is not possible to send a payment allocation to a final state if the Open Balance Amount is
not zero.
10.2.5 Manual payment allocation
You may need to allocate some payment advices to cashflows manually, for example, if they could
not be processed automatically because they did not meet the configured criteria.
Method Description
Auto Match Creates payment allocations by automatically matching the payment advices and
cashflows based on the configured criteria specified in the Auto Match option.
By default, Auto Match results in an exact allocation and, consequently, a zero
balance.
Auto Match with
Amount Tolerance
Creates payment allocations where the amounts of payment advices and cashflows
can be slightly different based on the Auto Match Amount Tolerance - Open Balance Amount
in the configuration criteria set up in the Options.
Auto Match with
Toleran c e s
Creates payment allocations where the amounts or payment dates of payment
advices and cashflows can be slightly different based on the Auto Match Tolerances -
Open Balance Amount and Date offset in the configuration criteria set up in the Options.

10 Managing payment allocations
10.3 Processing underpayments and overpayments
Commercial Loans Module (CLM) User Guide 141
To carry out manual payment allocation:
1. Retrieve the outstanding cashflows and payment advices as described in 10.2.1 Retrieving
cashflows and payment advices on page 139.
2. Select New - Payment Allocation.
3. In the Payment Advice view, select the payment advice you want to allocate. This populates
fields in the new row in the Payment Allocation view.
4. Right-click the payment advice in the Payment Advice view and select Allocate.
The payment advice is set to Allocated and is displayed in the Allocated Payment Advice view.
The sum of the payment advices is shown in the Selected Payment Total field.
5. Right-click the cashflow you want to allocate and select Allocate.
The cashflow is set to Allocated and is displayed in the Allocated Cashflow view. The sum of the
cashflows is shown in the Selected Cashflow Total field.
6. In the Payment Allocation view, select the payment allocation and save it as described in 10.2.4
Approving payment allocations on page 140.
7. Process any discrepancies in the payment allocation as described in 10.3 Processing
underpayments and overpayments on page 141.
Note: When manually creating a payment allocation it is possible to allocate more than one
payment advice. Care needs to be taken when doing this. For instance, it makes sense to
allocate more than one payment advice if the payment advices are both for the same date,
but if they have different dates this may cause processing problems for late payment
penalties.
10.2.6 Retrieving payment allocations
In Payment Allocation Manager’s Payment Allocation Query view, you can retrieve the payment
allocations that already exist in the system for further processing.
Retrieving payment allocations is done in the same way as if you were retrieving normal TRM
transactions: see the TRM User Guide for more information.
10.2.7 Unallocating payment allocations
You can unallocate cashflows or payment advices by right-clicking the cashflows (or payments) in
the relevant view of allocated items and selecting Unallocate.
The related item is removed from the allocated view and returned to the Cashflow or Payment Advice
view. You can continue to process the items like any other unallocated item.
10.3 Processing underpayments and overpayments
Sometimes in payment allocation, the allocated payment advice amount is not equal to the allocated
cashflow amount. This occurs when an underpayment or overpayment is received. When this is the
case, an open balance amount remains.
To reduce the open balance to zero, you can do one of the following:
•Carry forward or allocate the open balance amount to a future date
–If the open balance is less than zero due to an underpayment, carry forward the expected
cashflow to a future payment date by using the Carry Forward action.
–If the open balance is greater than zero due to an overpayment, allocate the amount against
a future payment date by using the Offset Future Cashflows action.
10 Managing payment allocations
10.3 Processing underpayments and overpayments
142 © Wall Street Systems IPH AB - Confidential
•Leave the open balance amount unallocated
–If the open balance is less than zero due to an underpayment, leave it unallocated for future
payment allocation on the same payment date
–If the open balance is greater than zero due to an overpayment, leave it unallocated for
future payment allocation on the same payment date.
•Book the open balance amount to the P/L account by generating an accounting event
–The open balance amount is transferred to the P/L account, rather than retained for future
processing.
10.3.1 Processing underpayments
The following sections describe how to process an underpayment.
10.3.1.1 Carry forward
To carry forward the expected cashflow to a future payment date if the open balance is less than
zero due to an underpayment:
1. Right-click the payment allocation and select Carry Forward.
2. In the Carry Forward dialog, fill in the required details.
Note: Most of the values in the dialog are for information only and as such cannot be modified.
3. Click OK.
A new transaction is generated with the following attribute:
–Transaction Kind = Payment Allocation, Carried-Forward.
The transaction consists of two cashflows:
–Cashflow 1 offsets the amount of the underpayment in the payment allocation and has the
following attributes:
Information Description
Action Amount Amount you want to carry forward.
By default, it is the Outstanding Open Balance expressed as a positive absolute value.
You can change this amount to any lower absolute value.
Forward Date Date to which the Action Amount is carried forward.
By default, the system proposes the next logical payment date of the parent
transaction. You can change this date to any other of the parent transaction’s
payment dates.
Comment Comment you want to enter relating to the action.
Open Balance
Currency
Currency in which the outstanding open balance is displayed.
Outstanding Open
Balance
Cashflow amount which is not allocated, that is, the allocated payment advice
amounts are not equal to the allocated cashflow amounts:
• If the amount is greater than zero, there is an overpayment
• If the amount is less than zero, there is an underpayment.
This amount refers to the outstanding balance of the net total amount of payments
received.
Remaining Open
Balance
Remaining open balance amount if the amount entered in the Action Amount field is
less than the Outstanding Open Balance value.
Remaining Open Balance = Outstanding Open Balance + Action Amount
10 Managing payment allocations
10.3 Processing underpayments and overpayments
Commercial Loans Module (CLM) User Guide 143
Value Date = Original Value Date
Payment Date = Original Payment Date
Amount = Action Amount
This is reflected in the allocated cashflows of the payment allocation.
–Cashflow 2 carries forward the unallocated portion of the cashflow to the Carry Forward date
and has the following attributes:
Value Date and Payment Date = Carry Forward Date
Amount = -1 * Action Amount
This cashflow will come up for payment allocation according to the new payment (Carry
Forward) date.
10.3.1.2 Leave unallocated
If the open balance is less than zero due to an underpayment, you can unallocate the allocated
cashflows to leave an amount untreated for future payment allocation on the same payment date.
Note: The leave unallocated process is similar to the Carry Forward action except that the payment
date of the unallocated portion of the cashflow remains the same as the original payment
date.
1. Right-click the payment allocation and select Leave Unallocated.
2. In the Leave Unallocated dialog, fill in the required details.
Note: Most of the values in the dialog are for information only and as such cannot be modified
3. Click OK.
A new transaction is generated with the following attribute:
–Transaction Kind = Payment Allocation, Unallocation.
The transaction consists of two cashflows:
–Cashflow 1 offsets the underpayment amount in the payment allocation and has the
following attributes:
Information Description
Action Amount Amount you want to leave unallocated.
By default, this is the Outstanding Open Balance value. You can change this amount to
any absolute value which is less than the Outstanding Open Balance.
Comment Comment you want to enter relating to the action.
Open Balance
Currency
Currency in which the outstanding open balance is displayed.
Outstanding Open
Balance
Cashflow amount which is not allocated, that is, the allocated payment advice
amounts are not equal to the allocated cashflow amounts:
• If the amount is greater than zero, there is an overpayment
• If the amount is less than zero, there is an underpayment.
This amount refers to the outstanding balance of the net total amount of payments
received.
Remaining Open
Balance
Remaining open balance amount if the amount entered in the Action Amount field is
less than the Outstanding Open Balance value.
10 Managing payment allocations
10.3 Processing underpayments and overpayments
144 © Wall Street Systems IPH AB - Confidential
Value Date = Original Value Date
Payment Date = Original Payment Date
Amount = Action Amount
This is reflected in the allocated cashflows of the payment allocation.
–Cashflow 2 reflects the unallocated portion of the cashflow on the original payment date and
has the following attributes:
Value Date = Original Value Date
Payment Date = Original Payment Date
Amount = -1 * Action Amount
This cashflow will come up for payment allocation according to the original payment date.
10.3.1.3 Accept as Profit/Loss
It is also possible to book an open balance arising from an underpayment to the P/L account by
generating an accounting event, rather than retaining it for future processing.
1. Right-click the payment allocation and select Accept as Profit/Loss.
2. In the Accept as Profit/Loss dialog, fill in the required details.
Note: Most of the values in the dialog are for information only and as such cannot be modified
3. Click OK.
A new transaction is generated with the attribute:
–Transaction Kind = Payment Allocation, Profit/Loss.
The transaction consists of only one cashflow which offsets the underpayment amount in the
payment allocation. The cashflow has the following attributes:
Value Date = Original Value Date
Payment Date = Original Payment Date
Amount = -1 * Action Amount
This cashflow is then reflected in the allocated cashflows of the payment allocation and the
amount is transferred to the P/L statement.
Information Description
Action Amount Amount you want to accept as P/L.
By default, this is the Outstanding Open Balance value. You can change this amount to
any absolute value which is less than the Outstanding Open Balance.
Comment Comment you want to enter relating to the action.
Open Balance
Currency
Currency in which the open balance amount is displayed.
Outstanding Open
Balance
Cashflow amount which is not allocated, that is, the allocated payment advice
amounts are not equal to the allocated cashflow amounts:
• If the amount is greater than zero, there is an overpayment
• If the amount is less than zero, there is an underpayment.
This amount refers to the outstanding balance of the net total amount of payments
received.
Remaining Open
Balance
Remaining open balance amount if the amount entered in the Action Amount field is
less than the Outstanding Open Balance value.
Remaining Open Balance = Outstanding Open Balance + Action Amount
10 Managing payment allocations
10.3 Processing underpayments and overpayments
Commercial Loans Module (CLM) User Guide 145
10.3.1.4 Unallocate Cashflows
The Unallocate Cashflows action is used if there is a non zero value in the Cashflows to Unallocate
payment allocation field. Typically this will happen if the payment advice in the allocation does not
cover any whole cashflows which have been manually allocated. The Unallocate Cashflows action
removes these cashflows from the Allocated Cashflows view and leaves them untouched for future
allocations.
10.3.2 Processing overpayments
The following sections describe how to process an overpayment.
10.3.2.1 Offset future cashflows
If the open balance is more than zero due to an overpayment, it is possible to offset the amount
against future cashflows.
1. Right-click the payment allocation and select Offset Future Cashflows.
2. In the Offset Future Cashflows dialog, fill in the required details.
Note: Most of the values in the dialog are for information only and as such cannot be modified.
3. Click OK.
The system uses the Cashflow Group Priorities in the Options to work out how the overpayment
should be offset against the future cashflows date and allocates the necessary cashflows to the
current allocation.
A new transaction is generated with the attribute:
–Transaction Kind = Payment Allocation, Advance
The transaction consists of cashflows which represent the extra amount that has been received in
advance and other cashflows which offset against cashflows due in the future.
Information Description
Action Amount Amount you want to offset against a future payment date.
By default, Action Amount = -1 * Outstanding Open Balance. You can change this
amount to any negative value which is less than or equal to the Outstanding Open
Balance.
Forward Date Date to which the Action Amount is offset against a future payment date.
By default, this is the next logical payment date of the parent transaction, but it can
be changed to any other of the parent transaction’s payment dates.
Comment Comment you want to enter relating to the action.
Open Balance
Currency
Currency in which the outstanding open balance is displayed.
Outstanding Open
Balance
Cashflow amount which is not allocated, that is, the allocated payment advice
amounts are not equal to the allocated cashflow amounts:
• If the amount is greater than zero, there is an overpayment
• If the amount is less than zero, there is an underpayment.
This amount refers to the outstanding balance of the net total amount of payments
received.
Remaining Open
Balance
Remaining open balance amount if the amount entered in the Action Amount field is
less than the Outstanding Open Balance.
Remaining Open Balance = Outstanding Open Balance + Action Amount
10 Managing payment allocations
10.3 Processing underpayments and overpayments
146 © Wall Street Systems IPH AB - Confidential
10.3.2.2 Leave unallocated
If the open balance is greater than zero due to an overpayment, you can unallocate the allocated
payment advices to leave this amount untreated for future payment allocation on the same payment
date.
1. Right-click the payment allocation and select Leave Unallocated.
2. In the Leave Unallocated dialog, fill in the required details.
Note: Most of the values in the dialog are for information only and as such cannot be modified.
3. Click OK.
Two additional payment advices are generated which can be viewed in Payment Advice
Manager:
–Payment Advice 1 offsets the overpayment amount in the payment allocation and has the
following attributes:
Date = Original Date
Amount = Action Amount
–Payment Advice 2 treats the unallocated portion of the payment advice and has the following
attributes:
Date = Original Value Date
Amount = -1 * Action Amount
This payment advice can be used later to create another payment allocation.
If the Action Amount is less than the Outstanding Open Balance, you can continue to perform
overpayment actions to process the payment allocation and reduce it to zero as described in
10.3.2 Processing overpayments on page 145.
Information Description
Action Amount Amount you want to leave unallocated.
By default, Action Amount = -1 * Outstanding Open Balance. You can change this
amount to any negative value which is less than or equal to the Outstanding Open
Balance.
Comment Comment you want to enter relating to the action.
Open Balance
Currency
Currency in which the outstanding open balance is displayed.
Outstanding Open
Balance
Cashflow amount which is not allocated, that is, the allocated payment advice
amounts are not equal to the allocated cashflow amounts:
• If the amount is greater than zero, there is an overpayment
• If the amount is less than zero, there is an underpayment.
This amount refers to the outstanding balance of the net total amount of payments
received.
Remaining Open
Balance
Remaining open balance if the amount entered in the Action Amount field is less than
the Outstanding Open Balance.
Remaining Open Balance = Outstanding Open Balance + Action Amount
10 Managing payment allocations
10.3 Processing underpayments and overpayments
Commercial Loans Module (CLM) User Guide 147
10.3.2.3 Refund payment
If the open balance is greater than zero due to an overpayment, it is possible to refund the
payment. The Refund Payment action works in a manner similar to the Leave Unallocated action except
that it creates a reversal of the payment advice.
1. Right-click the payment allocation and select Refund Payment.
2. In the Refund Payment dialog, fill in the required details.
Note: Most of the values in the dialog are for information only and as such cannot be modified.
3. Click OK.
One additional payment advice is generated which reverses the direction of the payment. This
can be generated in a TO-BE-REFUNDED state so that you can validate it. This payment advice
does not create an actual settlement. You have to make the payment manually.
The Refund Payment is allocated to the Payment Allocation entity being processed to
compensate for the overpayment amount in the payment allocation.
If the Action Amount is less than the Outstanding Open Balance, you can continue to perform
overpayment actions to process the payment allocation and reduce it to zero as described under
10.3.2 Processing overpayments on page 145.
10.3.2.4 Accept as Profit/Loss
The Accept as Profit/Loss action transfers the Action Amount to P/L, rather than retaining it for future
processing.
Information Description
Action Amount Amount you want to refund.
By default, Action Amount = -1 * Outstanding Open Balance. You can change this
amount to any negative value which is less than or equal to the Outstanding Open
Balance.
Comment Comment you want to enter relating to the action.
Open Balance
Currency
Currency in which the outstanding open balance is displayed.
Outstanding Open
Balance
Cashflow amount which is not allocated, that is, the allocated payment advice
amounts are not equal to the allocated cashflow amounts:
• If the amount is greater than zero, there is an overpayment
• If the amount is less than zero, there is an underpayment.
This amount refers to the outstanding balance of the net total amount of payments
received.
Remaining Open
Balance
Remaining open balance if the amount entered in the Action Amount field is less than
the Outstanding Open Balance.
Remaining Open Balance = Outstanding Open Balance + Action Amount
10 Managing payment allocations
10.3 Processing underpayments and overpayments
148 © Wall Street Systems IPH AB - Confidential
It is also possible to book an open balance arising from an overpayment to the P/L account by
generating an accounting event, rather than retaining it for future processing.
1. Right-click the payment allocation and select Accept as Profit/Loss.
2. In the Accept as Profit/Loss dialog, fill in the required details.
Note: Some of the values are for information only and as such cannot be modified
3. Click OK.
A new transaction is generated with the attribute:
–Transaction Kind = Payment Allocation, Profit/Loss.
The transaction consists of only one cashflow which offsets the overpayment amount in the
payment allocation. The cashflow has the following attributes:
Value Date = ?
Payment Date = ?
Amount = Action Amount
This cashflow is then reflected in the allocated cashflows of the payment allocation and the
amount is transferred to the P/L statement.
Information Description
Action Amount Amount you want to accept as P/L.
By default, Action Amount = -1 * Outstanding Open Balance
You can change this amount to any absolute value which is less than the Outstanding
Open Balance.
Comment Comment you want to enter relating to the action.
Open Balance
Currency
Currency in which the open balance amount is displayed.
Outstanding Open
Balance
Cashflow amount which is not allocated, that is, the allocated payment advice
amounts are not equal to the allocated cashflow amounts:
• If the amount is greater than zero, there is an overpayment
• If the amount is less than zero, there is an underpayment.
This amount refers to the outstanding balance of the net total amount of payments
received.
Remaining Open
Balance
Remaining open balance if the amount entered in the Action Amount field is less than
the Outstanding Open Balance.
Remaining Open Balance = Outstanding Open Balance + Action Amount
Commercial Loans Module (CLM) User Guide 149
Appendix A Features
A.1 Categories of features
A.2 List of features
This list includes information about features specific to Commercial Loan instruments only.
For details about features that are common to other types of instrument: see TRM Instruments:
Processing & Calculations.
A.2.1 Add Facility Guarantees
Context Description
Primary Each instrument must have one primary feature attached to it. Primary features
enable trade capture in Transaction Manager. When a primary feature is added to an
instrument, underlying pages are displayed in Instrument Editor to allow you to
complete the instrument definition. Primary features cannot be deleted.
Trading Trading features affect deal entry at transaction or cashflow level. They can be specific
to one or more instrument classes or be applicable to all instruments
Valuation Setup This type of feature is always optional. If valuation setup is configured for an
instrument, the configuration is taken into account by the valuation method. If a
valuation setup has not been applied for the instrument, the valuation method follows
its default behavior.
Valuation Method This type of feature defines the valuation method to be used for an instrument. If a
valuation setup has been defined for the instrument (see above), it is used by the
method.
Action This type of feature enables some actions to be carried out on an instrument.
Function Function features enable the use of specific functions in an expression.
Accounting This type of feature defines the instrument as requiring specific accounting treatment.
Performance Performance features are used in performance measurement, specifically by the
Performance Monitor application.
Id: ADD-FACILITY-GUARANTEES
Usage: Enables a facility guarantee to be added to the drawdown.
With: COMMERCIAL-LOAN
Context: Action
Setup: None
A Features
A.2 List of features
150 © Wall Street Systems IPH AB - Confidential
A.2.2 Allow Drawdown FX Freeze
A.2.3 Allow Funding Call
A.2.4 Allow Guarantee
A.2.5 Allow Revision
Id: ALLOW-DRAWDOWN-FX-FREEZE
Usage: Used for setting and freezing the FX rate between the credit currency and the drawdown
currency.
With: COMMERCIAL-LOAN
Context: Action
Setup: None
Id: ALLOW-FUNDING-CALL
Usage: Exclusively used when an institution is lending external/third party funds.
When the lending is done using third party funds, the fund owner is informed of the
disbursal and asked for a transfer of the Nominal Amount.
In general, this feature is not needed in normal Commercial Lending.
With: COMMERCIAL-LOAN
Context: Action
Setup: None
Id: ALLOW-GUARANTEE
Usage: Allows a generic guarantee to be added to a Drawdown.
With: COMMERCIAL-LOAN
Context: Trading
Setup: None
Id: ALLOW-REVISION
Usage: Some drawdowns are made with the possibility of rate revision after certain time
intervals: this feature enables rate revision for these revisable drawdowns.
With: COMMERCIAL-LOAN
Context: Action
Setup: None
A Features
A.2 List of features
Commercial Loans Module (CLM) User Guide 151
A.2.6 Allow Subsidy Call
A.2.7 Cancel Provisional Settlements
A.2.8 Commercial Loan
A.2.9 Conditional Remuneration
Id: ALLOW-SUBSIDY-CALL
Usage: Exclusively used for subsidized lending by multilateral institutions.
In general, this feature is not needed in normal Commercial Lending.
With: COMMERCIAL-LOAN
Context: Action
Setup: Subsidy
Id: DELETE-PROVISIONAL-SETTLEMENTS
Usage: Allows the cancellation of provisional settlements and removes the Paid flag from
cashflows at cashflow level in Transaction Manager.
With: COMMERCIAL-LOAN
Context: Action
Setup: None
Id: COMMERCIAL-LOAN
Usage: Defines the instrument as a Commercial Loan instrument.
This feature guides the business logic of commercial lending operations, for example, the
relationship between facilities, tranches, instruments, transaction templates, and so on,
as well as credit validations.
With: COMMERCIAL-LOAN
Context: Primary
Setup: Generic Loan
Details: See TRM Instruments: Processing and Calculations
Id: CONDITIONAL-REMUNERATION
Usage: Enables the insertion of an ad-hoc cashflow into a drawdown arising out of a specific
contractual agreement.
Conditional remuneration may be exchangeable between the borrower and the lender,
based upon contractual conditions that are linked to specific financial or rate outcomes
(for example, financial results of the lender, or fluctuations in exchange rates).
With: COMMERCIAL-LOAN
Context: Action
Setup: None
A Features
A.2 List of features
152 © Wall Street Systems IPH AB - Confidential
A.2.10 Continuation Aggregated Rate Function
A.2.11 Payment Amount Extraction
A.2.12 Deferment Commission (Setup)
A.2.13 Drawdown Amendment
Id: CONT-AGGREG-RATE
Usage: When calculating an interest rate for a Loan Event such as Late Payment Penalty this
feature enables the use of the parent's Aggregated Rate within an expression, i.e.
cntaggrt + spread%
With: COMMERCIAL-LOAN
Context: Function
Setup: None
Id: DEBT-FLOWS-METHOD
Usage: Allows the Debt Monitor to show past figures (dates and amounts) instead of just future
figures.
With: COMMERCIAL-LOAN
Context: Valuation Method
Setup: None
Id: DEFERMENT-COMMISSION
Usage: Enables the generation of a deferment commission.
When a drawdown is "deferred", the lender can demand a deferment commission from
the borrower.
For example, if the borrower does not wish to receive the money earmarked for a
drawdown on its scheduled value date, then they would request the lender to defer the
value date. This would entitle the lender to receive an additional compensation, known as
deferment commission.
With: COMMERCIAL-LOAN
Context: Trading
Setup: None
Id: DRAWDOWN-AMENDMENT
Usage: Allows the modification of a drawdown that has already been disbursed.
With: COMMERCIAL-LOAN
Context: Action
A Features
A.2 List of features
Commercial Loans Module (CLM) User Guide 153
A.2.14 Drawdown Cancellation
A.2.15 Drawdown Classification
A.2.16 Drawdown Fee
Setup: None
Details: After a drawdown has been disbursed, the borrower and lender may agree to modify it,
for example:
- Change the instrument and/or transaction template (terms of the drawdown)
- Change the currency of the drawdown
- Change the counterparty of the drawdown
- Change other terms and conditions of the drawdown, thereby altering its structure
(for example, rate).
Id: DRAWDOWN-CANCELLATION
Usage: Allows the drawdown to be canceled, for example, when the lender does not wish to use a
disbursal that has already been agreed upon.
With: COMMERCIAL-LOAN
Context: Action
Setup: None
Details: The cancellation of the drawdown may or may not be accompanied by payment of a
cancellation commission. The cancellation of the drawdown effectively reinstates the
utilization of credit in the facility.
Id: DRAWDOWN-CLASSIFICATION
Usage: Allows the user to "classify" the amount when a borrower's ability to pay, either the
principal or the interest (or both), becomes doubtful.
With: COMMERCIAL-LOAN
Context: Action
Setup: None
Details: The feature allows the user to classify a normal drawdown into a user-defined set of
sub-normal categories, thereby indicating the deterioration of the creditworthiness of the
borrower.
The same feature also allows a sub-normal drawdown to be reclassified to normal.
Id: DRAWDOWN-FEE
Usage: Allows the user to add an ad-hoc fee on a drawdown.
With: COMMERCIAL-LOAN
Context: Action
Setup: None
A Features
A.2 List of features
154 © Wall Street Systems IPH AB - Confidential
A.2.17 Drawdown Fixing
A.2.18 Drawdown Prepayment
A.2.19 Drawdown Rescheduling
A.2.20 Due Amount Carry Forward
Id: DRAWDOWN-FIXING
Usage: Enables the rate-setting functionality for a floating-rate drawdown.
With: COMMERCIAL-LOAN
Context: Action
Setup: None
Details: If the drawdown’s loan structure contains a floating-rate component, this feature allows
the user to renew the rate of interest.
Id: DRAWDOWN-PREPAYMENT
Usage: Used in cases where the borrower wants to repay the borrowed amount in advance of
their scheduled repayment dates.
With: COMMERCIAL-LOAN
Context: Action
Setup: None
Details: The borrower may choose to pay-back the borrowed amount before its scheduled
repayment date. This could be in the form of a full-foreclosure (entire outstanding
amount repaid), or a partial-foreclosure (part of the outstanding debt is repaid).
Id: DRAWDOWN-SCHEDULING
Usage: Allows the borrower to request the re-scheduling of the value date of a drawdown before
it is disbursed, or of a drawdown that has been "deferred".
With: COMMERCIAL-LOAN
Context: Action
Setup: None
Id: DUE-AMOUNT-CARRY-FORWARD
Usage: If the scheduled repayments from the borrower are not received/made, this feature
permits the user to carry-forward such amounts to future dates.
With: COMMERCIAL-LOAN
Context: Action
Setup: None
A Features
A.2 List of features
Commercial Loans Module (CLM) User Guide 155
A.2.21 Edit Commitment Fee
A.2.22 Guarantee Call
A.2.23 Guarantee Refund
A.2.24 Guarantee Valuation
Id: EDIT-COMMITMENT-FEE
Usage: Allows the user to edit a facility Commitment Fee transaction.
With: COMMERCIAL-LOAN
Context: Action
Setup: None
Id: GUARANTEE-CALL
Usage: Enables the processing of a demand of payment received from a lender against an issued
guarantee.
For example, this feature enables the processing when the owner receives a demand for
funds from a lender who had lent funds to a borrower against a guarantee issued by the
owner, and when the said borrower has defaulted on payments.
With: COMMERCIAL-LOAN
Context: Action
Setup: None
Id: GUARANTEE-REFUND
Usage: Processes the demand for funds from the guarantor to the borrower, against funds that
the guarantor has already paid to the original lender.
With: COMMERCIAL-LOAN
Context: Action
Setup: None
Id: GUARANTEE-METHOD
Usage: Defines the valuation method.
With: COMMERCIAL-LOAN
Context: Valuation Method
Setup: None
A Features
A.2 List of features
156 © Wall Street Systems IPH AB - Confidential
A.2.25 Insert Default Guarantees
A.2.26 Late Payment Penalty
A.2.27 Late Payment Penalty Realization
A.2.28 Loan Pricing
A.2.29 Off Balance Sheet Accounting (Facility)
Id: INSERT-DEFAULT-GUARANTEES
Usage: If a Facility’s specific Guarantee Set is set up with a Guarantee where the switch Default
Guarantee is set, then that default Guarantee will be automatically added at the time of
Drawdown entry.
With: COMMERCIAL-LOAN
Context: Action
Setup: None
Id: LATE-PAYMENT-PENALTY
Usage: Processes the case when the borrower has failed to make a payment on time.
With: COMMERCIAL-LOAN
Context: Action
Setup: None
Id: LATE-PAYMENT-PENALTY-REALIZE
Usage: Allows the realization of Late Payment Penalties. So this should be used on Instruments
that are used in the generation of Late Payment Penalty transactions.
With: COMMERCIAL-LOAN
Context: Action
Setup: None
Id: LOAN-PRICING
Usage: Allows pricing of fixed-rate and revisable loans.
With: COMMERCIAL-LOAN
Context: Action
Setup: None
Id: OBS-FACILITY
Usage: Used to identify the instrument as needing off-balance sheet accounting treatment.
A Features
A.2 List of features
Commercial Loans Module (CLM) User Guide 157
A.2.30 Risk Venture Capital
A.2.31 Write Off
With: COMMERCIAL-LOAN
Context: Accounting
Setup: None
Id: RISK-VENTURE-CAPITAL
Usage: Enables the investment in equities under a lending facility.
With: EQUITY
Context: Action
Setup: None
Id: WRITE-OFF
Usage: This feature is used when the borrower no longer has the ability to repay: the lender has
to write-off the balance outstanding amounts.
With: COMMERCIAL-LOAN
Context: Action
Setup: None
A Features
A.2 List of features
158 © Wall Street Systems IPH AB - Confidential
Commercial Loans Module (CLM) User Guide 159
Appendix B Loan event parameters
B.1 Commitment Fee
B.2 Conditional Remuneration
Parameter Description
Commitment Type Defines the basis for the calculation of a Commitment Fee transaction on one of the
following: Total Credit, Unutilized Credit, or Utilized Credit.
• If Commitment Type = Total Credit, the entire credit amount attached to the
facility or facility/tranche combination is used to calculate the fee.
• If Commitment Type = Utilized Credit, the total credit amount (the difference
between the total and utilized credit amount) of a facility or facility/tranche
combination is used to calculate the fee.
• If Commitment Type = Unutilized Credit, the unutilized portion of the credit
amount drawn against a facility or facility/tranche combination is used to calculate
the fee.
Commitment
Counterparty
Counterparty to be used for the Commitment Fee transaction.
Commitment Portfolio Portfolio to be used for the Commitment Fee transaction.
Commitment
Instrument
Instrument to be used for the Commitment Fee transaction.
Commitment
Tem p lat e
Transaction template to be used for the Commitment Fee transaction.
Parameter Description
Cashflow Type List of cashflow types set up in the system (for example, Interest, Principal, and so
on).
Note: If you want to have a specific conditional remuneration accounted for as a part
of the principal cashflows, for example, in a Prepayment event, then you should
enter: Cashflow Type = Principal, and Event Sub-type (in the upper part of the
editor) = FX or IX.

B Loan event parameters
B.3 Deferment Commission
160 © Wall Street Systems IPH AB - Confidential
B.3 Deferment Commission
B.4 Drawdown Amendment
Parameter Description
Commission End Date
Method
Method used to determine the date of the Deferment Commission transaction. Choose
from: Any or Maturity Date.
Commission Template Transaction template used for the transaction.
Parameter Description
Amendment Types (Information only)
One of the following switches is activated, depending on which Event Sub-type has been
selected (in the upper part of the editor):
• Counterparty Conversion
• Transaction Condition Conversion
• Instrument Conversion
•Currency Conversion
• Transaction Template Conversion
• Non Pro-rate Prepayment
• Non-editable.
Allow Past-Period
Amendments
Switch on Allow Past-Period Amendments so that the transaction can be amended with
retrospective effect (Amendment Date is before the Action Date).
• If this switch is on, the system allows the Amendment Date to be prior to an existing
due date before the Action Date.
• If this switch is off, the system only allows the Amendment Date to be on or after the
last existing due date preceding the Action Date.
This value controls whether the system accepts an Amendment Date which is before the
last due date before the Action Date. Typically, any payments on that date would
already have been received and allocated, and accounting entries would have been
generated. Therefore, if past period amendment dates are accepted, some special
cashflows are created to compensate these cashflows.
Partial Amount Switch on Partial Amount so that it is possible to make an amendment for less than the
transaction Nominal Outstanding Amount.
Keep Guarantees Determines whether the amendment transaction inherits the original transactions
guarantees:
• If this switch is on, the amendment transaction automatically inherits the
guarantees of the original transaction.
• If this switch is off, the amendment transaction is created initially without any
guarantees.
B Loan event parameters
B.5 Drawdown Cancellation
Commercial Loans Module (CLM) User Guide 161
B.5 Drawdown Cancellation
Payment Date Method Method used to determine the payment date. Choose from:
• Amendment Date – any payable amount as of the Amendment Date is settled on
the Amendment Date
• Next Due Date - any payable amount as of the Amendment Date is settled on the
next due date
This value controls when any payable amounts calculated as of the Amendment Date
(for example, the accrued interest up to the Amendment Date or breakage costs
calculated for the original transaction) should be paid.
Target Counterparty When Event Sub-type = Counterparty Conversion, Client ID of the target
counterparty.
Target Instrument When Event Sub-type = Instrument Conversion, Instrument ID of the target
instrument.
Target Transaction
Tem p lat e
When Event Sub-type = Instrument Conversion or Transaction Template
Conversion, Transaction Template ID of the target transaction template.
Target Currency When Event Sub-type = Currency Conversion, Currency ID of the target currency.
Reference Rate
Scenario
When Event Sub-type = Currency Conversion, scenario to be used to fetch the
rates.
Breakage Cost Method When Event Sub-type = Non Pro-rata Prepayment or Transaction Condition
Conversion, choose from: Indemnity Interest, Net Amount, Valuation, or None.
Breakage Cost Pricing
Factor
Number used to adjust the calculated Breakage Cost.
The number is treated as a percentage: for example, if Breakage Cost Pricing Factor =
100%, it would keep the Breakage Cost = Calculated Breakage Cost.
Parameter Description
Parameter Description
Revolving Switch on to set it as revolving.
Indemnity Method Choose from: Indemnity Interest, Net Amount, Valuation, or None.
Indemnity Pricing
Scenario
Scenario to be used to fetch the rate for calculating the indemnity.
Indemnity Pricing
Date Method
Choose from: Business Days, Days, Weeks, Months, or Years.
Indemnity Pricing
Offset
Number of days offset.
Indemnity Pricing
Date Convention
Choose from: Backward, Following, Modified Following, Modified Backward, or None.
Indemnity Base Rate
Method
Choose from: Current Rate, New Rate, Net Rate, or None.
Indemnity Pricing
Factor
Number used to calculate the indemnity.
Indemnity Rate
Condition
Condition used to define the indemnity rate.
B Loan event parameters
B.6 Drawdown Classification
162 © Wall Street Systems IPH AB - Confidential
B.6 Drawdown Classification
B.7 Drawdown Fee
B.8 Due Amount Carry Forward
Parameter Description
New Classification Choose from: Normal, In Distress, Quasi-liquidation, Liquidation, or Liquidated.
Parameter Description
Fee Method Choose from: Capitalization or Stand Alone.
Fee Instrument Instrument used for the fee.
Fee Templa t e Transact i on Template used for the fee.
Parameter Description
Carry Forward
Instrument
Instrument used for the carry forward.
Carry Forward
Tem p lat e
Transaction template used for the carry forward.
Carry Forward End
Date Method
Method used to determine the Carry Forward End Date. Choose from: Any, Client
Value Date, Facility Value Date, or Transaction Value Date.
• Any - allows you to select any date in the calendar after the Carry Forward Start
Date.
• Transaction Value Date - allows you to select one of the cashflow value dates of
the current transaction where the date is later than the Carry Forward Start Date.
• Facility Value Date - allows you to select one of the value dates of the cashflows
belonging to the Facility of the current transaction where the date is later than the
Carry Forward Start Date.
• Client Value Date - allows you to select one of the value dates of the cashflows
where the counterparty of the current transaction is the counterparty and where
the date is later than the Carry Forward Start Date.
DACF converts all payable, but not yet allocated, cashflows on the Value Date into the
principal amount of the DACF transaction. Depending on the transaction template
used with the DACF transaction, it may or may not calculate further interest on this
carried-forward amount.
Note: If Keep Original Cashflow Types is switched on (see below), the DACF transaction
is created with additional cashflows that reflect the exact Cashflow Type of the
cashflows that were carried forward. These cashflows are then used for
settlement on the carry-forward date.
B Loan event parameters
B.9 Facility Fee
Commercial Loans Module (CLM) User Guide 163
B.9 Facility Fee
B.10 Funding Call
B.11 Guarantee Call
Keep Original
Cashflow Types
Switch on to keep original cashflow types.
• If this switch is on, the system keeps the original cashflow types while generating
additional cashflows for settlement on the Carry Forward End Date. These
cashflows are flagged as External.
• If this switch is not on, the system treats all carried forward cashflows as
capitalized, and the settlement cashflows are generated in the normal manner.
Parameter Description
Parameter Description
Fee Counterparty Counterparty of the Facility Fee transaction.
Fee Portfolio Portfolio of the Facility Fee transaction.
Fee Instrument Instrument used for the Facility Fee transaction.
Fee Template Transaction template for the Facility Fee transaction.
Fee Currency Currency of the Facility Fee transaction.
Parameter Description
Funding Call
Counterparty
Counterparty used for the funding call.
Funding Currency Currency of the funding call.
Parameter Description
Call Method Choose from: Outstanding Nominal or Past Due Payment.
Call Delay Number of days delay.
Call Payment Delay Number of days payment delay.

B Loan event parameters
B.12 Guarantee Refund
164 © Wall Street Systems IPH AB - Confidential
B.12 Guarantee Refund
B.13 Late Payment Penalty
B.14 Prepayment
Parameter Description
Refund Instrument Instrument used for the refund.
Refund Template Transaction Template used for the refund.
Parameter Description
Penalty Instrument Instrument used for the penalty.
Penalty Template Transaction Template used for the penalty.
Penalty End Date
Method
Choose from: Any or Transaction Maturity Date.
Parameter Description
Revolving Switch on to make the prepayment revolving.
• If this switch is on, the Prepayment event creates an Amount Entity that decreases
the credit utilization in the Facility/Tranche of the drawdown on the Prepayment
Date of the prepayment
• If this switch is off, the Prepayment event does not have any effect on the credit
utilization.
Partial Prepayment
Allowed
Switch on to allow partial prepayment.
• If this switch is on, the Drawdown can be prepaid partially
• If this switch is off, the Drawdown can only be prepaid in full.
Allocation Method Method used to allocate the Prepayment Amount to outstanding repayment flows.
• Pro-Rata - In a partial repayment, the Prepayment Amount is allocated
proportionally to the outstanding repayment flows.
• Customized - In a partial repayment, the Prepayment Amount is initially allocated
proportionally to the outstanding repayment flows but the allocation of any
Allocation Amount can be modified to any value between 0 and the full amount of
the repayment flow.
In this case, the system automatically adjusts the last repayment flow to ensure
that the total repayment amount is equal to the Prepayment Amount.

B Loan event parameters
B.14 Prepayment
Commercial Loans Module (CLM) User Guide 165
Indemnity Method Method used to calculate the Prepayment Indemnity transaction:
• None - No Prepayment Indemnity is calculated.
• Net Amount - the amount of the Prepayment Indemnity is entered manually in the
Drawdown currency to be paid on the Prepayment Date.
• Valuation - the amount of the Prepayment Indemnity is calculated by the system
by revaluing the amortization cashflows and all interest cashflows of the
Drawdown which have been marked with the flag Prepayment Base Rate with
valuation rates as of the Indemnity Pricing Date of the Prepayment.
The difference between the current market value and the outstanding principal is
compensated by the Prepayment Indemnity on the Prepayment Date.
• Indemnity Interest - the amount of the Prepayment Indemnity is calculated by the
system by creating new interest cashflows (base indemnity, margin indemnity)
corresponding to the original interest due/payment dates of those interest
cashflows of the Drawdown which have been marked with the flag Prepayment
Base Rate and by calculating the net present value (NPV) of all interest amounts
as of the Prepayment Date.
The total NPV is used as the Prepayment Indemnity amount. The interest rates
used to calculate the interest amounts as well as in discounting them to the
Prepayment Date can be either set automatically by the system based on other
prepayment attributes or they can be set manually in the schedules of the
Prepayment transaction (see below).
Indemnity Pricing
Scenario
Rate scenario from which all required market rates for indemnity pricing are taken.
Indemnity Pricing
Date Method
Method used to interpret the Indemnity Pricing Offset. Choose from:
• Days - Indemnity Pricing Offset is interpreted as number of calendar days.
• Business Days - Indemnity Pricing Offset is interpreted as number of business
days using the calendar of the drawdown being prepaid.
• Weeks - Indemnity Pricing Offset is interpreted as number of calendar weeks.
• Months - Indemnity Pricing Offset is interpreted as number of calendar months.
• Years - Indemnity Pricing Offset is interpreted as number of calendar years.
Indemnity Pricing
Offset
Used with Indemnity Pricing Date Method to calculate the allowed offset.
Indemnity Pricing
Date Convention
Convention used to calculate the Indemnity Pricing Date. Choose from:
• None - Non-business days are accepted as Indemnity Pricing Date.
• Backward - if the calculated Indemnity Pricing Date falls on a non-business day, it
is moved backward to the closest preceding business day.
• Modified Backward - if the calculated Indemnity Pricing Date falls on a
non-business day, it is moved backward to the closest preceding business day
unless this falls on a different calendar month in which case it is moved forward to
the closest following business day instead.
• Following - if the calculated Indemnity Pricing Date falls on a non-business day, it
is moved forward to the closest following business day.
• Modified Following - if the calculated Indemnity Pricing Date falls on a
non-business day, it is moved forward to the closest following business day unless
this falls on a different calendar month in which case it is moved backward to the
closest preceding business day instead.
New Rate Reference
Indemnity Margin
Reference
Discount Rate
Reference
Discount Margin
Reference
ID of the yield curve from which all required market rates for calculating the new rate
are taken.
The Usage field that precedes each Reference field can be used to filter the list of
available yield curves in the corresponding Reference field.
Parameter Description
B Loan event parameters
B.15 Rate Condition
166 © Wall Street Systems IPH AB - Confidential
B.15 Rate Condition
New Rate Pricing
Method
Method used to determine the rate pricing.
• Direct Quote - identifies the rate as of the Maturity Date of the drawdown from the
selected yield curve.
• Zero Pricing - makes a theoretical zero-coupon pricing of the new rate using the
actual interest cashflows of the drawdown together with the amortization
cashflows of the drawdown.
New Rate Pricing Mode Choose from: Bid, Ask, Bid/Ask, Average, or Reverse Bid/Ask.
Discount Rate Pricing
Method
Method used to determine the Discount Rate pricing: Direct Quote or Zero Pricing.
Discount Rate Pricing
Mode
Choose from: Bid, Ask, Bid/Ask, Average, or Reverse Bid/Ask.
Indemnity Base Rate
Method
Method used to determine the Indemnity Base Rate.
• None - Indemnity Rate entered manually or defaults from the event condition.
• New Rate - Indemnity Rate is calculated as the new rate of the Prepayment.
• Current Rate - Indemnity Rate is calculated as the current rate of the Drawdown.
• Net Rate - Indemnity Rate is calculated as the difference between the current rate
of the Drawdown and the new rate of the Prepayment.
Indemnity Base Rate Number used for the indemnity base rate.
Indemnity Margin Number used for the indemnity margin.
Discount Base Rate Number used for the discount base rate.
Discount Margin Number used for the discount margin.
Indemnity Pricing
Factor
Number used as the indemnity pricing factor.
If the calculated prepayment indemnity amount is e.g. 950,000.00 and Indemnity
Pricing Factor is 80% the final Prepayment Indemnity Amount is calculated as follows:
Final Prepayment Indemnity Amount =
(80/100) * 950,000.00 = 760,000.00
Parameter Description
Parameter Description
Pricing Method Method to be used in calculating a rate based on a set of rates for different maturities
in a yield curve. Choose from: Direct Quote or Zero Pricing.
• Direct Quote - identifies the rate from the selected yield curve (see Pricing Rate),
for the Pricing Date, Pricing Scenario, and Pricing Period.
• Zero Pricing - executes a theoretical zero-coupon pricing of the cashflows from the
selected yield curve.
Leave this field blank if the rate is given directly in the condition (see Rate), or if it is to
be entered at the time of transaction entry.
Pricing Mode Mode used to control which type of rates are used when identifying a rate for the
schedule. Choose from: Bid, Ask, Bid/Ask, Average, or Reverse Bid/Ask.

B Loan event parameters
B.15 Rate Condition
Commercial Loans Module (CLM) User Guide 167
Rate Rate used for the pricing.
The rate is inserted into the Rate field in the Schedule view.
Leave this field blank if you have specified a Pricing Method to be used in calculating a
rate from a yield curve.
Pricing Rate Yield curve from which the rate is calculated.
Leave this field blank if the rate is given directly in the condition (see Rate), or if it is to
be entered at the time of transaction entry.
Pricing Gap Set Gap set used for supplying the date periods; these in turn are used to define exact
dates.
Pricing Period Period on the yield curve from which the rate is calculated.
This field is used when Pricing Method = Direct Quote.
If this field is left blank, and Pricing Method = Direct Quote, then the system
automatically identifies the rate for the end date of the schedule.
Leave this field blank if the rate is given directly in the condition (see Rate), or if it is
to be entered at the time of transaction entry.
Fixing Offset Number of days before the Start Date of an interest calculation period that the rate for
the next period must be set.
This value is used if the schedule of the condition is of a floating nature.
Fixing Rate Yield curve or index from which the market rate used to calculate a new rate for a
cashflow in Fixing is taken.
This value is used if the schedule of the condition is of a floating nature.
Expression Expression used to calculate the rate for a cashflow.
This value is used if the schedule of the condition is of a floating nature.
Spread Rate to be inserted into the Spread field in the Schedule view.
This value is used if the schedule of the condition is of a floating nature.
Cap A fixed numeric value to be used in calculating a new rate for a cashflow in Fixing
according to the expression of the schedule and cashflow.
This value is used if the schedule of the condition is of a floating nature and if the
expression contains the variable Cap. In practice this means that the field is only used
in floating schedules with conditions containing an upper limit to an acceptable output
from the expression.
Floor A fixed numeric value to be used in calculating a new rate for a cashflow in Fixing
according to the expression of the schedule and cashflow.
This value is used if the schedule of the condition is of a floating nature and if the
expression contains the variable Floor. In practice this means that the field is only
used in floating schedules with conditions containing a lower limit to an acceptable
output from the expression.
Divider A fixed numeric value to be used in calculating a new rate for a cashflow in Fixing
according to the expression of the schedule and cashflow.
This value is used if the schedule of the condition is of a floating nature and if the
expression contains the variable Divider. In practice this means that the field is only
used in indexed schedules, not in ordinary floating rate schedules.
Factor A fixed numeric value to be used in calculating a new rate for a cashflow in Fixing
according to the expression of the schedule and cashflow.
This value is used if the schedule of the condition is of a floating nature and if the
expression contains the variable Factor. In practice this means that the field is only
used in indexed schedules, not in ordinary floating rate schedules.
Parameter Description

B Loan event parameters
B.16 Write-Off
168 © Wall Street Systems IPH AB - Confidential
B.16 Write-Off
Parameter Description
Write-Off Choose from: Past Due Payments or Outstanding Debt.
• Past Due Payments - a past due payment on the given write off date is written off
without affecting the rest of the outstanding debt.
• Outstanding Debt - the full outstanding debt is written off.
Commercial Loans Module (CLM) User Guide 169
Appendix C Activity parameters
C.1 CLM Bulk Drawdown Amendment
Parameter Description
Facility Facility of the transactions to be processed. (Mandatory.)
Tranche Tranche of the transactions to be processed. (Mandatory.)
Event Date Method Method used to determine the Event Date. (Mandatory.)
Owner Owner of the portfolio of the transactions to be processed.
Counterparty Counterparty of the transactions to be processed.
Currency Currency of the transactions to be processed.
Instrument Instrument of the transactions to be processed.
Transaction Template Transaction template of the transactions to be processed.
Event Client Initiator of the amendment: Owner or Counterparty.
Fixing Rate New fixing rate to be applied to all drawdown transactions under the facility/tranche.
Fixing Period New fixing period to be applied to all drawdown transactions under the
facility/tranche.
Spread New spread to apply to all drawdown transactions under the facility/tranche.
Payment Date Method Method used to determine the payment date.
• Amendment Date – any payable amount on the Amendment Date is settled on the
Amendment Date.
• Next Due Date - any payable amount on the Amendment Date is settled on the
next due date.

C Activity parameters
C.2 CLM Fixing Drawdown Cashflow
170 © Wall Street Systems IPH AB - Confidential
C.2 CLM Fixing Drawdown Cashflow
Previously, CLM Fixing Drawdown Execution.
C.3 CLM Late Payment Penalty Generation
C.4 CLM Late Payment Penalty Realization
Parameter Description
Portfolio Portfolio of the transactions to be processed.
Instrument Group Instrument group of the transactions to be processed.
Instrument Instrument of the transactions to be processed.
Currency Currency of the transactions to be processed.
Fixing Rate New fixing rate to be applied to the transactions.
Fixing Period New fixing period to be applied to the transactions.
Fixing Subscenario Subscenario from which the quotation is to be retrieved.
Parameter Description
Event Subtype Choices are: None, Maximum, Adding-Benchmark-Rate or Adding-Aggregated-Rate.
(Mandatory.)
Portfolio Portfolio of the transactions to be processed. (Mandatory.)
Minimum Transaction
State
Minimum state that transactions must have reached to be included in the processing.
(Mandatory.)
Past Due Period in
Days
Number of days prior to the Due Date. Used to find cashflows in that period which
need to be included in the processing (Payment FX Rate Reminder).
Fallback Instrument Instrument used when no instrument is defined in the retrieved action rule.
Fallback Transaction
Tem p lat e
Template used when no transaction template is defined in the retrieved action rule.
Parameter Description
Penalty Instrument Instrument to be used to process late payment penalty (LPP) transactions.
Minimum Transaction
State
Minimum state that transactions must have reached to be included in the processing.
Past Due Date Offset The offset to be used in conjunction with the activity Due Date. Normally, you would
want to look at yesterdays Payment Allocation activity i.e. Offset = 1.
Past Due Period In
Days
The period in which the activity will search for LPP transactions that can be processed.

C Activity parameters
C.5 CLM Late Payment Reminder Generation
Commercial Loans Module (CLM) User Guide 171
C.5 CLM Late Payment Reminder Generation
C.6 CLM Payment FX Rate Generation
Parameter Description
Days Backward Number of days prior to the due date. Used to find unallocated cashflows within that
period that need to be included in the processing (Late Payment Reminder).
Generate by Payment reminders can be generated by Counterparty and Facility, or by Counterparty
only.
Client Counterparty for which late payment reminders are to be generated.
Portfolio Portfolio of the transactions to be included. (Mandatory.)
Facility Facility of the transactions to be included.
Tranche Tranche for which the payment reminders are to be generated.
Location Group Location Group (from Country Group) for which the late payment reminders are to be
generated. (Mandatory.)
Exclude HIPC Used to exclude cashflows classified as HIPC (High Indebted Poor Countries) from the
processing (Late Payment Reminder).
Funding Type The source of the funds disbursed under a facility.
Minimum Transaction
State
Minimum state that transactions must have reached to be included in the processing.
Parameter Description
Days Forward Number of days from the Due Date. Used to find cashflows in that period that need to
be included in the processing (Payment FX Rate Reminder).
Generate by Payment reminders can be generated by Counterparty and Facility, or by Counterparty
only.
Client Counterparty for which payment FX rate reminders are to be generated.
Portfolio Portfolio of the transactions to be included. (Mandatory.)
Facility Facility for which payment FX rate reminders are to be generated.
Tranche Tranche for which the payment reminders are to be generated.
Location Group Location Group (from Country Group) for which the payment FX rate reminders are to
be generated. (Mandatory.)
Exclude HIPC Used to exclude cashflows classified as HIPC (High Indebted Poor Countries) from the
processing (Payment FX Rate Reminder).
Funding Type The source of the funds disbursed under a facility. (Mandatory.)
Minimum Transaction
State
Minimum state that transactions must have reached to be included in the processing.
C Activity parameters
C.7 CLM Payment Reminder Generation
172 © Wall Street Systems IPH AB - Confidential
C.7 CLM Payment Reminder Generation
C.8 CLM Subsidy Call Follow-up Generation
Parameter Description
Period in Days Number of days from the Due Date. Used to find cashflows in that period which need
to be included in the processing (Payment Reminder).
Generate by Payment reminders can be generated by Counterparty and Facility, or by Counterparty
only.
Client Counterparty for which payment reminders are to be generated.
Portfolio Portfolio for which the payment reminders are to be generated. (Mandatory.)
Facility Facility for which the payment reminders are to be generated.
Tranche Tranche for which the payment reminders are to be generated.
Location Group Location Group (from Country Group) for which the payment reminders are to be
generated.
Exclude HIPC Used to exclude cashflows classified as HIPC (High Indebted Poor Countries) from the
processing (Late Payment Reminder).
Funding Type The source of the funds disbursed under a facility.
Minimum Transaction
State
Minimum state that transactions must have reached to be included in the processing.
Parameter Description
Period in Days Number of days prior to the Due Date. Used to find cashflows in that period which
need to be included in the Payment FX Rate Reminder.
Generate by Payment reminders can be generated by Counterparty and Facility, or by Counterparty
only.
Client Counterparty for which the Subsidy Call Follow Up is generated.
Portfolio Portfolio of the transactions to be included (mandatory field).
Mandate Mandate for which the Subsidy Call Follow Up is generated
Facility The facility of the transactions to be included.
Tranche Tranche for which the payment reminders are to be generated.
Location Group Location Group for which the Subsidy Call Follow Up is generated.
Minimum Transaction
State
Minimum state that transactions must have reached to be included in the processing.
