TRM System Admin Guide
User Manual:
Open the PDF directly: View PDF ![]() .
.
Page Count: 256 [warning: Documents this large are best viewed by clicking the View PDF Link!]
- Preface
- Chapter 1 System processes
- Chapter 2 Managing server processes
- Chapter 3 Interfaces with other tools
- 3.1 Bloomberg Interface
- 3.2 Reuters Dealing 3000 Link
- 3.3 Value-at-Risk Interface
- 3.4 Prices import - Import Market Information Activity
- 3.5 Using comKIT
- Chapter 4 Using Import Export tool
- 4.1 Introduction
- 4.2 Features
- 4.3 Structure of the Import Export tool
- 4.4 Importing data
- 4.5 Definition file (.def)
- 4.6 Perl functions (the Interface class)
- 4.7 External packages: predefined modules
- 4.8 Running Import Export tool
- 4.9 Debugging
- 4.10 Interface class
- 4.11 TemplateInterface class
- 4.12 Empty sample files
- Chapter 5 Setting up message management
- 5.1 Overview
- 5.2 Transaction and Entity flow
- 5.3 Message Manager and Message flow
- 5.4 Examples of messages
- 5.5 Setting up Message Manager
- 5.6 Previews
- 5.7 Extracting data
- 5.8 Setting up Document Formatter
- 5.9 Message transfer
- 5.10 Possible problems and solutions
- Chapter 6 Managing static data
- Chapter 7 Setting up transaction and entity flow
- 7.1 Transaction flow and entity flow
- 7.2 Loading default transaction flow
- 7.3 Setting up transaction flow
- 7.3.1 Setting permissions
- 7.3.2 Setting Transaction Status
- 7.3.3 Setting transaction tags
- 7.3.4 Setting Transaction States
- 7.3.5 Setting up flow operations
- 7.3.6 Setting up a COMMIT operation
- 7.3.7 Setting up status operations
- 7.3.8 Setting up limit operations
- 7.4 Using Transaction Manager modes
- 7.5 Database objects for transaction flow and modes
- 7.6 Loading default entity flows
- 7.7 Setting up entity broker-based flow
- 7.8 Setting up loan entity action-based flow
- 7.9 Setting up transaction and settlement comments
- Chapter 8 Controlling user access
- 8.1 Managing TRM users
- 8.2 User groups
- 8.3 Password expiry
- 8.4 Domains
- 8.5 Permissions
- 8.6 Limiting access to activity types
- 8.7 Using Security Center
- 8.7.1 User Administration Editor
- 8.7.1.1 Creating a new group
- 8.7.1.2 Modifying an existing group
- 8.7.1.3 Deleting an existing group
- 8.7.1.4 Creating a new user
- 8.7.1.5 Modifying an existing user
- 8.7.1.6 Deleting an existing user
- 8.7.1.7 Searching for a user
- 8.7.1.8 Assigning portfolio permissions to users and user groups
- 8.7.1.9 Assigning domain permissions to users and user groups
- 8.7.1.10 Assigning multiple groups to users and user groups
- 8.7.2 Password Change
- 8.7.3 Permission Editor
- 8.7.4 Object Hierarchy Editor
- 8.7.5 Reports
- 8.7.1 User Administration Editor
- 8.8 Domain Editor
- Chapter 9 Configuration Table Editor and Admin Center
- Chapter 10 Customizing TRM user interfaces
- Chapter 11 Managing activities
- Chapter 12 Setting up comKIT
- Chapter 13 Configuring and customizing reports
- 13.1 Report Generator components
- 13.2 Applying report definitions
- 13.3 Sample report definition file
- 13.4 Configuring New Report submenu
- 13.5 Setting up layout files
- 13.6 Running related reports
- 13.7 Customizing reports in python
- 13.8 Customizing reports in perl
- 13.9 Printing reports from the command line (Windows only)
- 13.10 Executing reports from the command line
- Chapter 14 Generating verification reports
- Chapter 15 Routine system admin operations
- Chapter 16 FIX trading platform interface
- Appendix A Utility programs and scripts
- Appendix B Object permissions
- Appendix C Unix operations
- Appendix D Configuring Dashboard
- Appendix E Adding valuation modes
- Appendix F External valuation

2
Information in this document is subject to change without notice and does not represent a commitment on the part
of Wall Street Systems. The software and documentation, which includes information contained in any databases,
described in this document is furnished under a license agreement or nondisclosure agreement and may only be
used or copied in accordance with the terms of the agreement. It is against the law to copy the software or
documentation except as specially allowed in the license or nondisclosure agreement. No part of this publication
may be reproduced, stored in a retrieval system, or transmitted, in any form or by any means, electronic, mechanical,
photocopying, recording, or otherwise, without the prior written permission of Wall Street Systems.
Although Wall Street Systems has tested the software and reviewed the documentation, Wall Street Systems
makes herein no warranty or representation, either expressed or implied, with respect to software or
documentation, its quality, performance, marketability, or fitness for a particular purpose. As a result, this
software is provided "as is", and in no event will Wall Street Systems be liable for direct, indirect, special,
incidental, or consequential damages from any defect in the software or by virtue of providing this
documentation, even if advised of the possibility of such damages. The documentation may contain technical
inaccuracies and omissions.
The mention of an activity or instrument in this publication does not imply that all matters relating to that activity or
instrument are supported by Wallstreet Suite, nor does it imply that processing of or by that activity or instrument is
carried out in any particular way, even if such processing is customary in some or all parts of the industry.
The windows and screen images shown herein were obtained from prototypes during software development. The
actual windows and screen images in the software may differ.
Wall Street Systems, WSS, WALLSTREET, WALLSTREET SUITE and the Wall Street Systems logos are
trademarks of Wall Street Systems Delaware, Inc.
Finance KIT, Trema and Trema logo are trademarks of Wall Street Systems Sweden AB.
Microsoft and Windows are either registered trademarks or trademarks of Microsoft Corporation in the United States
and/or other countries.
Adobe, Acrobat, and Acrobat Reader are either registered trademarks or trademarks of Adobe Systems
Incorporated in the United States and/or other countries.
All other products mentioned in this book may be trademarks or service marks of their respective companies or
organizations.
Company names, people names, and data used in examples are fictitious unless otherwise noted.
This edition applies to Wallstreet Suite version 7.3.14 and to all later releases and versions until indicated in new
editions or Wall Street Systems communications. Make sure you are using the latest edition for the release level of
the Wall Street Systems product.
© Copyright 2011 Wall Street Systems IPH AB. All rights reserved.
Second Edition (May 2011)
TRM System Administration Guide 3
Contents
Preface ...........................................................................................................................15
Associated documents ................................................................................................................ 15
1 System processes .....................................................................................................17
1.1 TRM clients ............................................................................................................................ 17
1.1.1 Server processes ............................................................................................................ 17
1.1.2 Onyx ................................................................................................................................ 19
1.1.2.1 Starting Onyx ........................................................................................................ 19
1.1.2.2 Configuring property files ...................................................................................... 19
1.1.2.3 Configuring number of service instances ............................................................. 19
1.1.2.4 Onyx log files ........................................................................................................ 19
1.1.3 User processes ............................................................................................................... 19
1.2 Network bandwidth ............................................................................................................... 20
2 Managing server processes .....................................................................................21
2.1 omniNames ............................................................................................................................ 21
2.2 Onyx rate interface ................................................................................................................ 21
2.3 Automatic start of server processes ................................................................................... 21
2.4 mdsd ....................................................................................................................................... 22
2.5 transd ..................................................................................................................................... 22
2.6 micd ........................................................................................................................................ 23
2.7 reportd .................................................................................................................................... 23
2.8 Limit Server ........................................................................................................................... 23
2.8.1 Start-up script .................................................................................................................. 24
2.8.2 Applying periodic stop/loss limits .................................................................................... 24
2.8.3 Setting up the limit daemon ............................................................................................ 25
2.8.3.1 Standard setup ..................................................................................................... 28
2.8.3.2 Setup with frozen rates ......................................................................................... 28
2.8.4 Checking the limit daemon .............................................................................................. 28
2.9 activityd .................................................................................................................................. 28
2.10 tmd ........................................................................................................................................ 29
2.10.1 Configuring views and books for Treasury Monitor ....................................................... 29
2.11 Configuring Monitor page templates ................................................................................ 31
2.12 Deal mirroring module (DMM) ............................................................................................ 31
4 © Wall Street Systems IPH AB - Confidential
3 Interfaces with other tools .......................................................................................33
3.1 Bloomberg Interface ............................................................................................................. 33
3.1.1 Environment variables .................................................................................................... 33
3.1.2 CSD possibility ................................................................................................................ 35
3.1.2.1 Entity script ...........................................................................................................35
3.1.2.2 Value Mapping Editor script .................................................................................. 36
3.1.2.3 Security Mapping Set Editor ................................................................................. 36
3.1.3 Data License Prices activity process .............................................................................. 37
3.1.4 Two step activity processing ........................................................................................... 37
3.2 Reuters Dealing 3000 Link ...................................................................................................38
3.2.1 Overview ......................................................................................................................... 38
3.2.2 Scripts ............................................................................................................................. 39
3.2.3 Log file ............................................................................................................................ 39
3.2.4 Implementation ............................................................................................................... 39
3.3 Value-at-Risk Interface ......................................................................................................... 39
3.3.1 Default VaR scenario ......................................................................................................39
3.3.2 VaR Mapping Types ....................................................................................................... 39
3.3.3 Default mapping .............................................................................................................. 40
3.3.4 Importing RiskMetrics data to TRM ................................................................................. 40
3.3.4.1 Fetching the risk files ............................................................................................ 40
3.3.4.2 Running the import script ...................................................................................... 40
3.3.5 Importing FEA data to TRM ............................................................................................ 41
3.3.6 VaR horizon .................................................................................................................... 42
3.3.7 Other scripts .................................................................................................................... 42
3.3.7.1 Fetching RM data via FTP .................................................................................... 42
3.3.7.2 Importing volatility and correlations routine .......................................................... 43
3.4 Prices import - Import Market Information Activity ........................................................... 44
3.4.1 Import process ................................................................................................................ 44
3.4.1.1 Import files list .......................................................................................................44
3.4.1.2 Validating the files ................................................................................................ 45
3.4.1.3 Parsing the files .................................................................................................... 45
3.4.2 Environment variables .................................................................................................... 46
3.4.3 Format of the import file .................................................................................................. 47
3.4.3.1 Query properties ................................................................................................... 47
3.4.3.2 Price data properties ............................................................................................ 47
3.4.3.3 Example imports ................................................................................................... 47
3.4.4 Permissions .................................................................................................................... 48
3.4.5 CSD possibilities ............................................................................................................. 48
3.4.6 Validation of Imported Prices .......................................................................................... 49
3.4.6.1 CSD validation ...................................................................................................... 49
3.5 Using comKIT ........................................................................................................................ 50
3.5.1 Overview ......................................................................................................................... 50
3.5.2 comKIT services ............................................................................................................. 50
4 Using Import Export tool ..........................................................................................53
4.1 Introduction ........................................................................................................................... 53
TRM System Administration Guide 5
4.2 Features ................................................................................................................................. 53
4.3 Structure of the Import Export tool ..................................................................................... 53
4.3.1 File organization and inheritance .................................................................................... 54
4.4 Importing data ....................................................................................................................... 54
4.5 Definition file (.def) ................................................................................................................ 55
4.5.1 Templates ....................................................................................................................... 55
4.5.2 Layout syntax of the template ......................................................................................... 55
4.5.2.1 Header ..................................................................................................................56
4.5.2.2 Body ..................................................................................................................... 56
4.5.2.3 Trailer ................................................................................................................... 56
4.5.2.4 Body template ....................................................................................................... 57
4.5.3 Variables ......................................................................................................................... 57
4.5.3.1 Definition of variables ........................................................................................... 58
4.5.3.2 Command line variables ....................................................................................... 58
4.5.3.3 Variables section in .def file .................................................................................. 58
4.5.3.4 Syntax of environment variables .......................................................................... 58
4.5.3.5 Built-in variables ................................................................................................... 59
4.5.4 Format ............................................................................................................................. 59
4.5.4.1 Data type definitions ............................................................................................. 60
4.5.4.2 Predefined data types ........................................................................................... 60
4.5.4.3 Format options of data types ................................................................................ 60
4.6 Perl functions (the Interface class) ..................................................................................... 62
4.6.1 Export hook functions .....................................................................................................62
4.6.1.1 Start functions ....................................................................................................... 62
4.6.1.2 Finish functions ..................................................................................................... 63
4.6.2 Import hook functions ...................................................................................................... 63
4.6.2.1 Start functions ....................................................................................................... 63
4.6.2.2 Finish functions ..................................................................................................... 63
4.6.3 Overriding default functions ............................................................................................ 63
4.7 External packages: predefined modules ............................................................................ 63
4.8 Running Import Export tool ................................................................................................. 64
4.8.1 Running from the command line ..................................................................................... 64
4.8.2 Methods of script execution ............................................................................................ 65
4.9 Debugging ............................................................................................................................. 65
4.10 Interface class ..................................................................................................................... 65
4.10.1 Interface class functions ............................................................................................... 66
4.10.2 Interface member functions .......................................................................................... 66
4.11 TemplateInterface class ..................................................................................................... 67
4.11.1 TemplateInterface class functions ................................................................................ 68
4.11.2 TemplateInterface member functions ........................................................................... 68
4.12 Empty sample files .............................................................................................................. 71
4.12.1 Definition file ................................................................................................................. 71
4.12.2 Empty Perl module ........................................................................................................72
5 Setting up message management ...........................................................................75
6 © Wall Street Systems IPH AB - Confidential
5.1 Overview ................................................................................................................................ 75
5.2 Transaction and Entity flow .................................................................................................76
5.3 Message Manager and Message flow ................................................................................. 76
5.4 Examples of messages ......................................................................................................... 77
5.5 Setting up Message Manager ............................................................................................... 77
5.6 Previews ................................................................................................................................. 77
5.7 Extracting data ...................................................................................................................... 78
5.7.1 Expressions .................................................................................................................... 78
5.7.1.1 Single Field ........................................................................................................... 78
5.7.1.2 Result set (multiple fields) .................................................................................... 80
5.7.1.3 System functions .................................................................................................. 82
5.7.2 SQL code in stored procedures ...................................................................................... 83
5.7.3 Filters .............................................................................................................................. 83
5.8 Setting up Document Formatter .......................................................................................... 83
5.8.1 Prerequisites ................................................................................................................... 83
5.8.2 Settings ........................................................................................................................... 84
5.8.3 Authoring template documents ....................................................................................... 84
5.8.4 Saving Word 2007 XML files ........................................................................................... 86
5.8.5 Authoring common placeholders .................................................................................... 86
5.8.6 Including reusable text (subdocuments) ......................................................................... 86
5.8.6.1 Writing and uploading templates .......................................................................... 86
5.8.6.2 Defining the expressions ...................................................................................... 88
5.8.7 Customizing the e-mail body ........................................................................................... 88
5.8.8 Customizing rounding numbers and amounts ................................................................ 89
5.9 Message transfer ................................................................................................................... 89
5.9.1 E-mail example ............................................................................................................... 90
5.9.2 Fax example 1 ................................................................................................................ 90
5.9.3 Fax example 2 ................................................................................................................ 91
5.9.4 Printer example ............................................................................................................... 91
5.10 Possible problems and solutions ...................................................................................... 92
5.10.1 Developing test cases ................................................................................................... 92
5.10.2 Previewing transactions ................................................................................................ 92
5.10.3 Test script for previewing transactions .......................................................................... 93
5.10.4 CORBA error when previewing ..................................................................................... 93
5.10.5 E-mail problems on windows ........................................................................................ 93
5.10.6 Error evaluating 'Source.field' ....................................................................................... 93
5.10.7 Checking the generated messages .............................................................................. 94
5.10.8 Filters do not work ......................................................................................................... 94
6 Managing static data .................................................................................................97
6.1 Introduction ........................................................................................................................... 97
6.1.1 Static data workflow ........................................................................................................ 97
6.1.2 Static data workflow with 4-eyes verification ................................................................... 99
6.1.3 Static data workflow: CMM and TRM .............................................................................. 99
6.2 Setting up static data management ................................................................................... 100
TRM System Administration Guide 7
6.2.1 State and state flow setup ............................................................................................. 101
6.2.1.1 Next state after an Accept action ........................................................................ 102
6.2.1.2 Creating and deleting states ............................................................................... 103
6.2.2 Mode setup ................................................................................................................... 103
6.2.2.1 The four system modes ...................................................................................... 104
6.2.2.2 Creating and deleting modes .............................................................................. 104
6.3 TRM with CMM - static data changes ................................................................................ 104
6.3.1 Dependencies between entities .................................................................................... 105
6.4 Using SDM-managed entities ............................................................................................. 107
6.4.1 Using static data editors ................................................................................................ 107
6.4.2 Using SDM Manager applications ................................................................................. 107
6.4.2.1 SDM Query application ....................................................................................... 107
6.4.2.2 SDM Verify application ....................................................................................... 107
6.4.2.3 SDM Admin application ...................................................................................... 108
6.5 Tables and processes used ............................................................................................... 108
7 Setting up transaction and entity flow ..................................................................111
7.1 Transaction flow and entity flow ....................................................................................... 111
7.2 Loading default transaction flow ....................................................................................... 111
7.3 Setting up transaction flow ................................................................................................ 112
7.3.1 Setting permissions ....................................................................................................... 112
7.3.2 Setting Transaction Status ............................................................................................ 113
7.3.3 Setting transaction tags ................................................................................................ 113
7.3.4 Setting Transaction States ............................................................................................ 114
7.3.4.1 Transaction State flags ....................................................................................... 114
7.3.4.2 Transaction State contexts ................................................................................. 116
7.3.5 Setting up flow operations ............................................................................................. 116
7.3.5.1 Setting condition Calls ........................................................................................ 117
7.3.5.2 Setting up agents ................................................................................................ 120
7.3.5.3 Using masks in agent setup ............................................................................... 125
7.3.5.4 Setting up service queues .................................................................................. 126
7.3.5.5 Testing transaction flow ...................................................................................... 127
7.3.5.6 Converting flow.py to CSV format ...................................................................... 128
7.3.5.7 Migrating a transaction flow from a pre-7.2 version ............................................ 128
7.3.6 Setting up a COMMIT operation ................................................................................... 129
7.3.7 Setting up status operations ......................................................................................... 129
7.3.8 Setting up limit operations ............................................................................................. 129
7.4 Using Transaction Manager modes .................................................................................. 130
7.4.1 Loading default modes .................................................................................................. 130
7.4.2 Setting up modes ......................................................................................................... 131
7.4.3 Example of mode setup ................................................................................................ 145
7.5 Database objects for transaction flow and modes .......................................................... 146
7.6 Loading default entity flows ............................................................................................... 147
7.6.1 Entity broker-based flow ............................................................................................... 147
7.6.2 CLM loan action-based flow .......................................................................................... 149
8 © Wall Street Systems IPH AB - Confidential
7.7 Setting up entity broker-based flow .................................................................................. 149
7.7.1 Entity States .................................................................................................................. 149
7.7.2 Cashflow actions for Call Money / Account ................................................................... 150
7.7.3 Entity Rules ................................................................................................................... 151
7.7.4 Entity broker operations ................................................................................................ 152
7.7.4.1 Condition calls .................................................................................................... 152
7.7.4.2 Agents ................................................................................................................ 154
7.7.4.3 Service queues ................................................................................................... 158
7.7.5 Entity Manager Modes .................................................................................................. 159
7.7.5.1 Loading default modes ....................................................................................... 160
7.7.5.2 Setting up modes ................................................................................................ 160
7.7.6 Setup scripts and database objects .............................................................................. 161
7.8 Setting up loan entity action-based flow .......................................................................... 163
7.8.1 Loan Entity States ......................................................................................................... 163
7.8.2 Loan Entity Rules .......................................................................................................... 164
7.8.3 Loan Entity Actions ....................................................................................................... 164
7.8.4 Setup scripts and database objects .............................................................................. 166
7.9 Setting up transaction and settlement comments ........................................................... 166
8 Controlling user access .........................................................................................169
8.1 Managing TRM users .......................................................................................................... 169
8.1.1 Creating TRM user accounts ........................................................................................ 169
8.1.2 Deleting a TRM user account ....................................................................................... 169
8.1.3 Locking a TRM user account ........................................................................................ 170
8.1.4 Setting the System Security Officer role ....................................................................... 170
8.2 User groups ......................................................................................................................... 170
8.2.1 Default user groups in TRM .......................................................................................... 170
8.2.2 Assigning users to a group ........................................................................................... 171
8.3 Password expiry .................................................................................................................. 171
8.4 Domains ............................................................................................................................... 171
8.5 Permissions ......................................................................................................................... 171
8.5.1 Setting up the object permissions ................................................................................. 171
8.5.2 Domain permission ....................................................................................................... 172
8.5.3 Portfolio access ............................................................................................................. 172
8.5.4 Mode permissions ......................................................................................................... 172
8.5.5 Payment mode permissions .......................................................................................... 172
8.6 Limiting access to activity types ....................................................................................... 172
8.7 Using Security Center ......................................................................................................... 173
8.7.1 User Administration Editor ............................................................................................ 174
8.7.1.1 Creating a new group ......................................................................................... 174
8.7.1.2 Modifying an existing group ................................................................................ 175
8.7.1.3 Deleting an existing group .................................................................................. 175
8.7.1.4 Creating a new user ........................................................................................... 175
8.7.1.5 Modifying an existing user .................................................................................. 176
8.7.1.6 Deleting an existing user .................................................................................... 176
TRM System Administration Guide 9
8.7.1.7 Searching for a user ........................................................................................... 177
8.7.1.8 Assigning portfolio permissions to users and user groups ................................. 177
8.7.1.9 Assigning domain permissions to users and user groups .................................. 178
8.7.1.10 Assigning multiple groups to users and user groups ........................................ 178
8.7.2 Password Change ......................................................................................................... 179
8.7.2.1 Password expiry and validation .......................................................................... 180
8.7.3 Permission Editor .......................................................................................................... 180
8.7.3.1 Navigating through Permission Editor ................................................................ 181
8.7.3.2 Granting a permission ........................................................................................ 181
8.7.3.3 Removing an existing permission ....................................................................... 182
8.7.3.4 Single-screen 4-eyes principle ........................................................................... 182
8.7.3.5 Granting Deal Mirroring permissions .................................................................. 182
8.7.4 Object Hierarchy Editor ................................................................................................. 183
8.7.4.1 Adding an object ................................................................................................. 183
8.7.4.2 Removing an object ............................................................................................ 183
8.7.4.3 Moving an object ................................................................................................ 184
8.7.4.4 Renaming an object ............................................................................................ 184
8.7.5 Reports ......................................................................................................................... 184
8.7.5.1 Portfolios Report ................................................................................................. 184
8.7.5.2 Domains Report .................................................................................................. 185
8.7.5.3 Objects Report .................................................................................................... 185
8.7.5.4 User Groups Report ........................................................................................... 185
8.7.5.5 Users Information Report ................................................................................... 185
8.8 Domain Editor ...................................................................................................................... 186
8.8.1 Creating a new domain ................................................................................................. 186
8.8.2 Modifying an existing domain ........................................................................................ 186
8.8.3 Deleting a domain ......................................................................................................... 187
9 Configuration Table Editor and Admin Center ....................................................189
9.1 Introduction ......................................................................................................................... 189
9.2 Configuration Table Editor ................................................................................................. 189
9.3 Admin Center ....................................................................................................................... 193
9.3.1 Renaming Tool .............................................................................................................. 194
9.3.1.1 Renaming a portfolio ID ...................................................................................... 194
9.3.1.2 Renaming a client ID .......................................................................................... 195
10 Customizing TRM user interfaces .......................................................................197
10.1 Setting up menus .............................................................................................................. 197
10.2 Setting up title bars ........................................................................................................... 197
10.3 Deactivating splash screen .............................................................................................. 197
10.4 Selecting a theme .............................................................................................................. 197
10.5 Customizing Transaction Manager ................................................................................. 198
10.5.1 Transaction Manager default configuration ................................................................. 198
10.5.2 Overriding the default configuration ............................................................................ 199
10.5.3 Adding custom parameters to Transaction Manager actions ...................................... 199
10 © Wall Street Systems IPH AB - Confidential
10.5.4 Removing a toolbar button from the Transaction Manager ......................................... 200
10.6 Customizing Enter Board ................................................................................................. 200
10.6.1 Adding the entity definition .......................................................................................... 200
10.6.2 Making fields accessible ............................................................................................. 201
10.6.3 Making properties available ........................................................................................ 201
11 Managing activities ...............................................................................................203
11.1 Overview ............................................................................................................................ 203
11.2 ActivityType table ............................................................................................................. 203
11.3 Generating Windows NT Reports .................................................................................... 203
11.3.1 Starting the cron service ............................................................................................. 203
11.3.2 Scheduling NT Reports ............................................................................................... 204
12 Setting up comKIT ................................................................................................205
12.1 Introduction ....................................................................................................................... 205
12.2 comKIT Components ........................................................................................................ 205
12.3 comKIT Server ................................................................................................................... 205
12.3.1 Architecture ................................................................................................................. 205
12.3.1.1 Garbage collecting ............................................................................................ 206
12.3.1.2 TRM Naming Service ....................................................................................... 206
12.3.1.3 comKIT Server Parameters .............................................................................. 206
12.3.2 comKIT Server Configuration ...................................................................................... 206
12.3.2.1 Naming Service ................................................................................................ 206
12.3.2.2 Firewall ............................................................................................................. 206
12.3.2.3 SSL ................................................................................................................... 207
12.3.2.4 omniORB .......................................................................................................... 207
12.4 comKIT Client .................................................................................................................... 207
12.4.1 Python ......................................................................................................................... 207
12.4.2 Java ............................................................................................................................ 207
12.4.3 Exceptions .................................................................................................................. 208
13 Configuring and customizing reports .................................................................209
13.1 Report Generator components ........................................................................................ 209
13.1.1 Dataloader modules .................................................................................................... 209
13.1.2 Report engine ............................................................................................................. 210
13.1.3 Report Generator UI ................................................................................................... 210
13.1.4 ReportD ....................................................................................................................... 210
13.1.5 Cover pages, headers, and footers ............................................................................. 210
13.2 Applying report definitions .............................................................................................. 210
13.3 Sample report definition file ............................................................................................. 211
13.3.1 Main section ................................................................................................................ 212
13.3.2 Rename section .......................................................................................................... 212
13.3.3 Filter section ................................................................................................................ 213
13.4 Configuring New Report submenu .................................................................................. 213
TRM System Administration Guide 11
13.5 Setting up layout files ....................................................................................................... 214
13.6 Running related reports ................................................................................................... 214
13.6.1 drilldown.ini files .......................................................................................................... 214
13.6.2 .frd report types ........................................................................................................... 214
13.7 Customizing reports in python ........................................................................................ 215
13.8 Customizing reports in perl ............................................................................................. 215
13.9 Printing reports from the command line (Windows only) ............................................. 215
13.9.1 Main section ................................................................................................................ 216
13.9.2 Parameters section ..................................................................................................... 216
13.10 Executing reports from the command line ................................................................... 216
14 Generating verification reports ............................................................................217
14.1 General System Auditing ................................................................................................. 217
14.1.1 Domain Map Verification report .................................................................................. 217
14.1.2 Market Info Map Verification report ............................................................................. 217
14.1.3 Property Map Verification report ................................................................................. 218
14.1.4 Price Verification report ............................................................................................... 218
14.2 Instrument auditing ........................................................................................................... 219
14.2.1 Instrument Feature Verification report ........................................................................ 219
14.2.2 Instrument Result Verification report ........................................................................... 219
14.3 Transaction Auditing ........................................................................................................ 219
14.3.1 Transaction Classification Verification report .............................................................. 219
14.4 Relationship auditing ........................................................................................................ 220
14.4.1 Entity Relationship Verification report ......................................................................... 220
14.5 Client auditing ................................................................................................................... 220
14.5.1 Client Accounts Verification Report ............................................................................ 220
15 Routine system admin operations ......................................................................223
15.1 Database administration using Admin Center ............................................................... 223
15.1.1 Database statistics (TRM tables) ................................................................................ 223
15.1.2 Connected Users ........................................................................................................ 224
15.1.3 Database consistency check (Microsoft SQL Server and Sybase only) ..................... 224
15.1.4 Log Truncation ............................................................................................................ 226
15.1.5 History Log .................................................................................................................. 227
15.1.6 Database Cleanup ...................................................................................................... 228
15.2 Setting Application Manager timeout .............................................................................. 228
16 FIX trading platform interface ..............................................................................229
16.1 Components ...................................................................................................................... 229
16.2 Component interactions ................................................................................................... 230
16.3 Workflow related to the trading platform ........................................................................ 231
16.4 Site customization ............................................................................................................ 231
12 © Wall Street Systems IPH AB - Confidential
16.4.1 process_order ............................................................................................................. 231
16.4.2 process_execution_report ........................................................................................... 232
16.4.3 process_cancel_request ............................................................................................. 232
Appendix A: Utility programs and scripts ...........................................................................233
A.1 Scripts ................................................................................................................................. 233
A.2 Real-time diagnostic tools ................................................................................................. 234
A.2.1 Monitoring Message Bus status ................................................................................... 234
A.2.1.1 Troubleshooting destinations ............................................................................. 235
A.2.2 md-status ...................................................................................................................... 235
A.2.3 md-trace ....................................................................................................................... 236
A.3 psql (Microsoft SQL Server and Sybase only) ................................................................. 237
A.3.1 Options ......................................................................................................................... 237
A.3.2 Commands ................................................................................................................... 238
A.4 Debugging ........................................................................................................................... 238
A.4.1 Tracing accesses to the database ................................................................................ 238
A.4.1.1 Tracing an end-user application (Windows) ....................................................... 238
A.4.1.2 Tracing a real-time application (UNIX) ............................................................... 239
A.4.2 Tracing TRM messages (Windows) ............................................................................. 239
A.4.2.1 Setting the trace level and log file output ........................................................... 239
A.4.2.2 Trace prefixes .................................................................................................... 240
Appendix B: Object permissions..........................................................................................243
B.1 List of TRM permissions .................................................................................................... 243
Appendix C: Unix operations................................................................................................245
C.1 Unix operations .................................................................................................................. 245
C.1.1 TRM Server Passwords ............................................................................................... 245
C.1.1.1 Passwords for server processes ....................................................................... 245
C.1.1.2 Sample .fk-login file ............................................................................................ 246
C.1.1.3 Checking shared memory .................................................................................. 247
C.1.2 Startup scripts .............................................................................................................. 247
C.1.3 Scheduled processes (crontab) .................................................................................... 247
Appendix D: Configuring Dashboard...................................................................................249
D.1 Introduction ......................................................................................................................... 249
D.2 Data sources configuration ............................................................................................... 250
D.2.1 Treasury Position ......................................................................................................... 250
D.2.2 Cash Management Reports ......................................................................................... 250
D.2.3 Report Generator ......................................................................................................... 250
D.2.4 Limits ............................................................................................................................ 251
D.2.5 Dashboard client application ........................................................................................ 251
Appendix E: Adding valuation modes..................................................................................253
14 © Wall Street Systems IPH AB - Confidential
TRM System Administration Guide 15
Preface
This guide describes the system administration tasks required for Transaction and Risk Module
(TRM).
The guide aims to:
•Provide guidelines for the system administration of TRM
•Provide documentation on scripts and procedures
This guide is intended for system administrators who maintain and administer TRM. Administrators
should have experience with the following:
•Common Object Request Broker Architecture (CORBA)
•Perl and Python scripts
The database used with TRM is a customer asset and its operation, maintenance, and administration
should be under the control of a qualified DBA. It is the DBA’s responsibility to ensure that the
maintenance of the database used with TRM reflects customer policies and procedures.
Associated documents
•TRM User Guide
•comKIT API Reference provided in TRM installation:
FK_HOME\support\comKIT\doc\idl\html\index.html (Windows platform only)
•Wallstreet Suite Installation Guide
•Wallstreet Suite System Admin Guide
•Wallstreet Suite Database Setup Guide
16 © Wall Street Systems IPH AB - Confidential

TRM System Administration Guide 17
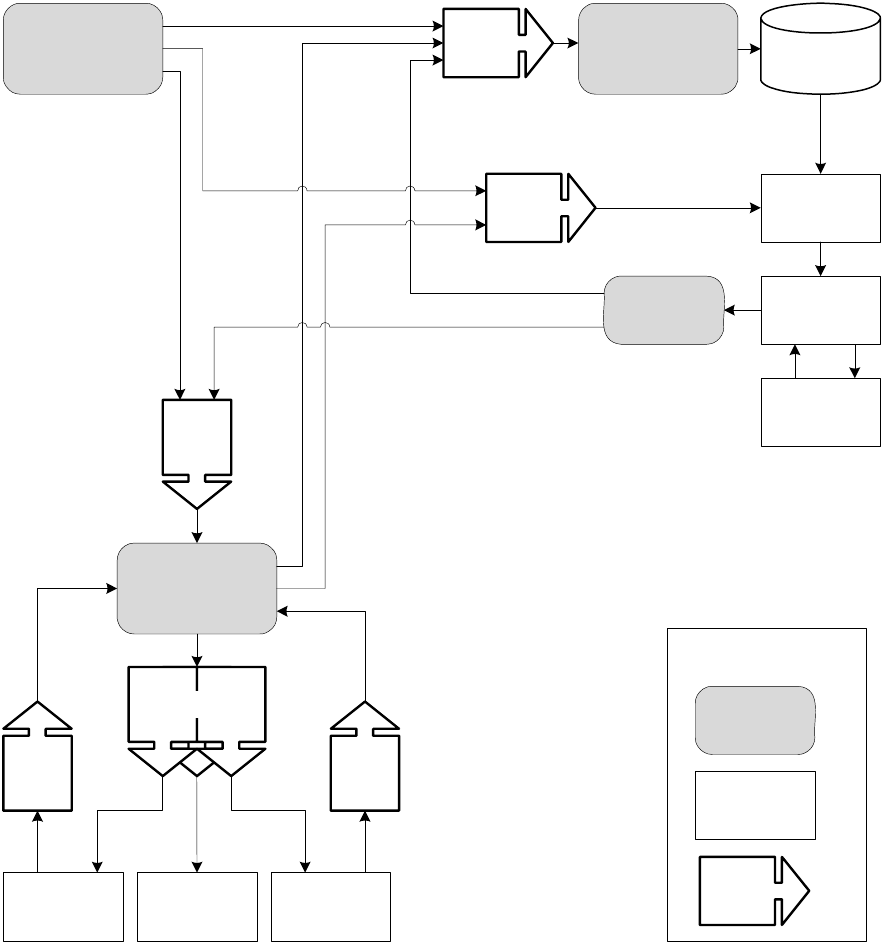
Chapter 1 System processes
1.1 TRM clients
The TRM clients can be divided into server processes that take care of the underlying information
flow between all TRM processes and user processes (for example monitors and editors).
1.1.1 Server processes
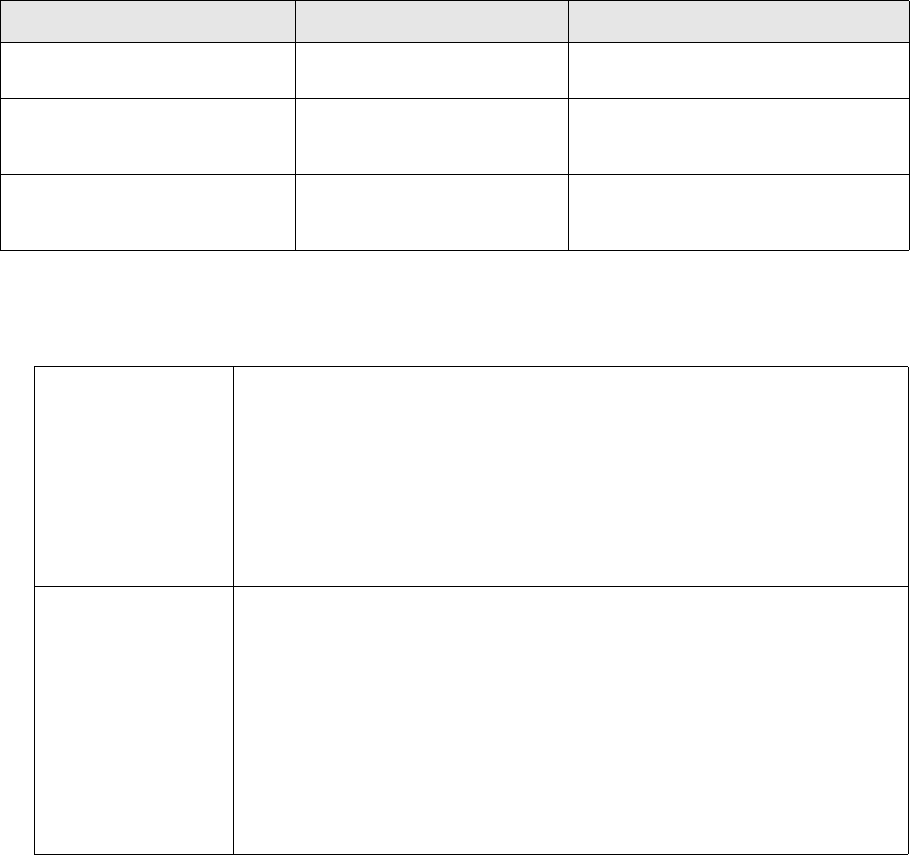
The server processes are as follows:
More details about these processes, see Chapter 2 Managing server processes on page 21.
Process Description
ActiveMQ Message bus
omniNames CORBA name server
mdsd Message Delivery System daemon (central point for all real-time traffic)
transd Deal transfer daemon for TRM
micd Market Information Calculation daemon (produces derived rates)
limitd Limit daemon
activityd Activity-launching daemon
tmd Treasury Monitor daemon
comkitd comkit daemon
reportd Generates reports on demand for TRMWeb.
serviced Service deamons, load CORBA modules to process and deliver data through
particular business logic.
sessiond Session deamons, deliver data to the end user through persistent connections
(sessions) that can be distributed among several instances.
TRM - Onyx Rate Interfaces Rate Feeder, Rate Saver, MDSD Gateway and Rate Broadcaster
1 System processes
1.1 TRM clients
18 © Wall Street Systems IPH AB - Confidential
The server processes, which may run on their own dedicated server computers, use CORBA for
inter-operability. The name server connects to all the processes and allows the server processes as
well as the user processes to locate each other. The following is a summary of how this works:
•The ORB (Object Request Broker) is configured with a naming service with a dedicated port for
requests.
•When an application connects to the mdsd, it uses the naming server to locate it. It then registers
a callback-object with the server. The server connects to this object whenever it needs to send
updates to the client.
•A timeout parameter to the server defines how long the connection is alive, and the connection
is restored on an as-needed basis if it has timed-out.
RateFeeder SaverQ RateSaver
Broadcaster
Broadcaster Q
micd Q
Rate Monitor Q
transd Q
Topic Tree
Topic Tree
micd Other C++
apps Rate Monitor
transd
mdsd
C++ apps
mdsd
Gateway
Database
Onyx
process
C++
applications
Key:
Queue
1 System processes
1.1 TRM clients
TRM System Administration Guide 19
1.1.2 Onyx
Onyx is a simple Java application server. It is complementary to ServiceD, which is used to run
services written in Python or c++.
1.1.2.1 Starting Onyx
Onyx is started by the following command:
On Windows
> onyx.bat
On Unix
> rc.onyx
It takes a space-separated list of services as arguments. For example, to start Onyx with the
services trmstaticdata and esiadapter, enter:
> rc.onyx trmstaticdata esiadapter
1.1.2.2 Configuring property files
Configuration files for Onyx and Onyx services are located under
$FK_HOME/etc/onyx/configuration/context/properties. This directory contains files with the
extension '.properties'. Each service has a configuration file named
'<service-name>.properties' (for example esiadapter.properties).
Some property files are used by all services (jdbc.properties, jms.properties,
ssl.properties, dbkit.properties, appserver.properties). You need to configure only the
property files required by the services you want to run. See the documentation of each service for
more information.
1.1.2.3 Configuring number of service instances
Each service in Onyx can be run in a specified number of instances. To change the number of
instances, edit the file
$FK_HOME/etc/onyx/configuration/services/<service-name>-bootstrap.xml.
Do not change anything in the content of the file except of number of instances, as in this example:
<bean id="esiadapterInitializer" class="biz.wss.onyx.server.ServiceInitializer">
<property name="provider" value="esiadapterClientRequest"/>
<property name="instances" value="1"/>
</bean>
1.1.2.4 Onyx log files
By default, Onyx and all its services create log files in the $FK_HOME/var/log structure
(onyx_trmswift.log in $FK_HOME/var/log/trmswift, onyx_basics.log in
$FK_HOME/var/log/trm). To change the level of logging detail, edit the file
$FK_HOME/etc/onyx/configuration/context/log4j.xml.
For logging, Onyx uses the Java open source library Log4J.
1.1.3 User processes
The main TRM user processes are:
•Transaction Managers (for example Deal Capture)
•Monitors (for example Treasury Monitor)
•Editors (for example Instrument Editor)
•Reports. Reports are generated on demand (TRMWeb only).
1 System processes
1.2 Network bandwidth
20 © Wall Street Systems IPH AB - Confidential
They all connect to the database when they are started, to read in their configuration data.
1.2 Network bandwidth
The network bandwidth required for TRM depends totally on the usage of the system. Entering a
deal in Deal Capture, for example, initiates a stored procedure (SQL insert to the database server)
and a real-time update to the mdsd. The network traffic for this kind of operation would be very
limited. An entry made with one of the editors, for example Client Editor, would also cause very
limited traffic.
There are two main traffic types: traffic between TRM applications and the TRM server processes,
and traffic between TRM applications and the TRM database.
The network traffic that is generated by receiving market information (for example, Reuters or
Telerate) will basically depend on the instruments configured in the system and the rate that they
are receiving updates from the information source.
It is also highly dependent on how the system is used. For example, Limit Monitor generates
different network traffic depending on the data used when started. This makes it very difficult to
predict how much network traffic will be generated.
The factor that has the most impact on network traffic is the update rate on the market information.
The update rate may be different from various providers.
The network traffic generated when the users request reports will depend on the parameters that
are given as well as the size and contents of the database. Reports or Treasury Monitor can cause a
lot of network traffic.
TRM System Administration Guide 21
Chapter 2 Managing server processes
The TRM server processes use a CORBA-based messaging technique for inter-process
communication. Two processes, mdsd and limitd, are contacted by other processes and
applications.
2.1 omniNames
The CORBA Names server must be running before any of the TRM server processes can function.
2.2 Onyx rate interface
The Onyx Rate Interface consists of the following Onyx processes:
2.3 Automatic start of server processes
All server processes, including the market information links, can be automatically restarted during
boot by:
•On UNIX: running the setup.fk script as follows:
cd $FK_HOME/etc
./setup.fk
Running the script puts the system passwords into memory.
Process Description
Rate Feeder Rate Feeder is responsible for retrieving the native rate format and converting it to
the standard message format used in Wallstreet Suite. Currently, the Reuters API
in version 7.3 is based on the Reuters Foundation API for Java (RFAJ) 6.3. It
Reuters’ latest and strategic API for connecting to RMDS servers. This API
introduces a new message format and a more efficient binary communication
protocol.
Rate Saver Rate Saver is responsible for storing real time or calculated rates into the
database. Special filtering logic can be applied in order to tune the frequency of
stored real time and calculated rates.
MDSD Gateway MDSD Gateway itransfers rate messages from the ActiveMQ platform to the
CORBA platform in order to distribute rates via MDSD.
Rate Broadcaster Rate Broadcaster distributes rates over the system and it takes over this role from
mdsd. Applications subscribe to the Rate Broadcaster to obtain new rate
messages.
2 Managing server processes
2.4 mdsd
22 © Wall Street Systems IPH AB - Confidential
•On Windows: In Start - Control Panel - Administrative Tools - Services, ensure that the Startup Type of all
Wallstreet Suite services is Automatic.
Note: When running Telerate, the tipd process should be started as the Telerate user aws. If not,
it will not start up properly.
Refer also to the description of Process Monitor daemons in the WSS System Admin Guide.
2.4 mdsd
The mdsd (Message Delivery System Daemon) is the hub of all real-time information flow. It is
essential for the real-time components of TRM. All activities requiring real-time updates must
indicate this by creating a connection with the mdsd.
The mdsd is a message exchange service. It allows for the arrival of correctly formatted messages
that are then broadcast to the processes that have indicated an interest in that particular message.
When a client (process) connects to mdsd, it requires a response to indicate that its request has
been accepted.
All applications (user and server processes) connect to mdsd. Some only receive information, like
Treasury Monitor and FX Forward Pricing; others send information, like Editors and Transaction
Manager.
2.5 transd
The transd real-time process is used to send information to the real-time server about updates of
prices and transactions that are imported or changed in a way that is not otherwise notified to the
mdsd.
Note: This is a required process for the Limit Monitor.
The PushPendingPrices and PushPendingTransactions procedures are used to update the
PendingPrices and PendingTransactions tables which are being read by the transd process.
Option/Argument Description
--log-directory arg Directory for log files
--service-name arg Service name to register with CosNaming
--max-queue-size arg Maximum allowed queue length for clients
--timeout-interval arg Timeout for non-responsive clients
Option/Argument Description
-I arg
--interval arg
Interval in milliseconds to check (default 70000)
-T arg
--topic arg
Topic to listen to
2 Managing server processes
2.6 micd
TRM System Administration Guide 23
2.6 micd
The micd real-time process calculates yield curves and derived rates. This process logs in to the
database as user batch.
2.7 reportd
The reportd program generate reports on demand. It is launched by TRMWeb, retrieves the report
data, supplies them to TRMWeb and terminates.
2.8 Limit Server
The TRM limit deamon monitors updates of transactions and market information changes. It accepts
connections from TRM applications and sends out information about the usage of current limits. The
limit servers watch the limits that are set up.
The limit deamon exists in two versions:
•limitd: the CORBA service, which only computes limits and serves data to applications
Option/Argument Description
-i arg
--include arg
Include given rates (default all)
-e arg
--exclude arg
Exclude given rates
-s arg
--init-scenario arg
List of scenarios to initialize by default
-d arg
--init-date arg
List of dates to initialize by default
-n
--dont-send
Inhibit sending of quotes, useful for debugging
-b
--batch
Batch mode, finish immediately after startup
--interval arg Interval in milliseconds to check.
--source-name arg Source name (default MICD)
Option/Argument Description
-l arg
--layout arg
Report layout
-t arg
--type arg
Report type
-f arg
--format arg (=bin)
Output format (bin|xml|xml3|html|txt|csv)
-p arg
--param arg
Report list of report parameters (-p name1=value1 -p name2=value2
etc.)
2 Managing server processes
2.8 Limit Server
24 © Wall Street Systems IPH AB - Confidential
•sessiond: the distributed limit service, which monitors limits, processes limit violations, and
serves data to the end user using persistent connections via the message bus.
2.8.1 Start-up script
On Unix systems, the script $FK_HOME/etc/rc/rc.limitd -e <environment> starts the limit
daemon for the specified environment.
The limit daemon can be run in a periodic mode in the same way as Treasury Monitor, for example,
is run (both Start Date and End Date are used as a selection criteria when starting up the server).
2.8.2 Applying periodic stop/loss limits
The period against which the limit daemon is run is critical in applying periodic stop/loss limits. The
Period End Date is currently always the current date. The generation of Period Start Date is made
based on three start-up options for the limit daemon described in the following tables:
•Period Method = NUMBER-OF-DAYS
This method can be used as a default if no Period Method has been given and the server is run
in a periodic mode.
Option/Argument Sessiond option Description
--use-business-days arg -s "use-business-days=arg" Use business days, affects how
period-method operates.
--start-date-value arg -s "start-date-value=arg" The number of days offset from
end-date (start-date = end-date -
offset)
--period-method arg -s "period-method=arg" Specify period method,
NUMBER-OF-DAYS, CURRENT-WEEK, or
CURRENT-MONTH
If --use-business-
days is set to No
(Default)
If NUMBER-OF-DAYS is used as Period Method and the parameter
--use-business-days is set to No, the preferred length of the period has to be
given as the number of days in parameter --start-date-value. The Start Date
for the limit daemon is then selected as:
Current Date - Start Date Value +1
where:
"1" in Start Date Value would result in the limit daemon being run with Start Date
= End Date (i.e. the current method). If nothing is given in
--Start-date-value, "1" should be used as default.
If --use-business-
days is set to Yes
If the parameter --use-business- days is set to Yes, the preferred length of
the period has to be given as number of business days in parameter
--start-date-value. The Start Date for the limit daemon is then selected as:
Current Date - Start Date Value +1
where:
Start Date Value is interpreted as business days validated against the calendar of
the base currency of the Portfolio ID used as a start up criteria for the limit
daemon.
"1" in Start Date Value would result in the limit daemon being run with Start Date
= End Date unless the previous day was a non-banking day. In this case, the
Start Date would be selected as one day after the previous business day.

2 Managing server processes
2.8 Limit Server
TRM System Administration Guide 25
•Period Method = CURRENT-WEEK
•Period Method = CURRENT-MONTH
2.8.3 Setting up the limit daemon
The environment variable $FK_LIMITD_SETUP is used to supply options to the rc.limitd script. On
UNIX, run $FK_HOME/sbin/limitd --help to list the available options; on Windows, run
%FK_HOME%\bin\limitd --help.
If --use-business-
days is set to No
(Default)
If CURRENT-WEEK is used as Period Method and the parameter
--use-business-days is set to No, the Start Date for the limit daemon is
selected as:
The closest past date for which the number of weekday was the same as the value
given in the parameter --start-date-value (1-7).
End Date is used as Start Date if the number of weekday of End Date (i.e. current
date) is the same as the value given in the parameter --start-date-value.
If --use-business-
days is set to Yes
If CURRENT-WEEK is used as Period Method and the parameter
--use-business-days is set to Yes, the Start Date for the limit daemon is
selected by:
Adding one day to the last business day preceding the closest past date for which
the number of weekday was the same as the value given in the parameter
--start-date-value (1-7).
For example, "1" (referring to Monday) is given as --start-date-value and the
server is started up on Wednesday.
The Start Date is selected by first going back to the previous Monday, then further
to last business day preceding Monday (normally Friday) and by adding one day to
it (i.e. ending up with Saturday).
End Date is used as a preliminary Start Date (i.e. before business day adjustment)
if the number of weekday of End Date (i.e. current date) is the same as the value
given in the parameter --start-date-value.
For example, in the previous example, the previous Saturday would be selected as
Start Date even when the server was started up on Monday.
If --use-business-
days is set to No
(Default)
If CURRENT-MONTH is used as Period Method and the parameter
--use-business-days is set to No, the Start Date for the limit daemon is
selected as:
The closest past date for which the number of day of month was the same as the
value given in the parameter --start-date-value (1-31).
End Date is used as Start Date if the number of day of month of End Date (i.e.
current date) is the same as the value given in the parameter
--start-date-value.
If --use-business-
days is set to Yes
If CURRENT-MONTH is used as Period Method and the parameter
--use-business-days is set to Yes, the Start Date for the limit daemon is
selected by:
Adding one day to the last business day preceding the closest past date for which
the number of day of month was the same as the value given in the parameter
--start-date-value (1-31).
For example, "1" is given as Start Date Value and the server is started up on 10th.
The Start Date is selected by first going back to first of month, then further back
to the last business day preceding the 1st day and then by adding one day to it.
End Date is used as a preliminary Start Date (i.e. before the business day
adjustment) if the number of day of month of End Date (i.e. current date) is the
same as the value given in the parameter --start-date-value.

2 Managing server processes
2.8 Limit Server
26 © Wall Street Systems IPH AB - Confidential
The following table outlines some of the typical definitions:
Option/Argument Description
--batch limits Run only once to compute and log the limits.
--category-warning-thresholds arg To generate a warning message when the threshold level,
expressed as a percentage, is reached for the corresponding
category. For example, if the categories CREDIT and
SETTLEMENT have been specified with the
--limit-categories parameter, then
--category-warning-threshold 75 80 specifies a
threshold of 75% for CREDIT and 80% for SETTLEMENT.
(Available categories are shown in the Limit Editor.)
--contexts arg The result contexts to include.
--end-date arg Period end-date, defaults to today.
--exclude-limit-categories arg Do not update specified limit categories.
--exclude-limits arg Do not update specified limits.
--exclude-limits-match arg Do not update limits matching.
--interval arg The update interval in milliseconds.
--limit-categories arg Update only specified limit categories.
--limits arg Update only specified limits.
--limits-match arg Update only limits matching.
--log-interval arg The logging interval in milliseconds.
--mark-all Pass all transactions through no-violation-action even if no
limit rule matches.
--min-log-interval arg The minimum logging interval.
--mode arg the valuation mode (default=0).
--no-violation-action arg This start-up parameter can be given the following values
and behavior:
--no-violation-action 0
When a transaction update results in a new limit violation, or
an old limit violation worsens, the server calls the transaction
action LIMIT VIOLATION that, by default, sets the status
LIMIT VIOLATION for the transaction. Any other types of
transaction actions can also be configured under the
action_id LIMIT VIOLATION.
--no-violation-action 1
The server behaves the same way as “0.” In addition, the
server calls the transaction action LIMIT VIOLATION CLEAR
that, by default, clears the LIMIT VIOLATION status when no
limits are violated as a result of a transaction update. (In
other words, the server automatically clears the previously
set LIMIT VIOLATION status when, following a new update,
no limits are violated by that transaction anymore.) Any
other type of transaction action can also be configured under
the action_id LIMIT VIOLATION CLEAR.
--no-violation-action 2
When value "2" is assigned, the server calls either the LIMIT
VIOLATION or NO LIMIT VIOLATION transaction action once
for the entire transaction, regardless of the number of limits
that might be affected.

2 Managing server processes
2.8 Limit Server
TRM System Administration Guide 27
--only-outstanding Include only outstanding transactions.
--pending-on-value-date Pre-Settlement Expression is used when value date = start
date.
--period-method arg Period method, NUMBER-OF-DAYS, CURRENT-WEEK, or
CURRENT-MONTH.
See 2.8.2 Applying periodic stop/loss limits on page 24.
--portfolio-id arg The top portfolio to start up.
--realized-end Period behavior Realized End.
--scenario-id arg The scenario to use.
--server-type arg Specify server type, either FINAL (default) or SIMULATION
--service-name arg The limit server name in Naming Service. Default is
limit-monitor.
--start-by-transaction When the limit server starts up, read transactions into limitd
by transaction number order, calculate limit utilizations and
call limit operations separately for every transaction.
--start-date-value arg The number of days offset from end-date (start-date =
end-date - offset).
See 2.8.2 Applying periodic stop/loss limits on page 24.
--state-context arg The state contexts to include.
--state-id arg The initial state to use.
--use-business-days Use business days, affects how period-method operates.
See 2.8.2 Applying periodic stop/loss limits on page 24.
--use-todays-fx-rate Limit daemon command line option --use-todays-fx-rate
now accepts optional arguments to support the calculation of
FX rates using the same methods as in the valuation.
• If the option is not used, FX rates are calculated using the
FX method 'Spot Rate'.
• If the option is used with no arguments or with argument
'=1', FX rates are calculated using the FX method 'Today's
Rate (Forward points)'.
• If the option is used with argument '=2', FX rates are
calculated using the FX method 'Today's Rate (IR
Difference)'.
--valuation-method arg Valuation method:
0 = Portfolio (default)
1 = Normal
2 = Zero Coupon
3 = Benchmark
4 = Zero Spot
--var-confidence-level arg The Value-at-Risk confidence level to use
--var-horizon-id arg The Value-at-Risk horizon id to use.
--var-scenario-id arg The Value-at-Risk scenario to use
Option/Argument Description
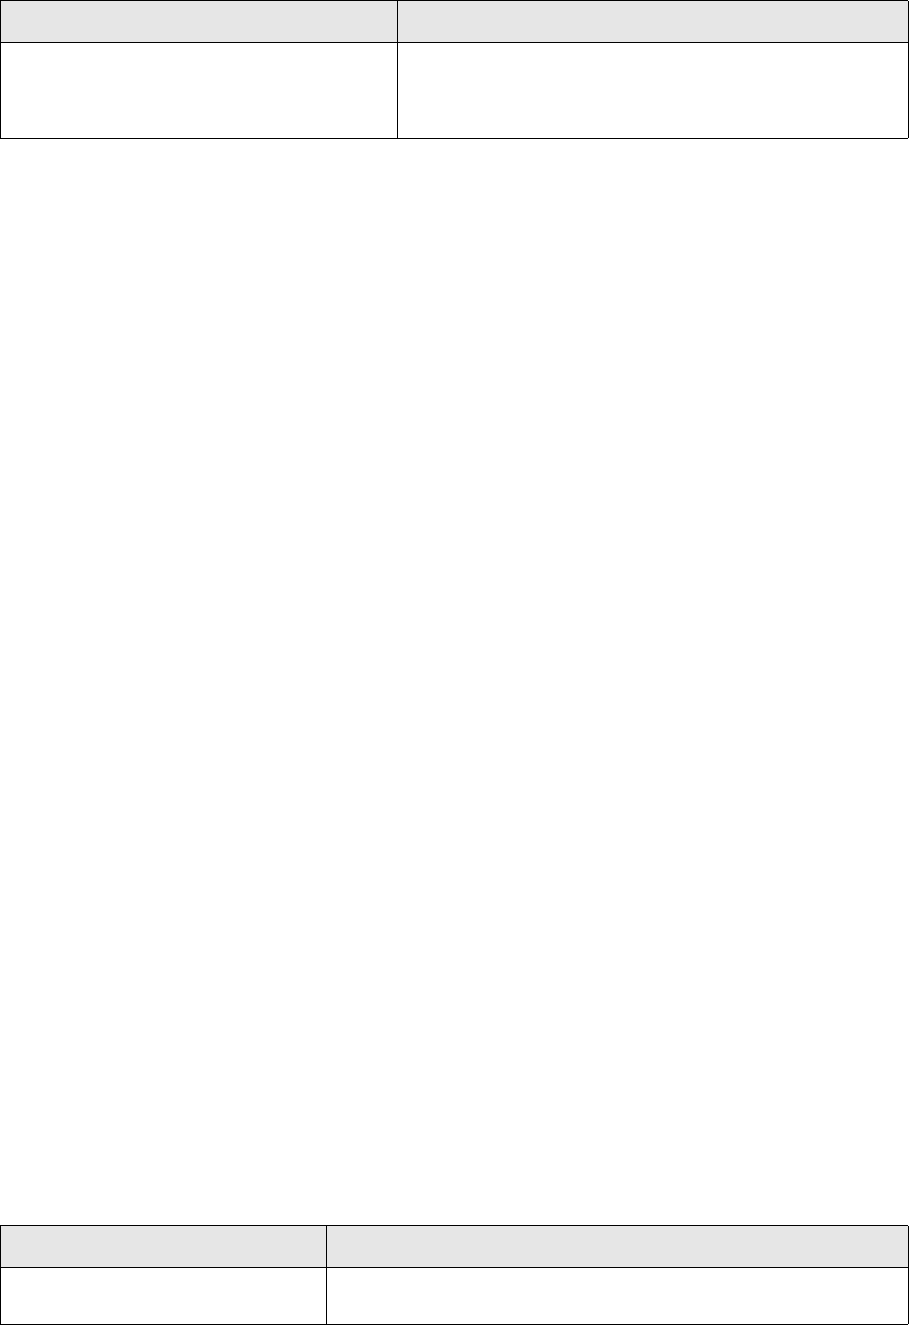
2 Managing server processes
2.9 activityd
28 © Wall Street Systems IPH AB - Confidential
2.8.3.1 Standard setup
$ENV{FK_LIMITD_SETUP} = "
--contexts 3
--portfolio-id LIMIT
--state-id OPEN
--interval 300000
--min-log-interval 300000
--log-interval 3600000
";
This limit daemon will recalculate the limits every five minutes for all limits defined for the portfolio
tree where the LIMIT is the top portfolio. It will log the usage every 60 minutes.
2.8.3.2 Setup with frozen rates
$ENV{FK_LIMITD_SETUP} = "
--contexts 3
--portfolio-id LIMIT
--state-id OPEN
--interval 300000
--min-log-interval 300000
--log-interval 3600000
--scenario-id FREEZE
";
This limit daemon will work just like the previous one, but it will use frozen rather than default rates
to calculate the limits.
2.8.4 Checking the limit daemon
The program lm-status will show the id’s of the limits for the limit daemon. If limit users are
defined the switch -limit-user <USERNAME> should be used.
Sample output from lm-status:
ID Name
----------------------------------------------------------
FX-LIMIT Forex Limit
IR-LIMIT Limits on Interest Rate products
IR-LIMIT-2 Second Limit on Interest Rate products
VAR LIMIT VaR Limit
2.9 activityd
The activityd process launches activities as soon as they are submitted from Activity Manager.
--warning-threshold arg To generate a warning message when the threshold level n,
expressed as a percentage, is reached. This parameter can
provide the means for generating a global warning level for
all limits.
Option/Argument Description
Option/Argument Description
-n arg
--pool-size arg
The number of parallel handlers (default from database)
2 Managing server processes
2.10 tmd
TRM System Administration Guide 29
2.10 tmd
The Treasury Monitor daemon provides position monitoring on the server and is used by comKIT’s
Position service. It can also be be used to take CPU and memory usage from the client machines
running Treasury Monitor.
tmd takes the following command line options:
To use tmd from Treasury Monitor give it a service name:
tmd.exe --tmd-config-file tmpos.xml -–service-name tmdtest
and set Treasury Monitor to connect to the specified service name:
FKTreasuryMonitor.exe -–service tmdtest
2.10.1 Configuring views and books for Treasury Monitor
To limit CPU and memory usage, run tmd in preconfigured mode by providing a configuration file.
You must configure the position and portfolio views you want in the configuration file, create the
books based on that configuration, then launch Treasury Monitor to re-use those books. To do this:
1. Open Treasury Monitor from Application Manager with the startup parameters you would like to
see.
2. Configure the columns and pages you would like to see in the application.
3. Select File - Save Position and Pages as XML. This saves all data to a single XML file.
If you want to save the position and perhaps a particular page or pages then:
a. Select File - Save Position as XML (this will save the startup parameters), e.g. tmpos.xml.
b. For each Page in TM, select Page - Save Page as XML, e.g tmpage1.xml, tmpage2.xml etc.
c. In an XML editor, open the above files (the position file as well as the page files).
-t arg
--poll-time arg
The maximum time to recheck (default from database)
-l arg
--log-program arg
The program to run at the end
-e arg
--external-program arg
The program to handle external commands.
--hostname arg The name activityd will use as hostname to filter activity types.
Note: To use the hostname parameter you need to set the Check
activity host name parameter to true in the configuration
table.
Option/Argument Description
Option/Argument Description
-s arg
--service-name arg
Service name in Naming Service: default is treasury-monitor
-c arg
--tmd-config-file arg
XML configuration file
-p arg
--param arg
List of xml parameters
2 Managing server processes
2.10 tmd
30 © Wall Street Systems IPH AB - Confidential
d. Insert the page information in the position file after the <position name="tmpos” line. Here
is an example:
<?xml version="1.0" encoding="utf-8"?>
<treasury-monitor>
<position name="tmpos" type="normal" portfolio="TOP TEST">
<view-configuration name="tmpage1">
<axis type="x">
<!-- Horizontal axis grouping definitions. -->
<!-- Note that the order is important here.-->
<axis-by-figure>
<!-- Selected figures and their modes. -->
<!-- The figures are shown in the order -->
<!-- in which they appear here.-->
<key-figure mode="normal" figure="market_value"/>
<key-figure mode="normal" figure="nominal_amount"/>
<key-figure mode="normal" figure="amount"/>
<key-figure mode="normal" figure="result_realized"/>
<key-figure mode="normal" figure="result_total"/>
<key-figure mode="normal" figure="result_unrealized"/>
</axis-by-figure>
</axis>
<axis type="y">
<!-- Vertical axis grouping definitions. -->
<!-- Note that the order is important here.-->
<axis-by-currency totals-after="yes"/>
</axis>
<selection>
<!-- No restrictive selection. -->
</selection>
</view-configuration>
<view-configuration name="tmpage2">
<axis type="x">
<!-- Horizontal axis grouping definitions. -->
<!-- Note that the order is important here.-->
<axis-by-figure>
<!-- Selected figures and their modes. -->
<!-- The figures are shown in the order -->
<!-- in which they appear here.-->
<key-figure mode="normal" figure="market_value"/>
<key-figure mode="normal" figure="nominal_amount"/>
</axis-by-figure>
</axis>
<axis type="y">
<!-- Vertical axis grouping definitions. -->
<!-- Note that the order is important here.-->
<axis-by-currency totals-after="yes"/>
</axis>
<selection>
<!-- No restrictive selection. -->
</selection>
</view-configuration>
<date-to date="2004-11-05" behavior="open"/>
<date-from date="2003-11-05"/>
<currency id="EUR"/>
<start-scenario id=""/>
<end-scenario id=""/>
<var-scenario id="1"/>
<minimum-state id="OPEN"/>
<state-context id="0"/>
</position>
</treasury-monitor>

2 Managing server processes
2.11 Configuring Monitor page templates
TRM System Administration Guide 31
4. By default, tmd goes to the $FK_HOME/etc directory to find this configuration file. If you wish to
place it somewhere else, then ensure that $FK_CONFIG_HOME is set, and that its value is the path
to this configuration file.
5. This XML configuration file must be placed in the $FK_HOME/etc folder. Otherwise its location
must be explicitly defined as FK_CONFIG_HOME.
Unix:
export FK_CONFIG_HOME=/home/user/xml
Windows:
set FK_CONFIG_HOME=c:\home\user\xml
6. Start the tmd (from shell, from script…)
tmd.exe --tmd-config-file tmpos.xml –service-name tmdtest
7. Start the Treasury Monitor (from shell, from script…) on Windows
FKTreasuryMonitor.exe -–service tmdtest
8. Select the position in the Position startup parameter (tmpos), and click OK.
9. Select Page - New Grid Page. Check that you can select the pages that you saved in the XML Page
files mentioned above. Click OK, and open the next Page, and so on.
From this point, you can rename the pages to something more meaningful, and then select Save
Book As...
2.11 Configuring Monitor page templates
The Monitor page template is a file that contains preconfigured axis information for use as a starting
point in creating a new Monitor page. The Monitor application comes with a number of page
templates, each of which contains a different selection of axes (or same axes set up differently).
A Monitor configuration file contains information about the page templates available for a particular
mode of operation. Currently there are two configuration files, RM.XML and CM.XML, that
correspond to the two supported modes of operation (Rate Monitor and Calibration Monitor). The
toolbar button configuration is defined in external page template files (*.page) and cannot be
modified from Rate Monitor.
Monitor application must be launched with an appropriate configuration file specified on the
command line using the -c switch. The application uses page template information found in the
configuration file to build a hierarchical menu, allowing users to create a new page based on a
certain template simply by clicking on the appropriate menu item.
2.12 Deal mirroring module (DMM)
Deal mirroring is provided by the Mirror Loop real-time process, which uses comKIT to access TRM.
You can set DMM related variables including user name and password, and location of logs in this
script: %FK_HOME%\share\environments\mirror_config.bat (Windows) or
$FK_HOME/share/environments/mirror_config.sh (Unix).
Hint:
Under Unix, instead of keeping the password in the mirror_config.sh file, you can have
the password written into shared memory. See C.1.1 TRM Server Passwords on page 245

2 Managing server processes
2.12 Deal mirroring module (DMM)
32 © Wall Street Systems IPH AB - Confidential
which describes how do this. DMM first checks the value of the environment variable
DMM_SERVER_PASSWORD and if it finds nothing, it tries to read it from shared memory.
The configuration file is evaluated under Unix by running the eval command.
Under Windows, before launching DMM, open an evaluated shell and enter:
set DMM_CONFIG=%FK_HOME%\share\environments\mirror_config.bat
Deal mirroring can be launched by %FK_HOME%\mirror_loop.bat (process under Windows) or
$FK_HOME/bin/rc.mirror (Unix). Otherwise, see the section on Process Monitor in the WSS System
Administration Guide.
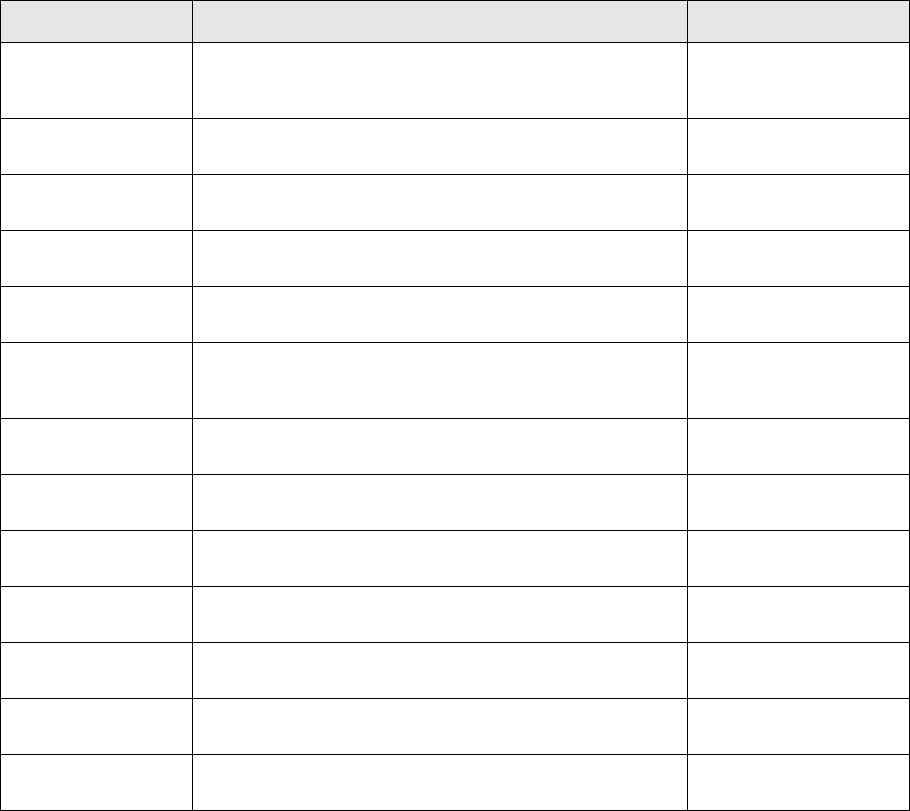
TRM System Administration Guide 33
Chapter 3 Interfaces with other tools
3.1 Bloomberg Interface
The Bloomberg interface consists of several activities. You can import and update instruments,
import corporate actions, update information in the Client Editor, or request new prices based on
information sent by Bloomberg. Each item is implemented by a dedicated activity which is described
in the TRM User Guide. Technical communication is the same for all of these activities. First, the
request is created, then it is sent via FTP communication to the Bloomberg site, the response file is
retrieved after a preset interval, and obtained data are processed based on their nature in the
Wallstreet Suite structures, instruments, clients or prices.
3.1.1 Environment variables
The following environment variables affect the behavior of all Bloomberg activities:
Name Comment Default
FK_BLOOMBERG_FTP
_REMOTE_DIR
This environment variable should point to the directory
where the request and reply files should be stored,
otherwise the default will be /tmp.
/tmp
FK_BLOOMBERG_FTP
_HOST
IP address of the primary FTP server, delivered by
Bloomberg.
bfmdr.bloomberg.com
FK_BLOOMBERG_FTP
_SEC_HOST
IP address of the secondary FTP server, delivered by
Bloomberg.
FK_BLOOMBERG_FTP
_USER
Login ID (user ID) for the Bloomberg FTP server, delivered
by Bloomberg.
FK_BLOOMBERG_FTP
_PASS
Login Password (user Password) for the Bloomberg FTP
server, delivered by Bloomberg.
FK_BLOOMBERG_FTP
_DES_PASS
Password that is used to decrypt the incoming file from
Bloomberg. The encryption/decryption method used is
DES.
FK_BLOOMBERG_FTP
_TRIES
Maximum number of attempts to download the response
file.
10
FK_BLOOMBERG_FTP
_POLL_TIME
Specifies the number of seconds in total to wait for the
reply file to appear on the FTP server.
15
FK_BLOOMBERG_FTP
_SERIALNUMBER
Serial number setup, delivered by Bloomberg.
FK_BLOOMBERG_FTP
_USERNUMBER
User number setup, delivered by Bloomberg.
FK_BLOOMBERG_FTP
_WORKSTATION
Workstation setup, delivered by Bloomberg.
FK_BLOOMBERG_FTP
_LOCAL_DIR
Local directory used for FTP communication - generated
request files are stored here.
TS_ENV_HOME/var/tmp/
FK_BLOOMBERG_FTP
_SCRIPT
Shell script that will take care of FTP communication with
Bloomberg instead of the built-in implementation.

3 Interfaces with other tools
3.1 Bloomberg Interface
34 © Wall Street Systems IPH AB - Confidential
FK_BLOOMBERG_RE
QUEST_SYSTEM
Specifies how request files are processed. Possible values:
FTP or DATA. DATA should be used only if the request files
will be communicated as Send File via the BLOOMBERG
PROFESSIONAL service.
FK_BLOOMBERG_CO
MPRESS
Specifies whether the request file should be compressed.
Possible values: YES or NO.
FK_BLOOMBERG_EN
CRYPTION_UTILITY
Utility to be used to encrypt and decrypt request and
response files. Possible values: OPENSSL and DES.
OPENSSL means that the openssl utility delivered with WSS
is used.
If DES is used, then it is necessary to specify a path to the
DES utility provided.
FK_MDI_BLOOMBER
G_PROVIDER_NAME
Name of the provider.
FK_MDI_FILE_IMPOR
T_DIR
Directory where the output files for the Data License
Output Processing activity are searched.
TS_ENV_HOME/var/impo
rt/
FK_MDI_FILE_ARCHI
VE
Archive response files if successfully processed. true
FK_MDI_FILE_ARCHI
VE_DIR
Dir where response files are archived. TS_ENV_HOME/var/archi
ve/
FK_MDI_FILE_ARCHI
VE_DIR
Pattern used to search file in FK_MDI_FILE_IMPORT_DIR '*.*'
FK_MDI_CHECK_INS
TRUMENT_EXISTS
Specifies whether duplicity instruments can be created.
Possible values: True, False
If set to true, then before each import of a specific security
(for example ISIN) a check is made to establish whether an
instrument with the same security ID already exists. If yes,
an error is reported and the security is skipped.
If set to false, no validation of whether the security id
exists is performed and the security is always imported. If
the name that should be used for the new instrument
already exists, then the counter is added at the end.
FK_MDI_UPDATE_CLI
ENT_TO_STATE
The maximum state to which the client will be accepted
after an update (valid only if SDM is installed)
Example: The client is in state FINAL before update. If the
value of the property is FINAL, the client is accepted to
state FINAL. If the value of the property is VERIFY, the
client is accepted only to state VERIFY.
FINAL
FK_MDI_SCRIPT_P
ACKAGE
The default package to be used when searching for the
scripts. The package should contain the following
subdirectories:
• field_mapping
•entity
• mapped_value
FK_MDI_SCRIPT_DIR The location of the scripts root if it is different from the
default location.
tasks.instrument.imp.scri
pt
Name Comment Default
3 Interfaces with other tools
3.1 Bloomberg Interface
TRM System Administration Guide 35
3.1.2 CSD possibility
You can adjust the behavior of the majority of Bloomberg actions according to your specific needs.
You can attach specific python scripts at various points (i.e. when inserting new instruments or
updating individual entities) to implement any necessary changes.
You need to store this python script as a python module with the extension .py in the folder
FK_MDI_SCRIPT_DIR/ FK_MDI_SCRIPT_PACKAGE/entity. Then, the name of this script (without the
.py extension) is attached to the appropriate Request or Mapping Rule Editor. Pre-save scripts are
executed before the entity is saved; Post-save scripts are executed after the entity is saved.
3.1.2.1 Entity script
You need to store the python entity script as a python module with the .py extension in the folder
FK_MDI_SCRIPT_DIR/ FK_MDI_SCRIPT_PACKAGE/entity. Then, the name of this script (without the
.py extension) is attached to the appropriate Request Editor (Instrument, Security, Corporate Action
or Client). Pre-save scripts are executed before the entity is saved; Post-save scripts are executed
after the entity is saved.
This script adjusts the entity that is supplied as the starting parameter. The ’process’ function then
returns the modified entity, which will be used in further processing.
The following provides an example of the script that is used to adjust the name of the Client entity.
def process(entity, providerData):
"""
This is a sample script to show how the entity (mapping for Client in this
case) can be processed and updated
"""
entity.setFieldValue('name', providerData['LONG_COMP_NAME'] + '__' +
providerData['ID_BB_COMPANY'])
return entity
The following provides an example of the script that is used to adjust the id of the Instrument entity.
import re
def process(entity, providerData):
"""
use pattern ${COUNTRY}G${MATURITY}_${CPN}
but take only YYYYMM of MATURITY and remove trailing zeros from coupon rate
"""
newID = providerData['COUNTRY'] + 'G'
# take only year and month from maturity date
newID = newID + providerData['MATURITY'][:-2]
# remove trailing zeros from coupon rate
newID = newID + '_' + re.sub('\.{0,1}0*$','',providerData['CPN'])
entity.setFieldValue('id',newID)
return entity

3 Interfaces with other tools
3.1 Bloomberg Interface
36 © Wall Street Systems IPH AB - Confidential
3.1.2.2 Value Mapping Editor script
You need to store the python script that is used in the Value Mapping Editor as a python module with
the .py extension in the folder FK_MDI_SCRIPT_DIR/ FK_MDI_SCRIPT_PACKAGE/ mapped_value.
Then, the name of this script (without the .py extension) will be populated in the Script field in the
Value Mapping Editor.
This script will adjust the value in the Destination field. This value is copied to the sourceValue
parameter. The ’process’ function will then return the modified value of the Destination field, which
will then be used in further processing.
Note: In general, all values from the 'process' function can be returned as strings except the
'date' fields. These fields should be returned after conversion by the DateTranslator.
3.1.2.3 Security Mapping Set Editor
You need to store the python script used in the Security Mapping Set Editor as a python module with
the .py extension in the folder FK_MDI_SCRIPT_DIR/ FK_MDI_SCRIPT_PACKAGE/ field_mapping.
Then, the name of this script (without the .py extension) will be populated in the Script field in the
Security Mapping Set Editor.
This script will adjust the value in the Provider Field. This value is copied to the sourceValue
parameter. The process function will then return the modified value, which will be used in further
processing and inserted in the defined field in the Instrument Editor.
Please note, that Script in this editor has a higher priority than Value Mapping, and only Script will be
used if Script is populated. This means that Script in the Value Mapping Editor will not be used if Script
is populated in the Security Mapping Editor.
Note: In general, all values from the 'process' function can be returned as strings except the
'date' fields. These fields should be returned after conversion by the DateTranslator.
The following provides an example of the script that is used to add a defined number of days to the
maturity date.
from tasks.instrument.imp.datatype import DateTranslator
import datetime
def process(sourceValue, localParsedEntity, localMapping):
year = int(localParsedEntity['FUT_LAST_TRADE_DT'][0:4])
month = int(localParsedEntity['FUT_LAST_TRADE_DT'][4:6])
days = int(localParsedEntity['FUT_LAST_TRADE_DT'][6:8])
print year, month, days
FUT_LAST_TRADE_DT = datetime.date(year, month, days)
print FUT_LAST_TRADE_DT
print localParsedEntity['DAYS_TDY_TO_NOTNL_MTY']
print int(localParsedEntity['DAYS_TDY_TO_NOTNL_MTY'])
DAYS_TDY_TO_NOTNL_MTY =
datetime.timedelta(int(localParsedEntity['DAYS_TDY_TO_NOTNL_MTY']))
print DAYS_TDY_TO_NOTNL_MTY
t = FUT_LAST_TRADE_DT + DAYS_TDY_TO_NOTNL_MTY

3 Interfaces with other tools
3.1 Bloomberg Interface
TRM System Administration Guide 37
print t
maturity_date_1 = t.strftime("%Y%m%d")
return DateTranslator().translate(maturity_date_1)
Note: In general, all values from the 'process' function can be returned as strings except the
'date' fields. These fields should be returned after conversion by the DateTranslator.
3.1.3 Data License Prices activity process
The following steps are performed during the Data License Prices activity process:
1. According to the query parameters in the activity, the appropriate Market Info definitions are
searched and a list of required quotations (represented by a unique identification item) is
evaluated.
2. A request for the file (in format bb-date-numberX.req) is generated and stored in the specified
folder FK_BLOOMBERG_FTP_REMOTE_DIR. If the value of the variable is not specified, the request
file will be stored in the tmp folder in the root directory (/tmp on UNIX, drive:\tmp on Windows
where the drive is the drive letter of the Wallstreet Suite installation).
3. A connection to the Data License FTP server is established based on the activity's connection
parameters.
4. The activity waits for a reply file (in format bb-date-numberX.out) from Data License, to be
stored in FK_BLOOMBERG_FTP_REMOTE_DIR.
5. The reply file is decrypted and unzipped.
6. For every quotation (represented by a unique identification item), the market info definition
valid for the date in question (either the current date or the historical rate, based on the
transaction parameters) is searched.
7. The price message containing all the necessary data such as price, scenario, and subscenario is
created. Typically, a price message consists of:
8. The price is stored in the database by calling the PushMarketInfo stored procedure.
9. The price is propagated to the message delivery system by marking the price as pending using
the PushPendingPrice stored procedure.
3.1.4 Two step activity processing
Bloomberg activities can be run either in one go, when the whole interface process is complete
(request generation, FTP communication and output processing), or you can split the process into
two executions:
1. Request generation
2. Output processing
type_id Type of instrument, for example IR-RATE, FX-RATE as defined in the
MarketInfoSource table.
period_id Price periods, as defined in the MarketInfoSource table.
period_1_id
period_2_id
source Source name, as defined in the MarketInfoSource table.
scenario Specified in the activity parameters or Market Info.
subscenario Specified in the activity parameters or Market Info.

3 Interfaces with other tools
3.2 Reuters Dealing 3000 Link
38 © Wall Street Systems IPH AB - Confidential
FTP processing is defined by user specific needs in a dedicated custom script. FTP communication
can be done asynchronously. This approach should be used in cases where there are security
limitations and direct FTP communication from the Wallstreet Suite servers is not allowed.
Both ways (all in one go and or two separate executions) are managed by the Bloomberg activities
Processing Type parameter. You need to select one of the following values:
•All,
•Generate Request, or
•Process Output.
3.2 Reuters Dealing 3000 Link
3.2.1 Overview
The Dealing 3000 Link is used to convey foreign exchange and money market deals from the
Reuters Dealing 3000 system and its ticket output feed to TRM.
The link is run as a background process and is transparent to the user. It consists of a
communications module and a data conversion and storage module.
•The communications module monitors the Dealing 3000 port and when new deals become
available it requests the deal details and passes them on to the data conversion and storage
module.
•The data conversion and storage module maps the Dealing 3000 deal details into TRM
transaction fields and stores the transactions into the database.
3 Interfaces with other tools
3.3 Value-at-Risk Interface
TRM System Administration Guide 39
Transaction details that are required by TRM but cannot be extracted from Dealing 3000 output can
be defined in a special configuration file. Such transaction details are for example the portfolio and
initial state of the transaction.
All deal conversions, errors and other events in either module are logged in a file.
3.2.2 Scripts
The executable Python scripts are config.py, D3000.py and CreateTransactions.py (which is
called by D3000.py).
1. Configure config.py
2. Evaluate your environment (this requires access to FK.Cache and Corba)
3. Use a command like the following:
python D3000.py > D3000.log 2>&1
3.2.3 Log file
Debug mode is enabled by default. All the received data from D3000 server is by default saved in
.\D3000Response.dat with datetime. The debug is verbose, so the file size should be monitored.
By default, the interface ignores real-time messages and polls the server every 30 seconds.
3.2.4 Implementation
D3000.py can be used standalone for testing purposes. Just comment out the transaction_maker
call in _processDeal, line 297. If configured, it saves the received data into a file which can be used
with CreateTransactions standalone. CreateTransactions.py can also be called standalone with a
file as parameter. This file will be read line by line to create transactions.
If the feed still needs to be serial, the old read-feed perl version can be used with
CreateTransactions.py. but the python main script needs to be adapted slightly to read from
STDIN instead of a file.
In addition, in Client Editor, a property DEALING-3000-ID should be defined for all Dealing 3000
counterparts. This property is the Dealing 3000 tcid.
3.3 Value-at-Risk Interface
This section describes how to install the Value-at-Risk (VaR) data in TRM via the VaR interface.
The aim of the VaR interface is to update the TRM database with the volatility and correlation data
from RiskMetrics for the currencies, yield curves and equities defined in the system. These variables
are used in VaR analysis within Treasury Monitor and also in performance calculations and risk
reports.
3.3.1 Default VaR scenario
The default VaR scenario is created at the first installation of TRM. VaR configuration is part of the
standard build procedure. The default VaR scenario does not have any mapping or data set
associated at initiation, and is the default scenario used by the import scripts.
3.3.2 VaR Mapping Types
The standard configuration has two mapping types, GOVT and SWAP. These are in the table
VaRMappingType, where they can be modified and new types added.
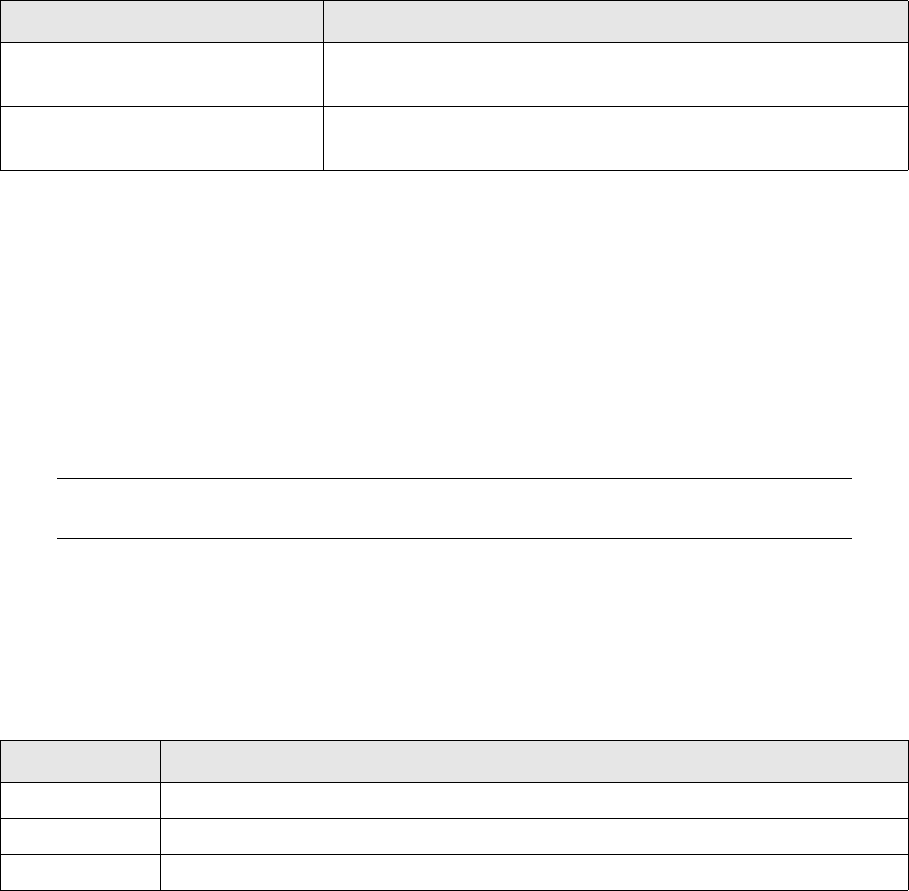
3 Interfaces with other tools
3.3 Value-at-Risk Interface
40 © Wall Street Systems IPH AB - Confidential
3.3.3 Default mapping
A default mapping between TRM data (currencies and interest rates) and the corresponding
RiskMetrics variables is built automatically. You may need to make some changes to this default
mapping. To view or edit the default mapping, open VaR Mapping Editor and choose mapping
RISKMETRICS.
The following changes may be required:
1. TRM currencies are mapped to their RiskMetrics counterparts. Not all TRM currencies are
provided by RiskMetrics.
2. All TRM yield curves are mapped to the corresponding RiskMetrics swap curves. Re-mapping
TRM yield curves to different RiskMetrics curves (for example zero-coupon GBond curves may
need to be mapped to the RiskMetrics equivalent) must be carried out manually. For more
information on using different RiskMetrics IR mappings, see the TRM User Guide.
3.3.4 Importing RiskMetrics data to TRM
The RiskMetrics Group publishes their data on the Web (and ftp) in the form of compressed files (zip
or tar) for both the UNIX and Windows environments. The RiskMetrics data files for correlation and
volatility are as follows:
More information about these data sets is in the RiskMetrics Technical Document, available from the
RiskMetrics Web site http://www.riskmetrics.com.
3.3.4.1 Fetching the risk files
There are two ways of getting the risk files:
•From their Web site, http://www.riskmetrics.com: Choose regular risk files, monthly and daily,
and copy them to the directory $FK_HOME/com/risk-metrics
•From their FTP site. TRM provides a script to get the files from their ftp site:
$FK_HOME/share/risk-metrics/fetch-from-riskmetrics
Note: Getting the risk files is a step that can be run automatically by the import script. See below
for additional details.
3.3.4.2 Running the import script
The program $FK_HOME/share/risk-metrics/import-from-riskmetrics is the main tool to import
RiskMetrics data in TRM. It first fetches data from the RiskMetrics FTP site, evaluates the TRM
environment and then imports the volatility and correlation data in the corresponding VaR scenario
(by default, the default VaR scenario).
The following options are recognized by the program:
RiskMetrics Data Files Description
<date>.dvf
<date>.dcf
Volatility data for 1 day horizon
Correlation data for 1 day horizon
<date>.mvf
<date>.mcf
Volatility data for 30 day horizon
Correlation data for 30 day horizon
Option Description
-h <directory> TRM home directory
-i, I, e, f <> Usual TRM environment arguments
-s Skips fetching of data via FTP
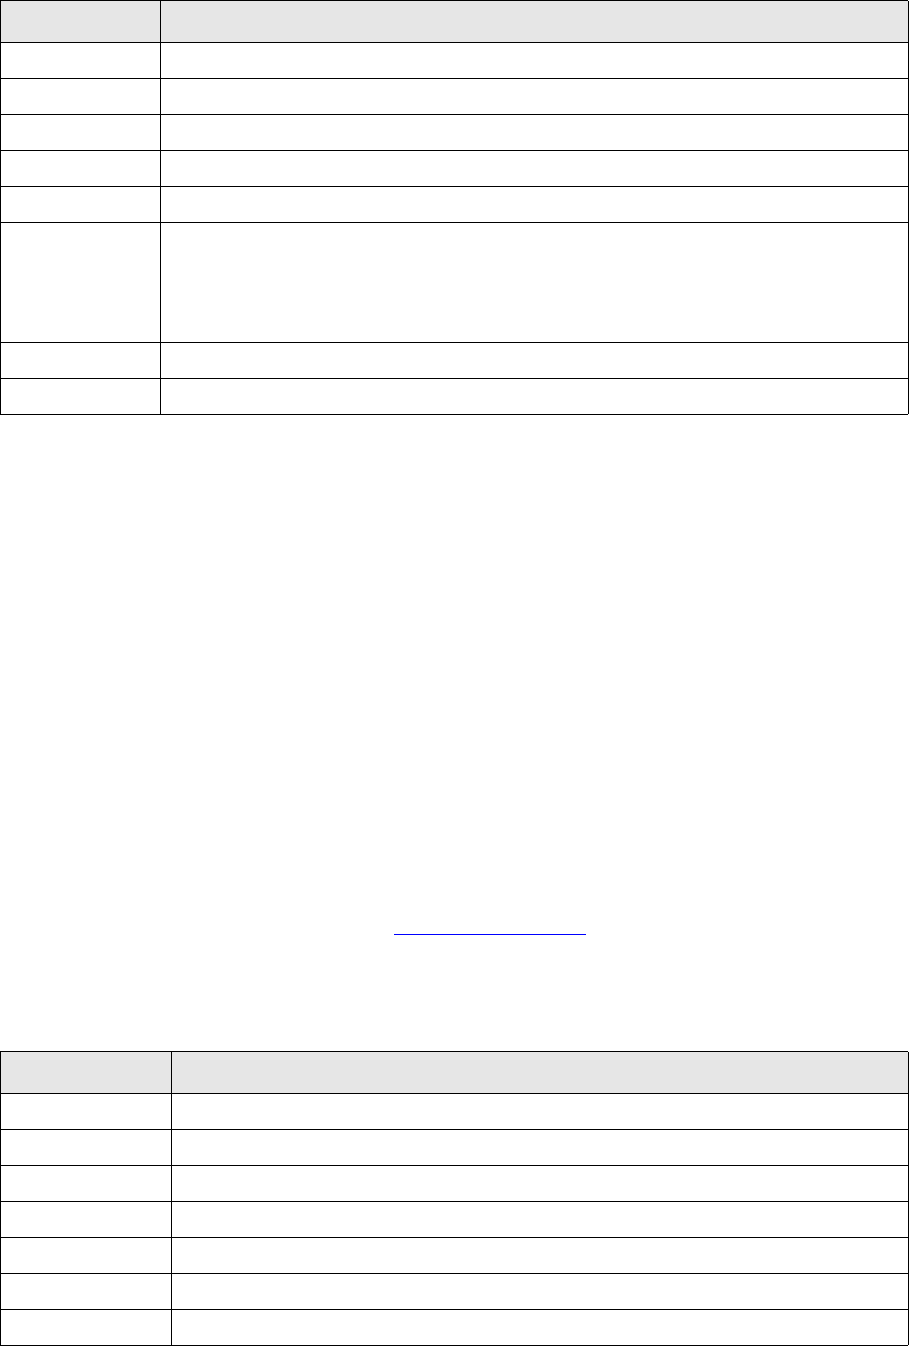
3 Interfaces with other tools
3.3 Value-at-Risk Interface
TRM System Administration Guide 41
Examples:
Importing data (from RMM.zip and RMD.zip) in the default VaR scenario:
$FK_HOME/share/risk-metrics/import-from-riskmetrics -h /usr/wss/v7 -e fk7_1_env
-s -v -z zip
Importing data (from <date>.dvf, etc…) in the default VaR scenario:
$FK_HOME/share/risk-metrics/import-from-riskmetrics -h /usr/wss/v7 -e dev1 -s -v
Importing data (from RMM.tar.Z and RMD.tar.Z) in a user specific scenario:
$FK_HOME/share/risk-metrics/import-from-riskmetrics -h /usr/wss/v7 -e dev1 -s -v
-U user -P passwd -c "TEST SCENARIO" -z tarZ
Notes:
•The import of RiskMetrics data in TRM is a lengthy process: about 20-30 minutes for a typical
data set (volatility and correlation, 1-day and 1-month horizon).
•Once ran, check that the correlation and volatility date exist in VaR Data Board.
3.3.5 Importing FEA data to TRM
The FEA (Financial Engineering associates) http://www.fea.com/ publishes data on the Web in the
form of compressed files (zip or tar) for both UNIX and Windows environments.
Program ‘import-from-fea’ is the main tool to import FEA data in TRM. It expects data to be present
either as *.zip or *.txt, and then imports the data in TRM. The program takes the following
arguments:
-u,p,l,d <> Arguments for connection to FTP site (see below)
-y Imports yield volatility for IR market (default is price volatility for all market data)
-U <user> Database login
-P <passwd> Database password
-c <scenario> Scenario name
-z <type> Data file type:
• ""tarZ" : use RMD.tar.Z and RMM.tar.Z
• ""zip" : uses RMD.zip and RMM.zip
• "If -z is not used, then it imports from *.dvf, *.dcf, *.mvf, and *.mcf.
-r Removes all data files after the import process
-v Verbose
Option Description
Option Description
-h <directory> TRM home directory
-i,I,e,f <> Usual TRM environment arguments
-y imports yield volatility (default is price vol.)
-U <user> Database login
-P <passwd> Database password
-c <scenario> Scenario name
-z <type> Datafile type ("zip"). If -z is not used then it imports from *.txt
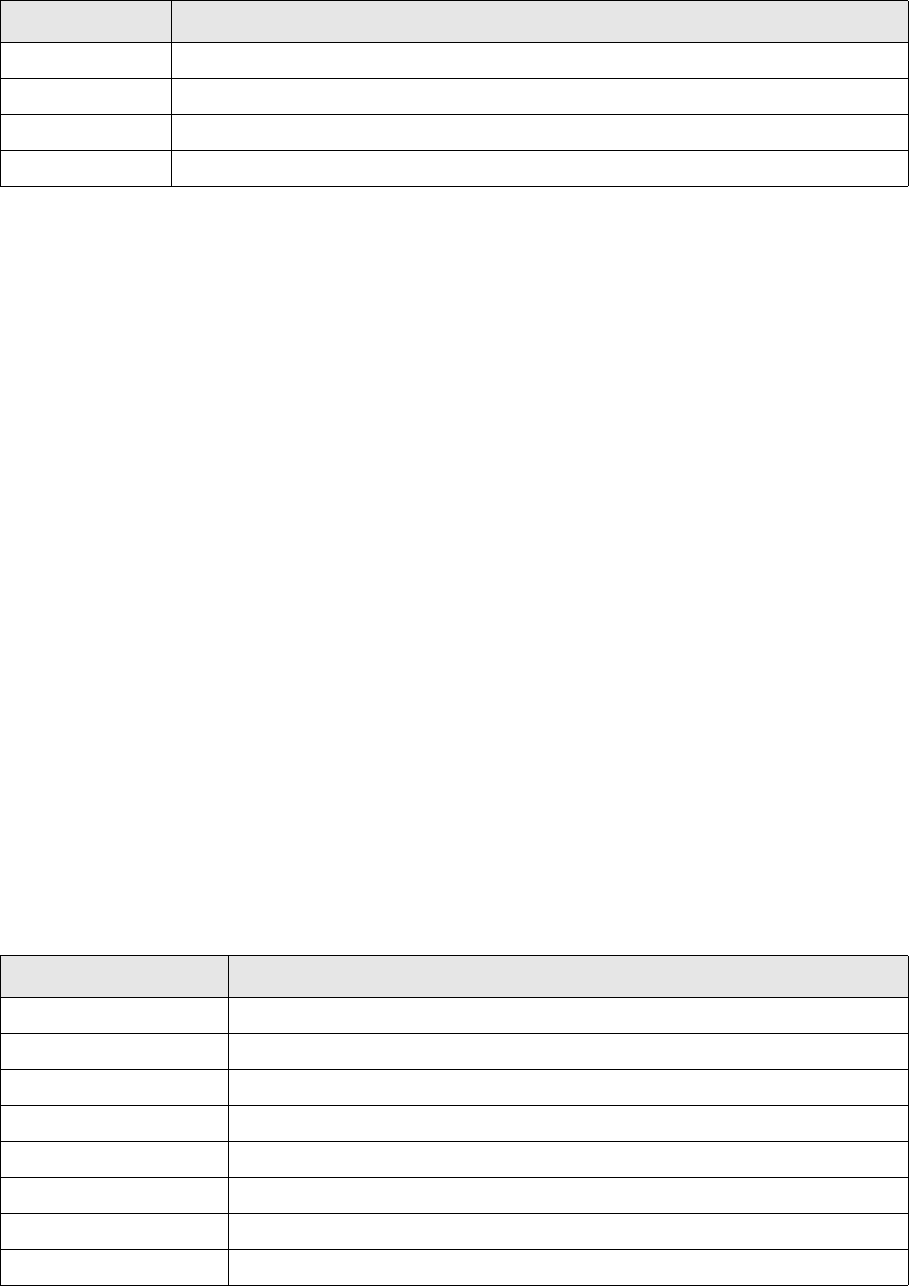
3 Interfaces with other tools
3.3 Value-at-Risk Interface
42 © Wall Street Systems IPH AB - Confidential
Examples:
Importing data from text file in the default scenario:
$FK_HOME/share/risk-metrics/import-from-fea –h /usr/wss/v7 -e test -r -y -v
Importing data from a zip file in a user specific scenario:
$FK_HOME/share/risk-metrics/import-from-fea -h /usr/wss/v7 -e test -r -y -v -c "TEST
SCENARIO"
3.3.6 VaR horizon
To set up a horizon other than the default horizons (1 day and 1 month), use the procedure
CommitVaRHorizon. For example, to set up a horizon of 10 days which interpolates between 1 and
30 days, run:
CommitVaRHorizon @id = 10,
@scenario_id=1,
@id_1 = 1,
@id_2 = 30,
@name = "10 Day VaR Horizon"
3.3.7 Other scripts
The scripts described in this section are mainly for illustration purposes. They should not be run if
the main import script was run:
$FK_HOME/share/risk-metrics/import-from-riskmetrics.
These scripts are actually called by the main import script.
3.3.7.1 Fetching RM data via FTP
The program $FK_HOME/share/risk-metrics/fetch-from-riskmetrics fetches the RiskMetrics
data via FTP. The arguments of this program are as follows:
Example:
-r removes all data files after import process
-R removes data files and compressed file after import process
-m only import data for which a mapping exists in given scenario
-v Verbose
Option Description
Option Description
-h <site> FTP site (ftp.riskmetrics.com by default)
-u <user> FTP site user login
-p <passwd> FTP site user password
-l <directory> Remote directory on FTP site
-a Passive mode
-d Debug mode
-v Verbose
<filename1><filename2> List of files to fetch
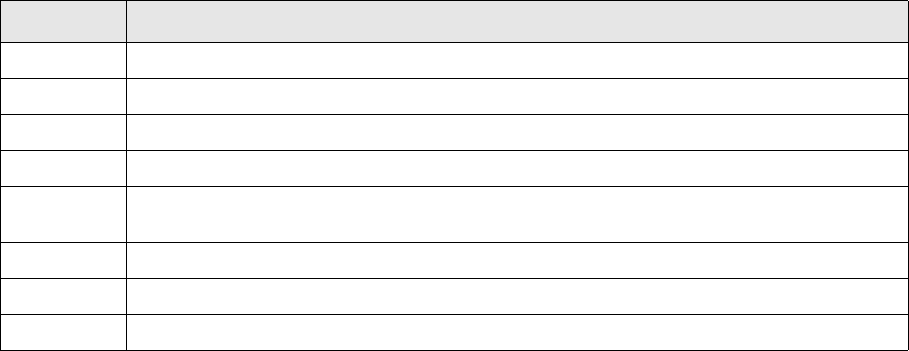
3 Interfaces with other tools
3.3 Value-at-Risk Interface
TRM System Administration Guide 43
$FK_HOME/share/risk-metrics/fetch-from-riskmetrics -h datomatic.com -u trema -p
pass12 RMD.zip RMM.zip
3.3.7.2 Importing volatility and correlations routine
The programs $FK_HOME/share/risk-metrics/import-volatilities and
$FK_HOME/share/risk-metrics/import-correlation are used by the main import script. These
programs can be run separately and both programs have the following arguments:
The data is read from the files in command line, or from the standard input.
Note: If no scenario is specified, data are imported in the default VaR scenario. When a scenario is
specified, only the owner of the scenario can import data.
Examples:
Importing 1-day volatility data in default VaR scenario:
$FK_HOME/share/risk-metrics/import-volatilities -h 1 -v 20011231.dvf
Importing 1-month volatility data (yield volatility) in user "trema" specific VaR scenario, "TEST
SCENARIO":
$FK_HOME/share/risk-metrics/import-volatilities -u trema -y -h 30 -s "TEST
SCENARIO" -v 20011231.mvf
Option Description
-u <user> Owner of scenario
-h <horizon> The time horizon, '1' for the daily data and '30' for the monthly data.
-y Imports daily volatility (price vol by default)
-d <date> Date, if different from what is in the file.
-s
<scenario>
Scenario ID.
-r Fetches data for mapped variables only.
-v Gives some feedback of the process.
<filename> RiskMetrics data file to import.

3 Interfaces with other tools
3.4 Prices import - Import Market Information Activity
44 © Wall Street Systems IPH AB - Confidential
3.4 Prices import - Import Market Information Activity
The TRM activity Import Market Information allows you to import rates from generic CSV files. This
section describes how to set it up.
You access the Import Market Information activity from the Activity Manager application (from TRM
Application Manager) as shown below:
The fields are explained in the TRM User Guide (search on Activity Parameters).
3.4.1 Import process
Consists of:
1. Identifying the list of files to be imported
2. Validating the files
3. Parsing the files.
3.4.1.1 Import files list
The list of import files is based on the contents of the Source Subdirectory field and the environment
variables FK_IMPORT_PRICES_DIR and FK_IMPORT_PRICES_PATTERN. The final path is constructed as
follows:
[FK_IMPORT_PRICES_DIR] Source Subdirectory [FK_IMPORT_PRICES_PATTERN]
If the Source Subdirectory field contains the full path from the root, then FK_IMPORT_PRICES_DIR is
ignored.
3 Interfaces with other tools
3.4 Prices import - Import Market Information Activity
TRM System Administration Guide 45
If the path ends with name of a file (with or without wildcards), then FK_IMPORT_PRICES_PATTERN is
ignored.
Examples
V:\WSS\var\import\prices\examples contains three files: a.csv, aa.csv, and b.csv.
FK_IMPORT_PRICES_DIR=V:\ WSS\var\import\prices
FK_IMPORT_PRICES_PATTERN=*
3.4.1.2 Validating the files
Before the files are parsed, they are first validated. If errors are found then the activity fails.
3.4.1.3 Parsing the files
The following steps are performed during the import prices process:
1. All scenarios and subscenarios are fetched in order to provide a means of translating names into
system ids.
2. Before parsing every file, processes are verified if the FK_IMPORT_PRICES_VERIFY_PROCESSES
environment variable is set (see 3.4.2 Environment variables on page 46.
3. For each price (equivalent to a line in an input file):
a. If any Market Info is cached for the specified name_id and date, then MarketInfos are loaded
using FetchMarketInfoData for the specified date and name_id.
b. If Market Info is not found, then possible reasons are searched and logged, using the stored
procedure FetchMarketInfoDetail.
c. Enrich the price with data from previously loaded MarketInfos:
d. Enrich the price with the Scenario/Subscenario specified in the Activity parameters, if supplied.
e. Set the period from/to, if not provided in the input file, to the date of the price.
f. A CSD hook can be called to modify the price before storing it to database. See 3.4.5 CSD
possibilities on page 48.
g. Store the price by calling PushMarketInfo.
h. Mark the price as pending using PushPendingPrice.
4. Verify that none of the processes has been restarted meanwhile; if so, the activity fails.
If Source Subdirectory= then files processed are:
V:\ WSS\var\import\prices\examples\a.csv a.csv
examples a.csv
aa.csv
b.csv
examples\ a.csv
aa.csv
b.csv
examples\a* a.csv
aa.csv
period_id, period_1_id, and period_2_id
name_id, and type_id (e.g. EUR/USD, FX-RATE resp.)
price type
scenario_id, subscenario_id
3 Interfaces with other tools
3.4 Prices import - Import Market Information Activity
46 © Wall Street Systems IPH AB - Confidential
5. Call CSD hooks if required.
6. File is archived, based on environment settings (see FK_IMPORT_PRICES_ARCHIVE below).
Archiving moves the file to a subfolder with the name batch_<activity_batch id> and
renames the file to <start_date>_<existing_filename>.
3.4.2 Environment variables
The following environment variables affect the behavior of the Import Market Information activity.
•FK_IMPORT_PRICES_VERIFY_PROCESSES
Certain processes must be running during the import to ensure that the derived prices are
automatically recomputed. The required processes are: mdsd, transd, and micd. The verification
logic uses the mdsd.get_status() service to obtain a list of processes connected to the mdsd
bus. If any of the mentioned processes is not connected to mdsd, the activity fails. Note that by
default, the FK_IMPORT_PRICES_VERIFY_PROCESSES variable is set to verify.
Default: verify
•FK_IMPORT_PRICES_DIR
Defines the path to the root directory for source directory where import prices files are located.
Default: %FK_VAR_DIR%\import\prices
•FK_IMPORT_PRICES_BATCH_SIZE
The number of records (batch size) to be processed before the import price activity is suspended
for a time interval equal to FK_IMPORT_PRICES_SLEEP_MSECS. Both values must be non-zero for
the suspend mechanism to work. This helps to avoid overloading the mdsd and micd processes
with huge amounts of direct and derived prices.
Default: 0
•FK_IMPORT_PRICES_SLEEP_MSECS
Price import is suspended for a time interval in milliseconds after a certain number of records
(batch size) specified in FK_IMPORT_PRICES_BATCH_SIZE. Both values must be non-zero for the
suspend mechanism to work. This helps to avoid overloading the mdsd and micd processes with
huge amounts of direct and derived prices.
Default: 0
•FK_IMPORT_PRICES_PATTERN
Defines which import files are processed, unless overridden by the contents of the Source
Subdirectory field. See 3.4.1 Import process on page 44.
Default: *.*
•FK_IMPORT_PRICES_ARCHIVE
The import file is archived in a subdirectory after processing, and is deleted from the import
directory. If FK_IMPORT_PRICES_ARCHIVE is not set, then archiving does not happen, and the
import file is left in the source directory.
Default: True
•FK_IMPORT_PRICES_ALLOW_ERROR _LINES
’False’ means that if there is an invalid datasource, no bid/ask quote, or no date of quote
specified on the particular line in the csv file, a message with severity ERROR will be logged, and
the file will not be archived.
’True’ means that in the case of an invalid datasource, no bid/ask quote, or no date of quote
specified, only WARNING messages are logged and the file is archived as processed. A message
with severity ERROR is logged and the file is not archived only in the case of 'technical' issues
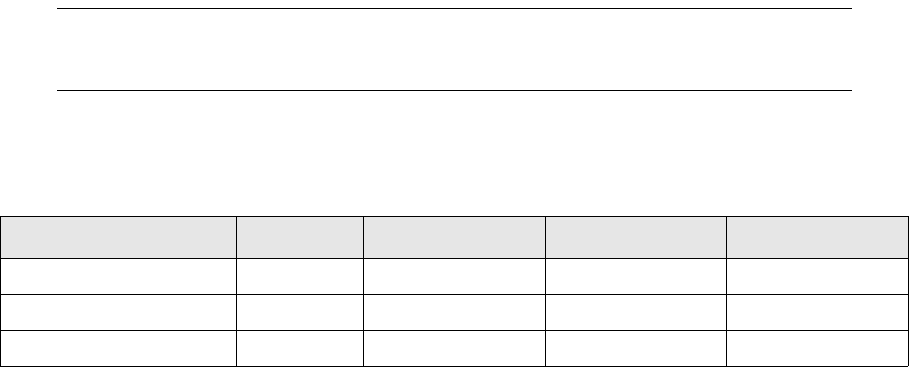
3 Interfaces with other tools
3.4 Prices import - Import Market Information Activity
TRM System Administration Guide 47
such as missing permissions, no connection/access to the database and other non-source data
related issues that prevent saving the data to the database.
Default: False
3.4.3 Format of the import file
The format of each file in the import directory must conform to the CSV specification: the first line of
the file must contain names of the properties and the remaining lines must contain the data. There
are two types of properties that can be specified:
•Query properties
•Price data properties
3.4.3.1 Query properties
These are used to identify the Market Info record - the values are used to search for the appropriate
MarketInfo record. One of item or name_id (or both) must be specified; other values are optional.
Each row in the import file must uniquely identify exactly one record in MarketInfo table.
3.4.3.2 Price data properties
These are the price details which would be stored in the database:
Note: All query properties must be properly filled. For example, empty columns are not ignored,
but MarketInfo is searched for condition "column"="", which can then cause activity
failure, because no MarketInfo record is found.
3.4.3.3 Example imports
Using Item:
item Identifier of the Market Info record. Mandatory if name_id is not provided.
name_id Name of the instrument, currency pair, etc. Mandatory if item is not provided.
type_id Type of instrument, for example IR-RATE, FX-RATE.
period_id,
period_1_id,
period_2_id
Price periods
source Source name, as defined in the MarketInfoSource table, e.g. FILE, ECB, REUTERS.
date The date (in MMDDYYYY format) to which the price applies.
date The date (in MMDDYYYY format) to which the price applies.
period_from, period_to The date period (in MMDDYYYY format) to which the price applies.
price_1 … price_10 Price data.
bid (ask) … Synonym for price_1 (price_2 etc.).
Item Source Date Bid Ask
SAMPLE-BOND-GOVT-CA FILE 01012000 20 21
USD1YD= REUTERS 12312005 4.7 4.8
EURON= REUTERS 11012008 0.8 0.9
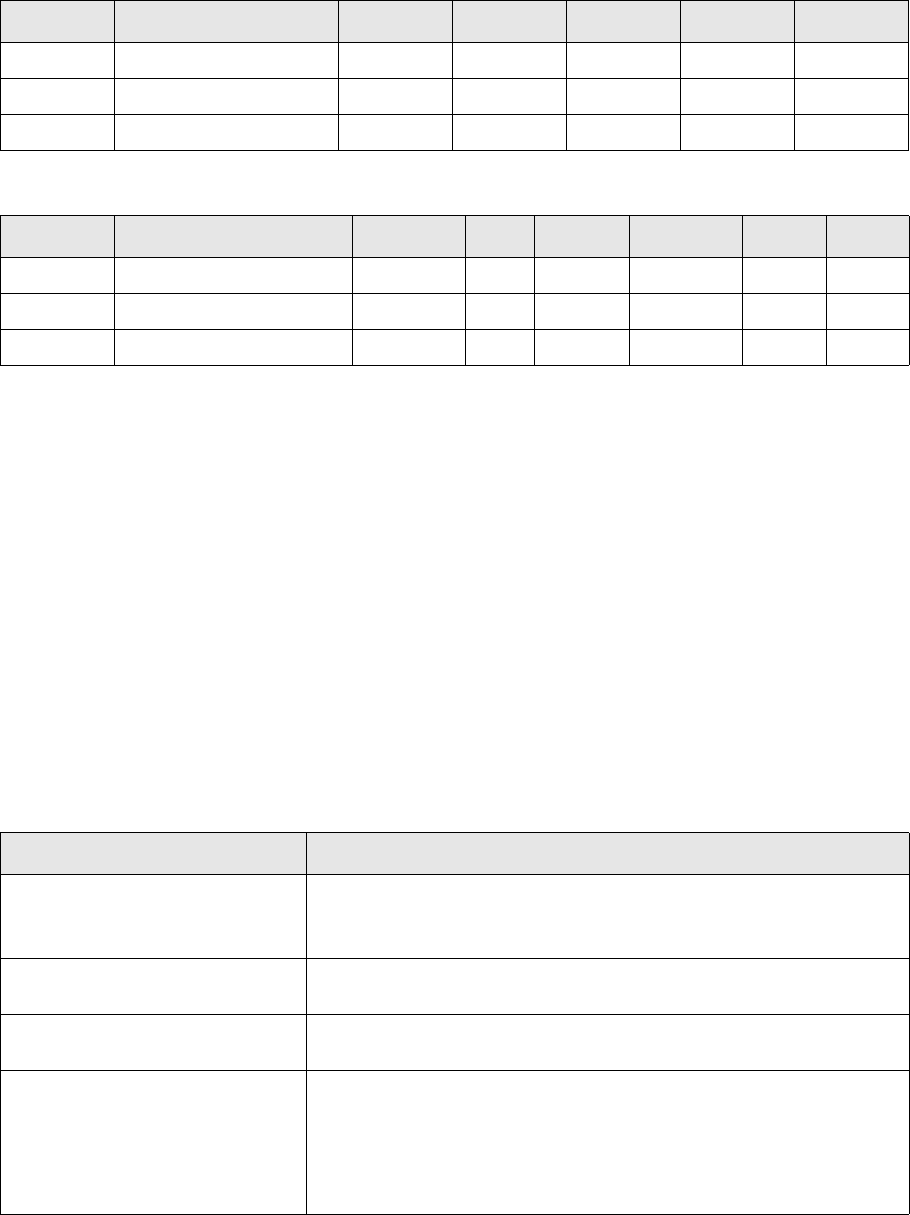
3 Interfaces with other tools
3.4 Prices import - Import Market Information Activity
48 © Wall Street Systems IPH AB - Confidential
Using name_id
Using unsupported format of FILE
The special source FILE is used for identifying Market Info definitions created for import via activity.
They can differ - for instance by scenario - from standard Market Info definition for source REUTERS.
If there are multiple definitions of Market Info for the same price that differs by source, then it is
necessary to distinguish between them using FILE, otherwise the activity could find two valid Market
Info definitions and it would fail.
3.4.4 Permissions
The process verifies permissions for the user that scheduled the activity. The permission checked is
for object=UpdatePrices and the permission verified is defined in the scenario or subscenario
relevant to the activity (Scenario Editor, Permission field).
3.4.5 CSD possibilities
Some CSD hooks exist in order to allow modification of prices prior to calling PushMarketInfo,
verification of processes, imported prices etc. All CSD hooks are located in csd.py. If an exception is
thrown, the importing process is terminated and the activity fails.
CSD Class
Type_id Name_id Period _id Source Date Bid Ask
UM-PRICE SAMPLE-BOND-GOVT-CA SPOT FILE 01012000 20 21
IR-RATE USD-DEPO/SWAP SPOT REUTERS 12312005 4.7 4.8
FX-RATE EUR/USD O/N REUTERS 11012008 0.8 0.9
Type_id Name_id Period _id Item Source Date Bid Ask
UM-PRICE SAMPLE-BOND-GOVT-CA SPOT FILE 01012000 20 21
IR-RATE USD-DEPO/SWAP SPOT 12312005 4.7 4.8
FX-RATE EUR/USD O/N 11012008 0.8 0.9
Name Comment
__init__ One instance of this class is created at the beginning of import.
CSD logic can be implemented in either the constructor (initialization) or
in the methods.
preprocessPrice Called for every price after the price has been enriched by market info
data. Price can be liberally modified in this hook.
postprocessPricess Called at the end of importing of one file, after all prices has been
successfully imported.
verifyProcesses This function should return True, if processes (micd, mdsd, transd)
should be verified (FK_IMPORT_PRICES_VERIFY_PROCESSES is set). If
processes should not be verified (environment variable
FK_IMPORT_PRICES_VERIFY_PROCESSES not set), it returns True
without checking the processes.
Business logic can be liberally changed here.

3 Interfaces with other tools
3.4 Prices import - Import Market Information Activity
TRM System Administration Guide 49
3.4.6 Validation of Imported Prices
In a market datastream like the Reuters interface, prices are updated continuously, which means
should a price be discarded for some reason, it is not critical since an update will soon be received.
In the price import activity, typically a price is only imported once it is critical that a price discard is
reported. The procedure FetchMarketInfoDetail is used to acquire additional information when:
•There is no market information found for the name_id or item provided.
•There is market information found for name_id or item but other fields in the imported line do
not match.
The activity then displays each candidate with the following additional information:
•Disabled Market Info
•Inactive Market Info
•Inactive Instrument Quote
•Inactive Currency Journal.
Also, the currently processed price and the import file line, along with the corresponding line
number, are printed out when the following errors occur:
•Scheduling of price recalculation has failed.
•Calling PushMarketInfo returns a non-zero code.
•The user does not have object permission to UpdatePrices.
•Calling GetMarketInfoId returns a non-zero code or does not fetch any data.
3.4.6.1 CSD validation
It is not possible to identify following problems and a CSD must be used where necessary:
verifyProcessesBeforeImport Called at the beginning of processing before any file is read.
The provided dictionary contains keys: transd, micd. The value under the
key contains result of the mdsd.get_status() call, that is, info usually
obtainable using the md-status utility, or None if no such process is
running.
The return value should be of type boolean:
• Returning True means the processes are fine and default verification
should be omitted.
• Returning False (default) means default verification should take
place.
Throw whatever exception to terminate the process and fail the activity if
the verification fails.
verifyProcessesAfterImport Called at the end of processing after all files have been imported.
The provided dictionary contains keys: transd, micd. The value under the
key contains result of the mdsd.get_status() call, that is, info usually
obtainable using the md-status utility, or None if no such process is
running.
The return value should be of type boolean:
• Returning True means the processes are fine and default verification
should be omitted.
• Returning False (default) means default verification should take
place.
Name Comment

3 Interfaces with other tools
3.5 Using comKIT
50 © Wall Street Systems IPH AB - Confidential
Error message if the date is not between issue_date and maturity_date
This must be handled in the CSD hook preprocessPrice. The Import Market Information activity
detects this situation only if valid_ from and valid_to dates on the quote tab are properly set
based on the maturity date and issue date of the instrument.
However, when a price is imported for an instrument after its maturity or before its issue_date, it
does not cause any problems in the system and the price is not used.
Error message if the "Calculated price" related to imported price has not stored
There is no simple link between direct (imported) price and derived (calculated) price, and therefore
the activity cannot verify that all possible derived prices are correctly calculated and stored.
However, there are mechanisms in the activity to check running processes in several places, to slow
down the importing of prices so that subsequent processes are not overloaded and can handle all
recalculation and storing of prices. Also a user-specific check can be performed that specific prices
were recalculated in the CSD hook postprocessPricess.
3.5 Using comKIT
3.5.1 Overview
Note: You can find HTML comKIT documentation in FK_HOME\support\comKIT\doc.
comKIT enables TRM to be run using an API instead of the traditional GUI. More specifically, comKIT
is a programmable interface that hides the details of the implementation and offers support for high
level objects (Business Objects) that make sense on the business side of TRM. CORBA is used to
expose methods and data to the programmer via interfaces defined in IDL. JacORB is supported for
Java interfaces. The IDL interfaces are the starting point for comKIT. These IDL files describe what
can be done using comKIT. IDL compilers exist for the most common programming languages and
these are used to generate classes.
comKIT makes importing transactions easier, since comKIT uses the same underlying software as
the transaction manager GUI to enter transactions; the calls you make in comKIT map directly to
the operations you would do in the Transaction Manager to enter a deal.
So, if a user with financial knowledge shows an interface programmer how a deal is entered in
transaction manager, it is quite easy to program the same using comKIT. There are no workarounds
and mappings to be implemented as with the cvt procedures.
Information on setting up comKIT is available in Chapter 12 Setting up comKIT on page 205.
3.5.2 comKIT services
The comKIT toolkit is made up of the following services:
•Settlement service
•Position service
•Static Data service
•Transaction service
•Performance service
Each service provides access to a area of TRM functionality. In most cases, each area corresponds to
a TRM application: for example, the Position service provides access to the features you find in
Treasury Monitor. There is a direct correspondence between the manner in which you work with a
TRM application and the way you make programming calls to the relevant comKIT service. For this
3 Interfaces with other tools
3.5 Using comKIT
TRM System Administration Guide 51
reason, it is highly recommended that you become familiar with the TRM application and interface
for any service you plan to use.
3 Interfaces with other tools
3.5 Using comKIT
52 © Wall Street Systems IPH AB - Confidential
TRM System Administration Guide 53
Chapter 4 Using Import Export tool
4.1 Introduction
The Import Export Tool application aims to make a standard interface tool available which can be
used as a base for all types of data transfers.
This tool provides:
•A consistent approach - making all interfaces look similar gives ease of use and maintenance.
•Reduced development time - many small issues are supported automatically.
•Ease of use - helps the developer to get at the available data more easily by having built-in
extensible functionality.
Import Export tool has been developed as a shell using the Perl language. The advantages of this
approach are:
•Rapid prototyping
•Inbuilt data conversions and pattern matching
•Existing TRM interfaces for database access
•Part of the standard TRM release
•Object-oriented approach for hierarchical design and extensibility for newer methods
4.2 Features
The basic shell of Import Export tool provides the following features:
•Formatting templates for data input (import) and output (export)
•Database interface that allows the calling of stored procedures for either export or import
•Data formatting including formats such as SWIFT Money
•Callback hooks for pre-processing of data and post-processing of output for export and import
•Automated unique file naming for file based output
4.3 Structure of the Import Export tool
When exporting data from TRM using Import Export tool, a stored procedure is used to extract the
data from the database. Each row returned from the stored procedure contains directly or indirectly
one data set for the output. This data set might contain all data to output, or it might be used for
input to routines in the perl package, which calculate the data to output.
When importing data, the stored procedure takes data from the input file and enters the data into
the TRM database.
4 Using Import Export tool
4.4 Importing data
54 © Wall Street Systems IPH AB - Confidential
When setting up the Import Export Tool for your specific data requirements, it is recommended to
use additional stored procedures rather than modifying the Perl package (i.e., adding new Perl
classes) if possible, for performance reasons. Please refer to your SQL reference for details on how
to write stored procedures.
4.3.1 File organization and inheritance
Templates, formats, and variables are defined in a definition file with extension .def.
The Perl code is put into a Perl class file, a file with extension .pm. The base part of both file names
must be the same. This name is the name of the import/export function.
If the interface is derived from another interface, a new subdirectory must be created, whose name
is that of the parent interface. For example, an interface XYZ derived from an interface called
''Payment'', which itself is derived from an interface called MYINTERFACE must have the following
file and directory structure:
MYINTERFACE.def
MYINTERFACE.pm
MYINTERFACE/
MYINTERFACE/Payment.def
MYINTERFACE/Payment.pm
MYINTERFACE/Payment/
MYINTERFACE/Payment/XYZ.def
MYINTERFACE/Payment/XYZ.pm
The corresponding Perl classes would be:
MYINTERFACE
MYINTERFACE::Payment
MYINTERFACE::Payment::XYZ
The Perl class files are not mandatory; if it is possible to define everything within the
template/stored procedures framework then you can leave out some of the Perl files and only have
the definition file. Template files are provided in the TRM package in $FK_HOME/share/interface.
4.4 Importing data
The basic principle of importing data is that the input data are compared on a row-by-row basis to
the template (header, body, and trailer). When there is a match, the regular expression engine picks
up the provided fields and puts them into an array of records. After all the records have been
successfully read, stored procedure calls are constructed for each record. Finally, these stored
procedure calls are executed.
The types of all fields must be defined because, at import time, the data types are not available from
the database.
Regular expressions are generated automatically from the template and format definitions. It is
possible, though, to override the default regular expression. This may be useful if performance is
bad with the default expression.
Once the records have been parsed, the construction of the stored procedure calls is simple. For
example, if one record has the fields number and reference with the values 766 and 'TII'
respectively, and the import procedure has the value UpdateReference, the procedure call would
be:
For Microsoft SQL Server and Sybase:
exec UpdateReference
@number = 766,
@reference = ''TII''
4 Using Import Export tool
4.5 Definition file (.def)
TRM System Administration Guide 55
For Oracle:
var r number
exec :r := HelpObjectPermission(pobject_id => 'aaa');
UpdateReference( Pnumber => 766,
Preference => 'TII');
Note that we must define the data type of the number field to be integer in the format section of
the .def definition file. (See 4.5.4 Format on page 59.) Otherwise, it will be interpreted as a string
and thus enclosed in quotes.
4.5 Definition file (.def)
Definition files define the layout of the imported/exported data files with templates (header, body,
and trailer) and the data structures used with formats and variables.
4.5.1 Templates
Templates are used to define the layout of the data file; the position of the actual data items relative
to one another and to other parts of the data file.
There are three sections in each template: header, body and trailer. There can be many different
definitions of each of these three types and it is possible to choose the correct one in the database
query or in the Perl hook functions.
The header and trailer definitions are each evaluated once only in each data transfer, at the
beginning and the end of the transfer, respectively. The body definition is evaluated for each row of
data that comes from the export query. When files are imported, the template is used to construct
regular expressions that will match into the input.
The header template sections are delimited by:
BEGIN HEADER [<NAME>]
....
END HEADER [<NAME>]
The body sections by:
BEGIN BODY [<NAME>]
....
END BODY [<NAME>]
The trailer sections:
BEGIN TRAILER [<NAME>]
....
END TRAILER [<NAME>]
where the optional <NAME> parameter specifies the name of the template if there are multiple
header, body or trailer template sections.
4.5.2 Layout syntax of the template
The layout of the header, body or trailer is described by 'example': the data is written as it will
appear in the imported/exported file, with all fill characters and line breaks, except that actual data
is replaced by variables. Variables are marked by a variable name surrounded with curly brackets
('{, }').
A sample header definition looks like this:
BEGIN HEADER
Risk metrics data from {date}
END HEADER

4 Using Import Export tool
4.5 Definition file (.def)
56 © Wall Street Systems IPH AB - Confidential
where the header in the file looks like:
Risk metrics data from 1999-04-23
At import time, the header is parsed, and the variable date is matched to '1999-04-23'.
Note: Remove trailing white space everywhere in layout definitions for importing data. The
sensitive matching process tries to match every single character in the template to the
data in the file.
4.5.2.1 Header
If the data file has a header before the start of the actual data section, the layout of this header has
to be defined. The header section of the template file defines the layout of this header. It is parsed
and read/written once. If the data file has no header, the header part in the template file should be
omitted.
There may be several layout definitions for the header. The correct template is chosen according to
the value of the variable template. This variable can either be given on the command line, in the
stored procedure, or it may be set in the Perl package. In the Perl package, it is the variable
$row->{template} that is set accordingly. In the stored procedure, an additional column with the
name template has to be returned (e.g. select template = TemplateName).
In the definition file, each of the headers would be defined with a specific name; for example:
BEGIN HEADER TemplateName
....header layout definition ....
END HEADER TemplateName
4.5.2.2 Body
The body section defines the layout of the main data in the data file which is to be imported or
exported. It defines the layout of one data set, one row in the database. It will be parsed for every
row.
There may be several layout definitions for the body. The template used is chosen according to the
value of the variable template. As described for the header above, this variable can either be given
on the command line, in the stored procedure, or it may be set in the Perl package. In the Perl
package, it is the variable $row->{template} that is set accordingly. In the stored procedure, an
additional column with the name template has to be returned (e.g. select template =
TemplateName).
BEGIN BODY TemplateName
....body layout definition ....
END BODY TemplateName
4.5.2.3 Trailer
If the data file has a trailer after the actual data section, the layout of this trailer has to be defined.
The trailer part of the template file defines this layout of the trailer. It is parsed and read/written
once. If the data file has no trailer, the trailer section in the template file should be omitted.
As for both the header and body sections, there may be several layout definitions for the trailer. The
template used is chosen according to the value of the variable template. This variable can either be
given on the command line, in the stored procedure, or it may be set in the Perl package. In the Perl
package, it is the variable $row->{template} that is set accordingly. In the stored procedure, an
additional column with the name template has to be returned (e.g. select template =
TemplateName).
BEGIN TRAILER TemplateName
....trailer layout definition ....
4 Using Import Export tool
4.5 Definition file (.def)
TRM System Administration Guide 57
END TRAILER TemplateName
4.5.2.4 Body template
The following is an example of a body template (SWIFT MT210):
BEGIN EXPORT VARIABLES
procedure=ListBatch
END EXPORT VARIABLES
BEGIN HEADER HEAD1
REC-01 Table Batch {rundate}
END HEADER HEAD1
BEGIN BODY
REC-02 {id};{date};{type};{user_id};{comment}
END BODY
BEGIN TRAILER TRAIL1
REC-09 total records {count}
END TRAILER TRAIL1
BEGIN FORMAT
id {
absolute:no
type:integer
length:10
leading_zeros:yes
}
type {
type:character
length:50
alignment:left
}
date.time_format:MM/DD/YYYY
user_id {
type:character
length:30
alignment:right
}
step.type:integer
END FORMATedure=ListBatch
4.5.3 Variables
Two types of variables can have values assigned to them:
•Built-in variables like import/export file names and debug switches
•Parameters of the stored procedure calls can have values assigned to them.
A full list of the built-in variables available is given in 4.5.3.5 Built-in variables on page 59.

4 Using Import Export tool
4.5 Definition file (.def)
58 © Wall Street Systems IPH AB - Confidential
Variable names can contain characters, digits and '_' ([a-zA-Z0-9_]). Parameters to stored
procedure calls always start with an @ sign. There can be any amount of white space anywhere in
variable assignments. If a variable is assigned more than once, then the last assignment is used.
4.5.3.1 Definition of variables
Variables can be assigned in the definition file and also on the command line. In addition, certain of
these variables can have values stored in normal environment variables. If variables are defined in
several places, the order of evaluation is as follows (from most dominant to least dominant):
•Command line variables
•Export/import variables in .def files
•Common variables in .def files (apply to both import and export)
•Environment variables
Variables can be assigned for export only, import only, or for both (common variables).
4.5.3.2 Command line variables
On the command line, variables are appended to the stored procedure command, separated by
space, as the following example shows:
On UNIX:
./interface MYINTERFACE::Payment::XYZ export @flags=2 @portfolio_id=\'TOP\ '
On Windows:
perl Interface MYINTERFACE::Payment::XYZ export @flags=2
@portfolio_id=TOP
Note: On UNIX, quotation marks must be preceded with backslashes to prevent expansion by the
shell.
4.5.3.3 Variables section in .def file
Variables or stored procedure parameters that are defined in the .def files exist in their own
sections. Variables that apply for both import and export are delimited by
BEGIN VARIABLES
variable=value
variable=value ....
END VARIABLES
Variables that apply for import only:
BEGIN IMPORT VARIABLES
variable=value
variable=value ....
END IMPORT VARIABLES
Variables that apply for export only:
BEGIN EXPORT VARIABLES
variable=value
variable=value ....
END EXPORT VARIABLES
4.5.3.4 Syntax of environment variables
Environment variables are of the form $FK_IMPORT_variable and $FK_EXPORT_variable for
import and export respectively. For example:
On UNIX (Bourne shell):
4 Using Import Export tool
4.5 Definition file (.def)
TRM System Administration Guide 59
set $FK_IMPORT_variable=value; \
export $FK_IMPORT_variable
On UNIX (C shell):
setenv $FK_IMPORT_variable value
On Windows:
set FK_IMPORT_variable=value
If environment variables are used, the most appropriate location to set these variables is in the TRM
system environments, which are defined in $FK_HOME/share/environments.
4.5.3.5 Built-in variables
There are several built-in variables, described in the following table:
4.5.4 Format
The format part of the definition file defines the data types used in the Import Export Tool.
Note: It is very important to specify the data types of the variables used as exactly as possible.
Import Export Tool internally generates regular expressions for each data type and
matches these regular expressions to the imported and exported data respectively.
The format section is delimited by:
BEGIN FORMAT
....
END FORMAT
Variable Description
procedure Name of the SQL stored procedure to use in export or import to extract or insert the data,
respectively.
@parameter1,
@parameter2
Possible default parameters for the stored procedure. They always start with @.
dir Specifies the directory in which the export file is created or from which the import file is
read.
file Specifies the name of the export or import file. If the name is undef (the default), the
filename is the current date plus a unique number 01..99 in the format: YYYYMMDDnn.
For example, 1999101702, would be the second file created on 1999/10/17.
ext Extension of input/output file name. Default is .exp for export files and .imp for import
files. Can be with or without the dot, i.e. ".dat" and "dat" are both accepted and will
result in ".dat" being appended.
filter Name of the program used to post process the export output. Could be a printer
command or xform, for example.
view_file If set to 1, every row will be printed to STDOUT as well as to the file.
debug If set to 1, every procedure call will be printed to STDOUT and nothing will be executed.
Default is 0.
line_terminator Character or string used to separate lines in the exported file. A typical use is to set
line_terminator to CRLF (line_terminator = \r\n). To set line_terminator to an empty
string (or remove linefeeds) use line_terminator = ''.
empty_output Output file is opened and header and trailer are written even if no data is returned from
the database query. Possible values yes and no.
my_own_variable You can define your own command-line variables.
4 Using Import Export tool
4.5 Definition file (.def)
60 © Wall Street Systems IPH AB - Confidential
4.5.4.1 Data type definitions
Every variable used in the body section of the template file has to have a data type associated with
it. This data type may be one of the pre-defined basic or built-in data types or may be defined by
the user in the format section of the template file.
There are two ways to write format definitions: by using curly brackets to group keywords for a
particular field/type or to use the field.keyword notation:
type_name {
type: value
format option: value
format_option: value
.....
}
or
variable_name.format_option: value
For example, to set the length and alignment of the field number, write:
number {
length: 16
alignment: left
}
or
number.length: 16
number.alignment: left
A user-defined data type may have any number of associated format options; user defined data
types build on existing data types and inherit all the format options of the type they are building on.
Any format option can however be overwritten by explicitly redefining it.
4.5.4.2 Predefined data types
There are a number of built-in and predefined data types. In the following table, these data types
are described and the regular expression which is internally created is shown.
4.5.4.3 Format options of data types
The following format options can be used to describe the data types:
Data type Regular expression
integer (\d*?)
float, money ([\+\-\d$decimal_separator$fill_character]*?)
(swift): ([\+\-\d,$fill_character]*?)
datetime Any digit in the time_format string is matched with \d.
character (.*?fill_character)
Formatting
keywords Description
absolute Converts integer, float or money values to their absolute value. Possible values are yes
and no.
alignment Specifies whether the formatted value is shown in the left or right end of the field (left
or right aligned), if the maximum field length exceeds the length of the formatted
value. If omitted, no alignment occurs. Possible values are left and right.

4 Using Import Export tool
4.5 Definition file (.def)
TRM System Administration Guide 61
fill_character Character used to fill fixed-length fields, if the maximum field length exceeds the length
of the formatted value. To fill in spaces one has to enclose the space character in single
quotes, i.e. ' '.
decimal_separator Specifies the character (sequence) used as decimal separator for float and money
types. To specify empty string one has to use single quotes, i.e. '', or use the undef
keyword. If the swift_format option is yes this option will be overridden.
thousand_separator Specifies the character (typically point, comma, or space) to separate adjacent 3 digit
sequences in the integer part of a number, e.g. 1,000,000.00. To have spaces one has
to enclose the space character in single quotes, i.e. ' '.
precision Specifies the decimal precision of money and float types. Possible values are
non-negative integers. If precision is zero, the decimal_separator will not be shown. If
the swift_format option is yes this option will be overridden.
leading_zeros Specifies whether zeros will be prepended to a number value if the maximum field
length exceeds the length of the formatted value. This is equivalent to setting
fill_character to 0 and alignment to right, but for negative numbers the output is
different. For instance, -100 would be displayed as -0000100 using the leading_zeros
approach and as 0000-100 using the fill_character approach.
swift_format Specifies whether the money or float value will be displayed according to the SWIFT
standard (numbers will be shown without sign, comma as the decimal separator and
without thousand separators). Possible values are yes and no.
time_format Specifies the format of dates and times for datetime types. Possible values are:
YYYY - year in four digits
YY - year in two digits
MM - month in two digits (01, 02, 03, ... ,12)
M - month in one or two digits (1, 2, 3, ..., 12)
DD - day of the month in two digits (01, 02, 03, ..., 31)
D - day of the month in one or two digits (1, 2, 3, ..., 31)
hh - hours
mm - minutes
ss - seconds
For example, to get a date/time like 1998/12/24 13:30, write YYYY/MM/DD hh:mm.
length Specifies the maximum length of the field. If the formatted value is longer then the
maximum field length, the value will be truncated. If it is shorter that the maximum
field length, it gets padded with the fill character.
case Specifies whether character type values should be shown in upper, lower or mixed case.
Possible values are upper and lower. To get mixed case one must use undef.
type Data type of the variable. This can be either one of the basic or built-in types (character,
integer, float, datetime, money) or a customized data type.
key_of Specifies the name of the database table which the field is a key of. This enables the
use of the dot notation to access database table fields. Possible values are Client,
Portfolio, Instrument and Equity.
regexp (import) With this option you can specify the regular expression to be used for internal parsing.
This option overrides the automatically created regexp. This option should be used as
an exception, only when the internal regexp generation does not work sufficiently. Do
not use, unless you know exactly what you are doing.
Formatting
keywords Description

4 Using Import Export tool
4.6 Perl functions (the Interface class)
62 © Wall Street Systems IPH AB - Confidential
4.6 Perl functions (the Interface class)
The Interface class allows complex logic to be included in the interface. If the templates and
formatting parameters are not expressive enough to create the specified output, additional logic
using Perl functions can be written (for instance, if some part of the template should not be
displayed depending on a certain condition in the input data).
The recommended approach to add this logic is to derive a new Perl class that inherits the
TemplateInterface class. (See 4.11 TemplateInterface class on page 67.) The TemplateInterface
class is a subclass of the Interface class.
Note: For performance reasons, it is generally recommended to use stored procedures as much
as possible rather than defining new classes.
The structure of a new subclass looks as follows:
package PACKAGENAME;
use TemplateInterface;
@ISA = qw (TemplateInterface);
sub new {
my ($class, @templates) = @_;
my $this = new TemplateInterface (@templates);
bless $this, $class;
return $this;
}
The new class can define so-called hook functions that can be called at certain stages in the process
of file creation to manipulate the incoming and outgoing data before and after parsing. Basically, the
hook functions can manipulate either the raw database input (start functions) or the formatted
output (finish functions).
4.6.1 Export hook functions
4.6.1.1 Start functions
export_header_start ($row)
export_body_start ($row)
export_trailer_start ($row)
These functions are called before the database query row is evaluated against the template. The
$row parameter is a reference to a hash containing name-value pairs that come from the query. It is
possible to change the existing row values and set new ones by using normal assignment.
A special feature is that one can specify the template to be used by setting $row->{template} to
the name of the required template. If, for some reason, the whole row should be excluded from
further processing, this can be achieved by returning the string ‘skip’ (return ‘‘skip’’;) from
the function export_body_start(). Other return values are ignored.
Here is an example of a start hook function that sets the template and some other fields and ignores
some rows.
sub export_body_start {
my ($this, $row) = @_;
if ($row->{layout} eq "MM") {
$row->{template} = "XYZ";
} elsif ($row->{layout} eq "FX") {
$row->{template} = "ABC";
} else {
4 Using Import Export tool
4.7 External packages: predefined modules
TRM System Administration Guide 63
return "skip";
}
$row->{count} = $count++;
}
4.6.1.2 Finish functions
export_header_finish ($output)
export_body_finish ($output)
export_trailer_finish ($output)
These functions are called after the template has been evaluated. The $output parameter is a
reference to the resulting output string. For instance, to remove new lines from the output one
would write:
$output =~ s/\n//g;
4.6.2 Import hook functions
4.6.2.1 Start functions
import_header_start ($input)
import_body_start ($input)
import_trailer_start ($input)
These functions are called before the input is matched against the appropriate templates (header,
body, trailer). The templates are tried in such an order that the one with least number of lines is
first. Generally it is not possible to say how many times these functions are called, it might be only
once or it might be as many times as there are templates.
If, for some reason, the whole row should be excluded from further processing, this can be achieved
by returning the string ‘skip’ (return ‘‘skip’’;)from the function import_body_start(). Other
return values are ignored.
4.6.2.2 Finish functions
import_header_finish ($params)
import_body_finish ($params)
import_trailer_finish ($params)
These functions are called after the input has been matched against a template. If the match was
successful, the $params variable contains a reference to the resulting name-value pairs. If the
match was not successful, $params will be undef.
4.6.3 Overriding default functions
It is, of course, possible to override any of the functions defined in the Perl classes Interface and
TemplateInterface (see 4.10 Interface class on page 65 and 4.11 TemplateInterface class on page
67).
4.7 External packages: predefined modules
Four predefined Perl modules are available for Import Export Tool. Each of the modules corresponds
to a table in the TRM database with the same name.
First, the variable used in the body part of the template file contains an extra element, the name of
the key used to index the external table, in addition to the variable name in that table.
4 Using Import Export tool
4.8 Running Import Export tool
64 © Wall Street Systems IPH AB - Confidential
BEGIN BODY
name_of_key.variable_name
END BODY
The first part is the name of the key used for indexing the respective table; the second part is the
field name from that table.
Secondly, in the format part of the definition (.def) file, the key is associated as a key of a table by
the following syntax:
BEGIN FORMAT
name_of_key.key_of: NameOfPredefinedModule
variable_name.type: type_name
END FORMAT
The variable itself must also be associated with a data type.
4.8 Running Import Export tool
4.8.1 Running from the command line
To run Import Export tool from the command line after an environment evaluation:
On UNIX:
cd $FK_HOME/share/interface/
interface <package> (import|export) [name=value ...] [@name=value ...]
On Windows:
cd %FK_HOME%\share\interface
perl Interface <package> (import|export) [name=value ...] [@name=value ...]
where:
•<package> is the interface you have set up
•(import|export) - choose the direction of the data transfer
•[name=value ...] - to specify one of the built-in variables. (See 4.5.3 Variables on page 57.)
•[@name=value ...] - to specify a stored procedure parameter variable.
For example, to export MYINTERFACE XYZ payments, use the following:
On UNIX:
./interface MYINTERFACE::Payment::XYZ export @portfolio_id='TOP'
On Windows:
perl Interface MYINTERFACE:Payment::XYZ export @portfolio_id=TOP
To import fx-match statements you could use:
On UNIX:
./interface FXMATCH import @file='/tmp/fxmatch.txt'
On Windows:
perl Interface FXMATCH import @file=/tmp/fxmatch.txt
4 Using Import Export tool
4.9 Debugging
TRM System Administration Guide 65
4.8.2 Methods of script execution
Running Import Export tool can be achieved in several different ways with TRM:
•Manually: on the command line as shown above.
•Repeatedly: via crontab (UNIX). For example every hour:
10 * * * * ./interface FXMATCH import @file='/tmp/fxmatch.txt'
•From Money Transfer Method Editor in TRM:
Define a new method in Money Transfer Method Editor: give a unique id and method name in the
ID and Method fields, and the required command in the Command field (for example the XYZ END
FORMAT payments example shown above). The method can now be used automatically for
exporting payments. The batch_id is appended as command-line variable and can thus be used in
Import Export Tool to export the payments to a file and/or to screen.
4.9 Debugging
To debug an interface, use the following command:
•On UNIX: fk-perl -d ./interface <PKGNAME> {import|export}
•On Windows: perl -d Interface <PKGNAME> {import|export}
and then
c 52
to continue to line 52. From here, it is possible to set breakpoints in your own .pm file. For example:
b MYINTERFACE::Payment::XYZ::export_body_start
sets a breakpoint in the subroutine export_body_start in the XYZ class, which is a subclass of the
MYINTERFACE class.
4.10 Interface class
An abstract class from which all import and export interfaces are derived. Defined in the file
Interface.pm.

4 Using Import Export tool
4.10 Interface class
66 © Wall Street Systems IPH AB - Confidential
4.10.1 Interface class functions
4.10.2 Interface member functions
Function Description
init Initialize.
find_package Return the most specific class that is defined @param @packages list of packages.
• Returns: the most specific one or undef if not found
package_split Split package name to an array of package names.
For example, $this->package_split ("abc::def::ghi") would return
("abc::def::ghi" "abc::def" "abc").
• Parameters: package - name of the package
• Returns: list of packages
package_to_file Construct Perl .pm file name from a package name.
• Parameters: package - name of package
• Returns: file name
file_exists See if a file exists in the include path.
• Parameters: name - name of the file
• Returns: the full file name if found, otherwise undef
default_file_name Return the default file name YYMMDDNN, where YY is the current year, MM is the current
month and DD is the current day. NN is an increasing sequence number for files with the
same date, 01 for the first file.
• Parameters: dir - directory; ext - extension
• Returns: file name (without directory and extension)
pad_right Add pad characters to the right of a string or truncate it.
• Parameters: value - input string, width - width of the output string, pad - pad
character
•Returns: result
pad_left Add pad characters to the left of a string or truncate it.
• Parameters: value - input string, width - width of the output string, pad - pad
character
•Returns: result
swift_amount Format amount in SWIFT format.
• Parameters: amount - unformatted amount
• Returns: formatted amount
Function Description
new Constructor.
process_args Store command line arguments.
Arguments of the type foo=bar are stored in a hash, referenced by
$this->{cmdline_variables}. Arguments of the type @foo=bar are stored in an array,
referenced by $this->{cmdline_parameters}.
export_file Fetch records from the database and write them to a file.
import_file Read records from a file and insert them to the database.

4 Using Import Export tool
4.11 TemplateInterface class
TRM System Administration Guide 67
4.11 TemplateInterface class
A class for importing and exporting files using templates. Defined in the file TemplateInterface.pm.
read_database Fetch records from the database and store them in a hash, referenced by
$this->{export_rows}. Store field types to the hash referenced by
$this->{export_types}.
write_database Insert records to the database.
write_file Write records to a file.
read_file Read records from a file.
write_file_body Loop through rows to write the body of the file. Calls pure virtual method write_row.
sql_value Format a field value for the database.
• Parameters: name - field name, value - field value
• Returns: formatted value
sybase_type Default function for getting Sybase type for a field
• Parameters: name - field name
• Returns: Sybase type
db Return the database handle.
procedure_
parameters
Return the array of parameters to the export or import stored procedure.
• Parameters: direction - import or export
line_terminator Return the default line terminator.
The default line terminator is defined in the VARIABLES section of the .def file.
export_handle Return the file handle to the export file.
import_handle Return the file handle to the import file.
open_export_ file Open the export file handle for writing. If file name is not defined, write to standard
output.
close_export_file Close the export file.
open_import_file Open the import file handle for reading. If file name is not defined, read from standard
input.
close_import_file Close the import file.
file_name Return the import or export file name.
Uses the dir, file and ext variables.
• Parameters: direction - import or export
• Returns: filename or undef if export directory is undefined.
variable Return a variable.
Try in order: command line variable, import or export variable, common variable,
environment variable (e.g. FK_EXPORT_DIR).
• Parameters: direction - import or export, variable - name of the variable
• Returns: variable value or undef if not defined
Function Description
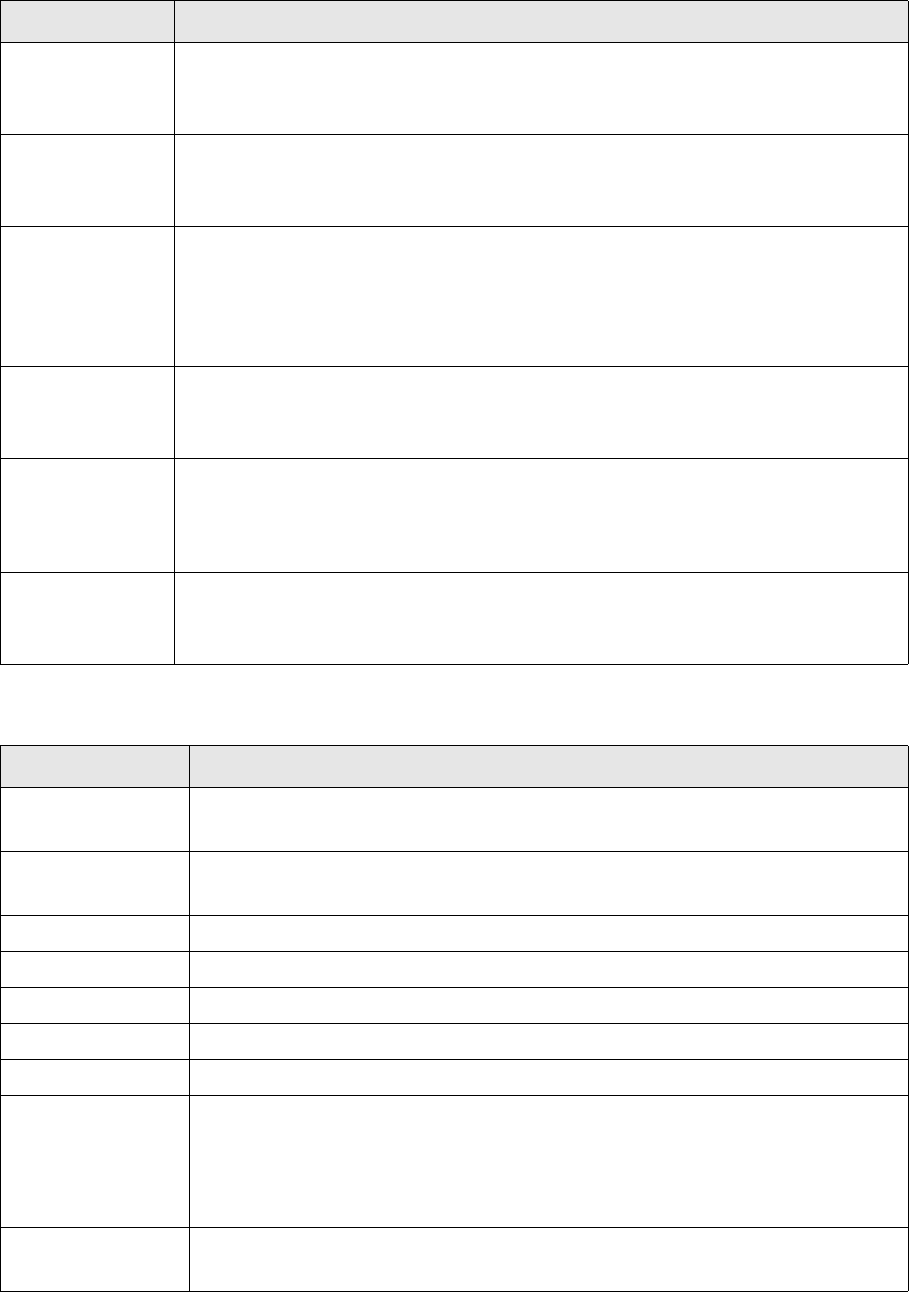
4 Using Import Export tool
4.11 TemplateInterface class
68 © Wall Street Systems IPH AB - Confidential
4.11.1 TemplateInterface class functions
4.11.2 TemplateInterface member functions
Function Description
get_fields Get field names from a template.
• Parameters: template - name of the template
• Returns: reference to an array of fields
read_lines Read a specified number of lines from a file handle.
• Parameters: handle - file handle, count- number of lines to read
• Returns: the most specific one or undef if not found
line_count Get the number of lines in a string.
For example, $this->package_split ("abc::def::ghi") would return
("abc::def::ghi" "abc::def" "abc").
• Parameters: string - input string
• Returns: number of lines
escape_meta Escape regular expression metacharacters in a string.
• Parameters: string - input string
•Returns: result string
align Do alignment, padding and truncation.
• Parameters: value - input value, length - length, fill_character - fill character,
alignment - alignment ("left" or "right")
•Returns: result
add_thousand_
separators
Add thousand separators to a number.
• Parameters: value - input number, thousand_separator - thousand separator
•Returns: result
Function Description
new Constructor.
• Parameters: templates - array of class names whose template files are read
read_def Read templates and format definitions from the .def file.
• Parameters: class - name of the class
write_file_header Write file header.
write_row Write one record to the export file.
write_file_trailer Write file trailer.
read_file_header Read file header.
read_file_body Read file body and trailer.
template_parse Parse input using template.
• Parameters: type - template type (HEADER/BODY/TRAILER), start_hook - name of
the function that is executed before parsing, finish_hook - name of the function that
is executed after parsing, input - input lines
• Returns: reference to the record hash
set_type Set the type of a field.
• Parameters: field - field name, type - field type

4 Using Import Export tool
4.11 TemplateInterface class
TRM System Administration Guide 69
type Get type of a field.
• Parameters: field - field name
• Returns: field type
select_template Select current template.
• Parameters: type - template type (HEADER/BODY/TRAILER), name - template name
template Return a reference to the current or specified template.
• Parameters: type - template type (HEADER/BODY/TRAILER), name - template name
or undef
• Returns: reference to the current (name is undef) or specified template
template_name Return current template name.
template_type Return the file handle to the import file.
export_header_ start • Virtual method that is executed before the current header template is evaluated
with the current header record.
• Parameters: row - reference to the header record hash (initially empty)
export_header_finish Virtual method that is executed after the current header template has been evaluated
with the current header record.
• Parameters: output - reference to the evaluated template
export_body_start Virtual method that is executed before the current body template is evaluated with the
current body record.
• Parameters: row - reference to the body record hash
export_body_finish Virtual method that is executed after the current body template has been evaluated
with the current body record.
• Parameters: output - reference to the evaluated template
export_trailer_start Virtual method that is executed before the current trailer template is evaluated with the
current trailer record.
• Parameters: row - reference to the trailer record hash (initally empty)
export_trailer_finish Virtual method that is executed after the current trailer template has been evaluated
with the current trailer record.
• Parameters: output - reference to the evaluated template
evaluate Evaluate a template
• Parameters: row - reference to the input record hash
• Returns: evaluated template
expand_field Expand a field of the form key1.key2. ... .field
• Parameters: field - fully qualified field name, data - data record
• Returns: base field name and field value
output Output a string to the export file.
• Parameters: string - output string
format Format a value according to its type.
• Parameters: key - field name, value - field value, row - rest of the record (optional),
sybtype - Sybase type of the field (optional)
• Returns: formatted value
parse Parse header/body/trailer record
• Parameters: input - input lines, template - template to be used for matching
• Returns: reference to a hash containing key/value pairs, undef if template does not
match with input
Function Description

4 Using Import Export tool
4.11 TemplateInterface class
70 © Wall Street Systems IPH AB - Confidential
regexp Construct a regular expression from a field definition.
• Parameters: key - field name
• Returns: regular expression
get_types Get the type array for a field. Elementary type (character, integer, etc.) is the first
element in the array, field name is the last one.
• Parameters: key - field name, sybtype - Sybase type (optional )
• Returns: reference to the array of types
sql_type Get SQL type for a field name.
• Parameters: name - field name
• Returns: SQL type
get_format Get a formatting option for a type array.
• Parameters: option - name of the formatting option, type_array - the type array
• Returns: value of the formatting option
cleanup Clean up a parsed record.
• Parameters: name - field name, value - field value
• Returns: cleaned up value
import_header_start Virtual method that is executed before the current header template has been evaluated
with the current header record.
• Parameters: input - reference to the header record hash
import_header_finish Virtual method that is executed after the current header template has been evaluated
with the current header record.
• Parameters: params - reference to the evaluated template
import_body_start Virtual method that is executed before the current body template has been evaluated
with the current body record.
• Parameters: input - reference to the body record hash
import_body_finish Virtual method that is executed after the current body template hasbeen evaluated
with the current body record.
• Parameters: params - reference to the evaluated template
import_trailer_start Virtual method that is executed before the current trailer template has been evaluated
with the current trailer record.
• Parameters: input - reference to the trailer record hash
import_trailer_finish Virtual method that is executed after the current trailer template has been evaluated
with the current trailer record.
• Parameters: params - reference to the evaluated template
add_thousand_separ
ators
Add thousands separators to a number.
• Parameters: value - input number, thousand_separator - thousands separator
• Returns: result
align Do alignment, padding and truncation.
• Parameters: value - input number, length - length, fill_character - fill character,
alignment - left or right.
• Returns: result
escape_meta Escape regular expression metacharacters in a string.
• Parameters: string - input string
• Returns: result string
Function Description

4 Using Import Export tool
4.12 Empty sample files
TRM System Administration Guide 71
4.12 Empty sample files
4.12.1 Definition file
BEGIN EXPORT VARIABLES
procedure =
@param =
dir =
file =
ext =
END EXPORT VARIABLES
BEGIN EXPORT HEADER
END EXPORT HEADER
BEGIN EXPORT BODY
END EXPORT BODY
BEGIN EXPORT TRAILER
END EXPORT TRAILER
BEGIN EXPORT FORMAT
END EXPORT FORMAT
BEGIN IMPORT VARIABLES
procedure =
@param =
dir =
file =
ext =
END IMPORT VARIABLES
BEGIN IMPORT HEADER
END IMPORT HEADER
BEGIN IMPORT BODY
END IMPORT BODY
BEGIN IMPORT TRAILER
END IMPORT TRAILER
line_count Get the number of lines in a string.
• Parameters: string - input string
• Returns: number of lines
read_lines Read a specified number of lines from a file handle.
• Parameters: handle - file handle, count - number of lines to read
• Returns: lines read
Function Description
4 Using Import Export tool
4.12 Empty sample files
72 © Wall Street Systems IPH AB - Confidential
BEGIN IMPORT FORMAT
END IMPORT FORMAT
4.12.2 Empty Perl module
Template for empty import export Perl module
package Empty;
use TemplateInterface;
@ISA = qw (TemplateInterface);
sub new {
my ($class, @templates) = @_;
my $this = new TemplateInterface (@templates);
bless $this, $class;
return $this;
}
sub export_header_start{
my $this = shift;
my ($row) = @_;
}
sub export_body_start{
my $this = shift;
my ($row) = @_;
}
sub export_trailer_start{
my $this = shift;
my ($row) = @_;
}
sub export_header_finish{
my $this = shift;
my ($row) = @_;
}
sub export_body_finish{
my $this = shift;
my ($row) = @_;
}
sub export_trailer_finish{
my $this = shift;
my ($row) = @_;
}
4 Using Import Export tool
4.12 Empty sample files
TRM System Administration Guide 73
#### The import part
sub import_header_start{
my $this = shift;
my ($row) = @_;
}
sub import_body_start{
my $this = shift;
my ($row) = @_;
}
sub import_trailer_start{
my $this = shift;
my ($row) = @_;
}
sub import_header_finish{
my $this = shift;
my ($row) = @_;
}
sub import_body_finish{
my $this = shift;
my ($row) = @_;
}
sub import_trailer_finish{
my $this = shift;
my ($row) = @_;
4 Using Import Export tool
4.12 Empty sample files
74 © Wall Street Systems IPH AB - Confidential
TRM System Administration Guide 75
Chapter 5 Setting up message management
5.1 Overview
Message Manager generates documents based on information in Wallstreet Suite (Transactions,
Schedule, Payment, Client). The documents can be printed, e-mailed or faxed. For information on
message management for business users, refer to the TRM User Guide.
The creation of a document is usually triggered by the fact that a transaction or other entity is
moved from one state to another in the process flow. If there are TransactionActions, a
MessageRequest is created. Also, EntityActions support the creation of MessageRequests. The
following entities are supported:
•Payment Allocation Report
•Payment Reminder
•Late Payment Reminder
•Drawdown Fixing
•FX Rate Notification
•Facility (using the flow in Facility Editor)
•Amount Event
Message Manager uses the serviced daemon (replacing messaged used in TRM 7.1). This daemon is
usually started by Process Monitor, but for debugging purposes, it can also be started in a TRM
environment as follows:
serviced document/document.xml
In general, serviced supports the same command line options as the other real-time services such
as tracing. For details of serviced, see the WSS System Administration Guide.
The steps in producing a message are as follows (details are given in the rest of this chapter):
1. MessageRequest is created in the process flow and sent on the message bus. This step
determines the MessageType.
2. Given a MessageRule, a MessageSubType is assigned.
3. Each MessageRule defines which MessageRuleInstance(s) to use. For example, a
DRAWDOWN-NOTIFICATION implies that one document should be e-mailed to the counterparty
and one other document should be faxed to the bank. There is a one-to-one mapping between
the MessageRuleInstance and Message. In this case there will be two messages created since
there are two MessageRuleInstances attached to the matching MessageRule.
4. The combination of MessageType, MessageSubType and MessageGroup is used to determine a
ContactPerson (found in ClientEditor). A ContactPerson contains among other things the address
such as fax number, e-mail address, language of the document etc.,
5. The combination of MessageType, MessageSubType, Language and TransferType is used to
retrieve a MessageTemplate.
6. The serviced daemon loads the data associated with the underlying message object. The data to
load is defined by the MessageType and the MessageSubType in MessageTypeEditor, using the
tab MessageContent.
7. The document is created, based on the template to use.
5 Setting up message management
5.2 Transaction and Entity flow
76 © Wall Street Systems IPH AB - Confidential
8. The command in the TransferMethod is used to transmit the message.
In Loan Drawdown Fixing Manager, Payment Allocation Manager and Payment Reminder Manager,
you can preview a message by right-clicking on the relevant line.
5.2 Transaction and Entity flow
MessageRequests can be created from both transaction flow and entity flow. An example of a
TransactionAction is as follows:
# Trade tickets for TRM transactions
(state ('OPEN'), mask (0),
rule ('TFLO-MESSAGE_TRADE-TICKET'),
send_full ('document.transaction', message_type='TRADE-TICKET',
state_id='TO-BE-TRANSMITTED')),
The message request gets the message type given by message_type. The parameter state_id
specifies the initial state_id in the message flow for the message request. By default, there are two
possible states:
•TO-BE-VALIDATED: you are given the option to approve the message request in Message
Manager
•TO-BE-TRANSMITTED: message transfer takes place immediately, without user intervention.
5.3 Message Manager and Message flow
The two main steps are creating messages (match rules and create message) and extracting data
(retrieving the fields defined in MessageContent for the given MessageType/MessageSubType).
To control and overview the process, use Message Manager. Message Manager is an entity board
application with a default message State ID flow is as follows:
1. TO-BE-VALIDATED typically allows the user to add comments. If the four-eyes principle is
applied, a message request is typically validated here.
2. EXECUTE is normally used just for previews. MessageRequests in this state now show in
Message Manager.
3. TO-BE-TRANSMITTED These message requests will be sent using the defined TransferMethod.
4. TRANSMITTED if external Message Manager successfully sends all subrequests, the message
request will be moved to this state.
Three thresholds are defined in the message flow (see the database setup folder):
•If the MessageRequest is flagged Provisional, Message Manager will try to create messages and
extract the underlying data. For example, the first provisional state is TO-BE-VALIDATED, so
message creation and data extraction take place as soon as a MessageRequest is created.
•If the MessageRequest is in a state flagged Intermediate, serviced tries to carry out the action
defined in the corresponding TransferMethod (e.g. send an e-mail, execute a script, fax or print).
By default, TO-BE-TRANSMITTED is an intermediate state.
•If the MessageRequest is in a state flagged Final, no further processing takes place. For
example, if a MessageRequest consists of three messages and all are sent successfully, the
MessageRequest will be accepted into TRANSMITTED which is a state flagged as Final.
5 Setting up message management
5.4 Examples of messages
TRM System Administration Guide 77
5.4 Examples of messages
A trade ticket should be printed immediately
The MessageRequest is created in a state which is defined as "to be transmitted immediately"
(TO-BE-TRANSMITTED). Since this MessageRequest does not have any messages yet and it is in an
intermediate state, the daemon instructs Message Manager to process the message. This processing
results in:
•Rule matching, finding subtype since there is no structure yet
•Data extraction
•Upon successful data extraction the MessageRequest is accepted. If the next state is a
transmission-enabled state (intermediate) the execution will be continued. This means that the
document will be either printed immediately, or sent as an e-mail.
A MessageRequest is created in TO-BE-VALIDATED
Since the daemon discovers that this MessageRequest does not yet have any structure, serviced will
create a structure (find subtype, match rules, messages according to the MessageRuleInstances).
The user approving messages starts Message Manager and clicks ACCEPT on the MessageRequest.
The MessageRequest will now be moved to state EXTRA-VERIFICATION (not defined by default).
This allows another person to also accept the message into an intermediate state (where it will be
transmitted). Any number of states can be created to reflect the work process.
Messages that need comments as well as approval
In this case, Message Manager allows editing of these remark fields before the message reaches a
state that allows transmission. Initially this MessageRequest is created in a provisional state . The
daemon will discover the non-existence of structure (Message), therefore it will be processed and
Messages will be created. The user starts Message Manager and edits the MessageRequest remark
fields. Then the user ACCEPTS the MessageRequest into state TO-BE-TRANSMITTED and everything
proceeds as in the above cases.
5.5 Setting up Message Manager
Set up Message Manager as follows:
1. Edit the layouts using MS Word 2003 or 2007 and save them as XML.
2. Install the XML plugin described below. This is needed in order to mark the TRM specific fields to
be replaced by real data.
3. If other type and subtype combinations than provided by the best practice package is needed,
they need to be entered in Message Type Editor.
4. Upload the templates using the script upload_documents.py
5. Review the message rules in Message Rule Editor.
6. Check Transfer Type Editor and review transfer types.
5.6 Previews
There are two kinds of previews:
•Transaction Manager
When the user selects preview action, the action scans all available TransactionActions for
5 Setting up message management
5.7 Extracting data
78 © Wall Street Systems IPH AB - Confidential
possible MessageTypes and MessageSubTypes and presents a dialog box. When the user clicks
OK, a hidden MessageRequest and Message(s) created. Only the Message where the
corresponding MessageRuleInstace is flagged primary message will be displayed.
•Message Manager
Right-click on a message. The message to preview is identified by its id.
5.7 Extracting data
Data extraction is based on the same modules as the GUI applications. For example, if a document
is based on a Transaction, the available fields are the same as in the corresponding Transaction
Manager view. If needed, additional static date fields can be included from static data editors.
For example, to display the name of a transaction currency:
1. Select Transaction.currency_id and Currency.name as fields in Message Type Editor. The
Currency source will not appear in the list until the transaction field is chosen).
2. Use the placeholder Transaction.currency_id.name in the document.
For cases when the built-in extraction capabilities are not enough, Message Manager provides
several ways to add and derive client-specific fields as follows:
1. Expressions (powered by python code)
•Single field
–Declaration in Message Type Editor (valid only in selected source and message type)
–Declaration in document-config.xml (available for all message types)
•Result set (many fields at a time)
In general, it is best to use expressions in Message Type Editor, because then the business user can
directly edit and review how a certain field is calculated or retrieved.
Making declarations directly in document-config.xml makes the expression available for all message
types. Expressions made in Message Type Editor are valid only in the selection message type.
Python code allows access to computed fields (same data as used by GUI applications) and is
database-independent. The python code to write depends on whether there is a need to process
only one field or many at a time.
2. SQL code in a stored procedure.
The stored procedure approach can be an easy method when migrating from earlier versions of
TRM. (database structure is relevant here). Processing SQL on the server side and returning many
fields in one call is normally efficient if performance is an issue.
5.7.1 Expressions
5.7.1.1 Single Field
Declare the expression directly in Message Type Editor. For each source, there is a special field
named Calculated. If this field is selected, the property fields become editable. Examples of
expressions that can be used in this field are:
logo='logo_wss.gif'
include_p=(cp_client_id != 'TP-CPTY')
transaction_sign_rev=if(sign_id == 'Buy','Sell','Buy')
sign_name=if(sign_id=='Buy', 'Receive', 'Pay')
date_basis1=if(type_subtype=='Netting',date_basis)
These expressions are driven by the same engine as in Transaction Manager. It is also possible to
call previously defined python functions from the expressions in the Message Type Editor.
5 Setting up message management
5.7 Extracting data
TRM System Administration Guide 79
If you have a single field to compute, this will be coded in a python function: for example, code your
"my_function" function in the python file my_functions.py (Make sure this file is in your python
path):
def my_function (number):
# do some calculation here
...
return result
Declare the calculated field in document-config.xml:
<expression source="Transaction" script="my_functions">
<field name="my_field" label="My Field"/>
my_function (number)
</field>
</expression>
It is possible to select the name of the owner or counterparty using the functions provided:
seller = if (sign_id == 'Sell', get_field ('Client',owner_id,'name'), get_field
('Client',cp_client_id,'name'))
For this to work, the following piece of python code must be saved in the python path, for example
as:
C:\wss\v7\python\lib\Lib\site-packages\functions.py
This folder is usually used for python scripts. Save the following file as functions.py:
import FK.Core
from FK.ORB import from_value, to_value
import IDL.FK.Data_Context
from FK.Cache import Cache
cache = Cache ()
# Arguments are of type value
def get_field (o,k,f):
obj = FK.ORB.from_value(o)
# k should be of type value already
key = to_value(k)
field = FK.ORB.from_value(f)
# print "get_field",obj,key,field
holder = cache.context ()
try:
umi = holder.get (obj, [key])
(found, v) = umi.get_field (field, FK.ORB.to_value ())
if found:
return FK.ORB.from_value (v)
except:
return ""
return ""
The file functions.py must be linked to the source to be used in document-config.xml:
<expression source="Transaction" script="functions"/>
This makes the get_field function available to all Transaction sources. It is also possible to define the
field in document-config directly:
<expression source="Transaction" script="dc-values">
<field name="test_name" label="Test name">
get_field('Client',cp_client_id,'name')
</field>
</expression>
5 Setting up message management
5.7 Extracting data
80 © Wall Street Systems IPH AB - Confidential
The field test_name is now available for selection in Message Type Editor and it will always contain
the name of the counterparty. It will be available for Transaction source only, but it will be available
across all Message types. If it is needed in yet other source, just add it again, but change the source
attribute.
5.7.1.2 Result set (multiple fields)
More complex processing may be required. There might be cases when the filter syntax is not
enough to get a certain cashflow. If there is a need to compute values based on several cashflows
and flags etc, the python code for this can be placed in the same python file as the above
expressions.
In general, if many parameters need to be computed at the same time, they are interdependent or
fetched altogether. Code a function called get_values in a python script, my_other_functions.py:
def get_values (ctx, values):
# compute some values
return values
The ctx parameter gives you the source you are considering (Transaction, Cashflow, UMI etc.),
values is a dictionary with fetched fields - from the source. You have to complement this list with
your own calculated information and return it. Finally link your script to Message Manager:
<service module="data/python@my_other_functions">
<fields>
<source name="Transaction">
<field name="my_field_1" label="My first field">
<dependency name="number"/>
<dependency name="comment"/>
</field>
<field name="my_field_2" label="My second field">
<dependency name="number"/>
</field>
</source>
</fields>
</service>
Pay attention to the module attribute where you setup your python script name:
module="data/python@my_other_functions"
A more detailed example of this:
<service module="data/python@myvalues">
<fields>
<source name="Transaction">
<field name="receive_principal" label="Receive Principal">
<dependency name="number"/>
</field>
<field name="pay_principal" label="Pay Principal">
<dependency name="number"/>
</field>
<field name="first_interest_amount" label="First Interest Amount">
<dependency name="number"/>
</field>
</source>
</fields>
</service>
The file myvalues.py must be in your python path. For example:
C:\wss\v7\python\lib\Lib\site-packages\myvalues.py
If above declaration is made in document-config.xml, the function get_values will be called for every
processed source (Transaction). A dictionary is passed as argument, so its contents can be changed
in the get_values function and then returned at the end. For example:
5 Setting up message management
5.7 Extracting data
TRM System Administration Guide 81
import FK.Core
import FK.ORB
FK.ORB.use_idl ("Type")
from FK.Cache import Cache
from IDL.FK.Database import Action
from FK.Module.Transaction_Manager import *
from FK.Core import Money
cache = Cache ()
def get_receive_pay_flows (flows, category_id):
receive_principal = Money (0)
pay_principal = Money (0)
for flow in flows:
if flow.type_id == 1 and flow.category_id == category_id:
amount = Money (flow.amount)
if amount > 0:
receive_principal += amount
else:
pay_principal += amount
return (receive_principal, pay_principal)
def cmp (c1, c2):
if c1.value_date == c2.value_date:
return int ((c1.id - c2.id).as_long ())
return c1.value_date - c2.value_date
def get_values (ctx, values):
print "get_values"
if values.has_key ('number'):
number = FK.ORB.from_value (values['number'])
container = Container ()
action = cache.session ().create_action ()
t = container.retrieve (action, number, True)
if t != None:
if values.has_key ('receive_principal') or values.has_key ('pay_principal'):
(values['receive_principal'], values['pay_principal']) =
get_receive_pay_flows (t.cashflows(), 0) # category settlement
if values.has_key ('receive_redemption') or values.has_key ('pay_redemption'):
(values['receive_redemption'], values['pay_redemption']) =
get_receive_pay_flows (t.cashflows(), 1) # category payback
if values.has_key ('first_interest_amount'):
flows = t.cashflows ()
flows.sort (cmp)
for flow in flows:
if flow.type_id == 2 and flow.category_id == 1: # type interest, category
payback
print '*' * 8, flow.value_date
values['first_interest_amount'] = flow.amount
break
return values
Note that it is possible to call the already existing get_field (to avoid code duplication) function to
lookup needed field in the TRM object hierarchy, for example. In the example below, depending on
transaction sign, different bank names and swift codes are selected. For the moment, all functions
are called with Type::Value arguments.
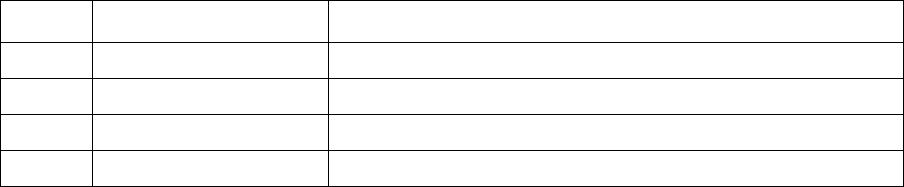
5 Setting up message management
5.7 Extracting data
82 © Wall Street Systems IPH AB - Confidential
def get_field (o,k,f):
obj = FK.ORB.from_value(o)
# k should be of type value already
key = k
field = FK.ORB.from_value(f)
print "get_field",obj,key,field
holder = cache.context ()
try:
umi = holder.get (obj, [key])
(found, v) = umi.get_field (field, FK.ORB.to_value ())
if found:
return FK.ORB.from_value (v)
except:
return ""
return ""
def get_bond_beneficiary(t):
flows = t.cashflows()
for flow in flows:
if flow.type_id == 1 and flow.sign != t.sign_id:
# Found cashflow to use
beneficiary_details = ()
client_v = FK.ORB.to_value("Client")
name_v = FK.ORB.to_value("name")
swift_v = FK.ORB.to_value("swift_code")
if t.sign_id > 0:
beneficiary_details =
(get_field(client_v,FK.ORB.to_value(flow.local_client_id),name_v),
get_field(client_v,FK.ORB.to_value(flow.local_bank_id),name_v),
flow.local_account_id,
get_field(client_v,FK.ORB.to_value(flow.local_bank_id),swift_v),
get_field(client_v,FK.ORB.to_value(flow.local_corr_bank_id),swift_v))
else:
beneficiary_details =
(get_field(client_v,FK.ORB.to_value(flow.other_client_id),name_v),
get_field(client_v,FK.ORB.to_value(flow.other_bank_id),name_v),
flow.other_account_id,
get_field(client_v,FK.ORB.to_value(flow.other_bank_id),swift_v),
get_field(client_v,FK.ORB.to_value(flow.other_corr_bank_id),swift_v))
return beneficiary_details
5.7.1.3 System functions
Message Manager also provides a set of predefined functions. Date handling is as follows:
Type Parameter Action
today None Gets the current date
year Date Extracts the year
month Date Extracts the month
day Date Extracts the date

5 Setting up message management
5.8 Setting up Document Formatter
TRM System Administration Guide 83
Multiple entities manipulation is as follows. These functions operate on all entities of a source and
return a single value. This unique value is then available on any of the source entities.
5.7.2 SQL code in stored procedures
The stored procedure and the fields to use must be declared in document-config.xml as follows:
<service module="data/stored-procedure@stored-procedure">
<procs>
<stored-procedure name="GetMyInfo" id-field="number" source="Transaction">
<field name="myfield1" label="My field 1 label"/>
<field name="myfield2" label="My field 2 label"/>
</stored-procedure>
</procs>
</service>
When fields are extracted from a transaction, the number is passed as key to GetMyInfo. This
procedure may return a lot of fields and record sets, but only myfield1 and myfield2 will be available
in Message Type Editor. In the document, the following placeholders Transaction.myfield1 and
Transaction.myfield2 can be used.
5.7.3 Filters
New sources can be configured in document-config.xml. The following example creates a new source
which is a subset of the cashflows:
<filter name="PayCashflow" source="Cashflow">
<and>
<and>
<eq field="#sign" type="INTEGER">1</eq>
<eq field="type_id" type="INTEGER">6</eq>
</and>
<eq field="XXX" type="STRING">hot</eq>
</and>
</filter>
5.8 Setting up Document Formatter
5.8.1 Prerequisites
Wallstreet Suite installation must contain the latest version of Apache FOP. There is nothing to
install except to add into the path the folder where FOP is extracted to. Since FOP is Java-based, the
Java runtime environment should also be present.
Entity Parameter Action
min_value Entity field Gets the minimum value of the field in the set of entities
max_value Entity field Gets the maximum value
total Amount field Sums the amounts
average Amount field Averages the amounts
count None Counts the entities
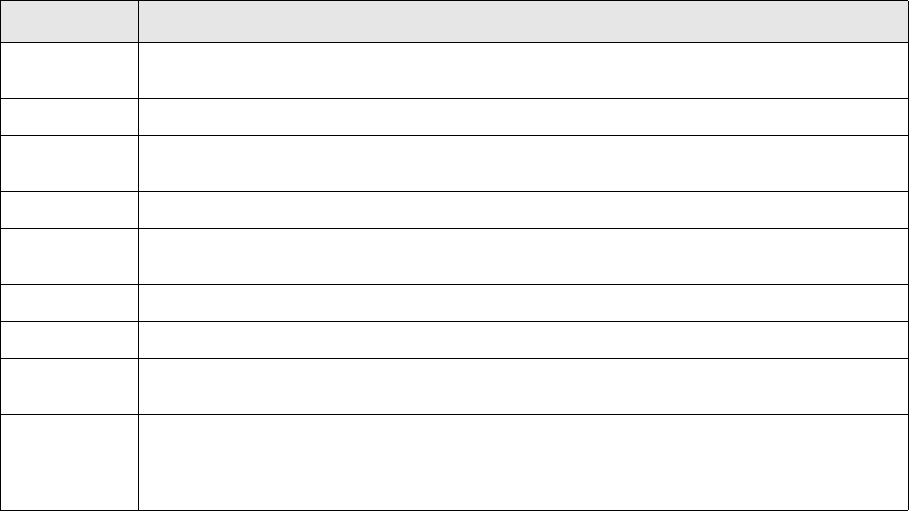
5 Setting up message management
5.8 Setting up Document Formatter
84 © Wall Street Systems IPH AB - Confidential
5.8.2 Settings
All document management settings are in this folder: <Suite Install Folder>/etc/document
which contains the following subfolders:
•images - this is where reusable pictures are kept, for example logos and similar items.
•interim - temporary folder for intermediate files and final results (PDF files). This folder location
can be customized during setup - if so, the directory to be used should be assigned to the
environment variable named FK_DOCUMENTS_INTERIM_DIRECTORY
.
•processor - contains XSLT code that translates WordML to FO (contains subfolders so that we
can use several input and output formats. Read-only.
The main activity is logically splitting message templates by type, subtype, media and language,
then uploading the document into the database. The name of the document is not the file name of
the Word XML document: it is the logical name that you give to this template document, and
defaults to "default".
For example, for type preview_type, subtype preview_subtype, medium email and language en-us,
and the name of the document is not specified, the following command line should be used:
python upload_documents.py --document <template document>
[--input <doc_format(if empty then 'word')>]
[--name <save name(if empty then 'default')>]
--type <type>
--subtype <subtype>
--media <media>
--language <language>
--flags <flags> (1=Subdocument)
--output <output> 0=NONE,1=PDF,2=PS,3=FO-XML,4=TEXT
5.8.3 Authoring template documents
Template files are plain Word documents saved as XML (WordML format). Sample templates are
provided in FK_HOME/etc/document/templates. Word 2003 or 2007 is required to edit these files.
Word XML is a round-trip format, although a small amount of formatting might be lost compared to
the native format.
Option Description
--document The physical path to the MS Word XML file. If --document is ALL, all templates in the
templates folder are uploaded.
--input Defaults to MS Word. If the experimental upload of old FK XML Forms is used, put fkf here.
--name The template document logical name. If left blank, this is DEFAULT. If a header is uploaded,
for example CLIENT_HEADER, it would be the name of the document.
--type The message type, for example CONFIRMATION. Type is determined by the folder name.
--subtype The subtype of the document to upload, for example FX-SWAP. Subtype is determined by the
name of the document file.
--media The media for this document, for example TRM-MESSAGE-EMAIL or TRM-MESSAGE-PRINTER.
--language Specifies the language of the document.
--flags Set to 1 if the document is a subdocument, reusable component or header; for example
en_US or fr_FR. This also controls the localization of the document.
--output Specifies the email output type. In some cases, when creating email documents that contain
an email body and a PDF attachment, the PDF type is determined by the TransferType, but we
still need to force the email body to be text. In this case, set --output to 4 for the email
body.
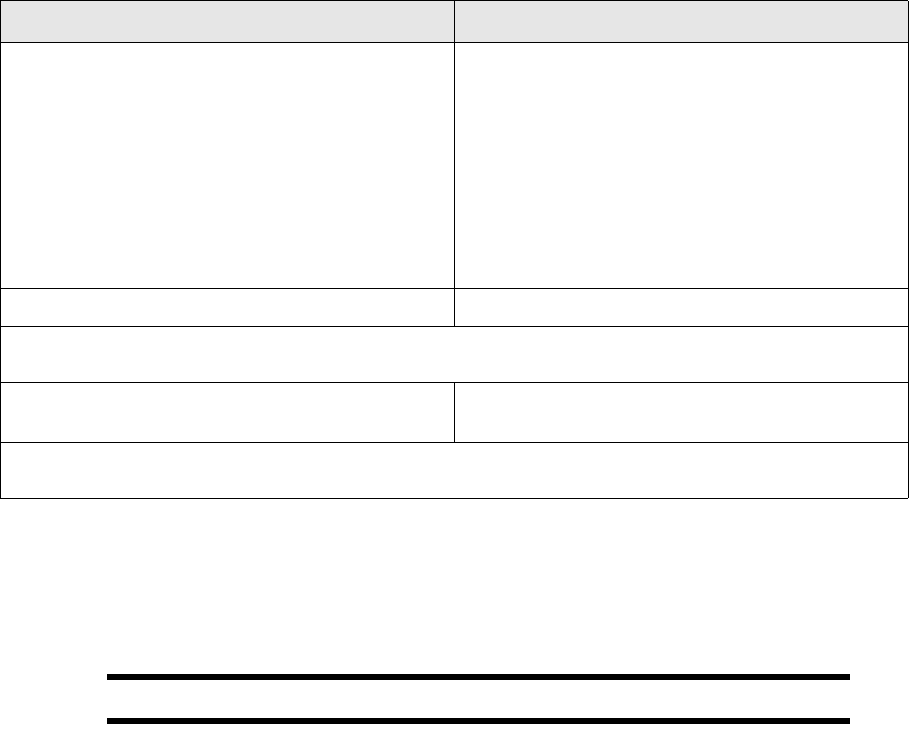
5 Setting up message management
5.8 Setting up Document Formatter
TRM System Administration Guide 85
In the Templates and Add-Ins dialog:
1. Select the XML Schema tab.
2. Click Add Schema.
3. Navigate to TremaData.xsd.
Important: The next step should be done very carefully.
4. The URI in the dialog that will open must precisely match the following URI:
urn:trema.com:module-document-manager:data-tags
The alias is not important, but for consistency we suggest that the text "tdm" is entered. We
recommend that you also check (switch on) the following options in the XML Options dialog and
leaves all other options OFF (accessible from XML Structure task pane once at least one XML
schema is associated with the document):
–Validate document against attached schemas
–Hide namespace alias in XML Structure task pane
–Show advanced XML error messages
The editing process can now proceed normally. To enter a placeholder/marker for the
transaction/cashflow data, it is enough to type the expression, like this:
Transaction.portfolio_id.name
Then select this text and click TremaData in the XML Structure task pane. The marker will be
highlighted and easily distinguishable from the rest of the text. The XML Structure task pane will
also show a list of all TremaData tags in the document for easy navigation from one to another. You
can change the formatting of the placeholder text and it will be preserved.
Sometimes there will be multiple values in the output document even though the template
document uses a simple marker. For example, if you specify Cashflow.value_date, there will be
as many values as are cashflows for the given transaction. This kind of value must be put in the
table with a single row for content and as many header rows as required. Values will be expanded to
multiple rows as necessary on the fly. There are some limitations (mainly driven by restricted
Preparing Word 2003 Preparing Word 2007
• Go to the Microsoft website and download and
install a free Add-in for Word 2003.
If you have Word 2007, then you already have XML
capability, but may need to activate it as follows:
•If the Developer tab is not visible in the Word
Ribbon (toolbar):
a. Click the Office button (big round button, top
left of the Word screen).
b. Click the Word Options button.
c. In the Word Options dialog, switch on (check)
the Show Developer tab in the Ribbon switch
(checkbox).
• Ensure that the XML Structure task pane. •Click
Structure in the XML box of the Developer tab.
Before you can start entering data, Word needs to know about the format of the data (which XML tags to use).
The format is defined in the XML schema file TremaData.xsd, provided in the same settings folder.
• In the XML Structure task pane, click Templates and
Add-Ins.
•Click
Schema in the Developer tab.
This opens the Templates and Add-Ins dialog. From now one the instructions are similar for both Word 2003
and 2007.
5 Setting up message management
5.8 Setting up Document Formatter
86 © Wall Street Systems IPH AB - Confidential
functionality of third party tools): the table has to be manually formatted (not using AutoFormat
feature of Word) and the columns have to have fixed width (not automatic which is the default).
There is one special placeholder called Header, used for fields that are not directly data
(transaction)-related: things like remarks, recipient and address are exposed through this
placeholder. The syntax for the first remark is therefore Header.remark_0.
To insert a page break, add the following line:
<TremaData>pagebreak</TremaData>
5.8.4 Saving Word 2007 XML files
We recommend that you save templates like this: Save As - Other Formats - Word 2003 XML Document.
5.8.5 Authoring common placeholders
Besides from data from the Wallstreet Suite you may need other types of information dynamically
evaluated during document construction.
Many documents have a placeholder for the date, to be replaced with the current date at the
moment of document creation. This is done using the date field in Word: Insert->Field, choose
category Date and Time and pick Field name->Date (date format is irrelevant and is ignored for the
moment). The resulting field is evaluated as the current date of the document creation using the
format of the language set for the document (set up as described in 5.8.2 Settings on page 84).
A frequent use of images in documents is for logos. To avoid storing logos in every template
document, users should always link to the picture and not embed it in the document. To insert a
linked image, go to menu Insert->Picture->From File, then navigate to the image and instead of
just clicking on Insert button, click on an arrow on the Insert button and choose Link to File.
In contrast, if image is linked, all that needs to be done is to replace the image on the hard drive. All
linked images should be put in the images folder. During evaluation, Trema will patch the path to
the image to point to the correct folder. You can press Alt+F9 to flip fields from their evaluated form
into the formula form and back (this will help identify if a linked image has a broken path but the
name of image itself is correct, or if the image linked to does not exist at all).
5.8.6 Including reusable text (subdocuments)
You can re-use existing sections in many documents. The inclusion of reusable text (a
subdocument) is conditional: a section is included or excluded depending on a certain condition. The
main reason for reusing text is to reduce the number of templates. Examples of conditions are:
•If the portfolio_id.owner is your own bank, more details are needed on the document. For
example, if the confirmation is to be sent to a counterparty, two places for signatures are
required. Note that addresses are written differently in the US and in Europe.
•If the confirmation is to be sent to a certain counterparty, two places are required for signatures.
•Addresses are written one way in US and one way in Europe
5.8.6.1 Writing and uploading templates
This example shows one main document and two subdocuments. The main document is as follows:
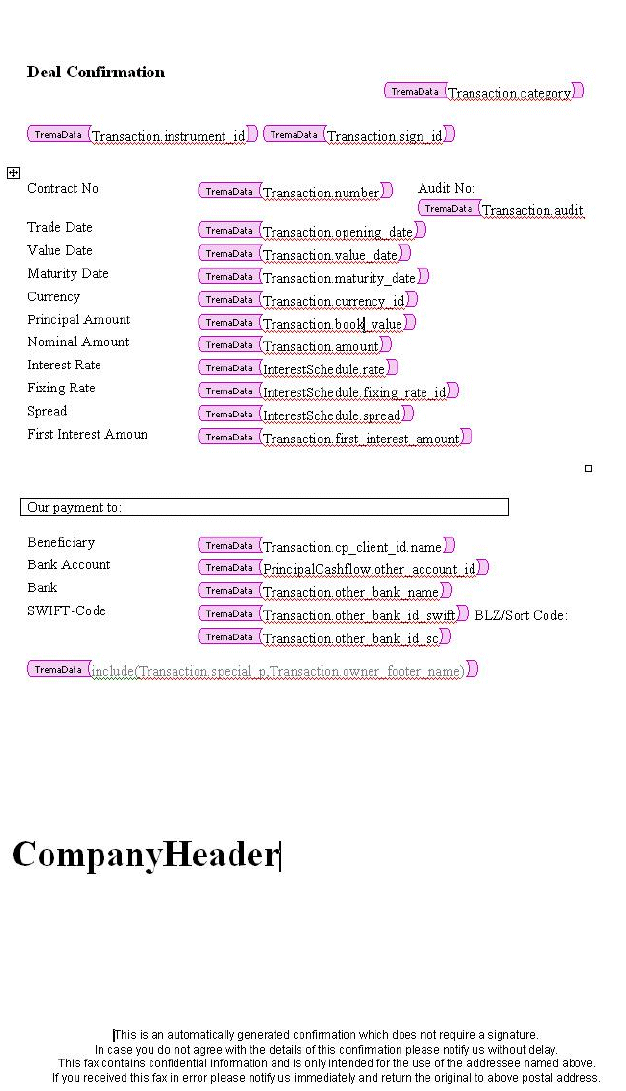
5 Setting up message management
5.8 Setting up Document Formatter
TRM System Administration Guide 87
The subdocuments are as follows:
An Include function inside TremaData tags accepts two arguments: the first one is a True/False
variable and the second refers to a document which is included if the first variable evaluates to True
or to 1.
Subdocuments should be normal documents, where the text goes in the body. The include
statements can be placed anywhere in the main document.
5 Setting up message management
5.8 Setting up Document Formatter
88 © Wall Street Systems IPH AB - Confidential
The subdocuments are loaded into the database in the same way as normal documents. To upload
the above example in the database, execute the following batch file:
set DOCMAN_TEMPLATES=d:\work\etc\subdoc
set UPLOAD_SCRIPT=d:\wss\v7\share\python\upload_documents.py
python %UPLOAD_SCRIPT% --document %DOCMAN_TEMPLATES%\default.xml --type FH --subtype
DEFAULT --media TRM-MESSAGE-EMAIL --language en_US
python %UPLOAD_SCRIPT% --document %DOCMAN_TEMPLATES%\ownbank.xml --name OWNBANK
--type FH --subtype DEFAULT --media TRM-MESSAGE-EMAIL --language en_US --flags 1
python %UPLOAD_SCRIPT% --document %DOCMAN_TEMPLATES%\special.xml --name SPECIAL
--type FH --subtype DEFAULT --media TRM-MESSAGE-EMAIL --language en_US --flags 1
Note that all are coded with the same type, subtype, media and language. The name is used to label
the subdocuments differently from the default one. To reuse the same subdocument for another
message type, upload the same xml file with the new type, subtype, media and language.
5.8.6.2 Defining the expressions
In this example there is a condition for including the header: if the owner is ABC, the ABCHEADER
subdocument should be included. This condition translates to the following expressions in the
MessageTypeEditor:
include_p=(owner_id == 'ABC')
owner_header_name=’ABCHEADER"
The fields need not be from an expression. For example the owner_header_name could also come
from a stored procedure: in this case, it is added as content, just like any other field.
Sometimes it is convenient to name the header and footer like the owner_id. In this case, this field
can be used to name the subdocument to be loaded:
owner_header_name=owner_id+'HEADER'
If the owner is ABC, the subdocument named ABCHEADER will be loaded if the following include
statement is used in the layout:
<TremaData>include(Transaction.include_p,Transaction.owner_header_name)</TremaDa
ta>
A dedicated header must be uploaded for each portfolio owner.
5.8.7 Customizing the e-mail body
Message Manager uses a default e-mail body (defined in transfer_manager.py), but you can write
an e-mail body in MS Word and use it instead of the default. TRM tags are supported as for other
documents.
The following example uses one main document which includes two subdocuments, and one body
for the e-mail:
python upload_documents.py --document %DOCMAN_TEMPLATES%\default.xml --type
TRADE-TICKET --subtype DEFAULT --media TRM-MESSAGE-EMAIL --language en_US
python upload_documents.py --document %DOCMAN_TEMPLATES%\emailbody.xml --name
EMAILBODY --type TRADE-TICKET --subtype DEFAULT --media TRM-MESSAGE-EMAIL --language
en_US --output 4
python upload_documents.py --document %DOCMAN_TEMPLATES%\ownbank.xml --name OWNBANK
--type TRADE-TICKET --subtype DEFAULT --media TRM-MESSAGE-EMAIL --language en_US
--flags 1
5 Setting up message management
5.9 Message transfer
TRM System Administration Guide 89
python upload_documents.py --document %DOCMAN_TEMPLATES%\special.xml --name SPECIAL
--type TRADE-TICKET --subtype DEFAULT --media TRM-MESSAGE-EMAIL --language en_US
--flags 1
The resulting e-mail to be sent consists of one attached document (default.xml) and the e-mail body
(emailbody.xml). The main document also uses two subdocuments (ownbank.xml and special.xml).
Note that:
•The subdocuments must be flagged with bit 1 when uploading. Otherwise the formatter will
process these documents in the same way as a normal document (this is not needed, as they
will be included in the main document).
•The EMAILBODY must be named "EMAILBODY" and it must have output format 4 (i.e. text - see
upload_documents.py --help). The exact name "EMAILBODY" is referenced in
transfer_manager.py, so if this name is changed, transfer_manager.py must be changed
accordingly.
5.8.8 Customizing rounding numbers and amounts
In most cases, all amount and number related fields use the same formatting as in Transaction
Manager. If a number is not correctly formatted, check if the field can be changed when configuring
Transaction Manager (using the view XML files).
In some cases, if you have customized fields it might still be necessary to fine-tune the number
formatting. One way of doing this would be to code the formatting in python and add the fields in
document-config.xml. For example, put the following functions in the python script. Numbers and
money types are handled differently:
def floatround(a,d):
return round(a,d)
def moneyround(a,d):
return a.round(d)
and in document-config.xml:
<expression source="Transaction" script="myscript">
<field name="rounded_deal_rate" label="Rounded deal rate">
floatround (deal_rate, 2)
</field>
<field name="rounded_amount" label="Rounded amount">
moneyround (amount, 2)
</field>
</expression>
5.9 Message transfer
When the message is formatted, it exists on disk as a temporary file. The format is given by the
TransferType (FO-XML, PDF or Postscript).
The next step is to transfer the file using the given TransferType. Usually, the way of transferring
the document or message is very client specific. The message transfer offers built in e-mail support
(sending e-mail document as attachment) and execution of scripts. If other processing is required, it
needs to be developed as an CSD.
The code which executes the message transfer is scripted (can be customized on site) in python to
allow for required flexibility. It can call any other script or executable (e.g. perl or fax client) with
needed arguments and all extracted data is available through CORBA.
This script is available in the following locations:
NT:
5 Setting up message management
5.9 Message transfer
90 © Wall Street Systems IPH AB - Confidential
FK_HOME\python\lib\Lib\site-packages\transfer_manager.py
UNIX:
FK_HOME/lib/python2.4/site-packages/transfer_manager.py
The daemon serviced will call a method called transfer with two arguments:
•the message reference. By calling different methods on this reference, you can both fetch data
and pass information back to the caller. In the IDL, the following methods are available:
// message current status
boolean validate_field (in Type::String_Sequence field_path);
// message current status
void set_status (in Status_Type status);
// log a error message
void log_message (in string msg);
// retrieve the content of the message
Entity_Values_List get_content ()
raises (Failed);
•The URL which is the path to the formatted document (FO-XML, Postscript or PDF).
5.9.1 E-mail example
The E-mail transfer type is available as an example in transfer_manager.py. It should work with
only minor modifications. For example the SMTP server and "from" address needs to be changed to
reflect your site. Edit line 207 in transfer_manager.py to a valid SMTP server and e-mail address.
The default implementation does the following:
1. Fetch address and medium_id from the message reference
2. if the medium_id equals "E-MAIL", an e-mail is constructed directly in the python servant.
3. The subject field is constructed as message type /message subtype + transaction number
(Optional)
4. The python smtplib is used to send the message.
5.9.2 Fax example 1
The client has an existing fax script:
perl send_fax.pl -n <phone_number> -u <postscript file>
To reuse this script we create a TransferType:
When the formatter finishes, a Postscript document is available at:
<FK_HOME>/etc/document/interim/tmp11467.ps
The address of the recipient is for example +12345, transfer_manager.py automatically translates
the @address@ and @url@ so that the actual call to the script will be:
Method FAX
Address Type Fax This makes Message Manager look in the
"fax" field in Contact Person tab in Client
Editor
Command perl send_fax.pl -n @address@ -u @url@
Format Postscript Desired file format of the url
5 Setting up message management
5.9 Message transfer
TRM System Administration Guide 91
perl send_fax.pl -n +12345 -u <FK_HOME>/etc/document/interim/tmp11467.ps
5.9.3 Fax example 2
Some fax gateways works by putting the fax number in a certain e-mail address. For example:
12345@mycompany.com would send the attached file as fax to number 12345. In this example we
need to modify the transfer_manager.py. First create a new TransferMethod as follows:
We choose to code this transfer inside the transfer_manager.py. Add the following code snippet just
before the create_and_send_email in the transfer method:
to_address = content['address'] + "@mycompany.com"
if medium_id == "FAX-GATEWAY":
self.create_and_send_email(url,to_address,content)
else if medium_id == "E-MAIL":
In short, we check the transfer method and then modify the address to work with the e-mail fax
gateway.
5.9.4 Printer example
Most Postscript printers (UNIX and NT) accept commands like this:
lpr -S PRINTSERVER -P TRADE_TICKET_PRINTER file.ps
By default, transfer_manager.py calls the command given in the TransferType, so to support
printing, the following transfer method is needed:
Method FAX-GATEWAY
Address Type Fax This makes Message Manager look in the "fax" field in ContactPerson tab
Command
Format PDF Desired file format of the url
url Path/url to the document to be faxed
to_address The destination e-mail address
content a python dictionary which contains all headers and extracted data
Method MYPRINTER
Address Type
Command lpr -S MYPRINTSERVER -P MYPRINTER @url@
Format PostScript Desired file format of the url
5 Setting up message management
5.10 Possible problems and solutions
92 © Wall Street Systems IPH AB - Confidential
5.10 Possible problems and solutions
5.10.1 Developing test cases
It is recommended to design well defined test cases for the documents to be created. A test case
defines how to run the test as well as its expected result. For example:
1. Duplicate transaction X
2. Commit transaction X in OPEN
3. Open MessageManager. Verify that there is a new line with message type Y and transaction X
4. After less than 20 sec., the message request should end up in state Transmitted
5. Verify that there is a PDF file created in folder Z
6. Open the PDF and verify the document itself.
If for example there is no PDF file created, there are some tools to find out why the message failed.
See sections below. The results of the scripts test.py and callproc.py are useful.
Test cases like this are a good way of measuring progress (the ratio between passed test cases and
the total number cases). They are also very valuable for CSS and R&D in case the a solution is not
found on the client site (they can be put directly into a TREMS item).
5.10.2 Previewing transactions
Start MessageManager. It is possible to examine errors on both MessageRequest level and for each
individual message.
By default, previews are not displayed in MessageManager. If the preview fails, use SQL to select
the MessageRequest like this:
select max(id) from MessageRequest
go
---------------
1298
(1 row affected)
select log from MessageRequest where id=1298
go
log
------------------------------------------------------------------------------------
Cannot find a matching message rule.
(1 row affected)
5 Setting up message management
5.10 Possible problems and solutions
TRM System Administration Guide 93
5.10.3 Test script for previewing transactions
The following is an example of a test script:
print "Initializing ..."
from FK.Core import Numeric
from FK.Cache import Cache;
from FK.ORB import Interface, to_value, from_value, get_reference
from IDL.FK.Document_Manager import Manager, Preview_Manager, Message_Manager
from IDL.FK.Document_Manager import Entity_Desc, Field_Name, Optional_Link, Link
from IDL.Type import Parameter
cache = Cache()
def test_preview (number,type):
print "Txn #%u preview" % number
manager = Interface (Preview_Manager, "document/manager", "preview-manager")
res = manager.preview (number, "Transaction", type)
print "Result in '%s'" % res
# test_preview(41,"CONFIRMATION")
# test_preview(3919,"CONFIRMATION")
test_preview(3361,"ISSUER-FAX-CONFIRMATION")
Run the script in a TRM shell like this:
set FK_TRACE_LEVEL=10
set DATABASE_DEBUG=1
python test.py > log.txt
The environment variables FK_TRACE_LEVEL and DATABASE_DEBUG are used to set the level of
details in the logging.
5.10.4 CORBA error when previewing
This section is relevant to CORBA error or something like Xalan stream error.
In most client installations, the FK file tree is not writable. When the PDF is created, Message
Manager needs a temporary folder to finish the processing. If FK_HOME\etc\document\interim is not
writable, it is necessary to use the environment variable FK_DOCUMENTS_INTERIM_DIRECTORY
which must point to an alternative location.
If TRM is launched on a Citrix server, there can be additional write problems. (no error, but file is
still not altered/created). Make sure that the location you select is really writable.
5.10.5 E-mail problems on windows
Make sure that your virus program allows messaged to do outgoing connections on the SMTP port
(25). The Wall Street virus program blocks this by default.
5.10.6 Error evaluating 'Source.field'
As a first step, check that the extraction was successful. All fields in the final document must be
added to [Message Type Editor]. There is a stored procedure called ReadMessage. This procedure
should return the Message and the extracted XML content. The message id can be found either in
MessageManager or by a simple SQL query.
However, the most common reasons for this are:
•Forgot to declare the field in Message Type Editor
5 Setting up message management
5.10 Possible problems and solutions
94 © Wall Street Systems IPH AB - Confidential
•Spelling mistake in the Word document
5.10.7 Checking the generated messages
The output of the stored procedure ReadMessage<tt> is useful when validating the extracted data.
A script <tt>callproc.py simplifies the calling of this stored procedure (especially on Oracle).
select max(id) from Message
go
---------------
587
Then use the script callproc.py which should work on all platforms. Example:
fkadmin3@s96td1p2:/trema/bcust/fk callproc.py
With /trema/bcust/fk/bin/callproc.py you call stored procedures interactively.
type 'help' and hit [Enter] for instructions.
dbo> readmessage @id=587
address contact_name content date flags format_id id kind language_id last_date log
medium_id number recipient_id recipient_role_id request_id stamp status
0049-180-125-4100 GCM Domestic Customer Service Fr. Dewitz null 11/07/06 2:34 PM 0 1
587 1 en_US 11/07/06 2:50 PM Failed while merging the data and the layout. Xalan
error is XalanStdOutputStreamWriteException: Error writing to standard stream.The
error code is '24'. (, line -1, column -1) FILE-OUT null DEUT-DESTR 1 1755
c8035230424323541c 3
null null
<msg xmlns="www.trema.com">
<e id="number" n="Transaction">
<f U="Instrument Type" n="_instrument_type_id"/>
<f U="Principal Settlement Amount" n="actual_amount"/>
<f U="Nominal Amount" n="amount"/>
<f U="Audit Number" n="audit_nu+ null null null 68839 null null null null null 0
null null 1755 c80352304243235164 null
null null mber"/>
<f U="" n="beneficiary_account_id"/>
<f U="" n="beneficiary_bank_name"/>
<f U="" n="beneficiary_bank_sc"/>
<f U="" n="beneficiary_bank_swift"/>
<f U="" n="beneficiary_corr_bank_sc"/>
<f U="" n="beneficiary_corr_bank_sw+ null null null 68840 null null null null
null 1 null null 1755 c803523042432352 null
null null ift"/>
<f U="" n="beneficiary_name"/>
<f U="Book Value" n="book_value"/>
<f U="" n="buyer_name"/>
<f U="Call Currency" n="call_ccy_id"/>
snip
5.10.8 Filters do not work
Example: problem with filters in the document-config.xml file. The filters are as follows:
<filter name="PayCashflow" source="Cashflow">
<and>
<eq field="sign" type="INTEGER">-1</eq>
<eq field="type_id" type="INTEGER">5</eq>
</and>
</filter>
<filter name="ReceiveCashflow" source="Cashflow">
<and>
<eq field="sign" type="INTEGER">1</eq>
5 Setting up message management
5.10 Possible problems and solutions
TRM System Administration Guide 95
<eq field="type_id" type="INTEGER">5</eq>
</and>
</filter>
Here the problem seems to be the sign. Apparently it matches what you see in the view. In
TransactionManager you'll see "+" or "-". In FK_HOME\etc\transaction-view\Cashflow.xml you see:
<column name="sign" type="INTEGER" width="8">
<label>Sign</label>
<enumerated name="CashflowSign"/>
</column>
The enumerated name CashflowSign looks as this: (FK_HOME\etc\transaction-view\Views.xml)
<enumerated name="CashflowSign">
<enumeration value="0" visible-value="" visible="false"/>
<enumeration value="1" visible-value="+"/>
<enumeration value="-1" visible-value="-"/>
</enumerated>
So, try the following in document-config.xml instead:
<filter name="ReceiveCashflow" source="Cashflow">
<and>
<eq field="sign" type="STRING">+</eq>
<eq field="type_id" type="INTEGER">5</eq>
</and>
</filter>
The type_id is the "Main Type" and it is an integer even in Cashflow view/Transaction Manager. You
can also use the "#" sign to use the underlying type and value. This is a better long-term solution, in
case the views are changed.
<filter name="PayCashflow" source="Cashflow">
<and>
<eq field="#sign" type="INTEGER">1</eq>
<eq field="type_id" type="INTEGER">6</eq>
</and>
</filter>
5 Setting up message management
5.10 Possible problems and solutions
96 © Wall Street Systems IPH AB - Confidential

TRM System Administration Guide 97
Chapter 6 Managing static data
6.1 Introduction
Wallstreet Suite manages its static data within a workflow in order to provide:
•Controlled access to modifications
•4-eyes verification
•Synchronization of static data shared between Wallstreet Suite modules.
6.1.1 Static data workflow
A static data "entity" (for example: client, currency, country, etc) has a state that determines its
position in a workflow. An entity’s state changes depending on the last action that was performed on
the entity. The diagram below shows an example workflow of states and actions:
reject*
OPEN FINAL
REEDIT
TO-DELETE DELETED
reject*
edit
undelete
accept
accept
accept
new
delete
reject
reject,
accept
reject,
accept
delete
delete
action action that changes the state of a static data entity
STATE static data state
reject* a reject at this state reverts to the FINAL state
6 Managing static data
6.1 Introduction
98 © Wall Street Systems IPH AB - Confidential
There are five main states for all static data entities:
•OPEN
The state of an entity when it is first created, as a result of the action new. For example, a user
creates a new currency in the Currency Editor.
The Wallstreet Suite production system is not yet aware of this entity.
•FINAL
The entity’s state after the action accept on an entity that has been created (OPEN) or modified
(REEDIT). For example, a user has created a country entity modified an existing country entity
in the Country Editor and accepts it.
If this is a new entity, it is added to the production system. If this is a modified entity, its "live"
version in the production system is updated.
•REEDIT
The state of an existing entity that is being modified, as a result of an action such as edit. For
example, a user opens the Client Editor, and selects a client entity for editing.
In this state, two versions of the entity exist: the production system’s version, and the "being
modified" version. The entity must pass to state FINAL before the production system is aware of
changes to the entity.
•TO-DELETE
The state of an existing entity that is about to be deleted, as a result of an action such as
delete. For example, a user opens the Client Editor, and selects a client entity for editing.
In this state, two versions of the entity exist: the production system’s version, and the "being
modified" version. The entity must pass to state DELETED before it is deleted from the
production system.
•DELETED
The state of an existing entity that has been deleted as a result of the action delete.
The entity is removed from the production system.
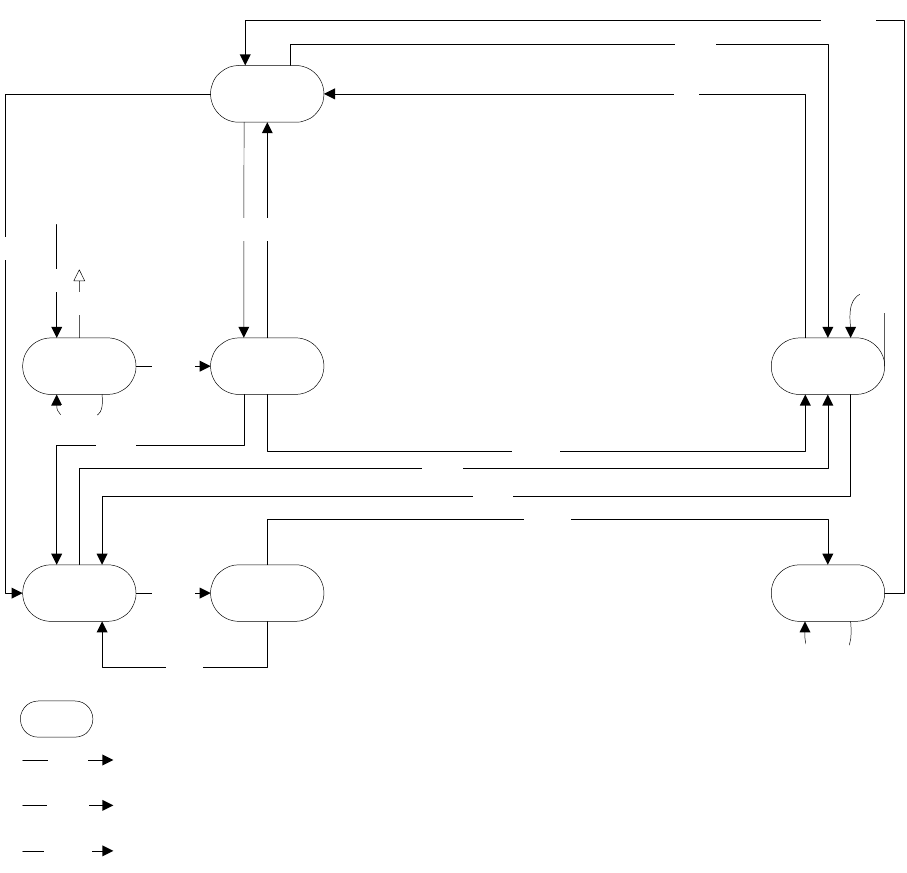
6 Managing static data
6.1 Introduction
TRM System Administration Guide 99
6.1.2 Static data workflow with 4-eyes verification
The next diagram shows an example of a Wallstreet Suite system with "4-eyes" verification. Two
extra states - VERIFY and DELETE-VERIFY - have been inserted into the workflow:
The two new states:
•VERIFY
The entity’s state after the action accept on an entity that has been created (OPEN) or modified
(REEDIT). The second pair of eyes must accept the entity’s state again so that it can pass to
state FINAL.
•DELETE-VERIFY
The entity’s state after the action accept on an entity in state TO-DELETE. The second pair of
eyes must accept the entity’s state again so that it can pass to state FINAL.
6.1.3 Static data workflow: CMM and TRM
If CMM is installed, static data management handles CMM-only static data entities and those shared
by TRM and CMM. For more information, see the CMM documentation and 6.3 TRM with CMM - static
data changes on page 104.
reject*
acceptOPEN FINALVERIFY
REEDIT
acceptTO-DELETE DELETED
DELETE-
VERIFY
reject
reject
accept1
reject*
edit
undelete
accept1
accept
new
delete
reject
reject,
accept
reject,
accept
delete
delete
delete
action action that changes the state of a static data entity
STATE static data state
reject* a reject at this state reverts to the FINAL state
accept1goes to this state when CMM not present.
6 Managing static data
6.2 Setting up static data management
100 © Wall Street Systems IPH AB - Confidential
6.2 Setting up static data management
Static data management applies to the following static data entities only:
Calendar
CalendarGroup
CMMBankAccountGroupMap
CMMInstrumentTypes
CMMRelationshipType
CommentRule
CommissionRule
Country
CreditRating
Currency
FINFormatRule
FINFormatRuleAction
Gapset
Limit
LimitCategory
LimitFactorSet
LimitItemClientQuery
LimitItemTemplate
MarketInfoSource
Portfolio
RateReasonabilityRule
ReferenceRate
Region
RulesHeader
SettlementAdviceMethod
SettlementRulesHeader
SettlementTransferMethod
SublimitTemplate
TaxRule
TraderLimit
TransferType
The following applications are available from the Application Manager to enable you to set up and
administer static data:
•SDM State Editor: set up states and state flow
•SDM Mode Editor: manage modes for applications, including static data Editors and the SDM
Manager applications.
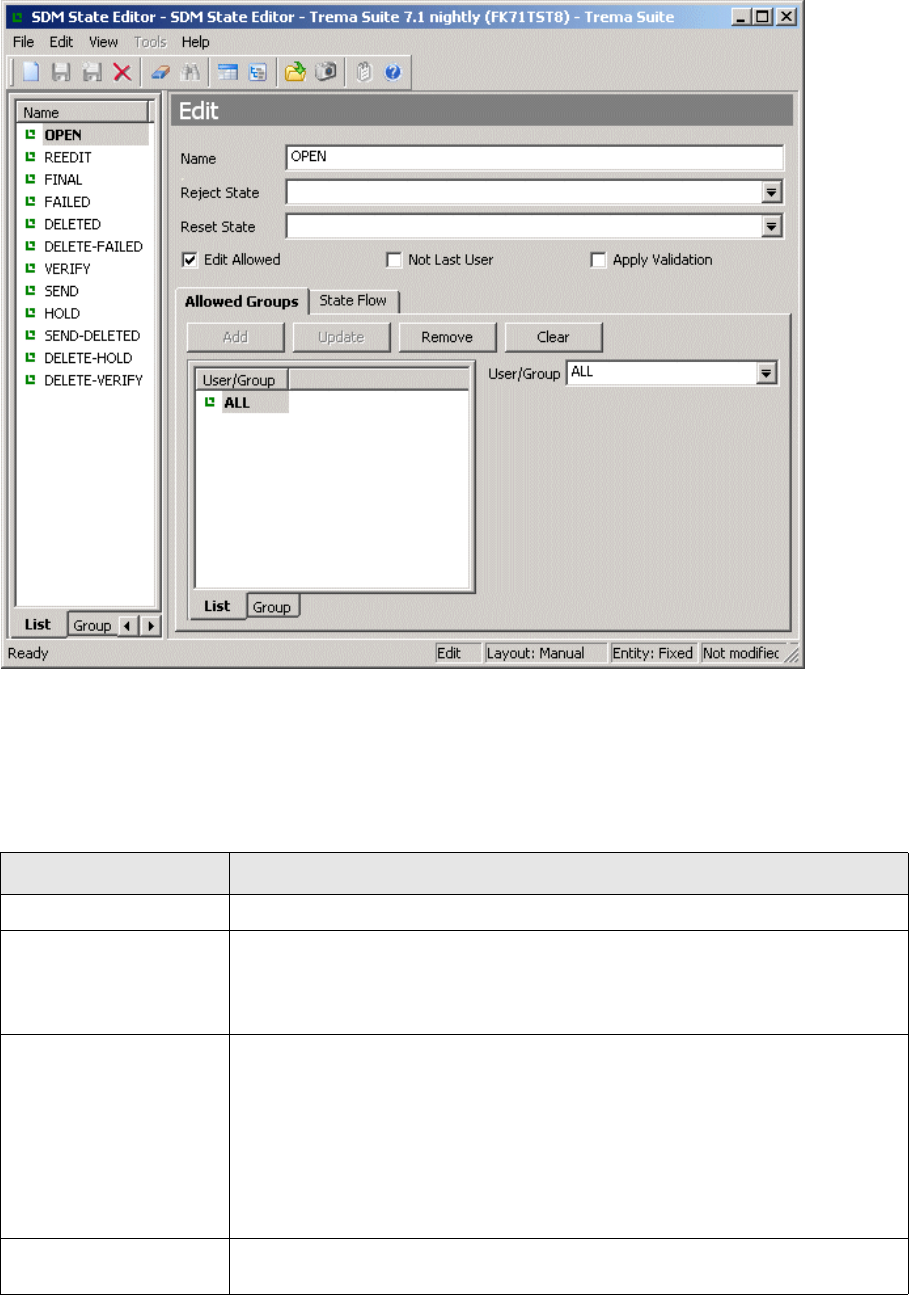
6 Managing static data
6.2 Setting up static data management
TRM System Administration Guide 101
6.2.1 State and state flow setup
From the Application Manager, open the SDM State Editor.
On the left is a list of currently defined states.
A static data state has attributes that describe and determine what should happen when an action
occurs. For example, what the next state should be if the entity receives a reject or accept action, if
a user can verify his/her own changes, and so on. Use the SDM State Editor to set these attributes,
and use the table below to help you.
The table below describes the controls in the top part of this editor:
Control Description
Name A descriptive name for the state.
Reject State The entity changes from this (current) state to the state selected here after a
reject action.
Select or enter the next state. Leave blank to remain in the current state after a
reject action.
Reset State If a state is selected here, it does two things:
•When an entity reaches the current state, and the Reset State is not blank, the
production system is updated with this entity’s data. Normally this applies only
to the FINAL and DELETED state.
• When an entity in this state is to be edited (i.e. modified or deleted), it goes to
the state selected in Reset State.
Except fore the FINAL and DELETED states, you should normally leave this field
blank.
Edit Allowed Switch this on to allow modifications (other than accepting and rejecting) to an
entity in this state.
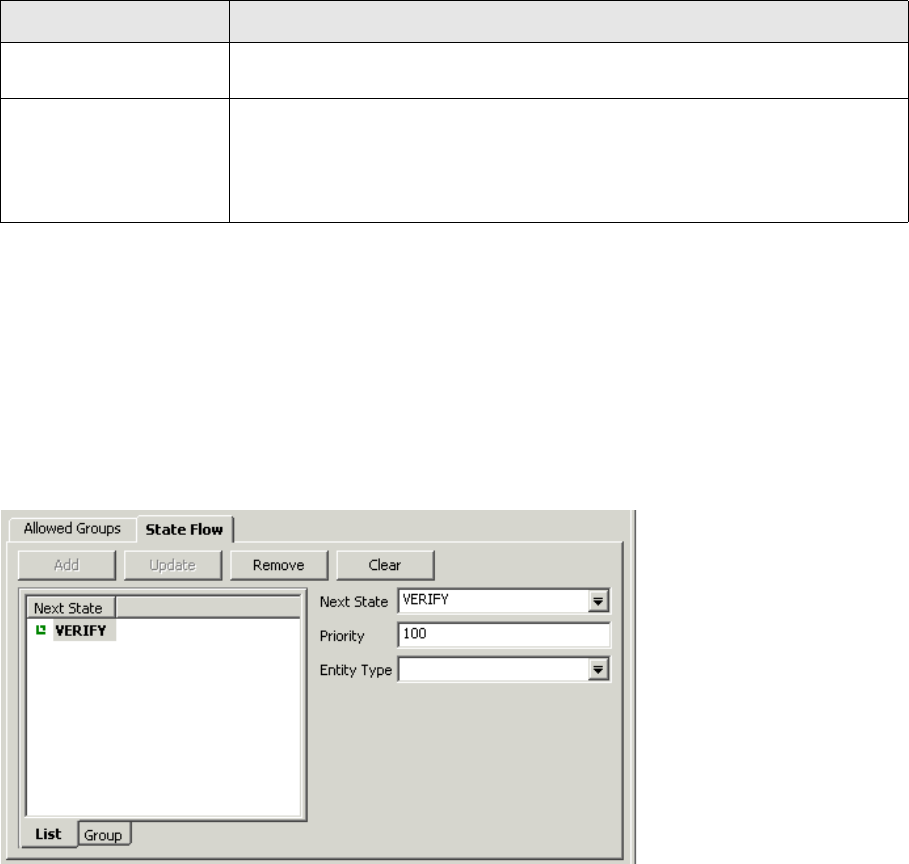
6 Managing static data
6.2 Setting up static data management
102 © Wall Street Systems IPH AB - Confidential
The Allowed Groups page of this editor enables you to determine which Wallstreet Suite users and
user groups can access the currently selected state. If a user is not in a group that is defined for a
state, then all entities in that state are invisible to that user.
6.2.1.1 Next state after an Accept action
The State Flow page enables you to configure the next state that an entity is sent to when an accept
action is performed on the entity. You can define multiple "Next States, each with different
conditions.
By setting a different priority number for each "Next State", you ensure that only one "Next State"
will be chosen by the system.
There are three types of matching criteria:
•Always match
By leaving the Entity Type undefined, all entities in the current state that receive an accept
action will match the criteria for this "Next State".
Creating a "Next State" with these criteria is very important where you have defined other "Next
States with more selective conditions. By setting the Priority to a higher number than all other
"Next States defined, you guarantee that if no other "Next State" match is found, this one will be
used.
•Match on entity type
You can use this to change the state flow for certain entity types.
For example, for most entities in state REEDIT, you decide to send them to state VERIFY on an
accept action. So for the REEDIT state, you define a "Next State" of VERIFY, with no conditions
and a low priority. But you do not need verification for Calendar Group entities that are in the
REEDIT state: once accepted, they can be sent directly to state FINAL. So you define a second
"Next State" of FINAL, where you select Calendar Group as the Entity Type, and give this a higher
priority than the VERIFY "Next State".
Not Last User Check this to prevent a user from accepting the state change of an entity to this
state if the same user was responsible for the state change.
Apply Validation Switch this on to validate an entity before sending it to the next state.
The validation process checks that all the entity’s dependencies already exist in
the production system. For example, for the entity type Client, validation would
include ensuring that its defined Country and Currency entities already exist in the
production system.
Control Description

6 Managing static data
6.2 Setting up static data management
TRM System Administration Guide 103
The table below describes the controls in the State Flow page of this editor:
6.2.1.2 Creating and deleting states
You cannot create or delete SDM states using the SDM State Editor. Instead, you should edit the file
$FK_HOME/share/<your_database_type>/data/sdm_state.pl. If you want to create a state, then
you should use the ID numbering convention that is recommended in the file.
When modified, the content of the file sdm_state.pl must be stored in the database using the
command:
perl build.pl <connection_options> -t <sdm_state.pl>
Where <connection_options> means the database connection options as described in the WSS
Database Setup Guide (see the Appendix about the build command).
Note: This command restores the table data as defined in this file, so any data in this table that
has been modified via the SDM State Editor will be lost.
6.2.2 Mode setup
From the Application Manager, open the SDM Mode Editor.
Control Description
Next State The entity changes from this (current) state to the state selected here after an
accept action, as long as any criteria defined are met.
Priority If several "Next States are configured, and more than one match is found, the
"Next State" with the highest priority (lowest number) wins.
Entity Type If you want this "Next State" to apply to a single entity type only, select or enter
an entity name.

6 Managing static data
6.3 TRM with CMM - static data changes
104 © Wall Street Systems IPH AB - Confidential
On the left is a list of currently defined modes.
A static data mode is a collection of static data states. There are four system modes, and modes
used as views and filters by the Static Data Manager applications - see 6.4.2 Using SDM Manager
applications on page 107.
6.2.2.1 The four system modes
These are:
1. EDITOR
This is the mode used by all static data Editor applications. This mode should contain all states
except the "system" states controlled by the TRM/CMM synchronization process (all states
shown in the greyed area of the diagram under Static data flow: TRM with CMM and 4-eyes
verification on page 105.
The EDITOR mode determines how a static data Editor behaves when in its Edit mode. In Edit
mode, an Editor displays entities in all states (except the "deletion" states - state names that
begin with "DELETE..."), but it allows users to use Tools - Accept/Reject only on entities that are in
states defined in the EDITOR mode.
2. SEND
This defines the SDM Synchronizer mode for selecting entities to send to CMM.
3. SEND-DELETED
This defines the SDM Synchronizer mode for selecting entities to be deleted, and sending them
to CMM. This mode contains the DELETE-SEND state only.
4. HOLD
This is an internal SDM Synchronizer mode which contains the HOLD and DELETE-HOLD states.
The last three modes are only relevant if you have CMM installed. for more information, see 6.3 TRM
with CMM - static data changes on page 104.
6.2.2.2 Creating and deleting modes
You cannot create or delete SDM modes using the SDM Mode Editor. Instead, you should edit the file
$FK_HOME/share/<your_database_type>/data/sdm_mode.pl. If you want to create a mode, then
you should use the ID numbering convention that is recommended in the file.
When modified, the content of the file sdm_mode.pl must be stored in the database using the
command:
perl build.pl <connection_options> -t <sdm_mode.pl>
Where <connection_options> means the database connection options as described in the WSS
Database Setup Guide (see the Appendix about the build command).
Note: This command restores the table data as defined in this file, so any data in this table that
has been modified via the SDM Mode Editor will be lost.
6.3 TRM with CMM - static data changes
When CMM is installed, TRM handles the administration and editing of CMM-only static data entities
as well as those entities shared by both modules.
The SDM Synchronizer is a software system that provides the bridge between static data entities in
the TRM database and the CMM database, and provides the system states SEND, FAILED, HOLD,
DELETE-SEND, DELETE-FAILED, and DELETE-HOLD that help manage the synchronization of static
data between TRM and CMM. See the CMM documentation for installation details.
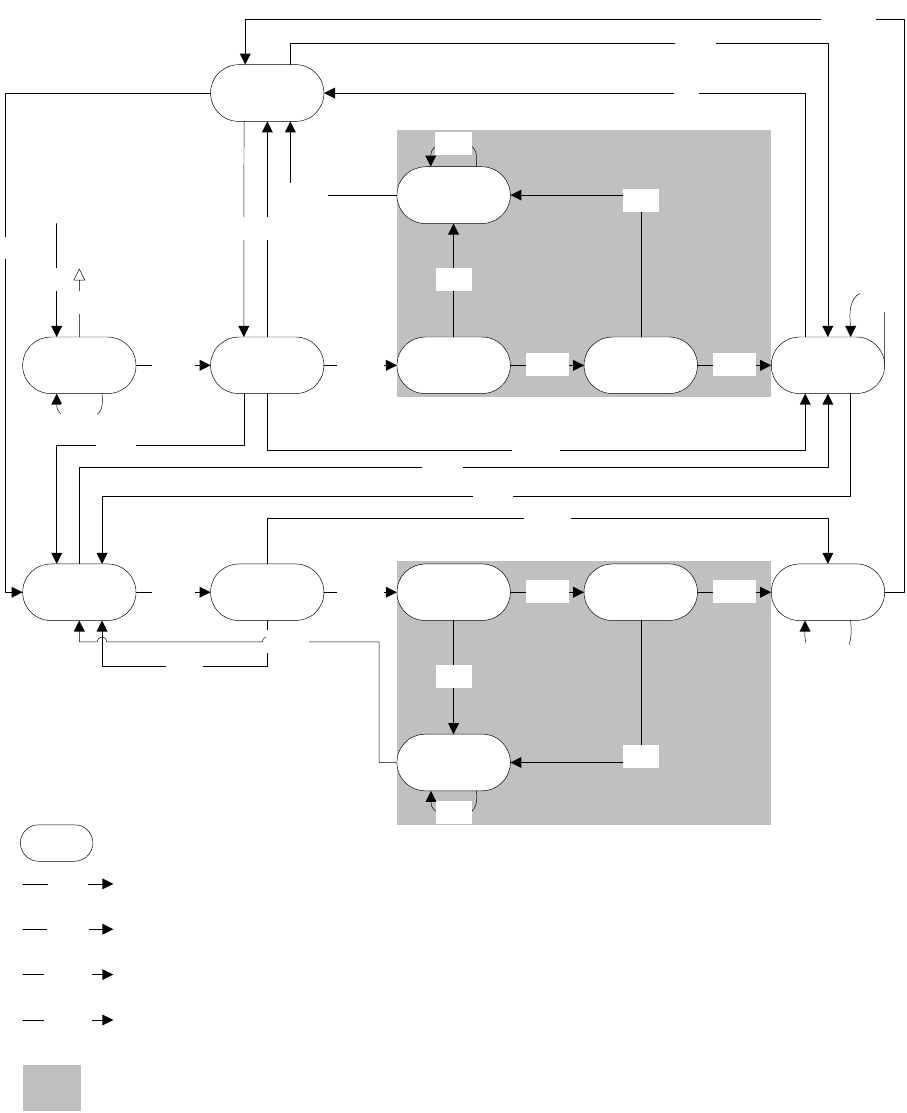
6 Managing static data
6.3 TRM with CMM - static data changes
TRM System Administration Guide 105
Static data flow: TRM with CMM and 4-eyes verification
6.3.1 Dependencies between entities
When an entity is sent from TRM to CMM, CMM fails the entity if its dependent entities do not exist.
The table below shows the dependencies for SDM-enabled entities. CMM entities are indicated.
Dependencies with further dependencies are marked "-->".
reject*
acceptOPEN FINALVERIFY SEND HOLD
REEDIT
DELETE-
FAILED
accept2accept accept
FAILED
reject
reject
acceptTO-DELETE DELETED
DELETE-
VERIFY DELETE-SEND DELETE-HOLDaccept2accept accept
reject
reject
reject
reject
accept
accept1
reject*
edit
accept
undelete
accept1
SDM - synchronizer flow for entity types that are shared between TRM and CMM, and entities that are CMM-only
action action that changes the state of a static data entity
STATE static data state
reject* a reject at this state reverts to the FINAL state
accept
accept1
goes to this state when CMM is present, and applies only to shared TRM/CMM entities and CMM-specific entities:
Currencies, Countries...
accept2
goes to this state when CMM not present.
new
delete
reject
reject
reject,
accept
reject,
accept
reject
delete
delete
delete

6 Managing static data
6.3 TRM with CMM - static data changes
106 © Wall Street Systems IPH AB - Confidential
Entity Dependency
CalendarGroup CommissionRule
Country (CMM) -->
Currency (CMM) -->
GapSet
MarketInfo
Client (CMM) Accounting
AccountingClosingBook
CMMBankAccountGroup (CMM)
CommissionRule
Limit
LimitFactorSet
LimitItemClientQuery
Portfolio
RulesHeader
SettlementRulesHeader
Ta x R u l e
ClientAccount CommissionRule
Country (CMM) Client (CMM) -->
LimitItemClientQuery
CreditRating Client (CMM) -->
Currency (CMM) AccountingClosingBook
CMMBankAccountGroup (CMM)
Client (CMM) -->
CommissionRule
Country (CMM) -->
Limit
LimitFactorSet
Portfolio -->
ReferenceRate (CMM)
RulesHeader -->
TraderLimit
GapSet Currency (CMM) -->
LimitCategory Limit
LimitItemClientQuery Limit
LimitItemTemplate Limit
Portfolio Client (CMM) -->
Limit
LimitFactorSet
Portfolio -->
Region (CMM) Client (CMM) -->
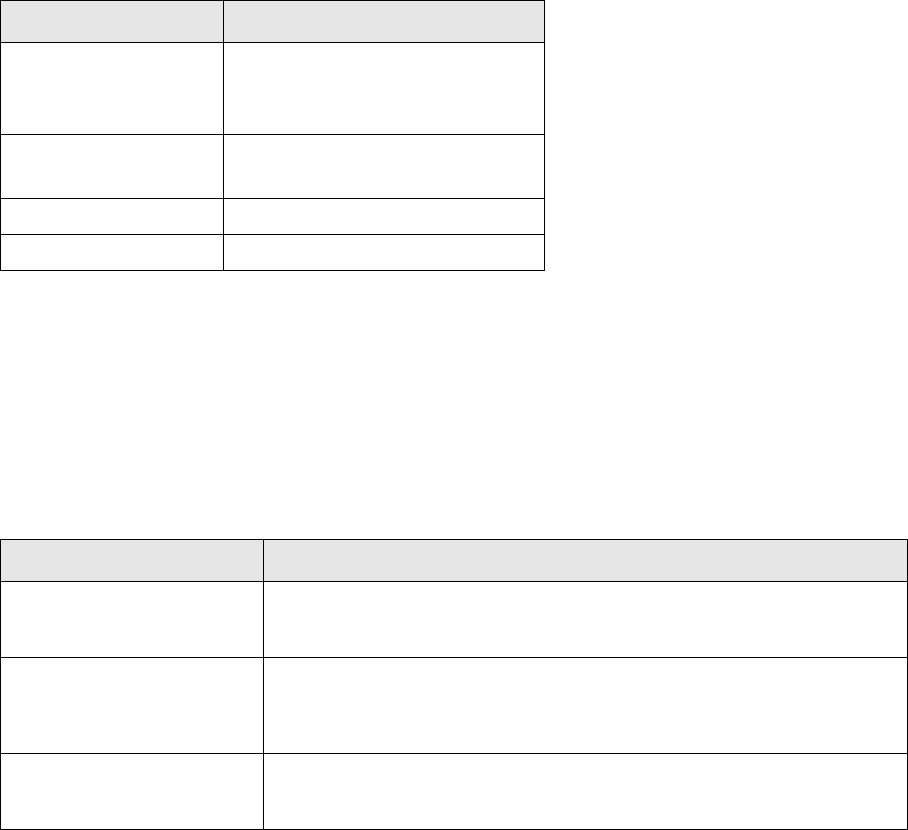
6 Managing static data
6.4 Using SDM-managed entities
TRM System Administration Guide 107
6.4 Using SDM-managed entities
6.4.1 Using static data editors
When you open the Static Data Editor for an SDM-managed entity, the options in the Tools menu
and editor main window are as follows:
6.4.2 Using SDM Manager applications
There are three SDM Manager applications: SDM Query, SDM Admin, and SDM Verify.
6.4.2.1 SDM Query application
Use this to view the status of SDM-managed entities. The entity states that you may view here
depends on the states selected for the QUERY mode in the SDM Mode Editor.
You can edit an entity by selecting one in the Query results and selecting the Command - Edit menu
option.
6.4.2.2 SDM Verify application
Use this to view the status of SDM-managed entities, and accept or reject their current status. The
entity states that you may view here depends on the states selected for the VERIFY mode in the
SDM Mode Editor.
You can edit an entity by selecting one in the Query results and selecting the Command - Edit menu
option.
RulesHeader Accounting
Client (CMM) -->
FINFormatRule
SettlementRulesHeader FINFormatRule
PaymentAdviceType
SublimitTemplate Limit
TransferType Settlem e n tR u le s H e ader -->
Entity Dependency
Menu Option Description
Swap View/Edit Mode When the Editor is launched, it starts up in View mode and no changes can be
made. Select Swap View/Edit Mode to launch a new instance of the editor in
Edit mode.
Accept and Reject In Edit mode, these options are available to users who have the right to
accept or reject the entity in its current state. Accepting or rejecting an entity
changes it to the state defined for that entity in the State Editor: see 6.2.1
State and state flow setup on page 101.
SDM Read-only/SDM Edit One of these views can be selected from a pull-down menu on the main
toolbar. If SDM Edit is selected, the left and right arrow buttons can be used to
specify SDM Accept or SDM Reject.
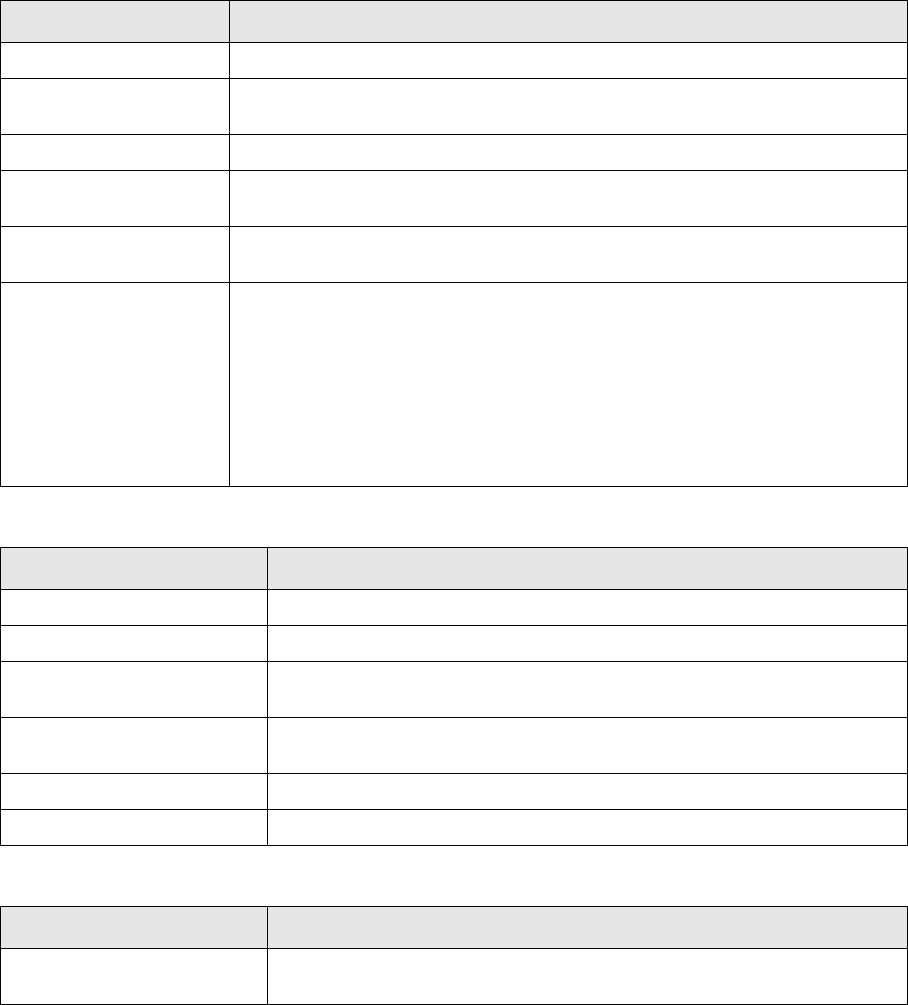
6 Managing static data
6.5 Tables and processes used
108 © Wall Street Systems IPH AB - Confidential
6.4.2.3 SDM Admin application
Use this to view the status of SDM-managed entities, and accept or reject their current status. The
entity states that you may view here depends on the states selected for the ADMIN mode in the
SDM Mode Editor.
You can edit an entity by selecting one in the Query results and selecting the Command - Edit menu
option.
6.5 Tables and processes used
Every aspect is defined and processed for a given entity type (Payment, PaymentAlloc…).
Table Data
EntityState States
[EntityRule] Rules used to activate / inactivate specific work flow transitions (relates to
EntityAction)
EntityAction Work flow transitions
ModeColumn (shared with
Transaction work flow)
Columns for a given view (Transaction, Cashflow, Schedule…) to be granted or not
(relates to EntityMode) for a given mode
ModeAction (shared with
Transaction work flow)
Menu, entity and sub-entity level action (New Transaction, Duplicate, Early-expire,
Fix…) to be granted or not (relates to EntityMode) for a given mode
EntityMode Modes, each of them operating on a set of states.
Two granting aspects:
• grant_p: relates to ModeColumn
• action_grant_p: relates to ModeAction
where:
• 0 means all is granted but what is listed in underlying table
• 1 means only what is listed in underlying table is granted
Setup Process Action
SetupEntityState Enables setup of EntityState
SetupEntityAction Enables setup of EntityAction
SetupModeColumn (shared
with Transaction work flow)
Enables setup of ModeColumn
SetupModeAction (shared with
Transaction work flow)
Enables setup of ModeAction
SetupEntityMode Enables setup of EntityMode
RenumberEntityStates Enables renumbering of states with regular gaps
Action Process Action
DoEntityAction Enables the sequential processing of entity actions as a chain driven by order
number and rule (uses MatchingEntityRule)
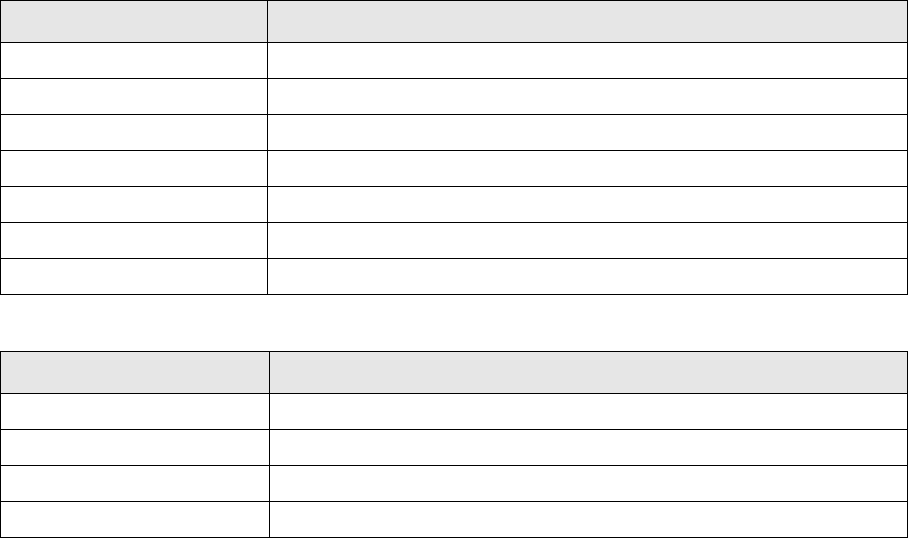
6 Managing static data
6.5 Tables and processes used
TRM System Administration Guide 109
MatchingEntityRule Enables entity rule matching (used by DoEntityAction, relates to EntityRule)
DoAmountEventSetState Specific action proc to set state for AmountEvent entity type
DoPASetState Specific action proc to set state for PaymentAlloc entity type
DoMessageRequestSetState Specific action proc to set state for MessageRequest entity type
DoPSetState Specific action proc to set state for Payment entity type
DoCancelEntityInput Cancels entity event / accounting input
DoEntityInput Creates entity event / accounting input
Setup Script Action
amount_event_flow.sql For Amount Event entity
message_flow.sql For Message Request entity
payment_alloc_flow.sql For Payment Allocation entity
payment_flow.sql For Payment entity
Action Process Action
6 Managing static data
6.5 Tables and processes used
110 © Wall Street Systems IPH AB - Confidential
TRM System Administration Guide 111
Chapter 7 Setting up transaction and entity flow
7.1 Transaction flow and entity flow
The transaction flow describes the states through which a transaction moves, reflecting the
workflow within the user organization. It can ensure that only specified functions can change a
transaction, and can be used to specify who can process the transaction; for example, to specify
that only Front Office staff can change the price of a transaction.
The entity flow describes the states through which various other entities (e.g. settlement or
message) move in their respective workflows.
Flow functionality is implemented using transaction and entity broker services. These services
provide a set of agents which execute tasks like those executed by Transaction and Entity Actions in
previous versions, e.g. set transaction/entity state, set/clear transaction status and call stored
procedures. They also support sending the transactions and entities to various queues for further
processing, like creating message requests for confirmation processing or generating settlements
from transactions. This chapter includes a description of how to migrate to a TRM 7.2-onwards
transaction flow.
7.2 Loading default transaction flow
TRM has a default transaction flow setup. To load it, run the following setup scripts available in
$FK_HOME\share\<database>\setup to load default definitions of the permissions, transaction
status and transaction states to be used in the flow into the database:
permission.sql
status.sql
tag.sql
transaction_state.sql
Then execute the following command to build the default transaction flow:
python -m flow.build
This command executes the following setup scripts as one logical step to build the entire transaction
flow:
flow.py
commit.py
status.py
tag.py
limit.py
irp.py
These scripts can also be run individually from the directory $FK_HOME\share\python\flow (e.g.
python status.py) but the recommendation is to always use the python -m flow.build command
and build the whole flow in one step. The roles of the individual scripts are as follows:
•flow.py creates ACCEPT and REJECT operations, defining transitions between states as well as
all other processing automatically triggered by accepting or rejecting transactions from their
current states

7 Setting up transaction and entity flow
7.3 Setting up transaction flow
112 © Wall Street Systems IPH AB - Confidential
•commit.py creates a COMMIT operation and a NOTIFY operation, defining all processing
automatically triggered by applying a new or existing transaction.
•status.py creates SET/CLEAR operations for transaction status, defining all processing
automatically triggered by manually setting or clearing the relevant status in a transaction.
•tag.py creates SET/CLEAR operations for transaction tags, defining all processing automatically
triggered by manually setting or clearing the relevant tag in a transaction.
•limit.py creates operations used by the limit server in limit violation-related processing of
transactions.
•irp.py creates the operations necessary for processing transactions from IR Pricing application.
This script must not be modified.
7.3 Setting up transaction flow
Transaction flow consists of several logical components linked together in the setup of transaction
broker operations by the script flow.py. These components and their modeling and setup are
discussed below in more detail.
7.3.1 Setting permissions
Operations in transaction flow can be made conditional on the user having the correct permissions in
the portfolio of the transaction. These permissions are referred to in flow.py and status.py and
must exist in the database for the flow setup to work.
Permissions are set up using a script permission.sql found in
$FK_HOME\share\<database>\setup. This script executes stored procedure SetupPermission to
create permissions using the parameters given in the script e.g. as follows:
exec SetupPermission @id = "STATE-VERIFY",
@name = "Verify",
@comment = "accept/reject transactions from VERIFY states",
@flags = 2 /* PORTFOLIO */
go
exec SetupPermission @id = "STATUS-LIMIT-VIOLATION",
@name = "Set/Clear Limit Violation",
@comment = "update (set/clear) status LIMIT VIOLATION",
@flags = 2 /* PORTFOLIO */
go
Note that all permissions used in transaction flow must have flags set to value 2, identifying them as
Portfolio permissions.
The fields of the SetupPermission procedure used in the script are given in the table below.
Parameter Description
id Permission ID (Create, Remove, Read, and other permissions)
name Name of the permission
comment Comment used for generic error messages
flags Possible flag values are 1: editor; 2: portfolio; 4: market information; 8: payments; 16:
domain; 32: custody; 64: archive.
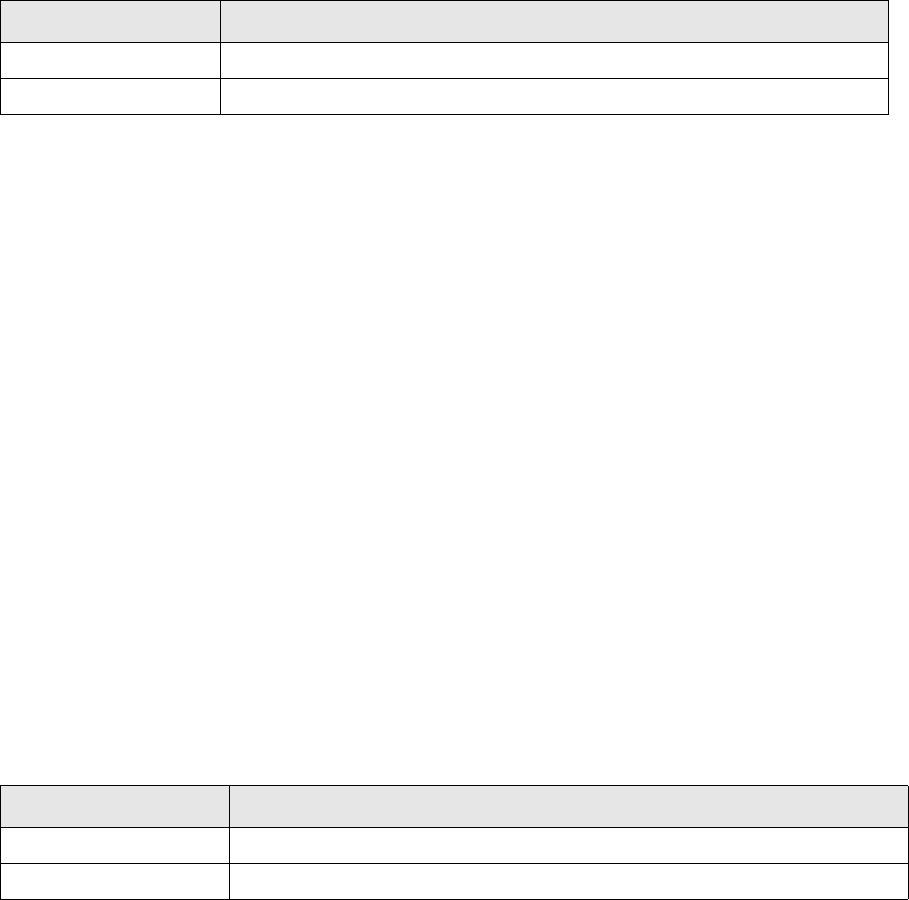
7 Setting up transaction and entity flow
7.3 Setting up transaction flow
TRM System Administration Guide 113
7.3.2 Setting Transaction Status
Transaction Status is a bit value that identifies a specific characteristic in a transaction (e.g. 32 –
‘Back Violation’ is used to identify a transaction that has been captured with a historic opening date)
and can be used in various ways inside the transaction flow setup:
•Transaction Status can be manually set or cleared via a specific operation set up in status.py
•Transaction Status can be automatically set or cleared inside another operation (e.g. ACCEPT or
REJECT set up in flow.py)
•Operations (e.g. ACCEPT or REJECT) can be made conditional on the transaction having or not
having a specified status
Setup of Transaction Status is done using the script status.sql, available in
$FK_HOME\share\<database>\setup. This script executes the stored procedure SetupStatus to
create status entries using the parameters given in the script as in this example:
exec SetupStatus @status = 16,
@name = "Limit Violation"
go
The fields of the SetupStatus procedure used in the script are given in the table below.
7.3.3 Setting transaction tags
Transaction Tags are very similar to transaction status and are also used identify a specific
characteristic of a transaction in a binary manner, a transaction either has the tag or it does not.
The main differences between transaction status and tags are technical:
•Tags are identified by strings of characters; statuses are numeric values.
•A transaction has no limitation in the number of its tags; there is a maximum of 31 statuses.
•Tags are stored independently from transactions (in the TransactionTag table) so that several
processes can modify them at the same time without locking or modifying the attached
transactions. This is important in some processing as it ensures secure concurrent access to
transactions. For example, when the limit server is setting or clearing the tag 'Limit Violation' for
a transaction being processed by a user in Transaction Manager)
Tags can be used in transaction flow setup in the same way as status. Because there is no limitation
on the number of tags in the system and because there is no risk of the system taking over in later
versions tag values that are currently available (as can happen with status), using tags is
recommended as a primary means of modeling customer-specific characteristics of transactions.
Setup of Transaction Tags is done using the script tags.sql, available from
$FK_HOME\share\<database>\setup. This script executes the stored procedure CommitTag to create
tag entries using the parameters given in the script as in this example:
exec CommitTag @id = "LIMIT-VIOLATION",
@name = "Limit Violation"
go
The fields of the CommitTag procedure used in the script are given in the table below.
Parameter Description
status The bit mask identifier: can have values 1,2,4,8,16... etc.
name Name to be shown in the Status transaction column of transaction manager.
Parameter Description
id Tag ID
name Tag name
7 Setting up transaction and entity flow
7.3 Setting up transaction flow
114 © Wall Street Systems IPH AB - Confidential
7.3.4 Setting Transaction States
Transaction States are the most important building blocks of transaction flow. States are configured
using a script transaction_state.sql found in $FK_HOME\share\<database>\setup. This script
executes the stored procedure SetupState to create state entries using the parameters given in the
script, as in this example:
/* State for first verification of new committed transactions */
exec SetupState @id = "VERIFY",
@name = "Verify",
@after_state_id = "OPEN",
@flags = 16 /* DEFAULT-P */
go
The fields of the SetupState procedure used in the script are given in the table below.
The logical order of states is important. A ‘minimum state’ type query condition (“transactions have
to be at least in state xyz”) is typically used when running reports or identifying transactions for
specific processing (e.g. for generating settlements). This order is controlled by the content of the
transaction_state.sql script. This script finishes by executing procedure RenumberStates and,
when run, prints out the configured states in the order by number. This output is very useful for
ensuring that the intended order of states was achieved by the setup
7.3.4.1 Transaction State flags
Flags in the TransactionState definition are used to set certain special characteristics to states.
Typically, flags are used to dynamically link this characteristic to any transactions that have reached
the first state with the flag in the transaction flow. For example, they can identify when a transaction
becomes available to be paid and booked (flags Payable and Bookable).
For example, when using flag ‘Payable’ to identify transactions from which settlements may be
generated, the query looks in the TransactionState table to find the first state ID (based on number
of the state) with flag ‘Payable’. It then compares that state’s order number with the order number
of the current state of the transaction. If the transaction’s state order number is equal to or higher
than the “payable state”, settlements will be generated. (Flags apply to all states with order
numbers equal to or higher than the order number of the state that set the flag.). Note, however,
that these flags exist only in the TransactionState table. For example, you will never see a
transaction that has the Payable flag set.
Parameter Description
id The ID of the state.
name Name to be shown in the Transaction State transaction column of transaction manager.
flags Flags which can be used to link various characteristics to transactions that have reached
a state with the flag in transaction flow, for example Payable, Bookable.
context A special meaning of this state matches an entry in the TransactionStateContext table.
category Category of the state. This is currently only used as a parameter in SetupMode
procedure to make it easier to set up Transaction Manager modes for specific subsets of
transaction states (e.g. states in parallel flow used for processing CLM transactions in
default transaction flow).
after_state_id The order number of the state will be set to a higher number than this state.
before_state_id The order number of the state will be set to a lower number than this state.
state_id The order number of the new state will be set to the same as the order number of this
state.
7 Setting up transaction and entity flow
7.3 Setting up transaction flow
TRM System Administration Guide 115
A common way to use this type of flag is to create “pseudo states,” with no transitions leading to or
from them in the flow, and to assign the flags to these states. They are present just to mark an
invisible place in the flow: the number column in the TransactionState table (order number of
states). These pseudo states are represented as states that are separate from the transaction flow.
The following figure illustrates some pseudo states.
The other typical use of state flags is to identify the state as a default to be assigned to new
transactions generated systematically (e.g. cost of carry balance transactions created by the
system).
The table below lists the flag values that each Transaction state can have.
Value Name Description
1 SELLABLE The transactions that have reached this state will be handled by the activity
Sell Batch.
4 REALIZABLE The realizing activities only handle transactions that are in this “realizable
state”.
16 DEFAULT The default transaction state shown in start-up boxes, for example when
starting a report.
32 HIDDEN Not shown in selection lists.
128 COMMITTED Transactions are considered committed, that is they are taken into account in
custody balances.
256 CLOSABLE Used by the UpdateInventory procedure, from CancelTransaction procedure.
512 BA-BALANCE This “BA-balance state” is used for bank account balances if no transaction
state is specified for the Bank Account Balances activity.
1024 CANCELED This flag is used to give a “canceled state” to canceled transactions.
2048 COST-OF-CARRY This “cost-of-carry state” is used for cost-of-carry transactions, if no
transaction state is specified for the Cost-Of-Carry activity.
4096 AVG-BALANCE This “average-balance state” is used for average cost balance transactions if no
transaction state is specified for the Average Balances activity.
8192 DIVIDEND This “dividend state” is used for dividend transactions if no transaction state is
specified for the Dividend activity.
16384 DETACHMENT This state is used for the detached transactions created by the Equity
Detachment activity.
32768 CONVERSION This state is used for the converted transaction by the Equity Conversion
activity.
65536 FX-POSITION This state is used for the FX position transactions created by the FX Position
Roll-Over activity.
131072 INDEX This state is used for the transactions created by the Index Portfolio Creation
activity.
262144 SM-NOT-EDITABLE The transactions in this state cannot be modified in Settlement Manager.
Open Verify BO-Verify Final
Committed Accepted
Setting Committed Setting Payable and Bookable
7 Setting up transaction and entity flow
7.3 Setting up transaction flow
116 © Wall Street Systems IPH AB - Confidential
7.3.4.2 Transaction State contexts
Contexts in the TransactionState definition are used to identify states used for special purposes.
They are used to query transactions including or excluding those in states with specific contexts.
For example, it may be necessary to include or exclude certain transactions from reports or Treasury
Monitor. A typical example is cost-of-carry transactions: to monitor the position either with
cost-of-carry or without. This is possible if cost-of-carry transactions are always in a specific state
(usually called COST-OF-CARRY) which is marked with a specific Cost-of-Carry context. In the
startup window of Treasury Monitor we can choose to include or exclude the transactions that are in
a state that has a specified context.
The table below lists the context values that each Transaction state can have.
7.3.5 Setting up flow operations
Transaction flow describes the life cycle of a transaction with all possible variations. Each main step
in that life-cycle is called a state. Moving between the states occurs via ACCEPT and REJECT
operations. These operation are set up using a script flow.py found in
$FK_HOME\share\python\flow.
The setup of the operation defines how the transaction is processed when the operation is executed
(typically, when a user presses ‘Accept’ or ‘Reject’ button in a Transaction Manager application). The
operation can for example, change the state or status of the transaction or send it to a message
service to create a confirmation letter, when executed.
Each flow starts with the transaction in an initial entry state controlled by the Transaction Manager
mode in which the transaction is created, and ends with the transaction in a state where everything
in the transaction is checked and found correct and all processing of a new transaction has been
done. All steps between these two states are definable in the operation.
The following figure shows a simplified transaction flow:
524288 PROVISIONAL The threshold below which transactions are not even provisional (simulated or
rejected), and above which they are provisional (to be possibly considered in
position/risk, but not fully finalized). Mainly used in CLM.
1048576 FINAL The threshold below which transactions are not finalized (are provisional or
being enriched/verified), and above which they are fully finalized. Mainly used
in CLM.
2097152 AUTOMATIC This state is used for automatic processing by the system. This flag is primarily
used to ignore any states in a "4-eyes" check in the transaction flow where the
user who is accepting a transaction is validated against the user who made the
previous accept for this transaction from any state without this flag.
Context Name Description
1 CANCELED Context identifying state(s) where canceled transactions are stored
2 COST-OF-CARRY Context identifying state(s) where cost of carry is calculated, normally the
hidden state COST-OF-CARRY.
16 ORDER Context identifying state(s) where order transactions are processed (used for
order management).
32 SIMULATED Context identifying state(s) where simulated transactions are processed
(currently used for states in CLM flows only)
Open Verify BO-Verify Final

7 Setting up transaction and entity flow
7.3 Setting up transaction flow
TRM System Administration Guide 117
Technically, transaction flow is based on a transaction broker service providing a set of agents which
support setup of operations, for example, to set state or status, save objects to the database, send
ids or full objects to destination queues and call stored procedures. The setup is saved in the main
tables TransactionOp and TransactionOpAgent, complemented by a set of agent-specific tables for
storing the detailed setup supported for the specific agent in question (e.g. AgentState for storing
setup of set_state agent).
The script Flow.py is a python script used to set up and create operations as in the following
example:
##### Move forward in the flow
define_op ("ACCEPT", "Accept Transaction", (
...
## from state CONFIRM
(state ('CONFIRM'), not_mask (0), action_mask (0),
set_state ('FINAL', 'Verify')),
...
))
To optimize performance, the setup of the operation should be structured so that necessary
database transaction is opened as late as possible. Note, however, that any agent executing a
stored procedure that updates the transaction in the database must be positioned inside the
database transaction.
Each agent setup entry within the definition creates an entry to table TransactionOpAgent. The
setup of such an agent consists of following components:
•Optional condition calls which validate whether the agent must be executed for the transaction,
e.g. state CONFIRM in the above example to limit execution of the agent to transactions in
states with order number equal to that of state CONFIRM)
•Optional setting of action mask for the case where all conditions are met, e.g. action_mask (0)
in the above example to identify that an agent setting a new transaction state has been
executed for the transaction
•Actual agent with relevant setup attributes (e.g. set_state (FINAL, Verify) in the above example
to execute agent set_state with attributes FINAL (setting transaction state to FINAL) and Verify
(displaying text ‘Verify’) in the button executing the ACCEPT operation in Transaction Manager
applications)
The logic of this setup is discussed in more detail below.
7.3.5.1 Setting condition Calls
Condition calls are functions used to validate the transaction for which an operation is being
executed against a specific condition to be met in order for the agent to be executed for the
transaction.
The table below lists the condition calls that can be used in agent setup.
Condition call Setup Attributes Description
state () ‘state_id’ (e.g. ‘CONFIRM’)
exact_match = True
‘Minimum State id’ and ‘Maximum State id’ of the
agent setup are both set to the given state and,
consequently, the condition is met by
transactions in any state where order number
equals that of the given state
exact match = True can be used to make the
condition stricter and only be met by transactions
in the identified state, i.e. not by transactions in
other states with the same order number

7 Setting up transaction and entity flow
7.3 Setting up transaction flow
118 © Wall Street Systems IPH AB - Confidential
state_at_least () ‘state_id’ (e.g. ‘OPEN’)
‘bit number’ of state context (e.g. 1
for context with mask value 2, ‘Cost
Of Carry’)
‘Minimum State id’ of the agent setup is set to
the given state and, consequently, the condition
is met by transactions in any state where order
number is equal to or greater than that of the
given state
The condition can be limited to states with a
specific state context by identifying the context
as a second attribute
state_at_most () ‘state_id’ (e.g. ‘PAYABLE’)
‘bit number’ of state context (e.g. 1
for context with mask value 2, ‘Cost
Of Carry’)
‘Maximum State id’ of the agent setup is set to
the given state and, consequently, the condition
is met by transactions in any state where order
number is equal to or less than that of the given
state
The condition can be limited to states with a
specific state context by identifying the context
as a second attribute
state_between () ‘min_state_id’ (e.g. ‘OPEN’)
‘max_state_id’ (e.g. ‘VERIFY’)
‘bit number’ of state context (e.g. 1
for context with mask value 2, ‘Cost
Of Carry’)
‘Minimum State id’ and ‘Maximum State id’ of the
agent setup are set to the given states and,
consequently, the condition is met by
transactions in any state where order number is
equal to or greater than that first given state and
equal to or less than that of the second given
state
The condition can be limited to states with a
specific state context by identifying the context
as a second attribute
new_state () ‘state_id’ (e.g. ‘VERIFY’)
exact_match = True
‘Minimum New State id’ and ‘Maximum New
State id’ of the agent setup are both set to the
given state and, consequently, the condition is
met by transactions moved to any new state
where order number equals that of the given
state
exact match = True can be used to make the
condition stricter and only be met by transactions
moved to the identified state, i.e. not by
transactions moved to other states with the same
order number
new_state_at_least
()
‘state_id’ (e.g. ‘PAYABLE’) ‘Minimum New State id’ of the agent setup is set
to the given state and, consequently, the
condition is met by transactions moved to any
new state where order number is equal to or
greater than that of the given state
new_state_at_most
()
‘state_id’ (e.g. ‘PAYABLE’) ‘Maximum New State id’ of the agent setup is set
to the given state and, consequently, the
condition is met by transactions moved to any
new state where order number is equal to or less
than that of the given state
new_state_between
()
‘min_state_id’ (e.g. ‘VERIFY’)
‘max_state_id’ (e.g. ‘CONFIRM’)
‘Minimum New State id’ and ‘Maximum New
State id’ of the agent setup are set to the given
states and, consequently, the condition is met by
transactions moved to any new state where order
number is equal to or greater than that first
given state and equal to or less than that of the
second given state
Condition call Setup Attributes Description

7 Setting up transaction and entity flow
7.3 Setting up transaction flow
TRM System Administration Guide 119
status () ‘bit number’ (e.g. 0 for status with
mask value 1, ‘Confirm’ or 4 for
status with mask value 16, ‘Limit
Violation’)
‘Status’ of the agent setup is set to the mask
value of the given status and consequently the
condition is met by transactions with the status
Note, that any number of status bits separated
with commas can be listed (e.g. status (0,4,7)
and the transaction must have all of them to
meet the condition.
not_status () ‘bit number’ of the status ‘Not Status’ of the agent setup is set to the mask
value of the given status and consequently the
condition is met by transactions without the
status.
Note, that any number of status bits separated
with commas can be listed (e.g. status (0,4,7)
and the transaction must not have any of them in
order to meet the condition.
rule () ‘rule_id’ (e.g.
‘TFLO-STATE-OPEN-TO-CONFIRM’)
‘Rule id’ of the agent setup is set to the given
rule and, consequently, the condition is met by
transactions matching the rule.
not_rule () ‘rule_id’ ‘Not Rule id’ of the agent setup is set to the given
rule and consequently the condition is met by
transactions not matching the rule
tag () 'tag_id' (e.g. 'ACCOUNTING-INPUT') 'Tag' of the agent setup is set to the given tag
and, consequently, the condition is met by
transactions with the identified tag.
Note: Any number of tags separated with
commas can be listed (tag ('TAG1','TAG2',
'TAG3')) and the transaction must have all
of them to meet the condition.
not_tag () ’tag_id’ 'Not Tag' of the agent setup is set to the given
tag and, consequently, the condition is met by
transactions without the identified tag.
Note: Any number of tags separated with
commas can be listed (tag ('TAG1','TAG2',
'TAG3')) and the transaction must not have
any of them to meet the condition.
mask () ‘bit number’ of mask ‘Mask’ of the agent setup is set to the mask value
of the given mask and consequently the
condition is met if the ‘current mask’ of the
operation contains the given mask.
Note, that any number of mask bits separated
with commas can be listed (e.g. mask (1,2,8)
and the current mask has to contain all of them
in order to meet the condition.
See 7.3.5.3 Using masks in agent setup on page
125 for information on using masks in
operations.
not_mask () ‘bit number’ of mask ‘Not Mask’ of the agent setup is set to the mask
value of the given mask and, consequently, the
condition is met if the ‘current mask’ of the
operation does not contain given mask
Note, that any number of mask bits separated
with commas can be listed (e.g. mask (1,2,8)
and the current mask must not contain any of
them in order to meet the condition.
Condition call Setup Attributes Description

7 Setting up transaction and entity flow
7.3 Setting up transaction flow
120 © Wall Street Systems IPH AB - Confidential
7.3.5.2 Setting up agents
An agent is the actual sub-operation executed for a transaction when condition calls of the agent
setup are met by the transaction. Some agents must be set up with specific attributes with which
they are executed (e.g. set_state (‘FINAL’) whereas some others do not need any specific setup
(e.g. txn_commit).
The table below lists agents that can be used in the setup.
Agent Setup Attributes Description
get_authorization ‘permission_id’ This agent is used to validate that current user executing
the operation (e.g. ACCEPT or COMMIT) has the required
permission given in the setup of the portfolio of the
transaction. If no permission is given in the setup,
permission CREATE is used by default for a new
transaction being created and MODIFY for an old
transaction being updated.
check_access ‘permission_id’ This agent has exactly the same functionality as
get_authorization described above. The two agents
coexist for historical reasons but get_authorization is
recommended to be used in all new setup.
set_state ‘state_id’ Sets the transaction state of the transaction to the state
given in the setup.
set_status ‘bit number’ of the status Sets the status given in the setup for the transaction.
Note that any number of statuses can be given in the
setup and all identified statuses are set by the agent.
Any comma-separated number of status bits can be
listed (for example, set_status (0,4,7)).
clear_status ‘bit number’ of the status Clears the status given in the setup for the transaction.
Note that any number of status can be given in the
setup and all identified statuses are cleared by the
agent. Any comma-separated number of status bits can
be listed (for example, clear_status (0,4,7)).
set_tag 'tag_id' Sets the tag given in the setup for the transaction. Note
that contrary to set_status, only a single tag can be set
by the same execution of the agent.
clear_tag 'tag_id' Clears the tag given in the setup for the transaction.
Note that contrary to clear_status, only a single tag can
be cleared by the same execution of the agent.
call_proc ‘procedure name’
‘param0’ to ‘param9’ passed
to the procedure as start-up
parameters
‘Predicate’
call_proc agent is used to run a stored procedure for the
transaction. The name of the procedure is given as an
attribute to the agent together with any values passed to
the procedure to be used as start-up parameters
call_proc can be as a ‘Predicate’ to make later agents
dependent on a specific check made by the procedure
(see 7.3.5.3.2 Setting masks with ‘predicate’ agents on
page 125 for more details). This can be done by setting
up call_proc to be executed with attribute ‘Predicate =
True’
Note that if the procedure updates the transaction in the
database, it must be positioned after the
update_transaction agent within the database
transaction. If the transaction is updated in the database
by a call_proc agent before the update_transaction
agent is executed, the whole operation will fail. It is also
recommended that you place the refresh_transaction
agent after any call_proc agents updating a transaction
in the database (see refresh_transaction below for
details).

7 Setting up transaction and entity flow
7.3 Setting up transaction flow
TRM System Administration Guide 121
refresh_transaction n/a The refresh_transaction agent refreshes the memory
version of the transaction during execution of the
operation against the database. It is typically used after
executing a call_proc agent resulting in an update of the
transaction in the database to synchronize the memory
version of the transaction with the updated database
version. This has the following benefits:
• refresh_transaction executed after a call_proc agent
makes it possible to take updated values into
account when evaluating condition calls (for
example, via rule matching) of any later agents
during the same execution of an operation.
• refresh_transaction executed after a call_proc agent
includes updated values in the real time notification
sent from the operation. For example, if a specific
transaction parameter field was updated by a
call_proc agent as part of the operation, this value
will be updated in all real time applications displaying
the transaction.
call_op 'operation_id A special agent used to execute an operation from inside
another one. Typically, call_op is used to execute a
NOTIFY operation sending real-time updates from
COMMIT, ACCEPT or REJECT operations.
Masks are not shared across operations, but when an
external operation is called using the call_op agent, the
new operation is started with an empty mask.
Consequently, if mask or not_mask condition calls are
used in the setup inside the new operation, the current
mask of the original operation is ignored and a new one
is started for the called operation.
new_audit_number n/a Assigns an owner-specific audit number to a transaction
if that does not exist already
send_full ‘queue name’
‘use_topic’
Sends the full transaction on the message bus to a
specific queue for further processing (e.g. for a generic
real time notification or to settlement generation)
‘use_topic’ can be set to ‘True’ or False’. If not given, it
defaults to ‘False’ indicating that the message is sent to
specific ‘listener’ (e.g. the service generating
settlements) and that the message will be received even
if the ‘listener’ is absent at the time of sending the
message. Setting this attribute to ‘True’ implies that a
message sent is a general real time message received by
whoever is ‘listening’ at the time of sending the
message.
In some specific case, addition parameters can be used
and given. When sending a message to document
management using:
send_full (‘document.transaction’)
The following parameters can be used to specify
additional information to be used by the receiving
service:
message type
state_id
e.g. send_full (‘document.transaction’, message_type =
‘CONFIRMATION’, state_id = ‘TO-BE-TRANSMITTED’)
sends the message to ‘document.transaction’ for
creating a ‘CONFIRMATION’ document into initial state
‘TO-BE-TRANSMITTED’
Agent Setup Attributes Description

7 Setting up transaction and entity flow
7.3 Setting up transaction flow
122 © Wall Street Systems IPH AB - Confidential
send_number ‘queue name’
‘use_topic’
Sends the transaction number on the message bus to a
specific queue for further processing. This can be used
instead of ‘send_full’ when the receiving service is going
to reload the transaction data in any case based on the
transaction number.
Other parameters are as in send_full.
service ‘module name’
‘table name’
‘params’
‘service’ is a generic syntax for agents without a
specialized keyword. For example ‘set_state’ agent could
be configured using the service syntax:
set_state('VERIFY', 'Verify')
is equivalent to:
service('service/transaction-broker@set-state',
'AgentState', state_id = 'VERIFY', name = 'Verify', flags
= 0)
Using specialized key words like ‘set_state’ is, however,
more readable and is recommended when possible.
Using the generic syntax can then be reserved for
situations where such key word does not exist, i.e. for
CSD agents.
A python CSD would be hooked to the flow through this
mechanism. For example
service("common/python@CSD_agent") inserts the
CSD_agent.py script in the agent chain.
service("common/python@CSD_agent", "CSDAgent",
value1="something", value2=10) will also save a record
in the CSDAgent table with value1="something" and
value2=10; when the hook is executed those values are
passed back to it.
instrument ‘minimum_priority’
‘maximum_priority’
Executes all ‘instrument’ handlers of features in the
instrument of the transaction where the priority of these
handlers (in UMFeatureEntry) is equal to or greater than
‘minimum_priority’ and equal to or less than
‘maximum_priority’
evaluate_trans_limit n/a This agent checks for potential transaction condition sets
and evaluates the transaction conditions of all matching
conditions against the transaction. The agent creates a
separate entry for each evaluated condition (table
'TransTransLimit', Transaction Manager view 'Transaction
Condition Set') and each individual limit condition in it
(table 'TransTransLimitCond', Transaction Manager view
'Transaction Condition') and is used primarily in the
COMMIT operation to activate transaction condition
functionality every time a transaction is applied in the
system.
Agent Setup Attributes Description

7 Setting up transaction and entity flow
7.3 Setting up transaction flow
TRM System Administration Guide 123
check_trans_limit 'action'
'msg'
'predicate_p'
'error_p'
This agent defines the consequences of transaction
violating one or more transaction condition sets.
'action' (e.g. 'Block on Accept') restricts the processing
to transactions violating a transaction condition set with
this action.
'msg' (e.g. 'Transaction Condition Warning, Block on
Accept') identifies the message to be displayed to the
user in Transaction Manager.
'predicate_p' controls whether the operation is
disallowed altogether.. If set to 'True', a warning
message is displayed but the operation is allowed. If set
to 'False' (or not set at all), the operation is disallowed.
'error_p' can be set to 'True' in order to force display of
warning message even if Transaction Manager option
'Display Warnings' is not set. If it is set to 'False' (or not
set at all), message is only displayed when 'Display
Warnings' is set.
Note that by using 'action_mask', any other processing
can be linked to check_trans_limit. The following setup
produces a message and sets status 'Transaction
Condition Violation' if any limit with action 'Mark as
Violation' is violated by the transaction:
check_trans_limit ('Mark as Violation', msg =
'Marking as Transaction Limit Violation',
predicate_p = True, error_p = True),
action_mask (14)),
(mask (14), set_status (11)),
check_events ‘event name’ Some TM actions trigger a business event – this is
decided in some setup file – check_events is a predicate
agent which activates other agents if the listed events
are met.
clear_events n/a Resets the business events on the transaction.
get_extensions ‘extension name list’ Sometimes an agent may need information from specific
transaction extensions for its process, if this is the case,
get_extensions can be used to load them before the
actual agent is executed.
For example: if you load a swap in TM without displaying
the legs, they are not loaded in memory; if you then
commit the swap and the broker calls send_full in the
COMMIT operation, in this scenario the message does
not contain the legs. But if you place
get_extensions("Leg") before send_full you make sure
that the legs are in the message.
set_param number, value Assigns a value to parameter #<number>.
txn_begin n/a Opens a database transaction.
txn_prepare n/a Prepares 2nd phase of the db transaction.
txn_commit n/a Commits a database transaction.
Agent Setup Attributes Description

7 Setting up transaction and entity flow
7.3 Setting up transaction flow
124 © Wall Street Systems IPH AB - Confidential
update_transaction n/a Updates the transaction in the database. Note that this
is a special agent designed to update a very limited set
of transaction fields (state_id and status) and does not
require the user executing the operation to have
create/modify permissions to the transaction. The agent
cannot be used to store values in any other transaction
field in the database. This agent is, typically, used in
ACCEPT/REJECT operations.
If a CSD agent setting values in any other transaction
fields is developed and added into the agent chain in
ACCEPT/REJECT operations, insert_transaction agent
must also be added into the chain. Note, however, that
this agent requires create/modify permission to the
transaction from the user executing the operation.
update_metadata n/a Updates transaction tags of the transaction in the
database. Note that this is a special agent designed for
processing tag values only and does not update any
other values of the transaction. Therefore, ACCEPT or
REJECT operations must always use update_transaction
agent, instead.
This agent is meant to be used in any operation
exclusively manipulating tag values. Primary benefit of
using update_metadata versus update_transaction is
that update_metadata can be processed concurrently
without locking or modifying the transaction.
update_reference_s
erial
n/a This agent operates on the result of a transaction action
only (rollover, early expiration…). It checks that the deal
has been created out of the correct version of the parent
transaction.
cancel_transaction n/a Cancels the transaction
check_portfolio n/a Checks the right to apply the transaction in the portfolio
(used in COMMIT operation)
new_transaction n/a Allocates a transaction number on new transactions
(used in COMMIT operation)
insert_transaction n/a Inserts the transaction in database (used in COMMIT
operation). Note that this agent does not update the
transaction in the database at all if only state_id and/or
status is updated. Consequently, in operation like
ACCEPT and REJECT agent update_transaction must be
always used.
check_4_eyes ’user_id’ ’user_id’ can be a user’s ID or a user group.
Prevents a user from performing the same operation
twice. When used in the flow, this agent will stop the
current operation if its previous execution was triggered
by the same user.
When the optional 'user_id' parameter is supplied, the
validation is limited to this particular user or user group.
When this parameter is absent, validation is performed
for all users.
dmm_cleanup n/a Mirrored transactions: removes the "reserved" status
that might have been left in a deal (for example, due to
a database error or a comKIT error).
dmm_reject n/a Mirrored transactions: ensures that a child deal is
canceled together with the parent deal and not canceled
on its own.
Agent Setup Attributes Description
7 Setting up transaction and entity flow
7.3 Setting up transaction flow
TRM System Administration Guide 125
7.3.5.3 Using masks in agent setup
The purpose of masks in agent setup is to enable dependencies of type ‘execute this agent only if a
specific other agent setup has already been executed’. The most typical use of this mechanism is to
use a ‘not_mask’ condition call to ensure that once a transaction has been assigned to a new state,
no further set_state agents are executed for the same transaction.
Masks used in agent setup are identified as specific ‘bit numbers’ corresponding to a mask values in
a similar manner to e.g. a Transaction Status (e.g. ‘bit number’ 4 corresponds to mask value 16).
The difference is that ‘Mask’ is not an attribute of the transaction but it is only set and used
dynamically within the operation during its execution for a specific transaction
7.3.5.3.1 Setting the mask
Mask value is dynamically set, based on the following Agent setup attribute:
action_mask ()
Any valid ‘bit number’ (0-31) can be given within the brackets in the setup. If the agent with this
attribute is executed, the mask is set accordingly, kept in memory for the duration of current
operation execution and used when condition calls of any subsequent agents are validated
As already discussed above, ‘mask ()’ and ‘not_mask ()’ can be used as condition calls for agents.
For example, if an earlier agent has been executed with action_mask (4), then any later agents with
condition call mask (4) can be executed. Similarly, no later agent with condition call not_mask ()
containing mask 4 (e.g. not_mask (2,4,9)) match the condition call and, consequently, cannot be
executed
When this mechanism is used, order of agents in the setup script becomes very important as that is
used as a basis when ‘number’ of the Agent is assigned in TransactionOpAgent. Agents are executed
in the order given by this number and, for example, in case of set_state agent, transaction is
assigned to a new state according to the first matching agent. After that, any subsequent agents fail
to meet the conditions as they, typically, have condition call not_mask (0) in their setup:
(state ('CONFIRM'), not_mask (0), action_mask (0),
set_state ('FINAL', 'Verify')),
7.3.5.3.2 Setting masks with ‘predicate’ agents
The mask mechanism of implementing dependencies can also used for more complex condition
checking using ‘predicate’ agents. The idea of a predicate agent is that instead of processing the
transaction, it performs a check of some kind and, if the predicate is validated, sets action_mask()
according to the agent setup. The following agents have this ‘predicate’ feature:
call_proc
instrument
service
check_events
A typical way to use this functionality is through a standard or customized stored procedure.
•If a ‘call_proc’ agent is run with attribute ‘Predicate = True’, the procedure is run only to find out
whether it produces exceptions or not and to set, or not set, action_mask accordingly.
•If the procedure does not return an exception (return status = 0), predicate is validated and
action_mask () is set. If it does return an exception (return status != 0), action_mask () is not
set.
•By using the mask value which was set by the ‘predicate’ stored procedure in mask () and
not_mask () condition calls of subsequent agents, their execution can be made dependent on
whatever the stored procedure checked.
The following setup is an example of this mechanism used in the distributed CLM transaction flow to
verify that no Funding Call transactions exist in some specific states before a drawdown transaction
can be accepted to a final state. This verification is done in the stored procedure CheckStateSync,
7 Setting up transaction and entity flow
7.3 Setting up transaction flow
126 © Wall Street Systems IPH AB - Confidential
producing no exceptions when such transactions are found and the agent setting the new state to
DD-FINAL is set up with a not_mask condition call accordingly.
## from state DD-CONFIRM
# ... checking first if there is any reference Funding Call (kind 550) in
provisional state
(state ('DD-CONFIRM'), not_mask (0), action_mask (1),
call_proc ('CheckStateSync',
param0 = 'DD-PROVISIONAL', # minimum state of reference transaction
param1 = 'DD-PS-FINAL', # maximum state of reference transaction
param2 = '550', # transaction kind of reference transaction
predicate = True)),
# ... to DD-FINAL if no reference Funding Call was found
(state ('DD-CONFIRM'), not_mask (1), action_mask (0),
set_state ('DD-FINAL', 'Confirm')),
A ‘predicate’ CSD could also be implement as a generic ‘service’ agent performing a test of some
kind and triggering, for example, a status change or posting a message, depending on the outcome
of that test, as follows:
(service('some_module@some_object'), action_mask(1)),
(mask(1), set_status(22)),
(not_mask(1), send_full("csd_queue")),
The above sequence of agents would set status 22 if the CSD predicate is verified, and post a
message if it is not.
7.3.5.4 Setting up service queues
Agents ‘send_full’ and ‘send_number’ are used to send the transaction to be further processed by
another service.
The table below lists service queues that are currently used in the setup.
Queue Name Setup Attributes Description
accounting-input.cancel n/a Cancels accounting inputs.
accounting-input.create n/a Creates accounting inputs.
accounting-input.update n/a Updates accounting inputs.
commitment-fee.accept n/a Updates a new commitment fee transaction with all existing
drawdowns, equities, amount events, etc. affecting it.
commitment-fee.drawdow
n.accept
n/a Updates an existing commitment fee transaction by adding
the effect of a drawdown transaction. This service is
normally used for drawdowns when they are accepted to a
final state.
commitment-fee.drawdow
n.reject
n/a Updates an existing commitment fee transaction by
removing the effect of a drawdown transaction. This service
is normally used for drawdowns when they are rejected
from a final state.
document.facility-transacti
on
n/a Creates a message request from a drawdown:
• in the identified message type
• into the identified message state.
document.transaction ‘message type id’
‘message state id’
Creates a message request from the transaction:
• in the identified message type
• into the identified message state.

7 Setting up transaction and entity flow
7.3 Setting up transaction flow
TRM System Administration Guide 127
7.3.5.5 Testing transaction flow
Transaction Admin (FKTransactionManager.exe) has a user interface called Discovery Console
which displays, among other things, real-time transaction flow traces in a hierarchical and
easy-to-read format. These traces include all the conditions that are both matched and unmatched,
and the reasons why.
Note: This replaces any previous method of tracing and testing transaction flow.
To make Discovery Console available, start Transaction Manager with the -d or --discovery option.
Launch Discovery Console (Options - Discovery Console) before testing the transaction flow (Accept,
Reject, Commit, and so on).
Test the flow by making a change, and notice that a trace appears in Discovery Console.
The hierarchical output and the Filter option in Discovery Console make it easy for you to quickly
locate the part of the transaction flow that you are looking for.
forecast.expire n/a Expires an existing forecast in CMM from all transactions in
any portfolio under the top portfolio given in the
configuration table parameter
'FORECAST-TOP-PORTFOLIO'.
forecast.generate n/a Creates new cashflow forecasts and modifies/expires an
existing forecast in CMM from all transactions in any
portfolio under the top portfolio given in the configuration
table parameter 'FORECAST-TOP-PORTFOLIO'.
idm.do_op ‘operation id’ Executes a flow operation (ACCEPT/REJECT) for an IDM
mirrored transaction if such exists. This service ensures
that when one leg of a mirrored transaction pair is moved
in the flow, the other leg is also automatically moved.
This service queue is typically set up using an ‘instrument’
agent with priority 7000 (identifies instruments with
feature IDM) as a predicate agent
idm.make n/a Creates/updates an IDM mirrored transaction from
pre-agreed transaction, i.e. from one which has not
reached IDM-AGREED state in the flow.
This is used in the COMMIT operation with ‘instrument’ as
predicate agent.
Note: The transaction must have already reached the state
IDM-MIRRORING.
idm.update n/a Updates an IDM mirrored transaction from an agreed
transaction, i.e. from one which has already reached
IDM-AGREED state in the flow
This is used in the COMMIT operation with ‘instrument’ as
predicate agent.
settlement.transaction.gen
erate
n/a Creates settlements from a transaction.
transaction n/a Sends a real-time notification from the transaction
7 Setting up transaction and entity flow
7.3 Setting up transaction flow
128 © Wall Street Systems IPH AB - Confidential
7.3.5.6 Converting flow.py to CSV format
If an extensive re-engineering of distributed flow is necessary, it may be easier to use Excel to
manipulate and maintain the flow setup. You can convert a flow.py script to a flow.csv file and
vice versa. The process would normally be the following:
1. Convert distributed flow.py to CSV format
2. Read the CSV file to excel and manipulate the operation/agent setup in excel
3. Save the new setup as a CSV file
4. Convert the CSV file to a new version of flow.py
5. Load the setup to database by running the new version of flow.py
6. Convert from python to Excel with the following command:
python flow.py –c > flow.csv
7. Convert from Excel to python with the following command:
python -m agents.convert.csv flow.csv > flow_new.py
7.3.5.7 Migrating a transaction flow from a pre-7.2 version
The workflow setup from version 7.2 onwards is defined by a combination of SQL and python
scripts. Tools are provided to facilitate migration from the old flow to the new one, but some manual
intervention is required.
The migration process starts from a database populated with a correct old flow setup – the
TransactionAction table must be complete. The new transaction flow setup script is built from this
database using migrate-flow.py; the following command extracts the old-style transaction flow
and generates the setup file customer_flow.py:
python migrate-flow.py -f <customer_flow>.py
When you migrate an old flow, you must also restrict the conversion to a subset of operations set up
in flow.py. In practice, this means that only ACCEPT and REJECT actions from the database must
be extracted. This can be done by identifying ACCEPT and REJECT as included action ids in the
command, as follows:
python migrate-flow.py -f <customer_flow>.py ACCEPT REJECT
This extraction of the old flow into a <customer_flow>.py script as described above must be done in
version 7.1 (or earlier) database. If the flow is not clean at the time of extraction, that is if the flow
references nonexistent states or statuses), warnings are displayed by migrate-flow.py:
--- Warning --- unknown status 'dummy'
--- Warning --- unknown status 'dummy'
Once this script has been successfully created, proceed as follows:
1. Upgrade the database to a 7.2 or later version
2. Ensure that all status and states of the old flow are included in the corresponding sql scripts
(status.sql and transaction_state.sql) used in the new version.
3. Ensure that the status.py script contains SET/CLEAR operations for all status of the old flow (if
the old flow contains customer-specific status, SET/CLEAR operations for them must be added to
status.py)
4. Merge manually customer_flow.py and distributed flow.py to a single python script by moving
all customized elements of customer_flow.py to distributed flow.py containing setup
supporting important system functionality.
To create the new setup, make sure that all flow-related python scripts reside in the same python
\flow directory, and load the setup to the database:
cd %FK_HOME%\share\python
python -m flow
7 Setting up transaction and entity flow
7.3 Setting up transaction flow
TRM System Administration Guide 129
7.3.6 Setting up a COMMIT operation
The COMMIT operation is executed every time a new transaction is inserted into the database, or an
existing one is updated. This operation is set up using a script commit.py found in
$FK_HOME\share\python\flow.
The setup of the operation defines how the transaction is processed when it is inserted in or updated
in the database. It is normally not necessary to modify the distributed setup of this operation, but
some customized processing of transactions at the time of inserting or updating them may need to
be added at the time of implementing the system. However, the setup in the script commit.py
contains important system functionality and any such changes must be made with care.
7.3.7 Setting up status operations
SET/CLEAR status operations are executed every time Set Status or Clear Status buttons in Transaction
Manager are used to set or clear a specific status in a transaction. These operations are set up using
a script status.py found in $FK_HOME\share\python\flow. The script creates a separate SET and
CLEAR operation for every status in the database as in the following example:
define_op('SET TRADE DATE BOOKING', 'Set Trade Date Booking', (
check_access('STATUS-OTHER'),
set_status(3),
txn_begin(),
update_transaction(),
txn_commit(),
call_op("NOTIFY")
))
define_op('CLEAR TRADE DATE BOOKING', 'Clear Trade Date Booking', (
check_access('STATUS-OTHER'),
clear_status(3),
txn_begin(),
update_transaction(),
txn_commit(),
call_op("NOTIFY")
))
It is normally not necessary to modify the distributed setup of this operation unless customized
status are added with status.sql. If this is done, however, you must add corresponding
SET/CLEAR operations for the new status in this script to enable manual setting or clearing of the
status when that is required. Transaction Manager modes in which manual setting or clearing of the
new status is to be enabled must also be modified accordingly.
7.3.8 Setting up limit operations
Limit server can be set up to run with various 'violation modes'. Depending on the mode, the server
may execute one of the limit operations for a transaction which has been processed into the server.
The following operations are used:
•LIMIT VIOLATION (executed for transaction causing a limit violation)
•LIMIT VIOLATION CLEAR (executed for a transaction not causing a limit violation when server is
run with the parameter no_violation_action having value 1)
•NO LIMIT VIOLATION (executed for a transaction not causing a limit violation when server is run
with the parameter no_violation_action having value 2)
These operations are set up using a script limit.py found in $FK_HOME\share\python\flow. The
setup of the operations defines how the transaction is processed as a result of a limit violation being
caused by the transaction (LIMIT VIOLATION) or as a result of no limit violation being caused by it
(LIMIT VIOLATION CLEAR or NO LIMIT VIOLATION). The distributed setup sets the tag
LIMIT-VIOLATION from operation LIMIT VIOLATION and clears the same tag from operation LIMIT
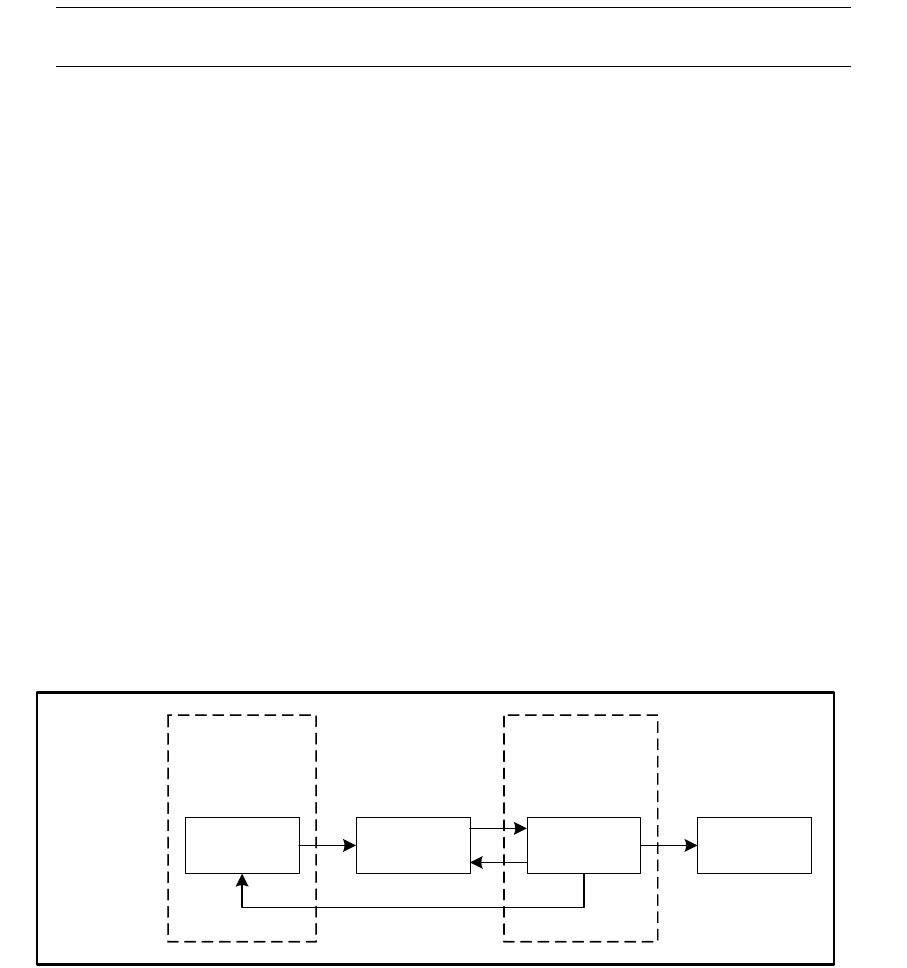
7 Setting up transaction and entity flow
7.4 Using Transaction Manager modes
130 © Wall Street Systems IPH AB - Confidential
VIOLATION CLEAR. If other processing is needed (e.g. moving the transaction to a specific state as
a result of violation), these modifications can be made in the limit.py script.
Note: If any of these operations are modified to updating anything else than tags (for, example,
state or status), the update_metada agent must be replaced with update_transaction.
7.4 Using Transaction Manager modes
Transaction Manager applications are the primary means of manually executing any transaction
processing, including flow-related operations like accepting or rejecting transactions.
A mode is a container used to describe a particular transaction manager. It is used to set up the
criteria that transactions must meet to appear in that transaction manager. It is also used to define
how these transactions can be processed in the application, for example, to enable or disable a user
to execute specific operations (ACCEPT, REJECT, etc), specific actions (Rollover, Exercise, etc) or to
edit specific transaction columns (e.g. the comment4 column in the Back Office Verification
transaction manager). Modes are defined in the following tables:
•Mode
•ModeColumn
•ModeAction
In the figure below showing a sample setup, three modes are described:
•TRADING, which contains only transactions in the state OPEN
•BO-VERIFY, which contains only transactions in the state BO-VERIFY. The cashflow column
Amount can be updated by the Back Office user group.
•ADMIN, which contains all transactions, from minimum state OPEN to maximum state FINAL
(“everything possible” mode).
Note the following about transactions and modes:
•A transaction is displayed if it matches the mode definition and at least one of its cashflows
matches the mode.
•A transaction is displayed if it matches the mode definition and has no cashflows (this is rare)
•A transaction is not displayed if it matches neither the mode nor its cashflows.
7.4.1 Loading default modes
The system is released with default transaction manager mode setup. Use the following setup
scripts found in $FK_HOME/share/<database>/setup to load default mode definitions into the
database:
Mode=ADMIN
Transaction Board
Transaction Admin
Mode=BO-VERIFY
Transaction Board
Back Office
Verification
Mode=TRADING
Transaction Board
Deal Capture
Open Verify BO-Verify Final
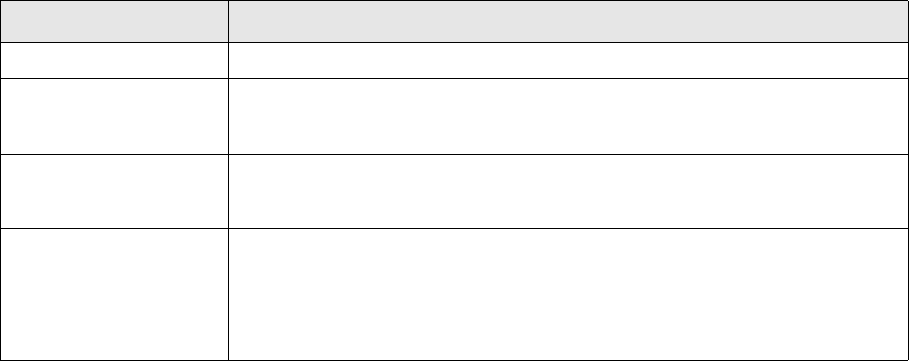
7 Setting up transaction and entity flow
7.4 Using Transaction Manager modes
TRM System Administration Guide 131
•modes.sql creates all mode definitions used in non-CLM transaction manager applications
available from Application Manager.
•loan_modes.sql creates all mode definitions used in CLM transaction manager applications
available from Application Manager.
All modes set up in these scripts are compatible with the default transaction states defined in
transaction_state.sql.
7.4.2 Setting up modes
Modes are configured using a script modes.sql found in $FK_HOME/share/<database>/setup. This
script executes the following stored procedures:
•SetupMode
•SetupModeColumn
•SetupModeAction
Create mode entries using the parameters given in the script as in the following example:
/* Mode for accepting/rejecting transactions from VERIFY states */
exec SetupMode @mode_id = "VERIFY",
@state_id = "VERIFY",
@context_mask = -1,
@set_status = 64, /* DELIVERY VS PAYMENT */
@clear_status = 64, /* DELIVERY VS PAYMENT */
@grant_p = 1,
@accept_p = 1,
@reject_p = 1,
@action_grant_p = 1,
@columns = "Transaction/comment Transaction/dvp_settlement
Transaction/dvp_repayment Transaction/_figure_date
Transaction/_figure_valuation_date Transaction/_figure_currency_id"
go
/* Actions allowed in mode VERIFY */
exec SetupModeAction @mode_id="VERIFY",
@state_id="VERIFY",
@action_id="preview runreport",
@entity_type="Transaction",
@revoke_p=0
go
The fields of the SetupMode procedure used in the script are given in the table below.
Parameter Description
mode_id The Mode ID to set up.
add_p This parameter indicates whether information should be added to the Mode
definition in the Mode and ModeColumn tables by overwriting the old data (=0) or
adding the new data on to the old data (=1).
user_id When defining a mode as accessible by certain users only, this parameter can be
used to identify the user or user group ID.
state_id The explicit transaction state of the mode. Note that a list of specific states
separated with spaces can be given as a value for the parameter, for example:
“OPEN VERIFY FINAL”
If this parameter is used, a single mode entry is created by the procedure for each
identified state.

7 Setting up transaction and entity flow
7.4 Using Transaction Manager modes
132 © Wall Street Systems IPH AB - Confidential
minimum_state_id When defining a mode for a range of transaction states, this is the state with the
lowest order number. If this parameter is used, a separate mode entry is created
by the procedure for each state where order number is equal to or greater than
that of the identified state.
maximum_state_id When defining a mode for a range of transaction states, this is the state with the
highest order number. If this parameter is used, a separate mode entry is created
by the procedure for each state where order number is equal to or less than that
of the identified state.
state_context When defining a mode for a range of transaction states, this parameter can be
used to identify the context which matching transaction states must have. (See
7.3.4.2 Transaction State contexts on page 116). If this parameter is used, a
separate mode entry is created by the procedure for each state with the specified
context.
state_category When defining a mode for a range of transaction states, this parameter can be
used to identify the category into which transaction states must belong. If this
parameter is used, a separate mode entry is created by the procedure for each
state in the specified category.
ignored_state_flags When defining a mode for a range of transaction states, this parameter can be
used to identify flags values of states to be ignored. If this parameter is used,
mode entries are not made for any states which have the specified flags. Unless
specified, state flag CANCELED_P is used.
context_group If a mode must be limited to displaying transactions and cashflows in any specific
context group, this parameter can be used to identify the context group in which
matching transactions and cashflows must have at least one context. The mask
value of the identified context group is set to both ‘mask’ and ‘contexts’ in table
Mode.
context_mask If a mode must be limited to displaying transactions and cashflows in any specific
contexts, this parameter can be used to identify the contexts of which matching
transactions and cashflows must have at least one context. If, for example, value
7 is given for this parameter, transactions and cashflows with at least one of
contexts 1, 2 and 4 are displayed, This value is set to both ‘mask’ and ‘contexts’ in
table Mode.
Note, that value -1 can be used ensure that transactions and cashflows with any
contexts are displayed.
contexts Same as ‘context_mask’ above but the value is only set to field ‘contexts’ in table
Mode.
not_contexts If transactions and cashflows with specific contexts must be excluded from a
mode, this parameter can be used to identify the contexts. If, for example, value 7
is given for this parameter, transactions with at least one of contexts 1, 2 and 4
are excluded.
status If a mode must be limited to displaying transactions with specific status, this
parameter can be used to identify the status which matching transactions must
have. If, for example, value 7 is given for this parameter only transactions with all
specified status (1, 2 and 4) are displayed.
not_status If transactions with specific status must be excluded from a mode, this parameter
can be used to identify the status. If, for example, value 7 is given for this
parameter all transactions with at least one of status (1, 2 or 4) are excluded.
Parameter Description

7 Setting up transaction and entity flow
7.4 Using Transaction Manager modes
TRM System Administration Guide 133
tag If a mode is to be limited to displaying transactions with a specific tag, this
parameter can be used to identify the tag that matching transactions must have.
Unlike status:
• It is possible to identify only a single tag for each state under the mode. If a
separate mode must be set up for transactions having two different tags
('TAG1' and 'TAG2'), a third 'combined' tag ('TAG1/TAG2') must be set up in
the system for this purpose and updated from associated operations
(ACCEPT/REJECT/SET-TAG/CLEAR-TAG) accordingly (set combined tag when
last 'composite' tag is set - and clear when first of them is cleared).
• It is not possible to exclude transactions with specific tags from the mode. If a
mode must be set up for transactions without a specific tag ('TAG1'), a
separate 'negative' tag ('NOT-TAG1') must be set up in the system for this
purpose and updated from associated operations
(ACCEPT/REJECT/SET-TAG/CLEAR-TAG) accordingly (set for all transactions by
default - clear when 'primary' tag is set - and set when 'primary' tag is
cleared).
cashflow_status If a mode must be limited to displaying cashflows with specific status, this
parameter can be used to identify the status which matching cashflows must have.
If, for example, value 7 is given for this parameter only cashflows with all specified
status (1, 2 and 4) are displayed.
cashflow_not_status If cashflows with specific status must be excluded from a mode, this parameter
can be used to identify the status. If, for example, value 7 is given for this
parameter all cashflows with at least one of status (1, 2 or 4) are excluded.
type_id If a mode must be limited to displaying transactions with specific Transaction
Type, this parameter can be used to identify the type which matching transactions
must have.
kind_id If a mode must be limited to displaying transactions with specific Transaction Kind,
this parameter can be used to identify the kind which matching transactions must
have.
own_p If set to 1, the user can only access transactions that he or she has created.
new_state_id A new transaction created from this mode will have this state.
new_kind_id A new transaction created from this mode will have this kind id.
set_status Specifies the available buttons for setting a status, for example, “Confirm” in the
Confirmations transaction manager. The value is the logical OR of the numeric
values of the statuses.
clear_status Specifies the buttons available for clearing a status, for example, “Unconfirm” in
the Confirmations transaction manager. The value is the logical OR of the
numeric values of the statuses.
set_tags Specifies the available buttons for setting a tag in Transaction Manager. Any
number of available tags to set can be identified for the same mode by giving a list
of ids separated by spaces as a value for this parameter
(@set_tags = "TAG1 TAG2 TAG3").
clear_tags Specifies the available buttons for clearing a tag in Transaction Manager. Any
number of available tags to set can be identified for the same mode by giving a list
of ids separated with spaces as a value for this parameter
(@set_tags = "TAG1 TAG2 TAG3").
grant_p If this field = 1, the transaction columns in the transaction manager of this mode
cannot be edited unless they are specified in the ModeColumn table via the
columns parameter of SetupMode or SetupModeColumn procedures. (See
ModeColumn table).
Parameter Description
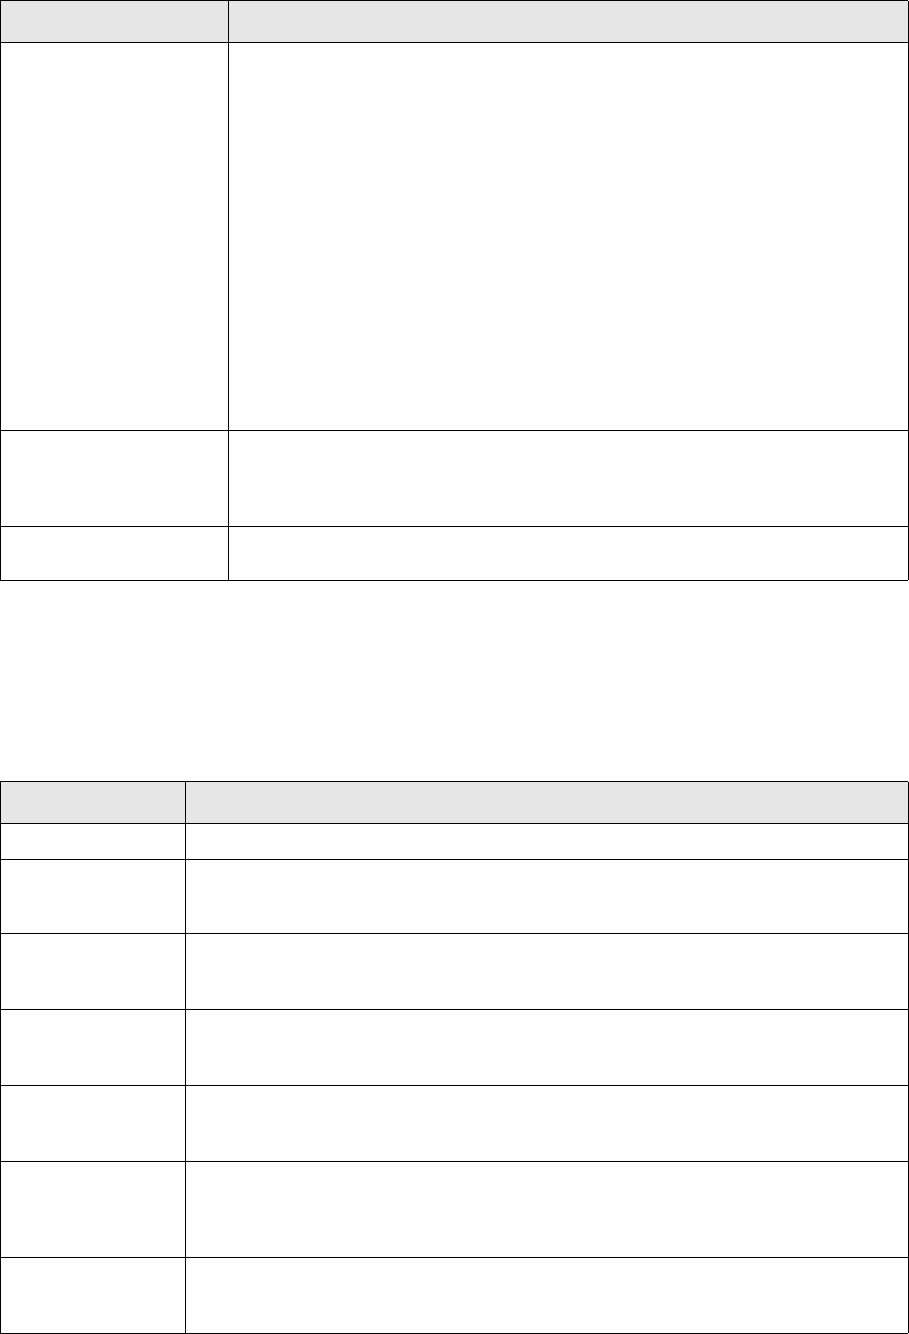
7 Setting up transaction and entity flow
7.4 Using Transaction Manager modes
134 © Wall Street Systems IPH AB - Confidential
If a large number of columns in a transaction or in any of its extensions (Leg, Schedule, Guarantee,
etc.) must be identified as exceptions to general grant_p setting, it may be necessary to use
SetupModeColumn procedure instead of parameter ‘columns’ in SetupMode procedure. The
maximum value of the parameter ‘columns’ is 255 characters and that is not always enough to
describe all columns as required. SetupModeColumn can be executed any number of times for the
same mode in the script and can, therefore, be used to identify an unlimited number of columns.
The fields of the SetupModeColumn procedure used in the script are given in the table below.
columns Columns listed here are exceptions to general grant_p setting as explained above.
Note, that a list of columns separated with spaces can be given as a value for the
parameter and that columns in several Transaction Manager Views can be
identified here by adding the ‘Entity Type’ as a prefix to column definition e.g. as
follows:
“Transaction/deal_rate Leg/amount Schedule/start_date”
If no entity type is specified (i.e. no prefix is given in the field), ‘Transaction’ is
used as a default. Note, that for cashflow columns, it is also possible to use syntax
‘cf_’ as a prefix instead of ‘Cashflow/’. For example, ‘cf_amount’ and
‘Cashflow/amount’ are interpreted in the same way by the procedure
If entity type contains some spaces, spaces must be replaced by ‘_’. For example,
setting column ‘value’ on entity type ‘Transaction Comment’ will be done by
‘Transaction_Comment/value’
Note also, the maximum length of the string given as a value for this parameter is
255 characters. When a large number of columns must be identified, it is also
possible to use procedure SetupModeColumn which can be run any number of
times for the same mode to create a large number of entries to ModeColumn.
action_grant_p If this field = 1, actions (e.g. Rollover, Exercise) cannot be executed unless they
are specified in the ModeAction table via the SetupModeAction procedure. If this
field = 0, all actions can be executed except those specified in the ModeAction
table.
big_p Used to optimize query for larger result sets, typically used for ADMIN mode.
Parameter Description
mode_id The ID of the mode for which the column setup is added.
user_id The user or user group ID that has edit permission granted / revoked on the transaction
manager columns specified in the columns field.
state_id The explicit transaction state of the mode in which setup of granted / revoked columns
apply. Note, that a list of specific states separated with spaces can be given as a value
for the parameter e.g. OPEN VERIFY FINAL
minimum_state_id When defining the column setup for a range of transaction states, this is the state with
the lowest order number. If this parameter is used, the column setup is made for each
state where order number is equal to or greater than that of the identified state
maximum_state_id When defining the column setup for a range of transaction states, this is the state with
the highest order number. If this parameter is used, the column setup is made for each
state where order number is equal to or less than that of the identified state
state_context When defining the column setup for a range of transaction states, this parameter can be
used to identify the context which matching transaction states must have. (see 7.3.4.2
Transaction State contexts on page 116). If this parameter is used, the column
setup is made for each state with the specified context
state_category When defining the column setup for a range of transaction states, this parameter can be
used to identify the category into which transaction states must belong. If this
parameter is used, the column setup is made for each state in the specified category
Parameter Description
7 Setting up transaction and entity flow
7.4 Using Transaction Manager modes
TRM System Administration Guide 135
In a similar manner to columns, access to various action executions (e.g. Rollover or Exercise of an
existing transaction) is also controlled via the mode setup.
Parameter ‘action_grant_p’ of SetupMode procedure is used to define the default behavior of the
mode in various transaction states. Value 0 (the default) makes the mode enable execution of all
actions from transactions in the specific state and value 1 makes it disable execution.
Any exceptions to this main definition are defined using SetupModeAction procedure with
corresponding value in parameter ‘revoke_p’ (‘0’ to enable exceptions, ‘1’ disable exceptions). When
‘action_grant_p’ of the mode is set to 0, all actions identified in SetupModeAction with parameter
‘revoke_p’ set to value ‘1’ are disabled as exceptions.
Similarly, when ‘action_grant_p’ of the mode is set to 0, all actions identified in the procedure with
parameter ‘revoke_p’ set to value ‘0’ are disabled as exceptions
The fields of the SetupModeAction procedure used in the script are given in the table below.
ignored_state_flags When defining the column setup for a range of transaction states, this parameter can be
used to identify flags values of states to be ignored. If this parameter is used, the
column setup is not made for any state which does have the specified flags. Unless
specified, state flag CANCELED_P is used.
columns Columns listed here are exceptions to general grant_p setting of the mode. Note, that a
list of columns separated with spaces can be given as a value for the parameter and
that columns in several Transaction Views can be identified here by adding the ‘Entity
Type’ as a prefix to column definition e.g. as follows:
Transaction/deal_rate Leg/amount Schedule/start_date
If no entity type is specified (i.e. no prefix is given in the field), ‘Transaction’ is used as
a default. Note, that for cashflow columns, it is also possible to use syntax ‘cf_’ as a
prefix instead of ‘Cashflow/’. For example, ‘cf_amount’ and ‘Cashflow/amount’ are
interpreted in the same way by the procedure.
Where a view/layer has a name that contains space characters, replace these with
underscores. Example: the syntax for "Valuation Model" view and column start_date is:
columns = "Valuation_Model/start_date".
Note also, the maximum length of the string given as a value for this parameter is 255
characters. When a large number of columns must be identified, you may execute
SetupModeColumn several times with different columns for the same mode.
Parameter Description
mode_id The ID of the mode for which the action setup is added.
add_p This parameter indicates whether information should be added to the ModeAction
definition by overwriting the old data (=0) or adding the new data on to the old
data (=1).
user_id The user or user group ID that has execution permission granted / revoked on the
actions specified in the action_class_id and action_id fields.
state_id The explicit transaction state of the mode in which setup of granted / revoked
actions apply. Note, that a list of specific states separated with spaces can be
given as a value for the parameter, e.g. OPEN VERIFY FINAL
minimum_state_id When defining the action setup for a range of transaction states, this is the state
with the lowest order number. If this parameter is used, the action setup is made
for each state where order number is equal to or greater than that of the identified
state.
maximum_state_id When defining the action setup for a range of transaction states, this is the state
with the highest order number. If this parameter is used, the column setup is
made for each state where order number is equal to or less than that of the
identified state.
Parameter Description
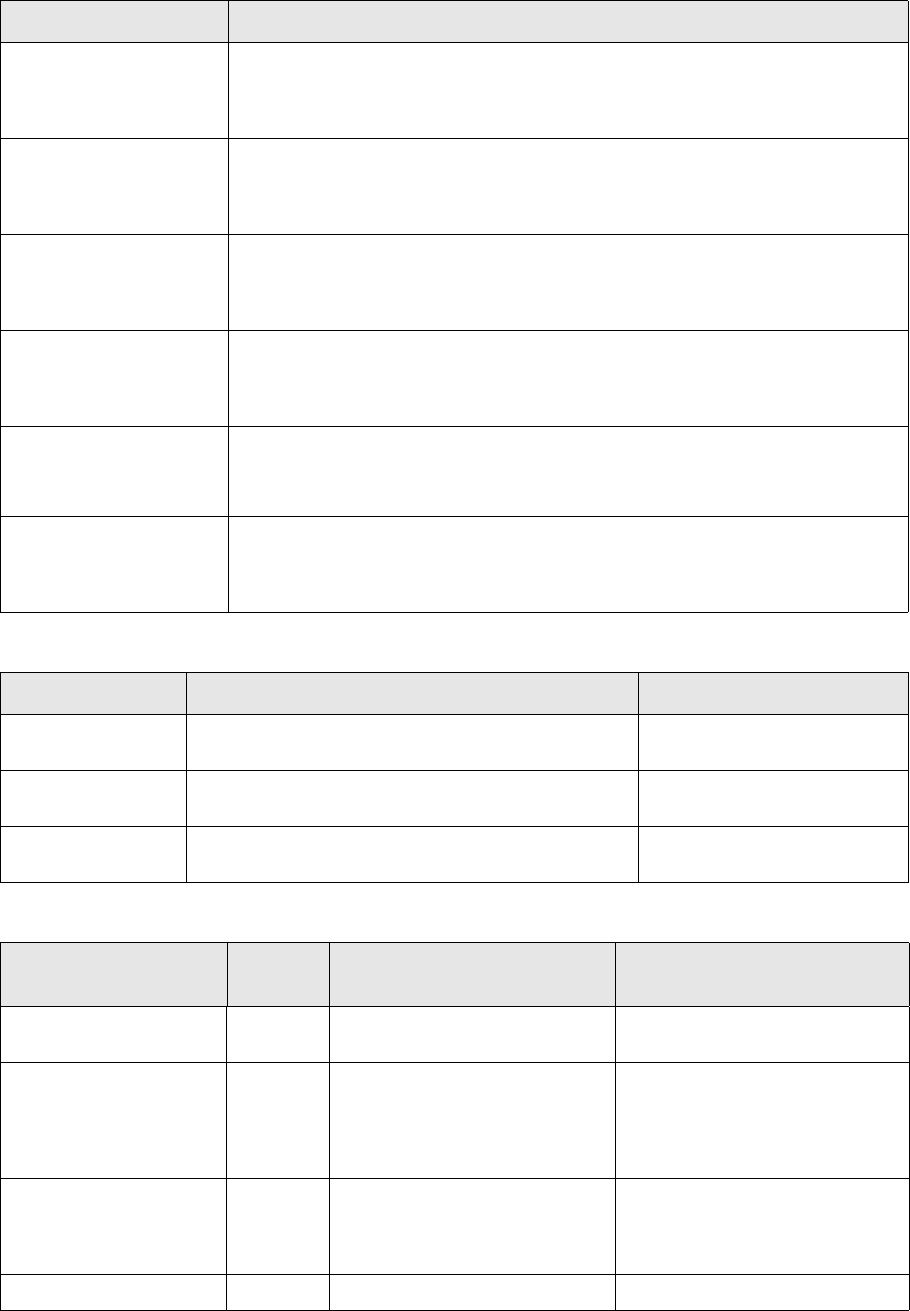
7 Setting up transaction and entity flow
7.4 Using Transaction Manager modes
136 © Wall Street Systems IPH AB - Confidential
Possible values for action_class_id are given in the table below:
Possible values for action_id are given in the table below:
state_context When defining the column setup for a range of transaction states, this parameter
can be used to identify the context which matching transaction states must have.
(see 7.3.4.2 Transaction State contexts on page 116). If this parameter is
used, the action setup is made for each state with the specified context.
state_category When defining the action setup for a range of transaction states, this parameter
can be used to identify the category into which transaction states must belong. If
this parameter is used, the action setup is made for each state in the specified
category.
ignored_state_flags When defining the action setup for a range of transaction states, this parameter
can be used to identify flags values of states to be ignored. If this parameter is
used, the action setup is not made for any state which does have the specified
flags. Unless specified, state flag CANCELED_P is used.
entity_type Table ModeAction as well as procedure SetupModeAction are used both in
Transaction- and Entity flows. This parameter is used to identify the entity for
which action setup is made. When setting up transaction manager modes, the
value must always be set to ‘Transaction’.
action_id Actions listed here are exceptions to general action_grant_p setting of the mode.
Note, that a list of actions separated with spaces can be given as a value for the
parameter e.g. rollover exercise call
action_class_id Some actions are structured into ‘action classes’ containing several individual
actions. In such cases, this parameter can be used to enable/disable all actions
belonging to the same class. Note, that a list of action classes separated by spaces
can be given as a value for the parameter e.g. package charge
Parameter Description
action_class_id Usage Enabled by Feature
charge Enables charges, such as fees and taxes, to be added
manually to a transaction on the cashflow level.
MANUAL-CHARGES
create_schedule Enables manual creation of schedules on any
instruments using schedules.
None
package Enables transactions packaging features: adding,
updating, removing.
None
action_id Functiona
l area Usage Enabled by feature
~delete Enables deletion of a schedule on
long term loans and IR swaps.
GENERIC-LOAN,
COMMERCIAL-LOAN
accept Enables rate reasonability
acceptance.
RATE-REASONABILITY-FX,
RATE-REASONABILITY-FX-SWAP,R
ATE-REASONABILITY-LOAN,
RATE-REASONABILITY-QUOTED,
RATE-REASONABILITY-SWAP
account_transfer Enables the management of
transfers between the account
where the gold is physically held
and the custodian sight account.
ALLOW-SIGHT-ACCOUNT-TRANSF
ER
action-split Enables to redo actions. FX

7 Setting up transaction and entity flow
7.4 Using Transaction Manager modes
TRM System Administration Guide 137
add_guarantee Guarantee
and
Collateral
Allows adding guarantees on a
guaranteed transaction (CLM
specific).
ADD-FACILITY-GUARANTEES
addon-assignment Allows entering a swap
(IRS/CCIRS) purchased during its
life, by entering the net amounts
exchanged with the seller.
None
adhoc-settlements Ad-Hoc Settlement Instructions. None
allow-swap Allows swapping action on bonds
to create an asset swap.
ALLOW-SWAP
allow-weight-difference Enables the management of any
difference in the weight of gold
that is delivered.
ALLOW-WEIGHT-DIFFERENCE
assignee Enables assignment from
assignee perspective.
ASSIGNMENT
assignment Enables assignment of a loan
from assignor perspective.
assignment-swap Enables assignment of a swap
from assignor perspective.
SWAP
bond Enables a call/put for a bond. BOND, CONVERTIBLE-BOND,
CREDIT-STEP-UP,
INDEX-LINKED-BOND
bond_fixing Enables cashflow price and rate
fixing (related to Expression) for
bonds.
ABS, BOND, CONVERTIBLE-BOND,
CREDIT-STEP-UP,
DENOMINATED-BOND,
INDEX-LINKED-BOND,
SCHULDSCHEIN, SWAP
bond-exercise Enables option exercise. BOND-OPTION
call Structured
IR
Allows executing a call event. None
cfc_early_expiration Enables transaction
early-expiration for a cap floor
collar.
CAP-FLOOR-COLLAR
classification Enables manual classification of
transactions in Transaction
Manager.
ALLOW-MANUAL-CLASSIFICATION
collateral-margin-return Enables to give back collateral
already received from the other
party (directly from the
collateral).
MARGIN-MOVEMENT
collateral-open-margin-re
turn
Enables to give back collaterals
already received from the other
party (directly from the
collateral). The margin
transaction will not have a
maturity date.
MARGIN-MOVEMENT
collateral-quote-default Enables automatic defaulting of
the prices when dealing a
collateral QUOTED instrument
COLLATERAL-QUOTE-DEFAULT
action_id Functiona
l area Usage Enabled by feature

7 Setting up transaction and entity flow
7.4 Using Transaction Manager modes
138 © Wall Street Systems IPH AB - Confidential
competitive_quote Enable the addition of new
competitive quotes
COMPETITIVE-PRICE,
COMPETITIVE-RATE,
COMPETITIVE-PREMIUM
compound_exercise FX Allows exercise of a compound
option
FX-OPTION-COMPOUND
conditional-remuneration CLM Allows entry of conditional
remuneration.
CONDITIONAL-REMUNERATION
conversion Enables execution of a
conversion of a convertible bond
to shares.
CONVERTIBLE-BOND,
GENERIC-LOAN, SWAP
create-collateral CLM Allows creating Facility Collateral
transactions for a selected
Facility.
None
create-commitment-fee CLM Allows creating Commitment Fee
transactions for a selected
Facility.
None
create-drawdown CLM Allows creating drawdown
(disbursement) transactions for a
selected Facility and Tranche.
None
create-facility-fee CLM Allows creating Facility Fee
transactions for a selected
Facility.
None
create-new-equity-invest CLM Allows creating investment
transactions on a selected equity
for a selected Facility.
None
create-schedule-data Irregular
Values
Creates Irregular Value entries
for a schedule.
GENERIC-LOAN,
COMMERCIAL-LOAN
create-schedule-date Schedules
for loans
Creates a schedule. GENERIC-LOAN,
COMMERCIAL-LOAN
credit_event Enables execution of a credit
event on a CDS
CDS
credit-event Enables exercising a credit event. CDS
currency-conversion Allows conversion of a coupon
into a different currency.
CURRENCY-CONVERSION
custody_account_transfer Defines the instrument as
deliverable (handled by a
Custodian) and enables the
generation of a delivery cashflow.
DELIVERY
cut Enables to undo security loan
cut.
SECURITY-LOAN
deactivate-fixing Enables to deactivate fixed
cashflows.
ALLOW-DEACTIVATE-FIXING
default_guarantee Guarantee
and
Collateral
Allows adding default guarantees
on a guaranteed transaction
(CLM specific).
INSERT-DEFAULT-GUARANTEES
deferment-commission CLM When a drawdown is "Deferred",
the Lender can demand a
Deferment Commission from the
Borrower
DEFERMENT-COMMISSION
action_id Functiona
l area Usage Enabled by feature

7 Setting up transaction and entity flow
7.4 Using Transaction Manager modes
TRM System Administration Guide 139
delete_competitive Enable deletion of competitive
quotes
COMPETITIVE-PRICE,
COMPETITIVE-RATE,
COMPETITIVE-PREMIUM
delete-schedule-data Irregular
Values
Deletes Irregular Value entries
for a schedule.
GENERIC-LOAN,
COMMERCIAL-LOAN
deposit-early-expiration Enables transaction
early-expiration for short term
loans.
SHORT-LOAN
discount-early-expiration Enables transaction
early-expiration for discount
papers.
DISCOUNT, DISCOUNT-OTC
do_currency_conversion Structured
IR
Allows conversion of a coupon
into a different currency.
CURRENCY-CONVERSION
do_netting Allows netting of futures and
options (except FX instruments:
see FX-NETTING).
NETTING, YIELD-NETTING,
SWEDISH-NETTING, FX-NETTED,
TICKS-NETTING,
FX-FUTURE-NETTING,
BOND-NETTING
do_rainbow_coupon Structured
IR
Allows choice of coupon for
rainbow structures.
CHOOSE-COUPON
drawdown-amendment CLM This feature allows the
modification of a drawdown that
has already been disbursed
DRAWDOWN-AMENDMENT
drawdown-cancellation CLM When the Lender does not wish
to avail of the disbursal that has
already been agreed upon, the
user can "Cancel" the said
drawdown
DRAWDOWN-CANCELLATION
drawdown-classification CLM When a Borrower's ability to pay
either the Principal or the
Interest (or Both) becomes
doubtful, this feature allows the
user to "Classify" the Amount
DRAWDOWN-CLASSIFICATION
drawdown-collateral CLM When a Borrower's ability to pay
either the Principal or the
Interest (or Both) becomes
doubtful, this feature allows the
user to "Classify" the Amount
DRAWDOWN-CLASSIFICATION
drawdown-fee CLM Allows creating a separate fee
transaction covering situations
where additional fees calculated
outside the system must be
entered into existing drawdowns
in the system.
DRAWDOWN-FEE
drawdown-fixing CLM The Feature enables the
Rate-setting functionality for a
Floating Rate Drawdown
DRAWDOWN-FIXING
drawdown-prepayment CLM The feature handles the case
where the Borrower wants to
repay the borrowed amount in
advance of their scheduled
repayment dates
DRAWDOWN-PREPAYMENT
action_id Functiona
l area Usage Enabled by feature

7 Setting up transaction and entity flow
7.4 Using Transaction Manager modes
140 © Wall Street Systems IPH AB - Confidential
drawdown-rescheduling CLM The Borrower may request the
"Re-scheduling" of the Value
Date of a drawdown before it is
disbursed, or of a drawdown that
has been "Deferred"
DRAWDOWN-RESCHEDULING
due-amount-carry-fwd CLM Allows carrying forward payable
amount with or without
indemnity.
DUE-AMOUNT-CARRY-FORWARD
duplicate Enables transaction duplication. None
early_expiration Enables transaction
early-expiration for long term
loans, IR swaps etc.
GENERIC-LOAN, XAU-LOAN
edit-commitment-fee CLM This feature allows the user to
Edit a Facility Commitment Fee
Transaction
EDIT-COMMITMENT-FEE
edit-deferment-commissi
on
CLM When a drawdown is "Deferred",
the Lender can demand a
Deferment Commission from the
Borrower
DEFERMENT-COMMISSION
edit-drawdown-amendme
nt
CLM This feature allows the
modification of a drawdown that
has already been disbursed
DRAWDOWN-AMENDMENT
edit-drawdown-classificati
on
CLM When a Borrower's ability to pay
either the Principal or the
Interest (or Both) becomes
doubtful, this feature allows the
user to "Classify" the Amount
DRAWDOWN-CLASSIFICATION
edit-drawdown-fee CLM Ad-hoc Fee on a Drawdown DRAWDOWN-FEE
edit-drawdown-prepayme
nt
CLM The feature handles the case
where the Borrower wants to
repay the borrowed amount in
advance of their scheduled
repayment dates
DRAWDOWN-PREPAYMENT
edit-drawdown-rescheduli
ng
CLM The Borrower may request the
"Re-scheduling" of the Value
Date of a drawdown before it is
disbursed, or of a drawdown that
has been "Deferred"
DRAWDOWN-RESCHEDULING
edit-due-amount-carry-fw
d
CLM If the scheduled repayments
from the Borrower are not
received/made, the system
permits the user to
Carry-Forward such amounts to
future dates
DUE-AMOUNT-CARRY-FORWARD
edit-guarantee-call CLM Processing of a demand of
payment received from a Lender
against an Issued Guarantee
GUARANTEE-CALL
edit-late-payment-penalt
y-realization
CLM Processes the case when the
Borrower has failed to make
payment on time
LATE-PAYMENT-PENALTY
edit-rvc-divestment CLM Investment in Equities under a
Lending Facility
RISK-VENTURE-CAPITAL
action_id Functiona
l area Usage Enabled by feature

7 Setting up transaction and entity flow
7.4 Using Transaction Manager modes
TRM System Administration Guide 141
equity-exercise Enables option exercise. EQUITY-OPTION
execute_option_barrier FX Allows execution of a barrier on
an option
EXOTIC-STRUCTURE, SWAPTION
execute_trigger Structured
IR
Allows executing a trigger event. None
fee Enables to undo security loan
fee.
SECURITY-LOAN
fixing Enables cashflow price and rate
fixing (related to Expression).
CAP-FLOOR-COLLAR, CDS,
GENERIC-LOAN, SWAP, TRS,
XAU-LOAN
fra-early-expiration Enables transaction
early-expiration for FRA.
FRA-DISCOUNT, FRA-DEPOSIT
FX-TIME-OPTION
funding-call CLM Exclusively used when an
institution is Lending
External/Third Party Funds. Not
needed for normal Commercial
Lending
ALLOW-FUNDING-CALL
fx_early_expiration FX Allows EE on FX forward deals FX, SWAP
fx-early-expiration-nettin
g
FX Enables transaction
early-expiration of FX NDF.
FX-NETTED,
FX-AVERAGE-RATE-FORWARD
fx_fixing Structured
IR
Allows fixing of the FX rate of a
dual currency structure.
FX-FIXING
fx_option_early_expiratio
n
FX Enables FX option
early-expiration.
FX-OPTION
fx_pair_shift Allows you to enter an FX Pair
Shift directly from Transaction
Manager.
None
fx_roll_over-diff FX Allow Roll Over on FX forward
with swap style.
ALLOW-FX-ROLL-OVER-SWAP-STY
LE
fx-exercise Enables option exercise. FX-OPTION
FX-OPTION_LISTED
fx-pair-shift Allows an FX Pair shift action to
be done on an existing FX deal.
ALLOW-FX-PAIR-SHIFT
fx-roll-over FX Allows Roll Over on FX forward. ALLOW-FX-ROLL-OVER
fx-roll-over-diff-margin FX Add margin points on Roll Over
FX forward with swap style.
ALLOW-FX-ROLL-OVER-SWAP-MA
RGIN
fx-roll-over-margin FX Add margin points on Roll Over
FX forward.
ALLOW-FX-ROLL-OVER-MARGIN
fx-time-option-early_expi
ration
Enables transaction
early-expiration for fx time
option.
guarantee_refund CLM Processes the demand for Funds
from the Guarantor to the
Borrower, against funds that the
Guarantor has already paid to the
original Lender
GUARANTEE-REFUND
action_id Functiona
l area Usage Enabled by feature

7 Setting up transaction and entity flow
7.4 Using Transaction Manager modes
142 © Wall Street Systems IPH AB - Confidential
guarantee-call CLM Allows entry of a guarantee call
transaction.
GUARANTEE-CALL
index-exercise Enables option exercise. INDEX-OPTION
late-payment-penalty CLM Allows creating a transaction for
the purpose of calculating a
penalty interest for a past due
amount.
LATE-PAYMENT-PENALTY
late-payment-penalty-rea
lization
CLM Processes the case when the
Borrower has failed to make
payment on time
LATE-PAYMENT-PENALTY
loan-pricing CLM Allows pricing of Fixed Rate and
Revisable Loans
LOAN-PRICING
margin-movement Enables to add or remove
collateral amounts.
REPO
margin-return Enables to give back collaterals
already received from the other
party (from the transaction).
MARGIN-MOVEMENT
matching Enables manual matching of
selected transactions.
None
mm-future-exercise Enables option exercise. MM-FUTURE-OPTION
modify_si Allows manual assignment of
settlement instructions to an
individual cashflow.
None
netting Allows netting. NETTING
new_collateral Guarantee
and
Collateral
Allows adding collateral entries
on a Collateralization transaction.
COLLATERAL-TRANSFER
new_repo Guarantee
and
Collateral
Allows adding collateral- and
repo entries on a repo
transaction.
REPO, MARGIN-MOVEMENT,
SUBSTITUTION
new-valuation-approach Valuation Creates a new "Valuation
Approach" entry for a
transaction. It allows choosing a
valuation feature depending on
the valuation mode and/or figure
date.
TRANSACTION-METHOD
new-valuation-model NumeriX
Valuation
Creates a new "Valuation Model"
entry for a transaction. It allows
set-up of NumeriX valuation
parameters at transaction level.
TRANSACTION-METHOD,
NUMERIX-METHOD,
NUMERIX-SWAP-METHOD,
NUMERIX-SINGLE-SWAP-METHOD
open-margin-return Enables to give back collaterals
already received from the other
party (from the transaction). The
margin transaction will not have
a maturity date.
MARGIN-MOVEMENT
option-barrier Enables to execute an option
barrier.
SWAPTION
option-early-expiration Enables to execute an option
early expiration.
SWAPTION
action_id Functiona
l area Usage Enabled by feature

7 Setting up transaction and entity flow
7.4 Using Transaction Manager modes
TRM System Administration Guide 143
preview Enables preview of a document of
a type selected by the user
amongst the matching ones.
None
quote_default Enables automatic defaulting of
the prices when dealing a
QUOTED instrument
QUOTE-DEFAULT
rainbow-coupon Allows choice of coupon for
rainbow structures.
CHOOSE-COUPON
regenerate_cashflows Enables cashflow regeneration
for a selected transaction from a
specified Refresh Date onwards
keeping manually changed fields.
None
repo_roll_over Enables transaction roll-over for
repos.
ALLOW-REPO-ROLL-OVER
reset_ssi Allows resetting of
manually-assigned settlement
instructions of an individual
cashflow.
None
revision Enables execution of the revision
event on Revisable long term
loan.
ALLOW-REVISION
risk-venture-capital CLM Allows entry of equity
investment.
RISK-VENTURE-CAPITAL
roll_over Enables transaction roll-over. ALLOW-ROLL-OVER
roll_over-dual Enables transaction roll-over for
gold deposits.
ALLOW-ROLL-OVER-DUAL
roll-over-one Enables transaction roll-over for
one payback.
ALLOW-ROLL-OVER-ONE
roll-over-swap Enables transaction roll-over for
swap.
ALLOW-ROLL-OVER-SWAP
runreport Enables report generation. None
rvc-divestment CLM Investment in Equities under a
Lending Facility
RISK-VENTURE-CAPITAL
schedule Enables a call/put for a loan. CAP-FLOOR-COLLAR,
COMMERCIAL-LOAN, SWAP,
XAU-LOAN
set-base-fx-book-rate Enables setting of base fx book
rate.
BOND, DISCOUNT, EQUITY,
GENERIC-LOAN, SHORT-LOAN,
XAU-LOAN
signature_date Enables defining and storing the
signature date for a transaction
(related to Accounting).
ALLOW_SIGNATURE_DATE
spot_forcing Sets transaction type to spot. None
subsidy_call CLM Exclusively used for Subsidized
Lending by Multi-lateral
Institutions. Not needed for
normal Commercial Lending
ALLOW-SUBSIDY-CALL
action_id Functiona
l area Usage Enabled by feature

7 Setting up transaction and entity flow
7.4 Using Transaction Manager modes
144 © Wall Street Systems IPH AB - Confidential
substitution Enables substitution of collaterals
by new collaterals having
different instruments.
REPO, SUBSTITUTION
swap-early-expiration Enables transaction early
expiration of IR swaps.
SWAP
swap-exercise Enables option exercise. SWAPTION
transaction_conversion Structured
IR
Allows conversion of a
transaction to another type of
transaction.
TRANSACTION-CONVERSION
transfer Enables to transfer a loan to
another portfolio.
GENERIC-LOAN
transfer-swap Enables to transfer a swap to
another portfolio.
SWAP
trs_early_expiration Structured
IR
Enables early-expiration for Total
Return Swaps.
TRS
trs_fixing Structured
IR
Allows fixing of DRS in order to
compute settlement at maturity.
TRS
undo_currency_conversio
n
Structured
IR
Allows conversion of a coupon
into a different currency.
CURRENCY-CONVERSION
undo_fixing Undoes fixing of cashflow price
and rate.
undo_netting Enables undoing netting. NETTING
YIELD-NETTING
SWEDISH-NETTING
FX-NETTING
TICKS-NETTING
FX-FUTURE-NETTING
BOND-NETTING
undo_option_barrier FX Allows undoing of an option
barrier execution
EXOTIC-STRUCTURE, SWAPTION
undo_rainbow_coupon Structured
IR
Allows choice of coupon for
rainbow structures.
CHOOSE-COUPON
undo_spot_forcing Sets default transaction type. None
undo_trigger Structured
IR
Allows undoing a trigger
previously executed.
None
undo-adhoc-settlements Undo Ad-Hoc Settlement
Instructions.
None
undo-matching Enables undoing matching. None
write-off CLM Allows user to write off cashflow
of drawdown.
WRITE-OFF
yield_to_maturity Enables pricing of yield to
maturity of bonds.
BOND-PRICING
yield-exercise Enables option exercise. FRA-OPTION
yield-netting Allows netting for yield. YIELD-NETTING
action_id Functiona
l area Usage Enabled by feature
7 Setting up transaction and entity flow
7.4 Using Transaction Manager modes
TRM System Administration Guide 145
7.4.3 Example of mode setup
To add a new transaction manager for exercising option transactions, add a new mode to the script
$FK_HOME\share\<database>\setup\modes.sql using the SetupMode and SetupModeAction
procedures.
•Set a restriction so that we see only transactions with the status OPTION and in state FINAL.
•The user must be able to edit value in transaction columns Fixing/Action Date and Comment4 on
these transactions in the new transactions manager.
•The user must be able to create exercise transactions to state EVENT-OPEN by executing
Exercise action on them and to accept created transactions forward in the flow or cancel them
immediately. But the user must not be able to execute any other actions.
To accomplish this, the following add-on in the modes.sql file is needed:
Exec SetupMode @mode_id = ‘OPTION-EXERCISE’,
@state_id = ‘FINAL’,
@new_state_id = ‘EVENT-OPEN’,
@status = 4, /* OPTION */
@grant_p = 1,
@action_grant_p = 1,
@columns = ‘Transaction/_fixing_date Transaction/comment_4’
To enable seeing and processing new exercise transactions in the state EVENT-OPEN as well, a new
SetupMode execution is needed:
Exec SetupMode @mode_id = ‘OPTION-EXERCISE’,
@add_p = 1,
@state_id = ‘EVENT-OPEN’,
@grant_p = 0,
@action_grant_p = 1,
@accept_p = 1,
@cancel_p = 1
Note the use of the add_p flag, which adds a new entry for the mode OPTION-EXERCISE in the Mode
table without overwriting the old one. Without this flag, the original mode is overwritten.
The grant_p parameter with the value “1” in the first entry indicates that all columns on the existing
option transactions in state FINAL should be locked except for those specified in columns.
Conversely, grant_p value “0” in the second entry indicates that all columns, which are editable in
option exercise transactions in general, can be edited in this mode as well.
The action_grant_p parameter with the value “1” in both entries indicates that no actions other
than those specifically identified as exceptions in ModeAction table can be executed in this mode.
Finally, in order to enable action Exercise from existing option transactions in state FINAL, the
following execution of SetupModeAction procedure is needed:
Exec SetupModeAction@mode_id = ‘OPTION-EXERCISE’,
@state_id = ‘FINAL’,
@action_id = ‘exercise’,
@entity_type = ‘Transaction’,
@revoke_p = 0

7 Setting up transaction and entity flow
7.5 Database objects for transaction flow and modes
146 © Wall Street Systems IPH AB - Confidential
7.5 Database objects for transaction flow and modes
The following table summarizes the database objects which define the transaction flow and modes.
Object Type Description
permission.sql Sql script Creates permissions in the database by running stored
procedure SetupPermission with parameters given in the script.
Permission Table Contains all permissions.
SetupPermission Stored Procedure Inserts information in the Permission table.
status.sql Sql script Creates transaction status in the database by running stored
procedure SetupStatus with parameters given in the script.
Status Table Contains all transaction statuses.
SetupStatus Stored Procedure Inserts information in the TransactionStatus table.
transaction_state.sql Sql script Creates transaction states in the database by running stored
procedure SetupState with parameters given in the script.
TransactionState Table Contains all transaction states.
SetupState Stored Procedure Inserts information in the TransactionState table.
modes.sql Sql script Creates transaction manager modes for processing non-CLM
transactions in the database by running stored procedures
SetupMode, SetupModeColumn and SetupAction with
parameters given in the script.
loan_modes.sql Sql script Creates transaction manager modes for processing CLM
transactions in the database by running stored procedures
SetupMode, SetupModeColumn and SetupAction with
parameters given in the script.
Mode Table Contains all Transaction Manager modes.
ModeColumn Table Keeps information about the edit permissions of Transaction
Manager columns that are granted / revoked for a particular
mode
ModeAction Table Keeps information about menu, entity and sub-entity level
actions (New Transaction, Duplicate, Early-expire, Fixing…) to
be granted / revoked for a particular mode.
SetupMode Stored Procedure Inserts information in the Mode and ModeColumn tables.
SetupModeColumn Stored Procedure Inserts information in the ModeColumn table.
SetupModeAction Stored Procedure Inserts information in the ModeAction tables.
flow.py Python script Creates ACCEPT and REJECT operations with agent setup given
in the script.
commit.py Python script Creates COMMIT operation with agent setup given in the script.
status.py Python script Creates all SET/CLEAR status operations with agent setup given
in the script.
TransactionOp Table Contains the header definition of transaction operations
TransactionOpAgent Table Contains the agent definition of all transaction operations.

7 Setting up transaction and entity flow
7.6 Loading default entity flows
TRM System Administration Guide 147
7.6 Loading default entity flows
In addition to transactions, many other transaction-like entities in the system are processed in a
workflow. Transaction flow is a special case in its complexity and, consequently, implemented as a
separate transaction-specific workflow model in the system, but the logic of process flow of most
other entities is very similar and, instead of a separate workflow model for each of them, the system
uses a single, generic entity flow for all entities requiring workflow processing.
Some CLM (Commercial Lending Module) entities are supported outside the main entity flow model
by a separate action-based entity flow implementation described separately below. CMM cash record
flow shares the setup as well as general logic with standard entity flow but the actual flow
processing is implemented separately. Cash record flow setup is documented in this chapter. Also,
special case of SDM (Static Data Module) workflow processing of static data is not described here.
7.6.1 Entity broker-based flow
Entity flow uses entity broker services similar to transaction broker services used in transaction flow
and requires entity state setup to support the flow operations. The system is distributed with a
separate sql script for each entity supported by the generic entity flow containing default setup of
entity states and modes. In addition to this, a separate python script containing setup of entity
broker operations and, in some cases, entity rules is distributed for each entity.
The scripts facility.sql and facility.py setup discussed below contain only the states and
operations required by facility message management. Actual CLM facility flow is managed in
separate action-based entity flow implementation.
AgentAccess Table Contains the setup attributes of all check_access agents.
AgentEvent Table Contains the setup attributes of all check_event agents.
AgentExtension Table Contains the setup attributes of all get_extensions agents.
AgentExtensionEntry Table Contains extension details used in get_extensions agent setup
AgentInstrument Table Contains the setup attributes of all instrument agents.
AgentMessaging Table Contains the setup attributes of all send_full and send_number
agents.
AgentMessagingProperty Table Contains additional setup parameters supported in some
messages from send_full and send_number agents
AgentProcedure Table Contains the setup attributes of all call_proc agents.
AgentState Table Contains the setup attributes of all set_state agents.
AgentStatus Table Contains the setup attributes of all set_status and clear_status
agents.
CashflowStatus Table Contains all cashflow statuses.
SetupCashflowStatus Stored Procedure Used for defining cashflow statuses.
CashflowAction Table Contains the definition of all cashflow actions.
SetupCashflowAction Stored Procedure Used for defining cashflow actions.
Object Type Description
7 Setting up transaction and entity flow
7.6 Loading default entity flows
148 © Wall Street Systems IPH AB - Confidential
To load default entity flows, run the following setup scripts available in
$FK_HOME\share\<database>\setup containing default definitions of entity states and entity modes
to be used in the flow into the database:
Note also that the following script, already used in loading default transaction flow, also contains
setup of cashflow status referred to in entity flow processing of call money/account:
Then execute the following command to build the default entity flow for all entities:
cd %FK_HOME\share\python
python -m entity-flow.build
This command executes the following setup scripts as one logical step to build the entire entity flow:
amount_event_flow.sql amount event states, modes and rules
call_money_account_flow.sql call money/account states and modes
cash_record.sql cmm cash record states
cashflow_action.sql cashflow actions for call money/account processing
facility.sql facility states
finmessage.sql finmessage states and modes
fixing_flow.sql fixing states and modes
fund_report_header nav report states and modes
hedge_relation.sql hedge relation states, modes and rules
message_flow.sql message request states and modes
payment_flow.sql payment advice states and modes
payment_alloc_flow.sql payment allocation states and modes
payment_rem_flow.sql payment reminder states, modes and rules
settlement.sql settlement states and modes
status.sql cashflow status
amount_event.py amount event operations and rules
call_money_account.py call money/account operations and rules
cash_record.py cmm cash record operations
facility.py facility operations and rules
finmessage.py finmessage operations and rules
fixing.py fixing operations and rules
fund_report_header.py nav report operations and rules
hedge_relation.py hedge relation operations and rules
message_manager.py message request operations and rules
payment_advice.py payment advice operations and rules
payment_allocation.py payment allocation operations and rules
payment_reminder.py payment reminder operations and rules
settlement.py settlement operations and rules

7 Setting up transaction and entity flow
7.7 Setting up entity broker-based flow
TRM System Administration Guide 149
These scripts can also be run individually from the directory $FK_HOME\share\python\entity-flow
(e.g. python amount_event.py) but the recommendation is to always use the python -m
entity-flow.build command, and to build the whole flow in one step.
7.6.2 CLM loan action-based flow
The following entities are still supported by CLM loan action-based entity flow implementation:
•Facility
•Mandate
•Approval
The setup of loan entity flow for all of the above entities is done in the following setup script:
•loan_entity_flow.sql (states, modes, loan entity actions)
•loan_validation_method.sql (loan validation methods)
To load default CLM entity flows, run the above setup scripts that are available in the directory
$FK_HOME\share\<database>\setup into the database.
7.7 Setting up entity broker-based flow
7.7.1 Entity States
Entity states for each entity are configured using the sql setup scripts listed above and found in
$FK_HOME\share\<database>\setup.
The same scripts are used for setting up both entity states and entity manager modes required for
processing the respective entities. These scripts execute the stored procedure SetupEntityState to
create state entries using the parameters given in the sample script as follows:
/* State for settlement to be processed by netting service */
exec SetupEntityState@entity_type= "Settlement",
@id = "TO-BE-NETTED",
@flags = 64, /* TO BE NETTED */
@name = "Waiting for Netting",
after_state_id = "GENERATED"
go
The fields of the SetupEntity procedure used in the script are given in the table below.
Parameter Description
entity_type Entity for which the state is to be used (e.g. “Settlement” or “FINMessage”)
id The ID of the state.
name Name to be shown in the State column of entity manager.
flags Flags which can be used to link a characteristic to any entities in this state or, in some
cases, to any entities in this or a later state in the flow
after_state_id The order number of the state will be set to a higher number than this state.
before_state_id The order number of the state will be set to a lower number than this state.
state_id The order number of the new state will be set to the same as the order number of this
state.
7 Setting up transaction and entity flow
7.7 Setting up entity broker-based flow
150 © Wall Street Systems IPH AB - Confidential
The table below lists the flag values that each entity state with entity type ‘Settlement’ can have.
7.7.2 Cashflow actions for Call Money / Account
In the special case of call money/account flow, the main flow handling is complemented by
cashflow-level flow handling, which is used to process individual movement cashflows inside an
existing call money/account transaction and primarily implemented as cashflow actions setting and
clearing cashflow status. These are not used anywhere outside call money / call accounts in the
system.
Cashflow actions perform similar tasks to entity agents but are executed on individual cashflows
instead of the main entity (i.e. transaction). They are configured using the cashflow_action.sql
script found in $FK_HOME\share\<database>\setup. This script executes the stored procedure
SetupCashflowAction to create action entries using the parameters given in the sample script below:
/* Action setting status Final when accepted from Verify */
exec SetupCashflowAction @action_id = "ACCEPT",
@status = 131072, /* Verify */
@action = "DoCSetStatus",
@param0 = "Final"
go
The fields of the SetupCashflowAction procedure used in the script are given in the table below.
Value Name Description
1 CANCELED This flag is used to give a “canceled state” to canceled entities.
2 FINAL The threshold before which entities are not finalized (are provisional or
being enriched/verified), and after which they are fully finalized. Mainly
used in CLM but also in Settlement to identify ‘released’ settlements.
Only transactions with no associated settlements in FINAL settlement
state(s) can be re-opened and modified in transaction flow
4 HIDDEN Not shown in selection lists.
8 PROVISIONAL The threshold before which entities are not even provisional (simulated
or rejected), and after which they are provisional (to be possibly
considered in position/risk, but not fully finalized) until they reach the
threshold for final entities. Mainly used in CLM.
16 INTERMEDIATE ???
32 NOT-ACTIVE ???
64 SETTLEMENT-TO-BE-N
ETTED
Settlements in this state must be processed by settlement netting
service. The flag is used to secure that all settlements in states with this
flag will be processed in situations where the service is restarted
following an earlier problem
Parameter Description
action_id Identifier of the action, for example ACCEPT, REJECT.
order_number Order number of entries belonging to one action.
rule_id This entry is applied only to cashflows matching this rule. Note that this rule refers
to ordinary rules, not to entity rules
not_rule_id This entry is not applied to cashflows matching this rule.
contexts This entry is applied only to transactions having this context.
not_contexts This entry is applied only to transactions not having this context.
7 Setting up transaction and entity flow
7.7 Setting up entity broker-based flow
TRM System Administration Guide 151
The table below lists stored procedures available as 'actions' to be used in cashflow action setup.
7.7.3 Entity Rules
The Settlement entity has dedicated rules: Settlement Rules are configured in Settlement Rule
Editor and Amount Rules are defined in Amount Rule Editor. These rules can be used as condition
calls for executing entity agents in settlement flow operations. Other entities supported by entity
broker do not have similar dedicated rules but generic entity rules can be used instead. There is no
Entity Rule Editor in the system and, if rules are needed in Entity Actions, they must be set up as
part of the python setup script used for entity flow operations (e.g. in amount_event.py) using the
command define_rule as shown in this example:
define_rule ("AmountEvent", "NEW-SUBSIDY-EVENT", "NEW-SUBSIDY-EVENT",
(equal_to("event_type", "Subsidy Estimation"), equal_to("event_subtype", "New")))
The above rule has the following main attributes:
entity_type = AmountEvent
id = NEW-SUBSIDY-EVENT
status This entry is applied only to cashflows having this status (or statuses).
not_status This entry is not applied only to cashflows having this status (or statuses).
mask If 'mask' is given, the condition is met if the 'current mask' of the operation
contains the given mask. Note, that is entity action setup, mask cannot be given
as a 'bit number' but must always be given as mask value (e.g. bit number 4
corresponding to mask value 16 must always be given as '16').
not_mask If 'not_mask' is given, the condition is met if the 'current mask' of the operation
does not contain the given mask.
action_mask If the conditions are met and the action entry is executed, the mask value given in
this parameter is added to the 'current mask' of the action execution and can,
consequently, be used as mask- or not_mask condition for the subsequent entries
in the same action execution.
action The stored procedure executed if all conditions were met.
param0...param9 Parameters for the stored procedure.
clear_p When set to 1, all actions with the same action_id are removed before the new one
is added.
Stored Procedure Name Parameters Description
DoCFBookAtTradeDate n/a Marks the cashflow to be booked on trade date.
DoCFBookAtValueDate n/a Marks the cashflow to be booked on value date.
DoCFCheckAccess Param0 = 'permission_id 'Checks that current user executing the action
(e.g. ACCEPT or REJECT) has the required
permission, given in param0, in the portfolio of the
transaction
DoCSetStatus Param0 = 'status name'
Param1 = 'display name
'Sets the cashflow status given in param0. Note
that the status is given as the name of the status
in table CashflowStatus
Text given in param1 is displayed in the
corresponding action button in Entity Manager
DoCClearStatus.pl Param0 = 'status name'
Param1 = 'display name
'Clears the cashflow status given in param0
Parameter Description

7 Setting up transaction and entity flow
7.7 Setting up entity broker-based flow
152 © Wall Street Systems IPH AB - Confidential
name = NEW-SUBSIDY-EVENT
and validates if the amount event being matched against the rule has the following values:
event_type = Subsidy Estimation
event_subtype = New
Other comparison operators are not_equal_to, rule.mask and rule.not_mask. The two last
operators define bit mask tests of a flag field in the entity.
For example the condition rule.mask("flags", 1, 7, 16) is true when bits 1, 7 and 16 are set in
the flags field of the entity.
7.7.4 Entity broker operations
Entity broker operations for supported entities listed above are set up in python scripts. The logic of
the entity broker-based flow setup is very similar to that of transaction flow. Operations (e.g.
ACCEPT, REJECT) are entity-specific and consist of a series of agents set up with condition calls and
parameters to achieve the required processing. Supported condition calls and agents are fewer than
in transaction flow but the basic functionality is very similar. Some of the condition calls and agents
are generic and applicable in setup of all entity flows and others are entity-specific.
7.7.4.1 Condition calls
Condition calls in entity broker operations are used as in transaction broker operations to validate
the entity for which an operation is being executed against a specific condition to be met in order for
the agent to executed.
The table below lists the condition calls that can be used in entity agent setup.
Entity
Type Condition call Setup Attributes Description
All state () ‘state_id’ (e.g.
‘TO-BE-NETTED’)
‘Minimum State id’ and ‘Maximum State id’ of the
agent setup are both set to the given state and,
consequently, the condition is met by entities in any
state where order number equals that of the given
state.
All state_at_least () ‘state_id’
(e.g. ‘GENERATED’)
‘Minimum State id’ of the agent setup is set to the
given state and, consequently, the condition is met
by entities in any state where order number is equal
to or greater than that of the given state.
All state_at_most () ‘state_id’ (e.g.
‘TO-BE-RELEASED’)
‘Maximum State id’ of the agent setup is set to the
given state and, consequently, the condition is met
by entities in any state where order number is equal
to or less than that of the given state.
All state_between () ‘min_state_id’ (e.g.
‘TO-BE-NETTED’)
‘max_state_id’ (e.g.
‘TO-BE-SPLIT’)
‘Minimum State id’ and ‘Maximum State id’ of the
agent setup are set to the given states and,
consequently, the condition is met by entities in any
state where order number is equal to or greater than
that first given state and equal to or less than that of
the second given state.
All mask () ‘bit number’ of mask ‘Mask’ of the agent setup is set to the mask value of
the given mask and, consequently, the condition is
met if the ‘current mask’ of the operation contains
given mask.
Note, that any number of mask bits separated with
commas can be listed (e.g. mask (1,2,8) and the
current mask has to contain all of them in order to
meet the condition.

7 Setting up transaction and entity flow
7.7 Setting up entity broker-based flow
TRM System Administration Guide 153
All not_mask () ‘bit number’ of mask ‘Not Mask’ of the agent setup is set to the mask
value of the given mask and, consequently, the
condition is met if the ‘current mask’ of the operation
does not contain given mask.
Note that any number of mask bits separated with
commas can be listed (e.g. mask (1,2,8) and the
current mask must not contain any of them in order
to meet the condition.
CallMoney
Account
rule () 'rule_id'
'rule service name'
'Rule id' of the agent setup is set to the given rule
and, consequently, the condition is met by the FIN
message that matches the rule.
The rule service used to match the identified rule
against the entity being processed must be given as
a parameter for this condition call. It is identified as
service/entity-broker/call-money@rule.
CallMoney
Account
not_rule () 'rule_id'
'rule service name'
'Not Rule id' of the agent setup is set to the given
rule and, consequently, the condition is met by
entities not matching the rule.
The setup is the same as for 'rule ()'
CallMoney
Account
status () 'bit number' (e.g. 0
for status with mask
value 1, 'Confirm' or 4
for status with mask
value 16, 'Limit
Violation')
'Status' of the agent setup is set to the mask value
of the given status and consequently the condition is
met by transactions with the status.
FINMessag
e
rule () 'rule_id'
'rule service name'
'Rule id' of the agent setup is set to the given rule
and, consequently, the condition is met by the FIN
message that matches the rule.
The rule service used to match the identified rule
against the entity being processed must be given as
a parameter for this condition call. It is identified as
service/entity-broker/finmesage@rule
FINMessag
e
not_rule () 'rule_id' 'Not Rule id' of the agent setup is set to the given
rule and, consequently, the condition is met by
entities not matching the rule. The setup is the same
as for 'rule ()'
Settlement rule () ‘rule_id’ (e.g.
‘SFLO-NETTING’)
‘rule service name’
‘Rule id’ of the agent setup is set to the given rule
and, consequently, the condition is met by
transactions matching the rule.
Since the same condition call is used for various
entities, the rule service used to match the identified
rule against the entity being processed must be
given as a parameter for this condition call. It is
identified as follows:
service/entity-broker/settlement@rule
for rules defined in Settlement Rule Editor, and:
service/entity-broker/settlement@amount-rule
for rules defined in Amount Rule Editor.
Settlement not_rule () ‘rule_id’ ‘Not Rule id’ of the agent setup is set to the given
rule and, consequently, the condition is met by
entities not matching the rule
The setup is the same as for ‘rule ()’
Entity
Type Condition call Setup Attributes Description

7 Setting up transaction and entity flow
7.7 Setting up entity broker-based flow
154 © Wall Street Systems IPH AB - Confidential
7.7.4.2 Agents
Agents in entity broker are used in the same way as in transaction broker, and executed when
condition calls of the agent setup are met by the entity being processed.
The table below lists agents that can be used in the setup.
Entity Type Agent Setup Attributes Description
All set_state ‘state_id’ Sets the entity state of the entity to the state
given in the setup
All send ‘queue name’
‘use_topic’
Sends the full entity on the message bus to a
specific queue for further processing
‘use_topic’ can be set to ‘True’ or False’. If not
given, it defaults to ‘False’ indicating that the
message is sent to specific ‘listener’ (e.g. the
service releasing settlements) and that the
message will be received even if the ‘listener’
is absent at the time of sending the message.
Setting this attribute to ‘True’ implies that a
message sent is a general real time message
received by whoever is ‘listening’ at the time
of sending the message
All send_id ‘queue name’
‘use_topic’
Sends the entity id on the message bus to a
specific queue for further processing. This
can be used, instead of ‘send’, when the
receiving service is going to reload the entity
data in any case based on the entity id
Other parameters are same as in send
All service ‘module name’
‘table name’
‘params’
Similar to transaction broker, python CSD
would be hooked to the flow through this
mechanism. For example
service("common/python@CSD_agent")
inserts the CSD_agent.py script in the agent
chain.
service("common/python@CSD_agent",
"CSDAgent", value1="something",
value2=10) will also save a record in the
CSDAgent table with value1="something"
and value2=10; when the hook is executed
those values are passed back to it.
All call_proc 'procedure name'
'param0' to 'param9'
passed to the
procedure as
start-up parameters
call_proc agent is used to run a stored
procedure for the entity. The name of the
procedure is given as an attribute to the
agent together with any values passed to the
procedure to be used as start-up parameters.
All call_op 'operation_id' A special agent used to execute an operation
from inside another one.
Masks are not shared across operations, but
when an external operation is called using
the call_op agent, the new operation is
started with an empty mask. Consequently, if
mask or not_mask condition calls are used in
the setup inside the new operation, the
current mask of the original operation is
ignored, and a new one is started for the
called operation.
All txn_begin n/a Opens a database transaction

7 Setting up transaction and entity flow
7.7 Setting up entity broker-based flow
TRM System Administration Guide 155
All txn_prepare n/a Prepares 2nd phase of the db transaction
All txn_commit n/a Commits a database transaction
All update_entity n/a Updates the transaction in the database
AmountEvent service/entity-board/
amount-event@save-
amount-event
n/a Saves the Amount Event in database
CallMoneyAccou
nt
set_status 'bit number' of the
status
Sets the status given in the setup for the call
money/account transaction.
CallMoneyAccou
nt
clear_status 'bit number' of the
status
Clears the status given in the setup for the
call money/account transaction.
CallMoneyAccou
nt
refresh_call_transacti
on
n/a The refresh_call_transaction agent refreshes
the memory version of the transaction during
execution of the operation against the
database. It is typically used after executing
a call_proc agent resulting in an update of
the transaction in the database to
synchronize the memory version of the
transaction with the updated database
version. This has the following benefits:
• refresh_call_transaction executed after a
call_proc agent makes it possible to take
updated values into account when
evaluating condition calls (for example,
via rule matching) of any later agents
during the same execution of an
operation.
• refresh_call_transaction executed after a
call_proc agent includes updated values
in the real time notification sent from the
operation. For example, if a specific
transaction parameter field was updated
by a call_proc agent as part of the
operation, this value will be updated in all
real time applications displaying the
transaction.
CallMoneyAccou
nt
send_call_number 'queue name'
'use_topic'
Sends the call money/account transaction
number on the message bus to a specific
queue for further processing. For example,
"settlement.transaction.generate" in order to
generate settlements. This agent is a
particular implementation of the general
'send_id' applied to the call money/account
context. Other parameters are the same as in
send.
CallMoneyAccou
nt
service/entity-board/
call-money@new-au
dit-number
n/a Assigns an owner-specific audit number to a
call money/account transaction if it does not
exist already
CallMoneyAccou
nt
service/entity-board/
call-money
@notify-transaction
n/a Sends a real time notification of Call
Money/Account transaction to transaction
based applications like Transaction Manager
and Treasury Monitor
Entity Type Agent Setup Attributes Description

7 Setting up transaction and entity flow
7.7 Setting up entity broker-based flow
156 © Wall Street Systems IPH AB - Confidential
CallMoneyAccou
nt
service/entity-board/
call-money
@update-transaction
n/a Saves the Call Money/Account transaction in
the database
CallMoneyAccou
nt
check_4_eyes_call_tr
ansaction
'user_id' 'user_id' can be a user's ID or a user group.
Prevents a user from performing the same
transaction flow operation twice. This agent
will stop the current operation if its previous
execution was triggered by the same user.
When the optional 'user_id' parameter is
supplied, the validation is limited to this
particular user or user group. When this
parameter is absent, validation is performed
for all users.
CallMoneyAccou
nt
log_call_event n/a Enables logging of transaction flow events.
Results are saved in the TransactionEvent
table. This agent is a prerequisite for the
'check_4_eyes_call_transaction' agent.
CallMoneyAccou
ntMovement
check_4_eyes_call_
movement
'user_id' This agent is similar to the
'check_4_eyes_call_transaction' but it
applies to the movements flow instead of
transactions.
CallMoneyAccou
ntMovement
log_call_movement_
event
n/a Enables logging of call money/account
movements flow events. Results are saved in
the TransactionEvent table. This agent is a
prerequisite for
'check_4_eyes_call_movement' agent.
CashRecord com.wss.workflow.ag
ents.setState.xml
'state_id' Sets the state of the CMM cash record to the
state given in the setup
Note, that whereas cash record flow in CMM
uses the generic entity flow setup, the actual
processing is not done by entity broker but
by corresponding functionality in CMM
FINMessage service/entity-broker
/finmessage@set_sta
tus
'bit number' of the
status
Sets FINMessage status. Supported status
are:
0 - 'SENDING'
1 - 'SENT'
2 - 'URGENT'
3 - 'STP'
FINMessage service/entity-broker
/finmessage@clear_s
tatus
'bit number' of the
status
Clears FINMessage status ()
FINMessage service/entity-broker
/finmessage@save
n/a Saves the FIN message in the database
FINMessage service/entity-broker
/finmessage@send-fi
nmessage
'queue name'
'use_topic'
Sends the full FIN Message on the message
bus to a specific queue for further processing
Parameters are the same as in generic 'send'
agent
Fixing service/entity-board/
fixing@save-fixing
n/a Saves the Fixing in database
HedgeRelation service/entity-board/
hedge-manager@che
ck-designation
n/a Checks the total designation of all
transactions being part of the hedge relation.
Displays a warning message if the total
designation exceeds 100%
Entity Type Agent Setup Attributes Description

7 Setting up transaction and entity flow
7.7 Setting up entity broker-based flow
TRM System Administration Guide 157
HedgeRelation service/entity-board/
hedge-manager@che
ck-events
n/a Checks the hedge events and displays a
warning message if some of them are already
processed
HedgeRelation service/entity-board/
hedge-manager@vali
date
n/a checks that the hedge relation is valid (there
is at least one hedge and one underlying
transaction as well as hedge types specified
for all defined risks). If the validation fails
error message is displayed and hedge
relation is not saved
HedgeRelation service/entity-board/
hedge-manager@sav
e
n/a Saves the Hedge Relation in database
MessageRequest service/entity-board/
message-manager@
process-provisional
n/a Processes and sends messages of message
request.
This service is used in message flow when
message request is initially generated into a
provisional state for manual validation to
trigger the actual message processing when
request is accepted to a post-provisional
state
MessageRequest service/entity-board/
message-manager@s
ave
n/a Saves the Message Request in the database
PaymentAdvice service/entity-board/
payment@make-acco
unting-inputs
n/a Creates accounting inputs from a payment
advice
PaymentAdvice service/entity-board/
payment@cancel-acc
ounting-inputs
n/a Cancels accounting inputs from a payment
advice
PaymentAdvice service/entity-board/
payment@save-pay
ment-advice
n/a Saves the Payment Advice in database
PaymentAlloc service/entity-board/
allocation@make-acc
ounting-inputs
n/a Creates accounting inputs from a payment
allocation
PaymentAlloc service/entity-board/
allocation@cancel-ac
counting-inputs
n/a Cancels accounting inputs from a payment
allocation
PaymentAlloc service/entity-board/
allocation@cancel-lp
pr
n/a Cancels all late payment penalty realization
transactions affected by the payment
allocation
PaymentAlloc service/entity-board/
allocation@reject-pa
yment-alloc
n/a Unallocates all cashflows and payments of
the Payment Allocation
PaymentAlloc service/entity-board/
allocation@save-pay
ment-alloc
n/a Saves the Payment Allocation in database
PaymentRem service/entity-board/
payment-reminder@
save-payment-remin
der
n/a Saves the Payment Reminder in database
Entity Type Agent Setup Attributes Description

7 Setting up transaction and entity flow
7.7 Setting up entity broker-based flow
158 © Wall Street Systems IPH AB - Confidential
7.7.4.3 Service queues
Various ‘send’ agents above are used to send the respective entities to be further processed by
another service.
The table below lists service queues that are currently used in the setup.
Settlement check_4_eyes_accep
t_settlement ()
'user_id' 'user_id' can be a user's ID or a user group.
Prevents a user from accepting the
settlement twice. When used in the flow, this
agent will stop the ACCEPT operation if its
previous execution was triggered by the
same user.
When the optional 'user_id' parameter is
supplied, the validation is skipped for this
particular user or user group.
When this parameter is absent, validation is
performed for all users.
Settlement reset_4_eyes_accept
_settlement ()
n/a This agent should be used in the flow for the
REJECT operation. It resets the 4 eyes
principal when the settlement is rejected so
that the check is correctly done in the next
ACCEPT operation by the agent
'check_4_eyes_accept_settlement ()'.
Settlement set_settlement_state ‘state_id’ sets the state of the settlement to the state
given in the setup
Settlement service/entity-broker
/settlement@cmm-ac
cept
n/a sends the settlement to CMM for further
processing
Settlement service/entity-broker
/settlement@cmm-re
ject
n/a rejects the existing CMM cash record created
off the settlement
Settlement service/entity-broker
/settlement@save
n/a Saves the settlement in database
Settlement service/entity-broker
/settlement@send-se
ttlement
‘queue name’
‘use_topic’
Sends the full settlement on the message bus
to a specific queue for further processing
Parameters are the same as in generic ‘send’
agent
Entity Type Agent Setup Attributes Description
Entity Type Queue Name Description
All document.entity Creates a message request from the entity:
• in the identified message type
• into the identified message state
The same queue is used for all entity types for which
message requests can be generated
AmountEvent commitment-fee.amount-even
t.accept
Updates an existing commitment fee transaction by adding
the effect of an amount event. This service is normally
used for amount events when they are accepted to a final
state
AmountEvent commitment-fee.amount-even
t.reject
Updates an existing commitment fee transaction by
removing the effect of an amount event. This service is
normally used for amount events when they are rejected
from a final state

7 Setting up transaction and entity flow
7.7 Setting up entity broker-based flow
TRM System Administration Guide 159
7.7.5 Entity Manager Modes
Entities processed in various entity flows are accessed and processed by the users in Entity Manager
applications in a similar manner to transactions in Transaction Manager. As in Transaction Manager,
modes are used to describe in more detail which entities can be accessed in the application and how
they can be processed in it. Entity Modes are defined in the following tables:
•EntityMode
•ModeColumn
•ModeAction
CallMoneyAccou
nt
settlement.transaction.generat
e
Creates settlements from a call money/account
transaction.
CallMoneyAccou
nt
call-money-account.realtime Sends a real-time notification from the call money/account
to entity manager applications
FINMessage finmessage.realtime Sends a real-time notification from the FINMessage
FINMessage finmessage.send Sends messages to the SWIFT network
FINMessage finmessage.to.trmswift Imports a message to TRMSwift
FINMessage match.checker Updates the confirmation matching status of the
transaction related to the FIN message placed on the
queue. The confirmation matching status will be based on
all relevant message for the transaction (i.e. if you haven't
received the status for all messages for an FX Swap, then
the transaction can't yet be considered matched)
HedgeRelation hedge-relation.realtime Sends a real-time notification from the hedge relation
MessageRequest document.realtime Sends a real-time notification from the message request
Settlement settlement.realtime Sends a real-time notification from the settlement
Settlement settlement.released.id Releases the settlement
Settlement settlement.rule-netting.settle
ment.id
Processes netting for the settlement
Settlement settlement.splitting.ids Processes splitting for the settlement
Settlement settlement.trmswift.cancel Processes swift cancellation messages for the settlement
Settlement settlement.trmswift.mt1 Processes swift MT100 series messages for the settlement
Settlement settlement.trmswift.mt2 Processes swift MT200 series messages for the settlement
Settlement settlement.trmswift.mt3 Processes swift MT300 series messages for the settlement
Settlement settlement.trmswift.mt5 Processes swift MT500 series messages for the settlement
Settlement settlement.trmswift.mt6 Processes swift MT600 series messages for the settlement
Settlement settlement.trmswift.mt9 Processes swift MT900 series messages for the settlement
Entity Type Queue Name Description
7 Setting up transaction and entity flow
7.7 Setting up entity broker-based flow
160 © Wall Street Systems IPH AB - Confidential
Note that only the main mode table is specific for entity modes, whereas column- and action tables
are shared with Transaction Manager Mode definitions
7.7.5.1 Loading default modes
The system is released with default entity manager mode setup for the various entities. There are
no separate setup scripts for entity modes but all mode setup is distributed as part of the generic
SQL script used for the entity. These scripts, listed above already, can be used to load both
distributed entity state and entity mode setup used to for the respective entity.
7.7.5.2 Setting up modes
Modes are configured the generic entity setup scripts found in $FK_HOME\share\<database>\setup.
These scripts execute the following stored procedures:
•SetupEntityMode
•SetupModeColumn
•SetupModeAction
To create mode entries using the parameters given in the script as e.g. follows:
/* Mode RELEASE for manual and automatic release of settlements */
exec SetupEntityMode @mode_id='RELEASE',
@minimum_state_id="MANUAL-RELEASE",
@maximum_state_id="TO-BE-RELEASED",
@new_state_id='',
@grant_p=1,
@action_grant_p=1,
@user_id='',
@entity_type='Settlement'
go
SetupModeColumn and SetupModeAction are already documented under Transaction Manager
Mode.
The fields of the SetupEntityMode procedure used in the script are given in the table below.
Parameter Description
entity_type Entity for which the mode is to be used (e.g. “Settlement” or “FINMessage”)
mode_id The Mode ID to setup.
add_p This parameter indicates whether information should be added to the Mode definition
in the Mode and ModeColumn tables by overwriting the old data (=0) or adding the
new data on to the old data (=1).
user_id When defining a mode for accessible by certain users only, this parameter can be used
to identify a user or user group ID to whom permission to the mode is granted
state_id The explicit entity state of the mode. Note, that a list of specific states separated with
spaces can be given as a value for the parameter e.g. VERIFY MANUAL-RELEASE
If this parameter is used, a single mode entry is created by the procedure for each
identified state
minimum_state_id When defining a mode for a range of transaction states, this is the state with the
lowest order number. If this parameter is used, a separate mode entry is created by
the procedure for each state where order number is equal to or greater than that of
the identified state
maximum_state_id When defining a mode for a range of transaction states, this is the state with the
highest order number. If this parameter is used, a separate mode entry is created by
the procedure for each state where order number is equal to or less than that of the
identified state
7 Setting up transaction and entity flow
7.7 Setting up entity broker-based flow
TRM System Administration Guide 161
7.7.6 Setup scripts and database objects
The following table summarizes the database objects which define the entity flow and modes. It
does not include scripts or objects used for transaction flow setup.
ignored_state_flags When defining a mode for a range of transaction states, this parameter can be used to
identify flags values of states to be ignored. If this parameter is used, mode entries
are not made for any states which have the specified flags. Unless specified, state flag
CANCELED_P is used.
new_state_id A new entity created from this mode will have this state.
grant_p If this field = 1, columns in the entity manager of this mode cannot be edited unless
they are specified in the ModeColumn table via the columns parameter of
SetupEntityMode or SetupModeColumn procedures. (See ModeColumn table.)
columns Columns listed here are exceptions to general grant_p setting as explained above.
Note, that a list of columns separated with spaces can be given as a value for the
parameter and that columns in several Entity Manager Views can be identified here by
adding the ‘Entity Type’ as a prefix to column definition e.g. as follows:
Settlement/amount Settlement/local_account_1_id
If no entity type is specified (i.e. no prefix is given in the field), value given in
parameter ‘entity_type’ is used as a default.
If entity type contains some spaces, spaces must be replaced by ‘_’. For example,
setting column ‘param_0’ on entity type ‘Settlement Detail’ will be done by
‘Settlement_Detail/param_0’
Note also, the maximum length of the string given as a value for this parameter is 255
characters. When a large number of columns must be identified, it is also possible to
use procedure SetupModeColumn which can be run any number of times for the same
mode to create a large number of entries to ModeColumn.
action_grant_p If this field = 1, actions (e.g. Net Settlement, Undo Netting) cannot be executed
unless they are specified in the ModeAction table via the SetupModeAction procedure.
If this field = 0, all actions can be executed except those specified in the ModeAction
table.
Parameter Description
Object Type Description
amount_event_flow.sql Sql script Creates entity states and entity modes for processing amount
events in the database by running stored procedures
SetupEntityState, SetupEntityMode, SetupModeColumn, and
SetupModeAction with parameters given in the script.
amount_event.py Python script Creates entity broker operations and rules for processing
amount events with agent setup given in the script.
call_money_account_flow.
sql
Sql script Creates entity states and entity modes for processing call
money and call account transactions and movements in the
database.
call_money_account.py Python script Creates entity broker operations for processing money and
call account transactions and movements with agent setup
given in the script.
cashflow_action.sql Sql script Creates cashflow actions used in processing call money and
call account movements in the database.
status.sql Sql script Creates cashflow status used in processing call money and
call account movements in the database. Note that the same
script is used for creating transaction status for transaction
processing.

7 Setting up transaction and entity flow
7.7 Setting up entity broker-based flow
162 © Wall Street Systems IPH AB - Confidential
finmessage.sql Sql script Creates entity states and entity modes for processing FIN
messages in the database.
finmessage.py Python script Creates entity broker operations for processing FIN messages
with agent setup given in the script.
fixing_flow.sql Sql script Creates entity states, entity actions, entity rules and entity
modes for processing fixing entities in the database.
fixing.py Python script Creates entity broker operations for processing fixing entities
with agent setup given in the script.
hedge_relation.sql Sql script Creates entity states and entity modes for processing hedge
relations in the database.
hedge_relation.py Python script Creates entity broker operations and rules for processing
hedge relations with agent setup given in the script.
message_flow.sql Sql script Creates entity states and entity modes for processing
message requests in the database.
message_manager.py Python script Creates entity broker operations for processing message
requests with agent setup given in the script.
payment_alloc_flow.sql Sql script Creates entity states and entity modes for processing
payment allocations in the database.
payment_allocation.py Python script Creates entity broker operations for processing payment
allocations with agent setup given in the script.
payment_flow.sql Sql script Creates entity states and entity modes for processing
payment advices in the database.
payment_advice.py Python script Creates entity broker operations for processing payment
advices with agent setup given in the script.
payment_rem_flow.sql Sql script Creates entity states and entity modes for processing
payment reminders in the database.
payment_reminder.py Python script Creates entity broker operations and rules for processing
payment reminders with agent setup given in the script.
settlement.sql Sql script Creates entity states and entity modes for processing
settlements in the database.
settlement.py Python script Creates entity broker operations for processing settlements
with agent setup given in the script.
EntityState Table Contains all entity states.
SetupEntityState Stored Procedure Inserts information in the EntityState table.
EntityMode Table Contains all entity actions used in entity action based flows.
SetupEntityMode Stored Procedure Inserts information in the EntityState table.
EntityOp Table Contains the header definition of entity operations
EntityOpAgent Table Contains the agent definition of all entity operations.
EntityRulesHeader Table Contains the header definition of entity rules
EntityRule Table Contains the condition definition of all entity rules.
EntityModeAction Table Contains all entity mode action entries.
CommitEntityModeAction Stored Procedure Inserts information in the EntityModeAction table.
Object Type Description

7 Setting up transaction and entity flow
7.8 Setting up loan entity action-based flow
TRM System Administration Guide 163
7.8 Setting up loan entity action-based flow
The main difference between entity broker-based flow and loan entity action-based flow is in the
methodology used to execute operations like ACCEPT and REJECT. Instead of entity broker
operations, these are modeled as actions executed in the database. The setup is also somewhat
simpler because loan entities are processed in editor applications not connected to a mode.This
modeling of the flow is used only for the following ‘semi-static’ CLM entities:
•Facility
•Approval
•Mandate
Setup for all these entities is done using the following scripts found in
$FK_HOME\share\<database>\setup.
•loan_entity_flow.sql
•loan_validation_method.sql
loan_entity_flow.sql is used to manage the setup of the actual flow and
loan_validation_method.sql is used to define transaction flow-dependent validation methods used in
some Facility setup. A validation method is linked to a Drawdown Condition setup in a facility and
controls at which point in the drawdown transaction flow the condition is validated against the
drawdown.
7.8.1 Loan Entity States
Setup script loan_entity_flow.sql is used for setting up loan entity states, loan entity rules and loan
entity actions required for processing the respective entities.The scripts executes stored procedure
SetupLoanEntityState to create state entries using the parameters given in the script as e.g.
follows:
exec SetupLoanEntityState
@id = "PROVISIONAL",
@name = "Provisional"
go
The fields of the SetupLoanEntityState procedure used in the script are given in the table below.
The table below lists the flag values available for loan entity states.
Parameter Description
id The ID of the state.
name Name to be shown in the State field of respective editor.
flags Flags which can be used to link a characteristic to any entities in this state or, in some cases, to
any entities in this or a later state in the flow. Most typically flags are used to control which data
of a facility entity can be edited in a particular state.
Value Name Description
1 PROVISIONAL The threshold after which entities become provisional.
2 FINAL The threshold after which entities become final.
4 AMEND-HEADER Header setup of a facility in a state with this flag can be
edited in Facility Editor.
8 AMEND-ALL All setup of a facility in a state with this flag can be edited in
Facility Editor.
16 AMEND-INSTRUMENTS Instruments setup of a facility in a state with this flag can be
edited in Facility Editor.

7 Setting up transaction and entity flow
7.8 Setting up loan entity action-based flow
164 © Wall Street Systems IPH AB - Confidential
7.8.2 Loan Entity Rules
Loan entity actions may use loan entity rules as conditions in loan action entries. There is no Entity
Rule Editor in the system and, if rules are needed in Entity Actions, they must be set up as part of
the setup script using the procedure SetupLoanEntityRule as shown in this example:
/* Rule validating presence of Signature Date in a Facility */
exec SetupLoanEntityRule
@id = "SIGNATURE-DATE-MISSING",
@entity_type = "Facility",
@param0 = "signature_date",
@value0 = null,
@flags = 1 /* VALIDATE EMPTY AS NULL" */
go
The above rule validates whether the facility being processed has a value in field 'signature date'.
7.8.3 Loan Entity Actions
Loan entity actions for each entity are configured using the same setup scripts by executing the
stored procedure SetupLoanEntityAction as shown in this example:
exec SetupLoanEntityAction
@action_id = "ACCEPT",
@entity_type = "Facility",
32 AMEND-TRANSACTION-TEMPLATES Transaction Templates setup of a facility in a state with this
flag can be edited in Facility Editor.
64 AMEND- FUNDING-TYPES Funding Types setup of a facility in a state with this flag can
be edited in Facility Editor.
128 AMEND-DD-CONDITIONS Drawdown Conditions setup of a facility in a state with this
flag can be edited in Facility Editor.
256 AMEND- SUBLIMITS Sublimits setup of a facility in a state with this flag can be
edited in Facility Editor.
512 AMEND-TRANCHES Tranches setup of a facility in a state with this flag can be
edited in Facility Editor.
1024 AMEND-MANDATES Mandates setup of a facility in a state with this flag can be
edited in Facility Editor.
2048 AMEND-OWNERS Owners setup of a facility in a state with this flag can be
edited in Facility Editor.
4096 AMEND-COUNTERPARTIES Counterparties setup of a facility in a state with this flag can
be edited in Facility Editor.
8192 AMEND-BENEFICIARIES Beneficiaries setup of a facility in a state with this flag can be
edited in Facility Editor.
16384 AMEND-GUARANTORS Guarantors setup of a facility in a state with this flag can be
edited in Facility Editor.
32768 AMEND-LOCATIONS Locations setup of a facility in a state with this flag can be
edited in Facility Editor.
65536 AMEND-DD-CURRENCIES Drawdown Currencies setup of a facility in a state with this
flag can be edited in Facility Editor.
131072 AMEND-DD-PARATETERS Drawdown parameters setup of a facility in a state with this
flag can be edited in Facility Editor.
262144 NON-EDITABLE Entity in a state with this flag cannot be edited.
Value Name Description
7 Setting up transaction and entity flow
7.8 Setting up loan entity action-based flow
TRM System Administration Guide 165
@current_state_id = "PROVISIONAL",
@not_mask = 1,
@action_mask = 1,
@action = "DoLoanEntitySetState",
@param0 = "PENDING-SIGNATURE"
go
Loan entity actions are setup with conditions like 'state_id' used in a similar manner to condition
calls in entity broker based flows and, when conditions are met, they execute stored procedures that
perform the necessary processing of the transactions in the database. These stored procedures are
used to accomplish similar things as agents do in entity broker-based flows.
The fields of the SetupLoanEntityAction procedure used in the script are given in the table below.
The table below lists stored procedures available as 'actions' to be used in entity action setup.
Parameter Description
entity_type Loan entity for which the action is to be used (e.g. 'Facility' or 'Mandate').
action_id The Action ID of the setup (e.g. 'ACCEPT').
current_state_id The loan entity state of the action (e.g. 'PROVISIONAL'). Action can only be executed for
loan entities in this state.
rule_id Loan entity rule which the entity must match as a condition for the action entry to be
executed.
not_rule_id Loan entity rule which the entity must not match as a condition for the action entry to be
executed.
mask When executing a chain of loan action entries in the same action id (e.g. 'ACCEPT'), current
mask is maintained within the action in the same way it is maintained in an entity broker
operation execution discussed earlier. The 'current mask' can be used as a condition for
executing any actions.
If 'mask' is given, the condition is met if the 'current mask' of the action execution contains
the given mask. Note, that in loan entity action setup, mask cannot be given as a 'bit
number' but must always be given as mask value (e.g. bit number 4 corresponding to mask
value 16 must always be given as '16').
not_mask If 'not_mask' is given, the condition is met if the 'current mask' of the action execution
does not contain the given mask.
action_mask If the conditions are met and the action entry is executed, the mask value given in this
parameter is added to the 'current mask' of the action execution and can, consequently, be
used as mask- or not_mask condition for the subsequent entries in the same action
execution.
action The stored procedure executed if all conditions were met.
param0 Parameter 0 passed on to the stored procedure when executing it.
Param1 Parameter 1 passed on to the stored procedure when executing it.
Stored Procedure Name Parameters Description
DoLoanEntityCheckAccess Param0 = 'permission id 'Validates that current user executing the action (e.g.
ACCEPT or REJECT) has the required permission given
in Param0 in the portfolio of the loan entity.
DoLoanEntitySetState Param0 = 'state_id 'Sets the state of the loan entity to one given in
Param0.
7 Setting up transaction and entity flow
7.9 Setting up transaction and settlement comments
166 © Wall Street Systems IPH AB - Confidential
7.8.4 Setup scripts and database objects
The following table summarizes the database objects which define the loan entity action-based flow.
Note that it does not repeat scripts or objects used for transaction broker- or entity broker-based
flow setup.
7.9 Setting up transaction and settlement comments
Transaction and/or settlement comments can be added automatically by the flow, using the
transaction agent for transaction comments and the settlement agent for settlement comments. The
agent is executed on a state transition (for example between OPEN and VERIFY).
To add comments directly, you can use one of the scripts in the following locations:
%FK_HOME%\share\python\entity-flow\settlement.py
%FK_HOME%\share\python\flow\commit.py
An example for commit.py:
(optional(),
service('service/comment@transaction-comment')),
An example for settlement.py: to execute the agent when ACCEPTING, put the following lines in the
ACCEPT section.
(state ('GENERATED'),
service('service/comment@settlement-comment')),
By default it is not possible to edit the comments in Settlement Processing. Check the setting in
EntityMode. If grant_p is 1, the setting in ModeColumn determines if a column is editable. If
grant_p is set to 0, the setting in SettlementComment.xml determines this (set to False/True).
Example for SettlementComment.xml
<view name="Settlement Comment" entity-name="SettlementComment"
xmlns:xsi="http://www.w3.org/2001/XMLSchema-instance"
Object Type Description
loan_entity_flow.sql Sql script Creates loan entity states, loan entity actions and loan
entity rules for processing facilities, mandates and
approvals in the database by running stored procedures
SetupLoanEntityState, SetupLoanEntityAction, and
SetupLoanEntityRule with parameters given in the script.
loan_validation_method.sql Sql script Creates validation methods in the database by running
stored procedure SetupValidationMethod
LoanEntityState Table Contains all loan entity states.
SetupLoanEntityState Stored Procedure Inserts information in the LoanEntityState table.
LoanEntityAction Table Contains all loan entity actions.
SetupLoanEntityAction Stored Procedure Inserts information in the LoanEntityAction table.
LoanEntityRule Table Contains all loan entity rules.
SetupLoanEntityRule Stored Procedure Inserts information in the LoanEntityRule table.
ValidationMethod Table Contains all validation methods.
SetupValidationMethod Stored Procedure Inserts information in the ValidationMethod table.
7 Setting up transaction and entity flow
7.9 Setting up transaction and settlement comments
TRM System Administration Guide 167
xsi:noNamespaceSchemaLocation="View.xsd">
<column name="name_id" type="STRING" width="20" editable="false">
<label>Id</label>
</column>
<column name="value" type="STRING" width="60" case-sensitive="true"
editable="true">
<label>Value</label>
For the XML configuration to take effect, the following SQL has to be executed. The
state/mode/columns can be configured as part of the implementation.
fk_home/share/dbms/setup/settlements.sql:
DECLARE dummyRet NUMBER;BEGIN dummyRet := SetupEntityColumn( Pmode_id =>'ADMIN',
Pstate_id =>'GENERATED',
Puser_id =>' ',
Pentity_type =>'Settlement',
Pcolumns => 'SettlementComment/value');
END;
7 Setting up transaction and entity flow
7.9 Setting up transaction and settlement comments
168 © Wall Street Systems IPH AB - Confidential
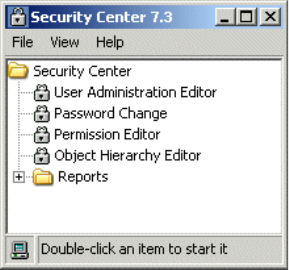
TRM System Administration Guide 169
Chapter 8 Controlling user access
This section explains the administration tasks required to control user access to the TRM database
and also the user permissions on specific objects within that database. Most of these tasks can be
performed using Security Center, which is available from Application Manager:
8.1 Managing TRM users
Most TRM user management can be done with the User Administration Editor in Security Center. See
8.7.1 User Administration Editor on page 174.
The following tables are used for TRM users:
•UserLoginInfo: contains login information such as password expiry.
•UserProfile: contains user profile data, such as menu files.
8.1.1 Creating TRM user accounts
To create a TRM user, first create an operating system login for that user in the environment where
the user logs in. Depending on your specific setup, this can be on a standalone Windows workstation
or a Windows domain.
Each user must be created in the specific database that they will be using (normally the TRM
production database) and assigned to a specific group. Use the User Administration Editor to do this,
which also creates database server logins automatically.
The user ID is upper case on Oracle, on Sybase, and on MSSQL except for Trusted users, where it is
case-sensitive.
8.1.2 Deleting a TRM user account
Users can be deleted from the TRM database in the User Administration Editor. This method
automatically drops the user’s database server login as well, as long as that login ID is not still in
use in another database on the server.
When a user account is dropped, the transactions entered with that userid remain in the system.
When a deleted is re-used for a different user, that user will see the transactions previously entered.
To avoid this, you should lock unused user IDs.
8 Controlling user access
8.2 User groups
170 © Wall Street Systems IPH AB - Confidential
8.1.3 Locking a TRM user account
It is possible to lock an account so that the user cannot log in. Use the User Administration Editor to
do this, and select the “Locked” switch.
8.1.4 Setting the System Security Officer role
To manage other users, a user must have the System Security Officer role. This role allows
unrestricted access.
•MSSQL
The System Security Officer role is implemented with the database securityadmin and
sysadmin roles. They are granted to a specified login with the following commands:
exec sp_addsrvrolemember @rolename="securityadmin", @loginame="<login>"
exec sp_addsrvrolemember @rolename="sysadmin", @loginame="<login>"
•Sybase
The System Security Officer role is implemented with the database sso_role role. It is granted
to a specified login with the following command:
exec sp_role ‘grant’, ‘sso_role’, <login>
•Oracle
The System Security Officer role is implemented with the database sso_role role. It is granted
to a specified user with the following command:
grant sso_role to <user>
8.2 User groups
Most TRM user group management can be done with the User Administration Editor in Security
Center. See 8.7.1 User Administration Editor on page 174. The following TRM tables are used for
TRM groups:
•UserProfile: contains group data, such as menu files
•UserGroupTree: contains users, groups and groups dependencies.
8.2.1 Default user groups in TRM
The default groups in TRM and their permissions are given below.
The dealer group can:
•Put in new transactions
•Update market information.
The backoffice group can:
•Use most of the editors, except Portfolio Editor
•Freeze and update market information
•Do payments.
The admin group can do all operations.
Object permissions are granted to the default groups when the objects (tables or procedures) are
being set up in the build program. The object permissions can be viewed and, if necessary,
changed in Permission Editor (available from Security Center).
8 Controlling user access
8.3 Password expiry
TRM System Administration Guide 171
8.2.2 Assigning users to a group
Users are assigned to a group when the user IDs are created in the database. (See 8.1.1 Creating
TRM user accounts on page 169.) Each user can be assigned to several groups. Other groups are
given in the Group page of the User Administration Editor.
8.3 Password expiry
To enable password expiry overall in TRM, the password expiry parameter in the Configuration
table must be set. By default, this field contains a value of 0, which means that passwords will never
expire. This table can be modified by using the Configuration Table Editor (available from Application
Manager). For example, if you want user passwords to expire monthly, set this field to 30 (days).
When creating a user in User Administration Editor, it is possible to specify a different Expiry. If no
expiry is explicitly given, it is defaulted to creation date plus the value of the password expiry
parameter (zero means "never").
The password expiry warning parameter in the Configuration table is used to define the number of
days before the password expires when a warning is issued to the user. The default value is 7 days.
The minimum password change parameter in the Configuration table sets the minimum number of
days between password changes. For example, if it is set to 7 (days), and you change your
password today, you have to wait one week until you can change it again. The default value is 0.
8.4 Domains
The purpose of domains is to restrict the data that each user can see or modify within the same
database. Domains are mainly used for "static" information such as portfolios, clients and
instrument definitions. For example, if an organization has one treasury center in the USA and
another in Europe, you can set up two domains (USA and Europe) to prevent users in one domain
from accessing data in another domain.
Users do not belong to domains but have domain permissions. They are not restricted to one
domain, but can have permissions on several domains. These permissions can be defined in the
User Administration Editor in Security Center.
You can add, modify or delete domains in the Domain Editor (available from Application Manager).
8.5 Permissions
All permissions that are allowed (for example CREATE or MODIFY) are defined in the Permission
table. These permissions are used in the definition of access rights to database objects in the
ObjectPermission table and also for the portfolio permissions for each user in the PortfolioAccess
table (see the following section). This section describes how to configure the object permissions.
8.5.1 Setting up the object permissions
It is assumed that the users only access data through the TRM applications. Each time a user tries to
access an object in the database, the procedure HavePermission is run which checks the entries in
the ObjectPermission table. It verifies whether the user or the group has permissions on an object.
The access rights to database objects for users and/or groups can be set up in Permission Editor (in
Security Center). User permissions have priority over group permissions; if the user has a different
permission to the group then it is the user permission that is used.
8 Controlling user access
8.6 Limiting access to activity types
172 © Wall Street Systems IPH AB - Confidential
The following stored procedures are useful for defining and verifying the user's permission:
•HelpObjectPermission
•GrantObjectPermission
•RemoveObjectPermission
•RevokeObjectPermission
Revoke disables the permission (permission is then inherited from the parents); Remove removes it
from the table.
8.5.2 Domain permission
8.5.3 Portfolio access
Portfolio permissions for users are described in 7.3.1 Setting permissions on page 106.
8.5.4 Mode permissions
It is possible to set mode permissions for users and groups.
8.5.5 Payment mode permissions
The permissions on the payment acceptance modes for Settlement Manager are set up in
share/<database>/setup/cash.sql. We recommend that any changes you make to these
permissions are made in this file, so that you will be able to keep track of the changes.
However, it is possible to modify these permissions with the following stored procedures:
•CommitPaymentModePermission
•RemovePaymentModePermission
8.6 Limiting access to activity types
Activity modes have the same basic principle as transaction manager modes: they can be used to
limit access to certain activities. For example you may want only back-office people to be able to run
certain accounting activities.
Activity modes can be set up for specific users or for domains.
The activity mode is included in the start-up of the Activity Manager in the same way as a
transaction mode is used in the start-up of any transaction manager:
FKActivityManager.exe --mode <mode_name>
Activity modes are set up in Activity Mode Editor following this procedure:
1. From Application Manager, open Activity Mode Editor.
2. In the ID field, enter an ID for the activity mode. Remember that the ID must be unique to this
activity mode.
3. If you are controlling access by domain rather than by user, select the domain in which this
activity mode applies. (If you are controlling access for the user you are currently logged on as,
leave this field blank.)
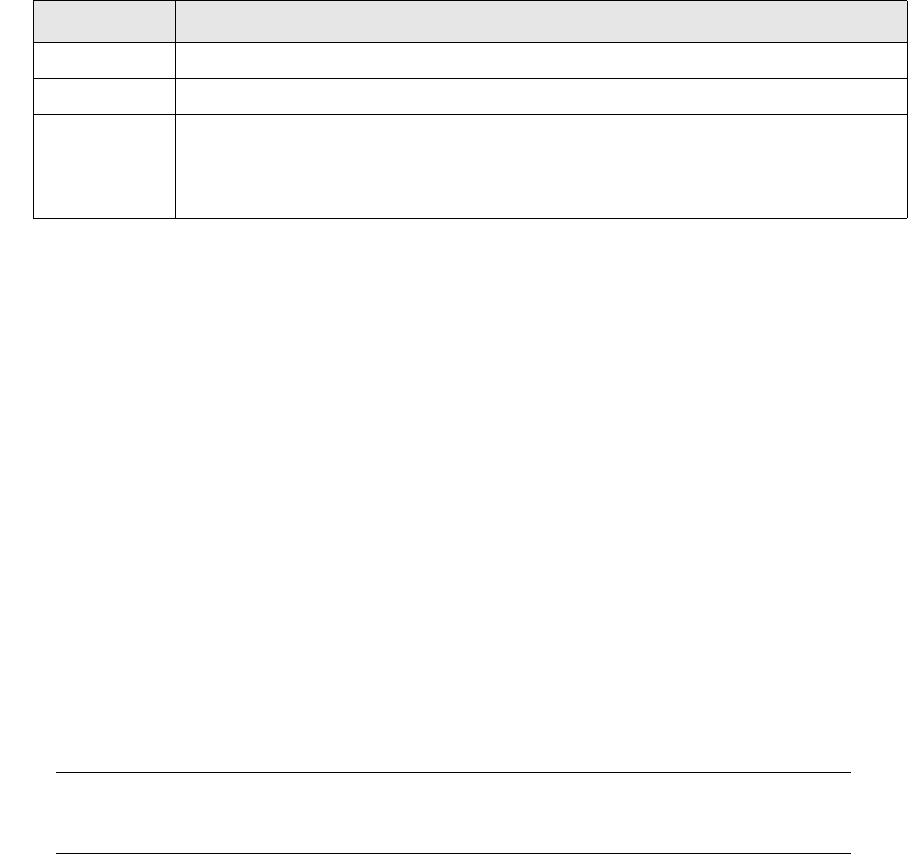
8 Controlling user access
8.7 Using Security Center
TRM System Administration Guide 173
4. The following switches determine what the individual user or domain can do with the activity
types added to the Type field:
5. In the Type page, select the desired activity type from the pull-down list, then click Add.
6. Save the whole activity mode definition using the Save button (or File - Save) or the Save As
button (or File - Save As New).
8.7 Using Security Center
Security Center automates some of the security tasks required for TRM. It includes the following
functionality:
•User Administration Editor
This application handles the setup of users and user groups in TRM (all users must belong to a
user group). You can define user groups and users, and add the users to groups. Users can also
be modified or deleted from the database. In Permission Editor you can define who has access to
User Administration Editor. The user administrator must have the System Security Officer role to
access the User Administration editor.
A TRM user can log into the application using a password. This user is directly linked to the
database user (or database login). Security Center allows the administrator to grant rights on
database objects and set password expiration, user locking and other technical security features.
Note: Neither Security Center nor Admin Center require a login if trusted connections are
activated and the user is a trusted user. See the WSS Suite Installer Guide, search for
FK_TRUSTED_CONNECTION.
In User Administration Editor, the administrator can set up security at more functional levels:
–Portfolio access permissions. Only portfolios in state FINAL are accessible in Security Center.
–Domain access permission
–Possibilities to set a specific menu file for a group of users.
Access permissions are granted to user groups. Each user belongs to one or several user groups,
and a group can belong to one or many other groups. If a group belongs to another group, it
then inherits all of its permissions. Users have the permission granted to the group or inherited
by the group.
•Password Change
This application enables TRM users to change their passwords. The system administrator (‘sa’)
and the database owner (generally defined as user ID ‘fk') do not have access to this
functionality. (Standard database tools can be used to change the passwords of these users.)
•Permission Editor
Used to add, edit, and remove access rights to TRM applications and objects.
Switch on… For this result
Own The user can only see/edit owned activities (activities created by that user).
Read Only In this mode it is possible to see the activities but not modify (or activate) them.
Deny Types The activity types listed in the Types page are changed from allowed activity types to
denied activity types.
For example, if the Types page contains ‘Average Balances’ and this switch is on, all
activity types except ‘Average Balances’ are available.
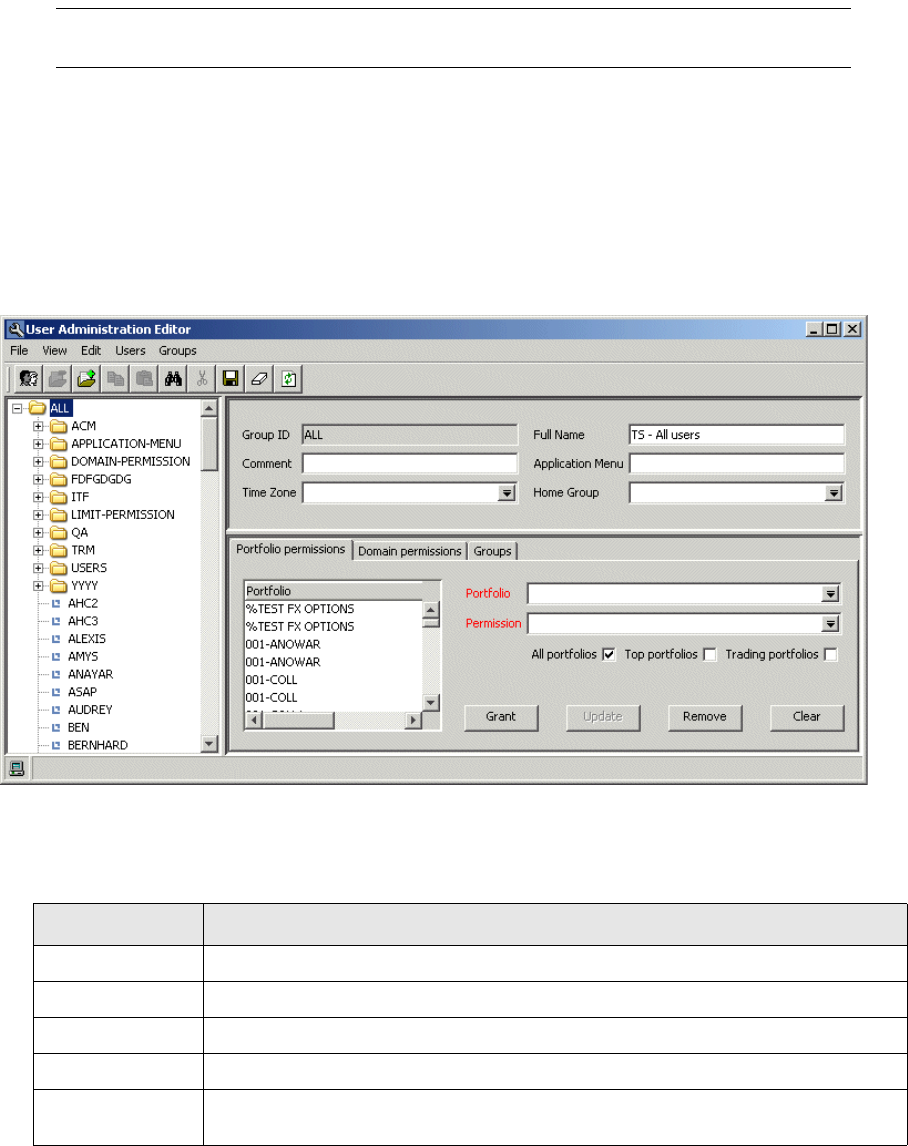
8 Controlling user access
8.7 Using Security Center
174 © Wall Street Systems IPH AB - Confidential
•Object Hierarchy Editor
With this editor you can view and modify the hierarchy of the objects in TRM. It should generally
not be necessary to modify the hierarchy once it had been set up in the implementation.
•Reports
You can launch the following reports from Security Center: Portfolios which shows the portfolio
permissions, Domains which shows domain permissions, Objects which shows object
permissions, and User Hierarchy which shows user group dependencies.
Note: The Domain Editor is used for setting up domains for global operations, and is available
from Application Manager.
8.7.1 User Administration Editor
In this editor you control the issues related to users and user groups. Only users with the System
Security Officer role can use the User Administration Editor.
8.7.1.1 Creating a new group
Since every user has to belong to a group, it is necessary to create the user groups before the users.
To create a new group, use the following procedure:
1. In the tree view on the left, select the parent group of the group you want to create.
2. Select Groups - New group.
3. Enter the main attributes for the new group:
Field Enter or select
Group ID Mandatory. The group ID must be a unique word.
Full Name The full name of the new group.
Comment Comments can be added if more information is required.
Application Menu The name of the Application Manager menu file.
Time Zone Select the appropriate time zone for the group (time zones are defined in the Time
Zone Editor).

8 Controlling user access
8.7 Using Security Center
TRM System Administration Guide 175
4. Select Groups/Save changes.
8.7.1.2 Modifying an existing group
To modify an existing group, use the following procedure:
1. Select the group you want to modify from the tree on the left-hand side of the editor.
2. Make the changes.
3. Select Groups - Save changes.
8.7.1.3 Deleting an existing group
The System Security Officer can delete an existing group as follows:
1. Select the group to delete from the tree on the left-hand side of the editor.
2. Select Groups - Delete, and click Yes in the confirmation box that appears.
8.7.1.4 Creating a new user
To create a new user, use the following procedure:
1. In the tree view on the left, select the parent group of the group you want to create.
2. Select Users - New user.
Home Group The ID of the primary group to which this group belongs. Like domains for
instruments, home groups are used to enable or prevent access to data. A user is
allowed to “see” only users/groups in his home group.
Field Enter or select

8 Controlling user access
8.7 Using Security Center
176 © Wall Street Systems IPH AB - Confidential
3. Enter the main attributes for the new user:
4. Select User - Save changes.
8.7.1.5 Modifying an existing user
The system manager can change a user password but cannot view it directly. The System Security
Officer can modify an existing user as follows:
To do so, use the following procedure:
1. Select the user you want to modify from the tree on the left-hand side of the editor.
2. Make the changes.
3. Select Users - Save changes, and click Yes in the confirmation box that appears.
8.7.1.6 Deleting an existing user
The System Security Officer can delete an existing user as follows:
Field Enter or select
User ID Mandatory. The user ID must be a unique word. The standard in TRM is to use lowercase
alphabetical names (no spaces, digits, underscores, or other symbols). If the login
already exists on the database, the Full Name and Password fields are no longer
mandatory.
Full Name The full name of the new user.
Comment Comments can be added if more information is required.
Application Menu The name of the Application Manager menu file.
Time Zone Select the appropriate time zone for the user (time zones are defined in Time Zone
Editor). All dates and times are converted to this time zone when they are shown to this
user.
Home Group The ID of the home group. Optional. Defines the users and groups that can be seen by a
specific user. If defined, the user can see users/groups in his home group only.
Password Password for the new user.
Password Expiry Date until which the password is valid.
The format for entering the dates is based on the application setup; for example
american MM/DD/YY.
If no date is given, the password is valid according to the configuration, see 8.3
Password expiry on page 171.
Locked A locked user cannot log in to the database. The database will automatically lock a user
if too many login attempts are made with an incorrect password.
Trusted User MSSQL only. If this is switched on, then the user can act on behalf of another user, for
example, he can enter a deal using someone else’s ID.
Max Failed Logins The maximum number of login attempts allowed before the database locks out the user
(not supported on MSSQL).
Web User Group -- Not a Web User --
User does not have access to TRMWeb.
ekit_admin
User can perform TRMWeb administration tasks.
ekit_synchro
User can perform TRMWeb administration tasks and synchronize data.
ekit_user
User has access to TRMWeb.

8 Controlling user access
8.7 Using Security Center
TRM System Administration Guide 177
To do so, use the following procedure:
1. Select the user you want to delete from the tree on the left-hand side of the editor.
2. Select Users - Delete, and click Yes in the confirmation box that appears.
8.7.1.7 Searching for a user
You can search for a particular user. To do this:
1. Select Edit - Find:
2. Fill in the User ID field and click on Find Now.
The user information is displayed for that user.
8.7.1.8 Assigning portfolio permissions to users and user groups
You can define portfolio permissions for a user or a user group.
1. Select the user or user group from the tree in the left-hand side of User Administration Editor.
2. Go to the Portfolio Permissions page:
3. Select a portfolio. Only portfolios in state FINAL are accessible in Security Center.
4. Select a permission.
5. Click Grant to grant the permission.
Click Update to update the permission.
Click Remove to remove the permission.
Click Clear to clear the fields.
Use the All Portfolios switch to quickly update basic portfolio permissions for all portfolios. This
options also applies to all future portfolios created in the system. You can also assign different
portfolio permissions to top portfolios and trading portfolios (which typically have different
permissions) using the Trading Portfolios and Top Portfolios switches. A user running activities in this
portfolio must also have ACTIVITY permission.
You can view all portfolio permissions that a user has inherited (for example, from another group)
by selecting View - Inherited Permissions. The inherited portfolio permissions are displayed with the
user or group that they belong to.
Note: Inheritance rules in TRM are straightforward. Users and other entities inherit the
permissions from the supersets (such as groups) with which they are associated. To
restrict a permission that is otherwise not restrictive, you must disassociate the user from
the “permissive” superset and then associate a more restrictive one.
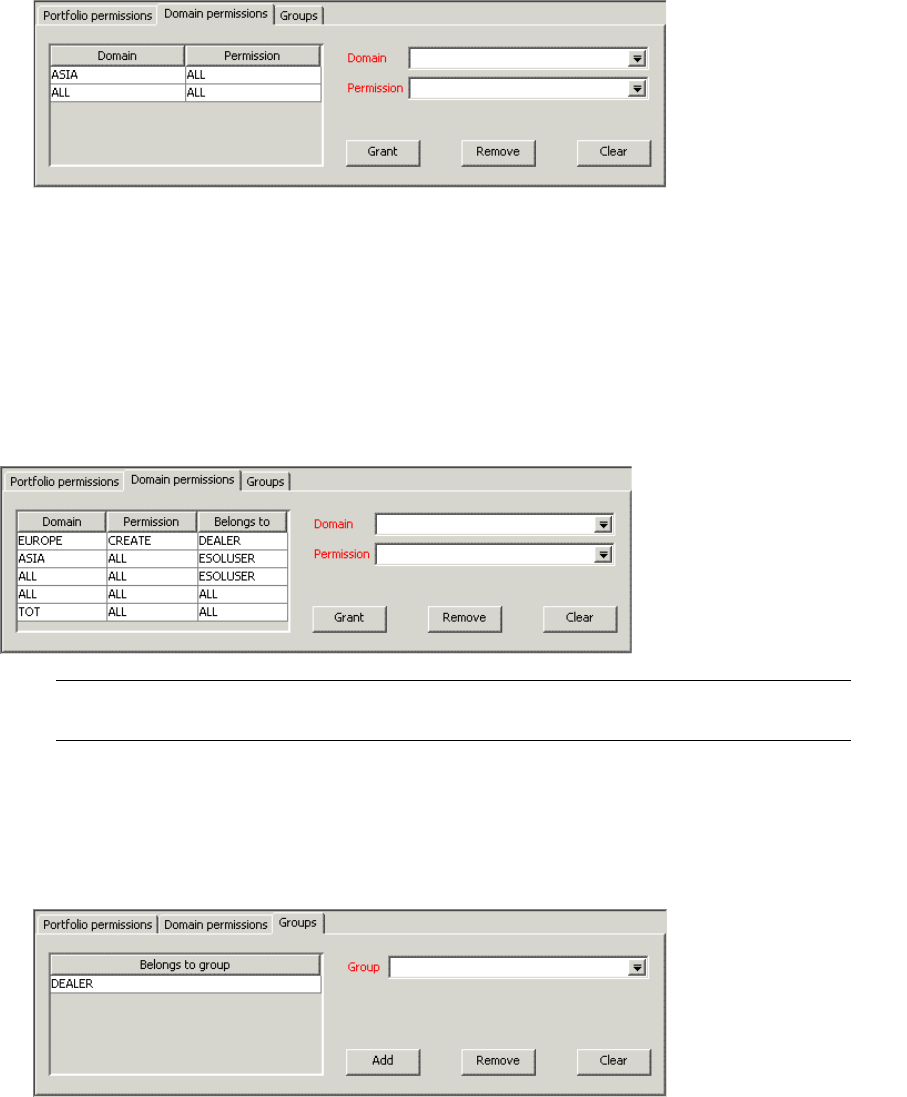
8 Controlling user access
8.7 Using Security Center
178 © Wall Street Systems IPH AB - Confidential
8.7.1.9 Assigning domain permissions to users and user groups
The System Security Officer can define domain permissions for a user or a user group.
1. Select the user or user group from the tree in the left-hand side of User Administration Editor.
2. Go to the Domain Permissions page:
3. Select a domain.
4. Select a permission.
5. Click Grant to grant the permission.
Click Remove to remove the permission.
Click Clear to clear the fields.
You can view all the domain permissions that a user has inherited by selecting View - Inherited
Permissions. The inherited domain permissions are displayed along with the user or group that they
belong to:
Note: READ permission for the domain of a portfolio is enough to create and modify transactions
in the portfolio, as long as the user has sufficient portfolio permissions.
8.7.1.10 Assigning multiple groups to users and user groups
You can assign users to multiple groups.
1. Select the user or user group from the tree in the left-hand side of User Administration Editor.
2. Go to the Groups page:
3. Select a group.
4. Click Add to add the group.
Click Remove to remove the group.
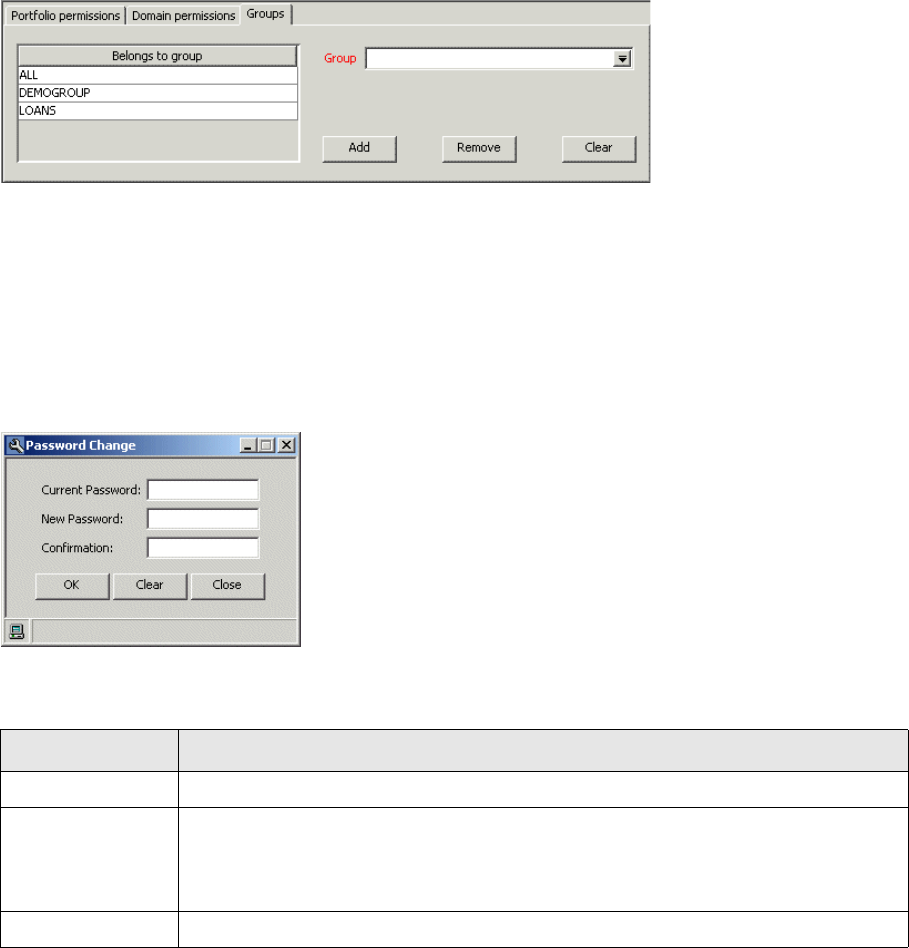
8 Controlling user access
8.7 Using Security Center
TRM System Administration Guide 179
Click Clear to clear the field.
You can view all the groups that a user has inherited by selecting View - Inherited Groups. The inherited
groups are displayed along with the user or group that they belong to:
8.7.2 Password Change
Password Change Editor enables users to change their passwords. The only users that cannot
change their passwords in Password Change Editor are the system administrator (‘sa’) and the
database owner (user ID ’fk’ by default). You can change the passwords for ‘sa’ and ‘fk’, as well as
modify user passwords, using standard database tools. No tool is provided to view or modify
passwords online.
TRM warns you through a pop-up window that your password will expire in a certain number of
days. From here, you can go directly to the Password Change application in Security Center.
To change your password, use the following procedure:
1. Enter the fields as described below:
2. Click Change to change the password.
Click Clear to clear the text fields.
Click Cancel to close the window.
Field Enter
Current Password Your existing TRM password.
New Password Your new password. You will be notified by a dialog box if it is considered invalid.
Note: The stored procedure specified in the password validation hook field in the
Configuration Table Editor (see the following section), will determine whether the
password is valid or not.
Confirmation Enter your new password a second time.

8 Controlling user access
8.7 Using Security Center
180 © Wall Street Systems IPH AB - Confidential
8.7.2.1 Password expiry and validation
The following settings are in the Configuration table and can be edited via Configuration Table
Editor (Admin Center). However they are relevant to password change so a description is also
included here.
8.7.3 Permission Editor
This application is used to grant and revoke access to TRM objects. Changes to the permissions are
stored in the ObjectPermission table.
The leftmost panel displays the groups and users in the database, while the center panel shows all
the objects in TRM, displayed in a hierarchical structure. Under Set-Up Management, for example,
you will find a folder for Portfolio Editor. It is possible to give a user or a group access to Portfolio
Editor and Permission Editor will then assign this access permission to every item in Portfolio Editor
folder. This hierarchical format simplifies the task since you do not need to know which specific
database objects are used by which editor. Finally, the rightmost panel is a table that lists the
permissions currently set for the selected user or group and the corresponding TRM object and
sub-objects.
Field Enter
password expiry This field determines whether password expiry is enabled; and if it is enabled, how often
passwords expire.
If set to 0, password expiry is disabled and all passwords are valid indefinitely.
If not set to 0, the figure entered here represents the number of days before a password
expires. For example, if password expiry = 15, all users will have to change their
passwords using the Password Change every 15 days.
password
validation hook
This field determines which, if any, stored procedure (hook) is used to check the validity
of a password. The default procedure, ValidatePassword, ensures that passwords are at
least 6 characters long and contain alphanumeric characters.
Customized validation schemes can be implemented by writing a custom procedure and
selecting it in this field.
minimum
password change
This field determines how often a user’s password can be changed. If set to 0, this
functionality is disabled. Any other value n indicates that a user can only change her
password every n days, not more frequently.
password expiry
warning
Number of days before password expires to issue warning. Default is 7 days.
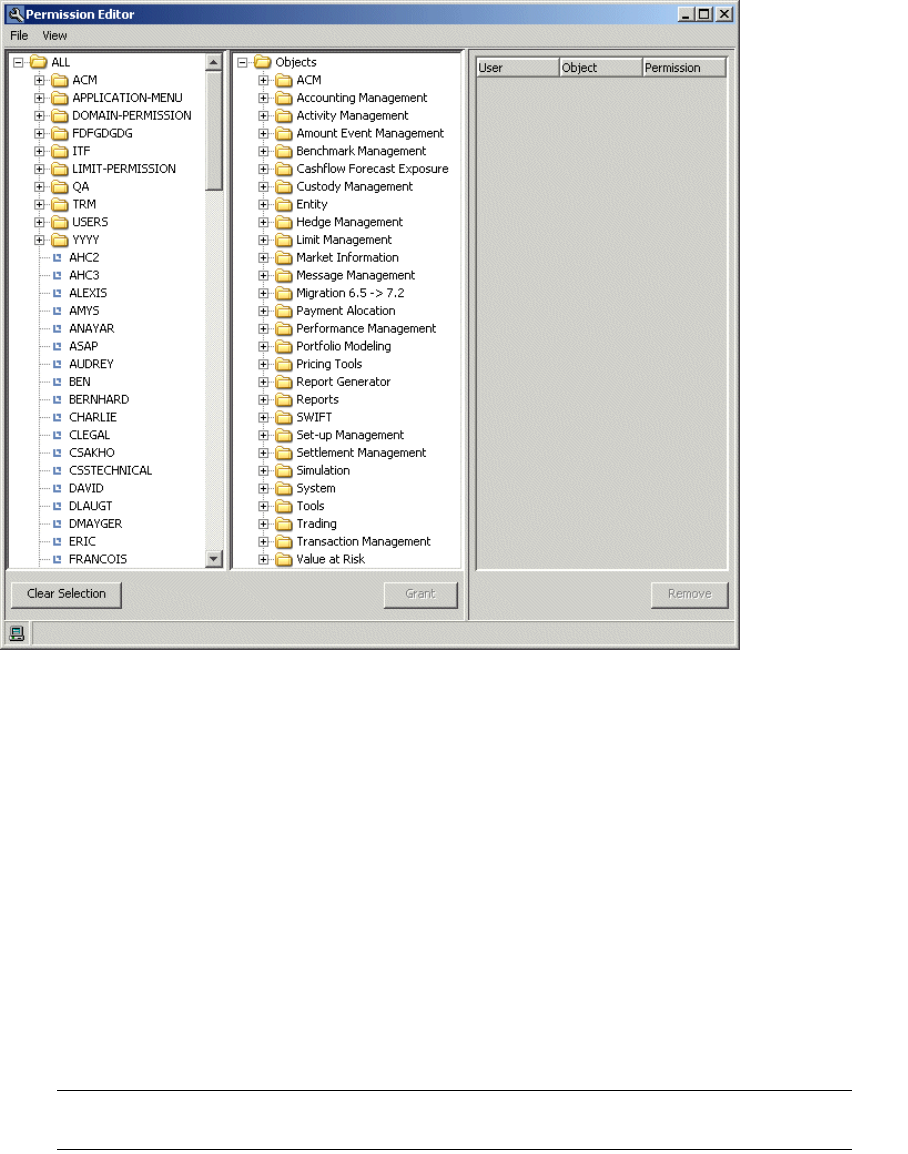
8 Controlling user access
8.7 Using Security Center
TRM System Administration Guide 181
User permissions have priority over group permissions; if the user has a different permission to the
group then it is the user permission that is used.
8.7.3.1 Navigating through Permission Editor
The permission table remains empty until a user or group is selected. Only one group or user can be
selected at one time. The permission table will then list every single object in TRM on which this
group or user was given a permission.
By clicking on different objects or object folders, the data in the permission table is updated to
display the appropriate subset of permissions. If the table is blank, it means that no permission was
explicitly given on that particular object or sub-object for the group or user selected.
8.7.3.2 Granting a permission
To grant a permission, use the following procedure:
1. Select the user or group that the permission will be set for.
2. Select the object or object folder for which the permission is required.
3. From the pull-down menu in the bottom left corner, select the permission you wish to give to the
user or group on the object or object folder.
Note: Permission type ’ALL’ gives the user or group all permissions on the object (CREATE,
MODIFY, REMOVE, READ, etc.).
4. Click Grant to grant the permission.

8 Controlling user access
8.7 Using Security Center
182 © Wall Street Systems IPH AB - Confidential
8.7.3.3 Removing an existing permission
Use the following procedure:
1. Select the user or group that the permission will be removed from.
2. Select the object or object folder for which the permission removal is required.
3. From the permission table on the right, select the permission you wish to remove. It should then
become highlighted.
4. Click Remove to remove the permission.
8.7.3.4 Single-screen 4-eyes principle
Single-screen 4-eyes principle means that the creation, modification, or deletion of an entity in a
static data editor must be authorized by a second person before it is saved. The verification is made
on the same screen.
This extra security check can be added to all of the static data editors (except Limits). It is activated
using Permission Editor in Security Center, as follows:
•The permission "Verify" allows the user to check data entry of other users before it is saved.
•The permission "Self-Verify" allows verification of the user’s own data entry, and could be given
to a super user or department manager.
The 4-eyes function would normally be used, for example, by back-office staff to approve the
creation of an instrument, or a manager to approve changes to a client’s details.
Configuration of the static data editors, which should use the 4-eyes principle, is done in the
ObjectVerification table when TRM is being set up.
The single-screen 4-eyes principle works as follows:
1. New data is created or modified by a user with regular permissions for that static data entity.
2. When the changes are complete, the user clicks the Save button.
3. The system checks if the 4-eyes principle should be used for this type of static data entry.
If so, the 4-eyes functionality is initiated and a verification dialog box appears.
4. The verifier must enter his user ID and password before the data can be saved in the TRM
database.
Each verification made using the 4-eyes principle is recorded in a log.
Note: The data input and checks are made on the same computer screen.
8.7.3.5 Granting Deal Mirroring permissions
The special permission MIRROR is used in cases where a user does not have READ or CREATE
permission for a portfolio but needs to create child transactions for it.
1. OpenPermission Editor.
2. Select ALL/DMM in the left pane. There are two folders: DMM-ADMINS for administrators, and
DMM-USERS for end users.
3. Select the appropriate folder depending on the user type.
4. Select the user being granted the permissions.
5. Select Objects/Modules/Deal Mirroring in the middle pane. There are two objects to choose from
here: DMM Configuration for both administrators and users, and DMM Operations for end users.
6. Select the appropriate object.
7. From the Permissions list, select the permission that you want to grant to the user for this
object. Typical permissions would be: ALL on DMM Configuration for administrators, READ on
DMM Configuration, and ALL on DMM Operations for end-users.

8 Controlling user access
8.7 Using Security Center
TRM System Administration Guide 183
8. Click Grant.
The user, object, and permission are displayed in the list in the right pane.
8.7.4 Object Hierarchy Editor
This editor can be used to define or modify the hierarchy of the objects in your implementation of
TRM. In this way you can define the hierarchy to best suit your requirements.
8.7.4.1 Adding an object
To add an object, use the following procedure:
1. Select the folder within which you want to add an object.
2. Select Object - New.
3. Type in the name of the object required in the field provided.
4. Press Enter.
The new object is now displayed in the hierarchy.
5. Define the type of the object.
8.7.4.2 Removing an object
To remove an object, use the following procedure:
1. Select the object that you want to remove.
2. Select Object - Remove.
The object is immediately removed from the hierarchy.
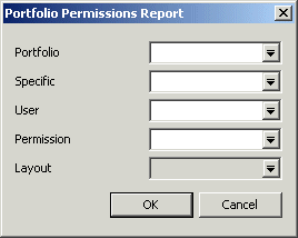
8 Controlling user access
8.7 Using Security Center
184 © Wall Street Systems IPH AB - Confidential
8.7.4.3 Moving an object
To move an object from one position in the hierarchy to another, use the following procedure:
1. Select the object that you want to move.
2. Select Object - Cut.
The object disappears from the hierarchy.
3. Select the folder that you want to move the object to.
4. Select Object - Paste.
The object reappears in the hierarchy in the new position.
8.7.4.4 Renaming an object
To rename an object:
1. Select the object you require.
2. Press F2.
A cursor appears at the end of the selected text.
3. Type in the name you want.
4. Press the Return key to add the text.
5. To restore the original text while editing, press the Esc key.
8.7.5 Reports
You can launch the following reports from Security Center:
•Portfolios - shows the portfolio permissions
•Domains - shows the domain permissions
•Objects - shows the object permissions
•User Hierarchies - shows the user group dependencies
8.7.5.1 Portfolios Report
The Portfolios Report shows the permissions for a given portfolio.
1. To launch this report, either select Portfolio Permission Report from Security Center, or select
File/New Report/Portfolio Permissions from Report Generator.
The following dialog is displayed:
2. Select the portfolio whose permissions you would like to see. Only portfolios in state FINAL are
accessible in Security Center.
3. Select the specific user for this portfolio that you would like to see.
4. Click OK.
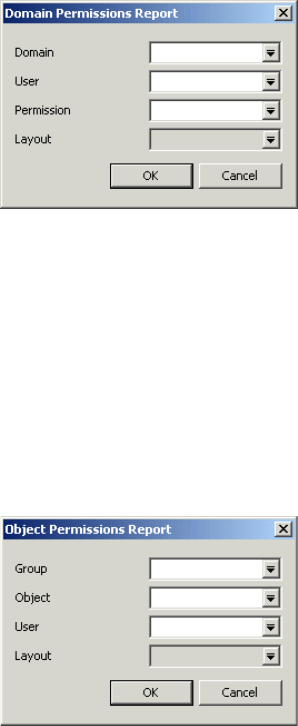
8 Controlling user access
8.7 Using Security Center
TRM System Administration Guide 185
The corresponding report is displayed.
8.7.5.2 Domains Report
The Domains Report shows the permissions for a given domain.
1. To launch this report, either select Domain Permission Report from Security Center, or select
File/New Report/Domain Permissions from Report Generator.
The following dialog is displayed:
2. Select the domain whose permissions you would like to see.
3. Select the specific user for this domain that you would like to see.
4. Click OK.
The corresponding report is displayed.
8.7.5.3 Objects Report
The Objects Report shows the permissions for a given object.
1. To launch this report, select Object Permission Report from Security Center.
The following dialog is displayed:
2. Select the group and object whose permissions you would like to see.
3. Select the specific user for this object that you would like to see.
4. Click OK.
The corresponding report is displayed.
8.7.5.4 User Groups Report
The Groups Report shows the shows the user group dependencies.
•To launch this report, either select User Hierarchy Report from Security Center, or select File - New
Report - User Groups Dependencies from Report Generator.
8.7.5.5 Users Information Report
This report shows detailed information on the user, including name, password expiry date and user
group.
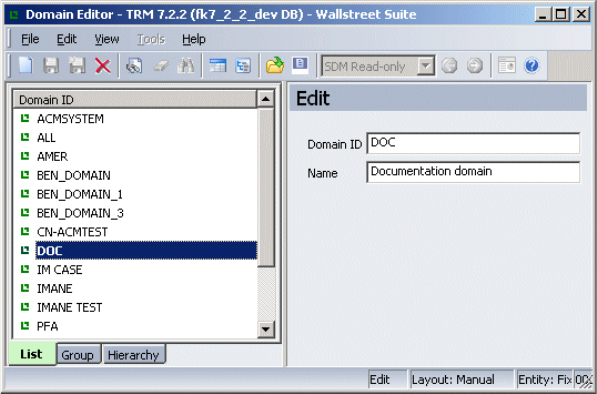
8 Controlling user access
8.8 Domain Editor
186 © Wall Street Systems IPH AB - Confidential
•To launch this report, either select Users Information Report from Security Center, or select File -
New Report - Users Information Report from Report Generator.
8.8 Domain Editor
Use this editor to set up the domains required for global operations.
Domains restrict what data each user can see or modify, and are used primarily for static
information such as portfolios, clients, and instrument definitions.
For example, assume that you have a treasury center in Europe, the US and in Asia. You would
define domains "EUROPE", "US", "ASIA" and "ALL". European counterparties would belong to
domain EUROPE, Asian counterparties to domain ASIA, etc. If there are counterparties that are
shared by several treasury centers, they could belong to domain ALL.
So, each client, portfolio, etc. belongs to a domain. This is defined in the Domain field in the
respective editor. And that domain is used to determine who can update the information of this
object. Some editors also contain a "Domains" subpart where you can define several domains. This
information is used to determine who can view the information of this object.
Users do not belong to domains. Users have permissions to domains. And each user can have
permissions to several domains. These permissions can be defined in the User Administration Editor
in Security Center, see 8.7.1.9 Assigning domain permissions to users and user groups on page 178.
You can add new domains and modify or delete the current domain.
8.8.1 Creating a new domain
1. From Application Manager, open Domain Editor.
2. Select File - New.
3. Enter the Domain ID and Name.
4. Select File - Save As New.
8.8.2 Modifying an existing domain
To modify an existing domain, use the following procedure:
1. Select the domain to modify from the list on the left-hand side of the editor.
2. Make the changes.
8 Controlling user access
8.8 Domain Editor
TRM System Administration Guide 187
3. Select File - Save.
8.8.3 Deleting a domain
To delete a domain, use the following procedure:
1. Select the domain that you want to delete from the list on the left-hand side.
2. Select File - Delete.
8 Controlling user access
8.8 Domain Editor
188 © Wall Street Systems IPH AB - Confidential
TRM System Administration Guide 189
Chapter 9 Configuration Table Editor and Admin
Center
9.1 Introduction
This section describes the Configuration Table Editor and Admin Center, which are used to automate
some of the administration tasks required for TRM. This section is for system administrators.
9.2 Configuration Table Editor
The Configuration table contains a set of configurable parameters that are used throughout TRM.
Note: Only the database owner is allowed to view and modify this table.
Launch Configuration Table Editor from Application Manager:
1. Select the value you to change by clicking the relevant row on the left.
2. Depending on whether the data-entry area for this value is a field or true/false switches, enter
the new value or change the switch setting, and confirm it by saving.

9 Configuration Table Editor and Admin Center
9.2 Configuration Table Editor
190 © Wall Street Systems IPH AB - Confidential
The table below shows the available configuration parameters and their default values. The types
are:
•S String
•B Boolean (true/false)
•I Integer
•M Float
•P Procedure.
ID Name Type Default Description
1 installation id S <none> Local installation ID.
2 site id S <site id> Local site client ID for the installation.
3 site name S <site name> Local site client name for the installation.
4 site time zone S <time zone> Local time zone for the installation, for example CET
for Central European Time.
10 version S <db version no.> Version of the database.
50 obey permissions B true If true, permissions take effect in all operations.
If false, no restrictions are applied.
51 allow transactions B true If true, allow transactions to be created. If false,
transactions cannot be entered in TRM. This is for
exceptional circumstances such as shutdowns.
52 log transactions B true If true, update transaction log and cashflow log.
53 log changes to data B true If true, log changes to data.
54 log payments B true If true, log any changes made to payments.
55 obey domain
permissions
B false To use domain permissions, you must create the
domain with the appropriate permissions and set
the parameter to true.
If you do not wish to use domain permissions, you
must create a Domain ALL to grant all permissions
to all objects (portfolios, instruments, and so on)
which would effectively disable domain permissions.
In this case, you may also set Obey Domain
Permissions to false which would also improve
performance.
60 freeze cashflows B true If true, freeze cashflows when needed.
62 Log TRMSwift
FINformat rules
B false If true, allow changes to TRMSwift FINFormat
history log
100 print request B true If true, allow confirmations and trade tickets to be
printed.
140
141
transd ip address
transd ip port
S
S
The IP address and port of TRANSD (the deal
transfer daemon).
You only need to supply an address and port if your
TRANSD is running on a server other than your TRM
server.
190 var yield volatility B false If true, VaR uses yield volatilities.
191 var square root of t
scaling
B false If true, VaR uses the square root of t for scaling.

9 Configuration Table Editor and Admin Center
9.2 Configuration Table Editor
TRM System Administration Guide 191
230 settlement manager
edit
clients
B true If true, enable client editing in Settlement
Manager via a menu option (client data can be
modified from within the application).
270 keep quotes days I 0 How many days TRM keeps quotes. Set this to a
number other than zero for the changes to appear.
It is usually set to 2.
271 booking period days I 0 Default number of days for the bookkeeping period,
which you specify when setting up an activity of
type REPORT-BOOKKEEPING.
0 means that the start date of the bookkeeping
batch is 1900-01-01, the earliest possible date
recognized in TRM.
272 payment period days I 0 The number of days into the past, counting
backwards from either:
• The payment due date, in the case of a
Settlement Generation Activity
Or
• The system date in the case of automatic flow
generation.
Express as a positive number. 0 means no looking
into the past.
273 balance period days I 0 How many days backwards balances are
recalculated. 0 means start date = end date.
274 balances from
payments
B false If true, update balances from payments. If false,
update balances from cashflows instead.
When this is set to false, activities of type balances
(for calculating bank account balances) can include
transactions made in Deal Capture and Enter
Board, even if the payments have not yet been
generated in Settlement Manager, since the
cashflows are available as a result of the deal.
275 capitalize cost of
carry
B false If true, capitalize the cost-of-carry.
300 booking batches B true If true, run activities of type SELLING automatically
when you run activities of type REPORT-BOOKKEEPING.
301 selling batch B true If true, automatically run Selling batch.
420 effectiveness
threshold
M 1.00 Default hedge effectiveness threshold. Assumes
hedge is 100% effective if both legs are inside
threshold.
450 fx book rate proc P CrossFX
RealizeRate
Procedure to calculate FX Book Rate.
451 fx position spot rate S deal-be-rate Method for calculating FX Position spot rate.
452 fx position combine B true If true, combine FX Position currency pairs.
453 fx prefer sell ccy B false If true, prefer FX currency FX rate.
470 default scenario S freeze Default rates scenario for activities, except
bookkeeping (which is handled by the “booking
scenario” below).
472 fixing scenario S freeze Default scenario ID for freezing.
ID Name Type Default Description

9 Configuration Table Editor and Admin Center
9.2 Configuration Table Editor
192 © Wall Street Systems IPH AB - Confidential
501 hook form info P <none> Hook procedure to return form information. Used by
the FormInformation procedure.
510 insert transaction
hook
P <none> Hook procedure for transaction insert. Used by the
InsertTransaction procedure. If the applied
transaction is “Transaction Kind” = Block Trade, the
Counterparty of the parent transaction is copied.
511 insert cashflow hook P <none> Hook procedure for cashflow insert. Used by the
InsertCashflow procedure.
512 insert hedge relation
hook
P <none> Hook procedure for hedge relation insert.
515 finish transaction
hook
P <none> Hook procedure for transaction finish. Used by the
InsertTransactionFinish procedure.
520 generate payment
hook
P <none> Mode procedure for generating payments. Called
before rule matching takes place.
530 accounting entry
hook
P <none> Hook procedure for accounting entry.
550 password expiry I 0 Number of days before a password expires. When
the password expiry reaches 0, the password is
invalid. The default value is 0 (password expiry
disabled).
551 password validation
hook
P Validate
Password
Hook procedure for password validation, used by
Security Center.
552 minimum password
change
I 0 Minimum number of days between password
changes.
553 password expiry
warning
I 7 Number of days before the password expires to
issue a warning to the user.
554 allow dbo login B false If true, the database owner is allowed to login to
TRM.
701
702
703
tax percent 1 name
tax percent 2 name
tax percent 3 name
STax % #1
Tax % #2
Tax % #3
Name that you want the tax percent to be displayed
with in TRM.
704 max payment entry
state
S FINAL Maximum state for transactions in Payment Entry.
780 insert payment hook P <none> Mode procedure for inserting payments. Called just
before the payment is inserted.
790 formvars rounding
float
I 2 Number of decimals for floating point in forms.
791 formvars rounding
money
I 4 Number of decimals for monetary values in forms.
800 check activity host
name
B false true - activity will be launched from the specified
host machine only.
801 activity queues I 1 Number of activity queues. This must be ‘1’.
850 call movement hook P <none> Hook procedure for Call Money/Account movement
mirroring.
860 adhoc settlement
mode
S <none> The mode in which ad hoc settlement instructions is
active.
870 portfolio model hook P Hook procedure to verify if a portfolio model is valid
ID Name Type Default Description

9 Configuration Table Editor and Admin Center
9.3 Admin Center
TRM System Administration Guide 193
9.3 Admin Center
Admin Center contains the following functionality:
•Renaming Tool
Renaming Tool is used to rename portfolios and clients in TRM.
•Database Administration
This application provides several database administration tools. You can:
–Display the database statistics for your organization and the statistics on connected users
(logs of connected users).
880 default min
effectiveness
M Default minimum hedge effectiveness
881 default max
effectiveness
M Default maximum hedge effectiveness
890 mode for sys final DD S Mode in which system generated final drawdowns
are created
891 mode for sys final DD
event/fe
S Mode in which system generated final drawdown
events or fees are created
892 mode for sys
pre-final DDEF
S Mode in which system generated pre-final
drawdown events or fees are created
895 mode for sys final
PaymentA
S Mode in which system generated final payment
advices are created
896 mode for sys
refunded PaymentA
S Mode in which system-generated refunded payment
advices are created
900 payment export state
ID
S OPEN State for which Settlement Manager sends
payments to CMM
1110 block tm actions B true Block any further actions on settled transactions.
1113 IDENTIFY_SETTLEME
NTS_ORIGIN
B true Indicates whether a settlement was created using
the transaction flow-based agent or the activity. The
settlement field param_9 stores the string
TRANSACTION-FLOW or ACTIVITY as a result.
1200 batch mode S ADMIN Used by all actions that retrieve transactions.
1201 automatic reconcile
batch mode
S ADMIN Used by automatic cash settlement reconciliation to
create the offset transactions that are generated by
the reconciliation differences. Thanks to the ADMIN
mode setup, such transactions will be created in the
OPEN state.
1202 manual reconcile
batch mode
SRECONCILE-ADM
IN
Used by manual cash settlement reconciliation to
create offset transactions that are generated by the
reconciliation differences. Thanks to the
RECONCILE-ADMIN mode setup, such transactions
will be created in the FINAL state.
1300 default system cpty S NULL The counterparty to be used by default in the FX
Pair Shift action.
1400 pricing stateflow
disabled
true or false Disable/enable the Commit and Re-Open actions in
the FX Pricing and IR Pricing tools.
ID Name Type Default Description
9 Configuration Table Editor and Admin Center
9.3 Admin Center
194 © Wall Street Systems IPH AB - Confidential
–Use the database consistency checker (dbcc) to check and fix the integrity of your database.
–Use the log truncation functionality to clear log tables that become too big.
–Shrink your database and remove old and unwanted transactions from the system using
Database Cleanup.
9.3.1 Renaming Tool
The Renaming Tool is used to rename portfolios and clients in TRM. This may be necessary when
TRM is installed in order to use terminology that corresponds to your organization. It is possible to
rename any portfolio or any client. To open the renaming tool, double-click on the appropriate node
(Rename Portfolio or Rename Client) under Renaming Tool folder in Admin Center.
Warning: The renaming process must not be done during business activity because it
disables/enables the database triggers. First, triggers are disabled, then the rename
process is run and finally the triggers are re-enabled.
The interfaces for Rename Portfolio and Rename Client are identical. Two input fields allow you
to select the current Client or Portfolio ID, and you can enter the new ID in the field below it.
Note: The Renaming Tool requires the user to have SSO permissions, otherwise the user receives
an error message when confirming the renaming process in the Portfolio and Client
Renaming dialogs (see below).
9.3.1.1 Renaming a portfolio ID
To rename a portfolio ID, use the following procedure:
1. Double-click the node Rename Portfolio.
2. Select the desired portfolio ID from the drop-down menu in the From field.
3. Once a Portfolio ID has been selected, enter its new ID name in the To field.
4. Click Rename to begin the renaming of the portfolio.
Warning: This task may take several minutes depending on the size of your database. DO NOT
END THIS TASK WHILE IT IS IN PROGRESS. When the task has been completed, an
information box is displayed to confirm this.
5. Click Refresh to refresh the portfolio list.
9 Configuration Table Editor and Admin Center
9.3 Admin Center
TRM System Administration Guide 195
9.3.1.2 Renaming a client ID
To rename a client ID, use the following procedure:
1. Double-click the node Rename Client.
2. Select the desired client ID from the drop-down menu in the From field.
3. Once a client ID has been selected, enter its new ID name in the To field.
4. Click Rename to begin the renaming of the client.
Warning: Note that this task may take several minutes depending on the size of your database.
DO NOT END THIS TASK WHILE IT IS IN PROGRESS. When the task has been
completed, an information box is displayed to confirm this.
5. Click Refresh to refresh the client list.
9 Configuration Table Editor and Admin Center
9.3 Admin Center
196 © Wall Street Systems IPH AB - Confidential
TRM System Administration Guide 197
Chapter 10 Customizing TRM user interfaces
10.1 Setting up menus
When a user opens TRM, the following logic is used to find the correct Application Manager menus
for the user:
1. If the name of the menu file is defined in the “Menu name” field in the definition of the user in
the Security Centerthe User Administration Editor, that name is used (the extension .xml is
added automatically).
2. If no menu is defined for the user, but a menu is defined for one of the groups that the user
belongs to, the menu name of the group is used.
3. If no menu name is defined for any groups that the user belongs to, the default menu name
FKApplicationManagerMenu.xml is used.
4. If the location of the menu file is defined in the environment variable FK_MENU_DIRECTORY, that
directory is used. Otherwise, the current directory is used.
10.2 Setting up title bars
For most TRM applications (excluding Security Center and Admin Center) the title bar contains the
name of the application followed by the value of the FK_TITLE environment variable: see the TRM
Installation Guide for your database type.
10.3 Deactivating splash screen
To save time with remote connections, you can deactivate the splash screen by setting the
environment variable FK_NO_SPLASH_SCREEN=1.
10.4 Selecting a theme
You can select a theme that determines the appearance of TRM applications. This menu item
becomes available when Application Manager is launched with the following start-up parameter:
-m [ --theme ]
This enables the Themes menu item in the application toolbar.
You can specify an extra title to appear in Security KIT or Admin KIT title bars. Below is the
definition of Admin KIT and Security KIT in the menu file. Security KIT has been defined with an
extra title, using the syntax: -Dtrema.extra.title="text of the added title"
<group name="Administration Tools">
<application name="Admin KIT">
<command>%FK_HOME%\jre\bin\javaw -cp %FK_CLASSPATH%

10 Customizing TRM user interfaces
10.5 Customizing Transaction Manager
198 © Wall Street Systems IPH AB - Confidential
com.trema.adminkit.AdminKIT</command>
</application>
<application name="Security KIT">
<command>%FK_HOME%\jre\bin\javaw -cp %FK_CLASSPATH% -Dtrema.extra.title="ADDED
TITLE" com.trema.adminkit.SecurityKIT</command>
</application>
</group>
Changes you make here apply to the main application (Admin KIT or Security KIT) and all of its
sub-dialogs.
Note: Certain special characters cannot be used in the xml files; the most important characters
are '&', '<' and '>'. You have to use '&', '<' and '>' instead. A sample TRM menu
xml file is given below:
<?xml version="1.0" encoding="utf-8" ?>
-<application-manager-menu name="Trema Suite">
- <group name="Transaction and Risk Mgmt">
- <group name="Front Office">
- <group name="Market Information Management">
- <application name="Rate Monitor">
<command>FKMonitor.exe</command>
</application>
- <application name="Rate Report">
<command>FKReport.exe --type prices</command>
</application>
- <application name="Rate Log Report">
<command>FKReport.exe --type prices-log</command>
</application>
- <application name="Rate Comparison Report">
<command>FKReport.exe --type price-diff</command>
</application>
</group>- <group name="Trading">
- <application name="Deal Capture">
<command>FKTransactionManager.exe -c TM.xml --mode TRADING</command>
</application>
</group>
</group>
</application-manager-menu>
10.5 Customizing Transaction Manager
10.5.1 Transaction Manager default configuration
The data content of Transaction Manager is described by a set of XML files that are located in the
directory %FK_HOME%\etc\transaction-view.
The XML files are used to configure the following in Transaction Manager: The fields in a view, field
properties, some behavior, etc.
The directory contains subdirectories which allow you to activate some of these configurations.
By default, Transaction Manager reads the configuration from the directory
%FK_HOME%\etc\transaction-view. You can set the configuration to be read from a subdirectory
using the --view command line option of Transaction Manager. The default configuration is always
read first. Then, the additional configuration (contained in the subdirectories) is added to the default
10 Customizing TRM user interfaces
10.5 Customizing Transaction Manager
TRM System Administration Guide 199
configuration. The additional configuration only specifies any differences to the default
configuration.
You can specify multiple subdirectories on the command line (see the Transaction Admin command
line as an example).
10.5.2 Overriding the default configuration
The directory %FK_HOME%\etc\site\transaction-view, if present, is used to complement the
default setup. You can define XML files as you would have done in a subdirectory of
%FK_HOME%\etc\transaction-view. Transaction Manager always searches for this directory: you
don't need additional command line parameters.
10.5.3 Adding custom parameters to Transaction Manager actions
It is possible to enrich the action dialog boxes and add custom parameters. These parameters will be
used to populate some fields in the transaction that is a result of the action.
In %FK_HOME%/etc/site/transaction-view you create two files:
Views.xml to specify an action file:
<?xml version="1.0" encoding="utf-8" standalone="yes"?>
<views actions="Actions"/>
Actions.xml the action file:
<?xml version="1.0" encoding="UTF-8"?>
<actions>
<action name="fx_roll_over">
<column name="comment" type="STRING" number="2" added="true"
defaulted="true" case-sensitive="true">
<label>Comment</label>
</column>
<column name="comment_2" type="STRING" number="0" added="true"
case-sensitive="true">
<label>Comment 2nd</label>
<value type="STRING">Yes</value>
</column>
</action>
</actions>
In the example above, two fields are added in the action fx_roll_over; the attribute defaulted
tells you that the comment in the dialog box should be defaulted with the comment of the
rolled-over transaction.
The tag value for comment_2 specifies the default value when opening the dialog box.
The number attributes provide the position where the parameter should be added in the dialog box.
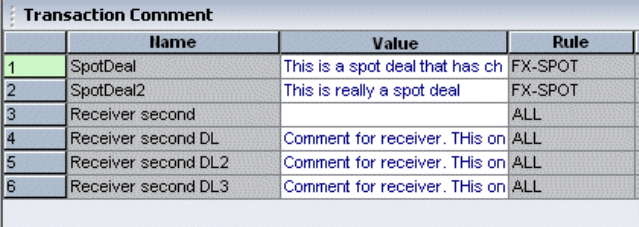
10 Customizing TRM user interfaces
10.6 Customizing Enter Board
200 © Wall Street Systems IPH AB - Confidential
When the action is executed, comment and comment_2 of the newly created rollover transaction will
be populated with the values that were added in the action box. Only comments, counterparty
trader, and parameters can be added to action dialog boxes.
10.5.4 Removing a toolbar button from the Transaction Manager
You can modify the toolbar behavior in the file
%FK_HOME%\etc\entity-manager\configuration\TM.xml using the element toolbar-remove.
For example:
<toolbar-remove id="commit-transaction"/>
removes the Apply button from the toolbar.
10.6 Customizing Enter Board
10.6.1 Adding the entity definition
You can add columns to Enter Board and specify the source of the data in the column.
To add the definition of an entity to the board you want to use, you can either create a new board in
%FK_HOME%\etc\transaction-view\Boards.xml or use the common board if the field is to be
displayed in all boards. You can add an entity for the Spot Deal Comment coming from the
Transaction Comment view with code such as the following:
<entity name="MyComment" view="Transaction Comment">
<and>
<eq field="name_id" value="SpotDeal"/>
</and>
</entity>
where:
•MyComment renames the Transaction Comment view because it filters to only one row of the this
view. You must rename it if you are filtering. The view is defined in a view file. The view value
can be found in the related view file: the file
%FK_HOME%\etc\transaction-view\TransactionComment-view.xml contains the line <view
name="Transaction Comment"..).
•<and> or <or> can be used for filtering.
•The <eq field= line defines the condition (or part of it). name_id is the name of the field
defined in the related view file (...<column name="name_id" type="STRING"
editable="false" width="20">…). The value is the actual value displayed in that field. In the
Transaction Manager's Transaction Comment view example shown here, the value SpotDeal in the
Name column on the first row is filtered on:
10 Customizing TRM user interfaces
10.6 Customizing Enter Board
TRM System Administration Guide 201
It is also possible to filter on multiple fields as follows:
<and>
<eq field="name_id" value="SpotDeal"/>
<eq field="rule_id" value="FX-SPOT"/>
</and>
This defines what is to be filtered and made available to the Enter Board so that it can display it.
10.6.2 Making fields accessible
In the <board> where the field is to be accessible, there is a <fields> element defining the visible
fields from which the user can select a field to add when editing the layout of the enter board. To
make the fields accessible from the row which has been filtered down to, add a new field there. For
example:
...<fields>
<field name="spot_deal_comment" entity="MyComment" field="value">
<label>Spot Deal Comment</label>
</field>...
where:
•MyComment is the name of the renamed entity as above.
•spot_deal_comment is the new name for this field.
•value is the name of the column that to display as spot_deal_comment: the value column from
the filtered TransactionComment view is renamed to spot_deal_comment. This can also be
looked up on the related view file ( ….<column name="value"….).
•Spot Deal Comment is a label.
The field's value ("value" in this case), can also be looked up on the related view file ( ….<column
name="value"….).
When the filtered results include more than one row, multiple rows will probably be updated when
you enter data in the Enter Board.
10.6.3 Making properties available
To make the transaction properties available in Enter Board, you can declare the properties as in the
following example, instead of using Property Editor. Use only one method, as otherwise the columns
will be duplicated.
<view name="Transaction" entity-name="Transaction"
xmlns:xsi="http://www.w3.org/2001/XMLSchema-instance"
xsi:noNamespaceSchemaLocation="View.xsd">
<!-- Column definitions for the transaction part. -->
<column name="cp_client_id" type="STRING" width="12" default="true"
entity-name="Client">
<label>JNS Counterparty</label>
<enumerated name="Counterparty"/>
</column>
<column name="jns_custom" type="STRING" width="19" editable="true"
case-sensitive="true">
<label>JNS Custom Property</label>
<enumerated>
<enumeration value="value-1" visible-value="Value 1"/>
<enumeration value="value-2" visible-value="Value 2"/>
<enumeration value="value-3" visible-value="Value 3"/>
</enumerated>
</column>
<column name="jns_custom_2" type="STRING" width="19" editable="true"
case-sensitive="true">
<label>JNS Custom Property 2</label>
10 Customizing TRM user interfaces
10.6 Customizing Enter Board
202 © Wall Street Systems IPH AB - Confidential
<enumerated>
<enumeration value="value-21" visible-value="Value 21"/>
<enumeration value="value-22" visible-value="Value 22"/>
<enumeration value="value-23" visible-value="Value 23"/>
</enumerated>
</column>
</view>
You can customize the Enter Board as in the following example:
<boards>
<board name="Common" description="Common Transaction Fields" visible="false">
<entities>
<entity name="Transaction" view="Transaction"/>
</entities>
<fields>
<field name="jns_custom" entity="Transaction" field="jns_custom">
<label>JNS Custom Property</label>
</field>
</fields>
</board>
<board name="CustomInclude" description="Custom Transaction Fields for Include"
visible="false">
<entities>
<entity name="Transaction" view="Transaction"/>
</entities>
<fields>
<field name="jns_custom_2" entity="Transaction" field="jns_custom_2">
<label>JNS Custom Property 2</label>
</field>
</fields>
</board>
<board name="Equity" description="Equity Enter Board">
<include board="CustomInclude"/>
<fields>
<field name="premium_date" entity="Transaction" field="premium_date">
<label>JNS Premium Date</label>
</field>
</fields>
</board>
<board name="Custom" description="Custom Transaction Fields" visible="true">
<include board="CustomInclude"/>
<entities>
<entity name="Transaction" view="Transaction"/>
</entities>
<fields>
<field name="portfolio_id" entity="Transaction" field="portfolio_id"/>
<field name="jns_custom" entity="Transaction" field="jns_custom">
<label>JNS Custom Property</label>
</field>
</fields>
</board>
</boards>
TRM System Administration Guide 203
Chapter 11 Managing activities
11.1 Overview
Activities can be actions performed at regular intervals or run only once.
The TRM Activity Manager application records activities to the database. The activity daemon
(activityd), launches activities as soon as they are submitted from Activity Manager. Every time an
activity is run, it is recorded to the Activity Log which can be viewed in Activity Manager.
The "Mail Notification" property can be defined for each activity in Activity Manager. This is the mail
address that receives a notification every time the activity is run.
Depending on the configuration of your system, a prerequisite might be the execution of the
rc.login script which creates the passwords in shared memory. In this case, crontab must be
installed under the same user ID as the logins have been initialized for with the rc.login script.
A user setting up an activity must have ACTIVITY permission for the relevant portfolio.
11.2 ActivityType table
The available activity types are stored in the table ActivityType. This table contains the ID, name,
handler procedure name, and the host server.
11.3 Generating Windows NT Reports
11.3.1 Starting the cron service
The cron process runs as a service on Windows NT.
1. Run the Windows sc command (used for creating and deleting services) with the following
parameters and spacing:
sc \\<Hostname> create wss.<SystemName>-cron type= own start= auto binpath=
<FK_HOME>\sbin\srvany.exe displayname= "WSS NT crond" depend=
wss.<SystemName>-names
2. Open the Windows Registry Editor (select Start-Run and then type regedit) and find the key:
\\HKEY_LOCAL_MACHINE\System\CurrentControlSet\Services\wss.<SystemName>-cron
3. Under this key, create a new key called Parameters, and add the following string values:
Application=<FK_HOME>\bin\perl.exe
AppDirectory=<FK_HOME>\sbin
AppParameters=<FK_HOME>\sbin\cron.pl <FK_HOME>\etc\crontab
4. Change the login for the service to fkadmin (Start-Control Panel-Services, select Startup, then This
Account in the Log On As window and enter the fkadmin login information).
5. Now you can start the service from Start-Control Panel-Services.
11 Managing activities
11.3 Generating Windows NT Reports
204 © Wall Street Systems IPH AB - Confidential
11.3.2 Scheduling NT Reports
ProcessActivities.exe is a binary file for execution at regular intervals on Windows NT. The most
common usage is to schedule NT Reports and send the created report by e-mail. In this case, the
cron.pl emulates cron on NT and initiates the query from the NT side. If an activity is due on the
NT server, it will be executed and the results will be e-mailed, if it is configured to do so. The cron
process cron.pl is normally installed as a NT service using the sc command.
In some setups, activityd runs on the UNIX side and handles the normal activities. On the NT side,
cron.pl + ProcessActivities runs NT reports. Normally cron.pl calls the supplied batch file
Activity.bat which in turn calls ProcessActivities.exe.
The NT reports must be scheduled to run on a NT server only (the activity type specifies the server
name). Another criterion is that the corresponding stored procedure returns an nt_report column.
This column specifies the report type to create. Examples of reports that support scheduling are:
•Balance Report
•Call Portfolio Report
•Call Transaction Report
•Cashflow Log Report
•Cashflow Report
•History Log Report
•Key Figure Report
•Limit Log Report
•Periodic PL Report
•Settlement Report
•Transaction Log Report
•Transaction Report
The NT report types are in <FK_HOME>/share/reports/types.
TRM System Administration Guide 205
Chapter 12 Setting up comKIT
12.1 Introduction
comKIT is included in the TRM installation, but a separate licence is required to develop comKIT
applications.
The API details are supplied in FK_HOME\support\comKIT\doc\idl\html\index.html (Windows
platform only).
12.2 comKIT Components
comKIT is a client/server application, and consists of:
•a comKIT server
•a comKIT client
•the comKIT TRM interface compiled for Python and Java
•comKIT client support code for Python and Java
12.3 comKIT Server
A comKIT server runs a service which gives you access to TRM functionality through the comKIT
API. The following specific comKIT services have been implemented:
•Transaction
•Static Data
•Position
•Performance
In addition there is the generic Entity Board service. It provides access to the TRM Transaction
Manager run with one of the following views: amount-event; call-money; custody-entry;
fin-message; hedge-manager; payment-advice; payment-allocation; settlement-processing;
settlement-reconciliation.
12.3.1 Architecture
comKIT services behave like their equivalent TRM applications:
•TRM application=comKIT service
•Transaction Admin=Transaction
•Generic Editor=Static Data
•Treasury Monitor=Position
•Performance Monitor=Performance
12 Setting up comKIT
12.3 comKIT Server
206 © Wall Street Systems IPH AB - Confidential
Each comKIT service is composed of the same objects, some of which are analogous to GUI
components:
•TRM application=comKIT service
•Service_Gate
•Service_Base
•ApplicationBusiness_Object_Factory
•Row in a board=Business_Object
•CellValue
12.3.1.1 Garbage collecting
Each comKIT object has a "time_to_live" with a default value of 1000 seconds. When this expires,
the object is garbage-collected. The starting time_to_live can be configured using the command line
parameter timeout=<timeout in seconds>.
comKIT objects form the hierarchy Service_Base - Business_Object_Factory - Business_Object
If a parent object in the hierarchy expires, it will first release all its children before it is itself
garbage-collected.
12.3.1.2 TRM Naming Service
The TRM Naming Service is a white pages-style lookup server for CORBA objects. The comKIT server
registers itself in the naming service.
Root context
finance-kit
<FK_IDENT>
<corba name>
12.3.1.3 comKIT Server Parameters
The mandatory parameters are as follows:
--module-name (-M), the shared library of the service or a shortcut
--corba-name (-C), typically <prefix>_<service-name>
For example: comkitd -C server1_transaction -M comkit/transaction --trace-level 10
A complete list of comKIT parameters can be found by using the --help switch.
12.3.2 comKIT Server Configuration
12.3.2.1 Naming Service
The location of the naming service root context is configured in the omniORB configuration file,
whose location is set by the OMNIORB_CONFIG environment variable.
InitRef = NameService=corbaname::<hostname>:<port>
The FK_IDENT environment variable describes the naming service context under which the comKIT
server will register itself.
12.3.2.2 Firewall
Bidirectional GIOP must be enabled to traverse firewalls. Base your configuration on the supplied
omniORB firewall configuration file (<FK_HOME>/support/etc/orb.conf.firewall).
Specific ports can be assigned to comKIT servers using a comKIT command line parameter like the
following: -ORBendPoint giop:tcp::12000
12 Setting up comKIT
12.4 comKIT Client
TRM System Administration Guide 207
12.3.2.3 SSL
The comKIT server is configured with the following environment variables:
FK_SSL_CA_CERT_FILE: Full path of the CA
FK_SSL_CERT_FILE: Full path of the application certificate
FK_SSL_PASSWORD: Application certificate private key password
12.3.2.4 omniORB
A sample omniORB configuration is supplied in <FK_HOME>/support/etc/orb.conf.
12.4 comKIT Client
The comKIT interface is described in the CORBA IDL. You can use a wide range of programming
languages covered by the OMG IDL to language binding specifications. For convenience, the comKIT
interface has been compiled for Python and Java. In addition, comKIT client support code exists for
these languages.
In general comKIT services behave like their equivalent TRM applications. Use the same field order
when setting values as you would in the TRM application. When problems arise in comKIT, try the
same actions in the TRM application.
Refer to the comKIT API reference guide for more information on the comKIT interface (Windows
only, on <FK_HOME>\support\comkit\doc\idl\html\index.html).
Refer to the Python and Java comKIT Helper Classes information (Windows only, on
<FK_HOME>\support\comkit\doc\python\index.html and
<FK_HOME>\support\comkit\doc\javaDoc\index.html).
12.4.1 Python
Please refer to the Python examples (Windows only, on <FK_HOME>\support\comkit\examples).
An interesting feature of Python and the TRM Python helper code is the 'in-process' client. Here the
client and server are collocated: see the provided examples.
12.4.2 Java
Please refer to the Java examples (Windows only, on <FK_HOME>\support\comkit\examples). You
must include the following sets of JAR files to build and run a Java comKIT client:
•The compiled comKIT TRM interface:
–%FK_HOME%\java\jupiter\lib\biz.wss.trm.lib.common.financekit.jar
•The compiled comKIT helper classes:
–%FK_HOME%\java\jupiter\lib\biz.wss.trm.lib.common.comkit.jar
–%FK_HOME%\java\jupiter\lib\biz.wss.lib.common.foundation.jar
•The runtime classes:
–%FK_HOME%\java\jupiter\lib\avalon-framework_4.1.5\avalon-framework-4.1.5.jar;
–%FK_HOME%\java\jupiter\lib\jacorb_2.3.0\jacorb-2.3.0.jar
–%FK_HOME%\java\jupiter\lib\logkit_1.3\logkit-1.3.jar
–%FK_HOME%\java\jupiter\lib\concurrent_1.3.4\concurrent-1.3.4.jar;
–%FK_HOME%\java\jupiter\lib\log4j_1.2.14\log4j-1.2.14.jar;
12 Setting up comKIT
12.4 comKIT Client
208 © Wall Street Systems IPH AB - Confidential
12.4.3 Exceptions
Most comKIT methods can raise an FK::Comkit::Comkit_Exception exception as a way of
indicating a warning or error condition. Refer to the online comKIT API reference and examples.
Each method invocation can also raise CORBA system exceptions; see the CORBA specification.
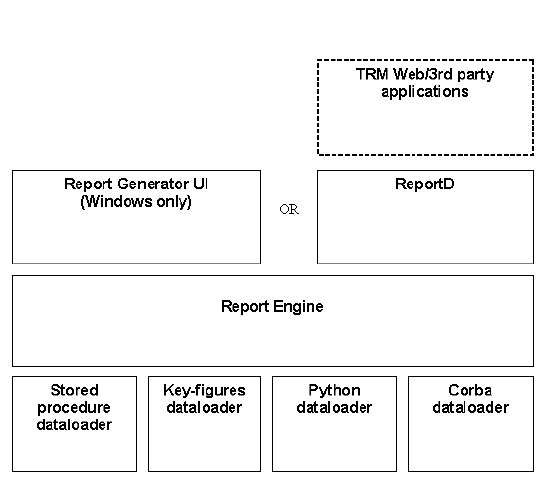
TRM System Administration Guide 209
Chapter 13 Configuring and customizing reports
13.1 Report Generator components
Reports are generated by the Report Generator tool. The architecture of Report Generator can be
summarized as follows:
Report Generator consists of the following components:
13.1.1 Dataloader modules
Dataloader modules provide the following report data to the report engine:
•Stored procedure: a stored procedure is invoked on the TRM database and the result set is
fetched into the engine.
•Key-figure, periodic, collateral : transaction/cashflow reports on which the valuation modules are
applied in the same way as in the transaction manager.
•Python: a python script is executed; a callback is available to insert arbitrary data into the
engine.
•perl: a perl script that either provides all the data or manipulates each row using callback
subroutines.
13 Configuring and customizing reports
13.2 Applying report definitions
210 © Wall Street Systems IPH AB - Confidential
13.1.2 Report engine
The report engine computes report expressions and implements criteria. It groups and sorts the
data. The full set of report data must be loaded into the engine before the user can start accessing
it. However memory use is greatly reduced by a disk swap.
13.1.3 Report Generator UI
Reports generator UI handles the data grid windows, the query parameter dialogs and the drilldown
functionality. It loads and saves the report layout files.
13.1.4 ReportD
ReportD is a shell application which invokes the report components with minimal overhead. It has
two modes of operation.
•Command line: query parameters are passed on the command line as in any shell application;
the results are sent as standard output using one of the available format (XML, CSV, TXT, HTML).
•POST CGI emulation: query parameters are sent to the standard input URL encoded; the result
set is piped to the standard output using a binary format. Java libraries exist to decode the
binary stream.
13.1.5 Cover pages, headers, and footers
There are two environment variables that control cover pages, headers, and footers:
FKREPORT_EXPORT_FORMAT_VERSION and FKREPORT_EXPORT_FORMAT. Here are the options:
•No cover pages, headers, or footers:
set FKREPORT_EXPORT_FORMAT_VERSION to a number less than 5.
•Cover pages and headers and footers:
set FKREPORT_EXPORT_FORMAT_VERSION to a number equal to or greater than than 5.
•Cover pages and/or headers and/or footers:
set FKREPORT_EXPORT_FORMAT to one or more of the following, separated by commas (this
overrides FKREPORT_EXPORT_FORMAT_VERSION):
–COVER_PAGE
–ROW_HEADER
–ROW_PLAIN
–ROW_FOOTER
For example, to add cover pages and footers to your reports, set
FKREPORT_EXPORT_FORMAT=COVER_PAGE,ROW_FOOTER.
13.2 Applying report definitions
Report definitions are stored in external files. The environment variable FK_REPORTS_TYPES is used
to specify the directory containing these files, for example
FK_REPORTS_TYPES=%FK_HOME%\share\reports\types. The files have the extension .frd (TRM
Report Definition).
You can add new reports to the list of available reports on-site by creating new definition files. The
filename, without the .frd extension, should be descriptive of the type of the report; for example,
transactions-log.frd is the definition file for a Transaction Log Report. All reports which have a
definition file can be launched from an entry in the Application Manager.
The report definition file includes:
•Report type (the name of the file)
13 Configuring and customizing reports
13.3 Sample report definition file
TRM System Administration Guide 211
•Report name (title printed on the headers)
•Name of the stored procedure
•List of the parameters required at start-up of the report
•Definition of each of the parameters: parameter type (defines the list of accepted values),
optional default value, and whether the parameter is mandatory
•Definition of drilldown fields
•Renaming and hiding of columns
•Filters to transform numerical results to text (via a database access).
13.3 Sample report definition file
[FK Report Definition]
[Main]
Type=transactions
Name=Transactions Report
Procedure=transactions-report
Parameters=portfolio_id,instrument_group,
instrument_id,cp_client_id,collateral_number,opening_date_from,opening_date_to,v
alue_date_from,value_date_to,state_id,number
HiddenParameters=number
ConvertToLocalTime=opening_time
[Parameter portfolio_id]
Name=Portfolio
Type=PORTFOLIO
[Parameter instrument_group]
Name=Instrument Group
Type=UM_INSTRUMENT_GROUP
[Parameter instrument_id]
Name=Instrument
Type=UM_INSTRUMENT
[Parameter cp_client_id]
Name=Counterparty
Type=COUNTERPARTY
[Parameter collateral_number]
Name=Collateral Number
Type=INT
[Parameter opening_date_from]
Name=Opening Date From
Type=DATE
[Parameter opening_date_to]
Name=Opening Date To
Type=DATE
[Parameter value_date_from]
Name=Value Date From
Type=DATE
13 Configuring and customizing reports
13.3 Sample report definition file
212 © Wall Street Systems IPH AB - Confidential
[Parameter value_date_to]
Name=Value Date To
Type=DATE
[Parameter state_id]
Name=Transaction State
Type=TRANSACTIONSTATE
Default=TransactionStateDefault
[Parameter number]
Name=Number
Type=INT
[Rename]
Fields=mattr_4
mattr_4=FX Quote Amount
Params=1
[Filter]
Fields=type_id,premium_type,date_basis,sign_id,kind_id,status,rate_type,rate_typ
e_2
type_id=TransactionType
premium_type=ModuleInterface
date_basis=ModuleInterface
sign_id=TransactionSign
kind_id=TransactionKind
status=Status
rate_type=ModuleInterface
rate_type_2=ModuleInterface
13.3.1 Main section
The Type field contains the root of the file name.
The Procedure field uses TRM syntax, not database syntax: lower case, words separated by ‘-’
instead of capital letters. The Report Generator will convert this name to the database stored
procedure name.
The Ignore field is used to specify the columns you do not want displayed.
The Parameters field contains a list of the parameters that will appear in the start-up window for
that report:
Parameters=start_date,end_date,custody_id,client_id
Subsequent sections contain definitions for each of these parameters. For example:
[Parameter end_date]
Name=End Date (the displayed name)
Type=DATE (see the list of accepted types)
Mandatory=0 (0 for non-mandatory, 1 for mandatory field)
Default= (’today’ or TransactionStateDefault or EUR-Euro by default)
13.3.2 Rename section
In the Rename section you can specify any columns you want to rename, for example:
[Rename]
Fields=other_custody_id,custody_id
other_custody_id=Other Custodian
custody_id=Custodian
13 Configuring and customizing reports
13.4 Configuring New Report submenu
TRM System Administration Guide 213
where
13.3.3 Filter section
The list of filters specified in this section will appear in a read me file in the distribution. Filters are
used to translate numeric values to text values, for example cashflow subtype id to name.
You can also write your own datafilter in perl (see below). Support for datafilters written in python is
not yet implemented.
13.4 Configuring New Report submenu
The menu.fkm file specifies the reports that appear in the File/New Report submenu of the Report
Generator. This file does not affect the reports that can be launched directly from the Application
Manager.
The environment variable FK_REPORTS_MENU is used to specify the path of the menu.fkm file, for
example FK_REPORTS_MENU=%FK_HOME%\share\reports\menu.fkm.
This file contains a list of the reports that will be shown in the File - New Report submenu. The
structure of this file is report type, report name and status line value. For example:
[activity-log]
DisplayName=Activity Log
StatusLine=New Activity Log Report
If this file is not available, the application will scan the %FK_HOME%\share\reports\types directory
for .frd files and create a menu entry for each report type found. The report name shown in the
menu will be taken from the Name field in the [Main] section of the definition file. The Key-Figure
and Periodic P/L reports will be separated from the others by a separator line.
[Rename]
Fields=col1,col2,... The list of columns to rename
Col1=new col1 name For Each column
Col2=new col2 name For Each column
Branches=1 To rename branch#1..20
Params=1 To rename param#1..10
[Filter]
Fields=col1,col2,... The list of columns to filter
Col1=filter1 For Each column
Col2=filter2 For Each column
Type=rate To show the deal rate column in the same way as in Enter Board.
Type= GapSetInfoFilter Activates gap-related columns in Report Generator.
row_filters=TransactionSignDataFilter,
GapSetInfoDataFilter, BranchDataFilter
Supplies filters to each row.
The row_filters (data filters) are more complex. They typically add
more fields to the report. The following filters are shipped by default:
TransactionSignDataFilter (adds columns based on labels in the
instrument definition. Buy/Sell etc)
GapSetInfoDataFilter (adds columns related to gap sets)
BranchDataFilter (adds information given for branch codes)
13 Configuring and customizing reports
13.5 Setting up layout files
214 © Wall Street Systems IPH AB - Confidential
To place menu items in a submenu called My Reports, add the following line to each item:
Add SubMenu=My Reports
13.5 Setting up layout files
Layout files are defined by users within the Report Generator. All layout files are saved in the
directory specified by the FK_REPORTS_LAYOUTS environment variable, for example
FK_REPORTS_LAYOUTS=%FK_HOME%\share\reports\layouts. The files have the extension .fkr (TRM
Report).
Layouts can now be selected in report start-up windows; only the layouts relevant to the type of
report will be shown. If no layouts are defined, the layout selection field is grayed out.
13.6 Running related reports
The drilldown functionality allows you to execute other reports or programs using the data in the
report as the argument. For example, by right-clicking on a transaction number you can launch a
transaction log report for the associated transaction. You declare actions in .ini files and additional
lines in the report type files.
13.6.1 drilldown.ini files
In the directory share/reports/layouts/, all *_drilldown.ini files are automatically read and their
contents are merged (acm_drilldown.ini, trm_drilldown.ini etc). A *_drilldown.ini file contains
a series of action declarations:
[my_action]
Type=report
Layout=Action Report
Parameters=param1,param2,param3,param4,param5
The following file declares the 'report' action as follows: launch a new report window with
Transactions.fkr as a layout, portfolio_id will be assigned the 1st parameter and instrument_id
the 2nd parameter.
[action_transaction_report]
Type=report
Layout=Transactions
Parameters=portfolio_id,instrument_id
It is also possible to launch an external command (an editor for example) as an action:
[action_transaction_board]
Type=command
Command=FKTransactionBoard.exe --layout=%1 --id=%2
13.6.2 .frd report types
This section declares a drilldown named 'my_drilldown' with 'Drilldown label' as a label:
[Drilldown my_drilldown]
Label=Drilldown label
Action=my_action(params.param1,row.colum1,'abc',123,null)
When this drilldown is executed launches the action 'my_action' (in the .ini file) with the following
arguments:
13 Configuring and customizing reports
13.7 Customizing reports in python
TRM System Administration Guide 215
–the report parameter 'param1'
–the value of the report column 'column1' for the line that the user clicked for this drilldown.
–the constants 'abc', 123 and null.
This section then does the mapping between report columns and drilldown:
[drilldown]
column1=my_drilldown,drilldown1,drilldown2
column2=drilldown3
This means that when you left-click on 'column1' the drilldown 'drilldown1' is executed. Right-click
on 'column1' to see a context menu with the actions 'drilldown1' and 'drilldown2'.
This is useful to bind many drilldowns in a column, for example in the transaction id column, you
could have 'edit transaction' to launch transaction board or 'show children' to start a new transaction
report with the child transactions.
13.7 Customizing reports in python
Most TRM modules are already accessible through python, so this is a good way to implement
customer-specific reports that would be otherwise difficult or impossible to do.
See python.frd and python_test.py in the FK_HOME\share\reports\types directory for
information on creating python data sources.
13.8 Customizing reports in perl
Report Generator also offers two ways of using perl: data source and datafilter. The data source
works like a stored procedure, but the data to be processed is prepared in perl instead of SQL (see
FK_HOME\share\reports\types\PerlSource.pl).
The data filter offers a way to add additional information. For example it is possible to add new fields
to an existing key-figure report. In this case you must implement a few hook subroutines in perl
(see FK_HOME\share\reports\types\balance.pl). Report Generator runs the primary report and
then calls subroutines in the perl file for each row to populate additional fields.
13.9 Printing reports from the command line (Windows only)
Reports can be created using command line arguments. The arguments required are specified in a
.frp (TRM Report Parameters) arguments file which is given on the command line after all the
options. The report can be printed using the --print option. Argument files are saved in the
directory specified by the FK_REPORTS_LAYOUTS environment variable
(FK_REPORTS_LAYOUTS=%FK_HOME%\share\reports\layouts). It is possible to generate or open
argument files from inside the Report Generator.
These files must have the following structure:
[FK Report Parameters]
[Main]
Type=balance
Layout=balance.fkr
[Parameters]
13 Configuring and customizing reports
13.10 Executing reports from the command line
216 © Wall Street Systems IPH AB - Confidential
Fields=from_date,to_date,minimum_state_id
from_date=07/20/00
to_date=07/21/00
minimum_state_id=FINAL
The first line must be [FK Report Parameters]. This is the signature.
13.9.1 Main section
The Type key is used to specify the report definition file required. Note that the file extension, .frd,
is not included. This parameter can not be omitted. Without it the report will not be created (this file
defines the type of the report).
The Layout key is used to specify the layout file required; this field is not mandatory. Note that the
file extension, .fkr, is included in this field.
13.9.2 Parameters section
The Fields key lists the parameters defined in this file. The values must be separated by commas,
without any spaces. The case used must match the case used in the .frd definition file.
The subsequent lines contain definitions for the parameters given in the Fields key. The parameter
names in these lines can appear in lower, upper, or mixed case. The parameters defined as
mandatory in the definition file must be included.
13.10 Executing reports from the command line
To execute a report from the command line (crontab, shell script), you can use reportd, a
lightweight version of Report Generator, available on Unix and windows. The report data is returned
on the standard output in the following format: csv, tab delimited text file, xml (two formats
available) and html (only intended for tests).
Example: a transaction report on 'LIMIT' portfolio exported as XML.
set FK_REPORTS_TYPES=...
set FK_REPORTS_LAYOUTS=...
reportd -U dbo -P password -D mydb -t transactions --param portfolio_id=LIMIT -f
xml3 > report.xml
TRM System Administration Guide 217
Chapter 14 Generating verification reports
The verification reports in this chapter are available in TRM Administration Tools. This chapter
explains how to generate reports to verify the consistency of static data. In some cases you can
repair corrupt data by setting the Repair parameter.
14.1 General System Auditing
14.1.1 Domain Map Verification report
This report checks for corruption in domain mapping. Enter the following parameters:
The report displays the table name and any inconsistencies. For example:
The report allows you to find a setup where the domain specified in the top part of the editor is
missing from the mapping table
14.1.2 Market Info Map Verification report
This report lists the incorrect info map rows. Enter the following parameters:
Parameter Description
Tab le Tab le n am e
Repair Choose 0-No or 1-Yes
Layout Choose a layout
Reason for inconsistency Description
Corrupt domain permissions Client is defined as modifiable on a specified
domain, but the domain is not Read-accessible.
Obsolete domain permission Displayed if you create a client with the ID of a
client which was removed without an update of the
corresponding domain.
Parameter Description
Instrument Instrument to check
Repair unknown types Choose 0-No or 1-Yes
Repair wrong type/name with
no prices
Choose 0-No or 1-Yes
14 Generating verification reports
14.1 General System Auditing
218 © Wall Street Systems IPH AB - Confidential
The report displays the price type, instrument, integer reference used in the market info map, and
reason for inconsistency.
14.1.3 Property Map Verification report
This report lists the properties that have an incorrect Type:
The report displays the name of the object, the object keys and the ID of the incorrect type.
14.1.4 Price Verification report
This report lists the market info map referencing objects that no longer exist. It checks that all
prices are attached to a market info map ID, and checks prices that have an orphan yield
curve-period:
.
Outputs are instrument ID, price type, period and integer reference used in MarketInfoMap. The
following inconsistencies can be reported:
Repair wrong type/name with
prices
Choose 0-No or 1-Yes
Layout Choose a layout
Parameter Description
Parameter Description
Object Object to be scanned
Key Key to be scanned
Property Type Property type to be scanned
Repair Choose 0-No or 1-Yes
Layout Choose a layout
Parameter Description
Repair Choose 0-No or 1-Yes
Layout Choose a layout
Reason for inconsistency Description
MarketInfoMap entry with reference to objects
that no longer exist
Prices that are not attached to any instrument
Price not attached to a MarketInfoMap Prices that are not attached to any instrument
Yield curve price with incorrect period Yield curve prices with incorrect period
14 Generating verification reports
14.2 Instrument auditing
TRM System Administration Guide 219
14.2 Instrument auditing
14.2.1 Instrument Feature Verification report
This report displays any inconsistencies in feature allocation on the instrument:
Outputs are feature, instrument and reason. Reasons are as follows:
•Invalid feature for the type
•Missing feature for the type
•Feature has to be mandatory for the type
•Invalid feature for the instrument
14.2.2 Instrument Result Verification report
This report displays inconsistencies in instrument setup.
Outputs are instrument, result type and reason. Possible reasons are as follows:
•Instrument with missing classification configuration
•Result type with missing result configuration
14.3 Transaction Auditing
14.3.1 Transaction Classification Verification report
This report lists the inconsistencies at transaction level when the classification mechanism is used.
The following parameters are available for checking this information:
Parameter Description
Feature Feature to be checked
Instrument Type Instrument type to check
Instrument Instrument to check
Repair Choose 0-No or 1-Yes
Layout Choose a layout
Parameter Description
Instrument Instrument to check
Layout Choose a layout
14 Generating verification reports
14.4 Relationship auditing
220 © Wall Street Systems IPH AB - Confidential
Possible sources of inconsistency are as follows:
•Owner with missing classification required
•No classification rule
•Result type with missing result
•Instrument with missing classification configuration
Static data are stored in tables: UMClass, UMClassFeature, UMFeatureEntry and UMFeature. Before
launching this report, make sure that these static tables are up to date by rebuilding the tables
using the build script with parameter -t.
14.4 Relationship auditing
14.4.1 Entity Relationship Verification report
Before enabling the SDM framework on top of TRM/CMM, check that the master-subentity
relationships in the static data tables to be managed by SDM are consistent. The Entity Relationship
Verification report provides this check. The following parameters are available:
The report shows the master entity, subentity and reason for inconsistency.
14.5 Client auditing
14.5.1 Client Accounts Verification Report
This report list the inconsistencies at Client level regarding account configuration.
Parameter Description
Portfolio Portfolio to be checked
Number Number of transaction to check (for a single transaction)
Layout Choose a layout
Parameter Description
Subset of tables The subset to check (only SDM is available at present)
Layout Choose a layout
Parameter Description
Client Client to be checked

14 Generating verification reports
14.5 Client auditing
TRM System Administration Guide 221
Possible sources of inconsistency are as follows:
- No settlement instructions rule is defined
- No account is attached to settlement instructions rule
Currency Currency to be checked
Layout Choose a layout
Parameter Description
14 Generating verification reports
14.5 Client auditing
222 © Wall Street Systems IPH AB - Confidential
TRM System Administration Guide 223
Chapter 15 Routine system admin operations
15.1 Database administration using Admin Center
15.1.1 Database statistics (TRM tables)
This application provides a report of the current state of your TRM database. Since it must query
every table in the database, it can take a while for the information to appear. The statistics report
will only appear when the all the queries are completed.
You can sort the tables ascending, by clicking on the displayed column headers. You can also export
the selected table to a CSV (Comma Separated Values) file.
You open this application by double clicking on Database Statistics from the Database
Administration folder.
15 Routine system admin operations
15.1 Database administration using Admin Center
224 © Wall Street Systems IPH AB - Confidential
At the top of the window, the name of the database (simply ‘fk’ in the example above) along with
the total size available on the device, the current size of the data, and the current size of the index
are displayed. All of the database tables are listed alphabetically in the report table. For each table,
you can view the number of rows and the data, index, and total space in KBs. The last column shows
the percentage of the database space that is taken up by this table. If you notice that the log tables
are getting too big, you can truncate them using the Log Truncation application (see 15.1.4 Log
Truncation on page 226).
15.1.2 Connected Users
Connected Users provides a report of the users currently connected to the TRM database. Note
that it does not show all of the users connected to the database server, but only those users that are
connected to the same TRM database as you. This functionality is convenient to track down
problems or to view who is currently working so they can be notified in the event of a shutdown (the
system administrator should always try to avoid shutdown with no wait).
From Admin KIT’s Database Administration folder, open Connected Users:
15.1.3 Database consistency check (Microsoft SQL Server and Sybase only)
This application is a graphical interface to the dbcc program on the server, and is usually invoked
through isql (or, for Sybase only, sqsh). Use this tool to diagnose and fix database problems. You
can check database tables, check table allocations, check index allocations, and check the
consistency within system tables. In addition, the table allocation and index allocation checks can be
run in Fast mode (less thorough) or in Full mode (slow but thorough).
Note: Database consistency check tasks can be lengthy (several hours) and can have a negative
impact on the performance of the other TRM applications. For this reason, it is a good idea
to run it at the end of the business day so as not to disturb TRM users.
dbcc can be run on a separate server and database so as not to disturb the production environment
(run it on a backup of the production database). It is also possible to set up a dbcc checkstorage
routine that runs in the background. See
http://techinfo.sybase.com/css/techinfo.nsf/DocId/ID=20266 for details.
15 Routine system admin operations
15.1 Database administration using Admin Center
TRM System Administration Guide 225
To run the database consistency checker:
1. From the Admin KIT Database Administration folder, select Database Consistency Check:
2. Your options are as follows:
Command What it does
Check
database
tables
Checks that index and data pages are linked correctly, indexes are
sorted properly, and all pointers are consistent.
If you skip non-clustered indexes, you do not check the page linkage,
pointers and sort order on non-clustered indexes.
The linkage and pointers of clustered indexes and data pages are
essential to the integrity of your tables. Others can easily be dropped
and recreated, if necessary.
Check table
allocations
Reports the amount of space allocated and used. For user tables, it
fixes all of the allocation errors and can also fix pages that remain
allocated to objects that have been dropped from the database.
Errors found in system tables are reported but not fixed, since you
must be in single-user mode to fix allocation errors in the system
tables (usually performed by the system administrator).
Check index
allocations
Provides integrity checks on all indexes in the database.
For user indexes, it fixes all of the integrity problems it encounters, but
it does not fix integrity errors on system indexes. These can be fixed by
going into single-user mode (usually performed by the system
administrator).
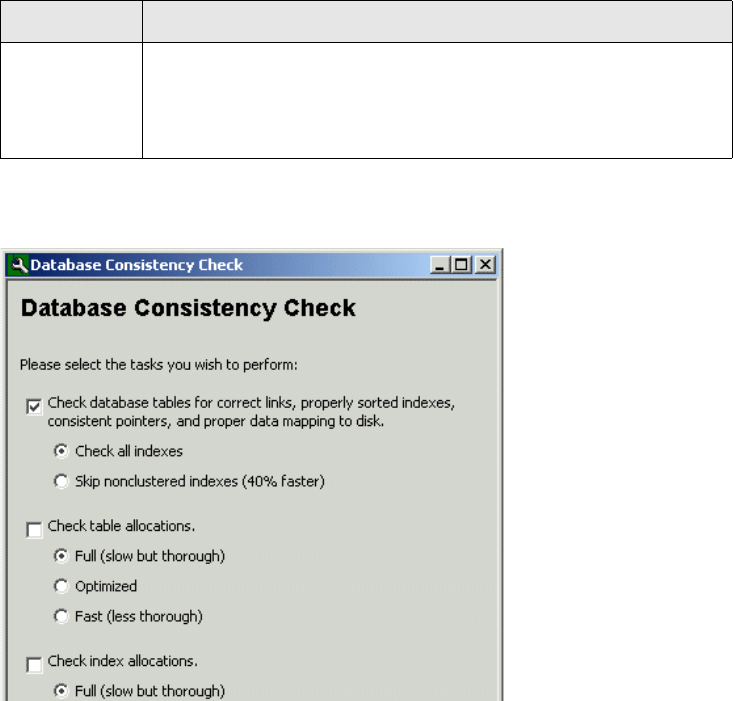
15 Routine system admin operations
15.1 Database administration using Admin Center
226 © Wall Street Systems IPH AB - Confidential
3. Click Next.
This displays the output page.
4. You can choose between receiving all output messages, which is quite verbose, or only receive
messages about problems and whether or not these problems have been fixed.
5. You can also have the output sent to a file. This is convenient if you are running dbcc but are not
the system administrator. The output file can then be e-mailed to the system administrator to
resolve any problems you have encountered. To do so, ensure that the None switch is off, and
use the Browse button to navigate to and name the output file.
6. Click Begin to start the tasks you requested.
An output console opens and a progress bar notifies you of how far dbcc has progressed in the
check.
15.1.4 Log Truncation
Owing to the high number of transactions in the system, it will sometimes be necessary to truncate
the log files in order to avoid using up all of the available space in your database.
Before running Log Truncation, you can check that this is necessary by running Database
Statistics and checking the ActivityLog, HistoryLog, CashflowLog, and TransactionsLog tables. If
you notice that some of them are getting too big, it may be time to truncate some or all of them.
Check catalog Checks for consistency within and between the system tables found in
a particular database. For example, it verifies that every type in
syscolumns has a matching entry in systypes, every table and view in
sysobjects has at least one column in syscolumns, and the last
checkpoint in syslogs is valid.
Command What it does
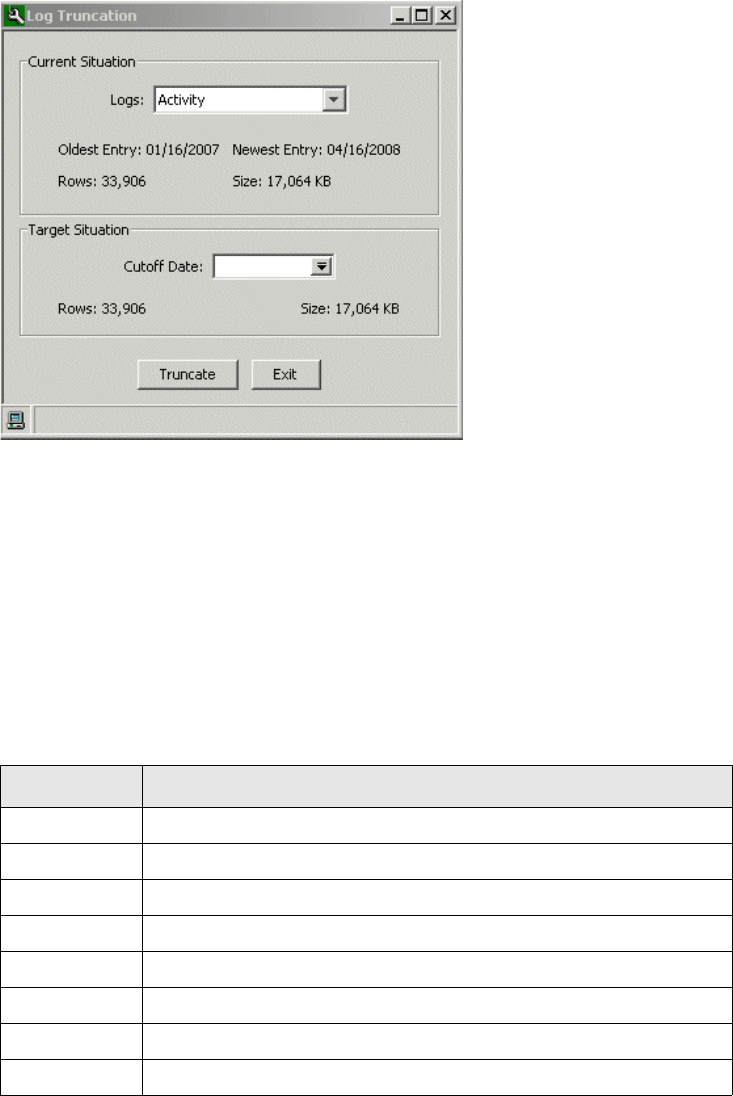
15 Routine system admin operations
15.1 Database administration using Admin Center
TRM System Administration Guide 227
1. From Admin Center’s Database Administration folder, open Log Truncation:
2. In the Logs field, select the set of logs you want to truncate.
3. In the Cutoff Date field, select the date on which you want the logs to be truncated (meaning that
all entries before this date will be removed from the log file).
4. If necessary, adjust the truncation date until you get an acceptable number of rows and size.
5. Click Truncate.
15.1.5 History Log
The start and stop of TRM application manager managed applications are logged to the History Log.
The following fields are used:
Field Description
object_id Application
action Start or Stop
key_1_string Application tag where applicable
key_2_string Application ID
key_3_string Application CORBA IOR
key_4_string Title of application
tag Subset of application class. For internal TRM framework use
ID Numeric identifier of application class. For internal TRM framework use.

15 Routine system admin operations
15.2 Setting Application Manager timeout
228 © Wall Street Systems IPH AB - Confidential
15.1.6 Database Cleanup
This tool can be used to shrink your database and remove old and unwanted data from the system.
The selection list in the “Data to delete” field shows all the types of data that you can delete, for
example custody balances, VaR data, transactions, and so on. If you select Transactions then extra
fields will appear allowing you to specify a specific portfolio or market.
In the Cutoff Date field you specify the earliest date that you want this type of information stored
for. When you then select the “Cleanup” button, any data before this date will be deleted.
15.2 Setting Application Manager timeout
On slow systems, it could be helpful to increase the Application Manager timeout, which is the
maximum time an application waits for another to respond. The default is 25 sec. The environment
variable FK_APPLICATION_MANAGER_PARAMS fixes the command line parameters for Application
Manager. A parameter --timeout can be set through this variable.
For example, to set the timeout to 50 seconds:
FK_APPLICATION_MANAGER_PARAMS=--timeout 50
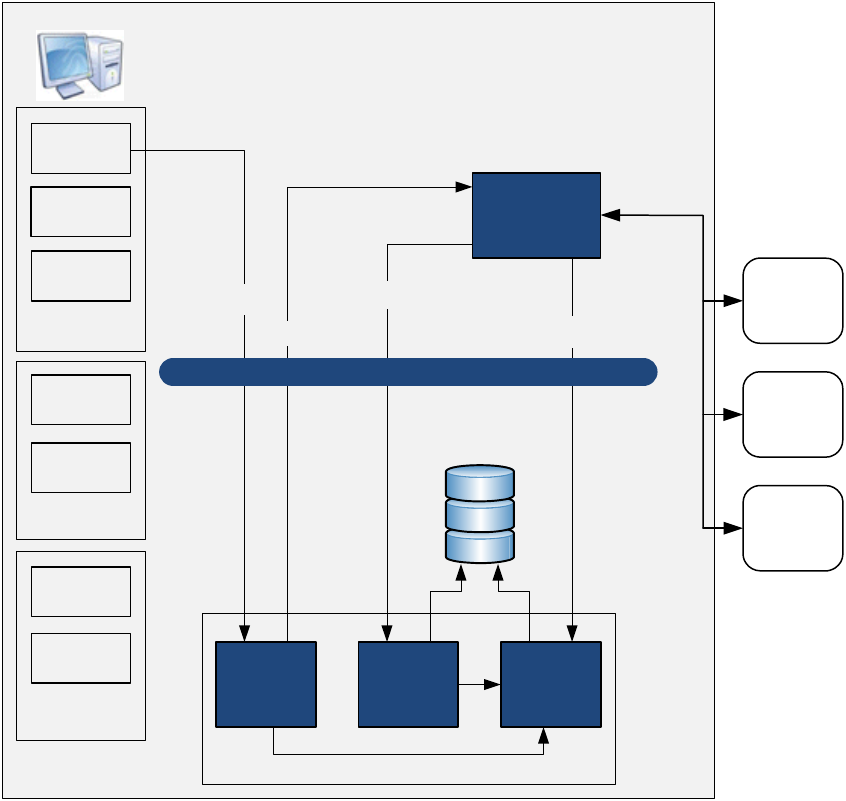
SWIFT Connectivity Guide 229
Chapter 16 FIX trading platform interface
16.1 Components
The trading platform interface is a set of software components that process requests to and
executions from external trading systems.
The client-side applications consist of:
•User boards:
–Order Capture and Order Processing: to create and trigger the processing of outgoing orders
–Execution Verification: to review the incoming trade executions
–Setup applications: the Platform Editor and the Order Routing Editor.
Wallstreet Suite
FIX Order
Production
FIX Execution
Processing
User boards
Setup tools
Administration
tools
ESI FIX Onyx Server
UserInterfaces
Platform Editor
Order Capture
Order
Processing
Order Admin
Platform Log
Execution
Verification
Order Routing
Editor
Logging Service
Connector to trading
platforms
TRM FIX serviced
Message Bus
360T
FXAll
FIX compatible
platform
FIX
Trading
Platforms
transaction-interface.
process-order
transaction-interface.
request
transaction-interface.
execution
transaction-interface.
log
Order Request
FIX Order
Execution Report

Component interactions
230 © Wall Street Systems IPH AB - Confidential
•Administrative tools:
–Order Admin: to manage exceptions in the order processing
–Platform Log: to browse through the traces logged by all the components.
The server side components are:
•The order production engine
•The trade execution integration service
•The logging service
•The ESIFix connector to the external trading platforms.
16.2 Component interactions
The ESIFix Onyx server exchanges FIX messages with the trading platforms through specific APIs.
Communications between these components is through the message bus via a set of queues. This is
how it works:
Queue Message
content Source Consumer Triggering
event
Actions on
reception
transaction-interface.
process-order
TRM
transaction
Order
Capture
board
TRM Fix
serviced
An order is
accepted in the
board.
An order is
prepared for the
trading platform
transaction-interface.
request
Order TRM Fix
serviced
ESIFix
server
Above
mentioned
message is
received.
A FIX order is
posted in the
trading platform.
transaction-interface.
report
Platform
report
ESIFix
server
TRM Fix
serviced
Trading platform
sends a report.
For an execution
report, a TRM
transaction is
created.
For a rejection
report, the order
is rejected.
For an update
report, the order
is marked as
uploaded in the
platform.
transaction-interface.
process-cancel-request
Cancellation
request
Order
Processing
board
TRM Fix
serviced
Order is
cancelled in the
board.
A cancellation
request is
prepared.
transaction-interface.
log
Log entry Any
component
TRM Fix
serviced
A component
logs a
processing
event.
A log is saved in
the database.
Workflow related to the trading platform
SWIFT Connectivity Guide 231
16.3 Workflow related to the trading platform
Both sets of client applications (order-related and execution-related boards) make use of a specific
transaction flow.
The FIX serviced process also performs its tasks with the help of some flow operations.
All these operations are delivered with the standard transaction flow in the order.py setup file.
Here are the main operations in this workflow:
16.4 Site customization
The TRM Fix serviced process can be extended for specific client needs. For order processing and
execution, you can add logic using a Python script.
A sample customization script called processor.py is delivered with the package in
%FK_HOME%\python\lib\Lib\site-packages directory in the Windows distribution and in
$FK_HOME$/bin directory in the other ones.
In this script a globally defined dictionary, processors, defines the mapping between the platforms
and the Python processor classes.
A processing class may define three methods:
•process_order
•process_execution_report
•process_cancel_request.
These definitions are optional. If provided, they will be called when sending an order, receiving an
execution, or sending a cancel request respectively.
16.4.1 process_order
An outgoing order structure is prepared by the Fix serviced process and passed to the
process_order method before it is sent the ESIFIX Onyx server.
The signature of the method is:
def process_order(self, order_struct, order_txn)
Where:
Operation Caller Result
COMMIT-ORDER Order boards Order is saved in the database.
ACCEPT-ORDER Order boards Order is send to TRM serviced.
CANCEL-ORDER Order boards Order is cancelled.
PLATFORM-FILL-ORDER FIX serviced Order is closed.
PLATFORM-REJECT-ORDER FIX serviced Order is rejected.
PLATFORM-CANCEL-ORDER FIX serviced Order is cancelled.
PLATFORM-COMMIT-EXECUTION FIX serviced Execution is created in TRM.
COMMIT-EXECUTION Execution board Execution is saved in the database.
ACCEPT-EXECUTION Execution board Execution is verified.
CANCEL-EXECUTION Execution board Execution is cancelled.
Site customization
232 © Wall Street Systems IPH AB - Confidential
•order_struct is the CORBA structure describing the order to send. Its type can be found in
%FK_HOME%\python\lib\Lib\site-packages\IDL\fix_types_idl.py.
•order_txn is the TRM transaction object representing the order.
The method must return the structure when it modifies it. It may be omitted in the class definition.
16.4.2 process_execution_report
The signature of the method is:
def process_execution_report(self, report_struct, order_txn, exec_txn)
Where:
•report_struct is the CORBA structure describing the received execution. Its type can be found
in %FK_HOME%\python\lib\Lib\site-packages\IDL\fix_types_idl.py.
•order_txn is the TRM transaction object representing the order if any.
•exec_txn is either empty or contains the execution as a TRM transaction.
This method is called twice upon reception of an execution:
•First with the execution structure and the order transaction. At this point, is it possible to enrich
the execution structure.
•It is called again with the execution structure, the order transaction, and the execution
transaction. At this point, the execution transaction may be complemented.
The method must return the structure when it modifies it. It may be omitted in the class definition.
16.4.3 process_cancel_request
The signature of the method is:
def process_cancel_request(self, request_struct, order_txn)
Where:
•request_struct is the CORBA structure describing the cancellation request to be sent.
•order_txn is the order transaction.
process_cancel_request is called before the request is passed to the ESIFIX Onyx server.
The method must return the structure when it modifies it. It may be omitted in the class definition.
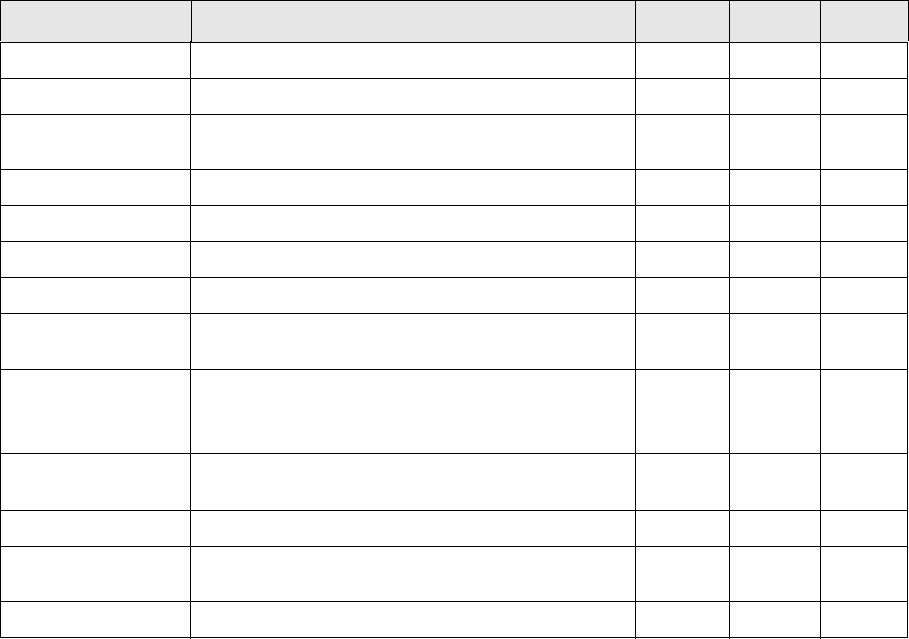
TRM System Administration Guide 233
Appendix A Utility programs and scripts
This appendix contains some of the utility programs and scripts used by TRM.
A.1 Scripts
The directory $FK_HOME/sbin/<database> contains some useful scripts for retrieving information
from and manipulating information in the database. By default the scripts use normal TRM login
information. If the user does not have a TRM login (on UNIX, root typically does not) it is better to
use login parameters via isql or psql. (See A.3 psql (Microsoft SQL Server and Sybase only) on
page 237.) Unless indicated, no special options apply.
The add-ons for each supported database type are as follows:
The scripts in $FK_HOME/share/<database>/setup/ can also be used for manipulating the
database.
Script Description Sybase Oracle MSSQL
bcp A bulk copy program for oracle 1
copy-tables Copies data between two tables. 1 1
daily-maintenance Delete old MarketQuotes data and updates statistics
on tables
11
drop-indexes Drops all indexes from user tables 1 1
drop-procedures Drops all user-defined stored procedures 1 1
drop-triggers Drops all user-defined triggers 1 1
extract-database Extracts the sql code that builds the database 1 1
extract-flow Extracts the sql code used for setting up the
transaction flow
111
extract-menus Extracts the sql code used for defining all user
configurations of Transaction Manager, enter boards,
etc.
111
extract-modes Extracts the sql code used for setting up the
transaction modes
111
nightly Recreate indexes and rebuild procedures 1 1
print-columns Prints the definitions of all columns in all tables and
views
11
print-database Prints the definitions of all database objects 1 1
A Utility programs and scripts
A.2 Real-time diagnostic tools
234 © Wall Street Systems IPH AB - Confidential
A.2 Real-time diagnostic tools
Three executables can be used for checking the status of different parts of the real-time platform:
•mb-status
•md-status
•md-trace
•lm-status
They should be run in the appropriate Wallstreet Suite environment to produce correct results. They
all run on both UNIX and Windows.
Use the --verbose (or -v) flag for more detailed output and --help (or -h) for the complete syntax.
A.2.1 Monitoring Message Bus status
Message Bus status can be monitored with mb-status.This uses the FK_MQ_BROKER_JMX_URL
environment variable to connect to the Message Bus. Only ActiveMQ 4.1.1 is supported.
mb-status manipulates JMX data published by ActiveMQ, like jconsole. The main benefits of
mb-status are:
•Absence of a graphical user interface (useful when only consoles are available).
•Combination of information on queue, topics and connection.
The scripts are as follows:
Windows:
%FK_HOME%\bin\mb-status.bat
Unix:
$FK_HOME/bin/mb-status.sh
Launch the script with the -h parameter to get the list of all possible options and their meanings.
An example of a command and resulting output is as follows:
mb-status -a -f v7syb
[fkadmin@atlas2 ~]$ mb-status
[NFO] Loading properties from file 'mbstatus.properties'
[NFO] Properties loaded:
# NAME VALUE
1 mbstatus.broker.name.id org.apache.activemq:BrokerName=
2 mbstatus.default.broker.name localhost
3 mbstatus.destination.name.id ,Destination=
4 mbstatus.object.type.id ,Type=
5 mbstatus.troubleshoot.destination.size.threshold 10
6 mbstatus.troubleshoot.memory.percent.usage.threshold 25
7 mbstatus.troubleshoot.refresh.period 60

A Utility programs and scripts
A.2 Real-time diagnostic tools
TRM System Administration Guide 235
[NFO] Passed options:
[NFO] Loading managed beans from URL
'service:jmx:rmi:///jndi/rmi://dinar2.corp.trema.com:1899/jmxrmi'
...
Note: Since version 7.3.0, browsing topics is now possible using the -bt parameter. The -b
parameter (queue browsing) has been replaced by -bq. As topic browsing is based on
subscription, it is now possible to visualize messages queued before mb-status -bt ... is
launched. Only messages produced while mb-status runs are reported. This is more a
message tracking feature than a real message browsing one.
A.2.1.1 Troubleshooting destinations
The mb-status -t switch allows you to detect destinations (queues or topics) that:
•Contain more than a certain number of pending messages (configurable via the
-Dmbstatus.troubleshoot.destination.size.threshold property),
•Consume more than a certain percentage of memory (configurable via the
mbstatus.troubleshoot.memory.percent.usage.threshold property)
•Contain at least one pending message that is not bound to any consumer.
A.2.2 md-status
This application shows all applications connected to the mdsd. It makes it possible to verify that all
associated processes are up and running.
Sample output from md-status:
Message Delivery Service Status:
Started at: 04/11/05 11:44 PM
Total # of messages: 2815338
Total # of connections: 80
Current # of connections: 32
ID S Host Program PID User In # Out # Pending #
----------------------------------------------------------------------
1 lev.labs. x-treasur 6710 tony 0 199397 0
1 lev.labs. x-fx-pric 5776 tt 0 6 0
74 lev.labs. x-fx-pric 5776 tt 0 6 0
48 lev.labs. x-treasur 6710 tony 0 199397 0
7 lev.labs. misd 11814 fkadmin 860855 0 0
2 lev.labs. transd 15305 fkadmin 19 12 0
4 lev.labs. micd 15304 fkadmin 1633297 669027 0
5 lev.labs. ssld 15368 fkadmin 28902 0 0
6 lev.labs. misd 15427 fkadmin 292228 0 0
12 lev.labs. x-transac 9006 risto 0 56942 0
13 HP-RISTO FKApplica 322 risto 0 0 0
22 lev.labs. x-transac 10639 guy 0 37609 0
SWITCH DESCRIPTION VALUE
-s JMX Unified Resource Locator (URL) service:jmx:rmi:///jndi/rmi://dinar2.corp.trema.c
om:1899/jmxrmi
-x JMS Unified Resource Locator (URL) failover:tcp://dinar2.corp.trema.com:61816?wireF
ormat.tcpNoDelayEnabled=true
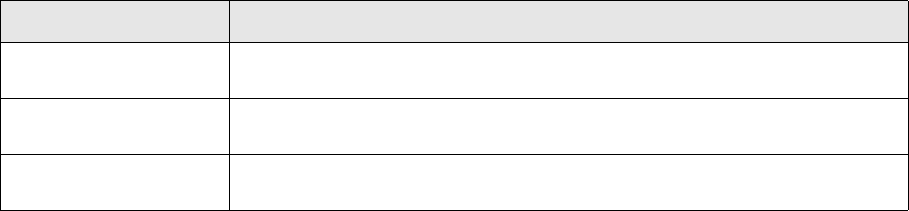
A Utility programs and scripts
A.2 Real-time diagnostic tools
236 © Wall Street Systems IPH AB - Confidential
23 lev.labs. x-transac 10747 said 0 3948 0
26 HP-RFEVRE FKApplica 257 rfevre 0 0 0
27 HP-RFEVRE FKTransac 332 rfevre 14 32 0
28 HP-RFEVRE FKPortfol 496 rfevre 2 5 0
29 HP-RFEVRE FKReport. 384 rfevre 0 6 0
30 LAPTOP-AS FKApplica 330 asap 0 0 0
31 HP-RFEVRE FKAccount 345 rfevre 3 6 0
32 HP-LYNNE FKApplica 268 lynne 0 0 0
33 HP-TOMMY FKApplica 284 tt 0 0 0
35 FRANC FKApplica 1458 dfraioli 0 0 0
36 FRANC FKTransac 939 dfraioli 0 12 0
39 FRANC FKReport. 955 dfraioli 0 12493 0
40 HP-RISTO FKInstrum 626 risto 0 11 0
42 HP-RISTO FKGapSetE 214 risto 6 0 0
43 HP-RISTO FKReferen 484 risto 0 1 0
44 HP-RU FKApplica 370 ru 0 0 0
45 HP-RU FKClientE 327 ru 3 6 0
46 HP-RU FKClientG 260 ru 2 0 0
52 lev.labs. md-status 16222 lynne 0 0 0
A.2.3 md-trace
This application shows all updated quotes and transactions through the real-time platform.
Sample output from md-trace:
At 2005-04-12 09:06:24.553 from `MIS', subject `USD/TRL'
type `IDL:trema.com/Finance_KIT/Market_Quote:1.0', size 824
At 2005-04-12 09:06:24.568 from `MIS', subject `DKK CIBOR'
type `IDL:trema.com/Finance_KIT/Market_Quote:1.0', size 832
At 2005-04-12 09:06:24.569 from `MIS', subject `DKK YIELD'
type `IDL:trema.com/Finance_KIT/Market_Quote:1.0', size 832
At 2005-04-12 09:06:24.576 from `Micd', subject `DKK ZERO'
type `IDL:trema.com/Finance_KIT/Market_Quote:1.0', size 840
At 2005-04-12 09:06:24.616 from `ssld', subject `Market-Info'
type `IDL:trema.com/Message_Delivery/Notification:1.0', size 740
At 2005-04-12 09:06:24.617 from `MIS', subject `USD ZERO MRKT'
type `IDL:trema.com/Finance_KIT/Market_Quote:1.0', size 840
At 2005-04-12 09:06:24.621 from `ssld', subject `Market-Info'
type `IDL:trema.com/Message_Delivery/Notification:1.0', size 740
At 2005-04-12 09:06:24.621 from `ssld', subject `Market-Info'
type `IDL:trema.com/Message_Delivery/Notification:1.0', size 740
At 2005-04-12 09:06:24.622 from `ssld', subject `Market-Info'
type `IDL:trema.com/Message_Delivery/Notification:1.0', size 716
At 2005-04-12 09:06:24.623 from `MIS', subject `JPY LIBOR'
type `IDL:trema.com/Finance_KIT/Market_Quote:1.0', size 832
lm-status
Option Description
-v
--verbose
Show contents of the messages
-a
--show-all
If verbose is on, show null fields
-f
--filter
Filter messages as <type>&<source>&<subject>
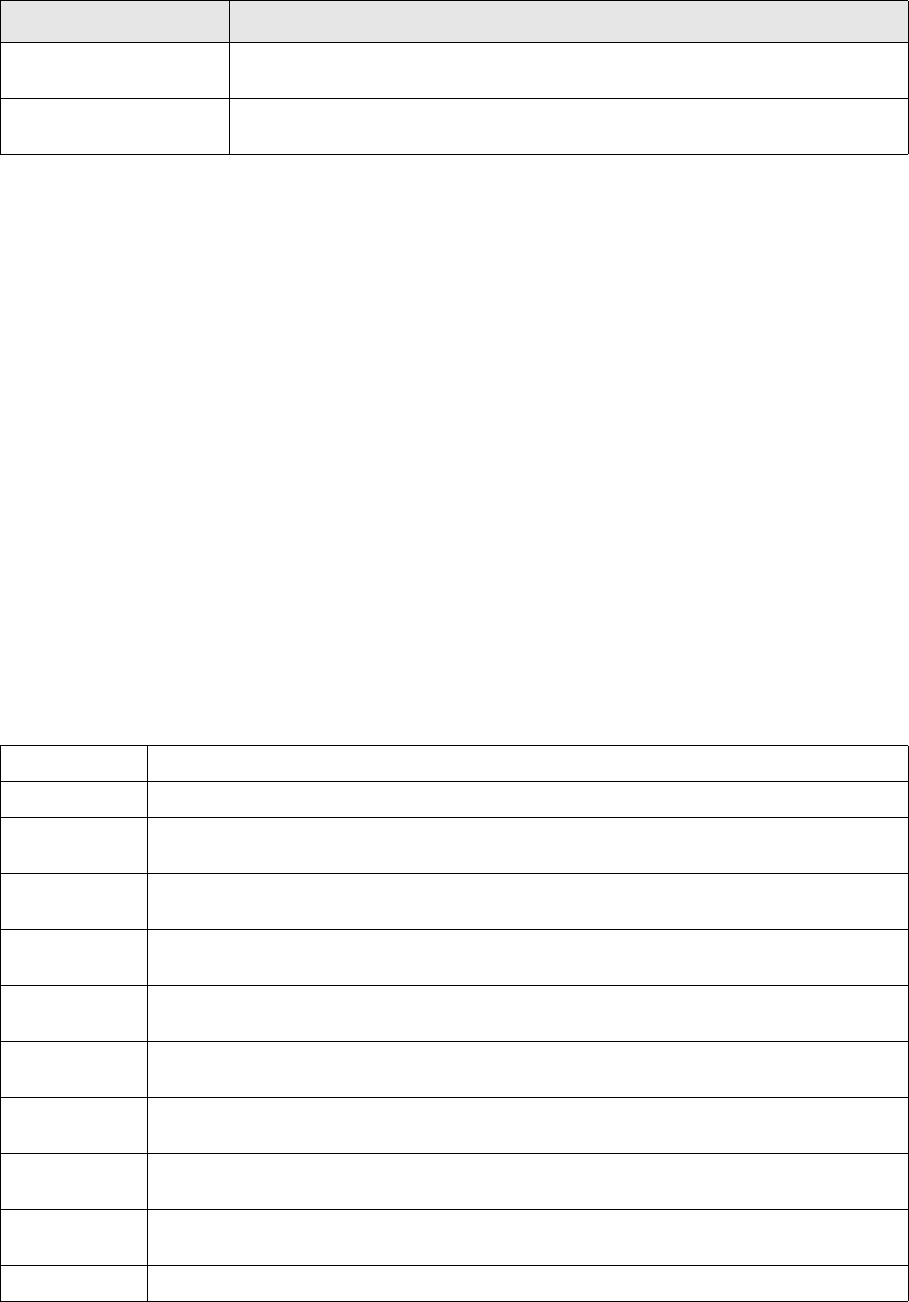
A Utility programs and scripts
A.3 psql (Microsoft SQL Server and Sybase only)
TRM System Administration Guide 237
This application shows all limits currently connected to the limit server.
Run in the appropriate environment, the program lm-status will show the IDs of the limits for the
limit server. If limit users are defined, the switch -limit-user <USERNAME> should be used.
Example output from lm-status:
ID Name
----------------------------------------------------------------------
FX-LIMIT Forex Limit
IR-LIMIT Limits on Interest Rate products
IR-LIMIT-2 Second Limit on Interest Rate products
VAR LIMIT VaR Limit
A.3 psql (Microsoft SQL Server and Sybase only)
psql is an interactive SQL parser to send commands to the SQL Server and to display the results. It
behaves very similarly to isql which is distributed with the Sybase SQL Server.
psql is written in the perl command language, and requires the syperl program, which contains a
DB-Library interface to communicate with the SQL Server.
A.3.1 Options
The following options are recognized:
Option Description
-s arg
--server arg
Limit server(s) to use
-i arg
--id arg
Limit IDs to show
-e Echo the command before sending it.
-n Do not display any prompt in interactive mode.
-v Just print versions of the software, and exit. The versions printed are the ones of perl,
syperl, and psql.
-c cmdend Set the command terminator to cmdend. The default is go. cmdend should not contain any
SQL reserved words or characters that have special meaning to the operating system.
-h headers The number of rows to print between column headings. The default is to print headings only
once for each set of query results.
-w
columnwidth
Set the screen width to columnwidth. The default is 80 characters.
-s colseparator Set the character to show between the columns. The default is blank. Only the first character
of colseparator is used.
-t timeout The number of seconds before a command times out. If no timeout is specified, a command
runs indefinitely; however, the default timeout for logging in to SQL Server is 60 seconds.
-m errorlevel For errors of the severity level specified or higher only the message number, state, and error
level are displayed. For errors of levels lower than errorlevel, nothing is displayed.
-H hostname Specify the hostname to tell to the SQL Server. The default is whatever is returned by
hostname(1) or equivalent command.
-U username Log in as username rather than the system login name.

A Utility programs and scripts
A.4 Debugging
238 © Wall Street Systems IPH AB - Confidential
A.3.2 Commands
When reading commands interactively, psql understands many commands to manipulate the SQL
command buffer. When not in interactive mode, the only command that is understood is cmdend,
which is “go” if nothing else is specified in the -c command line option. Commands are, in general,
understood only if they are at the beginning of line. The only exception is \g, which is understood
only at the end of a command line.
A.4 Debugging
A.4.1 Tracing accesses to the database
You can trace accesses made by TRM end-user or real-time applications to the database.
To do this, first set the environment variable DATABASE_DEBUG to 1. See the examples below.
A.4.1.1 Tracing an end-user application (Windows)
1. Open a Windows Command Prompt session on the TRM Client server.
2. Set the environment variable:
set DATABASE_DEBUG=1
3. Change to the directory where the end-user applications reside:
cd %FK_HOME%\bin
4. Run the application you want to trace:
FKActivityManager.exe | more
-P password Specify the password. If not supplied, psql prompts for the password.
-Z Allows login without password.
-I interface Specify the name of the interfaces file. The default is to use system dependent interfaces
file, which is typically $<DATABASE>/interfaces.
-S server Specify the server name to connect to. The default is to use $DSQUERY environment
variable, if set.
-D database Specify the database name to connect to.
-p Show name of current database as prompt.
-l filename Use login information in $HOME/.psql/filename. The file format is
server/username/password/database
exit, or quit Exit psql immediately.
read filename Read the contents of filename to the SQL command buffer, and print it.
reset Wipe out the SQL command buffer, and start again.
!! command Execute command using the default shell.
vi Edit the SQL command buffer with an editor, and reread the commands after editing. The
editor to use is taken from environment variable EDITOR if set, or VISUAL if set, or use the
default vi.
cmdend Send the commands to the SQL Server and display the results.
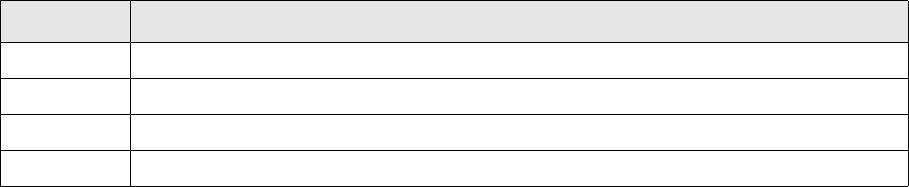
A Utility programs and scripts
A.4 Debugging
TRM System Administration Guide 239
The trace information is displayed in the Command Prompt session.
A.4.1.2 Tracing a real-time application (UNIX)
1. Change to the directory where the real-time applications reside:
cd $FK_HOME/sbin
2. Use the eval command to set your environment (replacing the example values given below):
eval `/usr/wss/v7/bin/environ -e fkprod_ora -h /usr/wss/v7 -f`
3. Set the environment variable:
export DATABASE_DEBUG=1
4. Run the application you want to trace:
./mdsd
A.4.2 Tracing TRM messages (Windows)
You can trace TRM messages by launching a TRM end-user application with trace parameters or by
setting environment variables. These specify the trace level to be used, and the path and name of
the trace log file.
A.4.2.1 Setting the trace level and log file output
A.4.2.1.1 Setting the trace level
You can set the trace level in either of two ways:
•Use the --trace-level <trace_level> parameter, like this:
<application>.exe --trace-level 1 <other options>
•Set the environment variable FK_TRACE_LEVEL before launching the application:
set FK_TRACE_LEVEL=1
The available trace levels are as follows:
A.4.2.1.2 Setting the trace output
You can specify the output log file generated by the trace in either of two ways:
•Use the --trace-output <path_filename> parameter, like this:
<application>.exe --trace-output C:\temp\logs\editor_trace.log <other options>
•Set the environment variable FK_TRACE_OUTPUT before launching the application:
Trace level Description
0 Exception or other error condition, such as invalid configuration
1 Often used to trace method entry/exit points
10 Used for more frequent information or debug information
20 Provides verbose debug information

A Utility programs and scripts
A.4 Debugging
240 © Wall Street Systems IPH AB - Confidential
set FK_TRACE_OUTPUT=C:\temp\logs\editor_trace.log
Note: Either --trace-level or FK_TRACE_LEVEL should be set to ensure an output in the log file.
A.4.2.1.3 Example
You can trace the Client Editor as follows:
1. Open a shell from Application Manager.
2. Run the application:
FKSDEditor.exe --fixed-entity --layout Client\Client.xml --trace-level 10
--trace-output C:\temp\logs\editor_trace.log
A.4.2.2 Trace prefixes
You can trace a specific module by prefixing the module name. For example, to trace the comKIT
Transaction service use:
--trace-level CK/Transaction=10 --trace-output C:\temp\logs\editor_trace.log
Trace prefixes used in TRM include the following:
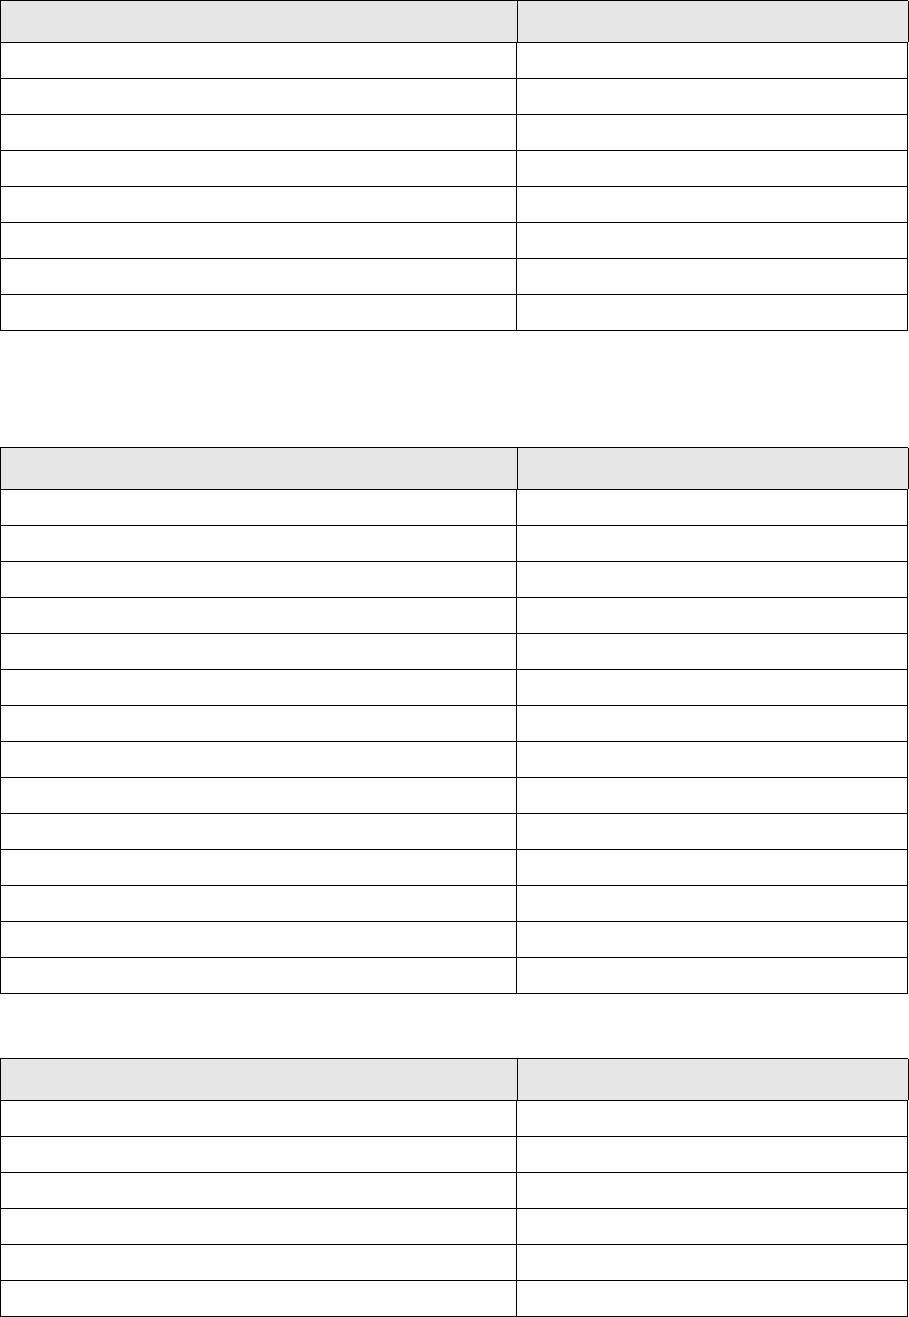
A Utility programs and scripts
A.4 Debugging
TRM System Administration Guide 241
A.4.2.2.1 TRM servers
A.4.2.2.2 TRM modules
General
Pricing
TRM feature Prefix
Activity Manager Daemon Activity
Loan Monitor Daemon LMD
Limit Daemon LMSD
Message Delivery System Daemon MDSD
Market Information Calculation Daemon MICD
Treasury Monitor Daemon TMD
Message Manager Daemon messaged
Reuters Source Sink Library Daemon ssld
TRM feature Prefix
Call Money CM
Message Manager DM
Hedge Manager HM
Loan Monitor LM
Payment Allocation PA
Price Manager PM
Treasury Monitor TM
Rate Monitor FK::monitor::rate-board
Numerix FK::Numerix
ODBC FK::ODBC
Oracle FK::Oracle
Python FK::Python
Simulation FK::simulation
Sybase FK::Sybase
TRM feature Prefix
pricing/annuity/annuity pricing/annuity
pricing/yield/yield pricing/bond
pricing/goal-seeker pricing/goal-seeker
Performance Monitor service/performance-monitor
pricing/spread-solver pricing/spread-solver
pricing/spread-to-benchmark pricing/spread_to_benchmark
A Utility programs and scripts
A.4 Debugging
242 © Wall Street Systems IPH AB - Confidential
Financials
Actions
Valuation
ComKIT
TRM feature Prefix
Volatility Interpolation/Bond_Interpolation financial/volatility-interpolation/bond
Volatility Interpolation/Cap_Interpolation financial/volatility-interpolation/cap
Volatility Interpolation/Caplet_Interpolation financial/volatility-interpolation/caplet
Caplet Stripper.cc financial/volatility-surface/caplet-stripper
Volatility Interpolation/Swap_Interpolation financial/volatility-interpolation/swap
Yield Interpolation financial/yield-interpolation
TRM feature Prefix
action/pricing/eq-option/eq_option action/pricing/eq-option
action/pricing/fx-option/fx_option action/pricing/fx-option
action/pricing/swap-option/swap_option action/pricing/swap-option
TRM feature Prefix
valuation/dual-currency dual_currency_values
valuation/bond-future-option ir-option-pricer
valuation/ctd valuation/ctd
valuation/expression valuation/expression
valuation/ir-option/pricer valuation/ir-option/pricer
valuation/option valuation/option
valuation/option/pricer valuation/option/pricer
TRM feature Prefix
Payment Service CK/Payment
Static Data Service CK/Static-Data
Transaction Service CK/Transaction

TRM System Admin Guide 243
Appendix B Object permissions
This appendix contains details for the Permission Editor, used to grant and revoke access to TRM
objects.
B.1 List of TRM permissions
The following table contains a complete list of all the permissions that can be set on objects in TRM:
Permission Description
ACCEPT By default, TRM is configured so that you must accept generated payments before
they are transferred. This moves the state of the payment forward in the payment
flow.
ACTIVITY Run activities. Usually batch users only.
ALL All permissions
CANCEL Cancel payment allocations
CREATE Permission to create entities
FIXING Not used.
FREEZE Permission to freeze cashflows
MATCH Match transactions
MIRROR Mirror new transactions
MODIFY Permission to modify entities
NET Payments which have the same payment date, currency and payment instructions
can be combined into a single payment, thereby simplifying payment transfer.
Combining payments in this way is known as ‘netting’. It is also possible to separate
previously netted payments into their original components. This process is known as
‘unnetting’. During payment generation of payments, some payments are netted
automatically according to the rules created in the Netting Rules page in the lower
part of Client Editor, see Assigning Netting Rules in Setting Up TRM. However, it is
also possible to net payments after payments have been generated. In order to be
able to net payments, the payments must have the following data in common:
• All counterparty fields
• Currency
•Value date
• Bank account information.
PACKAGE Package transactions
READ Permission to read entities
RECONCILE Permission to validate between balances and statements.
REJECT This moves the state of the payment backwards in the payment flow allowing it to
reappear in the Process mode.

B Object permissions
B.1 List of TRM permissions
244 © Wall Street Systems IPH AB - Confidential
REJECT-2 Reject alternative payment advices.
REMOVE Permission to remove entities.
REPORT-FINAL Reject NACV reports from state FINAL.
SELF-VERIFY Self-verify object modifications.
SPLIT With TRM, you can split one generated payment into several physical settlements.
There are several reasons for doing this: you may wish to break up a particularly
large payment into smaller settlements, or the portfolio owner or counterparty
wishes a single payment to be made in several different accounts. Split payments
can be modified and moved backwards and forwards in the payment flow. However,
the cashflow information is held within the cashflow of the original payment.
Furthermore, you cannot net and unnet split payments.
STATE-FINAL Accept/reject transactions from FINAL states.
STATE-OPEN Accept/reject transactions from OPEN states.
STATE-REJECTED Accept/reject transactions from REJECTED states.
STATE-VERIFY Accept/reject transactions from VERIFY states.
STATUS-LIMIT-VIOLATI
ON
Update (set/clear) LIMIT VIOLATION status.
STATUS-OTHER Update (set/clear) other transaction status.
STATUS-RATE-REASON Update (set/clear) RATE REASONABILITY status.
TRANSFER When you transfer payments, TRM creates a payment file that can then be used to
execute the transfer in SWIFT or in some other payment system.
UNNET Payments which have the same payment date, currency and payment instructions
can be combined into a single payment, thereby simplifying payment transfer.
Combining payments in this way is known as ‘netting’. It is also possible to separate
previously netted payments into their original components. This process is known as
unnetting. During payment generation of payments, some payments are netted
automatically according to the rules created in the Netting Rules page in the lower
part of Client Editor, see Assigning Netting Rules in Setting Up TRM. However, it is
also possible to net payments after payments have been generated. In order to be
able to net payments, the payments must have the following data in common:
• All counterparty fields
• Currency
•Value date
• Bank account information.
UPDATE Permission to update entities
Permission Description
TRM System Administration Guide 245
Appendix C Unix operations
C.1 Unix operations
C.1.1 TRM Server Passwords
Since all TRM server (real-time) processes connect to the TRM database, each component must be
able to supply both username and password when they connect. The most convenient way to do this
is to use hard-coded passwords that are stored in a file.
The permissions on this file are Read-only for everyone except the fkadmin Unix ID. If permissions
are incorrectly set, unauthorized users might be able to change the passwords: some sites have a
policy against this kind of hard-coded passwords.
To overcome the problem, TRM can store the necessary passwords in shared memory. The basic
concept of shared memory information is that an individual user’s shared memory cannot be
accessed by another user. This allows, for example, the user fkadmin to create a shared memory
region with all necessary passwords that can be accessed later by the user fkadmin, but cannot be
accessed by anyone else.
C.1.1.1 Passwords for server processes
To avoid using the hardcoded passwords in the $FK_HOME/etc/rc script, proceed as follows:
1. Set up the login names for the real-time processes as environment variables.
2. Write the passwords to shared memory.
C.1.1.1.1 Setting up the login names as environment variables
The $FK_HOME/etc/rc script checks whether the environment variables used for login names, for
example FK_MICD_LOGIN, already exist when the script is executed. If the variable exists, it is
assumed set to the correct login name and that the password can be retrieved from shared memory.
If the variable does not exist, it will be set to the default login/password values as specified in the
$FK_HOME/etc/rc script.
To set these environment variables, use the standard environment definition, that is the
default-site-env.pl script. Definitions for the daemons are:
$ENV{FK_LIMITD_LOGIN} = "limon";
$ENV{FK_MICD_LOGIN} = "batch";
$ENV{FK_TRANSD_LOGIN} = "batch";
$ENV{FK_TICKET_LOGIN} = "ticket";
$ENV{FK_ACTIVITY_LOGIN} = "batch";You can set these variables on only UNIX. On Windows, set
the FK_USER variable from the Command Prompt.
C.1.1.1.2 Writing the password to shared memory
There are two main methods of writing the password information to shared memory, interactively or
automatically:

C Unix operations
C.1 Unix operations
246 © Wall Street Systems IPH AB - Confidential
Interactive method
Execute the script $FK_HOME/etc/login as the user for whom you want to create the shared
memory passwords. It will prompt for the Sybase logins and passwords for the real-time processes
(limon, batch, and ticket, as shown in the section above) and the dbo (fk) in order to create the
shared memory information.
With this method you will not need to store the passwords in any file.
Note: Shared memory is cleared when the machine is rebooted, which requires you to redo this
procedure after each reboot of the machine.
Automatic method
The $FK_HOME/etc/rc.login script will create the shared memory information after sourcing the
passwords from a (normally hidden) file. There are four available filenames that can be used:
$FK_HOME/etc/.fk-login
$FK_HOME/etc/.fk-login.$FK_IDENT
/etc/opt/fk/fk*/.fk-login
/etc/opt/fk/fk*/.fk-login.$FK_IDENT
For best security, it is recommended to install a local /etc/opt/fk/fk*/.fk-login file on the
computer where the server processes are running.
The file should be built up with four colon-separated columns with the syntax:
<SYBASE server name>:<database name>:<username>:<password>
•The first column is the Sybase SQL server name (SYBASE), or '*' if all servers.
•The second column is the database name, or '*' if all databases.
•The third column is the user name, or '*' if for any username.
•The fourth column is the password.
It is recommended that the Sybase SQL server name is specified, to avoid confusion if another
server is installed. The server and database names are used only for lookups, so a specified name
has higher precedence than '*'. The user name can be '*' if the file is used only by one user, and the
user name has been specified somewhere else.
It is highly recommended to include the $FK_HOME/etc/rc.login script for the relevant
environment in the automatic boot scripts of the server, so the shared memory passwords are
always available. The script must be executed by the same user as the one that is to execute the
server processes.
Make sure that the passwords are created before you attempt to start the real-time processes.
C.1.1.2 Sample .fk-login file
A sample .fk-login file can be found in the /usr/trema/fk/etc directory, with the file name
hardcoded-dot-fk-login. It contains the following definitions
# For market information updates.
FKDB:*:miud:rBah898
# For printing trade tickets and confirmations.
FKDB:*:ticket:bDtXmo
# For most batches in the system, like activity manager.
FKDB:*:batch:TarHtM
# For the limit management server.
FKDB:*:limon:Lx1Lx2
# The nightly batch also needs the database owner password

C Unix operations
C.1 Unix operations
TRM System Administration Guide 247
# to update statistics and possibly to build procedures.
FKDB:*:fk:fkfkfk
and can be run by using the following command:
su - fkadmin -c /usr/trema/fk/etc/hardcoded-dot-fk-login
C.1.1.3 Checking shared memory
It is possible to check if the shared memory contains information with the ipcs command.
ipcs -m -a
This command prints information about shared memory.
To remove information from shared memory, use the ipcrm command:
ipcrm -mx
where x is the shared memory segment (ID) to be removed (found previously with the ipcs -m -a
command).
C.1.2 Startup scripts
This section contains a description of the TRM startup scripts, located in the directory
$FK_HOME/etc/.
C.1.3 Scheduled processes (crontab)
Crontab is a UNIX command that manages the crontab file. The crontab file is read by the cron
process to execute programs in the background. There are separate crontab files for different
users.
In TRM, the fkadmin user should execute all server and scheduled processes. The crontab file can
be listed with crontab -l as user fkadmin.
The first five fields consist of asterisks or numbers. They are separated by spaces or tabs and
represent:
Script Description
rc This script starts all the real-time processes. It is possible to specify which programs to
start by giving names of programs after arguments. If nothing is given, the following list
will be used: "mdsd micd transd limitd site ssld".
To start, for example, the miud and micd in the environment test, enter:
$FK_HOME/etc/rc -e test miud micd
rc.limitd This script starts the limit server limitd only.
rc.local.add This script runs rc.sybase, rc.login and rc.
rc.login This script creates the shared memory information after sourcing the passwords from a
(normally hidden) file.
rc.mdsd This script starts the mdsd only.
rc.sybase This script can be used to automatically start a Sybase SQL server.
rc.names This script starts the CORBA name server, names. It cannot be run by root.
rc.comkitd This script starts the comKIT process and you can specify the services to be started from:
amount-event, transaction-position, performance, data, static-data, payment,
call-money.
rc.mirror Starts mirror loop.
C Unix operations
C.1 Unix operations
248 © Wall Street Systems IPH AB - Confidential
•Minute (0-59)
•Hour (0-23)
•Day of the month (1-31)
•Month of the year (1-12)
•Day of the week (0-6 with 0=Sunday).
If an asterisk is given for a certain field, that means “every,” for example every minute or hour.
Within each field, several values can be entered and grouped by commas or minus signs. A sample
crontab file is shown below.
#
2,12,22,32,42,52 * * * * /usr/wss/v7/sbin/print-pending-requests
#
0 2 * * * /usr/wss/v7/sbin/sybase/nightly
#
5,20,35,50 * * * * /usr/wss/v7/sbin/ssl/reconfigure
•The print-pending-requests script
2,12,22,32,42,52 * * * * /usr/wss/v7/sbin/print-pending-requests
This script runs every 10 minutes. It checks if there are any trade-tickets or confirmations to
print (or send).
•The nightly script
0 2 * * * /usr/wss/v7/sbin/sybase/nightly
This script carries out maintenance in the database every night at 2am.
•The reconfigure script
5,20,35,50 * * * * /usr/wss/v7/sbin/ssl/reconfigure
This script updates the configuration file for the market information links every 15 minutes.
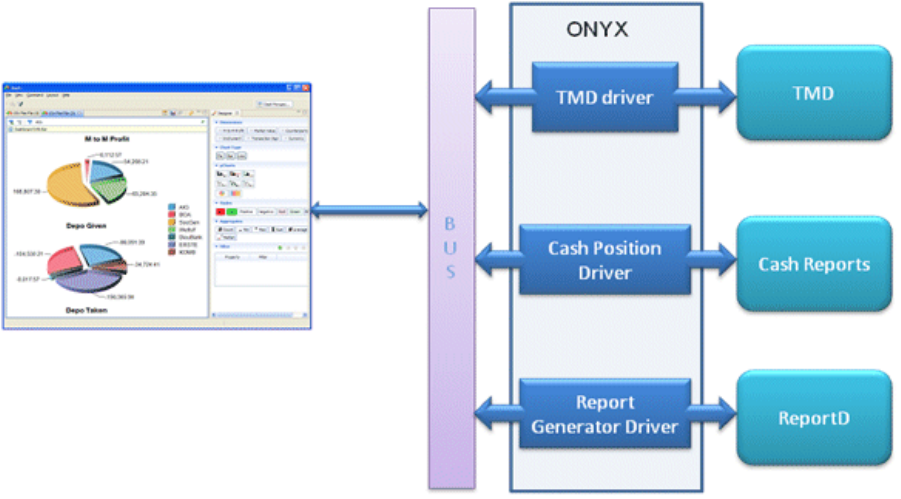
TRM System Administration Guide 249
Appendix D Configuring Dashboard
D.1 Introduction
The overall architecture of the Dashboard application is shown below.
The client application retrieves data from data source adapters provided as Onyx services. The
adapters act as a translator between the Dashboard and the underlying data source. The adapters
can be configured with number of properties specified in the
etc/onyx/properties/odabridge.properties file.
The properties are assigned appropriate defaults when installed by Suite Installer.
Properties
#The queue name for the communication between client and the onyx data source
adapters
odabridge.queue=${wss.env.name}.trm.odabridge.service.queue
D Configuring Dashboard
D.2 Data sources configuration
250 © Wall Street Systems IPH AB - Confidential
D.2 Data sources configuration
D.2.1 Treasury Position
Treasury position data is provided by a tmd process of which there are two types:
1. Pre-configured tmd which is started by specifying an XML configuration file that describes the
existing treasury positions and pages.
2. Flexible tmd which allows you to access to all saved treasury positions and pages.
There can be multiple tmd processes of either type running, and, provided that their service names
have a specific prefix, the Dashboard will automatically connect to them through the Onyx service.
The prefix in the naming convention described above is specified in the
etc/onyx/properties/odabridge.properties configuration file. An example of the tmd process
configuration is shown below.
Properties
biz.wss.oda.tmd.orb_context=${FK_ORB_CONTEXT}
# CORBA object reference name - defaults to tmd-dashboard
biz.wss.oda.tmd.service_name=${suite.installer.biz.wss.oda.tmd.service_name}
D.2.2 Cash Management Reports
The Cash Management Reports adapter retrieves data from WebSuite's Cash Management module.
The odabridge.properties file contains the URL to which the adapter connects.
Properties
biz.wss.oda.wsconector.end_point=${suite.installer.cmm.url}/iws/CaDashboardWebService
biz.wss.oda.wsconector.message_type=dashboard
D.2.3 Report Generator
The Report Generator adapter retrieves data by executing the reportd process. Only the layouts
accessible from the Onyx service (server installation) in the folder specified by the property (see
below) are available for Dashboard application.
Properties
biz.wss.oda.reportd.report_home=${FK_HOME}/bin
biz.wss.oda.reportd.types_home=${FK_HOME}/share/reports/types
tmd-dashboard-p1
tmd-dashboard-p2
tmd-dashboard-p3
tmd-dashboard-c1
tmd-dashboard-c2
Onyx dashboard
service
pre-configured
tmd
custom
tmd
D Configuring Dashboard
D.2 Data sources configuration
TRM System Administration Guide 251
biz.wss.oda.reportd.layout_home=${FK_HOME}/share/reports/layouts/Dashboard
biz.wss.oda.reportd.orb_context=${FK_ORB_CONTEXT}
D.2.4 Limits
The Limits adapter retrieves data by connecting to a standard limitd process.
Properties
biz.wss.oda.limitd.orb_context=${FK_ORB_CONTEXT}
biz.wss.oda.limitd.service_name=${suite.installer.biz.wss.oda.limitd.service_name}
D.2.5 Dashboard client application
The client application can be used with various data sources. It is possible to restrict the availability
of a data source in the client application with the following variables (defaults provided):
biz.wss.dashboard.sources.tmd.TMDDashboardDataSource.visibility=true
biz.wss.dashboard.sources.cmm.CashPositionSource.visibility=true
biz.wss.dashboard.sources.csv.CSVDataSource.visibility=false
biz.wss.dashboard.sources.reportd.ReportDDashboardDataSource.visibility=true
These properties can be specified either as environment variables of the client installation or directly
in the ${FK_HOME}/java/Jupiter/RCPSuite.bat file (-D <properties>).
The client application can also be configured to start with a predefined layout. You can set the
following property to the name of the layout to initialize the Dashboard when started:
rcp.rcpextension.usersetup.predefined-layout=My Dashboard 1
If the property is not specified, then the layout used last time the application was opened for the
current user will be used. If the property is set to none, the Dashboard application will be opened
with the initial layout (empty Dashboard and Designer views).
D Configuring Dashboard
D.2 Data sources configuration
252 © Wall Street Systems IPH AB - Confidential
TRM System Administration Guide 253
Appendix E Adding valuation modes
When configuring valuation, Wallstreet Suite provides three valuation modes: Default, Theoretical,
and Benchmark. To find out how these are used, search for valuation mode in the other Wallstreet
Suite documentation, starting with the TRM Instruments: Processing and Calculations Guide.
You can add a valuation mode by inserting a row in the ValuationMode table, or by adding the
corresponding information to the data file. The standard data is as follows:
&insert ("id" => 0,
"modes" => 1,
"name" => 'Default',
"DELETE" => [ "id" ]);
&insert ("id" => 1,
"modes" => 2,
"name" => 'Theoretical',
"DELETE" => [ "id" ]);
&insert ("id" => 2,
"modes" => 4,
"name" => 'Benchmark',
"DELETE" => [ "id" ]);
To add a new valuation mode, choose a name, an id number that is different from the currently
defined ones, and a modes number (a power of 2, whose exponent must be smaller than 32) that is
not already being used by another mode.
For example, to add a mode called "Standard" you could use:
&insert ("id" => 3,
"modes" => 8,
"name" => 'Standard',
"DELETE" => [ "id" ]);
E Adding valuation modes
254 © Wall Street Systems IPH AB - Confidential

TRM System Administration Guide 255
Appendix F External valuation
External Valuation is a valuation feature that can be used to replace the key-figures calculated by
TRM valuation with key-figures calculated outside TRM.
Attaching the External Valuation feature to an instrument, and setting the External Key-Figures cashflow
attribute (in a transaction with that instrument), triggers the following behavior when valuation is
performed for the transaction:
•The main valuation feature (e.g. Price Valuation or Generic IR Valuation) calculates all key-figures as
usual.
•The GetExternalFigures stored procedure is called with the valuation (figure) date and the
cashflow ID of the cashflow having the attribute.
•The stored procedure returns new values for certain key-figures, which will replace the
key-figure values calculated by the main valuation feature.
The GetExternalFigures stored procedure should be customized on site as required, in order to read
the figures from a table to which externally-calculated figures are imported. The key-figures
returned by the stored procedure need to be referred to using the system name of the key-figure.
The file FK_HOME\etc\fk-figures\key-figures.xml names the key-figures that can be replaced.
Note: Only the key-figures provided directly by valuation can be replaced, and not the
key-figures that are derived from other key-figures in the XML file. Derived key-figures will
be impacted if the key-figures used in the calculation of the derived figures are replaced.
Also, the Filtered Valuation feature may be used together with the External Valuation feature should a
whole group of TRM key-figures need to be silenced using the No Position, No Valuation, and No Risk
cashflow attributes.
Filtered Valuation is imposed in the end of the valuation; this filtering affects key-figures coming from
the main valuation feature as well as the External Valuation feature.
F External valuation
256 © Wall Street Systems IPH AB - Confidential
