TRM User Guide
User Manual:
Open the PDF directly: View PDF ![]() .
.
Page Count: 710 [warning: Documents this large are best viewed by clicking the View PDF Link!]
- Contents
- Preface
- Chapter 1 Overview
- Chapter 2 Navigating TRM
- 2.1 Application Manager
- 2.2 Common application features
- 2.2.1 Opening applications
- 2.2.2 Closing applications
- 2.2.3 Generating reports on application activity
- 2.2.4 Using application controls
- 2.2.5 Using keyboard shortcuts
- 2.2.6 Using application menus
- 2.2.7 Customizing the display of applications
- 2.2.8 Sorting data
- 2.2.9 Printing data
- 2.2.10 Using manager applications
- Chapter 3 Managing static data
- 3.1 Static data entities
- 3.2 Static Data Editor
- 3.3 Managing static data in Static Data Editor
- 3.3.1 Creating new static data entities
- 3.3.2 Creating static data from an existing entity
- 3.3.3 Creating static data entities in parallel
- 3.3.4 Modifying static data entities
- 3.3.5 Deleting static data entities
- 3.3.6 Verifying static data entities
- 3.3.7 Finding static data entities
- 3.3.8 Using templates to create static data entities
- 3.3.9 Common Static Data Editor attributes
- 3.4 Managing SDM-enabled static data
- 3.5 Countries
- 3.6 Calendars
- 3.7 Gaps (time intervals)
- 3.8 IR quotes and yield curves
- 3.9 Currencies
- 3.10 Currency priorities
- 3.11 Settlement locations
- 3.12 Client groups
- 3.13 Clients
- 3.13.1 Creating clients
- 3.13.1.1 Assigning clients to groups
- 3.13.1.2 Setting up client contact information
- 3.13.1.3 Defining properties
- 3.13.1.4 Creating groups of clients
- 3.13.1.5 Defining multiple branch SWIFT codes
- 3.13.1.6 Assigning portfolio-owner specific properties
- 3.13.1.7 Setting up internal deal mirroring
- 3.13.1.8 Configuring counterparty-specific limit amounts
- 3.13.1.9 Attaching collateral agreements to portfolio owners
- 3.13.1.10 Applying classification groups to a portfolio owner
- 3.13.1.11 Setting up client accounts
- 3.13.1.12 Linking settlement locations to clients
- 3.13.1.13 Setting up client settlement instructions
- 3.13.1.14 Specifying automatic netting for settlement flows
- 3.13.1.15 Settling in another currency
- 3.13.1.16 Assigning credit ratings to clients
- 3.13.1.17 Assigning credit spread curves to clients
- 3.13.2 Managing clients
- 3.13.1 Creating clients
- 3.14 Portfolios
- 3.14.1 Creating portfolios
- 3.14.1.1 Setting further portfolio attributes
- 3.14.1.2 Assigning allowed users and processes
- 3.14.1.3 Setting up cost-of-carry for portfolios
- 3.14.1.4 Restricting transactions into this portfolio (optional)
- 3.14.1.5 Defining result treatments for a portfolio
- 3.14.1.6 Aggregating result calculations across portfolios
- 3.14.2 Managing portfolios
- 3.14.1 Creating portfolios
- 3.15 Result types and results
- 3.16 Instrument types
- 3.17 Instrument groups
- 3.18 Instrument Templates
- 3.19 Instruments
- 3.20 Classification groups
- 3.21 Classification rules
- 3.22 Comments and comment rules (optional)
- 3.23 Bank Account Type Editor (optional)
- 3.24 Branch codes (optional)
- 3.25 Calendar groups (optional)
- 3.26 Cashflow charges (optional)
- 3.27 Cashflow groups (optional)
- 3.28 Cashflow types (optional)
- 3.29 Cash pools (optional)
- 3.30 Country groups (optional)
- 3.31 Credit ratings (optional)
- 3.32 Currency classes (optional)
- 3.33 Ladder sets (optional)
- 3.34 Ladder rules (optional)
- 3.35 Option schedule templates (optional)
- 3.36 Option schedule template groups (optional)
- 3.37 Package types (optional)
- 3.38 Parameters (optional)
- 3.39 Properties (optional)
- 3.40 Schedule templates (optional)
- 3.41 Schedule template groups (optional)
- 3.42 Security Basket Editor (optional)
- 3.43 Security Criteria Set Editor (optional)
- 3.44 Security identifier types (optional)
- 3.45 Time zones (optional)
- 3.46 Transaction charges (optional)
- 3.47 Volatilities (optional)
- Chapter 4 Managing market data
- 4.1 Defining real-time quotations
- 4.2 Defining scenarios and subscenarios
- 4.3 Freezing rates automatically
- 4.4 Defining simulation scenarios
- 4.5 Rate Monitor
- 4.5.1 Rate Monitor menus
- 4.5.2 Toolbar
- 4.5.3 Start-up parameters
- 4.5.4 Managing market data in Rate Monitor
- 4.5.4.1 Configuring page layouts
- 4.5.4.2 Selecting axes values
- 4.5.4.2.1 Instrument axes
- 4.5.4.2.2 FX Rate axes
- 4.5.4.2.3 FX Volatility axes
- 4.5.4.2.4 FX Fixing Rate axes
- 4.5.4.2.5 IR Quote /Yield Curve axes
- 4.5.4.2.6 Credit Default Swap axes
- 4.5.4.2.7 Bond Option Volatility axes
- 4.5.4.2.8 Cap / Floor Volatility axes
- 4.5.4.2.9 Caplet / Floorlet Volatility axes
- 4.5.4.2.10 Swaption Volatility axes
- 4.5.4.2.11 Composite Index axes
- 4.5.4.2.12 Performance Index axes
- 4.5.4.2.13 Imported Index axes
- 4.5.4.2.14 Example: setting the volatility for EUR/USD
- 4.5.4.3 Configuring period axes
- 4.5.4.4 Selecting figures
- 4.5.4.4.1 Instrument figures
- 4.5.4.4.2 FX Rate figures
- 4.5.4.4.3 FX Volatility figures
- 4.5.4.4.4 FX Fixing Rate figures
- 4.5.4.4.5 IR Quote / Yield Curve figures
- 4.5.4.4.6 Credit Default Swap figures
- 4.5.4.4.7 Bond Option Volatility figures
- 4.5.4.4.8 Cap / Floor Volatility figures
- 4.5.4.4.9 Caplet / Floorlet Volatility figures
- 4.5.4.4.10 Swaption Volatility figures
- 4.5.4.4.11 Composite Index figures
- 4.5.4.4.12 Performance Index figures
- 4.5.4.4.13 Imported Index figures
- 4.5.4.5 Manually adjusting and creating quotations
- 4.5.5 Generating quotation reports
- 4.6 Pricing tools
- 4.7 Pricing complex derivatives
- 4.8 Bloomberg interface
- 4.9 Market Data Status Monitor
- Chapter 5 Managing rules
- Chapter 6 Managing activities
- Chapter 7 Reporting
- Chapter 8 Managing transactions
- 8.1 Transaction Manager
- 8.2 Capturing deals
- 8.2.1 Entering new deals in Transaction Manager
- 8.2.1.1 Calculating key-figures
- 8.2.1.2 Displaying valuation parameters in the Discovery Console
- 8.2.1.3 Using fractional prices
- 8.2.1.4 Defaulting prices
- 8.2.1.5 Changing result mode
- 8.2.1.6 Entering competitive quotes
- 8.2.1.7 Adding charges and fees
- 8.2.1.8 Creating an FX pair shift
- 8.2.1.9 Trade assignment
- 8.2.2 Canceling deals
- 8.2.3 Entering new deals in Enter Board
- 8.2.4 Setting up a pre-trade limit check
- 8.2.5 Enabling limit queries at transaction level
- 8.2.1 Entering new deals in Transaction Manager
- 8.3 Managing settlement instructions
- 8.4 Processing transactions
- 8.4.1 Retrieving transactions
- 8.4.2 Displaying transaction data in a chart
- 8.4.3 Verifying transactions
- 8.4.4 Confirming transactions
- 8.4.5 Correcting transactions
- 8.4.6 Matching and unmatching transactions
- 8.4.7 Performing actions on deals
- 8.4.7.1 Duplicating transactions
- 8.4.7.2 Packaging transactions
- 8.4.7.3 Previewing messages
- 8.4.7.4 Running reports on transactions
- 8.4.7.5 Checking the unavailable actions on a transaction
- 8.4.7.6 Adding information links to deals
- 8.4.7.7 Generating transaction comments
- 8.4.7.8 Setting base FX rates
- 8.4.7.9 Defining the valuation approach at transaction level
- 8.4.7.10 Assigning valuation models at transaction level
- 8.4.7.11 Changing IR exposure calculations at transaction level
- 8.4.7.12 Canceling provisional settlements in Transaction Manager
- 8.4.7.13 Processing special actions or events
- 8.4.8 Generating reports on transactions
- 8.5 Deal mirroring
- 8.6 Managing call transactions
- 8.7 Managing cashflow forecasts
- Chapter 9 Managing orders
- Chapter 10 Managing funds
- Chapter 11 Managing collateral
- 11.1 Setting up master agreements
- 11.2 Monitoring collateral positions
- Chapter 12 Monitoring positions
- 12.1 Treasury Monitor
- 12.1.1 Treasury Monitor menus
- 12.1.2 Start-up parameters
- 12.1.3 Configuring Treasury Monitor
- 12.1.4 Monitoring positions in Treasury Monitor
- 12.1.5 Simulating movements in Treasury Monitor
- 12.1.6 Using Treasury Monitor for risk measurement
- 12.1.7 Monitoring cost-of-carry positions
- 12.1.8 Generating position-related reports
- 12.2 Position Monitor
- 12.3 FX Spot Monitor
- 12.4 FX Position Roll Over activity
- 12.1 Treasury Monitor
- Chapter 13 Monitoring performance
- 13.1 Measuring performance and risk
- 13.2 Setting up performance measurement and risk
- 13.3 Performance Monitor
- Chapter 14 Portfolio modeling
- 14.1 Setting up portfolio modeling
- 14.2 Portfolio Modeling Monitor
- 14.2.1 Portfolio Modeling Monitor menus
- 14.2.2 Start-up parameters
- 14.2.3 Configuring Portfolio Modeling Monitor
- 14.2.4 Analyzing positions in Portfolio Modeling Monitor
- 14.2.5 Rebalancing
- 14.2.6 Generating deals
- Chapter 15 Managing benchmarks
- Chapter 16 Managing limits
- 16.1 Overview
- 16.2 Setting up limits
- 16.3 Limit Monitor
- 16.4 Limit Notifications
- 16.5 Analyzing limit violations
- Chapter 17 Managing transaction conditions
- Chapter 18 Managing cash and settlements
- 18.1 Managing cash and cash position
- 18.1.1 Managing bank account balances and interest
- 18.1.2 Managing cost of carry
- 18.1.3 Managing cash pool leveling
- 18.2 Setting up settlement management
- 18.3 Generating and processing settlements
- 18.3.1 Settlement Processing menus
- 18.3.2 Start-up parameters
- 18.3.3 Settlement processing modes
- 18.3.4 Processing settlements
- 18.3.5 Modifying settlement instructions
- 18.3.6 Generating settlement processing reports
- 18.4 Managing custody movements and balances
- 18.5 Reconciling settlements and custodies
- 18.1 Managing cash and cash position
- Chapter 19 Managing accounting
- 19.1 Parallel accounting
- 19.2 Realizing and processing results
- 19.3 Updating the book value of deals
- 19.4 Using TRM with a General Ledger system
- 19.5 Hedge accounting in Wallstreet Suite
- Chapter 20 Monitoring VaR
- 20.1 Setting up Value-at-Risk
- 20.2 Managing VaR data
- Chapter 21 Managing messages
- Chapter 22 Managing RMI and CMI
- 22.1 Managing RMI
- 22.1.1 Assigning RMI mapping strategies to instruments
- 22.1.2 Grouping by instrument
- 22.1.3 No Pending Cashflows
- 22.1.4 Defining yield curves for RMI
- 22.1.5 Defining equities for RMI
- 22.1.6 Defining instruments for RMI
- 22.1.7 Exporting and importing positions
- 22.2 Managing CMI
- 22.1 Managing RMI
- Chapter 23 Pricing IR and FX trades
- 23.1 Pricing IR trades
- 23.2 Pricing FX trades
- 23.2.1 FX Pricing tool
- 23.2.1.1 Menus
- 23.2.1.2 Sections
- 23.2.1.3 Setting Up FX Pricing instruments
- 23.2.1.4 Capturing transactions and strategies
- 23.2.1.5 Valuating and pricing
- 23.2.1.5.1 Defining the default pricing settings
- 23.2.1.5.2 Overwriting the default pricing settings
- 23.2.1.5.3 Modifying market quotes
- 23.2.1.5.4 Modifying derived market quotes
- 23.2.1.5.5 Monitoring key figures
- 23.2.1.5.6 Changing the preferred premium
- 23.2.1.5.7 Applying new figures to a given target
- 23.2.1.5.8 Charting
- 23.2.1.6 Processing transactions and strategies
- 23.2.1 FX Pricing tool
- Chapter 24 Working with the Dashboard
- Appendix A Activity parameters
- A.1 Bank Account Balances
- A.2 Bank Account Interest Realizing
- A.3 Benchmark Cash Processing
- A.4 Benchmark Rebalancing
- A.5 Book Value Change
- A.6 Call Money Account Update
- A.7 Call Money Roll Over
- A.8 Cash Pool Leveling
- A.9 Cash Settlement Reconciliation
- A.10 Checking Instruments and Transactions Clients
- A.11 Checking Instruments and Transactions Holidays
- A.12 Closing the Books Valuation
- A.13 Copy Market Information
- A.14 Cost of Carry
- A.15 Cost of Carry Interest Realizing
- A.16 Cost of Carry Zero Balancing
- A.17 Custody Balances
- A.18 Dashboard Excel Export
- A.19 Data License Prices
- A.20 Data License Output Processing
- A.21 Delete Instrument
- A.22 Detachment
- A.23 Dividend
- A.24 End of Day Processing
- A.25 End of Period Processing
- A.26 Equity Conversion
- A.27 Fixing ABS Repayment
- A.28 Fixing ABS Repayment (Full Repayment)
- A.29 Fixing Bond Cashflow
- A.30 Fixing Bond Cashflow - Undo
- A.31 Fixing Transaction Cashflow
- A.32 Fixing Transaction Cashflow - Undo
- A.33 Fixing Transaction Trigger
- A.34 Fixing Transaction Trigger - Undo
- A.35 Forecast Exposures from CMM
- A.36 Forward Fixing
- A.37 Fund Data Calculation/Reporting
- A.38 Fund Fee Realizing
- A.39 FX Fixing Transaction Cashflow
- A.40 FX Fixing Transaction Cashflow - Undo
- A.41 FX Option Strategy Exercise
- A.42 FX Position Roll-Over
- A.43 FX Realizing
- A.44 Import Instrument
- A.45 Import Market Information
- A.46 Import Security List
- A.47 Index Freeze
- A.48 Index Rebalance
- A.49 Index Adjustment
- A.50 Netting
- A.51 Netting - Undo
- A.52 NumeriX Calibration
- A.53 NumeriX Valuation
- A.54 FX Option No Exercise
- A.55 Performance Data Calculation
- A.56 Portfolio Modeling Processing
- A.57 Purge Market Quotes
- A.58 Return of Capital
- A.59 Risk Manager Export
- A.60 Save Caplet/Floorlet Volatilities
- A.61 Save Derived IR Quotes and Yield Curves
- A.62 Selling (FIFO and Avg Balances)
- A.63 Selling Values
- A.64 Settlement Generation
- A.65 Security Positions Data
- A.66 Security Settlement Reconciliation
- A.67 Split
- A.68 Undo Book Value Change
- A.69 Update Client
- A.70 Update Corporate Action
- A.71 Update Instrument
- A.72 Update Settlement Instructions
- A.73 CreditManager Exposure Export
- A.74 CreditManager Obligor Export
- Appendix B Report parameters
- B.1 Activity Log Report
- B.2 Balance Report
- B.3 Bank Account Statement Report
- B.4 Book Value Change History Report
- B.5 Call Reports
- B.6 Cashflow Report
- B.7 Cashflow Fixing Report
- B.8 Cashflow Log Report
- B.9 Cheapest to Deliver Report
- B.10 Classification Report
- B.11 Client Update Log
- B.12 Collateral Management Report
- B.13 Collateral Report
- B.14 Competitive Quote Report
- B.15 Corporate Actions Update Log
- B.16 Corporate Actions Update Report
- B.17 Custody Balance Report
- B.18 Custody Reconciliation Report
- B.19 Data License Output Processing Report
- B.20 Data License Prices Log
- B.21 Data License Prices Import Log
- B.22 Delivery Report
- B.23 Drawdown Fixing Report
- B.24 Event Diary Report
- B.25 History Log Report
- B.26 Holidays Checking Report
- B.27 Holidays for Period Report
- B.28 Import Market Information Log Report
- B.29 Instrument Delete Log
- B.30 Instrument Import Log
- B.31 Instrument Import Report
- B.32 Instrument Update Log
- B.33 Instrument Update Report
- B.34 Key Figure Report
- B.35 Limit Log Report
- B.36 Periodic P/L Report
- B.37 Rate Report
- B.38 Rate Comparison Report
- B.39 Rate Log Report
- B.40 Realize Account Interest Report
- B.41 Reconciliation Report
- B.42 Reconciliation Log Report
- B.43 Renaming Client ID Report
- B.44 Security List Import Log
- B.45 Settlement Report
- B.46 Settlement Cashflows Report
- B.47 Settlement Instructions Chain Report
- B.48 Settlement Log Report
- B.49 Transaction Conditions Report
- B.50 Transactions Report
- B.51 Transaction Log Report
- B.52 Transaction Market Rate Report
- Appendix C Start-up parameters
- Appendix D SDM - CMM mapping
- Appendix E TRM - RMI/CMI mapping
- Appendix F Cashflow attributes

2
Information in this document is subject to change without notice and does not represent a commitment on the part
of Wall Street Systems. The software and documentation, which includes information contained in any databases,
described in this document is furnished under a license agreement or nondisclosure agreement and may only be
used or copied in accordance with the terms of the agreement. It is against the law to copy the software or
documentation except as specially allowed in the license or nondisclosure agreement. No part of this publication
may be reproduced, stored in a retrieval system, or transmitted, in any form or by any means, electronic, mechanical,
photocopying, recording, or otherwise, without the prior written permission of Wall Street Systems.
Although Wall Street Systems has tested the software and reviewed the documentation, Wall Street Systems
makes herein no warranty or representation, either expressed or implied, with respect to software or
documentation, its quality, performance, marketability, or fitness for a particular purpose. As a result, this
software is provided "as is", and in no event will Wall Street Systems be liable for direct, indirect, special,
incidental, or consequential damages from any defect in the software or by virtue of providing this
documentation, even if advised of the possibility of such damages. The documentation may contain technical
inaccuracies and omissions.
The mention of an activity or instrument in this publication does not imply that all matters relating to that activity or
instrument are supported by Wallstreet Suite, nor does it imply that processing of or by that activity or instrument is
carried out in any particular way, even if such processing is customary in some or all parts of the industry.
The windows and screen images shown herein were obtained from prototypes during software development. The
actual windows and screen images in the software may differ.
Wall Street Systems, WSS, WALLSTREET, WALLSTREET SUITE and the Wall Street Systems logos are
trademarks of Wall Street Systems Delaware, Inc.
Finance KIT, Trema and Trema logo are trademarks of Wall Street Systems Sweden AB.
Microsoft and Windows are either registered trademarks or trademarks of Microsoft Corporation in the United States
and/or other countries.
Adobe, Acrobat, and Acrobat Reader are either registered trademarks or trademarks of Adobe Systems
Incorporated in the United States and/or other countries.
All other products mentioned in this book may be trademarks or service marks of their respective companies or
organizations.
Company names, people names, and data used in examples are fictitious unless otherwise noted.
This edition applies to Wallstreet Suite version 7.3.16 and to all later releases and versions until indicated in new
editions or Wall Street Systems communications. Make sure you are using the latest edition for the release level of
the Wall Street Systems product.
© Copyright 2011 Wall Street Systems IPH AB. All rights reserved.
Second Edition (September 2011)
Transaction & Risk Management Module (TRM) User Guide 3
Contents
Preface ...........................................................................................................................21
1 Overview ....................................................................................................................23
1.1 TRM ........................................................................................................................................ 23
1.2 Principles of TRM .................................................................................................................. 23
1.2.1 Portfolio hierarchy principle .............................................................................................23
1.2.2 Transaction flow principle ............................................................................................... 24
1.2.3 Cashflow principle ........................................................................................................... 24
1.2.4 Valuation principle ........................................................................................................... 24
1.2.5 Real-time principle .......................................................................................................... 24
1.3 Types of information in TRM ................................................................................................ 25
1.3.1 Static data ....................................................................................................................... 25
1.3.2 Market data ..................................................................................................................... 25
1.3.3 Transaction management information ............................................................................ 25
1.3.4 Calculated information ....................................................................................................25
1.4 Applications of TRM ............................................................................................................. 25
1.4.1 Front, Middle, and Back Office applications .................................................................... 25
1.4.2 Editors ............................................................................................................................. 26
1.4.3 Managers and Boards ..................................................................................................... 26
1.4.4 Monitors .......................................................................................................................... 26
1.4.5 Reports ........................................................................................................................... 27
1.4.6 Activities .......................................................................................................................... 27
1.5 Setting up and using TRM ....................................................................................................27
2 Navigating TRM .........................................................................................................29
2.1 Application Manager ............................................................................................................. 29
2.1.1 Launching Application Manager ...................................................................................... 29
2.1.2 Application Manager menus ........................................................................................... 30
2.1.3 Start-up parameters ........................................................................................................ 31
2.1.4 Customizing Application Manager .................................................................................. 31
2.2 Common application features .............................................................................................. 31
2.2.1 Opening applications ......................................................................................................32
2.2.2 Closing applications ........................................................................................................ 32
2.2.3 Generating reports on application activity ....................................................................... 32
2.2.4 Using application controls ............................................................................................... 32
2.2.5 Using keyboard shortcuts ............................................................................................... 34
2.2.6 Using application menus ................................................................................................. 34
4 © Wall Street Systems IPH AB - Confidential
2.2.7 Customizing the display of applications .......................................................................... 35
2.2.8 Sorting data ..................................................................................................................... 35
2.2.9 Printing data .................................................................................................................... 35
2.2.10 Using manager applications .......................................................................................... 36
3 Managing static data .................................................................................................41
3.1 Static data entities ................................................................................................................ 41
3.2 Static Data Editor .................................................................................................................. 41
3.2.1 Static Data Editor menus and toolbars ........................................................................... 41
3.2.2 Start-up parameters ........................................................................................................ 43
3.2.3 Editor layouts .................................................................................................................. 43
3.2.4 Query and Edit modes .................................................................................................... 44
3.3 Managing static data in Static Data Editor ......................................................................... 45
3.3.1 Creating new static data entities ..................................................................................... 45
3.3.2 Creating static data from an existing entity ..................................................................... 45
3.3.3 Creating static data entities in parallel ............................................................................ 45
3.3.4 Modifying static data entities ........................................................................................... 46
3.3.5 Deleting static data entities .............................................................................................46
3.3.6 Verifying static data entities ............................................................................................46
3.3.7 Finding static data entities ..............................................................................................46
3.3.8 Using templates to create static data entities ................................................................. 48
3.3.9 Common Static Data Editor attributes ............................................................................. 49
3.4 Managing SDM-enabled static data ..................................................................................... 51
3.4.1 SDM-enabled Static Data Editors ................................................................................... 51
3.4.2 Static Data Manager .......................................................................................................54
3.4.3 Processing static data entities ....................................................................................... 57
3.4.4 Sharing SDM-enabled data across Wallstreet Suite modules ........................................ 58
3.5 Countries ............................................................................................................................... 59
3.6 Calendars ............................................................................................................................... 59
3.6.1 Creating calendars .......................................................................................................... 60
3.7 Gaps (time intervals) ............................................................................................................. 62
3.7.1 Order of cashflow sorting to gaps ................................................................................... 63
3.8 IR quotes and yield curves ................................................................................................... 64
3.8.1 Date Conventions ........................................................................................................... 64
3.8.2 Creating IR Quote and Yield Curves ............................................................................... 65
3.8.3 Optional features ............................................................................................................. 78
3.9 Currencies ............................................................................................................................. 80
3.9.1 Creating currencies ......................................................................................................... 80
3.10 Currency priorities .............................................................................................................. 87
3.11 Settlement locations ........................................................................................................... 88
3.12 Client groups ....................................................................................................................... 89
3.13 Clients .................................................................................................................................. 89
3.13.1 Creating clients ............................................................................................................. 90
3.13.2 Managing clients ......................................................................................................... 106
Transaction & Risk Management Module (TRM) User Guide 5
3.14 Portfolios ........................................................................................................................... 107
3.14.1 Creating portfolios ....................................................................................................... 108
3.14.2 Managing portfolios ..................................................................................................... 113
3.15 Result types and results ................................................................................................... 114
3.15.1 Result types ................................................................................................................ 114
3.15.2 Results ........................................................................................................................ 115
3.15.3 Defining result treatments ........................................................................................... 115
3.15.4 Parallel Result Treatment ........................................................................................... 125
3.16 Instrument types ............................................................................................................... 126
3.17 Instrument groups ............................................................................................................ 127
3.18 Instrument Templates ....................................................................................................... 128
3.19 Instruments ........................................................................................................................ 129
3.19.1 Generating reports on instruments ............................................................................. 130
3.20 Classification groups ........................................................................................................ 130
3.21 Classification rules ........................................................................................................... 131
3.22 Comments and comment rules (optional) ...................................................................... 132
3.22.1 Setting up a comment rule .......................................................................................... 132
3.23 Bank Account Type Editor (optional) .............................................................................. 133
3.24 Branch codes (optional) ................................................................................................... 133
3.25 Calendar groups (optional) .............................................................................................. 134
3.25.1 Generating reports on calendar groups ...................................................................... 134
3.26 Cashflow charges (optional) ............................................................................................ 135
3.27 Cashflow groups (optional) .............................................................................................. 138
3.28 Cashflow types (optional) ................................................................................................ 139
3.29 Cash pools (optional) ....................................................................................................... 139
3.30 Country groups (optional) ................................................................................................ 142
3.31 Credit ratings (optional) ................................................................................................... 142
3.32 Currency classes (optional) ............................................................................................. 142
3.33 Ladder sets (optional) ....................................................................................................... 143
3.34 Ladder rules (optional) ..................................................................................................... 145
3.35 Option schedule templates (optional) ............................................................................. 145
3.35.1 Defining simple option schedules ............................................................................... 146
3.35.2 Defining complex option schedules ............................................................................ 146
3.36 Option schedule template groups (optional) .................................................................. 146
3.37 Package types (optional) .................................................................................................. 147
3.38 Parameters (optional) ....................................................................................................... 148
3.39 Properties (optional) ......................................................................................................... 148
3.39.1 Creating properties ..................................................................................................... 149
3.40 Schedule templates (optional) ......................................................................................... 150
3.41 Schedule template groups (optional) .............................................................................. 151
6 © Wall Street Systems IPH AB - Confidential
3.42 Security Basket Editor (optional) .................................................................................... 152
3.43 Security Criteria Set Editor (optional) ............................................................................. 153
3.44 Security identifier types (optional) .................................................................................. 154
3.45 Time zones (optional) ....................................................................................................... 154
3.46 Transaction charges (optional) ........................................................................................ 155
3.47 Volatilities (optional) ......................................................................................................... 158
4 Managing market data ............................................................................................161
4.1 Defining real-time quotations ............................................................................................ 161
4.1.1 Defining the source market quotations ......................................................................... 161
4.1.2 Defining filtering rules for real-time quotations .............................................................. 163
4.1.3 Quoting the rates .......................................................................................................... 165
4.2 Defining scenarios and subscenarios .............................................................................. 165
4.2.1 Defining scenarios ........................................................................................................ 166
4.2.2 Defining subscenarios ................................................................................................... 166
4.3 Freezing rates automatically .............................................................................................. 166
4.4 Defining simulation scenarios ........................................................................................... 167
4.4.1 Defining FX simulation scenarios .................................................................................. 167
4.4.2 Defining IR and volatility simulation scenarios .............................................................. 168
4.5 Rate Monitor ........................................................................................................................ 171
4.5.1 Rate Monitor menus ...................................................................................................... 171
4.5.2 Toolbar .......................................................................................................................... 173
4.5.3 Start-up parameters ...................................................................................................... 173
4.5.4 Managing market data in Rate Monitor ......................................................................... 173
4.5.5 Generating quotation reports ........................................................................................ 186
4.6 Pricing tools ........................................................................................................................ 186
4.6.1 FX Forward Pricing ....................................................................................................... 186
4.7 Pricing complex derivatives ............................................................................................... 190
4.7.1 Defining Calibration Baskets ......................................................................................... 190
4.7.2 Defining a calibration model for a currency ................................................................... 191
4.7.3 Defining cross-currency calibration models .................................................................. 192
4.7.4 Defining BGM calibration models .................................................................................. 193
4.7.5 Calibration Monitor ........................................................................................................ 195
4.7.6 Calibrating pricing models ............................................................................................. 198
4.7.7 Assigning calibration models to instruments ................................................................. 199
4.8 Bloomberg interface ........................................................................................................... 199
4.8.1 Interface configuration and usage overview ................................................................. 199
4.8.2 Generic configuration .................................................................................................... 201
4.8.3 Security import .............................................................................................................. 206
4.8.4 Security list import ......................................................................................................... 210
4.8.5 Instrument update ......................................................................................................... 211
4.8.6 Client update ................................................................................................................. 213
4.8.7 Corporate Actions update ............................................................................................. 216
4.8.8 Prices Import ................................................................................................................. 218
Transaction & Risk Management Module (TRM) User Guide 7
4.9 Market Data Status Monitor ................................................................................................ 218
4.9.1 Market Data Status pane .............................................................................................. 218
4.9.2 Properties pane ............................................................................................................. 218
4.9.3 Other panes .................................................................................................................. 218
4.9.4 Menus ........................................................................................................................... 219
5 Managing rules ........................................................................................................221
5.1 Defining rules ...................................................................................................................... 221
5.1.1 Identifying rule criteria ................................................................................................... 223
5.1.2 Selecting transaction parameter values ........................................................................ 224
5.1.3 Specifying cashflow attributes ....................................................................................... 225
5.1.4 Assigning branch codes to a rule .................................................................................. 225
5.1.5 Capturing transactions according to status ................................................................... 225
6 Managing activities .................................................................................................227
6.1 Activity Manager ................................................................................................................. 227
6.1.1 Activity Manager menus ................................................................................................ 228
6.1.2 Start-up parameters ...................................................................................................... 229
6.1.3 Activity modes ............................................................................................................... 229
6.2 Managing activities ............................................................................................................. 229
6.2.1 Creating activities .......................................................................................................... 229
6.2.2 Running activities immediately ...................................................................................... 232
6.2.3 Adding extra properties to activities .............................................................................. 232
6.2.4 Checking the running of activities ................................................................................. 232
6.2.5 Generating reports on activities .................................................................................... 233
7 Reporting .................................................................................................................235
7.1 Report Generator ................................................................................................................ 235
7.1.1 Report Generator menus .............................................................................................. 235
7.1.2 Start-up parameters ...................................................................................................... 238
7.1.3 Report files .................................................................................................................... 238
7.2 Managing reports ................................................................................................................ 239
7.2.1 Creating new reports ..................................................................................................... 239
7.2.2 Opening entity reports ................................................................................................... 239
7.2.3 Drilling down into reports .............................................................................................. 239
7.2.4 Creating columns for special information or groupings ................................................. 240
7.2.5 Building expressions for reports .................................................................................... 241
7.2.6 Configuring columns ..................................................................................................... 252
7.2.7 List of reports ................................................................................................................ 254
8 Managing transactions ...........................................................................................257
8.1 Transaction Manager .......................................................................................................... 257
8.1.1 Transaction Manager menus ........................................................................................ 258
8.1.2 Start-up parameters ...................................................................................................... 262
8.1.3 Transaction Manager modes ........................................................................................ 262
8 © Wall Street Systems IPH AB - Confidential
8.2 Capturing deals ................................................................................................................... 263
8.2.1 Entering new deals in Transaction Manager ................................................................. 264
8.2.2 Canceling deals ............................................................................................................ 271
8.2.3 Entering new deals in Enter Board ............................................................................... 272
8.2.4 Setting up a pre-trade limit check ................................................................................. 277
8.2.5 Enabling limit queries at transaction level ..................................................................... 280
8.3 Managing settlement instructions ..................................................................................... 280
8.3.1 Modifying settlement instructions .................................................................................. 280
8.3.2 Entering ad-hoc settlement instructions ........................................................................ 281
8.4 Processing transactions .................................................................................................... 283
8.4.1 Retrieving transactions ................................................................................................. 283
8.4.2 Displaying transaction data in a chart ........................................................................... 286
8.4.3 Verifying transactions .................................................................................................... 286
8.4.4 Confirming transactions ................................................................................................ 286
8.4.5 Correcting transactions ................................................................................................. 287
8.4.6 Matching and unmatching transactions ........................................................................ 288
8.4.7 Performing actions on deals ......................................................................................... 289
8.4.8 Generating reports on transactions ............................................................................... 299
8.5 Deal mirroring ...................................................................................................................... 300
8.5.1 Internal deal mirroring ................................................................................................... 300
8.5.2 Deal mirroring using mirror cases ................................................................................. 305
8.6 Managing call transactions ................................................................................................ 315
8.6.1 Call Manager ................................................................................................................. 316
8.6.2 Entering call transactions .............................................................................................. 317
8.6.3 Processing call transactions ......................................................................................... 317
8.6.4 Generating call reports .................................................................................................. 318
8.7 Managing cashflow forecasts ............................................................................................ 318
8.7.1 Setting up forecast instruments .................................................................................... 318
8.7.2 Setting up cashflow forecasting .................................................................................... 318
8.7.3 Forecast Exposure Board ............................................................................................. 321
8.7.4 Processing forecast exposures ..................................................................................... 322
9 Managing orders .....................................................................................................323
9.1 Overview .............................................................................................................................. 323
9.2 Setting up order management ........................................................................................... 324
9.2.1 Defining an order platform ............................................................................................ 325
9.2.2 Defining order routing rule ............................................................................................ 326
9.3 Order Managers ................................................................................................................... 326
9.3.1 Views ............................................................................................................................ 327
9.4 Processing orders ............................................................................................................... 327
9.4.1 Entering orders ............................................................................................................. 328
9.4.2 Manually executing internal orders ............................................................................... 328
9.4.3 Overriding external order execution .............................................................................. 328
9.5 Monitoring orders ............................................................................................................... 329
Transaction & Risk Management Module (TRM) User Guide 9
10 Managing funds .....................................................................................................331
10.1 Setting up fund portfolios ................................................................................................ 331
10.1.1 Creating fund portfolios ............................................................................................... 331
10.2 Fund Managers .................................................................................................................. 333
10.2.1 Managing fund shares ................................................................................................ 333
10.2.2 Managing fund fees .................................................................................................... 333
10.3 Setting up default NAV calculation values ..................................................................... 334
10.4 NAV Monitor ...................................................................................................................... 335
10.4.1 Configuring NAV Monitor ............................................................................................ 335
10.4.2 Monitoring net asset value in NAV Monitor ................................................................. 336
10.4.3 Saving NAV reports .................................................................................................... 341
10.5 NAV Report Manager ........................................................................................................ 341
10.5.1 Managing reports ........................................................................................................ 341
10.5.2 Automating NAV reporting .......................................................................................... 342
11 Managing collateral ...............................................................................................345
11.1 Setting up master agreements ......................................................................................... 345
11.1.1 Defining collateral agreements ................................................................................... 345
11.1.2 Attaching master agreements to portfolio owners ....................................................... 352
11.1.3 Applying master agreements to instruments ............................................................... 352
11.2 Monitoring collateral positions ........................................................................................ 352
11.2.1 Collateral Valuation Board .......................................................................................... 353
11.2.2 Collateral Management Reports ................................................................................. 359
12 Monitoring positions .............................................................................................361
12.1 Treasury Monitor ............................................................................................................... 361
12.1.1 Treasury Monitor menus ............................................................................................. 361
12.1.2 Start-up parameters .................................................................................................... 364
12.1.3 Configuring Treasury Monitor ..................................................................................... 365
12.1.4 Monitoring positions in Treasury Monitor .................................................................... 366
12.1.5 Simulating movements in Treasury Monitor ................................................................ 387
12.1.6 Using Treasury Monitor for risk measurement ............................................................ 390
12.1.7 Monitoring cost-of-carry positions ............................................................................... 390
12.1.8 Generating position-related reports ............................................................................ 391
12.2 Position Monitor ................................................................................................................ 392
12.2.1 Position Monitor menus .............................................................................................. 392
12.2.2 Monitoring positions with Position Monitor .................................................................. 392
12.3 FX Spot Monitor ................................................................................................................ 393
12.3.1 FX Spot Monitor menus .............................................................................................. 393
12.3.2 Start-up parameters .................................................................................................... 393
12.3.3 Monitoring positions in FX Spot Monitor ..................................................................... 393
12.4 FX Position Roll Over activity .......................................................................................... 397
13 Monitoring performance .......................................................................................399
10 © Wall Street Systems IPH AB - Confidential
13.1 Measuring performance and risk ..................................................................................... 399
13.1.1 Performance versus risk ............................................................................................. 399
13.1.2 AIMR-PPS™ standards .............................................................................................. 401
13.2 Setting up performance measurement and risk ............................................................. 401
13.2.1 Setting up entities for performance measurement ...................................................... 401
13.2.2 Generating historical market values for performance measurement .......................... 404
13.2.3 Configuring Treasury Monitor for risk measurement ................................................... 405
13.3 Performance Monitor ........................................................................................................ 405
13.3.1 Performance Monitor menus ....................................................................................... 405
13.3.2 Start-up parameters .................................................................................................... 408
13.3.3 Configuring Performance Monitor ............................................................................... 408
13.3.4 Monitoring performance in Performance Monitor ........................................................ 409
14 Portfolio modeling ................................................................................................413
14.1 Setting up portfolio modeling .......................................................................................... 413
14.1.1 Characteristics of portfolios models ............................................................................ 413
14.1.2 Defining portfolio models ............................................................................................ 415
14.1.3 Defining portfolio model security lists .......................................................................... 416
14.1.4 Applying a portfolio model or benchmark to a portfolio ............................................... 416
14.2 Portfolio Modeling Monitor .............................................................................................. 417
14.2.1 Portfolio Modeling Monitor menus .............................................................................. 418
14.2.2 Start-up parameters .................................................................................................... 420
14.2.3 Configuring Portfolio Modeling Monitor ....................................................................... 421
14.2.4 Analyzing positions in Portfolio Modeling Monitor ....................................................... 423
14.2.5 Rebalancing ................................................................................................................ 424
14.2.6 Generating deals ......................................................................................................... 427
15 Managing benchmarks .........................................................................................429
15.1 About benchmarks ............................................................................................................ 429
15.1.1 Components ................................................................................................................ 429
15.1.2 Definition Methods ...................................................................................................... 430
15.1.3 Re-Investment Methods .............................................................................................. 430
15.1.4 Activities ...................................................................................................................... 430
15.2 Benchmark Manager ......................................................................................................... 431
15.2.1 Benchmark Manager menus ....................................................................................... 431
15.2.2 Actions ........................................................................................................................ 432
15.3 Defining benchmarks ........................................................................................................ 433
15.3.1 Setting up a benchmark portfolio ................................................................................ 433
15.3.2 Setting up a benchmark .............................................................................................. 434
15.4 Processing benchmarks ................................................................................................... 443
15.4.1 Copying a benchmark revision .................................................................................... 444
15.4.2 Rebalancing ................................................................................................................ 444
15.4.3 Cash Processing ......................................................................................................... 445
15.4.4 Performing a manual adjustment ................................................................................ 446
15.4.5 Closing a benchmark .................................................................................................. 446
Transaction & Risk Management Module (TRM) User Guide 11
15.4.6 Deleting a benchmark ................................................................................................. 446
16 Managing limits .....................................................................................................447
16.1 Overview ............................................................................................................................ 447
16.2 Setting up limits ................................................................................................................ 449
16.2.1 Creating limit factor sets ............................................................................................. 450
16.2.2 Creating limit item templates ....................................................................................... 452
16.2.3 Creating sublimit calculation templates ....................................................................... 461
16.2.4 Creating limit client queries ......................................................................................... 467
16.2.5 Creating limit categories ............................................................................................. 467
16.2.6 Creating limits ............................................................................................................. 468
16.2.7 Creating limit templates .............................................................................................. 470
16.3 Limit Monitor ..................................................................................................................... 471
16.3.1 Limit Monitor menus .................................................................................................... 471
16.3.2 Start-up parameters .................................................................................................... 473
16.3.3 Configuring limits ........................................................................................................ 473
16.4 Limit Notifications ............................................................................................................. 482
16.4.1 Limit Notifications menus ............................................................................................ 483
16.4.2 Start-up parameters .................................................................................................... 483
16.5 Analyzing limit violations ................................................................................................. 484
16.5.1 Generating reports on limit violations .......................................................................... 484
17 Managing transaction conditions ........................................................................485
17.1 Overview ............................................................................................................................ 485
17.2 Setting up transaction condition sets ............................................................................. 486
17.3 Processing transaction condition sets ........................................................................... 491
17.3.1 Evaluation ................................................................................................................... 491
17.3.2 Action .......................................................................................................................... 491
17.4 Monitoring transaction conditions .................................................................................. 492
17.4.1 Transaction Manager .................................................................................................. 492
17.4.2 Transaction Condition Violations ................................................................................ 493
17.4.3 Exception Verification ................................................................................................. 493
17.4.4 Transaction Conditions report ..................................................................................... 493
18 Managing cash and settlements ..........................................................................495
18.1 Managing cash and cash position ................................................................................... 495
18.1.1 Managing bank account balances and interest ........................................................... 495
18.1.2 Managing cost of carry ................................................................................................ 499
18.1.3 Managing cash pool leveling ....................................................................................... 502
18.2 Setting up settlement management ................................................................................ 505
18.2.1 Defining settlement parameters .................................................................................. 505
18.3 Generating and processing settlements ......................................................................... 510
18.3.1 Settlement Processing menus .................................................................................... 513
18.3.2 Start-up parameters .................................................................................................... 513
12 © Wall Street Systems IPH AB - Confidential
18.3.3 Settlement processing modes ..................................................................................... 514
18.3.4 Processing settlements ............................................................................................... 514
18.3.5 Modifying settlement instructions ................................................................................ 520
18.3.6 Generating settlement processing reports .................................................................. 520
18.4 Managing custody movements and balances ................................................................ 520
18.4.1 Start-up parameters .................................................................................................... 520
18.4.2 Custody Manager views .............................................................................................. 521
18.4.3 Retrieving custody movements ................................................................................... 521
18.4.4 Generating custody balances ..................................................................................... 521
18.4.5 Retrieving custody balances ....................................................................................... 522
18.4.6 Entering custody statement data ................................................................................ 523
18.4.7 Custody reports ........................................................................................................... 524
18.5 Reconciling settlements and custodies .......................................................................... 524
18.5.1 Start-up parameters .................................................................................................... 525
18.5.2 Reconciliation application views ................................................................................. 525
18.5.3 Defining reconciliation setup ....................................................................................... 526
18.5.4 Entering statements of account .................................................................................. 528
18.5.5 Querying statements of account and settlement information ...................................... 529
18.5.6 Matching settlements .................................................................................................. 529
18.5.7 Processing actions ...................................................................................................... 531
18.5.8 Reconciliation reports ................................................................................................. 532
19 Managing accounting ...........................................................................................533
19.1 Parallel accounting ........................................................................................................... 533
19.1.1 Classification ............................................................................................................... 533
19.1.2 Result treatment methods ........................................................................................... 535
19.1.3 Classification rules ...................................................................................................... 536
19.1.4 Classification of transactions ...................................................................................... 537
19.2 Realizing and processing results .................................................................................... 537
19.2.1 Realizing profit/loss ..................................................................................................... 537
19.2.2 Processing results ....................................................................................................... 538
19.3 Updating the book value of deals .................................................................................... 539
19.3.1 Defining the book value change method ..................................................................... 539
19.3.2 Making book value changes ....................................................................................... 539
19.3.3 Making book value adjustments .................................................................................. 540
19.3.4 Undoing book value changes and adjustments .......................................................... 541
19.3.5 Generating a book value change report ...................................................................... 542
19.3.6 Posting book value changes ....................................................................................... 542
19.4 Using TRM with a General Ledger system ..................................................................... 542
19.4.1 Setting up the portfolio owner for accounting .............................................................. 543
19.4.2 Configuring accounting for the portfolio owner ........................................................... 543
19.4.3 Defining bookkeeping entries ...................................................................................... 545
19.4.4 Calculating bookkeeping entries ................................................................................. 546
19.5 Hedge accounting in Wallstreet Suite ............................................................................. 546
Transaction & Risk Management Module (TRM) User Guide 13
20 Monitoring VaR ......................................................................................................547
20.1 Setting up Value-at-Risk ................................................................................................... 547
20.1.1 Mapping RM volatilities and correlations to TRM market data .................................... 547
20.1.2 Defining VaR scenarios .............................................................................................. 549
20.1.3 Assigning VaR properties to portfolios ........................................................................ 550
20.2 Managing VaR data ........................................................................................................... 550
20.2.1 VaR Data Board .......................................................................................................... 551
21 Managing messages .............................................................................................555
21.1 Setting up message requests .......................................................................................... 555
21.1.1 Setting up message groups ........................................................................................ 555
21.1.2 Setting up message types ........................................................................................... 556
21.1.3 Setting up message rules ........................................................................................... 558
21.1.4 Assigning message details to clients .......................................................................... 559
21.2 Message Manager ............................................................................................................. 560
21.2.1 Message Manager menus .......................................................................................... 560
21.2.2 Start-up parameters .................................................................................................... 560
21.2.3 Message modes .......................................................................................................... 560
21.3 Processing messages ...................................................................................................... 561
21.3.1 Retrieving messages .................................................................................................. 561
21.3.2 Previewing messages ................................................................................................. 561
21.3.3 Verifying or modifying messages ................................................................................ 561
21.3.4 Retransmitting messages ........................................................................................... 561
21.3.5 Creating personalized warning messages .................................................................. 562
22 Managing RMI and CMI .........................................................................................563
22.1 Managing RMI .................................................................................................................... 563
22.1.1 Assigning RMI mapping strategies to instruments ...................................................... 564
22.1.2 Grouping by instrument ............................................................................................... 564
22.1.3 No Pending Cashflows ................................................................................................ 564
22.1.4 Defining yield curves for RMI ...................................................................................... 564
22.1.5 Defining equities for RMI ............................................................................................. 568
22.1.6 Defining instruments for RMI ...................................................................................... 569
22.1.7 Exporting and importing positions ............................................................................... 570
22.2 Managing CMI .................................................................................................................... 571
22.2.1 Assigning CMI mapping strategies to instruments ...................................................... 571
22.2.2 Defining obligors ......................................................................................................... 571
22.2.3 Defining obligor credit ratings ..................................................................................... 572
22.2.4 Defining exposures ..................................................................................................... 573
22.2.5 Exporting and importing exposures and obligors ........................................................ 573
23 Pricing IR and FX trades .......................................................................................575
23.1 Pricing IR trades ................................................................................................................ 575
23.1.1 Defining IRP payoff types ........................................................................................... 575
14 © Wall Street Systems IPH AB - Confidential
23.1.2 IR Pricing tool .............................................................................................................. 576
23.2 Pricing FX trades ............................................................................................................... 593
23.2.1 FX Pricing tool ............................................................................................................. 593
24 Working with the Dashboard ...............................................................................611
24.1 Overview ............................................................................................................................ 611
24.1.1 Pivot tables ................................................................................................................. 611
24.1.2 Charts ......................................................................................................................... 612
24.1.3 Data sources ............................................................................................................... 612
24.2 Getting started with the Dashboard ................................................................................ 612
24.2.1 Input Parameters ........................................................................................................ 613
24.2.2 Menus and buttons ..................................................................................................... 615
24.2.3 Shortcuts ..................................................................................................................... 616
24.2.4 Data view .................................................................................................................... 616
24.2.5 The Designer .............................................................................................................. 620
24.3 Data source details ........................................................................................................... 624
24.3.1 Cash management reports ......................................................................................... 624
24.3.2 Limits ........................................................................................................................... 624
24.3.3 Report Generator ........................................................................................................ 625
24.3.4 Treasury Position ........................................................................................................ 625
Appendix A: Activity parameters..........................................................................................627
A.1 Bank Account Balances ..................................................................................................... 627
A.2 Bank Account Interest Realizing ...................................................................................... 627
A.3 Benchmark Cash Processing ............................................................................................ 628
A.4 Benchmark Rebalancing .................................................................................................... 628
A.5 Book Value Change ............................................................................................................ 628
A.6 Call Money Account Update .............................................................................................. 628
A.7 Call Money Roll Over .......................................................................................................... 629
A.8 Cash Pool Leveling ............................................................................................................ 629
A.9 Cash Settlement Reconciliation ........................................................................................ 630
A.10 Checking Instruments and Transactions Clients .......................................................... 630
A.11 Checking Instruments and Transactions Holidays ....................................................... 630
A.12 Closing the Books Valuation ........................................................................................... 631
A.13 Copy Market Information ................................................................................................. 631
A.14 Cost of Carry ..................................................................................................................... 632
A.15 Cost of Carry Interest Realizing ...................................................................................... 632
A.16 Cost of Carry Zero Balancing .......................................................................................... 633
A.17 Custody Balances ............................................................................................................ 633
A.18 Dashboard Excel Export ................................................................................................. 633
A.19 Data License Prices .......................................................................................................... 634
Transaction & Risk Management Module (TRM) User Guide 15
A.20 Data License Output Processing .................................................................................... 635
A.21 Delete Instrument ............................................................................................................. 635
A.22 Detachment ....................................................................................................................... 636
A.23 Dividend ............................................................................................................................ 636
A.24 End of Day Processing .................................................................................................... 636
A.25 End of Period Processing ................................................................................................ 637
A.26 Equity Conversion ............................................................................................................ 637
A.27 Fixing ABS Repayment .................................................................................................... 638
A.28 Fixing ABS Repayment (Full Repayment) ...................................................................... 638
A.29 Fixing Bond Cashflow ...................................................................................................... 638
A.30 Fixing Bond Cashflow - Undo ......................................................................................... 638
A.31 Fixing Transaction Cashflow ........................................................................................... 639
A.32 Fixing Transaction Cashflow - Undo .............................................................................. 639
A.33 Fixing Transaction Trigger .............................................................................................. 640
A.34 Fixing Transaction Trigger - Undo .................................................................................. 640
A.35 Forecast Exposures from CMM ....................................................................................... 641
A.36 Forward Fixing .................................................................................................................. 641
A.37 Fund Data Calculation/Reporting .................................................................................... 641
A.38 Fund Fee Realizing ........................................................................................................... 643
A.39 FX Fixing Transaction Cashflow ..................................................................................... 643
A.40 FX Fixing Transaction Cashflow - Undo ......................................................................... 643
A.41 FX Option Strategy Exercise ........................................................................................... 644
A.42 FX Position Roll-Over ....................................................................................................... 644
A.43 FX Realizing ...................................................................................................................... 645
A.44 Import Instrument ............................................................................................................. 646
A.45 Import Market Information ............................................................................................... 646
A.46 Import Security List .......................................................................................................... 647
A.47 Index Freeze ...................................................................................................................... 647
A.48 Index Rebalance ............................................................................................................... 648
A.49 Index Adjustment ............................................................................................................. 648
A.50 Netting ............................................................................................................................... 648
A.51 Netting - Undo ................................................................................................................... 648
A.52 NumeriX Calibration ......................................................................................................... 649
A.53 NumeriX Valuation ............................................................................................................ 649
A.54 FX Option No Exercise ..................................................................................................... 649
A.55 Performance Data Calculation ........................................................................................ 650
A.56 Portfolio Modeling Processing ........................................................................................ 650
A.57 Purge Market Quotes ....................................................................................................... 651
16 © Wall Street Systems IPH AB - Confidential
A.58 Return of Capital ............................................................................................................... 651
A.59 Risk Manager Export ........................................................................................................ 652
A.60 Save Caplet/Floorlet Volatilities ...................................................................................... 652
A.61 Save Derived IR Quotes and Yield Curves ..................................................................... 653
A.62 Selling (FIFO and Avg Balances) .................................................................................... 653
A.63 Selling Values ................................................................................................................... 654
A.64 Settlement Generation ..................................................................................................... 654
A.65 Security Positions Data ................................................................................................... 655
A.66 Security Settlement Reconciliation ................................................................................ 655
A.67 Split .................................................................................................................................... 655
A.68 Undo Book Value Change ................................................................................................ 656
A.69 Update Client .................................................................................................................... 656
A.70 Update Corporate Action ................................................................................................. 656
A.71 Update Instrument ............................................................................................................ 657
A.72 Update Settlement Instructions ...................................................................................... 657
A.73 CreditManager Exposure Export ..................................................................................... 657
A.74 CreditManager Obligor Export ........................................................................................ 658
Appendix B: Report parameters ...........................................................................................659
B.1 Activity Log Report ............................................................................................................ 659
B.2 Balance Report ................................................................................................................... 659
B.3 Bank Account Statement Report ...................................................................................... 660
B.4 Book Value Change History Report .................................................................................. 660
B.5 Call Reports ........................................................................................................................ 661
B.6 Cashflow Report ................................................................................................................. 661
B.7 Cashflow Fixing Report ..................................................................................................... 662
B.8 Cashflow Log Report ......................................................................................................... 662
B.9 Cheapest to Deliver Report ............................................................................................... 663
B.10 Classification Report ........................................................................................................ 663
B.11 Client Update Log ............................................................................................................ 663
B.12 Collateral Management Report ........................................................................................ 664
B.13 Collateral Report ............................................................................................................... 664
B.14 Competitive Quote Report ............................................................................................... 665
B.15 Corporate Actions Update Log ...................................................................................... 665
B.16 Corporate Actions Update Report ................................................................................. 665
B.17 Custody Balance Report .................................................................................................. 666
B.18 Custody Reconciliation Report ....................................................................................... 666
B.19 Data License Output Processing Report ....................................................................... 666
Transaction & Risk Management Module (TRM) User Guide 17
B.20 Data License Prices Log ................................................................................................. 667
B.21 Data License Prices Import Log ..................................................................................... 667
B.22 Delivery Report ................................................................................................................. 667
B.23 Drawdown Fixing Report ................................................................................................. 668
B.24 Event Diary Report ........................................................................................................... 668
B.25 History Log Report ........................................................................................................... 668
B.26 Holidays Checking Report ............................................................................................... 669
B.27 Holidays for Period Report .............................................................................................. 669
B.28 Import Market Information Log Report ........................................................................... 669
B.29 Instrument Delete Log ..................................................................................................... 670
B.30 Instrument Import Log .................................................................................................... 670
B.31 Instrument Import Report ............................................................................................... 670
B.32 Instrument Update Log ................................................................................................... 671
B.33 Instrument Update Report .............................................................................................. 671
B.34 Key Figure Report ............................................................................................................ 671
B.35 Limit Log Report ............................................................................................................... 672
B.36 Periodic P/L Report .......................................................................................................... 673
B.37 Rate Report ....................................................................................................................... 674
B.38 Rate Comparison Report ................................................................................................. 675
B.39 Rate Log Report ................................................................................................................ 675
B.40 Realize Account Interest Report ..................................................................................... 675
B.41 Reconciliation Report ...................................................................................................... 676
B.42 Reconciliation Log Report ............................................................................................... 676
B.43 Renaming Client ID Report .............................................................................................. 677
B.44 Security List Import Log ................................................................................................. 677
B.45 Settlement Report ............................................................................................................. 677
B.46 Settlement Cashflows Report .......................................................................................... 677
B.47 Settlement Instructions Chain Report ............................................................................ 678
B.48 Settlement Log Report ..................................................................................................... 678
B.49 Transaction Conditions Report ....................................................................................... 679
B.50 Transactions Report ......................................................................................................... 679
B.51 Transaction Log Report ................................................................................................... 680
B.52 Transaction Market Rate Report ..................................................................................... 680
Appendix C: Start-up parameters .........................................................................................681
C.1 Activity Manager ................................................................................................................. 681
C.2 Application Manager .......................................................................................................... 681
C.3 FX Forward Pricing ............................................................................................................. 681
18 © Wall Street Systems IPH AB - Confidential
C.4 Limit Monitor ....................................................................................................................... 682
C.5 Limit Notifications .............................................................................................................. 682
C.6 Performance Monitor ......................................................................................................... 682
C.7 Portfolio Modeling Monitor ................................................................................................ 683
C.8 Rate Monitor ........................................................................................................................ 683
C.9 Report Generator ................................................................................................................ 684
C.10 Static Data Editor .............................................................................................................. 684
C.11 Transaction Manager ....................................................................................................... 685
C.12 Treasury Monitor .............................................................................................................. 686
C.13 VaR Data Board ................................................................................................................ 687
Appendix D: SDM - CMM mapping ......................................................................................689
D.1 Client Editor ........................................................................................................................ 689
D.1.1 Client role mapping ...................................................................................................... 689
D.1.2 Preventing client replication ......................................................................................... 689
D.1.3 Mapping of SDM Counterparty - CMM Party entity ...................................................... 689
D.2 Country Editor .................................................................................................................... 693
D.2.1 Mapping of Country entity ............................................................................................ 693
D.3 Currency Editor .................................................................................................................. 694
D.3.1 Mapping of Currency entity .......................................................................................... 694
D.4 Calendar Group Editor ....................................................................................................... 694
D.5 Gap Editor ........................................................................................................................... 695
D.5.1 Mapping to CMM Interest Rate Type entity .................................................................. 695
D.6 Settlement Advice Method Editor ..................................................................................... 695
D.6.1 Mapping of Settlement Advice Method entity ............................................................... 695
D.7 Yield Curve Editor .............................................................................................................. 696
D.7.1 Mapping to CMM Interest Rate Category entity ........................................................... 696
D.8 CMM static data entities ..................................................................................................... 696
D.8.1 CMM Instrument Category Editor ................................................................................. 696
D.8.2 CMM Instrument Type Editor ....................................................................................... 696
D.8.3 CMM Payment Method Editor ...................................................................................... 697
D.8.4 CMM Region Editor ...................................................................................................... 697
D.8.5 CMM Industry Code Editor ........................................................................................... 698
D.8.6 CMM Relationship Type Editor ..................................................................................... 698
D.8.7 CMM Bank Account Group Editor ................................................................................ 698
Appendix E: TRM - RMI/CMI mapping ..................................................................................699
E.1 RMI mapping strategies ..................................................................................................... 699
E.1.1 RM template ................................................................................................................. 699
E.1.2 Yield curve mapping logic ............................................................................................. 702
E.1.3 Equity mapping ............................................................................................................. 703
E.2 CMI mapping strategies ..................................................................................................... 704
Transaction & Risk Management Module (TRM) User Guide 19
E.2.1 CM Template ................................................................................................................ 704
E.2.2 CM Seniority Level ...................................................................................................... 707
Appendix F: Cashflow attributes ..........................................................................................709
20 © Wall Street Systems IPH AB - Confidential

Transaction & Risk Management Module (TRM) User Guide 21
Preface
Welcome to the Transaction & Risk Management Module (TRM) User Guide. This guide describes
how to start the Wallstreet Suite Transaction & Risk Management Module (referred to as TRM), open
and close the system’s applications, and enter data using the different TRM tools.
This guide also explains how to set up the system with all the information users need before TRM
can be used to manage transactions, monitor positions, and so on.
For example, users cannot enter deals until the static data entities (such as, currencies,
instruments, counterparties, bank accounts), and all other required elements have been defined.
Intended audience
This guide is intended for users who are involved in the following tasks:
•Defining and setting up static data
•Making trades
•Monitoring and analyzing positions
•Measuring performance and risk
•Managing payments and cash
•Accounting.
Note: For information relating to the calculations that TRM performs, and the setup, processing,
and position monitoring of specific types of instruments: see TRM Instruments: Processing
and Calculations Guide.
Associated documents
Associated documents can be accessed from the Help menu of the Wallstreet Suite’s applications.
•TRM Instruments: Processing and Calculations
•TRM System Administration Guide
•ACM User Guide
•CLM User Guide
•WebSuite User Guide.

22 © Wall Street Systems IPH AB - Confidential
Change history
Edition Date Changes Updated By
0.1 August 2011 Initial release 7.3.16.
Performance Monitor: Branch codes and Cost of Carry
IR Pricing: Underlying quotes and money market quotes
Reports, Treasury Monitor, Startup parameters: Closing the
Books
TRM Dev Team
0.2 September 2011 Result Editor: Payable Sell Profit (Future, Netted Option)
Cash management: Settlement generation new condition
TRM Dev Team
Transaction & Risk Management Module (TRM) User Guide 23
Chapter 1 Overview
This chapter introduces you to TRM and the steps required to set up and use it.
1.1 TRM
TRM is a real-time integrated front, middle, and back office system that is open and flexible. It
provides sophisticated tools for effective transaction management, decision support, risk
management, performance measurement, and operations.
TRM supports a wide range of instruments throughout their life cycle, providing full visibility, easier
regulatory compliance and decreased operational risk.
1.2 Principles of TRM
The entire flow of information in TRM is based on five main principles:
•Portfolio hierarchy principle
•Transaction flow principle
•Cashflow principle
•Valuation principle
•Real-time principle.
In TRM, the trade is regarded as a transaction (transaction flow principle). One transaction consists
of several cashflows, which are saved (cashflow principle). Each cashflow has a value date,
necessary for valuation, payment settlement, and bookkeeping.
When you enter the transaction, it is valued with mark-to-market rates to manage risks and
calculate unrealized and realized results (valuation principle). TRM continuously receives the latest
market information from a market feed which is used in valuations to obtain current and reliable risk
and result figures (real-time principle).
The powerful portfolio hierarchies enable the efficient control of risks and results. TRM provides a
flexible tool for the creation of unrestricted and open portfolio hierarchies (portfolio hierarchy
principle).
1.2.1 Portfolio hierarchy principle
Transactions always belong to a specific portfolio. The portfolio always belongs to a client and in
most cases the client is the user organization.
In TRM, you create the link between a transaction and the organization which executed the
transaction using portfolios.
You can build portfolio hierarchies, and you can create dynamic portfolio hierarchies by defining
sub-portfolios for each portfolio. In addition, one portfolio can belong to several hierarchies.
1 Overview
1.2 Principles of TRM
24 © Wall Street Systems IPH AB - Confidential
You can also create several levels in each hierarchy, as some levels may only contain sub-portfolios
that do not contain transactions.
Portfolio hierarchies are used throughout TRM and there are lots of possibilities for defining portfolio
hierarchies. The flexibility of being able to build a new portfolio hierarchy allows effective monitoring
and operation reporting. You can link portfolios freely, and you can build temporary hierarchies for
ad-hoc analyzing purposes (for example, for special groups of transactions). When the properties of
an individual portfolio are accurately defined, the flexibility of portfolio hierarchies can be fully used.
You can specify the instruments and currencies allowed in the portfolio and can also define the
dealers who have the right to enter trades in this portfolio.
Internal trading is possible in TRM, as traders can trade between portfolios. Internal trading means
that risks are transferred within the user organization and different types of risk can be split
between different portfolios: for example, the currency spot risk can be transferred from the
currency forward portfolio to the spot portfolio.
1.2.2 Transaction flow principle
The process of transaction handling and control, from initial trade entry to final acceptance, is
referred to in TRM as the transaction flow. You use the transaction flow to monitor the movement of
transactions from one state to another. You do so by configuring different modes of the Transaction
Manager application to control and manage the transactions in different parts of the flow, and by
limiting access rights to these applications to those users with the necessary permissions. You
configure the transaction flow to the needs of your organization and also define it specifically for
individual instruments, counterparties, currencies, and so on.
Other applications in TRM can also be made to adhere to the transaction flow principle. For example,
you can configure the flow so that bookkeeping entries or payments can be generated only from
transactions that have reached a verified state in the transaction flow. This configuration allows for
more accuracy, as bookkeeping entries and payments are only made from transactions which are
verified.
1.2.3 Cashflow principle
TRM creates cashflows for each transaction generated. A cashflow in TRM is defined as a specific
amount of money in a particular currency at a specific time.
The nature and processing rules of various cashflows depend on the instrument type. In TRM, all
calculations (market value, net market value, realized and unrealized result, and so on) are based
on transaction-related cashflows. TRM creates these cashflows when a transaction is created.
1.2.4 Valuation principle
Valuation is the process of determining the value of an entity. Most figures in TRM are based on
real-time market valuation. In general, cashflows are discounted to the valuation date to give the
market value of the cashflow.
Risk and unrealized result calculations are based on the market value of the cashflows at the time of
valuation. According to the valuation principle of TRM, the market value of a position is the present
value of the cashflows in the future that make up the position.
By default, market value is expressed in the base currency of the portfolio. Therefore, the present
values denominated in the foreign currency are converted into the base currency using the current
spot FX rate.
1.2.5 Real-time principle
Real-time means that all new information is available instantly. In practice, this means that all
applications in TRM receive any changed or new information automatically, without your having to
request it.
Most applications are configured to receive real-time updates. If this is not the case (for example, in
reports), the transaction information needs to be updated manually to obtain the new information.
1 Overview
1.3 Types of information in TRM
Transaction & Risk Management Module (TRM) User Guide 25
1.3 Types of information in TRM
TRM uses the following types of information:
•Static data information
•Market data information
•Transaction management information
•Calculated information.
1.3.1 Static data
A static data entity is the generic term for information that is set up in TRM and that changes little
over time. Static data entities include data such as currencies, clients, and portfolios. Static data
entities are also referred to as core data.
Static data entities are used in all aspects of TRM, for example, as components of deal entry, or as
parameters to monitor treasury positions and for running reports. Because these entities are used
so often, and assigned to so many other entities, they need to be set up before TRM can be used.
1.3.2 Market data
Market data refers to the market quotes of currencies, instruments, yield curves, equities,
volatilities, and so on, which are stored in TRM. Market data is used to value and calculate risk on
positions.
This information is typically imported from market data providers, such as Reuters, but you can also
enter and modify it manually. If quotations come from a live market feed, position monitoring in
TRM can take place in real-time; TRM constantly checks the market feeds, and can therefore
instantly recalculate the market value of each transaction.
Furthermore, it is possible to set up quotation and interest rate movement simulations for “what if?”
measuring in TRM.
In TRM, you can also trade any priced structure, including complex derivatives, using complex
pricing models.
1.3.3 Transaction management information
Transaction management information is information essential to define a transaction, for example,
transaction and cashflow amounts, transaction counterparties, and deal rates.
Calculated information (such as unrealized results and market value) is not part of this information.
1.3.4 Calculated information
A primary role of TRM is to calculate figures and to display them in the different applications.
Information and instructions from other parts of TRM are required to do these calculations.
1.4 Applications of TRM
This section gives an overview of the different types of TRM applications, and how you use them
depending on your position in the organization.
1.4.1 Front, Middle, and Back Office applications
Applications are divided into Front, Middle and Back Office groups which are centralized into one
main application called Application Manager.
1 Overview
1.4 Applications of TRM
26 © Wall Street Systems IPH AB - Confidential
The groups are divided further into sub-groups in which you can find the individual applications. The
applications available to you can vary depending on your organization’s configuration of TRM and
your user access rights.
1.4.2 Editors
Editors are used to define the static data information that needs to be set up before TRM can be
used. Defining data in the editors is done in the Edit mode. There is another mode, called the Query
mode, which is used to search existing static data definitions. For more information about these two
modes, see 3.2.4 Query and Edit modes on page 44.
Most editors are defined from a layout based on the Static Data Editor application. Each editor
layout is available as an individual application in Application Manager.
1.4.3 Managers and Boards
In TRM, there are a number of Manager applications that are used to manage the flow and
acceptance process of different types of information in the system. Managers are based on the
Transaction Manager application layout.
Different modes of the Manager layout can be configured to be used for a particular purpose or to
display information in a particular state in its process flow.
For example, the Deal Capture mode of Transaction Manager could be used to enter transactions in
the Front Office, whereas the Final Transaction Admin mode could be used by the Back Office to
verify and accept transactions before settlement occurs.
Each Manager mode is available as an individual application in Application Manager.
Permissions are set up and applied to users to restrict their access to different Manager modes and
layouts according to their responsibilities within the organization.
Static Data Manager (used to manage and process static data) and Message Manager (designed
specifically for processing and delivering messages or confirmations) are examples of other types of
Manager applications.
In TRM, there are also several types of Board applications: for example, Enter Board which offers a
simplified alternative to Transaction Manager for deal capture.
See 2.2.10 Using manager applications on page 36 for more information.
1.4.4 Monitors
Monitors consist of pages which display information in grids and charts.
In Rate Monitor, you can manage the market data that you use for transactions. Rate Monitor allows
you to view live quotations, to modify quotations, and to enter your own quotations.
Calibration Monitor is a version of Rate Monitor that is designed specifically for calibrating pricing
models.
In Treasury Monitor, you can measure your current exposure, and also simulate the effect that
market movements would have on your exposure.
In Performance Monitor, you can measure the performance of your own portfolio against an index or
benchmark, and in Limit Monitor, you can analyze and monitor the limits you have set up.

1 Overview
1.5 Setting up and using TRM
Transaction & Risk Management Module (TRM) User Guide 27
1.4.5 Reports
Reports display information which is generated from the information provided by other TRM
applications.
In TRM, you can create different types of reports: such as reports listing your data (for example,
clients or instruments), and position-related reports (for example, Transaction, Key-Figure, and
Periodic P/L).
You can also perform a variety of calculations on the data in a report, for example, calculations that
are not available from Treasury Monitor. You can add, multiply, subtract and divide totals, calculate
averages, produce subtotals at any grouping level, produce running totals, combine the output of
different columns, and create sophisticated “if” conditions for displaying and calculating data.
You can create as many different report layouts as you need (either completely new ones, or ones
based on existing layouts).
Reports are set up and managed in an application called Report Generator.
1.4.6 Activities
Some calculations and batch processes must be run on certain dates or at certain time intervals (for
example, daily or monthly). In TRM, these calculations and batch processes are called activities and
you can set them up to run automatically.
You can use activities to perform a variety of tasks, such as running batches and generating log
reports, fixing cashflows, updating modified data in the system automatically, and various other
calculations and realizing of key-figures.
Activities are managed and launched from an application called Activity Manager.
1.5 Setting up and using TRM
As a user, you are responsible for one or more of the following tasks:
Task More information
Set up the module:
• Launch the module
• Navigate the module’s applications
•Set up data
• Set up batch activity
• Set up and analyze data in reports.
Chapter 2 Navigating TRM on page 29
Chapter 3 Managing static data on page 41
Chapter 4 Managing market data on page 161
Chapter 5 Managing rules on page 221
Chapter 6 Managing activities on page 227
Chapter 7 Reporting on page 235

1 Overview
1.5 Setting up and using TRM
28 © Wall Street Systems IPH AB - Confidential
You complete the first of these tasks after your organization has installed TRM but before it begins to
use the module.
You complete the remainder of these tasks on a regular basis after the initial installation and setup.
Capture activity:
• Use the module to capture and process
deals
• Manage, monitor, and analyze positions
and performance
• Manage benchmarks
• Manage limits
• Manage payments, forecasts, and
settlements
• Manage results and accounting
processes
• Monitor risk information
• Manage messages and sending
correspondence
• Perform pricing before generating them
as transactions in TRM.
Chapter 8 Managing transactions on page 257
Chapter 11 Managing collateral on page 345
Chapter 12 Monitoring positions on page 361
Chapter 13 Monitoring performance on page 399
Chapter 14 Portfolio modeling on page 413
Chapter 15 Managing benchmarks on page 429
Chapter 16 Managing limits on page 447
Chapter 18 Managing cash and settlements on page 495
Chapter 19 Managing accounting on page 533
Chapter 20 Monitoring VaR on page 547
Chapter 21 Managing messages on page 555
Chapter 22 Managing RMI and CMI on page 563
Chapter 23 Pricing IR and FX trades on page 575
Reference data and parameters:
• Activity and report parameters
• Application parameters
• Mapping to other Wallstreet Suite
modules
• Mapping to RiskManager and
CreditManager.
Appendix A Activity parameters on page 627
Appendix B Report parameters on page 659
Appendix C Start-up parameters on page 681
Appendix D SDM - CMM mapping on page 689
Appendix E TRM - RMI/CMI mapping on page 699
Task More information
Transaction & Risk Management Module (TRM) User Guide 29
Chapter 2 Navigating TRM
TRM consists of an integrated set of applications which are centralized into one main application
called Application Manager.
Many of these applications can be set up in different modes or layouts: each one used for a different
purpose. For example, an application such as Transaction Manager may be set up in two modes: one
mode used for entering deals in the Front Office; and the other used for verifying deals in the Back
Office. Another type of application called Static Data Editor has many different layouts, each one
used to set up different types of core data (such as, currencies, instruments, or clients).
In Application Manager, the applications are structured into a logical hierarchy and are grouped and
ordered to meet the organization’s business needs.
Each user can then customize Application Manager according to their personal preferences, by
rearranging the application display on their desktop.
From Application Manager, all TRM users can carry out their business, whatever their role in the
organization. All users or groups of users are only able to access and launch those applications that
they have permission to use.
This chapter explains the main functions of Application Manager, and the commands or tools that
are common to other types of application.
2.1 Application Manager
Application Manager is the entry-point for launching the applications in TRM. All applications for
which you have permission are accessible from the Application Manager window.
Application Manager is customizable to allow users to personalize their workspace. It consists of a
toolbar which has buttons for easy access to the menu options, and several sub-windows that can
either be displayed on the workspace or hidden from view. Displayed sub-windows can be docked or
floating: docked windows have been repositioned somewhere within the main window; and floating
windows have been detached from the main window and repositioned elsewhere on the workspace.
2.1.1 Launching Application Manager
To launch Application Manager:
1. Select the TRM item from the Start menu, or select the TRM icon on your desktop.
2. Enter your user name and password in the Login dialog.
Contact your local system administrator if you do not have a user name and password.
3. Click OK.
Application Manager launches. From this window, you can open the applications to which you
have access rights.
2 Navigating TRM
2.1 Application Manager
30 © Wall Street Systems IPH AB - Confidential
2.1.2 Application Manager menus
The following tables describe the menu items found on Application Manager’s menu bar.
Other menu items which are common to all applications are described in 2.2.6 Using application
menus on page 34.
2.1.2.1 File
2.1.2.2 View
Menu item Description
Update Resets Application Manager to the default settings.
Exit Closes Application Manager.
Menu item Description
Toolbar
Status Bar
Shows the toolbar/status bar if the menu item is selected.
Hides the toolbar/status bar if the menu item is not selected.
Buttons are available on the toolbar for quick access to Application Manager’s menu
items.
Applications Displays the dockable sub-window which contains all applications to which you have
access rights. The applications are sorted into groups (as defined in the system
configuration) according to the business area for which they are used.
If a group is selected, the applications which belong to it are displayed in the main
Application Manager window.
Running Applications Displays the dockable sub-window which contains the list of applications currently
running on your system.
Favorites Displays the dockable sub-window which contains the applications which have been
added to your favorites list.
See 2.1.2.4 Favorites on page 31.
Minimized Minimizes Application Manager so that the main window and the docked sub-windows
are hidden, but the tool bar (and the floating sub-windows) remains visible on your
desktop.
You can restore the full Application Manager window using the same command.
Default Ordering Reverts the display of application names in the main Application Manager window to
the default order in which they were sorted in the system configuration.
If you need to sort the applications into alphabetical order, click the Application header
name in the main window (available only with the Details option of the View menu).
Large Icons
Small Icons
List
Details
Alters the display of the application names in the main Application Manager window.
Always on Top Keeps the Application Manager window on top of other windows that are running on
your desktop.
Using Always on Top together with the Minimized view (see above) means you can have
the Application Manager tool bar visible at all times but still see other open
applications on your desktop.
2 Navigating TRM
2.2 Common application features
Transaction & Risk Management Module (TRM) User Guide 31
2.1.2.3 Themes
2.1.2.4 Favorites
2.1.2.5 Tools
2.1.3 Start-up parameters
It is possible to alter the start-up parameters so that Application Manager launches in a different
mode.
See C.2 Application Manager on page 681 for information about the options available.
2.1.4 Customizing Application Manager
You can customize Application Manager according to your personal preferences by moving the
dockable windows to rearrange the application display.
See 2.2.7 Customizing the display of applications on page 35 for more information.
2.2 Common application features
There are some features (such as, opening and closing applications, menu options, start-up
parameters, and data-entry controls) which are common to all applications in TRM.
There are other features which are common to a certain type of application, for example,
rearranging an application’s components to customize your display.
This section describes these features.
Menu item Description
Wallstreet Suite
Native Windows XP
Office 2003
Office 2000
Office XP
Allows you to select a theme for the system. The theme determines the appearance of
TRM applications.
Note: This menu item becomes available when Application Manager is launched with
the appropriate start-up parameter: see 2.1.3 Start-up parameters on page 31.
Menu item Description
Favorites Opens a multi-selection list from which you can select your favorite applications. The
favorites are then listed in the Favorites dockable sub-window (see above).
2.2.4 Using application controls on page 32 for information about using
multi-selection lists.
Launch All Launches all favorite applications simultaneously.
Launch All on Startup Launches all favorite applications on start-up of Application Manager.
Holding down the Shift key at start-up prevents the favorites from launching.
Menu item Description
Switch To Allows you to move quickly between running applications.
Calculator Launches the calculator.
(Pressing F12 on the keyboard also opens the calculator.)
Close Applications Closes all running applications automatically when you exit Application Manager.
2 Navigating TRM
2.2 Common application features
32 © Wall Street Systems IPH AB - Confidential
2.2.1 Opening applications
To open the TRM applications for which you have access rights from Application Manager, do one of
the following:
•Select the required application from the Applications drop-down list found on Application
Manager’s toolbar. The applications are listed in alphabetical order.
•Select the folder containing the application you want from the Applications sub-window:
–Double-click the application name in the main window.
–Right-click the application name in the main window and select Launch.
2.2.2 Closing applications
To close the running applications one at a time, do one of the following:
•Select File - Exit from the application’s menu bar.
•Right-click the application name in Application Manager’s Running applications sub-window and
select Close.
To close all running applications simultaneously, use the Tools - Close Applications menu option
described in the 2.1.2 Application Manager menus on page 30.
2.2.3 Generating reports on application activity
When applications are opened or closed from Application Manager, an entry is logged in the History
Log report. The report records which user performed the action and when the action took place.
See Chapter 7 Reporting on page 235 for more information about reports.
2.2.4 Using application controls
The following table describes the most common application controls:
Control Description
Command Button Command buttons are used for executing commands.
They are located either above the status bar or in the command bar. Examples of
command buttons are Add, Fetch, Apply, and Commit.
Date Board Enables you to enter dates in date fields. Date boards are accessed by clicking the
arrow to the right of a date field.
Dates are displayed respecting the parameters defined in your Regional Settings in
the Control Panel.
You can also enter dates manually using the keyboard: see 2.2.4.1 Entering dates
manually on page 33 for more information.
Menu Bar Displays the menus specific to each application.
Multi-Selection List Enables you to select several items from a list. You use multi-selection lists to
configure the columns in Transaction Manager, or grids and charts in monitors.
Multi-selection lists have two columns. The left column lists unselected items and the
right column lists the items you have selected. You can use the transfer buttons found
between the two columns to move items from the Not Selected column to the Selected
column and vice versa. The buttons to the right of the Selected column are used to
define the order in which the columns are displayed in the application.
Pages and Tabs Pages can be located in the main part and lower part of TRM windows.
If pages are in the lower part they are used to enter additional information. You
access a page by clicking on its tab.
Selection Button Clickable arrow that opens a TRM tool (for example, a selection list or a date board).
Selection buttons can be found, for example, next to a field in an editor or next to a
selected column in the Transaction Manager display.
2 Navigating TRM
2.2 Common application features
Transaction & Risk Management Module (TRM) User Guide 33
2.2.4.1 Entering dates manually
If you enter a date manually in a date field, TRM interprets the values using the parameters defined
in the Regional Settings as guidelines. The three most common formats are: “day/month/year”,
“month/day/year”, and “year/month/day”. Some deviation from the standard date format is
accepted, as follows:
•The following date separators are recognized: “.”, “/”, and “-”, but the separator defined in the
Regional Settings takes precedence. The date is correctly interpreted if you use alternative date
separators, but you still enter the date in the format defined in the Regional Settings.
•You do not have to enter the full year, even if the date format is defined as such in the Regional
Settings:
Selection List Lists used to enter items in fields or columns in TRM.
When you use a selection list, only those items valid for the field are displayed in the
list. This means that when you use selection lists you always enter the correct type of
information in the fields.
Selection lists are available for all non-date fields which have a Selection Button (see
above) to the right of the field. Note that it is also possible to enter data manually in
these fields.
Note: When the field refers to an entity that is created in another editor, you can
right-click the field to launch the editor.
Status Bar Displays the status of the application.
If you do not want to view the status bar, you can deactivate it using the View menu.
Switch Switches are small check boxes which you turn on to activate.
You turn a switch on or off either by clicking the check box, or by clicking the text to
the right of the check box.
When the switch is on, a tick appears in the check box. When the switch is off, the
check box is empty. Switches are normally used for exceptions.
Text Field Text fields are fields in which you enter text using the keyboard or TRM tools.
Text can be characters, numbers, dates, and so on. TRM verifies that your input is
valid for the field.
If a field name is red, this means that the field is mandatory.
When you enter acceptable information in a mandatory field, the field name changes
from red to black.
Note: When the field refers to an entity that is created in another editor, you can
right-click the field to launch the editor.
Title Bar Displays the name of the application and the environment in which TRM is running.
The title bar is located at the top of the application.
Toolbar Buttons Toolbar buttons help you to enter information. If you do not want to view the toolbar,
you can deactivate it using the View menu.
Control Description
Example Result
dd/mm/yy For two digits: any number less than 54 is interpreted as 20XX (for example, 2020),
and any number greater than 54 is interpreted as 19XX (for example, 1986).
dd/mm/yyy For three digits: the entered year is used. You do not have to enter the leading zero.
dd/mm/yyyy For four digits: the entered year is used.
2 Navigating TRM
2.2 Common application features
34 © Wall Street Systems IPH AB - Confidential
•If the entered value is missing any of the date components, the date is interpreted, as follows:
2.2.5 Using keyboard shortcuts
You can use keyboard shortcuts to navigate and perform various actions in TRM applications, as
described in the following table:
2.2.6 Using application menus
The following tables describe the menu items which are common to all types of applications in TRM.
For details of menu items that are specific to a particular application, see the relevant section of this
guide.
2.2.6.1 File
Example Result
??/mm/yyyy
dd/mm
??/mm/yyyy
• If you do not enter a day, month, or year, the missing component is substituted
with the current day, month, or year, but only if the date matches the expected
format.
• If any of the entered values are greater than expected (for example, day greater
than 31, month greater than 12, or year greater than 9999), then the application
estimates the correct date based on the order of input, as follows:
• If the day and month (and/or year) exceed the allowed values, it is rejected.
• If one value is incorrect, but the others follow the date format, then the incorrect
value is treated as the year and the date rules are applied to the other values.
• If only the day is found, the month and year default to the current month and
year.
• If only the year is found, the date defaults to the last day of the previous month
(relative to the current month) of the entered year.
• If the year and month are found, the day defaults to the last day of the entered
month and year.
Key Explanation
Shift + Up arrow
Shift + Down arrow
Changes the day either forwards or backwards in date fields and date boards, and
selects the entity forwards or backwards in the list of entities in text fields.
F2 or Ctrl+E Fetches entities and transactions for the criteria entered in editors and managers.
Ctrl+N Creates a new entity in editors and managers. For example, Ctrl+N creates a new
transaction in Transaction Manager or creates a new instrument in the Instrument
Editor (switching from the Query mode to the Edit Mode).
TAB Moves forwards to the next editable field.
Shift + Left arrow Moves backwards to the previous editable field.
ALT + Up arrow
ALT + Down arrow
Opens selection lists in editors and managers.
F10 + arrow Activates the menu bar in all applications:
• The left and right arrows move from one menu to the next
• The up and down arrows move up or down the menu list.
Menu item Description
Exit Closes the application.
2 Navigating TRM
2.2 Common application features
Transaction & Risk Management Module (TRM) User Guide 35
2.2.6.2 View
2.2.6.3 Help
2.2.7 Customizing the display of applications
You can customize some applications in TRM according to your personal preferences by moving
dockable sub-windows to rearrange the application’s display.
To move a sub-window:
1. Use your mouse to drag the header on the sub-window to the place you want to reposition it on
the workspace.
When you drag a sub-window to the left, right, or bottom edge of the application, a group of
docking arrows appear on the screen. Each arrow in the group corresponds to an area of the
application.
2. Select the docking arrow you want by holding the sub-window over the arrow.
The arrow is selected when it changes color.
3. Drop the sub-window onto the highlighted arrow.
The window snaps into place on the corresponding area of the window. If you dock more than
one window in the same area of the application so that they overlap, then tabs are displayed.
Note: If you drag a dockable window, it becomes a floating window until it snaps into place on
the arrow when it is docked. Floating windows might overlap and hide the other windows
on display as they are not attached to the application main window.
2.2.8 Sorting data
By right-clicking on a column and choosing Sort by this column from the context menu, you can sort
rows temporarily by a single column while keeping the regular sort order settings. Sorting by the
same column multiple times flips the sorting order from ascending to descending and back.
2.2.9 Printing data
You can either print data from a TRM application using File - Print or use the Copy - Paste function to
copy information into an external application, such as Microsoft Word™ and print from there.
You can also print your workspace as a bitmap image.
Menu item Description
Toolbar
Status Bar
Shows the toolbar/status bar if the menu item is selected.
Hides the toolbar/status bar if the menu item is not selected.
Buttons are available on the toolbar for quick access to application menu items.
Menu item Description
Documentation Opens the Wallstreet Suite Help page from which you can access all user documents.
You can also use Search Index to search for one or more keywords throughout
documentation set.
Copy Version Info Copies version information about the TRM configuration to the clipboard.
About Wallstreet
Suite...
Displays information about the TRM configuration.
2 Navigating TRM
2.2 Common application features
36 © Wall Street Systems IPH AB - Confidential
To print the open application as an image:
1. Press the Print Screen button on your keyboard.
2. Paste the image into an external application that can display and print graphics.
3. Print the document according to the printing methods of the application you are using.
2.2.10 Using manager applications
In TRM, there are a number of manager applications that are used to manage the flow and
acceptance process of different types of information in the system. Managers are based on the
Transaction Manager application layout.
2.2.10.1 Manager menus
The following tables describe the menu items which are common to all manager applications in TRM.
For details of menu items that are specific to a particular manager, see the relevant section of this
guide.
2.2.10.1.1 View
Menu item Description
Query Displays the Query view.
This view is used to retrieve entities that are already in the system for further
processing.
Select Columns Opens a multi-selection list to enable you to select the columns for the layout.
Before you can enter information or query existing entities you must select the
columns for each view. If no columns are displayed in the manager, application, it is
because you have not selected any.
The available columns differ for each view. You need to click on the header of the view
for which you want to select the columns to open the appropriate selection list.
Sort Columns Opens a multi-selection list which allows you to sort the order of the displayed rows for
each view by the data in the columns; for example, you can sort transactions by
Transaction Number, or by Opening Date.
You can specify more than one sort criterion; for example, if you select Portfolio as
your first criterion in Transaction Manager’s Transaction view, and Transaction Number as
the second, the transactions are sorted first alphabetically by portfolio name, and
within each portfolio, by transaction number.
You can also specify whether the rows should be displayed in ascending or descending
order by right-clicking the column name in the Selected side of the list.
Hide Columns Allows you to remove the selected column from the display.
You can reinstate the column to the display using View - Select Columns.
Zoom In
Zoom Out
Zoom to Default
Allows you to zoom into the display (to enlarge the figures), zoom out (to see more of
the display), or zoom to default (to reset the original zoom).
2 Navigating TRM
2.2 Common application features
Transaction & Risk Management Module (TRM) User Guide 37
2.2.10.1.2 Command
2.2.10.1.3 Layout
2.2.10.1.4 Options
2.2.10.2 Start-up parameters
Manager applications can be configured in different modes and layouts, each one designed for a
specific purpose or to display entities at a certain state in their process flow.
The start-up parameters available to launch a specific layout or mode for manager applications are
listed in the appendix.
See C.11 Transaction Manager on page 685.
2.2.10.3 Manager modes
Different modes of a manager can be configured to be used for a particular purpose or to display
entities in a particular state in the static data flow. Permissions are set up and applied to users to
limit their access to the different modes according to their responsibilities in the organization.
Menu item Description
Apply
Reset
Clear
Accept
Reject
Cancel
Allows you to carry out different types of commands on entities.
Commands are used to save, cancel, or reject an entity and can move the entity to a
different state in the process flow.
The new state of the entity following a command depends on how the process flow has
been configured for the system.
Menu item Description
Save Saves any changes made to an existing layout.
Save As Opens a dialog so that you can save a new layout.
You need to enter the following information in the Save As dialog:
•Layout Name - descriptive name for the layout.
•Owner - user ID of the owner of the layout. Only this user is permitted to modify
the layout. You may also specify a Group ID in this field.
•User(s) - user or group of users that may use the layout.
The layouts you save are then listed in the Layout selection list: see Layout - My Layouts.
Properties Shows the properties of the current layout (for example, layout name, owner, and
user).
Delete Allows you to delete the current layout.
For a layout to be definitively purged from the system, it must be removed from all
manager modes where it is defined.
My Layouts Opens a multi-selection list to enable you to select the layouts that you want to be
displayed in the Layout menu.
In the menu, the layouts are split into two sections: own and shared.
Menu item Description
Display Warnings Allows you to specify whether you want warning messages to be displayed when there
are missing or incorrect values in an entity.
2 Navigating TRM
2.2 Common application features
38 © Wall Street Systems IPH AB - Confidential
At all points in the process flow, an entity has a state: when an entity moves forwards or backwards
in the flow, its state changes. The state of the entity depends on where it is in the flow. An entity
can only have one state at a time.
In a typical TRM implementation, a different manager mode may be configured for each stage in the
flow to correspond to each of the entity states used: it is possible to set up an unlimited number of
verification stages. Only the entities with the appropriate state are visible in the corresponding
mode.
For example, a static data flow could be set up as follows:
It is also possible to set up a separate manager mode for a specific task. For example, a Settlement
Processing mode can be configured that only allows manual netting or splitting of settlements.
Note: See the TRM System Administration Guide for more information.
2.2.10.4 Customizing manager applications
Manager applications consist of several views in which the entity information is displayed. The views
are opened from the View menu.
You can move and rearrange the selected views in the window according to your personal
preferences. You can select the information you want to see in each view, by selecting View - Select
Columns.
It is possible to save the current display by saving it as a layout in the Layout menu using Layout -
Save. You can create and save multiple layouts either for your own personal use, or to be shared by
other users.
When you start the application, the default layout is automatically displayed. You can create as
many layouts as you require and tailor each view according to your needs.
The views in the layout are displayed as individual windows: you can detach and reposition the
views in a manager application in the same way as you can reposition the sub-windows in
Application Manager: see 2.2.7 Customizing the display of applications on page 35.
2.2.10.5 Retrieving entities
To allow you to process existing entities, you need to retrieve them into the appropriate manager
application.
Retrieving entities is done in the Query view of the manager application. Entities are retrieved from a
blank transaction row called a Query Row. In this row you enter the criteria that you want the
retrieved entities to match.
When the entities have been retrieved, you need to move to another of the manager’s views as you
cannot process entities in the Query view. You can only retrieve entities that have the relevant state
that corresponds to the manager mode.
You can use selection criteria in several fields to retrieve entities. The criteria entered are connected
with an AND operator, which means that all the selection criteria must match simultaneously.
2.2.10.6 Looking up information in another manager application
To allow you to quickly look up information, such as messages, FIN messages, settlements,
transactions from inside some of the other manager applications (Transaction Manager, Settlement
Processing, and so on), you can use the Lookup right-click option from some of the views. The
State Description
Open The first stage of the verification flow showing any entities that have been edited.
Verify 4-eyes verification stage.
Final For all entities that have successfully completed the static data flow.
2 Navigating TRM
2.2 Common application features
Transaction & Risk Management Module (TRM) User Guide 39
corresponding manager application opens enabling you to continue processing. See the relevant
sections for more information about how to use these quick lookup options.
2.2.10.7 Changing the display fonts and colors
You can change the text (including font style, size, color) and/or the background color of the
following cell types:
•Header
•Invalid cells
•Mandatory cells
•Mandatory invalid cells
•Normal cells
•Read-only cells
•Read-only invalid cells
•Entities updated in real-time
To change display fonts and colors for a specific type of cell or column in a manager:
1. Right-click the column header of the view and select Appearance... from the list of options.
2. In the Visual Settings dialog, select the cell type you want to change from the Style field.
3. Click Text or Background to change the text (font style, size, or color) or the background color you
want to apply to the cell type.
Note: You can see what these settings look like in the Preview area of the dialog.
4. Select In Use to enable the settings.
5. Click OK to save the setup.
Hint:
To restore the default settings, click Reset to restore the default values of one cell type or
click Reset All to restore the default values of all cell types.
6. Save the layout using Layout - Save.
2 Navigating TRM
2.2 Common application features
40 © Wall Street Systems IPH AB - Confidential
Transaction & Risk Management Module (TRM) User Guide 41
Chapter 3 Managing static data
3.1 Static data entities
A static data entity is the generic term for data that is set up in TRM and that changes little over
time. Static data entities include data such as currencies, clients, and portfolios. Static data entities
are also referred to as core data.
Static data entities are used in all aspects of TRM, for example, as components of deal entry, or as
parameters to monitor treasury positions and for running reports. Because these entities are used
so often, and assigned to so many other entities, they need to be set up before TRM can be used.
Static data entities are made up of pieces of data called attributes. Attributes define an entity’s
characteristics, and include such data as an identifying code (ID), and name. For example, the
currency used in the United States may be set up with the ID USD, and the name US Dollar.
The order for setting up entities is dependent on the restrictions of assigning one type of static data
to another and the interdependencies between them. When you create static data entities, you may
often need to select something that is itself an entity. For this reason, the order in which you create
entities is very important. In some cases, you may even need to create entities in parallel.
The order in which static data definition is described in this chapter reflects the order in which it
needs to be done: for example, setting up a client is described before setting up a portfolio, since
you must define clients before you define portfolios. TRM will not allow you to create a portfolio if no
client exists.
3.2 Static Data Editor
Static data entities are set up and managed in applications called editors. Most editors are defined
as a layout based on the application Static Data Editor. Each editor layout is available as an
individual application in Application Manager.
Attributes that apply to the whole entity definition are entered in the upper part of an editor. Any
pages in the lower part of the editor are used to enter attributes that apply only to one element that
makes up the entity.
The upper and lower parts of an editor contain a number of fields and switches which you use to
define the entity’s attributes (see 2.2.4 Using application controls on page 32 for more information).
The List, Group, and Hierarchy tabs on the left side of the editor contain the static data entities that
have already been defined in the editor.
3.2.1 Static Data Editor menus and toolbars
The following tables describe the menu items which are specific to Static Data Editor and any editor
layout which is based on this application. Some of the menu items are also available as icons in the
toolbar.
The menu items which are common to all applications are described in 2.2.6 Using application
menus on page 34.
3 Managing static data
3.2 Static Data Editor
42 © Wall Street Systems IPH AB - Confidential
3.2.1.1 File
Some of these menu items are also available as icons in the Standard toolbar.
3.2.1.2 Edit
Some of these menu items are also available as icons in the Standard toolbar.
Menu item/shortcut Description
New
Ctrl+N
Switches to the Edit mode where you can define a new entity.
Note: To switch back to the Query mode, press Ctrl+Q or use the Query Mode icon in the
Standard toolbar to perform the same action.
Open
Ctrl+O
Opens the multi-selection list to allow you to select an editor layout.
Refresh Refreshes the information displayed.
Save
Ctrl+S
Saves modifications to the entity.
The item is grayed out (unavailable) until you have entered information in the
mandatory fields (the fields shown in red).
Static data entities are distinguished by their IDs; so if you change the existing ID,
TRM assumes that you are creating a new entity rather than modifying an existing
one, and makes the Save As New item available instead.
Save As New Saves the entity as a new entity.
The item is grayed out (unavailable) until you have supplied a new ID in the ID field,
and entered information in the mandatory fields (the fields shown in red).
Static data entities are distinguished by their IDs; so if you make changes to the
entity but not to its ID, TRM assumes that you are modifying the existing entity which
has that ID, and the Save item is made available instead.
Delete Deletes the current entity.
First
Previous
Last
Next
Goes to the first, previous, last, or next entity in the list of defined static data entities.
Menu item Description
Copy Copies the selection onto the clipboard.
Paste Inserts the contents of the clipboard.
Snapshot Copies the entity list to the clipboard.
Query Mode Switches to the Query mode from the Edit mode. (This command is only available in
the Edit mode.)
Clear Query
Ctrl+Delete
Clears the query criteria from the editor’s fields in the Query mode.
If the fields have already been cleared, the item is grayed (unavailable).
Note: You can also use the Clear Query icon in the Standard toolbar to perform the
same action.
Query
F2 or Ctrl+E
Runs the query and displays the entity list filtered by the query criteria entered in the
Query mode.
Note: You can also use the Execute Query icon in the Standard toolbar to perform the
same action.
Preferences Allows you to define editor behavior (for example, for confirmations) and the
appearance of the editor.
3 Managing static data
3.2 Static Data Editor
Transaction & Risk Management Module (TRM) User Guide 43
3.2.1.3 View
3.2.1.4 Tools
3.2.1.5 Standard toolbar
3.2.2 Start-up parameters
It is possible to alter the start-up parameters so that Static Data Editor launches in a different mode.
See C.10 Static Data Editor on page 684 for information about the options available.
3.2.3 Editor layouts
It is possible to create your own customized layouts for many of the editors. These layouts are
accessible through the Static Data Editor application when you select File - Open.
Layouts allow you to define which data is present in an editor and can be used to provide simplified
editors containing a minimal set of data. They can also be used to create multiple enter forms for
the data.
Menu item Description
Select Columns Opens a multi-selection list to enable you to specify the order in which the defined
static data is displayed in the List tab on the left side of the editor. You can display the
static data entities by ID, by Name, or by any other attribute that is available in the
editor layout.
The columns in the Selection dialog are organized into groups: the Main group contains
attributes found in the upper part of the editor; the other groups contain the
attributes found in the pages in the lower part of the editor.
See also 3.3.7 Finding static data entities on page 46.
Select Grouping
Columns
Opens a multi-selection list to enable you to define how the entities are grouped in the
Group tab on the left side of the editor.
Menu item Description
Reports Shows a list of reports specific to each static data editor. Generates a report showing
the static data already defined in the editor.
See 3.3.9.5 Generating reports on static data entities on page 50 for more
information.
Swap View/Edit Mode
SDM Accept
SDM Reject
These items are only active in this menu if your system is SDM-enabled: see 3.4
Managing SDM-enabled static data on page 51 for more information.
Menu item Description
Query Mode Switches to the Query mode from the Edit mode.
Clear Query Clears the query criteria from the editor’s fields in the Query mode.
Execute Query Runs the query and displays the entity list filtered by the query criteria entered in the
Query mode.
Swap View/Edit Mode This drop-down list is always visible, but only active when your system is
SDM-enabled. If your system is not SDM-enabled, the Swap View/Edit Mode drop-down
list is empty and SDM commands are not active. See 3.4 Managing SDM-enabled
static data on page 51 for more information.
SDM Accept
SDM Reject
These commands are only active if your system is SDM-enabled and you have
switched to the Edit mode.
3 Managing static data
3.2 Static Data Editor
44 © Wall Street Systems IPH AB - Confidential
It is important to ensure that any fields marked as mandatory (red fields) are available in the layout.
If mandatory fields are hidden from the layout, it will be impossible to create and save the entities.
Note: The creation of customized layouts requires some configuration and is usually set up
during implementation of the system.
3.2.4 Query and Edit modes
When you first launch an editor, it opens in Query mode. In Query mode, you can search for an
entity that has already been defined in the editor by entering search criteria in any of the fields and
selecting Edit - Query. All the matching static data display in the entity list on the left side of the
editor: see 3.3.7 Finding static data entities on page 46.
When you select an entity from the list or select File - New, the editor switches to Edit mode. In Edit
mode, you can make and save changes to an existing entity or create a new static data definition.
You can switch from the Edit mode to the Query mode by pressing Ctrl+Q.
3.2.4.1 Using auto-complete
The role of the auto-complete feature is to predict the word you are typing. The auto-complete
feature works in fields with a selection list. As you type text in a field, a selection list appears with
possible matches. If you type the letter "F", the auto-complete feature first displays all matches that
begin with the letter "F", and then displays all matches that contain the letter "F" somewhere within
the match. There may be no matches (in which case no list appears), only one match, or several
possible matches.
The example below shows that if you type the word FUND, the selection list displays all matches that
begin with FUND and then displays all matches that contain the word FUND. The nearer the word
FUND is to the beginning of the match the higher up it appears in the selection list. When FUND
appears in the same position in the selection list, the matches are displayed in alphabetical order.
If a number of matches are found, the auto-complete feature displays a More option. If you click
More, the same selection list appears as the one that appears when you click on the field button.
Note: You can cancel the auto-complete feature by pressing Esc.
Text Auto-complete matches Description
FUND FUND-0 FUND appears at the beginning of the match
T-FUND-BALANCE FUND contained within the match. FUND is in the same
position within three matches so the matches are displayed
alphabetically
T-FUND-CUSTOM
T-FUND-EUROPE
T-EUROPE-FUND FUND contained later on in the match is displayed after other
matches

3 Managing static data
3.3 Managing static data in Static Data Editor
Transaction & Risk Management Module (TRM) User Guide 45
3.3 Managing static data in Static Data Editor
3.3.1 Creating new static data entities
To create a new entity:
1. Open the appropriate editor or layout from Application Manager (for example, if you are creating
a new currency, open Currency Editor).
2. Enter the attributes that apply to the whole entity definition in the upper part of the editor.
For all entities, the first two fields are for giving an ID and a name to the entity. Since an entity’s
ID is the one attribute that distinguishes it from all other entities of the same type, the ID must
be unique.
3. In the pages in the lower part of the editor, specify any additional information that is needed for
the entity definition.
4. Click Add to add the information to the definition.
If you modify any of the attributes in the pages, click Update. If you want to delete any of the
attributes, select the attribute and click Remove.
5. When you have entered all the information you require for this entity, save the whole static data
definition by selecting File - Save As New.
3.3.2 Creating static data from an existing entity
To create an entity by modifying existing static data:
1. Open the appropriate editor or layout from Application Manager (for example, any non-SDM
enabled editor).
2. Select the existing entity that resembles the static data you want to create, from the list of static
data on the left side of the editor.
3. Give the entity a new ID in the ID field. The ID must be unique.
4. Modify any other values in the upper part of the editor that you need to change.
5. Make any necessary changes to the data in the pages in the lower part of the editor, and click
Add, Update, or Remove, as appropriate.
6. Save the whole static data definition by selecting File - Save As New.
Note: If you forget to save the static data entity definition, any updates you have made in a page
will be lost when you quit the entity, even if you click Add, Update, or Remove to update at
the page level.
3.3.3 Creating static data entities in parallel
Sometimes, it is not possible to define one type of entity unless another type of entity exists. In this
case, the static data definitions need to be created in parallel.
If you need to fill in a mandatory field (labeled in red) to create an entity, but the static data
definition that you need has not been created yet, right-click in the field and select the Edit entity
menu option.
This action opens the required editor and enables you to define the static data entity. In this way,
you can create static data entities that are interdependent.

3 Managing static data
3.3 Managing static data in Static Data Editor
46 © Wall Street Systems IPH AB - Confidential
3.3.4 Modifying static data entities
To modify an entity in TRM:
1. Open the relevant editor from Application Manager (for example, any non-SDM enabled editor).
2. Select the entity you want to modify from the list of static data on the left side of the editor.
3. Modify the values that you want to change in the upper part of the editor.
4. Modify the attributes in the pages in the lower part of the editor, and click Add, Update, or
Remove, as appropriate.
5. Save the modified static data definition by selecting File - Save.
Note: If you try to close the editor without saving your modifications, a message displays to
remind you that any changes you made will be lost if you do not save them.
3.3.5 Deleting static data entities
You can only delete static data entities that are not being used in TRM. If you try to delete a static
data definition that is currently being used by a transaction, TRM prevents it from being deleted, and
displays a message explaining why your delete request was rejected.
To delete an SDM enabled entity in TRM:
1. Open the relevant editor from Application Manager (for example, any non-SDM enabled editor).
2. Select the existing entity that you want to delete.
3. Select File - Delete.
3.3.6 Verifying static data entities
In TRM, it is possible to apply the 4-eyes principle to certain entities so that a user can check any
data modified by another user.
If you try to edit the data for an entity to which the 4-eyes principle has been applied, a Verification
dialog is displayed when you attempt to save or delete the static data entity. In this case, a second
user (or verifier) with appropriate permissions must enter his or her user name and password to
enable your changes to be applied.
When you carry out an action which requires 4-eyes verification, the details of the action are written
to a verification log.
The setting up of the 4-eyes verification principle requires some configuration and is usually set up
during implementation of the system.
Note: In addition to the 4-eyes verification, it is also possible to set up a more complex system to
verify some static data entities: see 3.4 Managing SDM-enabled static data on page 51 for
more information.
3.3.7 Finding static data entities
If you have defined many entities in an editor, it may be time-consuming to search for the particular
entity you need to view, modify, or delete. Using search criteria, you can isolate your search to
query only those static data entities that contain the attributes you specify.
There are two ways to find an entity; using the auto-complete search and using a wildcard search.
3 Managing static data
3.3 Managing static data in Static Data Editor
Transaction & Risk Management Module (TRM) User Guide 47
3.3.7.1 Auto-complete search
To find an entity using the auto-complete feature:
1. Make sure the editor is in Query mode by selecting Edit - Query Mode (or by pressing Ctrl+Q).
2. In the editor, enter your search criteria. For example, if you want to search for all templates that
begin with the letter "F", typing "F" in the Template field will display a selection list of all
templates beginning with the letter "F".
For more details on the auto-complete feature, see 3.2.4.1 Using auto-complete on page 44.
Note: Auto-complete can only be used in fields that have selection lists.
3.3.7.2 Wildcard search
To find an entity using a wildcard search:
1. Make sure the editor is in Query mode by selecting Edit - Query Mode (or by pressing Ctrl+Q).
2. In the editor, enter your search criteria.
–The search is case-sensitive: for example, you will not find US Dollars if you enter “us
dollars”.
–You can use the percentage sign ("%") as a wildcard matching for many characters, for
example:
–You can use the underscore sign ("_") as a wildcard matching for one character, for example:
–You can use as many fields and switches as you like to enter your query, but TRM will only
search the static data that match all and exactly the search criteria you give.
For example, in Instrument Editor, if you want to find all defined instruments that match a
particular Instrument Type, select the instrument type and run the query. If you want to find all
instruments that match a particular type and use a particular feature, select the instrument
type and then add the feature that you want to query to the Feature page and run the query.
3. Start the search by selecting Edit - Query.
Static data that match the attributes entered are displayed in the entity list on the left side of
the editor. If the search still returns too many entities, using the View - Select Columns menu
option, you can modify the display order of the entity list to search for the entity according to a
specific attribute.
Search criteria Enter
Starting with "F" F% in a Name field returns all names beginning with the letter "F".
Containing "enc" %enc% in a Name field returns all names containing the letters "enc".
Ending with "ing" %ing in a Name field returns all names ending with the letters "ing".
Search criteria Enter
Three characters
starting with "A"
A__ in an ID field returns all three-character IDs beginning with the letter "A".
If an ID contains more than three characters, it will not match the search
criteria.
Note: In this example, there are two underscore signs to replace the two
missing characters.
Starting with a three
character prefix and
ending with "- LOAN"
___ - LOAN in an ID field returns all IDs starting with a three-character prefix
and ending with "- LOAN".
Note: In this example, there are three underscore signs to replace the three
characters in the prefix. You should also include any spaces in the search
criteria.

3 Managing static data
3.3 Managing static data in Static Data Editor
48 © Wall Street Systems IPH AB - Confidential
3.3.8 Using templates to create static data entities
Certain static data entities (for example, instruments, clients and portfolios) can be set up with the
aid of a template. In a template, you can define a set of data for a certain business use, which you
would then use to set up static data following the same pattern.
A template contains all the fields and switches that are available in the corresponding editor. In the
template, you can activate or disable the fields and switches and specify which attributes need to be
editable, available, or mandatory in the editor. You can also use a template editor to restrict the
values displayed in selection lists.
When you select a template in the corresponding editor, the template will automatically fill in the
information, so that you only have to provide a limited set of values when you create the entity.
Using templates not only simplifies the set up of static data and saves time, but also reduces the risk
of errors.
Template editors are powerful tools and have a direct impact on how entities are set up. You should
verify that the template settings in an editor are those you had intended. The easiest way to do this
is to open the editor, apply the template you have created, and check that your settings have been
applied correctly.
Instrument template differs to some extent from other templates due to the feature-driven nature of
instrument entity and corresponding editor. These instrument-specific aspects of the template
concept are described in the TRM Instruments: Processing and Calculations Guide.
3.3.8.1 Defining templates
To define a template:
1. Open the template editor for the type of static data you wish to customize.
2. Enter the template’s ID, name, and domain in the upper part of the editor.
3. Customize the fields and switches as necessary.
There are three settings which you can apply to fields or sub-entities. These are:
–Mandatory - you must provide values for mandatory attributes. When this setting is applied on
a sub-entity, at least one valid entry must be made to the relevant page of the corresponding
editor. Labels for mandatory fields or editor pages are displayed in red in the corresponding
editor.
–Editable - you have access to the field and can provide a value. When this setting is applied on
a sub-entity, all entries in the relevant page of the corresponding editor are editable. All
mandatory fields and pages are editable by default.
–Ignore Template List- you will not override a value which was defined before you applied the
template. This means that if a field is blank in the template, if you apply the template to an
entity for which a value already exists for that field, the existing value is not replaced. When
this setting is applied on a sub-entity, existing entries in the relevant page of the
corresponding editor are kept unchanged.
4. Save the template using File - Save As New.
Note: The fields and switches are explained in the sections relating to the setting up of the
specific static data entities.
3.3.8.2 Applying templates
Once you have created a template you can apply it to a static data entity by selecting the template
in the corresponding editor’s Template field. The behavior of the application changes to take the logic
specified within the template into consideration.
3 Managing static data
3.3 Managing static data in Static Data Editor
Transaction & Risk Management Module (TRM) User Guide 49
When you are creating templates, the fields which are mandatory (labeled in red) in the editor are
also marked as mandatory in the template.
Note: When you use a layout together with a template, fields marked as mandatory in the
template must also be available in the layout. If mandatory fields are hidden by the layout,
it will not be possible to create and save static data definitions: see 3.2.3 Editor layouts on
page 43.
3.3.9 Common Static Data Editor attributes
The following sections describe attributes which are common to all editors based on the static data
editor layout.
3.3.9.1 Assigning domains
In TRM, domains are used to restrict information access within the same database: for example, if
your organization has one Treasury Center in the USA and another in Europe, you can prevent them
seeing each other’s static data by assigning different domains.
You assign the domain to the entity definition in the Domain field in the upper part of the editor.
In some editors, there is also a separate Domains page in the lower part of the editor. Here, you can
assign several domains to each entity, but only if the domain selected in the upper part of the editor
allows you to do so.
Note: By default, if a domain is not specified in the entity definition, then the static data
definition will be available in all domains.
3.3.9.2 Assigning properties
Properties are used to add miscellaneous pieces of information to a static data entity’s definition for
which there is no specific field or switch in the editor. The properties you will need are added at
implementation according to your organization’s requirements and are displayed in the lower part of
the editor in the Properties page.
When you assign a property to an entity, you also need to assign the corresponding value.
Hint:
You can create more properties using Property Editor (see 3.39 Properties (optional) on
page 148).
To assign a property to an entity:
1. Select the Properties page in the lower part of the static data editor layout.
2. Define the property’s attributes using the information in the following table:
3. Click Add to assign the property definition to the entity.
4. Save the whole static data entity definition using File - Save.
3.3.9.3 Adding links
In some editors (such as Client Editor or Instrument Editor), it is possible to attach multiple
information sources to an entity using the Links page. You add links to provide additional information
in an entity’s definition.
Information Description
Property Property you want to assign to the entity.
Value Value for the property.

3 Managing static data
3.3 Managing static data in Static Data Editor
50 © Wall Street Systems IPH AB - Confidential
You can add a link to any file stored on your network (for example, a link to a document which
contains information related to trading a specific instrument) or a hyperlink to an Internet URL (such
as, an issuer’s web site). Note that you can also attach a link directly to a transaction in Transaction
Manager: see 8.4.7.6 Adding information links to deals on page 294.
To add a link to an entity:
1. In the Links page, fill in the fields using the information in the following table:
2. Click Add to add the link to the entity.
3. Save the whole static data definition using File - Save.
3.3.9.4 Viewing the modification history
In the History Log page in the lower part of some editors, you can review the history of all
modifications made to an entity definition since it was defined in the system. These fields are
read-only, and display the following information:
Furthermore, you can produce a report called History Log which shows which user created or
modified a static data entity.
See B.25 History Log Report on page 668 for details of the report’s parameters.
3.3.9.5 Generating reports on static data entities
Editors have a Tools - Run report menu option, from which you can generate a report showing the
entities that have been created in that editor.
For example, if you open Currency Editor and select Tools - Run report, a report will be generated that
shows all currencies that have been created, plus details of their attributes.
You can control which attributes of each static data definition you want to view, by selecting the
relevant report columns (there is a report column for each attribute). See 7.2 Managing reports on
page 239 for more information.
For some static data entities, there is an additional option to drill down further into the definition’s
underlying attributes: see 7.2.3 Drilling down into reports on page 239.
Information Description
Name Name of the document or web page.
Address Address of the file: for example, a URL, or the path to a file accessible from your
computer.
Note: If you click the selection list, the Browse for Folder dialog is launched.
Comment Any additional information you want to enter which is relevant to the definition.
Information Description
Object Object, such as a specific table in the database, on which the change was made.
Date Date and time when the change was made.
Action Type of action the user has performed.
User User ID that made the change.
Field Field that was modified in the entity definition.
From Value of the field before the change was made.
To New value of the field.
3 Managing static data
3.4 Managing SDM-enabled static data
Transaction & Risk Management Module (TRM) User Guide 51
3.4 Managing SDM-enabled static data
In addition to the simple 4-eyes verification (described in the section 3.3.6 Verifying static data
entities on page 46), it is possible to set up a more complex system to verify some types of static
data. This more complex system is an enhanced static data management system (SDM) which uses
a static data process flow concept.
The following diagram illustrates an example of the default flow:
At all points in the static data flow, an entity has a state: when an entity moves forwards or
backwards in the flow, its state changes as illustrated in the previous figure. The state of the static
data depends on whether it is considered to be active or edited in TRM:
•Static data is said to be active when it has reached a state in which it can be used in TRM (for
example, as a parameter in a report or activity, to create another entity, or as input data for
capturing a deal).
•Static data is said to be edited when it cannot be used in TRM because it has not completed the
process flow.
When SDM is enabled in TRM, the Static Data Editor layout behaves in a slightly different way to the
standard layout in order to accommodate the static data flow concept when you are creating,
modifying, or deleting static data entities. That is, when you carry out an action on an entity in an
SDM-enabled editor, the entity enters the process flow and needs to be moved forward or backward
in the flow. This validation is done in Static Data Manager.
The Static Data Manager offers more specialized static data management tools than those provided
by the standard static data management system. Static Data Manager allows you to track the
progress of SDM-enabled entities in the flow, monitor the changes made to the static data entity,
move it forward or backwards in the flow, and view the changes made in more detail than is
available in the History Log page of Static Data Editor.
3.4.1 SDM-enabled Static Data Editors
When SDM is enabled in TRM and in the particular editor, SDM commands are active in the editor
layout. It is also indicated by the presence of both the SDM heading and the State field in the upper
part of the editor.
The SDM heading corresponds to the following modes:
•SDM Read-only (View mode) for querying active data. SDM commands are not available.
•SDM Edit (Edit mode) for creating new and modifying existing data, and for moving data through
the static data flow. SDM-enabled static data entities can only be created, modified, and deleted
in the Edit mode.
OPEN VERIFY
REEDITFINAL
Accept
Reject
Accept Accept
Reset
DELETE-
VERIFY
Delete
DELETED
Reject
Accept
Reject
Save
Accept
3 Managing static data
3.4 Managing SDM-enabled static data
52 © Wall Street Systems IPH AB - Confidential
The State field displays the current state of the static data definition in the entity flow.
Note: In the current version of TRM, SDM has been enabled for the following static data editors:
Client, Country, Currency, Calendar, Calendar Group, Gap Set, Settlement Advice Method,
Settlement Transfer Method, Market Info Source, Transaction Charge, Cashflow Charge,
Portfolio, Rule, Settlement Rule Editor and all types of reference rate editors (including IR
Quotes and Yield Curve).
In future versions, it will be possible to manage all static data entities in this way.
3.4.1.1 SDM-enabled editor menus
In SDM-enabled editors, some of the menu items behave in a slightly different way to the
corresponding items in a standard Static Data Editor layout (see 3.2.1 Static Data Editor menus and
toolbars on page 41 for information about the menu items that are common to all editors).
In the File menu, the affected menu items are as follows:
In SDM-enabled editors, the Tools menu and Standard toolbar include the following commands:
Note: If your system is not SDM-enabled, these commands are not active.
3.4.1.2 Accepting and rejecting static data entities in SDM-enabled editors
To move an entity forward or backward in the flow you need to either accept or reject the new
entity. Only entities that have progressed through the static data flow until they have reached a
state in which they can be used in TRM can be considered as active, for example, Final. Entities that
are still in an Edit mode cannot be used in TRM until their process flow is complete.
•SDM Accept in the standard toolbar allows you to move the current entity to the next state in the
flow, provided:
–You are in the Edit mode.
Menu item Description
New Creates a new entity as in the standard editor.
However, when the entity is saved, it is created in the Open state and must be
accepted to move forward in its processing.
See 3.4.1.3 Creating static data entities in SDM-enabled editors on page 53.
Delete An SDM-enabled entity can only be deleted either before it is in a state in which in can
be used in TRM or when it is in the Final state (and in Edit mode). When you delete an
entity, the entity is given the Delete-Verify state (default process flow) and must be
accepted in Static Data Manager to be fully deleted (state Deleted).
See 3.4.1.5 Deleting static data entities in SDM-enabled editors on page 54.
Save The Save command takes on a special meaning when applied to save modifications on
an entity that is currently in the Final state.
See 3.4.1.4 Modifying static data entities in SDM-enabled editors on page 53
Item Description
Swap View/Edit Mode Allows you to switch from SDM Read-only (View mode) to SDM Edit (Edit Mode), and vice
versa.
SDM Accept
SDM Reject
For SDM-enabled entities, these commands allow you to move the current entity to
the next state in the static data flow (SDM Accept), or backwards in the flow (SDM
Reject). These commands are only available in the SDM Edit mode.
See 3.4.1.2 Accepting and rejecting static data entities in SDM-enabled editors on
page 52.

3 Managing static data
3.4 Managing SDM-enabled static data
Transaction & Risk Management Module (TRM) User Guide 53
–There is a next state defined in the process flow.
–All other entities that are necessary to process this entity have been created and are
considered active in TRM.
The order for setting up entities is dependent on the restrictions of assigning one entity to
another, and the interdependencies between them. When you create entities, you may often
need to select other entities. For this reason, the order in which you create entities is very
important. In some cases, you may even need to create entities in parallel.
Hint:
TRM enables you to right-click an entity field in most of the editors in order to open the
relevant editor directly from that editor.
–You are authorized to perform this operation.
•SDM Reject in the standard toolbar allows you to move the current entity backwards in the flow,
provided:
–You are in the Edit mode.
–There is a reject state defined in the flow.
–You are authorized to perform this operation.
3.4.1.3 Creating static data entities in SDM-enabled editors
To create a new entity:
1. Open the relevant editor from Application Manager (for example, to create a new currency, open
Currency Editor).
2. Select Tools - Swap View/Edit Mode or select SDM Edit from the Swap View/Edit Mode drop-down list to
switch to the Edit mode.
3. Enter the relevant data. Refer to the corresponding section in 3.3 Managing static data in Static
Data Editor on page 45.
4. Save the entity definition by selecting File - Save As New.
The new entity is created in the Open state and needs to be accepted before it can move forward
in the static data flow.
3.4.1.4 Modifying static data entities in SDM-enabled editors
To modify an entity:
1. Open the relevant editor from Application Manager (for example, to modify a client, open Client
Editor).
2. Select Tools - Swap View/Edit Mode or select SDM Edit from the Swap View/Edit Mode drop-down list to
switch to the Edit mode.
3. Select the entity you want to modify from the list of entities on the left side of the editor and
modify the data.
4. Save the modified entity by selecting File - Save.
The state of the entity changes and needs to be accepted before it can move forward in the
static data flow.
Note: When you modify or delete an entity, a copy of the modified or deleted entity is made.
That is, there can be two instances of the entity, one that is the active entity and the other
which corresponds to the modified (Re-edit state) or deleted copy (Delete-Verify state). The
copy will become active, in the case of a modification, when it reaches the relevant state;
or deleted, in the case of a delete, when the delete process is validated. An editing or
deleting sequence can be canceled by rejecting the entity in the Re-edit state or Delete-Verify
state. In this case, the entity is restored to its previous state.
3 Managing static data
3.4 Managing SDM-enabled static data
54 © Wall Street Systems IPH AB - Confidential
3.4.1.5 Deleting static data entities in SDM-enabled editors
The delete process depends on whether or not the entity you want to delete is already in a state in
which it can be used in TRM (i.e. the entity is active or not). You can delete entities that are not yet
active directly in the editor without any further processing. If the entity is in the Open state, moving
the entity backward in the flow (SDM Reject) causes the entity to be deleted.
For active entities, you need to initiate the delete process in the editor and then validate it in Static
Data Manager by moving the entity forward in the flow. The deleted entity remains visible in the
editor, but only in the read-only mode, and is still available in TRM until it is moved forward to the
Deleted state.
An entity that is flagged for deletion (i.e. state Delete-Verify) is still available in the system until it is
completely deleted. You cannot delete entities that are already used in TRM.
In the event that the delete is rejected in Static Data Manager, the entity is returned to its previous
state, i.e. Final.
The following diagram illustrates the default flow of the delete process:
To initiate the delete process of an entity:
1. Open the relevant editor from Application Manager (for example, to delete a country, open
Country Editor).
2. Select Tools - Swap View/Edit Mode or select SDM Edit from the Swap View/Edit Mode drop-down list to
switch to the Edit mode.
3. Select the entity you want to delete from the list of entities on the left side of the editor.
4. Select File - Delete or click Delete to move the entity to the Delete-Verify state.
The deleted entity remains visible in the editor, but only in the read-only mode and is still
available in TRM until it is moved forward to the Deleted state in Static Data Manager, see 3.4.3.4
Validating deleted SDM-enabled entities on page 58.
Note: When you modify or delete an entity, a copy of the modified or deleted entity is made.
That is, there can be two instances of the entity, one that is the active entity and the other
which corresponds to the modified (Re-edit state) or deleted copy (Delete-Verify state). The
copy will become active, in the case of a modification, when it reaches the relevant state;
or deleted, in the case of a delete, when the delete process is validated. An editing or
deleting sequence can be canceled by rejecting the entity in the Re-edit state or Delete-Verify
state. In this case, the entity is restored to its previous state.
3.4.2 Static Data Manager
Static Data Manager is an application which is based on the Manager application layout (see 1.4.3
Managers and Boards on page 26).
In Static Data Manager, static data can be managed in a similar way to transactions using similar
state and mode concepts as those in Transaction Manager’s transaction flow.
Static Data Manager offers more specialized static data management tools than those provided by
the standard static data management system. It allows you to track an entity’s progress in the flow,
monitor the changes made to the entity, move it forward or backwards in the flow, and view the
changes made in more detail than is available in the History Log page of Static Data Editor.
FINAL
DELETE-
VERIFY
Delete
DELETED
Reject
Accept
Reject
Accept

3 Managing static data
3.4 Managing SDM-enabled static data
Transaction & Risk Management Module (TRM) User Guide 55
3.4.2.1 Static Data Manager menus
The following tables describe the menu items which are specific to Static Data Manager.
Other menu items which are common to all applications are described in 2.2.6 Using application
menus on page 34.
3.4.2.1.1 View
3.4.2.2 Start-up parameters
Static Data Manager is a special Transaction Manager mode, designed specifically for processing
SDM-enabled entities through the static data flow.
The start-up parameter used to open Transaction Manager’s Static Data Manager mode is:
FKTransactionManager.exe -m [ --mode ] arg -c SDM.xml
See C.11 Transaction Manager on page 685 for information about the options available.
3.4.2.3 Static data modes
Different modes of Static Data Manager can be configured to be used for a particular purpose or to
display static data in a particular state in the workflow. Permissions are set up and applied to users
to limit their access to the different modes according to their responsibilities in the organization.
When a static data entity is created or modified, it can be retrieved in Static Data Manager for
verification. The changes made to the entities’ attributes can be viewed and verified by a user with
the necessary permissions.
For example, the Open mode of Static Data Manager could be used to view entities that have been
modified or created, whereas the Verify mode could be used to verify the data before the changes
are accepted.
After verification, the entity can be processed using the accept or reject commands in either Static
Data Manager, or in the corresponding SDM-enabled editor layout, see 3.4.1.2 Accepting and
rejecting static data entities in SDM-enabled editors on page 52.
3.4.2.4 Static Data Manager views
In Static Data Manager, the following views are available: Query, Entity, Entity Log, and Entity State Log.
Each view has its own list of columns in which the static data information for the view is displayed.
You can select the information you want to display in each view using View - Select Columns.
Menu item Description
Query Displays the Query view.
This view is used to retrieve static data already in the system for monitoring or further
processing: see 3.4.2.4.1 Query on page 56.
Entity Displays the Entity view. This is the main view, which is always visible.
The results of the query are displayed in this view: see 3.4.2.4.2 Entity on page 56.
Entity Log Displays the Entity Log view.
In this view, you can view information about the modifications made to the static
data: see 3.4.2.4.3 Entity Log on page 56.
Entity State Log Displays the Entity State Log view.
This view displays auditing information on the flow history of the selected entity: see
3.4.2.4.4 Entity State Log on page 57.
3 Managing static data
3.4 Managing SDM-enabled static data
56 © Wall Street Systems IPH AB - Confidential
3.4.2.4.1 Query
In the Query view, you provide parameters to retrieve the static data entities you want to view. In
this view, the following columns are available for querying:
3.4.2.4.2 Entity
In the Entity view (the main view), the results of the query are displayed. The following columns are
available:
3.4.2.4.3 Entity Log
In the Entity Log view, you can view information about the modifications made to the entity.
This view is similar to the History Log page in Static Data Editor but contains more information for the
selected entity. It shows which field has been modified in an entity, and also shows the addition and
removal of sub-entities (for example, Bank Accounts for clients).
The Entity Log view is particularly useful to users who have to verify changes made by other users: it
gives them an effective picture of the changes from the currently active version.
The following columns are available in the Entity Log view:
Column Description
Entered By ID of the user who created the entity.
Entity Key
Entity Type
Type of entity (for example, Client, Country, Currency, and so on) or key.
Initiated By ID of the user who started a create, update, or delete sequence of events.
State State of the entity (to retrieve entities in a specific state).
Updated By ID of the user who made the last change.
Column Description
Entity Key
Entity Type
Type of static data entity (for example, Client, Country, Currency, and so on) or key.
Initiated By ID of the user who started a create, update, or delete sequence of events on the
entity.
State Current state of the entity.
Status An optional status about the last accept/reject operation performed on the entity.
(This information is particularly useful in environments where CMM is integrated and
provides more precise information as to why an entity may have failed to synchronize
with CMM: see 3.4.4.1 Sharing SDM-enabled data with CMM on page 58.)
Updated By ID of the user who made the last change to the entity.
Entered By ID of the user who created the entity.
Column Description
Field Name Name of the modified field.
Modify Type Type of change (New, Updated, Deleted).
New Value New value of the field (when Modify Type = Updated).
Old Value Previous value of the field (when Modify Type = Updated).
Entity Key
Entity Type
Type of entity or key of the entity that is affected.
3 Managing static data
3.4 Managing SDM-enabled static data
Transaction & Risk Management Module (TRM) User Guide 57
3.4.2.4.4 Entity State Log
The Entity State Log view provides auditing information on the flow history of the selected entity. The
following columns are available in this view:
3.4.3 Processing static data entities
The following sections describe how to process static data entities in Static Data Manager. In the
default process flow, certain actions carried out in SDM-enabled editors need to be completed in the
appropriate mode of the Static Data Manager.
3.4.3.1 Accepting, rejecting, and editing SDM-enabled entities
In Static Data Manager’s Command menu, you can select from the following commands: Accept,
Reject, or Edit. You use these actions to verify and/or complete actions that were started in an
SDM-enabled Editor according to the static data flow, for example, entities that are in Verify or
Delete-Verify states.
•The Accept command allows you to move the current entity to the next state in the flow,
provided:
–You are in the correct mode.
–There is a next state defined in the process flow.
–All other entities that are necessary to process this entity have been created and are
considered active in TRM.
–You are authorized to perform this operation.
•The Reject command allows you to move the current entity backwards in the flow, provided:
–You are in the correct mode.
–There is a reject state defined in the flow.
–You are authorized to perform this operation.
•The Edit command opens the corresponding Static Data Editor layout with the current entity
selected by default.
3.4.3.2 Retrieving SDM-enabled entities
To allow you to process entities, you need to retrieve them into Static Data Manager.
Retrieving entities is done in the Query view of Static Data Manager: see 3.4.2.4.1 Query on page 56
for the list of available parameters. For more information about querying in general, see 2.2.10.5
Retrieving entities on page 38.
3.4.3.3 Verifying SDM-enabled entities
Once an SDM-enabled entity has been modified, the entity’s state changes according to the flow
configuration (for example, from Open to Verify).
In a typical TRM implementation, the Verify mode of Static Data Manager is used to check these
entities.
Column Description
Entity Type Type of the entity.
New State State of the entity after the action.
Old State State of the entity before the action.
Update Time Time at which the action was performed.
Updated By ID of the user who performed the action.
3 Managing static data
3.4 Managing SDM-enabled static data
58 © Wall Street Systems IPH AB - Confidential
To verify an SDM-enabled entity:
1. Retrieve the entities in Static Data Manager’s Verify mode.
2. Check the details.
3. Move the entity forward or backward to the appropriate state in the static data flow, as follows:
–If the details are correct, accept the entity and move it forward in the flow.
–If the details are not correct, reject the entity and send it back to the previous state to be
modified or canceled.
3.4.3.4 Validating deleted SDM-enabled entities
When you delete an entity in an SDM-enabled editor, the entity remains visible in the editor, but
only in the read-only mode, and is still available in TRM until it is moved forward to the Deleted state.
The delete process needs to be validated in Static Data Manager in order for the entity to be
removed from the editor and to no longer be available in TRM. Such deleted entities are flagged with
the Deleted state.
For information about deleting entities in SDM-enabled editors, see 3.4.1.5 Deleting static data
entities in SDM-enabled editors on page 54.
To validate the delete process:
1. In the relevant Static Data Manager mode, fetch the deleted entity, see 3.4.3.2 Retrieving
SDM-enabled entities on page 57.
2. When you have fetched the entity, do one of the following actions:
a. Click Accept to validate the delete process and move the entity to the Deleted state.
b. Click Reject to cancel the delete process. The entity is moved backward to its previous state
before the deletion, i.e. Final.
3.4.4 Sharing SDM-enabled data across Wallstreet Suite modules
SDM-enabled entities can be shared across Wallstreet Suite modules. This means that any
modifications you need to make to an entity only need to be made once, thereby avoiding the
duplication of work in each module.
Static Data Editor layouts may change slightly depending on whether TRM is used alone, or as part
of Wallstreet Suite (for example, with CMM, the Cash Management Module).
3.4.4.1 Sharing SDM-enabled data with CMM
If SDM is used with CMM, there are additional editors which are necessary to set up CMM static data
entities in TRM. The parameters required to create these entities are explained in the CMM User
Guide.
In addition to the previously mentioned State field (see 3.4.1 SDM-enabled Static Data Editors on
page 51), some editor layouts may contain extra pages or fields that are used for data entry specific
to CMM use.
Furthermore, in an SDM-enabled system, some field values do not map directly to the equivalent
values in CMM.
Information about these additional fields or differences in field values when SDM is used with CMM
can be found in Appendix D SDM - CMM mapping on page 689.
3 Managing static data
3.5 Countries
Transaction & Risk Management Module (TRM) User Guide 59
3.5 Countries
Country entities are defined in Country Editor.
Location entities (which are specifically used in facility management in commercial loans) are set up
in the same way as countries, but with an additional attribute that defines the entity as a location.
To create a country:
1. Enter the main attributes for the country (or location) in the upper part of Country Editor, using
the information in the following table:
2. Modify the switches using the information in the following table:
3. Assign the country to a country group (optional) in the Country Group Map page.
(See 3.30 Country groups (optional) on page 142.)
4. Save the country definition using File - Save As New.
3.6 Calendars
In TRM, calendars are entities that specify sets of weekends and public holidays.
It is important to be able to determine non-business days in the system, in particular, for currencies
(because of FX deals) and IR instruments (because of the effect of weekends and public holidays on
settlement dates).
Calendars are used, for example, to reflect the way in which FX rates are quoted and to enable
payment due dates to be adjusted to take non-business days into account.
Calendars are subsequently assigned to currencies and instruments. By default, instruments take
the calendar of the currency assigned to them, and in the case of FX instruments, the calendars of
both currencies are used in the instrument definition. However, it is also possible to override the
calendar of the currency, by assigning another calendar (or calendar group) to the instrument (see
3.25 Calendar groups (optional) on page 134).
Calendars also must be assigned to any other entities (for example, yield curves, gap sets, and so
on) for which dates need to be computed. Calendars are defined in Calendar Editor.
Information Description
ID
Long ID
Name
Unique ID, long ID and name of the country or location.
Code Numerical code for the country. This is often the ISO 3166 code for the country.
This code is not used anywhere in TRM, but can be used in some client-specific
interfaces.
Information Description
Is Country Switch on to identify the entity as a country.
If this switch is on, the entity is included in any Country selection lists.
Is Location (Commercial loans use only)
Switch on to identify the entity as a location.
If this switch is on, the entity is included in any Location selection lists. More
specifically, it is available for selection in Facility Editor’s Location page. This switch is
normally used to configure project locations for commercial loans.
3 Managing static data
3.6 Calendars
60 © Wall Street Systems IPH AB - Confidential
A Holiday Calendar can be defined in addition to a normal calendar. The Holiday Calendar has an
effect only if a holiday on it coincides with the normal end date: the following date then becomes the
effective end date as in this example:
For instruments such as swaps, the calendar of a leg or schedule overrides other calendars such as
instrument or currency calendars.
3.6.1 Creating calendars
To create a calendar:
1. Enter a unique ID and name for the calendar in the upper part of Calendar Editor. Note that a
calendar cannot be created with the same ID as a calendar group (see 3.25 Calendar groups
(optional) on page 134).
To make the calendar easy to recognize, use the ID and name of the currency that the calendar
applies to: for example, "GBP" applies to the currency GBP.
2. In the Default Holidays field, select the calendar’s weekly non-business days, that is, any days of
the week which are always non-working (such as weekends).
In the Holidays page in the lower part of the editor, the days you select are displayed in bold on
the calendar.
3. Save the calendar using File - Save As New.
4. Complete the calendar definition using the information in the following sections.
3.6.1.1 Generating recurring public holidays
For each calendar, you need to define and generate any recurring public holidays (such as New
Year’s Day) in the calendar.
To generate recurring public holidays:
1. In Calendar Editor’s Calendar Rules page, enter a name or description of the public holiday (for
example, New Year’s Day) in the Reason field.
2. Complete the formula for the public holiday: reading from top to bottom, the values you select
describe how the public holiday is calculated.
For example, for New Year’s Day, the values you enter correspond to “1 Day Of Month
January”; and for Easter Monday, “1 Day After Easter Sunday”, or “1 Monday After
Easter Sunday”
Start Date Specified
Duration
Normal
End Date
Holiday on
Normal
Calendar
Holiday on
Holiday
Calendar
Effective
End Date
3 May 2 days 5 May None None 5 May
4 May None 6 May
None 4 May 5 May
None 5 May 6 May
4 May 5 May 7 May
Information Description
Count The number to use in the formula. For example, for New Year’s Day, enter "1".
Day of week The day to use in the formula if the holiday falls on a specific day, otherwise select
Day. For example, for New Year’s Day, select "Day".
3 Managing static data
3.6 Calendars
Transaction & Risk Management Module (TRM) User Guide 61
3. Click Add to add the rule to the calendar.
4. Return to the Holidays page and click Generate.
5. In the resulting dialog, enter the years in which the public holiday applies in the From Year and To
Year fields.
If the value you selected for the public holiday applies only to a specific year, specify the year in
which it applies.
6. Repeat the above procedure for any further public holidays you want to generate.
All the generated public holidays are listed in the left side of the Holidays page.
7. Save the calendar using File - Save.
3.6.1.2 Editing a holiday in the calendar
You can edit a generated public holiday in Calendar Editor or add a new one to the calendar using
the command buttons in the Holidays page. However, if you need to add, update, or remove a
recurring holiday, you must do so in the Calendar Rules page: see 3.6.1.1 Generating recurring public
holidays on page 60.
1. To add a new holiday to a calendar:
–Click the date for the new holiday in the calendar
–Enter a description for the holiday in the Reason field
–Click Add.
2. To modify an existing holiday in the calendar:
–Select the holiday that needs to be modified from the Holidays list
–Click the date for that holiday in the calendar if it needs to be changed
–Modify the description of the holiday in the Reason field if necessary
–Click Update to confirm your choice.
3. To remove a holiday from the calendar:
–Click on the holiday that you want to remove in the Holidays list
–Click Remove.
4. Save the calendar using File - Save.
3.6.1.3 Checking and updating instruments and transactions
If you have modified a calendar, (for example, a public holiday has been added or removed) you can
run the Checking Instruments and Transactions Holidays activity to automatically update the dates
Direction The direction to define how the defined values are interpreted in the formula: Before,
Of, or After. For example, for New Year’s Day, select "Of".
Reference The reference to which the formula refers: Easter Sunday, Month, Month/Day, or
Month/Year. For example, for New Year’s Day, select "Month".
The following fields change or become unavailable according to the values selected in
this and the previous fields.
Month The month of the year to use in the formula. For example, for New Year’s Day, select
"January".
Day/Year Enter any additional values to use in the formula.
Condition Enter an additional condition for the formula, for example, If Saturday or If Not
Monday. For example, for New Year’s Day, select "Every Year".
Information Description
3 Managing static data
3.7 Gaps (time intervals)
62 © Wall Street Systems IPH AB - Confidential
and regenerate the cashflows for any instruments and related transactions which refer to this
calendar. This is especially useful for bonds, when the dates of future cashflows are known in
advance and have already been generated in TRM.
See A.11 Checking Instruments and Transactions Holidays on page 630 for details of the activity’s
parameters.
Note: Activities are set up and managed in Activity Manager: see Chapter 6 Managing activities
on page 227 for more information.
3.7 Gaps (time intervals)
Gaps are time intervals (either actual dates or fixed periods such as a set number of months or
weeks). These gaps are used to calculate dates, to group cashflows in Treasury Monitor, and for
limit monitoring purposes.
Absolute gaps start and end on specific dates, for example, a calendar year or a financial year.
Absolute gaps are often used by investment managers.
Relative gaps are relative to a specific date, such as the spot date or another type of date on which
they are used.
Relative gaps are generally used for both risk and liquidity analysis, whereas absolute gaps are
usually used only for liquidity purposes. You can create different sets of gaps for different needs: for
example, for FX transactions, for IR transactions, for limits, and for analyzing liquidity.
Gaps are contained within a gap set. When you later assign a gap set (for example, to an
instrument), your choice of gaps is restricted to gaps that have been defined within that set.
To create a gap set:
1. In the upper part of Gap Editor, define the main attributes for the gap set using the information
in the following table:
2. In the Gaps page in the lower part of the editor, define the first gap in the gap set using the
information in the following table:
3. Define the dates (absolute gap) or period duration (relative gap) as follows:
Information Description
ID & Name Unique ID and name for the gap set.
Calendar Calendar or calendar group used when creating exact dates for a gap.
Note that the calendar of the Figure Currency is also taken into account in the
calculation of a gap period. If the calendar of the Figure Currency differs from the
calendar specified in this field, then a combination of the two calendars is used.
If you leave this field blank, by default, the calendar of the Figure Currency is used for
the gap period.
Information Description
ID & Name &
Short Name
Unique ID and name for the gap set. Optionally, you can also give a short name.
The ID must be unique to this gap within this gap set, although gaps can have the
same ID if they are in different gap sets.
No Ultimo When set, the Ultimo convention is not applied to the end date of the period. The
Ultimo convention means the month right before the current one.
Following When set, the Following convention is applied to the end period of the gap instead of
the Modified Following convention.

3 Managing static data
3.7 Gaps (time intervals)
Transaction & Risk Management Module (TRM) User Guide 63
–If the gap is an absolute (fixed dates) gap, enter the start and end dates in the Start Date and
End Date fields. If you want to restrict when this gap is available, enter a date in the Active
From and/or Active To fields.
–If the gap is a relative (periodic) gap, define when the gap starts using Start Period and Start
Unit, and how long the period lasts using Period Length and Period Length Unit. Relative gaps are
relative to the date from which they are used: so if someone analyzes their position in
Treasury Monitor on 30 July, “6 months” means “6 months from 30 July”, and so on.
4. Turn on the relevant switches (all switches apply to both absolute and relative gaps):
5. Click Add to add the gap period to the gap.
6. Repeat the procedure to add the rest of the gaps for this gap set.
7. Save the whole gap set definition using File - Save As New.
3.7.1 Order of cashflow sorting to gaps
The order in which cashflows are sorted into gaps is decided as follows. Consider a deposit of 18
months to maturity. A gap set is defined with two gaps: 0-12M and 12M+. The gaps do not have the
'Not Valid after end' switch set. Which gap is tried first to match the deposit?
For each gap we first calculate start and end dates based on the date and gap setting (often the
setup is with the same start and end date.)
For matching, we first find two gaps:
•The near gap is the gap with the latest start date, where the start date is before or on the
matching date (in this example, the 0-12M gap is the near gap)
•The far gap is the next gap by start date (in this example, the 12M+ gap is the far gap)
–If only one gap is found, pick that one. No match is returned if the only gap is disqualified by
the Not Valid Before/After setting.
–If the matching date is between the near gap's start and end periods, pick the near gap
(0-12M gap).
Switch Description
Exclude First Day
of Period
Exclude Last Day
of Period
Exclude the first day, or exclude the last day, in the period. You can use either or both
of these switches if the periods you define overlap.
Not Valid Before
Start
Not Valid After
End
Exclude cashflows from this gap if they fall outside this date range.
Spot Relative For relative gaps only.
If this switch is on, the gaps are relative to the spot date of the date used in Treasury
Monitor.
For example, if someone analyzes their position in Treasury Monitor on 25 August
with a gap of one week and the number of spot days is 2, the gap will be one week
starting from 27 August.
Use Absolute
Dates
Define the gap as absolute rather than relative.
Use Business Days
for Start Period
Use Business Days
for End Period
Make the gap period start and/or end on a business day. TRM uses the simple Next
Business Day convention for gap sets.
3 Managing static data
3.8 IR quotes and yield curves
64 © Wall Street Systems IPH AB - Confidential
–If one of the gaps is disqualified by Not Valid Before/After setting, pick the other one. If both
would be disqualified, ignore the setting.
–If the day count from the matching date to far gap's start date is less that day count to near
gap's end date, pick the far gap (12M+ gap)
–Otherwise pick the near gap (0-12M gap).
3.8 IR quotes and yield curves
IR quotes and yield curves are defined in the IR Quote and Yield Curve Editor. This editor is used to
define direct market quotes (e.g. deposit, FRA, swap, basis swap, credit default swap quotes);
derive new quotes for these market quotes, and define bootstrap zero-coupon yield curves.
In TRM, IR quotes and yields curves are defined as follows:
•IR Quotes are sets of discrete market or derived quotes and cannot as such be used directly in
valuation.
•Yield Curves are defined to bootstrap zero-coupon yield curves, which provide discount factors
as a function of time, and can thus be used to value any set of cashflows.
This section describes how to use the date conventions with IR quotes and yield curves, and how to
create IR quotes and yield curves.
See 3.8.1 Date Conventions on page 64 and 3.8.2 Creating IR Quote and Yield Curves on page 65.
3.8.1 Date Conventions
In TRM it is often necessary to refer to time periods, i.e. periods with specific start and end dates.
When defining IR quotes, such periods are described using Tenors.
In general terms, tenors are combinations of time units ('D' for business day, 'W' for week, 'M' for
month, and 'Y' for year) and the number of these time units (any integer). For example, '1Y' refers
to a one year period from spot, '2M' refers to a two month period from spot, and so on.
In the system, these tenors need to be attached to a date convention, which effectively interprets
the user entered tenors in order to establish the exact start and end dates for the tenor. Currently,
the following date conventions exist:
•Generic IR Tenor
•Generic IR Tenor (No Ultimo)
•FRA Tenor
•ISDA CDS Tenor
Both Generic IR Tenor date conventions understand the same tenors and interpret the tenors in the
same way, i.e. calculate the dates as of spot (except some special tenors), using the Modified
Following convention for monthly and yearly tenors, with the exception that Generic IR Tenor (No
Ultimo) does not apply the 'Ultimo Rule'. When the Ultimo Rule applies, then if the spot date falls on
the last business day of the month, then the end date of the tenor (when defined in months or
years) also falls on the last business day of the (end) month.
3 Managing static data
3.8 IR quotes and yield curves
Transaction & Risk Management Module (TRM) User Guide 65
The following tenor syntaxes are used in TRM:
Note: For composite tenors it is possible to leave out the time unit, in which case the 'time unit'
is interpreted as 'M'. In other words, '3X6' is the same as '3MX6M'.
3.8.2 Creating IR Quote and Yield Curves
IR Quote and Yield Curve Editor is used to define different types of interest rate related quotations
(usually associated with some term/tenor structure, e.g. deposit and swap quotes, tenor and cross
currency basis swap quotes, and even credit default swap quotes) as well as defining the zero-
coupon yield curves (later just 'yield curves') which are used in most valuation and risk calculations.
It should be understood that IR quotes are sets of discrete quotes usually from the market (such as
'USD 2Y Swap Rate') or quotes derived from other quotes (such as 'USD 2Y Swap Rate' + 20 basis
points). These sets of discrete quotes cannot be used directly in valuation. Instead, yield curves
need to be defined in order bootstrap a zero coupon yield curve, which effectively provides discount
factors as a function of time, and can thus be used to value any set of cashflows. The yield curves
can use e.g. deposit and swap quotes, MM futures and bonds as input for the bootstrapping.
Table 3-1 on page 66 shows the list of IR quotes and yield curves that can be defined using IR
Quote and Yield Curve Editor. These are grouped into different types and kinds, which are also used
to control which tabs and fields being exposed to the user in the editor.
Hint:
Direct Quotes and Spread Quotes can be captured and stored e.g. via Rate Monitor, while
all derived quotes and bootstrapped zero coupon quoted are calculated on-the-fly when
Tenors Description Example
Special Tenors 'O/N', 'T/N', 'S/N' define overnight, tomorrow
next and spot next periods.
Basic Tenors xD, xW, xM, xY where x is the number of
business days, weeks, months and years.
'1D', '6W', '18M', '10Y'
Composite Tenors Composed of two basic tenors, separated by
'X’, indicate that the second tenor is also
calculated as of spot.
'3MX1Y' is a period starting in
three months from spot and
ending in one year from spot.
Composite Tenors Composed of two basic tenors, separated by
'/', indicate that the second tenor is calculated
as of the start of the period.
'3M/1Y' is a period starting in
three months from spot and
ending one year after the start of
the period.
Date Tenors Where the period end date is defined directly
using syntax YYYY-MM-DD
'2010-09-25' is a period from spot
to September 25th, 2010
FRA Tenor xXyU, where x is the start of the FRA (value
date) from spot date and y the end of the FRA
(maturity date) from spot date. U represents
the unit, for example, 'M' for month, 'Y' for
year. 'M' is the default when no units are
defined.
ISDA CDS Tenor Same as Basic Tenors except that only 20th of
March, June, September, or December are
valid end dates (i.e. maturity dates).
Annual tenors or 3M, 6M or 9M
3 Managing static data
3.8 IR quotes and yield curves
66 © Wall Street Systems IPH AB - Confidential
required. Thus, derived and bootstrapped quotes can e.g. be viewed in Rate Monitor, but
not modified.
Table 3-1 List of types and kinds of IR quotes and yield curves
Type Kind Description
Direct Quotes
See 3.8.2.1 Direct
Quotes on page 69
Generic
See
Generic (usually) market quotes, e.g. deposit, swap,
FRA, LIBOR quotes.
Cross Currency Basis Swap Cross currency basis swap spread quotes.
Tenor Basis Swap Tenor basis swap spread quotes.
Credit Default Swap Credit default swap quotes.
Spread Quotes
See 3.8.2.2 Spread
Quotes on page 71
Single Spread A single spread quote. It is a simple number without
any characteristics (i.e. no date basis or interest type),
mainly used for creating Derived Quotes (see below).
Tenor Spreads Similar to a Single Spread, except that spreads can be
captured per tenor.
Derived Quotes
See 3.8.2.3 Derived
Quotes on page 72
Composite A simple combination of two sets of quotes, e.g. swap
and spread.
Derived Quotes derived from other IR quotes using
expressions.
Expression-Based Quotes defined from scratch using expressions.
Derived Virtual The method for deriving 'virtual' quotes for each
interest tenor of the underlying quote.
For example, if semi-annual swaps are quoted for
annual tenors only, the system will interpolate 'virtual'
swap quotes for each interest tenor, resulting in
semi-annual quotes. Such 'virtual' swap quotes can
then be used e.g. as input for bootstrapping zero
coupon curves.
Yield Curve
See 3.8.2.4 Yield
Curve on page 74
Constructed Yield Curve A bootstrapped zero-coupon yield curve calculated
from IR quotes, bonds, and/or MM futures. Using the
inputs specified, this yield curve provides discount
factors directly for any requested dates without any
intermediary calculation/rounding.
Tenor Basis Swap Curve
(Spread Leg)
Tenor Basis Swap Curve (Flat
Leg)
A bootstrapped zero-coupon (estimation) curve
calculated from the tenor basis swap spread quotes
and an underlying yield curve using the estimation
curve bootstrapping.
The Spread Leg kind bootstraps an estimation curve
for the spread leg (i.e. the leg on which the quoted
spread is added), while the Flat Leg kind bootstraps an
estimation curve for the flat leg (i.e. the leg with no
spread).
Cross Currency Basis Swap
Curve (Spread Leg)
Cross Currency Basis Swap
Curve (Flat Leg)
A bootstrapped zero-coupon (discount) curve
calculated from the cross-currency basis swap spread
quotes and underlying yield curves using the discount
curve bootstrapping.
The Spread Leg kind bootstraps a discount curve for
the spread leg (i.e. the leg on which the quoted spread
is added), while the Flat Leg kind bootstraps a
discount curve for the flat leg (i.e. the leg with no
spread).
3 Managing static data
3.8 IR quotes and yield curves
Transaction & Risk Management Module (TRM) User Guide 67
To define the main characteristics of IR quotes and yield curves:
1. Enter the main attributes in the upper part of the editor, using the information in the following
table:
Derived Quotes from
Yield Curve
See 3.8.2.5 Derived
Quotes from Yield
Curve on page 77
Zero Coupon Quotes from
Yield Curve
A special-purpose derivation method for deriving zero
coupon quotes for user-specified tenors from a
bootstrapped zero-coupon yield curve. These quotes
can then be used further for example when deriving
other IR quotes.
Quotes from Yield Curve Same as above, but the quotes to be derived can be
configured as something else than zero coupon (e.g.
semi-annual, annual).
Information Description
ID & Name Unique ID and name for the IR quote or yield curve.
Currency The currency of the IR quote or yield curve.
Note: For cross-currency basis swaps, this is the currency of the leg on which
the spread is quoted (and added).
Quotes • If you want one quote, select Single Quote.
• If you want both bid and ask quotes, select Bid/Ask.
Type & Kind Type and kind of the IR quote or yield curve, see Table 3-1 List of types and
kinds of IR quotes and yield curves on page 66.
Display Precision Number of decimals used to display the quotes in Rate Monitor.
Usage Usages are used as filtering criteria for the selection lists in TRM applications.
The usages are sensitive to the type/kind of the curve. The possible values
are:
•Discount - makes the yield curve available as a discounting curve
•Estimation - makes the yield curve available as an estimation curve
•Fixing - defines the IR quote as a fixing reference
•Interest Calculation - makes the IR quote available for interest calculation on
bank account balances and cost-of-carry
•Valuation - makes the yield curve available as a valuation curve.
•Valuation Spread - makes the yield curve available as a spread curve in
valuation
Domain Domain to which the entity belongs.
Type Kind Description

3 Managing static data
3.8 IR quotes and yield curves
68 © Wall Street Systems IPH AB - Confidential
2. Complete the IR quote or yield curve definition according to the type and kind using the
information in the following sections:
–Direct Quotes: 3.8.2.1 Direct Quotes on page 69
–Spread Quotes: 3.8.2.2 Spread Quotes on page 71
–Derived Quotes: 3.8.2.3 Derived Quotes on page 72
–Yield Curve: 3.8.2.4 Yield Curve on page 74
–Derived Quotes from Yield Curve: 3.8.2.5 Derived Quotes from Yield Curve on page 77.
The following section describes the pages and fields specific to each type/kind, while the
pages/fields related to the more common optional features are described in 3.8.3 Optional
features on page 78.
Optional Features Optional features can be added to the IR quote or yield curve if needed. The
features are available depending on the type/kind. The optional features are:
•Date Setup: Allows the definition of calendars and spot days attached to this
IR quote or yield curve.
•Estimation Curve Setup: If the IR quote is used for fixing, this allows you to
specify a default estimation curve to be used in valuation when estimating
the unfixed interest cashflows that will eventually be fixed to this IR quote.
It is possible to specify a yield curve for each fixing quote tenor (defined in
the Tenor tab). This allows you to have a different (default) estimation
curve for transactions which are fixed to 3M quotes compared to those
fixed to 6M quotes. It is possible to leave the Tenor field blank, in which
case the yield curve applies to all fixing tenors.
•Bootstrap Yield Curve: Allows direct quotes (e.g. an IR quote consisting of
deposit and swap quotes) and some derived quotes to be directly
bootstrapped into a yield curve (and thus be available for valuation).
•Properties: Allows the capturing of system or user-defined properties.
•Yield Curve Interpolation Setup: Allows specific interpolation definition for yield
curves to deviate from the default logic.
•Quote Interpolation Setup: Allows specific definition for interpolation IR
quotes to deviate from the default logic. This is currently available for
Derived Virtual Quotes.
•Input Instruments: For constructed yield curves, allows the capturing of
bonds and MM future chains as inputs into bootstrapping (instead of or in
addition to IR quotes).
•Other Leg Yield Curves: For cross-currency basis swap curves, allows the
definition of the estimation and discount curves for the leg not being
bootstrapped.
See 3.8.3 Optional features on page 78 for more information about these
features. This section also describes the default logic when optional features
are not added to the IR quote or yield curve.
Export this curve to CMM (For CMM integrated environment only)
Enables you to export Direct Quotes or Derived Quotes to be used in CMM.
Information Description
3 Managing static data
3.8 IR quotes and yield curves
Transaction & Risk Management Module (TRM) User Guide 69
3.8.2.1 Direct Quotes
3.8.2.1.1 Generic
To define generic quotes (e.g. deposit, FRA, swap, market quoted zero/coupon quotes):
1. In the Tenor page, define each tenor using the information in the following table:
2. If the defined quotes should be directly bootstrapped into a yield curve (without filtering out any
tenors or adding other inputs), select the optional feature Bootstrap Yield Curve. See 3.8.3
Optional features on page 78.
3.8.2.1.2 Tenor Basis Swap
To define tenor basis swap spread quotes:
1. In the Tenor page, define each tenor using the information in the following table:
2. In the Estimation Method page, define the method used to estimate the floating interests of the
quoted leg:
Information Description
Tenor The tenor for which quotes will be input/imported; interpreted by the selected
date convention, e.g. 'O/N', '1W', '1M' or '1Y'.
Date Convention The date convention that interprets the tenor to deduce exact start and end
dates for the tenor, select one of the following Generic IR Tenor or Generic IR
Tenor (No Ultimo) or FRA Tenor.
Interest Type The interest type of the quotation, usually Periodic Rate.
Date Basis The date basis of the quote.
Interest Structure The interest structure of the quote, i.e. in general the frequency of the interest
payments being quoted, e.g. 'Semi-Annual' for USD swaps or 'At Maturity' for
deposit and zero-coupon quotes.
Information Description
Tenor The tenor for which quotes will be input/imported; interpreted by the selected
date convention, e.g. '1Y', '2Y' or '5Y'.
Date Convention The date convention that interprets the tenor to deduce exact start and end
dates for the tenor, select one of the following Generic IR Tenor or Generic IR
Tenor (No Ultimo) or FRA Tenor.
Date Basis The date basis of the interests for the leg for which the spread is quoted.
Interest Structure The interest structure of the leg for which the spread is quoted, for example,
Monthly when quoting a swap of 1M vs 3M USD Libor flat.
Date Basis (Flat Leg) The date basis of the interests on the other (flat) leg of the swap.
Interest Structure (Flat
Leg)
The interest structure of the other (flat) leg of the swap, for example,
Quarterly when quoting a swap of 1M vs 3M USD Libor flat.
Information Description
Method The estimation method used to estimate the floating interest payments of the
leg on which the spread is quoted. This estimation is reflected in the
bootstrapped tenor basis swap curve.
Select Overnight Average for floating legs based on overnight average fixings
(e.g. 'Fed Fund') and Plain Vanilla for the others.
3 Managing static data
3.8 IR quotes and yield curves
70 © Wall Street Systems IPH AB - Confidential
3.8.2.1.3 Cross Currency Basis Swap
To define cross currency basis swap spread quotes:
1. In the Tenor page, define each tenor using the information in the following table:
2. In the Quote Currency page, define the currency against which the spreads are quoted:
3.8.2.1.4 Credit Default Swap
Credit default swap quotes, together with the captured recovery rate, will be automatically
bootstrapped into a default probability curve, which can then be used in valuation. Rate Monitor has
a separate page displaying the credit default swap quotes and the recovery rate, as well as the
calculated default probabilities and hazard rates.
To define credit default swap quotes:
1. In the Tenor page, define each tenor using the information in the following table:
2. In the Risk-Free Curve page, define the risk-free yield curve:
Information Description
Tenor The tenor for which quotes will be input/imported; interpreted by the selected
date convention, e.g. '1Y', '2Y' or '5Y'.
Date Convention The date convention that interprets the tenor to deduce exact start and end
dates for the tenor, select one of the following Generic IR Tenor or Generic IR
Tenor (No Ultimo) or FRA Tenor.
Date Basis The date basis of the interests on which the spread is quoted.
Interest Structure The interest structure of the leg on which the spread is quoted (i.e. often the
non-USD leg as spread quotes are mostly against USD flat).
Date Basis (Flat Leg) The date basis of the interests on the other (flat) leg of the swap.
Interest Structure (Flat
Leg)
The interest structure of the other (flat) leg of the swap, for example,
Quarterly when quoting a swap of 1M vs 3M USD Libor flat.
Information Description
Quote Currency The currency against which the spreads are quoted (most commonly USD),
i.e. the currency of the leg which is not the leg of the quoted spread. This
information is informative only.
Information Description
Tenor The tenor for which quotes will be input/imported; interpreted by the selected
date convention, e.g. '1Y', '2Y' or '5Y'.
Date Convention The date convention that interprets the tenor to deduce exact start and end
dates for the tenor, select one of the following Generic IR Tenor or Generic IR
Tenor (No Ultimo) or FRA Tenor or ISDA CDS Tenor.
Date Basis The date basis of the quote.
Interest Structure The frequency of the premium payments, e.g. Quarterly.
Information Description
Yield Curve The risk-free yield curve which together with the credit default swap quotes is
used to (automatically) calculate the default probability curve. This same yield
curve should be used as the valuation curve of the CDS transactions.

3 Managing static data
3.8 IR quotes and yield curves
Transaction & Risk Management Module (TRM) User Guide 71
3. In the Reference Entity page, define the reference entity of the credit default swap quotes:
3.8.2.2 Spread Quotes
3.8.2.2.1 Single Spread
Single spread quote provides a simple way for capturing a simple spread value in Rate Monitor,
which can then be used for deriving new IR quotes by adding this quote as a 'flat' spread on top of
other set of IR quotes (see Derived Quotes below). In Rate Monitor, a single period labeled 'SPREAD'
is exposed for capturing the spread quote.
To define single spread quotes:
1. In the Scaling page, define how the entered spread is scaled:
3.8.2.2.2 Tenor Spreads
Tenor spread quotes are similar to single spread quotes (see above), the only difference being the
possibility to define multiple tenors and to capture a separate spread value for each tenor in Rate
Monitor.
To define tenor spread quotes:
1. In the Tenor page, define each tenor using the information in the following table:
2. In the Scaling page, define how the entered spreads are scaled:
Information Description
Active From The date from which onwards the Client is attached as a reference entity to
these credit default swap quotes.
Active To The date until which the client is attached as a reference entity to these credit
default swap quotes.
Entity The reference entity attached to these credit default swap quotes. By default,
these quotes (and default probabilities) will be used to value all credit default
swaps where this entity is the reference entity. A reference entity of a CDS can
be a single entity or a basket of reference entities each with its own weight in
the basket. These entities are defined in the Client Editor: see 3.13.1 Creating
clients on page 90 or 3.13.1.4 Creating groups of clients on page 94.
It is possible to attach a specific credit default swap quotes at instrument
level, which overwrites this default setting.
Information Description
Scaling The factor by which the entered spread quote should be multiplied, e.g. 0.01 if
the spread is in basis points.
Information Description
Tenor The tenor for which quotes will be input (imported). These tenors are simple
labels, i.e. they are not interpreted by any date convention. The labels are
used when creating derived quotes (see 3.8.2.3 Derived Quotes on page 72).
Date Convention The date convention that interprets the tenor to deduce exact start and end
dates for the tenor, select one of the following Generic IR Tenor or Generic IR
Tenor (No Ultimo) or FRA Tenor.
Information Description
Scaling The factor by which the entered spread quotes should be multiplied, e.g. 0.01
if the spreads are in basis points.
3 Managing static data
3.8 IR quotes and yield curves
72 © Wall Street Systems IPH AB - Confidential
3.8.2.3 Derived Quotes
3.8.2.3.1 Composite
Composite quotes are a simple summation of two IR quotes. One IR quote is defined as base IR
quote and another IR quote is defined as the Spread Quote. All the characteristics for the composite
IR quote (tenors, date basis, interest type, and interest structure) are taken from Base IR Quote.
When calculating the composite quotes, all the quotes of Base IR Quote are taken, and then all the
quotes of Spread Quote are simply added (after possible scaling) to the matching tenors of Base IR
Quote.
To define composite quotes:
1. In the IR Quotes page, define composite IR quote using the information in the following table:
2. If the defined quotes should directly be bootstrapped into a yield curve (without filtering out any
tenors or adding other inputs), select the optional feature Bootstrap Yield Curve. See 3.8.3
Optional features on page 78.
3.8.2.3.2 Derived
Derived quotes are IR quotes based on another existing IR quote (Base IR Quote) and modified
through flexible expressions. All the characteristics for the derived IR quote (tenors, date basis,
interest type, and interest structure) are taken from Base IR Quote.
To define derived quotes:
1. In the IR Quotes page, define base IR quote using the information in the following table:
2. In the Tenor page, define each tenor using the information in the following table:
Interpolation Date
Convention
The date convention that interprets the tenor to deduce exact start and end
dates for the tenor, select one of the following Generic IR Tenor or Generic IR
Tenor (No Ultimo) or FRA Tenor.
Information Description
Information Description
Base IR Quotes The IR quote forming the base of the composite quote.
Spread Quotes The IR quotes that will be added to the base quotes to for the composite
quotes.
Factor The factor by which the spread quotes are multiplied before being added to
the base
Information Description
Base IR Quotes The IR quote forming the base of the derived quote.
Information Description
Tenor The tenor for which quotes will be derived/calculated; the available tenors are
those of the Base IR Quote.
Date Convention The date convention that interprets the tenor to deduce exact start and end
dates for the tenor, select one of the following Generic IR Tenor or Generic IR
Tenor (No Ultimo) or FRA Tenor.
Usually this would be set to be the same as in the Base IR Quote.
Expression The expression defining the quote is calculated, e.g. 'ir + 0.2' to add 20 basis
points to the Base IR Quote.
3 Managing static data
3.8 IR quotes and yield curves
Transaction & Risk Management Module (TRM) User Guide 73
3. If the defined quotes should directly be bootstrapped into a yield curve (without filtering any
tenors or adding other inputs), select the optional feature Bootstrap Yield Curve. See 3.8.3
Optional features on page 78.
3.8.2.3.3 Expression-Based
Expression-based quotes are derived IR quotes defined using expressions. All the characteristics
(tenors, date basis, interest type, and interest structure) are defined independently for the
expression-based quotes.
To define expression-based quotes:
1. In the Tenor page, define each tenor using the information in the following table:
2. If the defined quotes should directly be bootstrapped into a yield curve (without filtering out any
tenors or adding other inputs), select the optional feature Bootstrap Yield Curve. See 3.8.3
Optional features on page 78.
3.8.2.3.4 Derived virtual
Derived virtual quotes refers to quotes derived from other IR quotes in such a way that the derived
quotes are interpolated for each interest tenor of the underlying quote. These interpolated quotes
are referred to as 'virtual quotes'. For example, if an underlying swap has quarterly interests and is
quoted for annual tenors, then for the derived 'virtual swap' the system will interpolate three
quarterly 'virtual quotes' for each year. In Rate Monitor, the 'virtual quotes' are labeled using the
underlying tenors and a running order number. An underlying quarterly swap with tenors '1Y' and
'2Y' would display tenors '1Y' and '2Y' as well as 'virtual tenors' '1Y.1', '1Y.2', '1Y.3', '2Y.1', '2Y.2'
and '2Y.3' in the derived virtual swap.
The main purpose of defining virtual swaps is to use them as input in the zero coupon yield curve
bootstrapping instead of the underlying swap itself. When constructing the bootstrapped zero
coupon yield curve, it is possible to e.g. filter out any of the 'virtual tenors' exactly the same way as
normal tenors are filtered (see 3.8.2.4 Yield Curve on page 74).
To define virtual quotes:
1. In the IR Quotes page, define the base IR quote using the information in the following table:
Hint:
The use of quote interpolation (next step) requires that the optional feature Quote
Interpolation Setup is selected, see 3.8.3 Optional features on page 78.
Information Description
Tenor The tenor for which quotes will be derived/calculated; interpreted by the
selected date convention, e.g. 'O/N', '1W', '1M' or '1Y'.
Date Convention The date convention that interprets the tenor to deduce exact start and end
dates for the tenor, select one of the following Generic IR Tenor or Generic IR
Tenor (No Ultimo) or FRA Tenor.
Expression The expression defining how the quote is calculated, e.g. ir (’EUR SWAP',
'10Y')-ir ('EUR CMS', '2Y') giving a spread between two swap quotes.
Interest Type The interest type of the quotation, usually 'Periodic Rate'.
Date Basis The date basis of the quote.
Interest Structure The interest structure of the quote, i.e. in general the frequency of the interest
payments being quoted, e.g. 'Semi-Annual' for USD swaps or 'At Maturity' for
deposit and zero-coupon quotes.
Information Description
Base IR Quotes The base IR quote (usually IR swap) from which the virtual quotes are
derived.
3 Managing static data
3.8 IR quotes and yield curves
74 © Wall Street Systems IPH AB - Confidential
2. In the Interpolation page , define the method of interpolation using the information in the
following table:
3.8.2.4 Yield Curve
3.8.2.4.1 Constructed Yield Curve
Yield curves are bootstrapped zero-coupon yield curves using IR quotes (direct or derived), bonds,
and/or MM future chains as input. For IR quotes, it is possible to filter out tenors which should not be
included in the bootstrapping. Similarly, it is possible to define which contracts for any particular
future chain are to be included in the bootstrapping.
Using the inputs specified, this yield curve provides discount factors directly for any requested
dates. Rate Monitor by default displays the zero coupon yields and discount factors for the dates
that match the end/maturity dates of the inputs. The corresponding input tenors and
instrument/contracts IDs will be shown as labels on the Periods axis.
To define yield curves:
1. In the IR Quotes page, define the IR quotes used as inputs using the information in the following
table:
Information Description
Method The method used for interpolating the virtual quotes. The available methods
are:
• Linear, Flat Rate Extrapolation, i.e. linear interpolation with flat
extrapolation of rates.
• Linear, Slope Extrapolation, i.e. linear interpolation with flat extrapolation
of slope.
• Cubic Spline, i.e. the second derivative at each point is continuous.
• Hermite Spline (Two Points), i.e. the first derivative at each point in time is
approximated by taking the value at the current and previous points in
time.
• Hermite Spline (Three Points), i.e. the first derivative at each point in time
is approximated by taking the value at the previous, current and next point
in time.
Date Basis The date basis used in interpolation.
Information Description
Active Since The date from when onwards these IR quotes and exclude/include tenor filters
are used in bootstrapping.
Active Until The date until when these IR quotes and exclude/include tenor filters are used
in bootstrapping.
IR Quotes IR quotes included in bootstrapping.
Include Tenors Tenors of the selected IR quote included in bootstrapping. If left blank, all
tenors are included by this filter. The include/exclude tenor filters can be
expressed as:
• A comma separated list, e.g. '1Y, 2Y, 3Y' (exact tenors), or
• Range: '1Y…5Y' (all tenors between 1Y and 5Y inclusive), or
• Open-ended range: '…10Y' (all tenors up to 10Y) or '3Y…' (all tenors from
3Y).
Exclude Tenors Tenors of the selected IR quote excluded from bootstrapping. If left blank, no
tenors are excluded by this filter.
3 Managing static data
3.8 IR quotes and yield curves
Transaction & Risk Management Module (TRM) User Guide 75
Hint:
The use of bonds and MM futures (next two steps) in bootstrapping requires that the
optional feature Input Instruments is selected, see 3.8.3 Optional features on page 78.
2. In the Instruments page, define the instruments to be used as inputs using the information in the
following table:
3. In the Future Chains page, define the MM future chains used as inputs using the information in the
following table:
3.8.2.4.2 Tenor Basis Swap Curve (Spread Leg)
A zero-coupon yield curve for the spread leg is bootstrapped from tenor basis swap spread quotes
and an underlying yield curve using the estimation curve bootstrapping (see TRM Instruments:
Processing and Calculations Guide).
The bootstrapped estimation yield curve with the spread quotes and the underlying curve (used for
discounting) value the spread leg to Par. The flat leg (i.e. the leg with no spread) also values to Par
as the underlying curve is used for both estimation and discounting.
When valuing corresponding tenor basis swaps, this yield curve should be used as the estimation
curve for the spread leg (i.e. the leg on which the quoted spread is added). The underlying curve
should be used as the valuation curve for the spread leg, and as both the valuation and the
estimation curve for the flat leg.
Using the specified inputs, this yield curve provides the discount factors directly for any requested
dates. Rate Monitor (by default) displays the zero-coupon yields and discount factors for the dates
matching the dates of the inputs.
Information Description
Active Since The date from when this instrument is used in bootstrapping.
Active Until The date until when this instrument is used in bootstrapping.
Instruments Instrument included in bootstrapping. Instruments with the Bootstrap
Instrument feature are available for selection.
See TRM Instruments: Processing and Calculations Guide for more
information.
Information Description
Active Since The date from when onwards this MM future chain and the defined
exclude/include contract filters are used in bootstrapping.
Active Until The date until when this MM future chain and the defined exclude/include
contract filters are used in bootstrapping.
Future Chain The future chain instrument included in bootstrapping.
Exclude Contract Count The number of nearest active contracts in the chain that should be excluded
from bootstrapping. If left blank, no contracts are excluded by this filter.
Include Contract Count The number of nearest active contracts (after applying Exclude Contract Count)
in the chain that should be included in bootstrapping. If left blank, all
contracts are included by this filter.
Include Contract Filter List of contract months (separated by commas) to be included in
bootstrapping (according to the default Formatter, i.e. format 'MMM'). If left
blank, all contracts are included by this filter. For example, filter 'MAR, JUN,
SEP, DEC' will include the regular quarterly contracts.
Exclude Contract Filter List of contract months (separated by commas) to be excluded from
bootstrapping (according to the default formatter, i.e. format 'MMM'). If left
blank, no contracts are excluded by this filter.
3 Managing static data
3.8 IR quotes and yield curves
76 © Wall Street Systems IPH AB - Confidential
To define a tenor basis swap curve:
1. In the IR Quotes page, define the tenor basis swap quotes used as inputs using the information in
the following table:
2. In the Base Yield Curve page, define the underlying yield curve in the following table:
3.8.2.4.3 Tenor Basis Swap Curve (Flat Leg)
This is similar to Tenor Basis Swap Curve (Spread Leg) described in the previous section 3.8.2.4.2
Tenor Basis Swap Curve (Spread Leg) on page 75. However, here an estimation curve is
bootstrapped for the flat leg, in a way that with the underlying curve (used for discounting) the
curves value the flat leg, so that it matches the value of the spread leg. The spread leg is valued
using the spread quotes and the underlying curve, which is used for both estimation and
discounting.
When valuing corresponding tenor basis swaps, this yield curve should be used as the estimation
curve for the flat leg. The underlying curve should be used as the valuation curve for the flat leg,
and as both the estimation and the valuation curve for the spread leg.
3.8.2.4.4 Cross Currency Basis Swap Curve (Spread Leg)
A zero-coupon yield curve for the spread leg is bootstrapped from cross currency basis swap spread
quotes and underlying yield curves using discount curve bootstrapping (see TRM Instruments:
Processing and Calculations Guide). The bootstrapped discount yield curve together with the spread
quotes and the underlying curve (used for the estimation) value the spread leg, so that it matches
the value of the flat leg (i.e. the leg with no spread). The flat leg value is either assumed to be at
Par, or alternatively, the user can define the estimation and discount curves used for valuing the flat
leg.
When valuing corresponding cross currency basis swaps, this yield curve should be used as the
valuation curve for the spread leg (i.e. the leg on which the quoted spread is added). The underlying
curve should be used as the estimation curve for the spread leg. Similarly, the flat leg estimation
and valuation curves should be selected according to the flat leg curve setup.
Using the specified inputs, this yield curve provides the discount factors directly for any requested
dates. Rate Monitor (by default) displays the zero-coupon yields and discount factors for the dates
matching the dates of the inputs.
To define a cross-currency basis swap curve:
1. In the IR Quotes page, define the cross-currency basis swap curve used as inputs using the
information in the following table:
2. In the Base Yield Curve page, define the underlying yield curve in the following table:
Information Description
IR Quotes Tenor basis swap quotes used in bootstrapping. Only one set of quotes can be
used as input.
Information Description
Yield Curve The underlying yield curve used in the bootstrapping.
Information Description
IR Quotes Tenor basis swap quotes used in bootstrapping. Only one set of quotes can be
used as input.
Information Description
Yield Curve The underlying yield curve used in the bootstrapping.
3 Managing static data
3.8 IR quotes and yield curves
Transaction & Risk Management Module (TRM) User Guide 77
Hint:
If the leg that is not being bootstrapped is not to be assumed at Par, then the estimation
and discount curve for that leg should be captured using the Other Leg Yield Curves optional
feature. See 3.8.3 Optional features on page 78.
3.8.2.4.5 Cross Currency Basis Swap Curve (Flat Leg)
This is similar to Cross-Currency Basis Swap Curve (Spread Leg) described in the previous section
3.8.2.4.4 Cross Currency Basis Swap Curve (Spread Leg) on page 76. However, here a discount
curve for the flat leg is bootstrapped, in a way that with the underlying curve (used for the
estimation), the curves value the flat leg so that it matches the value of the spread leg. The spread
leg is valued using the spread quotes and the underlying curves, one for estimation and one for
discounting (the same curve can also be used for both).
When valuing corresponding cross-currency basis swaps, this bootstrapped yield curve should be
used as the valuation curve for the flat leg. The underlying curve should be used as the estimation
curve for the flat leg. Similarly, the spread leg estimation and valuation curves should be selected in
accordance with the spread leg curve setup.
3.8.2.5 Derived Quotes from Yield Curve
3.8.2.5.1 Zero Coupon Quotes from Yield Curve
Zero coupon IR quotes can be derived from a yield curve by defining the underlying yield curve, the
tenors for which quotes are to be derived, and how the derived zero coupon quotes are to be
expressed. The derived zero coupon quotes can be used for example when deriving other IR
quotes.
To define zero coupon quotes derived from yield curves:
1. In the Yield Curve page, define the underlying yield curve and the calculation rounding using the
information in the following table:
2. In the Tenor page, define each tenor using the information in the following table:
3.8.2.5.2 Quotes from Yield curve
Quotes from Yield Curve allows users to derive IR quotes with any interest frequency from a zero
coupon yield curve. Thus, this derivation method is otherwise exactly the same as above (Zero-
Coupon Quotes from Yield Curve), but in the Tenor page the user is also able to define the interest
structure (frequency) for each quote.
Information Description
Yield Curve The yield curve from which IR quotes are derived.
Rounding The precision to which the derived quotes will be rounded to, e.g. '0.0001' to
round the quotes to four decimals.
Information Description
Tenor The tenor for which quotes will be derived from the underlying yield curve;
interpreted by the selected date convention, e.g. 'O/N', '1W', '1M' or '1Y'.
Date Convention The date convention that interprets the tenor to deduce exact start and end
dates for the tenor, select one of the following Generic IR Tenor or Generic IR
Tenor (No Ultimo) or FRA Tenor.
Usually the same as in the underlying yield curve.
Interest Type The interest type in which the derived quote is expressed, e.g. 'Annually
Compounded Rate' or 'Periodic Rate'.
Date Basis The date basis of the derived quote.
3 Managing static data
3.8 IR quotes and yield curves
78 © Wall Street Systems IPH AB - Confidential
Quotes from Yield Curve can thus be used to reverse bootstrap 'Par quotes' from the zero-coupon yield
curves, and as above, these derived quotes can be used, for example, when deriving other IR
quotes.
3.8.3 Optional features
3.8.3.1 Date Setup
Allows the definition of calendars and spot days used with this IR quote or yield curve.
In the Date Setup page, define the date setup using the information in the following table:
3.8.3.2 Estimation curve
Allows the definition of a default estimation curve to be linked to IR quotes that are used to fix
floating cashflows. If no estimation curve is defined at instrument or transaction level, then
valuation will use this estimation curve to estimate the amount of those unfixed cashflows which use
this IR quote for fixing. If no estimation curve is found here either, the currency definitions will be
used to find the estimation curve.
In the Estimation Curve page, define a default estimation curve for an IR quote using the information
in the following table:
3.8.3.3 Yield Curve Interpolation Setup
The default method of interpolation of yield curves is Linear, Flat Rate Extrapolation with date basis
'Actual/365' and interest type Continuous Yield. To deviate from these defaults, the user can specify
the values used in interpolation.
Information Description
Calendar The calendar used to establish the valid business days for the IR quote or yield
curve.
Calendar (2nd) A possible additional calendar used to establish the valid business days for the IR
quote or yield curve, e.g. for cross currency basis swaps.
Spot Days The number of spot days associated with this IR quote or yield curve.
Holiday Calendar An additional holiday calendar. The dates established using the tenors and the two
calendars above need to be a business day according to the holiday calendar.
Information Description
Yield Curve Yield curve used as the default estimation curve for the IR quote.
3 Managing static data
3.8 IR quotes and yield curves
Transaction & Risk Management Module (TRM) User Guide 79
In the Interpolation page, define the values used in the interpolation of yield curves using the
information in the following table:
3.8.3.4 Bootstrap Yield Curve
This feature allows direct bootstrapping of IR quotes into a yield curve, without the need to define a
separate constructed yield curve when it is not really needed.
3.8.3.5 Properties
The allows the user to add user or system-defined properties for IR quotes or yield curves.
To define properties in the Properties page, use the information in the following table:
3.8.3.6 Other Leg Yield Curves
For cross currency basis swaps, this feature allows the user to add discount and estimation yield
curves for the other leg (i.e. the leg not being bootstrapped).
To define yield curves in the Other Leg Yield Curves page, use the information in the following table:
Information Description
Method The method used for interpolating the virtual quotes. The available methods are:
•Linear, Flat Rate Extrapolation, i.e. linear interpolation with flat extrapolation of
rates.
•Linear, Slope Extrapolation, i.e. linear interpolation with flat extrapolation of
slope.
•Cubic Spline, i.e. the second derivative at each point is continuous.
•Hermite Spline (Two Points), i.e. the first derivative at each point in time is
approximated by taking the value at the current and previous points in time.
•Hermite Spline (Three Points), i.e. the first derivative at each point in time is
approximated by taking the value at the previous, current and next point in
time.
Interest Type The interest type of the quotation, e.g. Annually Compounded Rate or Discount Factor.
Date Basis The date basis used in interpolation.
Scaling Whether to scale the interpolated variable, either 'None' for no scaling or
'Logarithmic' to interpolate the logarithm of the rate (according to rate
definitions).
Information Description
Property The property associated with IR quotes and yield curves.
Value The value given for the property.
Information Description
Yield Curve The yield curve used in the bootstrapping.
Type The type of the yield curve, i.e. how it is used in the bootstrapping, either
estimation or discounting.
3 Managing static data
3.9 Currencies
80 © Wall Street Systems IPH AB - Confidential
3.9 Currencies
Before you start to define currencies in TRM, it is important to understand the difference between
currency groups, currency classes, and currency families.
Currency groups can be used, for example, for money-transfer scheduling, and for selecting
currencies when generating payments in Settlement Processing according to how long before the
value date the payment instructions need to be sent.
The same currency can belong to several different groups.
The primary use of currency classes in TRM is to aggregate currencies as if they were one currency
(see 3.32 Currency classes (optional) on page 142).
Currency families are used for fixing the exchange rates between EMU currencies.
3.9.1 Creating currencies
To create a currency:
1. Define the main attributes of the currency in the upper part of Currency Editor using the
information in the following table:
2. Save the currency definition using File - Save As New.
3. Complete the currency definition using the information in the following sections.
3.9.1.1 Defining currency quotations
You receive quotations from currencies either through importing them from the market or defining
them in Rate Monitor (see Chapter 4 Managing market data on page 161).
To define how quotations are valued:
1. In Currency Editor’s Journals page, fill in the fields using the information in the following table:
Note: The Journals page is mandatory and must be filled in.
Information Description
ID & Name Unique ID and name for the currency.
Class Currency class to which you want this currency to belong.
Domain Domain in which this currency applies.
Information Description
Active From
Active To
In the Active From field, enter the date from which this journal entry applies.
You can leave the Active To field blank: this journal entry is then assumed to be valid
either indefinitely (if there are no other journal entries) or until the next Active From
date (if you specify another journal entry).
Quote Base Currency against which the currency you are defining is quoted. For example, if USD
is created as the Quote Base for GBP, then GBP market quotations must be entered
against USD, when taken from both external sources and when manually entering
quotations in Rate Monitor.
For most currencies (including EUR), the quote base is USD.

3 Managing static data
3.9 Currencies
Transaction & Risk Management Module (TRM) User Guide 81
Quote Factor Value that determines whether the FX rate for this currency against its quote base
currency is for 100 units, 1 unit, and so on. For example, GBP/USD = 1.5/1 is quoted
per 1 unit.
The actual quote factor depends on market conventions: this value affects valuations,
so you must give the correct factor.
This is a mandatory field.
Point Factor Value of one point of the currency against the quote base currency.
For example, if the currency is GBP and the quote base currency is USD, then the
point factor of 0.0001 means that one GBP/USD point affects the fourth decimal of
the GBP/USD outright quotation (an outright quotation being the forward rate,
namely the spot rate with forward points added).
Point Factor is also used for rounding of rates in cases where there is no specific
definition of cross rates.
The actual point factor depends on market conventions: this value affects valuations,
so you must give the correct factor.
Date Basis Date basis for this currency.
The date basis is the number of days (in months and years) used, for example, when
calculating FX transactions denominated in this currency.
Calendar Calendar that applies to this currency.
The calendar determines the non-business days (weekends and public holidays) for
the currency, that is, the days when the currency is not tradable and quotations are
not available.
Holiday Calendar An extra calendar to supplement the calendar you specify in the Calendar field.
This can be useful when, for example, you have an FX deal with two currencies that
are both quoted against USD and therefore need to consider the USD calendar as
well.
Gap Set Gap set to be used to calculate maturity periods.
Amount Precision Number of decimal places to which TRM rounds the cashflow amounts of the currency.
This is used to determine the number of decimals to be displayed in monitors.
The amount precision applies to all FX transactions in this currency, and to
money-market transactions made with instruments where neither the currency, nor
the amount precision is defined in Instrument Editor.
Spot Days Number of business days from the trade date to the spot date. The number of days
varies according to market conventions for the country and type of deal.
It is possible to define 0 spot days between two currencies in the Cross Rates page of
the editor by setting Spot Days to 0 for the relevant currency pair(s): see 3.9.1.2
Defining quotation entry and display (optional) on page 86.
Minimum Spot
Days
Minimum number of spot days.
This value is used to specify the minimum number of business days between
currencies: it has an impact on the calculation of such figures as Figure FX Rate.
• If this field contains a value (including zero), spot days are calculated using
calendar days instead of business days.
• If this field is left blank, spot days are calculated using business days.
Spot Time
Spot Time Zone
For global operations, a cut-off time has to be defined: deals before that time have
the number of spot days calculated from that day; deals after that time have the spot
days calculated from the following day. Define a time (Spot Time) within a selected
time zone (Spot Time Zone).
The market convention is 5pm New York time.
Information Description
3 Managing static data
3.9 Currencies
82 © Wall Street Systems IPH AB - Confidential
2. Click Add to save the currency’s journal definition.
3. If you want add any other journals, repeat the procedure.
4. Save the whole currency definition using File - Save.
Family
Family Rate
Family Amount
Precision
The family fields are used to define how the exchange rates between currencies are
fixed (for example, EMU currencies):
•Family specifies the family currency to which the currency belongs (EUR for EMU
currencies). TRM enables you to settle payments using a currency other than the
cashflow currency, but only if the payment currency belongs to the same family as
the cashflow currency.
•Family Rate specifies the fixed conversion rate between this currency and the family
currency. It must be set if Treasury Monitor is to convert correctly to Class
Amount.
TRM displays this rate in Rate Monitor and uses it for valuations. If you enter a
rate in this field, TRM prevents it from being modified in Rate Monitor (since the
rate is, by definition, fixed).
•Family Amount Precision specifies the number of decimals used when the
intermediate EMU amount is rounded using the triangular rule (an EU rounding
rule for converting between EMU currencies).
FX Exposure
Offset %
Percentage by which the market value of the cashflows denominated in this currency
are multiplied to obtain their FX exposure.
Indirect Defines quotations for this currency as being the basis currency.
When this switch is on, quotations (both imported and entered in Rate Monitor) are
interpreted as being indirect, and the display of rates shows the quotations as being
indirect.
For example, GBP is usually quoted indirectly against USD (GBP/USD). This means
that instead of displaying the number of GBP equal to one USD, the number of USD
equal to one GBP is quoted.
Fixed Fixes the exchange rate of the currency against the quote base currency. If you
switch on Fixed, you must enter the fixed quotation in Rate Monitor. This quotation is
used until a new quotation is entered.
Note: You must not switch on Fixed if you defined a family for this currency.
Cost of Carry
Spread
Switch on to use the bid/ask of the cost-of-carry yield, depending on whether the
position is long or short: in other words, if the balance is negative, one side of the
quotation is used, and if it is positive, the other side of the quotation is used.
Information Description
3 Managing static data
3.9 Currencies
Transaction & Risk Management Module (TRM) User Guide 83
3.9.1.1.1 Defining default rates
To define the default rates used for a currency:
1. In Currency Editor’s Default Rates page, for each currency, fill in the fields using the information in
the following table:
2. Click Add to save the currency’s default rate definition.
3. If you want add any other default rates, repeat the procedure.
4. Save the whole currency definition using File - Save.
3.9.1.1.2 Defining fixing rates
The FX cross rates used for fixing are defined in Currency Editor’s Fixing Rates page.
The rates for the currency pair can be viewed in Rate Monitor’s FX Fixing Rates page: see 4.5 Rate
Monitor on page 171.
Information Description
Active From
Active To
In the Active From field, enter the date from which this rate applies.
You can leave the Active To field blank: this rate is then assumed to be valid either
indefinitely (if there are no other default rate entries of the same type) or until the
next Active From date (if you specify another default rate of the same type).
Type Select from:
•Carry Rate: IR quote (defined with IR Quote and Yield Curve Editor’s Usage Interest
Calculation) used to calculate the cost-of-carry interest if the portfolio's
cost-of-carry instrument has been set up to calculate interest on the cost-of-carry
balance, but no interest calculation setup has been given for the cost-of-carry
instrument.
•Default Curve: Yield curve used as a generic curve in different parts of the system
whenever no specific curve has been defined. This curve is used, for example,
when deriving FX rates from yield curves, in quote defaulting, and as a default
curve in calibration. It is recommended that a Default Curve is defined for each
currency. The default curves used specifically for valuation, and which may differ
from one valuation mode to another, are defined in the Currency Editor’s Valuation
Defaults page.
•Fixing Rate: IR quote (defined with IR Quote and Yield Curve Editor’s Usage Fixing)
used as the default fixing curve for the currency.
•Risk Free Rate: Yield curve used as the risk-free curve in calculations in Performance
Monitor and when calculating Z-Spread and Zero Discount Margin in Rate Monitor.
This rate is used in performance monitoring.
Rate Yield curve to use as the default rate for the type specified in the Type field.
3 Managing static data
3.9 Currencies
84 © Wall Street Systems IPH AB - Confidential
To define the FX cross rates used for fixing:
1. In Currency Editor’s Fixing Rates page, fill in the fields using the information in the following
table:
2. Click Add and repeat the procedure for any other currency pairs.
3. Save the whole currency definition using File - Save.
Information Description
Currency Currency against which the parent currency is to be quoted.
Point Factor Value of one point of the currency against the parent currency.
Quote Factor Number of units in which this currency is quoted against the parent currency.
This is a mandatory field.
Rounding Factor Number of decimal places to which the rates are rounded.
If you leave this field blank, the value defaults to the point factor value.
Holiday Calendar An extra calendar to supplement the calendars of the currency you are defining and
the cross currency you select for the above Currency field.
Spot Days Number of business days from the trade date to the spot date.
The number of days varies according to market conventions for the country and type
of deal.
Spot Time
Spot Time Zone
For global operations, a cut-off time has to be defined: deals before that time have the
number of spot days calculated from that day; deals after that time have the spot
days calculated from the following day. Define a time (Spot Time) within a selected
time zone (Spot Time Zone).
The market convention is 5pm New York time.
3 Managing static data
3.9 Currencies
Transaction & Risk Management Module (TRM) User Guide 85
3.9.1.1.3 Defining valuation modes
To define a currency’s default valuation settings:
1. In Currency Editor’s Valuation Defaults page, fill in the fields using the information in the following
table:
2. Click Add and repeat the above procedure for any other default valuations you need for this
currency.
3. Save the whole currency definition using File - Save.
Information Description
Active From
Active To
In the Active From field, enter the date from which this rate applies.
You can leave the Active To field blank: this rate is then assumed to be valid either
indefinitely (if there are no other default rate entries of the same type) or until the
next Active From date (if you specify another default rate of the same type).
Type Type of yield curve you want to use for the default valuation of the currency:
•Valuation Curve
• Estimation Curve
• Caplet Volatilities
• Swaption Volatilities.
Curve/Surface Yield curve or volatility reference that you want to use as the default valuation rate for
the type specified in the Type field.
Valuation Mode Valuation mode. Choose from:
• Default - the yield curve that you want to use by default.
• Theoretical - the yield curve that you want to use for discounting cashflows
denominated in this currency.
• Benchmark - the yield curve that you want to use to calculate the benchmark
key-figures for all transactions denominated in this particular currency.
3 Managing static data
3.9 Currencies
86 © Wall Street Systems IPH AB - Confidential
3.9.1.2 Defining quotation entry and display (optional)
To define how quotations are entered and displayed for a currency:
1. In Currency Editor’s Cross Rates page, for each currency, fill in the fields using the information in
the following table:
Information Description
Currency Currency against which the parent currency is to be quoted. For example, if you are
defining USD and want to define how the Turkish lira is quoted against it, you select
TRL.
Point Factor Value of one point of the cross-rate currency against the parent currency. If the
Indirect switch is selected, then it is the opposite: the value of one point of the parent
currency against the cross-rate currency.
Quote Factor Number of units in which this cross-rate currency is quoted against the parent
currency. If the Indirect switch is selected, then it is the opposite: the number of units
in which the parent currency is quoted against the cross-rate currency.
This is a mandatory field.
Rounding Factor Number of decimal places to which the cross rates are rounded. For example, enter
0.01 to round the cross rate to two decimal places. The limit is ten decimal places.
If you leave this field blank, the value defaults to the Point Factor value.
Holiday Calendar An extra calendar to supplement the calendars of the currency you are defining and
the cross currency you select for the above Currency field. This can be useful when, for
example, you have an FX deal with two currencies that are both quoted against USD
and therefore need to consider the USD calendar as well.
Spot Days Number of business days from the trade date to the spot date.
The number of days varies according to market conventions for the country and type
of deal.
Spot Time
Spot Time Zone
For global operations, a cut-off time has to be defined: deals before that time have the
number of spot days calculated from that day; deals after that time have the spot
days calculated from the following day. Define a time (Spot Time) within a selected
time zone (Spot Time Zone).
The market convention is 5pm New York time.
Indirect Defines quotations for this currency as being the basis currency.
When this switch is on, quotations (both imported and entered in Rate Monitor) are
interpreted as being indirect, and the display of rates shows the quotations as being
indirect.
For example, GBP is usually quoted indirectly against USD (GBP/USD). This means
that instead of displaying the number of GBP equal to one USD, the number of USD
equal to one GBP is quoted.
3 Managing static data
3.10 Currency priorities
Transaction & Risk Management Module (TRM) User Guide 87
2. Click Add to add the cross rate definition to the currency.
3. Repeat the above procedure for any other cross rate definitions you need for this currency.
4. Save the whole currency definition using File - Save.
3.9.1.3 Assigning currency groups to currencies (optional)
You assign a currency to a currency group in Currency Editor’s Groups page. The same currency can
belong to more than one group. For this reason, a currency group cannot be used as a
display-grouping criterion. The currency groups themselves are defined for you at implementation.
To assign a currency group to a currency:
1. In Currency Editor’s Groups page, select the group you want the currency to belong to from the
Group field.
2. Click Add to assign the currency to the group.
3. If you want the currency to belong to any other groups, select and add those groups.
4. Save the whole currency definition using File - Save.
3.10 Currency priorities
Currency priorities determine the preferred quote currency (usually only one), and the most
commonly used currencies or preferred base currencies. Other currencies (unassigned) have a 0
priority. The currency priority is defined in the Currency Priority Editor. This editor is different to
standard TRM editors, in that it is closer in appearance to a currency selector, for example, similar to
the FX page of the Rate Monitor.
You use this editor to select the currencies from the ’unassigned’ list of currencies (i.e. currencies
with a 0 priority), and move them to the Selected area of the editor. The Selected area contains a line
that represents the 0 basket, i.e. the border between negative and positive priorities. Currencies
above this border are assigned negative priorities according to their position from this border. For
example, the currency the closest to the border is numbered -1, the next one up -2, and so on.
Interpolate Spot
Rate
Calculates the spot rate as a forward rate; that is, from the quote and base rates for
the spot date against the reference currency, calculated using the respective forward
points.
If this switch is off, the spot FX rate for the currency pair in question is calculated from
the spot quotes of the base and quote currencies.
For example, in the case of the cross rate: GBP/SEK
The spot date of GBP/SEK is calculated from the spot date of GBP/USD and the spot
date of USD/SEK. Assume for the purpose of the example that GBP/USD has spot
days = 2 days and USD/SEK has spot days = 3 days.
Since the spot dates of each underlying currency pair are different, turning on the
switch forces TRM to calculate the forward rate of each currency pair at a common
date, and thus derives the spot rate of the cross currency pair (GBP/SEK).
If the switch is not turned on, the calculation of the cross currency spot rate will be
inconsistent (in this example) as the calculation of the cross rate will be done by two
rates based on two different dates - that is, no derived rates are used, simply the spot
rate of each currency pair at its respective (different) spot date. Note that this will
work correctly if both underlying currency pairs have the same spot dates.
Information Description
3 Managing static data
3.11 Settlement locations
88 © Wall Street Systems IPH AB - Confidential
These are the preferred base currencies. The currency below the border is numbered 1, and
corresponds to the preferred quote currency.
Note: It is also possible to change the currency priority to be used for a given position in
Treasury Monitor. See 12.1.4.1 Defining position parameters on page 366.
To define your preferred base and quote currencies:
1. In Currency Priority Editor, select one or more currencies in the Not Selected area and move the
selection across to the Selected area.
Note: To select non-consecutive currencies, select the first currency, and then holding down the
Ctrl key, select the other currencies one after the other. To select consecutive currencies,
select the first currency, holding the Shift key, select the last currency. You can combine
both of these methods.
2. Arrange the currencies you want to define as the preferred base currencies above the 0 basket,
and use the up and down arrows to change the order of priority.
3. Move the currency you want to define as the preferred quote currency below the 0 basket.
4. Save these priorities by clicking Save.
Note: You can use the grouping by FX Currency Pair to monitor your transactions in Treasury
Monitor.
3.11 Settlement locations
Settlement locations are defined in the Settlement Location Editor. Settlement locations consists of
a location (usually a country) and a currency. Settlement Location is used to identify a location
within which two banks can carry out settlements each other without intermediaries. For example,
settlements between parties within the same country only need a single bank on each side, whereas
settlements between different countries (and currencies) require a correspondent bank in the other
country.
If you want to use settlement locations as part of the settlement instructions, you need to link the
them to banks and correspondent banks. This is done in Client Editor - Settlement Location page (see
3.13.1.12 Linking settlement locations to clients on page 100).
To define the settlement locations:
1. In Settlement Location Editor, complete the following fields as indicated:
2. Save the settlement location by selecting File - Save.
3. Repeat this procedure until you have defined all of your settlement locations.
Information Description
Currency Select the currency from the list of available currencies.
Name Enter the name of the location, for example, a country.
3 Managing static data
3.12 Client groups
Transaction & Risk Management Module (TRM) User Guide 89
3.12 Client groups
Within TRM, the term client covers all organizations that you operate with, including counterparties,
banks, issuers, subsidiaries and, very importantly, your own organization itself.
All clients must belong to a client group, which in turn must belong to a client main group. At
implementation, one client main group (Primary) is defined for you: you can also create other client
main groups in Client Group Editor.
Note: The Primary client group is mandatory and must not be removed.
Client main groups and client groups have a number of uses in TRM. For example, if you are
managing funds, you can use client groups to exclude a specific issuer from the calculation of fund
fees: for example, you may want to exclude your own issues, if money is transferred between funds
and you want to prevent the fund management fees from being duplicated.
Client groups are also available in Treasury Monitor to group issuers and counterparties.
To create a client main group and its associated client groups:
1. Define the client main group, in the upper part of Client Group Editor using the information in
the following table:
2. In the Groups page, define the groups that belong to the main group. The ID for each group must
be unique to this main group.
3. If you want this client group to be the default group selected in Client Editor’s Groups page, turn
on the Default switch.
4. Save the client group definition using File - Save As New.
3.13 Clients
All the organizations, with which you operate, including counterparties, banks, issuers, subsidiaries
and, your own organization itself, need to be set up in TRM as clients. Clients are created in Client
Editor.
Clients represent different legal entities. It is important to make a distinction between the different
kinds of organization signified by client entities. In TRM, this is done by assigning roles to the client.
Every client must have at least one role assigned to it, and some clients may have more than one
role.
Note: The choice of roles in the selection list is predefined; you cannot add, change, or delete the
types of role available.
Information Description
ID & Name Unique ID and name for the client main group.
Obligatory
Multiple
Either Obligatory or Multiple:
•Obligatory forces all clients to belong to one of the groups in this main group. Use
this for main groups containing mutually exclusive groups: for example, a client
main group containing the groups External Company, Holding Company, and
Subsidiary.
•Multiple enables clients to belong to more than one group within the main group.
Use this for main groups containing non-exclusive groups: for example, if you
have a main group called Geographical Region containing continents and
countries, a client can belong to both Europe and France.
3 Managing static data
3.13 Clients
90 © Wall Street Systems IPH AB - Confidential
Roles are used to fulfill the following main purposes:
•To restrict the client IDs available for selection in certain fields, columns, and selection lists
throughout the system.
For example, if you are defining a client that functions as a bank, you would select the role Bank.
If the bank also functions as a custodian, you would also select the role Custodian. The client ID
will then be available for selection wherever you need to select a Bank (for example, in
settlement instructions) or Custodian in the system.
Similarly, if you want to specify the Exchange on which a futures contract is traded, only the
clients that have been given the role Exchange will be available for selection in the Exchange field
when you are defining the instrument in Instrument Editor.
•Roles are also important if you are sharing SDM-enabled data with CMM (see 3.4.4 Sharing
SDM-enabled data across Wallstreet Suite modules on page 58).
Some clients need to be created before others: for example, since you create banks as clients, and
you need to assign these banks to clients that have bank accounts, you should create all your bank
clients first.
3.13.1 Creating clients
To create a client:
1. Define the main attributes of the client by filling in the fields in the upper part of Client Editor
using the information in the following table:
Information Description
Template The client template on which you want to base this client.
ID & Name Unique ID and name for the client.
Country Country in which the client is located. This is the country of residence of the client.
Domain Domain in which this client applies.
Short Name Short name for the client, used on confirmations. If you leave this field blank, TRM
uses the name given in the Name field.
Risk Country Country against which the exposure for the client is measured. For subsidiaries, this is
typically the risk country of the parent company.
Parent Name of the parent company of the client. You use parent companies to create limits
against a group of companies consisting of a parent company, subsidiaries, and
branches.
City Name of the city in which the client is located.
SWIFT Code SWIFT code of the client.
Postal Address
Street Address
Payment Address
Addresses of the client (used in confirmations and payments files), where typically:
•Postal Address: full postal address of the client.
•Street Address: full street address of the client.
•Payment Address: full address where payments are to sent to the client. Only
required if the payment address differs from the street address.
Note: Press CTRL + Enter to move to the next line in the address field when the address
is on more than one line.
Mark Limit
Violations
By default, this switch sets the transaction status to LIMIT VIOLATION.
The switch is relevant to the portfolio owner, so if the portfolio owner does not have
this turned on, the transactions will not get marked.
3 Managing static data
3.13 Clients
Transaction & Risk Management Module (TRM) User Guide 91
2. In the Roles field, select the role or roles that are appropriate to the client and click OK.
For example:
–If you are defining a portfolio owner, select the role Portfolio Owner, if you want this
portfolio owner to function as a counterparty, select the role Counterparty as well. This
client will be available for selection in all selection lists that require you to select portfolio
owners or counterparties.
–If you are defining a bank, and you want that bank to be available when you define
settlement instructions, select the role Bank.
–If you are trading securities, you may need to refer to where the settlement of the securities
trade takes place, i.e. the place of settlement. This place of settlement is known as
Settlement Client, and clients with roles of Central Securities Depository (CSD) or
International Central Securities Depository (ICSD) can be used as Settlement
Clients. For more information about how Settlement Clients are used in the settlement
instructions, see 3.13.1.13 Setting up client settlement instructions on page 100.
Note: To select all roles, click All. To clear the selection, click None.
3. Save the client definition using File - Save As New.
4. Complete the client definition using the information in the following sections.
3.13.1.1 Assigning clients to groups
To assign a client to a group:
1. In Client Editor’s Groups page, fill in the fields using the information in the following table:
2. Click Add.
3. Save the whole client definition using File - Save.
Clear Limit
Violations
By default, this action enables transactions which have violated a limit and have the
status LIMIT VIOLATION to be cleared (i.e. removes the status of LIMIT VIOLATION).
Mark Limit
Approvals
This action could for example be configured to change the state of all transactions
which do not violate a limit. For example, in a flow such as OPEN — LIMIT-CHECK —
VERIFY, the transaction will be moved from the LIMIT-CHECK state to VERIFY.
The switch is relevant to the portfolio owner, so if the portfolio owner does not have
this turned on, the transactions will not get marked.
Bank Account
Balances from
Payments
Switch on to calculate bank account balances from payments rather than cashflows.
Information Description
Information Description
Main Group Main group in which the client group is located.
Group Group belonging to the selected Main Group that the client belongs to for this portfolio
owner.
3 Managing static data
3.13 Clients
92 © Wall Street Systems IPH AB - Confidential
3.13.1.2 Setting up client contact information
You can make contact details for a client appear automatically on documents or messages (such as
trade confirmations). You can also specify different contact details for different kinds of transaction
for the same client. First you need to define your contacts and then you need to associate rules with
these contacts. The rules you want to use with the contacts must be previously defined in the Rule
Editor, see Chapter 5 Managing rules on page 221.
You can define the types of message to be sent to each contact or message recipient, and the
necessary information (such as the address, or fax number) to ensure that the automatic physical
delivery of the message actually takes place. You can manage the processing of these messages in
an application called Message Manager: see Chapter 21 Managing messages on page 555 for more
information.
3.13.1.2.1 Defining contact details
To define client contact details:
1. In Client Editor’s Contact Details page, enter the contact details using the information in the
following table:
2. Click Add to assign the contact to the client.
3. Repeat this procedure until you have created all the contacts for the client.
4. Save the whole client definition using File - Save.
5. Define the contact rules associated with these contacts, see 3.13.1.2.2 Defining contact rules on
page 92.
3.13.1.2.2 Defining contact rules
After you have defined the contact details, you need to define any specific handling for the contact.
Make sure that you have created the contact and rules must first define the contact details, see
3.13.1.2.1 Defining contact details on page 92.
To define rules to be used with the contact details:
1. In Client Editor’s Contact Rules page, define the contact rules using the information in the
following table:
Information Description
Name Name of the contact.
Phone Telephone number of the contact.
Address Postal address to which all ordinary mail to the contact is sent.
Fax Fax number to which all fax communication to the contact is sent.
Email E-mail address to which all e-mail communication to the contact is sent.
Note: To specify multiple e-mail addresses separate each one by a comma.
Telex Telex number to which all telex communication to the contact is sent.
SWIFT Code SWIFT address to which all SWIFT messages to the contact are sent.
Info Any additional information you want to add about the contact.
Information Description
Contact Name Name of the contact. Select the contact you created previously in the Contact Details
page.
Priority Priority of the rule. If the underlying event matches more than one rule, TRM uses the
rule with the highest priority.
3 Managing static data
3.13 Clients
Transaction & Risk Management Module (TRM) User Guide 93
2. Click Add to assign the rule to the client.
3. Repeat this procedure until you have created all the contacts for the client.
4. Save the whole client definition using File - Save.
3.13.1.3 Defining properties
Many properties are assigned to a client for information purposes only (for example, information to
be displayed in customized reports, or trade tickets). See 3.3.9.2 Assigning properties on page 49
for more information.
The client properties (in the standard configuration of TRM) are described in the following table:
Message Object Underlying object in TRM from which the message is generated, for example,
Transaction, Settlement, Fixing, Facility, and so on.
Message Group Message group for which the contact applies. Message Groups are defined in the
Message Group Editor.
Note: When the field refers to an entity that is created in another editor, you can
right-click the field to launch the editor.
Message Type Message type for which the contact applies. Message types are defined in the Message
Typ e Edi tor.
Note: When the field refers to an entity that is created in another editor, you can
right-click the field to launch the editor.
Message Subtype Subtype (defined in the Message Type Editor) for which the contact applies.
Rule
Not Rule
Rule or Not Rule (defined in Rule Editor) that selects the underlying event (for
example, a specific transaction) in order for the contact to apply: see Chapter 5
Managing rules on page 221.
Preferred
Language
Preferred language of the contact if no language has been defined in the message
rule.
This information is used to select the correct message layout for a specific message
request.
Preferred Medium Default medium (for example, Fax) of the contact if no medium has been defined in
the message rule.
This information is used to select both the correct message medium and the correct
message layout for a specific message request.
Information Description
Property Description
BENEFICIARY-BANK-
COMMENT
Free text.
This text appears in the Beneficiary Bank Comment field of generated payments in
Settlement Processing.
BENEFICIARY
COMMENT
Free text.
This text appears in the Beneficiary Comment field of generated payments in Settlement
Processing.
CASHPOOL-
PORTFOLIO-1-ID
Portfolio ID of the cashpool portfolio. This is the specific portfolio for the payment
transactions used to sweep an account.
CASHPOOL-
PORTFOLIO-2-ID
Portfolio ID of the secondary cashpool portfolio. This is the specific portfolio for the
payment transactions used to sweep an account if a portfolio owner owns an account
in TRM on behalf of an affiliate.
COMPANY-STATUS (Information only) Company status.
CREDIT-GROUP (Information only) Credit group.
3 Managing static data
3.13 Clients
94 © Wall Street Systems IPH AB - Confidential
3.13.1.4 Creating groups of clients
A group or combination of clients can be, for example, a group of multiple lenders/borrowers (i.e. a
syndicate), which is then used as a counterparty of a transaction, or as an issuer or guarantor of an
instrument; or the reference entities of an indexed CDS.
To create a group of clients in TRM, you create a client representing the group, and then you add the
client members to the group.
To add a client member to a group:
1. In Client Editor’s Member Clients page, select the first client belonging to the group from the Client
field.
2. In the Percentage field, specify the percentage that this client is issuing or guaranteeing.
Note: To exclude the client from the list of active clients in the group without removing them
(e.g. when a reference entity of a CDS defaults), switch on the Inactive switch.
3. Click Add.
4. Repeat this procedure until you have added all client members to the group.
5. Save the whole client definition using File - Save.
CUSTOMER-DEALER (Information only) Name of the customer dealer.
GUARANTOR-ID (Information only) Guarantor.
ID_BB_COMPANY The Bloomberg Company ID. Uniquely identifies the client for Bloomberg updates.
INTERMEDIARY-
COMMENT
Free text.
This text appears in the Intermediary Comment field of generated payments in
Settlement Processing.
INTERNET (Information only) Internet address.
ISDA (Information only) ISDA status/reference.
NETTING-CLIENT-ID Client to be used when netting settlements across different portfolio owners in
Settlement Processing.
NETTING-PORTFOLIO-
ID
Portfolio to be used when netting settlements across different portfolios in Settlement
Processing.
RATE-CHANGE-LIMIT Monetary amount for the rate change limit for any profit/loss resulting from the
roll-over or early expiration of a transaction.
RECONCILIATION-
PORTFOLIO-ID
Portfolio to use when transactions or payments are automatically generated as part of
the settlement reconciliation process in Settlement Processing.
REPORT-GROUP (Information only) Report group for the client.
SUBSTITUTION-CASH-
SETTLEMENT
Method to calculate the cash amount when substituting collateral (for reports and
buy-sellbacks), either: Original Collateral Value, if the cash amount is based on the
cash amount against which the collateral was originally delivered, or Current
Collateral Value, if the cash amount is based on the currency market value of the
collateral instrument being substituted.
TELEFAX (Information only) Telefax number.
TELEPHONE (Information only) Telephone number.
TELEX (Information only) Telex number.
Property Description

3 Managing static data
3.13 Clients
Transaction & Risk Management Module (TRM) User Guide 95
3.13.1.5 Defining multiple branch SWIFT codes
The SWIFT code is the unique identifier of a SWIFT participant. A legal entity can have more than
one SWIFT code (e.g. to identify different units of the legal entity). In case an owner or counterparty
has multiple SWIFT codes, you can define these additional SWIFT codes, and link them to
transaction rules to indicate when each is to be used. By default, the main SWIFT code (defined in
the upper part of Client Editor) is used.
For example:
You have decided to define a given bank as one single entity in the system, i.e. not define the bank’s
units as separate entities. Sometimes, you may need to trade with one of the units of this bank, or
have another unit of the bank take care of the confirmations. In the first case, you want to refer to
the unit’s SWIFT code instead of the main SWIFT code when referring to the counterparty of the
trade (in this case, unit is the Transaction Party). In the second case, you want the confirmation
messages' recipient to reflect the confirmation unit’s SWIFT code instead of the main SWIFT code (in
this case, unit is the Confirmation Party). In a similar manner, it is possible to refer to SWIFT codes of
two units of the portfolio owner in case the transaction owner or owner's confirmation party should
be identified through another SWIFT code than the owner's main SWIFT code. To do this, you need
to define the units' SWIFT codes, link them to rules identifying when the SWIFT codes are to be
used, and define whether the SWIFT code is to be used for referring to Transaction Party or
Confirmation Party.
These SWIFT codes are displayed in, for example, Transaction Manager - Transaction view, columns:
Owner SWIFT Code, Owner Confirmation SWIFT Code, Counterparty SWIFT Code and Counterparty
Confirmation SWIFT Code. So, by default the Owner SWIFT Code and Owner Confirmation SWIFT
Code columns show the main SWIFT Code of the Owner, but each can be separately overwritten by
defining SWIFT Branches for the owner using the mechanism described previously in this section.
Similarly, by default the Counterparty SWIFT Code and Counterparty Confirmation SWIFT Code
columns show the main SWIFT Code of the Counterparty, but each can be separately overwritten by
defining SWIFT Branches for the counterparty.
To define multiple codes for a single client:
1. In Client Editor’s SWIFT Branches page, fill in the fields using the information in the following
table:
2. Click Add to assign the SWIFT code to the client.
3. Repeat this procedure until you have defined all the SWIFT codes for the client.
Information Description
Rule Rule (created in Rule Editor) that selects the transactions relevant to this SWIFT code.
Priority Rule priority. A low number indicates a higher priority. Determines which SWIFT code
to use when there are multiple matches with the same usage (i.e. Transaction Party or
Confirmation Party).
Usage Determines whether the SWIFT code is to be used as the SWIFT code identifying the
transaction party or the confirmation party.
•Transaction Party: If the Transaction Party usage rule (defined for owner and/or
counterparty) matches a transaction, then the owner's/counterparty's main SWIFT
code will be overwritten by the SWIFT code defined in the Code field below for the
purpose of identifying the transaction party's SWIFT code (i.e. shown e.g. in
Owner/Counterparty SWIFT Code column of Transaction Manager).
•Confirmation Party: If the Confirmation Party usage rule (defined for owner and/or
counterparty) matches a transaction, then the owner's/counterparty's main SWIFT
code will be overwritten by the SWIFT code defined in the Code field below for the
purpose of identifying the confirmation party's SWIFT code (i.e. shown e.g. in
Owner/Counterparty Confirmation SWIFT Code column of Transaction Manager).
Code SWIFT code for the transactions selected by the rule in the Rule field.
Info Any additional information.
3 Managing static data
3.13 Clients
96 © Wall Street Systems IPH AB - Confidential
4. Save the whole client definition using File - Save.
3.13.1.6 Assigning portfolio-owner specific properties
Enhanced properties are like properties, but they are portfolio-owner specific. You can assign them
using Client Editor’s Enhanced Properties page.
3.13.1.7 Setting up internal deal mirroring
Internal deal mirroring enables transactions that are traded inter-company to be entered in one
portfolio and to be simultaneously mirrored in the portfolio of the counterparty.
To define internal deal mirroring for a client:
1. In Client Editor’s Counterparty Portfolio page, fill in the fields using the information in the following
table.
2. Click Add to apply the Counterparty/Portfolio combination to the client.
3. Repeat this procedure until you have assigned each combination for this client.
4. Save the whole client definition using File - Save.
Note: See 8.5 Deal mirroring on page 300 for more information.
3.13.1.8 Configuring counterparty-specific limit amounts
In TRM, it is possible to attach specific limit attributes to a client definition - typically, a client
defined with the Counterparty role.
These client-specific limits are subsequently accessible from the limit management functionality of
TRM and can be used to define limits, where the limit amount (minimum/maximum expression)
refers to a particular financial attribute of the counterparty, such as, the percentage of an equity
issue held by the counterparty.
Note: See Chapter 16 Managing limits on page 447 for more information about limits.
Information Description
Counterparty Counterparty to be used for the child transaction.
The client definition of the counterparty must be defined with the Counterparty and
Portfolio Owner roles.
Rule
Not Rule
Rule or Not Rule (defined in Rule Editor) you have created that defines which
Counterparty/Portfolio combination is used for the child transaction.
Priority Priority of the rule for the Counterparty/Portfolio combination (the lower the number,
the higher the priority).
Portfolio Portfolio to be used for the child transaction when the rule is matched.
• If you only define one portfolio, this is used by default at deal capture.
• If you define more than one portfolio, then the portfolio that matches the rule is
selected, but you can change it to one of the other defined portfolios at deal
capture.
3 Managing static data
3.13 Clients
Transaction & Risk Management Module (TRM) User Guide 97
To configure a limit amount for a counterparty:
1. In Client Editor’s Limit Amount page, fill in the fields using the information in the following table:
2. Click Add.
3. Repeat this procedure until you have added all limits specific to this counterparty.
4. Save the whole client definition using File - Save.
3.13.1.9 Attaching collateral agreements to portfolio owners
Master agreements define the terms applicable to the transfer of collateral between parties and the
respective obligations of the transferor and transferee. In TRM, they are set up as collateral
agreements and can be attached directly to a client definition.
Note: For more information about setting up collateral agreements and monitoring collateral in
general, see Chapter 11 Managing collateral on page 345.
To attach a collateral agreement to a portfolio owner:
1. In Client Editor’s Collateral Agreement page, fill in the fields using the information in the following
table:
2. Click Add to attach the collateral agreement to the client.
3. Repeat this procedure until you have added all collateral agreements to this client.
4. Save the whole client definition using File - Save.
Information Description
Function Name Unique name you want to give to the limit function. Note that you must not use the
name of an existing function.
When the client definition has been saved, the function is added to Sublimit
Calculation Template Editor’s Limit Usage Expression field selection list: see 16.2.3
Creating sublimit calculation templates on page 461.
Value Limit amount you want to apply.
Currency Currency of the limit amount.
Active From
Active To
Period within which the limit amount is active for the client.
Description Any further information you want to add about the limit.
Information Description
Agreement Master agreement (defined in Collateral Agreement Editor) you want to use for
the portfolio-owner.
See 11.1 Setting up master agreements on page 345 for more information.
Priority Priority of the rule that determines which master agreement is used (the lower
the number, the higher the priority).
Rule
Not Rule
Rule (or Not Rule) you have created in Rule Editor that defines which master
agreement is used.
Note: If more than one rule is matched, TRM uses the rule with the highest
priority.
Counterparty Counterparty to which the agreement applies when the rule is matched.
Counterparty Main Group
Counterparty Group
Main group and group of the counterparty.
3 Managing static data
3.13 Clients
98 © Wall Street Systems IPH AB - Confidential
3.13.1.10 Applying classification groups to a portfolio owner
For accounting purposes, classification groups under which transactions need to be classified for the
portfolio owner need to be defined in Client Editor. For example, if an Italian subsidiary needs to
report results according to the Local, IFRS, and FAS accounting standards, all of these classification
groups need to be applied. This allows the system to recognize which classifications are applicable to
each of the subsidiary’s transactions.
See 19.1.1.1 Setting up classification on page 534 for more information about classification of
transactions.
To apply classification groups to a portfolio owner:
1. In Client Editor’s Classification page, select and add the classification group you want to apply.
Classification groups are defined in Classification Group Editor: see 3.20 Classification groups on
page 130.
2. Repeat this procedure until you have defined all the classification groups needed for the client.
3. Save the whole client definition using File - Save.
3.13.1.11 Setting up client accounts
You define all cash and custody accounts for clients in Client Editor’s Accounts page.
Note: All bank entities that you want to use in the settlement instructions must be assigned the
role Bank.
To define an account for a client entity:
1. Select the client for which you want to define a cash and/or custody account.
2. In Client Editor’s Accounts page, define the account attributes for the client using the information
in the following table:
Information Description
Kind The type of account: Cash (default) or Custody or both.
Account Type The type of account. Choices may include: Agency, Closed, Current Account, Custody
Account, General, Gift Certificate, Mortgage Trust Funds, Payroll, Trust Fund Account, and so
on.
Bank
Bank Name
Bank (or other banking entity) where the account is held. Only clients with roles set
up as Bank, Correspondent Bank, Account Holder or Custodian are displayed in
the selection list.
TRM automatically populates the selected entity’s name in the Bank Name field.
Currency Currency of the account. If you are defining an account that accepts multiple
currencies using the switch Multi-Currency Account, you do not need to enter a currency.
Note: When you are setting up a Custody account (Kind is set to Custody), this field is
inactive.
Account Name
Account Number
Enter the number and name of the cash or custody account. The account number
should not exceed 30 characters.
Note: For CMM, if you want to leave the field empty (for example, for correspondent
or intermediary bank accounts) you must switch on the switch No CMM
replication.
Secondary
Account Number
Number of the entity’s secondary bank account.
This information is visible in Settlement Processing in Cashflow and Settlement Detail
views as Our Account (Secondary) or Counterparty Account (Secondary) depending
on the entity.

3 Managing static data
3.13 Clients
Transaction & Risk Management Module (TRM) User Guide 99
3. Click Add to add the account to the client.
Account Group Group of the cash account.
You use account groups for setting up cash pools. Account group IDs are set up for
you at implementation; if you need to change them, contact your TRM consultant.
Opening Date The date on which the account becomes operational.
Note: If you enter a date in this field, cash balances will not be calculated for the
account prior to this date. If you leave it empty balances may be calculated for
any date.
Balance Type (Cash accounts only)
Balance instrument (needed for calculating the balance on this cash account) that you
created for this purpose in the Instrument Editor.
See TRM Instruments: Processing and Calculations Guide for information about
setting up balance instruments.
Interest Type (Cash accounts only)
Interest-calculation instrument (that specifies how interest is calculated if this is an
interest-bearing account) that you created for this purpose in the Instrument Editor.
See TRM Instruments: Processing and Calculations Guide for information about
setting up interest-calculation instruments.
Owner Portfolio (Cash accounts only)
Portfolio to which the balance transaction is created.
Holder Portfolio (Cash accounts only)
Holder portfolio if the balance needs to be calculated and stored from the account
holder’s perspective (such as, from the perspective of the bank, or more typically, the
corporate treasury).
For example, this field is used when defining the accounts of a corporate subsidiary.
The portfolio specified in the field Owner Portfolio is owned by the subsidiary and the
portfolio specified in this field is owned by the corporate treasury. Both portfolios
would contain the same balance, but seen from two different perspectives.
Parent Account (Cash accounts only)
Account number of the parent account to which an aggregate balance of multiple
underlying accounts is calculated.
This field is used only for calculating an aggregate balance (and accrued interest).
Comment Any comment you want to add about the account.
No Balance (Cash accounts only)
Switch on to prevent the calculation of the balance for this account.
You can use this switch, e.g. if you need to temporarily stop the calculation of an
account balance without modifying or deleting the relevant Bank Account Balances
activity (see A.1 Bank Account Balances on page 627).
Multi-Currency
Account
(Cash accounts only)
Switch on to allow settling in different currencies on this account. (If an account is not
a multi-currency account, then only cashflows/payments in the currency of the
account can settle on that account.) When working with CMM, a multi-currency
account with an in-house bank will be an account in the entity’s functional currency in
CMM.
Note: If you turn on this switch, you do not have to specify a currency in the Currency
field.
Balance by
Counterparty
(Cash accounts only)
Switch on to generate account balances by counterparty (used sometimes for
intercompany accounts, i.e. not needed for external bank accounts).
Information Description

3 Managing static data
3.13 Clients
100 © Wall Street Systems IPH AB - Confidential
4. Repeat this procedure until you have defined all the accounts for the client.
5. Save the client definition using File - Save.
3.13.1.12 Linking settlement locations to clients
To link a settlement location to a client:
Note: For more information about defining settlement locations, see 3.11 Settlement locations on
page 88.
1. Select the client to which you want to link a settlement location.
2. In Settlement Location page, in the Settlement Location field, select the settlement location that you
want to link to this client from the list of available locations.
3. Save the whole client definition using File - Save.
3.13.1.13 Setting up client settlement instructions
Settlement instruction refers to the chain of banks and accounts on the counterparty's and owner's
sides needed to settle a cash payment or deliver a security. TRM supports up to four banks/accounts
on each side of the instruction (i.e. a maximum of four banks/accounts for the owner and a
maximum of four banks/accounts for the counterparty). TRM provides an automatic, rule-based
assignment of the settlement instructions to transactions/cashflows when transactions are entered
into TRM.
The standard way for setting up the rule-based settlement instructions is to first link the
counterparty's bank accounts to rules (defined in Rule Editor) in order to determine which
transactions/cashflows use which account. This is done for each counterparty separately. A similar
setup is done on the owner's side, i.e. owner's bank accounts are linked to rules.
Then, in exactly the same manner as for the owner and all counterparties, the banks themselves can
be linked to other banks (correspondents and other intermediaries) by defining the accounts of
these banks at their correspondents/intermediaries, and linking them to rules to identify when each
correspondent/intermediary bank/account is used.
When a transaction is captured, TRM then finds all of the relevant banks/accounts using the
rule-based instructions. This is first done for the counterparty, i.e. TRM selects the bank/account for
the counterparty using the matching settlement instruction with the highest priority (these will be
Bank/Account 1 in the counterparty chain). Once Bank 1 is selected, TRM will check settlement
instructions for Bank 1, and select the bank/account for Bank 1 using the matching instruction with
the highest priority (these will be Bank/Account 2 in the counterparty chain). Once Bank 2 is
selected, TRM will check settlement instructions for Bank 2, and so on. This process will stop at any
point when no matching rules are found, or latest when all four banks/accounts are assigned. The
same process is then performed on the owner's side, thus resulting in having from zero to four
banks/accounts on each side.
As the rule-based selection of banks (especially correspondents/intermediaries) can be quite
complicated to manage, TRM provides the following additional ways to facilitate the selection of the
banks/accounts:
Instruction Description
Stop looking for additional
banks/accounts
Mark the settlement instruction as the last link in the chain of banks/accounts
(switch Last Link), effectively telling the system not to look for additional
banks/accounts, even if rules would match.
In most cases, the settlement instruction between the owner's bank and
correspondent bank could be marked as the last link, telling TRM not to look for a
third bank into the chain.
3 Managing static data
3.13 Clients
Transaction & Risk Management Module (TRM) User Guide 101
In certain cases, a rule-based selection would never provide the ideal settlement instruction. This is,
for example, the case when the owner tries to use the same bank as the counterparty. TRM provides
three different types of preferences to handle these cases, all of them depend on the selected
counterparty bank (Bank 1). All of these preferences take priority over rule-based selection of
owner's banks/accounts. If such preferences are required, they all have to be identified when
defining the settlement instruction for selecting Bank 1 for the counterparty.
These three preferences are:
Control the length of the
chain
Control the length of the chain through the Settlement Location. Settlement
locations are defined in the Settlement Location Editor. Settlement locations are
used to identify a location within which two banks can carry out settlements
between each other without intermediaries. That is, usually Settlement Location is
a country, and two banks in the same country can settle with each other, while two
banks in different countries will still need to go through a correspondent bank to
make the settlement. When banks and correspondent banks and other
intermediaries are attached to countries, TRM automatically stops/cuts off the
chain of banks/accounts as soon as a common country is found.
So, when settlement location is used, TRM first creates the chain of counterparty
banks/accounts using the standard mechanism for creating the chain. Then, it
starts creating the owner's chain, again using the rule-based selection described
above. However, every time a bank/account is added on the owner's side, TRM
checks the settlement location of the bank added, and if it matches a location of
any of the counterparty banks (checked from bank 1 to bank 4), TRM stops adding
more banks to the owners chain, and counterparty's chain is cut off so that the
last banks in both chains share a common location.
For example, let’s assume a counterparty in US, portfolio owner in Germany, and
settlement currency in EUR. First, the counterparty's chain is created through
rules, by selecting bank 1 in US, bank 2 in Germany. Then, as the portfolio
owner’s bank 1 is already in Germany, TRM stops and does not attach bank 2,
even if rule-based selection for owner's bank 1 would find a EUR correspondent
bank in France.
For more information about setting up Settlement Locations, see 3.12 Settlement
locations on page 71.
Defining the complete
settlement instruction
Control the length of the chain by defining the complete settlement instruction
(i.e. the full chain of banks/accounts) of the counterparty and/or the owner. That
is, rather than applying the standard logic for selecting bank 1 through rules (at
owner/counterparty), then bank 2 through rules (at bank 1), and so on, it is
possible to define all the necessary banks, correspondents and intermediaries (up
to four banks), and to link them directly to the counterparty or the owner through
a single rule. Such instructions need to be marked as the full chain. Even in this
case, if settlement location is used, the chains on both sides will be stopped (cut
off) as soon as a common settlement location is found.
Preference Description
Prefer Counterparty's
Bank
If the matching counterparty instruction for selecting Bank/Account 1 is marked
as the preferred bank (switch Prefer Bank), then TRM tries to select the
counterparty’s Bank 1 as the bank 1 of the owner (provided that instructions for
this bank exist for the owner), even when rules would prioritize another bank.
Prefer Counterparty's
Bank/Account
If the matching counterparty instruction for selecting Bank/Account 1 is marked
as the preferred account (switch Prefer Account), then TRM tries to select the
counterparty’s Bank/Account 1 as the Bank/Account 1 of the owner (provided that
instructions for this bank/account exist for the owner), even when rules would
prioritize another bank/account.
This is usually used for transactions using internal accounts (e.g. subsidiary
transacting with the treasury, and settling through accounts with the treasury).
Instruction Description

3 Managing static data
3.13 Clients
102 © Wall Street Systems IPH AB - Confidential
In some cases, e.g. when a bank functioning as a counterparty holds accounts with itself in a foreign
currency, and still needs to use a correspondent bank to do the actual settlement, we need to
separate the own account held with itself from accounts at correspondent banks. Marking an
instruction as own account (switch Own Account) means that the instruction is only used for selecting
the counterparty's Bank/Account 1, and never as correspondent or intermediary bank/account (i.e.
as Bank/Account 2 to 4).
The settlement instructions are defined in Client Editor's Settlement Instructions page. This is where the
bank/accounts are linked to rules, and the switches mentioned above can be used to drive the
selection of the banks/accounts. Accounts that are defined as cash accounts (kind Cash) are only
used for settling cash, and never for securities, even if the rule attached to the settlement
instruction would match securities deliveries (i.e. cashflows of type Delivery). Similarly, accounts
defined as custody accounts (kind Custody) are only used for settling securities, and never cash.
Accounts that are defined as both cash and custody accounts (kinds Cash and Custody) can of course
be used to settle both.
There are a few specific points relating to securities settlement only. First of all, sometimes
securities are settled Delivery versus Payment (DvP), while at other times the cash and the
securities are settled independently (separately). In order for a delivery to occur DvP, the
settlement instructions of both the owner and counterparty for selecting Bank/Account 1 for the
security settlement must be defined as DvP instructions (Settlement Instructions page - switch DvP).
In addition to the normal chain of custodians and custody accounts, security settlements may need
to refer to a place of settlement, i.e. an entity handling the settlement of the security. These
entities, defined as any other clients in TRM, and referred to as Settlement Clients, need to have the
role of Central Securities Depository (CSD), usually the domestic CSD of the country of issue; or
International Central Securities Depository (ICSD), usually one of the global CSDs, e.g. Euroclear
and Clearstream. The Settlement Client is an additional piece of information in the delivery
instructions, and displayed, for example, in Settlement Client field in Transaction Manager (Instructions
and Cashflow views).
Although the Settlement Client can be selected manually when the transaction is captured, TRM
tries to default the Settlement Client based on the last custodians on the two sides of the custody
chain. However, sometimes the last custodian on either or both sides is not a CSD or ICSD, i.e. it
does not act as a Settlement Client. In this case, when defining settlement instructions, it is possible
to link such a custodian to a CSD (or ICSD), purely for the purpose of selecting the Settlement
Client, and not have the CSD appear as a custodian (i.e. Bank 2 to 4) in the chain of custodians. This
can be achieved by flagging the link between the custodian and the CSD specifically as a CSD Link
(switch CSD Link Only).
According to the above logic, both sides of the custody chain can be defined to end either in a CSD
or ICSD, or in a custodian linked to a CSD (which does not appear in the chain of custodians). Then,
by default, the system will select the CSD or ICSD of the counterparty as the Settlement Client. If
the counterparty chain does not end up in a CSD or ICSD, then the system will select the CSD or
ICSD of the owner as the Settlement Client.
In the selection of the Settlement Client, it is possible to prioritize the owner's CSD or ICSD over the
counterparty's by flagging the owner's settlement instruction for selecting Bank/Account 1 for the
securities delivery as preferred (switch Preferred CSD set on owner's side, and not set on
counterparty's side).
Similarly, if a CSD is prioritized over an ICSD, it can be achieved by flagging the counterparty's
settlement instruction for selecting Bank/Account 1 for the securities delivery as Prefer Domestic CSD.
This will check the two clients in the order specified above, but in addition, a client that is a CSD,
and not an ICSD, will be selected as the Settlement Client.
Prefer Counterparty's
Bank's Location
If the matching counterparty instruction for selecting Bank/Account 1 is marked
as the preferred location (switch Prefer Location), then TRM tries to select as the
owner's Bank 1 a bank in the same location as the counterparty's Bank 1, even
when rules would prioritize another bank.
Preference Description

3 Managing static data
3.13 Clients
Transaction & Risk Management Module (TRM) User Guide 103
Finally, in some cases, e.g. internal transactions, it is not necessary to assign settlement
instructions at all. For such cases, it is possible to define a 'no instructions' settlement rule (using
the No Instructions switch). Transactions/cashflows that match such a rule on both the owner and
counterparty side will not receive any instructions, and no settlements will be generated for them.
To define the settlement instructions for a client:
1. In Client Editor’s Settlement Instructions page, define the settlement instructions using the
information in the following table:
2. Select the switches you want to use with the instructions:
Information Description
Kind Type of account: Cash (default) or Custody or both. This field is used to filter the list of
available accounts. If you leave this field empty, it will be populated automatically
when you select the first account.
Rule Rule (created in Rule Editor) used to automatically select the correct bank account to
be used for each transaction and cashflow.
Not Rule Rule that defines which transactions do not use these settlement instructions.
Currency Currency to which the settlement instruction applies.
Priority Number indicating the priority of this settlement instruction.
You assign priorities to avoid conflicts between rules: the lower the number, the
higher the priority. If a transaction matches more than one settlement instruction,
then the instruction with the highest priority is applied.
Bank (1, 2, 3, 4) Select the ID of the bank (or banks) in the relevant Bank field from the list of available
banks. This list is filtered according to the account type you selected in the Kind field.
If you cannot find your bank in the selection list, check that it has the role Bank
assigned to it.
Note: To define an instruction that contains the complete settlement instruction (i.e.
the full chain of banks/accounts), switch on Full Chain switch.
Account Number
(1, 2, 3, 4)
Number of the account.
Active From
Active To
Start and end dates for period when the settlement instructions are active.
Comment Any comment you want to add about the account rule (settlement instruction).
Switch Description
Last Link Switch on to indicate that this bank is the last link. That is, the account chain stops at
this bank, and TRM does not look for additional banks/accounts, even if rules match.
Full Chain Switch on to indicate that the instruction contains the complete settlement
instruction, i.e., the full chain of banks/accounts (up to four banks). No other banks
will be added to the chain.
Own Account Switch on to identify an account held by the bank with itself.
When this switch is set, then this account is not used as a correspondent
bank/account.
Prefer Bank If this switch is on in the matching counterparty instruction for selecting
Bank/Account 1, then TRM tries to select counterparty’s Bank 1 as Bank 1 of the
owner (provided that instructions for this bank exist for the owner), even if rules
would prioritize another bank.
Prefer Account If this switch is on in the matching counterparty instruction for selecting
Bank/Account 1, then TRM tries to select the counterparty’s Bank/Account 1 as
Bank/Account 1 of the owner (provided that instructions for this bank/account exist
for the owner), even if rules would prioritize another bank/account.
3 Managing static data
3.13 Clients
104 © Wall Street Systems IPH AB - Confidential
3. For custody accounts only, you can flag the status as DvP:
4. For custody accounts only, you can use the following switches to change the default settlement
client behavior.
5. Click Add to add the settlement instructions for the client.
6. Save the whole client definition using File - Save.
3.13.1.13.1 Generating client settlement reports
In TRM, you can produce the following settlement instruction-related report:
Prefer Location If this switch is on in the matching counterparty instruction for selecting
Bank/Account 1, then TRM tries to select as owner's Bank 1 a bank in the same
location as the counterparty's Bank 1, even if rules would prioritize another bank.
Transactions/cashflows that match such a rule on both the owner and counterparty
side will not receive any instructions, and no settlements will be generated for them.
No Instructions If this switch is on in the matching owner and counterparty instruction for selecting
Bank/Account 1, then TRM assigns no instructions for the cashflow, and no
settlements are generated.
Switch Description
Switch Description
DvP (Delivery
versus Payment)
Switch on to indicate a settlement as delivery-versus-payment. For a delivery to occur
as DvP, both the owner and counterparty must have this switch on in their respective
settlement instructions for selecting Bank/Account 1.
Switch Description
Preferred CSD Indicates that the owners custodian is preferred as Settlement Client to the
Counterparty's custodian.
Switch on in the owner’s settlement instructions (and off in the counterparty’s
settlement instructions) to select Bank/Account 1 for the securities delivery.
Prefer Domestic
CSD
Indicates that CSD is preferred over ICSD.
Switch on in the counterparty's settlement instruction for selecting Bank/Account 1
for the securities delivery. TRM still checks the counterparty’s last custodian, owner’s
last custodian, and the default Settlement Client of the security (in that order), but a
client with the role CSD (and not ICSD) will be preferred as Settlement Client.
CSD Link Only Indicates that the settlement instruction is only a link between a custodian and a CSD
(or ICSD), i.e. this CSD (or ICSD) will only impact the selection of the Settlement
Client, and as such will not appear in the chain of custodians (Bank 2 to 4).
If the settlement instruction is marked as Full Chain and CSD Link Only, then the last
custodian of the full chain can only be considered as a settlement client, and no longer
as a custodian in the settlement chain.
Report Description
Settlement Instruction
Chain
Used to display a hierarchical view of a client’s chain of settlement instructions.
This report allows you to visualize the bank account details for a portfolio owner.
When a report has been generated, it is possible to drill-down further into the
settlement details to enable their modification directly in the editor.
See B.47 Settlement Instructions Chain Report on page 678 for details of the report’s
parameters.
3 Managing static data
3.13 Clients
Transaction & Risk Management Module (TRM) User Guide 105
3.13.1.14 Specifying automatic netting for settlement flows
For each counterparty, you can use rules to define which incoming and outgoing cashflows you want
to automatically net during the settlement process.
Note: It is possible to undo automatic netting in Settlement Processing.
To specify which settlement cashflows to net automatically for a counterparty:
1. In Client Editor’s Netting Rules page, fill in the fields using the information in the following table.
2. Click Add to add the netting rule.
3. Repeat this procedure until you have defined all the netting rules for the client.
4. Save the whole client definition using File - Save.
3.13.1.15 Settling in another currency
For a portfolio owner, you can use rules to define which cashflows are to be settled in a different
currency.
Note: TRM enables you to settle using a currency other than the cashflow currency, but only if
the payment currency belongs to the same family as the cashflow currency (see 3.9.1.1
Defining currency quotations on page 80).
To define a payment currency rule to indicate which cashflows are to be settled in a different
currency for a portfolio owner:
1. In Client Editor’s Payments page, fill in the fields using the information in the following table:
2. Click Add to add the rule.
3. Repeat this procedure until you have defined all the payment currency rules for the client.
Information Description
Rule The Settlement Rule (created in Settlement Rule Editor) that selects the settlements
you want to be netted automatically. For example, create a settlement rule called FX
to net only FX transactions.
Priority Number indicating the priority of this automatic netting rule.
You assign priorities to avoid conflicts between rules: the lower the number, the higher
the priority.
Contact Person
FAX
Phone
Contact details of a person or department to be informed when settlements are netted
automatically.
Info Any additional information you want to add.
Information Description
Priority Priority that this payment currency rule has compared to other payment currency
rules for this client.
Currency Currency of the cashflow which is to be settled in the currency specified in the
Payment Currency field.
Rule Rule that you created in the Rule Editor that defines to which transactions/cashflows
this payment currency rule applies.
Payment Currency Currency in which cashflows matching this payment currency rule are to be settled.
Comment Any additional information you want to add about this payment currency rule.

3 Managing static data
3.13 Clients
106 © Wall Street Systems IPH AB - Confidential
4. Save the whole client definition using File - Save.
3.13.1.16 Assigning credit ratings to clients
You can assign credit ratings to clients. This is usually done for clients who have cashflows, such as
issuers and counterparties).
Note that you must create the credit ratings before you can assign them to clients. Credit ratings are
set up in Credit Rating Editor: see 3.31 Credit ratings (optional) on page 142.
To assign a credit rating to a client:
1. In Client Editor’s Credit Ratings page, for each rating you want to assign to the client, select the
relevant rating and code.
2. In the Active From and Active To fields, define the period that the credit rating is active for the
client.
You can leave the Active To field blank: the rating is then assumed to be valid either indefinitely
(if there are no other ratings) or until the next Active From date (if you specify another rating).
3. Click Add.
4. Save the whole client definition using File - Save.
3.13.1.17 Assigning credit spread curves to clients
You can assign a default credit spread curves to a client entity. This means that it is not necessary to
define a credit spread curve at instrument level in order to value credit default swaps.
If no credit spread curve is defined at instrument level, valuation defaults to the credit spread curve
defined for the reference entity (that is, the client entity stored as the issuer of the transaction).
Note that you must create the credit spread curves before you can assign them to clients. Credit
spread curves are set up in IR Quotes and Yield Curve Editor: see 3.8 IR quotes and yield curves on
page 64.
To assign a credit spread curve to a client:
1. In Client Editor’s Credit Spread Curves page, in the Active From and Active To fields, define the period
that the credit spread curve is active for the client.
You can leave the Active To field blank: the curve is then assumed to be valid either indefinitely
(if there are no other curves) or until the next Active From date (if you specify another curve).
1. In the Spread field, select the credit spread curve you want to assign to the client.
2. Click Add.
3. Save the whole client definition using File - Save.
3.13.2 Managing clients
The following sections describe the different ways in which clients can be managed in TRM.
3.13.2.1 Renaming clients
It is possible to rename a Client Id using Admin Center’s Renaming Tool (see the TRM System
Administration Guide for more information).
The Rename Client ID report shows all instances where a client ID exists in TRM. You use this report
when you want to assess the impact involved in changing a client name.
See B.43 Renaming Client ID Report on page 677 for details of the report’s parameters.
Note: Reports are set up and managed from Report Generator: see Chapter 7 Reporting on page
235 for more information.

3 Managing static data
3.14 Portfolios
Transaction & Risk Management Module (TRM) User Guide 107
3.13.2.2 Modifying clients
If you have modified a client definition, it is possible to update any instruments and transactions
that refer to the client by running the Checking Instruments and Transactions activity.
See A.10 Checking Instruments and Transactions Clients on page 630 for details of the activity’s
parameters.
Note: Activities are set up and managed in Activity Manager: see Chapter 6 Managing activities
on page 227 for more information.
3.14 Portfolios
In TRM, all cashflows (transactions, payments, interest, fees, bank-account balances, and so on) are
held in portfolios. Each portfolio has an owner (normally, your own organization), and various
settings that determine how transactions and cashflows are handled in that portfolio.
For each portfolio, you can control which actions users can do (for example, all, create, modify,
read, and so on) with the transactions that portfolio contains. The concept of portfolio users covers
not only people, but also TRM processes affecting transactions in the portfolio. These processes are:
BATCH, which allows activities to update transactions in the portfolio; LIMON, which allows limit
calculations; and TICKET, which allows the automatic printing of trade tickets.
Portfolios can be designated as comparison and/or benchmark portfolios and used to measure how
much a trading portfolio’s key-figures deviate from those of the comparison portfolio. You can select
any portfolios to be comparison and/or benchmark portfolios: for example, similar portfolios held by
different dealers, if those dealers want to compare their positions’ profit/loss against that of the
other dealers.
When you have created all your portfolios, you can compile them into hierarchies. This enables you
to analyze positions at different levels (for example, for your whole organization, one subsidiary, or
one trader). The portfolio at the top of the hierarchy is called the top portfolio, and whenever one
portfolio is directly above another, then the higher one is the parent portfolio and the lower one is
the subportfolio of the parent.
If a portfolio is a parent in a portfolio hierarchy, its allowed user settings are automatically inherited
by subportfolios underneath it. However, you can modify these settings for each subportfolio, if
necessary.
Note: Parent portfolios are used for grouping subportfolios; you could theoretically have parent
portfolios as, for example, trading portfolios, but this is not recommended.

3 Managing static data
3.14 Portfolios
108 © Wall Street Systems IPH AB - Confidential
3.14.1 Creating portfolios
To define the main attributes of the portfolio:
1. In the upper part of Portfolio Editor, enter the main attributes for the portfolio using the
information in the following table:
2. Save the whole portfolio definition using File - Save As New.
3. Complete the portfolio definition using the information in the following sections.
3.14.1.1 Setting further portfolio attributes
It is possible to define how transactions are handled in each portfolio, and give various attributes to
the portfolio itself, for example, whether it is a trading portfolio, and so on.
Information Description
Template Portfolio template on which you want to base this portfolio.
ID & Name Unique ID and descriptive name for the portfolio.
Owner Client that owns the portfolio.
The clients listed in the selection list are those created with the role
Portfolio-Owner.
Base Currency Default currency for this portfolio’s risk and P/L calculations, and reporting.
Opening Date
Closing Date
Date from which, and until which, this portfolio is valid.
TRM prevents transactions from being saved to the portfolio on dates that are outside
this date range.
Risk Rate Enter a percentage offset (1 for 1%, 2 for 2%, and so on) for this portfolio. This is
used for IR exposure (parallel risk) calculations.
The offset is applied according to the date basis and the rate type defined in the
interpolation method of the yield curve (see 3.8 IR quotes and yield curves on page
64).
Creator (Information only)
ID of the user creating the portfolio.
Domain Domain in which this portfolio applies.

3 Managing static data
3.14 Portfolios
Transaction & Risk Management Module (TRM) User Guide 109
To set further portfolio attributes:
1. In Portfolio Editor's Switches page, turn on the switches you need using the information in the
following table (from left to right):
Switch Description
Allow Short
Selling
Match purchases and sales strictly in FIFO order, based on trade/value date
(depending on whether trade or value date selling is used) and input the time of the
transaction into the system.
It is therefore possible to short, that is, to sell before buying. For this to work in all
cases, back dated transactions should be entered with the opening time, not just
opening date.
Benchmark Define the portfolio as a benchmark portfolio to be used to generate benchmark
transactions. You must also switch on the Comparison switch.
For more information about benchmarking, see Chapter 15 Managing benchmarks on
page 429.
Comparison Define the portfolio as a comparison (or benchmark) portfolio.
Note: If you are defining a benchmark portfolio, you must also switch on the
Benchmark switch.
Fund Make this a fund portfolio.
FX Position Result Use this switch in combination with the switch FX Position Roll Over when you use
Closing rate to roll over FX positions and want the system to create result
transactions.
Note: If you want the system to use a result currency different to the portfolio
currency, you must also select the property FX Position Result Currency (Portfolio
Editor - Properties page) in combination with this switch.
FX Position
Roll-Over
Use this switch for portfolios where you want to roll over FX position. You will need to
select these portfolios when creating the activity FX Position Roll Over.
See 12.4 FX Position Roll Over activity on page 397 to create the activity.
Not Bookable
Not Payable
Prevent bookkeeping entries (Not Bookable) or payments (Not Payable) from being
generated for the transactions in the portfolio.
Note: If a portfolio’s setting conflicts with the result treatment setting of the
instrument, then the portfolio setting takes precedence.
For example, it is possible to define both a portfolio and a result treatment as Not
Payable and/or Not Bookable.
• If a portfolio has either of these switches turned on but the result treatment of the
transaction is not defined in the same way, then the portfolio setting overrides the
result treatment setting. For benchmark portfolios
• If these switches are not turned on in the portfolio definition, then the result
treatment setting is used.
Therefore, if a portfolio does not have either of these switches turned on, but Result
Method A = Not Payable and Not Bookable, and Result Method B = Payable and
Bookable; if you enter a transaction in this portfolio, then it will be both payable and
bookable for Result Method B, but not for Result Method A. In this case, the result
treatment setting is used because there is no setting in the portfolio.
However, if the portfolio has the Not Payable switch turned on, no matter which result
treatment is used, if you enter a transaction in this portfolio then it will never be
payable. In this case, the portfolio setting overrides the result treatment setting.
The portfolio definition defines the result treatment for the entire transaction. You use
the result treatment setting to define for which classification or accounting standard
the transaction should or should not be payable (or bookable): see Chapter 19
Managing accounting on page 533 for more information.
Note: For Benchmark portfolios: Switch on the switches Not Payable and Not Bookable so
that benchmark transactions are not included respectively in the settlement
process or accounting process.
3 Managing static data
3.14 Portfolios
110 © Wall Street Systems IPH AB - Confidential
2. Save the whole portfolio definition using File - Save.
3.14.1.2 Assigning allowed users and processes
To assign allowed users and their permissions in the portfolio:
1. In Portfolio Editor's Allowed Users page, select the first user or group you want to add in the User
field.
Note: The Allowed Users page cannot be used when SDM is enabled. With the correct object
permissions, a user may be able to view the page but will not be able to enter any new
portfolio permissions; the User and Permission fields are disabled.
Note: The DBO (database owner, generally defined as user ID "fk") has ALL access to all
portfolios. This user ID does not show in any portfolio user list.
2. From the Permission field, select the permission for the user or group, namely what they can do
with the transactions in this portfolio (create, modify, read, and so on). For example, if you are
setting up a benchmark portfolio, select BATCH in the User field and ALL in the Permission field.
3. Click Add to add the allowed user or group with the selected permission.
4. Repeat this procedure until you have added all the allowed users and their permissions for this
portfolio.
5. Add the following special users (processes) and give the permission ALL.
6. Save the whole portfolio definition using File - Save.
Own Issuing Define the Issuer as also being the portfolio-owner.
For example, this switch is used to specify that all bond purchases are to be
considered as buybacks.
Push Prices Used to save market data for transactions in the portfolio.
If this switch is on, you can view all market data applied in the Front Office for a
specific trade by generating a Transaction Market Rate report: see B.52 Transaction
Market Rate Report on page 680 for details of the report’s parameters.
Note: To store transaction prices, this switch must be set to on, and the
TFLO-ACT_STORE-TRANSACTION-PRICES rule must match for the transaction.
Sell Ignoring
Packages
When this switch is on, FIFO selling ignores all possible packaging of the transactions
being processed.
Simulation (Commercial Loans only)
Allow this portfolio to be used in simulation drawdowns.
Trading Portfolio Allow this portfolio to be used as a trading portfolio. The only portfolios available from
Transaction Manager are those which have been created as trading portfolios.
Switch Description
Process Permission
Batch Allow transactions in the portfolio to be updated by activities.
Limon Allow transactions in the portfolio to be included in limit calculations, and therefore to
appear in the Limit Violations mode of Transaction Manager if they exceed their limit:
see 16.5 Analyzing limit violations on page 484.
Ticket Allow transactions in the portfolio to be automatically given printed trade tickets.
3 Managing static data
3.14 Portfolios
Transaction & Risk Management Module (TRM) User Guide 111
3.14.1.3 Setting up cost-of-carry for portfolios
Cost-of-carry is the cost associated with funding a position. In TRM, you can have the cost-of-carry
calculated automatically for any portfolios with a position. The balance in each currency is displayed
separately, each with its own cost-of-carry result.
If you want to have cost-of-carry calculated for your portfolio, you need to assign a cost-of-carry
instrument (see the guide TRM Instruments: Processing and Calculations for information about
setting up cost-of-carry instruments).
For more information about cost-of-carry, see 18.1.2.1 Setting up cost-of-carry on page 500.
To set up cost-of-carry for a portfolio:
1. In Portfolio Editor’s Cost-of-Carry page, fill in the fields using the information in the following
table:
2. Repeat this procedure until you have added all the instrument and currency combinations you
need for the portfolio’s cost-of-carry calculations.
3. Save the whole portfolio definition using File - Save.
Note: For more information, see 12.1.7 Monitoring cost-of-carry positions on page 390.
3.14.1.4 Restricting transactions into this portfolio (optional)
You can control which types of transaction can enter this portfolio. You do so by assigning rules
(created in Rule Editor) in Portfolio Editor’s Rule page. If you do not specify any rules in the
definition, then all transactions will be able to enter the portfolio.
Note: See Chapter 5 Managing rules on page 221 for more information about rules.
Information Description
Instrument Cost-of-carry instrument you want to assign to the portfolio.
• If you do not specify a currency in the Currency field, the instrument set up will
apply to all currencies.
• If you enter a currency in the Currency field, you restrict the currency to which this
instrument applies to that currency.
Any number of instrument/currency combinations can be defined.
See 18.1.2.1.2 Assigning cost-of-carry instruments to portfolios on page 500.
Currency Currency for which the cost-of-carry instrument entered in the Instrument field applies
if you want to specify a yield curve per currency to calculate the cost-of-carry balance.
3 Managing static data
3.14 Portfolios
112 © Wall Street Systems IPH AB - Confidential
To restrict the transactions into this portfolio:
1. In Portfolio Editor’s Rules page, assign the rules using the information in the following table:
2. Click Add to assign the rule to the portfolio.
3. Repeat this procedure until you have assigned all the rules you need for this portfolio.
4. Save the whole portfolio definition using File - Save.
3.14.1.5 Defining result treatments for a portfolio
The default method used to calculate and treat results for an instrument can be overridden at
portfolio level.
To define result treatment for instruments in a portfolio:
1. In Portfolio Editor’s Result page, fill in the fields using the information in the following table.
2. Click Add to assign the result treatment to the portfolio.
3. Repeat this procedure until you have assigned each one you need for this portfolio.
Information Description
Rule Rule that identifies the type of transactions that you want to either include or exclude
from this portfolio (depending on whether the Allowed switch is on or off).
The only rules to appear in the selection list are those of the category Portfolio or
System (in other words, those rules for which, in Rule Editor’s Categories page, either
the Portfolio or System switches are turned on).
Note: If the rule does not appear in the list, right click this field to launch the Rule
Editor to verify that the rule is properly set up, or to create a new rule.
Priority Number indicating the priority of this rule compared to other transaction rules
assigned to the portfolio.
You assign priorities to avoid conflicts between rules: the lower the number, the
higher the priority. For example, if a rule with priority 1 (top priority) does not allow a
transaction to enter the portfolio and a rule with priority 2 does, the transaction is not
allowed into the portfolio.
Reason Comment that explains why the transactions defined by the rule are allowed, or not
allowed, into this portfolio.
Allowed This switch determines whether transactions matching the rule are to be included
(switch on) or excluded (switch off). By default, the switch is off (transactions
excluded).
Note: If you want to enter a rule to exclude transactions (switch off), you must enter
another rule to create which transactions can be included. This rule could be a
rule allowing all transactions. Also, the allowed rule must have a higher priority
(lower number) than the not allowed rule. For example, you want to allow all
transactions except equities: you assign first an allowed rule for all
transactions, and then a not allowed rule (with a lower priority) for equities.
Information Description
Result Type Result type to use for the portfolio.
Result types are defined in Result Type Editor: see 3.15 Result types and results on
page 114
Result Method of calculating and treating results that is applied to the result type.
Result treatment methods are defined in Result Editor: see 3.15.2 Results on page
115.
Result Mode (Information only)
Result mode that applies to this result treatment.

3 Managing static data
3.14 Portfolios
Transaction & Risk Management Module (TRM) User Guide 113
4. Save the whole portfolio definition using File - Save.
Note: For more information, see 19.1.2 Result treatment methods on page 535.
3.14.1.6 Aggregating result calculations across portfolios
It is possible to aggregate transactions across portfolios for the purpose of result calculation. This is
achieved by assigning a result portfolio for each trading portfolio.
It is also possible to aggregate transactions with average method on the level of parent portfolio for
different owners. The resulting balance transactions have one common owner who is the owner of
the parent portfolio.
For more information, see 19.1.2.3 Aggregating results across portfolios on page 536.
To aggregate result calculations across portfolios:
1. In Portfolio Editor’s Result Aggregation page, select the accounting standard (result mode) you
want from the Result Mode field.
2. In the Portfolio field, select the result portfolio.
This portfolio should be a direct parent of the actual trading portfolios.
3. Save the whole portfolio definition using File - Save.
3.14.2 Managing portfolios
The following sections describe the different ways in which portfolios can be managed in TRM.
3.14.2.1 Renaming portfolios
It is possible to rename a portfolio ID using Admin Center’s Renaming Tool (see the TRM System
Administration Guide for more information).
3.14.2.2 Creating portfolio hierarchies
To create a portfolio hierarchy:
1. In Portfolio Editor's Subportfolios page, select the first subportfolio for this parent from the
Subportfolio field.
2. Specify a factor if required.
You can define factors between top and subportfolios to support monitoring of partial ownerships
of subportfolios in the portfolio tree. The factor specifies how much of the subportfolio should be
taken into account when viewing the position through the top portfolio in question. Factors are
used as multipliers for all positions (cashflows) coming from the subportfolio when viewing
positions in Treasury Monitor and position reports.
3. Click Add to confirm your choice.
4. Repeat this procedure until you have added all the subportfolios for this parent portfolio.
5. Save the whole portfolio definition using File - Save.
3.14.2.2.1 Viewing portfolio hierarchies
You can view a portfolio hierarchy in the application called Portfolio Tree by selecting the portfolio
you want to view from the list on the left side of the application. The portfolio does not have to be a
top portfolio. TRM shows the portfolio, plus the hierarchy of all portfolios under it in the main part of
the application.
You can open a portfolio directly in Portfolio Editor by double-clicking any portfolio in either the list
(left side) or hierarchy (main part) of the application.
3 Managing static data
3.15 Result types and results
114 © Wall Street Systems IPH AB - Confidential
You can modify the display, if required using the following View menu options:
3.15 Result types and results
3.15.1 Result types
In TRM, the method of calculating results for transactions is based on result types. Result types are
used as a way of grouping result treatments.
A combination of result treatments can be defined for one result type, each one representing a
different way of calculating, treating, or processing the results of an instrument’s deals. These types
are important since they drive the available result treatment methods that can be applied for each
instrument. It is not possible to create an instrument definition without a result type.
Note: The result type must not be changed at instrument level once transactions have been
created using that instrument as there may be an impact on result calculations.
Result types are defined in Result Type Editor.
To define a result type:
1. Enter the main attributes for the result type in the upper part of Result Type Editor.
2. Save the result type using File - Save As New.
Menu item Description
Select List Columns Opens a multi-selection list from which you can select the columns you want to be
displayed on the left side of the application.
Select Boxes’ Columns Add or subtract information displayed in each portfolio box.
Show User
Permissions
Switch on and off the display of user permissions set for each portfolio.
Display Property
Names
Switch on and off the display of text that shows what the box column text is (ID,
Name, Client, and so on).
Tree Layout:
Vertical / Horizontal
Switch the orientation of the display: From horizontal (top portfolio to left and
branches to right) to vertical (top portfolio at top and branches underneath) From
vertical to horizontal.
Boxes Connection:
Straight / Corners
Switch the pathways connecting portfolios between corner connection and straight
connection.
Background Color:
Gray Background /
White Background
Change the background color of the display from white to gray, or gray to white.
Zoom In
Zoom Out
Zoom to Default
Zoom into the display (to enlarge the figures), zoom out (to see more of the grid), or
zoom to default (to reset the original zoom).
Information Description
ID & Name Unique ID and descriptive name for the result type.
Domain Domain in which the result type is available. Domains are used to restrict information
access to certain users of TRM.
3 Managing static data
3.15 Result types and results
Transaction & Risk Management Module (TRM) User Guide 115
3. Complete the definition of the result type by defining the different result treatments: see 3.15.2
Results on page 115.
Note: For more information, see Chapter 19 Managing accounting on page 533.
3.15.2 Results
For each result type defined in Result Type Editor, it is necessary to define the different ways results
can be calculated, treated, and processed for the same instrument according to the result mode
(accounting standard) that applies.
Result treatments are defined and attached to a result type in Result Editor.
Note: See 19.1.2 Result treatment methods on page 535 and 19.2 Realizing and processing
results on page 537 for more information.
3.15.3 Defining result treatments
To define a result treatment:
1. Define the main attributes of the result treatment by filling in the fields in the upper part of
Result Editor using the information in the following table:
2. Save the result treatment definition using File - Save As New.
3. Complete the result treatment definition using the information in the following sections.
3.15.3.1 Defining IR result methods
In Result Editor’s Result IR page, you define the methods used to calculate accrued interest, the
accrual or amortization of an instrument’s flows, and the way in which these flows are booked in
accounting.
The parameters defined in this page have an impact on the way the following figures are calculated:
Accrued Interest and Accrued Profit.
To define the IR calculation methods for the result treatment:
1. For swap instruments only, in the Leg Group field, specify the leg of the swap instrument to which
this result treatment applies.
This field allows you to define the Accrual Method separately for each leg of the swap.
Note: You would generally specify this value when you define the result treatment to use for a
settled cross-currency asset swap where the price on each leg is more or less than 100:
see the guide TRM Instruments: Processing and Calculations for more information.
Information Description
ID & Name Unique ID and descriptive name for the result treatment.
Type Result treatments are grouped within a result type (defined in Result Type Editor).
Select the result type to which you want to apply this result treatment.
Result Mode Result mode you want to use for the calculation of results according to this result
treatment. Choose from one of the following: FO/MO (Front Office/Middle Office)
which is used for trader or middle office views, and FAS, IFRS, or Local which are used
for accounting treatment.
Result Method (Information only)
Result method which is assigned to this result mode.
Default Switch on Default to specify if this is the default result treatment for the result type.
3 Managing static data
3.15 Result types and results
116 © Wall Street Systems IPH AB - Confidential
2. In the Accrued Interest field, select the method you want to use for interest accrual: for example,
Linear, Actual/Actual Accrual, and so on.
The AI method defined here is used to calculate the Accrued Interest figure.
If you leave this field blank, the system defaults to the AI Method defined at instrument level (in
Instrument Editor’s IR Valuation page) using the Base IR Setup feature: see the guide TRM
Instruments: Processing and Calculations for more information.
3. In the Accrual Method field, select the method you want to apply for the accrual or amortization of
discount/premium.
This is used to calculate the Accrued Profit figure.
Information Description
Actual/Actual
Accrual
This method is the same as Linear Accrual but uses actual days.
Actual/Actual
Accrual (Index
Linked)
This method is similar to Actual/Actual Accrual, except that the discount/premium is
calculated between the book value and the index-adjusted redemption amount
(Indexed Principal), instead of calculating it between the book value and the
redemption amount.
FRN Yield Accrual This method is similar to Yield Accrual, except that it calculates yield to maturity for
FRNs by using the latest fixing (coupon amount) as an estimate for all future coupon
amounts.
FRN Yield Accrual
(Next Call)
This method is similar to FRN Yield Accrual, except that it is used for callable/puttable
FRNs to accrue the discount/premium to the next call date. When there is no next call
date (i.e. all call dates are in the past) then the yield and accrual are calculated to the
maturity date.
Linear Accrual The discount/premium of a fixed/floating rate bullet instrument is amortized linearly
from the value date until the maturity date of the transaction using the cashflow date
basis. In the case of an amortizing instrument, the discount/premium is split
proportionally between the redemptions, and each portion is amortized linearly from
the value date until the payment date of the redemption to which it relates.
Linear Accrual
(Index Linked)
This method is similar to Linear Accrual, except that the discount/premium is calculated
between the book value and the index-adjusted redemption amount (Indexed
Principal), instead of calculating it between the book value and the redemption
amount.
Yield Accrual With this method, the effective interest rate (yield to maturity) is calculated by finding
the rate that exactly discounts the future cashflows of the transaction to the invested
capital (and costs included into book value).
This yield is then used to calculate interest income for assets, or interest expense for
liabilities.
When using this method, the Accrued Profit figure adjusts the Accrued Interest figure
(based on the coupon rate) to achieve the requirement that the total interest result is
calculated using the effective interest rate of the transaction.
Time dependent yields are displayed in the Accrual Yield view in Transaction Manager.
Yield Accrual
(Index Linked)
This method is used for Australian index-linked bonds (CIB) to allow yield based
accrual of discount/premium. Yield calculation and accrual are based on the
estimation of future coupons and redemption using the index ratio at latest index
fixing.
Yield Accrual
(Next Call)
This method is similar to Yield Accrual, except that the yield accrues to the next call
date of a callable bond. When there is no next call date (i.e. all call dates are in the
past) then the yield and accrual are calculated to the maturity date.
Yield Accrual
(Next Coupon)
This method is similar to Yield Accrual, except that the yield accrues to the next coupon
date instead of to the maturity of the transaction. Therefore the yield is not a YTM
(Yield to Maturity) but a yield to the next coupon value date.
3 Managing static data
3.15 Result types and results
Transaction & Risk Management Module (TRM) User Guide 117
4. In the Switches field, activate the switches that apply to this IR result treatment.
Note: For amortized bonds only: Depending on your business needs, you might need to treat
discount/premium in the same way as balanced costs. In which case, you must select the
switches Book at Par, Revalue Against Par, and Discount/Premium as Cost, and define a setup for
balanced costs (Accrual Method and Date Basis). See 3.15.3.7 Defining balanced costs
methods on page 124.
5. Click Add.
6. For swap instruments only, repeat the procedure to define the result treatment for the
remaining legs.
7. Save the result treatment definition using File – Save.
Yield Accrual
(U.S.Street)
This method is similar to Yield Accrual, except that the discount factor applied to
discounting the future cashflows is calculated using the U.S. Street formula, instead of
using straight discounting (ISMA).
Yield Accrual (w/o
Coupons)
This method is similar to Yield Accrual, except that all interest/coupon flows are
excluded from the yield calculation, and the difference between principal and
redemption is amortized as for a zero-coupon bond.
This method is generally used for floating-rate instruments, for which yield is not a
well-defined concept.
Information Description
Balance Accrued
Interest
Enables interest balancing accounting. If this switch is on, then relevant cashflows are
created at the time of a buy (balanced interest) and at the time of a sell (realized
interest, closing cashflow for balanced interest). The cashflows are used to generate
correct clearing accounting events.
Book At Par If this switch is on, any discount/premium at purchase or issue is booked on a
separate account.
Book Redemption
Premium
If this switch is on, any redemption premium is booked up front on a separate
account.
Discount
/Premium as Cost
If this switch is on, discount/premium is treated as a cost (as defined in the Balanced
Costs page).
See 3.15.3.7 Defining balanced costs methods on page 124.
Revalue Against
Par
If this switch is on (and Book At Par is also on):
• A Book Value (discount/premium) cashflow is generated, and the book value of the
transaction is adjusted to the nominal amount. All figures (for example, FX Profit
and MtoM Profit) are calculated based on the nominal amount.
• Original discount/premium is closed proportionally at de-recognition (re-booking
from the Balance Sheet to the Profit/Loss account as Accrued Profit).
• The FX Profit Adjustment figure is calculated for the discount/premium, and
realized when the Use Book FX Rate switch (see below) is off.
Separate Accrued
Discount Profit
If this switch is on, a separate, simple Accrued Discount Profit figure is calculated (and
realized), using the same formula as for Accrued Fee Profit and Accrued Profit (BVC).
Use Book FX Rate If this switch is on, the book FX rate is used instead of the daily FX rate when
converting foreign currency accruals (discount/premium) into base currency.
When this switch is on, the transaction FX rate is used as a basis for conversion of the
accrued profit. This applies for unrealized accrued profit during the life of a
transaction, as well as for the realized accrued profit at expiration or maturity of a
transaction.
Information Description
3 Managing static data
3.15 Result types and results
118 © Wall Street Systems IPH AB - Confidential
8. Complete the result treatment definition using the information in the following sections.
3.15.3.2 Defining yield accrual methods
In Result Editor’s Accrual Yield page, you define the methods used to calculate yield accrual.
To define the yield accrual method for this result treatment:
1. In the Accrual Yield page, fill in the fields using the information in the following table:
2. Save the result treatment definition using File – Save.
3. Complete the result treatment definition using the information in the following sections.
Note: In Instrument Editor’s Accrual Yield page you can define parameters at instrument level to
override the setup defined here (using the Accrual-Yield-Setup feature): see the guide TRM
Instruments: Processing and Calculations for more information.
3.15.3.3 Defining FX result methods
In Result Editor’s Result FX page, you specify how the total result of an FX deal should be distributed
into FX profit and IR profit.
See TRM Instruments: Processing and Calculations Guide for more information.
To define the FX result method for this result treatment:
1. In the Profit Method field, select the method you want to use:
Information Description
Interest Type Interest type used to calculate yield accrual: Periodic Rate, Compounded Rate,
Discount Rate, and so on.
Date Basis Date basis applied for yield accrual calculations.
Accrued Interest Method applied for interest accrual: for example, Linear or Actual/Actual Accrual.
Method Description
FX Forward With this method there is no calculation of accrued interest; the result is
simply split between FX result and IR result. The FX result is calculated as the
part of the result caused by changes in the FX Spot Rate. The IR result is the
part which cannot be attributed to changes in the FX Spot rate, in other words
it can be attributed to changes in the FX Forward Rate.
Since this method does not use interest accrual but uses movements in
market prices to calculate result, it corresponds most closely to
marking-to-market for IR instruments.
FX/IR Difference Accrued interest is calculated for the whole FX deal: the difference between
the Deal Spot Rate and the Deal Forward rate, accrued linearly. FX result is
calculated as for the FX method above. IR result is the part of the result that
cannot be attributed to accrued interest or to movements in the FX Spot Rate.
FX/IR Diff. No
Discount
This method is a modified version of FX/IR Difference; the FX result is
calculated based on changes in the FX rate, assuming that the forward rate
does not change. This FX result definition means that if an FX transaction has
no FX exposure, then it generates no FX result.
3 Managing static data
3.15 Result types and results
Transaction & Risk Management Module (TRM) User Guide 119
2. For accounting events only: If you are using the switch Position Accounting for FX (Accounting
Configuration Editor - Result Mode Configuration), you can suppress FX Profit on FX Profit
methods of type 'Interest' by setting the switch No FX Result.
Note: No FX Result is only supported for the FX Result methods that calculate interest, not for
methods where FX Profit is explicitly required, such as 'FX Forward'.
3. Save the result treatment definition using File – Save.
4. Complete the result treatment definition using the information in the following sections.
3.15.3.4 Defining option results
In Result Editor’s Result Option page, you define how results are calculated and treated for option
instruments.
To define the option result methods for this result treatment:
1. In the Exercise Treatment field, select the way in which you want the option’s premium flow to be
treated when the option is exercised.
2. In the Accrual Method field, select the method you want to apply for accrual of the premium.
Note that accrual will not take place in the following cases:
–If an Accrual Method is not specified
FX Interest Accrued interest is calculated by accruing the difference between the forward
cashflow amount and the spot cashflow amount.
In the case of an FX forward where there is no spot leg settlement amount,
the system calculates the ‘pseudo’ spot leg settlement amount by taking the
user-entered currency amount as the ‘pseudo’ spot leg settlement amount,
and calculating the ‘pseudo’ spot leg settlement amount for the other
currency, using the spot rate of the transaction.
FX Implied
Interest
Accrued interest is calculated by accruing the difference between the forward
cashflow amount and the book reference amount (the cashflow amount
discounted by the interest rate of the currency).
This method corresponds most closely to accrual bookkeeping (linear method)
for IR instruments.
FX Implied Yield Accrued interest is calculated by accruing the difference between the forward
cashflow amount and the book reference amount (the cashflow amount
discounted by the interest rate of the currency).
FX Interest (no
realization)
The method calculates unrealized AI figure, as it is done in method FX Interest
but with no realization.
Method Description
Information Description
Premium as Book
Value
Premium amount is added to the book value of the underlying transaction at exercise.
In the case of a no exercise, the premium amount is booked as profit or loss.
Premium as
Result
Premium amount is realized as profit or loss at exercise or no exercise.
Information Description
Linear Linear accrual of the full option premium until the exercise date.
3 Managing static data
3.15 Result types and results
120 © Wall Street Systems IPH AB - Confidential
–If Book Value Method = None (defined in Result Editor’s Book Value page). This parameter
should be set to one of the invested capital values.
3. In the Switches field, activate the switches that apply to this option result treatment.
4. Save the result treatment definition using File – Save.
5. Complete the result treatment definition using the information in the following sections.
3.15.3.5 Defining selling methods
In Result Editor’s Selling page, you define the selling parameters used to match transactions either
manually in Transaction Manager, or automatically using the End of Day Processing activity.
Note: See 8.4.6 Matching and unmatching transactions on page 288 for more information.
To define the selling methods for this result treatment:
1. In the Method field, select the selling method you want to apply using the information in the
following table:
2. In the Submethod field, select the selling sub-method you want to use for this result treatment:
Choose from:
–Opening Date = Trade Date selling
–Opening Time = Trade Time selling (available when Method = FIFO only)
–Settlement Date = Value Date selling.
3. In the Switches field, activate the switches that apply to this selling method.
Information Description
Separate Intrinsic
and Time Value
If this switch is on, at deal entry, the system stores the split between Time Value and
Intrinsic Value, so that time value accrual can be done and the premium can be split
into its components for accounting purposes.
Use Book FX Rate If this switch is on, the accrued profit (that is, the premium accrual) is converted
using the book FX rate.
Information Description
None If None is selected, matching will not be available for instruments with this result
treatment.
FIFO FIFO uses the "first in first out" principle to match transactions: therefore, the sold
transaction is automatically matched with the first transaction made.
Average Average is used for average balance transactions.
This means that the sold transaction is matched with the average balance transaction.
The sold transaction and the average balance transaction are in the same portfolio
and the same underlying instrument is used.
Manual Manual must be selected if you want to manually match sold and bought transactions
in Transaction Manager’s Matching mode.
This method allows you to manually match any sold transaction to any amount of any
bought transaction. For example, you can match Transaction A with half of Transaction
B and half of Transaction C.
Information Description
Allow P/L
Amortization in EE
When this switch is on, it is possible to amortize the Sell Profit resulting from a IRS or
loan early expiration linearly between the settlement date of the early expiration and
original maturity date of the swap.
3 Managing static data
3.15 Result types and results
Transaction & Risk Management Module (TRM) User Guide 121
4. Save the result treatment definition using File – Save.
5. Complete the result treatment definition using the information in the following sections.
3.15.3.6 Defining book value methods
In Result Editor’s Book Value page, you can define the methods used to establish the book value of
each transaction and to update a transaction’s book value. See 19.3 Updating the book value of
deals on page 539 for more information.
To define the book value methods for this result treatment:
1. In the Method field, select the method you want to use to establish the book value of each
transaction, for example, whether fees or accrued interest are included in the book value.
Note: If fees are going to be settled in different currencies, and you want a separate book value
cashflow for each fee settlement currency, use the corresponding method ending with (per
ccy).
Matching By
Counterparty
If this switch is on, any buys and sells will be matched against each other only if the
counterparty of the transactions is the same.
Matching by
Facility
(Commercial loans only)
If this switch is on, any buys and sells will be matched against each other only if they
have been traded under the same facility.
No Partial Cost
Realization
If this switch is on, no partial realization of the discount/premium will take place in the
case of a partial buy back.
Payable Sell Profit
(Future, Netted
Option)
If this switch is on, a payable P/L cashflow will be created for futures and options with
future style premium when the position is closed (i.e. long and short positions are
matched). If the switch is off, the P/L cashflow will be not payable.
Information Description
Information Description
Invested Capital • For On-balance instruments:
Book Value of the transaction does not include any transaction costs. Transaction
costs are expensed immediately (or balanced separately).
• For Options:
Option premium is not expensed immediately but balanced, and considered as the
book value of the transaction in result and risk calculations. It can be accrued into
P/L over the term of the option contract, or balanced and re-booked into P/L at
exercise/no-exercise/close-out.
If this method is used for Caps/Floors/Collars, the premium is allocated to the
entire option, and realized at maturity.

3 Managing static data
3.15 Result types and results
122 © Wall Street Systems IPH AB - Confidential
Note that:
–Deal Price is the price at which the investor buys the securities before fees, expenses and
accrued interest,
–Re-Offer Price is the Deal Price adjusted for all re-offer qualifying fees.
Invested Capital
and Costs
•For On-balance instruments:
Value of the transaction includes all transaction costs regardless of their attributes.
Costs included in the Book Value are amortized as part of the discount/premium
amortization, according to the Accrual Method (defined in the Results IR page) used
to calculate the Accrued Profit figure.
If this method is used and the Result IR switches Book at Par and Revalue Against Par
are activated:
- Book Value (original) + embedded fees + discount/premium = Nominal
Amount
If the asset/liability position account (balance sheet) needs to reflect the par
value, the fees should be mapped onto that account at purchase/issue.
- FX Profit is calculated on the Nominal Amount, and FX Profit Adjustment is
calculated on the discount/premium + embedded fees.
- At de-recognition, Accrued Profit is calculated as:
Closing factor * (discount/premium + fees)
• For Options:
This method is not applicable.
Invested Capital
and Re-Offer
Costs
Only fees with the Re-Offer Price attribute will be included in the book value.
•For On-balance instruments:
Book Value of the transaction consists of invested capital and transaction costs
with the Re-Offer Price attribute.
Costs included into the Book Value are amortized as part of the discount/premium
amortization, according to the Accrual Method (defined in the Results IR page) used
to calculate the Accrued Profit figure.
• For Options:
This method is not applicable.
Invested Capital
and All-In Costs
Only fees with the All-In Price attribute will be included in the book value.
•For On-balance instruments:
Book Value of the transaction consists of invested capital and transaction costs
with the All-In Price attribute.
Costs included into the Book Value are amortized as part of the discount/premium
amortization, according to the Accrual Method (defined in the Results IR page) used
to calculate the Accrued Profit figure.
• For Options:
This method is not applicable.
None • For On-balance instruments:
This method is not applicable.
• For Options:
Option premium is expensed immediately, that is, considered as realized result on
the premium payment date. The Option carries no book value affecting result and
risk calculations.
field empty • For Options, premium is balanced by default. The default handling for Cap/Floor
premium is to divide the premium proportionally between each caplet, and realize
per caplet.
Information Description

3 Managing static data
3.15 Result types and results
Transaction & Risk Management Module (TRM) User Guide 123
–All-In Price is the Deal Price (excluding Accrued Interest) adjusted for all transaction-related
fees.
–Deal Price is manually entered at deal entry, whereas Re-Offer Price and All-In Price are
calculated by the system.
2. In the Change Method field, select the method you want to use to update the book value of a
transaction.
3. In the Switches field, activate the switches you want using the information in the following table:
Information Description
Write Down
methods
Write Down methods take each profit figure into account individually before changing
the book value of the instrument.
For example, if MtoM Profit is positive but FX Profit is negative, only the FX Profit is
realized and nothing is done for the MtoM Profit figure.
• Write Down/Up - adjusts the book value either upwards or downwards (that is,
whether there is a profit or loss), and whatever the original book value.
• Write Down/Up (MtoM only) - same as Write Down/Up but any change will not take
FX Profit into account.
• Write Down/Up (FX only) - same as Write Down/Up but only FX Profit is realized.
• Write Down - same as Write Down/Up, but only losses are realized.
• Write Down (MtoM only) - same as Write Down but any change will not take FX
Profit into account.
• Write Down and Capped Write Back - only losses are realized, but book value can
be adjusted back up to the original book value.
• Write Down and Capped Write Back (MtoM only) - same as Write Down and
Capped Write Back, but any change will not take FX Profit into account.
The following apply to Index-linked Bonds only:
• Write Down/Up (Residual MtoM only) - same as Write Down/Up but any change
will not take Indexation Profit into account.
• Write Down (Residual MtoM only) - same as Write Down but any change will not
take Indexation Profit into account.
• Write Down and Capped Write Back (Residual MtoM only) - only losses are
realized, but book value can be adjusted back up to the original book value.
Indexation Profit is not taken into account.
HGB HGB method takes the sum of the figures into account, before an upward or
downward change in book value occurs.
For example, if MtoM Profit is positive, but FX Profit is negative and in excess of the
MtoM Profit figure, then the book value change will write down and book the figures
separately.
Never If this method is selected, then the instrument's book value will never change.
Manual If this method is selected, then the book value can be changed manually at
transaction level.
Information Description
Allow
Adjustments
Switch on if you want to allow book value adjustments during the life of the
transaction.
If this switch is on, the Book Value Adjustment action is enabled on the transaction. This
action allows you to make book value adjustments to target either cost accruals or fair
value changes: see 19.3.3 Making book value adjustments on page 540 for more
information.
3 Managing static data
3.15 Result types and results
124 © Wall Street Systems IPH AB - Confidential
4. Save the result treatment definition using File – Save.
5. Complete the result treatment definition using the information in the following sections.
3.15.3.7 Defining balanced costs methods
Sometimes fees that are not part of the book value still need to be accrued/amortized and booked
separately on the Balance Sheet.
In Result Editor’s Balanced Costs page, you define how these costs are handled.
The parameters defined in this page have an impact on the way the following figures are calculated:
Accrued Profit (Costs) and Accrued Profit (Excluding Costs).
To define the balanced costs methods for this result treatment:
1. In the Balanced Costs field, select the costs (excluded from the book value) that are to be
balanced. Select from: None, All Costs, Re-Offer Costs, and All-In Costs.
2. In the Accrual Method field, specify how the balanced costs are amortized.
3. In the Date Basis field, select the date basis you want to use for balanced cost accrual
calculations.
4. Save the result treatment definition using File – Save.
Allow Forward
Fixing
Switch on if you want to allow Forward Fixing.
This is essentially a book value change done on a transaction value date for securities
traded at forward. The change method for this case is always Write Down/Up (MtoM
only). Fixing itself is executed either with an action available in the Transaction
Manager or with the help of a dedicated Forward Fixing activity (see A.36 Forward
Fixing on page 641 for information on the activity parameters).
Amortize from
Value Date
Switch on to amortize book value changes since the value date.
If this switch is on, amortization figures related to the book value change cashflows
will be generated from the value date of a transaction onwards even though a book
value change was done before the value date: see also 19.3 Updating the book value
of deals on page 539 for more information.
Keep Costs
Separated
Switch on if you want to specify that costs that are part of the book value are to be
booked and realized separately (from discount/premium).
If this switch is on, Accrued Profit (Costs) and Accrued Profit (BVC) are calculated
separately for closing the books when these figures are defined as bookkeeping
entries: see 19.4.3 Defining bookkeeping entries on page 545.
No BVC for
Pending
Transactions
Switch on to suppress Book Value Change within the pending period.
If this switch is on, the Book Value Change action is not permitted for pending (spot
and pre-spot) transactions before their settlement date. Such transactions will also be
skipped when executing the Book Value Change activity: see also 19.3 Updating the
book value of deals on page 539 for more information.
No FX Realization Switch on to suppress FX realization for (on-balance) IR/EQ instruments.
When used, closing/maturity events are converted using the current FX rate.
Note: Only if you are using the switch Position Accounting for FX (Accounting
Configuration Editor - Result Mode Configuration)
Information Description
Information Description
Linear The fee is amortized linearly from the value date until the maturity date of the
transaction using the cashflow date basis.
Actual/Actual This method is the same as Linear but uses actual days.
3 Managing static data
3.15 Result types and results
Transaction & Risk Management Module (TRM) User Guide 125
3.15.4 Parallel Result Treatment
Parallel result calculation (parallel accounting) uses the concept of Result Modes. It is possible to
calculate different results on a single transaction for different purposes like accounting GAAPs (such
as LOCAL, IAS/IFRS, FAS), or to differentiate between front/middle office results and accounting
results.
A transaction can belong to one or more of the defined Result Modes. A single result definition is
assigned to the transaction in each of its Result Modes.
For parallel result calculation, definitions for the result calculation logic are defined as result
treatments in Result Editor (3.15.3 Defining result treatments on page 115), and linked to
instruments/portfolios, rather than directly in instrument or portfolio definitions.
To link the result treatment to transactions/cashflows, a result context is used. This bit mask is
stored as part of the cashflow information (Cashflow.contexts) at deal insert, and it is used by the
valuation and realization code to calculate parallel results according to the result definitions assigned
to the transaction. This information is also used for filtering the displayed/processed cashflows per
Result Mode on Transaction Admin, Treasury Monitor, reports and accounting.
Technical setup must be done during implementation (or during upgrade, before instrument and
transaction migration) in the ResultContext and ResultContextGroup tables. A setup file
result_contexts is supplied, and the Wallstreet Suite Installer provides a standard setup as
follows:
•three result context groups: AS-LOCAL (default), AS-IFRS, AS-FAS, with 8 contexts each
•eight result contexts in each of the three result modes, with a naming convention as in the
example later in this section.
Result contexts are bit values that are defined in the ResultContext table, according to the following
logic:
The number of result contexts assigned to a Result Mode defines the maximum number of different
parallel result treatments available per Result Type (see 3.15 Result types and results on page 114)
within that Result Mode. In the example below, a maximum of eight different results can be
configured for each Result Type in Result Mode AS-LOCAL. Result contexts are linked to the actual
result treatments in Result Editor.
Result Types are usually set per Instrument Type/Group. For example, BOND-INVEST could be
defined as the Result Type used for investments in debt securities, and different results configured
for the Result Type could define different selling methods (FIFO, Average Balances), and/or different
Accrual Methods (None, Linear, Yield Accrual).
Result Modes are configured in the ResultContextGroup table by grouping the context values defined
in ResultContext into named groups according to the following logic:
Value Description
id Integer value starting from 0 running across all Result Modes; maximum id is 31
(maximum 32 values can be set)
contexts Bit value defined as power of 2; maximum context value = 2^31
name Reference name of the result context; it appears as Result Method in Result Editor. In
the example below, the name consists of the name of the mode, the number of the
context within the mode and the total number of contexts allocated for that mode.
flags 1 = Not Bookable. Only to be used for a special Result Mode for which no accounting
is expected.
2 = Not Payable. Normally, only the contexts in the default Result Mode should be
payable, to avoid multiple payments.
Information Description
id Integer value starting from zero.
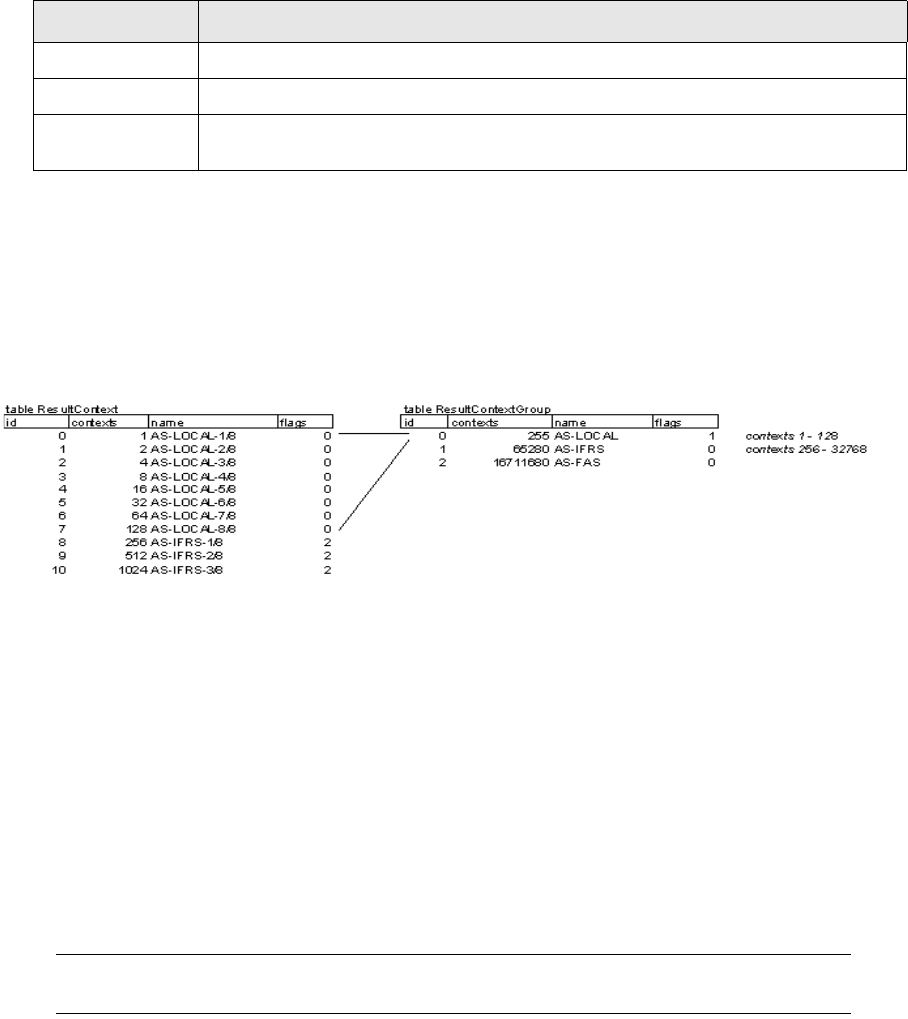
3 Managing static data
3.16 Instrument types
126 © Wall Street Systems IPH AB - Confidential
If parallel accounting is not used, only one Result Mode needs to be set up. One or more
Classification Groups can be defined for each Result Mode in Classification Group Editor (see 3.20
Classification groups on page 130), and linked to Portfolio Owners in Client Editor, implicitly defining
the Result Modes used by that Portfolio Owner. If no such setup is done for a Portfolio Owner, only a
context in the default Result Mode is assigned to the transactions/cashflows of the Owner.
The following is an example of the setup using multiple Result Modes:
3.16 Instrument types
The notion of instrument class is specific to TRM. Instrument classes denote the different categories
of instruments which are supported by TRM. They are pre-defined in the system and cannot be
changed by the user.
Classes are only used as a basis on which to define instrument types. Once the types have been
defined, the instrument classes are no longer used.
An instrument type inherits all the features contained in the instrument class automatically.
Features are system-defined attributes used to give instruments their distinctive functionality and
enable deal capture, transaction processing, and position monitoring.
Note: The concepts of instrument classes, instrument types, and features are explained in the
guide TRM Instruments: Processing and Calculations.
The first step in defining instruments involves creating all the instrument types that are necessary to
use the system.
You may wish to create more than one instrument type based on the same class to create more
specific instrument definitions. For example, the instrument class Bond is used to define many
different types of bond instruments, such as fixed-rate bonds, floating-rate bonds, dual-currency
bonds, and so on. Creating and customizing an instrument type for each type of bond makes it
easier to define the instruments. Nevertheless, it is still possible to have only one instrument type,
and differentiate the setup later, when the instruments themselves are created.
contexts Sum of the context values allocated to Result Mode.
name Name of the Result Mode
flags 1=Default. One of the Result Modes must be specified as default. If a separate mode
is defined for Front or Middle Office, it should be specified as default.
Information Description
3 Managing static data
3.17 Instrument groups
Transaction & Risk Management Module (TRM) User Guide 127
To create and customize an instrument type:
1. In Instrument Type Editor, define the main characteristics of the instrument type.
2. In the Features page, remove any features which are not required in the instrument type.
By default, the type inherits all the features contained in the instrument class.
3. Modify the characteristics of each feature as necessary using the Default and Frozen switches.
–If the Default switch is on, the feature is assigned by default to an instrument based on this
instrument type. Default features can be deleted in Instrument Editor, but may result in loss
of functionality.
–If the Frozen switch is on, the feature cannot be deleted in Instrument Editor. It is usually the
main (primary) feature for the instrument.
4. Save the instrument type definition using File - Save As New.
3.17 Instrument groups
Each instrument is assigned to an instrument group during the setup process. Groups are used as a
means of identifying instruments and matching transactions throughout TRM.
Instrument groups are arranged into a simple hierarchy, where each group is assigned one parent.
Instruments can only be assigned to a single instrument group in the hierarchy.
The first level of the instrument group hierarchy is pre-defined in the system, but can be modified at
implementation according to your organization’s requirements. You then create further instrument
groups for the lower levels of the hierarchy to reflect the requirements of your organization.
The first level of the hierarchy could typically represent the markets in which you trade; such as
Debt Instruments, Foreign Exchange, and Equities. Instrument groups in the second level could
correspond to different types of instruments traded in these markets, and any lower levels would
usually be created for instruments, which are derived from the same instrument type, but have
different characteristics.
Instrument groups from any level in the hierarchy can be used as a parameter when setting up
reports or rules, and when monitoring instruments. The instrument group you use depends on how
specific the rule, report, or position needs to be.
To create an instrument group:
1. In Instrument Group Editor, define the main characteristics of the instrument group.
2. Save the instrument group definition using File - Save As New.
Information Description
ID & Name Unique ID and name for the instrument type.
Class Instrument class on which the instrument type is based. The instrument class defines
which features are attached to the instrument type by default.
Information Description
System ID (Information only) System-generated identification number.
Parent Group ID of the parent of the instrument group.
ID & Name Unique ID and name for the instrument group.

3 Managing static data
3.18 Instrument Templates
128 © Wall Street Systems IPH AB - Confidential
3.18 Instrument Templates
Instrument type is a mandatory attribute of an instrument template. A template inherits all features
of the selected type automatically in the same manner as instrument types inherit their features
from instrument class. Just as in instrument types, inherited features can then be modified by
removing optional features, adding mandatory features, and changing the default features.
When a feature is identified as default or mandatory in the template, the editor automatically
refreshes the loaded data to allow the related setup of the feature to be added to the template in the
same way as in the Instrument Editor.
Instruments can be set up either against instrument types or against instrument templates:
•If the instrument is created by selecting the instrument type, default and mandatory features of
the type are automatically loaded into the instrument and optional features of the type are made
available on the selection list of features. All other setup is made manually in Instrument Editor.
See 3.19 Instruments on page 129 for more information about creating instruments.
•If the instrument is created from an instrument template, the following actions take place:
–The Instrument Type defined in the selected template is populated
–Default and mandatory features of the template are automatically loaded for the instrument
and optional features of the template are made available in the selection list of features.
–All values of fields and sub-entities pre-defined in the template are populated
–Fields and sub-entities identified as not-editable in the template are grayed out and those
identified as mandatory are displayed in red.
Instrument templates are created in the Instrument Template Editor. This editor is designed in a
similar way to any other static data template editors. It contains the configuration fields and pages
that can be found in the Instrument Editor; it can identify the default values and template settings
for them. However, there are some special characteristics of instrument entity which are reflected in
the template editor as well:
•Due to the potentially large number of pages, sub-entity settings are not identified in the main
part of the editor as in other static data template editors, but are identified in the Subentity Flags
page. All editor pages needed for setup of selected default and mandatory features are
automatically available on this page and normal template settings can be assigned to them.
•Pages that relate to setup information that is specific to the instrument, for example, Cashflows
page (Bonds), are not available in the template editor.
Note: These sub-entities are available on Subentity Flags page where they can be made mandatory
for instruments using the template.
•Schedules for bond instruments cannot be created in instrument template. Instead, one or
several schedule templates can be selected in Schedule Template page as available to be used in
Instrument Editor. When an instrument template is selected for an instrument, any one of the
identified schedule templates can be selected. If no schedule template is identified in the
instrument template, any template can be used in the instrument. If only one schedule template
is identified in instrument template, that schedule is automatically selected for the instrument
and the associated schedules are automatically created by the system.

3 Managing static data
3.19 Instruments
Transaction & Risk Management Module (TRM) User Guide 129
To create an instrument template:
1. In the Instrument Template Editor, define the main characteristics of the instrument template in
the upper part of the editor.
2. In the Features page, customize the list of features as necessary:
–Add or remove features
–modify the characteristics of each feature as necessary using the Default and Frozen switches.
3. In the Subentity Flags page, customize the the following switches as necessary and click Update to
save your changes:
–Editable: you have access to the page and can provide a value. All mandatory fields are
editable by default.
–Ignore Template Value: you will not override a value which was defined before you applied the
template. This means that if a field is blank in the template, if you apply the template to an
entity for which a value already exists for that field, the existing value is not replaced.
–Mandatory: you must provide values for mandatory attributes. Labels for mandatory fields are
displayed in red in the corresponding editor.
4. Define the specific parameters for each feature that you want to be inherited by the instruments.
The values you need to enter to define a particular category of instrument are explained in the
guide TRM Instruments: Processing & Calculations.
5. Save the whole definition by using File - Save As New.
3.19 Instruments
In TRM, all instruments share several main characteristics and are set up in a similar way in
Instrument Editor.
The specific instrument setup required for a particular category of instrument is explained in more
detail in the relevant section of the guide TRM Instruments: Processing and Calculations.
Information Description
Tem pl a t e
Template Name
Unique ID and name for the instrument template. The Template field mandatory.
Domain Domain in which the instrument template is available.
Instrument Type Instrument type on which the instruments will be based. This is a mandatory field.
When you select the instrument type, the associated features (flagged as Default and
Frozen) are loaded automatically in the Feature page and the subentity flags are added
to the Subentity Flags page when further setup is required.
3 Managing static data
3.20 Classification groups
130 © Wall Street Systems IPH AB - Confidential
To set up an instrument:
1. In Instrument Editor, define the main characteristics of the instrument in the upper part of the
editor.
2. In the Features page, add or remove the features you need for this instrument.
The addition of some features requires further parameters to be defined in the instrument setup.
3. Define the parameters for each feature that are specific to the instrument.
The values you need to enter to define a particular category of instrument are explained in the
guide TRM Instruments: Processing & Calculations.
4. Save the whole instrument definition using File - Save As New.
3.19.1 Generating reports on instruments
All static data editors have a Tools - Run report menu option, from which you can generate a report
showing the entities that have been created in that editor (see 3.3.9.5 Generating reports on static
data entities on page 50).
In Instrument Editor, it is also possible to run separate reports according to Instrument and
Instrument Type, for example, Instrument Bond report, Instrument Equity report, and so on.
When a report has been generated, it is possible to drill-down further into one of the listed
instruments in order to view its underlying attributes in more detail (such as a bond’s cashflows or
schedules): see 7.2.3 Drilling down into reports on page 239 for more information.
3.20 Classification groups
In TRM, the process of applying different accounting treatments to instruments or transactions can
be based on classification. In this case, each transaction needs to be classified appropriately within
each accounting standard; for example, Held-to-Maturity (HTM) for FAS, and Available for Sale
(AFS) for IFRS.
Information Description
ID & Name Unique ID and name for the instrument.
Instrument Type Instrument type on which the instrument is based. This is a mandatory field.
Instrument Group Instrument group to which the instrument belongs (defined in Instrument Group
Editor).
Active From
Active To
Active period (From/To dates inclusive) to restrict the period in which the instrument
can be traded in TRM (optional).
Buy Label
Sell Label
Labeling for Buy/Sell transactions (optional) to override the default settings.
Result Type Result type to use for this instrument. This is a mandatory field (see 3.15 Result types
and results on page 114).
Note: The result type must not be changed once transactions have been created using
the instrument as there may be an impact on result calculations.
Domain Domain in which the instrument is available.
To be checked Marks that the instrument has a calendar with holiday changes (not yet impacted).
This switch is switched on during the processing of the activity Checking Instruments
and Transactions Holidays, see A.11 Checking Instruments and Transactions Holidays
on page 630 for more information.
3 Managing static data
3.21 Classification rules
Transaction & Risk Management Module (TRM) User Guide 131
Transactions are classified once within each applicable classification group. A classification group is
usually defined as one accounting standard, with individual classifications set up within the group. It
is possible to define an unlimited number of classifications within each group: see Chapter 19
Managing accounting on page 533 for more information.
Classification groups are defined in Classification Group Editor.
To set up a classification group:
1. Enter the main attributes for the classification group in the upper part of the editor.
2. In the Classification page, define each individual classification within the group:
3. Save the classification group using File - Save As New.
3.21 Classification rules
Transactions need to be classified at some point in the transaction flow, but before the transactions
reach a state where they can be booked. Classification rules can be defined to provide default
classifications for transactions. These rules are defined in Classification Rule Editor.
See Chapter 19 Managing accounting on page 533 for more information.
To set up a classification rule:
1. In Classification Rule Editor, enter the main attributes for the classification rule.
2. Save the classification rule using File - Save As New.
Information Description
ID & Name Unique ID and descriptive name for the classification group.
Domain Domain in which the classification group is available. Domains are used to restrict
information access to certain users of TRM.
Result Mode The specific result mode that the classification is linked to.
The groups FO/MO, FAS, IFRS, and Local are preconfigured during implementation.
Information Description
ID & Name Name of the classifications within the group.
For IFRS, for example, the classifications may be: IFRS/TRADE; IFRS/HTM; and
IFRS/AFS.
Information Description
ID (Information only) System-generated identifier of the classification rule.
Priority Number indicating the priority of a rule in the event that two conflicting rules apply at
the same time: the lower the number, the higher the priority.
Classification
Group
Classification group to which the rule is applied.
Classification Classification to which the transaction is classified if the rule matches.
Rule
Not Rule
Rule (or not rule) to apply to the transaction.
Rules are set up in Rule Editor (see Chapter 5 Managing rules on page 221).
3 Managing static data
3.22 Comments and comment rules (optional)
132 © Wall Street Systems IPH AB - Confidential
3.22 Comments and comment rules (optional)
It is possible to attach any number of default comments to either a transaction or a settlement.
Default comments can be added either manually using the Add Comments action or automatically
when the transaction or settlement reaches a particular state in either the transaction or settlement
flow (for example when the transaction's state changes from OPEN to VERIFY). In the latter case,
comments can be added without explicit user intervention.
The setup of default comments is done in Comment Rule Editor. When a given transaction or
settlement matches a transaction or settlement rule, the default comments specified in the editor
are added to the transaction or settlement. Once the comments are available within Transaction
Manager or Settlement Processing, they can be accessed by TRMSwift and Document Manager.
A comment can be specified as mandatory, meaning that it must have a value if the transaction or
settlement is to move past a certain point in the flow.
3.22.1 Setting up a comment rule
To set up a comment rule:
1. In Comment Rule Editor, set up a rule as follows:
Information Description
Name Identifies the purpose of the comment. When formatting a message, this is used to
indicate which comments that have been added to the transaction or settlement
should be used.
For a given transaction/settlement, the name should be unique for all comments that
are added. If more than one exists, then the rule that matches with the highest
priority is the only one that is used.
Typically, many transactions/settlement may have comments with the same name
(purpose), but contain different values based on the rule. A transaction rule and a
settlement rule can have the same name and will be distinguished based on the type.
Code Indicates the type of information that the comment contains. TRMSwift uses this value
to construct field 72 of the message (Sender to Receiver information). The code to use
depends on the context and the type of SWIFT message; for more information, see
the SWIFT documentation.
Value The text value of the comment. If this is blank and the comment is set as mandatory
(i.e. a Mandatory Minimum State is specified), the user must supply a comment before
the transaction or settlement can be moved further in the flow.
Type Can be either Transaction or Settlement. This determines which of the two types of
entity the comment is for. It also determines which list of rules to show in the Rule
field.
Rule Rule ID of the available transaction or settlement rules (depending on the Type
specified).
Mandatory
Minimum State
Transaction or settlement state from which the comment is considered mandatory
before the transaction or settlement can be advanced in the flow. If a value is set here
and if the flow has been set up accordingly, then it will not be possible to move past
this point in the flow if the comment value is blank. See the TRM System
Administration Guide for information on how to set up transaction and entity flows.
Available
Minimum State
Transaction or settlement state from which the comment is available on the
transaction or settlement. Before this state the comment is not added. To be added by
the flow, the flow needs to be set up accordingly. See the TRM System Administration
Guide for information on how to set up transaction and entity flows.
Note: If the transaction is moved past the minimum state and then rejected to before
the minimum state, the comment will remain displayed.
3 Managing static data
3.23 Bank Account Type Editor (optional)
Transaction & Risk Management Module (TRM) User Guide 133
2. Save the rule definition using File - Save. The comment is now available to add to a transaction or
settlement via the action Add Comments or automatically depending on how the transaction and
settlement flows have been set up (see the TRM System Administration Guide for information on
how to set up transaction and entity flows).
For information on how to manually generate transaction comments, see 8.4.7.7 Generating
transaction comments on page 294.
For information on how to manually generate settlement comments, see 18.3.4.3 Generating
settlement comments on page 515.
3.23 Bank Account Type Editor (optional)
Important: Bank account types are optional for TRM and mandatory for CMM.
Bank account types are created in the Bank Account Editor.
Bank account types can be added to a bank account (in the Client Editor, Accounts page) to define
either a bank account's status (for example, Current, Closed, and so on) or function (General,
Internal, Disbursement, and so on).
To create a bank account type:
1. In the Bank Account Type Editor, enter a unique ID and Name for the bank account type.
2. Save the bank account type using File-Save As New.
3.24 Branch codes (optional)
Branch codes provide a way of grouping entities in monitors and reports. There are 20 possible
branch codes, numbered 0-19. You can give each branch code a name, and a set of branches or
values.
For example, if you want a way to group instruments by geographical region, you can define Branch
Code 0 as Geographical, and add the names of countries to it to represent the branches. You can
then assign the branch code (in this case, Geographical) and branch (the name of a country) to the
instrument in the Branch Code page of Instrument Editor.
Branch codes are defined in Branch Code Editor.
Note: To be able to assign branch codes to an instrument, you must first add the Branch-Code
feature in the instrument definition: see the guide TRM Instruments: Processing and
Calculations.
Switches Copy to Settlement: Check this to copy the transaction comment to the settlement
comment when the settlement is generated. It is available only for transaction
comments.
Note: The transaction comment will not be copied to the settlement if the comment is
empty.
Information Description

3 Managing static data
3.25 Calendar groups (optional)
134 © Wall Street Systems IPH AB - Confidential
To create a branch code:
1. From the list of branch codes on the left side of the editor, select the system-defined number of
the branch code you want to set up. This is displayed in the Number field in the upper part of the
editor (for information only).
If you are creating a branch code to use in an accounting rule, you can only use Branch Code 0.
2. Enter the name for the branch code in the Name field (for example, Geographical Region).
3. In the Values page, define each branch that you want to assign to the branch code.
4. Save the whole branch code definition using File - Save As New.
3.25 Calendar groups (optional)
When dealing certain instruments it is necessary to take more than one calendar into account (for
example, for cross-currency IR swaps, a calendar is required for each currency). This can be
achieved in TRM by creating a calendar group, that is, a set of calendars.
A calendar group assembles the non-business days of the individual calendars contained within the
group. TRM will then refer to all the calendars in the group when calculating values, such as
payment due dates, and adjust the values accordingly.
Furthermore, applying a calendar group instead of an individual calendar to a currency can be useful
when geographical issues arise, for example, when more than one country uses the same currency,
such as the Euro, or when there are regional public holidays within one country, for example, in the
USA.
Calendar group entities are created in Calendar Group Editor.
To create a calendar group:
1. Enter a unique ID and name for the calendar group. Note that a calendar group cannot be
created with the same ID as a calendar (see 3.6 Calendars on page 59).
2. Select the Default Holidays for the calendar group which correspond to the calendar group’s
weekly non-working days.
3. In the Calendar field, select and add the first calendar you want to add to the group.
The selection list contains all the calendars you created in Calendar Editor.
4. Repeat the procedure to add the other calendars to the group in the same way.
5. Save the whole calendar group using File - Save As New.
3.25.1 Generating reports on calendar groups
You can run the Holidays for Period report to view all holidays defined for a calendar group during a
specific period.
See B.27 Holidays for Period Report on page 669 for details of the report’s parameters.
Information Description
ID & Name ID and name for the value: for example, if you are creating a Geographical branch
code, enter an ID and name of a region or country.
Order Number The order in which you want the branches (for example, the geographical regions) to
appear in a Branch Code selection list (for example, 1 for first in the list).

3 Managing static data
3.26 Cashflow charges (optional)
Transaction & Risk Management Module (TRM) User Guide 135
3.26 Cashflow charges (optional)
Cashflow charges are charges that are associated with the cashflows of a transaction. A cashflow
charge can be a fixed amount or it can be calculated from the cashflow amount. A cashflow charge is
usually settled on the value date of the cashflow. An example of a cashflow charge is the taxes that
are withheld at each coupon payment.
Cashflow charges can be applied automatically if a cashflow charge rule is assigned to the
instrument using the Cashflow Charges feature: see the guide TRM Instruments: Processing and
Calculations for more information.
A cashflow charge rule includes how the charge is calculated and may provide details of payment
instructions for the charge. It also includes a standard rule (defined in Rule Editor) which is used to
identify the transactions (and possibly even cashflows) to which the charge applies. As with
standard rules, you can create several charge rules that share the same name. This means that you
can cover several cashflow charge conditions within the same rule. Cashflow charge rules are
defined in Cashflow Charges Editor.
Charges can be applied manually to cashflows in Transaction Manager if the Manual Charges feature is
applied to the instrument at instrument level: see 8.2.1.7 Adding charges and fees on page 268.
Note: You should not manually edit rule-based cashflow charges. Rule-based cashflow charges
are regenerated if the transaction is modified at a later date (i.e. if a parameter value is
added) and any manual changes may be overwritten.
3 Managing static data
3.26 Cashflow charges (optional)
136 © Wall Street Systems IPH AB - Confidential
To set up a cashflow charge rule:
1. In Cashflow Charges Editor, define the main attributes of the rule.
2. Specify the cashflow charge payment details.
Information Description
ID ID for this cashflow charge.
Domain Domain in which this cashflow charge applies.
Rule
Not Rule
Rule that defines to which type of transaction this charge applies (Rule), and rule that
defines to which type it does not apply (Not Rule).
Cashflow Main
Typ e
Main type of cashflow to which this charge applies.
This is a mandatory field.
Cashflow Type Type of cashflow (optional).
If you do not specify a cashflow type, then this charge will apply to all cashflows of the
same Cashflow Main Type which meet the rule criteria.
For example, if Cashflow Main Type = Interest, and Cashflow Type is not defined, the
cashflow charge will apply to all interest flows which meet the rule criteria.
Alternatively, if Cashflow Main Type = Interest, and Cashflow Type = Coupon, the
cashflow charge will only apply to any coupon cashflows which meet the rule criteria.
Minimum Figure
Value
Maximum Figure
Value
The maximum and minimum cashflow amount between which a cashflow charge is
matched.
Active From
Active To
Start and end dates for the period when the charge is active.
The charge is only applied to cashflows where the Active From date is earlier than the
cashflow’s value date.
If the Active To field is left blank: this charge is assumed to be valid indefinitely.
Information Description
Date Type Date type (for example, Payment Date, Fixing Date, or Value Date) of the cashflow
used to calculate the payment date of the charge.
Date Offset Number of business days that are added to the date type selected. This is used to
calculate the payment date of the charge. If you specify a date offset, you should also
specify a calendar (in the following field).
Calendar Calendar or calendar group that is used to calculate the payment date of the charge.
You only need to specify a calendar if you specified a date offset.
Charge Type Type of cashflow charge.
You can select from a list of charges that have been created in Cashflow Type Editor:
see 3.28 Cashflow types (optional) on page 139.
Currency Currency of the charge if this is different from the currency of the cashflow.
Our Bank
Our Account
Your organization’s bank (Our Bank) and that bank’s account (Our Account) that is used
to pay or receive the fee, if you do not want the account rules defined in Client Editor
to select the bank (or bank account) for you.
If you leave either of these fields empty, the local bank (or bank account) is selected
according to the account rules in Client Editor’s Settlement Instructions page.
3 Managing static data
3.26 Cashflow charges (optional)
Transaction & Risk Management Module (TRM) User Guide 137
3. In the Calculation Type field, specify how the amount of the cashflow charge is calculated.
4. Enter any further information about the cashflow charge.
5. Save the cashflow charge rule definition using File - Save As New.
Counterparty
Counterparty
Bank
Counterparty
Account
Same principle as for Our Bank, and Our Account: all of these fields are optional, and
give you the means of overriding the counterparty, bank of the counterparty, or
account of the counterparty, that are automatically selected for you by the account
rules in Client Editor’s Settlement Instructions page.
Type Description
Amount The fixed amount of the charge.
Amount Per Unit The amount of the charge per one unit.
Percent If the cashflow charge is a percentage of the cashflow, enter the percentage of the
charge.
The maximum number of decimal places which will be taken into account before
rounding is 12.
Percent Per
Annum
Percentage per annum of the cashflow specified. The charge amount depends on the
period between the From When and Until When dates of the cashflow.
Information Description
Value Value to be used by the Calculation Type field.
For example, if Calculation Type = Percent, and Value = 5, then the value is
interpreted as 5%.
Expression The perl expression that is used to calculate the amount of the cashflow charge.
In the expression, $figure_value is the cashflow amount; $maturity is the
number of days between the contract maturity and the transaction value date; and
$cf_maturity is the number of days between the contract maturity and the cashflow
value date.
You can access the transaction columns using the syntax:
$transaction->{"deal_rate"}
and cashflow columns can be accessed using the syntax:
$cashflow->{"fixing_price"}
Minimum Charge
Amount
Maximum Charge
Amount
The minimum or maximum amount that can be charged.
Amount Rounding
Rounding Method
Choices are: Down, Nearest or Up. The amount is rounded up, down, or to the nearest
figure as calculated using the specified Amount Rounding value.
• If rounding settings are defined, then these settings are used.
• If no rounding settings are defined, then the rounding specified at the currency
level is used.
Information Description
3 Managing static data
3.27 Cashflow groups (optional)
138 © Wall Street Systems IPH AB - Confidential
3.27 Cashflow groups (optional)
Cashflows can be grouped together to be used for reporting or analysis purposes in Report
Generator and Treasury Monitor, respectively.
For example, by specifying a cashflow group when monitoring portfolios in Treasury Monitor, a
global amount can be broken down into its different components (such as Principal, Fee, and
Interest). These cashflows can then be broken down even further. Fees, for example, could be
broken down into Issuer Fee and Tax.
Each type of cashflow needs to be defined individually in the main cashflow group, with a priority.
The priority defines the order in which the rule matching is done.
Group rules are set up for the cashflow group to define how the cashflows are identified. You can
define more than one rule within a group and specify different criteria that the cashflow should or
should not meet. All criteria need to be matched in order to include the cashflow within the group.
When all excluding criteria is matched, the cashflow is excluded from the group. Inclusive or
exclusive criteria can be used in the same rule. You can also set up a miscellaneous group rule for all
other cashflows. This rule would have the lowest priority and be completely open.
Cashflow groups are defined in Cashflow Group Editor.
To define a cashflow group:
1. Define the main attributes of the cashflow group in the upper part of the editor.
2. In the Groups page, define the main group using the information in the following table:
3. In the Group Rules page, define the criteria that each cashflow should or should not meet to
match the group rule, using the information in the following table:
Information Description
ID & Name Unique ID and name for the cashflow group.
Domain Domain in which this cashflow group applies.
Switches (Commercial loans only)
Payment Reminder Grouping: switch on so that this cashflow group is used for
grouping the cashflows in the Payment Reminder entities. Only one cashflow group
can be used at a time for grouping cashflows. To use a different cashflow group, the
switch must set to off for this cashflow group.
Information Description
Group ID of the main cashflow group.
Group Name Name of the main cashflow group.
Priority Number used to determine the priority if two or more cashflow groups meet the
conditions for the selected rules.
Information Description
Group ID of the main group you created in the Groups page.
Group Name (Information only) Name of the main group.
Main Type Main type of cashflow, such as Principal or Fee/Tax.
Type Cashflow type as defined in Cashflow Type Editor.
Attributes
Attributes 2nd
Kinds
Different attributes that the cashflow must have (or not have) to meet the rule criteria.
3 Managing static data
3.28 Cashflow types (optional)
Transaction & Risk Management Module (TRM) User Guide 139
4. Save the cashflow group using File - Save As New.
3.28 Cashflow types (optional)
It is possible to create different types of cashflows in Cashflow Type Editor. These cashflow types
can then be used to create charges (for example, fees or taxes).
Any charges you define can be applied to a transaction either automatically, using rules assigned at
instrument level (see 3.26 Cashflow charges (optional) on page 135 and 3.46 Transaction charges
(optional) on page 155), or they can be applied manually in Transaction Manager to a specific
cashflow (see 8.2.1.7 Adding charges and fees on page 268).
For certain instruments, it is also possible to specify whether a charge needs to be taken into
account in yield/price calculations: see also 8.2.1.7.1 Transaction charges and yield/price
calculations on page 269.
Note: To be able to attach cashflows to an instrument on the transaction level of Transaction
Manager, you must first add the relevant feature to the instrument: see the guide TRM
Instruments: Processing and Calculations for more information.
To create a cashflow type:
1. In Cashflow Type Editor, fill in the fields using the information in the following table:
2. Activate the relevant switches to define how any cashflows of this type are treated in accounting
or in price/yield calculations.
3. Save the cashflow type using File - Save As New.
3.29 Cash pools (optional)
In TRM, you can set up automatic leveling, namely the periodic movement of funds, often within a
cash pool, to manage cash centrally. This functionality is closely related to zero balancing, which is a
bank process where the bank adjusts at the end of each period (day, week, month) an account's
balance to zero by transferring funds to or from another designated account.
Sign Sign that the cashflow must have to meet the rule criteria.
Information Description
Information Description
Type Unique name for the cashflow type you want to create.
Main Type Main type of the cashflow type you are creating. Choose from: Principal, Interest, or
Fee/Tax.
Switch Description
Taxable Enables you to define whether an interest cashflow is taxable.
All-In Price The fee cashflow needs to be included in the All-in Price/Yield.
Re-Offer Price The fee cashflow needs to be included in the Re-offer Price/Yield.

3 Managing static data
3.29 Cash pools (optional)
140 © Wall Street Systems IPH AB - Confidential
Accounts involved in a cash pool are organized into a hierarchy of master accounts and
sub-accounts. These master and sub-account relationships within a cash pool, together with various
other attributes of the cash pool are defined in Cash Pool Editor.
See 18.1.3 Managing cash pool leveling on page 502 for more information.
To define the properties of a cash pool:
1. In Cash Pool Editor, enter the main attributes of the master and sub-accounts relationship in the
upper part of the editor.
2. In the Default Target page, define the default target balance amounts for the sub-accounts in this
cash pool; in other words, the data that is used for a sub-account if you do not give any target
balance amounts for the sub-account itself (in the editor’s Sub-accounts page).
Information Description
ID & Name Unique ID and name of the master and sub-account relationship.
Cash Pool Cash pool to which the master and sub-account relationship belongs.
Note: Cash pool IDs are set up for you at implementation, but can be changed.
Cash Pool Type Cash pool type (Leveling).
Account Account number of the master account.
After the account has been selected, the fields Bank, Currency and Owner will
automatically become available.
Only accounts that belong to the cash pool selected in the Cash Pool field are in the
selection list and are allowed in this field.
Cut Off Days Number to determine which cashflows the treasury needs to consider, in addition to
today’s balance, when making payments out of the accounts in this cash pool.
The resulting balance (today’s balance plus any cashflows included or excluded by the
number of cut-off days you select) is called the estimated balance:
•Enter
-1 to use today’s opening balance only when sweeping the cash pool
•Enter
0 to use today’s opening balance plus today’s cashflows
•Enter
1 to use today’s cashflows and the cashflows from the next business day.
Note that you can have today’s cashflows from today plus any number of business
days; for example, for the next two business days enter 2, and so on. The higher
the number, the less practical the cash pooling becomes; two days is a sensible
limit.
Domain Domain in which this cash pool is available.
Information Description
Minimum Balance Minimum balance that is allowed on the sub-accounts of this relationship.
If the estimated balance of any of the sub-accounts is below this value, TRM sweeps a
certain amount (determined by the currency, and the settings you give for Target
Balance and Denomination) from the master account to the specific sub-account.
Maximum Balance Maximum balance that is allowed on the sub-accounts of this relationship.
If the estimated balance of any of the sub-accounts is above this value, TRM sweeps a
certain amount (determined by the currency, and the settings you give for Target
Balance and Denomination) from the master account to the specific sub-account.
Target Balance Balance required on the sub-account.
The amount that will be swept is the difference between the target balance and the
estimated balance (allowing for any value entered in the Denomination field). The
estimated balance is determined by the number of cut-off days.
3 Managing static data
3.29 Cash pools (optional)
Transaction & Risk Management Module (TRM) User Guide 141
3. Save the whole cash pool definition using File - Save As New.
4. In Cash Pool Editor’s Sub Accounts page, define the properties of the individual sub-accounts.
5. In the Relation Type field, specify the master and sub-account relationship, namely whether the
master and sub-account are owned by the Treasury Center, an affiliate, or owned by an affiliate
that is not a portfolio owner (meaning that the accounts are set up under the Treasury Center as
memorandum accounts).
The remaining fields in this page (Minimum Balance, Target Balance, Maximum Balance, and
Denomination) are the same as their equivalents in the Default Target page, except that they only
apply to the individual sub-accounts.
6. Click Add to add the sub-account for the master account.
7. Repeat this procedure until you have added all the sub-accounts to the master account.
8. Save the whole cash pool definition using File - Save.
Denomination Basic unit of funds to be swept: for example, if you want the funds to be swept in
multiples of 25,000, enter 25,000.
If you want the exact amount to be swept, enter 0.
Information Description
Account Account number of the master account.
After the account has been selected, the fields Bank, Currency, and Owner will
automatically be displayed.
Only accounts that belong to the cash pool selected in the field Cash Pool are in the
selection list and are allowed in this field.
Relationship type Master account is held by Sub-account is held by
TC - TC or Affiliate - Affiliate Treasury Center Treasury Center
Affiliate (portfolio-owner) Affiliate (portfolio-owner)
TC - Affiliate or Affiliate - TC Treasury Center Affiliate (portfolio-owner)
Affiliate (portfolio-owner) Treasury Center
TC - TC(Affiliate) Treasury Center Affiliate (not a portfolio-owner).
TC(Affiliate) - TC Affiliate (not a portfolio-owner) Treasury Center
TC(Affiliate) - Affiliate Affiliate (not a portfolio-owner) Affiliate (portfolio-owner)
Affiliate - TC (Affiliate) Affiliate (portfolio-owner) Affiliate (not a portfolio-owner)
Identical TC(Affiliate) -
TC(Affiliate)
Affiliate (not a portfolio-owner) Same affiliate as master account
Different TC(Affiliate) -
TC(Affiliate)
Affiliate (not a portfolio-owner) Affiliate (not a portfolio-owner), but a
different affiliate from the one holding
the master account.
Information Description

3 Managing static data
3.30 Country groups (optional)
142 © Wall Street Systems IPH AB - Confidential
3.30 Country groups (optional)
Using country groups, you can create trading limits for a group of countries, rather than trading
limits for individual countries. For example, a company in Europe decides that the limit for the
country group South America is $500 million. This means that traders can only trade to a total of
$500 million with all countries in the group South America.
Countries can belong to more than one group. For example, you can create geographical groups
(such as continents), economy groups (such as stable or high inflation), so the same country could
belong to two groups: one showing which continent it is in, and the other its economic stability or
otherwise.
To create a country group:
1. Enter a unique ID and name for the country group in Country Group Editor.
2. Save the country group definition using File - Save As New.
3.31 Credit ratings (optional)
You can create credit ratings, and assign those ratings to clients. A client’s credit rating serves as
another risk parameter, since a transaction with a low-risk client obviously carries less risk than
exactly the same transaction with a high-risk client: the higher the credit rating, the lower the risk.
You use credit ratings in limits. For an explanation of limits: see Chapter 16 Managing limits on page
447.
To create a client rating:
1. In Credit Rating Editor, enter the main attributes of the credit rating in the upper part of the
editor.
2. In the Rating Codes page, enter and add each rating code and corresponding rating level which
applies to the agency.
The rating level identifies how much risk is carried by the code: the lower the level, the less risk
is involved. For example, a level 1 credit code of AAA carries less risk than a level 7 rating code
of A-.
3. Save the credit rating definition using File - Save As New.
3.32 Currency classes (optional)
Currency classes allow you to aggregate currencies (in Treasury Monitor and certain kinds of
reports) as if they were one currency (for example, as was the case with EMU currencies before the
introduction of the Euro). The way that you do this is by selecting Currency Class as the grouping
criterion.
You can also use Currency Class as a display-grouping criterion for other sets of currencies: for
example USD and CAD, or Gulf currencies.
Information Description
ID & Name Unique ID and name for the credit rating agency: for example, ID = MOODY’S and
Name = Moody’s; or ID = S&P and Name = Standard and Poor's.
Domain Domain in which this credit rating applies.
3 Managing static data
3.33 Ladder sets (optional)
Transaction & Risk Management Module (TRM) User Guide 143
You can create currency classes containing any currencies you like, but the same currency cannot
belong to more than one currency class.
To create a currency class:
1. Enter the main attributes of the currency class in Currency Class Editor.
2. Save the currency class using File - Save As New.
3.33 Ladder sets (optional)
A ladder set is a set of interest rates (ladders) that can be applied to a transaction; the interest rate
used then depends on the amount. In this way you can automatically apply different interest rates if
the amount changes.
Ladder sets are typically used in call transactions, or for calculating interest on bank account
balances.
Ladder sets are defined in Ladder Set Editor.
To define a ladder set:
1. Define the main attributes of the ladder set in the upper part of the editor.
2. In the Ladders page, enter the attributes for each ladder using the information in the following
table:
Information Description
ID & Name Unique ID and name for the currency class.
Currency Currency in which currencies belonging to this class are expressed (for some
key-figures).
For example, if a currency belongs to a currency class for which Currency = EUR, then
for the key-figures; Figure Class Equivalent Amount, Figure Class Equivalent Amount
(cum), and Figure Class Equivalent Spot Value, any transactions denominated in that
currency will be expressed in EUR.
This is a mandatory field.
No FX Exposure No FX exposure between the currencies in the class to be calculated: some currencies,
for example, can be considered to have no FX exposure between each other, because
each one of them has a fixed value against another currency, and therefore against
each other.
Net Exposure Nets the exposure of all the currencies within the currency class.
Normally (switch off), any currency movement is regarded as creating exposure
against your own currency. But this does not apply for currencies with no exposure
between themselves.
Information Description
ID & Name Unique ID and name for this ladder set.
Domain Domain in which this ladder set applies.
Active Date The date when the new ladder definitions should replace the old ladder definitions.
See the description of the Duplicate All button below.
Information Description
Description Descriptive name for the individual ladder rate.
3 Managing static data
3.33 Ladder sets (optional)
144 © Wall Street Systems IPH AB - Confidential
3. Click Add to add the ladder to the ladder set.
4. Repeat the procedure to add further ladders to the ladder set.
5. If necessary, modify the switch settings in the Switches page using the information in the
following table:
6. Save the whole ladder set using File - Save As New.
Lower Boundary
Upper Boundary
The ladder rate applies to balances that are lower than the upper boundary and
greater than the lower boundary.
Currency Ladder set currency.
Note that you can add multiple currencies to a ladder set. The ladder set can then be
used to calculate the interest for multi-currency bank accounts.
Rate Ladder rate.
This rate will be added to the rate derived from the yield curve. By default, this is an
absolute value. For example, if you enter 0.25 in this field, then 0.25 percentage
points will be added to the yield curve rate (if the yield curve rate is 5%, the total rate
will be 5.25%).
If you want to use relative rates, turn on the Relative Rate switch in the Switches page.
IR Reference The ladder set yield curve.
Period The period to be applied.
Scenario The pricing scenario for the ladder set.
Active Since
Active Until
The period within which this ladder rate and set are active (used in calculations).
Leave these fields blank if you want the rate to apply indefinitely.
Duplicate All Click
Duplicate All to set the Active Until date of all active ladders to the Active Date - 1
and to create a duplicate set of ladders with the Active Since date equal to the Active
Date. This is a simple way to manage time-dependent ladders.
Switch Description
Absolute
Boundary
Amounts
Switch on so that the Lower Boundary and Upper Boundary values apply to both positive
and negative balances.
For example, if this switch is on for boundaries defined as 1M to 5M, this ladder rate
will also apply to balances from -1M to -5M.
Apply Rates per
Ladder
Switch on so that rates of the ladder set are applied cumulatively rather than
absolutely.
Exclude Lower
Boundary
Exclude Upper
Boundary
Switch on to exclude boundary values when checking the balance range.
For example, if you have two ladders defined as 0 to 1M, and 1M to 5M, and you turn
on Exclude Upper Boundary then a balance of 1M will only belong to the second ladder.
Fund Fee Switch on to create a Fund Fee ladder set.
Relative Rate Switch on so that the ladder rate is treated as a relative figure (and not an absolute
figure).
For example, if you enter 5 in the Rate field, this means that the total rate will be 5%
higher than the yield curve rate; if the yield curve rate is 4%, the total rate will then
be 4.2%.
Floor Rate to 0 Switch on to specify that the final ladder rate should never be negative.
Information Description
3 Managing static data
3.34 Ladder rules (optional)
Transaction & Risk Management Module (TRM) User Guide 145
3.34 Ladder rules (optional)
Ladder rules determine which set of interest rates (ladder set) to use in specific circumstances. For
example, if you want to use different interest rates for different currencies, you specify in the ladder
rule which ladder set to use with which currency.
Ladder rules are defined in Ladder Rule Editor.
To define a ladder rule:
1. In Ladder Rule Editor, define the main attributes for the ladder rule in the upper part of the
editor.
2. In the Ladder Rule page, fill in the fields using the information in the following table:
3. Click Add.
4. Save the whole ladder rule using File - Save As New.
3.35 Option schedule templates (optional)
In TRM, an option schedule drives the creation of the exotic structure of an FX option or any
instrument belonging to the FX Option/Exotic instrument class.
Option schedules contain a number of values that determine how the cashflows of these instruments
are generated. They can be assigned to the instrument in Instrument Editor or at deal entry in
Transaction Manager.
As well as creating simple option templates, you can also create complex user templates by
combining multiple system templates together in one user-defined template. This allows you to build
composite template structures like double barriers, in and out barriers (corridors), with or without
rebates, bermuda barrier options and so on.
Please note that it is also possible to create these complex structure by combining several simple
templates at deal entry: It is possible to add a s many templates as you want to a deal…
TRM is delivered with a set of system-defined templates. However, it is also possible for users to
define their own templates but with some constraints:
•User-defined templates must be derived from a system template
•The default setup for system-defined templates cannot be changed when the user templates are
created.
Option schedules are defined in Option Schedule Template Editor.
Information Description
ID & Name Unique ID and name for this ladder rule.
Domain Domain in which this ladder rule applies.
Information Description
Ladder Set ID for the ladder set (defined in Ladder Set Editor).
Description Description of the ladder set.
Rule
Not Rule
Rule that determines when the ladder set will be used or the rule that determines
when the ladder set will not be used.
Rules are defined in Rule Editor.
Order Number This number is used to determine which ladder set has priority if there are two or
more ladder sets that meet the conditions for the selected rules.

3 Managing static data
3.36 Option schedule template groups (optional)
146 © Wall Street Systems IPH AB - Confidential
3.35.1 Defining simple option schedules
To define an option schedule:
1. In Option Schedule Template Editor, select the system template on which you want to base your
own option schedule from the left part of the editor.
2. Define the main attributes of the option schedule template in the upper part of the editor.
3. In the Option Schedule Templates Item page, define the parameters for the option schedule.
The information that can be defined in an option schedule is explained in the guide TRM
Instruments: Processing and Calculations.
4. In the Groups page, select and add the option schedule template group or groups that you want
this option schedule template to belong to: see 3.36 Option schedule template groups (optional)
on page 146.
5. Save the whole option schedule template using File - Save As New.
3.35.2 Defining complex option schedules
To define complex option schedules:
1. In Option Schedule Template Editor, select the system template on which you want to base your
own option schedule from the left part of the editor.
2. Rename the ID and name of the selected system template and save the new user-defined
template using File - Save As New.
3. In the Option Schedule Templates Item page, click Add Template to merge the structure of another
template with your existing template.
4. In the resulting dialog, select the template you want to merge and click OK. The new template is
added to the item list.
5. Save the whole option schedule template.
3.36 Option schedule template groups (optional)
Option schedule templates can be organized into groups according to their category or function in
Option Schedule Template Group Editor.
There are two main advantages to grouping option schedules: option schedule groups can be used
to restrict availability of the templates, and also can be used to make the template list easier to
navigate.
Any option schedules that have not been organized into a group are placed into an unclassified
group.
Information Description
ID & Name Unique ID and name for the option schedule.
User/System (Information only) Shows if the template is system-defined or user-defined.
Domain Domain in which this option schedule is available.
3 Managing static data
3.37 Package types (optional)
Transaction & Risk Management Module (TRM) User Guide 147
To define an option schedule template group:
1. In Option Schedule Template Group Editor, define the main attributes of the option schedule
template group in the upper part of the editor.
2. In the Option Schedule Templates page, select and add each option schedule you want to add to the
group from the ID field.
3. Save the whole option schedule group using File - Save As New.
3.37 Package types (optional)
It is possible to group transactions, which would otherwise have no attributes in common, into a
package. A package could include, for example, transactions that hedge each other, or transactions
forming option or arbitrage strategies (such as covered call, bull spread, or butterfly).
Packaging allows you to analyze the grouped transactions for position monitoring in Treasury
Monitor, or for reporting purposes.
To group transactions into a package, you first need to create a package main type with one or more
package types. Packages are basically containers into which you add whichever transactions you
want. A transaction can belong to one or several packages as long as the packages have different
package main types.
You add a transaction to a package type within Transaction Manager. See 8.4.7.2 Packaging
transactions on page 290 for more information.
To create a package main type with one or more package types:
1. In Package Type Editor, enter a unique ID and name for the package main type.
2. In the Domain field, specify the domain in which this package main type is available.
3. Define the attributes of the package main type:
4. In the Package Type page, enter a unique ID and name for the package type.
5. Click on Add to add the package type. You can add as many package types as you wish.
6. Save the package main type using File - Save As New.
Information Description
ID & Name Unique ID and name for the option schedule group.
Instrument setup
only
Switch on so that this option schedule group is only available during instrument setup.
This ensures that the group (and therefore the schedules within the group), are not
available for selection at transaction level.
Information Description
System System main types are manipulated by programs (such as activities and
services) and cannot be changed through a user interface.
Hidden Hidden main types are not visible in Transaction Manager.
Selling Selling defines the package main type to be used by the Selling activity (only
one selling main type can be defined).
Non Cancellable Transactions in a non-cancellable package cannot be cancelled. In order to
cancel such a transaction you need to remove it from the package.
3 Managing static data
3.38 Parameters (optional)
148 © Wall Street Systems IPH AB - Confidential
3.38 Parameters (optional)
When someone enters a deal in Transaction Manager, or a stand-alone payment in Settlement
Processing, they can specify the currency, the portfolio, and a variety of other fixed parameters.
To meet any extra transaction specification needs your organization may have, you can define your
own custom parameters for transactions (Type = Transaction, Number = 0-19), for payments (Type
= Payment, Number = 0-9), for guarantees (Type = Guarantee, Number = 0-9), and for collateral
(Type = Collateral, Number = 0-9).
Each parameter can contain a set of your own custom values. You can use these parameters in rule
definitions for selecting transactions, or as grouping criteria in reports and monitors.
Parameters are defined in Parameter Editor.
To define a parameter with its associated values:
1. From the list of parameters on the left side of the editor, select the number/type of the
parameter you want to define.
2. In the Name field, give a new name to the parameter.
Note: You can only rename a parameter, not create a new one.
3. In the Parameter page, enter the values that you want to assign to this parameter.
4. Click Add to add the value to the parameter definition.
5. Save the entire parameter definition, using File - Save As New.
3.39 Properties (optional)
TRM should normally provide all the data possibilities you need to define clients, instruments, and
portfolios. If it does not, you can create extra values for almost any type of information (for
example, a boolean value, date, integer, or character string).
These extra values are called properties and you create them in Property Editor. Any properties that
you create are added to the standard list of properties that appears in the Properties page of the
respective editor.
In Property Editor, you can also define extra parameters for a specific activity. You can make these
parameters invisible to the person using the activity, or make them appear as optional or mandatory
fields.
You can choose from two different categories of value types when you define the values for a
property.
•The first group consists of all the values ending with ID (for example Client ID, Portfolio ID, and
so on). These all serve the same basic purpose: they are for properties where you select the
relevant entity. For example, if you select Client ID, you will produce a property where the user
applying that property has to select a client ID.
Information Description
Value Name that you want each value to have throughout TRM: for example, in selection
lists, report columns, and so on.
Description Description of the purpose of this individual parameter.
Order Number Order in which you want the value to appear in selection lists for this parameter.
3 Managing static data
3.39 Properties (optional)
Transaction & Risk Management Module (TRM) User Guide 149
•The second group of value types consists of the following standard types: Boolean, Date, Date
Time, Integer, Money, Number, and String. For all of these value types, the possible values are
either Yes or No.
Note: New properties require underlying programming within TRM.
3.39.1 Creating properties
To create an extra property:
1. In the upper part of Property Editor, define the main attributes of the property using the
information in the following table:
2. Save the property definition using File - Save As New.
3. In the Switches page, set the attributes you need for the whole property using the information in
the following table:
Information Description
Object The object to which the property applies, such as UMI (for an instrument) or activity.
Note: To add a property to a payment advice, you need to use the Settlement Property
object.
Key
Key 2
Key 3
(Activity properties only)
ID of the activity to which the property applies.
Typ e
Name
ID and name that you want to give to the property.
These appear in the Property selection lists of the relevant editor’s Properties page. For
properties belonging to an activity, the name also appears as the field label.
Because you can use the same property in more than one editor, the ID does not have
to be unique to this one property.
Value Type Type of value to be input for the property, such as Portfolio ID.
Order Number Number determining the order in which the properties appear (1 for first property
listed, 2 for the second property listed, and so on):
• For activities, this is the order in which the fields are displayed in the Parameters
page.
• For clients, instruments and portfolios, this is the order in which the properties
appear in the selection list for the relevant editor’s Properties field.
Switch Description
Default If no property is selected, then this is the default.
Hidden Property cannot be viewed.
The property is not displayed in the property selection list, but if you type the name of
the property, the property is available.
Mandatory Property is a mandatory field for the entity or activity.
Mandatory fields are shown in red, and anyone using the activity or setting up the
entity will not be able to save the activity or entity until they have supplied a value for
this field.
Must Match Property must exactly match one of the values specified in the Values page.
Selectable Property field (as it appears in the activity or editor) will contain a selection list
containing all the values created for the property.
Unique Switch on to prevent two or more activities or editors from having the same value for
this property.
3 Managing static data
3.40 Schedule templates (optional)
150 © Wall Street Systems IPH AB - Confidential
4. Save the whole property definition using File - Save.
5. Complete the property definition using the information in the following section.
3.39.1.1 Defining property values
Once you have defined the main attributes for a property, you then need to set the various values
that the property is allowed to take.
For example, if you have defined value type String for the property, then you can specify the
character strings to be accepted as input, and how they are interpreted by TRM.
Note that the value type of the property defined here may be different from the value type defined
for the property itself.
To define the property values:
1. In the Property Item page, specify the property values using the information in the following table:
2. Click Add to add this value definition.
3. Repeat the procedure to add any further value definitions that you need for this property.
4. Save the whole property definition using File - Save.
3.40 Schedule templates (optional)
In TRM, a schedule drives the generation of a set of cashflows of the same type (for example,
interest flows).
Schedules are directly used to generate the cashflows for instruments belonging to the following
instrument classes: Asset Backed Securities, Bonds, Caps, Floors, and Collars, Generic Loans, and
Commercial Loans.
Schedules are also indirectly used for structured products which comprise the above-mentioned
instrument classes, namely: Swaps, Total Return Swaps, and Swaptions.
Information Description
Value Type Type of value that can be selected for this property. The value type you select here can
differ from the one you selected in the upper part of the editor.
String Value Value ID that will be shown in the selection list in the Value field of the Properties page
of the relevant editor or in the parameter field of the activity.
Name Name of the value that can be entered. The name appears next to the Value ID in the
property value selection list, or as the field label for the activity
Order Number Number determining the order in which the values will appear (1 for the value you
want to be shown first, 2 for the second value, and so on):
• For activities, this is the order in which the fields are displayed in the Parameters
page.
• For clients, instruments and portfolios, this is the order in which the properties
appear in the selection list for the relevant editor’s Properties field.
Integer Value If the value type is Integer, enter the integer value here.
Number Value If the value type is Number, enter the number value here.
Money Value If the value type is Money, enter the amount here.
Date Value If the value type is Date, enter the date here.

3 Managing static data
3.41 Schedule template groups (optional)
Transaction & Risk Management Module (TRM) User Guide 151
Schedules contain a number of values that determine how the cashflows of these instruments are
generated. They can be assigned to the instrument in Instrument Editor or at deal entry in
Transaction Manager.
TRM is delivered with a set of system-defined templates. However, it is also possible for users to
define their own templates but with some constraints:
•User-defined templates must be derived from a system template
•The default setup for system-defined templates cannot be changed when the user templates are
created.
Schedules are defined in Schedule Template Editor.
To define a schedule:
1. In Schedule Template Editor, select the system template on which you want to base your own
schedule from the left part of the editor.
2. Enter the ID and Name for the new schedule. Note that both must be unique.
3. Click File - Save As New, then click Yes to confirm.
4. In the Schedule Template Item page, click New... to define a new schedule item. In the displayed
dialog, select the relevant parameters and click OK.
These parameters are explained in the guide TRM Instruments: Processing and Calculations.
Note: To view the parameters of the selected schedule item, right-click anywhere in the List field
and select Select Columns.... You can select the information that you frequently use so that it
is always visible.
5. In the Groups page, select and add the schedule template group or groups that you want this
schedule template to belong to: see 3.41 Schedule template groups (optional) on page 151.
6. Save the whole schedule template using File - Save As New.
3.41 Schedule template groups (optional)
Schedule templates can be organized into groups according to their category or function in Schedule
Template Group Editor.
There are two main advantages to grouping schedules: schedule groups can be used to restrict
availability of the templates, and also can be used to make the template list easier to navigate.
Any schedules that have not been organized into a group are placed into an unclassified group.
Information Description
ID Unique ID for the schedule.
Name Unique Name for the schedule.
User/System (Information only) Shows if the template is system-defined or user-defined.
Primary/Secondary (Information only) Shows if the template is a primary or secondary template.
3 Managing static data
3.42 Security Basket Editor (optional)
152 © Wall Street Systems IPH AB - Confidential
To define a schedule template group:
1. Define the main attributes of the schedule template group in the upper part of the editor.
2. In the Schedule Templates page, select and add each schedule you want to add to the group from
the ID field.
3. Save the whole schedule group using File - Save As New.
3.42 Security Basket Editor (optional)
The Security Basket Editor allows you to group securities in a security basket. You can then use this
basket instead of single securities in TRM, for example, for benchmarks.
Each basket is associated to security criteria. The criteria serves as an IF condition and the security
basket as the THEN part. You can set the basket so that you include or exclude securities from the
basket, similar to TRM rules (rule and not rule).
You must first set up the security criteria in Security Criteria Set Editor, see 3.43 Security Criteria
Set Editor (optional) on page 153.
To define security baskets:
1. In Security Basket Editor, click New to create a new security basket.
2. Enter the main attributes of the security basket in the upper part of the editor:
3. In the Criteria Sets page, select the remaining attributes to use with this basket:
4. If you want to use this criteria to exclude securities from the basket, switch on the Not Criteria
switch. All securities that do not match the criteria are included in the basket.
5. Click Add to add the basket definition.
6. Repeat this procedure until you have added all criteria to the security basket.
Information Description
ID & Name Unique ID and name for the schedule group.
Instrument setup
only
Switch on so that this schedule group is only available during instrument setup. This
ensures that the group (and therefore the schedules within the group), are not
available for selection at transaction level.
Information Description
ID
Name
Enter a meaningful identifier and name for the security basket.
Domain Domain in which this basket applies.
Usage Select the purpose of this security basket. Choices are:
• Benchmark: Select if you are setting up a security basket to be used for
benchmarking.
• Collateral Eligibility and Collateral Haircut: used for Repos.
Note: Use All or None to respectively select all of the choices or to clear the
selection.
Information Description
Security Criteria Set Select the security criteria set (previously defined in the Security Criteria Set
Editor) you want to use with this basket.
3 Managing static data
3.43 Security Criteria Set Editor (optional)
Transaction & Risk Management Module (TRM) User Guide 153
7. Save the basket.
3.43 Security Criteria Set Editor (optional)
The Security Criteria Set Editor allows selecting several criteria, which can be used to include or
exclude a set of securities.
To define security criteria:
1. In Security Criteria Set Editor, click New to create a new security criteria set.
2. Enter the main attributes of the security basket in the upper part of the editor:
3. Select the main criteria you want to use to match securities:
Note: The more criteria you select, the more refined the result.
4. Optionally, select branch codes as criteria:
Information Description
ID
Name
Enter a meaningful identifier and name for the criteria set.
Domain Domain in which this criteria set applies.
Information Description
Instrument Group
Instrument
Matching instrument group and instrument to which the criteria set applies.
Instrument Rating
Instrument Rating Type
(Code)
Matching rating and rating code to which the criteria set applies.
Gap Set Matching gap set to which the criteria set applies.
Maturity Gap From/To Matching maturity Gaps to which the criteria set applies.
Currency Class
Currency
Matching currency class and currency to which the criteria set applies.
Issuer Matching issuers (clients with the role: Issuer) to which the criteria set
applies.
Parent Issuer Matching issuers (clients defined as parents) to which the criteria set applies.
Issuer Main Group
Issuer Group
Matching issuer Main Groups and groups to which the criteria set applies.
Issuer Rating
Issuer Rating Type (Code)
Min/Max Issuer Rating
Level
Matching issuer rating, rating code, and minimum and maximum level to
which the criteria set applies.
Information Description
Branch Codes Matching branch codes to which the criteria set applies. There are 20 possible
Branch Codes.

3 Managing static data
3.44 Security identifier types (optional)
154 © Wall Street Systems IPH AB - Confidential
5. Save the criteria set.
3.44 Security identifier types (optional)
Security identifier types are systems used to uniquely identify financial instruments: for example,
ISIN (International Securities Identification Number), CUSIP (Committee on Uniform Security
Identification Procedures), or SEDOL (Stock Exchange Daily Official List). Security identifier types
are defined in the Security Identifier Type Editor. When adding a security identifier to an instrument,
you select the type to which the identifier belongs.
For example, a bond may have more than one security identifier, in which case, you can add each
one (along with its type) to the bond instrument through the feature Security Identifier - Security
Identifiers page. See the TRM Instruments: Processing and Calculations guide for more information.
Note: You can query transactions by their security identifier or security identifier type in
Transaction Manager’s Query view.
To define a security identifier type:
1. In Security Identifier Type Editor, click New to create a new identifier type.
2. Use the following table to define the security identifier type:
3. Save the new type using File - Save As New.
4. Repeat this procedure to define more identifier types.
3.45 Time zones (optional)
If your TRM users are located in different parts of the world, you need to define each time zone in
Time Zone Editor.
You define the time zones as offsets compared to UTC (universal time coordinated, formerly known
as Greenwich mean time or GMT).
Note: Your system administrator can define the (default) time zone for each user in User
Administration Editor.
Information Description
ID Enter the ID of the security identification system, for example: Bloomberg
identifiers (such as, BB TICKER, TICKER, BB_UNIQUE), ISIN, CUSIP, SEDOL,
and so on.
Name Enter a meaningful name, for example, International Securities Identification
Number.
3 Managing static data
3.46 Transaction charges (optional)
Transaction & Risk Management Module (TRM) User Guide 155
To define a time zone:
1. In Time Zone Editor, enter a unique ID and name for the time zone.
2. In the Offset page, define the first offset for the time zone using the information in the following
table:
3. Click Add to add this offset.
4. Repeat the procedure to add further offsets that apply to this time zone.
5. Save the whole time-zone definition using File - Save As New.
3.46 Transaction charges (optional)
Transaction charges are charges that relate to the transaction itself. A transaction charge can be a
fixed amount or it can be calculated based on the book value, nominal amount or traded units. A
transaction charge is usually settled on the value date of the transaction. Examples of transaction
charges are broker fees and issue fees.
Transaction charges can be applied automatically if a transaction charge rule is assigned to the
instrument using the Transaction Charges feature: see the guide TRM Instruments: Processing and
Calculations for more information.
A transaction charge rule includes how the charge is calculated and may provide details of payment
instructions for the charge. It also includes a standard rule (defined in Rule Editor) which is used to
identify the transactions to which the charge applies. As with standard rules, you can create several
charge rules that share the same name. This means that you can cover several transaction charge
conditions within the same rule. Transaction charge rules are defined in Transaction Charges Editor.
Charges can be applied manually to transactions in Transaction Manager if the Manual Charges feature
is applied to the instrument at instrument level: see 8.2.1.7 Adding charges and fees on page 268.
Note: You should not manually edit rule-based transaction charges. Rule-based transaction
charges are regenerated if the transaction is modified at a later date (i.e. if a parameter
value is added) and any manual changes may be overwritten.
Information Description
Active From Select or enter the date and time from which this offset applies.
For each time zone, you should have one offset entry where the Active From date is
empty. This entry applies to all dates in the history, before other entries.
For time zones where daylight saving time is used, two entries per year are needed:
one for winter time and one for summer time. The time you enter is the time you are
changing to.
For example, daylight saving time starts at 2am on 25 March 2001, when the clock is
moved forward to 3am. So, enter here (depending on the date format you use)
03/25/01 03:00:00.
Offset Enter the offset (in minutes) from UTC: for example, 120 for daylight saving time in
CET.
Comment Any comment that you want to add about this time zone offset.
Active From (UTC) (Information only) The date/time of the offset in UTC.
3 Managing static data
3.46 Transaction charges (optional)
156 © Wall Street Systems IPH AB - Confidential
To set up a transaction charge rule:
1. In Transaction Charges Editor, define the main characteristics of the rule.
2. Specify the transaction charge payment details.
Information Description
ID ID for this transaction charge.
Domain Domain in which this transaction charge applies.
Rule
Not Rule
Rule that defines to which type of transaction this charge applies (Rule), and rule that
defines to which type it does not apply (Not Rule).
Key-Figure The key-figure based on the Figure Currency (either Nominal Amount, Nominal
Amount 2nd, Book Value, or Units).
If the charge rule is applied to a leg instrument, it applies to the leg-specific values.
Note: Nominal Amount 2nd can be used if you need to define a rule to calculate
charges as an annualized percentage of the nominal amount (and currency) of
the second leg of a (cross-currency) swap).
Figure Currency The key-figure specified in the Key-Figure field is converted to figure currency before it
is compared to Minimum Figure Value and Maximum Figure Value, or used in the calculation
of the charge. Transaction currency is used if no figure currency is specified.
Minimum Figure
Value
Maximum Figure
Value
The maximum and minimum figure values between which a transaction charge is
matched.
Maturity Gap Set The gap set to be used.
Maturity Gap
From
Maturity Gap To
This transaction charge is only applied for transactions that reach maturity between
these dates.
Active From
Active To
Start and end dates for the period when the charge is active.
The charge is only applied to transactions where the Active From date is earlier than
the transaction’s value date.
If the Active To field is left blank: this charge is assumed to be valid indefinitely.
Information Description
Date Type Date type (for example, Opening Date, Value Date, Maturity Date) of the transaction
used to calculate the payment date of the transaction charge.
Date Offset Number of business days that are added to the date type selected. This is used to
calculate the payment date of the charge. If you specify a date offset, you should also
specify a calendar (in the following field).
Calendar Calendar or calendar group that is used to calculate the payment date of the
transaction charge. You only need to specify a calendar if you specified a date offset.
Cashflow Type Type of transaction charge.
You can select a charge from a list of the cashflow types that have been created in
Cashflow Type Editor.
Currency Currency of the charge if this is different from the transaction currency.
Our Bank
Our Account
Your organization’s bank (Our Bank) and that bank’s account (Our Account) that is used
to pay or receive the charge, if you do not want the account rules defined in Client
Editor to select the bank (or bank account) for you.
If you leave either of these fields empty, the local bank (or bank account) is selected
according to the account rules in Client Editor’s Settlement Instructions page.

3 Managing static data
3.46 Transaction charges (optional)
Transaction & Risk Management Module (TRM) User Guide 157
3. Activate the switches that apply to this transaction charge.
See also 8.2.1.7.1 Transaction charges and yield/price calculations on page 269.
4. In the Calculation Type field, specify how the amount of the transaction charge is calculated.
5. Enter any further information about the transaction charge.
Counterparty
Counterparty
Bank
Counterparty
Account
Same principle as for Our Bank, and Our Account: all of these fields are optional, and
enable you to override the counterparty, bank of the counterparty, or account of the
counterparty, that are automatically selected for you by the account rules in Client
Editor’s Settlement Instructions page.
Information Description
Information Description
All-In Price Switch on when the charge cashflow needs to be included in the All-in Price/Yield.
Re-Offer Price Switch on when the charge cashflow needs to be included in the Re-offer Price/Yield.
No Payment
Netting
Switch on in order to have the charge cashflow settled separately.
Type Description
Amount The amount of the transaction charge if the charge is not dependent on the size or the
maturity of the transaction.
Amount Per Unit The amount of the charge per one unit.
Percent If the transaction charge is a percentage of the nominal amount of the transaction,
enter the percentage of the charge.
The maximum number of decimal places which will be taken into account before
rounding is 12.
Percent Per
Annum
Percentage per annum of the key-figure specified in the Key-Figure field. The charge
amount depends on the maturity of the transaction.
Information Description
Value Value to be used by the Calculation Type field.
For example, if Calculation Type = Percent, and Value = 5, then the value is interpreted
as 5%.
Expression The perl expression that is used to calculate the amount of the transaction charge.
In the expression, $figure_value is the value of the key-figure specified in the
Key-Figure field; maturity is the number of days between the contract maturity and
value dates.
For example: $figure_value * $maturity / 365 (if the key-figure is Nominal
Amount, the fee will be Nominal Amount * (maturity date - value date) / 365.
The transaction column is used to implement the transaction charge requirement and
contains the whole transaction information. Note that a decimal point is used as a
decimal separator in the expression whatever your system configuration for decimal
points.
For example, you can access each parameter using the syntax:
$transaction->{"deal_rate"}
$transaction->{"deal_price"}
$transaction->{"units"}
3 Managing static data
3.47 Volatilities (optional)
158 © Wall Street Systems IPH AB - Confidential
6. Save the transaction charge rule definition using File - Save As New.
3.47 Volatilities (optional)
You use IR Volatility Reference Editor to define volatility structures for instruments. TRM supports
usage of the volatility surface by taking into account: the time to expiry, delta correction, and the
underlying maturity, and linking them to real-time price sources (such as Reuters). You can view
and edit the volatilities in Rate Monitor.
You can price Caps, Floors, and Collars by using a volatility structure with ATM volatility or skew (flat
or forward), Swaptions with ATM straddle volatility or three dimensional structure, and Bond Options
by using a three dimensional structure.
To set up a volatility structure:
1. In IR Volatility Reference Editor, enter the main attributes of the volatility structure in the upper
part of the editor.
Minimum Charge
Amount
Maximum Charge
Amount
The minimum or maximum amount that can be charged.
Amount Rounding
Rounding Method
Choices are: Down, Nearest or Up. The amount is rounded up, down, or to the nearest
figure as calculated using the specified Amount Rounding value.
• If rounding settings are defined, then these settings are used.
• If no rounding settings are defined, then the rounding specified at the currency
level is used.
Information Description
Information Description
ID & Name Unique identifier and name for the volatility structure.
Domain The domain in which this volatility structure applies.
Currency The currency in which the implied volatility of the basket of instruments of the
volatility surface is defined.
Type The type of volatility structure: Cap, Floor, Swaption, or Bond Option.
Gap Set The gap set used to define the time to expiry period.
Underlying Gap
Set
The gap set used to define the time to maturity periods of the Cap or the expiry tenor
of the caplet depending on the surface type.
Yield Curve The yield curve used to estimate the forward rate according to the frequency.
If this field is empty, the yield curve of the volatility surface currency is used.
Rounding
Precision
The number of decimal places to which the volatility structure is rounded in
calculations.
Fixed Coupons Per
Year
The number of coupons per year of the fixed leg of the underlying swaps.
This is used for swaption volatility to calculate the ATM swap rate.
Floating Coupons
Per Year
The number of coupons per year of the floating leg of the underlying swaps used to
define the tenor of each Libor.
This is used for swaptions and cap/floor volatilities to evaluate the fixing rate for
Cap/Floor volatility, as well as the ATM swap rate for swaptions volatilities.
3 Managing static data
3.47 Volatilities (optional)
Transaction & Risk Management Module (TRM) User Guide 159
2. In the Volatility Strike page, fill in the fields using the information in the following table:
3. Save the volatility structure using File - Save As New.
Date Basis The date basis used to convert the time to expiry period calculated with the gap set,
into time.
Underlying Date
Basis
The date basis used to calculate Libor according to the frequency.
Underlying
Volatility
Reference
The underlying Cap/Floor surface used to derive the Caplet/Floorlet surface.
Caplet Stripper The Calculation module used for the Valuation, either NumeriX or TRM.
Caplet
Interpolation Type
Interpolation method used to define how the volatilities are interpolated.
Calendar Calendar used to calculate the dates.
Spot Days Number of business days until the spot date of the yield curve.
Logarithmic
Period Scale
The default setting is time to expiry.
Switch on to use the logarithm of the time to expiry in the interpolation.
Logarithmic
Underlying Period
Scale
The default setting is time to maturity.
Switch on to use the logarithm of the time to maturity in the interpolation.
Skew The default setting is to use the ATM volatilities.
Switch on to use the skew volatility for Caps/Floors and Swaptions.
Forward The default setting is to use the flat volatilities.
Switch on to use the forward volatility for Caps/Floors.
Information Description
Strike The identifier used to define the strike value.
• For Cap/Floor Volatilities, the Strike axis is defined by the delta. In this field, you
select the identifier S0.x according to the delta (see also Strike Value below).
Note: If you select ATM or STK, the remaining fields in this page are unavailable.
Strike Value The value of the strike.
• For Cap/Floor Volatilities, enter the delta points that correspond to the Strike
identifier (see above): for example, 0.015 for S01, 0.0175 for S02, 0.02 for S03,
and so on.
Note: For FX volatilities, when defining the RIC, you specify the identifier in Market
Info Source Editor, and not the value of the strike: see 4.1 Defining real-time
quotations on page 161.
Rate Type The strike can be given either in absolute value, like in Cap volatility, or as delta in the
case of FX volatility.
Variable Strike Switch on in the case of time dependent strike, such as in Cap volatility.
Information Description
3 Managing static data
3.47 Volatilities (optional)
160 © Wall Street Systems IPH AB - Confidential

Transaction & Risk Management Module (TRM) User Guide 161
Chapter 4 Managing market data
The quotations you use in TRM can come from three sources:
•Live market feeds that you import from external market information sources such as Reuters.
•Files which TRM imports (from various possible sources, depending on your implementation).
•Rates that you manually enter in Rate Monitor.
If quotations come from a live market feed, position monitoring in Treasury Monitor can take place
in real-time; TRM constantly checks the market feeds, and can therefore instantly recalculate the
market value of each transaction.
Furthermore, it is possible to set up quotation and interest rate movement simulations for “what if?”
measuring in Treasury Monitor.
In TRM, you can also trade any priced structure, including complex derivatives, using complex
pricing models.
4.1 Defining real-time quotations
This section describes how to define real-time quotations (for example, quotations received from
Reuters), and assign those quotations to whatever they apply to (for example, instruments, yield
curves and so on). You can also define filtering rules to control how the rates are distributed in the
system.
4.1.1 Defining the source market quotations
Quotations are defined in Market Info Source Editor. This editor layout is based on the application
Static Data Editor (see 3.2 Static Data Editor on page 41 for more information).
To import real-time quotations:
1. In Market Info Source Editor, define the market quotation information using the information in
the following table:
Information Description
Type What the quotation applies to: for example, FX-Rate if this is a quotation for a
currency exchange rate, or FX-Cross-Rate if this is a quotation for a currency pair, and
so on.
Note: Type CHAIN (Interest Rate Futures Chain) should only be used for MM Future
Chains. For these instruments, periods and items are generated dynamically, so
it is necessary to only specify the name of instrument in Market Info Source
Editor and leave Period and Item fields empty.
Name Equity, currency pair, index, IR instrument, chain instruments, or interest rate (yield
curve) to which you want to assign this quotation.
The selection list for this field remains empty until you have selected a value in the
Type field.
4 Managing market data
4.1 Defining real-time quotations
162 © Wall Street Systems IPH AB - Confidential
2. Turn on the switches you need using the information in the following table:
Period Period to which the quotation applies; for example, 3M for a three-month quotation,
and so on.
• For equities and IR instruments, select SPOT.
• For chain instruments, you can leave this field empty.
• For CDS instruments, you can enter RECOVERY in this field.
Source Market information source (provider) that is supplying the quotation: for example,
Reuters.
The actual market sources available to you depend on which ones you use, and your
configuration of TRM.
MI Group Name of the group to which you want this quotation to belong. You use quotation
groups if you want to freeze quotations in batches rather than all at once. For more
information, see 4.3 Freezing rates automatically on page 166.
If the group name does not already exist in the selection list, simply type the name
into the field. When you save this quotation definition, the group name will be added
to the selection list.
Producer The provider of the quotations. For quotes with a Bloomberg source, you can state the
producer from which the price should be obtained. The Data License Prices activity will
then explicitly ask for this producer price. This however does not apply to historical
prices.
Item Code identifying the market quotation.
For the actual codes, refer to the documentation supplied by the market information
provider.
Note: For chain instruments, you can leave this field empty.
Bid Tag
Ask Tag
Fields in the market quotation that you want to use to supply the bid and ask
quotations.
Usually, you can leave these two fields blank: they are only necessary if you want to
use fields from the market quotation other than the default bid and ask fields.
Date Tag Field in the market quotation that you want to use to supply a date (for example,
trade date or maturity date) in the quotations.
In particular, this field is used to retrieve the quotations for OTC bonds.
Underlying Period Underlying maturity of the instrument.
Strike The strike corresponding to the quotation. For FX volatility surfaces, the available
strike points are predefined in the system (from Put 5% to Call 5%). For IR volatility
surfaces, the available strike points are defined in IR Volatility Reference Editor.
Scenario Name of the scenario that is updated by the retrieved quotations.
Subscenario Name of the subscenario that is updated by the retrieved quotations.
Rate Type Price type for the quotation.
Divider (Turkish market only)
Number by which the incoming quotation has been divided: for example, if Divider =
1000, a quotation of 1000 TRL is interpreted by TRM as actually being 1,000,000 TRL.
Information Description
Switch Description
Enabled Allows the quotation to be retrieved.
Turn off this switch if you want to disable the quotation without deleting its definition.
Delayed Prices from your market feed to be stored as of yesterday.
4 Managing market data
4.1 Defining real-time quotations
Transaction & Risk Management Module (TRM) User Guide 163
3. Save the quotation definition using File - Save As New (note that the market information source
only takes effect when you save the entity).
The rates are now available in Rate Monitor, where you can view and (if necessary) adjust the
quotation.
4.1.2 Defining filtering rules for real-time quotations
This section describes how to define filtering rules to control how the rates are distributed in the
system. These rules are defined in the Market Info Filter Editor. Rules can be defined either in a
general way (for example for all FX rates), or very specifically for one individual rate or source.
Therefore, giving you a lot of flexibility in how you want to filter the rates. An advantage of correctly
defined filtering rules is to ensure a better usage of system resources.
To define filtering rules for real-time quotations:
1. In Market Info Filter Editor, define the rules using the information in the following table:
Ignore Zero
Zero is Null
These two switches work together, and must both be on for equities and equity
derivatives:
•Ignore Zero forces TRM to ignore all zeros in the quotation.
•Zero is Null changes zeros to nulls (non-defined quotations) which are then ignored
because of the Ignore Zero switch.
You need to ignore zeros in equity quotations, because sometimes a quotation
contains a zero as a delimiter saying "this is the end of the transmission": if this
delimiter is read as an actual quotation value of zero, it distorts the valuation.
Note: The only time these switches should not be on is for FX forward quotations,
where the points can be 0.
Variable Strike • If the switch is off, the strike is constant.
• If the switch is on, the strike changes, as in the case of a Cap/Floor volatility.
Switch Description
Information Description
Name The name of the filtering rule.
Source Market information source that is supplying the quotation: for example, provider
name (i.e. Reuters), CALCULATED or MANUAL).
The actual market sources available to you depend on which ones you use, and your
configuration of TRM.
Type The type of the filtered rate, for example, FX-RATE, IR-RATE, and so on.
Scenario Name of the scenario of the filtered rate.
Subscenario Name of the subscenario of the filtered rate.
Producer The provider of the filtered rate.
Item Code identifying the market quotation.
For the actual codes, refer to the documentation supplied by the market information
provider.
Period Period of the filtered rate, for example, SPOT, 7Y, and so on.
Underlying Period Underlying maturity of the filtered rate.
Strike The strike of the filtered quotation.
Priority The priority of the rule.
4 Managing market data
4.1 Defining real-time quotations
164 © Wall Street Systems IPH AB - Confidential
2. Then, use the following parameters to define how the rates are processed by the filtering rule:
3. Save the filtering rule using File - Save As New.
The following example demonstrates the business filtering logic:
–If Current Rate = Last Stored Rate, then do not send the rate.
–If (Current Time - Last Stored Time) < =1/Limit Throughput, then do not send rate.
–If (ABS(Current Rate - Last Stored Rate) / Last Stored Rate) > Change Percent,
then send rate.
–If (Current Time - Last Stored Time) > Maximum period, then send rate.
You can combine these conditions in one condition, for example:
If ((Current Rate != Last Stored Rate)
AND
(Current Time - Last Stored Time) > 1/Limit Throughput)
AND
(( (ABS(Current Rate - Last Stored Rate) / Last Stored Rate) > Change %)
OR
((Current Time - Last Stored Time) > Maximum period))
THEN send rate
Otherwise, store in filter, and if applicable, delete the previously not sent rate message.
Information Description
Limit Throughput Rates per minute. The default is 0, i.e. no filtering.
Rates are sent according to this frequency per minute. This should help to
limit the throughput of the most volatile rates, typically IR rates.
Maximum Period Time in seconds. The default is 60 (e.g. when left empty).
The time after which a new incoming rate will be sent regardless of the change
percentage condition (Change Percent field). That is, the rate is stored even
when the previous value is smaller than the predefined minimum change
percentage.
The exact time that the rate is sent depends on the frequency of incoming
rates. In the case where there are no new rates incoming, then the rates are
sent in the longer period.
Change Percent Rate is sent only if the change from its previous value is bigger than the
predefined percentage. The default change percent is 0.01 (e.g. when left
empty).

4 Managing market data
4.2 Defining scenarios and subscenarios
Transaction & Risk Management Module (TRM) User Guide 165
4.1.3 Quoting the rates
To start of with and during a short period, it may be useful to investigate each rate update and to
evaluate the frequency of updates on a daily basis. This period is called the investigation period and
short be kept short. At the end of the investigation period, you can then optimize the filtering rules
accordingly in order to keep a good balance between system performance and update frequency of
the rates.
Important: It is important that the filtering rules be properly optimized in order to reduce any
impact to system performances.
To switch on quoting rates during the investigation period, you need set up the following:
•The parameter keep quotes days is set in the Configuration Table Editor to the specified number of
days that you want to store the quotes in the system. See TRM System Admin Guide.
Note: This value is used by the activity Purge Market Quotes when the Keep Quotes Days is not set
directly in the activity. You can schedule this activity to run on a regular basis, for
example, daily, to keep the quotes only the number of days defined by these two
parameters. See A.57 Purge Market Quotes on page 651.
•The switch Log Changes is selected for the scenario that you want to use for the quoting in the
Scenario Editor, for example, DEFAULT.
Important: After you have completed the investigation period and optimized your filtering rules,
you can switch off the quoting the rates, i.e. switch off Log Changes at the scenario
level and set keep quote days to 0.
4.2 Defining scenarios and subscenarios
In TRM, you can specify multiple scenarios and subscenarios to identify more specifically the
quotation to be used for an instrument.
Subscenarios are useful for fixing of floating-rate cashflows and for calibration of complex pricing
models, for example when different sets of market prices must be captured at different times of day.
A single fixing scenario may be used, with subscenarios for fixings during the Tokyo, London and
New York trading days. The use of subscenarios avoids the need for separate fixing scenarios for
each fixing time/location. For example, you can define the following: EUR/USD spot 9:00 fixing
London, EUR/USD spot 9:00 fixing Tokyo, GBP LIBOR 3M fixing London, MSFT NYSE close, or MSFT
NASDAQ close, and so on.
When specifying events or cashflows (fixing, exercise, and trigger) for structured products, you can
link the event to any of the specific subscenarios. You can also specify whether the eventual
outcome of an event depends on the mid (default), bid, or ask quotation of the market variable to
which the event or cashflow is linked.
Subscenarios are independent of scenarios: each subscenario may be used with any scenario.
Scenarios are defined in Scenario Editor and subscenarios are defined in Subscenario Editor. Note
that both these editor layouts are based on the application Static Data Editor (see 3.2 Static Data
Editor on page 41 for more information).
4 Managing market data
4.3 Freezing rates automatically
166 © Wall Street Systems IPH AB - Confidential
4.2.1 Defining scenarios
To define a scenario:
1. In Scenario Editor, fill in the fields using the information in the following table:
2. Save the scenario using File - Save As New.
4.2.2 Defining subscenarios
To define a subscenario:
1. In Subscenario Editor, fill in the fields using the information in the following table:
2. Save the subscenario using File - Save As New.
4.3 Freezing rates automatically
For the calculation of profit/loss, generation of bookkeeping entries, and so on, you need rates that
are not constantly changing with market fluctuations; you need a snapshot of the rates as they were
at a pre-agreed time each day. These saved rates are called frozen rates.
•To set up TRM to freeze rates automatically, use the activity Copy Market Information (see Note:
This activity type is reserved for use by technical support staff - it is not intended for use by end
users. on page 631 for details of the activity’s parameters).
Note: Activities are set up and managed in Activity Manager: see Chapter 6 Managing activities
on page 227 for more information.
Information Description
Int ID Number of the scenario. This number is automatically generated by TRM: the first
scenario is 1, the second 2, and so on.
ID & Name ID and name for the scenario.
Fallback Substitute scenario to fall back on.
Permission (Technical use only)
Access parameter related to the TRM database ObjectPermission table: see the TRM
System Administration Guide for more information.
Domain Domain in which this scenario is available.
Log Changes Switch on if you want to log any changes in a scenario.
Information Description
Int ID Number of the subscenario. This number is automatically generated by TRM: the first
subscenario is 1, the second 2, and so on.
ID & Name ID and name for the subscenario.
Permission (Technical use only)
Access parameter related to the TRM database ObjectPermission table: see the TRM
System Administration Guide for more information.
Domain Domain in which this subscenario is available.

4 Managing market data
4.4 Defining simulation scenarios
Transaction & Risk Management Module (TRM) User Guide 167
4.4 Defining simulation scenarios
In TRM, it is possible to set up quotation and interest rate movement simulations for “what if?”
measuring in Treasury Monitor.
You can define hypothetical changes in quotations and interest rates using scenarios. This enables
you to simulate the impact of these changes on your position.
This section describes how to set up the different simulation scenarios:
•FX simulation scenarios
–FX spot simulation
–FX cross simulation
•IR simulation scenarios
–Offsets to be applied to a yield curve
–Offsets to be applied to a spread curve
•Volatility simulation scenarios
–Offsets to be applied to the volatility of a currency pair
–Offsets to be applied to a volatility reference.
Note that all simulation editor layouts mentioned in the following sections are based on the
application Static Data Editor (see 3.2 Static Data Editor on page 41 for more information).
See also 12.1.5 Simulating movements in Treasury Monitor on page 387.
4.4.1 Defining FX simulation scenarios
In FX simulation, the spot rates of the simulated currencies are changed against the reference
currency, so that the simulated change is equivalent to changing the market quotes.
There are two types of FX simulation available in TRM:
•FX spot simulation
•FX cross simulation.
4.4.1.1 FX spot simulation scenarios
The object of FX spot simulation is to simulate the spot rate of a currency pair.
FX spot simulation scenarios can be set up in FX Simulation Editor. Once the scenarios have been
defined, they can be selected in Treasury Monitor.
The steps and the simulation currency for FX spot simulation can also be defined in Treasury
Monitor: see 12.1.5 Simulating movements in Treasury Monitor on page 387.
To define FX spot simulation scenarios in FX Simulation Editor:
1. Enter a unique ID and name for the FX spot simulation in the upper part of the editor.
2. In the Scenarios page, define the simulation currency and steps for the scenario using the
information in the following table:
Information Description
Currency Class Specific currency class to which the scenario applies.
Currency Currency used in the simulation.
If a currency class has been specified in the Currency Class field, only the currencies
belonging to that class are available for selection.
Change Step to be applied during the simulation.
For example, to see the FX fluctuations in 1% intervals, enter 1.

4 Managing market data
4.4 Defining simulation scenarios
168 © Wall Street Systems IPH AB - Confidential
3. Repeat the procedure to add further scenarios.
4. Save the FX spot simulation definition using File – Save As New.
4.4.1.2 FX cross simulation scenarios
While the steps and the simulation currency for FX spot simulation can be defined in both FX
Simulation Editor and in Treasury Monitor, the steps for FX cross simulation can only be defined in
Treasury Monitor (see 12.1.5 Simulating movements in Treasury Monitor on page 387).
4.4.2 Defining IR and volatility simulation scenarios
You can define hypothetical changes in interest rate curves and volatilities to use “what if”
simulations in Treasury Monitor.
Although some of the required values vary between simulation editors, the general procedure for
setting up an IR or volatility simulation scenario is the same.
1. Enter a unique ID and name for the simulation scenario in the upper part of the editor.
2. In the Scenarios page, enter the parameters used to define the offset used in the simulation
scenario.
The simulation is defined around the coordinates of the pivot point. The pivot point is defined as
a time and a rate corresponding to this time.
Switches By default, the change is a percentage of the absolute value.
Switch on Absolute Change if you want the change to be considered as absolute.
Information Description
Information Description
Pivot Point The time (expressed in years) from the valuation/simulation date to the pivot point of
the curve/surface, i.e. the point around which the simulation parameters are defined
and simulated rates are calculated.
Pivot Point Shift Rate (expressed as a percentage) added to the underlying rate to get the simulated
rate, i.e. the entire underlying curve/surface is shifted according to this rate.
Short End Shift For dates before the Pivot Point, this is the rate (expressed as a percentage) per year
at which the underlying curve/surface, already shifted by the Pivot Point Shift, is further
shifted downwards. For example, for a Pivot Point Shift of 1% and a Pivot Point of 5Y, a
Short End Shift of 0.25% results in a shift of 0.75% for the 4Y rate (= 1% + (4 - 5) *
0.25%), and 0.50% for the 3Y rate (= 1% + (3 - 5) * 0.25%), and so on.
See also Long End Shift.
Long End Shift For dates after the Pivot Point, this is the rate (expressed as a percentage) per year at
which the underlying curve/surface, already shifted by the Pivot Point Shift, is further
shifted upwards. For example, for a Pivot Point Shift of 1% and a Pivot Point of 5Y, a Long
End Shift of 0.5% results in a shift of 1.5% for the 6Y rate (= 1% + (6 - 5) * 0.5%),
and 2% for the 7Y rate (= 1% + (7 - 5) * 0.5%), and so on.
See also Short End Shift.
Maximum Up Shift The largest value (expressed as a percentage) that the underlying curve/surface is
ever shifted. A Maximum Up Shift of 3% means that the underlying curve is never
shifted more than 3% upwards.
Minimum Down
Shift
The smallest value (expressed as a percentage) that the underlying curve/surface is
ever shifted. A Minimum Down Shift of 0% means that the underlying curve is never
shifted downwards.

4 Managing market data
4.4 Defining simulation scenarios
Transaction & Risk Management Module (TRM) User Guide 169
The following diagram illustrates how the parameters you set are used in the simulation:
3. Enter the remaining values (for example, currency or yield curve) for the scenario, as described
in the following sections.
4. Click Add to add the scenario.
5. Repeat the procedure to add any other scenarios you need for the simulation.
6. Save the simulation definition using File - Save As New.
4.4.2.1 IR simulation scenarios
In the simulation, TRM adjusts all interest rates used for the valuation with the offsets defined for
the scenario.
The editors used to define the different IR simulation scenarios are as follows:
•IR Simulation Editor to define the offsets to be applied to the yield curve
•Spread Simulation Editor to define the offsets to be applied to the spread curve.
Once the scenarios have been defined, they can be selected in Treasury Monitor.
IR simulation can also be configured in Treasury Monitor: see 12.1.5 Simulating movements in
Treasury Monitor on page 387.
4.4.2.1.1 Yield curve simulation scenarios
Offsets to be applied to the yield curve can be defined in IR Simulation Editor.
The values specific to this type of scenario are as follows:
4.4.2.1.2 Spread curve simulation scenarios
Offsets to be applied to the spread curve can be defined in Spread Simulation Editor.
1Y 5Y 9Y
0%
1%
2%
3%
Rate Shift
Time
PIVOT POINT
= 5Y
SHORT END SHIFT
= 0.25% (per year)
LONG END SHIFT
= 0.5% (per year)
MAXIMUM UP SHIFT = 3%
PIVOT POINT SHIFT = 1%
MINIMUM DOWN SHIFT = 0%
Information Description
Currency Class Specific currency class to which the scenario applies.
Currency Currency used in the simulation.
If a currency class has been specified in the Currency Class field, only the currencies
belonging to that class are available for selection.
Yield Curve Yield curve used in the simulation.
4 Managing market data
4.4 Defining simulation scenarios
170 © Wall Street Systems IPH AB - Confidential
The values specific to this type of scenario are as follows:
4.4.2.2 Volatility simulation scenarios
In the simulation, TRM adjusts all volatilities used for the valuation with the offsets defined for the
scenario.
The editors used to define the different volatility simulation scenarios are as follows:
•FX Volatility Simulation Editor to define the offsets to be applied to the volatility of the currency
pair
•IR Volatility Editor to define the offset to be applied to the volatility reference.
Once the scenarios have been defined, they can be selected in Treasury Monitor.
Volatility simulation can also be configured in Treasury Monitor: see 12.1.5 Simulating movements
in Treasury Monitor on page 387.
4.4.2.2.1 FX volatility simulation scenarios
Offsets to be applied to the volatility of a currency pair can be defined in FX Volatility Simulation
Editor.
The values specific to this type of scenario are as follows:
4.4.2.2.2 IR volatility simulation scenarios
Offsets to be applied to the volatility reference can be defined in IR Volatility Simulation Editor.
The values specific to this type of scenario are as follows:
Information Description
Currency Class Specific currency class to which the scenario applies.
Currency Currency used in the simulation.
If a currency class has been specified in the Currency Class field, only the currencies
belonging to that class are available for selection.
Spread Curve Spread curve used in the simulation.
Information Description
Currency Pair Currency pair used in the simulation.
Switches By default, the change is a percentage of the absolute value.
Switch on Absolute Change if you want the change to be considered as absolute.
Information Description
Currency Class Specific currency class to which the scenario applies.
Currency Currency used in the simulation.
If a currency class has been specified in the Currency Class field, only the currencies
belonging to that class are available for selection.
Volatility Reference Volatility structure used in the simulation.
Simulation Axis The axis used to which the simulation applies: Expiry or Underlying.
Switches By default, the change is a percentage of the absolute value.
Switch on Absolute Change if you want the change to be considered as absolute.
4 Managing market data
4.5 Rate Monitor
Transaction & Risk Management Module (TRM) User Guide 171
4.5 Rate Monitor
Rate Monitor is used for viewing and managing all sorts of quotations, for example interest rates,
instrument prices, index values, FX rates, and volatilities. These quotations can be (real-time)
market quotations, quotations captured by the used, or quotations derived/calculated from other
quotations.
4.5.1 Rate Monitor menus
The following tables describe the menu items which are specific to Rate Monitor and any layout
which is based on this application.
Other menu items which are common to all applications are described in 2.2.6 Using application
menus on page 34.
4.5.1.1 View
4.5.1.2 Page
Menu item Description
Zoom In
Zoom Out
Zoom to Default
Allows you to zoom into the display (to enlarge the figures), zoom out (to see more of
the display), or zoom to default (to reset the original zoom).
Toggle Tab Orientation Moves page names either to the top or the bottom of the display.
Menu item Description
New Page Adds a new page with the default layout. Select from:
•Instrument - to display quotations for quoted instruments such as Bonds, Equities,
or Indexes.
If you have a list of 1 to n quoted instruments somewhere (e.g. in Transaction
Manager, in a report, in Microsoft Excel) and you want to see/manipulate the prices
of these instruments in Rate Monitor, you can do the following:
a. Copy the instrument IDs (to the clipboard).
b. In the Instrument page of Rate Monitor, click the Paste button near the top right
corner. The instruments are added to the list of Selected instruments (provided
they are valid, quoted instruments).
•FX Rate - to display exchange rates for currencies (FX Rate or FX Volatility).
•FX Fixing Rate - to display exchange rates for currency pairs used for fixing.
The base currency of the fixing rate is the currency defined in Currency Editor’s
Fixing Rates page, while the quote currency of the fixing rate corresponds to the ID
of the currency.
•IR Quote / Yield Curve - to display direct and derived IR quotes and calculation zero
coupon yields.
•Credit Default Swap - to display credit default swap quotes and corresponding default
probabilities and hazard rates.
•IR Volatility: to display prices for volatility structures (Bond Option, Cap/Floor,
Caplet/Floorlet, or Swaption).
•Performance Index: to visualize and maintain prices and composition of a
performance index instrument.
Save Saves any changes made to the quote values.
Refresh Refreshes the display.
4 Managing market data
4.5 Rate Monitor
172 © Wall Street Systems IPH AB - Confidential
4.5.1.3 Layout
Dockable Converts the selected page into a floating window.
Using the same drag and drop function that is available in other applications (such as
Application Manager and Transaction Manager), you can detach a page from the main
Rate Monitor window so that it becomes a floating window, and then reposition it
either elsewhere in Rate Monitor, or as a separate window in your workspace.
See 2.2.7 Customizing the display of applications on page 35.
Hide
Auto Hide
Hide All
Hides dockable pages from the display. You can reinstate a page by clicking on the
page’s tab.
Close All Closes all open pages in the display.
Apply Date Range Opens a dialog in which you can specify a date range for the quotes you want to
display. (Un-checked ‘Start/End dates only’ implicitly meant ‘all dates in the range’.)
You can also specify recurrence of dates (weekly, monthly, quarterly and yearly) by
selecting from a list. The dates start at the Start Date and increase by
week/month/quarter/year, as long as the date is less than or equal to the End Date
Note: If you apply and save a date range it is saved with the layout. This means that
when you reopen the layout, any previously entered dates will be offered as the
initial choice.
Show Blank Rows
Show Blank Columns
Hides empty rows or columns from the display.
Delete in Send If you deleted any rates in Rate Monitor, and you want those rates to be removed from
the database, select this option.
Reset Re-fetches the data originally retrieved from the database, erasing any data that has
been modified.
Menu item Description
Save Opens the Save dialog so you can save any changes made to the current layout.
Save As Opens a dialog so that you can save a new layout.
You need to enter the following information in the Save As dialog:
•Layout Name - descriptive name for the layout.
•Owner - User ID of the owner of the layout. Only this user is permitted to modify
the layout. You may also specify a Group ID in this field.
•User(s) - User or group of users that may use the layout to enter their transactions.
The layouts you save are then listed in the Layout selection list: see Layout - My Layouts.
Properties Shows the properties of the current layout (for example, layout name, owner, and
user).
Delete Allows you to delete the current layout.
My Layouts Opens a multi-selection list to enable you to select the layouts that you want to be
displayed in the Layout menu.
In the menu, the layouts are split into two sections: own and shared.
Menu item Description
4 Managing market data
4.5 Rate Monitor
Transaction & Risk Management Module (TRM) User Guide 173
4.5.1.4 Window
4.5.1.5 Commands
Note: The Commands menu is available when you select a Caplet/Floorlet page from the Page menu.
4.5.2 Toolbar
4.5.3 Start-up parameters
It is possible to alter the start-up parameters so that Rate Monitor launches in a different mode.
See C.8 Rate Monitor on page 683 for information about the options available.
4.5.4 Managing market data in Rate Monitor
You can configure Rate Monitor according to your personal preferences by creating a page or groups
of pages and saving them in a layout. You select the values you want to be displayed in each page of
the layout.
You can create and save the layouts either for your own personal use, or to be shared by other
users.
4.5.4.1 Configuring page layouts
The procedure to configure a page layout so you can view quotations in Rate Monitor is identical for
all page types.
To configure a page layout:
1. Select Page - New Page and the specific page you want to configure.
2. In the resulting dialog, select the rates you want to display.
A new page with the default layout displays the rates you have selected.
3. Right-click the page tab and select Setup.
4. In the resulting dialog, set up the horizontal and vertical axes by selecting and configuring any
other values you want to view.
–For each axis, select the values you want to display, for example, Figures and Dates.
See 4.5.4.2 Selecting axes values on page 174 for more information.
–Right-click an item and select Configure.
Menu Item Description
Discovery Console Opens the Discovery Console.
If no results are displayed for zero curves, you can use the Discovery Console to
show information about the setup or quotation that may be preventing Rate
Monitor from displaying any results.
Menu Item Description
Generate Caplet/Floorlet
Surface
Triggers the calculation of caplet/floorlet volatility from the cap/floor volatility
surface.
Toolbar button Description
Toggle Realtime
Updates
Displays realtime updates if this button is enabled on the toolbar.
4 Managing market data
4.5 Rate Monitor
174 © Wall Street Systems IPH AB - Confidential
You can configure an item even if it is not in the Selected list.
You can also configure an item directly by right-clicking on the corresponding axis in the
Rate Monitor page. For example, if you want to set up the date range, right-click the date
and select Configure this axis.
–Repeat the procedure to configure each item as necessary.
5. Click OK to close the axes setup dialog.
Rate Monitor displays the page with the settings you have configured:
–Green cells indicate one of the following: that the quote does not correspond to today’s
price; that the quote does not originate from this scenario (a fallback scenario is used); or
that the quote is user-modified.
–Gray cells indicate that the quote cannot be edited.
–White cells indicate that the quote is saved to the database.
6. Right-click the page tab again, to view other options.
7. Save the layout using Layout - Save As.
4.5.4.2 Selecting axes values
The following tables describe the axes values that are available for each Page in Rate Monitor.
4.5.4.2.1 Instrument axes
Menu item Description
New Page Inserts another page into the display.
Dockable Converts the current page into a floating window.
Close Closes the current page.
Duplicate Inserts a new page into the display with the same values as the current page.
Title Allows you to change the name on the page’s tab.
Value Description
Dates The dates for which you want to view the quotations.
Choose the date range as follows:
•All dates to see all dates within the selected date range.
•Start/End dates only to see only the two selected dates.
•Weekly/Monthly/Quarterly/Yearly to see weekly/monthly/quarterly/yearly dates
within the selected date range.
Figures Figures displayed on the page. See 4.5.4.4.1 Instrument figures on page 179 for
more information.
Periods The 'period' of the quotation, i.e. SPOT for most quoted instruments. For CTD
bond futures, the selection of this axis also exposes the entire basket of
underlying bonds, allowing the monitoring of certain bond-specific figures (e.g.
implied repo rate, bid/ask risk). For future chain instruments, the selection
exposes all the active contracts in the chain.
Rates Instruments for which you want to view the quotations.
Scenarios Scenario of the quotations. If you select more than one scenario, you must select
Scenario for one of the axes to display the quotations.
Subscenarios Subscenario of the quotations. If you select more than one subscenario, you must
select Subscenario for one of the axes to display the quotations.
4 Managing market data
4.5 Rate Monitor
Transaction & Risk Management Module (TRM) User Guide 175
4.5.4.2.2 FX Rate axes
4.5.4.2.3 FX Volatility axes
4.5.4.2.4 FX Fixing Rate axes
Value Description
Dates See 4.5.4.2.1 Instrument axes on page 174.
Figures Figures displayed on the page. See 4.5.4.4.2 FX Rate figures on page 180.
Quote Currency The currency against which you want to see calculated (cross) quotations. See the
description for Rates.
Rates Currencies for which you want to view the quotations. The quotations are
displayed and editable against the Quote Base currency (usually USD) of each
selected currency. By selecting the Quote Currency axis, it is possible to view (but
not edit) calculated quotations against any currency.
Scenarios See 4.5.4.2.1 Instrument axes on page 174.
Subscenarios See 4.5.4.2.1 Instrument axes on page 174.
Tenors Tenor(s) of the quotations. If Tenors is not selected, then only SPOT quotations are
displayed. If Tenors is selected, the forward tenors and quotations are also
displayed.
Value Description
Dates See 4.5.4.2.1 Instrument axes on page 174.
Delta Volatility surface points to be displayed, from Put 5% to Call 5%. The axis can be
configured to display only ATM volatilities, or the entire surface.
Figures Figures displayed on the page. See 4.5.4.4.3 FX Volatility figures on page 181.
Quote Currency The currency against which you want to view (and capture) volatility quotations.
See the description for Rates.
Rates Currencies for which you want to view the volatility quotations. By default, the
volatility quotation of the selected currency against the Quote Base currency
(usually USD) is displayed. By selecting the Quote Currency axis, it is possible to
display and capture volatility quotations for the selected currency against the
quote currency.
Scenarios See 4.5.4.2.1 Instrument axes on page 174.
Subscenarios See 4.5.4.2.1 Instrument axes on page 174.
Tenors Tenor(s) of the quotations. If Tenors is not selected, then only SPOT quotations are
displayed. If Tenors is selected, the forward tenors and quotations are also
displayed.
Value Description
Dates See 4.5.4.2.1 Instrument axes on page 174.
Figures Figures displayed on the page. See 4.5.4.4.4 FX Fixing Rate figures on page 181.
FX Fixing Rate The currency against which you want to see calculated (cross) quotations. See the
description for Rates.
Periods SPOT, as only spot quotations are available for FX fixing rates.
Scenarios See 4.5.4.2.1 Instrument axes on page 174.
Subscenarios See 4.5.4.2.1 Instrument axes on page 174.
4 Managing market data
4.5 Rate Monitor
176 © Wall Street Systems IPH AB - Confidential
4.5.4.2.5 IR Quote /Yield Curve axes
4.5.4.2.6 Credit Default Swap axes
4.5.4.2.7 Bond Option Volatility axes
Value Description
Dates See 4.5.4.2.1 Instrument axes on page 174.
Figures Figures displayed on the page. See 4.5.4.4.5 IR Quote / Yield Curve figures on
page 181.
Rates IR quotes and yield curves for which you want to view the quotations and/or
calculations.
Scenarios See 4.5.4.2.1 Instrument axes on page 174.
Subscenarios See 4.5.4.2.1 Instrument axes on page 174.
Tenors Tenor(s) of the quotations and calculations. For constructed yield curves, all inputs
(i.e. also futures and bonds) are displayed as 'tenors'.
Value Description
Dates See 4.5.4.2.1 Instrument axes on page 174.
Figures Figures displayed on the page. See 4.5.4.4.6 Credit Default Swap figures on page
182.
Rates Credit default swaps for which you want to view the quotations.
Scenarios See 4.5.4.2.1 Instrument axes on page 174.
Subscenarios See 4.5.4.2.1 Instrument axes on page 174.
Tenors Tenor(s) of the quotations.
Value Description
Dates See 4.5.4.2.1 Instrument axes on page 174.
Expiry Expiry date of the option (i.e. final date when the option can be exercised).
Figures Figures displayed on the page. See 4.5.4.4.7 Bond Option Volatility figures on
page 182.
Rates Rates for which you want to view the quotations. You must select at least one
rate. Only the rates that are relevant to the current page are displayed. For
example, when you configure Rates in the Instrument page, you select the quoted
instruments (assigned with the Quoted feature) for which you want to view the
quotations. This includes such instruments as bonds, equities, or indexes.
Note: In the Yield Curve page, Rates = Yield Curves (or spread curves).
Scenarios See 4.5.4.2.1 Instrument axes on page 174.
Strike Strike of the corresponding option, i.e. bond price in percentage.
Subscenarios See 4.5.4.2.1 Instrument axes on page 174.
Underlying Maturity Maturity of the underlying bond.
4 Managing market data
4.5 Rate Monitor
Transaction & Risk Management Module (TRM) User Guide 177
4.5.4.2.8 Cap / Floor Volatility axes
4.5.4.2.9 Caplet / Floorlet Volatility axes
4.5.4.2.10 Swaption Volatility axes
Value Description
Caplet Length Length of the underlying caplets/floorlets.
Dates See 4.5.4.2.1 Instrument axes on page 174.
Figures Figures displayed on the page. See 4.5.4.4.8 Cap / Floor Volatility figures on page
182.
Maturity Maturity of the cap / floor.
Rates Rates for which you want to view the quotations. You must select at least one
rate. Only the rates that are relevant to the current page are displayed. For
example, when you configure Rates in the Instrument page, you select the quoted
instruments (assigned with the Quoted feature) for which you want to view the
quotations. This includes such instruments as bonds, equities, or indexes.
Note: In the Yield Curve page, Rates = Yield Curves (or spread curves).
Scenarios See 4.5.4.2.1 Instrument axes on page 174.
Strike Strike value of the corresponding cap/floor.
Subscenarios See 4.5.4.2.1 Instrument axes on page 174.
Value Description
Caplet Length Length of the underlying caplet/floorlet
Dates See 4.5.4.2.1 Instrument axes on page 174.
Figures Figures displayed on the page. See 4.5.4.4.9 Caplet / Floorlet Volatility figures on
page 182.
Maturity Start date of the corresponding caplet/floorlet (displayed values are in accordance
with the caplet/floorlet length).
Rates Rates for which you want to view the quotations. You must select at least one
rate. Only the rates that are relevant to the current page are displayed. For
example, when you configure Rates in the Instrument page, you select the quoted
instruments (assigned with the Quoted feature) for which you want to view the
quotations. This includes such instruments as bonds, equities, or indexes.
Note: In the Yield Curve page, Rates = Yield Curves (or spread curves).
Scenarios See 4.5.4.2.1 Instrument axes on page 174.
Strike Strike value of the corresponding caplet/floorlet.
Subscenarios See 4.5.4.2.1 Instrument axes on page 174.
Value Description
Dates See 4.5.4.2.1 Instrument axes on page 174.
Expiry Expiry date of the swaption (i.e. final date when the option can be exercised).
Figures Figures displayed on the page. See 4.5.4.4.10 Swaption Volatility figures on page
183.
4 Managing market data
4.5 Rate Monitor
178 © Wall Street Systems IPH AB - Confidential
4.5.4.2.11 Composite Index axes
4.5.4.2.12 Performance Index axes
Rates Rates for which you want to view the quotations. You must select at least one
rate. Only the rates that are relevant to the current page are displayed. For
example, when you configure Rates in the Instrument page, you select the quoted
instruments (assigned with the Quoted feature) for which you want to view the
quotations. This includes such instruments as bonds, equities, or indexes.
Note: In the Yield Curve page, Rates = Yield Curves (or spread curves).
Scenarios See 4.5.4.2.1 Instrument axes on page 174.
Strike Strike value of the swaption for which volatility will be displayed.
Subscenarios See 4.5.4.2.1 Instrument axes on page 174.
Underlying Maturity Length of the underlying swap.
Value Description
Dates See 4.5.4.2.1 Instrument axes on page 174.
Figures Figures displayed on the page. See 4.5.4.4.11 Composite Index figures on page
183.
Indexes The index you want to observe.
Scenarios See 4.5.4.2.1 Instrument axes on page 174.
Subscenarios See 4.5.4.2.1 Instrument axes on page 174.
Underlying The components of the index. The values for the index itself are displayed in row
"INDEX".
Value Description
Dates See 4.5.4.2.1 Instrument axes on page 174.
Note: When selecting an interval only the numerator and denominator dates are
effectively displayed, since any other date would be completely meaningless
for a performance index (index values cannot change between
observations).
Figures Figures displayed on the page. See 4.5.4.4.12 Performance Index figures on page
184.
Indexes The index you want to observe.
Num/Denom For the performance averaging index only. Indicates if the corresponding
observations are for numerator or denominator. (It is possible to have both
numerator and denominator observations for the same date).
Scenarios See 4.5.4.2.1 Instrument axes on page 174.
Subscenarios See 4.5.4.2.1 Instrument axes on page 174.
Underlying The components of the index. The values for the index itself are displayed in row
"INDEX".
Value Description
4 Managing market data
4.5 Rate Monitor
Transaction & Risk Management Module (TRM) User Guide 179
4.5.4.2.13 Imported Index axes
4.5.4.2.14 Example: setting the volatility for EUR/USD
In Rate Monitor, if you want to set the volatility for EUR/USD, you need the following configuration
in the FX Volatility page:
•Vertical axis:
–Teno rs
•Horizontal axis:
–Quote Currency: USD
–Rate: EUR
–Delta
–Figures.
4.5.4.3 Configuring period axes
All period axes (tenors, delta, and so on) are configurable by entering or selecting values that act as
inclusive filters. If the periods match these filters, they will be displayed in the page.
To configure a period axis:
1. Right-click the axis and select Configure this axis.
2. In the Filter Selection dialog, select or add the period that you want to display (for example,
Smile).
Note that user-defined filters that follow the regular expression syntax can be used in order to
select multiple periods.
3. Click OK to close the dialog.
The page filters the periods to show only those specified. If you selected All, then all available
periods will be displayed.
4.5.4.4 Selecting figures
The following tables describe the available values for the Figures axis in Rate Monitor for each Page.
4.5.4.4.1 Instrument figures
Value Description
Dates See 4.5.4.2.1 Instrument axes on page 174.
Figures Figures displayed on the page. 4.5.4.4.13 Imported Index figures on page 184.
Indexes The index you want to observe.
Scenarios See 4.5.4.2.1 Instrument axes on page 174.
Subscenarios See 4.5.4.2.1 Instrument axes on page 174.
Underlying The components of the index. The values for the index itself are displayed in row
"INDEX".
Figure Description
Bid, Ask The bid and ask quotations of the instrument. The type of the quotation is defined by
the Quoted feature attached to the instrument. See the TRM Instruments: Processing
and Calculations Guide for information about setting up quoted instruments.
4 Managing market data
4.5 Rate Monitor
180 © Wall Street Systems IPH AB - Confidential
4.5.4.4.2 FX Rate figures
Bid Price, Ask Price The bid and ask quotations expressed as a price (percentage), calculated according to
the setup of the instrument. This is relevant mainly for bonds and discount papers
quoted in yield or discount rate. For instruments quoted in price, Bid/Ask Price displays
the same as Bid/Ask.
Bid Risk, Ask Risk Bid/ask risk are relevant when the bond has been assigned the Risk-Yield feature (see
the TRM Instruments: Processing and Calculations Guide for more information).
Bid Trading Margin,
Ask Trading Margin
Relevant only for the following Australian instruments: Floating Rate Note and MBS.
Represents the quotation expressed in percentage of these instruments (specific
formula used when computing the price).
Bid Vol, Ask Vol The volatility of the instrument (may be used in valuation).
Bid Yield, Ask Yield The bid and ask quotations expressed as a yield, calculated according to the setup of
the instrument. For instruments quoted in yield, Bid/Ask Yield displays the same as
Bid/Ask.
Bid Yield (2nd), Ask
Yield (2nd)
Yield calculated according to the selected additional yield convention. See the
description for Convention (2nd).
Bid Z-DM/Spread,
Ask Z-DM/Spread
These fields display either the Z-Spread (for fixed rate bonds) or the Zero Discount
Margin (for FRNs) provided that the instrument has the Z-DM/Spread Setup feature: see
the TRM Instruments: Processing and Calculations Guide for more information.
Beta An IR sensitivity scaling factor (yield beta) for index-linked bonds. This factor is used as
a multiplier for scaling IR exposure, duration figures, and effective convexity.
Convention (2nd) For bonds, it is possible to configure additional yield calculations (in addition to the
trading convention) using the Yield feature (see the TRM Instruments: Processing and
Calculations Guide). This field displays the name of the default additional yield
convention. If multiple conventions have been defined for the instrument, you can
select another convention. The Bid/Ask Yield (2nd) fields display the yield calculated
according to the selected convention.
Fallback Date
Fallback Scenario
If quotations don't exist for the requested scenario and date, the 'fallback logic' results
in the displaying of quotations from another ('fallback') scenario and possibly a
historical ('fallback') date. In such a case, these fields display the actual scenario and
date from which the quotations were retrieved.
Implied Repo Rate The implied repo rate as calculated for each of the bonds in the underlying basket of a
CTD bond future. To see the underlying basket, the Periods axis needs to be selected.
Index Rate Specific to certain index-linked bonds, this figure displays an additional rate used in
index calculations (e.g. index prolongation rate for UK Gilts).
Index Ratio Specific to index-linked bonds, this figure displays the current index ratio associated
with the instrument.
Index Value Specific to index-linked bonds, this figure displays the current index value associated
with the instrument.
Index Value (LFT) Specific to Brazilian LFTs, this figure displays the index value associated with the
instrument.
Period From This field is used to store the publication date of the index value. This information is
relevant for Australian CPI values, as the date is used in Australian index-linked annuity
bond (IAB) calculations.
Price Type The type of quote displayed in the Bid and Ask fields.
Figure Description
Figure Description
Bid, Ask The bid and ask quotations of the currency. Forward quotations are expressed in
forward points (according to Currency Editor definitions).
4 Managing market data
4.5 Rate Monitor
Transaction & Risk Management Module (TRM) User Guide 181
4.5.4.4.3 FX Volatility figures
4.5.4.4.4 FX Fixing Rate figures
4.5.4.4.5 IR Quote / Yield Curve figures
Bid Rate, Ask Rate The Bid, Ask converted into outright quotations (spot + forward points).
Date From, Date To The exact dates for the tenor of the quotation, i.e. the spot date for the spot
quotation, and the spot date and e.g. a date three months from spot for the 3M
quotation.
Fallback Date
Fallback Scenario
See 4.5.4.4.1 Instrument figures on page 179.
Figure Description
Bid, Ask The bid and ask volatility quotations for the currency pair.
Date From, Date To The exact dates for the tenor of the quotation, i.e. the spot date for the spot
quotation, and e.g. the spot date and a date three months from spot for the 3M
quotation.
Fallback Date
Fallback Scenario
See 4.5.4.4.1 Instrument figures on page 179.
Figure Description
Bid, Ask The bid and ask (spot) quotations for the currency pair.
Date To The spot date of the quotation (currency pair), as only spot quotations are
available for FX fixing rates.
Fallback Date
Fallback Scenario
See 4.5.4.4.1 Instrument figures on page 179.
Figure Description
Bid, Ask The bid and ask quotations of the IR quote. For constructed yield curves, these
display the bootstrapped Bid/Ask Discount Factors converted into yields using the
interpolation setup of the yield curve.
Bid Yield, Ask Yield Bid/Ask Discount Factor converted into yield using the interpolation setup of the
yield curve. These are calculated for IR quotes bootstrapped directly into yield
curves and for constructed yields curves.
Bid Discount Factor, Ask
Discount Factor
The bootstrapped discount factors calculated separately from the bid and ask side
of the inputs (IR quotes or instrument prices). These are calculated for IR quotes
bootstrapped directly into yield curves and for constructed yields curves.
Date Basis The date basis of the IR quote.
Date From, Date To The exact dates for the tenor, e.g. the spot date and a date three months from
spot for the 3M quotation.
Discount Factor The bootstrapped (mid) discount factor calculated from the mid quotations of the
inputs (IR quotes or instrument prices). This is calculated for IR quotes
bootstrapped directly into yield curves and for constructed yields curves.
Price Type The price type of the IR quote (e.g. Periodic Rate).
Figure Description

4 Managing market data
4.5 Rate Monitor
182 © Wall Street Systems IPH AB - Confidential
4.5.4.4.6 Credit Default Swap figures
4.5.4.4.7 Bond Option Volatility figures
4.5.4.4.8 Cap / Floor Volatility figures
4.5.4.4.9 Caplet / Floorlet Volatility figures
Yield Discount Factor converted into yield using the interpolation setup of the yield
curve. This is calculated for IR quotes bootstrapped directly into yield curves and
for constructed yields curves.
Yield Date Basis The date basis used in the calculation of the yield.
Yield Price Type The price type in which the yield is expressed (e.g. Continuous Yield).
Figure Description
Bid, Ask The bid and ask CDS quotations.
Date From, Date To The exact dates for the tenor, e.g. the spot date and a date three months from
spot for the 3M quotation.
Default Probability (%) The default probability calculated from the CDS quotes, expressed as a
percentage.
Hazard Rate (bp) The hazard rate calculated from default probabilities, expressed in basis points.
Figure Description
Bid, Ask The bid and ask quotations.
Fallback Date
Fallback Scenario
See 4.5.4.4.1 Instrument figures on page 179.
Price Type The type of quote displayed in the Bid and Ask fields.
Strike Value This figure displays the value of the strike of each column of the volatility
reference.
Figure Description
Bid, Ask The bid and ask quotations.
Fallback Date
Fallback Scenario
See 4.5.4.4.1 Instrument figures on page 179.
Price Type The type of quote displayed in the Bid and Ask fields.
Figure Description
4 Managing market data
4.5 Rate Monitor
Transaction & Risk Management Module (TRM) User Guide 183
4.5.4.4.10 Swaption Volatility figures
4.5.4.4.11 Composite Index figures
Strike Value This figure displays the value of the strike of each column of the volatility
reference.
Figure Description
Bid, Ask The bid and ask quotations.
Fallback Date
Fallback Scenario
See 4.5.4.4.1 Instrument figures on page 179.
Price Type The type of quote displayed in the Bid and Ask fields.
Strike Value This figure displays the value of the strike of each column of the volatility
reference.
Figure Description
Accrued Interest • At component level, the AI of the component in the component's currency.
• At index level, the sum of AI of each component in the index currency.
Accrued Interest (Q) This is the equivalent of the Accrued Interest figure above but it is stored in the
Prices table (via the Index Freeze activity).
Cash • At component level, the cash accumulated since the last revision for this
component, in the component’s currency (Hold Cash On Security method).
• At index level, the cash accumulated for all components, in the index’s
currency (Hold Cash On Index method).
Cash (Q) This is the equivalent of the Cash figure above but it is stored in the Prices table
(via the Index Freeze activity)
Factor Factor applied to the stored units for this component.
• At component level, the factor applied to the units to compute the weight of
the component. It is used either to include a reinvestment, or to compensate
for a split (Reinvest Cash on Security method). Depends on the Rebalance
setup.
• At index level, the factor applied to the MV of the index. It represents the
investment of the component outflows at index level (Reinvest Cash On Index
method). Depends on the Rebate Setup.
FX Rate FX rate used for this component on this date.
FX Rate (Q) This is the equivalent of the FX Rate figure above but it is stored in Prices table (via
the Index Freeze activity.)
Market Value Total market capitalization of the index on this date. This figure applies only to the
index and not to individual components.
• At component level, the market capitalization of the component in the index,
expressed in the component’s currency.
• At index level, the marketing capitalization of the index expressed in the index
currency.
Market Value (Q) This is the equivalent of the Market Value figure above but it is stored in the Prices
table (via the Index Freeze activity)
Price The value of the index for the index; the price of the component for the
components.
Figure Description
4 Managing market data
4.5 Rate Monitor
184 © Wall Street Systems IPH AB - Confidential
4.5.4.4.12 Performance Index figures
4.5.4.4.13 Imported Index figures
Note: For information about the figures displayed in a Performance Index page, see the guide: TRM
Instruments: Processing and Calculations.
Price (Q) This is the equivalent of the Price figure above but it is stored in Prices table (via
the Index Freeze activity).
Units Units of the underlying taken into account for the index calculation (taken from
the index composition and re-balance factors).
Weight % Relative weight of the component in the index (only visible for components).
Weight % (Q) This is the equivalent of the Weight % figure above but it is stored in the Prices
table (via the Index Freeze activity).
Figure Description
Factor Factor applied to stored units for this component (taken from the Re-Balance
setup).
FX Rate FX rate used for this component on this date.
FX Rate (Q) This is the equivalent of the FX Rate figure above but it is stored in the Prices table
(via the Index Freeze activity).
Market Value Total market capitalization of the index on this date. This figure applies only to the
index and not to individual components.
• At component level, the market capitalization of the component in the index,
expressed in the component's currency.
• At index level, the marketing capitalization of the index expressed in the index
currency.
Market Value (Q) This is the equivalent of the Market Value figure above but it is stored in the Prices
table (via the Index Freeze activity).
Observation Date Date when the price of the underlying has been observed for the calculation.
Price The value of the index for the index; the price of the component for the
components.
Price (Q) This is the equivalent of the Price figure above but it is stored in the Prices table
(via the Index Freeze activity).
Units Units of the underlying taken into account for the index calculation (taken from
the index composition and re-balance factors).
Weight % Relative weight of the component in the index (only visible for components).
Weight % (Q) This is the equivalent of the Weight % figure above but it is stored in the Prices
table (via the Index Freeze activity)
Figure Description
Price The value of the index. This figure is available at index level only.
Weight % The relative weight of the component in the index. At index level, the calculated
sum is displayed in order to help track composition inconsistencies (it should be
100%).
Figure Description

4 Managing market data
4.5 Rate Monitor
Transaction & Risk Management Module (TRM) User Guide 185
4.5.4.5 Manually adjusting and creating quotations
You can manually adjust the quotations displayed in Rate Monitor if the cells are editable. You can
also enter values if no quotations are available in the scenario.
To adjust or enter quotations:
1. Enter the values directly into the corresponding cell of the Rate Monitor page.
The following table describes the values you can enter in each of Rate Monitor’s pages:
2. Select Page - Save to send the changes to the database.
If you deleted any rates and you want those rates to be removed from the database, set the
Delete in Send setting in the Page menu.
Page Description
Instrument You can view rates for quoted instruments in the Instruments page.
• If the instrument’s Price Type = Price %, enter a price as the quotation.
• If the instrument’s Price Type = Yield, enter a price or a yield as the quotation.
• If the instrument is a Bond or an Equity, enter the spot price.
• If an Equity’s Price Type = Amount/Unit, you can enter the Bid or Ask price only.
• For a CTD Future, you can enter the Bid or Ask price only.
You can only view instruments that have been assigned with the Quoted feature. This
feature determines which figures (prices) are available in Rate Monitor: see TRM
Instruments: Processing and Calculations Guide for information about setting up
quoted instruments.
FX Rate If the quotations are for rates:
•If
Periods = Spot, enter the spot rate.
• For any other period, enter the quotation as forward points.
For FX volatility:
• Volatility smile quotes are interpreted as absolute volatility values.
IR Quote / Yield
Curve
It is possible to enter, modify and save quotations for direct IR quotes. Derived IR
quotes and yield curves are calculated on the fly, and their quotations and yields can
only be viewed.
The type of quotation you can enter depends on the Quotes field of the IR definition.
• If Quotes = Bid/Ask, you can enter quotations in both the Bid and Ask fields.
• If Quotes = Single Quote, you can enter a quotation in the Bid field only.
The tenors for which you can enter quotations vary according to the tenors defined for
the IR quotes in IR Quote and Yield Curve Editor.
IR Volatility Before you can enter volatility rates for an instrument, you must create a volatility
surface in Volatility Reference Editor.
You enter the volatility expressed as a percentage.
• For cap volatilities, you enter the data using ATM (at-the-money volatility) strike
and an STK (at-the-money strike).
• For bond options and swaptions, you enter the data using an ATM strike. Your
model skews using HI and LO strikes.
Note that for variable strikes, if there is no volatility data from the market data feeds,
the values shown in Rate Monitor default to the defined strike values.
Performance
Index
This page is used to visualize and maintain prices and % weightings of the index.
The selected performance indexes can be displayed together with their component
instruments.
The relative weights of each component and the performance value of the index are
computed and displayed in the Price column for each observation date.
4 Managing market data
4.6 Pricing tools
186 © Wall Street Systems IPH AB - Confidential
In addition, the activity Save Derived IR Quotes and Yield Curves can be used to save zero-coupon
rates and derived yield curves. See A.61 Save Derived IR Quotes and Yield Curves on page 653.
4.5.5 Generating quotation reports
In TRM, you can produce the following quotation-related reports:
4.6 Pricing tools
TRM provides several tools which can be used to obtain the pricing of certain types of transaction.
This section describes FX Forward Pricing which is a tool used to display forward points for currency
pairs. TRM also provides the IR Pricing tool as a solution to traders who want to simulate the pricing
of plain vanilla swaps before generating a corresponding transaction in TRM.
See Chapter 23 Pricing IR and FX trades on page 575.
4.6.1 FX Forward Pricing
FX Forward Pricing is used to display forward FX rates for any pair of currencies and for any date in
the future. You can see the forward rates for defined periods, insert your own rates at pivot periods,
and view rates for broken dates in the tool.
4.6.1.1 FX Forward Pricing menus
The following tables describe the menu items which are specific to FX Forward Pricing and any layout
which is based on this application.
Other menu items which are common to all applications are described in 2.2.6 Using application
menus on page 34.
4.6.1.1.1 File
Report Description
Rate Used to show quotations for today or any other specified date.
See B.37 Rate Report on page 674 for details of the report’s parameters.
Rate Log Used to access stored rates.
See B.39 Rate Log Report on page 675 for details of the report’s parameters.
Rate Comparison Used to compare the quotations on one date with those on another date.
See B.38 Rate Comparison Report on page 675 for details of the report's
parameters.
Menu item Description
Save Configuration Saves the selected currency pair, so that the same currencies are displayed the next
time you open FX Forward Pricing.
Reset Resets any modified values in the tool to the market rates.
4 Managing market data
4.6 Pricing tools
Transaction & Risk Management Module (TRM) User Guide 187
4.6.1.1.2 View
4.6.1.1.3 Options
4.6.1.1.4 Period
4.6.1.1.5 Rows
Menu item Description
Zoom In
Zoom Out
Zoom to Default
Allows you to zoom into the display (to enlarge the figures), zoom out (to see more of
the grid), or zoom to default (to revert to the default setting).
Menu item Description
Show Forward Points Displays the values as forward points.
If this option is not selected, forward rates (spot rate plus forward points) are
displayed instead.
Show Inverse Quotes Allows you to see inverse quotes.
If this option is selected, the number of quotes per base are displayed, no matter
what the currency definition is in Currency Editor.
Freeze Updates Allows you to freeze the rates in the display.
If this option is not selected, the rates will be updated as and when market rates
change.
Starting Date Allows you to select the date from which the forward rates are calculated.
By default, the starting date is today’s date, but you can change this date to a date in
the past or in the future.
Note: If you select Columns - Dates to display the Date and Days columns, you can see
the number of days that are in each period calculated from the starting date.
Menu item Description
Add Broken Date Inserts a broken date between periods.
The rate shown for a broken date is the rate interpolated from the period (or pivot
date) on either side of the broken date.
Note: Unlike pivot dates, you cannot override the value displayed.
Menu item Description
Add Pivot Period Allows you to insert your own period, called a pivot period, between the pre-defined
periods.
O/N
T/N
Spot
1W, 1M, 1Y, and so on
Allows you to select the standard periods you want to display.
If you need more periods or dates to be displayed, use Add Pivot Period or Add Broken
Date.
See 4.6.1.3.4 Selecting FX pricing periods on page 189.
4 Managing market data
4.6 Pricing tools
188 © Wall Street Systems IPH AB - Confidential
4.6.1.1.6 Columns
4.6.1.1.7 Graphics
4.6.1.2 Start-up parameters
It is possible to alter the start-up parameters so that FX Forward Pricing launches in a different
mode.
See C.3 FX Forward Pricing on page 681 for information about the options available.
4.6.1.3 Configuring the display
This section explains how to use FX Forward Pricing and the different ways that the information can
be displayed in the tool.
4.6.1.3.1 Selecting the currency pair
To select the currency pair:
1. From the Base Currency and Quote Currency fields in the toolbar, select the pair of currencies for
which you want to display the rates.
The quotes for the currency pair are displayed for each period.
2. Select File - Save Configuration to save the currency pair, so that the same currencies are displayed
the next time you use FX Forward Pricing.
The following information is stored:
–Quote currency and base currency
–Broken dates and pivot dates
–IR differential columns.
Menu item Description
Reference Columns Displays the reference rates.
If the currency pair (base currency and quote currency) that are displayed are both
quoted against another currency, then you can display the quotes of each currency, as
well as against each other.
Ref/Base IR
Differentials
Displays the difference in interest rates between the reference currency and the base
currency.
Ref/Quote IR
Differentials
Displays the difference in interest rates between the reference currency and the quote
currency.
Base/Quote IR
Differentials
Displays the difference in interest rates between the base currency and the quote
currency.
Dates Displays for each period, the date on which the period falls, and the number of days
between the start and end of period (period date).
Menu item Description
Ref/Base IR
Differentials
Ref/Quote IR
Differentials
Base/Quote IR
Differentials
If you have selected the corresponding IR differential column from the Column menu,
you can choose to have a graphical representation of these IR differentials.
See 4.6.1.3.5 Displaying graphics on page 189.
4 Managing market data
4.6 Pricing tools
Transaction & Risk Management Module (TRM) User Guide 189
4.6.1.3.2 Selecting display options
It is possible to modify the display options by selecting the appropriate menu item from the Options
menu.
For example, you can choose to display the values as forward points instead of forward rates, or you
can change the starting date to a date in the past or in the future.
See 4.6.1.1.3 Options on page 187 for more information.
4.6.1.3.3 Selecting columns
For each currency pair, you can select different types of information to be displayed in different
columns.
For example, it is possible to display the quotes of each currency against a reference currency.
It is also possible to display the IR differentials (the difference in interest rates), calculated from the
forward points, the IR differentials between the currencies of the currency pair, or the IR
differentials between either currency and the reference currency.
These options are available for selection from the Columns menu option: see 4.6.1.1.6 Columns on
page 188 for more information.
4.6.1.3.4 Selecting FX pricing periods
There are various ways in which you can select the periods used in FX Forward Pricing.
The pre-defined standard periods (such as O/N, 3M, 6M, 1Y, and so on) can be selected from the
Rows menu option: see 4.6.1.1.5 Rows on page 187.
However, you can also insert your own periods, called pivot periods, between these pre-defined
periods.
Normally, all rates between periods are calculated by linear interpolation. If you insert a pivot date
between two periods, then the value displayed for the pivot period is the value interpolated from the
periods on either side of the pivot date. You can override this value with your own rate.
In addition to pivot dates, you can also insert broken dates between periods. The rate shown for a
broken date corresponds to the rate interpolated from the period (or pivot date) on either side of the
broken date. You cannot override the value displayed for a broken date.
To insert a pivot period or broken date:
1. Select Rows - Add Pivot Period or Period - Add Broken Date.
2. Select the date you want to add from the resulting dialog.
A new row displays in FX Forward Pricing and the period or date is added to the Row or Period
menu.
If you want to remove a period, pivot period, or broken date from the display, you can do so by
deselecting the period or date from the corresponding menu.
4.6.1.3.5 Displaying graphics
If you have selected one of the IR differential columns, you can choose to have a graphical
representation of these IR differentials: see 4.6.1.1.7 Graphics on page 188 for more information.
The graph is displayed using the default layout but it is possible to modify its appearance.
To change the appearance of a graph:
1. Select the component you want to modify by doing one of the following:
–Right-click the graph and select the component that you want to format from the menu.
–Double-click the component itself.
–Right-click the graph and select Wizard.
2. Make your changes in the resulting dialog.
4 Managing market data
4.7 Pricing complex derivatives
190 © Wall Street Systems IPH AB - Confidential
If you want to change the orientation of the graph, press and hold down the Ctrl key and drag the
graph to the position you want.
4.7 Pricing complex derivatives
In TRM, you can trade any priced structure, including complex derivatives, using complex pricing
models. These models are used in various TRM applications.
The procedure for setting up complex pricing models is as follows:
1. Define the instruments (such as, Swaptions, Caplets, and FX Options) needed to identify the
parameters of the calibration models. These are contained in a calibration basket.
See 4.7.1 Defining Calibration Baskets on page 190.
2. Define the calibration models, by linking the mathematical model, the volatility surface, and the
yield curve for each currency or currency pair. For more information, see:
–4.7.2 Defining a calibration model for a currency on page 191
–4.7.3 Defining cross-currency calibration models on page 192
–4.7.4 Defining BGM calibration models on page 193.
3. Define the correlation-related information.
Note: If correlation terms are not specified, then by default, they are taken as zero.
See 4.7.5 Calibration Monitor on page 195.
4. Calibrate derivative pricing models to market data either manually or automatically.
See 4.7.6 Calibrating pricing models on page 198.
5. Define a valuation model by linking the calibration model, the valuation method, and the
valuation quality to the instrument in Instrument Editor.
See 4.7.7 Assigning calibration models to instruments on page 199.
4.7.1 Defining Calibration Baskets
You need to define the liquid instruments required for the calibration procedure, for example,
Swaptions, Caplets, or FX Options, which are used to identify the parameters of the mathematical
models. This is known as a calibration basket.
Calibration baskets are defined in the Calibration Basket Editor. This editor layout is based on the
application Static Data Editor (see 3.2 Static Data Editor on page 41 for more information).
To define a calibration basket:
1. In Calibration Basket Editor, enter the main attributes of the basket in the upper part of the
editor.
Information Description
ID & Name Unique identifier and name for the calibration basket.
Instrument ID of the volatility structure from which the calibration instruments are selected.
• For IR, select either a Caplet volatility structure or a Swaption volatility structure.
The IR volatility structure is defined in Volatility Reference Editor and displayed in
Rate Monitor.
• For FX, select the currency pair.
The FX volatility structure is defined in the FX Volatility page of Rate Monitor.

4 Managing market data
4.7 Pricing complex derivatives
Transaction & Risk Management Module (TRM) User Guide 191
2. In Calibration Basket Editor’s Point page, define the values to determine which liquid instruments
(of the selected instrument in the Instrument field), are used for the calibration.
3. Add the point definition to the list by clicking Add.
4. Save the calibration basket definition using File - Save As New.
4.7.2 Defining a calibration model for a currency
The next step in the process is to define a calibration model for each currency. This is done in
Calibration Single Editor.
This editor layout is based on the application Static Data Editor (see 3.2 Static Data Editor on page
41 for more information).
To define a single currency calibration model:
1. In Calibration Single Editor, enter the main attributes of the model in the upper part of the
editor.
Reference Date Date against which the time to expiry, as well as the time to maturity of the
calibration instruments, is calculated.
• If a date is specified in this field, the calibration instruments are time dependent,
that is, the time to expiry of swaptions decreases with an offset equal to the
difference between the calibration date and the reference date.
• If a date is not specified in this field, the time to expiry of swaptions is constant
with respect to the calibration date.
Information Description
Expiry Period The expiry period of the selected instrument.
Expiry Date The expiry date of the selected instrument.
Underlying Period The underlying period of the selected instrument.
Underlying Date The underlying date of the selected instrument.
Strike The strike of the selected instrument.
Note: This corresponds to the strike value defined in Volatility Reference Editor.
Type The type of instrument used for the calibration. The possible values are: Call
(default), Put, or Straddle.
Weight The weight factor that applies to the instrument in the calibration process.
This is the weight by which the difference between market and model prices is
multiplied in the calibration process.
Information Description
Information Description
ID & Name Unique identifier and name for the single currency calibration model.
Currency Currency attached to the single currency model.
Yield Curve Yield curve used for the calibration of the single currency model.
If this field is left blank, the system uses the curve defined in Currency Editor’s
Journals page for the currency definition.
Quality Integer to define the speed and the numerical convergence of the calibration model.
Note: This number is only used for the following models: Black-Karasinsky, Spot
Skew, and Black-Derman-Toy.
Offset Percentage value by which the yield curve should be shifted before recalibration.
4 Managing market data
4.7 Pricing complex derivatives
192 © Wall Street Systems IPH AB - Confidential
2. In Calibration Single Editor’s Basket page, enter the values to define any time dependent
calibration basket instruments.
3. Add the basket definition to the list by clicking Add.
4. In Calibration Single Editor’s Models page, select the models (pre-defined list) to be calibrated
with respect to the calibration basket.
5. Add the model definition to the list by clicking Add.
6. Save the single currency calibration model definition using File - Save As New.
4.7.3 Defining cross-currency calibration models
To set up an FX model for a currency pair, you need to define a cross-currency valuation model by
combining single currency calibration models (as defined in Calibration Single Editor).
Cross currency valuation models are defined in Calibration Cross Editor. The editor layout is based
on the application Static Data Editor (see 3.2 Static Data Editor on page 41 for more information).
To define a cross currency valuation model:
1. In Calibration Cross Editor, enter the main attributes for the model in the upper part of the
editor.
Exclude from
calibration activity
Switch on to exclude the model during execution of the NumeriX Calibration activity.
See A.52 NumeriX Calibration on page 649.
Information Description
Active Since
Active Until
Date range within which the basket defined in the Basket field is active (see next).
Leave these fields blank if you want the basket to apply indefinitely.
Basket 1 Basket of instruments used for the calibration of the single currency model.
Basket 2 Second basket which can be used for the calibration if Basket 1 contains insufficient
instruments and it has been defined with a Reference Date.
Information Description
Model Mathematical model to be calibrated (pre-defined list).
Inputs • Beta: The skew parameter of the Spot Skew model.
• Lambda: The mean reversion of Hull and White, Black Karasinsky.
Default Switch on Default if the model selected in the Model field is used by default.
Information Description
Information Description
ID & Name Unique identifier and name for the cross currency calibration model.
Recalibrate Switch on if recalibration is required for the calculation of IR exposure. The default
setting is non-calibration of the model.
Exclude from
calibration activity
Switch on to exclude the model during execution of the NumeriX Calibration activity.
See A.52 NumeriX Calibration on page 649.

4 Managing market data
4.7 Pricing complex derivatives
Transaction & Risk Management Module (TRM) User Guide 193
2. In Calibration Cross Editor’s Map page, specify the values to determine the calibration basket’s
instruments, using the information in the following table:
Note: If the FX Estimation Curve field is empty, the value in the Yield Curve field is used. If both
fields are empty, the value in the Underlying field is used. The values in the Yield Curve and
Underlying fields are specified in Calibration Single Editor.
3. In Calibration Cross Editor’s Models page, select the models (pre-defined list) to be calibrated
with respect to the calibration basket.
The number of calibration models you need to set up to create a cross-currency valuation model
depends on the number of currencies you want to include:
–For 2-currency calibration you need to set up three calibration models
–For 3-currency calibration you need to set up five calibration models
–For 4-currency calibration you need to set up seven calibration models.
4. Save the cross currency valuation model definition using File - Save As New.
Note: When you set up a cross-currency valuation model, you always need to set up the
domestic currency first. Moreover, the current version of NumeriX only supports the
combination of a single-factor model, that is, you cannot create a cross currency model
when the IR model in one currency is a two-factor model.
4.7.4 Defining BGM calibration models
The procedure to set up a BGM (Brace Gatarek Musiela) calibration model differs slightly from the
procedure described in the previous sections. Due to the high volume of calibration output for BGM,
this is the only model where the output of the calibration is not shown.
The correlation between increments for the gap set of Libor is used as input for the calibration of the
BGM calibration model. You define the correlation in the Calibration BGM page of Calibration
Monitor.
Information Description
Underlying 1 ID of the domestic model used in the FX calibration.
Underlying 2 ID of the foreign model in the FX calibration.
Yield Curve 1 ID of the domestic yield curve used in the FX calibration.
Yield Curve 2 ID of the foreign yield curve in the FX calibration.
FX Estimation
Curve 1
ID of the domestic currency used to forecast FX rates.
FX Estimation
Curve 2
ID of the foreign currency used to forecast FX rates.
Basket 1 ID of the basket instrument corresponding to the FX instrument.
Basket 2 ID of the second basket which can be used for the calibration if Basket 1 contains
insufficient instruments and it has been defined with a Reference Date.
Information Description
Model Mathematical model to be calibrated (pre-defined list).
Default Switch on Default if the model selected in the Model field is used by default.
4 Managing market data
4.7 Pricing complex derivatives
194 © Wall Street Systems IPH AB - Confidential
The parameters you need to fit are the volatility of the Libor process, as well as the correlations
between the Brownian motion spanning the Libor’s processes.
See 4.7.6.2 Calibrating a BGM model on page 198.
BGM calibration models are defined in Calibration BGM Editor. The editor layout is based on the
application Static Data Editor (see 3.2 Static Data Editor on page 41 for more information).
To define a BGM calibration model:
1. In Calibration BGM Editor, enter the main attributes for the model in the upper part of the editor.
2. In Calibration BGM Editor’s Basket page, enter the values to define any time dependent
calibration basket instruments.
3. Save the BGM calibration model definition using File - Save As New.
Information Description
ID & Name Unique identifier and name for the BGM calibration model.
Currency Currency attached to the model.
Yield Curve Yield curve used for the calibration.
Factor Number of factors of the BGM model.
Calculation Option Option used to speed up the BGM model while pricing Backward (but will increase the
use of the memory). Choose from: Use LIBOR Cache or Conserve Memory.
Volatility Type Type of volatility used in the calibration of Libor. The possible choices are:
• General - no parametric form. This type is recommended when there are several
instruments in the Calibration basket.
• Composite - allows a time dependent component as well as an individual
movement parameter for each Libor.
• Flat Volatility - this is a combination of a volatility module and a direction
component. The volatility module consists of a scalar volatility function. The
direction component consists of unit-norm vectors that define instantaneous
correlations between forward Libors.
Correlation Type The type of correlation when type Volatility Type = Flat Volatility.
Weight Type If the weights are not defined at instrument level, you can select one of the following
available NumeriX options: Uniform, Vega, Inverse Price, or Square Inverse Price.
Offset Percentage value by which the yield curve should be shifted before recalibration.
If the offset is defined, then the system recalibrates the model. If it is not defined,
recalibration is not done.
Recalibrate Switch on if recalibration is required for the calculation of the model.
Exclude from
calibration activity
Switch on to exclude the model during execution of the NumeriX Calibration activity.
See A.52 NumeriX Calibration on page 649.
Information Description
Active From
Active To
The date range within which the basket defined in the Basket field is active (see next).
Leave these fields blank if you want the basket to apply indefinitely.
Basket 1 Basket of instruments used to define the calibration instruments for a Swaption
matrix, for example.
Basket 2 Second basket which can be used for the calibration if Basket 1 contains insufficient
instruments and it has been defined with a Reference Date.
This may be required, for example, if you want to calibrate against Swaptions and
Caplets.
4 Managing market data
4.7 Pricing complex derivatives
Transaction & Risk Management Module (TRM) User Guide 195
4.7.5 Calibration Monitor
You can calibrate, view, and modify the outputs of the calibration parameters in Calibration Monitor.
Calibration Monitor is a special Rate Monitor mode, designed specifically for calibrating pricing
models.
Note: Before using Calibration Monitor, the yield curves, as well as the IR and FX volatilities have
to be set up in Rate Monitor. You must also create a volatility surface in Volatility Reference
Editor before you can enter volatility rates for an instrument.
4.7.5.1 Calibration Monitor menus
The menu items in Calibration Monitor are basically the same as the menu items in Rate Monitor
(see 4.5.1 Rate Monitor menus on page 171). The exceptions are described in the following tables.
4.7.5.1.1 Page
4.7.5.1.2 Commands
4.7.5.1.3 Toolbar
4.7.5.2 Start-up parameters
The start-up parameter used to open Rate Monitor’s Calibration mode is:
FKMonitor.exe --service calibration-board
See C.8 Rate Monitor on page 683 for more information.
Menu item Description
New Page Adds a new page with the default layout. Select from:
•Calibration
Calibration pages allow you to select the calibration models you want to use and to
view the output of the calibration.
•Calibration BGM
Calibration BGM pages allow you to input the correlation for the BGM model and to
launch the calibration. The axis of the correlation matrix corresponds to the gap
set defined as the Correlation Gap in Calibration BGM Editor.
• Volatility
Volatility pages allow you to select and view the calibration basket you want to use
in the calibration process.
Note that you can see the instruments which are part of the calibration basket in
this page. However, you cannot add or remove an instrument from a basket. This
is only possible in Calibration Basket Editor.
Menu item Description
Calibrate Calibrates the pricing model according to the parameters you have defined.
Toolbar button Description
Toggle Realtime
Updates
Displays realtime updates in the monitor if this button is enabled on the toolbar.
Note: After the calibration, you must refresh the view using Page - Refresh before you
can see the updated value.
4 Managing market data
4.7 Pricing complex derivatives
196 © Wall Street Systems IPH AB - Confidential
4.7.5.3 Customizing Calibration Monitor
You can configure Calibration Monitor according to your personal preferences by creating a page or
groups of pages and saving them in a layout in the same way as in Rate Monitor. You select the
values you want to be displayed in each page of the layout.
You can create and save the layouts either for your own personal use, or to be shared by other
users.
4.7.5.3.1 Configuring layouts
To configure a layout in Calibration Monitor:
1. Select Page - New Page and the specific page you want to configure.
A new page with the default layout displays.
2. Right-click the page tab and select Setup.
A dialog (similar to the Setup dialog in Rate Monitor) displays in which you can select and
configure the values you want to view.
3. In the dialog, set up the horizontal and vertical axes as follows:
–For each axis, select the values you want to see.
–Right-click an item and select Configure.
You can configure an item even if it is not in the Selected list.
You can also configure an item directly by right-clicking on the corresponding axis. For
example, if you only want to set up the date range, right-click the date and select Configure
this axis. The Date dialog displays.
The following table describes the values you can configure:
Value Description
Baskets In a Volatility page, allows you to select the basket of instruments (defined in
Calibration Basket Editor) you want to use in the calibration procedure.
Calibrations In a Calibration page, allows you to select a single or cross currency calibration
model to use in the calibration procedure.
Dates Start and End Date for the period you want to calibrate.
Switch on Start/End dates only if you want to view the quotations for two separate
dates, instead of for a date range.
Note that if you save date information in the layout, this is applied each time
you use the layout.
Figures Figures that you want to display. These differ slightly according to the type of
page you are configuring: see 4.7.5.3.2 Calibration Monitor key-figures on
page 197.
Instruments In a Calibration page, displays the liquid instruments used in the basket of
instruments.
Models In a Calibration page, displays the mathematical model (pre-defined list).
Offsets Normal, Down, or Up
The system calculates the calibration parameters for the non offset, the up
offset, and the down offset for each scenario and subscenario.
4 Managing market data
4.7 Pricing complex derivatives
Transaction & Risk Management Module (TRM) User Guide 197
Note that in a Calibration page, calibrations, models, instruments, and processes must all be
selected on the same axis (horizontal or vertical), and in this exact sequence.
–Repeat the procedure to configure each item as necessary.
4. Click OK to close the axes setup dialog.
Calibration Monitor displays the page with the settings you have configured.
4.7.5.3.2 Calibration Monitor key-figures
The following table describes the key-figures in Calibration Monitor’s Calibration page:
Periods
Periods 1
Periods 2
Periods (ref)
Displays the periods of the calibration.
•In a Volatility page, the period (or periods) for which you want to view the
calibration.
- Period 1 corresponds to the Underlying Period that is used in the
definition of the volatility reference.
- Period 2 is used to enter the strike (volatilities).
•In a Calibration BGM page:
- Periods (ref) displays the reference date.
Processes In a Calibration page, displays the ID of the calibration process (pre-defined
list).
Scenarios Scenario from which you want to retrieve the rates.
If you select more than one scenario, you must select Scenario for one of the
axes to display all the rates.
Subscenarios Subscenario you want to use to retrieve the rates.
If you select more than one subscenario, you must select Subscenario for one of
the axes to display all the rates.
Value Description
Figure Description
Alpha Parameter used to define the shape of the smile in the Heston model.
Note: This figure is not yet implemented.
Mean Reversion The mean reversion of the Process. Used for Black Karasinsky, Hull and White, Spot
Skew, Black-Derman-Toy.
Model Correlations (For FX models)
Correlations between models used as inputs for cross currency calibrations.
Offset The offset to be used for the calibration.
Process Correlations Correlations between the processes of a given model. These are the outputs for the
calibration.
Max Date The maximum date required as input for the calibration of Spot Skew,
Black-Derman-Toy, or Black-Karasinsky.
Skew The Beta skew parameter is used in the Spot Skew model.
Theta Parameter of the volatility processes in the Heston model.
Note: This figure is not yet implemented.
V0 Initial value of the local volatility in the Heston and SABR models.
Note: This figure is not yet implemented.
Volatility Max Date Output volatility corresponding to the maximum date.
4 Managing market data
4.7 Pricing complex derivatives
198 © Wall Street Systems IPH AB - Confidential
The following table describes the key-figures in Calibration Monitor’s Calibration BGM page:
The following table describes the key-figures in Calibration Monitor’s Calibration Volatility page:
4.7.6 Calibrating pricing models
You can either calibrate pricing models manually in Calibration Monitor, or use activities to calibrate
the pricing models automatically.
4.7.6.1 Manual calibration
To calibrate the pricing models manually in Calibration Monitor:
1. In Calibration Monitor, open a Calibration Volatility page.
2. Select the ID of the calibration basket which is attached to your model.
Note that you can see the instruments which are part of the calibration basket in this page.
However, you cannot add or remove an instrument from a basket. This is only possible in
Calibration Basket Editor.
3. Open a Calibration page (or Calibration BGM page).
4. Select the calibration models you want to calibrate.
5. Select Commands - Calibrate to see the calibration output.
The output of the calibration can be visualized in the Calibration page by selecting the appropriate
key-figures: see 4.7.5.3.2 Calibration Monitor key-figures on page 197. For more information
about the calibration of a BGM model: see 4.7.6.2 Calibrating a BGM model on page 198.
4.7.6.2 Calibrating a BGM model
The calibration of a BGM model in the Calibration BGM page is done in the same way as described in
4.7.6.1 Manual calibration on page 198 using the Commands - Calibrate menu option.
In a Calibration BGM page, the Correlation matrix is the correlation between the increments of a set of
Libors with arbitrary start and end dates. Due to the high volume of calibration output, BGM is the
only model where the output of the calibration is not shown.
To define the start and end date of each Libor, you have to define a specific gap set in Gap Editor
(see 4.7.4 Defining BGM calibration models on page 193).
The start and end point of the Libor is defined by taking the reference date defined in the editor and
adding the corresponding gap.
Volatility The Sigma (short rate) volatility is used in the process.
Volatility (time
dependent)
The time-dependent Sigma (short rate) volatility is used in the process.
Figure Description
Correlations The gap set defined as the Correlation Gap for the model in Calibration BGM Editor.
Figure Description
Ask The ask quote, expressed in terms of percentage.
Bid The bid quote, expressed in terms of percentage
Used The character which specifies if an instrument is part of the basket.
Figure Description

4 Managing market data
4.8 Bloomberg interface
Transaction & Risk Management Module (TRM) User Guide 199
The Effective Correlation values are defined in the Calibration BGM page by selecting the appropriate
calibration BGM model.
4.7.6.3 Automatic calibration
You can calibrate derivative pricing models to market data by batch using an activity. You need to
set up one activity to calibrate the model, and another to value the transactions.
1. Use the NumeriX Calibration activity to calibrate the models: see A.52 NumeriX Calibration on
page 649 for details of the activity’s parameters).
You need to run this activity before you run the Valuation activity.
2. Use the NumeriX Valuation activity to value the transactions: see A.53 NumeriX Valuation on
page 649 for details of the activity’s parameters).
Running this activity logs the market value, present value, and local and global probability in the
database.
Note: Activities are set up and managed in Activity Manager: see Chapter 6 Managing activities
on page 227 for more information.
4.7.7 Assigning calibration models to instruments
You can assign the calibration models at instrument level so that they are used to price all the
instruments’ transactions.
To do so, you need to apply two features to the instrument setup: NumeriX Setup and NumeriX
Valuation: see the guide TRM Instruments: Processing and Calculations for more information about
these features.
4.8 Bloomberg interface
Manually entering any data (for instance, an insert of a newly issued bond) can be a time consuming
and error prone task. Likewise, for keeping the static data up-to-date, for instance, the update of
instruments credit rating. The same applies to client rating updates and corporate actions update.
You can automate all these activities by using Data License interface from Bloomberg, where you
can configure, for instance, instrument types, which should be regularly inserted or updated in the
system.
All necessary editors and reports are accessible from the Application Manager, for example, in Middle
Office - Market Data Import Management. All activities are available in Activity Manager.
The following sections provide a more detailed description of all those tools.
4.8.1 Interface configuration and usage overview
The following sections summarize which editors and activities need to be configured for the specific
actions.
4 Managing market data
4.8 Bloomberg interface
200 © Wall Street Systems IPH AB - Confidential
4.8.1.1 Editors usage
The following table shows which editors are used to perform specific Bloomberg interface actions.
Note: O = Optional and M = Mandatory.
Note: The Prices Import action is managed in the Market Info Source Editor, see the TRM System
Admin Guide for more information.
4.8.1.2 Activities usage
The following table shows which activities apply to specific Bloomberg interface actions. For more
information about these activities, see Appendix A Activity parameters on page 627.
Note: A = Applicable.
Editor
Interface actions
Securities
Import
Security
List Import
Instrument
Update
Clients
Update
Corporate
Actions
Update
Prices
Import
Client Subentity Filter O
Client Update Request M
Corporate Action Update
Request M
Instrument Subentity Filter OOO
Instrument Update Request M
Provider Field MMMM
Provider Field Set M
Security Import Request M
Security List Request M
Security Mapping Rule M
Security Mapping Set MM
Value Mapping OOOO
Activity
Interface actions
Securities
Import
Security
List Import
Instrument
Update
Clients
Update
Corporate
Actions
Update
Prices
Import
Data License Output
Processing AAAAAA
Data License Prices A
Delete Instrument A
Import Instrument A
Import Security List A

4 Managing market data
4.8 Bloomberg interface
Transaction & Risk Management Module (TRM) User Guide 201
4.8.2 Generic configuration
The generic configuration of the Bloomberg interface consists of the following steps:
•Define the fields you want to import, see 4.8.2.1 Defining fields for import on page 201.
•Group fields with a similar meaning and context in Provider Field Sets for easier recognition and
to use when loading the instruments, see 4.8.2.2 Defining provider field sets on page 202.
•Map individual fields to specific destination fields in the system, see 4.8.2.3 Mapping the
provider fields to specific system fields on page 202.
•Filter definitions for Instrument and Client Editor pages (so called sub-entities), see 4.8.2.4
Filtering rows in subentities on page 204.
•Map the loaded values to system-specific values, see 4.8.2.5 Mapping imported provider values
to system values on page 205.
4.8.2.1 Defining fields for import
You must define a record for each provider field you want to import. Data license fields are available
in the fields.csv file.
You should define only those fields that are essential to your needs in the Provider Field Editor.
These field definitions should comply to the provider’s convention.
Important: It is not necessary to import each record into the Provider Field Editor mainly
because of the large size of the file and secondly because only a fraction of these
fields can be mapped and used in the system.
To define the fields for the import:
1. In Provider Field Editor, use the following table to complete the main attributes:
Important: All of the fields must follow the same convention as the one used by the provider.
Update Client A
Update Corporate Actions A
Update Instrument A
Activity
Interface actions
Securities
Import
Security
List Import
Instrument
Update
Clients
Update
Corporate
Actions
Update
Prices
Import
Field Description
ID and Name The unique identifier and name
Comment Any additional information that is relevant to the definition.
Data Type Define what type of data is contained in the field. For example, INTEGER,
CHARACTER, DATE, and so on.
Data Type Length The length of the field.
Provider Type The name of the provider.
Note: In this version, only Bloomberg is supported.
4 Managing market data
4.8 Bloomberg interface
202 © Wall Street Systems IPH AB - Confidential
2. In the Market Sector page, add the market sectors where the field has a meaningful value. For
example, Equity, Govt, Corp, and so on.
3. Save the definition using File - Save As New.
4.8.2.2 Defining provider field sets
The fields that you defined previously in the Provider Field Editor and that you flagged to be used in
instrument imports and updates (switch Security) must be grouped in a provider field set. Provider
field sets are defined in the Provider Field Set Editor.
Provider field sets are then used in subsequent business logic. For example, each instrument type,
such as Equity, might have a dedicated field set, where the fields specific to this instrument type,
are grouped together and requested from the provider to properly update or import the instrument.
To define provider field sets for instruments
1. In Provider Field Set Editor, use the following table to complete the main attributes:
2. In the Provider Field page, add the provider fields that you want to include in this data set. You
can use one provider field in more than one data set.
3. Save the definition using File - Save As New.
4.8.2.3 Mapping the provider fields to specific system fields
The individual fields must be properly mapped to the specific client or instrument fields (destination)
in the system. That is, you need to create sets of mappings for each provider field to determine the
corresponding destination field where the data should be inserted.
For instrument updates, the mapping sets, which can be both general and specific, are defined in
the Security Mapping Set Editor and then used in one of the security request editors. For client
updates, the mapping is done directly in the Client Update Request Editor.
To map the provider fields to specific destination fields:
1. In Security Mapping Set Editor, use the following table to complete the main attributes:
Category (Information only) The type of data, for example, Security Identifiers, Ratings,
and so on.
Subcategory (Information only) Subcategory of the field.
Security Switch on to use the field for instrument imports and updates. You will later
include these fields in the appropriate data set, see 4.8.2.2 Defining provider
field sets on page 202.
Client Switch on to use the field for client updates. You will later include these fields
in the appropriate data set, see 4.8.2.2 Defining provider field sets on page
202.
Field Description
Field Description
Name The name of the provider field set.
Comment Any additional information that is relevant to the definition.
Provider Type The name of the provider.
Note: In this version, only Bloomberg is supported.
Field Description
Name The name of the mapping set.

4 Managing market data
4.8 Bloomberg interface
Transaction & Risk Management Module (TRM) User Guide 203
2. In the Mapping page, use the following table to add the mappings to the mapping set:
Provider Type The name of the provider.
Note: In this version, only Bloomberg is supported.
Comment Any additional information that is relevant to the definition.
Field Description
Entity The entity of the Instrument Editor to which the provider field should be
mapped. Typically, one entity corresponds to one page in the Instrument
Editor. In the entity selection box, for each entity, you can see the technical
name (Entity Name column) and the page name (Label column) as it appears in
the Instrument Editor.
For example, UMIRating corresponds to the Credit Ratings page, UMIBond
corresponds to the Bond page, and so on.
Entity Column The column of the selected entity, which is to be populated by the provider
field. Typically, one entity column corresponds to a field that appears on the
page in the Instrument Editor.
You must first select an entity before you can select an entity column. Only
the entity columns for the selected entity are available.
Provider Field The provider field to be inserted in the Instrument Editor field as defined by
the selected entity and entity column.
Subentity Filter The subentity filter definition you want to use when the selected entity
contains a list of possible options, for example, security identifiers, and not
just individual fields, you need to uniquely identify the option to establish what
exactly needs to be updated. See 4.8.2.4.1 Instrument subentities on page
204.
Value Mapping The value mapping definition that you want to use to do the mapping. Value
mapping definitions are used when the provider data (source) do not fit in to
the Instrument Editor values (destination), you can create a value mapping
definition that defines how the source data should be mapped to the
destination field. This mapping is defined in the Value Mapping Editor, see
4.8.2.5 Mapping imported provider values to system values on page 205.
Note: Value mapping definitions can be simple or enhanced by the use of
regular expressions.
For example, if the provider uses a different name for Date Basis, you need to
define a value mapping definition that tells the system how to handle the
provider’s name for Date Basis.
Script The script that will be used to do the mapping. Scripts are another way of
mapping provider fields to system fields when simple mapping is not
sufficient, you can create a simple python script that defines more complex
mappings. For example, when a value in the Instrument Editor depends on a
combination of two or more provider fields.
Note: Scripts have a higher priority than value mapping definitions and if you
have selected both a value mapping definition and a script then the
script is used and the value mapping definition ignored.
Field Description

4 Managing market data
4.8 Bloomberg interface
204 © Wall Street Systems IPH AB - Confidential
3. Save the definition using File - Save As New.
4.8.2.4 Filtering rows in subentities
Specific configuration must be done for the data (fields, switches, and so on) contained in
Instrument Editor and Client Editor pages. These pages are referred to as subentities. For example,
Security Identifiers page or Credit Ratings page.
Before you can run the import, you must first uniquely identify the destination row using the
appropriate subentity filter, and then map the provider fields to the proper column on the selected
row.
Subentity filters for the Instrument Editor are defined in the Instrument Subentity Filter Editor (see
4.8.2.4.1 Instrument subentities on page 204) and subentity filters for the Client Editor are defined
in the Client Subentity Filter Editor (see 4.8.2.4.2 Client subentities on page 205).
4.8.2.4.1 Instrument subentities
To filter rows in instrument subentities:
Client Mapping Switch on to identify the selected provider field as the ID of client, i.e.
ID_BB_COMPANY or ID_BB_PARENT_COMPANY, and so on. During the mapping,
the provider field is used to identify the client with the same property value
and the corresponding client name is then used in selected entity column.
Typically, such a field is used to populate issuer and other client-related fields
in the Instrument Editor.
You must use the client’s unique ID to identify each client and not the client’s
name because the naming convention may vary between the provider and
system. This unique identification is defined at the client level in the Client
Editor by adding the property ID_BB_COMPANY with the proper unique ID
supplied by the provider to any client that could potentially be using in market
data import and update processes.
Periodical Active From The time limit you want to set for particular entity.
Switch on to create a new time limited row in the selected subentity. The first
subset of rows is evaluated using the subentity filter. This switch then uniquely
identifies the Active From column. The last period that has column Active To
bigger than the provider value is searched. This subentity row is closed and a
new subentity row is inserted with the Active From column to set to the
relevant provider value.
This is typically used for time limited setup, in subentities like Credit Rating,
Equity Info, and so on.
Periodical Active To Switch on to define the column Active To in the subentity row. The last record
for the specified subentity filter is found and closed by the provider value. A
new row from date Active From and with new information fields, like changed
Credit Rating, is then entered.
This behavior differs when the following situations occur:
•If the Active From and Active To columns contain the same provider field,
then the Active To from the existing row is closed one day before the new
row Active From column is entered. This ensures a continuity of time
segments without any gaps.
• If the data have not changed and the last row contains the same values as
the value fetched during update from provider, then no new row is inserted
and the existing one stays valid. This is useful when the instrument is
regularly updated, but there is no change, for instance, to the credit
rating. Then only one credit rating record is inserted and is kept until any
changes occur.
Ignore Mapping When
Null
When switched on, any null values in the provider field are ignored and are
not inserted into the selected instrument field, i.e. existing previous values in
the instrument fields are not overwritten.
Field Description
4 Managing market data
4.8 Bloomberg interface
Transaction & Risk Management Module (TRM) User Guide 205
1. In Instrument Subentity Filter Editor, use the following table to complete the main attributes:
2. In the Filter Condition page, use the following table to add filtering conditions:
Note: A filter can contain one or more conditions.
3. Save the definition using File - Save As New.
4.8.2.4.2 Client subentities
To filter rows in client subentities:
1. In Client Subentity Filter Editor, use the following table to complete the main attributes:
2. In the Filter Condition page, use the following table to add the filtering conditions:
Note: A filter can contain one or more conditions.
3. Save the definition using File - Save As New.
4.8.2.5 Mapping imported provider values to system values
It may occur that the provider uses a different naming and value convention than the system does.
Therefore, you can can map the provider values to the WSS values by defining an easy one-to-one
translation. This mapping is done in the Value Mapping Editor. Value mapping definitions map the
possible values of provider fields to the corresponding system values.
To map provider values to system values:
Field Description
Name The name of the subentity filter.
Comment Any additional information that is relevant to the definition.
Entity Subentity in the Instrument Editor for which the filter is defined. The activity
will update or change only the rows that match the defined filter.
Field Description
Entity Column Column from the selected subentity.
Value Value that the selected column must contain to meet the filter condition. Only
the rows that match all conditions are populated or changed by the provider
data.
Field Description
Name The name of the subentity filter.
Comment Any additional information that is relevant to the definition.
Entity Subentity in the Client Editor for which the filter is defined. The activity will
update or change only rows that match the defined filter.
Field Description
Entity Column Column from the selected subentity.
Value Value that the selected column must contain to meet the filter condition. Only
the rows that match all conditions are populated or changed by the provider
data.
4 Managing market data
4.8 Bloomberg interface
206 © Wall Street Systems IPH AB - Confidential
1. In Value Mapping Editor, use the following table to complete the main attributes:
2. In the Mapped Value page, use the following table to map values:
3. Save the definition using File - Save As New.
4.8.3 Security import
You can configure updates to securities to run periodically by using the appropriate activities.
4.8.3.1 Configuring security import requests
After you have done the generic configuration, you must specify which securities need to be
requested from the provider and which new instruments need to be created for these securities.
These actions are referred to as requests. You configure these requests in the Security Import
Request Editor. You can also specify which provider fields should be requested in the same editor.
For more information about the generic configuration, see 4.8.2 Generic configuration on page 201.
To configure security import requests:
1. In Security Import Request Editor, use the following table to complete the main attributes:
Field Description
Name The name of the value mapping set.
Comment Any additional information that is relevant to the definition.
Field Description
Source Value of the provider field. It is possible to use regular expressions.
Destination Value of the corresponding system field. It is possible to use regular
expressions.
Script The script that will be used to do the mapping. Scripts are another way of
mapping provider fields to system fields when simple mapping is not
sufficient, you can create a simple python script that defines more complex
mappings. For example, when a value in the Instrument Editor depends on a
combination of two or more provider fields.
Priority The priority of the mapping. When a regular expression is used, it may arise
that source or destination values match more than one mapping. In which
case, the mapping with the highest priority is used.
Regular Expression Switch on to indicate that source or destination values contain regular
expressions. When this switch is off, the content of these columns is assumed
to be string values without any regular expressions.
Convert Value to
UPPERCASE
Switch on to convert the destination value to UPPERCASE.
Field Description
Name The name of the security import request.
Comment Any additional information that is relevant to the definition.
Provider Type The name of the provider.
Note: In this version, only Bloomberg is supported.
4 Managing market data
4.8 Bloomberg interface
Transaction & Risk Management Module (TRM) User Guide 207
2. In the Provider Field Set page, use the following table to indicate which field set to use:
3. In the Securities page, use the following table to map values:
4.8.3.2 Identifying instrument templates
After you have processed the security import request that you created previously, the provider
sends back all requested information about the security. Before you can import the securities as new
instruments, you need to have defined which instrument template you want to use. You cannot
import any security without the instrument template because the instrument setup contains a lot of
configuration, which is specific to the system and which the provider cannot supply. Without this
instrument setup, it is not possible to store or use the received security from the provider.
Instrument templates are created in the Instrument Template Editor. For more information about
instrument templates, see 3.18 Instrument Templates on page 128.
Security List Request (Read only) The original security list request that was used to create this
security import request. You can define the list of securities to be imported as
instruments in the Security List Request Editor by selecting the provider field
sets that should be used with a given security list request. See 4.8.4 Security
list import on page 210.
Field Description
Field Set The names of the provider field sets that you want to use to first request
information from the provider and then later to import the new instruments.
All selected fields sets will be requested from the provider.
Provider field sets are defined as part of the general configuration in the
Provider Field Set Editor, see 4.8.2.2 Defining provider field sets on page 202.
Field Description
Security Identifier Type The type of security code that is specified in the field Security Identifier.
Securities can be requested via any unique identifier, ISIN, CUSIP, and so on.
You must comply to the provider's naming convention when defining security
identifiers in the system, for example, TICKER.
Security Identifier The security identifier code. This code must be unique and recognized by the
provider in order to retrieve the correct information about this security.
Market Sector The market sector of the requested security. Identifying the market sector
may increase processing on the provider’s side when searching for the
requested security.
Field 0-9 (Read only) These fields are automatically populated when the list of securities
in this page were previously created by a security list request. These fields are
information requested in the security list processing and can be used to more
easily identify a security, for instance, by its coupon, issuer, maturity date,
and so on, and decide whether the security should be inserted as new
instrument.
Do not import Switch on to indicate that the security should not be loaded. This is
particularly useful when one security import request is processed in several
rounds, for example, when you are fine tuning individual mappings. Some of
the listed securities could be inserted as instruments, so they should not be
processed again. However, there are still other not yet inserted instruments,
for which mapping must be still adjusted, in which case, the switch must be on
for each already imported security.
In addition, you may decide, based on additional information in the fields 0 to
9, that you do not want to import the security, in which case, you would set
this switch to on.
Field Description
4 Managing market data
4.8 Bloomberg interface
208 © Wall Street Systems IPH AB - Confidential
Mapping rules should uniquely identify an instrument type and the instrument template to be used.
Hint:
You can also specify the naming convention for the new instruments in the Mapping Rule
Editor.
1. In Security Mapping Rule Editor, use the following table to complete the main attributes:
2. In the Rule Mapping Set page, add the mapping sets that you want to use to import the new
instruments. All selected mapping sets will be used to map the provider fields to the system
fields. All fields needed for mapping must be first mapped in a security mapping set and
requested in a security import request. See 4.8.2.3 Mapping the provider fields to specific
system fields on page 202.
If these conditions are not met, then the following behavior occurs:
–If some of the fields are not requested then no corresponding provider information is
returned and the mapping rule is not performed. No warning is displayed.
–If you have not defined a mapping for a requested field, a message is displayed.
Field Description
Name The name of the security import request.
Comment Any additional information that is relevant to the definition.
Provider Type The name of the provider.
Note: In this version, only Bloomberg is supported.
Instrument Template Instrument template, which would be used to create the new instrument when
this mapping rule is selected based on mapping conditions and priority.
Instrument ID Instrument ID of the created instrument. Define the naming convention to be
used for this particular instrument ID. You can use use variables - provider
fields. These variables could then be replaced by the real value of the provider
field. If the selected field does not contain any value, the variable will not be
replaced and it will stay in the name as a string.
It is important that you change the name manually, verify the naming
convention, and use a different provider field to be sure to return the proper
values.
A variable always starts with $ and is then followed by the provider field
between parentheses, for example ${CPN}. For example, this indicates that
the naming convention Bond_${COUNTRY}_${MATURITY}_${CPN} can be
replaced by Bond_CZ_01012010_5.2 in the Instrument ID.
Note: A special business logic has been implemented to remove the trailing
zeros from ID or name when the variable $CPN is used.
Instrument Name The instrument name of the imported security. It is also possible to use
variables as described for Instrument ID.
Pre-save script The Python script that is called before the instrument is created. You can use
the script to modify the provider fields and perform any additional tasks
before the instrument is created.
Post-save script The Python script that is called after the instrument is created and stored. You
can use the script to perform additional tasks after the instrument is created.
Priority The priority of this mapping rule. If more that one mapping rule matches the
condition set, then the one with the highest priority (meaning the lowest
number) is used. If there are more mapping rules with the same priority, a
warning is raised and a random rule is selected.

4 Managing market data
4.8 Bloomberg interface
Transaction & Risk Management Module (TRM) User Guide 209
Important: An error message is displayed only when the instrument cannot be stored because
some of the mandatory fields are missing. You can check this type of error in the
generated log file, as described in 4.8.3.4 Verifying the import process on page 209.
Hint:
For this type of error, it is necessary to either add the missing fields and map them to the
interface setup or update the instrument template with the missing information.
3. In the Rule Condition page, use the following table to set up the rule conditions:
4. Save the definition using File - Save As New.
4.8.3.3 Running the Instrument Import activity
To import the securities and create new instruments, you need to run the activity Import Instrument.
See A.44 Import Instrument on page 646.
You can run this activity for the same Security Import Request several times. You can change the
list of security codes and tune the mappings and mapping rules in order to insert instruments with
all the needed setup populated.
4.8.3.4 Verifying the import process
You can verify the import instrument process by checking the Instrument Import Log or report. The
Instrument Import Log shows all imported new instruments and processing details. You can filter
information based on message types or severity levels. You can, for instance, view only all ERRORS
in order to be able to fix the problems.
For more information about this log and report, see B.30 Instrument Import Log on page 670 and
B.31 Instrument Import Report on page 670.
Note: Typically, at the beginning of the configuration process, for a new instrument type, you
should also monitor information and warning messages, to check whether all mappings
and rules are configured properly.
Field Description
Provider Field The provider field to which you want to match a field value.
Operator The operator to be used in the condition. Choices are:
•= - The specified provider field must contain a value that exactly matches
the specified field value.
•MATCH - The specified provider field must contain a value in the specified
regular expression.
For example:
-A|B means that the specified provider field equals A or B
-A.* means that the specified provider field starts with A
-^((?!GOVT).)*$ means that the specified provider field should not
match GOVT.
If you insert more than one rule condition then the system interprets a logical
AND operator between the rule conditions.
For example, if you enter ISSUER = TREASURY as one rule condition and
COUNTRY = US as another rule condition in the same mapping rule then both
rules must be matched.
Field Value The value that the provider field must contain or match. The maximum length
of the value is 255 characters.
Note: This field is case sensitive.

4 Managing market data
4.8 Bloomberg interface
210 © Wall Street Systems IPH AB - Confidential
4.8.3.5 Processing Instrument Delete activity
It may happen, for example, during implementation and configuration phase, that not all mappings
and mapping rules are tuned correctly. Any wrong setup can result in the creation of new
instruments that are wrongly configured, do not have the proper name, use the wrong instrument
template, and so on.
In order to alleviate the work involved in deleting these instruments, you can use the activity Delete
Instrument. For a detailed description of parameters, see A.21 Delete Instrument on page 635.
Important: Only instruments created by the activity Import Instruments that are not used in any
transaction are deleted.
Hint:
You can verify the outcome of the activity in the Instrument Delete Log.
4.8.4 Security list import
You can configure updates to security codes, for regularly issued instruments, such as, government
bonds, to run periodically by using the appropriate activities. The Data License API provides a
possibility to request the list of securities that match the selection criteria.
Note: A detailed description of the conditions and queries supported by the API is available in the
provider's API documentation.
4.8.4.1 Configuring security list requests
After you have done the generic configuration, you must specify further configuration in the Security
List Request Editor. For more information about the generic configuration, see 4.8.2 Generic
configuration on page 201.
To configure security list requests:
1. In Security List Request Editor, use the following table to complete the main attributes:
Field Description
Name The name of the security import request.
Comment Any additional information that is relevant to the definition.
Provider Type The name of the provider.
Note: In this version, only Bloomberg is supported.
New Security Request The name of the security request, which is created, based on the output of the
security list activity processing. If the security request does not exist, it is
created. If it exists, it is replaced by the new list of securities and field sets, as
defined in the security list import request.
Macro Type The type of macro that is called to obtain the list of securities.
Note: Refer to the provider documentation for a detailed description of
possible values.
Macro Value The value of the macro type that is called to obtain the list of securities.
Note: Refer to the provider documentation for a detailed description of
possible values.
Security Type The security type that is called to obtain the list of securities.
Note: Refer to the provider documentation for a detailed description of
possible values.
4 Managing market data
4.8 Bloomberg interface
Transaction & Risk Management Module (TRM) User Guide 211
2. In the Fields page, use the following table to indicate which fields to use:
3. In the Provider Field Set page, use the following table to indicate which fields to use:
4. Save the definition using File - Save As New.
4.8.4.2 Running the Security List Import activity
To import the security list and create a new security import request, you need to run the activity
Security List Import. See A.46 Import Security List on page 647.
You can run this activity for the same Security List Import Request several times. The activity
enables you to fine tune and change the security list query.
4.8.4.3 Verifying the import process
You can verify the import process by checking the log, Security List Import Log. For more
information, see B.44 Security List Import Log on page 677.
The Security List Import Log shows all of the processing details. You can filter information based on
message types or severity levels.
4.8.5 Instrument update
You can identify which instruments should be regularly and automatically updated by new market
data by defining an Instrument Update Request and processing it periodically by running the Update
Secondary Qualifier The secondary qualifier that is called to obtain the list of securities.
Note: Refer to the provider documentation for a detailed description of
possible values.
Security Identifier Field The provider field that will be assumed as the security code and added to the
list of securities in the security import request.
Security Identifier Type The mapping of the Security Identifier field to the list of security codes defined
in Security Identifier Type Editor.
See 3.44 Security identifier types (optional) on page 154
Pre-save Script Python script that is called before the security request is created. You can use
the script to modify the provider fields and perform any additional tasks
before the instrument is created.
Post-save Script Python script that is called after security request is created and stored. You
can use the script to perform additional tasks after the creation.
Field Description
Field 0 - 9 You can define which provider fields will be fetched for the list of securities
defined by security list conditions. This more detailed information rather than
just using the security code is used in the Security Import Request Editor to
help you to determine whether the security should be imported. You can select
any provider field defined in the system.
Field Description
Field Set The names of the provider field sets that you want to use to first request
information from the provider and then later to import the new instruments.
All selected fields sets will be requested from the provider.
Provider field sets are defined as part of the general configuration in the
Provider Field Set Editor, see 4.8.2.2 Defining provider field sets on page 202.
Field Description
4 Managing market data
4.8 Bloomberg interface
212 © Wall Street Systems IPH AB - Confidential
Instrument activity. For example, when you need to update credit ratings, repayment schedules,
equity info data, and so on.
4.8.5.1 Configuring instrument update requests
After you have done the generic configuration, you must also configure the Instrument Update
Request Editor. For more information about the generic configuration, see 4.8.2 Generic
configuration on page 201.
To configure instrument update requests:
1. In Instrument Update Request Editor, use the following table to complete the main attributes:
2. In the Mapping Set page, use the following table to indicate which mapping sets to use:
3. In the Instrument page, use the following table to indicate which instruments to use:
4. In the Provider Field Set page, use the following table to indicate which field sets to use:
5. Save the definition using File - Save As New.
Field Description
Name The name of the instrument update request.
Comment Any additional information that is relevant to the definition.
Provider Type The name of the provider.
Note: In this version, only Bloomberg is supported.
Pre-save Script The Python script that is called before the instrument is updated. You can use
the script to modify the provider fields and perform any additional tasks
before the instrument is updated.
Post-save Script The Python script that is called after the instrument is updated and stored.
You can use the script to perform additional tasks after the update.
Field Description
Mapping Set The mapping set that contains the mapping of the provider fields to the
instrument fields, used to update the instrument.
All selected mapping sets will be used for the mapping of the fields. All
required fields for these mappings must be defined in field sets, and requested
in the instrument update request. If some of the fields are not requested and
provider therefore does not return the value, then the mapping is not
performed and no warning is raised.
On the other hand, when there is no mapping for the requested field, an
information message is shown.
Field Description
Instrument Group List of instrument groups that should be updated.
Instrument List of instruments that should be updated.
Field Description
Field Set The names of the provider field sets that you want to use to first request
information from the provider and then later to update the instruments. All
selected fields sets will be requested from the provider.
Provider field sets are defined as part of the general configuration in the
Provider Field Set Editor, see 4.8.2.2 Defining provider field sets on page 202.
4 Managing market data
4.8 Bloomberg interface
Transaction & Risk Management Module (TRM) User Guide 213
4.8.5.2 Running Instrument Update activity
In order to update the instruments, you must run an activity with activity type Update Instrument.
You can run the activity for the same Instrument Update Request regularly.
For more information, see A.71 Update Instrument on page 657.
4.8.5.2.1 Verifying the instrument update process
You can verify the update process by checking the Instrument Update Log and Report. In the
Instrument Update report you can see all updated instruments. In the Instrument Update Log, you
can monitor all processing details. You can filter information based on message types or severity
levels. You can, for instance, view only all ERRORS in order to quickly identify and fix the problems.
For more information about this log and report, see B.32 Instrument Update Log on page 671 and
B.33 Instrument Update Report on page 671.
Note: Typically, at the beginning of the configuration process for a new instrument type, you
should also monitor information and warnings messages to check whether all mappings
and rules are configured properly.
4.8.6 Client update
You can define which clients should be periodically and automatically updated by new market data.
Typically, it is usually necessary to update client credit ratings.
4.8.6.1 Configuring client update
After you have done the generic configuration, you must also ensure that clients are identified by a
unique id for a proper identification of clients at the provider side. For more information about the
generic configuration, see 4.8.2 Generic configuration on page 201.
For the Bloomberg provider, you must use the property ID_BB_COMPANY in the Client Editor (Property
page). You must populate the value with the unique id of the provider, for instance, ID_BB_COMPANY
or ID_BB_PARENT_COMPANY. For more information about client properties, see 3.13.1.3 Defining
properties on page 93.
Other setup must be configured in Client Update Request Editor.
To configure client update:
1. In Client Update Request Editor, use the following table to complete the main attributes:
2. In the Client page, specify the list of clients for which new market data should be fetched and
updated.
Field Description
Name The name of the instrument update request.
Comment Any additional information that is relevant to the definition.
Provider Type The name of the provider.
Note: In this version, only Bloomberg is supported.
Pre-save Script The Python script that is called before the client is updated. You can use the
script to modify the provider fields and perform any additional tasks before
the client is updated.
Post-save Script The Python script that is called after the client is updated. You can use the
script to perform additional tasks after the update.

4 Managing market data
4.8 Bloomberg interface
214 © Wall Street Systems IPH AB - Confidential
3. In the Mapping page, use the following table to specify the individual provider fields' mappings to
the Client Editor fields:
Field Description
Entity The entity of the Client Editor to which the provider field should be mapped.
Typically, one entity corresponds to one page in the Client Editor. In the entity
selection box, for each entity, you can see the technical name (Entity Name
column) and the page name (Label column) as it appears in the Client Editor.
For example, ClientContact corresponds to the Contact Details page, ClientAccount
corresponds to the Accounts page, and so on.
Entity Column The column of the selected entity, which is to be populated by the provider
field. Typically, one entity column corresponds to a field that appears on the
page in the Client Editor.
You must first select an entity before you can select an entity column. Only
the entity columns for the selected entity are available.
Provider Field The provider field to be inserted in the Client Editor field as defined by the
selected entity and entity column.
All fields mentioned in the Client Update Request Editor are automatically
requested from the provider, i.e. it is not necessary to specify a field set as in
the Security Import Request Editor.
Subentity Filter The subentity filter definition you want to use when the selected entity
contains a list of possible options and not just individual fields, you need to
uniquely identify the option to establish what exactly needs to be updated.
See 4.8.2.4.2 Client subentities on page 205.
Value Mapping The value mapping definition that you want to use to do the mapping. This
mapping is defined in the Value Mapping Editor, see 4.8.2.5 Mapping imported
provider values to system values on page 205.
Note: Value mapping definitions can be simple or enhanced by the use of
regular expressions.
Script The script that will be used to do the mapping. Scripts are another way of
mapping provider fields to systems fields when simple mapping is not
sufficient, you can create a simple python script that defines more complex
mappings. For example, when a value in the Client Editor depends on a
combination of two or more provider fields.
Scripts have a higher priority than value mapping definitions and if you have
selected both a value mapping definition and a script then the script is used
and the value mapping definition ignored.
Periodical Active From Switch on to create a new time limited row in selected subentity. The first
subset of rows is evaluated using the subentity filter. This switch then uniquely
identifies the Active From column. The last period that has column Active To
bigger than provider value is searched. This subentity row is closed and a new
subentity row is inserted with Active From column to set to provider value.
This is typically used for time limited setup, such as Credit Rating and so on.
4 Managing market data
4.8 Bloomberg interface
Transaction & Risk Management Module (TRM) User Guide 215
4. Save the definition using File - Save As New.
4.8.6.2 Client entity state
When SDM is installed in the client environment, then the client entity is in one of the possible entity
states. In order to be able to find the client and perform an update on it, it is necessary for the client
to have been in the FINAL state at least once.
The Update Client activity then finds the client, re-opens it in order to perform the update operation,
and then moves the client either back to its original state (state of the client before the update
operation was performed) or to the state defined by the environment variable
FK_MDI_UPDATE_CLIENT_TO_STATE, depending on which of these states was earlier.
This can be useful, for instance, in a situation where a manual verification still needs to be done
after the automatic Update Client activity on clients is performed. Then, all updated clients can be
moved to the state VERIFY and you can finalize them after you have performed a manual
verification.
4.8.6.3 Verifying Client Update Log
You can verify the update process by checking the Client Import Log. In the Client Update Log all
processing details are described. For example, you can filter information based on message type or
severity level. You can, for instance, choose to view all ERRORS in order to be able to fix the
problem.
For more information about this log and report, see B.11 Client Update Log on page 663.
Note: Typically, at the beginning of the configuration process, for a new instrument type, you
should also monitor information and warning messages, to check whether all mappings
and rules are configured properly.
Periodical Active To Switch on to define column Active To in the selected subentity row. The last
record for specified subentity filter is found and closed by the provider value.
A new row from date Active From and with new information fields, like changed
Credit Rating, is then entered.
This behavior differs when the following situations occur:
•If the Active From and Active To columns contain the same provider field,
then the following convention is used, the Active To from the existing row is
closed one day before the new row Active From column is entered. This
ensures a continuity of time segments without any gaps.
• If the data have not changed and the last row contains the same values as
the value fetched during update from provider, then no new row is inserted
and the existing one stays valid. This is useful when the instrument is
regularly updated, but there is no change, for instance, to the credit
rating. Then, only one credit rating record is inserted and kept until any
changes occur.
Ignore Mapping When
Null
When switched on, any null values in the provider field are ignored and are
not inserted into the selected instrument field, i.e. existing previous values in
the instrument fields are not overwritten.
Field Description
4 Managing market data
4.8 Bloomberg interface
216 © Wall Street Systems IPH AB - Confidential
4.8.7 Corporate Actions update
You can define which corporate actions should be periodically requested from the provider for the
defined list of instruments.
Important: Only corporate actions for equities are supported.
4.8.7.1 Configuring corporate actions update
There is no need to define the mapping from the provider data to Instrument Editor fields because
the mappings are set by default. All corporate actions are populated in the relevant corporate action
page in the Instrument Editor and typically the dedicated activity Update Corporate Action must be run
to perform the proper changes on transactions, see A.70 Update Corporate Action on page 656.
For more information about Equity instruments, see the TRM Instruments: Processing and
Calculations Guide.
The other setup must be done in the Corporate Action Update Request Editor.
To configure corporate actions update:
1. In Corporate Action Update Request Editor, use the following table to complete the main
attributes:
2. In the Instruments page, use the following table to indicate which field sets to use:
Field Description
Name The name of the instrument update request.
Comment Any additional information that is relevant to the definition.
Provider Type The name of the provider.
In this version, only Bloomberg is supported.
Request Data Type The corporate action you want to request based on different dates.
It can be set to the following values:
•Effective date - (Default) The day when the corporate action becomes
effective. The provider will send all corporate actions that match the
effective date and that do not exceed the maximum number of days
specified in the Processing Period In Days field.
•Entry date - The date when the corporate action was entered into the
Bloomberg database. The provider will send all corporate actions that
match the entry date that do not exceed the maximum number of days
specified in the Processing Period In Days field.
Processing Period In Days The number of days backward (offset) you request corporate action
information. The default value is 7 days, which is the maximum days
backwards for which you can request the information. Before this day, any
corporate actions are already unavailable on the provider side.
Pre-save Script Python script, which is called before the corporate action is updated. It is
possible to modify here provider fields and perform any additional tasks before
instrument update.
Post-save Script Python script that is called after the corporate action is updated. It is possible
to perform additional tasks.
Field Description
Instrument Group List of the instrument groups for which corporate actions should be requested.
Instrument List of the instruments for which corporate actions should be requested.
4 Managing market data
4.8 Bloomberg interface
Transaction & Risk Management Module (TRM) User Guide 217
3. In the Action page, use the following table to indicate which field sets to use:
4. Save the definition using File - Save As New.
4.8.7.2 Return of Capital
Return of Capital corporate action is modeled at the provider side as Cash Dividend action, where
the field CP_DVD_TYP may contain one of the following values:
•1014=return capital or
•1015=return capital - adj prc or
•1016=return capital - adj all.
In such a case, the Return of Capital page is populated by the new record. In other cases, the Cash
Dividend page is populated by the new record.
4.8.7.3 Stock Dividend
The Stock Dividend action must be modeled to the system in a special way:
A new instrument is created as a duplicate of the original one and the name is constructed using the
name of the original instrument and a suffix with the corporate action unique ID. This naming
ensures that the instrument does not already exist. This instrument has most of its setup cleared
and its validity is limited only to the corporate action time interval.
On this instrument, the Equity Conversion page is populated and the New Equity field is populated
with either the name of the original instrument or a completely new instrument, depending on the
data obtained from the provider.
The provider only sends the Ticker code, so the prerequisite is that such an instrument exists and
that its security code Ticker has been properly configured. It is only then that the activity is able to
identify this instrument properly.
On the original instrument, the Equity Detachment page is populated by the provider values and the
the New Equity field is populated with the name of the newly created instrument.
This setup ensures that after the processing of both activities Equity Detachment and Equity Conversion,
the transactions should properly adjust according to the received corporate actions.
4.8.7.4 Rights offering
Rights offering action is modeled in a similar way to the Stock Dividend action via the Equity
Detachment and Equity Conversion pages. For more information, see 4.8.7.3 Stock Dividend on page
217.
Field Description
Action The list of actions that should be requested for the list of instruments. When
no action is selected, then all actions are requested. You can request any
subset of all supported corporate actions.
•DVD_CASH (cash dividend) - creates an Equity Cash Dividend or Equity
Return of Capital record for an Equity instrument (see 4.8.7.2 Return of
Capital on page 217).
•STOCK_SPLT (stock split) - creates an Equity Split record for an Equity
instrument.
•DVD_STOCK (stock dividend) - this action corresponds to two actions in two
separate pages, Equity Detachment and Equity Conversion (see 4.8.7.3 Stock
Dividend on page 217).
•RIGHTS_OFFER (rights offering) - this action corresponds to two actions in
two separate pages, Equity Detachment and Equity Conversion (see 4.8.7.4
Rights offering on page 217).
•SPIN (spin-off) - creates Equity Detachment record for Equity instrument.

4 Managing market data
4.9 Market Data Status Monitor
218 © Wall Street Systems IPH AB - Confidential
4.8.8 Prices Import
Prices import is done via the activity Data License Prices, which enables you to import prices from
Bloomberg. For more information about this activity, see A.19 Data License Prices on page 634 and
the TRM System Administration Guide.
4.9 Market Data Status Monitor
The Market Data Status Monitor is an application that provides the status of all Reuters Market Data
System (RMDS) subscriptions.
The application can display the following information for each item subscribed:
•The current status of the item as provided by Reuters RMDS
•The time of the last quote
•The actual Market Info detail related to the item (instrument, period etc.).
To refresh the items, click the Refresh button on the toolbar. When an item’s status changes, its
status cell is updated and it flashes briefly.
Note: When the Wallstreet Suite Reuters connection is restarted, all previous data is lost.
4.9.1 Market Data Status pane
This is the main pane in the application which you can open from the View menu. This displays each
item ID, its status, and the last quote date in columns that can be ordered and moved.
By right-clicking in the column area, you can select which columns are displayed. You can move the
columns and sort them to help find the rows that you are interested in.
Right-clicking an item in the list opens a context menu where you can refresh the subscription to
that item, which is first unsubscribed from Reuters and then subscribed again. This also gives you
the latest price from Reuters.
4.9.2 Properties pane
The Properties pane, which you can open from the View menu, displays details of the currently
selected item in the Main Data Status pane.
You can open multiple Properties panes, and "freeze" each one to a particular item’s properties by
activating the "pin" icon at the top of the pane.
4.9.3 Other panes
Administration panes are available. These are described in the table below.
4 Managing market data
4.9 Market Data Status Monitor
Transaction & Risk Management Module (TRM) User Guide 219
4.9.4 Menus
4.9.4.1 View
4.9.4.2 Layout
As well as standard TRM layout functionality, Market Data Status Monitor also provides the following
layout options:
Menu item Description
New - Properties Starts a new Properties pane. See 4.9.2 Properties pane on page 218.
Market Data Status If this pane is not visible, selecting this option displays it. See 4.9.1 Market Data
Status pane on page 218.
(Properties) If one or more Properties panes are open, they are listed here. Selecting one of
them gives focus to that pane.
Administration Views •Log View: Enables you to check the application’s log file. Log files are stored on
your local drive, and the path is displayed in the information bar at the top of
the log pane.
•Progress View: Alternatively, you can also access this view by clicking the show
progress icon in the right-hand corner of the status bar. This view shows
recently performed actions. You can remove all completed operations from the
view or set up preferences by clicking the menu and selecting Preferences...
•Service Statistics: Shows information about the connections and failure reasons.
You can refresh statistics, keep them synchronized, or clear them.
•System Messages: Shows system messages organized by severity, time, and
message. When available, a hint is displayed. You can clear all messages when
you have finished checking them.
Menu Item Description
Set to Default Defines the active layout as the default layout.
4 Managing market data
4.9 Market Data Status Monitor
220 © Wall Street Systems IPH AB - Confidential
Transaction & Risk Management Module (TRM) User Guide 221
Chapter 5 Managing rules
You create and assign rules as a method of capturing data (such as transactions and individual
cashflows) to direct them to the correct place in TRM. Rules define what happens to a transaction
(either a deal or a payment) and its cashflows according to their properties.
When you have created the rules, you can use them for many different purposes throughout TRM,
for example:
•To define in which bank account a transaction is settled
•To control which transactions can go into a specific portfolio
•To set up trading limits
•To define classification of transactions
•To make contact details for a client appear automatically on trade confirmations
•To specify which transactions or cashflows are to receive a particular charge
•To determine which interests rates are applied to a transaction, according to the amount or
currency.
You can even use rules to specify under which circumstances rules should not apply to data.
When the same data matches two or more different rules, the rule with the highest priority is the
one that applies, the priority being a number you give to each rule. 1 is the top priority, 2 is the
second highest priority, and so on: so the lower the number, the higher the priority. The more
restrictive a rule, the higher the priority (lower number) you should give to it.
5.1 Defining rules
Currently under development •••
Rules are defined in Rule Editor, in the Rules page. The application is a layout based on the
application Static Data Editor: see 3.2 Static Data Editor on page 41 for more information.
To define the main attributes of a rule:
1. In the upper part of Rule Editor, fill in the fields using the information in the following table:
Information Description
Rule
Name
ID and name of the rule.
Rules, unlike other entities, do not need a unique ID. This is because you can create
several rules with the same name to produce "or" conditions.
For example:
- If a transaction meets the conditions XXX (Rule A), or
- If it meets the conditions XYY (from another rule called Rule A), or
- If it meets the conditions XYZ (from a third rule called Rule A)
…then [whatever purpose you assign Rule A to, for example, assigning transactions to
a specific bank account].
5 Managing rules
5.1 Defining rules
222 © Wall Street Systems IPH AB - Confidential
2. In the Rules page, Definition area, fill in the following fields:
3. Click Add to add the new rule subset.
4. Save the rule using File - Save As New.
5. Complete the rule definition using the information in the following sections.
Domain Domain in which this rule is available.
Category Turn on one or more switches to make the rule available in the corresponding editor.
You must turn on at least one switch for the rule to appear somewhere in TRM.
Choices are:
• Cashflow Charges: Makes the rule available in the Cashflow Charges Editor.
• Closing the Books: Makes the rule available in the Closing the Books Editor.
• Limit: Makes the rule available in the Limit Editor for limit management.
• Other: Makes the rule available to editors not already identified by the other
categories. This rule can be used for various purposes, such as netting rules.
• Portfolio: Makes the rule available in the Portfolio Editor, Rules page.
• Settlement Instructions: Makes the rule available in the Client Editor, Settlement
Instructions page.
• System: Only use this category for very general rules, for examples, ones that
apply to all cashflows.
• Transaction Charges: Makes the rule available in the Transaction Charges Editor or
Cashflow Charges Editor.
• Transaction Flow: Makes the rule available for the transaction flow.
• Transaction Condition Set: Makes the rule available in the Transaction Condition
Set Editor for transaction conditions management. See Chapter 17 Managing
transaction conditions on page 485.
Comment Any comment you want to add about this rule.
Disabled This rule is disabled, so it returns False when matching.
Information Description
Information Description
Name Enter a meaningful name for the rule subset you are defining.
Number Number of the rule.
This is a number which is automatically generated by TRM: the first rule is 1,
the second 2, and so on. Since this number is unique to one rule, it can be
useful for identifying individual rules (especially among rules that share the
same name).
Priority Number indicating the priority of a rule: in other words, which rule overrides
which, in the event that two conflicting rules apply at the same time.
You can view the current order of priority for existing rules by selecting the
Priority column as the first display column (or clicking the header area of the
Priority column). If several rules match at the same time, TRM applies the rule
with the highest priority (lowest number).
5 Managing rules
5.1 Defining rules
Transaction & Risk Management Module (TRM) User Guide 223
5.1.1 Identifying rule criteria
To specify the criteria to identify to which transactions and cashflows this rule applies:
1. In Rule Editor’s Rules page, Optional area, fill in the fields using the information in the following
table.
Note: Rules apply only to those transactions and cashflows that match the criteria you provide.
Information Description
Trader Trader of the transaction to which the rule applies.
Portfolio Owner Owner of the portfolio in which the transaction is entered.
Portfolio Portfolio in which the transaction is entered. If you enter a top portfolio in this field,
the rule is also matched against transactions belonging to any of the child portfolios in
the portfolio tree.
Instrument Group
Instrument
Instrument group and instrument to which the rule applies.
Currency
Currency (2)
Currency to which the rule applies.
Package Main
Typ e
Main package type for the package type. You need to select a Package Main Type before
you select a Package Type. Package main types are defined in Package Type Editor.
Package Type Package type of the transaction.
Note: Only applies if the transaction is packaged.
Broker Broker used for the transaction.
Issuer Main Group
Issuer Group
Issuer group to which the issuer of the instrument belongs.
Issuer Main Group by itself has no effect; its only purpose is to filter the available groups
in the Issuer Group field.
Counterparty
Main Group
Counterparty
Group
Client group to which the counterparty of the transaction belongs.
Counterparty Main Group by itself has no effect; its only purpose is to filter the available
groups in the Counterparty Group field.
Counterparty
Portfolio
Counterparty portfolio used for the transaction.
Issuer Issuer of the instrument used for the transaction.
Counterparty Counterparty of the transaction.
Transaction Sign
Transaction Type
Sign and the type of the transaction to which the rule applies.
Transaction Kind Kind of transaction: for example, Average Balance, Dividend, or Transfer.
Transaction State State of the transaction in the transaction flow.
Cashflow
Direction
Direction of the cashflow:
• Positive for incoming cashflows (money you receive)
• Negative for outgoing cashflows (money you pay)
• Any for both incoming and outgoing cashflows.
Cashflow Main
Typ e
Main type of cashflow to which this rule applies.

5 Managing rules
5.1 Defining rules
224 © Wall Street Systems IPH AB - Confidential
2. Click Add to add the new rule subset.
3. Save the rule using File - Save.
5.1.2 Selecting transaction parameter values
To select transaction parameters to be used in the rule:
Note: Parameters are defined in Parameter Editor: see 3.38 Parameters (optional) on page 148.
1. In Rule Editor’s Rules page, Parameters area, define any transaction parameter values that must
exist to be picked up by the rule.
Note: You can also manually add a value even though it is not in the selection list. When you do
this, the field name turns blue.
2. Click Add to add the new rule subset.
3. Save the rule using File - Save.
Cashflow Type Type of cashflow choices depend on the selected main cashflow type.
If you do not specify a cashflow type, then this rule will apply to all cashflows of the
same Cashflow Main Type which meet the rule criteria.
For example, if Cashflow Main Type = Interest, and Cashflow Type is not defined, the
rule will apply to all interest flows which meet the rule criteria. Alternatively, if
Cashflow Main Type = Interest, and Cashflow Type = Coupon, the rule will only apply to
any coupon cashflows which meet the rule criteria.
Cashflow
Category
Cashflow category. Choose from:
•Balance for balance cashflows, for example equity balance cashflows (these are
pseudo cashflows)
•Payback for cashflows taking place after the value date of the transaction.
•Settlement for cashflows taking place on the value date of the transaction.
Cashflow
Subcategory
Cashflow subcategory, for example, Call, Put, or Cap/Floor.
Cashflow Leg
Instrument Group
Cashflow Leg
Group
Cashflow Leg
These fields are used for IR swaps and FX transactions only. They represent different
ways of selecting one leg from deals matching the rule.
For example, use Cashflow Leg Group to set up a generic matching (such as always the
first leg of a swap) and Cashflow Leg to set up a more specific matching for specific
instruments.
• For IR swaps: for Cashflow Leg Group, you can select whichever leg you want the
rule to capture. For Cashflow Leg, you can select the specific instrument ID of the
leg.
• For FX transactions: for Cashflow Leg Group, you can select either Far Leg or Spot
Leg, depending on which leg you want the rule to capture. For Cashflow Leg, select
the currency that the cashflow belongs to.
Cashflow
Currency
Currency in which the cashflow is denominated.
Cashflow Payment
Currency
Currency in which cashflows are paid.
Secondary
Instrument
This field is used for Security Loan transactions only.
The IR or equity secondary instrument of the transaction.
Information Description

5 Managing rules
5.1 Defining rules
Transaction & Risk Management Module (TRM) User Guide 225
5.1.3 Specifying cashflow attributes
To specify to which type of cashflow the rule applies according to cashflow attribute:
1. In Rule Editor’s Rules page, Switches area, select the attributes that you want to use. If you do
not select any attributes, all cashflows are matched.
For a list of attributes see Appendix F Cashflow attributes on page 709.
2. Click Add to add the new rule subset.
3. Save the rule using File - Save.
5.1.4 Assigning branch codes to a rule
Currently under development. •••
To assign branch codes (instrument and transaction leg) to which the rule is applied:
Note: The label which is displayed before each selection list is taken from the name you applied
to the branch code in the Branch Code Editor. See 3.24 Branch codes (optional) on page
133 more information.
1. In Rule Editor’s Rules page, Instrument Branch Codes or Leg Branch Codes areas, select the branch
code for the instrument and transaction leg.
2. Click Add to add the new rule subset.
3. Save the rule using File - Save.
5.1.5 Capturing transactions according to status
Transaction statuses are given to transactions either manually in Transaction Manager, or
automatically when the transaction moves from one state to another. If statuses are inherited by a
transaction automatically, the status given depends on the state the transaction is coming from and
the state it is going to. A transaction can have more than one status.
To capture a transaction according to status:
1. In Rule Editor’s Rules page, Switches area, switch on the transaction status or statuses the
transaction must match (or not match) in order to be captured by the rule.
2. Click Add to add the new rule subset.
3. Save the rule using File - Save.
5 Managing rules
5.1 Defining rules
226 © Wall Street Systems IPH AB - Confidential
Transaction & Risk Management Module (TRM) User Guide 227
Chapter 6 Managing activities
Some calculations and batch processes must be run on certain dates or at certain time intervals (for
example, daily or monthly). In TRM, these calculations and batch processes are called activities and
you can set them up to run automatically.
You can use activities to perform a variety of tasks, such as running batches and generating log
reports, fixing cashflows, updating modified data in the system automatically, and various other
calculations and realizing of key-figures.
You can run activities immediately, at a specific date and time in the future, or at set intervals in
relation to a specific date and time (for example, “one week after 1 January 2006, and at weekly
intervals thereafter”).
In some cases, the running of one activity may be dependent on the outcome of another activity.
Therefore, it is possible to specify that one activity needs to run before the other.
Activity groups enable you to run all activities belonging to the same group at the same time. For
example, one group may be called "Nightly" and include all activities which need to run each day.
Another group may be called "Monthly" and include all activities which need to run on a monthly
basis. You can also use an activity group as a search criterion for listing activities and as a grouping
criterion in activity reports. Activity groups are predefined in TRM at implementation: you cannot
create your own groups.
Many activities execute processes that create new deals or other new information such as
accounting entries. These entries are identified with batch IDs, so that you can see when and where
they were created. Batch IDs can be used as a parameter to search for generated transactions in
Transaction Manager.
The available activities and the their parameters are described in Appendix A Activity parameters on
page 627.
6.1 Activity Manager
Activities are set up and managed in an application called Activity Manager. Activity Manager is
similar to an editor, but is based on a different layout.
The upper part of Activity Manager is used to enter the main attributes of the activity. In the lower
part of the application, there are three pages; Parameters, Intervals, and Log. These pages are used as
follows:
•In the Parameters page, you enter the data required to run the activity. The fields displayed in this
page differ according to the type of activity you selected in the upper part of the application.
•The Intervals page is used define the frequency for running the activity.
•The Log page is used to check the running of the activity, how many times it ran, and if it ran
correctly.

6 Managing activities
6.1 Activity Manager
228 © Wall Street Systems IPH AB - Confidential
6.1.1 Activity Manager menus
The following tables describe the menu items which are specific to Activity Manager.
Other menu items which are common to all applications are described in 2.2.6 Using application
menus on page 34.
6.1.1.1 File
6.1.1.2 View
6.1.1.3 Tools
Menu item Description
Save Saves modifications to the activity already defined in Activity Manager.
Save As New Saves the activity as a new activity.
Delete Deletes the current activity.
Activate Now Runs an individual activity immediately.
Activate Group Now Runs all the currently existing activities in a target activity group immediately.
First
Previous
Last
Next
Goes to the first, the previous, the last, or the next activity in the list of defined
activities.
Retrieve Retrieves the activity from the list of defined activities.
Clear Clears data from Activity Manager’s fields. If the fields have already been cleared, the
item is grayed out (unavailable).
Find Displays activities on the left side of Activity Manager according to any search criteria
entered in the fields.
Menu item Description
Select Columns Opens a multi-selection list to enable you to define how the list of defined activities is
displayed on the left side of Activity Manager.
Snapshot Copies the list of defined activities to the clipboard.
Refresh Refreshes the information displayed in Activity Manager’s Log page.
Menu item Description
Report Generates a report showing the activities that have been created in Activity Manager.
You can also generate a report to see if an activity ran correctly. See 6.2.5 Generating
reports on activities on page 233.
Running Displays the running activities.
See 6.2.4 Checking the running of activities on page 232.
6 Managing activities
6.2 Managing activities
Transaction & Risk Management Module (TRM) User Guide 229
6.1.1.4 Options
6.1.2 Start-up parameters
It is possible to alter the start-up parameters so that Activity Manager launches in a different mode.
See C.1 Activity Manager on page 681 for information about the options available.
6.1.3 Activity modes
Activity modes can be used to limit access to certain activities, for example you may only want to
permit back-office staff to run certain accounting activities.
The activity mode is included in the start-up parameters of Activity Manager (see 6.1.2 Start-up
parameters on page 229).
Activity modes can be set up for specific users or domains and are defined in Activity Mode Editor by
the system administrator: see the TRM System Administration Guide for more information.
6.2 Managing activities
Although some fields vary from activity to activity, the general procedure for setting up an activity in
Activity Manager is always the same.
Note: Further details about each of the individual activities are described in the section to which
they apply.
6.2.1 Creating activities
To create an activity:
1. Fill in the fields in the upper part of Activity Manager using the information in the following table:
Menu item Description
Confirm Save
Confirm Delete
Confirm Move
Gives the option to display a warning message to request confirmation of your actions.
Information Description
ID & Name Unique ID and name for the activity.
Domain Domain in which this activity applies. If you want the activity to apply to all domains,
select All.
Time Zone Time zone in which this activity is to run.

6 Managing activities
6.2 Managing activities
230 © Wall Street Systems IPH AB - Confidential
2. Save the whole activity definition using File - Save As New.
3. Complete the activity definition using the information in the following sections.
Due Date The date you want the activity to run, in relation to the local time specified using the
Time Zone field:
• Immediately: leave this field blank
• Once, on a fixed date: date for the activity to run (this can be a past date).
• More than once, at fixed intervals: first date for the activity to run; the intervals
are then measured from this date/time.
For example, if you enter 1 January 2005 with an interval of 1 week, the activity
runs first on 1 January 2005, then on 8 January 2005, 15 January 2005, and so
on.
Setting up intervals for an activity is explained later in this section.
Note: To specify the Due Date in UTC/GMT, use the Due Date (UTC) field. When you enter
the date in one field, TRM automatically displays the equivalent time in the
other field. When you select a date, the time defaults to "00:00" (midnight).
You can overwrite 00:00 with another time. Only one activity can run at a time.
So, if you have two activities with the same Due Date and time, TRM chooses an
order for the activities and runs them one after another. To force TRM to run the
activities in a specific order (for example, when one activity needs output from
another), use the Prerequisite ID field and Pending switch.
Enable To Last date and time that you want this activity to run, in relation to the local time
specified using the Time Zone field. If you want to run the activity indefinitely, leave
this field empty.
To s p e c i fy the Enable To date and time in UTC/GMT, use the Enable To (UTC) field. When
you enter the date in one field, TRM automatically displays the equivalent time in the
other field.
Due Date (UTC)
Enable To (UTC)
Same as the Due Date, and Enable To fields, but used for entering or viewing the date
and times in UTC (universal time coordinated, formerly known as Greenwich mean
time or GMT).
Prerequisite
Pending
Another prerequisite activity, if you want the activity you are defining to run according
to the same time schedule as another activity, but always after it.
If you specify a prerequisite activity, turn on the Pending switch. When the prerequisite
activity has run successfully, TRM automatically switches off Pending and starts this
activity.
Type Activity that relates to the activity you want to set up.
When you select an activity type, the Parameters page is updated with the fields
specific to that activity: see Appendix A Activity parameters on page 627.
Group Activity group (such as monthly or nightly) to which you want this activity to belong.
Running (switch) This switch is for information only, to show you whether the selected activity is
currently running (only one activity can run at a time).
TRM automatically turns this switch on for whichever activity is currently running, and
turns it off when the activity finishes running
You should never turn on the Running switch yourself, since doing so could interfere
with an activity that is actually running. The only time you may need to turn it off is in
the event of a system crash: when the switch may still be on for an activity that has
stopped.
You can check which activity is currently running by selecting Tools - Running: see 6.2.4
Checking the running of activities on page 232.
Information Description
6 Managing activities
6.2 Managing activities
Transaction & Risk Management Module (TRM) User Guide 231
6.2.1.1 Defining activity parameters
The fields displayed in the Parameters page vary according to which activity you selected in the Type
field in the upper part of Activity Manager. To find out the parameters required for a specific activity,
see Appendix A Activity parameters on page 627.
However, some fields are common to all activities, and should be filled in as follows:
Note: Information about how the different types of activities are used is provided in the relevant
section of the TRM User Guide or TRM Instruments: Processing and Calculations.
6.2.1.2 Defining activity intervals
If you specified that the activity needs to run "more than once, at fixed intervals", in the Due
Date field in the upper part of the application, you need to define the frequency for the activity in the
Intervals page.
First, you need to define in which order you want TRM to check the intervals defined for the activity.
This is mandatory because the calculation of the next due date of the activity can be affected by the
order in which the intervals are selected.
Secondly, you need to define the intervals themselves, and how they are calculated.
To define the intervals:
1. In Activity Manager’s Intervals page, specify the order (1 = first, 2 = second) in which you want
TRM to check the intervals defined for this activity in the Number field.
Even if you have only one interval definition, you must still give it a number, namely "1".
2. In the Unit Count and Unit fields, enter the size of the interval, where Unit Count is a number and
Unit is day, week, and so on.
For example:
–Every three days, Unit Count = 3, Unit = Add Day
–On the third of every month, Unit Count = 3, Unit = Set Day of Month.
Parameter Description
Mail Notification E-mail address to which TRM sends a message whenever the activity has run. The
message shows whether or not the activity ran successfully.
If your organization’s mail server is not running and TRM is unable to send a
notification to the e-mail address, you can refer to the activity log.
Calendar If you are setting up the activity to run at intervals, the calendar that is to be used for
calculations of those intervals. You set the intervals themselves using the Intervals
page.
If you are running this activity only once, you can leave this field blank.
Due Date Offset in
Days
"-1" if you want the activity to process data for the previous day rather than the day
of the Due Date.
For example, you set an accounting activity to run at 3 a.m. because you want it to
run during the night, but it is actually the accounting data from the previous day that
you want to process. You can enter positive and negative values to offset the activity
forwards or backwards, but back by one day is the most obvious and useful setting.
6 Managing activities
6.2 Managing activities
232 © Wall Street Systems IPH AB - Confidential
All the units that you can choose from give you dates or times in relation to the date defined in
the Due Date field in the upper part of the application. When the first interval is reached, that
date/time becomes the new due date from which the next one can be measured.
3. Save the whole activity definition using File - Save.
6.2.2 Running activities immediately
You can force activities (either individual activities, or all activities within the same activity group) to
run immediately, no matter what their current due date and interval settings are.
•To run an individual activity immediately, select File - Activate Now
•To run all the activities in a target activity group immediately, select File - Activate Group Now.
After the activity (or activity group) has run, TRM sets the next due date based on its interval
definitions. If you want the activity to run again, and if there are no intervals defined for the activity,
you must either supply a date in the Due Date field or define at least one interval.
6.2.3 Adding extra properties to activities
It is possible to add extra functions to a specific activity. These extra properties can be made
invisible to the person using the activity, or be made to appear as optional or mandatory fields.
See 3.39 Properties (optional) on page 148 for more information.
6.2.4 Checking the running of activities
You can check which activity is running now in the Running Activities dialog by selecting Tools -
Running.
Note that the Due Date column in the dialog shows the time as well as the date. The due date can also
be a date in the past, since you can backdate an activity by giving it a due date in the past and
saving the activity. This causes the activity to run immediately, but the resulting data is as if the
activity ran on that due date, and not today.
You can leave the Running Activities dialog open to keep a constant check on which activity is
currently running. You can set how frequently TRM checks whether a new activity is running, by
selecting the relevant time interval from the Update menu (10 Seconds, 30 Seconds, 1 Minute, or 5
Minutes). Alternatively, you can get TRM to check immediately, using File - Refresh.
Interval Select
Number of days,
months, weeks,
years, hours or
minutes forward
One of the following:
• Add Day (any day, including weekends and bank holidays); Add Month; Add Week;
Add Hour; Add Minute; Add Year.
• Business Day Forward (business days, based on the calendar specified in the
Parameters page).
Number of
business days
backward
Business Day Backward.
[nth] holiday or
weekend day
forward
Next Holiday.
This is determined by the calendar you selected for this activity in the Parameters page.
[nth] day of the
month
Set Day of Month.
For example, the third day of every month.
[nth] month of
the year
Set Month.
For example: the third month of every year (for March).
6 Managing activities
6.2 Managing activities
Transaction & Risk Management Module (TRM) User Guide 233
To check if an individual activity ran correctly (activity log) and how many times it ran, select the
activity whose log you want to view and look in Activity Manager’s Log page.
TRM updates the log information in real time, but to view the latest information in Activity Manager’s
Log page, you must refresh the display using View - Refresh Log.
The Log page shows the last 100 log entries for the selected activity, in reverse order (the most
recent entry is shown first). Each row shows information on one specific time that the activity ran,
the Number column showing you which time: 1 meaning first time, 2 meaning second time, and so
on.
6.2.5 Generating reports on activities
You can check which activities ran in a specific period by requesting an Activity Log report. The
report also shows whether the activity ran successively and, if not, why it failed.
See B.1 Activity Log Report on page 659 for details of the report’s parameters.
6 Managing activities
6.2 Managing activities
234 © Wall Street Systems IPH AB - Confidential

Transaction & Risk Management Module (TRM) User Guide 235
Chapter 7 Reporting
In TRM, you can create different types of reports: reports listing your data (for example, clients or
accounting rules), position-related reports (for example, Transaction, Key-Figure, and Periodic P/L),
and accounting reports. Reports are useful not only when you need a printed version of your data,
but also for viewing information on-screen that would either be too long or too complex to read in
Transaction Manager or in an application such as Treasury Monitor.
You can also perform a variety of calculations on the data in the report, for example, calculations
that are not available from Treasury Monitor. You can add, multiply, subtract and divide totals,
calculate averages, produce subtotals at any grouping level, produce running totals, combine the
output of different columns, and create sophisticated “if” conditions for displaying and calculating
data.
You can create as many different report layouts as you need (either completely new ones, or ones
based on existing layouts).
7.1 Report Generator
Reports are set up and managed in an application called Report Generator.
All types of report give you columns of data that you can choose either to display or to hide. So that
information appears the moment that you open the report, by default, all columns of data are
selected when you open the report.
In most cases, however, you will want to deselect at least some of the columns, because displaying
all of them makes the report impractically wide.
As well as the predefined columns that belong to a particular type of report, a report can contain
columns that you create yourself, and you can choose whether or not to display them as well as the
standard columns.
7.1.1 Report Generator menus
The following tables describe the menu items which are specific to Report Generator.
Other menu items which are common to all applications are described in 2.2.6 Using application
menus on page 34.
7.1.1.1 File
Menu item Description
New Report Displays a list of reports.
Select the report you want to generate from the list. The report’s start-up parameter
dialog displays.
Open Opens a dialog to enable you to select an existing report layout.
Parameters Allows you to reopen the current report with different start-up parameters, without
having to quit the report.
7 Reporting
7.1 Report Generator
236 © Wall Street Systems IPH AB - Confidential
7.1.1.2 Edit
Save As Allows you to save the report layout, either in the Personal folder (if this is a layout
you are creating for your own use), or in the Shared folder (if you want to make the
layout available to others).
The directory that appears by default is the one set during implementation with the
variable FK_REPORT_DIRECTORY.
Export Saves the report and allows you to export the data to another application.
The data can be saved as a text file (either .cvs or .txt), in XML format, or as a HTML
file.
Note that when exporting report content to an XML file, a Document Type Definition
(DTD) is not provided and therefore it is not possible to validate the content.
Print Prints the current report.
Print Preview Allows you to preview the report’s appearance before you print it.
Page Setup Allows you to modify the page size, orientation, margin sizes, and print settings for
this report.
Menu item Description
Copy Copies the selected report data and allows you to paste it into another application
Copy Report Copies the whole report and allows you to paste it into another application.
Find
Find Next
Allows you to search for a particular value in the report.
Column Opens a list of menu options which allow you to configure the appearance of the
report’s columns or create a calculated column.
•Properties: allows you to add a grand total or balance for the whole column using
the Grand Total field in the Column Properties dialog. If you grouped the data in the
report (Format - Grouping), you can also add a total for any level within the grouping
hierarchy.
•New Column: allows you to create your own columns.
•Alignment: changes the text alignment in the selected column to left, center, or
right.
•Decimal Precision: changes the decimal precision of a numbers column where
Millions rounds to the nearest million, Thousands to the nearest thousand, None
gives no decimal places, and 1 digit through to 10 digits give 1-10 decimal places.
•Hide Column: hides the selected column from the display. You can reinstate the
column using the Format - Columns option.
•Delete Column: deletes the selected column. You can only delete columns that you
have created.
•Merge Cells Vertically / Merge Cells Horizontally: enables selected columns which have
the same content to be combined to form a single cell. To split the cells, deselect
this menu option.
•Resize to Fit: automatically resizes columns to fit the content. Note that you can
also double-click between column headers to resize the column on the left.
Print Settings Allows you to define print settings for the current report layout.
Menu item Description

7 Reporting
7.1 Report Generator
Transaction & Risk Management Module (TRM) User Guide 237
7.1.1.3 Format
Menu item Description
Columns Opens a multi-selection list to enable you to define the columns to be displayed in the
report. By default, all columns are selected when you open a new report.
Note that you can also create your own columns.
Grouping Opens a multi-selection list to allow you to select the column you want to use to group
the information in the report.
You can group by more than one column. The number of nested levels in the report is
unlimited.
Each group of data rows is outlined by one row at the beginning (Grouping Header),
and another row at the end (Grouping Footer). Grouping headers cannot be modified.
However, grouping footers can be used for displaying group totals and you can assign
an expression to each column in a group footer row. See 7.2.5.3 Using groups in
expressions on page 251.
Note that when you select columns to group by, these columns do not need to be
displayed (Edit - Column - Hide Column).
Sorting Opens a multi-selection list to allow you to select the column you want to use to sort
the information in the report.
To make the report easy to read, it is best to make sure that the column you sort by is
the first column listed.
If you select more than one column, you can sort at more than one level.
Group Sort Opens a multi-selection list to allow you to select the column you want to use to sort
report data within groups based on figures provided at the group level (typically totals
but may be other values).
This option becomes available once you have selected a Grouping column.
Criteria Allows you to produce reports that contain only the information matching the search
criteria you specify.
You can use Report Generator’s Expression Builder to help you enter the search
argument (see 7.2.5 Building expressions for reports on page 241).
Display Only Totals Compresses the display to show only one row for each column; this is useful if you
only want to see totals and averages.
Since text columns can have neither averages nor totals, compressed text columns
are blank by default. However, you can display the first or last item for a text column
within a grouping hierarchy to identify the contents of the grouping: see Format -
Grouping and 7.2.5 Building expressions for reports on page 241 for more information.
Appearance Allows you to change the appearance of the report, including font properties and
background colors for cells.
Header/Footer Allows you to change the header and footer text for the whole report.
Images Allows you to add images to reports to enhance their appearance and impact. You can
specify where the image is positioned on the report.
Only .bmp files may be inserted. You can preview the image in the report using File -
Print Preview.
7 Reporting
7.1 Report Generator
238 © Wall Street Systems IPH AB - Confidential
7.1.1.4 View
7.1.1.5 Window
7.1.2 Start-up parameters
It is possible to alter the start-up parameters so that Report Generator launches in a different mode.
See C.9 Report Generator on page 684 for information about the options available.
7.1.3 Report files
Report Generator recognizes three types of files: report definitions, report parameters, and report
layouts.
The report definition file specifies the report type (unique report identifier), the data source to
retrieve the data from, definitions for all startup parameters and, in some cases, information about
how to transform numeric values to a more user-friendly text presentation. A document of this type
is not meant to be modified; it serves as a starting point when creating a customized variant of a
report. The default file extension is .frd
Report parameter files provide a way to specify values for startup parameters required by the report
so that it can be executed without user interaction. The parameter file itself does not contain enough
information to run the report; it also refers to either the report layout or the report definition. Once
Menu item Description
Zoom In
Zoom Out
Zoom Default
Allows you to magnify or reduce the report display in steps of 10%. The zooming
information can be saved in the report layout.
The zoom percentage has no effect on print settings: printing is always done using the
zoom default setting of 100%.
Refetch Data Updates the report’s data: either recalculates data in calculated columns (refresh
data), or updates the report with the latest market data (refetch data).
Report Outline Displays a hierarchy of all grouping headers and footers currently present in the
report and allows quick positioning in any part of the document.
Chart Allows you to display the report data as a chart.
In the Chart dialog, select the column that you want to appear on the x axis. It is
advisable to choose a date column.
Right-click the chart if you want to change its appearance.
Options Displays the Report Generator options dialog which enables you to specify the default
settings for all reports. There are three tabs in the dialog: Layouts; Print; and
Clipboard.
•Layouts - allows you to view or modify the default directories for saving report
layouts.
If the shared files location refers to a network drive, it may be slow to build a
Layout menu. In such a case, you can skip scanning for layout files in the shared
network folder by turning off the Scan Shared Layouts switch.
•Print - allows you to change the default print settings for all reports.
Note that the print settings defined here apply to the application, whereas those
defined in Edit - Print Settings only apply to the current report layout.
•Clipboard - allows you to define the settings related to copying row and column
header cells. If these switches are on, data from all cells, including the content
from header cells, is copied to the clipboard.
Menu item Description
Tile
Cascade
Displays several open reports within one instance of Report Generator.
Open reports are also accessible from the Window menu.

7 Reporting
7.2 Managing reports
Transaction & Risk Management Module (TRM) User Guide 239
this referred document is opened, parameters are set and the report is run automatically. The
default file extension is .frp.
A report layout determines how the report will appear, whether rows of data will be grouped and/or
sorted, which columns will be visible and in what order, which colors and fonts will be used, and so
on. The layout file can also contain default values for report startup parameters. The layout file is a
layer on top of the underlying report definition. The default file extension is .fkr.
Settings for decimal and thousands separators are saved in the report layout, so that when a layout
is opened on a machine with different regional settings, the settings from the layout are used.
The regional settings specified on your machine are used if no information relating to separators is
found in the layout when it is opened.
It is important that the same separators as those defined in the layout are used when numeric
values are added or modified in the report.
Note: A basic set of report layouts is distributed with the software.
7.2 Managing reports
The following sections explain how to create new reports, and how you can configure columns so
that they display specific information or calculated data.
7.2.1 Creating new reports
To create a new report:
1. In Report Generator, select File - New.
2. From the resulting menu containing a list of available reports, select the type of report you want
to create.
See 7.2.7 List of reports on page 254.
3. In the resulting dialog, enter the parameters for the data you want to view in the report.
The parameters for each report are described in Appendix B Report parameters on page 659.
4. Click OK.
5. In the resulting report, customize the layout of the report if necessary.
6. Select File - Save As to save the report layout.
Note: Information about how the different types of report are used is provided in the relevant
section of the guide.
7.2.2 Opening entity reports
Editors have a Tools - Run report menu option, from which you can generate a report showing the
entities that have been created in that editor.
For example, if you open Currency Editor and select Tools - Run report, a report will be generated that
shows all currencies that have been created, plus details of their attributes: see 3.3.9.5 Generating
reports on static data entities on page 50.
7.2.3 Drilling down into reports
In some reports, for example, those run from Instrument Editor (as described in 3.19.1 Generating
reports on instruments on page 130), it is possible to drill down further into the listed data in order
7 Reporting
7.2 Managing reports
240 © Wall Street Systems IPH AB - Confidential
to view the underlying attributes in more detail in a separate report. IDs of the data that can be
drilled-down display as hyperlinks.
To drill down further into an item in the report, do one of the following:
•Right-click the ID and select one of the available underlying attributes.
•Left-click the ID: the underlying attribute which is first in the list of available attributes is
selected automatically.
In both cases, a new report is generated which shows more information about the underlying
attribute of the static data.
7.2.4 Creating columns for special information or groupings
In most cases, the standard columns for the type of report you are creating should provide you with
all the information that you want to display. If not, you can create and configure your own columns,
which can be derived from information in other columns.
With these columns you can also produce a variety of conditional output, such as: “if value is less
than this, then do this; otherwise, do that”. These conditional statements can be either numeric or
alphabetical: for example, you can separate clients whose names start with A-M from those starting
with N-Z by producing an argument of the form, “if client ID is less than or equal to M, then add text
‘group 1’; if not, then add text ‘group 2’” and then use this output as a grouping criterion.
For convenience, these special columns are called calculated columns in TRM, but it is worth
remembering that they can serve more purposes than simply performing calculations.
7.2.4.1 Creating calculated columns
To create a calculated column:
1. Select the column to the right of where you want the new column to appear.
2. Select Edit - Column - New Column.
3. In the New Report Column dialog, enter a name for the new column in the Name field.
Do not use upper-case text or spaces (you can use an underscore sign as a separator).
4. Enter a name in the Displayed as field.
The name you give here will appear in the Select Columns multi-selection list and on the report.
5. Click > to the right of the Column field to open the Expression Builder dialog.
6. Enter the formula you want for the new column in the Expression Builder dialog, and click OK to
confirm.
Each cell for which the calculation has failed is displayed as <Calculation Error> (white text on
a red background). In addition, a message displays with detailed information about the first
calculation error.
For information on using the Expression Builder dialog and building formulas, see 7.2.5 Building
expressions for reports on page 241.
7.2.4.2 Creating dynamic column headings
You can create a dynamic column heading based on a report’s start-up parameters. To do so, you
modify the properties of the column using a formula which refers to one or more data rows in the
report. The results of the formula are then displayed in the column heading.
To create a dynamic column heading:
1. In the report display itself, select the column for which you want to create the dynamic heading.
2. Select Edit - Column - Properties.
3. Click > to the right of the Displayed As field to open the Expression Builder dialog.
7 Reporting
7.2 Managing reports
Transaction & Risk Management Module (TRM) User Guide 241
4. Enter the formula you want for the new heading column in the Expression Builder dialog, and
click OK to confirm.
7.2.5 Building expressions for reports
The Expression Builder dialog can be used to build expressions for calculated columns. The
components that are available to help you build the expression are available on the left side of the
dialog, and include: built-in functions (function syntax templates), columns, constants (for example,
the date) and the report’s start-up parameters. Built-in functions are described in the following
section.
Operators also help you build your formula for a calculated column and can be used together with
built-in functions. The operators you can use in the Expression Builder dialog are described in 7.2.5.2
Operators on page 247.
Note: The definition of a new column cannot include the column itself in the expression as this
creates a circular dependency.
7.2.5.1 Built-in functions
The following table describes the built-in functions, and gives some examples of how they can be
used.
Built-in function Description
abs()
abs( «argument» )
Returns absolute value of a given number.
This function accepts a single column value as an argument, and it can
also accept a set of columns.
In the latter case, the result will be a set of absolute values and as such, it
can be passed to other built-in functions that expect the set of values as
an argument (useful when defining expressions for group totals).
For example:
abs(amount)
sum(abs(@amount))
as_datetime( «column» )
as_float( «column» )
as_int( «column» )
as_money( «column» )
as_numeric( «column» )
as_text( «column» )
Conversion methods used to convert any data type to a string where
columns of different types are combined.
For example:
as_text(my_date_column) + ": " + my_string_column)
Gives a result such as:
"DD/MM/YYYY: MyStringColumnContent"
Note: The following rounding is associated with these functions:
as_float(): 10 digits, as_money(): 8 digits, as_numeric(): 4
digits.

7 Reporting
7.2 Managing reports
242 © Wall Street Systems IPH AB - Confidential
avg()
avg(@ «column» )
Calculates the average of a set of numeric values.
This function has two forms: the one with one argument is used for
calculating simple average (formula: ( values) / num of elements).
The one with two arguments calculates the weighted average (formula:
(volume * value) / volume).
Since it makes no sense to apply this function on a single value, both
syntax forms expect columns to be specified using the 'set of columns'
qualifier ('@' sign).
For example:
Simple average:
avg(@amount)
Weighted average:
avg(@volume, @price)
business_days()
business_days
«calendar_id» ,
«date_column» ,
«date_column» )
Calculates the number of business days between two dates according to a
specific calendar.
day() or hour() or minute()
day( «date_column» )
minute( «date_column» )
hour( «date_column» )
Extracts the time (hour or minute) or day of the month from a date.
The result is an integer (1-31).
For example:
day(payment_date)
date_add()
date_add(«date» , «days» ,
«calendar_id» )
Returns a date which adds business <days> to the <date> according to
the specified <calendar> (if no calendar is specified, it implies we use
calendar days).
extract_word
extract_word( «text_column»
, «word_separators» ,
«word_index» [,
«exact_match»] )
Extracts part of a string:
•where
[, «exact_match»] is 0 or 1
• there is a space after «word_index» to avoid any confusion with
regional settings.
For example:
extract_word (instrument_group, "/", 3) returns:
- "EQUITY" if instrument_group = "/EQ/EQUITY"
- "FX" if instrument_group = "/FX"
- "BOND" if instrument_group = "/MM/BOND/USD"
extract_word (instrument_group, "/", 3 , 1) returns:
- "EQUITY" if instrument_group = "/EQ/EQUITY"
- "" if instrument_group = "/FX"
- "BOND" if instrument_group = "/MM/BOND/USD"
extract_word (instrument_group, "/", 1 , 1) returns:
- "" if instrument_group = "/EQ/EQUITY"
Built-in function Description
Σ
ΣΣ

7 Reporting
7.2 Managing reports
Transaction & Risk Management Module (TRM) User Guide 243
first()
first(@ «column» )
Returns a value from the first row in the current group, under the column
"column".
Since the notion of a 'first' row makes sense only when you are grouping,
the column must be preceded with the '@' qualifier.
For example:
first(@amount)
In the case of compressed text columns (see Format - Display Only Totals),
which are blank by default, you can use this function to display the first
item within a grouping hierarchy to identify the contents of the grouping.
For example:
first(@column_id)
get_client_country()
get_client_country(«client_
id»)
Returns the country of the client.
get_client_group()
get_client_group(
«client_id»,
"«main_group»")
Returns the group that the client "client_id" belongs to, within the
specified main group "main_group".
If the client belongs to more than one group in the main group, the first
one will be returned.
For example:
get_client_group(client_id, “PRINCIPAL”)
get_client_top_parent()
get_client_top_parent(«clie
nt_id»)
Returns the ID of the parent.
This always displays the Top Parent should there be a chain of ownership
(or the same client_id if the client has no parents).
get_client_country()
get_client_top_parent()
Combined together, get_client_country and get_client_top_parent can be
used to get the country_id of the topmost parent:
For example:
get_client_country(get_client_top_parent(«client_id»))
The client here can be, for example: the trade counterparty, the
instrument issuer, the instrument guarantor, or any cashflow credit client.
get_field()
get_field("«table»",
«key_column_ids»,
"«field»")
Retrieves certain fields from selected tables in the system.
The selected tables are those that have a Get<TableName> function
defined, for example, the Client and Portfolio tables, with the
corresponding GetClient and GetPortfolio functions.
Note that arguments "db_table" and "field" must be specified in quotes.
For example:
get_field(“client”, client_id, “name”)
get_field(“portfolio”, portfolio_id, “name”
get_field(“currency”, currency_id, “class_id”)
get_field("UMICreditClient", instrument_id, 1,
"cover_percent")
Note: get_field() accepts both strings and numerical data as key values
(for the second argument).
Built-in function Description

7 Reporting
7.2 Managing reports
244 © Wall Street Systems IPH AB - Confidential
get_property_value()
get_property_value("«db_tab
le»", «key1», «key2»,
«key3», "«prop_id»")
Retrieves user-defined properties from any table or database in the
system.
• Both <db_table> and <prop_id> must be specified in double quotes
• Argument <db_table> is case-sensitive (i.e. “Client” instead of
“client”)
• Argument <property> will be automatically converted to uppercase
• Even though currently only <key1> and <key2> are used, all three
keys have to be specified (most of the time <key2> and <key3> will
be empty strings)
• Type of the result depends on actual type of the property: it can be a
text, integer or floating point value.
For example:
get_property_value(“Client”, client_id, ““, ““,
“TELEPHONE”)
get_property_value(“FXInstrument”, id, ““, ““, “FXTYPE”
get_security_identifier
get_security_identifier(
«instrument_id»,
"«security_identifier_type_
id»")
Retrieves the security identifier for the given instrument and type.
For example:
get_security_identifier (instrument_id, 'ISIN')
get_security_identifier ('EURBOND', 'CUSIP')
get_transaction_property()
get_transaction_property(«t
ransaction_number_column»,
"«prop_id»")
Retrieves user-defined transaction property «prop_id».
The property «prop_id» is defined in the Property Editor and associated
with the transaction «transaction_number» in Transaction Manager.
• «transaction_number» can be anything that evaluates to a number
(the name of a column containing transaction number, plain number,
expression, and so on)
• The type of the result depends on the actual type of the property: it
can be a text, an integer, a floating point value, and so on.
For example:
get_transaction_property(my_transaction_number_column,
“PREVIOUS-COUNTERPARTY”)
get_transaction_property(12345, “MY-INFO”)
human_rate()
human_rate( «rate»,
«base_currency_column»,
«quote_currency_column»)
This function uses the arguments in parameter where «rate» is either a
numerical value, or the name of a column containing a rate,
«base_currency_column» is either the name of the base currency the rate
is expressed in, or the name of a column containing such a currency, and
«quote_currency_column» is either the name of the quote currency the
rate is expressed in, or the name of a column containing such a currency.
if()
if( «cond» )( «expr_true»
)( «expr_false» )
Evaluates expression “condition”.
If it evaluates to true (i.e. a non-zero value), then the result of expression
«expr_true» will be the final result; otherwise, the result of expression
«expr_false» will be used. Nested IFs are allowed.
For example:
if(type-id = ‘BOND’) (1) (0)
if(type_id = ‘BOND) (1) (if(type-id = ‘GBOND’) (2) (0))
Built-in function Description

7 Reporting
7.2 Managing reports
Transaction & Risk Management Module (TRM) User Guide 245
last()
last(@ «column» )
Returns the value from the last row (preceding the footer row) within the
current group, under the column <column>.
Since the idea of a 'last' row makes sense only when grouping is applied,
the column must be preceded with '@' qualifier.
For example:
last (@amount)
In the case of compressed text columns (see Format - Display Only Totals),
which are blank by default, you can use this function to display the last
item within a grouping hierarchy to identify the contents of the grouping.
For example:
last(@column_id)
left ()
mid ()
right ()
left(«text» , «pos»)
mid(«text» , «pos» , «len»)
right(«text» , «pos»)
These functions are similar to those found in standard spreadsheets and
are used for text manipulation.
For example:
If Issuer ID = ABN AMRO
left(issuer_id, 2) = AB
mid(issuer_id, 5, 3) = MRO
right(issuer_id, 3) = MRO
like()
<text_column> like “<text>”
Performs string comparison, returning true if strings match, otherwise
false.
The percentage sign '%' can be used to specify various modes of
comparison.
‘Like’ cannot be combined with the ‘not’ expression.
For example:
name like “Wa%”
returns true for all name that begin with ‘Wa’
name like “%Street%”
returns true for all names that contain ‘Street’
name like “%em”
returns true for all addresses that end with ‘em’.
match
<text_column> match
“<regular_expression>”
Performs a complex string comparison using regular expressions. Returns
true if strings match, otherwise false.
A regular expression is a pattern of text that consists of ordinary
characters (for example, letters a to z) and special characters, known as
metacharacters.
The pattern describes one or more strings to match when performing a
comparison. The regular expression serves as a template for matching a
character pattern to the string being compared.
For example:
name match '^A.*|^B.*'
returns true for every 'name' that begins with 'A' or 'B'.The '^' sign stands
for 'at the beginning of the text', so in this case '^A' means 'A at the
beginning of the text'. The dot stands for 'any sequence of characters',
and the asterisk stands for 'any number of times (zero or more)'.
Putting everything together, expression becomes 'A at the beginning of
the text, and any sequence of characters that occurs after it zero or more
times'.
name match '[AB].*a$'
returns true for every 'name' that contains 'A' or 'B' and ends with an 'a'.
Built-in function Description

7 Reporting
7.2 Managing reports
246 © Wall Street Systems IPH AB - Confidential
Square brackets are used to list all possible characters that can match. It
is not specified exactly where in the string those characters must appear,
so they are allowed to appear anywhere in the text. The dollar sign stands
for 'at the end of text'.
Putting everything together, expression becomes 'A or B anywhere in the
text, followed by any sequence of characters that occurs zero or more
times, and with an 'a' at the end of the text'.
name match '^A.*[^a]$'
returns true for every 'name' that begins with an 'A' and does not end with
an 'a'.
The square brackets can also be used to specify an exclusion list of
characters. The '^' sign specified at the beginning of the list means 'the
characters in this list must not appear in the text'.
Combined with the dollar sign, it becomes 'the characters from the list
that must not appear at the end of the text'.
min()
min(@«column»)
Returns the smallest numeric or date value in the specified group or
column.
max()
max(@«column»)
Returns the largest numeric or date value in the specified group or
column.
month()
month( «date_column» )
Extracts the month of the year from a date.
Result is an integer (1-12).
For example:
month(payment_date)
prev()
prev(@ «column» )
When used on plain rows (that is, not totals), displays the value in a given
column on the previous row (within the grouping).
For example:
prev(@amount)
displays the value found in the Amount column on the row above.
prod()
prod(@ «column» )
Calculates the product of a set of numeric values.
Since it makes no sense to apply this function on a single value, the
column has to be specified using the 'set of columns' qualifier ('@' sign).
For example:
prod(@number)
round()
round( «numeric_column»,
«precision» )
Rounds floating point value to a specified number of decimal digits.
This allows you to convert a decimal amount to the superior as opposed to
the inferior (truncate).
For example:
round(nominal_amount, 1)
For nominal_amount = 1.16, the above method will return value of 1.2.
sum()
sum(@ «numeric_column» )
Calculates the sum of a set of numeric values (formula: values).
Since it makes no sense to apply this function on a single value, column
has to be specified using the 'set of columns' qualifier ('@' sign).
For example:
sum (@amount)
text_to_num()
text_to_num( «text_column»
)
Performs a conversion from text to a numeric value.
If the conversion is not possible, the result will be zero.
For example:
text_to_num(“123.45”)
Built-in function Description
Σ
7 Reporting
7.2 Managing reports
Transaction & Risk Management Module (TRM) User Guide 247
7.2.5.2 Operators
You use operators to help you build your formula for a calculated column. This section describes the
operators, and provides examples of how you can use them with built-in functions.
For conditional statements, you use “if” (built-in function). Here are some examples:
to_date()
to_date( «column» )
Extracts the date part from a date/time column (useful for making date
comparisons without comparing time parts).
For example:
to_date(log_date)
truncate()
truncate( «numeric_column»,
«precision» )
Truncates the floating point value to a specified number of decimal digits
without rounding it.
Allows you to convert a decimal amount to the inferior as opposed to the
superior (round).
For example:
truncate(nominal_amount, 1)
For nominal_amount = 1.16, the above method will return value of 1.1.
year()
year( «date_column» )
Extracts the year from a date.
The result is an integer.
For example:
year(payment_date)
Built-in function Description
Operator Examples
+ add book_value + accrued_interest
Or, for the portfolio ID, followed by one space, followed by the instrument ID:
portfolio_id + “ ” + instrument_id
Note: The result of an add operation that involves text and date will be text if the
left operand is text. The result will be date if the left operand is date.
- subtract nominal_amount - book_value
/ divide nominal_amount / 1000
book_value / nominal_amount
* multiply amount * market_fx_spot_rate
^ to the power of maturity ^ 2
or, for the square root:
maturity ^ 0.5
To do this Formula
In a report of type Instrument, if the instrument is a
bond, name the output ‘Bond’; otherwise, name the
output ‘Other’.
(With this output, you can later create a grouping that
separates your bond instruments from the rest of your
instruments)
Note: Pay special attention to the use of quotation
marks: they act as delimiters for text, so if your
output is numbers instead, you do not use the
quotation marks:
if (type_id = ‘BOND’) (1) (2)
if (type_id = ‘BOND’) ('Bond') ('Other')
Where the syntax is:
if (condition) (then) (else)
7 Reporting
7.2 Managing reports
248 © Wall Street Systems IPH AB - Confidential
For conditional statements based on text matches, you can use ‘like’ and ‘match’ (built-in functions)
to produce conditions such as “all names starting with a target letter” or “all names containing a
specific character string”. Note that both are case-sensitive:
As you can see, ‘like’ is simple (% as a wild character before, after, or either side of the target letter
or string), but not very flexible, since these three options are the only ones available.
Note: ‘Like’ cannot be combined with the ‘not’ expression.
With ‘match’, the syntax is more complex, but you have more possibilities; ‘match’ uses “regular
expressions” (also known as Perl expressions). The separators and operators are described in the
following table:
As above, but expanded to naming the output ‘GBond’,
‘Bond’ or ‘Other’, depending on whether the instrument is
a government bond, other kind of bond, or an instrument
that is neither of these two.
if (type_id = ‘BOND’) (‘Bond’) (if (type_id =
‘gbond’) (‘GBond’) (‘Other’))
Where the syntax is:
if (first condition) (then give this output) (else
(second condition) (then give this output) (else
give this output))
Group results according to whether they represent big
movements (positive or negative) or small.
if (abs(amount) > 100000) (“Big”) (“Small”)
Where the syntax is:
if (condition) (then) (else)
To do this Formula
For all names… ‘Like’ example ‘Match’ example
Starting with [string] (type_id like ‘A%’) (type_id match ‘^A’)
Containing [string] (type_id like ‘%France%’) (type_id match ‘France’)
Ending with [string] (type_id like ‘%a’) (type_id match ‘a$’)
For this Use Example
“Starting with…” ^Starting with capital ‘A’ (notice that ^ goes before the “starting with”
character):
"^A"
“Ending with…” $Ending with capital ‘Z’ (notice that $ goes after the “ending with” character):
"Z$"
Any character .Starting with capital ‘A’ then exactly one character:
"^A."
You can specify two or more characters by using the appropriate number of
dots.
For example:
Starting with ‘A’ then two characters:
"^A.."
Starting with ‘A’ then three characters:
"^A..."
7 Reporting
7.2 Managing reports
Transaction & Risk Management Module (TRM) User Guide 249
Here are some examples of complete arguments:
You can also produce further conditions with the following operators:
Previous character
any number of times
(including none)
*Starting with capital ‘A’ and ending with lower-case ‘s’ (with any characters, any
number of times, in-between):
"^A.*s$"
Note: * qualifies the character that it follows: here, the “any” ("." ) character is
being qualified, so ".*" means “any character, any number of times.”
Compare this with:
"^A*s$"
which will only find As, AAs, AAAs, and so on (since the character that is
allowed any number of times is capital ‘A’ rather than “any character.”)
Previous character
one or more times
++ is the same as * described above, except for the fact that it requires at least
one character, and does not accept strings with zero occurrences of the
character it qualifies.
For example, compare:
"^Ab*"
… which simply allows any character string starting with ‘A’ (since the syntax of
b* means “lower-case ‘b’ no times, or one or more times), with:
"^Ab+"
… which means “starting with capital ‘A’ and then lower-case ‘b’ one or more
times.”
Including all the
characters listed
[ ] ^[ABC]
This is useful if you want to make statements that are not case-sensitive. For
example, if you want any names starting with ‘A’ (either upper-case or
lower-case):
"^[Aa]"
Excluding all the
characters listed
[^] Not ending with ‘a’:
"[^a]$"
Or | Starting with A or ending with ‘a’:
"^A.*|.*a$"
For this Use Example
To specify all names… ‘Match’ example
Instrument type starting with either A or B (type_id match ‘^A|^B’)
Countries starting with A or B, and ending with ‘a’ (country_id match ‘^[AB].*a$’)
Operator/for items Syntax Example/for items where...
and
Only items meeting all
conditions (“only items with
this value and that value”)
[expression] AND
[expression]
Client ID is ANYBANK and the currency is US
dollars:
cp_client_id = “ANYBANK” AND currency_id =
“USD”
Bitwise and
Bitwise or
«num» bitand «num»
«num» bitor «num»
Number expressed in binary:
• Bitwise and: 1 and 1 = 1, anything else is equal
to 0
• Bitwise or: 1 or anything = 1, anything else
equals 0
TRM uses binary storage for client roles, cashflow
attributes, and other switches.
7 Reporting
7.2 Managing reports
250 © Wall Street Systems IPH AB - Confidential
You can use open and close parentheses as delimiters. For example, if you want market = FX, or
market = EQ expressed in the currency DEM:
(market_id = “FX” OR market_id = “EQ”) and currency_id = “DEM”
You can also use single or double quotation marks around names; for names containing dashes,
slashes, or other characters reserved for mathematical functions, you must use quotation marks.
For example:
or
Items meeting any one of the
conditions (“this value or that
value”)
[expression] OR
[expression]
Client ID is either ANYBANK1 or ANYBANK2:
cp_client_id = “ANYBANK1” OR cp_client_id=
“ANYBANK2”
=
Equal to the expression
[expression] =
[expression]
Client ID is ANYBANK:
cp_client_id=”ANYBANK”
NOT
!=
Not equal to the expression
[expression] !=
[expression]
Client ID is not ANYBANK:
cp_client_id != “ANYBANK”
Note: ‘Like’ cannot be combined with ‘not’ to create
a ‘not like’ expression. However, the following
examples show commands that you can use
as alternatives:
Example criteria:
!(cashflow_type_name like “Expi%”)
In the report, you will see all cashflows which are
not like “Expi%”.
Example new column:
if (!(transaction_currency_id like “EU%”)) (1) (0)
In the report, there will be a ‘1’ for every row where
the currency is not like “EU%”.
Being able to utilize ‘not’ with ‘like’ in this way can
be useful, for example, when you are creating
authority or reconciliation reports.
> and <
Greater than (>) or less than
(<) the given values.
[expression] >
[expression]
[expression] <
[expression]
Amount is greater than 0 but less than 1,000,000:
amount>0 AND amount<1000000
Note that for both > and <, you can add the equals
sign ( = ) to mean “...or equal to.” For example, for
amount is greater or equal to 0, but less than or
equal to 1,000,000:
amount>=0 AND amount<=1000000
Enter this Otherwise...
cp_client_id = “ANY-1”
rather than:
cp_client_id = ANY-1
TRM misreads the dash as a minus sign.
Operator/for items Syntax Example/for items where...
7 Reporting
7.2 Managing reports
Transaction & Risk Management Module (TRM) User Guide 251
7.2.5.3 Using groups in expressions
The general form of referring to a group in an expressions is:
Column:GroupingColumn
This means "a single value from GroupingColumn footer row, under column Column".
For example, a column named Amount% is created with the following formula:
amount/amount:date*100
Here, amount and date are column identifiers for columns Amount and Date, respectively. The term
amount:date refers to a single cell value in the footer row of the Date group, under the column
Amount.
For this to work there must be a value under column Amount in all Date footer rows. Technically
speaking, an expression for column Amount and grouping Date must be defined first in order to
make sure that all Date footer rows contain a defined value. After that the computation of Amount%
may take place.
7.2.5.4 Using ranges in expressions
The general form of referring to a range of rows in an expression is:
@Column:GroupingColumn
The @ stands for “range of rows”. Therefore, @Column means a “range of row values under column
Column”. The part to the right of the colon means, “row range starts with the first row in current
GroupingColumn group”. Both the first and last rows are part of the range.
•Using ranges in plain row expressions without a grouping specifier
One of the cases where this can be very useful is when building a cumulative sum: a value in a
certain column is increased by successive additions, row by row. For example, a column named
Cumulative Sum is created with the following formula:
sum(@amount)
Here, amount is the column identifier for column Amount. The GroupingColumn part has been
omitted, so the range of rows always begins with the first row in the innermost group.
•Using ranges in plain row expressions with a grouping specifier
If the GroupingColumn part was specified, it would mean that the range starts with the first row
in the group GroupingColumn, which is not always the same thing as the first row in the
innermost group. If the column formula is modified to look like this:
sum(@amount:currency_id)
then all the @amount ranges start with the first row in the Currency group.
opening_date <
“31/12/1999”
rather than:
opening_date < 31/12/1999
TRM does not recognize the date as a date.
Note: You can also specify dates using the number of days from 01/01/1900.
For this, you do not need quotation marks.
For example:
opening_date < 36523
rather than:
opening_date < “31/12/1999”
If you use Microsoft Excel, be aware that it gives a number that is two
more than the TRM number. This is because of a bug in Excel (it counts
01/01/1900 as day 1 instead of 0, and it wrongly assumes that there
was a 29 February 1990).
Enter this Otherwise...
7 Reporting
7.2 Managing reports
252 © Wall Street Systems IPH AB - Confidential
•Using ranges in footer row expressions without a grouping specifier
Results are different when the same expressions are assigned to a grouping: they will be
evaluated on that group's footers only. When evaluating @Column in a footer row expression, the
range is automatically assumed to be the whole group to which the footer row belongs.
Therefore, if the expression sum(@amount) is assigned to the Date grouping under the Amount
column, instead of being used to create the new column Cumulative Sum (as in the earlier
example), it will be evaluated only on the Date footer rows.
•Using ranges in footer row expression with a grouping specifier
If the expression sum(@amount) (which was assigned to the Date grouping in the previous
example) is assigned to a Currency grouping, it will therefore only be evaluated on the Currency
group footer rows.
Such a configuration where the inner grouping (Date) is used as the GroupingColumn and the
expression is assigned to the outer grouping (Currency) is intentionally done that way. It
illustrates the fact that the range sometimes can be of footer rows - instead of plain data rows.
7.2.6 Configuring columns
It is possible to further modify how the data in a report’s columns is displayed.
7.2.6.1 Modifying heading and text properties
To modify the displayed heading and text properties of a column:
1. Select the column that you want to modify.
2. Select Edit - Column - Properties.
3. In the Properties dialog, modify the column’s display name, in the Displayed as field.
By default, columns are displayed with the name they have when you select them from the Select
Columns selection list (Format - Columns).
4. Click OK to save your changes.
7.2.6.2 Adding totals and averages to numeric columns
To add totals and averages to numeric columns:
1. Select the column to which you want to add the total (or average).
2. Select Edit - Column - Properties.
3. In the Grand Total field of the Column Properties dialog, add a formula to calculate the grand total or
balance for the whole column.
4. If you want to calculate the total or average for a specific grouping level, enter the formula in
the Group field.
Note that you can specify a different total for each grouping level.
5. Click OK to close the dialog.
6. Save the report layout using File - Save As.
If you open the Expression Builder dialog from the Column Properties dialog (by clicking > to the right of
a field), it automatically suggests an expression which matches the column’s data type. For
example, for a numeric data type, the sum() expression is suggested, while for a non-numeric data
type, the last() expression is suggested.
See 7.2.5 Building expressions for reports on page 241 for more information.
7 Reporting
7.2 Managing reports
Transaction & Risk Management Module (TRM) User Guide 253
Some example formulas are described in the following table:
7.2.6.3 Displaying zero values in numeric columns
To turn on the display of zeros when the number in a cell = 0 (the default is off):
1. Select the column that you want to modify.
2. Select Edit - Column - Properties.
3. In the Column Properties dialog, switch on Show Zeroes.
4. Click OK to confirm your choice.
7.2.6.4 Modifying date and time formats of columns
To change the format used to display the dates or times in columns:
1. Select the column that you want to modify.
2. Select Edit - Column - Properties.
3. In the Column Properties dialog, enter the elements of the date and time you want to see in the
Date and Time fields.
Syntax Description
Tot a l o f an “a m o u nt ”
column
sum(@column_id)
sum(@amount)
Running total of
another column
The above formula is a simplified syntax that you can use if the column for which you
want the running total is the lowest level in the grouping hierarchy.
To produce the running total of any other column, you must follow the running-total
column by a colon, then the column whose running total you want.
For example, if you want the running total at Instrument-type level (assuming that
this column is called Instr_Type):
sum(@Column C:Instr_Type)
or at Portfolio level (assuming that this column is called Portfolio):
sum(@Column C:Portfolio)
Average of a column
avg(@column_id)
avg(@book_value)
Average of “amount”,
divided by a “number”
avg(@amount/1000)
Average of (“amount”
multiplied by a
“number”)
avg(@amount*@number)
Average of subgroups,
rather than whole
column:
avg(@amount:credit_client_id)
Weighted average avg(@amount,@days)
Absolute value
sum(abs(@column_
id))
sum (abs(@amount))
In other words numbers are always regarded as positive, whether their sign is plus or
minus.
Multiplied total
prod(@column_id)
prod(@amount)
Like “sum” except multiplying instead of adding.
7 Reporting
7.2 Managing reports
254 © Wall Street Systems IPH AB - Confidential
Note that you can separate the date and time formats using any separator you choose: for
example a space, a slash ("/" ), colon (":") or underscore ("_").
4. Turn on the Do not format using regional settings switch if you do not wish to use the formatting
specified in Control Panel - Regional Settings.
5. Click OK to confirm your choice.
7.2.7 List of reports
The available reports and the parameters you need to enter for each one are described in this
section.
Note: All editors have a Tools - Run report menu option, from which you can generate a report
showing the entities that have been created in that editor plus details of their attributes.
You do not need to specify any parameters for this type of report: see 3.3.9.5 Generating
reports on static data entities on page 50.
Format Example Element
Date (as a number) 30 dd
Day name (abbreviated) Fri ddd
Day name (full) Friday dddd
Month (as a number) 07 MM
Month (abbreviated) Jul MMM
Month (full name) July MMMM
Year (last two digits) 99 y or yy
Year (four digits) 1999 yyy
Hour (12-hour, single digit for 1-9) 5 h
Hour (12-hour, always double digits) 05 hh
Hour (24-hour) 17 H
Minutes 58 m
Seconds 23 s
Report type Parameters
Activity Log B.1 on page 659
Balance B.2 on page 659
Bank Account Statement B.3 on page 660
Book Value Change History B.4 on page 660
Cashflow B.5 on page 661
Cashflow Fixing B.7 on page 662
Cashflow Log B.8 on page 662
Cheapest to Deliver B.9 on page 663
Classification B.10 on page 663
Collateral B.13 on page 664

7 Reporting
7.2 Managing reports
Transaction & Risk Management Module (TRM) User Guide 255
Competitive Quote B.14 on page 665
Custody Balance B.17 on page 666
Custody Reconciliation B.18 on page 666
Delivery B.22 on page 667
Drawdown Fixing B.23 on page 668
Event Diary B.24 on page 668
History Log B.25 on page 668
Holidays Checking B.26 on page 669
Holidays for Period B.27 on page 669
Limit Log B.35 on page 672
Rate B.37 on page 674
Rate Log B.39 on page 675
Rate Comparison B.38 on page 675
Realize Account Interest B.40 on page 675
Reconciliation B.41 on page 676
Renaming Client ID B.43 on page 677
Settlement B.45 on page 677
Settlement Cashflows B.46 on page 677
Settlement Instruction Chain B.47 on page 678
Settlement Log B.48 on page 678
Transaction Condition Sets B.49 on page 679
Tran s acti ons B.50 on page 679
Tran s acti on Log B.51 on page 680
Tran s acti on Market Rate B.52 on page 680
Key Figure B.34 on page 671
Periodic P/L
Instrument Periodic P/L
B.36 on page 673
Collateral Management B.12 on page 664
Call (Portfolio)
Call (Transaction)
B.5 on page 661
Report type Parameters
7 Reporting
7.2 Managing reports
256 © Wall Street Systems IPH AB - Confidential
Transaction & Risk Management Module (TRM) User Guide 257
Chapter 8 Managing transactions
Transaction Manager, the transaction management application in TRM, makes it easy to deal and
manage a wide variety of financial instruments, from simple transactions to complex structured
products.
In Transaction Manager, you can perform different actions or processes related to transactions, for
example, entering or querying transactions, fixing variable interest rates, adding fees or taxes, or
assigning complex cashflow schedules to a transaction. It is also possible to cancel any actions or
processes performed on a transaction.
Different modes of Transaction Manager can be configured to be used for a particular purpose or to
display transactions in a particular state in the transaction flow. Transaction Manager modes are
configured at implementation to meet the requirements of your organization.
Permissions are set up and applied to users to limit their access to different Transaction Manager
modes according to their responsibilities in the organization.
At all points in the transaction flow, a transaction has a state: when a transaction moves forwards or
backwards in the flow, its state changes. The state of the transaction depends on where it is in the
transaction flow. All transactions must have a state and can only have one state at a time. In a
typical TRM implementation, a different Transaction Manager mode may be configured for each of
the transaction states used. Only the transactions with the appropriate state are visible in the
corresponding mode.
Transaction statuses are given to transactions either manually in Transaction Manager, or
automatically when the transaction moves from one state to another. If statuses are inherited by a
transaction automatically, the status given depends on the state the transaction is coming from and
the state it is going to. A transaction can have more than one status.
Some actions that can be performed on transactions are linked to the states and statuses of
transactions in the transaction flow. For details of procedures that are specific to a particular
instrument, see the relevant section of the guide TRM Instruments: Processing and Calculations.
8.1 Transaction Manager
Transaction Manager is customizable to allow users to personalize their workspace. It consists of
several views which correspond to the different components of a transaction. Some views are only
used for certain types of transactions.
Each view has its own list of columns in which the transaction information for the view is displayed.
You can configure the display in Transaction Manager to show only the columns that you want to use
in each view. The columns can be different for each type of transaction that you trade.
For details of the columns you need to select for a specific deal, see the relevant section of the guide
TRM Instruments: Processing and Calculations.

8 Managing transactions
8.1 Transaction Manager
258 © Wall Street Systems IPH AB - Confidential
8.1.1 Transaction Manager menus
The following tables describe the menu items which are specific to Transaction Manager and any
layout or mode which is based on the application.
Other menu items which are common to all applications are described in 2.2.6 Using application
menus on page 34.
8.1.1.1 View
The main view in Transaction Manager is the Transaction view. This view is always displayed and
shows the resulting transactions from the executed queries. This view allows you to display specific
outputs of the transaction in their related views and to perform specific actions at the transaction
level. For example, from this view, you can quickly look up the settlements and messages attached
to a transaction by right-clicking the transaction and selecting either Settlement Lookup or Message
Lookup depending on the action you want to do.
Menu item Description
Enter Board Opens Enter Board.
Enter Board is a less complex layout in which you can capture deals if you do not want
to enter them directly in Transaction Manager.
See 8.2.3 Entering new deals in Enter Board on page 272.
Accrual Yield Displays the Accrual Yield view.
This view displays time dependent and result mode specific yields for the purpose of
accrual of discount/premium for bonds. The columns available for selection are: Active
From/To, Leg Group, Yield %, and Nominal Rate.
Cashflow Displays the Cashflow view.
Mainly used to display the output of transactions and to perform specific actions at the
cashflow level. For a more detailed view of the key-figures, use the Cashflow/Event
Figure view.
Note: You can also quickly look up generated settlements by right-clicking the
settlement and selecting Settlement Lookup.
Cashflow/Event Figure Displays the Cashflow/Event Figure view.
This view gives a more detailed view of the key-figures relating specifically to
expanded cashflows or events which are not available in the Cashflow view. For
example, Figure Interest Rate and Figure Discount Rate for floater instruments.
Intermediate results can also be viewed here: see 8.2.1.1 Calculating key-figures on
page 265.
Charge Displays the Charge view.
The charge view of Transaction Manager allows you to view and manipulate the fees
and charges relating to the selected transaction.
Collateral Displays the Collateral view.
This view displays details of underlying collateral attached to a Collateral Transfer
transaction (that is, a collateral basket).
In the Transaction view, it is possible to add new collateral to a transaction using the
New Collateral right-click action (see the guide TRM Instruments: Processing and
Calculations). You can then specify the collateral parameters, namely the Collateral
Agreement, Instrument, and Units.
See Chapter 11 Managing collateral on page 345 for more information.
Competitive Quote Displays the Competitive Quote view.
You can note details of quotes received from your counterparties in this view: see
8.2.1.6 Entering competitive quotes on page 267 for more information.
Denomination Displays the Denomination view.
This view is used to display information relating to the unit size of denominated bonds.

8 Managing transactions
8.1 Transaction Manager
Transaction & Risk Management Module (TRM) User Guide 259
Event Displays the Event view.
This view is used for event management and displays the details of possible events for
the selected transaction or cashflow.
Event information may be generated from the instrument definition or the transaction.
See the guide TRM Instruments: Processing and Calculations for information relating
to events for specific types of instruments.
Note: The Events Diary report displays all upcoming events that may require user
intervention: see B.24 Event Diary Report on page 668 for details of the report’s
parameters.
Guarantee Displays the Guarantee view.
This view is used to display guarantee information.
Instructions Displays the Instructions view where you can view and edit settlement instructions.
See 8.3 Managing settlement instructions on page 280.
Irregular Date Displays the Irregular Date view where you can modify the dates for the current
schedule’s corresponding cashflow or event.
A new row is added to this view when the New Irregular Date processing action is
selected in the Schedule view. This action becomes available on a schedule when its
method of frequency has been defined as Irregular.
Generally, irregular dates are used to define cashflow/event dates that do not occur on
a regular basis and therefore cannot be defined using any of the other frequency
methods (such as Bullet or Times/Year).
See also Schedule and Irregular Values.
Irregular Value Displays the Irregular Value view where you can modify schedule data with validity
ranges when a given field needs to take several values into account depending on the
date.
Using this view together with Irregular Dates (see previous) enables the provision of an
irregular date and rate amortization structure without needing to touch any cashflows
or add additional schedules.
Note: You can only modify schedule data if the instrument has been assigned with the
Schedule-Data feature (see the guide TRM Instrument: Processing and
Calculations).
Leg Displays the Leg view.
This view is only used for swap instruments. The information corresponding to the
different legs of the swap are displayed.
Observation Date Displays the Observation Date view.
This view is used for average FX rate forwards and average FX rate options.
Observation Schedule Displays the Observation Schedule view.
This view is used for average FX rate forwards and average FX rate options.
Option Schedule Displays the Option Schedule view.
Similar to the Schedule view, but used for FX option transactions.
See the guide TRM Instruments: Processing and Calculations for more information
about option schedules.
Package Displays the Package view. If a transaction belongs to a package, the Package view
displays the package ID, package main type, package type and package attributes.
Package attributes include System, Selling and Non Cancellable. Hidden package types are
not displayed in Transaction Manager. See 3.37 Package types (optional) on page 147
for information on package types and attributes.
Menu item Description

8 Managing transactions
8.1 Transaction Manager
260 © Wall Street Systems IPH AB - Confidential
Pricing Displays the Pricing view where you can view the outcome if a Pricing action has been
carried out on a transaction.
The following columns can be selected: Pricing Target, Target Value, Variable, Result,
and the corresponding Transaction Number to which the values apply.
See the guide TRM Instruments: Processing and Calculations for information relating
to the pricing of specific types of instruments.
Query Displays the Query view.
This view is used to retrieve transactions that are already in the system for further
processing: see 8.4.1 Retrieving transactions on page 283.
Repo Displays the Repo view.
This view is used to add collateral to repo transactions: see the guide TRM
Instruments: Processing and Calculations for more information about repos.
Schedule Displays the Schedule view.
The schedule is generated either from the transaction or (in the case of swaps) from
the Leg view.
In this view, you can view or enter more specific information from which the
transaction’s cashflows and related events are generated.
For schedules defined as Method = Irregular (see also Irregular Dates below), you can
specify more complex date information using the New Irregular Date right-click action.
See TRM Instruments: Processing and Calculations Guide for more information about
schedules.
Note: For bond instruments, no schedule information is displayed in this view because
it is already visible in the instrument definition.
Transaction Condition Displays the Transaction Condition view where you can see detailed information about
the conditions.
The following columns are selected: Attributes, Condition, Condition Type, Date,
Condition Set, Message, Rate, Reference Time, Reference, and Value.
See Chapter 17 Managing transaction conditions on page 485.
Transaction Condition
Set
Displays the Transaction Condition Set view where you can see the result of the
evaluation.
The following columns are selected: Attributes, Date, Condition Set, Message, User,
and Value.
See Chapter 17 Managing transaction conditions on page 485.
Transaction Figure Displays the Transaction Figure view.
This view gives a more detailed view of the key-figures for the selected transaction.
You can modify some of the valuation parameters for an individual transaction in this
view (for example, Figure Currency, Figure Date, and Figure Valuation Date).
Intermediate results can also be viewed here: see 8.2.1.1 Calculating key-figures on
page 265.
Valuation Approach Displays the Valuation Approach view.
You can define/view the valuation approach used for the transaction.
See 8.4.7.9 Defining the valuation approach at transaction level on page 295 for more
information.
Note: This view is only activated if the instrument has been assigned with the
Mode/Transaction Specific Method feature.
Menu item Description
8 Managing transactions
8.1 Transaction Manager
Transaction & Risk Management Module (TRM) User Guide 261
8.1.1.2 New
8.1.1.3 Action
8.1.1.4 Tools
8.1.1.5 Options
Valuation Model Displays the Valuation Model view.
You can define/view the valuation model used to price structured products.
See 8.4.7.10 Assigning valuation models at transaction level on page 296 for more
information.
Note: This view is only activated if the instrument has been assigned with the NumeriX
Setup and NumeriX Valuation features: see 4.7.7 Assigning calibration models
to instruments on page 199.
Valuation Spread Displays the Valuation Spread view.
You can add spread curves to a transaction in this view.
Menu item Description
Tran s acti on
Ctrl+N
Inserts a new transaction row to allow you to capture a deal.
See 8.2.1 Entering new deals in Transaction Manager on page 264.
Menu item Description
Assignment (purchase) Allows you to enter a swap (IRS/CCIRS) purchased during its life, by entering the
net amounts exchanged with the seller.
FX Pair Shift Allows you to enter an FX Pair Shift directly in Transaction Manager, without first
having to create an FX transaction.
See 8.2.1.8 Creating an FX pair shift on page 270.
Menu item Description
Refresh Static Data
Recalculate Key Figures
Updates transaction data following modifications made to static data, key figures,
or cashflows elsewhere in the system.
Menu item Description
Hide Warnings Allows you to specify whether you want to display warning messages when there are
missing or incorrect values in a transaction. By default, warning messages are
displayed.
Note: Holiday warning messages are not displayed if the date in question is defaulted
from the instrument setup. For example, no warning message will be displayed
if a bond’s maturity date falls on a holiday because the maturity date is defined
in the instrument’s definition.
Menu item Description

8 Managing transactions
8.1 Transaction Manager
262 © Wall Street Systems IPH AB - Confidential
8.1.2 Start-up parameters
It is possible to alter the start-up parameters so that Transaction Manager launches in a different
mode.
See C.11 Transaction Manager on page 685 for information about the options available.
8.1.3 Transaction Manager modes
Different modes of Transaction Manager can be configured for a particular purpose.
For example, the Deal Capture mode of Transaction Manager could be used to enter transactions in
the Front Office, whereas the Final Transaction Admin mode could be used by the Back Office to
verify transactions before settlement occurs.
Discovery Console Opens Discovery Console. You can use the Discovery Console to do the following
actions:
• Display the valuation parameters (yield curves) for plain vanilla instruments
(Bonds, FX Forward, Floater, Swap): see 8.2.1.2 Displaying valuation parameters
in the Discovery Console on page 265.
• Check the actions you cannot do on a transaction: see 8.4.7.5 Checking the
unavailable actions on a transaction on page 293.
• Check the transaction flow. For more information on how to check transaction flow,
see the TRM System Admin Guide.
Valuation
Configuration
Opens the Valuation Parameters dialog in which you can specify alternative parameters
for calculating key-figures in your Transaction Manager view, thereby overriding the
configuration of the instruments: see 8.2.1.1 Calculating key-figures on page 265.
Pricing Configuration Opens the Pricing Parameters dialog in which you can specify alternative parameters for
calculating prices in your Transaction Manager view.
Note: For FX options, set up these parameters before running the Pricing action. The
instrument must be correctly setup. See TRM Instruments: Processing and
Calculations Guide for more information.
Quote Default
Configuration
Opens the Quote Default Configuration dialog to enable you to apply different pricing
parameters in your Transaction Manager view, thereby overriding the configuration of
the instruments: see 8.2.1.4 Defaulting prices on page 266.
Result Mode Enables you to change the Transaction Manager view to another result mode: see
8.2.1.5 Changing result mode on page 267.
Active Transactions
Only
Enables you to specify whether you only want to view active transactions in
Transaction Manager: see 8.4.1.2 Retrieving active transactions on page 285.
Include Mirror
Tran s acti ons
If this option is switched on, all mirrored parent and child deals are fetched, even
those not directly linked by the parent number, i.e. in the case of rollovers.
Limit Setup Enables you to perform pre-trade and post-trade limit checks and to specify the
default limit query book that you want to use: see 8.2.4 Setting up a pre-trade limit
check on page 277 and 8.2.5 Enabling limit queries at transaction level on page 280.
Preferred Package
Main Type
See 8.4.7.2.3 Displaying packaged transactions on page 292.
Retrieve Full Package See 8.4.7.2.3 Displaying packaged transactions on page 292.
Security Identifier
Typ e
Enables you to select which security identifier type to use. After you have retrieved
the related transactions, you can then use the Security Identifier column (in the
Transaction view) to select an instrument that uses the previously selected security
identifier type.
Note: You can query transactions by their security identifier or security identifier type
in Transaction Manager’s Query view.
Menu item Description
8 Managing transactions
8.2 Capturing deals
Transaction & Risk Management Module (TRM) User Guide 263
In a typical TRM implementation, a different Transaction Manager mode may be configured for each
stage in the transaction flow to correspond to each of the transaction states used. Only the
transactions with the appropriate state are visible in the corresponding mode.
The following table describes possible transaction states:
8.1.3.1 Filtering the view display
For some types of deals (for example, deals which involve two or more legs) you may find it easier if
only part of the deal information is shown in the display. In some of the views, it is possible to filter
the transaction data by leg, by cashflow, or by schedule. In which case, the selected filters are
displayed in the title bar of the Cashflow view. In the case of Filtered by... filters, the filters and total
number of displayed items are displayed when you have selected items in the relevant views. You
can use a combination of filter options to show only very specific deal information. If you frequently
use specific filters, you can save your filter selections with the layout.
For example, for deals involving swap instruments, if you only want to display the cashflows that
relate to a specific leg: in the Leg view, select one or more items, then right-click anywhere in the
Cashflow view, click Filter to open the filter options menu and select Filtered by Leg. Only the cashflows
for the selected leg or legs are displayed.
In the same way, it is possible to only display transaction data that relates to a specific schedule: in
the Schedule view, select one or more schedules, and then in the Cashflow view, right-click and select
Filtered by Schedule filter option. Only the cashflows for the selected schedule or schedules are
displayed.
Likewise, it is also possible to only display cashflows of a specific cashflow type or attribute, by
selecting one or more cashflow types from the filter options. Not all cashflow types are available for
filtering.
8.2 Capturing deals
In a typical TRM implementation, the Deal Capture mode of Transaction Manager is used to enter
transactions in the Front Office (see 8.1.3 Transaction Manager modes on page 262 for more
information about modes).
As Transaction Manager can be configured in many different ways and used for different purposes
(such as, capturing deals and performing actions on existing transactions), there is no single
comprehensive procedure for all its uses. This section provides procedures for the main tasks that
are common to all types of transactions.
State Description
Open The transaction is in the initial stage of the flow. The transaction is either a new
transaction, that has not yet been committed, or a transaction that has been sent
back in the flow, either to be corrected or to be canceled.
Trader Verify The transaction has been committed (for example, in Deal Capture), and is ready to
be verified by the trader.
Back Office Verify The transaction has been verified at trader level and is ready for verification at
back-office level.
Final The transaction has been verified at back-office level and is ready for back-office
processing.
Canceled The transaction has been removed from the flow at trader level.

8 Managing transactions
8.2 Capturing deals
264 © Wall Street Systems IPH AB - Confidential
Note that it is also possible to capture a new deal in a Transaction Manager view called Enter Board:
see 8.2.3.3 Capturing deals in Enter Board on page 277 for more information.
Note: For details of processing procedures that are specific to a particular instrument, see the
relevant section of the guide TRM Instruments: Processing and Calculations.
8.2.1 Entering new deals in Transaction Manager
To enter a new deal in Transaction Manager:
1. Select New - Transaction (or press Ctrl+N).
2. Enter the transaction information in the new row in the Transaction view.
Note: The auto-complete feature, which tries to predict the word you are typing, can help you to
quickly enter transaction information in the fields. For more details, see 3.2.4.1 Using
auto-complete on page 44. You can cancel the auto-complete feature by pressing Esc.
Some of the information required to enter a deal is common to all types of transactions:
For details about the remaining information you need to enter a deal which is specific to certain
types of instrument, see the relevant section of the guide TRM Instruments: Processing and
Calculations.
3. Select one of the following actions from the Command menu:
–Apply to save the transaction and not change the transaction state
–Commit to save the transaction and move its state forward in the transaction flow.
After a transaction has been applied or committed, some information is automatically set by the
system:
–Transaction Number: identifies the deal in the system
–State: shows the transaction’s position in the workflow
–Status: gives additional information about the status of the deal.
Transaction column Description
Instrument Instrument ID used in the transaction.
Note: Some columns in the Transaction Manager view are disabled according to
the nature of the transaction. For example, for deals involving bonds, the
Maturity Date and Currency columns in the Transaction view are disabled, as
are all columns in the Cashflow view.
Transaction Sign Direction of the transaction.
If you enter a minus ("-") sign in front of the deal amount, the transaction sign
defaults to Sell/Borrow and you do not need to specify the transaction sign.
Opening Date First date the transaction is taken into account in calculations:
• For new transactions this is automatically the current date.
• For back-dated deals, you need to enter the opening date before selecting the
instrument.
Portfolio Portfolio in which the transaction is entered.
Counterparty The counterparty of the transaction.
This is selected from the list of clients defined with the Counterparty role in
Client Editor.
8 Managing transactions
8.2 Capturing deals
Transaction & Risk Management Module (TRM) User Guide 265
8.2.1.1 Calculating key-figures
In Transaction Manager, you can either maintain the default valuation configuration defined at
instrument level to calculate key-figures so that each deal is valued individually according to its
setup, or you can override the parameters in the following ways:
•Specify alternative figure values in Transaction Manager’s Transaction Figure view or
Cashflow/Event Figure view for a specific transaction or cashflow (for example, Figure Currency,
Figure Date, and Figure Valuation Date).
•Apply a common valuation to all deals in the Transaction Manager view.
In this case, your valuation configuration is modified without affecting the settings of other
Transaction Manager users.
To apply a common valuation configuration to calculate the key-figures for all deals in Transaction
Manager if you want to override the instrument configuration:
1. Select Options - Valuation Configuration.
2. In the Valuation Parameters dialog, enter the values you want to apply.
3. Click OK to apply the valuation configuration.
8.2.1.2 Displaying valuation parameters in the Discovery Console
After you have calculated the key figures, you can display the valuation parameters (yield curves)
for plain vanilla instruments (Bonds, FX Forward, Floater, Swap), as well as some floaters specific to
key figures, such as volatilities.
For each cashflow, the Discovery Console displays:
•The valuation and discount curve.
•The estimation curve in case of a floater.
For floaters, the Discovery Console displays additional volatilities figures, such as:
•For Cap/Floors, the volatility used to calculate Cap/Floor adjustment factor.
•For Constant Maturity/In Arrears, the volatility used to calculate Constant/In Arrears adjustment
factor.
To display the valuation parameters:
1. Select the transaction and run the valuation configuration (Options - Valuation Configuration).
2. Select Options - Discovery Console.
3. In the Discovery Console dialog, the calculated key figures are displayed in the lower part of the
dialog.
Information Description
Date Date on which all key-figures display their values. The key-figures are displayed
in the Figures view.
Currency Currency into which the key-figures are converted.
Scenario Scenario you want to use.
Valuation Mode Valuation mode: Default, Benchmark, or Theoretical.
Include Realized Results Switch on to include realized results in the valuation.
8 Managing transactions
8.2 Capturing deals
266 © Wall Street Systems IPH AB - Confidential
4. Additionally, you can select Regular Expression and enter a regular expression or use the Filter field
and Apply to display one particular figure.
Hint:
For example, to display the figures for a particular cashflow, enter the cashflow number in
the Filter field and click Apply. The Discovery Console updates the displayed figures to
match the filter.
8.2.1.3 Using fractional prices
If a default price denominator is set up at the instrument level (Bond page - Default Price Denom.), you
can use fractional prices in the Deal Price column in Transaction Manager.
The following table shows the various notations that can be used:
8.2.1.4 Defaulting prices
In Transaction Manager, you can either maintain the default quote information defined at
instrument level so that each deal is priced individually according to its setup, or you can override
the parameters of each instrument to apply a common defaulting policy to all deals.
Note: Modifying your quote default configuration does not affect the Transaction Manager
settings of other Transaction Manager users.
The defaulting of the deal price (or the deal rate) for quoted instruments is defined using the Quote
Default feature in the instrument definition. This feature works together with the Quoted feature with
which you define the market quote type of a quoted instrument. See the guide TRM Instruments:
Processing and Calculations for more information about these features.
To set your default pricing configuration in Transaction Manager if you want to override the
instrument configuration:
1. Select Options - Quote Default Configuration.
2. In the Quote Default Configuration dialog, enter the values you want to apply:
Notation Value of the Expression Example
A_N
where A and N are integer numbers
A + N / D 35_15
with a default price denominator of
32nd represents 35 + 15 / 32
A_N/D
where A and N are integer numbers and D
a power of 2
A + N / D 28_14/16
represents 28 + 14 / 16
A_N+ or A_N/D+
where the + sign stands for an additional
half unit A_N/D+
A + (N + ½) / D 10_31+
with a default price denominator of
32nd represents 10 + 31.5 / 32
A_N1/D1 N2/D2
Introduces a second denominator D2
which must be a power of 2
A + (N1 + N2/D2) / D1 12_14 1/4
represents 12 + (14 + ¼) / 32
Note: D1 or D2 may be omitted.
Information Description
Mode Pricing mode. Choose from:
•[From Instrument] (default): To use the pricing mode defined in the
instrument definition.
•Automatic: To retrieve the quotes automatically into Transaction Manager.
•Manual: To retrieve the quotes manually.
8 Managing transactions
8.2 Capturing deals
Transaction & Risk Management Module (TRM) User Guide 267
3. Click OK to save the configuration.
4. Depending on pricing mode you selected, choose one of the following options:
–If the Mode = Automatic, the Deal Price (or Deal Rate) fields are updated.
–If the Mode = Manual, right-click inside the Transaction view and select Quote Default to retrieve
the quotes for the transactions.
Note: If you have manually modified a transaction, select Quote Default to reset the quote
according to the mode configuration.
8.2.1.5 Changing result mode
A result mode drives the calculation of results, and effectively one single transaction can
simultaneously be treated in as many ways as there are result modes. In Transaction Manager, it is
possible to change the display in order to view transactions according to each configured result
mode.
•Select Options - Result Mode and choose the result mode in which you want to display the
transactions.
Note: For more information about result modes, see 19.1 Parallel accounting on page 533.
8.2.1.6 Entering competitive quotes
In the Competitive Quote view of Transaction Manager, you can enter details of any competing
quotes you receive from your counterparties.
When you have received and compared all offers from your counterparties, you can select the best
offer and update the transaction with the new values.
For example, for an FX swap, when the competitive quote’s counterparty is flagged as Chosen, the
Near Quote and Quote update the transaction fields for the FX swap as follows:
•Near Quote updates the transaction field Nominal/Spot Rate
•Quote updates the transaction field Deal Rate.
To be able to enter competitive quotes for a transaction, the relevant feature must be included in
the instrument definition:
•Competitive Premium for Cap/Floor/Collar instruments, FRA Options, FX Options, and Swaptions
•Competitive Price for Equities
•Competitive Rates for Discount Papers, FRA contracts, FX transactions, and Short-Term Loans
•Competitive Price or Competitive Rates for Bonds and Credit-step-up instruments, whichever is
appropriate
Method Defaulting method: [From Instrument] (default), Ask, Bid, Bid/Ask (Spread Against),
Bid/Ask (Spread in Favor), or Mid.
• If you select Bid/Ask (Spread Against): when the transaction sign is positive,
the Ask price is used; when the transaction sign is negative, the Bid price
is used.
• If you select Bid/Ask (Spread in Favor): when the transaction sign is positive.
the Bid price is used; when the transaction sign is negative, the Ask price
is used.
Scenario Scenario you want to use to price the transactions.
•[From Instrument]: To use the scenario defined in the instrument definition.
Information Description
8 Managing transactions
8.2 Capturing deals
268 © Wall Street Systems IPH AB - Confidential
•Competitive Rates (FX Swap) for FX swaps.
Note: See the guide TRM Instruments: Processing and Calculations for more information about
these features.
To enter and select a competitive quote:
1. In Transaction Manager, select the transaction for which you want to enter a competitive quote.
2. Select View - Competitive Quotes to display the Competitive Quote view in the Transaction Manager
window (make sure that the view’s columns are selected using View - Select Columns).
3. Right-click the transaction and select New Competitive Quote.
4. Enter the competitive quote details in the new row as follows:
–The name of the counterparty in the Counterparty field.
–The deal price, the deal rate, or the premium amount, whichever is appropriate, in the Quote
field.
–For an FX Swap, the rate of the near leg is displayed in the Near Quote field.
Hint:
You can remove a quote you have entered by selecting Delete Competitive Quote.
5. To select the preferred quote in either the Near Quote or Quote fields, set the Chosen column to
Yes.
The transaction is updated with the quote details (the counterparty and cashflow amount).
8.2.1.7 Adding charges and fees
In Transaction Manager, you can capture an unlimited number of transaction charges or fees at deal
entry.
You can manually add a charge or fee to a cashflow at deal entry if the Manual Charges feature is
applied to the instrument definition.
It is also possible to apply a charge automatically on a cashflow or transaction by applying a charge
rule at instrument level using either the Cashflow Charges or Transaction Charges feature: see TRM
Instruments: Processing and Calculations Guide for more information about these features.
For information about setting up charge rules, see 3.26 Cashflow charges (optional) on page 135
and 3.46 Transaction charges (optional) on page 155.
To manually attach a charge or fee to a cashflow:
1. Right-click the cashflow to which you want to add the charge.
2. Select Create Charge.
3. Select the charge you want to apply from the resulting list.
Note: Charges are set up in Cashflow Type Editor: see 3.28 Cashflow types (optional) on page
139.
4. Fill in the details of the charge in the Charge view using the information in the following table:
Information Description
Amount Amount of the charge or fee.
This is calculated as the equivalent of the Payment Amount at the Payment FX spot
rate when the Payment Currency is different from the Currency.
8 Managing transactions
8.2 Capturing deals
Transaction & Risk Management Module (TRM) User Guide 269
5. Click OK.
8.2.1.7.1 Transaction charges and yield/price calculations
In addition to the transaction yield and price that are calculated without considering any added
charges, for bonds, loans, and discount papers, the system can also take some or all of these
charges into account in yield/price calculations:
•All-in yield and price are calculated using any charges that have the All-In attribute
•Re-offer yield and price are calculated using any charges or fees with the Re-Offer attribute.
These attributes can be set either manually in Transaction Manager’s Cashflow view, or defined for
the charge in Cashflow Type Editor (see 3.28 Cashflow types (optional) on page 139).
Note: Only charges with the same value date as the transaction settlement date are taken into
account in the calculation of all-in and re-offer yield/price calculations. For the purpose of
yield calculations, any charges in a currency different from the transaction currency can be
converted into the transaction currency using defaulted or manually entered FX rates.
Amount % Percentage of the Reference Value.
This field is only used if you manually enter a percentage charge: it is not populated
for automatically generated charges.
Amount Rounding The rounding precision you want to use for this charge.
Attributes Attributes of the charge:
• Amortize: the charge needs to be amortized
• All-in: the charge needs to be included in the All-in Price/Yield
• Re-offer: the charge needs to be included in the Re-offer Price/Yield
• External: a system-required attribute
This attribute identifies the charge as unique to the transaction. By default it is on.
• User: a system-required attribute
This attribute identifies the charge as manually added in TRM. By default it is on.
Note: See 3.28 Cashflow types (optional) on page 139 for more information.
Counterparty
Client
Counterparty Client if different from the Credit Client.
Currency Currency of the charge amount.
This is always equal to the currency of the cashflow.
Payment Amount Amount of the charge in the payment currency when Payment Currency is different to
the currency of the charge amount.
Payment Currency Currency in which the charge is paid.
Payment Date Payment date of the charge.
This value is copied from the cashflow row in which you created the charge.
Payment FX Rate Exchange rate between the Currency and the Payment Currency.
The default rate is the current (last available) FX spot rate in the accounting scenario
of the owner of the transaction.
Reference Value Value used to calculate Amount with Amount %. By default it is the Nominal Amount.
Value Date Value date of the charge.
This value is copied from the cashflow row in which you created the charge.
Information Description
8 Managing transactions
8.2 Capturing deals
270 © Wall Street Systems IPH AB - Confidential
8.2.1.8 Creating an FX pair shift
In Transaction Manager's Deal Capture mode, you can split a position from one underlying currency
pair into two new positions, each of which contains one of the currencies with a third currency
(usually, the portfolio currency).
For example, if the portfolio currency is EUR, and you make a trade where GBP is bought for JPY,
you may wish to separate this trade into two deals, one where GBP is bought for EUR, and another
where JPY is sold for EUR. You need to enter the reverse of the deal you want to shift from: you
enter the FX pair shift as if you are selling GBP and buying JPY.
There are two ways of creating an FX pair shift: you can either split a position on an existing FX
transaction or you can enter an FX pair shift directly. In both cases, the information required to
process the FX pair shift is the same.
To create an FX pair shift in Transaction Manager's Deal Capture mode:
1. Do one of the following:
–If you have an existing FX transaction that you want to base the FX pair shift on, you can
split the position using the FX Pair Shift right-click action on the selected deal.
Note that this processing action is only available if the Allow-FX-Pair-Shift feature has been
assigned to the instrument: see TRM Instruments: Processing and Calculations Guide for
more information.
–If you want to create an FX pair shift directly, select Action - FX Pair Shift.
2. In the upper part of the FX Pair Shift dialog, enter the required data.
Note that you need to enter the reverse of the deal you want to shift from.
TRM calculates the remaining values according to the FX rates of the underlying currency pair
against the third currency. Note that:
–If you have based the FX pair shift on an existing transaction, most of the values in the FX
Pair Shift dialog are filled automatically with the data from the selected deal, but some can be
modified.
Information Description
Instrument FX instrument to use for the transaction.
Sign Direction of the transaction: Buy or Sell.
Base CCY
Quote CCY
Base and quote currency of the FX pair shift (the reverse deal).
FX Rate FX rate of the reverse deal.
Opening Date First date the transaction is taken into account in calculations.
Value Date Official date when money is transferred.
Base Amount Amount of the FX transaction in the base currency.
Quote Amount Amount of the FX transaction in the quote currency.
This value is calculated by the system using the above FX Rate.
Portfolio Portfolio in which the transaction is entered.
Shift CCY The third currency of the FX pair shift (usually, the portfolio currency).
This value defaults to the base currency of the portfolio entered in the Portfolio field,
but can be modified.
Counterparty The counterparty of the transaction.
FX Rate FX rate of the Base CCY and the Shift CCY.
8 Managing transactions
8.2 Capturing deals
Transaction & Risk Management Module (TRM) User Guide 271
–If you have created an FX pair shift directly, only the Opening Date field in the FX Pair Shift
dialog is populated (with today's date): the remaining data needs to be entered.
3. Click OK to split the position: TRM generates the transactions.
In the example, the FX pair shift would generate three transactions as follows:
–Sell GBP Buy JPY (the reverse of the initial deal)
–Sell JPY Buy EUR
–Sell EUR Buy GBP.
8.2.1.9 Trade assignment
A transaction can be bought during its life from an external counterparty, by paying or receiving
settlement amounts for each leg. This amount is not paid to the counterparty of the new transaction
but is paid to the seller.
Required data for assignment are:
You can complete transaction characteristics as usual in Transaction Manager. Start dates of
schedules must be equal to the last interest date for correct computation of accrued interest from
the last interest to assignment value date.
A new transaction is created, with settlement cashflows exchanged with the original owner of the
transaction. To undo the action, you can cancel the generated transaction.
8.2.2 Canceling deals
You can cancel a deal in Transaction Manager’s Deal Capture mode, if after entering it you decide
you no longer wish to proceed.
Canceling a transaction in this way results in either of the following:
•If the deal has not been applied, the deal is removed from the database.
•If the deal has been applied, the transaction remains in the database, and the status of the
transaction changes to Cancelled.
Transactions with Transaction Status = Canceled can only be removed from the database using
the appropriate Transaction Manager mode (for example, Cancellation or Admin).
To cancel a transaction:
1. Select the transaction that you want to cancel.
2. Select Command - Cancel.
Information Description
Opening Date Opening date of the transaction.
Instrument Instrument to use for the transaction (such as IRS/CCIRS deals).
Sign Buy or Sell.
Portfolio Portfolio where the transaction is entered.
Counterparty Counterparty of the purchased transaction.
Beneficiary External counterparty from whom the swap is purchased.
Net Amount
Method
• Dirty: accrued interest is already included in the settlement amount/price
• Clean: accrued interest is paid separately
Net Amount
(Leg1/Leg2)
Settlement amounts for each leg exchanged with the original owner of the
transaction.

8 Managing transactions
8.2 Capturing deals
272 © Wall Street Systems IPH AB - Confidential
8.2.3 Entering new deals in Enter Board
Enter Board is an application which is opened from Transaction Manager’s View menu. It offers an
alternative, less complex way in which to capture deals.
Using layouts, Enter Board can be configured to show only the minimum number of fields necessary
to enter a deal and to enter values automatically, such as counterparties or currencies, using
macros. You can also add settlement instructions in the Enter Board. Settlement instruction fields
differ depending on the selected instrument. For example:
•For FX: There are two sets of instruction fields, one set for currency 1 and one for currency 2.
For example, Cpty Account (Currency 1), Cpty Account (Currency 2), Our Account (Currency 1), Our Account
(Currency 2) etc.
•For bonds and other deliverable IR instruments: There are three sets of instructions for
settlement, payback and delivery. For example, Cpty Account (Settlement), Cpty Account (Payment),
Cpty Account (Delivery), Our Account (Settlement), Our Account (Payment), Our Account (Delivery) etc.
•For loans, swaps and other non deliverable IR instruments: There are two sets of instructions for
settlement and payback. For example, Cpty Account (Settlement), Cpty Account (Payment), Our Account
(Settlement), Our Account (Payment).
•For payments: There is one set of instructions. The fields are Our Client, Our Bank, Our Account,
Counterparty Client, Counterparty Bank, Counterparty Account.
•For transfers: There is one set of instructions for the inflow and one set for the outflow. The
fields are Receiving Client, Receiving Bank, Receiving Account, Receiving Correspondent Bank, Paying Client,
Paying Bank, Paying Account, Paying Correspondent Bank.
In the Enter Board, it is also possible to set up lists of favorites, for example, a list of the currencies
or the instruments in which you most often trade.
Layouts can be configured for each instrument group or instrument type and some standard default
layouts are supplied at implementation, although it is possible to modify them later.
For example, if you select a layout designed to enter FX transactions, only the fields relating to this
type of deal are displayed. If you click on the field button, the dialog only shows instruments for a
specified group and it is not possible to navigate to any parent group. Furthermore, in the
Instrument field, the auto-complete selection list which appears as you type, only suggests matches
that belong to the current instrument group.
Transaction Manager and Enter Board are linked – whenever you enter a new transaction in Enter
Board, it simultaneously appears in Transaction Manager. The fields that are available in the Enter
Board view are the same as the fields in Transaction Manager. However, Enter Board layouts
typically contain a subset of Transaction Manager’s fields, that is, only the fields that are necessary
to enter a certain type of trade. Because you can easily switch from one application to another, if a
field you require is not present in the Enter Board layout, you can either edit the Enter Board layout,
or enter the information in the field in Transaction Manager.
8.2.3.1 Enter Board menus
Most of the menu items in Enter Board are the same as the menu items in Transaction Manager (see
8.1.1 Transaction Manager menus on page 258). The following tables describe the menu items
which are specific to Enter Board and any layout which is based on this application.
Other menu items which are common to all applications are described in 2.2.6 Using application
menus on page 34.
8.2.3.1.1 File
Menu item Description
Data Layout Opens a dialog so you can select the correct field configuration to go with the current
layout.
This dialog also opens when you are importing a new Enter Board layout: see File -
Import.
8 Managing transactions
8.2 Capturing deals
Transaction & Risk Management Module (TRM) User Guide 273
8.2.3.1.2 Edit!
8.2.3.1.3 Command
8.2.3.1.4 Macro
8.2.3.1.5 New
Instrument Group Selects the default instrument group of the instrument that is displayed in the
Instrument field.
Import Opens the
Open dialog so you can select the layout you want to import into Enter
Board. Usually, this is done for you at implementation.
See also File - Data Layout.
Export Opens the Save As dialog so you can make an Enter Board layout available to other
users in the organization, for example, on a shared network.
Usually, this is done for you at implementation.
Hide Allows you to remove Enter Board from your desktop display.
To make Enter Board reappear, select View - Enter Board in Transaction Manager.
Menu item Description
Menu item Description
Edit Layout Displays the Edit toolbar so you can modify an imported layout.
This toolbar enables you to toggle between the edit mode and the normal mode of
Enter Board. In the edit mode, you can add more fields or rows to a layout, move
fields or rows, change the name of a field’s label, or delete fields.
See 8.2.3.2.1 Editing Enter Board layouts on page 274.
Menu item Description
Apply
Reset
Clear
Accept
Reject
Cancel
Allows you to carry out different types of commands on entities.
See 2.2.10.1.2 Command on page 37 for more information about using commands.
Menu item Description
Edit... Opens the Macros dialog so you can create a new macro or edit an existing one.
Macros are displayed in the Macro toolbar. Macros are saved with the layout.
See 8.2.3.2.3 Defining Enter Board macros on page 275.
Menu item Description
Transaction Clears the Enter Board fields in the layout so you can capture a new deal: see 8.2.3.3
Capturing deals in Enter Board on page 277.
See also 8.2.1 Entering new deals in Transaction Manager on page 264 for more
information.

8 Managing transactions
8.2 Capturing deals
274 © Wall Street Systems IPH AB - Confidential
8.2.3.1.6 Action
To open Enter Board, do one of the following:
•Select View - Enter Board from the Transaction Manager menu
•Click the Enter Board icon in the toolbar.
8.2.3.2 Enter Board layouts
Enter Board layouts are configured at implementation, imported into the application, and saved to
the TRM database. Some standard default layouts are also delivered with TRM.
Any of the fields from Transaction Manager’s Transaction or Schedule views (and Cashflow view for
cash transactions) can be included in the layout. Typically, the layout contains a subset of
Transaction Manager’s fields, that is, only the fields that are necessary to enter a certain type of
trade. A data layout file defines which of these fields are present in the layout, but this can be
modified by adding, removing, or renaming fields.
You can also further configure the layout within Enter Board, to create macros and a list of favorites
for even faster deal entry.
Layouts are available for selection from the Layout - My Layout menu item.
8.2.3.2.1 Editing Enter Board layouts
It is possible to modify a layout using the Edit layout toolbar. This toolbar is displayed when Enter
Board is in edit mode. The Edit! menu enables you to toggle between the edit mode and the normal
mode of Enter Board.
From the Edit layout toolbar, it is possible to add more fields to a layout or rename existing fields,
for example, for a layout used to enter Credit Default Swaps, the Deal Price field can be renamed
Spread.
As well as adding, renaming, or deleting fields or rows, you can also move the fields or rows in the
Enter Board to a layout that best meets your purposes. To move a field or row, select the field or
row and press Ctrl + arrow key to move the field or row in the chosen direction.
Menu item Description
Duplicate
Regenerate Cashflows
Actions which can be performed on the transaction.
In Transaction Manager, these actions become available when you select a transaction
in the appropriate view of Transaction Manager and right-click.
See 8.4.7 Performing actions on deals on page 289.
8 Managing transactions
8.2 Capturing deals
Transaction & Risk Management Module (TRM) User Guide 275
You can edit the Enter Board layout as follows:
Note: It is also possible to edit an Enter Board data layout file using an XML editor. This may be
the preferred method for a complex layout. However, in most cases, Enter Board’s edit
mode should prove more than sufficient.
8.2.3.2.2 Defining Enter Board favorites
In Enter Board, to make data entry much easier, you can define a list of favorites, for example, a list
of counterparties or a list of currencies that you frequently use.
To define a list of favorites in a layout:
1. In Enter Board, select the layout for which you want to define some favorites.
2. Right-click the field that corresponds to the list of favorites you want to create.
For example, if you want to create a list of favorite currencies, right-click the Currency field.
3. Select Favorites.
4. In the Favorites dialog, do one of the following:
–Click Select to open the selection list which corresponds to the field, and select each entity or
value you want to include in the list of favorites.
–Enter the value directly in the field in the top of the dialog and click Add.
You can change the order in which the items are listed by clicking Move Up or Move Down. You can
also remove an item from the list by clicking Remove.
5. Repeat the procedure to create any other lists for the fields in the layout.
6. Select Layout - Save to save the favorites with the layout.
8.2.3.2.3 Defining Enter Board macros
In the Enter Board, you can use macros to define the common attributes of the transactions in which
you frequently deal, such as Instrument ID, Counterparty, Currency, and Amount. For example, you
may want to define a macro for a Depo/Loan transaction for 1M EUR with XYZ London as the
counterparty.
Menu item Description
Insert a row Inserts a new row into the layout.
Insert a field Inserts the field you chose from the drop-down list into the selected row. You can only
insert fields that are not already in the layout, i.e. Insert a field is not enabled.
Insert a spacer Inserts a space in the row so you can add another field.
Insert a label Allows you to add a label to the row. A text field becomes active in which you can
either enter a name for the label or rename a selected field.
Set label of the
element
Saves the name you have given to the label or field.
Note: If you rename a field, the new label name is also displayed in the list of
available columns when you define a macro: see 8.2.3.2.3 Defining Enter Board
macros on page 275.
Restore original label If you have changed a field’s name, restores the standard name of the field.
Set relative element
width
Allows you to increase (or decrease) the width of the field or label.
Delete selected
element
Removes the selected row, field, or label from the layout.

8 Managing transactions
8.2 Capturing deals
276 © Wall Street Systems IPH AB - Confidential
When you select a macro, TRM automatically populates the corresponding Enter Board fields with
the defined values.
To define a new macro in a layout:
1. In Enter Board, select the layout for which you want to define a macro.
2. Select Macro - Edit to open the main Macros dialog.
3. Click Add and fill in the Macro Properties dialog as follows:
4. Click OK to add the macro name and corresponding hotkey to the list on the left side of the
Macros dialog.
5. Select the fields you want to include in the macro from the list of available fields displayed in the
center of the dialog.
If you have renamed a field label, the new name is also available for selection from the list: see
8.2.3.2.1 Editing Enter Board layouts on page 274.
Although you can order the fields as you wish, it is recommended that the selected fields are
listed in a similar order to the fields in the layout to avoid errors in the calculation of certain
values.
6. For each of the fields you have selected, specify the value:
–Select the field in the right side of the dialog.
–Enter or select the value in the Value field and click Set.
7. Click OK to close the dialog.
The macro is available either from the Macro toolbar or from the Macro menu (or by using the
corresponding hotkey).
8. Select Layout - Save to save the macro with the layout.
8.2.3.2.4 Modifying Enter Board macros
You can edit or remove macros that you have created using the corresponding buttons in the Macros
dialog. You can also set up a new macro by editing an existing macro.
To modify a macro or create a new macro by modifying an existing one:
1. In Enter Board, select the layout which contains the macro you want to modify.
2. Select Macro - Edit to open the main Macros dialog.
3. Select the existing macro from the left side of the Macros dialog.
4. Modify the macro’s values as required, and do one of the following:
–If you have no further changes to make, click OK to close the Macros dialog and save the
changes.
Information Description
Name Name of the macro.
Hotkey Press the key combination you want to use if you want to assign a keyboard shortcut
to the macro, for example:
Ctrl + <letter> or Ctrl + Shift and/or Alt + <letter>
A warning message is displayed if the Hotkey is already in use.
Clear remaining
unspecified fields
Switch on to clear all fields not specified in the macro.
Save as a new
macro
Switch on to make a copy of an existing macro: see 8.2.3.2.4 Modifying Enter Board
macros on page 276.
8 Managing transactions
8.2 Capturing deals
Transaction & Risk Management Module (TRM) User Guide 277
–If you want to create a new macro from the existing macro, click Edit, and fill in the Macro
Properties dialog as follows:
–Click OK to close the Macro Properties dialog.
5. Click OK to close the Macros dialog.
8.2.3.3 Capturing deals in Enter Board
To capture a deal in Enter Board:
1. Select the layout that corresponds to the type of deal you want to capture using the Layout
menu.
2. Select New - Transaction to clear the fields in Enter Board.
A new blank row is also added in the Transaction view of Transaction Manager.
3. Enter the transaction information.
As you enter information in Enter Board, it is displayed in the corresponding fields in Transaction
Manager.
4. Select one of the following actions from the Enter Board toolbar:
–Apply to save the transaction and not change the transaction state
–Commit to save the transaction and move its state forward in the transaction flow.
Once a transaction has been applied or committed, some information is automatically set by the
system:
–Transaction Number: identifies the deal in the system
–State: shows the transaction’s position in the workflow
–Status: gives additional information about the status of the deal.
You can reset a deal to cancel any modifications made since the last time it was applied by
clicking Reset.
5. If you need to complete any other actions on the deal (for example, you need to manually add a
charge), do so in Transaction Manager.
See the relevant section in 8.2.1 Entering new deals in Transaction Manager on page 264 for
more information.
8.2.4 Setting up a pre-trade limit check
Pre-trade limit checks and post-trade limit lookups are designed to enable you to easily identify
which limits are affected by a specific transaction. The main difference between the two functions is
that a pre-trade limit check can only be executed from a new transaction (i.e. a transaction that has
not yet been saved in the database) whereas a post-trade limit lookup is executed from an existing
transaction with a transaction number.
8.2.4.1 Defining limit check conditions
You can define limit check conditions for pre-trade (simulated) limit checks as well as for post-trade
limit lookups.
Information Description
Name
Hotkey
Name and keyboard shortcut for the new macro.
Note: The Name and the Hotkey of the new macro must not already be assigned
to any other macro (including the one currently being edited).
Save as a new
macro
Switch on to save the macro as a new one.

8 Managing transactions
8.2 Capturing deals
278 © Wall Street Systems IPH AB - Confidential
To define limit check conditions:
1. In Transaction Manager, click Options - Limit Setup.
Note: The setup dialog is available in all Transaction Manager applications which have been
started with the -v limit parameter.
2. Enter the following information in the resulting dialog:
3. Click OK.
8.2.4.2 Setting up Limit Monitor books
It is recommended that you set up one or more Limit Monitor books specifically for pre-trade limit
checks and post-trade limit lookups (see 16.3 Limit Monitor on page 471 for information on how to
create books). The default book is TM-LIMIT-CHECK.
The affected limits identified by a limit check and limit lookup can be filtered through Limit Monitor
queries used on the respective pages of the book. These queries should be set up to display different
types of limits on the most suitable pages. They can also be used to display only a subset of affected
limits (such as counterparty trading limits) by querying limits in a specific category only (see
16.3.3.3 Configuring limit selection and queries on page 475 for more information).
8.2.4.3 Processing pre-trade limit checks
A limit check can be used to identify all limits that will be affected by a new transaction before the
transaction has been created in the system.
The system identifies one or several limit servers against which the limit check must be executed (as
defined in Limit Setup in Transaction Manager). The transaction is given a temporary Limit Check
Number and sent to the servers, which process it like a real transaction. If the limit check is
executed against a simulated server, new limit amounts are calculated for each affected limit as
usual. If it is executed against a real server, affected limits are identified but no new limit amounts
are calculated; this is to avoid triggering incorrect violations and log entries from pre-trade limit
checks. The servers generate a list of affected limits as output. Affected limits are all sublimit
outputs affected by the new transaction (in the case of expanded sublimits, only rows affected by
the transaction are included).
Limit Monitor is launched automatically (if it is not already started) and displays the limits affected in
the book that you specified in the Limit Setup.
Note: All Limit Monitor queries saved as part of the page setup are applied to the overall list of
affected limits. This feature can be used to display a subset of affected limits (e.g.
counterparty limits) or to split the presentation of affected limits across several pages,
each of which is set up to support the display of specific limit types (credit, settlement,
risk, etc.).
Information Description
Limit Monitor Book The name of the book that will display the affected limits in Limit Monitor (see
8.2.4.2 Setting up Limit Monitor books on page 278 for more information).
Limit Monitor Servers One or more limit servers against which the limit check from a new transac-
tion or a limit lookup from an existing transaction will be processed.

8 Managing transactions
8.2 Capturing deals
Transaction & Risk Management Module (TRM) User Guide 279
To process a pre-trade limit check you need to:
1. Create a transaction in Transaction Manager. The transaction must be logically complete and
must have a cashflow structure with dates and amounts as if it were a final transaction. It should
not however be saved in the database.
2. Select Limit Check, either from the Action menu of the Enter Board, or by right-clicking on the
active transaction in the Transaction view of Transaction Manager and selecting Limit Check.
Note: This action is available for all new transactions that do not yet have a transaction number,
in all Transaction Manager applications, which have been started with the -v limit
parameter.
3. In Transaction Manager, you can now do one of the following:
–Click Apply to create the transaction in the database. All effects of the Limit Check Number on
the limit amount are removed from the server and replaced by those of the actual
transaction.
–Click Reset or Cancel. The working version of the transaction is removed from Transaction
Manager, and all effects of the Limit Check Number on the limit amount are deleted from the
server.
–Select Cancel Limit Check from the right-click menu. All effects of the Limit Check Number on
the limit amount are deleted from the server.
–Modify the transaction (e.g. change the Nominal Amount or Counterparty) and select Limit Check
from the right-click menu. The current effects of the Limit Check Number on the limit
amount are deleted from the server, and a new limit check is processed, resulting in a new
set of affected limits and/or new limit amounts.
8.2.4.4 Processing post-trade limit lookups
A post-trade limit lookup can be used to identify all limits affected by an existing transaction at any
time after the transaction has been created in the system.
The system identifies one or several limit servers against which the limit lookup must be executed
from the Limit Setup given in Transaction Manager. The servers generate a list of affected limits as
output. Affected limits are all sublimit outputs affected by the transaction (in the case of expanded
sublimits, only rows affected by the transaction are included).
Limit Monitor is automatically launched (if it is not already started) and displays the limits affected in
the book that you specified in the Limit Setup.
Note: All Limit Monitor queries saved as part of the page setup are applied to the overall list of
affected limits. This feature can be used to display a subset of affected limits (e.g.
counterparty limits) or to split the presentation of affected limits across several pages,
each of which is set up to support the display of specific limit types (credit, settlement,
risk, etc.).
To process a post-trade limit look-up you need to do the following:
1. Select an existing transaction in Transaction Manager.
2. Select Limit Lookup, either from the Action menu of the Enter Board, or by right-clicking on the
active transaction in the Transaction view of Transaction Manager and selecting Limit Lookup.
Note: This action is available for all transactions in all Transaction Manager applications, which
have been started with the -v limit parameter.
3. You can now do one of the following:
–Close the Limit Monitor application.
–Select a transaction in Transaction Manager and execute the Limit Lookup action.
8 Managing transactions
8.3 Managing settlement instructions
280 © Wall Street Systems IPH AB - Confidential
8.2.5 Enabling limit queries at transaction level
A limit query enables you to launch Limit Monitor directly from a transaction and to process some
client values (normally, Counterparty) of the transaction to limit queries according to how you have
set up the external parameters in Limit Monitor. See 16.3.3.3 Configuring limit selection and queries
on page 475.
8.2.5.1 Defining the limit query book
In order for you to execute the Limit Query action, you must define limit server, if it is not already
defined (see 8.2.4.1 Defining limit check conditions on page 233), and the limit query book to be
used described in the following steps.
To define the limit query book:
1. In Transaction Manager, click Options - Limit Setup.
Note: The setup dialog is available in all Transaction Manager applications, which have been
started with the -v limit parameter.
2. Enter the following information in the resulting dialog:
3. Click OK.
8.2.5.2 Processing limit queries
To process the limit query: select a transaction in Transaction Manager, and execute the Limit Query
action, either from the Action menu of the Enter Board, or by right-clicking on the active transaction
selecting Limit Query.
Note: This action is available for all transactions in all Transaction Manager applications, which
have been started with the -v limit parameter.
Limit Monitor opens the book specified in Limit Setup and executes the query on each page of the
book according to the mapped external parameters.
8.3 Managing settlement instructions
Standard settlement instructions are specified in the client definition and assigned automatically at
deal capture to each payable cashflow.
Rules (defined in Rule Editor) determine which instructions are used for which type of transaction or
cashflow. If two rules match the same transaction or cashflow, TRM applies the rule with the highest
priority (lowest number).
See 3.13.1.13 Setting up client settlement instructions on page 100 and 18.3 Generating and
processing settlements on page 510 for more information.
8.3.1 Modifying settlement instructions
Settlement instructions can be viewed in the Instructions view of Transaction Manager. Each
instruction affects one or more cashflows. There is a separate row for each instruction in the
transaction.
Information Description
Limit Query Book The name of the book from where the queries will be executed that contains
the mapped external parameters (see 16.3.3 Configuring limits on page 473
for more information).

8 Managing transactions
8.3 Managing settlement instructions
Transaction & Risk Management Module (TRM) User Guide 281
Settlement instructions are defaulted based on the standard settlement instruction (SSI) definitions
in the Settlement Instructions page of Client Editor. If the system setup allows, you can modify the
defaulted settlement instructions in the Instructions view of Transaction Manager. The two ways of
modifying settlement instructions are described below.
8.3.1.1 Selecting another SSI
To select another SSI:
1. In Transaction Manager, select the transaction for which you want to modify instructions.
2. Select View - Instructions to display the Instructions view.
3. In the Instructions view, right-click and choose Select Counterparty Instructions or Select Our
Instructions (depending on which SSI you want to modify).
4. From the selection list, choose the SSI to be used in the settlement.
5. Save the changes you have made to the transaction using the appropriate command to move its
state forward in the transaction flow.
8.3.1.2 Changing the banks and accounts in the settlement chain
To change any of the banks and accounts in the settlement chain:
1. In Transaction Manager, select the transaction for which you want to modify instructions.
2. Select View - Instructions. Click in the field you wish to edit and select a new value.
Note: The system tries to match the new bank/account against the settlement instruction
definitions in the Settlement Instructions page of Client Editor, and if a match is found, the
system completes the settlement chain accordingly.
3. Save the changes you have made to the transaction using the Apply command.
8.3.1.3 Setting settlement instructions for an individual cashflow
Usually, a settlement instruction applies to multiple cashflows. For example, often the Interest and
Expiration cashflows of a deposit are settled in one payment, thus the cashflows share the same
instruction. However, it is possible to set new instructions on an individual cashflow, e.g. if the
Interest of the above deposit is to be settled on a different account.
To set the settlement instructions for an individual cashflow:
1. In Transaction Manager, select the transaction for which you want to modify the instructions.
2. Select View - Instructions to display the Instructions view.
3. In the Cashflow view, right-click the cashflow for which you want to set the settlement
instructions and select Modify instructions. A new row is added to the Instructions view.
4. In the new row, specify the instructions that you want to apply to the cashflow. The instructions
can be set using either of the two ways described above.
5. Save the changes you have made to the transaction using the appropriate command to move its
state forward in the transaction flow.
Note: You can revert to the standard settlement instructions (SSI) as defined in the client
definition by using the Reset to SSI right-click action on the modified cashflow.
8.3.2 Entering ad-hoc settlement instructions
In Transaction Manager, it is possible to enter ad-hoc settlement instructions to a cashflow. Ad-hoc
settlement instructions can be added to cash, commercial-loan, equity and FX transactions when the
Allow Ad-Hoc Instructions or the Allow Ad-Hoc Clients/Instructions action feature has been included in the
instrument definition. A transaction is marked with the status Ad-Hoc Settlement Instructions which
8 Managing transactions
8.3 Managing settlement instructions
282 © Wall Street Systems IPH AB - Confidential
allows you to modify the flow and force a second verification where instructions have been modified.
(The status Ad-Hoc Settlement Instructions is visible in the Transaction view, Transaction Status column.)
Note: See the guide TRM Instruments: Processing and Calculations for more information about
features.
8.3.2.1 Allow ad-hoc instructions
The Allow Ad-Hoc Instructions action enables you to attach counterparty settlement instructions ad hoc
at transaction level, even if no standard settlement instructions or even bank accounts have been
defined for the counterparty in Client Editor. When capturing the counterparty's ad hoc instructions,
you can choose banks that have already been defined in the system, and then enter the bank
account numbers required for settlement.
To add an ad-hoc settlement instruction to a cashflow:
1. Select the transaction to which you want to add an ad-hoc instruction.
2. In the Cashflow view, right-click the cashflow you want and select Ad-Hoc Settlement Instructions.
3. In the dialog, fill in the fields using the information in the following table:
4. Click OK to update the settlement instructions for the cashflow. The changes are displayed in the
Instructions view. You can cancel the action using Undo Ad-Hoc Instructions. The default settlement
instructions are reinstated.
5. Save the changes you have made to the transaction using the appropriate command to move its
state forward in the transaction flow.
8.3.2.2 Allow ad-hoc clients/instructions
The Allow Ad-Hoc Clients/Instructions action enables you to attach a payment counterparty as well as its
banks and account numbers ad hoc at transaction level, even if the payment counterparty or the
banks have not been previously defined in the system. The payment counterparty and its
instructions can be saved and reused later when you enter similar ad hoc instructions.
To add an ad-hoc client/instruction to a cashflow:
1. Select the transaction to which you want to add an ad-hoc instruction.
2. In the Cashflow view, right-click the cashflow you want and select Ad-Hoc Clients/Instructions.
3. In the dialog, fill in the fields using the information in the following table:
Information Description
Bank Client ID of the bank.
Note: Bank Name and Bank SWIFT Code appear when the bank is selected.
Account Account number.
(#2, #3, #4) You can define up to four levels of bank details.
Information Description
Counterparty Name of the payment counterparty.
SWIFT Code SWIFT code of the payment counterparty.
Payment Address Payment address of the payment counterparty.
Account Account number of the payment counterparty.
Bank Client ID of the bank.
Bank Name Name of the bank.
8 Managing transactions
8.4 Processing transactions
Transaction & Risk Management Module (TRM) User Guide 283
4. Click OK to update the settlement instructions for the cashflow. The changes are displayed in the
Instructions view. You can cancel the action using Undo Ad-Hoc Clients/Instructions. The default
settlement instructions are reinstated.
5. Save the changes you have made to the transaction using the appropriate command to move its
state forward in the transaction flow.
8.4 Processing transactions
This section describes the steps you need to take to retrieve existing deals into Transaction Manager
so that they can be verified, and subsequently confirmed, and also how to perform actions which are
common to all types of transactions, such as packaging.
Note: For information about processing the transactions of a particular type of instrument, such
as performing an early expiration: see the relevant section of TRM Instruments: Processing
and Calculations.
8.4.1 Retrieving transactions
To allow you to carry out actions on existing deals or move them along the transaction flow, you
may need to retrieve them into Transaction Manager. Retrieving transactions is done in the Query
view of Transaction Manager. Transactions are retrieved from a blank transaction row called a Query
Row. In this row you enter the criteria that you want the retrieved transactions to match.
It is possible to limit the transactions retrieved to only those that are currently active: see 8.4.1.2
Retrieving active transactions on page 285.
You can only retrieve transactions that have the relevant state and status that corresponds to the
Transaction Manager mode as defined in your transaction flow. For example, you may only retrieve
transactions with the state Final onto the Final Transaction Admin mode of Transaction Manager if
your transaction flow has been defined in that way.
When the transactions have been retrieved, you need to move to another of the views as you cannot
modify the transactions in the Query view.
You can use selection criteria in several fields to retrieve transactions. The criteria entered are
connected with an AND operator, which means that all the selection criteria must match
simultaneously.
You can enter wildcard characters as selection criteria in fields that contain string-type data. There
are several wildcard symbols available in the SQL syntax of Sybase; however the % character is the
Bank SWIFT Code SWIFT code of the bank.
(#2, #3, #4) You can define up to four levels of bank details.
Reuse Instructions Switch on to allow these settlement instructions to be reused.
If this switch is on, the ad-hoc settlement instructions are stored in the
system and can be viewed and invalidated (but not modified) in Ad-Hoc
Settlement Instructions Editor.
Note: To invalidate an ad-hoc settlement instruction, open Ad-Hoc Settlement
Instructions Editor, select the instruction you want to invalidate, switch
on the switch Invalidate This Ad-Hoc Settlement Instruction, and click
Save. The instruction is no longer visible in the editor or available in
related drop-down lists.
Information Description
8 Managing transactions
8.4 Processing transactions
284 © Wall Street Systems IPH AB - Confidential
most useful wildcard symbol. Some wildcard examples for selection criteria using the % symbol to
find the Counterparty ID field are:
In addition, you can enter several separate selection criteria. In this case, the search displays all
transactions that match any of the entered criteria. To enter several separate criteria, press the
down arrow key and enter the criteria in the row that is displayed.
To retrieve transactions:
1. In the Query view, select the columns in which you wish to enter your selection criteria.
2. Right-click the Query view and select Add row.
You can remove a query row using Delete row.
3. Enter the appropriate query criteria for your request in the field. You can do this in one of two
ways:
–By typing the selection criterion directly into the field
–By right-clicking the field to open a selection list. This feature is not available for all
transaction columns.
4. Right-click the query row and select Execute to run the transaction query.
Only those transactions which match all the criteria are retrieved. A message is displayed if no
transactions are found.
5. Right-click the query row and select Clear to clear the query row if you wish to enter alternative
query parameters.
8.4.1.1 Retrieving transactions for a given period or range or both
You can retrieve transactions for a given period or range by specifying dates or values in the
corresponding To and From columns for the following fields:
•Period: Date, Expiry Date, Maturity Date, Opening Date, and Value Date.
•Range: Deal Rate, Nominal Amount, Deal Price, and Units.
Note: Dates and values are inclusive.
To retrieve the transactions for a given period or range:
1. In the Query view, select the corresponding From and To columns for which you want to specify
a period or a range.
2. In the From and To columns enter the period or range for which you want to retrieve
transactions:
Hint:
You can include a combination of these columns in a single query row to reduce the
number of results.
Criterion Matches
S% All the counterparties that begin with the character S.
%S% All the counterparties that have the character S in them.
%S All the counterparties that end with the character S.
8 Managing transactions
8.4 Processing transactions
Transaction & Risk Management Module (TRM) User Guide 285
–For example, to retrieve all transactions within a period:
–For example, to retrieve all transactions within a range:
3. Run the query to display all transactions that match the query criteria.
8.4.1.2 Retrieving active transactions
When you execute the transaction query in Transaction Manager, all transactions that match the
criteria are retrieved. To limit the transactions retrieved to only those that have cashflows which are
currently active, in other words, which remain to be settled, you can use the Options - Active
Transactions menu option.
Note: The Options - Active Transactions menu option is set by default in Transaction Manager’s
Fixing Admin mode so that only transactions that are active on the fixing date are
retrieved.
To ... Enter ... In Columns ...
Display all transactions that were captured
between January 1st, 2009 and December 1st,
2009.
From: 01-Jan-2009
To: 01-Dec-2009
Date From / To
Display all transactions with an expiry date
between January 1st, 2009 and December 1st,
2009.
From: 01-Jan-2009
To: 01-Dec-2009
Expiry Date From / To
Display all transactions with a maturity date
between January 1st, 2009 and December 1st,
2009.
From: 01-Jan-2009
To: 01-Dec-2009
Maturity Date From / To
Display all transactions with an opening date
between January 1st, 2009 and December 1st,
2009.
From: 01-Jan-2009
To: 01-Dec-2009
Opening Date From / To
Display all transactions with an value date
between January 1st, 2009 and December 1st,
2009.
From: 01-Jan-2009
To: 01-Dec-2009
Value Date From / To
To ... Enter ... In Columns ...
Display all transactions with a deal price between
1,500 and 2,000
From: 1500
To: 2000
Deal Price From / To
Display all transactions with a deal rate between
1.2 and 4.5
From: 1.2
To: 4 . 5
Deal Rate From / To
Display all transactions with a nominal amount
between 1000000 and 1500000
From: 1000000
To: 1500000
Nominal Amount From /
To
Display all transactions with units between 0 and
100
From: empty or 0
To: 1 0 0
Units From / To
8 Managing transactions
8.4 Processing transactions
286 © Wall Street Systems IPH AB - Confidential
Important: When this option is selected, the system also retrieves any transactions that
originate from an active transaction (for example, early expiration or call/put
transactions).
8.4.2 Displaying transaction data in a chart
After you have retrieved transactions, you can choose to display selected data in a chart by using
Transaction Manager’s charting functionality.
Hint:
To use Transaction Manager’s charting functionality, Transaction Manager must be started
up in the chart mode (--chart). See 8.1.2 Start-up parameters on page 262.
To display the queried transaction data in a chart:
1. Retrieve the transactions in Transaction Manager’s Chart mode (see 8.4.1 Retrieving
transactions on page 283).
2. Click Display Chart.
3. In the resulting dialog, select the data you want to display. One of the selected columns should
be non-numeric.
4. A chart is displayed showing the selected data in the Transaction - Chart view. You can do any of
the following:
–To modify the selected data, right-click inside the chart and select Select columns..., change
the selected data and click OK. The chart is redrawn according to the selected data.
–To modify the chart properties, right-click inside the chart and select Configure... and then
modify the properties (data, tools, legend, titles, axis, and so on) according to your needs.
8.4.3 Verifying transactions
Once a deal has been entered and committed in either Transaction Manager or Enter Board, the
transaction’s state changes according to your mode configuration (for example, from Open to Verify)
and is no longer visible in the Deal Capture mode.
In a typical TRM implementation, the Verification mode of Transaction Manager is used to check
these transactions (see 8.1.3 Transaction Manager modes on page 262 for more information about
modes).
To verify a transaction:
1. Retrieve the transactions with the state Verify into Transaction Manager’s Verification mode (see
8.4.1 Retrieving transactions on page 283).
2. Check the transaction details.
3. Send or return the transaction to the appropriate state in the transaction flow, as follows:
–If the transaction details are correct, accept the transaction and move it forward in the
transaction flow for back-office verification using Command - Verify
–If the transaction details are not correct, reject the transaction and send it back to the Open
state to be modified or canceled in the Deal Capture mode using Command - Reopen.
8.4.4 Confirming transactions
When the deal has been verified in the Verification mode of Transaction Manager, you can confirm
the transaction with the counterparty in the Confirmation mode. Here, you confirm the transaction
information with the counterparty as well as whether the transaction is a delivery versus payment.

8 Managing transactions
8.4 Processing transactions
Transaction & Risk Management Module (TRM) User Guide 287
You can give the transaction the status Confirmed (Command - Set Confirmed) if you agree it with the
counterparty, and the status Delivery vs. Payment (Command - Set Delivery vs. Payment) if the delivery
and payment of the transaction occur at the same time.
You can confirm all transactions that have the state Back Office Verify and Final (both, only if the
transaction is not yet confirmed). In the Confirmation mode, you can only retrieve transactions with
these states if the transaction information is not yet received by the counterparty or confirmed by
both parties.
Transactions automatically have the status Delivery vs. Payment if they use a custodian who has a
delivery versus payment custody account (a custodian who supports delivery versus payment). If
the transaction does not have the status Delivery vs. Payment, the custodian treats the delivery and
payment of the transaction as two completely separate issues. The latter can create a delay in the
payment of the transaction.
The confirmation message for SWIFT payments is physically different for transactions with the
status Delivery vs. Payment.
To confirm transactions:
1. Retrieve the transactions whose status you want to change into Transaction Manager’s
Confirmation mode (see 8.4.1 Retrieving transactions on page 283).
You can only retrieve transactions with the state Final and Back Office Verify.
2. Select the transaction that you want to add the status to and check the transaction information
with the counterparty.
–Select Command - Set Confirmed to add the status Confirmed to the transaction.
This means that the transaction is agreed with the counterparty.
–Select Command - Set Delivery vs Payment to add the status Delivery vs. Payment to the
transaction.
This means that the delivery and payment of the transaction occur simultaneously.
You can remove either status by selecting Clear Confirmed or Clear Delivery vs Payment from the
Command menu.
8.4.5 Correcting transactions
Note: The system does not allow you to modify transactions with Paid cashflows. Paid cashflows
are cashflows from which settlements have been generated. Settlements can be canceled
in either Settlement Processing or Transaction Manager. See 18.3.4.8 Canceling
settlements on page 520 in Settlement Processing or 8.4.7.12 Canceling provisional
settlements in Transaction Manager on page 298.
To correct a transaction or modify its status:
1. Retrieve the transaction into Transaction Manager’s Final mode (see 8.4.1 Retrieving
transactions on page 283).
You can only retrieve transactions with the state Final.
2. Select the transaction that you want to correct or modify.
–If you want to correct a transaction’s details, select Command - Re-Open to change the state of
the transaction from Final to Re-Open.
The transaction is given the Amend status and is no longer displayed in Transaction
Manager’s Final mode. This is because it has been returned to the previous mode (such as
Back Office Verify) as configured in the transaction flow. From here, send the transaction
back to the Deal Capture mode where it is possible to modify it.
8 Managing transactions
8.4 Processing transactions
288 © Wall Street Systems IPH AB - Confidential
Note that reopening a transaction, which has already gone through the accounting process, may
have an impact on the creation of accounting entries when it is processed again (see 19.2.2
Processing results on page 538 for more information).
If accounting entries are affected, then a warning message will be displayed. It is possible to
personalize the warning message (see 21.3.5 Creating personalized warning messages on page
562 for more information).
3. If you want to change the status of a transaction, select the status you want from the Command
menu, for example:
8.4.6 Matching and unmatching transactions
Automatic matching of transactions occurs each night with the End of Day Processing activity: see
A.24 End of Day Processing on page 636 for details of the activity’s parameters.
The selling parameters used to automatically match transactions are specified in the result type
linked to the instrument definition: see 3.15.2 Results on page 115 for more information.
In TRM, you can also manually match sold transactions against bought transactions (both must be
tradeable on the secondary market) in Transaction Manager’s Matching mode. This option is
available if you specified Manual or FIFO as the selling method for the instrument.
When you manually match transactions, you can match any sold transaction to any amount of any
bought transaction. For example, you can match Transaction A with half of Transaction B and half of
Transaction C.
8.4.6.1 Matching
To match transactions:
1. Retrieve the transaction into Transaction Manager’s Matching mode (see 8.4.1 Retrieving
transactions on page 283). It is recommended to use the transaction number or instrument as
the criteria.
You can retrieve transactions in any state.
2. Select the transaction that you want to match.
In order to be matched:
–Transactions must use the same instrument and be in the same portfolio.
Status Description
Set Confirmed
Clear Confirmed
Select Set Confirmed if the information from the counterparty matches the information
in the transaction (see also 8.4.4 Confirming transactions on page 286).
Select Clear Confirmed to remove the Confirmed status if the information from the
counterparty is incorrect, that is, it does not match the information in the transaction.
Set Pending
Clear Pending
Select Set Pending if the transaction is pending. This is used for early expirations and
roll over transactions.
Select Clear Pending to remove the Pending status.
Set Back
Valuation
Clear Back
Valuation
Select Set Back Valuation to back-date the value of a deal.
An example of a back-valued deal is a transaction that has been left open by the
dealer at the end of the day, pending confirmation. The following day, the
confirmation is received, and the dealer then back-dates the deal to the previous day.
When the deal is changed in this way, the system time stamps the transaction at
23:59:59:999 local time for the previous day.
Select Clear Back Valuation to remove the status.

8 Managing transactions
8.4 Processing transactions
Transaction & Risk Management Module (TRM) User Guide 289
–The value date of the bought transaction must be before the value date of the sell
transaction.
Note: It is not possible to match special transactions such as average balance or early expiration
transactions.
3. Select Action - Matching to match the transactions. Transactions can be matched differently in
different result modes:
4. When a transaction has been matched, the system creates closing cashflows for the sold
transactions with a Target Transaction Number that points to the original transaction. These closing
cashflows close the position of the bought transaction.
8.4.6.2 Undo matching
You can also unmatch sold transactions using Action - Undo Matching if the cashflows resulting from
the sell transactions are not yet paid or booked.
Note: Undo Matching can be done only on the sell transactions and for transactions that have been
matched using the FIFO selling method.
To undo matching:
1. Retrieve the transaction into Transaction Manager’s Matching mode (see 8.4.1 Retrieving
transactions on page 283). It is recommended to use the transaction number or instrument as
the criteria.
You can retrieve transactions in any state.
2. Select the sell transaction for which you want to undo the matching.
3. Select Action - Undo Matching. Transactions can be unmatched in different result modes:
8.4.7 Performing actions on deals
In Transaction Manager, you can perform several actions on a deal. Some of these actions are
common to all types of deals (for example, Duplicate), while other special actions require the addition
of a feature to the instrument (such as Roll Over).
Note: For more information about processing the transactions of specific types of instruments,
see the guide TRM Instruments: Processing and Calculations.
Menu Description
Matching (Single Result
Mode)
Matches transactions in the active result mode only. You can set the active
result mode in Result Mode in the Options menu. See 3.15.2 Results on page
115 for more information about result modes.
Matching (All Result
Modes)
Displays a dialog from which you can select the modes to which matching is
applied. See 3.15.2 Results on page 115 for more information about result
modes.
Menu Description
Unmatching (Single
Result Mode)
Unmatches transactions in the active result mode only. You can set the active
result mode in Result Mode in the Options menu. See 3.15.2 Results on page
115 for more information about result modes.
Unmatching (All Result
Modes)
Displays a dialog from which you can select the modes to which unmatching is
applied. See 3.15.2 Results on page 115 for more information about result
modes.

8 Managing transactions
8.4 Processing transactions
290 © Wall Street Systems IPH AB - Confidential
These actions become available when you select the transaction in question in the appropriate view
of Transaction Manager and right-click. The actions that you are able to carry out on the selected
transaction are displayed in a pop-up menu. If you cannot see an action that you expected to see in
right-click action menu, you can check why the action is not available by using the Discovery
Console. For more information, see 8.4.7.5 Checking the unavailable actions on a transaction on
page 293.
The system does not allow you to perform actions on transactions when the action will result in a
settlement on or before some future cashflow(s) that are already in settlement, i.e. Paid flag. By
default, in this case, the system displays a message showing the settlement ID, currency, and state
of the impacted settlements and will not allow you to complete the action. To proceed with the
action, you will have to cancel these settlements. You can cancel settlements in Settlement
Processing, which is the main application for handling settlements, or in Transaction Manager at
either transaction or cashflow levels. For more information about canceling settlements in
Transaction Manager, see 8.4.7.12 Canceling provisional settlements in Transaction Manager on
page 298.
This default behavior is configurable in Configuration Table Editor and is described in the TRM
System Admin Guide. If the system is configured to allow the continuation of actions on transactions
with cashflows that are in settlement, the system also informs you of the impacted settlements,
except that you are given the choice to continue or abort the action. If you choose to continue, the
action will result in the paid cashflows being closed with unpaid ones, i.e. a reversal settlement can
be processed later in Settlement Processing as with any other settlement. Settlement Processing is
described in 18.3 Generating and processing settlements on page 510.
Note: You can use the Settlement and Settlement State columns in the Cashflow view to check
the settlement and settlement state.
8.4.7.1 Duplicating transactions
The Duplicate action creates a new deal with the same characteristics as the initial transaction, apart
from the transaction number and the state. After the deal has been duplicated, it is possible to
change some of the characteristics of the new deal. This is a useful function when you need to
create many deals with similar characteristics using the same instrument.
To enter a duplicate deal:
1. Select the transaction row for the deal data you want to duplicate.
2. Right-click the transaction and select Duplicate.
A new deal is created with the same transaction data as the original transaction. You can modify
any of the transaction column data before applying the deal.
8.4.7.2 Packaging transactions
If several transactions have something in common (for example, they are traded as a hedge or an
arbitrage), you can package them together in a group to create a link between them, allowing you to
analyze the grouped transactions for position monitoring in Treasury Monitor, or for reporting
purposes.
In Transaction Manager, the New Package action assigns a transaction or several transactions to a
package main type and package type. A transaction can belong to one or several packages as long
as the packages have different package main types. Package main types and package types are
defined in Package Type Editor: see 3.37 Package types (optional) on page 147.
To add one or several transactions to a package:
1. In Transaction Manager, select the transaction/s that you want to add to a package.
2. Select Action - New Package from the menu.
3. Select the Package Main Type from the resulting selection list. Note that hidden and system main
types are not available for creation.
4. Select the Package Type from the resulting selection list.
8 Managing transactions
8.4 Processing transactions
Transaction & Risk Management Module (TRM) User Guide 291
5. Click OK. The transaction is added to a new package with a package ID. You can view the
package ID and package attributes of a packaged transaction in the Package View, available from
the View menu.
Note: You can add a single transaction to a package, by selecting the transaction and then using
the right-click menu to select Package - New Package.
In addition to the New Package action, the following actions can be performed on a transaction, by
right-clicking on the transaction and then selecting the Package menu:
8.4.7.2.1 Copying packages to new transactions
When a new transaction is created by performing an action on an existing transaction, all packages
are copied from the existing transaction to the new transaction, with the following exceptions:
•System packages (packages in Package Main Types which have the System attribute) are not
copied.
•By default, packages are cleared from purchase transactions when using the Assignment
(purchase) action.
•The Duplicate action does not copy any packages.
For the following actions, it is possible to clear all packages from the new transaction by selecting
the Clear Packaging switch:
•Roll over
•Option exercise
•Loan/swap transfer (for the opening transaction)
•Bond transfer (for the opening transaction).
8.4.7.2.2 Querying for packaged transactions
In Transaction Manager, you can query for transactions that belong to a particular package or
package type using the Package or Package Type fields. To use the Package Type field, you first need to
select a Package Main Type.
Information Description
Remove from Package This menu lists the packages to which the transaction belongs. The list comprises
the package ID, package main type and package type. Selecting an item removes
the transaction from the package.
Note: It is not possible to remove a transaction from a system package.
Update Package Type You can use this action to change the package type (not the main type).
Note: It is not possible to update a system package type.
Add to Package This menu lists the packages to which other transactions n the board belong. For
example, if you have several transactions displayed as the result of a query, the
menu lists any packages to which any of these transactions belong. The package
list comprises the package ID, package main type and package type. If the
transaction already belongs to a package, this package will not show up in the list.
Note: It is not possible to add transactions to system or hidden packages.
8 Managing transactions
8.4 Processing transactions
292 © Wall Street Systems IPH AB - Confidential
8.4.7.2.3 Displaying packaged transactions
It is possible to set two display options from the Options menu:
•Preferred Package Main Type: When a package main type is selected, the two fields Package Type and
Package in the Transaction view are populated with the values of the package type and package ID
of the selected package main type. If no preferred package main type is specified then these
fields are empty.
•Retrieve Full Package: When you set this option, you need to also set a Preferred Package Main Type.
In the below example, the Preferred Package Main Type is MT_1. When you run a query, the query
will do the following:
–Retrieve all transactions that match the query parameters or criteria (in this example
Transactions 1 and 2)
–Examine the packages to which the matching transactions belong. In this example,
Transaction 1 belongs to packages 1 and 2, and Transaction 2 belongs to packages 3, 4, and
5.
–Look at which packages have a package main type that matches the Preferred Package Main
Type. In the example, packages 1 and 3 have package main type MT_1.
–Retrieve all transactions that are also in the same packages as the matching transactions
where the package main type is the Preferred Package Main Type. In the example, all
transactions from packages 1 and 3 are retrieved since the package main type for these
packages is MT_1. No transactions from packages 2, 4 or 5 are retrieved because the
package main type for these packages does not match the Preferred Package Main Type.
Package 5
MT_4
Transaction 1
Transaction 2
Query
Package 2
MT_7
Package 1
MT_1
Package 4
MT_3
Package 3
MT_1
Result
Transaction 1
Transaction 2
Transaction 3
Transaction n
Transaction 3
Transaction n
All transactions in Package 3 MT_1
All transactions in Package 1 MT_1
Settings: Retrieve Full Package
Preferred Main Package Type = MT_1
Packages for Transaction 1
Packages for Transaction 2

8 Managing transactions
8.4 Processing transactions
Transaction & Risk Management Module (TRM) User Guide 293
8.4.7.3 Previewing messages
It is possible to preview any messages (for example, the confirmation of a deal) that will be
generated and sent automatically according to the type of transaction and the rules that have been
set up in TRM.
See Chapter 21 Managing messages on page 555 for more information about setting up and
managing messages.
To preview a message:
1. Select the transaction for which you want to preview the message.
2. Right-click the transaction and select Preview.
3. In the Preview dialog, select the Message Type which corresponds to this type of transaction.
The list of available message types is filtered by the state of the transaction and matching
message rule.
4. Click OK.
TRM creates and displays an on-screen version of the final message. This preview is for display
purposes only.
Note: Once the transaction has been applied and committed, messages requests are created.
These requests either enter the message process flow for further processing, or are
transmitted immediately. The message process flow, including when messages should be
transmitted, is defined at implementation.
8.4.7.4 Running reports on transactions
You can generate a Transaction Log report for a single transaction from Transaction Manager.
•Right-click the transaction’s Transaction Number, and select Run Report.
This report shows the attributes of the selected transaction along with the user ID responsible
for making any modifications.
See B.51 Transaction Log Report on page 680 for details of the report’s parameters.
See also 8.4.8 Generating reports on transactions on page 299 for information about other types of
transaction-related reports.
8.4.7.5 Checking the unavailable actions on a transaction
When you right-click a transaction, you can see the actions that you can perform on that particular
transaction. To check why some actions are not available (or denied) use the Discovery Console.
To check why some actions are not available (or denied):
1. Retrieve the transaction and select it.
2. Select Options - Discovery Console. The Discovery Console dialog is displayed.
3. Right-click the selected transaction. The list of denied actions appears in the dialog.
4. Expand the list, the actions are displayed by the name of the view and the time where and when
you performed the right-click.
Note: A new entry is added each time you perform a right-click on the transaction.
5. For each action, you can see the name of the action and the reason why it is not available. For
example:
–execute_trigger - Execute Trigger: no event to trigger

8 Managing transactions
8.4 Processing transactions
294 © Wall Street Systems IPH AB - Confidential
Informs you that you cannot execute a trigger because there are not any events. You can
then check why there are no events.
–reset-kept-columns - Reset Kept Columns: schedule action only
Informs you that you can only perform this action in the Schedule view. You can then go to
the indicated view.
6. Additionally, you can select a Regular Expression and enter a regular expression or use the Filter
field and Apply to display a particular action.
Hint:
For example, to display only reset actions, enter reset in the Filter field and click Apply. The
Discovery Console updates the displayed actions to match the filter.
8.4.7.6 Adding information links to deals
In the Transaction view of Transaction Manager, you can add complementary information to a deal
(for example, a document containing information related to the transaction, or a link to an issuer’s
web site).
To add a link to a transaction:
1. Select View - Select Columns.
2. Add the Document Link column.
3. Select the transaction to which you want to add the link.
4. Double-click the Document Link column to open the Browse for Folder dialog.
5. Select the required document or if you want to add a link to a web page, type the URL directly in
the column.
6. To open the link or web page, right-click the column and select Open.
Note: You can also attach a link directly to an instrument in Instrument Editor. See 3.3.9.3
Adding links on page 49 for more information.
8.4.7.7 Generating transaction comments
In the Transaction Comment view of Transaction Manager, you can view any rule-based transaction
comments that apply to the transaction. These comments can be generated manually using the Add
Comments action. Once generated, it is possible to manually edit the value of a comment if the
transaction is not in the Final state.
To manually generate transaction comments:
1. Open the Transaction Comment view from the View menu in Transaction Manager.
2. Right-click on the transaction and select Add Comments. The Transaction Comment view will be
populated with any transaction comments that apply to the transaction.
Note: Any transaction comments that need to be copied to settlement processing (i.e.
transaction comments that have the Copy to Settlement switch set to on in Comment Rule
Editor) will be copied automatically.
3. If you have manually edited some comments and want to go back to the default comments or if
you want to remove comments that no longer apply, re-run the Add Comments action. Re-running
the action gives you the opportunity to either:
–Replace existing comments with default values
This action replaces any comments that have been modified manually by the default comments
defined in the Comment Rule Editor.

8 Managing transactions
8.4 Processing transactions
Transaction & Risk Management Module (TRM) User Guide 295
–Delete existing comments for non matching rules
This action removes any comments that no longer apply to the transaction. For example, a
comment may be added to a transaction based on a rule that applies to all transactions in USD.
Then, if the transaction's currency is changed from USD to Euro, the rule and therefore the
comment no longer apply.
Note: See 3.22 Comments and comment rules (optional) on page 132 for more information on
transaction comments.
8.4.7.8 Setting base FX rates
The Base FX Rate is the rate used to convert amounts when the currency of the cashflow and the
portfolio’s base currency are not the same. This rate has an impact on the calculation of the FX Profit
figure during end-of-day processing.
For some transactions (namely on Bond, Discount Paper, Depo/Loan, and Equity instruments), it is
possible to manually fix the Base FX Rate and Base FX Book Rate, so that a subsequent running of
the End-of-Day Processing activity does not change the rate or base amount of any of the following
types of cashflow:
•Principal cashflow
•Discount/Premium cashflow
•Redemption/Amortization/Expiration flow on the opening date or since when date
•Position cashflow on the opening date or since when date.
To set the Base FX Rate for a transaction:
1. Select the transaction in Transaction Manager's Transaction view.
2. Right-click the transaction and select Set Base FX Book Rate.
Note that this action is only available when the currency of the cashflow and the portfolio’s base
currency are not the same.
3. In the resulting dialog, enter the values using the information in the following table:
4. Click OK to set the rate.
The attributes Fixed FX Rate or Fixed FX Book Rate are set on the cashflows.
Note: See 19.2 Realizing and processing results on page 537 for more information.
8.4.7.9 Defining the valuation approach at transaction level
In Transaction Manager’s Valuation Approach view, you can specify a transaction- and mode-specific
valuation approach for an individual deal for a specific time frame.
This is useful in situations where you initially value a transaction using one approach, but later
decide to change to another approach for either the original transaction or subsequent transactions
from the same instrument.
Information Description
Leg Leg of the transaction.
Note: This field is only displayed when a transaction contains leg information.
FX Rate Base FX Rate that you want to set for the transaction.
8 Managing transactions
8.4 Processing transactions
296 © Wall Street Systems IPH AB - Confidential
You can define the valuation approach at transaction level when the Mode/Transaction Specific
Method feature is present in the instrument definition.
Note: See the guide TRM Instruments: Processing and Calculations for more information about
this feature.
To specify a valuation approach for an individual deal:
1. In Transaction Manager, select the transaction for which you want to specify the valuation
approach.
2. Select View – Valuation Approach to display the Valuation Approach view in the Transaction
Manager window (make sure that the view’s columns are selected using View - Select Columns).
3. Right-click the transaction and select New Valuation Approach to add a row to the Valuation
Approach view.
4. Enter the details in the new row as follows:
5. Repeat the procedure if you want to add further valuation approaches for other periods.
6. Select Command – Apply to save the transaction.
Note: When valuing such a transaction, TRM uses the approach that is active on the valuation
date (in the requested mode) and does the valuation accordingly. If no approach is found
at transaction level, the system falls back on the valuation approach specified at
instrument level (in the Mode Valuation page).
8.4.7.10 Assigning valuation models at transaction level
In Transaction Manager’s Valuation Model view, you can specify a transaction-specific valuation
model for an individual deal for a specific time frame.
This is useful in situations where you initially price a transaction using one model, but later decide to
change to another pricing model for either the original transaction or subsequent transactions from
the same instrument.
You can define the valuation model at transaction level when the NumeriX Setup and NumeriX
Valuation features are present in the instrument setup: see the guide TRM Instruments: Processing
and Calculations for more information about these features.
To specify the valuation model used to price an individual deal:
1. In Transaction Manager, select the transaction for which you want to specify the valuation
model.
2. Select View – Valuation Model to display the Valuation Model view in the Transaction Manager
window (make sure that the view’s columns are selected using View - Select Columns).
Information Description
Active From Start date for the period within which the valuation approach is valid for the
transaction.
If this field is left blank, the opening date of the transaction is used.
Active To End date for the period within which the valuation approach is valid for the
transaction.
If this field is left blank, the closing date of the transaction is used.
Valuation
Approach
Valuation approach to be applied to the transaction for the active period.
Valuation Mode Valuation mode in which the specified valuation approach is used for the active period.
8 Managing transactions
8.4 Processing transactions
Transaction & Risk Management Module (TRM) User Guide 297
3. Right-click the transaction and select New Valuation Model to add a row to the Valuation Model
view.
4. Enter the details in the new row as follows:
5. Repeat the procedure if you want to add further valuation models for other periods.
6. Select Command – Apply to save the transaction.
Note: See 4.7 Pricing complex derivatives on page 190 for more information about setting up
and using pricing models.
8.4.7.11 Changing IR exposure calculations at transaction level
TRM enables you to switch on or off the IR exposure calculations on a per transaction basis when
using NumeriX valuation. That is, when you have set up NumeriX settings (NumeriX page - Numerix
Setup feature) and either switched on or off the Calculate Exposure switch at the instrument level, you
can change that setting in Transaction Manager’s Valuation Model view.
This is useful when you only want to switch on or off the IR exposure calculations of a single
transaction, as opposed to all transactions that use that instrument.
To switch on or off the IR exposure calculations on a per transaction basis:
1. In Transaction Manager, select View – Valuation Model to display the Valuation Model view in the
Transaction Manager window. (Make sure that the Calculate IR Exposure column is visible.)
2. Select the transaction for which you want to switch on or off IR exposure calculations.
3. In the Valuation Model view, click inside the Calculate IR Exposure column and do one of the
following options:
–Select Yes, if you want to switch on IR exposure calculations on the selected transaction, i.e.
the Calculate Exposure switch is off at the instrument level.
–Select No, if you do not want switch off IR exposure calculations on the selected transaction,
i.e. the Calculate Exposure switch is on at the instrument level.
Note: If you want the IR exposure defined at the the instrument setup to apply, simply leave the
column empty.
4. Select Command – Apply to save the transaction.
Information Description
Start Date Start date for the period within which the valuation model is valid for the transaction.
If this field is left blank, the opening date of the transaction is used.
End Date End date for the period within which the valuation model is valid for the transaction.
If this field is left blank, the closing date of the transaction is used.
Calibration ID of the calibration model to be applied to the transaction for the active period.
Valuation Model Valuation model you want to use for the active period.
Choose from a list of models that have been predefined in the calibration editors (for
example, Hull-White-One-Factor or Hull-White-Two-Factor).
Valuation Method Pricing direction (for example, Forward/Backward Monte Carlo).
Quality
Analytics Quality
Quality required for the pricing
8 Managing transactions
8.4 Processing transactions
298 © Wall Street Systems IPH AB - Confidential
8.4.7.12 Canceling provisional settlements in Transaction Manager
You can cancel paid cashflows in Transaction Manager when the following conditions are met:
•Settlements are in a state flagged as ’provisional’. The default provisional states are Generated,
Rejected, Waiting for Netting, and Error.
•The instrument used in the transaction includes the action feature Cancel Provisional
Settlement. See the TRM Instruments: Processing and Calculations Guide.
You can cancel settlements at transaction and cashflow levels according to whether you want to
cancel single cashflows or all cashflows on or after a specified date. In both cases, the Cancel
Provisional Settlements action processes the settlements as follows:
–If the related settlement is not a netted settlement across transactions, then the settlements
are canceled (i.e. deleted), and the Paid flag removed from the cashflows that were part of
the settlement.
–If the related settlement is a netted settlement across transactions, then the cashflows of
the transaction affecting the net settlement are removed from this settlement, and the Paid
flag removed from these cashflows.
After you have canceled the settlements and proceeded with the action you wanted to initially
perform on the transaction, the settlements can be regenerated and processed in Settlement
Processing (Chapter 18 Managing cash and settlements on page 495).
8.4.7.12.1 Canceling single provisional settlements
To cancel a single cashflow in settlement (paid):
1. In Transaction Manager’s Cashflow view, you can check the settlement state of the cashflows.
Note: To check the settlement ID and state of the settlement, the columns Settlement and
Settlement State must be visible in the Cashflow view.
2. Right-click the cashflow for which you want to cancel the settlement and select Cancel Provisional
Settlement.
8.4.7.12.2 Canceling all provisional settlements on or after a specific date
To cancel all cashflows in settlement (paid) on or after a specific date:
1. In Transaction Manager’s Cashflow view, you can check that the settlement state of the
cashflows.
Note: To check the settlement ID and state of cashflows, the columns Settlement and Settlement
State must be visible in the Cashflow view.
2. In the Transaction view, right-click the transaction on which you want to cancel settlements and
select Cancel Provisional Settlement.
3. In the resulting dialog, enter the date from which you want to cancel the settlements. Only the
cashflows with a payment on or after the specified date will be canceled.
4. Click OK.
Note: If non-provisional settlements exist on or after the specified date, the system displays a
message listing the settlements that could not be canceled. These settlements can be
canceled manually in Settlement Processing.
8.4.7.13 Processing special actions or events
The processing of special actions or events on a transaction (for example, Fixing, Option Exercising,
and so on), is usually carried out when the transaction is in the Final state. Therefore, for this

8 Managing transactions
8.4 Processing transactions
Transaction & Risk Management Module (TRM) User Guide 299
reason, the Deal Capture mode of Transaction Manager is not normally used to perform such
actions.
It is recommended that additional modes of Transaction Manager are configured in order to handle
these types of special events. Transaction Manager modes are configured at implementation to meet
the requirements of your organization: see the TRM System Administration Guide for more
information.
Note: For more information about processing special actions or events on the transactions of
specific types of instruments, see the guide TRM Instruments: Processing and Calculations.
8.4.8 Generating reports on transactions
There are a number of reports you can use to view transaction information.
Report Description
Transactions Used to view transaction information for a specific day or for a specific period.
See B.50 Transactions Report on page 679 for details of the report’s parameters.
Transaction Log Used to view all modifications made to one or more transactions over a period of time
along with the user ID responsible for making the modifications.
This report can also be launched for a single transaction from Transaction Manager:
see 8.4.7.4 Running reports on transactions on page 293.
See B.51 Transaction Log Report on page 680 for details of the report’s parameters.
Tran s acti on Market
Rate
Used to view all market data associated with a particular trade.
The report displays the market data for each time the trade was applied in the Front
Office and contains all price columns relevant to the transaction.
See B.52 Transaction Market Rate Report on page 680 for details of the report’s
parameters.
Cashflow Used to view the Treasury’s future incoming and outgoing cashflows.
See B.5 Call Reports on page 661 for details of the report’s parameters.
Cashflow Fixing This report displays the cashflows which have been fixed. It shows the fixing
information for floating-rate deals, such as floating loans and the floating legs of IR
swaps, as well as the cashflow fixing of FRAs.
See B.7 Cashflow Fixing Report on page 662 for details of the report’s parameters.
Note: The Event Diary report can be used to display the transactions (grouped by
affect number) that need to be fixed on a given date.
Cashflow Log Used to display a log of the changes made to cashflows.
See B.8 Cashflow Log Report on page 662 for details of the report’s parameters.
Competitive Quote Used to view competing quotes received from other institutions.
This information can be used, for example, for audit purposes and for bank
relationship management.
See B.14 Competitive Quote Report on page 665 for details of the report’s
parameters.
Event Diary This report shows all transactions in a selected portfolio (hierarchy) that have
cashflows (grouped by affect number) on which an event may be initiated during a
specified period. The transactions need to be open in the Inventory between the Start
Date and the End Date of the report in order to be displayed.
Events can include: all types of fixings, call or put exercises, triggered events,
currency or transaction conversions, equity-related events, and option expirations or
other types of option events.
See B.24 Event Diary Report on page 668 for details of the report’s parameters.

8 Managing transactions
8.5 Deal mirroring
300 © Wall Street Systems IPH AB - Confidential
8.5 Deal mirroring
TRM enables you to mirror deals by generating "child" transactions from "parent" transactions.
Deal mirroring works in a similar way to the Duplicate action in Transaction Manager (see 8.4.7.1
Duplicating transactions on page 290). However, instead of creating a new deal with the same
characteristics as the initial transactions, you have the following possibilities:
•Internal deal mirroring
This is similar to a reverse Duplicate action, where transactions that are traded inter-company
can be entered in one portfolio and then be simultaneously mirrored in the portfolio of the
counterparty.
With internal deal mirroring, most of the values of the child transaction are inherited from the
parent transaction. Some values (such as, transaction sign and amount) are reversed in the
child transaction, while some values follow an advanced logic (for example, settlement
instructions, and so on.)
See 8.5.1 Internal deal mirroring on page 300 for more information.
•Deal mirroring using mirror cases
Mirror cases are used in more complex deal mirroring. They can automatically create one or
more child transactions with values that are either the same as the parent transaction, or
different from the parent transaction.
See 8.5.2 Deal mirroring using mirror cases on page 305 for more information.
With both types of deal mirroring, you first need to create standard rules (in Rule Editor) to
determine which transactions should be affected by the mirroring: see Chapter 5 Managing rules on
page 221.
Note: Deal mirroring requires some additional parameters in the configuration of the transaction
flow: see the TRM System Administration Guide for more information.
8.5.1 Internal deal mirroring
Internal deal mirroring is carried out when a transaction that is initiated in one portfolio, is copied
with the same terms and conditions but with the opposite sign and amount, to the portfolio of the
counterparty.
The initial transaction is known as the parent transaction and the mirror copy transaction is known
as the child transaction. Most of the values of the child transaction are inherited from the parent:
the child transaction uses the same instrument, the same currency, the same dates, the same rate,
and so on.
Typically, internal deal mirroring is used in the following situations:
•When the organization is trading with one of its branches or subsidiaries, (for example, by
lending funds), and both parties (that is, the initiator of the transaction and the counterparty)
are identified in TRM with the Portfolio Owner role in their respective client definitions.
•When the trading desk is transferring a position to the customer desk: the counterparty and the
owner of the transaction are the same.
8.5.1.1 Setting up static data for internal deal mirroring
This section describes the additional values or specific configuration needed for static data entities
used in internal deal mirroring.
8 Managing transactions
8.5 Deal mirroring
Transaction & Risk Management Module (TRM) User Guide 301
8.5.1.1.1 Setting up portfolio permissions
In addition to the standard permissions, it is important that there is some control on which users can
trigger mirroring to create transactions into target portfolios.
This is done by ensuring that the correct users and corresponding permissions are assigned to the
portfolios involved in internal deal mirroring.
To set up a target portfolio for internal deal mirroring:
1. In Portfolio Editor’s Allowed Users page, specify the values as follows:
2. Repeat the procedure for each user involved in internal deal mirroring on this portfolio.
3. Save the portfolio definition using File – Save.
Note: See 3.14.1.2 Assigning allowed users and processes on page 110 for more information.
8.5.1.1.2 Setting up clients
Mirroring internal deals is based on the values set up in the client definition.
In Client Editor, you can specify a list of counterparties that are eligible for mirroring, and for each
counterparty, one or more portfolios which may contain the mirror transaction.
Each counterparty/portfolio combination must be given a rule and priority. If the counterparty
selected in the deal is listed in the client definition of the portfolio owner, a rule is executed to
determine the default counterparty portfolio.
See 3.13.1.7 Setting up internal deal mirroring on page 96 for more information.
Note: If you have not defined any values for the counterparty in the portfolio owner’s client
definition, you can still trigger mirroring by manually selecting the Counterparty Portfolio at
deal entry. In this case, all portfolios of the counterparty will be available for selection.
8.5.1.1.3 Setting up instruments
Internal deal mirroring is available on deals involving the following types of instrument: short-term
loans, long-term loans, FX spot, FX forward or FX swap deals, FX options, and commercial loans.
Instruments used in internal deal mirroring must be assigned with the Internal Deal Mirroring feature.
Note: See the guide TRM Instruments: Processing and Calculations for more information about
features. For information about mirroring on commercial loans, see the CLM User Guide.
8.5.1.2 Processing internal deal mirroring
This section describes the processing procedures for internal deal mirroring.
8.5.1.2.1 Generating internal deal mirroring
Transactions involved in internal deal mirroring are entered in a similar way to normal transactions,
but the transaction flow requires some additional configuration.
Concretely, internal deal mirroring is automatically generated when the transactions reach a state
that has an order number greater than or equal to the order number of the hidden state that
triggers the mirroring. This hidden state is called IDM-MIRRORING. A hidden state is never visible in
Transaction Manager.
Information Description
User User ID of the dealer allowed to initiate deal mirroring in this portfolio.
Permission MIRROR.
8 Managing transactions
8.5 Deal mirroring
302 © Wall Street Systems IPH AB - Confidential
When the parent transaction reaches this state, internal deal mirroring generates the child
transaction.
The transaction states and values of both transactions are synchronized: each time the values in
either transaction are modified or either of the transactions moves forwards (or backwards) in the
flow, the other transaction is updated or moved in the same way.
Most of the values of the child transaction are inherited from the parent: the child transaction uses
the same instrument, the same currency, the same dates, the same rate, and so on. However, the
transaction sign and amount are reversed in the child transaction.
The values in either of the transactions can be modified up to a later "agreed" state in the deal
mirroring flow (this state being comparable to the Final state of a normal transaction). However,
once the transactions have reached this agreed state, their deal data can no longer be modified: it is
only possible to execute some processing actions on the transactions: see 8.5.1.2.2 Executing
processing actions on mirrored deals on page 303.
See also the TRM System Administration Guide for more information about configuring the
transaction flow.
To mirror a transaction into a target portfolio:
1. Enter the transaction information for the parent transaction (as described in 8.2 Capturing deals
on page 263).
The deal data required for specific types of instruments can be found in the guide TRM
Instruments: Processing and Calculations.
Note that you need to ensure that the static data you enter has been set up correctly in order to
generate the mirror child transaction: see 8.5.1.1 Setting up static data for internal deal
mirroring on page 300.
2. Save the parent transaction and move it forward in the transaction flow using the options in the
Command menu.
Information Description
Instrument Instrument ID used in the transaction.
Portfolio Portfolio in which the transaction is entered. For a portfolio suffix which contains a
space, use backslash-space e.g. for "Portfolio EUR" enter "Portfolio\ EUR".
Counterparty Counterparty to be used for the mirror child transaction.
The counterparty must be named in Client Editor’s Counterparty Portfolio page. This
value is used to filter the available portfolios in the Counterparty Portfolio field.
Counterparty
Portfolio
Target portfolio in which the child transaction will be generated.
This portfolio must be assigned with the necessary Mirror permissions for the user
entering the deal.
The portfolios available for selection depend on the Counterparty Portfolio definition of
the portfolio owner:
• If only one portfolio has been defined, this is selected by default.
• If more than one portfolio has been defined, then the portfolio that matches the
rule is selected, but it is possible to select another of the defined portfolios.
Note: If you do not enter Counterparty before Counterparty Portfolio, then the Counterparty
Portfolio selection list will display all trading portfolios.
Transaction Sign Direction of the parent transaction.
The child transaction will be generated with the opposite sign.
Amount Amount of the parent transaction.
The child transaction will be generated with the same but opposite amount.

8 Managing transactions
8.5 Deal mirroring
Transaction & Risk Management Module (TRM) User Guide 303
When the parent transaction reaches the appropriate state in the deal mirroring flow, the child
transaction is generated. Some information is automatically set by the system:
–On the child transaction
Transaction Number: identifies the deal in the system
State: shows the child transaction’s position in the workflow
Mirror Parent = Transaction Number of the parent transaction
Transaction Sign and Nominal Amount = opposite to the parent transaction
–On the parent transaction:
State: shows the parent transaction’s position in the workflow
Mirror Child = Transaction Number of the child transaction
3. Save either of the transactions using the options in the Command menu. The other transaction is
automatically updated.
You can also move both transactions back in the transaction flow by selecting Command – Re-open
on either of the saved transactions.
4. Before the mirrored transactions reach the final state, make any changes to the values of either
of the transactions (for example, if necessary, modify the amount): the change will
automatically be reflected in the other transaction.
At this stage in the flow, either party can modify the transactions’ values, but cannot execute
any processing actions (such as Fixing, Early Expiration, or Roll Over). Processing actions can
only be executed when the transactions have reached the final state.
5. Confirm the transactions using the options in the Command menu.
6. When the transactions have reached the final state, you can execute processing actions on the
transactions using the information in the following section.
8.5.1.2.2 Executing processing actions on mirrored deals
Once the parent and child transactions have reached the final state in the deal mirroring process
flow, you can perform the relevant processing actions on either the parent or the child transaction
(for example, Fixing, Early Expiration, or Roll Over).
When a processing action is executed on one of the transactions, the same action is mirrored on the
other deal.
Note: When a deal is generated by an action, only a limited number of fields in the action dialog
can be updated.
The following actions can be executed on mirrored deals:
•Early expiration is executed on the mirror transaction with the same parameters except for amount
(which is reversed). A new transaction is generated and linked to the parent early expiration
transaction.
Early expiration is available on short-term and long-term loans, FX spot and FX forward deals,
and FX swaps and FX options.
•Roll Over is executed on the mirror transaction with the same parameters except for amount
(which is reversed). A new transaction is generated and linked to the parent roll over
transaction.
Roll over is available on short-term and long-term loans, and FX swaps.
•Fixing is executed on the mirror transaction with the same parameters as the initial transaction.
The Undo Fixing action is also available.
Fixing is available on long-term loans.
•Netting is executed on the mirror transaction with the same parameters as the initial transaction.
The Undo Netting action is also available.

8 Managing transactions
8.5 Deal mirroring
304 © Wall Street Systems IPH AB - Confidential
This action is available on Non-deliverable forward (NDF) FX deals.
Note that some processing actions will not be reflected on mirrored deals: these include actions such
as: Asset Swap, Book Value Change, Classification, and Package.
To execute an action on both deals:
1. Right-click either of the mirrored transactions and select the action you want to execute: Early
Expiration, Roll Over, Fixing, or Netting.
2. Depending on the action you have chosen, the transactions will be modified (as in Fixing) or new
transactions will be generated (as in Roll Over) which are linked to the corresponding parent
transaction.
3. Select Command – Apply to save either the modified deals or the new deals.
Note: For more information about performing actions on specific types of instruments, see the
guide TRM Instruments: Processing and Calculations.
8.5.1.2.3 Rejecting mirrored deals
When the parent and child transactions reach a certain state in the flow, you can no longer modify
their deal data or move them back in the transaction flow: you can only reject the transactions using
Command – Reject.
Note that if mirrored deals that have reached the final state are rejected, they can only be
definitively cancelled and removed from the system by an administrator possessing the appropriate
permissions.
The administration procedure must also ensure that all eventual payments or bookings linked to
rejected deals have been correctly reversed or cancelled.
8.5.1.2.4 Settlement of mirrored deals
Generated settlement instructions for mirrored deals are automatically mirrored into the child
transaction, as follows:
•The Our Bank and Our Account values of the parent transaction are copied into the Counterparty Bank
and Counterparty Account fields of the child transaction.
•The Counterparty Bank and Counterparty Account values of the parent transaction are copied into the
Our Bank and Our Account fields of the child transaction.
Each portfolio owner can modify their settlement instructions and any changes are then
automatically reflected in the other transaction.
However, each portfolio owner must independently run their own payment generation processes in
Settlement Processing.
After this point, payments are no longer synchronized: each payment will have its own transfer
method, go separately through the settlement process flow, and so on.
8.5.1.2.5 Accounting for mirrored deals
Accounting processes are executed independently for each mirrored deal.
Each portfolio owner must run their own accounting activities regardless of the other party.
If a mirrored transaction is subsequently modified by the other portfolio owner when one side has
already run their daily accounting, the appropriate accounting reversal entries are triggered
automatically in the system.
Selling and profit and loss calculations are result mode dependent and must be done independently
for each transaction.
Note: See Chapter 19 Managing accounting on page 533.
8 Managing transactions
8.5 Deal mirroring
Transaction & Risk Management Module (TRM) User Guide 305
8.5.2 Deal mirroring using mirror cases
In TRM, you can configure a mirror case to automatically create one or more child transactions with
either the same, or different, values from the initial parent transaction.
In the mirror case, you select a rule to capture the transactions that should be mirrored, and you
define the child transactions that should be generated when the rule is matched.
There are several reasons for wanting to mirror deals in this way, including implementing
risk-management strategies, fulfilling regulatory requirements, and transferring positions between
portfolios.
For example, configuring mirror cases allows you to automate the following tasks:
•Transfer positions between trading and customer desks, and strip the resulting deals of any
margin that the customer desk passed on to the customer.
•Transfer a customer margin to a specific profit portfolio, and convert that margin to the base
currency of the underlying portfolio structure.
•Transfer FX exposure between portfolios.
•Hedge FX rate risk by IR risk. Deal mirroring does this automatically by generating two
depo/loan transactions from your choice of FX forward or swap future cashflows. The remaining
spot part of the FX deal is also taken care of automatically.
8.5.2.1 Setting up user permissions
Users must have certain permissions to be able to mirror deals using mirror cases. These
permissions are granted in Security Center’s Permission Editor.
Note: See the TRM System Administration Guide for more information.
8.5.2.2 Configuring mirror cases
Mirror cases are configured in Deal Mirroring Editor. This editor layout is based on the application
Static Data Editor (see 3.2 Static Data Editor on page 41 for more information).
To configure a generic mirror case:
1. In Deal Mirroring Editor, enter the main attributes of the mirror case in the upper part of the
editor.
2. In the Parent and Type section of the Child Attributes page, fill in the fields specific to the mirror
case.
Information Description
Mirror Rule Rule (defined in Rule Editor) used to select the parent transaction.
Package Main
Typ e
Main package type for the package type. You need to select a Package Main Type before
you select a Package Type. Package main types are defined in Package Type Editor.
Package Type Package into which the child transactions will be grouped.
Package types are defined in Package Type Editor.
Information Description
Child Number of this particular child transaction.
Mirror Type Type of mirror case. Choose from: Duplicate, Spot, Swap, Forward, Payment, and
Depo/Loan.
Note: The values required to set up a mirror case which are described in this section
apply to all mirror types unless otherwise specified. The values that are specific
to a particular mirror type are described in 8.5.2.2.1 Setting up specific mirror
types on page 310.

8 Managing transactions
8.5 Deal mirroring
306 © Wall Street Systems IPH AB - Confidential
3. In the Attributes section of the Child Attributes page, fill in the fields using the information in the
following table.
Derived From Number of the parent transaction from which the child transaction is derived:
•Enter
"0" if you are referring to the initial transaction.
• Enter the child’s number (from the Child field) if you want to derive the
transactions from another parameterized child transaction from this mirror case.
Information Description
Portfolio Portfolio into which the child transaction should go.
• Parent Portfolio - the same portfolio as its parent transaction.
• Parameterized Parent Portfolio - a portfolio whose name is derived from either:
the whole of the parent portfolio’s name, plus a suffix; or from the first few
characters taken from the parent portfolio’s name, plus a suffix. The number of
characters used is defined in the Portfolio Prefix field.
The suffix can be any character string and represent, for example, the currency ID
of the transaction.
• Parent Counterparty - a portfolio that has the same name as its parent
transaction’s counterparty.
For example, when the counterparty of the parent transaction is “Acme,” the child
transaction goes into the portfolio “Acme.” You need to set up the appropriate
information in Client Editor and in Portfolio Editor before using this option.
• Parameterized Parent Counterparty - a portfolio whose name is derived from
either: the whole of the name of the parent transaction’s counterparty, plus a
suffix; or from the first few characters taken from the name of the parent
transaction’s counterparty, plus a suffix. The number of characters used is defined
in the Portfolio Prefix field.
This can be useful for portfolios named after subsidiaries. For example,
transactions with ‘”Subsidiary A” can be mirrored to “Subsidiary A USD,”
“Subsidiary A EUR,” and “Subsidiary A JPY.” The suffix can be any character string.
• Parameterized Portfolio - a portfolio whose name is not derived from another
portfolio but is solely composed of a prefix and a suffix.
Portfolio Prefix Prefix to use for the portfolio (for use only when you use one of the Parameterized
options in the Portfolio field).
Choose from:
• Currency ID - to use the currency ID.
• Enter a number to specify how many characters are taken from the name of the
portfolio or the name of the parent transaction’s counterparty.
Portfolio Suffix Suffix to use for the portfolio (for use only when you use one of the Parameterized
options in the Portfolio field).
Choose from:
• Currency ID - to use the currency ID.
• Any character string.
For example, if the parent portfolio is named TRADING and you are parameterizing
the name by currency, the name of the child portfolio used is TRADINGUSD when the
currency of the transaction is USD.
Information Description

8 Managing transactions
8.5 Deal mirroring
Transaction & Risk Management Module (TRM) User Guide 307
Instrument Instrument for the child transaction. In addition to the instruments defined in TRM,
you can choose from:
• Parent Instrument - the same instrument as its parent. This is useful for the
Duplicate mirror type, and for some FX transactions.
• Parameterized Instrument - based on a combination of the full name of the parent
instrument’s ID or the currency ID of the transaction, depending on what you
select in the Instrument Prefix and Instrument Suffix fields.
Instrument Prefix (For use only if you have chosen Parameterized Instrument in the Instrument field).
Choose from:
• Any string, such as Depo/Loan.
• Currency ID - to use the currency ID.
• Parent Instrument - to use the name of the parent instrument.
Instrument Suffix (For use only if you have chosen Parameterized Instrument in the Instrument field).
Choose from:
• Any string, such as Depo/Loan.
• Currency ID - to use the currency ID.
• Parent Instrument - to use the name of the parent instrument.
For example: you can set the prefix as DEPO/LOAN and the suffix equal to the
currency ID. The instrument would then be DEPOLOANUSD when the currency of the
transaction is USD.
Counterparty Counterparty of the child transaction. In addition to the counterparties defined in TRM
(a client with the Counterparty role), you can choose from:
• Parent Counterparty - the same counterparty as its parent. This is useful for the
Duplicate mirror type.
• Parent Portfolio - the portfolio of the parent.
• Parent Portfolio Owner - the portfolio owner of the parent.
Transaction
Direction
Direction of the child’s transaction. You can choose from:
• Parent Direction - to use the same as the parent’s.
• Reverse Direction - to use the opposite of the parent (buy becomes sell, and sell
becomes buy).
• Positive Direction - always positive, no matter what the direction of the parent.
• Negative Direction - always negative, no matter what the direction of the parent.
• Reverse Direction/Reverse Adjusts - to override the default TRM handling of
margins when the duplicate of a transaction with adjusts is done.
• Reverse Direction/All Cashflows - (Duplicate mirror type only) to reverse all
cashflows (including, for example, charges).
Information Description
8 Managing transactions
8.5 Deal mirroring
308 © Wall Street Systems IPH AB - Confidential
4. In the Attribute Overrides section of the Child Attributes page, fill in the fields specific to the mirror
case.
Amount Value to determine the amount of the child. You can choose from the following:
• Parent Amount - to use the parent’s amount
• Parameterized Parent Amount - to use a multiple of the parent’s amount: for
example 2 for twice the amount, 0.5 for half the amount, and so on. You specify
the actual multiplier using the Amount Multiple field.
• Parent Cashflow Amount - to use the amount of the parent’s cashflow. The actual
cashflow that is used to supply the amount depends on the values you selected for
the Parent Cashflow Type, Parent Cashflow Group, and Parent Cashflow Currency fields.
• Parameterized Parent Cashflow Amount - (Payment mirror type only) to use a
multiple of the parent cashflow’s amount (for example, 2 for twice the amount,
0.5 for half the amount, and so on). You specify the actual multiplier using the
Amount Multiple field.
• Parent Adjust Amount - (Payment mirror type only) to use the margin adjust of
the parent.
• Discounted Parent Amount - (Spot and Swap mirror types only) to use the
discounted amount of the parent.
• Parent Discount - (Spot mirror type only) to use the discount of the parent; in
other words, Amount - Discounted Parent Amount.
• Settlement Amount - to use the settlement amount of the parent.
• Parent Cashflow Settlement Amount - to use the settlement amount of the
parent’s cashflow.
Opening Date Opening date for the child transaction.
Value Date Value date for the child transaction.
Information Description
Counterparty Select the custom parameter or property (defined in Parameter Editor or Property
Editor) that you would like to use to override the default value for the counterparty.
To do the override:
1. In this field, select the value to use here which corresponds to the parameter or
property you have defined for this purpose.
For example, you have renamed Parameter 7 as Mirror Counterparty. The
parameter is listed in the transaction column selection list.
2. In Transaction Manager, select Mirror Counterparty (Parameter 7) as one of the
transaction columns.
3. In the Parameter 7 column, enter the counterparty that you want to use for the
mirror child.
You can define a selection list of the allowed values in Parameter Editor.
Note: To meet any extra transaction specification needs your organization may have,
you can define up to ten of your own custom parameters for transactions or
payments: see 3.38 Parameters (optional) on page 148 for more information.
Properties of type string (and string-based IDs) and number can be used: see
3.39 Properties (optional) on page 148.
Portfolio As for Counterparty above, except this time it is to override the portfolio.
Deal Rate (For Duplicate, Depo/Loan, Spot, Forward, and Swap mirror types)
Use the deal rate from special attributes.
FX Spot Rate (For Spot, Forward, and Swap mirror types)
Value taken from the parameter.
Information Description
8 Managing transactions
8.5 Deal mirroring
Transaction & Risk Management Module (TRM) User Guide 309
5. In the Switches section of the Child Attributes page, turn on the switches you need that are specific
to the mirror case.
6. Click Add.
You can add several child transactions by repeating the procedure, incrementing the number in
the Child field each time. Child transactions can be derived from either the initial transaction, or
from another mirror child (as defined in the Derived From field in the Parent and Type section of the
Child Attributes page).
7. In the Not Rule field on the Rule Exceptions page, select a rule to exclude any transactions from the
mirror rule.
8. Select File - Save As New to save the mirror case.
FX Fwd Points (For Spot, Forward, and Swap mirror types)
Value taken from the parameter.
Amount Multiple Value taken from the parameter.
Switch Description
Strip-Off Margins Select this if you want to delete margin cashflows on the child transaction. For long
term loans, you will also delete the Margin schedule on the child transactions and
adjust the rate of the corresponding interest schedule.
Apply Only Select this if you want the transaction to stay in state Open in Transaction Manager’s
Deal Capture mode and not be moved along the transaction flow.
Standalone Select this to prevent the status Mirror Child (256) from being set on the new child
transaction. The parent number stays filled and connects the child with its parent
transaction.
When mirroring goes wrong, this standalone child is cancelled, along with all the other
children created. When mirroring successfully completes, the child is already
standalone and is no longer connected to the parent movement in the flow. As
children and parent transactions are not bound through child status, it is no longer
possible to cancel the child transaction when reopening the parent.
It is also possible to reopen a child transaction and to perform another mirroring after
the commit. The former child transaction is now a parent of other child transactions.
Once the child transaction is created as not bound, it cannot be bound retrospectively.
Not Bookable Select this to prevent the child transaction cashflows from being booked.
This can be useful for distinguishing between “real” mirrored transactions and
transactions that were mirrored only for simulation or reporting purposes.
Not Payable Select this to define the child transaction cashflows as not to be paid.
This can be useful for distinguishing between “real” mirrored transactions and
transactions that were mirrored only for simulation or reporting purposes.
Strip-Off Margins
(Nominal Rate)
This is the same as Strip-Off-Margins except the Deal Rate is set to the Nominal Rate
on the child transaction.
Generate
Difference
Cashflow
(Not in use in this version of TRM)
Information Description
8 Managing transactions
8.5 Deal mirroring
310 © Wall Street Systems IPH AB - Confidential
8.5.2.2.1 Setting up specific mirror types
In addition to the generic values described in 8.5.2.2 Configuring mirror cases on page 305, the
following sections describe the values you can set up for a specific mirror type.
Mirror Type = Duplicate
Use the Duplicate mirror type to create a duplicate of the parent transaction.
Mirror Type = Spot
Use the Spot mirror type to derive an FX Spot deal from an FX Forward, FX Spot, FX Swap, MM, or
Equity parent transaction.
Information Description
Opening Date Opening date for the child transaction. You can choose from the following:
• Parent Opening Date - to use the parent transaction’s opening date. This is the
default value if you leave this field blank.
• Today - use today’s date. This will then have an impact on the other dates (value
date, maturity date, and so on). Today is relevant only when the parent
transaction is an FX Spot, FX Forward, or FX Swap.
Value Date Value date for the child transaction. You can choose from the following:
• Parent Value Date - to use the parent’s value date. This is the default value if you
leave this field blank.
• Spot Date - to use the parent’s spot date. This has an impact on the other dates
(maturity date, and so on). Spot Date is relevant only when the parent is an FX
Spot, FX Forward, or FX Swap.
Strip-Off Adjusts Adjusts Deal Rate.
Switch on to remove margins (adjust fields) from the parent before the child
transaction is generated. This is relevant only when the parent is an FX Spot, FX
Forward, FX Swap, or MM depo/loan.
Strip-Off Adjusts
(Nominal Rate)
Adjusts Nominal Rate and Deal Rate.
Switch on to remove margins (adjust fields) from the parent before the child
transaction is generated. This is relevant only when the parent is an FX Spot, FX
Forward, FX Swap, or MM depo/loan.
Lead Amount Specifies whether the amount is by the base or quote amount, or keeps the setting of
the parent transaction.
Deal Rate Choose one of the following: Parent Deal Rate or Override.
Nominal/Spot Rate Select Parent Nominal/Spot Rate to copy the parent transaction’s nominal/spot rate
into the child transaction.
Information Description
FX Spot Rate FX spot rate of the child spot deal. This field is mandatory if the parent is an FX
transaction. You can choose from the following:
• Parent Spot Rate
• Parent Final Spot Rate
• Parent Final FX Rate.
Deal Rate Rate used for the deal. This field is mandatory if the parent is an FX transaction. You
can choose from the following:
• Parent Spot Rate
• Parent Deal Rate
•Market Rate
• Override from parameter.
8 Managing transactions
8.5 Deal mirroring
Transaction & Risk Management Module (TRM) User Guide 311
Mirror type = Forward
Use the Forward mirror type to derive an FX forward from an FX Swap, MM or Equity transaction.
The child forward transaction amount is equal to the amount of the parent swap. The child may have
different spot or forward FX rates from its parent.
Opening Date Opening date for the child. This field is mandatory. You can choose from the following:
• Parent Opening Date - to use the parent’s opening date. This is the default value if
you leave this field blank.
• Today - use today’s date. This will then have an impact on the other dates (value
date, maturity date, and so on).
• Parent Spot Date - to use the parent’s spot date.
Value Date Value date for the child. This field is optional. You can choose from the following:
• Parent Value Date - to use the parent’s value date. This is the default value for this
field.
• Spot Date - to use the parent’s spot date. This will then have an impact on the
other dates (maturity date, and so on).
Amount Choose from:
• Settlement Amount
• Parameterized Parent Amount
•Parent Amount
• Discounted Parent Amount - use this, for example, when an uneven swap is being
mirrored into an FX forward and an FX spot. This is valid only if the parent is an FX
transaction.
• Parent Discount - use this, for example, when an FX swap is mirrored in two
depo/loans and one spot. Amount is taken from Book/Ref Value from cashflow.
Lead Amount Specifies whether the amount is by the base or quote amount, or keeps the setting of
the parent transaction.
Payment/2nd
currency
Second currency if the parent is an MM or equity transaction. The default value is the
portfolio-based currency.
FX Spot Rate FX spot rate of the child spot deal. This field is mandatory if the parent is an FX
transaction. You can choose from the following:
• Parent Spot Rate
• Parent Final Spot Rate
• Parent Final FX Rate.
Deal Rate Rate used for the deal. This field is mandatory if the parent is an FX transaction. You
can choose from the following:
• Parent Spot Rate
• Parent Deal Rate
•Market Rate
• Override from parameter.
Information Description
Information Description
FX Spot Rate FX spot rate of the forward child deal. You can choose from the following:
• Parent Spot Rate
• Parent Final Spot Rate
• Parent Final FX Rate.
8 Managing transactions
8.5 Deal mirroring
312 © Wall Street Systems IPH AB - Confidential
Mirror type = Swap
Use the Swap mirror type to derive an FX swap from an FX Spot, FX Forward, another FX Swap, MM,
or Equity transaction.
The child swap transaction amount is equal to the amount of the parent. For swaps, "amount" is the
far amount, and you can set up the generation of uneven swaps by configuring the child’s near
amount to the discounted amount. (This can be combined, for example, with a generation of
discounted spot mirror child). The child may have different spot and forward rates from its parent.
If you are generating the FX swap from an FX spot deal, the value date of the FX spot must be
different from its spot date, otherwise the generated cashflows cancel each other out. So, when
entering the FX spot you need to make the value date earlier than the spot date (or the FX
instrument definition has to have the value date earlier than the spot). This is true, for example for
"cash" spot transactions.
FX Forward Points Forward points to use when deriving the child. You can choose from the following:
• Parent Forward Points
• Parent Total Forward Points.
Opening Date Opening date for the child. This field is optional. You can choose from the following:
• Parent Opening Date - to use the parent’s opening date. This is the default value if
you leave this field blank.
• Today - use today’s date. This will then have an impact on the other dates (value
date, maturity date, and so on).
Value Date Value date for the child. This field is optional. You can choose from the following:
• Parent Value Date - to use the parent’s value date. This is the default value if you
leave this field blank.
• Spot Date - to use the parent’s spot date. This will then have an impact on the
other dates (maturity date, and so on).
Amount One of the following: Parameterized Parent Amount or Settlement Amount.
Lead Amount Specifies whether the amount is by the base or quote amount, or keeps the setting of
the parent transaction.
Deal Rate Choose one of the following:
• Parent Deal Rate
• Market Rate (this is the default)
• Override.
Payment/2nd
Currency
Currency if the parent is an MM or Equity transaction. The default value is the
portfolio-based currency.
Information Description
Information Description
FX Spot Rate FX spot rate of the swap child deal. This field is mandatory if the parent is an FX
transaction. You can choose from the following:
• Parent Spot Rate
• Parent Final Spot Rate
• Parent Final FX Rate.
FX Forward Points Forward points to use when deriving the child. This field is mandatory if the parent is
an FX transaction. You can choose from the following:
• Parent Forward Points
• Parent Total Forward Points.

8 Managing transactions
8.5 Deal mirroring
Transaction & Risk Management Module (TRM) User Guide 313
Mirror Type = Depo/Loan
Use the Depo/Loan mirror type to derive a depo/loan from an FX Forward, Swap, MM or Equity
transaction.
Opening Date Opening date for the child. This field is optional. You can choose from the following:
• Parent Opening Date - to use the parent’s opening date. This is the default value if
you leave this field blank.
• Today - use today’s date. This will then have an impact on the other dates (value
date, maturity date, and so on).
Value Date Value date for the child. This field is optional. You can choose from the following:
• Parent Value Date - to use the parent’s value date. This is the default value if you
leave this field blank.
• Spot Date - to use the parent’s spot date. This will then have an impact on the
other dates (maturity date, and so on).
Amount Parent Amount, Parameterized Parent Amount and Settlement Amount are supported.
Spot Amount Used for the near cashflow. You can select Discounted Parent Amount to generate an
uneven FX swap.
Lead Amount Specifies whether the amount is by the base or quote amount, or keeps the setting of
the parent transaction.
Deal Rate Choose one of the following:
• Parent Deal Rate
•Market Rate
• Override.
Payment/2nd
Currency
Currency if the parent is an MM or Equity transaction. The default value is the
portfolio-based currency.
Information Description
Information Description
Parent Cashflow
Currency
If the parent is an FX transaction, select either the base or quote cashflow currency, or
any of the currencies available in the list.
Amount Select Parent Cashflow Amount if the parent is an FX transaction, otherwise select
Parent Amount, if the parent is an MM or Equity transaction.
Deal Rate If the parent is an FX transaction, you can select either of the following for the Deal
Rate:
• Parent FX Forward Points Based - to use the rate based on the forward points. This
is the most commonly used option.
• Parent Currency Interest Rate Based - to use the rate based on the interest rate
linked with the parent currency (fields Quote Currency %, Base Currency %).
8 Managing transactions
8.5 Deal mirroring
314 © Wall Street Systems IPH AB - Confidential
Mirror Type = Payment
Use the Payment mirror type to derive a payment from the parent transaction.
Use Parent Settings If the Depo/Loan is derived from an MM or Equity parent transaction, the child
transaction inherits the following from the parent:
date basis, accrued date basis
payment convention, interest adjustment
coupons per year, amount precision
nominal/spot rate
accrued from (= From When column of accrued interest cashflow)
fixing offset, fixing period, fixing rate, fixing calendar
spread, repayment method, repayment %, repayment per year
first irregular interest period
If the parent is a Swap transaction, the first leg of the child Swap transaction is filled
from the second leg of the parent transaction. In all other cases, the first leg is taken
from the parent MM or Equity transaction. If the parent fields are empty, they are
searched during setup of the child instrument in the instrument definition.
Information Description
Field Description
Parent Cashflow Type Select the cashflow type depending on your instrument type. If you have an FX
instrument you do not need to select a value here.
Parent Cashflow Leg
Group
Used for swaps. This is the leg for which you want to generate a payment. You can
choose from:
• Near Leg (value date flow)
• Far Leg (maturity date flow).
Parent Cashflow
Currency
Used for payments from FX deals (spots, forwards, swaps). The currency of the parent
cashflow. You can choose from:
• Quote Currency
• Base Currency
• Any actual currency that is specified in the list.
Amount Select either:
• Parent Cashflow Amount
• Parameterized Parent Cashflow Amount
• Parent Cashflow Settlement Amount - if you select this option, you do not need to
specify a currency; the Settlement Currency will be used by default.
Amount Multiple Use this field if Amount = Parameterized Cashflow Amount.
This is the number by which the parent cashflow amount will be multiplied to produce
the child amount.
Opening Date Opening date for the child. You can choose from the following:
• Parent Opening Date - to use the parent’s opening date. This is the default value if
you leave this field blank.
• Parent Cashflow Value Date - the default is to use the value date of the parent’s
cashflow.
• Parent Cashflow From When - to use the date from the cashflow’s From When field.
Value Date Value date for the child. This field is optional. You can choose from the following:
• Parent Cashflow Value Date - the default is to use the value date of the parent’s
cashflow.
• Spot Date - to use the spot days of the currency.

8 Managing transactions
8.6 Managing call transactions
Transaction & Risk Management Module (TRM) User Guide 315
8.5.2.3 Generating mirrored deals
To generate mirrored deals:
1. In addition to the standard transaction columns, select the deal mirroring specific transaction
columns in Transaction Manager:
–Parent Number - the transaction number of the parent transaction.
–Status - the status of the transaction, which can be either Mirror Parent or Mirror Child.
2. Enter a deal (as described in 8.2 Capturing deals on page 263) that matches a mirror case.
Note: The deal must also match a mirror switch rule.
3. Select Command - Apply and/or Command - Commit to save the deal.
The child transactions are generated by a mirror server according to the rule and mirror case.
Note: The mirror switch rule and the mirror server are managed by the system administrator.
8.5.2.4 Querying mirrored deals
To retrieve all mirrored parent and child deals, even those not directly linked by the parent number,
i.e. in the case of rollovers, select Include Mirror Transactions in Transaction Manager’s Options menu.
See 8.1.1.5 Options on page 261.
8.5.2.5 Canceling mirrored deals
To cancel a mirrored deal:
1. In Transaction Manager, select the deal you want to cancel.
2. Select Command - Re-Open.
Note: You cannot re-open transactions that have the status Mirror Child; you can only re-open
the transactions that have the status Mirror Parent.
8.6 Managing call transactions
A Call Account is similar to a normal bank account. The client can withdraw and deposit funds (lend
or borrow) from the account whenever it is necessary. The funds earn interest on the account at a
rate that is fixed daily. The interest is accrued and paid or capitalized at regular intervals. The client
can withdraw all or part of the interest from the account when interest is payable (without first
having to capitalize the interest).
Call Money is an overnight deposit used in the wholesale banking market. Although such
transactions are normally expired the following day, they can also be rolled over and the interest
rate changed. It is possible to increase/decrease the principal of the original deal. In addition, the
interest can be paid, capitalized, or simply accrued.
The main difference between Call Money and Call Account is the presumed length of the transaction.
Call Money is assumed to mature on a daily basis, while Call Account is automatically rolled over
every day.
Call Money and Call Account instruments are set up in Instrument Editor.
Note: See the guide TRM Instruments: Processing and Calculations for details about setting up
call money or call account instruments.

8 Managing transactions
8.6 Managing call transactions
316 © Wall Street Systems IPH AB - Confidential
8.6.1 Call Manager
Call Manager is an application based on the Transaction Manager application layout, designed
specifically for managing Call Money and Call Account transactions.
8.6.1.1 Call Manager menus
The menu items in the Call Manager applications are basically the same as the menu items in
Transaction Manager (see 8.1.1 Transaction Manager menus on page 258). The exceptions are
described in the following tables.
8.6.1.1.1 View
8.6.1.1.2 Options
8.6.1.2 Start-up parameters
The start-up parameter used to open Transaction Manager’s Call Manager mode is:
FKTransactionManager.exe -c CM.xml
See C.11 Transaction Manager on page 685 for information about the options available.
8.6.1.3 Automatically updating balances
To automatically update the balances after any action (such as roll over or interest realization), the
Automatically Update Balances item in the Options menu must be selected.
In most situations, you should have this item selected unless you are doing back-dated deals that
have automated realization set up in the call instrument definition.
When performing back-dated deals with this option selected, TRM forwards the date on which the
change is valid to the bank account balance calculation. Instead of recalculating the balance from
Menu item Description
Cashflow Displays the Cashflow view.
This view shows historical cashflow information for the currently selected transaction.
It displays all movements made on the trade, and the accrued interest within the
period defined.
Note: You cannot modify call transactions in this view.
Movement Displays the Movement view.
This view is used to enter new movements on a call transaction.
Users with the correct permissions (for example, a back-office administrator) can also
amend the payment details in this view.
Daily Balances Displays the Daily Balances view.
This view displays the daily opening and closing balances of the call transactions. It
also displays realized and unrealized accrued interest figures.
Menu item Description
Call Configuration Choose from:
•Query Only Active Transactions - allows you to restrict the query to only search for
active transactions when you are retrieving call transactions.
•Query Only Expired Transactions - allows you to restrict the query to only search for
expired transactions when you are retrieving call transactions.
•Automatically Update Balances - automatically updates the balances after any action
(such as roll over or interest realization): see 8.6.1.3 Automatically updating
balances on page 317.
8 Managing transactions
8.6 Managing call transactions
Transaction & Risk Management Module (TRM) User Guide 317
the opening date, the balance is recalculated only from the "change" date onwards. Depending on
the type of back-dated change, this date is calculated as follows (numbers represent calendar days):
•Movement: Value Date -1
•Update AI: Date entered -1
•Realize AI: Opening Date entered -1
•Undo Realize AI: Date entered -1
•Expire: Expiring Date entered -1
•Undo Expire: Date entered -1.
8.6.2 Entering call transactions
Call account or call money transactions are entered in a similar way to other types of deals (see 8.2
Capturing deals on page 263).
1. In Call Manager, select New - Transaction.
2. Enter the call transaction information in the new row in the Transaction view.
Some of the data required to enter a deal is common to all types of transactions (see 8.2.1
Entering new deals in Transaction Manager on page 264).
For information about the specific data required for call transactions, see the relevant section of
the guide TRM Instruments: Processing and Calculations.
3. Select the appropriate actions from the Command menu to save the transaction and move its
state forward in the transaction flow.
8.6.3 Processing call transactions
In Call Manager, you can perform several actions on call money or call account transactions, some
of which are common to both types of call transactions (for example, Realize AI), while others are
specific to one type of call transaction only (for example, Dormant/Pledged on call account
transactions).
These actions become available when you select the transaction in the appropriate view of Call
Manager and right-click. The actions that you are able to carry out on the selected call transaction
are displayed in a pop-up menu.
The call dialog displays a default settlement date from the calendar of the redemption schedule, to
be used as the payment date of the settlement cashflow. You can overwrite this date.
Note: For information about processing call transactions, see the guide TRM Instruments:
Processing and Calculations.
8.6.4 Generating call reports
There are a number of reports you can use to view call information:
Report Description
Call (Portfolio)
Call (Transaction)
These reports display the balances, movement, and interest over a given period. They
only display call money or call accounts that match the parameters: they do not
display any other types of instruments.
See B.5 Call Reports on page 661 for details of the reports’ parameters.
8 Managing transactions
8.7 Managing cashflow forecasts
318 © Wall Street Systems IPH AB - Confidential
8.7 Managing cashflow forecasts
A cashflow forecast is the estimation of a money transfer (payment or receipt) in the future where
the exact amount is not currently known. The estimation may change over time.
When TRM is used with the Cash Management Module (CMM), CMM can provide TRM with cashflow
forecasts. The forecasts imported from CMM are aggregated and turned into forecast exposures and
saved in TRM.
TRM is then able to use these forecast exposures in figure calculations (both for risk management
and hedge accounting), and in the hedge accounting process.
Note: See 19.5 Hedge accounting in Wallstreet Suite on page 546 for more information about
hedge accounting.
8.7.1 Setting up forecast instruments
The instruments used to generate forecast exposures in TRM are defined in Instrument Editor.
The setup for Forecast Exposure instruments is described in the guide TRM Instruments: Processing
and Calculations.
8.7.2 Setting up cashflow forecasting
This section describes how to define the parameters and criteria used to import cashflow forecasts
from CMM, and how to group together these values in order to generate forecast exposures in TRM.
Note: All editor layouts used to set up cashflow forecasting parameters are based on the
application Static Data Editor (see 3.2 Static Data Editor on page 41 for more information).
8.7.2.1 Defining forecast aggregation values
The values used for the aggregation (grouping) of the forecasts that are imported from CMM are
defined in Forecast Aggregation Editor.
To define the values used for the grouping of imported forecasts:
1. In Forecast Aggregation Editor, enter the main values of the aggregation in the upper part of the
editor.
2. From the Cashflow Forecast Aggregation page’s Name field in the lower part of the editor, select and
add the values used to aggregate the forecasts.
The selection list contains the CMM fields that are available for aggregation.
3. Save the aggregation values using File – Save As New.
Note: To use forecast exposure, all the fields in the aggregation list must be mapped in the
mapping list. See 8.7.2.3 Defining forecast mapping on page 320 for more information.
8.7.2.2 Defining forecast queries
The criteria used to select which exposures are imported from CMM are defined in a query in
Forecast Query Editor.
Information Description
ID & Name Unique ID and name for the aggregation.
Domain Domain in which the aggregation is available.
8 Managing transactions
8.7 Managing cashflow forecasts
Transaction & Risk Management Module (TRM) User Guide 319
To define the values applied in the query for the importing of forecasts:
1. In Forecast Query Editor, enter the main values of the query in the upper part of the editor.
2. In the Cashflow Forecast Selection Params page in the lower part of the editor, select and add each
field that you want to include in the query with the corresponding value it needs to meet the
selection criteria.
3. Save the selection query using File – Save As New.
8.7.2.3 Defining forecast mapping
Mapping of TRM fields to CMM fields for the purpose of importing cashflow forecasts is done in
Forecast Field Mapping Editor. The Forecast Field Mapping Editor specifies the relationship between
columns on forecasts returned from CMM and columns in TRM.
To map one TRM field to one or more CMM fields:
1. In Forecast Field Mapping Editor, enter the main attributes of the forecast mapping.
2. In Forecast Field Mapping Editor’s Mapping page, specify the TRM field that maps to one or more
CMM fields. To map a TRM field to a combination of CMM fields, use the plus sign ’+’ to separate
the CMM fields as shown in the following example:
TRM Field = Forecast ID
CMM Field = Time Bucket To + Workflow Status + Counterparty ID
3. Repeat the procedure for each TRM/CMM field combination you want to define in the mapping.
Information Description
ID & Name Unique ID and name for the query.
Domain Domain in which the query is available.
Information Description
Field CMM fields available for the query.
Operator Operator that can be used to configure an expression.
For example, if you want to import all forecasts in a currency other than your home
currency (EUR), set up the criteria as follows:
Field = Entity Currency ID, Operator = "!=" (not equal to), Value = EUR
The following operators are available:
• “==” - selection value equal to forecast value
• “!=” – not equal
•“>” – greater than
• “<” – smaller than
• “>=” – greater than and equal to
• “<=” – smaller than and equal to
Value Available values for the selected CMM field, for example, a list of currencies, or
entities.
Source Available forecast exposure values.
Information Description
ID & Name Unique ID and name for this forecast mapping.
Domain Domain in which the forecast mapping is available.

8 Managing transactions
8.7 Managing cashflow forecasts
320 © Wall Street Systems IPH AB - Confidential
4. Save the forecast mapping definition using File – Save As New.
Note: To use forecast exposure, all the fields in the mapping list have to be in the aggregation
list. See 8.7.2.1 Defining forecast aggregation values on page 318 for more information.
8.7.2.4 Defining forecast exposure capture
In Forecast Exposure Capture Editor, you link the criteria you defined for the aggregation and
selection of imported forecasts with a Forecast Exposure instrument and other forecast exposure
parameters (for example, the Portfolio, to determine into which portfolio the forecast exposure will
be imported).
To define forecast exposure capture:
1. In Forecast Exposure Capture Editor, enter the information used to generate the forecast
exposures using the information in the following table:
2. Save the forecast exposure capture you have defined using File – Save As New.
8.7.2.5 Importing forecast exposures
Forecast exposures in TRM correspond to a group of cashflow forecasts that have been imported into
the system from CMM.
Information Description
ID & Name Unique ID and name for this forecast exposure capture.
Domain Domain in which the forecast exposure capture is available.
Portfolio Portfolio into which the forecast exposure transaction is placed under this forecast
exposure capture.
Instrument Forecast Exposure instrument used with this forecast exposure capture.
Note: See the guide TRM Instruments: Processing and Calculations for information on
how to set up this type of instrument.
Counterparty Counterparty used for the forecast exposure capture.
Owner Portfolio owner used for the forecast exposure capture.
Currency Currency of the forecast exposure capture.
Aggregation Aggregation values used for the grouping of imported forecasts (as defined in
Forecast Aggregation Editor) under this forecast exposure capture.
See 8.7.2.1 Defining forecast aggregation values on page 318.
Selection Selection criteria used to determine which forecasts to import (as defined in Forecast
Query Editor) under this forecast exposure capture.
See 8.7.2.2 Defining forecast queries on page 319.
Mapping Criteria (defined in Forecast Mapping Editor) used to determine field mapping
between Wallstreet Suite modules (TRM and CMM).
See 8.7.2.3 Defining forecast mapping on page 320.
Result Mode Specific result mode (accounting standard) that the forecast exposure capture is
linked to.
The groups AS-LOCAL, AS-FAS, AS-IFRS are preconfigured during implementation.
Active Since
Active Until
Date range within which this forecast exposure capture is valid.
Leave these fields blank if this exposure capture is valid indefinitely.
8 Managing transactions
8.7 Managing cashflow forecasts
Transaction & Risk Management Module (TRM) User Guide 321
•To import forecast exposures from CMM into TRM, you use the Forecast Exposures from CMM
activity: see A.35 Forecast Exposures from CMM on page 641 for details of the activity’s
parameters.
Note: The Due Date specified in the activity setup corresponds to the "as of date" in the CMM
report. The "as of date" can be compared to the Opening Date in TRM.
Note: Activities are set up and managed in Activity Manager: see Chapter 6 Managing activities
on page 227 for more information.
8.7.3 Forecast Exposure Board
A cashflow forecast is the estimation of a money transfer (payment or receipt) in the future where
the exact amount is not currently known. The estimation may change over time.
In TRM, a forecast exposure corresponds to a group of cashflow forecasts that has been imported
into the system from CMM.
Forecast Exposure Board is an application based on the Transaction Manager application layout,
designed specifically for managing forecast exposures.
Forecast Exposure Board is used to query aggregated forecast exposures that have been imported
from CMM, and allows you to drill down into the individual cashflow forecasts. It is also possible to
view the state of both current and historical forecasts and make any adjustments to the forecast if
necessary.
8.7.3.1 Forecast Exposure Board menus
The menu items in Forecast Exposure Board are basically the same as the menu items in
Transaction Manager (see 8.1.1 Transaction Manager menus on page 258). The exceptions are
described in the following tables.
8.7.3.1.1 View
8.7.3.2 Start-up parameters
The start-up parameter used to open Transaction Manager’s Forecast Exposure mode is:
FKTransactionManager.exe –c FE.xml –-view forecast-exposure –-title "Forecast
Exposure Board"
See C.11 Transaction Manager on page 685 for information about the options available.
8.7.4 Processing forecast exposures
In Forecast Exposure Board, you can perform several actions on forecast exposures, for example,
Adjust and Drill Down).
Menu item Description
Forecast Exposures
Query
Displays the Forecast Exposures Query view.
This view is used to enter search criteria in order to retrieve forecast exposures. The
retrieved forecast exposures are displayed in the Forecast Exposures view.
Exposure Drilldown Displays the Exposure Drilldown view.
This view displays the results when a Drill Down action has been performed on a
forecast exposure.
Figures Displays the Figures view.
This view displays the figures for the selected forecast exposure following the Calculate
Figures right-click action.

8 Managing transactions
8.7 Managing cashflow forecasts
322 © Wall Street Systems IPH AB - Confidential
These actions become available when you select the forecast exposure in the Forecast Exposures view
of Forecast Exposure Board and right-click. The actions that you are able to carry out on the
selected forecast exposure are displayed in a pop-up menu.
Note: For information about processing forecast exposures, see the guide TRM Instruments:
Processing and Calculations.
Transaction & Risk Management Module (TRM) User Guide 323
Chapter 9 Managing orders
9.1 Overview
Important: Supported trading platforms are 360T and FXall using the FIX protocol 4.4. Only FX
Spot, Forward, NDF and Swap are supported in this version.
Order management is a front office application. Order management provides traders with a means
to enter orders (namely, single FX orders) and to automatically route them internally within
Wallstreet Suite or externally to the foreign currency trading platform (360T, 360T Intergroup
Exchange or FXall).
The two-way interface with FXall and 360T consists in single FX (Spot, Forward, NDF, Swap) orders
export and executions imports between Wallstreet Suite and these trading platforms using the FIX
protocol. A one-way interface from FXall QuickTrade or 360T is also possible, so that orders directly
processed and executed in these platforms are imported in Wallstreet Suite.
Furthermore, 360T Intergroup Exchange is mainly used for orders processed on behalf of
subsidiaries. Orders executed on I-TEX generate both an internal execution between the subsidiary
and the Main Treasury and the external execution between the Main Treasury and counterparty
banks (Street). The latter execution can be automatically mirrored in TRM (as a Main Treasury trade
with the subsidiary) by using the Internal Deal Mirroring functionality (for more information about
deal mirroring, see 8.5 Deal mirroring on page 300).
The orders are limited to all or nothing orders at market price i.e. that the order execution is
expected to be traded as one single execution of the whole quantity.
These order transactions are assigned dedicated system-defined package types: ORDER (single order
executions) and MULTI-TRANSACTION (multiple trade executions). These package types are defined in the
Package Type Editor: see 3.37 Package types (optional) on page 147.
In order management, the term execution is used to designate the processing that is done in the
external platform unless specified otherwise.
Note: In this version, the Financial Information eXchange (FIX) Protocol 4.4 is supported. This
protocol is a messaging standard developed specifically for the real-time electronic
exchange of securities transactions.
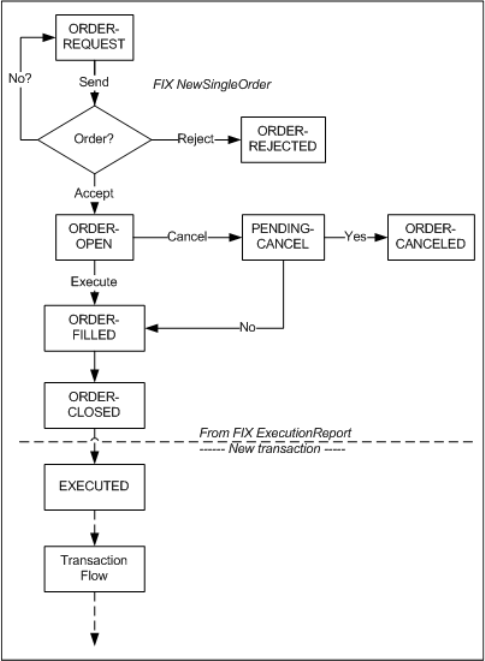
9 Managing orders
9.2 Setting up order management
324 © Wall Street Systems IPH AB - Confidential
The order processing is handled using a similar flow to transactions except that it has specific states
and commands as shown in the following diagram.
9.2 Setting up order management
Order platforms and routing rules are required to use Wallstreet Suite’s order management
functionality. Order routing and order platforms are defined respectively in Order Platform Editor
and Order Routing Editor. You must first define the platform entities that you want to use in the
routing rules.
At the instrument level, the instruments that you want to use in order management must be set up
with the trading feature FX Trading Platform, and optionally, for FX Swap instruments, you can also set
up the trading feature FX Swap Split to define the near / far leg to be used when splitting the two legs
into separate FX transactions. For more information about these instruments, see TRM Instruments:
Processing and Calculations Guide.

9 Managing orders
9.2 Setting up order management
Transaction & Risk Management Module (TRM) User Guide 325
9.2.1 Defining an order platform
To define an order platform:
1. In the Order Platform Editor, enter the main attributes of the order platform using the following
information:
2. In the Mapped Object page, define how you want the various entities to be mapped in the external
trading platform according to whether they are input (from the trading platform) or output (from
Wallstreet Suite).
3. In Data Mapping page, define how you want the various entities to be mapped. By default, you
have only to set up the mapping for incoming instruments (i.e. switch In is ON).
Note: Mappings for client, portfolio, user, and instrument class are not required but can be used
for client specific developments, such as, to enrich the sending of the order
(NewSingleOrder), in which case, the switch Out would be ON; or to enrich
ExecutionReport, in which case, the switch In would be ON)
Information Description
ID
Name
Enter the unique ID and name for the order platform.
Switches Switch on according to your needs as follows:
• If you are defining an order management within Wallstreet Suite that does
not require the sending of messages, select Internal.
• If you do not want orders sent to this platform to be canceled, select No
Order Cancellation. By default, this switch is ON for FXall trades.
Note: In FXall order cancellation is not currently supported.
• If you are using Intergroup Exchanges, select Support for ITEX.
Information Description
Entity Select the entity you want to map. Choices are: Client, Instrument, Portfolio,
User, and InstrumentClass.
When no input/output
mapping found
Define how you want to handle the values when no corresponding mapping is
found:
•Keep Value - keep the same value, i.e. do not map.
•Stop - to stop the execution.
•Use default value - enter the value you want to use by default in the default
value field when mapping is found. In general, you would set an input
default value for client, portfolio, instrument and user.
Note: The output default value is mainly used for client specific developments.
Input/Output Default
Value
If you select Use default value in the previous field, enter the default value you
want to be used.
Note: The output default value is mainly used for client specific developments.
Information Description
Entity Select the entity you want to map. Choices are: Client, Instrument, Portfolio,
User, and InstrumentClass.
Reference ID of the client, portfolio, instrument, user, instrument class used in Wallstreet
Suite.
External Reference ID of the client, portfolio, instrument, user, instrument class used in the
trading platform.
9 Managing orders
9.3 Order Managers
326 © Wall Street Systems IPH AB - Confidential
4. In Account page, complete the account information as follows:
5. Save the definition using File - Save As New.
9.2.2 Defining order routing rule
Order routing rules enable you to assign and route orders automatically to the specified platform
using the relevant account.
To define an order routing rule:
1. In the Order Routing Editor, enter the main attributes in the upper part of the editor using the
information in the following table:
2. Save the routing rule using File - Save As New.
9.3 Order Managers
In TRM, there are three dedicated order manager boards: Order Admin, Order Capture, and Order
Processing. These boards are based on Transaction Manager and have the same menus and
configuration options, see Chapter 8 Managing transactions on page 257 for more information.
In
Out
•In - switch ON to map the references executed in the external platform and
imported in to Wallstreet Suite.
•Out - switch ON to map the references in the order (NewSingleOrder) sent
from Wallstreet Suite to the external platform.
Information Description
Account ID
Name
Add the account ID and name that you want to use to book the trade as
defined in the trading platform (Tag 1 Account in FIX Protocol). The account
is assigned to the legal trading entity on behalf of which the order is
processed.
ITEX Account Only switch ON when the order is processed on a 360T Intergroup Exchange
platform.
Information Description
Information Description
ID
Name
Unique ID and descriptive name for the routing rule.
Platform Platform (defined in the Order Platform Editor) you want to use. See 9.2.1
Defining an order platform on page 325.
Note: Right-click and select Edit entity... to open the editor.
Priority Priority of the rule. If the underlying event matches more than one rule, TRM
uses the rule with the highest priority.
Rule
Not Rule
Rule or Not Rule (defined in Rule Editor) that defines which orders are routed
or not routed. You can modify the rules directly in the Rule Editor.
Account Account defined in the order platform. For each platform that matches the
rule, the account is assigned.
9 Managing orders
9.4 Processing orders
Transaction & Risk Management Module (TRM) User Guide 327
The following table describes each of these boards in more detail:
9.3.1 Views
This section describes the order-specific or related views (View menu) that are available in the order
managers previously described. In addition to these views, there is also the Transaction view, which
is always displayed. This view shows new and selected order transactions.
To show order-related information, make sure that Order Package and Order Status columns are visible.
Order Package shows the package ID and Order Status shows the status of the order: Filled (after an
execute), Rejected (after a reject), or Pending New (after an accept).
9.4 Processing orders
This section describes how to enter, execute and process orders in TRM.
Board Description
Order Admin This board is similar to Transaction Admin in that it enables you to enter, query
and perform actions on orders in all states.
Order Capture This board is similar to Deal Capture except that a transaction entered in this
board is potentially to be processed as an order. When the destination platform is
blank, it shows deals in state ORDER-REQUEST and is handled as an internal
order.
Furthermore, if you have set up an order routing rule (see 9.2.2 Defining order
routing rule on page 326), the platform and account are automatically populated.
Otherwise, you will have to enter the platform and account manually.
Order Processing This board is used to process open orders. It shows order transactions in state
ORDER-OPEN. You cannot enter new orders in this manager.
Information Description
Order Execution Displays the Order Execution view.
Shows execution information about the order transaction, including nominal
amount, currency, opening date and time, transaction number and state, and so
on.
You can monitor transactions in this view directly in the Execution Verification
board, by right-clicking the order transaction and selecting Execution Lookup. See
9.5 Monitoring orders on page 329
Order Event Displays the Order Event view.
Displays the log information of the selected order transaction, including date and
time, ID, log, and order status. You can also use the Order Platform Log to check
the messages and monitor the status of the orders. See 9.5 Monitoring orders on
page 329.
Package Displays the Package view.
ORDER (single order executions) and MULTI-TRANSACTION (multiple trade
executions) are dedicated system-defined order package types that are defined in
the Package Type Editor. You can select the following package types:
• SINGLE-ORDER: Assigned to all order transactions.
• INTER-EXCHANGE: Assigned to multiple trade executions linked together
(MULTI-TRANSACTION) and processed through 360T I-TEX.
• FX-SWAP: For executions of FX swaps when splitting far and near legs into
separate FX transactions. (For FX swap instruments defined with the feature FX
Swap Split. See the TRM Instruments: Processing and Calculations Guide.)
9 Managing orders
9.4 Processing orders
328 © Wall Street Systems IPH AB - Confidential
9.4.1 Entering orders
To enter a new order :
1. In one of the Order Manager modes that enables you to enter a new order, select New -
Transaction (or press Ctrl+N).
2. In the new row, enter the following information as well as basic FX transaction information:
3. When you have populated all required order information, apply and send the order to the
platform. Sent orders are visible in Order Processing.
Hint:
You can check the status of an order in the Order Event view.
9.4.2 Manually executing internal orders
It is sometimes necessary to manually execute internal orders (i.e. orders processed only in TRM).
To manually execute internal orders, in Order Admin or Order Processing, right-click the relevant
internal order and select Execute Order. You can check the Order Event view or Order Platform Log for
more information about the status of the execution: see 9.5 Monitoring orders on page 329.
9.4.3 Overriding external order execution
In most cases, the orders are executed in the external platform. However, it may be necessary to
override the platform execution and manually execute, accept or reject the orders in TRM, for
example, when the orders are pending and cannot be executed by the external platform. You can
only override orders that have an order status of Pending New.
To override external orders (i.e. orders processed through external platforms, such as, 360T, FXAll):
1. In Order Admin, right-click the relevant pending order (status Pending New) and select one of the
following actions according to your needs:
–Execute Order (override platform): The order status is set to Filled.
–Reject Order (override platform): The order status is set to Rejected.
–Accept Order (override platform): The order status is set to New. The order can be executed or
rejected.
2. Check the Order Event view or Order Platform Log for information about the status of the
execution: see 9.5 Monitoring orders on page 329.
Information Description
Platform Platform (defined in the Order Platform Editor) you want to use.
For more information about defining order platforms, see 9.2.1 Defining an
order platform on page 325.
Portfolio The portfolio you want to use.
Instrument The instrument you want to use. Only instruments with the feature FX Trading
Platform are displayed.
If the instrument you want to use is not visible, check that it has the FX
Trading Platform feature. For more information about this feature, see the
TRM Instruments: Processing and Calculations Guide.
FX Base Amount Amount of the FX transaction in the base currency.
9 Managing orders
9.5 Monitoring orders
Transaction & Risk Management Module (TRM) User Guide 329
9.5 Monitoring orders
You can monitor the orders in either of the following places:
Application Description
Execution Verification Enables you to show the order transactions in state EXECUTED and to confirm the
execution and move them to the state VERIFY.
Order Platform Log Enables you to check messages and monitor the status of the orders.
Exception Verification Enables you to retrieve order transactions in state EXCEPTION only. Order
transactions can be flagged as exceptions by setting up transaction conditions. For
more information about transaction conditions, see Chapter 17 Managing
transaction conditions on page 485.
You can either accept them and they are returned to the regular flow or reject
them and they are set to state Re-Open.
9 Managing orders
9.5 Monitoring orders
330 © Wall Street Systems IPH AB - Confidential

Transaction & Risk Management Module (TRM) User Guide 331
Chapter 10 Managing funds
Funds provide investors with the possibility to invest collectively in a wide range of investments
which would not be possible for most individual investors. Furthermore, funds enable investors to
share the related fund fees. Funds include investment, managed, mutual, and hedge funds. A fund's
valuation is based on the Net Asset Value (NAV) per fund share unit, that is to say, the asset value
minus the fees, divided by the outstanding fund share units. The fund management company
usually determines the NAV per unit on every business day, and makes it available to all investors
via a publication in a daily newspaper and/or website.
TRM enables you to:
•Set up a dedicated fund portfolio to generate and consolidate all fund-related transactions.
•Issue fund shares to counterparties and buy back fund shares.
•Enter and query fund fees such as shareholder transaction costs, investment advisory fees, and
marketing and distribution expenses.
•Calculate, monitor and publish the net asset value of the fund unit.
10.1 Setting up fund portfolios
To create a fund portfolio you first need to define the following entities:
•A fund owner. The fund owner (the fund manager) is defined in Client Editor (see 3.13.1
Creating clients on page 90 for information). The fund owner must have the following roles:
Portfolio Owner, Counterparty, Issuer, Account Holder. In the Accounts and Settlement Instructions pages,
the fund owner must have cash (including bank balances) and custody accounts and
instructions.
•Fund share and fund fee instruments. You can define fund share instruments for capitalization
and distribution shares in different currencies. You can define fund fee instruments for the
different fees such as management fees and incentive fees. Instruments are defined in
Instrument Editor. Instrument setup is described in TRM Instruments: Processing and
Calculations Guide.
•The default net asset value calculation. This is done in NAV Calculation Setup Editor, see 10.3
Setting up default NAV calculation values on page 334 for more information.
10.1.1 Creating fund portfolios
A fund portfolio is used to generate and consolidate all fund-related transactions (fund investment,
fund fee, and outstanding fund share unit transactions).
Furthermore, a fund portfolio may have underlying trading portfolios which invest in specific asset
classes (for example, cash, equity, fixed income etc.).
To create a fund portfolio:
1. In Portfolio Editor, create the portfolio as described in 3.14.1 Creating portfolios on page 108.
Note: If you want to monitor/group a set of funds, you can create a top portfolio and set your
funds as subportfolios in order to create a fund hierarchy.

10 Managing funds
10.1 Setting up fund portfolios
332 © Wall Street Systems IPH AB - Confidential
2. In the main page, define the Owner and the Base Currency.
3. In the Switches page, turn on the switch Fund.
4. The Fund Fees page is used to define the fee setup. You need to enter the following information:
5. In the Fund Shares page, assign the different fund share instruments:
Information Description
Owner The fund management company.
Base Currency The default currency of the fund.
Information Description
Priority
(optional)
The Priority is used if the fees depend on other fees.
Note: For example, an Incentive Fee may be paid based on Net Assets minus
Management Fee 1%. In this case, Management Fee 1% has an Order
Number = 1, and Incentive Fee an Order Number = 2.
Fee Instrument
(mandatory)
ID of the fund fee instrument defined in Instrument Editor. For information on
the fund fee instrument see TRM Instruments: Processing and Calculations
Guide.
Charging Basis
(mandatory)
Net Assets (default): The basis for the calculation of the fee is today's market
value of the net assets. Formula: (market_value - market_value_exclude -
_total_accrued_fees) * percentage/100*_fraction_of_year
By default the calculation of the fees excludes the market value of the
instruments which have the fund management company itself (i.e. the owner
of the fund) as an issuer.
Net Assets (T-1): The basis for the calculation of the fee is the previous day's
market value of the net assets. Formula: (market_value_previous -
market_value_exclude_previous - _total_accrued_fees) *
percentage/100*_fraction_of_year
Investment Return: The basis for the calculation of the fee is today's market value
of the net assets relative to the original investment. Formula: (market_value -
market_value_exclude - _original_investment _total_accrued_fees) *
percentage/100*_fraction_of_year
Original Investment: The basis for the calculation of the fee is the original
investment. Formula: _original_investment *
percentage/100*_fraction_of_year
Customized (available if you have set up a new charging basis fee in the Fund
Fee Module): The basis for the calculation of the fee is customized by a CSD
using the Fund Fee Module settings.
Information Description
Fund Instrument ID of the fund share instrument defined in Instrument Editor. For information
on the fund fee instrument see TRM Instruments: Processing and Calculations
Guide.
Scaling Factor Any number (typically slightly > 1) determining the price difference between
non-dividend-paying and dividend-paying shares in the fund.
This is a multiplier; the NAV per unit displayed in Rate Monitor being NAV x
NAV scaling factor.
If the scaling factor is left empty, it defaults to 1.
For example,
• If Fund Share Instrument A is a capitalized share and the dividend
reinvestment = 5%, the scaling factor is: 1,05
• If Fund Share Instrument B is an income share, the scaling factor is: 1
10 Managing funds
10.2 Fund Managers
Transaction & Risk Management Module (TRM) User Guide 333
6. In the NAV Calculation Setup page, specify the following information:
7. In the Properties page, add the following properties and values:
8. Save the portfolio definition using File - Save.
10.2 Fund Managers
In TRM, there are two managers that are used for managing fund shares and fund fees: Fund Share
Manager and Fund Fee Manager. These managers are based on Transaction Manager and have the
same menus and configuration options, (see 8.1 Transaction Manager on page 257 for more
information).
10.2.1 Managing fund shares
You use Fund Share Manager to issue fund shares to counterparties and buy back fund shares from
counterparties. Different fund share instruments can be set up so that you can issue capitalization or
distribution shares in different currencies (see TRM Instruments: Processing and Calculations Guide
for more information). To issue a fund share you create a new transaction. See 8.2.1 Entering new
deals in Transaction Manager on page 264 for more information on creating transactions.
Note: In the Fund Share Manager you issue and buy back fund shares by entering a transaction
and then setting the Transaction Sign to either Sell or Buy respectively.
10.2.2 Managing fund fees
10.2.2.1 Entering fund fees
In Fund Fee Manager you can query the various fees that are associated with the fund such as fund
management fees, brokers fees and custody fees.
Fund management fee transactions are generated by:
•The activity Fund Data Calculation/Reporting when you set the report Status to Published. You can
schedule to run the activity as often as required (for example, nightly). See 10.5.2 Automating
NAV reporting on page 342 for more information.
•NAV Report Manager when you manually set the NAV report to Published. See 10.5.1.2 Publishing
a report on page 342 for more information.
Information Description
NAV Calculation Setup ID of the NAV calculation setup defined in NAV Calculation Setup Editor. See
10.3 Setting up default NAV calculation values on page 334 for more
information.
Property Value Description
EXCLUDE-GROUP-ID OWN-ISSUE This property is used during the calculation of fees
to exclude the market value of the instruments
which have an issuer in the specified issuer group.
The purpose is to prevent shareholders from paying
"double" fund management fees on their fund
shares.
ORIGINAL-INVEST Money This property is used during the calculation of fees
to calculate the fee based on the original
investment amount.

10 Managing funds
10.3 Setting up default NAV calculation values
334 © Wall Street Systems IPH AB - Confidential
Other fees (brokers fees, custody fees or other one-off fees) can be manually entered in Fund Fee
Manager by selecting New - Transaction. See 8.2.1 Entering new deals in Transaction Manager on
page 264 for more information on creating transactions.
10.2.2.2 Realizing fund fees
You can realize the accrued fund fee both manually and automatically (for manual realization, see
TRM Instruments: Processing and Calculations Guide).
You can automate the payment of fund fees by setting up the Fund Fee Realizing activity. This
activity creates a payment transaction for the fees that have accrued since the previous payment.
Only NAV fees in the state Final and with NAV status Published can be realized.
To automate the payment of fund fees, you need to ensure that the following have been done:
•The Fund Data Calculation/Reporting activity has run and generated accrued fund fees. The
accrued fund fee transaction updates the realization date based on the realization frequency
defined in the Fund Fee Realization page of Instrument Editor.
•The realization frequency has been defined in the Fund Fee Realization page of Instrument Editor.
If this is not defined, the realization will take place on demand according to the activity's due
date.
To set up the Fund Fee Realizing activity:
1. In Activity Manager, create a new activity using activity type Fund Fee Realization.
2. Select group NIGHTLY.
3. Enter the necessary parameters. See A.38 Fund Fee Realizing on page 643 for more information.
You can create an Undo Realize Fund Fee activity using the activity type Fund Fee Realization. You
need to set the Mode in the Parameters page to Undo Realize. You use the Undo Realize Fund Fee
activity to:
•Remove all the paid flags on the accrued fund fee cashflows
•Remove the generated fund fee, and principal cashflows.
10.3 Setting up default NAV calculation values
The net asset value of the fund is the cumulative market value of an entity's assets less the value of
its liabilities. The net asset value per unit, which is the price per fund unit, is calculated simply by
dividing the net asset value by the number of units.
The net asset value per unit is calculated based on a NAV scenario of market rates used to calculate
the assets' market value. Furthermore, a minimum transaction state and a cut-off time identify the
fund portfolio transactions that must be included in the NAV calculation. In NAV Calculation Setup
Editor you specify the minimum transaction state, the cut-off times/time zone and rate scenarios.
For example, you can specify that the published NAV will include all the transactions that are in State
Final, that have been included before the cut-off time of 5pm CET, and that the transactions will be
valued using a default scenario (i.e. market closing rates).
Note: In Scenario Editor, you can define multiple rate scenarios for the rates used in the
valuation of the fund's assets and fees (for example a Market Price scenario, a Fair Value
Scenario). You can also create scenarios for storing the NAV output. See 4.2.1 Defining
scenarios on page 166 for more information on how to create scenarios.
You attach the calculation setup that you define in NAV Calculation Setup Editor to the fund portfolio
(see 10.1 Setting up fund portfolios on page 331 for more information). This setup is displayed
when you start up NAV Monitor (in the Initialize NAV Monitor dialog). See 10.4.2 Monitoring net asset
value in NAV Monitor on page 336 for more information.
10 Managing funds
10.4 NAV Monitor
Transaction & Risk Management Module (TRM) User Guide 335
To define default calculation values in NAV Calculation Setup Editor:
1. Use the following information to define the NAV calculation setup:
2. Enter the following information in the NAV Calculation Setup page:
3. Save the NAV calculation setup using File - Save.
10.4 NAV Monitor
In TRM, you can monitor the net asset value in real-time using NAV Monitor. You can view results
both as figures in a grid, and as various charts. NAV Monitor is based on Treasury Monitor, with the
same menus and configuration options (see 12.1 Treasury Monitor on page 361 for more
information). In NAV Monitor you can group and display all NAV-related data as well as key-figures,
and you can save the calculated NAV data for NAV Report.
10.4.1 Configuring NAV Monitor
You can configure NAV Monitor by creating pages or groups of pages in books, by selecting the rows
and columns you want to be displayed in each page, and by selecting the values or key-figures to
monitor. See 12.1.3 Configuring Treasury Monitor on page 365 for more information.
You insert a new page using Page - New Grid Page or Page - New Chart Page and then selecting one of the
four types of page that are available:
Note: You can change the page name by double-clicking on the page name and entering a new
name in the Set Page Name dialog.
Information Description
ID Unique ID of the net asset value calculation.
Name Name of the net asset value calculation.
Active From Date from which the NAV Calculation Setup applies. If left empty, it will apply
to all dates.
Active To Date until which the NAV Calculation Setup applies. If left empty, it will apply
to all dates.
Domain Domain in which the net asset value calculation is available.
Information Description
Transaction State Minimum state that the transactions must have reached in order to be included
in the analysis.
Time Zone ID defined in the Time Zone Editor and used to set the cut-off time zone.
Cutoff Time Time, up until which, transactions are included in the NAV calculation.
Rate Scenario The scenario of the market rates in which the fund's assets and fees are
calculated.
Information Description
Position Page Relates to one fund and is only active if one of the funds in the navigation bar is
selected.
Total Page Displays the totals for each fund. The rows are fixed at one per fund.
10 Managing funds
10.4 NAV Monitor
336 © Wall Street Systems IPH AB - Confidential
10.4.1.1 Setting a warning deviation
You can use the NAV Warning Deviation function in the Total Page to highlight the funds that have a
large change in the net asset value.
To set a NAV warning deviation:
1. In the Total Page, right-click in the grid and select NAV Warning Deviation. The Set NAV Warning
Deviation % dialog is displayed.
2. Set the warning deviation. This is based on the formula Abs(NAV Change in %)>k, where the
parameter k is 10.00% by default. This warning deviation is saved with a book definition.
10.4.1.2 Setting a quoted instrument deviation
You can use the Quoted Instrument Warning Deviation function in the Position Page to highlight the funds
that have a large change in the quote.
To set a quoted instrument warning deviation:
1. In the Position Page, right-click in the grid and select Quoted Instrument Warning Deviation. The Set
Quoted Instrument Warning Deviation % dialog is displayed.
2. Set the warning deviation. This is based on the formula Quote (relative Change in %) > k,
where the parameter k is 10.00% by default. This warning deviation is saved with a book
definition.
10.4.2 Monitoring net asset value in NAV Monitor
10.4.2.1 Defining NAV parameters
To define net asset value parameters:
1. Start NAV Monitor or, if the NAV Monitor is already open, select File - Change Parameters to open
the Initialize NAV Monitor dialog.
2. If you want to select a position you have previously saved, enter the following information and
click OK:
Fund Info Page Relates to one fund and is only active if one of the funds in the navigation bar is
highlighted. It displays the fund instruments attached to the highlighted fund. This
page also has fixed rows, one per fund instrument.
Fund Fee Page Relates to one fund and is only active if one of the funds in the navigation bar is
selected. The management fees are an integral part of the NAV calculation.
The fund management fees are defined in Portfolio Editor and are calculated for
display purposes in NAV Monitor. The calculation is done in real-time and therefore
is updated when the fund's market value changes. This page displays the fixed
and relative management fees for each fund. The rows adjust to the number of
management fees.
Information Description
Information Description
Position The position you want to monitor by selecting one of the views available in the
selection list. This field is available if you have launched NAV Monitor in
pre-configured mode.
Note: You can save all the start-up parameters (including your preferred book)
except for NAV Date and Previous Report Date, which are dynamic entries.
Book (optional) The book you want to monitor. This book is saved for the next time.
10 Managing funds
10.4 NAV Monitor
Transaction & Risk Management Module (TRM) User Guide 337
3. In the Selection page, enter the parameters you want to monitor:
Note: You can define certain parameters at fund level in NAV Calculation Setup Editor. See 10.3
Setting up default NAV calculation values on page 334 for more information.
Information Description
Portfolio (mandatory) ID of the relevant top fund or individual fund. By default, when you enter the
portfolio, certain parameters are inherited from the NAV calculation setup
defined for the fund: (Transaction State, Cut-Off Time Zone, Cut-Off Time, Rate
Scenario, NAV Output Scenario. See 10.3 Setting up default NAV calculation values
on page 334 for more information).
Transaction State
(mandatory)
Minimum state that the fund assets and fee transactions must have reached in
order to be included in the analysis.
Note: By default, the Transaction State is retrieved from the NAV calculation
setup defined for the fund. However, the Transaction State can be
manually overwritten.
NAV Date (mandatory) The date of the net asset value.
Note: The default value is today's date.
Previous Report Status
(mandatory)
In the course of one day, there may be several reports. You therefore need to
set the status of the previous report.
Note: The default value is Published.
Previous Report Date
(mandatory)
Used if you want to compare the current NAV with a previous report. This date
corresponds to the NAV Date of the previous report.
Note: The default value is today's date - 1.
Time Zone (mandatory) Time zone as defined in the Time Zone Editor.
Cut-Off Time
(mandatory)
Time, up until which, transactions are included in the analysis.
Note: By default the Cut-Off Time is retrieved from the NAV calculation setup
defined for the fund. However, the Cut-Off Time can be manually
overwritten.
Figure Currency
(mandatory)
The currency in which you want the results to be displayed.
Note: By default the currency of the fund defined in Portfolio Editor. This value
can be overwritten.
Rate Scenario
(mandatory)
The Market Information scenario in which the fund's assets and fees are
calculated.
Note: By default the Rate Scenario is retrieved from the NAV calculation setup
defined for the fund. However, the Rate Scenario can be manually
overwritten.
Result Context Accounting standard for which you want to define the scenario.
State Context Value specifying whether certain transaction types are to be included in the
position:
• Default - no cost-of-carry or collateral transactions.
• w/Cost-of-Carry - cost-of-carry transactions.
• w/Collateral - collateral transactions. These transactions are generated
from repo transactions.
• w/Cost-of-Carry/Collateral - both cost-of-carry and collateral transactions.
• w/Cost-of-Carry/Order - both cost-of-carry and order transactions.
• w/Order - order transactions.
Note: w/Cost-of-Carry can only be selected for portfolios which have the
Cost-of-Carry switch turned on: see 12.1.7 Monitoring cost-of-carry
positions on page 390 for more information.
10 Managing funds
10.4 NAV Monitor
338 © Wall Street Systems IPH AB - Confidential
4. Save the position parameters you have defined in the Saving page and then click OK:
10.4.2.2 Selecting key figures
The following tables explain the key figures that are specific to NAV data. All the key figures show
results for the period you defined in the Initialize NAV Monitor dialog.
Note: To open the list of key-figures, select View - Select Key Figures or right-click the column
header and select Select Key Figures.
10.4.2.2.1 Position Page
The Position Page has the same key-figures as the Treasury Monitor. See 12.1.4.7 Selecting
key-figures on page 379 for more information.
10.4.2.2.2 Total Page
The Total Page has the following key-figures:
Valuation
Update in Real-Time Switched on by default. If you do not want to update the analysis in real-time,
turn off the Update in Real Time switch.
As TRM calculates all transaction-related cashflows that are active for the
selected period and portfolio, you may wish to turn off the switch for large
portfolio structures. You can revert to real-time mode by selecting Update -
Realtime.
Information Description
Information Description
Position Name Name of the position.
Position Owner User or user group that can modify the position.
Position User User or user group that can use the position.
Save /Delete button Save/delete the position you have defined in the Saving page.
Key Figure Description
Market Value (Normal) The market value.
Market Value (Change) The change in the market value. This is calculated from the last selected report.
(Market Value - Previous Market Value).
Market Value (Relative
Change)
The relative change in market value, expressed as a percentage. This is calculated
from the last selected report.
((Market Value - Previous Market Value)/Previous Market Value)*100.
Accrued Interest (Normal) The accrued interest.
Accrued Interest (Change) The change in the accrued interest. This is calculated from the last selected report
(Accrued Interest - Previous Accrued Interest).
Accrued Interest (Relative
Change)
The relative change in accrued interest, expressed as a percentage. This is
calculated from the last selected report.
(Accrued Interest - Previous Accrued Interest)/Previous Accrued Interest)*100.
10 Managing funds
10.4 NAV Monitor
Transaction & Risk Management Module (TRM) User Guide 339
Previous Report
Net Asset Value
Fund
10.4.2.2.3 Fund Info Page
The Fund Info Page has the following key-figures:
Previous Report
Fund Instrument
Key Figure Description
Previous Report Id ID of the previous report.
Previous Report Owner User who has validated the previous report.
Previous Report Time Time of creation of the previous report.
Previous Report Date Previous NAV report date.
Previous NAV Net asset value of the previous report.
Previous Report Status Status of the previous report.
Key Figure Description
NAV The net asset value.
(Market Value + Total Accrued Fees)/Fund Shares.
NAV Change The change in the net asset value. This is calculated from the last selected report.
(NAV - Previous NAV).
NAV Change in % The relative change in the net asset value, expressed as a percentage. This is
calculated from the last selected report.
(NAV Change/Previous NAV) * 100.
Key Figure Description
Fund Shares From the fund units entered in the fund portfolio (sum of outstanding units of the
fund shares generated in the fund)
(scaling factor*units).
Key Figure Description
Previous NAV per Unit Net asset value of the fund share at a previous date.
Previous Report Date
(Normal)
Previous net asset value report date.
Key Figure Description
Units Outstanding shares. Units of the fund share in the fund portfolio.
NAV Scaling Factor Net asset value scaling factor.
FX Rate FX sport rate to convert the currency into the currency set in NAV Monitor.
Price Price of the fund share (from rate scenario).
Σ
10 Managing funds
10.4 NAV Monitor
340 © Wall Street Systems IPH AB - Confidential
Net Asset Value
10.4.2.2.4 Fee Info Page
The Fee Info Page has the following key-figures:
Valuation
Previous Report
Key Figure Description
NAV per Unit (Normal) The net asset value per unit (NAV (Fund)) * NAV scaling factor.
NAV per Unit (Change) The change in the net asset value per unit. This is calculated from the last selected
report. NAV per unit - NAV per unit in the previous report.
NAV per Unit (Relative
Change)
The relative change in the net asset value per unit, expressed as a percentage.
This is calculated from the last selected report.
(NAV Change/ NAV in the previous report) * 100.
Key Figure Description
Market Value (Normal) The market value.
Market Value (Change) The change in the market value. This is calculated from the last selected report
(Market Value - Previous Market Value).
Market Value (Relative
Change)
The relative change in market value, expressed as a percentage. This is calculated
from the last selected report
((Market Value - Previous Market Value)/Previous Market Value)*100.
Market Value Exclude
(Normal)
Market value of the instruments that belong to the Exclude Issuer group set up on
a portfolio.
Fund Management Fee
(Normal)
Fixed fee or relative management fee set.
Fund Management Fees
(Change)
The change in the fund fee. This is calculated from the last selected report
(Fund Management Fee - Previous Fund Management Fee).
Fund Management Fees
(Relative Change)
The relative change in the fund fee, expressed as a percentage. This is calculated
from the last selected report
(Fund Management Fee Change/Previous Fund Management Fee)*100.
Fee Percent (Normal) The management fee percentage.
Accrued Fund
Management Fees
(Normal)
Accrued Fund Management Fee + Fund Management Fee Amount from the last
published report.
Key Figure Description
Previous Fund
Management Fees
The fund management fee loaded from the selected previous report.
Previous Report Date The date of the previous NAV report.
10 Managing funds
10.5 NAV Report Manager
Transaction & Risk Management Module (TRM) User Guide 341
10.4.3 Saving NAV reports
To save the net asset value as a report:
1. In NAV Monitor, switch to report mode by selecting Report - Report.The following report menu
options are available:
2. Select Save Report.
3. Add a Comment in the Save Report dialog. You an see this comment in NAV Report Manager.
4. You can view the report in NAV Report Manager by selecting Report - Open Report Manager.
10.5 NAV Report Manager
NAV Report Manager enables you to view all saved NAV reports and to publish one NAV report per
day. NAV reports are created and saved in NAV Monitor (see 10.4 NAV Monitor on page 335 for
more information).
NAV Report Manager can be started from Application Manager or from NAV Monitor (from the Report
menu).
The available report columns are:
10.5.1 Managing reports
In NAV Report Manager you can:
•Query for reports by selecting View - Query.
•Run a report by right-clicking on the report and selecting Run Report.
Information Description
Report Switch to show or not the report. Only enabled if a fund is selected in the list.
Save Report Enabled if a report is open and a fund is selected in the list.
Save All Reports Enabled if a report is open.
Reset Enabled if a report is open and has been modified manually.
Open Report Manager Opens NAV Report Manager.
Information Description
Comment User comment as defined in NAV Monitor or the Fund Data Calculation/Reporting
activity. You can modify the comment. In order to store your modifications in the
database, you need to click Apply.
ID ID of the NAV report.
Owner User who has saved the report.
Time Time of the NAV report (including Time Zone ID).
Date Date of the NAV report.
Fund Portfolio ID of the fund portfolio.
NAV Net asset value.
State State of the report (for example Open).
Status Status of the report (for example Published, or End of Day (if you do not want to
publish the report).

10 Managing funds
10.5 NAV Report Manager
342 © Wall Street Systems IPH AB - Confidential
•Save report data for different scenarios using the Save NAV command.
•Publish one report per day using the Set Published command.
Note: Reports have a state, and you can only save a report or change a report’s status when the
report is in State Final.
10.5.1.1 Saving a report scenario
To save a report for a specific scenario:
1. Select the report you want to save.
2. Select the menu Command - Save NAV. Enter the scenario in the dialog.
The report will be saved.
Note: Each time you save a report for a specific scenario, you overwrite the previous report.
10.5.1.2 Publishing a report
To publish a report:
1. Select the report you want to publish.
2. Select the menu Command - Set Publish. The report Status will change to Published.
Note: You can unpublish a report by selecting the menu Command - Clear Published.
3. When a report is in the Final state and Published status, the system automatically generates a
transaction for the fund fee. The transaction can be viewed in the Fund Fee Manager.
Note: If a report which is in the Final state has a Status of Unpublished, the system deletes the
generated fee transactions.
10.5.2 Automating NAV reporting
You can use the Fund Data Calculation/Reporting activity to automatically save the fund report and
set it to the required state and status. This activity simulates the behavior of NAV Monitor and NAV
Report Manager. For information about activities, see 6.2.1.2 Defining activity intervals on page
231.
To set up the Fund Data Calculation/Reporting activity:
1. In Activity Manager, create a new activity using activity type Fund Data Calculation/Reporting.
2. Select group NIGHTLY.
3. Enter the necessary parameters. See A.37 Fund Data Calculation/Reporting on page 641 for
more information.
4. Click Save As to save the whole activity definition.
Note: Fund Management fee transaction(s) and NAV published price(s) can only be created for a
report in the Final state and with the status Published.
Information Description
NAV Net asset value (read only).
Scenario NAV scenario.
10 Managing funds
10.5 NAV Report Manager
Transaction & Risk Management Module (TRM) User Guide 343
10 Managing funds
10.5 NAV Report Manager
344 © Wall Street Systems IPH AB - Confidential

Transaction & Risk Management Module (TRM) User Guide 345
Chapter 11 Managing collateral
In principle, most money market and foreign exchange operations can be collateralized.
Collateralization is a means to reduce or offset the risk borne by one party against another party in
a transaction. The collateral is an asset which is transferred from one to the other to cover the risk
in case of default.
11.1 Setting up master agreements
Collateral is governed by a master agreement agreed between two parties that set forth the terms
applicable to the transfer of collateral and the respective obligations of the transferor and
transferee.
Master agreements can set the same terms for all counterparties or they can be
counterparty-specific, with specific terms (for example, haircut and valuation currency) varying from
one counterparty to another.
Different operations can be governed by different master agreements with different terms with the
same counterparty. For example, the terms applicable to a repo/reverse repo will be different to
those applicable to commercial loans.
All collateralized transactions (including all transactions in which collateral is delivered) are linked to
a collateral agreement.
11.1.1 Defining collateral agreements
A collateral agreement set up in TRM defines the important terms of an agreement, for example,
margin conditions, substitution, instruments involved, and collateral monitoring rules.
The agreement establishes a link between the main terms of exposure and collateralization, namely
details of the haircut (cover haircut and collateral haircut).
The following formula is used to calculate asset exposure covered by collateral:
Exposure of asset * (1 + cover haircut) = MV of collateral * (1 – HFX – H1*F1 –
H2*F2 – H3*F3)
where:
HFX = FX haircut, H1, 2, 3 = collateral haircuts, and F1, 2, 3 = collateral haircut factors
Collateral agreements are defined in Collateral Agreement Editor. This editor layout is based on the
application Static Data Editor (see 3.2 Static Data Editor on page 41 for more information).
Note: Some of the terms which make up the master agreement need to be defined as separate
entities in TRM: see 11.1.1.1 Defining the components of collateral agreements on page
348.

11 Managing collateral
11.1 Setting up master agreements
346 © Wall Street Systems IPH AB - Confidential
To set up a collateral agreement:
1. In Collateral Agreement Editor, enter the main attributes of the master agreement in the upper
part of the editor.
2. In Collateral Agreement Editor’s Covered Clients page, define the specific client to which this
master agreement applies:
–For commercial loans: A covered client refers to the client whose exposure is secured by the
collateral, not to the owner of collateral. If a guarantor of a loan also provides collateral as
additional security, this guarantor is the owner of collateral and also the counterparty in the
collateral agreement, whereas the counterparty of the loan transaction whose exposure is
secured by the collateral is a covered client in the collateral agreement.
Information Description
ID & Name Unique ID and name for the collateral agreement.
Domain Domain in which this collateral agreement applies.
Requirement
Method
Method used to calculate the value to be collateralized. Choose from:
• Accrued Value (book value + accrued interest)
• Book Value
•Market Value
• Nominal Amount
• Repayment Amount (total amount of all repayment cashflows)
Currency Valuation currency of the collateral agreement.
Cover Haircut Set Cover Haircut Set is used to determine which value is automatically assigned to field
cover haircut of a guarantee entry in a collateralized transaction. The value is a
percentage (i.e. 2.00 for 2%) used to adjust up value to cover (normally book value)
when calculating collateral requirement of a transaction. Using the previous example
of a 2.00 cover haircut would mean that collateral requirement of a transaction with
book value of 100 would be 102.
Cover haircut sets are defined in Cover Haircut Editor: see 11.1.1.1.1 Defining cover
haircut sets on page 348.
Collateral
Valuation Set
Collateral valuation set used to specify the conditions of collateral valuation, including
the collateral haircuts used to adjust the market value of the collateral down based on
its quality.
Collateral valuation sets are defined in Collateral Valuation Editor: see 11.1.1.1.4
Defining collateral valuation sets on page 351.
Counterparty This field is used in collateral management of commercial loans to restrict the use of a
Collateral Agreement to a single counterparty or guarantor. In the case of collateral
management of repo operations, the same is achieved via the Covered Clients page
described in the next step.
Leave empty if the agreement can be used by any counterparty or guarantor in
commercial loans.
Signature Date Signature Date of Collateral Agreement.
Active From Date
Active To Date
Period within which the Collateral Agreement is valid.
Cover All Clients Switch on to indicate that the agreement is eligible for all clients.
Note: When this switch is on, the Covered Clients page is disabled.
Display Only
Eligible
Switch on to display only eligible collaterals in Transaction Manager. An eligible
collateral is a collateral that is defined as acceptable security under the collateral
agreement of the repo. Conditions for eligible collaterals are defined in the Collateral
Haircut Editor through the Ineligible field. See 11.1.1.1.3 Defining collateral haircut
sets on page 350.
11 Managing collateral
11.1 Setting up master agreements
Transaction & Risk Management Module (TRM) User Guide 347
–For repo operations: It is always assumed that the collateral is provided by the counterparty
of the repo and counterparty definition in collateral agreement is not used at all. Instead, if
the eligibility of a collateral agreement is restricted to one or several specific counterparties,
they must be identified in the Covered Clients page of Collateral Agreement Editor.
3. In Collateral Agreement Editor’s Substitution page, specify the method and instrument to be used
for collateral substitution under the master agreement.
Note: If this setup is not defined in the Collateral Agreement, collateral substitutions cannot be
made in any transactions under it.
4. In Collateral Agreement Editor's Margin page, specify the conditions for margin management
under the master agreement.
5. Save the collateral agreement definition using File – Save As New.
Information Description
Collateral Substitution
Method
Method used to calculate the amount of new collateral delivered against the
substituted collateral under this agreement. Choose from:
•Current Collateral Value: The new collateral must have the same market value
on the substitution date as the collateral to be returned.
•Original Collateral Value: On the substitution date, the new collateral must be
worth as much as the collateral to be returned was worth when the
transaction was arranged.
Substitution Instrument Instrument used in collateral substitution.
Collateral substitution instruments are described in the guide TRM
Instruments: Processing and Calculations.
Information Description
Margin Instrument Instrument used in margin transactions. If you do not specify a margin
instrument you will not be able to make margin transactions in this
agreement.
Margin instruments are described in the guide TRM Instruments: Processing
and Calculations guide.
Minimum Movement
Value
Minimum acceptable value of collateral being transferred under this
agreement.
Margin Trigger Type Method used to calculate Cover % validated against Margin Trigger % (Call)
and Margin Trigger % (Return) to trigger a margin call or margin return for a
collateral position in Collateral Valuation Board under this agreement. Choose
from:
•Requirement Cover %: The cover % is calculated as the percentage of Cover
Value (of collateral) over Requirement Value (of underlying exposure)
where requirement value is the exposure adjusted with cover haircut
•Value Cover %: The cover % is calculated as the percentage of Cover Value
(of collateral) over Value to Cover (of underlying exposure) where value to
cover is the unadjusted exposure
For example, with a cover haircut of 2.00%, Requirement Cover % produces
initial Cover % of 100% and Value Cover % initial Cover % of 102%
Margin Trigger % (Call) Cover % that will trigger a margin call for a collateral position in the
agreement in Collateral Valuation Board.
Margin Trigger % (Return) Cover % that will trigger a margin return for a collateral position in the
agreement in Collateral Valuation Board

11 Managing collateral
11.1 Setting up master agreements
348 © Wall Street Systems IPH AB - Confidential
11.1.1.1 Defining the components of collateral agreements
The following entities can be set up separately and grouped together under a collateral agreement
to define a master agreement:
•Cover haircut set: Defines the rules that determine the cover haircut by which the underlying
exposure is adjusted when calculating the cover requirement according to the parameters of the
collateralized transaction.
•Collateral valuation set: Groups together collateral haircuts and collateral FX haircuts, as well as
some additional valuation conditions:
–FX haircut set to define the rules to determine which haircut applies between currencies
(that is, the asset currency and the collateral currency) in collateral operations
–Collateral haircut sets to define the rules to determine the collateral haircuts by which the
market value of the collateral is adjusted when calculating the cover value according to the
instrument, ratings, and other related parameters of the collateral instrument.
Use the following sections to define the individual components that make up the master agreement.
Note: All editor layouts used to set up the component entities of collateral agreements are based
on the application Static Data Editor (see 3.2 Static Data Editor on page 41 for more
information). Collateral-related entities are created in the same way as other types of
static data entities: see 3.3.1 Creating new static data entities on page 45.
11.1.1.1.1 Defining cover haircut sets
Cover haircut is used to adjust the exposure of a collateralized transaction up when calculating its
cover requirement. The haircut is not assigned to the transaction directly but to a guarantee entry of
the transaction. Repo transactions always have a single guarantee entry, but commercial loans may
have any number of them. Each guarantee entry is linked to a collateral agreement and a haircut is
assigned to it based on the cover haircut definitions of the agreement.
To define a cover haircut set to identify the rules for assigning the cover haircut to the collateralized
transactions according to the transaction parameters:
1. In Cover Haircut Editor, enter the main attributes of the cover haircut set in the upper part of
the editor.
2. In Cover Haircut Editor’s Cover Haircut page, specify the attributes to determine which cover
haircut is used.
Information Description
ID & Name Unique ID and name for the cover haircut set.
Domain Domain in which the cover haircut set is available.
Information Description
Value Value of the cover haircut to be applied (expressed as a percentage).
This value is assigned to matching collateralized transactions and is displayed in the
Cover Haircut column of Transaction view and/or in the Cover Haircut column of
Guarantee view in Transaction Manager.
Description Any meaningful information you want to add to describe the cover haircut.
Order Number Number used to determine which cover haircut has priority if there is more than one
cover haircut with conditions that match the transaction.
Rule
Not Rule
Rule that determines when the cover haircut will be used or not used.
Rules are defined in Rule Editor.
Guarantor Condition is met if the client of the guarantee entry matches the Guarantor given in
the field.
11 Managing collateral
11.1 Setting up master agreements
Transaction & Risk Management Module (TRM) User Guide 349
3. Click Add to add the cover haircut definition.
4. Save the cover haircut definition using File - Save As New.
11.1.1.1.2 Defining collateral FX haircut sets
A collateral FX haircut is used to adjust the market value of collateral instrument down when
calculating its cover value. The haircut is optionally assigned to the collateral entry (row) of a
transaction based on currency and the currency of that collateral.
To define an FX haircut set to identify which FX haircut is used if the collateral currency is different
from the exposure currency:
1. In Collateral FX Haircut Editor, enter the main attributes of the FX haircut set in the upper part of
the editor.
Guarantor Main
Group
Guarantor Group
Condition is met if the client of the guarantee entry belongs to Guarantor Group of the
Guarantor Main Group given in these fields.
Gap Set
Maturity Gap
From
Maturity Gap To
Condition is met if the transaction maturity falls to a maturity gap in the identified gap
set which is within the range defined by values given in Maturity Gap From/To fields.
Currency Condition is met if the currency of the transaction matches the Currency given in this
field.
Nominal Amount
From
Nominal Amount
To
Condition is met if the Nominal Amount of the transaction is within the range defined
by the values given in these fields.
Book Value From
Book Value To
Condition is met if the book value of the transaction is within the range defined by
values given in these fields.
Rating
Rating Code
Condition is met if the client of the guarantee has a rating matching the rating and
rating code given in these fields. Credit ratings are defined in the Credit Rating Editor:
see 3.31 Credit ratings (optional) on page 142.
Min Rating (level)
Max Rating (level)
Condition is met if the client of the guarantee has a credit rating with rating level
definition which is within the range defined by the values given in these two fields.
Credit ratings are expressed as a level. The rating level identifies how much risk is
carried by the code: the lower the level (number), the less risk involved, i.e. the
higher the rating (code).
For example, for S&P, if the minimum is set to BBB and the maximum is set to AAA,
then you would select the corresponding minimum rating (i.e. lowest) as 6 and the
maximum rating (i.e. highest) as 1, where 6 corresponds to rating code BBB and 1 to
AAA.
Information Description
ID & Name Unique ID and name for the FX haircut set.
Domain Domain in which the FX haircut set is available.
Information Description
11 Managing collateral
11.1 Setting up master agreements
350 © Wall Street Systems IPH AB - Confidential
2. In Collateral FX Haircut Editor’s Collateral FX Haircut page, specify the attributes to determine
which FX haircut is used.
3. Click Add to add the collateral FX haircut definition.
4. Save the collateral FX haircut definition using File - Save As New.
11.1.1.1.3 Defining collateral haircut sets
Collateral haircut is used to adjust the market value of a collateral instrument down when
calculating its cover value. The haircut is assigned to the collateral entry of a transaction based on
attributes of the collateral instrument.
To define a collateral haircut set to identify which haircut is used according to the instrument,
ratings, and other relevant parameters of the collateral instrument:
1. In Collateral Haircut Editor, enter the main attributes of the collateral haircut set in the upper
part of the editor.
2. In Collateral Haircut Editor’s Collateral Haircut page, specify the attributes to determine which
collateral haircut is used.
Information Description
Value Value of the FX haircut to be applied.
This value is assigned to collateral entries of transactions and displayed in column
Collateral FX Haircut of the Repo view (for repo related transactions) and in column FX
Haircut of the Collateral view (for commercial-loan related transactions) in Transaction
Manager.
Description Any meaningful information you want to add to describe the FX haircut.
Order Number Number used to determine which FX haircut has priority if there are two or more FX
haircuts with conditions matching the transaction currency and collateral currency.
Currency
Currency Group
Currency and Currency Group of the collateralized transaction.
Collateral
Currency
Collateral
Currency Group
Currency and Currency Group of the collateral instrument.
Information Description
ID & Name Unique ID and name for the collateral haircut set.
Domain Domain in which the collateral haircut set is available.
Information Description
Ineligible Switch on to make the collateral ineligible (value = 100%) in the agreement.
If a collateral instrument with a total haircut of 100% is selected in a transaction, it is
considered as ineligible and is not accepted by the system.
Value Value of the haircut to be applied (expressed as a percentage).
Description Any information you want to add about the haircut.
Order Number Number used to determine which haircut has priority if there are two or more haircuts
with conditions matching the collateral instrument.
11 Managing collateral
11.1 Setting up master agreements
Transaction & Risk Management Module (TRM) User Guide 351
3. Click Add to add the collateral haircut definition.
4. Save the collateral haircut definition using File - Save As New.
11.1.1.1.4 Defining collateral valuation sets
Collateral valuation sets define the conditions used in the valuation of collateral. When the market
value of a collateral instrument is adjusted down to calculate its cover value, the total haircut used
in the calculation is received by combining collateral FX haircut with up to three separate collateral
haircut components as follows:
Cover Value = MV of collateral * (1 - HFX - H1*F1 - H2*F2 - H3*F3)
where:
HFX = FX haircut, H1, 2, 3 = collateral haircuts, and F1, 2, 3 = collateral haircut factors
The setup defining the source of each haircut component (HFX, H1, H2, H3) as well as factors used
to adjust collateral haircut components (F1, F2, F3) are given in the collateral valuation set.
Instrument Group
Instrument …
to
… Issuer Group
Matching parameter of the collateral instrument to which the haircut applies.
Issuer Rating
Issuer Rating Type
Matching the rating and rating code of the collateral instrument to which the haircut
applies. Credit ratings are defined in the Credit Rating Editor: see 3.31 Credit ratings
(optional) on page 142.
Min Issuer Rating
(level)
Max Issuer Rating
(level)
Matching the credit rating of the issuer to the rating level range given in these two
fields. Credit ratings are expressed as a level. The rating level identifies how much
risk is carried by the code: the lower the level (number), the less risk involved, i.e.
the higher the rating (code).
For example, for S&P, if the minimum is set to BBB and the maximum is set to AAA,
then you would select the corresponding minimum rating (i.e. lowest) as 6 and the
maximum rating (i.e. highest) as 1, where 6 corresponds to rating code BBB and 1 to
AAA.
Branch Code 0...
to
… Branch Code 19
Matching branch code of the collateral instrument to which the haircut applies.
Information Description

11 Managing collateral
11.2 Monitoring collateral positions
352 © Wall Street Systems IPH AB - Confidential
To group together collateral haircuts and collateral FX haircuts to define a collateral valuation set:
1. In Collateral Valuation Set Editor, fill in the fields using the information in the following table.
2. Save the collateral valuation set definition using File - Save As New.
11.1.2 Attaching master agreements to portfolio owners
Collateral agreements can be attached to a portfolio owner definition: see 3.13.1.9 Attaching
collateral agreements to portfolio owners on page 97.
11.1.3 Applying master agreements to instruments
Collateral agreements can be applied to an instrument definition using the Collateral-setup feature. In
this case, the instrument definition overrides any collateral agreement setup in the portfolio owner
definition.
Note: See the guide TRM Instruments: Processing & Calculations for more information about this
feature and about features in general.
11.2 Monitoring collateral positions
The primary TRM application used to monitor collateral positions consisting of underlying exposures
of collateralized transactions and collateral received against those exposures is called Collateral
Valuation Board.
Collateral positions can also be monitored on several report generator reports.
Information Description
ID & Name Unique ID and name for the collateral valuation set.
Domain Domain in which the collateral valuation set is available.
Instrument ID of the collateral transfer instrument.
This is only used in collateral management of commercial loans.
Valuation Method Method used for in valuation, usually Dirty Price. Choose from:
•Clean Price - Accrued interest of collateral instrument is ignored when calculating
collateral market value.
•Dirty Price - Accrued interest of collateral instrument is included when calculating
collateral market value.
FX Haircut Set ID of the FX haircut set you want to use in the collateral valuation set.
FX haircut sets are defined in Collateral FX Haircut Editor: see 11.1.1.1.2 Defining
collateral FX haircut sets on page 349.
Haircut Set (1, 2,
3)
ID of the collateral haircut set you want to use in the collateral valuation set.
Collateral haircut sets are defined in Collateral Haircut Editor: see 11.1.1.1.3 Defining
collateral haircut sets on page 350.
Haircut Factor (1,
2, 3)
Corresponding factor for the collateral haircut set.
Switches •Bid Valuation: Switch on to use bid price. If this switch is not on, then the average
Bid and Ask prices are used.
11 Managing collateral
11.2 Monitoring collateral positions
Transaction & Risk Management Module (TRM) User Guide 353
11.2.1 Collateral Valuation Board
Collateral Valuation Board is based on the Entity Manager application and has the same look and feel
as, for example, the Transaction Manager. Collateral Valuation Board is specifically designed to allow
you to monitor the collateral position of the underlying exposures as well as the collateral securing
them.
11.2.1.1 Collateral Valuation Board menus
The menu items in Collateral Valuation Board are basically the same as the menu items in
Transaction Manager (see 8.1.1 Transaction Manager menus on page 258).
11.2.1.1.1 View
Collateral Valuation Board has its own set of views displaying the collateral related data.
11.2.1.2 Start-up parameters
The start-up parameter used to open Collateral Valuation Board is:
FKTransactionManager.exe -c Collateral.xml –v collateral -–title “Collateral
Valuation Board”
See C.11 Transaction Manager on page 685 for information about the options available.
11.2.1.3 Using Collateral Valuation Board
11.2.1.3.1 Constructing a collateral position
In Collateral Valuation Board’s Query view, you can define your query parameters in the same way
as in the Query view of Transaction Manager.
Information Description
Query This view is used to fetch a position to be monitored according to the entered
query criteria.
Collateral Position Collateral Position is the main view of the application. It aggregates requirements
(in other words, the underlying exposures secured by collateral) and collateral
securing them based on the following grouping columns:
• Portfolio (Grouping) – Aggregates all requirement and collateral entries in the
same portfolio in a single row.
• Collateral Agreement (Grouping) – Aggregates all requirement- and collateral
entries in the same Collateral Agreement in a single row.
• Counterparty (Grouping) – Aggregates all requirement and collateral entries
against the same counterparty in a single row.
• Collateral Number (Grouping) - Aggregates all requirement and collateral
entries with the same collateral number in a single row.
When more than one of the grouping columns is selected, an aggregated row is
created for each combination of values in the selected columns, for example, for
each combination of Collateral Agreement and Counterparty.
Requirement Displays all collateral requirements of collateralized transactions that match the
query.
Collateral Displays all collaterals that match the query.

11 Managing collateral
11.2 Monitoring collateral positions
354 © Wall Street Systems IPH AB - Confidential
The query identifies collateral requirements as well as the collateral securing them. In addition to
generic parameters like portfolio and counterparty, some additional parameters are used in
Collateral Valuation Board query.
The Requirement view only shows the exposures of collateralized transactions for the selected row in
Collateral Position view.
Information Description
Date Position date used to identify active requirements and collateral.
This is defaulted to current date.
Valuation Date Date as of which the valuation is made for the identified requirements and
collateral. Market rates used in the valuation are always taken from the same date
as the position, but for example, accrued interest is calculated to valuation date.
Defaulted to Date but can be changed to any later date.
Figure Currency Valuation currency of the collateral position.
When figure currency is not given in the query, the currency of the collateral
agreement is used as the valuation currency for requirements and collateral. This
behavior is almost always the correct one since collateral management is made
separately under each agreement and all margin calls are executed against
valuations in the currency of the agreement.
This field is only used to identify a common valuation currency in the rare cases of
grouping the collateral position across agreements with different currencies.
First Date Method Method used to define the first date as of which a requirement or collateral affects
the position. Choose from:
•Date >= Active From (default method)
Matched by the query if Active From date of the requirement or collateral
(normally, Opening Date of the transaction) is on or before the position date
(Date of the query)
•Date >= Value Date
Matched by the query if Value Date of the transaction is on or before the
position date (Date of the query)
•Valuation Date >= Value Date
Matched by the query if Value Date of the transaction is on or before the
Valuation Date of the query
Last Date Method Method used to define the last date as of which a requirement or collateral affects
the position. Choose from:
•Date <= Active Until (default method)
Matched by the query if the Active Until date of the requirement or collateral
(normally, Maturity Date of the transaction) is on or after the position date
(Date of the query)
•Date <= Maturity Date
Matched by the query if the Maturity Date of the transaction is on or after the
position date (Date of the query)
•Valuation Date <= Maturity Date
Matched by the query if the Maturity Date of the transaction is on or after the
Valuation Date of the query.
Value Date Offset Number of days to be subtracted from (positive value) or added to (negative
value) the value date of the transaction when applying First Date Methods which
are dependent on the value date of the transaction. For example, offset 1 would
make the transaction affect the position 1 day before value date.
Maturity Date Offset Number of days to be subtracted from (positive value) or added to (negative
value) the maturity date of the transaction when applying Last Date Method 'Date
<= Maturity Date'. For example, offset 1 would stop the transaction from affecting
the position on the maturity date and 2 would stop the transaction from affecting
the position 1 day before maturity date.
11 Managing collateral
11.2 Monitoring collateral positions
Transaction & Risk Management Module (TRM) User Guide 355
In addition to generic parameters like portfolio and counterparty, the following fields are used to
display the details of collateral:
The Collateral view displays the collateral being held that matched the query. Displayed items of this
view are also filtered against the selected row in Collateral Position view.
In addition to generic parameters like portfolio and counterparty, the following fields are used to
display the details of collateral:
Information Description
Currency Valuation currency of the requirement.
This is the currency of collateral agreement of the exposure unless a different
currency has been given as Figure Currency for the position in the query.
Currency (Local) Original currency of the requirement.
This is the currency of the exposure transaction.
FX Rate FX Rate used to convert values in original currency to valuation currency. The rate
used is the current market FX spot rate between the two currencies.
Value To Cover
Value To Cover (Local)
Unadjusted exposure of the requirement.
This value is calculated by the system based on Requirement Method of the
collateral agreement of the requirement.
Cover Haircut Cover Haircut of the requirement used to adjust Value To Cover up to get the
actual Cover Requirement.
Cover Requirement
Cover Requirement
(Local)
Actual value of the requirement to be secured by collateral calculated as follows:
Cover Requirement = Value To Cover * (1 + Haircut)
Information Description
Currency
Currency (Local)
FX Rate
Same as in requirement.
Instrument Instrument of the collateral.
For example, the bond instrument received as collateral.
Underlying Instrument
Underlying Type
Instrument and transaction type of the transaction in which collateral is delivered.
For example, collateral received from margin call displays the transaction type of
the margin call transaction (for example, ‘Open Margin’) in Underlying Type and
the instrument of the margin transaction in Underlying Instrument.
Amount
Units
Nominal Amount and Units of collateral instrument.
Market Price Current market price of the collateral instrument.
Market Value
Market Value (Local)
Market Value of the collateral.
FX Haircut
Haircut (1, 2, 3)
Haircut Factor (1, 2, 3)
Components of the valuation haircut.
These are identified from the setup of collateral agreement of the collateral.
11 Managing collateral
11.2 Monitoring collateral positions
356 © Wall Street Systems IPH AB - Confidential
The Collateral Position view displays aggregated requirements and collateral together to enable
position level collateral analysis. Aggregation is made according to selected grouping columns (for
example, by Collateral Agreement and Counterparty). Several Collateral Valuation Board layouts can
be prepared with different grouping setup to support collateral positions at different levels.
In addition to grouping columns and direct aggregation fields of requirement- and collateral views,
the following fields are used to display information on the aggregated position as a whole:
Total Haircut Total Haircut used to adjust Market Value down to get the actual Cover Value.
Total Haircut is calculated from the components as follows:
Total Haircut = HFX + H1*F1 + H2*F2 + H3*F3
where:
HFX = FX Haircut, H1, 2, 3 = Haircuts, and F1, 2, 3 = Haircut Factors
Cover Value
Cover Value (Local)
Actual value of collateral securing the collateral requirement of the collateralized
exposure calculated as follows:
Cover Value = Market Value * (1 – Total Haircut)
Information Description
Currency Valuation currency of the collateral position.
This is the currency of collateral agreement unless a different currency has been
given as Figure Currency for the position in the query.
Cover Difference
Cover Difference (ABS)
Difference between Cover Value (of collateral) and Cover Requirement (of
requirement).
Cover Difference = Cover Value – Cover Requirement
Cover % The percentage of exposure secured by the value of collateral held against it.
Calculation of Cover % is dependent on requirement method of the collateral
agreement as follows:
• Requirement Method = Requirement Cover %
Cover % = 100 * (Cover Value / Cover Requirement)
• Requirement Method = Value Cover %
Cover % = 100 * (Cover Value / Value To Cover)
Margin Trigger % (Call)
Margin Trigger % (Return)
Percentages defined in collateral agreement to trigger margin calls or returns
when the value of collateral deviates from the value of underlying exposure too
much. Cover % is evaluated against these values to identify the need for margin
calls or returns.
Collateral Status Identifies the current status of collateral position as one of the following:
• Fully-Collateralized
Cover % = Requirement %
•Over-Collateralized, Owner: The collateral is held by you (owner).
Cover % > Requirement %
• Under-Collateralized, Owner: The collateral is held by you (owner).
Cover % < Requirement %
•Over-Collateralized, Counterparty: The Collateral is held by the counterparty.
Cover % > Requirement %
•Under-Collateralized, Counterparty: The Collateral is held by the counterparty.
Cover % < Requirement %
Information Description

11 Managing collateral
11.2 Monitoring collateral positions
Transaction & Risk Management Module (TRM) User Guide 357
11.2.1.3.2 Creating margin calls
Margin calls are required when the value of collateral is no longer adequate to secure the underlying
exposure. They can be made for an indefinite period of time to secure an overall exposure against a
specific counterparty under a collateral agreement or for the remaining maturity of a specific
transaction to secure the exposure of that operation under a collateral agreement.
Margin calls are created in Collateral Valuation Board using right-click actions Open Margin
Movement and Margin Movement from Collateral Position view. Actions are available on right-click
menu if the following conditions are met:
•Open Margin Movement:
–Selected position is in a single collateral agreement
–Selected position is against a single counterparty
–Collateral action of the selected position is Collateral to Receive or Collateral to Give.
•Margin Movement (in addition to the above):
–Selected position is in a single Collateral Number.
Selecting the action from the right-click menu opens a dialog where transaction-level conditions of
the margin call are completed. When the dialog is accepted, the system opens a Transaction
Manager application used to capture margin calls and creates the new transaction. Collateral details
of the margin call must be given in the new transaction displayed in Repo view of the application.
If preferred, you can also create margin call transactions directly in Transaction Manager.
See TRM Instruments: Processing and Calculations Guide for details of margin call transactions.
11.2.1.3.3 Creating margin returns
Margin returns are required when a collateral delivered earlier in a margin call must be returned to
the owner of the collateral.
Margin returns are created in Collateral Valuation Board using right-click actions Open Margin
Return and Margin Return from Collateral view. The following actions are available on right-click
menu if the described conditions are met:
•Open Margin Return:
Collateral Action Identifies the recommended action based on the evaluation of Cover % against
Margin Trigger % (Call) and Margin Trigger % (Return) as one of the following:
•No Action
Margin Trigger % (Call) < Cover % < Margin Trigger % (Return)
• Collateral to Receive
Cover % < Margin Trigger % (Call), Collateral is held by you
or
Cover % > Margin Trigger % (Return), Collateral is held by the
counterparty
• Collateral to Give
Cover % < Margin Trigger % (Call), Collateral is held by the
counterparty
or
Cover % > Margin Trigger % (Return), Collateral is held by you
Furthermore, Cover Difference (ABS) is evaluated against the Minimum Movement
Value of collateral agreement. Regardless of the Cover %, Collateral Action is
always set to No Action if the following is true:
Cover Difference (ABS) < Minimum Movement Value
Information Description
11 Managing collateral
11.2 Monitoring collateral positions
358 © Wall Street Systems IPH AB - Confidential
–Selected collateral is in the same instrument
–Selected collateral is in the same collateral agreement
–Selected collateral is against the same counterparty
–Underlying Type of selected collateral is 'Open Margin'.
•Margin Movement:
–Selected collateral is in the same Collateral Number
–Selected collateral has the same Maturity Date (this refers to the maturity date of the margin
transaction, not to maturity of the collateral instrument)
–Underlying Type of selected collateral is 'Margin'
Selecting the action from the right-click menu opens a dialog where conditions of margin return are
completed. When the dialog is accepted, the system opens a Transaction Manager application used
to capture margin returns and creates the new transaction.
Margin return transactions can only be created from existing collateral holdings in Collateral
Valuation Board. A corresponding action is not available in Transaction Manager.
See TRM Instruments: Processing and Calculations Guide for details of margin return transactions.
11.2.1.3.4 Creating cash collateral movements
Margin calls can also be executed in cash instead of securities. Cash collateral movements are
created in Collateral Valuation Board using right-click actions Open Cash Collateral and Cash
Collateral from Collateral Position view. The following actions are available on right-click menu if the
described conditions are met:
•Open Cash Collateral:
–Selected position is in a single collateral agreement
–Selected position is against a single counterparty
–Collateral action of the selected position is 'Collateral to Receive' or 'Collateral to Give'.
•Cash Collateral (in addition to the above):
–Selected position is in a single Collateral Number.
Selecting the action from the right-click menu opens a dialog where conditions of cash margin
movement are completed. When the dialog is accepted, the system opens a Cash Collateral
application used to capture new cash collateral movements. If a matching cash collateral transaction
already exists in the system, that is used and a new cash collateral movement is added to it. If no
matching transaction is found, a new cash collateral account transaction is created and the
movement added to it.
Cash collateral movements can also be created directly in Cash Collateral applications, if preferable.
See TRM Instruments: Processing and Calculations Guide for details of cash collateral transactions.
11.2.1.3.5 Creating collateral substitutions
Collateral Substitutions are required when existing collateral delivered in a specific collateralized
operation (for example, a reverse repo transaction) needs to be substituted for different collateral
before the maturity of the transaction.
Collateral substitutions are created in Collateral Valuation Board using right-click action Substitution
from Collateral view. This action is available if the following conditions are met:
•Selected collateral is in the same instrument
•Selected collateral is in the same collateral agreement
•Selected collateral is against the same counterparty

11 Managing collateral
11.2 Monitoring collateral positions
Transaction & Risk Management Module (TRM) User Guide 359
•Selected collateral is in the same transaction (collateral substitutions are supported from earlier
substitutions as well as the original repo transactions but substituted collateral must all be in the
same transaction). This transaction is identified in field 'Number (Grouping)' in Collateral view.
•Underlying Type of selected collateral is not 'Open Margin' or 'Margin' (a margin collateral cannot
be substituted).
Selecting the action from the right-click menu opens a dialog where transaction-level conditions of
substitution are completed. When the dialog is accepted, the system opens a Transaction Manager
application used to capture substitutions and creates the new transaction. Details of the new
collateral in substitution must be given in the new transaction in Repo view of the application.
You can also create collateral substitutions in Transaction Manager.
See TRM Instruments: Processing and Calculations Guide for details of collateral substitution
transactions.
11.2.1.3.6 Creating repo rollovers
A rollover is required when the original maturity of the repo must be deferred.
Rollovers are created in Collateral Valuation Board using right-click Roll Over action in Collateral
Position view. This action is available if the following conditions are met:
•The selected position is in a single Collateral Number.
•Instrument of the repo transaction (with the same collateral number) is defined with the feature
Allow Roll Over (repo). (See TRM Instruments: Processing and Calculations Guide for more
details.)
•There are no rollover or substitution transactions with the same collateral number and opening
date is after the query date (to make sure the collateral position displayed in Collateral Valuation
Board is fully available for rollover at the maturity of the transaction).
Selecting the Roll Over action from the right-click menu opens a Transaction Manager application
used to capture rollovers and a dialog where transaction-level conditions of the rollover are
completed. When the dialog is accepted, the system creates a new rollover transaction. Details of
the rolled over collateral can be modified in Repo view of the application.
Note: You can also roll over repo transactions in Transaction Manager, see TRM Instruments:
Processing and Calculations Guide.
11.2.2 Collateral Management Reports
In addition to Collateral Valuation Board, collateral operations can be monitored using a set of
reports designed for this purpose.
The following reports can be used for monitoring collateral positions:
Report Description
Guarantee/Collateral
Management
This report contains all guarantees securing underlying transactions, including
guarantees with collateral requirements, as well as all collateral holdings.
Cashflows of underlying transactions are also included in the report unless
start-up parameter Drop Cashflows is used. The report can be used for pure
collateral management purposes as well but it offers wider functionality for
reporting any secured operations, for example, commercial loans secured partially
with guarantees and partially with collateral.
Report query is based on transaction attributes and is almost identical with
corresponding query in Key Figure Report. The report contains full valuation of
both underlying exposures and collateral.
11 Managing collateral
11.2 Monitoring collateral positions
360 © Wall Street Systems IPH AB - Confidential
Collateral Valuation This report replicates the logic used in Collateral Valuation Board to construct a
collateral position. Only guarantees requiring collateral are included and cashflows
of underlying transaction are not displayed. This is a pure collateral management
report.
Report query is the same as in Collateral Valuation Board and the report contains
all valuation information of both underlying exposures and the collateral.
Collateral Inventory This report contains only collateral related data.
Report query is largely based on attributes of the collateral instruments.
Guarantee Inventory This report contains only guarantee related data.
Report query is largely based on attributes of the guarantor client.
Report Description
Transaction & Risk Management Module (TRM) User Guide 361
Chapter 12 Monitoring positions
In TRM, you can measure your current exposure and simulate the effect of market movements on
your exposure (for example, the effect on your exposure of an increase or decrease in interest
rates). You can view results both as figures in a grid, and as various charts.
To see both your current exposure and simulations, you use Treasury Monitor: see 12.1 Treasury
Monitor on page 361. TRM also has various types of report you can use to obtain an inventory of
your current exposure, and also to measure your profit/loss since a target date you specify.
For measuring your positions and results for FX spot transactions, FX Spot Monitor application is
provided; this works in the same way as Treasury Monitor, but is adapted to FX spot transaction
data: see 12.3 FX Spot Monitor on page 393.
12.1 Treasury Monitor
To measure your exposure and results, you use Treasury Monitor. You can measure your actual
exposure, and perform simulations to test the effect that various transactions would have on your
portfolio. These simulations include spot, IR and volatility simulations, and movements over time.
You can also use Treasury Monitor to measure the risk levels of a portfolio against index portfolios.
12.1.1 Treasury Monitor menus
The following tables describes the menu items specific to Treasury Monitor and any layout which is
based on this application.
Other menu items which are common to all applications are described in 2.2.6 Using application
menus on page 34.
12.1.1.1 File
Menu item Description
Position Parameters Opens the Position Parameters dialog which allows you to specify new position
parameters, or to select a position you previously saved. The Position Parameters dialog
opens automatically when you start Treasury Monitor.
See 12.1.4.1 Defining position parameters on page 366.
Save Position As XML Allows you to save positions in an XML format. The saved position can be used by the
system administrator to initialize the server.
Save Position and
Pages As XML
Allows you to save the position and all pages in XML format. This is required when
starting the tmd process in preconfigured mode (see the TRM System Admin Guide for
more information).
Open Book
Ctrl+O
Allows you to select an existing book.
Save Book
Ctrl+S
Saves any modifications made to the current book.
12 Monitoring positions
12.1 Treasury Monitor
362 © Wall Street Systems IPH AB - Confidential
12.1.1.2 Edit
12.1.1.3 View
Save Book As Opens the Save As dialog so you can save the displayed pages as a new book.
Enter the following information:
•Book Name - name for the book.
•Owner - user or user group that can modify the book.
•User(s) - user or user group that can use the book.
Close Book Closes the current book.
Delete Book Deletes the current book.
Book Properties Opens the Book Properties dialog so you can view or modify the book’s owner and user
details.
The owner is allowed to modify the book and the user or user group can use the book,
but not modify its properties.
Print Prints the information currently displayed in the page.
Recent Books Allows you to quickly access the books that you have most recently used: a maximum
of nine books can be listed.
Menu item Description
Copy
Ctrl+C
Copies the values in the selected rows or columns. You can then paste the values into
another application.
Copy Page Copies the current page including headers. You can then paste the values into another
application.
Select/Unselect All Selects or unselects all cells in the current page. You can then use Edit - Copy to paste
the values into another application.
Menu item Description
Select Columns
Select Rows
Opens a multi-selection list so you can select the column or row groupings that you
want to display.
See 12.1.4.3 Selecting axis (column and row) groupings on page 371.
Swap Rows/Columns Changes the display of the columns and rows: the columns become rows and the rows
become columns.
Select Key-Figures Opens a multi-selection list so you can select the key-figures you want to display.
See 12.1.4.7 Selecting key-figures on page 379.
Zoom In
Zoom Out
Zoom to Default
Allows you to zoom into the display (to enlarge the figures), zoom out (to see more of
the grid), or zoom to default (to reset the original zoom).
Freeze Columns Locks the selected column and all columns to the left of it. This allows you to scroll
through the remaining columns, while the columns in the non-scrolled area remain
visible.
Move Page Left Moves the current page in the display to the left.
Move Page Right Moves the current page in the display to the right.
Menu item Description
12 Monitoring positions
12.1 Treasury Monitor
Transaction & Risk Management Module (TRM) User Guide 363
12.1.1.4 Page
Visual Settings Changes the display; select from:
•Bold, Gray, or Color Totals
•Normal, Gray, or Color Headers
•Flash Cells.
•Show Currency: If selected, cells that display monetary values show the currency
(code) in which the amount is calculated. (The currency is displayed between
parentheses to the left of the amount.)
•Full Precision: If selected, displays the maximum number of useful decimal places
(i.e. drops the trailing zeros) for all figures. If Full Precision is not selected, you can
configure the precision for a single figure using the Configure Precision menu item
which is available from the Key Figure dialog when you right-click on the selected
value. The default precision is 2 decimal places. The figure can be abbreviated to K
(thousands), M (millions), or B (billions) using the negative integers -3, -6, -9
respectively. The Configure Precision functionality works as follows:
Using the same figure as in the example above, the Full Precision functionality
works as follows:
Note: The full precision value is always shown in a tool-tip when you hover the mouse
over the figure, even if Full Precision is not selected.
•Show Axes Labels: Displays, in the top left corner of the grid, the names of the axis
groupings for the rows and columns.
Menu item Description
New Grid Page Inserts a new grid page with the default layout. A group of pages can be saved in a
book using File - Save Book As.
New Chart Page Inserts a new chart page with the default layout. A group of charts can be saved in a
book using File - Save Book As.
New Page with Layout Opens a selection list so you can select an existing page on which you want to base
your new page.
This allows you to create a new grid or chart page based on all, or part of the
configuration of the existing page.
Note: This short-cut is particularly useful when you have created a grid page and you
want a matching chart page to display the same data graphically rather than
numerically.
Menu item Description
Set Precision To... Result
2 (default) 104,814,886.84
8 104,814,886.8392
-3 104,814.89K
-6 104.81M
-9 0.10B
-365 Multiplies the underlying figure by 365.25. Used,
for example, to express duration figures in terms
of days rather than years.
Select… Result
Full Precision 104,814,886.8392
12 Monitoring positions
12.1 Treasury Monitor
364 © Wall Street Systems IPH AB - Confidential
12.1.1.5 Update
12.1.2 Start-up parameters
It is possible to alter the start-up parameters so that Treasury Monitor starts in a different mode.
See C.12 Treasury Monitor on page 686 for information about the options available.
New Page with Quick
Zoom
Creates a new page with the quick zoom layout.
Duplicate Page Creates a new page with the same properties as the current page.
Copy Page From Opens a list from which you can select a page you have already configured from one
book to copy it into the current book.
Apply Page Filter Allows you to apply a filter from a page you have already configured to the current
page.
See 12.1.4.2 Using filters on page 368 for more information.
Apply Page Layout Allows you to apply a layout from a page you have already configured to the current
page.
Apply Standard Layout Allows you to apply the default layout to the current page.
Apply Quick Zoom Allows you to apply quick zoom to the current page.
Edit Filter Opens Filter Editor so you can create logical expressions to filter the contents of the
current page.
See 12.1.4.2 Using filters on page 368 for more information.
Transaction Look-Up Allows you to view the transactions that correspond to the selection in Treasury
Monitor.
TRM does this by activating a special Transaction Manager mode from Treasury
Monitor.
Note: This functionality is not available if Treasury Monitor is running in
pre-configured mode.
Save Page as XML Allows you to save the current page in an XML format.
Rename Page Opens the Set Page Name dialog so you can rename the page.
Remove Page Removes the current page from the book. You need to select File - Save Book for the
removal to be taken into account.
Page Parameters Displays the details for the current page, including position parameters, the page
layout (rows and columns), and a filter (if one has been applied).
Menu item Description
Now (F5)
Realtime
Manually
Every 30 Seconds
Every Minute
(or Every 5, 10, 30
Minutes)
Every Hour
Allows you to select the update frequency, that is, how figures are updated and how
often. Figures can be updated automatically or manually.
• Automatic updating
If you want figures to be updated automatically, you select the updating period.
This period can range from Realtime (figures are updated continuously) to Every
Hour
.
• Manual updating
If you want figures to be updated manually, you first select Update - Manually. Then,
whenever you want to force the figures to be updated, you select Update - Now.
Menu item Description

12 Monitoring positions
12.1 Treasury Monitor
Transaction & Risk Management Module (TRM) User Guide 365
12.1.2.1 Running Treasury Monitor in pre-configured mode
You can run Treasury Monitor in pre-configured mode. This means that you can run it with only a
predefined set of views and positions available (for read only). You can monitor the position but
cannot change any of the axis selections or groupings. You can choose to save a page or book,
which is then available in both normal mode and in pre-configured mode for the running view.
12.1.3 Configuring Treasury Monitor
You can configure Treasury Monitor by creating pages or groups of pages in books, by selecting the
rows and columns you want to be displayed in each page, and by selecting the values or key-figures
to monitor.
You insert a new page using Page - New Grid Page or Page - New Chart Page. You select the values you
want to display in a page using View - Select Columns, View - Select Rows, and View - Select Key-Figures:
see 12.1.4.3 Selecting axis (column and row) groupings on page 371 and 12.1.4.7 Selecting
key-figures on page 379.
You can create and save the pages in multiple books either for your own personal use, or to be
shared by other users using File - Save Book As.
12.1.3.1 Default layouts
In Treasury Monitor, default layouts also exist which determine the layout of all new grids, charts,
and quick zoom pages, that you insert into a book.
These pre-configured settings for new pages are contained in a book called _Templates. The book
contains three pages: Standard Grid, Standard Chart, and Quick Zoom.
You can modify your default layout without affecting the _Templates book of other users using
Treasury Monitor. This is because you are only modifying the _Templates book that is applicable to
your user ID and group. (Permissions for users and groups are defined in Security Center by your
system administrator.)
Note: You should create the _Templates book if it does not already exist in the book selection
list. You name the book with an underscore at the beginning of the name, so that it is
displayed at the top of the list.
12.1.3.2 Modifying chart pages
You can display the information as a graph or chart using Page - New Chart Page. The chart is displayed
using the Standard Chart default layout but it is possible to modify the chart’s appearance.
To change the appearance of a chart page:
1. Select the component you want to modify by doing one of the following:
–Right-click the graph and select the component that you want to format from the menu.
–Double-click the component itself.
–Right-click the graph and select Wizard.
2. Make your changes in the resulting dialog.
3. Click Apply and OK to save the changes.
4. If you want to change the orientation of the graph, press and hold down the Ctrl key and drag
the graph to the position you want.
Note: For technical reasons, you can only change the appearance of a graph or chart. Any
changes made to the data in the graph will have no impact on the underlying data in TRM
and should be avoided.
12 Monitoring positions
12.1 Treasury Monitor
366 © Wall Street Systems IPH AB - Confidential
12.1.4 Monitoring positions in Treasury Monitor
12.1.4.1 Defining position parameters
To define position parameters:
1. Start Treasury Monitor or select File - Position Parameters to open the Position Parameters dialog.
2. Do one of the following:
–If you want to select a position you have previously saved, enter the following information
and click OK:
–If you want to enter new position parameters, click Details to display the lower part of the
dialog and fill in the parameters as described in the following steps.
Note: If you click Details again, the lower part of the dialog is hidden.
3. Enter the parameters you want in the Selection page:
Information Description
Position The position you want to monitor by selecting one of the views available in the
selection list.
This field is available if you have launched Treasury Monitor in pre-configured
mode. Once you have selected a position, the other parameters for the position
are populated as read-only information.
Book The book you want to monitor. This book is saved for the next time.
Information Description
Portfolio Portfolio or subportfolio you want to monitor. When you specify a portfolio, all
subportfolios within that portfolio’s hierarchy structure are also monitored.
Note: The selection list shows only those portfolios (and their subportfolios) to which
you have been given access. Portfolio permissions are set using Portfolio
Editor’s Allowed Users page.
Transaction State Minimum state that the transactions must have reached to be included in the analysis.
For example, if the minimum state is Open (the default value), Treasury Monitor
includes all transactions of state Open or later.
The various states that transactions can have are configurable to your organization.
Period Start
Period End
The start date is interpreted as one day before the date entered. The end date is the
actual date entered here.
Note: If you do not specify a period start date, the valuation is done only on the
Period End date. This means that no start figures are calculated, and cashflows
maturing before Period End date are not displayed.
Result Mode Result mode (accounting standard): FO/MO, FAS, IFRS, or Local.
12 Monitoring positions
12.1 Treasury Monitor
Transaction & Risk Management Module (TRM) User Guide 367
4. Enter the parameters you want in the Calculation page:
5. If you want to view or change the currency priorities defined in the Currency Priority Editor, click
Currency Priority. In the Select Currencies dialog, make the changes to the priorities and click OK to
save.
These changes are specific to the current position and do not affect the priorities defined in the
Currency Priority Editor. For more information about currency priorities, see 3.10 Currency
priorities on page 87.
Note: If you need to make further changes to the priorities, for the same position, after you have
saved the position, then the last saved priorities for that position are displayed.
State Context A value specifying whether certain transaction types are to be included in the position:
• Default - no cost-of-carry or collateral transactions.
• W/Cost-of-Carry - cost-of-carry transactions.
• W/Collateral - collateral transactions. These transactions are generated from repo
transactions.
• W/Cost-of-Carry/Collateral - both cost-of-carry and collateral transactions.
• W/Cost-of-Carry/Order - both cost-of-carry and order transactions.
• W/Order - order transactions.
Note: W/Cost-of-Carry can only be selected for portfolios which have the Cost-of-Carry
switch turned on: see 12.1.7 Monitoring cost-of-carry positions on page 390 for
more information.
Information Description
Information Description
Figure Currency The currency in which you want the results displayed.
TRM suggests the currency of the portfolio, but you can choose any currency you
want from the selection list.
Start Scenario
End Scenario
Market information scenario (for example, Freeze, Default) used for the Period Start
and Period End dates.
Valuation Mode Valuation mode: Default, Benchmark, or Theoretical.
VaR Scenario Correlation and volatility scenario you want to use in the calculations related to
value-at-risk.
VaR Date Date of the value-at-risk volatility and correlation data.
For example, to get today’s position and market rates (Period End = Today), but first
of the month volatility and correlation, set VaR Date to the 1st of the month.
VaR Horizon Length of the horizon: this can be one day, one month, or one week.
VaR Confidence
Level
Level of confidence that you wish to use for your Value-at-Risk analysis, expressed as
a percentage.
Start Date
Valuation
End Date
Valuation
Choose between Unrealized and Realized (default) or Unrealized and Closing the Books (if
triggered via a start-up parameter, see C.12 Treasury Monitor on page 686), where:
•Unrealized - Cashflows settling on the Valuation Date are considered as not yet
settled, i.e. they are valued normally (and profit figures are shown).
•Realized - Cashflows settling on the Valuation Date are considered as settled, i.e.
they display amount, market value and risk, but no profit figures are shown.
•Closing the Books - Cashflows settling on the Valuation Date are ignored. This
corresponds to valuation done in closing the books.
12 Monitoring positions
12.1 Treasury Monitor
368 © Wall Street Systems IPH AB - Confidential
6. If you do not want to update the analysis in real-time, turn off the Update in Real Time switch (it is
turned on by default).
As TRM calculates all transaction-related cashflows that are active for the selected period and
portfolio, you may wish to turn off the switch for large portfolio structures. You can revert to
real-time mode by selecting Update - Realtime.
Note: You can configure Treasury Monitor to disable real-time updates by using the
-no-realtime startup parameter: see C.12 Treasury Monitor on page 686.
7. Save the position parameters you have defined in the Saving page:
Note: If you save the position parameters with the current day, they are interpreted as "today"
whenever they are used in the future.
8. Click OK.
Treasury Monitor opens. Treasury Monitor does not contain any data if you have not saved a
configuration for the portfolio you selected.
Note: You can configure Treasury Monitor to be started directly with a given named position
parameter, thus skipping the Position Parameters dialog, using the start-up parameters
-skip and -position parameter. You can give such an instance a specific name, using the
-title parameter. This can also be used for saving the position of the window on the
screen, so you can set up more instances of Treasury Monitor, and re-start them later at
the same position: see C.12 Treasury Monitor on page 686.
12.1.4.2 Using filters
Filter Editor is a simple editor used to set up logical expressions that filter the content of a page in a
Treasury Monitor book. You can specify filters on all Treasury Monitor grouping criteria. For
example, if you only want to view data where the currency is SEK, you can set the filter to
Currency=SEK.
To set up a filter:
1. Select Page - Edit Filter.
2. In the Edit filter dialog, enter the expression you want to filter by.
–If you want to display all the available values, enter ? and press the Tab key.
Information Description
Position Name Name for the position.
Position Owner User or user group who can modify the position.
Position User User or user group who can use the position.
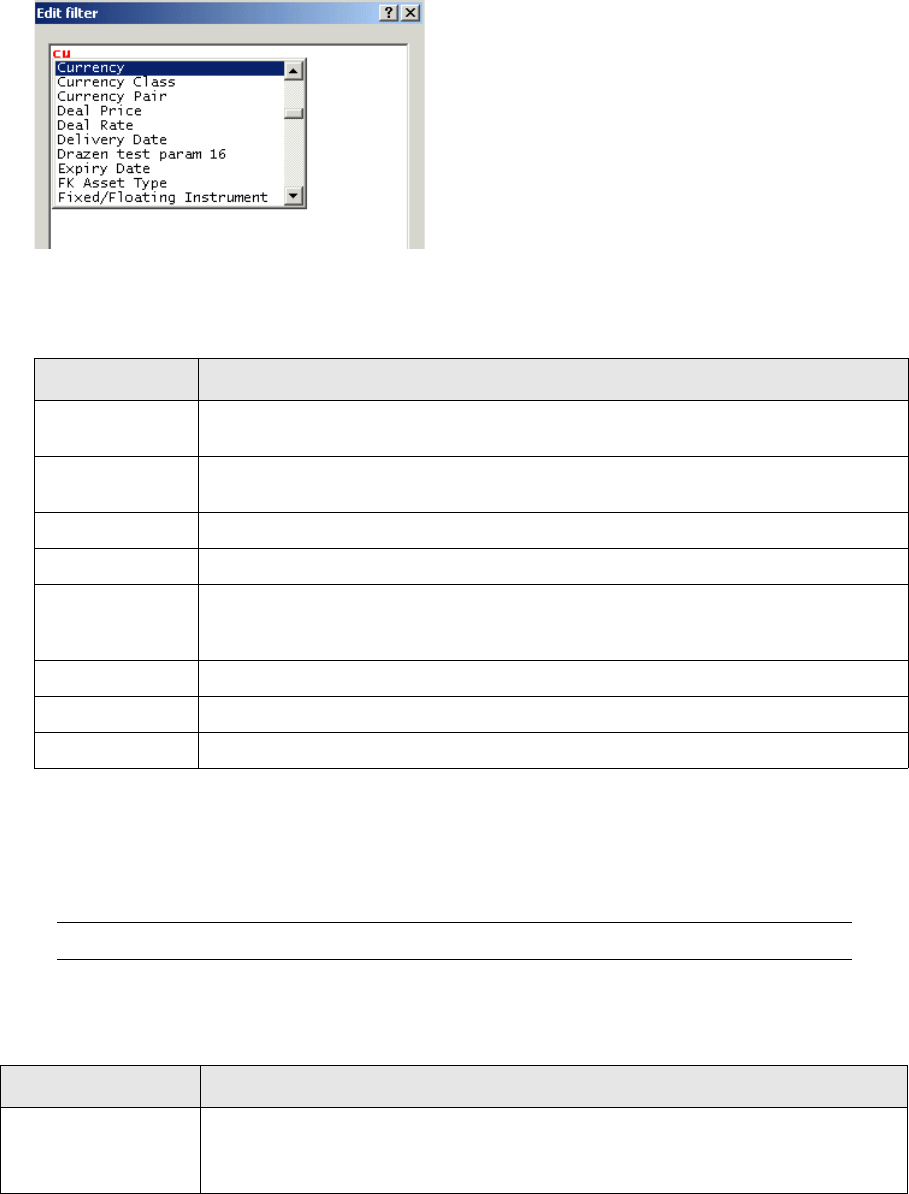
12 Monitoring positions
12.1 Treasury Monitor
Transaction & Risk Management Module (TRM) User Guide 369
–To display a context-sensitive list, enter the first letter or letters and press the Tab key: for
example, enter "cu" and the following list of values is displayed:
The context-sensitive list of values is supported for names and groupings (such as Currency),
and for values with selection lists (for example, USD, EUR).
3. You can use the following command keys when creating your filters:
4. Click OK when you have finished entering your filter criteria (the OK button is only enabled when
there are no syntax errors).
The data is filtered according to the criteria that you entered. The filter criteria are saved with
the page (in your book).
Note: This functionality is not available if Treasury Monitor is running in pre-configured mode.
12.1.4.2.1 Building filters
The table below contains some examples to help you build your filter:
Key Result
Tab Displays a context-sensitive list of values. Press the Tab key again or the Enter key to
make your selection.
Arrow Up
Arrow Down
Moves the cursor up or down the list of values.
F4 Moves the cursor to a syntax error. Syntax errors are displayed in red.
F8 Formats a complex expression.
Ctrl+Space Inserts a non-breaking space. Non-breaking spaces are required for row or column
names that are composed of more than one word, for example, Instrument Group
Name.
Ctrl+A Selects all the text in the Edit filter dialog.
Ctrl+C Copies the selected text.
Ctrl+V Pastes the selected text.
Filter Description
Simple expressions All conditions must include the equals (=) sign (with the exception of the in operand
explained below).
Currency = SEK

12 Monitoring positions
12.1 Treasury Monitor
370 © Wall Street Systems IPH AB - Confidential
Multiple conditions You can link conditions using the operands and and or. To simplify multiple or
conditions, you can use in. Use commas to separate conditions.
Currency = SEK or Currency = USD or Currency = GBP
Currency = USD and Portfolio = P1
Currency in [SEK, USD, GBP]
Negative conditions To specify a negative condition, enter not before the expression.
not Currency = SEK
Currency = USD and not Portfolio = P1
Brackets Filter Editor uses a standard prioritization of operands in expressions; brackets affect
the priorities in an expression.
Currency = SEK and (Portfolio = P1 or Portfolio = P2)
Pair Values Some values are more complex than a simple number, string or date. They require
definition of the context. The first parameter in the brackets describes the context,
the second the value.
The format can vary with the regional setting. For example, UK Regional Setting uses
a comma separator as shown here, while French Regional Setting uses a semicolon.
When a text field is specified in lower case, double quotes are required. In upper case,
quotes are not required.
For example:
Counterparty Group = {ISSUER-EXCLUDE, OWN-ISSUE}
In the Payment Period example, cashflows falling into the overnight gap according to
the IR gap set are filtered.
Payment Period = {IR, O/N}
Some groupings (for example, Instrument Group Name and Leg Instrument Group Name)
can have their values configured to enable the position to be filtered on several levels
for the same grouping (1 = Top, 2 = Second, 3 = Third, and 4 = Lowest). For these,
the filter syntax is slightly different: the pair value must be in line for the filter to work
correctly.
For example, for Instrument Group Name, the grouping must be at the suggested level.
Instrument Group Name = {1, "Debt Instruments"} and
Instrument Group Name = {2, "Bond"} and
Instrument Group Name = {3, "Fixed-Rate Bond"} and
Instrument Group Name= {4, "Corporate"}
The number for the first parameter in the brackets represents the grouping level.
Note that it is also possible to use 0 (which represents the lowest Instrument Group
Name level).
The Branch grouping can also have its values configured to enable the position to be
filtered on more than one branch. In this case, the number represents the relevant
Branch Code (found in Branch Code Editor).
Branch Code = {0, "Automobile Industry"} and
Branch Code = {1, "Issued in Europe"}
Handling of spaces in
names and values
In grouping criteria names, where the name is composed of more than one word,
spaces are represented by a non-breaking space character. You enter a non-breaking
space using Ctrl + Space.
Transaction Type = Spot
Cashflow Sign = +
To specify a value that contains a space, use quotes (“”).
Issuer = “ABN AM”
Instrument Group Name = “EQ CHF”
Filter Description
12 Monitoring positions
12.1 Treasury Monitor
Transaction & Risk Management Module (TRM) User Guide 371
12.1.4.2.2 Clearing filters
To clear a filter:
1. Select Page - Edit Filter.
2. Press Ctrl+A to select everything in the filter.
3. Use the Delete or Backspace keys to delete the content.
4. Click OK.
12.1.4.2.3 Drill-down filters
In Treasury Monitor you can drill-down an analyzed position further by selecting part of the position
and creating a new page. The new page contains only the selected sub-position, using a filter that
has been created automatically. You can edit this filter using Filter Editor.
If you drill-down a position which is already limited by a filter, the filter in the new page is inherited
from the original page and extended based on your sub-selection.
12.1.4.3 Selecting axis (column and row) groupings
Using the View - Select Columns and View - Select Rows menu options, you can open the multi-selection
lists that enable you to select the axis values according to how you want to group the information
displayed in the monitor’s page.
You can configure the values of some axes and also select the same axis as many times as you
want. This allows you to display information for multiple instances of the same axis grouping (see
12.1.4.4 Configuring axis values on page 378 for more information).
See also 12.1.4.5 Specifying time intervals on page 379 and 12.1.4.6 Positioning totals for axis
groupings on page 379.
The tables below explain the different column or row names, according to the order in which they
are grouped in the dialog.
12.1.4.3.1 Position
Numbers and dates Number and date formats follow the settings in your Windows Regional and Language
Options control panel.
For example, if the date setting is dd-MMM-yyyy, you enter 23-Mar-2010 to specify
23 March 2010. Use commas to separate numbers and dates.
Transaction Number=123567
Transaction Number in [123567,124567]
Expiry Date=23-Mar-2010
Expiry Date in [23-Mar-2010,20-Feb-2010]
Dates in expressions You can use a date parameter in an expression to filter the values dynamically.
For example, you can set the filter so that the values for "Today" (or a date relative to
Today) are always displayed.
Opening Date = Today
Opening Date = Yesterday
Opening Date = "Today 5 days ago"
Date comparisons It is possible to use ">" and "<" comparisons with some dates: Opening Date, Expiry
Date, and Payment Date.
Opening Date > "2005-01-31"
Filter Description
Value Groups information according to...
Total Total of the position.
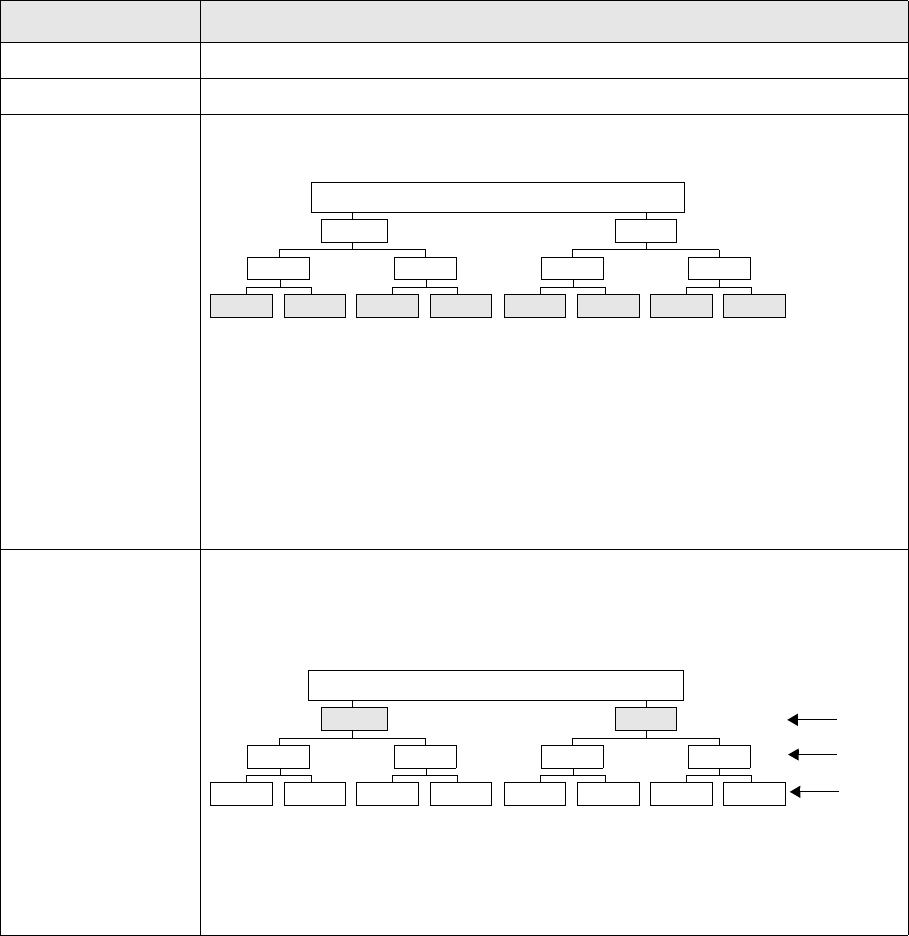
12 Monitoring positions
12.1 Treasury Monitor
372 © Wall Street Systems IPH AB - Confidential
Package Type Package type to which the transaction belongs.
Package ID of the package to which the transaction belongs.
Portfolio Subportfolios in the portfolio hierarchy you selected in the Position Parameters dialog.
For example:
You will probably want to use Portfolio most often when you have selected a low-level
portfolio: using the example above, if you are a European FX trader, you are only
interested in E-Spot and E-Fwd, so it makes more sense to select E-FX when you start
up Treasury Monitor.
• If you want a higher-level, more general grouping (for example, if you are a
general manager wanting an overview per country), use Top Portfolio instead (see
below).
• You can also compare the difference between portfolios and their comparison
portfolios: see Portfolio Compare below.
Top Portfolio Top Portfolio is useful for getting a high-level overview: for example, if you are a
general manager and interested in performance for a whole country.
By default, this corresponds to the portfolio in Level 1 of the hierarchy which is
directly below the portfolio you specified in the Position Parameters dialog. For example:
It is also possible to use a portfolio from a lower level in the hierarchy as the top
portfolio:
1. Right-click this field in the axis values list and select Configure Values.
2. Specify the level you want from the selection list.
Value Groups information according to...
Portfolio specified in T-Monitor start-up
E-FIE-MM
Europe
E-IR
E-FwdE-Spot
E-FX
U-FIU-MM
USA
U-IR
U-FwdU-Spot
U-FX
Portfolio specified in T-Monitor start-up
E-FIE-MM
Europe
E-IR
E-FwdE-Spot
E-FX
U-FIU-MM
USA
U-IR
U-FwdU-Spot
U-FX
Level 1
Level 2
Level 3
12 Monitoring positions
12.1 Treasury Monitor
Transaction & Risk Management Module (TRM) User Guide 373
Portfolio Compare Portfolios against their comparison portfolio. For the comparison portfolio, TRM
displays the key-figure. For any other portfolio, TRM displays the difference between
the portfolio and the comparison portfolio, where:
Difference = Portfolio Key-Figure – Comparison Key-Figure.
If, for example, you want to measure the performance of one trader against another,
the comparison portfolio can be a similar portfolio held by another trader. Usually,
however, you will probably want the comparison portfolio to be the index portfolio, so
that you can compare your portfolio against its benchmark index key-figures.
If you want to view relative figures as percentages of total change, for example,
Market Value% of Total Change, you must select Portfolio Compare. If you only want to
compare the actual key-figures of different portfolios, use Portfolio or Portfolio Top Level
instead.
TRM selects the comparison portfolio as follows:
The comparison portfolio is always either the uppermost portfolio (if Portfolio Compare
is on the X axis), or leftmost (for the Y axis).
Position Type Cashflows separated into Settlement and Position groups, enabling the separation of
settlement cashflows (Principal, Accrued Interest, Premium) from the rest of the
transaction cashflows.
Liquidity Type Two categories of cashflow, namely position cashflows (committed) and settlement
cashflows (uncommitted), where:
• Committed cashflows include the following: all cashflows with a value date after
the current spot date of the respective instrument; all pseudo cashflows, except
balances (in other words, FRAs, futures, options, and so on).
• Uncommitted cashflows include the following: physical account balances, fees,
profit and loss, synthetic portfolio (cost-of-carry) balances; all other cashflows
with a value date on or before the current spot date of the respective instrument.
Compare with Position Type (see 12.1.4.3.1 Position on page 371), which also splits
the cashflows into position and settlement cashflows, but where the definitions of
position and settlement are different.
Note: For futures with daily fixing, grouping by Liquidity Type is as follows:
- The 'uncommitted' liquidity type is equal to the profit and loss (netting result)
of the day, and
- The 'committed' liquidity type is equal to the difference between the market
price and the actual fixing price of the day.
Liquidity Type
(Extended)
This is similar to Liquidity Type, except that it automatically gives a second level of
grouping.
• Uncommitted cashflows are grouped into receivables and payables
• Committed cashflows are grouped by instrument.
Position This is instrument-sensitive. Depending on the definition of the instrument under
analysis, the position can be either grouped by transaction, or grouped by instrument.
Classification Classification group of the transaction
Value Groups information according to...
None: Use first portfolio
(in alphabetical order)
from this hierarchy level
More than one: Use first
comparison portfolio
(in alphabetical order)
Only one: Use this
portfolio
How many portfolios in the selected portfolio hierarchy have
the Comparison switch in Portfolio Editor turned on?
12 Monitoring positions
12.1 Treasury Monitor
374 © Wall Street Systems IPH AB - Confidential
12.1.4.3.2 Instrument
12.1.4.3.3 Transaction
Value Groups information according to...
Instrument Group Id of the instrument group
Instrument Group
Name
Name of the instrument group to which the instrument belongs.
You can specify up to four levels of Instrument Group Name (1 = Top, 2 = Second, 3 =
Third, and 4 = Lowest) by selecting multiple instances of the axis and configuring the
values of each one: see 12.1.4.4 Configuring axis values on page 378
Instrument Instrument used to valuate the cashflows.
Note: When grouping by Instrument or Leg/Delivery Instrument, the information is
sorted by Expiry Date, Maturity Date, and then by Instrument Id.
Secondary Instrument Instrument used in certain transactions, such as, Security Loan transactions.
Leg Instrument Group Id of the leg instrument group (as for Instrument Group, but for the leg instrument of
the cashflow).
Leg Instrument Group
Name
Name of the leg instrument group to which the leg instrument belongs (As for
Instrument Group Name, but for the leg instrument of the cashflow).
Leg/Delivery
Instrument
Leg defined as an instrument in Instrument Editor. This is useful for viewing swap
positions when the swap is defined as an instrument with two legs, for example, a
fixed-to-floating instrument where the 1st leg is fixed and the 2nd leg is floating.
Note: When grouping by Instrument or Leg/Delivery Instrument, the information is
sorted by Expiry Date, Maturity Date, and then by Instrument Id.
FX Currency Pair Currency pair of an FX transaction.
Underlying Instrument For derivatives: the instrument defined (in Instrument Editor) as the underlying for
the derivative. If there is no underlying, Underlying Instrument groups according to the
instrument itself
Leg Security Identifier
Typ e
The default security identifier attached to the leg instrument. The behavior is identical
to the behavior described for the Security Identifier.
You can also choose to display only one specific type of identifier by right-clicking the
field, selecting Configure Values..., and then selecting the specific type.
Security Identifier
Typ e
The default security identifier attached to the instrument. When no identifier is
attached, then the instrument ID is displayed.
You can configure the value to display only one specific type of identifier: right-click,
select Configure Values... and select the identifier type you want to display. In this case,
if no identifier of that type is found, then the field is left blank.
Security identifiers are defined in the Security Identifier Editor, see 3.44 Security
identifier types (optional) on page 154.
Branch Branch used for grouping the instrument. You can use these branch codes for
miscellaneous groupings, such as geographical area, or industrial sector.
You can group the information under more than one branch by selecting multiple
instances of the axis and configuring the values of each one: see 12.1.4.4 Configuring
axis values on page 378.
Value Groups information according to...
Tran s acti on Nu mbe r Transactio n num ber (unique ID for the transaction).
Parent Transaction
Number
Parent transaction number.
Continuation Number Transaction number of the initial (underlying) transaction.
Reference Number Reference number of the transaction.
12 Monitoring positions
12.1 Treasury Monitor
Transaction & Risk Management Module (TRM) User Guide 375
12.1.4.3.4 Cashflow
Transaction Sign Sign of the transaction: in other words, Buy or Sell.
Tran s acti on Typ e Type of tran saction ( for example, Spot, Forward, Repo, and so on).
Transaction Kind Transaction kind: for example, Exercise, Early Expiration.
Transaction State Transaction state, for example, Final.
Deal Rate Deal/strike rate of the transaction. Strike is relevant to options.
Note that when the Deal/Strike Rate (Normal) figure is used as a total in Treasury
Monitor for options, the weighted average is given (weighted with nominal amount).
Deal Price This is calculated using the Book Value and Nominal Amount. In addition, for swaps
and swaptions, the "weight" for transaction level Deal/Strike Price is the deal nominal
amount, thus displaying meaningful figures, for example, for on-balance swaptions
(premium as percentage of nominal).
If the price multiplier is used, Deal/Strike Price is divided by this multiplier to display
the actual Deal Price.
Trading Unit Number of contracts in one trading unit.
Property Property defined by the user at transaction level.
Leg Leg of the transaction to which the cashflow belongs.
Value Groups information according to...
Value Groups information according to...
Currency Currency of the cashflow.
Risk Currency Risk currency of the cashflow.
Local/Foreign Currency of the cashflow:
• Local - transactions where the cashflow currency is the same as the base currency
of the portfolio
• Foreign - transactions where the cashflow currency is different from the base
currency of the portfolio.
Currency Class Currency class of the cashflow.
Currency classes are optional groupings of currencies. When you define a currency in
Currency Editor you can select a currency class for it. The currency classes
themselves are created for you at implementation.
Class Currency Class equivalent currency.
Displays the currency in which class-equivalent key-figures are expressed.
Payment Currency The currency in which the payment is made.
Payment Type The type of payment. The following payment types are available:
• Fixed - all instruments with known cashflows.
• Forecasted Interest - instruments that have interest associated with them, for
example, FRNs.
• Forecasted Profit/Loss - instruments that have p/l associated with them, for
example, FRAs and futures.
• Optional - options, settlements, and CTD cashflows
Cashflow Sign Sign of the cashflow: either “receive” or “pay”.
Cashflow Type Cashflow type, namely: Principal; Redemption; Expiration; Interest; Coupon; FX
settlement; Balance; Fixing; Fee.
Cashflow Main Type Main type of cashflow, such as Principal or Fee/Tax.
12 Monitoring positions
12.1 Treasury Monitor
376 © Wall Street Systems IPH AB - Confidential
12.1.4.3.5 Client
12.1.4.3.6 Valuation
12.1.4.3.7 Date
Cashflow Group Cashflow group used to analyze the cashflows.
Cashflow groups are defined in Cashflow Group Editor.
Value Groups information according to...
Value Groups information according to...
Payment Counterparty Id of the payment counterparty.
Payment Counterparty
Name
Counterparty of the cashflow.
Counterparty Id of the counterparty of the transaction
Counterparty Name Counterparty of the transaction
Counterparty Group Counterparty group to which the counterparty of the transaction belongs.
Issuer Issuer of the instrument
Issuer Group Issuer group to which the issuer of the instrument belongs.
Owner Account owner.
Owner Group Account owner group.
Credit Client Guarantors of the issue.
Value Groups information according to...
Key-Figure Key-figure.
To see any key-figures at all, you must specify Key-Figure for either the rows or the
columns: this value adds (or removes), all the key-figures you have selected.
If Key-Figure is not selected as a row or column grouping, the key-figures are not
displayed.
For an explanation of the key-figures you can use, see 12.1.4.7 Selecting key-figures
on page 379.
Market Rate Either the instrument or the valuation rate (depending on the instrument definition)
that is used to calculate the market value of the position.
Cashflows that are not discounted, in other words those that mature on the current
date, are displayed under the label Other.
Market Period Yield curve used to value the instrument.
Position Date Date of the position.
Valuation Date Date of the valuation.
Realized Displays realized and unrealized results separately.
Value Groups information according to...
Risk Date Date when the cashflow takes place, or when a pseudo cashflow is assumed to take
place.
Payment Date Payment date of the cashflow.
Value Date Value date of the transaction.
12 Monitoring positions
12.1 Treasury Monitor
Transaction & Risk Management Module (TRM) User Guide 377
12.1.4.3.8 Period
Note: See 12.1.4.5 Specifying time intervals on page 379 for more information.
12.1.4.3.9 Account
12.1.4.3.10 Parameter
Opening Date Opening date of the transaction.
Expiry/Maturity Date The maturity date of the transaction (in the case of non-derivatives such as bonds and
loans) or the expiry date of the transaction (in the case of derivatives such as options
and futures).
Underlying Maturity
Date
The maturity date of the transaction (in the case of non-derivatives) or the maturity
date of the underlying instrument/transaction (in the case of derivatives).
Delivery Date Date when the instrument is to be delivered.
Value Groups information according to...
Value Groups information according to...
Risk Period Gap (of the selected Gap Set) into which the cashflow's Risk Date falls.
Payment Period Gap (of the selected Gap Set) into which the cashflow's Payment Date falls.
Expiry/Maturity Period Gap (of the selected Gap Set) into which the transaction's Expiry / Maturity Date falls.
Underlying Maturity
Period
Gap (of the selected Gap Set) into which the transaction's Underlying Maturity Date falls.
Value Groups information according to...
Bank/Custody Account Bank account into which the payment is made.
Bank/Custodian Bank into which the payment is made.
Value Groups information according to...
Parameter 1-19 Parameter of the transaction.
Parameters are grouping categories for transactions. You can define the parameters to
group transactions according to your own choice of criteria.

12 Monitoring positions
12.1 Treasury Monitor
378 © Wall Street Systems IPH AB - Confidential
12.1.4.3.11 Simulation
Note: See 12.1.5 Simulating movements in Treasury Monitor on page 387 for more information
about the Simulation groupings.
12.1.4.3.12 Loans
Note: See the guide TRM Commercial Lending User Guide for a detailed explanation of the
column and row names.
12.1.4.4 Configuring axis values
Some axis groupings can be defined further by configuring their values. It is also possible to select
the same axis more than once.
For example, you can select Branch as one or more axis groupings, then select the individual
branches you want to use to group the information on each axis by configuring the values.
To configure the axis values:
1. Select View - Select Columns or View - Select Rows to open the corresponding configuration dialog.
2. In the resulting dialog, select the grouping value you want to configure from the Selected list on
the right side of the dialog.
3. Right-click the grouping value and select Configure Values.
Value Groups information according to...
Simulate FX Spot Range and offset of the FX spot simulation. See 12.1.5.1.1 Simulate FX spot on page
388.
Simulate FX Cross Range and offset of the FX cross simulation. See 12.1.5.1.2 Simulate FX cross on
page 388.
Simulate FX Rate
Volatility
Range and offset of the volatility simulation of the FX Currency Pair. Select switch
Relative Changes to determine if the offset should be absolute or relative. By default, it
is not set. See 12.1.5.1.3 Simulate FX Rate Volatility on page 389.
Simulate FX ATM
Volatility
Range and offset of the ATM volatility simulation of the FX Currency Pair. Select switch
Relative Changes to determine if the offset should be absolute or relative. By default, it
is not set. See 12.1.5.1.4 Simulate FX ATM Volatility on page 389.
Simulate IR Volatility Range and offset of the volatility reference simulation. See 12.1.5.1.5 Simulate IR
Volatility on page 389.
Simulate Interest Rate Range and offset of the IR simulation. See 12.1.5.1.6 Simulate Interest Rate on page
389.
Simulate IR Scenario
Simulate Spread
Scenario
Simulate Price
Scenario
Simulate FX Scenario
Simulate IR Volatility
Scenario
Simulate FX Volatility
Scenario
Range and offset of the simulation scenario.
To select a particular scenario, right-click the selected grouping value, select Configure
Values... and select the specific scenario from the list.
Scenarios are defined in the relevant scenario or simulation editors, for example, FX
Volatility scenarios are defined in FX Volatility Simulation Editor.
Simulate Quotation
Date
Date for the price/rate are loaded.
The split in the Y-axis column between ‘Base’ and ‘Simulate Quotation Date’ is
displayed. Other figures are calculated at Valuation Date (start-up parameter), but
use the price/rate from this date (Market Value, for example).

12 Monitoring positions
12.1 Treasury Monitor
Transaction & Risk Management Module (TRM) User Guide 379
The values available for this axis are displayed. Note that this menu item is only available for
axes that can be configured further.
4. In the resulting dialog, select the value you want to assign to the axis.
5. Click OK.
6. Repeat the procedure for each axis grouping you want to configure.
12.1.4.5 Specifying time intervals
In Treasury Monitor, you can select the gap set (set of time intervals), that is used when the
grouping value Period is selected (see 12.1.4.3.8 Period on page 377).
To select the gap set:
1. Using either View - Select Columns or View - Select Rows, select the Period value for which you want
to define the time intervals.
2. In the Selected list on the right side of the resulting dialog, right-click the Period value, for
example, Payment Period, and select Configure Values.
The gap sets available for that period type are displayed.
3. In the resulting dialog, select the gap set that you want to use from the list.
Turn on the Relative switch if you want the gaps to be relative.
4. Click OK.
Note: If the calendar of the Figure Currency differs from the calendar specified in the Gap Editor,
then a combination of the two calendars is used. If no calendar is specified for the gap,
then the calendar of the Figure Currency is used by default. Gap sets are created in Gap
Editor (see 3.7 Gaps (time intervals) on page 62).
12.1.4.6 Positioning totals for axis groupings
Once you have selected the groupings that you want to use in Treasury Monitor, you can select
whether totals are displayed for the various groupings.
•For rows, you can display totals at the top or the bottom of the set of figures, or both.
•For columns, you can display totals and sub-totals at the left or at the right of the set of figures,
or both.
Displaying totals at both top and bottom (or both left and right) is useful if you have a long set of
figures.
To position totals for groupings:
1. Using either View - Select Columns or View - Select Rows, select the grouping value for which you
want to display totals.
2. In the Selected list on the right side of the resulting dialog, right-click the grouping value and
select either Left Totals or Right Totals for columns, or Top Totals or Bottom Totals for rows.
3. Click OK.
12.1.4.7 Selecting key-figures
The following tables explain the key-figures you can select. All the key-figures show results for the
period you define in the Position Parameters dialog. For any of the key-figures to be displayed, either
your columns or rows must contain the Key-Figure column or row grouping.
Note: To open the list of key-figures, select View - Select Key Figures or right-click the column
header and select Select Key Figures
12 Monitoring positions
12.1 Treasury Monitor
380 © Wall Street Systems IPH AB - Confidential
Many key-figures have different characteristics. For example, Market Value can be viewed as Market
Value, Market Value (Start) or Market Value (Change), and so on. The result displayed is different depending
on the characteristic specified between brackets.
Key figures that do not have a characteristic specified between brackets can be found under the
Figures section. For key figures that can have several characteristics, such as Market Value, the one
provided in the Figures section displays the value of the figure at the end of the period.
Key figures with specified characteristics are grouped under Special Figures. For an explanation of the
different modes, see 12.1.4.7.11 Special figures on page 387.
The tables below describe the key-figure values, according to the way they are grouped in the
key-figure selection dialog.
12.1.4.7.1 Cashflow
12.1.4.7.2 Transaction
Key-figure Shows this result (for period defined in T. Monitor start-up)
Amount Nominal cashflow amount expressed in the currency of the cashflow, for example,
coupon, interest, redemption cashflow, and so on.
Compare with Nominal Amount in 12.1.4.7.2 Transaction on page 380.
Payment Date Payment date of the cashflow.
Risk Date Date when the cashflow takes place, or when a pseudo cashflow is assumed to take
place.
Maturity Date Maturity date of the transaction.
Payment Amount Amount expressed in the payment currency of the transaction.
Class Amount Payment amount expressed in the currency class to which the payment currency
belongs.
Class amount is calculated from payment currency and payment amount if the family
rate has been set for the class currency: otherwise payment currency and amount are
shown.
Spot Value Spot value gives the amount of an FX spot transaction that would hedge the FX
exposure of the position. In most cases, this is the local market value of the
instrument given at spot.
The exception is FX derivatives, where spot value is based on the delta of the option.
Also, if the market value of an FX forward deal is calculated with the Quoted method
(i.e. using forward FX points instead of the valuation curve of the currency), then the
spot value is based on present value, which is calculated using the forward curve,
instead of market value.
Payment Spot Value Spot value expressed in the payment currency of the transaction.
Base Amount Amount of the cashflow multiplied by the FX spot rate against base currency.
Base Amount (Fwd) Amount of the cashflow multiplied by the FX forward rate against base currency.
Risk Value Amount upon which risk calculations are based.
Risk Base Value Amount upon which risk calculations are based, converted into the figure currency
using the FX spot rate.
Key-figure Shows this result (for period defined in T. Monitor start-up)
Size Units or Nominal Amount.
Nominal Amount Face value of the transaction, either with or without interest, depending on the type of
instrument.

12 Monitoring positions
12.1 Treasury Monitor
Transaction & Risk Management Module (TRM) User Guide 381
12.1.4.7.3 Valuation
Spot Nominal Amount For IR options, this is the spot equivalent exposure, namely:
delta * Nominal Amount
For ordinary IR instruments, it is the same as Nominal Amount.
Units Amount of units of the equity, futures, or options transaction.
Underlying Units Number of units of the underlying equity corresponding to the size of the option
contract.
Underlying Units
(Spot)
Spot equivalent exposure of units, namely:
delta * Units
Delivery Amount Amount of a security that is delivered on the delivery date. To use this key-figure,
grouping is done by Leg, rather than by instrument.
Delivery Face Amount Face amount (i.e. the original nominal amount) of a security that is delivered on the
delivery date.
Delivery Units Number of units of a security that is delivered on the delivery date.
Deal Nominal Amount Nominal amount of the first leg. This is useful for swaps, swaptions, and FX
transactions.
Deal Rate
Deal Price
Price or rate at which the transaction is made. This key-figure provides the transaction
rates or average rates for all transactions made with a particular instrument as simple
break-even averages of all outstanding transactions.
For future transactions, Deal Price displays the last fixing price (or deal price if not
fixed) of the transaction. Matching does not affect this.
Key-figure Shows this result (for period defined in T. Monitor start-up)
Key-figure Shows this result (for period defined in T. Monitor start-up)
Book Value Book value of the transaction, expressed in the figure currency.
Accrued Book Value Total of the transaction book value and the accrued part of the premium or discount of
the original transaction.
To display this key-figure, the instrument must have an accrual method defined.
Local Book Value Book value of the transaction, expressed in the transaction/cashflow currency.
Market Value Market value is the value of a transaction according to the prices in the market in
which that transaction is traded.
Local Market Value Market value of the transaction, expressed in the transaction/cashflow currency.
Clean Market Value Market values not including accrued interest.
Underlying Market
Value
Underlying market value shows what a position looks like if it only consists of spot
positions. You use it for monitoring whether you have more capital invested than you
own.
The underlying market value for short MM futures is defined as the Present Value of
the far leg.
Underlying Market
Value Local
Underlying market value of the transaction, expressed in the transaction/cashflow
currency.
Residual Market Value Residual market value is = Total Market Value - Underlying Market Value.
IR Difference Difference between interest rates of the two currencies.
12 Monitoring positions
12.1 Treasury Monitor
382 © Wall Street Systems IPH AB - Confidential
12.1.4.7.4 Option figures
Key-figure Shows this result (for period defined in T. Monitor start-up)
Intrinsic Value For an option, this is the part of the market value that is due to the difference between
the strike price and the spot (or forward price). For a put FX option, with the Intrinsic
Value type "Spot" this is:
Intrinsic value = Max (Spot Price - Strike Price, 0).
Depending on the intrinsic value type selected for the instrument, the forward price
may be used instead of the spot price, and you can also choose whether to discount
this value to the valuation date.
Time Value For an option, this is the part of the market value due to the time to expiry. It is
defined as:
Time Value = Market value - Intrinsic Value.
Time Risk Time risk figure for options, based on the unit price of the option presented as a
function of time and the spot price.
Asset Rho Sensitivity of the market value with regards to the interest rate of the asset currency.
Cash Rho Sensitivity of the market value with regards to the interest rate of the cash currency.
Gamma Value Measurement of the non-linearity of the axis grouping, calculated as gamma *
Nominal Amount.
Delta Sensitivity of the market value with regards to the fx spot rate between the asset and
the cash currency.
Delta Cash The Delta multiplied by FX Spot Rate between the asset and the cash currency.
Delta Asset The Delta minus the Market Value expressed in the Asset currency.
Gamma The theoretical Gamma multiplied by the FX Spot Rate between the asset and the
cash currency scaled by 100.
Gamma Cash The Gamma multiplied by the FX Spot Rate between the asset and the cash currency.

12 Monitoring positions
12.1 Treasury Monitor
Transaction & Risk Management Module (TRM) User Guide 383
Upper Barrier Asset
Rho Gap
Upper barrier sensitivities. See TRM Instruments: Processing and Calculations Guide
for more details.
Upper Barrier Asset
Yield Gamma Gap
Upper Barrier Cash
Rho Gap
Upper Barrier Cash
Yield Gamma Gap
Upper Barrier Delta
Gap
Upper Barrier Digital
Upper Barrier Digital
Local
Upper Barrier Gamma
Gap
Upper Barrier Sigma
Gamma Gap
Upper Barrier Theta
Gap
Upper Barrier Vega
Gap
Upper Barrier Volga
Gap
Lower Barrier Asset
Rho Gap
Lower barrier sensitivities. See TRM Instruments: Processing and Calculations Guide
for more details.
Lower Barrier Asset
Yield Gamma Gap
Lower Barrier Cash
Rho Gap
Lower Barrier Cash
Yield Gamma Gap
Lower Barrier Delta
Gap
Lower Barrier Digital
Lower Barrier Digital
Local
Lower Barrier Gamma
Gap
Lower Barrier Sigma
Gamma Gap
Lower Barrier Theta
Gap
Lower Barrier Vega
Gap
Lower Barrier Volga
Gap
Key-figure Shows this result (for period defined in T. Monitor start-up)
12 Monitoring positions
12.1 Treasury Monitor
384 © Wall Street Systems IPH AB - Confidential
12.1.4.7.5 Risk
Vega Exposure against a change in the volatility of the underlying instrument.
Volga Second derivative with respect to the volatility.
Vanna Sensitivity of the Vega with regards to FX spot rate between asset and Cash currency.
Rho An interest-rate exposure figure for FX options.
The difference between IR Exposure and Rho is that Rho considers the change in the
delta, implied by a change in the interest rates (whereas IR Exposure does not).
Theta Sensitivity of the option in relation to the time to expiry.
Bleed
Speed
For all Greeks: Delta, Gamma, Vega, Cash Rho, Asset Rho, and Theta; the Bleed and
Speed figures are the derivatives of the Greeks with respect to the time and the spot
rate, as follows:
• The Delta Bleed is the sensitivity of the delta with respect to the time
• The Delta Speed is the sensitivity of the delta with respect to the spot rate, that is,
the Gamma in this context.
Key-figure Shows this result (for period defined in T. Monitor start-up)
Key-figure Shows this result (for period defined in T. Monitor start-up)
FX Exposure The sensitivity of the value of the cashflow to a change in the FX rate.
Price Exposure The sensitivity of the present value of the transaction to a change in the price of the
instrument, or the underlying instrument in case of a derivative. Price Exposure is
scaled so that it corresponds to a price change defined as Exposure Offset at the
instrument level.
IR Exposure +%
IR Exposure -%
These key-figures divide into IR Exposure (+ %) and IR Exposure (- %) key-figures,
where (+ %) figures give the gain or loss that would result from interest rates moving
up, and (- %) the result from interest rates moving down.
Apart from the fact that the IR exposure key-figures relate to IR sensitivity rather
than EQ sensitivity, the IR Exposure key-figures are the same as the EQ Exposure
key-figures.
Note also the key-figure Rho Risk, which is similar to IR Exposure, except that Rho
Risk considers the change in the delta, implied by a change in the interest rates
(whereas IR Exposure does not).
To see the % of Total Change figures, you must select the axis grouping Portfolio
Compare: see 12.1.4.3.1 Position on page 371.
IR Exposure (1bp) IR exposure calculated as the average of a one basis point upward change in interest
rate and a one basis point downward change in interest rate.
Price Exposure Value Price exposure without the scaling by Exposure Offset.
Present Value Market value of the cashflow calculated using the risk method specified for the
instrument. This may differ from the market value calculated using the valuation
method if the two methods specified for the instrument are different.
For FX options, present value is the expected market value of each cashflow.
Present Value (Next
Day)
The best estimate of tomorrow’s present value given no change in the market
conditions.
Local Present Value Present value of the transaction, expressed in the transaction/cashflow currency.
Yield Risk is shown as the average yield of the position. See TRM Instruments: Processing
and Calculations Guide.

12 Monitoring positions
12.1 Treasury Monitor
Transaction & Risk Management Module (TRM) User Guide 385
12.1.4.7.6 Profit and Loss
Note: See the guide TRM Instruments: Processing and Calculations for a detailed explanation of
Profit and Loss key-figures.
12.1.4.7.7 Margin
Note: See the guide TRM Instruments: Processing and Calculations for a detailed explanation of
Margin key-figures.
12.1.4.7.8 Duration
Key-figure Shows this result (for period defined in T. Monitor start-up)
Duration (On-balance instruments only)
Interest-rate exposure figure, scaled by the market value of the position.
For off-balance instruments, use Modified Duration instead.
Duration (Days) This is the same as Duration but expressed in the number of days.
Duration +
Duration -
Duration (in number of years) of the cashflows where Duration (+) is the positive
(incoming) cashflows, and Duration (-) the negative (outgoing) cashflows.
Effective Duration (On-balance instruments only)
Conversion of IR exposure into a relative figure for a single bond valuated with the
quoted method:
• Continuously compounded yield is converted into Macaulay effective duration
• Yearly compounded yield is converted into a modified effective duration on the
figure date.
For off-balance instruments, use Modified Duration instead.
Effective Duration + Effective Duration for positive cashflows only.
Effective Duration - Effective Duration for negative cashflows only.
Modified Duration Interest-rate exposure figure scaled by the present value equivalent of the underlying
on-balance transaction.
If you group by transaction or any other type of grouping except for total, you see
modified duration; if you group by total, then you see effective duration. For IR
Swaps, you need to group by Leg/Delivery Instrument to see modified duration. See
TRM Instruments: Calculations and Processing Guide.
Effective Convexity Measure of the non-linearity of the position.
If the effective convexity is 0, the position is linear, and IR exposure and duration can
be used to estimate the changes for parallel shifts of any magnitude. The larger the
effective convexity, the faster the estimate error grows with the magnitude of the
parallel shift.
Effective convexity is calculated by taking the second derivative of the market value of
the position against a parallel shift in the IR curve. For more information, see TRM
Instruments: Processing and Calculations Guide.
Note: By default, this key-figure is not available. To access it, refer to the
configuration information supplied with TRM.
Elasticity Relative change in the market value of a bond (or any other instrument valued using a
yield quote), corresponding to a change in the IR rate, calculated against a relative
change in the yield on the figure date.
For zero-coupon valuations, the calculation is against a relative change in all
zero-coupon yields.
12 Monitoring positions
12.1 Treasury Monitor
386 © Wall Street Systems IPH AB - Confidential
12.1.4.7.9 Market Information
12.1.4.7.10 Value-at-Risk
Key-figure Shows this result (for period defined in T. Monitor start-up)
Quote Market quote for the instrument.
Volatility The interpolation of the FX volatility matrix using the time to expiry and the driftless
delta.
ATM Volatility Figure used to calculate the driftless delta.
ATM Volatility (Tenor
Quote)
The interpolation of the ATM Volatility with regards to the tenor.
FX Spot Rate The FX Rate between two currencies at the spot date corresponding to the figure date.
FX Rate FX rate used in valuation calculations.
FX Cross Rate Cross rate used as underlying stochastic variable in the valuation of FX options.
Interest Rate Interest rate used in valuation calculations.
Key-figure Shows this result (for period defined in T. Monitor start-up)
Value-at-Risk Total value-at-risk of the position.
FX Value-at-Risk Value-at-risk generated from FX variables in the position by forcing all volatilities of
Price and IR variables to 0.
Compare with Price Value-at-Risk and IR Value-at-Risk, which work on the same principle
of forcing all other volatilities except their own to 0.
IR Value-at-Risk Value-at-risk generated from IR variables in the position by forcing all volatilities of FX
and Price variables to 0.
Compare with Price Value-at-Risk and FX Value-at-Risk, which work on the same principle
of forcing all other volatilities except their own to 0.
Price Value-at-Risk Value-at-risk generated from Price variables in the position by forcing all volatilities of
FX and IR variables to 0.
Compare with FX Value-at-Risk and IR Value-at-Risk, which work on the same principle of
forcing all other volatilities except their own to 0.
Uncorrelated
Value-at-Risk
Value-at-risk calculated by forcing all correlations between all variables to 0.
FX/IR/Price
Value-at-Risk
Value-at-risk calculated with all correlations between FX, IR and Price variables set to
zero.
Undiversified
Value-at-Risk
Sum of values-at-risk with respect to the individual market variables.
Value-at-Risk
Incremental
Value of the previous expression in absolute terms where the exposure of the position
as well as the risk factors are calculated for all the selected axis groupings.
IR Value-at-Risk
Incremental
As for Value-at-Risk Incremental, calculated with the IR variables.
FX Value-at-Risk
Incremental
As for Value-at-Risk Incremental, calculated with the FX variables.
Price Value-at-Risk
Incremental
As for Value-at-Risk Incremental, calculated with the Price variables.
12 Monitoring positions
12.1 Treasury Monitor
Transaction & Risk Management Module (TRM) User Guide 387
12.1.4.7.11 Special figures
Key figures with specific characteristics are grouped under Special Figures in the Key-Figure dialog box.
The following table explains these special figures
12.1.5 Simulating movements in Treasury Monitor
In Treasury Monitor, you can simulate the effect that market movements would have on your
exposure using one of the Simulation groupings (see 12.1.4.3.11 Simulation on page 378).
The Simulation groupings enable you to either define the simulation values directly in Treasury
Monitor (see 12.1.5.1 Defining simulation steps and ranges on page 387), or to select a simulation
scenario that has already been configured (as described in 4.4 Defining simulation scenarios on
page 167.
12.1.5.1 Defining simulation steps and ranges
You can select the range over which the simulation takes place, and the offset between simulations
for each of the simulation axes.
Special figure
characteristic Shows this result (for period defined in T. Monitor start-up)
Start Value of the figure at the start of the period.
Change Change in the value between the start and the end of the period, expressed as an
absolute value.
KF Change = KF Normal - KF Start
Relative Change Change in the value between the start and the end period, expressed as a percentage
of the value at the end of the period.
KF Relative Change = 100 * KF Change / KF Start
Cumulative If periods or dates are selected as an axis value, then the KF Cumulative figure shows
the amount of all periods, or dates, up to and including the specified period, or date.
% of Total Value of the key-figure expressed as a percentage of the total key-figure value.
Percentage of the total for all selected axis groupings.
% of Subtotal Percentage of the sub-total. Sub-totals are the individual totals you get when a
position is divided according to two or more parameters.
Scaled by Subtotal MV Key-figure expressed as a proportion of the market value of the sub-total.
Delta Reference This is only applicable if Portfolio Compare is selected as an axis value. The Delta
Reference key-figure shows the key-figure amount in relation to the corresponding
key-figure amount for the comparison portfolio.
Delta Reference % of
Tot a l
The Delta Reference, as a percentage of the total.
Reference % of Total
Change
Change for selected axis grouping, expressed as a percentage of the change in the
total for all selected axis groupings.
Delta Reference % of
Tot a l M V
The Delta Reference, as a percentage of the total market value.
Simulated Change Difference between the simulated value and the non-simulated value.
Simulated % Change Difference between the simulated value and the non-simulated value expressed as a
percentage.
12 Monitoring positions
12.1 Treasury Monitor
388 © Wall Street Systems IPH AB - Confidential
To select simulation steps and ranges:
1. Using either View - Select Columns or View - Select Rows, select the Simulation value for which you
want to define the range and offset.
2. In the Selected list on the right side of the resulting dialog, right-click the Simulation value (for
example, Simulate FX Spot) and select Configure Values.
The dialog varies slightly according to the kind of simulation you want to perform.
12.1.5.1.1 Simulate FX spot
In FX simulation, the spot rates of the simulated currencies are changed against the reference
currency, so that the simulated change is equivalent to changing the market quotes.
For example: USD deposit in a EUR portfolio
For the given currency pair, you can specify which of the currencies you would like to simulate. This
can be either of the currencies.
•If the simulation currency is EUR for a given step, the FX rate is modified by a multiplication
factor equal to 1/(1+step) if the step is positive and (1+step) if the step is negative.
•If the simulation currency is USD for a given step, the FX rate is modified by a multiplication
factor equal to (1+step) if the step is positive and 1/(1+step) if the step is negative.
12.1.5.1.2 Simulate FX cross
For example: EUR/USD option in a JPY portfolio
The EUR/USD cross rate will be the ratio of the rate EUR/JPY and USD/JPY. In this context the
EUR/USD rate will be simulated via the EUR/JPY rate. The simulation of EUR/JPY is done in the same
way as the FX Spot Simulation where the simulation currency is set to EUR.
Information Description
From Offset
To Offset
Simulation range.
For example, to simulate FX changes from -5% to +5% of current level, enter -5 in
From Offset and 5 in To Offset.
Step Size of interval.
For example, to see the above FX fluctuations in 1% intervals, enter 1.
Currency Currency used in the simulation.
Information Description
From Offset
To Offset
Simulation range.
For example, to simulate FX changes from -5% to +5% of current level, enter -5 in
From Offset and 5 in To Offset.
Step Size of interval.
For example, to see the above FX fluctuations in 1% intervals, enter 1.
Relative Change Turn on this switch if you want changes to be relative.
• If this switch is on, the values you enter for From Offset and To Offset are considered
as a percentage of the current rate.
• If this switch is off, the values in From Offset and To Offset are considered as absolute
changes.
12 Monitoring positions
12.1 Treasury Monitor
Transaction & Risk Management Module (TRM) User Guide 389
12.1.5.1.3 Simulate FX Rate Volatility
12.1.5.1.4 Simulate FX ATM Volatility
12.1.5.1.5 Simulate IR Volatility
12.1.5.1.6 Simulate Interest Rate
Information Description
From Offset
To Offset
Simulation range.
For example, to simulate FX changes from -5% to +5% of current level, enter -5 in
From Offset and 5 in To Offset.
Step Size of interval.
For example, to see the above FX fluctuations in 1% intervals, enter 1.
Relative Change Turn on this switch if you want changes to be relative.
• If this switch is on, the values you enter for From Offset and To Offset are considered
as a percentage of the current IR rate.
• If this switch is off, the values in From Offset and To Offset are considered as
absolute interest rates.
Information Description
From Offset
To Offset
Simulation range: the values you enter here depend on whether you have the Relative
Changes switch turned on.
Step Size of interval.
Relative Changes Turn on this switch if you want changes to be relative.
• If this switch is on, the simulated value (X) at offset (%) relative shift is defined by
X*(1+offset (%))
• If this switch is off (default), the simulated value (X) at offset (%) absolute shift is
defined by X+ offset (%).
Information Description
From Offset
To Offset
Simulation range.
For example, to simulate volatility rate changes from -5% to +5% of current level,
enter -5 in From Offset and 5 in To Offset.
Step Size of interval.
For example, to see the above IR fluctuations in 1% intervals, enter 1.
Information Description
From Offset
To Offset
Simulation range: the values you enter here depend on whether you have the Relative
Changes switch turned on.
For example, if you want to simulate IR rates from -0% to +5%, enter 0 in From Offset
and 5 in To Offset, and leave the Relative Changes switch turned off.
If you want to simulate the IR rate from -5% to 5% of the current level, enter the -5
in From Offset and 5 in To Offset, and turn on the Relative Changes switch.
Step Size of interval.
For example, to see the above IR fluctuations per 1% enter 1.
12 Monitoring positions
12.1 Treasury Monitor
390 © Wall Street Systems IPH AB - Confidential
12.1.5.2 Using simulation scenarios
You can set up simulation scenarios in which you can specify different offsets for different
quotations, interest rates, or volatilities. These scenarios are available for selection from the
corresponding Simulate Scenario grouping.
The actual scenarios are defined using one of the simulation editors: see 4.4 Defining simulation
scenarios on page 167.
To select one of the scenarios:
1. Using either View - Select Columns or View - Select Rows, select the specific Simulate Scenario
grouping that you want to display in the monitor.
2. In the Selected list on the right side of the resulting dialog, right-click the Simulate Scenario
value and select Configure Values.
3. In the resulting dialog, select the simulation scenario that you want to use.
12.1.6 Using Treasury Monitor for risk measurement
Treasury Monitor can be used to measure the risk levels of your portfolios, compared to those of
benchmark portfolios.
To measure your trading portfolios against benchmark portfolios:
1. In Treasury Monitor, select a top portfolio that contains both the trading portfolios and the
benchmark portfolio.
2. To see by how much the key-figures of your portfolios deviate from those of the benchmark
portfolio, select the axis Portfolio Compare.
If you just want to see the actual values for the key-figures of your portfolios, use Portfolio or Portfolio
Top Level instead.
Note: See 12.1.4.3 Selecting axis (column and row) groupings on page 371 for more information
about configuring these values in Treasury Monitor.
12.1.7 Monitoring cost-of-carry positions
Cost-of-carry is the cost associated with funding a position. See 18.1.2 Managing cost of carry on
page 499 for more information on cost-of-carry. When analyzing your position in Treasury Monitor
you can include cost-of-carry transactions to make the picture more realistic.
12.1.7.1 Analyzing cost-of-carry positions and P/L
In Treasury Monitor, you can view the profit/loss of cost-of-carry for a certain period.
In the Position Parameters dialog, you can specify whether cost-of-carry transactions (balances and
accruals) are included in the position or excluded from the position by selecting w/Cost Of Carry in
the Context field: see 12.1.4.1 Defining position parameters on page 366.
Normally you include these transactions in the position to make the full picture more realistic,
including all realized cashflows and the financing cost incorporated into carrying forward the position
held.
Relative Changes Turn on this switch if you want changes to be relative.
• If this switch is on, the values you enter for From Offset and To Offset are considered
as a percentage of the current IR rate.
• If this switch is off, the values in From Offset and To Offset are considered as
absolute interest rates.
Information Description

12 Monitoring positions
12.1 Treasury Monitor
Transaction & Risk Management Module (TRM) User Guide 391
12.1.7.1.1 Analyzing cost-of-carry positions
Cost-of-carry is displayed as a separate instrument and included in the analysis as with any other
product traded in the position. The market value of cost-of-carry includes both the balance and
outstanding accrued interest.
12.1.7.1.2 Analyzing P/L
Accrued interest for the day is calculated by taking the outstanding accrued interest from today’s
transaction and the negative outstanding accrued interest from yesterday's transaction and adding
them together. If the accruals are in a foreign currency, they are converted into the base currency
of the portfolio with the relevant spot FX rates.
FX profit/loss is calculated by comparing, that is, by subtracting the book FX rate used in today's
cost-of-carry transaction (yesterday's official (Frozen) spot FX rate) from the current market rate
and multiplying the difference with the balance amount.
The FX result is calculated separately for each balance transaction. During a 1 day period only the
second transaction (today's transaction) generates an FX result. During a longer period, all
transactions apart from those from the date before Period Start Date in Treasury Monitor analysis
generate an FX result.
12.1.8 Generating position-related reports
In TRM, you can produce reports to see the following position-related information:
Report Description
Key-Figure A report giving an inventory of your current position and exposure.
Since key-figure reports only give your current exposure, they differ from Periodic P/L
reports in that they do not contain any key-figures that show the difference between
the figures between two dates (for example, realized results), since these comparison
key-figures are irrelevant to a report that give the current figures only.
For reports for today’s exposure, TRM uses the latest available rates. If you request a
report for a past date, TRM uses the last rates for that date.
See B.34 Key Figure Report on page 671 for details of the report’s parameters.
Periodic P/L
Instrument P/L
A profit-loss report for the period you select. The end date is today, since live updates
are meaningless for any other day.
See B.36 Periodic P/L Report on page 673 for details of the report’s parameters.
12 Monitoring positions
12.2 Position Monitor
392 © Wall Street Systems IPH AB - Confidential
12.2 Position Monitor
Position Monitor combines the ability to query transactions with the Treasury Monitor functionality.
It can be used when you want to monitor a position that corresponds to a set of transactions. It is
especially useful for large portfolios when you are interested in a subset of transactions; instead of
valuing a large position and applying a filter afterwards, you can directly value only the transactions
which are of interest.
When you run a query in Position Monitor, the transactions that match the query are displayed in
the Position Monitor and are sent to the Treasury Monitor for valuation. Clicking on the Show Treasury
Monitor button will display the queried transactions according to the position setup (valuation
parameters and book).
Whenever you modify a query or whenever new transactions are entered into the system that match
the existing query, the position gets updated in real-time in both windows (Position Monitor and
Treasury Monitor). The position is also updated in real-time when market rates change, thus
allowing accurate real-time monitoring of the defined position.
In order to speed up the display of the query results in Position Monitor, it is recommended that you
select only the views and columns that you need. It is possible not to display any fields in the
Transaction view.
Note: The Treasury Monitor window is linked to the Position Monitor: it is not possible to use this
instance of Treasury Monitor in a standalone way. Whenever you close Position Monitor,
the two windows get closed at the same time. On the other hand, if you close the Treasury
Monitor window, the Position Monitor window stays open and you can display the Treasury
Monitor window at any time by pressing on the Show Treasury Monitor button: It can be
useful to hide the Treasury Monitor window while you fine tune your query if you need to
manipulate many transactions.
12.2.1 Position Monitor menus
The following table describes the menu items specific to Position Monitor. Menu items that also are
available in Transaction Manager are detailed in 8.1.1 Transaction Manager menus on page 258.
12.2.2 Monitoring positions with Position Monitor
To monitor positions:
1. Start Position Monitor and select Valuation Setup to open the Valuation Setup dialog. Specify the
valuation parameters. See 12.1.4.1 Defining position parameters on page 366 for information
about each parameter.
2. In the Query view of Position Monitor, query for the transactions that correspond to the exact
position you want to monitor and execute the query. The transactions are displayed in the
Position Monitor and sent to the Treasury Monitor for valuation.
3. Click on the Show Treasury Monitor button to view the valued transactions. The transactions are
displayed according to the book configuration and valued according to the valuation setup
parameters you specified in step 1.
Menu Item Description
Clear Clears the query results.
Show Treasury Monitor Displays the Treasury Monitor window. From here you can view the transactions
that you queried for valuation according to the valuation setup parameters and
the book configuration you specified in the Valuation Setup.
Valuation Setup Displays the Valuation Setup dialog. From here you can define the valuation param-
eters and the Treasury Monitor book. See 12.1.4.1 Defining position parameters
on page 366 for information about each parameter.
12 Monitoring positions
12.3 FX Spot Monitor
Transaction & Risk Management Module (TRM) User Guide 393
12.3 FX Spot Monitor
FX Spot Monitor is a Treasury Monitor mode for monitoring FX spot transaction positions by currency
pair. It is a modification of the standard cashflow-based Treasury Monitor to produce
transaction-based average rate and result key-figures, supporting position monitoring of currency
pair-driven FX spot trading.
See 12.4 FX Position Roll Over activity on page 397.
12.3.1 FX Spot Monitor menus
The menu items in FX Spot Monitor are the same as the menu items in Treasury Monitor (see 12.1.1
Treasury Monitor menus on page 361 for more information).
12.3.2 Start-up parameters
The start-up parameter used to open Treasury Monitor’s FX Spot mode is:
FKTreasuryMonitor.exe --mode fx-spot
See C.12 Treasury Monitor on page 686 for more information.
12.3.3 Monitoring positions in FX Spot Monitor
FX Spot Monitor works in the same way as Treasury Monitor, but differs in the following respects:
•Axis groupings
FX Spot Monitor contains a subset of the groupings supported in Treasury Monitor. Since the
application is designed specifically for monitoring currency pair FX positions, only groupings
considered to be meaningful for this purpose are included.
•Key-figures
FX Spot Monitor has a unique set of key-figures providing information for monitoring FX spot
positions by currency pair, such as different types of average rates and currency pair-specific
results. See 12.3.3.1 Selecting key-figures in FX Spot Monitor on page 393.
•Start-up query
Special start-up query is used to identify transactions affecting currency pair FX positions. The
following transactions are included in the position:
–FX spot and forward transactions where value date is on or after spot date of the traded
currency pair as of current date (i.e. Period End date of the startup)
–FX spot and forward transactions where value date is before the current spot date of the
traded currency pair if opening date is the current date (i.e. pre-spot transactions traded
today are included)
–Cashflows from FX swap transactions where cashflow value date is on or after current spot
date of the traded currency pair (typically, far leg of swap transaction created by activity FX
Position Roll Over used to move forward open currency pair positions from the previous spot
date to the next one).
12.3.3.1 Selecting key-figures in FX Spot Monitor
In FX Spot Monitor, as in Treasury Monitor, you can select any items for the X and Y axes to view
results grouped by any criteria. However, since in FX Spot Monitor all average rate and result
calculations are based on information specific to the transaction and currency pair rather than on
individual cashflows, most key figures are calculated only when position is grouped by FX Currency
Pair.
This grouping makes it possible to view all traded currency pairs with average rates and results. You
can of course split the currency pair position further by grouping by Instrument or Transaction, but
it is probably more useful to group by FX Currency Pair only.
12 Monitoring positions
12.3 FX Spot Monitor
394 © Wall Street Systems IPH AB - Confidential
To net the position across all currency pair positions into currency-specific positions, replace the axis
grouping FX Currency Pair with Currency. You can then view the aggregated position, in USD for
example, regardless of the currency pairs in which the trading takes place, using specific
key-figures.
The following sections show whether to select grouping by FX Currency Pair or grouping by Currency,
for the key-figures to be meaningful. The descriptions of key-figures in FX Spot Monitor correspond
to the submenus in the key-figure selection dialog.
12.3.3.1.1 Risk
Risk key-figures refer to the sensitivity of the position expressed in value gained or lost when
market FX rates move.
The only key-figure in this category, FX Exposure, works exactly as in Treasury Monitor. To provide
meaningful output, it must be used in combination with axis grouping by Currency.
12.3.3.1.2 Market Information
Market Information key-figures are described in the following table. You can group by FX Currency
Pair, or by Currency:
12.3.3.1.3 Currency Pair Amount
Currency Pair Amount key-figures refer to the size of the position expressed in amounts bought and
sold in each currency pair.
The following key-figures are relevant only if you select FX Currency Pair for one of the axes:
Key-figure Shows this result (for period defined in FX Spot Monitor start-up)
FX Rate Market FX rate used in valuation:
• If you select grouping by FX Currency Pair, this rate is specific to a currency pair
• If you select grouping by Currency, the rate is between this currency and the
figure currency of the analysis.
Spot Date Spot Date displays the current spot date of the currency pair. As FX Spot Monitor is
heavily based on the spot date by currency pair, it is important that holiday calendars
are correct.
Spot Date is relevant only if you select grouping by FX Currency Pair for one of the
axes
Key-figure Shows this result (for period defined in FX Spot Monitor start-up)
Base CCY Amount Net amount bought or sold in the base currency (deal currency) of the currency pair.
You use this key-figure to display the current net position of all transactions in the
currency pair expressed in the base currency.
Base CCY Buy Amount
Base CCY Sell Amount
Total amount bought (Base CCY Buy Amount) or sold (Base CCY Sell Amount) in the
base currency (deal currency) of the currency pair.
You use these key-figures if you are, for example, interested in the trading turnover of
the position expressed in the base currency.
Quote CCY Amount Net amount bought or sold in the quote currency (price currency) of the currency pair.
You use this key-figure to display the current net position of all transactions in the
currency pair expressed in the quote currency.
Quote CCY Buy
Amount
Quote CCY Sell
Amount
Total amount bought (Quote CCY Buy Amount) or sold (Quote CCY Sell Amount) in the
quote currency (price currency) of the currency pair. You use this key-figure if you are,
for example, interested in the trading turnover of the position expressed in the quote
currency.

12 Monitoring positions
12.3 FX Spot Monitor
Transaction & Risk Management Module (TRM) User Guide 395
12.3.3.1.4 Currency Amount
Currency Amount key-figures refer to the size of the position expressed in amounts bought and sold
in each currency. The following key-figures are relevant only if you select Currency as one of the
axes:
12.3.3.1.5 Average Rate and MtoM Average Rate
Note: For each Deal Rate key-figure, there is a matching MtoM Rate key-figure: for example, B-E
MtoM Rate matches B-E Deal Rate.
The only difference between Deal Rates and MtoM Rates is in the sets of rates used to calculate the
results for transactions which were traded before the start of the analysis period (i.e. before Period
Start date given in the start up of FX Spot Monitor):
•Deal rate key-figures are calculated from the rates actually entered for the deal
•MtoM rate key-figures are calculated from closing rates prior to the analysis period for all deals
traded before the analysis period, and from deal rates for all deals traded during the analysis
period.
If your position contains transactions traded before the analysis period (including swap transactions
created by the FX Position Roll Over activity and used to move open currency pair positions forward
from the previous spot date to the next one):
•Deal Rates calculates the average rates of the position using historic transaction rates regardless
of when transactions were traded
•MtoM Rates treats the period prior to analysis period as realized at closing market rates as of
one day before the start of the analysis period. It calculates average rates using market rates of
that date for all transactions traded before the analysis period as if the transactions were traded
at those closing rates.
Average Rate and MtoM Average Rate key-figures are relevant only if you select FX Currency Pair for
one of the axes (to view the information by currency pair):
Key-figure Shows this result (for period defined in FX Spot Monitor start-up)
Buy Amount
Sell Amount
Total amount bought (Buy Amount or sold Sell Amount) in one currency regardless of
the currency pairs in which trading takes place.
You use this key-figure if you are, for example, interested in the trading turnover of
one particular currency.
Net Amount Net amounts bought or sold in one currency regardless of the currency pairs in which
trading takes place.
The main purpose of this key-figure is to display the exposure of one currency against
the figure currency of the net analysis of all transactions in the position.
Net Amount Base Net amount converted to the figure currency using the current spot rate. Net Amount
Base is displayed as zero for the figure currency cashflows. This enables you to use
this key-figure total as an accurate measure of the current total exposure of all
non-figure currencies expressed as equivalent value in figure currency (that is, the
current market value of all foreign currency positions expressed in the figure
currency).
Key-figure Shows this result (for period defined in FX Spot Monitor start-up)
B-E Deal Rate
B-E MtoM Rate
Weighted average rate (weighted by the base currency amount) of all the transactions
in any particular currency pair. In effect, the key-figure displays the accumulative level
(break-even) at which the position (the base amount) is long or short in any particular
currency pair.
Deal Buy Rate
MtoM Buy Rate
Weighted average rate (weighted by base currency amount) of all buy transactions in
any particular currency pair.

12 Monitoring positions
12.3 FX Spot Monitor
396 © Wall Street Systems IPH AB - Confidential
12.3.3.1.6 Result and MtoM Result
As with the Deal Rate and MtoM Rate key-figures, the only difference between these two sets of
matching key-figures is in the sets of underlying rates are used to calculate the results: see the
explanation under 12.3.3.1.5 Average Rate and MtoM Average Rate on page 395.
Result and MtoM key-figures are relevant only if you select FX Currency Pair for one of the axes (to
view the information by currency pair).
Note: Closed is realized, and open is unrealized.
Deal Sell Rate
MtoM Sell Rate
Weighted average rate (weighted by base currency amount) of all sell transactions in
any particular currency pair.
Last Open Deal Rate
Last Open MtoM Rate
Break-even average rate calculated for transactions traded after the last change in the
position from long to short or vice versa. The transaction that takes the position
across zero is divided so that only the part which contributes to the current base
amount is taken into account in the weighting.
Open Deal Rate
Open MtoM Rate
• Either the Deal to MtoM Buy Rate or the Deal to MtoM Sell Rate, depending on
whether the Base CCY Amount of the currency pair is positive or negative (the
position is long or short).
You use this key-figure to see the average rate of your open position in the
currency pair as the average rate of open bought or sold amounts only, instead of
the break-even rate calculated for all transactions (B-E Rate) or for transactions
traded after the last change in the position from long to short or vice versa (Last
Open Rate).
Key-figure Shows this result (for period defined in FX Spot Monitor start-up)
Key-figure Shows this result (for period defined in FX Spot Monitor start-up)
Closed Deal Result
Closed MtoM Result
• Closed Deal Result is the result of the closed part of the total position and
calculated using the Deal Buy Rate and the Deal Sell Rate. The result is expressed
in the quote currency of the currency pair. The closed part of the position is
calculated by taking the smaller of the absolute values of the Base CCY Buy
Amount and the Base CCY Sell Amount.
Closed Deal Result = ((Deal Sell Rate - Deal Buy Rate) x ABS(MIN(Base CCY Buy
Amount and Base CCY Sell Amount))
• Closed MtoM Result is the same, except based on MtoM Buy and Sell rates.
Closed Deal Result
Base
Closed MtoM Result
Base
• Closed Deal Result and Closed MtoM Result converted to the figure currency using
the current spot rate.
Closed Last Open Deal
Result
Closed Last Open
MtoM Result
• Closed Last Open Deal Result is the remainder after Open Last Open Deal Result.
In other words:
Closed last Open Deal Result = Total Deal Result - Open Last Open Deal Result
• Closed Last Open MtoM Result is the same principle, but for MtoM figures, namely
the remainder after Open Last Open MtoM Result:
Closed last Open MtoM Result = Total MtoM Result - Open Last Open MtoM Result
Closed Last Open Deal
Result Base
Closed Last Open
MtoM Result Base
• Closed Last Open Deal Result and Closed Last Open MtoM Result converted to the
figure currency using the current spot rate.
Open Deal Result
Open MtoM Result
• Open Deal Result = Total Deal Result - Closed Deal Result
• Open MtoM Result = Total MtoM Result - Closed MtoM Result.

12 Monitoring positions
12.4 FX Position Roll Over activity
Transaction & Risk Management Module (TRM) User Guide 397
12.4 FX Position Roll Over activity
This section describes how to set up a nightly activity in Activity Manager to roll over FX Spot
positions. You can then monitor these positions in FX Spot Monitor (12.3 FX Spot Monitor on page
393). Before creating the nightly activity, make sure that the top portfolio on which you want to roll
over spot positions is correctly set up for FX position roll over, see 3.14.1.1 Setting further portfolio
attributes on page 108. (Only portfolios with the switch FX Position Roll-Over turned on are available
for this activity in Activity Manager.)
This nightly activity rolls the open position over (by currency pair) from the previous spot date to a
new spot date. This position roll-over is done by creating internal roll over transactions, which move
spot positions forward. After the activity has run (spot positions rolled over), you can query spot
transactions against all transactions with spot (or later) value dates in FX Spot Monitor. The position
at spot is when the value date of all cashflows is equal to the current spot date.
The system always combines currency pairs to roll over the position. The base currency of the
roll-over transaction (the position currency) is determined according to market conventions defined
in the Currency Editor. For example, for a standard EUR customer, both USD/CHF and CHF/USD
deals will be rolled over as a USD/CHF position.
To set up a nightly activity to move the spot positions forward:
1. In Activity Manager, create a new activity using activity type FX Position Roll-Over.
2. Select group NIGHTLY.
Open Deal Result Base
Open MtoM Result
Base
• Open Deal Result and Open MtoM Result converted to the figure currency using
the current spot rate.
Open Last Open Deal
Result
Open Last Open MtoM
Result
• Open Last Open Deal Result is the result generated from the current open position
based on the Last Open Deal Rate, that is, the average rate of the position traded
after the position last went from short to long or vice versa. The result is
expressed in the quote currency of the currency pair:
Open Last Open Deal Result = (FX End Rate - Last Open Deal Rate) x Base CCY
Amount
• Open Last Open MtoM Result is the same, but based on the Last Open MtoM Rate:
Open Last Open MtoM Result = (FX End Rate - Last Open MtoM Rate) x Base CCY
Amount
Open Last Open Deal
Result Base
Open Last Open MtoM
Result Base
• Open Last Open Deal Result and Open Last Open MtoM Result converted to the
figure currency using the current spot rate.
Total Deal Result
Total MtoM Result
• Total Deal Result is the total result displayed in the quote currency of the currency
pair for all transactions in one currency pair and calculated for each transaction
using the current rate (FX End Rate) and the deal rate of the transaction. For an
aggregated currency pair position, this can also be calculated using Deal B-E Rate:
Total Deal Result = (FX End Rate - Deal B-E Rate) x Base CCY Amount
• Total MtoM Result is the same, but based on MtoM rates rather than deal rates. For
an aggregated currency pair position:
Total MtoM Result = (FX End Rate - MtoM B-E Rate) x Base CCY Amount
Total Deal Result Base
Total MtoM Result Base
• Total Deal Result and Total MtoM Result converted to the figure currency using the
current spot rate.
Key-figure Shows this result (for period defined in FX Spot Monitor start-up)

Transaction & Risk Management Module (TRM) User Guide 399
Chapter 13 Monitoring performance
The basic principle of measuring performance in TRM is to use an agreed index or benchmark
portfolio representing a target performance for a portfolio, and measure the performance of your
own portfolio against that agreed index or benchmark. The indexes you can use can be
industry-standard indexes (supplied by Reuters or OTS and imported, in real-time, into TRM), or
indexes that you derive from a "basket" of indexes ("derived indexes").
Note: The real-time market feeds you have (Reuters, or OTS) depend on whether your
organization has access to these services, and your configuration of TRM.
13.1 Measuring performance and risk
This section explains:
•Performance versus risk: how you can outperform a benchmark by deviating from it, and how
your risk is then the degree of deviation
•The AIMR-PPSTM standard that TRM’s functionality is based on.
13.1.1 Performance versus risk
The objective of performance measurement is to calculate the performance of your traded portfolio,
and then compare it to the performance of the selected benchmark.
The closer the position in the investment portfolio matches the benchmark position, the closer the
development of the market values. Therefore, in order to outperform the benchmark, your position
needs to differ from the benchmark portfolio. This means that, for performance measurement, risk
is the amount of deviation from the benchmark portfolio, rather than the absolute changes in the
fund’s market value.
An investment portfolio can vary from its benchmark in terms of:
•Asset Allocation - how the portfolio is spread among shares, bonds, cash, and so on
•Investment Selection - the selection of individual investments within each asset class.
In principle, you can outperform the benchmark by picking instruments that perform better than
those in the benchmark portfolio. For example, the return on leveraged instruments such as
forwards, futures, and options can be greater than the return on non-leveraged instruments (but
obviously the risk is higher).
There are two approaches you can take to outperforming the benchmark:
•Either actively, by varying a portfolio's exposure in different assets to take advantage of
opportunities or to avoid risks in the markets in the short to medium term
•Or passively, by setting target exposures to different assets, then keeping them static for the
medium to long term.
In many cases, you might be able to measure your portfolio’s risk exposure just by monitoring its
deviation from the relative share of market values in the benchmark portfolio. TRM offers you more
flexibility, however, because you can generate transactions and create an index portfolio, and use
13 Monitoring performance
13.1 Measuring performance and risk
400 © Wall Street Systems IPH AB - Confidential
Treasury Monitor to produce a key-figure level analysis of your portfolio versus the generated index
portfolio.
13.1.1.1 TWR method for measuring performance
Performance is measured by the TWR (time-weighted rate of return). TWR calculates the changes in
the value of a portfolio as a percentage of the capital that has actually been invested during the
reporting period. TWR is an attempt to measure performance without the distortions caused by
additions and withdrawals of cash.
In any portfolio, however, there are always cashflows going out (withdrawals) or in (deposits, and
coupon and dividend payments). The ideal TWR calculations would need to re-evaluate portfolios
intraday (in other words, every time there is a cash inflow or outflow); since this is not practical,
TRM calculates the TWR using modified Dietz returns, whereby a constant rate of return is assumed
each day and each cashflow is weighted by the amount of time that it is held in the portfolio.
13.1.1.2 Measurement methods
Typically, a cash (spot) transaction is committed on the trade date but physically delivered and paid
some days later on the value date. Clearly, a bought position is exposed to the market from trade
date; the market value during the period until value date depends, however, on which of the
following two evaluation methods is used:
•Value date method
The market value during the period between trade and value date is the netted value of the
position and the settlement payment. On the value date the cashflow term is equal to the
settlement payment and the market value is equal to the value of the position side.
For example:
•Trade date method
This can be seen as trading with immediate delivery and payment. The market value on the
trade date equals the value of the position side of the transaction, and consequently the
cashflow term on the trade date is equal to the discounted settlement payment.
For example:
Performance in TRM is measured using time-weighted returns (TWRs) on both the trade and value
date bases. TRM calculates the monetary result based on the assumption that all investment in the
portfolio is performed in the selected index.
Day MV begin MV end Cashflows Result
00000
10100
2120100%
3 2 53 50 1.5%
4 53540 0
Day MV begin MV end Cashflows Result
00000
1051500
2 51 52 0 1.96%
3 52530 1.5%
4 53540 0

13 Monitoring performance
13.2 Setting up performance measurement and risk
Transaction & Risk Management Module (TRM) User Guide 401
13.1.2 AIMR-PPS™ standards
TRM’s performance monitoring is based on an industry-standard methodology, the AIMR-PPSTM
standards. The goal of the AIMR-PPS standards is to promote uniformity in performance reporting so
that the results of investment managers are directly comparable.
13.1.2.1 Actual basis and all cash basis
The AIMR-PPS standards require that performance is measured on both an actual basis and an all
cash basis. Actual basis and all cash basis can be defined as follows:
•Actual basis measures the growth of the actual invested capital, in other words it is a
combination of both stock picking and leverage.
•All cash basis attempts to eliminate the effects of leverage by restating the position into an
equivalent cash position having the same market exposure (the spot equivalent position, SEP).
The all cash basis performance is then the performance measured on the restated cash
equivalent position.
If a fund is using leverage, the AIMR-PPS standards require the presentation of both actual and all
cash basis performance. Since the benchmark is normally non-levered, the comparison between the
benchmark and all cash basis show the stock picking ability of the fund manager whereas the
difference between the actual and the all cash basis performance indicate timely and efficient use of
leverage in managing the fund.
13.2 Setting up performance measurement and risk
This section explains the settings you need to be able to monitor performance and risk in TRM.
•Performance Monitor is used to measure the performance of your portfolios against indexes and
benchmark portfolios
•Treasury Monitor is used to measure the risk levels of your portfolios, compared to those of
benchmark portfolios.
This section also explains how to generate historical market values for portfolios; these are required
before you can measure the performance of portfolios in Performance Monitor.
Note: Although you can use benchmark portfolios in both Performance Monitor and Treasury
Monitor, you can use index values in Performance Monitor only.
This is because Treasury Monitor only works on portfolios containing transactions, and
index values do not relate to individual transactions. Also, Treasury Monitor measures the
exposure of current positions in real-time, whereas Performance Monitor is designed to
measure the performance of positions over time.
13.2.1 Setting up entities for performance measurement
This section describes the additional values or specific configuration needed for static data entities
used in performance measurement.
13.2.1.1 Setting up instruments
It is important that instrument entities used in performance measurement are defined with the
appropriate valuation approach for the valuation mode. The valuation approach you select must be
in line with your expectations for their valuation in performance measurement.
The definitions of some instrument entities also need to include a performance-related feature
before they can be used in performance measurement. These are described in the following
sections.
13 Monitoring performance
13.2 Setting up performance measurement and risk
402 © Wall Street Systems IPH AB - Confidential
13.2.1.1.1 Instrument Type = Index
13.2.1.1.2 Instrument Type = Cash
13.2.1.1.3 Instrument Type = FX
Note: See the guide TRM Instruments: Processing and Calculations for more information about
features.
Feature Description
PERFORMANCE-INDEX Used to identify an Index instrument as a benchmark index.
If this feature is applied to the instrument, the index is available for selection in
Performance Monitor’s Benchmark selection list.
Feature Description
PERFORMANCE-
CASH-IN-OUT
Used to identify payment instruments that should be treated as cash injections or
outflows in the performance calculations.
• If this feature is applied to the instrument, in the return calculation for the
position, the payment instrument generates an extra cashflow that offsets the
change of the bank account balance (or Cost of Carry balance) caused by the
payment.
This extra cashflow appears on the Portfolio grouping level on the opening date or
value date of the payment (depending on whether Trade Date or Value Date basis
is used). On the same date, there will be a change in the market value of the bank
account caused by the payment, which would otherwise generate a return, but
which is now exactly offset by the cashflow.
• If this feature is not applied to the instrument, there will not be any cashflows
from the payment on the Portfolio level. However, there will be cashflows on the
instrument and account, but these will offset each other on the Portfolio level.
Therefore, when calculating the return on the portfolio level, the change in market
value on the account balance caused by the payments will generate a return for
the portfolio.
PERFORMANCE-
TRADE-DATE
Determines that the market value for the payment transactions should be shown in
the period between the Opening Date and Value Date of the transaction.
• If this feature is applied to the instrument, payment transactions will appear in
Performance Monitor in a similar way to FX transactions (that is, showing
discounted market value).
• If this feature is not applied to the instrument, payments will only show a market
value on their value date (unless Trade Date method is used in Performance
Monitor).
Feature Description
PERFORMANCE-
FX-HEDGE
Used to identify FX instruments that are to be treated as hedges in performance
calculations.
13 Monitoring performance
13.2 Setting up performance measurement and risk
Transaction & Risk Management Module (TRM) User Guide 403
13.2.1.2 Setting up portfolios
To set up portfolios for performance measurement:
1. In Portfolio Tree, make sure that the portfolio structure is correct.
The design of the portfolio structure affects how many different top portfolios are needed for
saving market values and for monitoring performance on various levels. This includes the
structure for benchmarks in case they are also maintained as real portfolios.
See 3.14.2.2.1 Viewing portfolio hierarchies on page 113 for more information about portfolio
structure.
2. In Portfolio Editor, for each top portfolio, select the currency in which the market values are to
be saved in Performance Monitor in the Base Currency field in the upper part of the editor.
Usually, the base currency you select is based on your accounting needs. However, if the
decision relates to a top level grouping portfolio for which accounting is not done (for example, a
benchmark portfolio), then performance measurement is one of the main factors behind the
decision.
The base currency of the top portfolio used in the Performance Data Calculation activity (see
13.2.2 Generating historical market values for performance measurement on page 404)
determines in which currency the market values are saved. Market values are saved in the local
(cashflow) currency and in the base currency.
3. In Portfolio Editor’s Switches page, turn on the switches you need for each top portfolio as
described in the following table:
4. Optionally, if the portfolio you are defining will be used in the trading of Futures, in Portfolio
Editor’s Cost of Carry page, select the cost of carry instrument you want to use. This instrument is
used by the Performance Data Calculation activity to produce system-generated cost-of-carry
balances adjusting the daily netting margins of the Futures. See A.55 Performance Data
Calculation on page 650.
5. Save each portfolio definition using File-Save.
13.2.1.3 Setting up portfolio owners
To set up portfolio owners for performance measurement:
1. In Client Editor, for each portfolio owner used, make sure the account details and settlement
instructions are correctly set up.
Note that the ability to display and save market values of bank account balances for
performance measurement is dependent on the following:
Switch Description
Calculate
Cost-of-Carry
Switch on to trigger the Cost-of-Carry calculation for the portfolio.
Comparison Switch on to allow the portfolio to be used as a benchmark in Performance Monitor.
This switch defines the portfolio as a benchmark, enabling the Portfolio Compare
key-figures to be correctly interpreted as actual results. For any other portfolio, the
system displays the difference between the portfolios and the comparison portfolio,
where:
Difference = Portfolio Key-Figure - Comparison Key-Figure
Note: You can only compare an index to a benchmark portfolio if they have different
IDs. If you give the index the same ID as the benchmark portfolio, comparison
will not be possible in Performance Monitor as only the benchmark portfolio
will be available in the Benchmark selection list.
Trading Portfolio Switch on to mark the portfolio as an active trading portfolio, where transactions can
be created and for which Cost-of-Carry can be calculated.

13 Monitoring performance
13.2 Setting up performance measurement and risk
404 © Wall Street Systems IPH AB - Confidential
–Cashflows from transactions are directed to the correct accounts for settlement (see
3.13.1.13 Setting up client settlement instructions on page 100)
–Bank Account Balances are calculated (see 18.1.1.1 Setting up bank account balances and
interest on page 495).
2. Save each portfolio owner definition using File-Save.
13.2.1.4 Setting up currencies
To set up currencies for performance measurement:
•In Currency Editor, in the Default Rates page, add the type Risk Free Rate for each of the currencies
used.
This is the risk-free rate used in performance attribution. This rate is the local currency risk-free
rate of return (in the Karnosky-Singer attribution framework, it is called Local Cash Return). The
rate set on the O/N period of the curve is used in multi-currency performance attribution.
13.2.1.5 Setting up cost-of-carry
Cost-of-carry is an essential part of performance measurement when bank accounts are shared
across portfolios. The cost-of-carry balances are saved as separate transactions within each portfolio
in question, calculated for each date, and are visible in Treasury Monitor and Performance Monitor,
as well as certain Transaction Manager modes configured for this purpose.
In TRM, cost-of-carry related configuration is implemented in several editors and the calculation is
triggered through the Cost-of-Carry activity. See A.14 Cost of Carry on page 632 for information on
the activity parameters
Also see 12.1.7 Monitoring cost-of-carry positions on page 390 for more information.
13.2.2 Generating historical market values for performance measurement
For Treasury Monitor (and elsewhere in TRM), the current market values of portfolios are not saved
because they are constantly being updated in real-time. However, Performance Monitor is designed
to measure the performance of a portfolio over time.
Therefore, before using an index in Performance Monitor, you must set up an activity to calculate
and save the past daily market values for the portfolios. To calculate these market values, TRM uses
historical rates, viewable from Rate Monitor, for the rates scenario you select for the activity.
•To set up TRM to generate historical market values, use the Performance Data Calculation
activity (see A.55 Performance Data Calculation on page 650 for details on the activity
parameters).
Because Performance Monitor works on a daily basis, you must set the interval for this activity
(in Activity Manager’s Intervals page) to one day. The Due Date you give for this activity
determines the value date of the transactions that will be generated in the benchmark portfolio.
Note: Activities are set up and managed in Activity Manager: see Chapter 6 Managing activities
on page 227 for more information.
13.2.2.1 Generating historical market values in a third currency
In Performance Monitor the saved Performance Data (Market Value) of a Portfolio is based on
Treasury Monitor' s market value calculation.
You can display these historical market values in a third currency in the Performance Monitor by
running the Performance Data Calculation activity to save the Performance Monitor’s market value in
a currency other than the trading portfolio currency.
This activity saves the home currency market value (home currency is the currency to which you
save your performance data) and the local market value as calculated by Treasury Monitor. Treasury
Monitor’s FX conversion from the transaction's Trading Currency into the chosen Figure Currency
depends on the FX method set up at the instrument level (Instrument Editor - Base Valuation page).
13 Monitoring performance
13.3 Performance Monitor
Transaction & Risk Management Module (TRM) User Guide 405
Performance Monitor converts the home currency market values into the third currency by using the
FX Spot Rate.
Note: Only one home currency market value is saved at a time. When you run the activity again,
the previous market value is replaced with the new one.
For information about these conversions and calculations, see TRM Instruments: Processing and
Calculations Guide.
13.2.3 Configuring Treasury Monitor for risk measurement
Treasury Monitor can be used to measure the risk levels of your portfolios, compared to those of
benchmark portfolios: see 12.1.6 Using Treasury Monitor for risk measurement on page 390.
13.3 Performance Monitor
The Performance Monitor application is used to measure the performance of your portfolios against
an agreed index or benchmark portfolio.
The portfolio data that Performance Monitor uses is the market value for each instrument; this is
automatically saved by the Performance Data Calculation activity (see 13.2.2 Generating historical
market values for performance measurement on page 404 for more information).
13.3.1 Performance Monitor menus
The following tables describe the menu items which are specific to Performance Monitor and any
layout which is based on this application.
Other menu items which are common to all applications are described in 2.2.6 Using application
menus on page 34.
13.3.1.1 File
Menu item Description
Open Book Opens an existing book with the possibility to define start and end dates.
Save Book Saves any modifications made to the current book.
Save Book As Saves a new book.
Close Book Closes the current book.
Delete Book Deletes the current book.
Book Properties Opens the Book Properties dialog to allow you to view or modify the book’s owner and
user details.
The owner is allowed to modify the book and the user or user group can use the book,
but not modify its properties.
Print Prints the information currently displayed in the page.
Recent Books Allows you to quickly access the books that you have most recently used: a maximum
of nine books can be listed.
13 Monitoring performance
13.3 Performance Monitor
406 © Wall Street Systems IPH AB - Confidential
13.3.1.2 Edit
13.3.1.3 View
13.3.1.4 Page
Menu item Description
Copy Copies the values in the selected rows or columns. You can then paste the values into
another application.
Copy Page Copies the current page including headers. You can then paste the values into another
application.
Select / Unselect
All Cells
Selects or unselects all cells in the current page. You can then use Edit - Copy to paste
the values into another application.
Menu item Description
Select Columns
Select Rows
Opens a multi-selection list to allow you to select the column or row groupings that
you want to display.
See 13.3.4.2 Selecting column and row groupings on page 410 for information about
the available values.
Swap Columns and
Rows
Changes the display of the columns and rows: the columns become rows and the rows
become columns.
Select Key-Figures Opens a multi-selection list to enable you to select the key-figures you want to
display.
See 13.3.4.3 Selecting key-figures on page 411 for more information.
Zoom In
Zoom Out
Zoom to Default
Allows you to zoom into the display (to enlarge the figures), zoom out (to see more of
the grid), or zoom to default (to reset the original zoom).
Freeze Columns Locks the selected column and all columns to the left of it. This allows you to scroll
through the remaining columns, while the columns in the non-scrolled area remain
visible.
Move Page Left Moves the current page in the display to the left.
Move Page Right Moves the current page in the display to the right.
Visual Settings Changes the display: select from Bold, Gray, or Color Totals; and Blue, Gray, or Normal
Headers.
Menu item Description
New Grid Page Inserts a new grid page with the default layout. A group of pages can be saved in a
book using File - Save Book As.
New Chart Page Inserts a new chart page with the default layout. A group of charts can be saved in a
book using File - Save Book As.
Duplicate Page Creates a new page with the same properties as the current page.
Copy Page From Opens a list from which you can select a page you have already configured from one
book to copy it into the current book.
Rename Page Opens the Set Page Name dialog so you can rename the page.
Remove Page Removes the current page from the book. You need to select File - Save Book for the
removal to be taken into account.
Open XML Page Displays a dialog to enable you to open a page that has been saved in an XML format.
13 Monitoring performance
13.3 Performance Monitor
Transaction & Risk Management Module (TRM) User Guide 407
13.3.1.5 Data
13.3.1.6 Calculation
Save Page as XML Allows you to save the current page in an XML format.
Page Parameters Displays the details for the current page, including parameters and the page layout
(rows and columns).
Menu item Description
Scenario Allows you to set the scenario of market rates (for example, default or frozen) you
want to use to calculate the market value of your instruments.
Currency Displays a drop-down list of figure currencies for the selected portfolios.
Note: If the data has not been saved in either the portfolio base currency (default) or
in the selected figure currency for a particular portfolio, the Performance
Monitor will not display any values.
See the TRM Instruments: Processing and calculations guide for more information on
figure currency.
Portfolios Allows you to select the portfolios you want to include.
It is possible to select more than one portfolio from the same level in a portfolio
hierarchy.
Benchmarks Allows you to select the portfolio or index, which is to be used as a benchmark for
performance measurement.
Riskfree Position Allows you to select the interest rate, index, or portfolio which is to be considered at
the risk-free position for performance measurement.
Dates Allows you to specify the start and end date of the period you want to view.
If you do not specify a date range, the performance key-figures are shown for the
default period (the start of the year until yesterday).
Calendar Allows you to select the calendar you want to use.
Gap Set Allows you to select the gap set you want to use.
Exclude from Cash
In/Outs...
Allows you to exclude instruments that have feature Performance, Cash In/Out
attached to them. If you exclude an instrument, this feature is ignored. That is, the
payments will have an effect on the return of the portfolio.
See TRM Instruments: Processing and Calculations Guide.
Exclude Dividends Allows you to specify whether you want to exclude dividends from the calculations. By
default, all are included.
Exclude Cost-of-Carry Allows you to specify whether the cost-of-carry is excluded from calculations. By
default, it is included.
Exclude Fees Allows you to specify whether fees are excluded from calculations. By default, they
are included.
Menu item Description
Recalculate
Recalculate
Automatically
Recalculates the performance calculations.
Value Date Basis
Trad e Dat e Basi s
Allows you to specify whether you want your calculations to be based on trade date
basis or value date basis.
See 13.1.1.2 Measurement methods on page 400.
Menu item Description

13 Monitoring performance
13.3 Performance Monitor
408 © Wall Street Systems IPH AB - Confidential
13.3.2 Start-up parameters
It is possible to alter the start-up parameters so that Performance Monitor launches in a different
mode.
See C.6 Performance Monitor on page 682 for information about the options available.
13.3.3 Configuring Performance Monitor
You can configure Performance Monitor according to your personal preferences by creating pages or
groups of pages in books, by selecting the rows and columns you want to be displayed in each page,
and by selecting the values or key-figures you want to monitor.
You insert a new page using Page - New Grid Page or Page - New Chart Page. You select the values you
want to display in a page using View - Select Columns, View - Select Rows, and View - Select Key-Figures:
see 13.3.4.2 Selecting column and row groupings on page 410 and 13.3.4.3 Selecting key-figures
on page 411 for information about the available values.
All Cash Basis Allows you to specify whether you want your calculations to be based on an all cash
basis.
See 13.1.2.1 Actual basis and all cash basis on page 401
Weight Factor 0
Weight Factor 1/2
Weight Factor 1
The weight factor indicates the proportion of the day the inter-day cashflows are
assumed to have been in/out of the position. With w=1, w=1/2, or w=0, all cashflows
are assumed to happen at the beginning, middle, or end of the day.
For example, if traders in general are informed about capital injections or withdrawals
at the end of the day, it may be more realistic to have weight factor = 0. In this case,
the performance for this day is calculated as follows:
[MV End + (0 – 1)*Cashflows] / [MV Start + 0*Cashflows] = (155 – 50) / 100 = 1.05
TRM’s weight factor calculations are based on modified Dietz returns, whereby a
constant rate of return is assumed each day and each cashflow is weighed by the
amount of time that it is held in the portfolio.
Use one of the following options, depending on when you want TRM to assume that
the cashflows occur:
• End of the day (available for 0 of the day)
• Half the cashflows in the morning, and half the cashflows at the end of the day
• Start of the day (available for the whole day).
Index Scale Default
Index Scale 100
Index Scale First
If you select indexes, you need to specify how they are to be scaled. For example,
suppose that the Dow Jones is at 7900 - you can choose between:
• Keeping its value at 7900 against your portfolio’s default value of 100 (Index Scale
Default)
• Scaling it to 100 to match your portfolio’s default value of 100 (Index Scale 100)
• Scaling your portfolio’s value up to match the imported value giving, for example,
7900 for Dow Jones and 7900 for your portfolio’s value (Index Scale First).
Periodic Return
Logarithmic Return
Allows you to specify whether rates of return are calculated as periodic rates or
continuously compounded rates.
Daily Sampling
Weekly Sampling
Monthly Sampling
Quarterly Sampling
Allows you to specify the frequency at which data is sampled to produce risk-adjusted
return statistics. This frequency, combined with the sample count, gives the
aggregation period for the calculations.
Select Sample Count Allows you to specify the number of samples used to produce risk-adjusted return
statistics. This number, combined with the sampling frequency, gives the aggregation
period for the calculations.
Menu item Description
13 Monitoring performance
13.3 Performance Monitor
Transaction & Risk Management Module (TRM) User Guide 409
You can create and save the pages in multiple books either for your own personal use, or to be
shared by other users using File - Save Book As.
13.3.4 Monitoring performance in Performance Monitor
Using Performance Monitor, you can measure a portfolio’s performance and compare it against
index values and compositions.
13.3.4.1 Defining performance values
To define the values used to monitor the performance of a portfolio:
1. In Performance Monitor, define the period you want to monitor using Data - Dates.
If you open a book with more than one page, you must define the period for each page. If you
do not define a period, the start of the year until yesterday is used as the default date range.
2. Configure the grid or chart pages by selecting the columns and rows according to how you want
to group information in the monitor’s page: see 13.3.4.2 Selecting column and row groupings on
page 410.
3. Select the key-figures for which you want to view the results: see 13.3.4.3 Selecting key-figures
on page 411.
4. For each page, select the data you want to use in the performance calculations from the Data
menu (see 13.3.1.5 Data on page 407):
–Select Data - Scenario to set the scenario of market rates.
Note that the scenario you select must be the same scenario defined for the Performance
Data Calculation activity (see 13.2.2 Generating historical market values for performance
measurement on page 404).
–Select Data - Portfolios to select the portfolios you want to include.
It is possible to select more than one portfolio from the same level in a portfolio hierarchy.
–Select Data - Benchmarks to select the portfolio or index, which is to be used as a benchmark
for performance measurement.
You can only compare an index to a benchmark portfolio if they have different IDs. If you
have given an index the same ID as a benchmark portfolio, comparison will not be possible
in Performance Monitor as only the benchmark portfolio will be available in the Benchmark
selection list.
–Select Data - Riskfree Position to select the interest rate, index, or portfolio which is to be
considered at the risk-free position for performance measurement.
If you want to use an interest rate as the risk-free position, enter the rate directly as a
percentage in the dialog.
If you want to use a portfolio or index as the risk-free position, select the index or portfolio
from the selection list.
–Select any other types of data you want to use in the calculations from the Data menu, such
as Calendar and Gap Set.
5. Specify any data you want to exclude from the performance calculations using one of the Data -
Exclude menu options: Dividends, Cost of Carry, or Fees (see 13.3.1.5 Data on page 407).
6. Define the methods you want to use for the performance calculations from the Calculation menu.
–Select Calculation - Value Date Basis or Calculation - Trade Date Basis according to the method you
want to use.
–Select Calculation - All Cash Basis if you want your calculations to be based on an all cash basis.
–Select the appropriate Weight Factor to define the proportion of the day that inter-day
cashflows are assumed to have been in/out of the position.
13 Monitoring performance
13.3 Performance Monitor
410 © Wall Street Systems IPH AB - Confidential
–If indexes are used, specify how they are to be scaled using one of the Index Scale menu
options.
–Specify the method used to calculate rates of return: Periodic Return or Logarithmic Return.
–Select one of the Sampling menu options to identify the frequency at which data is sampled to
produce risk-adjusted return statistics.
–Select Calculation - Select Sample Count to define the number of samples used to produce
risk-adjusted return statistics.
See 13.3.1.6 Calculation on page 407 for more information about the available methods.
7. Select Calculation - Recalculate or Calculation - Recalculate Automatically to calculate the performance
measurement calculations.
8. Save the book and its parameters using File - Save Book.
13.3.4.2 Selecting column and row groupings
To define the values according to how you want to group information in the monitor’s page, use View
- Select Columns and View - Select Rows.
The following table describes the rows and columns that you can select in Performance Monitor. The
order in which you select the values determines the order in which they are displayed:
Value Groups information according to...
Benchmark Benchmark portfolio, or index, against which you want to measure the performance of
your portfolio.
Branch Code [0-19] Branch code of the instrument or equity.
Note: When grouping by Branch Code the Performance Monitor's behavior is
consistent with Treasury Monitor: the Cost-of-Carry pending settlement cashflows are
assigned to the corresponding instrument and inherit its branch code grouping.
Date Daily results.
You can also choose to view results per month (axis value Month), per quarter (axis
value Quarter), or per year (axis value Year).
Day of Month Number of the day in the chosen month.
If you select Day of Month, you should also select Month to see which month is being
referred to in the display.
Instrument Instrument transacted:
• For FX transactions, you see the position by currency pair
• For equities, you see the position by equity.
If you use this axis value to group at Instrument level, the cashflows are shown with
respect to the instrument: positive flow means that we have bought more instruments
whereas negative flow means that we have sold instruments.
For example, consider futures that are fixed on a daily basis. If the daily P/L is
positive, the fixing takes out money from the instrument; this is equivalent to selling
and therefore the cashflow is negative.
Instrument Currency
Instrument Type
Instrument Group
Issuer
Issuer Group
Currency, instrument type, instrument group, issuer and issuer group of the
instrument transacted.
13 Monitoring performance
13.3 Performance Monitor
Transaction & Risk Management Module (TRM) User Guide 411
13.3.4.3 Selecting key-figures
All the key-figures show results for the default period with which Performance Monitor opens (the
start of the year until yesterday), unless you specify another period using Data - Dates, in which case
the period you specify applies instead.
The results for the period are shown by time intervals of a day, month, quarter, or year, depending
on whether you have selected Date, Month, Quarter, or Year as your axis grouping. For any of the
key-figures to be displayed, either your columns or rows must contain the Key-Figure column or row
grouping.
•To open the list of key-figures, select View - Select Key Figures.
Note: Performance measurement calculations and key-figures are described in detail in the guide
TRM Instruments: Processing and Calculations.
Key-Figure Key-figure.
To see any key-figures at all, you must specify Key-Figure for either the X axis or the Y
axis: this axis value adds, or removes, all the key-figures you have selected.
For an explanation of the key-figures you can use, see 13.3.4.3 Selecting key-figures
on page 411.
Month Monthly results.
You can also choose to view results per day (axis value Date), per quarter (axis value
Quarter) or per year (axis value Year).
Owner Owner of the portfolio or portfolios you have selected.
Package Type Package type of the transaction if it has been assigned to a package.
Portfolio Name of the portfolio or portfolios you have selected.
Quarter Quarterly results.
You can also choose to view results per day (axis value Date), per month (axis value
Month), or per year (axis value Year).
Security Identifier Default Security Identifier.
Allows you to do grouping by the default security identifier defined at the
instrument-level.
Trading Portfolio Names of the trading portfolios belonging to the portfolio or portfolios that you have
selected.
Underlying Maturity
Period
Period or gap into which the underlying’s maturity date falls.
Year Yearly results.
You can also choose to view results per day (axis value Date), per month (axis value
Month), or per quarter (axis value Quarter).
Value Groups information according to...
13 Monitoring performance
13.3 Performance Monitor
412 © Wall Street Systems IPH AB - Confidential
Transaction & Risk Management Module (TRM) User Guide 413
Chapter 14 Portfolio modeling
Fund managers who are responsible for dynamic portfolios need to be able to monitor actual
exposures in real-time and refocus management strategy based on changing market conditions and
client demands.
Portfolio modeling in TRM enables fund managers to analyze, simulate, generate, and process deals
to align portfolios to a model or a benchmark portfolio.
Fund managers create portfolio models as part of their research responsibilities. These models
represent the best possible structure of a portfolio within any given mandate, risk profile, or
regulatory constraint. They can be created using any combination of security or asset-mix target
weights.
Once the models are in place, the fund manager's portfolios are linked to a model that has the same
profile. Portfolio modeling is the process of managing these models and ensuring that each client
portfolio is constantly adjusted to keep in line with its associated model when the factors having an
impact on the model change.
14.1 Setting up portfolio modeling
You can set up several types of portfolio models, namely absolute (tactical allocation) or relative to
a benchmark. In a relative portfolio model, the portfolio mirrors the relative weights of a benchmark
index.
Portfolio Modeling Monitor is then used to analyze the portfolios’ position in relation to the model
and the target, and to display guideline breaches. You can rebalance a portfolio based on a
benchmark or absolute model and manually make any adjustments.
See 14.2 Portfolio Modeling Monitor on page 417 for more information.
Finally, you can realign the portfolio with the model by generating the necessary deals.
See 14.2.6 Generating deals on page 427 for more information.
14.1.1 Characteristics of portfolios models
A model contains a set of characteristics:
•Type of Model (defined in Portfolio Model Editor)
A model may be absolute or relative to a benchmark.
•Base Key Figure on which the rebalancing is based (defined in Portfolio Model Editor)
The base key figures are: market value percentage, and position duration contribution and
position effective duration contribution (for IR portfolios).
•Grouping definition (defined in Portfolio Modeling Monitor)
The groupings are: Instrument Group, Branch Codes, Issuer, Underlying Maturity Period,
Instrument Type, Currency, and Instrument.
14 Portfolio modeling
14.1 Setting up portfolio modeling
414 © Wall Street Systems IPH AB - Confidential
•Target (defined in Portfolio Modeling Monitor)
Models can be set up with a target on different levels:
–A Target expressed as Absolute % either of the total or sub-total (Absolute model case).
–A Bet expressed as Relative % of the benchmark (Relative model case).
For example:
Benchmark = 10%
Target relative to the benchmark = +3%
Expected allocation result = 13%
See 14.2.3.5 Defining Targets and Bets on page 423.
•Minimum/Maximum % of Total or Sub-Total (defined in Portfolio Modeling Monitor)
–Minimum % of Total
–Minimum % of Sub Total
–Maximum % of Total
–Maximum % of Sub Total.
See 14.2.3.6 Defining minimum/maximum % of total or sub-total on page 423.
•Asymmetrical Global Tolerances on the target
You use tolerances to monitor if the position of the portfolio is within an interval defined around
the target.
There are two types of tolerances that you can define: you can define the tolerances either as
relative, or as absolute to the target. You define global tolerances in Portfolio Model Editor.
The maximum tolerance is applied when the position is higher than the target and the minimum
tolerance is applied when the position is lower than the target.
In the following example, the minimum and maximum tolerances are defined as absolute:
In this example, the minimum and maximum tolerances are defined as relative:
The line is highlighted in Portfolio Modeling Monitor if the position of the portfolio falls outside
the interval.
•Asymmetrical Tolerances on the grouping level
You can add further asymmetrical tolerances on the grouping level in Portfolio Modeling Monitor.
Target Type Tolerance min Tolerance max Interval
10.00% Absolute -5% +10% [5%;20%]
Target Type Tolerance min Tolerance max Interval
10.00% Relative -5% +10% [9.5%;11%]

14 Portfolio modeling
14.1 Setting up portfolio modeling
Transaction & Risk Management Module (TRM) User Guide 415
14.1.2 Defining portfolio models
You define the main characteristics of a portfolio model in Portfolio Model Editor. This editor layout is
based on the application Static Data Editor (see 3.2 Static Data Editor on page 41 for more
information).
To define the characteristics of a portfolio model:
1. In Portfolio Model Editor, fill in the fields in the upper part of the editor using the information in
the following table:
2. In the Switches page, turn on the switches using the information in the following table:
3. In the Tolerances page, specify the global tolerances for the portfolio model: you can define
either absolute or relative minimum and maximum tolerances.
You can set up a model with a target on different levels. The global tolerance defined here
monitors if the portfolio position is within an interval defined around that target. The position is
then displayed in Portfolio Modeling Monitor.
Information Description
ID
Name
Unique ID and name for the portfolio model.
Base Key Figure The base key figure on which the rebalancing will be based:
• Market Value Percentage
• Position Duration Contribution (for IR instruments)
• Position Effective Duration Contribution (for IR instruments).
Security List The security list to be used in the portfolio model.
Security lists are defined in Portfolio Model Security List Editor (see 14.1.3 Defining
portfolio model security lists on page 416 for more details). You can open this editor
by right-clicking in this field.
Security lists are used to restrict the choice of securities in the rebalancing process:
• If you add a security list to the model, only securities in the list will be available for
selection in the rebalancing process.
• If no security list is added, then all securities will be available for selection in the
rebalancing process.
See 14.2.5.1 Adding a security on page 425.
Information Description
Include Cash Switch on if you want to take the cash bucket into account in the rebalancing.
Relative Switch on if the model is relative to a benchmark.
Information Description
Minimum
Tole ra n ce
Maximum
Tole ra n ce
The minimum and maximum absolute tolerance of the portfolio position to be used in
Portfolio Modeling Monitor.
These are expressed as a percentage.
Minimum Relative
Tole ra n ce
Maximum Relative
Tole ra n ce
The minimum and maximum relative tolerance of the portfolio position to be used in
Portfolio Modeling Monitor.
These are expressed as a percentage.
14 Portfolio modeling
14.1 Setting up portfolio modeling
416 © Wall Street Systems IPH AB - Confidential
4. Save the portfolio model, using File - Save as New.
Note: In Portfolio Modeling Monitor, you can specify the target and minimum and maximum
tolerances on a grouping level. You can also further define the portfolio model by adding
more values (asymmetrical tolerances), or even manually adjust the values you previously
set up for the model in Portfolio Model Editor.
14.1.3 Defining portfolio model security lists
In TRM, a security list is a list of tradable securities that you can use in the rebalancing of a portfolio.
You define the security list in Portfolio Model Security List Editor. This editor layout is based on the
application Static Data Editor (see 3.2 Static Data Editor on page 41 for more information).
You link the security list to your model by selecting the required list from the Security List field in
Portfolio Model Editor. Security lists are used when you add new instruments to the model in
Portfolio Modeling Monitor and as a suggestion list when you are rebalancing a portfolio with a
position shortage.
To create a security list:
1. In Portfolio Model Security List Editor, enter a unique ID and name for the security list in the
upper part of the editor.
2. In the Security List page, select a security you want to include in the list.
Note that only instruments that include the Quoted feature in their instrument definition are
available for selection.
3. Click Add.
You can remove a security from the list by selecting it, and clicking Remove.
4. Repeat the procedure to add more securities to the list as required.
5. Save the security list, using File - Save As New.
14.1.4 Applying a portfolio model or benchmark to a portfolio
Portfolios can be compiled into hierarchies: the portfolio at the top of the hierarchy is referred to as
the top portfolio, and any lower ones belonging to the top portfolio are known as the subportfolios.
The top portfolio may also contain the benchmark portfolio (if needed).
See 3.14.2.2 Creating portfolio hierarchies on page 113 for more information.
The following examples show how the portfolio hierarchy may be configured, depending on the type
of rebalancing.
Top Portfolio
(linked to model)
Benchmark Subportfolio 1
Example 1: Simple rebalancing with only one subportfolio
14 Portfolio modeling
14.2 Portfolio Modeling Monitor
Transaction & Risk Management Module (TRM) User Guide 417
The portfolio model needs to be applied to the top portfolio that contains the subportfolio, or set of
subportfolios, that you want to model. The benchmark used for the rebalancing of the portfolio also
needs to be applied to the top portfolio definition.
A portfolio may act as a subportfolio in one hierarchy, and exist in another hierarchy where it is used
as a benchmark. You define which subportfolio will be the benchmark in the specific hierarchy during
the set up of the top portfolio.
To apply a portfolio model or benchmark to a top portfolio:
1. In Portfolio Editor, select the portfolio to which you want to apply the model or benchmark.
2. In Portfolio Editor’s Properties page, define and add the properties and values you want using the
information in the following table:
3. Save the portfolio definition using File - Save.
14.2 Portfolio Modeling Monitor
Portfolio Modeling Monitor enables the real-time calculation of equities, market value percentage
distribution, interest rate duration contribution, and other related figures that are important for
portfolio managers.
Portfolio Modeling Monitor can be used to further define the portfolio models that have been set up,
as follows:
•On different levels based on attributes (such as, Instrument Group, Branch Code, Underlying
Maturity Period, or Currency)
•By adding more values (asymmetrical tolerances)
•By manually adjusting the values previously set up for the model.
Portfolio Modeling Monitor is then used to analyze the portfolios’ position in relation to the model
and the target, and to display guideline breaches.
It is also possible to do "what if?" scenarios, different kinds of rebalancing based on a benchmark or
model, and manually make any adjustments.
Finally, you can realign the portfolio with the model by generating the necessary deals.
Top Portfolio
(linked to model)
Benchmark Subportfolio 2
Subportfolio 1
Example 2: Multiple rebalancing with two subportfolios and the same
Property Value
MODEL The portfolio model you want to apply to a top portfolio.
MODELING-BENCHMARK The benchmark portfolio you want to use for the rebalancing of the portfolio.
14 Portfolio modeling
14.2 Portfolio Modeling Monitor
418 © Wall Street Systems IPH AB - Confidential
14.2.1 Portfolio Modeling Monitor menus
The following tables describe the menu items which are specific to Portfolio Modeling Monitor and
any layout which is based on this application.
Other menu items which are common to all applications are described in 2.2.6 Using application
menus on page 34.
14.2.1.1 File
14.2.1.2 Edit
14.2.1.3 View
Menu item Description
Set Default Date Displays the Set Default Date dialog in which you can specify the book you want to
display in the monitor, and the date you want displayed.
All pages in the book that have the Use Default Date switch turned on will use this date:
see 14.2.3.1 Starting Portfolio Modeling Monitor on page 421 and 14.2.3.2 Loading
pages and books on page 421 for more information.
Open Book Opens an existing book.
Save Book Saves any modifications made to the current book.
Save Book As Opens the Save As dialog so you can save the displayed pages as a new book.
Enter the following information:
•Book Name - name for the book.
•Owner - user or user group that can modify the book.
•User(s) - user or user group that can use the book.
Close Book Closes the current book.
Delete Book Deletes the current book.
Book Properties Opens the Book Properties dialog so you can view or modify the book’s owner and user
details.
The owner is allowed to modify the book and the user or user group can use the book,
but not modify its properties.
Print Prints the information currently displayed in the page.
Menu item Description
Copy Copies the values in the selected rows or columns. You can then paste the values into
another application.
Paste Pastes values you have copied into the selected rows or columns.
Copy Page Copies the current page including headers. You can then paste the values into another
application.
Select / Unselect All Selects or unselects all cells in the current page. You can then use Edit - Copy to paste
the values into another application.
Menu item Description
Select Columns
Select Rows
Opens a multi-selection list so you can select the column or row groupings that you
want to display.
See 14.2.3.3 Defining column configurations on page 422.

14 Portfolio modeling
14.2 Portfolio Modeling Monitor
Transaction & Risk Management Module (TRM) User Guide 419
14.2.1.4 Page
14.2.1.5 Model
Select Portfolio
Key-Figures
Opens a multi-selection list so you can select the key-figures that you want to display.
See 14.2.3.3 Defining column configurations on page 422.
Zoom In
Zoom Out
Zoom to Default
Allows you to zoom in to the display (to enlarge the figures), zoom out (to see more of
the page), or zoom to default (to reset the original zoom).
Freeze Columns Locks the selected columns and all columns to the left of it. This allows you to scroll
through the remaining columns, while the columns in the non-scrolled area remain
visible.
Move Page Left
Move Page Right
Moves the current page in the display to the left or right.
Visual Settings Changes the display; select from:
•White, Gray, or Color Totals
•Normal, Gray, or Color Headers
• Show Tooltips
•Show Disabled Lines.
Menu item Description
New Page Inserts a new page. A group of pages can be saved in a book using File - Save Book As.
Duplicate Page Creates a new page with the same properties as the current page.
Copy Page From Opens a list from which you can select a page you have already configured from one
book to copy it into the current book.
Rename Page Opens the Set Page Name dialog so you can rename the page.
Remove Page Removes the current page from the book. You need to select File - Save Book for the
removal to be taken into account.
Portfolio Model
Parameters
Displays the Portfolio Model Parameters dialog.
See 14.2.3.2 Loading pages and books on page 421 for more information.
Show Parameters Displays the parameters as defined in the Portfolio Model Parameters dialog.
Menu item Description
Save Model Saves the model.
Reload Model Reloads the model.
Analysis Shows the deviation or breaches of the portfolio from the model. Select from:
•Position Analysis - to view the current position.
•Simulation Analysis - to view the position after rebalancing.
See 14.2.4 Analyzing positions in Portfolio Modeling Monitor on page 423 for more
information.
View Analysis
Summary
Displays a dialog that shows the reason for each breach.
See 14.2.4.1 Breaching the model on page 423 for more information.
Menu item Description
14 Portfolio modeling
14.2 Portfolio Modeling Monitor
420 © Wall Street Systems IPH AB - Confidential
14.2.1.6 Rebalancing
14.2.1.7 Update
14.2.1.8 Tools
14.2.2 Start-up parameters
It is possible to alter the start-up parameters so that Portfolio Modeling Monitor launches in a
different mode.
See C.7 Portfolio Modeling Monitor on page 683 for information about the options available.
Menu item Description
Select Security List Opens a multi-selection list to allow you to select a security in the case of a position
shortage. The securities available for selection depend on the portfolio model setup
(see 14.1.2 Defining portfolio models on page 415):
• If a security list has been applied to the model, only securities within that list are
available for selection.
• If no security list is applied to the model, all securities in the system are available
for selection.
See 14.2.5.1 Adding a security on page 425.
Options Allows you to set further parameters:
• Keep Input Values
• No Overdraft.
See 14.2.5.2 Rebalancing options on page 425.
Distribution Methods Allows you to select the distribution method you want to use.
See 14.2.5.3 Distribution methods on page 425 for more information.
Reset Allows you to reset the relative cells if there are errors in the rebalancing.
See 14.2.5.5.2 Rebalancing errors on page 427 for more information.
Rebalance Rebalances all of the holdings in the portfolio in the rebalancing process.
See 14.2.5.5 Launching rebalancing on page 426.
Invest Allows you to specify that any extra cash is rebalanced on the portfolio composition.
See 14.2.5.4 Investing extra cash on page 426
Generate Deals Displays the Generated Deals mode of Transaction Manager to allow you to apply and
process any deals generated from the rebalancing process.
See 14.2.6 Generating deals on page 427.
Menu item Description
Update Now
Realtime Update
Allows you to update the displayed values according to market information.
Menu item Description
Portfolio Model Editor Opens Portfolio Model Editor.
See 14.1.2 Defining portfolio models on page 415.
Portfolio Model
Security List Editor
Opens Portfolio Model Security List Editor.
See 14.1.3 Defining portfolio model security lists on page 416.

14 Portfolio modeling
14.2 Portfolio Modeling Monitor
Transaction & Risk Management Module (TRM) User Guide 421
14.2.3 Configuring Portfolio Modeling Monitor
You can configure Portfolio Modeling Monitor according to your personal preferences by creating
pages or groups of pages in books, by selecting the rows and columns you want to be displayed in
each page, and by selecting the values or key-figures you want to monitor.
You insert a new page using Page - New Page and select the values you want to display in a page using
View - Select Columns, View - Select Rows, and View - Select Key-Figures.
You can create and save the pages in books either for your own personal use, or to be shared by
other users using File - Save Book As.
14.2.3.1 Starting Portfolio Modeling Monitor
When Portfolio Modeling Monitor is opened, the Set Default Date dialog is displayed.
•Select the book you want to load, and the date you want it loaded with.
All the pages (portfolio positions) are loaded with the same date, known as the Default Date
(except pages that have been created with a specific date).
14.2.3.2 Loading pages and books
As in other TRM monitors, Portfolio Modeling Monitor uses the concept of books and pages. In this
monitor, each page is relative to one top portfolio. It contains the position of the subportfolios and
the model linked to the top portfolio.
To load a page:
1. Select Page - New Page.
2. In the Portfolio Model Parameters dialog, fill in the fields using the information in the following
table:
Information Description
Portfolio Top portfolio that contains the portfolio hierarchy that you want to model.
See 14.1.4 Applying a portfolio model or benchmark to a portfolio on page 416.
Transaction State Minimum state that the transactions must have reached to be included in the analysis.
Scenario Market information scenario.
Figure Currency Currency in which you want the results displayed.
Date Date of the analysis.
Note that if you enter a date in this field, the date of the page will be fixed, that is,
you will always monitor this page on this date.
By default, the date of the analysis is set to the Default Date. This field only becomes
available if the Use Default Date switch (see below) is not selected.
Result Mode Result mode (accounting standard): FO/MO, FAS, IFRS, or Local.
State Context Value specifying whether certain transaction types are to be included in the position:
• Default - no cost-of-carry or collateral transactions.
• W/Cost-of-Carry - cost-of-carry transactions.
• W/Collateral - collateral transactions. These transactions are generated from repo
transactions.
• W/Cost-of-Carry/Collateral - both cost-of-carry and collateral transactions.
• W/Cost-of-Carry/Order - both cost-of-carry and order transactions.
• W/Order - order transactions.
Note: W/Cost-of-Carry can only be selected for portfolios which have the Cost-of-Carry
switch turned on: see 12.1.7 Monitoring cost-of-carry positions on page 390 for
more information.
14 Portfolio modeling
14.2 Portfolio Modeling Monitor
422 © Wall Street Systems IPH AB - Confidential
3. Click OK.
14.2.3.3 Defining column configurations
You select the columns you want to display in the main part of the monitor view, using View - Select
Columns. The available columns are: Adjust, Benchmark, Model, Portfolio, and Summary.
You can further configure each column by selecting the key-figures you want to monitor under each
section. The available key-figure values change according to the column.
To configure the columns:
1. Select the columns you want to configure using View - Select Columns.
2. Right-click a column on the right side of the selection list and select Configure Values.
3. In the Select Key-Figures multi-selection list, select the key-figures you want to display under the
column header.
Note that the menu item changes according to the section you are configuring: if you are
configuring the Benchmark column, the menu will show Select Benchmark Key-Figures.
4. Click OK.
You can also configure a column by right-clicking the column header in the display and selecting the
corresponding Select Key-Figures menu item.
In both cases, you can further configure the selected key-figures, as follows:
1. Right-click the selected key-figure on the right side of the key-figure selection list.
2. Select Configure Parameters.
3. In the Parameters dialog, set values in the Precision and Divider fields.
The values you set here are taken into account when the key-figure is displayed in the monitor.
4. Click OK.
You can also select and configure the key-figures you want to display under the Portfolio column
grouping using View - Select Portfolios Key Figures.
14.2.3.4 Defining security groupings
You can define security groupings in Portfolio Modeling Monitor. These groupings determine how the
list of securities you select for the portfolio model are displayed on the left side of the monitor.
For example, you can group the list by Instrument Group or by Currency. Other available groupings are:
Branch Codes, Issuer, and Underlying Maturity Period.
To define security groupings:
•Select the groupings you want using View - Select Rows.
Use Default Date Switch on if you are using the Default Date for this new page.
If this switch is not selected, then you have to specify a date in the Date field. This
date is saved with the page.
Analysis Page By default, the page displays the groupings defined in the model. Using this switch
allows you to use different sets of groupings and save them with the page.
If this switch is on you can:
• Define or save a page with groupings that differ from the ones defined in the
model
• Save some values relative to this new grouping in your model.
Note: Deal generation is not possible from an Analysis page.
Information Description
14 Portfolio modeling
14.2 Portfolio Modeling Monitor
Transaction & Risk Management Module (TRM) User Guide 423
14.2.3.5 Defining Targets and Bets
You can set up a model with a target or bet (model relative to a benchmark) on different levels. You
define the target or bet in the Model section of Portfolio Modeling Monitor.
To define targets or bets:
1. Right-click on the header of the Model section.
2. Select Select Model Key-Figures from the menu.
3. Select Target or Bet from the list of available key-figures in the multi-selection list.
4. Click OK.
In the Target or Bet column of Portfolio Modeling Monitor you can manually enter or alter targets
and bets for your cash and position.
14.2.3.6 Defining minimum/maximum % of total or sub-total
To define the minimum or maximum % for the total or sub-total:
1. Right-click on the header of the Model section.
2. Select Minimum Total, Minimum Sub Total, Maximum Total, or Maximum Sub-Total from the list of
available key-figures in the multi-selection list.
3. Click OK.
In the Minimum Total, Minimum Sub Total, Maximum Total, and Maximum Sub-Total columns, you can
manually enter or alter the maximum and minimum values for your cash and position.
14.2.3.7 Defining asymmetrical tolerances
To define asymmetrical tolerances:
1. Right-click on the header of the Model section.
2. Select Minimum Tolerance, Minimum Relative Tolerance, Maximum Tolerance, or Maximum Relative
Tolerance from the list of available key-figures in the multi-selection list.
3. Click OK.
In the Minimum Tolerance, Minimum Relative Tolerance, Maximum Tolerance, and Maximum Relative
Tolerance columns, you can manually enter or alter the maximum and minimum values for your
cash and position.
14.2.4 Analyzing positions in Portfolio Modeling Monitor
Portfolio Modeling Monitor shows the deviation or breaches of the current position of the portfolio
from the model (minimum, maximum and tolerances).
To turn this on:
•Select Model - Analysis - Position Analysis.
This analysis can also be done on the position after rebalancing.
To turn this on:
•Select Model - Analysis - Simulation Analysis.
The analysis set up is saved with the book.
14.2.4.1 Breaching the model
When the current position breaches the model, different colors are used to display the breaches:
breaches to Global Tolerances and Tolerances are displayed in yellow, breaches to Min Total, Min
Subtotal, Max Total and Max Subtotal are displayed in red.

14 Portfolio modeling
14.2 Portfolio Modeling Monitor
424 © Wall Street Systems IPH AB - Confidential
If all of the guidelines are broken, then the highest priority color is displayed, based on the following
priority order:
–Min/Max in Total
–Min/Max in Sub Total
–Min/Max Absolute Tolerance
–Min/Max Relative Tolerance
–Min/Max Global Absolute Tolerance
–Min/Max Global Relative Tolerance.
You can place your cursor on a breach to display its content.
To see a list of these warnings:
•Select Model - View Analysis Summary.
The resulting dialog shows the reason for each breach.
14.2.4.2 Example of a model setup
Here is an example of a model setup. If the portfolio (position) is breaching a guideline, the line is
highlighted.
1 Tolerance Max broken: 80% (Target) + 5% (Tolerance Max) = 85% but the position = 90%
2 Tolerance Max Relative broken: 15% (Target) * 10% (Tolerance Min Relative) = 1.5%, 1 6.5% < 27%
(Position Total)
3 Maximum Sub Total broken: 28% but the position in Sub Total = 30%
4 Minimum Total broken: 15% but the position in Total = 10%
14.2.5 Rebalancing
The rebalancing tool can adjust one or more portfolios or funds to target weights defined as models.
The model can be absolute, the definition of a tactical allocation, or relative to a benchmark.
•If the model is defined as absolute, the calculations are based on the allocation defined in the
Target column.
•If the model is defined as relative, the calculations are based on the allocation of the benchmark
and the Bet defined in the model.
Position
total
Position
sub total
Minimum
total
Minimum
sub total Target
Toleranc
e
maximu
m
Maximu
m
sub total
Maximu
m
total
Sector 1 90.00% 90.00% 80.00% 80.00% 5%1
Instrument 1 45.00% 50.00% 40.00% 50.00% 50.00%
Instrument 2 27.00% 30.00% 10.00% 15.00% 10%228.00%3
Instrument 3 18.00% 20.00% 10.00% 15.00% 40.00%
Sector 2 10.00% 10.00% 15.00%420.00% 30.00%
Instrument 1 8.00% 80.00% 40.00% 15.00% 60.00%
Instrument 2 2.00% 20.00% 5.00%
14 Portfolio modeling
14.2 Portfolio Modeling Monitor
Transaction & Risk Management Module (TRM) User Guide 425
The columns under the Adjust column section are used for rebalancing; the Adjust Value column is
used for Absolute, and the Relative Adjust Value is used for Relative. You can use these columns to
enter any manuals adjustments that you want to make.
•If you do not enter anything in the Adjust section, the model is used as the target allocation for
the rebalancing.
•If you do specify a value in the Adjust section then the system ignores the model and used this
value for the rebalancing.
14.2.5.1 Adding a security
Security lists are used when you add new instruments to the model in Portfolio Modeling Monitor.
They can be used as a suggestion list when you are rebalancing a portfolio with a position shortage.
Security lists are defined in Portfolio Model Security List Editor: see 14.1.3 Defining portfolio model
security lists on page 416.
To select a list in the case of a position shortage:
1. Select Rebalancing - Select Security List.
2. Select the securities you want from the list.
Note that if a security list is applied to a portfolio model, only the securities belonging to the list
will be available for selection (see 14.1.2 Defining portfolio models on page 415.
3. Click OK.
14.2.5.2 Rebalancing options
You can further define the rebalancing process, as follows:
•Keep Input Values
If this option is selected, the rebalancing keeps the existing input values in the Adjust column.
•No Overdraft
If this option is selected, over-investment is avoided (that is, investing more than indicated) as a
result of rounding.
Cash is not impacted when rounding of the rebalancing results in an increase in the investment.
In consequence, the last displayed instrument in the position is the one affected (adjusted
downwards).
14.2.5.3 Distribution methods
The aim is to keep a position of 100% and to follow the model distribution. You first need to decide
which distribution method you want to use.
There are two methods available:
•Even Proportional
•Even Relative Bet.
You specify the distribution method you want to use from the Rebalancing - Distribution Methods menu
item.
14 Portfolio modeling
14.2 Portfolio Modeling Monitor
426 © Wall Street Systems IPH AB - Confidential
14.2.5.3.1 Even proportional bet
For example:
The % in Sector 1 was changed, the other % was removed from the model, and Even Proportional was
chosen as the rebalancing method. The system suggests the remaining weights using the Even
Proportional Bet method.
It redistributes the rest according to the model distribution (that is, 40 = 45*80/90).
14.2.5.3.2 Even relative bet
For example:
The % in Sector 1 was changed, the other % was removed from the model, and Even Relative Bet was
chosen as the rebalancing method. The system suggests the remaining weights using the Even
Relative Bet method.
It redistributes the rest to keep the same bet and according to the model distribution (that is, 41.67
= 45 + (-3.33)).
14.2.5.4 Investing extra cash
If you select Rebalancing - Invest, any extra cash is rebalanced on the existing portfolio composition.
14.2.5.5 Launching rebalancing
To launch the rebalancing process from Portfolio Modeling Monitor:
1. Select a rebalancing distribution method: Even Proportional Bet or Even Relative Bet.
See 14.2.5.3 Distribution methods on page 425 for more information.
2. Select Rebalancing - Rebalance if you want to rebalance all of the holdings in the portfolio.
3. Select Rebalancing - Generate Deals to generate orders in Transaction Manager.
See 14.2.6 Generating deals on page 427.
Model Adjust Suggested allocation
Sector 1 10.00% 20.00% 20.00%
Sector 2 45.00% 40.00%
Sector 3 15.00% 13.33%
Sector 4 30.00% 26.67%
Total 100.00 20.00 100.00
Model Bet Adjust Suggested allocation
Sector 1 10.00% 10.00 20.00% 20.00%
Sector 2 45.00% -3.33 41.67%
Sector 3 15.00% -3.33 11.67%
Sector 4 30.00% -3.33 26.67%
Total 100.00 0.00 20.00 100.00

14 Portfolio modeling
14.2 Portfolio Modeling Monitor
Transaction & Risk Management Module (TRM) User Guide 427
14.2.5.5.1 Partial rebalancing
You can also do partial rebalancing. For this, you need to deselect the parts of the portfolio that you
do not want to rebalance:
1. Select the row or rows that you want to exclude from the rebalancing process:
–Double-click a single row you want to exclude.
The row is grayed out and excluded from the rebalancing.
–Select the row or rows that you want to exclude, right-click and select Exclude from Rebalance.
2. Select Rebalancing - Rebalance to do the partial rebalancing.
The system displays a list of suggestions according to the reference. Depending on the
key-figure on which the rebalancing is based (market value percentage, position duration
contribution), the relative generated and rebalanced figures are calculated. You can alter the
generated units (EQ case) or nominal amount (IR case) per portfolio if you wish.
To re-include an excluded row in the rebalancing:
•Select the row or rows that you want to re-include, right-click and select Include in Rebalancing.
14.2.5.5.2 Rebalancing errors
Some errors may occur when you launch the rebalancing function. The relative cells in the Adjust
section are marked.
You can rebalance any errors using the Rebalancing - Reset menu options, or by right-clicking the cell
and selecting the appropriate item from the menu:
–Adjust to Target
–Rebalance Values
–All.
14.2.5.6 Automatic portfolio rebalancing
Rebalancing of a portfolio can be set up to occur automatically on a daily basis or on a specific date
using the Portfolio Modeling Processing activity.
•To set up the activity see A.56 Portfolio Modeling Processing on page 650 for details of the
activity’s parameters.
Note: Activities are set up and managed in Activity Manager: see Chapter 6 Managing activities
on page 227 for more information.
14.2.6 Generating deals
As soon as you have identified the orders that you want to generate, you can launch the deal
generation by selecting Rebalancing - Generate Deals.
The Generated Deals mode of Transaction Manager opens and displays the list of generated deals.
The deals automatically contain the following information:
Column Description
Instrument ID of the instrument.
Portfolio ID of the rebalanced portfolio.
Trading Units Number of generated units. This is only displayed for equities.
Nominal Amount Generated nominal amount.
Deal Price Deal price of the instrument.
14 Portfolio modeling
14.2 Portfolio Modeling Monitor
428 © Wall Street Systems IPH AB - Confidential
The orders generated by the portfolio modeling process can be modified if necessary. They are given
a transaction number when they have been applied. The deals can then follow the usual transaction
process flow: see Chapter 8 Managing transactions on page 257.
Deal Rate Deal rate (IR) of the instrument.
Opening Date Date of rebalancing.
Closing Date Date after which the transaction is considered closed.
Value Date Opening Date + Spot Days (instrument).
Currency Currency of the portfolio model.
Issuer Organization that is the issuer of sellable instruments. For non-sellable instruments
this can be the portfolio-owner or the counterparty.
Counterparty Counterparty to use for the deal.
If no counterparty is specified, Counterparty = Anon.
Column Description
Transaction & Risk Management Module (TRM) User Guide 429
Chapter 15 Managing benchmarks
TRM provides a specific benchmarking application called Benchmark Manager, which using static
data, allows you to define and process benchmark revisions and rebalancing. There is a clear
distinction between a composite index and a benchmark. While an index is defined in the market
place, by index providers (Dow Jones, MSCI, and so on), a benchmark is typically a user-specific
structure defined down to the security level and adjusted to your investment guidelines. You can use
benchmarks to measure the performance over time (in Performance Monitor), or in real-time (in
Treasury Monitor), of another portfolio. You can compare any of your portfolios's key-figures against
those in the benchmark portfolio. Benchmark portfolios offer a much finer level of analysis than a
simple index figure, where you only know that you were above or below the index by n points or n%.
You can use instruments derived from the following instrument classes for benchmarks: ABS, BOND,
CONVERTIBLE-BOND, CREDIT-STEP-UP, DISCOUNT, EQUITY, INDEX, INDEX-LINKED-BONDS. For
more information about these instruments, refer to the TRM Instruments: Processing and
Calculations guide.
15.1 About benchmarks
Benchmark management consists of two main steps: benchmark definition and benchmark
processing, i.e. what you need to do during the life of the benchmark. Benchmark definition involves
setting up dedicated portfolios in Portfolio Editor and defining the benchmarks in Benchmark
Manager. Benchmark processing refers to the actions you can perform after the initial definition of
your benchmark, such as:
•Revise the benchmark, i.e. re-define the composition of a benchmark for a given date by
adding/removing components. The revision usually depends on irregular economic review and
decision on the structure of the components.
•Rebalance the benchmark i.e. periodically adjust the benchmark to initial weightings by
changing the units of the components. Rebalancing is usually automated by scheduling a
Benchmark Rebalancing activity.
•Define cash processing and re-investment methods.
•Manually adjust the benchmark by adding/removing transactions.
•Query, close, monitor, and delete benchmarks.
15.1.1 Components
You can build benchmarks from transactions generated from one or a combination of the following
components depending on the selected method:
•Securities
•Security Baskets. A set of securities can be defined in Security Basket Editor (see 3.42 Security
Basket Editor (optional) on page 152).
•Indexes
•Derived Indexes.
15 Managing benchmarks
15.1 About benchmarks
430 © Wall Street Systems IPH AB - Confidential
15.1.2 Definition Methods
The benchmark definition is based on different Definition Methods:
•Nominal amount and units: Defines the benchmark’s components in terms of their nominal
amount (IR) and units (for equities). This method can only be used on single securities, i.e. not
security baskets.
•Market value percentage: Depends on the selected component.
–Single Security: Benchmark Manager ensures that the Market Value (MV) of the security is
equal to the % of the benchmark MV defined for this security.
–Security Baskets: When a set of securities is assigned to a benchmark (or to a group of the
position axis), all the components (or the ones belonging to the group) are assigned to the
benchmark with even market value in order to fulfill the objective percentage (% of the
group , % of the set).
–Index with Expand Index on Individual Securities: Benchmark Manager selects the components of
the index and generate transactions on those components so that the relative weightings of
the components are the same as in the index composition and that the total weighting
correspond to benchmark definition.
–Index without Expand Index on Individual Securities: Benchmark Manager values the index as a
single instrument.
•Duration: You can only use duration targets with single securities and sets of securities
(baskets):
–Single securities: Based on the duration contribution defined for the security, Benchmark
Manager computes the number of units needed to reach that target.
–Security Baskets: Based on the duration contribution and weight target defined for the set of
securities, Benchmark Manager distributes the market value among the securities as well as
possible to reach that target.
15.1.3 Re-Investment Methods
As well as these definition methods, benchmark definition uses your choice of Re-investment
Methods whenever cash (coupon, dividend, and so on) is detached from your benchmark:
•Withdraw Cash: The cash is withdrawn from the benchmark. You need to run the activity
Benchmark Cash Processing to withdraw the cash. See 15.1.4 Activities on page 430.
•Re-invest Cash on Security: The cash is immediately re-invested on the security where the
detachment took place.
•Re-invest Cash When Rebalancing: The cash is re-invested only at the time of the next rebalancing.
You need to run the activity Cost of Carry if you want to keep the cash bucket until the next
rebalancing.
•Hold Cash: The cash is left in the benchmark without being re-invested. You need to run the
activity Cost of Carry if you want to keep a (growing) cash bucket in the benchmark.
For more information about the activity Cost of Carry, see A.14 Cost of Carry on page 632.
15.1.4 Activities
TRM also provides the possibility to automate the benchmark processes by setting up rebalancing
schedules (daily, weekly, monthly, and so on), and corresponding activities:
•Benchmark Cash Processing: see A.3 Benchmark Cash Processing on page 628.
•Benchmark Rebalancing: see A.4 Benchmark Rebalancing on page 628.
These two benchmark activities are described in more detail in section 15.4 Processing benchmarks
on page 443. For more information about activities in general, see Chapter 6 Managing activities on
page 227.
15 Managing benchmarks
15.2 Benchmark Manager
Transaction & Risk Management Module (TRM) User Guide 431
15.2 Benchmark Manager
The Benchmark Manager is based on the Manager application layout (see 1.4.3 Managers and
Boards on page 26). Other menu items common to all applications are described in 2.2.6 Using
application menus on page 34.
15.2.1 Benchmark Manager menus
The following tables describe the menu items which are specific to Benchmark Manager.
15.2.1.1 View
This section describes the various views that are available in the View menu. In addition to these
views, there is also the Transaction view, which is always displayed. This view shows the selected
benchmarks. You use this view to perform specific actions on the whole benchmark definition, such
as, create initial revision settings, add new revisions, and close and delete benchmarks.
For more information about the types of actions you can perform in the specific views, see 15.2.2
Actions on page 432.
Menu item Description
Benchmark Query Displays the Benchmark Query view.
Shows the query criteria. Use this view to retrieve benchmarks that are already in TRM
for further processing. You can use the following criteria to retrieve benchmarks:
Benchmark, Currency, Domain, Name, and/or Owner.
Revision Displays the Revision view.
Shows the revisions (initial, next, future) that belong to the benchmark. Use this view
to add new revisions to the benchmark definition.
Rebalance Displays the Rebalance view.
Shows rebalancing current and future dates for the selected revision. Use this view to
perform rebalancing, i.e. to return the benchmark to its initial weightings.
Group Displays the Group view.
Shows the groups of the selected revision. Use this view when you have defined your
benchmark on Axis group. You then use these groups to add components for the
specific groups.
Component Displays the Component view.
Shows the components for the selected revision. Use this view to add or delete
securities, security baskets, and indexes (expanded or not) according to the definition
method.
Transaction Displays the Transaction view.
Shows the generated transactions for the selected benchmark/rebalance/revision. If
no rebalance exists, then only the transactions for the initial generation of the revision
are displayed. Canceled transactions are not displayed.
15 Managing benchmarks
15.2 Benchmark Manager
432 © Wall Street Systems IPH AB - Confidential
15.2.1.2 New
15.2.2 Actions
This section describes all of the available benchmark actions and commands. It also shows the views
where these actions can be carried out.
Menu item Description
New Benchmark Create a new benchmark definition.
Command Description View
Accept Composition Allows you to accept the proposed percentage after
the check.
Revision, Benchmark
Add Date Generates a new rebalance row if the rebalance
method is set to Manual.
Rebalance
Add Group Allows you to add a group to an inactive revision. If
you select a group that already exists, no new row is
added, and the existing group is selected.
Group, Revision
Cancel Transactions Allows you to cancel the generated transactions.
Note: You can only cancel benchmark transactions in
Benchmark Manager, not in Transaction
Manager.
Revision
Check Composition Checks the distribution of the percentages you have
entered for the selected components. When
applicable proposes another distribution.
Revision, Benchmark
Close Benchmark Closes the selected benchmark. The closing date
must be after the date of the most recent
transaction.
Benchmark
Delete Benchmark Removes the selected benchmark including all
associated data. All transactions are canceled. The
benchmark must not have any active revisions.
Benchmark
Delete Component Removes the selected component if the revision is
not active.
Component
Delete Group Allows you to remove a group from an inactive
revision.
Group
Delete Revision Removes the last revision in the Revision view if it
does not have any transactions.
Revision
Generate Generates the transactions for the selected revision.
Note: All instruments used in transactions generated
by Benchmark Manager need to have a quote.
Non listed discount/securities without a
quotation cannot be used in the benchmark
composition.
Revision, Benchmark
Import Composition Allows you to import a composition (in terms of
individual securities) from a file directly into a
revision.
Note: This action is available only for compositions
defined in Nominal/Units or Percentages.
Revision
Initial Revision Adds the first revision to a new benchmark definition. Benchmark
Initialize Axis Only available when Axis is selected. Allows you to
expand the selected groups to all groups in the
selected axis.
Revision
15 Managing benchmarks
15.3 Defining benchmarks
Transaction & Risk Management Module (TRM) User Guide 433
15.3 Defining benchmarks
You first need to set up a dedicated benchmark portfolio in Portfolio Editor and then create the
benchmark in Benchmark Manager.
15.3.1 Setting up a benchmark portfolio
This section describes how to set up an existing portfolio as a benchmark portfolio. If you have not
yet defined the portfolio you want to use for benchmarking, refer to 3.14 Portfolios on page 107 to
find out how to create portfolios. Benchmark portfolios are trading portfolios.
To set up a dedicated benchmark portfolio:
1. In Portfolio Editor, select the portfolio you want to serve as the benchmark portfolio.
2. In the Switches page, enable the following switches:
3. In Allowed Users page, add the user (process) BATCH with the permission ALL.
4. Save the whole portfolio definition using File - Save.
New Component Allows you to add a new component to the last
revision (next or future).
Revision, Component, Group
New Revision Allows you to create a new revision to a benchmark
as long as the benchmark has not been closed. You
can also use this action to create a copy of an
existing revision, see 15.4.1 Copying a benchmark
revision on page 444.
Benchmark, Revision
Rebalance Generates rebalance transactions and adds a new
row for the next rebalance date. If rebalancing was
already performed, it cancels the transactions before
generating the new ones.
Rebalance, Benchmark
Remove Date Removes the rebalance schedule if the rebalance
method is set to Manual and a rebalancing has not
been done on the selected row.
Rebalance
Command Description View
Switch Description
Comparison Defines the portfolio as a benchmark, enabling the Portfolio Compare
key-figures to be correctly interpreted as actual results. For any other
portfolio, TRM displays the difference between the portfolios and the
comparison portfolio, where
Difference = Portfolio Key Figure – Comparison Key Figure
Benchmark The portfolio can be used to generate benchmark transactions.
Trading The portfolio can be used for trading.
Not Payable The benchmark transactions are not part of the settlement process.
Not Bookable The benchmark transactions are not part of the accounting process.
15 Managing benchmarks
15.3 Defining benchmarks
434 © Wall Street Systems IPH AB - Confidential
15.3.2 Setting up a benchmark
Benchmarks are set up in Benchmark Manager.
15.3.2.1 Creating a benchmark
To create a benchmark:
1. In Benchmark Manager, click New - New Benchmark and fill in the fields using the information in
the following table:
2. Click OK to save the main characteristics of the benchmark. The benchmark is added to the
Benchmark view.
3. To complete the benchmark creation, go to the relevant section according to the definition
method you want to use:
–Nominal/Units: 15.3.2.1.1 Benchmark using Nominal/Units on page 434.
–Percentage: 15.3.2.1.2 Benchmark revision using Percentage on page 436.
–Duration: 15.3.2.1.3 Benchmark revision using Duration on page 439.
15.3.2.1.1 Benchmark using Nominal/Units
This step describes how to add an initial (or new) revision that uses the Nominal/Units definition
method to the benchmark you created in the previous step (15.3.2.1 Creating a benchmark on page
434). You can only define single securities as components when using the Nominal/Units method.
Information Description
Benchmark (Mandatory) The benchmark ID for the benchmark. The ID should be as
explicit as possible, for example, the ID could include definition method,
currency, and any other information that will make the definition distinctive.
Name The name for the benchmark.
Portfolio The portfolio ID of the benchmark where the transactions will be generated.
Note: If you cannot find the portfolio you want to use, check that it has been
properly set up for benchmarking. See 15.3.1 Setting up a benchmark
portfolio on page 433.
Counterparty Id of the counterparty client to be used for benchmark transactions.
Currency (Mandatory) The currency ID of the benchmark that will be used by default in
benchmark valuation.
Domain (Mandatory) The benchmark domain ID.
Payment Instrument Id of the instrument to be used for generating payment transactions
Scenario Scenario used to retrieve rates used for benchmark calculations. If left blank,
it will be the Default scenario.
Calendar Calendar used to shift rebalance dates. If left blank, the calendar of the
currency will be used.
Holiday Calendar Holiday calendar used to check if a rebalance date is a business day or not. If
left blank, calculations use currency holiday calendar.

15 Managing benchmarks
15.3 Defining benchmarks
Transaction & Risk Management Module (TRM) User Guide 435
To add the initial (or new) revision using the Nominal/Units method:
1. In Benchmark view, right-click the new definition you have just created, and select Initial Creation
(or New Revision for subsequent revisions).
2. Complete the benchmark definition with the information in the following table:
Note: All other fields are not applicable to this method and can be ignored.
3. Click OK to save the initial (or new) revision. The revision is added to the Revision view.
Note: You can remove a revision provided that you first cancel its transactions. Right-click the
revision you want to remove and click Delete Revision.
4. In the Revision view, you can either add a new component to the revision you have just created
or import a full composition directly from a file:
Note: To import a full composition from a file, you must have first specified the name of the file
and the security identifier, if the instrument uses one, in the Revision view, Composition
File and Security Identifier Type fields.
–To add a new component to the revision: right-click the revision you have just created and
select New Component. In the resulting dialog, select the security from the list of available
securities and click OK. The component is added to the Component view.
–To import a full composition: right-click the revision row and select Import Composition. In the
resulting dialog, keep or change the default separators for thousands and decimals. Click OK
to import the composition. The dialog also shows a preview of the file you want to import.
5. In the component row, enter either the nominal amount for IR or units (for equities) and click
Apply when ready.
Information Description
Date The date must be later than the opening date of the portfolio. Defaulted to the
current date (today).
Definition Method Choose Nominal/Units to define the benchmark's components in terms of their
Nominal Amount (for IR) and units (for equities).
See 15.1.2 Definition Methods on page 430.
Re-Investment Method Determines how dividends and coupons are handled. Choose from:
•Withdraw Cash (default for Nominal/Units and Duration definition methods)
•Hold Cash (default for the Percentage definition method)
• Re-Invest Cash when Rebalancing
• Re-Invest Cash on Security
For more information about these methods, see 15.1.3 Re-Investment
Methods on page 430.
Zero Spot Days • When left blank, the value date of the benchmark transactions are
configured according to the instrument.
• When switched on, Benchmark Manager forces the value date of the
generated to be equal to the date the benchmark was created or
rebalanced.
Previous Day’s Prices • When left blank, the day's prices of the benchmark components are used
for the benchmark calculations.
• When switched on, the previous day 's prices of the benchmark
components are used for the benchmark calculations.
15 Managing benchmarks
15.3 Defining benchmarks
436 © Wall Street Systems IPH AB - Confidential
6. In the Revision view, right-click the revision row or rows for which you want to generate the
transactions and click Generate.
7. When you are satisfied that the transactions are generated correctly, click Apply.
Note: To cancel transactions, right-click the revision and select Cancel Transactions. If you have
already applied the transactions you might need to reset the transactions first. You can
only cancel benchmark transactions in Benchmark Manager.
15.3.2.1.2 Benchmark revision using Percentage
This step describes how to add an initial (or new) revision using the Percentage definition method to
the benchmark you created previously (15.3.2.1 Creating a benchmark on page 434).
You can use Market Value Percentage method with single securities, sets of securities and indexes.
For information about setting up security baskets see 3.42 Security Basket Editor (optional) on page
152.
Note: The method (Market Value) Percentage without any axis definition allows only single
securities or indexes.
To add an initial (or new) revision using the Percentage method:
Note: Check that all of the columns you need to use are visible in the individual views, i.e
right-click the column header and select Select Columns.
1. In Benchmark view, right-click the new definition you have just created, and select Initial Creation
(or New Revision for subsequent revisions).
2. Complete the benchmark definition with the information in the following table:
Information Description
Date The date must be later than the opening date of the portfolio. Defaulted to the
current date (today).
Definition Method Choose Percentage. You can use Market Value Percentage method with single
securities, sets of securities, and indexes (with or without Expand Index on
Individual Securities).
See 15.1.2 Definition Methods on page 430.
Re-Investment Method Determines how dividends and coupons are handled. Choose from:
•Hold Cash (default for the Percentage definition method)
•Withdraw Cash (default for Nominal/Units and Duration definition methods)
• Re-Invest Cash when Rebalancing
• Re-Invest Cash on Security
For more information about these methods, see 15.1.3 Re-Investment
Methods on page 430.
Rebalance From The date from which rebalancing can be done. This date must be later than
the date specified in the Date field.
Note: Rebalance is only available for Percentage and Duration definition
methods.

15 Managing benchmarks
15.3 Defining benchmarks
Transaction & Risk Management Module (TRM) User Guide 437
3. Choose the one of the following options before closing the Initial Creation or Revision dialog:
–If you are defining a benchmark revision with axis group, complete the instructions in section
15.3.2.1.4 Benchmark revision with axis group (optional) on page 441 before proceeding to
step 6. on page 438.
–If you are not defining a benchmark revision with axis group, continue to the next step.
4. Click OK to save the initial (or new) revision. The revision is added to the Revision view.
Note: You can remove a revision provided that you first cancel its transactions. Right-click the
revision you want to remove and click Delete Revision.
5. Add components to the revision:
Rebalance Method The method used to generate the rebalancing dates. Choose from:
•Days
• Business Days
•Weeks
•Months
•Years
• Manual: use this method when you cannot schedule rebalancing.
Note: Rebalance is only available for Percentage and Duration definition
methods.
Rebalance Frequency Determines the interval that you want rebalancing to be scheduled. For
example, if you want rebalancing to be scheduled every business day, you
need to select, Business Days as Rebalance Method and specify 1 as the
frequency.
Note: Rebalance is only available for Percentage and Duration definition
methods.
Rebalance Convention The convention used to generate the rebalancing dates. For example, if you
want to postpone the rebalancing to the next business day when the
rebalancing falls on a holiday, select Modified Following. Choose from:
•None: No adjustment.
•Following: The next business day is used.
•Modified Following: The next business day is used, unless this falls in the
following month, in which case the previous business day is used.
•Backward: The previous business day is used.
•Modified Backward: The previous business day is used except if not in the
same month, in which case the next business day is used.
•Business Days: The business day.
Note: Rebalance is only available for Percentage and Duration definition
methods.
Zero Spot Days • When left blank, the value date of the benchmark transactions are
configured according to the instrument.
• When switched on, Benchmark Manager forces the value date of the
generated to be equal to the date the benchmark was created or
rebalanced.
Previous Day’s Prices • When left blank, the day's prices of the benchmark components are used
for the benchmark calculations.
• When switched on, the previous day 's prices of the benchmark
components are used for the benchmark calculations.
Information Description
15 Managing benchmarks
15.3 Defining benchmarks
438 © Wall Street Systems IPH AB - Confidential
a. In the Revision view, you can either add a new component to the revision you have just
created or import a full composition directly from a file:
Important: To import a full composition from a file, you must have first specified the name of the
file and the security identifier, if the instrument uses one, in the Revision view,
Composition File and Security Identifier Type fields.
–To add a new component to the revision: right-click the revision you have just created and
select New Component. In the resulting dialog, use the following table to add the component:
Click OK. The component is added to the Component view.
–To import a full composition: right-click the revision row and select Import Composition. In the
resulting dialog, keep or change the default separators for thousands and decimals.
Click OK to import the composition. The dialog also shows a preview of the file you want to
In the Component view, enter the percentage (weighting) in the % column.
b. Optionally, if you selected an Index or Derived Index, and you want the underlying securities
to be expanded, set the switch Expand Index on Individual Securities in the Attributes column.
Note: The underlying securities must be defined at the instrument level with the Index
Composite feature. See TRM Instruments: Processing and Calculations Guide for more
information.
c. Repeat these steps for each component you want to add to the revision.
d. Click Apply when you have finished.
6. Check that the weightings meet the targets:
a. In the Revision view, right-click the revision row you want to check and select Check
Composition.
b. Verify that the composition is valid (i.e. no red fields).
c. When you are satisfied, select Accept Composition.
Accepting the composition copies the proposed fields (Proposed %) to standard ones (%)
and validates the composition.
Note: If you make further changes to the composition, you must repeat the composition check.
d. Click Apply to validate the composition.
7. When you have finished setting up the benchmark, right-click the revision row for which you
want to generate the transactions, and click Generate.
Note: Generate can only be done on a valid composition (no red fields).
Information Description
Type Select the type you want to use. Choose from: Security, Security Basket,
Index, and Derived Index.
Component Select the component from the list of available components for the given
type.

15 Managing benchmarks
15.3 Defining benchmarks
Transaction & Risk Management Module (TRM) User Guide 439
8. Enter the market value in the Generate dialog and click OK.
Note: If the OK button is not active, click elsewhere in the dialog to activate it.
9. When you are satisfied that the transactions have generated correctly, click Apply to apply the
transactions.
Note: To cancel transactions, right-click the revision and select Cancel Transactions. If you have
already applied the transactions you might need to reset the transactions first. You can
only cancel benchmark transactions in Benchmark Manager.
15.3.2.1.3 Benchmark revision using Duration
This step describes how to add an initial (or new) revision using the Duration definition method to
the benchmark you created previously (15.3.2.1 Creating a benchmark on page 434).
You can use Duration method with single securities and sets of securities (security baskets). For
information about setting up security baskets see 3.42 Security Basket Editor (optional) on page
152.
To add an initial (or new) revision using the duration method:
1. In Benchmark view, right-click the new definition you have just created, and select Initial Creation
(or New Revision for subsequent revisions).
2. Complete the benchmark definition with the information in the following table:
Information Description
Date The date must be later than the opening date of the portfolio. Defaulted to the
current date (today).
Definition Method Choose Duration. You can only use duration targets with single securities and
with security baskets.
See 15.1.2 Definition Methods on page 430.
Duration Corresponds to the target duration for fixed duration benchmarks. The
duration is used for rebalancing.
Re-Investment Method Determines how dividends and coupons are handled. Choose from:
•Hold Cash (default for the Percentage definition method)
•Withdraw Cash (default for Nominal/Units and Duration definition methods)
• Re-Invest Cash when Rebalancing
• Re-Invest Cash on Security
For more information about these methods, see 15.1.3 Re-Investment
Methods on page 430.
Rebalance From The date from which rebalancing can be done. This date must be later than
the date specified in the Date field.
Note: Rebalance is only available for Percentage and Duration definition
methods.

15 Managing benchmarks
15.3 Defining benchmarks
440 © Wall Street Systems IPH AB - Confidential
3. Choose the one of the following options before closing the Initial Creation or Revision dialog:
–If you are defining a benchmark revision with axis group, complete the instructions in section
15.3.2.1.4 Benchmark revision with axis group (optional) on page 441 before proceeding to
step 6. on page 441.
–If you are not defining a benchmark revision with axis group, continue to the next step.
4. If you defined Click OK to save the initial (or new) revision. The revision is added to the Revision
view.
Note: You can remove a revision provided that you first cancel its transactions. Right-click the
revision you want to remove and click Delete Revision.
Rebalance Method The method used to generate the rebalancing dates. Choose from:
•Days
• Business Days
•Weeks
•Months
•Years
• Manual: Use this method when you cannot schedule rebalancing. See
15.4.2.2 Manual benchmark rebalancing with scheduling on page 444.
Note: Rebalance is only available for Percentage and Duration definition
methods.
Rebalance Frequency Determines the interval that you want rebalancing to be scheduled. For
example, if you want rebalancing to be scheduled every business day, you
need to select, Business Days as Rebalance Method and specify 1 as the
frequency.
Note: Rebalance is only available for Percentage and Duration definition
methods.
Rebalance Convention The convention used to generate the rebalancing dates. For example, if you
want to postpone the rebalancing to the next business day when the
rebalancing falls on a holiday, select Modified Following. Choose from:
•None: No adjustment.
•Following: The next business day is used.
•Modified Following: The next business day is used, unless this falls in the
following month, in which case the previous business day is used.
•Backward: The previous business day is used.
•Modified Backward: The previous business day is used except if not in the
same month, in which case the next business day is used.
•Business Days: The business day.
Note: Rebalance is only available for Percentage and Duration definition
methods.
Zero Spot Days • When left blank, the value date of the benchmark transactions are
configured according to the instrument.
• When switched on, Benchmark Manager forces the value date of the
generated to be equal to the date the benchmark was created or
rebalanced.
Previous Day’s Prices • When left blank, the day's prices of the benchmark components are used
for the benchmark calculations.
• When switched on, the previous day 's prices of the benchmark
components are used for the benchmark calculations.
Information Description

15 Managing benchmarks
15.3 Defining benchmarks
Transaction & Risk Management Module (TRM) User Guide 441
5. Add components to the revision:
a. In the Revision view, right-click the revision you have just created and select New Component.
b. In the New Component dialog, use the following table to add the component:
c. Click OK. The component is added to the Component view.
d. In the Component view, enter the percentage (weighting) in the % column.
e. Repeat these steps for each component you want to add to the revision.
f. Click Apply when you have finished.
6. Check that the weightings meet the targets:
a. In the Revision view, right-click the revision you want to check and select Check Composition.
b. Verify that the composition is valid (i.e. no red fields). You can either accept or change the
values and then repeat the check.
c. When you are satisfied, select Accept Composition.
Accepting the composition copies the proposed fields (Proposed %) to standard ones (%)
and validates the composition.
Note: If you make further changes to the composition, you must repeat the composition check.
d. Click Apply to validate the composition.
7. When you have finished setting up the benchmark, right-click the revision row for which you
want to generate the transactions, and click Generate.
Note: Generate can only be done on a valid composition (no red fields).
8. Enter the market value in the Generate dialog and click OK.
Note: If the OK button is not active, click elsewhere in the dialog to activate it.
9. When you are satisfied that the transactions have generated correctly, click Apply to apply the
transactions.
Note: To cancel transactions, right-click the revision and select Cancel Transactions. If you have
already applied the transactions you might need to reset the transactions first. You can
only cancel benchmark transactions in Benchmark Manager.
15.3.2.1.4 Benchmark revision with axis group (optional)
This step describes how to add axis group to the benchmark revision you are creating. Follow these
steps before completing the revision definition.
Note: Axis group is only available for benchmark revisions using Percentage and Duration
methods.
Information Description
Type Select the type you want to use. Choose from: Security and Security Basket.
Component Select the component from the list of available components for the given
type.
15 Managing benchmarks
15.3 Defining benchmarks
442 © Wall Street Systems IPH AB - Confidential
To complete a Percentage or Duration revision with axis group:
1. In Initial Creation (or Revision) dialog, complete the benchmark definition with the information in
the following table:
2. Click OK to save the initial (or new) revision. The revision is added to the Revision view.
3. In the Group view, configure the group using the following table:
Information Description
Axis Mandatory when one of these two definition methods is selected.
Axis used as grouping for the components. The default is None. Choose from:
• Branch (code)
•Maturity Period
• Currency Class
• Currency.
Note: Axis can only be used with Percentage and Duration definition methods.
Axis Configuration When you select a choice other than None, the Full Axis field is enabled.
• If you selected Branch (Branch Code axis), you configure which Branch
Code to be used.
• If you selected Maturity Period (Maturity Period axis) you specify which gap
set to be used.
Note: Axis can only be used with Percentage and Duration definition methods.
Full Axis (Optional)
Allows you to include all groups instead of just the ones you selected
previously. Axis can only be used with Percentage and Duration definition
methods.
For example, if you selected Currency Axis, and chose only a few currency
groups, you can expand these groups to all currency groups by selecting this
switch.
Information Description
Revision Read-only. The date of the revision.
Group Read-only. The ID of the group that corresponds to the Axis you selected in
the Revision dialog. For example, if you selected Currency you will see the
currencies.
% Target weight of the group, expressed as a percentage which changes with
duration or duration contribution according to the following formula:
% = DurC / Dur
If Dur equals zero (0) then the percentage is not recalculated.
Note: Benchmark Manager always re-computes the field (Percentage,
Duration or Duration Contribution), which has the oldest modified date.
Duration For Duration method only. Target duration for this group should follow changes
of % and duration contribution according to formulae:
Dur = DurC / %
Note: Benchmark Manager always re-computes the field (Percentage,
Duration or Duration Contribution), which has the oldest modified date.
Duration Contribution For Duration method only. Target duration contribution for this group should
follow changes of % and duration according to formulae:
DurC = Dur * %
In addition DurC should always be less than or equal to the revision duration.
Note: Benchmark Manager always re-computes the field (Percentage,
Duration or Duration Contribution), which has the oldest modified date.
15 Managing benchmarks
15.4 Processing benchmarks
Transaction & Risk Management Module (TRM) User Guide 443
Note: All other fields are provided for information only.
4. Add components to the revision:
a. In the Group view, right-click the group you want to use and select New Component.
b. In the New Component dialog, use the following table to add the component:
c. Click OK. The component is added to the Component view.
d. In the Component view, enter the percentage (weighting) in the % column.
e. Optionally, if you selected an Index or Derived Index, and you want the underlying securities
to be expanded, set the switch Expand Index on Individual Securities in the Attributes column.
Note: The underlying securities must be defined at the instrument level with the Index
Composite feature. See TRM Instruments: Processing and Calculations Guide for more
information.
f. Repeat these steps for each component you want to add to the revision.
g. Click Apply when you have finished.
5. Complete the Percentage or Duration benchmark revision you are creating:
–Benchmark revision using the Percentage method, go to step 6. on page 438.
–Benchmark revision using the Duration method, go to step 6. on page 441.
15.4 Processing benchmarks
This section describes some of the processing actions that you can perform after the initial
benchmark definition.
Proposed % Read-only. Proposed target weight after check composition, if different from
the % field, the figures appear in red.
Proposed Duration Read-only. Proposed target duration after checking, if different from the
Duration, the figures appear in red.
Proposed Duration
Contribution
Proposed target duration contribution after checking. If different from the
Duration, the figures appear in red.
Information Description
Type Select the type you want to use. Choose from: Security, Security Basket,
Index, and Derived Index.
Component Select the component from the list of available components for the
selected type and group.
Group (Information only) Shows the selected group.
Information Description

15 Managing benchmarks
15.4 Processing benchmarks
444 © Wall Street Systems IPH AB - Confidential
15.4.1 Copying a benchmark revision
To create a copy of an existing revision:
1. In the Revision view, right-click the revision row you want to copy, and select New Revision.
2. In the New Revision dialog, select Copy Previous if not already selected.
Note: If you do not want to create a copy of an existing revision, simply clear the Copy Previous
switch. The relevant fields will become editable.
The new revision is a duplicate of the current one (except the date) and parameters are
unavailable or defaulted with the values of the current revision.
3. If you do not want to copy the components of the previous revision, select the Exclude
Composition switch. Exclude Composition is switched on by default if a "Composition File" has been
entered in the previous revision.
4. Click OK to create a copy of the revision. The revision is added to the Revision view.
Note: You can remove a revision provided that you first cancel its transactions. Right-click the
revision you want to remove and click Delete Revision.
15.4.2 Rebalancing
The rebalance schedule is defined in the Initial Creation or Revision dialog at the initial or new revision
creation. Rebalancing can be done either automatically via the activity Benchmark Rebalancing or
manually if you selected Manual as the Rebalancing method or if you want to run a rebalancing
outside of the scheduled activity.
Rebalancing is performed in the Benchmark Manager - Rebalance view. You can only rebalance
revisions that have generated transactions.
Note: Rebalancing is only available for benchmarks that use the Percentage and Duration
definition methods.
15.4.2.1 Automatic benchmark rebalancing
Benchmark rebalancing of a benchmark portfolio can be set up to occur automatically on a daily
basis or on a specific date using the Benchmark Rebalancing activity. The rebalancing activity
performs the rebalancing according to a pre-defined schedule or dates that you provided when you
created the benchmark. The activity sells and buys back open positions, and then updates the
inventory. Schedule the Rebalancing activity to run daily (Group is set to NIGHTLY).
To set up the activity, see A.4 Benchmark Rebalancing on page 628 for details of the activity’s
parameters.
Note: Activities are set up and managed in Activity Manager, see Chapter 6 Managing activities
on page 227 for more information.
15.4.2.2 Manual benchmark rebalancing with scheduling
This section describes how to perform a manual rebalancing according to the predefined schedule or
dates that you defined in the revision.
To manually rebalance revisions of benchmarks:
1. In the Revision view, right-click the revision for which you want to perform rebalancing and select
Rebalance.
A new rebalance schedule is added to the Rebalance view with a new status, either Current, Next
or Future.

15 Managing benchmarks
15.4 Processing benchmarks
Transaction & Risk Management Module (TRM) User Guide 445
2. Check that the date corresponds to the next logical rebalance according to the rebalance method
and frequency.
3. Click Apply.
Note: Only the current and next rebalance schedules remain in the Rebalance view.
4. Click Generate.
Rebalance transactions are generated and the next rebalance schedule is added. If rebalancing
was already done, the previous transactions are canceled before generating the new ones.
15.4.2.3 Manual benchmark rebalancing without scheduling
This section describes how to perform a manual rebalancing when you do not know the scheduling
details of the rebalancing. To indicate that you want rebalancing to be performed manually, you
need to set the Rebalancing Method to Manual.
To manually rebalance revisions of benchmarks:
1. In the Revision view, right-click the revision for which you want to perform rebalancing and select
Add Date.
A rebalance schedule is added to the Rebalance view with a new status. The status can be either
Current, Next or Future.
2. In the Rebalance view, enter the rebalance date. The date should be after the last revision date.
3. Click Apply.
Note: Only the current and next rebalance schedules remain in the Rebalance view.
4. Click Rebalance.
15.4.2.4 End-of-Day Processing Activity
Optionally, you may want to run the End-of-Day Processing activity to automatically close out the
historical Buy/Sell transactions generated by the rebalancing. This is useful when monitoring the
benchmark portfolios in Treasury Monitor. See A.24 End of Day Processing on page 636 for more
information.
15.4.3 Cash Processing
Cash processing should be set up according to the selected Re-Investment Method you defined in
Benchmark Manager.
Note: Activities are set up and managed in Activity Manager: see Chapter 6 Managing activities
on page 227 for more information.
15.4.3.1 13.4.3.1 Hold Cash
If your re-investment method is Hold Cash, no action is required as the cash (coupons, dividends
etc.) is ignored.
15.4.3.2 Withdraw Cash
If your re-investment method is Withdraw Cash, you need to set up the Benchmark Cash Processing
activity to generate the withdrawal (cash payment).

15 Managing benchmarks
15.4 Processing benchmarks
446 © Wall Street Systems IPH AB - Confidential
15.4.3.3 Re-Invest Cash when Rebalancing
If your re-investment method is Re-Invest Cash when Rebalancing, you need to rebalance (manually or
automatically) the benchmark in order to re-invest the cash (coupons, dividends and so on) received
since the last rebalancing proportionally in the benchmark components.
15.4.3.4 Re-Invest Cash on Security
If your re-investment method is Re-Invest Cash on Security, you need to set up the Benchmark Cash
Processing activity to generate the re-investment on the day the cash is received.
15.4.4 Performing a manual adjustment
TRM allows you to add transactions (for example, cash, derivatives, and so on) to a benchmark
outside of Benchmark Manager.
Manual adjustment is performed in Transaction Manager (i.e. not in Benchmark Manager) by
entering new transactions to the relevant benchmark portfolio.
Note: Transactions entered this way into the benchmark portfolio via Transaction Manager are
not visible in Benchmark Manager. There is no link between manually adjusted trades and
the benchmarks.
15.4.5 Closing a benchmark
You can close a benchmark at any time provided that the closing date is later than the opening date
of the most recent transaction.
To close a benchmark, right-click the benchmark you want to close and select Close Benchmark. Enter
the closing date in the dialog and click OK.
15.4.6 Deleting a benchmark
You can delete a benchmark that does not have any active revision; active revisions must be deleted
beforehand by using Delete Revision.
To delete a benchmark, right-click the benchmark you want to delete and select Delete Benchmark.
Benchmark Manager deletes the benchmark and all of its associated data.
Note: The portfolio is not deleted, but all of the transactions that were generated are canceled.
Transaction & Risk Management Module (TRM) User Guide 447
Chapter 16 Managing limits
16.1 Overview
It is possible to set limits to control positions and transactions: for example, you may want to set an
accepted level of risk exposure, or specify a credit limit with a named counterparty. You can also set
up limits per trader.
You can set a limit for almost anything, including FX, IR, and equity market risks; stop-losses, both
total outstanding, and periodic; credit risks; settlements (FX and securities); and countries. Limits
can be both absolute and relative, for example, accepted deviations from a benchmark.
You can define limit controls for simulated (pre-trade) as well as executed (post-trade) transactions.
If executed limit control is configured (the default case), only the applied transactions in the
relevant state of the Transaction Flow are checked by a limit server. If pre-trade limit checks are
also configured (see 8.2.4 Setting up a pre-trade limit check on page 277), you can request a check
on affected limits before the transaction is applied and stored in the database, before deciding to
apply, reset or cancel the transaction.
Creating a limit can be complex due to the number of variables. Take a simple credit limit for a
specific counterparty: with an off-balance instrument such as a £1m FRA, the money is not handed
over on the date of the deal, whereas with a £1m loan it is; you have the same sum of money, but
a different credit exposure.
Also, a transaction involves different parties (counterparty and issuer, for example), so you need a
way of specifying to which elements of the transaction the limit applies. Furthermore, you may want
to divide the limit by instrument type, currency, or other criteria of your choice: for example,
instead of simply having IR exposure against counterparties, you may want to have IR exposure
netted by (grouped according to) instrument type.
This means that you need to be able to define different limit calculations, and apply them to
different cashflow calculations. To make this possible, limit management is modeled on the following
concepts:
•Limit: a grouping of limit items. For example, all credit exposure for a specific counterparty, or
all IR exposures by currency.
–Limit factor set: a group of scaling factors for increasing or scaling up the impact on limits of
certain transactions. For example, longer exposures have a proportionally higher risk than
short exposures, so you may want to increase the impact of long-exposure transactions on
limit results.
–Limit item template: a calculation definition (expression) combined with rules for
determining which cashflows are to be affected by that calculation, and also various other
criteria controlling how the calculation is to be applied or netted.
You use limit item templates to calculate sublimits.
–Sublimit calculation template: The sublimit is the actual limit you want to apply to a selected
group of transactions. For example, the FX spot limit for a particular bank, or the IR
exposure for a particular portfolio. The sublimit calculation template defines how exposures
produced in limit items are aggregated for the sublimit. You can assign sublimit calculation
templates to multiple limits, or to multiple sublimits within the same limit.
–Limit client query: a client query that you use to specify which clients are queried by a limit.
–Limit category: each limit is linked to a category which can be later used as a grouping when
monitoring limits.
16 Managing limits
16.1 Overview
448 © Wall Street Systems IPH AB - Confidential
See 16.2 Setting up limits on page 449 for more information.
The limits you set can be analyzed and monitored in an application called Limit Monitor. In this
application, you can create layouts (pages) and suites of layouts (books) with different types of
information groupings and limit queries. These layouts can be saved for personal use or shared
among users.
See 16.3 Limit Monitor on page 471 for more information.
If limit usage is approaching any of the thresholds that you have defined or a limit has been
violated, the limit server will notify you by sending a warning message. These notifications are
received in an application called Limit Notifications.
See 16.4 Limit Notifications on page 482 for more information.
The limits you set are for information only. Although transactions that exceed their limits are flagged
as limit violations by default, you cannot block transactions to stop them from exceeding their limits.
You can, however, set up your transaction flow to apply special processing for transactions violating
limits (for example set status LIMIT-VIOLATION for deals violating a limit, or send such deals to a
specific transaction state).
See 16.5 Analyzing limit violations on page 484 for more information.
The following limit editors include SDM support:
•Limit Category
•Limit Client Query
•Limit Item Template
•Sublimit Calculation Template
•Limit Factor
•Credit Rating
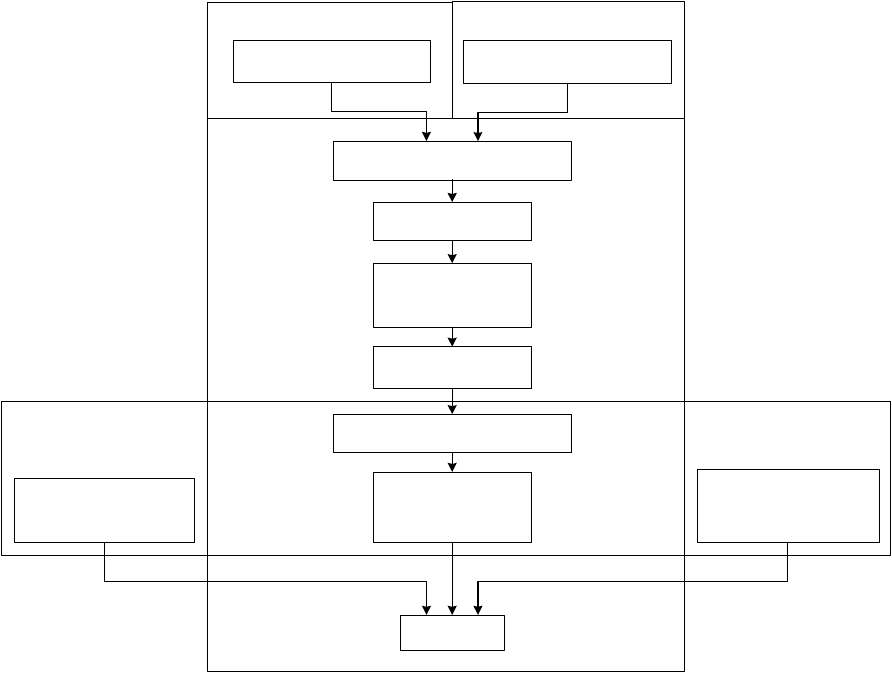
16 Managing limits
16.2 Setting up limits
Transaction & Risk Management Module (TRM) User Guide 449
16.2 Setting up limits
The following diagram provides an example of the steps involved in creating position-related limits:
To create a limit you need to:
1. Create rules (optional) to filter transactions prior to potentially applying a limit. For instance, you
can filter for all transactions in a particular portfolio, and then apply the limit to these specific
transactions.
Rules are set up in Rule Editor: see Chapter 5 Managing rules on page 221 for more information.
2. Create limit factor sets (optional) to determine the impact of certain transactions on limits, for
example, to make longer-exposure transactions affect the limit more than shorter-exposure
transactions.
Limit factor sets are set up in Limit Factor Editor: see 16.2.1 Creating limit factor sets on page
450 for more information.
3. Create limit item templates to define limit exposure calculations (which can optionally be
combined with rules and/or factor sets to determine which cashflows are to be affected by that
calculation for different types of exposures).
Limit item templates are set up in Limit Item Template Editor: see 16.2.2 Creating limit item
templates on page 452 for more information.
4. Create sublimit calculation templates to define the calculations used to select and aggregate
exposures from limit items into actual sublimits to be applied to selected groups of transactions.
Sublimit calculation templates are defined in Sublimit Calculation Template Editor: see 16.2.3
Creating sublimit calculation templates on page 461 for more information.
Limit Client Query
Editor
Sublimit
Calculation
Template
Editor
Limit Item
Template Editor
Limit Factor Editor
Create Limit Factor Set
(optional)
Create Limit Item Template
Create Sublimit Calculation Template
Create Limit Client Query
(optional)
Create Limit Category
Create Rule
(optional)
Rule Editor
Add Rule (optional)
Define calculation
including tag if required
(optional)
Add Limit Factor Set
(optional)
Define sublimit calculation
referring to tag if used
(optional)
Limit Category
Editor
Limit Editor
Create Limit
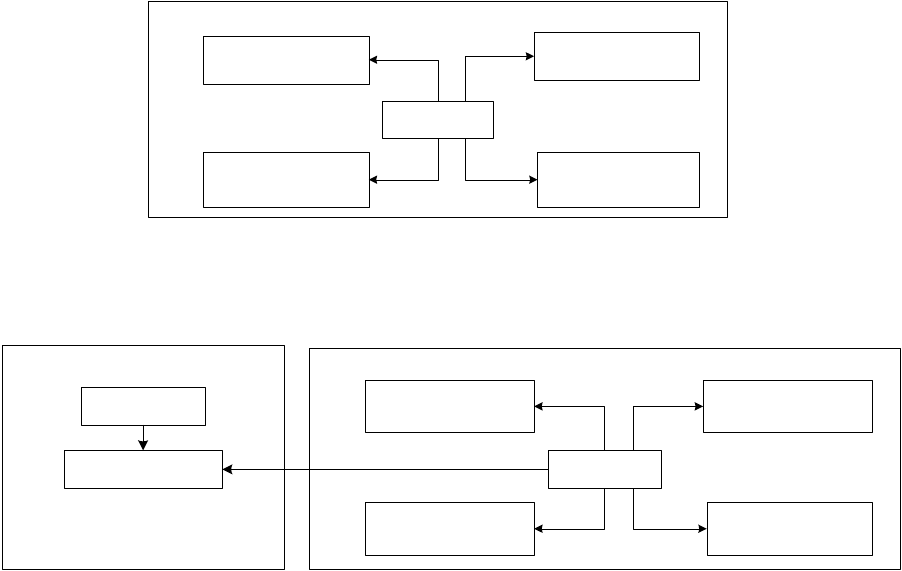
16 Managing limits
16.2 Setting up limits
450 © Wall Street Systems IPH AB - Confidential
5. Create limit client queries (optional) which you use to specify which clients are queried by the
limit.
Limit client queries are defined in Limit Client Query Editor: see 16.2.4 Creating limit client
queries on page 467 for more information.
6. Create limit categories to which limits are linked.
Limit categories are defined in Limit Category Editor. See 16.2.5 Creating limit categories on
page 467 for more information.
7. Create limits referring to the entities described above, to set up the actual limits to be applied to
selected groups of transactions.
Limits are set up in Limit Editor: see 16.2.6 Creating limits on page 468 for more information.
Limits reference the following limit entities: limit category, sublimit calculation, limit item template,
limit client query. You can either add the entities directly to the limit in Limit Editor or you can add a
limit template to the limit in Limit Editor. The following diagram shows which limit entities to add to
the limit:
The following diagram provides an example of how a limit template is used. You attach a limit
template to a limit in the Limit Editor. A limit template is created in Limit Template Editor and
references the following limit entities: limit category, sublimit calculation, limit item template, limit
client query.
Limit templates are set up in Limit Template Editor: see 16.2.7 Creating limit templates on page 470
for more information.
16.2.1 Creating limit factor sets
A limit factor set is a set of rules which is used to increase or scale up the impact on limits of
transactions that match certain criteria.
Limit factors can be used in cases such as the following:
•Longer exposures have a proportionally higher risk than short exposures
•Some currencies can carry a higher risk than others
•A transaction with a counterparty that has a poor credit rating represents a greater risk than a
transaction of the same value with a counterparty that has a better credit rating.
Limit
Add Limit Item Template
(mandatory)
Add Limit Client Query
(optional)
Add Sublimit Calculation
(mandatory)
Add Limit Category
(mandatory)
Limit Editor
Limit
Limit Editor
Add Limit Template Limit Template
Add Limit Item Template
(mandatory)
Add Limit Client Query
(optional)
Add Sublimit Calculation
(mandatory)
Add Limit Category
(mandatory)
Limit Template Editor
16 Managing limits
16.2 Setting up limits
Transaction & Risk Management Module (TRM) User Guide 451
Limit factor sets consist of a selection of criteria for transactions, with a number (the scaling factor)
by which those transactions are to be scaled. For example, if you have a limit item using limit factors
with an expression such as market_value + factor * deal_nominal_amount, you can set up a
limit factor set where factor = 0.01 when Criteria X = A, but for all other transactions, factor = 0.02
to apply different scaling for different transactions in the same limit item.
You can only use criteria that are used as netting parameters in limit items with the same limit ID
(for example, to make scaling dependent on an instrument, limit items must be set up with netting
by instrument).
See 16.2.2 Creating limit item templates on page 452 for more information.
Limit factor sets are created in Limit Factor Editor.
To create a limit factor set:
1. In Limit Factor Editor, enter the main attributes for the limit factor set in the upper part of the
editor.
2. In Limit Factor Editor’s Limit Factor page, define and add the individual limit factors and criteria
that make up the limit factor set.
Information Description
ID & Name Unique ID and name for the limit factor set.
Domain Domain in which this limit factor set is available.
Information Description
Expression A number representing the scaling factor for the rule.
Scaling factors are later used dynamically in limit item expressions.
Client Rating
Client Min Rating
Code
Client Max Rating
Code
A specific credit rating for the client, where:
•Rating gives the rating agency and type (for example, Moody’s long rating, or
Standard & Poors short rating)
•Rating Code gives the actual rating (A+, BB, and so on).
By setting minimum and/or maximum rating levels of the credit rating, you can
define a ratings order.
You must select a value for the Rating field for the Rating Code fields to work.
The credit ratings themselves are defined in Credit Rating Editor.
Instrument Rating
Instrument Min
Rating Code
Instrument Max
Rating Code
Same as Client Credit Rating, but for an instrument. An instrument’s credit rating is
applied to the instrument definition using the Credit-Rating feature.
An instrument’s credit rating may differ from that of the issuer, for example, an
Asset-backed Security may have a higher credit rating than the issuing institution
because it is based on the asset.
Gap Gap definition, as defined in Gap Editor.
Maturity Period
From/To
Risk Period
From/To
Delivery Period
From/To
The relevant from and to periods for transactions and cashflows:
• Maturity periods relate to transactions. For example, the maturity period for a
bond is the redemption date.
• Risk periods relate to individual cashflows. For example, the risk periods for a
bond are the periods between coupons, and between the final coupon and the
redemption date.
• Delivery periods relate to when securities are delivered (delivery cashflows), and
only apply when you have ‘Delivery Amount’ in the limit item expression.
Note that the periods that are available from the selection lists of these fields are
dependent on the gap definition you select in the Gap field.
Instrument Group Instrument group of the transaction.

16 Managing limits
16.2 Setting up limits
452 © Wall Street Systems IPH AB - Confidential
3. Save the limit factor set definition using File - Save As New.
16.2.2 Creating limit item templates
A limit item template is a calculation (expression) combined with rules for determining which
cashflows are to be affected by the calculation, and also various other criteria to control how the
calculation is to be applied or netted. Limit item templates are combined with limit client queries in
the setup of actual limits in Limit Editor, to define the limit items used to calculate exposures for
sublimits.
Limit item templates are defined in Limit Item Template Editor and can be assigned to multiple
limits.
To create a limit item template:
1. Enter a unique ID and name for the limit item template in the upper part of the editor.
2. In the Order Number field, enter a number to define the order in which this limit item is queried, in
relation to other limit items with the same limit ID: the limit item with Order Number = 1 is
queried first, followed by the limit item with Order Number = 2, and so on.
Generally, it is useful to give a higher priority (a lower number) to limit items with a more exact
and complex query definition.
Instrument Instrument of the transaction.
Leg Leg of the transaction.
Currency Currency of the cashflow.
Currency Class Class of currency; in other words, include cashflows denominated in a currency
belonging to this class.
Portfolio Portfolio in which the transaction is entered.
Package Main
Typ e
Main package type for the package type. You need to select a Package Main Type before
you select a Package Type. Package main types are defined in Package Type Editor.
Package Type Package type of the transaction. This only applies if the transaction is packaged.
Bank
Account
Bank and bank account (which represents a credit risk since, for example, a bank with
which you have an account could go bankrupt).
Client A specific client (as defined in Client Editor).
Parent A specific client parent. You define client/parent relationships in Client Editor.
Client Main Group
Client Group
The group that a client belongs to (as defined in Client Editor’s Groups page).
You must select a main group before you can select a group, since this selection
determines the list of groups displayed in the associated Group field. In fact, the
Client/Not Client Main Group fields do not provide selection criteria for the limit item, but
simply filter the associated Client/Not Client Group lists.
Risk Country A specific country (as defined in Country Editor).
Branch Code
#0-#19
Branch codes are defined in Branch Code Editor and assigned to instruments in
Instrument Editor.
Guarantor Client defined as a Guarantor (Roles = Guarantor) for a transaction.
Guarantee Level Guarantee level of the transaction: Primary or Secondary.
Guarantee Type Guarantee type.
Guarantee
Parameter
#0-#19
Guarantee parameters, defined in Parameter Editor.
Information Description
16 Managing limits
16.2 Setting up limits
Transaction & Risk Management Module (TRM) User Guide 453
Any cashflows already included in one limit item are excluded from subsequent limit items: this
is to prevent cashflows from being duplicated, although you can deliberately allow duplicates by
turning on the Allow Duplicates switch (see below).
3. In the Limit Client Mode field, select the kind of client within the transaction to which all
client-related features of this limit item apply. Limit Client Query and netting By Client are done
against the selected client. One of the following values must be selected:
The following further processing is done in all Limit Client modes:
•If the netting switch By Client is off:
–The limit item is based on the identified client regardless of whether the client is a syndicate.
•If the netting switch By Client is on:
–If the client is a syndicate, every cashflow of the transaction is further split between
individual clients according to percentages of each of them in the syndicate. No exposure is
allocated to the syndicate but all of it is shown for the underlying members.
–If the client is not a syndicate, the whole exposure is allocated to the client directly.
4. Fill in the next fields in the upper part of the editor using the information in the following table:
Client query
mode Description
Counterparty The counterparty of the transaction is always used as the client.
Credit Client If the instrument of the transaction has been set up with Guarantors (typically, a
bond):
• All cashflows of the transaction are split between identified Guarantors of the
instrument using the Cover Percent of each guarantor
• The guarantor of each split cashflow is used as the client
If the transaction has Guarantees (typically a loan):
• All cashflows of the transaction are split between Guarantors of the guarantees
using the Cover Percent of each guarantee
• The Guarantor of each split cashflow is used as the client
otherwise,
• The Issuer of the transaction is used as client for all cashflows.
Issuer The Issuer of the transaction is always used as the client.
Leg Issuer If the leg instrument of the cashflow has been set up with an Issuer, then:
• The Issuer of the leg instrument is used as the client for the cashflow.
otherwise:
• The Issuer of the transaction is used as the client for the cashflow.
Underlying Issuer If the transaction has a secondary instrument:
• The Issuer of the secondary instrument is used as the client for all cashflows
otherwise,
• The Issuer of the transaction is used as the client for all cashflows.
Information Description
Rule Rule defining the transaction or cashflow characteristics (such as, portfolio,
instrument, and currency) to which the limit item query applies.
You do not need a rule for selecting clients, since the client aspects of a limit query are
set up separately in the Limit Item Query page.
The rules that are available from the selection list are those for which either the Limit
or System switches are turned on, in the Rule Editor (see 5.1 Defining rules on page
221).
16 Managing limits
16.2 Setting up limits
454 © Wall Street Systems IPH AB - Confidential
5. In the fields Expression and Pre-Settlement Expression, define the calculation method, or methods,
used for cashflows (before or after settlement date).
Before you enter any expressions, note the following:
–You can have a different expression for each field. If you want the same expression for both
fields, you can enter it in the Expression field only, and the other field automatically takes the
same expression.
–If you want no output at all for Pre-Settlement Expression, you must type or select 0 (zero): if
you leave the field blank, the output will default to the expression you select for Expression.
The following table explains the basic expressions that are available from the Expression selection
lists.
Not Rule Same as the Rule field above, but defining the transaction or cashflow characteristics
to which the limit item query does not apply (include all transactions matching Rule,
except those matching Not Rule).
Tag Name of the tag that you want this limit item to have.
The tag is an identifier which can be assigned to a sublimit to specify which limit item
to use. You can combine one or more limit items in a single sublimit calculation.
A tag is useful if you have more than one limit item in the same limit and want to
create any kind of sublimit in that limit where the calculation uses 'output' from a
specific one (or more, but not all) limit item in the limit. For example, the sublimit
expression 'sum()' means 'sum of all outputs from all limit items in the limit' and
'sum(abc)' means 'sum of all limit items with tag 'abc' in the limit'.
Note: Avoid names with special characters, since these can be misinterpreted by TRM;
for example, a dash ( - ) can be interpreted as a minus sign. Also, avoid names
that could be misinterpreted with other entities in TRM. Also, be aware that tags
are case-sensitive; for example, TRM considers “EXP” to be a different tag from
“exp”.
Allow Duplicates Switch on if you want to allow all cashflows matching the query to be included in the
limit calculation, even if they have already been included in a limit item with a higher
order number.
Usually, TRM monitors the limit items according to the order you specify using the
Order Number field, and ignores any cashflows in later limit items that it has already
found in earlier limit items. This is to avoid cashflows from being duplicated, so that
you do not unintentionally multiply the exposure.
Expression Output
0 Zero expression, giving 0 as output.
accrued_book_value Total of the transaction book value and the accrued part of the premium or
discount.
accrued_interest Outstanding accrued interest as of end date of the limit server calculated in
currency of the limit server
accrued_interest_local Outstanding accrued interest as of end date of the limit server in cashflow
currency
accrued_profit Outstanding accrued profit as of end date of the limit server calculated in
currency of the limit server
accrued_profit_local Outstanding accrued profit as of end date of the limit server in cashflow
currency
accrued_result Periodic accrued result combining periodic changes in accrued interest and
accrued profit between the start date and end date (normally, current date) of
the limit server including realized interest and accrued profit during the period
Information Description

16 Managing limits
16.2 Setting up limits
Transaction & Risk Management Module (TRM) User Guide 455
amount Payable amount (or estimated payable amount) of a cashflow.
book_value Original book value of a cashflow or transaction in the currency of the limit
server.
collateral_amount Nominal Amount of collateral instrument held as collateral. This figure is
calculated for collateral entries of transactions, not for cashflows
collateral_market_value Current market value of the collateral held
collateral_requirement Collateral requirement calculated for collateralized transactions
collateral_units Number of units of collateral instrument held as collateral
collateral_value Current market value of the collateral held adjusted with Collateral Haircut of
the collateral entry
deal_nominal_amount Nominal amount for only one cashflow (the primary cashflow) in the
transaction. Needed for those instruments that have two nominal amounts that
cancel each other out, namely FX transactions (which have a nominal amount
per currency), and IR swaps (which have a different nominal amount per leg):
• In FX spot, forward and option transactions, deal nominal amount =
nominal amount of the base currency cashflow.
• In FX swap transactions, deal nominal amount = nominal amount of the
base currency cashflow of the far leg of the swap.
• In IR swap transactions, deal nominal amount = nominal amount of the
cashflows in leg 1 of the swap.
In all other cases, deal_nominal_amount is identical to nominal_amount.
delivery_amount Amount for a deliverable instrument (in a delivery cashflow).
delivery_units Number of units for a deliverable instrument (in a delivery cashflow).
duration Aggregated duration of all cashflows in the position.
duration_days Aggregated duration in days of all cashflows in the position.
duration_negative Duration of the negative cashflows in the position.
duration_positive Duration of the positive cashflows in the position.
effective_convexity Effective convexity (a measure of the non-linearity of the position).
effective_duration Aggregated effective duration of all cashflows in the position.
effective_duration_
negative
effective_duration_
positive
Effective duration of the negative cashflows (effective_duration_negative) and
positive cashflows (effective_duration_positive) in the position.
elasticity Elasticity of the cashflow or transaction.
factor Scaling factor set that you specify in the Limit Factor Set field (see below).
fx_exposure FX exposure of the cashflow or transaction.
fx_profit Outstanding fx profit as of end date of the limit server
fx_result Periodic change in fx profit between the start date and end date (normally,
current date) of the limit server including realized fx profit during the period.
gamma_value Gamma value of the cashflow or transaction.
interest_result Periodic change in accrued interest between the start date and end date
(normally, current date) of the limit server including realized interest during
the period.
intrinsic_value Intrinsic value calculated for options.
Expression Output
16 Managing limits
16.2 Setting up limits
456 © Wall Street Systems IPH AB - Confidential
ir_exposure_1 IR exposure calculated as the average of the market value one basis point shift
in the interest rate in either direction.
ir_exposure_down
ir_exposure_up
IR exposure measured by moving rates down (ir_exposure_down) or up
(ir_exposure_up) by the number of basis points given as the risk offset in the
portfolio of the cashflow or transaction.
ir_sensitivity_up
ir_sensitivity_down
Money gain/loss resulting from the parallel shift of the valuation curve by the
offset specified at portfolio level.
issue_size Defined in the Outstanding Size field at the instrument level (Security Info
feature - Security Info page).
local_book_value Original book value of a cashflow or transaction in cashflow currency.
market_value Current market value of the cashflow or transaction.
mtom_profit Outstanding mtom profit as of end date of the limit server calculated in
currency of the limit server
mtom_profit_local Outstanding mtom profit as of end date of the limit server in cashflow currency
mtom_result Periodic change in mtom profit between the start date and end date (normally,
current date) of the limit server including realized sell profit during the period
market_value_share_of_
equity
Percentage expressed in terms of market value of held equities over the whole
equity issue.
mv_share_of_equity_floa
t
Percentage expressed in terms of market value of held equities over the equity
issue in circulation.
nominal_amount Nominal amount of the cashflow.
nominal_share_of_equity Percentage expressed in terms of nominal amount of held equities over the
whole equity issue.
nominal_share_of_equity
_float
Percentage expressed in terms of nominal amount of held equities over the
equity issue in circulation.
other_profit Outstanding other profit as of end date of the limit server calculated in the
currency of the limit server
other_profit_local Outstanding other profit as of end date of the limit server in cashflow currency
other_result Periodic change in other profit between the start date and end date (normally,
current date) of the limit server
rho_risk rho risk of the cashflow or transaction.
risk_value Cashflow amount of any cashflow with IR exposure (payable or not payable).
When you want to measure sensitivity, you often measure the IR exposure.
Sometimes you might want to see the exposure as an amount of money
(cashflows) in a date period. risk_value enables you to do this, even for
derivatives (since it makes no distinction between real and pseudo cashflows).
spot_nominal_amount • For IR instruments, the nominal spot amount. In other words, the same as
Treasury Monitor’s Spot Nominal Amount (Normal).
• For IR options, the delta equivalent of the nominal amount.
Compare with underlying_spot_units, which is the equity equivalent of this
expression.
Expression Output

16 Managing limits
16.2 Setting up limits
Transaction & Risk Management Module (TRM) User Guide 457
spot_value Spot value gives the amount of an FX spot transaction that would hedge the FX
exposure of the position. In most cases, this is the local market value of the
instrument given at spot.
The exception is FX derivatives, where spot value is based on the delta of the
option. Also, if the market value of an FX forward deal is calculated with the
Quoted method (i.e. using forward FX points instead of the valuation curve of
the currency), then the spot value is based on present value, which is
calculated using the forward curve, instead of market value.
strike_price Strike price of the transaction.
time_risk Time risk of the cashflow or transaction.
total_profit Outstanding total profit (some of all profit components) as of end date of the
limit server calculated in currency of the limit server
total_profit_local Outstanding total profit (some of all profit components) as of end date of the
limit server in cashflow currency
total_result Periodic change in total profit between the start date and end date (normally,
current date) of the limit server, including all profit components realized during
the period
underlying_market_value Current market value of the instrument underlying the option, which has the
same exposure as the option itself.
underlying_spot_units • For equities, the number of underlying units. In other words, the same as
Treasury Monitor’s Underlying Units (Normal).
• For equity options, the delta-adjusted number of units that the option is
written on.
Compare with spot_nominal_amount, which is the IR instrument equivalent of
this expression.
units Number of units of the cashflow or transaction
value_at_risk Value-at-risk measured for the cashflows matching the limit item.
This limit item can be combined with the “sum” or “query_total” sublimit
expressions (item_total will not work).
For this expression, you can specify parameters in the following way:
value_at_risk(currency,confidence interval)
The currency parameter must be set to the same currency as the sublimit in
which it is used, for correct results. The confidence interval parameter is used
to set the confidence interval (99, 95, and so on) used for the VaR calculations.
If nothing is specified here, then the confidence interval set at limit server level
is taken by default.
value_at-risk_eq Price value-at-risk measured for the cashflows resulting from EQ deals
matching the limit item.
The same conditions apply to this as to the value_at_risk expression.
value_at-risk_fx FX Value-at-risk measured for the cashflows resulting from FX deals matching
the limit item.
The same conditions apply to this as to the value_at_risk expression.
value_at-risk_ir IR Value-at-risk measured for the cashflows resulting from IR deals matching
the limit item.
The same conditions apply to this as to the value_at_risk expression.
value_at-risk_fx_ir_eq FX/IR/Price value-at-risk measured for the cashflows matching the limit item,
assuming no correlation between EQ, FX, and IR markets.
The same conditions apply to this as to the value_at_risk expression.
Expression Output

16 Managing limits
16.2 Setting up limits
458 © Wall Street Systems IPH AB - Confidential
You can combine any of the above expressions, and perform mathematical functions on them, to
give a more specific result. You can add ( + ), multiply ( * ), subtract ( - ) and divide ( / ) two or
more key-figures, or key-figures and actual numbers. Here are some examples:
Note that the system does not monitor the syntax of modified expressions. All elements of the
expressions have to be written in lowercase letters: for example, abs(market_value), and not
ABS(market_value). Spaces between the elements of the expression, however, are optional.
6. In the Limit Factor Set field, specify a limit factor set, if you want to scale a limit. For a limit factor
set to apply to a limit item expression, you must add factor to that expression.
7. Define how you want to group (that is, to net) cashflows with the limit item by turning on the
relevant netting switches and fields. If no netting switches are set, all cashflows matching the
limit item queries will be aggregated and a single exposure will be calculated for them using the
expression of the item. Setting one or several of the netting switches produces a separate
exposure for each combination of selected netting variables.
For example, instead of having a limit item for all FX spot exposure, you can have FX exposure
netted By Portfolio.Scaling by factor as well as sublimit query and grouping all take place on the
level of netting output which means that factors, sublimit query and sublimit grouping can only
be made dependent on the attributes of cashflows which have been used in limit item netting.To
apply different scaling for different portfolios, query exposures of a specific portfolio in a sublimit
or apply sublimit grouping by portfolio, netting By Portfolio must be set in the limit item.
value_at_risk_uncorr value_at_risk measured for the cashflows matching the limit item, assuming
no correlation between market variables.
The same conditions apply to this as to the value_at_risk expression.
value_at_risk_undiv value_at_risk measured for the cashflows matching the limit item, assuming
perfect correlation between market variables.
The same conditions apply to this as to the value_at_risk expression.
vega_risk Vega risk of the cashflow or transaction.
votes Number of votes that you are holding.
Compare with votes_share_of_equity (), which gives the percentage of voting
rights.
votes_share_of_equity () Held equities divided by total voting rights, expressed as a percentage.
Expression Output
Syntax Result
market_value * 0.15 15% of market value.
market_value + 0.1 * deal_nominal_amount Sum of market value, plus 10% of deal
nominal amount.
max(market_value, 0.15 * deal_nominal_amount) Market value or 15% of deal nominal amount,
depending on which is the larger.
Netting switch Example of usage
By Payment Date Settlement limits.
By Delivery Date Risk limits by the dates on which securities are delivered (namely the value dates of
delivery cashflows).
By Transaction Credit limits where transactions with a positive exposure are not allowed to be netted
with transactions with a negative exposure.
By Bank Settlement limits that are set against a bank instead of the counterparty.

16 Managing limits
16.2 Setting up limits
Transaction & Risk Management Module (TRM) User Guide 459
By Account Settlement limits that are set against an individual bank account instead of a payment
correspondent or the counterparty.
By Currency Risk limits by currency.
By Currency Class Risk limits by currency class.
By Instrument
Group
Risk limits by instrument group.
By Instrument Risk limits by instrument.
By Underlying
Instrument
Risk limits by underlying instrument.
By Leg/Delivery
Instrument
One of the following:
• Separating the two legs of an interest rate swap (usually a fixed and a floating
leg).
• Identifying a delivery instrument in delivery flows of a transaction that has a
collateral instrument; for example, with repo transactions consisting of deposits
with bonds as collateral, the netting can be used to identify the bond instrument.
By Branch Code
#0-#19
Risk limits by branch code. Useful for investment management in equities, limiting
how much of the portfolio can be invested in a certain industry, country, and so on.
Branch codes are defined in Branch Code Editor and assigned to instruments in
Instrument Editor.
By Portfolio
Owner
Risk limits by portfolio owner.
By Portfolio Risk limits by portfolio.
By Client Risk limits by client. If the limit item query matches cashflows against several
counterparties or in instruments issued by several issuers, this netting can be used to
produce separate exposures for each of them. Note that the identified client is
dependent on the selected Client Query Mode.
Parent Level
By Parent
Risk limits by parent client. You define client/parent relationships in Client Editor.
If no parent level is specified, the oldest parent of the client is used. If the specified
level does not exist, then an empty parent id is returned.
By Risk Country Risk limits by country (as defined in Country Editor). You assign Risk Countries to
clients in Client Editor.
Package Main
Typ e
Identifies the package main type (as defined in Package Type Editor) to be used in risk
limits by package type and by package. Both By Package Type and By Package nettings
only work if a valid Package Main Type has been given.
By Package Risk limits by package.
To do this, you combine Package netting at the limit item level with Expand by Netting
Output in the sublimit definition.
By Package Type Risk limits by package type (as defined in Package Type Editor).
Client Rating/
By Client Rating
Code
By Instrument
Rating/
By Instrument
Rating Code
Risk limits by credit rating, either for the issuer or the instrument, where:
•Rating gives the rating agency and type (for example Moody’s long rating, or
Standard & Poors short rating) to be used
•Rating Code gives the actual rating (A+, BB, and so on).
You must select a value for the Rating field, for the Rating Code switch to work.
The credit ratings themselves are defined in Credit Rating Editor.
Client Group
Client Main Group
Risk limits by Client Groups (as defined in Client Editor’s Groups page).
Netting switch Example of usage

16 Managing limits
16.2 Setting up limits
460 © Wall Street Systems IPH AB - Confidential
8. If you want the limit item to be netted by maturity gap, risk gap, or delivery gap:
–Use the Gap Set field to select the gap set you want to use.
–Select the relevant switches (By Risk Gap, By Maturity Gap, By Delivery Gap).
–In the Spot Days field, specify the number of days used to calculate the gap in which the
cashflow falls. This is used if the spot days and the calendars for the currencies of the
cashflows do not match the base currency of the portfolio.
–If you want to use relative IR exposure in limits, select the gap set and switch on By Risk Gap
and Relative Risk Gap.
If the Relative Risk Gap switch is on, the key-figure amount is attributed proportionally to the
adjacent gaps. Otherwise all key-figure amounts are attributed to the closest gap.
You can specify which gap periods from the gap set are to be used for individual sublimits (using
the Risk Gap From/To, Maturity Gap From/To, and Delivery Gap From/To fields). This is done in Limit
Editor’s Sublimits sub-page in the Sublimit Query section).
Note that, for the netting to work, the sublimit must use the same gap set as the limit item.
See 16.2.6.2 Defining sublimits for a limit on page 468.
9. A limit item normally produces an exposure as of the end date of the limit server. This exposure
can be split into smaller components using netting switches but even if the exposure is, for
example, netted by Maturity Gap, it is still calculated for the current moment in time.
In order to support identification of limit exposure as of future points in time, netting by Affect
Date can be used in combination with another setup supporting this. The principle of affect date
netting is that, instead of a single limit effect, each cashflow produces two incremental effects:
one initializing the limit effect of the cashflow at affect start date and another one reversing it at
affect end date. When sublimit grouping by Affect Date is used together with the Expand by Netting
Output option, limit item exposures are grouped by Affect Date in a cumulative manner to produce
By Guarantee
Level
Guarantee-related netting is primarily meant to be used as a means to apply scaling
with factors which are dependent on the type and quality of guarantees received
against the transaction. It can be used when scaling must be dependent on Guarantee
Level.
By Guarantee
Typ e
Can be used when scaling must be dependent on Type of guarantee.
By Guarantee
Parameter
#0-#19
Can be used when scaling must be dependent on Guarantee parameters, defined in
Parameter Editor.
Netting switch Example of usage
16 Managing limits
16.2 Setting up limits
Transaction & Risk Management Module (TRM) User Guide 461
a timeline of limit exposure where, for example, exposure of a deposit transaction can be seen
to start on the value date of the transaction and end on the maturity date of the transaction.
10. Save the global limit item definition using File - Save As New.
16.2.3 Creating sublimit calculation templates
A sublimit is the actual limit you want to apply to a selected group of transactions, for example, the
FX spot limit for a particular bank, or the IR exposure of a particular portfolio. The sublimit
calculation template defines how exposures produced in limit items are aggregated for the sublimit.
Sublimit calculation templates are defined in Sublimit Calculation Template Editor and can be
assigned to multiple limits or to multiple sublimits within the same limit.
To create a sublimit calculation template:
1. In Sublimit Calculation Template Editor, enter a unique ID and name for the sublimit calculation
template.
2. In the Limit Usage Expression field, use the following table to enter the expression that defines how
you want the sublimit to be calculated from the limit item exposures. This field is limited to 1024
characters. For long expressions, you can use the short version of the name. These short names
Field Description
Affect Start Date Controls the date assigned as affect start date for the cashflow. The following dates
are supported:
• Current Date
Current date of the limit server
•Payment Date
Payment date of the cashflow is used when the server is running for a date before
the payment date of the cashflow and current date is used when the server is
running for a date after the payment date of the cashflow
•Maturity Date
Maturity date of the transaction
•Risk Date
Risk date of the cashflow
•Value Date
Value date of the transaction is used when the server is running for a date before
the value date of the transaction and current date is used when the server is
running for a date after the value date of the transaction
Affect Start Date
Offset
Number (positive or negative) of days to be added to selected date when assigning
affect start date to a cashflow.
Affect End Date Controls the date assigned as affect end date for the cashflow. The same dates as for
Affect Start Date are supported.
Affect End Date
Offset
Number (positive or negative) of days to be added to selected date when assigning
affect end date to a cashflow.
Netting By Affect
Date
Activates netting by affect date treatment
Netting By Affect
Gap
Activates netting by Affect Gap treatment. This works with the same principle as
netting by Affect Date but aggregates all affect dates within the same gap into a single
exposure using gap set identified in field Gap Set
Use Business
Days Offset
When used in combination with Affect Start/End Date Offset, this makes the offset to
be calculated as business days using the calendar of the currency of limit server
(currency of the top portfolio for which the server is running)

16 Managing limits
16.2 Setting up limits
462 © Wall Street Systems IPH AB - Confidential
are displayed between parentheses in the Name column of the expression selection list. For
example, the short name for duration () is _dur.
Note: If you have configured a client-specific limit amount in the Client Editor and used it in one
or several clients to make the limit refer to a particular financial attribute of the client
entity, this is available for selection from this field in addition to all standard expressions
(see 3.13.1.8 Configuring counterparty-specific limit amounts on page 96).
Hint:
For long expressions, you can press Ctrl+F2 to view the full expression.
Expression Description
duration () Adds outputs from limit items using one of the following expressions: duration
(); duration_positive (); duration_negative ().
In fact, if you selected duration, duration_negative or duration_positive for the
limit item, you must select duration for the sublimit: this is because duration is
aggregated as a relative value dependent on both the market value and the
duration of the underlying cashflows, and cannot be simply summed up by
using an expression such as sum ().
Used for risk limits for duration: for example, setting excepted deviations from
benchmark durations.
effective_convexity () Adds the outputs from limit items that use effective_convexity ().
In other respects, works on the same principle as duration () described above.
effective_duration () Adds the output from limit items that use one of the following expressions:
effective_duration (); effective_duration_positive ();
effective_duration_negative ().
In other respects, works on the same principles as duration () described
above.
elasticity () Adds the output from limit items that use the expression elasticity ().
In other respects, works on the same principles as duration () described
above.
item_duration ()
item_effective_convexity
()
item_effective_duration()
item_elasticity()
The expressions withe "item_" prefix are variations of corresponding standard
expressions which aggregate all limit item netting outputs, whether or not they
have been queried into the Sublimit, and whether or not they have been
expanded in the Sublimit.
For example, a limit for maximum allowed deviation in duration between a
position in a queried portfolio and the whole position of a limit item can be
defined by using a Sublimit query against that portfolio and by using the
following Sublimit Expression (against a Limit Item with Tag "mm"):
(duration(mm) - item_duration (mm))
duration (mm) would produce the duration in the queried portfolio in Limit
Items with Tag "mm" and item_duration (mm) would produce the total
duration in Limit Items with Tag "mm".
item_total()
item_total_abs()
item_total_negative()
item_total_positive()
item_total_units()
Item total expressions are variations of the corresponding sum expression
which aggregates all limit item netting into a total, regardless of whether they
have been queried into the Sublimit or not, and regardless of whether they
have been expanded in the Sublimit or not.
For example, a limit for the maximum % of total market value that any single
instrument may have in the total position can be defined by using an Expand
by Netting Output option in sublimit and by using the following Sublimit
Expression (against a Limit Item with Tag "mm"):
(sum(mm) / item_total (mm)) * 100
sum (mm) would produce the exposure in the instrument of the grouping in
Limit Items with Tag "mm" and item_total (mm) would produce the total
exposure in Limit Items with Tag "mm".

16 Managing limits
16.2 Setting up limits
Transaction & Risk Management Module (TRM) User Guide 463
item_value() This expression can only be used together with the sum_if () expression.
item_value () produces the values against which the filter is applied and simply
refers to individual limit item outputs. As in most other expressions, a
reference against a specific tag can be given within the brackets.
For example, if a limit item is netted By Issuer, the expression item_value ()
would refer to each issuer-specific output from the limit item.
market_value_share_of_
equity ()
Adds the outputs from limit items that use the expression
market_value_share_of_equity.
In other respects, works on the same principles as duration () described
above.
query_total ()
query_total_abs ()
query_total_negative ()
query_total_positive ()
query_total_units ()
Query_total expressions are variations of corresponding sum expression which
aggregate all limit item netting outputs matching the sublimit query into a
total, regardless of whether they have been expanded in the Sublimit or not.
For example, a limit for the maximum % of total market value that any one
instrument may have in the position of a specific portfolio can be defined by
using limit item netting per instrument and per portfolio, sublimit groupings
per instrument together with Expand by Netting Output option in sublimit,
sublimit query against the specific portfolio and by using the following Sublimit
Expression (against a Limit Item with Tag "mm"):
(sum (tag-x) / query total (tag-x))*100
where sum gives the exposure in the instrument of the grouping in the queried
portfolio in Limit Items with Tag "mm" and query total gives the exposure of all
instruments in the queried portfolio of Limit Items with Tag "mm".
rel_value_at_risk (tag1,
tag2, conf)
The relative VaR between the sets of cashflows matching the limit items with
tag1, and tag2. In normal cases, tag1 would be used for the position, and tag2
would be used for the benchmark against which the relative VaR is being
measured. For this expression to work correctly, the limit items should use the
expression “market_value”.
The “conf” parameter is used to set the confidence level used for the VaR
calculation (99, 95, and so on). If this is not specified, then the confidence
level specified at limit server level is used by default.
rel_value_at_risk (tag1,
tag2, conf)
rel_value_at_risk_eq
(tag1, tag2, conf)
rel_value_at_risk_fx
(tag1, tag2, conf)
rel_value_at_risk_fx_ir_e
q (tag1, tag2, conf)
rel_value_at_risk_ir
(tag1, tag2, conf)
rel_value_at_risk_uncorr
(tag1, tag2, conf)
rel_value_at_risk_undiv
(tag1, tag2, conf)
These expressions calculate various types of rel_value-at-risk for instruments
affected by the relevant variable.
For example, rel_value_at_risk_eq () is for instruments affected by equity
variables, rel_value_at_risk_ir is for instruments affected by interest rate
changes, and so on.
In normal cases, tag1 would be used for the position, and tag2 would be used
for the benchmark against which the relative VaR is being measured.
For these expressions to work correctly, the limit items should use the
expression "market_value".
The "conf" parameter is used to set the confidence level used for the VaR
calculation (99, 95, and so on). If this is not specified, then the confidence
level specified at limit server level is used by default.
sum () Adds all outputs. For example, -10 +25 = 15.
Expression Description
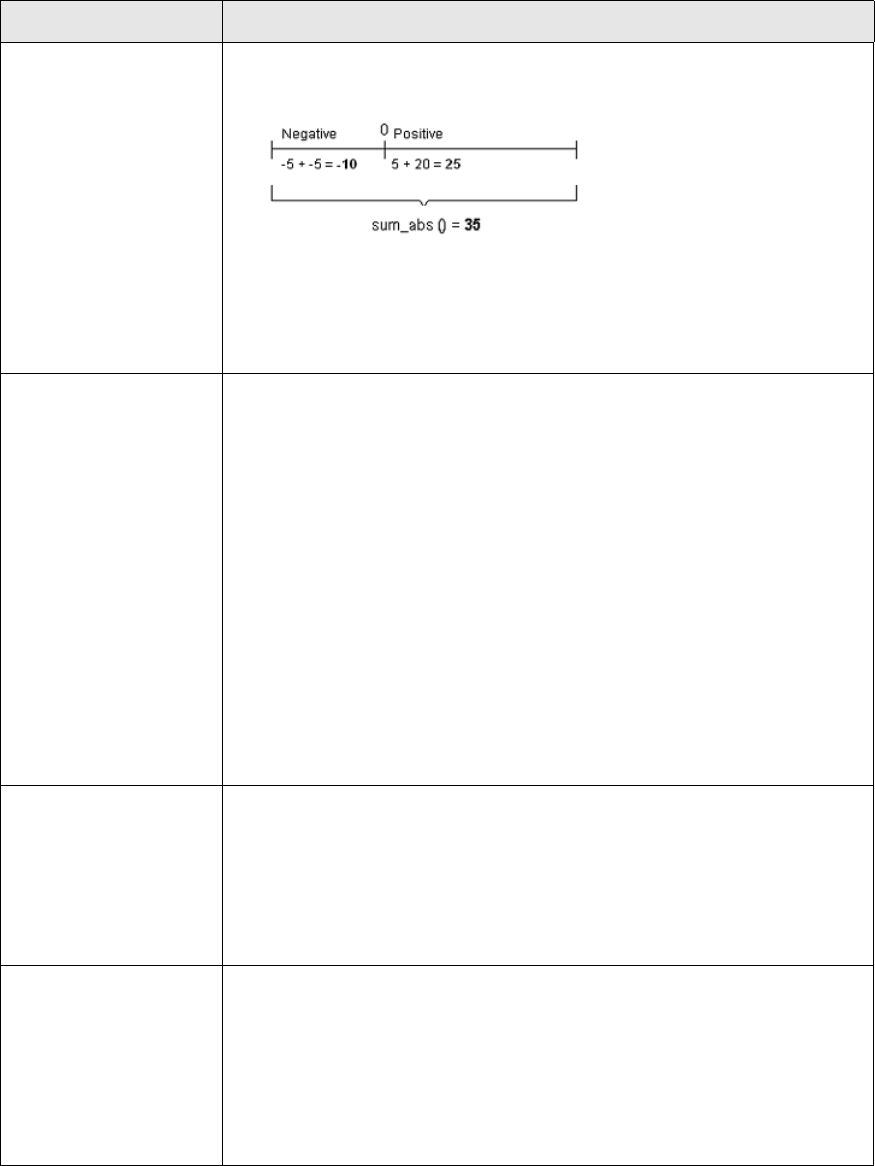
16 Managing limits
16.2 Setting up limits
464 © Wall Street Systems IPH AB - Confidential
sum_abs () The sum of absolute values, namely the spread between the total of all
negative figures and the total of all positive figures. For example:
Mainly used in risk limits where, for example, FX exposure is netted by
currency but the total exposure is calculated by adding up the absolute risks in
each currency.
If you set a grouping switch to specify Sublimit grouping, values in that
Sublimit grouping will be aggregated before this expression is applied.
sum_if () This expression can only be used together with the item_value () expression.
sum_if () produces the sum of all item_value () outputs matching the filter
criteria. You must specify two parts for the expression within the brackets.
These are:
• An item_value () expression. This can in turn, be modified by other
functions. For example:
abs (item_value ())
You can also combine item_value () with other expressions, for example
item_value () / item_total ()
• A filter condition which is applied against the modified output of item_value
(), for example “>0.05”. Note that any references to specific tags are given
in the item_value () expression.
sum_if () produces the sum of all modified outputs of item_value () matching
the given filter condition as a simple total. This value is given as a Limit
Amount for the sublimit.
If you set a grouping switch to specify Sublimit grouping, values in that
Sublimit grouping will be aggregated before this expression is applied.
sum(x)_max() The sum of x highest Expansion Level Limit Amount outputs from Sub_limit.
For example, a limit for the maximum % of total market value that the five
highest Expansion Level outputs (such as instruments) can account for could
be defined by using the following Sublimit Expression:
( sum(5)_max () / sum() ) * 100
If you set a grouping switch to specify Sublimit grouping, values in that
Sublimit grouping will be aggregated before this expression is applied.
sum(x)_min() The sum of x lowest Expansion Level Limit Amount outputs from Limit Item(s).
For example, a limit for the maximum % of total market value (in this case
negative, perhaps in a loan portfolio) that the five lowest Netting Level outputs
(such as instruments) can account for could be defined by using the following
Sublimit Expression:
( sum(5)_min() / sum() ) * 100
If you set a grouping switch to specify Sublimit grouping, values in that
Sublimit grouping will be aggregated before this expression is applied.
Expression Description

16 Managing limits
16.2 Setting up limits
Transaction & Risk Management Module (TRM) User Guide 465
For example, if you want the sum of all calculations made by the limit item, select the sum
()expression. Then, between the parentheses, enter the name of the relevant limit item tag (as
defined in Limit Item Template Editor). For example, if you want the sum of a limit item tag
called "exp", update the expression sum( ) to sum(exp). Tag names are case-sensitive: for
example, "EXP" is not the same name as "exp".
sum_mismatch
(tag1,tag2)
This expression computes the sum of the groupings that have output from the
first tag, but not from the following tags.
For example:
• Benchmark Portfolio BM has transactions from instruments A, B, and C
• Investment Portfolio INV has transactions from instruments B, C, and D
To get the A and D amounts from the limit, two limit items are required:
• Tag "bm" takes all the transactions from Benchmark Portfolio BM, netted by
instrument
• Tag "inv" does the same from Investment Portfolio INV.
The sublimit is grouped by instrument but not expanded.
Therefore, the sublimit expressions should be:
To get the A amounts:
sum_mismatch(bm, inv)
To get the D amounts:
sum_mismatch(inv, bm)
sum_negative () The sum of negative figures only; all positive figures are ignored (-10 + 25 =
-10).
If you set a grouping switch to specify Sublimit grouping, values in that
Sublimit grouping will be aggregated before this expression is applied.
sum_positive () The sum of positive figures only; all negative figures are ignored (-10 + 25 =
+25).
Mainly used in credit limits where you want only transactions with positive
market values to affect the total exposure. Note that in this case, the limit item
that the sublimit takes its input from needs to be netted by transaction.
If you set a grouping switch to specify Sublimit grouping, values in that
Sublimit grouping will be aggregated before this expression is applied.
sum_units () The sum of non-currency values, with no currency conversions performed.
value_at_risk (tag,conf)
value_at_risk_eq
(tag,conf)
value_at_risk_fx
(tag,conf)
value_at_risk_fx_ir_eq
(tag,conf)
value_at_risk_ir
(tag,conf)
value_at_risk_uncorr
(tag,conf)
value_at_risk_undiv
(tag,conf)
These expressions calculate various types of value-at-risk for instruments
affected by the relevant variable.
For example, value_at_risk_eq () is for instruments affected by equity
variables, value_at_risk_ir is for instruments affected by interest rate changes,
and so on.
The tag parameter is used to set the tag of the limit item to be used in the VaR
calculation.
For these expressions to work correctly, the limit items should use the
expression “market_value”.
The “conf” parameter is used to set the confidence level used for the VaR
calculation (99, 95, and so on). If this is not specified, then the confidence
level specified at limit server level is used by default.
votes_share_of_equity () Adds the outputs from limit items that use expression votes_share_of_equity.
In other respects, works on the same principles as duration () described
above.
Expression Description

16 Managing limits
16.2 Setting up limits
466 © Wall Street Systems IPH AB - Confidential
You can modify the expressions in the same way that you can modify limit item expressions. In
addition, you can combine tags, for example:
3. If the sublimit calculation template defines an intra-day limit of some kind in the Valid From Time
and Valid To Time fields, specify the period when this sublimit is valid.
4. If the sublimit calculation template defines an intra-day limit of some kind in the Time Zone field,
specify the time zone that applies to the times you have entered in the Valid From Time, Valid To
Time fields.
5. Switch on Expand By Netting Output if you want to make the total sublimit amount (specified in the
Limit Usage Expression field) apply to each of the groupings specified with the Grouping Switches.
–If the switch is off, the total sublimit amount applies to the entire output of the sublimit.
–If the switch is on, the total limit amount is per netted item rather than for the entire output
of the sublimit.
This switch is used if you have a limit where the maximum exposure produced by any one
netting output (for example, instrument, portfolio, client or payment date) is limited to the same
maximum/minimum value. It can be used as an efficient means of simplifying limit setup when
the same limit is shared by a large number of instances.
Note that Expand By Netting Output filters the limit item netting (as defined in Limit Item Template
Editor). For example, if a limit item is netted By Bank, By Currency, and By Leg Instrument (Netting
Switches), but the sublimit only has By Leg Instrument (Grouping Switches) switched on, the
output is only expanded by leg instrument. Therefore, for the expansion by netting output to
work, the corresponding Netting Switches must be turned on for the limit item.
6. If Expand By Netting Output is on, turn on the switch or switches that match the criteria by which
you want to expand the output.
7. Specify the domain in which this sublimit template is available in the Domain field.
8. Save the sublimit calculation template definition using File - Save As New.
16.2.3.1 Conditionally aggregating limit item outputs
Some limits require a filter condition to be applied when summing up outputs from limit items.
A typical example of this is the "40" part of the standard "5/10/40" compliance rule applied in many
investment portfolios. This means that you may invest up to 10% of the total funds market value in
securities of any one issuer (limit 1). However, the total market value of the securities of issuers
whose portion of the total funds market value exceeds 5% must not be greater than 40% of the
total fund market value (limit 2).
In order to support the second part of this rule the following calculation steps must be followed:
1. Produce the output from the limit item netted by issuer.
2. Calculate the % share of each issuer in the portfolio.
3. Apply a filter on the above calculated values and select only those matching the filter ( >5%)
4. Calculate an aggregated total by summing up the values matching the above filter.
You can create the 5/10/40 rule using a combination of the item_value () and sum_if () expressions
as follows:
100 * (sum_if (item_value () / item_total () > 0.05)) / item_total ())
Syntax Result
sum(tag1)+sum(tag2)
You can select the first item - in this case sum () - from the selection list, but you must
manually type the second (if you try selecting a second, TRM assumes that you want to
replace the first). Also note that TRM does not check the syntax of expressions, so be
very careful to enter the item correctly.
The sum of
tag1 plus the
sum of tag2
16 Managing limits
16.2 Setting up limits
Transaction & Risk Management Module (TRM) User Guide 467
This produces the percentage share of holdings in all individual issuers accounting for more than 5%
of the total value of limit items.
16.2.4 Creating limit client queries
Limit client queries can be created to specify which clients are queried by the limit item. Limit item
client queries can be assigned as Global Client Queries to multiple limits, or as Limit Item Client
Queries to multiple limit items within the same limit.
Limit item client queries are created in Limit Client Query Editor.
To create a limit item client query:
1. Enter a unique ID for the limit item client query.
2. Select the client selection parameters you want.
You use the Not fields for exceptions.
Note that if you specify more than one selection parameter, the query is for only those cashflows
that match all the parameters (“and” logic rather than “or”).
The selection parameters are described in the following table:
3. Specify the domain in which this limit item client query is available.
4. Save the limit item client query definition, using File - Save As New.
16.2.5 Creating limit categories
Limit categories are used to link logically similar limits together. They can be used in limit
monitoring to make it easier to monitor similar limits together and to easily recognize limits. Limit
categories are defined in Limit Category Editor.
To create a limit category:
1. Enter a unique ID and name for the limit permission template.
2. Save the limit category definition using File - Save As New.
Information Description
Client Rating
Client Min Rating
Code
Client Max Rating
Code
A specific credit rating of the client, where:
•Rating gives the rating agency and type (for example, Moody’s long rating, or
Standard & Poors short rating)
•Rating Code gives the actual rating (A+, BB, and so on).
By setting minimum and/or maximum rating levels of the credit rating, you can
define a ratings order.
You must select a value for the Rating field for the Rating Code fields to work.
The credit ratings themselves are defined in Credit Rating Editor.
Portfolio Owner A specific portfolio owner (as defined in Client Editor).
Client A specific client (as defined in Client Editor). This is useful if you want to create
counterparty-issuer or credit limits against individual clients.
Parent A specific client parent. You define client/parent relationships in Client Editor.
Client Main Group
Client Group
The group that a client belongs to (as defined in Client Editor’s Groups page).
You must select a main group before you can select a group, since this selection
determines the list of groups displayed in the associated Group field.
Risk Country A specific country (as defined in Country Editor).
Risk Country
Group
A group of countries.

16 Managing limits
16.2 Setting up limits
468 © Wall Street Systems IPH AB - Confidential
16.2.6 Creating limits
Limits provide the means of grouping limit items into logical entities; for example, you can have a
limit named Counterparty Limit Anybank, containing all the limit items applying to a counterparty
called Anybank and sublimits set to limit the exposures produced by them.
Limits are created in Limit Editor.
To create a limit:
1. Enter the main attributes of the limit using the information in the following table:
2. Save the limit using File - Save As New.
3. Complete the limit definition using the information in the following sections.
16.2.6.1 Defining limit items for a limit
Limit item definition in a limit involves simply selecting limit item templates and optionally selecting
a specific limit client query used to identify cashflows to be treated as specified in the limit item
template.
To define the limit items for the limit:
1. Select Limit Editor’s Limit Items page.
2. If you want to specify a limit item client query other than the one specified in Limit Editor’s Global
Client Query field, select the client query to use in the Limit Item Client Query field.
3. Select the limit item template to use in this limit item.
4. Click Add to add the limit item.
5. Save the whole limit definition using File - Save.
16.2.6.2 Defining sublimits for a limit
There are three parts to a sublimit, namely its definition, its calculation, and its query parameters.
You set these up using Limit Editor’s Sublimits page.
Information Description
Template Limit template on which to base this limit. A limit template can contain all or some of
the information required to create a limit in Limit Editor. See 16.2.7 Creating limit
templates on page 470 for more information.
ID & Name Unique ID and name for the limit.
Category Category of the limit.
You can use the category in Limit Monitor queries and grouping, as well as in Limit Log
report, as a grouping and sorting criterion.
Global Client
Query
Global client query that applies to limit items within this limit.
Using the Limit Item Client Query field in the Limit Item sub-page of the Limit Editor page,
you can specify different client queries for specific limit items. TRM checks in the Limit
Item Client Query definition first: if it finds nothing there, the client query specified here
in the Global Client Query field applies.
Usage Logging By Interval, Daily, and None, depending on the frequency with which you want limit
usage to be logged.
Limit violations are always logged regardless of the selected usage logging.
Domain Domain in which this limit is available.
16 Managing limits
16.2 Setting up limits
Transaction & Risk Management Module (TRM) User Guide 469
To create a sublimit for a limit:
1. Select Limit Editor’s Sublimits page.
2. In the Sublimit Definitions section, fill in the fields using the information in the following table:
3. In the Sublimit Calculation section, in the Template field, select the sublimit calculation template
that you want to use.
4. In the Sublimit Query section, select the parameters by which you want limit items to be queried
when the sublimit is set for a specific subset of exposures produced by limit items. You can only
query with parameters that are used as netting parameters in limit items of the same limit (for
example, to select exposures in a specific instrument, limit items must be set up with netting by
instrument). See 16.2.2 Creating limit item templates on page 452
Information Description
ID Identifier of the sublimit definition.
Limit Currency Currency of the sublimit definition.
All limit item exposures that are queried for this sublimit are automatically converted
from the original currency of the exposure to the currency you specify here.
Minimum Limit
Maximum Limit
Expressions defining the minimum and maximum limit.
You will probably usually only need to give a Maximum Limit. Here are some examples of
situations where you may want to give both a minimum and maximum expression:
• You want to define a duration limit for a position where the duration must be kept
within a certain range (for example, greater than 5.00 and less than 7.00).
• You want to define a limit for a deviation between the actual portfolio and a
benchmark portfolio. You may, for example, want to ensure that the difference in
relative share of holdings in some specific asset type between the actual portfolio
and a benchmark portfolio is kept within a certain range (for example, greater than
-5.00% and less than +5.00%).
For either field, you can enter a number (such as 5.5 for a duration limit or
25,000,000.00 for a limit in market value).
You can also give an expression to specify a value relative to limit item exposures: this
is very useful if you want to specify an accepted deviation from a benchmark, rather
than an absolute value. For example, for Maximum Expression you could enter:
duration (xxx) + 2
where tag xxx refers to the limit item containing a benchmark portfolio, and 2 the
number of units of the deviation (for example, two years, or whatever the duration
unit happens to be). Supported expressions are exactly the same as for corresponding
expressions in Sublimit Calculation Template.
It is possible to make the maximum/minimum limit refer to a particular client-specific
limit amount assigned to a client in Client Editor. These limit amounts are available for
selection from these fields in addition to all standard expressions (see 3.13.1.8
Configuring counterparty-specific limit amounts on page 96). For client-specific limit
amounts to work, the Expand by Netting Output option must be used with sublimit
grouping by Client.
Valid From Date
Valid To Date
Dates defining the period when this sublimit is valid.
16 Managing limits
16.2 Setting up limits
470 © Wall Street Systems IPH AB - Confidential
When defining the query by identifying the values to be queried in the supported parameters,
note also the following:
5. Click Add to add the sublimit query.
6. Save the whole limit definition using File - Save.
16.2.6.3 Defining allowed users for a limit
By default, all users can access the limit in Limit Monitor and receive limit notifications from it. If
necessary, access to a limit can be restricted to users or user groups identified in the Allowed Users
page of Limit Editor.
To define allowed users for the limit:
1. Select Limit Editor's Allowed Users page.
2. Select the user or user group to whom you want to give access to this limit.
3. Select the permission as ALL or READ.
4. Click Add to add the allowed user.
5. Save the whole limit definition using File - Save.
16.2.7 Creating limit templates
A limit template can be used as a base for creating limits with similar attributes. See 16.2 Setting up
limits on page 449 for an overview of limit templates. Setting up a limit template is done in the
same way as setting up a limit except that in the Limit Template Editor you can specify the status
the fields will have in Limit Editor once the template has been applied. For example, you can apply
one of the following statuses:
•Editable: you have access to the page and can provide a value. All mandatory fields are editable
by default.
•Ignore Template Value: you will not override a value which was defined before you applied the
template. This means that if a field is blank in the template, if you apply the template to an
entity for which a value already exists for that field, the existing value is not replaced.
Information Description
Client Rating
Client Min Rating
Code
Client Max Rating
Code
Instrument Rating
Instrument Min
Rating Code
Instrument Max
Rating Code
You must select the same value for the Rating field which is used in limit item netting
for the query against Rating Code to work.
By setting minimum and/or maximum rating levels for the credit rating, you can
define a query matching any ratings in the given range.
Gap Set
Risk Gap From/To
Maturity Gap
From/To
Delivery Gap
From/To
Affect Gap
From/To
You must select the same value for the Gap Set field as used in limit item netting for
the query against Gap to work. By setting From and/or To gaps, you can define a
query matching any gaps in the given range.
Client Main Group
Client Group
You must select the same value for the Client Main Group field as used in limit item
netting for the query against Client Group to work.

16 Managing limits
16.3 Limit Monitor
Transaction & Risk Management Module (TRM) User Guide 471
•Mandatory: you must provide values for mandatory attributes. Labels for mandatory fields are
displayed in red in the corresponding editor.
To create a limit template, in Limit Template Editor:
1. Enter the main attributes of the limit template using the information in the following table:
2. In the Limit Main page, enter information as detailed in 16.2.6 Creating limits on page 468.
3. In the Allowed Users page, enter information as detailed in 16.2.6.3 Defining allowed users for a
limit on page 470In the Sublimits page, enter the information as detailed in section Defining
sublimits for a limit (ref).
4. In the Limit Items page, enter information as detailed in 16.2.6.1 Defining limit items for a limit on
page 468.
5. Save the limit template. It can now be applied to a limit in Limit Editor.
16.3 Limit Monitor
Limit Monitor is used to analyze and monitor limits, sublimits, and to make queries against the limit
server.
It is possible to design and save specific layouts (pages) and even complete suites of layouts
(books). The pages and books can be user-specific or shared by several users or user groups.
Limit Monitor pages are saved with information such as access grouping, key-figures, limit queries,
limit filters, limit selection, servers, and cells styles.
16.3.1 Limit Monitor menus
The following tables describe the menu items which are specific to Limit Monitor and any layout
which is based on this application.
Other menu items which are common to all applications are described in 2.2.6 Using application
menus on page 34.
16.3.1.1 File
Information Description
Template Unique ID for the limit template.
Template Name Name of the limit template.
Domain Domain in which the limit template is available.
Allowed Users Specify the status that the Allowed Users fields will have in Limit Editor.
Sublimits Specify the status that the Sublimits fields will have in Limit Editor.
Limit Items Specify the status that the Limit Items fields will have in Limit Editor.
Menu item Description
Open Book Opens an existing book.
Save Book Saves any modifications made to the current book.
Save Book As Saves a new book.
Close Book Closes the current book.
Delete Book Deletes the current book.
16 Managing limits
16.3 Limit Monitor
472 © Wall Street Systems IPH AB - Confidential
16.3.1.2 View
16.3.1.3 Edit
Book Properties Opens the Book Properties dialog to allow you to view or modify the book’s owner and
user details.
The owner is allowed to modify the book and the user or user group can use the book,
but not modify its properties.
Menu item Description
Select Columns Opens a multi-selection list to allow you to select the column groupings that you want
to display.
See 16.3.3.1 Limit grouping values on page 473 for information about the available
values.
Select Rows Opens a multi-selection list to allow you to select the row groupings that you want to
display.
See 16.3.3.1 Limit grouping values on page 473 for information about the available
values.
Swap Columns and
Rows
Changes the display of the columns and rows: the columns become rows and the rows
become columns.
Select Key-Figures Opens a multi-selection list to enable you to select the key-figures you want to
display.
This selection list can also be opened from the View - Select Columns or View - Select Rows
selection lists as follows:
1. Select Key-Figures as a grouping value.
2. Right-click Key-Figures in the right side of the selection list.
3. Select Configure Values.
See 16.3.3.1.6 Key-figures on page 474.
Zoom In
Zoom Out
Zoom to Default
Allows you to zoom into the display (to enlarge the figures), zoom out (to see more of
the grid), or zoom to default (to reset the original zoom).
Freeze Columns Locks the selected column and all columns to the left of it. This allows you to scroll
through the remaining columns, while the columns in the non-scrolled area remain
visible.
Move Page Left Moves the current page in the display to the left.
Move Page Right Moves the current page in the display to the right.
Visual Settings Changes the display: select from Blue Headers, Gray Headers, or Normal Headers.
Menu item Description
Copy Copies the values in the selected rows or columns. You can then paste the values into
another application.
Copy Page Copies the current page including headers. You can then paste the values into another
application.
Select/Unselect All Selects or unselects all cells in the current page. You can then use Edit - Copy to enable
you to paste the values into another application.
Menu item Description
16 Managing limits
16.3 Limit Monitor
Transaction & Risk Management Module (TRM) User Guide 473
16.3.1.4 Page
16.3.2 Start-up parameters
It is possible to alter the start-up parameters so that Limit Monitor launches in a different mode.
See C.4 Limit Monitor on page 682 for information about the options available.
16.3.3 Configuring limits
You can customize Limit Monitor according to your personal preferences by creating pages or groups
of pages in books, by selecting the rows and columns you want to be displayed in each page, and by
selecting the values or key-figures you want to monitor.
You can create and save the pages in multiple books either for your own personal use, or to be
shared by other users.
16.3.3.1 Limit grouping values
You can select the axis values you want to display in a page using View - Select Columns or View - Select
Rows. The following tables explain the different values in each available grouping.
16.3.3.1.1 Limit properties
The values available in the Limit Properties grouping are:
16.3.3.1.2 Sublimit properties
The values available in the Sublimit Properties grouping are:
Menu item Description
New Grid Page Inserts a new page with the default layout. A group of pages can be saved in a book
using File - Save Book As.
New Duplicate Page Creates a new page with the same properties as the current page.
Copy Page From Opens a list from which you can select a page in one book to copy it into the current
book.
Remove Page Removes the current page from the book. You need to select File - Save Book for the
removal to be taken into account.
Rename Page Opens the Set Page Name dialog so you can rename the page.
Page Parameters Displays the details for the current page, including position parameters and the page
layout (rows and columns).
Value Description
Limit Category Category of the limit to which the sublimit belongs (and therefore the category of the
sublimit itself).
The category is set in the Category field of the limit definition. The values available
here can be configured in Limit Category Editor.
Limit ID of the limit.
Limit Name Name of the monitored limit.
Limit Comment Comment of the monitored limit.
Value Description
Limit Currency Currency in which the sublimit values are displayed.
16 Managing limits
16.3 Limit Monitor
474 © Wall Street Systems IPH AB - Confidential
16.3.3.1.3 Sublimit grouping
These grouping values are used for sublimits which have been expanded by netting output to display
grouping values by which the limits have been expanded (for example, if sublimit is expanded by
instrument, 'Grouped by Instrument' must be used to see the exposures of individual instruments).
They available groupings are described in 16.2.3 Creating sublimit calculation templates on page
461.
16.3.3.1.4 Sublimit query
These grouping values are used for limits which have sublimit queries specified in the limit
definition. They are described in the section 16.2.6.2 Defining sublimits for a limit on page 468.
16.3.3.1.5 Server type
If you use multiple servers, for example, to monitor simulated or final limits, it is possible to select
them as an axis value. The possible values are:
16.3.3.1.6 Key-figures
Every Limit Monitor page must have the grouping parameter Key-Figure selected either as rows or
columns. You can then separately select the key-figures shown in that grouping either from a
separate Select Key Figures selection dialog or by right clicking the selected Key-Figure grouping in the
selection dialog for limit groupings and selecting Configure Values.
The following table explains the key-figures you can select in Limit Monitor and the result shown for
the selected figure:
Sublimit ID of the sublimit.
Limit Usage
Expression
The expression that defines how the sublimit is calculated.
Minimum Limit
Expression
The expression that defines how the minimum value is calculated.
Maximum Limit
Expression
The expression that defines how the maximum value is calculated.
Valid From Date,
Valid To Date
Dates defining the period when this sublimit is valid.
Value Description
Final Limits To group final limits.
Simulated Limits To group simulated limits.
Key-figure Shows this result (for the period defined in Limit Monitor start-up)
Available Limit (%) of
Maximum
Available Limit (%) of
Minimum
Available Limit to
Maximum
Available Limit to
Minimum
How much of the amount given in the sublimit’s Maximum Expression, and Minimum
Expression, fields is still available:
• Available Limit (%) of Maximum and Available Limit (%) to Minimum express the
amount as a percentage
• Available Limit of Maximum and Available Limit to Minimum express the amount as
a value.
Compare with Used Limit (%) of Maximum, and Used Limit (%) of Minimum, which
show the percentage used, rather than the percentage still available.
Limit Amount The current sum/total for the sublimit, expressed in the currency set for the sublimit
(use the Limit Currency grouping to see the currency).
Value Description
16 Managing limits
16.3 Limit Monitor
Transaction & Risk Management Module (TRM) User Guide 475
16.3.3.2 Sorting data
By default, data is sorted according to the values of the rows and columns. However, within each
grouping level, you can alternate between having the data sorted in ascending or descending order.
To sort data in the display:
•Right-click the row or column header, and select Sort Ascending or Sort Descending.
It is possible to override the rows and columns sorting and have data sorted instead by the content
of the key-figure columns.
To sort data by content:
•Right-click the key-figure header and choosing one of the Sort Ascending or Sort Descending
options.
If two or more key-figures are selected for sorting, then the data is first sorted by the content of the
left-most column or top-most row. If the contents of some of the cells in the first sorting are equal,
then the data is next sorted by the content of the next column or row, for which the key-figure has
one of the sort options selected.
16.3.3.3 Configuring limit selection and queries
Limit selections and queries can be configured in Limit Monitor. They are used to select which limits
are displayed, according to some criteria.
•Limit selection is used to select the limits to be displayed.
•Limit queries are used to select only those limits which match some criteria in the limit
configuration. For example, they can be used to display only those limits which have specific
data entered in the Limit Client Query used by the limit, or which have specific values entered in
the sublimit query section of the Sublimit page of Limit Editor.
Limit queries and selections can be configured either for personal use only or to be shared among all
users (by turning on a Shared switch in the corresponding dialog). The configuration is saved with
the page properties and is applied again automatically each time the page is opened.
16.3.3.3.1 Selecting limits
To select the limits you want to display:
1. Select Data - Limits.
2. Use the arrows in the multi-selection list to select limits.
–If the Include All switch is on, then all the limits are shown in the multi-selection list, but
disabled. If this switch is off, you can select any combination of limits from the
multi-selection list.
Maximum Limit
Amount
The maximum value for the sublimit. The value is expressed in the currency set for
the sublimit.
Minimum Limit
Amount
The minimum value for the sublimit. The value is expressed in the currency set for the
sublimit.
Used Limit (%) of
Maximum
Used Limit (%) of
Minimum
How much of the amount given in the sublimit’s Maximum Expression and Minimum
Expression fields has been used, expressed as a percentage.
Compare with Available Limit (%) of Maximum, and Available Limit (%) of Minimum,
which show the percentage still available, rather than the percentage used.
You can also see the amount as an actual figure, see Limit Amount.
Used Limit (%) Larger of Used Limit (%) of Maximum and Used Limit (%) of Minimum.
The primary purpose of this key figure is to enable sorting of limits in such a manner
that limits which are closest to being broken are displayed first regardless of whether
the limit is closer to Maximum Limit Amount or Minimum Limit Amount
Key-figure Shows this result (for the period defined in Limit Monitor start-up)
16 Managing limits
16.3 Limit Monitor
476 © Wall Street Systems IPH AB - Confidential
–If the Require Queries switch is on, sublimits of the selected limits are never shown in Limit
Monitor unless they match specific queries. No sublimits are shown when queries are not
used. If the Require Queries switch is not on, all sublimits of the selected limits are shown
when queries are not used.
3. Click OK to save the selection.
16.3.3.3.2 Creating client name limit queries
You use client name limit queries if you want Limit Monitor to display only those limits where client
parameters entered in the Limit Client Query used in the limit match the queried client.
Hint:
For example, if you have configured some limits which have Counterparty X specified as
the client in the Limit Client Query used in the limit, then you can use client name limit
queries to display only those limits.
These queries can also be used to display all limits which have the same parent, counterparty group,
risk country, or risk country group as the client used in the query specified in the Limit Item Query
used in the limit.
Hint:
For example, if Counterparty X belongs to Country Y, then if the include country option
is used in the query, then Limit Monitor displays all limits which have either Counterparty
X specified as the client in the Limit Client Query used in the limit, or which have Country Y
as the Risk Country in Limit Client Query used in the limit.
To create a client name limit query:
1. Select Data - Client Name Limit Query.
2. Use the following selection lists and switches to build the client name query:
–Lists: Client ID, Category ID, Portfolio Owner
–Switches: Include Parent, Include Client Group, Include Risk Country, Include Risk Country
Group.
The query matches only sublimits of limits with the category given in the query (if used).
Otherwise, the way the query works depends on the combination of the Client ID, Portfolio
Owner and the switches, as described in the following table:
Combination Matching limits
Client ID only All Limit Client Queries where:
• Client ID matches the Limit Client Query parameter Client or Not Client
• Portfolio Owner matches the Limit Client Query parameter Portfolio Owner or Not
Portfolio Owner.
Client ID and
Include Parent
All Limit Client Queries where:
• Parent (or Parent of the Parent, and so on) of the selected Client ID matches the
Limit Client Query parameter Parent and Not Parent
• Portfolio Owner matches the Limit Client Query parameter Portfolio Owner and Not
Portfolio Owner.
Client ID and
Include Client
Group
All Limit Client Queries where:
• Any Client Group to which the Client ID belongs, matches the Limit Client Query
parameter Client Group and Not Client Group
• Portfolio Owner matches the Limit Client Query parameter Portfolio Owner and Not
Portfolio Owner.
16 Managing limits
16.3 Limit Monitor
Transaction & Risk Management Module (TRM) User Guide 477
3. Optionally, you can map some of your transaction fields (external parameters) with query fields
to control which of your attributes are used with which query field when executing the Limit Query
action in Transaction Manager, click External Parameters...
In the resulting dialog, select the query field and the external parameter you want to map, and
then click Add. You can map the following query fields to the following external parameters:
Note: For more information about Limit Query, see 8.2.5 Enabling limit queries at transaction
level on page 280.
4. Click OK to save the external mapping.
5. Click OK to save the query.
Note: To clear all the fields in the query, click Clear or to cancel without saving the query, click
Cancel.
16.3.3.3.3 Creating client parameter limit queries
You use client parameter limit queries if you want Limit Monitor to display only those limits where
one of the fields in the Limit Client Query used in the limit matches the corresponding parameter of the
query.
Hint:
For example, if you have configured some limits which have Country Y specified as the
Risk Country in the Limit Client Query used in the limit, then you can use client parameter limit
queries to display only those limits.
Client ID and
Include Risk
Country
All Limit Client Queries where:
• Risk Country of the Client ID matches the Limit Client Query parameter Risk
Country and Not Risk Country
• Portfolio Owner matches the Limit Client Query parameter Portfolio Owner and Not
Portfolio Owner.
Client ID and
Include Risk
Country Group
All Limit Client Queries where:
• Risk Country Group to which the Risk Country of the Client ID belongs, matches
the Limit Client Query parameter Risk Country Group and Not Risk Country Group
• Portfolio Owner matches the Limit Client Query parameter Portfolio Owner and Not
Portfolio Owner.
Combination Matching limits
Query Fields External Parameters
Client Counterparty
Portfolio Owner Issuer
Owner
16 Managing limits
16.3 Limit Monitor
478 © Wall Street Systems IPH AB - Confidential
To create a client parameter limit query:
1. Select Data - Client Parameter Limit Query.
2. Use the following selection lists to build the client parameter query (the Not lists are for
exceptions):
3. Click OK to save the query.
Note: To clear all the fields in the query, click Clear or to cancel without saving the query, click
Cancel.
16.3.3.3.4 Creating sublimit output limit queries
Use sublimit output limit queries if you want Limit Monitor to display only those sublimits which
match a value in the corresponding sublimit grouping or sublimit query field displayed in Limit
Monitor.
Selection list Makes the query apply/not apply to
Category The query returns all the sublimits that belong to any limits matching the following
conditions:
• The limit category of the limit matches the limit category selected in the query. If
no limit category is selected in the query, then all limits are selected
• The parameters in the Limit Client Query used in the limit match all the
parameters specified in the query.
Client Rating
Client Rating Code
A specific credit rating of the client where:
• Rating gives the rating agency and type
• Rating Code gives the actual rating, and the rating/rating code of the Limit Client
Query used in the limit matches the rating/rating code selected in the query.
You must select a rating before you can select a rating code, since this selection
determines the list of rating codes displayed in the associated rating field.
Portfolio Owner
Not Portfolio
Owner
A specific portfolio owner where the portfolio owner of the Limit Client Query used in
the limit matches the portfolio owner selected in the query.
Client
Not Client
A specific client, where the client of the limit matches the client selected in the query.
Parent
Not Parent
A specific client parent, where the parent of the Limit Client Query used in the limit
matches the parent selected in the query.
Client Main Group
Not Client Main
Group
Client Group
Not Client Group
A specific client group, where:
• Client Main Group is the main group
• Client Group is the actual group
• Client Main Group/Client Group of the Limit Client Query used in the limt matches
the Client Main Group/Client Group selected in the query.
The group that a client belongs to (as defined in Client Editor’s Groups page).
Note: You must select a main group before you can select a group, since this selection
determines the list of groups displayed in the associated Group field.
Risk Country
Not Risk Country
A specific country, where the country of the Limit Client Query used in the limit
matches the country selected in the query.
Risk Country
Group
Not Risk Country
Group
A specific risk country group, where the risk country group of the Limit Client Query
used in the limit matches the risk country group selected in the query.
16 Managing limits
16.3 Limit Monitor
Transaction & Risk Management Module (TRM) User Guide 479
For example, if you have configured some limits which have Counterparty X specified as the
Counterparty in the Sublimit Query page of Limit Editor, or of you have some limits with output for
Counterparty X in a sublimit which is expanded by client, then you can use sublimit output limit
queries to display only those limits.
To create a sublimit output query:
1. Select Data - Sublimit Output Limit Query.
2. In the Transaction/Cashflow, Client, and Branches pages, use the selection lists in the to specify the
values for the sublimits you want to display.
3. In the Client page, use the selection lists to control the client values for the sublimits you want to
display and the switches to include parent, client group, and risk country for the client ID you
have selected.
Note: The include switches only affect the query when a client ID is specified.
4. In the Affect Date page, you can set up specific queries to be used if you have limits where
exposures are calculated for, and expanded by, by using the affect date fields as follows:
5. Optionally, you can map some of your transaction fields (external parameters) with query fields
to control which of your attributes are used with which query field when executing the Limit Query
action in Transaction Manager, click External Parameters...
In the resulting dialog, select the query field and the external parameter you want to map, and
then click Add. You can map the following query fields to the following external parameters:
Note: For more information about Limit Query, see 8.2.5 Enabling limit queries at transaction
level on page 280.
6. Click OK to save the external mapping.
Field Value Makes query apply/not apply to
Affect From Date Date All sublimits where grouped by affect date is on or after the
given date. If nothing is given, all sublimits match the query.
Affect To Date Date All sublimits where grouped by affect date is on or before the
given date. If nothing is given, all sublimits match the query
Affect From Offset A whole
number
All sublimits where grouped by affect date is on or after current
date + Affect From Offset. For example, by giving ‘1’ as offset, the
first matching sublimit would be the one where grouped by
affect date is the date of tomorrow.
Note: Affect From Date and Affect From Offset cannot be used
together.
Affect To Offset A whole
number
All sublimits where grouped by affect date is on or before
current date + Affect From Offset. For example, by giving ‘10’ as
offset, the last matching sublimit would be the one where
grouped by affect date is the date of 10 days from the current
date
Note: Affect To Date and Affect To Offset cannot be used together.
Query Fields External Parameters
By Client Counterparty
By Parent Issuer
Owner
16 Managing limits
16.3 Limit Monitor
480 © Wall Street Systems IPH AB - Confidential
7. Click OK to save the query.
Note: To clear all the fields in the query, click Clear or to cancel without saving the query, click
Cancel.
16.3.3.4 Creating limit filters
You use limit filters if you want Limit Monitor to display only those limits for which a specified
key-figure (or key-figures) matches some pre-defined criteria, for example, to display all limits
which have Limit Usage (%) greater than 100%.
Limit filters can be configured either for personal use only or to be shared among all users (by
turning on a Shared switch in the corresponding dialog). The configuration is saved with the page
properties and is applied again automatically each time the page is opened. A limit filter can consist
of multiple conditions combined using AND and OR operators.
If you add a new condition to existing ones in a filter, it is always added with logic given by the
operator of the new condition to the combined condition of all previous conditions. For example,
(((condition1) AND condition2) OR condition3)
would mean that a limit matches the filter in the following cases:
•it matches both condition1 and condition2
•it matches condition3
whereas,
(((condition1) OR condition2) AND condition3)
would mean that a limit matches the filter in following cases:
•it matches both condition1 and condition3
•it matches both condition2 and condition3
To create a limit filter:
1. Select Data - Limit Filter.
2. Use the following fields and selection lists in the Conditions section to add conditions to the filter:
Information Possible value
Operator • AND to add the condition to previous conditions with AND logic
• OR to add the condition to previous conditions with OR logic
If you leave the Operator field blank, it defaults to AND.
Lower Bound • The minimum number for the condition.
Condition • Less than (<)
• Less than or equal to (<=).
16 Managing limits
16.3 Limit Monitor
Transaction & Risk Management Module (TRM) User Guide 481
3. Click Add to add the new condition to those already in the filter.
4. Click OK to save the filter.
Note: To clear all the fields in the query, click Clear or to cancel without saving the query, click
Cancel.
16.3.3.5 Combining selections, queries, and filters
You can use a combination of the following: Limit selection, Client Name Limit Query, Parameter
Limit Query, Sublimit Output Limit Query and Limit Filters. The combination of queries returns all
sublimits that match:
Limit selection AND (Client Name Limit Query OR Client Parameter Limit Query) AND
Sublimit Output Limit Query AND Limit Filter.
16.3.3.6 Configuring cell styles
You can modify cell styles to highlight sublimits for which certain key-figures lie within a range of
values.
For example, cell styles can be configured to display all sublimits for which the figure Used Limit %
of Maximum is greater than 100 in bold on a red background, and to display all sublimits for which
the figure Used Limit % of Maximum is greater than 80 but less than 100 in bold on an orange
background.
You can use the limit feature functionality described above to identify ranges of key-figure values
which would cause the cell style to be applied. The system prevents you from defining overlapping
ranges.
Cell styles can be configured either for personal use only, or to be shared among all users (by
turning on a Shared switch in the dialog). The configuration is saved with the page properties and is
applied again automatically each time the page is opened.
Key-Figure • Available Limit (%) of Maximum
• Available Limit (%) of Minimum
• Available Limit to Maximum
• Available Limit to Minimum
•Limit Amount
• Maximum Limit Amount
• Minimum Limit Amount
•Used Limit (%)
• Used Limit (%) of Maximum
• Used Limit (%) of Minimum.
The limit key-figures are described in 16.3.3.1.6 Key-figures on page 474.
Condition • Less than (<)
• Less than or equal to (<=).
Upper Bound The maximum number for the condition.
Information Possible value

16 Managing limits
16.4 Limit Notifications
482 © Wall Street Systems IPH AB - Confidential
To configure a cell style:
1. Select Data - Cell Style.
2. Use the following fields and selection lists to add cell styles:
3. Click Add Cell to add the new cell style.
–Click Update to save the changes to the cell style. This button becomes active when you
modify any of the fields in the selected cell style.
–Click Remove to remove the selected cell styles.
4. Use the filter setup fields as described in Creating limit filters on page 480 to add a filter
condition for the cell style to be applied.
5. Click Add Filter to add the new filter condition.
–Click Update to save the changes to the condition. This button becomes active when you
modify any field in the selected condition.
–Click Remove to remove the selected condition.
6. Click OK to save the whole cell style definition.
–Click Clear to clear all the fields in the cell style.
–Click Cancel to close the dialog without saving the cell style.
16.4 Limit Notifications
Limit Notifications is an application that receives messages from the limit server to warn you when
limit usage is approaching a limit threshold. Limit Notifications advises you when limits have been
violated and which trader has caused the violation.
In the upper part of the application, a list is displayed giving a summary of the notification
messages. The list can be sorted by clicking on the column headers.
When you select one of the items in the list, a more detailed view of the notification is shown in the
lower part of the application.
Note: Some of the limit notification parameters are set up by the system administrator in the
limit server (limitd).
Information Possible value
Server Type • Final
•Simulated.
Font Style The style of the text:
•Bold
•Bold Italic
•Italic
•Normal.
Font Color Any color from the color palette.
Cell Color Any color from the color palette.

16 Managing limits
16.4 Limit Notifications
Transaction & Risk Management Module (TRM) User Guide 483
16.4.1 Limit Notifications menus
The following table describes the violation and warning type messages available to you from the
Options menu in Limit Notifications:
16.4.2 Start-up parameters
It is possible to alter the start-up parameters so that Limit Notifications launches in a different
mode.
See C.5 Limit Notifications on page 682 for information about the options available.
Message Description
Restore On New
Message
If the Limit Notifications window is hidden behind other windows, its icon in the
Windows task bar flashes when Limit Notifications receives a new message. If Limit
Notifications is minimized, its window is restored.
Show Immediately You see a new message as soon as it is received; the new message replaces the
message that is currently displayed.
If this option is switched off, only the message count changes (displayed at the bottom
right corner of the Limit Notifications window). Use the toolbar navigation buttons to
display the new message.
Ring Bell You hear a beep when a new message is received. The beep sound is the Windows
"default beep".
Own Notifications You receive a message when a limit is violated for transactions which you originally
created or transactions where you were the last trader to modify the deal.
Add Violation (Rate) You receive a message when a limit is violated as a result of an update to market
information. The limit had already been violated before the update was made.
Add Violation (Deal) You receive a message when a limit is violated as a result of a new transaction
breaching a limit. The limit had already been violated before the transaction was
entered.
New Violation (Rate) You receive a message when a limit is violated as a result of an update to market
information. The limit had not been violated before the update was made.
New Violation (Deal) You receive a message when a limit is violated as a result of a new transaction
breaching a limit. The limit had not been violated before the update was made.
Log / Start-up You receive a message when the log time interval has elapsed; the limit was
exceeded, but not added to.
No Violation Limit Notifications also displays other types of message, such as syntax errors.
Add Warning (Rate) You receive a warning when a limit may be violated as a result of a change in market
information. Limit usage had already passed the warning threshold before the
transaction was entered.
Add Warning (Deal) You receive a warning when a limit may be violated as a result of a new transaction.
Limit usage had already passed the warning threshold before the transaction was
entered.
New Warning (Rate) You receive a warning when a limit may be violated as a result of a change in market
information. Limit usage had not passed the warning threshold before the transaction
was entered.
New Warning (Deal) You receive a warning when a limit may be violated as a result of a new transaction
breaching a limit. Limit usage had not passed the warning threshold before the
transaction was entered.
16 Managing limits
16.5 Analyzing limit violations
484 © Wall Street Systems IPH AB - Confidential
16.5 Analyzing limit violations
If a limit is violated, you can analyze which transaction caused the violation in a specific mode of
Transaction Manager such as Limit Violations, which has been set up for this purpose (see 8.1.3
Transaction Manager modes on page 262 for more information). Basically, this mode shows only
transactions that have been given the status of a limit violation.
Note: The process of setting the limit violation status can be configured by the system
administrator so that other events can take place instead of, or in addition to, the limit
violation status being set.
To analyze limit violations:
1. In Limit Violations, retrieve the transactions (see 8.4.1 Retrieving transactions on page 283).
2. When you have analyzed a transaction that caused a violation, you can choose to accept that
violation using Command - Clear Violation.
The transaction is no longer flagged as a limit violation, and is removed from the list of
transactions in Limit Violations.
Alternatively, you can manually set a limit violation on a transaction in Transaction Manager using
Command - Set Violation.
16.5.1 Generating reports on limit violations
There are a number of reports you can use to view limit violation information.
Report Description
Limit Log Used to view historical limit usage that is logged in the database for a specific period.
This report displays limit violations caused by either new transactions, or market rate
movements.
See B.35 Limit Log Report on page 672 for details of the report’s parameters.

Transaction & Risk Management Module (TRM) User Guide 485
Chapter 17 Managing transaction conditions
17.1 Overview
Transaction conditions are simple conditions that must be checked on a single transaction in order to
allow it to continue through the transaction flow.
These conditions are set up in transaction condition sets, which can be defined as three main
concepts:
•Scope: The transactions to which the breach applies.
•Conditions: The conditions that will generate a breach when they are reached.
•Action: The subsequent action that the system will take when a condition is breached.
The process of checking transaction conditions can be summarized as follows:
•When a user applies a transaction, a check is made to verify whether the transaction matches
one or several condition sets defined in the system.
•For each condition set found, the conditions are combined to evaluate whether there is a breach
or not.
•If a condition is breached, the action selected in the corresponding transaction condition set is
executed. For example, an action may be to block the deal, to move it to a specified state, or to
display a warning, and so on. These actions are configured in the transaction flow. Depending on
the configuration, these actions may behave differently according to when they are triggered in
the transaction flow. See 17.2 Setting up transaction condition sets on page 486.
Note: The following actions are provided with TRM: Block on Accept, Block on Apply, Mark as Violation,
Process as Exception, and Warn on Apply. See 17.3.2 Action on page 491.
You can monitor and report transaction conditions using dedicated managers. See 17.4 Monitoring
transaction conditions on page 492.
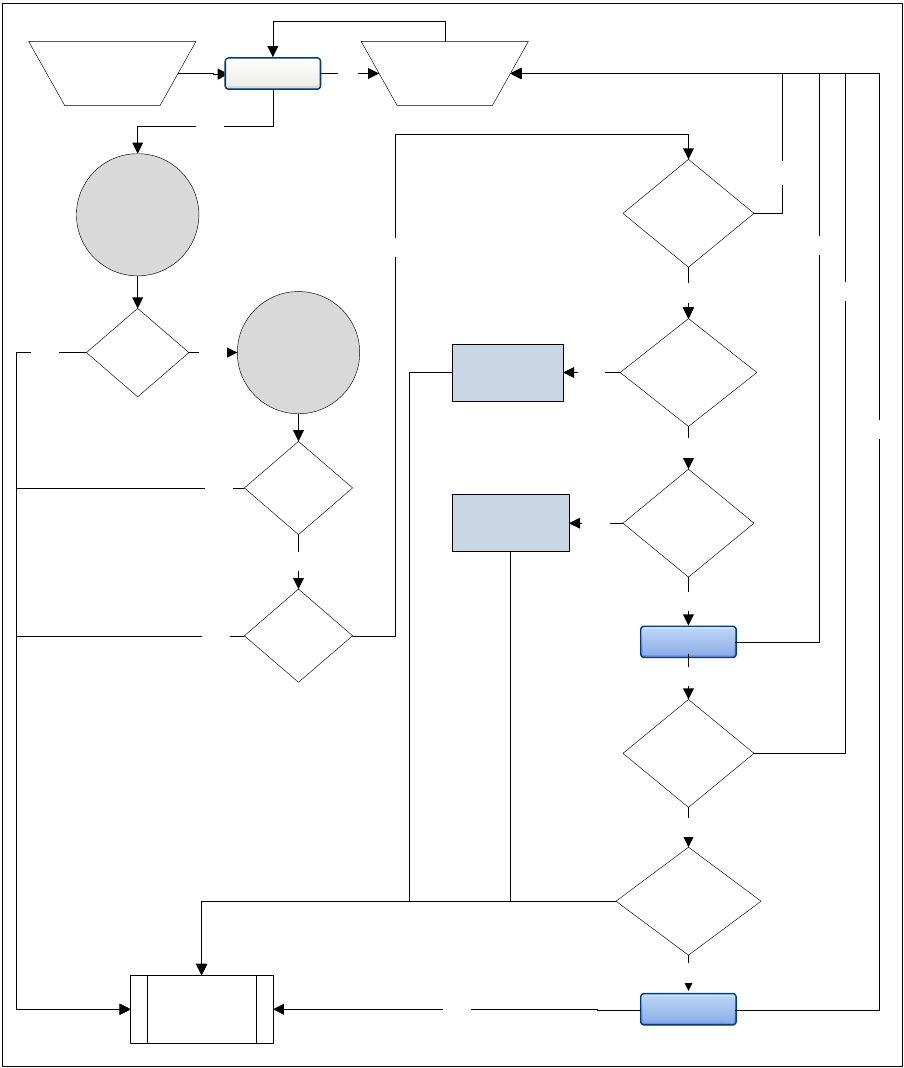
17 Managing transaction conditions
17.2 Setting up transaction condition sets
486 © Wall Street Systems IPH AB - Confidential
The following diagram shows an example of the transaction condition mechanism:
17.2 Setting up transaction condition sets
Transaction condition sets determine which transactions to check, the conditions that determine a
breach, and the actions that need to be taken when a breach occurs.
You can use transaction conditions as follows:
Found?
Breach?
Block on
Accept?
Block on
Apply?
Mark as
Violation?
Process as
Exception?
Warn on
Apply?
Yes
Yes
No
Set violation
Check for
applicable
Condition
Sets
Evaluate &
Store
Conditions
Action?
Enter a
transaction
Modify a
transaction
Transaction
Flow
Display
warning
No
Yes
Yes
Yes
Yes
NoNo
No
No
Apply?
Accept?
Yes
No
No
Yes
Accept?
Yes
Yes
No
No
No
No
No
Yes

17 Managing transaction conditions
17.2 Setting up transaction condition sets
Transaction & Risk Management Module (TRM) User Guide 487
•To compare the rate of the transaction to the market rate, and to ensure that the difference does
not exceed the specified level of tolerance (Attribute field). The level of tolerance can be
expressed as either a percentage or an absolute variation.
•To ensure that certain characteristics of the transaction are or are not equal to a certain value.
For example, to check that a counterparty belongs to a certain group or that a security cannot
be traded.
•To set a maximum or a minimum for certain values like amount, units original maturity
Transaction condition sets use rules to include (Rule) or exclude (Not Rule) transactions from the
check, consequently, you must first set up the Rules and Not Rules that you want to use with the
transaction condition set. See Chapter 5 Managing rules on page 221.
Furthermore, it is also possible to restrict the scope of a condition set to a list of portfolios or traders
by setting the conditions set as type Portfolio or Trader. These are described further on in this section.
Hint:
The rules you want to use in condition sets must be set up with category Transaction
Condition Set.
To set up transaction condition sets:
1. In Transaction Condition Set Editor, define the main attributes for the condition set in the upper
part of the editor:
Information Description
Id
Name
Unique ID and name of the condition set.
Type You can set the following types of condition sets:
•Global: Means that the condition set applies to any transaction matching
the rule and not matching the not rule.
•Portfolio: Means the condition set applies to any transaction belonging to a
portfolio listed in the Portfolios page and matching (and not matching) the
rule.
•Trader: Means the condition set applies to the transactions listed in the
Traders page and matching (and not matching) the rule.
Action Select the type of action you want the system to carry out when there is a
breach. These actions are described in 17.3.2 Action on page 491.
Note: If you do not select the type of action, no action is taken on the
breached transaction, but the evaluation of the conditions is completed
and stored with the transaction. This information is visible in
Transaction Managers and in the Transaction Conditions Report.
See 17.4 Monitoring transaction conditions on page 492
Rule
Not Rule
Select the Rule or Not Rule (defined in Rule Editor) you created that defines
the transactions to which this condition set should or should not apply.
Note: If you do not select rules, the condition set applies to all transactions.
Active From The opening date of the transaction must be after or equal to the date you set
here.
Active To The opening date of the transaction must be before or equal to the date you
set here.
Attributes Not Limit: The logic is reversed, which means the condition set is breached
when all of the conditions are false.
Comment Any additional information you want to enter which is relevant to the
definition.
17 Managing transaction conditions
17.2 Setting up transaction condition sets
488 © Wall Street Systems IPH AB - Confidential
2. In the Rate Conditions page, set the conditions by which you want to control the maximum
deviation allowed with regards to a reference rate. This deviation can be expressed as a
percentage (by default) or as an absolute variation.
Note: If the condition set applies to transactions where the instrument does not support rate
conditions for the field defined in the condition (Column field), the condition is ignored and
not taken into account by the evaluation. (The evaluation itself of non-applicable
conditions is still stored in the database and can be monitored in Transaction Conditions
Report).
Hint:
To avoid any performance problems, it is better to make sure that the scope and
conditions defined in the condition set are fully compatible whenever possible.
3. Click Add to add the condition to the condition set definition. Repeat step 2. on page 488 to add
more rate conditions to the condition set definition.
Information Description
ID Unique ID automatically populated by the system when you add the condition
definition.
Column The rate column on which you want the condition to apply. The transaction
fields that can be checked and the reference to be used are dependent on the
nature of the instrument:
• Quoted Instruments: The reference is the price (or yield) of the instrument
itself. For bonds and similar debt instruments the control can be performed
on either deal price or deal rate, for equities and derivatives (futures,
options…) the control can only be made on Deal Price.
• Deposits and OTC Discount Papers: The control is made on the deal rate
and the calculation of the reference to be used follows the same logic as
deal rate defaulting.
• Long Loans and IR Swaps: The control can only be made on the coupon
rate of the fixed rate interest schedule. Reference rate is calculated using
the Yield Curve set on the transaction schedule.
• FX Instruments: Control can be made on one or several of the following
fields: Spot Rate, Forward Points, Deal Rate, Base Interest rate, Quote
Interest Rate. The reference used is the currency pair.
Method Determines which method you want to use to retrieve the reference rate.
Choices are: Ask, Avg, Bid, Bid/Ask (Spread Against), or Bid/Ask (Spread in Favor).
Scenario Determines which scenario you want to use to retrieve the reference rate.
Offset Enter the deviation above which the condition is considered as true, i.e.
breached.
Attributes The default offset is a percentage of the reference value.
•Absolute Variation means the offset is an absolute number which adds to the
reference value.
•Not Condition reverses the logic, i.e. a breached condition becomes not
breached and vice-versa.
Description The description is automatically populated according to the selected
conditions. You can modify the description according to your internal policies.
For example, if you selected: Deal Price, Bid/Ask (Spread Against) and
DEFAULT, the description shows as:
Deal Price outside market rate +/- 0 % - DEFAULT, Bid/Ask
(Spread Against)
17 Managing transaction conditions
17.2 Setting up transaction condition sets
Transaction & Risk Management Module (TRM) User Guide 489
4. In the Value Conditions page, set the conditions by which you want to control certain values for
the transaction:
5. Click Add to add the condition to the condition set definition. Repeat step 4. on page 489 to add
more value conditions to the condition set definition.
6. In the Characteristic Conditions page, set the conditions by which you want to control certain
characteristics of the transaction:
Information Description
ID Unique ID automatically populated by the system when you add the condition
definition.
Column Select the value column on which you want the condition to apply.
• Book Value
• Nominal Amount
•Original Maturity (days): Difference in days between opening date and
maturity date.
•Units
Operator Select the comparison operator you want to use. Available choices are: != (not
equal to), < (less than), <= (less than or equal to), = (equal to), > (greater
than), >= (greater than or equal to)
Value The value you want to compare the column with (can be a number or an
amount depending on the column).
Rounding
Rounding Method
The rounding and rounding method you want to apply to the column before
the comparison.
Currency If you selected columns Amount or Book Value, select the currency of the
value you entered in the Value field.
Scenario If you selected columns Amount and Book value, select the scenario to use in
order to retrieve the FX rate used to convert the column into the currency of
the value. The FX rate corresponds to the spot rate at opening date of the
transaction.
Attributes You can choose to use the absolute value (default) or the signed value for the
comparison.
To use signed values, select Use signed values. A signed value is a value that
can be negative or positive.
Description The description is automatically populated according to the selected
conditions. You can modify the description according to your internal policies.
For example, if you selected: Original Maturity (days), > and 365, the
description shows as:
Abs(Original Maturity (days)) > 365
Information Description
ID Unique ID automatically populated by the system when you add the condition
definition.
Characteristic Select the characteristic you want to control, possible choices are:
•Counterparty
• Currency
• Instrument
•Owner
• Transaction (in this case reference will be a rule (see below)
17 Managing transaction conditions
17.2 Setting up transaction condition sets
490 © Wall Street Systems IPH AB - Confidential
7. Click Add to add the condition to the condition set definition. Repeat step 6. on page 489 to add
more characteristic conditions to the condition set definition.
8. If your condition set is of type Portfolio, in the Portfolio page, select the portfolios to which you
want this condition set to apply:
9. Click Add to add the portfolio to the condition set definition. Repeat step 8. on page 490 as many
times as you have portfolios that you want to add.
10. If your condition set is of type Trader, in the Trader page, select the traders to which you want
this the condition set to apply:
11. Click Add to add the trader to the condition set definition. Repeat step 10. on page 490 as many
times as you have traders that you want to add.
12. Save the whole condition set definition by clicking Save As.
Hint:
You can view all of the conditions for the selected condition set in the Conditions page. This
page is read-only.
Reference Type Depending on the characteristic you selected previously the available
reference types are:
• Counterparty: Counterparty, Client Group, Parent Client
• Currency: Currency, Currency Class, Currency Family
• Instrument: Instrument, Instrument Group
• Owner: Owner, Client Group, Parent Client
• Transaction: Rule (condition will be true if the transaction matches)
Reference Depend on the reference type, for example, if the reference type is a rule the
selection list shows all rules defined for transaction condition set (i.e. rule is
set with category Transaction Condition Set).
Offset Enter the deviation above which the condition is considered as true, i.e.
breached.
Attributes Not Condition: By default the condition is breached if the characteristic matches
the reference (for example, if the counterparty is in the reference client
group)
When this switch is on, the logic is reversed so that the condition is breached
if the characteristic does not match the reference.
Description The description is automatically populated according to the selected
conditions. You can modify the description according to your internal policies.
For example, if you selected: Instrument, Instrument Group, /FX/OPTION, Not
Condition, the description shows as:
Instrument not belonging to group '/FX/OPTION'
Which means that if you use an instrument that is not an FX option, it will
trigger a condition breach.
Information Description
Portfolio Select the portfolio id. If you select a top portfolio, all trading portfolios
belonging to the hierarchy are taken into account.
Information Description
Trader Select the user id of the trader.
Information Description
17 Managing transaction conditions
17.3 Processing transaction condition sets
Transaction & Risk Management Module (TRM) User Guide 491
17.3 Processing transaction condition sets
The evaluation of transaction condition sets is performed when you create a new transaction or
when you modify a transaction. It is automatically done without any intervention from the user.
The corrective actions are taken according to setup as described in 17.3.2 Action on page 491.
17.3.1 Evaluation
The evaluation is carried out as follows:
Whenever you apply a transaction, The system checks for transaction condition sets to be evaluated
by matching the rule/not rules used in transaction condition sets against the transaction
characteristics. All condition sets found are evaluated and the results are stored with the transaction
(see 17.4 Monitoring transaction conditions on page 492).
Note: In the event the transaction was already in the system, only newly found condition sets are
re-evaluated.
Condition sets that have already been previously evaluated are left unchanged, unless the
transaction was modified in a way that affects the result of evaluation. For example, if a field
affecting the reference value, such as the opening date, or the field to be checked itself, for example
deal price, has been changed). In which case, the application automatically detects that some
conditions have to be re-evaluated due to a modification of the transaction.
In the event that some of the condition sets were previously evaluated, but no longer match the
transaction, the condition set is marked as inactive and will only be visible in the Transaction
Conditions Report for the purpose of auditing.
In some cases, for rate conditions, it may be useful to force the re-fetching of the reference value
and the re-evaluation of a condition; for this purpose a specific action can be granted to users. To
force the re-fetching of the reference value, right-click the condition and select Reset Reference Rate.
The reference value is fetched again which forces the re-evaluation of the condition on Apply.
Important: The evaluation of the condition set does not necessarily affect the transaction
processing. When a condition set is evaluated as breached, the evaluation only
enables the selected corrective action (see 17.3.2 Action on page 491).
17.3.2 Action
The action setup on a condition set is only carried out if the result of the evaluation is true.
Depending on the characteristic of the conditions, you may want to perform different actions; at
different stages of the transaction flow. The system is delivered with the following pre-configured
actions:
Action Result
Block on Accept The transaction can be applied, but not accepted; you have to modify the
transaction, so that it no longer breaches the condition set before it can be
accepted.
Block on Apply The breached transaction cannot be saved. You have to modify the transaction to
be able to save it.
Mark as Violation The breached transaction is marked as a TR Condition Violation. You can monitor
transactions with this flag in Transaction Condition Violations, see 17.4.2
Transaction Condition Violations on page 493.
17 Managing transaction conditions
17.4 Monitoring transaction conditions
492 © Wall Street Systems IPH AB - Confidential
Hint:
If you only want a condition set to be evaluated for auditing purposes, but not to affect the
transaction processing, it is possible to leave the action blank. In this case the condition
set is evaluated and the result stored, but no corrective action is required.
17.4 Monitoring transaction conditions
You can use the following applications to monitor transaction condition sets and conditions:
•Transaction Manager: Use the dedicated views to display both false and true conditions. Only
active transaction conditions are visible in Transaction Manager.
•Transaction Condition Violations: You can view the transactions marked with the flag TR
Condition Violation (i.e. those with breached conditions configured to be processed as violations).
•Exception Verification: You can only view transactions marked as an Exception (i.e. those with
breached conditions configured to be processed as exceptions). Authorized users can then
accept or reject transactions.
•Transaction Conditions Report: Shows information about the condition sets and conditions.
This report includes a lot of information about the transactions to facilitate auditing and analysis.
For information about the report parameters, see B.49 Transaction Conditions Report on page
679.
17.4.1 Transaction Manager
You can monitor all active conditions for a given transaction in most modes of the Transaction
Manager, such as, Deal Capture or Transaction Admin in the Transaction Condition Set and Transaction
Condition views. These views enable you to see the conditions that were breached and take the
required corrective action for the selected transaction.
Additionally, you can filter out conditions that are not breached by right-clicking the header of either
of the condition views and selecting Filters - Breached Condition Sets or Breached Conditions (depending
on the view).
These views are available in all applications relating to transaction conditions (for example,
Exception Verification and Transaction Condition Violations).
17.4.1.1 Views
Condition sets and conditions are visible in the following dedicated views:
17.4.1.1.1 Transaction Condition Set
Process as Exception Whenever a breached transaction is accepted, the transaction is marked as an
Exception. Such transactions are visible in the Exception Verification board.
Authorized users can either accept them in this board, in which case, they will
follow the normal transaction flow, or reject them. See 17.4.3 Exception
Verification on page 493.
Warn on Apply A warning message is displayed and transaction processing can continue normally.
Action Result
Column Description
Attributes •Evaluated means evaluation is complete.
•Not Logic means the logic is reversed, i.e. the condition set was breached
because all of the conditions were false.
17 Managing transaction conditions
17.4 Monitoring transaction conditions
Transaction & Risk Management Module (TRM) User Guide 493
17.4.1.1.2 Transaction Condition
17.4.2 Transaction Condition Violations
Transaction Condition Violations enables you to monitor in real-time all breached transactions
marked as violations (i.e. action Mark as Violation) as soon as they are accepted.
17.4.3 Exception Verification
Exception Verification enables you to monitor all breached transactions marked as exceptions (i.e.
action Process as Exception).
Hint:
For example, the system can be configured to process as exceptions all equity transactions
where the deal price deviates by 10% or more from the market price.
The person responsible for verifying the validity of these transactions can then either accept or
reject them. For example, if the breach can be justified by an extreme volatility, then it may be
accepted. The decision really depends on the internal policies in place.
17.4.4 Transaction Conditions report
Transaction Conditions reports are used for auditing conditions that have been evaluated. The report
shows information at the transaction and condition levels which can be then aggregated, if needed.
Condition Set The ID of the condition set.
Date The date and time when the condition set was last evaluated.
Message Details of the conditions that caused the breach.
User The user that triggered the last evaluation.
Value No means the condition set was not breached; Yes means it was.
Column Description
Attributes Evaluated means evaluation is complete.
Not Logic means the logic is reversed, i.e. the condition was breached because the
condition was false.
Condition The number of this condition as it appears in the editor.
Condition Set The ID of the condition set.
Condition Type The rate, characteristic or value.
Date The date and time when the condition was last evaluated.
Message Information about the condition that was breached.
Rate (Rate conditions only)
The ID of the reference rate.
Reference Time (Rate conditions only)
The date and time that the reference rate was last fetched.
Reference Value (Rate conditions only)
The value of the reference rate.
Value No means the condition was not breached; Yes means it was.
Column Description
17 Managing transaction conditions
17.4 Monitoring transaction conditions
494 © Wall Street Systems IPH AB - Confidential
The report can be used to do statistics about condition breaches or to audit specific cases
a-posteriori. The fact that inactive and not applicable conditions are shown in the report provides
you with the full history (audit trail) of a transaction with regards to transaction conditions.

Transaction & Risk Management Module (TRM) User Guide 495
Chapter 18 Managing cash and settlements
It is possible to define bank accounts, custody accounts, and settlement instructions for your client
entities, for example, banks, issuers, custodians, and even your own organization.
You can define different kinds of accounts: standard bank accounts, accounts with correspondent
banks, accounts with intermediary banks, and intercompany accounts. Balances and accrued
interest for these accounts can be calculated automatically.
You can set up automatic leveling for accounts, namely the periodic movement of funds, often within
a cash pool, to manage cash centrally.
Furthermore, you can send settlement instructions automatically to your bank whenever a
settlement or custody transaction is manually entered or generated.
It is possible to send automatic messages to your counterparties, to inform them of any settlement
transfers that they will receive from you and reminders of payments that they have to make to you.
You can automatically dial up banks to retrieve the bank statements of the previous day and
intra-day information. After the bank statement information has been imported, it is possible to
reconcile the payments showing on the bank statement with the matching payments in the system.
18.1 Managing cash and cash position
18.1.1 Managing bank account balances and interest
18.1.1.1 Setting up bank account balances and interest
Bank account balances and accrued interest calculated on a bank account are created as
transactions using instruments set up for this purpose. These transactions must be entered into a
portfolio.
It is recommended that a separate Balance portfolio is defined for the balance- and interest
calculation transactions. This allows you restrict update access to the balance information to the
back office, while the trading portfolios can only be updated by the front office and middle office.
If your organization has internal bank accounts (for example, accounts for subsidiaries held by a
central treasury), you may find it useful to have a Balance portfolio for your internal bank accounts
as well.
Note: The instruments used to calculate the balance and accrued interest of a bank account are
defined in Instrument Editor. Instruments setup is described in TRM Instruments:
Processing and Calculations Guide.
This section explains how to set up balances on bank accounts. For a more global explanation of how
to set up bank accounts, see 18.2 Setting up settlement management on page 505.

18 Managing cash and settlements
18.1 Managing cash and cash position
496 © Wall Street Systems IPH AB - Confidential
18.1.1.1.1 Creating balance portfolios
To create a balance portfolio:
1. In Portfolio Editor, create the portfolio and its relationship with the others in the hierarchy, as
described in 3.14 Portfolios on page 107.
For this portfolio, turn on the switch Not Payable (since balances are not payable), and make sure
that the Trading switch is turned off (to prevent the portfolio from being selectable in Transaction
Manager when you are entering deals). The portfolio needs no other special settings, except for
the correct user access rights (see 3.14.1.2 Assigning allowed users and processes on page
110).
2. Save the portfolio definition using File - Save.
18.1.1.1.2 Assigning balance and interest-calculation instruments to accounts
Once the instruments that are used for calculating the balance and bank-account interest on bank
accounts have been defined, they are assigned (in Client Editor’s Accounts page) to all bank accounts
for which you want to calculate the balance and accrued interest.
Note: The balance instrument can also be used to define how interest is calculated if a specific
interest-calculation instrument is not assigned to the account.
To assign the instruments to a bank account:
1. In Client Editor, select the client for which you want to set up a bank account balance.
See 18.2 Setting up settlement management on page 505 for more information about defining
bank accounts for clients.
2. In the Accounts page, enter the details specific to balance (and interest-calculation) instruments
as described in 3.13.1.11 Setting up client accounts on page 98.
3. Click Update to update the details of this account.
4. Repeat this procedure until you have updated all the accounts for this client.
5. Save the whole client definition using File - Save.
18.1.1.2 Calculating bank account balances and interest
Bank account balances and accrued interest on bank accounts are calculated automatically using the
activity Bank Account Balances.
To set up the activity for automatic calculation of balances and accrued interest, see A.1 Bank
Account Balances on page 627 for details of the activity’s parameters.
Note: Activities are set up and managed in Activity Manager: see Chapter 6 Managing activities
on page 227 for more information.
18.1.1.2.1 Aggregating balances (optional)
Aggregate balances are stored in an account (the Parent Account) and calculated per bank. You
need to define one parent account for each bank in which you hold accounts.
Each parent account must be set up for each portfolio owner in the same way as any other account.
However, settlement instructions do not need to be defined for the parent account.
Each parent account must be linked to a balance instrument and a balance portfolio so that the
balances can be calculated for the account. These may be different to the balance instrument and
balance portfolio used for the settlement accounts.
This section explains how you can calculate an aggregated balance based on the balance of multiple
underlying accounts.
18 Managing cash and settlements
18.1 Managing cash and cash position
Transaction & Risk Management Module (TRM) User Guide 497
To link the parent account to the accounts in order to aggregate balances:
1. Create the underlying accounts (that is, the accounts which will be used for settlements and for
which you require a balance).
2. Create the parent account that will be used to calculate the aggregated balance.
You create this account in the same way as an underlying account.
3. Add a balance instrument and a balance portfolio to the parent account.
4. Assign the parent account to each of the underlying accounts (in the Parent Account field in the
Accounts page). The bank of the parent account must be the same as the bank of the underlying
accounts.
Note: The balance of the parent account is simply the sum of the balances of the underlying
accounts. Therefore, the underlying balances need to have been calculated before the
balance of the parent account using the activity Bank Account Balances. Note also that the
interest calculation on the underlying accounts is totally independent of the interest
calculation on the parent account.
18.1.1.2.2 Generating balance reports
18.1.1.3 Realizing bank account interest
Bank account interest realization involves the settlement or capitalization of accrued bank account
interest which has previously been calculated, depending on the Settlement Method specified for the
instrument. In the case of capitalization, the realized interest is added to the bank account balance.
Interest realization can be done at the portfolio, bank, currency or bank account level.
Interest realization can be done either manually in the Bank Account Balances application or you can
schedule payments to be made automatically using the activity Bank Account Interest Realizing.
18.1.1.3.1 Setting up interest realization
You can automate the payment of accrued interest by setting up the activity Bank Account Interest
Realizing. This activity creates a payment transaction for the interest that has been accrued since the
previous payment.
To automate the payment of accrued interest, you need to ensure that the following have been
done:
•The activity Bank Account Balances has run and generated accrued interest. The accrued interest
transaction updates the realization date based on the realization frequency defined in the Interest
Realization page of Instrument Editor.
•The realization frequency has been defined. If this is not defined, realization will take place on
demand according to the activity's due date. To schedule the realization frequency:
–In the Interest Realization page of Instrument Editor, specify the Frequency, Frequency Unit and
Method for the Bank Account Interest instrument (for example, once a month, periodically).
–In the Bank Account Balances application, update the Realization Date field. See 18.1.1.4
Monitoring bank account balances and interest on page 498 for more information.
Report Description
Balance This report displays the payments affecting your cash account and balances of your
cash accounts.
See B.2 Balance Report on page 659 for details of the report’s parameters.
18 Managing cash and settlements
18.1 Managing cash and cash position
498 © Wall Street Systems IPH AB - Confidential
To set up the activity Bank Account Interest Realizing:
1. In Activity Manager, create a new activity using activity type Bank Account Interest Realizing.
2. Fill in the fields in the upper part of Activity Manager (for more information see 6.2.1 Creating
activities on page 229). If realization is done on demand, the Due Date must be the Value Date of
the interest realization cashflow. If the realization method is set to Periodically in Instrument
Editor, the Due Date must be the transaction's Realization Date. In this case, if the Due Date of the
activity has not reached the Realization Date, no realization will take place.
3. Enter the necessary parameters. See A.2 Bank Account Interest Realizing on page 627 for more
information.
Note: If the Bank Account Interest instrument has the Interest on Value Date switch turned on, you
need to set the Due Date Offset in Days to -1. If this value is not set to -1, the Bank Account
Balances activity will not capitalize the interest, since the interest cashflow's Value Date is
on Day-1 compared to the bank account balance's Value Date.
Note: For one-off payments, you can use the Realize AI action in the Bank Account Balances
application. See the TRM Instruments: Processing and Calculations Guide for more
information.
18.1.1.3.2 Undoing bank account interest realization
You can create an Undo Realize Interest activity using the activity type Bank Account Interest Realizing
(see 18.1.1.3.1 Setting up interest realization on page 497 more information). You need to set the
Mode in the activity's Parameters page to Undo Realize. The Undo Realize Interest activity removes all the
paid flags on the accrued interest cashflows.
Note: You can also cancel realized interest using the Undo Realize AI action in the Bank Account
Balances application. See the TRM Instruments: Processing and Calculations Guide for
more information.
18.1.1.4 Monitoring bank account balances and interest
You can use the cashflow report to monitor realized bank account interest over a period of time. You
need to filter on Transaction Type = Balance and Cashflow Type = Interest. See 7.1 Report Generator on
page 235 for more information.
In the Bank Account Balances application you can monitor realized bank account interest by
selecting the relevant transaction columns:
Information Description
Realization Attributes Realize Periodically: Defined at the instrument level.
None. No realization method defined at the instrument level. Realization takes
place on-demand.

18 Managing cash and settlements
18.1 Managing cash and cash position
Transaction & Risk Management Module (TRM) User Guide 499
18.1.2 Managing cost of carry
Cost-of-carry is used to capture the internal funding cost of outstanding cash. A cost-of-carry
transaction is used to track the outstanding cost-of-carry balance and its accrued interest. The
cost-of-carry balance can be used to monitor how much cash is outstanding for a position. The
accrued interest creates pseudo cashflows, which are used to simulate how much could have been
earned by investing the cash.
For instance, if cash is held in a portfolio and not invested, the cost-of-carry is the risk-free interest
rate that could be earned by investing the cash. For example, if your portfolio contains 6 million
un-invested euros, the cost-of-carry may be 5% (i.e. if the risk-free interest rate is set to 5%), the
cost-of-carry balance is 6 million and the accrued interest on the cost-of-carry balance is 3 thousand
per day (6 million x 5%). The rate is determined by a yield curve.
Cost-of-carry can be used to compare the performance of portfolios, taking into account the
different currencies.
You can:
•Calculate the cost-of-carry balance for any portfolio with a position and calculate the accrued
interest on the cost-of-carry balance.
•Realize the cost-of-carry interest that has accrued since the last interest realization and either:
–Start with the same closing cost-of-carry balance the next day, or
–Start with a zero cost-of-carry balance the next day.
•Close out the outstanding cost-of-carry balance for the relevant reporting period without
realizing the interest. This is useful for portfolio managers who monitor the cost-of-carry balance
Realization Date The calculated next realization date if the realization is periodic. This date is
re-calculated after each realization.
If you want the Realization Date to occur on the last day of the month you need to
set Method to Periodically and Convention to Last of Month at instrument level.
If you want the Realization Date to occur on a specific date each month you need to
do the following:
• Set the following parameters at instrument level:
Method: Periodically
Frequency Unit: Months
Frequency: 1
Convention: None
• In the Bank Account Balance application, set the Realization Date to the required
date.
Note: If the date falls on a holiday, the payment will be set to the next business
day.
Realization Convention Convention to use for interest realization as defined at the instrument level. See
the TRM Instruments: Processing and Calculations Guide for more information.
Realization Frequency Frequency of the payment, i.e. once a month. Set at instrument level. See the
TRM Instruments: Processing and Calculations Guide for more information.
Note: This field applies if the Method is set to Periodically in the instrument.
Realization Unit Frequency of the payment, i.e. monthly. Values include Business Days, Days, Months,
Weeks, Years. Set at instrument level. See the TRM Instruments: Processing and
Calculations Guide for more information.
Note: This field applies if the Method = Periodically is set in the instrument.
Realization Method Capitalize, Settle. Set at instrument level. See the TRM Instruments: Processing and
Calculations Guide for more information.
Information Description
18 Managing cash and settlements
18.1 Managing cash and cash position
500 © Wall Street Systems IPH AB - Confidential
without accruing cost-of-carry interest and need to close out their outstanding cost-of-carry
balance for the relevant reporting period in order to start with a zero balance for the next
reporting period.
18.1.2.1 Setting up cost-of-carry
To set up cost-of-carry you need to:
1. Configure the yield curves for cost-of-carry calculations.
See 18.1.2.1.1 Configuring yield curves for cost-of-carry calculations on page 500.
2. Create the cost-of-carry instruments.
The instruments used to calculate the cost-of-carry on a position are defined in Instrument
Editor. The setup for cost-of-carry instruments is described in the guide TRM Instruments:
Processing and Calculations.
3. Assign the instruments you created to calculate the cost-of-carry balance and accrued interest
on a position to a portfolio.
See 18.1.2.1.2 Assigning cost-of-carry instruments to portfolios on page 500.
18.1.2.1.1 Configuring yield curves for cost-of-carry calculations
You configure yield curves in IR Quote and Yield Curve Editor. If the cost-of-carry is calculated on
the basis of the O/N period of the yield curve, only the O/N period needs to be configured. See 3.8.2
Creating IR Quote and Yield Curves on page 65 for more information on configuring yield curves.
One cost-of-carry transaction is calculated per portfolio currency. You can specify the currency at
yield curve level or at portfolio level. By default, if you do not specify a yield curve in the instrument
definition, the yield curve defined as the default cost-of-carry rate in Currency Editor's Default Rate
page is used (see 3.9.1.1.1 Defining default rates on page 83).
To assign different yield curves per currency you can either:
•Create one cost-of-carry instrument per currency and set the currency in the Currency field in
Portfolio Editor. In this case you do not specify a yield curve at the instrument level. See
18.1.2.1.2 Assigning cost-of-carry instruments to portfolios on page 500.
•Create one cost-of-carry instrument per currency and set the yield curve in the Interest Rate Curve
field in Instrument Editor.
•Create only one cost-of-carry instrument and use the Ladder field in Instrument Editor. A ladder
is configured in Ladder Set Editor and can be used to assign a set of yield curves per currency.
See 3.33 Ladder sets (optional) on page 143 for more information.
18.1.2.1.2 Assigning cost-of-carry instruments to portfolios
Cost-of-carry is calculated for portfolios which have a cost-of-carry instrument assigned to them
(see 3.14.1.3 Setting up cost-of-carry for portfolios on page 111).
To assign cost-of-carry attributes to a portfolio:
1. In Portfolio Editor, select the portfolio to which you want to assign cost-of-carry attributes and
make sure that the Trading switch is turned on.
2. In Portfolio Editor’s Cost-of-Carry page, select the cost-of-carry instrument from the Instrument
field: the set up for these instruments is described in the guide TRM Instruments: Processing
and Calculations.
3. Select a currency from the Currency field if you want to specify a yield curve per currency to
calculate the cost-of-carry balance (and if you have not specified a yield curve at the instrument
level).
4. Repeat the procedure to select and add any further instrument and currency combinations.
5. Save the whole portfolio definition using File - Save.

18 Managing cash and settlements
18.1 Managing cash and cash position
Transaction & Risk Management Module (TRM) User Guide 501
18.1.2.2 Calculating cost-of-carry balances and interest
Cost-of-carry balances and accrued interest on balances are calculated automatically using the
activity Cost of Carry. To set up the activity:
1. In Activity Manager, create a new activity using activity type Cost of Carry.
2. Enter the necessary parameters. See A.14 Cost of Carry on page 632 for details of the activity’s
parameters.
Note: Activities are set up and managed in Activity Manager: see Chapter 6 Managing activities
on page 227 for more information.
18.1.2.3 Realizing cost-of-carry interest
Cost-of-carry interest realization involves the capitalization of accrued cost-of-carry interest which
has previously been calculated by the activity Cost of Carry. The realized interest is added to the
cost-of-carry balance. Interest realization can be done at the portfolio, bank, currency or bank
account level.
Interest realization can be done either manually in the Cost of Carry application or you can schedule
payments to be made automatically using the activity Cost of Carry Interest Realizing.
18.1.2.3.1 Setting up interest realization
You can automate the realization of accrued interest using the activity Cost of Carry Interest Realizing.
This activity creates a payment transaction for the interest that has been accrued since the previous
realization.
To automate the realization of accrued interest, you need to ensure that the following have been
done:
•The activity Cost of Carry has run and generated accrued interest. The accrued interest
transaction updates the realization date based on the realization frequency defined in the Interest
Realization page of Instrument Editor. You can see the updated realization date in the Cost of
Carry application.
•The realization frequency has been defined. If this is not defined, realization will take place on
demand according to the activity's due date. To schedule the realization frequency:
–In the Interest Realization page of Instrument Editor, specify the Frequency, Frequency Unit and
Method for the cost-of-carry instrument (for example, once a month, periodically).
–In the Cost of Carry application, update the Realization Date field. See 18.1.2.5 Monitoring
cost-of-carry balances and interest on page 502 for more information.
To set up the activity Cost of Carry Interest Realizing:
1. In Activity Manager, create a new activity using activity type Cost of Carry Interest Realizing.
2. Fill in the fields in the upper part of Activity Manager (for more information see 6.2.1 Creating
activities on page 229). If realization is done on demand, the Due Date must be the Value Date of
the interest realization cashflow. If the realization method is set to Periodically in Instrument
Editor, the Due Date must be the transaction's Realization Date. In this case, if the Due Date of the
activity has not reached the Realization Date, no realization will take place.
3. Enter the necessary parameters. If you want to realize the accrued interest and set the
cost-of-carry balance to zero, you need to select Yes in the field Zero Balancing. See A.15 Cost of
Carry Interest Realizing on page 632 for more information about the parameters.
Note: If the Cost of Carry instrument has the Interest on Value Date switch turned on, you need to
set the Due Date Offset in Days to -1. If this value is not set to -1, the Cost of Carry activity will
18 Managing cash and settlements
18.1 Managing cash and cash position
502 © Wall Street Systems IPH AB - Confidential
not capitalize the interest, since the interest cashflow's Value Date is on Day-1 compared to
the cost-of-carry balance's Value Date.
Note: For one-off payments, you can use the Realize AI action in the Cost of Carry application. See
the TRM Instruments: Processing and Calculations Guide for more information.
18.1.2.3.2 Undoing cost-of-carry interest realization
You can create an Undo Realize Interest activity using the activity type Cost of Carry Interest Realizing (see
18.1.1.3.1 Setting up interest realization on page 497 more information). You need to set the Mode
in the activity's Parameters page to Undo Realize. The Undo Realize Interest activity removes all the paid
flags on the accrued interest cashflows.
Note: You can also cancel realized interest using the Undo Realize AI action in the Cost of Carry
application. See the TRM Instruments: Processing and Calculations Guide for more
information.
18.1.2.4 Setting the cost-of-carry balance to zero
It is possible to close out the outstanding cost-of-carry balance without realizing any interest using
the activity Cost of Carry Zero Balancing.
Note: In order to use the activity Cost of Carry Zero Balancing the activity Cost of Carry must have run
and generated the cost-of-carry balance.
To set up the activity Cost of Carry Zero Balancing:
1. In Activity Manager, create a new activity using activity type Cost of Carry Zero Balancing.
2. Fill in the fields in the upper part of Activity Manager (for more information see 6.2.1 Creating
activities on page 229).
3. Enter the necessary parameters. See A.16 Cost of Carry Zero Balancing on page 633 for more
information about the parameters.
18.1.2.4.1 Undoing cost-of-carry zero balancing
You can create an Undo Cost of Carry Zero Balancing activity using the activity type Cost of Carry Zero
Balancing (see 9.1.2.1 Setting up interest realization on page 283 more information). You need to set
the Mode in the activity's Parameters page to Undo Zero Balancing. Running this activity creates a
negative cashflow of Type Balance.
18.1.2.5 Monitoring cost-of-carry balances and interest
In the Cost of Carry application you can monitor realized cost-of-carry interest by selecting the
relevant transaction columns. See 18.1.1.4 Monitoring bank account balances and interest on page
498 for more information.
You can monitor cost-of carry balances and compare portfolios in Treasury Monitor. See 12.1.7
Monitoring cost-of-carry positions on page 390 for more information.
18.1.3 Managing cash pool leveling
18.1.3.1 Setting up cash-pool leveling
You can set up automatic leveling, namely the periodic movement of funds, often within a cash pool,
to manage cash centrally. This functionality is closely related to zero balancing, which is a bank
process where the bank adjusts at the end of each period (day, week, month) an account's balance
to zero by transferring funds to or from another designated account.
18 Managing cash and settlements
18.1 Managing cash and cash position
Transaction & Risk Management Module (TRM) User Guide 503
The differences between leveling performed by your organization, and zero balancing performed by
a bank, are as follows:
•Leveling does not necessarily adjust all balances to zero; you can leave a specified target
balance (cushion) in the account.
•Since only banks know at any one time the exact amount in accounts, leveling is based on
balance estimates, rather than actual balances.
18.1.3.1.1 Creating cash-pool leveling accounts
You can have multiple cash pools, typically one for each currency. One leveling cash pool can have
different levels. The sweeping (checking of accounts to see how much to move, and in which
direction) starts from the lowest level, sweeping upwards through the hierarchy to the highest level.
The account at the top of the hierarchy is usually the treasury’s own account.
As any one account can only be swept to once, it can have only one parent within the cash pool and
it cannot belong to more then one cash pool.
A parent in the hierarchy is referred to as a master account and the child is referred to as a
sub-account. An account can be both a master account and a sub-account, within the same
hierarchy.
These master and sub-accounts need to be set up in TRM under their respective account owners.
The owner of each affiliate account can be either the affiliate itself or the Treasury Center. Within
TRM, for an account balance to be calculated, it has to be one defined for a client that is a portfolio
owner. But in some cases, you may not want an affiliate to be a portfolio owner. So, if you want an
affiliate to own its account, you have two options:
•If the affiliate is a portfolio owner, you simply set up the cash pool account under the affiliate in
Client Editor, and balances are calculated in the affiliate's own portfolio.
•If the affiliate is not a portfolio owner, you set up the cash pool account both under the Treasury
Center and under the affiliate.
The account under the Treasury Center is called a memorandum account, and this account is
used for calculating the balance for the affiliate in one of the treasury's portfolios. The account
under the affiliate is for settlement purposes only, and not to calculate any balances (since the
affiliate is not a portfolio owner and therefore cannot have its balances calculated directly).
See 3.29 Cash pools (optional) on page 139 for information about how to set up a cash pool.
Note: For more information on setting up clients (the generic term for any organization defined in
TRM, whether that be a treasury, affiliate, bank and so on), see 3.13 Clients on page 89.
For information on setting up bank accounts, see 3.13.1.11 Setting up client accounts on
page 98.
18.1.3.1.2 Defining the portfolios for sweep transactions
The payment transactions that are used to make the sweep between the accounts need to be
entered in specific portfolios.
To define these portfolios for each portfolio owner that owns sub-accounts or master accounts:
1. In Client Editor, select the portfolio owner that owns the relevant sub-account or master
account.
2. In the Properties page, define and add the following property to the client definition:
3. Save the whole client definition using File - Save.
Information Description
Property CASHPOOL-PORTFOLIO-1-ID
Value The portfolio for the payment transactions.
18 Managing cash and settlements
18.1 Managing cash and cash position
504 © Wall Street Systems IPH AB - Confidential
See 3.13.1.3 Defining properties on page 93.
If the Treasury Center owns an affiliate’s account
If the Treasury Center owns an account on behalf of an affiliate, the payment transaction used to
sweep an amount from that account should not necessarily be part of the Treasury Center's position
and can therefore be created in a separate portfolio. Therefore, for portfolio owners that own
accounts in TRM on behalf of affiliates, it is recommended that you define two portfolios:
1. In Client Editor, select the portfolio owner that owns a sub-account or master account.
2. In the Properties page, define and add the following property to the client definition:
3. Save the whole client definition using File - Save.
See 3.13.1.3 Defining properties on page 93.
18.1.3.1.3 Settling the sweeps on inter-company accounts
When there are sweeps between two different clients, this needs to be reflected on the
intercompany accounts. If, for example, an amount is transferred from an affiliate's sub-account to
a Treasury Center's master account, the intercompany account needs to be updated for this amount
as well.
To update the rules attached to the intercompany accounts that are set up under the affiliates:
1. In Rule Editor, select the rule ID that is attached to the intercompany account defined under the
affiliate, or affiliates (see 3.13.1.11 Setting up client accounts on page 98).
2. Enter a priority that is higher than the priority for any other account rules.
This is because you need to make sure that this account is used, otherwise the settlement will be
made on the wrong account (for example, an external account).
3. Enter the rule conditions, using the information in the following table:
4. Save this new condition using File - Save As New.
5. Enter the following additional conditions:
6. Save this new condition using File - Save As New.
7. Repeat the above procedure for any other rules that are attached to intercompany accounts that
need to be updated.
Information Description
Property CASHPOOL-PORTFOLIO-2-ID
Value The portfolio for the payment transactions.
Information Description
Instrument Cashpool-Transfer
Cashflow Type Payment
Information Description
Instrument Cashpool-Payment
Cashflow Type Other Payment

18 Managing cash and settlements
18.2 Setting up settlement management
Transaction & Risk Management Module (TRM) User Guide 505
18.1.3.1.4 Processing cash-pool leveling
To calculate the sweep amounts and automatically creating the necessary leveling transactions, you
use the Cash Pool Leveling activity: see A.8 Cash Pool Leveling on page 629 for details of the
activity’s parameters.
Note: Activities are set up and managed in Activity Manager: see 6.2 Managing activities on page
229.
18.2 Setting up settlement management
18.2.1 Defining settlement parameters
This section describes the parameters you need to define to automate the settlement process in
TRM.
18.2.1.1 Defining settlement rules
Settlement rules are created in Settlement Rule Editor. These settlement rules can then be used in
other editors which define cutoff times, splitting and netting rules, and settlement flow rules,
described later in this chapter.
For example, if the portfolio owner has accounts with three different local banks, and each bank
expects to receive a different file format, you would need to set up three separate rules: one rule for
each of the banks: see 18.2.1.2 Defining settlement methods on page 507.
Note: In the case of a DvP settlement, you would need to set up one settlement rule with two
conditions, a cash condition (Settlement Type = Cash) and a security condition (Settlement
Type = Security). Thus, such a settlement rule matches a DvP settlement only if both
conditions match.
To create a settlement rule:
1. In Settlement Rule Editor (upper part of the editor), enter the main attributes of the rule:
2. In the Settlement Rule page (lower part of the editor), define the conditions that settlements must
match for this rule to apply. it is possible to specify several conditions, using the logical
relationship OR between them.
Information Description
ID
Name
ID and name of the settlement rule.
Domain Domain in which this rule applies.
Comment Any additional information you want to add about the settlement rule.
Information Description
Name Name of the specific rule within the settlement rule for which you are defining the
conditions.
Instrument Group Instrument group to which the rule applies.
Instrument Specific instrument to which the rule applies.
Portfolio Portfolio to which the rule applies.

18 Managing cash and settlements
18.2 Setting up settlement management
506 © Wall Street Systems IPH AB - Confidential
Owner Portfolio owner to which the rule applies.
Currency Currency of the settlement.
Original Currency Original currency of the cashflow.
Sign Direction of the settlement, which can be: Any (either settlement made or received),
Negative (settlement going out), or Positive (settlement coming in).
Settlement
Attributes
Additional settlement attributes assigned to settlements during generation
Collateral: Coupon and redemption settlements related to collateral holdings are
flagged as 'Collateral'. This includes coupons and redemptions from the issuer to the
holder of the security, and from the holder to the 'economic owner' of the security.
Payback: All settlements related to the 'payback' of an investment are flagged
'Payback'. These include Interest and Redemption settlements from deposits, discount
papers, bonds, IRSs and repos. All settlements related to early expirations and
roll-overs are also flagged 'Payback'.
Repo: All settlements from repos (and reverse repos, buy/sellbacks and
sell/buybacks) are flagged 'Repo'.
Security: All payback settlements from the issuer of a security to the holder of the
security are flagged as 'Security'. Securities in this context includes bonds, discount
papers and equities. Also, netting flows of futures (and future style options) are
flagged as 'Security'.
Our Client
Our Client Main
Group
Our Client Group
Client (or Client Main Group or Client Group) making/receiving the settlement (that is,
the portfolio owner).
Our Bank
Our Account
1, 2, 3, and 4
Bank and account details of the client (portfolio owner) making/receiving the
settlement.
Counterparty
Client
Counterparty
Client Main Group
Counterparty
Client Group
Client (or Client Main Group or Client Group) making/receiving the settlement (that is,
the counterparty or beneficiary of the settlement).
Counterparty
Bank
Counterparty
Account
1, 2, 3, and 4
Bank and account details of the client (counterparty or beneficiary) receiving the
settlement.
Settlement Type Settlement type for this rule. Choose from:
• Cash - cash settlement (payments only)
• Security - security settlement.
Settlement Client Place of settlement. This is a client defined with the role Central Securities
Depository (CSD) or International Central Securities Depository (ICSD).
State Select the settlement state on which you want the rule to apply. Examples of
settlement states: Released, Generated, Waiting for Release, and so on.
Transfer Method Method of transfer (or advice), for example fax or file, used for the transfer. See
18.2.1.2 Defining settlement methods on page 507.
Information Description
18 Managing cash and settlements
18.2 Setting up settlement management
Transaction & Risk Management Module (TRM) User Guide 507
3. Click Add to add the settlement rule.
4. Repeat these steps for each condition that you want to include in the settlement rule definition.
5. Save the settlement rule definition using File - Save As New.
18.2.1.2 Defining settlement methods
After you have defined the settlement rules, the next step is to set up transfer methods (or advice
methods) and to assign the settlement rules to them.
You can set up TRM to send settlement instructions automatically to your bank whenever a
settlement is generated in TRM. In TRM, these automated settlement instructions are called
settlement transfers. You can define the method used for settlement transfers and the format of the
transfer (for example, a SWIFT message or Fed wire).
Settlements can be negative as well as positive (payments that you receive rather than make,
namely receipts). You can set up TRM to send automatic messages to your counterparties, informing
them of any settlement transfers that they will receive from you and reminders of payments that
they have to make to you: these are called settlement advice messages.
The procedure for creating settlement transfers and settlement advice messages is almost identical.
Transfer methods are defined in Settlement Transfer Method Editor, and settlement advice
messages are set up in Settlement Advice Method Editor.
Both editor layouts are based on the application Static Data Editor (see 3.2 Static Data Editor on
page 41 for more information).
See also Chapter 21 Managing messages on page 555.
Settlement
Parameter
#0-19
Define the conditions that settlements must match for this rule to apply.
Note that you can change the names of settlement parameters, and define your own
values for them: see 3.38 Parameters (optional) on page 148 for more information.
Note also that the settlement parameters can be populated during settlement
generation via a CSD.
Switches Activate the switches that apply to this settlement rule.
•DvP Rule - for custody settlement where there is a delivery-versus-payment
agreement.
The resulting instruction or advice message contains information for both the
payments side and the security transfer side (compare with Settlement Type =
Security above).
•Dispatched to SWIFT - set automatically on the settlement when TRMSwift has sent
the settlement to SWIFT. Setting this switch in the rule, you can use the rule in the
settlement flow to determine when a settlement should be sent further in the flow
or when it can no longer be rejected.
•Netting Completed - set automatically on the settlement when the automatic netting
is finalized (i.e. netting cut off time reached). When switched on in the rule, you
can use the rule in the settlement flow to determine when a settlement should be
sent further in the flow or when it can no longer be rejected.
•SWIFT Success - set automatically on the settlement when TRMSwift has received a
success message from SWIFT. When switched on, you can use the rule in the
settlement flow to determine when a settlement should be sent further in the flow
or when it can no longer be rejected.
Information Description
18 Managing cash and settlements
18.2 Setting up settlement management
508 © Wall Street Systems IPH AB - Confidential
To set up the settlement transfers or settlement advice methods:
1. In Settlement Transfer Method Editor (or Settlement Advice Method Editor), complete the fields
using the following information:
2. Click Add to add the method to the definition.
3. Repeat these steps for each method that you want to include in the definition.
4. Save the definition using File - Save As New.
18.2.1.3 Defining cut-off times
A bank cut-off time is a deadline set by a financial institution for a specific region or location that
indicates when specific types of transactions need to be received by the bank in order to receive
"good value" for the funds on a specific day.
For example, Citibank New York may need to receive all EUR international wire instructions by two
o’clock in the afternoon in order for the bank to guarantee the value of the funds for today’s value.
Any wire instructions received after this cut-off time will still be processed but good value for the
funds will not be received by the beneficiary’s bank until the next business day.
In TRM, the bank cut-off time is for information only. It is possible to define a generation cut-off
time to indicate the date/time when settlements will be automatically generated from cashflows, a
netting cut-off time to define when netting should be completed, and a release cut-off time to define
when settlements will be automatically released (sent to the financial institution).
The logic for calculating the cutoff date/time is always the same. First, to establish the cutoff date
(for a settlement matching the rule), the system calculates a date backwards from the payment
date of the settlement. If the convention is to use business days in the calculation, it is the calendar
of the currency of the settlement that is used. If a holiday calendar is defined, the system will
further check whether the date obtained (after applying the offset) is a non-business day according
to the holiday calendar. If it is a non-business date, the cut-off date is moved backwards to the
closest prior business date. As the last step, the cutoff time of the settlement is assigned as the time
of day (in the given time zone) as entered by the user.
Cut-off times are set up in Cut-Off Time Editor.
Information Description
ID Unique ID for the transfer type or advice type.
Priority Priority of the settlement rule that determines which method is used (the lower the
number, the higher the priority).
Rule
Not Rule
Rule (or Not Rule) you have created in Settlement Rule Editor that defines which
method is used.
If more than one rule is matched, TRM uses the rule with the highest priority.
Method Method of transfer (or advice), for example fax or file, used for the transfer.
You can also create a method that is for specifying no method at all, to avoid
duplications for exceptions: for example, if you want SWIFT MT 100 messages for all
clients meeting certain criteria, except client X.
Your TRM consultant can advise you which methods are available during
implementation.
Address Type (Settlement transfer methods only)
Address type. Choose from: Address, E-mail, Fax, Swift, or Telex.
Command Command necessary to execute a program for sending the settlement instructions or
advice by fax, or for creating the settlement transfer files.
Your TRM consultant can advise you which commands are available during
implementation.
Format (Settlement transfer methods only)
Format of the transfer method. Choose from: FO XML, PDF, or Postscript.

18 Managing cash and settlements
18.2 Setting up settlement management
Transaction & Risk Management Module (TRM) User Guide 509
To define a cut-off time:
1. In Cut-Off Time Editor, enter the details of the cut-off time using the information in the following
table:
Information Description
ID (Information only) System-generated identification number.
Domain (Mandatory) Domain in which this cut-off time is available.
Owner Portfolio owner to which the cut-off time applies.
Description Any comment you want to add about the cut-off time.
Rule Settlement rule (defined in Settlement Rule Editor) that identifies the type of
settlements that are concerned by this cut-off time.
If you do not specify a Rule, then the cut-off time applies to all settlements.
Not Rule Settlement rule that identifies the type of settlements that are not concerned by this
cut-off time.
Currency
Currency Group
Currency / Currency Group concerned by this cut-off time.
If no Currency or Currency Group is specified, then the cut-off time applies to all
currencies.
Transfer Method Transfer method used for settlement that is concerned by this cut-off time (defined in
Settlement Transfer Method Editor).
If no Transfer Method is specified, then the cut-off time applies to all transfer methods.
Type (Mandatory) Type of cut-off. Choose from:
•Bank Cutoff - defines the cut-off time as enforced by the financial institution. Any
instructions received after this cut-off time will not receive "good value". When
selected, the Convention field defaults to Business Days and cannot be changed.
•Generation - defines when the settlements are to be generated. If no generation
cutoff is defined, then the cashflows are generated at the release cutoff. When
selected, the Convention field defaults to Days. You can modify the convention
according to you needs.
•Netting - defines by when netting should be completed. When selected, the
Convention field defaults to Business Days and cannot be changed.
•Release - defines when settlements will be released. When selected, the
Convention field defaults to Business Days and cannot be changed.
Priority (Mandatory) Number indicating the priority of this cut-off time and rule combination.
You assign priorities to avoid conflicts between rules: the lower the number, the
higher the priority.
Days (Mandatory) Number of days (negative or zero), in relation to the payment date, to
which this cut-off time applies.
For example, if you select -2, then the payments are generated two days before the
value date according to the convention. You can select 0 if you want to generate
payments on the value date.
If Calendar Group is specified, then the business days are calculated accordingly.
Convention (Mandatory) This field is set automatically according to the type you select in the Type
field. Depending on the selected type, you may or may not be able to modify the
convention.
•Business Days - checks the calendar for holidays associated to the calendar group.
•Days (normal calendar week) - no check is done.
Holiday Calendar An additional calendar to be checked so that the cutoff date is not a non-business day
in this calendar. This is usually the local calendar.
Time Zone Time zone in which the cut-off time applies (defined in Time Zone Editor).
18 Managing cash and settlements
18.3 Generating and processing settlements
510 © Wall Street Systems IPH AB - Confidential
2. Save the cut-off time definition using File - Save As New.
18.3 Generating and processing settlements
This section describes how settlements are generated, and processed through the settlement flow in
Settlement Processing. The settlement flow uses similar state and mode concepts as those in
Transaction Manager’s transaction flow. Depending on the flow configuration, different versions of
this board can be used for different states of the settlement.
Note: See the TRM System Administration Guide for information about setting up the settlement
flow.
Settlement Processing enables you to view and verify generated settlements. Settlements are
generated from cashflows, and they represent the incoming and outgoing cash and security (bond,
equity) settlements between the cash and custody accounts of the portfolio owner and counterparty.
For a given financial transaction, the system will by default try to generate as few settlements as
necessary. Normally, all cashflows with matching terms (settlement date, currency, and settlement
instructions) are automatically aggregated during settlement generation. For example, the final
interest payment of a deposit will be aggregated with the repayment of principal, giving only one
settlement on the maturity date. The accrued interest and principal payment of a bond
purchase/sale will result in one cash settlement, and will also include the security settlement for a
DvP (Delivery versus Payment) settlement.
In certain cases, not all cashflows should be automatically aggregated even if the settlement date,
currency, and settlement instructions match. For example, coupons compensation payments
between repo parties should not always be settled with the repo interest and maturity settlement.
Settlement generation creates separate settlements for such cashflows, and in general provides
additional information in some settlements in order to allow you to identify certain types of
settlements (and create settlement rules against them). The information (settlement attributes)
added to settlements during settlement generation is listed in the table below. Settlements that do
not share the same settlement attributes will not be automatically aggregated during settlement
generation.
Settlement attributes added to settlements during generation:
Time Time to which the cut-off time applies.
Alarm Time The alarm time corresponds to the latest time you would want to send a payment to
the bank: this should be before the bank’s cut-off time but after the release time. All
payments should be paid by this time.
Switches Disabled - switch on to disable the cut-off time definition without deleting it.
Information Description
Settlement Attribute Description
Repo All settlements from repos (and reverse repos, buy/sellbacks and sell/buybacks)
are flagged 'Repo'.
Collateral Coupon and redemption settlements related to collateral holdings are flagged as
'Collateral'. This includes coupons and redemptions from the issuer to the holder
of the security, and from the holder to the 'economic owner' of the security.
Payback All settlements related to the repayment of an investment are flagged 'Payback'.
These include Interest and Redemption settlements from deposits, discount
papers, bonds, IRSs and repos. All settlements related to early expirations and
roll-overs are also flagged 'Payback'.
18 Managing cash and settlements
18.3 Generating and processing settlements
Transaction & Risk Management Module (TRM) User Guide 511
As explained above, in settlement generation, the cashflows within a transaction are automatically
aggregated into one settlement provided the terms and settlement attributes match. However, it is
possible to slightly deviate from this transaction level aggregation by using the instrument feature
Settlement Setup. This instrument feature exposes a Settlement Setup tab with Generation Method field,
allowing you to select one of the following Settlement Methods to be applied to the instrument:
Note: Settlement terms and attributes still need to match in order for cashflows to be aggregated
i.e. this setup only applies to the level of aggregation. To clarify, the above logic applies to
automatic aggregation of cashflows into settlements that takes place immediately during
settlement generation. It is possible to further net different settlements during the
settlement process. This can be done automatically according to netting rule definitions, or
manually by the user.
Settlement generation can be triggered in three different ways:
•Automatically at a certain point in the transaction flow.
•Using the Settlement Generation activity.
•Manually in Settlement Processing.
The automatic generation in the transaction flow and the activity always check the cut-off time
definitions, and settlements will only be generated from cashflows having reached their cut-off time.
For example, the transaction flow may be configured to generate settlements when a transaction
reaches the Final state. Then, if a 1 month term deposit reaches the Final state, and if the cut-off
time for the initial Principal flow of the deposit has been reached, the system will immediately
generate the settlements for the Principal cashflow. The settlement related to the Expiration and
Interest cashflows will be generated by an activity (set up to run automatically at regular intervals)
approximately one month later, i.e. when the cashflows reach their generation cut-off time. It is
Security All payback settlements from the issuer of a security to the holder of the security
are flagged as 'Security'. Securities in this context includes bonds, discount papers
and equities. Also, netting flows of futures (and future style options) are flagged
as 'Security'.
Generation Method Description
Transaction Number Cashflows belonging to the same transaction are automatically aggregated. This is
the default behavior, i.e. this is how the settlements are aggregated when no
generation method is selected.
Transaction Number, Leg Same as 'Transaction Number', but aggregation is done within the leg group of a
transaction, i.e. cashflows in different leg groups are not aggregated (applies to
IRSs, i.e. IRS interest payments would be settled separately).
Cashflow Type Cashflows belonging to the same transaction are aggregated as long as they share
the same cashflow type.
Continuation Number Cashflows from transactions sharing the same continuation number are
aggregated.
Continuation Number, Leg Same as 'Continuation Number', but aggregation is done within leg groups, i.e.
cashflows in different leg groups are not aggregated.
Position Cashflow aggregation is done across all transactions that use the same instrument
within the same portfolio (allowing for example bond coupons to be aggregated
across multiple transactions).
Note that this applies to cashflows that are being generated into settlements in
one go. If there are previously generated settlements, they will not be aggregated
with the new settlement even if the terms match.
None No settlements are generated for this instrument.
Settlement Attribute Description
18 Managing cash and settlements
18.3 Generating and processing settlements
512 © Wall Street Systems IPH AB - Confidential
always possible to generate the settlements manually, by simply supplying the payment date range
for which settlements will be generated. In this case the cut-off time definitions will not be checked.
The following general conditions must be met in order to generate a settlement:
•Transactions must be in the configured state in the transaction flow for generation, usually
FINAL. For more information see the TRM System Administration Guide.
•Cashflows must belong to portfolios that are not flagged as Not Payable see 3.15.1.1 Setting
further portfolio attributes on page 94).
•Cashflows must not be flagged Paid, i.e. settlements must not have already been generated from
the cashflow.
•All cashflows of the transaction payable on the same day that share the same settlement
instructions and currency must be fixed, i.e. settlements are not created if some of the
cashflows that could be aggregated into a single settlement are still unfixed.
•All cashflows that are to be netted belonging to transaction(s) must be in a Payable state, i.e.
settlements are not generated if any of the cashflows that are to be netted belong to
transaction(s) that are not yet in a Payable state.
Note: In some cases, it may be necessary to look back a set number of days to check for any
backdated settlements that may not have been generated. This number of days is
configured in Configuration Table Editor using the Payment Period Days parameter. The
default is 0. If this setting is configured, TRM generates settlements for cashflows from the
due date (in the case of Settlement Generation activity) or system date (in the case of the
flow) and then looks back the number of days configured in this parameter. For more
information, see the TRM System Administration Guide.
You can also use Settlement Processing to net and split settlements or undo netting and unsplitting.
Netting enables you to group a large number of settlements together into one settlement. Netting
can be set up at the client level through a netting rule attached to the definition on the payment
counterparty, but you can also net settlements manually in Settlement Processing, see 18.3.4.5
Netting settlements on page 516. Splitting enables you to break down a large settlement into
smaller settlements, for example, if netted settlements exceed the authorized single amount for a
settlement defined in the Amount Rule Editor. See 18.3.4.6 Splitting settlements on page 517.
The following figure illustrates a simple settlement flow:
Netting Verify Splitting ReleasedAccept Verify Accept
RejectedCancel RejectReject
Accept
Generate
Cancel
18 Managing cash and settlements
18.3 Generating and processing settlements
Transaction & Risk Management Module (TRM) User Guide 513
18.3.1 Settlement Processing menus
The following tables describe the menu items which are specific to the processing mode of
Settlement Processing and any other layout or mode which is based on the application.
Other menu items which are common to all applications are described in 2.2.6 Using application
menus on page 34.
18.3.1.1 View
Like other TRM applications, Settlement Processing also provides a main view, named Settlement
view, which is always displayed. The Settlement view shows all retrieved settlements. It is in this view
that you can do most of the settlement processing actions.
18.3.1.2 Command
18.3.2 Start-up parameters
Settlement Processing is a special Transaction Manager layout, designed specifically for processing
settlements through the process flow.
Menu item Description
Settlement Query Displays the Settlement Query view.
This view is used to retrieve settlements that are already in the system into the
Settlement view for further processing: see 18.3.4.4 Retrieving settlements on page
516.
Settlement Detail Displays the Settlement Detail view.
This view displays additional information about the selected settlement. For example,
banking information.
Transaction Cashflow
Details
Displays the Transaction Cashflow Details view.
This view displays details of the transaction cashflows belonging to a settlement.
Note: You can quickly look up the transaction by right-clicking the cashflow row and
selecting Transaction Lookup.
Settlement Comment Displays the Settlement Comment view.
This view displays the comments and other comment-related information of the
selected settlement. For example, id of the user who entered the comment, comment
text, mandatory and minimum states, id of the rule that was used, and settlement
number, and so on.
Menu item Description
Accept Accepts the selected settlement and moves it forward in the settlement flow.
See 18.3.4.7 Accepting or rejecting settlements on page 519 for more information.
Reject Allows you to reject settlements in Settlement Processing and so move them
backwards in the settlement flow.
See 18.3.4.7 Accepting or rejecting settlements on page 519 for more information.
Apply
Cancel
Reset
Commands are used to save, cancel, or reset an entity and can move the entity to a
different state in the process flow.
Net Settlements
Undo Netting
Allows you to combine payments which have the same payment date, currency, and
settlement instructions into a single settlement. You can also undo a netted
settlement. See 18.3.4.5 Netting settlements on page 516 for more information.
Split Settlement
Unsplit Settlement
Allows you to split one generated settlement into several smaller settlements. You can
also unsplit split settlements. See 18.3.4.6.2 Splitting settlements manually on page
519 for more information.

18 Managing cash and settlements
18.3 Generating and processing settlements
514 © Wall Street Systems IPH AB - Confidential
The start-up parameter used to open Transaction Manager’s Settlement Processing mode is:
FKTransactionManager.exe -c SMP.xml
See C.11 Transaction Manager on page 685 for information about the options available.
Note: To use the specific Credit/Debit Client view in Settlement Processing, include the following
argument in the startup parameter
--view settlement-credit-debit-processing
18.3.3 Settlement processing modes
Settlement Processing has a settlement flow process resembling the transaction flow process used
for transactions in Transaction Manager.
The settlement flow process is configured so that only users with the necessary permissions have
access to committing or accepting settlements. For example, in settlement processing one person
may have the rights to net settlements, while another person can only accept them.
See 2.2.10.3 Manager modes on page 37 for more information.
18.3.4 Processing settlements
The settlement processing procedure includes the following:
•Retrieving generated settlements for a specific date or period, or when applicable, generating
settlements manually.
•Verifying and accepting generated settlements.
•If necessary, netting, unnetting, splitting and unsplitting settlements.
These stages of the settlement procedure are carried out in Settlement Processing and are described
in the following sections.
Optionally, you may find it useful to run the Settlement Report to verify the generated settlements
before processing them in Settlement Processing.
18.3.4.1 Generating settlements via an activity
In general, settlements are generated by an activity. Settlements are generated when:
•The transaction has reached the configured state in the transaction flow, and
•The cashflow has reached the generation cut-off time.
Note: Some settlements may get generated through the transaction flow since some cashflows
may have already reached their cut-off time when the transaction is set to the configured
state.
To set up the Settlement Generation activity:
1. In Activity Manager, create a new activity using activity type Settlement Generation.
2. Select group NIGHTLY.
3. Enter the Due Date Offset, for example, -1 if you want the activity to process data from the
previous day. The intervals that you define in the Intervals page are then measured from this
date/time.
If your system is set up to look back for past unpaid cashflows, the system generates
settlements for unpaid cashflows in the period defined by the due date and the number of days
configured in the Configuration Table Editor. See TRM System Admin Guide.
Note: For information on the other activity parameters, see A.64 Settlement Generation on page
654.

18 Managing cash and settlements
18.3 Generating and processing settlements
Transaction & Risk Management Module (TRM) User Guide 515
4. Set the activity to run at regular intervals in the Intervals page, for example, every morning to
ensure that you can process the generated settlements during the day.
For example, if you enter 20-Feb-2009 as due date, and then set the unit count to 1 and the unit
to Add Day, the activity will run once every day from the due date.
For more information about activities, see 6.2.1.2 Defining activity intervals on page 231.
5. Click Save As to save the whole activity definition.
Note: Activities are set up and managed in Activity Manager: see Chapter 6 Managing activities
on page 227 for more information.
18.3.4.2 Generating settlements manually
Settlements that have not been generated automatically or by an activity can be generated
manually in Settlement Processing. You can generate settlements for one particular portfolio or
transaction for the selected date range.
To generate settlements manually:
1. In Settlement Processing, select New - Generate Settlements.
2. In the Generate Settlements dialog, select the date range in which you want to the generate
settlements for payable cashflows within this range.
3. Select one of the following options according to your needs:
–To generate settlements for one particular portfolio, leave the Transaction Number field empty
and select the portfolio for which you want to generate settlements.
–To generate settlements for one particular transaction, enter the transaction number in the
Transaction Number field and leave the Portfolio field empty.
Note: You can select a Rule/Not Rule to include/exclude particular settlements.
4. Click OK.
All generated settlements are displayed in the Settlement view.
18.3.4.3 Generating settlement comments
In the Settlement Comment view of Settlement Processing you can view any rule-based settlement
comments that apply to the transaction. These comments can be generated manually using the Add
Comments action.
To manually generate settlement comments:
1. Open the Settlement Comment view from the View menu in Settlement Processing.
2. Right-click on the transaction and select the action Add Comments. The Settlement Comment view
will be populated with any settlement comments that apply to the transaction as well as any
transaction comments that have been copied to the settlement.
3. If you have manually edited some comments and want to go back to the default comments or if
you want to remove comments that no longer apply, re-run the Add Comments action. Re-running
the action gives you the opportunity to either:
–Replace existing comments with default values
This action replaces any comments that have been modified manually by the default comments
defined in the Comment Rule Editor.
–Delete existing comments for non matching rules
This action removes any comments that no longer apply to the transaction. For example, a
comment may be added to a transaction based on a rule that applies to all transactions in USD.

18 Managing cash and settlements
18.3 Generating and processing settlements
516 © Wall Street Systems IPH AB - Confidential
Then, if the transaction's currency is changed from USD to Euro, the rule and therefore the
comment no longer apply.
Note: See 3.22 Comments and comment rules (optional) on page 132 for more information on
settlement comments.
18.3.4.4 Retrieving settlements
This section describes how to retrieve generated settlements using the Settlement Query view.
Settlements are retrieved from a blank query row, much in the same way as you would do to
retrieve transactions in Transaction Manager. See 2.2.10.5 Retrieving entities on page 38 for more
information.
Note: You can only retrieve settlements that have the relevant state that corresponds to the
Settlement Processing mode.
You enter the criteria that you want the retrieved settlements to match in this row. The Date From
and Date To columns default to the current date. You can select the same date for both to retrieve
settlements for a given date or select different dates to retrieve settlements for a period. The
resulting settlements are displayed in the Settlement view.
Note: You can view the cashflows of a settlement by making sure that the Transaction Cashflow
Details view is visible, and then selecting the settlement in the Settlement view. The cashflow
details for that settlement appear in the Transaction Cashflow Details view.
18.3.4.5 Netting settlements
You can net settlements with the same payment date, currency, and settlement instructions (default
netting criteria) into one single settlement.
Settlement netting can be carried out in two ways: manually and automatically.
•Manual netting can be done on a settlement by settlement basis and is carried out in Settlement
Processing after settlements have been generated. In this case, the settlements must have the
following data in common: counterparty, currency, payment date, and settlement instructions.
For more information about manually netting settlements, see 18.3.4.5.1 Netting settlements
manually on page 516.
•Automatic netting is done based on the conditions set up in the Netting Rules page of Client Editor.
A netting cut-off time can be defined in Cut-Off Time Editor. Settlements generated after the
netting cut-off time are not netted. For those settlements that were not netted, you can
nevertheless choose to net them manually. For more information about setting up automatic
netting, see 3.13.1.14 Specifying automatic netting for settlement flows on page 105.
Security netting can be carried out when the same instrument is traded on several deals with the
same counterparty and for the same value date. DvP and free security settlements are netted
separately.
Note: To net settlements from sub-portfolios that belong to the same client, but do not have the
same top portfolio, use the NETTING-PORTFOLIO-ID property in Client Editor. To net
settlements across different portfolio owners, use the NETTING-CLIENT-ID property. For
more information about properties, see 3.13.1.3 Defining properties on page 93.
18.3.4.5.1 Netting settlements manually
To manually net several settlements into a single settlement in Settlement Processing:
1. Select the settlements that you want to net into one single settlement by clicking their rows in
the Settlement view while keeping the Ctrl key pressed.
2. Select Command - Net Settlements.

18 Managing cash and settlements
18.3 Generating and processing settlements
Transaction & Risk Management Module (TRM) User Guide 517
The selected settlements are replaced by one single net settlement. Details of the original
settlements can be seen in the Transaction Cashflow Details view when the net settlement is
selected.
Note: To undo the netting and reinstate the individual underlying settlements, select Command -
Undo Netting.
18.3.4.6 Splitting settlements
You can split one generated settlement into several settlements. For example, you may want to
break up a particularly large settlement into smaller settlements. This can be done either
automatically (set up in the Split Rule Editor) or by manual split (defining the maximum allowed
amount). These rules are used for both automatic and manual splitting of settlements.
Split settlements can be modified and moved backwards and forwards in the settlement flow: the
cashflow information is held within the cashflow of the original payment. You can specify split
amounts with Amount Rule Editor (see 18.3.4.6.2 Splitting settlements manually on page 519).
18.3.4.6.1 Setting up splitting rules
Splitting can be done automatically at the time that settlements are generated through the flow or
manually. To automate the split, you must first set up the transaction flow accordingly (see TRM
System Admin Guide).
To ensure that splitting is done correctly, you need to set up a splitting rule that uses the settlement
rule you set up previously (18.2.1.1 Defining settlement rules on page 505) and, if applicable, the
amount rule described in this further on in section. Automatic splitting produces the same result as
a manual split, but without user intervention.
Specifying split amounts with Amount Rule Editor
You can use Amount Rule Editor to define either a range of amounts (usable for the settlement flow)
or a maximum amount to be used for the split. Amount Rule Editor allows you to create a rule
specifying maximum and minimum positive and negative amounts, for example. You can then select
this rule in the Amount Rule field of Split Editor to define the split operation.
18 Managing cash and settlements
18.3 Generating and processing settlements
518 © Wall Street Systems IPH AB - Confidential
To define an amount rule:
1. In Amount Rule Editor, enter the following information:
2. Switch on the switch Use FX Spot if you want the amount to be converted using the FX spot rate.
3. Switch on the switch Zero Amount Rule if you want the rule to apply to settlements with an amount
equal to zero.
Note: Zero Amount Rule switch is only available with the Settlement Flow rule type.
4. Save the amount rule.
Specifying split proportions with Split Rule Editor
Use the Split Rule Editor to define what types of settlement are split into what portions. Enter the
following information:
Information Description
ID ID of the rule.
Name Name of the rule
Rule Type Choices are Settlement Flow or Split. Select Split to define an amount
rule for splitting.
Domain List of domains. Select the domain to which this amount rule applies.
Amount type Choose from Amount, Delivery Amount, Face Amount, or Units. See
18.3.4.6.2 Splitting settlements manually on page 519.
Minimum Positive Amount Absolute value of minimum amount.
Maximum Positive Amount Absolute value of maximum amount.
Maximum Negative Amount Absolute value of maximum amount.
Minimum Negative Amount Absolute value of minimum amount.
Figure currency Choose a currency from the list.
Scenario Choose from the list of defined scenarios. The selected scenario is
used for the conversion. If no scenario is defined, the fallback
scenario is used, and if this is not defined, the DEFAULT scenario is
used.
Information Description
ID Split Rule ID.
Name Split Rule name.
Domain List of domains to which this rule applies.
Settlement Rule Shows the list of available settlement rules. Settlement rules are defined in the
Settlement Rule Editor. If you cannot find the settlement rule you want to use,
right-click in the field and select Edit settlement rule entity... menu option to open the
Settlement Rule Editor and create the rule.
Amount Rule Shows the list of available amount rules. Amount rules are defined in the Amount Rule
Editor. Select the rule you want to apply to this split.
Minimum
Remaining
Amount
Minimum threshold amount.
18 Managing cash and settlements
18.3 Generating and processing settlements
Transaction & Risk Management Module (TRM) User Guide 519
18.3.4.6.2 Splitting settlements manually
To split a single settlement into several settlements:
1. In the Settlement view, select the settlement that you want to split.
2. Select Command - Split Settlement or right-click the settlement and select Split Settlement.
3. In the Split Settlement dialog, depending on the type of transaction to be settled, enter the
amount or number of delivery units to be split from the original settlement.
4. Click OK when you have finished entering the amount or unit.
TRM generates the new settlement details in the Settlement view. The number of the original
settlement is displayed in the Split Source column. The new settlement(s) can be processed
through the settlement flow in the usual way.
Note: To unsplit settlements which have previously been split back into the original settlement,
select Command - Unsplit Settlement.
18.3.4.7 Accepting or rejecting settlements
TRM is usually configured so that you must accept generated settlements before they are
transferred.
To accept a settlement:
1. Retrieve the settlements into Settlement Processing (see 18.3.4.4 Retrieving settlements on
page 516).
2. Verify the settlement details.
Note: You can quickly look up attached FINMessage by right-clicking the settlement and selecting
Lookup FIN Message.
3. Send or return the settlement to the appropriate state in the settlement flow, as follows:
–If the details are correct, accept the settlement and move it forward in the settlement flow
using Command - Accept.
–If the details are not correct, reject the settlement and send it back in the flow to be
modified or canceled using Command - Reject.
Information Description
Amount Amount of the settlement that you want to split from the original settlement. This
specifies the amount package sizes used.
This amount must be less than the original payment amount, and must have the
same sign.
Delivery Amount Delivery amount of the settlement that you want to split from the original settlement.
Delivery amount is the amortized value (for an amortizing structure) when the paper
is traded on face amount. This amount would represent the remaining amount /
delivery.
Face Amount Face amount of the paper being traded that you want to split.
Delivery Units Number of units of the settlement that you want to split from the original settlement.
The amount is always rounded down to the next trading unit (in the case of delivery).
Otherwise, the amount is rounded according to the rounding precision defined for the
currency.
18 Managing cash and settlements
18.4 Managing custody movements and balances
520 © Wall Street Systems IPH AB - Confidential
18.3.4.8 Canceling settlements
In some cases, you may have to cancel settlements, for example, when you have to amend the
settlement. When you cancel settlements, the settlements are deleted, paid flag is removed from
the related cashflows, and the cashflow is available to be regenerated.
18.3.5 Modifying settlement instructions
You can only modify existing instructions defined in the Client Editor. To set new instructions, first
update Client Editor accordingly. When accounts are updated or new accounts are created in Client
Editor, you can update all outstanding (future) cashflows by running the Update Settlement
Instructions activity (see A.72 Update Settlement Instructions on page 657). The activity allows you
to see which transactions need settlement instructions to be updated before actually committing the
changes.
Note: Activities are set up and managed in Activity Manager: see Chapter 6 Managing activities
on page 227 for more information.
18.3.6 Generating settlement processing reports
There are a number of reports you can use to view settlement processing information.
18.4 Managing custody movements and balances
You can monitor the custody movements and the corresponding custody balances in Custody
Manager. Custody Manager allows you to:
•Query and monitor custody movements and balances
•Generate custody balances
•Retrieve, monitor, import and create custody balance statements
Other menu items which are common to all applications are described in 2.2.6 Using application
menus on page 32.
18.4.1 Start-up parameters
Custody Manager is a special Transaction Manager mode, designed specifically for processing
custodies.
The start-up parameter used to open Transaction Manager’s Custody Manager mode is:
FKTransactionManager.exe -c CBE.xml --view custody-entry
Report Description
Settlement This report is used to control and verify settlements. It also serves as an aid for
liquidity planning and lists all the settlements which must be paid and received within
the selected period.
See B.45 Settlement Report on page 677 for details of the report’s parameters.
Settlement
Cashflows
Similar to the Settlement report, this report shows all of the related cashflows of the
transactions.
See B.46 Settlement Cashflows Report on page 677 for details of the report’s
parameters.
Settlement Log This report provides a log of all changes made to the settlements in Settlement
Processing.
See B.48 Settlement Log Report on page 678 for details of the report’s parameters.
18 Managing cash and settlements
18.4 Managing custody movements and balances
Transaction & Risk Management Module (TRM) User Guide 521
See C.11 Transaction Manager on page 685 for information about the options available.
18.4.2 Custody Manager views
Custody Manager uses various views for querying and displaying custody movements, balances,
future custody balances.
The following views are available from the View menu in Custody Manager:
18.4.3 Retrieving custody movements
Custody Manager shows custodies that have been generated automatically by transactions made
using instruments defined as deliverable in Instrument Editor. If any transfer transactions have
been entered for deliverable instruments, these can be retrieved into the Custody Movements view.
To retrieve custody movements:
1. In the Custody Movements Query view, right-click the column headers and select Select Columns to
select the columns where you want to enter query criteria.
2. Enter criteria in one or more columns to retrieve the custody movements.
Note: Criteria entered in the same row is separated by the AND operator and all criteria must
match. On the other hand, criteria entered in a different row is separated by the operator
OR and can match either.
3. Select File - Query (or press Ctrl+E) to retrieve the custody movements that match the criteria you
entered.
4. The query result is displayed in the Custody Movements view.
18.4.4 Generating custody balances
You can view custody balances (i.e. to see how much each custodian is holding) in Custody
Manager’s Custody Balances view. However, before the custody balances can be viewed, they must be
calculated from the custody movements.
There are two ways to generate custody balances:
View Description
Custody Balances Query Displays the Custody Balances Query view.
Use this view to retrieve custody balances. The results are displayed in the Custody
Balances view or a future date are displayed in the Future Custody Balances view.
Unlike the other views that are available from the Views menu, the Custody
Balances view is always displayed at the top of screen.
Future Custody Balances Displays the Future Custody Balances view.
Shows all custody balances that match the query criteria.
Custody Movements
Query
Displays the Custody Movements Query view.
Use this view to retrieve custody movements. The results are displayed in the
Custody Movements view.
Custody Movements Displays the Custody Movements view.
Shows all custody movements that match the query criteria.
Custody Balance
Statements Query
Displays the Custody Balance Statements Query view.
Use this view to retrieve custody balances. The results are displayed in the Custody
Balance Statements view.
Custody Balance
Statements
Displays the Custody Balance Statements view.
Shows all custody balance statements that match the query criteria.

18 Managing cash and settlements
18.4 Managing custody movements and balances
522 © Wall Street Systems IPH AB - Confidential
•Automatically by using the activity Custody Balances: see A.17 Custody Balances on page 633
for details of the activity’s parameters.
Activities are set up and managed in Activity Manager: see Chapter 6 Managing activities on
page 227 for more information.
•Manually by selecting New - Generate Custody Balances and selecting the relevant parameters.
These parameters are identical to the ones you set up in the activity.
18.4.5 Retrieving custody balances
After you have generated the custody balances, you can view the custody balances in the Custody
Balances view. See 18.4.4 Generating custody balances on page 521 for more information about
generating. The custody balances show how much each custodian is holding.
Custody balances are calculated based on custody movements, such as, how many of one particular
instrument exists in a particular custody.
To retrieve custody balances:
1. In the Custody Balance Query view, select the custody balance columns for which you want to
retrieve information.
2. Enter criteria into one or more of the custody balance columns that you have selected in order to
retrieve specific balance information.
3. Select File - Query (or press Ctrl+E) to retrieve custody balances that correspond to the criteria you
specified.
18.4.5.1 Retrieving for active today
In the Custody Balance view, you can view the balances which are active with today’s date. However,
it is important to note that when you retrieve custody balances which are active today, the balances
may not always have today’s date. This is because the Date field displays the date on which the
custody balance was last modified, therefore balances from previous dates are also visible.
To retrieve balances active today:
1. In the Custody Balances Query view, select Yes in the Active Today column.
2. Retrieve the transactions with today’s date using File - Query (or press Ctrl+E).
Note: You can also search for custody balances which are active today but with a date in the
past. Simply enter the date into the date field, activate Search Active Today, and select File -
Query (or press Ctrl+E). The custody balances are retrieved for the date you entered and
previous dates, depending on when some of the balances were last modified.
18.4.5.2 Retrieving future custody balances
You can retrieve specific balance information into Custody Manager and see how this information will
appear on a future date. For this to work properly, the activity Custody Balance must be run after
the end of business, but before midnight (see 18.4.4 Generating custody balances on page 521).
To view balances in the future:
1. In the Custody Balances page, retrieve the custody balances for which you want to view balances
in the future.
2. Select the columns for which you want to view balance information in the future using Query -
Balance Query Columns.
3. Click OK.
4. Select View - Future Balances.
The future balances are displayed on the Custody Balances page. You can only view balances in
the future for one custody and instrument at a time.
18 Managing cash and settlements
18.4 Managing custody movements and balances
Transaction & Risk Management Module (TRM) User Guide 523
Note that if you have retrieved more than one balance and you therefore want to view the
balances in the future for a different custody and instrument, you must select the new
instrument and then reselect Query - Future Balances.
18.4.6 Entering custody statement data
You can use Custody Manager to reconcile custody balances, that is, match the custody balances in
TRM with those of the custodian. Before you can do this, the custodian’s data must be entered into
TRM. This data can be input in one of two ways:
•It can be retrieved from a file (using Command - Import Custody Balance Statement)
•It can be entered manually in the Custody Balance Statements page (using Command - New Custody
Balance Statement).
18.4.6.1 Importing custody statement data
To retrieve custody balance statements from a file:
1. In the Custody Balance Statements page, select the custody statement columns for which you want
to display information using View - Statement Columns.
2. Select Command - Import Custody Balance Statement.
3. In the Import dialog, enter the Import Command and the File Name.
–The Import Command is the script command (for example, PERL script) used to import the file.
–The File Name is the name of the data file to be imported.
This file should contain the minimum information that you must enter into TRM to be able to
reconcile: Account, Date, Security Identifier Type (ISIN, SEDOL, CUSIP), Instrument ID, and
either Units for equities or Amounts for money market instruments.
4. Click OK.
18.4.6.2 Entering custody statement data manually
To enter custody statement data manually:
1. In the Custody Balance Statements page, select the custody statement columns for which you want
to display information using View - Statement Columns.
2. Select Command - New Custody Balance Statement.
3. Enter the custody statement data in the new row that appears in Unmatched Custody Balance
Statements view.
4. Select Command - Apply to save the custody statement data.
18.4.6.3 Retrieving custody statement data
To retrieve custody statements that were previously entered in the Custody Balance Statements page:
1. In the Custody Balance Statements page, select the custody statement columns for which you want
to display information using View - Statement Columns.
2. Enter criteria into one or more of the custody statement columns that you have selected in order
to retrieve specific statement information.
Note that if you use Face Amount, Amount, or Units to retrieve the data, the same criteria is used
to match the custody balances and statements in the Custody Balance Reconciliation page.
3. Select Edit - Fetch to retrieve the custody information that corresponds to the criteria you
specified.

18 Managing cash and settlements
18.5 Reconciling settlements and custodies
524 © Wall Street Systems IPH AB - Confidential
18.4.7 Custody reports
There are a number of reports you can use to view custody information:
18.5 Reconciling settlements and custodies
This section describes reconciliation of settlements and custodies using Settlement Reconciliation
(for cash) and Custody Reconciliation (for instruments). These two applications have similar layouts,
based on the Manager application layout (see 1.4.3 Managers and Boards on page 26). Other menu
items common to all applications are described in 2.2.6 Using application menus on page 34.
After you have imported or entered the statement of account information, you can proceed with the
reconciliation of bank accounts, that is, you can compare the cashflow and settlement information or
custody balances in TRM with the information reported to you by the bank.
Reconciliation of balances and statements is based on pre-defined or dynamically-defined
reconciliation criteria, including Client, Account, Custodian, Instrument, Date, Balance Amount and
Sellable Account. You can define a tolerance on amounts. This reconciliation criteria is set up in
Reconciliation Setup Editor, see 18.5.3 Defining reconciliation setup on page 526.
Reconciliation can be either automatic, in which case all retrieved items are taken into account, or
manual for selected items. Matching can be done on a single basis, or after grouping of similar
items. You can also automatically create settlement transactions from unreconciled settlements or
statements of account, or from the reconciliation difference between the settlements and the
statements.
TRM also provides a log mechanism to track the processing of the reconciliation, such as, the setup
file reference used, applied difference action or actions, transaction number of the offset
transaction, and so on. You can view this information in the Log column in the Matched view. You can
also view the log information in the Reconciliation Log report (see 18.5.8 Reconciliation reports on
page 532). Additionally, you can attach comments to the matched item, for example, if you took
additional actions not tracked in the Log column. User-defined comments are visible in the Comments
column.
Report Description
Custody Balance This report is used to monitor custody information and inform the custodian about
deliveries. The custodian administers the instrument-related documents. This report
lists any custody transaction in the same way as the Custody Balances page in Custody
Manager.
See B.17 Custody Balance Report on page 666 for details of the report’s parameters.
Custody Reconciliation The results of custody reconciliation are displayed in this report.
See B.18 Custody Reconciliation Report on page 666 for details of the report’s
parameters.
Delivery The Delivery report is used to monitor custody information and to inform the
custodian about deliveries. Delivery Report links custody movements to actual
transactions so that you can derive portfolio, instrument type, and other information
that the custody transaction does not carry.
The report lists the location of the securities, where they were transferred from, when
they were purchased, and their destination once they have been sold. It contains
information on all transactions which have Value Date as well as the delivery on the
reporting date.
The Delivery feature in Instrument Editor defines the instrument as deliverable
(handled by a custodian) and enables the generation of a delivery cashflow. Only the
transactions of instruments assigned with this feature are included in the Delivery
Report.
See B.22 Delivery Report on page 667 for details of the report’s parameters.
18 Managing cash and settlements
18.5 Reconciling settlements and custodies
Transaction & Risk Management Module (TRM) User Guide 525
18.5.1 Start-up parameters
Custody Reconciliation and Settlement Reconciliation are special Transaction Manager modes
designed specifically for reconciling custodies and settlements.
See C.11 Transaction Manager on page 685 for information about the options available.
18.5.1.1 Custody Reconciliation
The start-up parameter used to open Transaction Manager’s Custody Reconciliation mode is:
FKTransactionManager.exe -c CBR.xml --view custody-reconciliation
18.5.1.2 Settlement Reconciliation
The start-up parameter used to open Transaction Manager’s Settlement Reconciliation mode is:
FKTransactionManager.exe -c SMR.xml --mode RECONCILIATION --view
settlement-reconciliation
Note: To use the specific Credit/Debit Client view in Settlement Reconciliation, include the
following argument in the startup parameter
--view settlement-credit-debit-reconciliation
18.5.2 Reconciliation application views
Reconciliation applications use various views for querying matched and unmatched items (balances,
settlements, and statements). This section describes the reconciliation of cash account types in
Settlement Reconciliation. Though, the items’ names may differ, the general concept of query,
matched, and unmatched views remains the same in Custody Reconciliation.
In addition to the views available from the View menu in Reconciliation applications, there is also a
view, called Summary view. Unlike the other views, which can be hidden or shown via the View menu,
this view is always displayed at the top of the screen. The Summary view shows the total number of
matched and unmatched items currently retrieved.
Note: In some of these views, you can quickly look up the transaction to which the item is
attached, by right-clicking the item and selecting Transaction Lookup.
The following views are available from the View menu in Settlement Reconciliation:
View Description
General Query Displays the General Query view.
Use this view to retrieve statements of account and settlements that you want to
reconcile (unmatched) and those that are already reconciled (matched). The
results are displayed in the corresponding matched and unmatched views.
Matched Query Displays the Matched Query view.
Use this view to retrieve matched statements of account and settlements. The
results are displayed in the Matched view.
Unmatched (Settlement)
Query
Displays the Unmatched Settlement Query view.
Use this view to retrieve unmatched settlements. The result of the query is
displayed in the Unmatched Settlement view.
Unmatched (Settlement) Displays the Unmatched Settlement view.
Shows all unmatched settlements that match the query criteria.
Unmatched (Statement of
Account) Query
Displays the Unmatched Statement of Account Query view.
Use this view to retrieve unmatched statements of account. The result of the
query is displayed in the Unmatched Statement of Account view.
18 Managing cash and settlements
18.5 Reconciling settlements and custodies
526 © Wall Street Systems IPH AB - Confidential
18.5.3 Defining reconciliation setup
Automatic reconciliation allows TRM to match settlements in TRM with the payments in Statement of
Account for a specified account according to criteria that you set up in the Reconciliation Setup
Editor. You can also define how any differences will be handled by specifying difference actions. For
example, how to handle the reconciliation when accounts or amounts are different.
To define reconciliation criteria:
1. In Reconciliation Setup Editor, enter the following information:
–Account information:
–Cash or security matching criteria and difference actions:
Unmatched (Statement of
Account)
Displays the Unmatched Statement of Account view.
Shows all unmatched statements of account that match the query criteria.
View Description
Menu item Description
ID and Name Account ID and Name
Type Reconciliation type (Cash or Security). The available matching criteria
depends on which type you select. When you select Cash, the criteria relating
to Securities (custodies) are no longer available, such as Custodian,
Instrument/Security Identifier, and so on. Likewise, when you select Security,
the criteria relating to Cash are no longer available, such as Amount.
Owner (Mandatory.) Account owner.
Bank Bank where account is held.
Currency Account currency.
Sign Select Any, Positive or Negative.
Account Select the account.
Switches Allow Grouping: if switched On, payments with the same criteria will be
grouped together where possible
Matching Criteria Description Difference Actions
Currency Cash accounts only.
Match by currency.
None.
Counterparty Cash accounts only.
Match by counterparty.
None.
Account Match by account. Cash accounts only:
• Account Difference Action: Create
Transfer - Creates an internal cash
transfer to correct TRM balances.
• Account Difference Instrument:
Select an instrument for an internal
cash transfer transaction which
corrects TRM balances and accounts.
• Account Difference Portfolio: Select
an portfolio for an internal cash
transfer transaction which corrects
TRM balances and accounts.
Date Match by payment date. None.

18 Managing cash and settlements
18.5 Reconciling settlements and custodies
Transaction & Risk Management Module (TRM) User Guide 527
Custodian Security accounts only. None.
Instrument/Security
Identifier
Security accounts only.
Match by instrument ID or Security
Identifier Type
• To match by Instrument ID,
leave the Security Identifier
Type blank.
• To match by Security Identifier
Type, select a type from the
drop-down list.
Note: Security Identifier Types are
defined in the Security
Identifier Type Editor, see
3.44 Security identifier types
(optional) on page 154.
None.
Amount Cash accounts only.
• If payment amount > 0, the
payment credit account is used.
• If payment amount < 0, the
payment debit account is used.
• Amount Difference Action: Create
Offsetting Cash Transaction - If this is
within the specified Tolerance, it
creates an offsetting cash
transaction to correct the TRM
balance.
•Amount Difference Instrument:
Select an instrument for the Amount
Difference Action
• Amount Difference Portfolio: Select
an portfolio for the Amount
Difference Action.
• Auto Matching Amount Tolerance:
- If difference is under tolerance:
Auto Match and generate a
difference.
- If difference is above tolerance:
No Auto Match, only manual
matching is possible and
generate a difference.
• Auto Matching Amount Currency:
Before any difference versus
tolerance comparisons are made,
the Amount Difference will be
converted to the Auto-Matching
Amount Currency using the FX rate
between the Amount Difference
currency and the Auto-Matching
Amount Currency found in the
scenario defined in the
Auto-Matching Scenario (NULL =
Default scenario). If the
Auto-Matching Amount Currency is
not given, then Auto-Matching
Amount Tolerance is assumed to be
in the currency being reconciled, i.e.
no FX conversion is necessary.
• Auto Matching Scenario: Select a
scenario for the Auto Matching
Amount Currency.
Matching Criteria Description Difference Actions
18 Managing cash and settlements
18.5 Reconciling settlements and custodies
528 © Wall Street Systems IPH AB - Confidential
2. Save the reconciliation criteria by using File - Save As New.
18.5.4 Entering statements of account
Before you can reconcile statements of accounts from the banks with settlements in TRM, you must
enter the statements of account information in TRM. You can enter statements of accounts
information in two ways:
•Imported from a file, by selecting Command - Import Statements of Account. See 18.5.4.1 Importing
statements of account information on page 528.
•Manually entered in the Unmatched Statement of Account view, by selecting Command - New Statement
of Account. See 18.5.4.2 Entering statements of account information manually on page 528.
18.5.4.1 Importing statements of account information
Before importing the statements of account, you must first know which import command should be
used and the file name where the account information is stored. This file should contain the
minimum information that you must enter into TRM to be able to reconcile: Account, Date,
Instrument ID, and either Units for equities or Amounts for money market instruments.
To import statements of account information from a file:
1. In the Unmatched Statement of Account view, right-click any of the column headers and select Select
Columns to select the columns you want to display.
2. Select Command - Import Statements of Account.
3. In the Import Statements dialog, enter the following information:
–The Import Command (Import Type) is the script command (for example, PERL script) used to
import the file.
–The File Name is the name of the file to be imported.
4. Click OK.
18.5.4.2 Entering statements of account information manually
To enter statements of account information manually:
1. In the Unmatched Statement of Account view, right-click any of the column headers and select Select
Columns to select the columns you want to display.
2. Select Command - New Statement of Account.
3. In the Unmatched Statement of Account view, enter the statement information in the new row that
appears.
4. Select Command - Apply Statement to save the statement of account.
An ID is assigned to the statement and the Matched column shows, false (i.e. not reconciled)
Note: To cancel the entry of a new statement, right-click the row and select Cancel. The
statement is completely removed from the application.
Balance Amount
Sellable Amount
Security accounts only.
Match by balance amount or
sellable amount.
None.
Reference Column Cash accounts only.
Select a column to be used as a
comment in the settlement.
None.
Matching Criteria Description Difference Actions
18 Managing cash and settlements
18.5 Reconciling settlements and custodies
Transaction & Risk Management Module (TRM) User Guide 529
18.5.4.3 Modifying statements of account information
To modify unmatched statements of account information:
1. In Unmatched Statement of Account view, make changes to the unmatched item.
2. Right-click the item you have just changed and select the Apply action.
Note: To cancel the changes, right-click the changed item and select Reset.
18.5.5 Querying statements of account and settlement information
Before you can reconcile settlements with their corresponding entries in the statement of account,
you must first retrieve the settlement information and the statement information. You can use the
General Query view to retrieve both settlements and statements or you can use the specific query
views to retrieve each separately. Retrieved items are displayed in the relevant unmatched or
matched views, for example, retrieved unmatched statements of account are visible in the
Unmatched Statements of Accounts view.
To retrieve unmatched and/or matched settlement and statements of account information:
1. In the selected query view, enter the query criteria as indicated in the following table:.
2. Execute the query by pressing Ctrl+E
The retrieved items are displayed in the corresponding view according to whether they are
matched and unmatched.
Note: You can see the total number of retrieved unmatched and matched items in the Summary
view.
18.5.6 Matching settlements
To increase the speed of the reconciliation process, you can set up reconciliation criteria to handle
differences in an automatic way in the Reconciliation Setup Editor (18.5.3 Defining reconciliation
setup on page 526). Reconciliation criteria is used for both automatic and manual reconciliations. In
the case of a manual reconciliation, if you have not set up reconciliation criteria for a bank or owner,
you are prompted to specify it to complete the reconciliation.
After the reconciliation, you can do further actions to correct any differences or mismatches
manually. In some cases, you might not be able to match statements to transactions in TRM or vice
versa, in which case, you need to ignore these items. For more information about these actions, see
18.5.7 Processing actions on page 531.
Concretely, there are two ways of reconciling settlements in TRM with the payments from the
Statements of Account:
•Automatically - TRM automatically matches the settlements according to the reconciliation
criteria. Automatic matching can be done in two ways:
–Using the instructions described in 18.5.6.1 Automatic matching on page 530.
Parameter Description
Date From The first date of the period for which payment and statement information is to be
retrieved. By default, the current date is selected.
Date To The last date of the period for which payment and statement information is to be
retrieved. By default, the current date is selected.
Client The portfolio owner for which the information is to be retrieved.
Bank The bank for which the information is to be retrieved.
Account The account for which the information is to be retrieved.

18 Managing cash and settlements
18.5 Reconciling settlements and custodies
530 © Wall Street Systems IPH AB - Confidential
–Using an activity. You can run Cash Settlement Reconciliation and Security Settlement Reconciliation
activities in Activity Manager. These activities retrieve all unmatched statements between the
Period Start and Period End Dates. The Owner field is mandatory. Additionally, for securities,
you need to specify the instrument as well.
See A.9 Cash Settlement Reconciliation on page 630 and A.66 Security Settlement
Reconciliation on page 655 for more information on the activity parameters.
•Manually - you manually match payments in TRM with payments in the Statements of Account
as described in 18.5.6.2 Manual matching on page 530.
18.5.6.1 Automatic matching
Automatic reconciliation can be set up using Reconciliation Setup Editor as described in 18.5.3
Defining reconciliation setup on page 526. With automatic matching, TRM matches all of the
settlements and statements of account currently retrieved in the unmatched views according to the
criteria defined in the editor. At the end of the process, you can check the Log column in the Matched
view for more details on the reconciliation or you can generate the Reconciliation report, see 18.5.8
Reconciliation reports on page 532.
To match settlements automatically:
1. In the Reconciliation application, Select Command - Auto Match.
The retrieved items are displayed in the Matched view. Check the Log column for details of the
reconciliation processing.
2. In the Matched view, you can perform additional actions on the matched items by right-clicking
the row or rows and selecting the available actions. See 18.5.7 Processing actions on page 531.
Note: To undo one or more matchings, right-click the matching row (or rows) and click Unmatch.
18.5.6.2 Manual matching
When you do a manual matching, the system automatically uses the reconciliation setup defined for
the owner/bank. If no setup is found for the given owner or bank, you are prompted to define the
reconciliation criteria. Manual matching can be done even if the settlements’ attributes differ: in this
case, TRM displays a warning. Depending on whether a difference action was defined in the
reconciliation criteria, mismatches are processed in a different way. For example, if there is a
mismatch warning, the following scenarios are possible:
•If a difference action was defined, the difference action is processed. Information about the
applied difference is available in the Log column.
•If no difference action is defined, a warning message is displayed, and the related column is left
empty in the Matched view. For example, for an account mismatch, the Account column is
empty.
Differences can be processed manually in the Matched view, see 18.5.7.1 Processing differences on
page 531. You can view the applied differences in the Log column or in the Reconciliation Report, see
18.5.8 Reconciliation reports on page 532.
In some cases, you may not find matching Settlement or statement of account items. In which case,
you can flag the settlement or statement of account items as Ignored. The ignored items are moved
to the Matched view and removed from the unmatched views.
To manually match items:
1. Select one or more settlement rows and one or more statement of account rows in the
unmatched views respectively.
2. Select Command - Match.
The Match dialog appears.
3. Verify the proposed reconciliation setup, or if no setup is defined, specify the reconciliation
criteria, and click OK.

18 Managing cash and settlements
18.5 Reconciling settlements and custodies
Transaction & Risk Management Module (TRM) User Guide 531
Successfully matched items are displayed in the Matched view.
Note: To undo one or more matchings, right-click the matching row (or rows) and click Unmatch.
4. In the Matched view, you can do additional actions on the matched items by right-clicking the row
or rows. See 18.5.7 Processing actions on page 531.
18.5.7 Processing actions
There are two kinds of actions: processing unmatched items and processing differences.
18.5.7.1 Processing differences
You can see difference information in Matched view columns. For example, when an amount
difference occurs, you will see an amount in the Amount Difference column, you can choose to capture
this amount in an offset cash transaction.
To process amount or account differences:
1. In the Matched view, right-click the matching row and click Process Differences.
The Process Differences dialog appears.
2. Depending on whether you want to process an amount or account difference, choose one of the
following options:
–To process an amount difference: select the amount difference action (i.e. create an
offsetting cash transaction) and the instrument and portfolio you want to use to capture
amount differences.
Note: Amount differences are visible in the Amount Difference column.
–To process an account difference: select the account difference action (i.e. transfer to
another account) and the instrument and portfolio you want to use to capture account
differences.
Note: Account differences are visible in the Account column, for example, when this column is
empty.
For more information about difference actions, see 18.5.3 Defining reconciliation setup on page
526.
3. Click OK to perform the reconciliation.
The Log column updates with the new reconciliation setup.
18.5.7.2 Processing settlement and statement information
In the event that you do not have a statement to match a settlement in TRM, you can either choose
to create an offset transaction, which will update the balances for the whole amount; or to ignore
the statement, in which case, the statement is matched without affecting the TRM balances.
To reconcile when missing a match:
1. In the unmatched view, right-click the item and select the Process action.
2. In the Process Statements (or Process Settlements) dialog, select the amount difference action and
the instrument and portfolio you want to use to capture amount differences.
3. Click OK to perform the reconciliation.
The item is moved to the Matched view. You can see the number of the offsetting transaction in
the Log column.

18 Managing cash and settlements
18.5 Reconciling settlements and custodies
532 © Wall Street Systems IPH AB - Confidential
18.5.8 Reconciliation reports
There are reports you can use to view bank statement and reconciliation information.
Report Description
Bank Account
Statement
This report displays the information that has been imported from the bank and
intra-day statements.
See B.3 Bank Account Statement Report on page 660 for details of the report’s
parameters.
Reconciliation This report is used to display the results of the settlement reconciliation.
See B.41 Reconciliation Report on page 676 for details of the report’s parameters.
Reconciliation Log This report provides a log of all the user actions performed in Reconciliation
applications.
See B.42 Reconciliation Log Report on page 676 for details of the report’s parameters.
Transaction & Risk Management Module (TRM) User Guide 533
Chapter 19 Managing accounting
In TRM, it is possible to set up an accounting framework in order to meet the need to publish
accounts for multiple accounting standards. Often, multinational corporations are required to report
both globally and locally, and companies listed on different markets are obliged to release figures
according to different accounting standards such as IAS or US-GAAP, while still conforming to the
local standard. In TRM, this is known as parallel accounting.
It is also possible to set up off-balance sheet accounting in TRM. Off-balance sheet accounting is
used to account for "notional" amounts generated by IR, EQ, and FX derivatives.
TRM can also be configured so that it can be used with a General Ledger system, such as the
Wallstreet Suite Accounting Module (ACM). The General Ledger system can then convert the
accounting events generated by the capture and processing of transactions in TRM into posted
accounting entries (see 19.4 Using TRM with a General Ledger system on page 542).
Furthermore, you can use TRM together with ACM to enable hedge accounting in the Wallstreet
Suite (see 19.5 Hedge accounting in Wallstreet Suite on page 546).
19.1 Parallel accounting
TRM provides a means of applying different accounting treatments without the need to duplicate
transactions. One transaction can be treated in several ways simultaneously, allowing the
transaction to be booked into multiple ledgers according to the valuation approach and result
distribution applicable to each ledger.
Parallel accounting, that is, the process of applying different treatments to instruments or
transactions can be based on classification. In this case, each transaction needs to be classified
appropriately within each accounting standard; for example, Held-to-Maturity (HTM) for FAS, and
Available for Sale (AFS) for IFRS. The actual result treatment then depends on the
classification-specific result treatment methods defined for the instrument of the transaction. These
contain details of how a deal should be treated, for example, whether FIFO or average price method
should be applied, and whether or not discount should be accrued.
The parallel accounting framework can also be used to provide Front and Middle Office valuation and
result figures that are different from any accounting figures. In this case, Front/Middle Office is set
up as if it was an accounting standard, but no accounting posting will actually be generated.
This chapter explains how classification and result treatments are set up in TRM, the way in which
result treatments are linked to instruments, how transactions are classified, and the processing
involved to book the results in the appropriate way and to the correct location.
19.1.1 Classification
In TRM, transactions are classified once within each applicable classification group. A classification
group is usually defined as one accounting standard, with the individual classifications set up within
the group. For example, if two accounting standards need to be followed, it is necessary to set up
two classification groups.

19 Managing accounting
19.1 Parallel accounting
534 © Wall Street Systems IPH AB - Confidential
Typical classifications and classification groups could appear as follows:
It is possible to define an unlimited number of classifications within each group.
19.1.1.1 Setting up classification
As described above, the classification group effectively identifies the accounting standard. Each
classification group needs to be attached to a specific result mode. The result mode drives the
calculation of results, and effectively one single transaction can simultaneously be treated in as
many ways as there are result modes. Often, this means that there is one result mode for each
classification group. However, multiple classification groups can share one result mode. In this case,
a transaction will only be classified into one classification group attached to the result mode.
Result mode is used as a start-up parameter in accounting activities and reports. This means that
the position is always processed and viewed according to a specific result mode (that is, a specific
accounting standard).
For example, if the user organization has subsidiaries in 20 countries, 20 different classification
groups could be defined; to represent one group for each country. But since each subsidiary’s
transactions are posted only to the subsidiary’s own local ledger, it is possible to link all the 20
classification groups to one result mode. This means that as far as local standards are concerned,
there is no need for any parallel accounting.
Of course, many of the 20 subsidiaries may also have to report each transaction according to an
international or other standard, for example, IFRS or FAS. These standards would be defined with
their own unique classification group, which is linked to a unique result mode. With such a
configuration, each of the 20 subsidiaries could report their transactions simultaneously in three
different ways, that is, according to their local standard, IFRS, and FAS. Groups may be added or
removed at implementation.
The system is preconfigured with the following result modes: Front/Middle Office (FO/MO), IFRS,
FAS, and Local. FO/MO is defined as Not Bookable, as accounting will not be generated from that
group. Similarly, all other modes, except FO/MO, are defined as Not Payable, as settlement of the
transactions will only be done from the FO/MO group. In Transaction Manager, it is possible to
change the display in order to view transactions according to each individual result mode.
A result mode consists of one or more result treatment methods. A result method can only be
assigned to one result mode and a transaction cannot have more than one result method from the
same result mode, but a transaction may have multiple result methods across result modes.
However, if a portfolio’s setting conflicts with the result method of the transaction, then the
portfolio’s setting takes precedence.
For example, it is possible to define both a portfolio and a result treatment as Not Payable and/or Not
Bookable. If a portfolio has either of these switches turned on but the result treatment of the
transaction is not defined in the same way, then the portfolio setting overrides the result treatment
setting. If these switches are not turned on in the portfolio definition, then the result treatment
setting is used (see 3.14.1.1 Setting further portfolio attributes on page 108 for more information).
The portfolio definition defines the result treatment for the entire transaction. You use the result
method to define for which classification or accounting standard the transaction should or should not
be payable (or bookable).
Classification group Classification
IFRS HTM – Held to Maturity
ORL – Originated Loans
AFS – Available for Sale
HFT – Held for Trading
FAS HTM – Held to Maturity
AFS – Available for Sale
HFT – Held for Trading
19 Managing accounting
19.1 Parallel accounting
Transaction & Risk Management Module (TRM) User Guide 535
The following example illustrates how classification groups could be mapped to result modes (and
their corresponding result methods):
To set up a classification group for each accounting standard, see 3.20 Classification groups on page
130.
The classification groups that apply to the portfolio owner also need to be defined in Client Editor.
So, if an Italian subsidiary needs to report results according to the Local, IFRS, and FAS standards,
the applicable classification groups would be specified as Local-Italy, IFRS, and FAS; whereas a
Spanish subsidiary would specify Local-Spain, IFRS, and FAS. This allows the system to recognize
which classifications are applicable to each transaction.
See 3.13.1.10 Applying classification groups to a portfolio owner on page 98 for more information.
19.1.2 Result treatment methods
A combination of result treatments can be defined for one result type. Result types are used as a
way of grouping the different ways of calculating and treating results of an instrument’s deals. These
types are important since they drive the available result methods that can be applied for each
instrument. It is not possible to create an instrument definition without a result type.
For example, the Bond result type is defined, and then four different ways in which results could be
treated for the Bond result type according to the result mode can be set up as individual result
treatments. For example, two result treatments for FAS, and two for IFRS, could be defined for the
same Bond result type as follows:
Note that it is possible to specify which of these is used as the default result treatment for the result
type. You can also override the default treatment at portfolio level: see 19.1.2.2 Overriding the
default treatment on page 536.
Note: For information about setting up result types and result treatment methods, see 3.15
Result types and results on page 114 and 3.15.2 Results on page 115.
Classification group Result mode Result method
Front/Middle Office FO/MO Result Method 1
IFRS IFRS Result Method 2
Result Method 3
FAS FAS Result Method 4
Result Method 5
Result Method 6
Result Method 7
Local-Italy LOCAL Result Method 8
Local-Brazil LOCAL Result Method 9
Local-Spain LOCAL Result Method 10
Result Setup
BOND-FAS-HFT Bond FAS HFT - FIFO selling
BOND-FAS-HTM Bond FAS HTM - FIFO selling - Yield based amortization
BOND-IFRS-HFT Bond IFRS HFT - FIFO selling - Linear amortization
BOND-IFRS-HTM Bond IFRS HFM - FIFO selling – Yield based amortization

19 Managing accounting
19.1 Parallel accounting
536 © Wall Street Systems IPH AB - Confidential
19.1.2.1 Assigning result types to instruments
Once the result types have been defined, they are applied at instrument level in the Result Type field
of Instrument Editor.
Note that the result type must not be changed once transactions have been created using the
instrument as there may be an impact on result calculations.
Result types are used to define classification-specific result treatments to the same instrument: see
19.2 Realizing and processing results on page 537.
For example, when setting up the bond instrument UST-5.0%-092010, you would attach the
appropriate result type defined in the earlier example: Bond. Then, for each possible classification
that the transactions in this instrument may eventually be classified as, you can pick the appropriate
result treatment in Transaction Manager.
Note: The Result feature must be present in the instrument setup unless rule-based classification
of transactions is used (in which case, the Result-Classification feature must be present
instead: see 19.1.4 Classification of transactions on page 537.
See the guide TRM Instruments: Processing and Calculations for information about these
features.
19.1.2.2 Overriding the default treatment
The default method used to calculate and treat results for an instrument can be overridden at
portfolio level.
See 3.14.1.5 Defining result treatments for a portfolio on page 112.
19.1.2.3 Aggregating results across portfolios
It is possible to aggregate transactions across portfolios for the purpose of result calculation. This is
achieved by assigning a result portfolio for each trading portfolio. The results are then calculated as
if all the transactions were in the result portfolio (this primarily impacts selling results when FIFO
and average balance are used).
It is also possible to aggregate transactions with average method on the level of parent portfolio for
different owners. The resulting balance transactions have one common owner who is the owner of
the parent portfolio.
For the sake of transparent reporting of positions, the result portfolio should be a direct parent of
the actual trading portfolios: see 3.14.2.2 Creating portfolio hierarchies on page 113 for more
information.
The result portfolios are defined per result mode, allowing, for example, a definition where FO/MO
results are always calculated within the trading portfolio, while IFRS and FAS are calculated across
all trading portfolios.
For information about how to apply the parameters for result aggregation to the top portfolio in the
hierarchy, see 3.14.1.6 Aggregating result calculations across portfolios on page 113 for more
information.
19.1.2.4 Viewing results
In Transaction Manager, it is possible to view the results of transactions according to the defined
result treatments. You can change the view by switching between result modes: see 8.2.1.5
Changing result mode on page 267.
19.1.3 Classification rules
Transactions need to be classified at some point in the transaction flow, but before the transactions
reach a state where they can be booked. Classification rules can be defined to provide default
classifications for transactions. The defaulted classifications can be overwritten by users.
19 Managing accounting
19.2 Realizing and processing results
Transaction & Risk Management Module (TRM) User Guide 537
Classification rules use the standard TRM rule and not rule concept (see Chapter 5 Managing rules
on page 221): if a transaction matches a rule (and does not match the not rule), then the
transaction is assigned a specific classification automatically. Rule matching is done for each
classification group. The first rule with the highest priority that matches the classification group is
applied.
For example, a classification rule may be defined based on the portfolio where the transaction is
entered. So, if a bond transaction is traded in a specific Trading portfolio, rules can be used to
classify it as AFS in the IFRS classification group and as HFT in the Local classification group.
Alternatively, if the same bond is traded on a specific Investment portfolio, rules can be used to
classify it as HTM in both classification groups.
For information about setting up classification rules, see 3.21 Classification rules on page 131.
19.1.4 Classification of transactions
Classification is done in Transaction Manager at any stage of the transaction flow. Using the earlier
example, when a bond is traded in the Trading portfolio, it is possible to execute the classification
process. Classification rules provide default classifications, and you may change or complete the
classifications as appropriate. The classification can be done for each classification group that has
been defined as applicable for the portfolio owner.
Classification of transactions according to the rules is performed when the Result-Classification feature
is assigned in the instrument setup.
See the guide TRM Instruments: Processing and Calculations for more information.
19.1.4.1 Performing manual classification of transactions
When classification is triggered manually (using the Classification right-click processing action in
Transaction Manager), a dialog displays all the classification groups within which the selected
transaction can be classified, and the rule-based default classifications within each group. You can
change or complete the classification.
To be able to change the classification process for a transaction manually in Transaction Manager,
the Allow-Manual-Classification feature needs to be assigned in the instrument setup.
See the guide TRM Instruments: Processing and Calculations for more information.
19.1.4.2 Generating reports
The Classification report can be used to view the classification of transactions.
See B.10 Classification Report on page 663 for details of the report’s parameters.
19.2 Realizing and processing results
The following section describes how results are realized and processed in TRM.
19.2.1 Realizing profit/loss
To see your true position in Treasury Monitor and in Periodic P/L reports, IR and FX profit or loss
needs to be realized daily.
19.2.1.1 IR profit/loss
IR profit/loss may result from an instrument reaching maturity and can also arise from the sale of an
instrument.
19 Managing accounting
19.2 Realizing and processing results
538 © Wall Street Systems IPH AB - Confidential
If required, you can define whether you want to use a specific selling convention when an
instrument is sold (such as, the FIFO principle), or whether you want to manually map sales against
purchases (see 8.4.6 Matching and unmatching transactions on page 288).
Note: The methods you wish to use to realize IR profit/loss or sell instruments are defined in the
result treatment definition and applied to the instrument, using a result type: see 3.15
Result types and results on page 114 and the guide TRM Instruments: Processing and
Calculations for more information.
19.2.1.2 FX profit/loss
FX profit/loss occurs as a result of currency fluctuations. For example, if you buy foreign equities,
you may make a profit if the equity’s value increases, but your ultimate profit/loss is also affected
by whether your currency on the settlement date is weaker or stronger than what it was when the
deal was made:
•For money market and equity sell (closing) deals, TRM can calculate FX profit/loss either
assuming that the FX profit/loss is realized on the value date of the deal only (value-date
accounting), or assuming that it is realized on both the value date and the trade date
(trade-date accounting).
•For FX deals, FX profit/loss is calculated from the currency fluctuations between the trade date
and the value date of a deal.
TRM always calculates FX profit/loss whenever the currency of the portfolio is different from the
currency of the transaction, unless the transaction is a payment transfer between two accounts
within the same portfolio (counterparty is the same as the portfolio owner).
For some transactions, it is possible to manually fix the Base FX Rate and Base FX Book Rate: see
8.4.7.8 Setting base FX rates on page 295.
Note: The method you wish to use to realize FX profit/loss is defined in the result treatment
definition and applied to the instrument, using a result type: see 3.15 Result types and
results on page 114 and the guide TRM Instruments: Processing and Calculations for more
information.
19.2.2 Processing results
End-of-day and end-of-period processing are executed separately for each result mode. This
processing can be set up to occur automatically on a daily basis or on a specific date using activities.
The End-of-Day Processing activity realizes profit/loss, performs automatic selling according to the
defined convention, creates accounting events, and can generate payment bookkeeping entries.
•To set up the activity see A.24 End of Day Processing on page 636 for details of the activity’s
parameters.
(See also 19.4 Using TRM with a General Ledger system on page 542.)
Note that modifying a transaction, which has already gone through the accounting process (see
8.4.5 Correcting transactions on page 287), may have an impact on the creation of accounting
entries when it is processed again.
–If a transaction is reopened, modified, and recommitted to Final, the original accounting
entries will be reversed and new correcting accounting entries will be created in their place if
the changes impact accounting.
–If the changes made to the transaction do not impact accounting, no new accounting entries
will be generated.
The End-of-Period Processing activity saves key-figures and creates accounting events.

19 Managing accounting
19.3 Updating the book value of deals
Transaction & Risk Management Module (TRM) User Guide 539
•To set up the End-of-Period Processing activity, see A.25 End of Period Processing on page 637
for details of the activity’s parameters.
Note: Activities are set up and managed in Activity Manager: see Chapter 6 Managing activities
on page 227 for more information.
19.3 Updating the book value of deals
In addition to automatically processing results, you can set up TRM to automatically update the book
value of deals in a portfolio, for example, following a decline or increase in the instrument’s market
value.
Updating the book value of assets is necessary under certain accounting standards, for example, it
may be compulsory to account for impairment (downward change in book value) of an asset,
whereas an upward change in book value may not be allowed.
In some countries, there are also specific legal requirements relating to the book value of certain IR
instruments and equities when a financial organization closes the books. In Finland, for example,
insurance companies have to realize the loss between the original book value and the current
market value.
Furthermore, there are specific rules when this type of realization must, or can, be done. One
example of these rules is that the Balance Sheet value can never exceed the original book value.
19.3.1 Defining the book value change method
The values used to update the book value of an instrument are defined in the result treatment
definition and applied to the instrument using a result type.
The Change Method determines which profit figures (MtoM Profit and FX Profit) are taken into account.
For example:
•Write Down methods take each profit figure into account individually before changing the book
value of the instrument.
For example, if MtoM Profit is positive but FX Profit is negative, only the FX Profit is realized and
nothing is done for the MtoM Profit figure.
•HGB method takes the sum of the figures into account, before an upward or downward change
in book value takes place.
For example, if MtoM Profit is positive, but FX Profit is negative and in excess of the MtoM Profit
figure, then the system will write down and book the figures separately.
•Manual method allows you to force a change in book value of an individual transaction in
Transaction Manager.
Note that a change in book value only occurs for instruments that have a change method selected.
If Change Method = Never, then no change in book value takes place.
Note: See 19.1.2 Result treatment methods on page 535, and the guide TRM Instruments:
Processing and Calculations for more information.
19.3.2 Making book value changes
Updating the book value of an instrument or transaction fetches the rates from Rate Monitor, based
on the scenario defined in the parameters, and calculates the change in book value amounts (MtoM
Profit and FX Profit figures).
19 Managing accounting
19.3 Updating the book value of deals
540 © Wall Street Systems IPH AB - Confidential
The change in book value equals the sum of MtoM Profit and Accrued Profit (and FX Profit, if taken
into account).
Changing the book value results in the creation of two new cashflows (for each type of profit figure)
in the transaction. The first cashflow books (realizes) the change, and the second cashflow increases
or decreases the book value for valuation purposes.
When book value is adjusted, the difference between Market Value adjusted to spot and Accrued
Book Value is equal to MtoM Profit plus FX Profit (not allowing for discounting).
You can set up TRM to automatically update the book value of deals in a portfolio using the Book
Value Change activity. You can also force a change in book value manually on an individual
transaction. It is possible to undo the most recent book value adjustment made on a transaction.
19.3.2.1 Changing the book value automatically
•To set up the activity, see A.5 Book Value Change on page 628 for details of the activity’s
parameters.
Note that if you run the Closing the Books Valuation activity (see 19.4.4 Calculating bookkeeping
entries on page 546) after running the Book Value Change activity, due to the adjusted book
value of a transaction, the MtoM Profit on the date of the Book Value Change will be equal to
Accrued Profit (expressed as a negative figure).
Note: Activities are set up and managed in Activity Manager: see Chapter 6 Managing activities
on page 227 for more information.
19.3.2.2 Changing the book value manually
If an instrument’s book value Change Method = Manual, it is possible to force a Book Value Change on
an individual transaction at transaction level using a right-click processing action.
To force a book value change:
1. In Transaction Manager, select the transaction for which you want to update the book value.
2. Right-click the transaction and select Book Value Change.
3. In the Book Value Change dialog, if necessary, modify the following parameters:
4. Click Next.
5. In the resulting dialog, select the Change Method you want to use.
The remaining fields are computed automatically according to the specified parameters.
6. Click Finish.
19.3.3 Making book value adjustments
The Book Value Adjustment right-click action is available on transactions made using instruments that
have the Allow Adjustment switch activated in the Book Value settings of their result treatment
definition: see 3.15.3.6 Defining book value methods on page 121.
Information Description
Date Date of the book value change. By default, this is today’s date.
Scenario Scenario you want to use for the calculations.
This should be the same rate scenario that is used for calculating results: see 19.4.2.1
Defining rate scenarios for result calculations on page 543.
Valuation Mode Valuation mode you want to use: Default, Benchmark, or Theoretical.
This should be the same valuation mode that is used for closing the books: see 19.4.4
Calculating bookkeeping entries on page 546.
19 Managing accounting
19.3 Updating the book value of deals
Transaction & Risk Management Module (TRM) User Guide 541
This action allows you to adjust the book value by adding additional amounts to the transaction and
can be used, for example, to capture additional fees during the life of a bond, that are charged after
its issuance date.
To adjust the book value of a transaction:
1. In Transaction Manager, select the transaction to which you want to modify.
2. Right-click the transaction and select Book Value Adjustment.
3. In the Book Value Adjustment dialog, if necessary, modify the following parameters:
4. Click Next.
5. In the resulting dialog, enter the amount of the adjustment.
The remaining fields are computed automatically according to the specified parameters.
6. Use the Treat as Cost switch, as follows:
–Switch on Treat as Cost if the adjustment is expected to target costs.
If the switch is on, the adjustment creates a Book Value cashflow of type Cost Adjustment.
–Switch off Treat as Cost if the adjustment is expected to target fair value change.
If the switch is off, the adjustment creates a Book Value cashflow of type BVC Adjustment.
7. Click Finish.
19.3.4 Undoing book value changes and adjustments
You can undo the most recent book value changes and adjustments made on a transaction either
manually on an individual transaction or automatically by using the Undo Book Value Change activity.
Note: If a transaction contains book value changes as well as adjustments for a certain date, you
cannot undo them separately; only all of them together.
Important: Each time you perform the undo action, you need to re-run any daily and
closing-the-books accounting that have taken place between the book value change
and its reversal.
19.3.4.1 Undoing book value changes manually
To manually undo (remove) the last book value changes and adjustments:
1. In Transaction Manager, select the transaction for which you want to undo any
changes/adjustments.
Information Description
Date Date of the book value adjustment. By default, this is today’s date.
Scenario Scenario you want to use for the calculations.
This should be the same rate scenario that is used for calculating results: see 19.4.2.1
Defining rate scenarios for result calculations on page 543.
Valuation Mode Valuation mode you want to use: Default, Benchmark, or Theoretical.
This should be the same valuation mode that is used for closing the books: see 19.4.4
Calculating bookkeeping entries on page 546.

19 Managing accounting
19.4 Using TRM with a General Ledger system
542 © Wall Street Systems IPH AB - Confidential
2. Right-click the book value change/adjustment cashflow for the last book value change date and
select Undo Book Value Change.
Note: Any earlier book value changes cannot be undone until the last book value change has
been reversed.
19.3.4.2 Undoing book value changes automatically
To automatically undo (remove) the book value changes and adjustments, use the Undo Book Value
Change activity. See A.68 Undo Book Value Change on page 656.
19.3.5 Generating a book value change report
You can generate a report to view the book value change history for an instrument or transaction
during a specific period.
The report displays details of the two cashflows generated by a change in book value, as well as the
yield associated with the book value change.
See B.4 Book Value Change History Report on page 660 for details of the report’s parameters.
19.3.6 Posting book value changes
The following are key rules for accounting of book value changes:
•You must not run the selling process on the BVC date after the BVC processing.
•You should run CTB and/or daily delta events generation activities just after making the book
value changes (since results in accounting should reflect changed figures affected by book value
changes and adjustments).
•If you need to enter a backdated deal before the already processed BVC date, you must first run
the Undo Book Value Change activity for the portfolio on which you want to capture the deal. Then
you can enter the deal and repeat all accounting activities.
•Each time you perform the undo action, you need to re-run any daily and closing-the-books
accounting that have taken place between the book value change and its reversal
The following steps describe a possible accounting processing for the BVC date, typically done at
year-end:
1. TRM Daily Events Generation activity including the selling process (Process Selling activity starting
field is empty or is set to Yes)
2. Book value change and/or adjustment (manually or via the activity)
3. TRM Daily Events Generation activity without the selling process (Process Selling = No)
4. Accounting Processing
5. CTB/Daily Delta accounting
6. Accounting Processing
7. Other ACM closing activities, e.g. Time to Maturity, Account Balance Revaluation, Accounting
End of Year, Period Closing, and so on.
19.4 Using TRM with a General Ledger system
It is possible to set up TRM so that it can be used with a General Ledger system, such as Wallstreet
Suite Accounting Module (ACM).
The General Ledger system can then convert the accounting events generated by the capture and
processing of transactions in TRM into posted accounting entries.

19 Managing accounting
19.4 Using TRM with a General Ledger system
Transaction & Risk Management Module (TRM) User Guide 543
Before TRM can be used with such a system, the following configuration is required:
1. Ensure that the portfolio owner for whom you want to configure accounting is defined.
See 19.4.1 Setting up the portfolio owner for accounting on page 543.
2. Configure the accounting setup (per result mode) for the portfolio owner:
–Assign the rate scenarios you want to use to calculate realized and unrealized results for the
portfolio owner (see 19.4.2.1 Defining rate scenarios for result calculations on page 543).
–Set up off-balance sheet (OBS) accounting treatment, if required (see 19.4.2.2 Configuring
OBS accounting treatment on page 544).
See 19.4.2 Configuring accounting for the portfolio owner on page 543.
3. Define the rules to establish which transactions TRM must include in the closing-the-books
unrealized results calculation and define the expected unrealized results (key-figures).
See 19.4.3 Defining bookkeeping entries on page 545.
4. Calculate and save the results for the closing-the-books key-figures.
See 19.4.4 Calculating bookkeeping entries on page 546.
19.4.1 Setting up the portfolio owner for accounting
The first step in configuring TRM for use with a General Ledger system is to ensure that the portfolio
owner for whom you want to configure accounting is defined.
A portfolio owner is defined in Client Editor (Roles = Portfolio Owner).
If you intend to perform parallel accounting, you also need to ensure that a classification group is
assigned to the portfolio owner: see 3.13.1.10 Applying classification groups to a portfolio owner on
page 98.
19.4.2 Configuring accounting for the portfolio owner
You configure the accounting setup for the portfolio owner in Accounting Configuration Editor.
Note that this editor layout is based on the application Static Data Editor (see 3.2 Static Data Editor
on page 41 for more information).
19.4.2.1 Defining rate scenarios for result calculations
For the portfolio owner, you need to assign the rate scenarios you want to use to calculate realized
and unrealized results.
The rate scenario used to calculate realized results is the same for all result modes. However, the
rate scenario used to calculate unrealized results can differ according to the result mode.
Scenarios are defined in Scenario Editor: see Chapter 4 Managing market data on page 161 for more
information.
You assign the rate scenarios you want to use for the portfolio owner in Accounting Configuration
Editor.
To define a rate scenario for the portfolio owner:
1. In Accounting Configuration Editor, select the main attributes in the upper part of the editor.
Information Description
Owner ID of the client that is defined as the portfolio owner.
Scenario Realized Scenario used to calculate realized results for the portfolio owner.
This scenario is also used to convert daily bookkeeping amounts into the booking
currency.
19 Managing accounting
19.4 Using TRM with a General Ledger system
544 © Wall Street Systems IPH AB - Confidential
2. In the Result Mode Configuration page, select and add the scenario you want to use to calculate
unrealized results for each of the portfolio owner’s result modes.
3. Save the accounting configuration using File - Save As New.
4. Complete the accounting configuration for the portfolio owner, if you need to set up off-balance
sheet accounting treatment, using the information in the following section.
19.4.2.2 Configuring OBS accounting treatment
In TRM, it is possible to handle off-balance sheet (OBS) accounting.
OBS accounting generates opening and closing entries to account for the "notional" amounts arising
from IR, EQ, and FX derivatives.
In the system, an instrument is identified automatically as requiring OBS accounting treatment by
its instrument class.
For example, FRA contracts are automatically classified as off-balance sheet instruments: they are
not reflected on the balance sheet since the transaction will be carried out at some future date. The
principal cashflows are marked as pseudo.
The way in which accounting entries for these transactions are treated for off-balance sheet
accounting is configured for the portfolio owner per result mode.
Within the configuration, you need to use standard rules (defined in Rule Editor) to capture the
transactions for which you want to generate OBS accounting entries, select the appropriate handler
(for the instrument class) to book the entries, and determine on which date or dates they need to be
booked.
Note: For information about defining rules, see Chapter 5 Managing rules on page 221.
To configure OBS accounting for the portfolio owner:
1. In Accounting Configuration Editor, select the portfolio owner from the Owner field in the upper
part of the editor.
2. In the Off-Balance Sheet page, fill in the fields using the information in the following table:
Information Description
Result Mode Result mode (accounting standard) for which you want to define the scenario.
Client Group Client main group used for accounting.
Groups of the counterparty and/or issuer can then be used in account mapping (for
example, in ACM).
Scenario
Unrealized
Scenario used to calculate unrealized results for the result mode.
Information Description
Result Mode Result mode (accounting standard) for which you want to define the OBS accounting
treatment.
Rule
Not Rule
Rule that captures the transactions for which you want to generate OBS accounting
entries and, if necessary, the Not Rule that defines the transactions that you do not
want to include (include all transactions matching Rule, except those matching Not
Rule).
Rules are defined in Rule Editor: see Chapter 5 Managing rules on page 221.
Priority Priority of this rule, in relation to other OBS accounting rules for this result
mode/portfolio owner.
19 Managing accounting
19.4 Using TRM with a General Ledger system
Transaction & Risk Management Module (TRM) User Guide 545
3. Save the OBS accounting configuration using File - Save.
19.4.3 Defining bookkeeping entries
The next step involves the definition of rules to establish which transactions TRM must include in the
closing-the-books unrealized results calculation. You also need to define the list of expected
unrealized results (key-figures).
You define the bookkeeping entries in Accounting Closing Book Editor. Note that this editor layout is
based on the application Static Data Editor (see 3.2 Static Data Editor on page 41 for more
information).
To define the bookkeeping entries:
1. In Accounting Closing Book Editor, enter the main attributes for the rule.
Handler Type of handler used to generate the OBS accounting entries.
For example, to generate the appropriate entries for a swap transaction, select
OBS-SWAP.
Opening Date
Signature Date
Settlement Date
Maturity/Expiry
Date
Date or dates on which you want the OBS accounting entries to be booked for the
transactions captured by the rule according to the selected result mode. Choose from:
•Opening Date
• Signature Date
• Settlement Date (if prior to Expiry Date)
• Maturity/Expiry Date.
Information Description
Information Description
Owner ID of the client that has been defined as the portfolio owner to which this rule applies.
Priority Priority of this rule, in relation to other closing-the-books rules for this owner.
Rule
Not Rule
Rule that selects the transactions for which you want to generate closing-the-books
entries and, if necessary, the Not Rule that defines the transactions that you do not
want to include (include all transactions matching Rule, except those matching Not
Rule).
Rules are defined in Rule Editor: see Chapter 5 Managing rules on page 221.
Key Figure Key-figure for which you want to generate bookkeeping entries.
Currency Currency of the items to be booked. For example, specify USD if you want a rule that
only selects the book value figure of bonds that are denominated in USD.
Result Mode Result mode (accounting standard) for which the closing the book rule applies.
Note that each accounting standard may have different key-figures booked for the
same transaction.
Classification Classification for which the closing the book rule applies.
If classification is specified, it is possible to generate different figures for different
classifications under the same Result Mode.
Tag Name that can be used for the grouping of key-figures (for example, in ACM).
For example, you can use a tag to calculate and assign several key-figures together
(such as FX and IR profit/loss) so reducing the number of entries.

19 Managing accounting
19.5 Hedge accounting in Wallstreet Suite
546 © Wall Street Systems IPH AB - Confidential
2. Save the rule using File - Save As New.
3. Repeat the procedure for any other bookkeeping entries you want to define for the portfolio
owner.
19.4.4 Calculating bookkeeping entries
In 19.4.3 Defining bookkeeping entries on page 545, you selected the key-figures for which you
want to generate bookkeeping entries.
You now need to set up the activity or activities to calculate and save the results for those
key-figures, based on the rule/not rule and grouping that you defined for each key-figure.
•To set up the Closing the Books Valuation activity to save the key-figures, see A.12 Closing the
Books Valuation on page 631 for details of the activity’s parameters.
•If you want to book the key-figures, you then need to run the End of Day Processing activity: see
A.24 End of Day Processing on page 636 for details of the activity’s parameters, and 19.2.2
Processing results on page 538.
•To calculate and book the key-figures in one step, you use the End of Period Processing activity:
see A.25 End of Period Processing on page 637 for details of the activity’s parameters.
Note: Activities are set up and managed in Activity Manager: see Chapter 6 Managing activities
on page 227 for more information.
19.5 Hedge accounting in Wallstreet Suite
You can set up Wallstreet Suite for the Financial Accounting Standards Board (FASB) hedge
accounting and reporting requirements needed to comply with FAS 133/138 US GAAP standard and
IAS 139 (part of the International Financial Reporting Standards (IFRS), which applies to all EU
listed companies).
Hedge accounting requires some configuration across Wallstreet Suite modules; that is, in both TRM
and ACM. Together, these Wallstreet Suite modules provide a set of tools to aid compliance in hedge
accounting core plain vanilla and base scenarios.
Note: Hedge accounting configuration across the Wallstreet Suite is described in the ACM User
Guide.
Switches
Not Switches
When key-figures are saved for closing-the-books, they are flagged as Pre-Settlement if
the transaction's valuation date is before the settlement date.
• If Pre-Settlement is selected in the Switches field, then the pre-settlement
key-figures are included in closing the books calculations.
• If Pre-Settlement is selected in the Not Switches field, then the pre-settlement
key-figures are excluded from closing the books calculations.
Information Description

Transaction & Risk Management Module (TRM) User Guide 547
Chapter 20 Monitoring VaR
Value-at-Risk is a measure of the largest likely loss for a portfolio or a position that can occur during
a given period (for example, during one month or one year) and for a given confidence level (for
example, 95% or 99%).
Note: Volatility and correlation data need to be imported from RiskMetricsTM or other similar data
provider into TRM for the VaR calculation. This is set up by the system administrator: see
the TRM System Administration Guide.
20.1 Setting up Value-at-Risk
This section explains how to set up TRM to use RiskMetricsTM Value-at-Risk data. The process is
similar for other volatility and correlation data providers.
Setting up Value-at-Risk information in TRM consists of the following steps:
1. Map RiskMetricsTM market data to TRM market data. The information you need to map includes
market variable mapping information.
See 20.1.1 Mapping RM volatilities and correlations to TRM market data on page 547.
2. Define the time horizons for each VaR mapping.
See 20.1.2 Defining VaR scenarios on page 549.
3. Assign a confidence level and risk horizon to each portfolio.
See 20.1.3 Assigning VaR properties to portfolios on page 550.
The section 20.2 Managing VaR data on page 550 describes how to view and modify VaR data in an
application called VaR Data Board.
20.1.1 Mapping RM volatilities and correlations to TRM market data
You need to map the volatility and correlation data for certain market variables provided by
RiskMetricsTM (or other data provider) to market variables recognized by TRM (currency rates, yield
curves, and instrument quotes). This is because there is not a perfect match between the
RiskMetricsTM market variables and the TRM market variables.
The mapping of RM volatilities and correlations to TRM market data is done using an application
called VaR Mapping Editor. This editor layout is based on the application Static Data Editor (see 3.2
Static Data Editor on page 41 for more information).
20 Monitoring VaR
20.1 Setting up Value-at-Risk
548 © Wall Street Systems IPH AB - Confidential
To map RM volatilities to TRM market data:
1. In VaR Mapping Editor, enter the main attributes for the mapping in the upper part of the editor.
2. In the Currency Mapping page, map each TRM currency ID to the corresponding external VaR
variable.
3. In the Interest Rate Mapping page, create the mappings between interest rate periods and the
external VaR variables. You can create several different mappings for each currency/period
combination.
Information Description
Name Name for the VaR mapping.
Gap Set Gap set used for supplying the available periods.
Currency Postfix Suffix of the external currency data, for example, “.XS”.
Index Postfix Suffix of the external index data, for example, “.I”.
Equity Postfix Suffix of the external equity data, for example, “.SE”.
Information Description
Currency The TRM currency ID, for example, EUR.
External Tag The corresponding external currency ID.
The RiskMetricsTM standard for currency mapping is AAA.XS, where AAA is the
currency code, for example, EUR.XS.
Note that since FX quotes used by RM are denominated against the USD, you do not
have to map the USD.
Information Description
Currency The TRM currency ID, for example, EUR.
Type Two standard VaR mapping types are provided at implementation: GOVT and SWAP. It
is possible to add or modify these mapping types during the implementation of the
system (see TRM System Admin Guide).
• To use only one mapping per currency (default mapping), leave this field empty.
• To use multiple mappings per currency, select a type (for example, GOVT) for the
periods that belong to the new mapping. To use this mapping with an instrument,
add the feature VaR Mapping Type to the instrument, and specify which mapping is
to be used with that instrument. See TRM Instruments: Processing and
Calculations Guide for more information.
Note: If an instrument is not set up with VaR Mapping Type feature, the default
mapping is used (i.e. one mapping per currency).
Gap Set Gap set used for supplying the available periods.
Period One of the gap periods, from the above-specified gap set, that you want to specifically
use, for example, T/N.
External Tag The corresponding VaR variable, for example, EUR.TN.
• Money market rates are for the periods (vertices) 1, 3, 6, and 12 months. The
symbols for these rates are of the form R030, R090, R180 and so on (for example,
EUR.R030, EUR.R060).
• Swap zero rates for different currencies are provided for the periods (vertices) 2,
3, 4, 5, 7, 9, and 10 years. The symbols for these rates are of the form S02, S03
and so on (for example, USD.S02, USD.S03).
• Government Bonds zero rates are for the periods 2, 3, 4, 5, 7, 9, 10, 15, 20 and 30
years for a subset of the group of currencies previously defined.
20 Monitoring VaR
20.1 Setting up Value-at-Risk
Transaction & Risk Management Module (TRM) User Guide 549
4. In the Instrument Mapping page, map each TRM instrument ID to the corresponding external
instrument ID.
5. Save the mapping using File - Save As New.
20.1.2 Defining VaR scenarios
You create VaR scenarios by defining the time horizons for each VaR mapping. The time horizon
represents the number of days of the risk period.
VaR scenarios are defined in VaR Scenario Editor. This editor layout is based on the application
Static Data Editor (see 3.2 Static Data Editor on page 41 for more information).
To define a VaR scenario:
1. In VaR Scenario Editor, enter the main attributes of the scenario in the upper part of the editor.
2. In the Horizons page, define the time horizons for the scenario.
Information Description
Instrument The TRM instrument ID.
External Tag The corresponding VaR variable.
If you have created your own data set including volatilities and correlations for the
instrument’s quotes, you can directly map each instrument you selected to the
corresponding instrument in the data set.
An equity may be handled in VaR calculations either directly or via an index depending
on the information available to you:
• If the volatility and correlation data are available for the equity in question, map
the equity to the external tag corresponding to this data, for example, map the
equity ATT (in TRM) to ATT.XS (in your data set).
• If an index is available for the equity, assign the index to the equity using the
Price-Exposure-Setup feature in Instrument Editor (see TRM Instruments: Processing
and Calculations Guide for more information about this feature).
If you choose mapping via an index, you need to map only the index to an external
data tag, not individual equities. In this case you may also use either fixed (see
next) or variable (given in Rate Monitor) beta with respect to the chosen index.
Factor The beta of the equity (Fixed Beta column) is used to obtain the equity’s volatility from
the volatility of the index.
• If you want to use a fixed beta, you can enter it in this field.
• If you enter 0, the system uses the beta entered in Rate Monitor.
Information Description
ID & Name ID and name for the VaR scenario.
Mapping ID of the VaR mapping that you defined in VaR Mapping Editor (see 20.1.1
Mapping RM volatilities and correlations to TRM market data on page 547).
Domain Domain in which this VaR scenario is available.
Information Description
Name Descriptive name for the time horizon, for example, 1 week.
Days Length of the time horizon in days: for example, enter 7 if the horizon is 1 week (see
previous).
Calculation
Method
Select the method used to retrieve the data from RiskMetrics or other similar data
provider: Import, Interpolation, or Scaling.
This field works with the Source Horizon 1 and Source Horizon 2 fields (see next).
20 Monitoring VaR
20.2 Managing VaR data
550 © Wall Street Systems IPH AB - Confidential
3. Add the definition to the scenario and repeat the procedure for each of the scenario’s time
horizons.
4. Save the scenario using File - Save As New.
20.1.3 Assigning VaR properties to portfolios
You define the confidence level and the risk horizon individually for each portfolio.
The risk horizon is the number of days of the risk period, and the confidence level is a percentage of
certainty.
For example, if a portfolio is defined with a risk horizon of 30 and a confidence level of 95% and the
Value-at-Risk is $1m, this means that you assume that, for the next 30 days, there is a 5% risk of
losing more than $1m.
In Treasury Monitor, the Value-at-Risk figures are always calculated with the attributes of the
portfolio that is entered in the Treasury Monitor Position Parameters dialog (see 12.1.4.1 Defining
position parameters on page 366), regardless of the corresponding attributes of the subportfolios. If
nothing is defined, the VaR engine uses default values:
–Confidence level: 95%
–Time horizon: 1 day
To define the confidence level and the risk horizon:
1. In Portfolio Editor, select the portfolio to which you want to assign the VaR properties.
2. In Portfolio Editor’s Properties page, define and add the properties and values you want using the
information in the following table:
3. Save the portfolio definition using File - Save.
20.2 Managing VaR data
Value-at-Risk is a measure of the largest likely loss for a portfolio or a position that can occur during
a given period (for example, overnight or during one month) and for a given confidence level (for
example, 95% or 99%).
This section displays how you can view the volatility and correlation data for FX rates, IR rates and
equities. It also describes how you can change the correlation and volatility data for purposes such
as stress-testing.
Source Horizon 1
Source Horizon 2
The horizon or horizons from which the data is interpolated or scaled.
This field works with the Calculation Method field (see previous):
• Import: an imported horizon does not use source horizons.
• Interpolation: an interpolated horizon requires two horizons (one horizon must be
shorter than the interpolated horizon, and the other horizon must be longer than
the interpolated horizon).
• Scaling: a scaled horizon requires one horizon.
Information Description
Property Value
VAR-CONFIDENCE
-LEVEL
Any number from 51 to 99. This value, used in Value-at-Risk calculations, defines the
probability of not making a loss.
VAR-HORIZON-ID Length (in whole days) of the risk horizon used in VaR calculations. The available risk
horizon depends on how the system is set up.
20 Monitoring VaR
20.2 Managing VaR data
Transaction & Risk Management Module (TRM) User Guide 551
20.2.1 VaR Data Board
VaR data is managed in an application called VaR Data Board.
VaR Data Board is split into three parts:
•In the upper part of the board, you select the scenario, date and horizon you want to view.
•In the middle of the board, you specify the confidence level information.
•In the lower part of the board, you can view the volatilities and correlations that correspond to
the scenario you have selected in a page. It is possible to add more pages and also to customize
their appearance.
20.2.1.1 VaR Data Board menus
The following tables describe the menu items which are specific to VaR Data Board.
Other menu items which are common to all applications are described in 2.2.6 Using application
menus on page 34.
20.2.1.1.1 File
20.2.1.1.2 Edit
20.2.1.1.3 View
Menu item Description
Save Data Saves any changes made to the data in the current scenario.
Menu item Description
Set Zero
Set One
Set Minus One
Allows you to set the selected rates to the same value.
• Set Zero resets all selected cells to zero (0)
• Set One resets all selected cells to one (1)
• Set Minus One resets all selected cells to minus one (-1).
Multiply by Factor Allows you to scale rates by a factor.
See 20.2.1.6.1 Scaling rates on page 553 for more information.
Add Factor Allows you to add an offset to the rates.
Fetch Retrieves the volatilities and correlations into VaR Data Board.
See 20.2.1.3 Retrieving volatilities and correlations on page 552.
Menu item Description
Select Columns
Select Rows
Opens a multi-selection list so you can select the axis values for the following rates to
be displayed: FX rates, IR reference rates, and Equities.
Swap Columns and
Rows
Changes the display of the columns and rows: the columns become rows and the rows
become columns.
Show Symmetric
Matrix
Show X/Y Matrix
Allows you to display the same rates on both axes.
• To select symmetrical axes, select View - Show Symmetrical Axes.
Any rates displayed on the Y axis are replaced by the rates on the X axis.
• To revert to a matrix with different values on the X and Y axes, select View - Show
X/Y Matrix.
20 Monitoring VaR
20.2 Managing VaR data
552 © Wall Street Systems IPH AB - Confidential
20.2.1.1.4 Page
20.2.1.1.5 Select
20.2.1.2 Start-up parameters
It is possible to alter the start-up parameters so that VaR Data Board launches in a different mode.
See C.13 VaR Data Board on page 687 for information about the options available.
20.2.1.3 Retrieving volatilities and correlations
To retrieve volatilities and correlations:
1. In the upper part of VaR Data Board, specify the scenario, date, and horizon that you want to
view.
Zoom In
Zoom Out
Zoom Default
Allows you to zoom into the display (to enlarge the figures), zoom out (to see more of
the grid), or revert to the default setting.
Hide/Show Top
Volatilities
Hide/Show Left
Volatilities
Allows you to change the values displayed on each axis.
• To hide volatility rates, and only display the correlation rates, select View - Hide Top
Volatilities or View - Hide Left Volatilities.
• To redisplay the volatility rates, select View - Show Top Volatilities or View - Show Left
Volatilities.
Show VaR Variable
Name
Show VaR Mapped
Name
Allows you to change between variable names and mapped names.
The names of the rates can be displayed using the RiskMetricsTM variable names, or
the names to which they are mapped in TRM.
Show Correlations
Show Covariances
Allows you to switch between covariance and correlation.
Menu item Description
Menu item Description
New Page Inserts a new page into the lower part of the board.
Save Page Saves the current page.
Save All Pages Saves all pages in the display.
Delete Page Deletes the current page.
Menu item Description
Scenario
Date
Horizon
Opens a selection list so you can select the scenario, date, and horizon values.
To activate these menu items, you must first click in the upper part of the board.
See also 20.2.1.3 Retrieving volatilities and correlations on page 552.
Information Description
Scenario Scenario for which you want to change the VaR data.
These are the scenarios you created in VaR Scenario Editor (see 20.1.2 Defining VaR
scenarios on page 549).
Date The date of the analysis.
20 Monitoring VaR
20.2 Managing VaR data
Transaction & Risk Management Module (TRM) User Guide 553
2. Select Edit - Fetch to retrieve and display the scenario’s volatilities and correlations into the lower
part of the board.
20.2.1.4 Changing the layout of VaR pages
From the View menu, you can change the layout of the page on which the VaR data is viewed. You
can also change the way in which the rates are displayed or expressed on the page.
To activate the menu items which allow you to make these changes, you must first click in the lower
part of the board.
20.2.1.5 Viewing data for different confidence levels
You need to enter the level of confidence used for your value-at-risk analysis. This is done in the
middle part of VaR Data Board.
The level of confidence can be expressed as a percentage, or as a multiple of the standard deviation.
If you enter one value, the other value is calculated and displayed automatically.
20.2.1.6 Changing the volatilities and correlations
From the Edit menu, there are certain operations you can perform for changing the values in the VaR
Data Board pages. It is only possible to change values when the view is configured to show VaR
variable names (not mapped names), and when the selected Horizon is not showing figures
calculated based on other Horizon’s figures (Interpolated or Scaled).
For example, it is possible to change all the rates that you select in a page to the same value (such
as, Edit - Set Zero which resets all cells to zero).
You can also scale all selected rates by a factor, or add an offset to all selected rates.
20.2.1.6.1 Scaling rates
To scale rates by a factor:
1. Select the cells whose values you want to change.
2. Enter the factor by which you want to scale the values in the Area Factor field in the middle part
of the board.
3. Select Edit - Multiply by Factor.
20.2.1.6.2 Adding offsets
To add an offset:
1. Select the cells whose values you want to change.
2. Enter the amount by which you want the values to be offset in the Area Factor field in the middle
part of the board.
Horizon Length of the horizon: these correspond to the time horizons you defined in VaR
Scenario Editor (see 20.1.2 Defining VaR scenarios on page 549).
Information Description
Information Description
Confidence Level The level of confidence that you wish to use for your VaR analysis, expressed as a
percentage.
Std. Deviation The level of confidence that you wish to use for your VaR analysis, expressed as a
multiple of the standard deviation.
Area Factor The factor by which you want to scale the values or the amount by which you want the
values to be offset (see 20.2.1.6 Changing the volatilities and correlations on page
553).
20 Monitoring VaR
20.2 Managing VaR data
554 © Wall Street Systems IPH AB - Confidential
3. Select Edit - Add Factor.
4. Select File - Save Data.
Transaction & Risk Management Module (TRM) User Guide 555
Chapter 21 Managing messages
In TRM, a message request is a record in the system which indicates that a message or a document
must be created. It contains all the information to allow the system to create the correct type of
message, in the correct message layout, and from the correct event (for example, a transaction).
The creation of the message request involves setting up message groups, message types, and
message rules, and applying them to the appropriate contact.
The processing of a message request requires that the actual message is produced. The message
may correspond to either a single-record message or a multi-record message. In both cases, the
messages are produced using the preconfigured message layouts identified in the message request.
Messages can be managed in TRM in a similar way to transactions. At each stage in the processing
of the message requests, they can be viewed, modified, and moved forward (or backwards) in the
flow.
The last step in the process is the physical delivery of the message or document to the correct
contact or contacts via the appropriate message medium (such as Fax, E-mail, or Telex) as
identified in the message request.
Note: See the TRM System Administration Guide for more information about how to set up
message management.
21.1 Setting up message requests
The following sections describe the procedure for setting up message requests.
21.1.1 Setting up message groups
A message group can be used as a grouping tool when setting up individual message types.
Also, the selection of the contact can be made dependent on the message group of the message
being processed.
Message groups are defined in Message Group Editor. This editor layout is based on the application
Static Data Editor (see 3.2 Static Data Editor on page 41 for more information).
To set up a message group:
1. In Message Group Editor, enter the main attributes of the group.
2. Select File - Save As New to save the group.
Information Description
ID Unique ID for this message group.
Description Descriptive name for this message group.
Domain Domain in which this message group is available.
21 Managing messages
21.1 Setting up message requests
556 © Wall Street Systems IPH AB - Confidential
21.1.2 Setting up message types
A message type defines a specific type of message. A message type may be made up of several
message subtypes. Subtypes can define multiple sets of message instructions within one message
type.
From a processing point of view, a message type may involve the creation of a single message, or it
may involve the creation of multiple messages to be sent to multiple contacts.
For example, within one message request, it is possible to instruct TRM to send the main notification
by SWIFT to the counterparty, a second one by E-mail to the portfolio-owner, and a third by fax to
the bank.
Message types (and subtypes) are set up in Message Type Editor. This editor layout is based on the
application Static Data Editor (see 3.2 Static Data Editor on page 41 for more information).
To set up a message type:
1. In Message Type Editor, enter the main attributes of the message type in the upper part of the
editor.
2. Select File - Save As New to save the message type definition.
3. Complete the message type definition using the information in the following sections.
21.1.2.1 Defining the recipients of the message
To define one or more contacts to whom message requests generated from this message type can
be sent:
1. In Message Type Editor’s Recipient Role page, select and add the client roles you want from the
Role field.
The available roles are filtered according to the value defined in the Message Object field in the
upper part of the editor. For example, if Message Object = Transaction, the list will include roles
such as Counterparty and Bank. TRM will take the appropriate Client ID from the corresponding
field in Transaction Manager when the message is generated.
You may also add an Ad Hoc role. This allows you to identify a specific Client ID (that is not
available with the message object) when you define the message rules: see 21.1.3 Setting up
message rules on page 558.
2. Select File - Save to save the message type definition.
21.1.2.2 Defining the message medium
Message medium identify all possible media via which messages under the message type can be
sent (for example, Fax and E-mail).
Information Description
ID & Name Unique ID and descriptive name for the message type.
Group Message group to which the message type belongs.
Message Object Underlying object in TRM from which the message is generated, for example,
Transaction, Payment, and so on.
This value determines the set of data components that can be used in the message,
known as the message content. See 21.1.2.4 Defining the message subtypes on page
557 for more information.
Domain Domain in which this message type is available.
21 Managing messages
21.1 Setting up message requests
Transaction & Risk Management Module (TRM) User Guide 557
To define the method by which message requests generated from this message type can be sent:
1. In Message Type Editor’s Medium page, select and add each medium you want to include.
2. Select File - Save to save the message type definition.
21.1.2.3 Defining the message language
Message languages identify all possible languages in which messages under the message type can
be produced. This implies that separate layouts will have to be created for each language.
To define the languages in which messages generated from this message type can be sent:
1. In Message Type Editor’s Language page, select and add each language you want to include.
2. Select File - Save to save the message type definition.
It is also possible to define a preferred language for a specific contact: see 3.13.1.2 Setting up client
contact information on page 92.
21.1.2.4 Defining the message subtypes
Message subtypes identify all possible instances of individual messages created under the same
message type.
They define a version of the message type which should be used for a specific type of underlying
event (for example, for a specific type of transaction). A message subtype links a message object to
a set of data properties which represent the content of the message.
These properties correspond to the actual data fields or reports that you would expect to see in the
message output. The list of available message properties for a particular message type/subtype
combination is filtered according to the message object and the source of the data.
To define the message subtypes and the content to include in the message type:
1. In Message Type Editor’s Subtype page, enter and add an ID and descriptive name for each
subtype.
2. Select File - Save to save the message type definition.
3. In Message Type Editor’s Content page, select and add the details of the properties used to
generate the output for the message.
Information Description
Medium Medium used for the physical delivery of the message, such as E-mail, Fax, Telex, or
SWIFT.
Message media are defined in Settlement Transfer Method Editor.
Switches Switch on Default to identify the message medium as the default.
The default medium is always used if the medium selected for the message request is
not one of the eligible media in the message type.
Information Description
Language ID of the eligible language for the message type, for example, en_US for English (US).
Switches Switch on Default to identify the language as the default.
The default language is always used if the language selected for the message request
is not one of the eligible languages in the message type.
Information Description
Subtype ID of the message subtype for which the message content is set up.
21 Managing messages
21.1 Setting up message requests
558 © Wall Street Systems IPH AB - Confidential
4. Select File - Save to save the message type definition.
21.1.3 Setting up message rules
Message rules are used to identify the message requests that need to be created from a specific
underlying event (for example, a new transaction). Message rules also identify the detailed
attributes of the message requests.
When message requests are processed for a specific event, a matching message rule must be found
for the message processing to take place. If no matching message rule is found, then no message
requests can be created or delivered.
Message rules are defined in Message Rule Editor. This editor layout is based on the application
Static Data Editor (see 3.2 Static Data Editor on page 41 for more information).
To set up a message rule:
1. In Message Rule Editor, define the main attributes of the rule in the upper part of the editor.
The main attributes determine the data against which the underlying event is matched when
identifying the message rule under which message requests for a specific message group can be
processed.
2. In the Subtype field, select the specific message subtype for which the message rule is set up.
Note that the available subtypes are dependent on the Message Type defined for the message rule
in the upper part of the editor.
Source Source of the content, for example, Transaction.
This field works with the Message Object field in the upper part of the editor. Only the
properties which relate to the defined message object are available for selection.
Once you have selected the main source of content, you can then select attributes of
the source from the Item field: the list of available data in the Item field changes
according to the source.
Item Name of the individual source attribute that you want to use to generate the content
in the message.
When you add a source, more items become available for selection. You can select as
many of the items (and sub-items) associated with the Message Object or Source as
necessary.
Property (Information only) ID of the property name.
Information Description
Information Description
ID & Name Unique ID and name of the message rule.
Message Type Type of message for which the message rule is set up.
Priority Priority of the message rule. If the underlying event matches more than one rule,
TRM uses the rule with the highest priority.
Entity Type (Commercial Loans only)
Type of entity (for example, Facility) if the message rule has been set up for a specific
entity type.
Entity (Commercial Loans only)
ID of an entity if the message rule applies only to that individual entity.
Location Location to which the message rule applies. Locations are set up in Country Editor.
Rule Rule that the underlying event must match in order for the message rule to apply.
Not Rule Rule that the underlying event must not match in order for the message rule to apply.
21 Managing messages
21.1 Setting up message requests
Transaction & Risk Management Module (TRM) User Guide 559
3. In Message Rule Editor’s Message Rule Instance page, enter the values to identify which message
instances must be included in the message request created from the source record.
4. Repeat this procedure until you have defined all message instances for the message rule.
5. Save the message rule definition using File - Save.
21.1.4 Assigning message details to clients
Once the message requests have been defined, they need to be applied to the appropriate client
contact.
Contact information for a client is set up in Client Editor’s Contacts page. Here, you can define the
types of message to be sent to each contact or message recipient, and the necessary information
(such as the address, or fax number) to ensure that the physical delivery of the message actually
takes place.
Any number of client contacts can be attached to a single client and the correct one to be used is
selected based on various filter criteria (Rule, Message Object, Message Group, and so on),
depending on the business context in which the contact is used.
In message processing, a Client Contact is always used to create a message request. The contact is
selected by matching information in the source record (for example, a transaction) with the
attributes of the message request being created against the contact entries.
See 3.13.1.2 Setting up client contact information on page 92 for more information.
Information Description
Recipient Role Role of the client for which this message instance applies.
Recipient ID of the client to whom a message must be sent (that is, the client ID entered in the
Recipient field of the message request).
This field becomes available when Ad Hoc has been specified as the role in the
Recipient Role page: see 21.1.2.1 Defining the recipients of the message on page 556.
In most cases this field is not used as the Recipient is automatically identified by the
system from the source record based on the Recipient Client value of the message
instance (that is, Counterparty, Beneficiary, and so on).
However, in facility-specific message rules for example, it may be necessary to send
an additional copy of the message instance to a specific legal entity (such as, a parent
company of the Counterparty) that is not named in the source record. In this case,
the client ID of the legal entity can be entered here and the message rule set up as
follows: “every time a notification is created in this facility, this client ID “CP-ABC”
must also be notified”.
Medium Medium (for example, E-mail or Fax) used in the message request for this message
instance.
If a message medium is defined in this field, this medium is always used regardless of
whether a Preferred Medium is defined for the recipient client contact.
Language Language used in the message request for this message instance.
If a language is defined in this field, this language is always used regardless of
whether a Preferred Language is defined for the recipient client contact.
Template Template to be used for the message instance for the specified medium.
If no template is specified, the system uses the default template. Templates are set
up at implementation.
Switches •Switch on Primary Recipient to identify the message instance as the primary (first)
message of the message type. A primary message is always the first message in
any message request generated for the message type.
• (Commercial Loans only) Switch on Optional Message to use in conjunction with the
role Facility / Tranche Adhoc when there are no Adhoc Clients defined on the Facility,
but you still want to process the Message Request for any other roles, such as
Counterparty.
21 Managing messages
21.2 Message Manager
560 © Wall Street Systems IPH AB - Confidential
21.2 Message Manager
Message Manager is an application which is based on the Transaction Manager application layout.
In Message Manager, messages can be managed in a similar way to transactions using similar state
and mode concepts as those in Transaction Manager’s transaction flow.
Message Manager allows you to track a message’s progress, and move it forwards or backwards in
the flow.
21.2.1 Message Manager menus
The following tables describe the menu items which are specific to Message Manager.
Other menu items which are common to all applications are described in 2.2.6 Using application
menus on page 34.
21.2.1.1 View
21.2.2 Start-up parameters
Message Manager is a special Transaction Manager mode, designed specifically for processing
messages in TRM.
The start-up parameter used to open Transaction Manager’s Message Manager mode is:
FKTransactionManager.exe -c MM.xml
See C.11 Transaction Manager on page 685 for information about the options available.
21.2.3 Message modes
Different modes of Message Manager can be configured to display messages in a particular state in
the flow.
At all points in the flow a message has a state (for example, To be validated, To be transmitted, or
Transmitted). When a message moves forwards or backwards in the flow, its state changes based
on the process flow defined for it.
In a typical TRM implementation, a different Message Manager mode may be configured for each
stage in the flow to correspond to each of the message states used: it is possible to set up an
unlimited number of verification stages.
For certain message types, the process flow may consist of only one relevant state (those that do
not require validation).
Only the messages with the appropriate state are visible in the corresponding mode.
Note: The message process flow is set up at implementation: see the TRM System Administration
Guide.
Menu item Description
Message Request
Query
Displays the Message Request Query view.
This view is used to retrieve message requests that are already in the system for
monitoring or further processing: see 21.3.1 Retrieving messages on page 561.
Message Request Displays the Message Request view.
The results of the query are displayed in this view.
Message Displays the Message view.
This view displays all message instances generated from the selected message
request.

21 Managing messages
21.3 Processing messages
Transaction & Risk Management Module (TRM) User Guide 561
21.3 Processing messages
21.3.1 Retrieving messages
To allow you to process messages, you need to retrieve them into Message Manager.
Retrieving messages is done in the Message Request Query view of Message Manager. Message
requests are retrieved from a blank query row. In this row you enter the criteria that you want the
retrieved messages to match.
When the messages have been retrieved, you need to move to another of the views as you cannot
process the messages in the Message Request Query view. You can only retrieve messages that
have the relevant state that corresponds to the Message Manager mode.
21.3.2 Previewing messages
In the Message view, you can preview the message that will be transmitted.
•To see a preview, right-click the message and select Preview.
TRM creates and displays an on-screen version of the final message. This preview is for display
purposes only.
Note: The document templates and layouts used to generate the messages are defined at
implementation: see the TRM System Administration Guide.
21.3.3 Verifying or modifying messages
When you have checked the message preview, you can approve, modify, or cancel the message as
appropriate.
However, it is only possible to modify the message request in one of the Remark fields in the
Message Request view. The Save action (in both the toolbar and the context menu) enables you to
save the current message without moving it in the flow.
Note that if you modify or cancel a message request, this applies to the entire message request. You
cannot modify or cancel an individual message if the message request contains more than one
message.
Once the message has been approved (or rejected), it moves to the next state, which may
correspond either to a state consistent with the transmission of the message or another
intermediate state of the process flow.
•In Message Manager’s Command menu, you can select from the commands: Accept, Reject,
Transmit, and In Error.
The message request is moved to the next (or previous) state in the flow.
If any errors have been encountered in the processing or delivery of a message, these are described
in the Log Message fields.
21.3.4 Retransmitting messages
In the Message view, you can retransmit a message that has already been transmitted.
•To retransmit a message, right-click the message and select Resend.
Resending a message creates a duplicate record of the original message with the new date/time
of the retransmission.
Note: Note that this action is only available when the message request has reached a state that
is compatible with the successful transmission of all messages belonging to it.

21 Managing messages
21.3 Processing messages
562 © Wall Street Systems IPH AB - Confidential
21.3.5 Creating personalized warning messages
It is possible to configure the transaction flow to create a message request with personalized text,
instead of a default system message, at a particular stage in the flow.
The message request can either be transmitted immediately without further intervention, or it can
follow the normal approval process in Message Manager before it is sent to the recipients (see 21.3
Processing messages on page 561).
For example, when a transaction is moved from the Final state to the Re-Open state (as described in
8.4.5 Correcting transactions on page 287), a default warning message will be displayed if
accounting entries are impacted. The default warning message can be replaced with a personalized
message, such as an E-mail. The E-mail can then be sent to the concerned users (for example, in
the Accounting department) to inform them of the changes made to the transaction and their impact
on accounting.
Note: The transaction process flow, together with the creation of message requests triggered by
a change in transaction state, are set up by the system administrator: see the TRM System
Administration Guide for more information.

Transaction & Risk Management Module (TRM) User Guide 563
Chapter 22 Managing RMI and CMI
This chapter explains how to use RiskManager Interface (RMI) and CreditManager Interface (CMI) in
TRM.
22.1 Managing RMI
RMI is used to export position information from TRM to RiskManager. RMI supports the XML-based
RML position format to describe positions.
RiskManager is a RiskMetrics Group's application for measurement and analysis of market risks that
implements the industry-standard methodologies including: Parametric VaR, Monte Carlo
simulation, historical simulation, advanced stress testing (simple and predictive), and customizable
reports.
All calculations within RiskManager are performed using RiskMetrics historical time series from
DataMetrics.
RMI is defined at instrument level using the RiskManager position template trading feature. This feature
allows you to assign RMI parameters to an instrument, as follows:
1. Select the appropriate RM template according to the instrument type.
See 22.1.1 Assigning RMI mapping strategies to instruments on page 564.
2. Specify whether a position should be aggregated at instrument level.
See 22.1.2 Grouping by instrument on page 564.
3. Define yield curve risk factor mappings for use with RMI.
See 22.1.4 Defining yield curves for RMI on page 564.
4. Define equity risk factor mappings for use with RMI.
See 22.1.5 Defining equities for RMI on page 568.
5. Define instrument-specific risk factor mappings for use with RMI.
See 22.1.6 Defining instruments for RMI on page 569.
Once you have assigned the mapping strategies, you also need to define the parameters required to
export your TRM positions to RiskManager. See 22.1.7 Exporting and importing positions on page
570.
Note: See the guide TRM Instruments: Processing and Calculations for more information about
the RiskManager position template feature and about features in general.

22 Managing RMI and CMI
22.1 Managing RMI
564 © Wall Street Systems IPH AB - Confidential
22.1.1 Assigning RMI mapping strategies to instruments
Each TRM position, that is, a transaction or an aggregated position, can be exported using one of the
following mapping strategies:
•One-to-one RM template
This is the most straightforward and secure strategy, and it should be used whenever an
RiskManager template matches the TRM instrument or transaction.
•Risk-equivalent cashflow approach
This strategy can be considered the default export strategy and can be used for all TRM
instruments. However, this approach generates a lot of risk information for optional instruments
and should, therefore, be used only for "linear" instruments.
Using this approach, the cashflows of the TRM risk-equivalent position of this transaction are
exported (and not the true cashflows of the transaction).
In TRM, the corresponding cashflow key-figures are called Risk Value for the cashflow amount and
Risk Date for the cashflow date. These key-figures are available in Treasury Monitor and
Transaction Manager.
•Risk-equivalent portfolio approach
This approach should only be used for optional instruments, either those not covered by
RiskManager, or when neither of the first two strategies is possible or acceptable.
See E.1 RMI mapping strategies on page 699 for more information about the instruments covered
by RMI and the mapping strategy that should be selected for each one.
Note: It is possible to exclude withholding tax cashflows from the cash section of the bond RM
template: see the TRM Installation Guide for more information.
22.1.2 Grouping by instrument
By default, RMI exports individual transactions. This is the case for all openly-defined instruments
such as Depo/Loan, Swaps, FX Forwards, and FRNs.
If you want to export a position aggregated at instrument level, this must be specified in the
instrument definition (using the Group by Instrument switch).
Grouping by instrument is useful for exchange-traded instruments, such as Bond Futures (and
Options), Interest Rate Futures (and Options), Equities, and Bonds. It makes position processing
much more efficient in RMI and RiskManager.
22.1.3 No Pending Cashflows
If there is a cashflow to be settled on the day of exporting, RMI, by default, exports the balance
output (e.g. the settlement cashflows). However, this default behavior can be overwritten by setting
the switch No Pending Cashflows to on in the RMI tab of the Instrument Editor, see the TRM
Instruments: Processing and Calculations guide for more information.
22.1.4 Defining yield curves for RMI
All IR asset types have a discount curve that is used for pricing purposes, and some of them, such
as floating-rate instruments, also have a reference curve that is used to estimate unknown future
coupons.
Most RiskManager asset types have four yield curve-related fields that need to be mapped
consistently:
•discountCurve
•discountCurveSpread
22 Managing RMI and CMI
22.1 Managing RMI
Transaction & Risk Management Module (TRM) User Guide 565
•referenceCurve
•resetSpread.
Only the discountCurve and the referenceCurve fields must contain a yield curve name that matches
one currently defined in the RiskManager Market Data database. The discountCurveSpread and
resetSpread are "flat" or "actuarial" spreads that will be added to the discountCurve and
referenceCurve, respectively. Therefore, the spread and the curve should be consistent with each
other for both the discount and the reference parts.
For a given IR position, RMI populates the yield curve-related fields for the discount part and the
reference part according to a particular priority and logic.
The reference and discount parts can be treated separately: RMI populates the discount and
reference parts using different priority logic. However, within each part, the curve and spread should
be consistent with each other and, therefore, will be populated using the same priority logic.
This logic is described in E.1.2 Yield curve mapping logic on page 702.
The following sections describe the steps you need to take to define yield curve mappings between
TRM and RiskManager.
•The TRM-instrument based set-up (priority 1) should be used to override the best practice
set-up for a specific instrument.
See 22.1.4.1 Setting up TRM instrument-based mapping (priority 1) on page 565.
•The recommended setup is to use TRM-based yield curve mapping (priority 2).
See 22.1.4.2 Setting up TRM-based mapping (priority 2) on page 566.
•If no yield curve related set-up has been found in TRM for a given position, then the default logic
will then be applied apply (priority 3, then 4).
See 22.1.4.3 Setting up the RM template-based mapping (priority 3) on page 566.
The following sections describe how to set up yield curve mapping for priorities 1, 2, and 3.
22.1.4.1 Setting up TRM instrument-based mapping (priority 1)
The TRM-instrument based setup should be used to override the best practice setup for a specific
instrument. This logic assumes that the curve (either discount or reference) is defined at instrument
level.
To set up this type of yield curve mapping, the following parameters need to be specified at
instrument level:
Note: If one of the valuation or forward curves is missing in Instrument Editor for the instrument
under consideration, RMI will try to use the TRM instrument-based yield curve mapping
logic (see 22.1.4.3 Setting up the RM template-based mapping (priority 3) on page 566).
Information Description
RM Discount Curve Name of the RM yield curve used as the discount curve.
You can also enter any yield curve name available in RM such as a corporate yield
curve (for example, "US Corp All Industry Ba")provided that the instrument is
sufficiently narrowly defined.
RM Reference Curve Name of the RM yield curve used as the reference curve.
RM Spread Discount
Curve
Name of the RM yield curve used for the spread.
If you have specified a RM Reference Curve, you also need to specify the RM Spread
Discount Curve. If this field is left blank, then Spread is used as the default value.
22 Managing RMI and CMI
22.1 Managing RMI
566 © Wall Street Systems IPH AB - Confidential
22.1.4.2 Setting up TRM-based mapping (priority 2)
The TRM-based yield curve mapping simply mimics the way TRM defines the yield curve used for
discounting purposes, and the yield curve used for future coupon estimation (defined as the
valuation curve in Instrument Editor). The valuation curve refers to yield curves defined in IR Quote
and Yield Curve Editor, and assigned the RM-INTEREST-RATE-ID property in IR Quote and Yield
Curve Editor.
If the curves can be used for discounting purposes, you should also assign the
RM-SPREAD-TO-INTEREST-RATE property. The way RMI populates the discountCurveSpread field
depends on the Value specified in IR Quote and Yield Curve Editor for this property:
Note: See 3.3.9.2 Assigning properties on page 49 for more information about properties and
how to assign them to static data entities.
22.1.4.3 Setting up the RM template-based mapping (priority 3)
If the two steps above have failed due to an incorrect or missing setup, RMI will try to use the RM
template-based yield curve mapping.
The logic that RMI uses to populate the discountCurve and referenceCurve fields depends on specific
properties assigned in Client Editor (for the issuer of the bond or underlying bond) and in Country
Editor (country of the issuer).
22.1.4.3.1 Bond-related instruments
Bond-related instruments are bonds and bond-based derivative RM templates as defined in
RiskManager (such as, bond, bondFuture, bondOption, and bondFutureOption).
To define the correct RM yield curve to discount the cashflows of these instruments, the following
characteristics must be taken into account:
•Issuer type of the instrument
•Country of the issuer
•Currency of the transaction.
For the first two characteristics, you have to set up some properties in Client Editor and in Country
Editor.
Note: See 3.3.9.2 Assigning properties on page 49 for more information about properties and
how to assign them to static data entities.
Value Result in discountCurveSpread field
Zero No spread is added.
Spread Spread found in Transaction Manager’s Spread column or in Instrument Editor’s Spread
field is used.
Discount Margin Value of Transaction Manager’s Discount Margin key-figure is used.
22 Managing RMI and CMI
22.1 Managing RMI
Transaction & Risk Management Module (TRM) User Guide 567
The following table describes the algorithm that is used to define the yield curves:
Note: In general, countries with a small economy, a weak currency, or a low credit rating tend to
issue bonds in strong foreign currencies of countries with a large economy and a high
credit rating.
As a result, from the point of view of a foreign investor, such bonds involve the "same"
credit-spread risk as bonds issued by a non-government issuer (for example, a private
company) from their own country which have also the "same" credit-spread risk as
domestic swaps.
22.1.4.3.2 Setting up the instrument’s issuer type
The RM-GOVT-ISSUER property is used in RMI to distinguish between a Government and a
non-Government issuer (default value). You only need to set up properties for a Government issuer.
When the RM-GOVT-ISSUER property is not assigned to the issuer client entity, RMI considers that
the issuer is not a Government one.
•To identify an issuer as a government issuer, assign the RM-GOVT-ISSUER property to the client
entity in Client Editor's Properties page and select Yes in the Value field.
22.1.4.3.3 Setting up the issuer’s currency
You can define the currency of the issuer’s country in Country Editor’s Properties page. This is done
by assigning the RM-CURRENCY-ID property to the issuer’s country and specifying the issuer’s
currency in the Value field.
22.1.4.3.4 Money Market instruments
For Money Market instruments, the RM yield curves are populated depending on the maturity of the
instruments as explained in the following table:
22.1.4.3.5 Swap-related instruments
Swap-related instruments include all other derivative IR instruments covered by RiskManager:
Interest Rate Future, Option on Interest Rate Future, FRN, FRA, Cap/Floor/Collar, Swap, and
Swaption.
Issuer Country of
issuer
Currency of
transaction RM yield curve Example
Govt Euro zone EUR <Currency of the
Country Govt>
"ITL Govt" for an Italian
bond
Any < >EUR = the currency
of the country
<Currency of the
transaction> Swap
"USD Swap" for a Spanish
bond issued in USD
Any =EUR = the currency of
the country
<Currency of the
transaction> Govt
"GBP Govt" for a British
bond
Non-Euro zone EUR EUR Swap "EUR Swap" for a Japanese
bond
Non-Govt Any Any <Currency of the
transaction> Swap
"SEK Swap" for ABB
Maturity RM yield curve Example
(Maturity Date - Due Date) < 1 Year <Currency> Money Market "USD Money Market" for a 3M Depo/Loan
in USD
(Maturity Date - Due Date) > 1 Year <Currency> Swap "EUR Swap" for a 1.5Y Depo/Loan in Euro

22 Managing RMI and CMI
22.1 Managing RMI
568 © Wall Street Systems IPH AB - Confidential
For these instruments, both the discountCurve and the referenceCurve should be:
•<Currency> "Swap"
where <Currency> is the currency of the instrument (or the currency of the specific leg for
swaps).
22.1.5 Defining equities for RMI
RMI offers the possibility to map an equity to an external proxy, for example, DataMetrics used by
RiskManager, or to internal data, that is, a TRM equity instrument. This section describes the proxy
logic and the way to set up these proxies in TRM.
22.1.5.1 Using external market data
Typically, equity proxies are set up in TRM to map equity names to RiskManager equity names. The
default treatment is to export equities using the TRM equity ID. However, this would lead to errors
at import as RiskManager equity names are seldom used as a TRM equity ID. Therefore, the
mapping proxy functionality of RMI should be used in the following ways:
•To map a TRM equity to its counterpart in RiskManager (same equity, different names): only the
RM Equity Name field in Instrument Editor must be set to the RM equity name.
•To map a TRM equity to another equity in RiskManager (different equities, different names): the
RM Equity Name field in Instrument Editor must be set to the RM equity name, and the beta factor
between the TRM equity and RM proxy must be set (RM Equity Beta field in Instrument Editor).
•To map a TRM equity to a RiskManager stock index: a stock exchange must be set up in TRM in
Client Editor, and the RM-PROXY-ID property in Client Editor must be set to the RM stock index
name (see 3.3.9.2 Assigning properties on page 49) for more information about properties and
how to assign them to static data entities).
The beta factor between the equity and the index is taken from the RM Equity Beta field in
Instrument Editor or from Rate Monitor.
The proxy mapping logic used by RMI is summarized in E.1.3 Equity mapping on page 703.
22.1.5.2 Using internal market data
If you specify a value (an equity instrument) in the Native Equity Proxy field in Instrument Editor’s RMI
page to indicate that internal market data should be used, you also need to select a value in the RM
TRM Equity Beta field.
22.1.5.3 Equity mapping for equity derivatives
The RM Equity Name and RM Equity Beta logic involves three main fields of the RiskManager Import file,
namely: equityName, beta, and equityPrice.
The first two fields are populated using the equity mapping setup as explained in the previous
sections.
The last field, equityPrice, refers to the underlying equity. For normal equity positions, the proxy
logic can be applied to the equity instrument. However, for equity derivatives (equity futures and
equity options), the mapping logic is applied to the underlying equity.
RMI fetches the underlying equity id from the Underlying field of the equity option instrument
definition and then applies the proxy logic to that underlying equity.
Note: If the Underlying field is not defined, the mapping proxy is applied to the derivative
instrument. This could lead to an incorrect statement of risk in RiskManager.
22 Managing RMI and CMI
22.1 Managing RMI
Transaction & Risk Management Module (TRM) User Guide 569
22.1.6 Defining instruments for RMI
Some RM templates contain a specific reference to the RiskManager database. These are: Inflation
Index bonds, Mortgage-Backed Securities, and Overnight Index Swaps.
The TRM instruments based on these RM templates must have an instrument-specific mapping
defined. This is a mandatory setup.
22.1.6.1 Index-linked bonds
Index-linked bonds are exported using the RiskManager inflationIndexedBond RM template. This RM
template supports Capital Inflation Index Bonds, where both the capital and interest are linked to an
inflation index. The specific entries required by the RM import specifications are described in the
table below:
22.1.6.2 Mortgage-backed securities
Mortgage-backed securities (MBS) are exported using the RiskManager mortgageBackedSecurity
template. Indeed, when it is known that the ABS/MBS is in the RM Market Data database, the
position is exported as RM MBS. Otherwise, you can always export the underlying risk-equivalent
stream of cashflows. The specific entry required by the RM import specifications is described in the
table below:
Note: RiskManager covers MBS issued by the US agencies (Fannie Mae, Ginnie Mae, and Freddie
Mac) only.
22.1.6.3 Overnight index swaps
Overnight index swaps (OIS) should be exported with the RM template OvernightIndexSwap. The
specific entries required by the RM import specifications are described in the table below:
Note: RiskManager covers standard overnight index swaps and the pricing method it uses is
similar to that of TRM. In terms of risk, TRM estimates the risk of the floating leg like a
RM field Mapping
realYieldCurve Yield curve used for discounting future coupons as found in the Market Data database;
typically an inflation-based yield curve (for example, "Swedish Inflation linked bond
3.5 due Dec 2015"). This information must be set at instrument level in TRM.
The RM Specific Mapping field in Instrument Editor’s RMI page should be used.
refIndex Unique identifying name of an inflation index (for example, "FRCPI").
Use the RM Index field in Instrument Editor’s RMI page to specify the index.
Lag Reference index read lag time in months (the lag between the publication of the
reference index and its valuation date).
Use the RM Index Lag field in Instrument Editor’s RMI page to specify the index.
RM field Mapping
mbsName MBS name is bond specific, and therefore this information must be set at instrument
level in TRM (assuming MBS are narrowly defined).
The RM Specific Mapping field in Instrument Editor’s RMI page should be used.
RM field Mapping
overnightIndex Overnight index on which floating coupon payments are based. This must be a yield
curve name that matches one currently defined in the RiskMetrics Market Data
database.
The RM Specific Mapping field in Instrument Editor’s RMI page should be used.

22 Managing RMI and CMI
22.1 Managing RMI
570 © Wall Street Systems IPH AB - Confidential
deposit (calculated from the known fixing up to today) with a term of 1 day for O/N OIS or
2 days for T/N OIS. The OIS RM template does not cover OIS based on the T/N rate.
If desired, you can approximate T/N OIS by exporting T/N OIS transactions with the
normal OIS RM template. The risk generated by the floating leg will be smaller than it
should be, and will be attributed to the O/N instead of the T/N period.
If this approximation is not satisfactory, then T/N OIS can be exported as Risk Cashflows.
This will replicate the exact risk structure of the instrument, although the position will be
less tractable in RiskManager.
22.1.7 Exporting and importing positions
This section explains how to export and import positions between RiskManager and TRM.
22.1.7.1 Exporting positions
You use the Risk Manager Export activity to export positions in the position file from TRM into
RiskManager.
The extension of the position file is always "rml", which stands for risk markup language. RML is the
RiskMetrics format used in RiskManager 3.x to describe a position (risk-based XML).
Once this file has been created, you can run RiskManager and import the data in the RiskManager
database.
Before importing the position file within RiskManager, it is important to check for warnings and
errors in the activity notification mail and make the necessary fixes within TRM (or directly in the
position file).
•To set up the activity see A.59 Risk Manager Export on page 652 for details of the activity’s
parameters.
If you want to use TRM market data for some portfolios and RiskManager market data for
others, you have to set up more than one activity. You will also need to define a portfolio
hierarchy. You must split your portfolio tree into as many branches as you have activities (see
3.14.2.2 Creating portfolio hierarchies on page 113).
Note: Activities are set up and managed in Activity Manager: see Chapter 6 Managing activities
on page 227 for more information.
22.1.7.2 Importing position files into RiskManager
Refer to your RiskManager documentation to find out how to import your position from TRM into
RiskManager.

22 Managing RMI and CMI
22.2 Managing CMI
Transaction & Risk Management Module (TRM) User Guide 571
22.2 Managing CMI
CMI is used to export obligors and exposures (transactions or positions) information from TRM to
CreditManager.
CreditManager enables firms to measure and manage their credit risks using a Credit VaR
framework (CreditMetrics). The CreditMetrics methodology was introduced in 1997 by J.P. Morgan
to enable financial institutions to quantify credit risk of traditional credit products, fixed income
instruments, and market-driven instruments, subject to counterparty default.
CMI is defined at instrument level using the CreditManager position template trading feature. This
feature is used to define whether all transactions based on a specific instrument should be exported,
as follows:
1. Select the appropriate CM template according to the instrument type.
See 22.2.1 Assigning CMI mapping strategies to instruments on page 571.
2. Set up the static data for use with CMI:
–See 22.2.2 Defining obligors on page 571.
–See 22.2.3 Defining obligor credit ratings on page 572.
Once you have assigned the mapping strategies, you also need to define the parameters required to
export your TRM exposures and obligors to CreditManager: see 22.2.5 Exporting and importing
exposures and obligors on page 573.
Note: See the guide TRM Instruments: Processing and Calculations for more information about
the CreditManager position template feature and about features in general.
22.2.1 Assigning CMI mapping strategies to instruments
You need to specify the appropriate CM mapping template in the instrument setup.
The instruments covered by CMI and the recommended CM template for each instrument are listed
in E.2 CMI mapping strategies on page 704.
Once you have selected the appropriate template for the instrument, there are some additional
parameters you also need to define. These are explained in the following sections.
22.2.2 Defining obligors
An obligor is an entity to which you have credit exposure, such as an issuer (for example, corporate
bonds), a borrower (for example, participants in the interbank market), a customer on credit (for
example, retail banking), or a counterparty (for example, an OTC derivative transaction).
From a credit risk perspective, the true obligor is the parent entity of the entity holding the
exposure. In TRM, the purpose of the Parent field in Client Editor is to link all subsidiaries and
branches to their parent companies. Therefore, the parent obligor is identified as the ultimate
ancestor of the client family tree, based on the Parent.
The obligor, as defined in CreditManager, depends on the TRM instrument’s definition as well as
related transaction parameters (such as, transaction type, issuer, owner, or counterparty).
In Transaction Manager, the CM Obligor transaction parameter field will default to the
parent-counterparty of the transaction in the following cases:
•Transaction where the underlying instrument is an off-balance instrument
•Transaction with transaction type equal to Option or Call or Put
•Transaction where the Issuer and Owner fields are the same.
In all other cases, the CM Obligor will default to the parent-issuer of the transaction. In these cases,
you can overwrite the default value.
22 Managing RMI and CMI
22.2 Managing CMI
572 © Wall Street Systems IPH AB - Confidential
Obligors are defined in Client Editor by assigning properties and enhanced properties.
Note: See 3.3.9.2 Assigning properties on page 49 for more information about properties and
how to assign them to static data entities.
22.2.3 Defining obligor credit ratings
CMI supports standard credit rating systems from Standard & Poor's or Moody's investors service.
For instance, the "S&P 8-state" rating system contains 8 different rating states from AAA (the best)
to CCC (the worst) plus the default state D. Custom rating systems can be added to the CMI
database.
Defining obligor credit ratings is done in two stages. First, you must define the credit rating systems
for CMI. You then need to map the CMI credit ratings to the obligor entity.
To define credit rating systems for CMI:
1. In Credit Rating Editor, select the relevant entity.
See also 3.31 Credit ratings (optional) on page 142 for more information about setting up this
type of static data.
2. In the Credit Rating Map page, enter the relevant rating code.
3. In the Properties page, select CM-RATING-ID from the Property field.
4. In the Value field, enter a value using the following syntax:
<RATING AGENCY>
where <RATING AGENCY> is one of the possible credit systems available in CreditManager.
Property Value
CM-OBLIGORS-
WEIGHTS
(Enhanced Properties
page)
Each obligor is assigned a credit rating. Correlations of credit rating migrations
between individual obligors are derived using the country/industry profile of each
obligor.
1. In the Object(2) field, enter a value using the following syntax:
<Country>^<Industry>
2. In the Value field, enter a value using the following syntax:
<Number>
where Number represents the dependency of the obligor with respect to the
related Equity Indices.
CM-TOTAL-ASSETS Enter a value.
CM-COUNTERPARTY-
TYPE
The possible values are: Corporate, Banks, and Sovereign.
CM-EXPORT To prevent the export of obligors that do not have any related exposures, and to allow
the export of those that do, you add the CM-EXPORT property to the entity. This
property has two possible values:
• Yes - export the obligor
• No - do not export the obligor.
Note: The default value is Yes. If the property is missing, the obligor will be exported.
CM-SHORT-EXPOSURE For netting and collateralization, you add the CM-SHORT-EXPOSURE property to the
entity to define whether short positions against a specific obligor should be either of
the following:
• Not exported (Do not Export)
• Exported as such (Export as such).
22 Managing RMI and CMI
22.2 Managing CMI
Transaction & Risk Management Module (TRM) User Guide 573
To map the CMI credit ratings to the obligor client entity:
•In Client Editor, fill in the fields in the Credit Ratings page using the information in the following
table:
22.2.4 Defining exposures
In Instrument Editor, you can define the following exposures for CMI:
22.2.5 Exporting and importing exposures and obligors
This section describes how to export and import exposures and obligors between CreditManager and
TRM.
22.2.5.1 Exporting exposures and obligors
CMI exports individual transactions. This is the case for all openly-defined instruments such as
Depo/Loan, Swaps, FX Forward, and FRN.
Note that settlement cashflows are not exported.
You use the CreditManager Exposure Export activity to export positions from TRM into
CreditManager.
•To set up the activity, see A.73 CreditManager Exposure Export on page 657 for details of the
activity’s parameters.
Information Description
Rating Rating for the obligor.
The choices available are the credit ratings that you defined in Credit Rating Editor.
Rating Code Credit rating that corresponds to the obligor.
Information Description
CM Debt Issuer Type The possible values are Libor or Government (Govt).
CM Seniority Level To add a seniority class to an instrument enter a value using the following syntax:
<Code (Recovery rate, Standard Deviation)>
where:
Code is defined by the table found in the appendix: see E.2.2 CM Seniority Level on
page 707.
CMI can also send its own recovery rates and standard deviation. In this case, specify
the CM Seniority Level as USER(<rate>,<std_dev>).
CM Spread Curve CMI uses spread curves (and yield curves) for future valuations of exposures.
Standard spread curves, supplied in CMI, are corporate spreads to government zero
yields by industry and credit ratings.
Enter a value using the following syntax:
<Industry^CM-RATING-SYSYTEM^CurrencyCode>
where:
RATING-SYSTEM is one of the credit rating systems available in CreditManager,
Industry is one of the CreditManager industries, and CurrencyCode represents the
currency.

22 Managing RMI and CMI
22.2 Managing CMI
574 © Wall Street Systems IPH AB - Confidential
You use the CreditManager Obligor Export activity to export obligors from TRM into CreditManager.
•To set up the activity, see A.74 CreditManager Obligor Export on page 658 for details of the
activity’s parameters.
Note: Activities are set up and managed in Activity Manager: see Chapter 6 Managing activities
on page 227 for more information.
22.2.5.2 Importing exposure and obligor files into CreditManager
Refer to the CreditManager documentation to find out how to import your exposures and obligors
into CreditManager.

Transaction & Risk Management Module (TRM) User Guide 575
Chapter 23 Pricing IR and FX trades
TRM provides pricing tools for IR and FX trades: IR Pricing and FX Pricing. You can use IR Pricing to
simulate the pricing of Vanilla swaps and swaptions (see 23.1 Pricing IR trades on page 575), and
FX Pricing to simulate different types of pay-off, such as, Digital/Vanilla options, Barriers, and so on
(see 23.2 Pricing FX trades on page 593).
Both tools use TRM static data, market feed, valuation methods, and other entities to provide
real-time pricing simulations from which you can generate transactions in TRM.
As in TRM, trades and transactions created in these tools go through TRM’s transaction flow to
control the static data at various stages of the trade or transaction definition. For both tools, it is
possible to disable/enable the Commit and Re-Open actions using the Configuration Table Editor (see
the TRM System Administration Guide for more information).
The main difference between these tools and existing TRM pricing tools is that IR Pricing and FX
Pricing tools are designed to allow you to do the pricing in a single application. That is, you can
create a trade with all relevant information in one place before generating the transaction in TRM.
For more information about existing TRM Pricing tools, see 4.6 Pricing tools on page 186.
Note: In this chapter, the term trade refers to the pricing simulation; the term transaction refers
to the deal booked to TRM.
23.1 Pricing IR trades
This section describes how to use the IR Pricing tool to capture and store pricing simulations. The IR
Pricing tool makes it easy for traders to capture and store pricing simulations using dedicated
instruments with IR Pricing features. These features define the characterization of the instruments
and the pricing valuation and calibration. Calibration is done through NumeriX features attached to
the instrument.
See TRM Instruments: Processing and Calculations Guide for more information about IR Pricing
instruments.
Additionally, IR Pricing uses payoff types which are defined in a specific editor called IRP Payoff
Types Editor. This editor functions in a similar way to other TRM editors.
23.1.1 Defining IRP payoff types
Payoff types are defined in the IRP Payoff Type Editor. This editor is specific to IR Pricing. Payoff
Types are predefined expressions that are used in floating leg trades in IR Pricing. When you
retrieve an existing trade, IR Pricing matches the expression that was saved with the trade with one
of the predefined payoff types. The matching process includes both active and inactive payoff types.
When a match is found, the payoff type is automatically populated. When a match is not found, and
there is an active and modifiable payoff type with an empty expression, then this type is displayed
and the expression remains modifiable. Otherwise, a special Unknown type is displayed. This type is
modifiable, if and only if, there is at least one active and modifiable payoff type.
Note: If the payoff type matched with the expression in the retrieved trade has since been
disabled, it will still be recognized, but will not be modifiable.
23 Pricing IR and FX trades
23.1 Pricing IR trades
576 © Wall Street Systems IPH AB - Confidential
TRM provides the following predefined payoff types:
To define a payoff type:
1. In IRP Payoff Type Editor, click New to create a new payoff type and complete the following
information:
2. Click Save As to save the definition.
23.1.2 IR Pricing tool
The IR Pricing tool enables you to capture trades, run pricing simulations, view and adjust quotes
and key figures, and then to generate the trade as a standard TRM transaction. In fact, the IR
Pricing tool enables you to perform deal entry, pricing, and monitoring functions in one application.
The IR Pricing tool functions in the same way as any other TRM manager, monitor, and so on.
23.1.2.1 Perspectives
IR Pricing provides two perspectives in which to perform pricing, one is dedicated to providing a
global vision of the trade; the other perspective is dedicated to the calibration aspect of the trade.
You access these perspectives through two buttons (Trade perspective and Calibration perspective)
located on the upper right-hand side of the screen.
Payoff Type Expression
Capped / Floored CMS max (floor %, min (cap%, cms +spread %))
Capped / Floored Libor max (floor %, min (cap%, ir +spread%)
CMS cms+spread%
Leverage CMS factor*cms + spread %
Leverage CMS Cap / Floor max (floor %, min (cap%, factor*ir +spread%)
Leverage Libor factor*ir + spread %
Leverage Libor Cap / Floor max (floor %, min (cap%, factor*ir +spread%)
Libor ir +spread%
Overnight Compound compound(@,@,@,@,[ir+spread%],@)
Undefined This expression is modifiable so that you can enter the expression when you
create a trade.
Unweighted Average average_q(@,@,@,@,[ir+spread%])
Weighted Average average(@,@,@,@,[ir+spread%])
Information Description
ID & Name Unique ID and name for the payoff type.
Expression Unique expression used to calculate the trade. If the payoff type is modifiable
and you modify the expression, then the original payoff type definition is also
updated.
Note: Only the expression part of the payoff type definition is saved with the
trade.
Inactive Switch on to exclude the payoff type from the list of available payoff types.
Payoff types set to inactive cannot be selected in IR Pricing. Existing trades
that use inactive payoff types are not effected by the inactive switch. In this
case, the expression cannot be modified.
Modifiable Switch on if you want to be able to modify the expression in the IR Pricing.
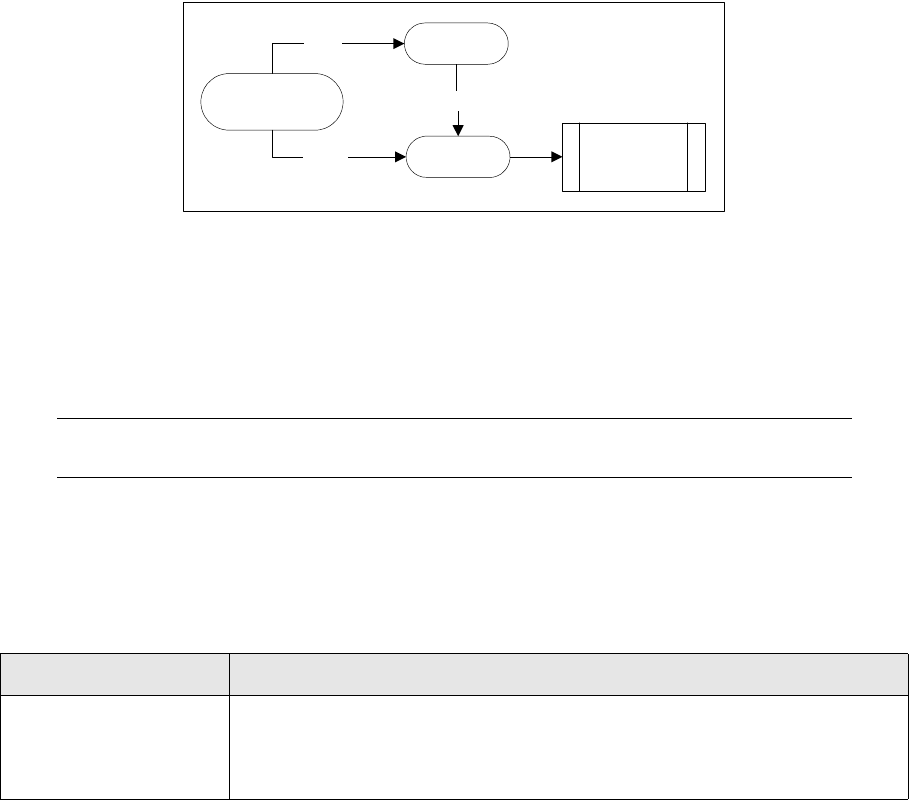
23 Pricing IR and FX trades
23.1 Pricing IR trades
Transaction & Risk Management Module (TRM) User Guide 577
•Trade perspective, provides a layout containing all the views you will need to perform pricing, for
example, Enter Board, Trade Setup, Key Figures, Blotter, Query, Quotes Graph and Quotes. The Trade
perspective is the default perspective.
•Calibration perspective, only shows the Calibration view where you can select and run the
calibration and view the calibration output. Calibration is mainly needed for NumeriX.
23.1.2.2 IR Pricing trade processing
IR Pricing uses similar commands as TRM to move the trades through the transaction flow to
different states. The transaction flow after the Open state is identical to the one in TRM, except for
the Simulated state, which is specific to IR Pricing trades, as shown in the following flow:
The Save command moves the trade to the Simulated state, i.e. draft trade. Unlike trades in the Open
state, trades in the Simulated state are not yet booked.
The Apply command moves the trade to the Open state; a trade in this state is booked. A booked
trade means that it is considered by the system as any deal captured in TRM. Trades in Simulated and
Open states can be re-priced or canceled. In both cases, trades are assigned a transaction number
(TX Number) and can be queried in the Query view or in IRP Transaction Lookup (Ctrl+L).
Note: When you have booked the trade, you can continue to process the generated transaction
in Transaction Manager like you would any other TRM transaction.
23.1.2.3 IR Pricing menus
This section describes the menus that you use to create pricing simulations, and then generate them
in TRM.
23.1.2.3.1 File
23.1.2.3.2 View
All IR Pricing views are available from the View menu. IR Pricing views function in a similar way to
TRM views in that they are dockable and you can arrange them on the screen in a manner that best
suits your purposes. You can use the icons in the view’s toolbar to customize the width of the views,
or minimize and maximize views. Another way to minimize and maximize views is to double-click
the view’s tab. This minimizes the other views, and maximizes the view to use the freed space.
Double-clicking the maximized view tab restores the view to its initial size and position, and restores
the other views.
The information in the views dedicated to capturing trades is organized into one or more sections.
Each section contains specific information about the selected trade. This information can be
New trade
(no state)
SIMULATED
OPENApply Transaction
Flow
Apply
Save
Menu Item/Shortcut Description
Properties...
Ctrl+P
Opens the Properties dialog where you set up your pricing properties. This dialog is
used only when there are no pricing properties specified at the trade level, i.e.
default only, and when the trade is not saved.
Typically, you define the pricing properties at the trade level in the Pricing section.

23 Pricing IR and FX trades
23.1 Pricing IR trades
578 © Wall Street Systems IPH AB - Confidential
customized to your needs. For more information about sections, see 23.1.2.4 IR Pricing sections on
page 581.
Hint:
Some columns may be hidden. To show or hide columns, click the Select Properties icon in
the toolbar of the section.
Blotter
Shows the information (trade and legs) of all trades (new and queried). This view is useful when
pricing multiple trades at the same time, as you can use it to navigate from one trade to the other.
It is similar to the Transaction view in TRM. The results of queries made in the Query view are
displayed in the blotter.
Calibration
Shows the models and calibration parameters used for the pricing of transactions. It shows the
same information as the Calibration perspective. It functions in a similar way to TRMs Calibration
Monitor. You can calibrate, view, and modify the outputs of the calibration. When you modify the
outputs, all pricing figures are updated to reflect the changes. Outputs are displayed in the right side
of the view. There can be more than one output for a calibration depending on the trade.
Calibration is needed only when using NumeriX valuation. When estimation curves and NumeriX
valuation are defined at the instrument level, IR Pricing defaults to these settings for the calibration.
If NumeriX valuation is not defined at the instrument level, the calibration model defaults to the Hull
and White model.
These defaults are explained in more detail in the TRM Instruments: Processing and Calculations
guide.
You can also modify and save calibration sets and baskets in the Calibration view. The calibration
sets and baskets are saved to the relevant editor.
Cashflows
Mainly used to display the output of transactions, similar to the Transaction Manager’s Cashflow
view.
Enter Board [Ctrl+Home]
Displays all of the information relative to the transaction definition. By default, both legs are visible
side by side with the fields that must be set up for the pricing. Once you have selected the currency,
any information that you select or enter in this view is taken into account in the Quote view.
*Key Figures
This view enables you to view the relevant key figures for the selected trade. For a swaption, you
can view the following key figures among others: Strike Price, Forward Price, Delta, Gamma, Theta,
and Vega.
Hint:
To refresh key figures press Ctrl+K.
The key figures you can see in this view are identical to the ones you can see in TRM, except for the
following:
•Weighted Average Life (WAL): Weighted average life is computed by leg and corresponds to the
weighted average of the principal repayments.
Equation 23-1 Weighted Average Life calculation
WAL n
i1=
∑pi
p
----ti
=

23 Pricing IR and FX trades
23.1 Pricing IR trades
Transaction & Risk Management Module (TRM) User Guide 579
where
–P is the Principal
–Pi is the principal repayment on the coupon i and ti at the time from the valuation date to
the coupon i
If applicable, you can use the Solver to set a target value for the market value and adjust either the
fixed rate of the fixed leg, the spread of the floating leg; or for swaptions, the premium price.
To use the Solver to set a target market value, click the Solver icon (or press Ctrl+S), enter the target
market value, and either select the leg to adjust the rate or spread according to the leg type; or
select Premium to adjust the premium price.
Query
Enables you to fetch existing trades and transactions previously entered in IR Pricing. You can only
fetch trades and transactions entered in IR Pricing. The result of the query is displayed in the Blotter
view.
Similar to the TRM Query view, you can enter criteria in multiple rows and/or columns combined with
the operator OR to fetch specific trades and transactions. Empty cells mean that the column is not
relevant to the query, and is ignored. You can also hide or show query columns by right-clicking
anywhere in the column header and selecting Select Columns.
The following columns are available for querying: Tx Number, Tx State, Portfolio, Counterparty, Trader,
Instrument, Instrument group, Trade Type (Swap or Swaption), Currency, Secondary Instrument (underlying
swap instrument for swaptions, not used for swaps), Opening Date, Value Date, Maturity Date, Expiry Date
(for swaptions only).
Hint:
You can rename the labels of these columns to suit your business purposes in the Select
Properties dialog (Select Columns), by right-clicking the property you want to rename and
selecting Rename. These new labels are saved with the layout. To reset the name, simply
click Reset Renamed, the label is reset to its initial value.
Quotes
Enables you to visualize the market information of the specified currency (or currencies) in the
dedicated tab for the trade you are pricing. For each currency, the following pages are displayed:
Yield Curves, Swaption, Cap/Floor, and Caplet/Floorlet. When you modify any pricing settings that directly
impact the calculations, the market information is updated dynamically.
•Bid, Ask quote, Bid discount factor (DF), Ask discount factor, and for IR Quotes defined with the
Bootstrap Yield Curve feature and yield curves defined as Single Quote, yield and discount factor of the
yield curve attached to the currency for the scenarios. You can have direct access to the quotes
received from the feed for a given date and scenario. See 3.8 IR quotes and yield curves on page
64.
•PAR value of the currency as well as the Zero Curves.
•Bid, Ask quotes of the volatility surfaces of the Caplets/Floorlets and Swaption attached to the
currency for the scenarios.
•Graph showing the bid, ask and average quotes of the yield curves at a given time.
You can modify the market values, for example, if you estimate that the market value will attain a
certain rate, and you want to simulate the trade based on that estimate. Modified values appear in
bold and are saved with the trade.
You can also use the underlying curve switches to filter one or more of the underlying curves in the
Yield Curves page, for example, if you want to focus on the market information for a given underlying
curve.
23 Pricing IR and FX trades
23.1 Pricing IR trades
580 © Wall Street Systems IPH AB - Confidential
When the yield curve is calculated from the MM Future Chain instrument, the underlying money
market quotes are also displayed. These quotes can be modified to check their impact on the
transaction key figures. MM future quotes are saved with the trade.
Note: For more information, see Chapter 4 Managing market data on page 161.
Trade Setup [Ctrl+End]
Shows the same information as the Enter Board view, except that it is arranged differently. The Trade
Setup view is split into two main sections, Trade Structure (which cannot be customized) and a section
that shows the selected component’s details. You can display the Trade Structure as a standalone
view.
This view is typically used to perform more advanced pricing on the trade, for example, to define
schedule structures, callable swaps, valuation setup, irregular values and irregular amortizations,
and so on.
Trade Structure
Shows the main components of the trade in a tree-like hierarchy, e.g. for swaps, per leg, schedule
(Interest, Compounding, Amortizing), and Call (for a callable swap) . You can navigate these
components by using the Expand (+) and Collapse (-) buttons located on the left of each component.
Administration Views
23.1.2.3.3 Application
View Description
Log View Enables you to check the log file while you are working in IR Pricing. Log files are
stored on your local drive in the following folder:
\Application Data\Wall Street Suite
Progress View Alternatively, you can also access this view by clicking the show progress icon in
the right-hand corner of the status bar. This view shows recently performed
actions. You can remove all completed operations from the view or set up
preferences by clicking the menu and selecting Preferences...
Service Statistics Shows information about the connections and failure reasons. You can refresh
statistics, keep them synchronized or clear them.
System Messages Shows system messages organized by severity, time and message. When
available a hint is displayed. You can clear all messages when you have finished
checking them.
Menu Item/Shortcut Description
Pricing Tools Opens IR Pricing or FX Pricing.
23 Pricing IR and FX trades
23.1 Pricing IR trades
Transaction & Risk Management Module (TRM) User Guide 581
23.1.2.3.4 Command
23.1.2.3.5 Screen
23.1.2.3.6 Window
23.1.2.4 IR Pricing sections
The views are organized in sections. Each section contains all relevant information to specific
settings of the trade. You can use the default display, or you can customize the display by using the
Menu Item/Shortcut Description
New Trade...
Ctrl+N
Opens the New Trade... dialog where you select the instrument type (trade type),
such as Swap, Swaption or Any) and then the instrument itself.
This dialog is split into two main parts: the upper part shows a list of instruments
(with IR Pricer feature); the lower part shows characteristics of the selected
instrument, for example:
• For swaps: Leg types (fix or Floating), whether the swap is callable (or not),
the instruments assigned to the legs, and swap type (single or cross currency).
• For swaptions: Trade type, type, amortization type, underlying swap and
underlying swap type, and leg types.
You can navigate the list of instruments by using the Up and Down arrow keys.
See TRM Instruments: Processing and Calculations Guide for more information
about swap instruments.
Duplicate Trade
Ctrl+D
Creates a new trade with the same characteristics as the initial trade, apart from
the transaction number and the state. After the trade has been duplicated, it is
possible to change some of the characteristics of the new trade. This is a useful
function when you need to create many deals with similar characteristics using the
same instrument.
To duplicate a trade, select the trade or transaction and press Ctrl-D.
Execute Query
Ctrl+E
Fetches the transactions that match the query you have entered in the Query view.
(This command works in the same way as it does in TRM.)
Refresh Key Figures
Ctrl+K
Refreshes the market feed and re-calculates figures for the pricing.
Toggle Solver
Ctrl+S
Toggles the solver on or off. The Solver is located in the Key Figures view; it
enables you to change key figures and to apply these new figures to the trade.
Transaction Lookup
Ctrl+L
Opens IRP Transaction Lookup. IRP Transaction Lookup is a mode of the Transaction
Manager dedicated to IR Pricing transactions. You can use it to perform TRM-like
actions on the transactions you generated in IR Pricing.
Note: Only transactions captured in IR Pricing are displayed.
Refresh Static Data
Ctrl+R
Refreshes the static data and re-calculates figures.
For general information about static data, see Chapter 3 Managing static data on
page 41.
Menu Item/Shortcut Description
<application name> Shows all open sessions and enables you to toggle between these sessions.
Close Screen Closes the active Pricing session.
Menu Item/Shortcut Description
New Window Opens another session of the active pricing application in a new window.

23 Pricing IR and FX trades
23.1 Pricing IR trades
582 © Wall Street Systems IPH AB - Confidential
icons located in the toolbar in each section. Use the following icons to customize what information is
displayed in the sections:
•The Select Properties... icon enables you to show or hide fields in a section to display only those
that are relevant to your needs. In some cases, you will find that some of these fields are used
in other parts of IR Pricing.
For example, if you change the Maturity Code in the Enter Board view - main characteristics, the
corresponding field is updated in the Trade Setup view. It is a means to organize the information
according to a specific purpose.
•The Select Sections... icon enables you to add or remove sections from a view.
The following table describes the main sections at the top component level:
The following table describes the main sections at the leg component level:
You use most of these sections to enter a trade. The fields in these sections are described in more
detail further on in this chapter.
Section Description
Pricing Enables you to modify or define the pricing settings for the selected trade.
NumeriX Enables you to configure NumeriX valuation settings for trades using NumeriX.
Transaction Enables you to select the information required to save or apply the trade. You can
also see the transaction number when the trade has already been saved or
applied.
Section Description
Conventions Available for both types of legs: Contains the fields you can use to set up business
and payments conventions.
Irregular Values (For Swaps only.) Available for the Interest component, for both types of legs:
Enables you to add, remove, duplicate, import or export irregular values. You use
irregular values to modify schedule data with validity ranges when a given field
needs to take several values into account depending on the date:
• Fixed: From When and Rate
• Floating: From When, Factor, Spread, Divider, Cap, Floor.
Use the + or x icons to respectively add or remove values to or from the view.
Irregular Amortizations (For Swaps only.) Available for the Amortizing component, for both types of legs:
Enables you to specify irregular amortization schedules. The grid shows two
columns: Date and Value. The dates are generated automatically according to
start and end dates and frequency of the trade. The value corresponds to the
selected amortization type: Percent, Amount or Outstanding Amount. By default,
the principal is repaid at maturity date.
You can synchronize the amortization values of both legs by selecting the leg you
want to copy and clicking Copy to Other Leg. You can also import and export
irregular amortizations by clicking the Import Irregulars or Export Irregulars.
Note: Select Irregular as the calculation method to activate this section.
Reset Available for the Interest component, for floating legs only: Enables you to change
certain settings of the trade.
You can use the information in this section to capture, as part of the transaction,
details of the interpolation period to be used for the first or last cashflow, For
example, to specify the periods between which the first stub will be interpolated
by using the Initial Fixing period and Initial Fixing period 2nd fields.
23 Pricing IR and FX trades
23.1 Pricing IR trades
Transaction & Risk Management Module (TRM) User Guide 583
23.1.2.5 Pricing IR trades
This section describes how to capture a trade, simulate pricing, perform calibration, view market
information, and then generate a TRM transaction based on the simulation.
Note: All default values appear between parentheses.
23.1.2.5.1 Entering a new trade
This step describes how to enter a trade specific to IR Pricing. IR Pricing trades use swap
instruments with a special feature IR Pricer attached. The IR Pricer feature defines the
characterization or characteristics of the swap instrument, which includes whether the swap is
callable (Yes or No), leg types (Fixed or Floating) and swap type (Single or Cross Currency). These
characteristics cannot be modified at the trade level. For more information about setting up
instruments for IR Pricing see TRM Instruments: Processing and Calculations Guide.
Most of the fields used to enter a trade are similar to the ones used to capture deals in TRM. See
TRM documentation for more information about these fields.
When you have entered all mandatory fields, you can save the trade at any time by using the Save
command. Mandatory fields are indicated as such in the following tables.
Note: New or changed data always appears in bold in the views.
To enter a new trade:
Note: The displayed fields may differ according to your user defined settings. To show or hide
properties in sections, click Select Properties icon in the toolbar of the section.
1. In the IR Pricing window, Trade perspective, press Ctrl+N or click the New Trade... icon to create a
new trade.
2. In the New Trade... dialog, select the instrument type, i.e. swap or swaption. The available
instruments are displayed.
3. Select the instrument with the characterization that best meets your needs. You can view the
characteristics of the selected instrument in the Instrument details area of the dialog.
4. Click Select.
5. In the Enter Board view, use the following table to complete the main characteristics of the swap
or swaption trade:
–If you are entering a swaption trade, complete the Swaption and Premium fields as follows:
Field Description
Instrument Read-only. Shows the swap instrument used for this trade.
Exercise Type Read-only. Defaults from the characterization.
Sign Buy or Sell.
Opening Date (Mandatory) The opening date of the trade. Defaults to the current date.
This date is also the default pricing date.
Expiry Code If the Expiry Date Setup feature is applied at instrument level, you can
enter the expiry date period you want to use to calculate the expiry date
for the transaction.
Expiry Date Last date when the option can be exercised.
23 Pricing IR and FX trades
23.1 Pricing IR trades
584 © Wall Street Systems IPH AB - Confidential
Premium fields:
–If you are entering a swap or a swaption trade, complete the IR Swap fields according to the
swap type:
6. Use the following table to complete the main characteristics of the legs:
Field Description
Type
Currency
Type and currency of the premium. If these values are defined at the
instrument level using the Option Premium feature at instrument setup,
then these values are used as the default in the transaction and cannot
be modified.
Price Depends on the premium type: this could be specified in amount,
percent, or points.
Amount (Read-only). Computed from the premium type/price.
Date Settlement date of the premium.
Field Description
Instrument Read-only. Shows the swap instrument used for this trade.
Opening Date (Mandatory) The opening date of the trade. Defaults to the current date.
This date is also the default pricing date.
Value Date (Mandatory) This date corresponds to the Spot date which is also the
trade date. This date depends on the convention used.
Maturity Code The code of the maturity period of the Swap, which can be in months or
years, for example, 1M, 5M, 3Y, 6Y, and so on. The systems automatically
calculates the maturity date.
Maturity Date (Mandatory) The maturity date of the Swap. The maturity date is
calculated according to the selected maturity code.
Maturity Adjusted Choices are Yes or No:
• Select Yes, if the maturity date is calculated based on the selected
Days Convention defined in Amortizing.
• Select No, if the maturity date is calculated based on the Days
Convention defined in Interest.
Pricing Mode The valuation mode used for the pricing. For example, Default (default),
Theoretical, Benchmark or All.
Callable Read-only. Shows whether the swap is callable (Yes) or not (No).
Note: This information is defined at instrument level as part of the
characterization and cannot be modified.
No Common Maturity Yes or No:
•No (default) means that the same maturity date is used for both legs.
• Select Yes, if you want each leg to have a different maturity date.
FX Rate (For cross currency instruments only.) FX Rate that you want to set for
the transaction.
Field Description
Instrument Read-only. Shows the instrument used for this trade.
23 Pricing IR and FX trades
23.1 Pricing IR trades
Transaction & Risk Management Module (TRM) User Guide 585
7. Use the following table to complete the Interest fields of the legs:
Note: You can also choose to complete the interest fields in the Trade Setup view - Interest
component.
Currency (Mandatory) The currency of the leg of the Swap. If you are defining a single
currency swap, the currency of the second (right) leg is automatically
populated when you select the currency of the first (left) leg.
Note: When you select a currency, the Quotes view displays the market
information based on the entered parameters.
Amount (Mandatory) The amount of the Swap’s leg. The Sign field is populated.
Sign This field is automatically populated when you enter the amount. By default,
the first leg is always Receive, the second Pay.
Estimate Rate (For floating legs only.) Defaults to the estimation curve defined at the
instrument level, or if not defined, uses the setup defined at the currency
level instead. You can overwrite the default curves (in which case, defaulting
should be done according to the mode and currency).
Valuation Rate Defaults to the valuation curve defined at the instrument level, or if not
defined, uses the setup defined at the currency level instead. You can
overwrite the default curves (in which case, defaulting should be done
according to the mode and currency).
Field Description
Generation Method The method used for cashflow generation. The choices are:
Bullet, Times/Year (default), IMM dates, ISDA dates, weeks, year and so on.
Frequency The number of coupons per year.
Days Convention The convention used to generate the cashflows. The choices are:
•Backward: The previous business day is used.
•Following: The next business day is used.
•Modified Backward: The previous business day is used except if not in the
same month, in which case the next business day is used.
•Modified Following: The next business day is used, unless this falls in the
following month, in which case the previous business day is chosen.
•None: No adjustment.
Calendar The calendar of the currency used to generate cashflows.
Day Count Fraction The day count fraction used in the coupon calculations. You can use the filter
field to shorten the list of available options.
Corresponds to TRM’s standard date bases. See TRM Instruments: Processing
and Calculations Guide for detailed descriptions of date bases.
Start Date The start date used for the generation of coupons.
End Date The end date used for the generation of coupons.
Period End Dates Yes or No:
If you want the value dates of the coupons to be adjusted according to the
conventions, select Yes, otherwise keep the default, No.
Field Description

23 Pricing IR and FX trades
23.1 Pricing IR trades
586 © Wall Street Systems IPH AB - Confidential
8. For both swaps and swaptions, use the following tables to complete the Interest fields according
to the type of leg:
Hint:
You can also choose to complete the interest fields in the Trade Setup - Interest component.
–If you are defining a fixed leg:
–If you are defining a floating leg:
Field Description
Rate The fixed rate of the fixed leg of the Swap.
Rate Type The rate type of the rate, for example, monthly, quarterly, semiannual
compounded, periodic, or coupon rates.
Field Description
Payoff Type Select the payoff type according to the trade you are entering:
• For swaps: select the payoff type that you want to apply to this trade.
Each type contains a unique expression which is displayed in the
Expression field. Payoff types are defined in the IRP Payoff Type Editor,
see 23.1.1 Defining IRP payoff types on page 575.
• For swaptions, the payoff type defaults to LIBOR (i.e. ir+spread%)
and is not editable.
Note: If you select Undefined, the Expression field is editable and you can
enter an expression, if and only if you have defined a modifiable
expression.
Expression Shows the expression corresponding to the selected Payoff Type. You can
only modify the expression if you select the Undefined payoff type or the
selected payoff type is set to modifiable.
If you retrieve an existing trade, IR Pricing matches the expression in the
trade with one of the expressions in the predefined payoff types. When a
match is found, the Payoff Type field is populated. When a match is not
found, and there is an active and modifiable payoff type with an empty
expression, then this type is displayed and the expression remains
modifiable. Otherwise, a special Unknown type is displayed. This type is
modifiable, if and only if, there is at least one active and modifiable payoff
type.
Initial Rate The initial rate of the first coupon of the floating leg.
Reference Rate The identifier of the fixing curve. Defaults from the instrument.
See TRM Instruments: Processing and Calculations Guide.
Reference Period The fixing period. Defaults from the instrument.
See TRM Instruments: Processing and Calculations Guide.
Spread The additive factor to be added to the factor*ir or factor *cms.
Business Days The fixing offset. Number of days’ offset allowed, that is, the difference in
days between the fixing date and the due date (default = 0).
23 Pricing IR and FX trades
23.1 Pricing IR trades
Transaction & Risk Management Module (TRM) User Guide 587
9. Use the following table to complete the Amortizing fields for both fixed and floating legs:
Hint:
You can also choose to complete the amortizing fields in the Trade Setup - Amortizing
component.
Note: See TRM Instruments: Processing and Calculations Guide for more information about
schedule parameters.
10. Click Save to save the trade and continue the setup (23.1.2.5.2 Setting up pricing properties on
page 587). The trade is assigned a transaction number and set to Simulated state.
Note: When you do a save or apply, you are required to enter the portfolio and counterparty
information.
23.1.2.5.2 Setting up pricing properties
When you have defined the trade and legs, and you are not using NumeriX, you need to set up the
pricing properties for the trade. (If you are using NumeriX, see 23.1.2.5.5 Selecting calibration on
page 591.) Pricing properties are located in the Pricing section of Trade Setup view.
Field Description
Rate The fixed rate of the fixed leg of the Swap.
Calculation Method Amortizing calculation methods are identical to the ones used in TRM. The
choices are:
Annuity, Capitalization Dates, Capitalization In, Capitalization Out, Compound
Interest, Delaying, Discounted Interest, Irregular, and so on. See Chapter 3
Managing static data on page 41 for more information.
Frequency The amortizing frequency.
Generation Method Amortizing generation method used for cashflow generation. The choices are:
Bullet, Business Days, Days, IMM Dates (M), ISDA Dates (Q), Last of Month,
Months, Months (Sticky), and so on.
For swaptions, the generation method depends on the characterization. If the
selected amortization type is Bullet, then the generation method defaults to
Bullet and is not editable.
Roll Date Specific date to be used in the schedule each year, without reference to the
year: for example, 15 March annually.
First Date First date generated from a schedule. Required value if it does not follow the
standard rolling dates.
Day Count Fraction The day count fraction used in the coupon calculations. You can use the filter
field to shorten the list of available options.
Corresponds to TRM’s standard date bases. See TRM Instruments: Processing
and Calculations Guide for detailed descriptions of date bases.
Days Convention The Convention used to generate the cashflows. The choices are:
•Backward: The previous business day is used.
•Following: The next business day is used.
•Modified Backward: The previous business day is used except if not in the
same month, in which case the next business day is used.
•Modified Following: The next business day is used, unless this falls in the
following month, in which case the previous business day is chosen.
•None: No adjustment.

23 Pricing IR and FX trades
23.1 Pricing IR trades
588 © Wall Street Systems IPH AB - Confidential
To define the pricing properties:
1. In the Trade Setup view, Trade Structure, select the top component that corresponds to the
instrument you have entered.
2. In the right-hand side of screen, expand the Pricing section, and complete the pricing
information:
3. You can view the result of the pricing in the Key Figures view. (The market information updates
dynamically as you change the parameters.)
4. Click Save to save any changes to your trade (unsaved changes are outlined in bold), and then
continue to the next step (23.1.2.5.3 Defining trade structures on page 588).
23.1.2.5.3 Defining trade structures
This step describes how to define compounding and capitalizing structures of the swap in the Trade
Setup view. The components of the active trade are displayed in a tree-like hierarchy. The top
component corresponds to the main characteristics of the trade; the others correspond to the leg
components, and optionally, to the call component. For more information about configuring schedule
and cashflow structures, see TRM Instruments: Processing and Calculations Guide.
Use the Expand (+) and Collapse (-) buttons to navigate and configure the information in these
components. The details of the selected component are displayed in the section on the right of the
Trade Structure.
To define Compounding and Capitalizing structures:
1. In the Enter Board view, press Ctrl+End to switch to the Trade Setup view.
2. In the Trade Setup view, Trade Structure, select the leg component you want to define.
Note: You can move to the previous or next components by clicking the up and down arrows in
the Trade Setup toolbar.
3. In the Payment Adjust field, select one of the following options:
–No Postponing (default)
–Postponing: Attaches Payment dates schedules to postpone payments.
–Postponing & Capitalizing: Attaches the corresponding schedule(s) to the selected leg.
Field Description
Figure Date The date at which the pricing was performed. Defaults to the current date.
Figure Currency The currency in which the figures are calculated. Defaults to the currency of
the trade.
Figure Scenario The scenario used to store the market data. The default is Freeze.
Risk Offset (%) Expressed as a percentage. Indicates how much to add or subtract for the
period.
Estimate Rate The yield curve used to overwrite the estimate on both legs.
Valuation Rate The yield curve used to overwrite the discounting on both legs.
Pricing Mode The valuation mode used for the pricing: Default (default), Theoretical,
Benchmark or All.
Volatility Surface For swaptions: The volatility surfaces defaults from the instrument or if not
defined at the instrument level, defaults to the one defined at the currency
level.

23 Pricing IR and FX trades
23.1 Pricing IR trades
Transaction & Risk Management Module (TRM) User Guide 589
–Postponing & Compounding: Attaches the corresponding schedule(s) to the selected leg.
Note: For swaptions: The payment adjust field defaults to No Postponing and is not editable.
4. If you kept the default setting in the previous step, check that the Interest settings are complete
and move to the next step. Otherwise, use the following tables to complete the structures
according to the leg type (fixed or floating):
–For both fixed and floating legs:
–For floating legs only:
5. When you are satisfied with the pricing, and you are not using pricing a callable swap or
NumeriX valuation, you can generate the transaction, see 23.1.2.5.7 Generating the transaction
on page 593.
23.1.2.5.4 Setting up a callable Swap
The callability of a swap is defined at the instrument level as part of the characterization. The
characterization cannot be changed. If the swap is callable, the Trade Structure shows a Call
component.
To set up a callable swap:
1. In the Trade Structure, select the Call component, and use the following table to define the call
schedule.
Note: The following fields are found in Notification and Convention sections.
Field Description
Roll Date Specific date to be used in the schedule each year, without reference to
the year: for example, 15 March annually.
First Date First date generated from a schedule. Required value if it does not follow
the standard rolling dates.
Field Description
Floor The minimum value that the expression can take.
Cap The maximum value that the expression can take.
Factor The multiplicative factor of the expression which can be positive or
negative.
Divider Expression parameter.
Fixing Offset Minimum number of days’ offset is allowed for fixing (default is 0).
Roll from Start Yes or No.
When set to Yes, dates are calculated from Start Date rather than End
Date.
Holiday Calendar The selection list of all calendars.
Initial First Period First interpolation period used to calculate the first fixing rate .
Initial Second Period Second interpolation period used to calculate the first fixing rate.
23 Pricing IR and FX trades
23.1 Pricing IR trades
590 © Wall Street Systems IPH AB - Confidential
–Main
–Notification
–Conventions (Business)
Field Description
From Leg 1st or 2nd
Defaults dates and frequency from the selected leg.
Sign For optional events, determines who has the right to do the action: Asset
or Liability.
Field Description
In Arrears The choices are:
•No
•Yes
• Yes, Fixing From
•Yes, Fixing To
Fixing Convention The fixing convention to be followed if the fixing date is a business
holiday. The choices are:
Backward, Following, Modified Backward, Modified Following, and None
(default).
Fixing Calendar Calendar used for fixing.
Offset Calendar Days
Offset Business Days
Offset Months
The upper limit of the Call period. Define the number of calendar days,
business days, and months.
Max Offset Calendar Days
Max Offset Business Days
Max Offset Months
The lower limit of the Call period. Define the number of calendar days,
business days, and months.
Field Description
Days Convention The convention used to generate the cashflows.
Calendar Calendar used for adjustment purposes.
Holiday Calendar Additional calendar to supplement the calendar specified in calendar field.
Long Stub To change the first coupon period to a long first coupon. By default, it is a
short first coupon when the period is broken.
If you select Yes the coupon will be a long last coupon.
Min Stub Length Minimum stub length in calendar days. If a short stub is less than the
minimum length, a time step is added to create a long stub.
Penultimate Date Last-but-one date for a schedule used for adjusting irregular periods, for
example, in an Annuity situation.
Roll from Start Yes or No.
When set to Yes, dates are calculated from Start Date rather than End
Date.

23 Pricing IR and FX trades
23.1 Pricing IR trades
Transaction & Risk Management Module (TRM) User Guide 591
–Conventions (Payment)
23.1.2.5.5 Selecting calibration
The calibration is done in the Calibration perspective or in the Calibration view. Calibration is only
required if you are using NumeriX. The calibration defaults to the estimation curves and NumeriX
valuation setup (calibration set, calibration model, quality and analytic quality) defined at the
instrument level. When the NumeriX valuation is not defined at the instrument level, the Hull and
White model is used.
When the default valuation is not defined at the instrument level, you can select other calibration
sets that you have previously defined in TRM’s Calibration Single Editor or Calibration Cross Editor.
Calibration sets contain baskets and models. Baskets can be defined in TRM Calibration Basket
Editor; models are predefined in the system and cannot be modified. For more information about
these editors, see 4.7 Pricing complex derivatives on page 190.
To calibrate the new trade
1. Click Calibration in the top right side of the view.
2. In the Calibration Set tab (left side of the view), complete the following information:
Field Description
In Advance Yes or No.
When set to Yes, payment is made at the beginning of the period rather
than at the end.
Min. Length Minimum stub length in calendar days. If a short stub is less than the
minimum length, its value date is kept, but its payment date is moved to
the next one creating a long stub.
Days
Business Days
Months
Number of business days, calendar days, or months after which a
convention is to be applied.
Information Description
FX Calibration
IR Calibration
Defaults to the calibration set defined at the instrument level when this is
available. If the calibration set is not defined, select a model from the list of
pre-defined models.
Note: You can create a new calibration set or you can save changes to an
existing one, by modifying the ID and/or changing the settings and then
clicking Save Calibration.
Calibration Model Calibration model to apply to this trade. Defaults to the calibration model
defined at the instrument level. If the calibration model is not defined, select a
model from the predefined list:
• Black Derman Toy
•Black Karasinsky
• Deterministic
• Hull and White One Factor
• Hull and White Two Factors
• Hull and White Three Factors
•Spot Skew
For more information about which models can be used with which methods,
see TRM Instruments: Processing and Calculations Guide.
Max Date Only available when the calibration model is Spot Skew or Black Karasinsky.
Quality Only available when the calibration model is Spot Skew, Black Derman Toy, or
Black Karasinsky.
23 Pricing IR and FX trades
23.1 Pricing IR trades
592 © Wall Street Systems IPH AB - Confidential
3. Additionally, when you have selected the calibration information, you can perform the following
tasks:
–If you are calibrating a cross currency trade, you can add a currency yield curve by clicking
Add/Currency Curve.
–If you want to use another calibration set with this trade, click Add Calibration Set (+) to add a
new calibration set tab.
–If you want to save your changes or create a new calibration set (i.e. you have changed the
ID), click Save Calibration.
4. In the Basket tab (lower left side of the view), select the basket and volatility surface you want to
use in the calibration process:
–For single and cross currency trades (all tabs):
–For cross currency (Domestic and Foreign tabs only):
5. Optionally, when you have selected the basket and volatility surface, you can perform additional
actions:
–If you want to add more rows to the structures, click Add Item (+). Complete all relevant
fields.
–When a trade is callable and you want calibration instruments that have expiry dates to
match the call dates, click Fetch Date. Complete the information.
–If you want to simulate pricing using another basket, click Add Basket (+) to add a new basket
tab, and repeat step 4. on page 592.
–If you want to save your changes or create a new basket (i.e. you have changed the ID),
click Save Calibration Basket.
6. When you are satisfied with the settings, click Calibrate.
The outputs of the calibration are displayed in the right side of the view, you can modify the
Mean Reversion and Volatility outputs according to your needs.
Note: Depending on the trade you are pricing you can have one or more outputs, for example,
for a single currency: IR Output; for a cross currency: one output per tab.
7. If you are using NumeriX valuation, complete the step 23.1.2.5.6 Entering NumeriX settings on
page 593.
Information Description
Basket ID Defaults to the basket defined at the instrument level. If no basket is defined,
select a basket from the list.
Note: For Cross Currency trades, you need to check or select the basket for
each tab: Domestic, Foreign and FX Basket.
Volatility Surface Volatilities are defined in the IR Volatility Reference Editor. See 3.47 Volatilities
(optional) on page 158.
Information Description
IR Set Defaults to the calibration set defined at the instrument level. If no calibration
set is defined, select the calibration set.
Model Defaults to the model defined at the instrument level. if

23 Pricing IR and FX trades
23.2 Pricing FX trades
Transaction & Risk Management Module (TRM) User Guide 593
23.1.2.5.6 Entering NumeriX settings
1. In the Trade Setup view, Trade Structure, select the top component.
2. In the NumeriX section, complete the Pricing Rates and Valuations settings. These settings
default from the NumeriX valuation defined at the instrument level.
Note: Default settings appear between parenthesis.
23.1.2.5.7 Generating the transaction
When you are satisfied with the pricing, you can generate the transaction based on pricing figures in
TRM.
To generate a trade:
1. Select the trade in the Blotter view.
2. Click Apply to move the trade to the Open state.
See 23.1.2.2 IR Pricing trade processing on page 577 for more information about states.
3. In the Applying Transaction dialog, complete the trade with the following information:
–Portfolio
–Counterparty
A transaction number is assigned to the trade, and the state set accordingly.
4. You can continue to work on the pricing in both Simulated and Open states, or move the
transaction forward to the other states.
23.2 Pricing FX trades
This section describes how to use the FX Pricing tool to capture and store pricing simulations. FX
Pricing enables you to enter standalone FX trades (basic forwards and spot transactions, and Vanilla
and Digital options with or without compound and barrier features) or use some predefined
strategies (such as Call Spread, Put Spread, Risk Reversal, Straddle, Seagull and so on).
23.2.1 FX Pricing tool
The FX Pricing tool is designed to be used by users, for example, traders who may move in to the
market as book runners or price takers, and who need to be able to carry out pricing simulations on
specific trades. Like IR Pricing, it is used to capture, price, and valuate FX transactions. FX Pricing
also uses a similar design and pricing flow as IR Pricing. Like IR Pricing it also uses the static data
and similar functionality as TRM. For more information about the specific pricing flow, see 23.1.2.2
IR Pricing trade processing on page 577.
From a mode perspective, FX Pricing mode corresponds to the TRM ADMIN mode. For more general
information about TRM, see Chapter 1 Overview on page 23.
You use FX Pricing to simulate and apply trades in order to generate the transaction in TRM (i.e the
trade is booked). A pending trade is not booked to TRM. For strategies, the same flow applies to the
underlying transactions at the strategy-ID level in FX Pricing, but not in Transaction Manager where
the flow only applies at the individual transaction level.
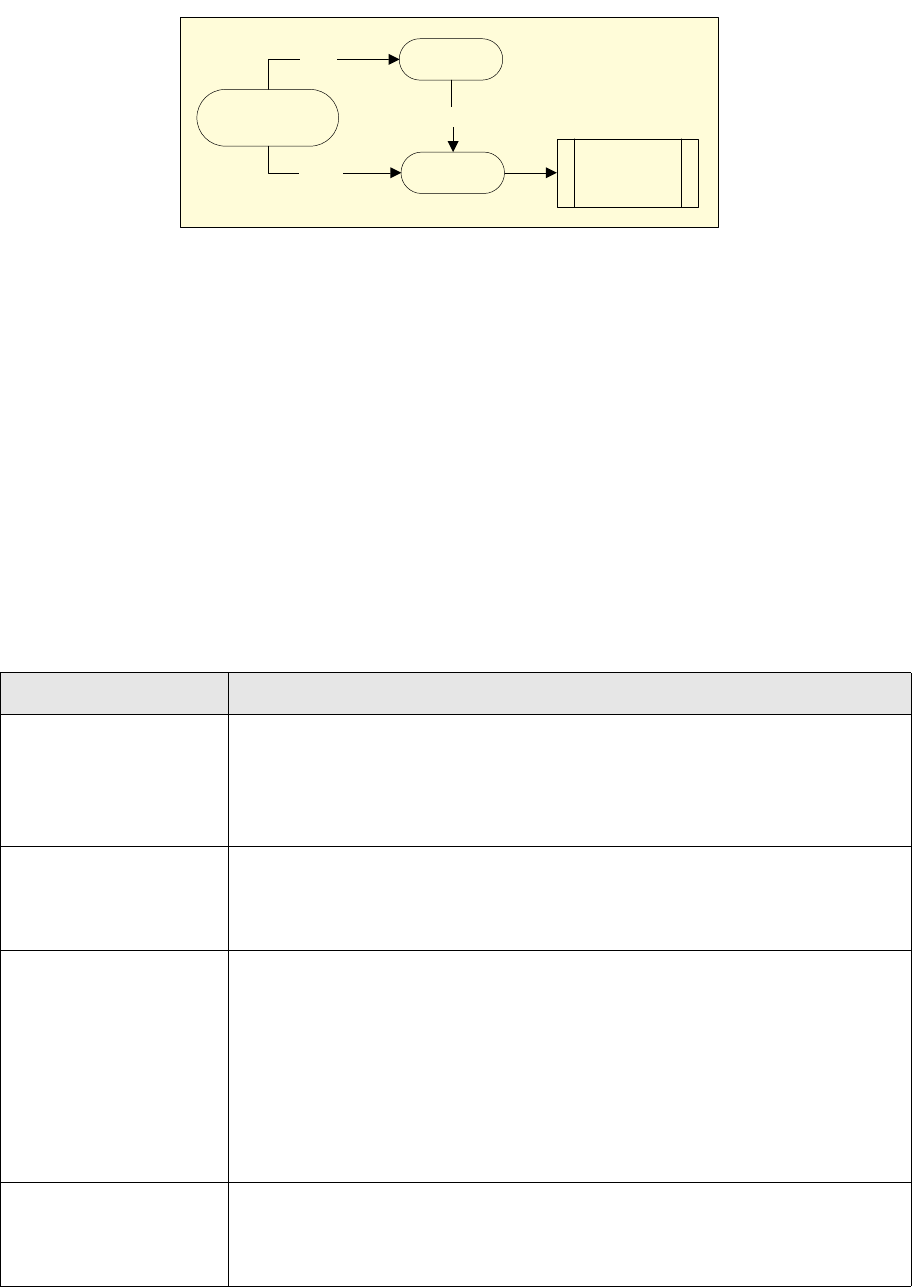
23 Pricing IR and FX trades
23.2 Pricing FX trades
594 © Wall Street Systems IPH AB - Confidential
The following diagram illustrates the flow:
Trades are created with the valuation and market quotes at the time of the pricing. For strategies,
risk analysis and events are performed on the package as a whole instead of on each separate
component.
After you have created the transaction in TRM, you can retrieve it later on in either FX Pricing or
Transaction Manager by running a query on the transaction number or on any other available query
criteria similar as you would do in TRM. You cannot cancel these generated transactions in TRM, but
you can perform standard FX actions, such as, Early Expiration.
You can also view market quotes, derived market quotes and key figures for the selected
transaction. Market value and basic Greeks key figures are shown in both the base and quote
currencies.
23.2.1.1 Menus
This section describes the menus and commands that you use to create FX trades, and generate
TRM transactions based on these trades.
23.2.1.1.1 View
1HZWUDGH
3HQGLQJ
6LPXODWHG
2SHQ
$SSO\ 7UDQVDFWLRQ
)ORZ
$SSO\
6DYH
Menu Item/Shortcut Description
Chart Displays the Chart view or makes the view active if it is already displayed.
This view provides a graphic representation of the key figures according to the
selected variable. See 23.2.1.5.8 Charting on page 608.
To customize the chart settings, click Visual Settings and select the key figures you
want to display on the chart and the color in which you want them to be rendered.
Pricing Setup Displays the Pricing Setup view.
This view is used to display and modify the different scenario and valuation mode
to be used for the premium calculations. See 23.2.1.5.1 Defining the default
pricing settings on page 605.
Query Displays the Query view.
This view is used to retrieve trades and transactions that are already in the system
for further processing. The retrieved trades and transactions are displayed in the
Transaction view.
The Query view is very similar to the Query view in TRM. You can retrieve trades and
transactions stored in the FX Pricing tool in the same way as you would in TRM.
You can use it to retrieve one particular transaction or a number of transactions
that use the same instrument or strategy ID or package ID, and so on. When you
query transactions by strategy ID, and at least one transaction is matched, then all
transactions in the strategy are retrieved.
Quotes Displays the Quotes view.
This view shows all market quotes (FX Swap Points, Yield Curves, and Volatility
Surfaces). You can view and modify the underlying quotes, and simulate the
behavior of the key figures. See 23.2.1.5.3 Modifying market quotes on page 606.
23 Pricing IR and FX trades
23.2 Pricing FX trades
Transaction & Risk Management Module (TRM) User Guide 595
Trad e Set up
Ctrl+End
Displays the Trade Setup view.
This view is used to view and modify the trade parameters of the selected trade or
strategy. These parameters are organized in sections, each section grouping
common parameters: basic, digital and vanilla, option, and optionally, premium
(options) and exotic features (compound and barrier). Two additional sections are
dedicated to derived market information and key figures. For more information
about sections, see 23.2.1.2 Sections on page 597.
When you change any trade parameters. all impacted values are updated
accordingly in the other sections and views.
Transaction Displays the Transaction view.
Similar in functionality to TRM’s Transaction view, this view shows a summary of all
trades. This view is useful when pricing multiple trades at the same time, as you
can use it to switch from one trade to another; or to create a new trade from an
existing trade with different strategies by pressing Ctrl+D. You can also edit the
fields directly as an alternative to the Trade Setup view.
To customize the view, show or hide columns, right-click the column header and
click Select Columns.
Transaction Figures Displays the Transaction Figures view.
Similar in functionality to TRM’s Transaction Figure view. This view shows the key
figures for the selected strategy or transaction. You can also modify the trade
parameters in this view. In which case, the modified values appear in bold and the
aggregated totals appear in bold and in a different color according to your
configuration.
To customize the view, show or hide columns, right-click the column header and
click Select Columns.
Administration Views •Log View: Enables you to check the log file while you are working in FX Pricing.
Log files are stored on your local drive in the following folder:
\Application Data\Wall Street Suite
•Progress View: Alternatively, you can also access this view by clicking the show
progress icon in the right-hand corner of the status bar. This view shows
recently performed actions. You can remove all completed operations from the
view or set up preferences by clicking the menu and selecting Preferences...
•Service Statistics: Shows information about the connections and failure reasons.
You can refresh statistics, keep them synchronized or clear them.
•System Messages: Shows system messages organized by severity, time and
message. When available a hint is displayed. You can clear all messages when
you have finished checking them.
Menu Item/Shortcut Description
23 Pricing IR and FX trades
23.2 Pricing FX trades
596 © Wall Street Systems IPH AB - Confidential
23.2.1.1.2 Command
23.2.1.1.3 Action
This section describes the actions that you can perform at the transaction level (in either the
Transaction view or the Transaction Figures view). As well as these actions, you can also perform the
standard TRM actions for the particular instrument in Transaction Manager.
For more information about the actions that you can perform on FX transactions, refer to the
relevant instrument in TRM Instruments: Calculations and Processing Guide.
Menu Item/Shortcut Description
New Trade...
Ctrl+N
Opens the New Trade... dialog to select the type of trade you want to price.
Execute Query
Ctrl+E
Fetches the transactions that match the query you have entered in the Query view.
(This command works in the same way as it does in TRM.)
Refresh Key Figures
Ctrl+K
Refreshes the market feed and re-calculates the figures. Key figures are
summarized in the Key Figures section of the Trade Setup view.
Toggle Solver
Ctrl+S
Toggles the solver on or off. The Solver icon is located in the Key Figures section.
Transaction Lookup
Ctrl+L
Opens FXP Transaction Lookup and displays the selected FX pricing transaction. FXP
Transaction Lookup is a mode of Transaction Manager that is dedicated to FXP
displaying transactions.
Refresh Static Data
Ctrl+F5
Refreshes the static data and re-calculates the figures.
Menu Item/Shortcut Description
Duplicate Trade
Ctrl+D
Enables you to create other transactions from existing ones. This is useful when
you need to create many transactions with similar characteristics using the same
instrument or strategy.
To duplicate a transaction or strategy, select the transaction or strategy and press
Ctrl-D.
• If you are duplicating a transaction, this action creates a new trade with the
same characteristics as the selected transaction, except for the transaction
number and state.
• If you are duplicating a strategy, this action creates a new strategy based on
the same strategy as the selected strategy, but assigns a different strategy ID.
Split Strategy (Strategies only) Enables you to remove the strategy and/or packaging type and
strategy ID and/or package ID from the transactions, making each transaction
independent. See 23.2.1.6.3 Split Strategy on page 609.
Note: You can only split strategies in FX Pricing, not in TRM.
Early Expiration Enables you to early expire a transaction or strategy. This action generates
duplicate reverse strategy transactions. See 23.2.1.6.1 Early expiration on page
608.
Note: You can only do a full early expiration, not a partial.
23 Pricing IR and FX trades
23.2 Pricing FX trades
Transaction & Risk Management Module (TRM) User Guide 597
23.2.1.1.4 Layout
As well as standard TRM layout functionality, FX Pricing also provides following layout options.
23.2.1.2 Sections
The views in FX Pricing are organized in sections. Each section is dedicated to a particular aspect of
the trade and contains all relevant information. You can use the default display, or you can
customize the display by using the icons located in the toolbar in each section. The sections may
varying according to the selected trade.
The following table describes the main sections:
23.2.1.3 Setting Up FX Pricing instruments
Before you can start creating trades in FX Pricing, you need to set up the FX instruments that you
want to use in FX Pricing with one of the FX Pricer features. You will need to define instruments for
each of the standalone instruments (i.e. Forwards and Vanilla and Digital options) and for the
strategies that you want to use in FX Pricing.
Hint:
If the instrument does not have the FX Pricer feature, the instrument will not be available
in FX Pricer.
Menu Item/Shortcut Description
Set to Default Define the active layout as the default layout.
Lock Customization Lock the current layout for modification by other concurrent users using the same
layout.
Section Description
Premium (For options) Displays the settings used to calculate the premium of options.
Premium figures can be calculated as percentage, basis points, or amount. See
23.2.1.5.6 Changing the preferred premium on page 607.
You can view premium figures in base and quote currencies and in different types
in the Transaction Figures view.
Transaction Enables you to select the information required to save or apply the trade. You can
also see the transaction number when the trade has already been saved or
applied. If you are saving or applying a strategy, the strategy ID and strategy type
are also displayed.
Option (For strategies only) Enables you to select the main characteristics of the
underlying option (Vanilla option, Digital option).
Compound or Barrier (For compound or barrier features only). Enables you to select the compounding
or barrier features of the underlying option (Vanilla option, Digital option).
Derived Market Info Displays the derived market quotes, see 23.2.1.5.3 Modifying market quotes on
page 606.
Key Figures Enables you to view most of the key figures that are visible in TRM including
Greeks (delta, gamma, vega, theta, and so on).
Greek key figures can be expressed as a percentage of the nominal amount. See
23.2.1.5.5 Monitoring key figures on page 607.
Solver Output Displays the results of the last modification using the Solver in the Key Figures
section. See 23.2.1.5.5 Monitoring key figures on page 607.
Feature Feature ID Class Instrument
FX Pricer (Option) FX-PRICER-FORWARD FX FX Forward.
23 Pricing IR and FX trades
23.2 Pricing FX trades
598 © Wall Street Systems IPH AB - Confidential
For more information about these features, see TRM Instruments: Processing and Calculations
Guide.
23.2.1.4 Capturing transactions and strategies
This section describes how to capture a trade; create different scenarios using various strategies
available; and then generate a transaction in TRM. You will use existing TRM static data, key figures,
and valuation models and methods.
Entering a trade in FX Pricing is similar to entering a transaction in one of TRM’s transaction boards,
you will use the same data as you would to enter a standard Forward, Digital option or Vanilla
option, except that you will be able to simulate pricing and valuation before booking the transaction
to TRM.
Note: The following sections do not describe all of the fields that you can populate when
capturing a transaction, only those that are specific to or have a specific behavior to FX
Pricing. For more information, see TRM Instruments: Processing and Calculations Guide.
23.2.1.4.1 Entering a standalone trade
This section describes how to enter a standalone trade (forwards and spot transactions, and Vanilla
and Digital options). Before starting, you must know which trade type you are going to enter to have
the relevant information available.
To enter a standalone trade:
1. In FX Pricing, press Ctrl+N.
2. In the New Trade... dialog, click the standalone instrument type, i.e. Forward, or Digital Option or
Vanilla Option, you want to use. The available instruments are displayed.
Hint:
Only instruments with the features FX Pricer (Forward) or FX Pricer (Option) are available in FX
Pricing. If your instrument does not appear in the list, check that it is properly set up with
one of the FX Pricer features.
3. Select the instrument with the characterization that best meets your needs. You can preview the
characteristics of the selected instrument in the Instrument details area of the dialog.
4. Click Select to select the instrument without entering the basic trade parameters or Next to enter
the basic trade parameters (these are the same for all trade types):
Note: For Forwards and Options, you do not have to populate all basic trade fields, you can click
Select to create the trade, and then complete the trade in the Trade Setup view. On the other
hand, for predefined strategies, you must populate all basic trade fields before you can
click Select. See 23.2.1.4.2 Entering predefined strategies on page 601.
FX Pricer (Option) FX-PRICER-OPTION FX-OPTION Vanilla Option, Vanilla Compound Option,
Vanilla Barrier Option
Digital Option, Digital Compound Option,
Digital Barrier Option
Feature Feature ID Class Instrument
Field Description
Opening Date The opening date of the pending trade. This is also the pricing date by
default.
Base Currency The base currency of the trade.
Quote Currency The quote currency of the trade.
23 Pricing IR and FX trades
23.2 Pricing FX trades
Transaction & Risk Management Module (TRM) User Guide 599
5. If you chose to enter the basic trade parameters, click Select.
A new row is added to the appropriate views and the Trade Setup view is populated with the
default parameters from the selected instrument.
6. In the Transaction view, select the trade you just created and complete it with the relevant
parameters in the Trade Setup view:
–Forward (Forward section):
–Vanilla Options (Vanilla and Vanilla Option sections):
Deal/Strike Rate The deal rate used for Forwards or the strike rate used for Options.
Expiry Date The date when the trade will expire. You can either type it in or select a
date from the calendar.
Field Description
Sign Choices are Sell or Buy. The default is Buy.
Base Amount The base amount of the transaction.
Quote Amount The opposite value of the base amount multiplied by the deal rate.
For example, if the sign is Sell and the Base Amount is negative, then the
Quote Amount is positive. On the other hand, if the sign is Buy and the Base
Amount is positive, then the Quote Amount is negative.
Value Date The expiry date plus the spot days. Select a Gap to calculate the value
date automatically or select a date from the calendar or enter a shortcut
using M for month, Y for year, and so on. For example, for one month,
enter 1M, for six months enter 6M, for two years enter 2Y, and so on.
When you have populated the value date, the Derived Market Info section
and Quotes view are populated.
Note: You must select both Base and Quote Currencies to enable the
choice of a Gap as well as a date. Otherwise only the date is
available.
Forward Margin Margin to apply to the forward rate.
Spot Margin Margin to apply to the spot rate.
Trade Spot Date (Read only) The opening (trade) date plus the spot days.
Valuation Method
Date Method
Figure Date
Figure Currency
Figure Scenario
Default to the pricing settings set up in the Pricing Setup view. See
23.2.1.5.1 Defining the default pricing settings on page 605. The default
settings appear between parentheses.
Field Description
Option Smile Choices are Yes or No.
•No (default). The pricing is based on At-The-Money (ATM) volatility.
•Yes. The pricing is based on the Volatility Smile.
Sign Choices are Sell or Buy. The default is Buy.
Option Type The choices are Call and Put. The default is Call.
Field Description
23 Pricing IR and FX trades
23.2 Pricing FX trades
600 © Wall Street Systems IPH AB - Confidential
–Digital Options (Digital and Digital Option sections):
–Digital or Vanilla Compound options (Compound section): Define the compound feature.
From a pricing perspective, the compound feature is similar to a Vanilla option, except that
the underlying is an option on a given underlying.
Note: You must define some predefined option schedules to be used in the Barrier definition. See
TRM Instruments: Processing and Calculations Guide for more information about
Compound Options.
–Digital or Vanilla Barrier Options (Barrier section): Define the following fields to make sure
that the Barrier feature is taken into account.
Value Date The value date is populated automatically when you select the Quote
Currency. It corresponds to the expiry date plus the spot days.
By default, the value date is taken from the underlying. If the underlying's
value date changes, the option's value date changes. The converse is not
true; i.e. if the option's expiry changes, the underlying's value date is not.
Exercise Type Defines when the option can be exercised. The choices are American and
European. The default is European.
Field Description
Sign Choices are Sell or Buy. The default is Buy.
Option Type The choices are Call and Put. The default is Call.
Value Date The expiry date plus the spot days. The value date is automatically
populated when you select the Base or Quote Currency.
By default, the value date is taken from the underlying. If the underlying's
value date changes, the option's value date changes. The converse is not
true; i.e. if the option's expiry changes, the underlying's value date is not.
Payout Amount Amount to be paid. If the amount is in the base currency, it is an Asset or
Nothing. If the Amount is in the quote currency, it is Cash or Nothing.
Payout Currency Choices are Base or Quote Currency.
Exercise Type Defines when the option can be exercised. The choices are American and
European. The default is European.
Field Description
Option Type The choices are Call and Put. The default is Call.
Expiry Date The expiry date of the compound option.
Value Date The value date of the compound option.
Strike Currency The base or the quote currency of the trade.
Strike Type The type of strike. Choices are: Amount, Percentage, or Points.
Strike Price Only editable when you select Percentage or Points as Strike Type.
Enter the relevant percentage or number of points. The Strike Amount is
calculated automatically from the Base Amount.
Strike Amount Only editable when you select Amount.
Enter the amount.
Field Description
23 Pricing IR and FX trades
23.2 Pricing FX trades
Transaction & Risk Management Module (TRM) User Guide 601
Depending on the type of barrier, the Barrier feature acts as upper or lower boundary
conditions for the pricing.
7. When you have entered the trade parameters, you can do the following:
–Valuate and price the trade before saving it to TRM, see 23.2.1.5 Valuating and pricing on
page 605.
–Save the trade to TRM by clicking Save or Apply. In the resulting dialog, enter the
counterparty and portfolio. A transaction number is assigned to the strategy and the state is
set to Simulated if you saved or Open if you applied.
Hint:
You can continue to work on the pricing in both Simulated and Open states, or move the
transaction forward to the other states.
23.2.1.4.2 Entering predefined strategies
Depending on the market movements, you may want to apply predefined strategies like Call and Put
Spread, Strangles and Straddles, and so on. When you apply a predefined strategy (risk reversal,
butterfly, and so on) all underlying transactions of the strategy are assigned the same strategy main
type, type, and ID.
Note: All strategies in the same package share the same currency pair and the same notional
amount.
Field Description
Kind The choices are: Up-In, Up-Out, Down-In, Down-Out, Knock-In, Knock-Out.
See TRM Instruments: Processing and Calculations Guide for more
information.
Rebate Currency The base or quote currency of the trade.
Rebate Type The type of rebate. Choices are: Amount, Percentage, or Points.
Rebate Price Only editable when you select Percentage or Points as Rebate Type.
Enter the relevant percentage or number of points. The Rebate Amount is
calculated automatically from the Base Amount.
Rebate Amount Only editable when you select Amount as Rebate Type.
Enter the amount.
Mon. Period Start The start of the monitoring period at which the barrier is activated. The
default is the opening date of the trade.
Note: For a double barrier, both barriers share the same monitoring
period.
Mon. Period End The end of the monitoring period at which the barrier is activated. The
default is the value date of the trade.
Note: For a double barrier, both barriers share the same monitoring
period.
Upper Level The upper level of the barrier should be entered in the same way as
required by the market convention of the currency pair.
Lower Level The lower level of the barrier should be entered in the same way as
required by the market convention of the currency pair.
23 Pricing IR and FX trades
23.2 Pricing FX trades
602 © Wall Street Systems IPH AB - Confidential
To enter predefined strategies:
1. Press Ctrl+N. You can choose from:
–Call Spread: The Bull Spread strategy involves buying an in-the-money call and sell and an
out-of-the-money call with the same expiry date. In the case of a Bull Spread Call, the long
Call has the lowest strike.
Note: The same strategy can be replicated with the usage of Puts due to the Call-Put parity.
–Put Spread: The Bear Spread involves the sell of a put and the purchase of a put with a
higher strike. Because of the Call-Put parity, it is possible to build the pay-off by using other
contracts.
–Risk Reversal: Risk Reversal is a Long Call and Short Put.
–Straddle: A call and put with the same strike.
–Seagull: The purchase of a call spread (two calls), financed by the sale of one
out-of-the-money put (or vice versa), ideally to create a zero-premium structure.
–Strangle: Identical to Straddle except that the strike of the call and put are different.
–Butterfly: The purchase and sale of options with three different strikes. More concretely,
buy one call with a lower strike; sell two calls with a middle strike, and buy one call with a
higher strike.
2. Select the predefined strategy and enter the basic setup (these fields are common to all
strategies) and the leg parameters (the number of legs varies according to the strategy):
3. Click Select.
A new row is added to the appropriate views and the Trade Setup view is populated with the
parameters from the selected instrument.
4. In the Transaction view, select the strategy you just created and use the following options to
complete the strategy in the Trade Setup view:
–Call Spread (Bull Spread): The following table shows the default settings and
dependencies of the two legs.
Fields Description
Opening Date The opening date of the strategy. This is also the pricing date by default.
Base Currency The base currency of the strategy.
Quote Currency The quote currency of the strategy.
Base Amount Absolute value of the base amount of the strategy
Expiry Date The expiry date of the strategy.
Field 1st Leg 2nd Leg
Option Type Call Call
Sign Buy Sell
Base Amount A -A
Deal/Strike Rate K1 K2
Quote Amount -K1*A K2*A
Expiry Date Underlying Expiry Date Underlying Expiry Date
Value Date Underlying Value Date Underlying Value Date

23 Pricing IR and FX trades
23.2 Pricing FX trades
Transaction & Risk Management Module (TRM) User Guide 603
–Put Spread (Bear Spread): The following table shows the default settings and
dependencies of the two legs.
–Risk Reversal: The following table shows the default settings and dependencies of the two
legs.
–Straddle: The following table shows the default settings and dependencies of the two legs.
Exercise Type European European
Field 1st Leg 2nd Leg
Field 1st Leg 2nd Leg
Option Type Put Put
Sign Buy Sell
Base Amount A -A
Deal/Strike Rate K1 greater than K2 K2
Quote Amount -K1*A K2*A
Expiry Date Underlying Expiry Date Underlying Expiry Date
Value Date Underlying Value Date Underlying Value Date
Exercise Type European European
Field 1st Leg 2nd Leg
Option Type Call Put
Sign Buy Sell
Base Amount A A
Deal/Strike Rate K1 K2
Quote Amount -K1*A K2*A
Expiry Date Underlying Expiry Date Underlying Expiry Date
Value Date Value Date Value Date
Exercise Type European European
Field 1st Leg 2nd Leg
Option Type Call Put
Sign Buy Buy
Base Amount A A
Deal/Strike Rate K1 K1
Quote Amount -K1*A -K1*A
Expiry Date Underlying Expiry Date Underlying Expiry Date
Value Date Value Date Value Date
Exercise Type European European
23 Pricing IR and FX trades
23.2 Pricing FX trades
604 © Wall Street Systems IPH AB - Confidential
–Seagull: The following table shows the default settings and dependencies.
–Butterfly: The following table shows the default settings and dependencies of the three
different strikes.
–Strangle: The following table shows the default settings and dependencies of the two legs
5. When you have entered the strategy parameters, you can do the following:
–Valuate and price the strategy before saving it to TRM, see 23.2.1.5 Valuating and pricing on
page 605.
Field 1st Leg 2nd Leg 3rd Leg
Option Type Call Call Put
Sign Buy Sell Sell
Base Amount A -A A
Deal/Strike Rate K1 K2 K3
Quote Amount -K1*A K2*A K3*A
Expiry Date Underlying Expiry Date Underlying Expiry date Underlying Expiry Date
Value Date Value Date Value Date Value Date
Exercise Type European European European
Field 1st Leg 2nd Leg 3rd Leg 4th Leg
Option Type Call Call Call Call
Sign Buy Sell Sell Buy
Base Amount A A A A
Deal/Strike Rate K1 K2 K2 K3
Quote Amount -K1*A -K2*A -K2*A -K3*A
Expiry Date Underlying
Expiry Date
Underlying
Expiry date
Underlying
Expiry Date
Underlying
Expiry Date
Value Date Value Date Value Date Value Date Value Date
Exercise Type European European European European
Field 1st Leg 2nd Leg
Option Type Call Put
Sign Buy Buy
Base Amount A A
Deal/Strike Rate K1 K2
Quote Amount -K1*A -K2*A
Expiry Date Underlying Expiry Date Underlying Expiry Date
Value Date Value Date Value Date
Exercise Type European European
23 Pricing IR and FX trades
23.2 Pricing FX trades
Transaction & Risk Management Module (TRM) User Guide 605
–Save the strategy to TRM by clicking Save or Apply. In the resulting dialog, enter the
counterparty and portfolio. A transaction number is assigned to the strategy and the state is
set to Simulated if you saved or Open if you applied.
Hint:
You can continue to work on the pricing in both Simulated and Open states, or move the
transaction forward to the other states.
23.2.1.5 Valuating and pricing
FX Pricing enables you to simulate pricing and valuation before booking the transaction to TRM. You
can simulate the pricing settings, quotes, premium settings of a particular transaction or strategy.
The following table identifies the default valuation model (Pricer) per instrument type:
For more information about valuation models, see TRM Instruments: Processing and Calculations
Guide.
23.2.1.5.1 Defining the default pricing settings
You can define the pricing settings that you want to use by default when creating a new trade in the
Pricing Setup view. These settings apply to all new trades and to trades that are in the Pending state,
i.e. not yet booked to TRM.
When creating a new trade, the pricing settings default to the ones defined in the Pricing Setup view.
In the trade, the default pricing settings appear between parentheses. However, you can overwrite
these default settings at the trade/transaction level in the Trade Setup view. See 23.2.1.5.2
Overwriting the default pricing settings on page 606.
To set up default pricing:
1. In the View menu, select Pricing Setup, if not already visible.
2. In Pricing Setup, enter the following information:
Instrument Default Valuation Model
Vanilla Option European Symbolic Greek - uses the exact Black Scholes formula to derive the Greeks.
Vanilla Option American
Digital Option
Finite Difference - used to solve the Black Scholes partial differential equation
numerically, applying barrier and terminal conditions relevant to the option.
Barrier Option Analytic - uses the exact or approximation Black Scholes formula.
Information Description
Figure Scenario The scenario used to store the market data. The default scenario is FREEZE.
Valuation Method Method used to default/calculate forward figures (forward points) for FX
forwards:
•Quoted: The FX spot rate and the forward points are taken from the
market. The base currency interest rate is taken from the market from the
yield curve defined for the currency (in Currency Editor’s Journals page) on
the spot date and the maturity date, and the quote currency interest rate
is calculated from the FX forward points and the base currency interest
rate. If the FX forward points are changed manually, the IR Rate Quote and
Deal/Strike Rate columns are updated.
•Theoretical: The FX spot rate, base currency interest rate, and the quote
currency interest rate are taken from the market. Forward points are
calculated from the FX spot rate of the deal and the discount factors in the
base and quote currencies of the transaction. The forward points are
updated if one of the following columns is changed: Nominal/Spot Rate, IR
Rate Base, and IR Rate Quote.
23 Pricing IR and FX trades
23.2 Pricing FX trades
606 © Wall Street Systems IPH AB - Confidential
3. The changed default pricing settings apply to all non-booked trades, i.e. new trades and trades
in state Pending.
23.2.1.5.2 Overwriting the default pricing settings
You can overwrite the default pricing at the transaction level in the Trade Setup view by editing the
pricing fields. Default values appear between parentheses.
For information about the default pricing, see 23.2.1.5.1 Defining the default pricing settings on
page 605.
23.2.1.5.3 Modifying market quotes
You can view and modify the market quotes. Market quotes are visible in the Quotes view and
provide a direct access to the same market feed as in Rate Monitor. In some cases, you may need to
modify the market quotes. Modified quotes are displayed in bold. You can see the following pages in
the Quotes view:
•Swap Points - FX term structure of the Base/Quote Currency pair
•Volatility - FX Volatility surface of the Base/Quote currency pair
•Yield - Base and Quote yield curves for each currency.
Note: Underlying quotes and money market future quotes used to calculate the base yield curve
are displayed and can be modified.
To modify market quotes:
1. In the Quotes view, change the quote you want to simulate. All calculated data are computed.
2. The changed quote appears in bold.
Hint:
To reset the quotes to their original values, click Reload Quotes.
23.2.1.5.4 Modifying derived market quotes
You can view and modify the derived market quotes. Derived quotes are displayed in the Derived
Market Info section in the Trade Setup view. You can see the following figures in the Derived Market Info
section:
Figure Currency The currency in which the figures are calculated. The default should be the
currency of the trade.
Figure Date The date at which the pricing is performed for the pending transaction.
Date Method Choices are At Date or At Spot. The valuation discounts until Valuation Date or
Spot Date respectively.
Market Info Description
Base Interest Rate The continuous compound interest rate between the figure date and the
settlement date interpolated using the base yield curve and the date basis of the
base currency.
Quote Interest Rate The continuous compound interest rate between the figure date and the
settlement date interpolated using the quote yield curve and the date basis of the
base currency.
FX Spot Rate The FX spot rate between the base and the quote currency.
Swap Points The swap points at the settlement date interpolated from the swap curve.
Information Description

23 Pricing IR and FX trades
23.2 Pricing FX trades
Transaction & Risk Management Module (TRM) User Guide 607
You can modify these quotes manually to simulate pricing using different values. When you modify
the quotes manually, an asterisk is inserted in front of the name of the section (for example, *Derived
Market Info). You can reset any changes by clicking Refresh/Reset Market Info. The values revert back to
the original market quotes.
Important: If you change the characteristics of the transactions (currencies, dates, and so on),
the manually changed derived quotes are not kept, but are recalculated based on the
market quotes.
23.2.1.5.5 Monitoring key figures
You can monitor the key figures for a particular transaction in the Key Figures section. The key figures
displayed in this view are identical to the ones used in TRM, except for the following key figures:
The key figures displayed in the Key Figures section that are expressed as an amount indicate to
which currency the amount refers (base or quote) and the currency is displayed between
parentheses. When the figure is expressed in the figure currency, the currency is not displayed
between parentheses.
Hint:
To display the Greek key figures as a percentage, click Select Columns... and select the
relevant figures that contain percent in the name for base and quote currencies. For
example, Figure Base Percent Volga.
23.2.1.5.6 Changing the preferred premium
You can select your preferred premium, currency, type (percentage, basis points, amount) based on
the computed figures:
1. In the Key Figures section and select one of the following figures:
–Market Value
–Premium Amount Base or Quote
Implied Swap Points The implied swap points calculated from the FX spot rate and adjusted by the
interest rate difference.
Volatility The at-the-money volatility between the figure date and the expiry date
interpolated using the date basis of the base currency.
In FX Pricing In TRM
Market Value Price
Dual Delta Strike Delta
Dual Gamma Strike Gamma
Gamma Rho Asset Asset Yield Gamma
Cash Rho Cash Rho
Gamma Rho Cash Cash Yield Gamma
Volga Sigma Gamma
Vanna Vega Speed
Charm Delta Bleed
Color Gamma Bleed
Market Info Description
23 Pricing IR and FX trades
23.2 Pricing FX trades
608 © Wall Street Systems IPH AB - Confidential
–Premium % Base or Quote
–Premium bp Base or Quote
2. Click the arrow Default Transaction premium with computed Transaction Figure next to the figure you
want to update.
The selected figures are updated in the Premium section with the computed values.
23.2.1.5.7 Applying new figures to a given target
You can use the pricing solver in the Key Figures section to apply new figures to a given target for a
single trade; or to define a target for each aggregate value, leg to be modified and trade parameter
to be changed in order to reach the target for a strategy.
To apply new figures to a given target:
1. In Key Figures section, click Solver and enter the value you want to apply, click anywhere outside
of the field you have just modified. A popup menu shows the available legs.
2. Select the leg on which you want to apply the new target and then select the variable: Base
Amount, Strike, or Volatility.
FX Pricing computes the quotes, derived market quotes and displays the results in the Solver
Output section.
Hint:
To reset the changed values to the original values, click Refresh Key Figures.
23.2.1.5.8 Charting
This view provides a graphic representation of the selected key figures according to the selected
variable (Base Rate, Quote Rate, Spot, Strike/Deal Rate, ATM Volatility). ATM volatility for exotic
features and strike rate for options.
Note: When Option Smile is set to No in the trading part and the variable ATM Volatility is used
then any graph displays meaningful information.
To show key figures on the chart for a selected variable:
1. In the Chart view, click Visual Settings.
2. In the resulting dialog, do the following:
–Select the key figures you want to show on the chart. The default key figure is Market Value.
–Click the color box next to the key figure, select a particular color for that key figure, and
click OK.
3. Click Apply to apply the changes without closing the dialog or OK to apply and close the dialog.
The chart updates with the new settings.
Hint:
The selected variable and key figures are shown immediately below the chart. To deselect
key figures, click Visual Settings and clear the corresponding checkbox of the key figures you
do not want to display in the chart.
23.2.1.6 Processing transactions and strategies
This section describes the actions related to FX transactions generated in FX Pricing. For more
information about these actions in TRM, see TRM Instruments: Calculations and Processing Guide.
23.2.1.6.1 Early expiration
You can fully early expire transactions and strategies in FX Pricing.
•Execution

23 Pricing IR and FX trades
23.2 Pricing FX trades
Transaction & Risk Management Module (TRM) User Guide 609
Right-click the transaction or strategy you want to early expire and select Early Expiration. The
action is processed immediately.
The early expiration generates offsetting (duplicate reverse) transactions as follows:
–For strategies: These offset transactions are given the same strategy type, but are assigned
a new strategy ID. You can perform pricing of the offsetting strategies as you can a new
strategy by selecting one of the early expired transaction and by loading the underlying
transactions and pricing strategy.
–For transactions: These offsetting (duplicate reverse) transactions defaults to the
counterparty of the parent transaction and the nominal amount of the original transaction.
•Cancellation
To cancel this action, select the generated offset transactions, and click Cancel.
23.2.1.6.2 Exercise/no exercise
•Execution
You can exercise an option either manually in TRM or automatically by using an activity as
follows:
–To manually exercise an option in TRM: Open the transaction in Transaction Lookup from FX
Pricing, right-click the transaction, and select Exercise/No Exercise.
–To automatically exercise an option or no exercise on every underlying transaction of a
strategy, run the activity Activity FX Option Strategy Exercise. For more information about this
activity, see A.41 FX Option Strategy Exercise on page 644.
Note: The default delivery type of the exercise at the strategy level is cash settlement.
23.2.1.6.3 Split Strategy
Note: This action is only available for strategies.
You might be required to split strategies in order to process them as individual transactions, i.e.
remove the strategy type and ID.
•Execution
Right-click the strategy ID you want to split and select Split Strategy. The action is processed
immediately.
The strategy/package type or strategy/package ID is removed from the split transactions.
23 Pricing IR and FX trades
23.2 Pricing FX trades
610 © Wall Street Systems IPH AB - Confidential
Transaction & Risk Management Module (TRM) User Guide 611
Chapter 24 Working with the Dashboard
24.1 Overview
The Dashboard application accesses information that comes from the entire Wallstreet Suite and
displays a summarized version within a window with multiple views. The Dashboard enables you to
view data in a concise and consistent manner and allows you to configure views by providing a wide
range of powerful features such as pivot tables, filters, styles, and charts. These features are easily
applied using an intuitive drag-and-drop approach.
The Dashboard has two main views; the Data view which displays data in the form of a pivot table,
a chart, or both, and the Designer view which contains the functions that are used to configure the
data: Styles, aggregates, filters, and so on.
Information presented in Data views can be refreshed manually or automatically at a configurable
frequency. You can easily undo and redo your actions, and you can save the Dashboard window
(with all its configured views) as a named layout to reuse at a later date.
24.1.1 Pivot tables
Pivot tables are displayed in the Data view. You can modify a pivot table by rearranging the
underlying fields (e.g. changing a column axis to a row axis, changing a figure to a column or row
axis or vice versa) or by adding and dropping fields from the palette in the Designer into the Data
view. The pivot table is adjusted and recalculated on-the-fly.
A pivot table can be enhanced with styles, microcharts and aggregates, and the source data can also
be filtered:
•Styles:
Using the various styles it is possible to:
–Change the font type, font color and background color.
–Highlight specific values within a range of values (such as minimum and maximum values).
–Add a gradient background or bar-chart to values to highlight the relative magnitude of the
value.
–Apply rounding and abbreviations to numbers.
Styles are applied by dragging and dropping the style onto the target area.
•Microcharts:
Microcharts are cell entities which enable you to graphically represent values in specific rows or
columns. Microcharts can be used to highlight trends or exceptions and can be applied by
dragging and dropping the microchart onto the relevant row or column.
•Aggregates:
Aggregates are used to perform simple operations such as sum and count operations.
Aggregates are applied by drag-and-drop, where the drop is done on the relevant row or column
grouping. The result is displayed in a row or column that is appended to the specific grouping.
Aggregates are used in two different places:
–When you remove (or collapse) a detailed axis (row and column) grouping inside the pivot
table, the underlying figures are aggregated.
24 Working with the Dashboard
24.2 Getting started with the Dashboard
612 © Wall Street Systems IPH AB - Confidential
–When you add an aggregated row or column to specific axes (e.g. show sums for all items in
the underlying axis).
Both methods offer the same set of mathematical functions: sum, count, minimum, maximum,
average, and median.
•Filters:
The Dashboard allows you to construct filters in order to filter the source data. Filters can be
marked as favorites and used quickly in the Data view. Filtering can be set up in the following
two ways:
–By right-mouse click from the relevant axis value in the pivot table and either including or
excluding the value in the filter.
–By entering the filter in the Filter section of the Designer.
For simple filters the first option is more efficient. More advanced filtering can be achieved
through the second method which is described in more detail below. Active filters are always
shown in the Designer’s filter section regardless of where they are created. In addition, filters
are always shown in the Data view information bar where they are visible even if the Designer is
hidden.
24.1.2 Charts
In addition to pivot tables, it is also possible to display the data as a chart. Supported chart types
include pie, line and bar charts.
24.1.3 Data sources
Data sources can be set up before starting the Dashboard or can be configured in the Dashboard
using the Wizard. By default, data sources are named according to the selected source. Data
sources are displayed in the Data view of the Dashboard.
The following data sources are supported:
•Cash Management Reports - provides data similar to that found in the Cash Position, Cash
Transaction and Bank Transaction reports.
•Limits - provides data on limit violations.
•Report Generator - provides data available from any report configured in Report Generator. You
first need to create the report to be able to use it as a data source.
•Treasury Position - provides computed figures similar to those found in the Treasury Monitor.
See 24.3 Data source details on page 624 for specific information about the data sources.
24.2 Getting started with the Dashboard
This section describes the Dashboard window and provides some information on how to navigate
within the window.
When you first open the Dashboard, you can see two views: a Data view and a Designer view. The
Data view displays an icon for each available data source (e.g. Cash Management, Limits, Report
Generator, Treasury Position and so on).
Before you select a data source, the Designer contains a single tool for creating new Data views. For
more information about creating Data views, see TRM System Admin Guide. Once you have selected
a data source, the Designer displays a set of configuration tools which you can use to change the
properties of the active Data view.

24 Working with the Dashboard
24.2 Getting started with the Dashboard
Transaction & Risk Management Module (TRM) User Guide 613
24.2.1 Input Parameters
It is possible to configure the data source from within the Dashboard application. Configuring the
data source is done using a simple Wizard which allows you to either select an existing configuration
or to specify parameters.
Note: In some cases, you can modify the input parameters of an existing Data view by clicking
on the Open Wizard icon in the Data view toolbar.
To specify input parameters:
1. Open the data source from the Data view.
2. Customize the data source by selecting input parameters from the drop-down selection lists in
the Wizard and clicking OK.
For the Treasury Position and Report input parameters, you can enter relative dates in the date
fields, such as t for today, sm for start of month, em for end of month, etc. When a relative date
is entered, it is immediately translated into the absolute date and both the symbolic expression
and the evaluated date are shown. When you save the layout, the relative date gets stored and
when you reload the layout in the future the expression gets translated again.
The following symbols are recognized:
–t for today
–sw for week start
–ew for week end
–sm for month start
–em for month en
–sq for quarter start
–eq for quarter end
–se for year start
–ey for year end
Example assuming that the current date is 29-September-2010:
sm = 1-September-2010
t = 29-September-2010
ey = 31-December-2010
Note: These symbols are not case sensitive.
It is possible to enter basic expressions in all date fields. The following symbols can be used:
–d for day
–m for month
–y for year
–+ for plus
–- for minus.
Example assuming that the current date is 29-September-2010:
sm+1m = 1-October-2010
+1d = t+1d = 30-September-2010

24 Working with the Dashboard
24.2 Getting started with the Dashboard
614 © Wall Street Systems IPH AB - Confidential
ey-1y = 31-December-2010
em-1m = 30-August-2010
Note: These symbols are not case sensitive.
Note: Parameters marked in red with a star are mandatory. The OK button is enabled only if all
mandatory fields are specified.
24.2.1.1 Cash Management Reports
Cash Management reports consist of three separate types of report which you can select from the
Dashboard Wizard:
•Cash Position
•Cash Transaction
•Bank Transaction
Once you have selected the report type, you can select a specific report from a list of reports. You
can then either use the default settings or configure the report by selecting input parameters from
the drop-down selection lists in the Wizard.
Note: The configuration of Cash Management Data views can be modified by accessing the
Wizard from the Data view toolbar.
24.2.1.2 Limits
When you open the Limits data source, you need to configure the data source by specifying input
parameters from the drop-down selection lists in the Wizard. For example, you can specify the Book
and Page, Client Name, Client Parameters and Sublimit Output. For information on limits, see Chapter 16
Managing limits on page 447.
24.2.1.3 Report Generator
You can open the saved Report Generator reports in the Dashboard using the Wizard in one of two
ways: you can either use the default configuration or customize the report by selecting input
parameters from the drop-down selection lists. Available parameters depend on the report type.
24.2.1.4 Treasury Positions
Treasury Positions are provided in two separate modes: the Wizard allows you to either select
pre-computed treasury positions which are taken from a running tmd process or to configure a
custom position. Pre-computed treasury positions can be selected from the list of saved Treasury
Monitor positions.
Note: Pre-computed treasury positions can be selected in the Dashboard only if a tmd process
has been explicitly started with the underlying position: in order to make the treasury
position available in the Dashboard, the treasury position must be saved and a tmd
process must first be started for the specific position.
Custom treasury positions can be configured using a set of available input parameters that are
provided in drop-down selection lists.
For a description of each parameter see 12.1.4 Monitoring positions in Treasury Monitor on page
366.
Note: The Data view for pre-computed treasury positions cannot be modified using the Wizard.

24 Working with the Dashboard
24.2 Getting started with the Dashboard
Transaction & Risk Management Module (TRM) User Guide 615
24.2.2 Menus and buttons
Menu / Button Description
File - Preferences Configure the Dashboard, for example, the Refresh Interval.
File - Exit Close the Dashboard.
View - New Display a new Data view, which contains the available data sources.
View - Designer Display the Designer. There is always only one Designer in the application at one
time. The Designer is used to set up the active Data view.
View - (list of data views) All available Data views, for example, Cash Position, Treasury Position, and so
on. The Data view can display data as a pivot table, chart, or both.
View - Administration View Log View, Progress View, Service Statistics, and System Messages.
View - Duplicate Dashboard
View
Make a copy of the original Dashboard view including all configuration and data.
The copy will be positioned alongside the original view.
Command Refresh static data.
Refresh All (button only) Refresh data manually.
Toggle Automatic Refresh
All (button only)
Switch automatic refresh on or off according to the specified Refresh Interval set in
the Preferences dialog.
Layout - Set to Default Define the active layout as the default layout.
Layout - Save and Save As It is possible to save a layout of the whole window including all configured views.
The layout also contains the setup of configured data sources, fields, styles,
filters, and so on.
The menu options/buttons allow you to save changes to the active layout or to
create a new layout from an existing one. You can save layouts for a specific user
or for a group of users. You can then re-use these layouts whenever you use the
Dashboard or even use them as part of the application startup parameter.
Layout - Layout Properties Display the name, owner, and user of the active layout.
Layout - Delete Delete the active layout.
Export to Excel Available from the drop-down menu.
Export all Data views to Microsoft Excel. The generated spreadsheet preserves
the style of all cells in the pivot table and displays the chart as a bitmap image. A
summary of the underlying source data parameters and any active filters are
also exported.
Note: Microcharts and bar charts which overlay table cells are not supported at
this time.
Save Excel Workbook Available from the drop-down menu.
Save all Data views to Microsoft Excel.
Print Print all Data views to the printer. For best results, multiple views should be
printed individually rather than all at once. For better control over the print area
of the underlying pivot tables, you can export multiple views to an Excel
spreadsheet before printing.
Print Screen Available from the Print on Printer’s drop-down menu.
Print all Data views to the printer.
Save Screen Available from the Print on Printer’s drop-down menu.
Save all Data views as an individual image file (e.g. .bmp, .png, .jpg).
Screen to Clipboard Available from the Print on Printer’s drop-down menu.
Save all Data views (as an individual image) to the clipboard.
24 Working with the Dashboard
24.2 Getting started with the Dashboard
616 © Wall Street Systems IPH AB - Confidential
24.2.3 Shortcuts
You can display a list of shortcuts by pressing Ctrl+Shift+L.
24.2.4 Data view
The Data view displays the data from the data source as a pivot table, chart, or both. By default,
Data views are named according to the selected data source with an added sequential suffix. You
can change the name of the Data view in the View section of the Designer or by selecting the
appropriate item in the drop-down menu in the Data view toolbar. The active Data view is
highlighted with a red border.
There are several intuitive ways to organize the data in the pivot table:
To ... Press ...
Close the active view. Ctrl+W
Close all views. Ctrl+Shift+W
Copy selected data. Ctrl+C
Cut selected data to the clipboard. Ctrl+X
Delete selected data. Delete
Maximize the active view. Ctrl+M
Switch to the next view. Hold down the Ctrl key, press F7 as required to select
the view from the list.
Ctrl+F7
Switch to the previous view. If more than three Data views are open, then the
Shift key allows you to cycle through the views in the opposite direction.
Ctrl+Shift+F7
To paste text in the text fields in the Designer and other dialogs that offer text
input (such as the Filter Editor).
Ctrl+V
Refresh static data. F5
Select all cells in the pivot table. Ctrl+A
To ... Then ...
Move a Data view to the
right or left side of the
Dashboard window
Drag the Data view header to the right/left edge of the window - the Data view is
placed on the specific side and the remaining views are pushed in the opposite
direction to make space.
Place multiple Data views
in tabs
Drag the Data view header into the header of another view - the data views are
placed in tabs.
Detach the Data view
from the Dashboard
window
• Drag the Data view header outside of the main window - the data view
detaches from the main window.
• Right-click on the Data view tab and select Detached or Fully Detached.
The Fully Detached view is completely independent of the parent window whereas
the Detached view is still part of the parent suite. For example, when the parent is
minimized, the Detached window is also hidden. A Fully Detached window does
not get minimized in this case.
Re-attach a detached
Data view
Right-click on the Data view tab and deselect Detached or Fully Detached
Hide the Designer Click on the minimize button in the Designer.
24 Working with the Dashboard
24.2 Getting started with the Dashboard
Transaction & Risk Management Module (TRM) User Guide 617
24.2.4.1 Data View toolbar
The Data view toolbar is located at the same level as the view tabs.
Drag and drop fields from
the Designer
Drag and drop fields from the Designer into the configured pivot table at the
relevant place. To help you to drop the field in the correct place, a blue line
appears to indicate where the field will be placed in the pivot table; a green line
indicates that the field will become a figure.
Drag and drop fields
within the Data view
Drag axes and figures from the Data view and drop them into another relevant
place in the Data view.
Remove fields from the
Data view
Drag and drop fields back into the Designer or drop the field into the bin which
automatically appears in the bottom right corner of the Data view.
Select figures Select figures in the pivot table by right-clicking anywhere in the table and
selecting Select Figures.
Drag and drop figures Drag and drop individual figures. To reposition a whole figure axis, hold the control
key when dragging (shown as a tooltip in the application).
To ... Then ...
Menu Description
Undo Undo an action.
Redo Redo an action.
Choose Table/Chart Layout Choose whether to display a pivot table, chart or both in the active view.
When both are displayed, the subviews are automatically selected. You can
display the subviews horizontally or vertically.
Note: When the Data view contains a pivot table and a chart, the Dashboard
restricts the configuration of the X and Z axes to only those axes which are
present in the pivot table. This restriction is necessary in order to maintain
the integrity of the derived data between the table and the chart. The
Dashboard automatically checks for consistency between the data
displayed in the pivot table and the chart, and if a mismatch is detected it
replaces the chart with a warning message. You can then either add the
missing axis to the pivot table or remove the extra axis from the chart.
Reset Table Layout Reset the table to the original state in which it was presented when the data
source was initially opened.
Refresh Refresh data manually.
Toggle figure aggregation
in Pivot Table
Switch on or off figure aggregation. Default is off.
When on, row and column groupings are removed from the pivot table and the
data is automatically aggregated using the relevant function.
When off, figures are expanded by source lines with no aggregation. This toggle
is on by default.
Open Wizard Open the Dashboard Wizard from which you can change the input parameters of
the data source.
24 Working with the Dashboard
24.2 Getting started with the Dashboard
618 © Wall Street Systems IPH AB - Confidential
24.2.4.2 Filter toolbar
The filter toolbar is located immediately beneath the Data view toolbar.
24.2.4.3 Information bar
The information bar is located at the top of the Data view and shows information related to the data
source, such as the name of the data source, time of the latest update, the applied filter, and so on.
Information about the data source input parameters is only summarized when the number of
underlying parameter settings is large. Detailed information is presented in a floating box when you
hover the mouse pointer over the incomplete parameter list.
Export to Excel Available from the drop-down menu
Export the selected Data view to Microsoft Excel. The generated spreadsheet
preserves the style of all cells in the pivot table and displays charts as bitmap
images. A summary of the underlying source data parameters and any active
filters are also exported.
Note: Microcharts and bar charts which overlay table cells are not supported at
this time.
Note: It is possible to export to Excel using the Dashboard Excel Export activity. In
this way, the export is triggered automatically by the activity and you do
not need to open the Dashboard. See A.18 Dashboard Excel Export on
page 633 for more information.
Save Excel Workbook Available from the drop-down menu.
Save the selected Data view to Microsoft Excel.
Print Print the selected Data view to the printer.
Print View Available from the Print on Printer’s drop-down menu.
Print the selected Data view to the printer.
Save View Available from the Print on Printer’s drop-down menu.
Save the selected Data view as an individual image (e.g. .bmp, .png, .jpg).
View to Clipboard Available from the Print on Printer’s drop-down menu.
Save the selected Data view (as an individual image) to the clipboard.
Rename Dashboard View Available from the drop-down menu.
Rename the active view.
You can also rename the active view in the View section of the Designer.
Menu Description
Menu Description
Clear Filter Remove the applied filter.
Add as Favorite Add the current filter to the list of favorite filters, which is shown in the Filter bar.
Note: Filters are created in the Designer.
Favorite Filters Apply one of the favorite filters.
Filters marked as favorites are shown as icons. When clicked the filter is applied.
Filters can be removed the favorites by right-clicking the filter’s icon and removing
it.
Pin / Unpin Pin or unpin the Filter toolbar.
When you unpin the toolbar, it is displayed as an expandable bar at the top, middle
of the view. Click to expand the toolbar and access the options.

24 Working with the Dashboard
24.2 Getting started with the Dashboard
Transaction & Risk Management Module (TRM) User Guide 619
24.2.4.4 Right-click menu
The following items are available when you right-click in the Data view:
Menu Description
Sorting Data is automatically sorted in the pivot table in ascending order according to the
rows and columns. Sorting is performed according to the data type. Sorting can be
customized from two places:
• Right mouse-click on the relevant field in the Fields section of the Designer.
• Right mouse-click on the relevant field header in the Data view.
A contextual menu with the following options is displayed:
•Sort Ascending - set to ascending.
•Sort Descending - set to descending.
•Reset Sorting to Default - remove previous sort customizations.
•Advanced Sorting - opens a dialog which allows you to specify another field to be
used for sorting. For example, the Treasury position source can contain fields
representing different gaps (1W, 1Y, 3M, O/N etc.) for which standard sorting
cannot be used. It is however possible to specify another field to provide a
basis for temporal sorting. The link between these two fields can be specified
in the Advanced Sorting dialog.
Set filter Exclude all values other than the selected value from the pivot table.
Filter Out Exclude the value from the pivot table.
Clear Styles and Formats Remove all styles and formats.
Set Number Format Decimal Places- allows you to set the number of decimal places for value. By default
it displays the precision provided by the data source.
Abbreviate To- allows you to set the magnitude of the figure - K (thousands), M
(millions), B (billions).
Set Aggregate Aggregate the selected row or column.
Aggregation Criteria To support more advanced aggregations needed for certain data sources, it is
possible to set-up aggregation criteria in a specific dialog which is accessible by a
right-mouse click on the figure header. The Aggregation Criteria setup offers the
following choices:
•Don't aggregate - aggregate functionality is not provided if there is more than
one value in the group. If there is only one value, the functionality is provided.
•Aggregate only within the same values of a certain field - example: select the
Currency field if the figure can be expressed in different Local Amounts. The
application will provide aggregate amounts only if all values have the same
currency units, otherwise the aggregates will be empty. Note that some data
sources provide a basic default setup which automates the above
configuration.
Remove Remove selected row or column.
Drill down value
Drill down row
Drill down column
If aggregations have been applied within the pivot table, it is possible to drill-down
to rows, columns or values to reach the lowest level in the Dashboard source data.
This is possible on the row, column or figure via the right mouse-click menu. After
selecting this option together with the axis to be expanded, a filter is applied and
the selected axis is added to show figures in more detail. The back button restores
the original Data view. In addition to drill-down it is also possible to display details
for the selected area by applying a Filter Only option from the right click menu.
Select Figures Specify the fields to add to or remove from the pivot table.
Insert Source Tools Insert aggregates which are pre-computed at the source. The data provided by
certain sources includes aggregates across some groupings. These aggregates
cannot be computed by the Dashboard, but the application can display them
whenever it is possible.
24 Working with the Dashboard
24.2 Getting started with the Dashboard
620 © Wall Street Systems IPH AB - Confidential
24.2.4.5 Configuring charts
To display data in the form of a chart:
1. Select Chart Layout from the Data view toolbar. You can select to view a chart on its own, or a
chart with a table.
2. Drag and drop the relevant fields into the chart axes that are hidden inside an expandable tab at
the bottom of the chart view. There are three axes. The axes become automatically visible when
the mouse pointer hovers over the expandable tab. They can also be pinned into place by the pin
icon in the upper right hand corner of the axis tab.
3. Use the tools in the Designer to configure your chart. See 24.2.5 The Designer on page 620 for
more information.
24.2.5 The Designer
There is always only one Designer in the application. The Designer is used to configure the currently
active data view. When you have finished configuring the Data view, you can minimize the Designer
to have more space for the Data view.
Hint:
To restore the Designer, click Restore or select the view in the View menu.
The Designer is separated into the following sections. Each section is dedicated to a specific
configuration:
24.2.5.1 Fields
The Designer contains all of the fields coming from the data source. You can drag and drop the fields
into the pivot table to change column and row grouping or figures. When you drag and drop fields, a
blue line indicates where you will drop the field; likewise, a green line indicates that the field will
become a column.
24.2.5.2 View
The View section of the Designer allows you to assign a name to or rename the active Data view.
24.2.5.3 Chart
The Chart section of the Designer allows you to assign a title to the chart and choose the type of
chart (pie, line and bar charts). The following controls are available for pie charts:
•Minimum Slice and Percent: Define the minimum slice as a percentage or an absolute value (default).
•Number Precision to adjust the precision of the numeric labels on charts and Abbreviate to set the
magnitude of the figure to thousands (K), millions (M) or billions (B).
•Highlighting: To highlight trends or exceptions.
•2D with Depth: Toggle to add depth to the chart’s appearance.
•Shuffle Colors: With each click a different color is applied to the chart.
The following controls are available for line charts:
Transpose Table Changes the display of the columns and rows: the columns become rows and the
rows become columns.
Reset Table Size Set the table rows and columns to the default width and height.
Copy Table Copy table to clipboard.
Copy selected figure Copy selected figure to clipboard.
Menu Description

24 Working with the Dashboard
24.2 Getting started with the Dashboard
Transaction & Risk Management Module (TRM) User Guide 621
•Number Precision to adjust the precision of the numeric labels on charts and Abbreviate to set the
magnitude of the figure to thousands (K), millions (M) or billions (B).
•X Label Angle: To rotate the angle of the X-axis label.
•Line Thickness: To set the thickness of the chart’s line.
•Smoothing: To smooth the straight line into a curved one.
•Highlighting: Use to highlight trends or exceptions.
•Flip Axes: To change around the X and Y axes.
The above controls are available for bar charts, although instead of changing the line’s thickness you
can change the bar shape.
24.2.5.4 µCharts (Microcharts)
The µCharts section of the Designer allows you to highlight trends or exceptions. You can apply the
different types of microcharts by dragging-and-dropping in a similar way to aggregation rows and
columns.
24.2.5.5 Styles and Formats
The Styles and Formats section of the Designer allows you to change and improve visual settings for
relevant columns, rows, aggregations or figures. You can use the palette of styles that can be
applied by dragging the style from the Designer and dropping it onto the relevant area of the Pivot
Table, for example, either to a figure column or an aggregation row.
The available styles are:
•Text style: Select bold, italic, underline.
•Text color: Select text color.
•Background color: Select the background color.
•Min/Max: Apply the selected color to a minimum or maximum based on the magnitude figure. It is
applied across the whole row or column.
•Gradient: Apply gradients of the selected color based on the relative magnitude of the underlying
figure. Apply the gradient across the whole row or column and/or separately for positive and
negative values.
•Bars: Apply bars behind the selected figure based on its relative magnitude. You can apply bars
across the whole row or column and/or separately for positive and negative values (different
color), or only positive or negatives values.
•Number precision: Set the number of decimal places. The default is the precision provided by the
data source.
•Number abbreviation: Set the magnitude of the figure - K (thousands), M (millions), B (billions).
Note: To remove styles and formats you need to right-click in the Data view and select Clear
Styles and Formats.
24.2.5.5.1 Custom styles
It is possible to define your own style with the font, foreground color and background color of your
choice. To create a custom style:
1. In the Styles and Formats section of the Designer, right-click on an existing style or format and
select Duplicate Style.
2. Enter a name for the new style and then specify the font type, foreground and background color.
Click OK. The style will appear at the bottom of the Styles and Formats section.
3. You can then drag and drop the style onto the relevant place in the pivot table.

24 Working with the Dashboard
24.2 Getting started with the Dashboard
622 © Wall Street Systems IPH AB - Confidential
24.2.5.5.2 Conditional styles
Styles can be applied conditionally, where the condition is specified using a favorite filter. To apply a
conditional style:
•Create the appropriate filter and add it to favorites, see 24.2.5.7 Filter on page 623 for more
information.
•Select the filter from the drop-down list at the top of the Styles and Formats section. The filter’s
presence is indicated by an icon which overlays all applicable styles.
•You can then drag and drop the conditional styles onto the relevant place in the pivot table.
Note: To remove the filter, click on the Clear button next to the drop-down list at the top of the
section.
24.2.5.5.3 Right-click menu
Right-clicking on any style or format in the Designer opens a menu with the following options:
•Apply Style to All Figures.
•Apply Style to All Aggregates.
•Duplicate Style. Used to create your own custom style, see 24.2.5.5.1 Custom styles on page 621.
In the case where the underlying style or format is not applicable, the menu items are shown in an
inactive state.
Custom styles have the following two additional items in the menu:
•Edit: Used to edit the custom style, see 24.2.5.5.1 Custom styles on page 621.
•Remove: Used to remove the custom style, see 24.2.5.5.1 Custom styles on page 621.
24.2.5.6 Aggregates
The Aggregates section of the Designer allows you to aggregate data in the Data view. Aggregation
functions include Sum, Count, Min, Max, Average, Median, and Source Total. By default the Sum function is
used and automatic aggregation is enabled. The function can be changed from within the right-click
menu on the underlying field header in the Data view. Automatic aggregation can be switched off in
the Data view toolbar. In this case figures are not aggregated and are shown in the detail provided
by the data source.
Aggregation rows and columns can be added by dragging and dropping the relevant function from
the Designer into the relevant level in the row or column headers. The level for totaling is shown as
a blue rectangle that surrounds the relevant grouping, and the place where the new aggregated
rows or columns will be inserted is indicated by a green line. At the top level axis, the field label is
divided into two sections which determine whether the aggregation will be applied at the underlying
level or above. In the latter case the function is applied across the entire pivot table.
When a table axis contains figures and an axis grouping which breaks down the figures into
subcategories, the aggregation over the axis grouping can be applied to either figure or to both
figures. Dropping the desired aggregation function onto the axis grouping brings up a menu listing
all figures to which the aggregation can be applied.
Aggregation rows and columns are removed by dragging and dropping the row or column outside of
the pivot table or to the trash can in the bottom-right corner.
The Source Total aggregation function allows the Dashboard to display pre-computed aggregates that
are taken from the data source. These aggregates provide a summary of the underlying data for a
given grouping. The values provided by the Source Total cannot be updated by the Dashboard, and
in general the values are valid only if the composition of the grouping does not change. For
example, if a filter is applied that affects the composition of the underlying Source Total grouping,
the displayed Source Total is no longer correct. The Dashboard does have a built in mechanism to
check data validity and will not display potentially erroneous figures.

24 Working with the Dashboard
24.2 Getting started with the Dashboard
Transaction & Risk Management Module (TRM) User Guide 623
24.2.5.7 Filter
The Filter section of the Designer presents a list of active filter conditions, where each entry is
characterized by a pair consisting of a Field and the Filter expression.
To create a filter:
1. Enter the field either by typing its name, by double-clicking the Field cell and then selecting the
field from the selection list, or by dragging and dropping the field into the entry cell.
2. Enter the filter expression. The filter expression can be typed in manually using a specific syntax
or it can be created by a Filter Editor which is accessed by double-clicking the Filter cell. A
summary of the syntax is provided in the table below:
You can filter out single or multiple values, patterns and ranges. You can filter the data by
percentiles or quantiles which are specified either as percentages or integer rankings (providing
the possibility to create a filter that selects or eliminates the minimum/maximum values).
The Filter Editor can offer a range of values in selection lists. For example, if you filter by a
specific column such as "Account Name", the Filter Editor presents a list of all valid account
names.
3. To create a favorite filter, click on the Add as Favorite icon and add a name for the filter. The filter
can now be selected in the Styles and Formats section.
The filter distinguishes between source data and derived data. The source data are the underlying
raw data taken from the specified source. A specific configuration of the pivot table, which is based
on user-selected groupings and aggregation functions, leads to the computation of derived data.
The derived data are the data that are visible in the pivot table. When using filters it is also
important to differentiate between the table axes (labels of what is being presented) and the
figures:
•For filters on axes, it is irrelevant whether they are applied to the source data or derived data.
By default the Dashboard applies filters on the dimensions at source level.
•For filters on figures, the level at which the filter is applied is important. By default, filters of
figures are applied to the derived data, but you can override this behavior. Any modifications to
the pivot table automatically reapply the filter to the new derived figures. A checkbox labelled
with the letter "S" (which stands for "source"), allows you to set the filtering to the underlying
source data.
Function Syntax Examples
wildcard *? *UK* - filter out rows with string "UK" in the field.
range [min]:[max] -1000:1000 - include rows with values between -1000 and
+1000
0: - show rows with values greater than or equal to 0.
negation !expression ! -1000:1000 - exclude rows with values between -1000 and
+1000 (interval limits included).
combining ; :-1000; 1000: - exclude rows with values between -1000 and
+1000 (interval limits excluded).
strict inequality <, > >0 filters values greater than 0.
Note: When defining the filter, the syntax for open ranges is
automatically converted into the inequalities syntax. For
example, when you type ":0" this will appear as "<=0".
inequality >=, <= >=0 filters values greater than or equal to 0.
Note: When defining the filter, the syntax for open ranges is
automatically converted into the inequalities syntax. For
example, when you type ":0" this will appear as "<=0".
24 Working with the Dashboard
24.3 Data source details
624 © Wall Street Systems IPH AB - Confidential
24.3 Data source details
24.3.1 Cash management reports
Many of the defined cash management reports with saved criteria can be used as dashboard data
sources. Three types of reports are supported: Cash Position, Cash Transaction and Bank
Transaction.
24.3.1.1 Cash Position Report
The Cash Position Report offers access to cash position information including forecasts. The
following Cash Position specifics should however be taken into account:
•Reports should be configured without the Report Mapping - Report as Component (in Format)
option to prevent putting balances and report groups in the same axis.
•Total lines provided by the Cash Position are ignored; the Dashboard processes only the lowest
level raw data.
•Since the report returns Opening Balance, Movements (categorized by Report Groups) and
Closing Balance, the aggregation of these values and graphing would be distorted. For this
reason it is suggested to filter out Closing Balance in the Dashboard (using the built-in filtering
feature) and to insert a sum aggregation instead. This ensures that Closing Balance values are
shown in the aggregation row and graphing will take into account the correct figures.
•To preserve the sort order of Opening Balance and then that of Movements by Report Group,
several additional sorting fields are automatically created and assigned to the relevant fields
(Type, Report Group). No user configuration is needed; the Advanced Sorting feature is set
automatically. This behavior is applied analogously to the forecast value date in the case of time
buckets - the Dashboard will present time bucket names (as July-09) but will automatically link
forecast values to the correct date sort order.
•Some figures cannot be aggregated across the board in a simple manner. For example, the
Current Available figure in EUR cannot be summed with Current Available in USD. To address
this, the Dashboard includes an advanced feature called Aggregation Criteria which allows you to
specify another field as the one that will determine the aggregation (in this case Currency). The
Dashboard defaults to the relevant Aggregation Criteria for certain cases. The default can also
be set manually provided that the other field is part of the data source output.
•In the Cash Position Report it is possible to specify a standard expression for the date type
parameters. This feature makes it possible to reuse existing layouts for the most recent day
without changing/saving start-up parameters (see the WebSuite documentation for more
details).
24.3.1.2 Cash Transaction Report
The Cash Transaction Report provides either detailed or summary information regarding expected or
instructed activity.
24.3.1.3 Bank Transaction Report
The Bank Transaction Report provides either detailed or summary information regarding all
bank-reported activity.
24.3.2 Limits
The Limits data source allows you to monitor pre-defined limits which are available through the
standard limitd process. Each Data view can display a single limits page. When the Limits data
source is selected, the aggregation feature in the pivot table is automatically enabled, but
aggregation across higher-level dimensions is not performed. For groupings without pre-computed
aggregates, the Dashboard behaves in the same way as Limit Monitor. The absence of aggregates is
indicated by "N/A" in the appropriate cell.
24 Working with the Dashboard
24.3 Data source details
Transaction & Risk Management Module (TRM) User Guide 625
24.3.3 Report Generator
The Report Generator layout with saved parameters can be used as dashboard data source. The
Report Generator offers access to a very wide range of data which can be further adjusted by
defining additional calculated columns.
To make the data available to the Dashboard the following steps should be performed:
1. Create the desired report in the Report Generator, including start-up parameters.
2. Save the report with the option "Save current report query parameters".
3. Put the layout file in the appropriate directory on the relevant server.
See the TRM System Administration Guide for more information.
There are certain aspects of the Report Generator data source which should be taken into account:
•Row ID is added as the last grouping axis (it can easily be removed if not desired). This ensures
that the Dashboard presents the data with the same granularity as the Report Generator.
•Total lines provided by the Report Generator are ignored; the Dashboard processes only the
lowest level raw data.
•The "Hide Details" feature of the Report Generator cannot be used since the total rows are
ignored i.e. if the Dashboard does not receive any rows.
•For aggregations and sorting there is a similar requirement as in tmd (straight forward sums not
always applicable). However, since reports are completely custom made, the relevant set-up
should be done in the Dashboard (e.g. linking Currency as Aggregation Criteria to Market Value
Local). Similarly, the advanced sorting - sorting field should be defined in Report Generator and
then attached to the source field via the Advanced Sorting feature.
•The Report Generator date parameter can be set to "Today" to enable reuse of existing layouts
for the most recent day without having to change/save the start-up parameters.
24.3.4 Treasury Position
Treasury Position uses tmd (Treasury Monitor Daemon) as the data source. tmd is a server process
that provides output related to the Treasury Monitor. For more information see TRM System
Administration Guide.
To connect the Dashboard to the tmd, the relevant process must be running. One tmd process can
maintain multiple positions and each of the positions can have multiple pages.
The following specifics of the Treasury Position should be taken into account:
•Total lines provided by tmd are ignored; the Dashboard processes only the lowest level raw data.
•Some figures cannot be aggregated across the board in a simple manner. For example - Local
Market Value in EUR cannot be summed with Local Market Value in USD. To address this, the
Dashboard includes an advanced feature called Aggregation Criteria which allows you to specify
another field as the one that will determine the aggregation (in this case Currency). The
Dashboard defaults to the relevant Aggregation Criteria for certain cases. The default can be
overridden provided that the underlying field is part of the data source output.
•Some figures, such as value at risk or duration cannot be aggregated in a simple manner. To
avoid showing incorrect figures in the dashboard aggregations, it is possible to set a "Do not
aggregate switch" in the Aggregation Criteria. When this switch is on, "N/A" will appear at the
appropriate places to indicate that the aggregation is not applicable.
•Default sorting logic is not meaningful for some fields. In this case additional fields are
introduced, such as Risk Period (Sort Order).
•The Dashboard will show the qualification in brackets for axes that are configurable in the
Treasury Monitor (such as Client Group, Instrument Group, Periods) Examples: Client Group
(Risk Grouping), Instrument Group (Second), Risk Period (MM Gaps).
tmd position start-up parameters allow for the date field to be empty (the current day is used as the
default). The tmd can be restarted every day without having to change the start-up parameters to
see the current positions.
24 Working with the Dashboard
24.3 Data source details
626 © Wall Street Systems IPH AB - Confidential
Transaction & Risk Management Module (TRM) User Guide 627
Appendix A Activity parameters
A.1 Bank Account Balances
A.2 Bank Account Interest Realizing
Parameter Description
Balance Period in Days Number of days, prior to the Due Date to be included when calculating the balances.
This is used to include backdated transactions in the calculations. For example, if the
activity runs daily and the number of days specified here is 3, then the balance is
recalculated daily using the transactions from the past three days.
Balance Transaction
State
State in which balance transactions are created.
If left blank, the transactions are created in the default state, for example
BA-BALANCE, or the default state chosen by your organization for bank account
balances.
Balance Owner The client (bank account owner) of the accounts to be processed.
Bank The bank of the accounts to be processed.
Account The account to be processed.
Account Group The account group of the accounts to be processed.
Parameter Description
Mode Realize (default) or Undo Realize.
Select Undo Realize if you want to undo the realization of interest on accounts.
Portfolio Portfolio containing the accounts to be processed.
Bank Bank of the accounts to be processed.
Account The account to be processed.
Currency Currency of the accounts to be processed.
Interest Bank ID of a bank if you want to settle the interest realization in a specific bank, which
differs from the default bank.
Interest Account ID of a bank account if you want to settle the interest realization in a specific account,
which differs from the default bank account.
Skip Calendar Check State if you want to skip the currency calendar check.
If you select Yes to skip the check, the value date of the realized interest will be
posted on the day the activity runs, even if it falls on a non-business day.
A Activity parameters
A.3 Benchmark Cash Processing
628 © Wall Street Systems IPH AB - Confidential
A.3 Benchmark Cash Processing
A.4 Benchmark Rebalancing
A.5 Book Value Change
A.6 Call Money Account Update
Parameter Description
Portfolio Benchmark portfolio to be processed to re-investment the cash according to the
selected method.
Parameter Description
Benchmark Benchmark to be processed to perform rebalancing according to the benchmark’s
rebalancing schedule.
Parameter Description
Portfolio Trading portfolio containing the deals that are to be processed (mandatory field).
Minimum Transaction
State
Minimum state that transactions must have reached to be included in the processing.
Scenario Market data scenario to be used in the processing.
Should be the same scenario that is used for calculating results: see 19.4.2.1 Defining
rate scenarios for result calculations on page 543.
Valuation Mode Market valuation mode to be used: Default, Benchmark, or Theoretical.
Should be the same valuation mode that is used for closing the books: see 19.4.4
Calculating bookkeeping entries on page 546.
Result Mode Result calculation mode (accounting standard) to be used.
Classification Only transactions in this classification group are be processed.
Instrument Group The instrument group containing the deals that are to be processed.
Instrument The instrument attached to the deals that are to be processed.
Pending Transactions Whether to include pending transactions, i.e. transactions whose settlement date is
after the BVC date.
•Yes - revalues pending transactions (default).
•No - ignores pending transactions.
Parameter Description
Minimum Transaction
State
Minimum state that transactions must have reached to be included in the processing.
A Activity parameters
A.7 Call Money Roll Over
Transaction & Risk Management Module (TRM) User Guide 629
A.7 Call Money Roll Over
A.8 Cash Pool Leveling
Portfolio Portfolio containing the call money accounts to be processed.
Owner Owner (client) of the portfolio containing the call money accounts to be processed.
Counterparty Counterparty of the call money accounts to be processed.
Counterparty Main
Group
Counterparty main group of the call money accounts to be processed.
Counterparty Group Counterparty group of the call money accounts to be processed.
Instrument The instrument attached to the call money accounts that are to be processed.
Instrument Group Instrument group that contains the call money accounts that are to be processed.
Currency Currency of the call money accounts to be processed.
Interest Rate Curve Yield curve attached to the instrument of the call money accounts to be processed.
Parameter Description
Minimum Transaction
State
Minimum state that transactions must have reached to be included in the processing.
Portfolio Portfolio containing the call money transactions to be processed.
Owner Owner (client) of the portfolio containing the call money transactions to be processed.
Counterparty Counterparty of the call money transactions to be processed.
Counterparty Main
Group
Counterparty main group of the call money transactions to be processed.
Counterparty Group Counterparty group of the call money transactions to be processed.
Instrument The instrument attached to the call money transactions that are to be processed.
Instrument Group Instrument group that contains the call money transactions to be processed.
Currency Currency of the call money transactions to be processed.
Parameter Description
Cash Pool Hierarchy Cash pool hierarchy that contains the accounts to be processed. This can be a single
cash pool account, or a parent account with subaccounts.
Transaction State Transaction state given to the created leveling transactions.
Minimum Transaction
State
Minimum state that transactions must have reached to be included in the processing.
Include Sub Hierarchy Specifies whether to process the subaccount hierarchy:
•Yes - includes the subaccounts
•No - only processes the selected account.
Parameter Description

A Activity parameters
A.9 Cash Settlement Reconciliation
630 © Wall Street Systems IPH AB - Confidential
A.9 Cash Settlement Reconciliation
A.10 Checking Instruments and Transactions Clients
A.11 Checking Instruments and Transactions Holidays
Parameter Description
Owner Owner (client) of the portfolio containing the statements to be processed (mandatory
field).
Bank Select the holding bank of the securities to be processed.
If left blank, all banks are included.
Account Select the account (held by the custodian) that is to be processed. If left blank, all the
accounts held with the custodian are processed.
Period Start Date
Period End Date
Specify a period for which the reconciliation is to run. This allows reconciliation of past
statements against outstanding settlements.
Parameter Description
Client The client that has been modified.
Parameter Description
Keep Holidays
Changes
Specifies whether to mark the holiday changes as already done.
•No - (default) marks the holiday changes as already incorporated so if the activity
is repeated the new holidays are not considered.
•Yes - incorporates the holiday changes.
Update Instruments
and Transactions
Specifies whether to incorporate the calendar changes in the instrument and
transactions.
•No - (default) marks but does not update the instruments and transactions that
require cashflows to be regenerated following a change in holidays.
This means that at the instrument level, the To be checked switch will be switched
on for all instruments potentially impacted and at the transaction level,
transactions will be set with the status To be checked. You can then update the
instruments and transactions in Transaction Manager.
•Yes - the holiday changes are automatically incorporated into instruments and
transactions.
If Yes is selected, any modifications made to the cash flows prior to this update are
saved and reinstated after regeneration.

A Activity parameters
A.12 Closing the Books Valuation
Transaction & Risk Management Module (TRM) User Guide 631
A.12 Closing the Books Valuation
Note: This activity type is reserved for use by technical support staff - it is not intended for use
by end users.
A.13 Copy Market Information
Parameter Description
Top Portfolio to
Process
The portfolio to be processed (mandatory field).
If a parent portfolio is selected, all the subportfolios are also processed.
Minimum State Minimum state that transactions must have reached to be included in the processing.
Note: If left blank, the default state is Open.
Scenario Market data scenario to be used in the processing.
If left blank, the scenario specified in Accounting Configuration Editor is used.
Result Mode Result calculation mode (accounting standard) to be used.
Valuation Mode Market valuation mode to be used: Default, Benchmark, or Theoretical
Benchmark Mode The mode to be used for the calculation of benchmark figures: Default, Benchmark, or
Theoretical.
Delta Figures If set to No (the default), the key figures are stored, to be used by the TRM CTB
Events Generation activity, i.e. Realized Period End = 0.
If set to Yes, the key figures are stored, to be used by the TRM Daily Delta Events
Generation activity, i.e. Unrealized Period End with two sets of figures: beginning of
day = -1, end of day = +1.
Next Day Valuation Yes or No.
Shifts the Valuation Date one day forward, while keeping the Figure Date unchanged.
This results in determining the position as of due date, using market rates as of due
date, and doing the valuation (e.g. calculating accruals) as of due date + 1 day.
Parameter Description
MI Group Market Information Group of market rates to be copied (frozen).
Select a group here to copy a subset of the rates from the Source Scenario, for
example, European rates, US rates.
If left blank, all the rates in the Source Scenario are copied.
Source Scenario The scenario from which the quotations are copied.
If left blank, the default scenario (real-time feed) is used.
Destination Scenario The scenario to which the quotations are copied. For example, FREEZE.
Source Subscenario The subscenario from which the quotations are copied.
Destination
Subscenario
The subscenario to which the quotations are copied.
Mode The mode that determines which quotations are copied from the source scenario.
•Day - The default mode. Copies quotations entered on the day the activity is run.
•Last - Copies the most recent quotations received before the activity is run.
Note: When copying prices intra-scenario, the Copy Price starts the last date search
from the day before the target date.
A Activity parameters
A.14 Cost of Carry
632 © Wall Street Systems IPH AB - Confidential
A.14 Cost of Carry
A.15 Cost of Carry Interest Realizing
Override Existing
Prices
Yes or No.
•Yes - overrides any existing quotations for the specified date.
•No - keeps the existing quotations copied on that day.
This is useful if the activity is running several times in one day. For example, some
rates are only available in the afternoon, so the activity will need to run again but
without overwriting the rates that were copied in the morning.
Parameter Description
Cost-of-Carry Period in
Days
Number of days prior to the Due Date that are to be considered when calculating the
cost-of-carry.
The reason for this is to make sure that backdated transactions are included in the
calculation. For example, if the activity runs daily and the number of days specified
here is 3, then balances are calculated every day including transactions from the
previous three days.
Top Portfolio The portfolio to be processed.
If a parent portfolio is selected, all the subportfolios are also processed.
Cost-of-Carry
Transaction State
The state to be given to the cost-of-carry cash flow once calculated.
Minimum Transaction
State
Minimum state that transactions must have reached to be included in the processing.
Parameter Description
Mode Realize (default) or Undo Realize. Select Undo Realize if you want to undo the
cost-of-carry interest realization.
Portfolio Portfolio for which you want to realize the cost-of-carry interest.
Currency The currency of the cost-of-carry interest to be processed. If left blank, all currencies
will be processed.
Zero Balancing Yes or No (default).
•Yes - the accrued cost-of-carry interest and the cost-of-carry balance are closed
out, so that the next day, the starting cost-of-carry balance is zero when the
cost-of-carry activity is run.
•No - the accrued cost-of-carry interest is realized today, and the next day, the
starting cost-of-carry balance is today's balance.
Parameter Description
A Activity parameters
A.16 Cost of Carry Zero Balancing
Transaction & Risk Management Module (TRM) User Guide 633
A.16 Cost of Carry Zero Balancing
A.17 Custody Balances
A.18 Dashboard Excel Export
Parameter Description
Mode Zero Balancing (default) or Undo Zero Balancing. Select Undo Zero Balancing if you want to
undo the cost-of-carry zero balancing. See the TRM User Guide for information on
zero-balancing.
Portfolio Portfolio for which you want to set the balance to zero.
Currency The currency of the cost-of-carry interest to be processed. If left blank, all currencies
will be processed.
Parameter Description
Balance Period in Days Number of days prior to the Due Date that are to be considered when generating the
balances.
The reason for this is to make sure that backdated transactions are included in the
calculation. For example, if the activity runs daily and the number of days specified
here is 3, then balances are calculated ever day including transactions from the
previous three days.
Instrument The instrument to be processed.
Client Custodian (a client with the role of Custody) for which the balances are to be
calculated.
Always Store Balance Yes or No.
•Yes - stores all the balances.
•No - only stores the balances when they have changed (default).
Note: Set to Yes, if the activity is running before Custody Reconciliation, to guarantee
having balances with the correct dates.
Undo Reconciled
Balance
Yes or No.
•Yes - to undo reconciled custody balances when generating new ones.
•No - do not undo reconciled custody balances.
Parameter Description
Dashboard Layout The name of the Dashboard layout to be exported. The user scheduling the activity
must be entitled to access this layout. This is a mandatory parameter.
Output File Name The name of the generated Excel file. These files are generated to the location
specified by the DASHBOARD_EXPORT_HOME environment variable. By default it is
%WSS_HOME%/var/export/dashboard.
This parameter is optional and if not specified the filename is derived from the activity
parameters in the form ${Dashboard Layout}_${Due Date in yyyyMMdd
format}_${ activity_number}.xlsx.
Unless it is already present, the .xlsx extension of the filename will get added
automatically.
A Activity parameters
A.19 Data License Prices
634 © Wall Street Systems IPH AB - Confidential
A.19 Data License Prices
Suppress File Name
Suffix
Select Yes if you want to remove the _${Due Date in yyyyMMdd format}_${
activity_number} ending from the file name.
Merge Cells Yes, No or empty.
•Yes: The cells in the pivot tables are merged as in the Dashboard user interface.
This is useful for printing.
•No or empty: The cells in the pivot tables are not merged. This is useful if the
output is used for further processing in Excel.
Timeout in Minutes If the default timeout of 300000 ms (5 minutes) is insufficient then it can be extended
here.
Parameter Description
Default Ask Tag The default identifier for the Ask field if it has not been set in the Market Info
Source Editor. If left blank, defaults to PX_ASK.
For a list of possible field identifiers, see the Bloomberg documentation.
Default Bid Tag The default identifier for the Bid field if it has not been set in the Market Info
Source Editor. If left blank, defaults to PX_BID.
For a list of possible field identifiers, see the Bloomberg documentation.
Default Date Tag The default identifier for the Date field if it has not been set in the Market Info
Source Editor.
For a list of possible field identifiers, see Bloomberg documentation.
Source Source from which market info is searched in the Market Info Source Editor and
for which quotations are requested. If left blank, defaults to BLOOMBERG.
Type Type for which market info is searched in the Market Info Source Editor and for
which quotations are requested. If left blank, all market info types are requested.
MI Group MI Group from which the market info is searched in the Market Info Source Editor
and for which quotations are requested. If left blank, then no filter is applied to
the MI Group field.
Name Name for which the market info is searched in the Market Info Source Editor and
for which quotations are requested.
Destination Scenario Destination scenario into which prices are imported. If specified, the specified
scenario will override the scenario defined in the Market Info Source Editor.
Destination Subscenario Destination subscenario, where prices are to be imported. If specified, the
specified subscenario will override the subscenario defined in the Market Info
Source Editor.
Pricing Source A user can request quotes for a specific market source only. In the header of the
request file, the following command is added: PRICING_SOURCE = parameter of
activity.
Historical End Date
Historical Start Date
• If you specify a start date without an end date, then the historical prices are
imported up to the current date.
• If you specify both start and end dates, then the historical prices are imported
for the selected period.
• If no dates are specified, then the current prices are imported.
Parameter Description
A Activity parameters
A.20 Data License Output Processing
Transaction & Risk Management Module (TRM) User Guide 635
A.20 Data License Output Processing
A.21 Delete Instrument
Processing Type Select the processing type:
•All - The request file is created and uploaded via the FTP connection to the
appropriate site, the response is fetched and processed.
•Generate Request - Only the request file is created. The request file is stored in
the folder defined by environment variable FK_BLOOMBERG_FTP_LOCAL_DIR.
•Process Output - The output file is processed. Output files are stored in the
folder defined by the environment variable FK_BLOOMBERG_FTP_LOCAL_DIR.
All files with the following extensions are processed: .out , .out.gz., and
out.enc.gz
________________________________________
Note: The FTP communication must be properly configured.
Work Station (WS) Select the Bloomberg workstation that you want to be used for requesting prices
instead of the one set up by the environment variable
FK_BLOOMBERG_FTP_WORKSTATION.
For more information about Bloomberg specific environment variables, refer to the
TRM System Admin Guide.
Parameter Description
Source Subdirectory The subdirectory containing the files to be imported. The list of import files is based
on the contents of the Source Subdirectory field and the environment variables
FK_MDI_FILE_IMPORT_DIR and FK_ MDI_IMPORT_FILE_PATTERN.
The final path is constructed as follows:
[FK_IMPORT_PRICES_DIR] Source Subdirectory [FK_ MDI_IMPORT_FILE_PATTERN]
• If the Source Subdirectory field contains the full path from the root, then
FK_MDI_FILE_IMPORT_DIR is ignored.
• If the path ends with name of a file (with or without wildcards), then FK_
MDI_IMPORT_FILE_PATTERN is ignored.
Note: Do not include the extension in the pathname as the system only searches and
processes files with extensions .out, .out.gz, .out.enc.gz. from
Bloomberg. For example, a file with extension .out.enc.gz is decompressed
(.gz) then decrypted (.enc), and finally, the text file (.out) is processed
•If the Source Subdirectory field is empty then the default value '*' is used, i.e. all
files in the source subdirectory.
Parameter Description
Import Request (Mandatory) Select the previously imported request for which you want to delete
the instruments.
Import Batch ID Select the corresponding batch ID of the import request for which you want to
delete the instruments.
Parameter Description

A Activity parameters
A.22 Detachment
636 © Wall Street Systems IPH AB - Confidential
A.22 Detachment
A.23 Dividend
A.24 End of Day Processing
Note: This activity type is reserved for use by technical support staff - it is not intended for use
by end users. See the TRM Daily Events Generation activity type in the ACM User Guide.
Parameter Description
Portfolio The portfolio to be processed (mandatory field).
If a parent portfolio is selected, all the subportfolios are also processed.
Minimum Transaction
State
Minimum state that transactions must have reached to be included in the processing.
Commercial Lending
Context
To be used in the commercial lending context. Yes or No.
Facility Only include transactions in this facility.
Only applies when Commercial Lending Context = Yes
Instrument The equity instrument to be processed (optional).
Parameter Description
Portfolio The portfolio to be processed (mandatory field).
Minimum Transaction
State
Minimum state that transactions must have reached to be included in the processing.
Commercial Lending
Context
To be used in the commercial lending context. Yes or No.
Facility Only include transactions in this facility.
Only applies when Commercial Lending Context = Yes
Instrument The equity instrument to be processed (optional).
Parameter Description
Processing Period in
Days
Process transactions from the Due Date and this number of days relative to the Due
Date. For example, -5 means that data is processed for the due date and the five days
prior to that date.
Portfolio The portfolio to be processed (mandatory field).
If a parent portfolio is selected, all the subportfolios are also processed.
Type Type of processing: Closing, Off-balance, or Running.
Result Mode Result calculation mode (accounting standard) to be used.
Do Payment
Bookkeeping
Specify whether to include payment bookkeeping in the processing.
A Activity parameters
A.25 End of Period Processing
Transaction & Risk Management Module (TRM) User Guide 637
A.25 End of Period Processing
Note: This activity type is reserved for use by technical support staff - it is not intended for use
by end users. See the TRM CTB Events Generation activity type in the ACM User Guide.
A.26 Equity Conversion
Payment Owner Owner of the payments to be included in the processing.
Process Selling If you want to disable the processing of average balances and selling, select No. For
example, when you want to run this activity after the Book Value Change and there
are some sell transactions on the BVC date and you are using Average selling method.
Logging Mode Select the level of logged messages (None, Normal, Extensive) that you want to receive
during the processing.
Parameter Description
Parameter Description
Top Portfolio to
Process
The portfolio to be processed (mandatory field).
If a parent portfolio is selected, all the subportfolios are also processed.
Minimum State Minimum state that transactions must have reached to be included in the processing.
Note: If left blank, the default state is Open.
Scenario Market data scenario to be used in the processing.
If left blank, the scenario specified in Accounting Configuration Editor is used.
Result Mode Result calculation mode (accounting standard) to be used.
Valuation Mode Market valuation mode to be used: Default, Benchmark, or Theoretical.
Benchmark Mode The mode to be used for the calculation of benchmark figures: Default, Benchmark, or
Theoretical.
Next Day Valuation Yes or No.
Shifts the Valuation Date one day forward, while keeping the Figure Date unchanged.
This results in determining the position as of due date, using market rates as of due
date, and doing valuation (e.g. calculating accruals) as of due date + 1 day.
Parameter Description
Portfolio The portfolio to be processed (mandatory field).
If a parent portfolio is selected, all the subportfolios are also processed (mandatory
field).
Minimum Transaction
State
Minimum state that transactions must have reached to be included in the processing.
Commercial Lending
Context
To be used in the commercial lending context. Yes or No.
Facility Only include transactions in this facility.
Only applies when Commercial Lending Context = Yes
A Activity parameters
A.27 Fixing ABS Repayment
638 © Wall Street Systems IPH AB - Confidential
A.27 Fixing ABS Repayment
A.28 Fixing ABS Repayment (Full Repayment)
A.29 Fixing Bond Cashflow
A.30 Fixing Bond Cashflow - Undo
Instrument The equity instrument to be processed (optional).
Parameter Description
Instrument Group Instrument group to be processed.
Instrument Instrument to be processed.
Use % Below Triggers the use of the Repayment % parameter for the repayment fixing.
Repayment % The fixing rate for the cash flow.
If Use % Below is set to Yes, and this field is blank, then the fixing rate is 0.
Parameter Description
Instrument Group Instrument group to be processed.
Instrument Instrument to be processed.
Parameter Description
Instrument Group Instrument group containing the bond instrument to be processed.
Instrument The bond instrument to be processed.
Currency Currency for the fixing.
Fixing Rate Yield curve used in the fixing.
Fixing Period Interest period from which the quotation is retrieved when fixing the floating leg of
the transaction, for example 1M, 3M, 1Y.
Fixing Subscenario Subscenario from which the quotation is retrieved.
Parameter Description
Instrument Group Instrument group containing the bond instrument to be processed.
Parameter Description

A Activity parameters
A.31 Fixing Transaction Cashflow
Transaction & Risk Management Module (TRM) User Guide 639
A.31 Fixing Transaction Cashflow
A.32 Fixing Transaction Cashflow - Undo
Instrument The bond instrument to be processed.
Currency Currency of the fixing.
Fixing Rate Yield curve used in the fixing.
Fixing Period Interest period from which the quotation is retrieved.
Fixing Subscenario Subscenario from which the quotation is retrieved.
Parameter Description
Processing Period in
days
Process transactions from the Due Date and this number of days relative to the Due
Date. For example, -5 means that data is processed for the due date and the five days
prior to that date.
Portfolio The portfolio to be processed.
Minimum Transaction
State
Minimum state that transactions must have reached to be included in the processing.
Instrument Group Instrument group to be processed.
Instrument The instrument to be processed.
Currency Currency for the fixing.
Fixing Rate Yield curve to be used to fix a floating cash flow.
Fixing Period Interest period from which the quotation is retrieved when fixing the floating leg of the
transaction, for example 1M, 3M, 1Y.
Fixing Subscenario Subscenario from which the quotation is retrieved.
Re-fixing Included Yes or No.
•Yes - re-fixing is done using the last fixing price.
•No - fixing already done and remains unchanged.
Parameter Description
Processing Period in
days
Process transactions from the Due Date and this number of days relative to the Due
Date. For example, -5 means that data is processed for the due date and the five days
prior to that date.
Portfolio The portfolio to be processed.
Minimum Transaction
State
Minimum state that transactions must have reached to be included in the processing.
Instrument Group Instrument group to be processed.
Instrument The instrument to be processed.
Parameter Description
A Activity parameters
A.33 Fixing Transaction Trigger
640 © Wall Street Systems IPH AB - Confidential
A.33 Fixing Transaction Trigger
A.34 Fixing Transaction Trigger - Undo
Currency Currency of the fixing.
Fixing Rate Yield curve used in the fixing.
Fixing Period Interest period from which the quotation was retrieved.
Fixing Subscenario Subscenario from which the quotation was retrieved.
Parameter Description
Portfolio The portfolio to be processed.
Minimum Transaction
State
Minimum state that transactions must have reached to be included in the processing.
Instrument Group Instrument group to be processed.
Instrument The instrument to be processed.
Currency Currency for the fixing.
Fixing Rate Yield curve used in the fixing.
Fixing Period Interest period from which the quotation is retrieved when fixing the floating leg of the
transaction, for example 1M, 3M, 1Y.
Fixing Subscenario Subscenario from which the quotation is retrieved.
Re-fixing Included Yes or No.
•Yes - re-fixing is done using the last fixing price.
•No - fixing already done and remains unchanged.
Parameter Description
Portfolio The portfolio to be processed.
Minimum Transaction
State
Minimum state that transactions must have reached to be included in the processing.
Instrument Group Instrument group to be processed.
Instrument The instrument to be processed.
Currency Currency of the fixing.
Fixing Rate Yield curve used in the fixing.
Fixing Period Interest period from which the quotation was retrieved.
Fixing Subscenario Subscenario from which the quotation was retrieved.
Parameter Description
A Activity parameters
A.35 Forecast Exposures from CMM
Transaction & Risk Management Module (TRM) User Guide 641
A.35 Forecast Exposures from CMM
A.36 Forward Fixing
A.37 Fund Data Calculation/Reporting
Parameter Description
Portfolio The portfolio to be processed.
If a parent portfolio is selected, all the subportfolios are also processed
Minimum Transaction
State
Minimum state that transactions must have reached to be included in the processing.
Value Date From First date that the forecasts from CMM are considered.
This parameter corresponds to the Report From field in the Cashflow Forecast Selection
parameters.
Value Date To Last date that the forecasts from CMM are considered.
This parameter corresponds to the Report To field in the Cashflow Forecast Selection
parameters.
Scenario Market data scenario to be used in the processing.
Parameter Description
Portfolio The portfolio to be processed.
If a parent portfolio is selected, all the subportfolios are also processed
Minimum Transaction
State
Minimum state that transactions must have reached to be included in the processing.
Scenario Market data scenario to be used in the processing.
Valuation Mode Market valuation mode to be used: Default, Benchmark, or Theoretical.
Result Mode Result calculation mode (accounting standard) to be used.
Classification Only transactions in this classification group are be processed.
Instrument Group Instrument group to be processed.
Instrument The instrument to be processed.
Information Description
Fund Portfolio ID of the relevant top fund or individual fund.
Transaction State
(mandatory)
Minimum state that the fund assets and fees transactions must have reached in
order to be included in the activity.
Time Zone Mandatory. Time zone as defined in Time Zone Editor.
Cut-Off Time
(mandatory)
Time, up until which, transactions are included in the analysis.

A Activity parameters
A.37 Fund Data Calculation/Reporting
642 © Wall Street Systems IPH AB - Confidential
Currency The currency in which you want to display the results.
Note: By default this is the currency of the fund portfolio.
Rate Scenario
(mandatory)
The Market Information Scenario in which the fund's assets and fees are
calculated.
Note: If left empty, the default scenario is used.
Result Context Accounting standard for which you want to define the scenario.
State Context Value specifying whether certain transaction types are to be included in the
position:
•Default - no cost-of-carry or collateral transactions.
•w/Cost-of-Carry - cost-of-carry transactions.
•w/Collateral - collateral transactions. These transactions are generated from
repo transactions.
•w/Cost-of-Carry/Collateral - both cost-of-carry and collateral transactions.
•w/Cost-of-Carry/Order - both cost-of-carry and order transactions.
•w/Order - order transactions.
Note: w/Cost-of-Carry can only be selected for portfolios which have the Cost-of-Carry
switch turned on: see 12.1.7 Monitoring cost-of-carry positions on page 390
for more information.
Fund Report Comment Written comment to be displayed in NAV Report Manager.
Fund Report State State of the report (for example Final)
Note: If the Fund Report State = Final, the activity can also save the NAV (on top
of running a NAV report).
Fund Report Status Status of the report (for example, Set Published)
Note:
• If the Fund Report State = Final and Fund Report Status = Set Published
- The activity runs the report and saves the NAV by default in the NAV
output scenario defined in the Portfolio Editor/NAV Calculation Setup page.
• If the Fund Report State = Final and Fund Report Status = End of Day or empty
- The activity runs the report and saves the NAV in the NAV output scenario
defined in NAV Scenario field (below).
NAV Scenario The Market Information Scenario in which the calculated NAV is saved.
Note: This field only applies if the Fund Report State = Final.
Clear published Yes or No (default).
Yes - the activity undoes the processing of the Final and Published NAV; it undoes
the generation of the accrued management fees and the saving of the NAV.
Information Description
A Activity parameters
A.38 Fund Fee Realizing
Transaction & Risk Management Module (TRM) User Guide 643
A.38 Fund Fee Realizing
A.39 FX Fixing Transaction Cashflow
A.40 FX Fixing Transaction Cashflow - Undo
Information Description
Mode Realize (default) or Undo Realize. Select Undo Realize if you want to undo the
realization of fund fees. This removes all the paid flags on the accrued fund fee
cashflows and removes the generated fund fee and principal cashflows.
Portfolio Portfolio for which you want to realize the accrued fund fees.
Counterparty Counterparty to whom you pay the accrued fund fee.
Instrument ID of a fee instrument, but only if you want to realize specific fees for this
instrument. Otherwise, leave this field blank, and the system will realize all the
accrued fund fees defined in the portfolio.
Currency The currency of the fee, but only if you want to realize the accrued fund fees in
that one currency. Otherwise, leave this field blank, and the system will default to
the portfolio currency.
Parameter Description
Processing Period in
days
Process transactions from the Due Date and this number of days relative to the Due
Date. For example, -5 means that data is processed for the due date and the five days
prior to that date.
Portfolio The portfolio to be processed.
Minimum Transaction
State
Minimum state that transactions must have reached to be included in the processing.
Instrument Group Instrument group to be processed.
Instrument The instrument to be processed.
Currency Currency for the FX fixing.
Fixing Subscenario Subscenario from which the FX rate is retrieved.
Re-fixing Included Yes or No.
•Yes - re-fixing is done using the last FX rate.
•No - fixing already done and remains unchanged.
Parameter Description
Processing Period in
days
Process transactions from the Due Date and this number of days relative to the Due
Date. For example, -5 means that data is processed for the due date and the five days
prior to that date.
Portfolio The portfolio to be processed.
Minimum Transaction
State
Minimum state that transactions must have reached to be included in the processing.
A Activity parameters
A.41 FX Option Strategy Exercise
644 © Wall Street Systems IPH AB - Confidential
A.41 FX Option Strategy Exercise
A.42 FX Position Roll-Over
Instrument Group Instrument group to be processed.
Instrument The instrument to be processed.
Currency Currency of the FX fixing.
Fixing Subscenario Subscenario from which the FX rate was retrieved.
Parameter Description
Portfolio The portfolio to be processed (mandatory field).
If a parent portfolio is selected, all the subportfolios are also processed (mandatory
field).
Minimum Transaction
State
Minimum state that transactions must have reached to be included in the processing.
Strategy Type The strategy type of the selected transaction (for example, Risk Reversal).
Strategy The strategy ID of the selected transaction.
Fixing Scenario The scenario used to retrieve the relevant FX spot rate for the Exercise action for fixing.
Parameter Description
Top Portfolio The portfolio to be processed.
If a parent portfolio is selected, all the subportfolios are also processed
Note: If the portfolio is not visible, check that it has the FX Position Roll-Over switch set
to on.
Minimum Transaction
State
Minimum state that transactions must have reached to be included in the processing.
Currency
Currency 2nd
Only include this currency pair in the processing.
Note: The system always combines currency pairs to roll-over the position. The base
currency of the roll-over transaction (the ’position’ currency) is determined
according to market conventions defined in the Currency Editor. For example,
for a standard EUR customer, both USD/CHF and CHF/USD deals are rolled over
as a USD/CHF position.
Roll-Over Spot Rate Method to be used to determine Spot Rate of the Roll-Over Transaction:
• DEAL-BE-RATE - Roll-over closes previous spot position (no result with this
method)
• CLOSING-RATE - Use closing spot rate of the previous day.
Use Forward Points Yes or No.
•Yes - to include cost of carry for rolling position over by adding forward points to
the Spot Rate.
•No - do not include cost of carry.
Parameter Description
A Activity parameters
A.43 FX Realizing
Transaction & Risk Management Module (TRM) User Guide 645
A.43 FX Realizing
Important: Do not use if you run daily accounting (TRM Daily Event Generation). This
activity calculates realized FX Profit and should be run with activity Selling (FIFO and
Avg Balances), see A.62 Selling (FIFO and Avg Balances) on page 653.
Scenario Market data scenario to be used in the processing to retrieve Closing Rate and
Forward Points, if needed. Usually, FREEZE (Frozen Rates).
Minimum Home
Amount
Minimum amount required to roll-over a position, expressed in portfolio’s home
currency.
This is to avoid rolling forward and generating extra transactions if the position is
empty or contains a very small amount.
Mirror Portfolio Portfolio where the internal swap transaction is mirrored.
Usually a short-term liquidity management or funding portfolio since the activity
transfers the required funding from spot portfolios to the mirror portfolio.
Counterparty Client Counterparty to use to create the internal Roll-Over transactions.
Ignore Back Dated
Changes
Yes or No.
Avoids recalculating the position of back dated changes, such as new back-dated spot
deals, or changes and cancellations of deals already calculated.
The system automatically detects if back-dated changes that affect the spot position
have occurred. If they have, any changes are taken into account automatically, and
the positions are recalculated (for the selected currency pair and portfolio only).
Note: Once the activity has run with this option for a given day, the back-dated
changes present on that day are taken into account but are marked as
processed. It means that they are never taken into account except by
re-running the activity day by day from the date when the back dated changes
start impacting the position and using Force Full Recalculation For Due Date
option (see below).
Force Full
Recalculation For Due
Date
The system automatically detects which positions are out of date, and recalculates
them without changing the previously calculated position. For example, if position
roll-over is run for a given due date on a given portfolio, and later re-run for all
portfolios (including that one), and provided there are no new deals in that portfolio,
the previously calculated position is not recalculated.
Nevertheless, it may sometimes be useful to force recalculation of the full position. For
example, when FX Rates are not correct after the activity has completed, or when
back dated changes were inadvertently set to be ignored (see Ignore Back Dated
Change).
When this option is selected the system recalculates positions for the due date,
regardless of whether they have already been calculated.
Parameter Description
Parameter Description
Processing Period in
Days
Process transactions from the Due Date and this number of days relative to the
Due Date. For example, -5 means that data is processed for the due date and the
five days prior to that date.
Portfolio
(Mandatory field)
The portfolio to be processed.
If a parent portfolio is selected, all the subportfolios are also processed.
Instrument Instrument to be processed.
A Activity parameters
A.44 Import Instrument
646 © Wall Street Systems IPH AB - Confidential
A.44 Import Instrument
A.45 Import Market Information
Facility ID Facility to be processed. Transactions only traded under the specified facility will
be processed.
Note: For a proper handling of selling results you must configure your selling
method with Matching by Facility switch in the Selling page of the Result Editor.
Result Mode
(Mandatory field)
Result calculation mode (accounting standard) to be used.
Parameter Description
Parameter Description
Import Request (Mandatory) Select the request to be imported.
Processing Type Select the processing type:
•All - The request file is created and uploaded via the FTP connection to the
appropriate site, the response is fetched and processed.
•Generate Request - Only the request file is created. The request file is stored in
the folder defined by environment variable FK_BLOOMBERG_FTP_LOCAL_DIR.
•Process Output - The output file is processed. Output files are stored in the
folder defined by the environment variable FK_BLOOMBERG_FTP_LOCAL_DIR.
All files with the following extensions are processed: .out , .out.gz., and
out.enc.gz
Note: The FTP communication must be properly configured.
Parameter Description
Source Subdirectory The subdirectory containing the files to be imported (mandatory field).
The list of import files is based on the contents of the Source Subdirectory field and the
environment variables FK_IMPORT_PRICES_DIR and FK_IMPORT_PRICES_PATTERN.
The final path is constructed as follows:
[FK_IMPORT_PRICES_DIR] Source Subdirectory [FK_IMPORT_PRICES_PATTERN]
• If the Source Subdirectory field contains the full path from the root, then
FK_IMPORT_PRICES_DIR is ignored.
• If the path ends with name of a file (with or without wildcards), then
FK_IMPORT_PRICES_PATTERN is ignored.
The import process treats one file at a time. After successful completion of the import,
the file is renamed/moved to a new subdirectory under the import directory. The name
of the subdirectory is derived from the batch_id of the activity.
Destination Scenario The destination FX scenario.
This overrides the scenario specified in the Market Info Source Editor and the import
file. If left blank, the prices are stored in the scenario selected in the Market Info Source
Editor which may not necessarily be the DEFAULT scenario.
If prices are to be stored in the DEFAULT scenario, then explicitly select that scenario
here.

A Activity parameters
A.46 Import Security List
Transaction & Risk Management Module (TRM) User Guide 647
A.46 Import Security List
A.47 Index Freeze
Destination
Subscenario
The destination FX subscenario.
This overrides the subscenario defined in the Market Info Source Editor and the import
file. If left blank, the prices are stored in the subscenario selected in the Market Info
Source Editor, which may not necessarily be the DEFAULT subscenario.
If prices are to be stored in the DEFAULT subscenario, then explicitly select that
subscenario here.
Destination Source The destination source stored in the Prices table. This overrides all scenarios defined in
the Market Info Source Editor and import file.
Parameter Description
Security List Request Select the list to be imported. The list will be imported using the import request
defined in the security list. To use a different import request, specify the import
request you want to use in the Import Request field.
Import Request Optionally, select a request to be used instead of the one defined at the security
list level.
Processing Type Select the processing type:
•All - The request file is created and uploaded via the FTP connection to the
appropriate site, the response is fetched and processed.
•Generate Request - Only the request file is created. The request file is stored in
the folder defined by environment variable FK_BLOOMBERG_FTP_LOCAL_DIR.
•Process Output - The output file is processed. Output files are stored in the
folder defined by the environment variable FK_BLOOMBERG_FTP_LOCAL_DIR.
All files with the following extensions are processed: .out , .out.gz., and
out.enc.gz
Note: The FTP communication must be properly configured.
Parameter Description
Scenario Market data scenario to be used in the processing.
Subscenario Market data subscenario to be used in the processing.
Instrument Instrument to be processed.
Instrument Group Instrument group to be processed.
Parameter Description
A Activity parameters
A.48 Index Rebalance
648 © Wall Street Systems IPH AB - Confidential
A.48 Index Rebalance
A.49 Index Adjustment
A.50 Netting
A.51 Netting - Undo
Parameter Description
Instrument Instrument to be processed.
Instrument Group Instrument group to be processed.
Parameter Description
Scenario Market data scenario to be used in the processing.
Instrument Group Instrument group to be processed.
Instrument Instrument to be processed.
Index Type The index type.
Parameter Description
Portfolio The portfolio to be processed.
Minimum Transaction
State
Minimum state that transactions must have reached to be included in the processing.
Instrument Group Instrument group to be processed.
Instrument Instrument to be processed.
Re-netting Included Yes or No.
•Yes - re-netting is done using the last fixing price.
•No - netting already done remains unchanged.
Processing Period in
days
Process transactions from the Due Date and this number of days relative to the Due
Date. For example, -5 means that data is processed for the due date and the five days
prior to that date.
Parameter Description
Portfolio The portfolio to be processed.
Minimum Transaction
State
Minimum state that transactions must have reached to be included in the processing.
Instrument Group Instrument group to be processed.
A Activity parameters
A.52 NumeriX Calibration
Transaction & Risk Management Module (TRM) User Guide 649
A.52 NumeriX Calibration
A.53 NumeriX Valuation
A.54 FX Option No Exercise
Instrument Instrument to be processed.
Processing Period in
days
Process transactions from the Due Date and this number of days relative to the Due
Date. For example, -5 means that data is processed for the due date and the five days
prior to that date.
Parameter Description
Scenario Market data scenario to be used in the processing.
Subscenario Market data subscenario to be used in the processing.
Calibration Select the model you want to calibrate. To calibrate a single model enclose the
selected model between ’^’ and ’$’, for example, ^MyModel$. If left blank, all the
calibration models are included.
Note: You can exclude calibration models from the list of available models by
switching on Exclude from calibration activity in the model definitions, see 4.7
Pricing complex derivatives on page 190.
Parameter Description
Portfolio Market data scenario to be used in the processing.
Minimum Transaction
State
Minimum state that transactions must have reached to be included in the processing.
Instrument Group Instrument group to be processed.
Instrument Instrument to be processed.
Scenario Market data scenario to be used in the processing.
Valuation Mode Market valuation mode to be used: Default, Benchmark, or Theoretical.
Result Mode Result calculation mode (accounting standard) to be used.
Transaction Number The transaction to be processed.
Figure Currency The figure currency of the transactions to be processed.
Parameter Description
Processing Period in
Days
Process transactions from the Due Date and this number of days relative to the Due
Date. For example, -5 means that data is processed for the due date and the five days
prior to that date.
Parameter Description
A Activity parameters
A.55 Performance Data Calculation
650 © Wall Street Systems IPH AB - Confidential
A.55 Performance Data Calculation
A.56 Portfolio Modeling Processing
Portfolio The parent portfolio of the portfolio hierarchy to be processed.
Minimum Transaction
State
Minimum state that transactions must have reached to be included in the processing.
Instrument Group Instrument group to be processed.
Instrument Instrument to be processed.
Fixing Subscenario Only transactions using this subscenario for fixing are to be processed.
Parameter Description
Top Portfolio to
Process
The parent portfolio of the hierarchy for which market values are to be calculated.
Note that the design of the portfolio structure has an effect on how many different
parent portfolios are needed for saving market values and for monitoring performance
on various levels. This includes the structure for benchmarks in case they are also
maintained as real portfolios.
Note also that the base currency of the parent portfolio determines in which currency
the market values are saved.
Minimum Transaction
State
Minimum state that transactions must have reached to be included in the processing.
Scenario Market data scenario to be used in the processing.
Valuation Mode Market valuation mode to be used: Default, Benchmark, or Theoretical.
Result Mode Result calculation mode (accounting standard) to be used.
Force Spot to Zero Yes or No.
Calculates the market value as if the market quote was for delivery today (regardless
of the number of spot days defined for the instrument).
For bonds quoted on clean price, the market value is:
Clean_price * nominal + AI_today, without any discounting from spot.
For instruments quoted on yield, the yield is used for discounting the cash flows from
cash flow date to revaluation date.
Save Market Value
Period in Days
Number of days, back from the Due Date, to be included when calculating market
values.
The reason for specifying a period is to make sure that backdated transactions are
included in the calculation. For example, if the activity runs daily and the number of
days specified here is 3, then every day, the system calculates the market value from
transactions during the past three days.
Parameter Description
Top Portfolio The parent portfolio of the portfolio hierarchy to be processed (mandatory field).
Minimum Transaction
State
Minimum state that transactions must have reached to be included in the processing.
Parameter Description
A Activity parameters
A.57 Purge Market Quotes
Transaction & Risk Management Module (TRM) User Guide 651
A.57 Purge Market Quotes
A.58 Return of Capital
Scenario Market data scenario to be used in the processing.
Distribution Method Method to be used when rebalancing:
Even Proportional (default).
Even Relative Bet.
Keep Input Values Yes or No.
•Yes - no rescaling is applied (default).
•No - rescaling is applied.
No Overdraft Yes or No (default).
Avoids over investment (that is, investing more than indicated) as a result of
rounding. Cash is not impacted when the rounding of the rebalancing results in an
increase in the investment. The last investment is adjusted downwards.
Security to Exclude The instrument to be excluded from the rebalancing process.
Invest Cash Only Yes or No (default).
Allows any extra cash to be rebalanced on the existing portfolio composition.
Rebalancing Figure
Precision
Rebalancing figure precision (base key-figure).
Changes the default precision. For example, any amount less than 0.0001 of the total
market value of the portfolio can still be invested.
Mode Transaction mode used to generate the orders. The default is PM-GENERATION.
Package Type Name of the package type to be used to package the generated orders.
Parameter Description
Days to Keep All quotes older than the due date of the activity minus Keep Quotes Days are purged.
If not specified, then by default, the value from the Configuration Table Editor,
parameter Keep Quotes Days is taken.
Scenario Quotes in which scenario should be cleaned. By default, all scenario’s quotes are
cleaned.
Parameter Description
Portfolio The portfolio to be processed.
If a parent portfolio is selected, all the subportfolios are also processed.
Minimum Transaction
State
Minimum state that transactions must have reached to be included in the processing.
Commercial Lending
Context
To be used in the commercial lending context. Yes or No.
Parameter Description
A Activity parameters
A.59 Risk Manager Export
652 © Wall Street Systems IPH AB - Confidential
A.59 Risk Manager Export
A.60 Save Caplet/Floorlet Volatilities
Facility Only include transactions in this facility.
Only applies when Commercial Lending Context = Yes
Instrument The equity instrument to be processed (optional).
Parameter Description
Export Directory The directory where the file is to be created.
Export File The file name (without an extension).
Portfolio The portfolio to be processed.
Export Strategy The strategy to be used to export the position.
•Risk Equivalent Cashflows - only use this approach for IR and FX instruments.
This strategy can be useful to compare RiskManager’s Parametric VaR with TRM’s.
•RMI Setup - as specified in the RMI setup (the default strategy)
The RMI setup is defined at instrument level using the RiskManager position template
trading feature.
Scenario Market data scenario to be used in the processing. If left blank, the default scenario is
used.
Native Equity Market
Data
Specifies whether equities are proxied to external data, such as to a RiskMetrics data
set (select No), or to internal data (select Yes). If left blank, defaults to No.
Native Yield Curve Select Yes if the field Yield Curve contains TRM Yield Curve names, or No if the field
contains RM Yield Curve names. If left blank, defaults to No.
Export Cost-of-carry Select Yes if cost-of-carry transactions are to be exported, or No if they are not to be
exported. If left blank, defaults to No.
Balance transactions, if available, are always exported to be consistent with Treasury
Monitor.
Export Obligors Specific to the CreditManager Interface combined with RMI:
•All clients - export obligor information based on issuer.
•No - do not export obligor information.
•Parent clients - export obligor information based on CreditManager obligor.
Minimum Transaction
State
Minimum state transactions must have reached to be included in the processing.
If left blank, defaults to Open.
Export Branch Codes Select Yes if Branch Codes are to be exported at the end of each transaction using
TAGs, or No if Branch Codes are not to be exported. If left blank, the default value is
No.
Parameter Description
Volatility Reference ID of the volatility reference you want to use.
Parameter Description
A Activity parameters
A.61 Save Derived IR Quotes and Yield Curves
Transaction & Risk Management Module (TRM) User Guide 653
A.61 Save Derived IR Quotes and Yield Curves
A.62 Selling (FIFO and Avg Balances)
Important: Do not use if you run daily accounting (TRM Daily Event Generation). This
activity closes the positions and calculates realized results for viewing in Treasury
Monitor and Periodic PL Reporting. Run this activity with FX Realizing activity (A.43
FX Realizing on page 645).
Scenario Market data scenario to be used in the processing.
Subscenario Market data subscenario to be used in the processing.
Parameter Description
Due Date Offset in
Days
"-1" if you want the activity to process data for the previous day rather than the
day of the Due Date.
IR Quote / Yield Curve Specific IR Quote or yield curve for which yields will be saved. If left blank, the IR
Quotes or yields will be saved for all IR Quotes or yield curves (matching the
selected kind and currency below if applicable).
Scenario Market data scenario to be used in the processing.
Subscenario Market data subscenario to be used in the processing.
Kind Select either IR QUOTE or YIELD CURVE or leave blank for both.
Currency Currency of the IR Quotes and/or yield curves to be processed.
Parameter Description
Parameter Description
Processing Period in
Days
Process transactions from the Due Date and this number of days relative to the
Due Date. For example, -5 means that data is processed for the due date and the
five days prior to that date.
Portfolio
(Mandatory field)
The portfolio to be processed.
If a parent portfolio is selected, all the subportfolios are also processed.
Instrument Instrument to be processed.
Facility ID Facility to be processed. Transactions only traded under the specified facility will
be processed.
Note: For a proper handling of selling results you must configure your selling
method with Matching by Facility switch in the Selling page of the Result Editor.
Result Mode
(Mandatory field)
Result calculation mode (accounting standard) to be used.
A Activity parameters
A.63 Selling Values
654 © Wall Street Systems IPH AB - Confidential
A.63 Selling Values
A.64 Settlement Generation
Parameter Description
Top Portfolio to
Process
The portfolio to be processed.
If a parent portfolio is selected, all the subportfolios are also processed.
Minimum Transaction
State
Minimum state transactions must have reached to be included in the processing.
Scenario Market data scenario to be used in the processing.
Result Mode Result calculation mode (accounting standard) to be used.
Valuation Mode Market valuation mode to be used: Default, Benchmark, or Theoretical.
Parameter Description
Portfolio The portfolio to be processed.
Owner Owner (client) of the portfolio to be processed.
Currency Currency of the transactions to be processed.
Currency Class Currency class of the transactions to be processed.
Currency Group Currency group of the transactions to be processed.
Rule Process the transactions that match the rule selected here.
Rules are used to filter data. See 5.1 Defining rules on page 221.
Not Rule Process the transactions that do not match the rule selected here.
Rules are used to filter data. See 5.1 Defining rules on page 221.
A Activity parameters
A.65 Security Positions Data
Transaction & Risk Management Module (TRM) User Guide 655
A.65 Security Positions Data
A.66 Security Settlement Reconciliation
A.67 Split
Parameter Description
Top Portfolio to
Process
The portfolio to be processed.
If a parent portfolio is selected, all the subportfolios are also processed.
Result Mode Result calculation mode (accounting standard) to be used.
Scenario Market data scenario to be used in the processing.
Valuation Mode Market valuation mode to be used: Default, Benchmark, or Theoretical.
Parameter Description
Owner Owner (client) of the portfolio to be processed.
Custodian The custodian holding the securities that are to be processed. If left blank, all the all
custodians are included.
Account The account holding the securities that are to be processed. If left blank, all the all
accounts are included.
Instrument Instrument to be processed.
Period Start Date
Period End Date
Specify a period for which the reconciliation is to run. This allows reconciliation of past
statements against outstanding settlements.
Parameter Description
Portfolio The portfolio to be processed.
If a parent portfolio is selected, all the subportfolios are also processed.
Minimum Transaction
State
Minimum state that transactions must have reached to be included in the processing.
Commercial Lending
Context
To be used in the commercial lending context. Yes or No.
Facility Only include transactions in this facility.
Only applies when Commercial Lending Context = Yes
Instrument The equity instrument to be processed (optional).
A Activity parameters
A.68 Undo Book Value Change
656 © Wall Street Systems IPH AB - Confidential
A.68 Undo Book Value Change
A.69 Update Client
A.70 Update Corporate Action
Parameter Description
Portfolio Parent or trading portfolio containing the deals that are to be processed
(mandatory field)
Minimum Transaction
State
Minimum state that transactions must have reached to be included in the
processing.
Result Mode Result calculation mode (accounting standard) in which the process should be
done (mandatory field).
Classification Only transactions in this classification group are be processed.
Instrument Group The instrument group containing the deals that are to be processed.
Instrument The instrument attached to the deals that are to be processed.
Parameter Description
Client Update Request (Mandatory) Select the request that defines the clients to be updated.
Processing Type Select the processing type:
•All - The request file is created and uploaded via the FTP connection to the
appropriate site, the response is fetched and processed.
•Generate Request - Only the request file is created. The request file is stored in
the folder defined by environment variable FK_BLOOMBERG_FTP_LOCAL_DIR.
•Process Output - The output file is processed. Output files are stored in the
folder defined by the environment variable FK_BLOOMBERG_FTP_LOCAL_DIR.
All files with the following extensions are processed: .out , .out.gz., and
out.enc.gz
Note: The FTP communication must be properly configured.
Parameter Description
Corporate Action
Update Request
(Mandatory) Select the request that defines the instruments to be updated.
Processing Type Select the processing type:
•All - The request file is created and uploaded via the FTP connection to the
appropriate site, the response is fetched and processed.
•Generate Request - Only the request file is created. The request file is stored in
the folder defined by environment variable FK_BLOOMBERG_FTP_LOCAL_DIR.
•Process Output - The output file is processed. Output files are stored in the
folder defined by the environment variable FK_BLOOMBERG_FTP_LOCAL_DIR.
All files with the following extensions are processed: .out , .out.gz., and
out.enc.gz
Note: The FTP communication must be properly configured.
A Activity parameters
A.71 Update Instrument
Transaction & Risk Management Module (TRM) User Guide 657
A.71 Update Instrument
A.72 Update Settlement Instructions
A.73 CreditManager Exposure Export
Parameter Description
Update Request (Mandatory) Select the request that defines the instruments to be updated.
Processing Type Select the processing type:
•All - The request file is created and uploaded via the FTP connection to the
appropriate site, the response is fetched and processed.
•Generate Request - Only the request file is created. The request file is stored in
the folder defined by environment variable FK_BLOOMBERG_FTP_LOCAL_DIR.
•Process Output - The output file is processed. Output files are stored in the
folder defined by the environment variable FK_BLOOMBERG_FTP_LOCAL_DIR.
All files with the following extensions are processed: .out , .out.gz., and
out.enc.gz
Note: The FTP communication must be properly configured.
Parameter Description
Client Client for which settlement instructions are to be updated:
• Enter a portfolio owner as the client, and all counterparties with which the owner
has outstanding transactions are included.
• Enter a counterparty as the client, and only those cash flows made with the
counterparty are included.
Currency Target currency to be updated.
Instrument Select the instrument on which you want the cashflow updates to apply if you want to
limit these updates to one particular instrument.
Cashflows After Earliest settlement date for cash flows to be included in the update. If left blank, the
Due Date of the activity is used. All cashflows with a Settlement Date after this date
receive new settlement instructions.
Cashflows Until Latest settlement date for cash flows to be included in the update. All cash flows with
a settlement date after this date are excluded from the update.
Commit Changes to
Tran s acti ons
If set to No, the changes are calculated, but not committed to the database. Instead
an email listing the changes is generated.
Parameter Description
Export Directory Directory where the file is created.
Export File File name (without any extension).
Top Portfolio ID of the (top) portfolio (mandatory field).
A Activity parameters
A.74 CreditManager Obligor Export
658 © Wall Street Systems IPH AB - Confidential
A.74 CreditManager Obligor Export
Netting Strategy Defines if short positions are to be used as collateral for a long one:
• As specified in Client Editor
• Never.
Obligor Grouping Specifies if the exposure has to be split by parent client or by client:
•Clients
• Parent Clients.
Note: If left blank, the default value is Parent Clients.
Export Strategy Specifies which clients are to be exported.
•Clients
• Parent Clients.
Minimum Transaction
State
Minimum state that transactions must have reached to be included in the processing.
Note: If left blank, the default state is Open.
Parameter Description
Export Directory Directory where the file is created.
Export File File name (without any extension).
Export Strategy Specifies which clients are to be exported.
• Clients
•Parent Clients.
Parameter Description
Transaction & Risk Management Module (TRM) User Guide 659
Appendix B Report parameters
B.1 Activity Log Report
B.2 Balance Report
Parameter Description
Period Start
Period End
The start and end dates for the reporting period.
Note: The default range is “today to today”.
Parameter Description
Output File
Output Mail
Printer Name
Layout
Period Length
Portfolio The portfolio containing the accounts to be included.
Currency The currency of the accounts to be included.
Currency Class The currency class of the accounts to be included.
Client The owner of the portfolio of the accounts to be included.
Bank The bank of the accounts to be included.
Bank Account The bank account to be included.
Transaction State The state that transactions must have reached to be included.
Rule
Display All Balances Specifies whether the opening balance is displayed for each date:
•Yes - the opening balance is displayed for each date from Period Start to End
•No - the opening balance is only displayed for the start date.
Display Balance AI Specifies whether the account accrued interest is displayed for each date:
•Yes (and Display All Balances = Yes) - the accrued interest is displayed for each
date from period start to end.
•Yes (and Display All Balances = No) - the accrued interest is only displayed for the
period start date.
•No - no accrued interest is displayed.
B Report parameters
B.3 Bank Account Statement Report
660 © Wall Street Systems IPH AB - Confidential
B.3 Bank Account Statement Report
B.4 Book Value Change History Report
Parameter Description
Booking Date From The booking date from which information is displayed.
Booking Date To The booking date until when information is displayed.
Valid Date From The value date from which information is displayed.
Valid Date To The value date until when information is displayed.
Bank Statement
Number
The unique ID given by the system to each bank statement.
Site The ID for the site that has imported the bank statement.
Owner Information for the accounts held by this owner should be displayed.
Bank Information for the accounts with this bank should be displayed.
Bank Account The account ID for which information should be displayed.
Information Type • If All is selected then all information should be displayed
• If Balances is selected then only balance information should be displayed
• If Movements is selected then only movement information should be displayed.
Bank Statement Type Only balances and movements for this bank statement type should be displayed.
Parameter Description
Portfolio The portfolio for which you want to view the change in book value history. This is a
mandatory field.
Period Start
Period End
The start and end dates for the period for which you want the information to be
displayed.
Note: The default date range is “today to today”.
Instrument Group The instrument group for which you want to view the change in book value history.
Instrument The instrument for which you want to view the change in book value history.
Result Mode Result mode (accounting standard): FO/MO, FAS, IFRS, or Local.
Only the result modes defined for the portfolio owner are available for selection.
Classification Group The classification group for which you want to view the change in book value history.
If Result Mode is specified, only the classification groups applied to the result mode
are available for selection.
Classification The classification within the classification group for which you want to view the
change in book value history.
Number Transaction Number of a specific transaction for which you want to view the change in
book value history.
B Report parameters
B.5 Call Reports
Transaction & Risk Management Module (TRM) User Guide 661
B.5 Call Reports
B.6 Cashflow Report
Parameter Description
Output File
Output Mail
Printer Name
Layout
Mode Call money mode: admin, final or trading.
Category Call account or call money.
Portfolio The portfolio to be included.
Number Call money or account number.
Period Length
Currency Currency for the call money or accounts to be included.
Instrument Instrument of the call money or accounts to be included.
Account The account to be included.
Counterparty Counterparty of the call money or accounts to be included.
Trad e r Trade r name.
Parameter Description
Output File
Output Mail
Printer Name
Layout
Period Length
Portfolio The portfolio to be included in the report (mandatory field).
Instrument The instrument to be included in the report.
Instrument Group The instrument group to be included in the report.
Currency The currency of the transactions to be included in the report.
Currency Class The currency class of the transactions to be included in the report.
Currency Group The currency group of the transactions to be included in the report.
Gap Set Only transactions whose value date falls in to the specified gap are included.
Counterparty The counterparty of the transactions to be included in the report.
Counterparty Main
Group
The counterparty main group of the transactions to be included in the report.
Counterparty Group The counterparty group of the transactions to be included in the report.
B Report parameters
B.7 Cashflow Fixing Report
662 © Wall Street Systems IPH AB - Confidential
B.7 Cashflow Fixing Report
B.8 Cashflow Log Report
Our Bank The organization’s bank used for cash flows.
Our Bank Account The organization’s bank account used for the cash flows.
Transaction State The state that transactions must have reached to be included.
Parameter Description
Period Start The start date of the period queried.
Period End The end date of the period queried.
Portfolio The portfolio of the transactions for which you want to view the cash flows.
Currency The currency of the transactions for which you want to view the cash flows.
Counterparty The counterparty of the transactions for which you want to view the cash flows.
Counterparty Type The counterparty type of the transactions for which you want to view the cash flows.
Main Counterparty
Typ e
The main counterparty type of the transactions for which you want to view the cash
flows.
Instrument Group The instrument group of the transactions for which you want to view the cash flows.
Instrument The instrument of the transactions for which you want to view the cash flows.
Transaction State The state that transactions must have reached to be included.
Parameter Description
Output File
Output Mail
Printer Name
Layout
Period Length
Number The number of the single transaction to be included.
Portfolio The portfolio of the transactions to be included.
Trader Trader name. Only include transactions created/modified by this trader.
Parameter Description
B Report parameters
B.9 Cheapest to Deliver Report
Transaction & Risk Management Module (TRM) User Guide 663
B.9 Cheapest to Deliver Report
B.10 Classification Report
B.11 Client Update Log
Parameter Description
Instrument The cheapest to deliver instrument.
Date The delivery date.
Parameter Description
Portfolio The portfolio to which the transactions you want to view belong.
Instrument Group The instrument group used in the transactions that you want to view.
Instrument The instrument used in the transactions that you want to view.
Counterparty The counterparty of the transactions that you want to view.
Collateral Number The number used to group all transactions involved in the same collateral transaction.
Opening Date From The opening date from when you want to view the transactions.
Opening Date To The opening date up until when you want to view the transactions.
Value Date From The value date from when you want to view the transactions.
Value Date To The value date up until when you want to view the transactions.
Classification Group The classification group for which you want to view the transactions.
Transaction State The state that transactions must have reached to be included.
Parameter Description
Request The name of the Client Update Request for which you want to generate the log.
Batch ID Specific run of the activity, defined by a unique Batch ID, for which you want to
generate the log.
Severity Severity of the information shown in the log. Possible values are Error, Warning and
Info.
Message Type More detailed information about the type of information to show in the log. For
example, you may want to view technical FTP Communication errors only, or business
problems, such as errors when updating the client. You can filter the information
based on the message type.
Layout Layout of the report.
B Report parameters
B.12 Collateral Management Report
664 © Wall Street Systems IPH AB - Confidential
B.12 Collateral Management Report
B.13 Collateral Report
Parameter Description
Position Date Date for which you want the report.
Valuation Date Date on which the value of the outstanding collateralized transactions and the
associated collateral is measured.
Portfolio The trading or higher level portfolio for which the report is being run.
Instrument Group ...
... Trader
All of the fields from Instrument Group to Trader are used to restrict the report to only
those transactions matching the criteria you specify.
Figure Currency By default, the figure currency is the portfolio (base) currency. It is also possible to
enter another currency in the figure currency transaction column.
Period Behavior Specify whether you want cash flows realizing on the period end date to be displayed
as realized or unrealized.
Valuation Mode Option for specifying which method is to be used for which portfolio: Default,
Benchmark, or Theoretical.
Transaction State The state that transactions must have reached to be included.
Scenario Rate class (for example, default, freeze) for the report.
Result Mode Result mode (accounting standard): FO/MO, FAS, IFRS, or Local.
Only the result modes defined for the portfolio owner are available for selection.
State Context Value specifying whether certain transaction types are to be included in the position:
• Default: no cost-of-carry or collateral transactions.
• W/Cost-of-Carry: cost-of-carry transactions.
This can only be selected for portfolios which have the Cost-of-carry switch turned
on.
• W/Collateral: collateral transactions.
These transactions are generated from repo transactions. If this is not turned on,
then only the cash (that is, depo/loan) part of repo transactions is included.
• W/Cost-of-Carry/Collateral: both cost-of-carry and collateral transactions.
• W/Cost-of-Carry/Order: both cost-of-carry and order transactions.
• W/Order: order transactions.
Parameter Description
Period Start
Period End
The start and end dates for the period for which you want the information to be
displayed.
Note: The default date range is “today to today”.
Instrument The instrument for which you want to view the report.
Currency The currency for which you want to view the report.
Counterparty The counterparty for which you want to view the report.
B Report parameters
B.14 Competitive Quote Report
Transaction & Risk Management Module (TRM) User Guide 665
B.14 Competitive Quote Report
B.15 Corporate Actions Update Log
B.16 Corporate Actions Update Report
Parameter Description
Portfolio The portfolio in which the transactions are made.
Instrument Group The instrument group of the transaction.
Instrument The instrument of the transaction. If you enter an instrument the report only displays
transactions with this instrument.
Counterparty The counterparty of the transaction.
Transaction State The state that transactions must have reached to be included.
Opening Date From The opening date from when you want to view the transactions.
Opening Date To The opening date up until when you want to view the transactions.
Value Date From The value date from when you want to view the transactions.
Value Date To The value date up until when you want to view the transactions.
Collateral Number The number of the underlying transaction.
Competitive
Counterparty
The competitive counterparty of the transaction.
Parameter Description
Request The name of the Corporate Action Update Request for which you want to generate the
log.
Batch ID Specific run of the activity, defined by a unique Batch ID, for which you want to
generate the log.
Severity Severity of the information shown in the log. Possible values are Error, Warning and
Info.
Message Type More detailed information about the type of information to show in the log. For
example, you may want to view technical FTP Communication errors only, or business
problems, such as errors when updating the instrument. You can filter the information
based on the message type.
Layout Layout of the report.
Parameter Description
Request The name of the Corporate Action Update Request, for which you want to generate the
list of received corporate actions and the list of subsequent instrument updates.
Batch ID Specific run of the activity, defined by a unique Batch ID, for which you want to
generate the list of all updated instruments.
Layout Layout of the report.
B Report parameters
B.17 Custody Balance Report
666 © Wall Street Systems IPH AB - Confidential
B.17 Custody Balance Report
B.18 Custody Reconciliation Report
B.19 Data License Output Processing Report
Parameter Description
Balance Period Start The start date of the period for which you want to view custody information.
Balance Period End The end date of the period for which you want to view custody information.
Note: when Period Start is equal to Period End, the latest balances are displayed
including back-dated balances.
Custodian The client who is defined as Custodian and who is affected by the transaction viewed
on the report.
You must enter something in this field for the portfolio-owner’s custody account
number to be displayed on the report. The Custodian is defined in the Roles field in the
upper part of Client Editor.
Owner The portfolio-owner.
Custody Account The portfolio owner’s custody account number.
Instrument Group The instrument group for which you want to view a custody balance report.
Instrument The instrument for which you want to view a custody balance report.
Security Code
Standard
The type of security identifier that you require: CUSIP, ISIN, or SEDOL.
Security Code The specific security identifier of the custody, based on the standard specified in the
previous field.
Parameter Description
Period Start The first day of the period under analysis.
Period End The last day of the period under analysis.
Client The custodian for the report.
Custody The custody for the report.
Account The custody account.
Reconciliation Type • Ignored Balances: all custody balances which have been ignored.
• Ignored Statements: all custody statements which have been ignored.
• Matched Balances: all custody balances which have been matched.
• Unmatched Balances: all custody balances which have not been matched.
• Unmatched Statements: all custody statements which have not been matched.
Parameter Description
Batch ID Specific run of the activity, defined by a unique Batch ID, for which you want to
generate the log.
B Report parameters
B.20 Data License Prices Log
Transaction & Risk Management Module (TRM) User Guide 667
B.20 Data License Prices Log
B.21 Data License Prices Import Log
B.22 Delivery Report
Severity Severity of the information shown in the log. Possible values are Error, Warning and
Info.
Message Type More detailed information about the type of information to show in the log. For
example, you may want to view technical FTP Communication errors only, or business
problems, such as errors when updating the instrument. You can filter the information
based on the message type.
Layout Layout of the report.
Parameter Description
Batch ID Specific run of the activity, defined by a unique Batch ID, for which you want to
generate the list of all updated instruments.
Severity Severity of the information shown in the log. Possible values are Error, Warning, Info
and Summary.
Layout Layout of the report.
Parameter Description
Batch ID Specific run of the activity, defined by a unique Batch ID, for which you want to
generate the list of all updated instruments.
Severity Severity of the information shown in the log. Possible values are Error, Warning and
Info.
Layout Layout of the report.
Parameter Description
Opening Date The opening date of the custody transaction.
Delivery Date The delivery date of the custody transaction. If generated from a normal transaction,
this date is the same date as the custody transaction.
Client The portfolio owner of the custody transaction.
Portfolio The portfolio to which the custody transaction belongs.
Parameter Description
B Report parameters
B.23 Drawdown Fixing Report
668 © Wall Street Systems IPH AB - Confidential
B.23 Drawdown Fixing Report
(Commercial loan use only)
B.24 Event Diary Report
B.25 History Log Report
Custodian The client who is defined as Custodian and who is affected by the transaction viewed
on the report.
You must enter something in this field for the portfolio owner’s custody account
number to be displayed on the report. The Custodian is defined in the Roles field in the
upper part of Client Editor.
Custody Account The account which belongs to the custodian.
Instrument The instrument used in the transactions that you want to view.
Instrument Group The instrument group used in the transactions that you want to view.
Number The number of the transaction to be included in the report. Only enter something into
this field if you want to view one transaction.
Collateral Number The number used to group all transactions involved in the same collateral transaction.
Parameter Description
Parameter Description
Period Start The date from which information is displayed.
Period End The date until when information is displayed.
Portfolio The portfolio concerned.
Instrument Type The instrument type for which you want to view the upcoming events.
Instrument The instrument for which you want to view to view the upcoming events.
Transaction State The state that transactions must have reached to be included.
Events Select an event from the list.
Events can include: all types of fixings, call or put exercises, triggered events,
currency or transaction conversions, equity-related events, and option expirations or
other types of option events.
Inactive Included Yes or No according to whether you want to include inactive events in the report.
Parameter Description
Output File
Output Mail
Printer Name
B Report parameters
B.26 Holidays Checking Report
Transaction & Risk Management Module (TRM) User Guide 669
B.26 Holidays Checking Report
B.27 Holidays for Period Report
B.28 Import Market Information Log Report
Layout
Period Length
User The name of a single user to be included.
Action The type of actions to be included:
•CREATE - new entities.
•GRANT - portfolio permissions granted to a user.
•MODIFY - modified entities.
•REMOVE - deleted entities.
•REVOKE - portfolio permissions revoked from a user.
Parameter Description
From When Date Date from which you want to check holidays.
Mode Report.
Full Short List or Full List.
• If you select Full List, all available data is displayed.
• If you select Short List, only the entity (transaction number or instrument ID)
affected by the holiday change is displayed.
Parameter Description
Calendar Group The ID of the calendar group for which you want to generate the report.
Start Date
End Date
The period for which you want to view the defined holidays for the calendar group.
Maximum Rows The maximum number of rows to display in the report.
Parameter Description
Batch ID Specific run of the activity, defined by a unique Batch ID, for which you want to
generate the log.
Severity Severity of the information shown in the log. Possible values are Error, Warning, Info
and Summary.
Layout Layout of the report.
Parameter Description
B Report parameters
B.29 Instrument Delete Log
670 © Wall Street Systems IPH AB - Confidential
B.29 Instrument Delete Log
B.30 Instrument Import Log
B.31 Instrument Import Report
Parameter Description
Request The name of the Security Import Request, for which you want to generate the log and
all deleted instruments.
Batch ID Specific run of the activity, defined by a unique Batch ID, for which you want to
generate the log.
Severity Severity of the information shown in the log. Possible values are Error, Warning and
Info.
Message Type More detailed information about the type of information to show in the log. For
example, you may want to view technical FTP Communication errors only, or business
problems, such as errors when updating the instrument. You can filter the information
based on the message type.
Layout Layout of the report.
Parameter Description
Request The name of the Security Import Request, for which you want to generate the log.
Batch ID Specific run of the activity, defined by a unique Batch ID, for which you want to
generate the log.
Severity Severity of the information shown in the log. Possible values are Error, Warning and
Info.
Message Type More detailed information about the type of information to show in the log. For
example, you may want to view technical FTP Communication errors only, or business
problems, such as errors when updating the instrument. You can filter the information
based on the message type.
Layout Layout of the report.
Parameter Description
Request The name of the Instrument Update Request, for which you want to generate the list
of all updated instruments.
Batch ID Specific run of the activity, defined by a unique Batch ID, for which you want to
generate the list of all updated instruments.
Layout Layout of the report.
B Report parameters
B.32 Instrument Update Log
Transaction & Risk Management Module (TRM) User Guide 671
B.32 Instrument Update Log
B.33 Instrument Update Report
B.34 Key Figure Report
Parameter Description
Request The name of the Instrument Update Request, for which you want to generate the log.
Batch ID Specific run of the activity, defined by a unique Batch ID, for which you want to
generate the log.
Severity Severity of the information shown in the log. Possible values are Error, Warning and
Info.
Message Type More detailed information about the type of information to show in the log. For
example, you may want to view technical FTP Communication errors only, or business
problems, such as errors when updating the instrument. You can filter the information
based on the message type.
Layout Layout of the report.
Parameter Description
Request The name of the Instrument Update Request, for which you want to generate the list
of all updated instruments.
Batch ID Specific run of the activity, defined by a unique Batch ID, for which you want to
generate the list of all updated instruments.
Layout Layout of the report.
Parameter Description
Output File
Output Mail
Printer Name
Layout
Portfolio Portfolio to be included.
Instrument Group
Instrument
Currency
Currency Class
Time Zone
Opening Time
Gap Set
Counterparty
Counterparty Group
Issuer
Issuer Group
Trad e r
Use these parameters to filter the content of the report.
B Report parameters
B.35 Limit Log Report
672 © Wall Street Systems IPH AB - Confidential
B.35 Limit Log Report
Figure Currency The results are expressed in this currency.
Defaults to the currency of the portfolio.
End Date P/L Select how you want to handle cashflow settling on the valuation date:
•Unrealized - Cashflows settling on the Valuation Date are considered as not yet
settled, i.e. they are valued normally (and profit figures are shown).
•Realized - Cashflows settling on the Valuation Date are considered as settled, i.e.
they display amount, market value and risk, but no profit figures are shown.
•Closing the Books - Cashflows settling on the Valuation Date are ignored. This
corresponds to valuation done in closing the books.
Valuation Mode Market valuation mode to be used: Default, Benchmark, or Theoretical.
Transaction State The state that transactions must have reached to be included.
Scenario Market data scenario to be used.
Package Valuation
Result Mode Result calculation mode (accounting standard) to be used.
Only the result modes defined for the portfolio owner are available.
Context Only these transaction types are to be included:
•Default: no cost-of-carry or collateral transactions.
•W/Collateral: collateral transactions.
These transactions are generated from repo transactions. If this is not set to on,
then only the cash (that is, depo/loan) part of repo transactions is included.
•W/Cost-of-Carry: cost-of-carry transactions.
This can only be selected for portfolios that have the Cost-of-carry set to on.
•W/Cost-of-Carry/Collateral: both cost-of-carry and collateral transactions.
•W/Cost-of-Carry/Order: both cost-of-carry and order transactions.
•W/Order: order transactions.
Parameter Description
Output File
Output Mail
Printer Name
Layout
Period Length
Limit Category Select a limit category to filter the report content.
If left blank, all categories are included.
Limit Select a limit to filter the report content.
Parameter Description
B Report parameters
B.36 Periodic P/L Report
Transaction & Risk Management Module (TRM) User Guide 673
B.36 Periodic P/L Report
Log Entry Type Select a log entry type to filter the report content.
•All: all updates and all violations.
•High-Low-Last: the highest and lowest utilizations in the period, and the last log
entry.
•Update: log entries created as part of regular logging with a predefined time
interval.
•Violation: log entries created as a result of a limit violation.
Violation Type • Add Violation (Deal): where the log entries are created as a result of a new
transaction breaching a limit (that is, where a log entry contains a causing
number) and where the limit was breached before the transaction was entered.
• Add Violation (Rate): where the log entries are created as a result of a limit
breached by market information update (that is, where a log entry does not
contain a causing number) and where the limit was breached before the update
was made.
• Log/Startup: the log time interval was passed, the limit was exceeded, but not
added to. If the log interval was not passed, it would not have been logged as the
limit amount did not increase.
• New Violation (Deal): where the log entries are created as a result of a new
transaction breaching a limit (that is, where a log entry contains a causing
number) and where the limit was not breached before the transaction was entered.
• New Violation (Rate): where the log entries are created as a result of a limit
breached by market information update (that is, where a log entry does not
contain a causing number) and where the limit was not breached before the
update was made.
Note: If left blank, then all the above are included by default.
Parameter Description
Output File
Output Mail
Printer Name
Layout
Period Length
Portfolio The portfolio to be included.
If a parent portfolio is selected, all the subportfolios are also included.
Instrument Group
Instrument
Currency
Currency Class
Time Zone
Opening Time
Gap Set
Counterparty
Counterparty Group
Issuer
Issuer Group
Trad e r
Use these parameters to filter the content of the report.
Parameter Description

B Report parameters
B.37 Rate Report
674 © Wall Street Systems IPH AB - Confidential
B.37 Rate Report
Figure Currency The results are expressed in this currency.
Defaults to the currency of the portfolio.
End Date P/L Select how you want to handle cashflow settling on the valuation date:
•Unrealized - Cashflows settling on the Valuation Date are considered as not yet
settled, i.e. they are valued normally (and profit figures are shown).
•Realized - Cashflows settling on the Valuation Date are considered as settled, i.e.
they display amount, market value and risk, but no profit figures are shown.
•Closing the Books - Cashflows settling on the Valuation Date are ignored. This
corresponds to valuation done in closing the books.
Valuation Mode Market valuation mode to be used: Default, Benchmark, or Theoretical.
Transaction State Minimum state that transactions must have reached to be included.
Start Scenario
End Scenario
Package Valuation
Result Mode Result calculation mode (accounting standard) to be used.
Only the result modes defined for the portfolio owner are available.
Context Only these transaction types are to be included:
•Default: no cost-of-carry or collateral transactions.
•W/Collateral: collateral transactions.
These transactions are generated from repo transactions. If this is not set to on,
then only the cash (that is, depo/loan) part of repo transactions is included.
•W/Cost-of-Carry: cost-of-carry transactions.
This can only be selected for portfolios that have the Cost-of-carry set to on.
•W/Cost-of-Carry/Collateral: both cost-of-carry and collateral transactions.
•W/Cost-of-Carry/Order: both cost-of-carry and order transactions.
•W/Order: order transactions.
Parameter Description
Period Start
Period End
The period for which you want to view the rates (default is today).
If no quotations exist for the period you specify, the most recent quotations are
included in the report.
MI Group Market Info group (subset of rates in a scenario) that you want to view.
For all rates in the scenario, leave this field blank. The values here are those that were
entered in Market Info Source Editor.
Scenario Name of the scenario containing the quotations you want to analyze.
Instrument Instrument for which you want to view the quotations. If you enter an instrument, the
report only displays quotations for this instrument.
Rate Type Type of quotation.
Parameter Description
B Report parameters
B.38 Rate Comparison Report
Transaction & Risk Management Module (TRM) User Guide 675
B.38 Rate Comparison Report
B.39 Rate Log Report
B.40 Realize Account Interest Report
Parameter Description
First Date
Second Date
Use the First Date and Second Date fields to specify the two dates whose rates you
want to compare.
Portfolio Specific portfolio containing the instruments you want to view.
MI Group MI group (subset of rates in a scenario) that you want to view (for all rates in the
scenario, leave this field blank). The values here are those that were entered in Market
Info Source Editor.
Scenario Name of the scenario containing the quotations you want to analyze.
Instrument Group Instrument group you want to analyze.
Instrument Instrument for which you want to view the quotations. If you specify an instrument,
the report only displays quotations for this instrument.
Rate Type Type of quotation you want to view.
Parameter Description
Date Type Select either Logging Date or Effective Date.
• Logging Date: the query is against the date_time field.
The exact time is stored here, and so the value you enter in Period Start is
considered as the first second of the day, and the value entered in Period End is
considered as the last second of the day.
• Effective Date: the query is against date field.
Period Start The start date of the period you want to view.
Period End The end date of the period you want to view.
Scenario Name of the scenario containing the quotations you want to analyze.
Instrument Instrument for which you want to view the quotations. If you enter an instrument the
report only displays quotations for this instrument.
Rate Type Type of quotation.
Parameter Description
Interest Date The date on which the interest is realized.
Payment Date The date on which the accrued interest is paid.
Client The owner of the account.
Counterparty The counterparty of the account (for balances that are stored by counterparty, the
Balance by Counterparty switch is set for the account in Client Editor).
B Report parameters
B.41 Reconciliation Report
676 © Wall Street Systems IPH AB - Confidential
B.41 Reconciliation Report
B.42 Reconciliation Log Report
Portfolio The balance portfolio of the account.
Bank The name of the bank involved.
Account The account from into which the accrued interest is paid.
Currency The currency in which the accrued interest is paid.
Transaction State The state that transactions must have reached to be included.
Payment Instructions Here you select whether you want the accrued interest paid into the account itself, or
whether you want to make new instructions.
Parameter Description
Period Start The first day of the period under analysis.
Period End The last day of the period under analysis.
Portfolio The balance portfolio containing the payments for which the report is going to be
viewed.
Owner The owner of the portfolio.
Bank The bank of the portfolio owner.
Currency The currency of the cash flows to be included in the report.
Currency Class The currency class for the cash flows to be included in the report.
Currency Group The currency group of the cash flows to be included in the report.
Parameter Description

B Report parameters
B.43 Renaming Client ID Report
Transaction & Risk Management Module (TRM) User Guide 677
B.43 Renaming Client ID Report
B.44 Security List Import Log
B.45 Settlement Report
B.46 Settlement Cashflows Report
Parameter Description
Client ID ID of the client for which you want to generate the report.
Category Category for which you want to view the occurrences of the client ID in the system:
for example, By Table, Bank Accounts, Custody Accounts, Rules, Limits, Instruments,
or Transactions.
Parameter Description
Request The name of the Security List Import Request, for which you want to generate the log.
Batch ID Specific run of the activity, defined by a unique Batch ID, for which you want to
generate the log.
Severity Severity of the information shown in the log. Possible values are Error, Warning and
Info.
Message Type More detailed information about the type of information to show in the log. For
example, you may want to view technical FTP Communication errors only, or business
problems, such as errors when updating the instrument. You can filter the information
based on the message type.
Layout Layout of the report.
Parameter Description
Transaction Specific transaction to be included.
Portfolio The portfolio to be included.
If a parent portfolio is selected, all the subportfolios are also included.
Currency Currency of the settlements to be included.
Currency Class Currency class of the settlements to be included.
Currency Group Currency group of the settlements to be included.
Parameter Description
Transaction Specific transaction to be included.
Settlement Specific settlement to be included.

B Report parameters
B.47 Settlement Instructions Chain Report
678 © Wall Street Systems IPH AB - Confidential
B.47 Settlement Instructions Chain Report
B.48 Settlement Log Report
Portfolio The portfolio to be included.
If a parent portfolio is selected, all the subportfolios are also included.
Currency Currency of the settlements to be included.
Currency Class Currency class of the settlements to be included.
Currency Group Currency group of the settlements to be included.
Parameter Description
Client Client ID for which you want to view the chain of settlement instructions. (Mandatory)
Currency Currency for which you want to view the chain of settlement instructions.
Parameter Description
Log Period Start First day of the period under analysis.
Log Period End Last day of the period under analysis.
Transaction Number Number of the transaction queried.
Payment ID Identifier number of the payment.
Payment Date Date of the payment.
Our Client Client (portfolio owner) making the settlement.
Our Bank Bank where the debit account is held.
Our Account Bank account debited because of the payment.
Our Counterparty Client (counterparty) receiving the settlement.
Counterparty Bank Bank where the credit account is held.
Counterparty Account Bank account credited due to the payment.
Tran s fer Type Type of transf er used.
User ID of the user who modified the payment.
Parameter Description
B Report parameters
B.49 Transaction Conditions Report
Transaction & Risk Management Module (TRM) User Guide 679
B.49 Transaction Conditions Report
B.50 Transactions Report
Parameter Description
Number The number of the transaction on which you want to run the report or leave blank
for all transactions.
Opening Date From/To The opening date of the transactions or leave blank for all dates.
Value Date From/To The value date of the transactions or leave blank for all dates.
Trader Show only transactions entered by a single user or leave blank for all users.
Portfolio Show only transactions from this portfolio or leave blank for all portfolios.
Transaction Condition Show only this condition or leave blank for all conditions.
Limit Type Not implemented in this version
Condition Type Not implemented in this version
Active Select Yes to show only active limits or No to show all limits.
Breached Select Yes to show only breached limits and conditions or No to show all of them,
i.e. breached and not breached.
Parameter Description
Output File
Output Mail
Printer Name
Layout
Portfolio Portfolio in which the transactions are made.
Instrument Group Instrument group to be included.
Instrument Instrument to be included.
Counterparty Counterparty to be included.
Collateral Number The collateral number of the transactions to be included.
Opening Date Offset
Opening Period Length
Value Date Offset
Value Period Length
Transaction State State the transactions must have reached to be included.
B Report parameters
B.51 Transaction Log Report
680 © Wall Street Systems IPH AB - Confidential
B.51 Transaction Log Report
B.52 Transaction Market Rate Report
Parameter Description
Output File
Output Mail
Printer Name
Layout
Date Type •Logging Date: the date and time the transaction was updated.
•Value Date: the official date when money was transferred.
•Opening Date: the first date the transaction is taken into account in calculations.
Period Length
Number The number of a single transaction to be the subject of the report.
Portfolio Portfolio to be included.
Instrument Instrument to be included.
Trader Trader name. Only include transactions created/modified by this trader.
Counterparty Counterparty to be included.
Collateral Number The collateral number of the transactions to be included.
Parameter Description
Transaction Number Transaction number of a trade if you want to view all market data associated with a
particular transaction.
The report displays the market data for each time the trade was applied in the Front
Office and contains all price columns relevant to the transaction.
Note: The Push Prices switch must be turned on for the portfolio: see3.14.1.1 Setting
further portfolio attributes on page 108.
Transaction & Risk Management Module (TRM) User Guide 681
Appendix C Start-up parameters
It is possible to alter the start-up parameters when launching applications in TRM so that they
appear in a different mode or layout.
C.1 Activity Manager
The available options can be viewed using the command:
FKActivityManager.exe –-help
C.2 Application Manager
The available modes can be viewed using the command:
FKApplicationManager.exe –-help
C.3 FX Forward Pricing
The available options can be viewed using the command:
FKFXPricing.exe –-help
Command Description
-M [ --mode ] arg Display the activity mode name.
Activity modes are set up in Activity Mode Editor by the system
administrator.
--empty Do not fetch activity list at start-up.
Command Description
-T [ --title ] arg : Program title Display the name of the application in the application’s title bar.
-m [ --theme ] Enable the Themes menu item in the application’s toolbar.
-V [ --version ] arg : Program
version
Display the name of the application and the environment in
which TRM is running in the application’s title bar.
Menu item Description
--title arg (=FX Pricing) Application title.
C Start-up parameters
C.4 Limit Monitor
682 © Wall Street Systems IPH AB - Confidential
C.4 Limit Monitor
The available modes can be viewed using the command:
FKLimitMonitor.exe –-help
C.5 Limit Notifications
The available options can be viewed using the command:
FKLMNotify.exe --help
Note: To limit the number of notifications you receive, you can restrict the violation types that
cause notifications by specifying xyz in the command line parameter A.
C.6 Performance Monitor
The available options can be viewed using the command:
Command Description
--servers arg Connect to specified limit servers.
--listening arg Listening Limit Monitor.
--book-name arg Startup book’s name.
--page-index arg Startup page’s index.
--title arg Program title.
Command Description
--restore arg Set the option Restore On New Message.
--show arg Set the option Show Immediately.
--ring arg Set the option Ring Bell.
--own-notifications arg Set the option Own Notifications.
--freeze-options Freeze the entire Options menu to prevent users from making
changes to the option settings.
--freeze-start-up-options Freeze the items in the Options menu which have been explicitly
given on the command line (set or not set) to prevent users from
making changes to these option settings, but leaves other
options open for modifications by the user. In order to prevent
users from making changes to an option without setting it on the
command line, the option must be given on the command line
with argument '0' (e.g. --ring 0).
--servers arg Connect to specified limit servers.
--violation-types arg Specify the violation types you wish to see. Value is a bit string
(OR’d values of 1 << violation_type from LimitLog table.
C Start-up parameters
C.7 Portfolio Modeling Monitor
Transaction & Risk Management Module (TRM) User Guide 683
FKPerformanceMonitor.exe --help
C.7 Portfolio Modeling Monitor
The available options can be viewed using the command:
FKPMMonitor.exe --help
C.8 Rate Monitor
The available options can be viewed using the command:
FKMonitor.exe --help
Command Description
--service arg CORBA Performance Monitor Service.
--book-name arg Start-up book’s name.
--book-user arg Start-up book’s user.
--book-owner arg Start-up book’s owner.
Command Description
--mode arg Mode for transaction generation.
--title arg Program title.
--start-date arg Default start date.
--service-arg CORBA PM Monitor Service.
--book-name arg Start-up book’s name.
--book-user arg Start-up book’s user.
--book-owner arg Start-up book’s owner.
--skip-init Skip the init dialog.
Command Description
--nort Disable real-time updates.
-s [ --service ] arg Service.
--layout-compatibility-mode Load main window size and position per application title, ignoring
the main window size and position stored in individual layouts.
-c [ --config ] arg Configuration file. Defines the business modules and
configuration options that are available for the monitor.
-r [ --rate ] arg Rate.
--start-date arg Default start date for the period you want to view the quotations
(in yyyy-mm-dd).
C Start-up parameters
C.9 Report Generator
684 © Wall Street Systems IPH AB - Confidential
C.9 Report Generator
The available options can be viewed using the command:
FKReport.exe --help
C.10 Static Data Editor
The available options can be viewed using the command:
FKSDEditor.exe –-help
--end-date arg Default end date for the period you want to view the quotations
(in yyyy-mm-dd).
--no-fractions Allow users to enter and view prices for instruments with a
configured Default Price Denominator in the standard way i.e.
not as fractions.
Command Description
Command Description
--title arg Application title.
-T [ --type ] arg Report type to open.
-F [ --file-name ] arg Report document to open.
It is possible to launch Report Generator with the argument
--file-name <layout>. The layout can be saved with the
report start-up parameters.
-p [ --print ] Print report on default printer and exit.
-o [ --output ] arg Export report to file-name and exit.
-n [ --printer-name ] arg Printer to use.
-P [ --param ] arg List of start-up parameters.
Command Description
-L [ --layout ] arg Editor layout to open.
-T [ --layout-mode ] arg Layout mode <fixed|manual|automatic>
-F [ --fixed-entity ] Allow only layouts within the same entity.
-E [ --empty ] Do not fetch entity list at start-up.
--no-list-view Do not display list view in the left editor pane.
--no-tree-view Do not display group tree view in the left editor pane.
--no-hier-view Do not display hierarchy tree view in the left editor pane.
--entity-key arg Use this as the key to the entity.
--new-entity Create new entity immediately upon opening.
C Start-up parameters
C.11 Transaction Manager
Transaction & Risk Management Module (TRM) User Guide 685
C.11 Transaction Manager
The available options can be viewed using the command:
FKTransactionManager.exe –-help
--read-only Do not allow data modification. This parameter displays all fields
in read-only mode and disables the Save, Save As, and Delete
menu items.
--startup-query arg Execute a query immediately upon startup.
--sdm-mode Show non-finalized entity data.
Command Description
Command Description
-m [ --mode ] arg Transaction Manager mode.
-s [ --service ] arg Service.
-v [ --view ] arg Add-on view paths.
For example, include: --view
settlement-credit-debit-processing or --view
settlement-credit-debit-reconciliation to use the
specific Credit/Debit Client view in Settlement Processing or
Settlement Reconciliation respectively.
--chart Enable charting support.
--nort Disable real-time updates.
--noincomingrt Disable incoming real-time updates.
--fixing Default fixing date.
If this command is set, the Fixing/Action Date of each query row
defaults to today’s date. When executing the query, only fixable
transactions are retrieved.
-r [ --refresh ] Default refresh date.
-q [ --query ] Allow empty queries.
This command enables transactions to appear automatically in
the respective mode after the user commits.
--noinit Do not load Transaction Manager configuration at start-up.
This command instructs Transaction Manager to skip loading of
any previously saved configuration from the database, and to
start the application with the default configuration.
--layout-compatibility-mode Load main window size and position per application title,
ignoring the main window size and position stored in individual
layouts.
-c [ --config ] arg Configuration file.
--start-up action arg Name and parameters of the action to execute immediately upon
start-up.
--ui-start-up action arg Name and parameters of the action with the UI to execute
immediately upon start-up.
C Start-up parameters
C.12 Treasury Monitor
686 © Wall Street Systems IPH AB - Confidential
C.12 Treasury Monitor
The available options can be viewed using the command:
FKTreasuryMonitor.exe –-help
-g [ --group ] arg Restrict instrument lists in Transaction Manager to only include
instruments belonging to the specified instrument groups.
This command is used to restrict the instruments available to
input deals (for example, -g/CASH -g/FX/SPOT).
The Instrument Group field is frozen in the query and the query
is automatically filtered according to the start-up groups.
-u [--all-umi] Use full instrument lists including inactive instruments. By
default, without this option, inactive instruments are filtered out
from the lists.
--no-query-limit By default, Transaction Manager retrieves a maximum of 10 000
transactions at a time. You can specify this parameter to switch
off this limit.
-d [ --discovery] Enable the Discovery Console option in the Options menu.
Command Description
Command Description
-M [ --mode ] arg Monitor mode.
-P [ --portfolio ] arg Default portfolio.
-C [ --currency ] arg Default currency.
--state arg Default state.
--start-date arg Default start date.
--end-date arg Default end date.
--start-scenario arg Default start scenario.
--end-scenario arg Default end scenario.
--valuation-mode arg Default valuation mode.
--var-scenario arg Default VaR Scenario.
--var-date arg Default VaR Date.
--var-horizon arg Default VaR Horizon.
--var-confidence-level arg Default VaR Confidence Level.
--context arg Default Context Group.
--state-context arg Default State Context.
--secs arg Remove update menus up to given seconds.
--valuation-interval arg Valuation interval (in seconds) to use when no-real-time is
supplied. If this is set to zero, attempts to disable real-time are
overridden.
C Start-up parameters
C.13 VaR Data Board
Transaction & Risk Management Module (TRM) User Guide 687
C.13 VaR Data Board
The available options can be viewed using the command:
FKVaRBrowser.exe –-help
--closing-the-books Replaces the Realized Start/End Date Valuation parameter with
the Closing the Books parameter.
-R [ --no-real-time ] Don’t set real-time as default.
--service arg CORBA Treasury Monitor service.
--book-name arg Start-up book’s name.
--book-user arg Start-up book’s user.
--book-owner arg Start-up book’s owner.
--position arg Start-up position’s name.
--position-user arg Start-up position’s user.
--position-owner arg Start-up position’s owner.
--counterparty arg Start-up position’s counterparty.
--drawdown arg Start-up position’s drawdown.
--facility arg Start-up position’s facility.
--skip Skip the init dialog.
Command Description
Command Description
--title arg (=Va R Browser) Application title.
C Start-up parameters
C.13 VaR Data Board
688 © Wall Street Systems IPH AB - Confidential
Transaction & Risk Management Module (TRM) User Guide 689
Appendix D SDM - CMM mapping
D.1 Client Editor
See also 3.13 Clients on page 89.
D.1.1 Client role mapping
A TRM client is mapped to a CMM client according to roles. If the TRM role is empty (set to No CMM
Replication) then the client is not replicated. Otherwise, the CMM client's fields party_type and
external party_type values are assigned according to the following rules:
Table D-1 Party Type
Table D-2 External Party Type
D.1.2 Preventing client replication
To prevent a client created in SDM from being replicated in CMM, select No CMM Replication.
D.1.3 Mapping of SDM Counterparty - CMM Party entity
D.1.3.1 SDM entity - Client
TRM Setup Party Type
Client has role ACCOUNT-HOLDER or PORTFOLIO-OWNER Internal
Client does not have role ACCOUNT-HOLDER nor PORTFOLIO-OWNER External
TRM Setup External Party Type
Client has role ACCOUNT-HOLDER BANK
Client does not have role ACCOUNT-HOLDER but does have role PORTFOLIO-OWNER COUNTERPARTY
Client does not have role ACCOUNT-HOLDER or PORTFOLIO-OWNER but does have
role BANK and there exists at least one 'Party Relationship' where 'Relationship' has
value 'AGGR'
AGGRBANK
Client does not have role ACCOUNT-HOLDER or PORTFOLIO-OWNER but does have
role BANK and there does not exist any 'Party Relationship' where 'Relationship' has
value 'AGGR'
BANK
Client does not have role ACCOUNT-HOLDER or PORTFOLIO-OWNER or BANK COUNTERPARTY
SDM value CMM value
client_id party_ID - Party ID
ID of the CMM party.
no_cmm_replication_p
No CMM Replication
If this switch is on (no_cmm_replication_p = 'true') then the client is not
replicated in CMM.
D SDM - CMM mapping
D.1 Client Editor
690 © Wall Street Systems IPH AB - Confidential
D.1.3.2 SDM entity - ClientExtra
short_name short_name - Short Name
Short form of the entity’s name. This form of the entity’s name is used in most
of CMM’s Entity and Counterparty selection lists.
country_id country_code - Country
Country of the CMM party.
name long_name - Long Name
Long form of the CMM party’s name. This form is used in some of CMM’s
reports.
name party_description (removed from CMM)
swift_code swift_code - Swift Code
SWIFT code of the CMM party.
city city - City
City of the CMM party.
parent_id parent_party_id - Parent Party
Parent of the CMM party or None Selected (if the party does not have a
parent).
roles See D.1.1 Client role mapping on page 689.
SDM value CMM value
ce_ihb_owner_id ihb_owner_party_id (removed from CMM)
ce_aba_code_id aba_code - ABA Code
ABA code of the CMM party.
ce_region_id region_id - Region
Region of the CMM party.
ce_functional_currency_id functional_currency_code - Functional Currency
Currency of the CMM party.
ce_incorp_state state_of_incorporation - State of Incorporation
State of incorporation of the CMM party. In CMM, the term "state" applies to
states, provinces, cantons, and other divisions of countries.
ce_industry_code_id industry_code_id - Industry Code
Industry of the CMM party.
ce_tax_status_code_id legal_tax_status_code - Legal Tax Status Code
Legal tax status of the CMM party.
ce_tax_id tax_id - Tax ID
Legal tax identifier of the CMM party.
ce_incorp_country_id country_of_incorporation - Country of Incorporation
Country of incorporation of the CMM party.
SDM value CMM value

D SDM - CMM mapping
D.1 Client Editor
Transaction & Risk Management Module (TRM) User Guide 691
D.1.3.3 SDM entity - ClientAccount
SDM value CMM value
no_cmm_replication_p
No CMM Replication
If this switch is on (no_cmm_replication_p='true)' then the ClientAccount is
not replicated to CMM.
cmm_hierarchy_only_p
Hierarchy Only
If this switch is on then the bank account is defined as a virtual account.
Virtual bank accounts are used in bank account relationships where you want
to use the bank account as a parent but do not want users to process activity
in it.
message_group_id Message group used to replicate client accounts to CMM.
• If message_group_id<>'CMM-CONTACT' then the ClientAccount is not
replicated to CMM.
• If multiple ClientAccount have CMM-CONTACT message group then only the
first one is replicated.
p_acct_type primary_type_id (computed)
primary_type_id primary_acct_number_type - [Primary] Account Number Type
Primary account type number (used in confirmation documents). The only
value it can contain in CMM is BBAN.
id primary_acct_number - Primary Account Number
The entity bank account’s BBAN.
secondary_type_id secondary_acct_number_type - [Secondary] Account Number Type
Secondary account number type (used in confirmation documents). The only
value it can contain in CMM is IBAN.
secondary_id secondary_acct_number - Secondary Account Number
The entity bank account’s IBAN.
If secondary_id is empty then secondary_type_id is set to 0
• Else, if secondary_type_id (from TRM) = 'BBAN' then secondary_type_id is
set to 1
• Else, secondary_type_id is set to 2
bank_id bank_id - Bank
The bank account’s bank.
account_type_id bank_acct_type_id - Account Type
The bank account’s type.
currency_id currency_code - Currency
Currency of the bank account.
client_id party_id - Entity/Counterparty
Owner of the bank account.
name bank_acct_name - Account Name
Name of the bank account.
account_group_id group_bank_account_id (removed from CMM)
zero_balance_p
pool_account_p
Used in cash pools and account sweeping.
• If zero_balance_p is true then policy_type_id = 1
• Else, if pool_account_p is true then policy_type_id = 2
- Else, policy_type_id = 0
D SDM - CMM mapping
D.1 Client Editor
692 © Wall Street Systems IPH AB - Confidential
D.1.3.4 SDM entity - ClientAddress
D.1.3.5 SDM entity - ContactPerson
SDM value CMM value
line_1
line_2
line_3
line_4
address1 / address2 / address3 / address4
Address of the CMM party.
address_type_id
Address Type
CMM does not store the value from this field.
However, if all four Address Types (ACCOUNT, PAYMENT, POSTAL, STREET) are
available from the TRM client, CMM will populate the four Address fields for the
CMM party with the values found in the Street/PO Box (Line Two) and City (Line
Three) fields, from the STREET address type entry. The STREET address type
has the highest priority.
post_code postal_code - Postal Code
Postal or zip code of the CMM party.
state state - State
State of the CMM party.
country_id country - Country
Country of the CMM party.
SDM value CMM value
message_group_id Only the first ContactPerson with message_group_id='CMM-CONTACT' is
mapped to the following fields.
phone phone_number - Phone Voice
The person’s telephone number.
fax fax_number - Fax
The person’s fax number.
e_mail email_account - E-mail
The person’s e-mail address.
client_id party_id - Entity/Counterparty
The person’s party.
name
(truncated after the first
space char)
last_name - Last Name
The person’s last name.
name
(truncated after the first
space char)
first_name - First Name
The person’s first name.
rule_id external_id - External ID
The person’s external ID.
info job_id - Job
The person’s employee role.
D SDM - CMM mapping
D.2 Country Editor
Transaction & Risk Management Module (TRM) User Guide 693
D.1.3.6 SDM entity - ClientCreditRating
D.1.3.7 SDM entity - ClientRelationshipMap
D.2 Country Editor
See also 3.5 Countries on page 59.
D.2.1 Mapping of Country entity
D.2.1.1 SDM entity - Country
D.2.1.2 SDM entity - CountryExtra
SDM value CMM value
code_id rating_code (removed from CMM)
SDM value CMM value
Child Used to organize entities into hierarchical relationships.
This field maps to a CMM party that is the child client of the current client.
Relationship Used to organize entities into hierarchical relationships.
Entity Relationship Types define the nature of the hierarchies (for example,
legal, operational, regional, and so on).
Report Weight Percentage Used to organize entities into hierarchical relationships.
The client Report Weight Percentage maps to the weighting percentage of the
entity relationship.
SDM value CMM value
country_id country_code - Country Code
ID of the country. Use the country’s ISO code if appropriate.
name country_name - Country Name
Name of the country.
SDM value CMM value
ce_currency_id national_currency_code - National Currency
Currency for the country.
ce_max_branch_code_length max_len_branch_code - Maximum Length of Branch Code
The maximum length for branch codes in the country.
ce_min_branch_code_length min_len_branch_code - Minimum Length of Branch Code
The minimum length for branch codes in the country.
ce_max_account_length max_len_bank_code - Maximum Length of Bank Account
The maximum length for bank account numbers in the country.
ce_min_account_length min_len_bank_code - Minimum Length of Bank Account
The minimum length for bank account numbers in the country.
D SDM - CMM mapping
D.3 Currency Editor
694 © Wall Street Systems IPH AB - Confidential
D.3 Currency Editor
See also 3.9 Currencies on page 80.
D.3.1 Mapping of Currency entity
D.3.1.1 SDM entity - Currency
D.3.1.2 SDM entity - CurrencyJournal
D.3.1.3 SDM entity - CurrencySetup
D.4 Calendar Group Editor
See also 3.25 Calendar groups (optional) on page 134.
ce_buba_country_code german_central_bank_cntry_code - German Central Bank Country Code
The country’s code as provided by the German central bank.
ce_sort_code_p bank_sort_code_required - Bank ABA/Branch Code Required
Switch on to indicate whether the branch code is required.
ce_branch_an_p char_allowed_branch - Branch Code Alphanumeric Allowed
Switch on to indicate whether branch codes can include both letters and
numbers.
ce_account_an_p char_allowed_bank_acct - Basic Account Number Alphanumeric Allowed
Switch on to indicate whether BBANs can include both letters and numbers.
SDM value CMM value
SDM value CMM value
id currency_code - Currency Code
ID of the currency.
name currency_name - Currency Name
Name of the currency.
SDM value CMM value
amount_precision digits_right_of_decimal - Number of Decimals
Number of decimal places to which cashflow amounts in this currency are
rounded.
SDM value CMM value
The name_id of the CurrencySetup
when type_id='Default Curve' is
used.
interest_rate_category_id - Yield Curve
The currency’s yield curve (or interest rate category).
D SDM - CMM mapping
D.5 Gap Editor
Transaction & Risk Management Module (TRM) User Guide 695
Calendar Group in TRM is used to identify all holidays that will be linked to a particular country in
CMM. In this version of TRM, the data must be captured separately in CMM if the CMM Calendar is to
be used.
D.5 Gap Editor
See also 3.7 Gaps (time intervals) on page 62.
D.5.1 Mapping to CMM Interest Rate Type entity
D.5.1.1 SDM entity - RatePeriod
D.6 Settlement Advice Method Editor
See 18.2.1.2 Defining settlement methods on page 507.
D.6.1 Mapping of Settlement Advice Method entity
D.6.1.1 SDM entity - PaymentAdviceType
SDM value CMM value
period_id shortname - Short Description
The interest rate type’s short description.
id interestratecategoryid - Category/Curve
The interest rate type’s interest rate category.
gap_start_period_s Point on Curve
The point on the yield curve (interest rate category) where the interest rate
type is positioned.
• If gap_start_period_s='Spot' or if gap_start_period_s then dayforward is
set to 0
- Else dayforward is set to the value of gap_start_period_s
gap_start_unit_sid Forward Units
The interest rate type’s forward units. Possible values are: Days, Months,
Years.
• If gap_start_unit_sid='Business Days' then forwardunit is set to 'Days'
- Else forwardunit is set to the value of gap_start_unit_sid
SDM value CMM value
send_to_cmm_p
Send to CMM
If this switch is on (send_to_cmm_p = 'true'), then the PaymentAdviceType is
replicated to CMM.
Send to CMM defines which settlements create cash records in CMM (either to
be released in CMM or to allow the cash position to be updated in CMM).
D SDM - CMM mapping
D.7 Yield Curve Editor
696 © Wall Street Systems IPH AB - Confidential
D.7 Yield Curve Editor
See also 3.8 IR quotes and yield curves on page 64.
D.7.1 Mapping to CMM Interest Rate Category entity
D.7.1.1 SDM entity - ReferenceRate
D.8 CMM static data entities
For details about the information required to create CMM static data entities, see the CMM User
Guide.
D.8.1 CMM Instrument Category Editor
D.8.2 CMM Instrument Type Editor
SDM value CMM value
is_cmm_curve_p If this switch is off (is_cmm_curve_p = ’false’) then the reference rate is not
replicated to CMM.
id shortname - Name
The interest rate category’s name.
name interestratecategorydesc - Description
A descriptive name for the interest rate category.
SDM value CMM value
instrumentcategoryid instrument_category_id - ID
ID of the instrument category.
name name - Name
Name of the instrument category.
SDM value CMM value
instrumenttypeid instrument_type_id - Type ID
ID of the instrument type.
name name - Name
Name of the instrument type.
instrumentcategoryid instrument_category_id - Instrument Category
The instrument type’s parent instrument category. In CMM, instrument types
are children of instrument categories.
payment_or_receipt payment_or_receipt - Payment or Receipt
The instrument type’s transaction type. Possible values are:
• Payment - if the instrument type only applies to payments
• Receipt - if the instrument type only applies to receipts
• All - if the instrument type applies to both payments and receipts.
D SDM - CMM mapping
D.8 CMM static data entities
Transaction & Risk Management Module (TRM) User Guide 697
D.8.3 CMM Payment Method Editor
D.8.4 CMM Region Editor
displayable displayable - Status
The instrument type’s status. Possible values are:
• Enabled - to display the instrument type in Cash Flow Type lists throughout
CMM
• Disabled - to not display the instrument type in Cash Flow Type lists
throughout CMM.
posting_rule_selection_level posting_rule_selection_level - Posting Rule Selection Level
The instrument type’s posting rule selection level. Possible values are:
• Merge Category & Type
•Use Only Type
• Use Only Category.
trm_instrument_group trm_instrument_group
TRM instrument group to which the instrument type belongs.
SDM value CMM value
paymentmethodcode payment_method_code
ID of the payment method.
paymentmethodshortname payment_method_short_name
Name of the payment method.
releaseable_p is_releaseable
Switch on to indicate if transactions assigned the payment method can be
released to banks for processing.
req_cp_info_p requires_cpty_bank_account_info
Switch on to indicate if transactions assigned the payment method require
counterparty bank information.
displayable_p displayable
Switch on to indicate if the payment method is included in Payment Method
lists throughout CMM.
positive_pay_indicator_p positive_pay_indicator
Switch on to indicate if the payment method is available for use with positive
payments.
SDM value CMM value
id region_id - ID
ID of the region.
description region_name - Name
Name of the region.
SDM value CMM value

D SDM - CMM mapping
D.8 CMM static data entities
698 © Wall Street Systems IPH AB - Confidential
D.8.5 CMM Industry Code Editor
D.8.6 CMM Relationship Type Editor
CMM relationship type entities created in SDM are identical to those in CMM.
D.8.7 CMM Bank Account Group Editor
CMM Bank Account Group entities will be replaced by CMM Relationship Type entities (see the CMM
User Guide for more information). Therefore, if implementing CMM for the first time, use
relationship type entities rather than bank account group entities.
SDM value CMM value
id industry_code - Industry Code
ID of the industry.
description industry_name - Industry Name
Name of the industry.
Transaction & Risk Management Module (TRM) User Guide 699
Appendix E TRM - RMI/CMI mapping
E.1 RMI mapping strategies
E.1.1 RM template
E.1.1.1 Fixed rate instruments
E.1.1.2 Floating rate instruments
TRM instrument RM Template Mapping
Discount papers DiscountPaper one-to-one
Forward discount papers ForwardDiscountPaper one-to-one
Short term loans and deposits ShortTermLoanAndDepo one-to-one
Fixed rate bonds FixedRateBond one-to-one
Zero coupon bonds ZeroCouponBond one-to-one
Japanese registered T-bills JapaneseRegisteredTBill one-to-one
Long term loans and deposits LongTermLoanAndDepo one-to-one
Facilities Facility one-to-one
Bond forwards BondForward one-to-one
Bonds futures BondFuture
SwapFuture
one-to-one
Australian bonds futures AustralianBondFuture one-to-one
Australian short futures AustralianShortFuture one-to-one
Asset/Mortgage backed securities MortgageBackSecurity one-to-one
South African bonds SouthAfricanBond one-to-one
South African fixed rate loans SouthAfricanLoan one-to-one
Forward rate agreements (FRAs) ForwardRateAgreement one-to-one
Interest rate futures InterestRateFuture one-to-one
Callable bonds CallableBond one-to-one
Call money CallMoney Risk-equivalent cashflows
TRM instrument RM Template Mapping
Floating rate notes FloatingRateNote one-to-one
Floating rate loans/deposits FloatingRateLoanAndDepo one-to-one
E TRM - RMI/CMI mapping
E.1 RMI mapping strategies
700 © Wall Street Systems IPH AB - Confidential
E.1.1.3 Index linked instruments
E.1.1.4 Composite instruments
E.1.1.5 IR option instruments
Negotiable certificate of deposits NegotiableCertificateOfDeposit one-to-one
Floater FRNFloater Risk-equivalent portfolio
Reverse Floater FRNReverseFloater Risk-equivalent portfolio
TRM instrument RM template Mapping
Canadian index linked bonds IndexLinkedBond one-to-one
French index linked bonds IndexLinkedBond one-to-one
Swedish index linked bonds IndexLinkedBond one-to-one
US index linked bonds IndexLinkedBond one-to-one
UK index linked bonds IndexLinkedBond one-to-one
Australian index linked bonds IndexLinkedBond one-to-one
UK inflation-linked gilts IndexLinkedUKGilt one-to-one
TRM instrument RM template Mapping
Repurchase agreements (repos) Repo one-to-one
Open basis repos OpenBasisRepo one-to-one
Interest rate swaps InterestRateSwap one-to-one
Average rate swaps AverageRateSwap Risk-equivalent cashflows
Amortized swaps AmortizedInterestRateSwap one-to-one
Overnight index swaps OvernightIndexSwap one-to-one
Constant maturity swaps ConstantMaturitySwap one-to-one
Libor in arrears swaps LiborInArrearsSwap one-to-one
TRM instrument RM Template Mapping
TRM instrument RM template Mapping
Bond options BondOption one-to-one
Bond future options BondFutureOption one-to-one
Money market future options InterestRateFutureOption one-to-one
FRA options FRAOption one-to-one
Caps Cap one-to-one
Floors Floor one-to-one
Collars Collar one-to-one
Caps floaters CapFloater Risk-equivalent portfolio
E TRM - RMI/CMI mapping
E.1 RMI mapping strategies
Transaction & Risk Management Module (TRM) User Guide 701
E.1.1.6 FX instruments
E.1.1.7 Equity instruments
Floors floaters FloorFloater Risk-equivalent portfolio
Collars floaters CollarFloater Risk-equivalent portfolio
Caps reverse floaters CapReverseFloater Risk-equivalent portfolio
Floors reverse floaters FloorReverseFloater Risk-equivalent portfolio
Collars reverse floaters CollarReverseFloater Risk-equivalent portfolio
Swaptions Swaption one-to-one
TRM instrument RM template Mapping
TRM instrument RM template Mapping
FX spot FXSpotForward one-to-one
FX forwards FXSpotForward one-to-one
Domestic currency swaps DomesticCurrencySwap one-to-one
FX swaps FXSwap Risk-equivalent portfolio
Vanilla FX options VanillaFXOption one-to-one
American exercise FX options VanillaFXOption one-to-one
Single barrier FX options SingleBarrierFXOption one-to-one
Double barrier FX options DoubleBarrierFXOption one-to-one
Asset or nothing binary FX options AssetOrNothingFXBinaryOption Risk-equivalent portfolio
Cash or nothing binary FX options CashOrNothingFXBinaryOption Risk-equivalent portfolio
GAP FX binary option GAPFXBinaryOption Risk-equivalent portfolio
TRM instrument RM template Mapping
Security loans SecurityLoan Risk-equivalent cashflows
Funds Fund one-to-one
Equities Equity one-to-one
Equity forwards EquityForward one-to-one
Equity futures EquityFuture one-to-one
EBOR EBOR one-to-one
Rights Right one-to-one
Warrants Warrant one-to-one
Equity options EquityOption one-to-one
Equity index options EquityIndexOption one-to-one
E TRM - RMI/CMI mapping
E.1 RMI mapping strategies
702 © Wall Street Systems IPH AB - Confidential
E.1.1.8 Balances
E.1.2 Yield curve mapping logic
E.1.2.1 RM Discount Curve / RM Discount Spread Curve
E.1.2.2 RM Reference curve
TRM instrument RM template Mapping
Bank account balances Balance one-to-one
Cost-of-carry balances CostOfCarry one-to-one
Priority / Logic Mapping
Priority 1
TRM instrument-based
• discountCurve:
Value of property RM-DISCOUNT-ID
• discountSpread:
Depends on the value of property RM-SPREAD-TO-DISCOUNT:
- Discount Margin: Discount Margin key-figure in Transaction Manager
- Spread: Spread column in Transaction Manager or Spread field in Instrument
Editor
-Zero: 0
(if missing then Spread).
Priority 2
TRM-based
• discountCurve:
Value of property RM-INTEREST-RATE-ID for the yield curve defined as the
valuation curve for the instrument
• discountSpread:
Depends on the value of property RM-SPREAD-TO-INTEREST-RATE:
- Discount Margin: Discount Margin key-figure in Transaction Manager
- Spread: Spread column in Transaction Manager or Spread field in Instrument
Editor
-Zero: 0
(if missing then Spread).
Priority 3
RM template-based
• discountCurve:
Yield curve as defined by the default yield curve logic in RMI
• discountSpread:
Discount Margin key-figure in Transaction Manager, Spread column in Transaction
Manager or Spread field in Instrument Editor
Priority 4
Default
• discountCurve:
Transaction Currency + Swap
• discountSpread:
Spread column in Transaction Manager or Spread field in Instrument Editor
Priority / Logic Mapping
Priority 1
TRM instrument-based
• referenceCurve:
Value of property RM-REFERENCE-ID
• referenceSpread:
Spread column in Transaction Manager or Spread field in Instrument Editor
E TRM - RMI/CMI mapping
E.1 RMI mapping strategies
Transaction & Risk Management Module (TRM) User Guide 703
E.1.3 Equity mapping
E.1.3.1 RM Equity Name / RM Equity Beta
Priority 2
TRM-based
• referenceCurve:
Value of property RM-INTEREST-RATE-ID in Yield Curve Editor for the yield curve
defined as the forward curve in Instrument Editor
• referenceSpread:
Spread column in Transaction Manager or Spread field in Instrument Editor
Priority 3
RM template-based
• referenceCurve:
Yield curve as defined by the default yield curve logic in RMI
• referenceSpread:
Spread column in Transaction Manager or Spread field in Instrument Editor
Priority 4
Default
• referenceCurve:
Transaction Currency + Swap
• referenceSpread:
Spread column in Transaction Manager or Spread field in Instrument Editor
Instrument Editor
RM Equity Name
Instrument Editor
RM Equity Beta
Client Editor
RM-PROXY-ID Value
not defined not defined not defined Name="Equity id", Beta=""
not defined not defined defined Name="RM-PROXY-ID of Client",
Beta="beta in Rate Monitor for Equity id"
not defined defined not defined Name="Equity id", Beta=""
not defined defined defined Name="RM-PROXY-ID of Client",
Beta="RM-BETA-VALUE"
defined not defined not defined Name="RM-PROXY-ID of Equity",
Beta="1.0"
defined not defined defined Name="RM-PROXY-ID of Equity",
Beta="1.0"
defined defined not defined Name="RM-PROXY-ID of Equity",
Beta="RM-BETA-VALUE"
defined defined defined Name="RM-PROXY-ID of Equity",
Beta="RM-BETA-VALUE"
Priority / Logic Mapping
E TRM - RMI/CMI mapping
E.2 CMI mapping strategies
704 © Wall Street Systems IPH AB - Confidential
E.2 CMI mapping strategies
E.2.1 CM Template
E.2.1.1 Fixed rate instruments
E.2.1.2 Floating rate instruments
TRM instrument CM template CM exposure
Discount papers DiscountPaper creditBond
Forward discount papers MarketDrivenInstrument MDI
Long term loans and deposits LongTermLoanAndDeposit fixedCouponLoan
Fixed rate bonds FixedRateBond creditBond
Amortizing fixed rate bonds AmortizingFixedRateBond amortizingBond
Zero coupon bonds ZeroCouponBond creditBond
Japanese registered T-bills JapaneseRegisteredTBill creditBond
LT loans and deposits LTLoanAndDeposit fixedCouponLoan
Amortizing LT loans and deposits AmortizingLTLoanAndDeposit amortizingFixedCouponLoan
Facilities Facility Commitment
Bond forwards MarketDrivenInstrument MDI
Bonds futures MarketDrivenInstrument MDI
Australian bond futures MarketDrivenInstrument MDI
Australian short futures MarketDrivenInstrument MDI
Call money CashflowStream
Asset/Mortgage backed securities MortgageBackedSecurity CashflowStream
South African bonds SouthAfricanBond creditBond
South African fixed rate loans SouthAfricanDepoLoan fixedCouponLoan
Forward rate agreements (FRAs) MarketDrivenInstrument MDI
Interest rate futures MarketDrivenInstrument MDI
Callable bonds CallableBond creditBond
Depo/Loans FixedLoanAndDeposit cashflowStream
TRM instrument CM template CM exposure
FRNs FloatingRateNote creditFRN
Amortizing FRNs AmortizingFloatingRateNote amortizingFRN
Floating rate depo/loans FloatingRateDepoLoan floatingCouponLoan
Amortizing floating rate depo/loans AmortizingFloatingRateDepoLoan amortizingFloatingCouponLoa
n
Negotiable certificate of deposits NegociableCertificateOfDeposit CashflowStream
Floaters MarketDrivenInstrument MDI
E TRM - RMI/CMI mapping
E.2 CMI mapping strategies
Transaction & Risk Management Module (TRM) User Guide 705
E.2.1.3 Index linked instruments
E.2.1.4 Composite instruments
E.2.1.5 IR option instruments
Reverse floaters MarketDrivenInstrument MDI
TRM instrument CM template CM exposure
Canadian index linked bonds IndexLinkedBond creditBond
French index linked bonds IndexLinkedBond creditBond
Swedish index linked bonds IndexLinkedBond creditBond
US index linked bonds IndexLinkedBond creditBond
UK index linked bonds IndexLinkedBond creditBond
Australian index linked bonds IndexLinkedBond creditBond
TRM instrument CM template CM exposure
Repurchase agreements (repos) Repo fixedCouponLoan
Open basis repos OpenBasisRepo fixedCouponLoan
Interest rate swaps MarketDrivenInstrument MDI
Average rate swaps MarketDrivenInstrument MDI
Amortized swaps MarketDrivenInstrument MDI
Overnight index swaps MarketDrivenInstrument MDI
Constant maturity swaps MarketDrivenInstrument MDI
Libor in arrears swaps MarketDrivenInstrument MDI
TRM instrument CM template CM exposure
Bond options MarketDrivenInstrument MDI
Bond future options MarketDrivenInstrument MDI
Money market future options MarketDrivenInstrument MDI
FRA options MarketDrivenInstrument MDI
Caps MarketDrivenInstrument MDI
Floors MarketDrivenInstrument MDI
Collars MarketDrivenInstrument MDI
Caps floaters MarketDrivenInstrument MDI
Floors floaters MarketDrivenInstrument MDI
Collars floaters MarketDrivenInstrument MDI
Caps reverse floaters MarketDrivenInstrument MDI
Floors reverse floaters MarketDrivenInstrument MDI
TRM instrument CM template CM exposure

E TRM - RMI/CMI mapping
E.2 CMI mapping strategies
706 © Wall Street Systems IPH AB - Confidential
E.2.1.6 FX instruments
E.2.1.7 Equity instruments
E.2.1.8 Balances
Collars reverse floaters MarketDrivenInstrument MDI
Swaptions MarketDrivenInstrument MDI
TRM instrument CM template CM exposure
FX spot MarketDrivenInstrument MDI
FX forwards MarketDrivenInstrument MDI
Domestic currency swaps MarketDrivenInstrument MDI
FX swaps MarketDrivenInstrument MDI
Vanilla FX options MarketDrivenInstrument MDI
American exercise FX options MarketDrivenInstrument MDI
Single barrier FX options MarketDrivenInstrument MDI
Double barrier FX options MarketDrivenInstrument MDI
Asset or nothing binary FX options MarketDrivenInstrument MDI
Cash or nothing binary FX options MarketDrivenInstrument MDI
Gap FX binary options MarketDrivenInstrument MDI
TRM instrument CM template CM exposure
Security Loans (Still to investigate)
Funds None None
Equities None None
Equity forwards MarketDrivenInstrument MDI
Corporate actions - Detachment None None
Equity futures MarketDrivenInstrument MDI
EBOR MarketDrivenInstrument MDI
Rights MarketDrivenInstrument MDI
Warrants MarketDrivenInstrument MDI
Equity options MarketDrivenInstrument MDI
Equity index options MarketDrivenInstrument MDI
TRM instrument RM template Mapping
Bank account balances None None
Cost-of-carry balances None None
Payments, transfers Payment Receivable
TRM instrument CM template CM exposure
E TRM - RMI/CMI mapping
E.2 CMI mapping strategies
Transaction & Risk Management Module (TRM) User Guide 707
E.2.2 CM Seniority Level
Exposure Code Description
Bonds AK97SS(58,23) Altman & Kishore [97] Senior Secured
AK97SU(47.7,26.6) Altman & Kishore [97] Senior Unsecured
AK97SSu(35,25) Altman & Kishore [97] Senior Subordinated
AK97Su(32,22) Altman & Kishore [97] Subordinated
AK97JSu(21,18) Altman & Kishore [97] Junior Subordinated
CL97SS(63,26) Carty & Leiberman [97] Senior Secured
CL97SU(48,26) Carty & Leiberman [97] Senior Unsecured
CL97SSU(38,25) Carty & Leiberman [97] Senior Subordinated
CL97JSU(28,20) Carty & Leiberman [97] Subordinated
CL97(15,9) Carty & Leiberman [97] Junior Subordinated
Loans, Commitments AE95(65,38) Asarnow & Edwards [95]
CL97(71,21) Carty & Leiberman [97]
CDS, MDI, Letters of
Credit, Receivable
CL97(48,26) Carty & Leiberman
AK97(48,27) Altman & Kishore
E TRM - RMI/CMI mapping
E.2 CMI mapping strategies
708 © Wall Street Systems IPH AB - Confidential
Transaction & Risk Management Module (TRM) User Guide 709
Appendix F Cashflow attributes
Cashflow attributes are used throughout TRM, but are mainly visible in Rule Editor and Transaction
Manager (Cashflow view - Attributes column). All cashflow attributes are system defined, not all are
relevant to the user; some are used only by the system. This section describes only those attributes
that are relevant to the user.
Attribute Description
Closing Identifies the cashflow as a (technical) cashflow created to close (neutralize)
another cashflow (such cashflows are created for example in early expiration and
selling).
External Identifies that the cashflow is not an integral part of the transaction (i.e. not
generated from the transaction/instrument details). Manually added fees are
'External'.
Fixed FX Book Rate Identifies that the FX book rate of the cashflow has been supplied externally, and
that the cashflow is to be booked at that FX rate (rather than at the FX rate set by
the accounting process). Such book rates can be captured by using the action Set
Base FX Book Rate, see 8.4.7.8 Setting base FX rates on page 295.
Keep Instructions Identifies that standard (default rule) settlement instructions have been
overwritten by the user, and should not be redefaulted by the system.
No DvP Indicates (on the Delivery cashflow) that the security (each security in a repo) is
not settled DvP (Delivery Versus Payment), instead there is a settlement of
security and cash separately (in Settlement Processing).
No Payment Netting Indicates that the cashflow will not be netted with other cashflows when
generating settlements.
No Position
No Valuation
No Risk
• No Position: Filters out position-related key-figures (e.g. Nominal Amount,
Units)
• No Valuation: Filters out valuation-related key-figures (e.g. Market Value,
Results)
• No Risk: Filters out risk-related key-figures (e.g. IR Exposure, FX Exposure).
Note: For the filtering to take effect, the instrument must have the feature
FILTER-METHOD in addition to the 'normal' valuation feature. See TRM
Instruments: Processing and Calculations Guide.
Nominal Amount Identifies that the cashflow contributes to the nominal amount of the transaction,
and is included in the amount on which, for example, the interest is calculated.
Not Bookable Identifies the cashflow as a cashflow from which accounting entries will not be
generated.
Not Fixed Identifies the cashflow as a floating rate (or index-linked) cashflow which has not
yet been fixed.
Not Payable Identifies the cashflow as a cashflow that will not be settled, and which does not
impact liquidity figures or market valuation figures.
Paid Identifies the cashflow as a cashflow from which settlement/payment has been
generated as part of the settlement process (e.g. processed in Settlement
Processing). The ’Paid’ attribute is set as soon as the payment/settlement is
generated. Transactions with paid cashflows cannot be modified.
F Cashflow attributes
710 © Wall Street Systems IPH AB - Confidential
Processed Identifies that the cashflow has been processed by the FX conversion within end of
day processing (e.g. End of Day Processing or TRM Daily Events Generation
activities), and that its Base FX Rate, Base Book FX Rate and/or Base Amount
have been updated in the case where the FX spot rate has changed since the deal
was entered.
Note: The rates on the future interest and payback principal flows are also
updated and marked 'Processed' when end-of-day processing is run on the
payment date of the settlement principal.
Pseudo Identifies the cashflow as a technical cashflow required for transaction
management, valuation and risk purposes, which has no settlement impact and
will not be booked. For example, FRAs are modeled via cashflows marked as
'Pseudo', and notional principals of IRSs are marked as 'Pseudo'.
Trade Date Selling Identifies the (result) cashflow as having been generated via a trade
opening-date-based selling method (as opposed to settlement-date-based selling
method).
User Identifies that the cashflow has been added by a user, for example, manually
added fees are marked User.
Attribute Description
