TRX 15 ENGINE MANUAL
User Manual: TRX-15-ENGINE-MANUAL
Open the PDF directly: View PDF ![]() .
.
Page Count: 12

INTRODUCTION
Thank you for purchasing a new Traxxas TRX
engine. This manual contains the instructions
you will need to operate and maintain your new
engine. Look over the manual and examine
the engine carefully before starting it. If for
some reason you think the engine is not what
you wanted, then do not continue any further.
Your hobby dealer absolutely cannot accept an
engine for return or exchange after it has been
run.
Please read this entire manual before
attempting to start your new engine. Even if
you are an experienced R/C enthusiast, please
continue reading to learn about the special fea-
tures that make the TRX engine unique. Pay
special attention to the break-in instructions
outlined in this manual. The engine must be
broken in (or “run in”) before maximum perfor-
mance can be achieved. Follow the directions
in this manual exactly. Do not be tempted to
takeashortcut here and immediately adjust for
top speed and acceleration. A comprehensive
rebuild section and a troubleshooting guide
have also been included.
If you have any questions about your new
engine, then call Traxxas’ technical support line
at 1-888-TRAXXAS (toll free, U.S.A. residents
only- outside U.S.A. call 972-265-8000).
Technical support is available Monday through
Friday, from 8:30am to 9:00pm Central
Standard Time. We hope that you will enjoy
your TRX engine for many hours to come.
HOW IT WORKS
The TRX engine is a two-stroke, air-cooled
design. It features “ABC” (Aluminum, Brass,
Chrome) type construction. The chrome sleeve
is tapered so that the aluminum piston feels
tighter at the top of the stroke than at the bot-
tom. The piston and sleeve are designed to
reach perfect running clearance when they
reach normal operating temperatures. The pis-
ton will feel tighter when cold.
Fuel enters the engine through the carbure-
tor where it is metered and mixed with air. The
fuel/air mixture is then drawn into the
crankcase. A rotating valve in the crankshaft
opens and closes the crankcase. On the pis-
ton’sdown stroke, the crankcase becomes
pressurized, and fuel is blown into the com-
bustion chamber through two timed intake
ports cut into the sleeve. Swirling action pre-
vents the fresh fuel/air mixture from exiting the
exhaust port. On the upstroke, the fuel is com-
pressed and ignited. When the engine is first
started, the electrically heated glow plug caus-
es the fuel to ignite. Once the engine is run-
ning, the fuel is ignited by a combination of
rapid compression (similar to a diesel) and
retained heat from the glow plug. Exhaust
gasses are evacuated through a third port in
the sleeve.
The contact surfaces of the engine are lubri-
cated by the oil carried in the fuel mixture. The
oil also helps to cool the engine. Some of the
oil is burned with the fuel mixture, producing
the characteristic smoketrail.
The ratio of air to fuel (mixture) is critically
important. Amixture that is too “rich” means
that there is too muchfuel, and a mixture
that is too “lean” means that there is not
enough fuel for the given amount of air.
When the mixture is too rich, performance will
be sluggish and there will be an excessive
amount of smoke. There is also a potential to
WARNING!
FAILURE TO FOLLOW THE PROCEDURES
IN THIS MANUAL COULD VOID YOUR
WARRANTY AND CAUSE PERMANENT
DAMAGE TO YOUR ENGINE.
TRX NITRO ENGINE
MANUAL
Covers:
TRX .12 and TRX Pro .15

2
foul the glow plug when the mixture is too rich.
When the mixture is too lean, there is not
enough fuel to cool or lubricate the internal
engine components, and damage to the engine
and a burned out glow plug is almost certain.
REQUIRED EQUIPMENT
To operate the engine, you will need the fol-
lowing equipment, which is available from your
hobby shop.
1. Glow starter (must be long enough to
reach the glow plug)
2. Model engine fuel (see fuel recommend-
ations)
3. Fuel dispensing bottle (or some way of
easily filling the vehicle’s tank, ie. fuel
bulb or pump.
4. Small phillips head and flat screwdrivers
(for making adjustments)
5. “AA” size batteries for your transmitter(8)
and receiver(4)
6. After-run oil
7. Spare glowplugs
8.Air-filter lube
GLOW STARTER
The glowstarter is a battery-powered device
used to heat the glowplug so that the engine
can be started. Once the engine is running,
the glowstarter is removed. The glow starter is
used even when the engine is hot.
FUEL
Fuel is the most critical component of mak-
ing your engine performproperly. Improper
fuels will cause hard starting, poor perfor-
mance,and excessive wear on the engine. At
the time of this publication, Traxxas has tested
and recommends the following fuels:
Blue Thunder
Byron’s Originals
Omega
Power Master
Other brands of fuel which are not listed may
also be used however, they must meet the fol-
lowing requirements completely.
CAUTION:
ALWAYS FOLLOW THE PRECAUTIONS
PRINTED ON THE CONTAINER OF FUEL.
KEEP IT AWAY FROM FLAMES AND
CHILDREN. THE MIXTURE IS FLAMMA-
BLE AND POISONOUS.
1. The fuel must contain both castor and syn-
thetic oils with a total oil content of 12 to 18%
2. 3-5% castor oil must be present in a syn-
thetic/castor blend fuel.
3. Nitromethane (nitro) content should try to be
kept between 10% and 20%.
The best fuels are castor/synthetic blends.
The castor provides high-temperature lubrica-
tion while the synthetic oils help prevent var-
nish build up. The best fuels also contain anti-
wear agents, anti-foaming agents, lubrication
additives, and rust and corrosion inhibitors.
Use fuels that are made for use in cars, not air-
planes. Car fuel will provide better throttle
response, easier tuning, and longer run times.
For more detailed information about fuels,
refer to the section on page 11, “More About
Fuels.”
FUEL BOTTLE
Fuel is usually purchased bythe gallon, so a
smaller bottle with a dispensing tube is
required to fill the fuel tank. Fuel tanks typical-
ly havecapacities from 75cc (car and truck) to
120cc (marine). The fuel bottle should be
capped to prevent the fuel from evaporating
and becoming contaminated with debris or
moisture. The alcohol and nitro contents of the
fuel will evaporate,thus upsetting the fuel bal-
ance and spoiling the fuel. Do not use fuel
which is old and/or discolored.
Aftermarket inline fuel filtersare avail-
able from your hobby shop and can be used
to insure a clean supplyof fuel for your
engine. Dirtis a serious threat to your engine.
RADIO SYSTEM OPERATION
Fully-assembled Traxxas models only.
Install the “AA” batteries into the battery
holder in your model. Tape the batteries into
the holder to prevent them from falling out dur-
ing rough driving. Wrap a rubber balloon over
the batteryholder to prevent fuel contamina-
tion, and to prevent the battery holder from
short-circuiting against the metal chassis.
Makesure the battery holder is held securely.
CAUTION:
KEEP THE FUEL CONTAINERS CAPPED
ATALL TIMES WHEN NOT IN USE. THE
FUEL CAN SPOIL VERY QUICKLY.
CAUTION:
Synthetic-only fuels are not designed for
ABC engines and can permanently dam-
age your engine. If you have any ques-
tions about fuels call us toll-free at
1-888-TRAXXAS.
3
1) Turn on the radio system, and make sure
the throttle and steering servos are operating
quickly and that none of the linkages are bind-
ing. When operating your model, always turn
the transmitter on first, followed by the receiv-
er in the model. After driving, turn off the
receiver first, and then turn off the transmitter.
NEVER TURN OFF THE RADIO WHILE THE
ENGINE IS RUNNING. (The on/off switch only
turns the receiver on and off. It does not turn
off a running engine.)
2) It is very important that all of the “AA”
radio system batteries are strong or fully
charged. DO NOT ATTEMPT TO OPERATE
THE MODEL WITH WEAK BATTERIES. IF
THE BATTERIES FAIL WHILE THE MODEL
IS IN MOTION, IT CAN CONTINUE TO RUN
OUT OF CONTROL.
3) Always check the routing of the battery
pack wires and their condition before each
use. A melted wire can cause a short-circuit
and lead to a loss of control.
4) Before start-up, have a friend help in
range testing the model’s radio to insure com-
plete control at the maximum distance from
the driver.
STARTING THE ENGINE
STEP 1: FILLING THE FUEL TANK
Use a small fuel bottle or bulb to put fuel
into the tank. Only fill the tank to the bottom of
the fill neck. The model can carefully be refu-
eled while the engine is running.
STEP 2: OILING THE AIR FILTER ELEMENT
The foam air filter element must be oiled
before running the engine. For the best fil-
tration, use the special type of oil made for
foam air filters. It should be available locally
from motorcycle shops and small engine
repair shops. Lightweight motor oil or after-run
oil mayalso be substituted. Saturate the filter
element with oil and then thoroughly squeeze
out the excess. For extremely dusty conditions,
special two or three-stage, pre-lubed filters are
available from Traxxas (Part #4062, and 4063).
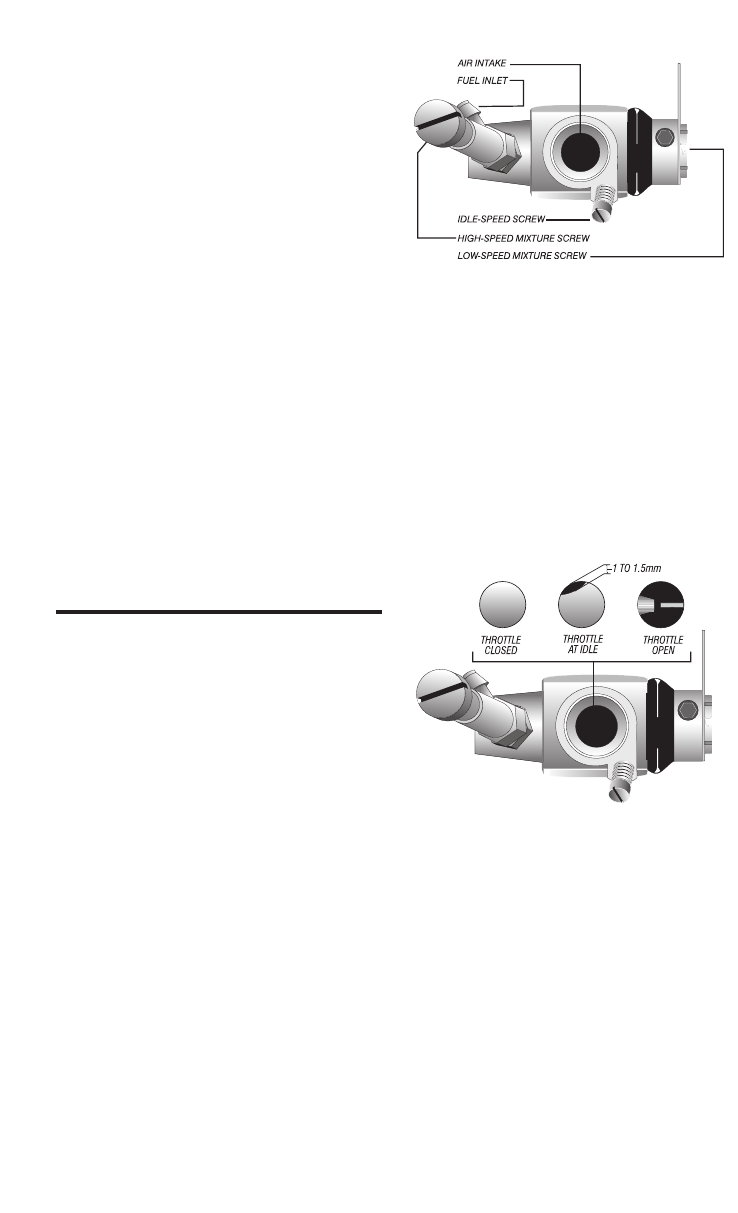
STEP 3: HIGH-SPEED MIXTURE SETTING
The high-speed mixture screw controls how
much fuel enters the engine during mid and
high-speed operation. Turn the high-speed
mixture screw clockwise, by hand, until it stops
(Do not tighten or the needle may be dam-
aged). Now, turn the mixture screw counter-
clockwise 21/2complete turns.
Note: If you live in higher altitudes (1000
feet or higher above sea level), it may be nec-
essary for you to set your high-speed fuel
mixture as much as 1/2aturn leaner than out-
lined here. Call 1-888-TRAXXAS if you have
questions about setting your fuel mixture.
STEP 4: SETTING THE IDLE SPEED
The idle screw regulates the throttle open-
ing to control the idle speed The throttle open-
ing at idle should be set as shown in the draw-
ing. The opening should be 1 to 1 1/2millime-
ters at the widest point in the opening. The idle
speed may need to be readjusted after the
engine is warm.
STEP 5: LOW SPEED MIXTURE SETTING
This screw meters the fuel at low speeds.
The low-speed mixture screw is located in the
end of the carburetor, inside the throttle arm.
This screw controls how much fuel enters the
engine at idle and low throttle. This adjustment
will smooth the idle and improve acceleration
to mid speed. Make this adjustment with the
throttle closed, after setting the idle. Gently
turn this screw clockwise until it stops. Now
turn the low-speed mixture screw counter-
clockwise 13/4turns.
STEP 6: PRIMING THE ENGINE
Some models haveabutton on top of the
fuel tank, referred to as the prime button.
Pressing it will manually pump fuel into the
carburetor. Press the button several times until

4
the fuel moves through the hose up to the car-
buretor. Once the fuel has reached the carbu-
retor, press the button a few more times to
ensure that there is fuel in the engine. On mod-
els which are not equipped with a prime button
(such as marine), the engine may be primed by
holding your finger over either the carburetor
intake or the exhaust outlet(s) and pulling the
recoil starter. ALLOW A HOT ENGINE AND
EXHAUST TO COOL FIRST SO THAT YOU
DO NOT BURN YOURSELF. Pull until the fuel
reaches the carburetor and then pull one more
time to prime.
STEP 7: SHUTTING OFF THE ENGINE
To stop the engine, pinch and hold the car-
buretor’s fuel line while running at idle speed.
Do not shut the engine off by placing your fin-
ger over the exhaust outlet. On some models,
you can stop the engine by placing your shoe
against the flywheel where it protrudes through
the bottom of the chassis.
STEP 8: STARTING
Before starting your engine, read the
safety and mechanical engine precautions.
Turn the radio system on. Now, attach the
glow starter to the glow plug. Hold the model
firmly and pull the handle on the recoil starter
with short, quick pulls until the engine starts.
Do not extend the starter rope more than 12
inches, or pull it to its limit. This could dam-
age the starter. To prevent over extending the
starter, try resting your elbow against your
knee while bendig over to start the model. This
technique will make it difficult for you to have a
long enough stroke to over-pull the starter.
Note: Do not relate the starting of the TRX
engine to that of a lawnmower or weed trim-
mer. Those types of engines and starters are
completely different.
If the starter is difficult to pull, try loosening
the glow plug 1/4turn. This will reduce com-
pression and put less strain on the starter com-
ponents. Retighten the glow plug once the
engine starts.
Once the engine starts, do not let it yank the
starter handle from your hand. This could
cause the spring or the string to break.
CAUTION:
IF THE STARTER BECOMES LOCKED OR
DIFFICULTTOPULL, DO NOTFORCE IT
OR YOU COULD BREAK THE STARTER. A
STIFF OR LOCKED STARTER IS USUALLY
CAUSED BY ENGINE FLOODING.
If the engine does not start, then while
pulling the starter, open the throttle slightly by
either using the transmitter or by manually
pulling on the throttle arm adjustment collar.
If, after many tries, the engine still will not
start, there could be a problem with the glow
plug, glow starter, or the engine could be
flooded. Refer to the troubleshooting section
for more information. Any starting problems
are most likely fuel or glow starter related. Refer
to the Troubleshooting Guide for more detailed
information.
BREAKING-IN THE ENGINE
The key to breaking in your engine is
patience. During the break in period, your
engine may appear to malfunction with symp-
toms such as stalling, wildly inconsistent per-
formance, and fouled glow plugs. Don’t give up
on it! These are just “break-in pains” that every
new engine has to go through, and which will
disappear once you get through the break in
period. Just keep it running, and throttle on
and off as smoothlyas you can. Sudden
bursts or releases of the throttle can stall
your engine. Soon, after about the fourth tank
of fuel, your patience will pay off with solid,
consistent, performance.
The break in time will take about 1 to 11/2
hours. During this time, you should resist the
temptation to tune the engine for performance
and/or run for extended times at wide open
throttle. Completing the break in process as
instructed will result in the fastest, best per-
forming engine as compared to those engines
which were improperly broken in.
READ THIS BEFORE YOU BEGIN:
During break in, use fuel with the same per-
centage of nitro which you plan to run every
day. Do not use a lower percentage of nitro
during break in and then switch to a high-
er percentage for normal running.
THE ENGINE SHOULD BE BROKEN-IN
WHILE DRIVING THE MODEL ON A
SMOOTH, HARD SURFACE. For marine
engines, choose a body of water which is
clean and calm.
CAUTION:
TRX ENGINES MUST BE BROKEN-IN FOR
MAXIMUM LIFE AND HIGHEST LEVEL OF
PERFORMANCE. THIS PROCESS MUST
NOT BE SKIPPED. A SHORTCUT HERE
COULD SHORTEN THE ENGINE LIFE

5
AVOID BREAKING IN THE THE ENGINE ON
VERY HOT, HUMID DAYS. Wait until the
morning or evening when it is cooler.
Turn the high-speed mixture screw (needle)
clockwise (in) to lean the mixture. This
decreases fuel flow for the given amount of air.
Turn counter-clockwise (out) to richen the mix-
ture and increase the amount of fuel to be
mixed with the air.
BREAK-IN THE ENGINE WITH THE BODY
REMOVED FROM THE MODEL (FOR
EXTRA COOLING). You must not allow the
engine to overheat by running it with too lean
amixture or blocking the cooling air.
Overheating can cause severe engine damage.
DURING BREAK-IN, THE ENGINE CON-
SUMES A LARGE QUANTITY OF FUEL.
Watch the fuel level in the tank. As the fuel
level decreases, the engine will run leaner
which is undesirable during break in. If the
engine is allowed to run out of fuel while it is
running at speed, the glow plug could be dam-
aged and require replacement
During the break-in period the performance
level of the engine will be limited bythe rich
fuel mixture which is required. Once the
engine is fully broken-in (after about 4-6 tanks
of fuel) the mixture can be leaned out, and
speed and acceleration will increase.
Because of the rich fuel mixtures and the
wearing of the new parts, deposits will form on
the glowplug causing it to fail. Expect to
replace the glowplug possibly during the
break-in period, and definitely after the engine
is broken-in and the fuel mixture is leaned.
Glowplugs are consumable items which
have a tremendous effect on how your
engine performs. Keep a supply of extra
glow plugs available.
THE FIRST TANK OF FUEL
1. Set the high-speed and low-speed mixture
screws as described in STEPS 3 and 5. Once
the engine is started, drive the model slowly
for approximately 30 seconds to warm the
engine. Ease in and out of the throttle slow-
ly. If the engine keeps stalling when accelerat-
ing, then richen the high-speed mixture screw
to 23/4turns and/or the low-speed mixture
screw to 2 turns out from closed.
2. The idle speed should be set as fast as pos-
sible without causing the model to move. If
necessary, adjust as shown in Step 4 (page 3).
3. The baseline setting of the high-speed mix-
ture screw will vary slightly with each engine.
To know if your engine is set correctly for
break in, look for the following performance
characteristics (on a warm engine):
*The engine will accelerate sluggishly from a
standing start and may even try to stall if the
throttle is applied too quickly.
*Blue-white smoke will be emitted from the
exhaust.
*When the model is accelerating at full throt-
tle, the engine will never “clean out.” When an
engine “cleans out”, the speed and rpms will
increase suddenly and dramatically,as if the
engine has gone into “second gear.” Also the
amount of smokeemitted from the exhaust will
decrease.“Cleaning out” is a desirable
characteristic once the engine is broken-
in; however, during the first four tanks, try
to avoid it.
4. Alternate driving the model at medium
speeds and short(2-second) bursts of full-
throttle acceleration.
5. As the engine reaches normal operating
temperature, it will speed up and performance
will improve. This occurs because the fuel mix-
ture is becoming leaner with the increased
temperature. You will need to richen the fuel
mixture 150or more, so that the engine contin-
ues to run as described above. Tip:
Remember to keep the engine from “clean-
ing out” during break in by richening the
high-speed mixture as necessary.
6. When the first tank is almost gone, bring the
model in, shut off the engine, and allow it to
cool for 7-10 minutes before continuing.
7. Form the habit of inspecting the air cleaner
each time you refuel. Look inside the carbure-
tor for anysigns of dust entering the engine.
Removeany dust with a Q-tip and clean and
re-oil the filter.When the model is used in
extremely dusty conditions,use Traxxas 2-
stage (part#4062) or 3-stage (part #4063)
foam air filters.

6
TANKS 2-4
1. Turn the high-speed mixture screw clock-
wise 150and run through the second tank of
fuel. Repeat this process for the third and
fourth tanks of fuel as well. Important: Do not
lean the high speed mixture less than 2
turns out from closed (see illustration).
Also, be sure to allow the engine to cool
between each run.
2. During tanks 1-4, Watch closely for any
signs of overheating. These include:
- Steam or smoke emanating from the engine
surfaces
- Cleaning out and then lagging during high-
speed acceleration (as if running out of fuel)
- Popping or clattering sound when decelerat-
ing (detonation)
- Idle speed will surge or possibly diminish to
the point of stalling.
CAUTION:
IF THE ENGINE STALLS WHILE YOU ARE
DRIVING, BECAUSE OF AN OVERHEAT-
ING CONDITION, SEVERE DAMAGE MAY
HAVE ALREADY OCCURRED. OVER-
HEATING IS CAUSED BY THE FOLLOW-
ING OPERATIONAL ERRORS:
- FUEL MIXTURE IS SET TOO LEAN
- COOLING AIR FOR THE HEAD IS
BLOCKED
-EXCESSIVE NITRO CONTENT IN THE
FUEL
-INCORRECT OIL CONTENT IN THE FUEL
-POOR QUALITY FUEL
-EXCESSIVE LOADS PLACED UPON THE
ENGINE (caused byabound drivetrain
or driving in grass and deep sand)
YOUR ENGINE WILL BE SHORT-LIVED IF
ANY OF THE ABOVE CONDITIONS ARE
ALLOWED TO EXIST FOR ANY LENGTH
OF TIME.
TO TEST FOR OVERHEATING, place a drop
of water or spit on the top of the cylinder head.
If it sizzles away immediately, shut the engine
off at once. If it takes approximately 3-5 sec-
onds for the water drop to boil away, then the
engine is running within a normal temperature
range. Tip: On-board digital temperature
gauges are available from your hobby shop.
TUNING FOR POWER
Sometime between the fourth and sixth
tank of fuel, the internal engine parts should
be broken-in.You can then begin adjusting the
fuel mixture to maximize performance for your
normal driving needs.
The engine should never be run at more
than 90-95% of its maximum performance
capacity. As you continue to lean the fuel mix-
ture, the engine will run faster up to a point.
When the engine is set too lean, it will seem to
run strong at first, but will bog, hesitate, or stall
when running at high speed. The engine will
also rapidly overheat when the setting is too
lean. CHECK THE ENGINE TEMPERATURE
OFTEN AS YOU LEAN THE MIXTURE. DO
NOT LET THE ENGINE OVERHEAT.
At the optimum setting, the engine will clean
out; have a strong-sounding, high-pitched
whine at full speed; and there will be a thin trail
of whitish smokeemitted from the exhaust. It
is always better to set the engine a little
richrather than a little lean.
Find an area with a long smooth straight-
away that will allow the engine to run at full
throttle. Run the model two or three passes at
full throttle and note the top speed and accel-
eration. Turnthe high-speed mixture screw
clockwise 150and retest the model, again not-
ing the performance. Continue to lean the mix-
ture and retest the model until the highest
speed is achieved. At that point, turnthe mix-
ture screwcounterclockwise 15 to 300.This is
the optimum setting that the engine should be
run at.
If the engine stalls on acceleration,
begins to bog or slow down at full throttle,
or if there is a significant reduction in
exhaust smoke, then the engine is running
too lean. Immediately turn the high speed
mixture screw counterclockwise 450and oper-
ate the model at medium speeds for 1 or 2
minutes to allow the engine to cool. Then, con-
tinue testing. At no point should your high-
speed mixture needle be adjusted to fewer
than 2 turns out from the closed position.

7
TUNING THE LOW-SPEED
MIXTURE FOR PERFORMANCE
The low-speed mixture affects how the
engine will perform in the low and mid-rpm
ranges. Turning clockwise will lean the mix-
ture. As with the high-speed mixture, leaning
the low-speed mixture increases performance.
Again, if the mixture here is set too lean, the
engine may be starved for lubrication in the
low and mid-rpm ranges, thus causing over-
heating and excessive engine wear.
Perform the following test to determine if the
low speed mixture is set correctly. With the
engine warm and running, allow it to idle for
approximately 15 seconds. Now apply wide-
open throttle and note performance. If the
engine bogs, accelerates erratically, and a
large puff of blue smoke is emitted, then the
low speed mixture is too rich. Turn the screw
clockwise 150. If the engine speeds up
momentarily and then bogs, hesitates, or
stalls, then the low speed mixture is too lean.
Turn the screw counterclockwise 150. Adjust
the mixture screw in 150increments, wait 15
seconds, and retest after each change. Adjust
for the best acceleration without stalling.
ADJUSTING THE SLIPPER CLUTCH
Some Traxxas fuel-powered models are
equipped with an adjustable slipper clutch
which is built into the large spur gear. The pur-
pose of the slipper clutch is to regulate the
amount of power sent to the wheels in order to
prevent tire spin. When it slips, the slipper
clutch makes a high-pitch chirping noise,
which you should be able to hear over the
engine noise. When running on pavement, set
the clutch so that it is tight. When running on
dirt, slightly loosen the adjusting nut 1/8of a
turn out to reduce tire spin.
STORAGE
After running your model, use a good
“after-run” oil prior to storage. The
methanol used in the fuel attracts moisture
and can cause moisture and corrosion to form
inside the engine. Drain the fuel tank, attach
the glow starter and try to start the engine until
all of the remaining fuel is completely used up.
Remove the air cleaner and place the recom-
mended number of drops (usually 6 drops) of
the after-run oil into the carburetor. Now pull
the recoil starter 4 or 5 times to circulate the oil
and then replace the air cleaner. Never store
your model with unused fuel in it.
TROUBLESHOOTING:
GLOW PLUG PROBLEMS
The glow plug in your engine is a consum-
able item which must be replaced periodically
to maintain peak performance and starting
ease. Most often, any starting problems or
erratic performance can be traced back to
the glow plug. The glow plug should also be
suspected if the engine’s acceleration and
high-speed performance suddenly become
flat.
Aleaking glow plug can cause many prob-
lems with engine performance, especially if
the engine is not running well at speed. While
the engine is running, look for bubbles at the
base of the glow plug. Loosen the glow plug
and then re-tighten. If the problem persists,
remove the glow plug and replace it.
The only sure way to test for a faulty
glowplug is simply to install a NEW one to
see if the problem goes away. Remove the
plug from the cylinder head with a 5/16 inch nut
driver or socket. Make sure there is no dirt or
debris on the top of the head which could fall
down into the engine. Do not lose the copper
gasket which seals the glow plug. Touch the
glow plug to the contacts of the glow starter.
All of the coils should glow bright orange.
Sometimes the first few coils will not glow
while the rest are bright, most likely indi-
cating a bad plug. Do not perform this test in
direct sunlight. If the glow is dim orange, then
the glow starter battery should be replaced or
recharged.
Tip: Glow plugs can be damaged by run-
ning the fuel mixture too lean, applying
more than 1.5 volts to the plug, or by run-
ning out of fuel while the engine is running
at high RPMs.
Replacement glowplugs are available from
your hobbyshop or Traxxas. From the factory,
your engine was equipped with a standard
long-reach plug. For the best performance,
use the original Traxxas replacement plugs:
(part #3230, standard long plug for TRX .12 or
part #3231 heavy-duty long for TRX .15). Glow
plugs with idle bars should not be used.
Always use the new gasket which comes with
the glow plug. Do not use plugs with idle bars.
Tip: Traxxas heavy-duty glow plugs (part
#3231) should also be used in TRX .12s
equipped with tuned pipes. Do not use the
heavy-duty plug in a TRX .12 with stock
exhaust or poor performance may result.

8
FUEL PROBLEMS
Aclean, properly-lubed, air filter is essential
for maintaining the performance of the engine.
NEVER RUN YOUR ENGINE WITH A DRY
FILTER, OR WITHOUT THE AIR FILTER IN
PLACE. If dirt gets into the engine, all of the
internal parts can be severely damaged in a
short amount of time. INSPECT THE AIR FIL-
TER EACH TIME YOU REFUEL. The air filter
could become saturated with fuel when the
model is turned upside down, or when the
engine is flooded. The air filter should be
cleaned at the first sign of deterioration, oil
contamination, or blockage.
If you will be running your engine in
extremely dusty conditions or where there is
fine, powdery dust, then the Traxxas two-stage
oil/foam air filter (part #4062)or three stage fil-
ter (part #4063) should be used.
Your engine consumes more fuel than you
might expect. It will run approximately 8-10
minutes on a tank of fuel. Run time will be
even less during break-in because of the rich
fuel mixtures. Try not to let the fuel level drop
below 1/4of a tank. When the fuel level is low,
the engine will begin to draw air in with the
fuel, as the fuel sloshes away from the fuel
pickup point in the bottom of the tank. The air
in the line causes erratic performance and rad-
ical leaning of the fuel mixture. In this case, the
engine may lean out, stall, and the glow plug
could be damaged.
The main component of model engine fuel
is methanol. Methanol will attract moisture
from the air when left uncapped. If the fuel is
left uncapped, for even a few days, it
should be disposed of. Also,fuel left open
will get dust in it, which can damage your
engine. Keep the fuel tightly capped at all
times and store it awayfrom direct sun-
light.
Poor quality fuels maylead to overheating
problems. If the methanol is not pure,or the
nitro content is composed of nitromethane and
nitropropane instead of nitromethane, you
could experience all types of running problems
in addition to destructive ash buildup inside
the engine. Also, if the fuel does not contain
both castor oil and high quality synthetic oil,
then the fuel will cause many problems and
should not be used. You simply MUST use a
fuel which meets the standards outlined in the
fuel requirements section of this manual.
Other types of fuel are unacceptable.
The TRX engine is designed to perform
best on nitro contents between 10 and 20%.
When the 20% mark is surpassed, all risk and
responsibility for engine performance
becomes your own. Engine temperatures will
increase when more nitro is used, with only
modest gains in performance, and a decrease
in engine life. Use less nitro in warm weath-
er, and more in cool weather. Perform the
following test to determine if you are using
enough nitro. Start the engine, allow it to warm
up, and disconnect the glow starter. If there is
no discernable drop in RPMs, then you are
using enough nitro. If the engine doesn’t idle
smoothly or as fast when the glow starter is
removed, then the next higher level of nitro
should probably be purchased on your next
gallon of fuel. This test assumes that the glow
plug is good (a bad glow plug will also cause
poor running when the glow starter is
removed) and the engine is broken in.
It is possible for the fuel lines to develop
cuts and pinhole leaks when the fuel lines
are removed from their fittings. These leaks
allow air in the line which interrupts the fuel
flow. If a leak is suspected, replace the lines
with new tubing. DO NOT BLOW ON THE
TUBES WITH YOUR MOUTH. MODEL FUEL
IS POISONOUS.
FLOODING:
Occasionally, you may accidentally flood
the engine. Symptoms of a flooded engine
include difficulty pulling the starter and muffled
sound coming from the exhaust. Remove the
glowplug with a 5/16 inch nut driver and then
remove the air cleaner. Turn the engine upside
down to drain any excess fuel out of the com-
bustion chamber and carburetor. Pull the recoil
starter 4-5 times to clear the engine. Be
extremely careful not to let the fuel spray into
your face!Turn the model back over, install the
glow plug, and re-prime the carburetor. The
engine should start and run normally.
CARBURETOR TIPS:
The carburetor, because of its simple
design, is very reliable. Its only enemy is dirt.
Dirtparticles become embedded in the needle
seats and prevent consistent mixture settings.
The carburetor should be suspected when a
sudden and persistent leaning of the fuel mix-
ture is observed (the engine may suddenly
speed up). T
odislodge the dirt particle, try
screwing the high and low-speed mixture
screws all the way in and then back out to their
original settings. If the engine doesn’t return to
normal operation, try backing the mixture
screws out several more turns and then use
the prime button to force fuel through the car-
buretor. Return the mixture screws to their

9
original position. The engine will be flooded
after this process so follow the steps in the
above paragraph to return the engine to nor-
mal. If the dirt particles are still not cleared,
then remove the carburetor and clean both the
high-speed and low-speed needles with dena-
tured alcohol. To prevent this from re-occur-
ring, replace the air filter with a new unit and
install a new in-line fuel filter between the car-
buretor and fuel tank.
FUEL MIXTURE TIPS:
The fuel mixture is the largest variable you
have to control while operating your engine.
Fuel brand, ambient temperature, and humidi-
ty all effect how your mixture should be set. If
the engine runs great one day but runs rich or
lean on another day, it is most likely the result
of a change in the air quality and temperature.
This should be expected and adjusted for.
STARTER PROBLEMS
Most starter problems result from pulling
the starter too far or after the engine has been
flooded and/or is in a “locked” condition. The
starter can be removed from the engine by
removing the four 3x6mm philips head screws
that fasten the housing to the engine. The
starter must be removed in order to perform
any service on it. Refer to rebuild steps 6-12
on pages 13-14 for starter service.
COOLING PROBLEMS
Engine overheating is most often caused by
running the engine too lean or because the
cooling air for the cylinder head is blocked. If
the mixture is too lean, simply allow the engine
to cool, richen the mixture, and try again (both
the high-speed and low-speed mixtures have
an effect on running temperatures). Truck,
buggy,and car bodies must haveholes cut in
them to allowcooling air to moveacross the fin
surfaces of the cylinder head. On some bodies,
the windshield should be cut out so that air
can flowto the head. Additional cooling can be
achieved bycutting an opening in the backof
the body so that air will pass completely
through the body.
If the fuel meets all of the requirements,the
mixture is set rich, the head is receiving ade-
quate ventilation, and the engine continues to
overheat, then the model may have a bound-
up drivetrain. Look for dirty wheel bushings
which may have tightened or any other moving
part which may be causing excess drag on the
model. Driving through deep sand and grass
will also put excessive loads on the engine.
CHANGING CLUTCH BELLS
The clutch bell gear will wear from use and
should be changed periodically. The gear
should be replaced when the teeth on the gear
are sharp and pointed rather than square-
shouldered. Metal particles become embedded
in the spur gear and it should be replaced at
this time also. Refer to engine rebuild steps
and the exploded-view drawing when disas-
sembling the clutch mechanism (the numbers
in parenthesis are part identification numbers).
MAINTENANCE
CONNECTING ROD
The connecting rod inside the engine
should be inspected for wear about every gallon
of fuel. We recommend that the connecting rod
be replaced if it shows wear. See engine
rebuild steps 1-5. If your engine is being used
in an application that requires continuous
high-speed operation, or if a lean fuel mixture
has been used to gain performance, then the
connecting rod should be checked more often.
Follow the step-by-step instructions in the
rebuild section of this manual to inspect or
change the connecting rod. Failure to inspect
the connecting rod at the prescribed intervals
could result in severe internal engine damage.
AIR CLEANER
The air cleaner is essential for keeping dirt
out of the engine. The air cleaner should be
inspected carefully every time you refuel. It
should be cleaned and re-oiled whenever it is
dirty. If you will be running your engine in
extremely dusty conditions or where there is
fine, powdery dust, then the Traxxas two-stage
oil/foam air filter (part #4062)or three stage
filter (part #4063) should be used.
CLEANING
The engine should be kept clean of oil and
grime for more effective cooling. The more
often the engine is cleaned, the easier it will be
to clean the engine. The easiest and most
effective cleaning method is to use dena-
tured alcohol applied with a trigger spray
bottle. Denatured alcohol is available from
paint and hardware stores and it will not attack
the plastics used in the construction of your
model. THE DENATURED ALCOHOL IS
FLAMMABLE SO KEEP IT AWAY FROM
OPEN SPARKS AND FLAME. FOLLOW ALL
OF THE PRECAUTIONS ON THE CONTAIN-
ER. Remove the batteries and radio system
from your model before spraying it with the

10
cleaner. Tilt the model up so that the alcohol
will dissolve the grime causing it to run off the
back of the model. The alcohol will then evap-
orate leaving little residue.
STORING YOUR MODEL
Use an after-run product in the engine
whenever the model is going to be stored and
whenever it has been cleaned with alcohol.
Use of the after run oil is described on page 7.
The denatured alcohol and the alcohol in the
fuel attracts moisture so the oil is needed to
prevent rusting and corrosion. Clean the
model as thoroughly as possible. Clean and oil
the bushings in the front wheels and rear
axles. Store unused fuel in a tightly-capped
container away from direct sunlight.
PRECAUTIONS
If the precautions are followed and your model
is operated sensibly and with care at all times,
it poses very little danger to you or your spec-
tators. Failure to operate your model in a safe
and responsible manner could result in prop-
erty damage and injury. You alone must see to
it that the instructions are followed and that the
precautions are adhered to.
PERSONAL PRECAUTIONS
* The fuel is dangerous. Follow all of the direc-
tions and precautions on the fuel container.
* The fuel can look like a cool drink to a young
child. Keep it out of children’s reach.
* The fuel is flammable Do not allow sparks,
flame, or smoking in the presence of model
fuel.
* The engine emits poisonous carbon monox-
ide gas just like a real automobile engine.
Always run the model in a well-ventilated
area. Never attempt to run the engine indoors
unless there is adequate ventilation.
*The engine, head, and exhaust system
become extremely hot during use. Be careful
not to touch these parts,especially when re-
fueling or reaching for the starter handle.
*Do not drivethe model at night, on public
streets, or in large crowds of people.
* Do not reach underneath a running model to
pickit up. You might accidentally come in
contact with the spinning flywheel.
*Fuel-powered models are very fast and can
cause injury if allowed to run into people or
animals. For this reason, it is very important
to maintain the mechanical integrity of the
model. The radio system, batteries, connec-
tions, and brakes should all be kept in good
working order so that they will be reliable.
* The engine produces a fair amount of noise.
Be considerate of your neighbors by not run-
ning your model early in the morning or late
in the evening. Try to find a place to run your
model where no one will be disturbed by its
noise.
MECHANICAL PRECAUTIONS
* The engine is capable of turning 30,000 or
more RPMs at full throttle. Continuous full-
throttle, high-speed operation will rapidly
decrease the life span of the internal
engine parts. For longer engine life, vary
your speed. If the engine will be run at
high speeds in a racing situation, expect
to replace worn parts more often.
* Do not attempt to operate the engine using
gasoline, alcohol, naptha, or any other fuel
other than model engine fuel.
* Do not allow the engine to overheat.
Overheating can damage the engine.
* Never run the engine without the air cleaner.
Inspect the air cleaner carefully each time
you re-fuel. Replace the air cleaner when
even the slightest signs of deterioration are
visible.
* Do not run excessively lean mixtures. A mix-
ture which is too lean will cause engine over-
heating and damage.
*If the engine performance suddenly changes,
stop at once and find the cause for the
change.
*Do not over-rev the engine. The engine will
over-rev if the throttle is fully opened while
the rear wheels of the model are off the
ground.
*If the model flips upside down, do not rev the
engine.
*Do not allow the engine to run out of fuel
while it is running at high RPMs. This could
damage the glowplug.
*Test the radio system each time before you
operate the model. Always use strong batter-
ies in the radio system. Stop running immedi-
ately at the first sign of weak batteries.
* Do not drive your model in thick grass or
deep sand. This puts excessive loads on the
engine and could cause it to overheat.
* Do not run your car, truck, or buggy through
water. The engine is not waterproof.
*The fuel used must meet the recommenda-
tions outlined in this manual. Failure to use
the correct fuel will damage the engine.
* The starter rope should not be pulled out
more than 12 inches. Longer pulls are not
necessaryand can damage the starter.
*Using fuels containing more than 20%
nitromethane will cause the engine to run
hotter and decrease its longevity.

11
MORE ABOUT FUELS
Do not use fuels blended with 100% syn-
thetic oils, without castor. Synthetic oils have
alower flash point than castor. Thus, when
the engine reaches its higher operating tem-
peratures, the synthetic oil may burn off the
bearing surfaces and not provide adequate
lubrication. This will result in severe damage
to your engine. When castor oil is present in
fuel, there is an extra margin of safety, provid-
ing for some measure of lubrication if the syn-
thetic oils have possibly burned away.
Also, do not use fuels blended with 100%
castor oil and no synthetic oil. 100% castor oil
will cause varnish to build up inside the
engine. The varnish coats the parts and pre-
vents effective heat transfer.
The purpose of the nitromethane in the fuel
is to increase the amount of fuel being burned,
thus improving power. The TRX-12 engine will
run on fuels which contain no nitromethane;
However, fuels containing 10-20%
nitromethane should be used. Increasing the
nitro content beyond 20% may improve power
up to a point; however, running temperatures
will also increase. A cool-running engine will
last longer and perform better.
There are several different types of “nitro”:
nitromethane, nitromethane, and nitro-
propane. Only use fuels with nitromethane in
model engines. Nitroethane and nitropropane
cause the engines to run very hot, but are
sometimes used in small percentages to lower
the cost of the fuel. Nitropropane is a known
carcinogen, and should be avoided.
The color in the fuel is simply for identifica-
tion purposes only. It has no effect on the per-
formance of the engine.
Do not buy fuel if you are unsure of its con-
tents. Proper fuel is absolutely vital for the life
and performance of your engine. Not all fuel is
created equal. If there is anydoubt about the
content of the fuel, the quality of the fuel, or
the reputation of the maker or seller, do not
buy it. Your best source for fuel is a reputable,
well-known hobby dealer who has experience
with small model engines. Always read the the
label, but generally speaking, nationally-rec-
ognized, brand-name fuels should have the oil
content you need.
During the break-in period, use the percent-
age of nitro which you plan to run every day.
Do not use a lower percentage of nitro during
break in and then switch to a higher nitro per-
centage for normal running.

12
Engine will not start
Starter will not retract
Starter will not pull
Engine starts and then stalls
Engine sluggish/ poor performance
Engine overheats
Engine hesitates or stumbles
Engine stalls instantly when throttle is
fully opened from idle
Engine stalls while driving around turns
Engine stalls while running for no
apparent reason
Out of fuel ..............................................
Improper or contaminated fuel ..............
Carburetor not primed ............................
Glow starter not charged ........................
Glow plug bad ........................................
Engine flooded........................................
Engine overheated ................................
Carburetor incorrectly adjusted ..............
Exhaust blocked ....................................
Air cleaner blocked ................................
No lubrication ........................................
Rope is jammed ....................................
Spring is unwound or broken ................
Engine is flooded....................................
Rope is jammed ....................................
Engine seized ........................................
Idle speed set too low ............................
Air bubble in fuel line ..............................
Glow plug is fouled or weak ..................
Engine overheated ................................
Insufficient fuel tank pressure ................
High-speed fuel mixture is too rich ........
Leaking glow plug ..................................
Glow plug is fouled or weak ..................
Fuel bad or contaminated ......................
Carburetor dirty or blocked ....................
Engine overheating ................................
Slipper clutch is improperly adjusted ....
Engine overgeared for application..........
Centrifugal clutch slipping ......................
Model has bound up drivetrain ..............
Engine excessively worn ........................
High-speed mixture too lean ..................
Cooling air is blocked ............................
Excessivenitro in the fuel ......................
Incorrect oil content in the fuel ..............
Poor quality fuel......................................
Excessive load on the engine ................
Low-speed mixture too lean ..................
High-speed mixture too lean ..................
Low-speed mixture too rich ....................
Engine overheated ................................
Air bubble in fuel line ..............................
Glow plug fouled ....................................
Insufficient fuel tank pressure ................
Glowplug fouled or weak ......................
Low-speed mixture too lean ..................
High-speed mixture too rich ..................
Fuel level is low ......................................
Idle speed set too low ............................
Glow plug fouled or weak ......................
Engine overheated ................................
Fuel line blocked with trash ....................
Insufficient fuel tank pressure ................
Fill fuel tank
Replace fuel
Prime carburetor
Charge glow starter
Replace glow plug- see “Glow Plug
Problems” section
See “Fuel Problems-Flooding” section
Allow engine to cool- find cause for overheating
Readjust carburetor
Remove and clean exhaust system
Clean air filter
Turn flywheel by hand to retract starter rope-
problem will correct itself after first run
Repair starter- see “Starter Problems” section
Repair starter- see “Starter Problems” section
Clear excess fuel- see “Flooding” section
Repair starter- see “Starter Problems” section
Disassemble engine to find cause
Increase idle speed
Use prime button to force bubble through-
check for a hole in the fuel lines
Replace glow plug- see “Glow Plug
Problems” section
Allow engine to cool- find cause for overheating
Replace pressure hose- Clear blockage at
exhaust header fitting- check flow to and
from tank
Set high-speed mixture to a leaner setting
Check glow plug gasket/ tighten glow plug
Replace glow plug- see “Glow Plug
problems” section
Replace fuel
Clean carburetor- see “Fuel Problems” section
Stop at once- find cause for overheating
Tighten slipper clutch (when equipped)
Use a lower gear ratio
Replace clutch shoes (return for service)
Find the bound item and repair
Return for service
Richen high-speed mixture
Direct air to the head
Use fuel with lower nitro content
Purchase correct fuel
Purchase correct fuel
Check for bound up drivetrain
Richen low-speed mixture
Richen high-speed mixture
Lean low-speed mixture
Stop at once- find cause for overheating
Use prime button to force bubble through-
check for a hole in the fuel lines or low fuel level
Test and/or replace glow plug- see “Glow
Plug Problems” section
Replace pressure hose- Clear blockage at
exhaust header fitting- check flow to and
from tank
Replace glowplug- see “Glow Plug
Problems” section
Richen low-speed mixture
Lean high-speed mixture
Refill fuel tank
Increase idle speed
Replace glow plug- see “Glow Plug
Problems” section
Stop at once- find cause for overheating
Replace fuel line- install fuel filter
Replace pressure hose- Clear blockage at
exhaust header fitting- check flow to and
from tank
