T_TLA7M4 T TLA7M4
User Manual: T_TLA7M4
Open the PDF directly: View PDF ![]() .
.
Page Count: 136 [warning: Documents this large are best viewed by clicking the View PDF Link!]
- Service Manual
- Table of Contents
- List of Figures
- List of Tables
- General Safety Summary
- ServiceSafety Summary
- Preface
- Introduction
- Specifications
- Operating Information
- Theory of Operation
- Performance Verification Procedures
- Adjustment Procedures
- Maintenance
- Removal and Installation Procedures
- Troubleshooting
- Repackaging Instructions
- Options
- Replaceable Electrical Parts
- Diagrams
- Replaceable Mechanical Parts

Service Manual
TLA 700 Series Logic Analyzer Modules
TLA 7Lx & TLA 7Mx
070-9779-02
This document supports module firmware version
1.00 and above.
Warning
The servicing instructions are for use by qualified
personnel only. To avoid personal injury, do not
perform any servicing unless you are qualified to
do so. Refer to all safety summaries prior to
performing service.
Copyright Tektronix, Inc. All rights reserved.
Tektronix products are covered by U.S. and foreign patents, issued and pending. Information in this publication supercedes
that in all previously published material. Specifications and price change privileges reserved.
Printed in the U.S.A.
Tektronix, Inc., P.O. Box 1000, Wilsonville, OR 97070–1000
TEKTRONIX and TEK are registered trademarks of Tektronix, Inc.
MagniVu and PowerFlex are registered trademarks of Tektronix, Inc.
WARRANTY
Tektronix warrants that the products that it manufactures and sells will be free from defects in materials and workmanship
for a period of one (1) year from the date of shipment. If a product proves defective during this warranty period, Tektronix,
at its option, either will repair the defective product without charge for parts and labor, or will provide a replacement in
exchange for the defective product.
In order to obtain service under this warranty, Customer must notify Tektronix of the defect before the expiration of the
warranty period and make suitable arrangements for the performance of service. Customer shall be responsible for
packaging and shipping the defective product to the service center designated by Tektronix, with shipping charges prepaid.
Tektronix shall pay for the return of the product to Customer if the shipment is to a location within the country in which the
Tektronix service center is located. Customer shall be responsible for paying all shipping charges, duties, taxes, and any
other charges for products returned to any other locations.
This warranty shall not apply to any defect, failure or damage caused by improper use or improper or inadequate
maintenance and care. Tektronix shall not be obligated to furnish service under this warranty a) to repair damage resulting
from attempts by personnel other than Tektronix representatives to install, repair or service the product; b) to repair
damage resulting from improper use or connection to incompatible equipment; c) to repair any damage or malfunction
caused by the use of non-Tektronix supplies; or d) to service a product that has been modified or integrated with other
products when the effect of such modification or integration increases the time or difficulty of servicing the product.
THIS WARRANTY IS GIVEN BY TEKTRONIX IN LIEU OF ANY OTHER WARRANTIES, EXPRESS OR
IMPLIED. TEKTRONIX AND ITS VENDORS DISCLAIM ANY IMPLIED WARRANTIES OF
MERCHANTABILITY OR FITNESS FOR A PARTICULAR PURPOSE. TEKTRONIX’ RESPONSIBILITY TO
REPAIR OR REPLACE DEFECTIVE PRODUCTS IS THE SOLE AND EXCLUSIVE REMEDY PROVIDED TO
THE CUSTOMER FOR BREACH OF THIS WARRANTY. TEKTRONIX AND ITS VENDORS WILL NOT BE
LIABLE FOR ANY INDIRECT, SPECIAL, INCIDENTAL, OR CONSEQUENTIAL DAMAGES IRRESPECTIVE
OF WHETHER TEKTRONIX OR THE VENDOR HAS ADVANCE NOTICE OF THE POSSIBILITY OF SUCH
DAMAGES.
TEKTRONIX SERVICE OPTIONS
Tektronix offers the following service options. These options are modular, flexible, and easy to order with your instru-
ment. Designed to ease installation and start up, to support tracking of calibration to requirements of ISO9000, and
to provide for extended repair coverage, these options help fix your long-term maintenance costs and eliminate un-
planned expenditures. And these options can be converted from service at Tektronix service depots to service on-site
(see Option S3), which helps keep downtime to a minimum.
Product installation service1Option IN Provides initial installation of the product and
familiarizes new users with some of its opera-
tion features
Three years of calibration services Option C3 Provides initial Certification on delivery, plus
two more annual calibrations from your ser-
vice center
Test data Option D3 Provides test data on delivery and when annu-
al calibration services are provided (three to-
tal, requires Option C3)
Three years repair coverage Option R3 Provides three years of repair coverage for the
instrument, including displays and accessories
sold with the instrument
One year uplift to on–site service1,2 Option S1 Converts the standard one year, “return to de-
pot” warranty to provide service on site for
one year
Three year uplift to on-site service1,2 Option S3 Converts any C3, D3, and R3 options pur-
chased to on-site services for three years
Tektronix Service Options are available at the time you order your instrument. Contact your local Tektronix Sales
Office for more information.
1Availability of installation and on-site services depends on the type of product and may vary by geography.
2Uplift options are ordered with the mainframe products and cover individual modules.

TLA 700 Series Logic Analyzer Modules Service Manual i
Table of Contents
General Safety Summary vii. . . . . . . . . . . . . . . . . . . . . . . . . . . . . . . . . . . .
Service Safety Summary ix. . . . . . . . . . . . . . . . . . . . . . . . . . . . . . . . . . . . .
Preface xi. . . . . . . . . . . . . . . . . . . . . . . . . . . . . . . . . . . . . . . . . . . . . . . . . . .
Manual Structure xi. . . . . . . . . . . . . . . . . . . . . . . . . . . . . . . . . . . . . . . . . . . . . . . . .
Manual Conventions xii. . . . . . . . . . . . . . . . . . . . . . . . . . . . . . . . . . . . . . . . . . . . . .
Related Manuals xiv. . . . . . . . . . . . . . . . . . . . . . . . . . . . . . . . . . . . . . . . . . . . . . . . . .
Introduction xv. . . . . . . . . . . . . . . . . . . . . . . . . . . . . . . . . . . . . . . . . . . . . . .
Adjustment and Certification Interval xv. . . . . . . . . . . . . . . . . . . . . . . . . . . . . . . . .
Strategy for Servicing xv. . . . . . . . . . . . . . . . . . . . . . . . . . . . . . . . . . . . . . . . . . . . .
Service Offerings xvi. . . . . . . . . . . . . . . . . . . . . . . . . . . . . . . . . . . . . . . . . . . . . . . . .
Contacting Tektronix xviii. . . . . . . . . . . . . . . . . . . . . . . . . . . . . . . . . . . . . . . . . . . . . .
Specifications
Product Description 1–1. . . . . . . . . . . . . . . . . . . . . . . . . . . . . . . . . . . . . . . . . . . . . . .
Characteristic Tables 1–2. . . . . . . . . . . . . . . . . . . . . . . . . . . . . . . . . . . . . . . . . . . . . .
Operating Information
Installation 2–1. . . . . . . . . . . . . . . . . . . . . . . . . . . . . . . . . . . . . . . . . . . . . . . . . . . . . .
Setting the Logical Address 2–1. . . . . . . . . . . . . . . . . . . . . . . . . . . . . . . . . . . . .
Merging Modules 2–2. . . . . . . . . . . . . . . . . . . . . . . . . . . . . . . . . . . . . . . . . . . . .
Operating Information 2–3. . . . . . . . . . . . . . . . . . . . . . . . . . . . . . . . . . . . . . . . . . . . .
Front Panel Connectors and Indicators 2–3. . . . . . . . . . . . . . . . . . . . . . . . . . . . .
Merge Cable Connectors 2–6. . . . . . . . . . . . . . . . . . . . . . . . . . . . . . . . . . . . . . . .
Rear Panel Connectors 2–6. . . . . . . . . . . . . . . . . . . . . . . . . . . . . . . . . . . . . . . . .
Probes 2–6. . . . . . . . . . . . . . . . . . . . . . . . . . . . . . . . . . . . . . . . . . . . . . . . . . . . . .
Online Help 2–6. . . . . . . . . . . . . . . . . . . . . . . . . . . . . . . . . . . . . . . . . . . . . . . . . .
Diagnostics 2–7. . . . . . . . . . . . . . . . . . . . . . . . . . . . . . . . . . . . . . . . . . . . . . . . . .
Self Calibration 2–7. . . . . . . . . . . . . . . . . . . . . . . . . . . . . . . . . . . . . . . . . . . . . . .
Menu Overview 2–8. . . . . . . . . . . . . . . . . . . . . . . . . . . . . . . . . . . . . . . . . . . . . .
Theory of Operation
Block Level Description 3–1. . . . . . . . . . . . . . . . . . . . . . . . . . . . . . . . . . . . . . . . . . .
Local Processor Unit Board 3–2. . . . . . . . . . . . . . . . . . . . . . . . . . . . . . . . . . . . .
Acquisition Board 3–3. . . . . . . . . . . . . . . . . . . . . . . . . . . . . . . . . . . . . . . . . . . . .
Daughter Boards 3–5. . . . . . . . . . . . . . . . . . . . . . . . . . . . . . . . . . . . . . . . . . . . . .
Probes 3–5. . . . . . . . . . . . . . . . . . . . . . . . . . . . . . . . . . . . . . . . . . . . . . . . . . . . . .
Merged Modules 3–5. . . . . . . . . . . . . . . . . . . . . . . . . . . . . . . . . . . . . . . . . . . . . .
Performance Verification Procedures

Table of Contents
ii TLA 700 Series Logic Analyzer Modules Service Manual
Adjustment Procedures
Maintenance
Related Maintenance Procedures 6–1. . . . . . . . . . . . . . . . . . . . . . . . . . . . . . . . . . . . .
Preventing ESD 6–2. . . . . . . . . . . . . . . . . . . . . . . . . . . . . . . . . . . . . . . . . . . . . . . . . .
Inspection and Cleaning 6–2. . . . . . . . . . . . . . . . . . . . . . . . . . . . . . . . . . . . . . . . . . . .
General Care 6–2. . . . . . . . . . . . . . . . . . . . . . . . . . . . . . . . . . . . . . . . . . . . . . . . .
Inspection and Cleaning Procedures 6–3. . . . . . . . . . . . . . . . . . . . . . . . . . . . . . .
Removal and Installation Procedures 6–7. . . . . . . . . . . . . . . . . . . . . . . . . .
Preparation — Please Read 6–7. . . . . . . . . . . . . . . . . . . . . . . . . . . . . . . . . . . . . . . . .
List of Circuit Boards 6–7. . . . . . . . . . . . . . . . . . . . . . . . . . . . . . . . . . . . . . . . . . . . . .
Summary of Procedures 6–8. . . . . . . . . . . . . . . . . . . . . . . . . . . . . . . . . . . . . . . . . . . .
Tools Required 6–8. . . . . . . . . . . . . . . . . . . . . . . . . . . . . . . . . . . . . . . . . . . . . . . . . . .
Injector/Ejector Handles 6–9. . . . . . . . . . . . . . . . . . . . . . . . . . . . . . . . . . . . . . . . . . . .
Removal 6–9. . . . . . . . . . . . . . . . . . . . . . . . . . . . . . . . . . . . . . . . . . . . . . . . . . . .
Installation 6–10. . . . . . . . . . . . . . . . . . . . . . . . . . . . . . . . . . . . . . . . . . . . . . . . . . .
Cover 6–10. . . . . . . . . . . . . . . . . . . . . . . . . . . . . . . . . . . . . . . . . . . . . . . . . . . . . . . . . .
Removal 6–11. . . . . . . . . . . . . . . . . . . . . . . . . . . . . . . . . . . . . . . . . . . . . . . . . . . .
Installation 6–12. . . . . . . . . . . . . . . . . . . . . . . . . . . . . . . . . . . . . . . . . . . . . . . . . . .
Daughter Boards 6–14. . . . . . . . . . . . . . . . . . . . . . . . . . . . . . . . . . . . . . . . . . . . . . . . . .
Removal 6–15. . . . . . . . . . . . . . . . . . . . . . . . . . . . . . . . . . . . . . . . . . . . . . . . . . . .
Installation 6–16. . . . . . . . . . . . . . . . . . . . . . . . . . . . . . . . . . . . . . . . . . . . . . . . . . .
Local Processor Unit Board 6–16. . . . . . . . . . . . . . . . . . . . . . . . . . . . . . . . . . . . . . . . .
Removal 6–16. . . . . . . . . . . . . . . . . . . . . . . . . . . . . . . . . . . . . . . . . . . . . . . . . . . .
Installation 6–17. . . . . . . . . . . . . . . . . . . . . . . . . . . . . . . . . . . . . . . . . . . . . . . . . . .
Acquisition Board 6–19. . . . . . . . . . . . . . . . . . . . . . . . . . . . . . . . . . . . . . . . . . . . . . . .
Removal 6–20. . . . . . . . . . . . . . . . . . . . . . . . . . . . . . . . . . . . . . . . . . . . . . . . . . . .
Installation 6–24. . . . . . . . . . . . . . . . . . . . . . . . . . . . . . . . . . . . . . . . . . . . . . . . . . .
Fuses 6–25. . . . . . . . . . . . . . . . . . . . . . . . . . . . . . . . . . . . . . . . . . . . . . . . . . . . . . . . . . .
Removal 6–25. . . . . . . . . . . . . . . . . . . . . . . . . . . . . . . . . . . . . . . . . . . . . . . . . . . .
Installation 6–26. . . . . . . . . . . . . . . . . . . . . . . . . . . . . . . . . . . . . . . . . . . . . . . . . . .
P6417 Probe Podlet Replacement 6–26. . . . . . . . . . . . . . . . . . . . . . . . . . . . . . . . . . . .
Rear EMI Gaskets 6–26. . . . . . . . . . . . . . . . . . . . . . . . . . . . . . . . . . . . . . . . . . . . . . . .
Troubleshooting 6–29. . . . . . . . . . . . . . . . . . . . . . . . . . . . . . . . . . . . . . . . . . . .
Service Level 6–29. . . . . . . . . . . . . . . . . . . . . . . . . . . . . . . . . . . . . . . . . . . . . . . .
Required Documents 6–30. . . . . . . . . . . . . . . . . . . . . . . . . . . . . . . . . . . . . . . . . . .
Check for Common Problems 6–30. . . . . . . . . . . . . . . . . . . . . . . . . . . . . . . . . . . . . . .
Eliminate Other Problem Sources 6–32. . . . . . . . . . . . . . . . . . . . . . . . . . . . . . . . . . . .
Substitute a Good Module 6–32. . . . . . . . . . . . . . . . . . . . . . . . . . . . . . . . . . . . . .
Check the Mainframe 6–32. . . . . . . . . . . . . . . . . . . . . . . . . . . . . . . . . . . . . . . . . .
Probe-Level Troubleshooting 6–33. . . . . . . . . . . . . . . . . . . . . . . . . . . . . . . . . . . .
Troubleshoot the Logic Analyzer Module 6–33. . . . . . . . . . . . . . . . . . . . . . . . . . . . . .
Equipment Required 6–33. . . . . . . . . . . . . . . . . . . . . . . . . . . . . . . . . . . . . . . . . . .
Preparation 6–34. . . . . . . . . . . . . . . . . . . . . . . . . . . . . . . . . . . . . . . . . . . . . . . . . .
Fault Isolation Procedure 6–35. . . . . . . . . . . . . . . . . . . . . . . . . . . . . . . . . . . . . . .
Primary Troubleshooting Chart 6–37. . . . . . . . . . . . . . . . . . . . . . . . . . . . . . . . . .
Diagnostic Tests Table 6–38. . . . . . . . . . . . . . . . . . . . . . . . . . . . . . . . . . . . . . . . .
Adjustment After Repair 6–40. . . . . . . . . . . . . . . . . . . . . . . . . . . . . . . . . . . . . . . . . . .
Overview of Procedures 6–41. . . . . . . . . . . . . . . . . . . . . . . . . . . . . . . . . . . . . . . . . . . .

Table of Contents
TLA 700 Series Logic Analyzer Modules Service Manual iii
Repackaging Instructions 6–43. . . . . . . . . . . . . . . . . . . . . . . . . . . . . . . . . . . .
Packaging 6–43. . . . . . . . . . . . . . . . . . . . . . . . . . . . . . . . . . . . . . . . . . . . . . . . . . . . . . .
Storage 6–44. . . . . . . . . . . . . . . . . . . . . . . . . . . . . . . . . . . . . . . . . . . . . . . . . . . . . . . . .
Options
Replaceable Electrical Parts
Diagrams
Replaceable Mechanical Parts
Parts Ordering Information 10–1. . . . . . . . . . . . . . . . . . . . . . . . . . . . . . . . . . . . . . . . .
Using the Replaceable Parts List 10–2. . . . . . . . . . . . . . . . . . . . . . . . . . . . . . . . . . . . .

Table of Contents
iv TLA 700 Series Logic Analyzer Modules Service Manual
List of Figures
Figure 2–1: Logical address switches 2–2. . . . . . . . . . . . . . . . . . . . . . . . . . .
Figure 2–2: Front panel of the logic analyzer module 2–4. . . . . . . . . . . . .
Figure 2–3: Typical system window 2–8. . . . . . . . . . . . . . . . . . . . . . . . . . . .
Figure 6–1: Injector/ejector handle replacement 6–9. . . . . . . . . . . . . . . . .
Figure 6–2: Cover removal 6–11. . . . . . . . . . . . . . . . . . . . . . . . . . . . . . . . . . .
Figure 6–3: Feeding the merge cable through the cover 6–12. . . . . . . . . . .
Figure 6–4: Seating the cover on the chassis 6–13. . . . . . . . . . . . . . . . . . . . .
Figure 6–5: Daughter board replacement 6–15. . . . . . . . . . . . . . . . . . . . . . .
Figure 6–6: LPU board removal 6–17. . . . . . . . . . . . . . . . . . . . . . . . . . . . . .
Figure 6–6: LPU board removal 6–17. . . . . . . . . . . . . . . . . . . . . . . . . . . . . .
Figure 6–7: Inserting LPU board tabs into front subpanel 6–18. . . . . . . . .
Figure 6–8: Crimping the interconnect cables 6–19. . . . . . . . . . . . . . . . . . .
Figure 6–9: Removing the cables from the Acquisition board 6–21. . . . . .
Figure 6–10: Removing the Merge cable connector from the chassis 6–22
Figure 6–11: Removing the Acquisition board from the chassis 6–23. . . . .
Figure 6–12: Fuse replacement 6–25. . . . . . . . . . . . . . . . . . . . . . . . . . . . . . .
Figure 6–13: Rear EMI gasket removal 6–27. . . . . . . . . . . . . . . . . . . . . . . .
Figure 6–14: Rear EMI gasket replacement 6–27. . . . . . . . . . . . . . . . . . . . .
Figure 6–15: Primary troubleshooting chart 6–37. . . . . . . . . . . . . . . . . . . .
Figure 9–1: Interconnections 9–1. . . . . . . . . . . . . . . . . . . . . . . . . . . . . . . . .
Figure 9–2: Block diagram 9–2. . . . . . . . . . . . . . . . . . . . . . . . . . . . . . . . . . .
Figure 10–1: TLA 7L1 and TLA 7M1 Logic Analyzer Module
exploded view 10–5. . . . . . . . . . . . . . . . . . . . . . . . . . . . . . . . . . . . . . . . . .
Figure 10–2: TLA 7L2 and TLA 7M2 Logic Analyzer Module
exploded view 10–9. . . . . . . . . . . . . . . . . . . . . . . . . . . . . . . . . . . . . . . . . .
Figure 10–3: TLA 7L3 and TLA 7M3 Logic Analyzer Module
exploded view 10–13. . . . . . . . . . . . . . . . . . . . . . . . . . . . . . . . . . . . . . . . . .
Figure 10–4: TLA 7L4 and TLA 7M4 Logic Analyzer Module
exploded view 10–17. . . . . . . . . . . . . . . . . . . . . . . . . . . . . . . . . . . . . . . . . .
Figure 10–5: P6417 Probe exploded view 10–21. . . . . . . . . . . . . . . . . . . . . . .

Table of Contents
TLA 700 Series Logic Analyzer Modules Service Manual v
List of Tables
Table 1–1: Logic analyzer module variations 1–1. . . . . . . . . . . . . . . . . . .
Table 1–2: Channel width and depth 1–2. . . . . . . . . . . . . . . . . . . . . . . . . .
Table 1–3: Clocking 1–3. . . . . . . . . . . . . . . . . . . . . . . . . . . . . . . . . . . . . . . .
Table 1–4: Trigger system 1–5. . . . . . . . . . . . . . . . . . . . . . . . . . . . . . . . . . .
Table 1–5: Input parameters (with P6417 Probe) 1–7. . . . . . . . . . . . . . . .
Table 1–6: MagniVu feature 1–7. . . . . . . . . . . . . . . . . . . . . . . . . . . . . . . . .
Table 1–7: Merged modules 1–8. . . . . . . . . . . . . . . . . . . . . . . . . . . . . . . . . .
Table 1–8: Data handling 1–8. . . . . . . . . . . . . . . . . . . . . . . . . . . . . . . . . . . .
Table 1–9: Atmospherics 1–8. . . . . . . . . . . . . . . . . . . . . . . . . . . . . . . . . . . .
Table 1–10: Mechanical 1–9. . . . . . . . . . . . . . . . . . . . . . . . . . . . . . . . . . . . .
Table 1–11: Certifications and compliances 1–9. . . . . . . . . . . . . . . . . . . . .
Table 2–1: Logic analyzer module variations 2–5. . . . . . . . . . . . . . . . . . .
Table 3–1: Local Processor Unit board fuses 3–3. . . . . . . . . . . . . . . . . . . .
Table 3–2: Acquisition board fuses 3–5. . . . . . . . . . . . . . . . . . . . . . . . . . . .
Table 6–1: External inspection check list 6–3. . . . . . . . . . . . . . . . . . . . . . .
Table 6–2: Internal inspection check list 6–4. . . . . . . . . . . . . . . . . . . . . . .
Table 6–3: Tools required for circuit board replacement 6–8. . . . . . . . . .
Table 6–4: Failure symptoms and possible causes 6–29. . . . . . . . . . . . . . . .
Table 6–5: Diagnostic tests 6–36. . . . . . . . . . . . . . . . . . . . . . . . . . . . . . . . . . .
Table 6–6: Requirements after replacement 6–38. . . . . . . . . . . . . . . . . . . .
Table 6–7: Troubleshooting overview 6–39. . . . . . . . . . . . . . . . . . . . . . . . . .
Table 7–1: TLA 7L1, TLA 7L2, TLA 7L3, and TLA 7L4 options 7–1. . .
Table 7–2: TLA 7M1, TLA 7M2, TLA 7M3, and TLA 7M4 options 7–1.

Table of Contents
vi TLA 700 Series Logic Analyzer Modules Service Manual

TLA 700 Series Logic Analyzer Modules Service Manual vii
General Safety Summary
Review the following safety precautions to avoid injury and prevent damage to
this product or any products connected to it. To avoid potential hazards, use this
product only as specified.
Only qualified personnel should perform service procedures.
While using this product, you may need to access other parts of the system. Read
the General Safety Summary in other system manuals for warnings and cautions
related to operating the instrument.
Ground the Product. This product is indirectly grounded through the grounding
conductor of the mainframe power cord. To avoid electric shock, the grounding
conductor must be connected to earth ground. Before making connections to the
input or output terminals of the product, ensure that the product is properly
grounded.
Observe All Terminal Ratings. To avoid fire or shock hazard, observe all ratings
and marking on the product. Consult the product manual for further ratings
information before making connections to the product.
The common terminal is at ground potential. Do not connect the common
terminal to elevated voltages.
Do Not Operate Without Covers. Do not operate this product with covers or panels
removed.
Use Proper Fuse. Use only the fuse type and rating specified for this product.
Do Not Operate With Suspected Failures. If you suspect there is damage to this
product, have it inspected by qualified service personnel.
Do Not Operate in Wet/Damp Conditions.
Do Not Operate in an Explosive Atmosphere.
Keep Product Surfaces Clean and Dry.
Provide Proper Ventilation. Refer to the manual’s installation instructions for
details on installing the product so it has proper ventilation.
To Avoid Fire or
Personal Injury
General Safety Summary
viii TLA 700 Series Logic Analyzer Modules Service Manual
Terms in this Manual. These terms may appear in this manual:
WARNING. Warning statements identify conditions or practices that could result
in injury or loss of life.
CAUTION. Caution statements identify conditions or practices that could result in
damage to this product or other property.
Terms on the Product. These terms may appear on the product:
DANGER indicates an injury hazard immediately accessible as you read the
marking.
WARNING indicates an injury hazard not immediately accessible as you read the
marking.
CAUTION indicates a hazard to property including the product.
Symbols on the Product. The following symbols may appear on the product:
Protective Ground
(Earth) Terminal CAUTION
Refer to Manual Double
Insulated
WARNING
High Voltage
Symbols and Terms

TLA 700 Series Logic Analyzer Modules Service Manual ix
Service Safety Summary
Only qualified personnel should perform service procedures. Read this Service
Safety Summary and the General Safety Summary before performing any service
procedures.
Do Not Service Alone. Do not perform internal service or adjustments of this
product unless another person capable of rendering first aid and resuscitation is
present.
Disconnect Power. To avoid electric shock, disconnect the main power by means
of the power cord or, if provided, the power switch.
Use Care When Servicing With Power On. Dangerous voltages or currents may
exist in this product. Disconnect power, remove battery (if applicable), and
disconnect test leads before removing protective panels, soldering, or replacing
components.
To avoid electric shock, do not touch exposed connections.

Service Safety Summary
x TLA 700 Series Logic Analyzer Modules Service Manual

TLA 700 Series Logic Analyzer Modules Service Manual xi
Preface
This is the service manual for the TLA 7Lx/TLA 7Mx Logic Analyzer Module.
Read this preface to learn how this manual is structured, what conventions it
uses, and where you can find other information related to servicing this product.
Read the Introduction, which follows this preface, for safety and other important
background information needed before using this manual for servicing this
product.
Manual Structure
The TLA 7Lx/TLA 7Mx Logic Analyzer Module Service Manual is divided into
chapters, which are made up of related subordinate topics. These topics can be
cross referenced as sections.
Be sure to read the introductions in the sections and subsections because they
contain information that you will need to do the service correctly and efficiently.
A brief description of each chapter follows:
Specifications contains a product description of the TLA 7Lx/TLA 7Mx
Logic Analyzer Module and tables of the characteristics and descriptions that
apply to it.
Operating Information includes basic installation and operating instructions
at the level needed to safely operate and service the TLA 7Lx/TLA 7Mx
Logic Analyzer Module. For complete installation and configuration
procedures, refer to the TLA 700 Series Installation Manual. Instructions for
shipping the module are also found in this chapter.
Theory of Operation contains circuit descriptions that support general service
to the circuit board level.
Performance Verification refers you to the TLA 700 Series Performance
Verification and Adjustment Technical Reference Manual that contains the
performance verification procedures for the TLA 7Lx/TLA 7Mx Logic
Analyzer Module and for other major components in the TLA 700 Series
Logic Analyzer.
Adjustment Procedures refer you to the TLA 700 Series Performance
Verification and Adjustment Technical Reference Manual that contains the
adjustment procedures for the TLA 7Lx/TLA 7Mx Logic Analyzer Module
and for other major components in the TLA 700 Series Logic Analyzer.

Preface
xii TLA 700 Series Logic Analyzer Modules Service Manual
Maintenance contains information and procedures for doing preventive and
corrective maintenance on the TLA 7Lx/TLA 7Mx Logic Analyzer Module.
Included are instructions for cleaning, for removal and installation of
replaceable parts, and for troubleshooting to the circuit board level.
Options contains information on servicing any of the factory-installed
options that may be available for the TLA 7Lx/TLA 7Mx Logic Analyzer
Module.
Diagrams contains block diagrams and interconnection diagrams that are
useful when isolating failed circuit boards.
Mechanical Parts List includes a table of all replaceable parts, their
descriptions, and their Tektronix part numbers.
Manual Conventions
This manual uses certain conventions that you should become familiar with
before attempting service.
The acquisition board is one of the circuit boards inside the TLA 7Lx/TLA 7Mx
Logic Analyzer Module. The circuit board receives and stores acquisition data
from the probes and works with the LPU board to provide logic analysis
information to the operator of the TLA 700 Series Logic Analyzer.
Adjustment procedures check for, and if necessary, correct any adjustment errors
discovered when performing functional or performance verification procedures.
Adjustment procedures are documented in the TLA 700 Series Performance
Verification and Adjustment Technical Reference Manual.
The adjustment/verification fixture is a test fixture used to perform the adjust-
ment, functional check, and performance verification procedures. Specifications
and replaceable parts information are documented in this service manual. The
procedures for using the test fixture are documented in the TLA 700 Series
Performance Verification and Adjustment Technical Reference Manual.
Certification procedures are used to certify a product and provide a traceability
path to national standards. These procedures are documented in the TLA 700
Series Performance Verification and Adjustment Technical Reference Manual.
The daughter board provides additional channels for the TLA 700 Series Logic
Analyzer. Data from these channels is sent to the acquisition board for proces-
sing with other data from the acquisition board.
Acquisition Board
Adjustment Procedures
Adjustment/Verification
Fixture
Certification Procedures
Daughter Board

Preface
TLA 700 Series Logic Analyzer Modules Service Manual xiii
Functional verification procedures verify the basic functionality of the main-
frame and the module inputs, outputs, and basic logic analyzer actions. These
procedures include power-on and extended diagnostics, self calibration, as well
as semi-automated or manual check procedures. These procedures can be used as
incoming inspection purposes. This manual only provides information on
power-on and extended diagnostics and the self calibration. Other functional
verification procedures are provided in the TLA 700 Series Performance
Verification and Adjustment Technical Reference Manual.
The Local Processor Unit (LPU) Board. The LPU board is one of the circuit
boards inside the TLA 7Lx/TLA 7Mx Logic Analyzer Module that provides the
main communications interface with the TLA 700 Series Logic Analyzer
mainframe.
Maintenance procedures are used for fault isolation and repair to the circuit board
level or to the replaceable part level.
Throughout this manual, the term module refers to a TLA 700 Series Logic
Analyzer or DSO unit that mounts inside a TLA 700 Series Portable or Benchtop
Mainframe. A module is composed of circuit cards, interconnecting cables, and a
user-accessible front panel.
Performance verification procedures confirm that a product meets or exceeds the
performance requirements for each of the published specifications. These
procedures are documented in the TLA 700 Series Performance Verification and
Adjustment Technical Reference Manual.
This manual refers to any field-replaceable assembly or mechanical part
specifically by its name or generically as a replaceable part. In general, a
replaceable part is any circuit board or assembly, such as the hard disk drive, or a
mechanical part, such as the I/O port connectors, that is listed in the replaceable
parts list.
Symbols and terms related to safety appear in the Safety Summary found at the
beginning of this manual.
Functional Verification
Procedures
LPU Board
Maintenance Procedures
Modules
Performance Verification
Procedures
Replaceable Parts
Safety
Preface
xiv TLA 700 Series Logic Analyzer Modules Service Manual
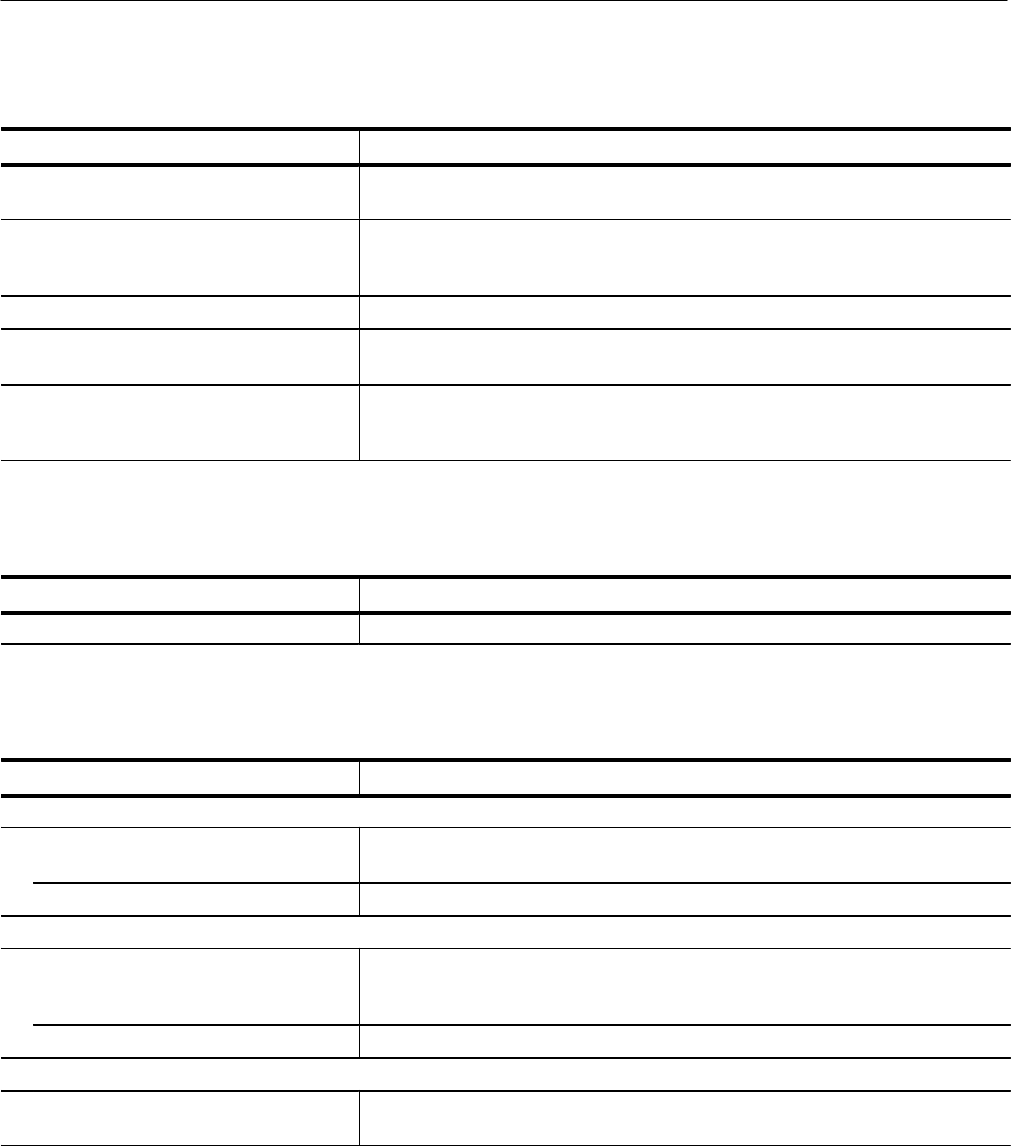
Related Manuals
The following manuals are available as part of the TLA 700 Series Logic
Analyzer documentation set. (See Standard Accessories and Optional Accesso-
ries on page 10–20 for part numbers.)
The procedures and information in this manual assumes that service personnel
have access to all manuals listed in the following table, except for the TLA 7QS
(Quick Start) manuals.
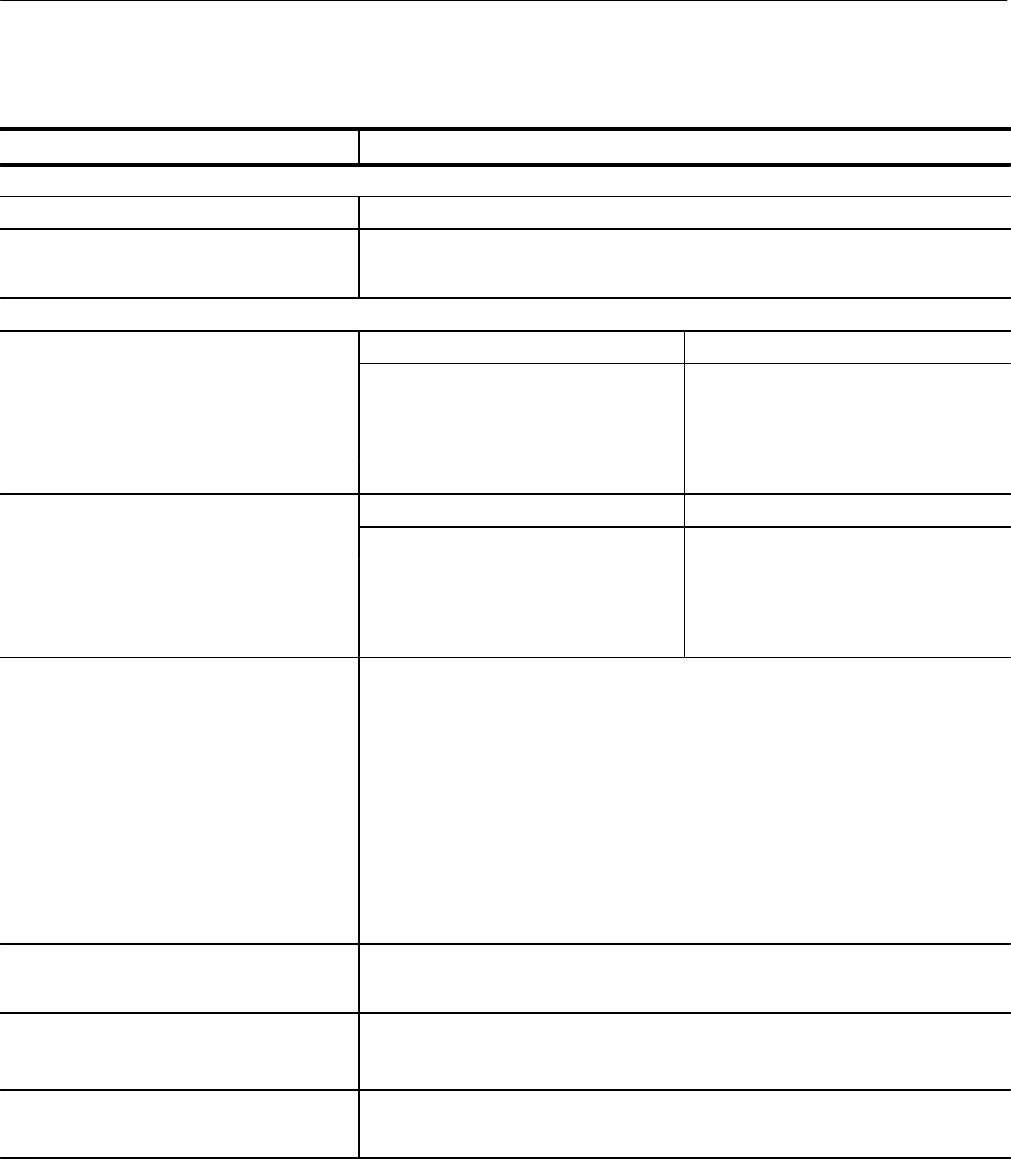
Manual Name Description Service Use
The TLA 700 Series Installation Manual Provides the basic installation instructions
for the TLA 700 Series Logic Analyzer. Installation and removal of DSO, Logic
Analyzer, and Benchtop-Controller Modules
Replacing individual podlet cables in the
logic analyzer probes
Reformatting the hard disk
Reinstallation of Windows 95 and TLA 700
software
The TLA 700 Series Performance Verifica-
tion and Adjustment Technical Reference
Manual
Provides performance verification, certifica-
tion, and adjustment procedures for the
TLA 700 Series Logic Analyzer.
Performing periodic or after-repair function-
al or performance verifications, or calibra-
tion and certification
Performing periodic or after-repair adjust-
ment
The TLA 700 Series User Manual and TLA
700 Online Help Provides operating information on the
TLA 700 Series Logic Analyzer. Augments operating information found in
chapter 2 of this manual.
The TLA 711 Color Benchtop Chassis
Service Manual Provides service information for the
benchtop chassis. Isolating and correcting failures in the
benchtop chassis
The TLA 711 Color Benchtop Controller
Service Manual Provides service information for the slot 0
controller in the benchtop chassis. Isolating and correcting failures in the
benchtop controller
The TLA 704 Color Portable Mainframe
Service Manual Provides service information for the
portable mainframe. Isolating and correcting failures in the
portable mainframe
The TLA 7Dx/TLA 7Ex Digitizing Oscillo-
scope Service Manual Provides service information for the
digitizing oscilloscope modules. Isolating and correcting failures in the DSO
module
The TLA 7QS Training Manual Provides examples of using the TLA
QuickStart training board with TLA 700
Series Logic Analyzers.
None
The TLA 7QS Technical Reference Manual Provides service information and technical
information for the TLA QuickStart Training
board.
Servicing the TLA Quickstart Training board
only.

TLA 700 Series Logic Analyzer Modules Service Manual xv
Introduction
This manual contains information needed to properly service the TLA 7Lx/
TLA 7Mx Logic Analyzer Module, as well as general information critical to safe
and effective servicing.
To prevent personal injury or damage to the TLA 7Lx/TLA 7Mx Logic Analyzer
Module, consider the following requirements before attempting service:
The procedures in this manual should be performed only by a qualified
service person.
Read the General Safety Summary and Service Safety Summary found at the
beginning of this manual.
Read the Preface beginning on page xi.
Read Operating Information beginning on page 2–3.
When using this manual for servicing, be sure to follow all warnings, cautions,
and notes.
Adjustment and Certification Interval
Generally, you should perform the adjustments and certification (calibration)
described in the TLA 700 Series Performance Verification and Adjustment
Technical Reference Manual once per year or following repairs that affect
adjustment or calibration.
Strategy for Servicing
This manual contains the information needed for periodic maintenance and
service of the TLA 7Lx/TLA 7Mx Logic Analyzer Module.
This manual also supports and contains information for corrective maintenance
of this product:
supports isolation of faults to the failed circuit board or assembly level
shown in the replaceable parts list
supports removal and replacement of those boards or assemblies
supports removal and replacement of fuse, knobs, chassis, and other
mechanical parts listed in the replaceable parts list
This manual does not support component-level fault isolation and replacement.

Introduction
xvi TLA 700 Series Logic Analyzer Modules Service Manual
Service Offerings
Tektronix provides service to cover repair under warranty as well as other
services that are designed to meet your specific service needs.
Whether providing warranty repair service or any of the other services listed
below, Tektronix service technicians are well equipped to service the TLA 7Lx/
TLA 7Mx Logic Analyzer Module. Tektronix technicians train on Tektronix
products; they have access to the latest information on improvements to the
TLA 7Lx/TLA 7Mx Logic Analyzer Module as well as the latest new product
upgrades. Services are provided at Tektronix Services Centers and on-site at your
facility, depending on your location.
Tektronix warrants this product for one year from date of purchase. (The
warranty appears behind the title page in this manual.) Tektronix technicians
provide warranty service at most Tektronix service locations worldwide. The
Tektronix product catalog lists all service locations worldwide or you can visit us
on our Customer Services World Center web site at http://www.tek.com/Mea-
surement/Service. See our latest service offerings and contact us by email.
In addition to warranty repair, Tektronix Service offers calibration and other
services which provide cost-effective solutions to your service needs and quality-
standards compliance requirements. Our instruments are supported worldwide by
the leading-edge design, manufacturing, and service resources of Tektronix to
provide the best possible service.
The following services can be tailored to fit your requirements for calibration
and/or repair of the TLA 7Lx/TLA 7Mx Logic Analyzer Module.
Service Options. Tektronix Service Options can be selected at the time you
purchase your instrument. You select these options to provide the services that
best meet your service needs. These service options are listed on the Tektronix
Service Options page following the title page of this manual.
Service Agreements. If service options are not added to the instrument purchase,
then service agreements are available on an annual basis to provide calibration
services or post-warranty repair coverage for the TLA 7Lx/TLA 7Mx Logic
Analyzer Module. Service agreements may be customized to meet special
turn-around time and/or on-site requirements.
Service on Demand. Tektronix also offers calibration and repair services on a
“per-incident” basis that is available with standard prices for many products.
Warranty Repair Service
Calibration and Repair
Service

Introduction
TLA 700 Series Logic Analyzer Modules Service Manual xvii
Self Service. Tektronix supports repair to the replaceable-part level by providing
for circuit board exchange.
Use this service to reduce down-time for repair by exchanging circuit boards for
remanufactured ones. Tektronix ships updated and tested exchange boards. Each
board comes with a 90-day service warranty.
When you exchange some circuit boards, such as the LPU board, you must
supply the following information. This will allow the board to be preconfigured
to the proper PowerFlex level for your logic analyzer. Alternatively, you can
return the repaired module (with the necessary information) to your local service
center for configuration.
Model number
Serial number
PowerFlex option upgrade number
Firmware level
For More Information. Contact your local Tektronix service center or sales
engineer for more information on any of the Calibration and Repair Services just
described.

Introduction
xviii TLA 700 Series Logic Analyzer Modules Service Manual
Contacting Tektronix
Product
Support For application-oriented questions about a Tektronix measure-
ment product, call toll free in North America:
1-800-TEK-WIDE (1-800-835-9433 ext. 2400)
6:00 a.m. – 5:00 p.m. Pacific time
Or, contact us by e-mail:
tm_app_supp@tek.com
For product support outside of North America, contact your
local Tektronix distributor or sales office.
Service
Support Contact your local Tektronix distributor or sales office. Or, visit
our web site for a listing of worldwide service locations.
http://www.tek.com
For other
information In North America:
1-800-TEK-WIDE (1-800-835-9433)
An operator will direct your call.
To write us Tektronix, Inc.
P.O. Box 1000
Wilsonville, OR 97070-1000
TLA 700 Series Logic Analyzer Modules Service Manual 1–1
Specifications
This chapter provides a general description of the logic analyzer module and a
list of specifications under Characteristic Tables beginning on page 1–2.
Product Description
The logic analyzer module is designed to be used with either the benchtop
mainframe or portable mainframe in a TLA 700 Series Logic Analyzer. The logic
analyzer module is used as a test and measurement tool for high-speed digital
timing and state acquisition across several channels.
Some of the key features of the logic analyzer module include the following:
Standard channel widths and memory depths as listed in Table 1–1
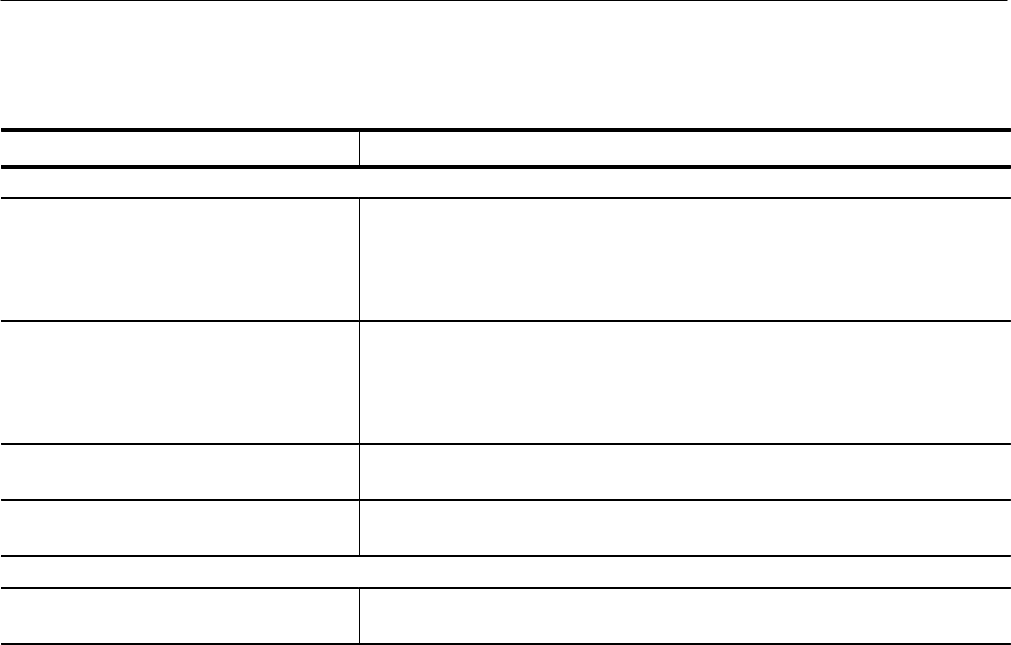
Table 1–1: Logic analyzer module variations
Product Number of channels Memory depth
TLA 7L1 34 32 K1
TLA 7L2 68 32 K1
TLA 7L3 102 32 K1
TLA 7L4 136 32 K1
TLA 7M1 34 512 K
TLA 7M2 68 512 K
TLA 7M3 102 512 K
TLA 7M4 136 512 K
1PowerFlex configurable to 128 K
100 MHz synchronous acquisition with a programmable setup and hold
window (PowerFlex configurable to 200 MHz)
250 MHz asynchronous full depth selections with selectable sampling rates
2 GHz asynchronous acquisition into a 2 K high resolution timing buffer
250 MHz trigger capability, plus special setup and hold violation triggering
and glitch triggering
Data correlation with other modules
Specifications
1–2 TLA 700 Series Logic Analyzer Modules Service Manual
Characteristic Tables
This section lists the specifications for the logic analyzer module. All specifica-
tions are guaranteed unless noted Typical. Specifications that are marked with the
n symbol are checked directly (or indirectly) in the TLA 700 Series Perfor-
mance Verification and Adjustment Technical Reference Manual. The specifica-
tions apply to all versions of the logic analyzer module unless otherwise noted.
The performance limits in this specification are valid with these conditions:
HThe logic analyzer module must have been calibrated/adjusted at an ambient
temperature between +20_ C and +30_ C.
HThe logic analyzer module must be in an environment with temperature,
altitude, humidity, and vibration within the operating limits described in
these specifications.
HThe logic analyzer module must have had a warm-up period of at least
30 minutes.
HThe logic analyzer module must have had its signal-path-compensation
routine (self calibration) last executed after at least a 30 minute warm-up
period.
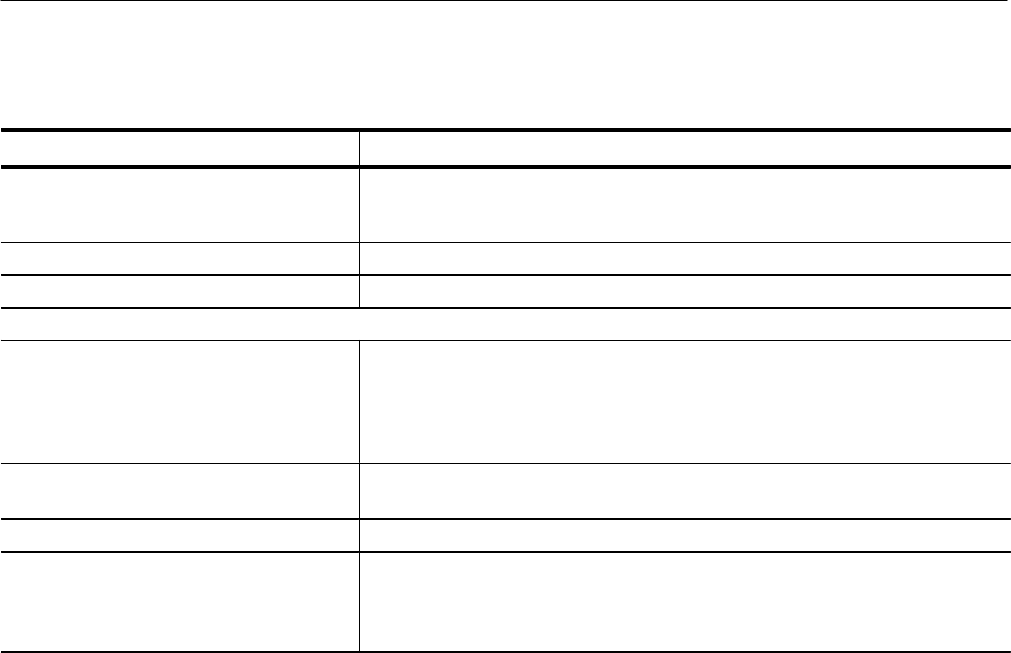
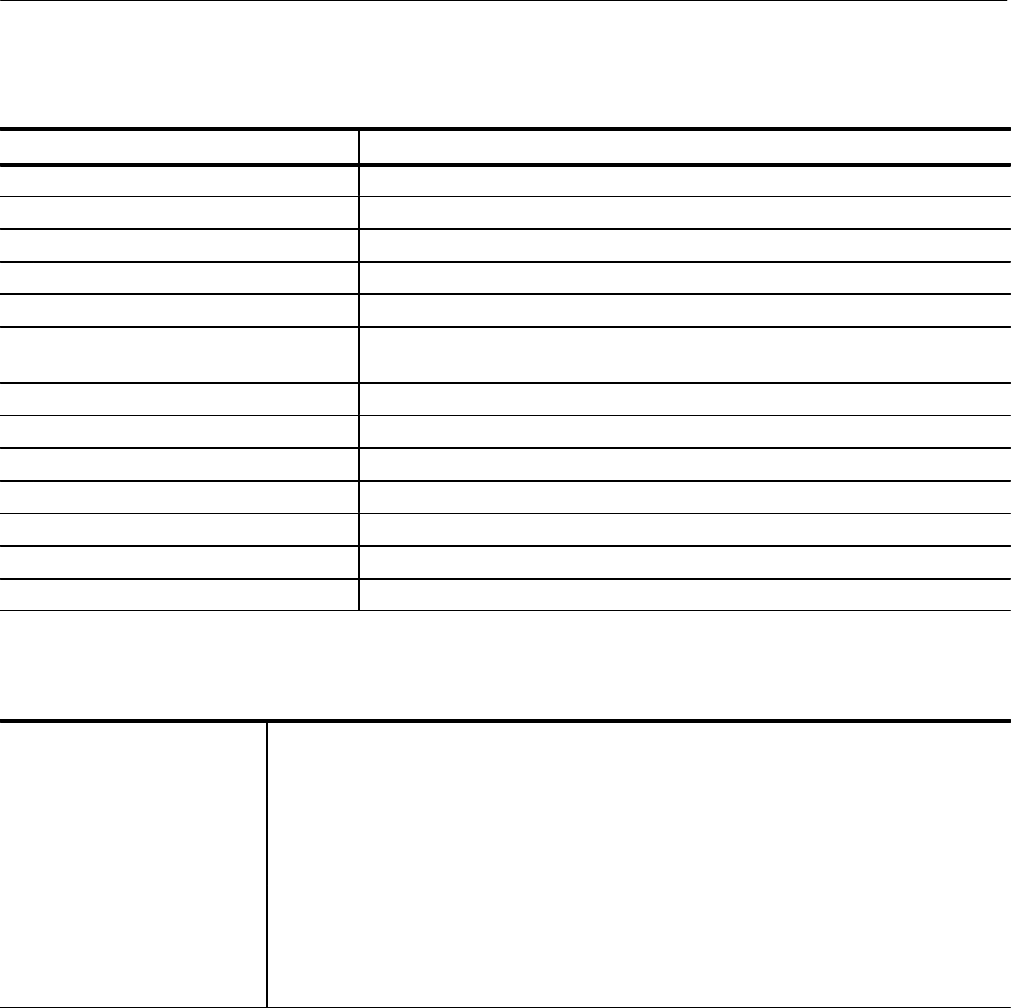
Table 1–2: Channel width and depth
Characteristic Description
Number of channels Product Channels
TLA 7L1 and TLA 7M1 32 data and 2 clock
TLA 7L2 and TLA 7M2 64 data and 4 clock
TLA 7L3 and TLA 7M3 96 data, 4 clock, and 2 qualifier
TLA 7L4 and TLA 7M4 128 data, 4 clock, and 4 qualifier
Acquisition memory depth Product Memory depth
TLA 7L1, TLA 7L2, TLA 7L3, TLA 7L4 32 K1
TLA 7M1, TLA 7M2 ,TLA 7M3, TLA 7M4 512 K
1PowerFlex configurable to 128 K
Specifications
TLA 700 Series Logic Analyzer Modules Service Manual 1–3
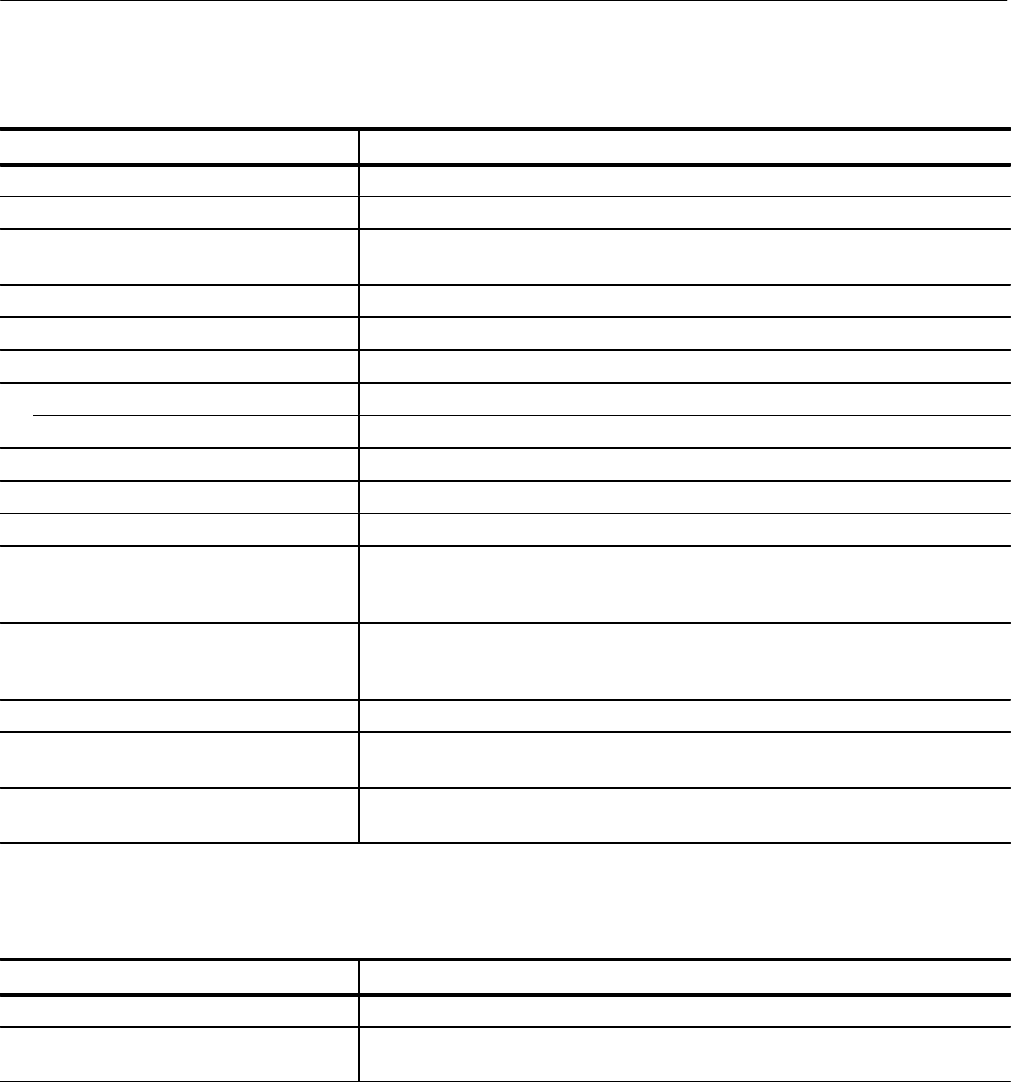
Table 1–3: Clocking
Characteristic Description
Asynchronous clocking
nInternal sampling period14 ns to 50 ms in a 1–2–5 sequence
nMinimum recognizable word2
(across all channels) Channel-to-channel skew + sample uncertainty
Example: for a P6417 Probe and a 4 ns sample period = 1.6 ns + 4 ns = 5.6 ns
Synchronous clocking
Number of clock channels3Product Clock channels
TLA 7L1 and TLA 7M1 2
TLA 7L2 and TLA 7M2 4
TLA 7L3 and TLA 7M3 4
TLA 7L4 and TLA 7M4 4
Number of qualifier channels Product Qualifier channels
TLA 7L1 and TLA 7M1 0
TLA 7L2 and TLA 7M2 0
TLA 7L3 and TLA 7M3 2
TLA 7L4 and TLA 7M4 4
nSetup and hold window size
(data and qualifiers) Maximum window size = Maximum channel-to-channel skew + (2 x sample
uncertainty) + 0.4 ns
Maximum setup time = User interface setup time + 0.6 ns
Maximum hold time = User interface hold time + 0.4 ns
Maximum setup time for slave module of merged pair =
User Interface setup time + 0.8 ns
Maximum hold time for slave module of merged pair =
User Interface hold time + 0.7 ns
Example: for P6417 Probe and user interface setup & hold of 2.0/0.0 typical
Maximum setup time = 2.0 ns + 0.6 ns = 2.6 ns
Maximum hold time = 0.0 ns + 0.4 ns = 0.4 ns
Setup and hold window size (data and
qualifiers) (Typical)Channel-to-channel skew (typical) + (2 x sample uncertainty)
Example: for P6417 Probe = 1 ns + (2 x 500 ps) = 2 ns
Setup and hold window range The setup and hold window can be moved for each channel group from +8.5 ns (Ts) to
–7.0 ns (Ts) in 0.5 ns steps (setup time). Hold time follows the setup time by the setup
and hold window size.
nMaximum synchronous clock rate4200 MHz in full speed mode (5 ns minimum between active clock edges)
100 MHz in half speed mode (10 ns minimum between active clock edges)
Specifications
1–4 TLA 700 Series Logic Analyzer Modules Service Manual
Table 1–3: Clocking (Cont.)
Characteristic Description
Demux clocking
Demux Channels
(TLA 7L3 ,TLA 7L4, TLA 7M3, TLA 7M4) Channels multiplex as follows:
A3(7:0) to D3(7:0)
A2(7:0) to D2(7:0)
A1(7:0) to D1(7:0)
A0(7:0) to D0(7:0)
(TLA 7L1, TLA 7L2, TLA 7M1, TLA 7M2) Channels multiplex as follows:
A3(7:0) to C3(7:0)
A2(7:0) to C2(7:0)
A1(7:0) to D1(7:0) TLA 7L2 and TLA 7M2 only
A0(7:0) to D0(7:0) TLA 7L2 and TLA 7M2 only
Time between DeMux clock edges4
(Typical) 5 ns minimum between DeMux clock edges in full-speed mode
10 ns minimum between DeMux clock edges in half-speed mode
Time between DeMux store clock edges4
(Typical) 10 ns minimum between DeMux master clock edges in full-speed mode
20 ns minimum between DeMux master clock edges in half-speed mode
Clocking state machine
Pipeline delays Each channel can be programmed with a pipeline delay of 0 through 3 active clock
edges.
1It is possible to use storage control and only store data when it has changed (transitional storage).
2Applies to asynchronous clocking only. Setup and hold window specification applies to synchronous clocking only.
3Any or all of the clock channels may be enabled. For an enabled clock channel, either the rising, falling, or both edges
can be selected as the active clock edges. The clock channels are stored.
4Full and half speed modes are controlled by PowerFlex options and upgrade kits.

Specifications
TLA 700 Series Logic Analyzer Modules Service Manual 1–5
Table 1–4: Trigger system
Characteristic Description
Triggering Resources
Word/Range recognizers 16 word recognizers. The word recognizers can be combined to form full width, double
bounded, range recognizers. The following selections are available:
16 word recognizers 0 range recognizers
13 word recognizers 1 range recognizer
10 word recognizers 2 range recognizers
7 word recognizers 3 range recognizers
4 word recognizers 4 range recognizers
Range recognizer channel order From most-significant probe group to least-significant probe group: C3 C2 C1 C0 E3
E2 E1 E0 A3 A2 D3 D2 A1 A0 D1 D0 Q3 Q2 Q1 Q0 CK3 CK2 CK1 CK0
Missing channels for modules with fewer than 136 channels are omitted. When
merged, the range recognition extends across the two modules; the master module
contains the most-significant groups.
Glitch detector1,2 Each channel group can be enabled to detect a glitch
Minimum detectable glitch pulse width
(Typical) 2.0 ns (single channel with P6417 probe)
Setup and hold violation detector1,3 Each channel group can be enabled to detect a setup and hold violation. The range is
from 8 ns before the clock edge to 8 ns after the clock edge. The range can be
selected in 0.5 ns increments. The setup and hold violation of each window can be
individually programmed.
Transition detector1, 4Each channel group can be enabled or disabled to detect a transition between the
current valid data sample and the previous valid data sample.
Counter/Timers5,6 2 counter/timers, 51 bits wide, can be clocked up to 250 MHz.
Maximum count is 251
Maximum time is 9.0076 seconds or 104 days
Signal In 1 A backplane input signal
Signal In 2 A backplane input signal
Trigger In A backplane input signal that causes the main acquisition and the MagniVu acquisition
to trigger if they are not already triggered.
Active trigger resources716 maximum (excluding counter/timers)
Trigger States 16
nTrigger State sequence rate Same rate as valid data samples received, 250 MHz maximum
Trigger Machine Actions
Main acquisition trigger Triggers the main acquisition memory
Main trigger position Trigger position is programmable to any data sample (4 ns boundaries)
Increment counter Either of the two counter/timers used as counters can be incremented.
Start/Stop timer Either of the two counter/timers used as timers can be started or stopped.
Specifications
1–6 TLA 700 Series Logic Analyzer Modules Service Manual
Table 1–4: Trigger system (Cont.)
Characteristic Description
Reset counter/timer Either of the two counter/timers can be reset. When a counter/timer used as a timer
and is reset, the timer continues in the started or stopped state that it was in prior to
the reset.
Signal out A signal sent to the backplane to be used by other modules
Trigger out A trigger out signal sent to the backplane to trigger other modules
Storage Control
Global storage Storage is allowed only when a specific condition is met. This condition can use any of
the trigger machine resources except for the counter/timers. Storage commands
defined in the current trigger state will override the global storage control.
Global storage can be used to start the acquisition with storage initially turned on
(default) or turned off.
By event Storage can be turned on or off; only the current sample can be stored. The event
storage control overrides any global storage commands.
Block storage8When enabled, 31 samples are stored before and after the valid sample.
Glitch violation storage The acquisition memory can be enabled to store glitch violation information with each
data sample when asynchronous clocking is used. The probe data storage size is
reduced by one half (the other half holds the violation information). The fastest
asynchronous clocking rate is reduced to 10 ns.
1Each use of a glitch detector, setup and hold violation detector, or transition detector requires a trade-off of one word
recognizer resource.
2Any glitch is subject to pulse width variation of up to the channel-to-channel skew specification + 0.5 ns.
3Any setup value is subject to variation of up to 1.6 ns; any hold value is subject to variation of up to 1.4 ns.
4This mode can be used to create transitional storage selections where all channels are enabled.
5Counters can be used as setable, resetable, or testable flags and have zero reset latency.
6Timers can be used as testable flags with TLA 7Lx and TLA 7Mx Modules with serial numbers B020000 and higher and
TLA 700 Series Software Version 1.10 or higher.
7Word recognizers are traded off one-by-one as Signal In 1, Signal In 2, glitch detection, setup and hold detection, or
transition detection resources are added.
8Block storage is disallowed when glitch storage or setup and hold violation is enabled.
Specifications
TLA 700 Series Logic Analyzer Modules Service Manual 1–7
Table 1–5: Input parameters (with P6417 Probe)
Characteristic Description
nThreshold Accuracy ±100 mV
Threshold range and step size Setable from +5 V to –2 V in 50 mV steps
Threshold channel selection 16 threshold groups assigned to channels. Each probe has two threshold settings, one
for the clock/qualifier channel and one for the data channels.
nChannel-to-channel skew ≤1.6 ns maximum (When merged, add 0.5 ns for the slave module.)
Channel-to-channel skew (Typical) ≤1.0 ns typical (When merged, add 0.3 ns for the slave module.)
Sample uncertainty
Asynchronous: Sample period
Synchronous: 500 ps
Probe input resistance (Typical)20 k
Probe input capacitance (Typical)2 pF maximum
Minimum slew rate (Typical)0.2 V/ns
Maximum operating signal 6.5 Vp-p
–3.5 V absolute input voltage minimum
6.5 V absolute input voltage maximum
Probe overdrive ±250 mV or ±25% of signal swing minimum required beyond threshold, whichever is
greater
±4 V maximum beyond threshold
Maximum nondestructive input signal to probe ±15 V
Minimum input pulse width signal
(single channel) (Typical)2 ns
Delay time from probe tip to input probe
connector (Typical)7.33 ns
Table 1–6: MagniVu feature
Characteristic Description
MagniVu memory depth 2016 samples per channel
MagniVu sampling period Data is asynchronously sampled and stored every 500 ps in a separate high resolution
memory; there are no clocking options.
Specifications
1–8 TLA 700 Series Logic Analyzer Modules Service Manual
Table 1–7: Merged modules
Characteristic Description
Number of modules that can be merged
together Two adjacent modules regardless of channel widths and memory depths (TLA 7L3,
TLA 7L4, TLA 7M3, TLA 7M4 only)
Number channels after merge The sum of the data channels of both modules plus the CLK/QUAL channels (active
clocks for the merge system) of the master module plus the CLK/QUAL channels
(nonactive stored clock channels to the merge system)
Merge system acquisition depth Channel depth is equal to the smaller depth of the two modules.
Number of clock and qualifier channels after
merge Same number of clock and qualifier channels on the master module. The clock and
qualifier channels on the slave module have no effect on clocking and are only stored.
Merge system triggering resources Triggering resources are the same as a single module except that the widths of the
word/range recognizers, setup and hold violation detector, glitch detector, and
transition detector are increased to the merged channel width.
Table 1–8: Data handling
Characteristic Description
Nonvolatile memory retention time (Typical)Battery is integral to the NVRAM. Battery life is > 10 years.
Table 1–9: Atmospherics
Characteristic Description
Altitude
Operating To 15,000 ft. (4570 m) provided maximum ambient temperature is derated by
1_ C/1000 ft. above 1000 ft.
Nonoperating 40,000 ft. (12190 m)
Temperature
Operating 0_ C to 50_ C (32_ F to +122_ F) for exterior air when operated in an appropriate
mainframe. Maximum operating temperature is derated by 1_ C/1000 ft. above
1000 ft.
Nonoperating –40_ to +71_ C (–40_ F to +160_ F)
Humidity
Operating and nonoperating To 95% relative humidity at or below 30_ C (86_ F)
To 45% relative humidity up to 50_ C (122_ F)
Specifications
TLA 700 Series Logic Analyzer Modules Service Manual 1–9
Table 1–10: Mechanical
Characteristic Description
Construction material
Chassis parts Aluminum alloy
Front panel Plastic laminate
Circuit boards Glass laminate
Cabinet Aluminum
Weight 5 lbs 10 oz. (2.55 kg) for TLA 7L4 or TLA 7M4
8 lbs (3.63 kg) for TLA 7L4 or TLA 7M4 packaged for domestic shipping
Overall dimensions
Height 10.32 in. (26.2 cm.)
Width 2.39 in. (6.1 cm.)
Depth 14.7 in. (37.3 cm.)
Probe cables
P6417 length 6 ft. (1.8 m.)
Mainframe interlock 1.4 ECL keying is implemented
Table 1–11: Certifications and compliances
EC Declaration of Conformity –
EMC Meets intent of Directive 89/336/EEC for Electromagnetic Compatibility. Compliance was
demonstrated to the following specifications as listed in the Official Journal of the European
Communities:
EN 55011 Class A Radiated and Conducted Emissions
EN 50081-1 Emissions:
EN 60555-2 AC Power Line Harmonic Emissions
EN 50082-1 Immunity:
IEC 801-2 Electrostatic Discharge Immunity
IEC 801-3 RF Electromagnetic Field Immunity
IEC 801-4 Electrical Fast Transient/Burst Immunity
IEC 801-5 Power Line Surge Immunity

Specifications
1–10 TLA 700 Series Logic Analyzer Modules Service Manual

TLA 700 Series Logic Analyzer Modules Service Manual 2–1
Operating Information
This chapter provides brief operating information for performing maintenance.
The operating information is limited to the functions you need to perform the
procedures found in this document. You can find more detailed operating
instructions in the TLA 700 Series User Manual and in the online help.
This chapter is divided into the following sections:
Installation provides pointers to the TLA 700 Series Installation Manual
which contains most of the installation procedures for the TLA 700 Series
Logic Analyzer. This section also includes information not found in the
installation manual.
Operating Information beginning on page 2–3 describes the front panel
connectors and indicators, side and rear panel connectors, and the self
calibration procedures.
Installation
The basic installation instructions are contained in the TLA 700 Series Installa-
tion Manual. This section contains additional information not listed in the
installation manual.
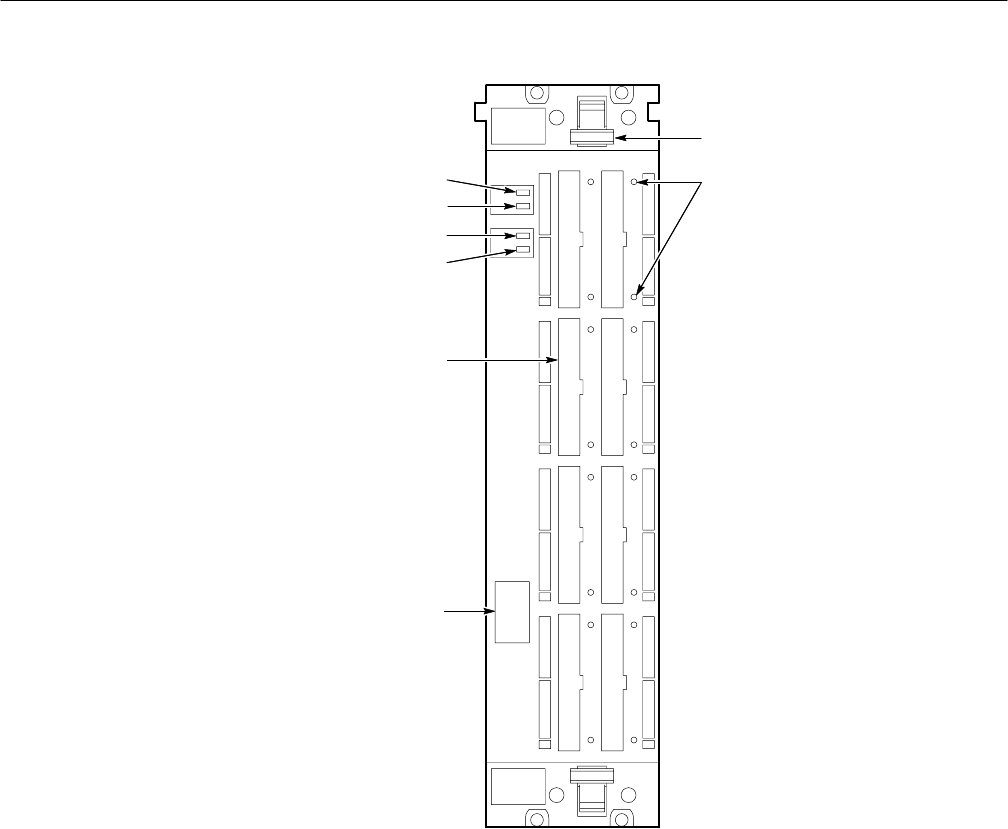
Every module in the logic analyzer must have a unique logical address; no two
modules can have the same address. On the logic analyzer module, two rotary
switches on the rear panel select the logical address. Refer to Figure 2–1 for the
switch locations.
The factory default recommended switch setting (FF) allows the controller to
assign a logical address to the logic analyzer module. This is called Dynamic
Auto Configuration. You can also select static addresses between 01 and FE
hexadecimal (1 to 254 decimal). Read the following descriptions before setting
the logical address.
NOTE. Do not set the logic analyzer module logical address to 00. Logical
address 00 is reserved for the controller.
Setting the Logical
Address

Operating Information
2–2 TLA 700 Series Logic Analyzer Modules Service Manual
Most-significant
digit
Least-significant
digit
Flash
programming
jumper pins
Figure 2–1: Logical address switches
Dynamic Auto Configuration (Recommended). With Dynamic Auto Configuration
selected (hexadecimal FF or decimal 255), the logic analyzer automatically sets
the address to an unused value. For example, if there are modules set to
addresses 01 and 02 already in your system, the resource manager will automati-
cally assign the logic analyzer module an address other than 01 or 02.
Static Logical Address. Static logical address selections set the address to a fixed
value. A static logical address ensures that the logic analyzer module address
remains fixed for compatibility with modules that require a specific address
value. Remember that each module within the logic analyzer must have a unique
address to avoid communication problems.
You can combine two logic analyzer modules to create a single two-wide
module. This process is called merging modules. The procedures for merging
modules is described in the TLA 700 Series Installation Manual.
Merging Modules

Operating Information
TLA 700 Series Logic Analyzer Modules Service Manual 2–3
Operating Information
This section provides the information you will need to operate the logic analyzer
module when performing the procedures in this manual. The following operating
information is provided:
Front panel connectors and indicators
Merge cable connectors
Rear panel connectors
Probes
Online help
Diagnostics
Self calibration
Menu overview
Figure 2–2 on page 2–4 shows the connectors and indicators on the front panel
of a 136 channel logic analyzer module. The 102, 68, and 34 channel versions
look and operate the same, but without the additional probe connectors.
Descriptions of each connector and indicator follow the illustration.
Injector/Ejector Handles. The injector/ejector tabs are used to seat and unseat the
modules in the mainframe.
Probe Connectors. The probe connectors are color-coded to match the labels on
the probes. Table 2–1 on page 2–5 summarizes the probe connectors and data
channels available for each version of the logic analyzer module.
Front Panel Connectors
and Indicators
Operating Information
2–4 TLA 700 Series Logic Analyzer Modules Service Manual
READY Indicator
ACCESSED Indicator
ARM’D Indicator
TRIG’D Indicator
Probe connectors
Configuration label
Injector/ejector handle
Probe retainer mounting
holes
Figure 2–2: Front panel of the logic analyzer module
Operating Information
TLA 700 Series Logic Analyzer Modules Service Manual 2–5
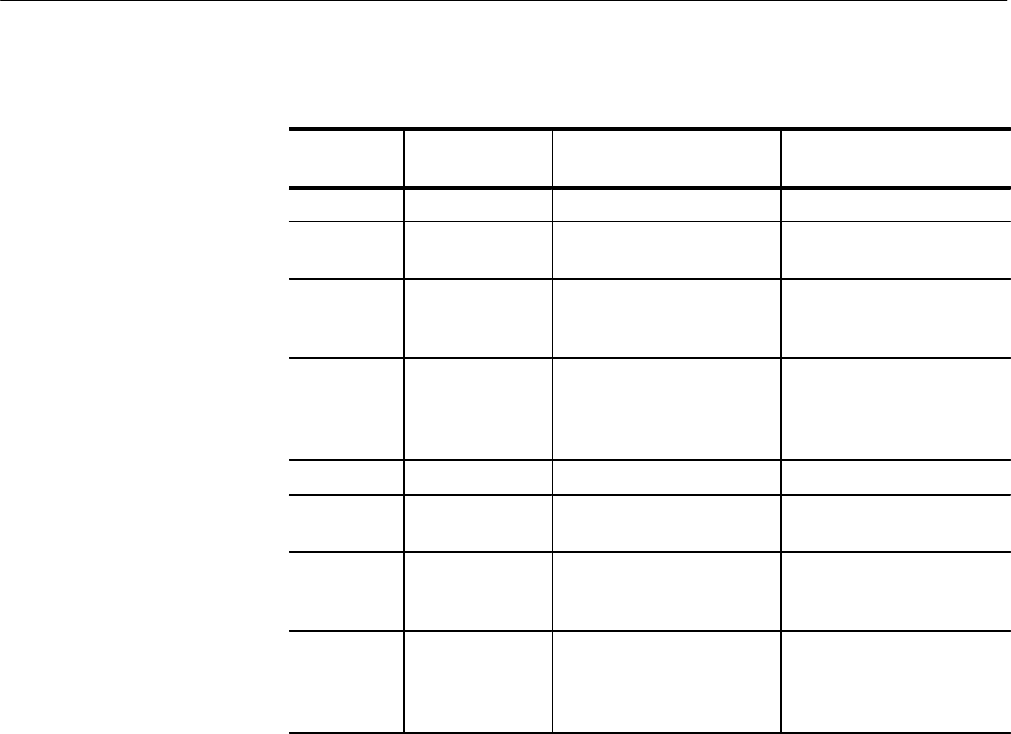
Table 2–1: Logic analyzer module variations
Product Memory depth Number of channels Channels at the probe
connectors
TLA 7L1 32 K134 A2, A3, CK0, C2, C3, CK3
TLA 7L2 32 K168 D0, D1, CK2, A0, A1, CK1,
A2, A3, CK0, C2, C3, CK3
TLA 7L3 32 K1102 D2, D3, Q0, A2, A3, CK0,
D0, D1, CK2, A0, A1, CK1,
C0, C1, Q1, C2, C3, CK3
TLA 7L4 32 K1136 E0, E1, Q2, E2, E3, Q3,
D2, D3, Q0, A2, A3, CK0,
D0, D1, CK2, A0, A1, CK1,
C0, C1, Q1, C2, C3, CK3
TLA 7M1 512 K 34 A2, A3, CK0, C2, C3, CK3
TLA 7M2 512 K 68 D0, D1, CK2, A0, A1, CK1,
A2, A3, CK0, C2, C3, CK3
TLA 7M3 512 K 102 D2, D3, Q0, A2, A3, CK0,
D0, D1, CK2, A0, A1, CK1,
C0, C1, Q1, C2, C3, CK3
TLA 7M4 512 K 136 E0, E1, Q2, E2, E3, Q3,
D2, D3, Q0, A2, A3, CK0,
D0, D1, CK2, A0, A1, CK1,
C0, C1, Q1, C2, C3, CK3
1PowerFlex configurable to 128 K
READY Indicator. The READY indicator lights continuously after the logic
analyzer module successfully completes the power-on process. If the indicator
fails to light within five seconds of power-on, an internal module failure may be
present.
ACCESSED Indicator. The ACCESSED indicator lights anytime the controller
accesses the logic analyzer module.
ARM’D Indicator. The ARM’D indicator lights when the logic analyzer module is
armed during an acquisition.
TRIG’D Indicator. The TRIG’D indicator lights when the logic analyzer module
triggers and stays on until the module finishes acquiring data.
Configuration Label. The configuration label indicates the speed and memory
depth of the logic analyzer module.

Operating Information
2–6 TLA 700 Series Logic Analyzer Modules Service Manual
Probe Retainer Mounting Holes. The threaded probe retainer mounting holes
provide a means of securely holding the probes in place.
The merge cable connectors (not shown) are located on the sides of the logic
analyzer module. The connectors are used to merge two logic analyzer modules
together to create a two-wide logic analyzer module. When merged, the master
module is the module to the left (lower numbered slot) and the slave module is
on the right.
Slave Merge Cable Connector. The slave merge cable connector is located on the
left side panel of the module. When the module is used by itself the merge cable
is stored inside the cover. When you want to merge two modules together, you
must set up the merge connector so that it mates with the master merge connector
in an adjacent logic analyzer module. Instructions for merging two modules are
described in the TLA 700 Series Installation Manual.
Master Merge Connector. The master merge connector is located on the right side
of the module. It connects to the slave module merge cable connector when two
modules are merged together.
Four rear panel connectors (see Figure 2–1 on page 2–2) connect the logic
analyzer module to the backplane of the mainframe. The module receives power,
processor communication, and intermodule communication through these four
connectors.
Logical Address Switches. Figure 2–1 on page 2–2 shows the location of the
logical address switches. Refer to the discussion of the address switches
beginning on page 2–1.
Flash Programming Jumper Pins. Figure 2–1 on page 2–2 shows the location of
the two pins that are used when updating the firmware of the logic analyzer
module. You must jumper the pins when updating the flash image. The logic
analyzer module is shipped without a jumper installed on these pins. Refer to the
TLA 700 Series Installation Manual for instructions on upgrading the firmware.
Depending on the channel width of the logic analyzer module, there may be up
to eight (8) P6417 acquisition probes with each module. Each probe has 16 data
channels and one clock/qualifier channel.
Most user information for operating the logic analyzer module is available
through the online Help within the TLA 700 Series application.
Merge Cable Connectors
Rear Panel Connectors
Probes
Online Help

Operating Information
TLA 700 Series Logic Analyzer Modules Service Manual 2–7
The logic analyzer module performs the power-on diagnostics each time you
power on the mainframe. The Calibration and Diagnostics property sheet appears
at power-on if one of the module diagnostics fails. You can also access the
diagnostics from the System menu.
In addition to the power-on diagnostics, you can also run the extended diagnos-
tics or the self calibration. Refer to Power-On Diagnostics beginning on
page 6–34 for detailed information on the power-on and extended diagnostics.
NOTE. For best results, only run the diagnostics with probes disconnected from
the module.
Self calibration is an internal routine that optimizes performance. No external
equipment or user actions are needed to complete the procedure. The logic
analyzer module saves data generated by the self calibration in nonvolatile
memory.
NOTE. Performing the self calibration does not guarantee that all logic analyzer
module parameters operate within limits. Operation within limits is achieved by
performing the Adjustment Procedures, described in the TLA 700 Series
Performance Verification and Adjustment Technical Reference Manual. Proper
operation may be confirmed by performing the performance verification
procedures in this same manual.
When to Perform the Self Calibration. You can run the self calibration at any time
during normal operation. To maintain measurement accuracy, perform the
self calibration if more than one year has elapsed since the last self calibration.
You can check the status of the self calibration in the Calibration and Diagnostics
property sheet.
If the logic analyzer module loses power during the self calibration, rerun the
self calibration following the next power-on. The self calibration data generated
before power was interrupted must be replaced with a complete set of new data.
For best results, always perform the self calibration after at least a 30 minute
warm-up.
Diagnostics
Self Calibration
Operating Information
2–8 TLA 700 Series Logic Analyzer Modules Service Manual
Running the Self Calibration. The logic analyzer module may require several min-
utes to run the self calibration depending on the number of channels. Select
Calibration and Diagnostics property sheet from the System menu. Select the
Self Calibration tab page and select the logic analyzer module. Click on the Run
button to start the self calibration. Upon completing the self calibration the logic
analyzer module menu selection changes from Running to Calibrated.
The logic analyzer is controlled by interactive windows through the TLA 700
Series Windows 95 application. The TLA 700 Series application consists of the
following windows:
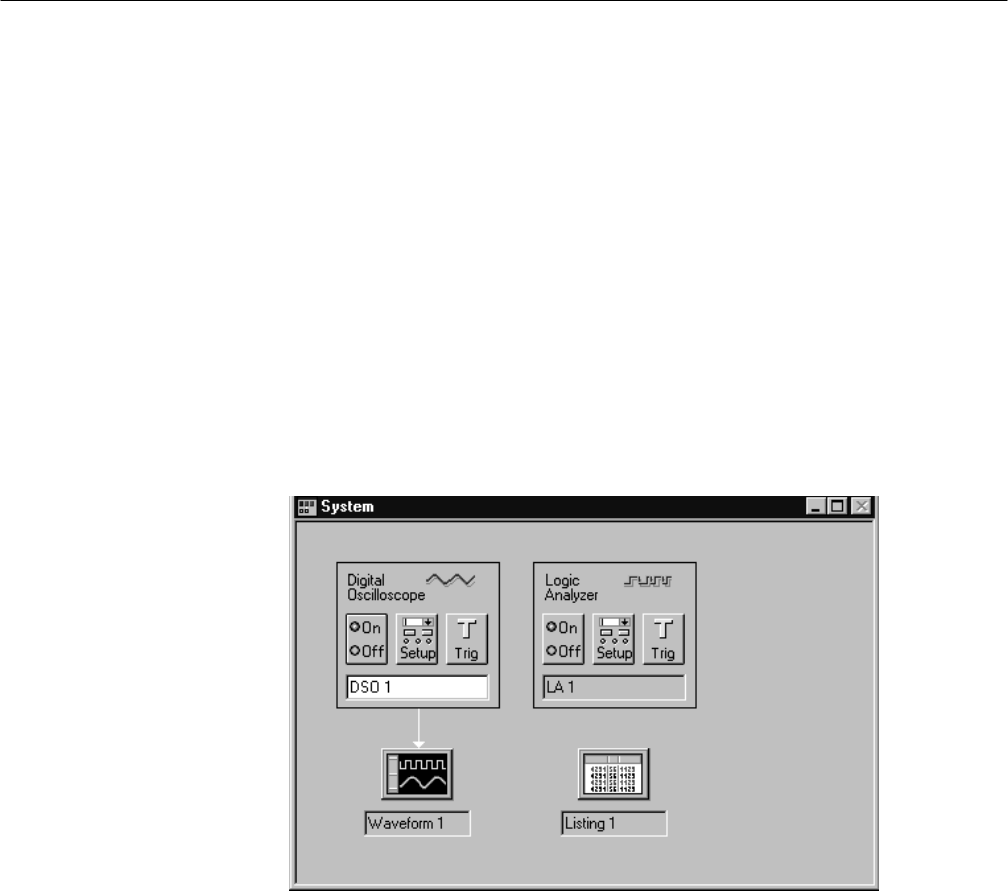
System window. This window provides an overview of the entire logic
analyzer. Use this window to navigate through the logic analyzer. Figure 2–3
shows an example of the system window.
Figure 2–3: Typical system window
The center of the System window displays icons which represent hardware
modules installed in the logic analyzer. The icons are links to the other
windows in the logic analyzer.
Setup Window. A setup window exists for each module in the logic analyzer.
It contains all of the setup information for the logic analyzer module such as
clocking, memory depth, threshold information, and channel information.
Menus and dialogs contain information to set up the window as needed.
Menu Overview

Operating Information
TLA 700 Series Logic Analyzer Modules Service Manual 2–9
For the DSO the Setup Window contains setup information for each DSO
channel such as input voltage ranges, bandwidth, coupling, and termination.
It also contains horizontal setup information and a link to the DSO Trigger
window.
Trigger Window. The Trigger window provides access to the logic analyzer
module or DSO module trigger setups. For either module, you can specify
various trigger events and trigger actions to help you capture the data that
you are interested in.
Listing Data Window. The Listing Data Window displays acquired data as
tabular text. Each column of data represents one group of data or other
logical data information, such as timestamps. Each row of data represents a
different time that the data was acquired; newer samples of data display
below older samples.
Waveform Data Window. The Waveform Data Window displays acquired
data as graphical waveforms. All defined channel groups display as busforms
for the logic analyzer and as individual analog channels for the DSO module.
On/Off buttons. These buttons enable or disable the operation of the
modules. Click on the appropriate button to enable or disable the modules.
Refer to the online help for more information on the individual menus, icons,
and fields within each window. You may also want to refer to the TLA 700 Series
Logic Analyzer User Manual for additional information.

Operating Information
2–10 TLA 700 Series Logic Analyzer Modules Service Manual

TLA 700 Series Logic Analyzer Modules Service Manual 3–1
Theory of Operation
This chapter describes the general operation of the logic analyzer module. The
information supports fault isolation to the probe or to the circuit board level. It
supplements the diagnostic information in the Troubleshooting section beginning
on page 6–29.
The following Block Level Description describes circuit operation to the
functional block level. The block diagrams are located in the Diagrams chapter
beginning on page 9–1.
Block Level Description
The block level description provides an overview of each functional circuit
within the logic analyzer module. Except for the number of channels, the basic
operation is the same for each model.
The basic logic analyzer module consists of two main circuit boards: the Local
Processor Unit (LPU) board and the Acquisition board. The logic analyzer
modules with 102 or 136 channels also have one and two (respectively)
Comparator Daughter boards present. Up to eight probes acquire data from a
system-under-test and send it to the logic analyzer module for processing.
A single 102-channel or 136-channel logic analyzer module can be merged with
a second module to create a two-module-wide logic analyzer. Lower channel
count modules do not support merging.

Theory of Operation
3–2 TLA 700 Series Logic Analyzer Modules Service Manual
The Local Processor Unit board controls instrument hardware, signal acquisition,
power conditioning, and communications functions. Two 100-pin ribbon cables
provide interconnections with the Acquisition board for power supplies, data,
and control signals.
The Local Processor Unit board contains the following circuits:
Processor System
Communications Interface
Power Supplies
Processor System. The Processor System contains a 68330 microprocessor that
controls the entire instrument. Commands and data sent to the instrument
through the mainframe pass through the Communications Interface, which
resides on the 68330 bus. The 68330 bus also routes data between the Main
Processor System and the Acquisition board.
The Processor System includes the instrument firmware. To facilitate upgrades
the firmware resides in Flash ROM. The system also includes the nonvolatile
RAM (NVRAM) used for the calibration constants, module serial numbers, and
the PowerFlex configuration information.
Communications Interface. The Communications Interface transfers commands
and data between the mainframe and the slot 0 controller. Signals pass between
the instrument and the mainframe through the rear connectors.
Power Supplies. The Power Supplies receive +5 V, –5.2 V, 12 V, and 24 V
from the mainframe through the rear connectors to power the logic analyzer
module. Fuses protect the mainframe from over-current conditions. Voltage
converters produce additional +5 V and +3.5 V supplies for use on the Acquisi-
tion board. The power connections to the Acquisition board are made through
one of the 100-pin ribbon cables and from the backplane.
Local Processor Unit
Board
Theory of Operation
TLA 700 Series Logic Analyzer Modules Service Manual 3–3
Local Processor Unit Board Fuses. Table 3–1 lists the fuses on the Local
Processor Unit board and briefly describes their functions.
Table 3–1: Local Processor Unit board fuses
Fuse Voltage Purpose
F1780 +5 V Supplies the 5 V-to-3.5 V DC to DC converter. The converter
powers the 3 V PALS and the 3 V ASICs on the Acquisition
board. The converter also enables the ±24 V-to-5V DC to DC
converter.
F1881 +5 V Supplies the microprocessor and the supporting circuitry.
F1681 +12 V Supplies the Control IC and MOSFET drivers for the
5 V-to-3.5 V DC to DC converter.
F1983 –24 V Supplies the ±24 V-to-5 V DC to DC converter. This +5 V
output powers the acquisition RAM on the Acquisition board.
F1981 +24 V Supplies the ±24 V-to-5 V DC to DC converter. This +5 V
output powers the acquisition RAM on the Acquisition board.
The Acquisition board accepts input signals from the probes and converts them
to digital information. Two 100-pin ribbon cables provide interconnections with
the Local Processor Unit board; one cable provides power supplies, while the
other provides data, and control signals.
The Acquisition board contains the following circuits:
Clock circuitry
Probe interface (also contained on the Daughter boards)
Acquisition system
Trigger and storage control circuitry
Acquisition memory
Backplane interface
Local Processor Unit interface
Clock Circuitry. The system clock is 125 MHz and has both edges active. The
system clock is derived from the 10 MHz clock (from the backplane) through a
phase-locked loop. The acquisition run circuitry is integrated with the clock
circuitry to support time correlation.
Acquisition Board

Theory of Operation
3–4 TLA 700 Series Logic Analyzer Modules Service Manual
Probe Interface. Acquisition data passes from the probe input circuitry to the
probe receivers. The probe receivers convert these signals into digital signals.
Each probe receiver receives 16 data signals and one clock/qualifier signal.
Two threshold voltages are generated for each probe input circuit (one for the
clock/qualifier signal and one for the 16 data signals). The threshold output
voltages are sent to the probe receiver. The threshold adjustment procedure,
performed by software, guarantees the accuracy of the reference voltages
provided to the probe receivers to achieve the desired low/high logic level
detection. Refer to the TLA 700 Series Performance Verification and Adjustment
Technical Reference Manual for instructions on performing the threshold
adjustment procedure.
Acquisition System. Acquired data from the probe interface is sent to the data
recognition circuitry. The data recognition circuitry analyzes the acquired data
and determines which data to qualify and send to the acquisition memory. It also
sends trigger event signals to the trigger and storage circuitry.
Trigger and Storage Control Circuitry. The trigger and storage control circuitry
works with the data recognition circuitry. The trigger circuitry determines when
to store data and when to trigger, controls counter/timers, and drives intermodule
signals. The storage circuitry receives information from the trigger circuitry to
determine when to start storing data and when to stop storing data.
Acquisition Memory. The acquisition memory stores acquired data. The acquisi-
tion memory can be set up to contain all data samples or it can be split to contain
data samples and glitch information.
When the acquisition memory is split, half of the memory depth is lost and the
logic analyzer module can only run at half speed. Each stored data sample takes
up two memory locations, one to store the actual data sample and the other to
store the corresponding glitch information. Glitch recognition can only be
enabled while using asynchronous clocking.
Backplane Interface. The backplane interface provides the interface with the
mainframe and the Acquisition board. The interface contains intermodule signals
that communicate with other modules. It also provides the 10 MHz reference
clock.
Local Processor Unit Interface. The Local Processor Unit interface provides the
interface between the Local Processor Unit circuit board and the Acquisition
board through two 100-pin ribbon cables (W100 and W200).
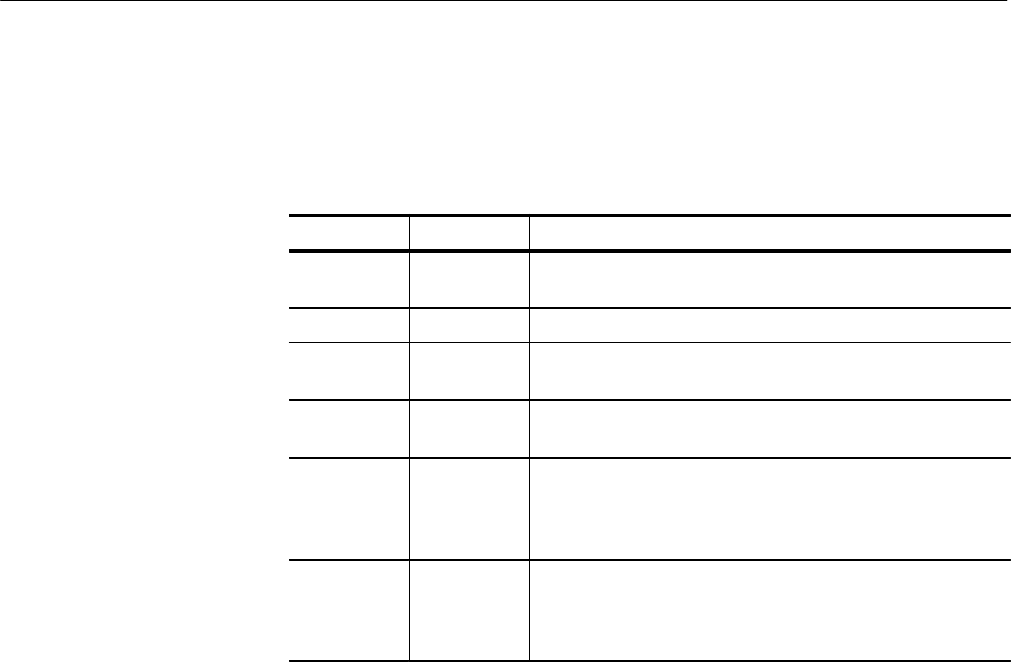
Theory of Operation
TLA 700 Series Logic Analyzer Modules Service Manual 3–5
Acquisition Board Fuses. Table 3–2 lists the fuses on the Acquisition board and
briefly describes their functions.
Table 3–2: Acquisition board fuses
Fuse Voltage Purpose
F2508 +5 V Powers the probe receivers, digital to analog converter (DAC)
circuitry, and the Local Processor Unit board interface.
F2506 –5 V Powers the clock circuitry.
F2500 +12 V Powers the clock circuitry and the digital to analog converter
circuitry.
F2504 –12 V Powers the clock circuitry and the digital to analog converter
circuitry.
F2903 –24 V Supplies the –24 V to the Local Processor Unit board. The
–24 V combines with the –24 V from the Acquisition board. The
voltages power ±24 V-to-5 V DC to DC converter. The +5 V
powers the acquisition RAM.
F2901 +24 V Supplies the +24 V to the Local Processor Unit board. The
+24 V combines with the +24 V from the Acquisition board.
The voltages power ±24 V-to-5 V DC to DC converter. The
+5 V powers the acquisition RAM.
Each Comparator Daughter board passes 32 data signals and two (2) clock/quali-
fier signals from the probes through two probe receiver ICs to the Acquisition
board. Each probe receiver also receives two threshold voltages (four threshold
signals total) from the Acquisition board. This results in 72 signal pins connect-
ing each Daughter board to the Acquisition board.
The 136-channel logic analyzer modules have two Daughter boards; the
102-channel logic analyzer modules have only one Daughter board. No Daughter
boards are present in 68-channel or 34-channel logic analyzer module; the probe
input circuitry for these modules is present on the Acquisition board.
Each P6417 probe acquires 17 channels (16 data channels and one clock or
qualifier) of data.
A merged module consists of a Master module and a Slave module connected
together by a merge cable connector and by signals on the local bus of the
mainframe backplane. The local bus sends the system clock of the Master
module to the Slave module. The two merged modules must be located in
adjacent slots.
Daughter Boards
Probes
Merged Modules

Theory of Operation
3–6 TLA 700 Series Logic Analyzer Modules Service Manual
The Merge Cable Connector passes 26 signals between the two modules
(16 trigger event signals, two storage control signals, four valid sample clock
identification signals, and four data-login control signals).

TLA 700 Series Logic Analyzer Modules Service Manual 4–1
Performance Verification Procedures
The performance verification and calibration (certification) procedures for the
TLA 7Lx/TLA 7Mx Logic Analyzer Module are located in the TLA 700 Series
Performance Verification and Adjustment Technical Reference Manual.
You must use the adjustment/verification fixture to complete the performance
verification and adjustment procedures.

Performance Verification Procedures
4–2 TLA 700 Series Logic Analyzer Modules Service Manual

TLA 700 Series Logic Analyzer Modules Service Manual 5–1
Adjustment Procedures
The TLA 7Lx/TLA 7Mx Logic Analyzer Module has no manual adjustments. All
adjustments are controlled by software and by a Adjustment/Verification test
fixture. Refer to the TLA 700 Series Performance Verification and Adjustment
Technical Reference Manual for the adjustment procedures.
You must use the adjustment/verification fixture to complete the performance
verification and adjustment procedures.

Adjustment Procedures
5–2 TLA 700 Series Logic Analyzer Modules Service Manual

TLA 700 Series Logic Analyzer Modules Service Manual 6–1
Maintenance
This chapter contains the information needed for periodic and corrective
maintenance of the TLA 7Lx/TLA 7Mx Logic Analyzer Module. The following
sections are included:
The Maintenance section provides general information on preventing
damage to internal circuit boards when doing maintenance, procedures for
inspecting the logic analyzer module, and cleaning external and internal
circuit boards.
The Removal and Installation Procedures (page 6–7) provide procedures for
removing and installing circuit boards.
Troubleshooting (page 6–29) provides information for isolating faulty circuit
boards and probes.
Repackaging Instructions (page 6–43) provides packaging information for
shipment or storage.
Related Maintenance Procedures
The TLA 700 Series Installation Manual contains maintenance procedures not
included in this manual. Refer to the TLA 700 Series Installation Manual for the
following information:
Refer to the Upgrades chapter for instructions on upgrading the software or
firmware in the logic analyzer module.
Refer to Replacing Podlets in the In Case of Problems chapter for instruc-
tions on replacing individual podlet channels in the logic analyzer probes.
Refer to Merging Modules for instructions on merging two logic analyzer
modules to create a wider module.
Maintenance
6–2 TLA 700 Series Logic Analyzer Modules Service Manual
Preventing ESD
When performing any service which requires internal access to the logic analyzer
module, adhere to the following precautions to avoid damaging internal modules
and their components due to electrostatic discharge (ESD).
CAUTION. Static discharge can damage any semiconductor component in the
logic analyzer module.
1. Minimize handling of static-sensitive modules.
2. Transport and store static-sensitive modules in their static protected
containers or on a metal rail. Label any package that contains static-sensitive
modules.
3. Discharge the static voltage from your body by wearing a grounded antistatic
wrist strap while handling these modules. Service static-sensitive modules
only at a static-free work station.
4. Nothing capable of generating or holding a static charge should be allowed
on the work station surface.
5. Handle circuit boards by the edges when possible.
6. Do not slide the modules over any surface.
7. Avoid handling modules in areas that have a floor or work-surface covering
capable of generating a static charge.
Inspection and Cleaning
This section describes how to inspect for dirt and damage, and how to clean the
logic analyzer module. Inspection and cleaning are done as preventive mainte-
nance. Preventive maintenance, when done regularly, may prevent malfunctions
and enhance reliability.
Preventive maintenance consists of visually inspecting and cleaning the logic
analyzer module, and using general care when operating it. How often to do
maintenance depends on the severity of the environment in which the logic
analyzer module is used. A proper time to perform preventive maintenance is
just before performing adjustments on the module.
The side cover keeps dust out of the module and should be in place during
normal operation.
General Care

Maintenance
TLA 700 Series Logic Analyzer Modules Service Manual 6–3
Inspect and clean the logic analyzer module as often as operating conditions
require. Collection of dirt on internal components can cause them to overheat
and breakdown. Dirt acts as an insulating blanket, preventing efficient heat
dissipation. Dirt also provides an electrical conduction path that can cause
failures, especially under high-humidity conditions.
CAUTION. Avoid using chemical cleaning agents that might damage the plastics
and external labels used in the logic analyzer module. Use a cloth dampened
with water to clean external surfaces. To clean internal surfaces, use a 75%
isopropyl alcohol solution as a cleaner and rinse with deionized water. Before
using any other type of cleaner, consult your Tektronix Service Center or
representative.
Inspection — Exterior. Inspect the outside of the module for damage, wear, and
missing parts. Use Table 6–1 as a guide. Instruments that appear to have been
dropped or otherwise abused should be checked thoroughly to verify correct
operation and performance. Immediately repair defects that can cause personal
injury or lead to further damage to the logic analyzer module or mainframe
where it is used.
Table 6–1: External inspection check list
Item Inspect for Repair action
Front panel and side
cover Cracks, scratches, deformations,
missing or damaged retainer
screws, ejector handles, or EMI
shields.
Replace defective or missing
mechanical parts.
Front panel connectors Broken shells, cracked insulation,
and deformed contacts. Dirt in
connectors.
Replace defective parts. Clear or
wash out dirt.
Rear connectors Cracked or broken shells, dam-
aged or missing contacts. Dirt in
connectors.
Replace defective parts. Clear or
wash out dirt.
Accessories Missing items or parts of items,
bent pins, broken or frayed
cables, and damaged connectors.
Replace damaged or missing
items, frayed cables, and defec-
tive modules.
Inspection and Cleaning
Procedures
Maintenance
6–4 TLA 700 Series Logic Analyzer Modules Service Manual
CAUTION. To prevent damage to electrical components from moisture during
external cleaning, use only enough liquid to dampen the cloth or applicator.
Cleaning Procedure — Exterior. To clean the exterior, perform the following
steps:
1. Remove loose dust on the outside of the logic analyzer module with a lint
free cloth.
2. Remove remaining dirt with a lint free cloth dampened with water. Do not
use abrasive cleaners.
Inspection — Interior. Remove the module cover (see page 6–11) to access the
inside of the logic analyzer module for inspection and cleaning.
Inspect the internal portions of the logic analyzer module for damage and wear
using Table 6–2 as a guide. Defects found should be repaired immediately. If you
replace any electrical circuit board, refer to Table 6–6 on page 6–40 to determine
which procedures you must perform to ensure proper operation of the logic
analyzer module.
Table 6–2: Internal inspection check list
Item Inspect for Repair action
Circuit boards Loose, broken, or corroded
solder connections. Burned
circuit boards. Burned, broken,
or cracked circuit-run plating.
Remove failed circuit board and replace
with a new circuit board.
Resistors Burned, cracked, broken,
blistered condition. Remove failed circuit board and replace
with a new circuit board.
Solder connections Cold solder or rosin joints. Resolder joint and clean with isopropyl
alcohol.
Capacitors Damaged or leaking cases.
Corroded solder on leads or
terminals.
Remove failed circuit board and replace
with a new circuit board.
Semiconductors Damaged parts or distorted
pins. Replace circuit board if parts are
damaged.
Wiring and cables Loose plugs or connectors.
Burned, broken, or frayed
wiring.
Firmly seat connectors. Repair or replace
circuit boards with defective wires or
cables.
Maintenance
TLA 700 Series Logic Analyzer Modules Service Manual 6–5
CAUTION. To prevent damage from electrical arcing, ensure that circuit boards
and components are dry before applying power to the logic analyzer module.
Cleaning Procedure — Interior. To clean the interior, perform the following steps:
1. Blow off dust with dry, low-pressure, deionized air (approximately 9 psi).
2. Remove any remaining dust with a lint free cloth dampened in isopropyl
alcohol (75% solution) and rinse with warm deionized water. (A cotton-
tipped applicator is useful for cleaning in narrow spaces and on circuit
boards.)
NOTE. If, after performing steps 1 and 2, a module is clean upon inspection, skip
the remaining steps.
If steps 1 and 2 do not remove all the dust or dirt, the module may be spray
washed using a solution of 75% isopropyl alcohol (see steps 3 through 7).
3. Gain access to the parts to be cleaned by removing easily accessible shields
and panels (see Removal and Installation Procedures on page 6–7).
4. Spray wash dirty parts with the isopropyl alcohol and wait 60 seconds for the
majority of the alcohol to evaporate.
5. Use hot (48.9_ C to 60_ C/120_ F to 140_ F) deionized water to thoroughly
rinse the parts.
6. Dry all parts with low-pressure, deionized air.
7. Dry all components and assemblies in an oven or drying compartment using
low-temperature (51.7_ C to 65.6_ C/125_ F to 150_ F) circulating air.
Lubrication. There is no periodic lubrication required.

Maintenance
6–6 TLA 700 Series Logic Analyzer Modules Service Manual
TLA 700 Series Logic Analyzer Modules Service Manual 6–7
Removal and Installation Procedures
This section describes how to remove and install the major mechanical and
electrical modules. The procedures in this section assume that you already have
removed the module from the mainframe. This section provides the following
information:
List of Circuit Boards describes where to locate a list of replaceable circuit
boards.
Summary of Procedures on page 6–8 lists the procedures for removing and
installing circuit boards.
Tools Required on page 6–8 describes the tools needed to perform the
procedures.
Beginning with Injector/Ejector Handles on page 6–9, detailed procedures
describe the removal and installation of circuit boards.
Preparation — Please Read
Please read the following warning statement. Then read the following general
instructions before removing a circuit board.
WARNING. Before doing this or any other procedure in this manual, read the
General Safety Summary and Service Safety Summary found at the beginning of
this manual. Also, to prevent possible injury to service personnel or damage to
electrical components, read Preventing ESD on page 6–2.
1. Read the Summary of Procedures on page 6–8 to understand how the
procedures are grouped. Then read Tools Required on page 6–8 for a list of
tools needed to remove and install circuit boards in the TLA 7Lx/TLA 7Mx
Logic Analyzer Module.
2. If you are disassembling the TLA 7Lx/TLA 7Mx Logic Analyzer Module for
cleaning, refer to the Inspection and Cleaning procedure on page 6–2 for
cleaning instructions.
List of Circuit Boards
The Mechanical Parts List section provides a list of all replaceable circuit
boards.
Removal and Installation Procedures
6–8 TLA 700 Series Logic Analyzer Modules Service Manual
Summary of Procedures
The procedures are listed below in the order in which they appear in this section:
HInjector/Ejector Handles on page 6–9 describes how to replace the
Injector/ejector handles.
HCover on page 6–11 describes how to replace the cover.
HDaughter Boards on page 6–14 describes how to replace the daughter
boards.
HLocal Processor Unit Board on page 6–16 describes how to replace the
Local Processor Unit board.
HAcquisition Board on page 6–19 describes how to replace Acquisition board.
HFuses on page 6–25 describes how to replace fuses on the Local Processor
Unit board and on the Acquisition board.
HRear EMI Gaskets on page 6–26 describes how to replace the EMI gaskets at
the rear of the module
Tools Required
Most circuit boards in the TLA 7Lx/TLA 7Mx Logic Analyzer Module can be
removed using a screwdriver handle mounted with size T-10 TorxR screwdriver
bits. Table 6–3 lists the tools needed to replace circuit boards in the TLA 7Lx/
TLA 7Mx Logic Analyzer Module. All tools required to remove and install each
circuit board are listed before the procedure.
Table 6–3: Tools required for circuit board replacement
Item number Name Description
1Torque screwdriver handle Accepts TorxRdriver bits
2T-10 Torx tip TorxR driver bit for T-10 size screw heads
3Soldering iron Standard tool
4Solder wick Standard tool
51/4-inch nut driver Standard tool

Removal and Installation Procedures
TLA 700 Series Logic Analyzer Modules Service Manual 6–9
Injector/Ejector Handles
You will need a screwdriver with a size T-10 TorxR tip (Table 6–3, items 1
and 2) to replace the injector/ejector handles.
Use the following procedure and Figure 6–1 to remove the injector/ejector
handles.
1. Place the module on the right side (see Figure 6–1).
2. Remove the two screws that secure the injector/ejector handle to the chassis.
3. Remove the injector/ejector handle from the module.
Ejector handles (2)
Remove screws (4)
Figure 6–1: Injector/ejector handle replacement
Removal

Removal and Installation Procedures
6–10 TLA 700 Series Logic Analyzer Modules Service Manual
Use the following procedure and Figure 6–1 to install the injector/ejector
handles.
NOTE. The top and bottom injector/ejector handles are not interchangeable. The
top injector/ejector handle assembly has a notch on right side and a tab on the
left side; the bottom injector/ejector handle assembly does not have a notch or a
tab.
1. Install the injector/ejector handle through the front panel cutout onto the
mounting post.
2. Install the screws to secure the injector/ejector handle to the chassis.
3. Apply the proper replacement label.
Cover
You will need a screwdriver with a size T-10 TorxR tip (Table 6–3,
items 1 and 2) to replace the cover.
Installation
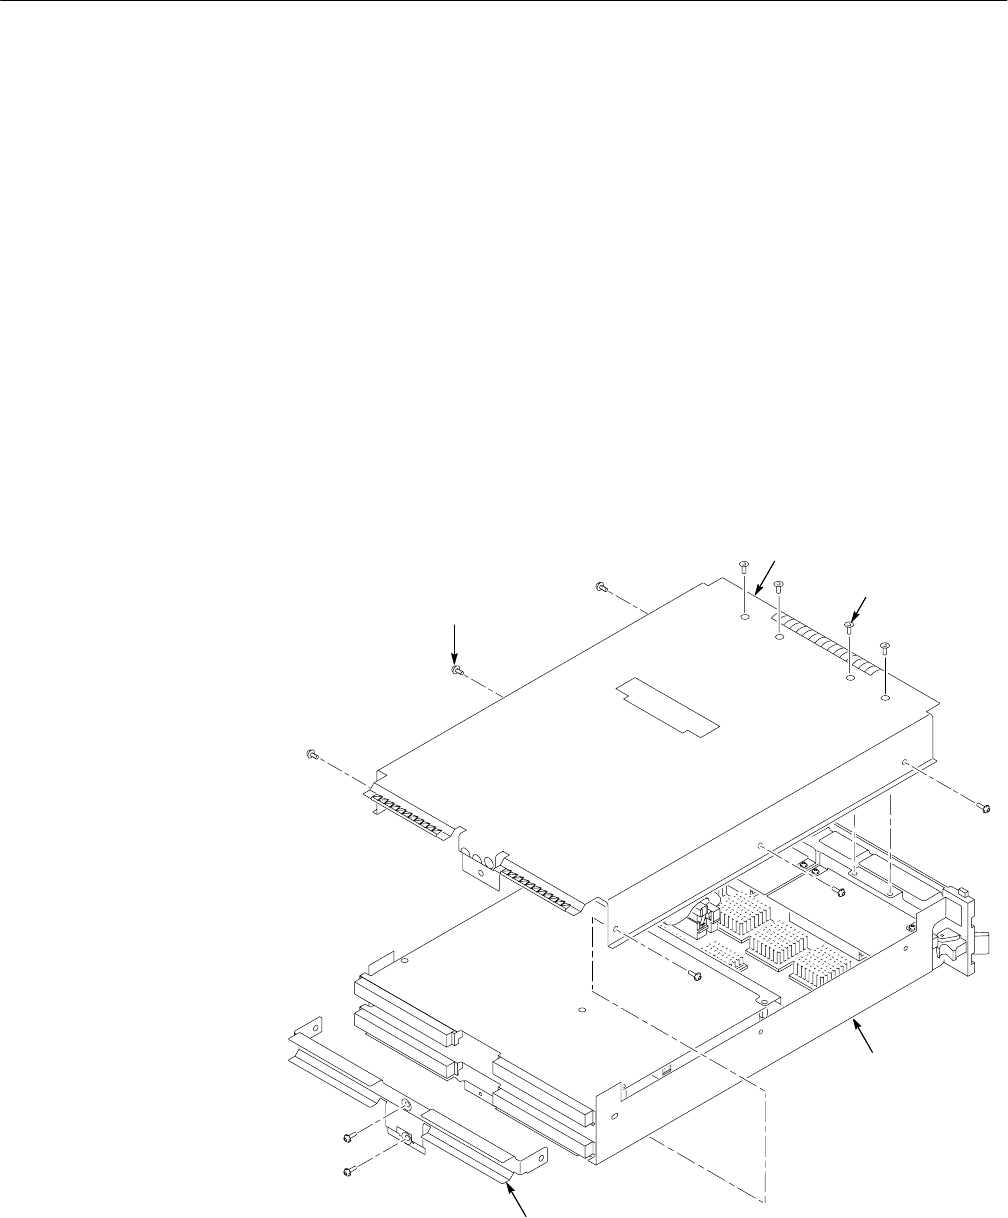
Removal and Installation Procedures
TLA 700 Series Logic Analyzer Modules Service Manual 6–11
Use the following procedure and Figure 6–2 to remove the cover.
1. Place the module on the right side.
2. Remove two (2) screws on the rear of the chassis and two (2) top and bottom
rear screws that secure the rear panel to the chassis. Set the rear panel aside.
3. Remove two (2) top screws and two (2) bottom screws that secure the cover
to the chassis.
4. If you have a 102-channel module or a 136-channel module, remove the
flat-head screws near the front of the module.
5. If the merge cable is connected to the merge cable bracket, remove the two
screws holding the cable and then remove the bracket.
6. Slide the cover back to disengage the tab and lift the cover from the chassis
(guide the merge cable through the center hole while removing the cover).
Rear panel
Chassis
Cover
Remove screws (8) Remove screws (4)
Figure 6–2: Cover removal
Removal

Removal and Installation Procedures
6–12 TLA 700 Series Logic Analyzer Modules Service Manual
Use the following procedure and Figure 6–2 and Figure 6–4 to install the cover.
NOTE. Install the cover tightly against the chassis. This will ensure that the
module fits into adjacent slots in the mainframe.
1. Place the module on its right side.
2. Place the cover onto the chassis.
3. If you are replacing the cover of the slave module in a merged module pair,
refer to Figure 6–3 to feed the merge cable through the cover and then install
the merge cable bracket as shown.
Merge cable connector
Merge cable bracket
Figure 6–3: Feeding the merge cable through the cover
CAUTION. To prevent damage to the module during the installation process,
reinstall the cover exactly as described in steps 4 through 8. If the cover is not
properly seated, the module can be damaged when you install it in a mainframe
or it will not meet EMC requirements.
Installation

Removal and Installation Procedures
TLA 700 Series Logic Analyzer Modules Service Manual 6–13
4. Push forward on the cover so the tab on the front edge of the cover inserts
into the rear of the front subpanel. Make sure that the cover is fully seated
(no gaps) against the front and rear chassis flanges (see Figure 6–4).
Leave no vertical gap
Make sure tab inserts into
slot on rear of front panel
Figure 6–4: Seating the cover on the chassis
5. While holding the cover in place, install the four (4) screws nearest the front
of the module (two on the top and two on the bottom), to secure the cover to
the chassis. Tighten the screws to 4 in lbs.
6. If you have a 102-channel module or a 136-channel module, install the
flat-head screws near the front of the module. Tighten the screws to 4 in lbs.
7. Slide the rear panel on the chassis and install the two rear panel screws.

Removal and Installation Procedures
6–14 TLA 700 Series Logic Analyzer Modules Service Manual
8. Install the top and bottom rear screws.
9. Check and tighten all screws to 4 in lbs.
Daughter Boards
You will need a screwdriver with a size T-10 TorxR tip (Table 6–3, items 1
and 2) to replace the Daughter boards.
The 136-channel modules have two Daughter boards; the 102-channel modules
have one Daughter board, and the 68-channel and 34-channel modules have no
Daughter boards. The illustrations in this section show 136-channel modules
with two Daughter boards installed.
It is not necessary to remove the Local Processor Unit board to access the
Daughter boards.
NOTE. After replacing the Daughter boards refer to Table 6–6 on page 6–40 and
to Table 6–7 on page 6–41 to determine the proper procedures to perform
post-repair adjustments and to verify proper operation of the logic analyzer
module.
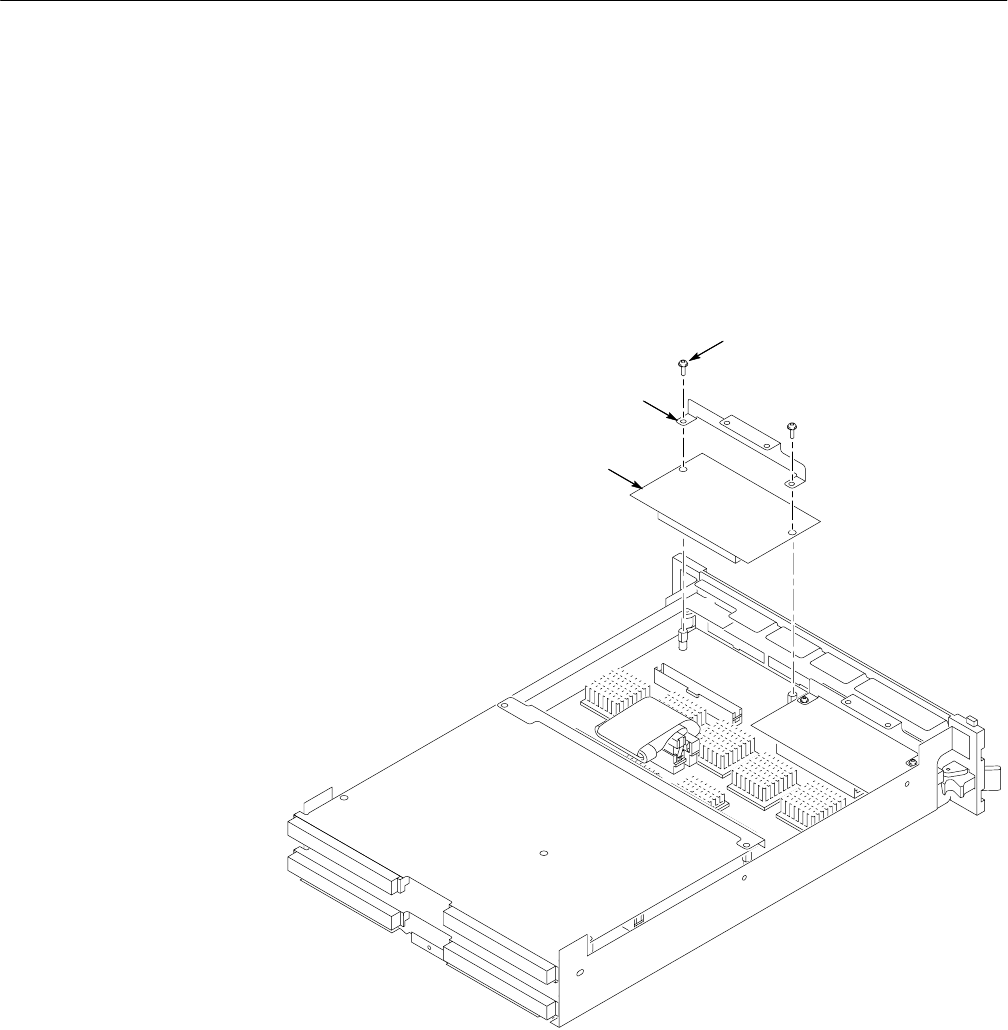
Removal and Installation Procedures
TLA 700 Series Logic Analyzer Modules Service Manual 6–15
Use the following procedure and Figure 6–5 to remove the Daughter boards.
1. Perform the Cover removal procedure (see page 6–11).
2. Remove the two (2) screws that secure each EMI bracket and Daughter board
to the Acquisition board.
3. Lift the Daughter board straight up to disconnect it from the Acquisition
board connector.
Remove screws (2)
Daughter board
EMI bracket
Figure 6–5: Daughter board replacement
Removal

Removal and Installation Procedures
6–16 TLA 700 Series Logic Analyzer Modules Service Manual
Use the following procedure and Figure 6–5 to install the Daughter boards.
1. Line up the Daughter board over the circuit board connector on the Acquisi-
tion board and gently press down until the Daughter board fully seats in the
connectors.
2. Place the EMI bracket on the Daughter board.
3. Install the two (2) screws that secure the EMI bracket and the Daughter
board to the Acquisition board.
4. Perform the Cover installation procedure (see page 6–12).
Local Processor Unit Board
You will need a screwdriver with a size T-10 TorxR tip (Table 6–3, items 1
and 2) to replace the Local Processor Unit (LPU) board.
NOTE. When placing an order for a replacement LPU board or an LPU
exchange board from the Tektronix Exchange Center, you must supply the
following information: Model number, serial number, PowerFlex Option
upgrade number, and firmware level.
Use the following procedure and Figure 6–6 to remove the LPU board.
1. Perform the Cover removal procedure (see page 6–11).
2. Remove five (5) screws that secure the LPU board to the chassis.
3. Remove the cable bracket and unplug two 100-pin ribbon cables from J1330
and J1630.
4. For 102-channel modules or 136-channel modules, remove the two screws
that secure the top EMI bracket to the chassis.
5. Remove the top EMI bracket to gain access to the front of the LPU board.
CAUTION. Handle the LPU board gently to avoid breaking the front panel LED
extension.
6. Carefully move the LPU board away from the front panel until the tabs
(Figure 6–6) clear the front subpanel.
7. Lift the LPU board above the chassis.
Installation
Removal
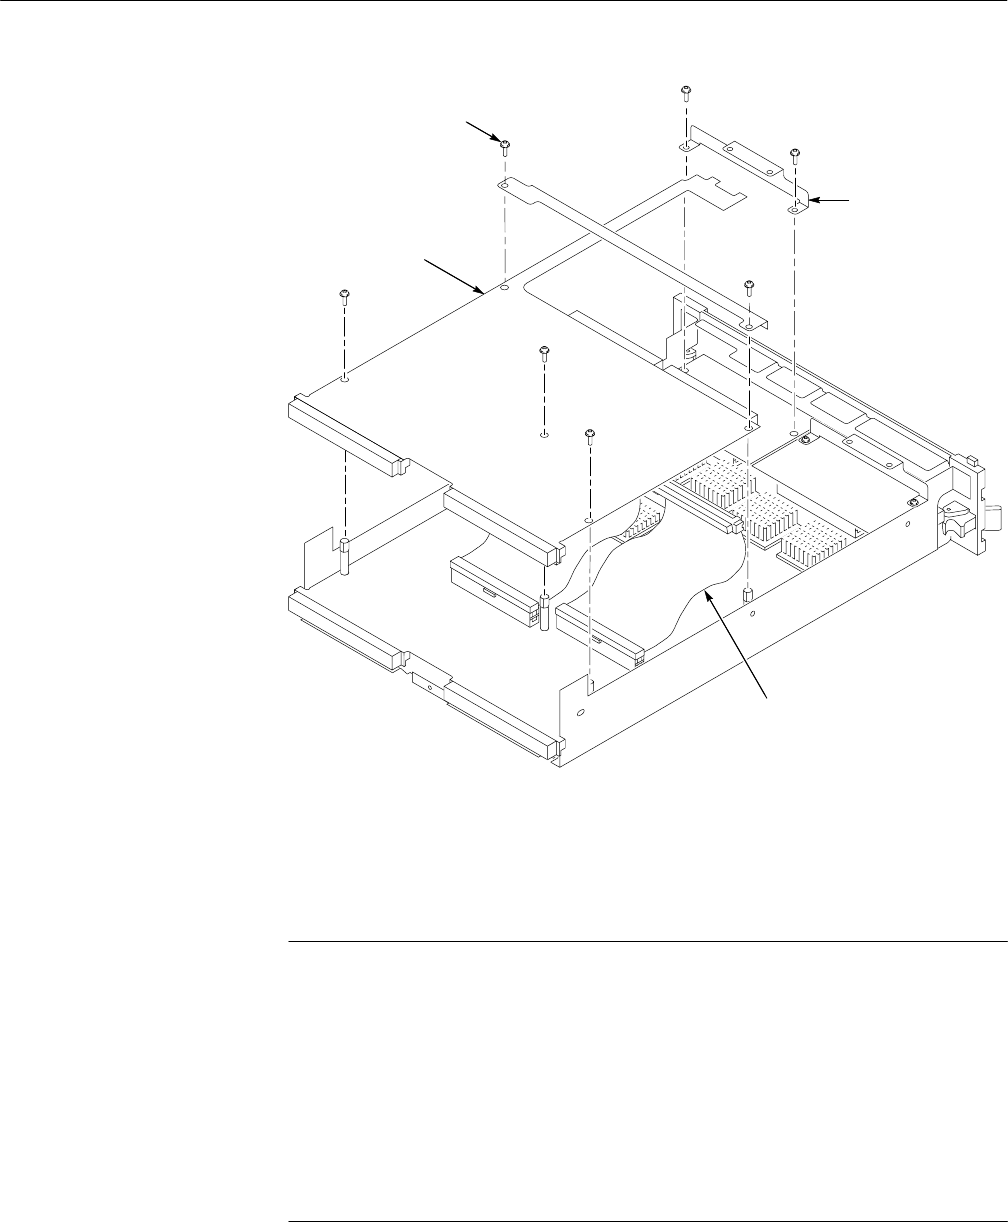
Removal and Installation Procedures
TLA 700 Series Logic Analyzer Modules Service Manual 6–17
LPU board
Cables (2)
Remove screws (5)
EMI bracket
Figure 6–6: LPU board removal
Use the following procedure and Figure 6–6 to install the LPU board.
NOTE. After replacing the LPU board, you must verify the proper PowerFlex
level. The PowerFlex configuration information is listed on the side panel of the
logic analyzer module.
If the PowerFlex level does not match the information on the side panel label,
you must return the entire logic analyzer module to your local Tektronix service
center.
Refer to Table 6–6 on page 6–40 and to Table 6–7 on page 6–41 to determine
the proper procedures to run to verify proper operation of the logic analyzer
module.
Installation
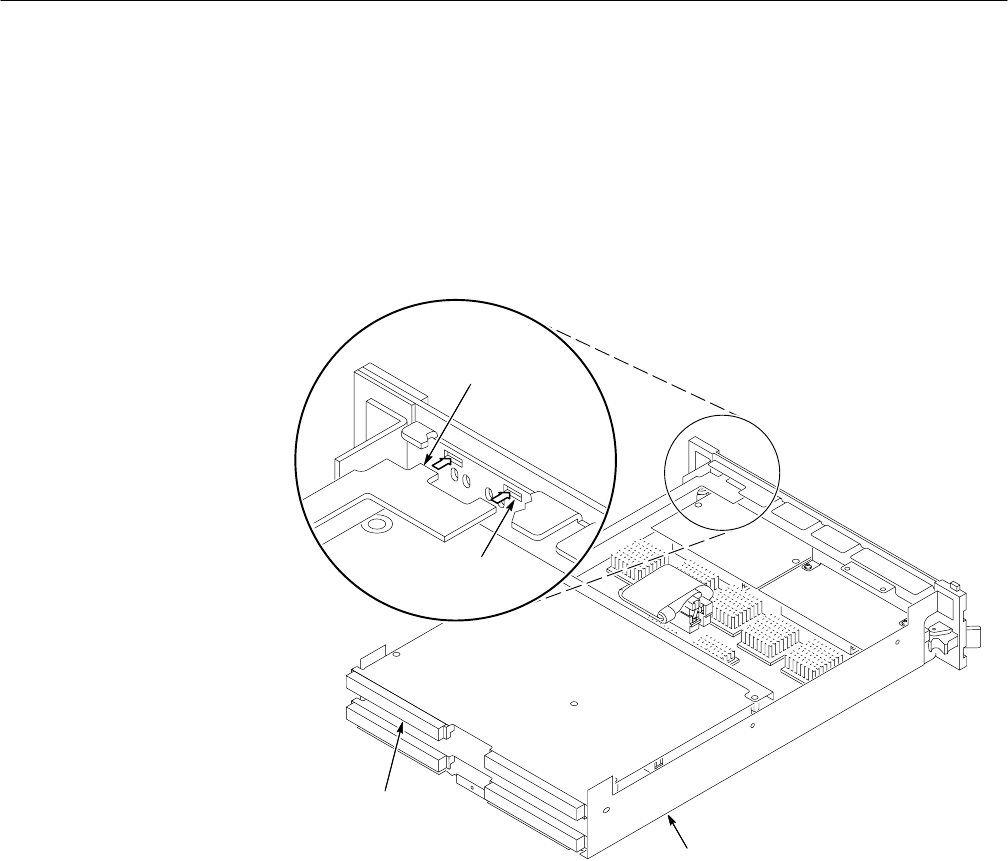
Removal and Installation Procedures
6–18 TLA 700 Series Logic Analyzer Modules Service Manual
1. Insert the tabs on the LPU board into the front subpanel as shown in
Figure 6–7. Then set the LPU board in place on the chassis.
2. Push forward on the LPU board rear connector while aligning the LPU board
until the LPU board is even with the acquisition board.
3. Reinstall the top EMI bracket, if you removed it in step 4 on page 6–16;
reinstall and tighten the two screws holding the EMI bracket in place.
Chassis
Push forward on
P1 connector
during installation
Tabs on
LPU board
Front subpanel
slot
Figure 6–7: Inserting LPU board tabs into front subpanel
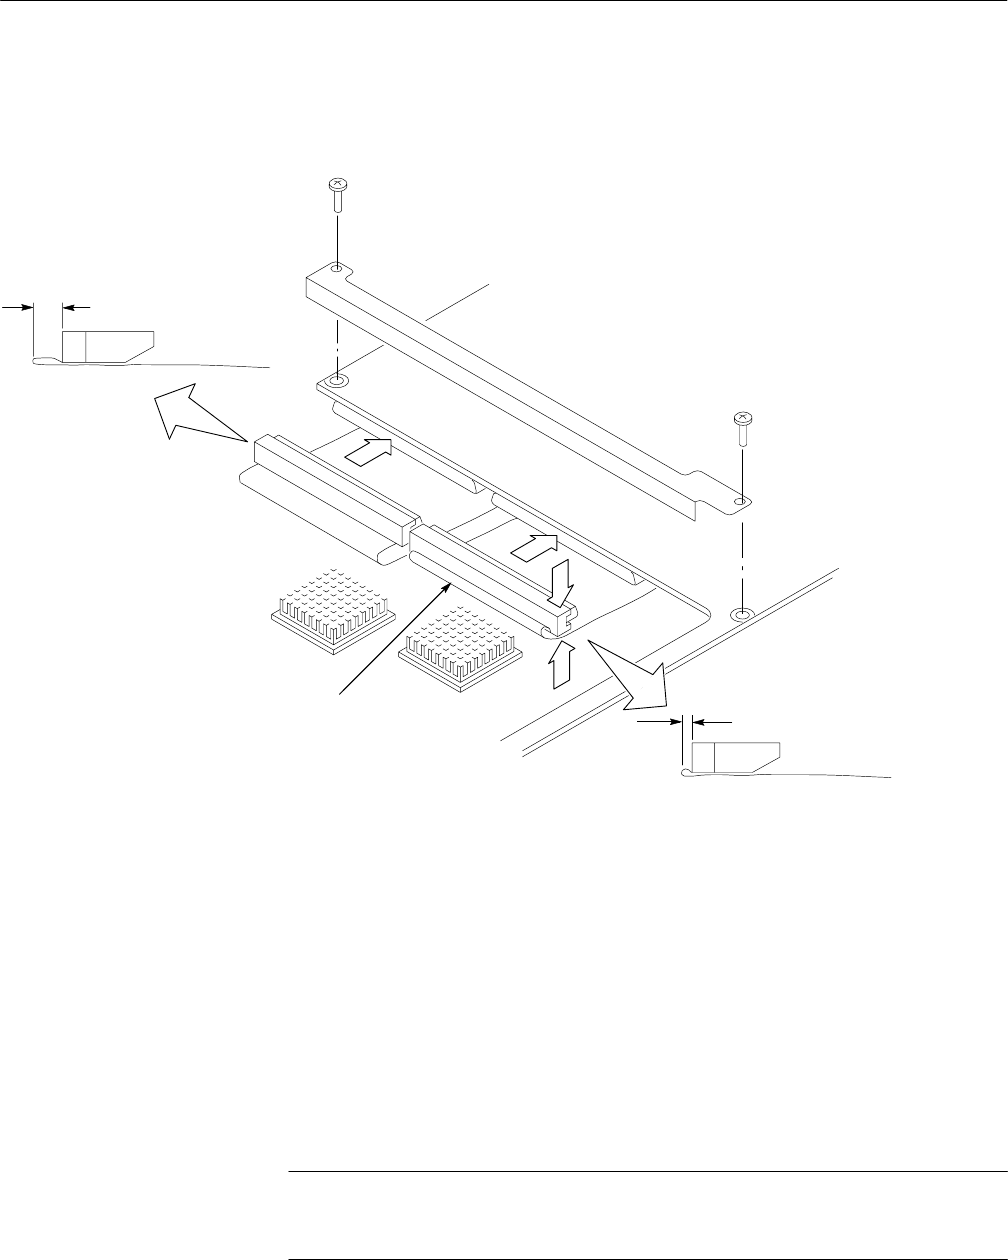
Removal and Installation Procedures
TLA 700 Series Logic Analyzer Modules Service Manual 6–19
4. Crimp and fold the two 100-pin ribbon cables as shown in Figure 6–8 and
then connect them to the LPU board at J1330 and J1630.
Crimp cable as shown before
connector to LPU board
12 mm (.437 in)
3 mm (.125 in)
Figure 6–8: Crimping the interconnect cables
5. While holding the LPU board in place, install the cable bracket and the
five (5) screws that secure the board to the chassis.
6. Perform the Cover installation procedure (see page 6–12).
Acquisition Board
You will need a screwdriver with size T-10 TorxR tip and a 1/4 inch nut driver
(Table 6–3, items 1, and 2) to replace the Acquisition board.
NOTE. The 34-channel and 68-channel modules do not have a Merge cable or
Merge Cable connector. For these modules; ignore the steps dealing with the
Merge cable and the Merge Cable connector.

Removal and Installation Procedures
6–20 TLA 700 Series Logic Analyzer Modules Service Manual
NOTE. After replacing the Acquisition board refer to Table 6–6 on page 6–40
and to Table 6–7 on page 6–41 to determine the proper procedures to run to
verify proper operation of the logic analyzer module.
Use the following procedure and Figure 6–9 to remove the Acquisition board.
1. Perform the Cover removal procedure (see page 6–11).
2. If there are Daughter boards installed in the module, perform the Daughter
Board removal procedure (see page 6–14).
3. Perform the Local Processor Unit Board removal procedure (see page 6–16).
4. Unplug two (2) 100-pin ribbon cables from J1270 and J1420 as follows:
a. Grasp and squeeze the metal cable retainers (Figure 6–9) to unlock each
cable from the connector.
b. Unplug the cables from the Acquisition board and set them aside.
NOTE. It may be necessary to remove the spacer post between the two cables to
unlock the cables from the connector.
Removal
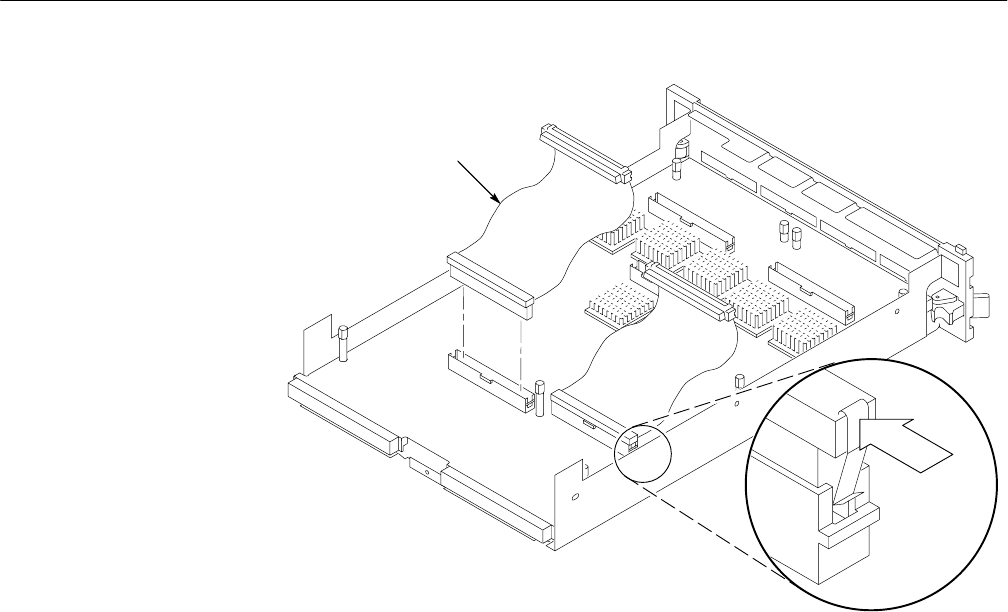
Removal and Installation Procedures
TLA 700 Series Logic Analyzer Modules Service Manual 6–21
Unplug ribbon
cables (2)
Squeeze to
unlock cable
Figure 6–9: Removing the cables from the Acquisition board
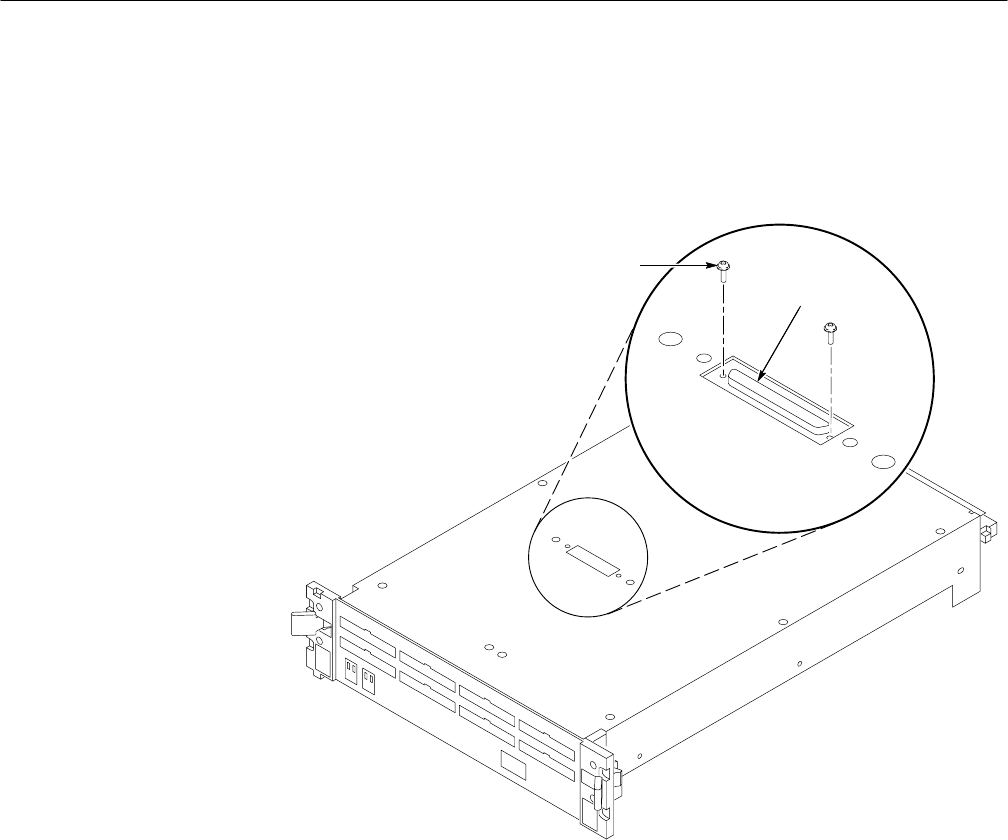
Removal and Installation Procedures
6–22 TLA 700 Series Logic Analyzer Modules Service Manual
5. Turn the chassis over.
6. Using the screwdriver with a T-10 TorxR tip, remove the two screws that
secure the merge cable connector to the chassis (see Figure 6–10).
Remove screws (2) Merge cable
connector
Figure 6–10: Removing the Merge cable connector from the chassis
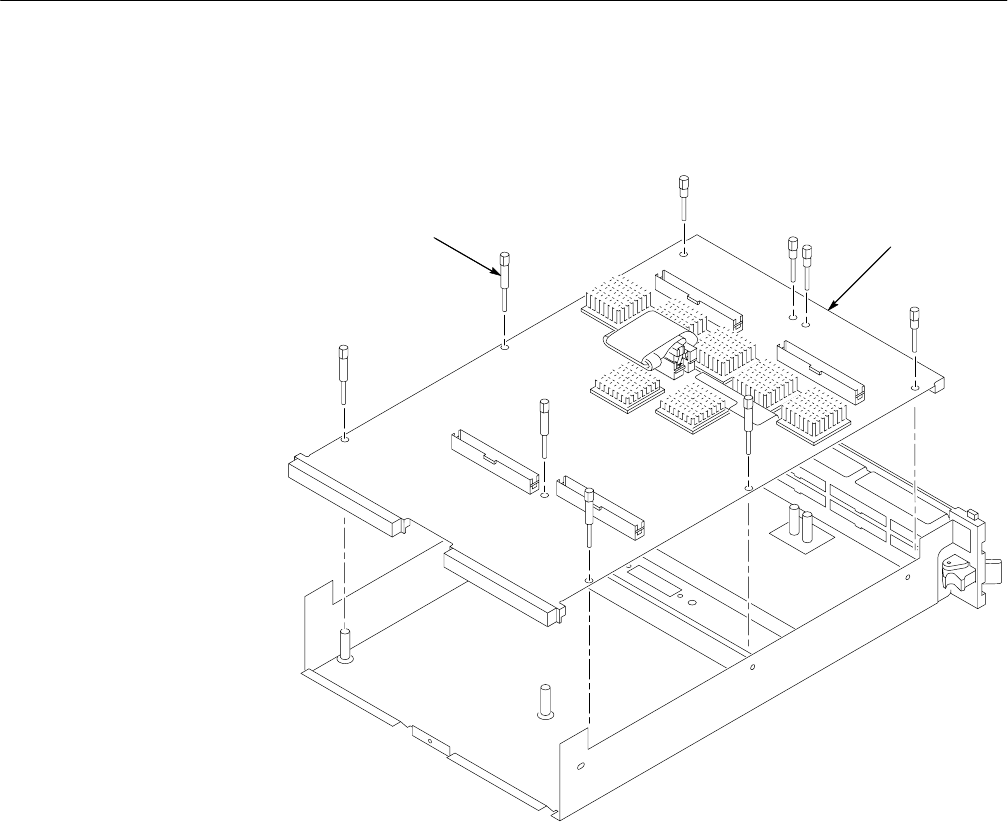
Removal and Installation Procedures
TLA 700 Series Logic Analyzer Modules Service Manual 6–23
7. Using a 1/4 inch nut driver, remove nine (9) spacer posts that secure the
Acquisition board to the chassis (see Figure 6–11).
Remove spacer posts (9) Acquisition board
Figure 6–11: Removing the Acquisition board from the chassis
8. Carefully slide the Acquisition board away from the front panel until the
probe connectors clear the front panel. Then lift the circuit board from the
chassis.
9. Disconnect the Merge cables from the Acquisition board.

Removal and Installation Procedures
6–24 TLA 700 Series Logic Analyzer Modules Service Manual
Use the following procedure to install the Acquisition board.
NOTE. After replacing the Acquisition board refer to Table 6–6 on page 6–40
and to Table 6–7 on page 6–41 to determine the proper procedures to run to
verify proper operation of the logic analyzer module.
1. Connect the Merge cables to the Acquisition board.
2. Refer to Figure 6–11 on page 6–23 and carefully slide the Acquisition board
into the chassis while making sure that the Merge Cable connector lines up
with the slot in the chassis.
3. Using the screwdriver with a T-10 TorxR tip, install two (2) screws on the
Merge Cable connector.
4. Gently push forward on the Acquisition board rear connector while aligning
the Acquisition board so that the mounting holes line up with the stand-offs
on the chassis.
5. Using a 1/4 inch nut driver, install nine (9) spacer posts that secure the
Acquisition board to the chassis. Be sure to install the four (4) short spacer
posts toward the front of the chassis (see Figure 6–11).
6. Dress the top Merge cable as shown in Figure 6–11 (if the module will not
be merged).
7. Perform the Daughter Board installation procedure (see page 6–16).
8. Perform the Local Processor Unit Board installation procedure (see
page 6–17).
9. Perform the Cover installation procedure (see page 6–12).
Installation
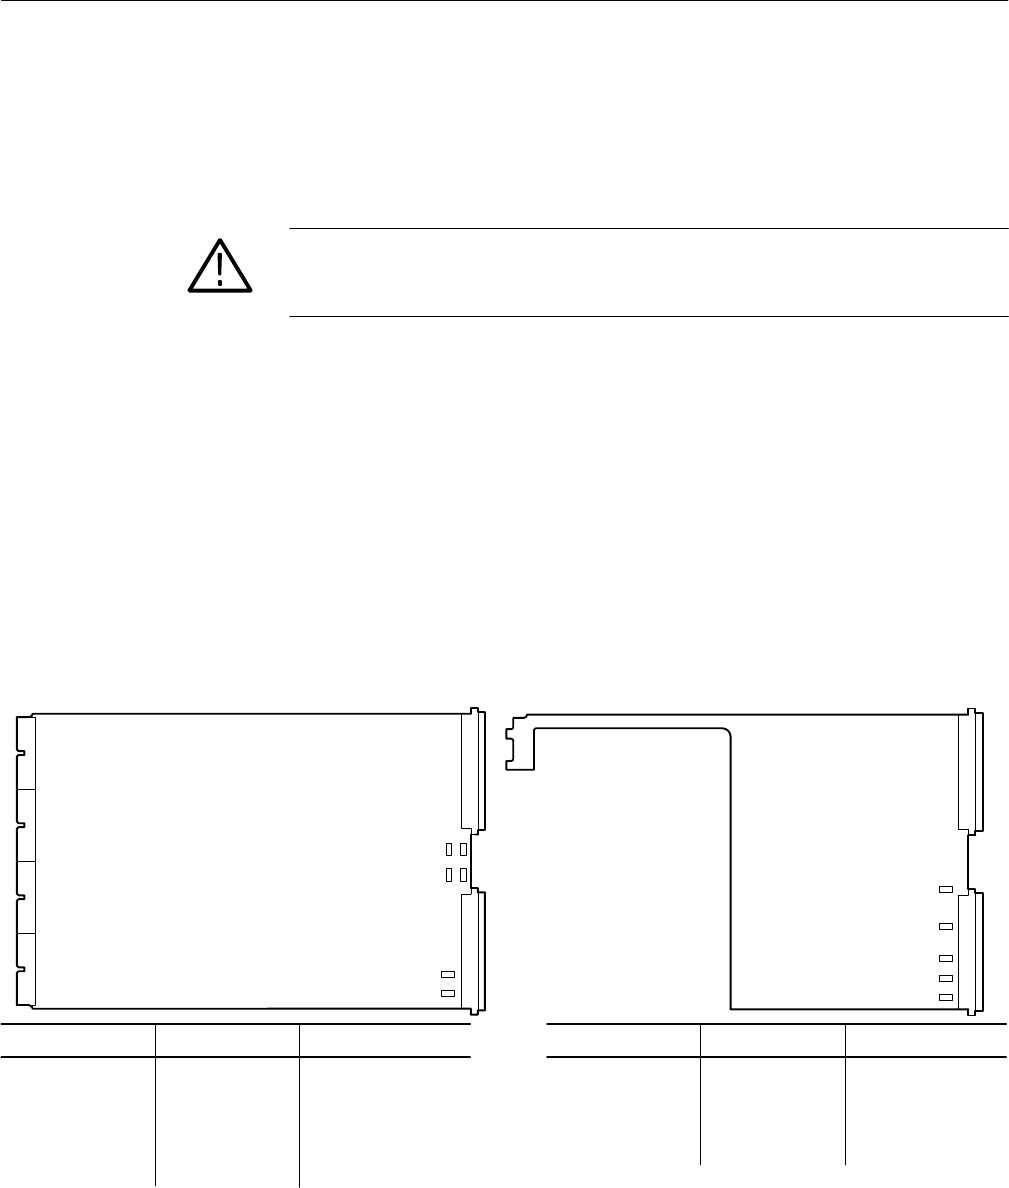
Removal and Installation Procedures
TLA 700 Series Logic Analyzer Modules Service Manual 6–25
Fuses
All fuses are located on the component side of the LPU board or on the
Acquisition board (for information on the fuses see the Theory of Operation
chapter beginning on page 3–1).
CAUTION. To avoid damage to the module, use only replacement fuses that match
the type, voltage, and current rating of the original fuse. See the Mechanical
Parts List section for the part number of replacement fuses.
You will need a screwdriver with a size T-10 TorxR tip, a soldering iron, and
solder wick (Table 6–3, items 1, 2, 3, and 4) to replace the fuses.
Use the following procedure and Figure 6–12 to remove the fuses.
1. Perform the Local Processor Unit Board removal procedure (see page 6–16).
2. Use Figure 6–12 to locate the fuse to be replaced on the component side of
the boards. For fuses mounted on the back side of the Acquisition board,
perform the Acquisition Board removal procedure (see page 6–19).
3. Using a soldering iron and solder wick, unsolder and discard the fuse.
F1681 LPU board +12 V
F1780 LPU board +5 V
F1881 LPU board +5 V
F1981 LPU board +24 V
F1983 LPU board –24 V
Circuit number Circuit board Supply
F2500 Acquisition board +12 V
F2504 Acquisition board –12 V
F2506 Acquisition board –5 V
F2508 Acquisition board +5 V
F2901 Acquisition board +24 V
F2903 Acquisition board –24 V
Circuit number Circuit board Supply
Ac
qu
isitio
n b
o
a
r
dLPU board
F1983
F1981
F1881
F1780
F1681
F2903
F2901
F2500 F2504
F2506 F2508
Figure 6–12: Fuse replacement
Removal
Removal and Installation Procedures
6–26 TLA 700 Series Logic Analyzer Modules Service Manual
Use the following procedure and Figure 6–12 to install the fuses.
CAUTION. To avoid damage to the module, use only replacement fuses that match
the type, voltage, and current rating of the original fuse. See the Mechanical
Parts List section for the part number of replacement fuses.
1. Using a soldering iron, solder the new fuse into place.
2. If you removed the Acquisition board, perform the Acquisition Board
installation procedure (page 6–24).
3. Perform the Local Processor Unit Board installation procedure (see
page 6–17).
4. Perform the Cover installation procedure (see page 6–12).
P6417 Probe Podlet Replacement
Refer to Replacing Probe Podlets in the TLA 700 Series Installation Manual for
instructions on replacing the individual probe podlets.
Rear EMI Gaskets
NOTE. Use both hands to replace the four rear EMI Gaskets.
Use the following procedure and Figure 6–13 to remove the rear EMI gaskets.
1. Perform the Cover removal procedure (see page 6–11).
2. For the two rear gaskets on the chassis, perform the Daughter Boards
removal procedure (page 6–15), the Local Processor Unit Board removal
procedure (page 6–16), and the Acquisition Board removal procedure
(page 6–20).
3. Lift the gasket fingers and rotate the gasket off (see Figure 6–13).
Installation
Removal
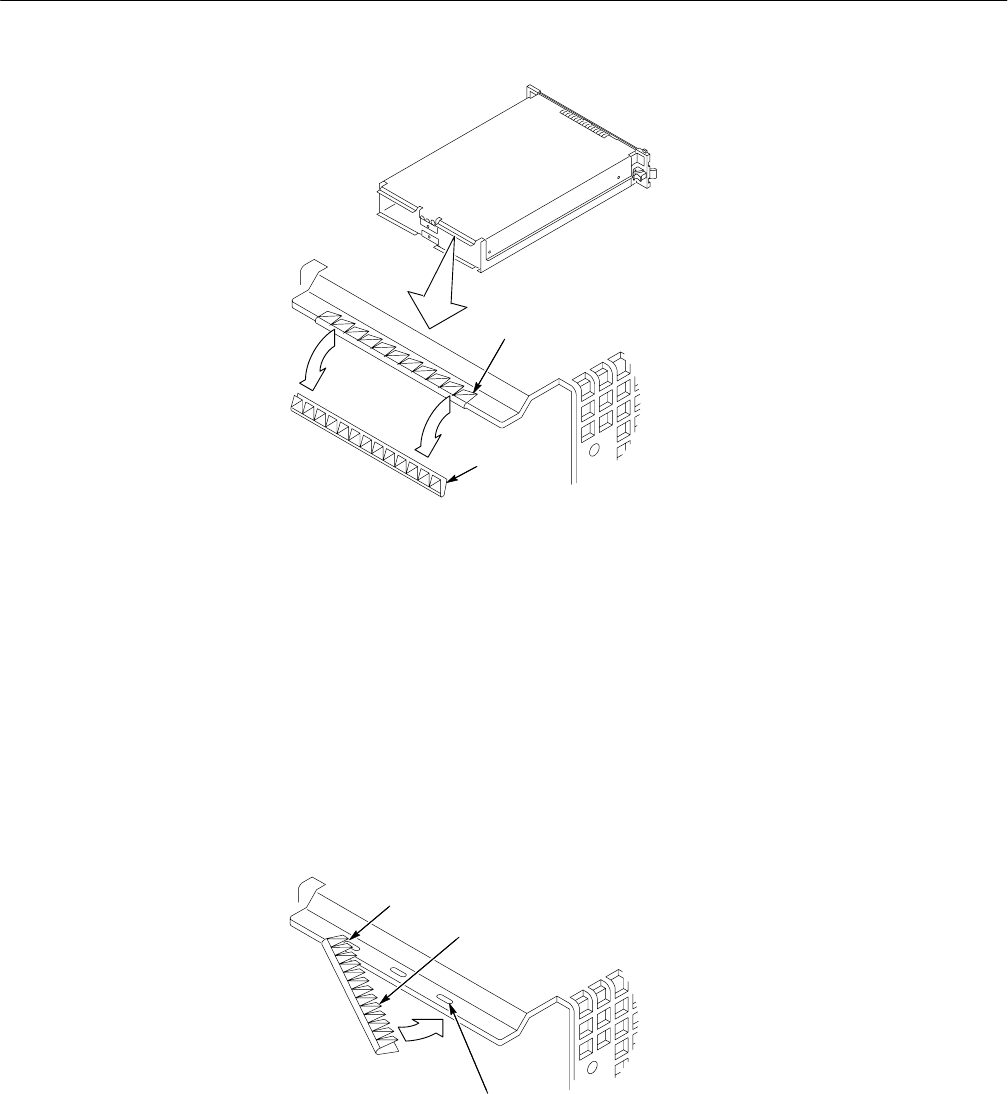
Removal and Installation Procedures
TLA 700 Series Logic Analyzer Modules Service Manual 6–27
Lift gasket finger
1
Rotate
2
Figure 6–13: Rear EMI gasket removal
Use the following procedure and Figure 6–14 to install the rear EMI gaskets.
1. Position each gasket so the gasket fingers face the outside of the module.
2. Pick up each gasket at the end where the gasket finger is formed up. Then
rotate the gasket on. As you do this, lift up any fingers that bind to the
chassis or cover.
3. Slide each gasket gently from side to side to ensure that the gasket snaps in
place.
Slide open end on
Rotate into place lifting any
gasket finger that bind.
Make sure gasket snaps into
holes by pulling on gasket
1
2
3
Figure 6–14: Rear EMI gasket replacement
4. Perform the Acquisition Board installation procedure (see page 6–24).
Installation

Removal and Installation Procedures
6–28 TLA 700 Series Logic Analyzer Modules Service Manual
5. Perform the Daughter Boards installation procedure (see page 6–16).
6. Perform the Local Processor Unit Board installation procedure (see
page 6–17).
7. Perform the Cover installation procedure (see page 6–12).
TLA 700 Series Logic Analyzer Modules Service Manual 6–29
Troubleshooting
WARNING. Before doing this or any other procedure in this manual, read the
General Safety Summary and Service Safety Summary found at the beginning of
this manual. Also, to prevent possible injury to service personnel or damage to
electrical components, read Preventing ESD on page 6–2.
This section contains information and procedures designed to help you isolate
faults to within the TLA 7Lx/TLA 7Mx Logic Analyzer Module. The process is
as follows:
Do Check for Common Problems on page 6–30 to eliminate easy to find
problems first.
Do Eliminate Other Problem Sources on page 6–32 to eliminate the
mainframe, probes, and other modules as the fault(s) source next.
Do Troubleshoot the Logic Analyzer Module, beginning on page 6–33, to
isolate locate the failed replaceable part within the module.
If you have replaced a faulty circuit board or assembly found using these
procedures, you must follow any verification and adjustment procedures
identified in Table 6–6 on page 6–40 for the replaced board.
This section supports isolation of faults within the logic analyzer module to the
replaceable-part level that’s reflected in the replaceable parts list in Chapter 10.
In most cases, faults are isolated to circuit boards or assemblies, but not to
individual components on those boards. (See Strategy for Servicing on page xv.)
Fault isolation is supported to the following circuit boards and replaceable parts:
LPU board (A10)
Acquisition board (A11, A12, A16, A17, A18, A19, A20, A21)
Daughter boards (A13)
Power supply fuses
Interconnect cables
Service Level

Troubleshooting
6–30 TLA 700 Series Logic Analyzer Modules Service Manual
Other TLA 700 manuals may be required to help you isolate faults; other
manuals and other sections in this manual contain instructions you will need to
complete repairs after locating a faulty part. See the table that follows.
Manual or Section Purpose
TLA 704 Portable Mainframe or
TLA 711 Benchtop Chassis and TLA 711
Benchtop Control
To eliminate benchtop or portable mainframe
as problem source (whichever configuration is
in use)
TLA 700 Series Performance Verification and
Adjustment Procedures To check and adjust after circuit board or
assembly replacement
TLA 700 Series Installation To remove and reinstall modules in mainframe;
to reinstall Windows95 or TLA 700 Software
when required
Removal and Replacement Instructions (in this
manual) To remove and reinstall failed replaceable
parts.
Replaceable Parts List (in this manual) To order replaceable parts
For a list of all manuals available for the TLA 700 Logic Analyzer, see Related
Manuals on page xiv of the Preface to this manual.
Check for Common Problems
Use Table 6–4 to quickly isolate possible failures. The table lists problems
related to the logic analyzer module and possible causes. The list is not
exhaustive, but it may help you eliminate a problem that’s quick to fix, such as a
blown fuse or loose cable.
Required Documents
Troubleshooting
TLA 700 Series Logic Analyzer Modules Service Manual 6–31
Table 6–4: Failure symptoms and possible causes
Symptom Possible Cause(s)
Mainframe does not
power on Power connection faulty; check or substitute power cord
Fuse blown; check line fuse
Mainframe power supply failure; contact local Tektronix service
center
Mainframe does not boot Non-system disk or floppy in external drive; make sure logic
analyzer boots from hard drive (Refer to the TLA 700 Series
Installation Manual for software reinstallation procedures.)
Hard drive failure or corrupted files on hard drive; contact local
Tektronix service center
Modules not recognized Modules not fully inserted; make sure front of module is flush
with front panel
Flash jumper installed on rear of module
Mainframe power supply failure; contact local Tektronix service
center
Open fuses on logic analyzer module LPU board
Corrupted module firmware; reinstall firmware. Refer to
Upgrading Module Firmware in the TLA 700 Series Installation
Manual
Controller does not
power on Module not fully inserted; make sure front of module is flush
with front panel
Module failure; contact local Tektronix service center
Module does not pass the
normal power on diagnos-
tics (READY indicator not
green)
Module not fully inserted; make sure front of module is flush
with front panel
Module failure; see Troubleshoot the Logic Analyzer Module,
or contact local Tektronix service center
Open fuses on logic analyzer module LPU board or Acquisition
board
Module loses settings
when power is turned off Module failure; see Troubleshoot the Logic Analyzer Module,
or contact local Tektronix service center
NV RAM failure; refer to page 6–16 for Local Processor Unit
Board replacement instructions
Module will not acquire
data or the acquired data
is incorrect
Module failure; see Troubleshoot the Logic Analyzer Module,
or contact local Tektronix service center
Faulty probe or leadset

Troubleshooting
6–32 TLA 700 Series Logic Analyzer Modules Service Manual
Eliminate Other Problem Sources
The TLA Logic Analyzer Module is part of the TLA 700 Series Logic Analyzer,
which comprises modules installed in one of two mainframes (benchtop or
portable). The following procedures will help you eliminate the mainframe and
other modules as possible sources of the failure(s) that you troubleshoot.
If you have available a known-good logic analyzer module, perform the
following procedure:
1. Remove the suspect logic analyzer module from the mainframe.
2. Install a known-good logic analyzer module in the same slot as the suspected
module (verify that address switches on the rear of the module are set to
same address as the module that you are replacing).
3. Power-on the logic analyzer and check for normal operation.
4. If the failure symptoms are still present with the known-good logic analyzer
module installed, the problem most likely is in the Portable or Benchtop
Mainframe, not in the logic analyzer module. Refer to the Troubleshooting
section in Chapter 6 of your Portable Mainframe or Benchtop Controller
and Mainframe Service Manuals.
NOTE. Viewing the diagnostic window from the TLA 700 Logic Analyzer
application may help you isolate failures to individual modules or to the
mainframe.
5. If your TLA 700 Series Logic Analyzer operates normally with the known-
good logic analyzer module installed, the suspect logic analyzer module
needs to be repaired. Refer to Troubleshoot the Logic Analyzer Module on
page 6–33 for the troubleshooting procedures you need to locate faults
within the logic analyzer module.
If you do not have a known-good module and are not sure the problem is in the
TLA Logic Analyzer module, perform the following procedure to make sure the
mainframe is not the source of the failure:
Remove all plug-in modules from the mainframe (except the controller for
the Benchtop mainframe).
Perform the troubleshooting procedures in either the TLA 704 Portable
Mainframe Service Manual or those in the TLA 711 Benchtop Controller and
Benchtop Chassis manuals, depending on in which mainframe the logic
analyzer module is installed.
Substitute a Good Module
Check the Mainframe

Troubleshooting
TLA 700 Series Logic Analyzer Modules Service Manual 6–33
If the fault is that the logic analyzer module acquires no data or faulty data, the
probe may be at fault. Do the following procedure to isolate such faults to a
probe or to the logic analyzer module.
NOTE. The procedure below requires that the logic analyzer is functional and
operates normally when the modules are installed. Procedures to functionally
verify the probes are located in the TLA 700 Series Performance Verification and
Adjustment Technical Reference Manual.
1. Verify that the probe is correctly connected to the module and to the
system-under-test; check for loose or disconnected probe channels.
2. Move the suspected probe to another probe connector and observe if the
problem follows the probe. If the problem does not follow the probe, the
module may be faulty.
3. Substitute the suspected probe with a known good probe and observe if the
problem is still present. If the problem still occurs, the module may be
faulty. Refer to Troubleshoot the Logic Analyzer Module to isolate the
problems within that module.
4. If you have determined that the probe is faulty, try to isolate the problem to
an individual channel. A faulty channel may indicate a faulty probe podlet.
Isolate faulty podlets by switching single podlets and observing if the
problem tracks with the suspected podlet. Refer to the instructions in the
TLA 700 Series Installation Manual for replacing faulty probe podlets.
Troubleshoot the Logic Analyzer Module
Follow the procedure in this section to identify the failed part within the logic
analyzer module.
This procedure requires that the module is installed in a fully functional
mainframe. If you have not determined that the mainframe is functional, or if
you suspect the problem might be in a probe or in another module, refer to
Eliminating Other Problem Sources on page 6–32.
The basic troubleshooting procedures require minimal test equipment. There are
no accessible test points to measure voltages. An ohmmeter is recommended for
checking fuses.
Testing and adjustments might be required to correct some faults. Under those
circumstances, you will need the test equipment listed in the TLA 700 Series
Performance Verification and Adjustment Technical Reference Manual.
Probe-Level Troubleshooting
Equipment Required

Troubleshooting
6–34 TLA 700 Series Logic Analyzer Modules Service Manual
The fault isolation procedure requires that you:
recognize codes flashed by the front–panel LEDs during power up.
be familiar with the power-on diagnostics.
know how to run extended diagnostics and self calibration.
To fill these requirements, read the topics below before performing the Fault
Isolation Procedure on page 6–35.
Front-Panel LEDs. The READY, ACCESSED, ARM’D, and TRIG’D front panel
LEDs provide information about the TLA 7Lx/TLA 7Mx Logic Analyzer
Module at power-on.
LED behavior follows:
The green READY LED indicates that the module has passed the power-on
diagnostics and is ready to communicate with the controller.
The ACCESSED LED turns on any time the controller accesses the logic
analyzer module.
The ARM’D LED turns on when the logic analyzer module is armed during
an acquisition.
The TRIG’D LED turns on when the logic analyzer module triggers during
an acquisition.
Self Calibration. Use self calibration to calibrate the installed modules. Run the
self calibration after a minimum of a 30 minute warm-up and prior to running the
extended diagnostics. For more information on when to run the self calibration,
refer to Running the Self Calibration on page 2–7.
Power-On Diagnostics. Power-on diagnostics check basic functionality of the
logic analyzer at every power on. If any failures occur at power on, the screen
displays the calibration and diagnostics property sheet.
If there are no diagnostic failures when you power on the logic analyzer, you can
display and run the calibration and diagnostics property sheet by selecting
Calibration and Diagnostics from the System menu.
Preparation

Troubleshooting
TLA 700 Series Logic Analyzer Modules Service Manual 6–35
Extended Diagnostics. The extended diagnostics execute more thorough tests than
the power-on diagnostics. Using the extended diagnostics, you can do the
following tasks:
Run tests individually or as a group
Run tests once or continuously
Run tests until a failures occur
NOTE. For best results, run the diagnostics with probes disconnected from the
module.
To run the extended diagnostics, do the following steps:
1. Start the TLA 700 Series application if it is not already running.
2. Select the System menu, and point to Calibration and Diagnostics.
3. Select the extended diagnostics property page.
4. Select the individual tests, group of tests, or all tests.
5. Run the tests.
While the tests are executing, the word Running displays adjacent to the tests.
When the tests are complete, the tests display either a Pass or Fail indication.
The Primary Troubleshooting Tree (Figure 6–15 on page 6–37) provides
troubleshooting steps that test the logic analyzer module. Use the following
procedure with that tree.
To determine if module is recognized, perform the following steps:
1. Install the logic analyzer module into a known-good mainframe.
2. Before you power on the mainframe, look at the READY, ACCESSED
ARM’D, and TRIG’D front panel indicators.
3. Power on the mainframe and note how the front panel indicators respond.
a. Verify that the green READY indicator turns on while the diagnostics
are being checked. If the green READY indicator does not turn on, the
module is not being recognized which indicates possible problems on the
Local Processor Unit board.
b. Verify that after a few seconds the ACCESSED indicator turns on. The
indicator stays on while the module is accessed by the controller. After
the System window displays, the indicator blinks anytime the controller
accesses the module.
Fault Isolation Procedure

Troubleshooting
6–36 TLA 700 Series Logic Analyzer Modules Service Manual
4. If a and b are verified, the module is recognized; if not verified, the module
is not recognized. Proceed as the troubleshooting tree instructs.
5. If diagnostic failures occur, replace the board indicated by the tree. For
further confirmation, you can correlate the failed test displayed with a board
using Table 6–5 on page 6–38. You should also first check the “special
cases” of diagnostic failures below:
Note from the tree, that if all the diagnostics pass, but self calibration
fails, replace the Acquisition board.
If any of the Kernel test groups fail (ROM check, LPU RAM, LPU
Address decode, etc.) replace the LPU board.
The At-Speed Threshold Acquire check tests the functionality of the
daughter boards (TLA 7L3, TLA 7L4, TLA 7M3, or TLA 7M4 only) and
the Acquisition board. If this test fails for modules with daughter boards,
and the DAC and both of the At-Speed Async Acquire pass, replace the
daughter board; otherwise, replace the Acquisition board. Also, ensure
that the probes are disconnected from the module before running the
diagnostics.
If multiple tests fail, the problem could be power-supply related
problems on the Local Processor Unit board, faulty cables, or the
mainframe. If replacing the Acquisition board does not remedy the
failures, try replacing the Local Processor Unit board or the cables
between the Local Processor Unit board and the Acquisition board.
NOTE. Due to the module design, there are no accessible test points on the
module to connect test equipment, such as an oscilloscope or digital voltmeter, to
help isolate faults to an individual circuit board.
6. Use the Removal and Installation Procedures that begin on page 6–7 to
replace the faulty circuit board.
NOTE. Before replacing modules, be sure to inspect all associated cables and
connectors for damage and proper installation.
7. Refer to Table 6–6 on page 6–40 after module replacement and perform ALL
verification and adjustment procedures identified in that table for the
replaced board.
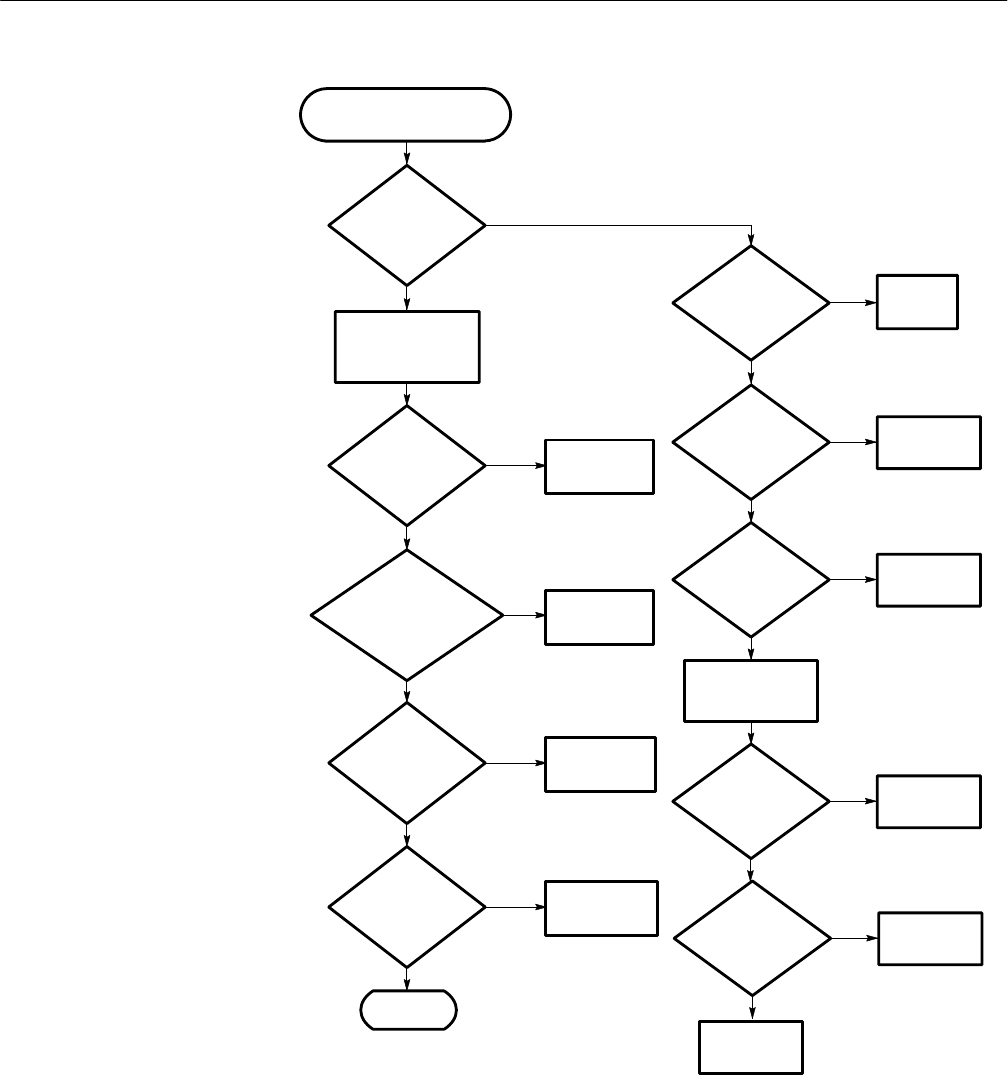
Troubleshooting
TLA 700 Series Logic Analyzer Modules Service Manual 6–37
Replace LPU
board
Start TLA 700 application
Run extended
diagnostics
Only at–speed
threshold acquire
test fail?
Module
recognized?
Other test fail?
Check fuses (see
page 6–25 for
fuse location)
Flash jumper
installed?
Address
switches set to
00? Set switches
to FF
Remove
jumper
No
Yes
No
Yes
Yes
Yes
No
No
No
Kernel tests
pass? No
Yes
Replace
daughter board
Replace
acquisition board
Yes
Self
calibration
fail?
No
No
Replace
acquisition board
Yes
Good module
Faulty
mainframe? Repair
mainframe
Yes
No
Fuses
good? Replace
fuses
No
Yes
Replace LPU
board
Faulty
module
firmware? Reinstall
firmware
Yes
No
Figure 6–15: Primary troubleshooting chart
Primary Troubleshooting
Chart
Troubleshooting
6–38 TLA 700 Series Logic Analyzer Modules Service Manual
Table 6–5 can help you isolate problems to one of the three circuit boards in the
module (use the Removal and Installation Procedures beginning on page 6–7 to
replace the faulty circuit board):
Table 6–5: Diagnostic tests
Circuit board Group & Test Power on Extended
LPU board Kernel
ROM Check n n
LPU RAM n n
Address Decode n n
NVRAM Check n n
Acquisition board Timestamp
Address/Data Bus n n
Memory Address Rollover n n
Timestamp Rollover n n
Timestamp Fast Clock n
Acquisition RAM Data Bus n n
Acquisition RAM Address Bus n n
Timestamp Acquire n
Store Signals n n
Acquisition board ClockAddress/Data Bus n n
Qualifier/Combiner RAM n n
Clock State Machine RAM n n
MagniVu RAM n n
Acquisition RAM Data Bus n n
Acquisition RAM Address Bus n n
Store Signals n n
Flag Bus n
Acquisition Data Path
Address/Data Bus n n
Hi-Resolution RAM n n
Acquisition RAM Data Bus n n
Acquisition RAM Address Bus n n
Store Signals n n
Bin & Log Busses n n
Diagnostic Tests Table
Troubleshooting
TLA 700 Series Logic Analyzer Modules Service Manual 6–39
Table 6–5: Diagnostic tests (Cont.)
Circuit board ExtendedPower onGroup & Test
Acquisition board Trigger
Address/Data Bus n n
Internal RAM n n
Data Events n
Clock Events n
Log_G Signal n n
Trigger Crossbar n n
Signal/Trigger Lines n n
Acquisition RAM
RAM Selection n n
Acquisition Data RAM 3 n
Acquisition Data RAM 2 n
Acquisition Data RAM 1 n
Acquisition Data RAM 0 n
Clock RAM n
Timestamp RAM n
Miscellaneous
DAC n n
Acquisition Address Decode n n
At-speed Threshold Acquire1n
At-speed Async Acquire n
At-speed Sync Acquire n
Daughter board Miscellaneous
(TLA 7L3, TLA 7L4, TLA 7M3, and TLA 7M4
only) At-speed Threshold Acquire1,2 n
1 Ensure probes are disconnected before running this test.
2Replace the Daughter board if this test fails and the DAC and the At-speed Async Acquire test both pass.
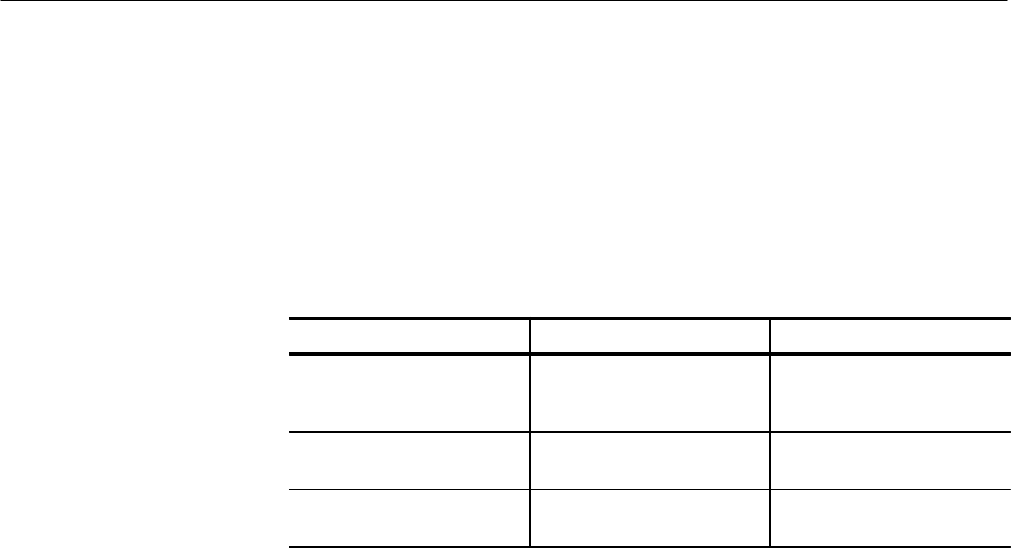
Troubleshooting
6–40 TLA 700 Series Logic Analyzer Modules Service Manual
Adjustment After Repair
After the removal and replacement of a circuit board or assembly due to
electrical failure, locate the board removed in Table 6–6 and perform the
indicated procedures. Note that Adjustment procedures are found in the TLA 700
Series Performance Verification and Adjustment Manual.
Table 6–6: Requirements after replacement
Board Replaced Adjustment Required Verification Checks
LPU board Adjustment: Powerflex1,
Firmware level restoration2,
Deskew, Self Calibration
Self Calibration, Power-on and
Extended Diagnostics
Acquisition board Adjustment: Self Calibration,
Deskew Self Calibration, Power-on and
Extended Diagnostics
Daughter boards Adjustment: Deskew Power-on and Extended
Diagnostics
1The PowerFlex restoration or changes can only be made by Tektronix service
personnel.
2Refer to the TLA 700 Series Installation Manual for instructions for updating module
firmware.
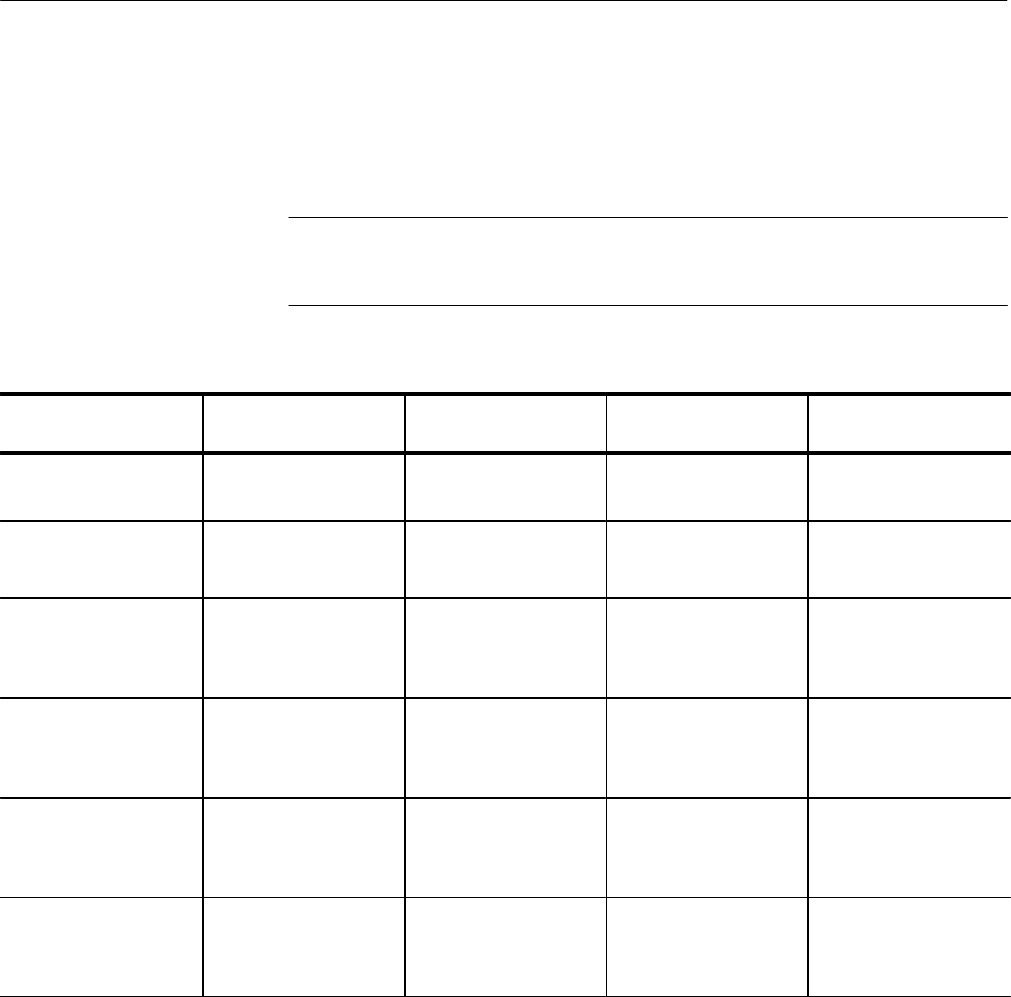
Troubleshooting
TLA 700 Series Logic Analyzer Modules Service Manual 6–41
Overview of Procedures
Table 6–7 provides a brief overview of the troubleshooting, adjustment,
verification, and calibration procedures.
NOTE. Calibration constants are stored in the LPU NVRAM. You must always
perform a new self calibration and certification after you replace the LPU
board.
Table 6–7: Troubleshooting overview
Procedure Recommended
interval Purpose When required Documented
Diagnostics (power on &
extended) Incoming inspection
Annually
Verifies basic
functionality. During troubleshooting Power on Diagnostics,
page 6–34
Adjustment:
self calibration Annually
As needed
Verifies basic
functionality. After acquisition, LPU, or
daughter board replace-
ment
When to perform Self
Calibration, page 2–7
Adjustment: deskew After board replacement
or annually Time-aligns the data
channel After board replacement TLA 700 Series Perfor-
mance Verification and
Adjustment Technical
Reference Manual
Functional verification Incoming inspection
As needed
Verifies front end and
basic functionality
including probes
After board replacement TLA 700 Series Perfor-
mance Verification and
Adjustment Technical
Reference Manual
Performance verification Annually or as needed Verifies advertised per-
formance specifications After board replacement TLA 700 Series Perfor-
mance Verification and
Adjustment Technical
Reference Manual
Calibration (certification) Annual recertification Verifies primary refer-
ences After acquisition, LPU, or
daughter board replace-
ment
TLA 700 Series Perfor-
mance Verification and
Adjustment Technical
Reference Manual

Troubleshooting
6–42 TLA 700 Series Logic Analyzer Modules Service Manual

TLA 700 Series Logic Analyzer Modules Service Manual 6–43
Repackaging Instructions
This section contains the information needed to repackage the logic analyzer
module for shipment or storage.
Packaging
If at all possible use the original packaging to ship or store the instrument. If the
original packaging is not available, use a corrugated cardboard shipping carton
having a test strength of at least 275 pounds (125 kg) and with an inside
dimension at least six inches (15.25 cm) greater than the instrument dimensions.
Add cushioning material to prevent the instrument from moving around in the
shipping container.
CAUTION. When returning the LPU board separately, be sure to properly support
the narrow LED arm of the circuit board so it will not be damaged during transit
or storage.
If the instrument is being shipped to a Tektronix Service Center, enclose the
following information:
The owner’s address
Name and phone number of a contact person
Type and serial number of the instrument
Reason for returning
A complete description of the service required
NOTE. When ordering the LPU board for exchange or repair, you will need to
supply the above information, including the firmware level and PowerFlex
configuration information.
Seal the shipping carton with an industrial stapler or strapping tape.
Mark the address of the Tektronix Service Center and also your own return
address on the shipping carton in two prominent locations.

Repackaging Instructions
6–44 TLA 700 Series Logic Analyzer Modules Service Manual
Storage
The TLA 7Lx/TLA 7Mx Logic Analyzer Module should be stored in a clean, dry
environment. The following environmental characteristics apply for both
shipping and storage:
Temperature range: –40° F to +160° F (–40° C to +71° C)
Altitude: To 40,000 feet (12,190 meters)
See Table 1–9 on page 1–8 for a complete listing of the environmental character-
istics.
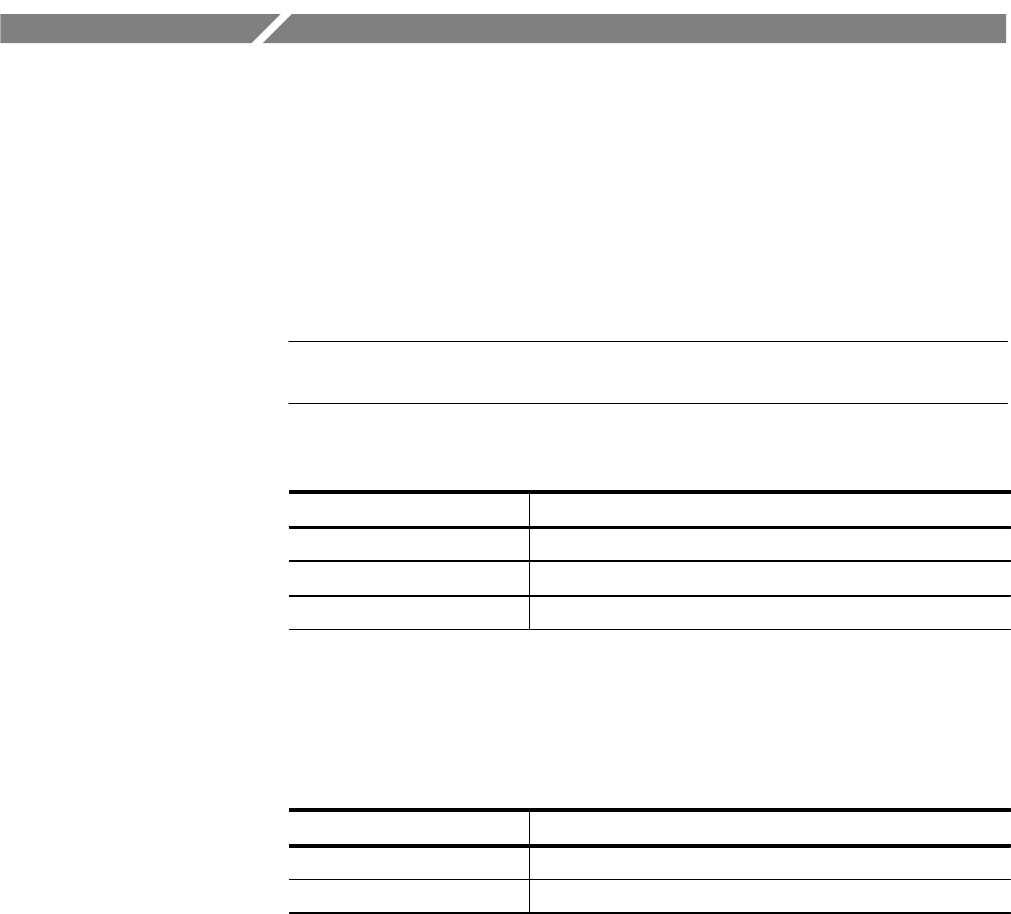
TLA 700 Series Logic Analyzer Modules Service Manual 7–1
Options
This chapter lists the advertised options for each logic analyzer module. Refer to
the Replaceable Mechanical Parts chapter for a list of standard and optional
accessories for each module.
Table 7–1 lists the options for the TLA 7L1, TLA 7L2, TLA 7L3, and TLA 7L4
Logic Analyzer modules.
NOTE. Service options are listed on the Tektronix Service Options page that
precedes the Table of Contents in this manual.
Table 7–1: TLA 7L1, TLA 7L2, TLA 7L3, and TLA 7L4 options
Option Description
1S Substitute 200 MHz State module
2S Substitute 128 K memory depth
95 Add calibration data report
Table 7–2 lists the options for the TLA 7M1, TLA 7M2, TLA 7M3, and
TLA 7M4 Logic Analyzer modules.
Table 7–2: TLA 7M1, TLA 7M2, TLA 7M3, and TLA 7M4 options
Option Description
1S Substitute 200 MHz State module
95 Add calibration data report

Options
7–2 TLA 700 Series Logic Analyzer Modules Service Manual

TLA 700 Series Logic Analyzer Modules Service Manual 8–1
Replaceable Electrical Parts
Refer to the Mechanical Parts List section for a complete listing and description
of replaceable parts.

Replaceable Electrical Parts
8–2 TLA 700 Series Logic Analyzer Modules Service Manual
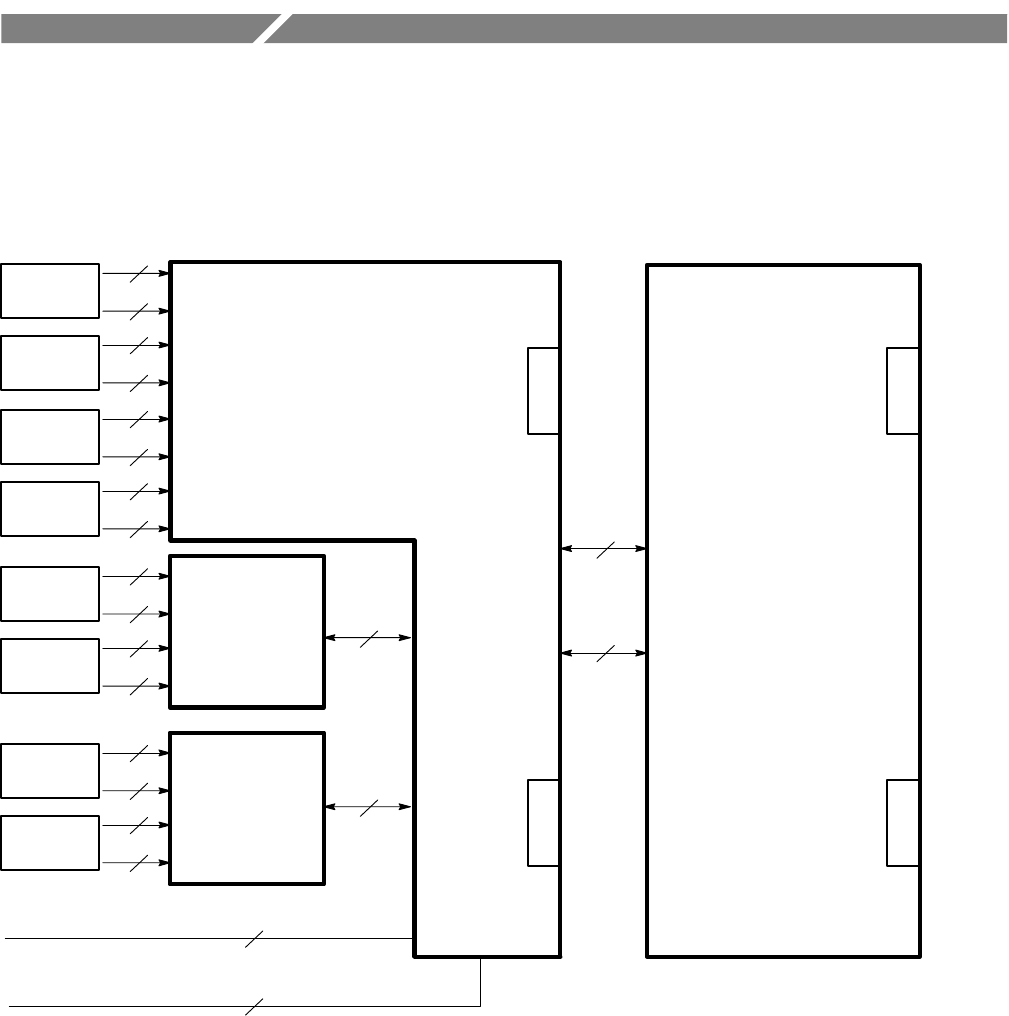
TLA 700 Series Logic Analyzer Modules Service Manual 9–1
Diagrams
This chapter contains the block diagram and the interconnection diagram for the
logic analyzer module.
Acquisition Board
100
Local Processor Unit Board
P2
P1
Daughter Board
Daughter Board
Merge
Probe
P2
P1
100
100
100
16
1
Probe 16
1
Probe 16
1
Probe 16
1
Probe 16
1
Probe 16
1
Probe 16
1
Probe 16
1
50
50
J1330
J1630
J1420
J1270
J1790J1480
J1390J1480
TLA 7L4 and
TLA 7M4 Only
TLA 7L3, TLA 7L4
TLA 7M3, TLA 7M4
W100
W200
W300
W350
Figure 9–1: Interconnections
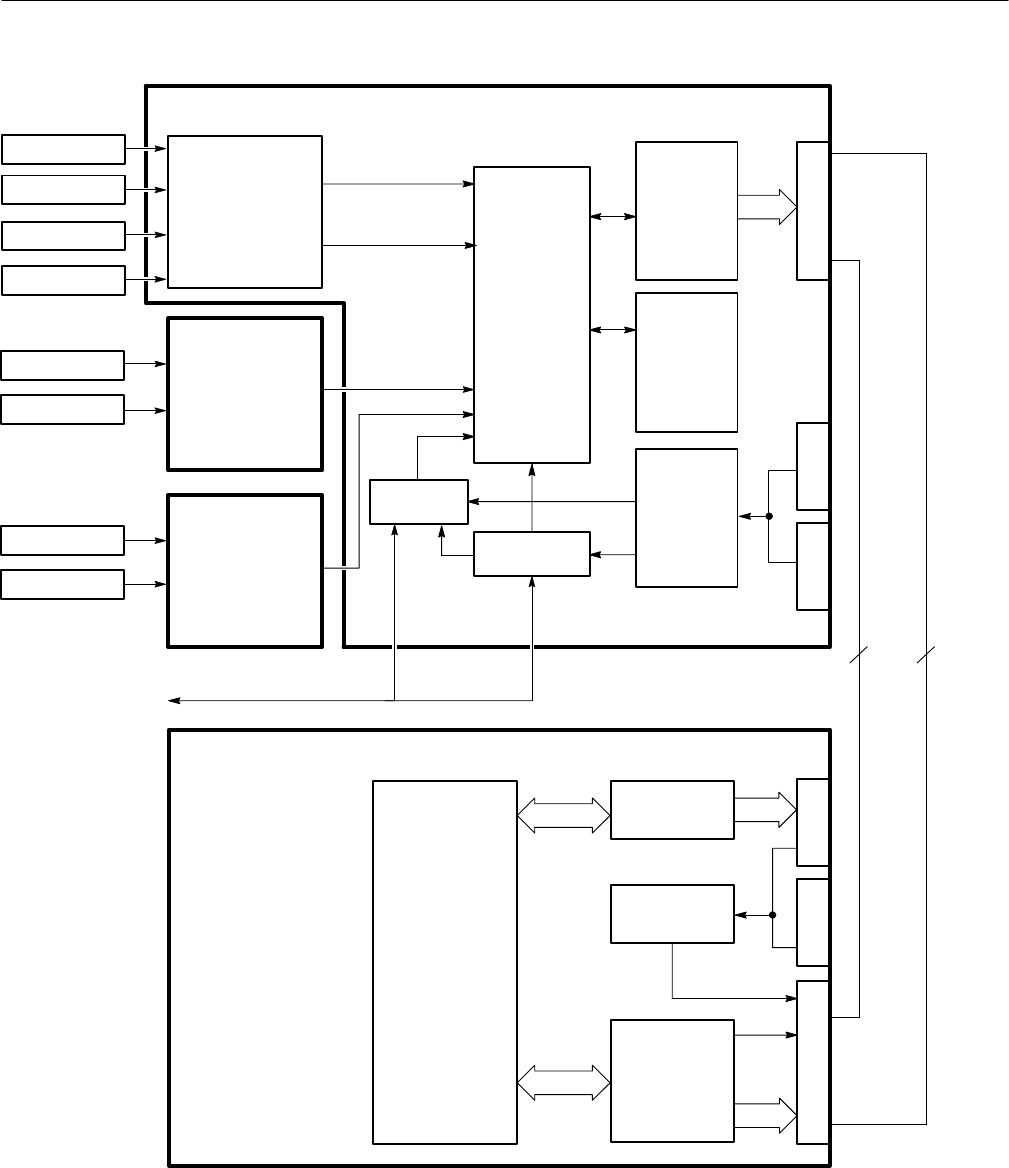
Diagrams
9–2 TLA 700 Series Logic Analyzer Modules Service Manual
Acquisition Board
100
Local Processor Unit Board
68330
processor system
Communications
Interface
68330 Bus
P1
P2
100
Acquisition
system
P2
Backplane
Interface
Trigger
Power
supplies
Acquisition
Board
Interface
LPU
Board
Interface
P1
TLA 7L4 and
TLA 7M4 Only
TLA 7L3, TLA 7L4
TLA 7M3, TLA 7M4
Only
Acquisition
Memory
Probe Interface
Clocks
Comparator
Daughter Board
Comparator
Daughter Board
Merge
68330 Bus
Probe
Probe
Probe
Probe
Probe
Probe
Probe
Probe
Figure 9–2: Block diagram

TLA 700 Series Logic Analyzer Modules Service Manual 10–1
Replaceable Mechanical Parts
This section contains a list of the replaceable parts for the TLA 7Lx/TLA 7Mx
Logic Analyzer Module. Use this list to identify and order replacement parts.
Parts Ordering Information
Replacement parts are available through your local Tektronix field office or
representative.
Changes to Tektronix products are sometimes made to accommodate improved
components as they become available and to give you the benefit of the latest
improvements. Therefore, when ordering parts, it is important to include the
following information in your order:
Part number
Instrument type or model number
Instrument serial number
Instrument modification number, if applicable
If you order a part that has been replaced with a different or improved part, your
local Tektronix field office or representative will contact you concerning any
change in part number.
When you exchange some circuit boards, such as the LPU board, you must
supply the following information. This will allow the board to be preconfigured
to the proper PowerFlex level for your logic analyzer. Alternatively, you can
return the repaired module (with the necessary information) to your local service
center for configuration.
Model number
Serial number
PowerFlex option upgrade number
Firmware level
Change information, if any, is located at the rear of this manual.
Modules can be serviced by selecting one of the following three options. Contact
your local Tektronix service center or representative for repair assistance.
Module Servicing
Replaceable Mechanical Parts
10–2 TLA 700 Series Logic Analyzer Modules Service Manual
Module Exchange. In some cases you may exchange your module for a reman-
ufactured module. These modules cost significantly less than new modules and
meet the same factory specifications. For more information about the module
exchange program, call 1-800-TEK-WIDE, extension 6630.
Module Repair and Return. You may ship your module to us for repair, after which
we will return it to you.
New Modules. You may purchase replacement modules in the same way as other
replacement parts.
Using the Replaceable Parts List
This section contains a list of the mechanical and/or electrical components that
are replaceable for the <instrument>. Use this list to identify and order replace-
ment parts. The following table describes each column in the parts list.
Parts list column descriptions
Column Column name Description
1Figure & index number Items in this section are referenced by figure and index numbers to the exploded view
illustrations that follow.
2Tektronix part number Use this part number when ordering replacement parts from Tektronix.
3 and 4 Serial number Column three indicates the serial number at which the part was first effective. Column four
indicates the serial number at which the part was discontinued. No entries indicates the part is
good for all serial numbers.
5 Qty This indicates the quantity of parts used.
6Name & description An item name is separated from the description by a colon (:). Because of space limitations, an
item name may sometimes appear as incomplete. Use the U.S. Federal Catalog handbook
H6-1 for further item name identification.
7Mfr. code This indicates the code of the actual manufacturer of the part.
8Mfr. part number This indicates the actual manufacturer’s or vendor’s part number.
Abbreviations conform to American National Standard ANSI Y1.1–1972.
The table titled Manufacturers Cross Index shows codes, names, and addresses
of manufacturers or vendors of components listed in the parts list.
Abbreviations
Mfr. Code to Manufacturer
Cross Index

Replaceable Mechanical Parts
TLA 700 Series Logic Analyzer Modules Service Manual 10–3
Manufacturers cross index
Mfr.
code Manufacturer Address City, state, zip code
00779 AMP INC. CUSTOMER SERVICE DEPT
PO BOX 3608 HARRISBURG, PA 17105–3608
05820 EG & G WAKEFIELD 60 AUDUBON ROAD WAKEFIELD, MA 01880
06383 PANDUIT CORP 17303 RIDGELAND AVE TINLEY PARK, IL 60477–3048
0JR05 TRIQUEST PRECISION PLASTICS 3000 LEWIS & CLARK HWY
PO BOX 66008 VANCOUVER, WA 98666–6008
0KB01 STAUFFER SUPPLY CO 810 SE SHERMAN PORTLAND, OR 97214–4657
0KB05 NORTH STAR NAMEPLATE INC 5750 NE MOORE COURT HILLSBORO, OR 97124–6474
0LXM2 LZR ELECTRONICS INC 8051 CESSNA AVENUE GAITHERSBURG, MD 20879
18677 SCANBE CORP A ZERO CORP COMPANY
3445 FLETCHER AVE EL MONTE, CA 91731
22526 BERG ELECTRONICS INC 825 OLD TRAIL ROAD ETTERS, PA 17319
23633 RICHEY ELECTRONICS INC 7441 LINCOLN WAY GARDEN GROVE, CA 92641
26742 METHODE ELECTRONICS INC BACKPLAIN DIVISION
7444 WEST WILSON AVE CHICAGO, IL 60656–4548
50434 HEWLETT PACKARD 370 W TRIMBLE ROAD SAN JOSE, CA 95131–1008
53387 3M COMPANY ELECTRONICS PRODUCTS DIV
3M AUSTIN CENTER AUSTIN, TX 78769–2963
55285 BERGQUIST COMPANY INC., THE 5300 EDINA INDUSTRIAL BLVD MINNEAPOLIS, MN 55435–3707
55322 SAMTEC INC 810 PROGRESS BLVD
PO BOX 1147 NEW ALBANY, IN 47150
61857 SAN–O INDUSTRIAL CORP 91–3 COLIN DRIVE HOLBROOK, NY 11741
75915 LITTELFUSE INC 800 E NORTHWEST HWY DES PLAINES, IL 60016–3049
80009 TEKTRONIX INC 14150 SW KARL BRAUN DR
PO BOX 500 BEAVERTON, OR 97077–0001
81073 GRAYHILL INC 561 HILLGROVE AVE
PO BOX 10373 LAGRANGE, IL 60525
81312 WINCHESTER ELECTRONICS DIV OF LITTON INDUSTRIES INC
400 PARK ROAD WATERTOWN, CT 06795–0050
8X345 NORTHWEST SPRING MFG CO 5858 SW WILLOW LANE LAKE OSWEGO, OR 97035
TK1943 NEILSEN MANUFACTURING INC 3501 PORTLAND RD NE SALEM, OR 97303
TK2469 UNITREK CORPORATION 3000 LEWIS & CLARK HWY
SUITE 2 VANCOUVER, WA 98661
TK2647 INSTRUMENT SPECIALTIES CO INC. C/O TEMCO NW
1336 SE 51ST STREET HILLSBORO, OR 97123

Replaceable Mechanical Parts
10–4 TLA 700 Series Logic Analyzer Modules Service Manual
Replaceable parts list
Fig. &
index
number Tektronix part
number Serial no.
effective Serial no.
discont’d Qty Name & description Mfr.
code Mfr. part number
TLA 7L1 AND TLA 7M1 34-CHANNEL MODULES
10–1–1 200–4338–00 1 COVER:HOLE COVER FOR NON-MERGED MODULES 0KB05 ORDER BY DESCR
–2 211–0409–00 17 SCR,ASSEM WSHR:4–40 X 0.312,PNH,STL,CDPL,T–10 TORX 0KB01 211–0409–00
–3 407–4489–00 1 BRACKET, LPU BUS CABLES
–4 386–1657–00 5 SUPPORT,CKT BD:ACETY,RESIN NATURAL
(PM1, PM2, PM3, PM4, PM5) 0JR05 ORDER BY DESCR
–5 671–3306–00 1 CKT BD ASSY:LPU,LOCAL PROCESSOR UNIT
(A10) 80009 671–3306–00
– 150–5013–00 1 DIODE,OPTO:LED,GRN,572NM,5MCD AT 10MA
(A10DS1460) (NOT ILLUSTRATED) 50434 HSMG–T600
– 159–0145–00 1 FUSE,WIRE LEAD:15A,32V,10 SECONDS
(A10F1780) (NOT ILLUSTRATED) 61857 SP7–15A
– 159–5009–00 4 FUSE,SMD:1.5A,125V,FAST BLOW
(A10F1681, A10F1881, A10F1981, A10F1983)
(NOT ILLUSTRATED)
75915 45101.5
–6 131–2866–00 2 CONN,DIN:PCB,MALE,RTANG,3 X 32,0.1 CTR
(A10P1, A10P2) 06383 100–096–053
–7 260–2597–00 2 SWITCH,ROTARY:HEXADECIMAL,100MA AT 50VDC,RIGHT
ANGLE,0.430 W X 0.400 H X 0.202 L
(A10S1, A10S2)
81073 94HAB16RA
–8 131–3766–00 1 CONN,HDR:PCB,MALE,RTANG,1 X 2,0.1 CTR
(A10J1) 00779 87232–2
–9 131–1857–00 1 CONN,HDR:PCB,MALE,STR,1 X 36,0.1 CTR
(A10J1250, A10J1258, A10J1450, A10J1458, A10J1465,
A10J1540, A10J1541, A10J1565, A10J1641)
22526 65507–136
– 131–3520–00 1 CONN,HDR:PCB,MALE,STR,2 X 5,0.1 CTR
(A10J1165) (NOT ILLUSTRATED) 53387 2510–6002UB
– 131–5562–00 1 CONN,RIBBON:PCB,MALE,STR,100 POS,0.050 CTR
(A10J1160) (NOT ILLUSTRATED) 53387 91100–2201BP
–10 129–1478–00 5 SPACER, POST:1.860 L,1.10 SPACING,W/0.35 L,0.25
HEX,W/4–40 X 0.750 L 6–32 THD,1/4 HEX 80009 129–1478–00
–11 671–3866–01 B010100 B019999 1 CIRCUIT BD ASSY:34 CH,128K,100MHZ ACQUISITION
(A16, TLA 7L1 ONLY) 80009 671–3866–01
–11 671–3866–02 B020000 1 CIRCUIT BD ASSY:34 CH,128K,100MHZ ACQUISITION
(A16, TLA 7L1 ONLY) 80009 671–3866–02
–11 671–3868–01 B010100 B019999 1 CIRCUIT BD ASSY:34CH,512K,100MHZ ACQUISITION
(A18, TLA 7M1 ONLY) 80009 671–3868–01
–11 671–3868–02 B020000 1 CIRCUIT BD ASSY:34CH,512K,100MHZ ACQUISITION
(A18, TLA 7M1 ONLY) 80009 671–3868–02
–12 131–6174–00 2 CONN,DIN:PRESSFIT,MALE,RTANG,3 X 32,0.1 CTR
(A16P1, A16P2, A18P1, A18P2) 81312 96P603307319
–13 386–6868–00 1 BACK PANEL TK1943 386–6868–00
–14 441–2102–00 1 CHASSIS ASSY:TWO WIDE, 34CH, W/SUB FRONT PANEL &
LABEL ATTACHED 80009 441–2102–00

Replaceable Mechanical Parts
TLA 700 Series Logic Analyzer Modules Service Manual 10–5
A16 A18
A10
1
2
3
456
7
8
9
10 11
12
13
14
15
16
17
18 19
20
21
22
23
24
25
26
27
28
29
30
Figure 10–1: TLA 7L1 and TLA 7M1 Logic Analyzer Module exploded view

Replaceable Mechanical Parts
10–6 TLA 700 Series Logic Analyzer Modules Service Manual
Replaceable parts list (Cont.)
Fig. &
index
number Tektronix part
number Serial no.
effective Serial no.
discont’d Qty Name & description Mfr.
code Mfr. part number
10–1–15 214–4762–00 4 SPRING,CONICAL:SPRING,CONICAL 8X345 ORDER BY DESCR
–16 211–0911–00 4 RETAINER SCREW,MACHINE:M2.5, PITCH 0.45MM, LENGTH
11MM, HEAD DIA 5MM, HEAD HEIGHT 2MM 18677 322401–05
–17 367–0484–00 1 HANDLE,EJECTOR:INJECTOR/EJECTOR ASSY, TWO
WIDE,W/OUT KEYING,SPRING LOADED 80009 367–0484–00
–18 334–9189–00 1 MARKER INDENT:EJECTOR LABEL,BOTTOM 0KB05 334918900
–19 334–9235–00 1 MARKER,IDENT:CONFIGURATION LABELS,6 LABELS PER
SHEET 80009 334–9235–00
–20 367–0483–00 1 HANDLE:INJECTOR/EJECTOR ASSEMBLY,TWO
WIDE,W/KEYING,SPRING LOADED 80009 367–0483–00
–21 334–9224–00 1 MARKER,IDENT:MKD,TOP INJECTOR/EJECTOR LABEL
(TLA 7L1 ONLY) 0KB05 ORDER BY DESCR
–21 334–9228–00 1 MARKER,IDENT:MKD,TOP INJECTOR/EJECTOR, LABEL
(TLA 7M1 ONLY) 0KB05 ORDER BY DESCR
–22 131–3363–00 2 CONN,HDR:PCB,MALE,RTANG,2 X 17,0.1CTR
(A16J2690, A16J2890, A18J2690, A18J2890) 53387 N2534–5002UB
– 159–5009–00 5 FUSE,SMD:1.5A,125V,FAST BLOW
(A16F2500, A16F2504, A16F2506, A16F2903, A16F2901,
A18F2500, A18F2504, A18F2506, A18F2903, A18F2901)
(NOT ILLUSTRATED)
75915 45101.5
– 159–5010–00 1 FUSE,SMD:7A,125V,FAST BLOW
(A16F2508, A18F2508) (NOT ILLUSTRATED) 75915 451007
– 214–4747–00 2 HEAT SINK,SEMIC:IC,PGA 11X11/MQUAD,1.1” X 1.1” X 0.45”
H,PIN FIN,ALUMINUM,BLACK
(A16XTU1570, A16XTU1670, A18XTU1570, A18XTU1670)
(NOT ILLUSTRATED)
05820 658–45AB
– 214–4748–00 2 HEAT SINK,SEMIC:IC,PGA 11X11/MQUAD,1.1” X 1.1” X 0.25”
H,PIN FIN,ALUMINUM,BLACK
(A16XSU1460, A16XSU1660, A18XSU1460, A18XSU1660)
(NOT ILLUSTRATED)
05820 658–25AB
–23 129–1479–00 4 SPACER, POST:1.285 OVERALL,0.535 L SPACING, W/0.35
L,0.25 HEX 4–40 INT THD X 6–32 EXT, 0.75 L 80009 129–1479–00
–24 131–5980–00 2 CONN,HDR:SMD,MALE,STR,2 X 50,0.05 X 0.1 CTR
(A16J1270 A16J1420, A18J1270, A18J1420) 00779 1–104549–0
–25 131–6069–00 2 CONN, RIBBON:PCB,MALE,RTANG,100 POS,0.05 CTR
(A10J1330, A10J1630) 00779 2–557100–5
–26 174–3533–00 2 CA ASSY,SP:RIBBON,IDC,30 AWG 80009 174–3533–00
–27 150–1278–00 3 DIODE,OPTO:LED,GRN,569NM,2MCD AT 5V
(A10DS1100, A10DS1102, A10DS1103) 50434 HLMP–1640–010
–28 150–1279–00 1 DIODE,OPTO:LED,YEL,585NM,2MCD AT 5V
(A10DS1101, A10DS1101) 50434 HLMP–1620–010
–29 200–4272–00 1 COVER 80009 200–4272–00
–30 348–1365–01 1 SHLD GSKT,ELEC:SYMETRICAL SLOTTED FINGER,0.350 W
X 7.5 L,RIVIT MTG,SNAP–IN,RIVIT SPACING 1.5 IN TK2647 0493–0069–01

Replaceable Mechanical Parts
TLA 700 Series Logic Analyzer Modules Service Manual 10–7

Replaceable Mechanical Parts
10–8 TLA 700 Series Logic Analyzer Modules Service Manual
Replaceable parts list
Fig. &
index
number Tektronix part
number Serial no.
effective Serial no.
discont’d Qty Name & description Mfr.
code Mfr. part number
TLA 7L2 AND TLA 7M2 68-CHANNEL MODULES
10–2–1 200–4338–00 1 COVER:HOLE COVER FOR NON-MERGED MODULES 0KB05 ORDER BY DESCR
–2 211–0409–00 17 SCR,ASSEM WSHR:4–40 X 0.312,PNH,STL,CDPL,T–10 TORX 0KB01 211–0409–00
–3 407–4489–00 1 BRACKET, LPU BUS CABLES
–4 386–1657–00 5 SUPPORT,CKT BD:ACETY,RESIN NATURAL
(PM1, PM2, PM3, PM4, PM5) 0JR05 ORDER BY DESCR
–5 671–3306–00 1 CKT BD ASSY:LPU,LOCAL PROCESSOR UNIT
(A10) 80009 671–3306–00
– 150–5013–00 1 DIODE,OPTO:LED,GRN,572NM,5MCD AT 10MA
(A10DS1460) (NOT ILLUSTRATED) 50434 HSMG–T600
– 159–0145–00 1 FUSE,WIRE LEAD:15A,32V,10 SECONDS
(A10F1780) (NOT ILLUSTRATED) 61857 SP7–15A
– 159–5009–00 4 FUSE,SMD:1.5A,125V,FAST BLOW
(A10F1681, A10F1881, A10F1981, A10F1983)
(NOT ILLUSTRATED)
75915 45101.5
–6 131–2866–00 2 CONN,DIN:PCB,MALE,RTANG,3 X 32,0.1 CTR
(A10P1, A10P2) 06383 100–096–053
–7 260–2597–00 2 SWITCH,ROTARY:HEXADECIMAL,100MA AT 50VDC,RIGHT
ANGLE,0.430 W X 0.400 H X 0.202 L
(A10S1, A10S2)
81073 94HAB16RA
–8 131–3766–00 1 CONN,HDR:PCB,MALE,RTANG,1 X 2,0.1 CTR
(A10J1) 00779 87232–2
–9 131–1857–00 1 CONN,HDR:PCB,MALE,STR,1 X 36,0.1 CTR
(A10J1250, A10J1258, A10J1450, A10J1458, A10J1465,
A10J1540, A10J1541, A10J1565, A10J1641)
22526 65507–136
– 131–3520–00 1 CONN,HDR:PCB,MALE,STR,2 X 5,0.1 CTR
(A10J1165) (NOT ILLUSTRATED) 53387 2510–6002UB
– 131–5562–00 1 CONN,RIBBON:PCB,MALE,STR,100 POS,0.050 CTR
(A10J1160) (NOT ILLUSTRATED) 53387 91100–2201BP
–10 129–1478–00 5 SPACER, POST:1.860 L,1.10 SPACING,W/0.35 L,0.25
HEX,W/4–40 X 0.750 L 6–32 THD,1/4 HEX 80009 129–1478–00
–11 671–3867–01 B010100 B019999 1 CIRCUIT BD ASSY:68CH,128K,ACQUISITION
(A17, TLA 7L2 ONLY) 80009 671–3867–01
–11 671–3867–02 B020000 1 CIRCUIT BD ASSY:68CH,128K,ACQUISITION
(A17, TLA 7L2 ONLY) 80009 671–3867–02
–11 671–3870–01 B010100 B019999 1 CIRCUIT BD ASSY:68CH,512K,100MHZ ACQUISITION
(A20, TLA 7M2 ONLY) 80009 671–3870–01
–11 671–3870–02 B020000 1 CIRCUIT BD ASSY:68CH,512K,100MHZ ACQUISITION
(A20, TLA 7M2 ONLY) 80009 671–3870–02
–12 131–6174–00 2 CONN,DIN:PRESSFIT,MALE,RTANG,3 X 32,0.1 CTR
(A17P1, A17P2, A20P1, A20P2) 81312 96P603307319
–13 386–6868–00 1 BACK PANEL TK1943 386–6868–00
–14 441–2103–00 1 CHASSIS ASSY:TWO WIDE, 68CH, W/SUB FRONT PANEL &
LABEL ATTACHED 80009 441–2103–00
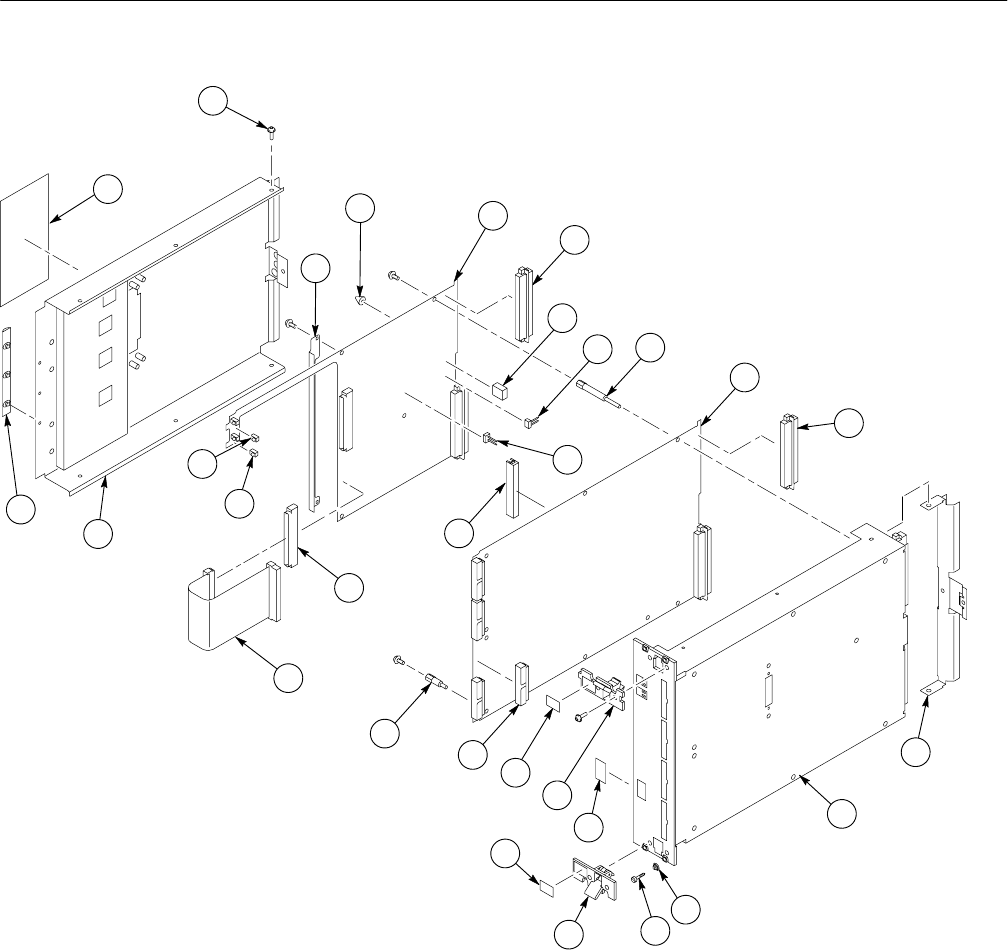
Replaceable Mechanical Parts
TLA 700 Series Logic Analyzer Modules Service Manual 10–9
A17 A20
A10
1
2
3
456
7
8
9
10 11
12
13
14
15
16
17
18 19
20
21
22
23
24
25
26
27
28
29
30
Figure 10–2: TLA 7L2 and TLA 7M2 Logic Analyzer Module exploded view

Replaceable Mechanical Parts
10–10 TLA 700 Series Logic Analyzer Modules Service Manual
Replaceable parts list (Cont.)
Fig. &
index
number Tektronix part
number Serial no.
effective Serial no.
discont’d Qty Name & description Mfr.
code Mfr. part number
10–2–15 214–4762–00 4 SPRING,CONICAL:SPRING,CONICAL 8X345 ORDER BY DESCR
–16 211–0911–00 4 RETAINER SCREW,MACHINE:M2.5, PITCH 0.45MM, LENGTH
11MM, HEAD DIA 5MM, HEAD HEIGHT 2MM 18677 322401–05
–17 367–0484–00 1 HANDLE,EJECTOR:INJECTOR/EJECTOR ASSY, TWO
WIDE,W/OUT KEYING,SPRING LOADED 80009 367–0484–00
–18 334–9189–00 1 MARKER INDENT:EJECTOR LABEL,BOTTOM 0KB05 334918900
–19 334–9235–00 1 MARKER,IDENT:CONFIGURATION LABELS,6 LABELS PER
SHEET 80009 334–9235–00
–20 367–0483–00 1 HANDLE:INJECTOR/EJECTOR ASSEMBLY,TWO
WIDE,W/KEYING,SPRING LOADED 80009 367–0483–00
–21 334–9225–00 1 MARKER,IDENT:MKD,TOP INJECTOR/EJECTOR
(TLA 7L2 ONLY) 0KB05 ORDER BY DESCR
–21 334–9229–00 1 MARKER,IDENT:MKD,TOP INJECTOR/EJECTOR
(TLA 7M2 ONLY) 0KB05 ORDER BY DESCR
–22 131–3363–00 4 CONN,HDR:PCB,MALE,RTANG,2 X 17,0.1CTR
(A17J2290, A17J2490, A17J2690, A17J2890, A20J2290,
A20J2490, A20J2690, A20J2890)
53387 N2534–5002UB
– 159–5009–00 5 FUSE,SMD:1.5A,125V,FAST BLOW
(A17F2500, A17F2504, A17F2506, A17F2903, A17F2901,
A20F2500, A20F2504, A20F2506, A20F2903, A20F2901)
(NOT ILLUSTRATED)
75915 45101.5
– 159–5010–00 1 FUSE,SMD:7A,125V,FAST BLOW
(A17F2508, A20F2508) (NOT ILLUSTRATED) 75915 451007
– 214–4747–00 3 HEAT SINK,SEMIC:IC,PGA 11X11/MQUAD,1.1” X 1.1” X 0.45”
H,PIN FIN,ALUMINUM,BLACK
(A17XTU1170, A17XTU1570, A17XTU1670, A20XTU1170,
A20XTU1570, A20XTU1670) (NOT ILLUSTRATED)
05820 658–45AB
– 214–4748–00 2 HEAT SINK,SEMIC:IC,PGA 11X11/MQUAD,1.1” X 1.1” X 0.25”
H,PIN FIN,ALUMINUM,BLACK
(A17XSU1460, A17XSU1660, A20XSU1460, A20XSU1660)
(NOT ILLUSTRATED)
05820 658–25AB
–23 129–1479–00 4 SPACER, POST:1.285 OVERALL,0.535 L SPACING, W/0.35
L,0.25 HEX 4–40 INT THD X 6–32 EXT, 0.75 L 80009 129–1479–00
–24 131–5980–00 2 CONN,HDR:SMD,MALE,STR,2 X 50,0.05 X 0.1 CTR
(A17J1270, A17J1420, A20J1270, A20J1420) 00779 1–104549–0
–25 131–6069–00 2 CONN, RIBBON:PCB,MALE,RTANG,100 POS,0.05 CTR
(A10J1330, A10J1630) 00779 2–557100–5
–26 174–3533–00 2 CA ASSY,SP:RIBBON,IDC,30 AWG 80009 174–3533–00
–27 150–1278–00 3 DIODE,OPTO:LED,GRN,569NM,2MCD AT 5V
(A10DS1100, A10DS1102, A10DS1103) 50434 HLMP–1640–010
–28 150–1279–00 1 DIODE,OPTO:LED,YEL,585NM,2MCD AT 5V
(A10DS1101) 50434 HLMP–1620–010
–29 200–4272–00 1 COVER 80009 200–4272–00
–30 348–1365–01 1 SHLD GSKT,ELEC:SYMETRICAL SLOTTED FINGER,0.350 W
X 7.5 L,RIVIT MTG,SNAP–IN,RIVIT SPACING 1.5 IN TK2647 0493–0069–01

Replaceable Mechanical Parts
TLA 700 Series Logic Analyzer Modules Service Manual 10–11

Replaceable Mechanical Parts
10–12 TLA 700 Series Logic Analyzer Modules Service Manual
Replaceable parts list
Fig. &
index
number Tektronix part
number Serial no.
effective Serial no.
discont’d Qty Name & description Mfr.
code Mfr. part number
TLA 7L3 AND TLA 7M3 102-CHANNEL MODULES
10–3–1 407–4458–00 1 BRACKET,CABLE:MALE MERGE ASSEMBLY 80009 407–4458–00
–2 211–0409–00 23 SCR,ASSEM WSHR:4–40 X 0.312,PNH,STL,CDPL,T–10 TORX 0KB01 211–0409–00
–3 348–1537–00 4 GASKET,EMI:CLIP–ON,1.98 L, BE CU,TIN PLATED,W/T
LANCES TK2647 97–563–17 W/2 T
LANCES
–4 407–4489–00 1 BRACKET, LPU BUS CABLES
–5 386–1657–00 5 SUPPORT,CKT BD:ACETY,RESIN NATURAL
(PM1, PM2, PM3, PM4, PM5) 0JR05 ORDER BY DESCR
–6 671–3306–00 1 CKT BD ASSY:LPU,LOCAL PROCESSOR UNIT
(A10) 80009 671–3306–00
– 159–0145–00 1 FUSE,WIRE LEAD:15A,32V,10 SECONDS
(A10F1780) (NOT ILLUSTRATED) 61857 SP7–15A
– 159–5009–00 4 FUSE,SMD:1.5A,125V,FAST BLOW
(A10F1681, A10F1881, A10F1981, A10F1983)
(NOT ILLUSTRATED)
75915 45101.5
– 150–5013–00 1 DIODE,OPTO:LED,GRN,572NM,5MCD AT 10MA
(A10DS1460) (NOT ILLUSTRATED) 50434 HSMG–T600
–7 131–2866–00 2 CONN,DIN:PCB,MALE,RTANG,3 X 32,0.1 CTR
(A10P1, A10P2) 06383 100–096–053
–8 260–2597–00 2 SWITCH,ROTARY:HEXADECIMAL,100MA AT 50VDC,RIGHT
ANGLE,0.430 W X 0.400 H X 0.202 L
(A10S1, A10S2)
81073 94HAB16RA
–9 131–3766–00 1 CONN,HDR:PCB,MALE,RTANG,1 X 2,0.1 CTR
(A10J1) 00779 87232–2
–10 131–1857–00 1 CONN,HDR:PCB,MALE,STR,1 X 36,0.1 CTR
(A10J1250, A10J1258, A10J1450, A10J1458, A10J1465,
A10J1540, A10J1541, A10J1565, A10J1641)
22526 65507–136
– 131–3520–00 1 CONN,HDR:PCB,MALE,STR,2 X 5,0.1 CTR
(A10J1165) (NOT ILLUSTRATED) 53387 2510–6002UB
– 131–5562–00 1 CONN,RIBBON:PCB,MALE,STR,100 POS,0.050 CTR
(A10J1160) (NOT ILLUSTRATED) 53387 91100–2201BP
–11 129–1478–00 5 SPACER, POST:1.860 L,1.10 SPACING,W/0.35 L,0.25
HEX,W/4–40 X 0.750 L 6–32 THD,1/4 HEX 80009 129–1478–00
–12 671–3869–01 B010100 B019999 1 CIRCUIT BD ASSY:102CH,128K,100MHZ ACQUISITION
(A19, TLA 7L3 ONLY) 80009 671–3869–01
–12 671–3869–02 B020000 1 CIRCUIT BD ASSY:102CH,128K,100MHZ ACQUISITION
(A19, TLA 7L3 ONLY) 80009 671–3869–02
–12 671–3871–01 B010100 B019999 1 CIRCUIT BD ASSY:102CH,512K,100MHZ ACQUISITION
(A21, TLA 7M3 ONLY) 80009 671–3871–01
–12 671–3871–02 B020000 1 CIRCUIT BD ASSY:102CH,512K,100MHZ ACQUISITION
(A21, TLA 7M3 ONLY) 80009 671–3871–02
–13 131–6174–00 2 CONN,DIN:PRESSFIT,MALE,RTANG,3 X 32,0.1 CTR
(A19P1, A19P2, A21P1, A21P2) 81312 96P603307319
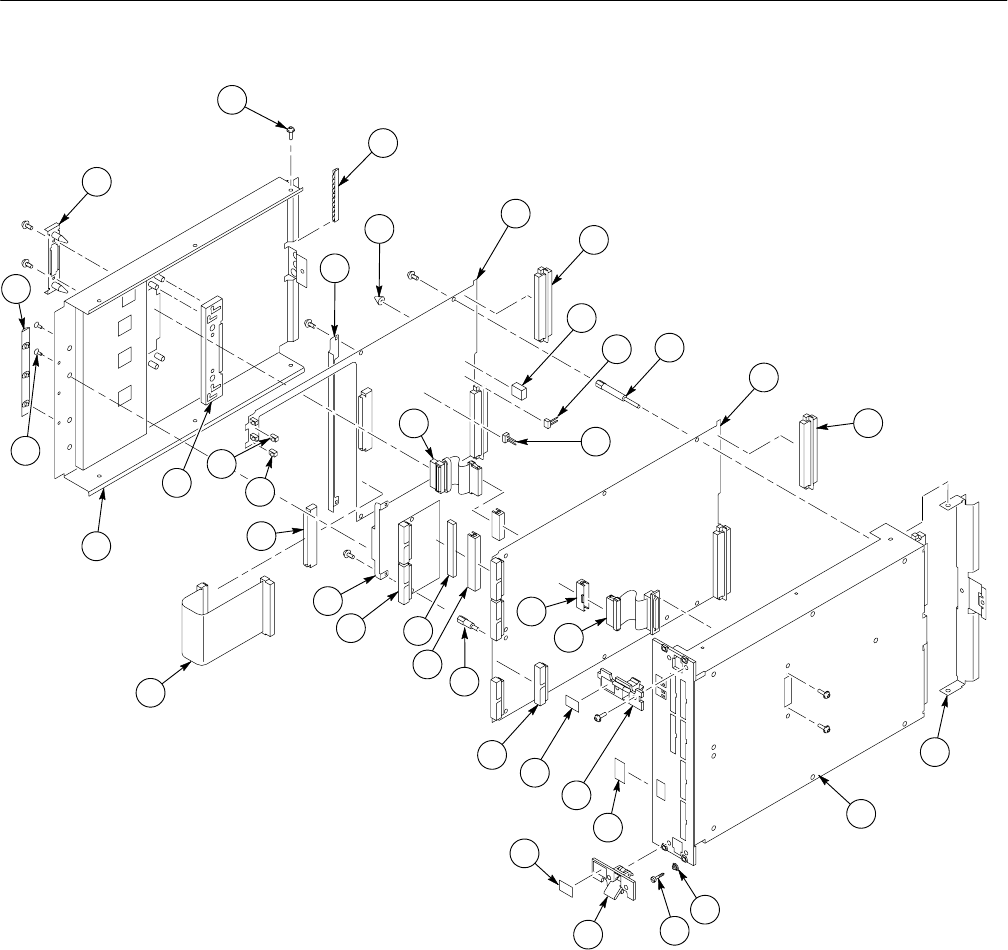
Replaceable Mechanical Parts
TLA 700 Series Logic Analyzer Modules Service Manual 10–13
1
2
3
A19 A21
A10
A13
4
567
8
9
10
11 12
13
14
15
16
17
18
19 20
21
22
23
24
25
26
27
28
29
30
31
32
33
34
35
36
37
38
39
Figure 10–3: TLA 7L3 and TLA 7M3 Logic Analyzer Module exploded view

Replaceable Mechanical Parts
10–14 TLA 700 Series Logic Analyzer Modules Service Manual
Replaceable parts list (Cont.)
Fig. &
index
number Tektronix part
number Serial no.
effective Serial no.
discont’d Qty Name & description Mfr.
code Mfr. part number
10–3–14 386–6868–00 1 BACK PANEL TK1943 386–6868–00
–15 441–2104–00 1 CHASSIS ASSY:TWO WIDE, 102CH, W/SUB FRONT PANEL &
LABEL ATTACHED 80009 441–2104–00
–16 214–4762–00 4 SPRING,CONICAL 8X345 ORDER BY DESCR
–17 211–0911–00 4 RETAINER SCREW,MACHINE:M2.5, PITCH 0.45MM, LENGTH
11MM, HEAD DIA 5MM, HEAD HEIGHT 2MM, BRIGHT
NICKEL
18677 322401–05
–18 367–0484–00 1 HANDLE,EJECTOR:INJECTOR/EJECTOR ASSY, TWO
WIDE,W/OUT KEYING,SPRING LOADED 80009 367–0484–00
–19 334–9189–00 1 MARKER INDENT:EJECTOR LABEL,BOTTOM 0KB05 334918900
–20 334–9235–00 1 MARKER,IDENT:CONFIGURATION LABELS,6 LABELS PER
SHEET 80009 334–9235–00
–21 367–0483–00 1 HANDLE:INJECTOR/EJECTOR ASSEMBLY,TWO
WIDE,W/KEYING,SPRING LOADED 80009 367–0483–00
–22 334–9226–00 1 MARKER,IDENT:MKD ,TOP INJECTOR/EJECTOR LABEL
(TLA 7L3 ONLY) 0KB05 ORDER BY DESCR
–22 334–9230–00 1 MARKER,IDENT:MKD,TOP INJECTOR/EJECTOR LABEL
(TLA 7M3 ONLY) 0KB05 ORDER BY DESCR
–23 174–3537–00 1 CA ASSY,SP:RIBBON,,IDC,30 AWG,0.025CTR,2.0 L 80009 174–3537–00
–24 131–6021–00 2 CONN,HDR:SMD,MALE,STR,2 X 25,0.05 X 0.1 CTR
(A19J1465, A19J2460, A21J1465, A21J2460) 00779 146144–3
– 159–5009–00 5 FUSE,SMD:1.5A,125V,FAST BLOW
(A19F2500, A19F2504, A19F2506, A19F2903, A19F2901,
A21F2500, A21F2504, A21F2506, A21F2903, A21F2901)
75915 45101.5
– 159–5010–00 1 FUSE,SMD:7A,125V,FAST BLOW
(A19F2508, A21F2508) 75915 451007
– 214–4747–00 4 HEAT SINK,SEMIC:IC,PGA 11X11/MQUAD,1.1” X 1.1” X 0.45”
H,PIN FIN,ALUMINUM,BLACK
(A19XTU1170, A19XTU1370, A19XTU1570, A19XTU1670,
A21XTU1170, A21XTU1370, A21XTU1570, A21XTU1670)
05820 658–45AB
– 214–4748–00 2 HEAT SINK,SEMIC:IC,PGA 11X11/MQUAD,1.1” X 1.1” X 0.25”
H,PIN FIN,ALUMINUM,BLACK
(A19XSU1460, A19XSU1660, A21XSU1460, A21XSU1660)
05820 658–25AB
–25 131–3363–00 4 CONN,HDR:PCB,MALE,RTANG,2 X 17,0.1CTR
(A19J2290, A19J2490, A19J2690, A19J2890, A21J2290,
A21J2490, A21J2690, A21J2890)
53387 N2534–5002UB
–26 129–1479–00 4 SPACER, POST:1.285 OVERALL,0.535 L SPACING, W/0.35
L,0.25 HEX 4–40 INT THD X 6–32 EXT, 0.75 L 80009 129–1479–00
– 131–3363–00 2 CONN,HDR:PCB,MALE,RTANG,2 X 17,0.1CTR
(PART OF A13) 53387 N2534–5002UB
–27 131–5980–00 3 CONN,HDR:SMD,MALE,STR,2 X 50,0.05 X 0.1 CTR
(A19J1390, A19J1420, A19J1790, A20J1390, A20J1420,
A20J1790)
00779 1–104549–0
–28 131–6016–00 1 CONN,HDR:SMD,FEMALE,STR,2 X 50,0.05 X 0.1 CTR
(PART OF A13) 00779 104550–9
–29 671–3307–00 1 CKT BD ASSY:COMPARATOR DAUGHTER BOARD
(A13) 80009 671–3307–00

Replaceable Mechanical Parts
TLA 700 Series Logic Analyzer Modules Service Manual 10–15
Replaceable parts list
Fig. &
index
number Tektronix part
number Serial no.
effective Serial no.
discont’d Qty Name & description Mfr.
code Mfr. part number
10–3–30 407–4494–00 1 BRACKET, EMI , DAUGHTER BOARD 80009 407–4494–00
–31 174–3536–01 1 CA ASSY,SP:MERGE RIBBON,IDC,30 AWG,0.025 CTR,2.5 L 80009 174–3536–01
–32 174–3533–00 2 CA ASSY,SP:RIBBON,IDC,30 AWG 80009 174–3533–00
–33 131–6069–00 2 CONN, RIBBON:PCB,MALE,RTANG,100 POS,0.05 CTR
(A10J1330, A10J1630) 00779 2–557100–5
–34 150–1278–00 3 DIODE,OPTO:LED,GRN,569NM,2MCD AT 5V
(A10DS1100, A10DS1102, A10DS1103) 50434 HLMP–1640–010
–35 150–1279–00 1 DIODE,OPTO:LED,YEL,585NM,2MCD AT 5V
(A10DS1101) 50434 HLMP–1620–010
–36 352–1062–00 1 HOLDER,MERGE:MALE, 18AWG CRS W/HARDWARE TK1943 ORDER BY DESCR
–37 200–4272–00 1 COVER 80009 200–4272–00
–38 211–0718–00 2 SCREW,MACHINE:6–32 X 0.312,FLH100,STL,CDPL,T–10
TORX DR 0KB01 ORDER BY DESCR
–39 348–1365–01 1 SHLD GSKT,ELEC:SYMETRICAL SLOTTED FINGER,0.350 W
X 7.5 L,RIVIT MTG,SNAP–IN,RIVIT SPACING 1.5 IN TK2647 0493–0069–01

Replaceable Mechanical Parts
10–16 TLA 700 Series Logic Analyzer Modules Service Manual
Replaceable parts list
Fig. &
index
number Tektronix part
number Serial no.
effective Serial no.
discont’d Qty Name & description Mfr.
code Mfr. part number
TLA 7L4 AND TLA 7M4 136-CHANNEL MODULES
10–4–1 407–4458–00 1 BRACKET,CABLE:MALE MERGE ASSEMBLY, 18 AWG CRS
W/HARDWARE 80009 407–4458–00
–2 211–0409–00 25 SCR,ASSEM WSHR:4–40 X 0.312,PNH,STL,CDPL,T–10 TORX 0KB01 211–0409–00
–3 348–1537–00 4 GASKET,EMI:CLIP–ON,1.98 L, BE CU,TIN PLATED,W/T
LANCES TK2647 97–563–17 W/2 T
LANCES
–4 407–4489–00 1 BRACKET, LPU BUS CABLES
–5 386–1657–00 5 SUPPORT,CKT BD:ACETY,RESIN NATURAL
(PM1, PM2, PM3, PM4, PM5) 0JR05 ORDER BY DESCR
–6 671–3306–00 1 CKT BD ASSY:LPU,LOCAL PROCESSOR UNIT
(A10) 80009 671–3306–00
– 150–5013–00 1 DIODE,OPTO:LED,GRN,572NM,5MCD AT 10MA
(A10DS1460) (NOT ILLUSTRATED) 50434 HSMG–T600
– 159–0145–00 1 FUSE,WIRE LEAD:15A,32V,10 SECONDS
(A10F1780) (NOT ILLUSTRATED) 61857 SP7–15A
– 159–5009–00 4 FUSE,SMD:1.5A,125V,FAST BLOW
(A10F1681, A10F1881, A10F1981, A10F1983)
(NOT ILLUSTRATED)
75915 45101.5
–7 131–2866–00 2 CONN,DIN:PCB,MALE,RTANG,3 X 32,0.1 CTR
(A10P1, A10P2) 06383 100–096–053
–8 260–2597–00 2 SWITCH,ROTARY:HEXADECIMAL,100MA AT 50VDC,RIGHT
ANGLE,0.430 W X 0.400 H X 0.202 L
A10S1, A10S2)
81073 94HAB16RA
–9 131–3766–00 1 CONN,HDR:PCB,MALE,RTANG,1 X 2,0.1 CTR
(A10J1) 00779 87232–2
–10 131–1857–00 1 CONN,HDR:PCB,MALE,STR,1 X 36,0.1 CTR
(A10J1250, A10J1258, A10J1450, A10J1458, A10J1465,
A10J1540, A10J1541, A10J1565, A10J1641)
22526 65507–136
– 131–3520–00 1 CONN,HDR:PCB,MALE,STR,2 X 5,0.1 CTR
(A10J1165) (NOT ILLUSTRATED) 53387 2510–6002UB
– 131–5562–00 1 CONN,RIBBON:PCB,MALE,STR,100 POS,0.050 CTR
(A10J1160) (NOT ILLUSTRATED) 53387 91100–2201BP
–11 129–1478–00 5 SPACER, POST:1.860 L,1.10 SPACING,W/0.35 L,0.25
HEX,W/4–40 X 0.750 L 6–32 THD,1/4 HEX 80009 129–1478–00
–12 671–3305–01 B010100 B019999 1 CKT BD ASSY:136CH,128K ACQUISITION
(A11, TLA 7L4 ONLY) 80009 671–3305–01
–12 671–3305–02 B020000 1 CKT BD ASSY:136CH,128K ACQUISITION
(A11, TLA 7L4 ONLY) 80009 671–3305–02
–12 671–3561–01 B010100 B019999 1 CKT BD ASSY:136CH,512K ACQUISITION
(A12, TLA 7M4 ONLY) 80009 671–3561–01
–12 671–3561–02 B020000 1 CKT BD ASSY:136CH,512K ACQUISITION
(A12, TLA 7M4 ONLY) 80009 671–3561–02
–13 131–6174–00 2 CONN,DIN:PRESSFIT,MALE,RTANG,3 X 32,0.1 CTR
(A11P1, A11P2, A12P1, A12P2) 81312 96P603307319
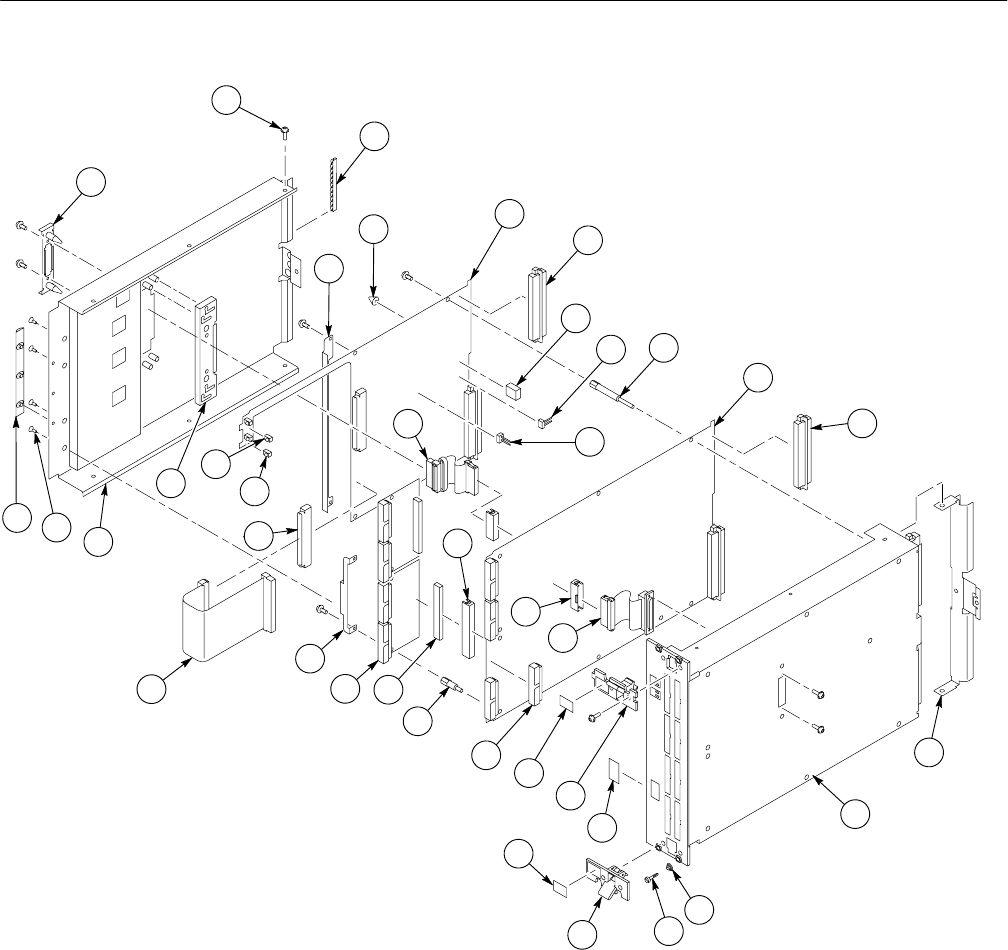
Replaceable Mechanical Parts
TLA 700 Series Logic Analyzer Modules Service Manual 10–17
1
2
3
A11 A12
A10
A13
4
567
8
9
10
11 12
13
14
15
16
17
18
19 20
21
22
23
24
25
26
27
28
29
30
31
32
33
34
35
36
37
38
39
Figure 10–4: TLA 7L4 and TLA 7M4 Logic Analyzer Module exploded view

Replaceable Mechanical Parts
10–18 TLA 700 Series Logic Analyzer Modules Service Manual
Replaceable parts list (Cont.)
Fig. &
index
number Tektronix part
number Serial no.
effective Serial no.
discont’d Qty Name & description Mfr.
code Mfr. part number
10–4–14 386–6868–00 1 BACK PANEL TK1943 386–6868–00
–15 441–2065–00 1 CHASSIS ASSY:TWO WIDE, W/SUB FRONT PANEL & LABEL
ATTACHED 80009 441–2065–00
–16 214–4762–00 4 SPRING,CONICAL 8X345 ORDER BY DESCR
–17 211–0911–00 4 RETAINER SCREW,MACHINE:M2.5, PITCH 0.45MM, LENGTH
11MM, HEAD DIA 5MM, HEAD HEIGHT 2MM 18677 322401–05
–18 367–0484–00 1 HANDLE,EJECTOR:INJECTOR/EJECTOR ASSY, TWO
WIDE,W/OUT KEYING,SPRING LOADED 80009 367–0484–00
–19 334–9189–00 1 MARKER INDENT:EJECTOR LABEL,BOTTOM 0KB05 334918900
–20 334–9235–00 1 MARKER,IDENT:CONFIGURATION LABELS,6 LABELS PER
SHEET 80009 334–9235–00
–21 367–0483–00 1 HANDLE:INJECTOR/EJECTOR ASSEMBLY,TWO
WIDE,W/KEYING,SPRING LOADED 80009 367–0483–00
–22 334–9227–00 1 MARKER,IDENT:MKD,TOP INJECTOR/EJECTOR LABEL
(TLA 7L4 ONLY) 0KB05 ORDER BY DESCR
–22 334–9231–00 1 MARKER,IDENT:MKD,TOP INJECTOR/EJECTOR LABEL
(TLA 7M4 ONLY) 0KB05 ORDER BY DESCR
–23 174–3537–00 1 CA ASSY,SP:RIBBON,,IDC,30 AWG,0.025CTR,2.0 L 80009 174–3537–00
–24 131–6021–00 2 CONN,HDR:SMD,MALE,STR,2 X 25,0.05 X 0.1 CTR
(A11J1465, A11J2460, A12J1465, A12J2460)
(NOT ILLUSTRATED)
00779 146144–3
– 159–5009–00 5 FUSE,SMD:1.5A,125V,FAST BLOW
(A11F2500, A11F2504, A11F2506, A11F2903, A11F2901,
A12F2500, A12F2504, A12F2506,A12 F2903, A12F2901)
(NOT ILLUSTRATED)
75915 45101.5
– 159–5010–00 1 FUSE,SMD:7A,125V,FAST BLOW
(A11F2508, A12F2508) (NOT ILLUSTRATED) 75915 451007
– 214–4747–00 2 HEAT SINK,SEMIC:IC,PGA 11X11/MQUAD,1.1” X 1.1” X 0.45”
H,PIN FIN,ALUMINUM,BLACK
(A11XTU1170, A11XTU1370, A11XTU1570, A11XTU1670,
A11XTU1870, A12XTU1170, A12XTU1370, A12XTU1570,
A12XTU1670, A12XTU1870) (NOT ILLUSTRATED)
05820 658–45AB
– 214–4748–00 2 HEAT SINK,SEMIC:IC,PGA 11X11/MQUAD,1.1” X 1.1” X 0.25”
H,PIN FIN,ALUMINUM,BLACK
(A11XSU1460, A11XSU1660, A12XSU1460, A12XSU1660)
(NOT ILLUSTRATED)
05820 658–25AB
–25 131–3363–00 4 CONN,HDR:PCB,MALE,RTANG,2 X 17,0.1CTR
(A11J2290, A11J2490, A11J2690, A11J2890, A12J2290,
A12J2490, A12J2690, A12J2890)
53387 N2534–5002UB
–26 129–1479–00 4 SPACER, POST:1.285 OVERALL,0.535 L SPACING, W/0.35
L,0.25 HEX 4–40 INT THD X 6–32 EXT, 0.75 L 80009 129–1479–00
–27 131–6016–00 1 CONN,HDR:SMD,FEMALE,STR,2 X 50,0.05 X 0.1 CTR
(PART OF A13) 00779 104550–9
– 131–3363–00 2 CONN,HDR:PCB,MALE,RTANG,2 X 17,0.1CTR
(PART OF A13) 53387 N2534–5002UB
–28 131–5980–00 4 CONN,HDR:SMD,MALE,STR,2 X 50,0.05 X 0.1 CTR
(A11J1270, A11J1390, A11J1420, A11J1790, A12J1270,
A12J1390, A12J1420, A12J1790)
00779 1–104549–0

Replaceable Mechanical Parts
TLA 700 Series Logic Analyzer Modules Service Manual 10–19
Replaceable parts list (Cont.)
Fig. &
index
number Tektronix part
number Serial no.
effective Serial no.
discont’d Qty Name & description Mfr.
code Mfr. part number
–29 671–3307–00 2 CKT BD ASSY:COMPARATOR DAUGHTER BOARD
(A13) 80009 671–3307–00
–30 407–4494–00 2 BRACKET, EMI , DAUGHTER BOARD 80009 407–4494–00
–31 174–3536–01 1 CA ASSY,SP:MERGE RIBBON,IDC,30 AWG,0.025 CTR,2.5 L 80009 174–3536–01
–32 174–3533–00 2 CA ASSY,SP:RIBBON,IDC,30 AWG 80009 174–3533–00
–33 131–6069–00 2 CONN, RIBBON:PCB,MALE,RTANG,100 POS,0.05 CTR
(A10J1330, A10J1630) 00779 2–557100–5
–34 150–1278–00 3 DIODE,OPTO:LED,GRN,569NM,2MCD AT 5V
(A10DS1100, A10DS1102, A10DS1103) 50434 HLMP–1640–010
–35 150–1279–00 1 DIODE,OPTO:LED,YEL,585NM,2MCD AT 5V
(A10DS1101) 50434 HLMP–1620–010
–36 352–1062–00 1 HOLDER,MERGE:MALE, 18AWG CRS W/HARDWARE TK1943 ORDER BY DESCR
–37 200–4272–00 1 COVER 80009 200–4272–00
–38 211–0718–00 4 SCREW,MACHINE:6-32 X 0.312,FLH100,STL,CDPL,T-10
TORX 0KB01 ORDER BY DESCR
–39 348–1365–01 1 SHLD GSKT,ELEC:SYMETRICAL SLOTTED FINGER,0.350 W
X 7.5 L,RIVIT MTG,SNAP–IN,RIVIT SPACING 1.5 IN TK2647 0493–0069–01

Replaceable Mechanical Parts
10–20 TLA 700 Series Logic Analyzer Modules Service Manual
Replaceable parts list
Fig. &
index
number Tektronix part
number Serial no.
effective Serial no.
discont’d Qty Name & description Mfr.
code Mfr. part number
STANDARD ACCESSORIES
10–5 010–6417–10 1 PROBE SET:17 CH PROBE & SHEET OF PROBE LABELS 80009 0100–6417–10
– 334–9239–00 1 MARKER,IDENT:PROBE,METIS, 8 SETS OF 2,(KISS
CUT)0.010 LEXAN WITH 0.002 ADHESIVE 80009 334–9239–00
–1 196–3431–00 2 CA ASSY,SP:DESCRETE,8 CH LEAD SET 80009 196–3431–00
–2 196–3432–00 1 CA ASSY,SP:DESCRETE,1 CH LEADSET 80009 196–3432–00
–3 206–0364–00 20 TIP,PROBE:MICROCKT TEST,0.05 CTR 80009 206–0364–00
– 070–9774–XX 1 MANUAL,TECH:INSTALLATION,TLA700 SERIES,DP 80009 070–9774–XX
–10 407–4435–00 1 BRACKET,SUPPORT:PROBE ASSY CLAMP,18 AWG STEEL,
BLACK ANODIZE FINISH W/RETAINING WASHER
(TLA 7L1 & TLA 7M1 MODULES REQUIRE 2 BRACKETS)
(TLA 7L2 & TLA 7M2 MODULES REQUIRE 4 BRACKETS)
(TLA 7L3 & TLA 7M3 MODULES REQUIRE 6 BRACKETS)
(TLA 7L4 & TLA 7M4 MODULES REQUIRE 8 BRACKETS)
80009 407–4435–00
OPTIONAL ACCESSORIES
– 070–9779–XX 1 MANUAL,TECH:SERVICE,TLA7LX/TLA7MX SERIES LOGIC
ANALYZER MODULE,DP 80009 070–9779–XX
– 070–9775–XX 1 MANUAL,TECH:USER,TLA 700 SERIES LOGIC ANALYZER
,DP 80009 070–9775–XX
– 070–9777–XX 1 MANUAL,TECH:SERVICE,TLA704 PORTABLE
MAINFRAME,DP 80009 070–9777–XX
– 070–9773–XX 1 MANUAL,TECH:SERVICE,TLA711 BENCH TOP CHASSIS,DP 80009 070–9773–XX
– 070–9778–XX 1 MANUAL,TECH:SERVICE,TLA711,BENCHTOP
CONTROLLER,DP 80009 070–9778–XX
– 070–9776–XX 1 MANUAL,TECH:TECHNICAL REFERENCE,TLA700 SERIES
PERFORMANCE VERIFICATION AND ADJUSTMENT,DP 80009 070–9776–XX
– 070–9780–XX 1 MANUAL,TECH:SERVICE,TLA7D1,TLA7E1 DIGITIZING
OSCILLOSCOPE MODULE,DP 80009 070–9780–XX
– 020–2018–00 1 ACCESSORY KIT:MINI PV HOUSING,15 HOUSING,VARIOUS
SIZES 23633 PER TEK
DOCUMENTATION
– 020–3000–XX 1 34CH PROBE INTERFACE KIT 80009 020–3000–XX
– 012–1412–00 4 LEAD SET ASSY:LAPIKPV 23633 68654
– 012–1426–00 1 LEAD SET,ELEC:PKG OF 12,2 TO 1 SIGNAL/GROUND 23633 69025
– 012–1427–00 1 LEAD SET,ELEC:PKG OF 4,4 TO 1 SIGNAL/GROUND 23633 69026
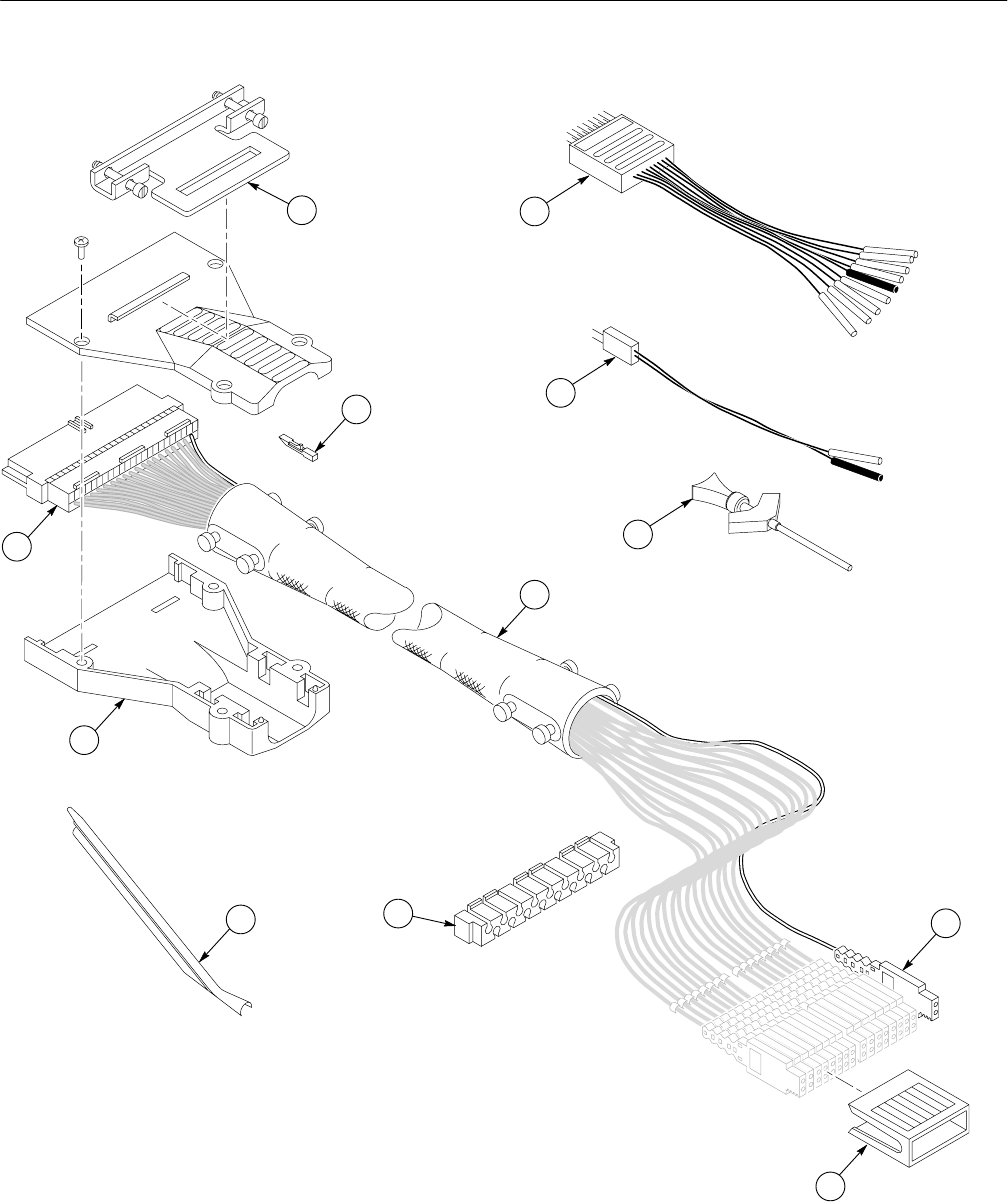
Replaceable Mechanical Parts
TLA 700 Series Logic Analyzer Modules Service Manual 10–21
1
2
3
4
5
6
7
8
9
10
11
12
Figure 10–5: P6417 Probe exploded view

Replaceable Mechanical Parts
10–22 TLA 700 Series Logic Analyzer Modules Service Manual
Replaceable parts list
Fig. &
index
number Tektronix part
number Serial no.
effective Serial no.
discont’d Qty Name & description Mfr.
code Mfr. part number
1PROBE ACCESSORIES KIT FOR P6417 (020–2198–00)
10–5–1 196–3431–00 2 CA ASSY,SP:DESCRETE,8 CH LEAD SET,SDI,16,22 AWG,5.0
L,2X8,MALE,0.278 MLG PIN HSG X 2X8,ULTR 80009 196–3431–00
–2 196–3432–00 1 CA ASSY,SP:DESCRETE,1 CH LEADSET,SDI,2,22 AWG,5.0
L,1 X 2,0.278 MLG,PIN HSG X 131–1998–00,W 80009 196–3432–00
–3 206–0364–00 20 TIP,PROBE:MICROCKT TEST,0.05 CTR 80009 206–0364–00
34CH PROBE INTERFACE KIT (020–2199–00)
10–5–1 196–3431–00 4 CA ASSY,SP:DESCRETE,8 CH LEAD SET,SDI,16,22 AWG,5.0
L,2X8,MALE,0.278 MLG PIN HSG X 2X8,ULTR 80009 196–3431–00
–2 196–3432–00 2 CA ASSY,SP:DESCRETE,1 CH LEADSET,SDI,2,22 AWG,5.0
L,1 X 2,0.278 MLG,PIN HSG X 131–1998–00,W 80009 196–3432–00
– 012–1377–00 1 LEAD SET,ELEC:2,26 AWG,STRD,2.030 L,PKG OF 12 23633 66156
– 012–1378–00 1 LEAD SET,ELEC:4,22 AWG,STRD,2.33 L (PKG OF 4) 23633 66155
–1PROBE REPAIR KIT (020–2196–00)
10–5–5 2 8-CHANNEL PODLET HOLDERS
–6 1 PODLET CHANNEL COMB
–7 1 PROBE SLEEVE (CABLES NOT INCLUDED)
–8 2 PROBE CASE HALVES WITH SCREWS
–9 1 2X17 HEADER CONNECTOR
10 1 PROBE RETAINER BRACKET WITH SCREWS
–12 INSTALLATION TOOL & PODLET COLOR-CODED BANDS
1PODLET REPLACEMENT KIT (020–2200–00)
10–5–4 1 PODLET (INCLUDING CABLE)
–5 2 8-CHANNEL PODLET HOLDERS
–11 10 PODLET LATCHES
–12 INSTALLATION TOOL & PODLET COLOR-CODED BANDS
