Software Design TXT Ubuntu XEN Setup Guide V7
User Manual:
Open the PDF directly: View PDF ![]() .
.
Page Count: 16

Intel Corporation :: IASI :: TXT Ubuntu XEN Setup Guide
1
Mt
TXT Provisioning Guide
OS: Ubuntu 11.10
VMM: XEN
IASI
CLOUD SOLUTIONS ENGINEERING

Intel Corporation :: IASI :: TXT Ubuntu XEN Setup Guide
2
Contents
INTRODUCTION ............................................................................................................. 5
SYSTEM HARDWARE REQUIREMENTS ..................................................................... 5
SYSTEM SOFTWARE REQUIREMENTS ...................................................................... 5
SECTION –I .................................................................................................................... 5
1.1 TXT/TPM Provisioning in BIOS setup ............................................................................. 5
1.2 OS installation – Ubuntu 11.10 ..................................................................................... 6
1.3 OS configuration: ......................................................................................................... 9
1.4 VMM Installation: ........................................................................................................ 9
SECTION -II .................................................................................................................. 11
1.1 Grub configuration/installation .................................................................................. 11
1.2 GRUB File Modification .............................................................................................. 12
SECTION -III ................................................................................................................. 13
1.1 Tboot installation ....................................................................................................... 13
1.2 TCG software Stack installation .................................................................................. 16
SECTION –IV ................................................................................................................ 16
1.3 Trust Agent Prerequisites ........................................................................................... 16

Intel Corporation :: IASI :: TXT Ubuntu XEN Setup Guide
3
1.4 Trust Agent Installation/Configuration ............................... Error! Bookmark not defined.

Intel Corporation :: IASI :: TXT Ubuntu XEN Setup Guide
4
INTEL CONFIDENTIAL
The information in this manual is furnished for informational use only, is subject to change without
notice, and should not be construed as a commitment by Intel Corporation. Intel Corporation assumes
no responsibility or liability for any errors or inaccuracies that may appear in this document or any
software that may be provided in association with this document.
Authors:
Kamal Natesan
Reviewers: Uttam Shetty, Raghu Yeluri, Bangalore Sudhir, Wheeler jerry

Intel Corporation :: IASI :: TXT Ubuntu XEN Setup Guide
5
Introduction
This document is intended to be used by Datacenter architects and developers designing
solutions to extend the functionality of the Intel TXT. This document focuses on methodology and
approaches with the step by step instructions to build the TXT test bed from linear perspective.
System Hardware Requirements
Processor
Starting X5600 Processor codename: Westmere-EP
Chipset
Starting Intel® 5520 Chipset (codename: Tylersburg)
TPM Chip
v 1.1
RAM
Minimum 12 Gig
HDD
Minimum 60 Gig
System Software Requirements
BIOS f/w
TXT Supported BIOS. Refer appendix for more detail on OEM bios
SINIT ACM
http://software.intel.com/en-us/articles/intel-trusted-execution-technology/
Tboot file
http://sourceforge.net/projects/tboot/
kvm
http://www.linux-kvm.org/page/Main_Page
TCG Software Stack
http://sourceforge.net/projects/trousers
SECTION –I
1.1 TXT/TPM Provisioning in BIOS setup
INTEL EPSD 1625UR
DELL Power Edge R710
HP DL380G7
Press F2 key to enter in to BIOS console
Press F2 key to enter in to BIOS console
Press F9 key to enter in to BIOS console
Setup BIOS password
(Security > Set Administrator Password)
Setup BIOS password.
(System Security > Password Status> locked)
(System Security > System Password > Enabled)
(System Security > Setup Password)
Set the BIOS password
(System Security > Set Admin Password)
Press F10 key twice to reboot the server
Press ESC key twice and select “save changes and
exit”
Enable TPM
(System Security > Trusted Platform Module >
TPM Functionality > Enabled )
On Boot, press F2 and enter the BIOS password
On Boot, press F2 and enter the BIOS password
Enable TXT
(System Security >Intel TXT support > Enabled)
Ensure VT/VT-d is enabled
(Advanced >Processor Configuration >Enable VT)
Enable TPM
(System Security >TPM security >On with Pre-boot
Measurement)
(System Security >TPM activation> Activate)
Press ESC key twice and Press F10 to “save changes
and exit” to reboot the server
Ensure VT-d is enabled
(Advanced >Processor Configuration >Enable VT-d)
Press ESC key twice and select “save changes and
exit”
Enable TPM
(Security >TPM Admin Control > Turn ON)
On Boot, press F2 and enter the BIOS password
Enable TXT
(Advanced > Processor Configuration > TXT)
Enable TXT
(System Security >Intel TXT> Enabled)
Press F10 key twice to save and reboot the server
Press ESC key twice and select “save changes and
exit” to reboot the server
Intel Corporation :: IASI :: TXT Ubuntu XEN Setup Guide
6
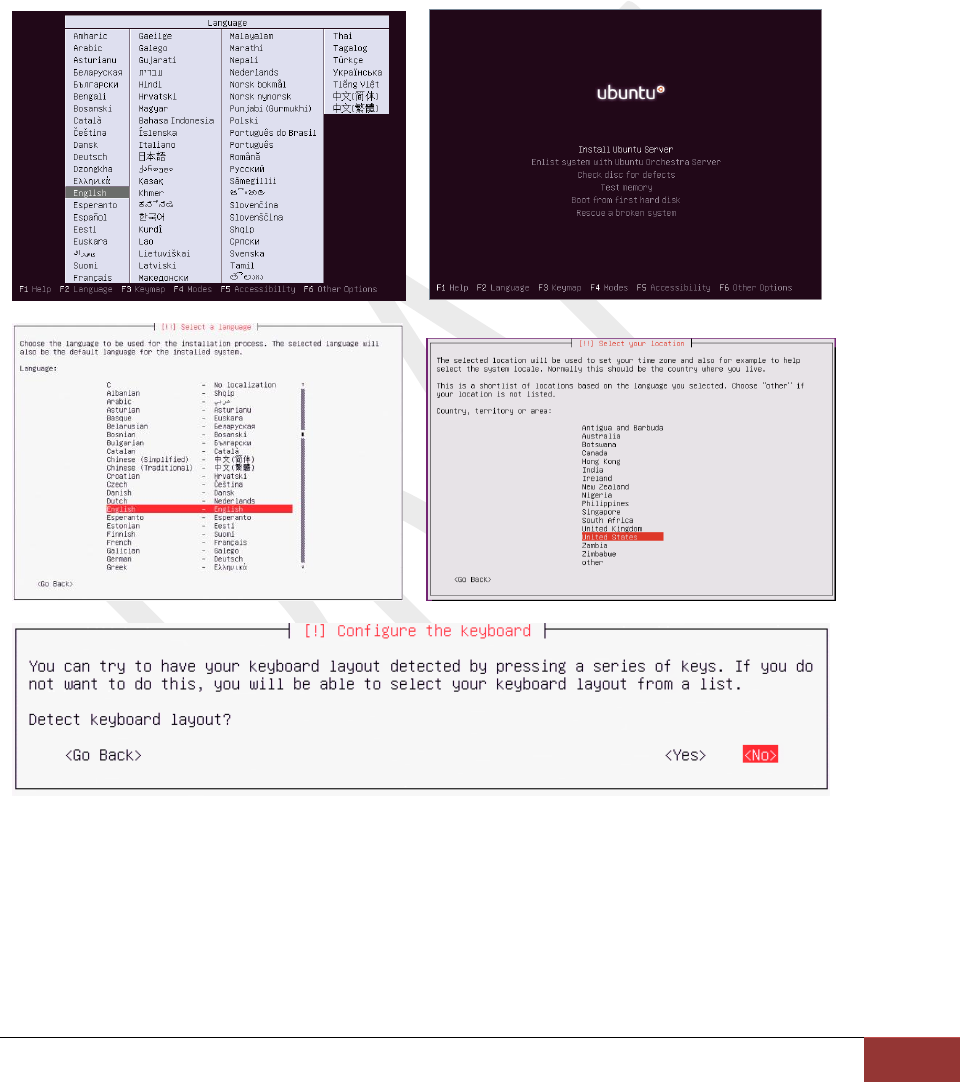
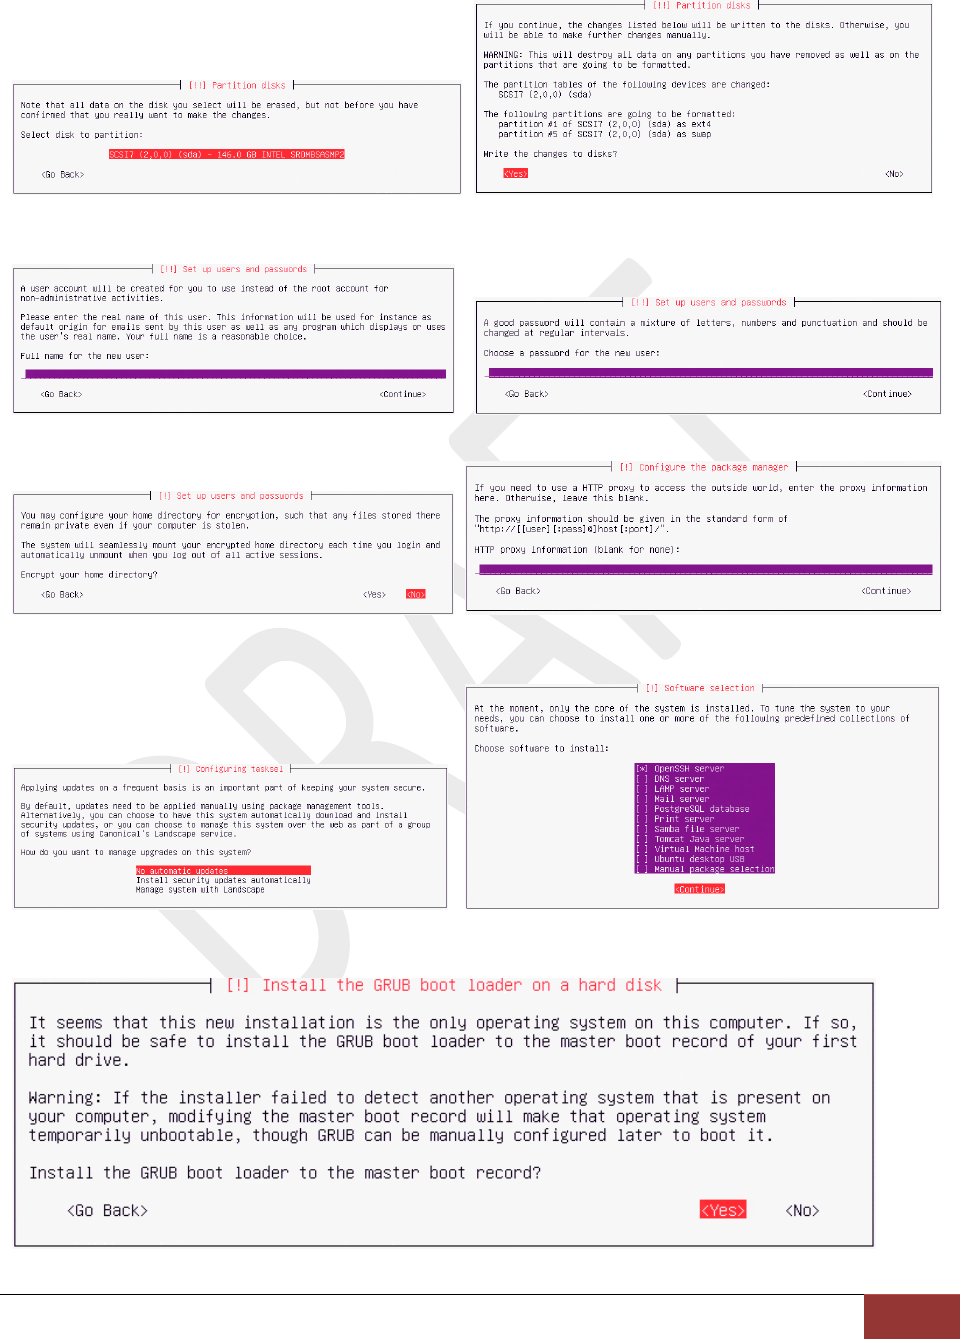
1.2 OS installation – Ubuntu 11.10
In this document we have covered the installation of Ubuntu 11.10 Codename: oneiric
and Kernel ver: 3.0.0-12-server. Below steps will walkthrough OS installation/configuration
with screenshot.
Step 1:

Intel Corporation :: IASI :: TXT Ubuntu XEN Setup Guide
7
Note: Will be prompted to enter the network configuration
Intel Corporation :: IASI :: TXT Ubuntu XEN Setup Guide
8
Note: Enter the proxy setting if needed.
Intel Corporation :: IASI :: TXT Ubuntu XEN Setup Guide
9
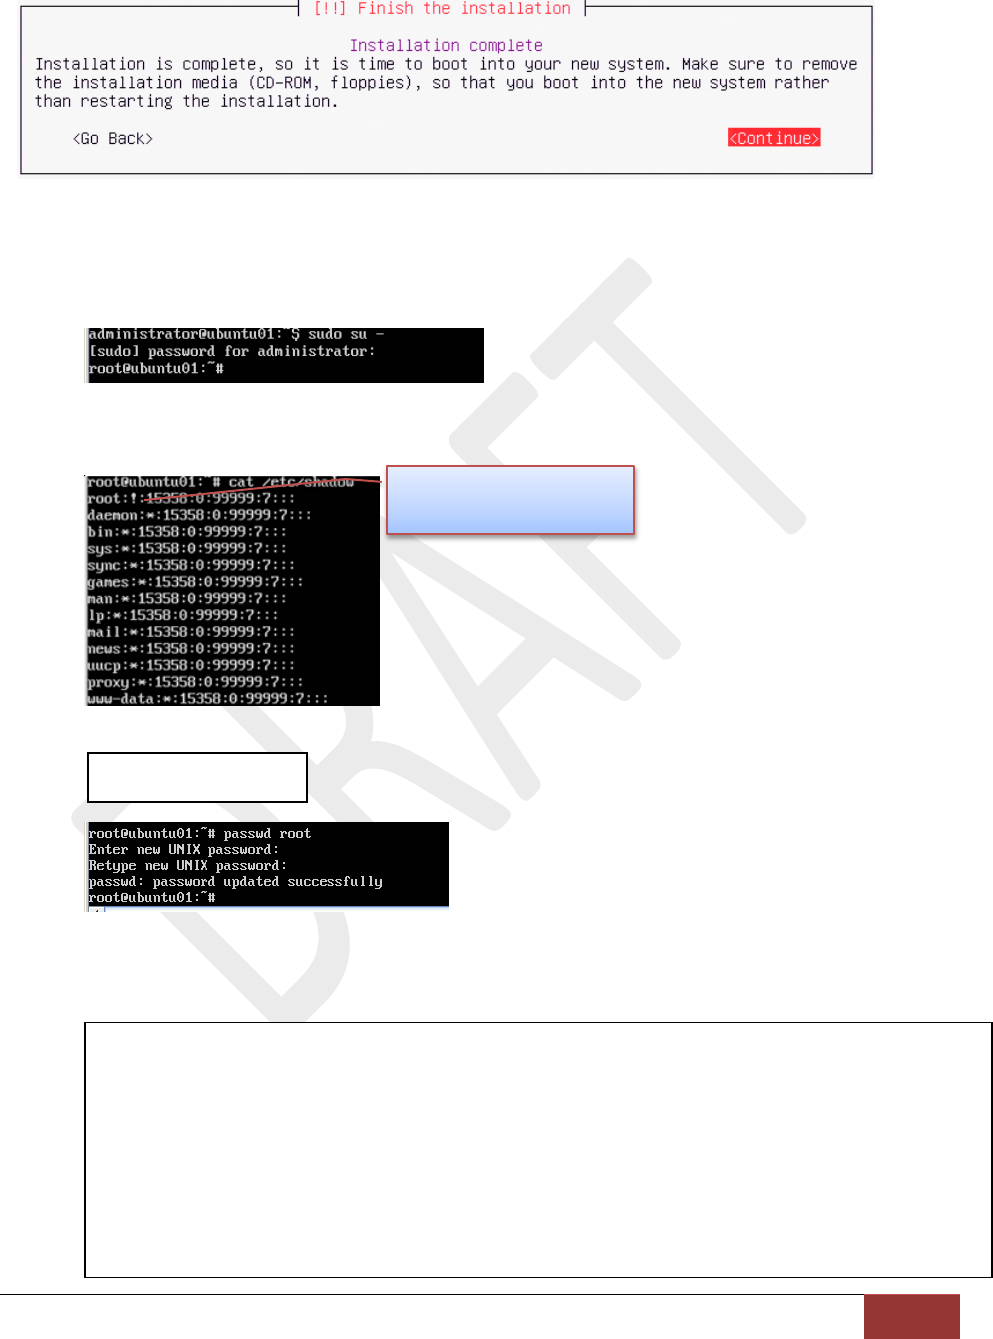
Once the installation of the OS is complete, accept the prompt to reboot the computer.
1.3 OS configuration:
1. Login as user
2. Remove the “!” from the file “/etc/shadow”
3. Enable Root user and set the Root password:
1.4 VMM Installation:
1. Install the Xen hypervisor
$ apt-get install xen-hypervisor-4.1-amd64
$ apt-get install xenwatch
$ apt-get install xen-utils-common
$ apt-get install xenstore-utils
$ apt-get install xen-utils-4.1
$ apt-get install gcc-multilib xz-utils
$ apt-get install bcc
$ apt-get install virtinst virt-viewer virt-manager
$ sudo passwd root
Remove the “!” from the
file “/etc/shadow”
Intel Corporation :: IASI :: TXT Ubuntu XEN Setup Guide
10
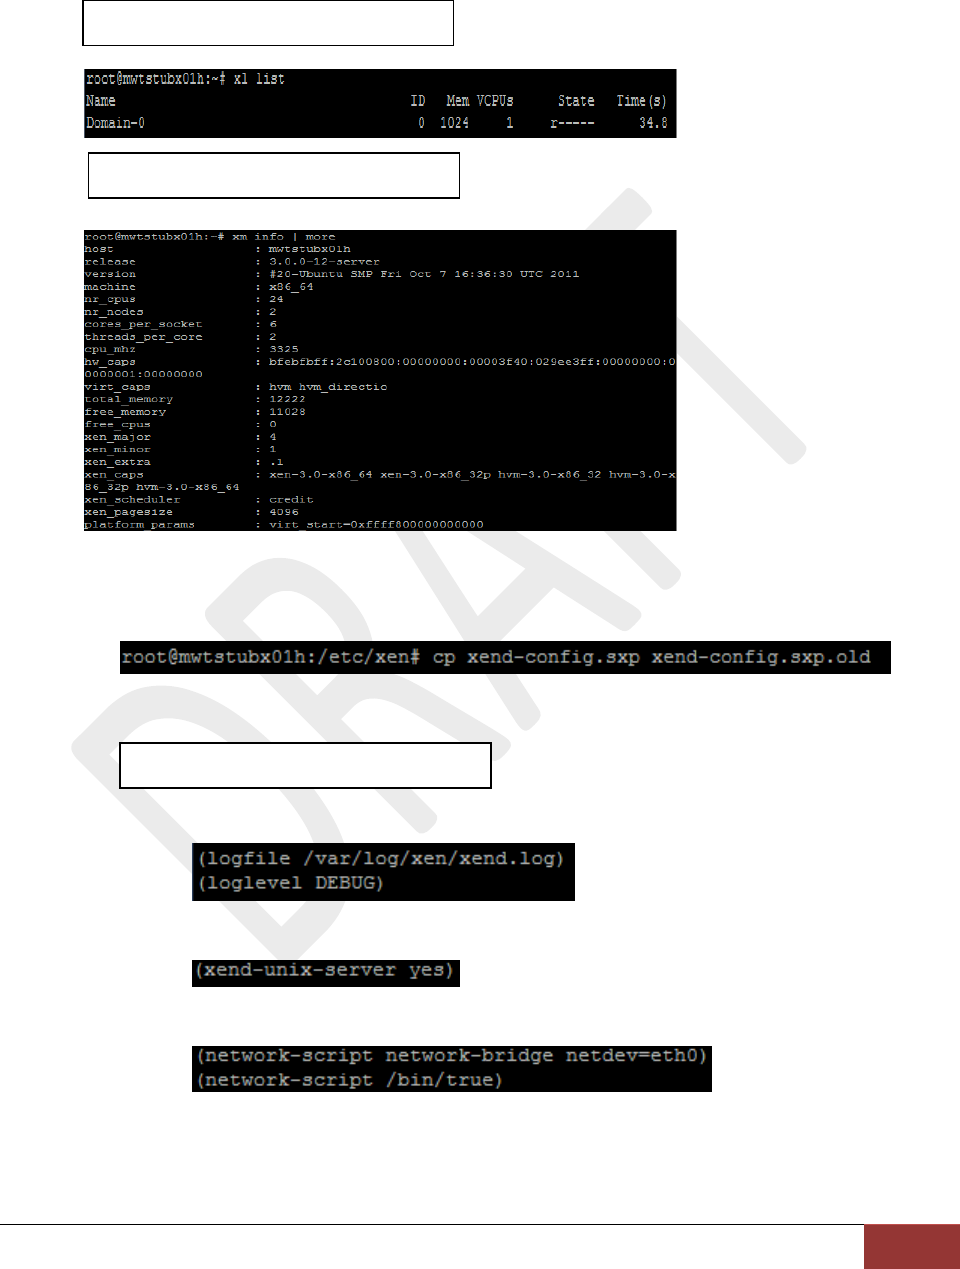
2. Verify that Xen is running correctly
3. Configure the installation of XEN by edit the xend-config.sxp. Backup your xend-
config.sxp before make changes to the xend-config.sxp
Edit the /etc/xen/xend-config.sxp file with below info:
i) Remove the comment
ii) Remove the comment for XEN API settings and set to yes
iii) Add Network bridge and virtual interface scripts to xend.config.sxp and Save
$ xl list
$ xm info | more
$ vi /etc/xen/xend-config.sxp
Intel Corporation :: IASI :: TXT Ubuntu XEN Setup Guide
11
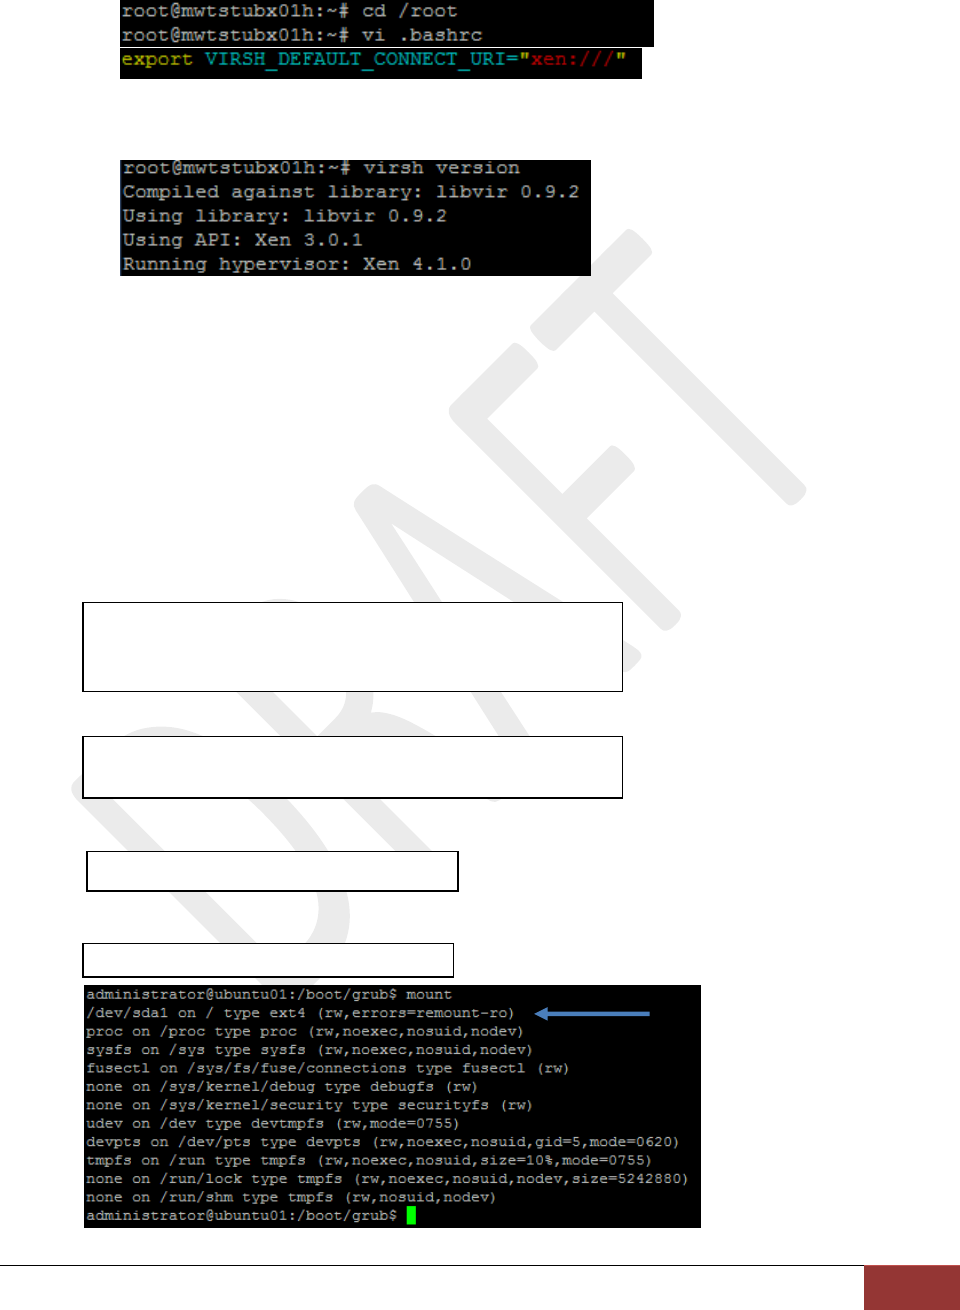
Edit your .bashrc file and add the line below. Save the file and then reboot
After rebooted the server, confirm if you can connect to your Xen server using
virsh command
SECTION -II
1.1 Grub configuration/installation
By default Ubuntu 11.10 installs the “grub2” boot loader. “GRUB2” will boot directly to the login
prompt or Desktop. No menu will be displayed and there is no /boot/grub/menu.lst file. In order to
edit the grub file, the user will need to downgrade from the default “grub2” to the older “grub” boot
loader.
Perform the following steps to uninstall “grub2” and install “grub.”
1. Login as root user, and copy the existing grub folder to a backup.
2. Remove the “grub2” boot loader
3. Install the downgraded “grub” boot loader
4. Determine the mount point of the boot loader
$ cp /etc/default/grub /etc/default/grub.old
$ cp -R /etc/grub.d /etc/grub.d.old
$ cp -R /boot/grub /boot/grub.old
$ apt-get purge grub2 grub-pc
Tab to “yes” when prompted
$ apt-get install grub
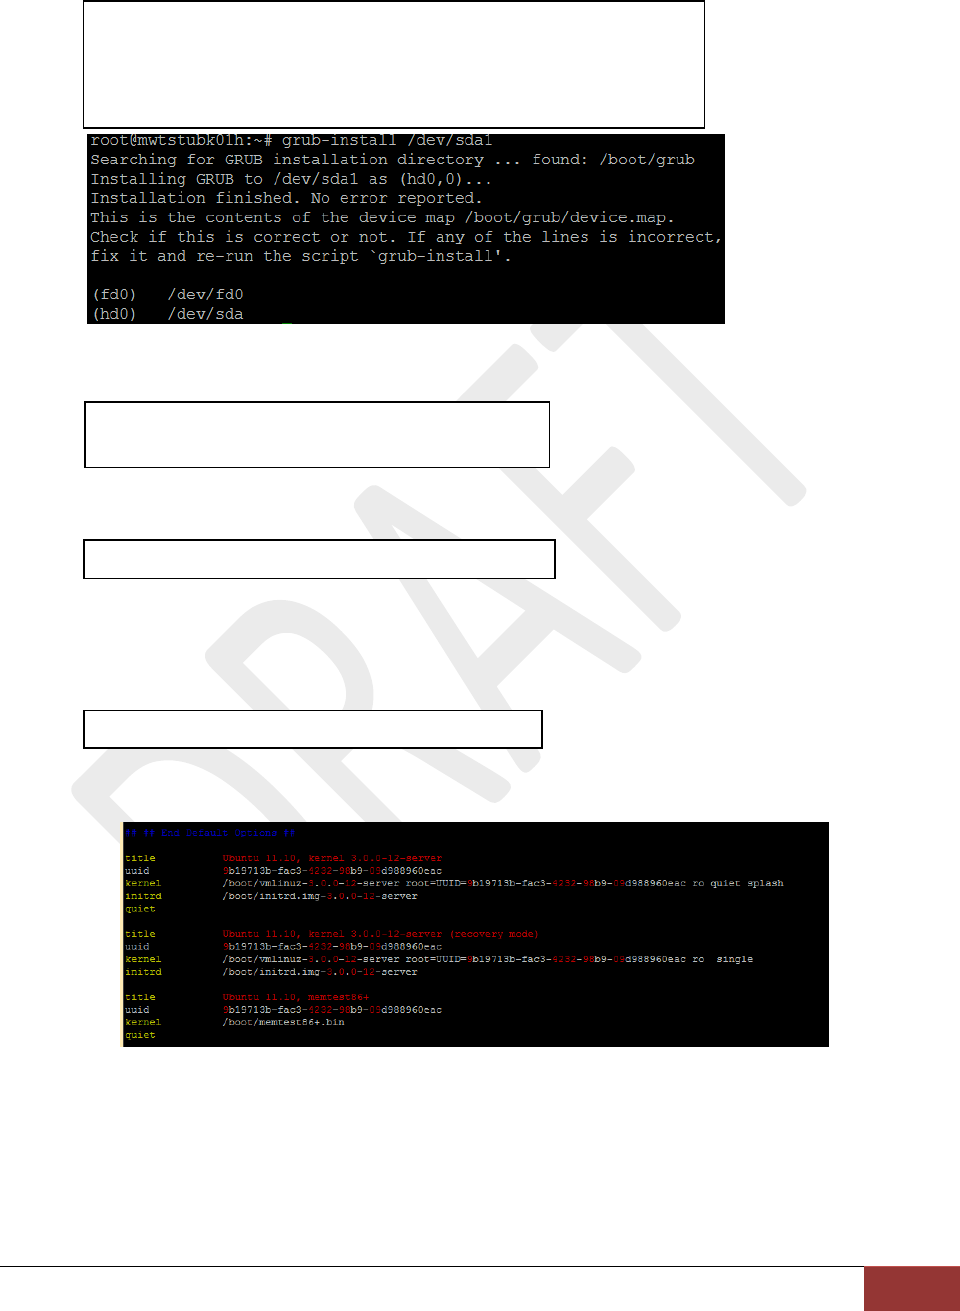
$ mount
Intel Corporation :: IASI :: TXT Ubuntu XEN Setup Guide
12
5. Write the “grub” boot loader to the appropriate mount point
6. Run the “update-grub” command to generate the “menu.lst” file
7. Reboot the server
1.2 GRUB File Modification
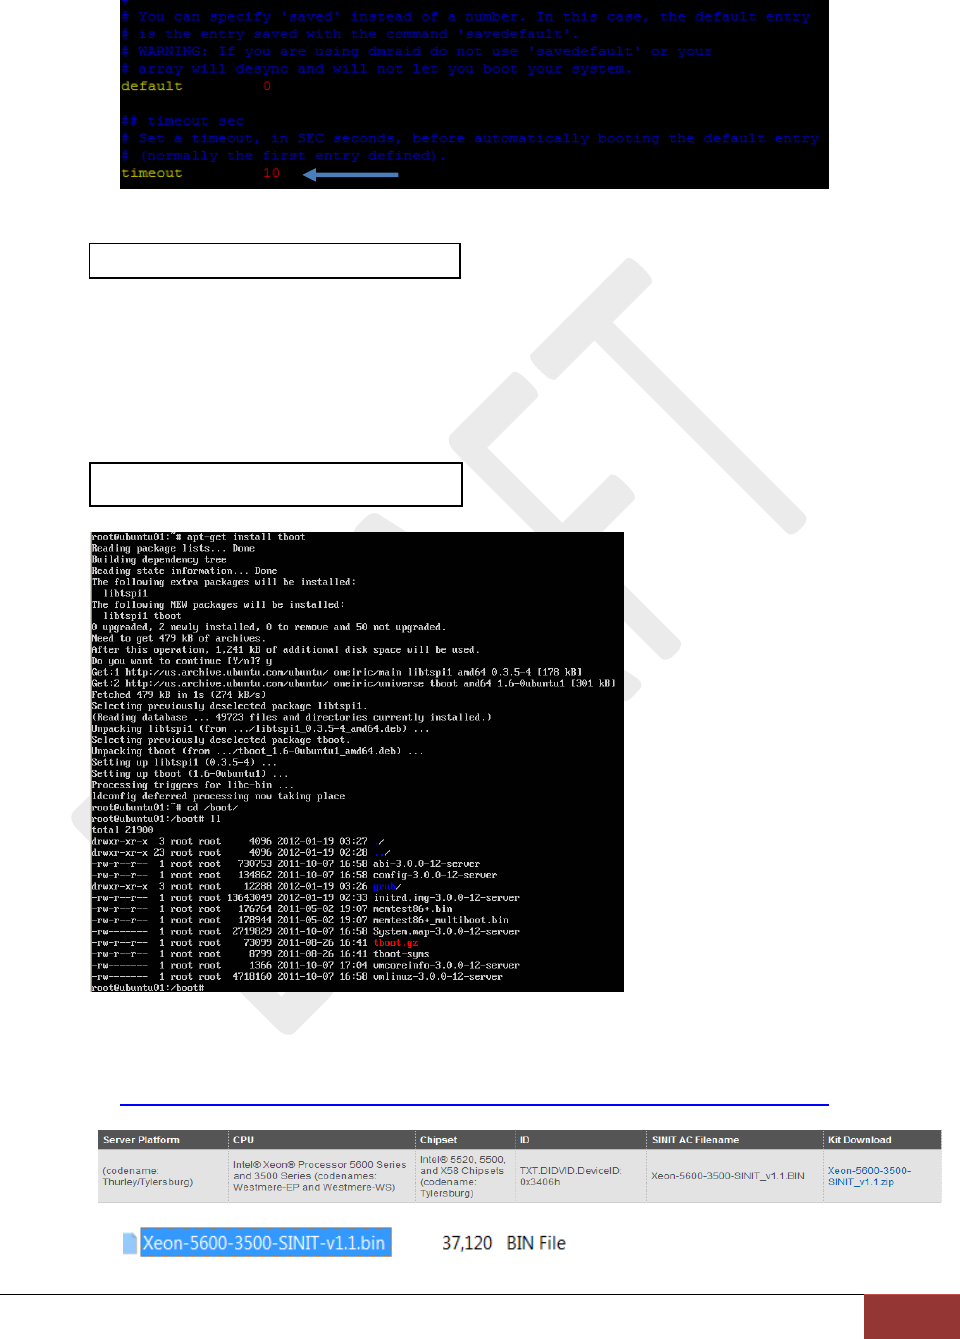
1) Edit the new grub file “/boot/grub/menu.lst” as shown in the below screenshots
By default, the menu.lst file will look like this:
2) Change the timeout to > 5
$ grub-install /dev/sda
Choose the correct device as marked in above snapshot.
Ensure it creates the stage1 & stage2 files in /boot/grub and
writes to the MBR.
$ update-grub
Tab to “yes” when prompted
$ reboot
$ vim /boot/grub/menu.lst
Intel Corporation :: IASI :: TXT Ubuntu XEN Setup Guide
13
3) Save and Reboot the server to verify that the changes are being reflected.
SECTION -III
1.1 Tboot installation
1. Login as root user and install tboot.
Note: Tboot.gz will be loaded in /boot
2. Copy the SINIT ACM from below link.
http://software.intel.com/en-us/articles/intel-trusted-execution-technology/
3. Extract the .bin file from the .zip archive
4. Copy the .bin file into the /boot directory
$ reboot
$ apt-get install tboot
Intel Corporation :: IASI :: TXT Ubuntu XEN Setup Guide
14
Note: For Romley Based servers the SINIT ACM is part of BIOS itself. So above steps 2 and 3
is not required for Intel E5xxx based processors.
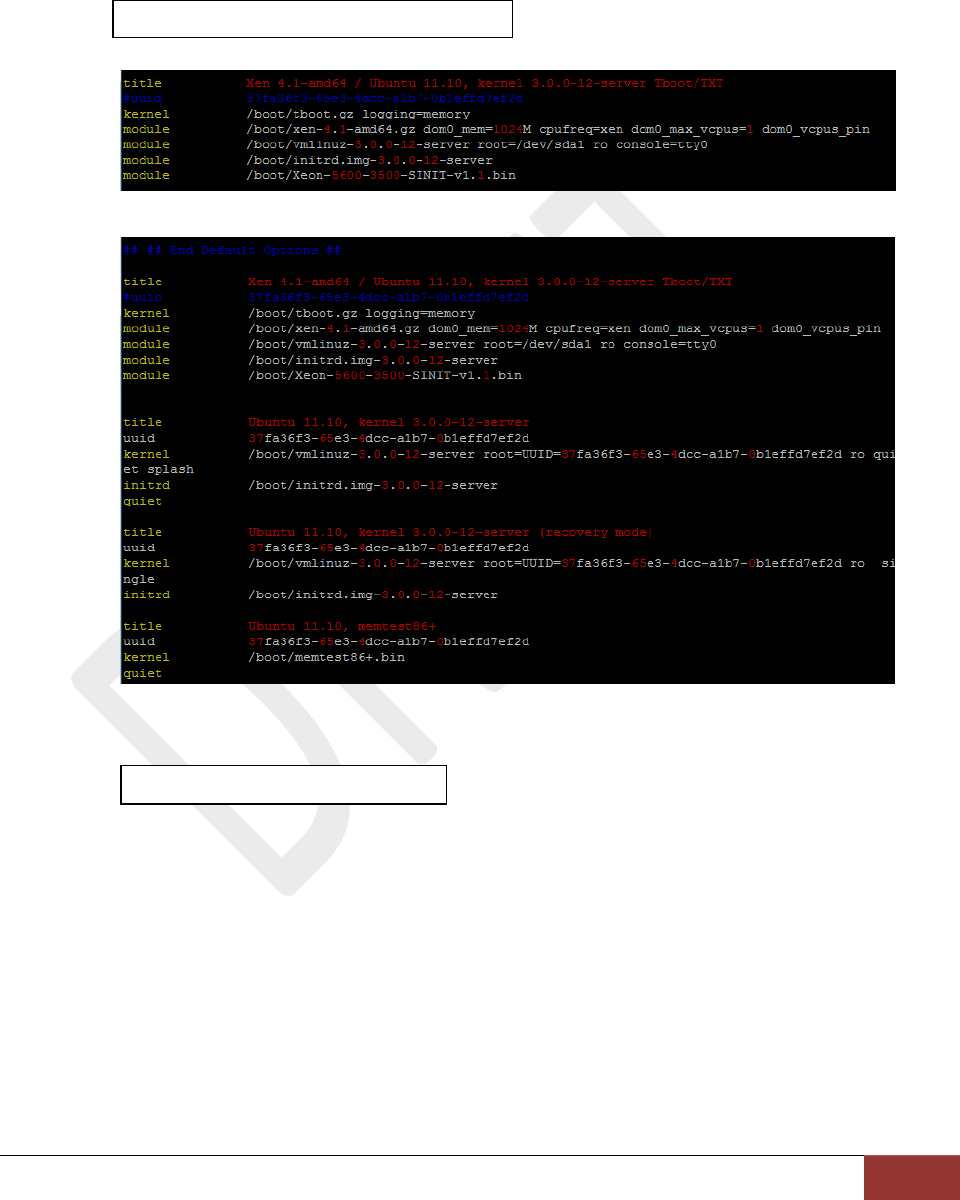
5. Modify the menu.lst file to add an additional boot option as per below snapshot
The entire section should look like this:
6. Reboot the server and login as root user.
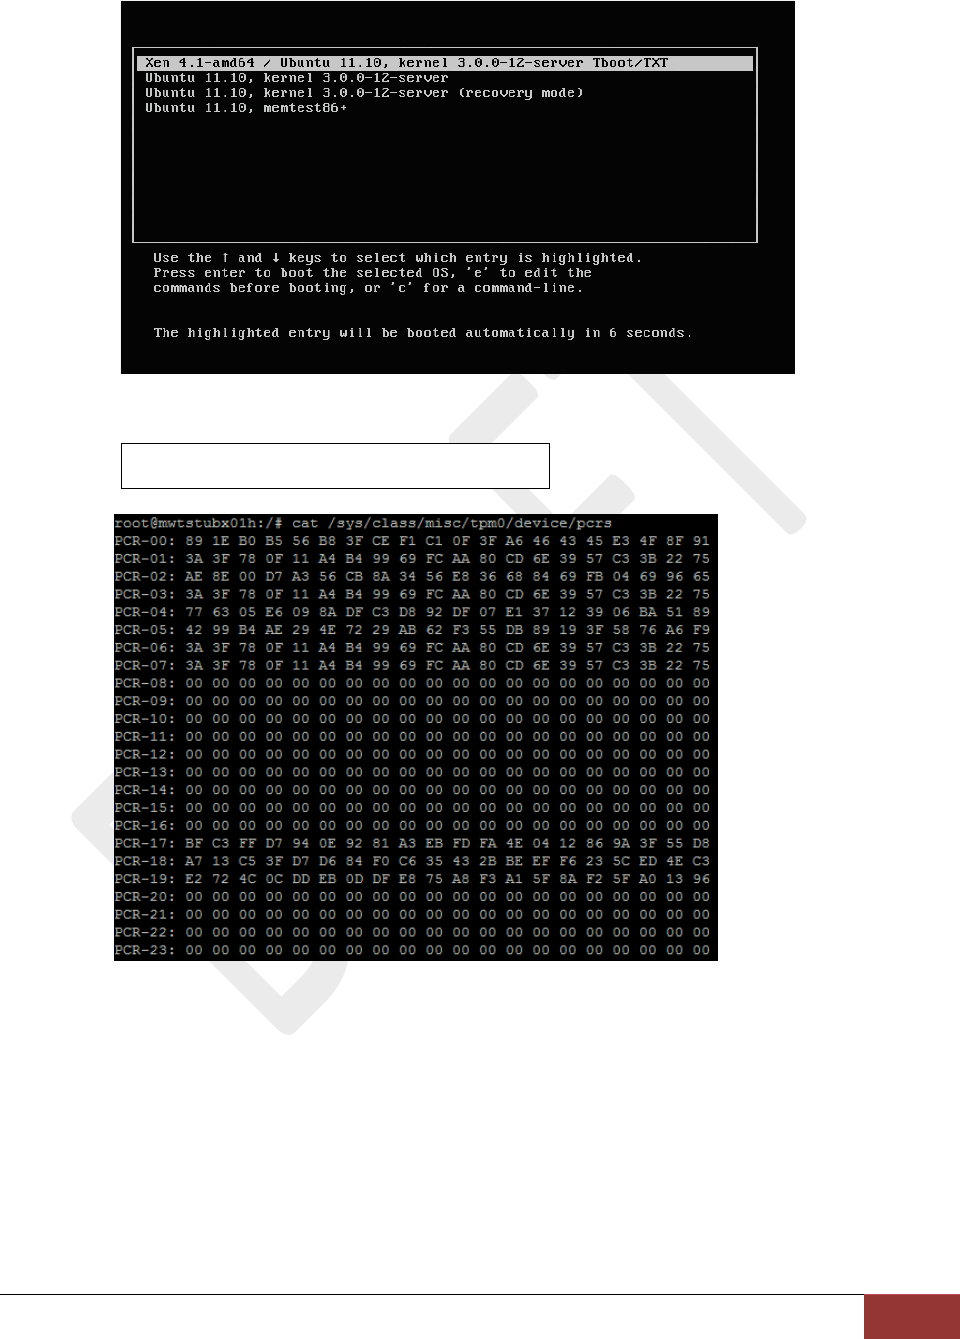
7. Upon rebooting, a boot menu will be displayed allowing the user to select which
environment to boot to. Select the first option to boot with TXT/tboot.
$ vim /boot/grub/menu.lst
$ reboot
Intel Corporation :: IASI :: TXT Ubuntu XEN Setup Guide
15
8. PCR 17-19 should now appear populated when queried using the below command:
$ cat /sys/class/misc/tpm0/device/pcrs
Intel Corporation :: IASI :: TXT Ubuntu XEN Setup Guide
16
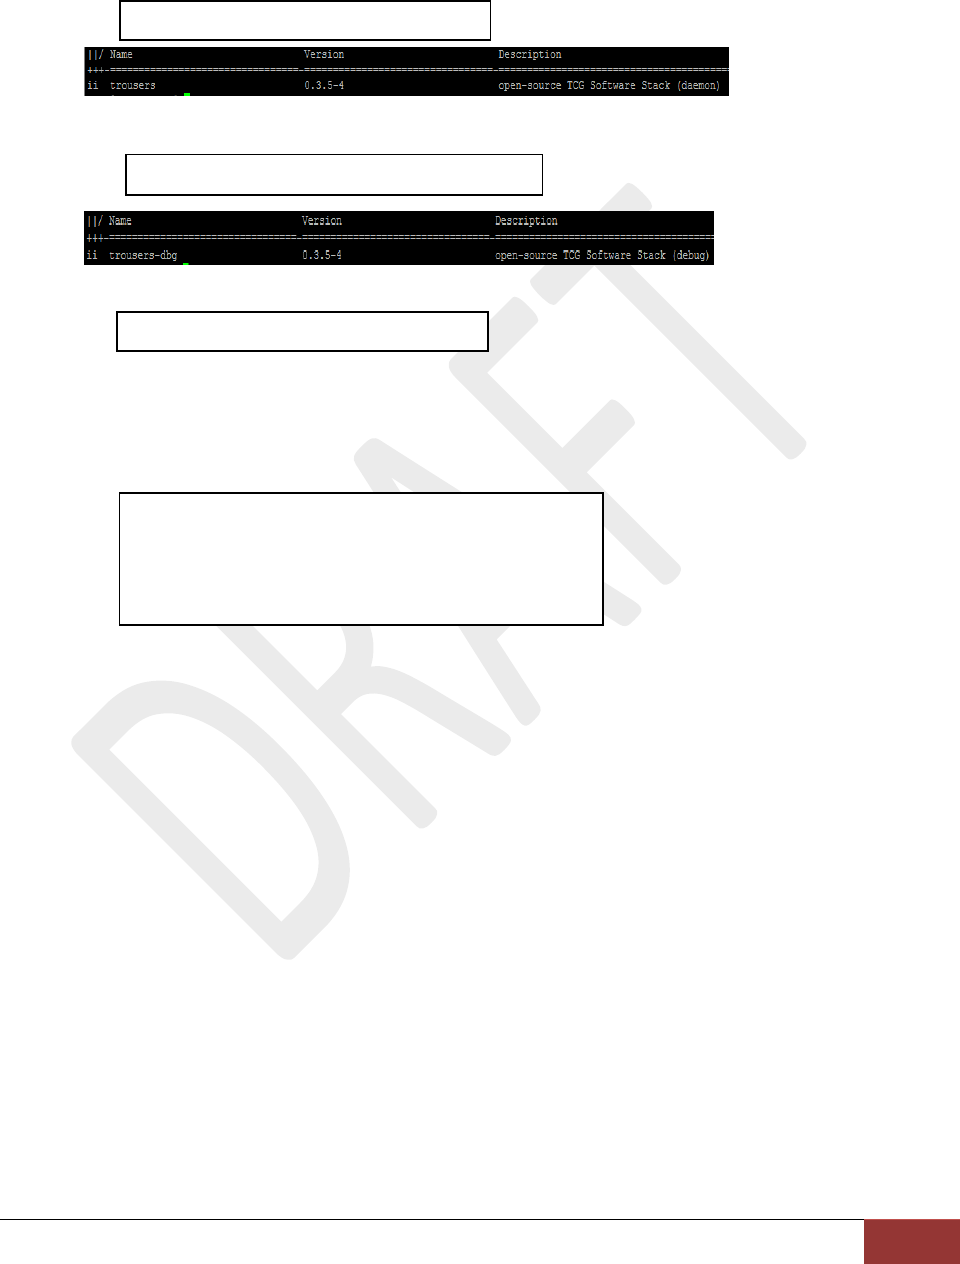
TCG software Stack installation
1. Login as root user and install trousers
2. Run the TCSD daemon in the background.
SECTION –IV
1.2 Trust Agent Prerequisites
1. Install the remaining software prerequisites
$ apt-get install trousers
$ apt-get install trousers-dbg
$ tcsd
$ apt-get install curl
$ apt-get install libcurl3-openssl-dev
$ apt-get install chkconfig
$ apt-get -f install
$ apt-get install make
