Team01 EB5001 Stock Price Analytics Using Big Data Installation And Setup Guide
User Manual:
Open the PDF directly: View PDF ![]() .
.
Page Count: 9
EB5001
Stock Analysis using Big Data Engineering
for Analytics
TEAM 1
ANURAG CHATTERJEE (A0178373U)
BHUJBAL VAIBHAV SHIVAJI (A0178321H)
GOH CHUNG TAT KENRICK(A0080891Y)
LIM PIER (A0178254X)
LIU THEODORUS DAVID LEONARDI (A0178263X)
TEO WEI KIN DARREN (A0178197L)
TSAN YEE SOON (A0178316Y)
Contents
1 Executive summary .............................................................................................................................. 3
2 Big data technologies landscape ......................................................................................................... 3
3 Installations and set-up ....................................................................................................................... 4
3.1 Installing JDK ................................................................................................................................ 4
3.2 Installing HDFS ............................................................................................................................. 4
3.3 Installing Spark ............................................................................................................................. 4
3.4 Setting up Cassandra ................................................................................................................... 5
3.5 Installing Kafka and Zookeeper .................................................................................................... 5
3.5.1 Creating Kafka topics ........................................................................................................... 6
3.6 Setting up and starting the real-time data producers ................................................................. 6
3.6.1 Producer for IEX data ........................................................................................................... 7
3.6.2 Producer for StockTwits data ............................................................................................... 7
3.7 Setting up Spark jobs ................................................................................................................... 8
3.8 Installing Redis ............................................................................................................................. 8
3.9 Visualizing using Qlik Sense ............................................................................................................... 8
1 Executive summary
The objective of the document is to introduce the Big data landscape, describe the functionalities of the
various components as part of this project and then lay down the steps that need to be performed to
install and set up the components so that the solution that has been built can be realized.
2 Big data technologies landscape
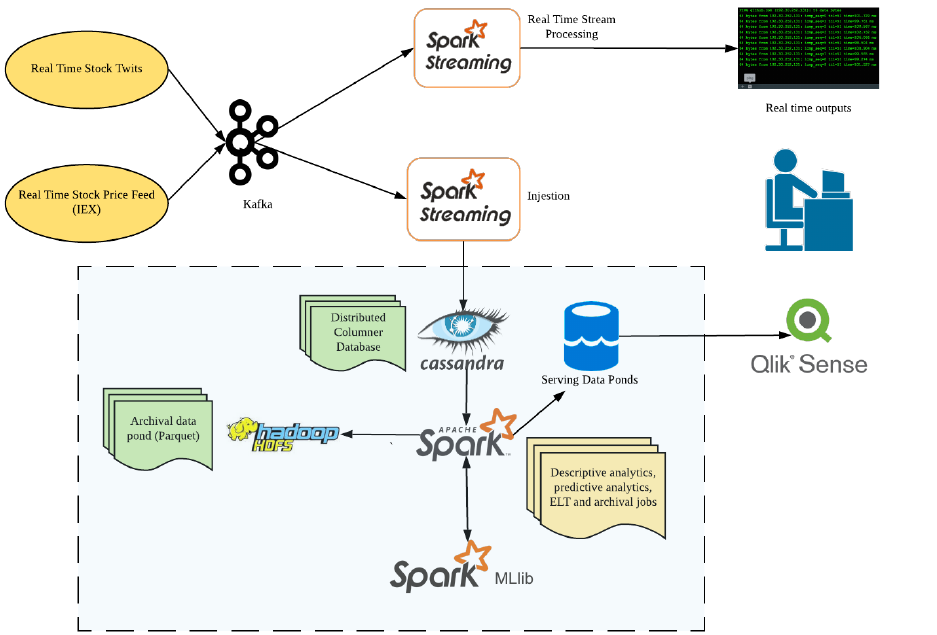
The overall landscape looks like the below in terms of Big data technologies and the proposed
functionalities.
Figure 1 Big data technologies landscape
There are 2 real-time data producers which fetch data from 2 different REST APIs. The stock quote API
provides updates on the real time price of the stocks from IEX and the stock twits API provides tweets
related to the stock. The producers continuously fetch responses from these APIs and push the retrieved

JSON to Kafka topics. The data from the Kafka topics are then processed by Spark streaming jobs in real-
time. There are 2 category of jobs, one that perform real-time aggregations and visualize in a console
and other that pushes to Cassandra. The data at rest in Cassandra are then processed by 2 categories of
Spark batch jobs. The first category performs aggregations on the static data and the other category
performs batch machine learning. The results from these batch jobs are saved in separate tables in
Cassandra. A separate batch job performs archival by routinely converting the data stored in Cassandra
to Parquet files. Qlik Sense is used to visualize the results of the batch processing into a dashboard using
the Cassandra connector. The below sections focus on setting up the various components to realize the
above landscape end to end.
3 Installations and set-up
These installation steps are tested on a machine with 32GB of memory running on Ubuntu 18.04.
3.1 Installing JDK
$ sudo apt install openjdk-8-jdk
You should see the following message after you check the java version.
$ java -version
openjdk version "1.8.0_191"
OpenJDK Runtime Environment (build 1.8.0_191-8u191-b12-2ubuntu0.18.10.1-b12)
OpenJDK 64-Bit Server VM (build 25.191-b12, mixed mode)
Set the path and JAVA_HOME variable, add the following commands to ~/.bashrc file.
export JAVA_HOME="/usr/lib/jvm/java-8-openjdk-amd64/jre/bin/java"
export PATH=$PATH:$JAVA_HOME/bin
3.2 Installing HDFS
Install Hadoop 3.1.2 by executing this commands:
$ cd /opt
$ sudo wget https://www-eu.apache.org/dist/hadoop/common/hadoop-3.1.1/hadoop-3.1.1.tar.gz .
$ sudo tar -zxvf hadoop-3.1.1.tar.gz
$ sudo ln -s Hadoop-3.1.1 hadoop
and add this entries to ~/.bashrc file
export HADOOP_HOME=/opt/hadoop
export PATH="$ HADOOP_HOME/bin:$PATH"
Hadoop HDFS is used by Archival script to archive old data (older than 10 year) based on UNIX
timestamp information as Parquet files with Snappy compression.
3.3 Installing Spark
Install Spark 2.3.3 by executing these commands:
$ cd /opt
$ sudo wget https://www-us.apache.org/dist/spark/spark-2.3.3/spark-2.3.3-bin-hadoop2.7.tgz .
$ sudo tar -zxvf spark-2.3.3-bin-hadoop2.7.tgz
$ sudo ln -s spark-2.3.3-bin-hadoop2.7 spark
and add this entries to ~/.bashrc file
export SPARK_HOME=/opt/spark
export PATH="$SPARK_HOME/bin:$PATH"
3.4 Setting up Cassandra
In order to run the Cassandra 3.11.4, we need to install docker on Ubuntu machine based on this
guideline: https://www.digitalocean.com/community/tutorials/how-to-install-and-use-docker-on-
ubuntu-18-04.
You need to assign Cassandra broadcast IP address to your private IP address.
$ ip addr show
Example: Private IP = 172.30.0.172
export CASSANDRA_IP_ADDRESS=172.30.0.172
Then run the Cassandra docker container by executing these bash commands.
$ mkdir -p /mnt/data/var/lib/cassandra
$ docker run --name cassandra-server --network cda -d -e
CASSANDRA_BROADCAST_ADDRESS="${CASSANDRA_IP_ADDRESS}" -p 7000:7000 -p 9042:9042 -v
/mnt/data/var/lib/cassandra:/var/lib/cassandra cassandra:3.11.4
3.5 Installing Kafka and Zookeeper
This section is on the instructions to install Apache Kafka and the dependencies required. The required
dependency is Zookeeper. The version that we have used for Apache Kafka and Zookeeper are as shown
below:
- ZooKeeper 3.4.6 (ZooKeeper-3.4.6.tar.gz)
- Apache Kafka 1.1.1 (Apache Kafka 1.1.1)
We will download Zookeeper using the following command and install using the command line.
$ cd opt/
$ sudo wget https://archive.apache.org/dist/zookeeper/zookeeper-3.4.6/zookeeper-3.4.6.tar.gz
$ sudo ln -s /opt/zookeeper-3.4.6 /opt/zookeeper
$ cd zookeeper
$ mkdir data
Upon installing Zookeeper, we will create the configuration file for Zookeeper to initialize properly.
$ vim conf/zoo.cfg
tickTime=2000
dataDir=/path/to/zookeeper/data
clientPort=2181
initLimit=5
syncLimit=2
The command code will initialize the Zookeeper server and if the initialization is successful, the
command will be similar to the one as shown below.
$ bin/zkServer.sh start
$ JMX enabled by default
$ Using config: /Users/../zookeeper/bin/../conf/zoo.cfg
$ Starting zookeeper ... STARTED
To check if the Zookeeper is working properly, we can run the following command to check if Zookeeper
is working. If it is working, we will be able to see that it is connected as shown below.
$ bin/zkCli.sh
Connecting to localhost:2181
................
................
................
Welcome to ZooKeeper!
................
................
WATCHER::
WatchedEvent state:SyncConnected type: None path:null
[zk: localhost:2181(CONNECTED) 0]
After installing, we will continue to work on installing Kafka. As mentioned, the version we have used for
this project is Apache Kafka 1.1.1. The following commands will download Apache Kafka and install it.
$ cd opt/
$ sudo wget https://archive.apache.org/dist/kafka/1.1.1/kafka_2.11-1.1.1.tgz
$ tar -zxf kafka_2.12-2.1.0.tgz
$ sudo ln -s /opt/kafka_2.12-2.1.0 /opt/kafka
$ cd kafka
You can start the server by giving the following command.
$ bin/kafka-server-start.sh config/server.properties
After starting the command, if Kafka were to run smoothly, we will be able to see the following response
on the screen.
$ bin/kafka-server-start.sh config/server.properties
[2016-01-02 15:37:30,410] INFO KafkaConfig values:
request.timeout.ms = 30000
log.roll.hours = 168
inter.broker.protocol.version = 0.9.0.X
log.preallocate = false
security.inter.broker.protocol = PLAINTEXT
3.5.1 Creating Kafka topics
The following command will create the topic stockquotes for the Kafka producer. The first command will
be for the stockquotes. The second command will be for the stocktwits.
$ sudo $KAFKA_HOME/bin/kafka-topics.sh --create --zookeeper localhost:2181 --replication-factor 1
--partitions 1 --topic stockquotes
$ sudo $KAFKA_HOME/bin/kafka-topics.sh --create --zookeeper localhost:2181 --replication-factor 1
--partitions 1 --topic stocktwits
3.6 Setting up and starting the real-time data producers
We have got 2 different producers for streaming the data from 2 different data sources to 2 Kafka topics
created as per section 3.5.1
$ sudo $KAFKA_HOME/bin/kafka-console-producer.sh --broker-list localhost:9092 —topic stockquotes
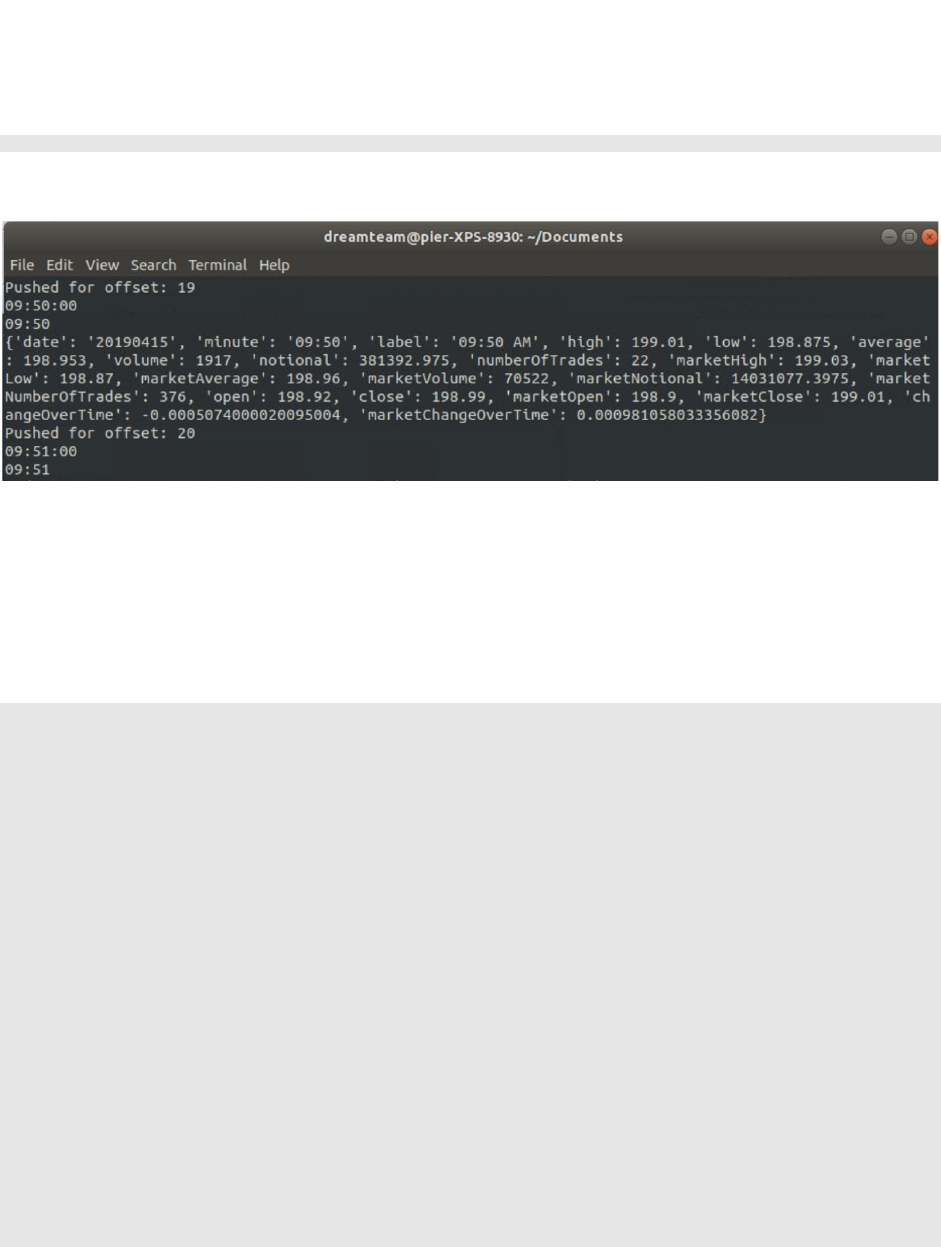
3.6.1 Producer for IEX data
The python script named “iex_producer.py” will act as a producer and will take date time in epoch
format as a command line parameter. This Python file will request the data from
“https://api.iextrading.com/1.0/stock/AAPL/ “ URL and transmit the response to the topic called
“stockquotes” created as per section 3.5.1. The command for starting the producer is
$ python iex_producer.py 20190415
API response format to be transmitted to the “stockquotes” topic is shown below.
3.6.2 Producer for StockTwits data
In order to ingest StockTwits data, please run Ingestion-StockTwits-Producer.jar with parameters:
• Topic name: stock-twits
• Stock ticker: "AAPL", "MSFT", "GOOG", etc
• Redis Host IP Address: 127.0.0.1 since we host Redis server locally
$ java -jar Ingestion-StockTwits-Producer.jar stock-twits AAPL 127.0.0.1
objc[14636]: Class JavaLaunchHelper is implemented in both
/Library/Java/JavaVirtualMachines/jdk1.8.0_144.jdk/Contents/Home/bin/java (0x10369e4c0) and
/Library/Java/JavaVirtualMachines/jdk1.8.0_144.jdk/Contents/Home/jre/lib/libinstrument.dylib
(0x1037224e0). One of the two will be used. Which one is undefined.
SLF4J: Failed to load class "org.slf4j.impl.StaticLoggerBinder".
SLF4J: Defaulting to no-operation (NOP) logger implementation
SLF4J: See http://www.slf4j.org/codes.html#StaticLoggerBinder for further details.
Pull stock tweets from https://api.stocktwits.com/api/2/streams/symbol/AAPL.json?since=150025459
since ID: 150025574, max ID: 150027266
Publish AAPL stock tweets: id AAPL-150027266
Publish AAPL stock tweets: id AAPL-150027168
Publish AAPL stock tweets: id AAPL-150027146
Publish AAPL stock tweets: id AAPL-150026955
Publish AAPL stock tweets: id AAPL-150026876
Publish AAPL stock tweets: id AAPL-150026822
Publish AAPL stock tweets: id AAPL-150026445
Publish AAPL stock tweets: id AAPL-150026408
Publish AAPL stock tweets: id AAPL-150026303
Publish AAPL stock tweets: id AAPL-150026279
Publish AAPL stock tweets: id AAPL-150026257
Publish AAPL stock tweets: id AAPL-150026234
Publish AAPL stock tweets: id AAPL-150026212
Publish AAPL stock tweets: id AAPL-150026193
Publish AAPL stock tweets: id AAPL-150026190
Publish AAPL stock tweets: id AAPL-150026163
Publish AAPL stock tweets: id AAPL-150026103
Publish AAPL stock tweets: id AAPL-150026044
Publish AAPL stock tweets: id AAPL-150026021
Publish AAPL stock tweets: id AAPL-150025870
Publish AAPL stock tweets: id AAPL-150025839
Publish AAPL stock tweets: id AAPL-150025824
Publish AAPL stock tweets: id AAPL-150025720
Publish AAPL stock tweets: id AAPL-150025663
Publish AAPL stock tweets: id AAPL-150025647
Publish AAPL stock tweets: id AAPL-150025636
Publish AAPL stock tweets: id AAPL-150025632
Publish AAPL stock tweets: id AAPL-150025618
Publish AAPL stock tweets: id AAPL-150025577
Publish AAPL stock tweets: id AAPL-150025574
Message sent successfully
3.7 Setting up Spark jobs
The different Scala projects as per different task have been created and converted into “jar” format. The
commands for executing jars can be given as follows. All the JARs are uploaded to Google drive and are
available in this link: https://drive.google.com/drive/folders/1kYnweP0WGCPd1yesRgAtZUrtLXoCqq-g.
$ spark-submit Streaming-Spark-StockwithUnixTS.jar localhost:9092 group1 stockquotes
This is a consumer Spark-Streaming job which will get the messages from “stock-twits” topic and insert
them in Cassandra table.
$ spark-submit SparkStreaming.jar
This is a consumer Spark-Streaming job which will get messages from “stockquotes” topic and perform
moving average for messages received for 10 seconds.
$ spark-submit BatchML.jar 18.136.251.110 9042
This is a batch job which will use Spark-Machine Learning to predict the marketAverage price.
$ spark-submit StockTwitAnalytics.jar
This is a batch job which will do batch aggregations on stock-twits data.
$ spark-submit StockQuoteAggregatesBatch.jar
This is a batch job which will do batch aggregations on IEX data.
3.8 Installing Redis
We run Redis 5.0.4 by executing these commands:
$ mkdir -p /mnt/data/var/lib/redis/data
$ docker run --name redis-server --network cda -v /mnt/data/var/lib/redis/data:/data -p 6379:6379
-d redis:5.0.4 redis-server --appendonly yes
3.9 Visualizing using Qlik Sense
1) Install Qlik Sense Desktop from the URL below: https://www.qlik.com/us/try-or-buy/download-
qlik-sense
2) It is required to setup a free Qlik Sense account
3) Once installed, paste the qvf file into the directory below
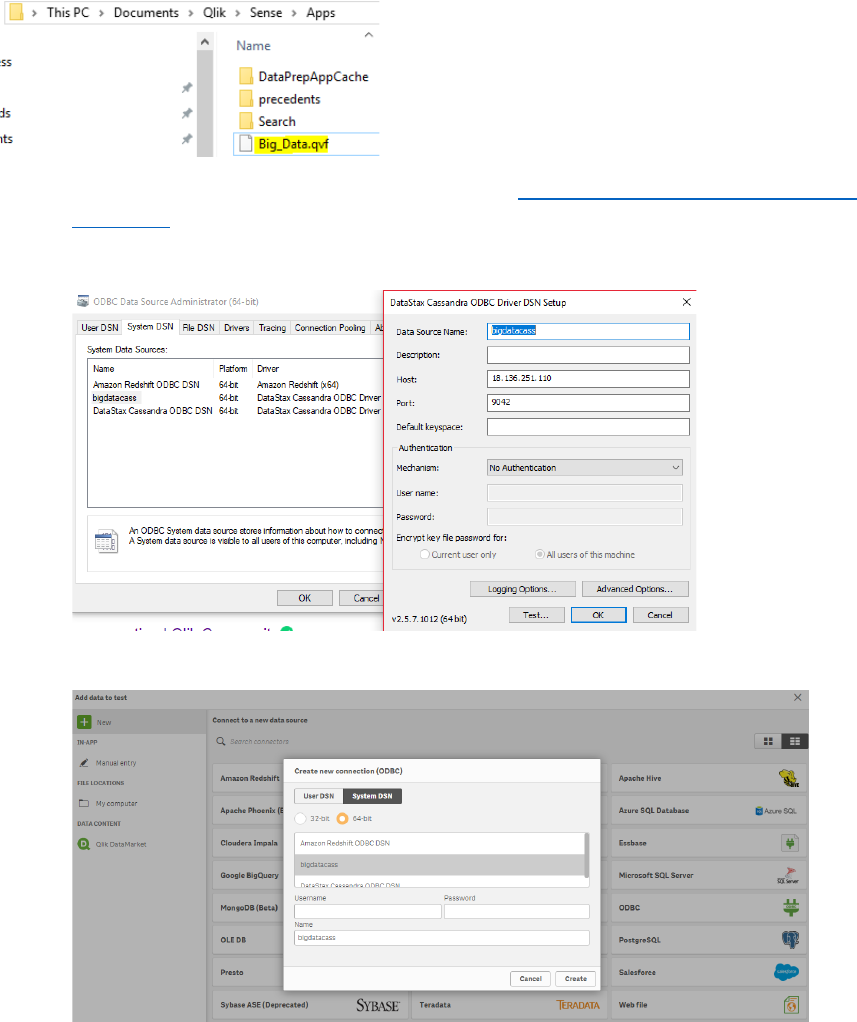
4) Download the Qlik Sense & Cassandra connector: https://academy.datastax.com/quick-
downloads
5) Setup the ODBC connector
6) The below shows how the Qlik Sense ODBC was initially setup (not required if the qvf file is
pasted into the app folder in step 3)
