TDS1000 And TDS2000 Series Digital Storage Oscilloscope User Manual Tektronix TDS1002
User Manual: Tektronix TDS1002 User Manual
Open the PDF directly: View PDF ![]() .
.
Page Count: 206 [warning: Documents this large are best viewed by clicking the View PDF Link!]
- Title Page
- WARRANTY (Digital Storage Oscilloscope)
- WARRANTY (P2200 Probe)
- Table of Contents
- General Safety Summary
- Preface
- Getting Started
- Understanding Oscilloscope Functions
- Operating Basics
- Application Examples
- Reference
- Math FFT
- TDS2CMA Communications Module
- Appendix A: Specifications
- Appendix B: Accessories
- Appendix C: General Care and Cleaning
- Appendix D: Default Setup
- Appendix E: GPIB and RS-232 Interfaces
- Index

User Manual
TDS1000- and TDS2000-Series
Digital Storage Oscilloscope
071-1064-00
This document supports firmware version
FV:v1.00 and above.
www.tektronix.com
Copyright ©Tektronix, Inc. All rights reserved.
Tektronix products are covered by U.S. and foreign patents, issued and
pending. Information in this publication supercedes that in all previously
published material. Specifications and price change privileges reserved.
Tektronix, Inc., P.O. Box 500, Beaverton, OR 97077
TEKTRONIX and TEK are registered trademarks of Tektronix, Inc.
WARRANTY SUMMARY
(TDS1000- and TDS2000-Series Digital Storage Oscilloscope)
Tektronix warrants that the products that it manufactures and sells will be free from defects
in materials and workmanship for a period of three (3) years from the date of shipment
from an authorized Tektronix distributor. If a product or CRT proves defective within the
respective period, Tektronix will provide repair or replacement as described in the complete
warranty statement.
To arrange for service or obtain a copy of the complete warranty statement, please contact
your nearest Tektronix sales and service office.
EXCEPT AS PROVIDED IN THIS SUMMARY OR THE APPLICABLE WARRANTY
STATEMENT, TEKTRONIX MAKES NO WARRANTY OF ANY KIND, EXPRESS
OR IMPLIED, INCLUDING WITHOUT LIMITATION THE IMPLIED WARRANTIES
OF MERCHANTABILITY AND FITNESS FOR A PARTICULAR PURPOSE. IN NO
EVENT SHALL TEKTRONIX BE LIABLE FOR INDIRECT, SPECIAL OR
CONSEQUENTIAL DAMAGES.
WARRANTY SUMMARY
(P2200 Probe)
Tektronix warrants that the products that it manufactures and sells will be free from defects
in materials and workmanship for a period of one (1) year from the date of shipment. If a
product proves defective within the respective period, Tektronix will provide repair or
replacement as described in the complete warranty statement.
To arrange for service or obtain a copy of the complete warranty statement, please contact
your nearest Tektronix sales and service office.
EXCEPT AS PROVIDED IN THIS SUMMARY OR THE APPLICABLE WARRANTY
STATEMENT, TEKTRONIX MAKES NO WARRANTY OF ANY KIND, EXPRESS
OR IMPLIED, INCLUDING WITHOUT LIMITATION THE IMPLIED WARRANTIES
OF MERCHANTABILITY AND FITNESS FOR A PARTICULAR PURPOSE. IN NO
EVENT SHALL TEKTRONIX BE LIABLE FOR INDIRECT, SPECIAL OR
CONSEQUENTIAL DAMAGES.

TDS1000/2000-Series Digital Oscilloscope User Manual i
Table of Contents
General Safety Summary v............................
Preface vii............................................
Help System ix........................................
Conventions xi........................................
Product End-of-Life Handling xii..........................
Contacting Tektronix xiii.................................
Getting Started 1.....................................
General Features 2....................................
Installation 4.........................................
Power Cord 4......................................
Security Loop 4....................................
Functional Check 5....................................
Probe Safety 6........................................
Probe Check Wizard 7.................................
Manual Probe Compensation 8...........................
Probe Attenuation Setting 9.............................
Self Calibration 10.....................................
Understanding Oscilloscope Functions 11.................
Setting Up the Oscilloscope 12...........................
Using Autoset 12....................................
Saving a Setup 12...................................
Recalling a Setup 12.................................
Default Setup 13....................................
Triggering 13.........................................
Source 14..........................................
Types 15..........................................
Modes 15..........................................
Coupling 15........................................
Position 16.........................................
Slope and Level 16..................................

Table of Contents
ii TDS1000/2000-Series Digital Oscilloscope User Manual
Acquiring Signals 17...................................
Acquisition Modes 17................................
Time Base 18......................................
Scaling and Positioning Waveforms 18.....................
Vertical Scale and Position 18.........................
Horizontal Scale and Position; Pretrigger Information 19....
Taking Measurements 24................................
Graticule 24........................................
Cursors 25.........................................
Automatic 25.......................................
Operating Basics 27...................................
Display Area 28.......................................
Message Area 31....................................
Using the Menu System 32...............................
Vertical Controls 34....................................
Horizontal Controls 35..................................
Trigger Controls 36.....................................
Menu and Control Buttons 38............................
Connectors 39.........................................
Application Examples 41...............................
Taking Simple Measurements 42..........................
Using Autoset 42....................................
Taking Automatic Measurements 43....................
Measuring Two Signals 46............................
Taking Cursor Measurements 48..........................
Measuring Ring Frequency 48.........................
Measuring Ring Amplitude 49.........................
Measuring Pulse Width 50............................
Measuring Rise Time 51..............................
Analyzing Signal Detail 54..............................
Looking at a Noisy Signal 54..........................
Separating the Signal from Noise 55....................
Capturing a Single-Shot Signal 56.........................
Optimizing the Acquisition 57.........................
Measuring Propagation Delay 58..........................

Table of Contents
TDS1000/2000-Series Digital Oscilloscope User Manual iii
Triggering on a Specific Pulse Width 60....................
Triggering on a Video Signal 62...........................
Triggering on Video Fields 63.........................
Triggering on Video Lines 64..........................
Using the Window Function to See Waveform Details 66....
Analyzing a Differential Communication Signal 68...........
Viewing Impedance Changes in a Network 70...............
Reference 73.........................................
Acquire 74............................................
Autoset 79............................................
Sine Wave 81......................................
Square Wave or Pulse 82.............................
Video Signal 83.....................................
Cursors 84............................................
Default Setup 85.......................................
Display 86............................................
Help 89..............................................
Horizontal 90.........................................
Math 93..............................................
Measure 94...........................................
Print 96..............................................
Probe Check 96........................................
Save/Recall 97........................................
Trigger Controls 99.....................................
Utility 110.............................................
Vertical 112............................................
Math FFT 115.........................................
Setting Up the Time-Domain Waveform 116.................
Displaying the FFT Spectrum 118..........................
Selecting an FFT Window 120.............................
Magnifying and Positioning an FFT Spectrum 124.............
Measuring an FFT Spectrum Using Cursors 126...............

Table of Contents
iv TDS1000/2000-Series Digital Oscilloscope User Manual
TDS2CMA Communications Module 127..................
Installing and Removing an Extension Module 127............
Checking Module Installation 130..........................
Troubleshooting Module Installation 130....................
Sending Screen Data to an External Device 131...............
Setting Up and Testing the RS-232 Interface 134..............
Transferring Binary Data 141...........................
Reporting RS-232 I/O Errors 141........................
Setting Up and Testing the GPIB Interface 143................
Command Entry 150.....................................
Appendix A: Specifications 151...........................
Appendix B: Accessories 169.............................
Appendix C: General Care and Cleaning 173...............
Appendix D: Default Setup 175...........................
Appendix E: GPIB and RS-232 Interfaces 179..............
Index 181.............................................

TDS1000/2000-Series Digital Oscilloscope User Manual v
General Safety Summary
Review the following safety precautions to avoid injury and prevent
damage to this product or any products connected to it. To avoid
potential hazards, use this product only as specified.
Only qualified personnel should perform service procedures.
To Avoid Fire or Personal Injury
Use Proper Power Cord. Use only the power cord specified for this
product and certified for the country of use.
Connect and Disconnect Properly. Do not connect or disconnect probes
or test leads while they are connected to a voltage source.
Ground the Product. This product is grounded through the grounding
conductor of the power cord. To avoid electric shock, the grounding
conductor must be connected to earth ground. Before making
connections to the input or output terminals of the product, ensure
that the product is properly grounded.
Connect the Probe Properly. The probe ground lead is at ground
potential. Do not connect the ground lead to an elevated voltage.
Observe All Terminal Ratings. To avoid fire or shock hazard, observe all
ratings and marking on the product. Consult the product manual for
further ratings information before making connections to the product.
Do Not Operate Without Covers. Do not operate this product with
covers or panels removed.
Use Proper Fuse. Use only the fuse type and rating specified for this
product.
Avoid Exposed Circuitry. Do not touch exposed connections and
components when power is present.
Do Not Operate With Suspected Failures. If you suspect there is damage
to this product, have it inspected by qualified service personnel.
Provide Proper Ventilation. Refer to the manual’s installation
instructions for details on installing the product so it has proper
ventilation.

General Safety Summary
vi TDS1000/2000-Series Digital Oscilloscope User Manual
Do Not Operate in Wet/Damp Conditions.
Do Not Operate in an Explosive Atmosphere.
Keep Product Surfaces Clean and Dry.
Safety Terms and Symbols
Terms in This Manual. These terms may appear in this manual:
WARNING. Warning statements identify conditions or practices that
could result in injury or loss of life.
CAUTION. Caution statements identify conditions or practices that
could result in damage to this product or other property.
Terms on the Product. These terms may appear on the product:
DANGER indicates an injury hazard immediately accessible as you
read the marking.
WARNING indicates an injury hazard not immediately accessible as
you read the marking.
CAUTION indicates a hazard to property including the product.
Symbols on the Product. These symbols may appear on the product:
Protective Ground
(Earth) Terminal
CAUTION
Refer to Manual
Measurment
Ground Terminal
Measurment
Input Terminal
Mains Disconnected
OFF (Power)
Mains Connected
ON (Power)

TDS1000/2000-Series Digital Oscilloscope User Manual vii
Preface
This manual contains operating information for the TDS1000-Series
and TDS2000-Series Digital Storage Oscilloscopes. The manual
consists of the following chapters:
HThe Getting Started chapter briefly describes features of the
oscilloscope and provides installation instructions.
HThe Understanding Oscilloscope Functions chapter describes
basic operations and functions of the oscilloscope: setting up the
oscilloscope, triggering, acquiring data, scaling and positioning
waveforms, and taking measurements.
HThe Operating Basics chapter covers operating principles of the
oscilloscope.
HThe Application Examples chapter includes examples of a wide
variety of measurements to give you ideas on how to solve your
own measurement problems.
HThe Reference chapter describes the selections or available range
of values for each option.

Preface
viii TDS1000/2000-Series Digital Oscilloscope User Manual
HThe Math FFT chapter contains detailed information about how
to use the Math FFT function.
HThe TDS2CMA Communications Module chapter describes this
optional module and how to set up the RS-232, GPIB, and
Centronics ports to use the oscilloscope with external devices,
such as printers and computers.
HThe Appendix A: Specifications chapter includes electrical,
environmental, and physical specifications for the oscilloscope,
as well as certifications and compliances.
HThe Appendix B: Accessories chapter briefly describes standard
and optional accessories.
HThe Appendix C: General Care and Cleaning chapter describes
how to take care of the oscilloscope.
HThe Appendix D: Default Setup chapter contains a list of the
menus and controls with the default (factory) settings that are
recalled when you push the DEFAULT SETUP front-panel
button.
HThe Appendix E: GPIB and RS-232 Interfaces chapter compares
the two protocols to help you decide which one to use.

Preface
TDS1000/2000-Series Digital Oscilloscope User Manual ix
Help System
The oscilloscope has a Help system with topics that cover all the
features of the oscilloscope. You can use the Help system to display
several kinds of information:
HGeneral information about understanding and using the
oscilloscope, such as Using the Menu System.
HInformation about specific menus and controls, such as the
Vertical Position Control.
HAdvice about problems you may face while using an oscillo-
scope, such as Reducing Noise.
The Help system provides three ways for you to find the information
you need: context-sensitive, hyperlinks, and an index.
Context-Sensitive
The oscilloscope displays information about the last menu displayed
on the screen when you push the HELP front-panel button. The
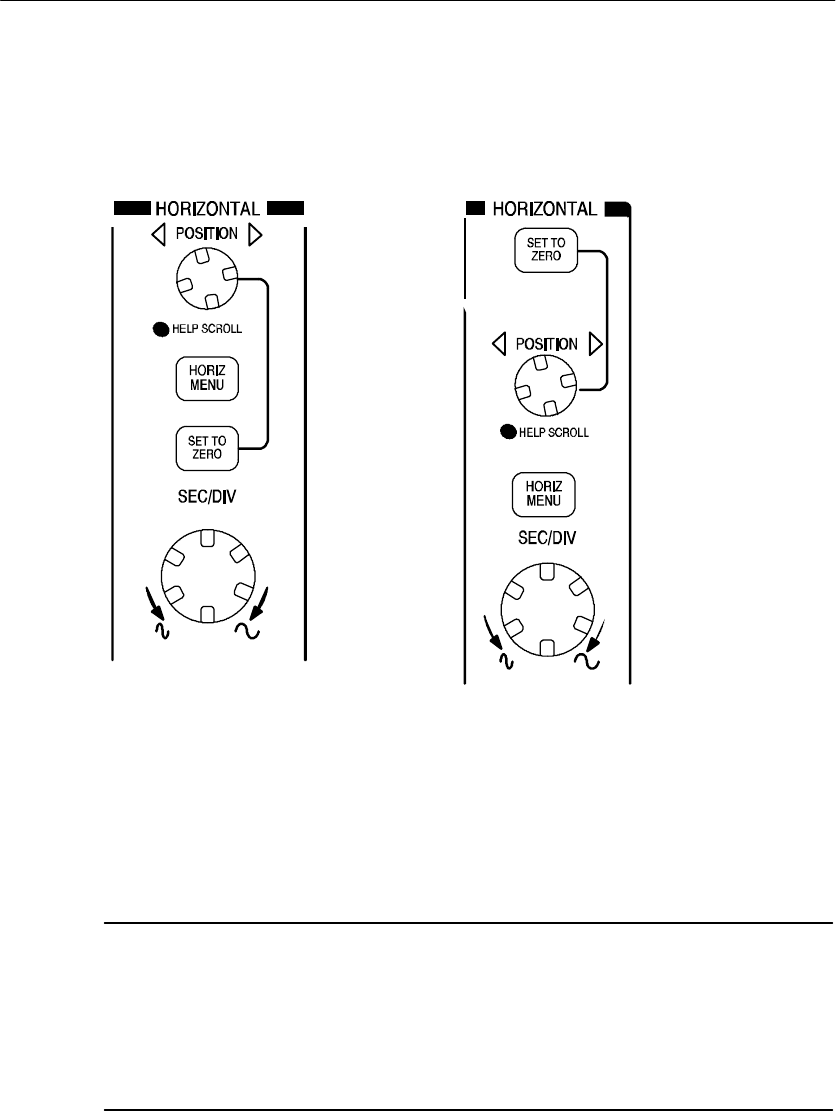
HELP SCROLL LED lights under the HORIZONTAL POSITION
knob to indicate the alternative function of the knob. If the topic uses
more than one page, turn the HELP SCROLL knob to move from
page to page within the topic.

Preface
xTDS1000/2000-Series Digital Oscilloscope User Manual
Hyperlinks
Most of the help topics contain phrases marked with angle brackets,
such as <Autoset>. These are links to other topics. Turn the HELP
SCROLL knob to move the highlight from one link to another. Push
the Show Topic option button to display the topic corresponding to
the highlighted link. Push the Back option button to return to the
previous topic.
Index
Push the front--panel HELP button, then push the Index option
button. Push the Page Up or Page Down option buttons until you find
the index page that contains the topic you want to view. Turn the
HELP SCROLL knob to highlight a help topic. Push the Show Topic
option button to display the topic.
NOTE. Push the Exit option button or any menu button to remove the
Help text from the screen and return to displaying waveforms.
Preface
TDS1000/2000-Series Digital Oscilloscope User Manual xi
Conventions
This manual uses the following conventions:
HFront-panel buttons, knobs and connectors appear in all
uppercase letters. For example: HELP, PRINT.
HMenu options appear with the first letter of each word in upper
case. For example: Peak Detect, Window Zone.
Front-panel buttons and
knob labels — All upper case
Option buttons — First letter of
each word on screen is upper case
NOTE. Option buttons can also be called screen buttons, side-menu
buttons, bezel buttons, or soft keys.
HThe "delimiter separates a series of button pushes. For example,
UTILITY "Options "RS-232 means that you push the
UTILITY button, then push the Options option button, and then
push the RS-232 option button.

Preface
xii TDS1000/2000-Series Digital Oscilloscope User Manual
Product End-of-Life Handling
Components that Contain Mercury. The cold cathode fluorescent tube
located in the liquid crystal display backlight contains trace amounts
of mercury. When you are ready to reclaim the instrument, you must
properly transfer it according to local regulations concerning
mercury-containing equipment or ship the instrument to the
Tektronix Recycling Operations (RAMS). You can contact Tektronix
for the RAMS shipping address and instructions.

Preface
TDS1000/2000-Series Digital Oscilloscope User Manual xiii
Contacting Tektronix
Phone 1-800-833-9200*
Address Tektronix, Inc.
Department or name (if known)
14200 SW Karl Braun Drive
P.O. Box 500
Beaverton, OR 97077
USA
Web site www.tektronix.com
Sales
support
1-800-833-9200, select option 1*
Service
support
1-800-833-9200, select option 2*
Technical
support
Email: techsupport@tektronix.com
1-800-833-9200, select option 3*
6:00 a.m. -- 5:00 p.m. Pacific time
*This phone number is toll free in North America. After office
hours, please leave a voice mail message.
Outside North America, contact a Tektronix sales office or
distributor; see the Tektronix web site for a list of offices.

Preface
xiv TDS1000/2000-Series Digital Oscilloscope User Manual

TDS1000/2000-Series Digital Oscilloscope User Manual 1
Getting Started
TDS1000-Series and TDS2000-Series Digital Storage Oscilloscopes
are small, lightweight, benchtop packages that you can use to take
ground-referenced measurements.
In addition to the list of general features, this chapter describes how
to do the following tasks:
HInstall your product
HPerform a brief functional check
HPerform a probe check and compensate probes
HMatch your probe attenuation factor
HUse the self calibration routine
NOTE. You can select a language to display on the screen when you
power on the oscilloscope. At any time, you can push the UTILITY
button, and push the Language option button to select a language.

Getting Started
2TDS1000/2000-Series Digital Oscilloscope User Manual
General Features
The next table and bulleted list describe the general features.
Model Channels Bandwidth Sample rate Display
TDS1002 260 MHz 1.0 GS/s Monochrome
TDS1012 2100 MHz 1.0 GS/s Monochrome
TDS2002 260 MHz 1.0 GS/s Color
TDS2012 2100 MHz 1.0 GS/s Color
TDS2014 4100 MHz 1.0 GS/s Color
TDS2022 2200 MHz 2.0 GS/s Color
TDS2024 4200 MHz 2.0 GS/s Color
HContext-sensitive Help system
HColor or monochrome LCD display
HSelectable 20 MHz bandwidth limit
H2500 point record length for each channel
HAutoset Menu
HProbe Check Wizard
HCursors with readouts
HTrigger frequency readout
HEleven automatic measurements
HWaveform averaging and peak detection

Getting Started
TDS1000/2000-Series Digital Oscilloscope User Manual 3
HDual time base
HMath Fast Fourier Transform (FFT)
HPulse Width trigger capability
HVideo trigger capability with line-selectable triggering
HExternal trigger
HSetup and waveform storage
HVariable persistence display
HRS-232, GPIB, and Centronics ports with the optional
TDS2CMA Communications Extension Module
HUser interface in ten user-selectable languages
Getting Started
4TDS1000/2000-Series Digital Oscilloscope User Manual
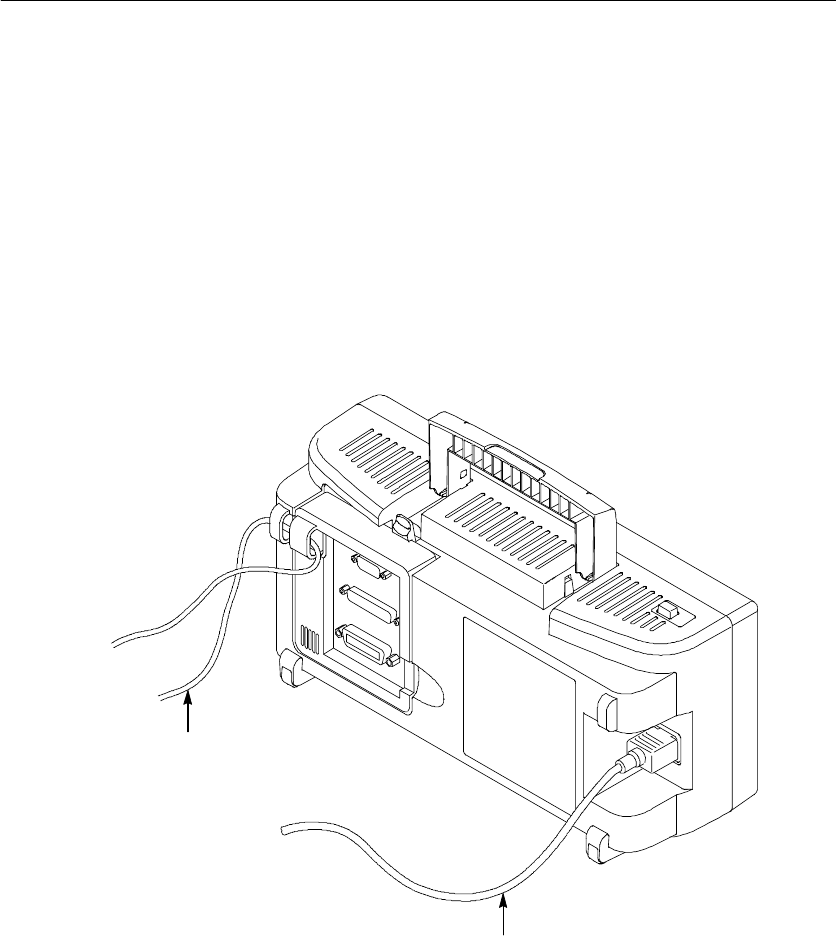
Installation
Power Cord
Use only power cords designed for your oscilloscope. Use a power
source that delivers 90 to 264 VACRMS, 45 to 66 Hz. If you have a
400 Hz power source, it must deliver 90 to 132 VACRMS, 360 to
440 Hz. Refer to page 171 for a list of available power cords.
Securing cable
Power cable
Security Loop
Use the built-in cable channels to secure both your oscilloscope and
extension module to your location.
Getting Started
TDS1000/2000-Series Digital Oscilloscope User Manual 5
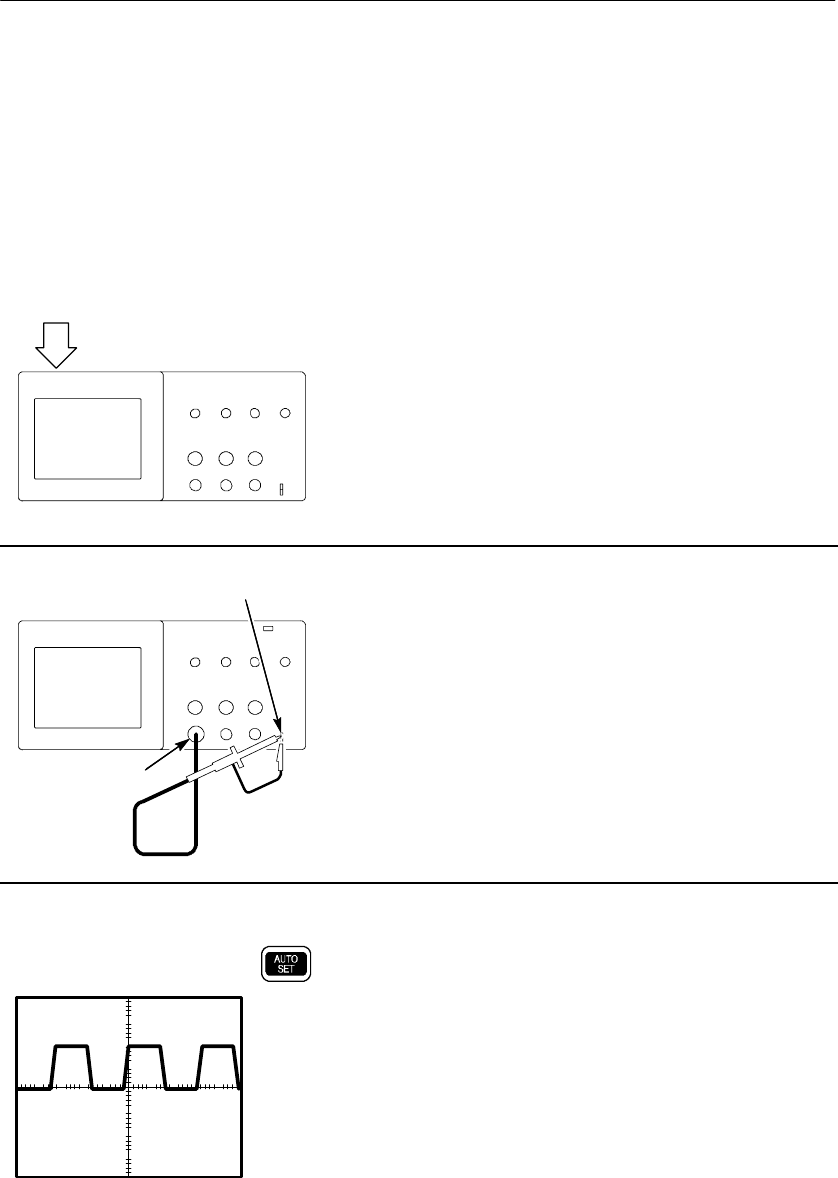
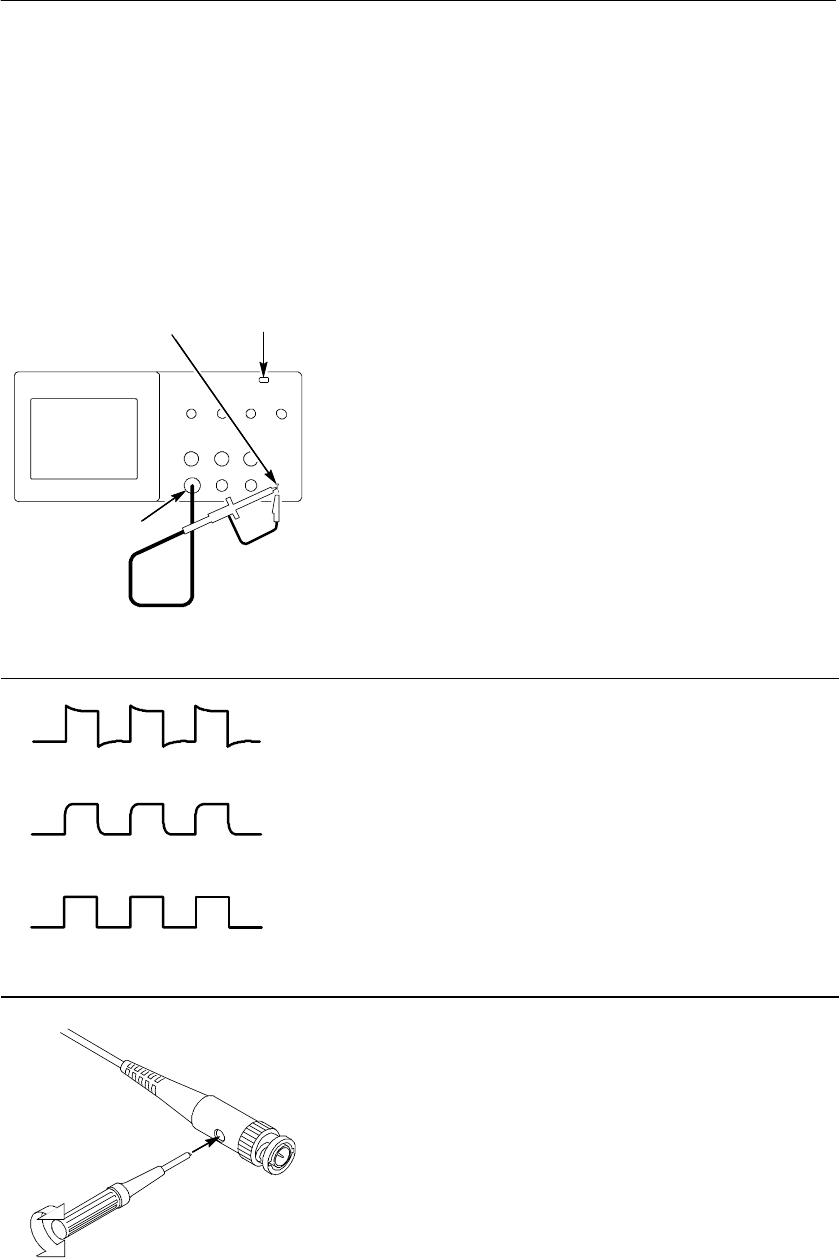
Functional Check
Perform this quick functional check to verify that your oscilloscope
is operating correctly.
PASSED
ON
/
OFF
button
1. Power on the oscilloscope.
Wait until the display shows that all
power-on tests passed. Push the DEFAULT
SETUP button. The default Probe option
attenuation setting is 10X.
CH 1
PROBE COMP 2. Set the switch to 10X on the P2200 probe
and connect the probe to channel 1 on the
oscilloscope. To do this, align the slot in
the probe connector with the key on the
CH 1 BNC, push to connect, and twist to
the right to lock the probe in place.
Connect the probe tip and reference lead
to the PROBE COMP connectors.
3. Push the AUTOSET button. Within a few
seconds, you should see a square wave in
the display of about 5 V peak-to-peak at
1kHz.
Push the CH 1 MENU button twice to
remove channel 1, push the CH 2 MENU
button to display channel 2, repeat steps 2
and 3. For 4-channel models, repeat for
CH 3 and CH 4.
Getting Started
6TDS1000/2000-Series Digital Oscilloscope User Manual
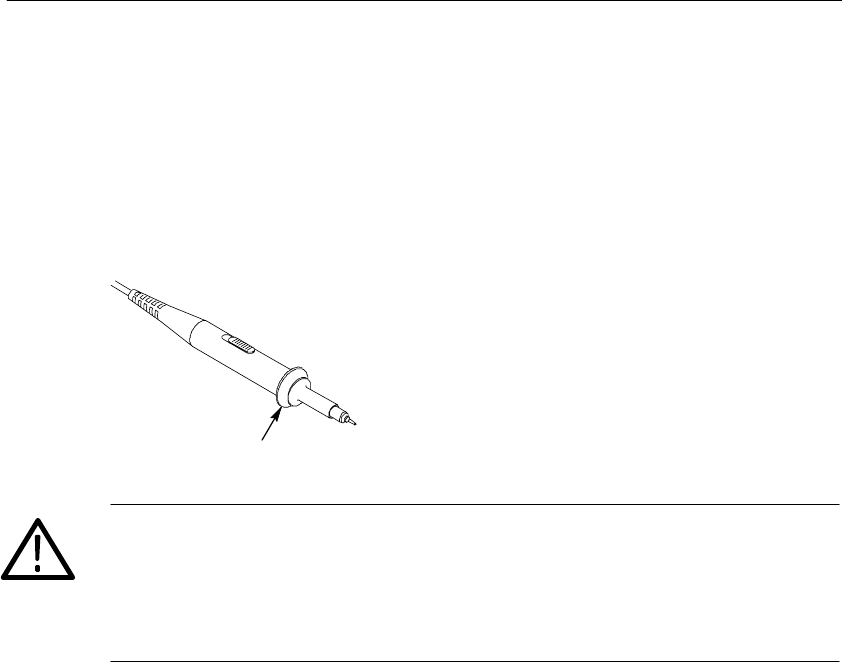
Probe Safety
A guard around the probe body provides a finger barrier for
protection from electric shock.
Finger guard
WARNING. To avoid electric shock when using the probe, keep fingers
behind the guard on the probe body.
To avoid electric shock while using the probe, do not touch metallic
portions of the probe head while it is connected to a voltage source.
Connect the probe to the oscilloscope and connect the ground
terminal to ground before you take any measurements.

Getting Started
TDS1000/2000-Series Digital Oscilloscope User Manual 7
Probe Check Wizard
You can use the Probe Check Wizard to quickly verify that your
probe is operating properly. The wizard also helps you adjust the
probe compensation (usually adjusted with a screw on the probe
body or probe connector) and set the Probe option attenuation factor
in the vertical menu (for example, the menu that appears when you
push the CH 1 MENU button).
You should do this each time you connect a probe to an input
channel.
To use the Probe Check Wizard, push the PROBE CHECK button. If
your probe is connected properly, compensated properly, and the
Probe entry in the oscilloscope VERTICAL menu is set to match
your probe, the oscilloscope will display a PASSED message at the
bottom of the screen. Otherwise, the oscilloscope will display
directions on the screen to guide you in correcting these problems.
NOTE. Probe check is useful for 1X, 10X, and 100X probes; it does
not work with the EXT TRIG front-panel BNC.
To compensate a probe connected to the EXT TRIG front-panel
BNC, follow these steps:
1. Connect the probe to any channel BNC, such as to CH 1.
2. Push the PROBE CHECK button and follow the directions on the
screen.
3. After you verify that the probe functions properly and is
compensated, connect the probe to the EXT TRIG BNC.
Getting Started
8TDS1000/2000-Series Digital Oscilloscope User Manual
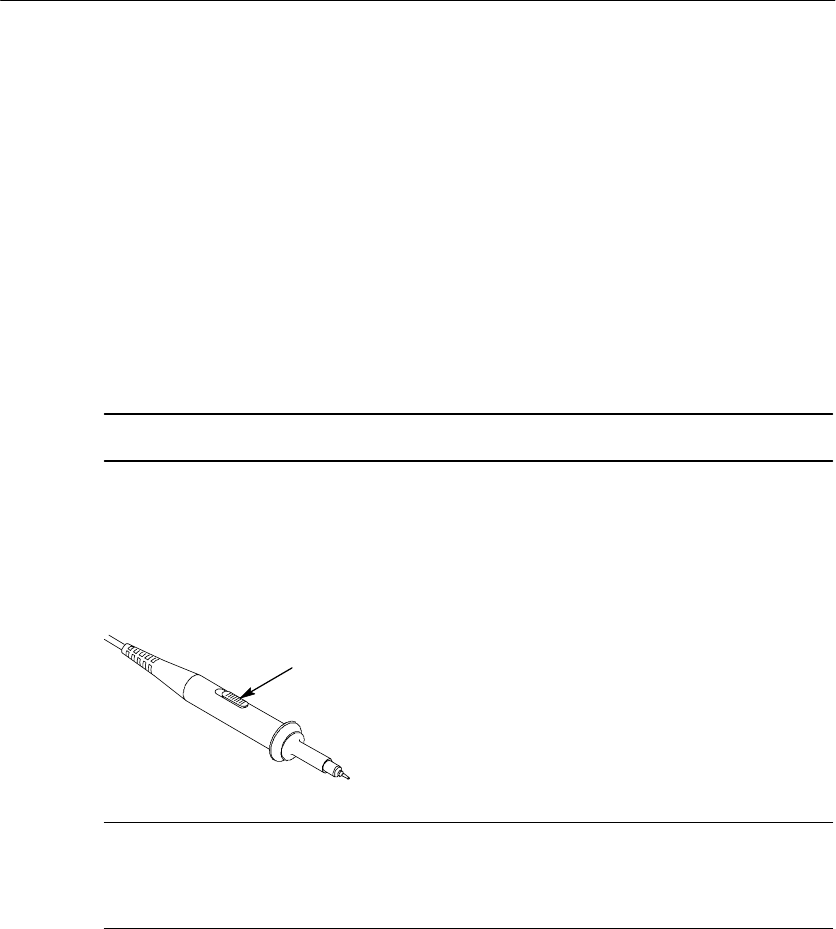
Manual Probe Compensation
As an alternative method to Probe Check, you can manually perform
this adjustment to match your probe to the input channel.
CH 1
PROBE
COMP
AUTOSET
button
1. Set the Probe option attenuation in the
channel menu to 10X. Set the switch to
10X on the P2200 probe and connect the
probe to channel 1 on the oscilloscope. If
you use the probe hook-tip, ensure a
proper connection by firmly inserting the
tip onto the probe.
2. Attach the probe tip to the PROBE COMP
~5V connector and the reference lead to
the PROBE COMP Ground connector.
Display the channel and then push the
AUTOSET button.
Overcompensated
Compensated correctly
Undercompensated
3. Check the shape of the displayed
waveform.
4. If necessary, adjust your probe.
Repeat as necessary.
Getting Started
TDS1000/2000-Series Digital Oscilloscope User Manual 9
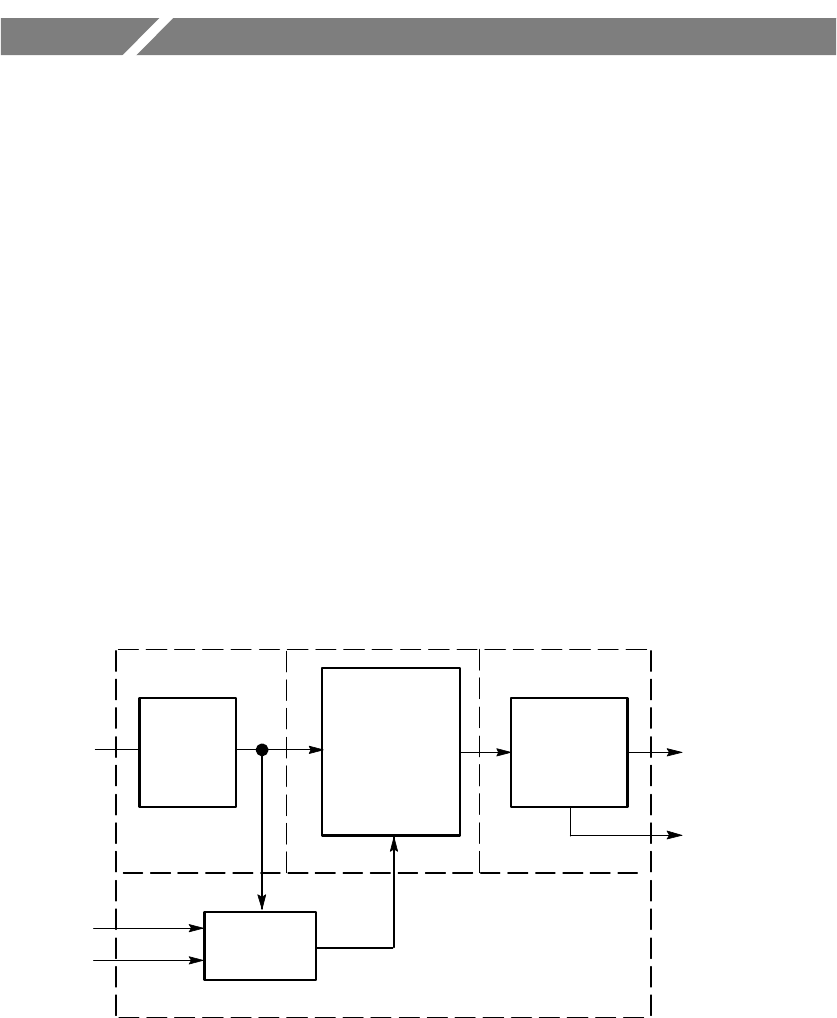
Probe Attenuation Setting
Probes are available with various attenuation factors which affect the
vertical scale of the signal. The Probe Check function verifies that
the Probe attenuation option matches the attenuation of the probe.
As an alternative method to Probe Check, you can push a vertical
menu button (such as the CH 1 MENU button), and select the Probe
option that matches the attenuation factor of your probe.
NOTE. The default setting for the Probe option is 10X.
Be sure that the Attenuation switch on the P2200 probe matches the
Probe option in the oscilloscope. Switch settings are 1X and 10X.
Attenuation switch
NOTE. When the Attenuation switch is set to 1X, the P2200 probe
limits the bandwidth of the oscilloscope to 7 MHz. To use the full
bandwidth of the oscilloscope, be sure to set the switch to 10X.

Getting Started
10 TDS1000/2000-Series Digital Oscilloscope User Manual
Self Calibration
The self calibration routine lets you optimize the oscilloscope signal
path for maximum measurement accuracy. You can run the routine at
any time but should always run the routine if the ambient tempera-
ture changes by 5_Cormore.
To compensate the signal path, disconnect any probes or cables from
the front-panel input connectors. Then, push the UTILITY button,
select the Do Self Cal option and follow the directions on the screen.
TDS1000/2000-Series Digital Oscilloscope User Manual 11
Understanding Oscilloscope Functions
This chapter contains information on what you need to understand
before you use an oscilloscope. To use your oscilloscope effectively,
you need to learn about the following oscilloscope functions:
HSetting up the oscilloscope
HTriggering
HAcquiring signals (waveforms)
HScaling and positioning waveforms
HMeasuring waveforms
The figure below shows a block diagram of the various functions of
the oscilloscope and their relationship to each other.
Vertical:
gain and
position
Each
channel
Trigger
Ext
AC Line
Acquire data:
mode and
time base
Waveform
record:
2500 points
Display
Computer
interface
(TDS2CMA)

Understanding Oscilloscope Functions
12 TDS1000/2000-Series Digital Oscilloscope User Manual
Setting Up the Oscilloscope
You should become familiar with three functions that you may use
often when operating your oscilloscope: Autoset, saving a setup, and
recalling a setup.
Using Autoset
The Autoset function obtains a stable waveform display for you. It
automatically adjusts the vertical scale, horizontal scale and trigger
settings. Autoset also displays several automatic measurements in the
graticule area, depending on the signal type.
Saving a Setup
The oscilloscope saves the current setup if you wait five seconds
after the last change before you power off the oscilloscope. The
oscilloscope recalls this setup the next time you apply power.
You can use the SAVE/RECALL Menu to permanently save up to ten
different setups.
Recalling a Setup
The oscilloscope can recall the last setup before power off, any of
your saved setups or the default setup. See page 175.
Understanding Oscilloscope Functions
TDS1000/2000-Series Digital Oscilloscope User Manual 13
Default Setup
The oscilloscope is set up for normal operation when it is shipped
from the factory. This is the default setup. To recall this setup, push
the DEFAULT SETUP button. To view the default settings, refer to
Appendix D: Default Setup.
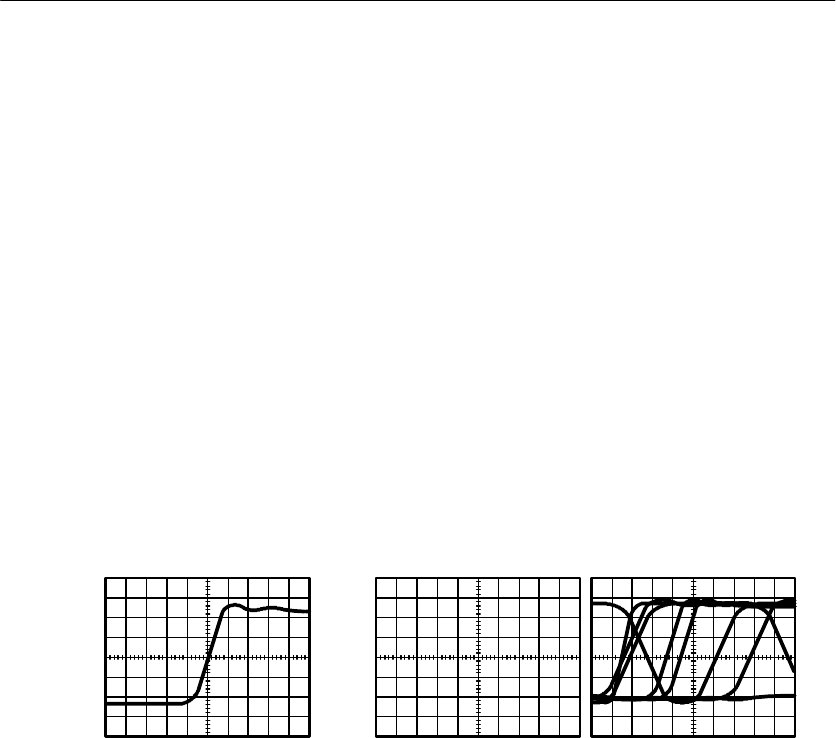
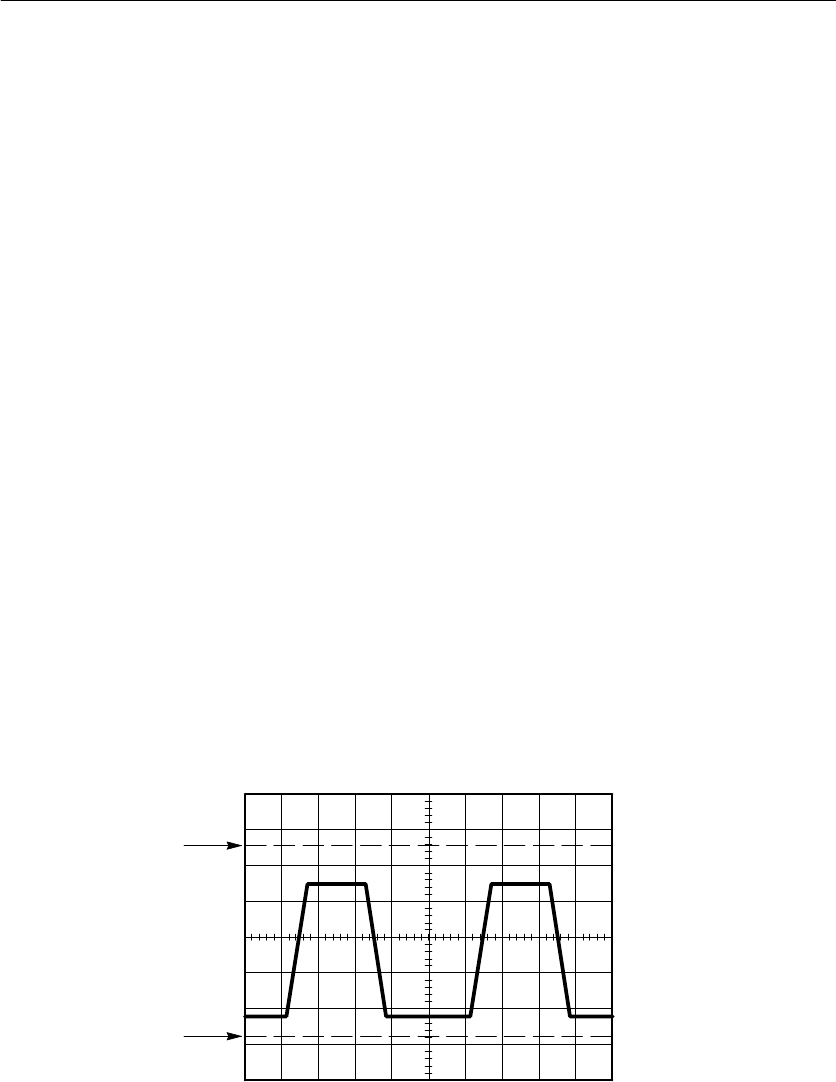
Triggering
The trigger determines when the oscilloscope starts to acquire data
and display a waveform. When a trigger is set up properly, the
oscilloscope converts unstable displays or blank screens into
meaningful waveforms.
Triggered waveform Untriggered waveforms
For oscilloscope-specific descriptions, refer to page 36 in the
Operating Basics chapter and page 99 in the Reference chapter.

Understanding Oscilloscope Functions
14 TDS1000/2000-Series Digital Oscilloscope User Manual
When you push the RUN/STOP or SINGLE SEQ buttons to start an
acquisition, the oscilloscope goes through the following steps:
1. Acquires enough data to fill the portion of the waveform record
to the left of the trigger point. This is also called the pretrigger.
2. Continues to acquire data while waiting for the trigger condition
to occur.
3. Detects the trigger condition.
4. Continues to acquire data until the waveform record is full.
5. Displays the newly-acquired waveform.
NOTE. For Edge and Pulse triggers, the oscilloscope counts the rate
at which trigger events occur to determine trigger frequency and
displays the frequency in the lower right corner of the screen.
Source
You can use the Trigger Source options to select the signal that the
oscilloscope uses as a trigger. The source can be any signal
connected to a channel BNC, to the EXT TRIG BNC or the AC
power line (available only with Edge triggers).

Understanding Oscilloscope Functions
TDS1000/2000-Series Digital Oscilloscope User Manual 15
Types
The oscilloscope provides three types of triggers: Edge, Video, and
Pulse Width.
Modes
You can select a Trigger Mode to define how the oscilloscope
acquires data when it does not detect a trigger condition. The modes
are Auto and Normal.
To perform a single sequence acquisition, push the SINGLE SEQ
button.
Coupling
You can use the Trigger Coupling option to determine which part of
the signal will pass to the trigger circuit. This can help you attain a
stable display of the waveform.
To use trigger coupling, push the TRIG MENU button, select an
Edge or Pulse trigger, and select a Coupling option.
NOTE. Trigger coupling affects only the signal passed to the trigger
system. It does not affect the bandwidth or coupling of the signal
displayed on the screen.
To view the conditioned signal being passed to the trigger circuit,
push and hold down the TRIG VIEW button.
Understanding Oscilloscope Functions
16 TDS1000/2000-Series Digital Oscilloscope User Manual
Position
The horizontal position control establishes the time between the
trigger and the screen center. Refer to Horizontal Scale and Position;
Pretrigger Information on page 19 for more information on how to
use this control to position the trigger.
Slope and Level
The Slope and Level controls help to define the trigger. The Slope
option (Edge trigger type only) determines whether the oscilloscope
finds the trigger point on the rising or the falling edge of a signal.
The TRIGGER LEVEL knob controls where on the edge the trigger
point occurs.
Rising edge Falling edge
Trigger slope can be rising or falling
Trigger level can be
adjusted vertically

Understanding Oscilloscope Functions
TDS1000/2000-Series Digital Oscilloscope User Manual 17
Acquiring Signals
When you acquire a signal, the oscilloscope converts it into a digital
form and displays a waveform. The acquisition mode defines how
the signal is digitized and the time base setting affects the time span
and level of detail in the acquisition.
Acquisition Modes
There are three acquisition modes: Sample, Peak Detect, and
Average.
Sample. In this acquisition mode, the oscilloscope samples the signal
in evenly spaced intervals to construct the waveform. This mode
accurately represents signals most of the time.
However, this mode does not acquire rapid variations in the signal
that may occur between samples. This can result in aliasing
(described on page 20) and may cause narrow pulses to be missed. In
these cases, you should use the Peak Detect mode to acquire data.
Peak Detect. In this acquisition mode, the oscilloscope finds the
highest and lowest values of the input signal over each sample
interval and uses these values to display the waveform. In this way,
the oscilloscope can acquire and display narrow pulses, which may
have otherwise been missed in Sample mode. Noise will appear to be
higher in this mode.
Average. In this acquisition mode, the oscilloscope acquires several
waveforms, averages them, and displays the resulting waveform. You
can use this mode to reduce random noise.

Understanding Oscilloscope Functions
18 TDS1000/2000-Series Digital Oscilloscope User Manual
Time Base
The oscilloscope digitizes waveforms by acquiring the value of an
input signal at discrete points. The time base allows you to control
how often the values are digitized.
To adjust the time base to a horizontal scale that suits your purpose,
use the SEC/DIV knob.
Scaling and Positioning Waveforms
You can change the display of waveforms by adjusting their scale
and position. When you change the scale, the waveform display will
increase or decrease in size. When you change the position, the
waveform will move up, down, right, or left.
The channel reference indicator (located on the left of the graticule)
identifies each waveform on the display. The indicator points to the
ground level of the waveform record.
To view the display area and readouts, refer to page 28.
Vertical Scale and Position
You can change the vertical position of waveforms by moving them
up or down in the display. To compare data, you can align a
waveform above another or you can align waveforms on top of each
other.
You can change the vertical scale of a waveform. The waveform
display will contract or expand about the ground level.
For oscilloscope-specific descriptions, refer to page 34 in the
Operating Basics chapter and page 112 in the Reference chapter.

Understanding Oscilloscope Functions
TDS1000/2000-Series Digital Oscilloscope User Manual 19
Horizontal Scale and Position; Pretrigger Information
You can adjust the HORIZONTAL POSITION control to view
waveform data before the trigger, after the trigger, or some of each.
When you change the horizontal position of a waveform, you are
actually changing the time between the trigger and the center of the
display. (This appears to move the waveform to the right or left on
the display.)
For example, if you want to find the cause of a glitch in your test
circuit, you might trigger on the glitch and make the pretrigger
period large enough to capture data before the glitch. You can then
analyze the pretrigger data and perhaps find the cause of the glitch.
You change the horizontal scale of all the waveforms by turning the
SEC/DIV knob. For example, you might want to see just one cycle of
a waveform to measure the overshoot on its rising edge.
The oscilloscope shows the horizontal scale as time per division in
the scale readout. Since all active waveforms use the same time base,
the oscilloscope only displays one value for all the active channels,
except when you use Window Zone. For information on how to use
the window function, refer to page 92.
For oscilloscope-specific descriptions, refer to page 35 in the
Operating Basics chapter and page 90 in the Reference chapter.
Understanding Oscilloscope Functions
20 TDS1000/2000-Series Digital Oscilloscope User Manual
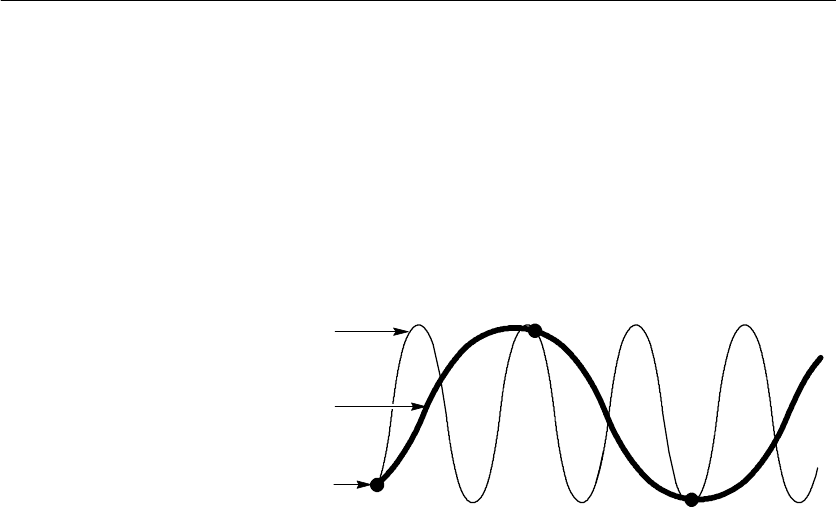
Time Domain Aliasing. Aliasing occurs when the oscilloscope does not
sample the signal fast enough to construct an accurate waveform
record. When this happens, the oscilloscope displays a waveform
with a frequency lower than the actual input waveform, or triggers
and displays an unstable waveform.
Actual high-frequency
waveform
Apparent low-frequency
waveform due to aliasing
Sampled points
The oscilloscope accurately represents signals, but is limited by the
probe bandwidth, the oscilloscope bandwidth, and the sample rate.
To avoid aliasing, the oscilloscope must sample the signal more than
twice as fast as the highest frequency component of the signal.
The highest frequency that the oscilloscope sampling rate can
theoretically represent is the Nyquist frequency. The sample rate is
called the Nyquist rate, and is twice the Nyquist frequency.

Understanding Oscilloscope Functions
TDS1000/2000-Series Digital Oscilloscope User Manual 21
Oscilloscope models with 60 MHz or 100 MHz bandwidth sample at
rates up to 1 GS/s. Models with 200 MHz bandwidth sample at rates
up to 2 GS/s. In both cases, these maximum sample rates are at least
ten times the bandwidth. These high sample rates help reduce the
possibility of aliasing.
There are several ways to check for aliasing:
HTurn the SEC/DIV knob to change the horizontal scale. If the
shape of the waveform changes drastically, you may have
aliasing.
HSelect the Peak Detect acquisition mode (described on page 17).
This mode samples the highest and lowest values so that the
oscilloscope can detect faster signals. If the shape of the
waveform changes drastically, you may have aliasing.
HIf the trigger frequency is faster than the display information, you
may have aliasing or a waveform that crosses the trigger level
multiple times. Examining the waveform should allow identify-
ing whether the shape of the signal is going to allow a single
trigger crossing per cycle at the selected trigger level. If multiple
triggers are likely to occur, select a trigger level that will generate
only a single trigger per cycle. If the trigger frequency is still
faster than the display indicates, you may have aliasing.
If the trigger frequency is slower, this test is not useful.
HIf the signal you are viewing is also the trigger source, use the
graticule or the cursors to estimate the frequency of the displayed
waveform. Compare this to the Trigger Frequency readout in the
lower right corner of the screen. If they differ by a large amount,
you may have aliasing.

Understanding Oscilloscope Functions
22 TDS1000/2000-Series Digital Oscilloscope User Manual
The next table lists the time bases that you should use to avoid
aliasing at various frequencies and the respective sample rate. At the
fastest SEC/DIV setting, aliasing is not likely to occur due to the
bandwidth limitations of the oscilloscope input amplifiers.
Settings to avoid aliasing in Sample mode
Time base
(SEC/DIV)
Samples per
second
Maximum
frequency
component
25 to 250.0 ns 1GS/sor
2GS/s*
200.0 MHz**
500.0 ns 500.0 MS/s 200.0 MHz**
1.0 s250.0 MS/s 125.0 MHz**
2.5 s100.0 MS/s 50.0 MHz**
5.0 s50.0 MS/s 25.0 MHz**
10.0 s25.0 MS/s 12.5 MHz**
25.0 s10.0 MS/s 5.0 MHz
50.0 s5.0 MS/s 2.5 MHz
100.0 s2.5 MS/s 1.25 MHz
250.0 s1.0 MS/s 500.0 kHz
500.0 s500.0 kS/s 250.0 kHz
* Depending on the oscilloscope model.
** Bandwidth reduced to 6 MHz with a 1X probe.

Understanding Oscilloscope Functions
TDS1000/2000-Series Digital Oscilloscope User Manual 23
Settings to avoid aliasing in Sample mode (Cont.)
Time base
(SEC/DIV)
Samples per
second
Maximum
frequency
component
1.0 ms 250.0 kS/s 125.0 kHz
2.5 ms 100.0 kS/s 50.0 kHz
5.0 ms 50.0 kS/s 25.0 kHz
10.0 ms 25.0 kS/s 12.5 kHz
25.0 ms 10.0 kS/s 5.0 kHz
50.0 ms 5.0 kS/s 2.5 kHz
100.0 ms 2.5 kS/s 1.25 kHz
250.0 ms 1.0 kS/s 500.0 Hz
500.0 ms 500.0 S/s 250.0 Hz
1.0 s 250.0 S/s 125.0 Hz
2.5 s 100.0 S/s 50.0 Hz
5.0 s 50.0 S/s 25.0 Hz
10.0 s 25.0 S/s 12.5 Hz
25.0 s 10.0 S/s 5.0 Hz
50.0 s 5.0 S/s 2.5 Hz
Understanding Oscilloscope Functions
24 TDS1000/2000-Series Digital Oscilloscope User Manual
Taking Measurements
The oscilloscope displays graphs of voltage versus time and can help
you to measure the displayed waveform.
There are several ways to take measurements. You can use the
graticule, the cursors, or an automated measurement.
Graticule
This method allows you to make a quick, visual estimate. For
example, you might look at a waveform amplitude and determine
that it is a little more than 100 mV.
You can take simple measurements by counting the major and minor
graticule divisions involved and multiplying by the scale factor.
For example, if you counted five major vertical graticule divisions
between the minimum and maximum values of a waveform and
knew you had a scale factor of 100 mV/division, then you could
easily calculate your peak-to-peak voltage as follows:
5 divisions x 100 mV/division = 500 mV.
Cursor
Cursor

Understanding Oscilloscope Functions
TDS1000/2000-Series Digital Oscilloscope User Manual 25
Cursors
This method allows you to take measurements by moving the
cursors, which always appear in pairs, and reading their numeric
values from the display readouts. There are two types of cursors:
Voltage and Time.
When you use cursors, be sure to set the Source to the waveform on
the display that you want to measure.
To use cursors, push the CURSOR button.
Voltage Cursors. Voltage cursors appear as horizontal lines on the
display and measure the vertical parameters.
Time Cursors. Time cursors appear as vertical lines on the display and
measure the horizontal parameters.
Automatic
The MEASURE Menu can take up to five automatic measurements.
When you take automatic measurements, the oscilloscope does all
the calculating for you. Because the measurements use the waveform
record points, they are more accurate than the graticule or cursor
measurements.
Automatic measurements use readouts to show measurement results.
These readouts are updated periodically as the oscilloscope acquires
new data.
For measurement descriptions, refer to page 94 in the Reference
chapter.

Understanding Oscilloscope Functions
26 TDS1000/2000-Series Digital Oscilloscope User Manual
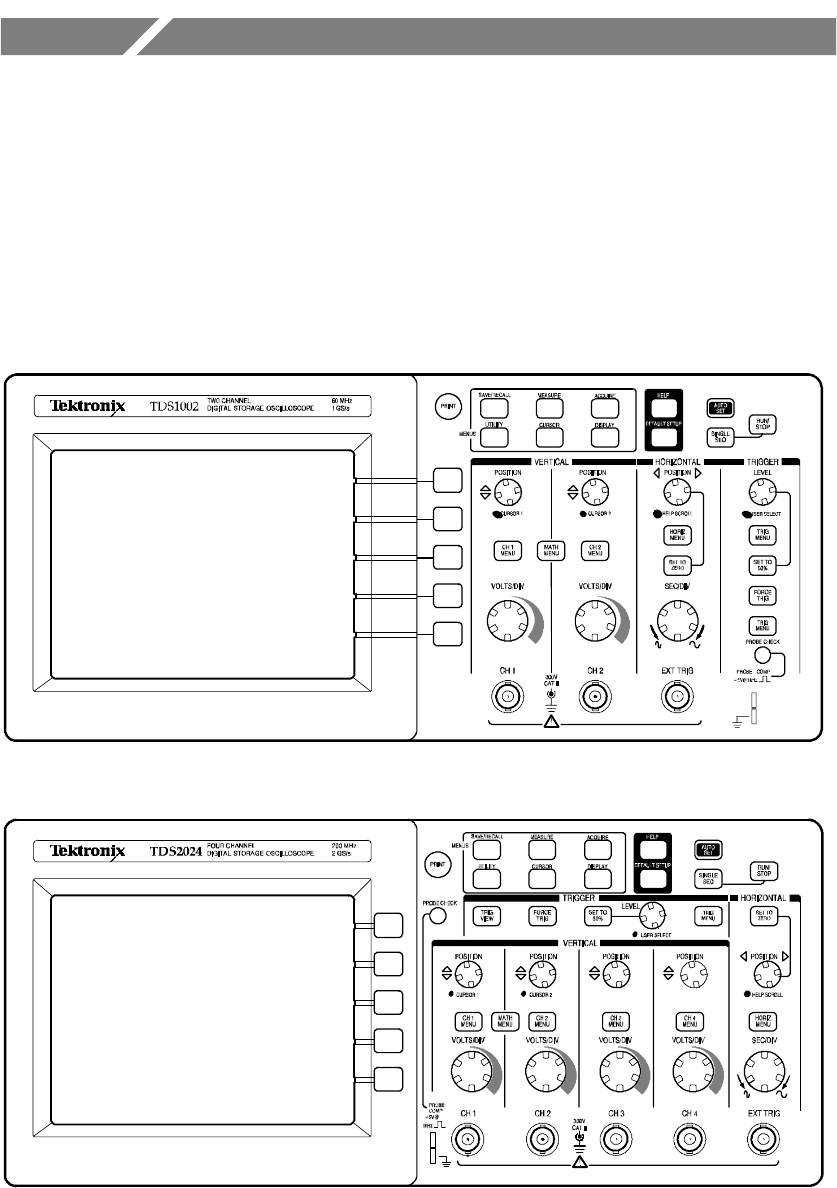
TDS1000/2000-Series Digital Oscilloscope User Manual 27
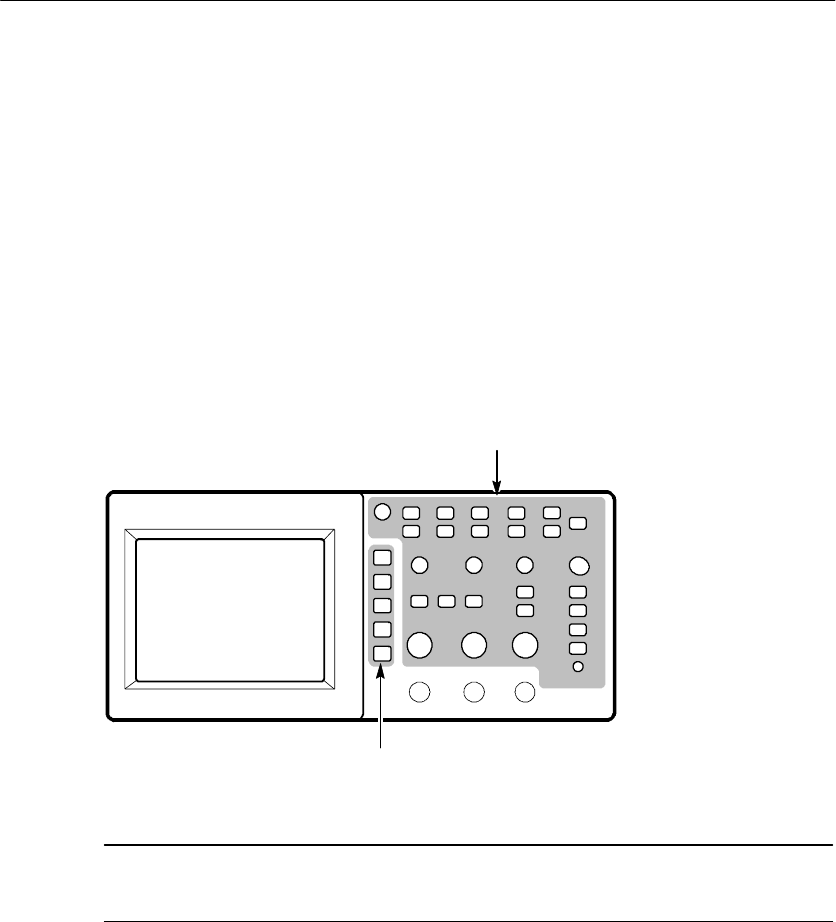
Operating Basics
The front panel is divided into easy-to-use functional areas. This
chapter provides you with a quick overview of the controls and the
information displayed on the screen. The next figure shows the front
panels for 2-channel and 4-channel models.
2-channel models
4-channel models
Operating Basics
28 TDS1000/2000-Series Digital Oscilloscope User Manual
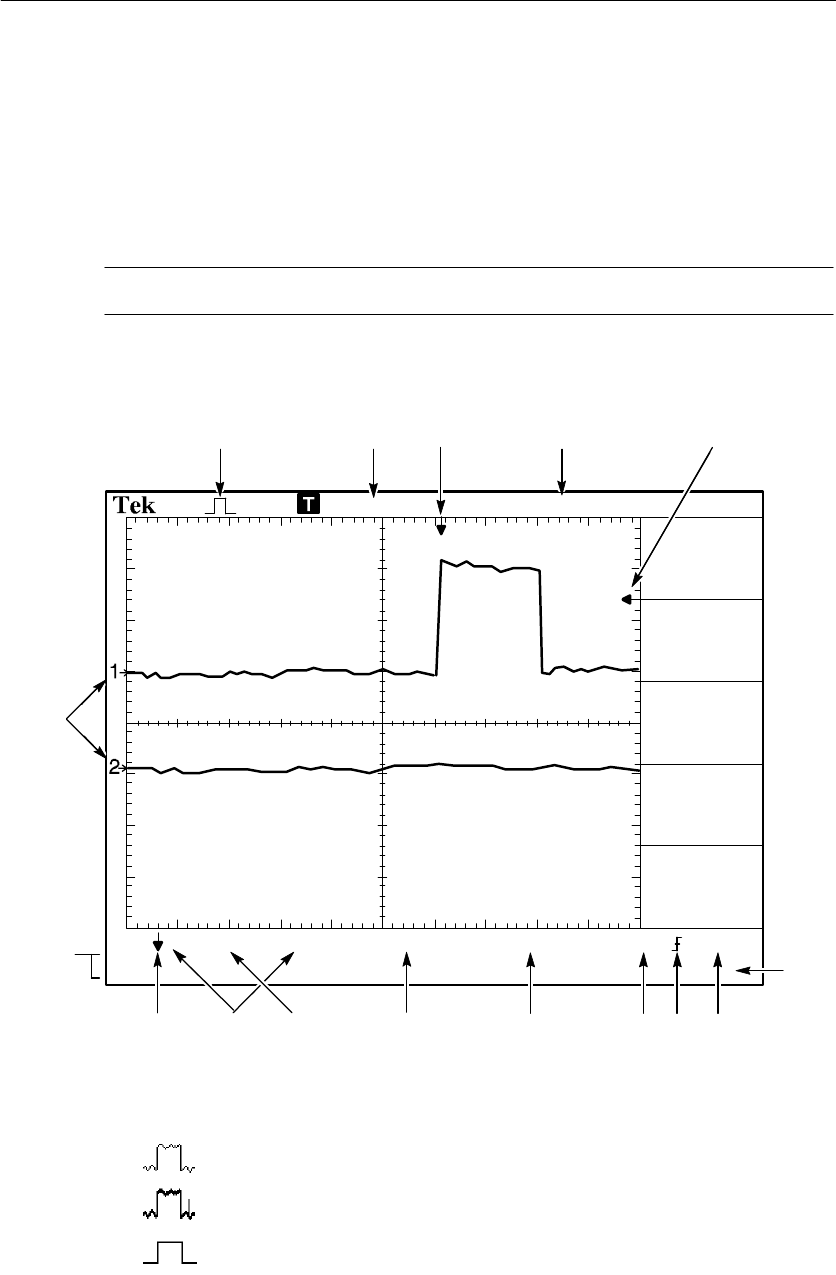
Display Area
In addition to displaying waveforms, the display is filled with many
details about the waveform and the oscilloscope control settings.
NOTE. For similar details for the FFT function, refer to page 119.
M Pos:-11.30ms
CH1 500mVBW
Trig’d
750mVCH1W 100msM 500msCH2 200mV
12 43
14
131211
10
8
6
5
15 Default setup recalled 16
1.00000kHz
9
7
1. Icon display shows acquisition mode.
Sample mode
Peak detect mode
Average mode

Operating Basics
TDS1000/2000-Series Digital Oscilloscope User Manual 29
2. Trigger status indicates the following:
Armed. The oscilloscope is acquiring pretrigger data. All
triggers are ignored in this state.
RReady. All pretrigger data has been acquired and the
oscilloscope is ready to accept a trigger.
TTri
g
’
d
.The oscilloscope has seen a trigger and is acquiring the
posttrigger data.
Stop. The oscilloscope has stopped acquiring waveform data.
A
c
q
.
C
o
m
p
l
e
t
e
.
The oscilloscope has completed a Single
Sequence acquisition.
RAuto. The oscilloscope is in auto mode and is acquiring
waveforms in the absence of triggers.
Scan. The oscilloscope is acquiring and displaying waveform
data continuously in scan mode.
3. Marker shows horizontal trigger position. Turn the HORIZON-
TAL POSITION knob to adjust the position of the marker.
4. Readout shows the time at the center graticule. The trigger time
is zero.
5. Marker shows Edge or Pulse Width trigger level.
6. On-screen markers show the ground reference points of the
displayed waveforms. If there is no marker, the channel is not
displayed.
Operating Basics
30 TDS1000/2000-Series Digital Oscilloscope User Manual
7. An arrow icon indicates that the waveform is inverted.
8. Readouts show the vertical scale factors of the channels.
9. AB
Wicon indicates that the channel is bandwidth limited.
10. Readout shows main time base setting.
11. Readout shows window time base setting if it is in use.
12. Readout shows trigger source used for triggering.
13. Icon shows selected trigger type as follows:
-- Edge trigger for the rising edge.
-- Edge trigger for the falling edge.
-- Video trigger for line sync.
-- Video trigger for field sync.
-- Pulse Width trigger, positive polarity.
-- Pulse Width trigger, negative polarity.
14. Readout shows Edge or Pulse Width trigger level.
15. Display area shows helpful messages; some messages display for
only three seconds.
If you recall a saved waveform, readout shows information about
the reference waveform, such as RefA 1.00V 500µs.
16. Readout shows trigger frequency.

Operating Basics
TDS1000/2000-Series Digital Oscilloscope User Manual 31
Message Area
The oscilloscope displays a message area (item number 15 in the
previous figure) at the bottom of the screen that conveys the
following types of helpful information:
HDirections to access another menu, such as when you push the
TRIG MENU button:
For TRIGGER HOLDOFF, go to HORIZONTAL Menu
HSuggestion of what you might want to do next, such as when you
push the MEASURE button:
Push an option button to change its measurement
HInformation about the action the oscilloscope performed, such as
when you push the DEFAULT SETUP button:
Default setup recalled
HInformation about the waveform, such as when you push the
AUTOSET button:
Square wave or pulse detected on CH1

Operating Basics
32 TDS1000/2000-Series Digital Oscilloscope User Manual
Using the Menu System
The user interface of TDS1000- and TDS2000-series oscilloscopes
was designed for easy access to specialized functions through the
menu structure.
When you push a front-panel button, the oscilloscope displays the
corresponding menu on the right side of the screen. The menu shows
the options that are available when you push the unlabeled option
buttons directly to the right of the screen. (Some documentation may
also refer to the option buttons as screen buttons, side-menu buttons,
bezel buttons, or soft keys.)
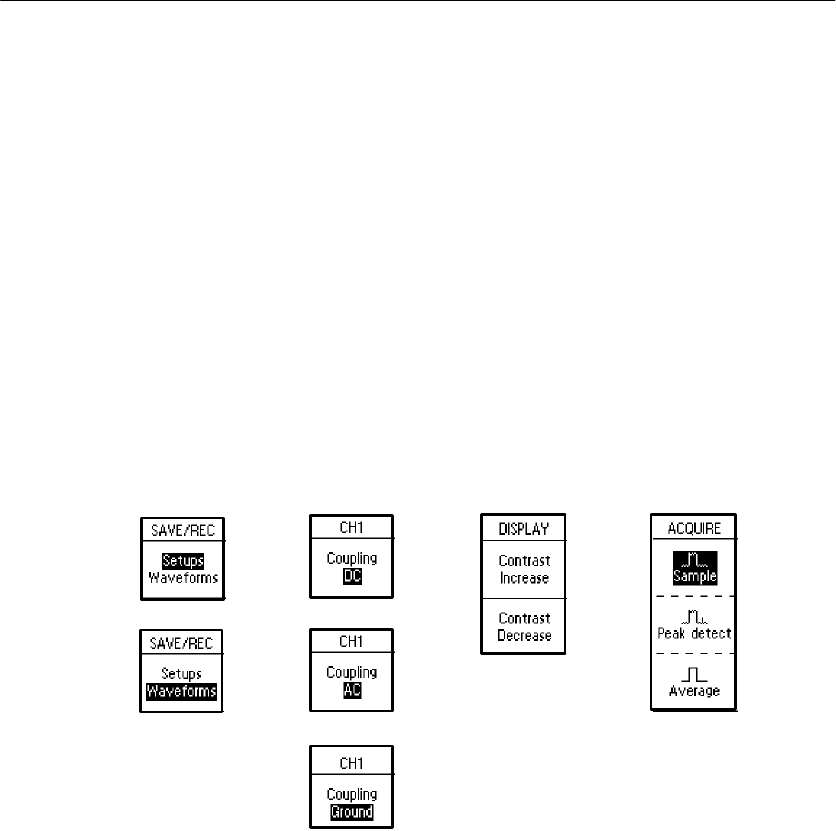
The oscilloscope uses four methods to display menu options:
HPage (Submenu) Selection: For some menus, you can use the top
option button to choose two or three submenus. Each time you
push the top button, the options change. For example, when you
push the top button in the SAVE/REC Menu, the oscilloscope
cycles through the Setups and Waveforms submenus.
HCircular List: The oscilloscope sets the parameter to a different
value each time you push the option button. For example, you
can push the CH 1 MENU button and then push the top option
button to cycle through the Vertical (channel) Coupling options.
Operating Basics
TDS1000/2000-Series Digital Oscilloscope User Manual 33
HAction: The oscilloscope displays the type of action that will
immediately occur when you push an Action option button. For
example, when you push the DISPLAY Menu button and then
push the Contrast Increase option button, the oscilloscope
changes the contrast immediately.
HRadio: The oscilloscope uses a different button for each option.
The currently-selected option is highlighted. For example, the
oscilloscope displays various acquisition mode options when you
push the ACQUIRE Menu button. To select an option, push the
corresponding button.
Page Selection Action RadioCircular List
or
or
or
Operating Basics
34 TDS1000/2000-Series Digital Oscilloscope User Manual
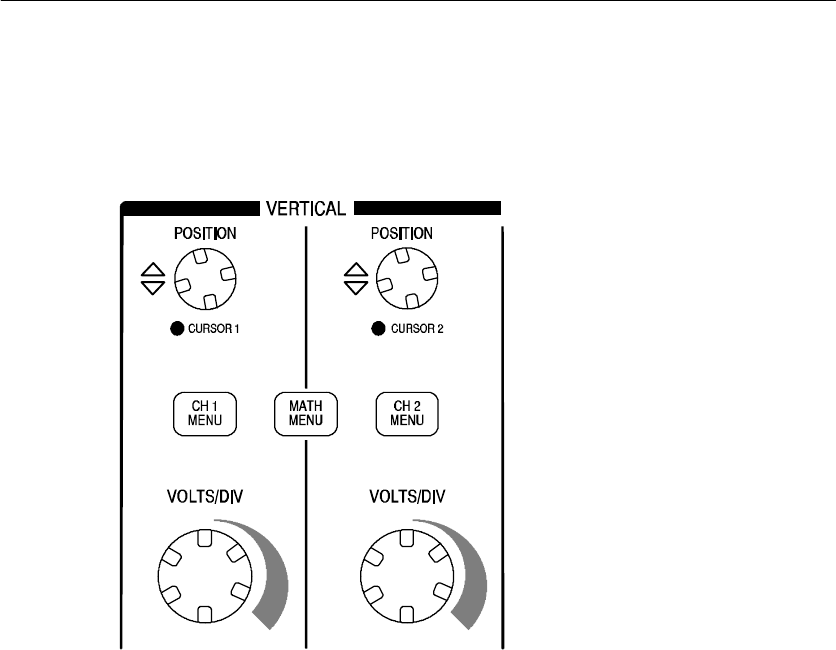
Vertical Controls
All models
CH 1, CH 2, CH 3, CH 4, CURSOR 1 and CURSOR 2 POSITION. Positions
the waveform vertically. When you display and use cursors, an LED
lights to indicate the alternative function of the knobs to move the
cursors.
CH 1, CH 2, CH 3 & CH 4 MENU. Displays the vertical menu selections
and toggles the display of the channel waveform on and off.
VOLTS/DIV (CH 1, CH 2, CH 3 & CH 4). Selects calibrated scale factors.
MATH MENU. Displays waveform math operations menu and can also
be used to toggle the math waveform on and off.
Operating Basics
TDS1000/2000-Series Digital Oscilloscope User Manual 35
Horizontal Controls
2-channel models 4-channel models
POSITION. Adjusts the horizontal position of all channel and math
waveforms. The resolution of this control varies with the time base
setting. For information on windows, refer to page 92.
NOTE. To make a large adjustment to the horizontal position, turn the
SEC/DIV knob to a larger value, change the horizontal position, and
then turn the SEC/DIV knob back to the previous value.
When you view help topics, you can use this knob to scroll through
links or index entries.
Operating Basics
36 TDS1000/2000-Series Digital Oscilloscope User Manual
HORIZ MENU. Displays the Horizontal Menu.
SET TO ZERO. Sets the horizontal position to zero.
SEC/DIV. Selects the horizontal time/div (scale factor) for the main or
the window time base. When Window Zone is enabled, it changes
the width of the window zone by changing the window time base.
Refer to page 92 for details about creating and using Window Zone.
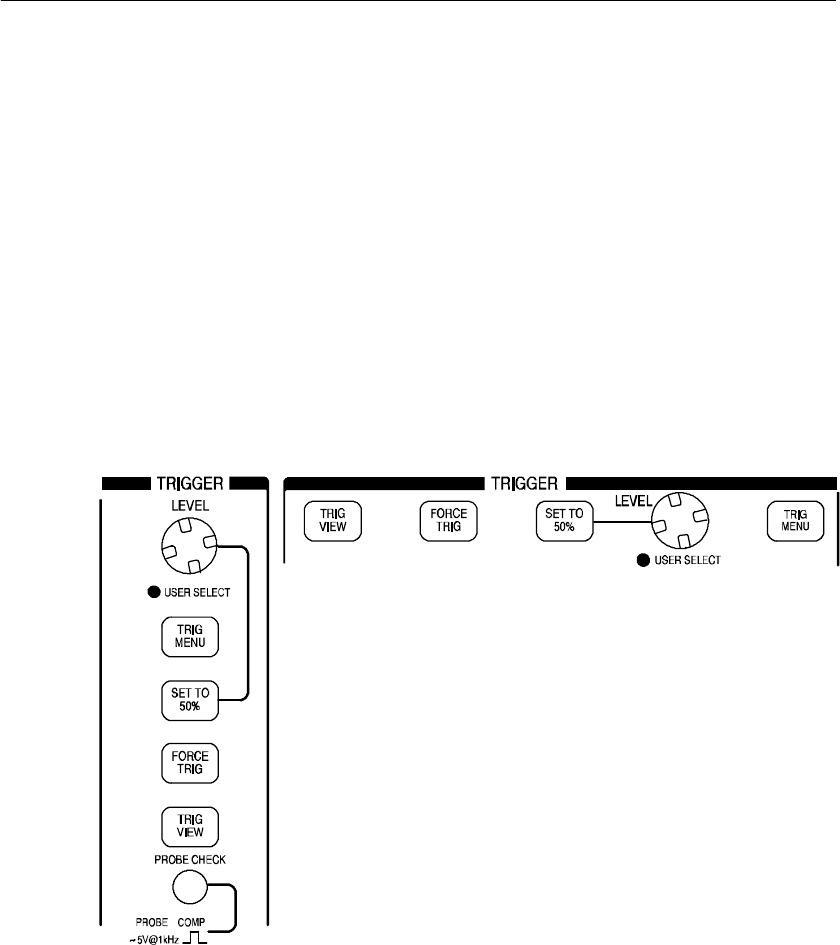
Trigger Controls
2-channel models
4-channel models
LEVEL and USER SELECT. When you use an Edge trigger, the primary
function of the LEVEL knob is to set the amplitude level the signal
must cross to cause an acquisition. You can also use the knob to
perform USER SELECT alternative functions. The LED lights below
the knob to indicate an alternative function.

Operating Basics
TDS1000/2000-Series Digital Oscilloscope User Manual 37
USER SELECT Description
Holdoff Sets the amount of time before another trigger event can
be accepted; refer to Holdoff on page 109
Video line number Sets the oscilloscope to a specific line number when the
Trigger Type option is set to Video and the Sync option is
set to Line Number
Pulse width Sets the width of the pulse when the Trigger Type option is
set to Pulse and you select the Set Pulse Wdith option
TRIG MENU. Displays the Trigger Menu.
SET TO 50%. The trigger level is set to the vertical midpoint between
the peaks of the trigger signal.
FORCE TRIG. Completes an acquisition regardless of an adequate
trigger signal. This button has no effect if the acquisition is already
stopped.
TRIG VIEW. Displays the trigger waveform in place of the channel
waveform while the TRIG VIEW button is held down. You can use
this to see how the trigger settings affect the trigger signal, such as
trigger coupling.
Operating Basics
38 TDS1000/2000-Series Digital Oscilloscope User Manual
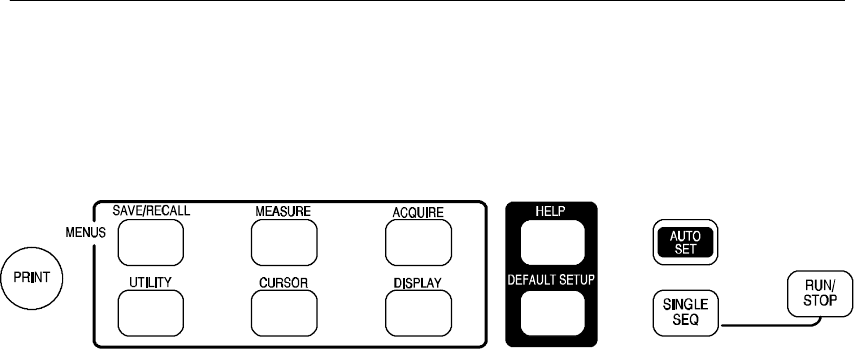
Menu and Control Buttons
All models
SAVE/RECALL. Displays the Save/Recall Menu for setups and
waveforms.
MEASURE. Displays the automated measurements menu.
ACQUIRE. Displays the Acquire Menu.
DISPLAY. Displays the Display Menu.
CURSOR. Displays the Cursor Menu. Vertical Position controls adjust
cursor position while displaying the Cursor Menu and the cursors are
activated. Cursors remain displayed (unless the Type option is set to
Off) after leaving the Cursor Menu but are not adjustable.
UTILITY. Displays the Utility Menu.
HELP. Displays the Help Menu.
DEFAULT SETUP. Recalls the factory setup.
AUTOSET. Automatically sets the oscilloscope controls to produce a
usable display of the input signals.
SINGLE SEQ. Acquires a single waveform and then stops.
RUN/STOP. Continuously acquires waveforms or stops the acquisition.
PRINT. Starts print operations. An extension module with a Centron-
ics, RS-232, or GPIB port is required. Refer to Optional Accessories
on page 169.
Operating Basics
TDS1000/2000-Series Digital Oscilloscope User Manual 39
Connectors
2-channel models
4-channel models
PROBE COMP. Voltage probe compensation output and ground. Use to
electrically match the probe to the oscilloscope input circuit. Refer to
page 8. The probe compensation ground and BNC shields connect to
earth ground and are considered to be ground terminals
CAUTION. If you connect a voltage source to a ground terminal, you
may damage the oscilloscope or the circuit under test. To avoid this,
do not connect a voltage source to any ground terminals.
CH 1, CH 2, CH 3 & CH 4. Input connectors for waveform display.
EXT TRIG. Input connector for an external trigger source. Use the
Trigger Menu to select the Ext or Ext/5 trigger source.

Operating Basics
40 TDS1000/2000-Series Digital Oscilloscope User Manual

TDS1000/2000-Series Digital Oscilloscope User Manual 41
Application Examples
This section presents a series of application examples. These
simplified examples highlight the features of the oscilloscope and
give you ideas for using it to solve your own test problems.
HTaking simple measurements
Using Autoset
Using the Measure Menu to take automatic measurements
Measuring two signals and calculating gain
HTaking cursor measurements
Measuring ring frequency and ring amplitude
Measuring pulse width
Measuring rise time
HAnalyzing signal detail
Looking at a noisy signal
Using the average function to separate a signal from noise
HCapturing a single-shot signal
Optimizing the acquisition
HMeasuring propagation delay
HTriggering on a pulse width
HTriggering on a video signal
Triggering on video fields and video lines
Using the window function to see waveform details
HAnalyzing a differential communication signal using math
functions
HViewing impedance changes in a network using XY mode and
persistance
Application Examples
42 TDS1000/2000-Series Digital Oscilloscope User Manual
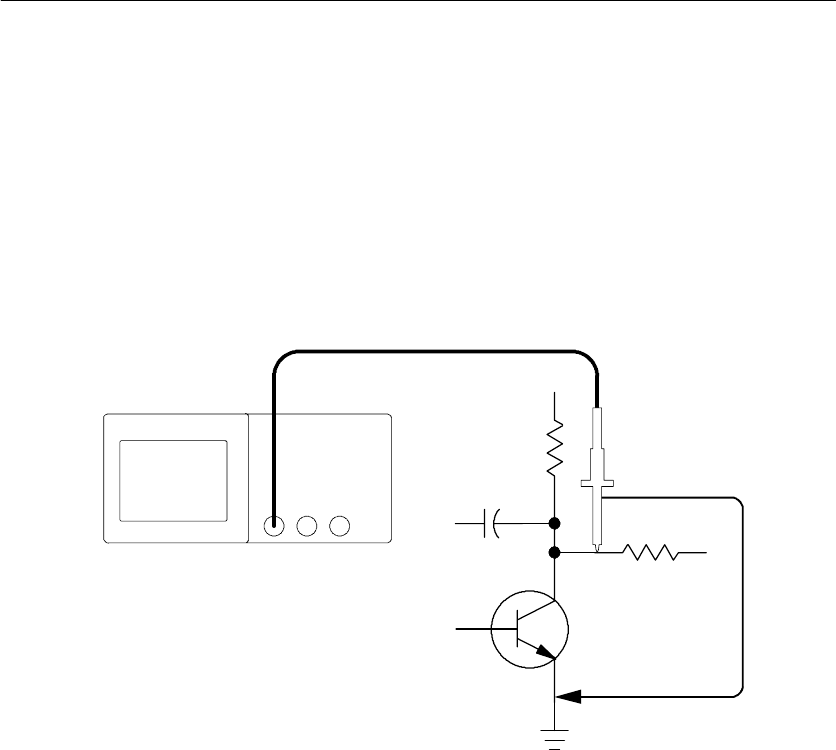
Taking Simple Measurements
You need to see a signal in a circuit, but you do not know the
amplitude or frequency of the signal. You want to quickly display the
signal and measure the frequency, period, and peak-to-peak
amplitude.
CH 1
Using Autoset
To quickly display a signal, follow these steps:
1. Push the CH 1 MENU button and set the Probe option
attenuation to 10X.
2. Set the switch to 10X on the P2200 probe.

Application Examples
TDS1000/2000-Series Digital Oscilloscope User Manual 43
3. Connect the channel 1 probe to the signal.
4. Push the AUTOSET button.
The oscilloscope sets the vertical, horizontal, and trigger controls
automatically. If you want to optimize the display of the waveform,
you can manually adjust these controls.
NOTE. The oscilloscope displays relevant automatic measurements in
the waveform area of the screen based on the signal type detected.
For oscilloscope-specific descriptions, refer to page 79 in the
Reference chapter.
Taking Automatic Measurements
The oscilloscope can take automatic measurements of most
displayed signals. To measure signal frequency, period, and
peak-to-peak amplitude, rise time, and positive width, follow these
steps:
1. Push the MEASURE button to see the Measure Menu.
2. Push the top option button; the Measure 1 Menu appears.

Application Examples
44 TDS1000/2000-Series Digital Oscilloscope User Manual
3. Push the Type option button and select Freq.
The Val u e readout displays the measurement and updates.
NOTE. If a question mark (?) displays in the Value readout, turn the
VOLTS/DIV knob for the appropriate channel to increase the
sensitivity or change the SEC/DIV setting.
4. Push the Back option button.
5. Push the second option button from the top; the Measure 2 Menu
appears.
6. Push the Type option button and select Period.
The Val u e readout displays the measurement and updates.
7. Push the Back option button.
8. Push the middle option button; the Measure 3 Menu appears.
9. Push the Type option button and select Pk-Pk.
The Val u e readout displays the measurement and updates.
10. Push the Back option button.
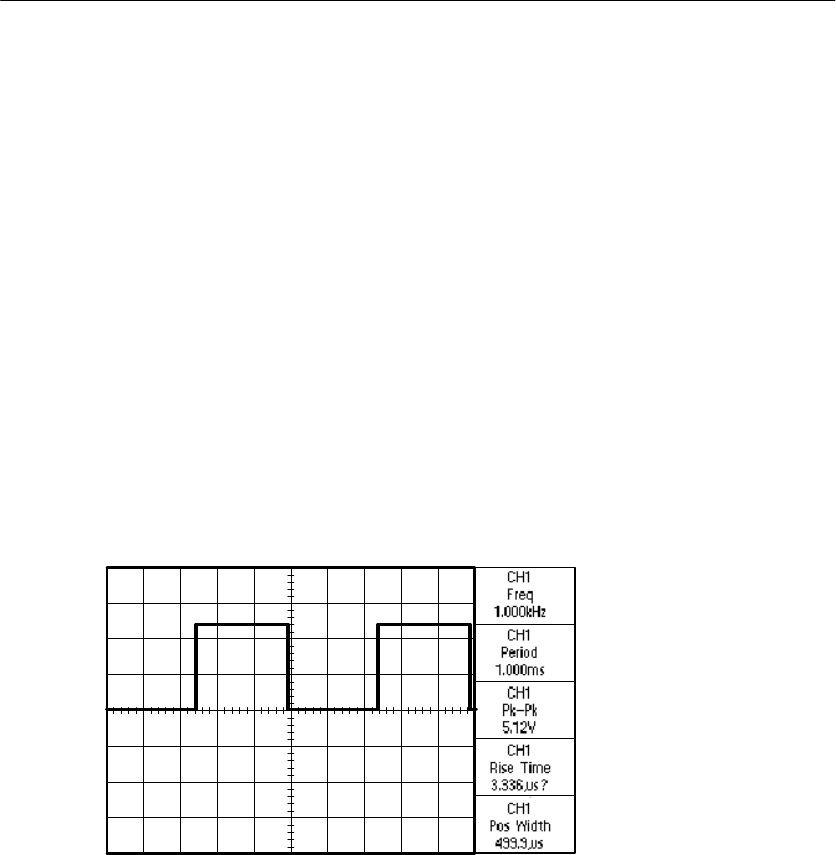
Application Examples
TDS1000/2000-Series Digital Oscilloscope User Manual 45
11. Push the second option button from the bottom; the Measure 4
Menu appears.
12. Push the Type option button and select Rise Time.
The Val u e readout displays the measurement and updates.
13. Push the Back option button.
14. Push the bottom option button; the Measure 5 Menu appears.
15. Push the Type option button and select Pos Width.
The Val u e readout displays the measurement and updates.
16. Push the Back option button.
Application Examples
46 TDS1000/2000-Series Digital Oscilloscope User Manual
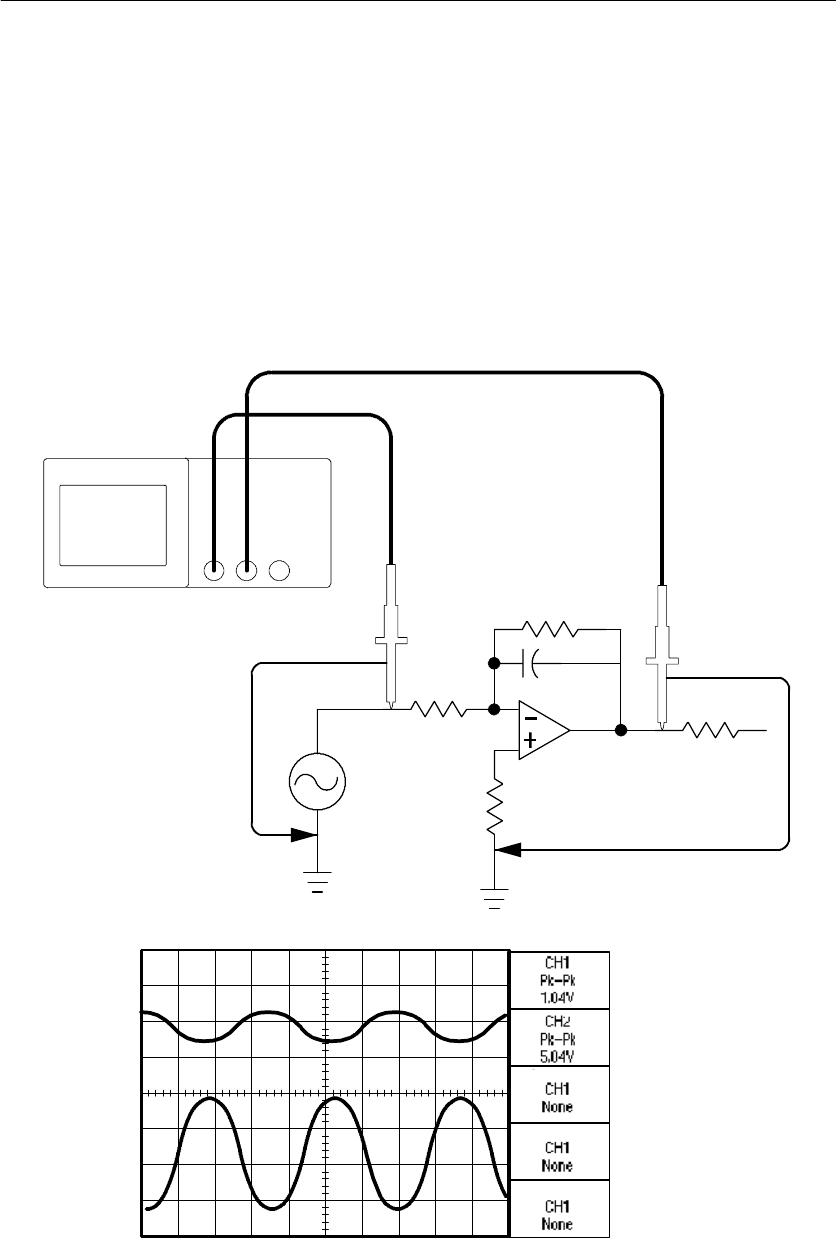
Measuring Two Signals
You are testing a piece of equipment and need to measure the gain of
the audio amplifier. You have an audio generator that can inject a test
signal at the amplifier input. Connect two oscilloscope channels to
the amplifier input and output as shown. Measure both signal levels
and use the measurements to calculate the gain.
CH 1 CH 2

Application Examples
TDS1000/2000-Series Digital Oscilloscope User Manual 47
To activate and display the signals connected to channel 1 and to
channel 2, follow these steps:
1. If the channels are not displayed, push the CH 1 MENU and
CH 2 MENU buttons.
2. Push the AUTOSET button.
To select measurements for the two channels, follow these steps:
1. Push the Measure button to see the Measure Menu.
2. Push the top option button; the Measure 1 Menu appears.
3. Push the Source option button and select CH1.
4. Push the Type option button and select Pk-Pk.
5. Push the Back option button.
6. Push the second option button from the top; the Measure 2 Menu
appears.
7. Push the Source option button and select CH2.
8. Push the Type option button and select Pk-Pk.
9. Push the Back option button.
Read the displayed peak-to-peak amplitudes for both channels.
10. To calculate the amplifier voltage gain, use these equations:
VoltageGain =
output amplitude
input amplitude
VoltageGain (dB) = 20 xlog10(VoltageGain)
Application Examples
48 TDS1000/2000-Series Digital Oscilloscope User Manual
Taking Cursor Measurements
You can use the cursors to quickly take time and voltage measure-
ments on a waveform.
Measuring Ring Frequency
To measure the ring frequency at the rising edge of a signal, follow
these steps:
1. Push the CURSOR button to see the Cursor Menu.
2. Push the Type option button and select Time.
3. Push the Source option button and select CH1.
4. Turn the CURSOR 1 knob to place a cursor on the first peak of
the ring.
5. Turn the CURSOR 2 knob to place a cursor on the second peak
of the ring.
You can see the delta time and frequency (the measured ring
frequency) in the Cursor Menu.
Application Examples
TDS1000/2000-Series Digital Oscilloscope User Manual 49
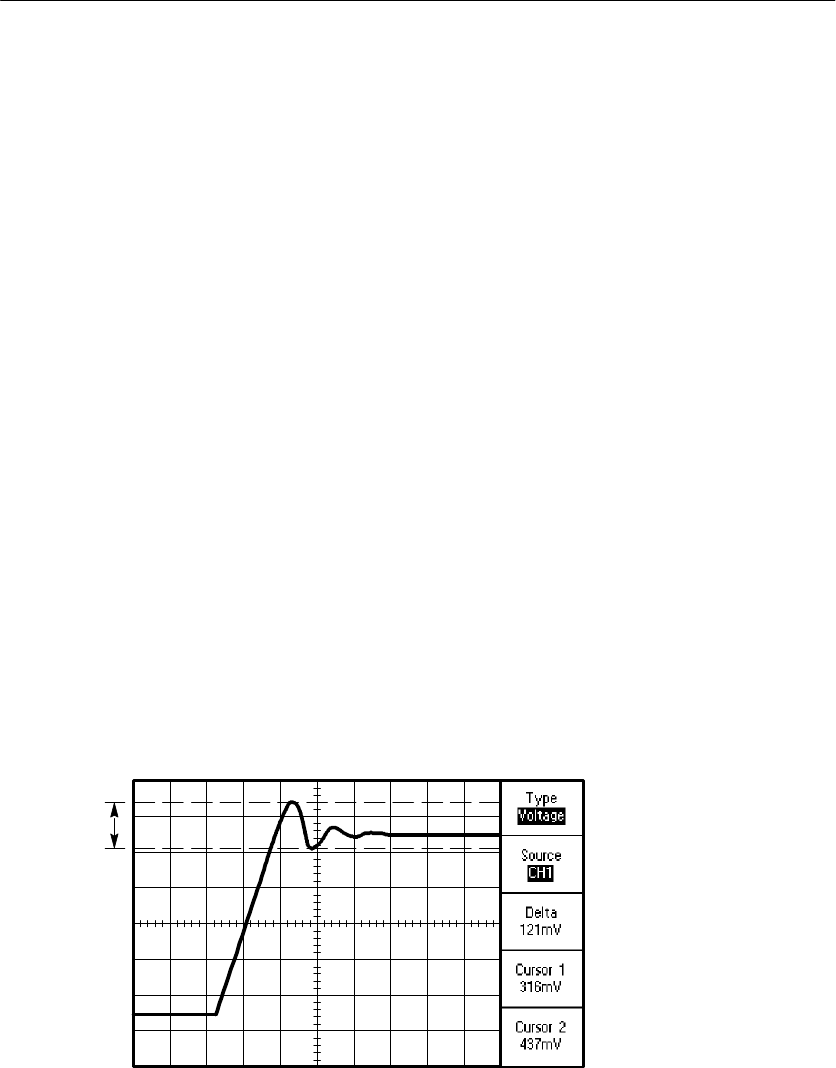
Measuring Ring Amplitude
You measured the ring frequency in the previous example. Now you
want to measure the amplitude of the ringing. To measure the
amplitude, follow these steps:
1. Push the CURSOR button to see the Cursor Menu.
2. Push the Type option button and select Voltage.
3. Push the Source option button and select CH1.
4. Turn the CURSOR 1 knob to place a cursor on the highest peak
of the ring.
5. Turn the CURSOR 2 knob to place a cursor on the lowest point
of the ring.
You can see the following measurements in the Cursor Menu:
HThe delta voltage (peak-to-peak voltage of the ringing)
HThe voltage at Cursor 1
HThe voltage at Cursor 2

Application Examples
50 TDS1000/2000-Series Digital Oscilloscope User Manual
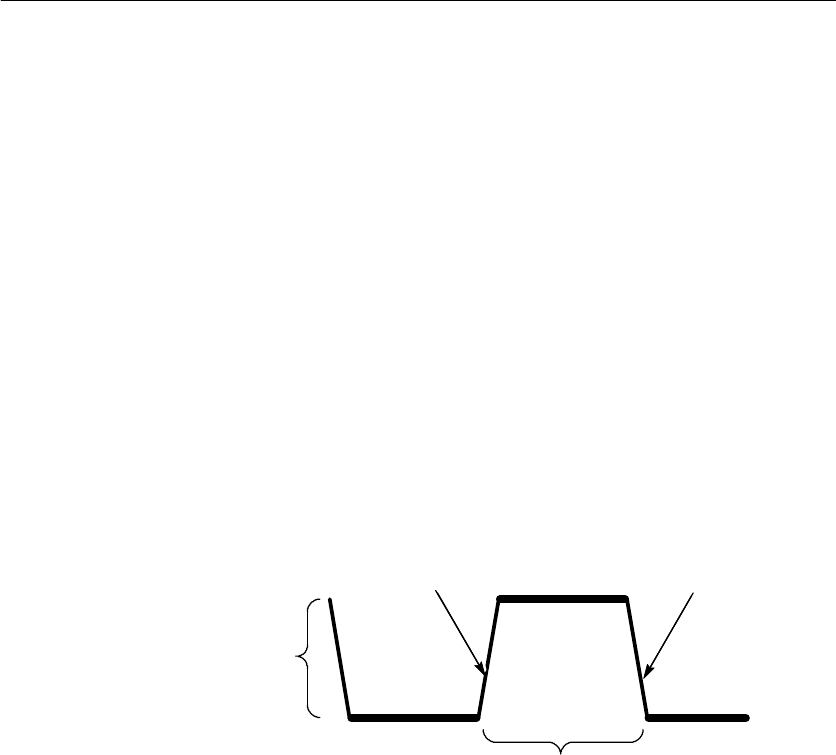
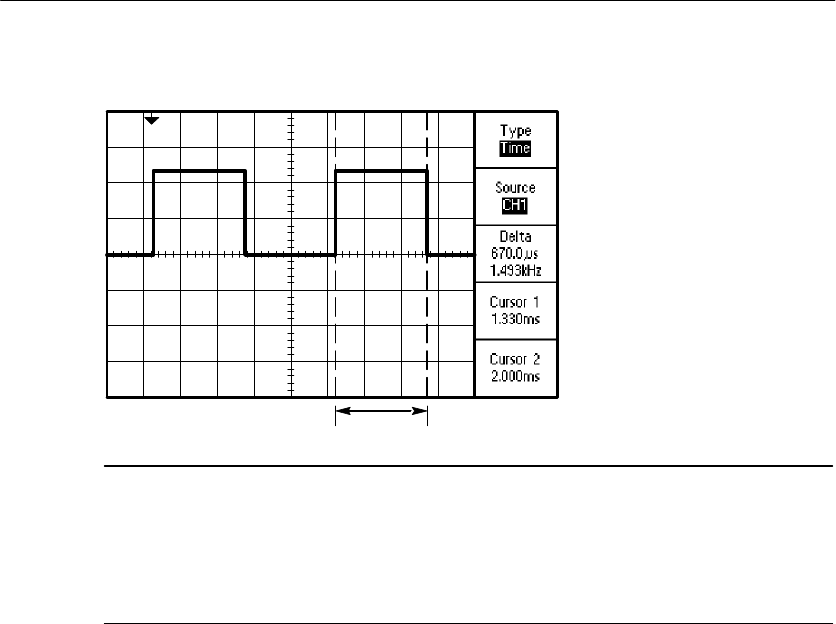
Measuring Pulse Width
You are analyzing a pulse waveform, and you want to know the
width of the pulse. To measure the width of a pulse using the time
cursors, follow these steps:
1. Push the CURSOR button to see the Cursor Menu.
LEDs light under the VERTICAL POSITION knobs to indicate
the alternative CURSOR1 and CURSOR2 functions.
2. Push the Source option button and select CH1.
3. Push the Type option button and select Time.
4. Turn the CURSOR 1 knob to place a cursor on the rising edge of
the pulse.
5. Turn the CURSOR 2 knob to place the remaining cursor on the
falling edge of the pulse.
You can see the following measurements in the Cursor Menu:
HThe time at Cursor 1, relative to the trigger.
HThe time at Cursor 2, relative to the trigger.
HThe delta time, which is the pulse width measurement.
Application Examples
TDS1000/2000-Series Digital Oscilloscope User Manual 51
NOTE. The Positive Width measurement is available as an automatic
measurement in the Measure Menu, described on page 94.
The Positive Width measurement also displays when you select the
Single-Cycle Square option in the AUTOSET Menu. Refer to page 82.
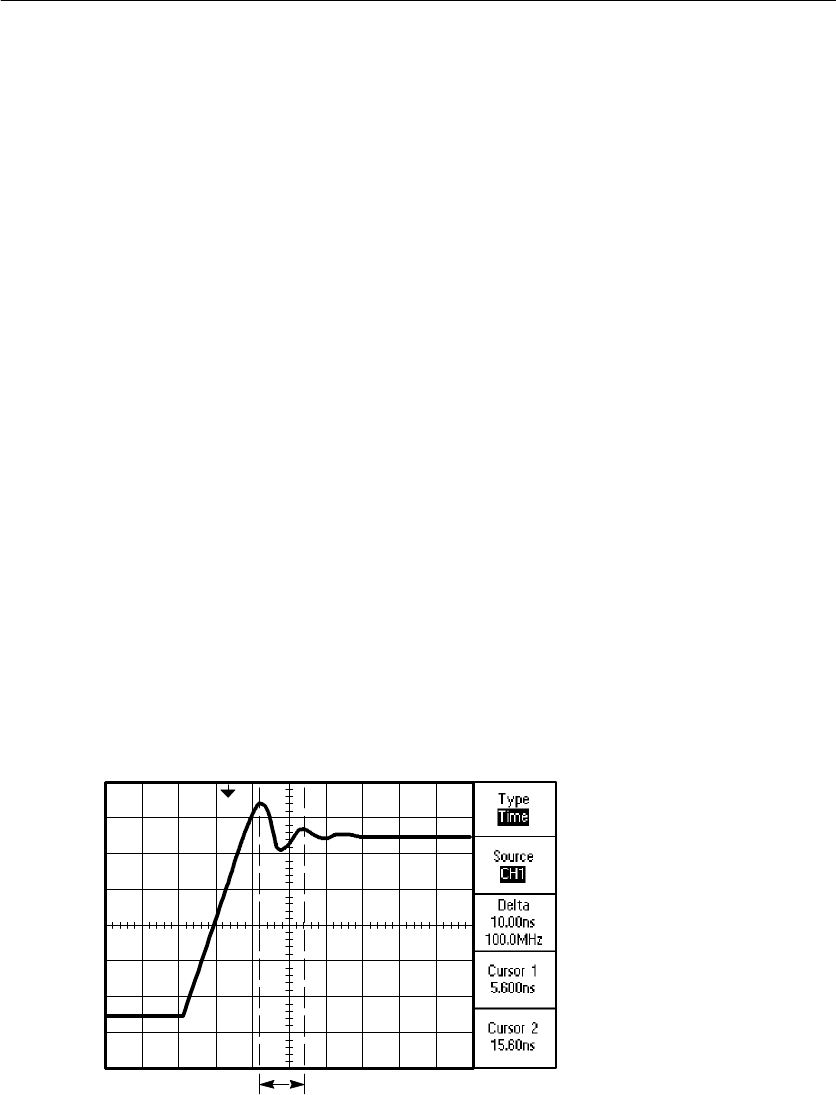
Measuring Rise Time
After measuring the pulse width, you decide that you need to check
the rise time of the pulse. Typically, you measure rise time between
the 10% and 90% levels of the waveform. To measure the rise time,
follow these steps:
1. Turn the SEC/DIV knob to display the rising edge of the
waveform.

Application Examples
52 TDS1000/2000-Series Digital Oscilloscope User Manual
2. Turn the VOLTS/DIV and VERTICAL POSITION knobs to set
the waveform amplitude to about five divisions.
3. Push the CH 1 MENU button to see the CH1 Menu if it is not
displayed.
4. Push the Vo l t s/ Di v option button and select Fine.
5. Turn the VOLTS/DIV knob to set the waveform amplitude to
exactly five divisions.
6. Turn the VERTICAL POSITION knob to center the waveform;
position the baseline of the waveform 2.5 divisions below the
center graticule.
7. Push the CURSOR button to see the Cursor Menu.
8. Push the Type option button and select Time.
9. Turn the CURSOR 1 knob to place the cursor at the point where
the waveform crosses the second graticule line below center
screen. This is the 10% level of the waveform.
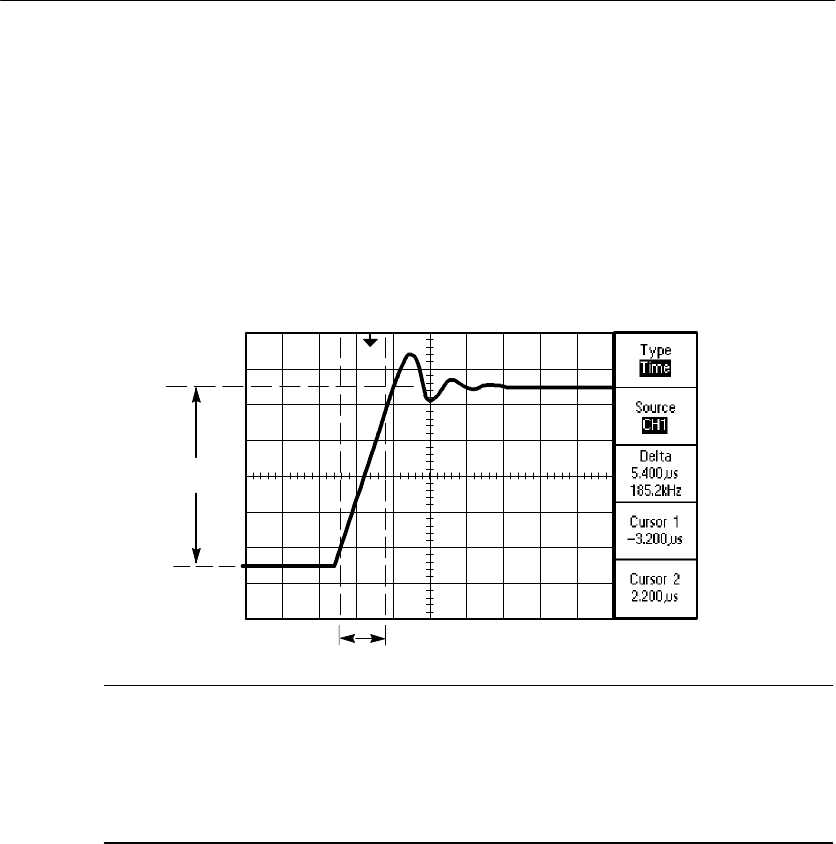
Application Examples
TDS1000/2000-Series Digital Oscilloscope User Manual 53
10. Turn the CURSOR 2 knob to place the second cursor at the point
where the waveform crosses the second graticule line above
center screen. This is the 90% level of the waveform.
11. The Delta readout in the Cursor Menu is the rise time of the
waveform.
5 divisions
NOTE. The Rise Time measurement is available as an automatic
measurement in the Measure Menu, described on page 94.
The Rise Time measurement also displays when you select the Rising
Edge option in the AUTOSET Menu. Refer to page 82.
Application Examples
54 TDS1000/2000-Series Digital Oscilloscope User Manual
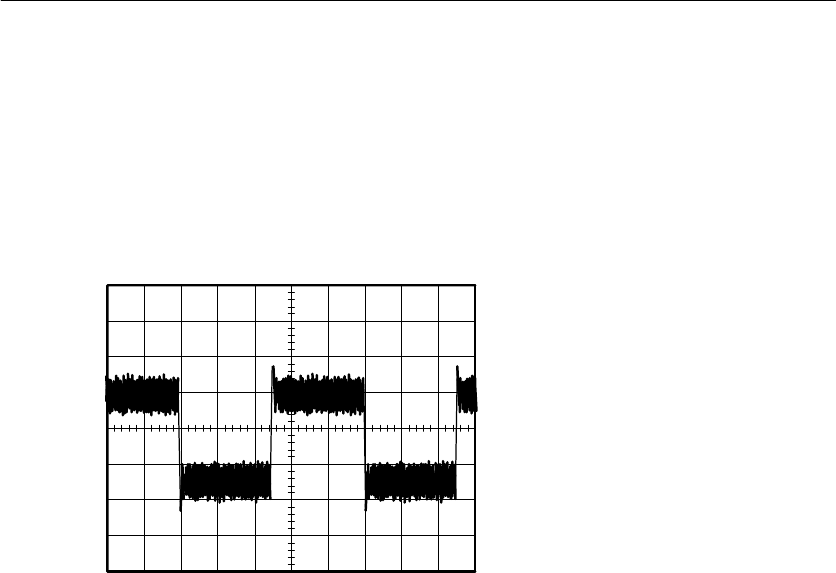
Analyzing Signal Detail
You have a noisy signal displayed on the oscilloscope and you need
to know more about it. You suspect that the signal contains much
more detail than you can now see in the display.
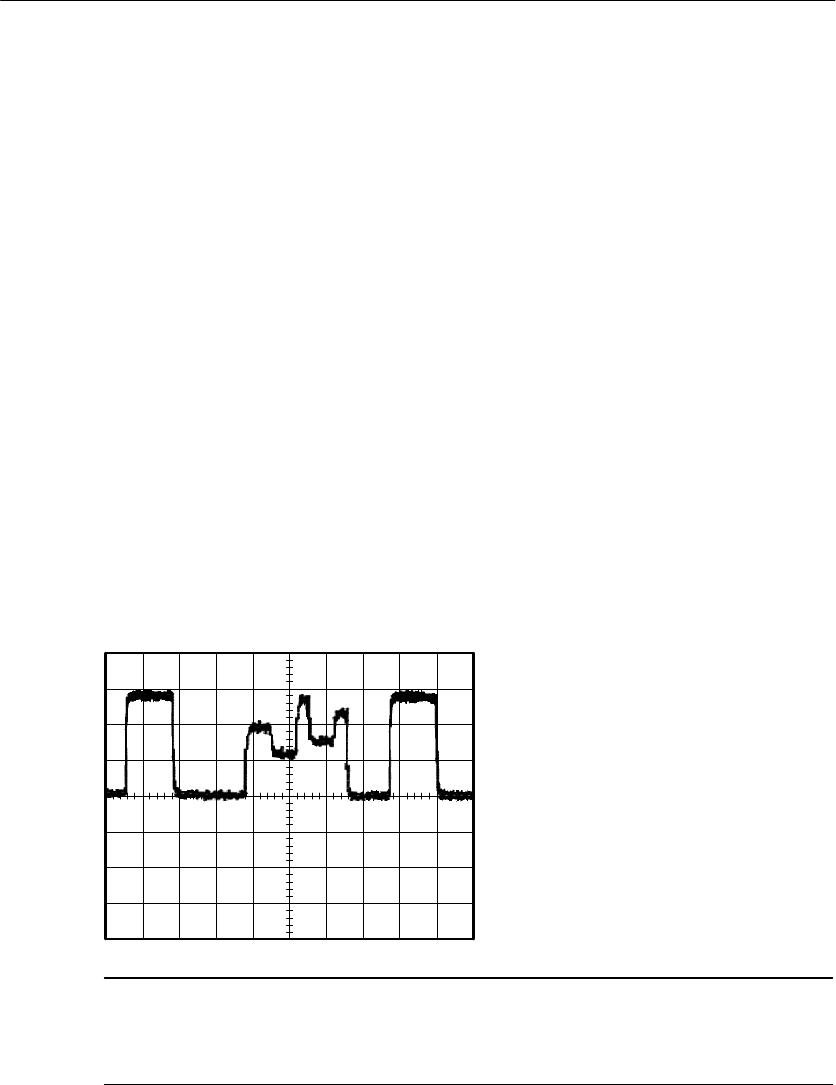
Looking at a Noisy Signal
The signal appears noisy and you suspect that noise is causing
problems in your circuit. To better analyze the noise, follow these
steps:
1. Push the ACQUIRE button to see the Acquire Menu.
2. Push the Peak Detect option button.
3. If necessary, push the DISPLAY button to see the Display Menu.
Use the Contrast Increase and Contrast Decrease option
buttons to adjust the contrast to see the noise more easily.
Peak detect emphasizes noise spikes and glitches in your signal,
especially when the time base is set to a slow setting.

Application Examples
TDS1000/2000-Series Digital Oscilloscope User Manual 55
Separating the Signal from Noise
Now you want to analyze the signal shape and ignore the noise. To
reduce random noise in the oscilloscope display, follow these steps:
1. Push the ACQUIRE button to see the Acquire Menu.
2. Push the Average option button.
3. Push the Averages option button to see the effects of varying the
number of running averages on the waveform display.
Averaging reduces random noise and makes it easier to see detail in a
signal. In the example below, a ring shows on the rising and falling
edges of the signal when the noise is removed.
Application Examples
56 TDS1000/2000-Series Digital Oscilloscope User Manual
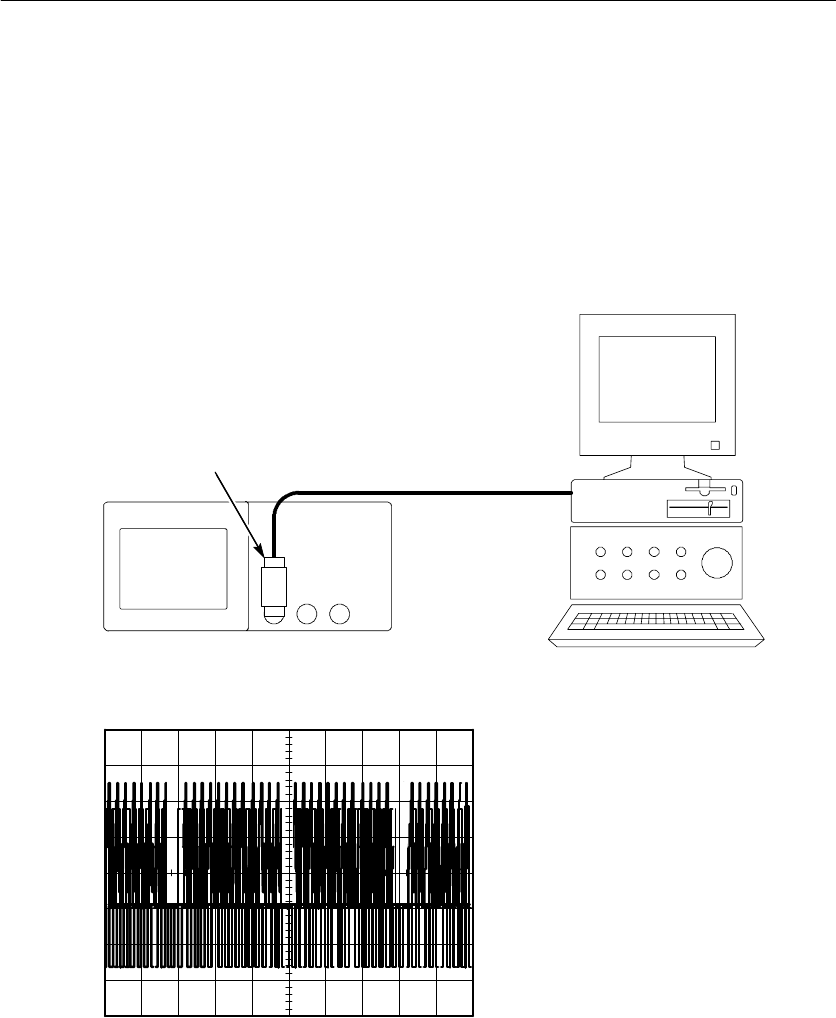
Capturing a Single-Shot Signal
The reliability of a reed relay in a piece of equipment has been poor
and you need to investigate the problem. You suspect that the relay
contacts arc when the relay opens. The fastest you can open and
close the relay is about once per minute so you need to capture the
voltage across the relay as a single-shot acquisition.
To set up for a single-shot acquisition, follow these steps:
1. Turn the vertical VOLTS/DIV and horizontal SEC/DIV knobs to
the appropriate ranges for the signal you expect to see.
2. Push the ACQUIRE button to see the Acquire Menu.
3. Push the Peak Detect option button.
4. Push the TRIG MENU button to see the Trigger Menu.
5. Push the Slope option button and select Rising.
6. Turn the LEVEL knob to adjust the trigger level to a voltage
midway between the open and closed voltages of the relay.
7. Push the SINGLE SEQ button to start the acquisition.
When the relay opens, the oscilloscope triggers and captures the
event.
Application Examples
TDS1000/2000-Series Digital Oscilloscope User Manual 57
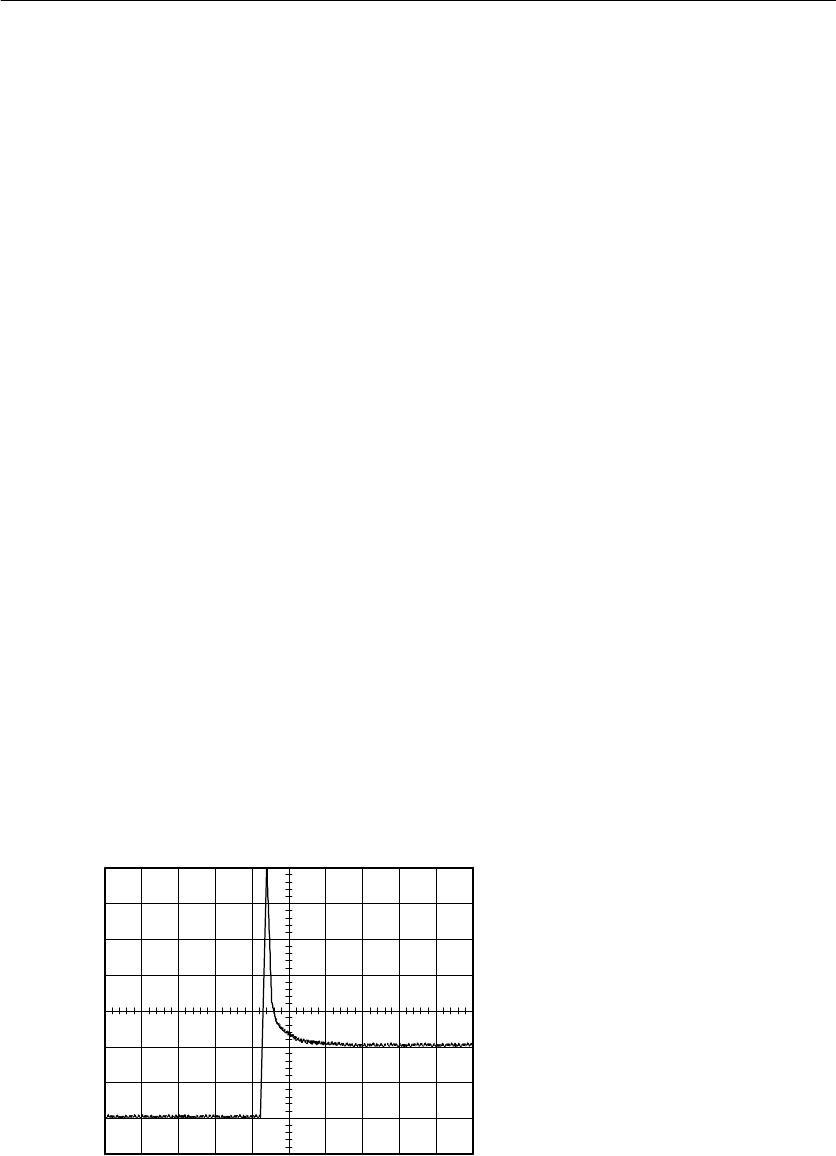
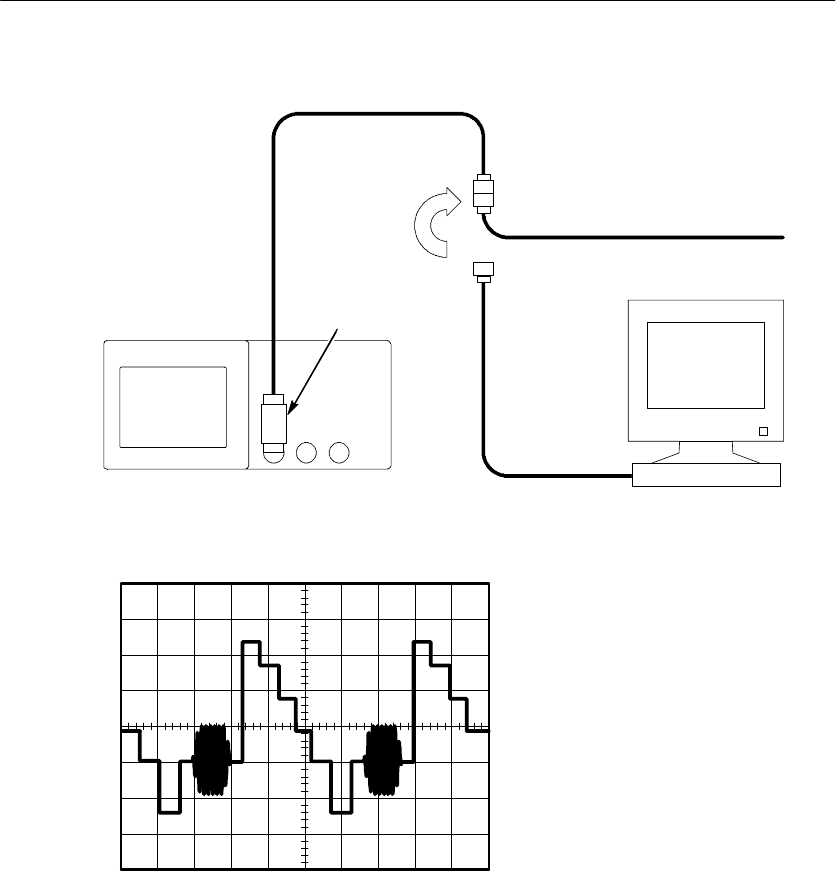
Optimizing the Acquisition
The initial acquisition shows the relay contact beginning to open at
the trigger point. This is followed by a large spike that indicates
contact bounce and inductance in the circuit. The inductance can
cause contact arcing and premature relay failure.
You can use the vertical, horizontal, and trigger controls to optimize
the settings before the next single-shot event is captured.
When the next acquisition is captured with the new settings (when
you push the SINGLE SEQ button again), you can see more detail
about the relay contact opening. You can now see that the contact
bounces several times as it opens.
Application Examples
58 TDS1000/2000-Series Digital Oscilloscope User Manual
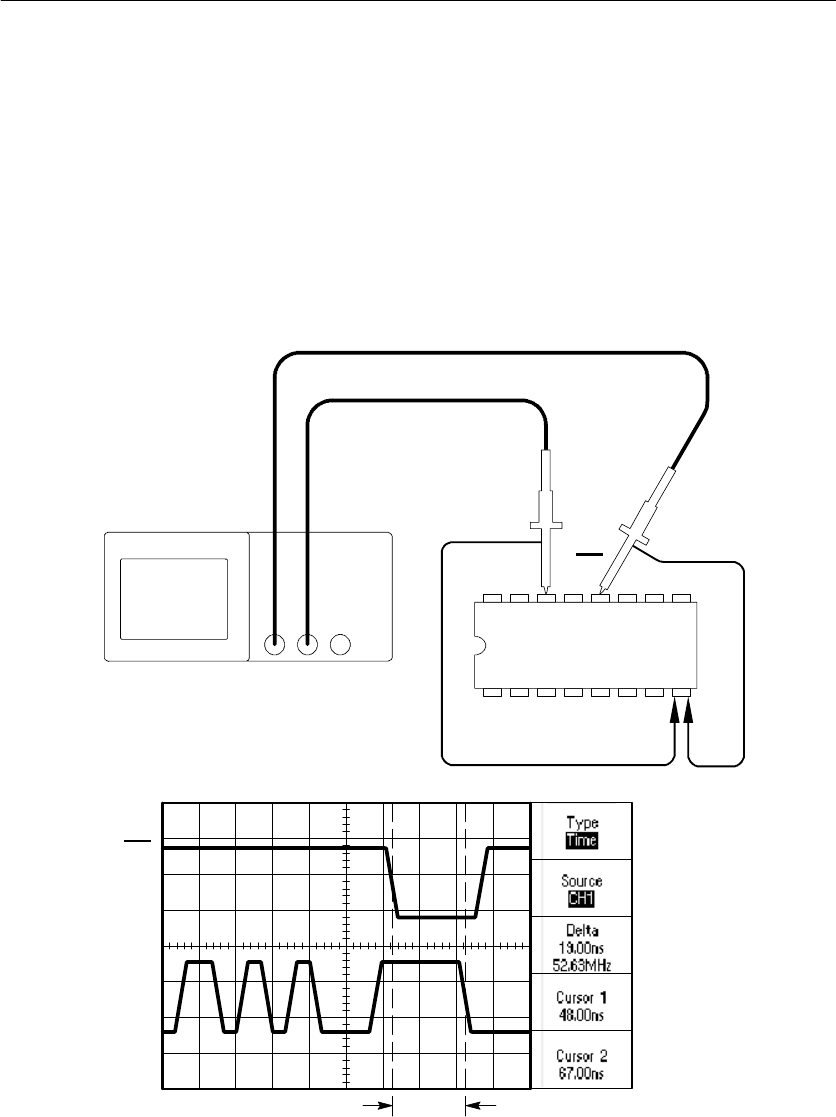
Measuring Propagation Delay
You suspect that the memory timing in a microprocessor circuit is
marginal. Set up the oscilloscope to measure the propagation delay
between the chip-select signal and the data output of the memory
device.
CH 1 CH 2
Data CS
CS
Data

Application Examples
TDS1000/2000-Series Digital Oscilloscope User Manual 59
To set up to measure propagation delay, follow these steps:
1. If the channels are not displayed, push the CH 1 MENU and then
CH 2 MENU buttons.
2. Push the AUTOSET button to trigger a stable display.
3. Adjust the horizontal and vertical controls to optimize the
display.
4. Push the CURSOR button to see the Cursor Menu.
5. Push the Type option button and select Time.
6. Push the Source option button and select CH1.
7. Turn the CURSOR 1 knob to place the cursor on the active edge
of the chip-select signal.
8. Turn the CURSOR 2 knob to place the second cursor on the data
output transition.
9. Read the propagation delay in the Delta readout in the Cursor
Menu.
Application Examples
60 TDS1000/2000-Series Digital Oscilloscope User Manual
Triggering on a Specific Pulse Width
You are testing the pulse widths of a signal in a circuit. It is critical
that the pulses all be a specific width and you need to verify that they
are. Edge triggering shows that your signal is as specified, and the
pulse width measurement does not vary from the specification.
However, you think there might be a problem.
To set up a test for pulse width aberrations, follow these steps:
1. Display the suspect signal on Ch 1. If Ch1 is not displayed, push
the CH1 MENU button.
2. Push the AUTOSET button to trigger a stable display.
3. Push the Single Cycle option button in the AUTOSET Menu to
view a single cycle of the signal, and to quickly take a Pulse
Width measurement.
4. Push the TRIG MENU button.
5. Push the Type option button to select Pulse.
Application Examples
TDS1000/2000-Series Digital Oscilloscope User Manual 61
6. Push the Source option button to select CH1.
7. Turn the TRIGGER LEVEL knob to set the trigger level near
the bottom of the signal.
8. Push the When option button to select =(equal).
9. Push the Set Pulse Width option button, and turn the USER
SELECT knob to set the pulse width to the value reported by the
Pulse Width measurement in step 3.
10. Push -- m o r e -- p a g e 1 o f 2 and set the Mode option to Normal.
You should achieve a stable display with the oscilloscope
triggering on normal pulses.
11. Push the When option button to select ¸,<,or>. If there are
any aberrant pulses that meet the specified When condition, the
oscilloscope triggers.
NOTE. The trigger frequency readout shows the frequency of events
the oscilloscope considers to be triggers, and may be less than the
frequency of the input signal in Pulse Width trigger mode.
Application Examples
62 TDS1000/2000-Series Digital Oscilloscope User Manual
Triggering on a Video Signal
You are testing the video circuit in a piece of medical equipment and
need to display the video output signal. The video output is an NTSC
standard signal. Use the video trigger to obtain a stable display.
CH 1
75 Ωterminator

Application Examples
TDS1000/2000-Series Digital Oscilloscope User Manual 63
NOTE. Most video systems use 75 ohm cabling. The oscilloscope
inputs do not properly terminate low impedance cabling. To avoid
amplitude inaccuracy from improper loading and reflections, place a
75 ohm feedthrough terminator (Tektronix part number 011--0055--02
or equivalent) between the 75 ohm coaxial cable from the signal
source and the oscilloscope BNC input.
Triggering on Video Fields
Automatic. To trigger on the video fields, follow these steps:
1. Push the AUTOSET button. When Autoset is complete, the
oscilloscope displays the video signal with sync on All Fields.
2. Push the Odd Field or Even Field option buttons from the
AUTOSET Menu to sync on odd or even fields only.
Manual. An alternative method requires more steps, but may be
necessary depending on the video signal. To use the method, follow
these steps:
1. Push the TRIG MENU button to see the Trigger Menu.
2. Push the top option button and select Video.
3. Push the Source option button and select CH1.
4. Push the Sync option button and select All Fields,Odd Field,or
Even Field.
5. Push the Standard option button and select NTSC.
6. Turn the horizontal SEC/DIV knob to see a complete field across
the screen.
7. Turn the vertical VOLTS/DIV knob to ensure that the entire
video signal is visible on the screen.

Application Examples
64 TDS1000/2000-Series Digital Oscilloscope User Manual
Triggering on Video Lines
Automatic. You can also look at the video lines in the field. To trigger
on the video lines, follow these steps:
1. Push the AUTOSET button.
2. Push the top option button to select Line to sync on all lines.
(The AUTOSET Menu includes All Lines and Line Number
options.)
Manual. An alternative method requires more steps, but may be
necessary depending on the video signal. To use the method, follow
these steps:
1. Push the TRIG MENU button to see the Trigger Menu.
2. Push the top option button and select Video.
3. Push the Sync option button and select All Lines.orLine
Number andturntheUSER SELECT knob to set a specific line
number.
4. Push the Standard option button and select NTSC.
5. Turn the SEC/DIV knob to see a complete video line across the
screen.
6. Turn the VOLTS/DIV knob to ensure that the entire video signal
is visible on the screen.
Application Examples
TDS1000/2000-Series Digital Oscilloscope User Manual 65
CH 1
Incoming video signal
75 Ωterminator
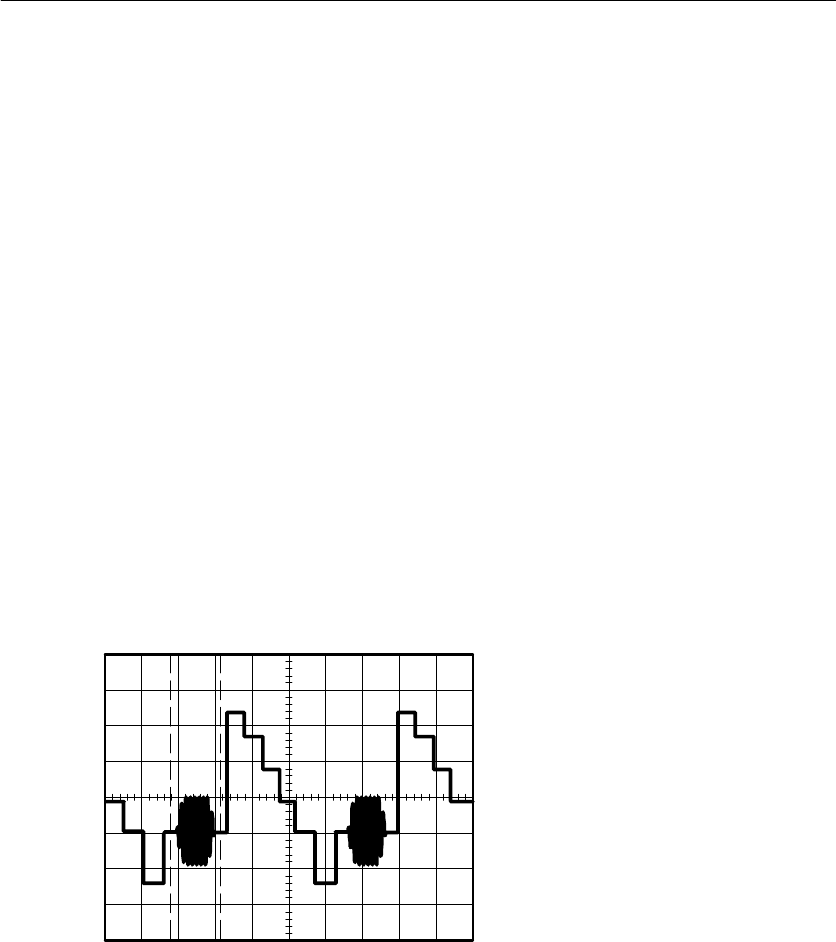
Application Examples
66 TDS1000/2000-Series Digital Oscilloscope User Manual
Using the Window Function to See Waveform Details
You can use the window function to examine a specific portion of a
waveform without changing the main display.
If you want to view the color burst in the previous waveform in more
detail without changing the main display, follow these steps:
1. Push the HORIZ MENU button to see the Horizontal Menu and
select the Main option.
2. Push the Window Zone option button.
3. Turn the SEC/DIV knob and select 500 ns. This will be the
SEC/DIV setting of the expanded view.
4. Turn the HORIZONTAL POSITION knob to position the
window around the portion of the waveform that you want to
expand.
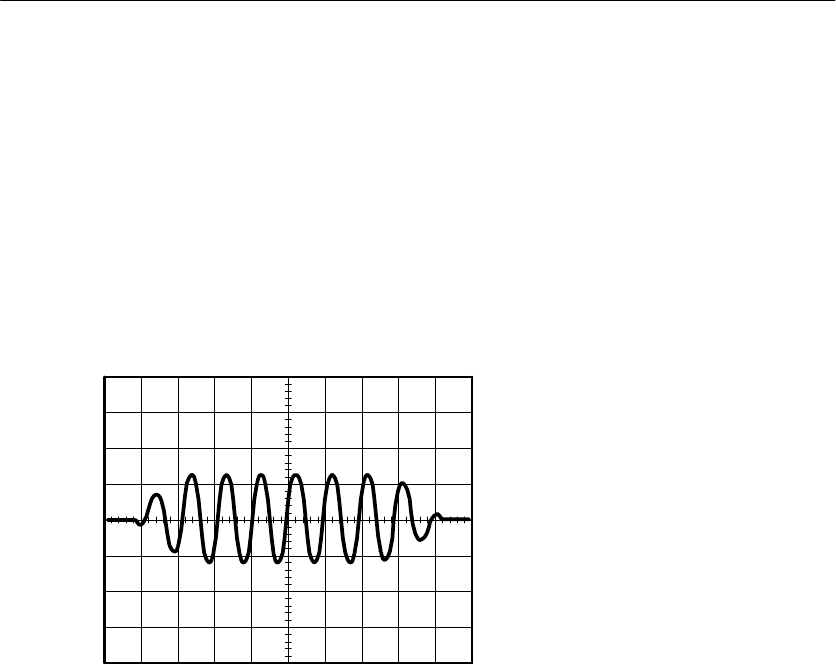
Application Examples
TDS1000/2000-Series Digital Oscilloscope User Manual 67
5. Push the Window option button to see the expanded portion of
the waveform.
6. Turn the SEC/DIV knob to optimize viewing the expanded
waveform.
To switch between the Main and Window views, push the Main
or Window option button in the Horizontal Menu.
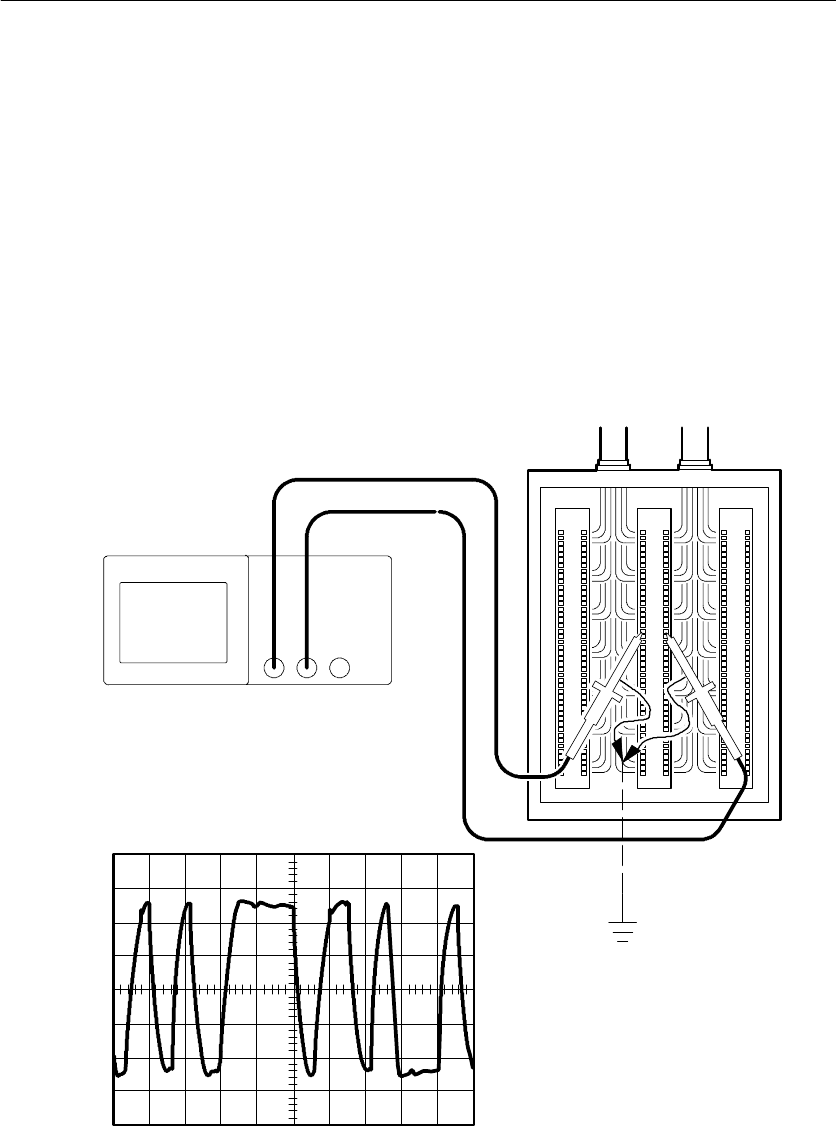
Application Examples
68 TDS1000/2000-Series Digital Oscilloscope User Manual
Analyzing a Differential Communication Signal
You are having intermittent problems with a serial data communica-
tion link, and you suspect poor signal quality. Set up the oscilloscope
to show you a snapshot of the serial data stream so you can verify the
signal levels and transition times.
Because this is a differential signal, you use the math function of the
oscilloscope to view a better representation of the waveform.
CH 1 CH 2

Application Examples
TDS1000/2000-Series Digital Oscilloscope User Manual 69
NOTE. Be sure to first compensate both probes. Differences in probe
compensation appear as errors in the differential signal.
To activate the differential signals connected to channel 1 and
channel 2, follow these steps:
1. Push the CH 1 MENU button and set the Probe option attenua-
tion to 10X.
2. Push the CH 2 MENU button and set the Probe option attenua-
tion to 10X.
3. Set the switches to 10X on the P2200 probes.
4. Push the AUTOSET button.
5. Push the MATH MENU buttontoseetheMathMenu.
6. Push the Operation option button and select -- .
7. Push the CH1--CH2 option button to display a new waveform
that is the difference between the displayed waveforms.
8. You can adjust the vertical scale and position of the Math
waveform. To do so, follow these steps:
a. Remove the channel 1 and channel 2 waveforms from the
display.
b. Turn the CH 1 and CH 2 VOLTS/DIV and VERTICAL
POSITION knobs to adjust the vertical scale and position.

Application Examples
70 TDS1000/2000-Series Digital Oscilloscope User Manual
For a more stable display, push the SINGLE SEQ button to control
the acquisition of the waveform. Each time you push the SINGLE
SEQ button, the oscilloscope acquires a snapshot of the digital data
stream. You can use the cursors or automatic measurements to
analyze the waveform, or you can store the waveform to analyze
later.
NOTE. Vertical sensitivity should match on waveforms used for math
operations. If they do not match, and you use cursors to measure the
waveform result, a Udisplays that represents unknown in the level
and delta readouts.
Viewing Impedance Changes in a Network
You have designed a circuit that needs to operate over a wide
temperature range. You need to evaluate the change in impedance of
the circuit as the ambient temperature is changed.
Connect the oscilloscope to monitor the input and output of the
circuit and capture the changes that occur as you vary the tempera-
ture.
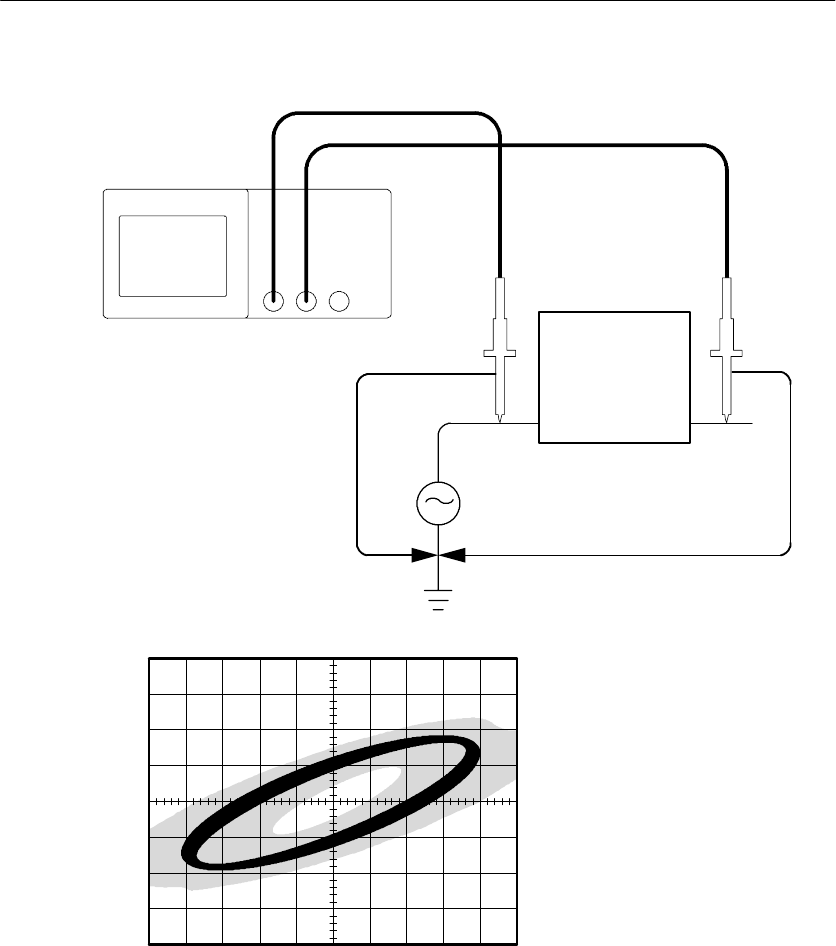
Application Examples
TDS1000/2000-Series Digital Oscilloscope User Manual 71
CH 1 CH 2
Circuit
In Out

Application Examples
72 TDS1000/2000-Series Digital Oscilloscope User Manual
To view the input and output of the circuit in an XY display, follow
these steps:
1. Push the CH 1 MENU button and set the Probe option
attenuation to 10X.
2. Push the CH 2 MENU button and set the Probe option
attenuation to 10X.
3. Set the switches to 10X on the P2200 probes.
4. Connect the channel 1 probe to the input of the network, and
connect the channel 2 probe to the output.
5. Push the AUTOSET button.
6. Turn the VOLTS/DIV knobs to display approximately the same
amplitude signals on each channel.
7. Push the DISPLAY button.
8. Push the Format option button and select XY.
The oscilloscope displays a Lissajous pattern representing the
input and output characteristics of the circuit.
9. Turn the VOLTS/DIV and VERTICAL POSITION knobs to
optimize the display.
10. Push the Persist option button and select Infinite.
11. Push the Contrast Increase or Contrast Decrease option buttons
to adjust the contrast of the screen.
As you adjust the ambient temperature, the display persistence
captures the changes in the characteristics of the circuit.

TDS1000/2000-Series Digital Oscilloscope User Manual 73
Reference
This chapter describes the menus and operating details associated with
each front-panel menu button or control.
Topic Page
Acquire: menu, RUN/STOP button and SINGLE SEQ button 74
Autoset 79
Cursors 84
Default setup 85
Display 86
Help 89
Horizontal controls: menu, SET TO ZERO button, HORIZONTAL POSITION knob
and SEC/DIV knob
90
Math 93
Measure 94
Print 96
Probe check 96
Save/Recall 97
Trigger controls: menu, SET TO 50% button, FORCE TRIG button, TRIG VIEW
button and LEVEL (or USER SELECT) knob
99
Utility 110
Vertical controls: menu, VERTICAL POSITION knobs and VOLTS/DIV knobs 112
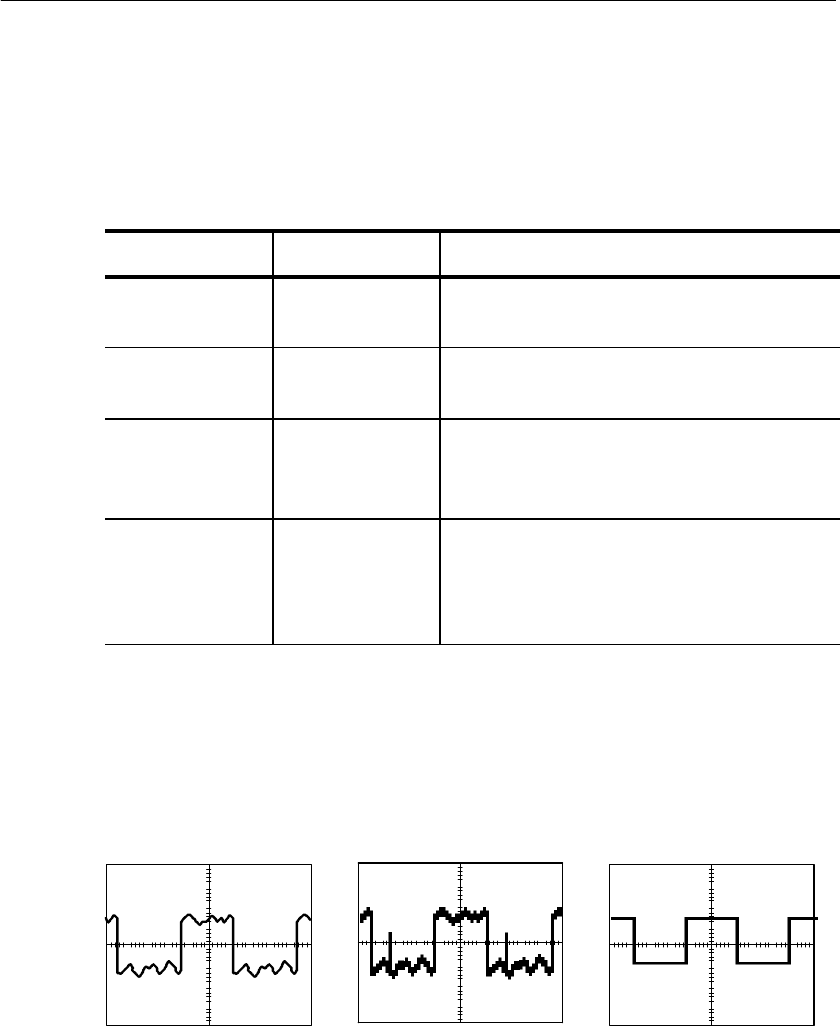
Reference
74 TDS1000/2000-Series Digital Oscilloscope User Manual
Acquire
Push the ACQUIRE button to set acquisition parameters.
Options Settings Comments
Sample Use to acquire and accurately display
most waveforms; this is the default mode
Peak Detect Use to detect glitches and reduce the
possibility of aliasing
Average Use to reduce random or uncorrelated
noise in the signal display; the number of
averages is selectable
Averages 4
16
64
128
Select number of averages
Key Points
If you probe a noisy square wave signal that contains intermittent,
narrow glitches, the waveform displayed will vary depending on the
acquisition mode you choose.
Sample Peak Detect Average
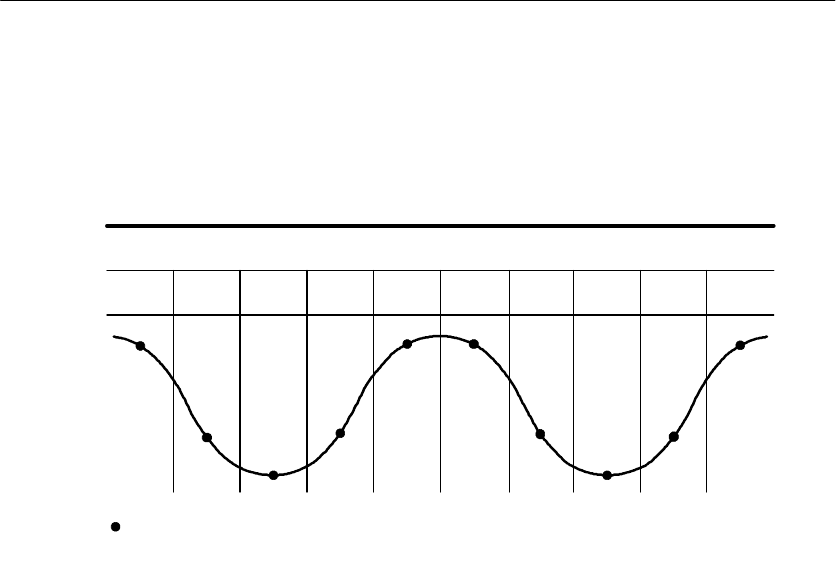
Reference
TDS1000/2000-Series Digital Oscilloscope User Manual 75
Sample. Use Sample acquisition mode to acquire 2500 points and
display them at the SEC/DIV setting. Sample mode is the default
mode.
12345678910
Sample acquisition intervals (2500)
Sample mode acquires a single sample point in each interval.
Sample points
The maximum sample rate is 1 GS/s for oscilloscope models with a
bandwidth of 60 MHz or 100 MHz and 2 GS/s for the 200 MHz
models. At 100 ns and faster settings, this sample rate does not
acquire 2500 points. In this case, a Digital Signal Processor
interpolates points between the sampled points to make a full 2500
point waveform record.
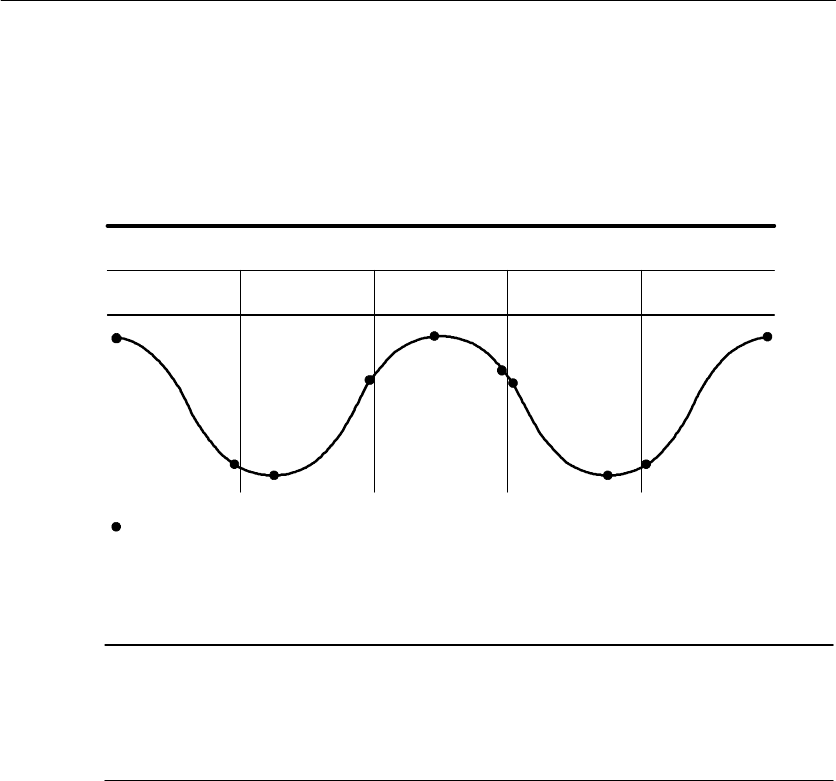
Reference
76 TDS1000/2000-Series Digital Oscilloscope User Manual
Peak Detect. Use Peak Detect acquisition mode to detect glitches as
narrow as 10 ns and to limit the possibility of aliasing. This mode is
effective when at the SEC/DIV setting of 5 s/div or slower.
12 34 5
Peak Detect mode displays the highest and lowest acquired voltage in each
interval.
Sample points displayed
Peak Detect acquisition intervals (1250)
NOTE. If you set the SEC/DIV setting to 2.5 s/div or faster, the
acquisition mode changes to Sample because the sample rate is fast
enough that Peak Detect is not necessary. The oscilloscope does not
display a message to tell you that the mode was changed to Sample.
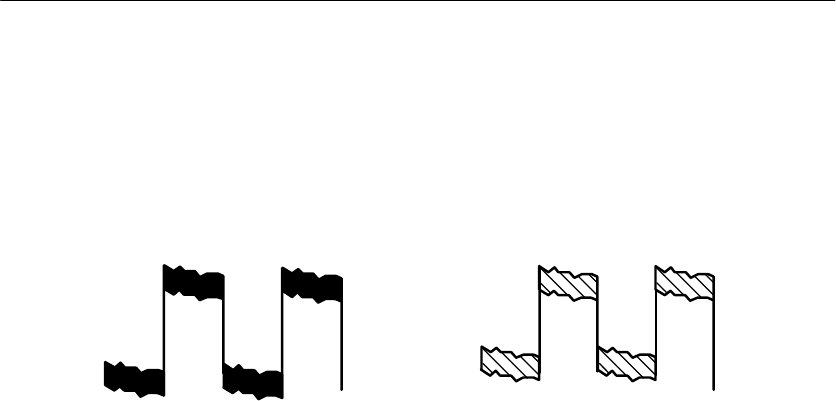
Reference
TDS1000/2000-Series Digital Oscilloscope User Manual 77
When there is enough waveform noise, a typical peak detect display
shows large black areas. The TDS1000- and TDS2000-series
oscilloscopes display this area with diagonal lines to improve display
performance.
Typical peak detect display TDS1000/TDS2000 peak detect display
Average. Use Average acquisition mode to reduce random or
uncorrelated noise in the signal you want to display. Data is acquired
in sample mode, then a number of waveforms are averaged together.
Select the number of acquisitions (4, 16, 64, or 128) to average for
the waveform.
RUN/STOP Button. Push the RUN/STOP button when you want the
oscilloscope to continuously acquire waveforms. Push the button
again to stop the acquisition.
SINGLE SEQ Button. Push the SINGLE SEQ button when you want the
oscilloscope to acquire a single waveform and then stop. Each time
you push the SINGLE SEQ button, the oscilloscope begins to acquire
another waveform. After the oscilloscope detects a trigger it
completes the acquisition and stops.

Reference
78 TDS1000/2000-Series Digital Oscilloscope User Manual
Acquisition mode SINGLE SEQ button
Sample, Peak Detect Sequence is complete when one acquisition is acquired
Average Sequence is complete when the defined number of
acquisitions is reached (refer to page 74)
Scan Mode Display. You can use the Horizontal Scan acquisition mode
(also called Roll mode) to continuously monitor signals that change
slowly. The oscilloscope displays waveform updates from the left to
the right of the screen and erases old points as it displays new points.
A moving, one-division-wide blank section of the screen separates
the new waveform points from the old.
The oscilloscope changes to the Scan acquisition mode when you
turn the SEC/DIV knob to 100 ms/div or slower, and select the Auto
Mode option in the TRIGGER Menu.
To disable Scan mode, push the TRIG MENU button and set the
Mode option to Normal.
Stopping the Acquisition. While the acquisition is running, the
waveform display is live. Stopping the acquisition (when you push
the RUN/STOP button) freezes the display. In either mode, the
waveform display can be scaled or positioned with the vertical and
horizontal controls.

Reference
TDS1000/2000-Series Digital Oscilloscope User Manual 79
Autoset
When you push the AUTOSET button, the oscilloscope identifies the
type of waveform and adjusts controls to produce a usable display of
the input signal.
Function Setting
Acquire mode Adjusted to Sample or Peak Detect
Display format Set to YT
Display type Set to Dots for a video signal, set to Vectors
for an FFT spectrum; otherwise, unchanged
Horizontal position Adjusted
SEC/DIV Adjusted
Trigger coupling Adjusted to DC, Noise Reject, or HF Reject
Trigger holdoff Minimum
Trigger level Set to 50%
Trigger mode Auto
Trigger source Adjusted; refer to page 80; cannot use Autoset
on the EXT TRIG signal
Trigger slope Adjusted
Trigger type Edge or Video
Trigger Video Sync Adjusted
Trigger Video Standard Adjusted
Vertical bandwidth Full
Vertical coupling DC (if GND was previously selected); AC for a
video signal; otherwise, unchanged
VOLTS/DIV Adjusted

Reference
80 TDS1000/2000-Series Digital Oscilloscope User Manual
The Autoset function examines all channels for signals and displays
corresponding waveforms.
Autoset determines the trigger source based on the following
conditions:
HIf multiple channels have signals, channel with the lowest
frequency signal
HNo signals found, the lowest-numbered channel displayed when
Autoset was invoked
HNo signals found and no channels displayed, oscilloscope
displays and uses channel 1

Reference
TDS1000/2000-Series Digital Oscilloscope User Manual 81
Sine Wave
When you use the Autoset function and the oscilloscope determines
that the signal is similar to a sine wave, the oscilloscope displays the
following options:
Sine wave
options Details
Multi-cycle sine
Displays several cycles with appropriate vertical and
horizontal scaling; the oscilloscope displays Cycle RMS,
Frequency, Period, and Peak-to-Peak automatic measure-
ments
Single-cycle sine
Sets the horizontal scale to display about one cycle of the
waveform; the oscilloscope displays Mean, and Peak-to-
Peak automatic measurements
FFT
Converts the input time-domain signal into its frequency
components and displays the result as a graph of frequency
versus magnitude (spectrum); since this is a mathematical
calculation, refer to the Math FFT chapter on page 115 for
more information
Undo Setup Causes the oscilloscope to recall the previous setup
Reference
82 TDS1000/2000-Series Digital Oscilloscope User Manual
Square Wave or Pulse
When you use the Autoset function and the oscilloscope determines
that the signal is similar to a square wave or pulse, the oscilloscope
displays the following options:
Square wave or
pulse options Details
Multi-cycle square
Displays several cycles with appropriate vertical and
horizontal scaling; the oscilloscope displays Pk-Pk,
Mean, Period, and Frequency automatic measurements
Single-cycle square
Sets the horizontal scale to display about one cycle of
the waveform; the oscilloscope displays Min, Max, Mean,
and Positive Width automatic measurements
Rising edge
Displays the edge, and the Rise Time and Peak-to-Peak
automatic measurements
Falling edge
Displays the edge, and the Fall Time and Peak-to-Peak
automatic measurements
Undo Setup Causes the oscilloscope to recall the previous setup
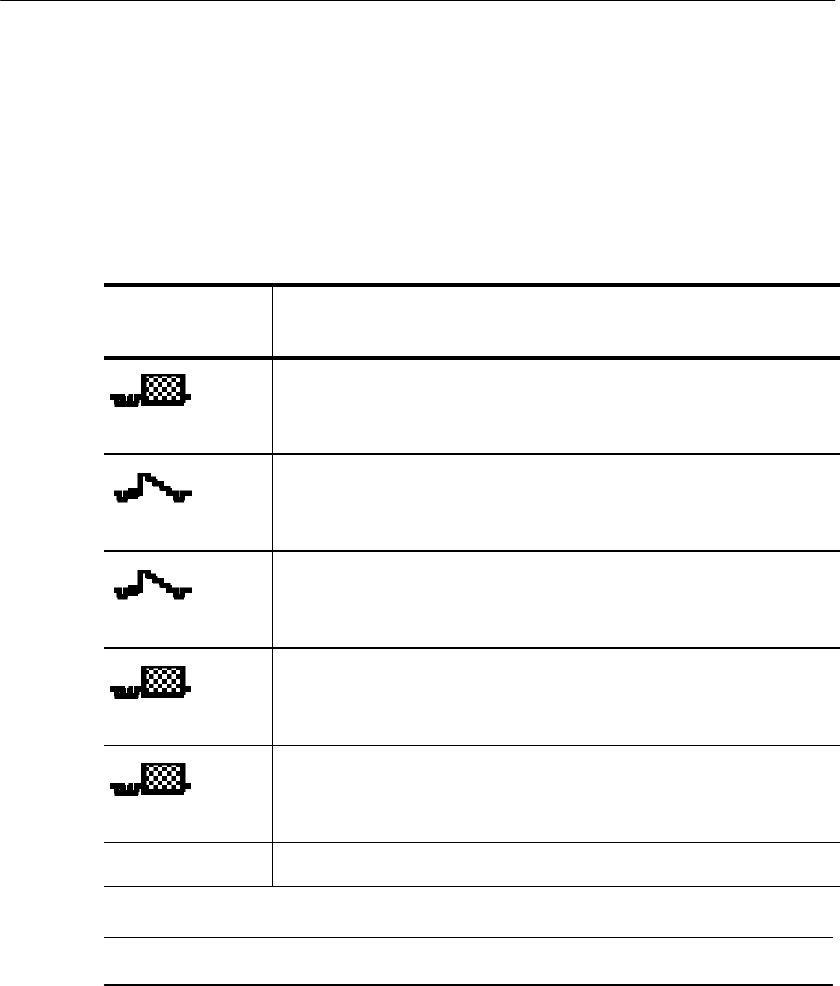
Reference
TDS1000/2000-Series Digital Oscilloscope User Manual 83
Video Signal
When you use the Autoset function and the oscilloscope determines
that the signal is a video signal, the oscilloscope displays the
following options:
Video signal
options Details
All Fields
Displays several fields and the oscilloscope triggers on any
field
All Lines
Displays one complete line with parts of the previous and
next line; the oscilloscope triggers on any line
Line Number
Displays one complete line with parts of the previous and
next line; turn the USER SELECT knob to select a specific
line number for the oscilloscope to use as a trigger
Odd Fields
Displays several fields and the oscilloscope triggers only on
odd fields
Even Fields
Displays several fields and the oscilloscope triggers only on
even fields
Undo Setup Causes the oscilloscope to recall the previous setup
NOTE. Video autoset sets the Display Type option to Dot Mode.

Reference
84 TDS1000/2000-Series Digital Oscilloscope User Manual
Cursors
Push the CURSOR button to display the measurement cursors and
Cursor Menu.
Options Settings Comments
Type*Voltage
Time
Off
Select and display the measurement
cursors; Voltage measures amplitude and
Time measures time and frequency
Source CH1
CH2
CH3**
CH4**
MATH
REFA
REFB
REFC**
REFD**
Choose the waveform on which to take
the cursor measurements
The readouts display this measurement.
Delta Displays the difference (delta) between
the cursors
Cursor 1 Displays cursor 1 location (time is
referenced to the trigger position, voltage
is referenced to ground)
Cursor 2 Displays cursor 2 location (time is
referenced to the trigger position, voltage
is referenced to ground)
* For a Math FFT source, measures magnitude and frequency.
** Available only on 4-channel oscilloscopes.
Reference
TDS1000/2000-Series Digital Oscilloscope User Manual 85
NOTE. The oscilloscope must display a waveform for the cursors and
cursor readouts to appear.
Key Points
Cursor Movement. Use the CURSOR 1 and CURSOR 2 knobs to move
cursors 1 and 2. You can move the cursors only while the Cursor
Menu is displayed.
Voltage cursors Time cursors
U in Level and Delta Readouts. Vertical sensitivity should match on
waveforms used for math operations. If they do not match, and you
use cursors to measure the waveform result of a math operation, a U
displays that represents unknown.
Default Setup
Push the DEFAULT SETUP button to recall most of the factory
option and control settings, but not all. For more information, refer to
Appendix D: Default Setup on page 175.

Reference
86 TDS1000/2000-Series Digital Oscilloscope User Manual
Display
Push the DISPLAY button to choose how waveforms are presented
and to change the appearance of the entire display.
Options Settings Comments
Type Vectors
Dots
Vectors fills the space between adjacent
sample points in the display
Dots displays only the sample points
Persist OFF
1sec
2sec
5sec
Infinite
Sets the length of time each displayed
sample point remains displayed
Format YT
XY
YT format displays the vertical voltage in
relation to time (horizontal scale)
XY format displays a dot each time a
sample is acquired on channel 1 and
channel 2
Channel 1 voltage determines the X
coordinate of the dot (horizontal) and the
channel 2 voltage determines the Y
coordinate (vertical)
Contrast
Increase
Darkens the display; makes it easier to
distinguish a channel waveform from
persistence.
Contrast
Decrease
Lightens the display
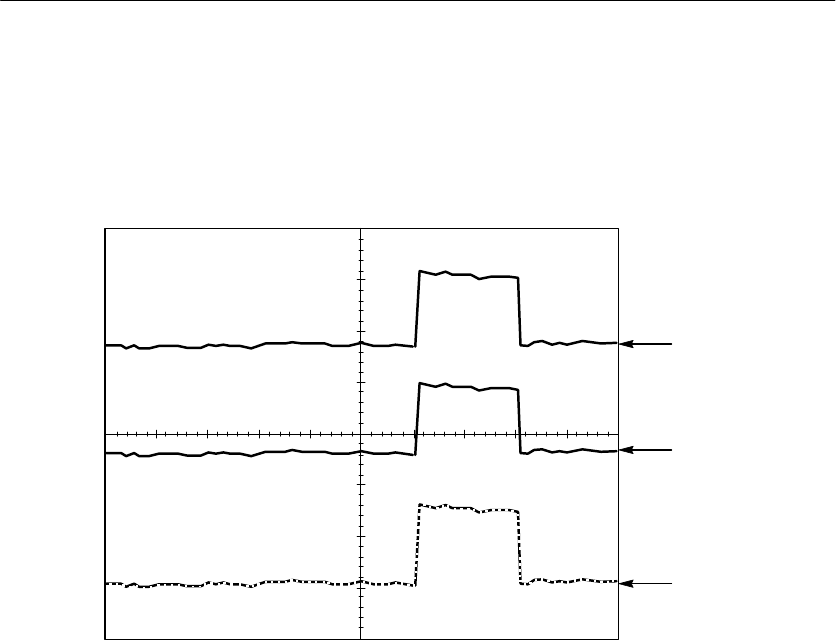
Reference
TDS1000/2000-Series Digital Oscilloscope User Manual 87
Depending on the type, waveforms will be displayed in three
different styles: solid, dimmed, and broken.
1
2
3
1. A solid waveform indicates a channel (live) waveform display.
The waveform remains solid when the acquisition is stopped if no
controls are changed that make the display accuracy uncertain.
Changing the vertical and horizontal controls is allowed on
stopped acquisitions.

Reference
88 TDS1000/2000-Series Digital Oscilloscope User Manual
2. For the TDS1000-series (monochrome monitor), a dimmed
waveform indicates reference waveforms or waveforms with
persistence applied.
For the TDS2000-series (color monitor), reference waveforms
appear white and waveforms with persistence applied appear in
the same color as the Main waveform, but with less intensity.
3. A broken line indicates the waveform display no longer matches
the controls. This happens when you stop the acquisition, and
change a control setting that the oscilloscope is not able to apply
to the displayed waveform. For example, changing the trigger
controls on a stopped acquisition causes a broken-line waveform.
Key Points
Persistence. The TDS1000- and TDS-2000 series oscilloscopes use
“dfm”at a “reduced intensity”for persistence.
With Persistence set to Infinite, record points accumulate until a
control is changed.
XY Format. Use the XY format to analyze phase differences, such as
those represented by Lissajous patterns. The format plots the voltage
on channel 1 against the voltage on channel 2, where channel 1 is the
horizontal axis and channel 2 is the vertical axis. The oscilloscope
uses the untriggered Sample acquisition mode and displays data as
dots. The sampling rate is fixed at 1 MS/s.

Reference
TDS1000/2000-Series Digital Oscilloscope User Manual 89
NOTE. The oscilloscope can capture a waveform in normal YT mode
at any sampling rate. You can view the same waveform in XY mode.
To do so, stop the acquisition and change the display format to XY.
The controls operate as follows:
HThe channel 1 VOLTS/DIV and VERTICAL POSITION controls
set the horizontal scale and position.
HThe channel 2 VOLTS/DIV and VERTICAL POSITION controls
continue to set vertical scale and position.
The following functions do not work in XY display format:
HReference or Math waveforms
HCursors
HAutoset (resets display format to YT)
HTime base controls
HTrigger controls
Help
Push the HELP button to display the Help menu. The topics cover all
the menu options and controls of the oscilloscope. For more
information on the Help system, refer to page ix.

Reference
90 TDS1000/2000-Series Digital Oscilloscope User Manual
Horizontal
You can use the horizontal controls to change the horizontal scale
and position of waveforms. The horizontal position readout shows
the time represented by the center of the screen, using the time of the
trigger as zero. Changing the horizontal scale causes the waveform to
expand or contract around the screen center.
Options Settings Comments
Main The main horizontal time base setting is
used to display the waveform
Window
Zone
Two cursors define a window zone
Adjust the Window Zone with the Horizon-
tal Position and SEC/DIV controls
Window Changes the display to show the wave-
form segment (expanded to screen width)
within the window zone
Trig knob Level*
Holdoff
Selects whether the Trigger Level knob
adjusts the trigger level (volts) or holdoff
time (sec)
The holdoff value is displayed
* For video trigger with sync on a line number, the USER SELECT
(alternative function) knob switches between setting a line
number and Trigger Level.

Reference
TDS1000/2000-Series Digital Oscilloscope User Manual 91
NOTE. You can push the horizontal option buttons to switch between
an entire waveform display and an enlarged, more detailed part of it.
The axis for vertical scale is the ground level. A readout near the top
right of the screen displays the current horizontal position in seconds.
An M indicates the Main time base and a W indicates the Window
time base. The oscilloscope also indicates horizontal position with an
arrow icon at the top of the graticule.
Knobs and Buttons
HORIZONTAL POSITION Knob. Use to control the position of the trigger
relative to the center of the screen.
SET TO ZERO Button. Use to set the horizontal position to zero.
SEC/DIV Knob (Horizontal Scale). Use to change the horizontal time
scale to magnify or compress the waveform.
Key Points
SEC/DIV. If waveform acquisition is stopped (using the RUN/STOP or
SINGLE SEQ button), the SEC/DIV control expands or compresses
the waveform.
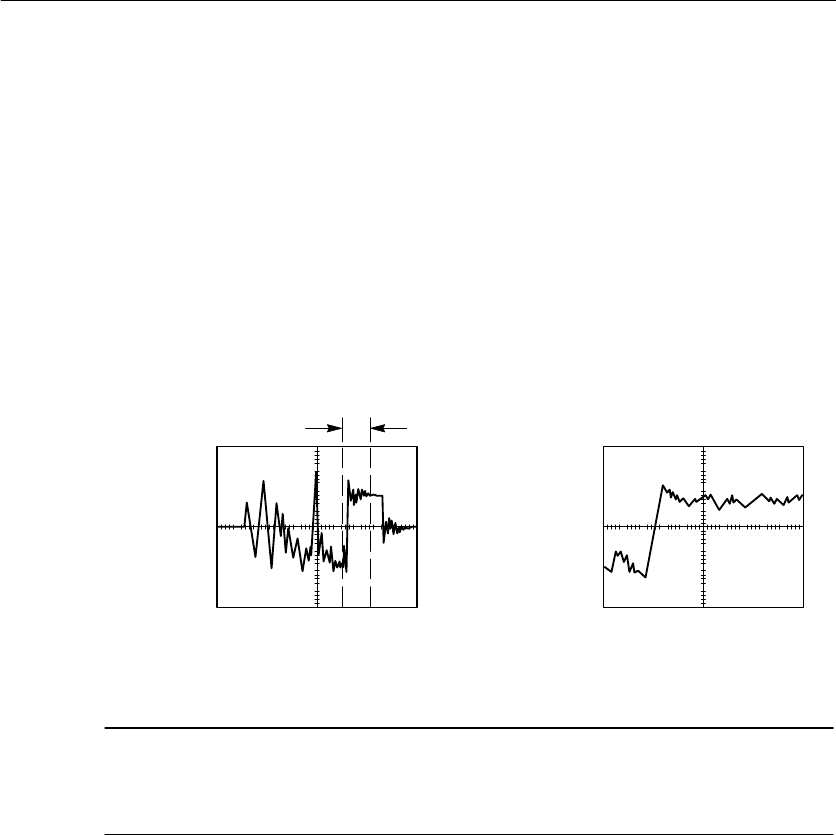
Reference
92 TDS1000/2000-Series Digital Oscilloscope User Manual
Scan Mode Display (Roll Mode). When the SEC/DIV control is set to
100 ms/div or slower and the trigger mode is set to Auto, the
oscilloscope enters the scan acquisition mode. In this mode, the
waveform display updates from left to right. There is no trigger or
horizontal position control of waveforms during scan mode.
Window Zone. Use the Window Zone option to define a segment of a
waveform to see more detail. The Window time base setting cannot
be set slower than the Main time base setting.
Main
time base
displayed
Window Zone
displayed
Vertical bars define Window Zone
Window. Expands the Window Zone to cover the entire screen.
NOTE. When you change between the Main, Window Zone, and
Window views, the oscilloscope erases any waveform saved on the
screen through persistence.
Holdoff. Use holdoff to help stabilize the display of aperiodic
waveforms. Refer to Trigger Controls on page 99 for more
information.

Reference
TDS1000/2000-Series Digital Oscilloscope User Manual 93
Math
Push the MATH MENU button to display the waveform math
operations. Push the MATH MENU button again to remove the math
waveform display. Refer to page 112 for vertical system descriptions.
Operations Setting Comments
--
(subtraction)
CH1 -- CH2 The channel 2 waveform is subtracted from
the channel 1 waveform
(
)
CH2 -- CH1 The channel 1 waveform is subtracted from
the channel 2 waveform
CH3 -- CH4*The channel 4 waveform is subtracted from
the channel 3 waveform
CH4 -- CH3*The channel 3 waveform is subtracted from
the channel 4 waveform
+
(
d
d
i
t
i
)
CH1 + CH2 Channels 1 and 2 are added together
(
a
ddition) CH3 + CH4*Channels 3 and 4 are added together
FFT Refer to the Math FFT chapter on page 115
* Available only on a 4-channel oscilloscope.
Key Points
VOLTS/DIV. Use the VOLTS/DIV control to scale the waveforms of
the channels. The math add or subtract waveform is the visual sum or
difference of the channel waveforms.

Reference
94 TDS1000/2000-Series Digital Oscilloscope User Manual
Measure
Push the MEASURE button to access automatic measurements.
There are eleven types of measurements available. You can display
up to five at a time.
Push the top option button to display the Measure 1 Menu. You can
choose the channel on which to take a measurement in the Source
option. You can choose the type of measurement to take in the Type
option. Push the Back option button to return to the MEASURE
Menu and display the selected measurements.
Key Points
Taking Measurements. Youcandisplayuptofiveautomaticmeasure-
ments at a time for a single waveform (or divided among the
waveforms). The waveform channel must be on (displayed) to make
a measurement.
Automated measurements cannot be taken on reference or math
waveforms, or while using XY or scan mode. The measurements
update about two times per second.
Measurement type Definition
Freq Calculates the frequency of the waveform by
measuring the first cycle
Period Calculates the time of the first cycle

Reference
TDS1000/2000-Series Digital Oscilloscope User Manual 95
Measurement type Definition
Mean Calculates the arithmetic mean voltage over the
entire record
Pk-Pk Calculates the absolute difference between the
maximum and minimum peaks of the entire
waveform
Cyc RMS Calculates a true RMS measurement of the first
complete cycle of the waveform
Min Examines the entire 2500 point waveform record
and displays the minimum value
Max Examines the entire 2500 point waveform record
and displays the maximum value
Rise Time Measures the time between 10% and 90% of the
first rising edge of the waveform.
Fall Time Measures the time between 90% and 10% of the
first falling edge of the waveform.
Pos Width Measures the time between the first rising edge
and the next falling edge at the waveform 50%
level.
Neg Width Measures the time between the first falling edge
and the next rising edge at the waveform 50%
level.
None Does not take any measurement

Reference
96 TDS1000/2000-Series Digital Oscilloscope User Manual
Print
Push the PRINT button to send the screen data to a printer or
computer.
The print function requires the optional TDS2CMA Communications
Extension Module. The module includes Centronics, RS-232, and
GPIB ports.
Refer to the TDS2CMA Communications Module chapter on
page 127 for complete operating information. Refer to Optional
Accessories on page 169 for ordering information.
Probe Check
You can use the Probe Check Wizard to quickly verify that your
probe is operating properly.
To use the Probe Check Wizard, push the PROBE CHECK button. If
your probe is connected properly, compensated properly, and the
Probe entry in the oscilloscope VERTICAL menu is set to match
your probe, the oscilloscope will display a PASSED message at the
bottom of the screen. Otherwise, the oscilloscope will display
directions on the screen to guide you in correcting these problems.

Reference
TDS1000/2000-Series Digital Oscilloscope User Manual 97
Save/Recall
Push the SAVE/RECALL button to save or recall oscilloscope setups
or waveforms.
Setups
Options Settings Comments
Setups Highlighting Setups displays the menus
for storing or recalling oscilloscope setups
Setup 1to10 Specifies the memory location in which to
save the current oscilloscope settings or
from which to recall the settings
Save Completes the save action
Recall Recalls the oscilloscope settings stored in
the location chosen in the Setup field
Key Points
Saving and Recalling Setups. The complete setup is stored in
nonvolatile memory. When you recall the setup, the oscilloscope will
be in the mode from which the setup was saved.
The oscilloscope saves the current setup if you wait three seconds
after the last change before you power off the oscilloscope. The
oscilloscope then recalls this setup the next time you apply power.
Recalling the Default Setup. You can push the DEFAULT SETUP
button to initialize the oscilloscope to a known setup. To view option
and control settings that the oscilloscope recalls when you push this
button, refer to Appendix D: Default Setup on page 175.

Reference
98 TDS1000/2000-Series Digital Oscilloscope User Manual
Waveforms
Options Settings Comments
Waveforms Highlighting Waveforms displays the
menu for storing or recalling waveforms
Source CH1
CH2
CH3*
CH4*
Math
Choose the waveform display to store
Ref A
B
C*
D*
Choose the reference location to store or
recall a waveform
Save** Stores source waveform to the chosen
reference location
Ref(x) On
Off
Displays or removes the reference
waveform on the screen
* Available only on 4-channel oscilloscopes.
** Waveform must be displayed to save it as a reference waveform.
Saving and Recalling Waveforms. The oscilloscope must display any
waveform that you want to save. Two-channel oscilloscopes can
store two reference waveforms in nonvolatile memory. Four-channel
oscilloscopes can store four, but only display two at a time.
The oscilloscope can display both reference waveforms and channel
waveform acquisitions. Reference waveforms are not adjustable, but
the oscilloscope does display the horizontal and vertical scales at the
bottom of the screen.

Reference
TDS1000/2000-Series Digital Oscilloscope User Manual 99
Trigger Controls
You can define the trigger through the Trigger Menu and front-panel
controls.
Trigger Types
Three types of triggering are available: Edge, Video, and Pulse
Width. A different set of options display for each type of trigger.
Option Details
Edge (default) Triggers the oscilloscope on the rising or falling edge of the
input signal when it crosses the trigger level (threshold)
Video Displays NTSC or PAL/SECAM standard composite video
waveforms; you trigger on fields or lines of video signals. Refer
to Video on page 104
Pulse Triggers on aberrant pulses. Refer to Pulse Width Trigger on
page 105

Reference
100 TDS1000/2000-Series Digital Oscilloscope User Manual
Edge Trigger
Use Edge triggering to trigger on the edge of the oscilloscope input
signal at the trigger threshold.
Options Settings Comments
Edge With Edge highlighted, the rising or falling
edge of the input signal is used for the
trigger
Source CH1
CH2
CH3*
CH4*
Ext
Ext/5
AC Line
Select the input source as the trigger
signal; see page 102
Slope Rising
Falling
Select to trigger on either the rising or
falling edge of the signal
Mode Auto
Normal
Select the type of triggering; see page 101
Coupling AC
DC
Noise Reject
HF Reject
LF Reject
Selects the components of the trigger
signal applied to the trigger circuitry; see
page 103
* Available only on 4-channel oscilloscopes.

Reference
TDS1000/2000-Series Digital Oscilloscope User Manual 101
Trigger Frequency Readout
The oscilloscope counts the rate at which trigger events occur to
determine trigger frequency and displays the frequency in the lower
right corner of the screen.
Key Points
Mode Options.
Mode option Details
Auto (default) Forces the oscilloscope to trigger when it does not detect a
trigger within a certain amount of time based on the SEC/DIV
setting; you can use this mode in many situations, such as to
monitor the level of a power supply output
Use this mode to let the acquisition free-run in the absence of a
valid trigger; this mode allows an untriggered, scanning
waveform at 100 ms/div or slower time base settings
Normal Updates displayed waveforms only when the oscilloscope
detects a valid trigger condition; the oscilloscope displays older
waveforms until the oscilloscope replaces them with new ones
Use this mode when you want to see only valid triggered
waveforms; when you use this mode, the oscilloscope does not
display a waveform until after the first trigger
To perform a Single Sequence acquisition, push the SINGLE SEQ
button.

Reference
102 TDS1000/2000-Series Digital Oscilloscope User Manual
Source Options.
Source option Details
Numbered chan-
nels
Triggers on a channel whether or not the waveform is
displayed
Ext Does not display the trigger signal; the Ext option uses the
signal connected to the EXT TRIG front-panel BNC and
allows a trigger level range of +1.6V to --1.6V
Ext/5 Same as Ext option, but attenuates the signal by a factor of
five, and allows a trigger level range of +8V to --8V.; this
extends the trigger level range
AC Line This selection uses a signal derived from the power line as
the trigger source; trigger coupling is set to DC and the
trigger level to 0 volts
Use when you need to analyze signals related to the
frequency of the power line, such as lighting equipment
and power supply devices; the oscilloscope automatically
generates the trigger, sets the Trigger Coupling to DC, and
sets the Trigger Level to zero volts
The AC Line selection is available only when you select the
Edge trigger type
NOTE. To view an Ext, Ext/5, or AC Line trigger signal, push and
hold down the TRIG VIEW button.

Reference
TDS1000/2000-Series Digital Oscilloscope User Manual 103
Coupling. Coupling allows you to filter the trigger signal used to
trigger an acquisition.
Option Details
DC Passes all components of the signal
Noise Reject Adds hysteresis to the trigger circuitry; this reduces sensitivity
which reduces the chance of falsely triggering on noise
HF Reject Attenuates the high-frequency components above 80 kHz
LF Reject Blocks the DC component and attenuates the low-frequency
components below 300 kHz
AC Blocks DC components and attenuates signals below 10 Hz
NOTE. Trigger coupling affects only the signal passed to the trigger
system. It does not affect the bandwidth or coupling of the signal
displayed on the screen.
Pretrigger. The trigger position is typically set at the horizontal center
of the screen. In this case, you are able to view five divisions of
pretrigger information. Adjusting the Horizontal Position of the
waveform allows you to see more or less pretrigger information.

Reference
104 TDS1000/2000-Series Digital Oscilloscope User Manual
Video Trigger
Options Settings Comments
Video With Video highlighted, triggering occurs
on an NTSC, PAL, or SECAM standard
video signal
Trigger coupling is preset to AC
Source CH1
CH2
CH3*
CH4*
Ext
Ext/5
Selects the input source as the trigger
signal
Ext and Ext/5 use the signal applied to the
EXT TRIG connector as the source
Polarity Normal
Inverted
Normal triggers on the negative edge of
the sync pulse and Inverted triggers on
the positive edge of the sync pulse
Sync All Lines
Line Number
Odd Field
Even Field
All Fields
Select appropriate video sync
Turn the USER SELECT knob to specify
a line niumber when you select Line
Number for the Sync option
Standard NTSC
PAL/SECAM
Select the video standard for sync and
line number count
* Available only on 4-channel oscilloscopes.
Key Points
Sync Pulses. When you choose Normal Polarity, the trigger always
occurs on negative-going sync pulses. If your video signal has
positive-going sync pulses, use the Inverted Polarity selection.

Reference
TDS1000/2000-Series Digital Oscilloscope User Manual 105
Pulse Width Trigger
Use Pulse Width triggering to trigger on aberrant pulses.
Options Settings Comments
Pulse With Pulse highlighted, triggering occurs
on pulses that meet the trigger condition
defined by the Source, Whe, and Set
Pulse Width options
Source CH1
CH2
CH3*
CH4*
Ext
Ext/5
Select the input source as the trigger
signal
When =
≠
<
>
Select how to compare the trigger pulse
relative to the value selected in the Set
Pulse Width option
Set Pulse Width 33 ns to 10.0
sec
Select this option to use the USER
SELECT TRIGGER knob to set a width
Polarity Positive
Negative
Select to trigger on positive or negative
pulses
Mode Auto
Normal
Select the type of triggering; Normal
mode is best for most Pulse Width trigger
applications
Coupling AC
DC
Noise Reject
HF Reject
LF Reject
Selects the components of the trigger
signal applied to the trigger circuitry; see
Edge Trigger for details on page 100
More Use to switch between submenu pages
* Available only on 4-channel oscilloscopes.
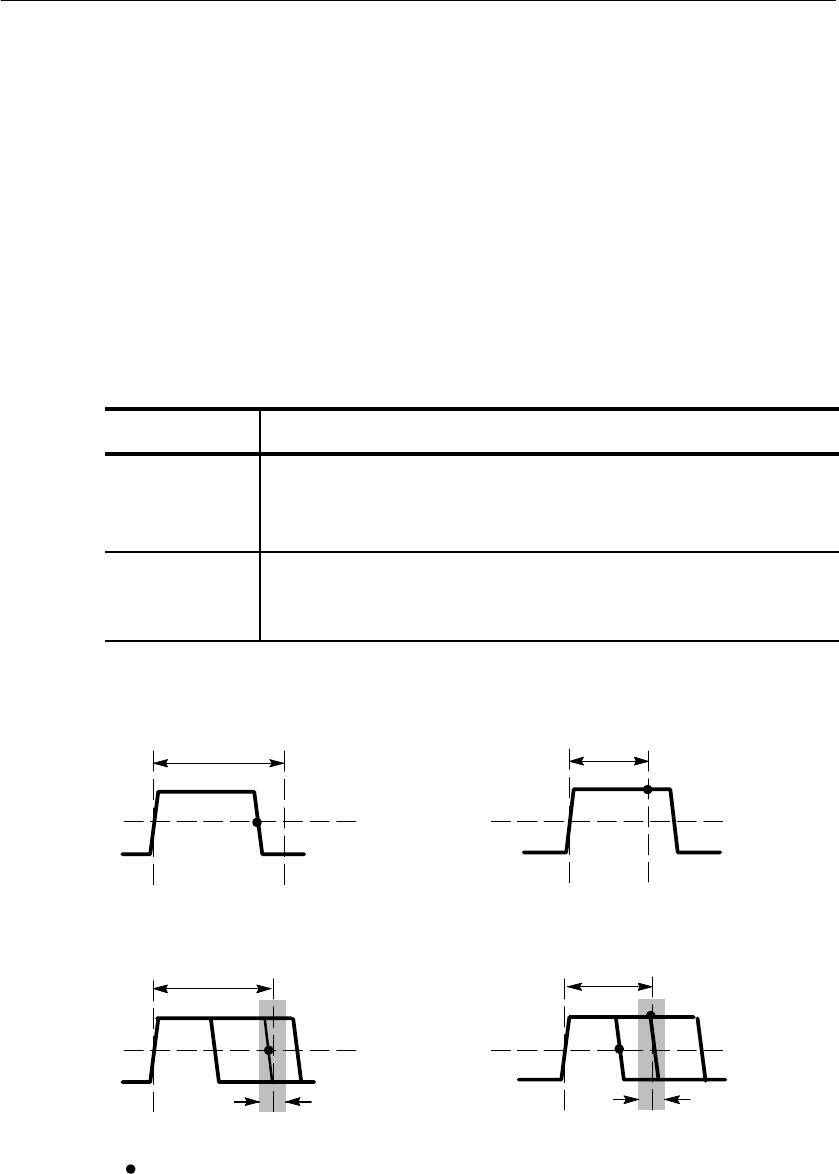
Reference
106 TDS1000/2000-Series Digital Oscilloscope User Manual
Trigger Frequency Readout
The oscilloscope counts the rate at which trigger events occur to
determine trigger frequency and displays the frequency in the lower
right corner of the screen.
Key Points
Trigger When. The pulse width of the source must be ≥5 ns for the
oscilloscope to detect the pulse.
When options Details
=Triggers the oscilloscope when the signal pulse width is equal
t
o
o
r
n
o
t
e
q
u
a
l
t
o
t
h
e
s
p
e
c
i
f
i
e
d
p
u
l
s
e
w
i
d
t
h
w
i
t
h
i
n
a
+
5
%
≠
t
oorno
t
equ
a
l
t
o
t
h
e spec
i
f
i
e
d
pu
l
se w
i
d
t
h
w
i
t
h
i
n
a
+
5
%
tolerance
<Triggers the oscilloscope when the source signal pulse width is
l
e
s
s
t
h
a
n
o
r
g
r
e
a
t
e
r
t
h
a
n
t
h
e
s
p
e
c
i
f
i
e
d
p
u
l
s
e
w
i
d
t
h
>less th
a
norgre
a
ter th
a
n the speci
f
ied pulse width
Tolerance
Tolerance
Triggers when pulse is
less than width setting
Triggers when pulse is
greater than width setting
Triggers when pulse is not
equal to width setting ±5%
Triggers when pulse is equal
to width setting ±5%
Threshold level
Threshold level
= Trigger point
Refer to page 60 for an example of triggering on aberrant pulses.

Reference
TDS1000/2000-Series Digital Oscilloscope User Manual 107
Knobs and Buttons
LEVEL or USER SELECT Knob. Use to control the Trigger Level,
Trigger Holdoff, Video Line Number or Pulse Width. The primary
function of this knob is to set the trigger level. When an alternative
function is active, the USER SELECT LED lights below the knob.
USER SELECT Description
Holdoff Sets the amount of time before another trigger event can
be accepted; to switch between the Trigger Level and
Holdoff functions, change the Trig Knob option in the
Horizontal Menu
Video line number Sets the oscilloscope to a specific line number when the
Trigger Type option is set to Video and the Sync option is
set to Line Number
Pulse width Sets the width of the pulse when the Trigger Type option is
set to Pulse and you select the Set Pulse Wdith option
SET TO 50% Button. Use the SET TO 50% button to quickly stabilize a
waveform. The oscilloscope automatically sets the Trigger Level to
be about halfway between the minimum and maximum voltage
levels. This is useful when you connect a signal to the EXT TRIG
BNC and set the trigger source to Ext or Ext/5.

Reference
108 TDS1000/2000-Series Digital Oscilloscope User Manual
FORCE TRIG Button. Use the FORCE TRIG button to complete the
current waveform acquisition whether or not the oscilloscope detects
a trigger. This is useful for SINGLE SEQ acquisitions and Normal
trigger mode. (In Auto trigger mode, the oscilloscope automatically
forces triggers periodically if it does not detect a trigger.)
TRIG VIEW Button. Use the Trigger View mode to have the oscillo-
scope display the conditioned trigger signal. You can use this mode
to see the following types of information: effects of the Trigger
Coupling option, AC Line trigger source, and the signal connected to
the EXT TRIG BNC.
NOTE. This is the only button that you must hold down to use. When
you hold down the TRIG VIEW button, the only other button you can
use is the PRINT button. The oscilloscope disables all other
front-panel buttons. The knobs continue to be active.
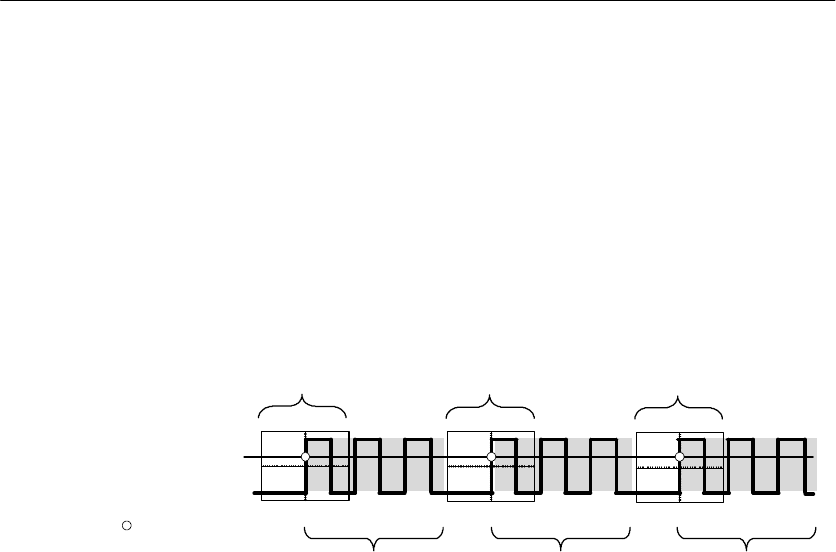
Reference
TDS1000/2000-Series Digital Oscilloscope User Manual 109
Holdoff. You can use the Trigger Holdoff function to produce a stable
display of complex waveforms, such as pulse trains. Holdoff is the
time between when the oscilloscope detects one trigger and when it
is ready to detect another. The oscilloscope will not trigger during
the holdoff time. For a pulse train, you can adjust the holdoff time so
the oscilloscope triggers only on the first pulse in the train.
Holdoff
Holdoff
Indicates
trigger points
Trigger level
Holdoff
Acquisition
interval
Acquisition
interval
Triggers are not recognized during holdoff time.
Acquisition
interval
Holdoff
To use Trigger Holdoff, push the HORIZ MENU button and set the
Trig Knob option to Holdoff. The USER SELECT LED lights to
indicate the alternative function. Turn the knob to adjust the holdoff.

Reference
110 TDS1000/2000-Series Digital Oscilloscope User Manual
Utility
Push the UTILITY button to display the Utility Menu. The Utility
Menu changes with the addition of a TDS2CMA extension module.
Refer to the next section for information on the extension module.
Options Settings Comments
System
Status
Displays summaries of the oscilloscope
settings
Options Display Style*Displays screen data as black on white, or
aswhiteonblack
Printer Setup** Displays the setup for the printer; see
page 131
RS232 Setup** Displays the setup for the RS-232 port;
see page 134
GPIB Setup** Displays the setup for the GPIB port; see
page 143
Do Self Cal Performs a self calibration
Error Log Displays a list of any errors logged
This list is useful when contacting a
Tektronix Service Center for help
Language English
French
German
Italian
Spanish
Portuguese
Japanese
Korean
Simplified
Chinese
Traditional
Chinese
Selects the display language of the
operating system
* Available only on TDS1000-series oscilloscopes.
** Available only with a TDS2CMA module installed.

Reference
TDS1000/2000-Series Digital Oscilloscope User Manual 111
Key Points
Self Calibration. The self calibration routine optimizes the oscilloscope
accuracy for the ambient temperature. For maximum accuracy, you
should perform a self cal if the ambient temperature changes by 5°C
or more. Follow the directions on the screen.
System Status
Selecting System Status from the Utility Menu displays the menus
available for obtaining a list of control settings for each group of
oscilloscope controls.
Push any front-panel menu button to remove the status screen.
Options Comments
Horizontal Lists horizontal parameters of channels
Vertical Lists vertical parameters of channels
Trigger Lists trigger parameters
Misc Lists the model of the oscilloscope and the software version
number
If the TDS2CMA module is installed, lists values of the
communications parameters

Reference
112 TDS1000/2000-Series Digital Oscilloscope User Manual
Vertical
You can use the vertical controls to display waveforms, adjust
vertical scale and position, and set input parameters. Refer to
page 93 for the vertical math descriptions.
Channel Vertical Menus
There is a separate vertical menu for each channel. Each option is set
individually for each channel.
Options Settings Comments
Coupling DC
AC
GND
DC passes both AC and DC components of
the input signal
AC blocks the DC component of the input
signal and attenuates signals below 10 Hz
GND disconnects the input signal
BW Limit 20 MHz*
Off
Limits the bandwidth to reduce display
noise; filters the signal to reduce noise and
other unwanted high frequency components
Volts/Div Coarse
Fine
Selects the resolution of the Volts/Div knob
Coarse defines a 1-2-5 sequence. Fine
changes the resolution to small steps
between the coarse settings
Probe 1X
10X
100X
1000X
Settomatchthetypeofprobeyouareusing
to ensure correct vertical readouts
Invert On
Off
Inverts the waveform
* Bandwidth is reduced to 7 MHz with a 1X probe.

Reference
TDS1000/2000-Series Digital Oscilloscope User Manual 113
NOTE. The oscilloscope vertical response rolls off slowly above its
bandwidth (60 MHz, 100 MHz, or 200 MHz, depending on the model,
or 20 MHz when the Bandwidth Limit option is set to On). Therefore,
the FFT spectrum can show valid frequency information higher than
the oscilloscope bandwidth. However, the magnitude information
near or above the bandwidth will not be accurate.
Knobs
VERTICAL POSITION Knobs. Use the VERTICAL POSITION knobs to
move the channel waveforms up or down on the screen.
VOLTS/DIV Knobs. Use the VOLTS/DIV knobs to control how the
oscilloscope amplifies or attenuates the source signal of channel
waveforms. When you turn a VOLTS/DIV knob, the oscilloscope
increases or decreases the vertical size of the waveform on the screen
with respect to the ground level.
Key Points
GND Coupling. Use GND coupling to display a zero-volt waveform.
Internally, the channel input is connected to a zero-volt reference
level.
Fine Resolution. The vertical scale readout displays the actual
Volts/Div setting while in the fine resolution setting. Changing the
setting to coarse does not change the vertical scale until the
VOLTS/DIV control is adjusted.

Reference
114 TDS1000/2000-Series Digital Oscilloscope User Manual
U in Level and Delta Readouts. Vertical sensitivity should match on
waveforms used for math operations. If they do not match, and you
use cursors to measure the waveform result of a math operation, a U
displays that represents unknown units or scaling.
Remove Waveform. To remove a waveform from the display, push the
menu button for the channel to display its vertical menu. Push the
menu button again to remove the waveform.
NOTE. You do not have to display a channel waveform to use it as a
trigger source or for math operations.

TDS1000/2000-Series Digital Oscilloscope User Manual 115
Math FFT
This chapter contains detailed information on how to use the Math
FFT (Fast Fourier Transform). You can use the FFT Math mode to
convert a time-domain (YT) signal into its frequency components
(spectrum). You can use the Math FFT mode to view the following
types of signals:
HAnalyze harmonics in power lines
HMeasure harmonic content and distortion in systems
HCharacterize noise in DC power supplies
HTest impulse response of filters and systems
HAnalyze vibration
To use the Math FFT mode, you need to perform the following tasks:
HSet up the source (time-domain) waveform
HDisplay the FFT spectrum
HSelect a type of FFT window
HAdjust the sample rate to display the fundamental frequency and
harmonics without aliasing
HUse zoom controls to magnify the spectrum
HUse cursors to measure the spectrum

Math FFT
116 TDS1000/2000-Series Digital Oscilloscope User Manual
Setting Up the Time-Domain Waveform
Before you use FFT mode, you need to set up the time-domain (YT)
waveform. To do so, follow these steps:
1. Push AUTOSET to display a YT waveform.
2. Turn the VERTICAL POSITION knob to move the YT
waveform to the center vertically (zero divisions).
This ensures that the FFT will show a true DC value.
3. Turn the HORIZONTAL POSITION knob to position the part
of the YT waveform that you want to analyze in the center eight
divisions of the screen.
The oscilloscope calculates the FFT spectrum using the center
2048 points of the time-domain waveform.
4. Turn the VOLTS/DIV knob to ensure that the entire waveform
remains on the screen. The oscilloscope may display erroneous
FFT results (by adding high frequency components) if the entire
waveform is not visible.
5. Turn the SEC/DIV knob to provide the resolution you want in the
FFT spectrum.
6. If possible, set the oscilloscope to display many signal cycles.
If you turn the SEC/DIV knob to select a faster setting (fewer
cycles), the FFT spectrum shows a larger frequency range, and
reduces the possibility of FFT aliasing, described on page 122.
However, the oscilloscope also displays less frequency resolution.

Math FFT
TDS1000/2000-Series Digital Oscilloscope User Manual 117
To set up the FFT display, follow these steps:
1. Push the MATH MENU button.
2. Set the Operation option to FFT.
3. Select the Math FFT Source channel.
In many cases, the oscilloscope can produce a useful FFT spectrum
even if the YT waveform is not triggered. This is especially true if
your signal is periodic or random (noisy).
NOTE. Transient or burst waveforms should be triggered and
positioned as close as possible to center screen.
Nyquist Frequency
The highest frequency that any real-time digitizing oscilloscope can
measure without errors is one-half the sample rate. This frequency is
called the Nyquist frequency. Frequency information above the
Nyquist frequency is undersampled which causes FFT aliasing,
described on page 122.
The math function transforms the center 2048 points of the
time-domain waveform into an FFT spectrum. The resulting FFT
spectrum contains 1024 points that go from DC (0 Hz) to the Nyquist
frequency.

Math FFT
118 TDS1000/2000-Series Digital Oscilloscope User Manual
Normally, the display compresses the FFT spectrum horizontally into
250 points, but you can use the FFT Zoom function to expand the
FFT spectrum to more clearly see the frequency components at each
of the 1024 data points in the FFT spectrum.
NOTE. The oscilloscope vertical response rolls off slowly above its
bandwidth (60 MHz, 100 MHz, or 200 MHz, depending on the model,
or 20 MHz when the Bandwidth Limit option is set to ON). Therefore,
the FFT spectrum can show valid frequency information higher than
the oscilloscope bandwidth. However, the magnitude information
near or above the bandwidth will not be accurate.
Displaying the FFT Spectrum
Push the MATH MENU button to display the Math Menu. Use the
options to select the Source channel, Window algorithm, and FFT
Zoom factor. You can display only one FFT spectrum at a time.
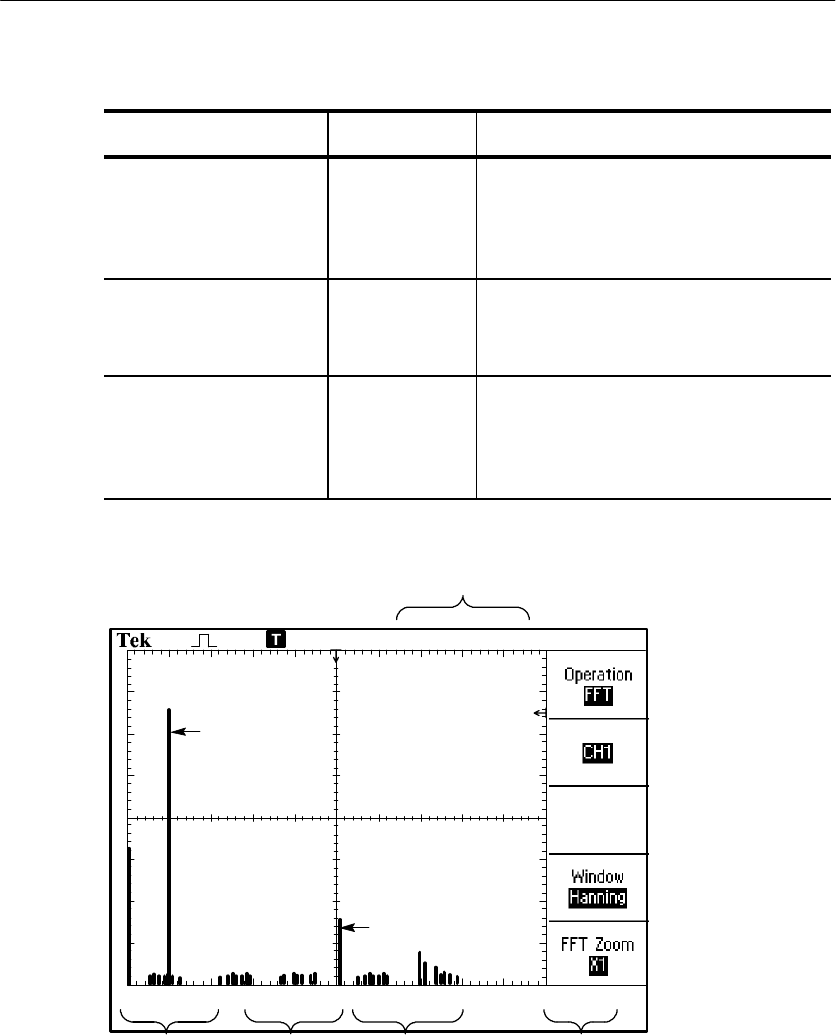
Math FFT
TDS1000/2000-Series Digital Oscilloscope User Manual 119
Math FFT option Settings Comments
Source CH1
CH2
CH3*
CH4*
Selects the channel used as the FFT
source
Window Hanning
Flattop
Rectangular
Selects the FFT window type; for
details, refer to page 120
FFT Zoom X1
X2
X5
X10
Changes the horizontal magnification
of the FFT display; for details, refer
to page 124
* Available only on 4-channel oscilloscopes.
Pos:250.0 kHZ
CH 1 10dB
Trig’d
Hanning50.0 kHz (1.00 MS/s)
MATH
M
Hanning
FFT
CH1
Fundamental
frequency
component
1
234 5
Frequency
component
1. Frequency at the center graticule line
2. Vertical scale in dB per division (0 dB = 1 VRMS)
3. Horizontal scale in frequency per division
4. Sample rate in number of samples per second
5. FFT window type
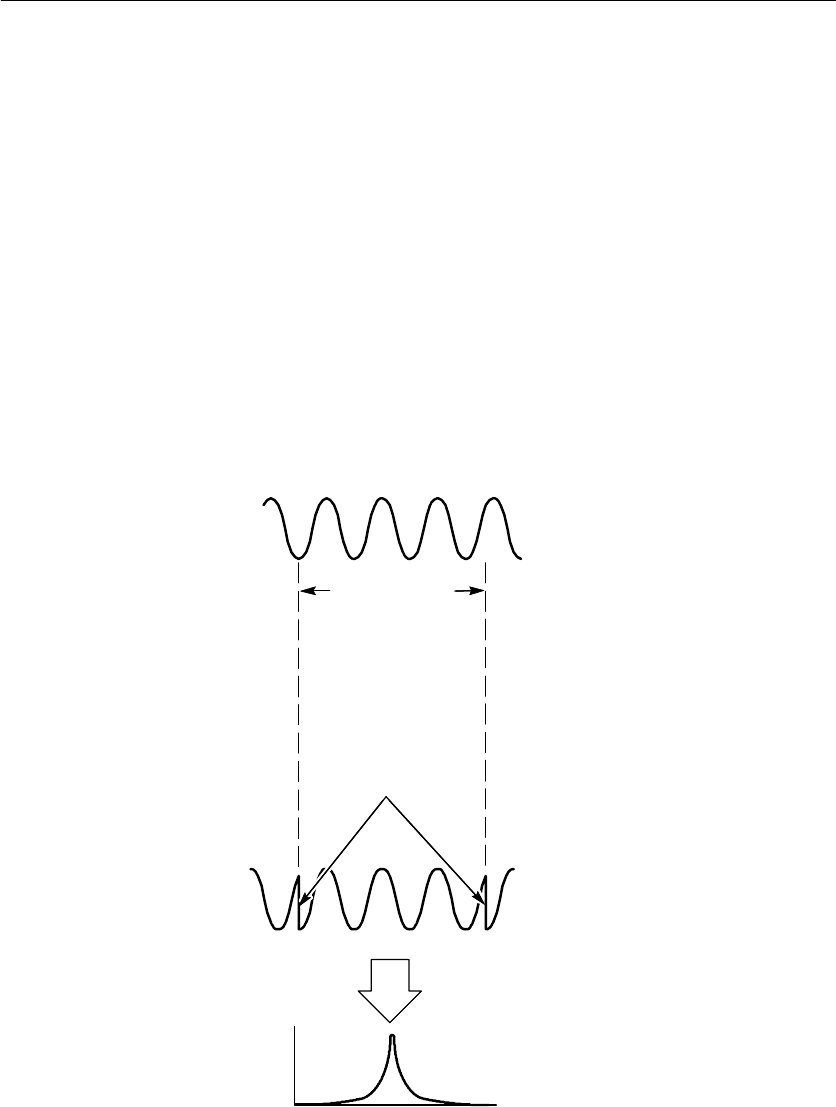
Math FFT
120 TDS1000/2000-Series Digital Oscilloscope User Manual
Selecting an FFT Window
Windows reduce spectral leakage in the FFT spectrum. The FFT
assumes that the YT waveform repeats forever. With an integral
number of cycles (1, 2, 3, ...), the YT waveform starts and ends at the
same amplitude and there are no discontinuities in the signal shape.
A non-integral number of cycles in the YT waveform causes the
signal start and end points to be at different amplitudes. The
transitions between the start and end points cause discontinuities in
the signal that introduce high-frequency transients.
Time-domain
(YT) waveform
Without windowing
FFT
Discontinuities
Center 2048
data points
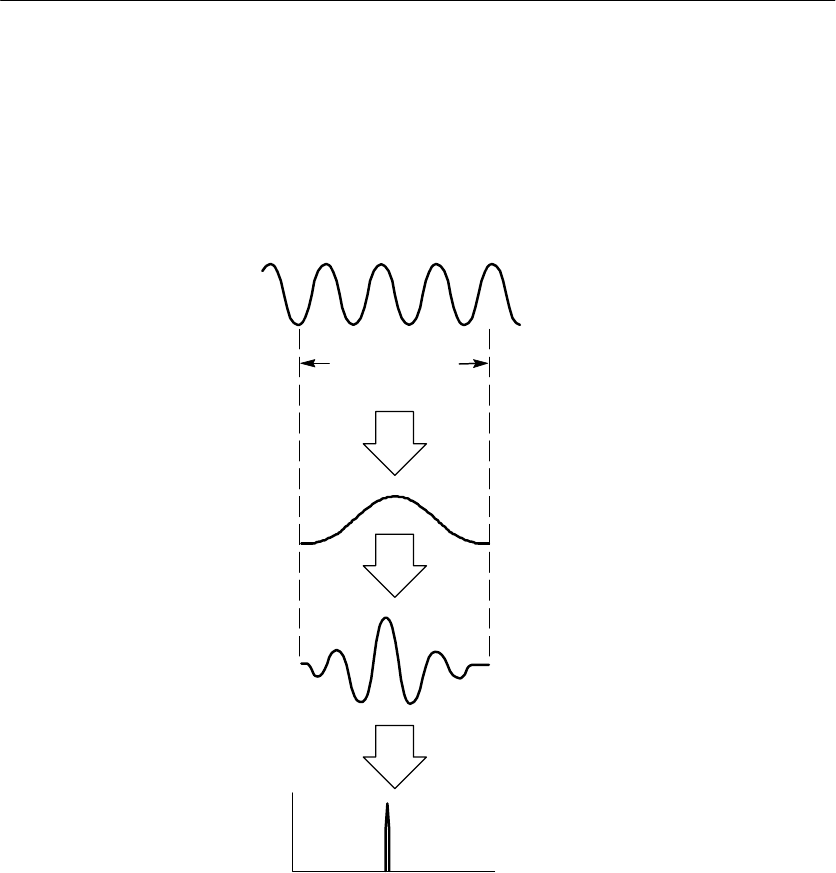
Math FFT
TDS1000/2000-Series Digital Oscilloscope User Manual 121
Applying a window to the YT waveform changes the waveform so
that the start and stop values are close to each other, reducing the
discontinuities.
Time-domain
(YT) waveform
YT waveform
after windowing
Window
function
(Hanning)
FFT
×
=
Point-by-point
multiply
With windowing
Center 2048
data points

Math FFT
122 TDS1000/2000-Series Digital Oscilloscope User Manual
The Math FFT function includes three FFT Window options. There is
a trade-off between frequency resolution and amplitude accuracy
with each type of window. What you want to measure and your
source signal characteristics help you to determine which window to
use.
Window Measure Characteristics
Hanning Periodic
waveforms
Better frequency, poorer magnitude
accuracy than Flattop
Flattop Periodic
waveforms
Better magnitude, poorer frequency
accuracy than Hanning
Rectangular Pulses or
transients
Special-purpose window for waveforms that
do not have discontinuities. This is essential-
ly the same as no window
FFT Aliasing
Problems occur when the oscilloscope acquires a time-domain
waveform containing frequency components that are greater than the
Nyquist frequency (refer to Nyquist Frequency on page 117). The
frequency components that are above the Nyquist frequency are
undersampled, appearing as lower frequency components that “fold
back”around the Nyquist frequency. These incorrect components are
called aliases.
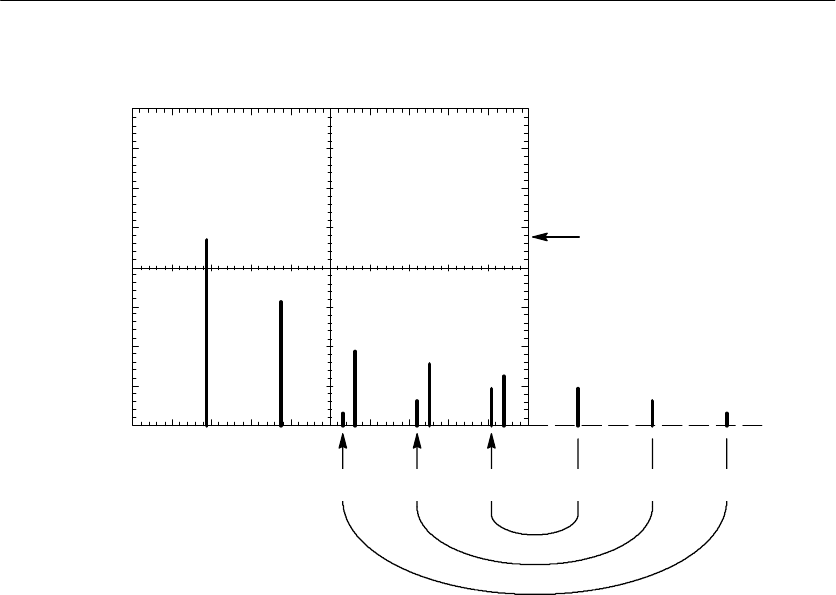
Math FFT
TDS1000/2000-Series Digital Oscilloscope User Manual 123
Nyquist frequency
(one-half sample rate)
Frequency
Amplitude
Aliased frequencies Actual frequencies
Eliminating Aliases
To eliminate aliases, try the following remedies:
HTurn the SEC/DIV knob to set the sample rate to a faster setting.
Since you increase the Nyquist frequency as you increase the
sample rate, the aliased frequency components should appear at
their proper frequency. If too many frequency components are
shown on the screen, you can use the FFT Zoom option to
magnify the FFT spectrum.

Math FFT
124 TDS1000/2000-Series Digital Oscilloscope User Manual
HIf you do not need to view frequencies components above 20
MHz, set the Bandwidth Limit option to On.
HPut an external filter on the source signal to bandwidth limit the
source waveform to frequencies below that of the Nyquist
frequency.
HRecognize and ignore the aliased frequencies.
HUse zoom controls and the cursors to magnify and measure the
FFT spectrum
Magnifying and Positioning an FFT Spectrum
You can magnify and use cursors to take measurements on the FFT
spectrum. The oscilloscope includes an FFT Zoom option to magnify
horizontally. To magnify vertically, you can use the vertical controls.
Horizontal Zoom and Position
The FFT Zoom option lets you horizontally magnify the FFT
spectrum without changing the sample rate. Zoom factors are X1
(default), X2, X5, and X10. At zoom factor X1, and with the
waveform centered in the graticule, the left graticule line is at 0 Hz
and the right graticule line is at the Nyquist frequency.

Math FFT
TDS1000/2000-Series Digital Oscilloscope User Manual 125
When you change the zoom factor, the FFT spectrum is magnified
about the center graticule line. In other words, the axis of horizontal
magnification is the center graticule line.
Turn the HORIZONTAL POSITION knob clockwise to move the
FFT spectrum to the right. Push the SET TO ZERO button to
position the center of the spectrum at the center of the graticule.
Vertical Zoom and Position
The channel vertical knobs become zoom and position controls for
their respective channels when displaying the FFT spectrum. The
VOLTS/DIV knob provides zoom factors of X0.5, X1 (default), X2,
X5, and X10. The FFT spectrum is vertically magnified about the
M marker (math waveform reference point on the left edge of the
screen).
Turn the VERTICAL POSITION knob clockwise to move the
spectrum up.
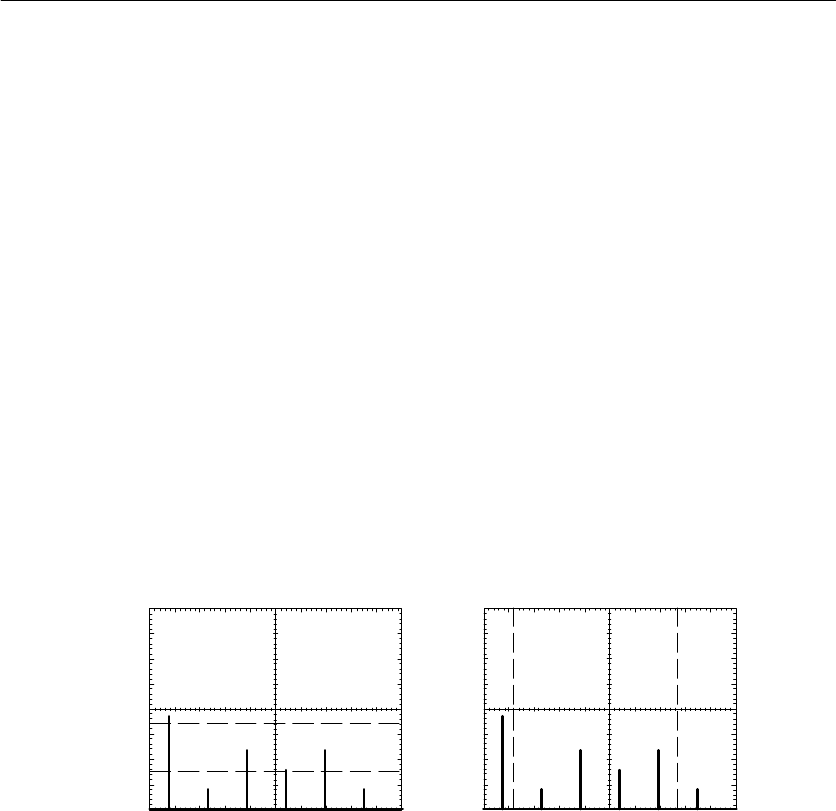
Math FFT
126 TDS1000/2000-Series Digital Oscilloscope User Manual
Measuring an FFT Spectrum Using Cursors
You can take two measurements on FFT spectrums: magnitude
(in dB) and frequency (in Hz). Magnitude is referenced to 0 dB,
where 0 dB equals 1 VRMS. You can use the cursors to take
measurements at any zoom factor.
Push CURSOR "Source and select Math. Push the Type option
button to select between Magnitude and Frequency. Use the Vertical
Position knobs to move cursors 1 and 2.
Use horizontal cursors to measure magnitude and vertical cursors to
measure frequency. The options display the delta between the two
cursors, the value at cursor 1 position, and the value at cursor 2
position. Delta is the absolute value of cursor 1 minus cursor 2.
Magnitude cursors Frequency cursors
You can also take a frequency measurement. To do so, turn the
Horizontal Position knob to position a frequency component on the
center graticule line and read the frequency at the top right of the
display.

TDS1000/2000-Series Digital Oscilloscope User Manual 127
TDS2CMA Communications Module
This chapter describes how to use the TDS2CMA Communications
Extension Module (optional) with a TDS1000- or TDS2000-series
oscilloscope.The TDS2CMA module adds Centronics, RS-232 and
GPIB communication ports to the oscilloscope. For ordering
information, refer to page 169.
This chapter describes how to do the following tasks:
HInstall the extension module
HSet up and test the RS-232 interface
HSet up and test the GPIB interface
HSend screen data to an external device (printer or computer)
Installing and Removing an Extension Module
This section describes how to safely remove and install an extension
module on your oscilloscope.

TDS2CMA Communications Module
128 TDS1000/2000-Series Digital Oscilloscope User Manual
CAUTION. Electrostatic discharge (ESD) can damage components in
the module and the oscilloscope. To prevent ESD, follow the next list
of precautions when installing, removing, or handling an module.
After removing a module, install the dummy module cover to protect
the contact pins.
HAlways power down the oscilloscope before removing or
installing the module.
HHandle the module as little as possible.
HTransport and store the module in a static-protected bag or
container.
HDo not slide the module over any surface.
HWear a grounded antistatic wrist strap to discharge the static
voltage from your body while installing or removing a module
from the oscilloscope.
HDo not touch the oscilloscope module connector pins.
HDo not use any devices capable of generating or holding a static
charge in the work area where you install or remove the module.
HAvoid handling the module in areas that have a floor or
work-surface covering capable of generating a static charge.
HMake sure that you install the module cover after you remove the
module.
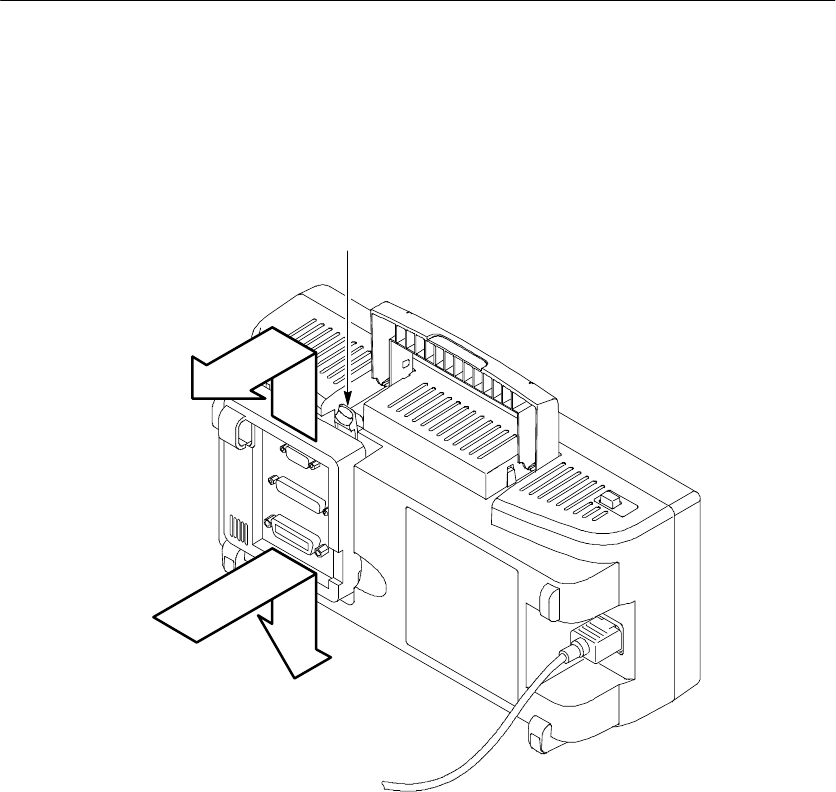
TDS2CMA Communications Module
TDS1000/2000-Series Digital Oscilloscope User Manual 129
Removing an Extension Module
To remove an extension module, refer to the next illustration and
follow the previous precautions.
Module release tab
Install
extension
module
Remove
extension
module
Installing an Extension Module
Make sure that you align the module tabs to the oscilloscope
connector pins and press down firmly to seat the module.

TDS2CMA Communications Module
130 TDS1000/2000-Series Digital Oscilloscope User Manual
Checking Module Installation
To check that the module is correctly installed, power on the
oscilloscope. The power-on screen should list the TDS2CMA module
and include the message “Power-up Tests Passed.”If the oscilloscope
does not recognize the module at power on, follow the steps in
Troubleshooting Module Installation.
Troubleshooting Module Installation
If the oscilloscope does not recognize the module at power on,
follow these steps:
1. Power off the oscilloscope.
2. Follow the ESD precautions on page 128.
3. Disconnect all cables from the module.
4. Remove the module as described on page 129.
5. Examine the oscilloscope connector for bent, broken, or missing
pins. If any pins are bent, carefully straighten them.
6. Reinstall the module onto the oscilloscope.
7. Power on the oscilloscope. If the oscilloscope still does not show
the module installed, contact the nearest Tektronix service center.
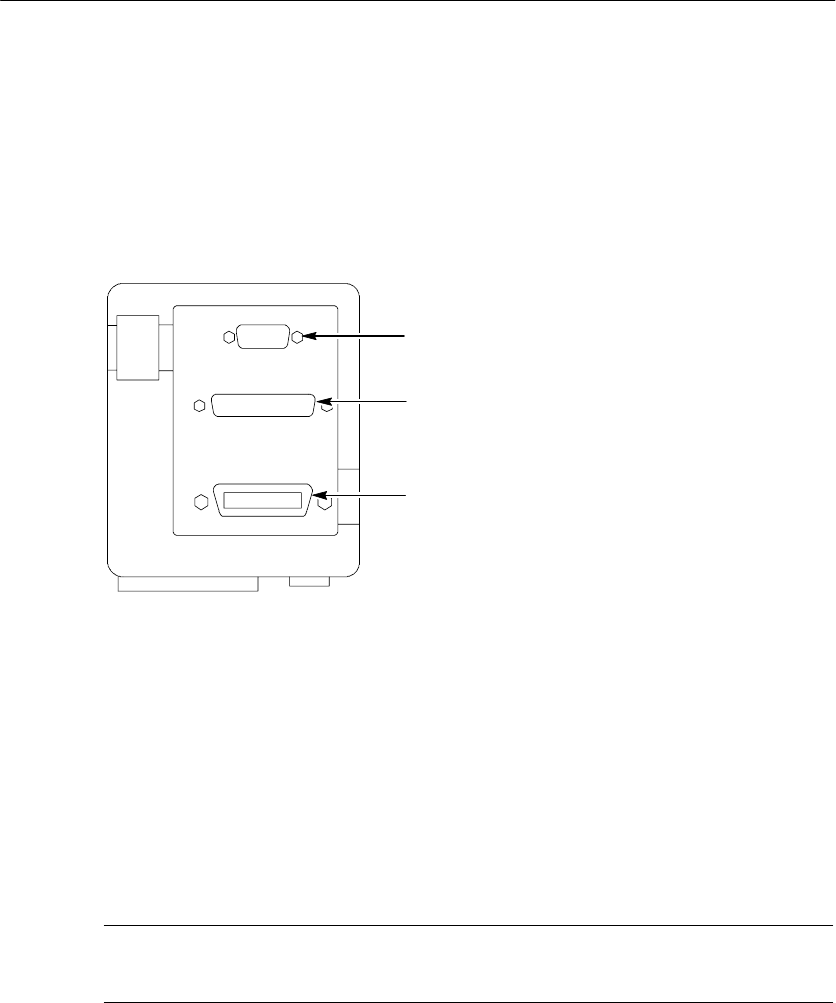
TDS2CMA Communications Module
TDS1000/2000-Series Digital Oscilloscope User Manual 131
Sending Screen Data to an External Device
The TDS2CMA module lets you send screen data to an external
device, such as a controller, printer, or computer.
RS-232 connector
GPIB connector
Centronics connector
Printer Setup
To setup the module, do the following:
1. Power on the oscilloscope.
2. Push UTILITY "Options "Printer Setup.
3. Push the option buttons to change the settings to match those of
your printer. The next table lists the settings you can change.
NOTE. The oscilloscope stores these settings until you change them,
even if you push the DEFAULT SETUP button.

TDS2CMA Communications Module
132 TDS1000/2000-Series Digital Oscilloscope User Manual
Option Settings Comments
Layout Portrait, Landscape Printer output orientation
Format Thinkjet, Deskjet, Laser Jet,
Bubble Jet, Epson, BMP, PCX,
TIFF, RLE, EPSIMAGE,
DPU411, DPU412, DPU3445
Type of device connected to
the communications port
Port Centronics, RS-232, GPIB Communications port used to
connect the oscilloscope to a
printer or computer
Ink Saver*On, Off On prints the screen data on a
white background
Abort
Printing
Stops sending screen data to
theprinter
*Only for TDS2000-series oscilloscopes.
NOTE. If you use the RS-232 or GPIB port, you also need to set up
the parameters for the port appropriately for your printer.

TDS2CMA Communications Module
TDS1000/2000-Series Digital Oscilloscope User Manual 133
Testing the Printer Port
To test the printer port, follow these steps:
1. If you have already connected the oscilloscope to a printer, go to
step 4.
2. Power off the oscilloscope and the printer.
3. Connect the oscilloscope to the printer using the appropriate
cable.
4. Power on the oscilloscope and the printer.
5. If you have not done so already, define an appropriate printer
setup. Refer to page 131.
6. Push the PRINT button. The printer should begin printing a copy
of the oscilloscope screen within twenty seconds, depending on
the selected printer.
Printing Oscilloscope Screen Data
To print the screen data, push the PRINT button. The oscilloscope
takes a few seconds to capture the screen data. The settings of your
printer and print speed determine how long it takes to print the data.
Additional time may be required according to the format selected.
NOTE. You can use the oscilloscope while the printer prints.

TDS2CMA Communications Module
134 TDS1000/2000-Series Digital Oscilloscope User Manual
Setting Up and Testing the RS-232 Interface
You may need to set up and test the module RS-232 interface.
RS-232 is an 8-bit serial communications standard that lets the
oscilloscope communicate with an external RS-232 device such as a
computer, terminal, or printer. The standard defines two device
types: Data Terminal Equipment (DTE) and Data Communications
Equipment (DCE). The oscilloscope is a DTE device.
RS-232 Conventions on page 141 describes RS-232 conventions.
RS-232 Connector Pinout Diagram on page 142 shows a diagram of
the 9-pin RS-232 connector with pin numbers and signal assign-
ments.
Selecting an RS-232 Cable
You need an RS-232 cable to connect the oscilloscope to an external
device. You can use the next table to choose the correct cable.
To connect the
oscilloscope to You need this type cable
Tektronix part
number
PC/AT or laptop
computers
9-pin female to 9-pin female, null
modem
012-1379-00
PCswith25-pinserial
port connector
9-pin female to 25-pin female, null
modem
012-1380-00
Serial printers, such as
an HP Deskjet, and Sun
workstations
9-pin female to 25-pin male,
null modem
012-1298-00
Telephone modems 9-pin female to 25-pin male,
modem
012-1241-00

TDS2CMA Communications Module
TDS1000/2000-Series Digital Oscilloscope User Manual 135
Connecting an External Device
When you connect the module to an external RS-232 device, follow
these guidelines:
HUse the correct cable (refer to the table on page 134).
HUse a cable that is no longer than 50 feet.
HPower off the oscilloscope and the external device before you
connect the cable between them.
HConnect the oscilloscope only to a DCE device.
HCheck that the oscilloscope signal ground (pin 5) is connected to
the external device signal ground.
HConnect the chassis ground of the oscilloscope to the chassis
ground of the external device.

TDS2CMA Communications Module
136 TDS1000/2000-Series Digital Oscilloscope User Manual
RS-232 Settings
To set up the oscilloscope RS-232 interface, follow these steps:
1. Push UTILITY "Options "RS-232.
2. Push the option buttons to match the settings of your external
device. The next table lists the settings you can change.
NOTE. The oscilloscope stores these settings until you change them,
even if you push the DEFAULT SETUP button.
Option Settings Comments
Set to
Defaults
Sets the RS-232 interface to factory
defaults (Baud=9600, Flow=hardflag-
ging, EOL String=LF, Parity=None)
Baud 300, 600, 1200,
2400, 4800, 9600,
19200
Sets the data transmission rate
Flow Control Hardflagging, Soft-
flagging, None
Sets data flow control (Softflagging =
Xon/Xoff, Hardflagging = RTS/CTS).
Use hardware flagging when you
transfer binary data
EOL String CR, LF, CR/LF,
LF/CR
Sets the end-of-line terminator sent by
the oscilloscope; the oscilloscope can
receive any EOL string
Parity None, Even, Odd Adds an error check bit (ninth bit) to
each character

TDS2CMA Communications Module
TDS1000/2000-Series Digital Oscilloscope User Manual 137
Testing the RS-232 Interface
To test the oscilloscope RS-232 interface, follow these steps:
1. Connect the oscilloscope to a personal computer (PC) using an
appropriate RS-232 cable (refer to the table on page 134).
2. Power on the PC.
3. On the PC, run a terminal-emulator program such as Microsoft
Windows Hyperterminal. Make sure the PC serial port is set as
follows:
Function Setting
Baud rate 9600
Data flow control hardflagging
Parity None
4. Power on the oscilloscope.
5. Connect the oscilloscope probe to the channel 1 input connector.
Attach the probe tip and ground lead to the PROBE COMP
connectors.
The PROBE COMP signal is a square wave with a frequency
of ≈1 kHz and a peak voltage of ≈5 V. The next figure shows how
to connect the probe to the oscilloscope.
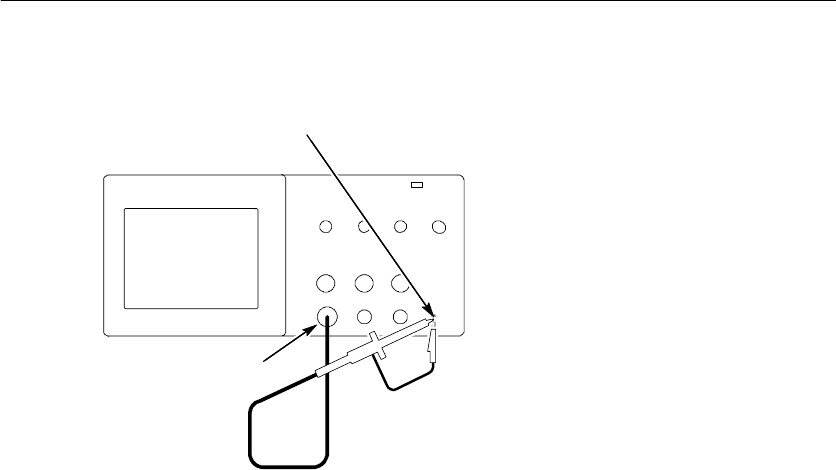
TDS2CMA Communications Module
138 TDS1000/2000-Series Digital Oscilloscope User Manual
CH 1
PROBE COMP
6. On the oscilloscope, push UTILITY "Options "RS-232.
7. Check that the menu settings match those listed in the table on
page 137.
8. From your PC terminal program, type ID?, then press the Return
or Enter key to send the command. The oscilloscope sends back
its identification string, which should look similar to the
following:
ID TEK/TDS 1002,CF:91.1CT,FV:V1.09 TDS2CMA:CMV:V1.04
If you do not get any response, refer to the troubleshooting steps
that start on page 139.
9. Send the command FACtory to reset the oscilloscope to factory
settings (defaults).

TDS2CMA Communications Module
TDS1000/2000-Series Digital Oscilloscope User Manual 139
NOTE. For brief information on command entry, refer to page 150.
For complete command information, refer to the programmer manual
that came with your extension module.
10. Send the command AUTOSet EXECute to have the oscilloscope
automatically acquire the input signal.
11. Send the command MEASUrement:IMMed:SOURCE CH1 to
select measurements on channel 1.
12. Send the command MEASUrement:IMMed:TYPe PK2 to set up
the voltage measurement.
13. Send the query MEASUrement:IMMed:VALue? to request the
measurement result. The oscilloscope will respond with a result
similar to 5.16E0, which is the voltage measurement of the
PROBE COMP signal using the standard 10X probe.
This completes the RS-232 interface test.
RS-232 Troubleshooting
If the oscilloscope and the external device (computer or printer) have
trouble communicating, follow these steps:
1. Verify that the module is working. Refer to Checking Module
Installation on page 130.

TDS2CMA Communications Module
140 TDS1000/2000-Series Digital Oscilloscope User Manual
2. Check that you are using the correct RS-232 cable. Determine
whether your external device requires a null-modem or a
straight-through connection. Refer to the table on page 134 for
information about RS-232 cables.
3. Check that the RS-232 cable is firmly connected to both the
oscilloscope and the correct port on the external device.
4. Check that the printer or the program on the personal computer is
using the same port to which you connected the RS-232 cable.
Try your program or printer again.
5. Check that the oscilloscope RS-232 settings match the settings
used by the external device:
a. Determine the RS-232 settings for the external device.
b. On the oscilloscope, push UTILITY "Options "
RS-232 Setup.
c. Set the oscilloscope to match the settings of the external
device.
d. Try your terminal-emulator program or printer again.
6. Try setting both the oscilloscope and the external device to a
slower baud rate.

TDS2CMA Communications Module
TDS1000/2000-Series Digital Oscilloscope User Manual 141
7. If you receive only part of the printer file, try these remedies:
a. Lengthen the timeout for the external device
b. Make sure the printer is set to receive a binary file, not a
text file.
RS-232 Conventions
There are processing conventions that are specific to the RS-232
interface, such as transferring binary data, processing break signals,
reporting RS-232 I/O errors, and checking command status.
Transferring Binary Data
To use the RS-232 port to transfer binary data to the oscilloscope, set
up the interface as follows:
HUse hardware flagging (RTS/CTS) whenever possible. Hardware
flagging guarantees no data loss.
HAll eight bits of binary data contain meaningful information. To
make sure that all eight bits are received or transmitted, configure
the external RS-232 device to receive and transmit eight-bit
characters (set the RS-232 word length to eight bits).
Reporting RS-232 I/O Errors
Errors are reported when there is a problem with parity, framing, or
input/output buffer overruns. To report errors, the oscilloscope posts
an event code. When an error occurs, the oscilloscope discards all
input and output and waits for a new command.

TDS2CMA Communications Module
142 TDS1000/2000-Series Digital Oscilloscope User Manual
Checking Command Status
If you want to check the status of each command sent, you can
append an *STB? query after every command and read the response
string.
Processing Break Signals
When the oscilloscope senses a break signal on the RS-232 port, it
returns DCL followed by the end of line terminator. Internally, the
oscilloscope acts as if it received a GPIB <DCL> command, causing
the oscilloscope to erase the contents of the input and output buffers
and then wait for a new command. Break signals do not change
oscilloscope settings or stored data and do not interrupt front-panel
operation or nonprogrammable functions.
If a break signal is sent in the middle of a character stream, several
characters immediately preceding or following the break can be lost.
The controller should wait until it receives the DCL and the end of
line terminator string before sending more characters.
RS-232 Connector Pinout Diagram
The next figure shows the pin numbering and signal assignments for
the TDS2CMA RS-232 connector.

TDS2CMA Communications Module
TDS1000/2000-Series Digital Oscilloscope User Manual 143
1 No connection
2 Receive data (RxD) (input)
3 Transmit data (TxD) (output)
4 Data terminal ready (DTR) (output)
5 Signal ground (GND)
6 Data set ready (DSR) (input)
7 Request to send (RTS) (output)
8 Clear to send (CTS) (input)
9 No connection
12345
67 89
Setting Up and Testing the GPIB Interface
You may need to set up and test the module GPIB interface. GPIB is
an 8-bit parallel communications standard that lets the oscilloscope
communicate with an external device such as a controller, computer,
terminal, or printer.
Connecting to External GPIB Devices
Follow these guidelines when you connect your oscilloscope to a
GPIB network:
HPower off the oscilloscope and all external devices before
connecting the oscilloscope to the GPIB network.

TDS2CMA Communications Module
144 TDS1000/2000-Series Digital Oscilloscope User Manual
HConnect the oscilloscope to the GPIB network. Use an appropri-
ate GPIB cable. You can stack cable connectors. The next table
lists cables that you can order to connect the oscilloscope to the
GPIB network.
Cable type Tektronix part number
GPIB, 6.6 feet (2 meters) 012-0991-00
GPIB, 3.3 feet (1 meter) 012-0991-01
HAssign a unique device address to the oscilloscope. No two
devices can share the same device address. The GPIB Settings
information describes how to set the oscilloscope GPIB interface.
HPower on at least two-thirds of the GPIB devices while using the
network.
GPIB Settings
To set the oscilloscope GPIB interface, follow these steps:
1. If you have not done so yet, connect the oscilloscope to the GPIB
network.

TDS2CMA Communications Module
TDS1000/2000-Series Digital Oscilloscope User Manual 145
2. On the oscilloscope, push UTILITY "Options "GPIB Setup.
3. Push the Address option button to assign a unique address to the
oscilloscope.
4. Push the Bus Connection option button to have the oscilloscope
start or stop using the GPIB bus.
Option Settings Comments
Address 0... 30 Sets oscilloscope GPIB bus address
Bus Connection Talk-Listen, Off-Bus Select Talk-Listen to start oscillo-
scope GPIB bus communications.
Select Off-Bus tostop oscilloscope
GPIB bus communications.
NOTE. The oscilloscope stores these settings until you change them,
even if you push the DEFAULT SETUP button.
Testing the GPIB Interface
To test the oscilloscope GPIB interface, you will need to refer to the
documentation that came with your controller.
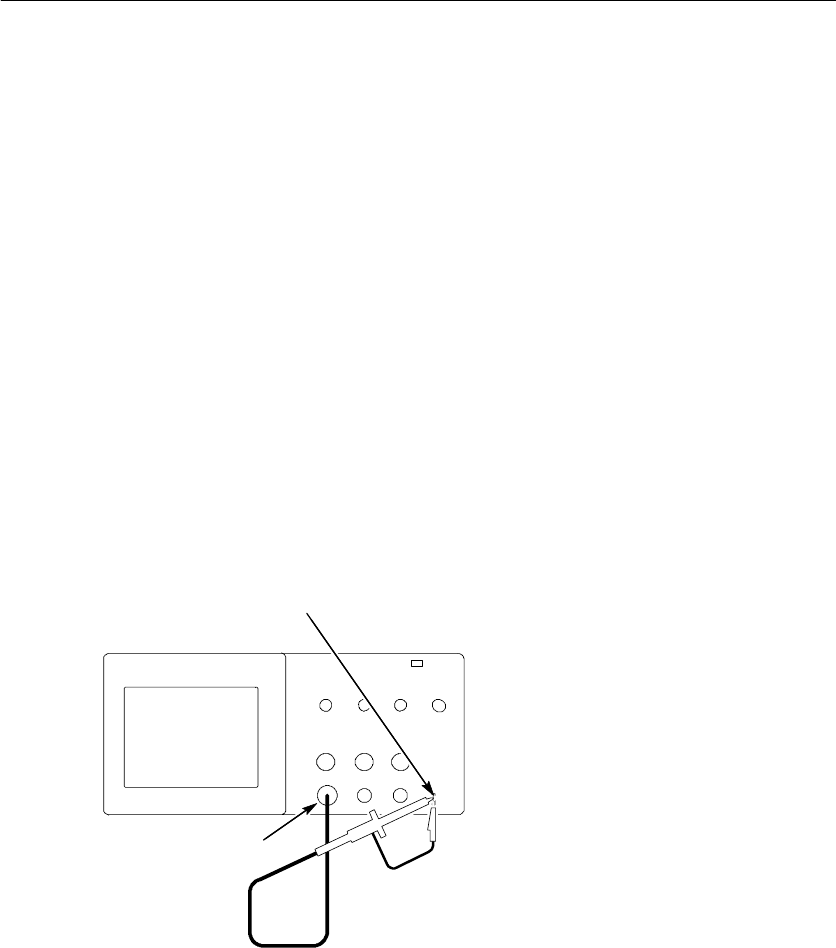
TDS2CMA Communications Module
146 TDS1000/2000-Series Digital Oscilloscope User Manual
The following procedure verifies communication with the oscillo-
scope by acquiring a signal and returning a voltage measurement.
This procedure assumes that the oscilloscope is connected to the
GPIB network, the oscilloscope has been assigned a unique bus
address, and that the controller software is running.
To test the GPIB interface, follow these steps:
1. Connect the oscilloscope probe to the channel 1 input connector.
Attach the probe tip and ground lead to the PROBE COMP
connectors. The figure on the next page shows how to hook up
the probe to the oscilloscope.
The PROBE COMP signal is a square wave with a frequency
of ≈1 kHz and a peak voltage of ≈5V.
CH 1
PROBE COMP

TDS2CMA Communications Module
TDS1000/2000-Series Digital Oscilloscope User Manual 147
2. In the controller software, send the ID?command to the
oscilloscope. The oscilloscope should send back its identification
string which looks similar to the following:
ID TEK/TDS 1002,CF:91.1CT,FV:V1.09 TDS2CMA:CMV:V1.04
3. Send the command FACtory to reset the oscilloscope to factory
settings (defaults).
NOTE. For brief information on command entry, refer to page 150.
For complete command information, refer to the programmer manual
that came with your extension module.
4. Send the command AUTOSet EXECute to have the oscilloscope
automatically acquire the input signal.
5. Send the command MEASUrement:IMMed:SOURCE CH1 to
select measurements on channel 1.
6. Send the command MEASUrement:IMMed:TYPe PK2 to set up
the voltage measurement.
7. Send the query MEASUrement:IMMed:VALue? to request the
measurement result. The oscilloscope will respond with a result
similar to 5.16E0, which is the voltage measurement of the
PROBE COMP signal using the standard 10x probe.
This completes the GPIB interface test.
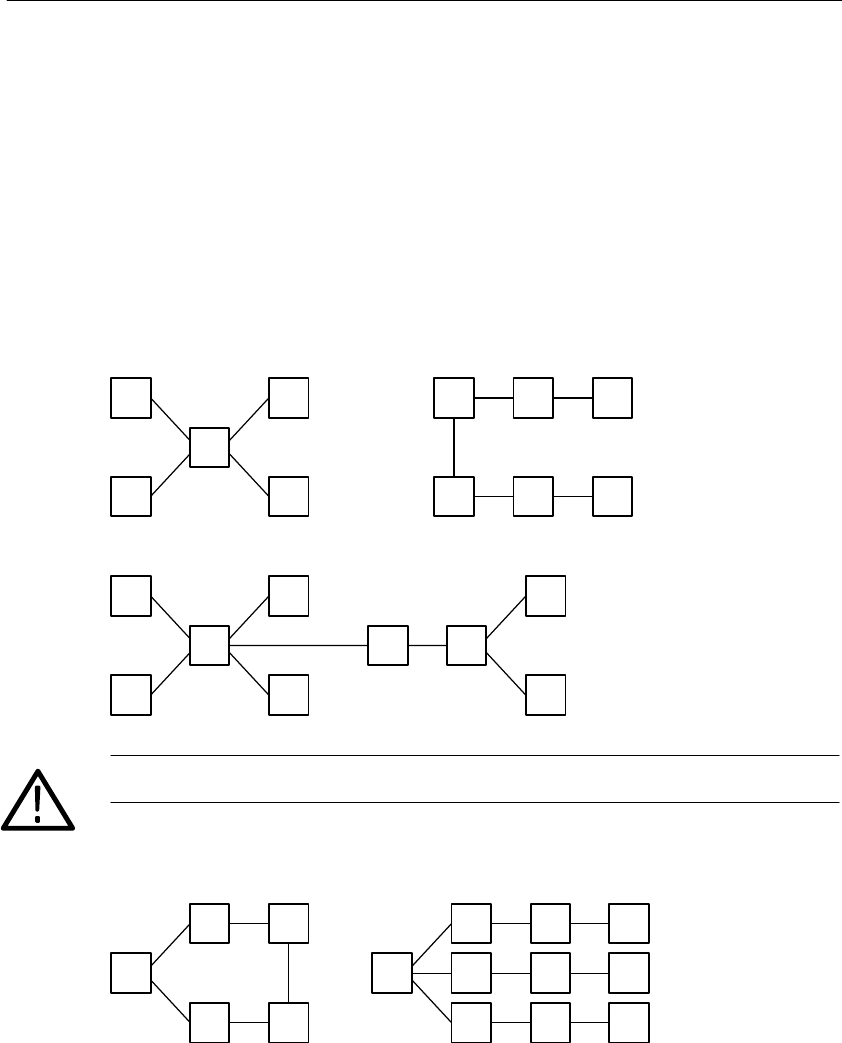
TDS2CMA Communications Module
148 TDS1000/2000-Series Digital Oscilloscope User Manual
GPIB Network Conventions
To achieve a high data transfer rate, the physical distance between
devices and the number of devices on the bus are limited. When you
create the GPIB network, follow these guidelines:
HConnect the GPIB devices in a star, linear, or combination
star/linear network.
CAUTION. Do not use loop or parallel networks.

TDS2CMA Communications Module
TDS1000/2000-Series Digital Oscilloscope User Manual 149
HA maximum separation of 13.2 feet (4 meters) between any two
devices and an average separation of 6.6 feet (2 meters) over the
entire bus.
HA maximum total cable length of 66 feet (20 meters).
HNo more than 15 device loads connected to each bus, with at least
two-thirds powered on.
HAssign a unique device address to each device on the network.
No two devices can share the same device address.

TDS2CMA Communications Module
150 TDS1000/2000-Series Digital Oscilloscope User Manual
Command Entry
When you enter oscilloscope commands over the RS-232 or GPIB
bus, follow these general rules:
HYou can enter commands in upper or lower case.
HYou can abbreviate many oscilloscope commands. These
abbreviations are shown in uppercase letters. For example, the
command ACQuire:NUMAVg can be entered simply as
ACQ:NUMAV or acq:numav.
HYou can precede any command with white space characters.
White space characters include any combination of the ASCII
control characters 00 through 09 and 0B through 20 hexadecimal
(0 through 9 and 11 through 32 decimal).
HThe oscilloscope ignores commands that consist of just a
combination of white space characters and line feeds.
Refer to the TDS200-, TDS1000- and TDS2000-Series Digital
Oscilloscope Programmer Manual (071-1075-XX) for more
information.

TDS1000/2000-Series Digital Oscilloscope User Manual 151
Appendix A: Specifications
All specifications apply to the TDS1000- and TDS2000-series
oscilloscopes. P2200 probe specifications appear at the end of this
chapter. To verify that the oscilloscope meets specifications, the
oscilloscope must first meet the following conditions:
HThe oscilloscope must have been operating continuously for
twenty minutes within the specified operating temperature.
HYou must perform the Do Self Cal operation, accessible through
the Utility menu, if the operating temperature changes by more
than 5°C.
HThe oscilloscope must be within the factory calibration interval
All specifications are guaranteed unless noted “typical.”
Oscilloscope Specifications
Acquisition
Acquisition Modes Sample, Peak Detect, and Average
Acquisition Rate,
typical
Up to 180 waveforms per second, per channel (Sample
acquisition mode, no measurements)
Single Sequence Acquisition Mode Acquisition Stops After
g
q
Sample, Peak Detect Single acquisition, all channels
simultaneously
Average N acquisitions, all channels
simultaneously, N is selectable
from 4, 16, 64, and 128
Appendix A: Specifications
152 TDS1000/2000-Series Digital Oscilloscope User Manual
Oscilloscope Specifications (Cont.)
Inputs
Input Coupling DC, AC, or GND
Input Impedance, DC
Coupled
1MΩ±2% in parallel with 20 pF ±3pF
P2200 Probe
Attenuation
1X, 10X
Supported Probe
Attenuation Factors
1X, 10X, 100X, 1000X
Maximum Voltage
B
S
i
l
d
Overvoltage Category Maximum Voltage
g
Between Signal and
C
o
m
m
o
n
a
t
i
n
p
u
t
B
N
C
CAT I and CAT II 300 VRMS, Installation Category II
C
o
m
m
o
n
a
t
i
n
p
u
t
B
N
C
CAT III 150 VRMS
Installation Category II; derate at 20 dB/decade above 100 kHz
to 13 V peak AC at 3 MHz*and above. For non-sinusoidal
waveforms, peak value must be less than 450 V. Excursion
above 300 V should be less than 100 ms duration. RMS signal
level including any DC component removed through AC coupling
must be limited to 300 V. If these values are exceeded, damage
to the instrument may result. Refer to the Overvoltage Category
description on page 164.
* Bandwidth reduced to 6 MHz with a 1X probe.

Appendix A: Specifications
TDS1000/2000-Series Digital Oscilloscope User Manual 153
Oscilloscope Specifications (Cont.)
Inputs
Channel-to-Channel
Common Mode
R
j
i
i
l
TDS1002 and
TDS2002
TDS1012, TDS2012, TDS2014, TDS2022
and TDS2024
Rejection, typical 100:1 at 60 Hz
20:1at30MHz*
100:1 at 60 Hz
20:1at50MHz*
Measured on MATH Ch1 -- Ch2 waveform, with test signal
applied between signal and common of both channels, and with
the same VOLTS/DIV and coupling settings on each channel
Measured on MATH Ch3 -- Ch4 waveform for 4-channel models
Channel-to-Channel
Crosstalk
TDS1002 and
TDS2002
TDS1012,
TDS2012 and
TDS2014
TDS2022 and
TDS2024
≥100:1 at
30 MHz*
≥100:1 at 50 MHz*≥100:1 at
100 MHz*
Measured on one channel, with test signal applied between
signal and common of the other channel, and with the same
VOLTS/DIV and coupling settings on each channel
Vertical
Digitizers 8-bit resolution (except when set to 2 mV/div), each channel
sampled simultaneously
VOLTS/DIV Range 2 mV/div to 5 V/div at input BNC
Position Range 2 mV/div to 200 mV/div, ±2V
> 200 mV/div to 5 V/div, ±50 V
* Bandwidth reduced to 6 MHz with a 1X probe.

Appendix A: Specifications
154 TDS1000/2000-Series Digital Oscilloscope User Manual
Oscilloscope Specifications (Cont.)
Vertical
Analog Bandwidth in
Sample and Average
modes at BNC or with
P
b
D
C
TDS1002 and
TDS2002
TDS1012,
TDS2012 and
TDS2014
TDS2022 and TDS2024
P2200 probe, DC
Coupled 60 MHz{*100 MHz{*200 MHz{*
32°F - 104°F(0°Cto+40°C)
160 MHz{*
32°F - 122°F(0°Cto+50°C)
20 MHz*(when vertical scale is set to < 5 mV)
Analog Bandwidth in
Peak Detect mode
(
/
d
i
/
d
i
*
*
)
TDS1002 and
TDS2002
TDS1012, TDS2012, TDS2014, TDS2022 and
TDS2024
(50 s/div to 5 s/div**),
t
y
p
i
c
a
l
50 MHz{*75 MHz{*
t
y
p
i
c
a
l
20 MHz*(when vertical scale is set to < 5 mV)
Selectable Analog
Bandwidth Limit,
typical
20 MHz*
Lower Frequency
Limit, AC Coupled
≤10 Hz at BNC
≤1 Hz when using a 10X passive probe
Rise Time at BNC,
typical
TDS1002 and
TDS2002
TDS1012,
TDS2012 and
TDS2014
TDS2022 and TDS2024
<5.8ns <3.5ns <2.1ns
Peak Detect
Response**
Captures 50% or greater amplitude of pulses ≥12 ns wide typical
(50 s/div to 5 s/div) in the center 8 vertical divisions
{When vertical scale is set to ≥5mV.
* Bandwidth reduced to 6 MHz with a 1X probe.
** The oscilloscope reverts to Sample mode when the SEC/DIV (horizontal scale)
is set from 2.5 s/div to 5 ns/div on 1 GS/s models, or from 2.5 s/div to
2.5 ns/div on 2 GS/s models. The Sample mode can still capture 10 ns glitches.

Appendix A: Specifications
TDS1000/2000-Series Digital Oscilloscope User Manual 155
Oscilloscope Specifications (Cont.)
Vertical
DC Gain Accuracy ±3% for Sample or Average acquisition mode, 5 V/div to 10 mV/div
y
±4% for Sample or Average acquisition mode, 5 mV/div and 2 mV/div
DC Measurement
A
A
Measurement Type Accuracy
Accuracy, Average
Acquisition Mode Average of ≥16 wave-
forms with vertical position
at zero
±(3% ×reading + 0.1 div + 1 mV) when
10 mV/div or greater is selected
Average of ≥16 wave-
forms with vertical position
not at zero
±[3% ×(reading + vertical position) +
1% of vertical position + 0.2 div]
Add 2 mV for settings from 2 mV/div to
200 mV/div
Add 50 mV for settings from > 200 mV/
divto5V/div
Volts Measurement
Repeatability,
Average Acquisi-
tion Mode
Delta volts between any
two averages of ≥16
waveforms acquired under
same setup and ambient
conditions
±(3% ×reading + 0.05 div)

Appendix A: Specifications
156 TDS1000/2000-Series Digital Oscilloscope User Manual
Oscilloscope Specifications (Cont.)
Horizontal
Sample Rate Range TDS1002, TDS1012,
TDS2002, TDS2012 and
TDS2014
TDS2022 and TDS2024
5S/sto1GS/s 5S/sto2GS/s
Waveform Interpolation (sin x)/x
Record Length 2500 samples for each channel
SEC/DIV Range TDS1002, TDS1012,
TDS2002, TDS2012 and
TDS2014
TDS2022 and TDS2024
5ns/divto50s/div,ina1,2.5,
5 sequence
2.5ns/divto50s/div,ina1,
2.5, 5 sequence
Sample Rate and
Delay Time Accuracy
±50 ppm over any ≥1 ms time interval
Delta Time Measure-
A
(
F
l
l
Conditions Accuracy
ment Accuracy (Full
Bandwidth) Single-shot, Sample mode ±(1 sample interval + 100 ppm
×reading + 0.6 ns)
> 16 averages ±(1 sample interval + 100 ppm
×reading + 0.4 ns)
Sample interval = s/div ÷250
Position Range TDS1002, TDS1012, TDS2002, TDS2012 and TDS2014
g
5ns/divto10ns/div (--4 div ×s/div) to 20 ms
25 ns/div to 100 s/div (--4 div ×s/div) to 50 ms
250 s/divto50s/div (--4 div ×s/div) to 50 s
TDS2022 and TDS2024
2.5 ns/div to 5 ns/div (--4 div ×s/div) to 20 ms
Appendix A: Specifications
TDS1000/2000-Series Digital Oscilloscope User Manual 157
Oscilloscope Specifications (Cont.)
Trigger
Trigger Sensitivity,
E
d
T
i
T
Coupling Sensitivity
g
g
y
,
Edge Trigger Type DC CH1, CH2,
CH3, CH4
1 div from DC to 10 MHz*,
1.5 div from 10 MHz*to Full
EXT 200 mV from DC to 100 MHz*,
350 mV from 100 MHz to
200 MHz*
EXT/5 1 V from DC to 100 MHz*,
1.5 V from 100 MHz to 200 MHz*
Trigger Sensitivity,
E
d
T
i
T
Coupling Sensitivity
g
g
y
,
Edge Trigger Type,
t
y
p
i
c
a
l
AC Same as DC at 50 Hz and above
t
y
p
i
c
a
l
NOISE
REJ
Reduces the DC-coupled trigger sensitivity by
2timesfor>10mv/divto5V/div
HF REJ Same as the DC-coupled limit from DC to 7 kHz,
attenuates signals above 80 kHz
LF REJ Same as the DC-coupled limits for frequencies
above 300 kHz, attenuates signals below 300 kHz
Trigger Level Range Source Range
g
g
g
CH1, CH2,
CH3, CH4
±8 divisions from center of screen
EXT ±1.6 V
EXT/5 ±8V
* Bandwidth reduced to 6 MHz with a 1X probe.

Appendix A: Specifications
158 TDS1000/2000-Series Digital Oscilloscope User Manual
Oscilloscope Specifications (Cont.)
Trigger
Trigger Level Accuracy,
i
l
Accuracies are for signals having rise and fall times ≥20 ns
g
g
y
,
typical Source Accuracy
Internal ±0.2 div ×volts/div within ±4 divisions from
center screen
EXT ±(6%ofsetting+40mV)
EXT/5 ±(6% of setting + 200 mV)
SET LEVEL TO 50%,
typical
Operates with input signals ≥50 Hz
Default Settings, Video
Trigger
Coupling is AC and Auto except for a single sequence acquisition
Sensitivity, Video
T
i
T
i
l
Composite video signal
y
,
Trigger Type, typical Source Range
Internal Pk-pk amplitude of 2 divisions
EXT 400 mV
EXT/5 2V
Signal Formats and
Field Rates, Video
Trigger Type
Supports NTSC, PAL, and SECAM broadcast systems for any
field or any line
Holdoff Range 500 ns to 10 s

Appendix A: Specifications
TDS1000/2000-Series Digital Oscilloscope User Manual 159
Oscilloscope Specifications (Cont.)
Pulse Width Trigger
Pulse Width Trigger
modes
Trigger when < (Less than), > (Greater than), = (Equal), or ≠
(Not Equal); Positive pulse or Negative pulse
Pulse Width Trigger
Point
Equal: The oscilloscope triggers when the trailing edge of the
pulse crosses the trigger level.
Not Equal: If the pulse is narrower than the specified width, the
trigger point is the trailing edge. Otherwise, the oscilloscope
triggers when a pulse continues longer than the time specified as
the Pulse Width.
Less than: The trigger point is the trailing edge.
Greater than (also called time-out trigger): The oscilloscope
triggers when a pulse continues longer than the time specified as
the Pulse Width.
Pulse Width Range Selectablefrom33nsto10s
Pulse Width 16.5 ns or 1 part per thousand, whichever is larger
Equal Guardband t > 330 ns: ±5% ≤guardband < ±(5.1% + 16.5 ns)
t≤330 ns: guardband = ±16.5 ns
Not Equal Guardband t≤330 ns: guardband = ±16.5 ns
165 ns < t ≤330 ns: guardband = --16.5 ns/+33 ns
t≤165 ns: guardband = ±16.5 ns

Appendix A: Specifications
160 TDS1000/2000-Series Digital Oscilloscope User Manual
Oscilloscope Specifications (Cont.)
Trigger Frequency Counter
Readout Resolution 6 digits
Accuracy (typical) ±51 ppm including all frequency reference errors and ±1 count
errors
Frequency Range AC coupled, 10 Hz minimum to rated bandwidth
Signal Source Pulse Width or Edge Trigger modes: all available trigger sources
The Frequency Counter measures trigger source at all times,
including when the oscilloscope acquisition is halted due to
changes in the run status, or acquisition of a single shot event
has completed.
Pulse Width Trigger mode: The oscilloscope counts pulses of
significant magnitude inside the 250 ms measurement window
that qualify as triggerable events, such as narrow pulses in a
PWM pulse train if set to < mode and the width is set to a
relatively small time.
Edge Trigger mode: The oscilloscope counts all edges of
sufficient magnitude and correct polarity.
Video Trigger mode: The Frequency Counter does not operate.

Appendix A: Specifications
TDS1000/2000-Series Digital Oscilloscope User Manual 161
Oscilloscope Specifications (Cont.)
Measurements
Cursors Voltage difference between cursors (∆V)
Time difference between cursors (∆T)
Reciprocal of ∆TinHertz(1/∆T)
Automatic
Measurements
Frequency, Period, Mean, Pk-Pk, Cycle RMS, Min, Max, Rise
Time, Fall Time, Pos Width, Neg Width
Oscilloscope General Specifications
Display
Display Type 5.7 in. (145 mm) ( diagonal liquid crystal
Display Resolution 320 horizontal by 240 vertical pixels
Display Contrast Adjustable, temperature compensated
Backlight Intensity,
typical
65 cd/m2
Probe Compensator Output
Output Voltage, typi-
cal
5Vinto≥1MΩload
Frequency, typical 1kHz
Power Source
Source Voltage 100 -- 120 VACRMS (10%) from 45 Hz through 440 Hz, CAT II
120 -- 240 VACRMS (10%) from 45 Hz through 66 Hz, CAT II
Power Consumption Less than 30 W
Fuse 1 A, T rating, 250 V

Appendix A: Specifications
162 TDS1000/2000-Series Digital Oscilloscope User Manual
Oscilloscope General Specifications (Cont.)
Environmental
Temperature Operating 32°F - 122°F
(0°Cto+50°C)
Nonoperating -- 4 0 °F - 159.8°F
(--40°Cto+71°C)
Cooling Method Convection
Humidity +104°F or below
(+40°C or below)
≤90% relative humidity
106°F - 122°F
(+41°Cto+50°C)
≤60% relative humidity
Altitude Operating and Nonoperating 3,000 m (10,000 ft)
Random Vibration Operating 0.31 gRMS from 5 Hz to 500 Hz,
10 minutes on each axis
Nonoperating 2.46 gRMS from 5 Hz to 500 Hz,
10 minutes on each axis
Mechanical Shock Operating 50 g, 11 ms, half sine
Mechanical
Size Height 151.4 mm (5.96 in.)
Width 323.8 mm (12.75 in.)
Depth 124.5 mm (4.90 in.)
Weight (approximate) When packaged for domestic
shipment
3.6kg(8.0lbs)

Appendix A: Specifications
TDS1000/2000-Series Digital Oscilloscope User Manual 163
Oscilloscope EMC Certifications and Compliances
European
Union
Meets the intent of Directive 89/336/EEC for Electromagnetic Compatibility.
Compliance was demonstrated to the following specifications as listed in the
Official Journal of the European Communities:
EN 61326, EMC requirements for Class A electrical equipment for measure-
ment, control, and laboratory use1,2
IEC 61000--4--2, Electrostatic discharge immunity (Performance criterion B)
IEC 61000--4--3, RF electromagnetic field immunity (Performance criterion A)3
IEC 61000--4--4, Electrical fast transient/burst immunity (Performance criterion B)
IEC 61000--4--5, Power line surge immunity (Performance criterion B)
IEC 61000--4--6, Conducted RF immunity (Performance criterion A)4
IEC 61000--4--11, Voltage dips and interruptions immunity (Performance
criterion B)
EN 61000--3--2, AC power line harmonic emissions
1Emissions that exceed the levels required by this standard may occur when
this equipment is connected to a test object.
2To ensure compliance to the standards listed above, attach only high
quality shielded cables to this instrument. High quality shielded cables
typically are braid and foil types that have low impedance connections to
shielded connectors at both ends.
3The increase in trace noise while subjected to a test field (3 V/m over the
frequency range 80 MHz to 1 GHz, with 80% amplitude modulation at 1 kHz)
is not to exceed 2 major divisions peak--to--peak. Ambient conducted fields
may induce triggering when the trigger threshold is offset less than 1 major
division from ground reference.
4The increase in trace noise while subjected to a test field (3 V/m over the
frequency range 150 kHz to 80 MHz, with 80% amplitude modulation at
1 kHz) is not to exceed 1 major division peak--to--peak. Ambient conducted
fields may induce triggering when the trigger threshold is offset less than
0.5 major divisions from ground reference.

Appendix A: Specifications
164 TDS1000/2000-Series Digital Oscilloscope User Manual
Oscilloscope EMC Certifications and Compliances (Cont.)
Australia/New
Zealand
Meets the intent of Australian EMC Framework as demonstrated to the
following specification: AS/NZS 2064.1/2
U.S.A. Emissions comply with FCC Code of Federal Regulations 47,
Part 15, Subpart B, Class A Limits
Oscilloscope Safety Certifications and Compliances
Certifications CAN/CSA C22.2 No. 1010.1-92
UL3111-1, First Edition
CSA Certified
Power Cords
CSA Certification includes the products and power cords appropriate
for use in the North America power network. All other power cords
supplied are approved for the country of use.
Pollution Degree 2 Do not operate in environments where conductive pollutants may be
present.
Overvoltage
Category
Category: Examples of Products in this Category:
CAT III Distribution-level mains, fixed installation
CAT II Local-level mains, appliances, portable equipment
CAT I Signal levels in special equipment or parts of equipment,
telecommunications, electronics
Adjustment (Factory Calibration) Interval
The recommended calibration interval is one year
Oscilloscope General Certifications and Compliances
Russian Federation This product was certified by the GOST ministry of Russia to be
in compliance with all applicable EMC regulations.
Peoples Republic of
China
This product has received the Chinese Metrology Certification (CMC)

Appendix A: Specifications
TDS1000/2000-Series Digital Oscilloscope User Manual 165
P2200 Probe Specifications
Electrical
characteristics
10X position 1X position
Bandwidth DC to 200 MHz DC to 6 MHz
Attenuation ratio 10:1 ±2% 1:1 ±2%
Compensation
Range
18 pf-35 pf Compensation is fixed; correct for
all oscilloscopes with 1 M Ωinput
Input Resistance 10 M Ω±3% at DC 1MΩ±3% at DC
Input Capacitance 14.5 pf-17.5 pf 80 pf-110 pf
Rise time, typical <2.2ns < 50.0 ns
Maximum input
voltage1
10X position 300 VRMS CAT I or 300 V DC CAT I
300 VRMS CAT II or 300 V DC CAT II
100 VRMS CAT III or 100 V DC CAT III
420 V peak, <50% DF, <1 s PW
670 V peak, <20% DF, <1 s PW
1X position 150 VRMS CAT I or 150 V DC CAT I
150 VRMS CAT II or 150 V DC CAT II
100 VRMS CAT III or 100 V DC CAT III
210 V peak, <50% DF, <1 s PW
330 V peak, <20% DF, <1 s PW
300 VRMS, Installation Category II; derate at 20 dB/decade above
900 kHz to 13 V peak AC at 3 MHz and above. For non-sinusoidal
waveforms, peak value must be less than 450 V. Excursion above 300
V should be less than 100 ms duration. RMS signal level including
any DC component removed through AC coupling must be limited to
300 V. If these values are exceeded, damage to the instrument may
result. Refer to the Overvoltage Category on the next page.
1As defined in EN61010-1 on the next page.

Appendix A: Specifications
166 TDS1000/2000-Series Digital Oscilloscope User Manual
P2200 Probe Specifications (Cont.)
Certifications and Compliances
EC Declaration of
Conformity
Compliance was demonstrated to the following specification as listed
in the Official Journal of the European Communities:
Low Voltage Directive 73/23/EEC as amended by 93/68/EEC:
EN 61010-1/A2
EN61010-2-031:1994
Safety requirements for electrical equipment
for measurement, control, and laboratory use
Particular requirements for hand-held probe
assemblies for electrical measurement and
test
Overvoltage
C
Category Examples of Products in this Category
g
Category CAT III
C
A
T
I
I
Distribution-level mains, fixed installation
L
l
l
l
i
l
i
t
b
l
C
A
TII Loc
a
l-le
v
el m
a
ins,
a
ppli
a
nces, port
a
ble
equipment
CAT I Signal levels in special equipment or parts of
equipment, telecommunications, electronics
Pollution Degree 2 Do not operate in environments where conductive pollutants may be
present.
Safety UL3111-1, First Edition & UL3111--2--031, First Edition
CSA C22.2 No. 1010.1-92 & CAN/CSA C22.2 No. 1010.2.031-94
IEC61010-1/A2
IEC61010-2-031
Pollution Degree 2

Appendix A: Specifications
TDS1000/2000-Series Digital Oscilloscope User Manual 167
P2200 Probe Specifications (Cont.)
Environmental characteristics
Temperature Operating 32°F - 122°F
(0°Cto+50°C)
Nonoperating -- 4 0 °F - 159.8°F
(--40°Cto+71°C)
Cooling Method Convection
Humidity +104°F(+40°C) or below ≤90% relative humidity
y
+105°F - 122°F(+41°Cto+50°C) ≤60% relative humidity
Altitude Operating 10,000 ft (3,000 m)
Nonoperating 40,000 ft (15,000 m)

Appendix A: Specifications
168 TDS1000/2000-Series Digital Oscilloscope User Manual

TDS1000/2000-Series Digital Oscilloscope User Manual 169
Appendix B: Accessories
All accessories (standard and optional) are available by contacting
your local Tektronix field office.
Standard Accessories
P2200 1X, 10X Passive Probes. The P2200 passive probes
havea6MHzbandwidth with a rating of 150 V CAT II when the
switch is in the 1X position, and a 200 MHz bandwidth with a
rating of 300 V CAT II when the switch is in the 10X position.
A probe instructions manual is included.
TDS1000- and TDS2000-Series Oscilloscope User Manual.
A single user manual is included. Refer to the Optional
Accessories for a complete list of available language manuals.
Optional Accessories
TDS2CMA Communications Extension Module. The
TDS2CMA Communications module plugs directly into the rear
panel of any TDS1000- or TDS2000-Series oscilloscope. This
module provides full GPIB and RS-232 compatibility and a
Centronics port for printing screen data.
RM2000 Rackmount Kit. The RM2000 Rackmount Kit lets you
install a TDS1000- or TDS2000-Series oscilloscope into an
industry-standard 19 inch rack. The rackmount kit requires seven
inches of vertical rack space. You can turn the oscilloscope power
on or off from the front of the rackmount kit. The rackmount kit
does not have slide-out capability.

Appendix B: Accessories
170 TDS1000/2000-Series Digital Oscilloscope User Manual
Optional Accessories (Cont.)
2-channel
4-channel
TDS200-, TDS1000- and TDS2000-Series Digital
Oscilloscope Programmer Manual. The programmer manual
(071-1075-XX English) provides command and syntax
information.
TDS1000- and TDS2000-Series Digital Storage
Oscilloscope Service Manual. The service manual
(071-1076-XX, English) provides module-level repair information.
TDS1000- and TDS2000-Series Digital Storage
Oscilloscope User Manuals. The User manual is available in
these languages:
English 071-1064-XX
French 071-1065-XX*
Italian 071-1066-XX*
German 071-1067-XX*
Spanish 071-1068-XX*
Japanese 071-1069-XX*
Portuguese 071-1070-XX*
Simplified Chinese 071-1071-XX*
Traditional Chinese 071-1072-XX*
Korean 071-1073-XX*
Russian 071-1074-XX
*These manuals contain a language overlay for the front-panel controls.
P2200 Probe Instructions Manual. The P2200 probe manual
(071--1102--XX, English) provides information on the probe and
probe accessories.
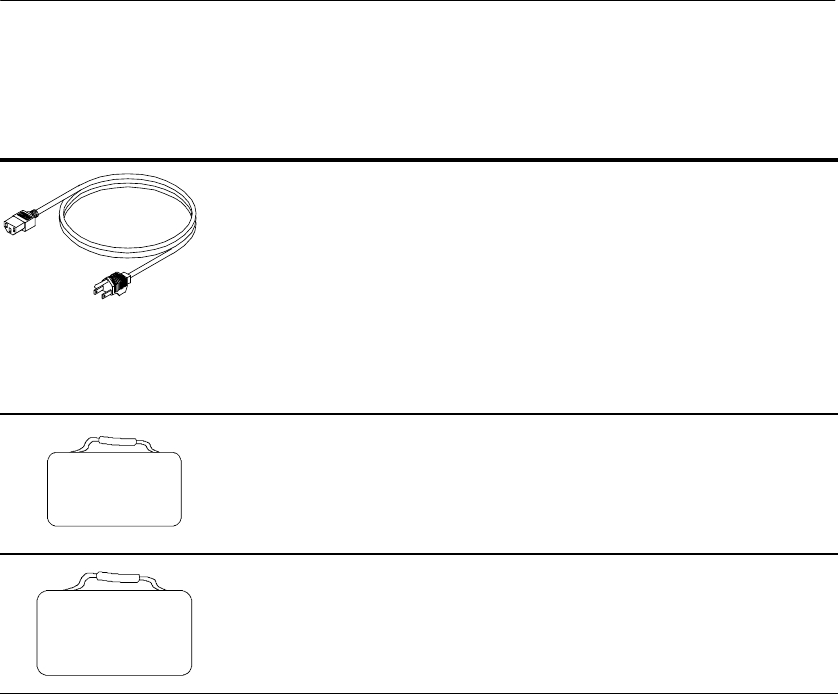
Appendix B: Accessories
TDS1000/2000-Series Digital Oscilloscope User Manual 171
Optional Accessories (Cont.)
International Power Cords. In addition to the power cord
shipped with your instrument, you can obtain the following cords:
Option A0, North American 120 V, 60 Hz 161-0066-00
Option A1, European 230 V, 50 Hz 161-0066-09
Option A2, United Kingdom 230 V, 50 Hz 161-0066-10
Option A3, Australian 240 V, 50 Hz 161-0066-11
Option A5, Switzerland 230 V, 50 Hz 161-0154-00
Option AC, China 220 V, 50 Hz 161-0304-00
Soft Case. The soft case (AC220) protects the instrument from
damage and provides space for probes, power cord, and
manuals.
Transit Case. The transit case (HCTDS32) provides shock,
vibration, impact and moisture protection for the instrument when
you transport it from one place to another. The required soft case
fits inside the transit case.

Appendix B: Accessories
172 TDS1000/2000-Series Digital Oscilloscope User Manual

TDS1000/2000-Series Digital Oscilloscope User Manual 173
Appendix C: General Care and Cleaning
General Care
Do not store or leave the instrument where the LCD display will be
exposed to direct sunlight for long periods of time.
CAUTION. To avoid damage to the instrument or probes, do not
expose them to sprays, liquids, or solvents.
Cleaning
Inspect the instrument and probes as often as operating conditions
require. To clean the exterior surface, perform the following steps:
1. Remove loose dust on the outside of the instrument and probes
with a lint-free cloth. Use care to avoid scratching the clear
plastic display filter.
2. Use a soft cloth dampened with water to clean the instrument.
Use an aqueous solution of 75% isopropyl alcohol for more
efficient cleaning.
CAUTION. To avoid damage to the surface of the instrument or
probes, do not use any abrasive or chemical cleaning agents.

Appendix C: General Care and Cleaning
174 TDS1000/2000-Series Digital Oscilloscope User Manual

TDS1000/2000-Series Digital Oscilloscope User Manual 175
Appendix D: Default Setup
This appendix describes the options, buttons and controls that change
settings when you push the DEFAULT SETUP button. For a list of
settings that do not change, refer to page 178.
NOTE. When you push the DEFAULT SETUP button, the oscilloscope
displays the CH1 waveform and removes all other waveforms.
Default settings
Menu or system Option, button or knob Default setting
ACQUIRE (three mode options) Sample
Averages 16
RUN/STOP RUN
CURSOR Type Off
Source CH1
Horizontal (voltage) +/-- 3.2 divs
Vertical (time) +/-- 4 divs
DISPLAY Type Vectors
Persist Off
Format YT
HORIZONTAL Window Main
Trig Knob Level
POSITION 0.00 s
S
E
C
/
D
I
V
5
0
0
s
S
E
C
/
D
I
V
5
0
0
s
Window Zone 50 s

Appendix D: Default Setup
176 TDS1000/2000-Series Digital Oscilloscope User Manual
Default setup (Cont.)
Menu or control Option Default setting
MATH Operation CH1 -- CH2
FFT operation:
S
o
u
r
c
e
C
H
1
S
o
u
r
c
e
Window
C
H
1
Hanning
W
i
n
d
o
w
FFT Zoom
H
a
n
n
i
n
g
X1
MEASURE Source CH1
Type None
TRIGGER (Edge) Type Edge
Source CH1
Slope Rising
Mode Auto
Coupling DC
LEVEL 0.00 V
TRIGGER (Video) Type Video
Source CH1
Polarity Normal
Sync All Lines
Standard NTSC

Appendix D: Default Setup
TDS1000/2000-Series Digital Oscilloscope User Manual 177
Default setup (Cont.)
Menu or control Option Default setting
TRIGGER (Pulse) Type Pulse
Source CH1
When =
Set Pulse Width 1.00 ms
Polarity Positive
Mode Auto
Coupling DC
Vertical system,
a
l
l
c
h
a
n
n
e
l
s
Coupling DC
a
ll ch
a
nnels BW Limit Off
Volts/Div Coarse
Probe 10X
Invert Off
POSITION 0.00 divs (0.00 V)
VOLTS/DIV 1.00 V

Appendix D: Default Setup
178 TDS1000/2000-Series Digital Oscilloscope User Manual
The DEFAULT SETUP button does not reset the following settings:
HLanguage option
HSaved setup files
HSaved reference waveform files
HDisplay contrast
HCalibration data
HPrinter setup
HRS232 setup
HGPIB setup

TDS1000/2000-Series Digital Oscilloscope User Manual 179
Appendix E: GPIB and RS-232 Interfaces
The next table provides an in-depth comparison of the GPIB and
RS-232 interfaces. You should select the interface that best meets
your requirements.
GPIB and RS-232 interface comparison
Operating attribute GPIB RS-232
Cable IEEE-488 Std. 9-wire
Data flow control Hardware, 3-wire hand-
shake
Flagging:
soft (XON/XOFF),
hard (RTS/CTS)
Data format 8-bit parallel 8-bit serial
Interface control Operator low-level con-
trol message
None
Interface messages Most IEEE-488 Std. Device clear using a
break signal
Interrupts reported Service requests, status
and event code
None, must be polled for
status

Appendix E: GPIB and RS-232 Interfaces
180 TDS1000/2000-Series Digital Oscilloscope User Manual
GPIB and RS-232 interface comparison (Cont.)
Operating attribute RS-232GPIB
Message termination
(Receive)
Hardware EOL,
software LF, or both
Software CR, LF, CRLF,
LFCR
Message termination
(Transmit)
Hardware EOL, software
LF
Software CR, LF, CRLF,
LFCR
Timing Asynchronous Asynchronous
Transmission path length
(max)
≤4 meters between
devices; ≤20 meters
total cabling
≤15 meters
Speed 200 kBytes/sec 19,200 bits/sec
System environment Multiple devices (≤15) Single terminal (point-to-
point connection)

TDS1000/2000-Series Digital Oscilloscope User Manual 181
Index
? in Value readout, 44
A
Abbreviating, commands, 150
AC coupling, 112
Accessories, 169–172
Acquire, menu, 74
ACQUIRE button, 38, 74
Acquire signals, basic concepts, 17
Acquisition
live display, 78
modes, 74
single--shot example, 56
stopping, 78
Acquisition mode, indicators, 28
Acquisition modes, 17
Average, 17
Peak Detect, 17
Sample, 17
Address, Tektronix, xiii
Aliasing
check for, 21
FFT, 122
time domain, 20
Application examples, 41
analyzing a differential commu-
nication signal, 68
analyzing signal detail, 54
automatic measurements, 42
autoset, using, 42
averaging, using, 55
calculating amplifier gain, 47
capturing a single--shot signal, 56
cursors, using, 48
looking at a noisy signal, 54
measuring propagation delay, 58
measuring pulse width, 50
measuring ring amplitude, 49
measuring ring frequency, 48
measuring rise time, 51
measuring two signals, 46
optimizing the acquisition, 57
peak detect, using, 54
reducing noise, 55
taking automatic measurements,
43
taking cursor measurements, 48
triggering on a specific pulse
width, 60
triggering on a video signal, 62
triggering on video fields, 63
triggering on video lines, 64
using persistence, 72
using the math functions, 69
using the window function, 66
using XY mode, 72
viewing impedance changes in a
network, 70
Attenuation, probe, 112
Auto trigger, 101
Automatic measurements
? in Value readout, 44
basic concepts, 25
AUTOSET, button, 38, 79
Autoset function, 12
overview, 79
pulse signal, 82
sine waves, 81
square wave, 82
video signal, 83
Average, 74, 77
Average mode, 17

Index
182 TDS1000/2000-Series Digital Oscilloscope User Manual
B
Bandwidth, limit, 112
Bandwidth limited, readout, 30
Bezel button, xi
Binary data, RS--232 transfer, 141
Break signals, RS--232 protocol,
142
Burst waveforms, 117
C
Calibration, 110
automatic routine, 10
Centronics port, 131
CH 1
connector, 39
MENU button, 34
CH 2
connector, 39
MENU button, 34
CH 3
connector, 39
MENU button, 34
CH 4
connector, 39
MENU button, 34
Channel, scale, 30
Cleaning, 173
Coarse resolution, 112
Command, abbreviating, 150
Communications module. See
TDS2CMA module
Compensation
probe, manual, 8
Probe Check Wizard, 7
PROBE COMP connector, 39
signal path, 111
Connectors
CH 1, CH 2, CH 3 and CH 4, 39
EXT TRIG, 39
PROBE COMP, 39
Contacting Tektronix, xiii
Context--sensitive help topics, ix
Contrast, 86
Conventions used in this manual, xi
Coupling
trigger, 15, 100, 103
vertical, 112, 113
Cursor, menu, 84
CURSOR button, 38, 84
CURSOR position knobs, 34
Cursors
adjusting, 38
application example, 48
basic concepts, 25
measurements, 48
measuring an FFT spectrum, 126
time, 25
using, 84
voltage, 25
D
DC coupling, 112
Default setup
Edge trigger, 176
Pulse trigger, 177
recalling, 97
Video trigger, 176
DEFAULT SETUP button
option and control settings, 175
retained option settings, 178
Description, general, 1
Display
contrast, 86
format, 86
intensity, 86
menu, 86
persistence, 86
readouts, 28
style (Invert), 112

Index
TDS1000/2000-Series Digital Oscilloscope User Manual 183
type, 86
DISPLAY button, 38, 86
Display style of waveforms, 87
Do Self Cal option, 10
Dots, 86
Dual time base, 36, 90
E
Edge trigger, 100
Error Log, 110
EXT TRIG connector, 39
Extension module. See TDS2CMA
module
External trigger connector, 39
F
Factory setup, 175
recalling, 97
Features, overview, 2
FFT aliasing, 122
remedies, 123
FFT spectrum
applications, 115
displaying, 118
magnify, 124
measuring magnitude and fre-
quency with cursors, 126
Nyquist frequency, 117
process, 115
readouts, 119
Window, 120
FFT Window
Flattop, 122
Hanning, 122
Rectangular, 122
FFT Zoom, 118
Fine resolution, 112
Flattop window, 122
FORCE TRIG button, 37
Format, 86
Frequency cursors, FFT spectrum,
126
Functional check, 5
Fundamental frequency compo-
nent, 119
G
GPIB port, 131
cable part numbers, 144
connecting a cable, 144
setup, 143
GPIB protocol
compared to RS--232 standard,
179
network configurations and
connection guidelines, 148
setup options, 144
testing, 145
Graticule, 24, 86
Ground
marker, 29
probe terminal, 6
terminals, 39
Ground coupling, 112
Ground lead for probe, 6
H
Hanning window, 122
HELP SCROLL LED, ix
Help System, ix
Helpful messages, 30
Holdoff, 92, 109

Index
184 TDS1000/2000-Series Digital Oscilloscope User Manual
HOLDOFF control, 36
access, push HORIZ MENU
button, 109
HORIZ MENU button, 36
Horizontal
aliasing, time domain, 20
how to make large adjustment, 35
menu, 90
position, 19
position marker, 29
scale, 19
status, 111
Hyperlinks in help topics, x
I
I/O errors, RS--232 report, 141
Index for help topics, x
Intensity, 86
Inverted waveform, readout, 30
L
Language, how to change, 1
Languages, 110
Level, 16, 36
LEVEL control, 36
Lissajous pattern, XY format, 88
M
Magnitude cursors, FFT spectrum,
126
Main time base, 36, 90
Manuals, ordering, 170
Math
FFT, 115, 118
functions, 93
menu, 93
MATH MENU button, 34
Measure, menu, 94
MEASURE button, 38
Measurements
automatic, 25, 94
basic concepts, 24
cursor, 25, 48
fall time, 95
FFT spectrum, 126
frequency, 94
graticule, 24
mean, 95
negative width, 95
peak--to--peak, 95
period, 94
positive width, 95
rise time, 95
RMS, 95
types, 94
Menu system, using, 32
Menus
Acquire, 74
Cursor, 84
Display, 86
Horizontal, 90
Math, 93
Math FFT, 118
Measure, 94
Save/Recall, 97
Trigger, 99
Utility, 110
Vertical, 112
Mercury, end--of--life handling, xii
Messages, 30, 31
N
Normal operation, recall default
setup, 13
Normal trigger, 101
NTSC, 104
Nyquist, frequency, 117

Index
TDS1000/2000-Series Digital Oscilloscope User Manual 185
O
Option button, xi
Options
Actiontype,33
Circular List type, 32
Page Selection type, 32
Radio type, 33
Oscilloscope
end--of--life handling, xii
front panels, 27
specifications, 151–164
understanding functions, 11
P
P2200 probe specifications,
165–167
PAL, 104
Peak Detect mode, 17, 74, 76
Persistence, 86, 88
Phone number, Tektronix, xiii
Ports, communications, 131
Position
horizontal, 90
vertical, 112
POSITION control
horizontal, 35
vertical, 34
Positioning waveforms, basic
concepts, 18
Power, 4
Power cords, 4
ordering, 171
Pretrigger, 14
Pretrigger view, 103
PRINT button, 38, 96
Printer, setup, 131
Printing
screen data, 96, 133
testing the port, 133
PROBE CHECK button, 7
Probe Check Wizard, 7
PROBE COMP connector, 39
Probe option, match to probe
attenuation, 9
Probes
1X attenuation and bandwidth
limit, 9
attenuation, 112
Attenuation switch, 9
compensation, 8, 39
safety, 6
specifications, 165–167
Product support, contact informa-
tion, xiii
Programmer manual, ordering, 170
Pulse signal, Autoset function, 82
Pulse width triggering, 105
R
Readouts
FFT (Math), 119
general, 28
Recall
factory setup (default), 13
setups, 12, 97
waveforms, 98
Rectangular window, 122
Reference waveforms
readout, 30
saving and recalling, 98
Resolution, fine, 113
RM2000 rackmount kit, ordering,
169
Roll mode. See scan mode
RS--232 port, 131
cable part numbers, 134
connecting a cable, 135
connector pinout, 142
setup, 134

Index
186 TDS1000/2000-Series Digital Oscilloscope User Manual
RS--232 protocol
Break signals, 142
compared to GPIB standard, 179
conventions, 141
I/O errors, 141
setup options, 136
testing, 137
troubleshooting, 139
RUN/STOP button, 38, 77
steps taken by the oscilloscope
when pushed, 14
S
Sample mode, 17, 74, 75
Sample rate, maximum, 75
Save
setups, 12, 97
waveforms, 98
SAVE/RECALL button, 38, 97
Scaling waveforms, basic concepts,
18
Scan mode, 78, 92
Scanning waveform, 92, 101
Screen button, xi
Screen data
printing, 133
sending to an external device,
131
SEC/DIV control, 36, 91
SECAM, 104
Security loop, 4
Service, 110
Service manual, ordering, 170
Service support, contact informa-
tion, xiii
SET TO 50% button, 37
SET TO ZERO button, 36
Setups
basic concepts, 12
saving and recalling, 97
Side--menu button, xi
Signal path compensation, 111
Sine waves, Autoset function, 81
SINGLE SEQ button, 77
steps taken by the oscilloscope
when pushed , 14
Single--shot signal, application
example, 56
Slope, 16
Soft case, ordering, 171
Soft keys, xi
Source
AC Line, 102
Ext, 102
Ext/5, 102
trigger, 14, 100, 104, 105
Specifications
oscilloscope, 151–164
P2200 probe, 165–167
Square wave, Autoset function, 82
Status
miscellaneous, 111
system, 110
Sync pulse, 104
T
TDS2CMA module, 127
GPIB setup, 143
how to install and remove, 129
ordering, 169
printer setup, 131
RS--232 setup, 134
Technical support, contact informa-
tion, xiii
Tektronix, contacting, xiii
Time base, 18
Main, 36, 90
readout, 30
Window, 36, 90
Time cursors, 25, 84

Index
TDS1000/2000-Series Digital Oscilloscope User Manual 187
Time domain , waveform, 116
Transient waveforms, 117
Transit case, ordering, 171
TRIG MENU button, 37
TRIG VIEW button, 37
Trigger
coupling, 15, 100, 103
definition, 13
edge, 100
external, 104
frequency readout, 30, 101, 106
holdoff, 36, 92, 109
level, 16, 36, 99
level marker, 29
level readout, 30
menu, 99
modes, 15
Auto, 101
Normal, 101
polarity, 105
position, 16
position marker, 29
position readout, 29
pretrigger information, 103
slope, 16, 100
source, 14, 30, 100, 105
status, 29, 111
sync, 104
type indicator, 30
types, 15
video, 104, 105
view, 37, 104
Trigger
source, 30
U
U in readout, 85
URL, Tektronix, xiii
USER SELECT knob, 36
alternative functions, 107
holdoff control, 109
Utility, menus, 110
UTILITY button, 38
V
Value readout, ? displays, 44
Vectors, 86
Vertical
menu, 112
position, 18
scale, 18
status, 111
Video signal, Autoset function, 83
Video trigger, 104
application example, 62
Voltage cursors, 25, 84
VOLTS/DIV, math waveform, 93
Volts/Div
Coarse, 112
Fine, 112
VOLTS/DIV control, 34
W
Waveforms
acquire data, 17
burst, 117
compression, 91
digitized, 17
display style meaning, 87
expansion, 91
position, 18
remove from screen, 114
saving and recalling, 98
scale, 18

Index
188 TDS1000/2000-Series Digital Oscilloscope User Manual
scanning, 78
take measurements, 24
time domain, 116
transient, 117
Web site address, Tektronix, xiii
Window time base, 36, 90
readout, 30
Window Zone, 90, 92
Windows, FFT spectrum, 120
X
XY, display format, 86, 88
XY , application example, 72
Y
YT, display format, 86
Z
Zoom, FFT, 124
