TDS3000C Series Digital Phosphor Oscilloscopes User Manual Tektronix
User Manual: Tektronix-TDS3000C-Digital-Phosphor-Oscilloscopes-User-Manual
Open the PDF directly: View PDF ![]() .
.
Page Count: 186 [warning: Documents this large are best viewed by clicking the View PDF Link!]
- toc
- Important safety information
- Compliance information
- Preface
- Getting Started
- Application Examples
- Reference
- Appendix A: Specifications
- Appendix B: Factory Setup
- Appendix C: Accessories
- Appendix D: Probe Basics
- Appendix E: General Care and Cleaning
- Appendix F: Ethernet Setup
- Your Ethernet Network Information
- Entering the Ethernet Network Settings
- Entering the Network Printer Settings
- Testing Your Ethernet Connection
- Troubleshooting Your Ethernet Connection
- The Instrument Setup Screen
- The Printer Configuration Screen
- The Add Printer Screen
- Ethernet Error Messages
- Ethernet Settings Form

xx
TDS3000C Series
Digital Phosphor Oscilloscopes
ZZZ
User Manual
*P071230805*
071-2308-05

TDS3000C Series
Digital Phosphor Oscilloscopes
ZZZ
User Manual
xx
REPRODUCTION AND DISTRIBUTION OF THIS
TECHNICAL MANUAL IS AUTHORIZED FOR UNITED
STATES OF AMERICA GOVERNMENT PURPOSES.
www.tektronix.com
071-2308-05
Last Published: November 15, 2013

Copyright © Tektronix. All rights reserved. Licensed software products are owned by Tektronix or its subsidiaries
or suppliers, and are protected by national copyright laws and international treaty provisions.
Tektronix products are covered by U.S. and foreign patents, issued and pending. Information in this publication
supersedes that in all previously published material. Specifications and price change privileges reserved.
TEKTRONIX and TEK are registered trademarks of Tektronix, Inc.
TEKPROBE, and TekSecure are registered trademarks of Tektronix, Inc.
DPX, WaveAlert, e*Scope, and OpenChoice are trademarks of Tektronix, Inc.
Contacting Tektronix
Tektronix, Inc.
14150 SW Karl Braun Drive
P.O. Box 500
Beaverton, OR 97077
USA
For product information, sales, service, and technical support:
In North America, call 1-800-833-9200.
Worldwide, visit www.tektronix.com to find contacts in your area.
Warranty
Tektronix warrants that the product will be free from defects in materials and workmanship for a period of three (3)
years from the date of original purchase from an authorized Tektronix distributor. If the product proves defective
during this warranty period, Tektronix, at its option, either will repair the defective product without charge for
parts and labor, or will provide a replacement in exchange for the defective product. Batteries are excluded from
this warranty. Parts, modules and replacement products used by Tektronix for warranty work may be new or
reconditioned to like new performance. All replaced parts, modules and products become the property of Tektronix.
In order to obtain service under this warranty, Customer must notify Tektronix of the defect before the expiration
of the warranty period and make suitable arrangements for the performance of service. Customer shall be
responsible for packaging and shipping the defective product to the service center designated by Tektronix,
shipping charges prepaid, and with a copy of customer proof of purchase. Tektronix shall pay for the return of the
product to Customer if the shipment is to a location within the country in which the Tektronix service center is
located. Customer shall be responsible for paying all shipping charges, duties, taxes, and any other charges for
products returned to any other locations.
This warranty shall not apply to any defect, failure or damage caused by improper use or improper or inadequate
maintenance and care. Tektronix shall not be obligated to furnish service under this warranty a) to repair damage
resulting from attempts by personnel other than Tektronix representatives to install, repair or service the product;
b) to repair damage resulting from improper use or connection to incompatible equipment; c) to repair any damage
or malfunction caused by the use of non-Tektronix supplies; or d) to service a product that has been modified or
integrated with other products when the effect of such modification or integration increases the time or difficulty
of servicing the product.
THIS WARRANTY IS GIVEN BY TEKTRONIX WITH RESPECT TO THE PRODUCT IN LIEU OF ANY
OTHER WARRANTIES, EXPRESS OR IMPLIED. TEKTRONIX AND ITS VENDORS DISCLAIM ANY
IMPLIED WARRANTIES OF MERCHANTABILITY OR FITNESS FOR A PARTICULAR PURPOSE.
TEKTRONIX' RESPONSIBILITY TO REPAIR OR REPLACE DEFECTIVE PRODUCTS IS THE SOLE
AND EXCLUSIVE REMEDY PROVIDED TO THE CUSTOMER FOR BREACH OF THIS WARRANTY.
TEKTRONIX AND ITS VENDORS WILL NOT BE LIABLE FOR ANY INDIRECT, SPECIAL, INCIDENTAL,
OR CONSEQUENTIAL DAMAGES IRRESPECTIVE OF WHETHER TEKTRONIX OR THE VENDOR HAS
ADVANCE NOTICE OF THE POSSIBILITY OF SUCH DAMAGES.
[W16 – 15AUG04]

Table of Contents
Important safety information..................................................................................... iii
General safety summary ..................................................................................... iii
Service safety summary...................................................................................... vi
Terms in this manual ........................................................................................ vii
Symbols and terms on the product......................................................................... vii
Compliance information ......................................................................................... viii
EMC compliance ............................................................................................ viii
Safety compliance ............................................................................................ ix
Environmental considerations.............................................................................. xii
Preface .............................................................................................................. xv
Getting Started ..... ........................................ .................. ....................................... 1
Initial Setup........ .......... .......... .......... .............................................. .......... ....... 1
Product and Feature Description............................................................................. 5
Operating Positions............................................................................................ 8
Connecting Power ............................................................................................. 9
Installing an Application Module ....................................... .................. .................. 13
Installing the Communication Module ....................... .................. .................. .......... 13
Front-Panel Menus and Controls............................................................................ 15
Front-Panel Connectors ...................................................................................... 23
Rear-Panel Connectors....................................................................................... 24
Communication Module Connectors ....................................................................... 24
Application Examples............................................................................................. 27
Taking Simple Measurements............................................................................... 27
Analyzing Signal Detail...................................................................................... 33
Taking FFT Measurements .................................................................................. 39
Triggering on a Video Signal................................................................................ 41
Capturing a Single-Shot Signal ............................................................................. 44
Saving Data to a USB Flash Drive.......................................................................... 46
Reference........................................................................................................... 51
Acquisition Controls.............. .................. ................................ .................. ........ 51
Cursor.......................................................................................................... 59
Display......................................................................................................... 63
Hard Copy ..................................................................................................... 65
Horizontal Controls........................................................................................... 67
Math and FFT................................................................................................. 72
Measure........................................................................................................ 79
QuickMenu.................................................................................................... 84
Save/Recall.................................................................................................... 84
Trigger Controls............................................................................................... 90
TDS3000C Series Oscilloscope User Manual i

Table of Contents
Utility .... .......... .......................................................................... .......... ...... 109
Vertical Controls ............................................................................................ 114
e*Scope Web-Based Remote Control .................................................................... 118
Appendix A: Specifications .................................................................................... 121
Appendix B: Factory Setup..................................................................................... 131
Appendix C: Accessories....................................................................................... 135
Appendix D: Probe Basics...................................................................................... 139
Probe Descriptions.......................................................................................... 139
Probe Compensation........................................................................................ 139
TekProbe Interface.......................................................................................... 140
Probe Guard ................................................................................................. 140
Ground Leads ............................................................................................... 140
P3010 High-Frequency Compensation................................................................... 141
P3010 Replaceable Parts and Accessories ............................................................... 142
P6139A Replaceable Parts and Accessories ............................................................. 143
Using Other Probes......................................................................................... 144
Supported Active Probes and Adapters .................................................................. 144
Unsupported Probes ........................................................................................ 145
Appendix E: General Care and Cleaning ..................................................................... 147
Appendix F: Ethernet Setup.................................................................................... 149
Your Ethernet Network Information...................................................................... 149
Entering the Ethernet Network Settings.................................................................. 150
Entering the Network Printer Settings.................................................................... 151
Testing Your Ethernet Connection........................................................................ 151
Troubleshooting Your Ethernet Connection ............................................................. 152
The Instrument Setup Screen.............................................................................. 153
The Printer Configuration Screen......................................................................... 154
The Add Printer Screen .................................................................................... 155
Ethernet Error Messages................................................................................... 156
Ethernet Settings Form ... ...................... ...................... ...................... ................ 157
Index
ii TDS3000C Series Oscilloscope User Manual

Important safety information
This manual contains information and warnings that must be followed by the user
for safe operation and to keep the product in a safe condition.
To safely perform service on this product, additional information is provided at
the end of this section. (See page vi, Service safety summary.)
General safety summary
Use the product only as specified. Review the following safety precautions to
avoid injury and prevent damage to this product or any products connected to it.
Carefully read all instructions. Retain these instructions for future reference.
Comply with local and national safety codes.
For correct and safe operation of the product, it is essential that you follow
generally accepted safety procedures in addition to the safety precautions specified
in this manual.
The product is designed to be used by trained personnel only.
Only qualified personnel who are aware of the hazards involved should remove
the cover for repair, maintenance, or adjustment.
Before use, always check the product with a known source to be sure it is
operating correctly.
This product is not intended for detection of hazardous voltages.
Use personal protective equipment to prevent shock and arc blast injury where
hazardous live conductors are exposed.
When incorporating this equipment into a system, the safety of that system is the
responsibility of the assembler of the system.
To avoid fire or personal
injury
Use proper power cord. Use only the power cord specified for this product and
certified for the country of use.
Do not use the provided power cord for other products.
Ground the product. This product is grounded through the grounding conductor
of the power cord. To avoid electric shock, the grounding conductor must be
connected to earth ground. Before making connections to the input or output
terminals of the product, make sure that the product is properly grounded.
Do not disable the power cord grounding connection.
Power disconnect. The power cord disconnects the product from the power
source. See instructions for the location. Do not position the equipment so that
TDS3000C Series Oscilloscope User Manual iii

Important safety information
it is difficult to operate the power cord; it must remain accessible to the user at
all times to allow for quick disconnection if needed.
Connect and disconnect properly. Do not connect or disconnect probes or test
leads while they are connected to a voltage source.
Use only insulated voltage probes, test leads, and adapters supplied with the
product, or indicated by Tektronix to be suitable for the product.
Observe all terminal ratings. To avoid fire or shock hazard, observe all ratings
and markings on the product. Consult the product manual for further ratings
information before making connections to the product. Do not exceed the
Measurement Category (CAT) rating and voltage or current rating of the lowest
rated individual component of a product, probe, or accessory. Use caution when
using 1:1 test leads because the probe tip voltage is directly transmitted to the
product.
Do not apply a potential to any terminal, including the common terminal, that
exceeds the maximum rating of that terminal.
Do not float the common terminal above the rated voltage for that terminal.
The measuring terminals on this product are not rated for connection to mains
Category III or IV circuits, or to mains Category II circuits greater than 100 V.
When connected to circuits other than mains, the maximum transient overvoltage
rating is 400 V peak."
Do not operate without covers. Do not operate this product with covers or panels
removed, or with the case open. Hazardous voltage exposure is possible.
Avoid exposed circuitry. Do not touch exposed connections and components
when power is present.
Do not operate with suspected failures. If you suspect that there is damage to this
product, have it inspected by qualified service personnel.
Disable the product if it is damaged. Do not use the product if it is damaged
or operates incorrectly. If in doubt about safety of the product, turn it off and
disconnect the power cord. Clearly mark the product to prevent its further
operation.
Before use, inspect voltage probes, test leads, and accessories for mechanical
damage and replace when damaged. Do not use probes or test leads if they are
damaged, if there is exposed metal, or if a wear indicator shows.
Examine the exterior of the product before you use it. Look for cracks or missing
pieces.
Use only specified replacement parts.
Use proper fuse. Useonlythefusetypeandratingspecified for this product.
iv TDS3000C Series Oscilloscope User Manual

Important safety information
Do not operate in wet/damp conditions. Be aware that condensation may occur if
a unit is moved from a cold to a warm environment.
Do not operate in an explosive atmosphere.
Keep product surfaces clean and dry. Remove the input signals before you clean
the product.
Provide proper ventilation. Refer to the installation instructions in the manual for
details on installing the product so it has proper ventilation.
Slots and openings are provided for ventilation and should never be covered or
otherwise obstructed. Do not push objects into any of the openings.
Provide a safe working environment. Always place the product in a location
convenient for viewing the display and indicators.
Avoid improper or prolonged use of keyboards, pointers, and button pads.
Improper or prolonged keyboard or pointer use may result in serious injury.
Be sure your work area meets applicable ergonomic standards. Consult with an
ergonomics professional to avoid stress injuries.
Probes and test leads Before connecting probes or test leads, connect the power cord from the power
connector to a properly grounded power outlet.
Keepfingers behind the finger guards on the probes.
Remove all probes, test leads and accessories that are not in use.
Use only correct Measurement Category (CAT), voltage, temperature, altitude,
and amperage rated probes, test leads, and adapters for any measurement.
Beware of high voltages. Understand the voltage ratings for the probe you are
using and do not exceed those ratings. Two ratings are important to know and
understand:
The maximum measurement voltage from the probe tip to the probe reference
lead.
The maximum floating voltage from the probe reference lead to earth ground
These two voltage ratings depend on the probe and your application. Refer to the
Specifications section of the manual for more information.
WARNING. To prevent electrical shock, do not exceed the maximum measurement
or maximum floating voltage for the oscilloscope input BNC connector, probe
tip, or probe reference lead.
TDS3000C Series Oscilloscope User Manual v

Important safety information
Connect and disconnect properly. Connect the probe output to the measurement
product before connecting the probe to the circuit under test. Connect the
probe reference lead to the circuit under test before connecting the probe input.
Disconnect the probe input and the probe reference lead from the circuit under test
before disconnecting the probe from the measurement product.
Connect and disconnect properly. De-energize the circuit under test before
connecting or disconnecting the current probe.
Connect the probe reference lead to earth ground only.
Do not connect a current probe to any wire that carries voltages above the current
probe voltage rating.
Inspect the probe and accessories. Before each use, inspect probe and accessories
for damage (cuts, tears, or defects in the probe body, accessories, or cable jacket).
Do not use if damaged.
Ground-referenced oscilloscope use. Do not float the reference lead of this probe
when using with ground-referenced oscilloscopes. The reference lead must be
connected to earth potential (0 V).
Floating measurement use. Do not float the reference lead of this probe above
the rated float voltage.
Servicesafetysummary
The Service safety summary section contains additional information required to
safely perform service on the product. Only qualified personnel should perform
service procedures. Read this Service safety summary and the General safety
summary before performing any service procedures.
To avoid electric shock. Do not touch exposed connections.
Do not service alone. Do not perform internal service or adjustments of this
product unless another person capable of rendering first aid and resuscitation is
present.
Disconnect power. To avoid electric shock, switch off the product power and
disconnect the power cord from the mains power before removing any covers or
panels, or opening the case for servicing.
Use care when servicing with power on. Dangerous voltages or currents may exist
in this product. Disconnect power, remove battery (if applicable), and disconnect
test leads before removing protective panels, soldering, or replacing components.
Verify safety after repair. Always recheck ground continuity and mains dielectric
strength after performing a repair.
vi TDS3000C Series Oscilloscope User Manual

Important safety information
Terms in this manual
These terms may appear in this manual:
WARNING. Warning statements identify conditions or practices that could result
in injury or loss of life.
CAUTION. Caution statements identify conditions or practices that could result in
damage to this product or other property.
Symbols and terms on the product
These terms may appear on the product:
DANGER indicates an injury hazard immediately accessible as you read
the marking.
WARNING indicates an injury hazard not immediately accessible as you
read themarking.
CAUTION indicates a hazard to property including the product.
When this symbol is marked on the product, be sure to consult the manual
to find out the nature of the potential hazards and any actions which have to
be taken to avoid them. (This symbol may also be used to refer the user to
ratings in the manual.)
The following symbol(s) may appear on the product:
TDS3000C Series Oscilloscope User Manual vii

Compliance information
Compliance information
This section lists the EMC (electromagnetic compliance), safety, and
environmental standards with which the instrument complies.
EMC compliance
EC Declaration of
Conformity – EMC
Meets intent of Directive 2004/108/EC for Electromagnetic Compatibility.
Compliance was demonstrated to the following specifications as listed in the
Official Journal of the European Communities:
EN 61326-1:2006, EN 61326-2-1:2006. EMC requirements for electrical equipment
for measurement, control, and laboratory use. 123
CISPR 11:2003. Radiated and conducted emissions, Group 1, Class A
IEC 61000-4-2:2001. Electrostatic discharge immunity
IEC 61000-4-3:2002. RF electromagnetic field immunity 4
IEC 61000-4-4:2004. Electrical fast transient/burst immunity
IEC 61000-4-5:2001. Power line surge immunity
IEC 61000-4-6:2003. Conducted RF immunity 5
IEC 61000-4-11:2004. Voltage dips and interruptions immunity 6
EN 61000-3-2:2006. AC power line harmonic emissions
EN 61000-3-3:1995. Voltage changes, fluctuations, and flicker
European contact.
Tektronix UK, Ltd.
Western Peninsula
Western Road
Bracknell, RG12 1RF
viii TDS3000C Series Oscilloscope User Manual

Compliance information
United Kingdom
1This product is intended for use in nonresidential areas only. Use in residential areas may cause electromagnetic
interference.
2Emissions which exceed the levels required by this standard may occur when this equipment is connected to a
test object.
3For compliance with the EMC standards listed here, high quality shielded interface cables should be used.
4Theincreaseintracenoisewhilesubjectedtoatestfield (3 V/m over the frequency range 80 MHz to 1 GHz, 1.4
GHz to 2.0 GHZ and 1 V/m from 2.0 GHz to 2.7 GHz, with 80% amplitude modulation at 1 kHz) is not to exceed 3
major divisions peak-to-peak at 5 mV/div and higher.l
5Theincreaseintracenoisewhilesubjectedtoatestfield (3 V/rms over the frequency range 150 kHz to 80 MHz,
with 80% amplitude modulation at 1 kHz) is not to exceed 2 major divisions peak-to-peak at 5 mV/div and higher.
6Performance Criterion C applied at the 70%/25 cycle Voltage-Dip and the 0%/250 cycle Voltage-Interruption test
levels (IEC 61000-4-11).
Australia / New Zealand
Declaration of
Conformity – EMC
Complies with the EMC provision of the Radiocommunications Act per the
following standard, in accordance with ACMA:
CISPR 11:2003. Radiated and Conducted Emissions, Group 1, Class A, in
accordance with EN 61326-1:2006 and EN 61326-2-1:2006.
Australia / New Zealand contact.
Baker & McKenzie
Level 27, AMP Centre
50 Bridge Street
Sydney NSW 2000, Australia
FCC–EMC Exempt from FCC 47 CFR Part 15, Subpart B, Class A
Safety compliance
This section lists the safety standards with which the product complies and other
safety compliance information.
EU declaration of
conformity – low voltage
Compliance was demonstrated to the following specification as listed in the
Official Journal of the European Union:
Low Voltage Directive 2006/95/EC.
EN 61010-1. Safety Requirements for Electrical Equipment for Measurement,
Control, and Laboratory Use – Part 1: General Requirements.
EN 61010-2-030. Safety Requirements for Electrical Equipment for
Measurement, Control, and Laboratory Use – Part 2-030: Particular
requirements for testing and measuring circuits.
TDS3000C Series Oscilloscope User Manual ix

Compliance information
U.S. nationally recognized
testing laboratory listing
UL 61010-1. Safety Requirements for Electrical Equipment for Measurement,
Control, and Laboratory Use – Part 1: General Requirements.
UL 61010-2-030. Safety Requirements for Electrical Equipment for
Measurement, Control, and Laboratory Use – Part 2-030: Particular
requirements for testing and measuring circuits.
Canadian certification CAN/CSA-C22.2 No. 61010-1. Safety Requirements for Electrical
Equipment for Measurement, Control, and Laboratory Use – Part 1: General
Requirements.
CAN/CSA-C22.2 No. 61010-2-030. Safety Requirements for Electrical
Equipment for Measurement, Control, and Laboratory Use – Part 2-030:
Particular requirements for testing and measuring circuits.
Additional compliances IEC 61010-1. Safety Requirements for Electrical Equipment for
Measurement, Control, and Laboratory Use – Part 1: General Requirements.
IEC 61010-2-030. Safety Requirements for Electrical Equipment for
Measurement, Control, and Laboratory Use – Part 2-030: Particular
requirements for testing and measuring circuits.
Equipment type Test and measuring equipment.
Safety class Class 1 – grounded product.
Pollution degree
descriptions
A measure of the contaminants that could occur in the environment around
and within a product. Typically the internal environment inside a product is
considered to be the same as the external. Products should be used only in the
environment for which they are rated.
Pollution degree 1. No pollution or only dry, nonconductive pollution occurs.
Products in this category are generally encapsulated, hermetically sealed, or
located in clean rooms.
Pollution degree 2. Normally only dry, nonconductive pollution occurs.
Occasionally a temporary conductivity that is caused by condensation must
be expected. This location is a typical office/home environment. Temporary
condensation occurs only when the product is out of service.
Pollution degree 3. Conductive pollution, or dry, nonconductive pollution
that becomes conductive due to condensation. These are sheltered locations
where neither temperature nor humidity is controlled. The area is protected
from direct sunshine, rain, or direct wind.
Pollution degree 4. Pollution that generates persistent conductivity through
conductive dust, rain, or snow. Typical outdoor locations.
x TDS3000C Series Oscilloscope User Manual

Compliance information
Pollution degree rating Pollution degree 2 (as defined in IEC 61010-1). Rated for indoor, dry location
use only.
IP rating IP20 (as defined in IEC 60529).
Measurement and
overvoltage category
descriptions
Measurement terminals on this product may be rated for measuring mains voltages
from one or more of the following categories (see specific ratings marked on
the product and in the manual).
Category II. Circuits directly connected to the building wiring at utilization
points (socket outlets and similar points).
Category III. In the building wiring and distribution system.
Category IV. At the source of the electrical supply to the building.
NOTE. Only mains power supply circuits have an overvoltage category rating.
Only measurement circuits have a measurement category rating. Other circuits
within the product do not have either rating.
Mains overvoltage
category rating
Overvoltage category II (as defined in IEC 61010-1).
TDS3000C Series Oscilloscope User Manual xi
Compliance information
Environmental considerations
This section provides information about the environmental impact of the product.
Product end-of-life
handling
Observe the following guidelines when recycling an instrument or component:
Equipment recycling. Production of this equipment required the extraction and
use of natural resources. The equipment may contain substances that could be
harmful to the environment or human health if improperly handled at the product’s
end of life. To avoid release of such substances into the environment and to
reduce the use of natural resources, we encourage you to recycle this product in
an appropriate system that will ensure that most of the materials are reused or
recycled appropriately.
This symbol indicates that this product complies with the applicable European
Union requirements according to Directives 2002/96/EC and 2006/66/EC
on waste electrical and electronic equipment (WEEE) and batteries. For
information about recycling options, check the Support/Service section of the
Tektronix Web site (www.tektronix.com).
Battery Recycling. This product might contain an optional lithium ion (Li-ion)
rechargeable battery, which must be recycled or disposed of properly.
Lithium-Ion batteries are subject to disposal and recycling regulations that
vary by country and region. Always check and follow your applicable
regulations before disposing of any battery. Contact Rechargeable Battery
Recycling Corporation (www.rbrc.org) for U.S.A. and Canada, or your local
battery recycling organization.
Many countries prohibit the disposal of waste electronic equipment in
standard waste receptacles.
Place only discharged batteries in a battery collection container. Use electrical
tape or other approved covering over the battery connection points to prevent
short circuits.
Mercury notification. This product uses an LCD backlight lamp that contains
mercury. Disposal may be regulated due to environmental considerations. Please
contact your local authorities or, within the United States, refer to the E-cycling
Central Web page (www.eiae.org) for disposal or recycling information.
Transporting Batteries The capacity of the optional lithium ion battery pack is under 100 Wh. The battery
meets the applicable requirements of UN Manual of Tests and Criteria Part III
Section 38.3. As shipped from Tektronix, the battery quantity is under the limit
for shipment according to Section II of the relevant Packing Instructions from the
IATA Dangerous Goods Regulations. Consult your air carrier for applicability and
determination of any special lithium battery transportation requirements.
xii TDS3000C Series Oscilloscope User Manual

Compliance information
Always check all applicable local, national, and international regulations
before transporting a Lithium-Ion battery.
Transporting an end-of-life, damaged, or recalled battery may, in certain
cases, be specifically limited or prohibited.
The battery pack must be adequately protected against short-circuit or damage
during transport.
Restriction of hazardous
substances
This product is classified as an industrial monitoring and control instrument,
and is not required to comply with the substance restrictions of the recast RoHS
Directive 2011/65/EU until July 22, 2017.
TDS3000C Series Oscilloscope User Manual xiii

Compliance information
xiv TDS3000C Series Oscilloscope User Manual

Preface
This manual contains operating information for the TDS3000C Series Digital
Storage Oscilloscopes. The manual consists of the following chapters:
The Getting Started chapter briefly describes features of the oscilloscope
and provides installation instructions.
The Application Examples chapter provides examples on how to solve a
variety of measurement problems.
The Reference chapter describes the selections or available range of values
for each option.
The Appendix A: Specifications chapter includes electrical, environmental,
and physical specifications for the oscilloscope, as well as certifications and
compliances.
The Appendix B: Factory Setup chapter contains a list of the menus and
controls with the default settings that the oscilloscope recalls when you push
the Save/Recall front-panel button, and then the Recall Factory Setup screen
button.
The Appendix C: Accessories chapter briefly describes standard and optional
accessories.
The Appendix D: Probe Basics chapter provides basic information on the
P3010 and the P6139A probes, and on other probes.
The Appendix E: Cleaning chapter describes how to take care of the
oscilloscope.
The Appendix F: Ethernet Setup chapter describes how to set up the
oscilloscope for printing through the network, and remote programming.
TDS3000C Series Oscilloscope User Manual xv

Preface
Preventing Electrostatic
Damage
CAUTION. Electrostatic discharge (ESD) can damage components in the
oscilloscope and its accessories. To prevent, ESD, observe these precautions
when directed to do so.
Use a Ground Strap. Wear a grounded, antistatic wrist strap to discharge the static
voltage from your body while installing or removing sensitive components.
UseaSafeW
ork Area. Do not use any devices capable of generating or holding a
static charge in the work area where you install or remove sensitive components.
Avoid handling sensitive components in areas that have a floor or benchtop
surface capable of generating a static charge.
Handle Components Safely. Do not slide sensitive components over any surface.
Do not touch exposed connector pins. Handle sensitive components as little as
possible.
Transport and Store Carefully. Transport and store sensitive components in a
static-protected bag or container.
xvi TDS3000C Series Oscilloscope User Manual

Preface
Firmware Updates Through
the Internet
If a newer version of firmware becomes available, you can use the Internet and a
USB flash drive to update your oscilloscope.
To update the firmware, follow these steps:
1. From your computer, access the www.tektronix.com Web site and check if a
newer version of oscilloscope firmware is available.
If there is a newer version of firmware, download the firmware file from the
web page. Unzip and copy the tds3000c.img file into the root folder of a
USB flash drive.
2. Power off your oscilloscope.
3. Insert the USB flash drive into the flash drive port on the front of the
oscilloscope.
4. Power on your oscilloscope.
5. When prompted, push the OK Load New Firmware menu button to start
the firmware load process.
NOTE. Do not power off the oscilloscope or remove the USB flash drive until the
oscilloscope finishes installing the firmware.
6. Wait for the oscilloscope to reboot itself.
7. When prompted, remove the USB flash drive.
8. Push the Utility front-panel button.
9. Push the Version bottom button. The oscilloscope displays the firmware
version number.
10. Confirm that the version number matches that of the new firmware.
TDS3000C Series Oscilloscope User Manual xvii

Preface
xviii TDS3000C Series Oscilloscope User Manual

Getting Started
In addition to a product and feature description, this chapter covers the following
topics:
How to perform a quick functional check, install and compensate passive
probes, compensate the signal path, and set the time and date
How to install the power cord, battery pack, and operate the oscilloscope
safely with battery power
How to install application modules and the communication module
How to use the menu system
How to identify the oscilloscope controls and connectors
Initial Setup
The following procedures describe how to quickly verify that the oscilloscope is
powering up and functioning correctly, compensate passive probes using the
built-in compensation signal, run the signal path compensation (SPC) routine for
maximum signal accuracy, and set the time and date.
You should perform all initial setup procedures the firsttimeyouusethe
oscilloscope.
You should perform the probe compensation procedure whenever you attach a
passive probe for the first time to any input channel.
You should run the signal path compensation routine whenever the ambient
temperature changes by 10 °C (18 °F) or more.
TDS3000C Series Oscilloscope User Manual 1
Getting Started
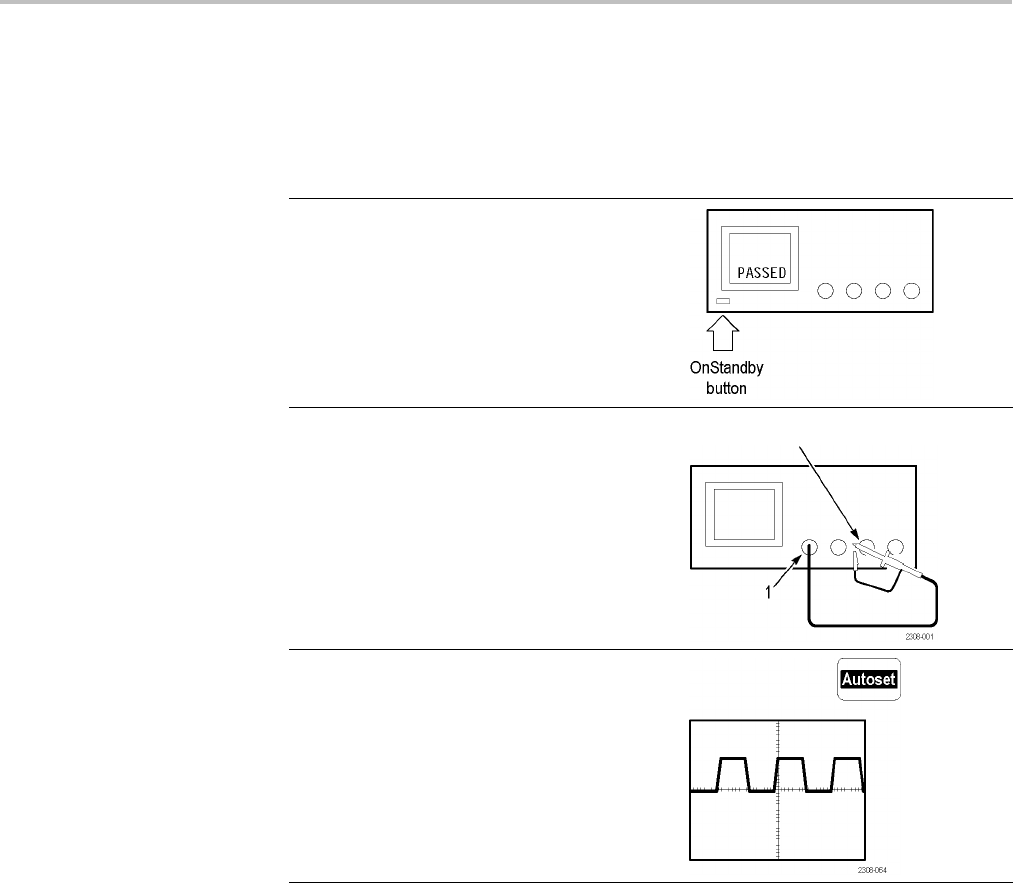
Functional Check Perform this quick functional check to verify that your oscilloscope is operating
correctly.
1. Connect the oscilloscope power cable. (See
page 9.)
2. Power on the oscilloscope.
Wait for the confirmation that all self tests
have passed.
Probe Comp
3. Connect the oscilloscope probe to channel
1. Attach the probe tip and reference lead to
the Probe Comp connectors.
4. Push the Autoset button. You should see a
square wave in the display (approximately
5Vat1kHz).
2 TDS3000C Series Oscilloscope User Manual
Getting Started
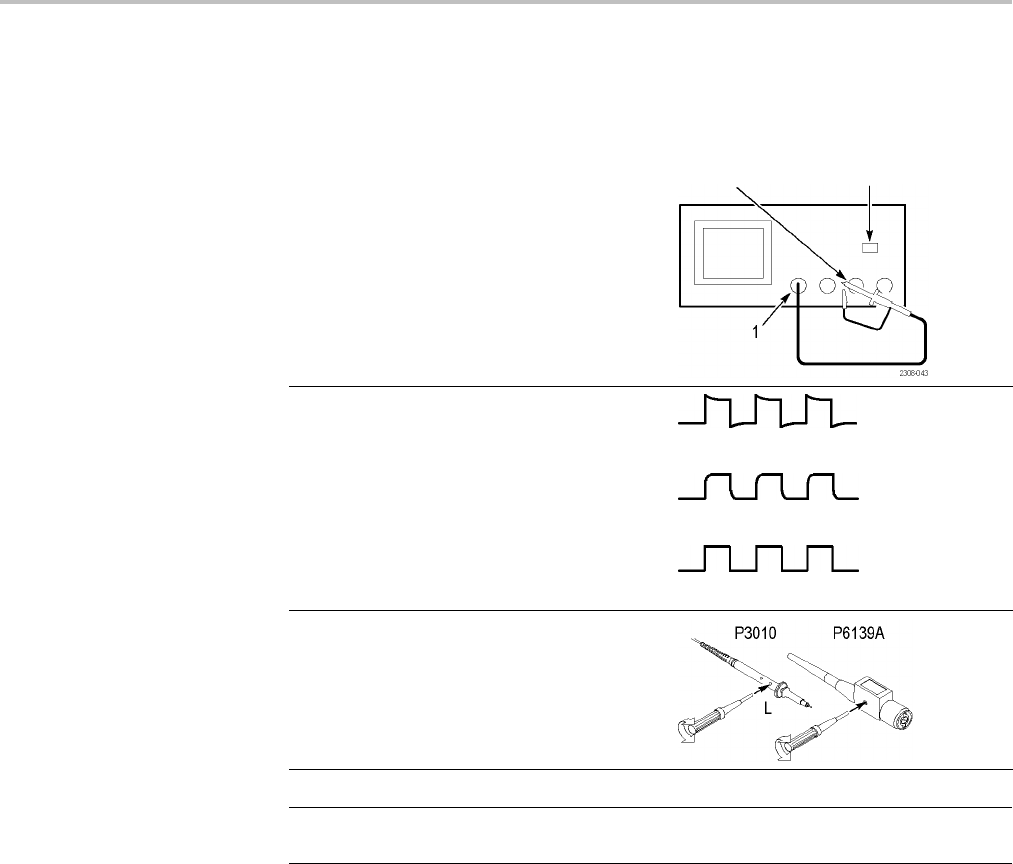
Probe Compensation Perform this adjustment to match your probe to the input channel. This should be
done whenever you attach a passive probe for the first time to any input channel.
Probe Comp Autoset button
1. Connect the oscilloscope probe to channel
1. Attach the probe tip and reference lead
to the Probe Comp connectors, then push
Autoset.
If using the probe hook-tip, ensure a proper
connection by firmly twisting the tip onto the
probe.
Over compensated
Under compensated
2. Check the shape of the displayed waveform.
Compensated correctly
3. If necessary, adjust your probe.
NOTE. See Appendix D: Probe Basics for more information about the probes
provided with your oscilloscope.
TDS3000C Series Oscilloscope User Manual 3

Getting Started
Signal Path Compensation
(SPC)
The SPC routine optimizes the oscilloscope signal path for maximum
measurement accuracy. You can run the routine anytime but you should always
run the routine if the ambient temperature changes by 10 °C (18 °F) or more.
To compensate the signal path, follow these steps:
1. Disconnect any probes or cables from the channel input connectors.
2. Push the Utility button.
3. Push the System screen button to select Cal.
4. Push the Signal Path screen button.
5. Push OK Compensate Signal Path. This procedure takes several minutes
to complete.
NOTE. The signal path compensation does not include calibration to the probe tip.
Adjusting the Oscilloscope
Time and Date
To set your oscilloscope to the current date and time, follow these steps:
1. Push the Utility button.
2. Push the System bottom button to select Config.
3. Push the Set Date & Time bottom button. Use the side menu buttons to
set the date and time values.
4. Push the OK Enter Date/Time side button to set the oscilloscope date and
time.
4 TDS3000C Series Oscilloscope User Manual
Getting Started
Product and Feature Description
The TDS3000C series oscilloscopes consist of the following models:
Model Channels Bandwidth Maximum
TDS3012C 2 100 MHz 1.25 GS/s
TDS3014C 4 100 MHz 1.25 GS/s
TDS3032C 2 300 MHz 2.5 GS/s
TDS3034C 4 300 MHz 2.5 GS/s
TDS3052C 2 500 MHz 5GS/s
TDS3054C 4 500 MHz 5GS/s
Acquisition Features WaveAlert Waveform Anomaly Detection. This feature automatically detects
anomalous waveforms by comparing the current waveform to the previous
waveform. WaveAlert sets how the oscilloscope responds: stop on anomaly, beep
on anomaly, and save anomalous waveform to a USB flash drive. It's useful for
capturing signal glitches and intermittent waveform errors. (See page 59.)
Separate Digitizers. This feature ensures accurate timing measurements with
separate digitizers for each channel. Each digitizer can sample at up to the
maximum sample rate; the acquisition on all channels is always concurrent to
provide full single-shot bandwidth on each channel.
Normal Acquisition. This feature acquires 10,000 point waveforms to capture
horizontal detail, and then you can use the zoom function to analyze the
detail. (See page 57.)
Fast Trigger Acquisition. This feature acquires up to 3,400 waveforms per second
(500 point mode) so you can see rapidly changing signals or intermittent signal
irregularities. (Seepage57.)
Pretrigger. You can capture signals that occur before the trigger point. You can
position the trigger point at the beginning of the acquisition, at the end, or at
any location in between. (See page 67.)
Delay. You can also delay the acquisition so that it starts after the trigger point.
Use delay when you want to acquire the signal at a specific time after the trigger
point. (See page 68.)
Peak Detect. This feature allows you to see pulses as narrow as 1 ns even at the
slower time base settings. Peak Detect helps you see noise and glitches in your
signal. (Seepage55.)
Signal Processing
Features
Average. You can apply averaging to your signal to remove uncorrelated noise
and improve measurement accuracy. (See page 56.)
TDS3000C Series Oscilloscope User Manual 5

Getting Started
Envelope. You can use envelope to capture and display the maximum variation of
a signal. (See page 56.)
Waveform Math. You can use waveform math to add, subtract, multiply, or divide
waveforms. For example, you can use math to analyze differential signals or to
calculate a power waveform. (See page 72.)
FFT Analysis. You can use FFT (Fast Fourier Transform) measurements to convert
a time-domain signal into its frequency components for analysis. (See page 73.)
Display Features Color LCD Display. You can identify and differentiate waveforms easily with
color coding. Waveforms, readouts, and buttons are color matched to increase
productivity and reduce operating errors. (See page 64.)
Digital Phosphor. A Digital Phosphor Oscilloscope can clearly display intensity
modulation in your signals. The oscilloscope automatically overlays subsequent
acquisitions and then decays them to simulate the writing and decay of the
phosphor in the CRT of an analog oscilloscope. This feature results in an
intensity-graded waveform display that shows the information contained in the
intensity modulation. (See page 53.)
Signal Preview. You can use the preview feature to optimize the control settings
when setting up a single-shot acquisition. As you adjust the controls, the
adjustments modify the current acquisition to show a preview of how the next
acquisition should appear. (See page 54.)
Measurement Features Cursors. You can use cursors to take simple voltage, time, and frequency
measurements. (See page 59.)
Automatic Measurements. You can choose from a list of automatic waveform
measurements. (See page 82.) You can customize the measurements by changing
reference levels or by adding measurement gating. (See page 79.)
XY Waveform Cursors. You can use cursors to take measurements on XY
waveforms. (See page 62.)
Trigger Features Dual Triggers. You can use the main (A) trigger system alone or add the B trigger
to capture more complex events. You can also use the A and B triggers together to
set up a wait-for-time or wait-for-events trigger. (See page 92.)
Logic Triggers. You can trigger on a Boolean condition between two signals. You
can use logic triggers to analyze problems in digital circuits, or synchronous
state machines. (See page 97.)
Pulse Triggers. You can trigger on a signal that meets a timing or threshold
condition. You can use pulse triggers to analyze problems in digital circuits, with
6 TDS3000C Series Oscilloscope User Manual

Getting Started
bus contention, or in bus transceivers, transmission lines, and op-amp circuits.
(See page 102.)
Video Trigger. You can trigger on video fields or lines to see a stable display of
standard video signals. (See page 107.)
Alternating Trigger. You can sequentially use each active channel as a trigger
source, from the lowest-numbered active channel to the highest-numbered active
channel. (See page 96.)
Built-In External Trigger. All models have an external trigger input. Four-channel
models have the external trigger connector on the back of the oscilloscope.
Two-channel models have the external trigger connector on the front panel.
Convenience Features e*Scope Web-based Remote Control. You can access your TDS3000C oscilloscope
through the Internet, from across a room to across the world. (See page 118.)
Built-in Ethernet. You can connect your TDS3000C oscilloscope to a network
or the Internet using the built-in 10BaseT Ethernet port, for e*Scope access or
printing screen images to network printers. (See page 149.)
Autoset. You can use Autoset to quickly set up the vertical, horizontal, and
trigger controls for a usable display. (See page 52.)
Scope QuickMenu. You can use the built-in Scope QuickMenu for simplified
oscilloscope operation. (See page 21.)
Single Sequence. One button sets the trigger parameters to the correct settings for
a single-shot acquisition (or single-sequence acquisition). (See page 51.)
USB Flash Drive Port. YoucanuseaUSBflash drive to store and recall
waveforms and setups, as well as upgrade the oscilloscope firmware and install
new features. (See page 86.)
Probe Support. You can use the standard probes or choose an optional probe for
aspecific application. Appendix D provides information and limitations. (See
page 139.)
Multilingual User Interface. On-screen menus and messages are in 11 languages.
(See page 109.)
TDS3000C Series Oscilloscope User Manual 7

Getting Started
Optional Features Application Modules. You can install application modules to add new test and
measurement features. (See page 135.)
Communication Module. You can install the communication module to add
RS-232, GPIB, and VGA ports for remote programmability, or to display the
oscilloscope screen on a monitor. (See page 13.)
Battery Power. You can install a rechargeable Lithium-Ion battery pack
(TDS3BATC) to use the oscilloscope without line power. (See page 9.)
Operating Positions
Use the handle and feet to place the oscilloscope in a convenient operating
position.
8 TDS3000C Series Oscilloscope User Manual

Getting Started
Connecting Power
You can operate the oscilloscope from a mains supply with line voltage between
100 VAC and 240 VAC (± 10%) and frequency between 47 Hz and 440 Hz. The
oscilloscope is grounded through the power cord grounding connector. The line
fuse is internal and is not operator replaceable.
Using Battery Power You can operate the oscilloscope continuously for approximately three hours from
the optional rechargeable TDS3BATC battery pack. A triangle icon in the display
shows when the battery is in use, a power-plug icon shows when line
power is connected, and a gauge icon shows the charge level in the battery.
The oscilloscope turns off automatically when the battery runs low; the screen
may turn white a few minutes before the automatic shutdown.
Refer to the Environmental Considerations for information about proper battery
disposal. (See page xii, Environmental considerations.)
TDS3000C Series Oscilloscope User Manual 9
Getting Started
Operating Safely with
Battery Power
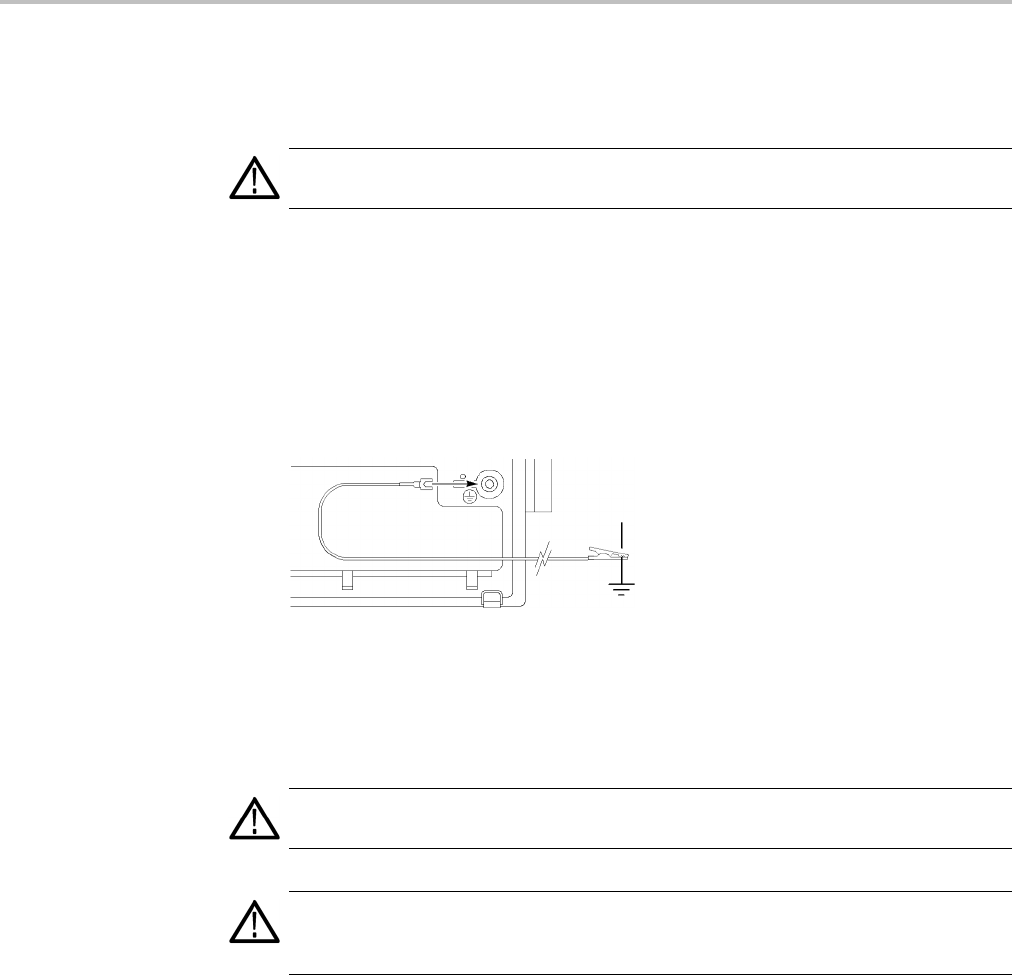
WARNING. To avoid electric shock, connect the rear-panel ground terminal to
earth ground when operating the oscilloscope from battery power.
For safe operation, the oscilloscope chassis should always remain at earth ground
potential. Without a connection between the chassis and earth ground, you can
receive a shock from exposed metal on the chassis if you connect an input to
a hazardous voltage (>30 VRMS,>42V
pk). To protect yourself against possible
shock, you can attach the Tektronix-supplied grounding wire from the terminal on
the rear panel to earth ground. If you use a different grounding wire, it must be
at least 18 gauge.
If you choose not to attach the grounding wire, you are not protected against
electric shock if you connect the oscilloscope to a hazardous voltage. You can still
use the oscilloscope if you do not connect a signal greater than 30 VRMS (42 Vpk)
to the probe tip, the BNC connector center, or the common lead. Ensure that all
probe common leads are connected to the same voltage.
WARNING. Hazardous voltages may exist in unexpected places due to faulty
circuitry in the device under test.
CAUTION. When operating the oscilloscope on battery power do not connect a
grounded device, such as a printer or computer, to the oscilloscope unless the
oscilloscope's grounding wire is connected to the earth ground.
10 TDS3000C Series Oscilloscope User Manual
Getting Started
Installing the Battery To install the optional battery pack, follow these steps:
1. Open the battery compartment door on the rear panel.
2. Remove the accessory tray.
Battery door (opened)
3. Slide the battery into the compartment and press it in from both sides until
you hear the latches click.
4. Press on both sides of the battery compartment door to snap it closed.
To remove the battery, follow these steps:
1. Open the battery compartment door.
2. Raise the handles on each side of the battery and use them to pull the battery
out of the oscilloscope.
TDS3000C Series Oscilloscope User Manual 11
Getting Started
Maximizing Operating Time To maximize the time that the oscilloscope can operate from a full battery charge,
consider doing these things:
Reduce the display backlight intensity (See page 63.)
Disconnect unused active probes
Only use passive probes
Charging the Battery The battery charges automatically when the oscilloscope is connected to line
power. You can also charge the battery with the optional external charger
(TDS3CHG).
Configuration Typical charging time
Battery charging in oscilloscope with oscilloscope turned
on or off
32 hours
Battery charging with TDS3CHG external charger 6 hours
NOTE. For optimal performance, charge the battery before using it for the first
time or after prolonged storage.
Refer to the TDS3BATC Rechargable Battery Pack Instructions (Tektronix part
number 071-0900-04) for information on storage and Battery Maintenance
Guidelines.
12 TDS3000C Series Oscilloscope User Manual
Getting Started
Installing an Application Module
CAUTION. To avoid damage to the oscilloscope or application module, observe
the ESD precautions. (See page xvi.)
Optional application modules are available to extend the capability of your
oscilloscope. You can install up to four application modules at one time.
Application modules can go into the two slots with windows in the upper right
corner of the front panel. Two additional slots are directly behind the two you
can see.
Refer to the TDS3000, TDS3000B, and TDS3000C Series Application Module
Installation Manual that came with your application module for instructions on
installing and testing an application module.
NOTE. If you remove an application module, the features provided by the
application module become unavailable. You can reinstall the module to restore
the features.
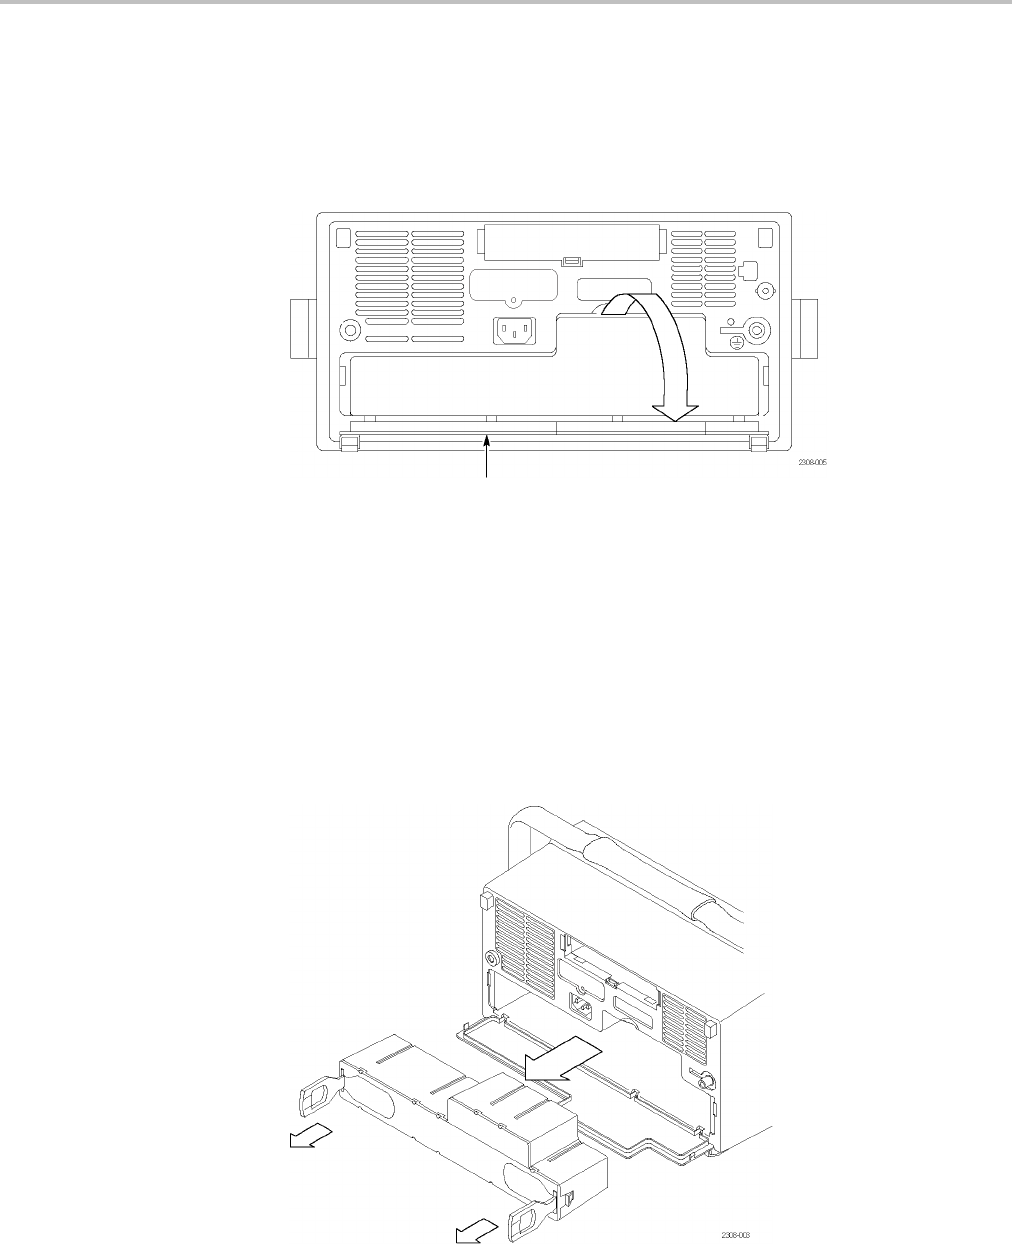
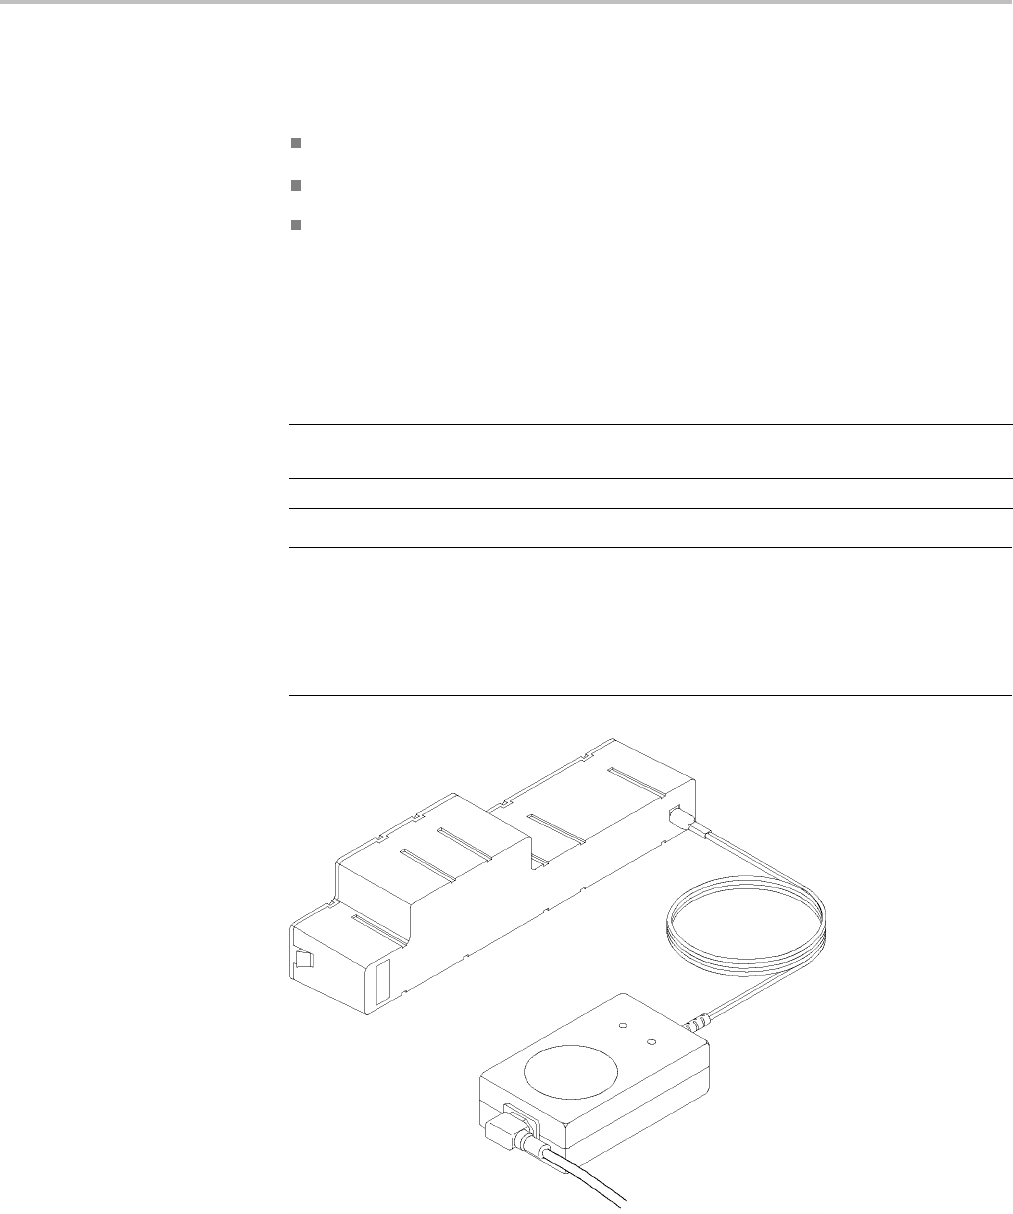
Installing the Communication Module
CAUTION. To avoid damage to the oscilloscope or communication module,
observe the ESD precautions. (See page xvi.)
To install the optional communications module, follow these steps:
1. Turn the oscilloscope power off.
2. Press down on the latching tab to remove the blank cover.
3. Slide the communication module into the compartment until the internal
connectors are seated and the latching tab locks.
4. Turn the power on. The communication module is now ready for your use.
TDS3000C Series Oscilloscope User Manual 13
Getting Started
Latching tab
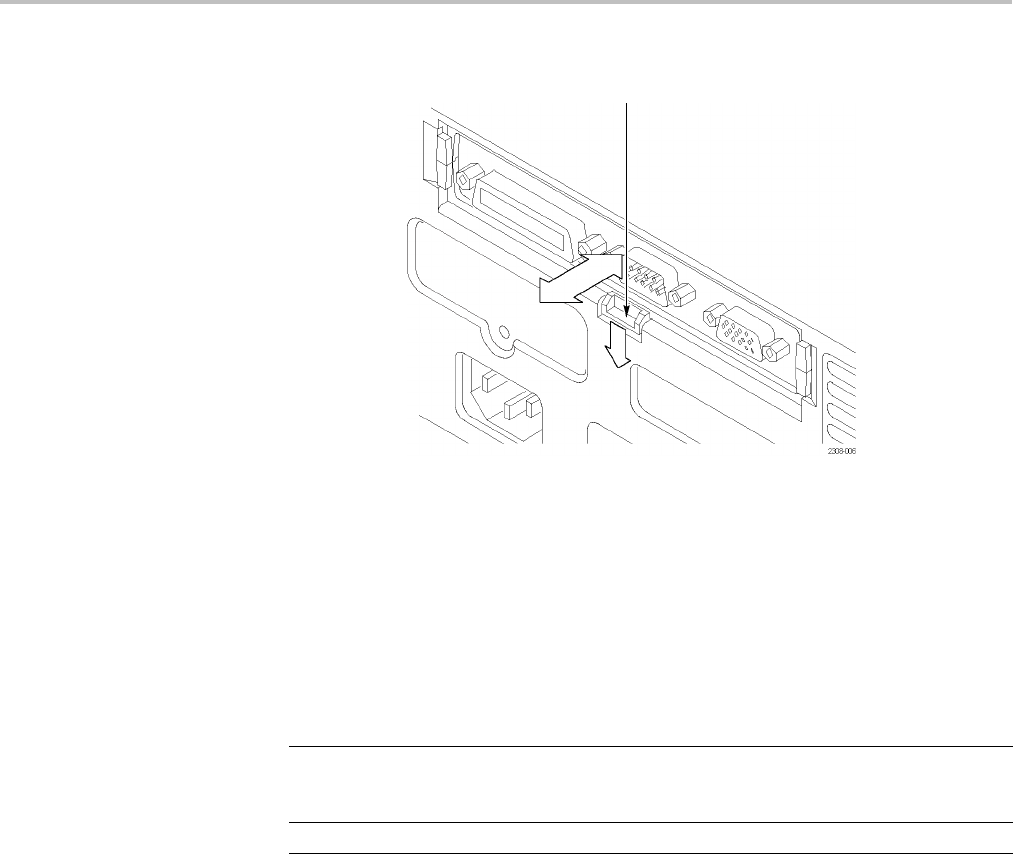
To remove a communication module, follow these steps:
1. Turn the oscilloscope power off.
2. Press down on the latching tab and then use a small screwdriver to alternately
pry out the sides of the communication module.
3. Slide out the communication module and store it in an ESD-shielded bag.
Install the blank cover.
Communication port For more information, see
GPIB
RS-232
The TDS3000, TDS3000B, and TDS3000C Series Digital
Phosphor Oscilloscopes Programmer Manual, and Hard Copy in
this user manual. (See page 65.)
VGA Specifications for the I/O ports in Appendix A in this user manual.
14 TDS3000C Series Oscilloscope User Manual
Getting Started
Front-Panel Menus and Controls
The front panel has buttons and controls for the functions you use most often. The
front panel has menus to access more specialized functions.
Using the MenuSystem To use the menu system, follow these steps:
1. Push a front-panel menu button to display the menu you want to use.
2. Push a bottom screen button to select a menu item. If a pop-up menu appears,
continue to push the screen button to select an item from the pop-up menu.
TDS3000C Series Oscilloscope User Manual 15

Getting Started
3. Push a side screen button to choose a menu item. If the menu item contains
more than one choice, push the side screen button again to make the choice.
4. Certain menu choices require you to set a numerical value to complete the
setup. Use the general purpose knob to adjust the parameter value. Push the
Coarse button to make larger adjustments.
16 TDS3000C Series Oscilloscope User Manual
Getting Started
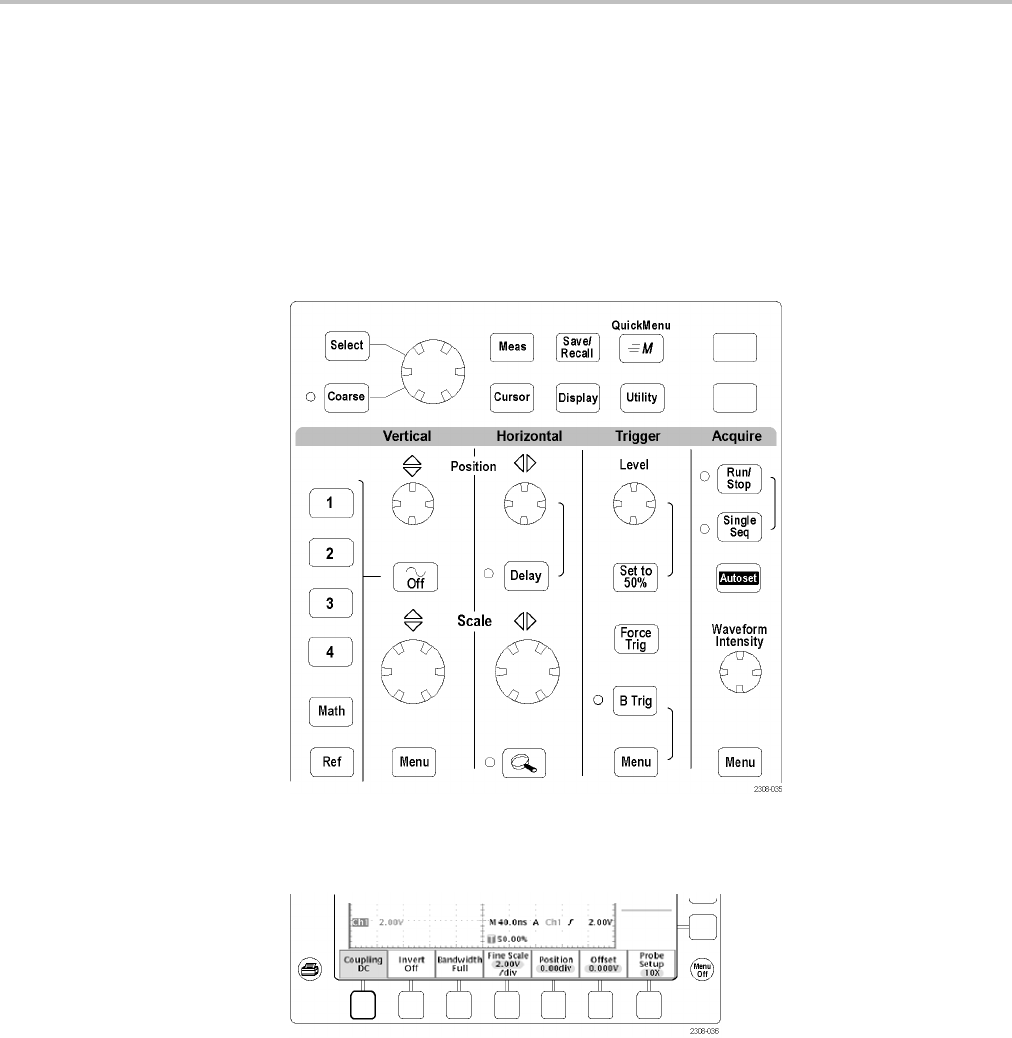
Using the Menu Buttons You can use the menu buttons to perform many functions in the oscilloscope.
1. Meas. Performs automated measurements of waveforms.
2. Cursor. Activates the cursors.
3. Save/Recall. Saves and recalls setups and waveforms to memory or a USB
flash drive.
4. Display. Changes the appearance of waveforms and the display screen.
5. QuickMenu. Activates QuickMenus such as the built-in Scope QuickMenu.
6. Utility. Activates the system utility functions, such as selecting a language.
7. Vertical Menu. Adjusts the scale, position, and offset of waveforms. Sets
the input parameters.
8.Trigger Menu. Adjusts the trigger functions.
9. Acquire Menu. Sets the acquisition modes and horizontal resolution, and
resets the delay time.
TDS3000C Series Oscilloscope User Manual 17

Getting Started
Using the Dedicated
Controls
These dedicated buttons and controls generally control waveforms and cursors
without the use of menus.
1. Coarse. Causes the general purpose knob and position knobs to make
adjustments more quickly.
2. Select. Toggles between the two cursors to select the active cursor.
3. General purpose knob. Moves the cursors. Sets numerical parameter values
for some menu items. Push the Coarse button to make adjustments quickly.
4. Vertical Position. Adjusts the vertical position of the selected waveform. Push
the Coarse button to make adjustments more quickly.
5. Horizontal Position. Adjusts the trigger point location relative to the acquired
waveforms. Push the Coarse button to make adjustments quickly.
6. Trigger Level. Adjusts the trigger level.
7. Run/Stop. Stops and restarts acquisition.
8. Single Seq. Sets acquisition, display, and trigger parameters for a single-shot
(single-sequence) acquisition.
9. Set To 50%. Sets the trigger level to the midpoint of the waveform.
10. Autoset. Automatically sets the vertical, horizontal, and trigger controls for
a usable display.
18 TDS3000C Series Oscilloscope User Manual

Getting Started
11. Force Trig. Forces an immediate trigger event.
12. Waveform Intensity. Controls waveform intensity.
13. B Trig. Activates the B trigger. Changes the Trigger menu to set the B-trigger
parameters.
14. Delay. Enables delayed acquisition relative to the trigger event. Use
horizontal Position to set the amount of delay.
15. Horizontal Scale. Adjusts the horizontal scale factor.
16. Horizontal Zoom. Splits the screen and magnifies the current acquisition
horizontally.
17. Waveform Off. Removes selected waveform from the display.
18. Vertical Scale. Adjusts selected waveform vertical scale factor.
19. 1, 2, (3, 4,) Math. Displays a waveform and chooses the selected waveform.
Ref shows the reference waveform menu.
20. Hard copy. Initiates a hard copy using the port selected in the Utility menu.
21. Power switch. Turns power to on or standby. Power-up time varies from
about 15 seconds to 45 seconds, depending on the oscilloscope internal
calibration process.
22. Wrist-strap ground. Connect a wrist strap when working with ESD-sensitive
circuits. This connector is not a safety ground.
NOTE. The wrist-strap ground terminal is only a ground when the oscilloscope is
connected to earth ground. When operating from a battery, connect the grounding
wire to earth ground to ensure the terminal is at ground.
23. USB Flash Drive port.
24. Menu Off. Clears menu from the display.
TDS3000C Series Oscilloscope User Manual 19
Getting Started
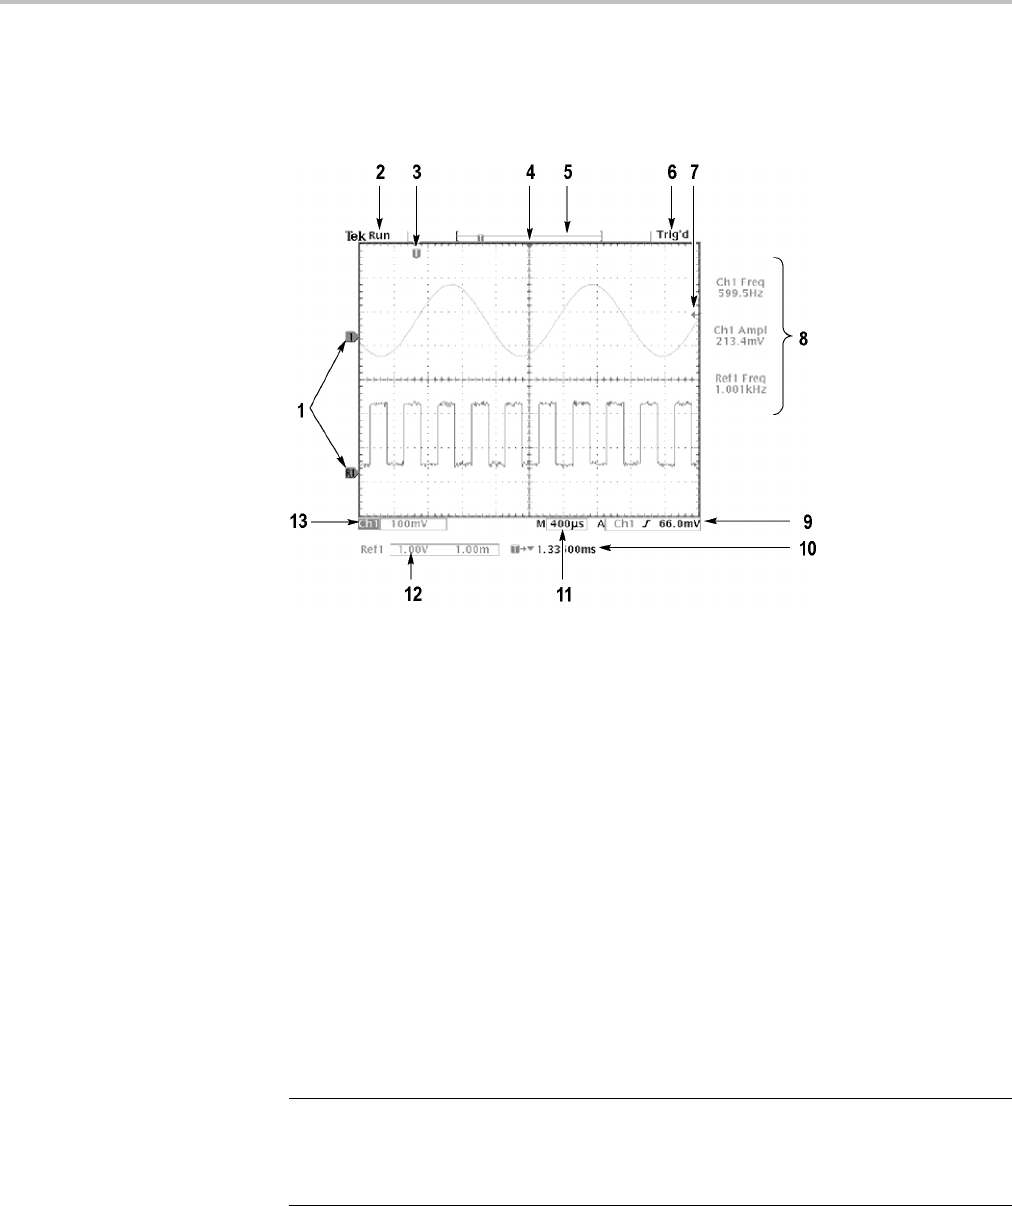
Identifying Items in the
Display
The following items may appear in the display; not all items are visible at any
given time. Some readouts move outside the graticule area when menus are
turned off.
1. Waveform baseline icons show the zero-volt level of the waveforms (ignoring
the effect of offset). The icon colors correspond to the waveform colors.
2. Acquisition readout shows when acquisition is running, stopped, or when
acquisition preview is in effect.
3. Trigger position icon shows the trigger location in the waveforms.
4. Expansion point icon shows the point that the horizontal scale expands and
compresses around.
5. Waveform record icon shows the trigger location relative to the waveform
record. The line color corresponds to the selected waveform color.
6. Trigger status readout show trigger status.
7. Trigger level icon shows the trigger level on the waveform. The icon color
corresponds to the trigger source channel color.
8. Cursor and measurement readouts show results and messages.
NOTE. Waveforms that extend beyond the screen (overrange) will display a
message in the measurement readout ("clipping"). This indicates that the
numerical readout is an invalid value. Adjust the vertical scaling to ensure the
readout is valid.
9. Trigger readouts show the trigger sources, slopes, and levels, and position.
20 TDS3000C Series Oscilloscope User Manual

Getting Started
10. Readout shows the delay setting or the trigger location within the record.
11. Horizontal readout shows the main or zoom time/division.
12. Auxiliary waveform readouts show the vertical and horizontal scale factors
of the math or reference waveforms.
13. Channel readouts show the channel scale factor, coupling, input resistance,
bandwidth limit, and invert status.
14. Triangle icon with the battery icon indicates a battery is installed and battery
power is in use. The battery icon shows the approximate charge level of the
battery. (See page 10, Operating Safely with Battery Power.)
15. Power-plug icon with the battery icon indicates a battery is installed but
line power is in use. The battery may be charging. The battery icon shows
the approximate charge level.
Using QuickMenus The QuickMenu feature simplifies the use of the oscilloscope. When you push the
QuickMenu button, a set of frequently used menu functions show on the display.
Then, push the screen buttons around the display to operate the QuickMenu.
The Reference chapter has general instructions on how to operate QuickMenus.
(See page 84.)
Using the Scope QuickMenu. Scope is one type of QuickMenu that you can use
to control the basic oscilloscope functions. You can perform many tasks without
using the regular menu system. If you need to use a function that is not contained
in the Scope QuickMenu, push the button you would normally push to access that
function. For example, if you want to add an automatic measurement, push the
Meas button to set up the measurement. Then, push the QuickMenu button to
return to the Scope QuickMenu with the measurement also in the display.
TDS3000C Series Oscilloscope User Manual 21

Getting Started
1. Edge Trigger controls. Push these screen buttons to set trigger parameters
for edge trigger.
2. Trigger controls if either B trigger or video trigger is selected. Logic and
Pulse trigger controls are not available through the QuickMenu.
3. Cursor control. Push this screen button to turn on cursors and select the cursor
type. Push the Select button to toggle between the two cursors to select the
active cursor. Use the general purpose knob to move the active cursor.
4. Acquisition controls. Push these screen buttons to set acquisition parameters.
5. Channel vertical controls. Push these screen buttons to set vertical controls
for the selected channel. Use the channel 1, 2, 3, 4, and the Math and Ref
buttons to select the channel you want to control.
6. Vertical controls if either the math waveform or a reference waveform is
selected.
7. Menu. Push this screen button to select a specific QuickMenu display if more
than one is available.
NOTE. Items in the Scope QuickMenu not mentioned above are also contained
in the regular display. (See page 20.)
Other QuickMenus. Some optional application packages include a custom
QuickMenu display. Those QuickMenus contain specific features that are
important for the application.
22 TDS3000C Series Oscilloscope User Manual

Getting Started
Front-Panel Connectors
1. Probe Comp. Square wave signal source to compensate probes.
2. 1, 2, (3, 4). Channel inputs with TekProbe interface.
3. Ext Trig. External trigger input with TekProbe interface (two-channel models
only). External trigger input specifications are in Appendix A.
TDS3000C Series Oscilloscope User Manual 23

Getting Started
Rear-Panel Connectors
1. Power input. Attach to an AC power line with integral safety ground.
2. Communication Module compartment. Install the optional communication
module.
3. Ethernet port. Connects the oscilloscope to a 10BaseT local area network.
4. Ext Trig. External trigger input with TekProbe interface (four-channel models
only). External trigger input specifications are in Appendix A.
5. Ground terminal. Connect to earth ground when using battery power. (See
page 10, Operating Safely with Battery Power.)
6. CAL switch. For use by authorized service personnel only.
Communication Module Connectors
24 TDS3000C Series Oscilloscope User Manual

Getting Started
1. GPIB port. Connect to a controller for remote programmability.
2. RS-232 port. Connect to a controller or terminal for remote programmability
or printing.
3. VGA port. Connect to a VGA monitor to display the screen image.
TDS3000C Series Oscilloscope User Manual 25

Getting Started
26 TDS3000C Series Oscilloscope User Manual
Application Examples
This chapter presents six common oscilloscope applications:
Taking simple measurements
Analyzing signal detail
Taking FFT measurements
Triggering on a video signal
Capturing a single-shot signal
Saving data to a USB flash drive
Each application example highlights different features of the oscilloscope and
gives you ideas about using the oscilloscope to solve test problems.
Taking Simple Measurements
You need to see a signal in a circuit, but you do not know the signal amplitude
or frequency. Connect the oscilloscope to quickly display the signal and then
measure its frequency and peak-to-peak amplitude.
Using Autoset To quickly display a signal, follow these steps:
1. Connect the channel 1 probe to the signal.
2. Push the Autoset button.
The oscilloscope sets vertical, horizontal, and trigger controls automatically. You
can manually adjust any of these controls if you need to optimize the display
of the waveform.
TDS3000C Series Oscilloscope User Manual 27
Application Examples
When you are using more than one channel, the autoset function sets the vertical
controls for each channel and uses the lowest-numbered active channel to set the
horizontal and trigger controls.
Selecting Automatic
Measurements
The oscilloscope can take automatic measurements of most displayed signals. To
measure signal frequency and peak-to-peak amplitude, follow these steps:
1. Push the Measbutton to see the Select Measurement menu.
2. Push the channel 1button and then push the Select Measurement for Ch1
screen button.
3. Select the Frequency measurement.
4. Push the more screen button and select the Pk-Pk measurement.
5. Push the Menu Off button.
The measurements show on the screen and update as the signal changes.
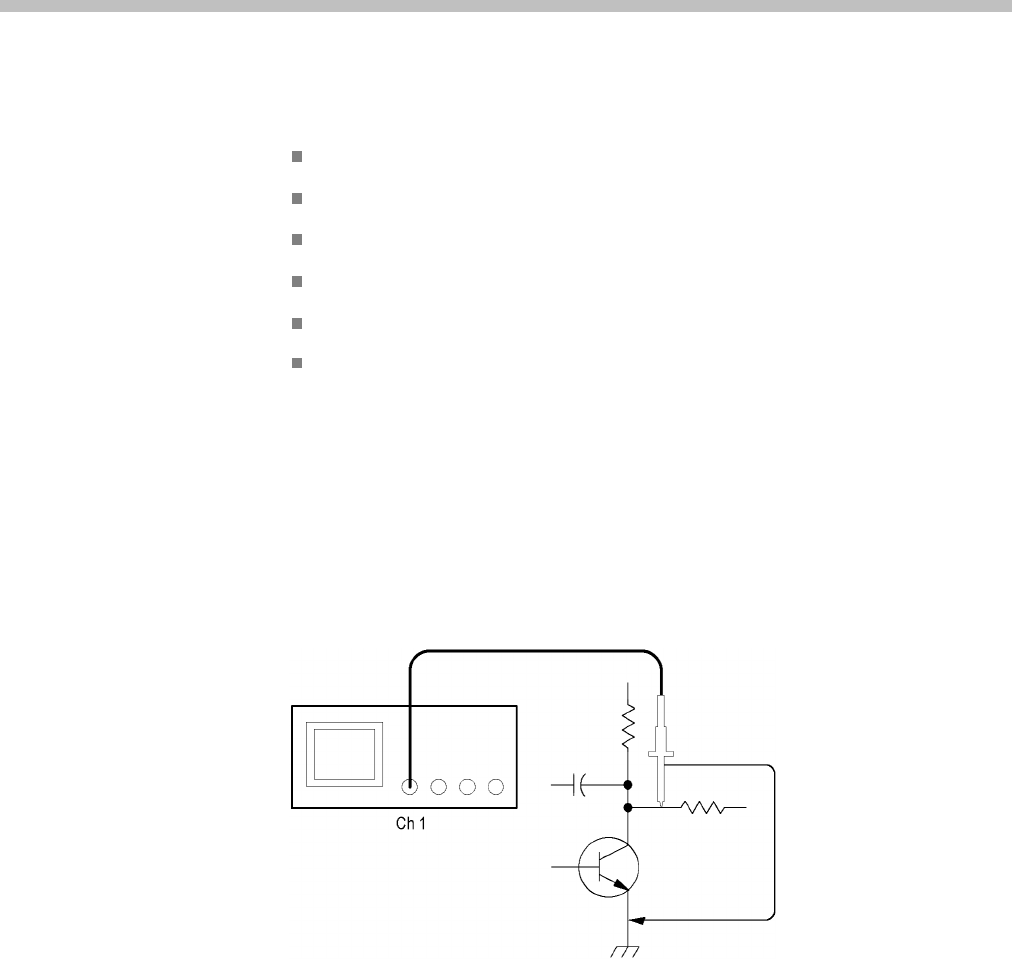
Measuring Two Signals You are testing a piece of equipment and need to measure the gain of its audio
amplifier. You have an audio generator that can inject a test signal at the amplifier
input. Connect two oscilloscope channels to the amplifier input and output as
shown. Measure both signal levels and use these measurements to calculate the
gain.
28 TDS3000C Series Oscilloscope User Manual
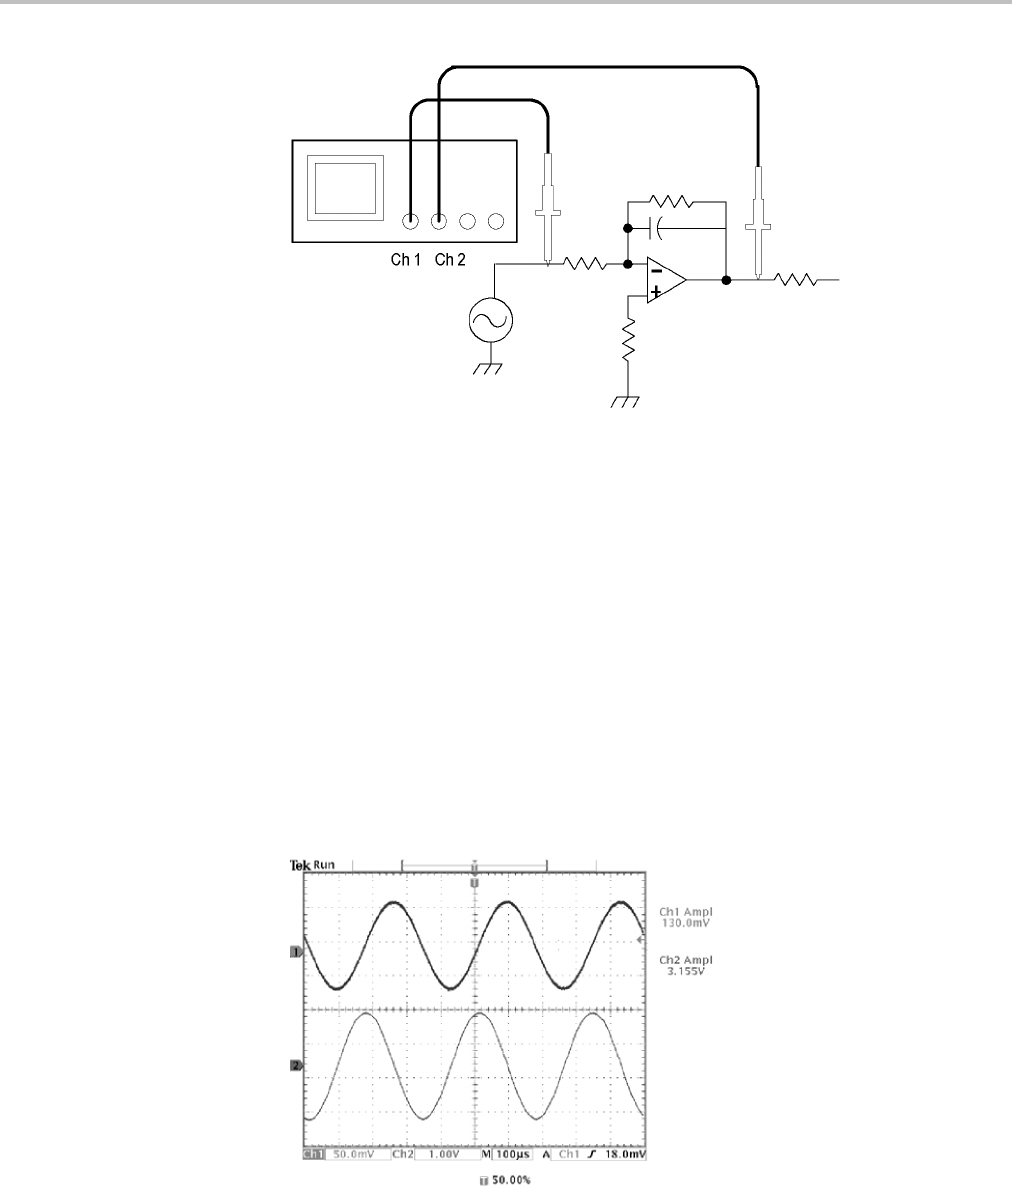
Application Examples
To display the signals connected to channels 1 and 2, follow these steps:
1. Push the channel 1and 2buttons to activate both channels.
2. Push the Autoset button.
To select measurements for the two channels, follow these steps:
1. Push the Meas button to see the Select Measurement menu.
2. Push the channel 1button and then push the Select Measurement for Ch1
screen button.
3. Select the Amplitude measurement.
4. Push the channel 2button and then push the Select Measurement for Ch2
screen button.
5. Select the Amplitude measurement.
TDS3000C Series Oscilloscope User Manual 29
Application Examples
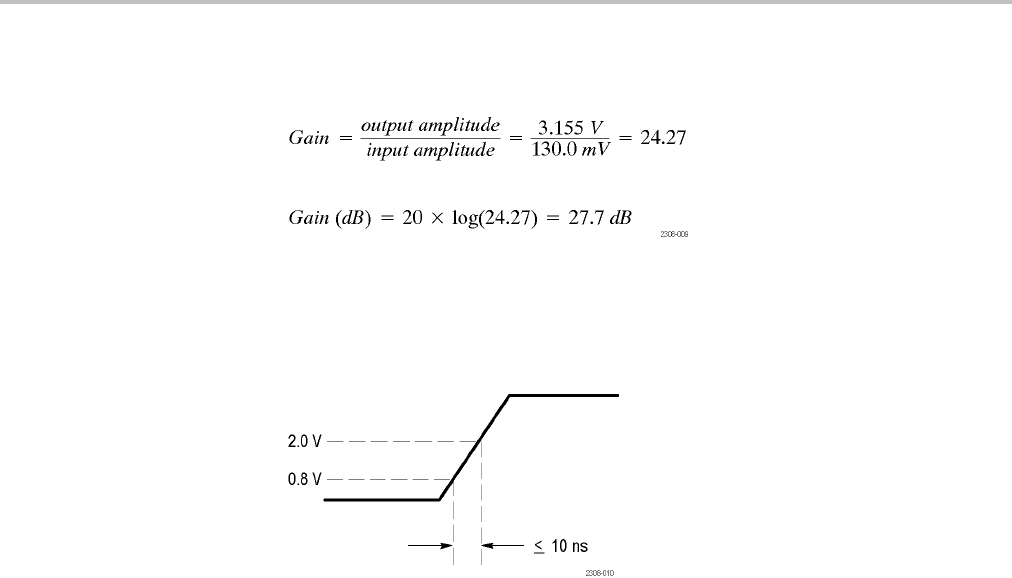
6. Calculate the amplifier gain using the following equations:
Customizing Your
Measurements
In this example you want to verify that the incoming signal to a piece of digital
equipment meets its specifications. Specifically, the transition time from a low
logic level (0.8 V) to a high logic level (2.0 V) must be 10 ns or less.
30 TDS3000C Series Oscilloscope User Manual
Application Examples
To select the rise time measurement, follow these steps:
1. Push the Meas button to see the Select Measurement menu.
2. Push the channel 1button and then the Select Measurement for Ch1 screen
button.
3. Select the Rise Time measurement.
Rise time is typically measured between the 10% and 90% amplitude levels of a
signal; these are the default reference levels the oscilloscope uses for rise time
measurements. However, in this example you need to measure the time the signal
takes to pass between the 0.8 V and 2.0 V levels.
You can customize the rise time measurement to measure the signal transition
time between any two reference levels. You can set each of those reference levels
to a specific percent of the signal amplitude or to a specific level in vertical units
(such as volts or amperes).
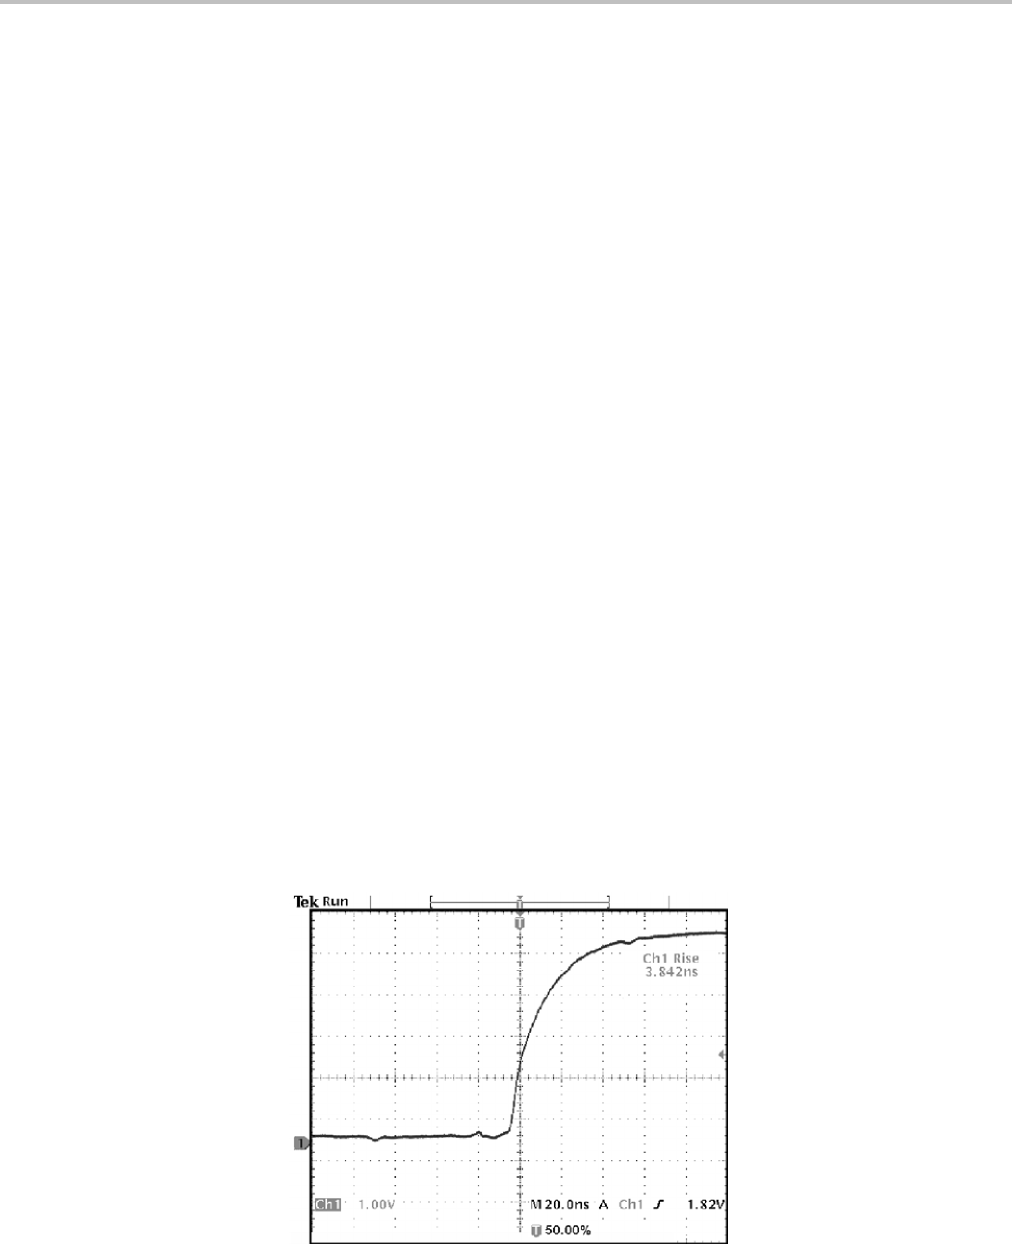
Setting Reference Levels. To set the reference levels to specific voltages, follow
these steps:
1. Push the Reference Levels screen button.
2. Push the Set Levels in screen button to select units.
3. Push the High Ref screen button.
4. Use the general purpose knob to select 2.0 V.
5. PushtheLow Ref screen button.
6. Use the general purpose knob to select 800 mV.
The measurement verifies that the transition time (3.842 ns) meets the specification
(≤10 ns).
TDS3000C Series Oscilloscope User Manual 31

Application Examples
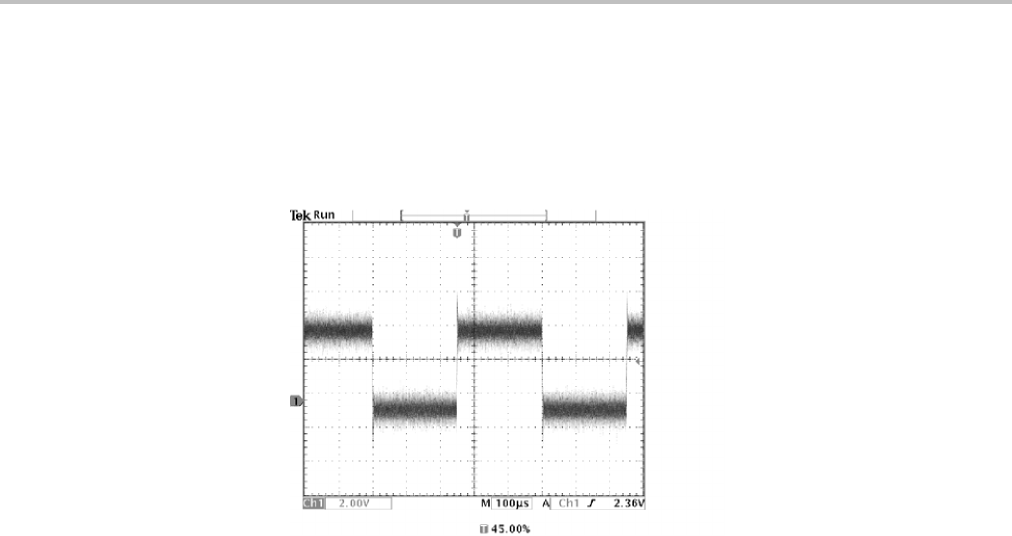
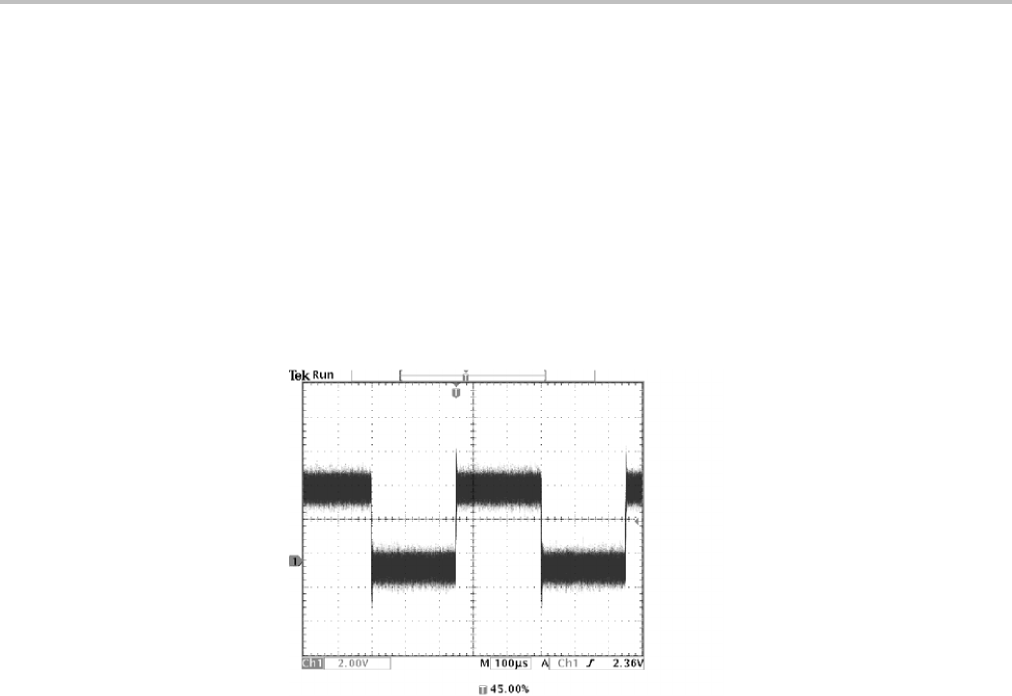
Measuring Specific Events. Next you want to see the pulses in the incoming
digital signal, but the pulse widths vary so it is hard to establish a stable trigger.
To look at a snapshot of the digital signal, follow this step:
1. Push the Single Seq button to capture a single acquisition.
Now you want to measure the width of each displayed pulse. You can use
measurement gating to select a specific pulse to measure. To measure the second
pulse, for example, follow these steps:
1. Push the Meas button.
2. Push the channel 1button and then push the Select Measurement for Ch1
screen button.
3. Select thePositive Pulse Width measurement.
4. Push the Gating screen button.
5. Select Between V Bar Cursors to choose measurement gating using cursors.
6. Place one cursor to the left and one cursor to the right of the second pulse.
The oscilloscope shows the width measurement (160 ns) for the second pulse.
32 TDS3000C Series Oscilloscope User Manual
Application Examples
Analyzing Signal Detail
You have a noisy signal displayed on the oscilloscope and you need to know more
about it. You suspect that the signal contains much more detail than you can
now see in the display.
TDS3000C Series Oscilloscope User Manual 33
Application Examples
Looking at a Noisy Signal The signal appears noisy and you suspect that noise is causing problems in your
circuit. To better analyze the noise, follow these steps:
1. Push the Acquire Menu button.
2. Push the Mode bottom button.
3. Select the Peak Detect acquisition mode.
4. Increase the Waveform Intensity control to see the noise more easily.
Peak detect emphasizes noise spikes and glitches in your signal as narrow as 1 ns,
even when the time base is set to a slow setting.
The Reference chapter has more information about peak-detect and the other
acquisition modes. (See page 55.)
Separating the Signal from
Noise
Now you want to analyze the signal shape and ignore the noise. To reduce random
noise in the oscilloscope display, follow these steps:
1. Push the Acquire Menu button.
2. Push the Mode bottom button.
3. Select the Average acquisition mode.
Averaging reduces random noise and makes it easier to see detail in a signal. In
the next example, a ring shows on the rising and falling edges of the signal when
the noise is removed.
34 TDS3000C Series Oscilloscope User Manual
Application Examples
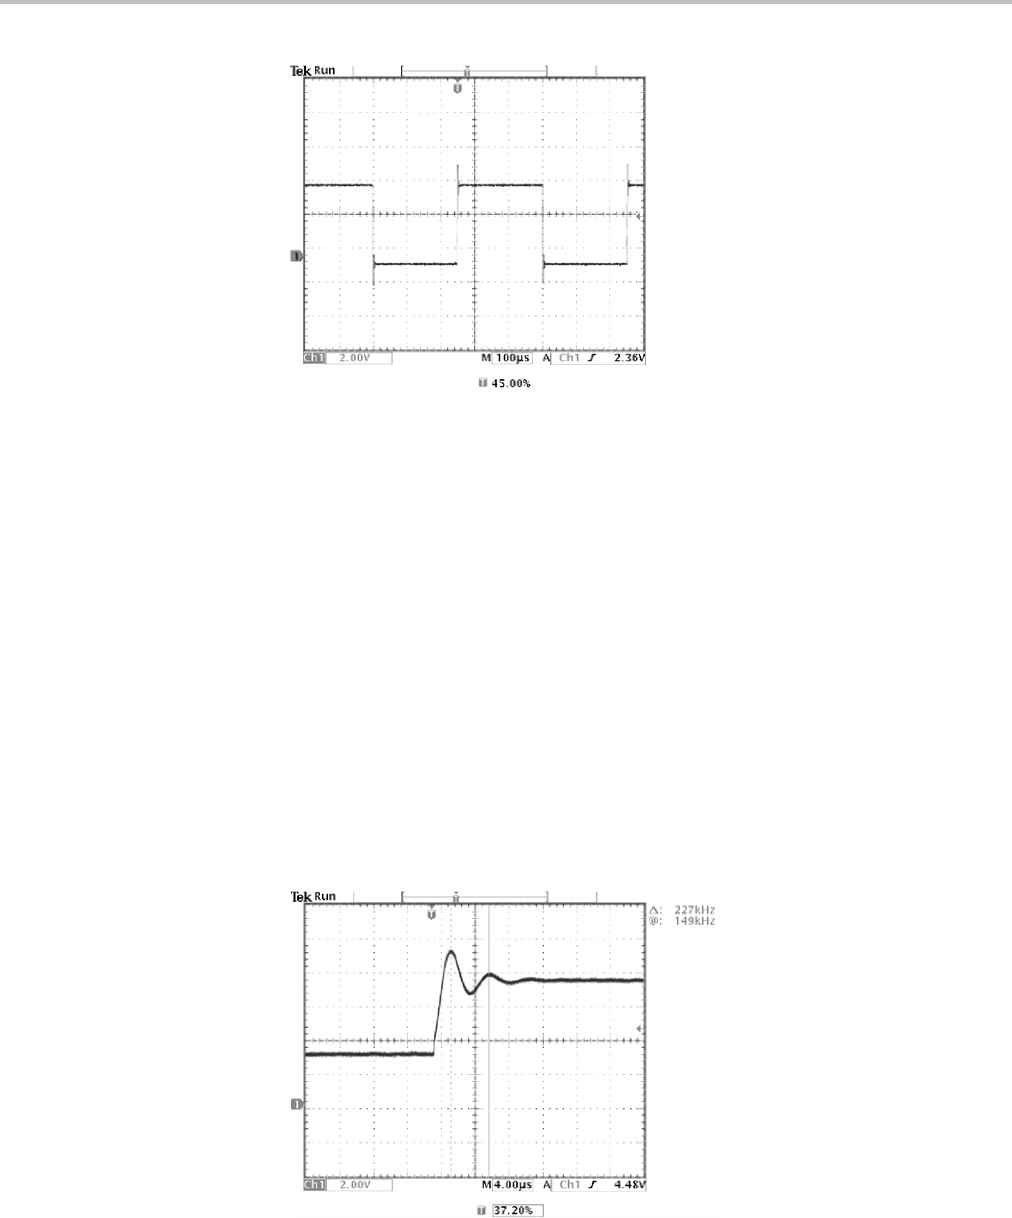
Taking Cursor
Measurements
You can use the cursors to take quick measurements on a waveform. To measure
the ring frequency at the rising edge of the signal, follow these steps:
1. Push the Cursor button.
2. Push the Function screen button.
3. Select VBarscursors.
4. Push the VBarUnitsscreen button.
5. Select 1/seconds (Hz).
6. Place one cursor on the first peak of the ring using the general purpose knob.
7. Push the Select button.
8. Place the other cursor on the next peak of the ring.
The cursor Δreadout shows the measured ring frequency is 227 kHz.
TDS3000C Series Oscilloscope User Manual 35
Application Examples
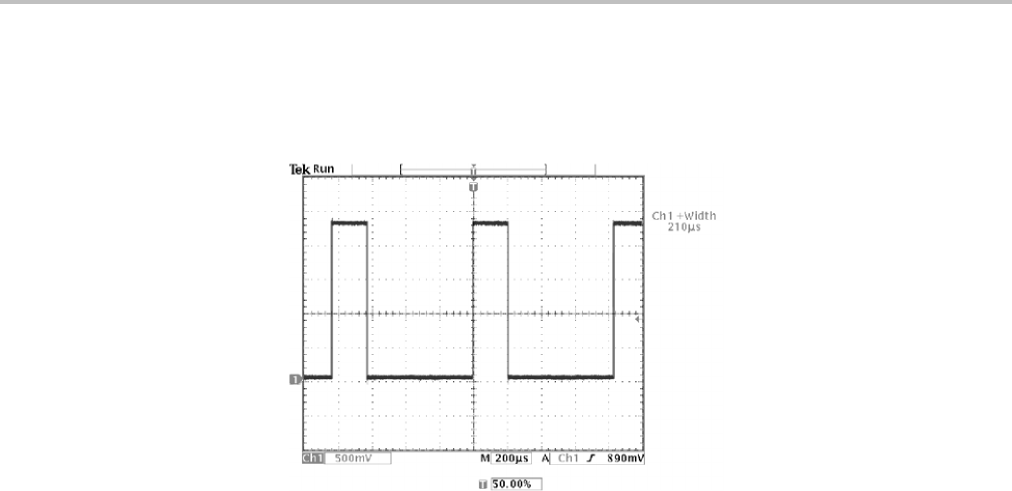
Using Delay You are analyzing a pulse waveform and use the + Width measurement to measure
the waveform pulse width. You notice that the measurement is not stable, which
implies that there is jitter in the pulse width.
36 TDS3000C Series Oscilloscope User Manual
Application Examples
To use delay to see the jitter, follow these steps:
1. Push the Delay button.
2. Adjust the horizontal Position control to set the delay close to the nominal
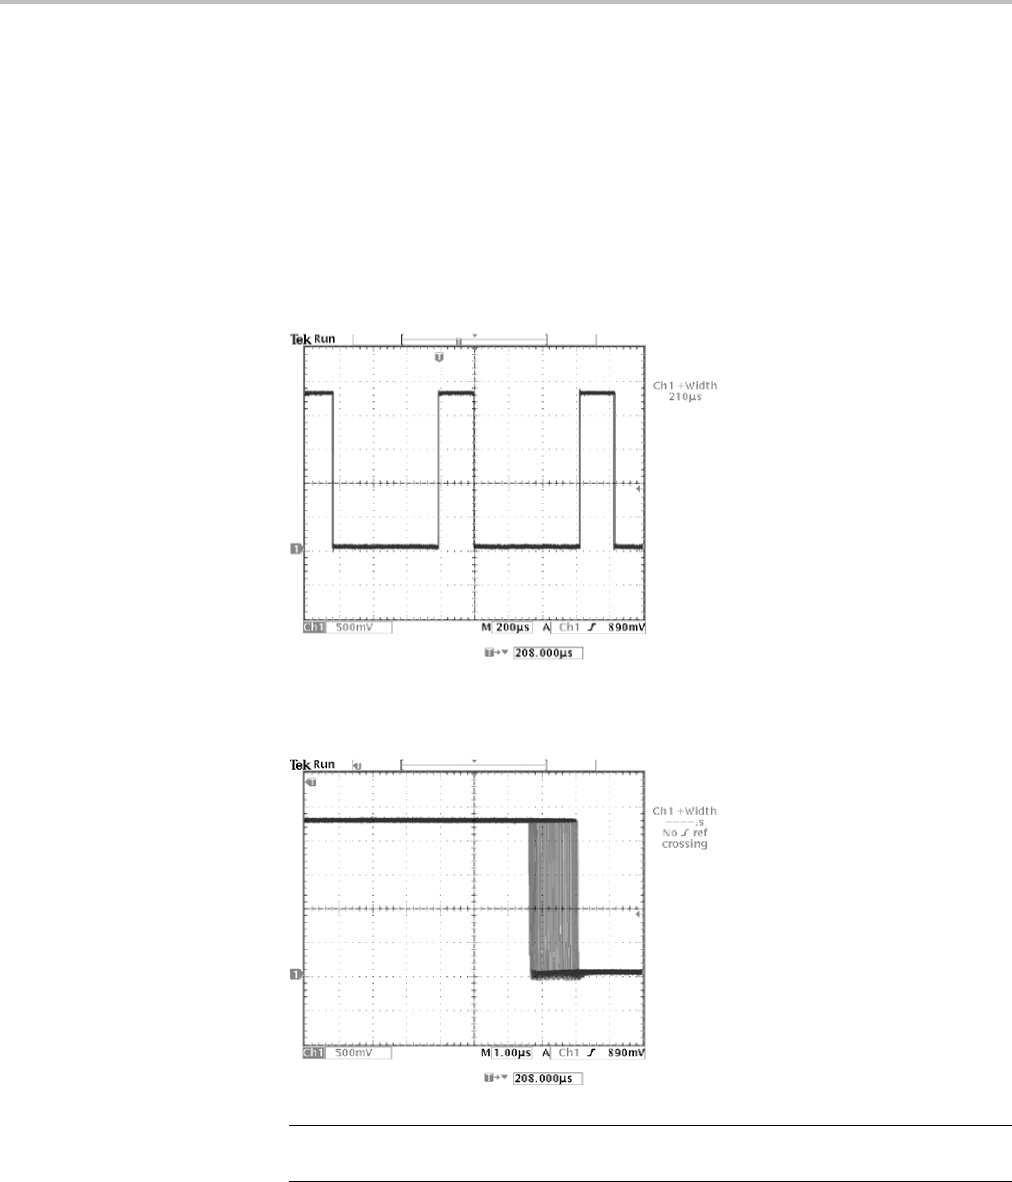
pulse width (210 μs). Push the Coarse button to make delay adjustments
more quickly. Push the Coarse button again to fine tune the delay time.
The falling edge of the pulse is now near the center of the screen. When delay
is on, the horizontal expansion point separates from the trigger point and
remains in the center of the screen.
3. Adjust the horizontal Scale to a faster time base setting and increase the
Waveform Intensity to see the jitter in the pulse width.
NOTE. You can toggle the delay function on and off to view signal details at two
different areas of interest.
TDS3000C Series Oscilloscope User Manual 37

Application Examples
Measuring Jitter To measure the peak-to-peak jitter, follow these steps:
1. Push the Cursor button.
2. Push the Function screen button.
3. Select the VB
ars cursors.
4. Push the Bring Both Cursors On Screen screen button to quickly locate
the cursors.
5. Place one cursor at the first falling edge and place the other cursor at the
last falling edge.
6. Read the peak-to-peak jitter in the Δreadout (1.40 μs).
You can also measure the minimum and maximum pulse widths. When you select
the first cursor, the @ readout displays the minimum pulse width (210 μs). When
you select the second cursor, the @ readout displays the maximum pulse width
(211 μs).
38 TDS3000C Series Oscilloscope User Manual
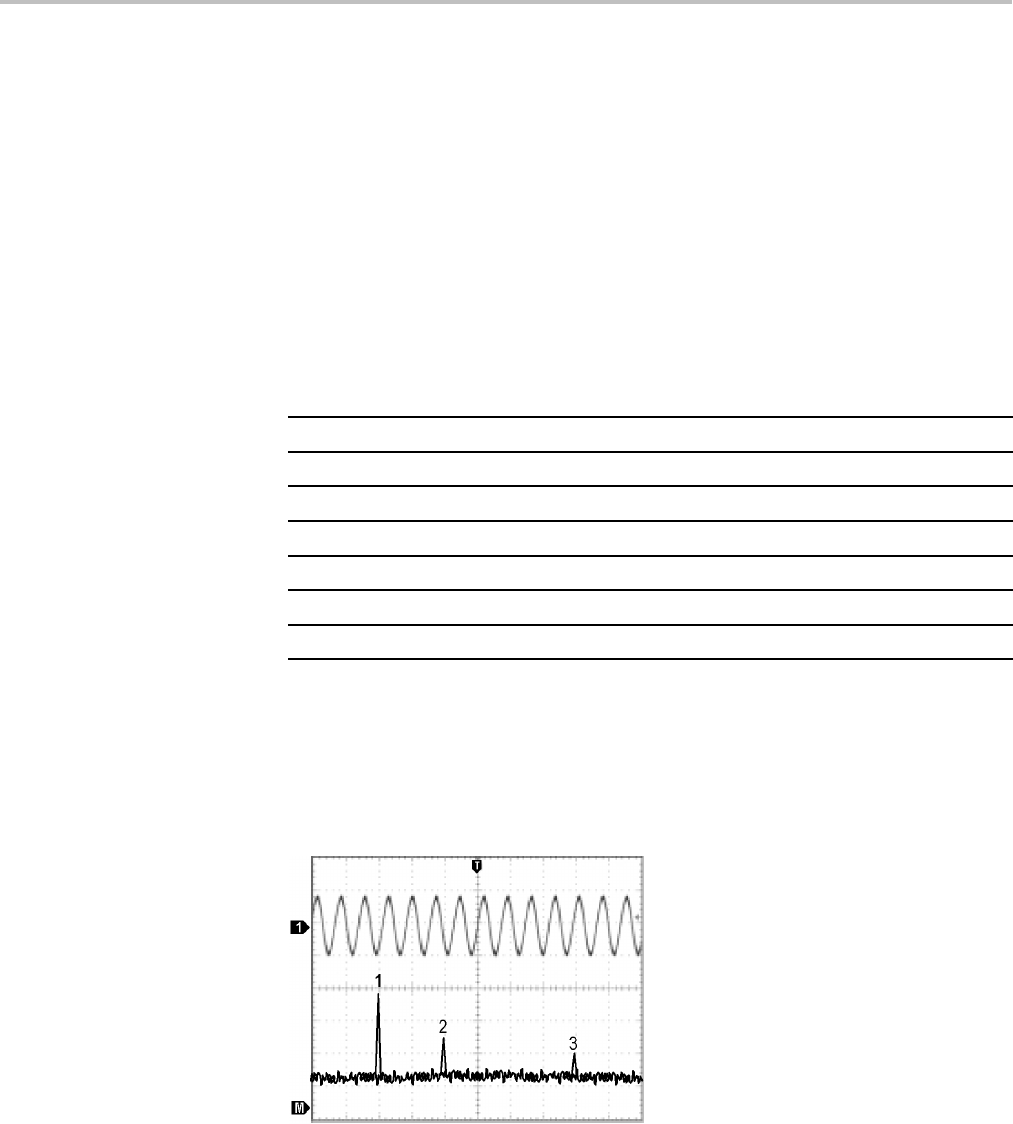
Application Examples
Taking FFT Measurements
You can take FFT measurements to determine if low-level distortion is present, or
to find the source of noise in a mixed circuit.
Detecting Distortion A pure sine wave can be input into an amplifier to measure distortion; any
amplifier distortion will introduce harmonics in the amplifier output. Viewing the
FFT of the output can determine if low-level distortion is present.
You are using a 20 MHz signal as the amplifier test signal. You would set the
oscilloscope and FFT parameters as listed in the next table.
Control Setting
1 Coupling AC
Acquisition Mode Average 16
Horizontal Resolution Normal (10k points)
Horizontal Scale 100 ns
FFT Source Ch1
FFT Vert Scale dBV
FFT Window Blackman-Harris
In thenextfigure, the first component at 20 MHz (figure label 1) is the source
signal fundamental frequency. The FFT waveform also shows a second-order
harmonic at 40 MHz (label 2), and a fourth-order harmonic at 80 MHz (label
3). The presence of components 2 and 3 indicate that the system is distorting
the signal. The even harmonics suggest a possible difference in signal gain on
half of the signal cycle.
TDS3000C Series Oscilloscope User Manual 39

Application Examples
Identifying the Source of
Noise
Noise in mixed digital/analog circuits can be easily observed with an oscilloscope.
However, identifying the sources of the observed noise can be difficult.
The FFT waveform displays the frequency content of the noise. You may then
be able to associate those frequencies with known system frequencies, such as
system clocks, oscillators, read/write strobes, display signals, or switching power
supplies.
The highest frequency on the example system is 40 MHz. To analyze the example
signal, you would set the oscilloscope and FFT parameters as listed in the next
table.
Control Setting
1 Coupling AC
Acquisition Mode Sample
Horizontal Resolution Normal (10k points)
Horizontal Scale 4.00 μs
Bandwidth 150 MHz
FFT Source Ch1
FFT Vert Scale dBV
FFT Window Hanning
40 TDS3000C Series Oscilloscope User Manual
Application Examples
In the next figure, notice the component at 31 MHz (figure label 1). This coincides
with a 31 MHz memory strobe signal in the example system. There is also a
frequency component at 62 MHz (label 2), which is the second harmonic of the
strobe signal.
Triggering on a Video Signal
You are testing the video circuit in a piece of medical equipment and need to
display the video output signal. The video output is an NTSC standard signal. Use
the video trigger to obtain a stable display.
To trigger on the video fields, follow these steps:
1. Push the Trigger Menu button.
2. Push the Type screen button to select Video.
3. Push the Standard screen button to select 525/NTSC.
4. Push the Trigger On screen button.
5. Select Odd.
6. Adjust the horizontal Scale to see a complete field across the screen.
7. Push the Acquire Menu button.
TDS3000C Series Oscilloscope User Manual 41
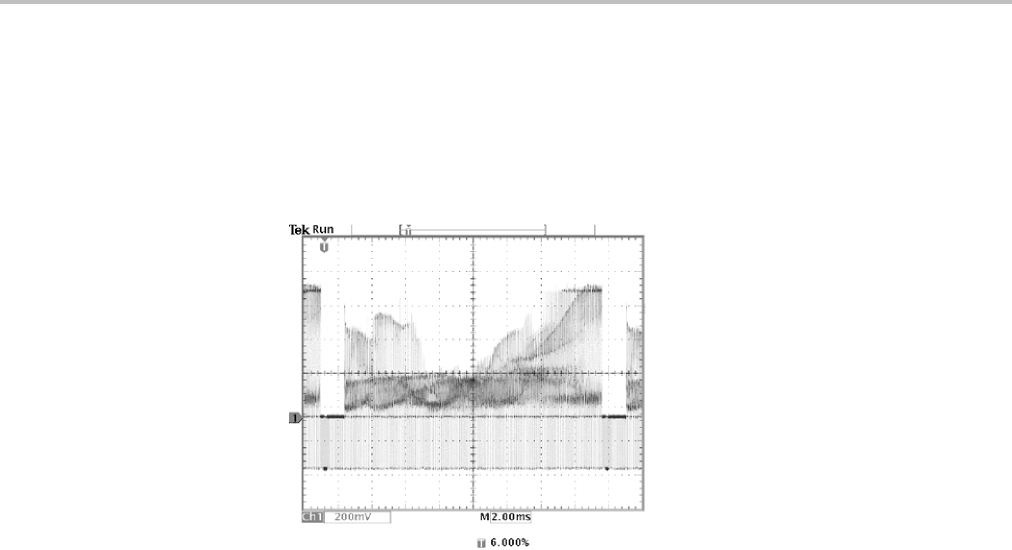
Application Examples
8. Push the Horizontal Resolution screen button.
9. Select Normal acquisition resolution.
Normal acquisition resolution is the best choice to acquire a video field signal
because the signal contains a great amount of horizontal detail.
If the signal had been noninterlaced, you could choose to trigger on All Fields.
Triggering on Lines. You can also look at the video lines in the field. To trigger on
the lines, follow these steps:
1. Push the Trigger On screen button.
2. Select All Lines.
3. Adjust the horizontal Scale to see a complete video line across the screen.
42 TDS3000C Series Oscilloscope User Manual
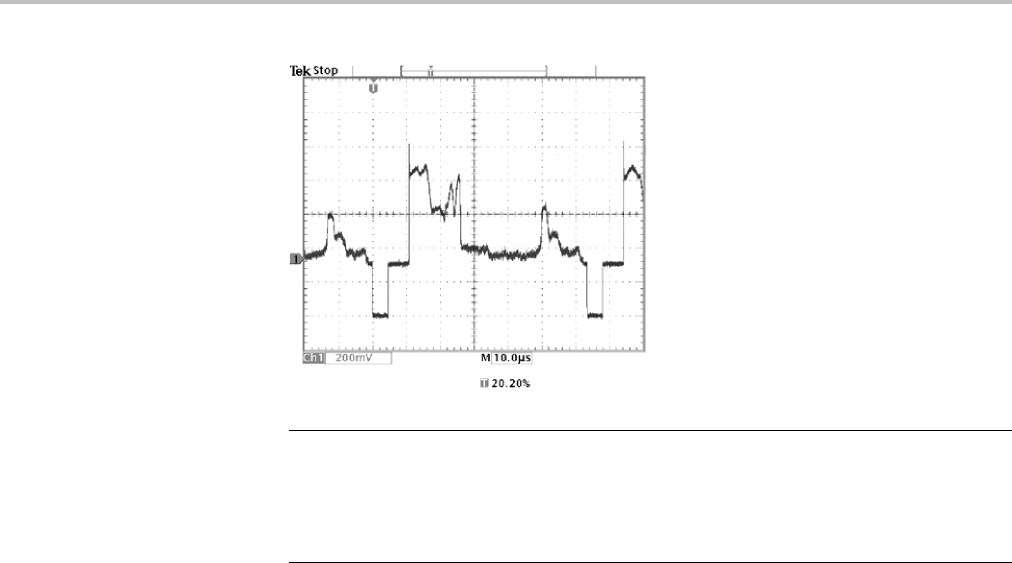
Application Examples
NOTE. The optional TDS3VID and TDS3SDI application modules add new video
functions such as a video QuickMenu, video Autoset, trigger on custom scan rates,
trigger on specific video lines, vectorscope (vectorscope supports component
video only), video picture, trigger on analog HDTV signals, and view 601 digital
video signals (TSD3SDI only).
Looking at Modulation. A dedicated video waveform monitor clearly shows
the modulation in a video signal. To see a similar modulation display on the
oscilloscope screen, follow these steps:
1. Start with triggered display of the video lines.
2. Push the Acquire Menu button.
3. Push the Horizontal Resolution screen button.
4. Select Fast Trigger acquisition resolution.
5. Adjust the Waveform Intensity control for the amount of modulation you
wanttosee.
The oscilloscope now shows signal modulation in shades of intensity and appears
similar to the display of a video waveform monitor or an analog oscilloscope. Fast
trigger acquisition resolution is the best choice to acquire a video line signal
with a rapidly changing shape.
TDS3000C Series Oscilloscope User Manual 43

Application Examples
Capturing a Single-Shot Signal
The reliability of a reed relay in a piece of equipment has been poor and you need
to investigate the problem. You suspect that the relay contacts arc when the relay
opens. The fastest you can open and close the relay is about once per minute so
you need to capture the voltage across the relay as a single-shot acquisition.
To set up for a single-shot acquisition, follow these steps:
1. Adjust the vertical Scale and horizontal Scale to appropriate ranges for the
signal you expect to see.
2. Push the Acquire Menu button.
3. Push the Horizontal Resolution screen button.
4. Select Normal acquisition resolution.
5. Push the Single Seq (single sequence) button.
44 TDS3000C Series Oscilloscope User Manual

Application Examples
TheSingleSeqb
utton sets trigger parameters to the correct settings for a
single-shot acquisition.
Optimizing the Acquisition The initial acquisition shows the relay contact beginning to open at the trigger
point. This is followed by a large spikes that indicate contact bounce and
inductance in the circuit. The inductance can cause contact arcing and premature
relay failure.
Before you take the next acquisition, you can adjust the vertical and horizontal
controls to give you a preview of how the next acquisition might appear. As
you adjust these controls, the current acquisition is repositioned, expanded, or
compressed. This preview is useful to optimize the settings before the next
single-shot event is captured.
When the next acquisition is captured with the new vertical and horizontal
settings, you can see more detail about the relay contact opening. You can now
see that the contact bounces several times as it opens.
Using the Horizontal Zoom
Function
If you want to take a close look at a particular spot on the acquired waveform, use
the horizontal zoom function. To look closely at the point where the relay contact
first begins to open, follow these steps:
1. Push the zoom button .
2. Use the horizontal Position to place the expansion point close to where the
relay contact begins to open.
3. Adjust the horizontal Scale to magnify the waveform around the expansion
point.
The ragged waveform and the inductive load in the circuit suggest that the relay
contact may be arcing as it opens.
TDS3000C Series Oscilloscope User Manual 45

Application Examples
The zoom function works equally well when acquisition is running or is stopped.
Horizontal position and scale changes affect only the display, not the next
acquisition.
Saving Data to a USB Flash Drive
You need to do some work inside a remote site. You expect to use the oscilloscope
to look at signal waveforms, to bring the waveform information back to the office
to complete a report, and to perform additional analysis. To do this, take along a
USB flash drive.
Remote site
When you need to capture screen images, it may be most convenient to first save
them to a USB flash drive. Once on the USB flash drive, you can load the screen
images into a PC, print hard copies with a printer attached to your PC, or import
the screen images into desktop publishing software to produce a report.
Similarly, you can also save waveform data on the USB flash drive. From the flash
drive, you can recall waveforms to the oscilloscope display or you can import the
data into spreadsheet and Mathcad software to perform additional analysis.
46 TDS3000C Series Oscilloscope User Manual

Application Examples
If you have oscilloscope setups that you want to use again, you also can store
them on the USB flash drive. The Reference chapter has more information on this
capability. (See page 84, Save/Recall.) For information about remote control
accessories, see Appendix C: Accessories.
Saving Screen Images While working at the remote site you discover a control signal that you want to
capture periodically to show its long-term variation. You want to include these
waveforms in a report you are preparing back at the office.
Your desktop publishing software can import BMP graphics, so you decide to use
this format for the screen images. To setup this configuration, follow these steps:
1. Insert a USB flash drive into the USB flash drive port.
2. Push the Utility button.
3. Push the System bottom button to select Hard Copy.
4. Push the Format screen button.
5. Select BMP Mono Windows mono image file format (youmayneedtopush
the -more-screen button several times before you see this choice).
6. Push the Port screen button.
7. Select File to send hard copies to a USB flash drive.
8. Push the hard copy button to save the image.
The oscilloscope reads the flash drive directory and displays its contents.
Naming Files. You should give files descriptive names so you can recognize them
when you get back to the office. You will be saving images of the control signal
so you decide if CNTRL is a logical target file name to use.
The oscilloscope can append an automatic sequence number to the target file
name. This feature is convenient because you want to capture a screen image of
the same control signal every five minutes. To set up the target file name and
automatic sequence, follow these steps:
1. Push the File Utilities bottom button.
2. Use the general purpose knob to highlight the file TEK?????.BMP.
3. Select the Rename screen button.
4. Use the screen buttons to clear the existing file name and enter the new
file name CNTRL???.BMP. The question marks are placeholders for an
automatic number sequence from 000 to 999.
5. Push the OK Accept screen button to setup the target base file name.
6. Push Menu Off to remove the file list from the display.
TDS3000C Series Oscilloscope User Manual 47
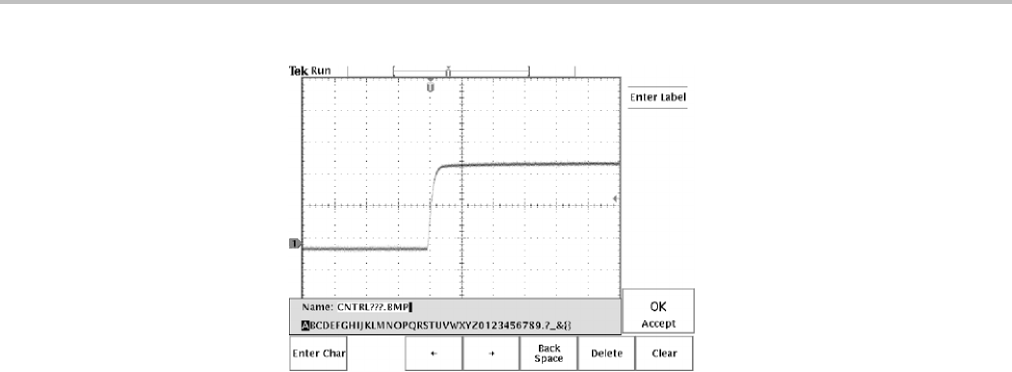
Application Examples
48 TDS3000C Series Oscilloscope User Manual
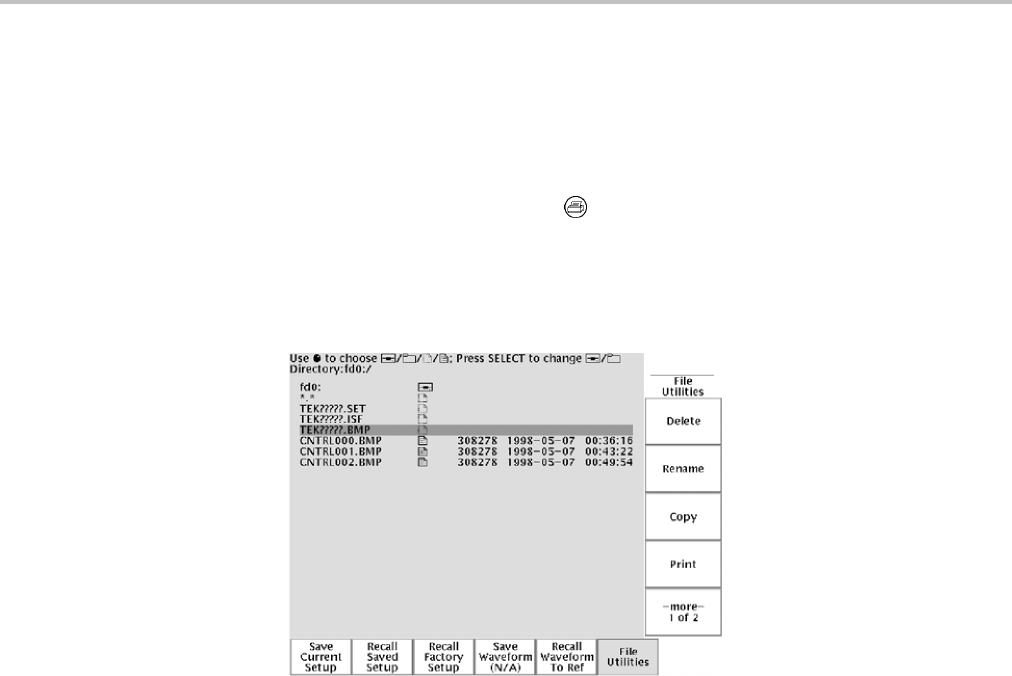
Application Examples
Running the Test. To capture the control signal every few minutes, follow these
steps:
1. Display the signal, measurements, and menus as you want them to appear
in the screen images.
2. Push the hard copy button .
3. Repeat step 2 every few minutes until you are finished with the test.
4. When you are finished, push Utility to see the list of sequential files that
have been saved.
The files are labeled with their sequentialnames,aswellasthetimeanddate
each was created.
Saving Waveform Data You find another signal that you want to analyze with a spreadsheet program back
at the office. To save the waveform data on a USB flash drive, follow these steps:
1. Display the signal on the oscilloscope screen.
2. Push the Save/Recall button.
3. Push the Save Waveform screen button.
4. Select To File.
5. Select Spreadsheet File Format. The default target file, TEK?????.CSV, is
now automatically highlighted.
6. Push the Save To Selected File screen button to save the waveform.
7. Push the File Utilities screen button to see the saved waveform file
TEK00000.CSV in the USB flash drive directory.
TDS3000C Series Oscilloscope User Manual 49

Application Examples
50 TDS3000C Series Oscilloscope User Manual
Reference
This chapter contains detailed information about the operation of the oscilloscope.
The topics in this chapter are arranged by front-panel button or control group
name.
Acquisition Controls
Run/Stop Button
Push the Run/Stop button to stop and start waveform acquisition. You can
also push Run/Stop when you want to resume continuous acquisition after a
single-sequence acquisition. A readout in the top left corner of the display shows
the status of the acquisition.
Acquisition status readout Description
Run: The acquisition is running.
Roll: A roll-mode acquisition is running.
Stop: The acquisition is stopped.
PreVu: Previewing; waiting for trigger.
While the acquisition is running or stopped, you can use these controls to examine
the waveforms:
Channel buttons to select a channel
Zoom button with horizontal Position and Scale to magnify waveforms
(does not affect the actual time base or trigger position settings)
Waveform Intensity to adjust gray-scale level
Cursor button to activate cursors to measure waveforms
Meas button to select automatic measurements of waveforms
Hard copy button to print a hard copy
While the acquisition is stopped, you can change the vertical and horizontal
controls to use in the next acquisition. (See page 54, Vertical and Horizontal
Preview.)
Single Sequence Button
Push the Single Seq button to execute a single-shot acquisition. The function of
the Single Seq button depends on the acquisition mode.
Acquisition mode Single Seq function
Sample or Peak Detect One acquisition of each displayed channel is acquired,
concurrently
TDS3000C Series Oscilloscope User Manual 51
Reference
Acquisition mode Single Seq function
Envelope N or Average N N acquisitions of each displayed channel are acquired
(N is adjustable with the general purpose knob)
When you push the Single Seq button, the oscilloscope does the following things:
At sweep speeds of 20 ms/div and faster, the trigger mode is set to Normal
The trigger system arms and an LED lights next to the Single Seq button
After the single-sequence acquisition is complete, the acquisition stops and the
light next to the Single Seq button turns off.
Push the Single Seq button again to acquire a new sequence, or push the Run/Stop
button to restart continuous acquisition.
Autoset Button
Push the Autoset button to automatically adjust the vertical, horizontal, and trigger
controls for a usable display. You can manually adjust any of these controls if you
need to optimize the display.
When you use more than one channel, the autoset function sets the vertical scale
for each channel and positions the channels to prevent overlapping. The autoset
function selects the lowest-numbered channel in use and then uses that channel to
set the horizontal and trigger controls.
The autoset function also changes the following oscilloscope settings:
Acquisition mode is set to Sample
Bandwidth limits are set to Full
Zoom is turned off
Trigger is set to Auto mode and minimum holdoff
Trigger is set to Edge type, DC coupling, and rising slope
B trigger is turned off
XY display format is turned off
Channel 1 is turned on and selected if no active channels are in use
If you push the Autoset button by accident, you can undo it with these steps:
1. Push the Acquire Menu button.
2. Push the Autoset screen button and then push the Undo Autoset screen
button.
52 TDS3000C Series Oscilloscope User Manual
Reference
Waveform Intensity
The Waveform Intensity knob adjusts the intensity of the waveforms in the display.
The term Digital Phosphor represents the way this control simulates the intensity
control of an analog oscilloscope. At maximum intensity, all waveform points are
displayed at full brightness. As you decrease the intensity, you can see intensity
gradingint
he waveforms. The brightest parts of the waveform are the points
most frequently acquired; the dimmer parts represent less frequently acquired
points. All points decay in intensity over time unless the display persistence
is set to infinite.
Use a medium intensity setting to get an analog-oscilloscope view of time-varying
signals and those containing modulation. Use the maximum intensity setting to
view the signals the way most digital oscilloscopes display them.
You can turn on display persistence to slow or prevent the decay of the waveform
points. With persistence on, you can simulate the function of an analog storage
oscilloscope. (See page 63, Display.)
NOTE. The waveform intensity may change when you change oscilloscope
acquisition modes or horizontal scale settings. Use the INTENSITY knob to
readjust waveform intensity.
Acquire Menu
Push the Acquire Menu button to show the Acquire menu.
Bottom SideDescription
Sample Use for normal acquisition.
Peak Detect Detects glitches and reduces the
possibility of aliasing.
Envelope N Captures variations of a signal
over a period of time. (Adjust N
with the general purpose knob.)
Mode
Average N Reduces random or uncorrelated
noise in the signal display. (Adjust
N with the general purpose knob.)
Fast Trigger (500
points)
Acquires 500 point waveforms at a
fast repetition rate.
Horizontal
Resolution
Normal (10k points) Acquires 10,000 point waveforms
with more horizontal detail.
Reset
Horizontal
Delay
Set to 0 s Resets the horizontal delay time to
zero.
TDS3000C Series Oscilloscope User Manual 53

Reference
Bottom Side Description
Normal AutosetExecutes the autoset function.
(Optional application modules may
add choices to execute specialized
autoset functions.)
Autoset
Undo Autoset Reverts to the settings before the
last autoset.
Wfm Anomaly
Detection
On Off
Enables or disables the WaveAlert
function. (See page 58, WaveAlert
Waveform Anomaly Detection.)
Sensitivity nn.n% Sets the WaveAlert sensitivity. Use
the general purpose knob to set
sensitivity from 0% (least sensitive)
to 100% (most sensitive).
Beep On Anomaly
On Off
When On, the oscilloscope beeps
when it detects a waveform
anomaly on any active channel.
Stop On Anomaly
On Off
When On, the oscilloscope stops
waveform acquisition when there
is a waveform anomaly on any
channel. The input waveforms and
anomalies remain displayed on the
screen.
Hard Copy On
Anomaly
On Off
When On, the oscilloscope sends
an image of the screen to the hard
copy device or USB flash drive file
when there is a waveform anomaly
on any channel.
Wfms To Disk On
Anomaly
On Off
When On, the oscilloscope saves
the anomalous waveform(s) data
to a file on a USB flash drive.
Highlight Entire
Wfm
Highlights the entire anomalous
waveform.
WaveAlert
Highlight Anomalies Highlights just the anomalous data
in a waveform.
Key Points Vertical and Horizontal Preview. The vertical and horizontal preview functions let
you change the vertical and horizontal controls while the acquisition is stopped or
while it is waiting for the next trigger. The oscilloscope rescales and repositions
the current acquisition in response to the new control settings, and then uses the
new settings for the next acquisition.
Preview helps you optimize these control settings before the next acquisition; this
makes it easier to work with signals that are single-shot or have a low repetition
rate. (Seepage116,Vertical Preview.) (See page 70, Horizontal Zoom and
Preview.)
54 TDS3000C Series Oscilloscope User Manual
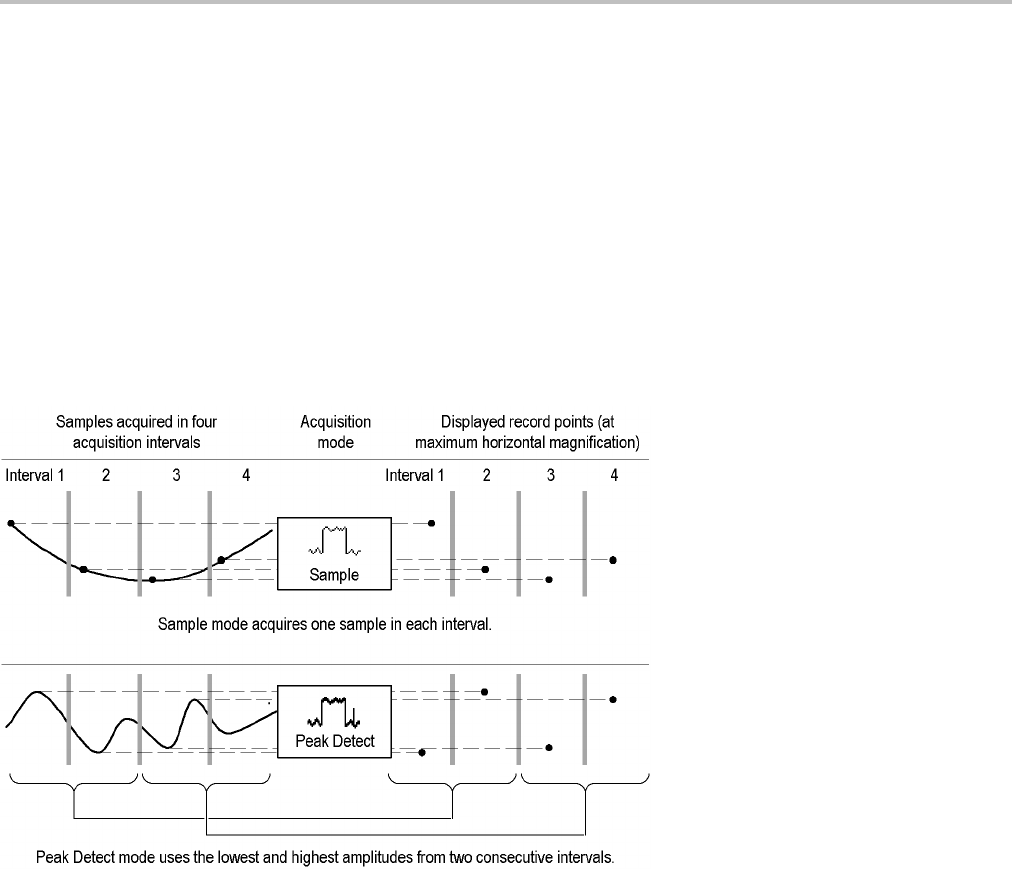
Reference
While the acquisition is stopped you can make changes to other controls, but those
changes will only take affect with the next acquisition. There is no preview for
control changes other than the vertical and horizontal controls.
The preview functions also do not affect automatic measurements, cursor
measurements, or the Math waveform. This data for these functions is always
based on the current acquisition. If you rescale or reposition a channel waveform
horizontally, it may not appear time-correlated to the automatic measurements,
cursor measurements, or the Math waveform.
Acquisition Modes. You can choose one of four acquisition modes: Sample, Peak
Detect, Envelope, or Average. The next few pages describe these acquisition
modes in detail.
Sample. Use Sample acquisition mode for the fastest acquisition at any SEC/DIV
setting. Sample mode is the default mode.
Peak Detect. Use Peak Detect acquisition mode to limit the possibility of aliasing.
Also, use Peak Detect for glitch detection. You can see glitches as narrow as 1 ns.
Peak Detect is only functional for sample rates up to 125 MS/s. For 250 MS/s and
faster sample rates, the oscilloscope reverts to Sample acquisition mode, where
the narrowest detectable pulse width is 1/(sample rate).
TDS3000C Series Oscilloscope User Manual 55
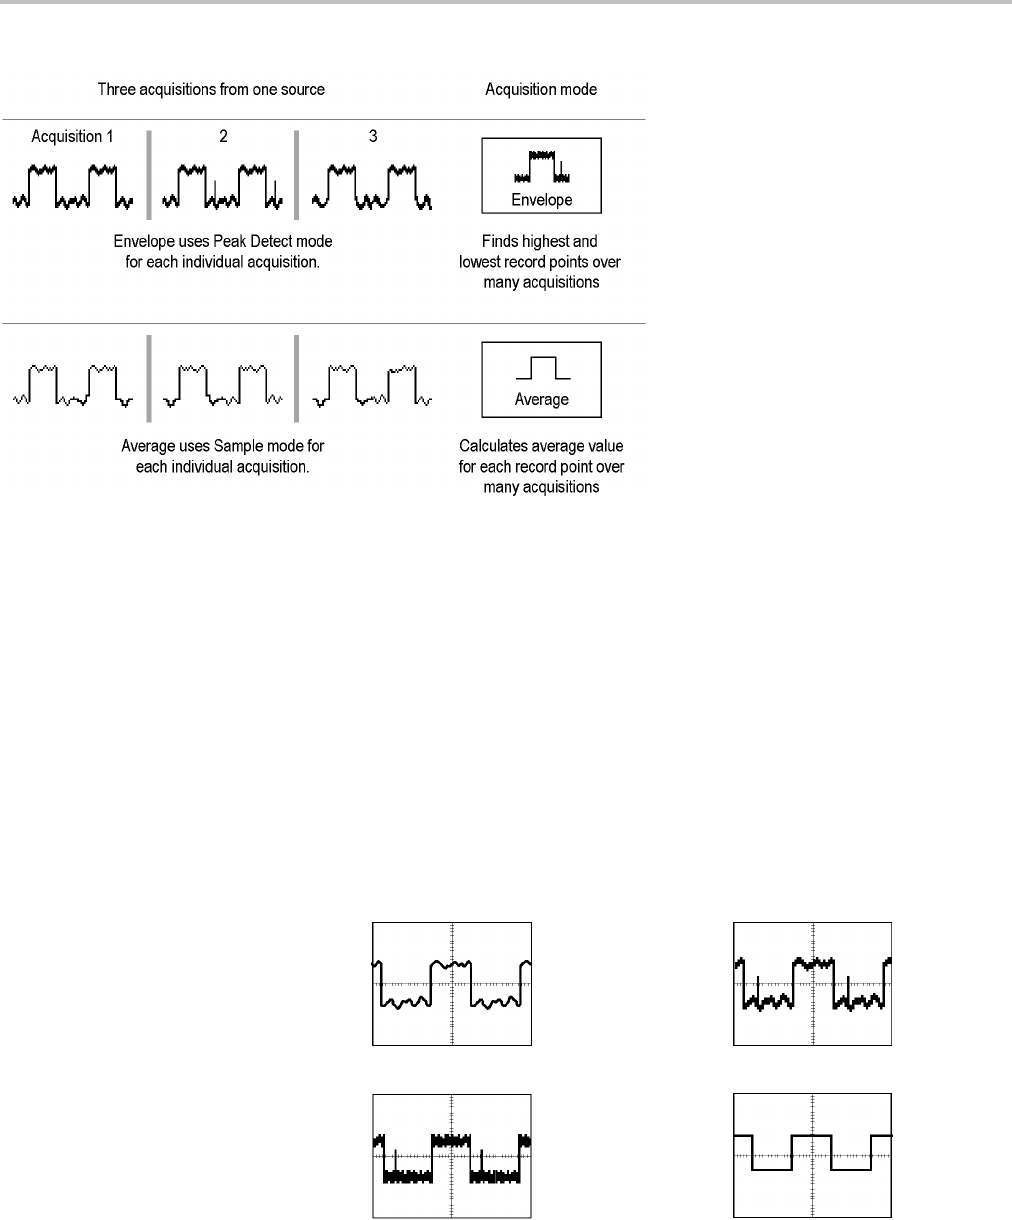
Reference
Envelope. Use Envelope acquisition mode to capture the minimum and maximum
extremes of a signal over a specified number of acquisitions (N). The enveloped
waveform data acquisition clears and then starts over after each N acquisitions. If
you push the Single Seq button, envelope acquisition stops after N acquisitions.
Use the general purpose knob to set the number of acquisitions.
Average. Use Average acquisition mode to reduce random or uncorrelated noise
in the signal you want to display. The averaged waveform is a running average
over a specified number of acquisitions (N). If you push the Single Seq button,
average acquisition stops after N acquisitions. Use the general purpose knob to
set the number of acquisitions.
If you probe a noisy square wave signal that contains intermittent, narrow glitches,
the waveform displayed will vary depending on the acquisition mode you choose.
Sample Peak Detect
Envelope Average
56 TDS3000C Series Oscilloscope User Manual

Reference
Acquisition Resolution. You can choose either Normal or Fast Trigger acquisition
resolution. This setting determines the record length that is acquired and affects
the other factors shown in the next table.
Factor Normal Fast trigger
Record length 10,000 points 500 points
Maximum acquisition rate 700 waveforms/s 3,400 waveforms/s
Maximum horizontal zoom 200X 10X
Choose Normal or Fast Trigger acquisition resolution based on the characteristics
of the signal you want to acquire.
Signal characteristic Better choice
Large amount of horizontal detail
Shape is stable or changes relatively slowly
Single shot
Normal
High trigger repetition rate
Shape changes rapidly
Contains modulation
Fast Trigger
TDS3000C Series Oscilloscope User Manual 57
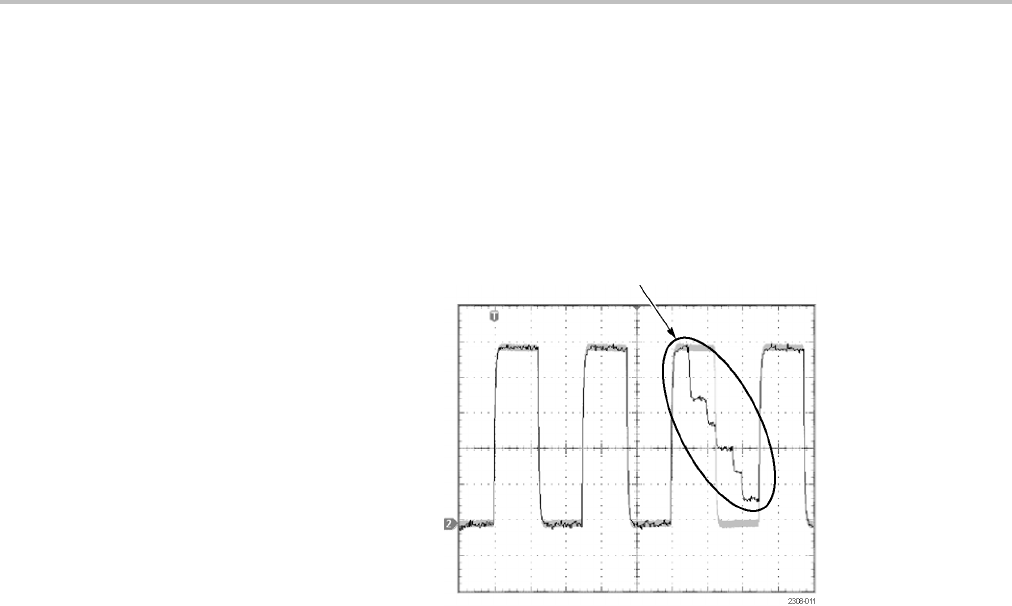
Reference
WaveAlert Waveform Anomaly Detection. WaveAlert provides a way to detect
when a waveform deviates from a steady-state condition. WaveAlert monitors
the current waveform acquisition and compares it to the previous DPO waveform
acquisitions, using a sensitivity value to adjust the comparison tolerance. If the
current acquisition exceeds the comparison tolerance, the oscilloscope considers
the current acquisition as an anomaly.
Anomaly
The oscilloscope can respond to an anomalous waveform by stopping acquisitions,
emitting a beep, saving the anomalous waveform to a USB flash drive file,
printing the screen image to a hard copy device, or any combination of the above.
You can also select to highlight just the anomalous data in a waveform, or the
entire anomalous waveform.
To use WaveAlert, follow these steps:
1. Display the waveform or waveforms on the screen.
2. Push the Acquire Menu front-panel button.
3. PushtheWaveAlert bottom button.
4. Push the Wfm Anomaly Detection side button to select On.
5. Push -more-1of2andthentheHighlight Anomalies side button to select
On.
6. Push -more-2of2andthentheSensitivity side button.
7. Use the general purpose knob to set the comparison sensitivity value. As
signal noise and intensity levels affect the displayed waveform, you will
need to experiment with the sensitivity setting to reduce the number of false
anomalies due to signal noise.
8. Use the Waveform Intensity front-panel button to adjust the persistence
of the anomaly waveform.
58 TDS3000C Series Oscilloscope User Manual

Reference
9. Once you have set the sensitivity value to reduce or eliminate false anomalies,
push one or more side menu buttons to select the actions to perform when
the oscilloscope detects an anomaly.
10. To restart WaveAlert while in Stop On Anomaly, push the Acquire Run/Stop
front panel button.
WaveAlert Key Points.
You can use WaveAlert to monitor up to four waveforms or DPO Math
waveforms. However, adjacent waveforms can not touch or overlap on the
screen.
To increase your chances of capturing an anomaly by acquiring the maximum
number of waveforms per second, set Acquire > Horizontal Resolution to
Fast Trigger (500 points).
When WaveAlert is on, the front-panel Waveform Intensity knob controls
the persistence of the anomalous waveform instead of waveform intensity.
To capture a very random event (minutes to hours), enable the Wfms To Disk
On Anomaly function to write anomalous waveform data to a USB flash
drive file in .isf format. The number of filesyoucansavedependsonthe
waveform record length. You can determine when the anomaly occurred by
checking the file create date and time.
You can use WaveAlert on DPO math waveforms.
Changing the vertical or horizontal oscilloscope settings does not affect the
sensitivity setting. The sensitivity is calculated from the new waveform data
after changing the oscilloscope settings.
Cursor
Cursors are on-screen markers that you position to take waveform measurements.
There are two cursor types: YT cursors and XY cursors. (See page 62, XY Cursor
Menu.)
YT Cursor Menu
The following YT cursor menu items are available while you are in YT display
mode (Display > XY Display > Off (YT)). Push the Cursor button to show the
cursor menu.
TDS3000C Series Oscilloscope User Manual 59

Reference
Bottom Side Description
Off Turns cursors off.
H Bars Use to make vertical measurements.
V Bars Use to make both vertical and horizontal
measurements.
Bring Selected
Cursor to
Center Screen
Moves the active cursor to center
screen.
Function
Bring Both
Cursors On
Screen
Moves any off-screen cursor onto the
screen.
Independent Sets cursors to move independently.
Mode
Tracking Sets cursors to move together when
cursor 1 is selected.
Sec (s) / 1/sec
(Hz)
Sets horizontal units to seconds or
frequency (Hz).
Ratio (%) Sets V Bar measurement units to
percent.
Phase (°) Sets V Bar measurement units to
degrees.
Use Cursor
Positions as
%/°
Sets the V Bar measurement scale so
that 0% or 0° is the current position of
the left V Bar cursor and 100% or 360°
is the current position of the right V Bar
cursor.
VBar
Units
Use 5 divs as
%/°
Sets the V Bar measurement scale so
that 5 screen major divisions is 100% or
360°, where 0% or 0° is -2.5 divisions
and 100% or 360° is +2.5 divisions
from center vertical graticule.
Base Sets the H Bar units to be the same
as the selected waveform's vertical
measurement units (volts, IRE, dB, and
so on).
Ratio (%) Sets H Bar units to percent.
Use Cursor
Positions as
100%
Sets the H Bar measurement scale so
that 0% is the current position of the
lowest H Bar cursor and 100% is the
current position of the highest H Bar
cursor.
H Bar
Units
Use 5 divs as
100%
Sets H Bar measurement scale so
that 5 screen major divisions is 100%,
where 0% is -2.5 divisions and 100% is
+2.5 divisions from the center horizontal
graticule.
60 TDS3000C Series Oscilloscope User Manual
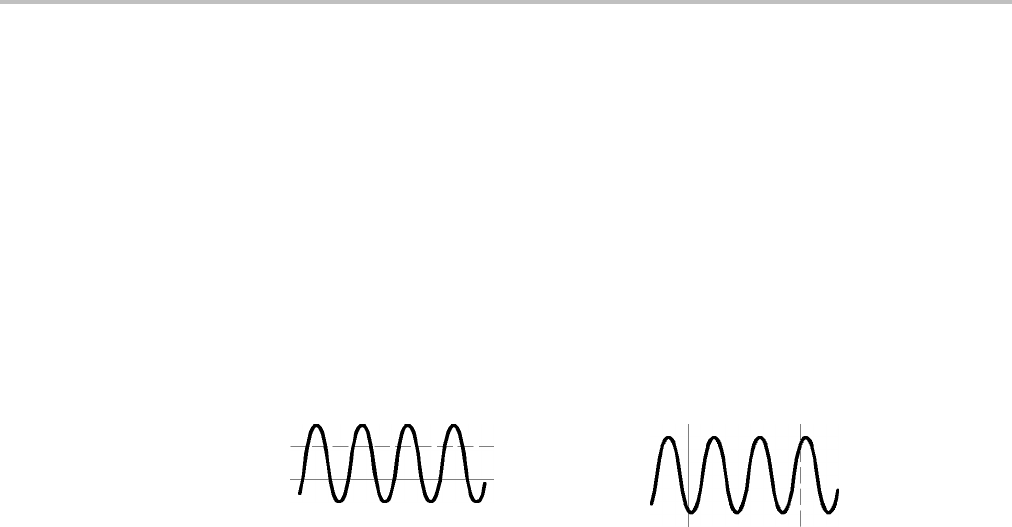
Reference
Key Points Cursor Movement. Use the general purpose knob to move the active cursor. Push
the Select button to change which cursor is active. The active cursor is the solid
line.
Faster Cursor Movement. Push the Coarse button to set the general purpose knob
to make faster cursor movement.
Finding Cursors. When using zoom, delay, or the fastest time base settings, the
cursors can go off screen. If you want to find them, use the Bring Both Cursors
On Screen function to move them onto the screen.
Fine Cursor Movement. When you magnify the waveform with the zoom function,
you can easily set the cursor to any point on the waveform.
Δ4.16V
@-1.78V
Δ6.32V
@3.16V
Δ5.86μs
@1.06μs
Horizontal bar cursors Vertical bar cursors
ΔReadout. The Δreadouts indicate the difference between the cursor positions.
@ Readout. For H Bar or V Bar cursors, the voltage readout after the @ symbol
indicates the location of the active cursor relative to zero volts. For V Bar cursors,
the time readout after the @ symbol indicates the location of the active cursor
relative to the trigger point.
Cursor Interaction with Preview. If you change a vertical or horizontal control
setting while acquisition is stopped or it is waiting for trigger, the cursors move
with the waveforms and cursor measurements remain valid.
Taking Gray-Scale Measurements. Using cursors is often the best way to
take simple measurements on waveforms that contain significant gray-scale
information. The automatic measurements operate only on the latest acquisition,
not on the previous acquisitions that are displayed in gray scale. However, you
can set the cursors to surround and measure the gray-scale area of the waveform.
CursorsatSamePosition. If both cursors are at the same position, and H Bars or
V Bars are set to Ratio or Phase, both cursors are set to 0% (or 0°). 100%/360° is
set to one pixel width away from the cursor position.
V Bars and FFT. When the selected waveform is an FFT waveform, selecting V
Bars and Phase sets the measurement to percent.
Tracking Mode. In cursor tracking mode, both cursors move together when cursor
1 is selected. Enabling tracking mode automatically selects cursor 1 as the active
cursor. If cursor 2 is selected while in tracking mode, only cursor 2 will move.
TDS3000C Series Oscilloscope User Manual 61
Reference
XY Cursor Menu
The following XY cursor menu items are available while you are in XY display
mode (Display > XY Display > Triggered XY). Push the Cursor button to show
the cursor menu.
Bottom Side Description
Off Turns cursors off.
Function
Waveform Turns waveform cursors on and
displays measurements in rectangular
format (X and Y values). Use the
front-panel Select button to select
whichcursortomove(theactive
cursor). Use the general purpose knob
to move the active cursor.
Independent Sets cursors to move independently.
Mode
Tracking Sets cursors to move together when
the reference cursor is selected.
NOTE. The Advanced Analysis application module (TDS3AAM) adds more XY
cursor features, including graticule cursors and polar readouts.
Key Points XY Waveform Cursors. To turn off the XY waveform cursor measurement, push
the front panel Cursor button, then push the Cursor Function Off side menu
button.
Measurements. The XY waveform cursor measurements show difference (Δ)and
absolute (@) values for the X axis, the Y axis, and the time of the active cursor.
ΔX: 1.43V @X: -140mV
ΔY: 2.14V @Y: 480mV
Δt: -660ns @t: 1.61ms
There are two waveform cursors; a reference cursor , and a delta cursor .
All difference (Δ) measurements are measured from the reference cursor to
the delta cursor. A negative ΔX measurement means that the delta cursor is
positioned earlier in the waveform record than the reference cursor. A negative
ΔY measurement means that the delta cursor is positioned at a lower Y waveform
signal level than the reference cursor.
All absolute (@) measurements are referenced to the XY waveform's 0, 0 origin,
and show the value of the active cursor.
0, 0 Origin. The XY waveform origin is the 0 volt point of each source waveform.
Positioning both source waveform 0 volt points on the vertical center graticule
places the origin in the center of the screen.
62 TDS3000C Series Oscilloscope User Manual

Reference
Switching Between XY and YT. You can switch between XY and YT display mode
to see the location of the cursors in the YT waveform. The waveform record
icon at the top of the graticule also shows the relative cursor positions in the
waveform record.
Waveform Sources. You can use XY cursors on active acquisitions, single
sequence acquisitions, and reference waveforms. You need to store both XY
source waveforms in order to recreate an XY waveform. The X axis waveform
must be stored in Ref1.
Display
Push the Display button to show the display menu.
Bottom Side Description
Dots OnlySet to on to see dots only. Set to off to
see dots and vectors.
PersistTime Sets persist time.
Set to Auto Sets the Waveform Intensity knob to
control the persistence time.
Waveform
Display
Clear
Persistence
Clears any displayed persistence.
High Use for bright ambient conditions.
Medium Use for dim ambient conditions.
Backlight
Intensity
Low Use to extend battery-operation time.
Graticule Full, Grid,
Cross Hair,
Frame
Sets the graticule type.
Off (YT) Turns off an XY display.
Triggered XY Turns on triggered XY display.
Gated XYZ Turns on gated XY display. Displays XY
signals when Z-channel signal is above
a set level. Only available on 4-channel
instruments.
Ch1 (X) Versus Sets Ch2, Ch3, or Ch4 as the Y channel
versus Ch1 as X.
Sets Ref2, Ref3, or Ref4 as the Y
channel versus Ref1 as X.
XY
Display
Ref1 (X)
Versus
Gated By Sets Ch2, Ch3, or Ch4 as the Z-channel
gate source, and sets the gating
channel threshold level.
Normal Selects the color display.
Color
Palette Monochrome Sets all waveforms to high-contrast
black and white.
TDS3000C Series Oscilloscope User Manual 63

Reference
Key Points Waveform Dots and Vectors. With Dots Only set to off, the vectors between
samples can be filled; increase the Waveform Intensity control to increase the
amount of vector fill between samples. The vector fill is most visible on fast signal
edges or when the horizontal zoom is turned on.
Turn Dots Only on if you want to see just the actual samples.
Waveform Persistence. Turn on waveform persistence to slow the decay of
waveform points. You can set the persistence to a specific time or to infinite.
Infinite persistence keeps all waveform points in the display until you change a
control setting that erases the display.
Display Colors. The channel buttons, waveforms, icons, and readouts are
color-codedtohelpyouidentifythemeasily. The colors are preset and cannot be
adjusted. However, you can select the Monochrome Color Palette if you prefer to
see all the waveforms in high-contrast black and white.
XY Waveform Triggering. The XY waveform is triggered so you can synchronize
periodic input signals to the XY waveform. This feature is useful when only
one part of the period contains valid information that you want to see in the XY
format. Set the time base and trigger location to acquire just that part of the period.
When you want to see the complete period of the signals regardless of the time
base setting, set the trigger source to an unused channel and the trigger mode
to Auto.
XY Waveform Scale and Position. If you want to display channel 1 in the
horizontal axis versus channel 3 in the vertical axis, for example, use these
controls to scale and position the XY waveform:
Push the channel 1 button and use the vertical Scale and Position controls to
set the horizontal scale and position of the XY waveform.
Push the channel 3 button and use the vertical Scale and Position controls to
set the vertical scale and position of the XY waveform.
XY Waveform Restrictions. The math waveform, zoom, and autoset functions do
not work in the XY display format. All reference waveforms displayed in XY
format must have the same record length, 500 or 10,000 points.
Gated XYZ. Displays XY signals only when the Z (gating) channel is true. Gated
XYZ is similar to analog oscilloscope modulated XYZ mode except that the
displayed XY signal is either on or off; there is no intensity modulation. Gated
XYZ is useful for showing constellation diagrams.
Push the Gated By Screen button to Select the Z (gate) Source Channel. The
general purpose knob sets the Z-channel threshold level. Z-channel signals above
the set threshold are true and open the XY signal gate; Z-channel signals below
the set threshold are false and close the XY signal gate. The gating channel is
always a high-true logic; to emulate a low-true gating logic, use the Vertical menu
to invert the Z-channel signal.
64 TDS3000C Series Oscilloscope User Manual

Reference
XY and XYZ Cursors. (See page 62, XY Cursor Menu.)
Hard Copy
Push the hard copy button at the left of the display to make a hard copy. You
canalsostorehard-copyimagesonaUSBflash drive (in normal or compressed
format) and then transfer them later to a PC for printing or use in a report.
Connecting a Printer Use the rear-panel RS-232 (available on the optional communication module), or
Ethernet port to connect your oscilloscope to a printer.
SettingUptoPrint To set up the oscilloscope to print a hard copy, follow these steps:
1. Push the Utility menu button.
2. Push the System bottom button to select Hard Copy.
3. Push the Format screen button and then choose the printer format appropriate
for your application.
4. Push the Options screen button to select the image orientation (portrait or
landscape) as well as turn on or off hard copy file compression.
5. Push the Ink Saver screen button and select On for most applications. If you
want the hard copy colors to be the same as the screen colors, you can select
Off. (Seepage66,Ink Saver and Preview.)
6. Push the Port screen button and select the port that your printer is connected
to, or select File to save the hard copy on a USB flash drive. (See page 86,
Using a USB Flash Drive.)
7. Push the hard copy button .
Key Points Printer Formats. The oscilloscope supports the following printers and file formats.
Format Description
Thinkjet HP monochrome ink-jet printer
Deskjet mono HP monochrome ink-jet printer
Deskjet color HP color inkjet printer
Laserjet HP monochrome laser printer
Epson Epson 9-pin and 24-pin dot matrix printers, C60 and C80 inkjet
printers
TIFF *.tif Tag image file format
Interleaf *.img Interleaf image object file format
RLE color Windows color image file format
TDS3000C Series Oscilloscope User Manual 65

Reference
Format Description
PCX mono PC Paintbrush monochrome image file format
PCX color PC Paintbrush color image file format
BMP mono Windows monochrome image file format
BMP color Windows color image file format
EPS mono Encapsulated PostScript monochrome image
EPS color Encapsulated PostScript color image
Bubble Jet Canon BJC-50, BJC-80 color printers
DPU-3445 Seiko DPU-3445 thermal printer
PNG colorPortable Network Graphics color image
Hard Copy File Compression. When compression is set to On, the oscilloscope
compresses the hard copy data, using the current printer format, into a gnuzip file
format, with the extension .gz.The.gzfiles can be decompressed using PKZIP
or WinZip programs.
Color and Gray-Scale Printing. You can print a color hard copy that uses the
display colors. Gray-scale waveform information is printed as shades of color.
If you have a Deskjet or Laserjet monochrome printer, gray-scale waveform
information is printed as a dithered image.
Ink Saver and Preview. As an alternative to printing the display colors, turn
on the Ink Saver function to print a hard copy with a white background. This
function saves printer ink while it preserves the color coding of the waveforms
and readouts, except for channel 1. Because yellow ink is hard to see on white
paper, Ink Saver prints channel 1 using a dark blue ink. Ink saver also works
with the monochrome print formats.
Push and hold the Preview screen button to show how the colors will appear
on the paper.
Clear Spool. You can push the Clear Spool screen button to empty the print
spooler to stop a hard copy operation in progress, if the hard copy port connection
is not made due to incompatible settings (such as baud rate), or if you lose the
hard copy port connection before the hard copy is complete.
Date and Time Stamp. To print the current date and time on your hard copies,
follow these steps:
1. Push the Utility button.
2. Push the System bottom button to select Config.
3. Push the Set Date & Time bottom button.
4. Set the Display Date/Time to On to add the current date and time to the
display screen.
5. Push the Menu Off button.
66 TDS3000C Series Oscilloscope User Manual
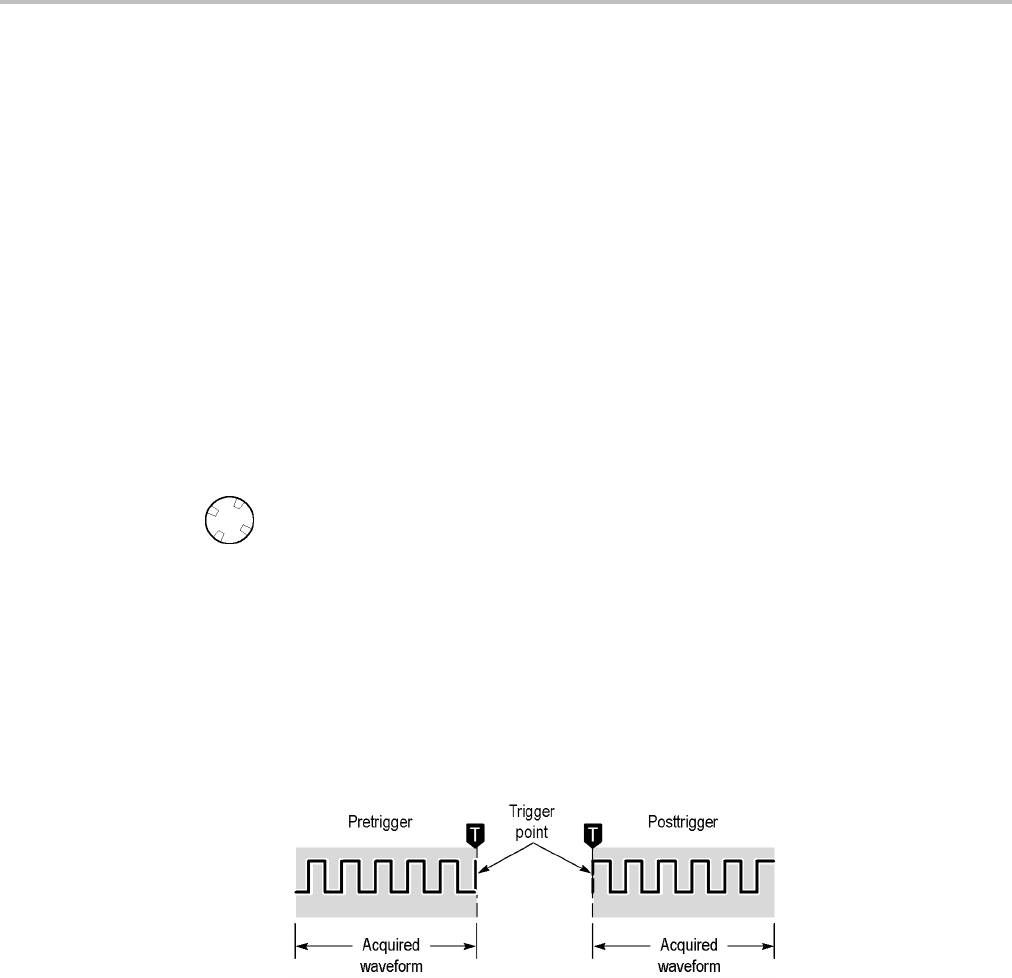
Reference
Printer Error Message. To avoid printer errors, always power on the printer and
allow it to complete its initialization process before powering on the oscilloscope.
If you see a 'Hard copy device not responding' error message, power the
oscilloscope off and then back on, and try to print again. If the printer still does
not work, check that the printer is online, you have selected the correct printer
format on the oscilloscope, there are no paper jams, and that the printer cable is
firmly connected to the printer and oscilloscope.
Horizontal Controls
Use the horizontal controls to adjust the time base, adjust the trigger location, and
to examine waveform details more closely.
Horizontal Position Control
When delay is off, the horizontal Position control moves the trigger point within
the acquired waveforms. You can select full pretrigger, full posttrigger, or any
point in between.
Use a pretrigger setting (trigger position near 100% of the record) to acquire
waveforms leading up to a trigger event. For example, if you can trigger on an
error condition, the waveforms leading up to the error condition might tell you
why the error occurred.
Use a posttrigger setting (trigger position near 0% of the record) when you want
to acquire waveforms that follow a trigger event. Use a mid-screen setting when
you are interested in information both before and after the trigger event.
Refer to the Reference chapter for information about how the horizontal Position
control operates when the Delay and Zoom functions are active. (See page 68,
Delay Button.) (See page 69, Zoom Button.)
The trigger position is marked with the letter T at the top of the graticule and also
in the waveform record icon at the top of the screen.
TDS3000C Series Oscilloscope User Manual 67
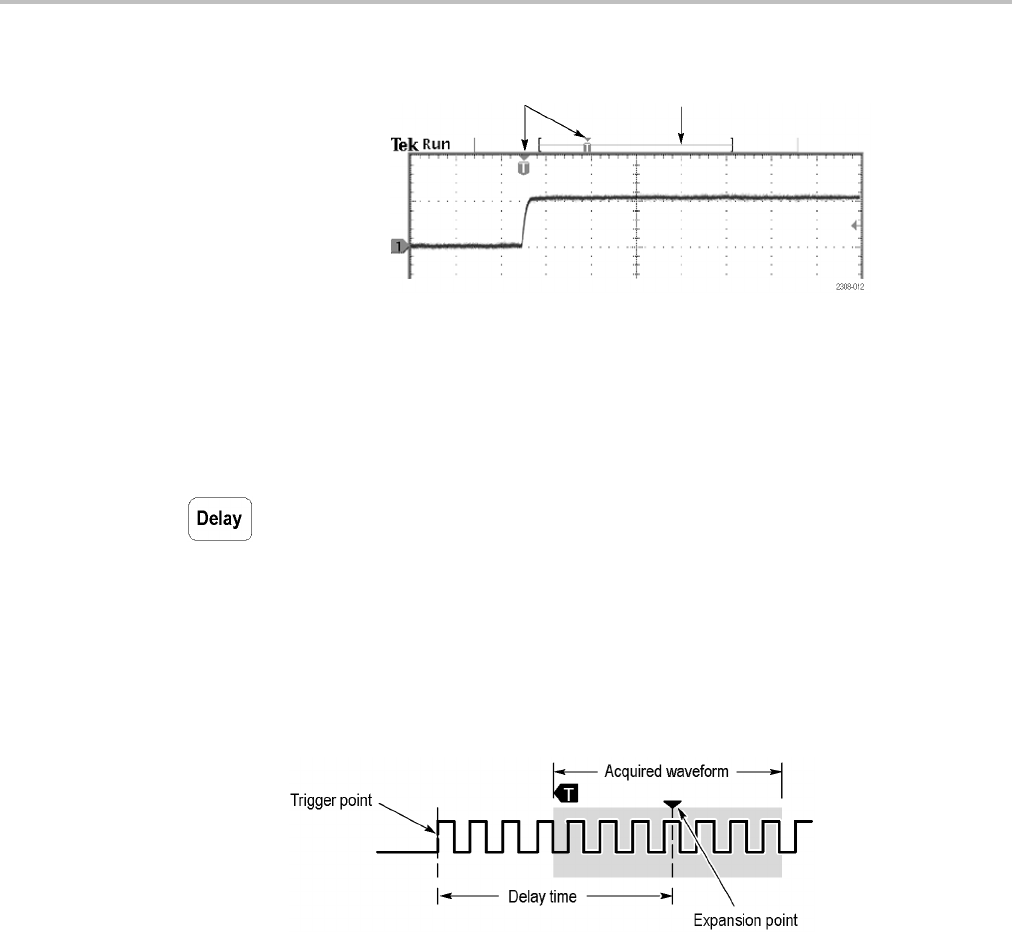
Reference
Trigger marker and horizontal expansion point Waveform record icon
The small inverted triangle is the horizontal expansion point. When you change
the horizontal Scale setting, the waveforms contract or expand about this point.
When delay is off, the horizontal expansion point is the same as the trigger point.
Delay Button
Push the Delay button when you want to delay the acquisition relative to the
trigger event. Turn the horizontal Position control counterclockwise to increase
the delay; the trigger point moves to the left and ultimately outside of the acquired
waveform. Then, you can adjust the horizontal Scale to acquire more detail
around the area of interest (center of the screen).
When delay is on, the trigger point separates from the horizontal expansion point.
The horizontal expansion point stays at the center of the screen. The trigger point
can move off the screen; when this happens, the trigger marker turns to point in
the direction of the trigger point.
Use the delay feature when you want to acquire waveform detail that is separated
from the trigger event by a significant interval of time. For example, you can
trigger on a sync pulse that occurs once every 10 ms and then look at high-speed
signal characteristics that occur 6 ms after the sync pulse.
In the next screen example, the trigger markers show that the trigger point is
before the acquired waveform. The delay time, shown in the readout, is the time
from the trigger point to the expansion point (center screen).
68 TDS3000C Series Oscilloscope User Manual
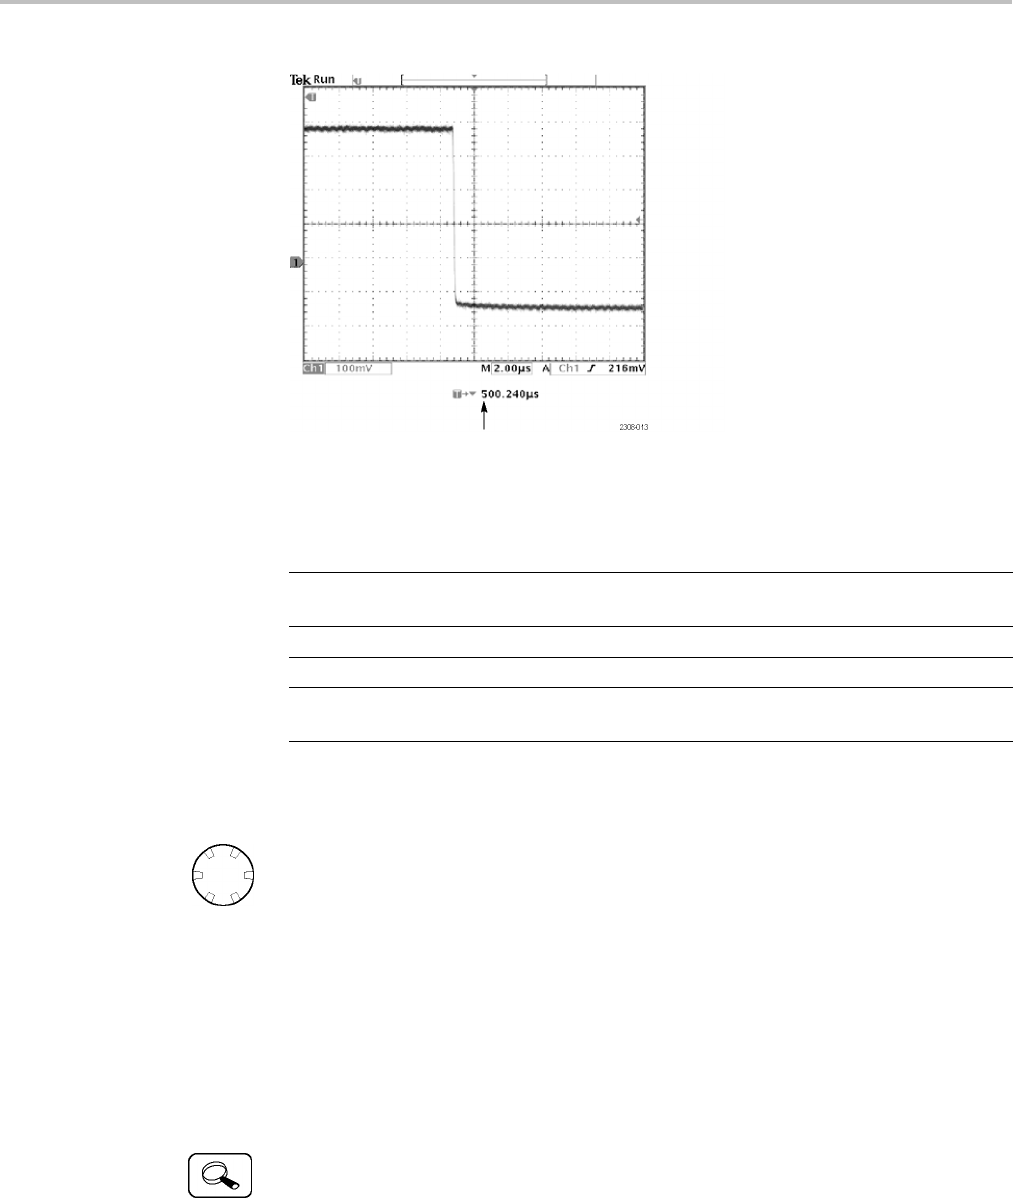
Reference
Delay time readout
The interaction between delay and other functions is summarized in the next table.
Function Delay off Delay on
Trigger point Any point within the acquired
waveform
Can occur prior to the
acquired waveform
Expansion point Same as the trigger point Always center screen
Horizontal Scale Sets time base Sets time base
Horizontal Position Sets trigger position in the
acquired waveform
Sets delay time
Horizontal Scale Control
Use the horizontal Scale control to adjust the time base. When delay is off,
the scale expands or contracts around the trigger point. When delay is on, the
scale expands or contracts around the center of the screen. The Reference
chapter includes possible exceptions. (See page 71, Delay Interactions.)
When the zoom function is active, use the horizontal Scale control to adjust
the amount of horizontal magnification (the actual time-base setting remains
unchanged). The magnified waveforms always expand or contract around the
center of the screen.
Zoom Button
Push the zoom button to magnify the current acquisition along the horizontal axis
so you can see more detail. Use the horizontal Scale control to adjust the amount
of magnification. Use the horizontal Position control to select the portion of the
waveform you want to magnify. When zoom is on, changes you make to these
controls do not affect the actual time base or trigger position settings.
TDS3000C Series Oscilloscope User Manual 69

Reference
The split screen shows the entire selected waveform in the upper window to give
you a point of reference as you examine the details in the lower window.
Actual time base
Zoom time base Zoom position
Key Points Maximum Zoom Magnification Factor. If you are using Normal acquisition
resolution, the maximum horizontal magnification factor is 200X; in Fast-trigger
the maximum is 10X.
Horizontal Zoom and Preview. There are two ways you can magnify a stopped
acquisition, horizontal zoom or preview. The differences in how horizontal zoom
and preview interact with other functions are shown in the next table.
Function Horizontal zoom Horizontal preview
Horizontal Scale Sets magnification factor Changes time base for the
next acquisition
Horizontal Position Selects portion of waveform
to magnify
Changes trigger position
or delay time for the next
acquisition
Delay button Turns delay on and off Turns delay on and off
Math waveform Remains valid; magnifies
and positions with other
waveforms
Remains fixed; does not
track changes to channel
waveforms
Cursors and automatic
measurements
Remain functional with valid
readouts
Remain locked to channel
waveforms
Gray-scale Gray-scale information may
be temporarily reduced
Gray-scale information is
lost
70 TDS3000C Series Oscilloscope User Manual

Reference
Slow Horizontal Settings. At horizontal Scale settings of 40 ms/div or slower,
the oscilloscope may display waveforms in roll mode. As the rolling waveform
fills the screen, the waveform intensity and vector fill appears to decrease. The
oscilloscope automatically reduces the number of displayed points in order to
maintain a high acquisition rate: this does not represent a loss of acquired data.
When you stop the acquisition, the original waveform intensity and vector fill
returns to the display.
Using Zoom and Delay Together. You can use both zoom and delay at the same
time to magnify a delayed acquisition.
Fast Time-Base Settings. At the fastest time-base settings, only a portion of the
waveform shows in the display. The waveform record icon indicates that portion
with brackets. Push the zoom button and then use the horizontal Position
control to scroll through the entire waveform to see any portion you want. The
affected time-base settings are shown in the next table.
Acquisition resolution Affected time-base settings
Normal 100 ns/div to 1 ns/div
Fast Trigger 4ns/divto1ns/div
At the fastest time-base settings, the maximum zoom magnification factor is also
reduced.
Delay Interactions. The maximum delay setting is a function of the time-base
setting and acquisition resolution. If you set a large positive or negative delay,
that amount of delay might be automatically reduced if you make the following
additional control changes:
Change to a faster time-base setting
Change from Fast Trigger to Normal acquisition resolution
If the delay reduction occurs, it may cause the waveform horizontal position
to shift.
Negative Delay. You can select up to ten divisions of negative delay. At the fastest
time base settings, you can use negative delay to see more of the waveform that
occurs before the trigger point.
Roll Mode Display. To obtain a rolling display similar to a strip-chart recorder,
turn off zoom and delay, select the Auto trigger mode, and set the horizontal Scale
control to 40 ms/div or slower. Subsequent changes to the horizontal Scale cause
the roll-mode display to erase and restart.
TDS3000C Series Oscilloscope User Manual 71

Reference
Math and FFT
Math and FFT functions are part of the Vertical menu group.
Math Waveform Push the Math button to define the math waveform using the math menu. Also
push the Math button to display or select the math waveform. The bottom menu
will show other menu items when you have a TDS3AAM application module
installed.
Bottom Side Description
Set 1st Source to Selects the first source waveform.
Set Operator to Selects the math operator: +, -, ×,
or ÷
Dual Wfm Math
Set 2nd Source to Selects the second source
waveform.
Key Points Dual-Waveform Math. For the dual-waveform math operations, the two source
waveforms interact with the math operators in the sequence shown next.
Operation Expression of math waveform
+Source 1 + Source 2
-Source 1 - Source 2
×Source 1 × Source 2
÷Source 1 ÷ Source 2
Scaling and Positioning the Math Waveform. To position or scale a math
waveform, select the math waveform and then adjust it with a vertical Position or
Scale control. You can do this whether acquisition is running or is stopped.
Math Interaction with Preview. If you select a channel waveform and then adjust
the vertical Position or Scale control while the acquisition is stopped, the math
waveform remains fixed. It does not track the changes you see to the channel
waveform. The same is true if you adjust the horizontal Position or Scale control
under these conditions.
Gray-Scale Restriction. Math waveforms are always based on the most current
acquisitions and do not contain any gray-scale information.
Source Waveform Screen Position. When displaying dual-waveform math
waveforms, make sure that the source waveforms do not extend beyond the top or
bottom edge of the screen. If part of the source waveform is positioned outside
the screen, the math waveform may not display correctly.
72 TDS3000C Series Oscilloscope User Manual

Reference
FFT Waveform The FFT (Fast Fourier Transform) function mathematically converts the standard
time-domain signal (repetitive or single-shot acquisition) into its frequency
components, providing spectrum analysis capabilities. You can use the FFT
function to look at the frequency components and spectrum shape of a signal:
To test impulse response of filters and systems
To measure harmonic content and distortion in systems
To identify and locate noise and interference sources
To analyze vibration
To analyze harmonics in 50 and 60 Hz power lines
The FFT function provides the following features:
FFT Windows – Four FFT windows (Rectangular, Hamming, Hanning, and
Blackman-Harris) let you match the optimum window to the signal you are
analyzing. The Rectangular window is best for nonperiodic events such as
transients, pulses, and one-shot acquisitions. The Hamming, Hanning, and
Blackman-Harris windows are better for periodic signals.
Analyze Repetitive, Single-Shot, and Stored Waveforms – You can display
an FFT waveform on any actively-acquired signal (periodic or one-shot), on
the last acquired signal, or on any signal stored in reference memory.
dB or Linear RMS Scales – The FFT vertical graticule can be set to either
dB or Linear RMS. A dB scale is useful when the frequency component
magnitudes cover a wide dynamic range, letting you show both lesser and
greater- magnitude frequency components on the same display. A Linear
scale is useful when the frequency component magnitudes are all close in
value, allowing direct comparison of their magnitudes.
Time Signals and FFT Waveforms Displayed Together – The time signals
and FFT waveforms can be shown together on the display. The time signal
highlights the problem; the FFT waveform helps you determine the cause
of the problem.
Displaying an FFT Waveform. To display an FFT waveform, follow these steps:
1. Set the source signal Vertical Scale so that the signal peaks do not go off
screen. Off-screen signal peaks can result in FFT waveform errors.
2. Set the Horizontal Scale control to show five or more cycles of the source
signal. Showing more cycles means the FFT waveform shows more frequency
components, provides better frequency resolution, and reduces aliasing. If
the signal is a single-shot (transient) signal, make sure that the entire signal
(transient event and ringing or noise) is displayed and centered on the screen.
3. Push the Vertical Math button to show the math menu.
4. Push the FFT screen button to show the FFT side menu.
TDS3000C Series Oscilloscope User Manual 73

Reference
Bottom Side Description
Set FFT Source to Sets the FFT signal source. Valid input sources
are Ch1 and Ch2 (2-channel instruments),
Ch1 through Ch4 (4-channel instruments), and
Ref1 through Ref4.
Set FFT Vert Scale to Sets the display vertical scale units. Available
scales are dBV RMS and Linear RMS.
FFT
Set FFT Window to Sets which window function (Hanning,
Hamming, Blackman-Harris, or Rectangular)
to apply to the source signal. (See page 75,
FFT Windows.)
74 TDS3000C Series Oscilloscope User Manual
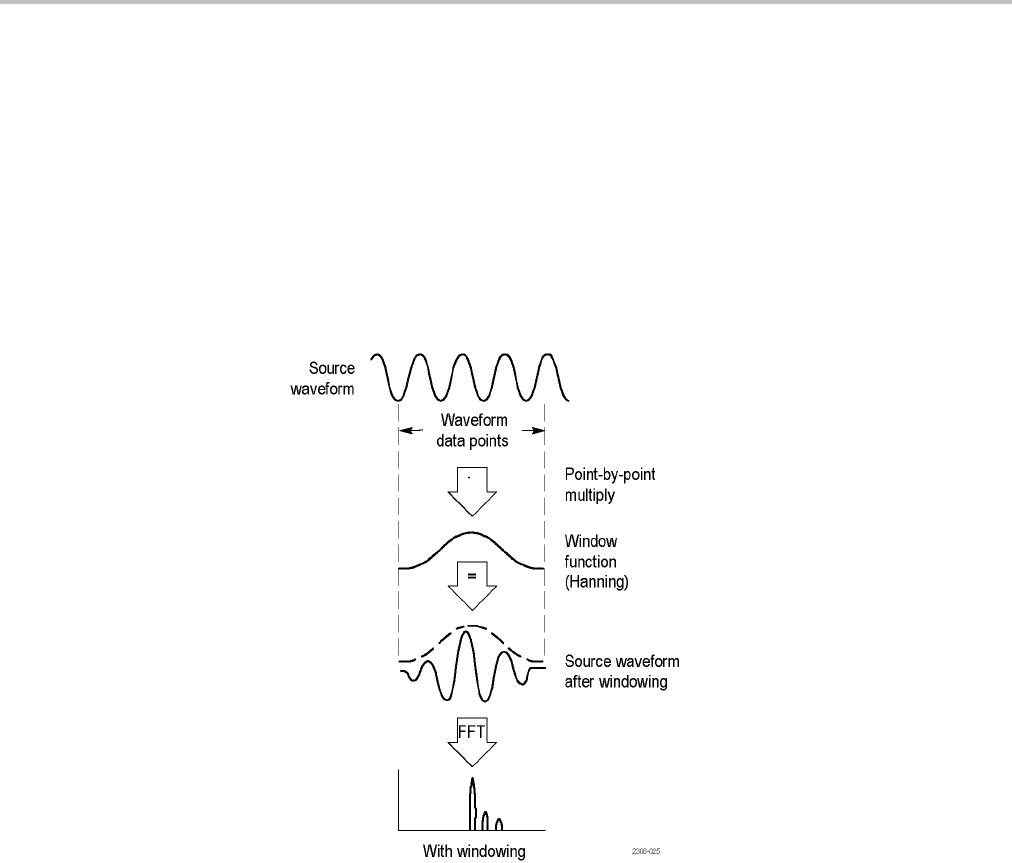
Reference
5. Select a signal source. You can do an FFT on any channel or any stored
reference waveform.
6. Select the appropriate vertical scale and FFT window.
7. Use zoom controls and the cursors to magnify and measure the FFT waveform.
FFT Windows. Applying a window function to the source waveform record
changes the waveform so that the start and stop values are close to each other,
reducing FFT waveform discontinuities. This results in an FFT waveform that
more accurately represents the source signal frequency components.
The shape of the FFT window determines how well the window resolves
frequency or magnitude information.
TDS3000C Series Oscilloscope User Manual 75
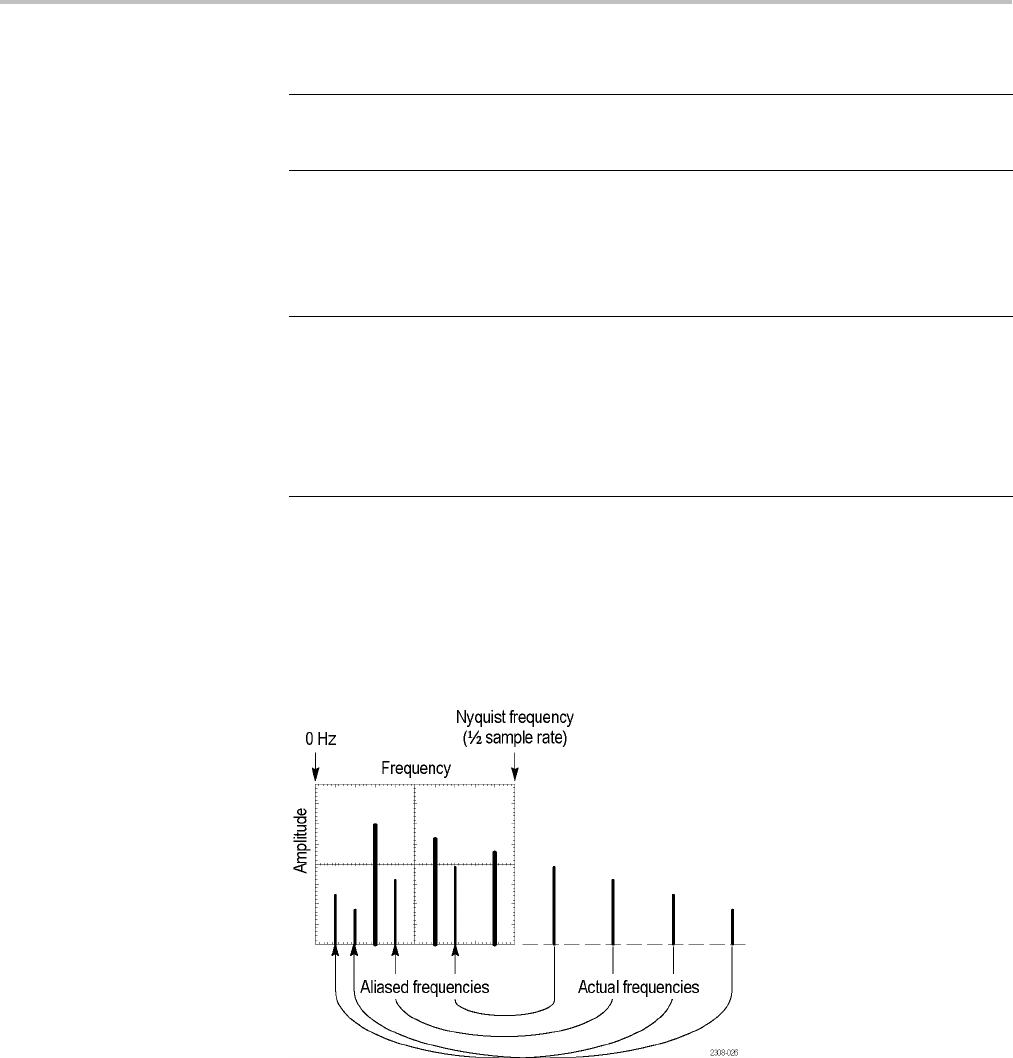
Reference
FFT window Characteristics Best for measuring
Blackman-Harris Best magnitude, worst at
resolving frequencies.
Predominantly single frequency
waveforms to look for higher order
harmonics.
Hamming, Hanning Better frequency, poorer
magnitude accuracy than
Rectangular. Hamming
has slightly better
frequency resolution
than Hanning.
Sine, periodic, and narrow-band
random noise.
Transients or bursts where the signal
levels before and after the event are
significantly different.
Rectangular Best frequency, worst
magnitude resolution.
This is essentially the
same as no window.
Transients or bursts where the signal
levels before and after the event are
nearly equal.
Equal-amplitude sine waves with
frequencies that are very close.
Broad-band random noise with a
relatively slow varying spectrum.
Aliasing. Problems occur when the oscilloscope acquires a signal containing
frequency components that are greater than the Nyquist frequency (1/2 the sample
rate). The frequency components that are above the Nyquist frequency are
undersampled and appear to "fold back" around the right edge of the graticule,
showing as lower frequency components in the FFT waveform. These incorrect
components are called aliases.
76 TDS3000C Series Oscilloscope User Manual

Reference
You can use the following methods to eliminate aliases:
Increase the sample rate by adjusting the Horizontal Scale to a faster
frequency setting. Since you increase the Nyquist frequency as you increase
the horizontal frequency, the aliased frequency components should appear at
their proper frequency. If the increased number of frequency components
shown on the screen makes it difficult to measure individual components,
push the zoom button to magnify the FFT waveform.
Use a filter on the source signal to bandwidth limit the signal to frequencies
below that of the Nyquist frequency. If the components you are interested
in are below the built-in bandwidth settings (20 MHz bandwidth for all
oscilloscopes, 150 MHz bandwidth for 300 MHz and 500 MHz oscilloscopes),
set the source signal bandwidth to the appropriate value. Push the Vertical
Menu button to access the source channel bandwidth menu.
TDS3000C Series Oscilloscope User Manual 77

Reference
Key Points FFT Source. To select the source, push the side menu button. Available sources
are the channels and reference waveforms.
Using FFT slows down the oscilloscope's response time in Normal acquisition
mode (10k record length).
A waveform acquired in Normal acquisition mode has a lower noise floor and
better frequency resolution than a waveform acquired in Fast Trigger mode.
Signals that have a DC component or offset can cause incorrect FFT waveform
component magnitude values. To minimize the DC component, choose AC
Coupling on the source signal.
To reduce random noise and aliased components in repetitive or single-shot
events, set the oscilloscope acquisition mode to average over 16 or more
samples. Average mode attenuates signals not synchronized with the trigger.
Do not use the Average acquisition mode if the source signal contains
frequencies of interest that are not synchronized with the trigger rate.
Do not use Peak Detect and Envelope modes with FFT. Peak Detect and
Envelope modes can add significant distortion to the FFT results.
For transient (impulse, one-shot) signals, set the oscilloscope to trigger on the
transient pulse in order to center the pulse information in the waveform record.
FFT Vertical Scale. To select the vertical scale, push the side menu button.
Available scales are dBV RMS and Linear RMS.
Use the Vertical Position and Scale knobs to vertically move and rescale the
FFT waveform.
To display FFT waveforms with a large dynamic range, use the dBV RMS
scale. The dBV scale displays component magnitudes using a log scale,
expressed in dB relative to 1 VRMS,where0dB=1V
RMS, or in source
waveform units (such as amps for current measurements).
To display FFT waveforms with a small dynamic range, use the Linear
RMS scale. The Linear RMS scale lets you display and directly compare
components with similar magnitude values.
Nyquist Frequency. To determine the Nyquist frequency, push the Acquire menu
button. This displays the current sample rate on the bottom right area of the
screen. The Nyquist frequency is one-half of the sample rate. For example, if the
sample rate is 25.0 MS/s, then the Nyquist frequency is 12.5 MHz.
Zooming an FFT Display. Use the Zoom button , along with horizontal Position
and Scale controls, to magnify FFT waveforms. When you change the zoom
factor, the FFT waveform is horizontally magnified about the center vertical
78 TDS3000C Series Oscilloscope User Manual
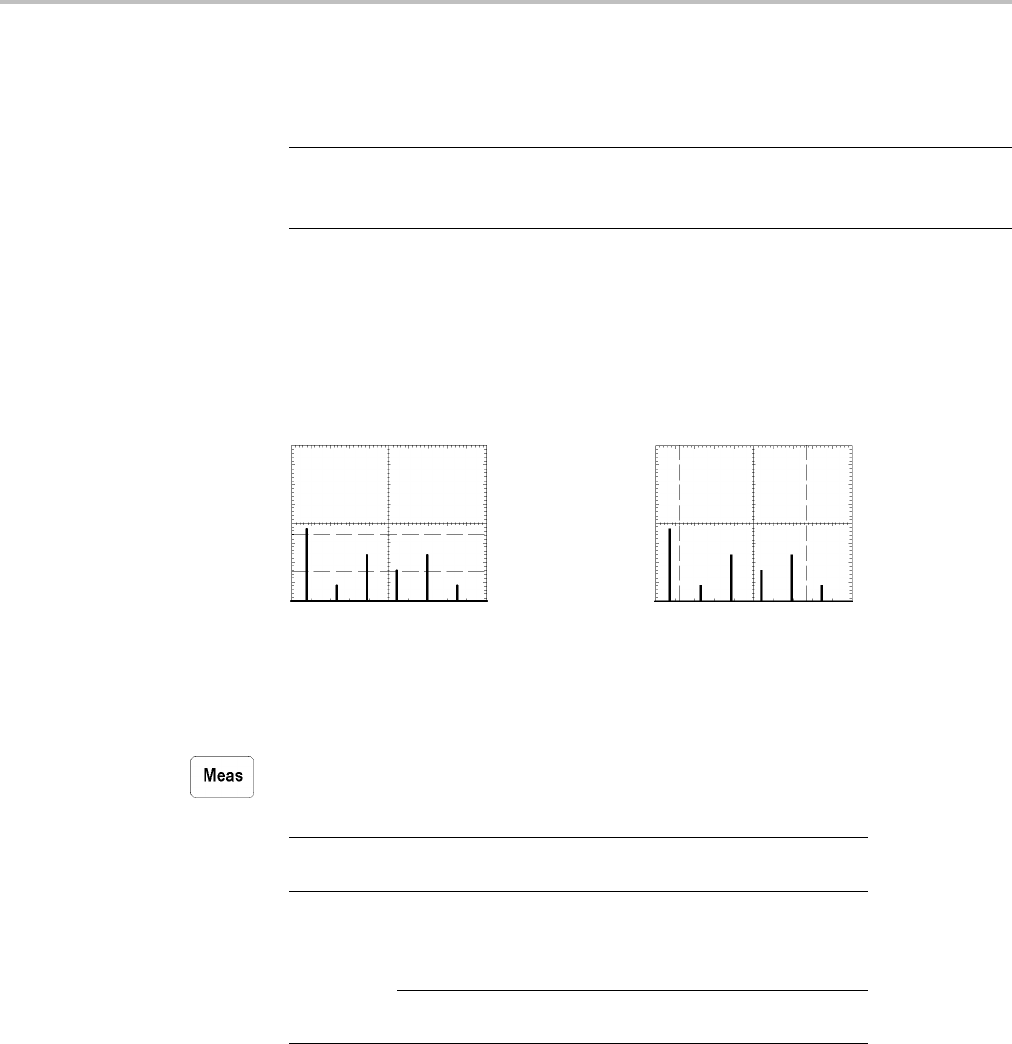
Reference
graticule, and vertically magnified about the math waveform marker. Zooming
does not affect the actual time base or trigger position settings.
NOTE. FFT waveforms are calculated using the entire source waveform record.
Zooming in on a region of either the source or FFT waveform will not recalculate
the FFT waveform for that region.
Measuring FFT Waveforms Using Cursors. You can use cursors to take two
measurements on FFT waveforms: magnitude (in dB or signal source units) and
frequency (in Hz). dB magnitude is referenced to 0 dB, where 0 dB equals 1 VRMS.
Use horizontal cursors (H Bars) to measure magnitude and vertical cursors (V
Bars) to measure frequency
Magnitude cursors Frequency cursors
Measure
Push the Meas button to show the measure menu.
Bottom Side Description
Select
Measurement
See the table on automatic
measurements. (See page 82.)
Measurement 1
Measurement 2
Measurement 3
Measurement 4
Removes a specific measurement.
Remove
Measurement
All
Measurements
Removes all measurements.
TDS3000C Series Oscilloscope User Manual 79

Reference
Bottom Side Description
Off Use to take measurements on the full
waveform record.
Screen Use to take measurements on the
portion of the waveform on screen.
Cursors Use to take measurements on the
portion of the waveform between the
V Bar cursors.
Bring Selected
Cursor to Center
Screen
Moves the active cursor to center
screen.
Gating
Bring Both
Cursors On
Screen
Moves any off-screen cursor onto the
screen.
Auto Select Automatically uses the best
measurement method depending on
the signal characteristics.
Histogram Usetome
asure pulses.
High-Low
Setup
Min-Max Use to measure other wave shapes.
Set Levels in %
or units
Use to choose custom reference
levels in relative or absolute units.
High Reference Sets custom high reference level.
Mid Reference Sets custom mid reference level.
Mid 2 Ref Sets the custom mid reference
level for the Delay and Phase
measurement second waveform.
Low Reference Sets custom low reference level.
Reference
Levels
Set to Defaults Sets reference levels to default
values.
Measurement 1-
Measurement 4
Selects the measurement for which to
display markers that show the portion
of the waveform used to calculate the
measurement value.
Indicators
Off Turns measurement indicators off.
Key Points Choosing Measurements. You can perform up to four automatic measurements
and display them along the right side of the graticule. All four measurements
can apply to a single channel or you can spread the measurements over several
channels. You can also take measurements on math and reference waveforms.
First push a channel, Math, or Ref button to select the waveform you want to
measure and then select a measurement. (See page 82, Automatic Measurements.)
80 TDS3000C Series Oscilloscope User Manual

Reference
Measurement Interaction with Preview. If you change a vertical or horizontal
control setting while acquisition is stopped or is waiting for trigger, measurements
track the changes and remain valid.
Taking Gray-Scale Measurements. Using cursors is often the best way to
take simple measurements on waveforms that contain significant gray-scale
information. The automatic measurements operate only on the latest acquisition,
not on the previous acquisitions that are displayed in gray scale. However, you
can set the cursors to surround and measure the gray-scale area of the waveform.
High-Low Setup. The oscilloscope determines the 10%, 50%, or 90% levels of
the waveform and then uses them to calculate the measurements. There are two
possible methods: Histogram or Min-max. Auto Select allows the oscilloscope
to determine the method used.
Histogram sets the values statistically; it finds the most common value either
above or below the midpoint (depending on whether it is defining the high
or low reference level). Since this statistical approach ignores short-term
aberrations (overshoot, ringing, noise), histogram is the best method for
measuring digital waveforms and pulses.
Min-max uses the highest and lowest values of the waveform record. This
method is best for measuring waveforms that have no large, flat portions at a
common value, such as sine waves and triangle waves.
Auto Select chooses one of the above methods automatically depending on
the signal characteristics. Auto Select chooses the histogram method if the
histogram contains prominent peaks. If not, Auto Select chooses the min-max
method.
Measurement Gating. You can use the gating feature to limit measurements to the
portion of the waveform that is on the screen or between the cursors.
When you turn Screen gating on, the oscilloscope only uses the waveform points
on screen in its measurements. This function is useful at the fastest time base
settings or when you want to take measurements on a magnified waveform (when
zoom is on).
When you turn Cursor gating on, the oscilloscope displays vertical bar cursors.
Use the general purpose knob and Select button to place the cursors around the
area of interest.
In the next example, the cursors surround the second positive-going pulse so the
oscilloscope can measure the width of that pulse.
TDS3000C Series Oscilloscope User Manual 81
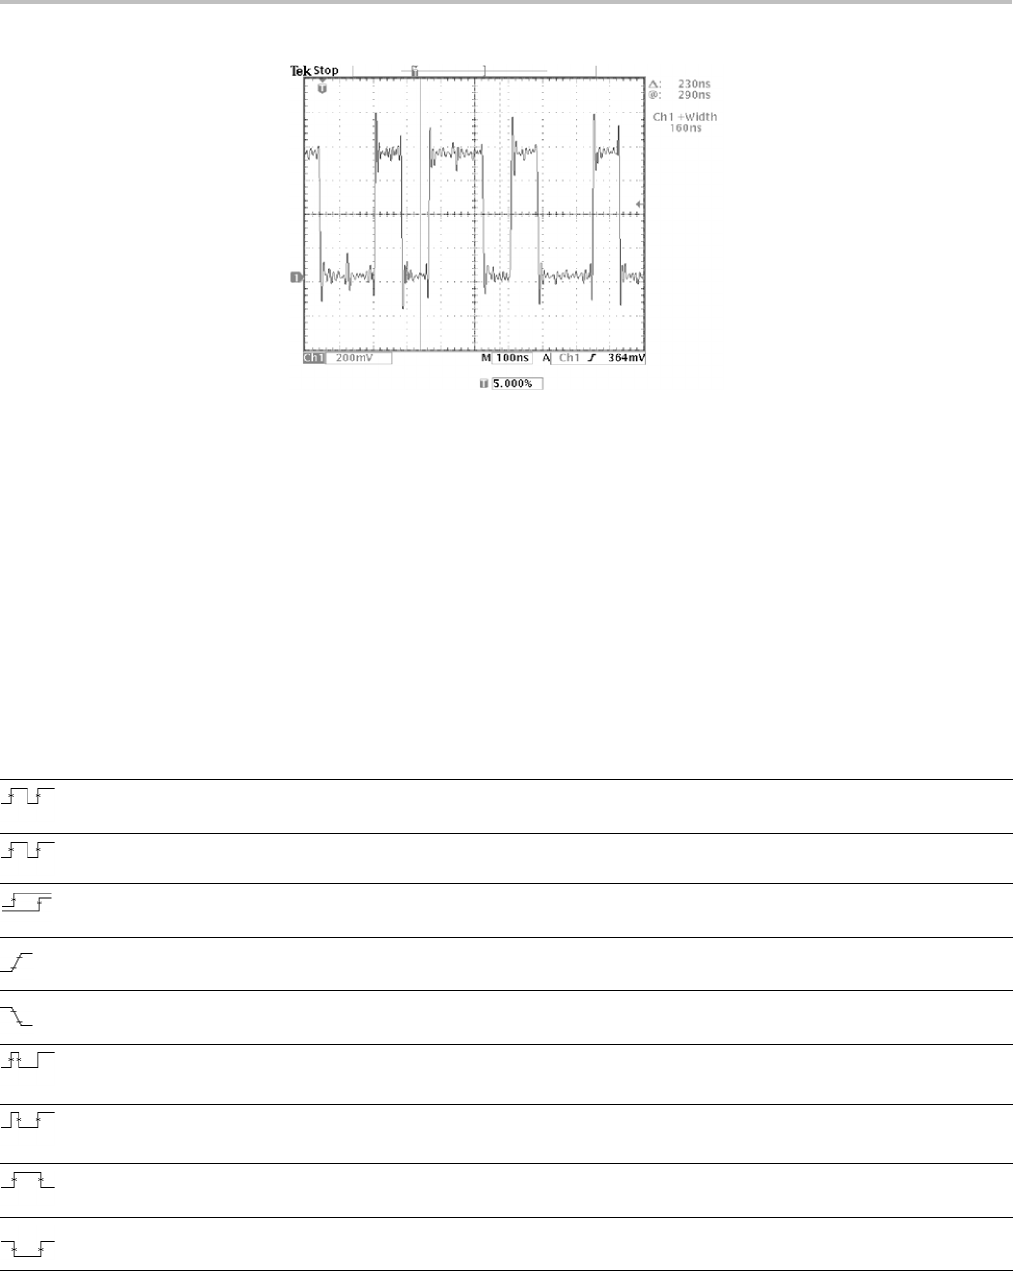
Reference
When gating is off, the oscilloscope takes measurements over the entire waveform
record.
Using Measurement Gating with Cursors. If V Bar cursors are already on when
you select Cursor gating, the cursors do both functions at the same time. The
cursor readouts are displayed at the same time that the cursors gate the automatic
measurements.
If H Bar cursors are on when you select cursor gating, the H Bar cursors are
turned off.
Automatic Measurements. The next table describes the measurements available
when you push the Select Measrmnt bottom screen button.
Measurement name Definition
Period Time it takes for the first complete signal cycle to complete in the waveform. Measured
in seconds.
Frequency Reciprocal of the period of the first cycle in the waveform. Measured in Hertz (Hz).
Delay Timing measurement. The time between the MidRef crossings of two different
waveforms or the gated region of the waveforms.
Rise Time Time that the leading edge of the first pulse in the waveform takes to rise from 10%
to 90% of its amplitude.
Fall Time Time that the falling edge of the first pulse in the waveform takes to fall from 90%
to 10% of its amplitude.
Positive Duty Cycle Measurement of the first cycle in the waveform.
Positive Duty Cycle = Positive Width/Period × 100%
Negative Duty Cycle Measurement of the first cycle in the waveform.
Negative Duty Cycle = Negative Width/Period × 100%
Positive Pulse Width Measurement of the first positive pulse in the waveform; time between the 50%
amplitude points.
Negative Pulse Width Measurement of the first negative pulse in the waveform; time between the 50%
amplitude points.
82 TDS3000C Series Oscilloscope User Manual
Reference
Measurement name Definition
Burst Width The duration of a burst. Measured over the entire waveform.
Phase Timing measurement. The amount one waveform leads or lags another in time.
Expressed in degrees, where 360° comprise one waveform cycle.
Positive Overshoot Measured over the entire waveform.
Positive Overshoot = (Max-High)/Amplitude × 100%
Negative Overshoot Measured over the entire waveform.
Negative Overshoot = (Low-Min)/Amplitude × 100%
Pk-Pk Measured over the entire waveform.
Peak-to-peak = Max - Min
AmplitudeMeasured over the entire waveform.
Amplitude = High (100%) - Low (0%)
High The value used as 100%. Calculated using either the min/max or the histogram
method. Measured over the entire waveform.
Low The value used as 0%. Calculated using either the min/max or the histogram method.
Measured over the entire waveform.
Max The maximum amplitude. The most positive peak voltage measured over the entire
waveform.
Min The minimum amplitude. The most negative peak voltage measured over the entire
waveform.
Mean The arithmetic mean over the entire waveform.
Cycle Mean The arithmetic mean over the first cycle in the waveform.
RMS The true Root Mean Square voltage over the entire waveform.
Cycle RMS The true Root Mean Square voltage over the first cycle in the waveform.
Area Voltage over time that returns the area over the entire waveform or gated region
in volt-seconds. The area measured above ground is positive, and below ground is
negative.
Cycle Area Area over the first cycle in the waveform or the first cycle in the gated region expressed
in volt-seconds. The area measured above the common reference point is positive,
and below the point is negative.
Snapshot All Measurements Displays all measurement values (except two-channel measurements) at the time you
pushed the Snapshot All Measurements button, for the selected waveform. Push
the Snapshot All Measurements button to update the list values. Push the Menu Off
button to clear the list from the screen.
TDS3000C Series Oscilloscope User Manual 83

Reference
QuickMenu
Push the QuickMenu button to see a set of frequently used menu functions on
the display. QuickMenus simplify oscilloscope operation and can increase your
productivity.
Scope is a standard QuickMenu for general purpose oscilloscope use. Some
optional application packages also include a custom QuickMenu display. (See
page 21, Using the Scope QuickMenu.)
Key Points Using the QuickMenus. To use a QuickMenu, push the screen button that
corresponds to the control you need to set. Push the screen button repeatedly to
choose one of the settings. The small arrow icon indicates that there are additional
settings available that are not shown.
You can use most of the front-panel controls at the same time you are using a
QuickMenu. For example, if you push a channel button to select a different
channel, the QuickMenu changes to show information about that channel.
Using Other Menus. You can still use the regular menus. For example, if you push
the Meas button, you can set up and take automatic waveform measurements in
the usual way. If you return to the QuickMenu, the measurement is still displayed
on thescreen.
Selecting Between QuickMenus. You may have optional application modules
installed that also have QuickMenu displays. To select the QuickMenu you want
to use, push the Menu screen button. This menu item is shown only if application
modules that contain a QuickMenu are installed.
Save/Recall
Push the Save/Recall button to show the save/recall menu.
Bottom Side Description
To File Saves a setup to a USB flash drive.
Save
Current
Setup To Setup 1 ...
To Setup 10
Saves a setup to nonvolatile memory.
From File Recalls a setup from a USB flash drive.
Recall
Saved
Setup Recall Setup
1 ... Recall
Setup 10
Recalls a setup from nonvolatile
memory.
Recall
Factory
Setup
OK Confirm
Factory Init
Initializes the setup.
84 TDS3000C Series Oscilloscope User Manual

Reference
Bottom Side Description
To File Saves one or more waveforms to a file.
Selecting this menu item changes the
side menu contents. (See page 85.)
Save
Wfm
To Ref1 ... To
Ref4
Saves the selected waveform to
nonvolatile memory. (See page 86.)
Recall
Wfm
From File Recalls a waveform from a USB flash
drive and displays it as a reference
waveform.
Ref1 ... Ref4 Recalls a reference waveform.
File
Utilities
Accesses the USB flash drive file utilities. (See page 86.)
Labels Lets you assign unique labels to reference waveforms and
oscilloscope setups stored in nonvolatile memory. (See
page 87.)
Key Points Saving Setups. To save the current setup to nonvolatile memory, push the Save
Current Setup screen button, and then select one of the ten storage locations.
Then, push the OK Overwrite Saved Setup screen button to complete the operation
or the Menu Off button to cancel the operation.
Recalling Setups. To recall a setup from nonvolatile memory, push the Recall
Setup screen button and then select one of the ten storage locations.
Recalling the Factory Setup. Recall the factory setup to initialize the oscilloscope
to a known setup. Appendix B describes the Factory Setup in detail.
To recall the factory setup, push the Recall Factory Setup screen button, and then
push the OK Confirm Factory Init screen button to complete the operation.
Saving a Waveform to File. When you push the To File side menu button, the
oscilloscope changes the side menu contents. The next table describes these side
menu items for saving data to a USB flash drive file.
Side menu button Description
Internal File Format Sets the oscilloscope to save waveform data to a USB flash drive in internal waveform
save file (.isf) format. This format is the fastest to write and creates the smallest-sized
files. Use the internal waveform format if you intend to recall a waveform and store it
into reference memory for viewing or measuring.
Spreadsheet File Format Sets the oscilloscope to save waveform data to a USB flash drive as a
comma-separated data file compatible with most spreadsheet programs.
MathcadFileFormat Sets the oscilloscope to save waveform data to a USB flash drive in Mathcad format.
Use this format if you intend to import the waveform data into Mathcad software.
Save Active Waveforms to Consecutive
Files
Immediately saves all active waveforms to consecutively-numbered files in internal
save file (.isf) format. This menu item is only available when the Internal File Format
is selected.
TDS3000C Series Oscilloscope User Manual 85
Reference
Side menu button Description
Save Active Waveforms to Selected File Immediately saves all active waveforms to a single spreadsheet or Mathcad format
file. This menu item is only available when either spreadsheet or Mathcad file format
is selected.
Save <wfm> to selected file Immediately saves the selected active waveform, math waveform, or reference
waveformdatatoaUSBflash drive using the selected file format.
Saving a Waveform to Reference Memory. To save a waveform to nonvolatile
memory, first select the waveform you want to save. Push the Save Wfm screen
button and then select one of the four reference waveform locations. (See
page 116.)
Saved waveforms contain only the most current acquisition; gray-scale
information, if any, is not saved.
Displaying a Reference Waveform. To display a waveform stored in nonvolatile
memory, push the Ref button and then push the Ref1, Ref2, Ref3, or Ref4 screen
button.
When a reference waveform is selected, it appears brighter than other reference
waveforms. Reference waveforms do not contain gray-scale information.
Removing a Reference Waveform from the Display. To remove a reference
waveform from the display, push the Ref button and then the Ref1, Ref2, Ref3,
or Ref4 screen button to select a reference waveform. Push the Waveform Off
button . The reference waveform is still in nonvolatile memory and can be
displayed again.
Erasing All Setups and Waveforms. Refer to TekSecure for instructions on how to
erase all setups and waveforms saved in nonvolatile memory. (See page 110.)
Using a USB Flash Drive
You can use the save and recall file functions with a USB flash drive. Push the
Save/Recall button, and the File Utilities screen button. The next table shows the
File Utilities submenu.
86 TDS3000C Series Oscilloscope User Manual

Reference
Bottom Side Description
Delete Deletes a file.
Rename Renames a file.
Copy Copies a file to another directory.
Print Prints a file to a printer connected
to one of the hard copy ports.
Create Directory Creates a new directory.
Confirm Delete Turns On or Off a confirmation
message before files are deleted.
Overwrite Lock Sets file overwrite protection to
On or Off.
File Utilities
Format Formats a USB flash drive
(erases all files).
Key Points Upgrading Firmware. You ca n use a U SB flash drive to upgrade the oscilloscope
firmware or install new application packages. (See page xvii.)
Navigating the File System. When you insert a USB flash drive and push the
File Utilities screen button, the oscilloscope shows a list of directories and files
on the flash drive.
Use the general purpose knob to select a directory or file. To change the working
directory, select the directory and then push the Select button. To move up one
directory level, select, and then push the Select button.
Automatic File Numbering. The oscilloscope gives all files created by the
oscilloscope the default name TEK?????, where the question marks are
placeholders for an automatic number sequence from 00000 to 99999.
You can change the TEK????? file to a new name with up to eight characters.
If you use fewer than eight characters and include trailing question marks, the
oscilloscope numbers the files sequentially if more than one are saved with the
same base name.
For example, if you rename the TEK?????.ISF file to TEST??.ISF for a series of
saved waveforms, the oscilloscope saves the first one as TEST00.ISF, the second
one as TEST01.ISF, up to the last one as TEST99.ISF.
Editing File, Directory, Reference Waveform, or Instrument Setup Names. Yo u can
edit file names, directory names, reference waveform and oscilloscope setup
labels, and Ethernet parameters. Use the general purpose knob to select an
alphanumeric character. Use the screen buttons described in the next table to
edit and enter the new name.
Screen button Function
Enter Char Enters the selected character into the field.
TDS3000C Series Oscilloscope User Manual 87
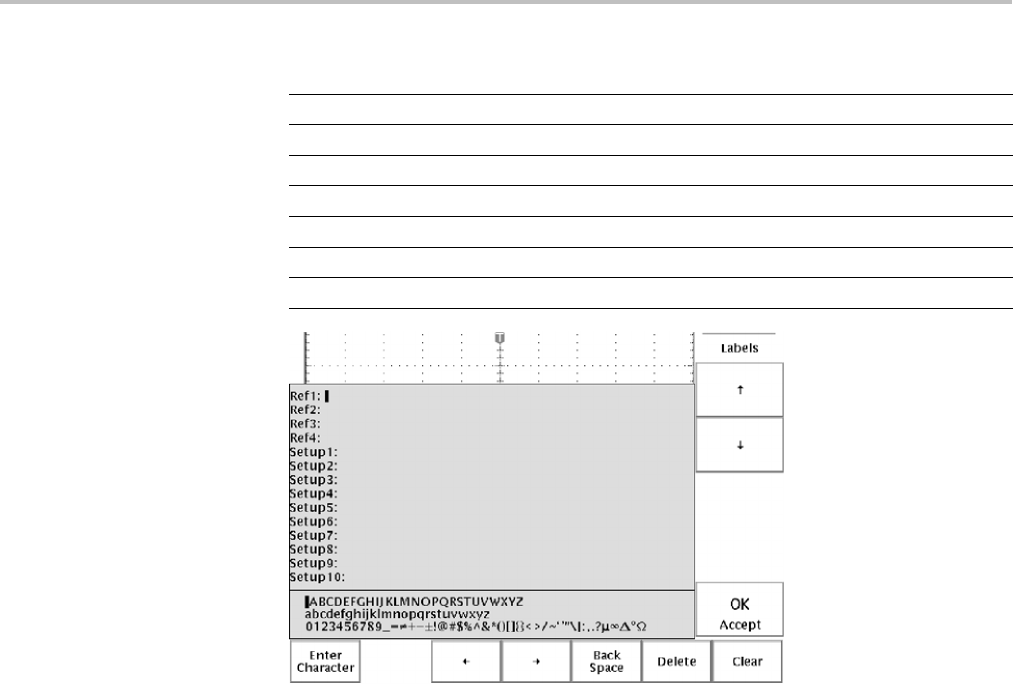
Reference
Screen button Function
←and →Moves the cursor to a different character in the field.
Back Space Deletes the character before the cursor location.
Delete Deletes the character at the cursor location.
Clear Erases the current field value.
↑and ↓Selects the field that you want to edit.
OK Accept Applies allfield values.
Menu Off Exits the menu without applying field values.
Deleting Files. To delete a file, select the file with the general purpose knob, push
the Delete screen button, and then push the OK Delete screen button when you
see the confirmation screen.
If you do not want to see a confirmation screen each time you delete a file, push
the Confirm Delete screen button to set it to Off.
Renaming Files. To rename a file, select the file with the general purpose knob,
push the Rename screen button, and then edit the file name. (See page 87.)
Once a directory is created, you cannot rename it. However, you can delete the
directory and create a new one with a new name.
Copying Files and Directories. To copy a file or directory, select the file or
directory with the general purpose knob and push the Copy screen button. Now
use the general purpose knob and Select button to select a destination directory.
Push the copy confirmation screen button to complete the operation.
Printing Files. Yo u can p rin t files through any installed printer port to your printer.
To print a file, select the file with the general purpose knob. Push the Print screen
button and then select the port to which your printer is connected. Make sure that
the oscilloscope is set to send the correct file format to your printer.
88 TDS3000C Series Oscilloscope User Manual
Reference
Creating a Directory. To create a directory, use the general purpose knob and
Select button to select the working directory where you want the new directory to
reside. Push the Create Directory screen button, and enter or edit the file name
using the screen buttons described in the previous table. (See page 87.)
Formatting a USB Flash Drive. To format a USB flash drive, insert it into the USB
flash drive port. Push the Format screen button and then push the OK Confirm
Format screen button to confirm the operation. If you decide not to format the
flash drive, push the Menu Off button to stop the format operation.
CAUTION. To avoid loss of data, do not format USB flash drives that already
contain important data. When you format a USB flash drive, all files and
directories will be erased and can never be recovered.
Setting Protections. The oscilloscope provides two protections to help you
prevent accidental loss of data:
Confirm Delete shows a confirmation message each time you try to delete a
file. You can turn Confirm Delete off if you do not want to see the message.
Overwrite Lock prevents the oscilloscope from writing over existing files. You
can turn Overwrite Lock off if you want to be able to write over existing files.
File Extensions. Files written by the oscilloscope have the following extensions.
The oscilloscope can only read files with the SET, MSK, and ISF extensions.
File extension File type
*.SET Saved setup file
*.ISF Saved waveform file, Internal format
*.CSV Saved waveform file, Spreadsheet format
*.DAT Saved waveform file, Mathcad format
*.TJ Hard copy file, Thinkjet format
*.DJ Hard copy file, Deskjet format
*.LJ Hard copy file, Laserjet format
*.IBM Hard copy file, Epson format
*.IMG Hard copy file, Interleaf format
*.TIF Hard copy file, TIFF format
*.RLE Hard copy file, RLE format
*.PCX Hard copy file, PCX format
*.BMP Hard copy file, BMP format
*.EPS Hard copy file, EPS format
*.BJC Hard copy file, Bubble Jet format
*.DPU Hard copy file, Seiko DPU-3445 format
*.GZ Gnuzip-compressed hard copy file
TDS3000C Series Oscilloscope User Manual 89
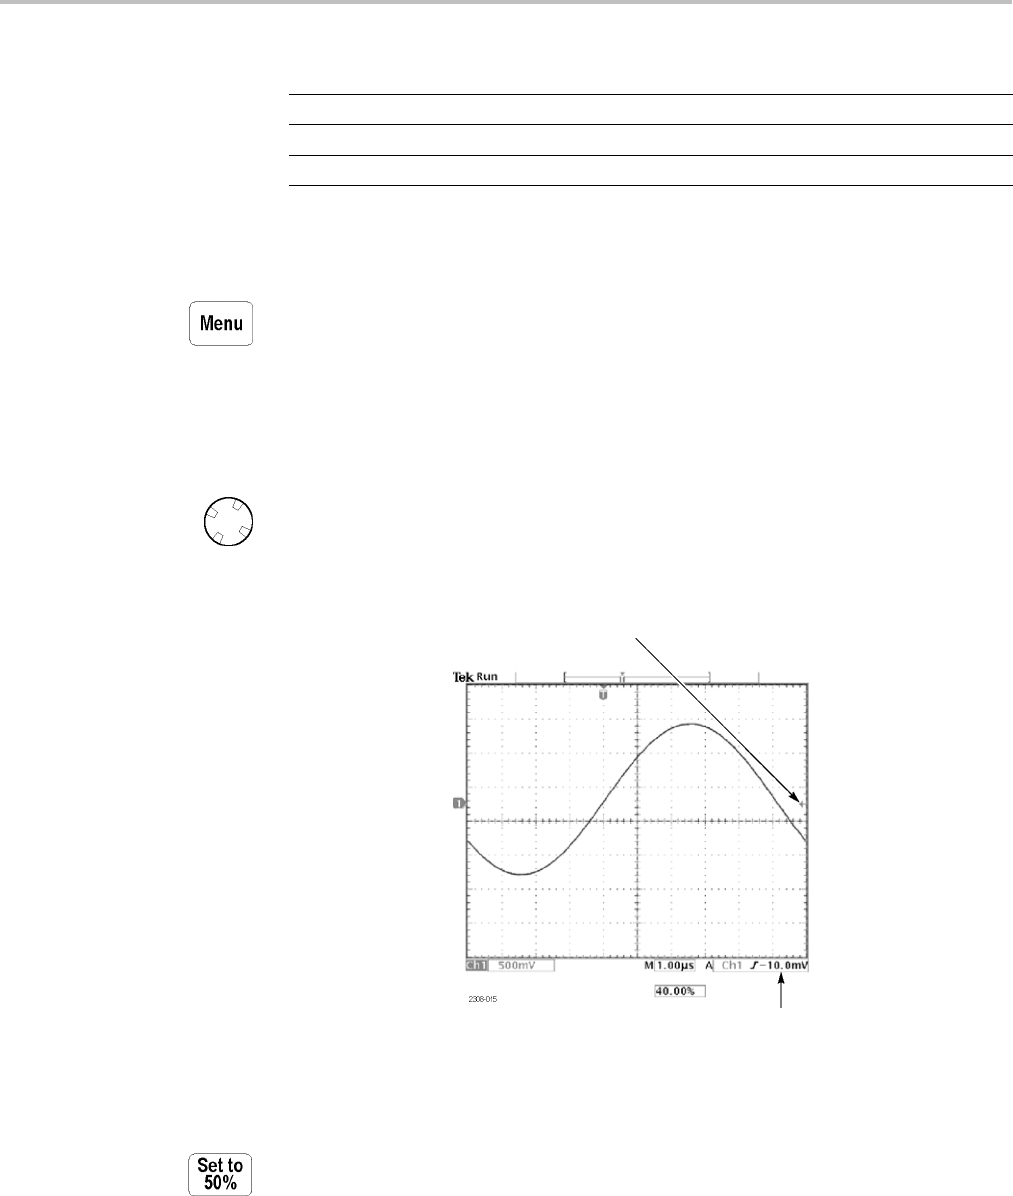
Reference
File extension File type
*.MSK Mask geometry file (requires TDS3TMT module)
*.PNG Hard copy file, Portable Network Graphics format
*.C60, *.C80 Hard Copy file, Epson C60 or C80 inkjet format
Trigger Controls
Push the Trigger Menu button, and then push the Type screen button to select
Edge, Logic, Pulse, or Video. If installed, see the user manual for the TDS3VID
Extended Video, the TDS3SDI 601 Digital Video, or the TDS3TMT Telecom
Mask Test application module for more information.
Trigger Level
Use the trigger Level control to adjust the trigger level. When you change the
trigger level, a horizontal line temporarily appears to show you the level on
screen. After the line disappears, the trigger level is marked with a small arrow.
Trigger level marker
Trigger level readout
Set to 50%
Push the Set To 50% button to set the trigger level to the 50% amplitude level of
the trigger source waveform.
90 TDS3000C Series Oscilloscope User Manual
Reference
Force Trigger
Push the Force Trig button to force an immediate trigger event, even in the
absence of a signal. This function is useful in these situations:
If you do not see a waveform on the screen when using Normal trigger mode,
push Force Trig to acquire the signal baseline to verify that it is on the screen.
After you push the Single Seq button to set up for a single shot acquisition,
you can push the Force Trig button to do a practice acquisition to verify the
control settings.
TDS3000C Series Oscilloscope User Manual 91

Reference
B Trigger
To use the B trigger, the A trigger type must be Edge. Push the Trigger Menu and
then the B Trig buttons to show the B-trigger menu and to activate triggering
using both the A and B triggers. The light next to the B Trig button indicates B
trigger is active. Push the B Trig button again to return to the single A trigger.
Bottom Side Description
B Trigger After A
Time
Sets the oscilloscope to trigger on
the next B-trigger event that occurs
after a specified period of time
from the A trigger. Use the general
purpose knob to set the time value.
Set to Delay Time
(B→▼ )then
Set ( B →▼)to
0s
Sets the B Trigger After A Time
value to the horizontal B→▼value,
then sets B→▼ to zero seconds.
B→▼is the delay time from the B
trigger point to the expansion point
(center screen).
Set to Min Sets B Trigger After A time to
26.4 ns.
B Events Sets the oscilloscope to trigger on
the nB-trigger event after the A
trigger. Use the general purpose
knob to set the event value.
B Trigger
After A
Set to Min Sets the B events count to 1.
Source
Coupling
Slope
Level
Sets Source, coupling, slope,
and level for the B trigger. These
settings are independent of similar
settings for the A trigger. The
table on Edge triggering includes
descriptions of these menu items.
(See page 94.)
The trigger wait time is the minimum time between the A and B triggers. The
trigger wait time is not the same as the horizontal delay time. You can use
the horizontal delay function to delay acquisition relative to any trigger event,
whether it is from the A trigger alone or from a trigger setup that involves both
the A and B triggers.
The next figures show the wait-for-time and the wait-for-events triggering, and
how they relate to the horizontal delay time.
92 TDS3000C Series Oscilloscope User Manual
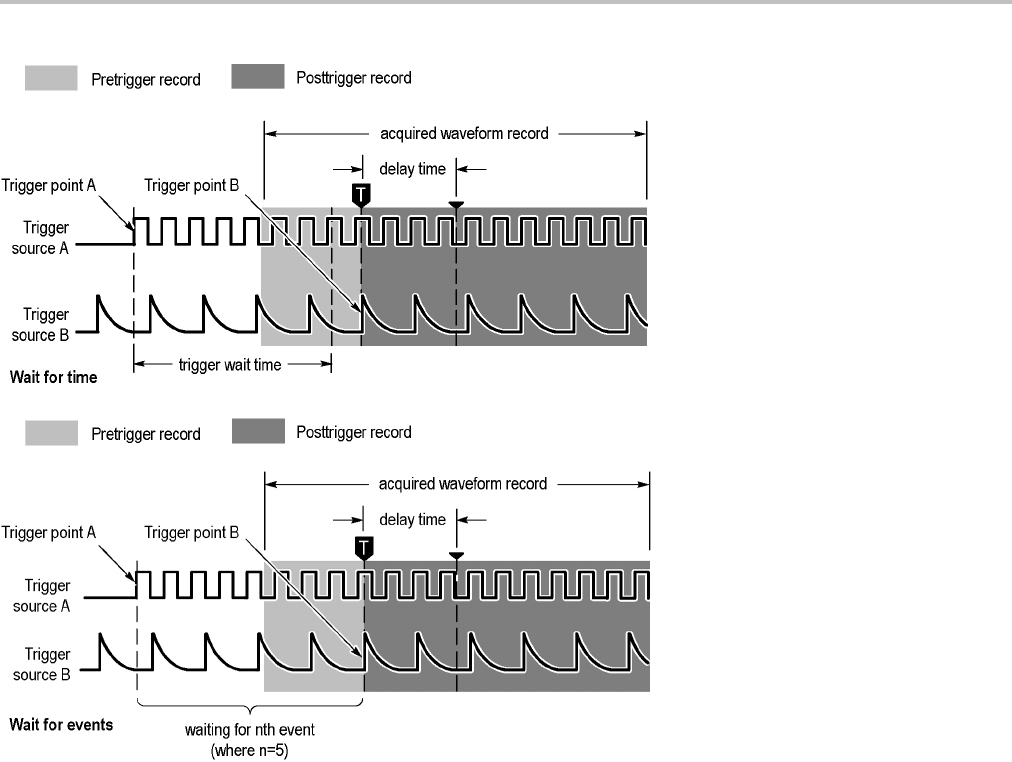
Reference
After the A trigger event is recognized, the oscilloscope begins counting B trigger
events. However, for the first B event to be counted, that event must consist of
both an opposite-polarity edge and the edge that is counted. The opposite-polarity
edge must occur ≥5 ns after the A trigger arming event. If this condition is not
met, the oscilloscope does not count the first event, which results in a trigger on
the n+1st event. Refer to the next figure, where n=3 and A and B trigger slopes
are set to rising edge.
TDS3000C Series Oscilloscope User Manual 93
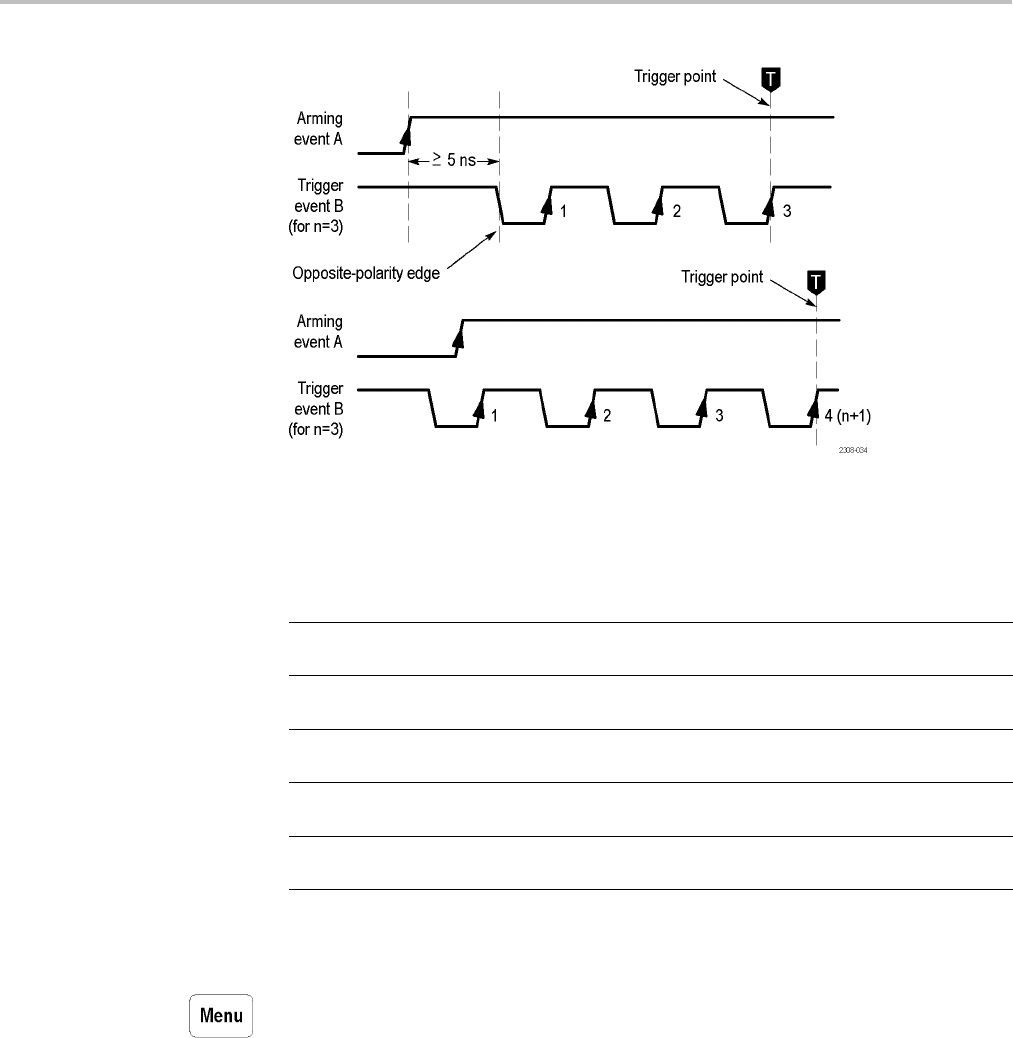
Reference
Trigger Status The readout at the top of the screen shows you the current trigger status. The next
table explains the trigger status indicators.
Trigger status Explanation
Auto The oscilloscope is acquiring using auto trigger. Valid trigger events,
if any, are infrequent.
Trig'd The oscilloscope is acquiring using valid trigger events that are
frequent enough to avoid auto triggering.
PrTrig The oscilloscope is acquiring the pretrigger part of the waveforms.
This status is shown only at the slowest time/division settings.
Trig The oscilloscope has acquired the pretrigger part of the waveforms
and is waiting for a valid trigger event.
BTrig The A trigger event has occurred. The oscilloscope is armed and
waiting for a valid B trigger event.
Edge Trigger
Push the Trigger Menu button, and then push the Type bottom screen button to
select Edge. Use Edge triggering to trigger on the rising or falling edge of the
input signal at the trigger threshold. The next table lists the menu items when
the trigger Type is set to Edge.
94 TDS3000C Series Oscilloscope User Manual

Reference
Bottom Side Description
Ch1, Ch2 (Ch3,
Ch4)
Sets the trigger source to a specific channel.
AC Line Sets the trigger source to use the AC line
signal (not available when operating with
batteries).
Ext
Ext/10
Sets the oscilloscope to trigger on the
external trigger source. Ext/10 attenuates
the external trigger signal by a factor of 10.
(See page 96.)
Ext Probe nnX
Voltage / Current
(4-channel only)
Set this value to match the attenuation factor
and the type of probe (voltage or current) that
is attached to the external trigger connector.
Push the menu button to select the probe
type. Use the general purpose knob to set
the attenuation factor. The default values
are 1x and voltage.
Vert Sets the trigger source to the
lowest-numbered active channel in
the display.
Source
Alternating (all
active channels)
Sequentially uses each active channel as a
trigger source, from the lowest-numbered
active channel to the highest-numbered
active channel. (See page 96.)
DC Selects DC coupling.
HF Reject Rejects frequencies above 30 kHz in the
trigger signal.
LF Reject Rejects frequencies below 1 kHz in the
trigger signal.
Coupling
Noise Reject DC coupling with low sensitivity to reject
noise in the trigger signal.
/(
rising edge) Triggers on the rising edge of a signal.
Slope
\(falling edge) Triggers on the falling edge of a signal.
Level Use to set the trigger level with the general
purpose knob.
Set to TTL Sets the trigger level to +1.4 V for TTL logic.
Set to ECL Sets the trigger level to -1.3 V for ECL logic
(Vee =-5.2V).
Level
Set to 50% Sets the trigger level to the 50% amplitude
level of the signal.
TDS3000C Series Oscilloscope User Manual 95

Reference
Bottom Side Description
Auto (untriggered
roll)
Enables free-running and roll-mode
acquisitions.
Normal Triggers only on valid trigger events.
Holdoff (time) Sets holdoff to a specifictime.
Holdoff (% of
record)
Sets holdoff to a percent of the record
duration.
Mode &
Holdoff
Set to Min Sets holdoff to the minimum value.
Key Points Displaying the Trigger Source. You do not have to display a channel to use it as
a trigger source.
NormalandAutoMode. Use Normal trigger mode when you want to trigger
only on a valid event. Use Auto trigger mode when you want the acquisition to
occur, even when there is not a valid trigger event. Also choose Auto when you
want a rolling waveform, with no trigger, at the slower time base settings. (See
page 71, Roll Mode Display.)
External Trigger. The trigger level range for the EXT setting is -0.8 V to +0.8 V.
The trigger level range for the EXT/10 setting is -8 V to +8 V.
For best external trigger performance, apply a square-wave signal with amplitude
greater than the specified minimum level range and with well-defined transitions.
Alternating Trigger. Alternating trigger sequentially uses each active channel as a
trigger source, from the lowest-numbered active channel to the highest-numbered
active channel. Alternating trigger is available in all trigger menus except for
logic triggers.
Alternating trigger uses the current trigger settings to trigger on all active
channels; there is not a separate trigger setup for each channel. Therefore, the
trigger settings must be able to trigger on all active signals in order to produce
a stable triggered display. If one or more of the source signals do not meet the
trigger settings, the oscilloscope either waits for that source channel to trigger
(Normal trigger mode) or autotriggers (Auto trigger mode).
Due to image persistence, all alternating trigger active channels may appear to
be synchronized. However, this does not mean that the displayed signals are
synchronized. Also, alternating trigger does not use EXT, EXT/10, or Line signals
as trigger sources.
Holdoff. You can use holdoff to help stabilize the display of complex waveforms.
After you push the Mode & Holdoff screen button, use the general purpose knob
to set the holdoff time as an absolute value or as a percent of the record duration.
Holdoff begins when the oscilloscope recognizes a trigger event and disables the
trigger system until acquisition is complete. The trigger system remains disabled
during the holdoff time.
96 TDS3000C Series Oscilloscope User Manual
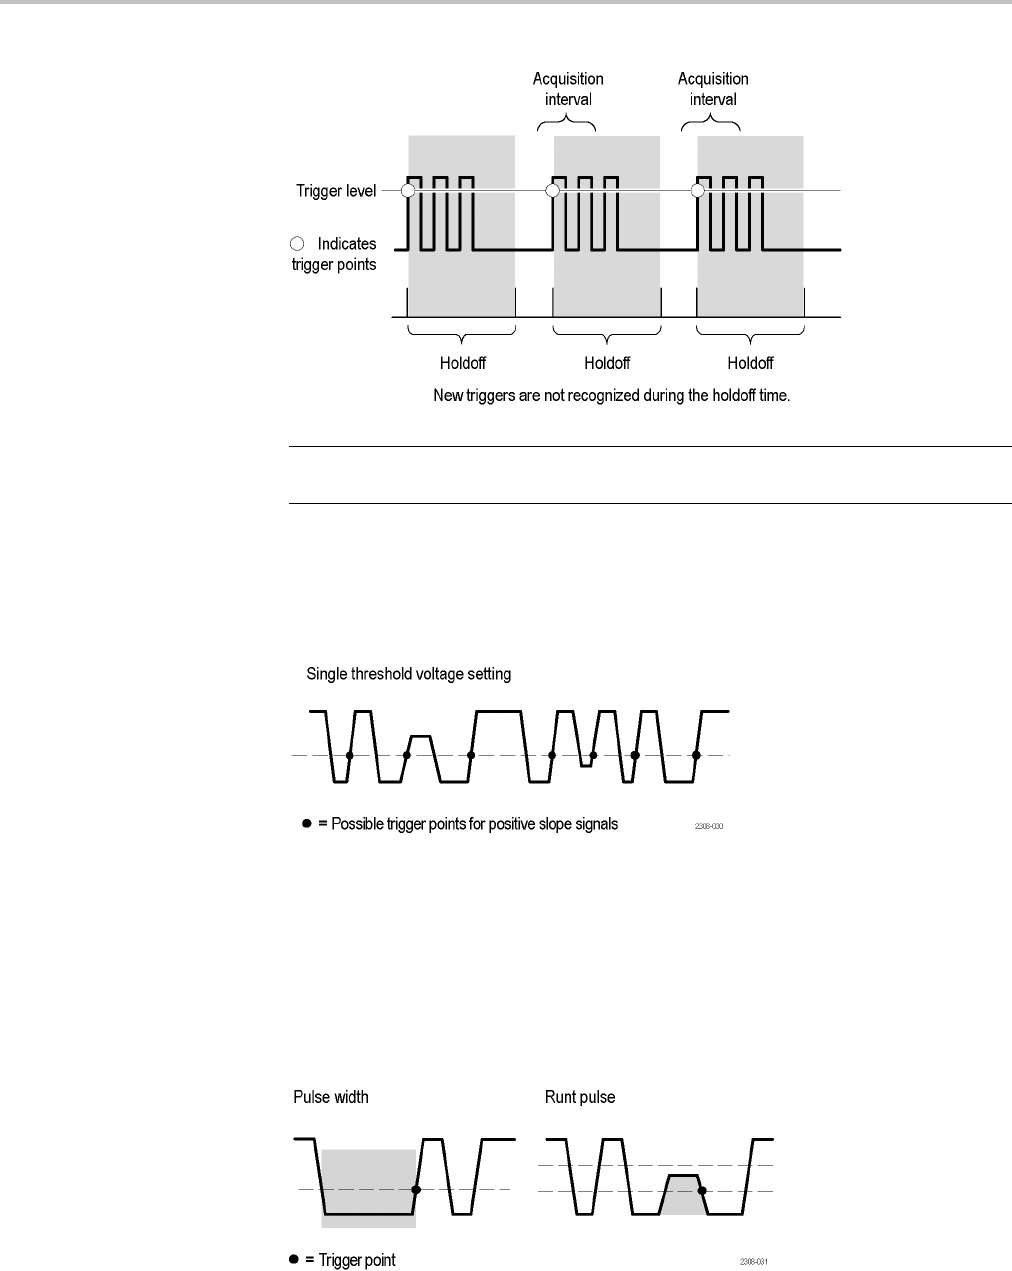
Reference
NOTE. For best results, choose Normal trigger mode when using long holdoff
settings (10 ms or greater).
Logic Triggers Edge triggering can trigger on most signals, and is the default trigger type. Edge
triggering sets the oscilloscope to trigger (acquire signal data) when a signal meets
aspecified signal slope and a single voltage-threshold condition.
However, there are times when you need to trigger the oscilloscope on a more
complex signal, or when two signals meet a condition to troubleshoot a problem.
These problems include a pulse that is too narrow or wide, and situations in which
one signal is true when a second signal transitions from low to high.
Logic and Pulse triggering lets you further qualify the trigger conditions by
adding parameters such as pulse width, delta time, logical comparisons of two
signals, and dual threshold levels.
TDS3000C Series Oscilloscope User Manual 97
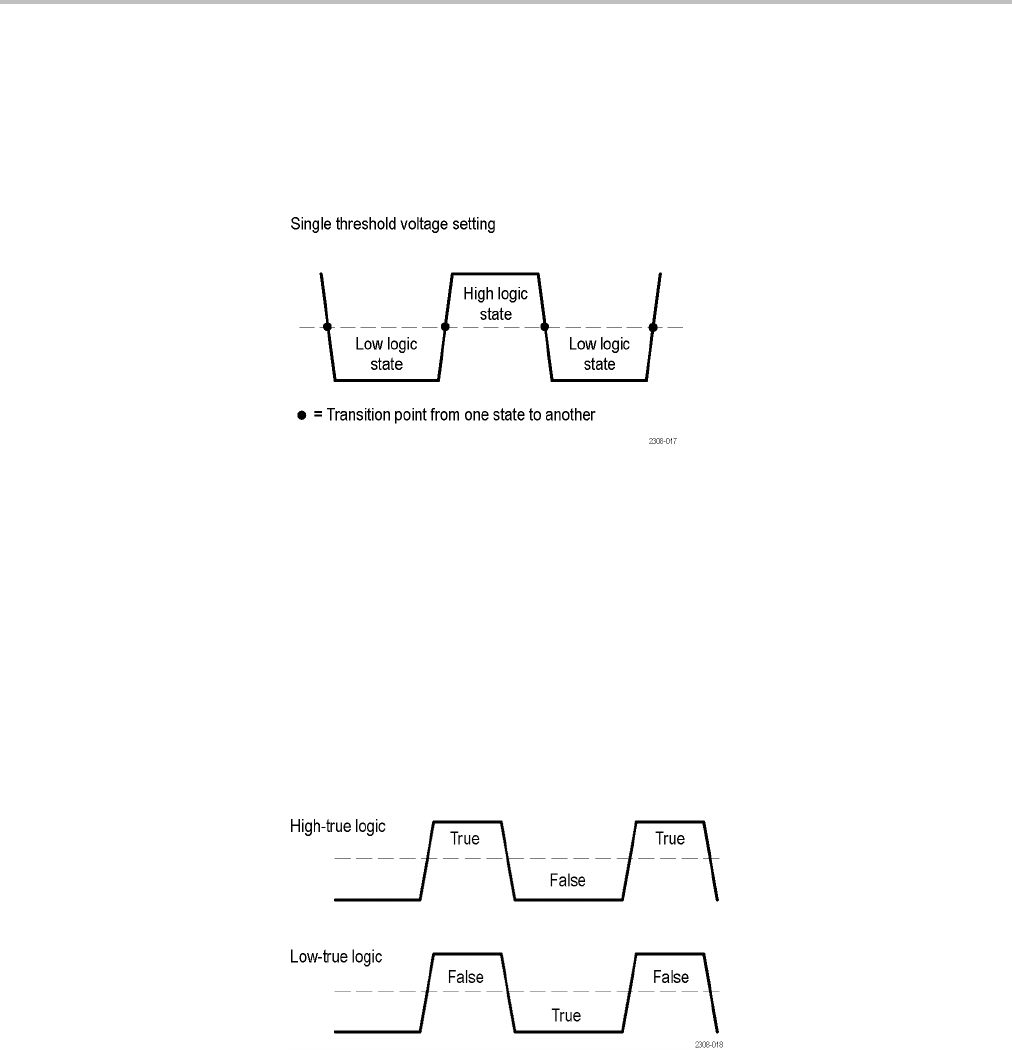
Reference
Thresholds. Both Pulse and Logic types trigger the oscilloscope when one or two
signals are logically true. To determine whether a signal is true or false, you must
set a signal reference point that determines whether a signal is in one of two
states. You set this reference point by specifying a threshold voltage level for each
trigger signal. Crossing the threshold level toggles the state value of that signal.
Logic State. The actual state (true or false) of a signal depends on how you
define its signal logic setting, which can be either high-true or low-true. Defining
asignalas high-true (H) means that signal levels above (more positive than)
the threshold level are true, and signal levels below (more negative than) the
threshold level are false.
A low-true (L) logic setting is just the opposite. Defining a signal as low-true
means that signal levels below (more negative than) the threshold level are true,
and signal levels above (more positive than) the threshold level are false. Low
logic effectively inverts the signal.
Defining the logical state of a signal lets you use Boolean logic to evaluate when a
condition is true for two signals.
Boolean Logic. The signal logic (threshold level and high-true/low-true logic)
defines which part of a waveform cycle is true or false. You then use Boolean
logic to evaluate or compare the logic of two signals as part of a trigger condition.
98 TDS3000C Series Oscilloscope User Manual
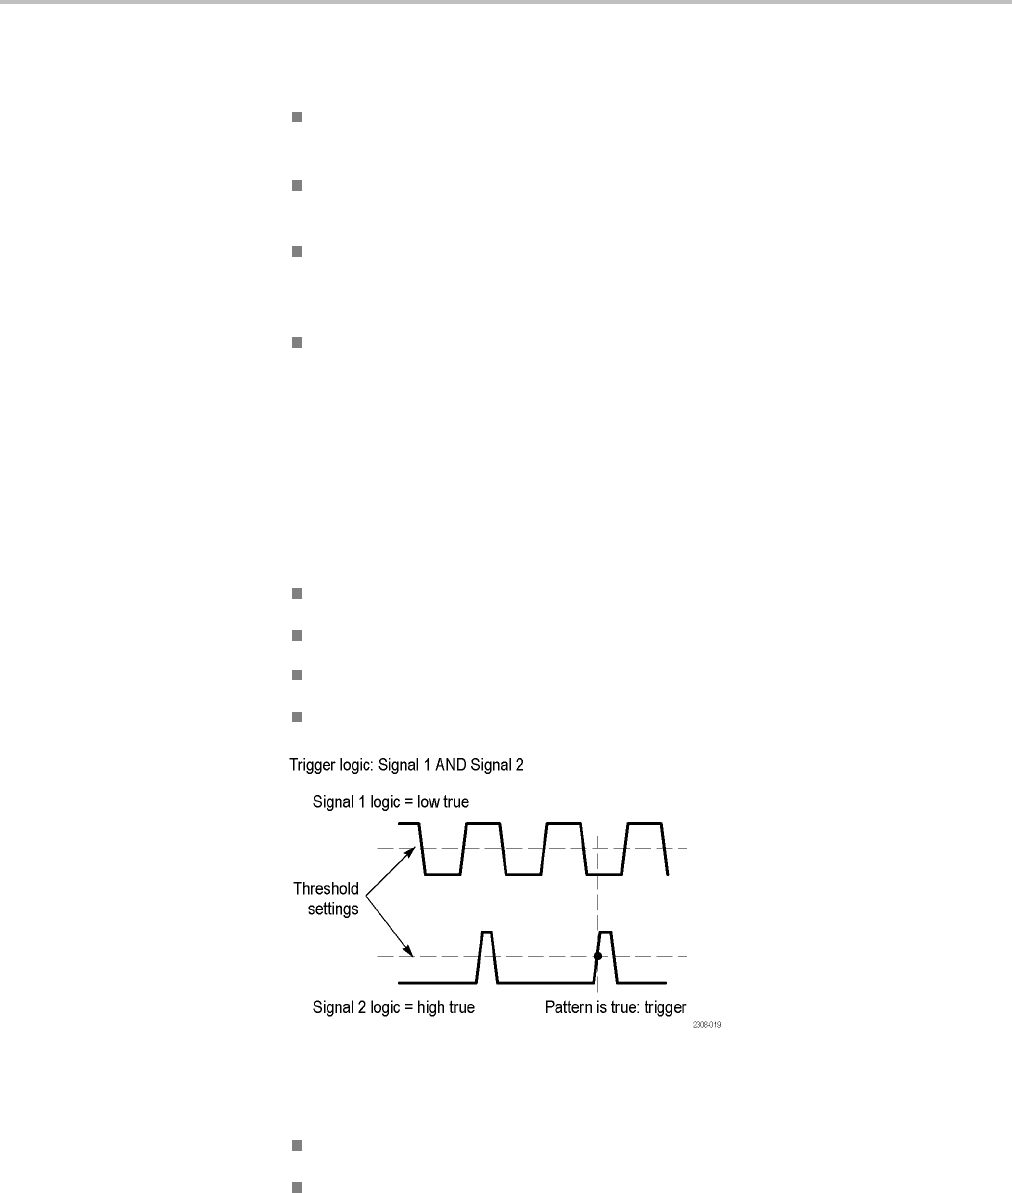
Reference
The four logical comparison functions are AND, OR, NAND, and NOR:
The AND function means that if both signal logic states are true, the condition
is true, otherwise the condition is false.
The OR function means if either or both signal logic states are true, the
condition is true, otherwise the condition is false.
The NAND function means that if both signal logic states are true, the
condition is false, otherwise the condition is true. This function is the inverse
of the AND function.
The NOR function means if any or all of the trigger signal logic states are
true, the condition is false, otherwise the condition is true. This function is the
inverse of the OR function.
Remember that the logic function evaluates the logic states of two signals, and
that the logic state of each signal depends on whether they are set to high-true
or low-true logic.
For example, assume that you want to trigger the oscilloscope only when signal
one is low at the same time that signal two is high. Therefore you want to:
Set a threshold level that is appropriate for each signal.
Set signal one to be true when it is low (low-true signal logic).
Set signal two to be true when the signal is high (high-true signal logic).
Trigger when both conditions are true (AND trigger logic).
Conventions for Logic and Pulse Trigger Types. This manual uses the following
conventions:
You cannot use any of the advanced trigger functions to arm B triggering.
You do not have to display a channel in order to use the channel as a trigger
source.
TDS3000C Series Oscilloscope User Manual 99
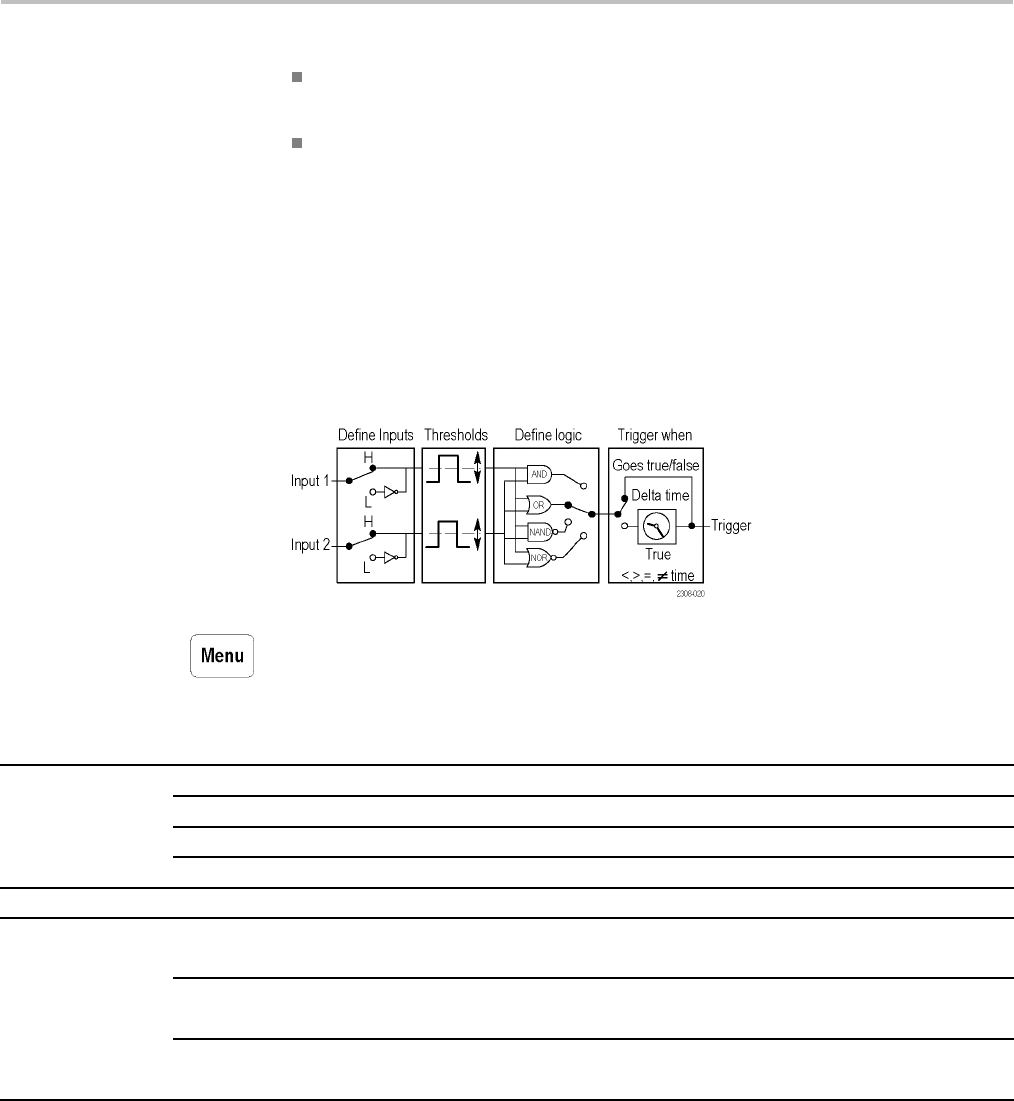
Reference
The range of time values for pulse width (regular and runt) and slew rate is
from39.6nsto10s.
In the menu tables, Nrepresents a numeric value entered using the general
purpose knob.
Pattern Trigger Pattern triggering triggers the oscilloscope when two signals become logically
true or false. Basically, the pattern-triggering feature triggers the oscilloscope
from the output of a two-input AND, OR, NAND, or NOR logic gate. You
can specify time constraints and signal threshold levels as part of the triggering
condition. This trigger is useful for digital logic troubleshooting.
Pattern Trigger Conditions
Push the Trigger Menu button, and then push the Type bottom screen button to
select Logic. The next table lists the menu items when the trigger Type is set to
Logic, and the Class is set to Pattern.
Bottom Side Description
Input 1 Source Sets the pattern trigger signal input 1 source.
Logic Sets the signal logic for input 1. H = high true, L = low true.
Input 2 Source Sets the pattern trigger signal input 2 source.
Define Inputs
Logic Sets the signal logic for input 2. H = high true, L = low true.
Define Logic AND, OR, NAND, NOR Sets which logic function to apply to the input signals.
Goes True
Goes False
Triggers the oscilloscope when the logic condition is true or false.
Is True < N
Is True > N
Triggers the oscilloscope when the input logic condition is true for a time
period greater than or less than time period N.
Is True = N
Trigger When
Is True 0 N
Triggers the oscilloscope when the input logic condition is true for a time
period equal to or not equal to time period Nwithin a ±5% tolerance.
100 TDS3000C Series Oscilloscope User Manual
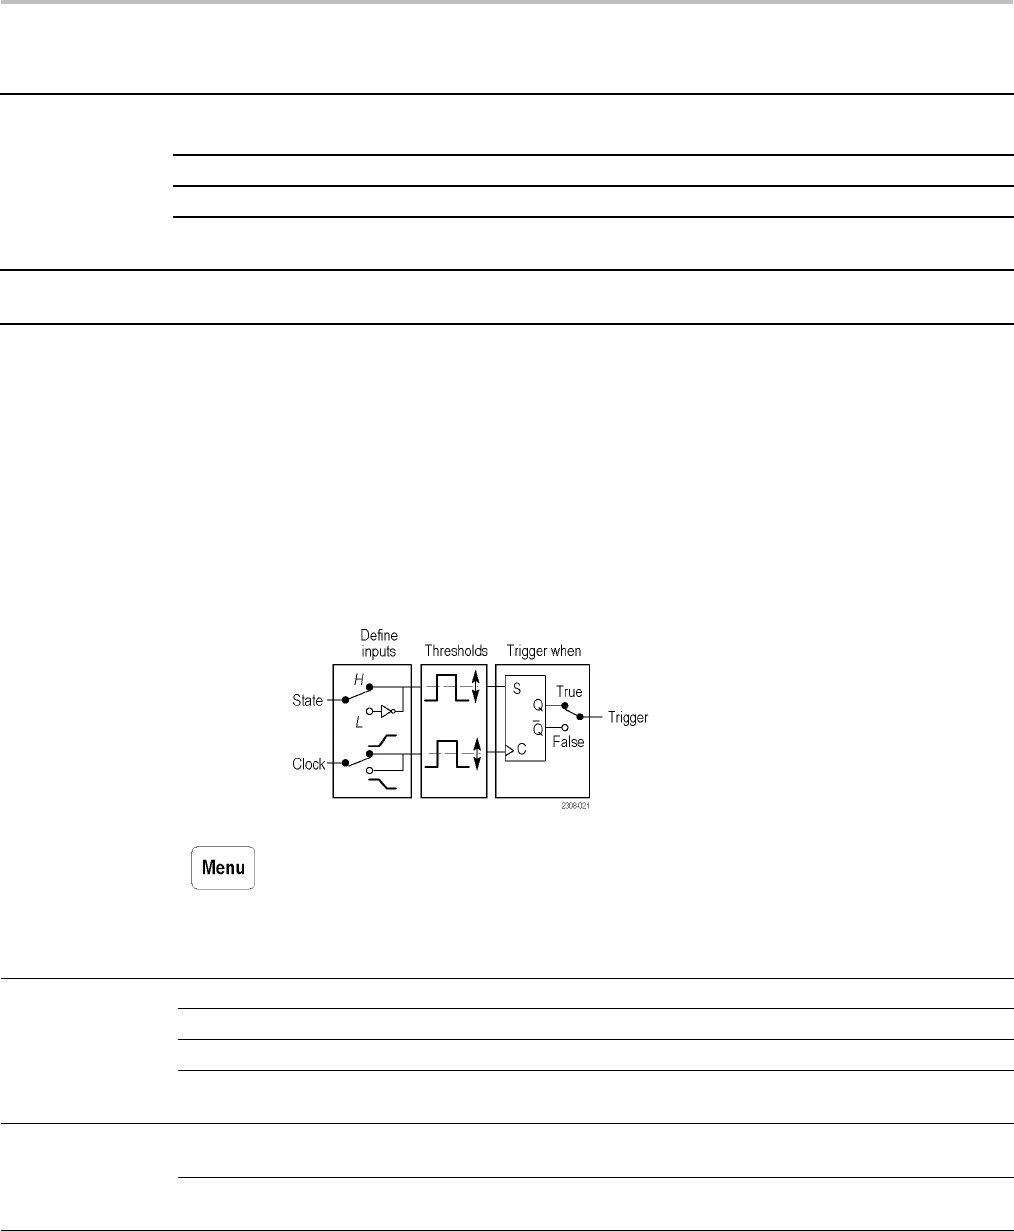
Reference
Bottom Side Description
Level (Input 1) N
Level (Input 2) N
Sets the threshold voltage level for input 1 and 2 to level N,usingthe
general purpose knob.
Set to TTL Sets the threshold voltage level to 1.4 V for both inputs.
Set to ECL Sets the threshold voltage level to -1.3 V for both inputs.
Thresholds
Set to 50% Sets the threshold voltage level to 50% of each input's peak-to-peak
value.
Mode & Holdoff The table on Edge triggering includes a description of this menu item.
(See page 94.)
Key Points Trigger When. The input condition must be true or false for ≥2nsinorderfor
the oscilloscope to detect the pattern.
State Trigger State triggering triggers the oscilloscope when a state signal is true or false at the
time a clock signal transition is true. This trigger is useful for troubleshooting
digital logic synchronous state machines.
State Trigger Conditions
Push the Trigger Menu button, and then push the Type bottom screen button to
select Logic. The next table lists the menu items when the trigger Type is set
to Logic, and the Class is set to State.
Bottom Side Description
State Input Source Sets the state signal source.
Logic Sets the signal logic for state input source. H = high true, L = low true.
Clock Input Source Sets the clock signal source.
Define Inputs
Slope Sets the signal slope (rising or falling) for clock input. The clock slope
defines when the clock signal is true.
Goes True Triggers the oscilloscope if the state signal is true when the clock signal
slope is true.
Trigger When
Goes False Triggers the oscilloscope if the state signal is false when the clock signal
slope is true.
TDS3000C Series Oscilloscope User Manual 101

Reference
Bottom Side Description
Level (State Input)N
Level (Clock Input) N
Sets the threshold voltage level for state and clock signals to level N,
using the general purpose knob.
Set to TTL Sets the threshold voltage level to 1.4 V for both inputs.
Set to ECL Sets the threshold voltage level to -1.3 V for both inputs.
Thresholds
Set to 50% Sets the threshold voltage level to 50% of each input's peak-to-peak
value.
Mode & Holdoff The table on Edge triggering includes a description of this menu item.
(See page 94.)
Key Points Trigger When. The state signal must be true or false for ≥2 ns prior to the clock
transition in order for the oscilloscope to detect the state.
Pulse Triggers Pulse Width Trigger. Pulse-width triggering triggers the oscilloscope when a
signal pulse width is less than, greater than, equal to, or not equal to a specified
pulse width. This trigger is useful for digital logic troubleshooting.
Pulse Width Trigger Conditions
Push the Trigger Menu button, and then push the Type bottom screen button to
select Pulse. The next table lists the menu items when the trigger Type is set to
Pulse, and the Class is set to Width.
102 TDS3000C Series Oscilloscope User Manual

Reference
Bottom Side Description
Ch1, Ch2 (Ch3, Ch4) Sets the pulse width signal source.
Ext
Ext/10
Sets external or external divided by 10 as the signal source.
Ext Probe nnX Voltage / Current
(4-channel only)
Set this value to match the attenuation factor and the type of probe
(voltage or current) that is attached to the external trigger connector. Push
the menu button to select the probe type. Use the general purpose knob
to set the attenuation factor. The default values are 1x and voltage.
AC Line Sets the AC line frequency as the trigger source. This trigger source is
only available when the oscilloscope is connected to AC power.
Source
Vert Sets the lowest-numbered displayed channel as the trigger source.
Alternating (all active channels) Sequentially uses each active channel as a trigger source, from the
lowest-numbered active channel to the highest-numbered active channel.
(See page 96.)
PositivePolarity
Negative
Sets the source signal pulse polarity on which to trigger.
Pulse Width < N
Pulse Width > N
Triggers the oscilloscope when the source signal pulse width is less than
or greater than the specified pulse width N.
Pulse Width = N
Trigger When
Pulse Width ≠N
Triggers the oscilloscope when the signal pulse width is equal to or not
equal to the specified pulse width Nwithin a ±5% tolerance.
Level NSets the signal threshold voltage level to Nusing the general purpose
knob.
Set to TTL Sets the signal threshold voltage level to 1.4 V.
Set to ECL Sets the signal threshold voltage level to -1.3 V.
Level
Set to 50% Sets the threshold voltage level to 50% of the signal's peak-to-peak value.
Mode & Holdoff The table on Edge triggering includes a description of this menu item.
(See page 94.)
Key Points Trigger When. The source pulse width must be ≥5 ns in order for the oscilloscope
to detect the pulse.
Runt Pulse Trigger Runt-pulse triggering triggers the oscilloscope when a signal pulse is less than a
specified threshold level. You can also specify runt pulse-width parameters. This
trigger is useful for troubleshooting bus-contention problems.
TDS3000C Series Oscilloscope User Manual 103
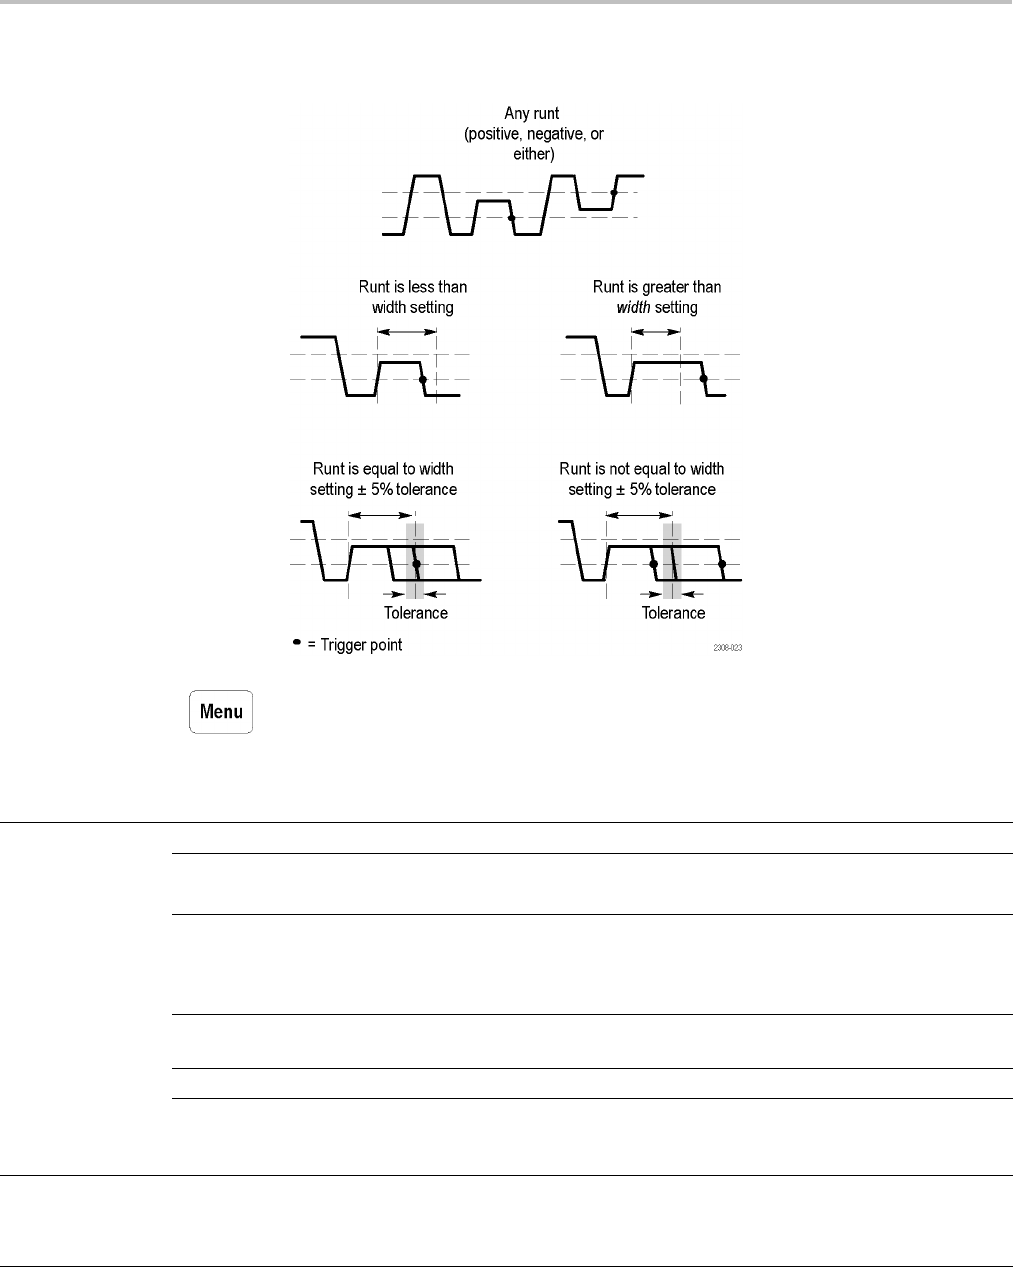
Reference
Runt Pulse Trigger Conditions
Push the Trigger Menu button, and then push the Type bottom screen button to
select Pulse. The next table lists the menu items when the trigger Type is set
to Pulse, and the Class is set to Runt.
BottomSide Description
Ch1, Ch2 (Ch3, Ch4) Sets the runt signal source.
Ext
Ext/10
Sets external or external divided by 10 as the signal source.
Ext Probe nnX Voltage / Current
(4-channel only)
Set this value to match the attenuation factor and the type of probe
(voltage or current) that is attached to the external trigger connector. Push
the menu button to select the probe type. Use the general purpose knob
to set the attenuation factor. The default values are 1x and voltage.
Source
AC Line Sets the AC line frequency as the trigger source. This trigger source is
only available when the oscilloscope is connected to AC power.
Vert Sets the lowest-numbered displayed channel as the trigger source.
Alternating (all active channels) Sequentially uses each active channel as a trigger source, from the
lowest-numbered active channel to the highest-numbered active channel.
(See page 96.)
Positive
Negative
Polarity
Either
Sets the source signal runt pulse polarity on which to trigger.
104 TDS3000C Series Oscilloscope User Manual

Reference
Bottom Side Description
Runt Occurs Triggers the oscilloscope when any runt pulse is detected, regardless
of width.
Runt Width < N
Runt Width > N
Triggers the oscilloscope when the runt signal pulse width is less than or
greater than the specified pulse width N.
Runt Width = N
Trigger When
Runt Width ≠N
Triggers the oscilloscope when the runt signal pulse width is equal to or
not equal to the specified pulse width Nwithin a ±5% tolerance.
High N
Low N
Sets the runt signal high threshold and low threshold voltage levels to
value N, using the general purpose knob.
Set to TTL Sets runt signal threshold voltage levels to 2.0 V (high threshold) and
0.8 V (low threshold).
Thresholds
Set to ECL Sets runt signal threshold voltage levels to -1.1 V (high threshold) and
-1.5 V (low threshold).
Mode & Holdoff The table on Edge triggering includes a description of this menu item.
(See page 94.)
Key Points Trigger When. The source runt pulse width must be ≥5 ns in order for the
oscilloscope to detect the pulse.
Slew Rate Trigger Slew-rate triggering triggers the oscilloscope when a signal's slew rate (rise or
fall time) is less than, greater than, equal to, or not equal to a specified slew rate.
This trigger is useful for troubleshooting digital bus transceivers, transmission
lines, and op-amp circuits.
TDS3000C Series Oscilloscope User Manual 105
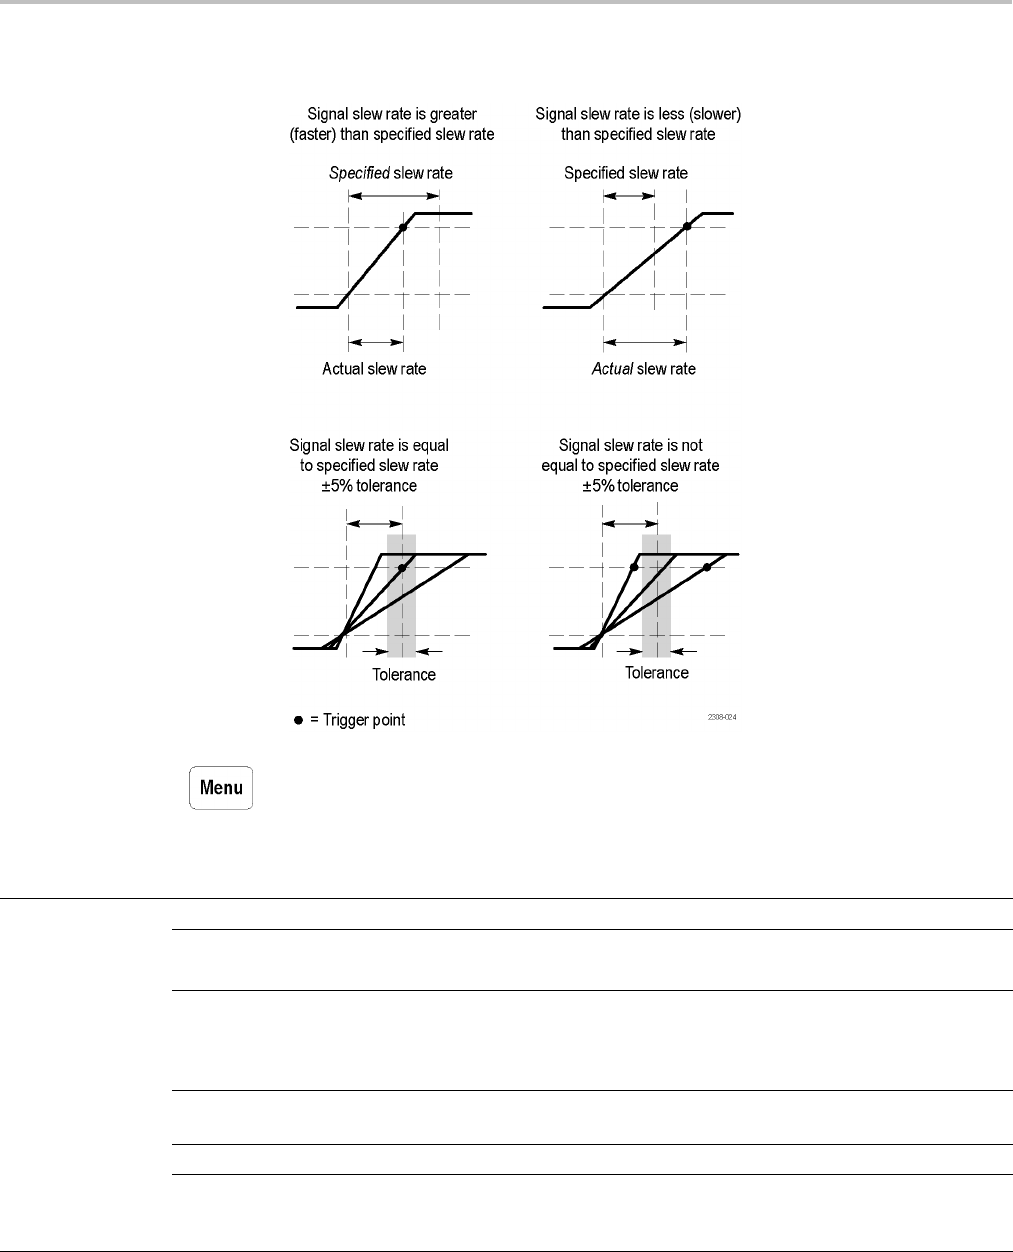
Reference
Slew Rate Trigger Conditions
Push the Trigger Menu button, and then push the Type bottom screen button to
select Pulse. The next table lists the menu items when the trigger Type is set to
Pulse, and the Class is set to Slew Rate.
Bottom Side Description
Ch1, Ch2 (Ch3, Ch4) Sets the slew rate signal source.
Ext
Ext/10
Sets external or external divided by 10 as the signal source.
Ext Probe nnX Voltage / Current
(4-channel only)
Set this value to match the attenuation factor and the type of probe
(voltage or current) that is attached to the external trigger connector. Push
the menu button to select the probe type. Use the general purpose knob
to set the attenuation factor. The default values are 1x and voltage.
Source
AC Line Sets the AC line frequency as the trigger source. This trigger source is
only available when the oscilloscope is connected to AC power.
Vert Sets the lowest-numbered displayed channel as the trigger source.
Alternating (all active channels) Sequentially uses each active channel as a trigger source, from the
lowest-numbered active channel to the highest-numbered active channel.
(See page 96.)
106 TDS3000C Series Oscilloscope User Manual
Reference
Bottom Side Description
Positive
Negative
Polarity
Either
Sets the source signal slew rate polarity on which to trigger.
Slew Rate < N
Slew Rate > N
Triggers the oscilloscope when the signal slew rate is less than or greater
than the specified slew rate N.
Slew Rate = N
Slew Rate ≠N
Triggers the oscilloscope when the signal slew rate is equal to or not
equal to the specified slew rate Nwithin a ±5% tolerance.
Trigger When
Delta TimeNShows the delta time component Nof the slew rate, as set using the
general purpose knob.
High N
Low N
Sets the signal high threshold and low threshold voltage level components
of the slew rate to value N, using the general purpose knob.
Set to TTLSets the signal threshold voltage levels to 2.0 V (high threshold) and
0.8 V (low threshold).
Thresholds
Set to ECL Sets the signal threshold voltage levels to -1.1 V (high threshold) and
-1.5 V (low threshold).
Mode & Holdoff The table on Edge triggering includes a description of this menu item.
(See page 94.)
Key Points Delta Time and Thresholds. The delta time and threshold settings determine the
calculated slew rate (volts ÷ time). Changing either value changes the calculated
slew rate.
Trigger When. The delta time component of the slew rate (time from threshold to
threshold) must be ≥5 ns in order for the oscilloscope to detect the slew rate.
Video Trigger
Push the Trigger Menu button, and then push the Type bottom screen button to
select Video. Choose video triggering to trigger on the odd fields, even fields, or
on all the lines of an NTSC, PAL, or SECAM video signal. If installed, see the
user manual for the TDS3VID Extended Video or the TDS3SDI 601 Digital Video
application module for more information. The next table lists the menu items
when the trigger Type is set to Video.
Bottom Side Description
525/NTSC Triggers on a NTSC signal.
625/PAL Triggers on a PAL signal.
Standard
SECAM Triggers on a SECAM signal.
TDS3000C Series Oscilloscope User Manual 107

Reference
Bottom Side Description
Ch1, Ch2 (Ch3,
Ch4)
Sets the video signal source.
Ext
Ext/10
Sets external or external divided by 10 as
the signal source.
Ext Probe nnX
Voltage / Current
(4-channel only)
Set this value to match the attenuation factor
and the type of probe (voltage or current) that
is attached to the external trigger connector.
Push the menu button to select the probe
type. Use the general purpose knob to set
the attenuation factor. The default values are
1x and voltage.
AC Line Sets the AC line frequency as the trigger
source. This trigger source is only available
when the oscilloscope is connected to AC
power.
Source
Vert Sets the lowest-numbered displayed channel
as the trigger source.
Alternating (all
active channels)
Sequentially uses each active channel as a
trigger source, from the lowest-numbered
active channel to the highest-numbered
active channel. (See page 96.)
Odd
Even
Triggers on odd or even fields in an interlaced
signal.
All Fields Triggers on any fieldinaninterlacedor
noninterlaced signal.
Trigger On
All Lines Triggers on all lines.
Mode &
Holdoff
The table on Edge triggering includes a
description of this menu item. (See page 94.)
Key Points Displaying the Trigger Source. You do not have to display a channel to use it as
a trigger source.
Sync Pulses. When you choose Video, the trigger always occurs on
negative-going sync pulses. If your video signal has positive-going sync pulses,
invert the signal using the Vertical menu. (See page 115.)
108 TDS3000C Series Oscilloscope User Manual
Reference
Utility
Push the Utility menu button, and the System Configbottomscreenbuttonto
access submenus.
Thefollowingareexamplesofwhatyoucandoin the Utility menu:
Use Config to select a language or set the time and date.
Use Apps if an installed application module places items in this menu. See the
documentation provided with your application modules for more information.
Use I/O to set up the communication ports.
UseHardCopytosetuphardcopyparameters.(Seepage65,Hard Copy.)
Use Cal to compensate the signal path.
Use Diags to run internal diagnostic routines.
Configure System Use the System Config menu to access these functions.
Bottom Side Description
System Config
English
French
Italian
German
Spanish
Japanese
Brazilian Portuguese
Simplified Chinese
Traditional Chinese
Korean
Language
Russian
Use to choose your native language. Most on-screen text
appears in the language you choose.
Display Date/Time Use to turn the date/time display On or Off.
Hour Min Use to set the internal clock with the current hour and minute.
Month Day Use to set the internal clock with the current month and day.
Year Use to set the internal clock with the current year.
Set Date & Time
OK Enter Date/Time Sets the date and time of the internal clock.
Power Off Time-Out Use to set the time before an automatic shut down.Battery Time-Outs
Backlight Time-Out Use to set the time before the backlight automatically turns off.
TekSecure Erase
Memory
Erases all nonvolatile waveform and setup memory. For more
information, refer to the TDS3000C Series Digital Phosphor
Oscilloscopes Declassification and Security Instructions.
Version Usetoseethefirmware version.
TDS3000C Series Oscilloscope User Manual 109

Reference
Key Points Setting the DateandTime. To set the internal clock with the current date and time,
push the Set Date & Time screen button. Use the general purpose knob to set the
values after you push the screen buttons for the year, day and month, hour and
minute. Push the OK Enter Date/Time screen button to complete the operation.
Power Off Time-Out. Use this feature to automatically turn the oscilloscope to
standby if it is not being used. Use the general purpose knob to set the power off
time-out delay to a fixed time or to ∞(time-out off). Cycle the power switch to
turn the oscilloscope back on after an automatic shut down.
Power off time-out operates only when you use battery power.
Backlight Time-Out. Push this button to adjust the backlight time-out delay.
This feature automatically turns the backlight off after a period of time if the
oscilloscope is not being used. Use the general purpose knob to set the backlight
time-outdelaytoafixed time or to ∞(time-out off). Push any button to turn the
backlight back on after an automatic time-out.
Backlight time-out operates only when you use battery power.
TekSecure. If you have acquired confidential data on your oscilloscope, you may
want to execute the TekSecure function before you return the oscilloscope to
general use. The TekSecure function does the following tasks:
Replaces all waveforms in all reference memories with null sample values
Replaces the current front-panel setup and all stored setups with the factory
setup
Calculates the checksums of all waveform memory and setup memory
locations to verify successful completion of waveform and setup erasure
Displays a confirmation or warning message if the checksum calculation
is successful or unsuccessful
After you execute the TekSecure function, you must turn off the oscilloscope
power and then turn the power back on to complete the process.
110 TDS3000C Series Oscilloscope User Manual

Reference
I/O System Use the System I/O menu to access these functions.
Bottom Side Description
System
I/O
Talk/Listen
Address
Sets the GPIB address.
Hard Copy
(Talk Only)
Sets the GPIB port to talk only for
making hard copies.
Off Bus Disables the GPIB port.
GPIB
(TDS3GV)
Debug Enables and disables a message
window to help you debug GPIB
problems.
Baud Rate Sets the baud rate in steps from 1200
to 38400.
FlaggingUse to enable hard flagging (RTS/CTS)
or turn flagging off.
EOL Selects end-of-line terminator.
Debug Enables and disables a message
window to help you debug RS-232
problems.
RS-232
(TDS3GV)
Set RS-232
Parameters to
Default Values
Sets baud rate = 9600, hard flagging =
on, and EOL = LF.
Change
Instrument
Settings
DHCP/BOOTP
Displays a list of fields in which you set
oscilloscope Ethernet parameters such
as address, oscilloscope name, domain
name, and so on.
See Appendix F, Ethernet Setup,for
information on setting the oscilloscope
Ethernet network parameters.
Debug Enables and disables a message
window to help you debug Ethernet
problems.
Ethernet
Network
Settings
Test
Connection
Tests the oscilloscope's Ethernet
connection.
Add Printer
Rename
Printer
Delete Printer
Adds, renames, or deletes an Ethernet
network printer from the oscilloscope
printer list. See Appendix F, Ethernet
Setup, for information on setting the
oscilloscope Ethernet network printer
parameters.
Ethernet
Printer
Settings
Confirm
Delete
Enables or disables displaying a
confirmation message before deleting a
printer from the oscilloscope printer list.
TDS3000C Series Oscilloscope User Manual 111

Reference
Key Points More Information. Refer to the TDS3000, TDS3000B and TDS3000C Series
Digital Phosphor Oscilloscopes Programmer Manual for more information about
using the Ethernet, RS-232 and GPIB ports.
RS-232 Troubleshooting. If you are having difficulties with RS-232
communication, try the following remedies:
Verify that you are using the correct RS-232 cable and adapters. Most
computers require a null-modem connection to the oscilloscope. Most printers
requireas
traight-through connection to the oscilloscope.
Verify that the RS-232 cable is connected to the correct port on your computer
or hard copy device.
Reset the RS-232 parameters to defaults and then set the baud rate to match
the computer or hard copy device. The default settings (except baud rate) are
standard on most computers and hard copy devices.
Enable the debug window to see the RS-232 status, errors, data transmitted,
and data received.
GPIB Guidelines. Follow these guidelines when you connect your oscilloscope to
aGPIBnetwork:
Turn off the oscilloscope and all external devices before connecting the
oscilloscope to the GPIB network.
Assign a unique device address to the oscilloscope. Two devices cannot share
thesamedeviceaddress.
Turn on at least two-thirds of the GPIB devices while using the network.
Calibration System Use the System Cal menu to access these functions.
Bottom Side Description
System Cal
Signal Path Compensates the signal paths
to obtain best measurement
accuracy.
Factory Cal Used to calibrate the oscilloscope.
This is a service function only.
Notify After
Hours of
Operation
Sets the number of hours of
operation before notifying you
that a calibration is due.
Cal Due
Control
Notify After
Years of Elapsed
Time
Sets the number of years before
notifying you that a calibration is
due.
112 TDS3000C Series Oscilloscope User Manual

Reference
Key Points Signal Path Compensation. For maximum accuracy at any time, run the SPC
routine just before taking critical measurements. To meet accuracy specifications,
run the routine if the ambient temperature changes by 10 °C (18 °F) or more.
Before running the routine, disconnect any probes or cables from the channel
inputs. Then, push the Signal Path and the OK Compensate Signal Path screen
buttons to confirm that you are ready to proceed. The routine takes several
minutes to complete. (See page 4.)
Factory Cal. Service personnel use these functions to calibrate the oscilloscope
internal voltage references using external sources. Refer to your Tektronix field
office or representative for assistance with these processes.
Cal Due Control. The calibration due notificationoccursonlyinthepower-on
screen. Set the controls to ∞if you do not want to be notified when calibration is
due.
Diagnostic System Use the System Diags menu to access these functions.
Bottom Side Description
System
Diags
Execute Starts diagnostics.
Once Executes the diagnostic loop
once.
Always Executes the diagnostic loop
continuously.
Loop
Until Fail Executes until a failure occurs.
Page Up Use to see the previous error log
page.
Error Log
Page Down Use to see the next error log
page.
Key Points Starting Diagnostics. To execute the built-in diagnostic routines, disconnect all
cables or probes from the oscilloscope inputs, and then push the OK Run Test
screen button.
Stopping Diagnostics. Choose how you want the diagnostic routines to execute:
Loop Once runs all diagnostic routines one time and then stops.
Loop Always runs the diagnostic routines continuously. Push the Run/Stop
and then the Menu Off buttons to resume normal operation.
Loop Until Fail runs the diagnostic routines until the oscilloscope fails a test
or until you cycle the power.
TDS3000C Series Oscilloscope User Manual 113

Reference
Error Log. The error log contains summary data gathered over the life of the
oscilloscope. The error log lists the last 100 errors encountered. The last error
in the list is the most recent.
Under normal circumstances, the error log should be empty. Any entry in the
error log may indicate a hardware failure or firmware fault. If you can repeatedly
cause an entry to be added to the error log, please contact a Tektronix service
representative for assistance.
Vertical Controls
You can use the vertical controls to select waveforms, adjust the waveform
vertical position and scale, and set input parameters. All vertical operations affect
the selected waveform. Push a channel button (1, 2, 3, or 4), the Math button, or
the Ref button to select a waveform.
For information on the Math Menu, refer to the description on Math and FFT.
(See page 72.)
Vertical Position Control
Use the vertical Position control to locate the selected waveform in the display.
When you change the vertical position, a horizontal line temporarily appears to
show you the ground reference level on the screen. After the line disappears, the
ground reference level is marked at the left of the graticule.
If acquisition is stopped you can still reposition waveforms for analysis. The new
position setting is used when acquisition resumes.
Waveform Off
Push the Waveform Off button to remove the selected waveform from the display.
You can still use the channel as a trigger source.
Vertical Scale Control
Use the vertical Scale control to set the vertical scale factor of the selected
waveform in 1-2-5 increments. If acquisition is stopped you can still rescale
waveforms for analysis. The new scale setting is used when acquisition resumes.
You can also make fine adjustments to the vertical scale. (See page 115, Channel
Buttons.)
114 TDS3000C Series Oscilloscope User Manual
Reference
Vertical Menu
Push the Vertical Menu button to show the Vertical menu of the selected
waveform. (See page 115, Channel Buttons.) (See page 72, Math and FFT.) (See
page 116, Ref Button.)
Channel Buttons
Push a channel button (1, 2, 3, or 4) to select a channel. Each channel button also
displays the channel if it is not already displayed. Push the Vertical Menu button
to show the Vertical menu of the selected channel. All vertical operations in the
next table affect only the selected waveform.
Bottom Side Description
DC Sets input coupling to DC.
AC Sets input coupling to AC.
GND Providesa0Vsignal reference. The
preamplifier disconnects from the input
BNC. Input termination remains connected
to the input BNC.
Coupling
ΩSets input resistance to 50 Ωor 1 MΩ,for
DC or AC coupling.
Invert Off Use for normal operation.
Invert
Invert On Inverts the polarity of the signal in the
preamplifier.
Full Bandwidth Sets bandwidth to the full oscilloscope
bandwidth.
150 MHz Sets the bandwidth to 150 MHz (not
available on some models).
Bandwidth
20 MHz Sets the bandwidth to 20 MHz.
Fine Scale Fine Scale Enables fine scale adjustment with the
general purpose knob.
Vertical Position Enables numerical vertical position
adjustment.
Position
Set to 0 divs Sets vertical position to center screen.
Vertical Offset Enables vertical offset adjustment with the
general purpose knob.
Offset
Set to 0 V Sets vertical offset to 0 V.
Voltage Probe
Current Probe
Use to set probe gain or attenuation for
probes that do not have the TekProbe II
interface.
Deskew Use to adjust the time skew correction for
each probe.
Probe Setup
Set to 0 Use to set probe skew correction to zero.
TDS3000C Series Oscilloscope User Manual 115
Reference
Key Points Using Probes with the TekProbe II Interface. When you attach a probe with the
TekProbe II interface, the oscilloscope sets the channel sensitivity, coupling, and
termination resistance automatically to match the probe requirements.
Vertical Preview. When you change the Vertical Position or Scale controls while
the acquisition is stopped or it is waiting for the next trigger, the oscilloscope
rescales and repositions the selected waveform in response to the new vertical
control settings. You may see a clipped waveform if the original acquisition went
off the screen. The oscilloscope then uses the new settings for the next acquisition.
In contrast to horizontal preview, the math waveform, cursors, and automatic
measurements remain active and valid when using vertical preview.
The Difference Between Vertical Position and Offset. Vertical position is a display
function. Adjust the Vertical position to place the waveforms where you want
to see them. The waveform baseline locations track adjustments made to their
positions.
When you adjust vertical offset you see a similar effect, but it is actually quite
different. Vertical offset is applied before the oscilloscope preamplifier and can
be used to increase the effective dynamic range of the inputs. For example, you
can use vertical offset to look at small variations in a large DC voltage. Set the
Vertical offset to match the nominal DC voltage and the signal appears in the
center of the screen.
50 ΩProtection. If you select the 50 Ωtermination resistance, the maximum
vertical scale factor is limited to 1 V/div. If you apply excessive input voltage,
the oscilloscope automatically switches to 1 MΩtermination resistance to protect
the internal 50 Ωtermination.
Ref Button
Push the Ref button to show the reference menu. Push one of the submenus to
display a reference waveform or make it the selected reference waveform.
116 TDS3000C Series Oscilloscope User Manual

Reference
Bottom Side Description
Save Ch1 to
Ref1
Saves channel 1 to Ref 1.
Save Ch2 to
Ref1
Saves channel 2 to Ref 1.
Save Ch3 to
Ref1
Saves channel 3 to Ref 1.
Save Ch4 to
Ref1
Saves channel 4 to Ref 1.
Ref 1
Save Math to
Ref1
Saves the math waveform to Ref
1.
Ref2,Ref3,
Ref 4
Identical settings for the reference waveforms Ref 2,
Ref3,andRef4.
Key Points Selecting and Displaying Reference Waveforms. You can display all four reference
waveforms at the same time. Push the submenu button to select a particular
reference waveform. The selected waveform appears brighter than other displayed
reference waveforms.
Removing Reference Waveforms from the Display. To remove a reference
waveform from the display, select that reference waveform and then push the
Waveform Off button .
Scaling and Positioning a Reference Waveform. You can position and scale a
reference waveform independently from all other displayed waveforms. Select
the reference waveform and then adjust it with a vertical or horizontal Position or
Scale control. You can do this whether acquisition is running or is stopped.
If a reference waveform is selected, scaling and repositioning of the reference
waveform operates the same way whether zoom is turned on or off.
Gray-Scale Restriction. Reference waveforms are always saved from the most
current acquisition and do not contain any gray-scale information.
NOTE. The TDS3AAM Advanced Analysis application module adds new
math features, including arbitrary math expressions, DPO (gray scale) math
waveforms, and FFT analysis.
TDS3000C Series Oscilloscope User Manual 117

Reference
e*Scope Web-Based Remote Control
With e*Scope, you can access any Internet-connected TDS3000C series
oscilloscope from a browser on your work station, PC, or laptop computer. No
matter where you are, your TDS3000C oscilloscope is as close as the nearest
browser.
There are two levels to e*Scope: basic and advanced. The basic level, which is
hosted on the oscilloscope, lets you view a screen image of the current acquisition,
save or load waveform and setup files, and send textual control and query
commands to the oscilloscope.
The advanced level, which is hosted on your system, provides a graphical
interface to view automatically updated screen images and to remotely control
the oscilloscope. You can access the www.tektronix.com/software Web page and
download the free advanced e*Scope Web-based Remote Control software.
Configuring Your
Oscilloscope Ethernet
Settings
Before using the e*Scope feature, you must set your oscilloscope Ethernet
network settings. Appendix F, Ethernet Setup, describes how to enter the Ethernet
network parameters for your oscilloscope.
Accessing e*Scope After your oscilloscope is set up with the correct ethernet settings, you are ready
to access that oscilloscope over the internet. To access the oscilloscope e*Scope
server, follow these steps:
1. On a PC or work station, open your preferred browser program.
2. In the Location or Address field (where you normally enter a URL), type in
the IP address of the TDS3000C oscilloscope to which you want to connect.
For example, 188.121.212.107. Do not precede the IP address with any
characters. Then push the Return key.
3. The browser program loads the oscilloscope's e*Scope home page, which is
an image of the screen contents when your browser accessed the oscilloscope.
The e*Scope home page will look something like the next image.
4. If you do not see the e*Scope home page after just a few moments, try the
following:
a. Verify that the oscilloscope is physically connected to the network.
b. Verify that the oscilloscope network settings are correct.
c. Push the Test Connection side menu button in the Ethernet Network
Settings menu to verify that the oscilloscope is electronically connected
to the network.
118 TDS3000C Series Oscilloscope User Manual
Reference
Basic e*Scope Menu
Functions
The previous menu provides the following functions:
Home. Home displays the oscilloscope screen.
Applications. Applications takes you to the application URL specified in the
Configure tab.
Configure. Configure lets you specify URLs for the advanced Web-based Control
HTML pages (accessed from the Control menu).
Data. Data provides the basic level of e*Scope control. It lets you upload or
download waveform data files and oscilloscope settings, as well as remotely
control the oscilloscope using oscilloscope programing commands listed in the
TDS3000, TDS3000B and TDS3000C Series Digital Phosphor Oscilloscope
Programmer Manual.
Status. Status displays the version screen, which shows the firmware version
and lists installed application modules.
Control. Control displays the advanced e*Scope Web-based Remote Control
screen that lets you remotely control the oscilloscope using a graphical interface
that includes on-screen interactive menus and selectable controls for all
front-panel buttons and knobs. You must download the free advanced e*Scope
software from the Tektronix Web site.
Help. Help takes you to the TDS3000 series frequently asked questions page
at www.tektronix.com.
NOTE. You can create your own local Applications and Help files and access
them by changing the Application and Help field in the Configure menu to point to
your local web site containing your files.
TDS3000C Series Oscilloscope User Manual 119

Reference
Application Examples The following are some possible e*Scope usage examples:
Prototype Development. An engineering lab contains prototype boards that need
evaluation. An engineer in the building can use e*Scope to access and remotely
control a TDS3000C series oscilloscope to capture and download waveform data
to a PC for analysis and inclusion in development reports.
Field Service Support. A company's central engineering department needs to
support many field service technicians who maintain and repair installed systems
located throughout the world. The field technicians can connect their TDS3000C
series oscilloscopes to the systems, and the engineers can then use e*Scope to
help the field technicians diagnose difficult problems.
Remote Line Down Troubleshooting. A production line is down in Korea.
The chief engineer in the United States can use e*Scope to remotely control
a TDS3000C series oscilloscope and view the waveforms to troubleshoot the
problem, while having a technician at the production site probe the oscilloscope.
Remote Broadcast Transmitter Monitoring. A television station needs to monitor
various voltages and waveforms at a remote transmitter site. An engineer at the
transmitter can connect the TDS3000C series oscilloscope to the station's LAN and
then connect the oscilloscope to the appropriate test points. The television station
engineer can then use e*Scope to remotely monitor the voltages and waveforms.
Remote Development. Several engineers on a project need to access waveform
and measurement data from a number of remote sites. Using e*Scope, the
engineers can capture screen hard copies and waveform data from these remote
sites and store the information in a central database.
120 TDS3000C Series Oscilloscope User Manual

Appendix A: Specifications
This appendix contains specifications for the TDS3000C Series oscilloscopes. All
specifications are guaranteed unless noted as "typical." Typical specifications
are provided for your convenience but are not guaranteed. Specifications
that are marked with the symbol are checked in the TDS3000C
Specifications and Performance Verification Technical Reference available on the
www.tektronix.com/manuals Web site.
All specifications apply to all TDS3000C Series models unless noted otherwise.
To meet specifications, two conditions must first be met:
The oscilloscope must have been operating continuously for twenty minutes
within the operating temperature range specified.
You must perform the Signal Path Compensation operation. (See page 4,
Signal Path Compensation (SPC).) If the operating temperature changes by
more than 10 °C (18 °F), you must perform the Signal Path Compensation
operation again.
Acquisition
Acquisition
modes
Sample (Normal), Peak detect, Envelope, and Average
Acquisition mode Acquisition stops after
Sample, Peak Detect One acquisition, all channels
simultaneously
Single
Sequence
Average, Envelope N acquisitions, all channels
simultaneously, N is settable from
2 to 256 (or ∞for Envelope)
TDS3000C Series Oscilloscope User Manual 121

Appendix A: Specifications
Inputs
Input coupling DC, AC, or GND
Channel input remains terminated when using GND coupling.
Input
impedance,
DC coupled
1MΩ±1% in parallel with 13 pF ±2 pF, TekProbe compatible
50 Ω±1%
VSWR ≤1.5:1 from DC to 500 MHz, V/div settings ≥100 mV, typical
VSWR ≤1.6:1 from DC to 500 MHz, V/div settings < 100 mV, typical
Overvoltage category Maximum voltage
Non-Mains Environment 150 VRMS (400 Vpk, Duty Factor of
37.5%)
CAT II Environment 1100 VRMS (400 Vpk, Duty Factor of
25%)
Maximum
voltage at input
BNC (1 MΩ)
For steady-state sinusoidal waveforms, derate at 20 dB/decade above
200 kHz to 13 Vpk at 3 MHz and above.
Maximum
voltage at input
BNC (50 Ω)
5V
RMS with peaks ≤±30 V
Maximum
transient
overvoltage
400 Vpk
Maximum
floating voltage
0Vfro
m chassis (BNC) ground to earth ground, or
30 VRMS (42 Vpk) only under these conditions: no signal voltages >30 VRMS
(>42 Vpk), all common leads connected to the same voltage, no grounded
peripherals attached
Measured on one channel, with test signal applied to another channel, and
with the same scale and coupling settings on each channel
Frequency range Crosstalk
≤100 MHz ≥100:1
≤300 MHz ≥50:1
Channel
to channel
crosstalk,
typical
≤500 MHz ≥30:1
Differential
delay, typical
100 ps between any two channels with the same scale and coupling
settings
1For definitions, refer to Compliance Information. (See page viii, Compliance information.)
122 TDS3000C Series Oscilloscope User Manual

Appendix A: Specifications
Vertical
TDS30x2C TDS30x4CNumber of
channels 2 plus external trigger input 4 plus external trigger input
Digitizers 9-bit resolution, separate digitizers for each channel, sampled
simultaneously
1MΩ50 ΩScale Range
(at BNC) 1 mV/div to 10V/div 1mV/div to 1 V/div
Fine Scale Adjustablewith≥1% resolution
Polarity Normal and Invert
Position range ±5 divisions
Bandwidth limit set to Full, operating ambient ≤30 °C, derate 1%/°C above
30 °C
Scale range TDS301xC TDS303xC TDS305xC
10 mV/div to
1V/div
100 MHz 300 MHz 500 MHz
5mV/d
iv to
9.98 mV/div
100 MHz 300 MHz 400 MHz
2mV/divto
4.98 mV/div
100 MHz250 MHz250 MHz
Analog
bandwidth,
50 Ω(also
typical at 1 MΩ
with standard
probe)
1mV/divto
1.99 mV/div
90 MHz 150 MHz 150 MHz
TDS301xC 3.5 ns
TDS303xC 1.2 ns
Calculated rise
time, typical
TDS305xC 0.7 ns
Analog
bandwidth
limit, typical
Selectable between 20 MHz, 150 MHz (not available on TDS3012C or
TDS3014C), or Full
Lower
frequency limit,
AC coupled,
typical
7Hzfor1MΩ, reduced by a factor of ten when using a 10X passive probe;
140 kHz for 50 Ω
Minimum width of pulse with amplitude of ≥2 div to capture 50% or greater
amplitude
Sample rates ≤125 MS/s Sample rates ≥250 MS/s
Peak detect
or Envelope
pulse
response,
typical 1ns 1/sample rate
DC gain
accuracy
± 2%, derated at 0.025%/°C for temperatures above +30 °C, in Sample or
Average acquisition mode
DC
measurement
accuracy,
Measurement type DC Accuracy (in volts)
TDS3000C Series Oscilloscope User Manual 123

Appendix A: Specifications
Vertical
Absolute measurement of any
waveform point
± [0.02 1×|rea
ding - (offset -
position) | + offset accuracy +
0.15 div + 0.6 mV]
Sample
acquisition
mode, typical
Delta voltage between any two
points on a waveform
± [0.02 1× | reading | + 0.15 div +
1.2 mV]
DC
measurement
accuracy,
Measurement type DC Accuracy (in volts)
Absolute measurement of any
waveform point
± [0.02 1× | reading - (offset -
position) | + offset accuracy +
0.1 div]
Average
acquisition
mode (≥16
averages) Delta voltage between any two
points on a waveform
± [0.02 1× | reading | + 0.05 div]
Scale range Offset range
1 mV/div to 9.95 mV/div ±100 mV
10 mV/div to 99.5 mV/div ±1 V
100 mV/div to 995 mV/div ±10 V
Offset range
1 V/div to 10 V/div ±100 V
Offset
Accuracy, all
ranges
± [0.005 | offset - position | +0.1 div]
Note: Convert both the constant offset and position terms to volts by
multiplying by the volts/div setting.
10.02 term (gain component) derated at 0.00025/°C above 30 °C.
124 TDS3000C Series Oscilloscope User Manual

Appendix A: Specifications
Horizontal
Acquisition
(horizontal)
resolution
Normal (10k point record) Fast trigger (500 point record)
Maximum acq
rate, typical
700 wfms/s 3,400 wfms/s
Sample rate
range
TDS301xC TDS303xC TDS305xC
Normal 100 S/s to
1.25 GS/s
100 S/s to
2.5 GS/s
100 S/s to 5 GS/s
Fast trigger 5 S/s to
1.25 GS/s
5 S/s to 2.5 GS/s 5S/sto5GS
/s
Seconds/division
range
4ns/divto
10 s/div
2ns/divto
10 s/div
1ns/divto10s/div
Sample rate
and delay time
accuracy
±20 ppm over any ≥1 ms time interval
Trigger
External
trigger input
impedance,
typical
TDS30x2C: 1 MΩin parallel with 17 pF, TekProbe compatible
TDS30x4C: 1 MΩin parallel with 52 pF, not TekProbe compatible
Overvoltage category Maximum voltage
Non-Mains Environment 150 VRMS (400 Vpk, Duty Factor of
37.5%)
CAT II Environment 1100 VRMS (400 Vpk, Duty Factor of
25%)
External trigger
maximum
voltage
For steady-state sinusoidal waveforms, derate at 20 dB/decade above
200kHzto13V
pk at 3 MHz and above.
External trigger
maximum
floating voltage
0 V from chassis (BNC) ground to earth ground, or
30 VRMS (42 Vpk) only under these conditions: no signal voltages >30 VRMS
(>42 Vpk), all common leads connected to the same voltage, no grounded
peripherals attached
Source Sensitivity
Edge
trigger
sensitivity Any channel, DC coupled ≤0.6 div from DC to 50 MHz,
increasing to 1 div at oscilloscope
bandwidth
Edge trigger
sensitivity,
typical
External trigger 200 mV from DC to 50 MHz,
increasing to 750 mV at 300 MHz
External/10 trigger 500 mV from DC to 50 MHz,
increasing to 3 V at 300 MHz
Any channel, NOISE REJ coupled 3.5 times the DC-coupled limits
TDS3000C Series Oscilloscope User Manual 125

Appendix A: Specifications
Trigger
Any channel, HF REJ coupled 1.5 times the DC-coupled limit
from DC to 30 kHz, attenuates
signals above 30 kHz
Any channel, LF REJ coupled 1.5 times the DC-coupled limits
for frequencies above 80 kHz,
attenuates signals below 80 kHz
Source Sensitivity
Any channel ±8 divisions from center of screen,
±8 divisions from 0 V if LF REJ
trigger coupled
External trigger ±800 mV
External/10 trigger ±8 V
Trigger level
range
Line Fixed at the midlevel of the AC line
SET Level TO
50%, typical
Operates with input signals ≥45 Hz
Source, DC coupled Sensitivity
Any channel ±0.2 divisions
External trigger ±20 mV
External/10 trigger ±200 mV
Trigger level
accuracy,
typical
Line N/A
Trigger holdoff
range
250.8nsto10s
Logic and
Pulse Trigger
Sensitivity,
typical
1.0 division at BNC, DC Coupled, ≥10 mV/div to ≤1 V/div (pattern, state,
delay, width, and runt triggering)
Slew Rate
Trigger
Sensitivity,
typical
Same as the Edge Trigger Sensitivity specifications shown earlier in this
appendix.
State Pattern Pattern with pulse width
2ns 2ns 5ns
Logic
Triggering
Minimum Logic
Time, typical State minimum logic time: the time that a logic state must be valid before
and after the clock edge to be recognized. Pattern minimum logic time:
the time that a logic pattern must be valid to be recognized. Pattern with
pulse width qualification, minimum logic time: the time that a logic pattern
must be valid to be recognized.
126 TDS3000C Series Oscilloscope User Manual

Appendix A: Specifications
Trigger
State Pattern Pattern with pulse width
4ns22ns 5ns
Logic
Triggering
Minimum
Rearm Time,
typical
State minimum rearm time: the time between consecutive clocks. Pattern
minimum rearm time: the time that a logic pattern must be invalid before a
new occurrence of the pattern will be recognized. Pattern with pulse width
qualification, minimum rearm time: the time that a logic pattern must be
invalid before a new occurrence of the pattern will be recognized.
Pulse
Triggering
Minimum Pulse
Width, typical
5ns
For width and runt, minimum pulse width refers to the pulse being
measured. For slew rate, minimum pulse width means the minimum delta
time that the oscilloscope recognizes.
Pulse
Triggering
Minimum
Rearm Time,
typical
5ns
For width and runt, rearm time refers to the time between measured
pulses. For slew rate, rearm time refers to the time it takes the signal to
recross the two signal thresholds.
Time Range Resolution
39.6nsto9.99μs 13.2 ns
10 μsto99.9μs 92.4 ns
100 μst
o 999 μs1μs
1msto9.99ms 10μs
10 ms to 99.9 ms 100 μs
100 ms to 999 ms 1ms
Delta Time
Resolution
using general
purpose knob
1sto10s 10ms
Triggers on negative sync of NTSC, PAL, or SECAM signal
Source Sensitivity
Any channel 0.6 to 2.5 divisions of video sync
tip
External trigger 150 mV to 625 mV of video sync
tip
Video trigger
sensitivity,
typical
External/10 trigger 1.5 V to 6.25 V of video sync tip
BTrigger Trigger After Time Trigger After B Events
Range 13.2nsto50s 1event to 9,999,999 events
Minimum time
between arm
and trigger,
typical
5 ns from the end of the time period
and the B trigger event
5 ns between the A trigger event
and the first B trigger event
TDS3000C Series Oscilloscope User Manual 127

Appendix A: Specifications
Trigger
Minimum Pulse
Width, typical
—B event width:
4 ns for TDS301xC
2 ns for TDS303xC, TDS305xC
Maximum
Frequency,
typical
—B event frequency:
100 MHz for TDS301xC
250 MHz for TDS303xC,
TDS305xC
1For definitions, refer to the Certifications and Compliances information at the end of this appendix.
2Minimum logic time is 4 ns or (1 ÷ input channel bandwidth), whichever is larger.
Display
Display screen 6.5 in (165 mm) diagonal color liquid crystal
Display resolution 640 horizontal by 480 vertical pixels
Backlight intensity, typical 200 cd/m2
Display color Up to 16 colors, fixed palette
External display filter Scratch-resistant tempered glass
128 TDS3000C Series Oscilloscope User Manual

Appendix A: Specifications
I/O Ports
Ethernet port 10BaseT RJ-45 female connector (all models)
GPIB interface Available in optional accessory TDS3GV
RS-232 interface DB-9 male connector, available in optional accessory
TDS3GV
USB flash drive port USB flash drive connector (all models)
VGA signal output DB-15 female connector, 31.6 kHz sync rate, EIA RS-343A
compliant, available in optional accessory TDS3GV
Probe compensator output,
typical
5.0Vinto≥1MΩload,
Frequency=1kHz
Miscellaneous
Nonvolatile memory Typical retention time ≥5 years for front-panel settings,
unlimited for saved waveforms and setups
Internal clock Provides date/time stamp for stored data and the current
time and date to the front panel, if enabled.
Power source
AC line power Operates the oscilloscope and charges the optional internal
battery
Source voltage 100 VRMS to 240 VRMS ± 10%, continuous range
Source frequency 47 Hz to 440 Hz
Power consumption 75 W maximum
Battery power Optional accessory TDS3BATC, rechargeable Li-Ion battery
pack
Operating time, typical 3ho
urs, depending on operating conditions
Battery charge time, typical 32 hours in the oscilloscope, 6 hours in the optional external
charger TDS3CHG
Line fuse Internal, not replaceable
Environmental
Temperature 1,
2,3
Operating range:
0 °C to +50 °C (+32 °F to +122 °F)
Nonoperating range (storage):
-40°Cto+71°C(-40°Fto+160°F)
Humidity 15% to 95% RH below 30 °C (+86 °F), derate upper limit to 45% RH at
50 °C (+122 °F)
Pollution
Degree
Pollution Degree 2: indoor use only
TDS3000C Series Oscilloscope User Manual 129

Appendix A: Specifications
Environmental
Altitude 4,5Operating limit: 3,000 m (3,280 yd.)
Nonoperating limit: 15,000 m (16,404 yd.)
Random
vibration
Operating: 0.31 gRMS from 5 Hz to 500 Hz, 10 minutes on each axis
Nonoperating: 2.46 gRMS from 5 Hz to 500 Hz, 10 minutes on each axis
1When a battery pack is installed, refer to the TDS3BATC Rechargable Battery Pack Instructions (Tektronix
part number 071-0900-04) for information on the charge, discharge and storage requirements for temperature
and humidity.
2Keep two inches of clearance at all ventilation openings.
3The maximum operating ambient air temperature for this product is 50 °C (measured at the air intake vent on the
rear of the product). Do not exceed this temperature when operating the instrument.
4This product's maximum operating altitude is 3000 m. If used in aircraft, this product should be kept in a
environment pressurized to no greater than 3000 m altitude.
5Probes used with this product may have different maximum altitude ratings, possibly including an altitude rating
of only 2000 m. Review the specifications for the particular probe you plan to use with the product and be
sure that it is within its ratings during use.
Mechanical
Size Height: 176 mm (6.9 in), 229 mm (9.0 in) including handle
Width: 375 mm (14.75 in)
Depth: 149 mm (5.9 in)
Weight Oscilloscope only: 3.2 kg (7.0 lbs)
With accessories and carry case: 4.1 kg (9.0 lbs)
When packaged for domestic shipment: 5.5 kg (12.0 lbs)
Optional TDS3BATC battery pack: 0.85 kg (1.9 lbs)
130 TDS3000C Series Oscilloscope User Manual

Appendix B: Factory Setup
The next table lists the state of the oscilloscope after you recall the Factory Setup.
Control Changed by factory setup to
Acquire horizontal resolution Normal (10k points)
Acquire mode Sample
Acquire number of averages 16
Acquire number of envelopes 16
Acquire run/stop Run
Acquire single sequence Off
Acquire WaveAlert actions all Off
Acquire WaveAlert sensitivity 50%
Acquire WaveAlert state Off
Acquire WaveAlert type Highlight entire waveform
Channel selection Ch1 (all others off)
Coarse No change
Confirm delete No change
Cursor function Off
Cursor H Bar 1 position -3.2 divisions from the center
Cursor H Bar 2 position +3.2 divisions from the center
Cursor H Bar units Base
Cursor V Bar 1 position 10% of record
Cursor V Bar 2 position 90% of record
Cursor V Bar units Seconds
Cursor tracking Independent
Delay measure from waveform edge Rising
Delay measure to edge occurrence First
Delay measure to waveform Ch1
Delay measure to waveform edge Rising
Display graticule type Full
Display backlight High
Display color palette Normal
Display dots only Off
Display persist time Auto
Dual waveform math function Ch1 + Ch2
Edge trigger coupling DC
Edge trigger level 0.0 V
Edge trigger slope Rising
Edge trigger source Ch1
TDS3000C Series Oscilloscope User Manual 131

Appendix B: Factory Setup
Control Changed by factory setup to
External trigger probe setup (four-channel
models only)
Voltage, 1X
Horizontal delay On
Horizontal delay time 0 ns
Horizontal trigger position 10%
Horizontal time/div 400 ms/div
Horizontal zoom Off
Horizontal zoom position 50%
Horizontal zoom time/div 400 ms/div
Math typeDual waveform
Measure gating Off (Full Record)
Measure high-low setup Auto
Measure high reference 90% and0V
Measure indicators Off
Measure low reference 10% and0V
Measure mid reference 50% and0V
Measure mid2 reference 50% and0V
Measure statistics Off
Overwrite lock No change
Phase measure to waveform Ch1
Reference waveforms No change
Saved setups No change
Trigger holdoff 250.8 ns
Trigger mode Auto
Trigger type Edge
Utility language No change
Utility date/time display On
Utility I/O No change
Utility hard copy No change
Vertical bandwidth Full
Vertical coupling DC 1 MΩ
Vertical invert Off
Vertical offset 0V
Vertical position 0 div
Vertical probe setup Voltage, 1 X (unless a non-1 X probe is
attached)
Vertical volts/div 100 mV/div
Video trigger standard 525/NTSC
Video trigger on All lines
132 TDS3000C Series Oscilloscope User Manual

Appendix B: Factory Setup
Control Changed by factory setup to
Waveform file format No change
XY display Off
TDS3000C Series Oscilloscope User Manual 133

Appendix B: Factory Setup
134 TDS3000C Series Oscilloscope User Manual
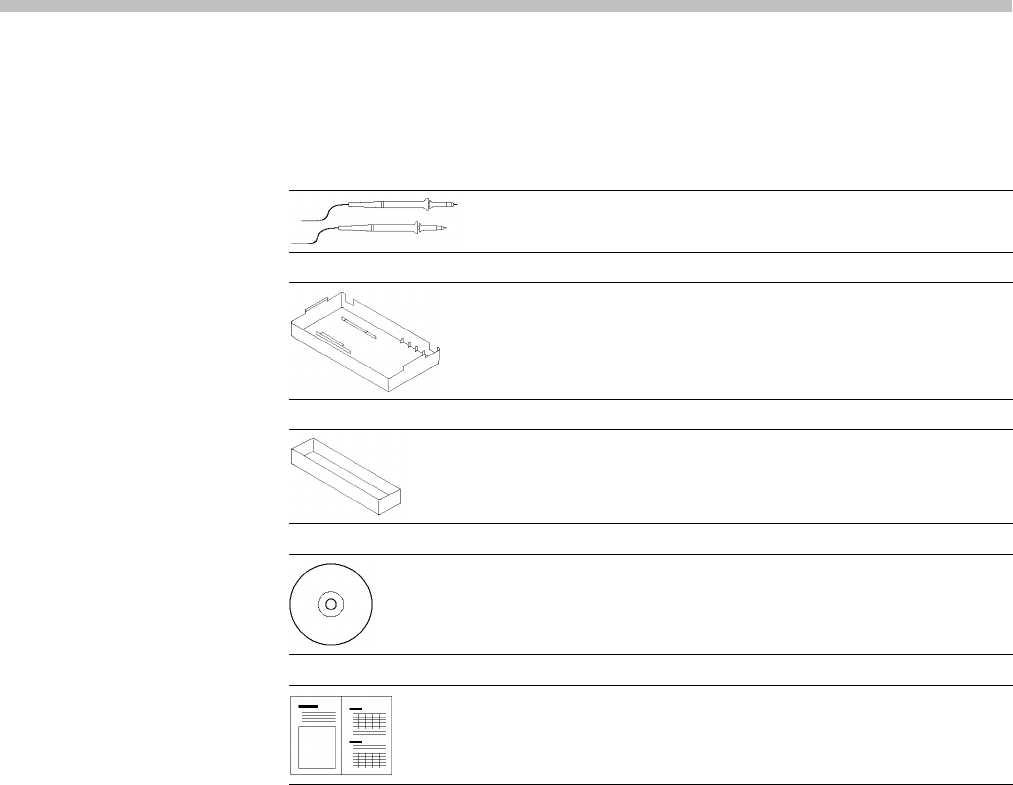
Appendix C: Accessories
The next table lists the standard accessories.
P6139A 10X passive probes (TDS303xC, TDS305xC)
The P6139A 10X passive probes have 300 MHz or 500 MHz
bandwidth and a CAT II voltage rating of 300 VRMS.
Front cover
The front cover (200-4416-01) snaps onto the front of the
oscilloscope to protect it during transit. The front cover
contains a convenient location to store the Reference manual.
Accessory tray
The accessory tray (436-0371-00) fits in the battery
compartment when you do not have a battery installed. You
can use the tray to store probes and other accessories.
PC communications CD-ROM
The PC communications software provides easy transfer of
data from the oscilloscope to a PC.
Manuals
The oscilloscope includes a printed User manual. All
TDS3000C product and optional accessory user manuals, in
all supported languages, are available to download from the
www.tektronix.com/manuals Web page.
TDS3000C Series Oscilloscope User Manual 135
Appendix C: Accessories
The next table lists the optional accessories.
TDS3VID Extended Video application module
This module adds video trigger, video picture, vectorscope
(vectorscope supports component video only), analog HDTV
triggering, and measurement capabilities to your oscilloscope.
TDS3TMT Telecom Mask Test application module
This module adds ITU-T G.703, ANSI T1.102 (up to DS3
data rates), and custom mask testing capabilities to your
oscilloscope.
TDS3SDI 601 Digital Video application module
This module adds 601 serial digital video to analog video
conversion, video picture, vectorscope, and analog HDTV
triggering capabilities to your oscilloscope.
TDS3AAM Advanced Analysis application module
This module adds advanced math capabilities to your
oscilloscope, including DPO math, arbitrary math expression
waveforms, new measurements, and measurement statistics.
TDS3LIM Limit Test application module
This module adds custom waveform limit testing capabilities
to your oscilloscope.
TDS3GV GPIB/RS-232/VGA communication module
This module adds RS-232, GPIB, and VGA ports for remote
programmability or to display the oscilloscope screen on a
monitor.
136 TDS3000C Series Oscilloscope User Manual
Appendix C: Accessories
TDS3CHG external battery charger
The battery charger recharges the oscilloscope battery pack in
approximately 6 hours.
TDS3BATC rechargeable battery pack
A rechargeable battery pack that provides up to three hours
of portable operation.
AC3000 soft case
The soft case protects the oscilloscope when not in use.
The soft case provides compartments for probes, one spare
battery, battery charger, and the User Manual.
HCTEK4321 transit case
The transit case provides shock, vibration, impact, and
moisture protection for the oscilloscope when you transport it
from one place to another, or when you store it. The required
soft case fits inside the transit case.
RM3000 rack mount kit
The rack mount kit contains all the hardware necessary to
mount your oscilloscope in a standard rack. The kit requires
7 inches of vertical space in the rack.
Manuals
The service manual (071-2507-XX) provides information about
maintenance and module-level repair.
The programmer manual (071-0381-XX) provides information
and a list of the oscilloscope control and query commands.
TDS3000C Series Oscilloscope User Manual 137

Appendix C: Accessories
138 TDS3000C Series Oscilloscope User Manual
Appendix D: Probe Basics
This appendix contains basic information about the P3010 or P6139A probes
provided with your oscilloscope. It also contains information about other probes
you can use with your oscilloscope and their limitations.
Probe Descriptions
The P3010 and P6139A are high-impedance passive probes with the following
general characteristics.
Characteristic P3010 P6139A
Cable length 2m 1.3m
Compatibility 100 MHz oscilloscope
models
300 MHz and 500 MHz
oscilloscope models
Bandwidth 100 MHz 500 MHz
Attenuation 10X 10X
Nominal input impedance 10 MΩin parallel with 13 pF 10 MΩin parallel with 8 pF
Maximum working voltage 300 V, CAT II, derated at
20 dB/decade to 50 V above
2.5 MHz
300 V, CAT II, derated at
20 dB/decade to 50 V above
2.5 MHz
Altitude 3,000 m 2,000 m
Temperature Range
Operating -15 °C to +55 °C
(+5°Fto+131°F)
-15°Cto+65°C
(+5 °F to +149 °F)
Non Operating -62 °C to +85 °C
(-80 °F to +185 °F)
-62°Cto+85°C
(-80 °F to +185 °F)
Pollution Degree 2, Indoor use only 2, Indoor use only
Probe Compensation
You should compensate a probe to an oscilloscope input whenever you attach a
probe for the first time to any input channel. (See page 3, Probe Compensation.)
When compensating the P3010, only adjust the trimmer marked L.
TDS3000C Series Oscilloscope User Manual 139
Appendix D: Probe Basics
TekProbe Interface
Probes with the TekProbe interface automatically communicate with the
oscilloscope to set the probe type and attenuation factor. If you use a probe
without the TekProbe interface, you can set these parameters in the Vertical menu
for the channel that the probe is connected to.
Probe Guard
A guard around the probe body provides a finger barrier for protection from
electric shock.
Guard
WARNING. To avoid electric shock when using the probe, keep fingers behind
the guard on the probe body.
To avoid electric shock when using the probe, do not touch metallic portions of
the probe head while connected to a voltage source.
Ground Leads
Always use a ground lead when you probe a circuit to minimize noise pickup and
signal aberrations. Connecting the ground lead to a point near the signal source
usually provides the best results.
Long ground leads can cause false ringing and aberrations in the acquired
waveform that are not in the actual signal. To see the best signal fidelity, use the
shortest possible ground lead.
Short ground lead Long ground lead
140 TDS3000C Series Oscilloscope User Manual
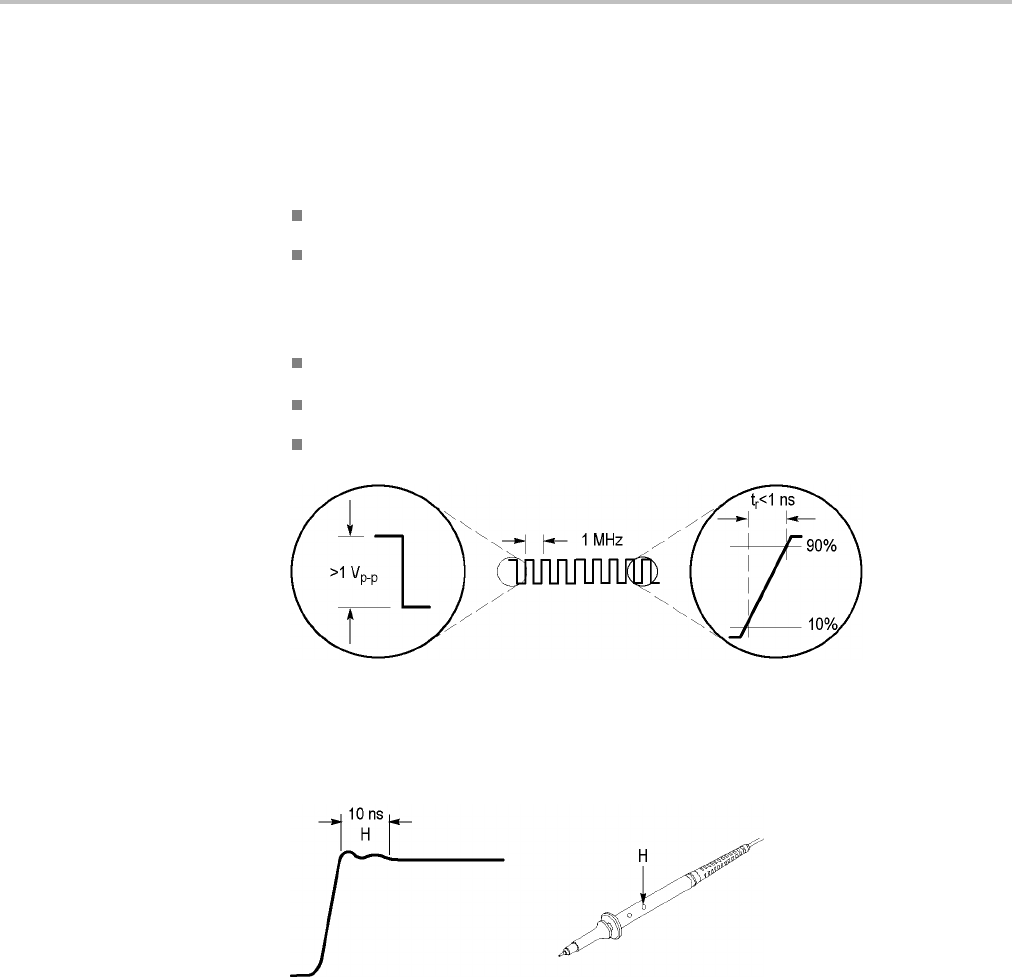
Appendix D: Probe Basics
P3010 High-Frequency Compensation
The P3010 high-frequency compensation should seldom require adjustment.
However, your probe may require high-frequency adjustment if either of the
following aretrue:
The probe has high-frequency aberrations
The probe does not perform at the rated bandwidth
To perform the high-frequency compensation adjustment, you will need a signal
source that has all of the following characteristics:
Square-wave output at 1 MHz
Fast rise output with rise time less than 1 ns
Output properly terminated
Connect the P3010 to the signal source to display a 1 MHz test signal on your
oscilloscope. Use the BNC-to-probe tip adapter (013-0277-00) to make the
connection. The oscilloscope should display a waveform similar to the one shown
next.
Adjust trimmer H until the waveform is flat on top and has a square leading edge.
TDS3000C Series Oscilloscope User Manual 141
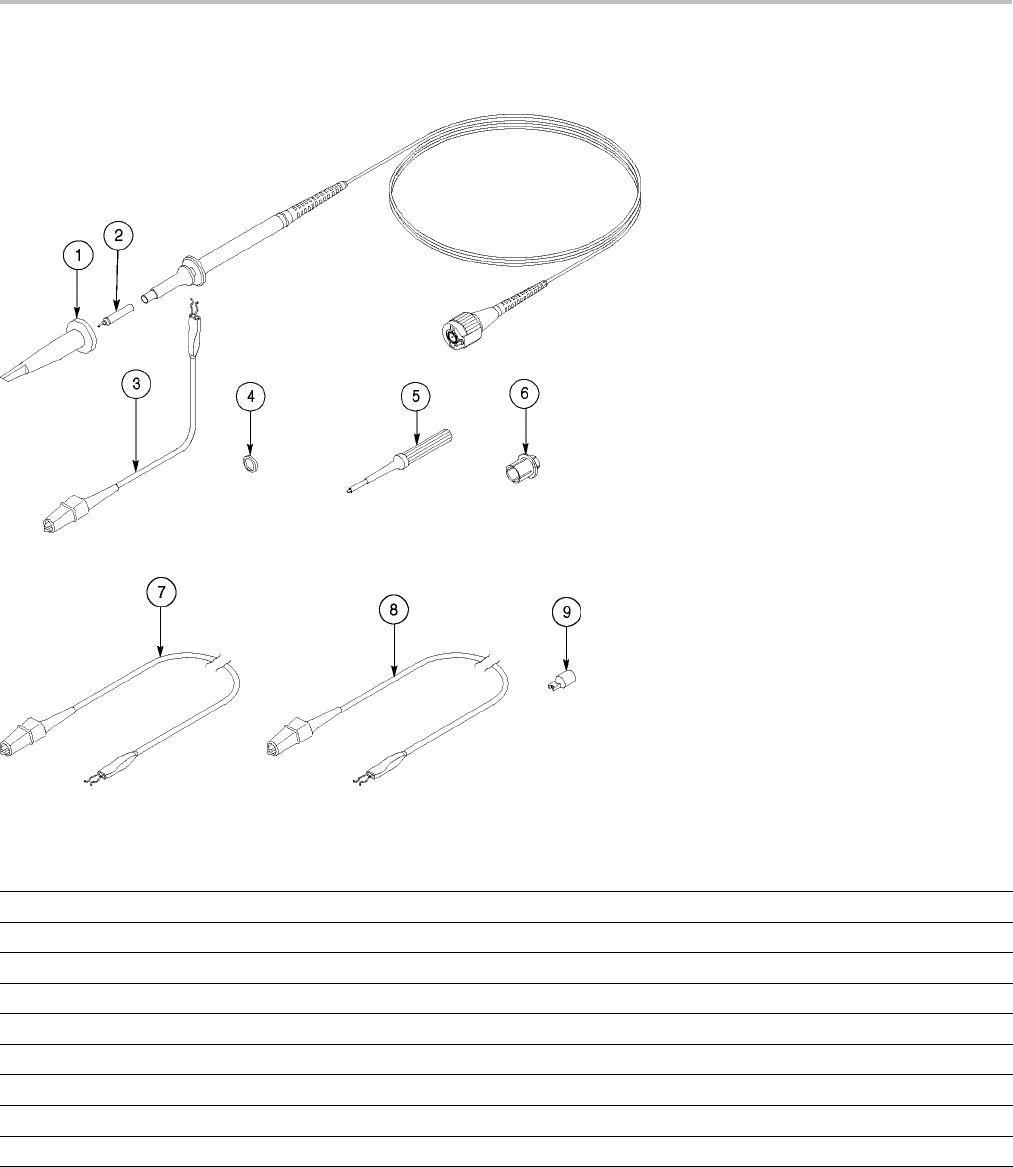
Appendix D: Probe Basics
P3010 Replaceable Parts and Accessories
Standard Accessories
Optional Accessories
Index Description Part
1Retra
ctable hook tip 013-0107-08
2 Probe tip 131-4997-01
3Ground lead, 6 in 196-3120-01
4Marker set (five colors, two each) 016-0633-00
5Adjustment tool 003-1433-01
6BNC-to-probe tip adapter 013-0277-00
7Ground lead, 28 in 196-3120-21
8Ground lead, 12 in 196-3121-01
9IC test tip, package of 10 015-0201-07
142 TDS3000C Series Oscilloscope User Manual
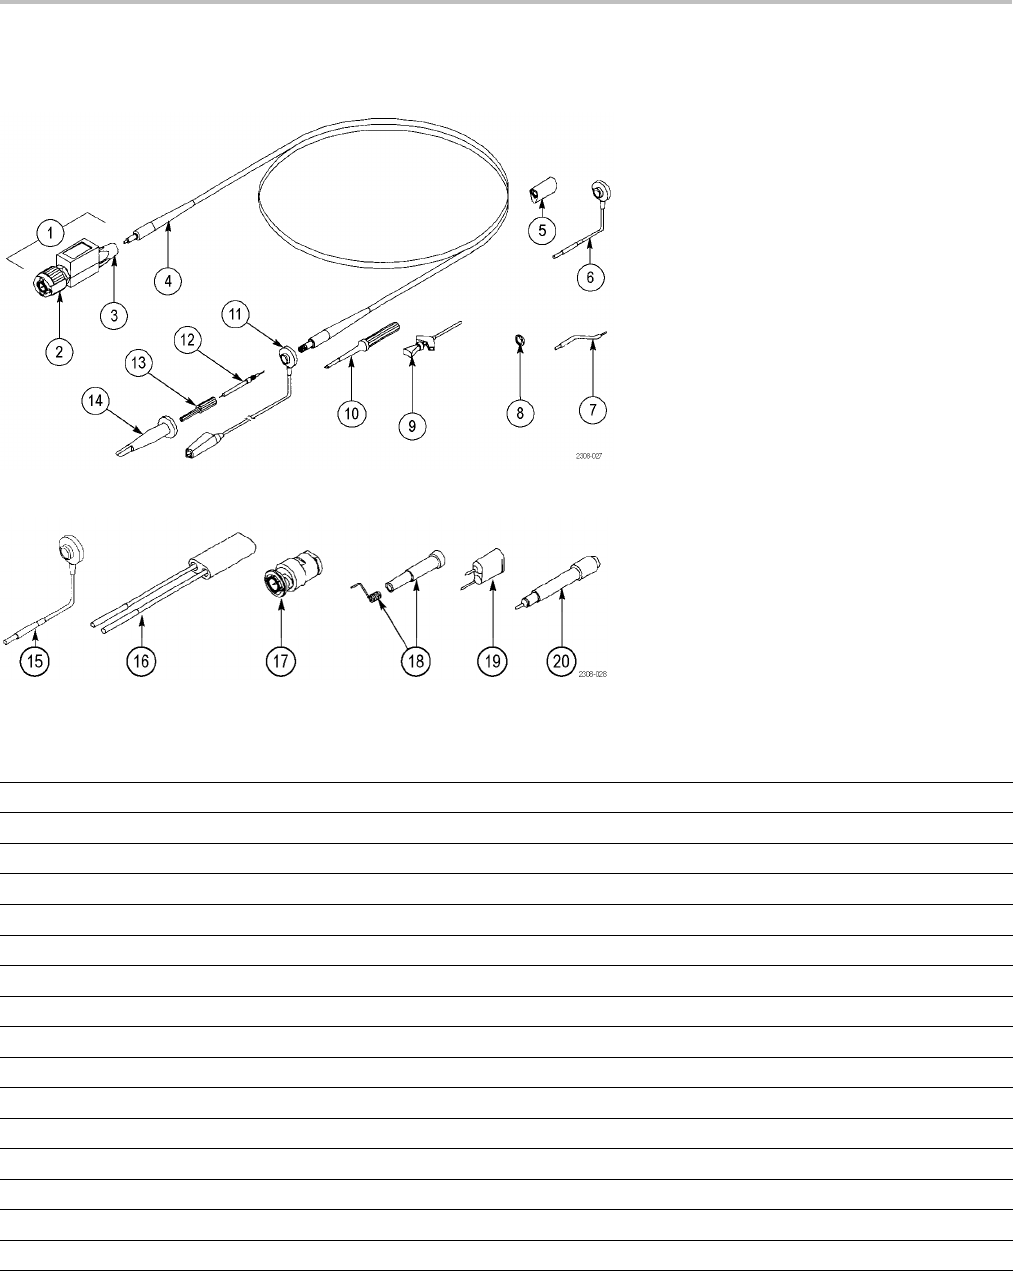
Appendix D: Probe Basics
P6139A Replaceable Parts and Accessories
Standard Accessories
Optional Accessories
Index Description Part
1Compensation box assembly 206-0440-04
2BNC connector 131-3219-03
3Cable cover nipple 200-3018-00
4Cable assembly 174-0978-02
5Ground collar 343-1003-02
6Ground lead, 6 in 196-3113-04
7Ground lead, 2.3 in 195-4240-00
8Marker set (five colors, two each) 016-0633-00
9IC Klipchip grabber 206-0569-00
10 Adjustment tool 003-1433-02
11 Ground lead with clip, 6 in 196-3305-01
12 Probe tip assembly 206-0441-00
13 Probe tip cover 204-1049-00
14 Retractable hook tip 013-0107-08
Optional accessories
15 Ground lead, 3 in 196-3113-04
TDS3000C Series Oscilloscope User Manual 143

Appendix D: Probe Basics
Index Description Part
16 Probe to connector pin adapter 015-0325-01
17 50 ΩBNC-to-probe tip termination and adapter 013-0227-00
18 Ground contact kit (two each of five lengths) with cover shell 016-1077-00
19 Grounding probe tip 013-0085-00
20 Adapter to use with the grounding probe tip, or with the probe to connector pin adapter 013-0202-04
Using OtherProbes
Optional probes can add capabilities to your oscilloscope that are useful in many
applications. You can use the following passive probes without any limitations.
Passive probe Recommended usage
P5100 High-voltage probe, 2500 Vpk CAT II, 250 MHz, 100X
P6015A High-voltage probe, 20 kV DC, 75 MHz, 1000X
P6021 Current probe, 15 A, 120 Hz to 60 MHz
P6022 Current probe, 6 A, 935 Hz to 120 MHz
P6158 Low capacitance probe, 3 GHz, 20X (50 Ω)
Supported Active Probes and Adapters
The oscilloscope supplies power to active probes. You can use the following
active probes as long as the total power required by the probes does not exceed
the capacity of the oscilloscope. To determine the total probe load, add the load
factors for all probes you want to use. The oscilloscope can supply power to this
combination if the sum of the load factors equals 10 or less. All passive probes
have a load factor of zero.
Active probe Recommended usage Load factor
P6205 FET probe, 750 MHz, 10X 0
P6243 SMT probe, 1 GHz, 10X 0
P5205 High-voltage differential probe, 1300 V,
100 MHz, 50X or 500X
6
P5210 High-voltage differential probe, 5600 V, 50 MHz,
100X or 1000X
6
ADA400A Differential preamplifier, 10 μV sensitivity, DC
to 10 kHz
5
AMT75 Telecom 75 Ωadapter 0
144 TDS3000C Series Oscilloscope User Manual

Appendix D: Probe Basics
Active probe Recommended usage Load factor
TCP202 Current probe, 15 A, DC to 50 MHz 4
013-0278-01 Video display clamp 5
CAUTION. To avoid a measurement error, do not connect active probes with a
combined load factor that is greater than 10. The signal distortion caused by such
an overload can be subtle (reduced gain, dynamic range, or slew rate).
Unsupported Probes
The TDS3000C oscilloscopes only support the probes listed in this chapter of
the manual. The oscilloscope may not display a message when you connect an
unsupported probe, so make sure that any probe you connect to the TDS3000C
is supported.
TDS3000C Series Oscilloscope User Manual 145

Appendix D: Probe Basics
146 TDS3000C Series Oscilloscope User Manual
Appendix E: General Care and Cleaning
General Care Protect the oscilloscope from adverse weather conditions. The oscilloscope
is not water resistant.
Do not store or leave the oscilloscope where the LCD display will be exposed to
direct sunlight for long periods of time.
CAUTION. To avoid damage to the oscilloscope, do not expose it to sprays,
liquids, or solvents.
Cleaning Inspect the oscilloscope as often as operating conditions require. To clean the
oscilloscope exterior, follow these steps:
1. Remove loose dust on the outside of the oscilloscope with a lint-free cloth.
Use care to avoid scratching the glass display filter.
2. Use a soft cloth or paper towel dampened with water to clean the oscilloscope.
You can use a 75% isopropyl alcohol solution for more efficient cleaning.
CAUTION. To avoid damage to the surface of the oscilloscope, do not use any
abrasive or chemical cleaning agents.
TDS3000C Series Oscilloscope User Manual 147

Appendix E: General Care and Cleaning
148 TDS3000C Series Oscilloscope User Manual

Appendix F: Ethernet Setup
This appendix describes how to set up the TDS3000C Series oscilloscope
for network hard copy printing, and remote programmability or access. The
TDS3000C requires a straight-through 10BaseT cable with an RJ-45 connector
to connect to a LAN, or a crossover cable to connect to a PC equipped with an
Ethernet card.
To connect to the oscilloscope through the Ethernet port, follow these steps:
1. Power off the oscilloscope.
2. Connect an Ethernet cable to the Ethernet port on the oscilloscope.
3. Power on the oscilloscope.
Your Ethernet Network Information
To connect the oscilloscope to the network, you must first obtain information
from your network administrator. For your convenience, use the form at the end
of this appendix.
Make two photocopies of the form and send them to your network administrator
to fill in. If you require remote access to the oscilloscope for programming or
e*Scope access, then have the network administrator fill in section 1. If you
require your oscilloscope to print screen hard copies to a network printer, then
have the network administrator fill in sections 1 and 2. The administrator can then
return one copy to you and keep the other copy.
NOTE. If the DHCP/BOOTP server assigns a dynamic IP address, then the
value in the Instrument IP Address field may be different each time you power on
the oscilloscope. This is not a problem if you are mostly sending hard copy to
a network printer.
However, if you intend to remotely control or access the oscilloscope, have the
system administrator assign a static IP address so that the oscilloscope IP address
does not change. A static IP address makes it easier for remote devices to access
aspecific oscilloscope.
TDS3000C Series Oscilloscope User Manual 149

Appendix F: Ethernet Setup
Entering the Ethernet Network Settings
The procedure for entering the oscilloscope Ethernet network parameters depends
on your network configuration.
Networks That Support
DHCP and BOOTP
If your network supports DHCP/BOOTP, follow these steps:
1. Push the Utility front panel button.
2. Push the System menu button to select I/O.
3. Push the Ethernet Network Settings screen button.
4. Push the DHCP/BOOTP side button to select On. The screen displays the
clock icon while it is talking with the network to obtain an IP address for the
oscilloscope. This step should only take a few moments, but the actual time
will vary depending on your network. The clock icon disappears when the
task is finished.
5. To verify that the network assigned an IP address to the oscilloscope, push the
Change Instrument Settings side button to display the oscilloscope ethernet
settings. The oscilloscope IP address field should now be filled in.
NOTE. If the oscilloscope IP address field is blank, then the oscilloscope was
not able to obtain an IP address from the network. Contact your network
administrator for help, or use the next procedure to manually enter the Ethernet
settings.
Networks That Do Not
Support DHCP and BOOTP
If your network does not support DHCP or BOOTP protocols, you will need to
manually enter the oscilloscope network settings. To enter the Ethernet network
settings information from section 1 of the form, follow these steps:
1. Push the Utility front panel button.
2. Push the System bottom button to select I/O.
3. Push the Ethernet Network Settings bottom button.
4. Push the Change Instrument Settings side button. The oscilloscope displays
the Instrument Setup screen.
5. Use the Instrument Setup screen menu items and controls to enter the
network settings information from section 1 of the form. (See page 153, The
Instrument Setup Screen.)
6. When you are done entering the Ethernet network settings, push the OK
Accept side button to store the settings in your oscilloscope.
7. If the form shows that DHCP or BOOTP are supported on your network, push
the DCHP/BOOTP side button to select On.
150 TDS3000C Series Oscilloscope User Manual

Appendix F: Ethernet Setup
Entering the Network Printer Settings
To enter the Ethernet printer settings information from section 2 of the form into
your oscilloscope, follow these steps:
1. Push the Utility front panel button.
2. Push the System bottom button to select I/O.
3. Push the Ethernet Printer Settings bottom button. The oscilloscope displays
the Printer Configuration screen, which lists all network printers loaded into
the oscilloscope.
4. Push the Add Printer side button. The oscilloscope displays the Add Printer
screen.
5. Use the Add Printer screen menu items and controls to enter the network
printer information from section 2 of the form. (See page 155, The Add
Printer Screen.)
NOTE. If you have set the domain name and DNS IP address in the Ethernet
Network Settings menu, then all you need to enter is the network printer's server
name or the printer's server IP address in the Add Printer screen. The DNS server
will look up the missing information.
6. When you are done entering the Ethernet printer settings, push the OK Accept
side button to store the settings in your oscilloscope. The oscilloscope returns
you to the Printer Configuration screen, which lists the printer information
you just entered. You can enter and store multiple network printer parameters.
Testing Your Ethernet Connection
You must already have entered the oscilloscope Ethernet network and printer
settings before you test the Ethernet connection, network printing, and the
e*Scope feature.
Testing the Oscilloscope
Connection
To test your oscilloscope's Ethernet connection, follow these steps:
1. Push the Utility front panel button.
2. Push the System bottom button to select I/O.
3. Push the Ethernet Network Settings bottom button to display the Network
Configuration side menu.
4. Push the Test Conne ction side button. If the connection is good, the side
menu displays OK. If you do not see OK, refer to the troubleshooting
suggestions. (See page 152, Troubleshooting Your Ethernet Connection.)
TDS3000C Series Oscilloscope User Manual 151

Appendix F: Ethernet Setup
Testing Network Printing To test sending screen hard copy images to an Ethernet network printer, follow
these steps:
1. On the oscilloscope, push Utility > System : I/O > Ethernet Printer
Settings.
2. Select a network printer from the list.
3. Push the System bottom button to select Hardcopy.
4. Push the appropriate bottom and side menu buttons to select the correct
settings for your network printer.
5. Push Menu Off to clear the screen.
6. Push the Hard Copy button. The oscilloscope sends a hard copy screen
image to the selected network printer. If the printer does not print the
oscilloscope screen, refer to the troubleshooting suggestions. (See page 152,
Troubleshooting Your Ethernet Connection.)
Testing e*Scope To use the e*Scope feature to test your oscilloscope's Ethernet connection, follow
these steps:
1. On a PC or work station, open your preferred browser program.
2. In the Location or Address field (where you normally enter a URL), type in
the IP address of the TDS3000C Series oscilloscope to which you want to
connect. For example, http://188.121.212.107. Do not precede the IP address
with any characters (such as www).
3. Push the Return key. The browser program loads the oscilloscope's
e*Scope home page. If the e*Scope home page does not display, refer to the
troubleshooting suggestions. (See page 152, Troubleshooting Your Ethernet
Connection.)
Troubleshooting Your Ethernet Connection
If you are not able to remotely access the oscilloscope using e*Scope or
programming commands, work with your system administrator to verify that:
Your oscilloscope is physically connected to the network.
Your oscilloscope network settings are correct.
Your system administrator can "ping" the oscilloscope to verify that the
oscilloscope is electronically connected to the network.
152 TDS3000C Series Oscilloscope User Manual

Appendix F: Ethernet Setup
If you are not able to send a hard copy to a network printer, work with your
system administrator to verify that:
You have set the oscilloscope to send hard copy output to the Ethernet port.
You have set the hard copy file format to the correct format for your network
printer.
You have selected the correct printer in the Printer Configuration screen.
The selected network printer is connected to the network and is online.
The selected network printer server is running.
The Instrument Setup Screen
The next figure shows the Instrument Setup screen. The text that follows describes
the screen menu items and controls for entering Ethernet network settings.
HTTP Port The HTTP Port field sets the network http socket value for the oscilloscope. This
field lets you set up the oscilloscope as an e*Scope web server on a port other than
the default port 80. This is useful for avoiding conflicts with existing web servers
that use the same IP address through a router. The default value is 80.
Instrument Setup Control Description
General purpose knob Selects (highlights) an alphanumeric character in the list.
Enter Character Adds the selected alphanumeric character to the current
network parameter field. You can also use the front panel
Select button. The list of available characters changes
depending on which field is selected.
←and →Moves the cursor left or right in the current field.
Back Space Erases the character to the left of the cursor.
TDS3000C Series Oscilloscope User Manual 153

Appendix F: Ethernet Setup
Instrument Setup Control Description
Delete Erases the character at the cursor position.
Clear Clears (erases) the current field.
↑and ↓Selects a field to edit.
OK Accept Closes the Instrument Setup screen and applies the
network settings.
Menu Off Closes the Instrument Setup screen and returns you to
the previous screen without applying changes.
The Printer Configuration Screen
The next figure shows the Printer Configuration screen.
To select a network printer to which to send hard copy, use the general purpose
knob to select (highlight) a printer. The oscilloscope uses the selected printer until
you select a different printer.
To add a new printer, push the Add Printer side button. The oscilloscope displays
the Add Printer screen. (See page 155.)
To rename an existing printer, select a printer and push the Rename Printer
side button.
To delete a printer, select a printer and push the Delete Printer side button. If
the Confirm Delete button is On, the oscilloscope asks you for confirmation
before deleting the printer.
154 TDS3000C Series Oscilloscope User Manual
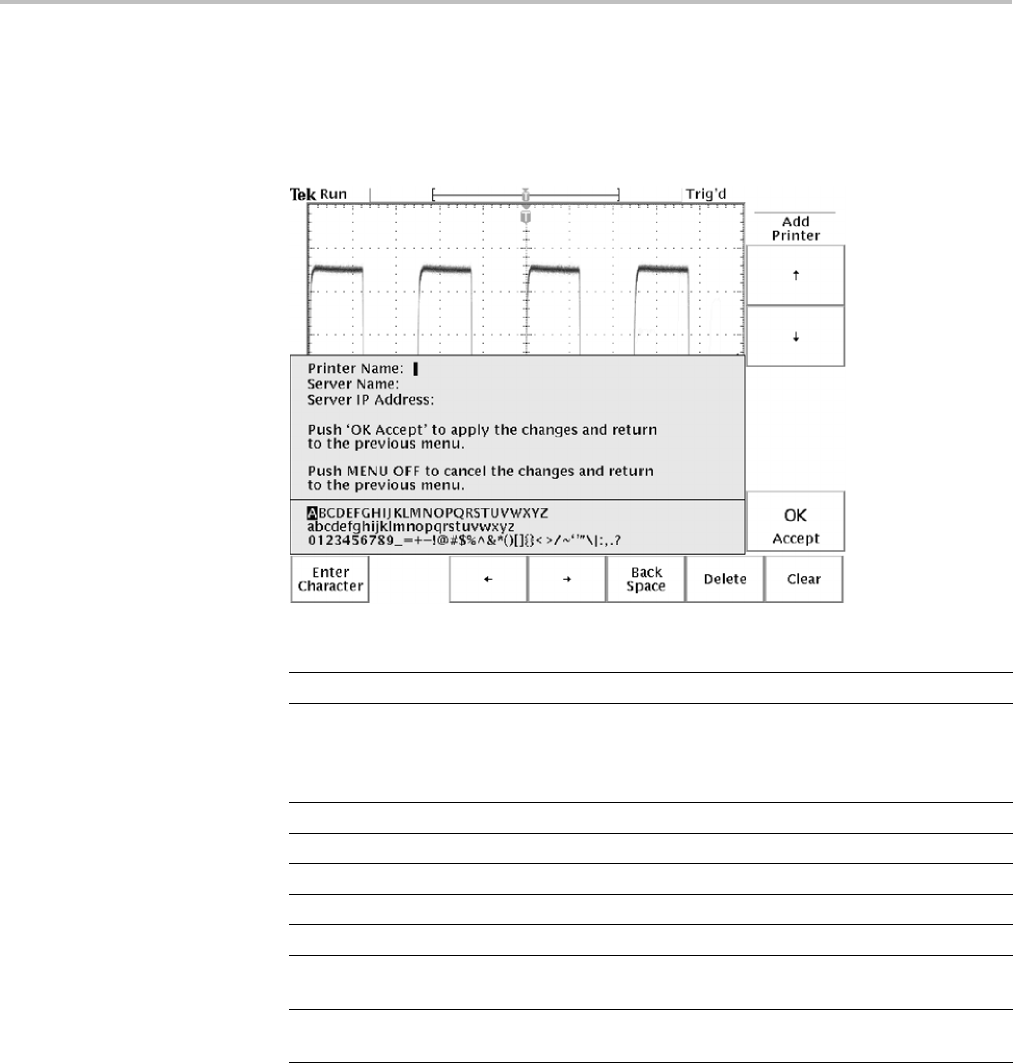
Appendix F: Ethernet Setup
The Add PrinterScreen
The next figure shows the Add Printer screen. The text that follows describes the
screen menu items and controls for entering printer configuration settings.
Add Printer Control Description
General purpose knob Selects (highlights) an alphanumeric character in the list.
Enter Character Adds the selected alphanumeric character to the current
printer setting field. You can also use the front panel
Select button. The list of available characters changes
depending on which field is selected.
←and →Moves the cursor left or right in the current field.
Back Space Erases the character to the left of the cursor.
Delete Erases the character at the cursor position.
Clear Clears (erases) the current field.
↑and ↓Selects a field to edit.
OK Accept Closes the Add Printer screen and applies the printer
settings. You can use the new printer immediately.
Menu Off Closes the Add Printer screen and returns you to the
previous screen without applying changes.
Other Network Printer
Settings
To verify that your oscilloscope is set to print to a network printer, follow these
steps:
1. Select a network printer in the Ethernet printer list. You select a printer by
using the general purpose knob to highlight a printer name in the list.
2. Push the Menu Off button to exit from the System I/O menus.
TDS3000C Series Oscilloscope User Manual 155

Appendix F: Ethernet Setup
3. Push Utility >System to select Hard Copy.
4. Push the Format bottom button and select the side button that is correct for
your network printer.
5. Push the Port bottom button and select the Ethernet side button.
6. Set Inksaver to ON to print the oscilloscope screen as a black on white
background image.
7. Push the Menu Off button to exit from the System Hard Copy menus.
Testing Network Printers To test that your oscilloscope is set to print to a network printer, push the Hard
copy button. The printer should print the current screen to the selected network
printer. If the printer does not print the screen, refer to the troubleshooting
suggestions. (See page 152, Troubleshooting Your Ethernet Connection.)
Ethernet Error Messages
The following error messages can occur when you are having network problems.
Read the text that follows to help rectify the problem.
Print Server Not Responding. This notifier displays when the oscilloscope
attempts to send data to the selected network printer but the network refuses the
connection to the network printer. This usually means that the network printer
server is offline or the print server IP address is incorrect.
If DNS is available then you can verify the network print server data by entering
the printer name and either (but not both) the print server name or the IP address.
The DNS protocol will fill in the missing data if the user-supplied data is correct.
If DNS is not available, then contact your network administrator for help.
Printer Not Responding. This notifier displays when the oscilloscope attempts to
send data to the selected network printer but the print server is unable to forward
the data to the network printer. This usually means that the network printer is
offline or the printer name is incorrect. Contact your network administrator to
obtain the correct printer queue name.
DNS Server Not Responding. This notifier displays when either the Domain
information (Domain name or IP address) is not correct, or the print server name
or printer server IP address is not validated (via the Domain Name Server).
156 TDS3000C Series Oscilloscope User Manual

Appendix F: Ethernet Setup
Ethernet Settings Form
TDS3000C Ethernet Setup Form for: ______________________________________
TDS3000C Ethernet Hardware address _____ : _____ :_____ :_____ :_____ :
(Copy this address from the Utility > System: I/O > Ethernet Network Settings > Change Instrument Setup screen before
sending this form to the network administrator.)
Type of IP address requested: Dynamic (DHCP/BOOTP) -□Static -□
(Refer to the beginning of this appendix for information on dynamic and static IP addresses. (See page 149, Ethernet Setup.))
1IP address settings (from network admin.):
Instrument Name: ____________________________________________
Instrument (IP) Address: ______.______.______.______
Domain Name: ___________________
DNS IP Address: ______.______.______.______
Gateway IP Address: ______.______.______.______
Subnet mask: ______.______.______.______
HTTP Port: ___________________
(Enter these values on the Utility > I/O > Ethernet Network Settings > Change Instrument Settings screen.) (See
page 149, Ethernet Setup.)
2Network Administrator: Please provide network information about the following printer:
Printer Location: _____________________________________________
Printer Make: ___________________
Model: ___________________
(User: fill in above printer information before sending form)
Printer Network Name: ___________________
Printer Server Name: ___________________
Print Server IP Address: ______.______.______.______
(Enter the above information on the Utility > I/O > Ethernet Printer Settings > Add Printer screen.)
TDS3000C Series Oscilloscope User Manual 157

Appendix F: Ethernet Setup
158 TDS3000C Series Oscilloscope User Manual

Index
A
acquisition
menu, 53
modes, 55
overview, 5
rate, 57
resolution, 57
single shot, 44, 51
status, 51
stopped, 51
waiting for trigger, 51
active cursor, 61
adjusting probes, 3
advanced analysis application
module,136
alternating trigger, 96
amplitude measurement, 83
application examples, 27
autoset, 27
averaging, 34
cursors, 35
custom measurements, 30
delay, 36
detecting distortion, 39
FFT measurements, 39
gray scale, 43
identifying the source of
noise, 40
measurements, 28, 29
measuring jitter, 38
peak detect, 34
saving to a USB flash
drive, 46
single shot signal, 44
video, 41
zoom, 45
application modules
descriptions, 136
installing, 13
application packages
descriptions, 136
installing, 13
area measurement, 83
Autoset, 52
button, 18
undo, 52
averaging, 55
B
B Trig button, 19
Btrigger
how to use, 92
backlight
intensity, 63
time out,110
bandwidth selection, 115
battery
charging, 12, 137
installation, 11
power, 9
safety, 10
burst width measurement, 83
C
calibration, 4, 113
channel button, 19
cleaning, 147
clear spool, 66
Coarse button, 18
how to use, 61
color
display, 64
printing, 66
communication module
description, 136
installing, 13
compressing hard copy files, 66
constellation diagram, 64
cursors
application example, 35
gating, 32, 81
interactions, 82
locating, 61,62, 63
measurements, 35
measurements when cursors
at same position, 61
readouts, 61
tracking mode, 61
VBarsandFFT
measurements, 61
XY cursor menu, 62
YT cursor menu, 59
cycle area measurement, 83
cycle mean measurement, 83
cycle RMS measurement, 83
D
date setting, 4
date/time
how to use, 110
delay
example application, 36
how to use, 68
interactions, 69, 71
Delay button, 19, 68
delay measurement, 82
deskew, probe, 115
detecting distortion
application example, 39
diagnostics, 113
digital phosphor, 53
display
colors, 64
identifying items in, 20
menu, 63
overview, 6
persistence, 64
roll mode, 71
slow horiz. settings, 71
TDS3000C Series Oscilloscope User Manual 159

Index
E
e*Scope, 118
edge trigger, 94
envelope, 55
error log, 113
Ethernet setup, 149
extended video application
module, 136
external trigger, 96
F
factory calibration, 113
factory setup
detailed description, 131
fall time measurement, 82
fast trigger, 57
FFT measurements
detecting distortion
application example, 39
identifying the source of noise
application example, 40
file compression, hard copy, 66
file system
application example, 46
extensions, 89
formatting a USB flash
drive, 89
how to use, 86
protections, 89
waveform data formats, 85
firmware update
internet, xvii
Force Trig button, 19, 91
frequency measurement, 82
front panel
connectors, 23
controls, 17
functional check, 2
G
gated xyz, 64
General Purpose knob, 18
GPIB, 112
communication module, 136
gray scale
application example, 43
controlling, 53
losing information, 70
measurements, 61
restrictions, 72, 117
.gz file format, 66
H
hard copy See printing
Hard Copy button, 19
hard copy file compression, 66
high measurement, 83
holdoff, 96
horizontal
expansion marker, 68
position, 67
Position knob, 18
resolution, 57
scale, 69
Scale knob, 19
ZOOM button, 19
horizontal preview
application example, 45
interactions, 70
horizontal zoom
application example, 45
how to use, 69
interactions, 70
maximum, 70
I
I/O ports, 111
initial setup, 1
ink saver, 66
L
language
how to select, 109
limit test application module, 136
logic trigger, 100, 101
low measurement, 83
M
magnify See zoom
math
preview, 72
source waveform screen
position, 72
Math button, 19
math waveform, 72
max measurement, 83
mean measurement, 83
measurement
overview, 6
measurements
automatic, 82
cursor, 35
gating, 32, 81
interactions, 80
menu, 79
reference levels, 31
V Bars and FFT, 61
Menu Off button, 19
menus
how to use, 15
min measurement, 83
N
negative measurement
duty cycle, 82
overshoot, 83
width, 82
noise source and identifying
application example, 40
O
Off button, 19
P
pattern trigger, 100
peak detect, 55
peak-to-peak measurement, 83
period measurement, 82
persistence, 64
phase measurement, 83
positions for operation, 8
positive duty cycle
measurement, 82
positive overshoot
measurement, 83
160 TDS3000C Series Oscilloscope User Manual

Index
positive width measurement, 82
power
AC line, 9
battery, 9
probe, 144
switch, 19
power off timeout, 110
pretrigger, 67
preview
application example, 45
horizontal, 70
vertical, 116
printing
color, 66
connections, 65
date/time stamp, 66
error message, 66
hard copy file
compression, 66
ink saver, 66
preview, 66
printer compatibility, 65
spooler, 66
probe deskew, 115
probes
compensating, 3
general information, 139
power limitations, 144
safety information, 140
product description
models, 5
overview, 5
probes, 144
pulse width trigger, 102
Q
QuickMenu, 21
how to use, 84
identifying menu items, 21
R
readouts
cursors, 61
rear panel
connectors, 24
record length, 57
Ref button, 19
reference
scale and position, 72, 117
waveforms, 116
remote control, e*Scope, 118
removing waveforms, 114
rise time measurement, 82
RMS measurement, 83
roll mode, 71
RS-232
communication module, 136
troubleshooting, 112
Run/Stop button, 18, 51
runt pulse trigger, 103
S
safety for battery operation, 10
sample, 55
save/recall
menu, 84
setups, 85
waveforms, 116
waveforms to file, 85
waveforms to ref memory, 86
saved waveforms
naming, 87
printing, 88
Select button, 18, 61
self test, 113
Set To 50% button, 18, 90
signal path compensation, 4, 113
signal processing
overview, 5
signal threshold concepts, 98
Single Seq button, 18, 51
single shot, 51
application example, 44
slew rate trigger, 105
slow roll mode, 71
snapshot all measurements, 83
SPC, 4, 113
specifications, 121
state trigger, 101
status
acquisition, 51
trigger, 94
stopped acquisition, 51
T
TDS3BATC, 10
TekProbe interface, 116, 140
TekSecure
how to use, 110
telecom mask test application
module, 136
threshold voltage concepts, 98
time base
controlling, 69
fast settings, 71
time out, 110
time setting, 4
trigger
alternating, 96
auto, 96
edge, 94
external, 96
holdoff, 96
level, 90
Level knob, 18
logic, 100, 101
menu, 90
normal, 96
overview, 6
pattern, 100
position marker, 67
pulse width, 102
runt pulse, 103
slew rate, 105
state, 101
status, 94
video, 107
XY waveforms, 64
trigger concepts
threshold voltage, 98
U
undo autoset, 52
USB flash drive
application example, 46
how to use, 86
port, 19
utility menus, 109
TDS3000C Series Oscilloscope User Manual 161

Index
V
vertical
channel button, 19
Math button, 19
menu, 72, 115, 116
offset, 116
position, 114
Position knob, 18
preview, 116
Ref button, 19
scale, 114
Scale knob, 19
video modulation
application example, 43
video trigger, 107
application example, 41
sync pulse, 108
W
WaveAlert, 58
Waveform Intensity knob, 19, 53
waveform off, 114
button, 19
waveforms
file formats, 89
record icon, 20
saving to file, 85
saving to reference
memory, 85
web-based remote control, 118
wrist strap ground, 19
X
XY waveform
controlling, 64
gated xyz, 64
restrictions, 64
triggering, 64
XY, XYZ cursors, 62
Y
YT cursors, 59
Z
zoom
application example, 45
how to use, 69
interactions, 70
maximum, 70
162 TDS3000C Series Oscilloscope User Manual
