Tex Var Manual
User Manual:
Open the PDF directly: View PDF ![]() .
.
Page Count: 24
TexVar – Manual
TexVar – LaTeX math calculations
Version: 1.5.22
Sebastian Pech
November 27, 2018
Contents
1 Description 2
2 Installation 2
2.1 Prerequisites ...................................... 2
2.2 Installation ....................................... 2
2.2.1 Conguration for Gnuplot . . . . . . . . . . . . . . . . . . . . . . . . . . . 2
3 Getting Started - Hello World 2
4 General Information on tVar Environment and Macro 3
5 TexVar - Commands 4
5.1 CreatingVariables ................................... 4
5.1.1 Creating Variables in Equations . . . . . . . . . . . . . . . . . . . . . . . . 5
5.1.2 Auto-Formatting of variable names . . . . . . . . . . . . . . . . . . . . . . 5
5.2 CreatingFunctions................................... 6
5.3 Indexing Matrices and Vectors . . . . . . . . . . . . . . . . . . . . . . . . . . . . 6
5.4 Output ......................................... 8
5.4.1 print()...................................... 8
5.4.2 outRES() .................................... 9
5.4.3 Other Output Commands . . . . . . . . . . . . . . . . . . . . . . . . . . . 9
5.4.4 L
A
T
EXOutput.................................. 10
5.4.5 Precise Manipulation of Output . . . . . . . . . . . . . . . . . . . . . . . . 10
5.4.6 NumberFormat ................................ 11
5.4.7 Grouping Math Environments . . . . . . . . . . . . . . . . . . . . . . . . . 13
5.5 GlobalParameters ................................... 13
5.5.1 Details on automatic removal of trailing zeros . . . . . . . . . . . . . . . . 14
5.6 PlottingwithGnuplot ................................. 15
5.6.1 Conguration.................................. 15
5.6.2 CreatingaPlot................................. 16
5.7 MathematicalCommands ............................... 18
5.7.1 General ..................................... 18
5.7.2 MatricesandVectors.............................. 18
5.8 TheLinkFunction ................................... 18
6 Examples 20
6.1 U-Value ......................................... 20
6.2 RotatingaVector.................................... 21

2 3 Getting Started - Hello World
6.3 Vector Calculations - Custom Function . . . . . . . . . . . . . . . . . . . . . . . . 22
1 Description
TexVar (short tVar) is a basic L
A
T
EX math calculations tool written in Lua. For integration into
L
A
T
E
X it has to be used together with LuaLaTeX. Compared to software like Mathcad TexVar is
a lot more exible. You can ll custom designed tables with results, do calculations within text
documents and print beautiful LaTeX equations. The current version also supports 2D-plotting
with gnuplot.
2 Installation
2.1 Prerequisites
The following software is needed in order to use TexVar:
• Lua 5.1 or higher
• LuaLaTeX (MikTex or Texlive)
• GnuPlot 5.0 (only needed for plotting)
By default the command \si{} is used for displaying units, so the siunitx package is mandatory.
If you want to dene your own command you can change the value of tVar.unitCommand = "\\si".
2.2 Installation
Download TexVar from https://gitlab.com/spech/TexVar and copy the folder tVar and the
le texvar.sty (subfolder package) to a location that is visible to L
A
T
EX. (e.g. the folder your
*.tex le is in or a global L
A
T
EX-folder 1)
2.2.1 Conguration for Gnuplot
In order to use Gnuplot with TexVar you have to allow LuaLaTeX to call external commands
during runtime. This works through the command-line switch --shell-escape. Your complete
call for LuaLaTeX could look like this: lualatex -synctex=1 -interaction=nonstopmode
--shell-escape %.tex.
3 Getting Started - Hello World
To ensure your installation is working test the following code. When using an luacode based
environment like tVar it’s important that the commands \begin{tVar} \end{tVar} are not
indented.
1\documentclass{article}
2%
3\usepackage{texvar}
4\ usepackage[ fleqn ]{ amsmath }
5%
1You can nd information on global L
A
T
E
X-folders athttps://www.math.hmc.edu/computing/support/tex/
installing/

4 General Information on tVar Environment and Macro 3
6\begin{document }
7\begin{tVar}
8#Hello World! I'm using TexVar
9tVar.getVersion()
10 \end{tVar}
11 \end{document}
Output
Hello World! I’m using TexVar Version: 1.5.22
4 General Information on tVar Environment and Macro
To execute TexVar commands from L
A
T
EX, the TexVar package oers two options:
•\begin{tVar} \end{tVar}, for commands blocks
•\tv{}, for inline calls
Both forward the commands to the TexVar interpreter.
1\begin{tVar}
2a:=10
3b:=3
4c:=a+b
5\end{tVar}
6The result is: \tv{c:outRES ()}
Output
a= 10
b= 3
c=a+b= 10 + 3 = 13
The result is: c= 13
Generally, there are two key commands the TexVar interpreter searches for 2:
1. #, for text output
2. :=, for calculations and assignments
Every other command is directly forwarded to the Lua interpreter. This means you can write
any Lua code you want inside the tVar environment.
1\begin{tVar}
2function mypow(a,b)
3return a^b
2Details on these key commands are discussed in Section 5

4 5 TexVar - Commands
4end
5for i=0,2 do
6tex.print("Step " .. mypow(2,i) .. "\\\\")
7end
8\end{tVar}
Output
Step 1
Step 2
Step 4
5 TexVar - Commands
5.1 Creating Variables
TexVar knows three types of variables:
tVar is the basic type for scalar values.
tMat is used for matrices.
tVec is used for vectors.
The following code generates a variable of each type. Every assignment is made with :=.
1\begin{tVar}
2a:=13
3e:={1,2,4}
4A:={{1,0},{2,4},{3,9.1}}
5\end{tVar}
Output
a= 13
~e =
1
2
4
A=
1 0
2 4
3 9.1

5 TexVar - Commands 5
5.1.1 Creating Variables in Equations
New variables can also be created inside equations. The notation for vectors and matrices is
explained in Section 5.1. Lua knows - by default - how to do calculations with numbers, so
any equation which does not contain tVar objects, can only be printed as it’s result. Any
mathematical operation with a tVar object and a decimal number results in a tVar value.
1\begin{tVar}
2# Variable a is created from the equation ...
3a:=13*2^2
4# To preserver the equation some of the ...
5a:= tVar :New (13) *2^2
6# At first Lua calculates $2^2=4$ ...
7# To print the whole ...
8a :=13* tVar :New(2) ^2
9# Matrices and Vectors
10 c:={{1,2 ,3} ,{4 ,2,6} ,{1,3,2}}*{1 ,2 ,3}* a
11 \end{tVar}
Output
Variable a is created from the equation 13 ·22. Since all numbers are
just decimal values, Lua calculates the result and creates the tVar object
afterwards.
a= 52
To preserver the equation some of the numbers have to be initialized as
tVar objects. In this case it’s the number 13.
a= 13 ·4 = 52
At rst Lua calculates 22= 4 and then multiplies the tVar object 13 with
4which results in a tVar object containing the equation. To print the
whole equation, one number from the rst calculation has to be trans-
formed into a tVar object.
a= 13 ·22= 52
Matrices and Vectors
~c =
123
426
132
·
1
2
3
·a=
123
426
132
·
1
2
3
·52 =
728
1352
676
5.1.2 Auto-Formatting of variable names
The L
A
T
EX-representation of a variable is automatically generated from the variable name. The
rst occurrence of an underline starts the subscript the rst occurrence of a double underline
starts the superscript. Every other underline becomes a comma.

6 5 TexVar - Commands
1\begin{tVar}
2a_1_3 :=13
3a__10_2 :=3
4b_1_x__y_2:=12
5\end{tVar}
Output
a1,3= 13
a10
2= 3
by,2
1,x = 12
5.2 Creating Functions
Functions can easily be dened with the following syntax. The auto-formatting of function
names and attribute names works according to Section 5.1.2.
1\begin{tVar}
2f(x,y):=x^2+y^2+4
3a:=f(2,3)+11
4\end{tVar}
Output
f(x, y) = x2+y2+ 4
a=f(2,3) + 11 = 22+ 32+ 4 + 11 = 28
5.3 Indexing Matrices and Vectors
The syntax for indexing a matrix is similar to the Matlab syntax. To access a matrix you have to
use square brackets and a string as key. The key has to be formatted according to the following
examples.
1\begin{tVar}
2A:={{1 ,2,6} ,{2,4 ,6},{7 ,6,9}}
3# Index one element with syntax [row , column ]
4A["1,2"]:outRES ()
5# Index a range
6A["1:2 ,1:end"]:outRES()
7# The range 1: end is equal to :
8A["1:2,:"]: outRES()

5 TexVar - Commands 7
9# You can also set matrices this way
10 A[" 1:2 ,: "]:={{1 ,2 ,3} ,{4 ,5 ,6}}
11 A["1:2,:"]: outRES()
12 # Adress vector
13 c:=A[":,2"]
14 d:=A["2,:"]
15 # The above also applies to vectors
16 {plain
17 v_1:={1,4,3}
18 #,~
19 v_1["2"]: outRES ()
20 #,~
21 v_1["1" ]:=9
22 v_1:outRES ()
23 }
24 \end{tVar}
Output
A=
126
246
769
Index one element with syntax [row,column]
A[1,2] = 2
Index a range
A[1:2,1:end] = 126
246!
The range 1:end is equal to :
A[1:2,:] = 126
246!
You can also set matrices this way
A[1:2,:] = 123
456!
Adress vector
~c =
2
5
6
=
2
5
6

8 5 TexVar - Commands
~
d=456=456
The above also applies to vectors
~v1=
1
4
3
, ~v1[1] = 9, ~v1=
9
4
3
The command {plain } groups equations to one math environment. For details see Section
5.4.7
5.4 Output
5.4.1 print()
The [tVar]:print() command creates the output according to the global parameter tVar.OUTPUT_MODE
. The following options are supported:
Output
a= 10
b= 2
c=a+b= 10 + 2 = 12
tVar.OUTPUT_MODE = "RES_EQ_N"
c=a+b= 10 + 2 = 12
tVar.OUTPUT_MODE = "RES_EQ"
c=a+b= 12
tVar.OUTPUT_MODE = "RES"
c= 12
If you do your calculations inside \begin{tVar} and \end{tVar} the [tVar]:print() command
is automatically added to your calculations. This means c:=(a+b) creates an output using the
[tVar]:print() command. To suppress the automatic output just add a ”;” at the end of the
line.
1\begin{tVar}
2# With output:
3a:=10
4b:=3
5c:=a+b
6# Without output (Lines 7 and 8 produce no output ):

5 TexVar - Commands 9
7a:=10;
8b:=3;
9c:=a+b
10 \end{tVar}
Output
With output:
a= 10
b= 3
c=a+b= 10 + 3 = 13
Without output (Lines 7 and 8 produce no output):
c=a+b= 10 + 3 = 13
5.4.2 outRES()
The [tVar]:outRES() command is equal to the combination of [tVar]:print() with tVar.OUTPUT
\_MODE = "RES". If you do your calculations inside \begin{tVar} and \end{tVar} the [tVar
]:outRES() command is automatically added to any assignment of a new variable. That means
a:=10 creates and output using the [tVar]:outRES() command.
In some cases you might want to print an equation without assigning it to a variable. This
can be achieved by directly calling the function tVar.outRES([tVar]) (now with a dot) and
passing your equation as argument to the function.
1\begin{tVar}
2a:=2
3b:=13
4tVar.outRES (( a+b) /2+b)
5\end{tVar}
Output
a= 2
b= 13
a+b
2+b= 20.5
This method also works for the output commands listed in Section 5.4.3.
5.4.3 Other Output Commands
For every output mode mentioned in Section 5.4.1 there is an equal output function.

10 5 TexVar - Commands
RES_EQ_N [tVar]:outRES_EQ_N(numbering,environment)
RES_EQ [tVar]:outRES_EQ(numbering,environment)
RES [tVar]:outRES(numbering,environment)
The attributes numbering and environment are boolean values and dene if the output is created
with numeration and a math environment. Both parameters are optional and can also be dened
via the global parameters tVar.EQUATION_NUMBERING and tVar.MATH_ENVIRONMENT3
Additionally there are the functions [tVar]:out() for printing the result without the variable
name and [tVar]:outN() for printing the variable name the equation with numbers and the
result.
5.4.4 L
A
T
EX Output
Inside \begin{tVar} and \end{tVar} the symbol # can be used to print a text in L
A
T
E
X.
Inside such a text you can use %%[tVar]%% to print a variables name and $$[tVar]$$ to print
a variables value.
L
A
T
E
X commands used within # have to be escaped. For example \textbf{} has to be written
as \\textbf{}.
1\begin{tVar}
2#\\ subsection *{ First Subsection }
3a_1_2 :=22.4 :setUnit("m")
4# Linebreaks are a bit confusing \\\\
5# The variable %%a_1_2 %% has the value $$a_1_2$$
6\end{tVar}
Output
First Subsection
a1,2= 22.4m
Linebreaks are a bit confusing
The variable a1,2has the value 22.4m
5.4.5 Precise Manipulation of Output
The following functions manipulate equations directly and can be used for detailed formatting.
1\begin{tVar}
2a:=10: setUnit("m")
3b:=3: setUnit("m")
4c:=((((a+b):bracR()^2):bracB() *5): bracC() *22): setUnit("m^2")
5#In case you do a really long calculation you can insert a
linebreak \\\\
3In case tVar.MATH_ENVIRONMENT is set to ”” no math environment is used.

5 TexVar - Commands 11
6c:=((a+a+a+a+a+a+a+a+b+b):CRLF("+")+b+b+b:CRLF_EQ("+")+b+b+b+
a+a+a+a):CRLFb("=")
7tVar.DEBUG_MODE = "off"
8\end{tVar}
Output
a= 10 m
b= 3 m
c=nh(a+b)2i·5o·22 = nh(10 + 3)2i·5o·22 = 18590 m2
In case you do a really long calculation you can insert a linebreak
c=a+a+a+a+a+a+a+a+b+b+b+b+b+
+b+b+b+a+a+a+a=
= 10 + 10 + 10 + 10 + 10 + 10 + 10 + 10 + 3 + 3+
+3+3+3+3+3+3+10+10+10+10=144
5.4.6 Number Format
The number format can be controlled globally and locally. The function [tVar]:setFormat([
string]) denes the local number format of a tVar object. In case no local format was dened,
tVar falls back to the global format set with tVar.NUMBERFORMAT = [string].
Common values are:
Output
Variable a is set to 192.6345
Integer %d
a= 192
Exponential %.2E
a= 1.93 ·102
Float %.3f
a= 192.635
There is one case where TexVar automatically changes the number format: When the output
precision return 0but the calculation precision is unequal to 0the number format is changed to
%.3E.

12 5 TexVar - Commands
[tVar]:bracR() Surrounds the [tVar] object with round brackets.
[tVar]:bracB() … boxed brackets.
[tVar]:bracC() … curly brackets.
[tVar]:bracR_EQ() Surrounds the equation part of the [tVar] object
with round brackets.
[tVar]:bracB_EQ() … boxed brackets.
[tVar]:bracC_EQ() … curly brackets.
[tVar]:bracR_N() Surrounds the numerical part of the [tVar] ob-
ject with round brackets.
[tVar]:bracB_N() … boxed brackets.
[tVar]:bracC_N() … curly brackets.
[tVar]:CRLF ([string]) Inserts a line break in N after the [tVar] ob-
ject and adds the string before and after the line
break.
[tVar]:CRLFb([string]) Inserts a line break in N before the [tVar] ob-
ject and adds the string before and after the line
break.
[tVar]:CRLF_EQ ([string]) Inserts a line break in EQ after the [tVar] ob-
ject and adds the string before and after the line
break.
[tVar]:CRLFb_EQ([string]) Inserts a line break in EQ before the [tVar] ob-
ject and adds the string before and after the line
break.
[tVar]:clean() Removes the calculation history from an object.
[tVar]:setUnit([string]) Sets the unit for a tVar object.
[tVar]:setFormat([string]) Sets the numberformat for a tVar Object. For
details see Section 5.4.6
Output
Variable a is set to 0.00001. Default number format is %.3f. Calculation
precision is 10
a= 1 ·10−5
b= 123432
c=a·b= 1 ·10−5
·123432 = 1.234

5 TexVar - Commands 13
5.4.7 Grouping Math Environments
By default TexVar creates a new mathematical environment for every output (except plain text-
output with #). To group equations into one environment, you can enclose them with curly
brackets. The group operator automatically adds an alignment symbol at the beginning of the
line and a line-break at the end. If you want to suppress this behavior you can open the group
with the command {plain.
1\begin{tVar}
2{
3a:=1
4b:=10
5c:=3
6}
7d:=(a+b):bracR ()/c
8#It's also possible to create environments without line -
breaks and alignment:
9{plain
10 f:=3
11 #,~
12 g:=f+d
13 }
14 \end{tVar}
Output
a= 1
b= 10
c= 3
d=(a+b)
c=(1 + 10)
3= 3.667
It’s also possible to create environments without line-breaks and align-
ment:
f= 3, g =f+d= 3 + 3.667 = 6.667
5.5 Global Parameters
Global parameters can be set during runtime and aect all commands.

14 5 TexVar - Commands
Tab. 1: Global parameters with default values and description
tVar.NUMBERFORMAT = "%.3f" Denes the number format for printing.
tVar.MATH_ENVIRONMENT = "align" Denes the environment used around equations.
tVar.OUTPUT_MODE = "RES_EQ_N" Denes the outputmode (Section 5.4.1).
tVar.EQUATION_NUMBERING = true Disables and enables numeration of equations.
tVar.DECIMAL_SEPARATOR = "." Denes the decimal separator.
tVar.MATRIX_COMMAND = "mathbf" Denes the style for matrices.
tVar.MATRIX_EQUATION_AS_MATRIX = false Enables and disables output of a matrix as vari-
able name or matrix with variable names
tVar.UNIT_COMMAND = "\\si"" Sets the macro for displaying units.
tVar.VECTOR_COMMAND = "vec" Denes the style for vectors.
tVar.CALC_PRECISION = 10 Denes the how many decimal places are used
for comparison.
tVar.OUTPUT_DISABLED = false Disables the complete output.
tVar.REMOVE_ZEROS = true Removes trailing zeros from a decimal number.
tVar.REMOVE_DECIMAL_SEPARATOR = true In case tVar.REMOVE_DECIMAL_SEPARATOR is
true remove the decimal separator if all trail-
ing zeros have been removed. Else show num-
ber with one decimal zero. (Only works if
tVar.REMOVE_DECIMAL_SEPARATOR = true)
tVar.DEBUG_MODE = "off" In case debugMode is set to ”on” the equations
are printed as L
A
T
E
Xcode.
tVar.DEBUG_LOG_COMMANDS_TO_FILE = false Enables logging of interpreted commands. Cre-
ates a le tVarLog.log
tVar.OUTPUT_COLORED = false Prints all variables with value=nil red.
5.5.1 Details on automatic removal of trailing zeros
The following example shows the dierence between the global parameters tVar.REMOVE_DECIMAL_SEPARATOR
and tVar.REMOVE_ZEROS. If tVar.REMOVE_ZEROS is disabled the number format from tVar.NUMBERFORMAT
get’s applied.
1\begin{tVar}
2#Default settings
3{
4a:=2.0
5b:=3.3
6c:= tVar.sqrt(a^2+b ^2)
7}
8#Disable \\verb|tVar.REMOVE_DECIMAL_SEPARATOR|
9tVar.REMOVE_DECIMAL_SEPARATOR = false
10 {
11 a:=2.0
12 b:=3.3

5 TexVar - Commands 15
13 c:= tVar.sqrt(a^2+b ^2)
14 }
15 #Disable \\verb|tVar.REMOVE_ZEROS|
16 tVar.REMOVE_ZEROS = false
17 {
18 a:=2.0
19 b:=3.3
20 c:= tVar.sqrt(a^2+b ^2)
21 }
22 \end{tVar}
Output
Default settings
a= 2
b= 3.3
c=pa2+b2=p22+ 3.32= 3.859
Disable tVar.REMOVE_DECIMAL_SEPARATOR
a= 2.0
b= 3.3
c=pa2.0+b2.0=p2.02.0+ 3.32.0= 3.859
Disable tVar.REMOVE_ZEROS
a= 2.000
b= 3.300
c=pa2.000 +b2.000 =p2.0002.000 + 3.3002.000 = 3.859
5.6 Plotting with Gnuplot
Plotting in TexVar is support via Gnuplot. The code describing the gure is generated in TexVar
and is sent to Gnuplot which creates the graphics.
5.6.1 Conguration
For enabling plotting the path to the Gnuplot executable has to be set via a global parameter.
By default its set to tVar.GNUPLOT_LIBRARY ="gnuplot". In case you work on a windows
system and want to specify the absolute path to your Gnuplot install the command has to be
tVar.GNUPLOT_LIBRARY =[==["WINDOWSPATH"]==].
The Gnuplot terminal is by default tVar.GNUPLOT_TERMINAL = "postscript eps enhanced
color font 'Helvetica,12'" and the le extension is tVar.GNUPLOT_FILE_NAME_EXTENSION
= "eps".

16 5 TexVar - Commands
5.6.2 Creating a Plot
Every parameter set through [tPlot].* is directly translated to a gnuplot command. Actually
tPlot is only aware of the following commands
tPlot:New(present[tPlot]) Creates a new plot. Present is an optional pa-
rameter. If a value gets passed the conguration
of the plot is used as template for the new plot.
[tPlot].steps = 0.1 Resolution for functions
[tPlot].conf.size = "14cm,8
cm"
Size of the plot
[tPlot].xrange = "[0,10]" Range of the x axis and min and max value for
function creation.
[tPlot]:add(f or
{{1,2},{3,2}},"f(x)", "
with line lt 1 lc 2")
Adds a functions or points to the plot.
[tPlot]:plot() Generates the plot and returns the include-
graphics command.
1\begin{tVar}
2f(x):=1/ x
3
4plot1=tPlot :New ()
5plot1.xlabel = "{/ Symbol e}_c"
6plot1.ylabel = "{/ Symbol s}_c"
7plot1.steps = 0.001
8
9plot1.xtics = "0.1"
10 plot1.xrange = "[0:1] "
11 plot1.yrange = "[0:16] "
12 plot1.conf.size = "6cm ,6cm"
13 plot1:add(f,"f(x)", "with line lt 1 lc 2")
14 plot1 :add({{0.2 ,6} ,{0 .5 ,12}} , "pt", "with points lc 1")
15 #\\ begin{ center }
16 plot1:plot ()
17 #\\end{center}
18 \end{tVar}
Output
f(x) = 1
x
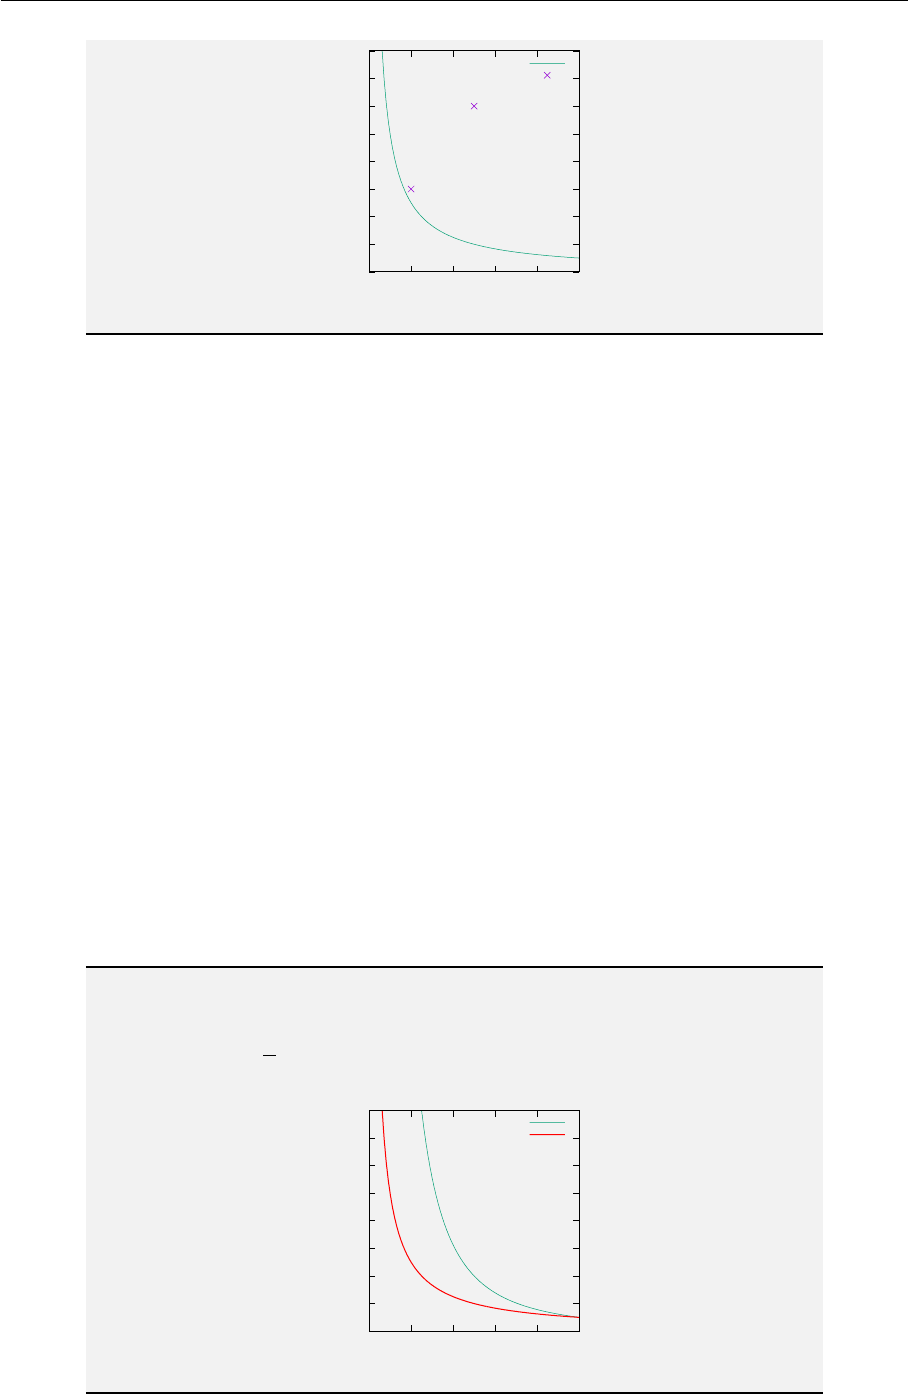
5 TexVar - Commands 17
0
2
4
6
8
10
12
14
16
0 0.2 0.4 0.6 0.8 1
σc
εc
f(x)
pt
Currently TexVar only supports 2D plots and functions with one attribute. If you want to
print a function with more than one attribute you can create a helper function.
1\begin{tVar}
2-- use plot1 as template
3plot2=tPlot :New(plot1)
4
5f(x,z):=(1/x)^z
6-- helper functions with fixed z values
7f_h_1(x):=f(x,2);
8f_h_2(x):=f(x,1);
9
10 plot2:add(f_h_1 ,"z=2","with line lt 1 lc 2")
11 plot2:add(f_h_2 ,"z=1","with line lt 1 lc 3")
12
13 #\\ begin{ center }
14 plot2:plot ()
15 #\\end{center}
16 \end{tVar}
Output
f(x, z) = 1
x
z
0
2
4
6
8
10
12
14
16
0 0.2 0.4 0.6 0.8 1
σc
εc
z=2
z=1

18 5 TexVar - Commands
5.7 Mathematical Commands
The following subsections are just a listing of currently implemented mathematical functions.
5.7.1 General
These functions can be used with every tVar object.
• tVar.sqrt([tVar],[tVar] nth-root)
• tVar.PI
• tVar.abs([tVar])
• tVar.acos([tVar])
• tVar.acosd([tVar])
• tVar.cos([tVar])
• tVar.cosd([tVar])
• tVar.cosh([tVar])
• tVar.asin([tVar])
• tVar.asind([tVar])
• tVar.sin([tVar])
• tVar.sind([tVar])
• tVar.sinh([tVar])
• tVar.atan([tVar])
• tVar.atand([tVar])
• tVar.tan([tVar])
• tVar.tand([tVar])
• tVar.tanh([tVar])
• tVar.ceil([tVar])
• tVar.oor([tVar])
• tVar.exp([tVar])
• tVar.ln([tVar])
• tVar.log10([tVar])
• tVar.atan2(X[tVar],Y[tVar])
• tVar.fact([tVar])
5.7.2 Matrices and Vectors
These functions can only be used with tMat or tVec objects.
• [tMat]:T()
• [tMat]:Det()
• [tMat]:Inv()
• tVec.crossP([tVec],[tVec])
5.8 The Link Function
If you want to use your own functions within TexVar, you can use the Link function to link
them to tVar functions. This only applies to functions that don’t use TexVar objects for calcu-
lation. If you want to write a TexVar function see Section 5.2. The following code shows the
implementation of the factorial function with the link function.
1\begin{tVar}
2function mycalcFactorial(n)

5 TexVar - Commands 19
3-- no tVar objects here just numbers
4if n <=1 then return 1end
5return n*mycalcFactorial(n-1)
6end
7
8-- link it
9myfact = tVar.link ( mycalcFactorial ,"","!",nil,nil,nil,true)
10
11 a:=10
12 b:=myfact(a)
13 \end{tVar}
Output
a= 10
b=a! = 10! = 3628800
The link function has the following attributes:
•function: The function that should be transformed to a TexVar function.
•texBefore: Text which is added before the return value.
•texAfter: Text which is added after the return value.
•returntype (optional): Denes the type of the return objecte, possible values are tVar,
tMat, tVec
•inputUnit (optional): Required unit for input attributes.
•outputUnit (optional): Unit of returned function.
•pipeUnit (optional): If true, the input and output unit is derived from the rst passed
argument.
All Lua math functions are implemented this way.
For example the Lua function math.atan2:
1--- calculates inverse tangens with with appr. quadrant
2--
3-- @param opposite (tVar ,number ) values
4-- @param adjacent (tVar ,number ) values
5-- @return ( tVar)
6tVar.link(math.atan2 ,"\\ text { atan2 }\\ left(" ,"\\ right )",nil,
tVar.units("m"),tVar.units ("rad"),false)

20 6 Examples
Output
a= 3 m
b= 4 m
c=atan2 (a;b) = atan2 (3; 4) = 0.644
6 Examples
6.1 U-Value
This is a very simple example using only the basic functionality of TexVar.
1Calculating the U-Value for an element with two layers. \\
2\begin{tVar}
3#\\ noindent Resistance of surface
4{plain
5R_se := 0.3: setUnit("m^2.K/W")
6#,~
7R_si := 0.13:setUnit("m^2.K/W")
8}
9#Parameters for elements
10 {
11 d_1 := 0.20:setUnit("m")
12 \\ lambda_1 := 0 .035:setUnit ("W/( m.K )")
13 d_2 := 0.10:setUnit("m")
14 \\ lambda_2 := 0.5: setUnit("W/( m.K) ")
15 }
16 #Calculate thermal resistance
17 R := (R_se + d_1/ lambda_1 + d_2/ lambda_2 + R_si ): setUnit("m^2
.K/W")
18 #Calculate U-Value
19 U:=(1/R): setUnit("W/(m^2 .K)")
20 \end{tVar}
Output
Calculating the U-Value for an element with two layers.
Resistance of surface
Rse = 0.3m2K/W, Rsi = 0.13 m2K/W

6 Examples 21
Parameters for elements
d1= 0.2m
λ1= 0.035 W/(m K)
d2= 0.1m
λ2= 0.5W/(m K)
Calculate thermal resistance
R=Rse +d1
λ1
+d2
λ2
+Rsi = 0.3 + 0.2
0.035 +0.1
0.5+ 0.13 = 6.344 m2K/W
Calculate U-Value
U=1
R=1
6.344 = 0.158 W/(m2K)
6.2 Rotating a Vector
This example shows the usage of the parameter tMat.eqTexAsMatrix as mentioned in Section
5.5.
1\begin{tVar}
2tMat.MATRIX_EQUATION_AS_MATRIX = true
3
4#Rotation angle in degree
5\\ theta :=45: setUnit ("°")
6
7#Rotation matrix in R2
8{
9A := {{ tVar.cos ( theta ),- tVar.sin ( theta )},{ tVar.sin ( theta ),
tVar.cos( theta )}}: outRES_EQ ()
10 e_x :={1 ,0}
11 }
12
13
14 tMat.MATRIX_EQUATION_AS_MATRIX = false
15 e:=(A*e_x)
16 \end{tVar}
Output
Rotation angle in degree
θ= 45 °

22 6 Examples
Rotation matrix in R2
A= cos (θ) (−sin (θ))
sin (θ)cos (θ)!= 0.525 (−0.851)
0.851 0.525 !
~ex= 1
0!
~e =A·~ex= 0.525 (−0.851)
0.851 0.525 !· 1
0!= 0.525
0.851!
6.3 Vector Calculations - Custom Function
This example shows how to create a custom TexVar function for calculating the angle between
two vectors. The function has an extra parameter for disabling printing.
1\begin{tVar}
2
3tVar.OUTPUT_MODE = " RES_EQ"
4function angleBetweenVectors(a,b, disablePrinting)
5if disablePrinting then
6tVar.OUTPUT_DISABLED = true
7end
8
9#Calculate the length of the vectors
10
11 len_a := tVar.sqrt (a*a)
12 len_b := tVar.sqrt (b*b)
13
14 #Normalize the vectors
15
16 a_n :=(a/len_a)
17 b_n :=(b/len_b)
18
19 \\ alpha := tVar.acosd (a_n* b_n ):setUnit ("°")
20
21 if disablePrinting then
22 tVar.OUTPUT_DISABLED = false
23 end
24
25 return alpha
26 end
27
28 #With output
29 {
30 v_1 :={1 ,0 .4 ,0 .5 }
31 v_2 :={0.3 ,1,0}
32 }

6 Examples 23
33
34 \\ alpha_1 := angleBetweenVectors (v_1 , v_2)
35
36 #Without output
37 {
38 v_3:={4,0.2,5}
39 v_4 :={9.3 ,8,1}
40 }
41 \\ alpha_2 := angleBetweenVectors (v_3 ,v_4 ,true)
42 \end{tVar}
Output
With output
~v1=
1
0.4
0.5
~v2=
0.3
1
0
Calculate the length of the vectors
lena=p~v1·~v1= 1.187
lenb=p~v2·~v2= 1.044
Normalize the vectors
~an=~v1
lena
=
0.842
0.337
0.421
~
bn=~v2
lenb
=
0.287
0.958
0
α=acos ~an·~
bn= 0.971 °
α1=α= 0.971 °

24 6 Examples
Without output
~v3=
4
0.2
5
~v4=
9.3
8
1
α2=α= 0.982 °
