The Definitive Guide To Cent OS
The%20Definitive%20Guide%20To%20CentOS%20-%20Peter%20Membrey%20-%20Apress
Angenendt_-_The_Definitive_Guide_to_CentOS
Angenendt%2C_Membrey%2C_Verhoeven_-_The_Definitive_Guide_to_CentOS
User Manual:
Open the PDF directly: View PDF ![]() .
.
Page Count: 353 [warning: Documents this large are best viewed by clicking the View PDF Link!]
- Prelims
- Contents at a Glance
- Contents
- Foreword
- About the Authors
- About the Technical Reviewer
- Acknowledgments
- Introduction
- Introducing CentOS
- Installing CentOS
- Getting Started with CentOS
- Using Yum
- Using apache
- Setting Up Mail
- Understanding DNS
- Setting Up DhCp
- Sharing Files with Samba
- Setting Up Virtual private Networks
- Using Core Builds
- Using high availability
- Monitoring Your Network Using Nagios
- Index

this print for content only—size & color not accurate spine = 0.813" 352 page count
Books for professionals By professionals®
The Definitive Guide to CentOS
Dear Reader,
CentOS is an incredible operating system based on Red Hat Enterprise Linux.
It is the best of both worlds: truly open source and an enterprise-class server
operating system. People are beginning to see CentOS as a viable enterprise
platform in its own right, and we’re here to help you get started.
The Definitive Guide to CentOS starts from scratch with the sole aim of getting
you up and running in the shortest amount of time. We concentrate on services
that the majority of people will want to set up and make available, and we show
the easiest path to accomplishing these goals. We also discuss the potential
challenges a CentOS user might come across and how best to solve them. This
book is a hands-on guide to getting the job done.
I have had the privilege of working with some of the key members of the
CentOS Project on this book. Together we have created something that will help
speed you on your journey of discovery and, most important, help you get your
server up and running as quickly as possible.
We hope this book will just be the start of your exploration of CentOS and
that you will come to depend on and trust CentOS for your critical applications
as we do for ours.
Peter Membrey
US $39.99
Shelve in
Linux General
User level:
Beginner–Intermediate
Membrey,
Verhoeven,
Angenendt
CentOS
The eXperT’s Voice® in open source
The Definitive Guide to
CentOS
cyan
MaGenTa
yelloW
Black
panTone 123 c
Peter Membrey, Tim Verhoeven,
and Ralph Angenendt
Foreword by Dag Wieers, CentOS Project
Companion
eBook
Available
www.apress.com
Companion eBook
See last page for details
on $10 eBook version
The complete guide to network administration
using CentOS, from members of the CentOS team.
ISBN 978-1-4302-1930-9
9 781430 219309
53999
The Definitive
Guide to
THE APRESS ROADMAP
Beginning
Ubuntu Linux
Beginning the
Linux Command Line
Foundations of
CentOS Linux
Beginning SUSE Linux
Beginning Ubuntu LTS
Server Administration
Pro Linux
System Administration
The Definitive Guide
to CentOS
The Definitive Guide to
SUSE Linux Enterprise Server
Pro Ubuntu
Server Administration

The Definitive Guide
to CentOS
Peter Membrey, Tim Verhoeven,
Ralph Angenendt
The Definitive Guide to CentOS
Copyright © 2009 by Peter Membrey, Tim Verhoeven, Ralph Angenendt
All rights reserved. No part of this work may be reproduced or transmitted in any form or by any means,
electronic or mechanical, including photocopying, recording, or by any information storage or retrieval
system, without the prior written permission of the copyright owner and the publisher.
ISBN-13 (pbk): 978-1-4302-1930-9
ISBN-13 (electronic): 978-1-4302-1931-6
Printed and bound in the United States of America 9 8 7 6 5 4 3 2 1
Trademarked names may appear in this book. Rather than use a trademark symbol with every occurrence
of a trademarked name, we use the names only in an editorial fashion and to the benefit of the trademark
owner, with no intention of infringement of the trademark.
Lead Editor: Michelle Lowman
Technical Reviewers: Bert de Bruijn, Karanbir Singh
Editorial Board: Clay Andres, Steve Anglin, Mark Beckner, Ewan Buckingham, Tony Campbell,
Gary Cornell, Jonathan Gennick, Michelle Lowman, Matthew Moodie, Jeffrey Pepper,
Frank Pohlmann, Ben Renow-Clarke, Dominic Shakeshaft, Matt Wade, Tom Welsh
Project Manager: Beth Christmas
Copy Editor: Kim Wimpsett
Associate Production Director: Kari Brooks-Copony
Production Editor: Candace English
Compositor: Lynn L’Heureux
Proofreader: April Eddy
Indexer: BIM Indexing & Proofreading Services
Artist: April Milne
Cover Designer: Kurt Krames
Manufacturing Director: Tom Debolski
Distributed to the book trade worldwide by Springer-Verlag New York, Inc., 233 Spring Street, 6th Floor,
New York, NY 10013. Phone 1-800-SPRINGER, fax 201-348-4505, e-mail orders-ny@springer-sbm.com, or
visit http://www.springeronline.com.
For information on translations, please contact Apress directly at 2855 Telegraph Avenue, Suite 600,
Berkeley, CA 94705. Phone 510-549-5930, fax 510-549-5939, e-mail info@apress.com, or visit http://
www.apress.com.
Apress and friends of ED books may be purchased in bulk for academic, corporate, or promotional use.
eBook versions and licenses are also available for most titles. For more information, reference our Special
Bulk Sales–eBook Licensing web page at http://www.apress.com/info/bulksales.
The information in this book is distributed on an “as is” basis, without warranty. Although every precaution
has been taken in the preparation of this work, neither the author(s) nor Apress shall have any liability to
any person or entity with respect to any loss or damage caused or alleged to be caused directly or indirectly
by the information contained in this work.
The source code for this book is available to readers at http://www.apress.com.
For my dear wife Sarah and xiaobao (little baby): without your unwavering support,
none of this would have been possible.
—Peter Membrey

v
Contents at a Glance
Foreword ..............................................................xvi
About the Authors ...............................................................xviii
About the Technical Reviewer . . . . . . . . . . . . . . . . . . . . . . . . . . . . . . . . . . . . . . . . . . . . . . . . . . . . . . xix
Acknowledgments ................................................................xx
Introduction .....................................................................xxi
Part 1 ■ ■ ■ Getting Started with CentOS
CHAPTER 1 Introducing CentOS. . . . . . . . . . . . . . . . . . . . . . . . . . . . . . . . . . . . . . . . . . . . . . 3
CHAPTER 2 Installing CentOS ...............................................13
CHAPTER 3 Getting Started with CentOS ....................................45
CHAPTER 4 Using Yum .....................................................61
Part 2 ■ ■ ■ Going into Production
CHAPTER 5 Using Apache ..................................................79
CHAPTER 6 Setting Up Mail ...............................................113
CHAPTER 7 Understanding DNS ...........................................155
CHAPTER 8 Setting Up DHCP ..............................................181
CHAPTER 9 Sharing Files with Samba .....................................199
CHAPTER 10 Setting Up Virtual Private Networks ............................219
Part 3 ■ ■ ■ Enterprise Features
CHAPTER 11 Using Core Builds .............................................253
CHAPTER 12 Using High Availability .........................................273
CHAPTER 13 Monitoring Your Network Using Nagios .........................299
INDEX .......................................................................315

vii
Contents
Foreword ..............................................................xvi
About the Authors ...............................................................xviii
About the Technical Reviewer . . . . . . . . . . . . . . . . . . . . . . . . . . . . . . . . . . . . . . . . . . . . . . . . . . . . . . xix
Acknowledgments ................................................................xx
Introduction .....................................................................xxi
Part 1 ■ ■ ■ Getting Started with CentOS
CHAPTER 1 Introducing CentOS ..........................................3
What Is Enterprise Linux? ..........................................4
Extended Support ............................................4
Low-Risk Security Updates ...................................5
ABI/API Stability .............................................6
Regular Updates and Bug Fixes ................................6
Certification .................................................7
Summary of Enterprise Linux’s Benefits ........................7
What Is CentOS? .................................................7
How to Read This Book ...........................................11
CHAPTER 2 Installing CentOS ............................................13
Hardware Requirements ..........................................13
Getting CentOS ..................................................14
Checking the Checksums ....................................17
Burning the ISOs ...........................................17
Performing a Super-Quick CentOS Install ...........................18

■CONTENTS
viii
Setting Other Installation Options ..................................37
Securely Erasing Your Disks .................................37
Creating a Custom Partition Layout ...........................39
Using Software RAID ........................................40
Setting IP Manually .........................................41
Summary .......................................................42
CHAPTER 3 Getting Started with CentOS ...............................45
CentOS Filesystem Layout ........................................45
Relative and Absolute Paths ..................................46
Filesystem Layout ..........................................46
/ ........................................................46
/root ......................................................47
/etc .......................................................47
/proc ......................................................47
/var .......................................................47
/boot ......................................................48
/bin and /sbin ..............................................48
/dev .......................................................48
/home .....................................................49
/lib ........................................................49
/lost+found ................................................49
/media ....................................................49
/mnt ......................................................49
/usr .......................................................50
/opt .......................................................50
/srv .......................................................50
/sys .......................................................50
/tmp ......................................................50
Getting Your Hands on a Command Prompt ....................51
Getting an SSH Client ............................................51
Using SSH ......................................................52

■CONTENTS ix
You’re Logged In; Now What? .....................................52
First, the Prompt ................................................52
Important Commands ............................................53
pwd .......................................................53
ls ........................................................54
mkdir .....................................................56
cd ........................................................57
rmdir ......................................................58
rm ........................................................58
touch .....................................................59
nano ......................................................59
cat ........................................................60
Summary .......................................................60
CHAPTER 4 Using Yum ...................................................61
What Are RPMs? ................................................61
What Are Yum Repositories? ......................................62
CentOS Repositories .............................................62
Official CentOS Repositories .................................63
Third-Party Repositories .....................................64
Getting Started with Yum .........................................64
Updating Your Server ........................................65
Installing a Package .........................................67
Installing a Group of Packages ...............................68
Searching for Packages .....................................70
Adding a Custom Repository ......................................73
Setting It Up with RPM ......................................73
How to Do It Without an RPM .................................73
Yumex .........................................................75
Summary .......................................................76

■CONTENTS
x
Part 2 ■ ■ ■ Going into Production
CHAPTER 5 Using Apache ................................................79
How Does the Server Work? ......................................80
A Brief Introduction to SSL ...................................81
Why Run Your Own Server? .......................................82
What It Involves ............................................82
When to Let Someone Else Do It ..............................83
What Is a Virtual Private Server (VPS)? .........................83
Picking a Web Server .......................................84
Installing Apache ................................................85
Configuring the Firewall .....................................85
Making Sure Apache Starts Each Time the Server Reboots .......88
Starting Up and Testing Apache ..............................89
Configuring Apache ..............................................91
Where Is Everything? ........................................92
Getting Started .............................................92
Configuring ServerAdmin ....................................93
Configuring ServerName .....................................93
Saving the Configuration File .................................93
Testing Your New Configuration File ...........................94
Restarting Apache ..........................................94
.htaccess .......................................................95
Enabling .htaccess ..........................................95
How to Password Protect a Directory ..........................95
Configuring Password Protection .............................96
Creating User Accounts ......................................97
Improving Performance ..........................................97
Compression ...............................................98
Enabling Compression in Apache .............................98
Why You Don’t Compress Everything ..........................98
Improving Server Performance ....................................99
Things to Watch Out For ....................................100
Log Files .................................................100

■CONTENTS xi
Setting Up Virtual Hosts .........................................100
Getting Started with Virtual Hosts ............................101
Creating Your First Virtual Host ..............................103
Using vhosts.d ............................................103
Using SSL .....................................................104
Installing mod_ssl .........................................105
Getting Your Shiny New Certificate ................................105
Signing Your Own Certificate ................................108
What to Do with an Intermediary Certificate ...................109
Putting Your New Certificate to Work .........................109
Removing the Password Protection from the Key ..............110
Summary ......................................................111
CHAPTER 6 Setting Up Mail .............................................113
How Do Mail Servers Work? .....................................114
Why Run Your Own Mail Server? .............................116
Caveats ..................................................116
When Not to Run Your Own Mail Server. . . . . . . . . . . . . . . . . . . . . . . 117
Which Mail Server to Choose ................................117
Installing the Mail Server ........................................118
Configuring the Firewall ....................................120
Making Sure Postfix Starts During Boot .......................121
Configuring Postfix .............................................123
Configuring Your System to Send Mail ........................124
Configuring Your System to Receive Mail .....................132
Setting Up Users to Receive Mails ...........................133
Taking a Few Antispam Measures ...........................136
Receiving Mails for Several Domains .........................137
Authenticating Users ............................................139
Encrypted Connections .....................................139
Usernames, Passwords, and Such ...........................141
Retrieving Mails ................................................145
Configuring Your Firewall ...................................148
Configuring Dovecot .......................................150
Using Webmail .................................................152
Summary ......................................................154

■CONTENTS
xii
CHAPTER 7 Understanding DNS ........................................155
What Is DNS? ..................................................156
DNS Was Born ............................................157
The WHOIS System ........................................159
The Root DNS Servers ......................................160
The Resolver ..............................................160
The Hosts File .............................................160
nsswitch .................................................161
NSCD .........................................................162
What Is BIND?. . . . . . . . . . . . . . . . . . . . . . . . . . . . . . . . . . . . . . . . . . . . . . . . . . 164
Primary and Secondary Name Servers ........................164
Installing BIND ............................................165
Setting Up a Caching Name Server ...............................166
Making DNS Available to Other Machines .....................168
Configuring BIND to Host Domains ...........................170
A Records ................................................170
CNAME Records ...........................................171
MX Records ...............................................172
NS Records ...............................................173
Quick Round-Up ...........................................174
Creating a Master Server ........................................175
Creating a Slave Zone ...........................................177
Allowing Zone Transfers .........................................178
Gotchas .......................................................178
Forgetting to Increment the Serial Number ....................179
Forgetting the Dot in the Record .............................179
Summary ......................................................180
CHAPTER 8 Setting Up DHCP ............................................181
How Does DHCP Work? .........................................181
DHCP and CentOS ..............................................183
Installing DHCP .................................................183
Configuring the Firewall ....................................184

■CONTENTS xiii
Configuring DHCP ..............................................184
A Minimal Configuration ....................................184
Extended Configuration .....................................186
Defining Static IP Addresses ................................187
Grouping Statements .......................................189
Shared Networks ..........................................191
Relaying DHCP Requests ...................................191
PXE Booting ...................................................193
Configuring dhcpd for PXE Boot .............................194
DHCP Integration with DNS ......................................194
Summary ......................................................197
CHAPTER 9 Sharing Files with Samba .................................199
Windows Networking Basics .....................................199
The Basic Protocols ........................................199
Workgroups ...............................................200
Windows Domains .........................................200
Active Directory ...........................................200
Samba and CentOS Basics .......................................200
Preparing to Set Up Samba ......................................201
Installing Samba ...............................................202
Configuring Samba .............................................202
Example Configuration .....................................203
Minimal Stand-Alone Samba Setup ..........................209
Shares and Security. . . . . . . . . . . . . . . . . . . . . . . . . . . . . . . . . . . . . . . . 212
Extended Stand-Alone Example .............................214
Samba As a Domain Member ...............................215
Summary ......................................................218
CHAPTER 10 Setting Up Virtual Private Networks ......................219
What Is a Virtual Private Network? ................................221
Using SSH for Virtual Private Networks ............................222
Virtual Private Networks with IPSec ...............................228
IPSec Explained ...........................................229
Using IPSec ...............................................230

■CONTENTS
xiv
Configuring OpenVPN ...........................................235
Looking at an Example .....................................237
Configuring the Server Side .................................240
Configuring the Client ......................................242
Some Security Considerations ...............................244
Doing It the Even Easier Way ................................246
Summary ......................................................249
Part 3 ■ ■ ■ Enterprise Features
CHAPTER 11 Using Core Builds ..........................................253
What Are Core Builds? ..........................................253
What Can’t Core Builds Do? .................................254
Why Create a Core Build? ...................................254
What Are Kickstart Files? ........................................255
Anatomy of a Kickstart File ..................................255
The Command Section .....................................256
%packages Section ........................................261
The Scripts Section ........................................263
Using a Kickstart File on a Web Server .......................267
Dynamically Creating Kickstart Files .........................268
Installing CentOS over HTTP .....................................270
Updating Your Kickstart File to Install CentOS via HTTP ..............271
Summary ......................................................271
CHAPTER 12 Using High Availability .....................................273
Clustering and High Availability ...................................273
Theory of HA ...................................................274
Split Brain and Fencing .....................................275
Resources ................................................276
Service or Virtual IP Address ................................276
HA Cluster Suite Components ....................................277
HA Clustering with CentOS .......................................278

xv
■CONTENTS
Preparing Your Cluster ..........................................278
Installing CCS .............................................279
Installing HPS .............................................279
Configuring CCS ................................................279
Configuring HPS ................................................281
Building Clusters Using CCS .....................................283
Creating a Basic Cluster with CCS ...........................283
Advanced Configurations Using CCS .........................288
Advanced Example with CCS ................................290
Building Clusters Using HPS .....................................292
Creating a Basic Cluster with HPS ...........................292
Advanced Configurations Using HPS .........................294
Advanced Setup with HPS ..................................295
Summary ......................................................297
CHAPTER 13 Monitoring Your Network Using Nagios ..................299
How Nagios Works .............................................299
Installing Nagios ................................................300
Initial Setup of Nagios ...........................................302
Nagios Configuration Overview ...................................303
Objects and Templates ..........................................304
Basic Nagios Configuration ......................................307
Contacts and Notifications .......................................311
Advanced Nagios Configuration ..................................312
Summary ......................................................313
INDEX .......................................................................315

xvi
Foreword
When I go back in time to when I bought my very first technical book (about Perl 4
programming), I had no idea what it would mean to me. Of course, I had expected to
learn about Perl, but indirectly the book opened a whole new world to me. The book
introduced me to Unix and taught me valuable things about operating systems in general.
It taught me about filesystems and networking, about Perl modules and Perl developers,
and about open source and communities.
Not only did it help me to discover all these things, but it also made clear what I
didn’t know. And although the book didn’t go into detail about a lot of topics, the fact
that it gave me a framework, a place to put newfound information and relate it to what
I already knew, was more important than anything else in that book.
Over the years I realized that the book itself was not that special, except that it
allowed me to start doing things with little hassle, learn from them, and build on that.
And the book was excellent in building momentum, with me learning and doing in a
rapid whirlpool of instant joy and eagerness for more. And although I was far from being
a good Perl programmer when I finished the book, it gave me the confidence to explore
without the fear of breaking things.
When you apply the examples of this book, The Definitive Guide to CentOS, I hope
you will get the same satisfaction and build that same confidence to help others with
CentOS. By reading this book and trying the examples, you become a member of the
CentOS community—or, as we say, the C in CentOS. But what is so special about CentOS?
Why CentOS?
Well, if you look at the different Linux distributions that exist today, CentOS has a
unique appeal because it doesn’t try to consist of the latest and greatest open source soft-
ware (which is in itself a never-ending story); it focuses instead on being the most reliable
and secure environment that is resistant to change over a seven-year lifetime. And apart
from resisting change, about every 24 to 30 months a newer CentOS version pops up with
newer software that is again tested for stability and goes unchanged for another seven-
year time span. It is up to you to decide when to stay or move to another version at any
point in time.
Those design characteristics make CentOS (and its commercial twin, Red Hat Enter-
prise Linux) perfect for environments where you don’t want to inflict too much change,
like an enterprise data center, but the same applies to, say, your office computer or your
personal laptop. With CentOS you minimize the time to maintain the operating system
and included software for the longest period possible. And as a benefit, you can discuss
■FOREWORD xvii
your environment with an estimated 10 million users worldwide running the same soft-
ware as you do.
The CentOS project and its community are there to assist you with any problems you
might encounter, and when you think the time is right, we want to help you transform
from being a CentOS user to a contributing member.
For this not much is needed, other than the willingness to help others as they have
helped you. If you learn something valuable, we welcome you to share it on the CentOS
wiki, mailing lists, or forums. Or simply blog about your experience and interact with
your peers.
The collective work of writing this book is a milestone for the CentOS community—
not only because it is the first book of its kind but mostly because it is the result of a joint
effort of the community; Peter Membrey, Ralph Angenendt, Tim Verhoeven, and Bert de
Bruijn are contributing members of our community. I am pleased that this book is a good
start to learning CentOS and an entry point to the larger worlds of Linux and open source.
But most of all, I sincerely hope it does not answer all your questions but instead inspires
you to question more.
Dag Wieers
Infrastructure Support and Event Advocacy
CentOS Project

xviii
About the Authors
■PETER MEMBREY lives in Hong Kong and is
actively promoting open source in all its various
forms and guises, especially in education. He
has had the honor of working for Red Hat and
received his first RHCE at the tender age of 17. He
is now a Chartered IT Professional and one of the
world’s first professionally registered ICT Techni-
cians. Currently studying for a master’s degree
in IT, he hopes to study locally and earn a PhD in
the not-too-distant future. He lives with his wife
Sarah and is desperately trying (and sadly failing)
to come to grips with Cantonese.
■TIM VERHOEVEN is a Linux system administrator during the day and a core member of
the CentOS Project during his free time. He has been working with Linux for more then
ten years and has been involved with the CentOS Project since 2007. He is interested in all
things related to enterprise Linux. He lives in Belgium and has an engineering degree in
computer science.
■RALPH ANGENENDT has been working as a systems and network administrator since 1998.
After being introduced to Linux in 1995, Ralph’s interest in non-Unix-like operating sys-
tems dropped dramatically, so his work environment mostly consists of Linux servers.
Besides having a sweet tooth for domesticating mail servers, Ralph has a strong interest in
automated system administration. That’s the reason why the networks he is responsible
for run Cfengine: to ease the pains of administrating growing sites.
Since 2006, Ralph has been a member of the CentOS development team, where he
leads the documentation force and does some infrastructure management. You can
probably meet him at open source conventions in Europe, largely in Germany and the
Benelux countries.

xix
About the Technical Reviewer
■BERT DE BRUIJN is a freelance Linux and virtualization specialist who specializes in
training and knowledge transfer on VMware and CentOS/Red Hat projects. Bert started
his professional IT life on early Linux versions and commercial Unix variants such as
SunOS, Solaris, and BSDi. He cofounded a local LUG chapter, helping the community
get the best out of free software. Bert prefers to use his experience rather than his
RHCE or LPIC-2 certification to show his Linux skills.

xx
Acknowledgments
It’s not until you actually try to write a book that you realize just how many people are
involved in its creation. It goes without saying that without the support I received from
Apress, this book wouldn’t be here. I’d therefore like to specifically thank Michelle
Lowman and Beth Christmas for their patience and tolerance going well beyond the
call of duty—I hope you like the results!
I would also like to thank the CentOS community for everything they have done.
Their continued hard work is what makes CentOS such a great operating system, and
I really hope that this book will give something back to the community that has given me
so much. Thanks to everyone at the project who has been involved in the book’s develop-
ment, including Karanbir Singh, Bert de Bruijn, Tim Verhoeven, Ralph Angenendt, and
Dag Wieers.
I am very fortunate to be studying at the University of Liverpool, which is an expe-
rience that has completely changed my life. I would like to show my gratitude to Britt
Janssen and Ranjay Ghai, who worked solidly for nearly two months on my application
and whose hard work made everything possible.
Last but certainly not least, I would like to make a special acknowledgment to two
people without whom I would not be where I am today. So, special thanks to Mr. David
Uden and Dr. Malcolm Herbert—two people who put their trust in me many years ago
and without whom I have no doubt I would be doing something very different today.
Peter Membrey
Thanks to all the people who make CentOS possible. Community, this also means you!
Ralph Angenendt

xxi
Introduction
Although CentOS has a huge number of benefits over other operating systems, we can-
not escape the fact that it’s also free. With virtual machines starting to replace traditional
hosted services, people are finding that having their own server is not only much more
flexible but also often cheaper.
But running your own server is very different from simply using a hosted service, and
this is where The Definitive Guide to CentOS comes in. It has been written to help new-
comers to the platform get up and running in production as quickly and as painlessly as
possible. Each of the chapters has a specific task-oriented goal and explains how to do the
majority of tasks that people are looking to do.
Just like CentOS itself, we hope to be able to improve and refine this definitive guide.
We would be grateful for any and all feedback with regard to the book and how it could
be improved to better suit the needs of new users. Your experiences are hard won, and we
would love to hear what you have to say. After all, The Definitive Guide to CentOS is here
to help, and who better to advise and provide feedback than the very people who have
made their first steps with it?
This book will let you hit the ground running, and the CentOS community will ensure
that you are able to keep in the race!
Who This Book Is For
The Definitive Guide to CentOS is for anyone who wants to build a production system
with the CentOS operating system. Previous Linux administration experience is help-
ful but not required. We’ll show you how to get started and how to build on existing
knowledge.
How the Book Is Laid Out
The book is laid out in three parts. The first part explains what CentOS is, where it came
from, and where it hopes to be. It also talks in some depth about enterprise Linux and
why you should run it on your systems. The first part also covers installation and getting
started.
■INTRODUCTION
xxii
The second part is the largest section and has chapters dedicated to specific topics
such as setting up a web server or an e-mail server. These are all task-oriented chapters
so that you can immediately start doing what you need to do. Generally speaking, these
chapters can be read in any order, although it might make sense to read certain chap-
ters before others, such as reading about DNS before trying to configure subdomains in
Apache.
The third part contains more advanced topics that will be of interest to people
deploying CentOS in an enterprise environment. The topics will still be of interest to
many people, but the concepts are somewhat more advanced than those in the previous
part and may require multiple servers and so forth.
The book was written so that you can dip in and take whatever you need from it. You
can realistically read it in any order you choose and apply each chapter completely inde-
pendently from the others. The idea is that it will allow you to quickly get up and running
and to focus on the things you need sooner rather than later.

PART 1
Getting Started with
CentOS
Part 1 of this book is where you’ll start to learn the basics of CentOS. No previous Linux
knowledge is assumed, because we’ll take things nice and slow. You will learn about CentOS
and why it’s a fantastic operating system that you can trust with your most important
workloads. We’ll cover a step-by-step install in Chapter 2 and talk about some of the more
advanced options that you can use. Chapter 3 provides a quick overview of how to log in to
your new system and move around. It’s not a full guide to working with CentOS, but it will
get you up and running quickly. Chapter 4 covers updating CentOS and hence is critical to
the health of your server.
After you’ve finished this part, you will be able to talk about CentOS and express why you
believe CentOS is a valuable addition to your IT infrastructure. You’ll be able to source CentOS
and install and configure it. You will also know your way around the system and will know
how to update your system.
If you’re already somewhat familiar with Linux, then feel free to skip to the chapter that
interests you most. However, it would be worth reading through this first chapter if you’re
not familiar with CentOS.

3
CHAPTER 1
Introducing CentOS
The CentOS (short for Community ENTerprise Operating System) Linux distribution is
an enterprise-grade, freely available, open source operating system that is derived from
the source code of Red Hat Enterprise Linux (RHEL) and developed and maintained by
the CentOS Project. The CentOS Project is about more than just a Linux distribution. The
project’s members are working to provide support, training materials, and, in the future,
even certification. Although at its core the project is the CentOS distribution, the CentOS
Project encompasses a whole ecosystem of software, developers, and projects. This book
focuses on the official CentOS distribution.
nNote CentOS is built from the source code that Red Hat makes available at ftp://mirrors.kernel.
org/redhat/redhat/linux/enterprise. This software has been released under the General Public
License (GPL), and the CentOS Project uses this software to build the CentOS distribution. The CentOS
Project is not affiliated with, sponsored by, or supported by Red Hat in any way.
CentOS is used around the world by people who need a robust and reliable platform
to deploy their applications and services. Although support options are available, CentOS
is best suited to those who do not need or want commercial support. When you have
commercial support, it usually means that you can pick up the phone and speak to some-
one or submit a request via a web site. Because you’ve paid for the service, you can expect
your problem to be resolved in a reasonable amount of time. If you already have your
own in-house expertise or know people who can help you if you get stuck, you probably
don’t want to have to pay for support, often at significant expense. But if you prefer to
have commercial support available, there are companies that do provide it. A list of com-
panies approved by the CentOS Project is currently being worked on and when complete
will be viewable on the CentOS web site (http://www.centos.org/).
Before you can really appreciate what CentOS can do for you, you need to explore
enterprise Linux (EL) in a bit more depth.
It is common for newcomers to Linux to set up servers using “consumer-grade” Linux
distributions such as Fedora and Ubuntu Desktop. Although these distributions make
CHAPTER 1 n INTRODUCING CENTOS
4
great desktops, they’re not the ideal choice for a production server because the software
versions change on a regular basis. Enterprise Linux distributions such as CentOS main-
tain specific software versions over an extended period of time, which helps to ensure
that you don’t have any nasty surprises (see the “Extended Support” section).
Examples of enterprise Linux are Red Hat Enterprise Linux, SUSE Linux Enterprise
Server, Ubuntu LTS, and CentOS. Examples of consumer Linux are Fedora, Ubuntu,
OpenSUSE, Gentoo, and Debian.
In this chapter, we’ll discuss why you should use enterprise Linux on your servers
(and possibly even your workstations) and how CentOS can provide a brilliant, enter-
prise-grade environment for you to deploy your critical services.
What Is Enterprise Linux?
Enterprise Linux has gained an awful lot of attention recently—for very good reason. Linux
has a reputation for being updated and improved at an amazingly fast rate. Conventional
wisdom would suggest that this is a good thing. After all, it means you’re getting better
software, and that can’t be a bad thing, can it? Actually, it can, and this is one of the key
areas that enterprise Linux looks to resolve.
Imagine for a moment you have developed a popular web site. You are making loads
of money, and the customers keep on coming. You hear about a dangerous exploit going
around, so you decide to update your server, at which point everything goes wrong.
You discover that the new version of the programming language you used to write your
application won’t work with your application, so you’re going to need to make extensive
changes to fix it. Not only that, but the database server has been updated as well—only it
can’t read the old data because the file format has changed in the new version!
An enterprise Linux distribution aims to provide a robust, stable, and reliable plat-
form on which users can deploy their applications. It provides a platform where the
previous scenario cannot happen and where you can update as often as you like, safe in
the knowledge that your software isn’t going to break.
Extended Support
Extended support is probably one of the most important parts of an enterprise Linux dis-
tribution, and care must be taken not to confuse it with commercial support. Commercial
support is the ability to pay someone to provide you with assistance. Extended support is
where a vendor (in this case the CentOS Project) undertakes the maintenance of a prod-
uct over an extended period of time. Normally, open source life cycles are very short. For
example, the Fedora Project stops releasing updates after about two years. After the two
years are up, you have little choice but to upgrade to the next release or live without vital
security updates. Assuming that you want to keep your server safe and secure, you will
CHAPTER 1 n INTRODUCING CENTOS 5
have to upgrade your machine. This may not sound like much of a problem, but Fedora
has a six-month release cycle, which means after updating your server for two years, you
suddenly have to jump four releases to have a secure server.
There are two big problems with doing this. First, it’s unlikely there is a safe and easy
upgrade path. Usually (but not always), it’s possible to upgrade directly from one release
to the next. It’s even possible (though riskier) to update to a release two versions ahead.
However, trying to jump four versions is asking for trouble, and even if the upgrade seems
to work without a hitch, you may find some strange behavior that you can’t quite explain.
The second problem is that the software versions on the new release are going to be
significantly different from the versions you are currently running. If your server is in pro-
duction (that is, doing something useful and important), you want it to keep running after
the upgrade, and you want as little downtime as possible. It’s quite possible, however,
that you will find that the new versions of the software you’ve just upgraded to don’t like
your old configuration files. This means you’ll have to rewrite and test them. Sometimes
this isn’t a big deal. Other times it can cause many hours of downtime.
Enterprise Linux platforms usually combat these two key issues by releasing new sta-
ble versions every couple of years or so. These platforms have significantly longer support
periods, ranging on average between five and seven years. This is very important because
it gives you plenty of opportunity to update and test new releases.
Low-Risk Security Updates
Enterprise Linux also comes with low-risk security updates. These are updates that are
designed to fix a specific issue without making large, sweeping changes to a software
application. This is very important in production environments where you need to ensure
that your servers are protected against the latest threats and that applying a particular
update is not going to adversely affect your machine. Microsoft’s Windows Server 2003
had a particularly nasty issue when installing Service Pack 2 (SP2). After installation and
the subsequent reboot, Windows would automatically turn on the firewall. This meant
that if you were updating the server using Remote Desktop, you’d suddenly find your-
self unable to reconnect to the server, and all of the services it was offering would then
be blocked. Although this isn’t a major issue if the server room is down the hall, if you
host in a remote data center, then fixing this problem can be very time-consuming and
expensive.
Most updates on enterprise Linux do not require reboots. Generally speaking, a
reboot is required only when updating the kernel. This ensures that your server remains
up and running without unwanted interruptions. Of course, at some point, you should
apply the kernel updates by performing a reboot, but the important difference here is that
you will be able to choose when this is done rather than the “all or nothing” options pro-
vided by other operating systems.
CHAPTER 1 n INTRODUCING CENTOS
6
ABI/API Stability
Application binary interface (ABI) and application programming interface (API) stability
is often underrated, but it’s especially important for third-party applications. Enterprise
Linux guarantees that during a given release, neither the ABI nor the API will change. This
means that software that will run on the platform when it is first released will continue to
run at the end of its life.
Consumer-grade Linux generally comes with a wealth of software. As long as you use
this software, everything will be fine—as one application updates, the supporting appli-
cations will also be updated. This breaks down, however, when you are using a custom
application that expects a certain library. After an update, if that library version changes,
your application will probably break. The vendor may not have an updated package
available, and the source code may not be available for you to recompile even if you’re
comfortable doing that. Basically, it’s not a good idea to rely on software that can change
at any time.
Freezing the ABI and API ensures that you don’t have to worry about this. When
security flaws are found in a particular piece of software, rather than simply replacing
that software with a new version (the cause of breaking your third-party application),
enterprise Linux distributions instead back-port the security fix into the current version.
This ensures that your software won’t notice the difference, and it also gives you all the
security benefits of running the latest version.
There is a downside, however. Because software versions are not updated, various
automated security audit solutions get confused and report security issues where there
aren’t any. For example, it is common for businesses to pay to have their web servers
audited. It would not be appropriate or feasible, however, for these tools to actually try
to break into the server. Instead, they tend to look at the version numbers of the software
you’re running. Because enterprise Linux does not update the version numbers, these
tools often generate a huge list of security vulnerabilities that apply to that version of the
software. Unfortunately, there is no way for these automated tools to know that all the
issues they’ve raised are actually patched already and the threat is effectively imagined.
Happily, though, it is fairly easy to check the history of a particular application to ensure
that it is indeed immune to the attacks that have been listed.
Regular Updates and Bug Fixes
Enterprise Linux also provides regular updates and bug fixes. These are released on a
regular basis and ensure that everything continues to run smoothly. By keeping to a time-
line, businesses can plan when to apply updates and schedule downtime or at-risk time if
need be. For home users, it might not be a problem to take a machine down in the middle
of the day to perform some maintenance. However, for a company that depends on its
servers being available, having a release schedule can be very reassuring.
CHAPTER 1 n INTRODUCING CENTOS 7
In CentOS, these regular updates are referred to as point releases after the way the
different versions are named, in other words, “five point two.” They are released approxi-
mately every six months, and this is where additional functionality or new technologies
are introduced to the distribution. Changes are never made in between point releases.
Certification
Enterprise Linux is also certified to run on certain types of hardware, to run certain soft-
ware applications, and to be used in certain environments. Certification helps give users
confidence that the operating system will work as advertised. Many hardware vendors
such as Dell and HP ensure that their hardware is certified for popular enterprise Linux
distributions. For end users who want to run a particular distribution, it’s an easy way to
distinguish hardware that is known to work without problems.
Software vendors such as Oracle and IBM certify their products for much the same
reasons. Oracle 11g is certified for use on both RHEL 4 and RHEL 5. The same is true for
IBM’s DB2 9.5. Software certifications are important because they show that a particular
piece of software not only works but works well enough to pass rigorous testing. If soft-
ware is certified for your platform, you can be assured that it’s going to perform the way
you expect.
Because CentOS maintains binary compatibility with Red Hat Enterprise Linux, it is
safe to assume that any certified hardware or software will run on CentOS equally well.
Unfortunately, the vendor may not see it that way, and even though its products will
work perfectly well, the vendor may not be willing to provide support. If your choice of
software is at least partly based on the support the vendor will be providing, you should
double-check that you’re still covered on your chosen platform.
Summary of Enterprise Linux’s Benefits
In conclusion, enterprise Linux attempts to provide a platform that is based on stable
software, will be updated and supported for an extended period of time, won’t change
software versions in the middle of a release, and has low-risk security updates. For these
reasons, enterprise Linux is far better suited for production servers than consumer-grade
solutions.
What Is CentOS?
Because this is a book on CentOS, you’re probably wondering how we’ve managed to get
this far through Chapter 1 without actually talking about it. What makes CentOS such a
fantastic choice for your next server can only be truly appreciated when you know what
enterprise Linux can do for you.

CHAPTER 1 n INTRODUCING CENTOS
8
CentOS is rebuilt from another enterprise Linux platform, Red Hat Enterprise Linux.
RHEL is free—“free” as in speech but not as in beer. In other words, when Red Hat pro-
vides the software to a subscriber, it must also include the source code. The subscriber
can alter that source code and use it in any way she sees fit. So although the subscriber
has the freedom to use and modify the software, it doesn’t necessarily follow that she
won’t have to pay for it. If she were to improve on the software and wanted to sell her new
version, she could do so, but she would also have to include the source code, if requested,
and in most cases under the same license. Because of this, free software helps ensure that
when software is improved, those benefits are passed on and not held by a single com-
pany or person.
In addition, to download RHEL, you need to have an active RHEL subscription, which
is not cheap.
nNote Software licenses (especially those claiming to be “free” or “open source”) can become very
confusing very fast. The GPL, for example, requires you to release any modifications to a program under
the same license. The Berkeley Software Distribution (BSD) license, on the other hand, makes no such
requirement. To add to the confusion, some projects create their own licenses that profess to be free
software but aren’t recognize as such by the Free Software Foundation. If you’re finding this a little over-
whelming, you are not alone! For a detailed list and explanation of the various licenses, take a look at the
Free Software Foundation’s web site at http://www.fsf.org/licensing/licenses/index_html.
Because Red Hat Enterprise Linux is based entirely on open source software, Red
Hat is obliged to release all of the source code to anyone who has a subscription. Red Hat
takes this another step further and makes its source code available to anyone. Although
the source code is freely available, Red Hat uses trademark protection laws to prevent
people from building their own versions of RHEL and then distributing them. CentOS
complies fully with Red Hat’s policy on distribution, and the CentOS Project spends
considerable time and effort removing all Red Hat logos and trademarks. Once done, the
software is rebranded as CentOS and then compiled.
CentOS is made available at no charge and is freely downloadable from the CentOS
web site. Although the initial packages come from Red Hat, it takes a lot of work to update
and maintain CentOS. The CentOS Project consists of volunteers who perform these
rebuilds, test updates, and provide support.
Because of their shared heritage, CentOS and RHEL have a lot in common. New ver-
sions of RHEL are released every 18–24 months (although usually it’s closer to 24 than 18).
New CentOS releases tend to trail about a month behind the RHEL release date because
the CentOS Project has to do all of the rebuild and testing work. Minor updates are
released every six months or so, and these include all the updates from the initial release,
additional hardware support, and any new technology or feature enhancements. The 5.3
point release, for example, adds support for encrypted filesystems. Security updates are
CHAPTER 1 n INTRODUCING CENTOS 9
released throughout the life of the release as and when they’re available. Both CentOS
and RHEL are supported for seven years from their initial release dates.
Although both operating systems share the same core values, some features are avail-
able in one that aren’t available in the other. First we’ll look at what CentOS can offer over
RHEL, and then we’ll cover where RHEL scores over CentOS.
The current version of RHEL has two server distributions: Red Hat Enterprise Linux
and Red Hat Enterprise Linux Advanced Platform (RHEL AP). RHEL is identical to RHEL
AP software-wise and differs only in cost and support options. RHEL, for example, sup-
ports only up to two sockets (in other words, physical processors) and allows for four
virtual guests. A virtual guest is a Xen-based virtual machine that can run another com-
pletely independent RHEL server. A RHEL license will cover both the main operating
system and the four RHEL virtual guests, saving a considerable amount in license fees.
RHEL AP, on the other hand, has no restrictions on sockets or virtual guests. RHEL AP
also ships with “storage virtualization and high availability capabilities” (Red Hat Global
File System and Cluster Suite), which RHEL lacks.
There is also a desktop version of RHEL called (somewhat predictably) RHEL-Desk-
top. This product is aimed more at corporate desktops than for home users and provides
a robust platform for people to use on a daily basis.
CentOS, however, provides all of these features in a single product, so there aren’t
different “flavors” of CentOS. CentOS is built like RHEL AP and does not place any limita-
tions on what hardware configurations are supported. Whereas with RHEL 5.0 Red Hat
started using installation numbers to ensure that customers would be able to install only
the software that they had purchased support for, happily CentOS does not use installa-
tion keys, and some of the more advanced components (such as virtualization and cluster
storage) are easily installed by simply selecting the relevant box.
CentOS also boasts a very strong worldwide community of more than 6 million sys-
tems installed. Because many of the mirrors used by the CentOS Project are donated
by third parties, no exact download numbers are currently available. Many systems are
installed from the same disc and many companies set up their own local repositories for
updates, so it is thought that there are considerably more CentOS systems out there than
estimated.
This community actively maintains and contributes to a wiki and mailing lists and
provides support on IRC. The wiki contains vast amounts of useful information about
CentOS, including details on the core team members, the purpose behind CentOS, fre-
quently asked questions, and how-tos, among other things. The wiki should probably be
your first stop when you look for help with CentOS. Specific mailing lists (you can find a
complete list at http://lists.centos.org) provide coverage of a wide variety of topics such
as development, promotion, documentation, and announcements.
For real-time support, there are a two channels on the Freenode IRC network that
you can join. #CentOS is the main CentOS channel and is where the majority of support
takes place. Anything not directly related to this should be discussed in #CentOS-Social,
where anything can be discussed. The people in #CentOS will do their best to help you,
CHAPTER 1 n INTRODUCING CENTOS
10
but remember that they are volunteers; they have their own lives to live and have no obli-
gation to help you. Help them help you by providing well-thought-out questions with lots
of information. Generally speaking, the more information you can give about your issue,
the greater chance you’ll have of getting a reply.
One of the key goals of the CentOS Project is to maintain binary compatibility with
RHEL. This isn’t too difficult, because CentOS is rebuilt from RHEL’s source RPMs. For
a lot of users, though, RHEL compatibility is not actually very important if, for example,
they are just looking for a solid enterprise system rather than a Red Hat “clone.” Of
greater interest is using additional software that doesn’t ship with RHEL. Red Hat does
not support third-party software. This in turn means that companies that need full Red
Hat support are restricted to what Red Hat offers.
CentOS has some additional repositories of software available. These provide a great
deal of flexibility, and it is up to users to decide which path they want to take. The CentOS
Plus repository contains packages that replace the original packages that were rebuilt
from RHEL’s source code. This breaks binary compatibility, but it does mean you can get
your hands on newer software that would otherwise be unavailable. The CentOS Extras
repository contains packages that are used in addition to the original packages. Using this
repository won’t break binary compatibility, because it won’t update any of the original
packages. However, solutions that depend on these packages won’t be able to run on a
vanilla RHEL install. To be fair, this is rarely an issue and should not dissuade anyone
from using the packages.
Enabling additional repositories affects how your CentOS install will work. The
majority of the issues around doing this come down to support and compatibility with
RHEL. For most users, these issues aren’t relevant, but it is important to understand what
the consequences are of using these extra packages.
Of course, there are some downsides when using CentOS over RHEL. CentOS as a
community project cannot provide the same levels of support that a commercial entity
such as Red Hat can. There are third-party companies that offer CentOS support, and the
CentOS community itself does a fantastic job, but even then, it cannot match what Red
Hat is offering. On the other hand, a RHEL subscription can cost more than $2,400!
Because CentOS maintains binary compatibility with RHEL, it follows that CentOS
must receive the RHEL updates before CentOS updates can be built. This in turn means
that there is a slight delay between the time the updates are made available for Red Hat
customers and when the updates become available to CentOS users. For the most part,
these delays are not significant, and although the CentOS Project has a target window
of 72 hours, updates are normally pushed out well within 24 hours. Minor releases lag
about four weeks behind the initial Red Hat releases. This is useful only for new installs
and doesn’t affect the updates received for machines that are already up and running.
Unless you need new hardware support, installing a machine with CentOS 5 and doing a
full update is equivalent to installing CentOS 5.2 and doing a full update. Obviously, the
update from CentOS 5 will take longer, but the end result will be the same.
CHAPTER 1 n INTRODUCING CENTOS 11
As a side effect of CentOS being built on RHEL’s source code, the CentOS Project
cannot directly fix problems within the main distribution. The CentOS Project does have
the means to push out important fixes, however, and this was highlighted recently when
a performance issue in Perl was fixed in CentOS a few weeks before it was fixed in RHEL.
Although the CentOS Project can, of course, submit bugs and supply patches “upstream”
to Red Hat, the members have no control over whether the bug will be fixed. This is one
of the sacrifices that must be made in order to ensure full binary compatibility.
CentOS doesn’t have all the hardware and software certifications that are available
on RHEL. Vendors spend considerable amounts of money to have their wares tested and
approved. However, although officially CentOS isn’t certified because it is built from
RHEL sources, anything that runs RHEL can run CentOS equally well. This means that
even though vendors may not openly state that their kit is certified for CentOS, if it is cer-
tified on RHEL, it will work fine.
In response to the intellectual property (IP) infringement issues raised a few years ago
by SCO, Red Hat put into place an indemnification program. This stated that should there
be any problems found relating to IP in Red Hat Enterprise Linux, Red Hat would sort out
the problem. This means Red Hat will either secure the rights to use the IP or remove the
offending code and replace it with fresh code that does not infringe the IP. This gives com-
panies an iron-clad safety net so that they can use RHEL without fear of being targeted for
IP infringement. CentOS as a community project does not offer such a guarantee. For most
people, this is a nonissue anyway. However, if this protection is important to you or your
company, it’s a good idea to read up on what protection Red Hat can offer.
Remember that CentOS is an enterprise Linux distribution. This means it is designed
for stability and reliability. It does not support the latest and greatest hardware, and it
rarely contains bleeding-edge software either. If your hardware is supported and CentOS
provides the software you need on a daily basis, you will find CentOS to be the ideal dis-
tribution for a desktop machine as well as a server. You will have long-term support, and
you won’t have to install 100 new packages every other day.
How to Read This Book
This book is divided into three parts. Part 1 covers the very basics, such as getting hold of
CentOS, installing it, and then finding your way around it. This is where you should start
if you’re new to Linux, because these chapters won’t make any assumptions about prior
Linux knowledge. Part 2 is about taking your new server into production. You don’t need
to read these chapters in order, and you can go straight to the chapter you need to get
started. Part 3 covers how to perform some higher-level tasks with CentOS, normally what
you might need in a data center or an enterprise environment. We’ll be covering high
availability, core builds, and how to package your own RPMs for distribution.
Let’s get started!

13
CHAPTER 2
Installing CentOS
CentOS is very easy to install, and for the vast majority of users, the default settings will
work very well. At this stage, especially if you’re new to Linux, some options might not
be obvious, and certain features (such as software RAID) might not be applicable to you.
We’re also conscious that for many readers CentOS will already be installed and running.
So, in this chapter, first we’re going to go through a plain-vanilla install without any of the
interesting bits. This will get you up and running in the shortest time possible and will
allow you to then jump ahead to any of the later chapters that interest you.
Of course, we also want to give a good deal of coverage to the installer itself. Some
users will certainly want to use software RAID, disable IPv6, or securely erase their hard
disks before they start the install. We’ll cover these features after we’ve done the basic
install. This will let you go directly to the topic of interest without having to read through
how to install every option that CentOS has to offer.
nNote We’ll be concentrating on the most current version of CentOS (at the time of writing, Centos 5.2).
The install procedure is somewhat similar for older versions of CentOS; however, because this book is for
people new to the platform, it’s most likely that you’ll want CentOS 5. Manuals and installation instructions
for older versions are available on the CentOS web site at http://www.centos.org.
Hardware Requirements
CentOS 5 is currently supported only on i386 (32-bit Pentium and AMD) and x86_64
(EM64T and AMD64) hardware. Support is expected in the future for ia64 (Itanium), PPC
(IBM Power and pre-Intel Mac), and SPARC (Sun) systems. You can even install CentOS
on an IBM s/390 mainframe if you happen to have one handy. You can find an in-depth
hardware compatibility list at https://hardware.redhat.com/.

CHAPTER 2 n INSTALLING CENTOS
14
nNote Red Hat provides only a 64-bit PPC version of Red Hat Enterprise Linux and doesn’t support SPARC
hardware, but the CentOS Project is planning to rebuild CentOS so that it runs on 32-bit PPC processors and
SPARC hardware. Because there is no direct upstream support for these platforms, these will be variants
based on Red Hat Enterprise Linux rather than the 100 percent compatible versions that are based on the
platforms that Red Hat supports.
The minimum install requirements for CentOS are surprisingly modest. A text-only
install can be completed with as little as 128MB of RAM. Depending on your needs, this
could potentially be a perfectly capable production server. The CentOS Project provides
a list of tested minimum requirements for an install, but for the majority of production
uses, you will want something a bit beefier. The requirements (which you can also find at
http://centos.org/product.html) are as follows:
• i386orx86-64processor
• 128MBofRAMfortextinstalloni386(allothersare512MB)
• 1.2GBofdiskspace
CentOS will install on pretty much any commodity hardware (including virtual envi-
ronments such as VMware and Virtual Box). However, as an enterprise-grade distribution,
CentOS does not have the latest and greatest hardware support, although each point
release does add better hardware support, including back-ported drivers. The easiest way
to tell whether CentOS is supported is simply to install it or try the LiveCD. However, if you
are purchasing hardware specifically for CentOS, please visit the Hardware Certification
List and research any hardware choices first.
Getting CentOS
There are few ways to get your hands on the latest CentOS release. Although most people
will want to download it from one of the CentOS mirror sites, you can also buy an official
CD set or DVD from various vendors. For a list of CentOS-approved vendors, see http://
www.centos.org/vendors. These vendors support the CentOS Project by making a donation
for every set sold, so please consider buying from these vendors.
To download the images, visit http://www.centos.org/mirrors-list. This page lists
North American mirrors by default, but you can select from various regional mirrors if
they are closer to you. This page will also show you which servers offer a direct download
link for the DVD image. We’re assuming you’re using the DVD during this install guide, so
make sure you pick a mirror that hosts the DVD.

CHAPTER 2 n INSTALLING CENTOS 15
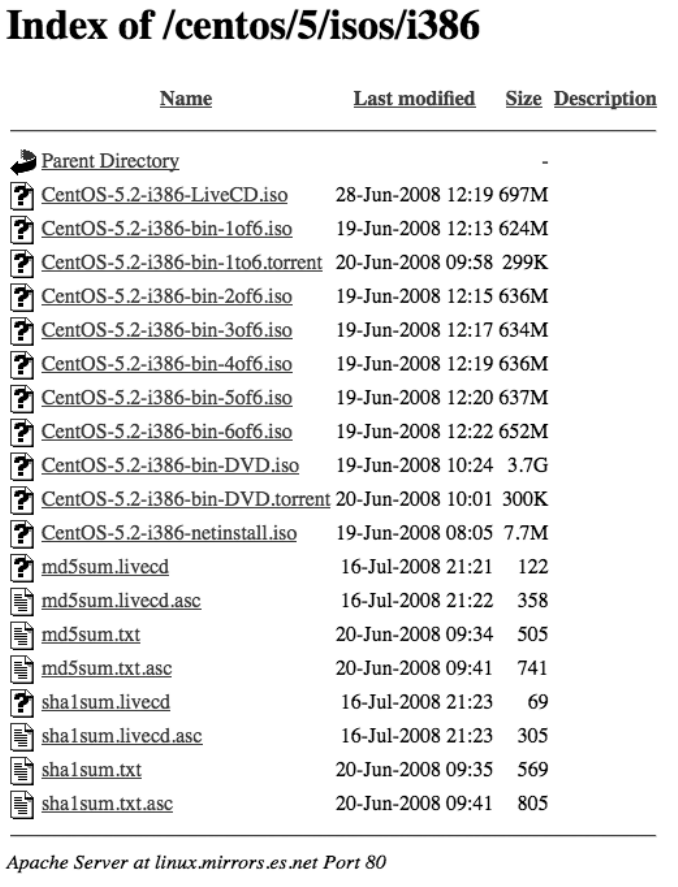
Once you’ve selected your mirror, you’ll need to pick the version of CentOS that you
want to install. There will be directories for individual versions, but those without a point
in the name always go to the latest version. Currently, 5 goes to 5.2, but when the next
point release is released, 5 will then go to 5.3.
You should then go into the isos directory. You’ll need to decide which architecture
you want to download—either 32-bit or 64-bit. Although a 32-bit release will run without
problems on a 64-bit machine, the reverse is not possible. If you’re in any doubt, down-
load the 32-bit (i386) version for now.
nNote For most purposes it doesn’t matter which architecture you install. Generally speaking, the main
benefits of the x86-64 version are that it can support large amounts of memory (more than 4GB) and that
under certain workloads it has better performance. For most people, however, the i386 version is the still the
version of choice (see Figure 2-1).
The easiest install media is without a doubt the DVD image. This contains all the
software in the CD set with the added bonus that you don’t need to swap CDs during the
install.
The CD set is very useful when you don’t have access to a DVD-ROM such as on
an older server or if you don’t have a DVD writer handy to burn the DVD image. In fact,
because of the large amount of software that is available as part of the standard CentOS
distribution, it can be somewhat difficult to work out which CDs are needed in advance. If
you’re going to use the CD set, make sure you download and burn all six images just in case.
It’s worth noting that you can also download the netinstall image. This is a bare-
bones image that contains just enough software to start the install process. The actual
installer and package library are then pulled from the network.
The LiveCD provides a full desktop working environment and comes complete with
theOpenOffice.orgsuite,Firefoxwebbrowser,Thunderbirdmailclient,andtheGaim
instant messaging client, among others. It’s not only a great way to try CentOS as a desk-
top replacement, but it also makes a great restore and rescue disc (although a dedicated
rescue system is currently being developed by the CentOS Project).
The mirrors also include tracker files for BitTorrent. This can provide faster down-
loads than directly downloading the images from the mirror. As with all torrents, though,
the download speed depends on how many other people are sharing the files.
Last but not least, you can download the MD5 and SHA1 hashes. When new images
are released, the CentOS Project generates hashes for all the new files. When you down-
load the images, they should have the same hash as the one posted to the web site. We’ll
cover how to do this on Mac and Windows machines later in this chapter. You should be
perfectly safe if you download the images from an official CentOS mirror; however, as a
best practice, you should also check that the checksums are valid.
CHAPTER 2 n INSTALLING CENTOS
16
Figure 2-1. Mirror file listing
CHAPTER 2 n INSTALLING CENTOS 17
Checking the Checksums
When the CentOS Project releases files for public download, they generate a checksum.
Two types of checksum are generated: MD5 and SHA1. MD5 remains the most popular in
use on the Internet today, although SHA1 is catching up fast. You should use SHA1 if
possible because it is more accurate and hence recommended over MD5. You can verify
the checksums on Windows with numerous free tools (such as the one at http://www.
fastsum.com/). If you’re using Mac OS X, you can verify the checksum with the built-in
command-line tool md5 or sha1. On Linux you can use md5sum or sha1sum.
Burning the ISOs
Fortunately, Mac OS X comes with CD-burning tools as standard. If you insert a blank CD
or DVD into your drive, it will pop up a dialog box asking you what you want to do with
it. From the list, select Disk Utility. If this doesn’t come up or you’ve already set another
default, you can find Disk Utility in Applications ➤ Utilities. Once the program is running,
click the Burn button (it looks like the radiation symbol). You will then be asked to select
which image you want to burn to the disc. Select the CentOS image, and click OK. Mac
OS X should now burn the image to the disc for you.
Unfortunately, Windows XP doesn’t come with its own built-in tool for burning ISO
images. A very popular tool is Nero, which you can download from http://www.nero.com.
A free trial is available, which should give you plenty of time to burn your CentOS images.
You will need to have the .NET 3.0 Framework to run Nero 9, but Nero has thoughtfully
provided a direct link from its download page. By default, Nero 9 installs a lot of applica-
tions. To burn the ISO images, the only component you need to install is Nero Burning
ROM.
Once you’ve downloaded and installed it, start Nero from your Start menu. After it
starts, cancel the New Compilation Wizard, and select Burn Image from the Recorder
menu. You’ll then be asked to select the image you want to burn. Select the CentOS ISO,
and then click Open. Nero will then burn the image to disc.
For Linux, my preferred tool of choice is cdrecord. This tool is available packaged for
most distributions and can be easily installed through your platform’s own installer. Nor-
mally cdrecord is very smart and works out the correct settings for your DVD writer. To
use cdrecord, you can run the following command:
cdrecord <ISO filename>
CHAPTER 2 n INSTALLING CENTOS
18
Here’s an example:
cdrecord CentOS-5.2-386-bin-DVD.iso
cdrecord should then find your DVD writer and burn the image. Although various
graphical tools are available on Linux (such as K3b), cdrecord is really easy to use and can
be run without having to install any extra dependencies.
Performing a Super-Quick CentOS Install
For our super-quick CentOS install, we’ll assume that you’re installing from the DVD
image. This doesn’t make any real difference apart from the disc swapping during the
actual install stage.
First you need to boot from DVD. Depending on your machine, this may already be
the default. If not, on newer machines, an option is often displayed during the memory
check stage (POST) to boot from a different device. Click this button, and select the
option for the DVD drive. This might be displayed as “removable media,” or it might actu-
ally list your DVD drive by name. BIOSs tend to vary on how they display device names,
but it should be fairly obvious from what is offered. If your hardware is a bit older, you
may need to go into the BIOS itself and change the boot order. If you do have to change
the boot order, it’s a good idea to change it back once you’re done. There’s usually a sec-
tion in the BIOS on boot order or boot priority. Because each BIOS is different, we can’t
provide exact instructions here, but a quick look at the manual (assuming you didn’t toss
it,ofcourse)orGoogleshouldhelpyouout.
Once you have booted from the DVD, you’ll get a nice CentOS screen displaying the
twobasicinstalloptions:graphicalortext(seeFigure2-2).Generallyspeaking,youwant
to do the graphical-based install because it is considerably easier to work with and has
some options that aren’t available in a text install. Having said that, a text install is quite
useful if you have a machine with limited amounts of RAM or there are issues with your
graphics card. Because we’re just stepping through a quick install to start with, simply
press Enter to start the default option (which happens to be the graphical installer). If you
want to use the text-based installer, you can start it by typing linux text instead.

CHAPTER 2 n INSTALLING CENTOS 19
Figure 2-2. CentOS boot screen
After a short wait, you’ll see the media check screen (see Figure 2-3). The idea here is
that you can feed CentOS all of your discs, and it will check to make sure that the check-
sums match. This is mainly to ensure that your media isn’t going to fail halfway through
an install and leave you with a broken machine. This is not a big deal on a test server,
but it can be rather upsetting if you’ve just traveled 100 miles to the data center to do an
urgent install only to find that you’re not going to be able to, especially if you find out
halfway through because the installer tells you that your disc has errors!
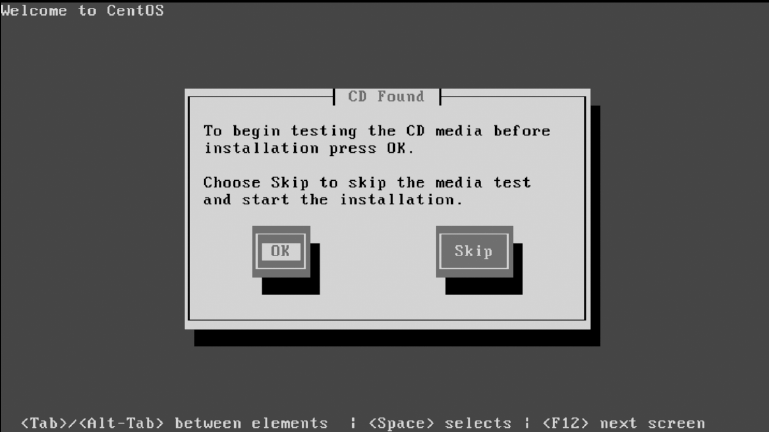
CHAPTER 2 n INSTALLING CENTOS
20
Figure 2-3. Media check
Generallyspeaking,yourdiscislikelytobefine,especiallyifyou’vejustuseditto
install another machine. Most of the time this option is skipped, but it is a handy feature
to have if you end up needing it. For now, though, we will assume that your disc burned
correctly, and we’ll skip the media check by pressing Tab and then Enter. If you are feel-
ing masochistic and have some time on your hands, feel free to just press Enter.
The next screen you should see (after the graphical installer has started) is a rather
empty welcome screen (see Figure 2-4). You have only two options on this page; you can
either read the release notes or click Next and continue with the install. In CentOS, the
release notes are only pointers to the full release notes available on the CentOS wiki at
http://wiki.centos.org. Because we’re on the fast track, just hit Next.
The next screen will ask you which language you want to use to install CentOS
(see Figure 2-5). The language selected here will then be used throughout the rest of
the installer. This doesn’t mean you have to use this language after CentOS is actually
installed, however. You will be able to select a range of languages later in the install pro-
cess. For now, we’ll stick with English. Because there’s nothing else to be done on this
page, select Next.
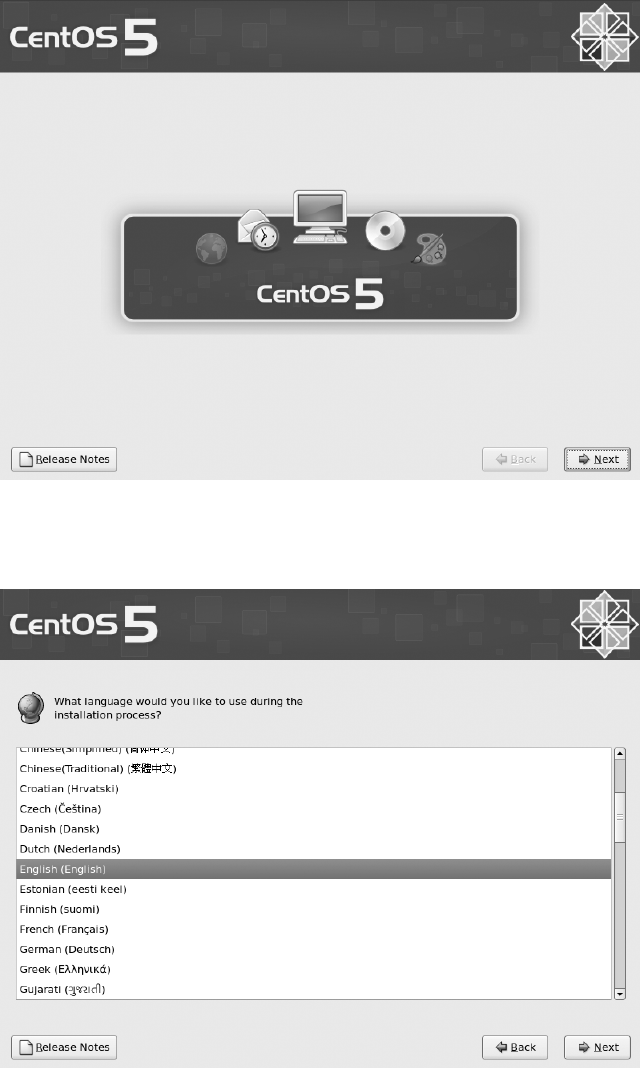
CHAPTER 2 n INSTALLING CENTOS 21
Figure 2-4. Graphical installer start screen
Figure 2-5. Selecting your language
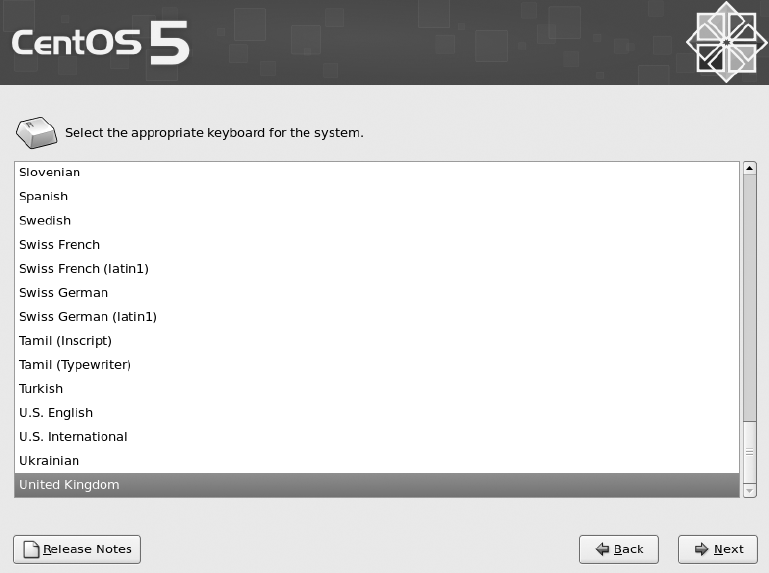
CHAPTER 2 n INSTALLING CENTOS
22
You’ll now be asked which keymap you want to use (see Figure 2-6). We prefer to
select the United Kingdom keymap regardless of the actual keyboard we’re using because
we touch type and get easily confused when characters aren’t where our fingers expect
them to be. If you’re not sure which keyboard you’re using, then sticking with the default
is probably a safe bet. Once you’ve selected your keyboard, click Next.
Figure 2-6. Selecting your keyboard
If your machine contains a new disk or it’s a completely fresh install, you will get a
warning that the disk partition table could not be read and that in order to create partitions
the installer must initialize the disk (see Figure 2-7). If you think that your disks should have
partition tables (that is, they were used by another operating system or another Linux distri-
bution), you might want to select No and do a bit of investigation, especially if the data on
any of the disks is important. If you know the disks are new or freshly erased, then click Yes.
Here’s a hard-won tip from the trenches: if in any doubt about the safety of a disk, unplug it
before turning the machine on and doing an install. If it’s not plugged in, you can’t acciden-
tally wipe it. Believe us when we say this does happen!
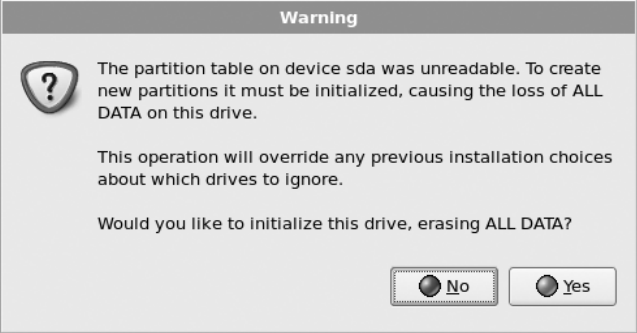
CHAPTER 2 n INSTALLING CENTOS 23
Figure 2-7. Initialization warning
Assuming you clicked Yes (or you weren’t asked the question because the disk was
already initialized), you will now be given some choices for partitioning the disks (see
Figure 2-8). From the first drop-down menu, you can select how you’d like the installer to
set up the disks. The default is to remove any Linux partitions and create the default lay-
out. This is what you want if your machine is a fresh install. However, if you had a Linux
distribution installed previously, you probably don’t want to blitz your data partitions. If
you do have important data on the disk or you don’t want to remove the Linux partitions,
you will need to do a custom layout. We’ll cover more details about using this option later
in this chapter.
You can also tell the installer to remove all partitions and create the default layout.
This is the same as the default except that it will also remove any Windows partitions. If
you’re replacing a server and want to remove everything, this is a good bet. It’s also pos-
sible to use the free space on a disk to create the default layout, or if all else fails, you can
select a custom layout.
As with the previous warning about uninitialized disks, you will need to be careful
about what you’re wiping. The standard options are all fairly safe for setting up a dedi-
cated server, but if you’re in any doubt, now is the time to check, because recovering data
after accidentally wiping the disk is practically impossible. If in doubt, unplug any disks
that contain data you want to keep.
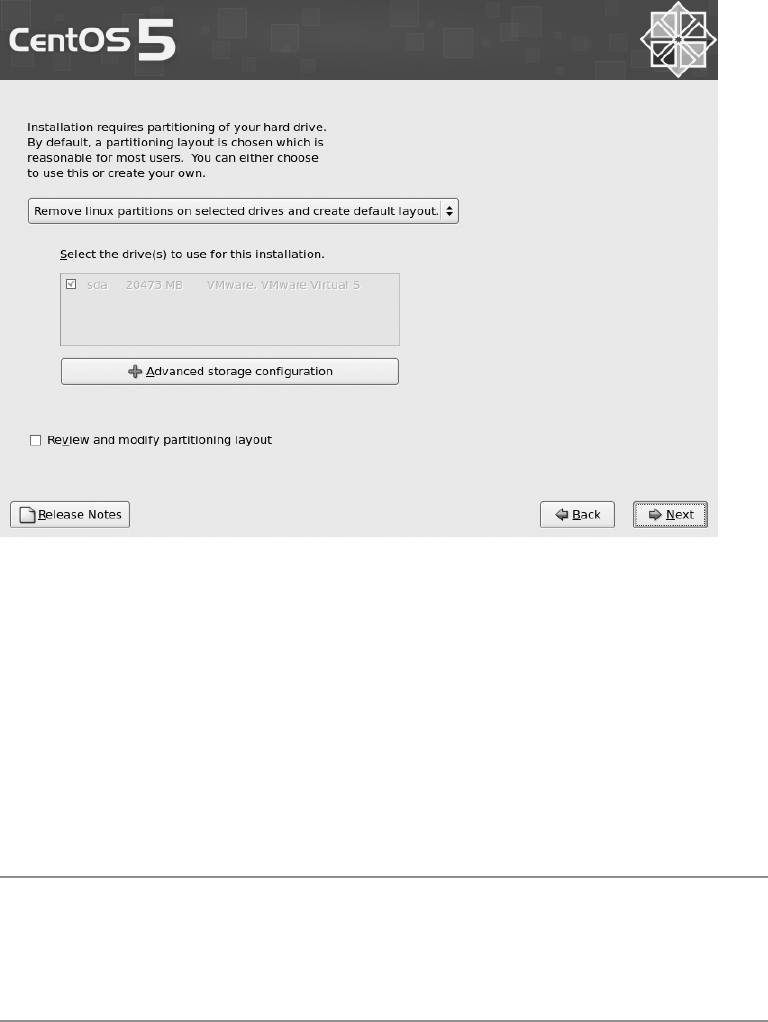
CHAPTER 2 n INSTALLING CENTOS
24
Figure 2-8. Selecting the partitioning scheme
You can also tell the installer which disks you want to work with. They will be shown
in the order that the kernel detected them. To make things clearer, it will also tell you the
size of the disk and the manufacturer. For the most part, this will help you decide which
disks you need to work with. You should select only the disks that you want the install
to perform the partitioning tasks on. In other words, make sure you unselect your data
disks! You can also select the option “Review and modify partitioning layout” to see what
exactly the installer has in mind for your disks. We talk about this again later in the “Cus-
tom Partition Layout” section when we cover the Custom Layout option.
nNote Sometimes hardware information is not reported correctly. This can happen when using hardware
RAID or when the hard disks are not reporting SMART data. If you can’t figure out which disks are which and
there is important data on them, get hold of someone who knows for sure. You don’t want to accidentally
erase irreplaceable data.
The default layout is ideal for most servers. If you should be using a different layout,
chances are you would already know about it. By default the installer will create two par-
titions on the disk (we’re assuming a one-disk install here). One partition (/boot) will be
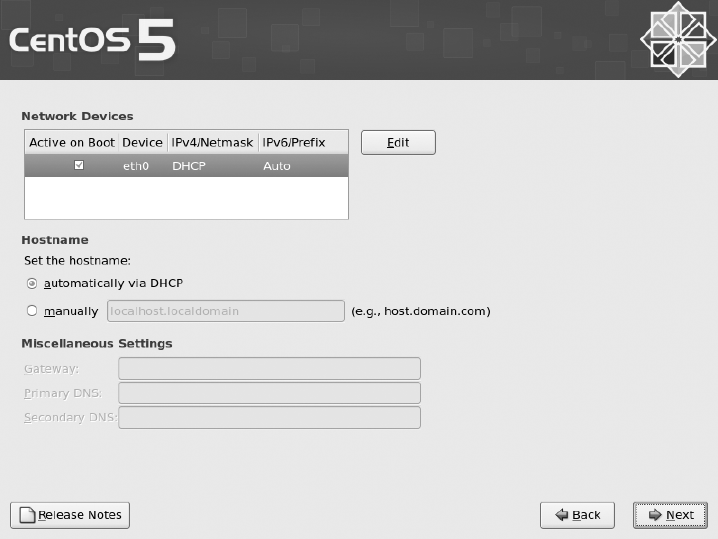
CHAPTER 2 n INSTALLING CENTOS 25
around 100MB, while another partition for Logical Volume Manager (LVM) will take up
the remainder of the space.
LVM is a great piece of software that allows you to separate the underlying physical
partitions and disks from the logical partitions that you format and use in Linux. As usual,
we look at this in a lot more depth later in the book, but for now just know that it lets you
create logical partitions from a combination of physical disks. This in turn means you can
create logical partitions that span more than one disk, which can greatly simplify how you
set up and use your disks. It’s also a great way of handling disks from a storage area net-
work (SAN) or providing storage space to Xen virtual machines. For now, though, let’s just
accept that LVM is a good thing.
Because you haven’t selected “Review and modify partitioning layout,” the next
screen you see will ask you to configure your network settings (see Figure 2-9). You
should see a list of network cards and an Edit option next to them. By default all the set-
tings are set to DHCP. For most home networks and corporate environments, a DHCP
server will be able to provide a working address. However, best practice states that you
should configure IP addresses of servers manually. This ensures that should DHCP fail,
you will still be able to contact your server. For our quick install, we’ll be leaving the IP
address set to DHCP here, but we’ll cover how to set the IP address manually later in the
“Setting IP Manually” section.
Figure 2-9. Network settings

CHAPTER 2 n INSTALLING CENTOS
26
One thing that is certainly worth changing is the hostname. When using DHCP, the
default is to request the hostname from the DHCP server. This usually results in being
assigned a rather cryptic name at best or localhost at worst. Either way, it won’t prevent
you from shutting down the wrong machine because you thought you were connected to
the test box instead of the production server. Select Manually, enter the hostname of your
choice, and then click Next.
The next screen (Figure 2-10) lets you set the time zone for your server. You can move
the red box over the map of Earth and highlight the country you’re in. It will then zoom
in, and you can pick your location from the options it provides. If this seems a bit difficult,
you can also select the time zone from the drop-down menu under the map. Once you
get used to it, the map is actually a very quick way of setting the time zone. By default the
option “System clock uses UTC” is selected. This means that the hardware clock will track
UTC time, and the system will apply the time zone difference. This is generally standard
practice for servers. Once you’ve selected a time zone that you’re happy with, click Next.
Figure 2-10. Selecting your time zone
Now you have to set the root password (see Figure 2-11). The root user account is the
most powerful account on a Linux system. This password should be made as complex
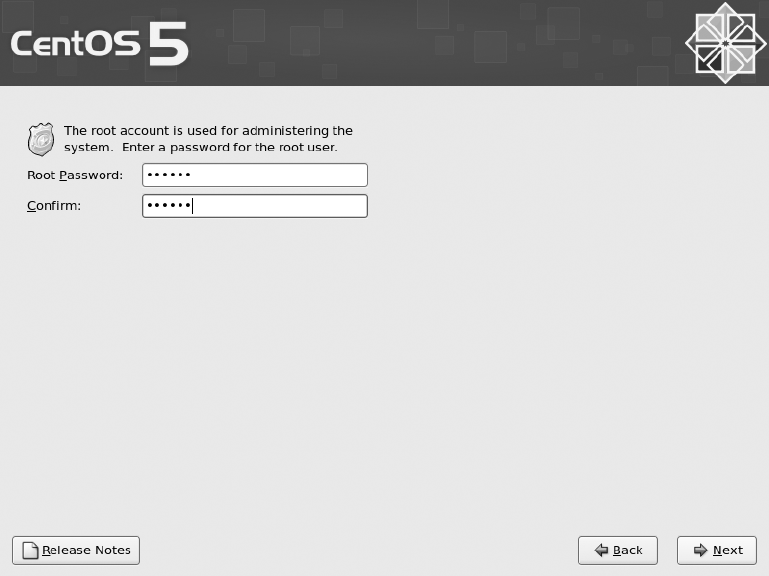
CHAPTER 2 n INSTALLING CENTOS 27
and as long as possible while preserving your sanity. Ideally, use a mixture of uppercase
and lowercase letters, numbers, and punctuation. Once you’ve entered the password
twice, click Next to continue.
Figure 2-11. Choosing a root password
The next page is where things get more interesting (see Figure 2-12). From here you
can pick the type of machine you’re installing. Each of these options automatically selects
a set of packages for installation. Most are fairly straightforward. For example, Desktop
–GnomeinstallsadesktopenvironmentusingGnome, and Desktop – KDE installs a
similar environment but with KDE instead.
Forthisbookwe’regoingtoselecttheDesktop–Gnome,Server,andVirtualiza-
tion options. You can add any other packages that you want after the install is complete
using the Yum package manager (see Chapter 4). You also have the option of adding the
CentOS Extras repository for installation (although this will require a working Internet
connection). The base CentOS distribution includes only the software that has been
rebuilt from the RHEL source RPMs (SRPMs) released by Red Hat. (SRPMs are packages
of source code with the instructions on how to build the software into a usable form.)
Because one of the key goals of the CentOS Project is to maintain complete compatibility

CHAPTER 2 n INSTALLING CENTOS
28
with RHEL, the project builds its software from the same blueprints as Red Hat. There is
a lot of software that Red Hat does not distribute that would be very useful (and in some
cases, essential) to have installed. The CentOS Extras repository provides additional
software to the software packages released by Red Hat. We will cover the different reposi-
tories in more depth later in the book. For now, let’s go with what we have selected and
click Next.
Figure 2-12. Selecting base packages for your CentOS install
If everything is going well, you should now be presented with a confirmation screen
telling you that you’re ready to install CentOS. Click Next to start the install and go and
grab a coffee, or if you’re feeling sufficiently paranoid, you can keep a very close eye on
the install process.
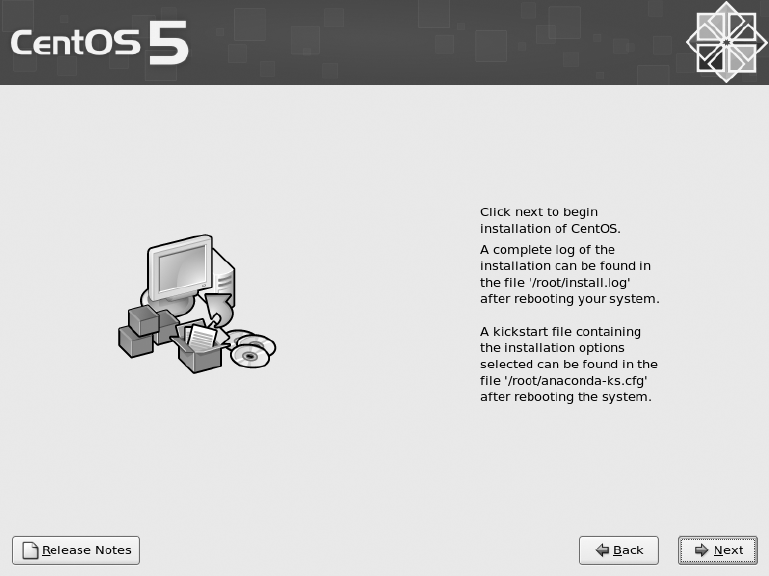
CHAPTER 2 n INSTALLING CENTOS 29
When the install has completed, you will see a screen telling you that everything went
as planned and that you should remove the CD and reboot the system (see Figure 2-13).
Congratulations! CentOS is now installed on your machine!
Figure 2-13. Clicking Next to install CentOS
Reboot the machine, and it should start booting into CentOS (but don’t forget to take
out the DVD first, or else you’ll start the install process again). This can take a couple of
minutes, and you’ll see a lot of text being printed on the screen. This is actually great for
debugging and seeing what your system is doing, but for now you can safely ignore it.
When the machine starts up for the first time, it will take you to the “first boot” con-
figuration screen. The first screen you’ll see explains that there are a few more settings
that need to be tweaked before the system is ready for use (see Figure 2-14). Click For-
ward to move to the next screen.
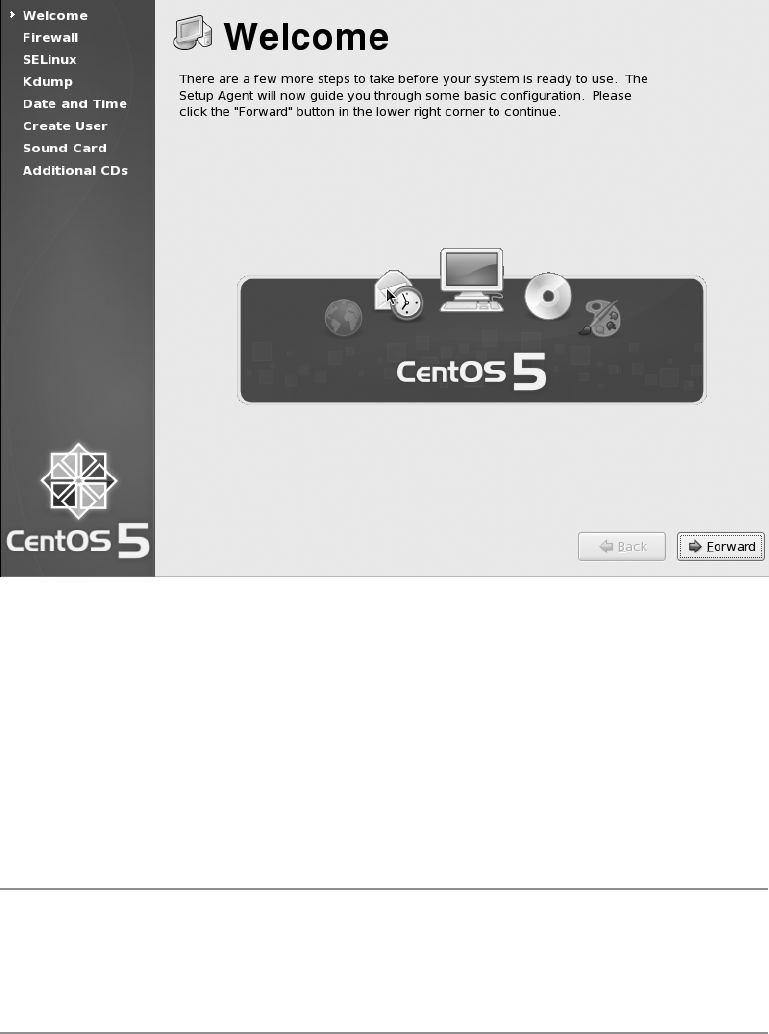
CHAPTER 2 n INSTALLING CENTOS
30
Figure 2-14. Some last-minute configuration
The next screen will help you configure your firewall. By default CentOS enables the
firewall and allows SSH to pass through (see Figure 2-15). This is a pretty safe default and
is ideal for an initial setup. You can disable the firewall if you really want, but there really
isn’t a good reason to do this. Instead of disabling the firewall, simply select the services
that you want other people to access from the list. If the service you want to allow isn’t in
the list, click the Other Ports drop-down arrow. From here you can allow access based on
port number and protocol. Once you’re happy with the settings, click Forward.
nNote Not knowing what port a service runs on is not an excuse to turn off the firewall. Doing so can acci-
dentally make you vulnerable to malicious attacks that the firewall would otherwise have prevented. Instead
of turning off the firewall, check the services documentation and Google for port listings. Although this takes
a bit more effort, it will ensure you have a well-protected server.
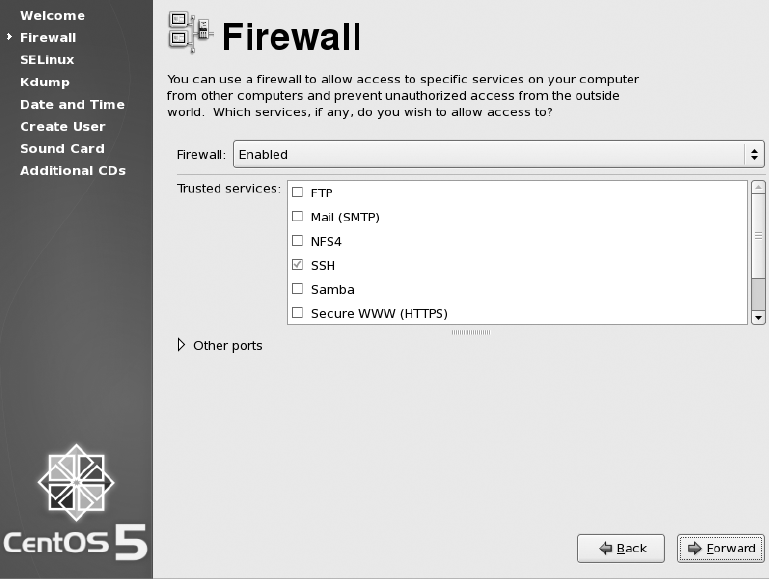
CHAPTER 2 n INSTALLING CENTOS 31
Figure 2-15. Configuring the firewall
SELinux is simple in theory, but in practice it can be something of a challenge. On
Linux there are really just two access levels—either you’re root or you’re not. This has
historically meant starting services initially as root so that you could access certain
resources, although root access is usually dropped almost immediately afterward. This
meant that if an attacker could compromise a service while it still had higher privileges,
the attacker could also gain root access. SELinux provides mandatory access control
(MAC), which greatly restricts what an application can do. It can also be used to grant
privileges. For example, the Apache web server could be given permission to bind to port
80 (a privilege normally requiring root access). This then would permit Apache to work
properly without ever needing higher access. An additional side effect is that if an attacker
were to exploit a service, they would be heavily restricted as to what files or system calls
they could make. All in all, SELinux is a good thing (see Figure 2-16).

CHAPTER 2 n INSTALLING CENTOS
32
Figure 2-16. Enabling SELinux
However, there is a downside. SELinux has a nasty habit of blocking behavior that
was commonplace and hence expected previously. It is possible, for example, to set up
Apache to display the contents of a directory via the Web but for seemingly random files
not to be shown in the list, even though they can be seen in the directory listing on the
server. Some applications simply don’t work with SELinux out of the box. Many consul-
tants and sysadmins just disable SELinux as a standard installation procedure.
If possible, it is much better to leave SELinux on and then adapt the system to work
with it. For most software provided with CentOS, everything will work as expected, and
SELinux won’t cause any trouble whatsoever. However, if you start seeing something a bit
weird, it might be worth checking the system audit logs to see whether SELinux has done
something. For now, unless you have a good reason, leave SELinux set to Enforcing and
click Forward.
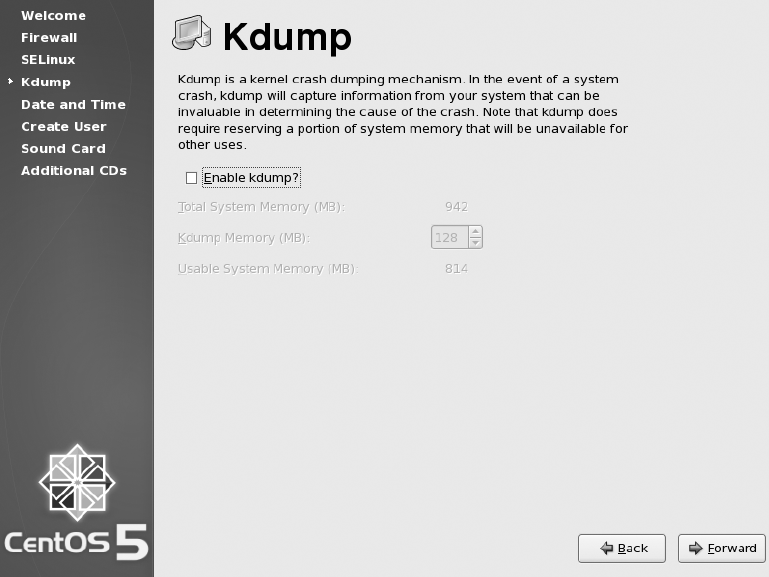
CHAPTER 2 n INSTALLING CENTOS 33
Kdump (see Figure 2-17) is a way for your system to record far more in-depth infor-
mation after a system crash than is normally possible. The only real downside with
turning it on is how much memory Kdump will take away from your system. It isn’t used
much currently, and with the CentOS kernel being heavily tested for robustness, ker-
nel crashes aren’t often seen. However, you can of course enable Kdump if you start to
have problems with your system and you do want to collect more information. For now,
though, we aren’t going to enable it, so just click Forward.
Figure 2-17. Enabling Kdump
The next screen (Figure 2-18) lets you set up your system date and time. With all going
well, it should already have the correct time set. If not, simply set the correct time. If you
want your system clock to keep in sync with Network Time Protocol (NTP) servers on the
Internet rather than having to be updated by hand, click the Network Time Protocol tab
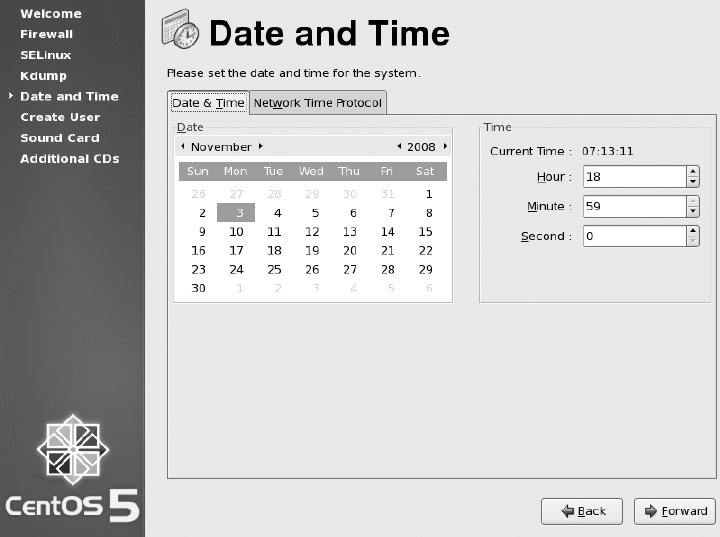
CHAPTER 2 n INSTALLING CENTOS
34
and select the Enable Network Time Protocol box. By default CentOS lists Internet NTP
servers that should work for most people. If you have your own NTP servers (such as a
Windows domain controller), then feel free to remove these servers and replace them with
your own server details. When you have set your clock the way you want it, click Forward.
Figure 2-18. Setting the date and time
You’re now given the option to create an unprivileged user for everyday use (see
Figure 2-19). Creating a user is straightforward enough. Simply fill in the boxes, and click
Forward.
Now you can test your sound card (if you have one installed, of course), as shown in
Figure 2-20. CentOS generally does a good job of detecting and setting up the sound card
automatically. If you click the Play button, you should hear the sound file being played. If
you’re planning on using this machine as a production server, chances are you aren’t all
that interested in its ability to play music. Either way, once you’re satisfied that all is as it
should be, click Forward.
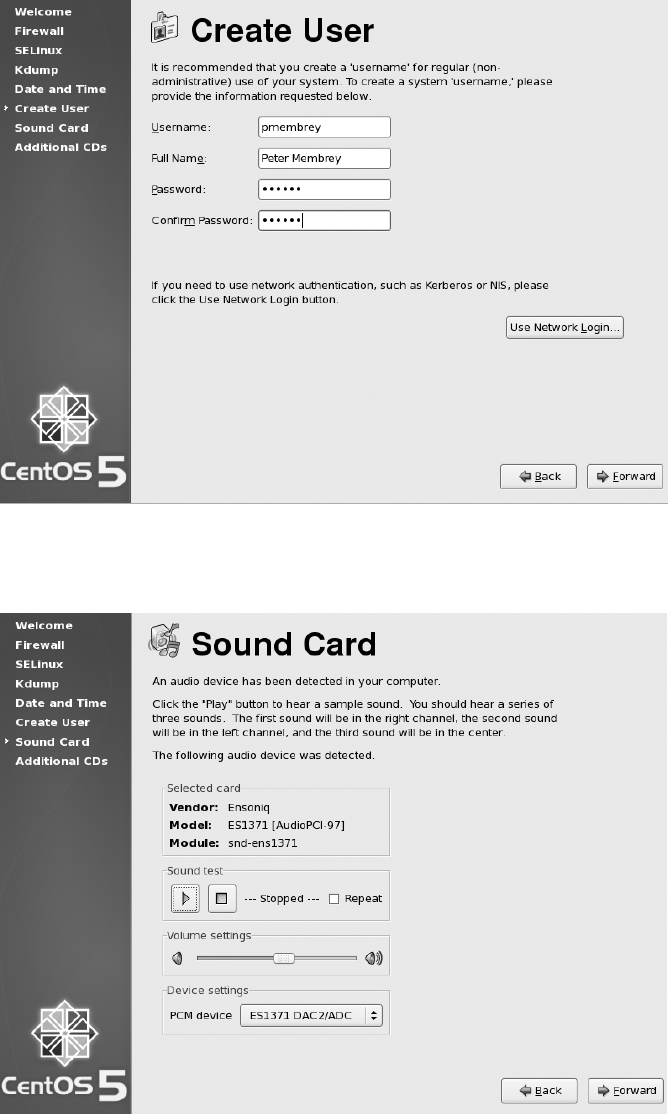
CHAPTER 2 n INSTALLING CENTOS 35
Figure 2-19. Creating an unprivileged user
Figure 2-20. From here you can test your sound card.
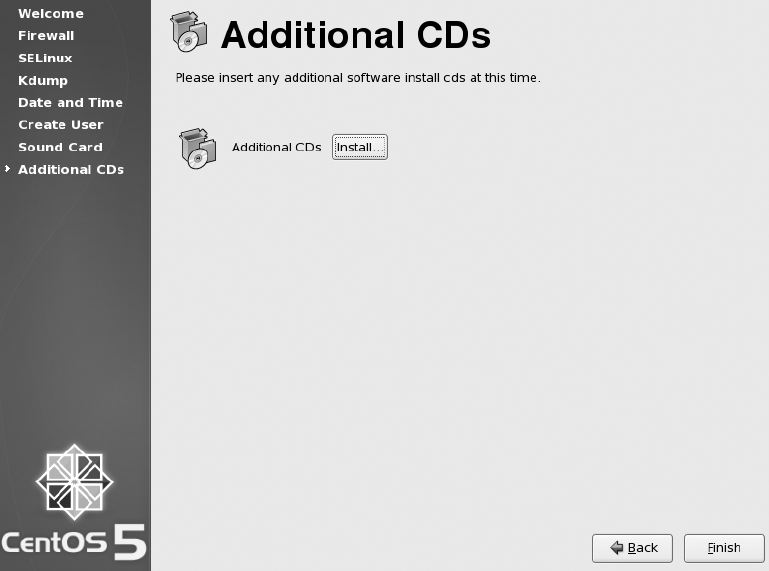
CHAPTER 2 n INSTALLING CENTOS
36
Lastly you’ll be given the option to install any additional CDs (see Figure 2-21).
Unless you have a CD and have been told this is the time to use it, just click Finish to
complete the configuration.
Figure 2-21. Adding additional CDs
That’s it! Your CentOS system is up and running and ready to go! You can now log
on either as root or as the user you just created. Figure 2-22 shows your login screen. It
is considered best practice to log in as root only when you need to make administrative
changes to the system. If you’re running a server, chances are that all you will ever do
is administration, and you might not see a need to create an unprivileged user. How-
ever, many servers do not allow network-based logins from the root user, because this
greatly reduces the chance of a remote attack successfully becoming root. Ideally then,
you should log in as a normal unprivileged user and become root only when needed (see
Chapter 3 for more information).
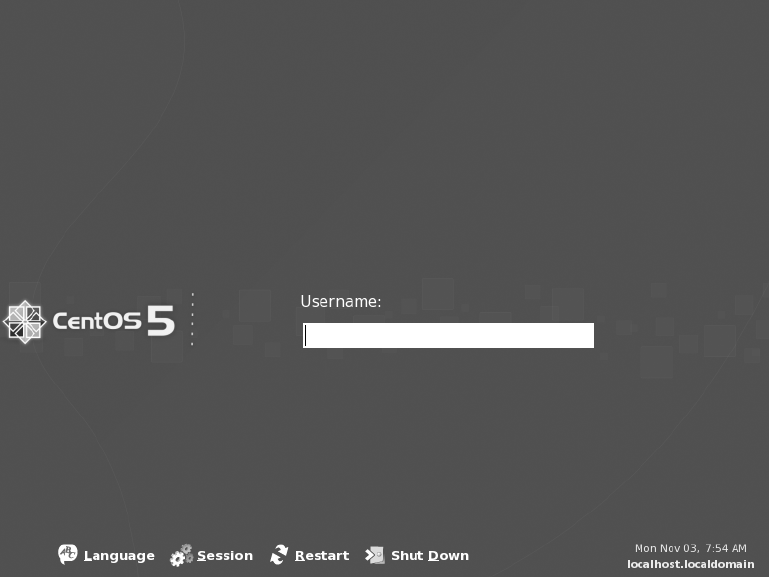
CHAPTER 2 n INSTALLING CENTOS 37
Figure 2-22. Logging in to your new CentOS server
Setting Other Installation Options
Now that we’ve shown how to do a basic installation, the following sections cover some
other features you can set during installation.
Securely Erasing Your Disks
CentOS makes it very easy to securely erase your disks before installation. You can
remove the old data in a few ways. The simplest and least effective (as in easiest to
recover) is to zero the disk. This literally means writing zeros onto the disk, replacing
whatever content was there before. This can take quite a long time even on fast machines,
but it is the fastest way to erase a disk. This option is useful if you want to wipe a disk with
a reasonable certainty that the data can’t be recovered.
CHAPTER 2 n INSTALLING CENTOS
38
First, start the installer as normal. When you get to the installer’s first graphical
screen, press Ctrl+Alt+F2. This will switch to a text-based console. It’s very important
that you identify your disk before attempting to erase the data, because even zeroing the
disk is almost impossible to recover from. If you’re not sure which disk is the correct one,
jump ahead in the installer first and check from the list of disks. For this example, we will
assume your disk is /dev/sda.
The command to zero /dev/sda is as follows:
cat /dev/zero > /dev/sda
It is also possible to use the same technique to wipe a partition rather than a disk. For
example, to wipe the first partition on sda (that is, /dev/sda1), you can use the following
command:
cat /dev/zero > /dev/sda1
As mentioned, this processing can take considerable time to complete; depending
on the size of the disk, the time required could be measured in minutes and hours rather
than seconds. If you cancel the command before it completes, part of the disk will not
have been erased.
A similar technique to zeroing the disk involves writing random characters to the
disk. The theory is that it would be harder to recover data from a disk where the end result
is unknown. To do this (again wiping /dev/sda), you can use the following command:
cat /dev/urandom > /dev/sda
This will take considerably longer than simply zeroing the disk. It is worth noting that
most people prefer to zero the disk after they have written random data over it.
These methods are effective for the vast majority of people and are relatively painless
to do. If you need something a bit more industrial in strength, CentOS ships with the shred
tool. This tool follows best practices in erasing disks and hence takes considerably longer
than either of the other two methods. In this case, by “longer” we mean it can take days!
shred has a couple of options, but the ones most used are as follows:
-n: Sets the number of passes including zeroing if selected
-z: Zeroes the disk
-v: Prints out continuous status reports

CHAPTER 2 n INSTALLING CENTOS 39
Currently, doing seven passes conforms to the US Department of Defense 5220-22 M
standard for erasing magnetic media. A 35-pass conforms to a similar standard issued by
theGermangovernment.Forexample,toshredadiskseventimesfollowedbyzeroing
the partition, you would use this:
shred -vzn 8 /dev/sda
Note that the total number of passes includes the zeroing; so if you want to make
seven passes in addition to zeroing the disk, you need to specify eight passes in total. It is
always advisable to use -v so that you have a rough idea what shred is up to. The erasure
process is very time-consuming and can take days on a slow or large disk.
When all is said and done, these techniques will make the data practically irre-
coverable by anyone. Having said that, there are certain techniques (such as magnetic
aura scanning) and certain issues (RAID devices not overwriting the exact same blocks,
journaling filesystems recording data, and so on) that may prevent secure erasure even
if the command completes successfully. If the contents of the drive are really that sensi-
tive, your safest bet is to physically destroy the disk. With terabyte disks being available
at reasonable prices, there is little point worrying about erasing a disk when it would be
cheaper and safer to simply destroy and replace it.
Creating a Custom Partition Layout
Sometimes the default options offered by the CentOS installer will need to be tweaked.
For those occasions, choosing Custom Layout from the menu will give you the ability to
create and delete partitions as well as set up LVM and software RAID. A bare-bones parti-
tion table should have a swap partition and a root partition. Technically, a swap partition
isn’t needed, but even if the server has a lot of RAM, having a swap partition can still
come in handy. Although most systems can boot from a large root partition, this wasn’t
always the case, so you will often see recommendations for creating a small (around
100MB) boot partition at the beginning of the disk. By default CentOS creates a boot par-
tition because it uses LVM for the root partition and it’s not considered best practice to
boot directly from LVM.
nNote As long as these basic requirements are met, you can create whatever partition scheme tickles your
fancy. We prefer to have a large root partition and then add specific partitions for data rather than having lots
of little partitions for the system itself.

CHAPTER 2 n INSTALLING CENTOS
40
nNote If possible, you should probably use LVM. This will allow you to easily expand partitions in the future
and be able to respond rapidly and easily (and potentially without any downtime) to demands for more disk
space. Although it’s possible to resize standard partitions, the benefits of LVM (such as partitions being able
to span multiple disks) really make it a must-have for all new systems.
Using Software RAID
Software RAID seems to be one of those technologies that some people swear by and
others swear at. Sometimes using hardware RAID is simply not possible, and getting a
commodity server with two identical disks is fairly common and not all that expensive. If
you want redundancy but you don’t want the cost of buying a hardware RAID controller
and aren’t planning to run with very high CPU loads, then software RAID is for you!
There are different types of software RAID. Each unique type is called a RAID level.
The three levels you will see the most often are RAID 0, RAID 1, and RAID 5.
RAID 0 is also referred to as striping. This level effectively sticks the disks together to
create one large disk. The total size of the new disk is the sum of all the other disks’ sizes.
This gives you a large disk, but it does not protect you from disk failure. In fact, if a single
disk fails, the whole array will be useless. LVM provides the ability to span disks with its
logical partitions. Use LVM over RAID 0 if possible.
RAID 1 is also known as mirroring. This is where you have two disks of the same size
and each is an identical copy of the other. The total size of the new disk is the same as the
size of the smallest disk. This level provides redundancy because if a single disk were to
fail, there is a complete copy on the second disk. It is possible to add more disks to the
array as “hot spares” that can be used to automatically replace a failed disk. CentOS will
automatically copy the data from the remaining good disk on to the hot spare, upgrading
it to one of the actual mirrored disks. You can then remove the failed disk (and ideally add
a new hot spare) when it is convenient.
RAID 5 is the most common RAID level when several disks are involved. RAID 0 pro-
vides no redundancy, and RAID 1 takes considerable amounts of space. RAID 5 provides
a compromise by allowing full redundancy but not requiring as much space. RAID 5
requires at least three disks, however. Although this is supported in CentOS, it’s not as
commonly used. If you need RAID 5 (or RAID 6, which is similar), it is normally consid-
ered best practice to invest in a hardware RAID controller.
CHAPTER 2 n INSTALLING CENTOS 41
CentOS supports software RAID out of the box, and you can enable it at install time.
This is a great way to ensure that your data is well protected. Of course, no amount of
RAID replaces the need for backups.
Before you can create a RAID device, you must first create some RAID partitions.
These can be created on any disks that CentOS can see. However, although you can cre-
ate two RAID partitions on a single disk and then create a RAID device from them, this
serves no real purpose because if the disk were to fail, both partitions would be lost.
You can create a RAID partition in one of two ways. You can select the RAID option
from the menu, or you can do it by selecting New from the menu and then selecting Soft-
ware RAID from the File System Type menu. Once you have at least two RAID partitions
available, you’ll then be able to access the Create a RAID Device option. Make sure that
this is selected, and click OK.
Depending on the number of RAID partitions you have created, you will have a num-
ber of options at this point. First you need to select what type of filesystem you want to
create. Usually it’s a good idea to create a physical LVM partition because you can then
create as many partitions as you need and they will all be backed by the RAID device. It’s
quite common if two disks are involved to create a small (say 200MB) RAID 1 device for
/boot (formatted to ext3), then create another RAID 1 device using up the remainder of
the disk space, and finally create an LVM volume group. In this volume group, you would
thencreateaswappartition(say2GB)anddedicatetheremainingspacetoroot(/). This
ensures that either hard disk can be booted from and both have complete copies of the
root partition.
Setting IP Manually
To configure an individual network card, select it from the list, and click the Edit button.
Figure 2-23 shows where you will set your IP. From the pop-up window, you’ll be able
to enable both IPv4 and IPv6. If you aren’t planning on using IPv6, then it’s a good idea
to disable it. IPv6 can cause some interesting and hard-to-find problems (such as delays
in resolving an IP address). If you want to disable IPv6, you can do it here by deselecting
the IPv6 box. By default, IPv4 is set to be configured from DHCP. Select Manual configu-
ration, and enter your IP address and gateway. Once you’re happy that you’ve set the
details correctly, click OK.

CHAPTER 2 n INSTALLING CENTOS
42
Figure 2-23. Setting the IP address manually
If there are no network cards set for DHCP, you will have to set the hostname and
associated details manually. Choose a hostname, and enter your gateway IP address
along with your primary and secondary DNS servers. When you’re happy, click Next, and
continue with the install.
Summary
You now know a lot more about CentOS than when you started this chapter. You know
where to find the various releases, how to check them for authenticity, and how to burn
the images to disc.
You have also walked through the entire install process from start to finish and
should have a pretty good idea of the steps involved, what they do, and how you might
install the system differently next time.
We also touched on some more advanced topics that weren’t part of our basic install
such as software RAID and how to securely erase data from your hard disk.
CHAPTER 2 n INSTALLING CENTOS 43
Many of you will be surprised at how easy this process is. After all, Linux is supposed
to be much harder than Windows! Yet, it wasn’t so bad, was it? As we proceed through
the rest of the book, you will come to see that although the CentOS way of doing things is
rather different from what you might be used to, it’s not as bad as some people make out.
In the next chapter, we’ll touch on some basic skills and information you need to find
your way around your newly installed system. It will give you the grounding you need
when you explore later chapters. If you’re desperate to install your web server or you
really want to have a play with DNS, feel free to skip ahead to those chapters. We have
tried to make them as “stand-alone” as possible. However, if you do find yourself a bit out
of your depth, refer to Chapter 3, because it might just point you in the right direction.

45
CHAPTER 3
Getting Started with CentOS
CentOS is a very powerful operating system, and it can be overwhelming at first if you
have never used Linux before. This chapter hopes to dispel the myth that “Linux is hard”
and give you a firm grounding to tackle the rest of the book. If you’re coming to CentOS
from another Linux distribution, then you’re probably going to want to skip this chapter
because it focuses on some Linux fundamentals that you’re most likely to have already
mastered.
We will cover the basic filesystem layout and what each directory contains or what it
does. We won’t go into much depth at this stage because this chapter is really meant to
give you an overview only. You will come across all of these topics again in later chapters
when we talk about how specific services use these directories.
Once you have an idea of how the filesystem is laid out, we’ll then cover some essen-
tial commands for moving around and creating, editing, and deleting files. We’ll also
cover file permissions and ownership along with the commands needed to manipulate
them. Before that, though, we’ll discuss how you can actually get to the command line in
the first place and how to use bash.
CentOS Filesystem Layout
CentOS, like all Linux systems, has a single root for all of its filesystems. Although this
is standard on Unix systems, users coming from a Windows background are more used
to seeing C: and D:. Each of these is a separate root and represents a physical or logical
device.
Under Linux, however, individual device type/location isn’t important. Instead, the
file layout provides a homogenous view over all the content independent from where that
content comes. In theory, this means that working with files on a Linux system is simpli-
fied because the files look the same regardless of where they are. For example, files on a
CD-ROM look the same as files on a hard disk or network share.
Sometimes this transparency can actually make things more difficult because the line
between separate filesystem roots is often blurred without directory names that clearly
CHAPTER 3 ■ GETTING STARTED WITH CENTOS
46
label the device and the data within it. Although at first the Unix way of handling files may
be a little more confusing, it does give a great deal of flexibility. For example, say you have
a web application that runs on a particular server and serves files from its local disk in
/var/www/html/files. Now your application becomes very popular, and you need to store
a lot more files than will currently fit on your disk. Your application may be hard-coded
and require that these files be in this location. There are various ways to solve this prob-
lem, but most of them involve adding storage (whether network or local) and attaching it
under /var/www/html/files. You can achieve something similar in Windows using mapped
drives, but it isn’t as elegant or as flexible as the Unix method. We’ll be looking at mount-
ing filesystems a little later in the chapter.
There are times, however, when you do need to see exactly what device is attached
where. You can find this out quite easily with the mount command, which will list all the
filesystems and where they are mounted (called the mount point). We will look at this
command in more depth at the end of this chapter.
Relative and Absolute Paths
Knowing the difference between relative and absolute paths is important and fortunately
very easy to understand. A path is the route you need to take to get from your current
location to another. The end result could be a file or another directory. There are two
ways to specify a path. You can specify the path based on your current location (a relative
path) or from the root directory (an absolute path).
The problem with a relative path is that it is dependent on your current location. This
isn’t a problem if you’re working on a machine and moving between a few directories, but
it’s not much use if you e-mail it to another user. If you need to be explicit about which
file you are talking about or you want to provide the path to a third party, it is far better to
use an absolute path.
Filesystem Layout
Now that you’ve had a quick overview of how filesystems work in CentOS, it’s time to take
a look at how the filesystem is actually laid out.
/
This is the root directory, and all other directories and files exist underneath it. It is often
confused with the root home area (/root/), which we’ll look at next. It also contains all the
key directories for the system.
CHAPTER 3 ■ GETTING STARTED WITH CENTOS 47
/root
This directory is the root home area. This is where all of root’s personal configuration and
files go. It is often confused with the root directory (/) itself. When asked the location of
a particular file, people will often say, “I put it in root.” Generally they are referring to the
root home area, although if you can’t find the file there, the next place to check before
complaining would be in the /root directory.
/etc
/etc is arguably the most important directory on your system. The /etc directory contains
all the configuration and settings files for your server applications. Sadly, despite its impor-
tance, it is constantly overlooked when preparing backups. New users often safely back
up all of their applications that they could easily replace but forget to back up the unique
configuration files. Generally speaking, however, this mistake is made only once. Make sure
you don’t learn this the hard way, and ensure that /etc is first on your backup list!
/proc
/proc is a virtual filesystem used by the kernel to communicate with userland tools. It
gives you everything you need to know about your running system such as details on the
CPU (/proc/cpuinfo), memory usage (/proc/meminfo), and much more. Tools such as top
use the contents of this directory. It is read-only; after all, the /proc filesystem is only a
virtual representation of the status of the machine. It is a great place for extracting raw
information either when the provided command-line tools don’t go into enough depth or
when you need a different output layout. The filesystem isn’t actually stored anywhere, so
it doesn’t take up any disk space.
/var
/var (short for variable) is traditionally where data that is created during the running of a
machine would go. It’s the default location now for web content (/var/www/html/) and mail
spools (/var/spool/mail/) as well as all of the system log files (/var/log/). This directory also
has a nasty habit of getting full very quickly. Many people consider this to be a sufficient
reason for implementing /var on its own partition. Doing so ensures that even if /var is
completely filled, the rest of the system is unaffected. With the size of today’s disks and with
proper maintenance and monitoring, the chances of this happening today are considerably
less. Having said that, partitioning is much easier now that Logical Volume Management
(LVM) allows dynamic creation and resizing. At the end of the day, like a lot of other setup
and configuration options, it comes down to the sysadmin’s individual tastes.

CHAPTER 3 ■ GETTING STARTED WITH CENTOS
48
/boot
/boot contains all the files needed to successfully boot CentOS. This includes the configu-
ration files for GRUB (the boot loader) and the kernel itself. It is very common (and in fact
the default in CentOS) to create a small (approximately 100MB) partition at the begin-
ning of the disk to hold this data. This has been standard practice for many years, firstly
because older BIOSs could boot only within the first 1024 cylinders of a disk (preventing
users from booting from a large disk with one partition) and then because LVM became
the standard and BIOSs can’t boot from these partitions (yet) either. Generally speak-
ing, there isn’t anything you’d want to tweak or change in this directory, and, for security
reasons, many admins actually unmount it once the system has booted. Because changes
here can prevent the machine from booting, don’t make any changes unless you really
know what you’re doing!
/bin and /sbin
/bin is the home for most user programs, and /sbin is the home for administration tools
and privileged binaries. By default, /sbin is put only into the root user’s path, which
means when a normal user tries to run a command in /sbin (such as ifconfig), they will
get “command not found.” The user does have permission to run this command, how-
ever, and giving the full path (/sbin/ifconfig) will work.
/dev
This is the location of all the device files on a Linux system. On newer systems (including
CentOS), device files are created as and when they’re needed. Older distributions still cre-
ate all the device files regardless of whether the system has or supports a particular type
of hardware. All hardware is accessed via a file in this directory. Some files point directly
to a piece of hardware (such as /dev/hdc pointing to a CD-ROM drive), and others are
symlinks (shortcuts) such as /dev/cdrom that actually point to /dev/hdc. The shortcuts are
there for convenience and are often used instead of the hard links.
■Note /dev/cdrom is system specific. On one of our machines, we have an IDE CD-ROM connected as
the secondary master, which is why it has been assigned to /dev/hdc. Depending on your system, /dev/
cdrom might point to something else entirely. This is OK and is one of the benefits of using shortcuts. If an
application looks for /dev/cdrom, it will find the CD-ROM regardless of how it’s attached.
CHAPTER 3 ■ GETTING STARTED WITH CENTOS 49
/home
This directory holds the home directories of users. On smaller systems (and some larger
systems), the home directories are created directly under /home such as /home/pmembrey.
On servers with thousands of users, however, it is quite common to see subdirectories
created based on a naming scheme such as /home/pm/pmembrey. Although convention
dictates that home directories should be stored here, that is not a requirement. Indeed,
home directories can be anywhere on a system.
/lib
/lib contains system libraries. There’s rarely anything that needs changing in here, and
most changes are made through installing software packages. Sometimes it becomes nec-
essary to manually create some symlinks in here, but this practice is generally something
that should be avoided if possible.
/lost+found
This directory can be found in the root of any ext2 or ext3 filesystem. It is used during disk
checking (fsck) to store files that have become detached or missing from the filesystem
because of filesystem damage. Files that end up here are often still intact, and data can be
recovered. It’s not an easy process, and it is often far easier to restore files from a known
good backup. However, it’s nice to have just in case, but it’s really more useful as a way to
determine you’re looking at the root of an ext filesystem.
/media
In order to access data stored on removable storage, the devices have to be mounted first.
On newer Linux systems, /media is the location of choice. Inserting a USB key, for exam-
ple, will cause the system to attempt to mount it in /media under a recognizable name
(usually the name stored on the device). /media has mostly replaced /mnt as the mounting
directory of choice, although it is still considered the correct place to mount remote file-
systems such as NFS or a Windows file share.
/mnt
On older systems, removable media was generally mounted under the /mnt directory. Now
that /media handles this, /mnt is really used only for infrequently mounted filesystems such
as mounting a directory from a Windows server. Some sysadmins still prefer to mount per-
manent filesystems here, but while this is largely down to personal choice and is still fairly
CHAPTER 3 ■ GETTING STARTED WITH CENTOS
50
common, it doesn’t take advantage of the unified file structure available on Unix-based
machines.
/usr
This directory contains the vast majority of user software and is often the largest directory
on a machine. Although it’s good to know where your software actually resides, because
the default path includes /usr/bin (and /usr/sbin for root), most software “just works”
wherever you are located on the system.
/opt
/opt is most often used for large third-party applications. It’s not uncommon to find /opt
empty on some systems and jam-packed on others. For example, by default, Oracle will
attempt to install itself in /opt. This directory doesn’t get all that much use on CentOS
systems, and on most of our servers it is still empty. Do not worry if you never have the
need to use this directory.
/srv
/srv is used for storing files that are used in providing a service. Most services don’t make
use of this directory and instead place such files somewhere under /var/. Like /opt and
/mnt, /srv is provided by default but doesn’t actually have to be used for anything. If
you do decide to use /srv, you will need to be aware that the default setup and most
documentation will presume that the files are in their default locations. Although sepa-
rating the actual content from other related files is not a bad idea (some would say it was
essential), moving away from the standard defaults may at first make things a bit more
challenging than they need to be. Once you are more comfortable with CentOS, do feel
free to use this directory.
/sys
This directory is for storing information about the system. The data stored here is written
to hard disk, so it can survive a reboot. This directory doesn’t seem to be used very often,
and you may never need to refer to the information stored there. Having said that, you
need to use it only once to appreciate why it exists.
/tmp
This directory is used for the creation of temporary files. Anything can be created here,
and most applications that need temporary information stored will put that data in
CHAPTER 3 ■ GETTING STARTED WITH CENTOS 51
/tmp. /tmp isn’t emptied automatically, although many sysadmins do wipe /tmp every time
the system is rebooted. It is also used as a temporary dumping ground for files, especially
when there’s no other logical location to store them. Again, it is not safe to leave files here
because anything in /tmp is assumed to be replaceable. If in doubt, save it in your home
directory.
For more information on the way the filesystem is laid out, take a look at the Linux
Standard Base (LSB) at http://en.wikipedia.org/wiki/Linux_Standard_Base. This is part
of a combined community effort to make the various distributions as similar as possible.
This should make it easier for software developers, administrators, and users to work with
different Linux platforms and easily apply skills learned from one to another.
Getting Your Hands on a Command Prompt
Before we can discuss how to use bash or work with your new server, we need to first
gain access to the command line. This is normally referred to as a command prompt on a
Windows machine but is normally simply called a shell on Unix machines. The command
line is where most administrators (and some users) spend the vast majority of their time.
Although a wealth of graphics- and web-based tools exist (some good, some not so), edit-
ing configuration files directly is generally considered to be the best way to administer a
machine.
There are a few ways of getting your hands on a bash prompt. Both Gnome and KDE
provide applications (Terminal and Konsole, respectively) that will give you access to the
command line. If you are having trouble with your graphics card or you haven’t installed
the X graphical system, you can access a text-based login prompt by pressing Ctrl+Alt+F1
all the way through to F6. You will still need to provide login details to gain access.
The most common way you’ll probably be accessing your new server is via SSH. SSH
(which stands for Secure SHell) is a suite of tools that provides secure access to machines
across an untrusted network. Before SSH, the standard way to connect to a server was to
use telnet. Unfortunately, telnet sends everything on to the network “in the clear,” so it
was often possible for attackers to be able to steal passwords directly from the network.
On top of this, there was no way to tell whether the server you were logging into was actu-
ally the server you thought it was.
Getting an SSH Client
For Linux and the Apple Mac, SSH is a standard part of their operating systems. On Linux,
wherever you can get a shell prompt, simply typing ssh will give you access to the pro-
gram. The same is true for OS X (which has a very strong BSD background). You will need
to run the Terminal program, which can be found in Applications ➤ Utilities. This tool
gives you a very similar command line that you would expect to see on CentOS. Indeed,
they both run bash!
CHAPTER 3 ■ GETTING STARTED WITH CENTOS
52
If you’re running Windows, you won’t have an SSH client as standard. Fortunately,
there is a really good client called PuTTY that’s open source and freely available for down-
load. You can download PuTTY from its web site at http://www.chiark.greenend.org.
uk/~sgtatham/putty/download.html.
PuTTY is a pretty simple tool that can be downloaded as a stand-alone executable as
well as part of an installer. The stand-alone executable is particularly handy for placing
on USB sticks when you need to connect to your server from someone else’s machine.
Using SSH
SSH provides basic authentication for your server using fingerprints. Each server has a
unique fingerprint that can be used to identify it. When you first connect to a new host-
name or IP address, your SSH client will prompt you that it hasn’t seen this machine
before and will ask whether the fingerprint is correct. To be honest, very few people actu-
ally know what the fingerprint on their server is supposed to be. It’s a fairly safe bet that if
the first four characters and last four characters match, then the server is in fact the server
you think it is.
Should this fingerprint change in the future, you will be warned that the fingerprint
doesn’t match, and SSH will refuse to connect. The most common reason for this is
reinstalling the server and hence generating new sets of SSH keys. If you have a good rea-
son to suspect the keys have changed, then this is nothing to worry about, and you can
update SSH to use the new fingerprint.
You’re Logged In; Now What?
Of course, once you’re logged into your new CentOS server, you now need to know how
to move around and perform basic tasks. This chapter cannot hope to tell you everything
there is to know about bash because entire books have been written about it. Instead,
we’re going to help you feel more at home without pretty windows and a mouse. Chances
are this is where you will spend the majority of your time on a Linux system, so you’ll
need to get used to it as quickly as possible.
First, the Prompt
Because you’ll be spending a lot of time at “the prompt,” we’ll talk about what that
means. The following is an example of a prompt:
[pmembrey@doublehelix ~]$
CHAPTER 3 ■ GETTING STARTED WITH CENTOS 53
This is the standard user prompt on CentOS. It is possible to change the prompt and
customize it to suit your preferences. Most users tend to leave it alone because the default
tends to be a good all-around prompt.
The first part of the prompt is pmembrey followed by the at (@) sign. This shows the cur-
rent user. The next part, doublehelix, identifies the hostname of the machine to which
you’re connected. Together, these two pieces of information uniquely identify who and
where you are. This is very important, especially if you’re working on more than one
machine. When you have ten different windows open to ten different servers, it can
become a challenge keeping track of everything!
The next part of the prompt tells you where you are in the filesystem. The tilde (~) is a
special Unix convention meaning home directory. In this example, the prompt is showing
that we’re in the home directory.
The last part of the prompt is either a dollar sign ($) or a number (or hash) sign (#).
This denotes whether the current user has root privileges. Generally speaking, you will
only ever see the hash sign when you are logged in as root. All other users show the dollar
sign. Seeing the hash sign is a useful reminder that you should be careful what you type
because you have unlimited access to the system.
Important Commands
If you haven’t used a Linux distribution before, you will find certain commands extremely
useful. The most important ones are described in the following sections.
pwd
The pwd command does nothing more than show you which directory you’re currently in,
but the usefulness of this information is rarely understated. For example, you can use this
command to make sure you’re editing the right file. There will be many times when you’ll
be working on files with identical names stored in different directories. pwd will ensure
you don’t accidentally change the wrong one!
[pmembrey@doublehelix ~]$ pwd
/home/pmembrey
[pmembrey@doublehelix ~]$
You can see that we’re in the home directory (/home/pmembrey). That’s pretty much
all there is to pwd, but it really comes into its own when you’re using a lot of relative paths
because it’s very easy to get lost.
CHAPTER 3 ■ GETTING STARTED WITH CENTOS
54
ls
This is another command that you will use on a very regular basis. ls will show you a
directory listing. It will also show various features such as symlinks and directories in
color. This really helps when you’re looking through a long directory listing to help you
find what you’re looking for more easily.
[pmembrey@doublehelix ~]$ ls
test1 test2 test3 test4 test5
[pmembrey@doublehelix ~]$
You can also use the –l option to provide far more information. This includes infor-
mation on file ownership and permissions as well as how big the file is. This shows the
amount of space used in bytes, which is not generally all that useful (unless you’re writ-
ing scripts that parse the output), and you can use the –h option to display the file sizes
in “human-readable” format. This will show much space is used in kilobytes, megabytes,
gigabytes, and so on. Of course, you can combine more than one option so that –lh shows
a listing with human-readable size.
[pmembrey@doublehelix ~]$ ls -lh
total 20K
drwxrwxr-x 2 pmembrey pmembrey 4.0K Nov 10 13:47 test1
drwxrwxr-x 2 pmembrey pmembrey 4.0K Nov 10 13:47 test2
drwxrwxr-x 2 pmembrey pmembrey 4.0K Nov 10 13:47 test3
drwxrwxr-x 2 pmembrey pmembrey 4.0K Nov 10 13:47 test4
drwxrwxr-x 2 pmembrey pmembrey 4.0K Nov 10 13:47 test5
[pmembrey@doublehelix ~]$
We’re going to take a quick detour here and talk briefly about file permissions and
ownership. The first thing you’ll notice is that long line of letters at the beginning of each
row. Ignoring the first letter for a moment, we have three sets of three letters—one each
for user, group, and other (or world). Each set is rwx (or read-write and execute). In our
last example, all of the files are read-write and executable by the user pmembrey (the user-
name is in the third column), the same for the group pmembrey (the group is in the fourth
column), and lastly only read and executable for everyone else. The w is missing, leaving a
hyphen or minus in its place. This means that that particular permission is not available.
The first character tells you what kind of file you’re viewing. A normal file is simply a
hyphen, but a directory is shown with a d. As you can see, in our example, all the entries
are directories. Symlinks (shortcuts in Windows) are shown with an l.

CHAPTER 3 ■ GETTING STARTED WITH CENTOS 55
The fifth column tells you the size of the file. As far as directories are concerned, it
shows the amount of space taken up by the directory record, not by the contents of the
directory. This is why you will see directories being 4.0K the vast majority of the time.
The sixth column is the time the file was last modified, and the seventh column is the
name of the file itself.
We’ll revisit file permissions throughout the book as they apply to each of the tasks
that we’re working on. For now, though, just be aware that CentOS provides security
mechanisms for the files and that there is a way to view them.
Lastly, the option –a will show you all the hidden files in a given directory. By conven-
tion, any file that starts with a period or dot is considered a hidden file. There’s nothing
mysterious about these files, and they can be seen easily—it just helps to keep various
directories clean and tidy because they are directories that you’ll seldom use. They gener-
ally contain configuration information such as your command history (.bash_history) or
your SSH configuration (the .ssh directory). Here’s the same command as earlier but with
the full –lha:
[pmembrey@doublehelix ~]$ ls -lha
total 44K
drwx------ 7 pmembrey pmembrey 4.0K Nov 10 13:47 .
drwxr-xr-x 14 root root 4.0K Nov 9 15:37 ..
-rw------- 1 pmembrey pmembrey 81 Nov 9 16:47 .bash_history
-rw-r--r-- 1 pmembrey pmembrey 33 Nov 9 15:37 .bash_logout
-rw-r--r-- 1 pmembrey pmembrey 176 Nov 9 15:37 .bash_profile
-rw-r--r-- 1 pmembrey pmembrey 124 Nov 9 15:37 .bashrc
drwxrwxr-x 2 pmembrey pmembrey 4.0K Nov 10 13:47 test1
drwxrwxr-x 2 pmembrey pmembrey 4.0K Nov 10 13:47 test2
drwxrwxr-x 2 pmembrey pmembrey 4.0K Nov 10 13:47 test3
drwxrwxr-x 2 pmembrey pmembrey 4.0K Nov 10 13:47 test4
drwxrwxr-x 2 pmembrey pmembrey 4.0K Nov 10 13:47 test5
[pmembrey@doublehelix ~]$
Here you can see two directories that are simply a dot and two dots. We explain these
special directories when we talk about cd later in this chapter. The other four files are
used by bash. We will look at these files later in the book.
■Note When presenting options in this way, they can be given in any order. We’ve always used –lha, but
–lah, –hal, –alh, and –ahl are all equally valid.
CHAPTER 3 ■ GETTING STARTED WITH CENTOS
56
mkdir
Once you can look at which directories you have, you’ll need mkdir to create new ones.
mkdir is short for “make directory,” and it pretty much does what it says on the tin. To
create a directory, simply pass it the name of the directory to create. Here’s an example:
[pmembrey@doublehelix ~]$ mkdir mydir
[pmembrey@doublehelix ~]$
If the directory was created successfully, you won’t receive any confirmation; you will
just be taken back to the command prompt. If there is a problem, you will get an error,
and the directory won’t be created. For example, use this if the directory already exists:
[pmembrey@doublehelix ~]$ mkdir mydir
mkdir: cannot create directory 'mydir': File exists
[pmembrey@doublehelix ~]$
It does have a very useful option in –p. This option will attempt to create the directory
but won’t complain if a directory doesn’t exist and will create it if need be. For example, if
you want to create lots/and/lots/of/directories and you use the previous command, you
get the following:
[pmembrey@doublehelix ~]$ mkdir lots/and/lots/of/directories
mkdir: cannot create directory 'lots/and/lots/of/directories': No such file or
directory
[pmembrey@doublehelix ~]$
Now, if you run the same command but this time add –p, you instead get this:
[pmembrey@doublehelix ~]$ mkdir -p lots/and/lots/of/directories
[pmembrey@doublehelix ~]$ ls lots/and/lots/of/directories/
[pmembrey@doublehelix ~]$
The previous code also shows a quick ls to do a directory listing of our newly created
directory. As you can see, no errors were returned by the creation or listing attempts, so
you know that the directories have been safely created. However, you should always
check to make sure. You can also use the tree command to create a more graphical
representation:
[pmembrey@doublehelix ~]$ tree lots
lots
'-- and
'-- lots
'-- of
'-- directories
CHAPTER 3 ■ GETTING STARTED WITH CENTOS 57
4 directories, 0 files
[pmembrey@doublehelix ~]$
cd
Of course, once you can see and create directories, you’ll need to be able to move between
them. cd, which is short for “change directory,” lets you do just that. If you don’t provide a
directory to change to, it will take you back to your home directory. This is actually quite a
handy shortcut, and you’ll probably find that you use it all the time. When you do specify a
path, you can specify either a relative or an absolute path—both will work fine.
Two special directory entries that you need to know about (and are common also in
Windows) are the single dot (.) and the double dot (..). The single dot refers to the current
directory. It would be very unusual to change to this directory unless you did it by acci-
dent. Far more useful is this command: cd ... The two dots (..) have a similar function,
but they refer to the parent directory, that is, the one that your current directory sits in.
This is very useful for copying files or moving things around. You will most probably use
it to jump back a directory with cd ... However, unlike Windows, cd.. is not a valid com-
mand (unless you create an alias), so you need to have a space between the command and
the path. For example:
[pmembrey@doublehelix ~]$ pwd
/home/pmembrey
[pmembrey@doublehelix ~]$ cd ..
[pmembrey@doublehelix home]$ pwd
/home
[pmembrey@doublehelix home]$
Although you could just use cd pmembrey to go back to your home directory, you can
also just type cd by itself. This will always take you back to your home directory:
[pmembrey@doublehelix home]$ pwd
/home
[pmembrey@doublehelix home]$ cd
[pmembrey@doublehelix ~]$ pwd
/home/pmembrey
[pmembrey@doublehelix ~]$
Lastly, a useful bash feature to remember is cd –. This will take you back to the last
directory you were in. This is very handy if you entered cd by itself and want to go back
where you were.
CHAPTER 3 ■ GETTING STARTED WITH CENTOS
58
rmdir
This command lets you remove a directory. It will remove a directory only when it is com-
pletely empty. This prevents you from deleting directories with content in them.
[pmembrey@doublehelix ~]$ rmdir test1
[pmembrey@doublehelix ~]$
If you try to delete a directory (such as the directories that were created earlier in this
chapter), you will get an error message:
[pmembrey@doublehelix ~]$ rmdir lots
rmdir: lots: Directory not empty
[pmembrey@doublehelix ~]$
We’ll look at the rm command next, which can do just that: delete a directory with
contents. To remove a chain of empty directories, you can use the option –p, which works
a lot like the mkdir option. If any of the directories aren’t empty, however, rmdir will fail.
This is a built-in safety feature.
[pmembrey@doublehelix ~]$ rmdir -p lots/and/lots/of/directories/
[pmembrey@doublehelix ~]$ cd lots
-bash: cd: lots: No such file or directory
[pmembrey@doublehelix ~]$
rm
rm is by far the most dangerous command on any Linux system. rm with the correct (or
incorrect depending on how you look at it) options can destroy a server with just a single
command. Remember, Linux assumes you know what you’re doing when you work on
the command line, so if you tell it to remove every file on your system, it will do its best to
accommodate you. Recovering files that rm has removed is extremely difficult and prob-
lematic. This is another great reason for ensuring you have good backups!
By default, root on CentOS systems has aliases that help to prevent destroying your
data. Although they do a good job, they can be overridden (by starting the command
with a backslash), or their protection doesn’t kick in until damage has already been done.
When used with the –r option, rm will attempt to remove any files and directories in the
path that you specify. It will prompt for confirmation in certain circumstances such as the
file being read-only. The option –f, however, effectively tells rm to ignore confirmations
and errors and just keep on going. Combining the two gives you rm –rf, which is probably
the most dreaded command in a sysadmin’s arsenal. Like nuclear weapons, this is one
command that should be used with extreme caution and even then only after checking
that everything is typed in as it should be.
CHAPTER 3 ■ GETTING STARTED WITH CENTOS 59
For example, say you want to vaporize your current directory. You could enter a com-
mand like this:
rm –rf ./
which as expected removes the current directory. However, if a typo was made and there
was a space between the dot and the slash:
rm –rf . /
the command would erase the current directory and continue to erase everything under
the root (/) directory! This includes all your device files and configuration files. True, it
won’t be able to remove everything, but it will certainly be more than enough to sink
your battleship. It cannot be stressed enough—be very, very careful where you point this
command!
touch
This command has two purposes. First, it will update the last modified time on a given
file. This is useful if you want to update a cache or simply make a program reload a con-
figuration file. Second, if the file doesn’t exist, touch will create it. This makes it a fantastic
tool for just creating a file when you aren’t concerned about the contents:
[pmembrey@doublehelix ~]$ touch test
[pmembrey@doublehelix ~]$ ls -lha test
-rw-rw-r-- 1 pmembrey pmembrey 0 Nov 10 16:02 test
[pmembrey@doublehelix ~]$ touch test
[pmembrey@doublehelix ~]$ ls -lha test
-rw-rw-r-- 1 pmembrey pmembrey 0 Nov 10 16:03 test
[pmembrey@doublehelix ~]$
You can see that initially it created a file called test. The initial timestamp is 16:02. A
minute or so later we used touch on the file again and took another look. You can see that
the timestamp now reads 16:03.
nano
nano is a fantastic little text editor. You will no doubt find people who tell you that vi or
emacs is the only way to edit your files, but there is a lot to be said for simple and basic
tools. nano is simple; it opens, edits, and saves files. It doesn’t do color coding, but if
you just want to save a couple of lines or quickly edit a config file, nano will do the job
brilliantly.
CHAPTER 3 ■ GETTING STARTED WITH CENTOS
60
A useful option to remember, though, with the nano command is –w. This tells nano
that you don’t want to wrap the text on to different lines. In config files especially, ending
the line early is likely to stop the application from working properly or to reject the config
file altogether. –w will ensure that one line is actually one line, and nano won’t try to for-
mat the text for you.
cat
cat is a handy utility for taking the contents of a file and printing it to the screen. This is
really useful if you want to see the contents of a file but don’t need to edit or adjust it. For
example, you can see the content of /etc/hosts with this:
[pmembrey@doublehelix ~]$ cat /etc/hosts
# Do not remove the following line, or various programs
# that require network functionality will fail.
127.0.0.1 localhost.localdomain localhost
::1 localhost6.localdomain6 localhost6
[pmembrey@doublehelix ~]$
Summary
In this chapter, we touched on a few important ideas to get you started with CentOS. You
are able to get to a command prompt either locally on the machine itself or over the net-
work via SSH. You know how to move around the filesystem, create and delete files and
directories, and edit them in the nano text editor.
This background will help you as you move on to the next chapter and learn how to
use Yum to search, install, update, and generally manage your software packages.

61
CHAPTER 4
Using Yum
One of the most important things that you will need to do now that you are running
your own server is ensure that you keep it up-to-date. On many operating systems, apply-
ing updates can be a rather “exciting” process and—usually—one to be avoided like the
plague. This is because updates have a nasty habit of not just fixing bugs but also intro-
ducing a complete set of new ones.
With CentOS, though, you can rest assured that applying updates is safe and isn’t
going to cause any major problems. This is because during a given release, all bug fixes
are back-ported into the currently running version. This means that the version of, say,
Apache running on a CentOS machine will be the same on the last day as it is on the first,
even though hundreds of updates might have been made since then. Each package is also
rigorously tested to ensure that new bugs aren’t created and, more important, that old
bugs aren’t reintroduced.
Yum is a powerful update manager that makes finding, installing, and updating pack-
ages simple and straightforward. Under CentOS, for example, running yum update will
be enough to completely update the server out of the box. Yum provides powerful tools
for working with multiple software repositories and provides a collection of powerful
commands to search the repositories for the software you want to find. Yum provides
automatic dependency resolution (making sure everything installs and keeps working)
and provides mechanisms to verify the authenticity of the packages its finds. Yum is not
just for updates!
What Are RPMs?
CentOS uses the RPM software packaging system. An RPM file contains not only the soft-
ware files but also in-depth information about the software, such as what it’s called, when
it was released, what changes have been made, and what other packages it depends on to
work. Every piece of software in the CentOS distribution comes in RPM packages. When
you installed CentOS, you selected the type of system you wanted to build. This gave the
installer a list of packages that it needed to install and, from the dependency information,
CHAPTER 4 ■ USING YUM
62
all the packages that those packages were dependent on. This helps ensure that whenever
a new piece of software is installed, it is all but guaranteed to work as expected.
There are many RPM-based Linux distributions such as Red Hat Enterprise Linux,
Fedora, Mandriva, and Yellow Dog Linux. Because of this widespread usage, people
have come up with various different tools and systems to handle installing and updating
RPM packages. One of the best solutions is Yum (which stands for Yellow dog Updater,
Modified).
Yum is a management tool for RPM-based Linux distributions and was originally
developed by Seth Vidal (who now works for Red Hat) and a collection of volunteers at
Duke University. Yum is now the standard update tool on most RPM-based platforms
(although SUSE uses YaST) and has several benefits over its competition such as auto-
matically syncing repository information.
What Are Yum Repositories?
RPMs are generally stored in repositories. These repositories store not only the RPM files
but also significant amounts of metadata and the means to find the RPMs that you’re
looking for. When you want to install or update a package, Yum will look in these reposi-
tories to find the relevant software. If the RPMs are simply stored on a local disk, it is not
overly difficult to search through them—but if you have access only to a remote web
site, you don’t want to have to guess at a file name. Even if you did get the name right,
you would have to download that file and then inspect it to see whether you needed any
others.
Repository metadata solves this problem by providing all of this information in a col-
lection of files referred to as repomd. Yum uses this information to work out which RPMs
it needs, and then it can proceed to download those files.
CentOS Repositories
CentOS has quite a large number of official repositories. This is to ensure that administra-
tors can maintain their servers in a known state. By using the default repositories, only
packages that are updated upstream are made available. This ensures binary compatibil-
ity with Red Hat Enterprise Linux.
For some people, this may be very important, especially if they are running software
that is certified for Red Hat Enterprise Linux. But what if you just want the CentOS core
but want to be able to use software that isn’t available upstream? What if you want to try a
newer version of a piece of software? Chances are you will find what you’re looking for in
one of the CentOS repositories, but if not, you can always add a third-party repository.
CHAPTER 4 ■ USING YUM 63
Official CentOS Repositories
The following are the official CentOS repositories.
[base]
This repository contains the RPM packages as they are supplied on the related ISO
images. This repository is enabled by default, although the contents of this repository
don’t update after a given release.
[updates]
This repository, which is also enabled by default, is where all the security, bug fix, and
enhancement updates for the [base] repositories are placed. All of the other repositories
contain their own updates.
[addons]
This repository (enabled by default) does not contain packages that are released
upstream. Instead, it contains additional packages that are needed to build software from
the source RPMs (SRPMs). Using this repository doesn’t cause CentOS to lose binary
compatibility with upstream versions and should remain enabled.
[contrib]
This repository is not enabled by default and contains additional software packages that
have been contributed by the CentOS community. The important distinction with this
repository is that none of the software will conflict with software in the base distribution.
This means that it is generally safe to use these packages and that they won’t break binary
compatibility with upstream versions. However, they are not tested by the CentOS devel-
opers and may not necessarily follow upstream versions of the software all that closely.
[centosplus]
This repository is similar to the [contrib] repository in that it contains contributed soft-
ware. Like [contrib], these packages are contributed by CentOS users, but packages are
also supplied by CentOS developers. The major difference, though, is that the software
that this repository provides may very well replace or upgrade packages that are included
in the base distribution. This means that use of this repository could break binary com-
patibility with upstream versions.
CHAPTER 4 ■ USING YUM
64
Before using this repository, you should be fully aware of what this means to you. If
you have no interest in maintaining compatibility with upstream versions or your project
desperately needs the software included in [centosplus], then by all means feel free to use
it. If you are more conservative and would rather keep your system as close to upstream
versions as possible, you’d be better off not enabling this repository.
[extras]
This repository is enabled by default and contains packages that add functionality to the
distribution. It’s written by the CentOS developers and has undergone reasonable testing.
Software versions should track upstream versions fairly closely, and these packages will
never conflict or interfere with [base] packages.
[testing]
The testing repository contains packages that are currently being tested and debugged.
Unless you have a specific reason for doing so, this repository should not be enabled on a
production server.
Third-Party Repositories
Now that you’ve seen the official repository list, you should also be aware that there are
many third-party repositories that you can use. These are not approved by the CentOS
Project but often contain many useful packages. For more information on third-party
repositories and how to use them, check out the CentOS wiki at http://wiki.centos.org/
AdditionalResources/Repositories.
Getting Started with Yum
Because it’s integrated into CentOS, Yum is pretty much ready to use out of the box. The
only thing that doesn’t come preinstalled with CentOS is the CentOS public signing key.
Every official package released by the CentOS Project is cryptographically signed with a
PGP key. This ensures that Yum installs only authentic packages.
Installing the key is very straightforward, and you will be prompted to accept it as
soon as you attempt to do an update or an install. If the key hasn’t already been installed,
you will see a message similar to this:

CHAPTER 4 ■ USING YUM 65
warning: rpmts_HdrFromFdno: Header V3 DSA signature: NOKEY, key ID e8562897
Importing GPG key 0xE8562897 "CentOS-5 Key (CentOS 5 Official Signing Key)
<centos-5-key@centos.org>" from http://mirror.centos.org/centos/RPM-GPG-KEY-CentOS-5
Is this ok [y/N]:
Just say y to this, and Yum will carry on with the task that you’ve given it. This hap-
pens only the first time Yum tries to access the CentOS repositories and shouldn’t happen
again. When using a new repository, however, you will most likely have to accept and
install its public key when you first try to access the repository.
Updating Your Server
As we mentioned earlier, installing updates for CentOS is generally painless and safe. It is
almost always the case that not installing an update is far riskier than leaving the machine
unpatched.
It is also worth remembering at this point that CentOS updates itself incrementally.
This means that if you install CentOS from the original ISO images and do a full update,
it will be exactly the same as installing from the latest ISO images and doing a full update.
Obviously, it will take considerably longer to update the first machine, but ultimately the
machines will end up in the same state.
If you have been provided with a CentOS server (perhaps from a hosting company),
it is possible that the host will have already updated your server to the latest release. If, on
the other hand, you’ve installed the server yourself, you will want to run a full update as
soon as the machine first boots.
Generally speaking, it is best to update your server on a regular basis and update all
the packages that have new versions available. Although you can be more specific in what
you update, apart from saving bandwidth there is no real benefit to being specific.
To update your server, enter this command:
yum update
If your server has already been updated to the latest release, you will see something
like this:
[root@doublehelix ~]# yum update
Loading "fastestmirror" plugin
Loading mirror speeds from cached hostfile
* base: mirror.bytemark.co.uk
* updates: mirror.bytemark.co.uk

CHAPTER 4 ■ USING YUM
66
* addons: mirror.bytemark.co.uk
* extras: mirror.bytemark.co.uk
Setting up Update Process
No Packages marked for Update
[root@doublehelix ~]#
Otherwise, you’ll see something like this:
[root@doublehelix ~]# yum update
Loading "fastestmirror" plugin
Loading mirror speeds from cached hostfile
* base: mirror.bytemark.co.uk
* updates: mirror.bytemark.co.uk
* addons: mirror.bytemark.co.uk
* extras: mirror.bytemark.co.uk
Setting up Update Process
Resolving Dependencies
--> Running transaction check
---> Package ruby-libs.i386 0:1.8.5-5.el5_2.6 set to be updated
---> Package ruby-rdoc.i386 0:1.8.5-5.el5_2.6 set to be updated
---> Package ruby-devel.i386 0:1.8.5-5.el5_2.6 set to be updated
---> Package ruby.i386 0:1.8.5-5.el5_2.6 set to be updated
---> Package ruby-irb.i386 0:1.8.5-5.el5_2.6 set to be updated
--> Finished Dependency Resolution
Dependencies Resolved
=============================================================================
Package Arch Version Repository Size
=============================================================================
Updating:
ruby i386 1.8.5-5.el5_2.6 updates 280 k
ruby-devel i386 1.8.5-5.el5_2.6 updates 555 k
ruby-irb i386 1.8.5-5.el5_2.6 updates 69 k
ruby-libs i386 1.8.5-5.el5_2.6 updates 1.6 M
ruby-rdoc i386 1.8.5-5.el5_2.6 updates 136 k

CHAPTER 4 ■ USING YUM 67
Transaction Summary
=============================================================================
Install 0 Package(s)
Update 5 Package(s)
Remove 0 Package(s)
Total download size: 4 M
Is this ok [y/N]:
If you press y, Yum will proceed to download and install the available updates. That’s
really all there is to it!
One thing to remember, though, is that if software is in use when it gets updated,
the new version won’t be used until that application is restarted. Because kernel updates
affect the core of the operating system, a reboot is required to activate them. Although
it’s not essential to do so, you really should also reboot your server if you’ve installed any
glibc updates.
Installing a Package
Installing a package with Yum is also very easy. All you need to do is specify the name of
the package that you want to install. For example, if you want to install php, you use yum
install php. This gives the following output:
[root@localhost ~]# yum install php
Setting up Install Process
Parsing package install arguments
Resolving Dependencies
--> Running transaction check
---> Package php.i386 0:5.1.6-20.el5_2.1 set to be updated
--> Processing Dependency: php-cli = 5.1.6-20.el5_2.1 for package: php
--> Processing Dependency: php-common = 5.1.6-20.el5_2.1 for package: php
--> Running transaction check
---> Package php-cli.i386 0:5.1.6-20.el5_2.1 set to be updated
---> Package php-common.i386 0:5.1.6-20.el5_2.1 set to be updated
--> Finished Dependency Resolution

CHAPTER 4 ■ USING YUM
68
Dependencies Resolved
Once dependencies are resolved, you’ll see all the necessary packages being installed,
along with a warning about the size of the packages:
=============================================================================
Package Arch Version Repository Size
=============================================================================
Installing:
php i386 5.1.6-20.el5_2.1 updates 1.1 M
Installing for dependencies:
php-cli i386 5.1.6-20.el5_2.1 updates 2.1 M
php-common i386 5.1.6-20.el5_2.1 updates 154 k
Transaction Summary
=============================================================================
Install 3 Package(s)
Update 0 Package(s)
Remove 0 Package(s)
Total download size: 3.4 M
Is this ok [y/N]:
As before, if you continue, Yum will install and set up php for you. If the package is
already installed, Yum is smart enough not to try to install it a second time. However, if
the package does need to be upgraded, then Yum will take care of that for you.
Yum also takes care of any dependencies that the software package might have. In
our example with php, the php package depends on both php-cli and php-common. Yum has
therefore arranged for these packages to be added to the install list.
Installing a Group of Packages
Yum also has the ability to install groups of packages. This is really useful because
many tasks require a collection of different software that may on first glance not look
at all related. One thing to remember is that Yum will install only those packages that
are marked as mandatory. This is normally fine because it usually installs all of the key
packages, but if you find it didn’t install what you’re looking for, you can still install any
missing packages individually. To find out what groups are available (and also which ones
you have already installed), you use the following:
yum grouplist

CHAPTER 4 ■ USING YUM 69
This will generate a list similar to the following:
[root@localhost ~]# yum grouplist
Setting up Group Process
Installed Groups:
Administration Tools
Graphical Internet
Available Groups:
Tomboy
Cluster Storage
Engineering and Scientific
MySQL Database
Development Libraries
Beagle
GNOME Software Development
.....
X Software Development
Virtualization
Done
[root@localhost ~]#
You will certainly see more than this because we have removed a large chunk of the
groups so that the list wouldn’t take up half the book! One of the groups that most people
tend to end up installing is Virtualization. This group contains all the packages you need
such as the Xen kernel, support libraries, and administration tools.
To install a group, you use the groupinstall command:
yum groupinstall Virtualization
If the group you want to install has a space in the name, enclose it in quotes:
yum groupinstall "Yum Utilities"
As with installing packages, Yum will present you with a list of packages that it needs
to download and install in order to fulfill your request.
Updating Individual Packages
Updating a package is a cross between updating the whole system and installing a single
package. To do this, run the following command:
yum update php
CHAPTER 4 ■ USING YUM
70
In this case, Yum will update the php package and any packages on which it depends.
If you already have a running web server using PHP, the new version will not be used
until you restart the web server.
Updating a Package Group
It is possible to update all the packages within a given group. Like updating individual
packages, it is usually better to update the entire system rather than just a handful of
packages. To update a group, run this:
yum groupupdate Virtualization
This will update all the packages in the Virtualization group.
Removing a Package with Yum
Although Yum is mostly used for installing and updating software, it can also be used to
remove it. This is especially helpful when removing package groups (which we’ll look at
in a moment). To remove a package, run the following command:
yum remove php
Note that this will remove the php package from the system. However, when we ini-
tially installed php, Yum also installed php-cli and php-common. These will not be removed
by this command, but other packages that might depend on the php package will be. It is
always best to very carefully check what Yum is proposing to do, especially when you are
removing packages.
Removing a Package Group
This command follows the same pattern as the other group commands. To uninstall the
Virtualization group, for example, you can use the following command:
yum groupremove Virtualization
This will remove all the packages within this package group.
Searching for Packages
Yum has a sophisticated search facility that will allow you to find pretty much any pack-
age across your repositories. The key to actually finding a specific package, though,
requires a more in-depth knowledge on how RPM packages are named—specifically, how
the version numbers work.

CHAPTER 4 ■ USING YUM 71
RPM Package Names
RPM packages are named in the following way:
package_name-version- release.architecture.rpm
package_name is the name of the package. For example, you saw how to install the php
package earlier. version is the version of the software that the package contains. release
is the CentOS release number. Most packages are version locked, whereas the release
changes as patches are added. architecture is what type of hardware the package is com-
piled to run on.
For the vast majority of people, the architectures of interest are i386 (32-bit Penti-
ums and Athlons), x86_64 (64-bit Pentiums and Athlons), and noarch, which is compatible
with all platforms. This usually implies that there are no precompiled files. Collections of
Python scripts usually come in a noarch package, for example.
Generally, if you’re working with Yum and the standard repositories, you won’t
need to do much with either architecture or version because Yum will make the correct
choices for you. However, knowing how the packages are put together will let you search
for specific versions and give you the option of manually locating and installing a file.
Doing a Simple Search
A simple search will look for packages based on the package name. To search for the php
package, you can do the following:
yum list php
This would show the following output:
[root@localhost ~]# yum list php
Available Packages
php.i386 5.1.6-20.el5_2.1 updates
[root@localhost ~]#
This tells you the package name and architecture (php.i386), the current version
(5.1.6), the release (20.el5_2.1), and which repository the package is in (updates). Now
that you’ve found the package, you can install it the same way as before.
Using Wildcards
Sometimes you aren’t going to know which specific package you want, or you might
want to see a list of all related packages. You can use an asterisk (*) to perform a wildcard
search. For example, if you search for php*, you get the following output:

CHAPTER 4 ■ USING YUM
72
[root@localhost ~]# yum list "php*"
Installed Packages
php.i386 5.1.6-20.el5_2.1 installed
php-cli.i386 5.1.6-20.el5_2.1 installed
php-common.i386 5.1.6-20.el5_2.1 installed
php-gd.i386 5.1.6-20.el5_2.1 installed
php-mbstring.i386 5.1.6-20.el5_2.1 installed
php-mcrypt.i386 5.1.6-15.el5.centos.1 installed
php-mysql.i386 5.1.6-20.el5_2.1 installed
php-pdo.i386 5.1.6-20.el5_2.1 installed
php-pecl-Fileinfo.i386 1.0.4-3.el5.centos installed
php-pgsql.i386 5.1.6-20.el5_2.1 installed
Available Packages
php.i386 5.1.6-23.2.el5_3 updates
php-bcmath.i386 5.1.6-23.2.el5_3 updates
php-cli.i386 5.1.6-23.2.el5_3 updates
php-common.i386 5.1.6-23.2.el5_3 updates
...
[root@localhost ~]#
■Note You can see here that the php package is installed (5.1.6-20.el5_2.1) and an update is available
(5.1.6-20.el5_3).
A More Useful Search
Using list is helpful only when you already know the package name that you want to
find. Generally, you’ll have a rough idea what it is you need but might not be able to put
your finger on the name. You can get a list of all the packages by using yum list—but if
you want to find a specific package, you will want to do a search.
To do a search that will look at the name, description, and summaries of all packages
in the repositories, you can use the search command. For example, you can do a search
for everything with php in it with this command:
yum search php
CHAPTER 4 ■ USING YUM 73
Currently this returns 87 potential hits. The list shows the package name with a
description next to it so that you can tell whether any of the packages are the one that you
want to find. Another way to perform the search is to use the provides command. When
using this, Yum will look to find any packages that provide the search item (for example,
a library package), and it will also look at the individual file list. However, doing so
requires the use of indexes that are considerably larger than those for a simple search.
That said, with a reasonably fast Internet connection, the delay is not really noticeable.
To do a search for any packages that provide php, you can use the following command:
yum provides php*
Adding a Custom Repository
Dag Wieers helps run a third-party software repository, and we’ll be using this repository
as the example in this section, because many people find his packages useful and would
rather have easy access via Yum than have to download and install the RPM packages
manually.
Setting It Up with RPM
Dag makes it very easy to set up and use his repository by providing all the configuration
as an RPM file. The rpm command-line tool can accept any valid URL that points to an
RPM package, which means it’s possible to install the RPM directly from Dag’s web site
without downloading it first. Installing this RPM file adds the correct .repo files for Yum
and configures the repository without any further intervention.
For example, the command listed on Dag’s web site is as follows (for i386):
rpm -Uhv \
http://apt.sw.be/redhat/el5/en/i386/rpmforge/RPMS/
rpmforge-release-0.3.6-1.el5.rf.i386.rpm
Running this command downloads and installs the RPM file from the web site. This
RPM contains the public keys for the signers, the repo configuration files, and the docu-
mentation, among other things. Using RPM to distribute the information makes sense
because it’s easy to update and manage future releases.
How to Do It Without an RPM
If you don’t have an RPM file, you will need to do a few extra steps to set up a new
repository. Most repositories make two files available—a .repo file containing all the

CHAPTER 4 ■ USING YUM
74
information about the repository and the public key that was used to sign the packages to
verify their authenticity. Both are required in order to get a repository up and running.
Another excellent CentOS repository is provided by Karanbir Singh. Actually, he
updates and maintains two repositories at http://centos.karan.org. These repositories
contain packages that are available on similar platforms but aren’t available for CentOS
without being rebuilt. One contains packages from Fedora Extras, and the other contains
miscellaneous packages that Karanbir has built. One thing to keep in mind is that pack-
ages from the Extras repository will not update or conflict with the [base] repository.
The Misc Packages repository, on the other hand, does contain packages that do. As men-
tioned on his web site, if you choose to use the Misc Packages repository, you also need to
enable the Fedora Extras repository because there are numerous dependencies that are
resolved in there.
As with some of the official CentOS repositories, you need to be aware that some pack-
ages will replace the base packages. It is important that you understand the consequences
of using third-party repositories before proceeding any further.
If you would still like to benefit from Karanbir’s work, you will need to tell Yum where
to find the two repositories. The easiest way to do this is with wget—a handy command-line
utility that can download files from web sites and FTP servers.
What you want to do is download the two .repo files available on the web site and
store them in /etc/yum.repos.d/. To do this, you can use the following commands (as root):
cd /etc/yum.repos.d/
wget http://centos.karan.org/kbsingh-CentOS-Extras.repo
wget http://centos.karan.org/kbsingh-CentOS-Misc.repo
This will download the files and store them in the current directory. The only thing
you need to do now to complete the setup process is to install the RPM signing key. This
is also available from Karanbir’s web site, and fortunately, RPM can work with a URL as
well as a local file. To install his PGP key, you can run the following command:
rpm --import http://centos.karan.org/RPM-GPG-KEY-karan.org.txt
To test that this is working properly, try running yum update. On one of our servers,
after you have run the previous commands, the output starts with this:
[root@localhost ~]# yum update
kbs-CentOS-Extras 100% |=========================| 951 B 00:00
primary.xml.gz 100% |=========================| 157 B 00:00
kbs-CentOS-Misc 100% |=========================| 951 B 00:00
primary.xml.gz 100% |=========================| 157 B 00:00
Setting up Update Process
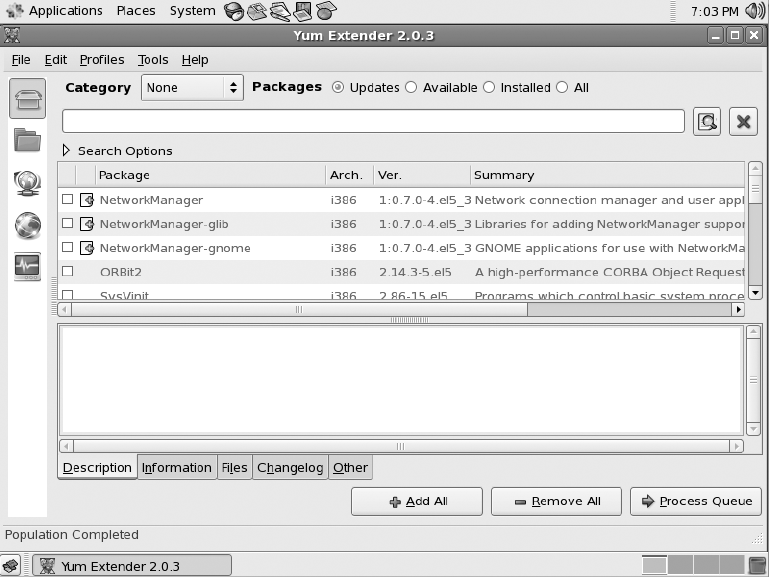
CHAPTER 4 ■ USING YUM 75
Here you can see that it knows about the new repositories and it has downloaded
the repository information for processing. You can return a list of enabled repositories by
running the command yum repolist. If you run yum repolist all, you will see the reposi-
tories on your system, even if they haven’t been enabled. You can now make use of any of
the RPMs in the new repositories, using the same commands discussed earlier.
Yumex
CentOS comes with a tool called Yumex that provides a useful graphical interface to the
yum command. If you want to give Yumex a try, you’ll first need to install it. It’s available in
the standard CentOS repositories and can be installed with yum install yumex.
Because Yumex is a graphical tool, you will need to log in to the graphical interface on
your server. You’ll find Yumex (which stands for Yum Extender) in System Tools under the
Applications menu. When you first start Yumex, it will show you Package view (Figure 4-1).
Figure 4-1. Starting Yumex
CHAPTER 4 ■ USING YUM
76
As you can see, Yumex lists the packages that need to be updated. You can select
packages individually or click Add All to select all the packages. Clicking Process Queue
will attempt to update the packages that you have selected.
You can view the available packages, the installed packages, or all the packages by
selecting the respective radio button. The search feature will allow you to find specific
packages that you want to install.
Selecting a package will show its description in the bottom window. By selecting the
different tabs, you will be able to see all the information about that specific package.
The buttons down the left side provide access to additional features. The first button
selects Package view, which is what is selected by default. The next button selects Group
view and shows packages based on their groups for easy selection. The next button selects
Queue view and lets you see an overview of what will happen once you process the queue
itself. The fourth button, Repos, shows you all the repositories that are available on the
machine. You can also enable and disable repositories from this screen. Lastly is Console
view, which shows the raw output from all of the Yum-related commands that Yumex has
executed.
Yumex is a really nice tool for handling packages, especially when you’re not quite
sure which package you want to find. It’s often much friendlier than trying to use the
command line and browsing through reams of text. For more information on using
Yumex, visit the Yum Extender web site at http://www.yum-extender.org/.
Summary
This chapter gave you a quick guide to using Yum. You now know how to update your
system and install, update, and remove specific packages and package groups. You also
know how to search for packages and how to add third-party repositories to your system
both by using an RPM file and by manually updating your configuration.
Yum is one of the tools that you will use on a regular basis, but it’s not overly hard
to use or understand. Now that you’ve learned the basics, you can learn more about the
advanced features by running man yum or running yum help.

PART 2
Going into Production
Certain services are required in any production environment. These include web services,
mail, name resolution, DHCP, file sharing, and more. The chapters in this part will show
you how to configure and run these essential network services on your CentOS server.

79
CHAPTER 5
Using Apache
When you hear the word Internet, what’s the first thing that pops into your head? If
you said “web sites,” you wouldn’t be alone! Indeed, most people think that the World
Wide Web and the Internet are the same thing. Perhaps it is no surprise then that one of
the most common reasons for setting up a Linux server is to run a web site of some kind.
People have all sorts of different reasons for putting content on the Internet. Sometimes
they want to share their photos with friends and family, they might want to set up a home
page for their business, or perhaps they want to start their own blog.
Whatever the reasons, before you can host your own stuff, you need a web server.
In this chapter, we’ll go through how to install the web server, and once everything is
installed, we’ll show how to do some initial configuration such as setting the web server
to start when the server boots and updating the firewall to allow people to connect from
the outside. Then we’ll show where all the configuration files are and do some basic con-
figuration such as setting the server name and contact details. We’ll also be setting up
SSL (see the “Using SSL” section a bit later in the chapter) and demonstrating how to use
virtual hosts (see the “Setting Up Virtual Hosts” section).
nNote DNS is very important for making your web site available to the masses. It’s also critical for provid-
ing virtual hosting. This (and more) is covered in depth in Chapter 7.
After that, we’ll move on to some of the more interesting tasks you’re likely to want
to do. We’ll look at password protecting a directory (a firm favorite), using caching to
improve the performance of your web site, finding where the logs are kept and what to
look out for, setting up virtual hosts, and more!
CHAPTER 5 n USING APACHE
80
How Does the Server Work?
You are no doubt very familiar with using a web browser, searching the Internet, and
viewing web pages. But do you really know what’s going on in the background? Do you
know how these pages actually get to you? Before you can view a web page or download
a file, you need to provide your browser with a uniform resource locator (URL). A URL
contains a number of distinct parts that affect how a page is requested. For example, let’s
dissect the following:
http://www.apress.com/book/catalog
The first part, http://, specifies which protocol will be used to access the page. These
days, you are likely to see only two protocols: HTTP and HTTPS. Occasionally you will
see others, such as FTP or application-specific protocols such as IRC and Skype. From
a web site point of view, though, we’re interested in only the first two. We will look at
HTTP in more depth in a moment. HTTPS is really just a special case of HTTP. The only
real difference is that the connection is secure. We look at setting up a secure server a
little later too.
The second part is the hostname or address of the server that you are requesting the
page from (from our example, www.apress.com). Generally, you will use a hostname rather
than an IP address because it’s easier for the user, and on the server side it has some
additional benefits such as a basic form of load balancing. One of the important things to
remember is that a single web server can handle many different web sites. For example, a
web server could provide completely different web sites for both www.apress.com and www.
example.com. Just as important to remember is that www.example.com and www2.example.com
can point to completely different IP addresses and as such can be hosted on completely
different servers. You will see this technique a lot where companies host the static parts of
their web sites (such as graphics and JavaScript files) on different machines than the ones
that run the main web site. eBay, for example, uses the ebaystatic.com domain to host its
static files and serves the dynamic part of its site from the ebay.com domain.
The third bit tells the web server which file or resource you want to access (from our
example, /book/catalog/). Not so long ago, this path would usually map quite closely to
specific files or scripts sitting on the server’s hard disk. These days, most web sites hide
the implementation details and try to present cleaner URLs.
When the web server receives the request, it will look at the whole URL that has been
requested. This is how it can tell the difference between the various sites that it hosts.
This technique is called virtual hosting and is covered in depth later in the chapter.
So, when you enter a URL and press Enter, your browser will look up the port for
the protocol you have requested. Unless you have specified a different port (for exam-
ple, http://www.example.com:1234/downloads/), by default HTTP will connect to port 80,
CHAPTER 5 n USING APACHE 81
and HTTPS will connect to port 443. If you have provided an IP address rather than a
hostname, the browser will immediately try to open a connection. If you provided a
hostname, the browser will ask the operating system to resolve it to an IP address before
trying to connect.
Once the connection has been established, the browser will send a GET request.
A GET request looks like this:
GET http://www.apress.com/book/catalog/
With every reply, the server includes a status code to indicate whether something
went wrong. These are defined in the HTTP protocol (RFC 2616). You might have come
across some of these:
200 OK: Not usually seen by end users because this means that the file requested was
found and is being returned.
404 Not Found: Very common and usually caused by someone moving a file that
someone else had linked to.
401 Unauthorized: You usually see this after entering an invalid username and pass-
word. Technically, though, it is this status code that makes your browser ask you to
authenticate in the first place. We look at this a bit later in the “.htaccess” section.
500 Internal Error: Something blew up on the server, usually seen only with web
applications rather than static web sites.
When your browser has downloaded the file requested, if it is X/HTML, it will then
repeat the whole process for all the files that the document refers to, such as graphics,
Cascading Style Sheets, and JavaScript. Depending on the web site, there can be more
than 50 individual requests needed to build a single page. Fortunately, most browsers will
cache these files, which tend to be reused on other pages. This greatly improves perfor-
mance and saves on bandwidth.
A Brief Introduction to SSL
Secure Sockets Layer (SSL) is a technology that provides a secure way to communicate
over a potentially insecure network such as the Internet. Although it’s most commonly
associated with secure web sites (such as those used for online banking), it is also equally
useful for securing other services such as e-mail. SSL provides two very important secu-
rity features. First, it provides an encrypted connection so that the data you send and
receive cannot be read by anyone else. The client and server send each other a list of
CHAPTER 5 n USING APACHE
82
encryption standards that they both support. They then choose the highest level that’s
supported by both. The second feature is the ability to identify the remote server. This
is done using certificates. The server presents its certificate to the client when it first
connects. The client has a database of certificate authorities (CAs) that it trusts, and it
looks to see whether one of these authorities signed the server’s certificate. If it has been
signed, if it hasn’t expired, and if the hostname matches, the client will show the web
page without prompting. If the certificate cannot be verified for some reason, a warning
will be displayed to the user.
There are some issues relating to using SSL with a web server (often referred to as
HTTPS), and we’ll cover these in more depth in the “Using SSL” section later in the chap-
ter. Although SSL sounds rather complicated, it’s surprisingly easy to set up. If you’re
going to be sending or receiving any personal or potentially confidential information,
using SSL would be a good idea.
Why Run Your Own Server?
Now, because this is a chapter on setting up and running a web server, you might be
thinking that the question in the heading is somewhat redundant. If you’ve already set
your heart on running a shiny new web server, feel free to skip to the next section. If
you’re still not sure if it’s for you, read on.
Running your own web server gives you a lot of flexibility because you control exactly
how everything is configured. You can decide where to put your files and whether you
want to run PHP, but most important, you can add web sites to your heart’s content. You
may have only one site in mind at the moment, but you’d be surprised how others tend
to crop up, especially when your friends find out you can give them some space for only a
modest charge.
Flexibility is the biggest benefit of having your own web server. Most shared hosting
companies restrict what you can host. They may not allow files over a certain size. They
may have older versions of the software that don’t have all the features you need. They
might restrict how long your scripts can run for or how much memory they can use. To
be fair, these are all valid precautions when running a system that many individuals have
access to; after all, one user should not be able to monopolize all the resources.
Actually, if too many people hear about your newfound skills, you might find yourself
implementing some of the same restrictions on your own server!
What It Involves
Running your server isn’t all fun and games, though. There is a serious aspect to it as well.
It becomes your responsibility to make sure that you keep your web server up-to-date
with the latest security patches. You also need to ensure that all of the web-based applica-
CHAPTER 5 n USING APACHE 83
tions that you’re running (for example, Gallery or SquirrelMail) are also kept up-to-date,
much for the same reasons.
Fortunately, updating any software that’s been installed as part of CentOS is very
easy to do and will be done during the normal update process. You’ll also need to be on
the lookout for any funny business, so you’ll need to keep an eye on the logs. If you’re
allowing other people to upload their own content, this becomes even more important
because you not only need to make sure that they’re not serving anything unsuitable but
also that their data is kept secure. To be honest, we’re not talking about a great deal of
work here. As long as you keep an eye on things and run regular updates, it’s unlikely that
you’ll have any trouble.
When to Let Someone Else Do It
Now that you’ve seen what’s involved, you might be wondering whether you really want
to run your own web server after all. Even if you are going to, there are good reasons why
a future web site might be best hosted elsewhere. For example, if you are hosting on a
machine at home or at work, you might not have a very fast Internet connection. If you’re
going to be serving large files such as streaming video, it may be best to see whether you
can host at least that aspect on a system that has more bandwidth available.
You may also have a friend who you just know is going to hassle you with questions,
so it might be worth pointing them to a commercial provider that will get paid to answer
all of their questions. Normally when we talk about hosting with a third party, hosting is
on a shared server. This is where you are provided with the details on where to upload
your content, and the provider handles the technical side of things. If you need some-
thing a bit more special, though, you can lease a dedicated server. This is a real machine
that sits in a data center somewhere.
As the name suggests, it is dedicated for your use, and you can install whatever soft-
ware you like. For all intents and purposes, it’s the same as the PC sitting under your
desk. As you’d expect, though, these services are a bit on the pricey side and generally
have minimum contract terms and other less than exciting restrictions. If you need the
flexibility of a dedicated server but don’t want to overcommit yourself, you could look at
a virtual private server.
What Is a Virtual Private Server (VPS)?
A virtual private server (VPS) is a fully functional Linux server. However, they could more
accurately be described as server instances because there can be numerous VPSs on a
single physical server. A VPS usually means that you won’t have dedicated hardware and
will in fact be sharing with other users. This is why they are offered at a much lower cost.
You have full root access, and you can install whatever software you like and use it in the
same way as you would a real server.
CHAPTER 5 n USING APACHE
84
The difference is that your server is most likely sharing real hardware with other
virtual private servers. Linux servers are well known for their ability to handle heavy
workloads without consuming much in the way of resources. A VPS puts this to good
use by allowing a collection of servers to share the same hardware. This means that for a
given amount of hardware, considerably more servers can be provided. It also means that
VPSs are significantly cheaper than real dedicated servers, and for most people, a VPS
will be more than sufficient for their needs. If not, it is very easy to upgrade your VPS with
some extra memory or hard disk space. If you do decide to get a VPS, make sure you find
a reputable provider. Lots of providers use weird and wonderful techniques to get the
maximum number of Linux instances running on one machine as they can. This means
you pay very little for the service, but you don’t really have a true dedicated Linux server.
When you start trying to install software or need to access certain devices, you’ll come
across all sorts of strange and arcane error messages.
If you’re just starting out with running your own server, a VPS could be for you.
It’s much cheaper than a real dedicated server, and there is usually plenty of room for
expansion. It will also save you from having to keep a machine permanently connected
at home. Most VPS are hosted in high-quality data centers and so have very fast Internet
connections. Many of our friends use a VPS combined with a server at home so that they
can have the best of both worlds!
Picking a Web Server
Picking the right web server software can be either very complicated or very straight-
forward depending on what you’re looking to achieve. For the vast majority of people,
the choice of web server isn’t particularly important. Although it spoils the surprise a
little (and you’ve probably already guessed anyway), we’ll be going with the Apache web
server in this chapter. It’s one of the most popular web servers on the planet, has tons of
features, and has a great user community with lots of support, tutorials, examples, and
too many books to count. Because it’s the most commonly used web server, you’ll be in a
much better position to get help and support.
If you really need something a bit lighter on its toes (for example, if you have limited
memory) or just want to try something a bit different, by all means take a look around.
nginx seems to be the current favorite especially for deploying Ruby on Rails applications,
but lighttpd still commands far more web share. At the end of the day, the choice is yours,
but if you’re new to the game and would like to ease your way into it before trying some-
thing a bit more exotic, then we strongly suggest starting your web-serving career with
Apache.
CHAPTER 5 n USING APACHE 85
Installing Apache
If you followed the install guide in Chapter 2, you’ll already have Apache installed. The
easiest way to check this is to use the service command:
service httpd status
Because you haven’t started Apache yet, you should receive the following message:
httpd is stopped
If Apache isn’t installed, you will get an error message:
httpd: unrecognized service
Installing Apache is very straightforward and can be done with a single command:
yum install httpd
If you haven’t updated your system before, you will be prompted to accept the CentOS
signing key (see Chapter 4). Otherwise, after the package has been installed, you will be
taken back to the command line.
Configuring the Firewall
Now you need to update your firewall because there’s not much point in going to all that
effort to set up a web server if no one is going to be able to see your lovingly crafted web
pages. We’ll use the setup tool that comes with CentOS because it already has the options
in there to easily enable both HTTP and HTTPS.
So, from the command line, run the following:
setup
This will open up a text-based menu system that you’ll be able to use to configure
a number of key system services such as the network configuration and the time zone
(Figure 5-1).
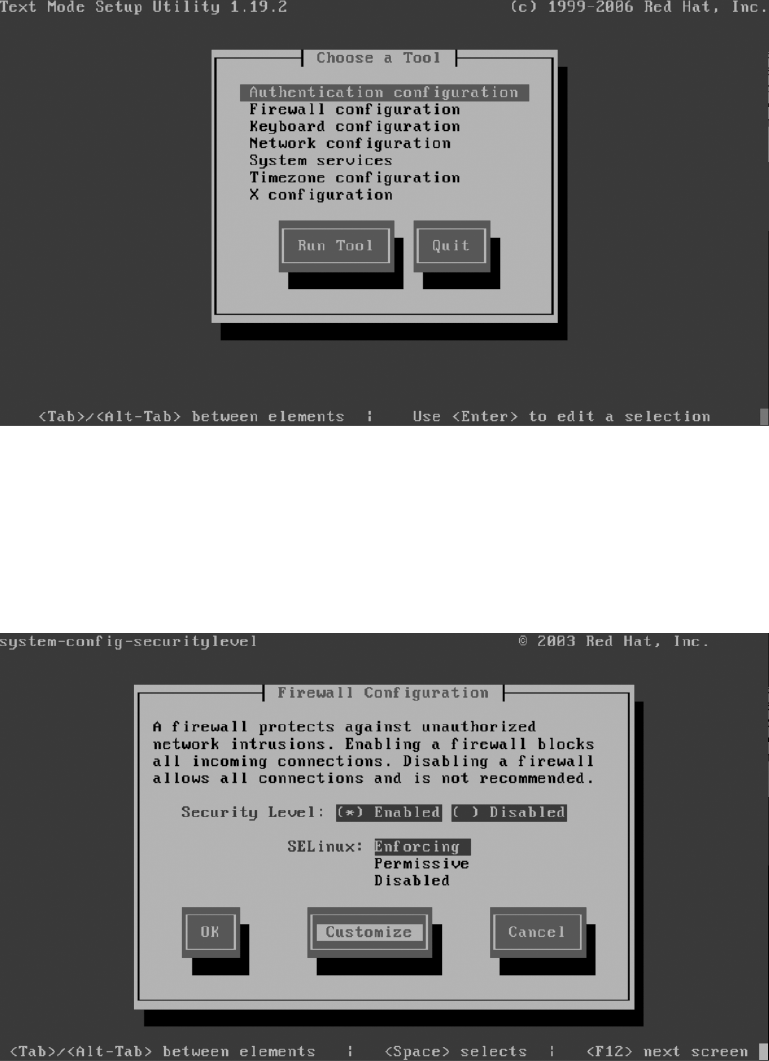
CHAPTER 5 n USING APACHE
86
Figure 5-1. Setup tool, configuring essential system services
Use the arrow keys to select Firewall configuration, press Tab, and then press Enter.
This will bring you to the Firewall Configuration screen where you can also configure
SELinux. Press the Tab key four times to highlight Customize, and press Enter (Figure 5-2).
Figure 5-2. Customizing the firewall
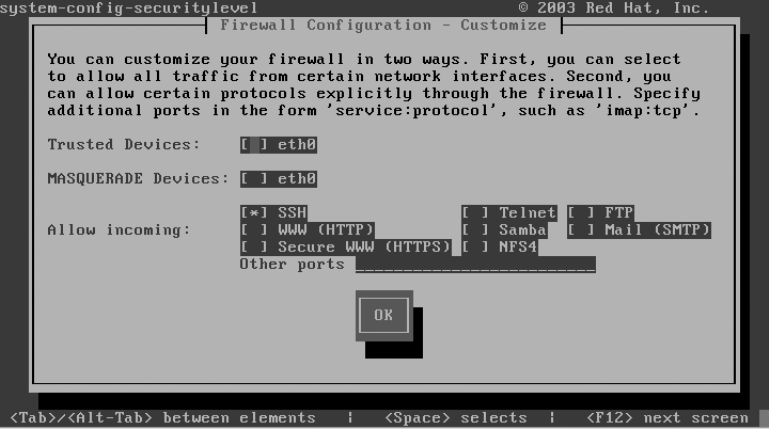
CHAPTER 5 n USING APACHE 87
You should see a section labeled Allow incoming. SSH will have an asterisk next to it
(Figure 5-3). Press Tab three times, and press the spacebar.
Figure 5-3. Current firewall configuration
This will add an asterisk next to WWW (HTTP). Press Tab and then the spacebar to
highlight Secure WWW (HTTPS) (Figure 5-4). If you don’t want to support secure web
traffic at this stage, then there’s no need to select it from the list. You can come back here
at any time to enable it in the future.
Finally, press Tab to highlight the OK button, and press Enter. This will take you back
to the previous page. Press Tab four times to select the OK button. After pressing Enter,
there will be a slight delay as the firewall rules are applied. Depending on whether any
rules were loaded previously, you may see some text relating to Netfilter. Don’t worry
about this; you’ll be taken back to the main menu as soon as the rules have been updated.
On the last page, press Tab once to select Quit, and press Enter. You should then be
returned to the command line. Congratulations, your firewall has now been configured to
allow other people to connect to your web server.
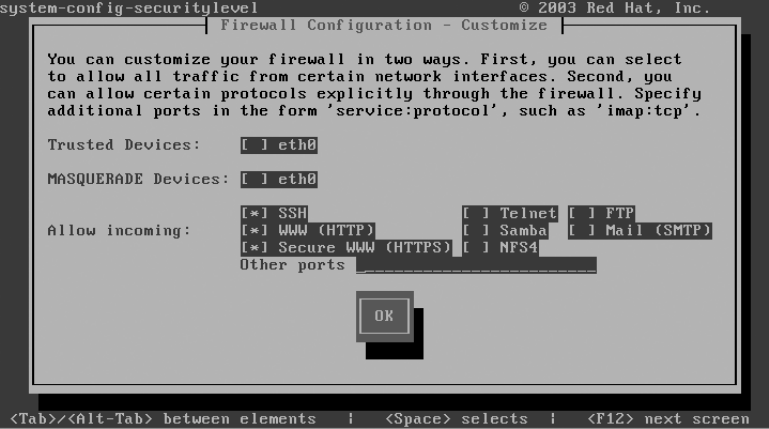
CHAPTER 5 n USING APACHE
88
Figure 5-4. New firewall configuration
Making Sure Apache Starts Each Time the Server Reboots
Believe it or not, this last step is often missed completely. If that happens, it’s usually
noticed only after a reboot and people are already on the phone complaining that the
web site appears to be down. Don’t let this happen to you, and make sure that you
configure Apache to start at the same time your server does.
Fortunately, this is really easy to do. Just run the following command:
chkconfig httpd on
That’s all there is to it! You can verify that Apache is going to start by using
chkconfig’s –list option:
chkconfig --list httpd
This should return something like this:
[root@centos ~]# chkconfig --list httpd
httpd 0:off 1:off 2:on 3:on 4:on 5:on 6:off
[root@centos ~]#
CentOS servers start in either run level 3 or run level 5. As you can see, we’ve con-
figured the system so that Apache is started in both those run levels. You could get more
CHAPTER 5 n USING APACHE 89
specific if you wanted and specify precisely which run levels that you want to start Apache
in, but that’s rarely done.
You can also update which services should start when the server reboots using the
same configuration tool that you used to configure the firewall. Some of the services in
there might be required for your system to start up properly, so disable only those ser-
vices that you are sure won’t cause any problems. Disabling Apache, for example, would
be fine, but disabling network would be a bad idea, especially if your machine is in a
remote location.
Starting Up and Testing Apache
You will no doubt be delighted to know that at long last you’re able to start up your web
server!
Although Apache has been configured to start each time the system does, CentOS
won’t start the service now. You can manually start the service by using this:
service httpd start
All going well, the output should look like this:
[root@centos ~]# service httpd start
Starting httpd: httpd: [ OK ]
You can use the same command you used at the beginning of the installation section
to check whether Apache is running. This time you should see something like this:
[root@centos ~]# service httpd status
httpd (pid 25082 25081 25080 25079 25078 25077 25076 25075 25073) is running...
[root@centos ~]#
Apache creates a number of processes to handle the incoming web requests. Under
Linux, each process is given a unique number to identify it. This is called the process ID
(PID). The status command is showing you that Apache is running and giving you a list
of the processes that have been created. Generally speaking, you won’t do much with this
information, but it’s useful if you ever have to do any debugging.
When you started Apache, you may have received a warning, although it seemed to
have started anyway. The warning you may have seen is as follows:
Could not reliably determine the server's fully qualified domain name,
using 127.0.0.1 for ServerName
All this means is that Apache wasn’t sure which name to use to identify itself. Most
of the time it’s possible to work it out based on the network configuration, but on a fresh
install, this information may not be readily available. We will actually set this manually

CHAPTER 5 n USING APACHE
90
in the Apache config file in the next section. Once it has been set manually, Apache will
no longer raise it as an issue. Apache will run perfectly happily even if you keep getting
this error message, so although it’s good form to ensure that ServerName is set correctly, it
won’t cause you any trouble.
Now it’s time to take a look at your new web site! The best way to really appreciate
your handiwork is to start up a browser on another machine and punch in the IP address
of your CentOS server. You should see something like Figure 5-5.
Figure 5-5. Web site as seen by a Mac
You should also be able to use HTTPS to access the same page, only this time the
link will be secured with SSL. At this stage, you will receive a warning that the certificate
is not valid. Don’t worry, this is normal. The certificate you’re using currently is one that
was created during the install process. It is perfectly fine for internal use, and if only a few
people are going to use the secure site, there’s probably no need to change it. Having said
that, you’re likely to give a panic attack or at least second thoughts to anyone who visits
your site. In the “Using SSL” section, we’ll cover how to generate your own self-signed
certificate as well as how to generate a certificate-signing request so that you can order a
trusted certificate from a third-party certificate authority.
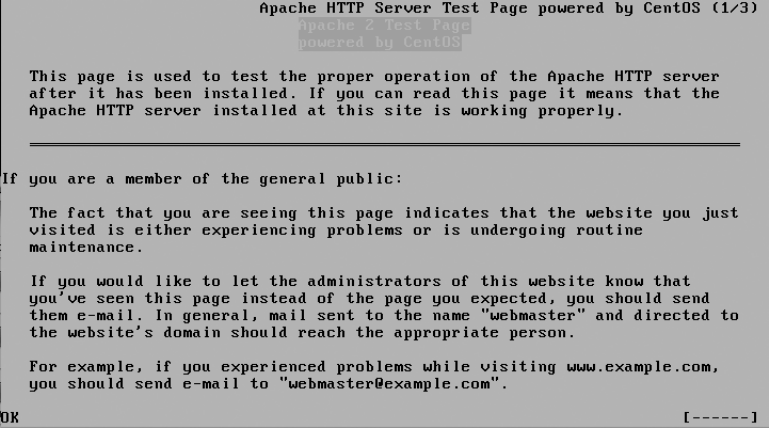
CHAPTER 5 n USING APACHE 91
If you don’t have another computer handy, you can still check that Apache is up and
running from the command line. links is a fully featured command-line web browser. It
doesn’t display graphics or any of the advanced features you’ve come to expect from the
browser on your desktop, but it’s an invaluable tool for testing web sites or doing some
basic browsing. It’s certainly a useful command to know. To try your site with links, run
the following command:
links http://localhost
This should give you something like Figure 5-6.
Figure 5-6. Web site as seen in links
To get out of links, press Q, and then press Enter. You’ll be taken back to the com-
mand line.
Well, that didn’t take long, and you have a nice new Apache server up and running.
Configuring Apache
Now that Apache is up and running, you can start to configure it. Most people don’t make
a lot of changes to the defaults. Apache comes out of the box configured in such a way
that it serves the needs of most people. The main things that people alter are configuring
the SSL settings so that they can use a new certificate, creating virtual hosts so they can
host multiple web sites, and changing access control so that they can use .htaccess files
CHAPTER 5 n USING APACHE
92
to password protect directories. We will be looking at all three of these topics as well as a
few other useful options that you can set to get the best out of Apache.
Where Is Everything?
You can find all the configuration files relating to Apache in /etc/httpd/. Right now you’re
really interested only in the contents of the conf and conf.d directories.
conf contains only one file of interest, and that’s httpd.conf. This file contains all the
core Apache configuration settings. On other distributions or when building for source, it
isn’t uncommon for Apache’s entire configuration to be stored in this file. This becomes a
problem, though, when you want to separate the different parts of Apache. For example,
if you install PHP, the installer updates Apache’s configuration so it knows where to
find it. But what if you want to then remove PHP? How does the installer know what to
remove?
This is where conf.d comes in. This directory contains various files depending on
what modules you have installed. If you have PHP and SSL enabled, for example, you
will find php.conf and ssl.conf sitting in this directory. When Apache starts, it checks this
directory and loads all the configuration files. If it helps, you can imagine this as a large
cut-and-paste operation. The contents of all these files are injected into the main Apache
configuration file at the same point as the instruction to load them.
This makes it very easy to add and remove software without breaking the rest of
Apache or accidentally removing configuration settings that you actually wanted to keep.
I wouldn’t recommend adding your own files here because then it’s harder to tell what
changes you have made and which files other CentOS packages have created. You can,
of course, create your own configuration directory, and we’ll show how to do something
very similar later in this chapter to make it easier and more manageable to add virtual
hosts. This also has the added bonus of making it a lot easier when you have to upgrade
your system later.
Getting Started
First, let’s start with the basics in httpd.conf. Really, there isn’t much to change here, and
it won’t be until you actually come up against a problem that you’ll want to delve in and
try tweaking some of these options. In this section, we’ll look at setting ServerName and
ServerAdmin.
The httpd.conf file is fully commented and provides a lot of useful information about
each of the options. To edit this file, we’ll use the basic text editor nano. So, to get started,
run this command:
nano /etc/httpd/conf/httpd.conf

CHAPTER 5 n USING APACHE 93
nTip nano automatically uses line wrapping, which can break configuration files. You can prevent this from
happening by using nano -w.
To save you from scrolling through the file by hand (at just less than a thousand lines,
it can take quite a bit of patience), we will show how to use nano’s search functionality.
Hold down the Ctrl key, and press W. You should then see a search prompt. Type in the
following, and then press Enter:
ServerAdmin
Configuring ServerAdmin
This will take you to the first place that word appears in the document. In this case, it’s
the first word in one of the comments telling you about the option and what it means.
ServerAdmin is the e-mail address that should be shown on error messages and other con-
tent that is generated by the server. As you can see, it defaults to root@localhost, which
isn’t really ideal. Feel free to replace this with your own e-mail address. That way, people
will know who to contact if they are having trouble accessing a resource on your web site.
Configuring ServerName
Next we’ll modify ServerName. There’s no need to search for this one because it’s situated
directly below ServerAdmin. This is the cause of the error message you looked at earlier.
In theory, you can set ServerName to anything you like, but it makes much more sense to
point it at something that truly represents what the server is called.
Saving the Configuration File
Saving a file in nano is straightforward. You can see the menu at the bottom of the screen.
The ^ character refers to the Ctrl key. So, to exit nano, you need to press Ctrl+X. If you
have made any changes to the file, then nano will ask you whether you want to save
changes. After you’ve confirmed that you want to save, it will ask you to choose the file
name. By default this will be the same as the file that you opened originally (in our case
/etc/httpd/conf/httpd.conf). To accept the default, just press Enter, and you’ll be taken
back to the command line.
CHAPTER 5 n USING APACHE
94
Testing Your New Configuration File
It’s possible to restart Apache without testing your configuration, but we don’t advise it.
Sometimes even a small change that shouldn’t affect anything suddenly causes Apache to
go on strike, which is not really what you were hoping for while making that quick change
over the lunch break.
One way to help protect you against these little mishaps is to check the config file
before restarting Apache. You can do this with the service command. Consider this
example:
[root@centos ~]# service httpd configtest
httpd: Could not reliably determine the server's fully qualified domain name,
using 127.0.0.1 for ServerName
Syntax OK
[root@centos ~]#
Now, to show you what it looks like, we’ve uncommented the last line of the config
file. This means that we’ve closed a tag without first opening it. This is a very common
reason for Apache to refuse to start; however, more often, people tend to forget to close
a tag rather than forget to open it. In this case, the output from the configtest command
looks like this:
[root@centos ~]# service httpd configtest
httpd: Syntax error on line 991 of /etc/httpd/conf/httpd.conf: </VirtualHost>
without matching <VirtualHost> section
[root@centos ~]#
You now have a very good idea of what went wrong. You know at which line the
error occurred (991), and you have a helpful description of what Apache believes to be
the problem. Although this is usually a very good guide and will generally point you in
the right direction, it’s also possible that the error Apache sees is caused by an unrelated
problem further up in the config file itself. If you suddenly see a complaint about the
virtual host configuration but you’ve been working on something completely different,
take a look at the area you were working on rather than trusting Apache’s guidance com-
pletely.
A quick way of moving to a specific line number in nano is to press Ctrl+W exactly as
if you were going to do a search, and then press Ctrl+T. You will then be able to enter the
line number that you want to go to.
Restarting Apache
When you’re confident that your Apache config file is good to go, you can restart Apache.
Again, we do this with the service command:
CHAPTER 5 n USING APACHE 95
[root@centos ~]# service httpd restart
Stopping httpd: [ OK ]
Starting httpd: [ OK ]
[root@centos ~]#
.htaccess
Apache also has the rather useful ability to allow its main configuration to be overridden
on a directory-by-directory basis. There are two ways to achieve this functionality. You
can enable support for .htaccess files, or you can add the configuration directly into the
main config file itself. Generally speaking, it’s more secure and better practice to enable
these settings in the main config file. That way, all the information is in one place rather
than scattered around the filesystem. Using .htaccess files isn’t exactly insecure, espe-
cially if you’re the only person who is making changes to the server. In fact, they are very
convenient because a lot of open source applications (such as Drupal) come with an
.htaccess file that modifies Apache’s settings so that the application works nicely out of
the box.
Enabling .htaccess
For security reasons, Apache ships with .htaccess disabled. This prevents an adminis-
trator from accidentally giving users or software the ability to make changes. Enabling
.htaccess file support is quite easy, though.
First, open the Apache config file in nano, and do a search for AllowOverride. The
first section you’ll come across is the one where .htaccess is specifically disabled. If you
search a couple more times, it will take you to the line inside the configuration area
for /var/www/html. If you want to enable .htaccess support, you can do so by changing
AllowOverride None to AllowOverride All. Once you’ve saved your changes and restarted
Apache, you’ll be able to use .htaccess files.
How to Password Protect a Directory
Password protecting a directory involves two distinct steps. First, you need to create an
.htaccess file in the directory that you want to protect. Then you must create a password
file so that Apache knows who can and can’t log in.
We’ll make use of what you’ve already set up to show how to secure the default direc-
tory. To do this, create an .htaccess file in /var/www/html/. Use your trusted nano to create
the file (make sure you don’t forget the dot before htaccess):
nano /var/www/html/.htaccess
CHAPTER 5 n USING APACHE
96
Configuring Password Protection
One of the key things that many people miss is that if they don’t put a restriction on it,
once a user has authenticated, the user can actually download the .htaccess file from the
server. This is probably not what you want because if the password is somewhere in that
directory, the user will be able to download that too. So, the first thing you need to put in
your .htaccess file is the following:
<Files .htaccess>
order allow,deny
deny from all
</Files>
<Files .htpasswd>
order allow,deny
deny from all
</Files>
This will prevent anyone from downloading either the .htaccess or .htpasswd file. It is
better to ensure that your .htpasswd file is stored outside of any area that may accidentally
become available for download. Many people create their .htpasswd files in /etc/httpd.
If you do this, then there’s no need for the second Files statement. You should leave the
first one in place, however.
Next you can specify that you want to protect this directory. Add this after the Files
statement:
AuthUserFile /etc/httpd/htpasswd
AuthName "Secret Secure Area"S
AuthType Basic
require valid-user
Here’s what each directive means:
• AuthUserFile points to the .htpasswd file that contains the login details for our
users. We’ll create this in a moment.
• AuthName is the text to display when the login windows pops up. You can name it
anything you like, although if you want to put spaces in the name, you’ll need to
remember to put them inside quotation marks.
• AuthType is usually set to Basic. There are other options, but they are rarely used.
Basic is just the exchange of a username and password. Because you want to use
password authentication here, this is the best choice.
CHAPTER 5 n USING APACHE 97
• require valid-user tells Apache that any valid user in the .htpasswd file should be
allowed to access the site. You can specify a particular username by using require
user <username>. For example, to allow access only to the admin user, you can use
require user admin.
If you save this file and restart Apache, you should find that when you go to your web
server, you get a login prompt. Of course, this page is now too secure because you haven’t
added any users yet, so no one can actually log in!
Creating User Accounts
To create a user account, you can use the htpasswd command. The command is very
straightforward and looks like this:
[root@doublehelix ~]# htpasswd -c /etc/httpd/htpasswd admin
New password:
Re-type new password:
Adding password for user admin
[root@doublehelix ~]#
The –c option tells htpasswd to create the file if it doesn’t already exist. After you’ve
added your first user, you don’t need to use this option again. The next argument is the
file you want to create or update. In this example, we’ve used the same path that we spec-
ified in our .htaccess file. The last argument is the username that you want to be created.
After you press Enter, you will be prompted for the password to use for this account and
then again to confirm it.
That’s it! Now you should be able to log in to your new secure web site with your new
account!
Improving Performance
Web site performance is a topic where entire books can (and have) been written. In this
section, we’ll look at some of the easier ways that you can get a performance boost from
your web server.
Compressing files lets you trade CPU time for network bandwidth. Because text com-
presses extremely well, this is usually a big win, especially when combined with some
form of caching.
We’ll also look at some settings that you can fine-tune, why you might want to fine-
tune them, and how to make sure that your performance-enhancing changes don’t end
up slowing your whole machine down!
CHAPTER 5 n USING APACHE
98
Compression
One of the fastest and easiest ways to get a real performance boost out of your server is to
enable compression. Of course, like most things, there is a trade-off taking place. In this
case, we are going to use more processing power to handle each request because Apache
must take the file and compress it. Once compressed, the file will be much smaller and
hence will take considerably less time to be sent over the network to the client. Because
even basic computers can very quickly extract compressed content, overall you should
find that your web site feels far snappier.
There is a really nice tool here: http://www.gidnetwork.com/tools/gzip-test.php.
You can put in any URL, and it will tell you whether compression is being used and,
if not, how different levels of compression would have improved the performance of the
site.
Enabling Compression in Apache
Enabling compression in Apache takes just a single line. This can be added in numerous
places, but for now, we’ll add it to the end of the main config file.
So, open the config file as before with this:
nano /etc/httpd/conf/httpd.conf
and move to the end of the file. The quickest way to do this is to hold down Ctrl+V until
you reach the end. Once you’re at the end, append this line of text (for formatting rea-
sons, it appears as two lines here, but it should be one line in your configuration file):
AddOutputFilterByType DEFLATE text/html text/plain text/xml text/css
application/javascript application/x-javascript
Save the file as before, and restart Apache. You should now find that you are provid-
ing compressed content to the world! Currently you have only told Apache to compress
the text files that you will most commonly use on your web site by specifying their MIME
types. To find a list of possible MIME types that you can compress, take a look (using
nano) in /etc/mime.types.
Why You Don’t Compress Everything
There are two reasons why you shouldn’t compress every file that Apache sends out. The
first reason is that most image and music files such as JPEG, PNG, or MP3 are already
highly compressed. This means that even though Apache will spend time compressing
them, it won’t make much difference in the file size and hence won’t help the file to be
sent any faster.
CHAPTER 5 n USING APACHE 99
The second issue is that although all the key browsers such as Firefox, Safari, Opera,
and Internet Explorer support compressed text, sometimes they don’t handle other com-
pressed formats very well. This is mainly a problem in Internet Explorer. Internet Explorer
looks at the content type of a given file and based on that decides which application to
open it with. For example, a file with a content type of application/pdf would for most
people be opened with Adobe’s Acrobat Reader. Unfortunately, in this case, Internet
Explorer passes the compressed file data to Acrobat Reader rather than decompressing
it first. Because it is not expecting compressed content, Acrobat Reader will fail to open
the file properly. Currently, this works fine in the other three browsers. It is expected that
once this particular issue is ironed out, most web servers will start compressing all of their
compressible content.
Improving Server Performance
There are six key configuration options that relate to performance. These options control
how many Apache processes are created, when they’re created, and when they are to be
destroyed.
You can find these settings around a tenth of the way through the config file. Although
this might change in a future revision, the options currently start on line 101.
The first option is StartServers. This is the number of processes that Apache will
initially create when the server is first started. By default, it will create eight processes
initially. If you are running a busy web site, it may be a good idea to increase this number,
but make sure you read the next section on what to look out for.
The second option is MinSpareServers. This is the minimum number of processes that
should be kept around to service new requests. Apache will always have at least this num-
ber of processes running. By default this is set to 5, so if the server isn’t particularly busy,
Apache could end up shutting down some of the spare processes.
The third option, MaxSpareServers, is the opposite of the last option. This is the maxi-
mum number of processes that Apache can have waiting around. The default for this
option is 20. If there are more than 20 idle servers, Apache will close them down.
The fourth and fifth options are somewhat related and should generally be set to the
same value. ServerLimit and MaxClients are both by default set to 256. MaxClients is the
number of incoming requests that Apache will serve at any given time. If your web site
receives more than 256 requests at any one time, the additional requests will be queued
until a slot becomes available. ServerLimit is the hard limit for the number of additional
processes that can be created during the lifetime of the running server.
You must be very careful with these two options. Setting them to too high a value
can sometimes cause Apache to fail to start or make your server unstable. Likewise, there
is no benefit to setting ServerLimit to be any higher than MaxClients. Doing so just takes
additional resources from the system, which neither Apache or other applications on
your server can take advantage of.
CHAPTER 5 n USING APACHE
100
Things to Watch Out For
In the previous section, we talked about the most common performance-related con-
figuration options that Apache offers. The important thing to remember is that there is
no secret recipe of options to give you optimum performance. For example, if you set
MaxSpareServers too high, you’ll find that although there are plenty of processes running,
Apache ends up spending more time switching between them than actually getting work
done. If MinSpareServers is set too low, you may find that if your web site has an uneven
load (busy and quiet times), Apache may spend too much time creating and destroying
server processes. Again, this takes time away from actually serving requests. For most
average workloads, the Apache defaults are perfectly acceptable. If you want to try to
improve performance, make small changes, and retest often. Lastly, for most people, far
greater performance benefits can be gained by designing the web site for performance.
For example, separating out CSS and JavaScript from your HTML files will allow them to
be cached, and hence there will be less load placed on your server.
Log Files
Apache keeps extensive log files in /var/log/httpd/. With a default install, three logs
are kept. The first is the access_log. This contains detailed information (such as remote
IP address, the time and date of the request, and what was requested) of all requests
received by Apache. error_log contains similar information but records error messages
instead. For example, if a file does not exist or Apache receives an invalid request (such
as those caused by attack scripts), the information will end up in here. It’s the first place
to look if you suspect something is amiss or you just want to make sure that everything is
running smoothly.
Apache separates the SSL side of things from the standard logs. Both ssl_access_log
and ssl_error_log contain the same sorts of information; they’re just separated out to
make them easier to work with.
Setting Up Virtual Hosts
The ability to create virtual hosts is probably one of the most powerful features that
Apache offers. It is also no doubt one of the most widely used, and for good reason; it lets
you run multiple web sites from a single web server.
There are effectively two types of virtual host. You can create name-based virtual
hosts or IP-based virtual hosts. Name-based virtual hosts are by far the most common
and most useful because they allow you to have an almost unlimited number of web sites
on one IP address. If you are hosting on an ADSL line or similar, chances are that you
have only one IP address anyway. Although most hosting providers can supply you with
more IP addresses, they often come at a hefty premium.
CHAPTER 5 n USING APACHE 101
So, why use IP-based virtual hosts? Well, they do have one very important and critical
role. You may remember from the beginning of the chapter when you looked at SSL cer-
tificates very briefly that because a secure session is established between the web browser
and the web server before the web browser sends its request, Apache has no way to know
which SSL certificate it should serve. In effect, it can serve only one SSL certificate on an
IP address. Using multiple IP addresses is the only way for the server to hand out separate
SSL certificates.
Other than that, IP-based virtual hosts aren’t really used that much. Apache already
comes with the settings needed to create a default SSL virtual host. You saw this when
you accessed the server using HTTPS when you first set up Apache. Although you saw the
same page on both the secure and insecure versions, this is because by default Apache
looks in the same location for both.
Getting Started with Virtual Hosts
First you need to enable virtual host support in the main Apache config file. Open the
config file in nano (nano /etc/httpd/conf/httpd.conf), and search for NameVirtualHost. You
should find it near the end of the file.
This section looks like this:
# Use name-based virtual hosting.
#
#NameVirtualHost *:80
#
The configuration option NameVirtualHost lets you specify the IP addresses and ports
that Apache should use for virtual hosts. The *:80 means that Apache should make virtual
hosts available for all possible IP addresses but only on port 80. This default is ideal for
most people, so uncomment this line by removing the hash (#) from the beginning of the
line, leaving you with the following:
#
# Use name-based virtual hosting.
#
NameVirtualHost *:80
#
# NOTE: NameVirtualHost cannot be used without a port specifier
# (e.g., :80) if mod_ssl is being used, due to the nature of the
# SSL protocol.
Now that you’ve told Apache that you want to use virtual hosts, you need to configure
one. Directly after the NameVirtualHost configuration option is a sample virtual host defi-
nition. We will show how to create a new virtual host beneath the example. You could, of

CHAPTER 5 n USING APACHE
102
course, uncomment the example and use that, but we find it’s always a good idea to keep
some documentation around in case you ever need to look back and double-check your
work.
The example looks like this:
# VirtualHost example:
# Almost any Apache directive may go into a VirtualHost container.
# The first VirtualHost section is used for requests without a known
# server name.
#
#<VirtualHost *:80>
# ServerAdmin webmaster@dummy-host.example.com
# DocumentRoot /www/docs/dummy-host.example.com
# ServerName dummy-host.example.com
# ErrorLog logs/dummy-host.example.com-error_log
# CustomLog logs/dummy-host.example.com-access_log common
#</VirtualHost>
You’ll recognize ServerAdmin and ServerName from earlier. They do the same thing
within the context of each virtual host, although ServerName has a special function here. In
this case, ServerName is how Apache will know which web site it should serve up to the web
browser. In the previous example, it will use this virtual host only if the web site requested
is dummy-host.example.com.
nNote There is a catch here. Whichever virtual host is defined first will be considered to be the default.
This means that if none of the other virtual hosts matches the URL that’s been requested, the first virtual host
will be used instead. Thus, it’s a good idea to make sure that your default virtual host is somewhat safe for
public consumption. Otherwise, visitors might get a shock when they expect one web site but get something
else altogether!
DocumentRoot tells Apache where to find the files for this web site. Although you can
put the files pretty much anywhere, you must make sure that Apache has permission
to view them. Apache doesn’t have any special access and so can access only those files
that have file permissions (and SELinux context if you’re using SELinux). If you’re not
sure about file permissions, flip back to Chapter 3. Most people like to keep their virtual
hosts in one location. We tend to keep ours in /var/www/vhosts/. We also name the actual
virtual host directory to match the web site name, replacing the dots with underscores.
For example, we would keep the web site for test.example.com in /var/www/vhosts/test_
example_com/.
CHAPTER 5 n USING APACHE 103
ErrorLog and CustomLog allow you to separate log files from each of your different
virtual hosts and more important from the main Apache logs in /var/log/httpd/. Some
people actually prefer all the logging to go in one place. If you want only one log file to
check, all you need to do is leave out these two options from your virtual host configu-
ration. If you want to analyze each site separately or you need to provide information
to a third party, it will make your life a lot easier if you do use separate files. You can, of
course, still store them in /var/log/httpd/ if you prefer.
Creating Your First Virtual Host
Because the first virtual host is also used as the default, we’ll set it up to mirror the origi-
nal setup. So, at the end of the file, add the following:
<VirtualHost *:80>
ServerName localhost
DocumentRoot /var/www/html/
</VirtualHost>
Of course, you can set ServerName to whatever you prefer; you don’t have to use
localhost. This is probably the simplest virtual host definition that you will come across.
Any options that you do not specifically set will be inherited from the original defaults.
For example, logging will continue to go to the main log files, and ServerAdmin will be set
to whatever you used previously.
To test this, save the config file, and restart Apache. Using one of the techniques dis-
cussed earlier, take a look to see whether you can still see your web server. All being well,
it should look just the same as before. If you receive an error message, look again at the
config file, and make sure that everything is as it should be.
Using vhosts.d
Some people prefer to keep all of their virtual hosts in the main Apache config file.
For small servers with ten or fewer virtual hosts, that is what we generally do as well.
However, if you’re thinking of hosting a couple hundred virtual hosts, you might want
something a bit easier to manage and use.
Apache has the ability to read in config files from other locations. You saw this at
the beginning of the chapter when you looked at how Apache’s config files were laid out
under CentOS. You can do a similar thing for virtual hosts. We recommend, though, that
your first virtual host is always configured in your main config file and is placed before
the line that instructs Apache to read in additional configuration files. This way, you can
be completely sure which virtual host is the default.
CHAPTER 5 n USING APACHE
104
First you need to create our vhosts.d directory. This is the most common name for
the directory, but as before, there is nothing stopping you from choosing something else.
To keep things neat and tidy, create this in /etc/httpd/ as follows:
[root@www ~]# cd /etc/httpd/
[root@www httpd]# mkdir vhosts.d
[root@www httpd]# cd vhosts.d/
[root@www vhosts.d]#
Now you can start creating your virtual host files. To see this in action, you’ll create a
virtual host definition for www.example.com. Again, you can call the file anything you want,
but to ensure that Apache loads only the files you want, give your virtual host files a .conf
extension.
So, let’s create a new config file for our example web site. You’re already situated
inside /etc/httpd/vhosts.d/, so there’s no need to specify the full path to nano. If you
aren’t in the right directory, you can use the full path instead. We’ll use nano to create the
new file:
nano www_example_com.conf
And add this content:
<VirtualHost *:80>
ServerName www.example.com
DocumentRoot /var/www/vhosts/www_example_com/
</VirtualHost>
Now save the file, and exit nano. All you need to do now is tell Apache that it should
look for additional configuration files in your newly created directory. So, edit the main
configuration file again (httpd.conf), and scroll down to the bottom. Add the following
line:
Include /etc/httpd/vhosts.d/*.conf
Save the file, and exit nano. You should now run a configtest, and assuming all is
well, you can restart Apache. Congratulations! You’re using virtual hosts!
Using SSL
You will no doubt know all about secure web sites. You probably use them every day such
as when you order a book from Amazon or log in to an online banking site to check your
statements. Depending on the browser, secure connections are shown in different ways.
Firefox, Safari, and Internet Explorer, for example, all show padlocks but in different
CHAPTER 5 n USING APACHE 105
places. For example, Firefox shows the padlock on the status bar at the bottom right of
the window, whereas Safari shows it in the top-right corner of the window.
During installation, a self-signed SSL certificate is created for you. This will work
perfectly well to encrypt traffic, but it will raise a warning for anyone who tries to use it.
If the secure site is going to be used only by a couple of people and you are able to con-
vince them that the certificate is actually valid, then there’s no urgent need to change it.
If, on the other hand, you want to use the server with the general public (for example, the
payment page of your new e-commerce venture), you’re going to have to get yourself a
certificate that has been signed by a trusted third party called a certificate authority (CA).
There are various CAs available ranging from the well known and incredibly expen-
sive (such as VeriSign and Thawte) to the lesser known, better priced, and equally usable
(such as DynDNS and GoDaddy).
You will find that there are various services offered to try to tempt you to part with
your money. Some will offer high assurance levels or will provide you with a seal to put
on your web site to show that your certificate is genuine. None of these features makes
your SSL certificate any more or less secure. If you think these features will help convince
customers that you’re legitimate and upstanding, then by all means give them a go. If you
just want a secure site that doesn’t flash up a warning, you can safely ignore these extra
features and go for a basic certificate.
Installing mod_ssl
Installing mod_ssl is very straightforward on CentOS and requires only one command:
yum install mod_ssl
As with Apache itself, if you followed the installation instructions in Chapter 2,
you will already have mod_ssl on your system. Once it has been installed, simply restart
Apache (service httpd restart), and you will be good to go!
Getting Your Shiny New Certificate
Before you can get a certificate from a CA, you need to generate a certificate-signing
request (CSR). Before you can do that, you need to generate a key. This key will be
password protected and will ensure that even if someone were to steal your certificate,
without your password they wouldn’t be able to use it. This isn’t always as useful as it
sounds, and we’ll cover removing the password protection a bit later.
First we’ll create a directory called /etc/certs/. We prefer to keep our certificates in
/etc because it is one place we’re always guaranteed to have backed up. From here, any
of the various tools that want to use SSL can do so without making the configuration files
look strange (that is, the mail server loading SSL certificates from the web server directory).

CHAPTER 5 n USING APACHE
106
[root@centos conf]# mkdir /etc/certs
[root@centos conf]# cd /etc/certs/
[root@centos certs]#
Now you can create the key file. We prefer to name the key the same as the host that
the certificate is going to be for. We generally create a separate key for each site so that we
can separate them or hand them over to other people if necessary. So, to create your key
file, do the following:
[root@centos certs]# openssl genrsa -des3 -out www_example_com.key 1024
Generating RSA private key, 1024 bit long modulus
....................................................................................
...........................................++++++
..................................++++++
e is 65537 (0x10001)
Enter pass phrase for www_example_com.key:
Verifying - Enter pass phrase for www_example_com.key:
[root@centos certs]#
You will be prompted for the password twice. When your key has been generated,
you’ll be returned to the command line.
nCaution The key file contains the private part of the key pair and should be kept secret at all costs. You
should never give anyone access to your key file, because with this, they could potentially impersonate your
server!
Now it’s time to create your CSR. You need to create a CSR so that a certificate
authority will be able to provide you with a signed certificate. You should answer the
questions honestly in this section because the answers form part of the certificate. The
big gotcha is that when it asks for the common name, you should put in the full hostname
for the web site. If you don’t do this or what you enter is not exactly the same as your web
server’s hostname, people will get a warning message that the certificate is for a different
server!
To create your CSR, do the following:
[root@centos certs]# openssl req -new -key www_example_com.key -out \
www_example_com.csr
Enter pass phrase for www_example_com.key:
You are about to be asked to enter information that will be incorporated
into your certificate request.
CHAPTER 5 n USING APACHE 107
What you are about to enter is what is called a Distinguished Name or a DN.
There are quite a few fields but you can leave some blank
For some fields there will be a default value,
If you enter '.', the field will be left blank.
-----
Country Name (2 letter code) [GB]:
State or Province Name (full name) [Berkshire]:
Locality Name (eg, city) [Newbury]:
Organization Name (eg, company) [My Company Ltd]:
Organizational Unit Name (eg, section) []:
Common Name (eg, your name or your server's hostname) []:www.example.com
Email Address []:
Please enter the following 'extra' attributes
to be sent with your certificate request
A challenge password []:
An optional company name []:
[root@centos certs]#
We’ve left most of the information blank. If you do this, OpenSSL will use the defaults
that it has suggested. As mentioned, you should use your real information here and make
sure that the common name is correct. There’s no need to set a challenge password or a
company name.
You will now have a CSR file. Before you can use this with Apache, you need to create
a signed certificate, which is generated from the public part of your key plus the signature
from the CA. The exact procedure for doing this will depend on the certificate authority
that you decide to use. However, they will at some point ask you to copy and paste your
CSR. The easiest way to do this is to use the cat command to display the contents on the
screen:
[root@centos certs]# cat www_example_com.csr
-----BEGIN CERTIFICATE REQUEST-----
MIIBpjCCAQ8CAQAwZjELMAkGA1UEBhMCR0IxEjAQBgNVBAgTCUJlcmtzaGlyZTEQ
MA4GA1UEBxMHTmV3YnVyeTEXMBUGA1UEChMOTXkgQ29tcGFueSBMdGQxGDAWBgNV
BAMTD3d3dy5leGFtcGxlLmNvbTCBnzANBgkqhkiG9w0BAQEFAAOBjQAwgYkCgYEA
14ccCDnF2/A5ol1JYkv/neA0rV6ou1BtiCo/LrZQNJiVdbHmNINaGSNXUpieSe2H
riJpmzW8xhURk0pPIVgIZa5HmVZVtGpiHIZ4BRyM0HXJKkOEn34Ew9A092JXrraS
f9bWDQE2pQkDWuSXRNgARUtjCeWohORTk/gtfhnSZbkCAwEAAaAAMA0GCSqGSIb3
DQEBBQUAA4GBAEaM7/92TUDH3Qnq/BqFfJsBpNaq2GjQ5TkyTaKcy8jQrHgUiSAe
/2ZlC9DpYlVf9lLNuHWkuFCVidntffLwJaZhq8KGsM+0wlIbDfpRXPMXMiMYBl9K
JC+9zj+uGdJ3noft1Z/dLrqVzKPcopmr5xJJzW2nUuouI6bRnE2HELFq
-----END CERTIFICATE REQUEST-----
[root@centos certs]#
CHAPTER 5 n USING APACHE
108
You need to make sure that you also copy the lines with BEGIN and END in them and try
not to introduce extra line breaks when pasting the text. At this stage, there is little more
you can do until your CA comes back to you with a signed certificate. Alternatively, of
course, you can sign your own certificate. We show how to do that next.
Signing Your Own Certificate
Signing your own certificate can be quite useful. Having a third-party CA sign your cer-
tificate costs money, and the certificate normally lasts only for a year or two. By signing
your own, you maintain complete control over the process. However, if the public visits
your secure site, they will get a warning that the person who signed your certificate is not
known, and therefore it isn’t trusted. Browsers generally come with a selection of CA cer-
tificates, which allows them to automatically recognize certificates signed by them. If you
self-sign your certificate, your visitors can elect to trust it, and from then on it will work
just like one signed by a CA. This isn’t a great idea for an e-commerce site, though.
[root@centos certs]# openssl x509 -req -days 365 -in www_example_com.csr -signkey \
www_example_com.key -out www_example_com.crt
Signature ok
subject=/C=GB/ST=Berkshire/L=Newbury/O=My Company Ltd/CN=www.example.com
Getting Private key
Enter pass phrase for www_example_com.key:
[root@centos certs]#
OpenSSL will show you all of the details that you originally entered in your CSR.
Double-check these to make sure everything is as you expect, and then enter your pass-
word to approve the request.
If you look at the contents of the directory, you now have this:
[root@centos certs]# ls -lh
total 24K
-rw-r--r-- 1 root root 847 Jan 12 14:15 www_example_com.crt
-rw-r--r-- 1 root root 647 Jan 12 13:55 www_example_com.csr
-rw-r--r-- 1 root root 963 Jan 12 13:35 www_example_com.key
[root@centos certs]#
This is now enough to configure Apache to use the new certificate. The CSR can now
be deleted because it’s not needed to actually use the certificate. That said, many people
like to keep it around as a record of what they used last time. We must confess that we
have a few CSR files hanging around. They don’t take up much space and aren’t a security
risk. You can decide whether you think they’re worth keeping.
CHAPTER 5 n USING APACHE 109
What to Do with an Intermediary Certificate
Some CAs, notably the cheaper ones, use what’s known as an intermediary certificate.
They may also refer to it as certificate bundle or certificate chain. Whatever they call it,
you need to install it along with your certificate. To establish the chain of trust, the web
browser needs to be able to back-track your certificate to an authority that it knows
about. Because your certificate was signed by an intermediary, you must also provide that
intermediary’s certificate so that the browser can see that the intermediary trusts you and
that the intermediary in turn is trusted by someone it knows about.
We’ll discuss adding this certificate to Apache’s configuration as part of the next sec-
tion. Although you could cut and paste the file, sometimes the intermediaries provide
considerably more content than can be comfortably managed. Because the information
contained in such a certificate is publicly available, most CAs publish them on their web
sites. If yours has done this and you have the URL, you can download it directly to your
server by using wget:
wget https://www.example.com/intermediary.cert
This will create a file of the same name in the current directory. wget is a very useful
tool and is ideal for downloading large files directly to your server. This is usually much
faster and more convenient than downloading to your home PC and then uploading the
file again to the server.
Putting Your New Certificate to Work
Now that you have your certificate ready, you can configure Apache to use it. If you opted
to get your certificate signed by a third party, simply use nano to create a new file with the
same naming scheme and cut and paste in your signed certificate. OK, let’s hook this up!
Open Apache’s SSL configuration file in nano (/etc/httpd/conf.d/ssl.conf). You’ll
need to change at least two things here; you need to tell Apache which certificate and key
to use (SSLCertificateFile and SSLCertificateKeyFile). If you also need to use an interme-
diary certificate, you will need to update SSLCertificateChainFile.
SSLCertificateFile: This will be the .crt file that either was created when you signed
your certificate or was returned to you by the CA. You should use the full path. In our
example, the path would be /etc/certs/www_example_com.crt.
SSLCertificateKeyFile: This is the key file that we created initially to start the whole
process. Apache needs this so it can unlock the contents of the certificate. In our
example, the path would be /etc/certs/www_example_com.key.
CHAPTER 5 n USING APACHE
110
SSLCertificateChainFile: This file will have been provided by your CA. Not all CAs
require this. If you’re not sure, leave this out for now. If on restarting Apache your
certificate shows up in the browser as invalid but everything looks OK, this would
suggest that your CA does need this to be set up. If you still aren’t sure, drop an
e-mail to the CA explaining what you’re trying to do. They’re normally very helpful
and have in-depth guides on their web sites explaining how to set up a variety of
servers with their products.
That should be it. You’re ready to give it a go! Remember to run the configtest before
restarting Apache just in case. When you do restart Apache, you should see something
like this:
[root@centos certs]# service httpd restart
Stopping httpd: [ OK ]
Starting httpd: Apache/2.2.3 mod_ssl/2.2.3 (Pass Phrase Dialog)
Some of your private key files are encrypted for security reasons.
In order to read them you have to provide the pass phrases.
Server www.example.com:443 (RSA)
Enter pass phrase:
OK: Pass Phrase Dialog successful.
[ OK ]
[root@centos certs]#
You’re now running with your own customized certificate!
Removing the Password Protection from the Key
You’ll have noticed, of course, that you have to enter your password to restart Apache.
This is because the key file is currently password protected and Apache is unable to
unlock the key file without the password. This is good for security because it means that
if someone stole your certificate, they would not be able to use it without first guessing
your password. Unfortunately, it also means that someone has to type the password in
every time Apache starts including every time the server boots, even after an unexpected
reboot, and that’s hardly ideal either.
If you want to remove the password protection, it’s easy enough to do. The following
command will do just that:
[root@centos certs]# openssl rsa -in www_example_com.key -out www_example_com.key
Enter pass phrase for www_example_com.key:
writing RSA key
CHAPTER 5 n USING APACHE 111
[root@centos certs]# service httpd restart
Stopping httpd: [ OK ]
Starting httpd: [ OK ]
[root@centos certs]#
This time a password wasn’t required to restart Apache. This means that Apache will
also start up fully functional when the server boots.
Summary
Well, you’ve reached the end of the chapter. You learned how a web server works and
how web browsers interact with them. You now know how to install and configure a basic
Apache server and how to configure some of the more basic features. You learned how to
configure Apache to serve multiple web sites from a single IP address with virtual hosting
and how to use SSL to secure and protect your content. We also touched briefly on how to
optimize Apache and why compression provides a quick return on investment.
In the next chapter, we’ll be taking a look at mail servers, the second-most popular
task for a Linux server.

113
CHAPTER 6
Setting Up Mail
In terms of Internet history, electronic mail is stone old. When the World Wide Web was
conceived in the early 1990s, e-mail already had reached its age of maturity. The first
electronic mail between two networked computers was sent in 1971, over the Internet’s
predecessor, ARPANET. Even though e-mail predates most other applications you use
on the Internet—with the exception of the File Transfer Protocol (FTP), which is about as
old—e-mail is still one of the most popular functions of the Internet today (and this is not
only because someone somewhere chose you to help him get his inheritance out of the
country). Even with spam mails rising to levels of 70 to 90 percent of all mails sent, most
Internet users write and receive mails on a daily basis.
E-mail still is one of the most versatile Internet applications: you can write to your
friends without having to wait for the postal carrier to deliver a letter; you can share pic-
tures, sounds, and videos over e-mail; and you can partake in discussion groups set up
as mailing lists. And all of this is delivered directly into your inbox without you having to
check web pages for newly arrived messages. Well, mostly.
If you want every mail that reaches you to be directly delivered to a computer that
you are responsible for, without the need to store mails on a provider’s mail server,
then you need a mail server. Or if you want to provide mail service for your family and
friends, you need a mail server.
A mail server usually consists of two different pieces of software. One is the mail
transfer agent (MTA), which basically sends mails from your machine to other mail serv-
ers on the Internet and which receives mails that have been sent from other hosts to your
domain. The second is a Post Office Protocol 3 (POP3) or Internet Message Access Protocol
(IMAP) server, which is used by your mail user agent (MUA) or mail client (such as Evolu-
tion, KMail, or Mutt) to retrieve the mails that have been delivered to your mailbox.
In this chapter, we’ll go through how to install the mail server software and how to do
a basic setup so you can send mails to the outside world. Then we’ll show how to set up
your machine to receive mails from the Internet, for which you also need to change your
firewall settings. After that, we’ll discuss some basic antispam settings and how to config-
ure your server to receive mails for multiple domains. Finally, we will show how to install
and configure a POP3 and an IMAP server so your family and friends can fetch the mails
you receive for them.

CHAPTER 6 ■ SETTING UP MAIL
114
■Note For sending and receiving mails, you need your own domain, a working Domain Name System
(DNS) server set up, and, preferably, a static IP address. Chapter 7 shows you how to set up your own DNS,
but if you have a provider that is willing to set up DNS for you, this is fine also.
How Do Mail Servers Work?
Sending mails seems to be easy. You just type an address of the form user@example.com into
your mail client, add a Subject line, and write some text. After that, you click Send, and
only seconds later the recipient of that message—user@example.com—has that mail sitting
in his inbox. But behind the scenes, sending mails is a bit more complex. After clicking the
Send button, your mail client does one of two things: either it has a built-in Simple Mail
Transfer Protocol (SMTP) client or it hands off the mail to /usr/sbin/sendmail, the so-called
Sendmail interface. SMTP is the protocol that defines how mail works on the Internet, and
applications with a built-in SMTP client, like Evolution or KMail, have the ability to send
mails via this protocol on their own but to only one predefined mail server, normally the
one that is responsible for sending out mails for your domain. Others rely on an installed
transfer software.
SENDMAIL INTERFACE
The Sendmail program was one of the first largely deployed mail transfer agents on the Internet. To
send mails, it used the program /usr/lib/sendmail, which on Linux distributions normally exists
as /usr/sbin/sendmail. A complete mail message including all headers and the message body is
piped into that program, and a recipient is specified on the command line. So, if you have a completely
formatted mail in mail.txt and you want to send this mail to user@example.com, you would use this
command line to send mail:
cat mail.txt | /usr/sbin/sendmail user@example.com
Because many mail clients such as Mutt, Alpine, or even Mail expected this program to be there,
Sendmail became a de facto standard. All mail transfer agents that are available on CentOS implement
this interface for sending mails.
So, what happens exactly when your mail client sends the mail to the SMTP server
you configured in the program’s preferences? The client opens up a session on port 25
with the SMTP server and sends SMTP commands to it. Luckily, SMTP is a clear-text
CHAPTER 6 ■ SETTING UP MAIL 115
protocol, so if you sniffed on the wire, this is what an example session would look like
(lines in bold show the output of the server; normal lines are client input):
220 mail.example.com ESMTP Postfix
HELO client.example.com
250 mail.example.com
MAIL FROM:<me@example.com>
250 2.1.0 Ok
RCPT TO:<you@example.net>
250 2.1.5 Ok
DATA
354 End data with <CR><LF>.<CR><LF>
From: Me <me@example.com>
To: You <you@example.net>
Subject: This is a mail from me to you
Hi!
.
250 2.0.0 Ok: queued as 48516F8279
The server sends an initial greeting to the client, which starts with 220. As you can see
here, the server is running Postfix, which is the mail transfer agent you’ll install and con-
figure in this chapter. After it sends the greeting, the client says HELO client.example.com,
which is not a typo. There’s also an EHLO greeting that turns on Extended SMTP, which the
server supports, too. The server is content with the client name on the HELO line and says
to go ahead with a 250. Mail programs look only at the numbers at the beginning of the
lines; the additional text is there for us humans, which makes it easier to debug problems.
Now the client tells the server who sends the mail and who is going to receive it. You
do that with MAIL FROM:<user> and RCPT TO:<user>. The angle brackets are required, and
there also must be no space between the colon and the opening angle bracket. If the
server is satisfied with both—it might tell you that it doesn’t want to relay a mail or that
it doesn’t know the sending user. Depending on configuration, it sends you an OK by
saying 250. You could now add a few more recipients to that mail. When you are finished
with this, you need to tell the mail server that you want to send the actual mail content
now. You can do this with the DATA command. You get back a 354, which means that the
server is willing to accept the mail content.
SMTP has a similarity with normal mail: there is an “envelope” around a “letter.” As
with letters on paper, addresses on the envelope can be different from those on the actual
letter inside the envelope. The addresses on the envelope are used for the mail trans-
port, and the addresses inside the mail are displayed by your mail client when you look
at the mail. So, for the first two lines after the DATA command, you repeat the sender and
recipient. Then a Subject: line follows, which will also be displayed by your mail client.
CHAPTER 6 ■ SETTING UP MAIL
116
To separate this header data from the content of the mail you are writing, you insert an
empty line.
When you have finished writing the mail, you end it with a . on a single line. This
way, the mail server knows that you reached the end of the mail and that it is supposed to
send it now. You get another 250 as an answer, with which the mail server tells you that it
has received the mail and now will send it to the recipient (which means talking to other
mail servers). The SMTP reply codes are explained in section 4.2 of RFC 2821 (http://www.
rfc-editor.org/rfc/rfc2821.txt), which describes SMTP.
Why Run Your Own Mail Server?
“Because I want to have control over all my mails” probably is the best reason for setting
up your own mail server. How often have you wondered why a mail did not reach the
recipient? And who is at fault? Is it your provider’s server that delayed the mail? Is it the
recipient’s provider? Running IMAP on your local machine often is faster than running
it over an Internet link to the provider too, so that is another reason. And you can set up
your own discussion lists, if you want.
You can also give out mail addresses within your domain to your family or to your
friends easily, which means that you will be their provider for their mail. Or you can use
as many mail addresses as you want for yourself, which is a great way to control who
knows what about you. If you have your own web server running (see Chapter 5 on how
to do that), you can run a web front end to your mail server too, which may make it easier
to access your mails from wherever you are, because you need only a web browser.
Caveats
Although it is fun to run your own mail server, a lot of responsibility comes with it. If you
provide mail addresses for friends and family, there are privacy issues you have to obey—
like not looking into their mails or not looking at mail logs to find out who they sent mails
to and when or who they receive mails from. Their mails need to be kept secure, too, so
that not everyone can read those mails. Normally, the user concept in Linux takes care of
that for you.
You also have to keep your mail server software up-to-date as with each public
service you are running. That is not a very difficult job, because CentOS will offer you
updated packages as soon as a security problem has been fixed—you just have to stay
alert and install those updated packages as soon as they are published.
But there is another issue to watch out for. Scammers and spammers are always look-
ing out for misconfigured mail servers to send their mails over—that way it will look like
you are the culprit who sent out those pesky mails, not them. It has gotten very difficult to
misconfigure modern mail transfer agents, so you should be safe if you use a configura-
tion that is close to the default config. But if you have problems with some aspect of the
mail configuration and one of the solutions seems to be opening up access very widely,
CHAPTER 6 ■ SETTING UP MAIL 117
you should find a better solution, which may be harder to implement. The question is not
if open mail servers will be found; the question is when they will be found. And when an
open server has been found, it will be abused.
Also, you will lose the spam filtering offered by your provider: when you run your own
mail server, you are the first line of defense, meaning that you are responsible for filtering
out spam—and viruses.
But don’t fret. It is not that hard to keep your configuration secure. If you follow this
chapter, you should have a safe configuration to work with.
When Not to Run Your Own Mail Server
Even if you think you have everything to run your own mail server, there still might be
some reasons as to why it might be smarter to let someone else run a mail server for you.
If you have your own domain and a hosted server somewhere in a data center, you prob-
ably also have a static IP address. You are all set then. If you have your own domain and a
static IP address and you want to run your server at your home or at your office, you nor-
mally should be set, too.
If you have your own domain name but no static IP address, you can still run a mail
server. Dynamic DNS (DDNS) providers will point a hostname at your current IP address
so that it is easily reachable. In this case, you have to make sure that the DDNS provider
points the name at your new IP address as soon as your address has changed. If there
is a noticeable delay, someone else might have gotten your old IP address already, and
mails will be sent to his computer. If that person has a mail server running and if it takes
all mails offered to it, you will lose your mails. So, think twice in this situation. There is a
second problem with this setup. Because of spam, many Internet service providers do not
accept mails from machines that don’t have a static IP address. If this is the situation—or
if your Internet provider blocks port 25 outgoing—you can still run your own mail server,
but you have to deliver the mails via the provider’s mail servers.
If you don’t have a domain and aren’t planning on getting one, there is no way for
you to run a reliable mail service.
Another thing you have to check is that many Internet service providers allow con-
nections to port 25 only to their own mail servers. If this is the case, you cannot run your
own server, because there will be no way to reach your server from the Internet.
Finally, you should also check that your Internet service provider’s terms of service
allow you to run servers on your end of the line.
Which Mail Server to Choose
This is not as easy a question as it looks. The debates between users of different mail serv-
ers can become as heated as the vi vs. emacs, Coke vs. Pepsi, or my football team vs. your
football team debates. CentOS ships with three mail server applications to choose from:
Exim, Postfix, and Sendmail. Sendmail has the longest history of those three and should
CHAPTER 6 ■ SETTING UP MAIL
118
be the one that is installed if you followed the install guide in Chapter 2. Sendmail is a great
mail server, and you can make it do everything you want, but many people deem Send-
mail’s configuration to be very hard; its main config file isn’t readable at all and should
be treated as read-only except by real experts. Exim also can be tweaked to do everything
regarding mail, but configuring it is not obvious at all times either. The third one, Postfix,
is relatively easy to set up and considered to be fast and secure. This doesn’t mean that the
others aren’t secure, even if some people tell you about the bad security
history of Sendmail. It has just had more time to be insecure than the other two.
Because Postfix is the easiest of the three mail servers to configure, we’re going to use
it as the mail server you are going to learn about during the rest of the chapter.
Installing the Mail Server
Installing Postfix would be rather straightforward, if Sendmail hadn’t been installed dur-
ing the installation of the system. Some of the installed packages require a mail server to
be on the system, and Sendmail is the one that gets pulled in by default. You can check
whether it is installed with rpm:
rpm -q sendmail
The output should be this:
sendmail-8.13.8-2.el5
You cannot remove Sendmail at this moment, because that in turn would remove
packages that rely on a mail transfer agent to be installed. But you can now install Postfix
via Yum without any errors. Sendmail still would be left installed and the preferred mail
transfer agent. Because several files between those two packages are the same (for exam-
ple /usr/sbin/sendmail), the system uses the alternative system to distinguish between
those packages. /usr/sbin/sendmail is a symbolic link to /etc/alternatives/mta, which in
turn is a symbolic link to /usr/sbin/sendmail.sendmail. The Postfix package contains this
file as /usr/sbin/sendmail.postfix. This way, both packages can be installed at the same
time without conflicting. To enable Postfix and make it preferred over Sendmail, you only
have to switch these links to the correct binaries so that /etc/alternatives/mta points to
/usr/sbin/sendmail.postfix. Luckily, there is a package that does this automatically for
you. This package is called system-switch-mail.
So, let’s install Postfix and make it the preferred mail server. If you haven’t updated
your system yet, it will ask you for the CentOS gpg-key to be installed (see Chapter 4):
yum install postfix system-switch-mail
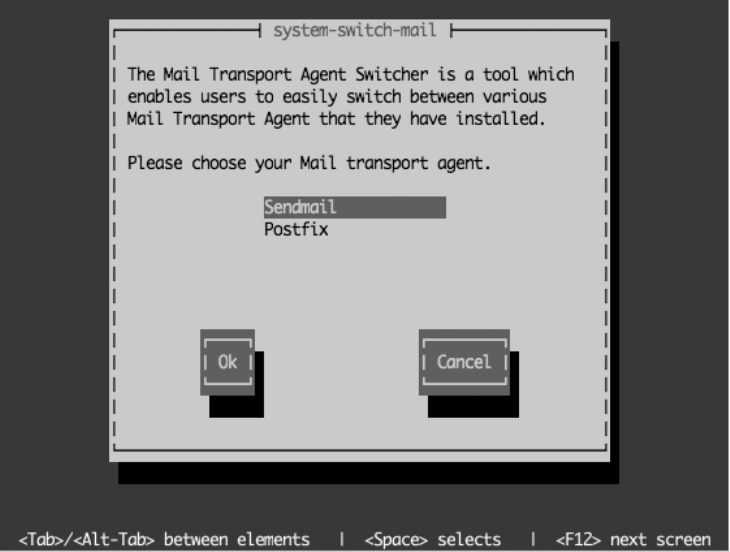
CHAPTER 6 ■ SETTING UP MAIL 119
To check whether it got installed, use this:
rpm -q postfix
The output should be similar to this:
postfix-2.3.3-2.1.el5_2
To switch between mail servers, run the following command. You will be asked for
the root password if you run it as a normal user:
system-switch-mail
This opens the menu that you can see in Figure 6-1. Choose Postfix, and press Tab to
select OK. Select OK again on the confirmation screen. If you check /etc/alternatives/
mta now, you will see that it points to /usr/sbin/sendmail.postfix. You can switch back to
Sendmail by running system-switch-mail again. Because you are going to use Postfix as
the standard mail server now, you can uninstall Sendmail with yum remove sendmail.
Figure 6-1. Switching the preferred mail transfer agent
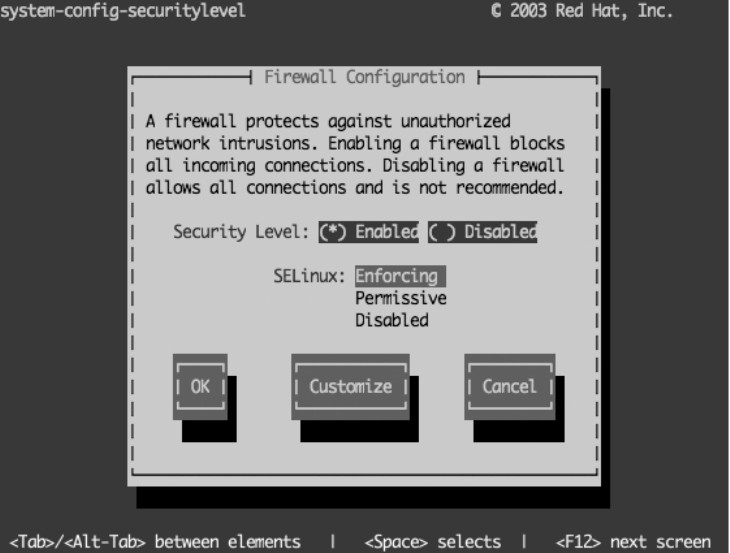
CHAPTER 6 ■ SETTING UP MAIL
120
You now have successfully installed Postfix and configured CentOS to use it as the
standard mail transfer agent. But to receive mails, your computer needs to be able to be
reached on port 25, which is blocked by the default firewall configuration.
Configuring the Firewall
To configure the firewall, run the command system-config-securitylevel-tui. This will
open a text-based menu system in which you will be able to configure your firewall set-
tings (see Figure 6-2). Use the Tab key to select Customize, and press Return.
Figure 6-2. Customizing your firewall settings
On the next screen (see Figure 6-3), use the arrow keys to go to [ ] Mail (SMTP),
and select it with the spacebar. This will put an asterisk (*) in the box. Now use the Tab
key to select OK, and press the Enter key. This will bring you back to the first screen (see
Figure 6-2). Use the Tab key to select OK on that screen, and press Enter to leave the
menu.

CHAPTER 6 ■ SETTING UP MAIL 121
Figure 6-3. Enable traffic to port 25, Mail (SMTP).
You are now accepting traffic on port 25 to your machine, which is the port SMTP will
use to deliver mails. To check whether it worked, you can use the iptables command:
iptables -L | grep smtp
You should see the following line. If you don’t, retry the previous steps.
ACCEPT tcp -- anywhere anywhere state NEW tcp dpt:smtp
Making Sure Postfix Starts During Boot
You haven’t configured Postfix yet, but you should make sure that it starts when your sys-
tem boots. Postfix has to be running not only to receive mails on your machine but also
to send any mails to other servers. This is often forgotten—and all your users will be left
wondering why they didn’t get any mails during the last three days—but you can enable it
easily. To do so, use the chkconfig tool:
chkconfig postfix on
CHAPTER 6 ■ SETTING UP MAIL
122
To check whether this has worked, you can use chkconfig’s list option:
chkconfig postfix --list
This should give some output similar to this:
[root@centos ~]# chkconfig postfix --list
postfix 0:off 1:off 2:on 3:on 4:on 5:on 6:off
[root@centos ~]#
Because CentOS servers normally start in run level 3, Postfix will be started each
time you reboot your system now. If you want to run your mail server on your desktop
machine, it will also be started at boot, because your desktop system starts in run level 5.
You might want to do this only if you want to use Postfix to send mails to your provider’s
or your own smart host, which then in turn will deliver the mails to the final recipients.
There’s no need to reboot now, so you can start Postfix with the following command:
service postfix start
Because system-switch-mail restarts the mail transfer agent after switching from one
to another, Postfix may already be running, and therefore this command might fail.
Now that you have Postfix started, you are ready to test it. Yes, without further con-
figuration Postfix is able to send mails on your local machine. Sending mails to other
destinations should also work, but probably the mail addresses will be off. So, please
refrain from trying that until you do at least a minimal configuration.
To test your server, run the following command as your normal user:
echo "hello" | mail -s "mailsubject" <username>
<username> is your user’s name on the system. To see whether the mail got delivered,
open /var/log/maillog as the root user. You should see something like this at the end of
the file:
Mar 22 19:39:24 localhost postfix/qmgr[3395]: 8BD11180D3: ➥
from=<ralph@centos.localdomain>, size=340, nrcpt=1 (queue active)
Mar 22 19:39:24 localhost postfix/local[12127]: 8BD11180D3: ➥
to=<ralph@centos.localdomain>, orig_to=<ralph>, relay=local,➥
delay=0.16, delays=0.11/0.02/0/0.03, dsn=2.0.0, status=sent ➥
(delivered to mailbox)
To read this mail now, fire up the Mail mail client, which is a very simple, though lim-
ited, way to read your mail. To read the mail, just press the Enter key, because there will
be only one message in your mailbox. This will give you the following output:
CHAPTER 6 ■ SETTING UP MAIL 123
[ralph@centos ~]$ mail
Mail version 8.1 6/6/93. Type ? for help.
"/var/spool/mail/ralph": 1 message 1 new
>N 1 ralph@centos.localdo Sun Mar 22 19:42 14/488 "mailsubject"
&
Message 1:
From ralph@centos.localdomain Sun Mar 22 19:42:50 2009
X-Original-To: ralph
Delivered-To: ralph@centos.localdomain
To: ralph@centos.localdomain
Subject: mailsubject
Date: Sun, 22 Mar 2009 19:42:50 +0100 (CET)
From: ralph@centos.localdomain (Ralph Angenendt)
hello
&
Just enter q to quit the mail client. This will save the read mail to a file called mbox in
your home directory.
Congratulations! You just sent your first mail!
Configuring Postfix
If your computer has a proper hostname, you might not need to do any more configura-
tion to Postfix to just send out mails. In most cases, you need to apply some changes to
the default configuration so that hostnames and mail addresses come out correctly. For
receiving mails, you have to do a little more configuration. All files you need to touch to
configure Postfix are in /etc/postfix. The most important file in there is main.cf, which
contains the main configuration, as you might have guessed by the name.
The file master.cf is used to configure the behavior of all the processes Postfix needs to
receive and deliver mail. Normally you should not have to touch this file. Some additional
software, such as virus- or spam-scanning programs, might require you to configure that
file (see the documentation for those programs for the exact entries). You will be intro-
duced to other files in /etc/postfix when they are required for special features.
One config file, the aliases file, does not live in that directory. The reason for that
is compatibility with Sendmail, which always used /etc/aliases instead of putting this
file into a subdirectory. The aliases file tells your mail transfer agent if a receiving mail
address is just an alias for a user on your system. Postfix, for example, does not deliver
mails to the user root because of security reasons. You can use the alias file to tell Postfix
which user should receive root’s mails instead. You can find a more detailed description
later in the “Setting Up Users to Receive Mails” section.
CHAPTER 6 ■ SETTING UP MAIL
124
Postfix uses /var/spool/postfix and the directories below it for handling mail. The
structure of this directory is explained in the qmgr(8) manual page. Under /var/spool/
mail/, you will find the user’s mailboxes where Postfix delivers mail to.
Configuring Your System to Send Mail
You’ll now configure your system for sending mail. You can do it in two ways, covered in
the following sections:
• Ifyouareluckyandhaveadedicatedmailserversomewhereoryouhavealeased
line to your home or office, you probably can send out mails directly. In the “Send-
ing Mail Directly” section, you will learn how to do that.
• Youcansendmailviaaso-calledsmarthost.Most,ifnotall,Internetproviders
will offer you an SMTP server you can point your mail client to that then will send
all mail to the recipient’s mail host. Depending on your provider, you might be
required to use this host, because many providers block the SMTP port to the
outside world. You’ll learn how to do this in the “Sending Mail via a Smart Host”
section.
Sending Mail Directly
Fire up your favorite editor, and open the file /etc/postfix/main.cf as the root user. You
will just have to make a few changes to this file to be able to send mails. As you can see,
this file is very well documented, and most options are explained. The top of that file
states: “A detailed explanation of all options in /etc/postfix/main.cf can be found in the
postconf manual page in section 5.” To view this manual page, you can use the command
man 5 postconf.
If you think your hostname is OK for a mail server, because it is mail.example.com or
something similar, you can leave it alone. If you want to set a specific hostname for the
mail server that is different from the hostname of the machine you are running the server
on, then search for the myhostname parameter. Set it to the hostname you want to see in
outgoing mails, and don’t forget to remove the comment sign (#) from the front of the line:
myhostname = centos.example.com
If you are running a web server on the same machine, your host can have several
domain names to it. If this is the case and you want to use a specific domain name for
serving mails, you should change the mydomain parameter. The default is to strip the first
part from myhostname and use the rest. In this case, example.com would be the domain,
because the centos would be stripped. The mydomain parameter will become important
when receiving mails. Let’s just leave it alone for now.
CHAPTER 6 ■ SETTING UP MAIL 125
The next parameter that you should change is myorigin. This parameter defines from
which mail addresses locally posted mails are coming from. For example, many jobs on
a CentOS machine send mails. Those mails normally have unqualified sender addresses,
meaning that just the part in front of the @ is used. As a default, Postfix fills in your
machine’s hostname, so the mails seem to come from user@centos.example.com in the
previous example. Normally you want to just put your domain name in there, especially
if the hostname of your machine is not resolvable from the Internet (think about your
workstation here, which sends mails to a smart host). Mail servers normally reject mails if
they cannot resolve the host or domain name in a mail address.
myorigin = example.com
Now mails originating on your machine seem to come from user@example.com. You
still have to make sure that example.com is a valid domain name. To make the new con-
figuration active, use the following command:
service postfix reload
And that’s it. You can now send mails from your mail server. If you changed some-
thing in your /etc/postfix/main.cf and you have forgotten what you changed, don’t be
afraid. The postconf program is able to show you which parameters have been changed
from Postfix’s default settings. Just type the following to see those values:
postconf -n
This is the output you should see after you make the previous changes:
[root@centos ~]# postconf -n
alias_database = hash:/etc/aliases
alias_maps = hash:/etc/aliases
[...]
inet_interfaces = localhost
[...]
myhostname = centos.example.com
myorigin = example.com
newaliases_path = /usr/bin/newaliases.postfix
The parameters that are left out here are default parameters for Postfix on CentOS
but differ from the parameters the standard Postfix distribution sees by default. Take a
look at the inet_interfaces line. This means that Postfix is listening on 127.0.0.1 only, so
it cannot receive mails not coming from your local machine. This is a great way to test
configuration changes, because those cannot affect mails coming from the outside—
because there aren’t any.

CHAPTER 6 ■ SETTING UP MAIL
126
THE POSTCONF COMMAND
The postconf command is able to do more than just show you what is different from the default
configuration. Just running postconf without any options will show the current Postfix configuration
without comments or inline documentation. The following will show you all the default parameters Post-
fix knows about:
postconf -d
The following will show the value the parameter has at the moment, so postconf myhostname
would show you the hostname that is configured within Postfix:
postconf <parameter>
You can also use postconf to set parameters and make them active at once without manu-
ally reloading the Postfix server. This is of great use when you deploy computers via core builds (see
Chapter 11 on how to do that). Maybe all your computers should use the same relay host to deliver
their mails to and let that host do the rest. You could edit the main configuration file on all machines for
that—or just put the following line into the %post section of your kickstart file:
postconf -e "relayhost = mailhub.example.com"
This will set the relayhost parameter to mailhub.example.com on the machine you are install-
ing.
Using postconf for simple changes can save you from firing up your editor and manually chang-
ing main.cf, and it makes the change active at once.
If you have made those changes, you can now try to send a mail to outside your net-
work. You can use the mail command from earlier to send a mail to your account you
have with your Internet service provider, for example.
What happens with your mail now? First Postfix looks at the domain part of your
mail. If the domain part is local to your mail server, Postfix will try to deliver the mail
locally, just as it did in the previous example. If it is not, Postfix does the following.
Imagine you have found an error in this chapter (which is improbable but not impos-
sible). So, you want to send a mail to support@apress.com to tell them about this error.
Please do this only if you really have found an error; don’t send mails there for fun. This is
just an example of how sending mail works. Fire up mail to send that mail:
[ralph@centos ~]$ mail -s "Error in chapter 6" ralph
Dear Apress support,
I have found an error in chapter 6.
CHAPTER 6 ■ SETTING UP MAIL 127
Regards,
Your Name
<CTRL>-d
Cc: <ENTER>
You press Ctrl+D to end the mail. The mail command then asks you whether you
want to add a Cc: to that mail. Because you don’t want to do that, just press Enter.
Postfix now looks up which server is responsible for mails going to the domain
apress.com. To do that, it asks the domain name system for the MX record of apress.com
(see the next chapter if you want to know how DNS works). The MX record defines the
mail exchanger for the domain—remember that you will meet this term again when con-
figuring your server to receive mails. You can find out the MX record for yourself by using
the host command, which should be installed by default:
[ralph@centos ~]$ host -t mx apress.com
apress.com mail is handled by 5 smtp3.intermedia.net.
apress.com mail is handled by 50 mail.uu.net.
[ralph@centos ~]$
After having found out that smtp3.intermedia.net is the preferred mail exchanger
(lower numbers have priority over higher numbers), Postfix will contact that server and
deliver your mail there.
If the mail does not show up, it is time to look at the mail log again. Postfix writes
everything it does with a message to /var/log/maillog, and maybe you made a typo in
your configuration. Because that happens to everyone sooner or later, it is a good idea
to look at the mail log after you change the configuration and reload Postfix with service
postfix reload.
Sending Mail via a Smart Host
Because spam from private PCs being part of botnets is a real problem nowadays, many
Internet service providers block the outgoing SMTP port. If your provider does that, you
cannot send mails directly to other machines as shown earlier. This is not how the Inter-
net is supposed to work, but it is understandable from the ISP’s point of view. If many
machines in the provider’s network send out spam, the amount of complaints about
spam is huge, too. But because your provider wants you to be able to send out mail, it
normally offers you a smart host, where you can drop off your mails. This smart host then
in turn will take care of further mail delivery. You will lose one of the main advantages of
running your own mail server—control over all your mails.
Again, there are two ways how such smart hosts are implemented. Normally the host
knows which IP addresses are allowed to send mail and which aren’t, so there is no need
for further authentication. The other type requires you to log in with a username and
CHAPTER 6 ■ SETTING UP MAIL
128
password before it will accept mails from you. There are other configuration possibilities—
for example, “POP before SMTP,” which requires you to first fetch your mail before you
can send mails—but those aren’t widely deployed.
You should check with your Internet service provider what kind of smart host it is
running if you are required to use one.
If it doesn’t require you to log in with a password but takes mails from known IP
addresses, there is only one line you have to change in /etc/postfix/main.cf. Instead of
editing the file with an editor, you will use the postconf command to make this change.
You should check first whether there already is a smart host definition in your con-
figuration. You can do that with the grep command:
[root@centos ~]# grep relayhost /etc/postfix/main.cf
# The relayhost parameter specifies the default host to send mail to
# no relayhost is given, mail is routed directly to the destination.
#relayhost = $mydomain
#relayhost = [gateway.my.domain]
#relayhost = [mailserver.isp.tld]
#relayhost = uucphost
#relayhost = [an.ip.add.ress]
[root@centos ~]#
Postfix uses the term relayhost for smart hosts—the term smart host comes from
Sendmail, and because that is the oldest mail server of them all, it defined many terms.
You can see that there are several occurrences of the term relayhost in the configuration
file, but all of them are commented out. To add your provider’s mail server as a relay host,
just type in the following command, and check the configuration again:
[root@centos ~]# postconf -e "relayhost = mail.example.com"
[root@centos ~]# tail -1 /etc/postfix/main.cf
relayhost = mail.example.com
[root@centos ~]#
Using the command tail -1 /etc/postfix/main.cf, you checked the last line in
the Postfix configuration file. Parameters you add with the postconf command always
are added to the end of the configuration. If you use postconf to change a parameter, it
gets changed where it is defined. You can try this by setting the myhostname parameter to
another hostname. But remember what the original setting was, because there is no way
to undo those changes.
You should tell Postfix to trust the computers on your local network; otherwise, you
will not be able to send out mails except from the local machine. Search for the mynetworks
parameter in the configuration and set it:
mynetworks = 192.168.1.0/24, 127.0.0.0/8
CHAPTER 6 ■ SETTING UP MAIL 129
Postfix now trusts every computer in the 192.168.1.0/24 network—and the localhost.
Trust in this case means that your mail server will accept mails from all computers that
are in this address range, and those mails will be relayed to other mail servers on the
Internet. You shouldn’t open this up too much to keep your mail server from becoming
an open relay for the complete Internet (or even only parts of it).
If your provider’s relay host doesn’t require a login, you are set now to send your
mails. If it does, you are not quite finished with the configuration. You are now going to
learn about configuring simple client authentication for Postfix—with the added security
of an encrypted connection to your provider’s relay host, if supported.
First you should check what your provider expects from you. As you have seen, SMTP
is a simple plain-text protocol, which enables you to talk to a mail server “by hand.” So,
let’s see what kind of authentication your provider supports. You can do that with the
telnet client program, which should already be installed on your CentOS system. If it isn’t,
just install the telnet package with Yum:
yum install telnet
Now open a session to the mail server you want to check. You should see something
like this:
[root@centos ~]# telnet mail.example.net 25
Trying 208.77.188.166
Connected to example.net (208.77.188.166).
Escape character is '^]'.
220 mail.example.net ESMTP Postfix
EHLO mail.example.com
250-mail.example.net
250-PIPELINING
[...]
250-STARTTLS
250-AUTH PLAIN LOGIN
250-AUTH=PLAIN LOGIN
250 DSN
You have been using the EHLO command to greet the mail server, instead of the HELO
command shown before. EHLO is the “extended hello,” which tells the foreign mail server
to run in Enhanced SMTP mode (ESMTP). The output will be a bit longer than this nor-
mally, but at the moment only a few lines are of interest. There are two AUTH lines in the
previous code, one with a blank between AUTH and the parameters and the other one with
= in between. The line with = denotes that your provider also supports older versions of
Outlook and Outlook Express, so if you don’t see it in the answer to your EHLO request,
there is nothing to worry about.
CHAPTER 6 ■ SETTING UP MAIL
130
You should see PLAIN LOGIN in the output, which is the simplest way to log in—
there are other authentication schemes like GSSAPI and MD5, but those aren’t widely
deployed. There is more interesting information up there, the STARTTLS line. This means
that your provider accepts encrypted connections, and it also means that if you don’t see
this line, your provider doesn’t. If you already worked through Chapter 5 (Apache), you
have learned that for accepting encrypted connections, the web server has to listen on
port 443 in addition to the standard HTTP port. STARTTLS works differently.
The daemon—in this case the mail server—listens on only one port, port 25. This con-
nection is done unencrypted. The first handshake the servers exchange is unencrypted
also. If your mail server detects the STARTTLS line in the answer to the EHLO command, it
then can use STARTTLS as the next command. From then on, all configuration is encrypted.
You will learn how to enable TLS for receiving mails later in the section “Authenticating
Users.”
You need the cyrus-sasl, cyrus-sasl-lib, and cyrus-sasl-plain packages if you are
required to log in. These should already be installed on your system, but if they aren’t,
just add them with Yum. Simple Authentication and Security Layer (SASL) is an authenti-
cation framework. As with most applications and frameworks that have “Simple” in their
name, it really isn’t—or you wouldn’t have to read this chapter that mostly talks about the
Simple Message Transfer Protocol. Now start your favorite editor again, and add the fol-
lowing lines to the Postfix configuration:
smtp_sasl_auth_enable = yes
smtp_sasl_security_options = noanonymous
smtp_sasl_password_maps = hash:/etc/postfix/sasl_passwd
smtp_tls_security_level = may
tls_random_source = /dev/urandom
The last two lines are needed only when your provider supports STARTTLS. This setting
enforces encrypted connections if a remote mail server offers TLS and falls back to plain-
text connections if it doesn’t. It might be a good idea to add these lines to your Postfix
configuration anyway—even if you don’t use a smart host.
The first three lines tell Postfix to enable authentication, to disable anonymous
authentication, and where Postfix will find the username and password for logging in.
This configuration statement needs a bit more explanation:
smtp_sasl_password_maps = hash:/etc/postfix/sasl_passwd
Postfix stores most external information (aliases, passwords, and the headers it
checks against) in map files, which really are small database files. Postfix uses this format
to speed up operation, because it can use database operations on those files and does
not have to parse them completely when they are read. The password map is of type
“hash,” where you have a key on the left side of the file and a value to the key on the right
CHAPTER 6 ■ SETTING UP MAIL 131
side. Enough theory. Open up your editor, and put the following line into /etc/postfix/
sasl_passwd:
mail.example.net myname:secretpassword
If there is more than one mail server you need to authenticate against, just add more
lines to this file. The key Postfix uses is the name of the mail server it connects to, and
the value is a username:password pair that it uses to log in. Now you only have to make a
map out of this file; Postfix cannot use the plain-text version:
postmap /etc/postfix/sasl_passwd
This will create a database file from the plain-text file you just created:
[root@centos postfix]# ls -l sasl_passwd*
-rw------- 1 root root 30 Mar 23 01:08 sasl_passwd
-rw------- 1 root root 12288 Mar 23 01:08 sasl_passwd.db
[root@centos postfix]#
Postfix will use the .db file for further operation. It takes about a minute for Postfix to
pick up that changed file. If you want it active at once, type this:
service postfix reload
To see which username and password Postfix uses for a certain mail server, you can
query Postfix with the postmap command:
[root@centos postfix]# postmap -q mail.example.net sasl_passwd
myname:secretpassword
[root@centos postfix]#
You should now be able to send mail over your provider’s relay host—after logging in.
Check with the mail command. If it doesn’t work, check the log file for errors.
If you just want to send mail over a central server in your network, you are all set
now. Local mail will be delivered to your mailbox on your mail server, and all other mails
will be sent to the recipient’s mail server, either directly or over a relay host. You can now
use that server as the SMTP-Server entry in your mail client (hey, this is your own relay
host) after one more change.
At the moment, Postfix listens only on the local interface 127.0.0.1, which is fine if
Postfix is running on your workstation. If you run it on a server, you have to add the serv-
ers IP address to the configuration. Change the following line in main.cf accordingly:
inet_interfaces = localhost,192.168.10.12
CHAPTER 6 ■ SETTING UP MAIL
132
Please use the internal interface for the time being. You will open up your server to
the rest of the world, after you learn how to configure Postfix for receiving mails in the
next section.
Configuring Your System to Receive Mail
Now that you are able to send out mail, you probably also want to receive some directly to
your server. You have to check some things before you can begin configuring Postfix for
doing so. Most important, do you have your own domain and a static IP address? If you do
not have your own domain, maybe a friend of yours has one and would give you a subdo-
main out of that. In other words, if your friend has the domain example.net and has access
to the name servers of that domain, he could give you—for example—good.example.com
and create a few hostnames under that: mail.good.example.com, www.good.example.com, and
so on.
No matter which way you go, you need to set up your domain name service correctly.
You need a hostname for your mail server that has a static IP address, and you should set
up a mail exchanger (MX record) for that domain. For DNS configuration, either ask your
domain host for help or set up your own official DNS. See Chapter 7 on how to do that.
If everything seems to be configured correctly, you can use the host command to
check whether it is indeed correct:
host -t MX example.net
This should give you something like the following output:
[ralph@centos ~]$ host -t MX example.net
example.net mail is handled by 5 mail.example.net
[ralph@centos ~]$
mail.example.net has to exist and should have a static IP address (see the earlier dis-
cussion about possible problems with hosting mail servers on a host with dynamic IP
addresses).
Once you have that configured, you have to make only a few changes to your Postfix
configuration. Postfix has to know which domain(s) it should feel responsible for; other-
wise, it will not accept the mails. Again, start your favorite editor, and open /etc/postfix/
main.cf. The first change you are going to make is a bit of a safety net. Normally if Postfix
cannot deliver mails permanently, it will answer the sending machine with a 5xx error
(see RFC 2821 for an explanation of SMTP error codes). This means that the remote host
will return the mail to the sender; it will not try to send it again. Search for the next two
lines and change them:
soft_bounce = yes
unknown_local_recipient_reject_code = 450
CHAPTER 6 ■ SETTING UP MAIL 133
This changes the reply to a 4xx reply, which is a temporary error. Temporary errors
can happen when your disk is full or your mailbox is over quota or, in several other cir-
cumstances, where Postfix expects the error to be fixed in a short amount of time. When
a sending host gets a notice about a temporary error, it will put the mail into the mail
queue again and try at a later time. So, setting this is a bit of a safety net against miscon-
figurations. You should turn this on when you plan to make large configuration changes
or when adding a new domain to your server. When everything works as planned, set
those two lines to the following:
soft_bounce = no
unknown_local_recipient_reject_code = 550
Now search for the following line in main.cf:
mydestination = $myhostname, localhost.$mydomain, localhost
This should be changed to the following:
mydestination = $mydomain, $myhostname, localhost.$mydomain, localhost
What does this do? This tells Postfix that it should regard itself as the last hop for
mails that go to user@example.com, user@centos.example.com, user@localhost.example.com,
and user@localhost. These mails are going to be delivered into local mailboxes under
/var/spool/mail for each user that exists on your machine. If you plan on hosting several
domains on your mail server that even might have different users, so that mails to user@
example.com and user@centos.example.com should not go to the same mailbox, do not enter
these domains in mydestination. You will learn about virtual domain hosting later in this
chapter.
Setting Up Users to Receive Mails
How does Postfix decide which users get mails on your server? It has to make several
decisions, depending on the setup of your server. Let’s begin with a simple setup. Say
you have only one domain. Mail will be delivered only to “real” users on your system, so
to be able to receive mails, you have to set up users on your machine. So if Peter, Ralph,
Tim, and you are the people who should receive mails, those users must exist on your
machine. Make sure their accounts exist with getent passwd ralph (and the other users).
These users do not need to have a login shell or a home directory on your computer.
Once those users exist, they are ready to receive mails. This also means that you don’t
have to do anything special when you create a new user. As soon as the user is created,
Postfix will accept mails for it. “Hmm,” you might say, “what should I do if I want to give
my mother a mail address in my domain but want that mail to be delivered to her pro-
vider’s mail server?” Or, as another example, what if you want to have a mail address that
CHAPTER 6 ■ SETTING UP MAIL
134
receives mails for Peter, Ralph, Tim, and you? Easy. For this, Postfix (and every other mail
server) knows about aliases. An alias is a mail address that will deliver the received mails
to another mail address. To create your own aliases, you need to edit the alias file. You
can easily find out which file Postfix accepts as an alias file with the postconf command.
[root@centos ~]# postconf alias_maps
alias_maps = hash:/etc/aliases
[root@centos ~]#
This file is outside of the /etc/postfix directory. Sendmail and Exim can use the same
file for finding aliases, so if you decide to switch your mail server software later, you can
reuse that file—both mail servers expect it to be at this location. If you take a look at this
file, you will see that several aliases have already been filled out:
# General redirections for pseudo accounts.
bin: root
daemon: root
adm: root
lp: root
sync: root
shutdown: root
These are all system accounts on your computer used for running software, and you
will also find the Apache user in that file. And as soon as a user is there, it will receive
mails. But because nobody is going to look through the mailboxes of those users, it has
been decided to send all those mails to the root account on your machine. If you look at
the last line of that file, you will find the following entry:
#root: marc
You should replace marc with your username and remove the # at the beginning of
the line so you get all mails that are going to the root account because Postfix refuses to
deliver mails to the root account because of security reasons. You should not read mails
as root.
As you can see, the format of the alias file is dead simple. On the left side, you have
the local part of the mail address, and on the right side, you have the user account where
those mails should go. And you can override system accounts, too, which happens with
the root account, for example. Giving out an address to your Mom is also easy:
mom: mother@example.net
So, if you have example.com as your domain name but your mother already has a mail
account with the large example.net Internet service provider, this is all you have to do to
CHAPTER 6 ■ SETTING UP MAIL 135
send all mails going to mom@example.com to her address mother@example.net. And because
Peter, Ralph, Tim, and you are administrating your network together, you want all mails
going to support@example.com to be delivered to those three users:
support: peter,ralph,tim,you
You can also mix those styles:
support: peter,ralph@example.net,tim@example.com,you
What you cannot do is put a fully qualified mail address at the beginning of the line,
because the left side is always considered as address@$mydestination. But you are going
to learn about virtual domains very soon in the section “Receiving Mails for Several
Domains.”
The alias file is also a map file like the earlier password file. So, you have to run the
following after you make changes to the file:
postmap /etc/aliases
Or even easier, you can just run newaliases after editing the file. This again is a stan-
dard set by the Sendmail mail server. If you just added the support line to your alias file
instead of changing the one that already was there, you should see the following error:
[root@centos ~]# newaliases
postalias: warning: /etc/aliases.db: duplicate entry: "support"
[root@centos ~]#
The first found entry has precedence, so mails to support would go to the postmaster
and not Peter, Ralph, Tim, and you.
You can have more than one alias file, which is practical if you need many aliases for
several reasons. Just add a second alias file to the alias_maps parameter:
alias_maps = hash:/etc/aliases, hash:/etc/postfix/company.aliases
The newaliases command will refresh both alias files when run.
Hey, you are all set up now to receive mails! Go ahead and let the Postfix daemon
listen to the world! For this, add the static IP address of your server to the inet_interfaces
line. Or tell Postfix to listen to all interfaces:
inet_interfaces = any
Run service postfix reload after that, and in a few minutes you will probably receive
your first spam.
CHAPTER 6 ■ SETTING UP MAIL
136
Taking a Few Antispam Measures
There is not enough space in this chapter to talk about the integration of antispam or
antivirus software into your mail server, so here are a few hints. There is SpamAssassin in
CentOS, and there is ClamAV in the RPMforge repository. SpamAssassin is an antispam
solution, and ClamAV is an open source virus scanner. You then need Amavisd (available
from RPMforge) or MailScanner (available from http://mailscanner.org) to integrate those
two into your mail server. The documentation for Amavisd and MailScanner should be
sufficient to get you running.
But there are a few other things you can do to lower the amount of spam mails you
will receive when running your own mail server. Let’s begin with a client requesting to
send a mail, which is around the HELO/EHLO phase. Oh, one thing: if you cannot fit every-
thing on one line in the config file, press Return and add a few spaces before you go on
typing. Postfix will then recognize it as one line:
smtpd_helo_required = yes
smtpd_client_restrictions = permit_sasl_authenticated,
permit_mynetworks,
reject_unauth_destinations,
reject_rbl_client bl.spamcop.net
This permits all clients that have authenticated themselves (you will learn about
authentication later in the “Authenticating Users” section) to permit all messages from
IP addresses that are listed in the mynetworks parameter, reject any mails to domains that
Postfix does not feel responsible for, and reject any client that is listed in the bl.spamcop.
net blacklist (see http://www.spamcop.net/bl.shtml). The first line tells Postfix to reject all
clients that do not issue a HELO or EHLO before trying to send mail.
The next restrictions are in the MAIL FROM phase of sending a mail, and they are
defined in the smtpd_sender_restrictions parameter:
smtpd_sender_restrictions =
permit_sasl_authenticated,
check_sender_access hash:/etc/postfix/access
reject_unknown_sender_domain,
reject_non_fqdn_sender,
reject_rhsbl_sender dsn.rfc-ignorant.org
Again, authenticated users are allowed to send. The next line checks mail addresses
(this again is the address on the envelope, not the one you see in your mail client) against
an access file. The third line rejects mails from senders where the domain does not exist.
This keeps out pretty much unwanted mail. The next line rejects senders without a fully
qualified domain name—like user@foobar, for example. And the last line checks the

CHAPTER 6 ■ SETTING UP MAIL 137
sender’s domain against the dsn.rfc-ignorant.org blacklist, which rejects all mails from
domains that don’t accept bounces; see http://rfc-ignorant.org/policy-dsn.php for more
information.
■Caution Although the usage of blacklists is shown here, do not use a blacklist in your configuration
except if you understand which rules the list operator uses to blacklist senders. If you use a blacklist, you
should regularly check that the blacklist still works as expected. Some blacklist providers shut down their
services and answer every request with “sender is listed.” This way, every sender is blacklisted. Remember,
when you use a blacklist to block mails, you let somebody else decide which mails will not reach your and
your users’ mailboxes.
The previous configuration shows the usage of an access map, which is a great way to
refuse or accept a few mail addresses. Again, it is a map, so you have to run postmap after
you edit the file. The format is as follows:
/^postmaster@.*$/ OK
/^abuse@.*$/ OK
support@example.net 554 FIX YOUR BROKEN GATEWAY. GET LOST.
/^.*@test.example.net/ 554 WE DO NOT ACCEPT MAIL FROM YOU.
On the left side is a mail address or a regular expression within two slashes. This is
the sender’s envelope address. On the right side you can put OK, which lets the mail go
through; REJECT, which rejects the mail during the SMTP dialogue; DISCARD, which takes
the mail but silently throws it away; or an error code with an additional statement there,
as shown in the previous example.
With these additions to your configuration, you will stop a fair share of spam. For
more information on smtpd _*_ restrictions, see the postconf(5) manual page.
Receiving Mails for Several Domains
Let’s say you got your hands on a second domain called example.org and want to receive
mails for it, too. You have also configured your DNS so that your mail server is the pri-
mary mail exchanger (MX) for this domain. If you just want a copy of your other domain,
meaning that all addresses in the new domain should be the same as all the addresses in
the old domain, you can add the new domain to the mydestination parameter:
mydestination = $mydomain, $myhostname, localhost.$mydomain,
,example.org, $myhostname.example.org,
localhost.example.org, localhost
CHAPTER 6 ■ SETTING UP MAIL
138
After reloading Postfix, all your configured addresses and aliases for example.com
will now also work for example.org. You won’t be able to differentiate between the two
domains when configuring Postfix like that. It’s not possible to have peter@example.org be
another Peter than the one at example.com when you do this.
Postfix knows about virtual domains, though, which enable you to do exactly that:
have several domains receive mail and have two different Peters in these domains. If you
want to set up your second (and third and fourth and fifth…) domain as a virtual domain,
you have to remove the entries you just added to mydestination.
Directly after this, add the following line:
virtual_alias_maps = hash:/etc/postfix/virtual
Virtual alias maps are a lot like the normal alias files for Postfix, with a few exceptions.
This time you need to have fully qualified mail addresses on the left side, something you
cannot do with an alias file. Here’s a short example:
example.org #put anything you want here
postmaster@example.org: peter
support@example.org: peter,ralph,tim
ralph@example.org: ralph@example.net
The first line in this file is important; it tells Postfix that the definitions for a new
domain follow after this line. You can really put anything you want on the right side, such
as a comment about who is the domain owner, for example. After this, the mail addresses
follow. If there is no fully qualified mail address on the right side, Postfix considers these
addresses to be in your primary domain, and it checks /etc/aliases and your user data-
base for those. This is a map file, postmap /etc/postfix/virtual, that must be run after
making changes to the file.
If you want to add another domain, just begin a new section at the end of the file:
example.net #This is ralph's domainname
ralph@example.net: ralph
You can also use more than one file for defining virtual aliases. If you want to give
Ralph full control over his virtual domain without giving him access to files under /etc/
postfix, you can do the following:
virtual_alias_maps = hash:/etc/postfix/virtual
hash:/home/ralph/virtual
Make sure that this file is readable by Postfix by giving it to the user Ralph, and give
read access to the rest of the world:
chown ralph /home/ralph/virtual; chmod 644 /home/ralph/virtual
CHAPTER 6 ■ SETTING UP MAIL 139
When Ralph uses the postmap command to make a database out of this virtual file, it
will automatically get the correct access rights.
Authenticating Users
Now you can send mail from your mail server and from the computers that are in the
network you configured with the mynetworks parameter. But what happens if you are
a roaming user and want to send mail when you are with a client or at your mother’s
house? If those are static IP addresses, you could add them to mynetworks, but in the case
of your client, that would mean that every user there could send mails over your server—
and that is something you don’t want, except if you are getting paid for offering them mail
access.
Like your provider, you can configure your mail server to let users authenticate them-
selves before being allowed to send mails—if they aren’t in any of the known networks.
Encrypted Connections
Before you learn how to configure authentication, let’s configure encrypted connections
first, because it never is a good idea to send passwords unencrypted over the Internet.
So, like your provider offering STARTTLS, you are going to do the same soon. For setting
up encrypted connections, you need an SSL certificate for your mail server. If you want
to set up business with providing mails, you should get a commercial certificate from a
well-known certificate authority. If you are just doing this for family and friends, you can
generate a certificate yourself.
You can read everything about creating your own certificate in Chapter 5. A certificate
for a mail server looks exactly the same as a certificate for a web server. When you are
asked for a “common name” during the certificate creation, please use your mail server’s
hostname (mail.example.com) and not your web server’s name.
After you have created your certificate, you should put the files in the correct places
now. Since CentOS 5, there is a directory called /etc/pki that should be used for storing
certificates and keys (PKI stands for Public Key Infrastructure).
If you did everything correctly, you should have two files, apart from the certificate
signing request (CSR) file:
[root@centos certs]# ls -lh
total 24K
-rw-r--r-- 1 root root 847 Jan 20 14:15 mail_example_com.crt
-rw-r--r-- 1 root root 647 Jan 20 13:55 mail_example_com.csr
-rw-r--r-- 1 root root 963 Jan 20 13:35 mail_example_com.key
[root@centos certs]#
CHAPTER 6 ■ SETTING UP MAIL
140
Copy mail_example_com.crt to /etc/pki/tls/certs and mail_example_com.key to /etc/
pki/tls/private. If you put all your certificates you have on your computer under /etc/
pki, you have just one place to back up, and you know where all your certificates are. Yes,
this can become a problem if you need lots of them on a server.
Now that you have your certificate in place, Postfix needs to know about them. Add
the following lines to the Postfix configuration:
smtpd_tls_security_level = may
tls_random_source = dev:/dev/urandom
smtpd_tls_cert_file = /etc/pki/tls/certs/mail_example_com.crt
smtpd_tls_key_file = /etc/pki/tls/private/mail_example_com.key
The last two lines tell Postfix where it can find the certificate and the key. tls_random_
source defines where Postfix can read random data out of. /dev/urandom is the default on
CentOS. And the first line tells Postfix to do opportunistic TLS. It doesn’t require the client
to open an encrypted connection but makes it possible to do so. You have to restart Postfix
after you make those changes.
You are now ready to test whether your server can talk TLS. Encrypted protocols are
hard to talk “by hand,” even with a deep understanding of encryption. openssl will help
you with that:
[ralph@centos ~]$ openssl s_client -starttls smtp -connect localhost:25
CONNECTED(00000003)
depth=0 /C=DE/ST=Bavaria/L=Munich/O=Unorganized & ➥
Co/OU=dsf/CN=mail.example.com/emailAddress= ➥
ralph@example.com
verify error:num=18:self signed certificate
verify return:1
[...]
Server certificate
-----BEGIN CERTIFICATE-----
MIICpTCCAg4CCQCPkT5jYJ1G8zANBgkqhkiG9w0BAQUFADCBljELMAkGA1UEBhMC
[…]
250 DSN
You just made your first TLS connection to your mail server! Don’t worry about the
verify error; this always happens when you use a self-signed certificate. For personal use
this is OK; you just have to tell your other users to expect this kind of certificate. You can
continue with a normal SMTP session by using EHLO or HELO to greet the server.
CHAPTER 6 ■ SETTING UP MAIL 141
Usernames, Passwords, and Such
Now that your server supports encrypted connections, it is time to move on to the actual
user authentication. The easiest is to use your /etc/passwd for that, because you already
have all your users in there and they all have a password. Postfix itself does not do authen-
tication; it uses SASL for this. Cyrus-sasl is the best-known implementation of this. Another
SASL implementation is included in the Dovecot POP3 and IMAP server. Setting up POP3
and IMAP access is explained in the section “Retrieving Mails” in this chapter, but we are
going to use Dovecot for user authentication right now. The following will install Dovecot
and its dependencies:
[root@centos ~]# yum install dovecot
Open up /etc/dovecot.conf with your favorite editor. This file is heavily commented.
Some options are already turned on and some are turned off, so be a bit careful when
enabling this in the configuration. Search for auth default, and change the section to look
like this:
auth default {
mechanisms = plain login
passdb pam {
}
userdb passwd {
}
user = root
socket listen {
client {
path = /var/spool/postfix/private/auth
mode = 0660
user = postfix
group = postfix
}
}
}
You are going to offer LOGIN and PLAIN authentication mechanisms to your users.
Dovecot will use PAM (which stands for Pluggable Authentication Modules; see /usr/
share/doc/pam-0.99.6.2/Linux-PAM_SAG.txt for more information) to check the users’
passwords, which is standard for CentOS, and your password file will be used as the
database for your users. The last few lines define how Postfix and Dovecot will talk to
CHAPTER 6 ■ SETTING UP MAIL
142
each other. There are tons of other options if you want to keep your users in a MySQL
database, for example, or in an LDAP directory. Just follow the comments and documents
that are mentioned in dovecot.conf if your users do not “live” in /etc/passwd.
Now turn on Dovecot, and make sure it stays turned on, even after reboots:
[root@centos ~]# service dovecot start
Starting Dovecot Imap: [ OK ]
[root@centos ~]# chkconfig dovecot on
[root@centos ~]#
You will learn a bit more about Dovecot later; now it’s time to get back to configuring
Postfix. Add the following lines to the config file:
smtpd_sasl_auth_enable = yes
smtpd_sasl_type = dovecot
smtpd_sasl_path = private/auth
broken_sasl_auth_clients = yes
smtpd_sasl_security_options = noanonymous
This turns on SASL, tells Postfix to use the Dovecot SASL implementation, and
defines the path for authentication against Dovecot. This is the same path that was used
in dovecot.conf earlier, but it is relative to Postfix’s spool directory. The broken_sasl_auth_
clients parameter is there to support broken clients, which do not honor LOGIN AUTH
PLAIN but need the = between LOGIN and AUTH. The last line turns off any anonymous login
mechanisms. Now add the following lines to your configuration. Recipient restrictions
are checked in the RCPT TO: phase of the SMTP dialogue.
smtpd_recipient_restrictions =
permit_mynetworks,
permit_sasl_authenticated,
reject_unauth_destination
Reload Postfix after you make those changes. Now you should test whether your mail
server announces authentication:
[ralph@centos ~]$ telnet localhost 25
Trying 127.0.0.1...
Connected to localhost.localdomain (127.0.0.1).
Escape character is '^]'.
220 centos.example.com ESMTP Postfix
EHLO mail.example.net
CHAPTER 6 ■ SETTING UP MAIL 143
250-centos.example.com
250-PIPELINING
250-SIZE 10240000
250-VRFY
250-ETRN
250-STARTTLS
250-AUTH PLAIN LOGIN
250-AUTH=PLAIN LOGIN
Et voilà! Now you just need to test whether authentication really works:
[ralph@centos ~]$ telnet localhost 25
Trying 127.0.0.1...
Connected to localhost.localdomain (127.0.0.1).
Escape character is '^]'.
220 centos.example.com ESMTP Postfix
EHLO mail.example.com
250-centos.example.com
250-AUTH PLAIN LOGIN
250-AUTH=PLAIN LOGIN
AUTH PLAIN AHRlc3QAMTIzNDU=
235 2.0.0 Authentication successful
quit
221 2.0.0 Bye
Connection closed by foreign host.
Oh, it does. But what is this AHRlc3QAMTIzNDU= line? The username and password are
Base64 encoded—not encrypted; they can be deciphered at this stage—and you can use
Perl to encode it. The user has the username test and the password 12345:
[ralph@centos ~]$ perl -MMIME::Base64 -e 'print ➥
encode_base64("\000test\00012345");'
AHRlc3QAMTIzNDU=
[ralph@centos ~]$
The \000 is a null byte with which the username and password have to be prefixed.
Now you are almost ready to offer authentication to your users; you have to make only
one more change to the configuration. With the previous configuration, you can authen-
ticate over an unencrypted connection. Sending plain-text usernames and especially
passwords over the Internet is very insecure, so you have to make sure that users can log
in only when they use an encrypted connection.

CHAPTER 6 ■ SETTING UP MAIL
144
■Note Most mail clients can be configured to use TLS when sending mails. If you happen to come across
one that cannot do this, you can leave out the next configuration step, but you must make sure that users
understand that their passwords go over the Internet in plain text. Clients configured to open TLS connections
will still do so.
Add the following line to the sasl section of your Postfix configuration, and reload
Postfix:
smtpd_tls_auth_only = yes
If you connect to your mail server now, you will see the following:
[ralph@centos ~]$ telnet localhost 25
Trying 127.0.0.1...
Connected to localhost.localdomain (127.0.0.1).
Escape character is '^]'.
220 centos.example.com ESMTP Postfix
EHLO mail.example.com
250-centos.example.com
250-PIPELINING
250-SIZE 10240000
250-VRFY
250-ETRN
250-STARTTLS
250-ENHANCEDSTATUSCODES
250-8BITMIME
250 DSN
There’s no mention of AUTH capabilities anymore. Try again with an encrypted
connection:
[ralph@centos ~]$ openssl s_client -starttls smtp -connect localhost:25
CONNECTED(00000003)
[...]
250 DSN
EHLO mail.example.com
250-centos.example.com
250-AUTH PLAIN LOGIN
250-AUTH=PLAIN LOGIN
CHAPTER 6 ■ SETTING UP MAIL 145
250-ENHANCEDSTATUSCODES
250-8BITMIME
250 DSN
Over an encrypted connection AUTH is advertised. This makes sure that none of your
users sends unencrypted passwords over the Internet. Your mail server is now ready for
production. Test it well before giving out accounts to other people. If everything works as
expected, turn off the safety net:
soft_bounce = no
unknown_local_recipient_reject_code = 550
Sit back and enjoy the spam.
Retrieving Mails
Your mail server is running now, mails are coming in, your users can send mails to each
other and the rest of the world, but something seems to be missing. Nobody can read
mails yet! Sure, if you are logged in locally, you can use the mail command to read and
send mails, but this is a very limited mail client, even by old standards. CentOS comes
with the Mutt mail client, which also is able to read mails from a local mailbox. The same
goes for the Alpine mail reader and some other console clients. Although those mail cli-
ents are a good choice for many people, other users prefer graphical mail clients such
as Evolution and Thunderbird. You probably don’t want to give all your users a shell
account on your mail server either. How do your users get their mail now?
Two protocols are used to retrieve mails over the Internet. One is POP3, which is
described in RFC 1939. The other one is Internet Message Access Protocol, version 4 rev 1
(IMAP4), which is described in RFC 2060. The most obvious difference between those two
protocols is that POP3 is like a real post office, where you go and retrieve your mail to take
it home with you. If you fetch mails via POP3, your client downloads them to your local
computer, stores them there, and then removes them on the server.
IMAP4 is mostly used to manage your mails on the server. Your client does not down-
load the mails but shows you the mails that are stored on the server. You can build up a
folder structure on the server to store read mails in another mail folder than new mails or
store all your replies in a separate mailbox. This is a good protocol if you regularly read
mails from different computers. With POP3, mails get deleted after retrieval and are avail-
able only on the computer you retrieved them with; by contrast, with IMAP4, mails stay
on the server and can be read from anywhere. This is also great if you want to test different
mail clients—your mail stays where it is, as long as you don’t remove it from the server.

CHAPTER 6 ■ SETTING UP MAIL
146
For you as a mail server administrator, this may look different. When all your users
use POP3 and retrieve all their mails before reading, the storage space for mails does
not have to be very big. You should take holidays into account, where some users do not
retrieve their mails over a longer period. With IMAP4, users will manage their mails on
your server. This can use up a considerable amount of storage space on your server, with
people sending and receiving holiday pictures, Word documents, and other large attach-
ments on your server.
■Note Postfix does not deliver mails to mailboxes that are larger than 50MB per default. This makes it
easy to calculate storage space on your mail server but will soon lead to calls from users who cannot receive
mails anymore, because of this limit. You can tune this with the mailbox_size_limit parameter, which
defaults to 51,200,000 bytes. Messages are limited to 10MB, which is reasonable, but if your users complain,
you can change it with message_size_limit.
It is up to you to decide which type of message retrieval you want to offer your users.
IMAP4 is much more powerful than POP3, but it leads to increased storage on your
server. Luckily, both servers that are available for CentOS support both protocols.
CentOS 5 ships with Dovecot (http://www.dovecot.org/) and the Cyrus IMAP server
(http://cyrusimap.web.cmu.edu/). Both servers are fast and reliable and offer a reasonable
feature set.
Cyrus IMAP is used in large-scale environments with several thousands, or even
hundreds of thousands, of users. It is written to be scalable even to the largest setups, and
you can spread it across several servers to level the load. It can also be used for smaller
setups, because it has at least one feature that the Dovecot implementation available
in CentOS 5 does not have: shared IMAP folders. Shared IMAP folders are mailboxes or
folders to which several people have access. Think of it as a “reverse alias”—mail gets
delivered to one folder, and three users can access this IMAP folder. Cyrus IMAP also
natively supports the sieve filtering system with which you can filter out unwanted mails
when they are received.
Dovecot is a new IMAP4 and POP3 server that has been written with speed and secu-
rity in mind. Dovecot’s development is very fast at the moment, so the CentOS version
lags a bit behind in features. Newer versions of Dovecot also support shared folders. To
use the sieve mail-filtering language, you need to download and install a plug-in, which
is not available from the CentOS repositories. One of the biggest advantages of Dovecot
is that it uses standard Unix mbox and maildir formats for mail storage, while Cyrus imapd
uses its own storage format.
Because you already installed Dovecot to provide authentication capabilities to Post-
fix and because it is very easy to set up, the next sections are about configuring Dovecot
for your users.
CHAPTER 6 ■ SETTING UP MAIL 147
The nice thing about Dovecot is that it works out of the box after you install and start
it. If you already have mails in your mailbox, you can test whether it works:
[ralph@centos ~]$ telnet localhost 110
Trying 127.0.0.1...
Connected to localhost.localdomain (127.0.0.1).
Escape character is '^]'.
+OK Dovecot ready.
user ralph
+OK
pass itsasecret
+OK Logged in.
stat
+OK 26 14419
list 5
+OK 5 554
retr 5
+OK 554 octets
Return-Path: <test@example.com>
X-Original-To: ralph@localhost
Delivered-To: ralph@localhost.example.com
Received: by centos.example.com (Postfix, from userid 501)
id C7AD818242; Tue, 24 Mar 2009 01:30:40 +0100 (CET)
Date: Tue, 24 Mar 2009 01:30:40 +0100
From: test@example.com
To: ralph@localhost.example.com
Subject: mail Nr. 5
Message-ID: <20090324003040.GA24807@centos.example.com>
Mime-Version: 1.0
Content-Type: text/plain; charset=us-ascii
Content-Disposition: inline
User-Agent: Mutt/1.4.2.2i
Lines: 1
Hello
.
quit
+OK Logging out.
After logging in, stat tells you that 26 messages are available, using 14,419 bytes.
With the command retr 5, you can retrieve the fifth mail, with all headers. Because this
mail has been sent from the local box, the header section is quite short. The mail wasn’t
CHAPTER 6 ■ SETTING UP MAIL
148
deleted after retrieval; your mail client will probably do that. Here’s the same for IMAP4
where you are going to fetch only the body of the sixth mail:
[ralph@centos ~]$ telnet localhost 143
Trying 127.0.0.1...
Connected to localhost.localdomain (127.0.0.1).
Escape character is '^]'.
* OK Dovecot ready.
1 login ralph isasecret
1 OK Logged in.
2 select Inbox
* FLAGS (\Answered \Flagged \Deleted \Seen \Draft)
* OK [PERMANENTFLAGS (\Answered \Flagged \Deleted \Seen \Draft \*)] Flags permitted.
* 26 EXISTS
* 0 RECENT
* OK [UNSEEN 1] First unseen.
* OK [UIDVALIDITY 1237853960] UIDs valid
* OK [UIDNEXT 27] Predicted next UID
2 OK [READ-WRITE] Select completed.
3 FETCH 6 BODY[TEXT]
* 6 FETCH (FLAGS (\Seen) BODY[TEXT] {7}
Hello
)
3 OK Fetch completed.
4 LOGOUT
* BYE Logging out
4 OK Logout completed.
The IMAP4 protocol is much more complicated than POP3, but it has to be because it
needs to be able to manage your mails on the server itself, while POP3 just lets you down-
load mails.
What is there left to configure if it already works? For one, you will need to open your
firewall so other users can access your IMAP server over the Internet. And because your
SMTP server already supports encryption, you probably want to turn that on for POP3
and IMAP4 also.
Configuring Your Firewall
Run system-config-securitylevel-tui to access the firewall configuration, as shown in
Figure 6-4.
Use the Tab key to choose Customize, and press the Return key to access the next
menu, as shown in Figure 6-5.

CHAPTER 6 ■ SETTING UP MAIL 149
Figure 6-4. Customizing your firewall settings
Figure 6-5. Allowing IMAP4S and POP3S through your firewall
CHAPTER 6 ■ SETTING UP MAIL
150
Use the Tab key to select the line saying Other ports. Enter 993:tcp 995:tcp on this
line—these ports are IMAP4 over SSL and POP3 over SSL. Press Tab to select OK, and use
the Return key to go to the previous menu. Select OK again, and press Return. Now check
whether you opened the correct ports:
[root@centos ~]# iptables -L -v | grep -E "pop3|imap"
0 0 ACCEPT tcp -- any any anywhere ➥
anywhere state NEW tcp dpt:imaps
0 0 ACCEPT tcp -- any any anywhere ➥
anywhere state NEW tcp dpt:pop3s
[root@centos ~]#
There is no need to open the unencrypted ports 110 and 143 to the outside world,
because all mail clients are able to use encrypted POP3 and IMAP4 connections.
Configuring Dovecot
All you have left to do is to configure Dovecot correctly so that it uses SSL. Dovecot even
brings its own certificates with it, which it stores in /etc/pki/dovecot/, but because you
created or requested a certificate for your Postfix mail server already, it’s better to use
that.
Open /etc/dovecot.conf with an editor, find the following lines, and change them to
the following values:
ssl_cert_file = /etc/pki/tls/certs/mail.example.com.cert
ssl_key_file = /etc/pki/tls/private/mail.example.com.key
ssl_cipher_list = ALL:!LOW:!SSLv2
Dovecot listens by default on the normal and the SSL ports, so you don’t have to
change that. Run service dovecot restart to restart Dovecot. To see the changes you did
to the default configuration, you can run dovecot -n, which reflects the changes you just
made. You should see the following lines in the output of that command:
ssl_cert_file: /etc/pki/tls/certs/mail_example_com.crt
ssl_key_file: /etc/pki/tls/private/mail_example_com.key
ssl_cipher_list: ALL:!LOW:!SSLv2
auth default:
mechanisms: plain login
passdb:
driver: pam
CHAPTER 6 ■ SETTING UP MAIL 151
userdb:
driver: passwd
socket:
type: listen
client:
path: /var/spool/postfix/private/auth
mode: 432
user: postfix
group: postfix
If you have the nmap package installed, you can use it to check that Dovecot indeed
runs on the needed ports:
[root@centos ~]# nmap localhost -p 110,143,993,995
Starting Nmap 4.11 ( http://www.insecure.org/nmap/ ) at 2009-03-24 03:17 CET
Interesting ports on localhost.localdomain (127.0.0.1):
PORT STATE SERVICE
110/tcp open pop3
143/tcp open imap
993/tcp open imaps
995/tcp open pop3s
You still can reach ports 110 and 143 locally for test reasons. Other users will have to
use the encrypted ports, because your firewall configuration denies access to the unen-
crypted ports. Let’s see whether POP3S works:
[ralph@centos ~]$ openssl s_client -connect localhost:995
CONNECTED(00000003)
[Lots of output]
Verify return code: 18 (self signed certificate)
---
+OK Dovecot ready.
This looks good. You can do the same now for IMAP4 using port 993.
Congratulations. You have just set up a complete mail server with secure connections
for SMTP, IMAP4, and POP3. As a cherry on top of that, you are now going to learn how to
install a webmail solution on your web server, which will use the mail server you have just
set up. With this you can reach your mails from every Internet café without having to start
a mail client.

CHAPTER 6 ■ SETTING UP MAIL
152
Using Webmail
A webmail interface enables you to read your mails from wherever you are; the only soft-
ware you need is a web browser. CentOS ships with an easy-to-set-up and fast webmail
interface written in PHP, SquirrelMail. If you haven’t set up your web server, Chapter 5
explains everything you need to know to get one running. If you want to use your web
server for webmail, please configure SSL so you can use encrypted HTTPS connections,
because you need to type in usernames and passwords. We’ll wait here for you. Back?
Everything running? Good. You can install SquirrelMail with Yum, which will also pull in
all the needed dependencies:
yum install squirrelmail
After the installation, you need to restart your web server, because the install drops
a configuration snippet in your Apache config directory. To configure SquirrelMail, you
need to run the following:
/usr/share/squirrelmail/config/conf.pl
This opens a text menu in which you can configure all aspects of your webmail inter-
face, like in Figure 6-6.
Figure 6-6. Main configuration screen for SquirrelMail
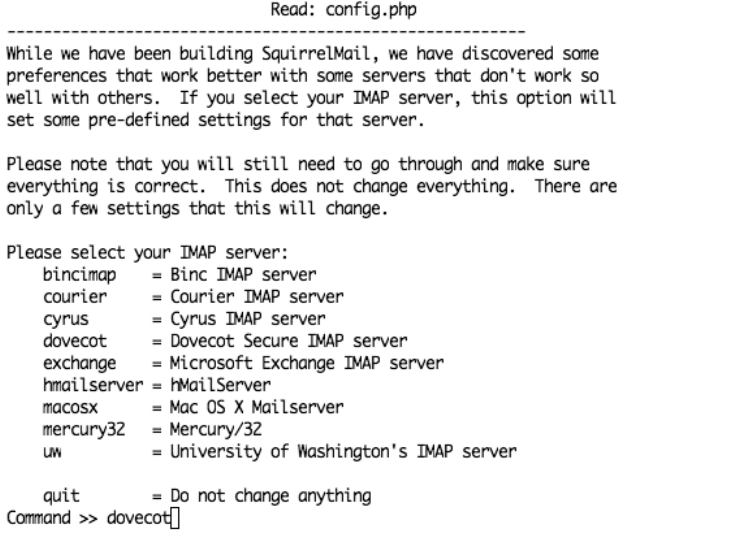
CHAPTER 6 ■ SETTING UP MAIL 153
SquirrelMail has a set of presets for different IMAP servers, which have proven to
work best with that server software. Of course, it also knows about Dovecot. Press D on
the main screen. This will open the menu shown in Figure 6-7.
Figure 6-7. SquirrelMail’s presets menu
Type dovecot at the command prompt, and press Return. This will bring you back to
the main menu from Figure 6-6. Press 2 now to get to the server settings (see Figure 6-8).
Here you should set the domain (press 1) to the domain you use for mails. If your web
server is running on the same host as your web server, you can leave the Sendmail or SMTP
value set to Sendmail (which is /usr/sbin/sendmail). If not, you have to set it to SMTP
and then configure your SMTP server settings by pressing B. You can now configure your
SMTP settings including SMTP-Auth and TLS. The same goes for the IMAP server set-
tings. You can update them by pressing A, which will show the menu in Figure 6-8.
This should be all you have to configure to get SquirrelMail working. You should go
through the other menus to see whether there is anything worthwhile to configure for
your site such as a different theme or an address book. Save the configuration by press-
ing S, and quit the setup program by pressing Q. To access your mail, point your browser
at https://www.example.com/webmail, which will show a login menu. Enter your username
and password, and press the Login button. A window with your mails will open. You can
now send and read mail just like you would with a normal mail client.
CHAPTER 6 ■ SETTING UP MAIL
154
Figure 6-8. Configuring your IMAP settings
Summary
In this chapter, you learned how to set up the Postfix mail server software to send and
receive mails. You can set up a mail server for multiple domains now. You saw how mail
works and how to secure SMTP connections with TLS and user authentication. You now
know how to set up a POP3 or IMAP4 server and how to configure it so it uses connec-
tions over SSL. You also learned how to set up a webmail client for you and your users.
You are now all set to run your own mail server on the Internet.
In the next chapter, we will cover the Domain Name System (DNS). This is the glue
that makes the Internet work.

155
CHAPTER 7
Understanding DNS
Domain Name System (DNS) is probably one of the most misunderstood technologies
in use on the Internet today. Despite that neither the Web nor e-mail would be possible
without it, many people do not understand how it works or why it’s important. To be
fair, that’s not all that surprising because DNS is one of those technologies that sits in the
background quietly getting the job done. The only time people really think about DNS is
when they can’t connect to a web site or their e-mail isn’t working.
Many professionals use DNS technology passively. Many people who use web host-
ing with control panels have all the relevant DNS records created for them. They never
have to worry about how it all fits together. They simply add a domain, and everything
just works. This is all well and good until the day you need to deploy your work onto a
machine with a standard install and nothing seems to work.
This chapter starts at the very beginning. It will talk about how DNS came about and
why things are done the way they are. We will explain how registries and registrars fit into
the mix and why the WHOIS system is vital to how we use DNS today. We will talk about
primary and secondary servers and why it’s quite possible for a server to be both. We’ll
also cover master and slave zones, their differences, and why they’re important.
We’ll continue our foray into the world of DNS by looking at the resolver and the
nsswitch file. We’ll then move on to working with DNS’s predecessor, the hosts file, and
show how flexible and useful it is even today. We’ll cover how the NSCD service can
speed up name resolution and why it’s sometimes too efficient for its own good. We’ll
then show how to set up a proper DNS server to provide a name-caching service and then
reconfigure it as a forwarding name server.
After all of that, we’ll start to get into the real reason you’re here: hosting your own
domain names! We’ll start by showing how to create a basic master zone for the domain
example.org. We’ll then pad it out by adding the various different types of records that
you’d expect to find on a live, working name server. Next we’ll cover how to set up a slave
server and how you can go about backing up your domains to ensure that they are always
available.
CHAPTER 7 ■ UNDERSTANDING DNS
156
DNS, once you’ve gotten the hang of it, is surprisingly simple. However, so much
rests on understanding and configuring DNS that it is crucial that you gain at least a
working knowledge of it. Other services work with and rely extensive on DNS. A web site
that doesn’t work properly or missing or delayed e-mail can often be traced back to an
issue with DNS.
So with that in mind, let’s get started.
What Is DNS?
DNS is the phone book of the Internet. Quite simply, it provides a mechanism to turn
human-readable names into IP addresses. Without this technology, we would have to
remember the IP addresses for every single server we wanted to talk to. Humans are
notoriously bad with numbers, and although it isn’t a problem on small networks, when
looking at something as immense as the Internet, it is a problem.
This problem isn’t new, and originally the hosts file was a very simple and elegant
way to handle it. The hosts file is usually the first port of call when the system needs to
convert a hostname into an IP address. This order can be changed, but we’ll look at that
a bit later in the “nsswitch” section. Most administrators use the hosts file to override any
other naming systems that might be in place such as DNS, NIS, or LDAP. More commonly,
though, it’s used for testing purposes or for setting up an alias for machines the admin-
istrator contacts on a regular basis. The key thing to remember, though, is that this file
affects only the local machine on which it’s running. Two servers managed by the same
person could have very different hosts files. There is also no guarantee that a name in one
file points to the same IP address that the same name in another hosts file points to.
Confusing? You’re not the only person to think so! All you really need to remember,
though, is that the hosts file tends to override everything else, so unless you know other-
wise, treat them as unique on each machine.
The hosts file is just a simple text file, and originally this file would be maintained and
shared among system administrators. This wasn’t too bad when there were only a hand-
ful of people connected to the Internet. However, it soon became obvious that trying to
manage all computer names in a single file was simply not going to work.
One of the big problems was deciding who was going to maintain and manage the
hosts file for these people. Who, for instance, gets to decide who gets to use what name?
Who decides whether a name is appropriate? Of course, whoever has that thankless job
would need to spend time and effort to collate all the new requests, update the hosts file,
and then make the file available for people to download.
CHAPTER 7 ■ UNDERSTANDING DNS 157
This was the second issue: distribution. There was no easy way to tell whether you
had the most up-to-date hosts file without actually downloading it again and taking a
look. As you can imagine, this meant that a lot of resources were required simply to host
the file, especially as people kept requesting updates even though no changes had been
made.
The hosts file started to get rather large. In effect, it held every single hostname in use
on the Internet at the time, and for many people, the vast majority of these names weren’t
relevant or useful. They had no choice but to download them, however. There was no
mechanism to allow partial updates or to selectively take the bits that interested them.
Thus, although the hosts file was fine for an individual system and is still quite effec-
tive on a closed network, it was simply too unwieldy to be used on such a large scale.
Something needed to be done.
DNS Was Born
DNS was developed by Paul Mockapetris in 1983 to solve this problem. What was needed
was a way for the individual organizations to manage their own names in such a way that
there was no possibility of naming conflicts. A hierarchical structure would allow respon-
sibility for a given name to be delegated to whoever was best suited to look after it. Today,
DNS still follows this hierarchical structure, which allows entire countries to look after
their own top-level domains (TLDs) without having to worry about interfering with any-
one else. This is called delegation.
At the very top of the DNS tree, we have what is known as the root. This holds all the
information on all the top-level domains. A top-level domain is anything that does not
have a dot (a period) after it. For example, .com and .org are both top-level domains,
whereas centosbook.com is not. centosbook is a subdomain of the .com top-level domain.
Each subdomain can have one or more subdomains of its own, up to a maximum of 127
levels.
Is it really necessary to learn all this? Generally speaking, you will not need to worry
about these finer points when dealing with DNS on a day-to-day basis. You simply add a
new subdomain (or hostname), point it at an IP address, and you’re done. However, there
may be times, especially if you’re working in a large organization, where you actually
have to delegate control to another party. We’ll come back to a specific example later, but
for now, take a look at Figure 7-1.

CHAPTER 7 ■ UNDERSTANDING DNS
158
.centosbook.com .co.uk .org.uk .com.hk .idv.hk
The Root
.com .org .uk .hk
Figure 7-1. A brief look at how DNS is organized
Directly below the root you can see all the top-level domains. Two of these are
generic top-level domains (.com and .org), and the other two are considered geographi-
cal or country code top-level domains (.uk and .hk). In fact, dozens of different top-level
domains are available. Check out http://en.wikipedia.org/wiki/List_of_Internet_TLDs
for a complete list. The root does not contain any information about any subdomains.
Instead, it delegates control over each top-level domain to the relevant authority. When
looking up a hostname with DNS, the DNS resolver (the software that actually goes out,
finds the name, and runs on every client system on the Internet) starts at the top of the
tree and works its way down.
For example, assuming no caching is involved, the resolver will first query the root
DNS servers to see who is responsible for the top-level domain of interest. If you’re look-
ing up the IP address of www.centosbook.com, it will ask the root servers for information.
The root servers, of course, do not have this information, but they do know who con-
trols the .com domain, and they provide a list of DNS servers that are authoritative for it.
The DNS resolver then contacts one of these servers and asks again for the information.
Again, the DNS servers in charge of the .com do not know about www.centosbook.com, but
they do know who is responsible for centosbook.com and, thus, who should be contacted
to find the answer. Once more, a set of name servers is sent back to the resolver; this time,
though, it is the authoritative servers for the centosbook.com domain. Finally, the DNS
resolver requests this information from one of the servers provided. This time, because
this server does know the IP address of www.centosbook.com, it returns this value to the
DNS resolver, which then passes the IP address back to the software that requested the
lookup.
CHAPTER 7 ■ UNDERSTANDING DNS 159
This sounds like a rather long and laborious process, but thanks to caching at all
levels of the DNS system, results are usually received pretty much instantly. Now, the
delegation you’ve looked at here happens on an international scale and is not something
you usually need to deal with. However, now that you know how DNS finds information
in the tree, let’s take a look at how those domain names come to be there.
The WHOIS System
WHOIS (pronounced as it sounds, “who is”) provides a central record of domain owner-
ship. There are various registries around the world. For example, the Nominet registry
manages all .uk domains, and the Hong Kong Internet Registry Corporation (HKIRC) han-
dles all .hk domains. Internet Corporation for Assigned Names and Numbers (ICANN)
is responsible for the allocation of all top-level domains as well as IP address delegation.
ICANN delegates country code domains to the national registrars (such as Nominet and
HKIRC). Depending on the individual registry, the way of purchasing domain names can
be very different. They also have their own unique policies and practices.
Both Nominet and HKIRC have restrictions in what domains can be purchased. For
example, although .co.uk and .org.uk are open to anyone, you can register a .net.uk
address only if you have a RIPE-assigned IP address block. Anyone can buy a domain
ending in .hk from HKIRC, but domains ending in .com.hk and .idv.hk are restricted to
Hong Kong companies and residents only.
Of course, the majority of domain names purchased today are either .com, .net, or
.org. There are hundreds of different registrars offering everything from simple domain
name registration to bundled hosting packages for web sites, e-mail, and online advertis-
ing. Our registrar of choice is GoDaddy (www.godaddy.com) because it offers good prices
and an easy-to-use web site for updating and managing domains.
When looking to choose a registrar, you are in effect getting a simple service, that
is, the ownership or the right to use a particular domain name. Because all registrars
offer this, you should be looking for registrars that provide good support and allow you
to manage your accounts entirely online. Before you choose the cheapest or the most
expensive provider, you should do some searches and find out what their customers say
about them. Sometimes a really cheap provider will give you amazing support, whereas
an expensive provider gives you nothing but grief and hassle. Generally speaking, though,
once your domain is set up, you probably won’t speak to your registrar until you renew
the domain in a year’s time.
Why are we discussing the WHOIS system in a chapter on DNS? The WHOIS system
is where the authoritative DNS servers for a given domain are listed. These records are
not directly queried when looking up a hostname. Instead, the WHOIS record is used by
the registry that looks after a given domain name to update their own DNS servers as to
which DNS servers are responsible (or authoritative) for a given domain. In other words,
it’s the first place to look if your domain name doesn’t seem to be working the way you
expect.

CHAPTER 7 ■ UNDERSTANDING DNS
160
The Root DNS Servers
We’re not going to spend too much time on root DNS servers because you will probably
never have to use them. That said, you should know what they are because you’ll often
find documentation that refers to them. There are currently 13 root servers, which answer
requests from around the world. Their job specifically is to tell people where to find the
DNS servers in charge of the top-level domains that we looked at in the previous section.
The Resolver
The resolver is a critical part of your computer’s network support, but it’s not something
you are ever likely to deal with directly. The resolver is used whenever a program needs to
convert a name to an IP address. Whenever you visit a web site, your browser will make
a request to the resolver to find out the IP address to which it should connect. This gives
the web browser and the various naming systems great flexibility. The browser wants to
exchange a name for an IP address, but it doesn’t care (or know) how that process takes
place. It doesn’t know, for example, whether the name was found in the local hosts file or
whether there are two possible IP addresses for a given name.
All of this is hidden in the background, and even as a DNS administrator, this low-
level stuff isn’t something you’ll come across much, if at all. In fact, the only reason I’m
even bringing it up is because it shows you how the applications you use on a daily basis
interact with the system on which they run. This is important because we’ll be looking at
various techniques to improve performance, and to appreciate those, you’ll need to have
a rough idea of how they fit into the grand scheme of things.
Let’s start by looking at the hosts file.
The Hosts File
Here is the hosts file from the server we built in Chapter 2:
[root@centosbook ~]# cat /etc/hosts
# Do not remove the following line, or various programs
# that require network functionality will fail.
127.0.0.1 centosbook localhost.localdomain localhost
::1 localhost6.localdomain6 localhost6
[root@centosbook ~]#
■Caution As the comment in the file says, the first two entries should not be altered. In Linux, many pro-
grams expect that the local hostname resolves to 127.0.0.1 and will break spectacularly if it doesn’t. You can
add new entries to this file without needing to worry; just leave these first two lines alone.
CHAPTER 7 ■ UNDERSTANDING DNS 161
The first column contains an IP address, and the second column contains the host
that should refer to it. You can add more than one host by separating them with a space.
It’s very easy to test content in the hosts file by using ping:
[root@centosbook ~]# ping localhost
PING centosbook (127.0.0.1) 56(84) bytes of data.
64 bytes from centosbook (127.0.0.1): icmp_seq=1 ttl=64 time=1.75 ms
64 bytes from centosbook (127.0.0.1): icmp_seq=2 ttl=64 time=0.091 ms
64 bytes from centosbook (127.0.0.1): icmp_seq=3 ttl=64 time=0.039 ms
--- centosbook ping statistics ---
3 packets transmitted, 3 received, 0% packet loss, time 2000ms
rtt min/avg/max/mdev = 0.039/0.626/1.750/0.795 ms
[root@centosbook ~]# ping centosbook
PING centosbook (127.0.0.1) 56(84) bytes of data.
64 bytes from centosbook (127.0.0.1): icmp_seq=1 ttl=64 time=0.028 ms
64 bytes from centosbook (127.0.0.1): icmp_seq=2 ttl=64 time=0.053 ms
64 bytes from centosbook (127.0.0.1): icmp_seq=3 ttl=64 time=0.035 ms
--- centosbook ping statistics ---
3 packets transmitted, 3 received, 0% packet loss, time 1998ms
rtt min/avg/max/mdev = 0.028/0.038/0.053/0.012 ms
[root@centosbook ~]#
nsswitch
You can find the nsswitch config file at /etc/nsswitch.conf. This is already configured for
optimum performance. Specifically, this configuration file determines (at least from a
lookup point of view) which service is asked first when a lookup is attempted. The default
entry is as follows:
hosts: files dns
What this means is that the system will first look in the local files (in this case /etc/
hosts), and then, if it can’t find what it’s looking for, it will try DNS. This setup is very
useful because it means you can sneak whatever names you want into /etc/hosts and set
them to arbitrary IP addresses. This is very useful for testing and development where you
may need to test using specific hostnames but those names are currently in use in pro-
duction. It’s also a very quick and easy way for local administrators to add short names
for machines they connect to on a regular basis.

CHAPTER 7 ■ UNDERSTANDING DNS
162
■Note There is nothing wrong with putting hosts in /etc/hosts, but you must remember that this data is
local to the machine, and not only could it be different on another server, it might also be completely different
from what the official DNS system is saying.
NSCD
Name Service Caching Daemon (NSCD) is a useful service that does exactly what its
name suggests. Because this is a chapter on DNS, we’re going to focus on how NSCD can
help us and where it fits into the overall picture. NSCD is very easy to use and should be
installed by default. If not, you can install it with the following:
yum install nscd
So, what exactly does NSCD do? Well, it actually has two caches for each server.
The first cache is called the positive cache, and this is where name lookups are stored
when the hostname is found. For example, the first time you run the command host
www.centosbook.com, the resolver will contact your DNS server and look up the name.
However, if you’re running NSCD, the next time you request that hostname, it will be
returned immediately from the cache rather than requiring another lookup. For heavily
used machines or those with slow or intermittent Internet connections, NSCD can make
a surprising amount of difference.
NSCD also has a negative cache, which as the name suggests is the opposite of the
positive cache. If you were to look up the name foo.centosbook.com, you would get a “host
not found” error message. That’s not overly surprising because there isn’t an entry with
that name. NSCD will remember this information in its negative cache. The next time
you look for this hostname, NSCD will immediately return a failure, saving the trip to the
Internet.
As you can see, there quite a few benefits to using NSCD, and you may be wondering
why NSCD isn’t enabled by default if it’s so useful. Well, the answer to that question is
that NSCD can be more trouble than it’s worth. To be fair, this isn’t really NSCD’s fault;
after all, its job is to remember and cache information. The problem occurs when the
cache becomes stale—when the knowledge that NSCD holds and is providing to you is no
longer accurate.
Because NSCD “short circuits” host lookups, it’s possible for a new host to be created
(such as our foo.centosbook.com example) but not be visible to your machine because
NSCD has remembered that it doesn’t exist and so doesn’t check again. The same issue
also occurs with the positive cache in that if the IP address of a web site changes, NSCD
might not pick up on it and will effectively leave you hanging.

CHAPTER 7 ■ UNDERSTANDING DNS 163
Fortunately, it’s really easy to refresh NSCD, and in fact you just need a single
command:
nscd –i hosts
This issue is not unique to CentOS. Windows users may well be familiar with the
command ipconfig /flushdns, which effectively does the same thing on Microsoft Win-
dows.
So, should you use NSCD? Well, it’s a very simple way to improve performance on
your machine. If you’re connecting via a slow link such as a GPRS modem or even dial-
up, running NSCD can actually make a noticeable difference. It’s also easy to use (the
default config file provided will suit most people very well) and simple to manage. It’s
also very easy to turn off if you decide it’s too much trouble.
■Tip NSCD caches more than just host lookups; it can also cache user and group information. If you want
to cache this information but not host lookups, you can disable the host cache in /etc/nscd.conf.
NSCD is a quick way to potentially get a performance boost, but if you have a fast
Internet connection, it may not make much difference, and if you deal with domain
names that update frequently, you may find that NSCD just gets in the way because it
doesn’t strictly follow DNS “time to live” instructions.
If you’re looking for a performance boost and you don’t mind doing an extra bit of
work, a caching name server will be right up your street. It doesn’t suffer from the issues
that NSCD does, and it isn’t that much harder to set up and use either.
NSCD supports the usual service commands including start, stop, and restart.
To start NSCD, use this:
service nscd start
To stop NSCD, use this:
service nscd stop
To restart NSCD, use this:
service nscd restart
If you decide you want to keep on using NSCD, you can enable it so that it starts by
default with this command:
chkconfig nscd on
CHAPTER 7 ■ UNDERSTANDING DNS
164
Now that we’ve covered these system-level options, it’s time to turn your attention to
the BIND DNS server.
What Is BIND?
BIND (short for Berkeley Internet Name Domain) is the de facto standard name server
on Unix-like systems. It has been in development since the early 1980s, but the current
version (BIND 9) is a complete rewrite that fixes a number of issues found in BIND 4 and
BIND 8. Because of various security issues with these older versions, you should never
run any version of BIND older than version 9. This isn’t a problem because this is the ver-
sion that ships with most modern Unix-like systems, including CentOS.
BIND will allow you to set up and run your own name server. There are four types of
name server:
• Caching
• Forwarding
• Master
• Slave
These are actually a bit of a misnomer because there is no reason why a single name
server couldn’t perform all of these roles simultaneously. In fact, many servers do pre-
cisely that, and we’ll look at how that can be of benefit in the next section. Really then,
each of these is simply a role that a name server can play. It’s not as confusing as it
sounds because these roles are actually quite distinct, and it will usually be pretty obvious
which is meant.
Unfortunately, these aren’t the only terms that can be confusing to someone new
to DNS.
Primary and Secondary Name Servers
Despite the name, from an outside point of view, DNS servers are treated equally, and
requests are distributed among the available servers. It’s also possible (depending on the
registry’s rules) to have only one DNS server or perhaps four or more.
Generally speaking, it’s a good idea to ensure that you follow convention. This will
make it a lot easier to get help if things go wrong. People who have been working with
DNS for many years will most likely assume that these conventions have been followed
and that certain terminology is understood. If you choose not to follow these rules with-
out good reason, you may find people are less willing to help you.
Lastly, the terms primary name server and secondary name server are not very pre-
cise in that a DNS server that is the primary for one domain could also be the secondary
CHAPTER 7 ■ UNDERSTANDING DNS 165
for another. It is also quite possible for a domain to have a large number of secondary
name servers. It is far more precise to refer to master and slave zones. However, you will
find these terms used all over the Internet and in tutorials and books. For the most part,
thanks to context, it will be somewhat obvious which term is being referred to. If not,
however, you should feel free to ask for more specific information.
Primary Name Server
The primary name server should hold the master zone for a given domain. This zone con-
tains “the truth” about the domain. This is known in DNS parlance as being authoritative.
We’ll talk more about authoritative servers in a moment. It is also usually assumed that
the first DNS server in the list is the primary. Some registries specifically mention terms
such as primary and secondary. Others just call them name server 1 and 2. So, the primary
server should be the first DNS server given, and it should also hold the master zone file.
Secondary Name Server
A secondary name server holds the same information as the primary server and is also
considered authoritative for any of its domains. However, these servers maintain slave
zones rather than master zones. Changes should never be directly made to zones on a
slave server. When changes are made on the primary name server, the secondary server is
notified and will then download the updates.
Installing BIND
Now that we’ve covered a large amount of theory, let’s put it to use. As usual, we’re going
to install BIND with Yum. If you are using a system you built with the instructions in
Chapter 2, you should already have BIND installed. Most hosted solutions will also come
with it pre-installed. Because some installs have explicitly removed BIND, we are going
to explicitly install it anyway. Don’t worry; if it’s already installed, this command won’t
break anything:
yum install bind bind-chroot bind-libs bind-utils
This will install (or update) all the relevant packages. The bind-chroot package is actu-
ally optional. bind-chroot improves the security of your DNS server by securing it in its
own root directory. The idea is that if someone were able to break into your DNS server,
they would be locked inside a directory that they can’t get out of. This prevents them
from being able to access any key system files. Although using this package can cause
confusion with some older management tools, generally speaking you will notice no dif-
ference in operation, and the extra security you gain is certainly worth having.
CHAPTER 7 ■ UNDERSTANDING DNS
166
That’s it really for the basics of running a name server. There is one more optional
package that we will be using in the next section. It doesn’t do anything that we couldn’t
do by hand; it just saves us a bit of hassle. Packages like this one are usually referred to as
convenience packages. We will use the caching-nameserver package to quickly and pain-
lessly set up a caching name server.
Setting Up a Caching Name Server
A caching name server caches hostname lookups. It’s pretty much what you’d expect
really. It’s different from NSCD in that it honors the time to live (TTL) value. The TTL val-
ues tell name servers how long they can remember a record.
Earlier in the chapter, we talked about how DNS works and how a request that starts
at your local machine works its way up the DNS hierarchy until it finds a server that can
help with the request. Can you imagine how many machines constantly request names
such as www.google.com or www.facebook.com? If all those queries had to be answered by
Google’s or Facebook’s own DNS servers, they would be put under tremendous load. It
would also mean that there would be constant heavy traffic crossing the Internet, just to
resolve names.
To avoid this issue, DNS servers are allowed (and expected) to remember the
response for a period of time: the TTL value. Each DNS server in the chain will remember
the hostnames that it has looked up. After the TTL value has passed, the DNS server must
request the name again. What this means is that because users on your ISP are no doubt
constantly visiting Google’s web site, when you come to visit it, your DNS request goes
to your ISP and can be answered from its local cache. There’s no need for your ISP to go
hunting on the Internet to try to find it. This not only saves time, but it also helps spread
the load from hundreds of thousands of requests across the DNS network rather than
focusing on any one server. It also means that network traffic is kept to a minimum.
So, we’ll now show how to set up a DNS server on our CentOS machine that is going
to perform this task for us. Once you have done the necessary setup (and tested it), you
will then tell your machine to start using it. We will also cover how to let other machines
use your caching server so that you can benefit from sharing the name cache.
You’ve already installed the basics of a DNS server. If you try to start it now, you will
see the following:
[root@centosbook ~]# service named start
Locating /var/named/chroot//etc/named.conf failed:
[FAILED]
[root@centosbook ~]#
This is because in CentOS 5 a default configuration file is no longer provided. You will
also note that it looks in /var/named/chroot. You’ll recall we touched on this earlier when
we showed how to install the bind-chroot package. Fortunately, creating a caching name
CHAPTER 7 ■ UNDERSTANDING DNS 167
server is such a common affair that CentOS provides a package that does all of the hard
work for you. All you need to do is install it like so:
yum install caching-nameserver
This will install some key configuration files that we’ll cover in a moment. For now,
though, simply start up your server with this:
service named start
and you should find that it now starts without any trouble. That’s it as far as the install
goes, and for many people, this is as far into setting up a DNS server as they will ever need
to go. Let’s give it a quick test. Let’s look up the details for www.centosbook.com:
host www.centosbook.com localhost
Notice that instead of just specifying the name, you’ve instructed the host command
to use a particular name server. If you don’t specify a name server, the host will use the
name servers list in /etc/resolv.conf, which probably points to your ISP. You will update
this configuration file in a moment so that it will primarily use your local server before
attempting to use the ones provided by your ISP. This is useful because if there is a prob-
lem with your local name server (perhaps you forgot to start it, for example), you will still
be able to resolve names on the Internet.
The output from the host command should look something like this:
[root@centosbook ~]# host www.centosbook.com localhost
Using domain server:
Name: localhost
Address: 127.0.0.1#53
Aliases:
www.centosbook.com is an alias for centosbook.com.
centosbook.com has address 212.13.194.215
centosbook.com mail is handled by 10 mail.doublehelix.hk.
centosbook.com mail is handled by 20 backup.mail.bitfolk.com.
[root@centosbook ~]#
The first section just confirms which DNS server was used to look up the request.
As you know, localhost points to 127.0.0.1, which is the internal local address (see /etc/
hosts), and #53 tells you which port you used, which in this case is the default for DNS.
The next section breaks down some key information such as that www.centosbook.
com is actually an alias (or CNAME) for centosbook.com. It then continues to tell you the IP
address for centosbook.com and shows you the mail-handling details. You will learn more
about these different types of records in just a moment.

CHAPTER 7 ■ UNDERSTANDING DNS
168
If you run the same command again (press the up key and then Enter), you should
find that you get a very fast response. The truth is, you might not actually be able to tell
any difference. This is partially because DNS is a very lightweight protocol, and there is
a good deal of caching going on upstream. Don’t be too concerned, though. Browsing
the Web can create thousands of individual DNS requests, and all of these will then be
cached locally, making them much faster to access next time. Taken individually, the
speed benefits are quite difficult to see, but when used on a busy machine, you can often
get quite a performance boost. Of course, you also save on bandwidth too, which is very
useful if you are being charged per gigabyte!
That said, although DNS caching is a best practice, it’s unlikely to make your machine
feel like it’s had a serious upgrade. Most DNS networks these days are quite fast and have
pretty decent response rates. However, if you’re stuck on dial-up, GPRS, or ISDN, you
might find that DNS caching makes browsing feel more responsive.
Making DNS Available to Other Machines
Right now if you try to access the DNS server from another machine (you can test this
using the host command), you’ll get an error something like this:
[root@doublehelix ~]# host www.google.com www.centosbook.com
;; connection timed out; no servers could be reached
[root@doublehelix ~]#
This is because caching name servers are almost always used solely by the machine
that’s running them. It would be rather unusual to make it publicly available (unless you
are an ISP), so by default the config files that we’ve used specifically listen only on our
local IP address. We’ll show how to update this configuration so that it listens on all inter-
faces so that other machines on the network can see it.
■Caution This is a bad idea if you’re not planning to make the DNS server available to all. If this is on a
server on your network behind a firewall, this is perfectly fine. If this server is your firewall, you shouldn’t
open DNS to the outside world unless you are also planning to run your own domain.
To tell BIND to listen on all interfaces, all you have to do is comment out this single
line in /etc/named.caching-nameserver.conf (line 15):
listen-on-port 53 { 127.0.0.1 };
You comment it out by putting a hash (or pound) sign in front of it:
#listen-on-port 53 { 127.0.0.1 };
CHAPTER 7 ■ UNDERSTANDING DNS 169
If you save the file and restart named (using the command service named restart),
attempting to look up the name again should give you this:
[root@doublehelix ~]# host www.google.com www.centosbook.com
Using domain server:
Name: www.centosbook.com
Address: 212.13.194.215#53
Aliases:
Host www.google.com not found: 5(REFUSED)
[root@doublehelix ~]#
Hmmm, what’s this? Well, even though BIND is listening for requests, that doesn’t
mean it’s actually going to answer them. What’s happened here is that BIND is refusing to
answer you. This is good practice because it means if you accidentally make your cache
available to the Internet at large, people wouldn’t be able to use it unless you’ve specifi-
cally let them do so. To do this, you need to make some more changes to the configuration
file. Specifically, you need to tell BIND to accept queries from everywhere. You should be
aware that we’re going about this in a bit of an awkward way. You could simply edit the file
more extensively to achieve the same effect. However, this way the original options are still
available, and you can easily put them back in again by uncommenting them.
First you need to comment out the line that looks like this (line 27):
allow-query { localhost; };
And then further down, comment out two more lines (lines 25 and 36):
match-clients { localhost;};
match-destinations {localhost;};
Now if you save and restart the service, you should see this:
[root@doublehelix ~]# host www.google.com www.centosbook.com
Using domain server:
Name: www.centosbook.com
Address: 212.13.194.215#53
Aliases:
www.google.com is an alias for www.l.google.com.
www.l.google.com has address 74.125.95.99
www.l.google.com has address 74.125.95.103
www.l.google.com has address 74.125.95.104
www.l.google.com has address 74.125.95.147
[root@doublehelix ~]#
CHAPTER 7 ■ UNDERSTANDING DNS
170
Now that’s more like it! You can see that lookups have now been enabled for all
machines that can connect to the server. Although there are no restrictions in force from
a BIND point of view, access can still be restricted by ample use of the firewall. This
configuration is quite common in home and small business networks and allows all the
machines on the network to benefit from a DNS cache. However, if the server is also the
gateway to the Internet (and therefore others can see the DNS server), the easiest way to
stop them from using your cache is with the firewall. An additional benefit to this method
is that you will still be able to allow certain people to connect remotely by simply updat-
ing the firewall rather than having to configure BIND separately.
Configuring BIND to Host Domains
In its current state, BIND is not able to host a real domain name. We’ve so far been using
the handy caching-nameserver package to provide you with a working configuration. This
is fine as far as it goes, but if you want something a bit more geared to Internet hosting,
then you’re going to have to create your own configuration file. Don’t worry, this is actu-
ally pretty painless.
First, we’ll show how to create the file /var/named/chroot/etc/named.conf using the
nano editor. This should be enough to get you started:
options {
directory "/etc";
pid-file "/var/run/named/named.pid";
recursion no;
};
If you restart BIND now (with the traditional service named restart) and try to run
some queries, you’ll discover very quickly that your server seems to be broken. This is
partly true in that BIND won’t resolve any domains currently. This makes sense because
you haven’t yet told BIND about any of the domains that you have. To start with, we’ll
show how to create a master zone, and then we’ll show how to set up a slave zone so you
can see how to configure the master server to allow replication (zone transfers). This
should be enough to get you up and running with hosting your own domains, but before
we can go much further, we need to talk about what you’ll find in your average zone file
should you happen to look.
A Records
An A record is probably the most common and easiest of all records to understand. Quite
simply, whatever is placed on the left will resolve to the IP address provided on the right.
Here’s an example of an A record:
www IN A 192.168.1.1
CHAPTER 7 ■ UNDERSTANDING DNS 171
Here, www (expanded to include the full domain name) would resolve to 192.168.1.1.
If this were the zone file for example.org, www would be expanded to www.example.org. You
could choose to be specific in your zone file and use something like this:
www.example.org. IN A 192.168.1.1
The final period (or dot) after .org is very important. If you left this out, the record
would be expanded to create www.example.org.example.org. That’s not quite what you
want. This may sound rather obvious, but it can catch people out if they’re not careful.
There is more information on this in the “Gotchas” section later in this chapter.
CNAME Records
CNAME records aren’t used as much as A records, and depending on who you talk to,
they either are very useful or should be avoided at all costs. That said, there are some
occasions where a CNAME record is definitely the way to go. A CNAME record looks
something like this (combined with the A record from the previous example):
www IN A 192.168.1.1
ftp IN CNAME www
This is the shortened form, but you can see what’s happening here. It’s not unusual,
especially with Linux servers, for CNAME records to have more than one job. This is cer-
tainly the case with most virtual machines because people tend to give them a huge range
of tasks to do. CNAME (short for “canonical name”) is a way of creating an alias from one
hostname to another. This saves you from the alternative, which is to create two A records
like the following:
www IN A 192.168.1.1
ftp IN A 192.168.1.1
The benefit with using CNAME is that if you change the IP address of the server (per-
haps you’re running this particular machine on an Internet connection that has a dynamic
IP address), you have to update only one IP address instead of two. This isn’t a big deal if
you have only two entries, but if you have more, it can save you a lot of time and hassle.
Another benefit of CNAME records is that they can point to a completely different host.
For example, if you have a mail server that looks after your main domain (example.com) and
you want to use the same mail server for example.org, you could do this by creating an A
record that points directly to the mail server. Alternatively, you could do this:
mail IN CNAME mail.example.com
This would in effect tell clients that the mail servers are effectively the same, but it
helps keep their identities separate. The biggest downside of using a CNAME record is
CHAPTER 7 ■ UNDERSTANDING DNS
172
that a lookup will require two attempts rather than one. In our previous example, the user
would need to look up mail.example.org and then look up mail.example.com. Many people
consider this additional overhead to be unacceptable. Others say that the overhead
caused is marginal and the benefits gained in making the records clearer and easier to
maintain far exceeds any potential performance issues. At the end of the day, use which-
ever feels right to you.
MX Records
Speaking of mail servers, it’s time we took a peek at MX records. These tend to cause a fair
bit of confusion among new DNS administrators because their need isn’t always obvi-
ous. First, you need to understand that MX records are completely separate from either
A or CNAME records. MX records are used to tell clients which hosts they should contact
in order to deliver e-mail. Some people create an A record for mail and expect it to work.
Others create an MX record (which ultimately doesn’t point to anything) and expect the
same. So, without further ado, let’s look at an example (we’ve used the expanded version
for clarity):
mailserver.example.org. IN A 192.168.1.1
example.org. IN MX 10 mailserver
So, what does this mean? Well, you first create an A record for mail. Now this could
be anything you wanted. The word mail accurately describes the server, but you could
call it anything you wanted. Ultimately what you call it makes no difference. The impor-
tant thing as far as e-mail is concerned is the MX record. The MX record tells mail clients
which servers they should use to deliver mail and in which order they should do it. In our
example, we have stated that example.org e-mail is handled by mail.example.org with a pri-
ority of 10. Historically, priorities start at 10 and increase by 10 for each new server. In our
case, we have only one server, so it makes little difference. Remember, though, that the MX
record must point to an existing hostname; in other words, it requires an A record. This
doesn’t have to be in the same domain, as we’ll see in one of the following examples.
First, though, let’s add another mail server. This one is going to be imaginatively
called mail2. Joking aside, although it may seem like a good idea to call your servers things
like gandalf or bilbo, it can get very confusing for people who are not in on your naming
scheme, especially because it doesn’t provide any useful information. If you want to use
such a naming scheme, it is best to do so internally rather than externally. So, our records
for two e-mail servers might look as follows:
mailserver.example.org. IN A 192.168.1.1
mailserver2.example.org. IN A 192.168.1.2
example.org. IN MX 10 mailserver
example.org. IN MX 20 mailserver2
CHAPTER 7 ■ UNDERSTANDING DNS 173
What we’ve done here is create two A records for two different machines (or at least
two different IP addresses anyway) and create the relevant MX records to use them.
You’ll notice that apart from differentiating between the names, mailserver2 has a much
higher priority (20) than mailserver. This tells mail clients that mailserver is preferred
over mailserver2. This is the most common arrangement where a business might have
its main e-mail server hosted on its premises but has a backup e-mail server somewhere
else on the Internet, just in case its Internet connection has problems. If a mail client
can’t contact mailserver, it should try to contact mailserver2. It is up to the mail server on
mailserver2 to handle incoming e-mail properly; DNS just provides the ability to find the
server.
But what if you want both servers to have the same priority? This is sometimes done
for very large companies where a single mail server simply isn’t enough to handle all the
e-mail needs. In this case, setting both mail server priorities to 10 will create a “round-
robin” system. In effect, this means that it is up to the mail client to decide which e-mail
server to contact because DNS shows that both can be used interchangeably.
Lastly, you may use a third party to provide your backup e-mail service. This could be
a commercial service (for example DynDNS) or provided along with your virtual machine
(as is the case for BitFolk). Either way, using these services is very straightforward and fol-
lows on from what we’ve already covered:
mailserver.example.org. IN A 192.168.1.1
example.org. IN MX 10 mailserver
example.org. IN MX 20 backup-email.example.com.
This works exactly like our previous example, only we’ve specified a server outside
of our domain to handle the task. As with CNAME records, there’s no reason why you
couldn’t create a new A record for mail2 and then point that IP address at the backup
server that’s been provided. However, best practice is to point to an already established
hostname because this prevents any issues caused by changing IP addresses or DNS load
balancing.
NS Records
Last but not least is the NS record. NS is short for “name server,” and the NS record tells
clients which name servers are authoritative (that is, have the official true view) for your
domain. Now, in theory, these entries should match the ones listed in the WHOIS record
for our domain. Technically this should always be true, and you should ensure your
domains follow this best practice. Not doing so won’t break anything per se, but it can
cause lookup delays and general confusion. An NS record looks like this:
example.org. IN NS dns0.example.com.

CHAPTER 7 ■ UNDERSTANDING DNS
174
■Caution As you can imagine, telling the world that the primary DNS server for example.org is dns0.
example.org has some issues. Mainly, this has you running around in circles because you’ve created
a catch-22 situation. You cannot look up dns0.example.org because to do so you need to ask dns0.
example.org. Now, as long as you have name servers in another domain, this will still work, but it’s
clearly a bad idea. Stay away from this one, and if you have to, use a so-called glue record that defines
dns0.example.org in the parent .org zone to solve the issue.
Generally speaking, you should have at least two DNS servers. This is good practice
because if your DNS server goes down, people won’t be able to find your web site or your
e-mail servers. Because many people host their web sites in the same place they host their
DNS, this won’t help much, but it will ensure that e-mail is properly routed to the backup
e-mail server. Multiple NS records look like this:
example.org. IN NS dns0.example.com.
example.org. IN NS ns1.example.net.
■Note As per mail servers, the hostname does not specifically matter, and it is how they are assigned using
the NS record that’s important. Also, like MX records, NS records must point to something that already exists.
Quick Round-Up
So, with that in mind, the following example should now make sense:
www.example.org. IN A 192.168.1.1
ftp.example.org. IN CNAME www
mail.example.org. IN A 192.168.1.2
mail2.example.org. IN A 10.0.0.1
example.org. IN NS dns0.example.com.
example.org. IN NS ns1.example.net.
example.org. IN MX 10 mail
example.org. IN MX 20 mail
To summarize then, we have two A records that define our web and mail servers. The
FTP service runs on the same server that provides the web site, so we’ve decided to use a
CNAME to alias FTP to www. We have two of our own mail servers (perhaps one in a differ-
ent building, city, or country) and have created A records for them. We have also created
MX records to tell mail clients which e-mail servers should be used and in which order.
CHAPTER 7 ■ UNDERSTANDING DNS 175
Lastly, we have confirmed the authoritative name servers for our domain by creating to
NS records.
This is really a whirlwind tour of the types of DNS record you might want to use.
There are others, but these are the ones you will most likely work with on a day-to-day
basis when hosting your own domains. The BIND documentation provides in-depth
information on all of these different types of record, and if you would like to know more,
this would be the best place to start. One of us looks after about 100 domain names, and
it’s rare that we need anything more than what we’ve talked about so far.
With all this in mind, we are now ready to move on to actually creating a master
zone. In reality, we’ve pretty much done this already, and we will reuse the content that
we’ve already created. There is some additional information that is needed when creating
a domain, but this is mostly seen as a template and is rarely altered once a domain has
been created.
Creating a Master Server
A master server is simply a DNS server that has the master zone for a particular domain.
This is the server that provides all the domain information to the slave servers and is
where you will make all your changes. There should only ever be one master server for a
given domain. This makes sense, and it makes it much easier to keep track of changes if
you make them on only one machine. Slave servers will get hold of up-to-date copies very
quickly after the changes are applied to the master, so there is no need to worry about
delays or try to come up with more efficient alternatives.
First, we’re going to update our named.conf file. So far, this has been configured to do
nothing except run and ignore queries. That’s not overly useful, but note that we’ll tell
BIND that we want it to be the master server for the example.org. domain. To do this, we
need to tell BIND three things. First, BIND needs to know the name of the domain. Sec-
ond, it needs to know that we wanted it to be a master, and third it needs to know where
to find the data for the zone itself. With this in mind, a complete named.conf (/var/named/
chroot/etc/named.conf) could look like this:
options {
directory "/etc";
pid-file "/var/run/named/named.pid";
recursion no;
};
zone "example.org" {
type master;
file "/var/named/example.org.hosts";
};
CHAPTER 7 ■ UNDERSTANDING DNS
176
If you try to restart BIND now, you’ll get an error because this file does not exist.
Remember, you installed the chroot package for extra security, so all the paths in this
configuration file are relative to /var/named/chroot. This means that although you have
/var/named/example.org.hosts in your config file, in actual fact the file name should
be /var/named/chroot/var/named/example.org.hosts.
Obviously, you need to put something in there, so add this to that file:
$ttl 38400
example.org. IN SOA dns0.example.com. pmembrey.example.org. (
1187790697 ; serial number
10800 ; refresh
3600 ; retry
604800 ; expiry
38400 ) ; minimum
www.example.org. IN A 192.168.1.1
ftp.example.org. IN CNAME www
mail.example.org. IN A 192.168.1.2
mail2.example.org. IN A 10.0.0.1
example.org. IN NS dns0.example.com.
example.org. IN NS ns1.example.net.
example.org. IN MX 10 mail
example.org. IN MX 20 mail
You should now be able to start your name server without errors. You can test your
server with host, but remember to specify the name server; otherwise, you won’t get the
answer you expect. Consider this example:
[root@centosbook ~]# host www.example.org localhost
Using domain server:
Name: localhost
Address: 127.0.0.1#53
Aliases:
www.example.org has address 192.168.1.1
[root@centosbook ~]# host -t mx example.org localhost
Using domain server:
Name: localhost
Address: 127.0.0.1#53
Aliases:
CHAPTER 7 ■ UNDERSTANDING DNS 177
example.org mail is handled by 10 mail.example.org.
example.org mail is handled by 20 mail.example.org.
[root@centosbook ~]#
For the most part, the header for our zone file can be used as a template. The only
thing you need to change on a regular basis is the serial number. This should be incre-
mented every time you make a change to the zone. If you don’t, you’ll find that strange
things begin to happen such as the new and old addresses both being returned at random
intervals. For more information on this, take a look at the “Gotchas” section later in this
chapter.
If you’re looking to have only one DNS server (perhaps you’ve created an internal
naming system for your own network), then you can stop reading here. A master server
can provide everything that a small network needs. Although you really should have at
least two DNS servers in a production environment as a backup, you might be able to get
away with just one if it’s for internal use.
On the other hand, if you want to host Internet domains or you want to ensure that
should any one server fail or reboot, name resolution will continue, then you should keep
on reading.
Creating a Slave Zone
Creating a slave zone has a lot in common with creating a master zone, only you don’t
need to create the zone file yourself because BIND will do this for you when it retrieves
information from the master server. A slave zone entry that could go into /var/named/
chroot/etc/named.conf could look like this:
zone "example.org" {
type slave;
file "/var/named/example.org.hosts";
masters {
192.168.1.1;
};
};
The big difference here is that we’re specifying the server that the information should
be requested from. It goes without saying that this example is unlikely to work for you
on your network. You will probably need to at least modify the IP address in order to get
this to work. Once you’re happy with the file, save it, exit nano, and restart named (with the
command service named restart).

CHAPTER 7 ■ UNDERSTANDING DNS
178
All going well, your server should have copied the zone information from your master
server and is not making it available to everyone who is asking for it. You can repeat this
process as many times as you like; there is no limit on how many slave servers you can
have. Bear in mind, though, that the key benefits of having slave servers are bandwidth
saving (by having servers closer to the people that use them) and redundancy (by hav-
ing servers that are resilient to localized problems, such as Internet connection failure).
Wherever possible, though, you should have at least one slave server, just in case.
Allowing Zone Transfers
When you update a record on your master server, the master server will contact the slave
servers and tell them that they need to update their copies of the data. Before the slave
servers can do this, though, you need to give them permission on your master server.
Giving permission is very straightforward. All you need to do is add the allow-transfer
statement to named.conf. For example, if your slave server had an IP address of 192.168.1.5,
you would add this in the options section:
allow-transfer {192.168.1.5;};
In order for this change to take effect, you need to restart BIND. If you restart your
slave name server as well, it will make a new zone transfer request, which will now be
allowed.
■Tip Another useful statement to remember is recursion no;. This statement tells BIND not to make
lookup requests for zones for which it is not responsible. This helps secure your server from DNS poison-
ing attacks (http://en.wikipedia.org/wiki/DNS_cache_poisoning) and prevents people from taking
advantage of your bandwidth and resources.
Gotchas
Generally speaking, DNS is one of those technologies that you pretty much deploy and
forget. Unless you have a very active domain (one that needs lots of changes), chances are
you’ll set things up and then won’t touch it for months. However, you won’t be surprised
to hear that DNS has a few little tricks up its sleeve. Even when you become familiar with
working with BIND on a regular basis, it’s still possible to get caught out by these.
CHAPTER 7 ■ UNDERSTANDING DNS 179
Forgetting to Increment the Serial Number
Forgetting to increment the serial number has to be the all-time number-one problem
faced by new DNS administrators. It’s also likely to cost you a lot of sleep if you’re not
careful, and you won’t be the only one! Because DNS is a distributed system, it is very
important that the various servers all have the same data. To ensure the servers stay in
sync, each zone has a serial number. The trick is remembering to update the serial num-
ber whenever you update the zone file.
This sounds very obvious, and you’d think that nobody would fall for this one, but the
simple fact is that they do. All the time. Imagine you’re working late and you’re just add-
ing a new host to your DNS zone, or perhaps you’re updating a variety of different zones.
You forget to update one of the serial numbers, but that won’t generate any errors. You
carry on about your business.
The next day you get a call asking why the DNS change that was requested hasn’t
been done. Surprised, you look at the file, and sure enough, the new entry is exactly
where it should be. You try to look up the name, but it’s not there, and your slave servers
don’t seem to have it either.
This is a dead giveaway that you forgot to update the serial number. Convinced you
did update it? No problem, update it again, and you’ll be absolutely sure. Remember,
having different records for the same serial number is a very bad idea, and although the
example we’ve just presented is somewhat obvious, it often isn’t that straightforward
when this particular issue bites. The quickest way to ensure you haven’t fallen prey to it is
to update the serial “just in case” and reload the zone file anyway.
Forgetting the Dot in the Record
When setting up your DNS zone, you don’t have to specify the full name if you don’t
want. This means that if you’re editing the zone file for the domain example.org and you
add the following record:
www IN A 192.168.1.1
then BIND would assume you were referring to www.example.org. Some people prefer to
explicitly state the full name, like so:
www.example.org. IN A 192.168.1.1
This is similar to our first example with one subtle but critically important differ-
ence. You’ll notice that after .com there is a follow-up dot. This tells BIND that the name is
explicit and should not have example.org added to the end. This feature is very important
because there will be times when you will need to reference a hostname outside of your
domain. Usually, for example, the DNS servers for a given domain have hostnames in
CHAPTER 7 ■ UNDERSTANDING DNS
180
a separate domain. This helps ensure that you don’t need to look up a server’s name in
order to find that server’s name.
Where people get caught out is that they forget to stick the dot on the end. If we had
left off the last dot in our previous example, BIND would have interpreted it as follows:
www.example.org.example.org.
Again, this would not show up as an error—it is, after all, a completely valid name—
it’s just not the one you wanted. This one is also hard to debug, because although it looks
OK on initial inspection (and often on a much closer inspection), BIND will still insist that
www.example.org does not exist.
After updating the serial number and reloading the zone (trust us, it never hurts to
start off with this), your next stop should be to carefully scan the zone to make sure that
all the dots are in the right places. Again, like the serial number, it is very easy to leave it
out. Because it doesn’t make much difference to the structure of the file, these issues can
be very hard to track down.
Summary
This chapter has been something of a whirlwind tour on how to set up and run your DNS
server. We covered how to create a caching and forwarding name server, which is ideal
for the home office or small business network. We also talked about how DNS is used
throughout the Internet and the different types of record that make up DNS zones. We
covered creating both master and slave zones and why it is important to have both. Ulti-
mately, you now know enough to register a new domain name and provide your own DNS.
The next chapter focuses on how to set up Dynamic Host Configuration Protocol
(DHCP) so that your CentOS server can automatically configure your workstations.
DHCP is one of those services that you really worry about only when it stops working;
otherwise, it sits quietly in the background making your life easier. One of areas where
DNS and DHCP come together is Dynamic DNS. This is a technology that allows DHCP
to directly request an update to a DNS record. This requires DHCP and BIND to work
closely together. You will learn more about this in the next chapter. Onward. . . .

181
CHAPTER 8
Setting Up DHCP
DHCP stands for Dynamic Host Configuration Protocol. This name pretty much covers
what DHCP is used for: to dynamically configure a host connected to a network so it can
use that network. In practice, DHCP is used to give a host an IP address, a subnet mask, a
default gateway, a name server, and so on. Basically, it provides a networked device with
everything it needs to be able to use the network to which it is connected.
This, of course, makes it clear why you could use DHCP. It allows you to control cen-
trally the configuration of your network and makes it easy to distribute changes of the
network configuration to all the hosts in that network. Therefore, it shouldn’t come as a
surprise that DHCP is used in almost all networks, even in networks where all hosts have
a static IP address. You can, of course, configure each host itself with its static configura-
tion, but using DHCP to hand out static IP addresses makes it possible to manage the
configuration of these hosts in a central place.
As you can see, DHCP is something that is used almost everywhere, and together with
DNS, it is considered to be the basis of a network setup. In this chapter, you’ll learn how
to use it.
How Does DHCP Work?
Before going into detail on how to configure the DHCP server included in CentOS, we will
first cover some basics of the Dynamic Host Configuration Protocol. Knowing how DHCP
works may help you understand how to configure it.
If there is a DHCP server, then of course there is a DHCP client. These days, a DHCP
client is present in almost all network-attachable devices. When this client connects to a
network, it starts by sending a DHCP discovery packet to the network. At this moment, the
client has no knowledge of the network, so it sends this packet to the broadcast address
(255.255.255.255). All devices connected to the network, including the DHCP server, will
see this packet.
After encountering this packet, the DHCP server responds by sending a DHCP offer to
the client. The offer includes, among other things, an IP address and a subnet mask. This
offer is called a lease, because the IP address is given only temporarily to the client. The
CHAPTER 8 ■ SETTING UP DHCP
182
lease (and the IP address included) is valid only for a certain time. The lease time is also
mentioned in the DHCP offer.
When the client has sent its discovery request, it can receive offers from multiple
DHCP servers. The client then selects an offer it wants to accept and replies by sending
a DHCP request to the DHCP server that sent that offer. What offer the client will accept
depends on the configuration of the client.
The DHCP server then responds with a DHCP acknowledgment packet, indicating it
has approved the request from the client and confirming that the client may use the given
IP address. This acknowledgment packet includes, besides the basic IP configuration,
the lease time and any other options specified in the DHCP server configuration such as
name servers, NTP servers, and proxy servers.
The client has now obtained a DHCP lease, so it can start using the network. How-
ever, because the lease expires after a while, the client needs to renew this lease from
time to time. To this end, the client sends a new DHCP request packet to the DHCP
server when 50 percent of the lease time has passed. The DHCP request packet signals
the DHCP server that the client is requesting an extension of its lease. If the DHCP server
approves this request, it sends another DHCP acknowledgment packet to the client, and
the client then can continue using the lease.
If the client does not receive an acknowledgment from the server by the time 87.5
percent of the lease time has passed, it starts sending DHCP request packages using the
broadcast address again. This way, it examines whether other DHCP servers may extend
the client’s lease. If these other DHCP servers can help the client, they, in turn, reply with
a DHCP acknowledgment.
If the client did not get any acknowledgment, the lease expires. Then, the client is
required to remove the IP configuration from its network interface. After this, the client
is free to restart the whole process by beginning again with a DHCP discovery packet and
potentially receiving a different address.
The lease time thus has an important impact on how “available” a DHCP server
needs to be. To be able to renew the leases on time, a DHCP server should not be unavail-
able for a period longer than half the lease time. Setting the lease time is therefore a
balancing act between setting a high value to allow the server to be unavailable for a
certain period and using a low value to let changes made to the configuration propagate
quickly over the network. Notably, it will also take half the lease time before all clients will
use the changes made to the system. A small lease time, however, implies a higher load
for the server because clients will be making renewal requests more quickly. This is, how-
ever, less of a problem with modern hardware, particularly when using DHCP, because it
is pretty lightweight compared to some other protocols.
CHAPTER 8 ■ SETTING UP DHCP 183
DHCP and CentOS
CentOS provides packages both for being a DHCP client and for being a DHCP server.
The DHCP client part has been around for a long time, and it is considered to be a
standard aspect of any Linux distribution. To configure the DHCP client, you can either
use the initscript configuration files located at /etc/sysconfig/network and inside /etc/
sysconfig/network-scripts or use the NetworkManager, which is present inside the GUI
of CentOS.
For running a DHCP server in CentOS, you have two choices. The first is the DHCP
daemon from ISC (the same people who created the BIND DNS server covered in the pre-
vious chapter). This is what is called an enterprise-grade DHCP server that can be used
from small to large environments and that allows you to configure a large set of options.
This is also the DHCP daemon that we will cover in this chapter.
A second option is the dnsmasq daemon. This daemon not only provides DHCP but
also, and foremost, a DNS server. It is intended to be used in small and medium-sized
networks, such as a home network. Since it is a lightweight application, it is often used
inside small (wireless) routers that are frequently used at home. You can find more infor-
mation about dnsmasq inside the package and at http://www.thekelleys.org.uk/dnsmasq/
doc.html.
Installing DHCP
Like all things that come with CentOS, you can install the DHCP server using the Yum
package manager. To install the DHCP server, use this command:
yum install dhcp
The dhcp package as delivered with CentOS comes by default with an empty configu-
ration file for the DHCP server. This configuration file is /etc/dhcpd.conf. You can find a
sample configuration file at /usr/share/doc/dhcp-3.0.5/dhcpd.conf.sample.
A second important file is /etc/sysconfig/dhcpd. It allows you to pass certain com-
mand-line options to the dhcpd daemon. This is, for example, used to restrict on which
interfaces the daemon will listen for DHCP requests.
Finally, the DHCP package also includes the file /var/lib/dhcpd/dhcpd.leases. As
its name indicates, this package is used to store all the leases the server hands out. It is
important that you do not change this file yourself. Changes to it are made by the dhcp
server itself. It may, however, be useful to inspect what leases the server has stored.
CHAPTER 8 ■ SETTING UP DHCP
184
Configuring the Firewall
If you have configured a firewall on your system, you will need to allow DHCP requests
to go through the firewall. You can find more detailed information on how to do this in
Chapter 5. For DHCP, you will need to allow all incoming traffic to UDP port 67. The dhcpd
daemon will listen to this port for incoming requests.
The dhcpd daemon will respond to the DHCP client by sending packets to UDP port
68. Since the default firewall configuration on CentOS allows all outgoing traffic, there is,
however, no need to configure this explicitly. No other ports are used by the DHCP proto-
col, so this is all that needs to be set up.
Configuring DHCP
Now that everything is prepared, you can configure the dhcpd daemon. As mentioned, the
configuration file for the daemon is /etc/dhcpd.conf. Just like most configurations within
CentOS, the configuration file is line based, and the # character can be used to make
comments.
The configuration file consists of parameters and declarations. Declarations, also
called sections, describe the topology of the network, characterize the clients on the net-
work, provide addresses to be assigned to the clients, or apply a group of parameters to a
group of declarations. These declarations are followed by curly brackets ({}).
Parameters state whether and how to perform something or what network configura-
tion options need to be sent to the client. Parameters specifying the network configuration
start with the option keyword. Parameters that are declared before a section are called
global parameters, and they apply to all sections after that section. You can specify a
parameter in multiple sections, but the most specific one is used.
A Minimal Configuration
So, let’s start with a very basic configuration to get a feel for how to configure the dhcpd
daemon:
ddns-update-style interim;
subnet 192.168.1.0 netmask 255.255.255.0 {
option subnet-mask 255.255.255.0;
option routers 192.168.1.1;
default-lease-time 600;
max-lease-time 604800;
range 192.168.1.100 192.168.1.200;
}
CHAPTER 8 ■ SETTING UP DHCP 185
If you read this example carefully, you probably will have a good understanding of
what it means. But let’s go over this example line by line:
• Theddns-update-style interim; line specifies the type of Dynamic DNS (DDNS)
that is used to talk to the DNS server. Even when you don’t use DDNS, you have to
specify this parameter. The default and preferred DDNS method is interim, which
is what is shown here.
• Thesubnet line specifies the network to serve IP addresses in. This is a mandatory
line; the dhcpd daemon will check whether it can find the configured networks on
the actual network interfaces of the machine on which it is running. If it does not
find them, it will give an error on startup.
• Theoption subnet-mask line tells the DHCP client what subnet mask it must use.
• Theoption routers line tells the DHCP client what default gateway it must use.
• Thedefault-lease-time stipulates a time (in seconds) that will function as the lease
time if the client does not request a specific lease time.
• Themax-lease-time is the time (in seconds) that defines the maximum lease time
the dhcpd daemon will accept from a client.
• Therange line specifies a range that the dhcpd daemon will use to hand out IP
addresses to clients.
To summarize, this sample configuration will allow the dhcpd daemon in the
192.168.1.0/24 network to hand out dynamic IP addresses between 192.168.1.100 and
192.168.1.200. This configuration has a default lease time of ten minutes and informs the
client to use 192.168.1.1 as the default gateway and 255.255.255.0 as the subnet mask.
Starting and Stopping the DHCP Daemon
Once you have a configuration file in place, you will need to start the dhcpd daemon. Just
like for most other daemons present in CentOS, you can achieve this with the service
command. Use the configtest option whenever you make a configuration change. This
will tell you whether the dhcpd daemon understands your config file and whether this file
is without any syntax errors:
# service dhcpd configtest
#
If you do not get any output from this command, your configuration is approved, and
you can start the daemon. If you do get output, you need to read it carefully and fix all the
errors mentioned.
CHAPTER 8 ■ SETTING UP DHCP
186
To start the daemon, use the start option:
# service dhcpd start
Starting dhcpd: [ OK ]
#
When the command returns “OK,” the daemon has started successfully and is run-
ning. Once the daemon is running, the dhcpd daemon logs output using syslog; you can
find this output in the /var/log/messages file by using the less or tail commands.
The status option allows you to query the current status of the daemon:
# service dhcpd status
dhcpd (pid 8715) is running...
#
The output of the command will indicate whether the daemon is running.
To stop the daemon, use the stop option:
# service dhcpd stop
Shutting down dhcpd: [ OK ]
#
When the command returns “OK,” the daemon is successfully stopped. There is also
a restart option, which stops and restarts the daemon.
If you want the daemon to start when the system is booted, you use the chkconfig
command to enable this:
# chkconfig dhcpd on
Extended Configuration
Now that you have a working minimal configuration, you can take the next step and
extend it a bit. One of the nice things of DHCP is that you can send along all sorts of
options to the clients. We covered the absolute basics to set up the minimal configuration
earlier. But there are a lot more options. So, let’s take a look at this configuration:
ddns-update-style interim;
subnet 192.168.1.0 netmask 255.255.255.0 {
option subnet-mask 255.255.255.0;
option broadcast-address 192.168.1.255;
CHAPTER 8 ■ SETTING UP DHCP 187
option routers 192.168.1.1;
default-lease-time 600;
max-lease-time 604800;
option domain-name "example.com";
option domain-name-servers 192.168.1.1, 192.168.1.2;
option time-offset 7200;
option ntp-servers 192.168.1.1;
range 192.168.1.100 192.168.1.200;
}
This configuration works the same way as the minimal configuration, but it’s sending
some additional options to the client. Let’s go over these extra options:
• Thestatementoption broadcast-address is an extra specification of the network
that includes the client. It is a bit redundant since the broadcast address gets cal-
culated from the subnet mask in case the broadcast address isn’t provided.
• Theoption domain-name line contains the name of the domain of which the client is
a part of.
• Withtheoption domain-name-servers option, you can specify the DNS servers that
the client can use to resolve hostnames.
• Theoption time-offset statement specifies the difference between the time zone
of the client and UTC in seconds.
• Theoption ntp-servers statement is used to specify the NTP servers that a client
can use.
As you can see, it is possible to send a range of parameters to the client telling where
particular services are, what configuration needs to be used to access the network, and
so on. You can find the full list of available options in the dhcp-options man page. How-
ever, it is important to remember that the client isn’t required to follow or use any of the
options sent along.
Defining Static IP Addresses
Until now, the configurations used a range, or pool, of addresses. You thus cannot predict
which IP address a host will receive. For roaming devices such as laptops, and so on, that
usually does not matter. For other devices, however, you will always want to receive the
same address, for example, to allow the device to pass through a firewall or for systems
that run a service that is used by other systems (like a web server).
CHAPTER 8 ■ SETTING UP DHCP
188
To this end, it is possible to define hosts with a static IP address in the dhcpd daemon
configuration. Consider this example:
ddns-update-style interim;
subnet 192.168.1.0 netmask 255.255.255.0 {
option subnet-mask 255.255.255.0;
option broadcast-address 192.168.1.255;
option routers 192.168.1.1;
default-lease-time 600;
max-lease-time 604800;
option domain-name "example.com";
option domain-name-servers 192.168.1.1, 192.168.1.2;
option time-offset 7200;
option ntp-servers 192.168.1.1;
range 192.168.1.100 192.168.1.200;
host server1 {
hardware ethernet 00:00:00:12:34:AB;
fixed-address 192.168.1.10;
}
}
As you can see, this is the same configuration as in the previous section except for the
added host entry. This host entry is the way to add static definitions to the dhcpd daemon
configuration. These three lines are required for every static host definition.
The host line consists of the word host followed by a name for the host entry. This
name is internally only within the dhcpd daemon. To send a hostname to the client, you
need to add an option host-name parameter to the host entry.
The hardware ethernet line is used to specify the MAC address of the host. The MAC
address is a unique identifier for a network interface. It is fixed inside the hardware.
Therefore, it can be used to match a certain host and to give it a static IP address. A MAC
address almost always shows as a string of six groups of two hexadecimal numbers (from
0 to F) separated by a colon (:). There are different ways to find the MAC address of a
host. Sometimes there is a label on the computer/motherboard with the address. Usually
the BIOS also has an option of showing it. When you have already installed CentOS on the
host, the command ifconfig can also display the MAC address. In this case, you can find
the MAC address next to the word HWaddr.
The final line of the host entry, the fixed-address line, specifies the static IP address
that will be given to the host. If you add a host with a fixed IP address in a subnet that also
has a range specified, that fixed IP address needs to be outside that range.
CHAPTER 8 ■ SETTING UP DHCP 189
It is important to note that all hosts defined in a certain subnet statement will be
sent all the different options specified in that section. You can, however, override these
options by placing the same option parameter with a host-specific value inside the host
definition. You can also add option parameters inside the host statement if needed. Here’s
an example:
ddns-update-style interim;
subnet 192.168.1.0 netmask 255.255.255.0 {
option subnet-mask 255.255.255.0;
option broadcast-address 192.168.1.255;
option routers 192.168.1.1;
default-lease-time 600;
max-lease-time 604800;
option domain-name "example.com";
option domain-name-servers 192.168.1.1, 192.168.1.2;
option time-offset 7200;
option ntp-servers 192.168.1.1;
range 192.168.1.100 192.168.1.200;
host server1 {
hardware ethernet 00:00:00:12:34:AB;
fixed-address 192.168.1.10;
}
host server2 {
hardware ethernet 00:00:00:23:45:EF;
fixed-address 192.168.1.11;
option host-name "web1.servers.example.com";
option domain-name "servers.example.com";
}
}
Here we added a second host statement with an additional host-name parameter and
a different domain-name parameter than the one in the subnet statement.
Using this mechanism, you can add different hosts with static IP addresses and send
along different and/or additional options to these hosts.
Grouping Statements
When you have a large number of statements (subnet, host, and so on) sharing a lot
of options with the same value, it can be easier to group them in order to avoid having
CHAPTER 8 ■ SETTING UP DHCP
190
to go over each statement when something needs to be changed. If you have grouped
statements, you can implement the changes in the grouped section, and all underlying
statements will be changed at once. The grouping feature is used a lot for hosts since
these are frequently used. Consider the following example:
ddns-update-style interim;
subnet 192.168.1.0 netmask 255.255.255.0 {
option subnet-mask 255.255.255.0;
option broadcast-address 192.168.1.255;
option routers 192.168.1.1;
default-lease-time 600;
max-lease-time 604800;
option domain-name "example.com";
option domain-name-servers 192.168.1.1, 192.168.1.2;
option time-offset 7200;
option ntp-servers 192.168.1.1;
range 192.168.1.100 192.168.1.200;
group {
option domain-name "servers.example.com";
option ntp-servers 192.168.1.5;
host server1 {
hardware ethernet 00:00:00:12:34:AB;
fixed-address 192.168.1.10;
option host-name "db1.servers.example.com";
}
host server2 {
hardware ethernet 00:00:00:23:45:EF;
fixed-address 192.168.1.11;
option host-name "web1.servers.example.com";
}
}
}
Here we’re grouping the different host statements and adding two options that over-
ride values from the subnet statement. It makes sense to start using a group as soon as you
have two or more statements that have identical options set. Grouping reduces consider-
ably the length of the configuration, makes it clearer and more readable, and facilitates
the administration.
CHAPTER 8 ■ SETTING UP DHCP 191
Shared Networks
The final statement that we will touch upon here is the shared-network statement. You can
use this statement when multiple subnets are present on a single physical network. Here
is an example of such a shared-network statement:
shared-network internal {
option domain-name "test.example.com";
option domain-name-servers 192.168.0.1;
option routers 192.168.0.1;
subnet 192.168.1.0 netmask 255.255.255.0 {
range 192.168.1.100 192.168.1.200;
}
subnet 192.168.2.0 netmask 255.255.255.0 {
range 192.168.2.100 192.168.2.200;
}
}
Here you have defined a shared-network called internal. All the subnets inside the
shared network share the options domain-name, domain-name-servers, and routers. You also
have two subnets: 192.168.1.0/24 and 192.168.2.0/24.
Because there are no statically defined hosts in this configuration, all hosts will be
assigned an IP address in the two available ranges. It is uncertain in what range a host
ends up. It depends on the free leases in each of the two ranges.
Relaying DHCP Requests
Larger networks are usually split up into different subnets to restrict the amount of
broadcast/multicast traffic going around in a network. The different subnets are then
linked to each other by means of routers.
In such a situation, you have two options on where to place your DHCP servers. The
first option is to place a DHCP server in each subnet. The advantage of this procedure is
that you will have a very simple configuration for each DHCP server. The disadvantage
is that you will need a machine inside each network and will need to manage all these
machines separately.
The second option is to have a single central DHCP server. The routers in the net-
works will then have to relay all DHCP requests they encounter on the network to that
central DHCP server. This is because DHCP requests are sent to the broadcast address, as
you remember. Routers, however, do not forward packets sent to the broadcast address.
CHAPTER 8 ■ SETTING UP DHCP
192
The DHCP relay mechanism was invented for such situations. The router serves as a kind
of proxy for DHCP traffic between networks. The advantage of using relaying is that you
have a central place to configure the DHCP server. The disadvantage is that you will need
to configure all the routers to do DHCP relaying and point them to the central DHCP
server.
To configure a central DHCP server, you simply add subnet statements for all the dif-
ferent networks. Take this code for example:
ddns-update-style interim;
subnet 192.168.1.0 netmask 255.255.255.0 {
option subnet-mask 255.255.255.0;
option broadcast-address 192.168.1.255;
option routers 192.168.1.1;
default-lease-time 600;
max-lease-time 604800;
option domain-name "example.com";
option domain-name-servers 192.168.1.1, 192.168.1.2;
option time-offset 7200;
option ntp-servers 192.168.1.1;
range 192.168.1.100 192.168.1.200;
}
subnet 192.168.2.0 netmask 255.255.255.0 {
option subnet-mask 255.255.255.0;
option broadcast-address 192.168.2.255;
option routers 192.168.2.1;
default-lease-time 600;
max-lease-time 604800;
option domain-name "example.com";
option domain-name-servers 192.168.2.1, 192.168.2.2;
option time-offset 7200;
option ntp-servers 192.168.2.1;
range 192.168.2.100 192.168.2.200;
}
The router that forwards a DHCP request to the server adds some extra fields to the
request indicating from which network the request came. This allows the server to look
for the matching subnet statement in its configuration and send back an offer to the
router for the correct network. The router then forwards the offer to the client.
CHAPTER 8 ■ SETTING UP DHCP 193
PXE Booting
Besides just being used to hand out IP addresses to hosts, DHCP can also be used in a
process called PXE booting (also sometimes called network booting or netbooting). In
short, PXE booting is a mechanism that allows a computer to boot over the network
without using a local disk, floppy, CD, DVD, and so on.
PXE booting is mostly used to do network-based installations. In this process, the
computer receives a Linux kernel over the network that starts the installation process.
The installer itself then looks for the install files on the network. PXE booting can be used
to fully automate installations since all commands then come from centrally managed
servers.
This sort of network installation requires a couple of services including DHCP. The
others are TFTP, FTP, NFS, or HTTP. The DHCP server is used to bootstrap or start the
process. In this case, the DHCP server gives an IP address lease to the server but includes
two additional pieces of information. First, the server also includes a server IP address
indicating where a particular application can be retrieved. Second, it provides the file
name of that particular application. The application’s job is then to start a Linux kernel
and the rest of the installation process.
For all of this to work, the computer booting the network needs to support this
network booting process. Therefore, it needs PXE (from which the name PXE booting
comes). PXE stands for Preboot eXecution Environment. It is a standardized environment
that can be set up by the network adapter in the computer, in which a small application
can run. Most recent network adapters support PXE, but it usually needs to be enabled in
the BIOS of the computer. After you have enabled PXE and the computer does a network/
PXE boot, three things happen:
1. First, the network adapter will do a standard DHCP request. After receiving a
response from a DHCP server, it will configure the network adapter with the infor-
mation received. Then it can communicate over the network.
2. Second, the adapter will look for two options in the reply from the DHCP server.
These are called next-server and filename. It will then request the file name using
TFTP from the address defined as next-server and download it into the local
memory.
3. Third, it will start this downloaded application and hand control of the computer
over to it.
This downloaded application is usually a kind of boot loader (a variant of GRUB or
LILO) that can download a Linux kernel over the network and start it. This boot loader is
then used to start the normal installation process.
CHAPTER 8 ■ SETTING UP DHCP
194
Configuring dhcpd for PXE Boot
How do you then configure the dhcpd daemon to send these two options to the PXE envi-
ronment so that it can continue the network boot? Well, here is an example:
ddns-update-style interim;
subnet 192.168.1.0 netmask 255.255.255.0 {
option subnet-mask 255.255.255.0;
option routers 192.168.1.1;
default-lease-time 600;
max-lease-time 604800;
next-server 192.168.1.5;
filename "/pxelinux.0";
range 192.168.1.100 192.168.1.200;
}
This configuration started from the minimal configuration used earlier and added
the two options required for a PXE boot. The first option is the next-server option. As
explained, it is the IP address of the TFTP server to get the application to continue with.
The second option is the filename option. This option specifies the complete path to
the application on the TFTP server.
With these two additional options, the PXE environment has sufficient information to
take the second step of the PXE boot. Setting up the rest of the system requirements to do
an installation over the network would take us a bit too far for this chapter. You can find
more information about network installations in Chapter 10 and in the installation guide
at http://www.centos.org/docs/5/.
DHCP Integration with DNS
DHCP and DNS are closely related. They both contain mappings of hosts to IP addresses.
So, it makes sense to try to let DHCP and DNS talk to each other. Dynamic DNS is spe-
cifically created for this purpose: it allows external applications, devices, and so on, to
update the entries of the DNS server. The dhcp daemon is an ideal candidate to do this.
As soon as the dhcp daemon has acknowledged a lease for a client, it sends the hostname
of the client and its IP address to the DNS server. Subsequently, the DNS information is
updated accordingly to the IP address that the DHCP server has given to the client.
For Dynamic DNS to work, both the DHCP server and the DNS server need to be con-
figured correctly: they both need to allow the use of Dynamic DNS, and the DNS server
needs to “trust” the DHCP server. The latter is usually accomplished through the use of a
cryptographic key.
CHAPTER 8 ■ SETTING UP DHCP 195
For the example in this section, we presume that you have working BIND DNS server
available, as explained in the previous chapter.
The first step in linking the DHCP and BIND daemons is to create the key that is
used to authorize the DHCP server to make DNS updates. You can do this using the
dnssec-keygen tool that is part of the BIND package:
# dnssec-keygen -a hmac-md5 -b 256 -n USER dyndns
This tool will create two files that start with Kdyndns. If you check the content of the
file that ends in .private, the last line should contain a line like this:
Key: QvVkTnvBcXy4ssmKHSwmADZ2LQtYxeusl+VqHzDl5jQ=
Everything that comes after the Key: is the actual key that you will use.
The next step is to configure the BIND daemon to allow dynamic updates from the
key you just created. To do this, add the following to the global part of the named.conf file
(before the zone definitions):
key dyndns {
algorithm HMAC-MD5;
secret "QvVkTnvBcXy4ssmKHSwmADZ2LQtYxeusl+VqHzDl5jQ=";
};
Do not forget to change the secret to the actual key you created. And then for each
zone that you want to allow dynamic updates for, add a line like this:
allow-update { key dyndns; };
When these changes are done, you can reload the BIND daemon so that it reads in
the new configuration, and those are all the changes that are needed on the BIND side
of things. One thing that you will need to watch out for is that BIND will need to be able
to write in the same directory where the zone files are located. So, make sure the permis-
sions for that directory are sufficient.
Next, you can configure the DHCP daemon to perform the actual dynamic updates.
First you tell the daemon what key to use and what zones to update. You do this by add-
ing the following to the global section of the dhcpd.conf file:
update-static-leases on;
key dyndns {
algorithm hmac-md5;
secret QvVkTnvBcXy4ssmKHSwmADZ2LQtYxeusl+VqHzDl5jQ=;
}
CHAPTER 8 ■ SETTING UP DHCP
196
zone 244.168.192.in-addr.arpa {
primary 127.0.0.1;
key dyndns;
}
zone example.com {
primary 127.0.0.1;
key dyndns;
}
The first line is needed only if you have static host entries for which you want the
DHCP daemon to perform dynamic updates.
The key block defines a key the DHCP daemon can use. In the example, the key is
called dyndns.
The two zone blocks define the zones the DHCP daemon should update (example.
com and 244.168.192.in-addr.arpa in this case), what server to send the updates to (in this
case 127.0.0.1), and what key to use (in this example dyndns).
The next step is then to say for which hosts the DHCP daemon should send dynamic
updates and what hostname it should use for it. For this, two options are used, namely,
ddns-hostname and ddns-domainname. They specify the hostname and domain name to use
for the dynamic update. Here’s an example using a static host:
host server2 {
hardware ethernet 00:00:00:23:45:EF;
fixed-address 192.168.1.11;
option host-name "web1.example.com";
option domain-name "example.com";
ddns-hostname "web1";
ddns-domainname "example.com";
}
If you want to do the same for a range of IP addresses, then you can use this example:
subnet 192.168.1.0 netmask 255.255.255.0 {
option subnet-mask 255.255.255.0;
option broadcast-address 192.168.1.255;
option routers 192.168.1.1;
default-lease-time 600;
max-lease-time 604800;
option domain-name "example.com";
option domain-name-servers 192.168.1.1, 192.168.1.2;
CHAPTER 8 ■ SETTING UP DHCP 197
option time-offset 7200;
option ntp-servers 192.168.1.1;
range 192.168.1.100 192.168.1.200;
ddns-hostname concat("dhcp", binary-to-ascii(10, 8, "-", leased-address));
ddns-domainname "example.com";
}
Here you’re using a couple of internal functions of the DHCP daemon to create the
hostname on the fly based on the IP address given in the lease. You can find more infor-
mation about these internal functions in the dhcpd-eval man page.
Now you can restart the DHCP daemon, and it should send dynamic updates to the
DNS server whenever it registers a lease. When testing, keep a close eye on the BIND and
DHCP daemon log files; they will tell you whether things have gone wrong.
Summary
In this chapter you learned the basics of DHCP. You learned how to install the DHCP
server included in CentOS and how to configure it. We also showed you different con-
figurations, going from simple to more extended ones. You got to know some different
options that can be sent to the DHCP client. In the final part of this chapter, we spoke
about relaying the DHCP request, PXE booting, and how to do dynamic DNS updates
between the DHCP daemon and the BIND daemon.

199
CHAPTER 9
Sharing Files with Samba
Samba is one of those open source projects that seems to have been around as long
as people can remember (like the Linux kernel or the Apache web server). It also is a
showcase of what open source software is capable of doing. Samba started as a file and
print server for Windows clients, but it has grown up into a project that provides a bridge
between Linux and Windows and makes these platforms integrate as tightly as possible.
In practice, Samba is almost always used as a file and print server. From a Windows
machine, a Samba server will look like any other Windows machine that is providing
shares on the network. In terms of integration with a Windows network, Samba can do
this in three ways. The first method requires no integration, meaning that the Samba
server is completely independent. The second method is when Samba becomes part
of a Windows domain. The third method is when Samba itself manages a domain and
other Windows machines and Samba servers can become part of it. Which mode to use
depends on the correct setup of the network and how you want to integrate Samba into it.
Windows Networking Basics
It is a bit strange to talk about another platform in a book about a Linux distribution. But
when you want to talk to that other platform, you will need to understand a bit how it
works.
The Basic Protocols
The protocol that is spoken by Samba and Windows file servers is Common Internet
File System (CIFS). The old name for it was Server Message Block (SMB), which is where
Samba got its name from (SaMBa).
The CIFS or SMB protocol is used only for the actual file and print services. Other
things we associate with Windows networking are other protocols, but Microsoft has
integrated all this tightly inside Windows. One of those other protocols is NetBIOS. This
is a network protocol on which SMB/CIFS can run. But these days SMB/CIFS can run
directly on TCP/IP. NetBIOS is responsible for naming and addressing hosts in a Windows
CHAPTER 9 ■ SHARING FILES WITH SAMBA
200
network. The automatic discovery of other hosts that are part of your network is an exam-
ple of NetBIOS at work.
In Windows versions since Windows 2000, Microsoft added even more protocols to
Windows networking, including Kerberos, LDAP, and DNS. They were added to create
Active Directory, but we’ll come back to this in a moment.
Workgroups
In the early days of Windows networking, groups of machines could be grouped into
workgroups. In workgroup mode, there is no central control of who is allowed on the net-
work. The workgroups are created arbitrarily by configuring a Windows machine to be
part of a certain workgroup. When browsing the network, all discovered machines will be
grouped by the workgroup (or domain for that matter) they are part of.
Windows Domains
To secure Windows networking and to better control what happens inside the network,
Microsoft introduced domains in Windows NT 3 as a way to centrally control the network.
A domain manages a central list of users, and these users can use any computer that is
part of the domain if the user’s profile is stored centrally. The machine that controls a
domain is called a domain controller. There is one active domain controller, called the
primary domain controller (PDC), and multiple backup domain controllers (BDCs).
Active Directory
In Windows 2000, Microsoft introduced a successor to Windows domains called Active
Directory. It allows domains to grow to larger environments. Active Directory uses an
LDAP implementation to store all the data related to the domain, and Kerberos is used to
provide authentication services.
Samba and CentOS Basics
The version of Samba included with CentOS at the time of writing this book is 3.0.33.
There are currently two branches of Samba available, the Samba 3 branch and the Samba
4 branch. The latest stable release of Samba at the moment is 3.3.4. Samba 4 is currently
still in development and has not seen a stable release at this time.
Samba 4 is a complete rewrite of Samba 3. It was started to clean up the way that
Samba was created. Before Samba 4, the developers did reverse engineering of Windows
CHAPTER 9 ■ SHARING FILES WITH SAMBA 201
networking. But doing this for all those years has made it possible to write proper docu-
mentation of all the protocols, and even Microsoft has released some documentation
about the protocols used. So, the developers thought that it was time to start over again
and use the documentation to create a new, cleaner, and simpler-to-maintain version of
Samba.
Initially, Samba 4 focused on only one goal, implementing a complete Active Direc-
tory–compatible domain controller. They have succeeded in that, and in the meantime,
the developers are now focusing on adding the missing pieces so that Samba 4 can be
used in production environments. (But only alpha, or test, releases are available at the
moment.)
While Samba 4 was being developed, other people were attending to Samba 3, and
this has led to some duplication of code. To rectify this, a new branch of Samba 3 (3.2)
was created to synchronize all that is possible between Samba 3 and 4, while not impact-
ing the stability and available features of Samba 3. When Samba 3.2 was ready, the 3.0
branch was put into maintenance mode, and it will soon stop being supported. At the
time of this writing, the Samba 3 version is up to the 3.3 branch.
So, the Samba version in CentOS isn’t the latest version with all the latest features,
but like anything else in CentOS, the focus is on stability; therefore, CentOS 5 will prob-
ably stick to a Samba 3.0.x version for the rest of its lifetime.
What exactly can Samba in CentOS be used for? Samba 3.0 can be used as a stand-
alone (or also called workgroup mode) file and print server. It can also be used as a
member of an NT-style domain or an Active Directory domain. Finally, it can also be used
as an NT-style domain controller.
In this book, we are going cover only the stand-alone and domain member functions
of Samba. Setting up a domain controller requires other components besides Samba,
which is beyond the scope of this chapter.
Preparing to Set Up Samba
When you set up Samba, you will of course need Windows-based machines, since that is
the whole point of Samba. You can also use the clients available in Linux as test tools, but
those are not a substitute for the real thing.
For using Samba in stand-alone mode, you need only a client. We suggest you use at
least a Windows 2000 machine since you probably won’t find any of the older versions
still used (or we hope so).
When Samba is used in domain member mode, you will, of course, need a domain and
a domain controller. We assume it will be an Active Directory–type domain running on a
Windows server since that is the most commonly used type these days. The domain con-
troller itself can be used as a client, but it is preferred to have a separate client for testing.
CHAPTER 9 ■ SHARING FILES WITH SAMBA
202
Installing Samba
Installing Samba is very simple because you can use the Yum tool to install software. To
install Samba, you run the following command:
yum install samba
This will install the Samba server part and all the required dependencies to make
Samba function correctly. These Samba packages contain the following things. First there
is the directory /etc/samba/. This is the configuration directory for Samba. It includes,
besides other things, the main configuration for Samba: smb.conf.
Then there are the three Samba daemons: smbd, nmbd, and winbindd. The smbd daemon
is responsible for the actual file sharing and the domain controller functionality. The nmbd
daemon is responsible for the NetBIOS protocol, the naming of machines on the network,
and the browsing. The winbindd daemon is used when Samba is part of the domain. Then
this daemon will make all the users and groups of the domain visible inside the Linux
environment.
To start these daemons, you need init.d scripts. But there are only two instead of
three, as you might have expected. /etc/rc.d/init.d/winbind will control the winbindd
daemon, and /etc/rc.d/init.d/smb will control both the smbd and nmbd daemons since you
will need both daemons working to have a working environment for the Windows clients.
You can use many command-line tools to manage the Samba setup. Commonly
used tools are net, smbstatus, smbcontrol, and smbpasswd. The net tool is inspired by the
command with the same name that is available on Windows. You can use it to configure
Samba that is part of a domain and perform a lot of different administrative tasks. You
can use the smbstatus and smbcontrol tools to manage the Samba daemons for tasks such
as changing the log level, viewing the current connections, and forcing a reload of the
configuration.
Finally, the complete Samba documentation, in HTML form, is included and is
located in the directory /usr/share/doc/samba-3.0.33/htmldocs. It contains all the man
pages, the Samba-HOWTO book, and the Samba by Example book.
Configuring Samba
Now that you know what Samba consists of, we’ll show you how to configure it. As
mentioned, the configuration file for Samba is /etc/samba/smb.conf. The CentOS Samba
package includes a sample file that you can use as a basis.
The configuration file works like most text configuration files. It is line based, and the
# and ; characters indicate a comment (but only if they are at the beginning of a line). In
the example included, a line starting with # is commentary, explaining something. A line
starting with ; means that it is a configuration statement that you might enable.
CHAPTER 9 ■ SHARING FILES WITH SAMBA 203
The Samba configuration consists of different sections. The first section is indicated
with [global] and, as the name indicates, is the global section of the configuration. All the
other sections are configurations for shares. They are indicated in the same manner as
the global section but with the name of the share between the brackets.
The actual configuration options are in the format of <parameter> = <value>. There
are a lot of these options, but we will go over them in the coming sections. You can use
the smb.conf man page as a reference for all the possible parameters. To view this man
page, use the following command:
man smb.conf
Example Configuration
As an introduction, we will go over the included example configuration file. Then, in the
next sections, we will show how to set up specific configurations. We suggest that you
open /etc/samba/smb.conf and follow along as we go through this example.
The first section of the example is an introduction; it basically repeats what we’ve
already mentioned. It ends with a note that you should use the testparm command when
you make changes to smb.conf. We also recommend this.
# This is the main Samba configuration file. You should read the
# smb.conf(5) manual page in order to understand the options listed
# here. Samba has a huge number of configurable options (perhaps too
# many!) most of which are not shown in this example
#
# For a step to step guide on installing, configuring and using samba,
# read the Samba-HOWTO-Collection. This may be obtained from:
# http://www.samba.org/samba/docs/Samba-HOWTO-Collection.pdf
#
# Many working examples of smb.conf files can be found in the
# Samba-Guide which is generated daily and can be downloaded from:
# http://www.samba.org/samba/docs/Samba-Guide.pdf
#
# Any line which starts with a ; (semi-colon) or a # (hash)
# is a comment and is ignored. In this example we will use a #
# for commentry and a ; for parts of the config file that you
# may wish to enable
#
# NOTE: Whenever you modify this file you should run the command "testparm"
# to check that you have not made any basic syntactic errors.
CHAPTER 9 ■ SHARING FILES WITH SAMBA
204
The next section talks about SELinux. When you have enabled SELinux and use Samba,
you might need to set certain booleans or labels so that SELinux does not interfere with
Samba.
# SELINUX NOTES:
#
# If you want to use the useradd/groupadd family of binaries please run:
# setsebool -P samba_domain_controller on
#
# If you want to share home directories via samba please run:
# setsebool -P samba_enable_home_dirs on
#
# If you create a new directory you want to share you should mark it as
# "samba-share_t" so that selinux will let you write into it.
# Make sure not to do that on system directories as they may already have
# been marked with othe SELinux labels.
#
# Use ls -ldZ /path to see which context a directory has
#
# Set labels only on directories you created!
# To set a label use the following: chcon -t samba_share_t /path
#
# If you need to share a system created directory you can use one of the
# following (read-only/read-write):
# setsebool -P samba_export_all_ro on
# or
# setsebool -P samba_export_all_rw on
#
# If you want to run scripts (preexec/root prexec/print command/...) please
# put them into the /var/lib/samba/scripts directory so that smbd will be
# allowed to run them.
# Make sure you COPY them and not MOVE them so that the right SELinux context
# is applied, to check all is ok use restorecon -R -v /var/lib/samba/scripts
Then you’ll come to the [global] section of the configuration. This is also split up in
the example file so that relevant options are together. The first part is about the network.
The workgroup option specifies the workgroup or domain that the Samba server will be
part of. The netbios name option specifies the name of the Samba server; it is commented
out here because Samba will by default use the hostname of the machine. But this option
allows you to override this.
CHAPTER 9 ■ SHARING FILES WITH SAMBA 205
[global]
# ----------------------- Network Related Options -------------------------
#
# workgroup = NT-Domain-Name or Workgroup-Name, eg: MIDEARTH
#
# server string is the equivalent of the NT Description field
#
# netbios name can be used to specify a server name not tied to the hostname
#
# Interfaces lets you configure Samba to use multiple interfaces
# If you have multiple network interfaces then you can list the ones
# you want to listen on (never omit localhost)
#
# Hosts Allow/Hosts Deny lets you restrict who can connect, and you can
# specifiy it as a per share option as well
#
workgroup = MYGROUP
server string = Samba Server Version %v
; netbios name = MYSERVER
; interfaces = lo eth0 192.168.12.2/24 192.168.13.2/24
; hosts allow = 127. 192.168.12. 192.168.13.
The following section contains options that control the logging of Samba, such as the
name and location of the log file and whether Samba needs to limit the size of the file:
# Log File let you specify where to put logs and how to split them up.
#
# Max Log Size let you specify the max size log files should reach
# logs split per machine
; log file = /var/log/samba/%m.log
# max 50KB per log file, then rotate
; max log size = 50
The three sections that follow then put Samba into three different modes of opera-
tion. The first is Samba as a stand-alone server, and the second is Samba as a domain
member. The third is Samba as a domain controller. Because we will go deeper into these
modes later, we will skip these sections for now.
CHAPTER 9 ■ SHARING FILES WITH SAMBA
206
Then you come to the browser control options section. This is one part of the Net-
BIOS layer and is what makes servers appear automatically when you “browse the
network” in Windows. As shown in this section, the default values are OK in most cases.
# set local master to no if you don't want Samba to become a master
# browser on your network. Otherwise the normal election rules apply
#
# OS Level determines the precedence of this server in master browser
# elections. The default value should be reasonable
#
# Preferred Master causes Samba to force a local browser election on startup
# and gives it a slightly higher chance of winning the election
; local master = no
; os level = 33
; preferred master = yes
The name resolution section is about another part of NetBIOS, namely, the resolu-
tion of names to IP addresses. As explained earlier, Windows networking does use DNS
for this but also uses its own protocol. This section allows you to configure how Samba
needs to behave in this regard.
# Windows Internet Name Serving Support Section:
# Note: Samba can be either a WINS Server, or a WINS Client, but NOT both
#
# - WINS Support: Tells the NMBD component of Samba to enable it's WINS Server
#
# - WINS Server: Tells the NMBD components of Samba to be a WINS Client
#
# - WINS Proxy: Tells Samba to answer name resolution queries on
# behalf of a non WINS capable client, for this to work there must be
# at least one WINS Server on the network. The default is NO.
#
# DNS Proxy - tells Samba whether or not to try to resolve NetBIOS names
# via DNS nslookups.
; wins support = yes
; wins server = w.x.y.z
; wins proxy = yes
; dns proxy = yes
CHAPTER 9 ■ SHARING FILES WITH SAMBA 207
Next is the printing section. If you want to use Samba as a print server, it could be
that you need to make changes here. But by default Samba will use CUPS and show all
the printers that CUPS knows about to the Windows network.
# Load Printers let you load automatically the list of printers rather
# than setting them up individually
#
# Cups Options let you pass the cups libs custom options, setting it to raw
# for example will let you use drivers on your Windows clients
#
# Printcap Name let you specify an alternative printcap file
#
# You can choose a non default printing system using the Printing option
load printers = yes
cups options = raw
; printcap name = /etc/printcap
#obtain list of printers automatically on SystemV
; printcap name = lpstat
; printing = cups
The final part of the [global] section is about the interaction of Samba with the file-
system and, more specifically, about how certain Windows attributes that don’t exist in
Linux filesystems are mapped. Either these attributes are mapped using the execute attri-
bute bit (all the different map... options) or Samba uses a new feature present in modern
filesystems called extended attributes to store these Windows attributes (the store dos
attributes option).
# The following options can be uncommented if the filesystem supports
# Extended Attributes and they are enabled (usually by the mount option
# user_xattr). Thess options will let the admin store the DOS attributes
# in an EA and make samba not mess with the permission bits.
#
# Note: these options can also be set just per share, setting them in global
# makes them the default for all shares
; map archive = no
; map hidden = no
; map read only = no
; map system = no
; store dos attributes = yes
CHAPTER 9 ■ SHARING FILES WITH SAMBA
208
The final part of the example configuration file contains a collection of shares. The
first four example shares have special functions in a Windows network. The first share in
the example is called [homes] and is used to share the home directory of each user defined
on the system. This means that when a user authenticates to the Samba server and that
user has a home directory present on the Samba server, the user’s home directory will be
made available over the network as a share with the name of the user’s name.
[homes]
comment = Home Directories
browseable = no
writable = yes
; valid users = %S
; valid users = MYDOMAIN\%S
The second example share is called [printers] and works like the [homes] share but for
all defined printers on the Samba server. Samba will ask the CUPS print server for a list of
all printers it knows, and Samba will create a printing share for each of these printers.
[printers]
comment = All Printers
path = /var/spool/samba
browseable = no
guest ok = no
writable = no
printable = yes
The third and fourth example shares are needed only when the Samba server will be
used as a domain controller. In that case, these shares are used to provide roaming pro-
files for users of the Windows network and to allow for scripts that are run when people
log in.
# Un-comment the following and create the netlogon directory for Domain Logons
; [netlogon]
; comment = Network Logon Service
; path = /var/lib/samba/netlogon
; guest ok = yes
; writable = no
; share modes = no
# Un-comment the following to provide a specific roving profile share
# the default is to use the user's home directory
; [Profiles]
; path = /var/lib/samba/profiles
CHAPTER 9 ■ SHARING FILES WITH SAMBA 209
; browseable = no
; guest ok = yes
The last share is a standard share called [public], and it points to a certain directory
(/home/samba in this case). We will go into more detail on how to define shares in the com-
ing sections.
# A publicly accessible directory, but read only, except for people in
# the "staff" group
; [public]
; comment = Public Stuff
; path = /home/samba
; public = yes
; writable = yes
; printable = no
; write list = +staff
Having reviewed the example configuration file for Samba that comes with CentOS,
you should have good idea of how configuring Samba works and what the configuration
file looks like. It’s time to put all this into practice and set up a stand-alone Samba server.
Minimal Stand-Alone Samba Setup
In this section, we will show how to create a minimal configuration file that will let Samba
run in stand-alone mode (something also called workgroup mode). It will have no rela-
tionship to a domain. It will also contain three simple shares with simple access rules to
get the basics covered. This is how the configuration looks:
[global]
workgroup = MYGROUP
server string = Samba Server Version %v
security = user
passdb backend = tdbsam
load printers = yes
cups options = raw
[homes]
comment = Home Directories
browseable = no
writable = yes
CHAPTER 9 ■ SHARING FILES WITH SAMBA
210
[printers]
comment = All Printers
path = /var/spool/samba
browseable = no
guest ok = no
writable = no
printable = yes
[public]
comment = Public Stuff
path = /home/samba
public = yes
writable = no
printable = no
This configuration is based on the example configuration file included with the Samba
packages. So, it should look pretty familiar. But let’s go over the different sections again.
The [global] section has only six lines. The workgroup line specifies that the server will
be in the workgroup MYGROUP. The server string line shows that this is a Samba server, and
the text %v will be replaced by the actual Samba version. The security statement indicates
that the authentication of users will be done by the Samba server itself, the passdb backend
option tells Samba where to look for/store user information, the load printers = yes line
means that Samba will export all defined printers, and cups options = raw means that
Samba will pass all printing data directly to CUPS for printing.
The next three sections in this configuration are definitions for shares. The first share,
[homes], is used to provide users with access to their home directories using Samba. Only
when a user is authenticated will the user see their home directory share, and it will have
the same name as the user has.
The [printers] share will, as mentioned earlier, make all defined printers available
for the network. The browseable = no statement means that Samba will not tell the net-
work it has this share, or printers in this case, available. The guest ok = no statement
means that only users who have authenticated will be able to use the printers that are
available.
The [public] share will export the directory /home/samba and all its content. This share
will be visible to the users with the name public. Everybody can see the share, but nobody
can write in it; they can only read from it. This is because of the writable = no statement.
You have a configuration file now, but you aren’t ready to start Samba yet at this
point. We have talked a lot about users and the authentication of users. So, you will need
to create them. The first step is to create a standard Linux user using the useradd com-
mand and give the user a password using the passwd command:
CHAPTER 9 ■ SHARING FILES WITH SAMBA 211
# useradd test1
# passwd test1
New UNIX password:
Retype new UNIX password:
passwd: all authentication tokens updated successfully.
This will create entries for the user in /etc/passwd, /etc/shadow, and /etc/group. It will
also create a home directory for the user with the path /home/test1.
One of the differences between Windows and Linux is the way that passwords are
encoded. This means that Samba cannot use the Linux-type encrypted password (present
in /etc/shadow) when a Windows client tries to log in since the Windows client will use
a different mechanism. The consequence is that Samba needs to maintain its own user
database with the passwords encrypted using the Windows methods. The passdb backend
option tells Samba what type of database it needs to use for this. In this case, we used the
tdbsam type, which is a lightweight file-based database from the Samba project itself. The
file used for this is /etc/samba/passdb.tdb.
Another effect of this difference between Linux and Windows is that you need to also
give the password of the user to Samba so it can encrypt the password using the Windows
method. For this, the command smbpasswd is used. You can add the test1 user to the
Samba database like this:
# smbpasswd -a test1
New SMB password:
Retype new SMB password:
Added user test1.
As you can see, this looks almost the same as the normal Linux passwd command. The
-a switch tells the smbpasswd that this is a new user and it should be added to the Samba
user database. Now the fact that the password needs to entered again means that the
Linux and Samba/Windows password of the user can be different; the choice of whether
this should be done or not is for either the administration or the user.
This procedure will need to be done for all users who need to access the Samba
server. Without an entry in the Samba user database, they cannot authenticate and log in.
The final thing that needs to be created before you can start Samba is the /home/samba
directory that is used for the [public] share. This will be a share that can be used by mul-
tiple users, so it cannot be a home directory of a normal user. Also, in this example, the
share is read-only, so users who connect to the share cannot write to it. Writing to this
share will be covered in the next section. In this example, create this directory as root, and
make sure it has the correct Unix permissions so that files can be read from it:
# mkdir /home/samba
# chmod 755 /home/samba
CHAPTER 9 ■ SHARING FILES WITH SAMBA
212
With the /home/samba directory in place, you can finally start Samba. In this example,
you are not part of a Windows domain, and therefore you don’t need the winbind service,
only the smb service:
# service smb start
Starting SMB services: [ OK ]
Starting NMB services: [ OK ]
Now Samba is started. You can check the smbd log file /var/log/samba/smbd.log to
see whether it started correctly. If it has, it is time to start up a Windows client and see
whether you can find the Samba server and use its shares. To find the Samba shares, first
make sure the Windows machine is in the same workgroup as Samba (MYGROUP in this
case). You can change this using the System entry in the Windows Control Panel (remem-
ber that changing the workgroup requires a reboot).
Then you should be able to find the Samba server by going to My Network Places and
clicking View Workgroup Computers (in Windows XP Professional). When you access the
Samba server, you will be prompted for a username and password; you can use the test1
user and its password you created earlier. Then you can see the public share and a share
called test1, which is the user’s home directory.
Shares and Security
When adding shares to Samba, you will probably want to have control over who has
access to the share and what they can do (read or write). For this, Samba has a large set of
options that allow you to fine-tune the behavior of Samba.
Before we go over some of these options, you will need to take care of the permis-
sions on the filesystem level. Because Samba runs as a normal Linux process and uses
normal Linux filesystems, any restrictions set on the filesystem level can interfere with the
permissions you set inside the Samba configuration. When an authenticated user uses
a share, Samba will access the filesystem as that user (like the user test1 in the example
earlier). For an unauthenticated user, Samba will use the user nobody. So, you will need to
make sure that the permissions on the filesystem are sufficient for these users. You can
always set all the directories completely open (mode 777 or drwxrwxrwx), but this isn’t
a good idea security-wise. If there is an error in the smb.conf file, users could potentially
access files they are not allowed to touch.
The first level of control available is if a share is read-only or read-write. For this,
two corresponding options are available: read only and writeable. If neither of these is
specified, the default will be that the share will be read-only. Setting read only = no or
writeable = yes will make the share read-write.
CHAPTER 9 ■ SHARING FILES WITH SAMBA 213
You can also control this on a per-user level using the read list or write list option.
These options allow you to specify a list of users or groups that will have read-only access
(when using read list) or read-write access (when using write list) independent of the
earlier read only or writeable settings. This allows you to force certain users to always
have read-only or read-write access.
A second level of control that is available is setting whether users have access to a
share. This is done using the valid users and invalid users options. If neither of these
options is specified, the default for Samba is that both are empty, and in that case, all
users will be allowed access to the share. If users or groups are specified for the valid
users option, then only these users are allowed access to the share and everybody else
is denied. If the invalid users option is used, then only these users or groups are denied
access while everybody else is allowed. If both options are used and a user or group that is
present in both lists is specified, then that user is denied access.
Then there is the browseable option. This can be set to yes or no, and it determines
whether the share will be visible when browsing the Windows network like in the pre-
vious section. If it is not made visible for browsing, it can still be used if you know the
name of the share. In Windows, you can do this using the Add a Network Place task, for
example, which allows you to type in the name of the server and share. This option is not
really a security measure but just a way to prevent people from finding out the existence
of a share by simply browsing.
Another useful option is admin users. You can use this option to specify a list of users
or groups that will have administrative privileges on the share. This means that all opera-
tions done by this user will be executed as the superuser (root).
A final option we will cover is username map, which specifies a file that contains a map-
ping between Linux users and Windows users. You can use this to allow certain Windows
users to access the Samba server without that user needing to have an account on the
Samba server. An example of such a mapping is root = Admin Administrator. Here the
Windows users Admin and Administrator will actually use the root user when accessing the
Samba server.
Some of these options allow you to specify users or groups. All these type of options
use the same mechanism to do this. For users, just use a space-separated list of each user,
such as valid users = root test1. Here only the users root and test1 will be allowed to
use the share.
If you have a lot of users, this method can quickly result in very long lists that are not
easy to use. To solve this, Samba also allows you to use groups, and this is done by using
the @ character followed by the name of the group such as write list = root @admins.
Here only user root and all members of the group admins will be allowed to write to the
share. This greatly reduces the amount of changes you need to do to the Samba configu-
ration; you can assign a user certain rights just by putting the user in the right group,
instead of each time needing to change the Samba configuration file.
CHAPTER 9 ■ SHARING FILES WITH SAMBA
214
Extended Stand-Alone Example
Now that you have seen how to manage permissions on shares, it is time for an extended
example that uses these new options. It is based on the previous minimal example. Here
is how it looks:
[global]
workgroup = MYGROUP
server string = Samba Server Version %v
security = user
passdb backend = tdbsam
load printers = yes
cups options = raw
username map = /etc/samba/smbusers
[homes]
comment = Home Directories
browseable = no
writable = yes
[printers]
comment = All Printers
path = /var/spool/samba
browseable = no
guest ok = no
writable = no
printable = yes
[public]
comment = Public Stuff
path = /home/samba
public = yes
writable = no
printable = no
write list = root @admins
[accounting]
comment = Accounting files
path = /home/accounting
writable = yes
CHAPTER 9 ■ SHARING FILES WITH SAMBA 215
printable = no
browseable = no
valid users = root @accounting @management
read list = @management
[apps]
comment = Applications
path = /home/apps
writable = no
printable = no
browseable = yes
write list = root @admins
admin users = @admins
In the [global] section, we only added the username map option and pointed it to the
file /etc/samba/smbusers. This file contains the following:
# Unix_name = SMB_name1 SMB_name2 ...
root = administrator admin
nobody = guest pcguest smbguest
Here we map the administrator and admin Windows users to the root Linux user. The
same principle is used for the nobody Linux user.
In the definition of the [public] share, we added the line write list = root @admins.
This means that the share that is normally read-only can be written to by the user root
and members of the group admins.
Then we added two new shares, [accounting] and [apps]. They follow the same pat-
tern as the [public] share. The [accounting] share is not browsable, meaning that it is
hidden from view and can be accessed only if you know its name. The share is accessible
only by the user root and members of the groups accounting and management. All users
except those of the management group have write access to the share.
The [apps] share is browsable and read-only for all users except for root and members
of the group admins. Also, the operations of members of the group admins will be done as
the superuser.
As you can see, using the options explained and using groups wisely allow you to eas-
ily manage access to shares, control who can write to a share, and so on.
Samba As a Domain Member
Now that you have seen how Samba is used on itself and how to configure shares, we
will show how to put your Samba server inside an Active Directory domain. The biggest
difference between stand-alone mode and member mode is that in member mode all
CHAPTER 9 ■ SHARING FILES WITH SAMBA
216
authentication is done by the domain controllers of the domain and not by the Samba
server itself. The main consequence of this is that Samba will no longer have a database
of all user accounts. This also means that the Samba server will not have Linux user
accounts for all the users who can use the server. This can be a problem since Samba
needs a user to perform operations on the filesystem.
There are two solutions for this. The first one is that you can force Samba to use a
certain Linux user or group. You can do this using the force user and force group options.
The user and group given will be used for all operations on the filesystem instead of the
user who is authenticated to use the share.
The second solution is to use the winbindd daemon. This daemon makes all users and
groups that are present inside a domain available inside a Linux system. It accomplishes
this by using Name Service Switch (NSS). This is an interface in the core Linux libraries
that allows for different ways to store and retrieve a list of users and groups (besides oth-
ers). You can find the configuration for NSS in the file /etc/nsswitch.conf. By default, it
will use only the standard Unix files for users and groups (/etc/passwd, /etc/shadow, /etc/
group, and so on).
The winbindd daemon will use NSS to inject all domain users and groups into the
Linux environment. This way, there is no need to create separate user accounts for all
domain users. Using winbind gets around the problem of having to create an account for
every user who logs in to the Samba server. In this example, we will be using the winbind
service.
To set this up, you will of course need an Active Directory domain controller. You
will also need to know the name of the domain and the name of the realm. For example,
if the realm is testdomain.com, then the domain name is testdomain. You will also need the
password of the domain administrator account to add the Samba server to the domain.
Finally, you need to install the krb5-workstation package using Yum.
The first thing we will show how to set up is Samba. We will show only the [global]
section of the configuration file. The way that shares work remains the same; only the
names of the users change. This is the Samba configuration:
[global]
workgroup = TESTDOMAIN
realm = TESTDOMAIN.COM
server string = Samba Server Version %v
security = ADS
load printers = yes
cups options = raw
template shell = /bin/bash
idmap uid = 5000-100000
idmap gid = 5000-100000
winbind use default domain = Yes
CHAPTER 9 ■ SHARING FILES WITH SAMBA 217
The biggest difference from the stand-alone example is that the security option is set
to ADS instead of user. We also added the realm option to indicate what Kerberos realm to
use. The final four options configure how the winbindd daemon behaves. Specifically, the
two idmap parameters tell winbind what UID and GID numbers it can use for the domain
users and groups. The template shell option says that winbind should give the domain
users /bin/bash as shell. The winbind use default domain option tells winbind to not add
the domain name in front of the name of a domain user (this makes the names a bit
shorter).
Next you edit the /etc/nsswitch.conf file so that the Linux environment gets to know
the domain users and groups. Add the word winbind to the following lines:
passwd: files winbind
shadow: files winbind
group: files winbind
Next you need to initialize Kerberos to allow the Samba server to become member.
To do this, run this command:
# kinit administrator@TESTDOMAIN.COM
Then you can join the Samba server to the domain using this command:
# net ads join -Uadministrator%password
Replace the password string with the real password of the domain administrator. If
the command returns a line Joined domain TESTDOMAIN, then it succeeded, and the Samba
server is now part of the domain. Now you can start the Samba daemons. First start the
winbindd daemon and then the others:
# service winbind start
Starting Winbind services: [ OK ]
# service smb start
Starting SMB services: [ OK ]
Starting NMB services: [ OK ]
To check whether the winbindd daemon is doing its job, you can run the wbinfo com-
mand, which directly talks to the daemon and can tell you, besides other things, the users
and groups it sees from the domain. You can also use the getent command. This can ask
the NSS directly for all information it knows. The getent passwd command should show
all users, including those present in /etc/passwd and those present in the domain. The
getent group command does the same but for groups.
Now the Samba server is ready for normal use, and you can add shares like in the pre-
vious examples.
CHAPTER 9 ■ SHARING FILES WITH SAMBA
218
Summary
In this chapter, you were introduced to Windows networking and to the Samba server
and its components. Then we explained how to configure Samba and reviewed the
example configuration file included in the Samba package as delivered by CentOS. We
also showed how to set up a minimal configuration of Samba in stand-alone mode. Then
we covered how to secure shares that the Samba server offers and what options are avail-
able for this. We then showed an extended configuration example that used some of the
options. Finally, we showed how to configure Samba as a domain member.
For more in-depth knowledge about Samba and more information on how to config-
ure Samba, we refer you to the documentation that is included in the Samba package and
available on the CentOS and Samba web sites.

219
CHAPTER 10
Setting Up Virtual Private
Networks
If you need an explanation of what the Internet is, here’s a simple one: the Internet is
the aggregation of all connected networks that use the Internet protocol. This also means
that you can run your personal internet (lowercase i) by connecting a group of networks
together that all use the Internet protocol. And many companies do exactly that. They
have their own private internet, often called an intranet, of which only a small part is
really connected to the Internet (capital I). Clients in the private internet normally con-
nect to the “real thing” over proxies or routers that translate the private addresses to
routed addresses. To the Internet, this looks like there is only one machine connected to
it that does a huge amount of traffic. For the client, this looks like they can connect to the
Internet, but the Internet cannot connect back; those clients just don’t exist there.
You, like most people, probably do the same at your home or in your office. There is
a machine storing your music and pictures and documents, another machine that acts
as a mail server, another machine that is a web server, and then your desktop machine
or laptop. And in most installations there is a machine that connects this network to
the Internet, known as a router. These machines mostly do network address translation
(NAT) from a private IP address range as described in RFC 1918 to the official address that
is reachable from the Internet (see Figure 10-1).
nNote As the Internet grew larger, more and more companies created their local internets that weren’t
connected—at least not directly—to the Internet. Still, most computers on these networks used IP addresses
that were supposed to be reachable from the Internet directly. RFC 1918 defines three networks that are
not supposed to be routed over the Internet but can be used in private networks. First, 192.168/16 is prob-
ably the best known one; many home WiFi routers use 192.168.0.0/24, for example. Second, 172.16/12
includes all addresses from 172.16.0.0 to 172.31.255.255. Finally, the 10/8 network contains 16,777,214 IP
addresses and is meant for large internal company networks. See http://www.faqs.org/rfcs/rfc1918.
html for the RFC and http://en.wikipedia.org/wiki/Private_network for a more extensive discus-
sion about private networks.
CHAPTER 10 n SETTING UP VIRTUAL PRIVATE NETWORKS
220
Internet
10.0.0.1
10.0.0.1
192.168.0.0/24
NAT Translates
192.168.0.0/24 to 10.0.0.1
<
Figure 10-1. Network address translation
Normally there also is a firewall in place that disallows traffic from the Internet to the
private network, except for a few applications. Because your mail server would be useless
if it couldn’t receive mail, your web server would be useless if nobody could see your web
site. This often is done via port forwarding, so all connects to the router on port 80 are
forwarded to the web server and connects to port 25 are forwarded to the mail server.
And there are good reasons to do that. You do not want the internals of your network
exposed to the Internet. Imagine if someone was able to access the machine on which
you store your private documents. And imagine the outcry of certain companies if the
whole world was able to access your music collection. The same is true for companies:
nobody should have access to the internal network from the outside, because the infor-
mation that is stored on this network is too important to share with the whole world.
On the other hand, if this information is so important to you or to the company, you
don’t want this information to leave your network. You don’t want people to store that
information on their laptops when they are visiting customers or taking the machines
home. If any laptops were stolen, this could be a catastrophe for the company and the
company’s customers. Who doesn’t remember some privacy scandals big companies
have gotten into because they lost customer data? And much of the information you store
on your private network should be as important to you, too. Nobody has to know how
much you pay in taxes, who you do business with, and where your money is stored (okay,
there are a few exceptions to that rule).
CHAPTER 10 n SETTING UP VIRTUAL PRIVATE NETWORKS 221
One possible solution to that would be to store everything you need on your laptop,
encrypt the laptop’s hard disk, and work with only this set of data. If you choose a good
and strong password, your documents are secure—but what if your laptop gets stolen? I
guess you want to keep a copy of the document on your network at home, where it gets
backed up.
But when you work on a document on your laptop, you have to synchronize the dif-
ferences between that document and the one you left at home. Wouldn’t it be better if
you could work like you were at home or in your office at your desktop computer?
And for administrators, sometimes it is enough to use SSH to log into one of the
machines at work. But what if you need to mount an internal share to the machine you
are working on?
There is a better solution to those problems: virtual private networks (VPNs).
In this chapter, you’ll learn what a VPN is and how to set up a VPN. You’ll take a look
at three different ways to set up VPNs, although there are many more. Also, you’ll learn
how to give out VPN access to other people and how to generally configure your client
and your VPN server.
What Is a Virtual Private Network?
A virtual private network is a network that connects two private networks over another
network like the Internet or that connects your local machine to a network over the Inter-
net. You can use a virtual private network when sitting in a hotel room and you absolutely
need to access your music collection because you forgot to take that one album with you
that you want to listen to. Or you want to connect site A of your company with the main
office’s intranet so people working at site A can edit documents that are available only
on the file server located at the headquarters. Connecting machines of employees to the
internal network is the most likely reason that you want to use a VPN, because this gives
them the ability to work on internal data from (nearly) wherever they are.
Because those connections go over the Internet, you want to protect them as well as
possible: encrypted and without a real chance for other people to see what you are doing.
With a virtual private network, anyone who is trying to snoop your traffic cannot see
whether you are sending a mail, editing a file on your file server, or browsing the intranet
pages in your company. All traffic is tunneled through the one connection, which makes
your VPN happen, and this connection is the only thing the intruder can see.
To make a VPN work, you need to have an endpoint in your network that you can
connect to. From this endpoint on, you should be able to see the rest of your (RFC 1918)
network. If you have a Linux machine acting as a router on your network, this would be
the perfect machine for setting up such an endpoint.
Next, you’ll learn how to use SSH for creating VPNs.
CHAPTER 10 n SETTING UP VIRTUAL PRIVATE NETWORKS
222
Using SSH for Virtual Private Networks
You are probably already using the Secure Shell client to connect to other machines on
your network. Most administrators do their daily work via SSH when connecting to mail
or web servers for changing configurations there or watching log files on the remote com-
puters. If all you need is text-based access to another computer anywhere in the world,
SSH is really a great way to work. There are mail clients for the console, and editors like
vim, nano, and emacs also work without a graphical user interface. If this is all you need,
you probably do not need a real VPN at all.
But what if you need to use a web browser on the remote machine to get to some data
from your web server? Or what if you have to run an Office program to edit a document
you don’t want to copy over to the laptop you have with you in your hotel?
SSH has a solution for that: it enables you to do X forwarding through an existing SSH
connection. The X Window system is a network transparent system, where the server—
the part displaying the graphics—runs on your local machine, while the client application
can run anywhere on the network. This works great if you have a reasonably fast link
available and not so great if you are sitting behind a slow line.
Make sure that you have the xorg-x11-xauth package installed on the remote
machine:
[ralph@centos ~]$ rpm -q xorg-x11-xauth
xorg-x11-xauth-1.0.1-2.1
[ralph@centos ~]$
If it isn't, just install it via Yum:
yum install xorg-x11-xauth
Now you have to enable X11 forwarding in SSH on the remote side. Become root and
check your sshd config:
[root@centos ~]# grep X11Forwarding /etc/ssh/sshd_config
#X11Forwarding no
X11Forwarding yes
[root@centos ~]#
X11 forwarding is turned off by default in SSH, but CentOS turns it on during the
installation of the OpenSSH server package. This is because the system-config-* applica-
tions need a working X11.
If you need to change the X11 forwarding setting, you have to restart the SSH daemon
with this:
service sshd restart

CHAPTER 10 n SETTING UP VIRTUAL PRIVATE NETWORKS 223
This will restart the SSH daemon but leave your running session intact. Let’s start
xclock on the remote machine:
ssh -l user -CX machine.example.com xclock
This will display the output of the xclock program—a graphical clock—on your local
machine. The -X option tells SSH to turn on X11 forwarding, and the -C option turns on
compression, which really helps on slower connections.
nNote ssh -X opens an untrusted X11 connection to the remote host. This prevents someone who is
also logged in on the remote machine from capturing or even sending keyboard or other events. Most X11
clients work great with untrusted connections. There are some applications that have problems running over
untrusted connections. If you start a program and it doesn’t display correctly on your screen, you have found
one of them. If you can really trust the remote machine and all users who are logged onto this machine, you
can open a trusted connection with SSH. Just use ssh -Y instead of ssh -X in this case.
Using SSH this way is not really a VPN solution, but it works in many situations. The
greatest problem with this approach is that you transfer the X display commands—these
are the commands your X Server uses for drawing windows and their content—over the
network. This can be really slow on DSL connections and isn’t usable at all on dial-up
networks. Wouldn’t it be much easier to transfer data instead of graphics over those links?
Of course. And you can do it with SSH, too. Since OpenSSH version 4.3, which is included
in CentOS 5, you can create network tunnels with SSH. Up to then you could tunnel ports
through a connection, meaning that you could connect port 80 on the remote machine—
your web server—with port 8080 on the local machine. Using a web browser, you can go
to http://localhost:8080/, which will be redirected to port 80 on your web server.
This is fine for one application, but if you need more than one service, you will have
to enable those tunnels for every service you want to access. OpenSSH version 4.3 solves
that by providing you with a complete network tunnel.
nCaution There are still many how-tos on the Internet that tell you how to create a VPN with SSH and the
pppd daemon by creating a tunnel between two ports and then running a PPP “dial-up” session through the
tunnel. Although this is really easy to set up, it never is a good idea to run TCP/IP through another TCP/IP
session, because it can cause long delays and connection abortions. See http://sites.inka.de/~W1011/
devel/tcp-tcp.html for a discussion of this phenomenon. And the tunnel solution included since OpenSSH
4.3 is even easier to set up anyway.
CHAPTER 10 n SETTING UP VIRTUAL PRIVATE NETWORKS
224
There is one big drawback to this solution: you need root access on the remote
machine, so you have to permit root logins within SSH. Many people forbid root to log in
from a remote machine, which normally is a good idea. In this case, the user logging in as
root will be allowed to start the tunnel on login only. And because you forbid root access
via a password, you need to have a valid private SSH key to connect.
If you haven’t done so already, create an SSH key pair for your root user on the local
machine:
[root@client ~]# ssh-keygen -f /root/.ssh/id_rsa -N my-passphrase
Generating public/private rsa key pair.
Your identification has been saved in /root/.ssh/id_rsa.
Your public key has been saved in /root/.ssh/id_rsa.pub.
The key fingerprint is:
a6:d7:98:28:b1:fd:d4:b9:bb:3b:ac:92:03:b6:08:38 ➥
root@client.example.com
[root@client ~]#
Choose a strong passphrase for your keys! Copy the public part of your key to the
server you want to connect to. You will need it later.
You are now going to create a tunneling TUN device to which the SSH tunnel will be
attached. A TUN device is a virtual point-to-point network device that behaves like a nor-
mal interface and can also be configured like one. But let’s set up SSH correctly first. You
need to edit the sshd configuration on the server, because you have to allow tunneling,
permit root logins, and turn off password authentication. Open /etc/ssh/sshd_config in
your editor to change or add the following configuration directives:
PermitRootLogin yes
PasswordAuthentication no
PermitTunnel yes
Don’t restart the SSH daemon yet. Now copy the public key from your client to
/root/.ssh/authorized_keys:
cat id_rsa.pub >> /root/.ssh/authorized_keys
Make sure that .ssh belongs to root:root and allows only the root user to access it.
The same goes for the key file:
[root@centos ~]# chmod 0700 .ssh ; chmod 0600 .ssh/authorized_keys
[root@centos ~]#
To see whether you did everything right, try to SSH into the server as root:
CHAPTER 10 n SETTING UP VIRTUAL PRIVATE NETWORKS 225
[ralph@client ~]$ssh admin@centos.example.com
Enter passphrase for key '/home/ralph/.ssh/id_rsa':
CentOS release 5.3 (Final)
[root@centos ~]
You should be asked to enter the passphrase for your key and not for the root pass-
word on the remote machine. If this works, then restart the SSH daemon. If it doesn’t
work, you should look at /var/log/secure or /var/log/messages on the remote machine to
see what has gone wrong. Check .ssh/ and .ssh/authorized_keys for correct access per-
missions. sshd is very picky regarding them, and they have to be as strict as possible.
Open authorized_keys in an editor, and add the following to the beginning of the line,
which contains the key you just added. Be careful that your editor does not break lines
when doing so. The part you are adding and the key must be on one line.
tunnel="0",command="/sbin/ifup tun0" ssh-rsa … example.com
This limits the key to only start the tunnel with the ID 0, and it will automatically
pull up the tun0 device if you connect. The root user cannot run any other commands via
SSH now, making this solution rather secure even though you allow root access to your
machine via SSH.
It’s time to configure the network devices. Say your network at home is 192.168.70.0
with a netmask of 255.255.255.0. It also has a public interface with an official IP address
(see Figure 10-2). Because this is your router, I’m assuming that you have already config-
ured IP forwarding on that computer. If not, open /etc/sysctl.conf with your editor, and
change net.ipv4.ip_forward = 0 to net.ipv4.ip_forward = 1. Run sysctl -p to apply this
change. Open /etc/sysconfig/network-scripts/ifcfg-tun0 with an editor:
DEVICE=tun0
BOOTPROTO=static
ONBOOT=no
TYPE=IPIP
MY_INNER_IPADDR=10.0.0.3
PEER_INNER_IPADDR=10.0.0.2
Now edit the same file on the client side:
DEVICE=tun0
BOOTPROTO=static
ONBOOT=no
TYPE=IPIP
MY_INNER_IPADDR=10.0.0.2
PEER_INNER_IPADDR=10.0.0.3
CHAPTER 10 n SETTING UP VIRTUAL PRIVATE NETWORKS
226
Internet
VPN Tunnel via tun0
LAN
192.168.70.0/24
tun0
10.0.0.2
tun0
10.0.0.3
Official IP Address
Official IP Address
Figure 10-2. A VPN via SSH tunneling
These are normal sysconfig network description files. The device is called tun0, it
is not started on boot, you use static IP addresses, and the type of the interface is IPIP
(IP over IP, which basically encapsulates IP packets into IP to create a tunnel). The two
IP addresses are the addresses of the tunnel endpoints: 10.0.0.2 on the client side and
10.0.0.3 on the server. The directives MY_OUTER_IPADDR and PEER_OUTER_IPADDR are the
addresses of the public interfaces. You don’t need to set these directives, especially
because you often won’t know the public address of the client. You can set it on the client
side, because the public IP address of your router probably does not change.
nNote If you are curious about the various settings you can use in files under /etc/sysconfig and especially
under /etc/sysconfig/network-scripts/, there is help. In /usr/share/doc/initscripts-8.45.25/
sysconfig.txt, all usable options are listed, sometimes with a terse explanation of what these options do. It’s
definitely worth a read.
Theoretically everything should work now, but practice might say otherwise. To set
up a tunnel with SSH, you use the following command:
ssh -w 0:0 server
with server being the computer to which you want to connect. The first 0 is the local
tunnel interface, and the second 0 is the one on the remote side. If you want to use tun1
instead of tun0 on the remote side, because tun0 already exists, the command is as follows:
ssh -w 0:1 server
This command does not detach from the command line, though. You can do so with
ssh -f server command, which detaches the SSH process but still asks for a passphrase if
CHAPTER 10 n SETTING UP VIRTUAL PRIVATE NETWORKS 227
you set one. You can specify any command you want here. By specifying command="/sbin/
ifup tun0" in authorized_keys, the SSH daemon will start the tunnel device only on con-
nect, ignoring each other command you send to it.
[root@client ~]# ssh -fw 0:0 server /bin/true
Enter passphrase for key '/root/.ssh/id_rsa':
[root@client ~]#
On the server side, the tunnel interface should already exist, because SSH starts it:
[root@centos ~]# ifconfig tun0
tun0 Link encap:UNSPEC HWaddr 00-00-00-00-00-00-00-00-00-00-00-00-00-00-00-00
inet addr:10.0.0.3 P-t-P:10.0.0.2 Mask:255.255.255.255
UP POINTOPOINT RUNNING NOARP MULTICAST MTU:1500 Metric:1
On the client side, the interface is missing; you have to start it with ifup tun0 first.
Check with ifconfig to see whether the interface is there. If it is, the tunnel is there, and
you should be able to ping 10.0.0.2 from the client. To be able to reach machines in your
network, you need only a network route.
[root@client ~]# ping 192.168.70.3
PING 192.168.70.3 (192.168.70.3) 56(84) bytes of data.
--- 192.168.70.3 ping statistics ---
3 packets transmitted, 0 received, 100% packet loss, time 2000ms
[root@client ~]# route add -net 192.168.70.0 netmask ➥
255.255.255.0 dev tun0
[root@client ~]# ping 192.168.70.3
PING 192.168.70.3 (192.168.70.3) 56(84) bytes of data.
64 bytes from 192.168.70.3: icmp_seq=1 ttl=64 time=1.95 ms
--- 192.168.70.3 ping statistics ---
1 packets transmitted, 1 received, 0% packet loss, time 0ms
rtt min/avg/max/mdev = 1.956/1.956/1.956/0.000 ms
You can now reach your web server at 192.168.70.7, your file server at 192.168.70.9,
and so on. You can mount Samba or NFS shares and browse your music collection, just
like you would be able to when you are at home. If you want to use name resolution and
you have a DNS resolver on your home network, you can change the name server entries
in /etc/resolv.conf to use it. If you are the only one using the tunnel, you might even
think about adding tun0 as a trusted interface to your firewall policy so that you can get
everywhere in your LAN without being subject to your firewall configuration. You can do
this with the following command:
lokkit -q -t tun0

CHAPTER 10 n SETTING UP VIRTUAL PRIVATE NETWORKS
228
lokkit is a command-line interface to the firewall and SELinux configuration tool.
The previous command sets the tun0 interface as a trusted interface from where all traffic
is accepted.
Using SSH to create a VPN is a good idea when you are in need of a VPN fast and
when it doesn’t have to be extremely reliable. There are better solutions for regular use.
Especially if you want to connect two company sites, VPN over SSH is not the solution
you should be using. IPSec was created for this—and that is what you are going to imple-
ment in the next section: a VPN via IPSec.
Using IPSec
Internet Protocol Security (IPSec) is a standard that was developed by the Internet Engi-
neering Task Force (IETF) to secure Internet connections. IPSec is a required part of the
IPv6 protocol. Most of this has been back-ported to the IPv4 protocol. IPSec works right at
the IP level of the network. IPSec not only offers encryption of traffic over the Internet, but
it also provides a means of controlling data integrity, access, and authentication. Keys for
authentication and encryption are exchanged via Internet Key Exchange (IKE). IKE sets up
a session secret from which keys for encryption are derived. For authentication between
hosts, certificates or preshared keys can be used. Certificates can be stored in files or in the
DNS infrastructure. IPSec can be used between two hosts, two networks, or a host and a
network.
In this section of the chapter, you will learn how to connect two networks with IPSec
in place. You will learn how to configure the network interfaces and how to set up racoon,
which is needed for IKE.
nNote racoon is a daemon that is responsible for the key exchange between IPSec endpoints. You need
to configure racoon, but there is no need for you to start it separately. It gets started automatically by the
kernel when you try to establish an IPSec connection. racoon is also responsible for establishing the security
associations (SAs) between two IPSec hosts. So after you have configured racoon, all the work it does hap-
pens transparently.
There are several implementations of IPSec for Linux, such as openswan, freeswan, and
an implementation in kernel 2.6. CentOS ships with openswan and the kernel implemen-
tation, plus the ipsec-tools package. The kernel implementation and the ipsec-tools
package will be used in the following sections.
CHAPTER 10 n SETTING UP VIRTUAL PRIVATE NETWORKS 229
IPSec Explained
IPSec is a suite of protocols, with two protocols being the primary protocols. One is
Authentication Header (AH), and the other one is Encapsulating Security Payload (ESP).
AH is protocol 51, and ESP is protocol 50 (see /etc/protocols). The preconfigured firewall
in CentOS is configured to let these two protocols pass; otherwise, IPSec wouldn’t be
usable:
[root@client ~]# iptables -L RH-Firewall-1-INPUT
Chain RH-Firewall-1-INPUT (2 references)
target prot opt source destination
[…]
ACCEPT esp -- anywhere anywhere
ACCEPT ah -- anywhere anywhere
AH provides authentication of an Internet packet by adding a checksum header
around the original packet, which can then be checked on the other side of the IPSec
tunnel. By running IPSec in AH mode, you can make sure that nobody on the route
between your networks tampered with the packages, but the packages themselves are not
encrypted. You might use this mode because you have very fast links between two sites
and want to make sure that the data that went in on one side comes out the same on the
other side, but you don’t want encryption because of performance issues.
If you need encryption, ESP is the protocol to use. ESP encrypts the content of the
original packet and adds its own header around it. Depending on if you use IPSec in
transport mode or in tunneling mode, ESP does things differently.
In transport mode, ESP puts its headers around the payload and encrypts that. Head-
ers for routing the package are left intact. An intruder would be able to see the control
information of these packets—routing information, for example—but would not be able
to see the actual data.
In tunneling mode, ESP encrypts the complete packet, not only the payload. Thus,
nobody except the endpoint of the tunnel is able to see the control or data information of
the packages.
What happens when you initiate an IPSec connection? The initiation takes place in
two phases. When you activate the IPSec interfaces, IKE does the following: it authenticates
that both peers really are who they pretend to be via the shared secret—either a preshared
key or a certificate. If phase 1 has finished successfully, it negotiates security associations
between the two peers. After that, it generates a symmetric key for encryption of payload or
packages using a Diffie-Hellman key exchange. This is phase 2.

CHAPTER 10 n SETTING UP VIRTUAL PRIVATE NETWORKS
230
The security associations are then stored in a security association database (SAD).
This keeps information about the two tunnel endpoints including IP addresses, informa-
tion about the mode IPSec is run in (AH or ESP), and information about secret keys and
the encryption algorithm that is used. Among those algorithms are AES, 3DES, and
Blowfish.
nNote IPSec on CentOS 5 supports the following three symmetric encryption cyphers in phase2: Triple Data
Encryption Standard (3DES), Rijndael, and Blowfish 448. IPSec uses symmetric encryption after the initial key
exchange, because this is much faster than public key algorithms. Rijndael is the cipher that is used in the
Advanced Encryption Standard (AES), which is the successor to DES. You can find more information about
Rijndael at http://csrc.nist.gov/archive/aes/rijndael/wsdindex.html. Blowfish is a cipher devel-
oped by Bruce Schneier, and is a fast but secure algorithm. You can find more information about Blowfish at
http://www.schneier.com/blowfish.html. Triple DES is explained in http://en.wikipedia.org/
wiki/Triple_DES. Watch out, because most of these documents are pretty heavy on mathematics.
Virtual Private Networks with IPSec
Make sure that the ipsec-tools package is installed:
[ralph@centos ~]$ rpm -q ipsec-tools
ipsec-tools-0.6.5-13.el5
[ralph@centos ~]$
If it isn’t installed, use yum install ipsec-tools to get it on your machine. Everything
else you need is already in the kernel. IPSec devices are set up in a similar fashion as normal
network devices by editing /etc/sysconfig/network-scripts/ifcfg-ipsec*. The exchange of
keys and security associations is done by the racoon daemon, which is called by the security
policy database (SPD) in the kernel when an IPSec interface comes up. On CentOS, authen-
tication is done via preshared keys. To set up an IPSec connection, you need to define and
configure the IPSec interface, you have to configure racoon, and you have to generate the
preshared key that is needed for the authentication between the hosts.
Let’s assume the following network configuration: you have two sites, site A and site
B. At both sites you have a Linux router that has a public network interface facing the
Internet and a second interface that acts as a gateway to the LAN at the site. Site A has
10.0.3.0/24 for the LAN, and site B has 10.0.7.0/24. The IP address of the router’s internal
interface is 10.0.3.254 for site A and 10.0.7.254 for site B. The public address of site A is
192.168.1.104, and site B has 192.168.1.105 (these aren’t “official” IP addresses, but they
will have to do for documentation purposes). See Figure 10-3 for a schema drawing of this
network.

CHAPTER 10 n SETTING UP VIRTUAL PRIVATE NETWORKS 231
Internet
IPSec Tunnel
10.0.3.254 10.0.7.254
192.168.1.105
Site B
10.0.7.0/24
Site A
10.0.3.0/24
192.168.1.104
Figure 10-3. An IPSec network
Both routers need to be able to route packages, meaning that IP forwarding has to
be enabled. To enable it, open /etc/sysctl.conf with your editor, and change net.ipv4.
ip_forward = 0 to net.ipv4.ip_forward = 1. Run sysctl -p to apply this change. Log in to
the router on site A.
nCaution If you do everything correctly, you can configure IPSec “online.” But everybody makes mis-
takes, even experienced system administrators. If you set up an IPSec connection, make sure that there is
someone at the remote site who you can talk to and who has the right access level to the machine so that
person can correct the mistake you made. Another way to do that is out-of-band administration, over an
ISDN or a modem backup line, for example.
Create the file /etc/sysconfig/network-scripts/ifcfg-ipsec0 on the router at site A:
TYPE=IPSEC
ONBOOT=yes
IKE_METHOD=PSK
SRCGW=10.0.3.254
DSTGW=10.0.7.254
SRCNET=10.0.3.0/24
DSTNET=10.0.7.0/24
DST=192.168.1.105
The type of this network interface is IPSEC, and you want to start the IPSec interface
when the router boots. The method for the key exchange is PSK, which defines a pre-
shared key. 10.0.3.254 is the gateway to the LAN at site A, and it’s 10.0.7.254 at site B—the
DSTGW. The next two lines define the networks for both sites. The last line holds the IP
address of site B’s public interface. The ifcfg-ipsec0 file on site B’s router looks like this:
CHAPTER 10 n SETTING UP VIRTUAL PRIVATE NETWORKS
232
TYPE=IPSEC
ONBOOT=yes
IKE_METHOD=PSK
SRCGW=10.0.7.254
DSTGW=10.0.3.254
SRCNET=10.0.7.0/24
DSTNET=10.0.3.0/24
DST=192.168.1.104
Now you need a preshared key as a secret password so IKE is able to do phase 1 of
the key exchange. This key should be readable and writable only by root, and it is stored
in /etc/sysconfig/network-scripts/keys-ipsec0. If you used a different number for defin-
ing the interface, you have to set this for the key file, too. If you chose ifcfg-ipsec1, the
appropriate key goes into keys-ipsec1. Choose a secure key that cannot be guessed.
[root@client ~]# dd if=/dev/random bs=1 count=20 status=noxfer ➥
| base64
20+0 records in
20+0 records out
FkxUD30peU2JCQBZ8fhYHR0Dsb8=
[root@client ~]#
This reads 20 bytes from /dev/random and pipes the random data into Base64, which
encodes it. Use the resulting string as a password at both sites. And do not use FkxUD-
30peU2JCQBZ8fhYHR0Dsb8=, because other people might read this book, too.
[root@centos ~]# cd /etc/sysconfig/network-scripts/
[root@centos network-scripts]# echo ➥
'IKE_PSK=FkxUD30peU2JCQBZ8fhYHR0Dsb8=' > keys-ipsec0
[root@centos network-scripts]# chown root:root keys-ipsec0
[root@centos network-scripts]# chmod 0600 keys-ipsec0
[root@centos network-scripts]#
Do the same on site B’s router. You now need to configure racoon. Open your editor,
and edit /etc/racoon/racoon.conf:
path include "/etc/racoon";
path pre_shared_key "/etc/racoon/psk.txt";
path certificate "/etc/racoon/certs";
CHAPTER 10 n SETTING UP VIRTUAL PRIVATE NETWORKS 233
sainfo anonymous
{
pfs_group 2;
lifetime time 1 hour ;
encryption_algorithm 3des, blowfish 448, rijndael ;
authentication_algorithm hmac_sha1, hmac_md5 ;
compression_algorithm deflate ;
}
There is not much to change in that file. The short explanation is that sainfo anonymous
defines that two hosts can securely associate anonymously if they know the same secret—
a preshared key in our case. With lifetime you can specify how long a security association
is valid, before it has to be renewed. You can put either a time value here or the number of
bytes that have to be transferred.
pfs_group 2 defines that group 2 of the Diffie-Hellman key exchange protocol is used,
which uses 1,024 bits of keying material. The encryption_algorithm parameter lists the
available encryption algorithms and their preferred order of usage. If you prefer Rijndael
(which is the algorithm AES is based on) over 3DES, put rijndael at the beginning of the
list. You should do that on both routers. authentication_algorithm chooses the hash algo-
rithm used for creating checksums. You should prefer SHA1, because the MD5 algorithm
is known to be weak. The last line tells racoon to negotiate payload compression, which
can result in a speed gain. There will be a line like this at the bottom of the file when the
tunnel is up:
include "/etc/racoon/X.X.X.X.conf"
The racoon daemon changes this file when IPSec is running, so be sure to not leave
the config file open after changing it. This is a very basic racoon configuration but still a
good starting point for network-to-network connections. If you want to use IPSec to con-
nect your laptop to an IPSEC gateway—a so-called road warrior configuration—you can
set policies within this file, such as giving out the DNS server the client should use.
Now that everything is configured, you can bring up the tunnel by running this on
both routers:
ifup ipsec0
If you take a look at the /etc/racoon directory on site B’s router, there will be a file
called 192.168.1.104.conf. This is the configuration that will be used for the tunnel.
CHAPTER 10 n SETTING UP VIRTUAL PRIVATE NETWORKS
234
remote 192.168.1.104
{
exchange_mode aggressive, main;
my_identifier address;
proposal {
encryption_algorithm 3des;
hash_algorithm sha1;
authentication_method pre_shared_key;
dh_group 2;
}
}
You can use tcpdump to check whether the tunnel works. Site A has SSH enabled on
the gateway address to the LAN, which means that you should be able to SSH to site A’s
LAN interface from site B. Start tcpdump on site A, and run ssh 10.0.3.254 on site B’s router
after that:
[root@centos ~]# tcpdump -i eth1 host 192.168.1.105
tcpdump: verbose output suppressed, use -v or -vv for full protocol decode
listening on eth1, link-type EN10MB (Ethernet), capture size 96 bytes
06:06:22.368328 IP 192.168.1.105 > 192.168.1.104: ➥
AH(spi=0x045529f8,seq=0xbe): IP 192.168.1.105 > 192.168.1.104: ➥
ESP(spi=0x0cdb1d46,seq=0xbe), length 92 (ipip-proto-4)
06:06:22.368328 IP 192.168.1.105 > 192.168.1.104: ➥
ESP(spi=0x0cdb1d46,seq=0xbe), length 92
06:06:22.368550 IP 192.168.1.104 > 192.168.1.105:➥
AH(spi=0x06247830,seq=0xae): IP 192.168.1.104 > 192.168.1.105: ➥
ESP(spi=0x0ca0bae7,seq=0xae), length 92 (ipip-proto-4)
Someone listening on the wire will see the packages listed here. All packages have an
AH header and are ESP packets, meaning that they are encrypted. You cannot see that
this is SSH traffic or to which host the traffic inside the tunnel is routed.
You can also use setkey -D to see what has been negotiated between the two hosts;
setkey shows the SAD:
[root@centos ~]# setkey -D
192.168.1.105 192.168.1.104
esp mode=tunnel spi=215686470(0x0cdb1d46) reqid=0(0x00000000)
E: 3des-cbc d83142ca 00706bdb 16da1fd1 39f92b74 f816d048 b63fb881
A: hmac-sha1 83c06fba ffdd6a7c 6a231e78 b142696f 21555916
seq=0x00000000 replay=4 flags=0x00000000 state=mature
CHAPTER 10 n SETTING UP VIRTUAL PRIVATE NETWORKS 235
created: Apr 4 05:35:16 2009 current: Apr 4 06:21:48 2009
diff: 2792(s) hard: 3600(s) soft: 2880(s)
last: Apr 4 05:35:17 2009 hard: 0(s) soft: 0(s)
current: 27833(bytes) hard: 0(bytes) soft: 0(bytes)
allocated: 290 hard: 0 soft: 0
sadb_seq=7 pid=7280 refcnt=0
In this case, there is an esp connection in tunneling mode. 3DES is used for encryp-
tion, and hmac-sha1 is the hash algorithm. It was created on April 4, at 5:35:16 a.m. Below
that are a few statistics. There is another entry for the AH protocol that looks similar.
You might wonder why there are no new interfaces created after you brought up
the tunnel. When you initiated the SSH tunnel earlier, you had to create a tun0 interface,
which had a point-to-point connection to the other side of the tunnel. IPSec does all of
this transparently. If there is traffic between the two networks you defined in the ifcfg-
ipsec0 files, it will be encrypted. All other traffic going through the public interfaces of the
two routers is not encrypted. This means you cannot set the public interface as a trusted
interface in your firewall configuration as you could do with the tunnel interface you con-
figured for the SSH tunnel.
Configuring IPSec has some pitfalls: not all implementations of IPSec are happy to
work together, which makes it a good idea to run the same operating system on both
sides of the tunnel—maybe even the same version. When running between two hosts or
a host and a network, this could be problematic if you want to use your Mac or your Win-
dows PC as a client. And road warrior configurations with IPSec aren’t as obvious as this
example.
If you want a VPN to connect two sites or two hosts with a static IP address configu-
ration and you have the same operating system on both endpoints, IPSec is a stable and
proven solution. For road warrior setups, where you have one static host or network and
one machine that is traveling, there is a better solution: OpenVPN. OpenVPN is available
for several operating systems, including Linux, FreeBSD, OS X, and Windows. In the next
section of this chapter, you will learn how to configure and implement OpenVPN for such
a scenario.
Configuring OpenVPN
In the previous section, you saw how you can transparently encrypt traffic and ensure
data validity between two networks by using IPSec without any additional software pack-
ages besides those available in CentOS. IPSec is a great protocol suite for creating VPNs,
but it has some drawbacks. It is not easy to implement on the protocol side, which some-
times makes two IPSec solutions from two different vendors incompatible with each
other. IPSec isn’t easy to debug either, and the setup for more complicated solutions than
the one shown earlier isn’t easy.

CHAPTER 10 n SETTING UP VIRTUAL PRIVATE NETWORKS
236
Enter OpenVPN (http://www.openvpn.org/). OpenVPN is an SSL/TLS-based VPN solu-
tion, which works similarly to the tunneling solution with OpenSSH shown earlier in
this chapter. But while the OpenSSH tunnel is for when you suddenly need a small VPN
solution, OpenVPN is a proven, scalable solution for creating VPNs. It scales from normal
home usage over small businesses up to large VPN concentrators for big enterprises. One
OpenVPN daemon can take care of up to 128 simultaneous clients.
It has several advantages over IPSec. For cryptographic operations, it uses the stan-
dard TLS/SSL libraries, which are available on many, if not most, operating systems.
Because of this, OpenVPN on a Windows computer has no problems talking to OpenVPN
on a CentOS computer. It completely operates in the user space, which makes it easier to
debug than kernel-based IPSec. If OpenVPN crashes, it won’t take the rest of the system
with it. And its biggest asset on the plus side is that it is easy to configure.
However, it is not available in the base CentOS repositories. OpenVPN is available
in the RPMforge (http://rpmforge.net/) and in the Extra Packages for Enterprise Linux
(EPEL, http://fedoraproject.org/wiki/EPEL) repositories, so if you have one of those two
configured, just use it. In this section, the EPEL repository is preferred, because it has
some accessories that aren’t available in RPMforge. If you haven’t configured the EPEL
repository, install the epel-release package: http://fedoraproject.org/wiki/EPEL.
rpm -Uvh http://download.fedora.redhat.com/pub/epel ➥
/5/i386/epel-release-5-3.noarch.rpm
This will set up everything needed to install packages from the EPEL repository:
yum install openvpn
For installing this package, Yum requires a GPG key to check that the package is
signed correctly. You will be asked if it is OK to install the key with the key ID 0x217521F6.
Respond with y to that.
It’s time to configure OpenVPN! OK, let’s poke a hole in the firewall first. OpenVPN
operates over one UDP port on the server side. The IANA assigned port 1194 is for
OpenVPN traffic, so check /etc/services.
nNote Why UDP? Encapsulating TCP sessions into other TCP sessions is a bad idea, because both lay-
ers—the inner and the outer one—check for correct network transmissions, try to reget packets they have
lost, and so on. If the outer layer has problems with connectivity, the inner layer also will. Then both layers
will try to work their magic, which normally leads to connection loss or at least slows down the connection.
UDP doesn’t check for that; it is a stateless “fire-and-forget” protocol. So, it makes sense to encapsulate TCP
packets in a UDP tunnel—only the inner protocol will check for correct transmissions. The outer layer does
not care. You can use OpenVPN with TCP for the tunnel, but this configuration is not advisable.
CHAPTER 10 n SETTING UP VIRTUAL PRIVATE NETWORKS 237
To open port 1194, you can use lokkit:
[root@centos ~]# lokkit -q -p 1194:udp
[root@centos ~]# iptables -L | grep open
ACCEPT udp -- anywhere anywhere state NEW udp dpt:openvpn
[root@centos ~]#
There will be only one OpenVPN daemon listening on that port, even with many cli-
ents connecting to it.
Looking at an Example
In this section, we will use the following scenario: say you have a LAN at home, with a
router in front of it. This router will become the endpoint for all OpenVPN sessions into
your LAN. Your LAN has the network 10.0.3.0/24, and your router has the IP address
10.0.3.254 in this LAN. The public IP address of your router is 192.168.1.104. The other
machine with which you will connect to the VPN is your trusty old laptop, which runs
CentOS 5 as the operating system. For OpenVPN’s TUN interface, we will use the network
10.10.10.0/24, which needs to be a network that is not in use on either side of the tunnel.
Figure 10-4 shows this scenario.
Internet
OpenVPN Tunnel
10.10.10.0/24
10.0.3.0/24
tun0
10.10.10.5
tun0
10.10.10.1
192.168.1.104 10.0.3.254
LAN Gateway
Official IP Address
Figure 10-4. A VPN done with OpenVPN
Although OpenVPN can work with preshared keys, just like IPSec earlier, this time
you will use X.509 certificates to manage authentication
Using X.509 certificates means that you need a public key infrastructure (PKI) for
managing, signing, and checking these certificates. The easiest PKI would be using
OpenSSL for creating a certificate authority (CA), for certificate requests, and for certifi-
cate creation. This can be a tedious task, and because of that, most administrators write
scripts for that.

CHAPTER 10 n SETTING UP VIRTUAL PRIVATE NETWORKS
238
OpenVPN brings a set of scripts with it, which can be used to manage certificates
very easily. The openvpn package installs those in /usr/share/openvpn/easy-rsa. You should
copy those scripts to /etc/openvpn in case a package update accidentally overwrites those
files:
[root@centos ~]# cd /etc/openvpn/
[root@centos openvpn]# cp -a /usr/share/openvpn/easy-rsa .
Now edit the vars file, because that defines a set of basic variables and shouldn’t
change. You can find the vars file in /etc/openvpn/easy-rsa/2.0. At least change the
settings on the last five lines:
export KEY_COUNTRY="DE"
export KEY_PROVINCE="Bayern"
export KEY_CITY="Muenchen"
export KEY_ORG="Unorganized Inc."
export KEY_EMAIL="ralph@example.com"
Depending on whether you set this up for your private use or for corporate use,
you might also want to look at KEY_EXPIRE, which is set to ten years, and at the KEY_SIZE,
which is set to 1024 bits. You can set this to 2048 bits if you are as paranoid as me. These
variables have to be exported to your current shell, and the other programs you need to
create certificates depend on them:
[root@centos 2.0]# source ./vars
NOTE: If you run ./clean-all, I will be doing a rm -rf on ➥
/etc/openvpn/easy-rsa/2.0/keys
[root@centos 2.0]#
Because you don’t have any keys yet or want to get rid of keys that you might have
created while doing tests, run the following command now:
[root@centos 2.0]# ./clean-all
[root@centos 2.0]#
This removes all keys and sets up an index and a file with serial numbers in the keys/
subdirectory. Next build the certificate authority.
nNote Chapter 5 also talks about creating SSL certificates, using OpenSSL to do so. The approach here
uses the same techniques, and the resulting certificates behave the same. We are using the scripts provided
by the OpenVPN package for ease of use here; you can create those certificates any way you like.
CHAPTER 10 n SETTING UP VIRTUAL PRIVATE NETWORKS 239
[root@centos 2.0]# ./build-ca
Generating a 2048 bit RSA private key
..............................+++
.....................................................+++
writing new private key to 'ca.key'
[…]
Organization Name (eg, company) [Unorganized Inc.]:
Organizational Unit Name (eg, section) []:
Common Name (eg, your name or your server's hostname) [Unorganized Inc. CA]:
Name []:
Email Address [ralph@example.com]:
[root@centos 2.0]#
This creates the files ca.crt and ca.key in the keys/ subdirectory, which are the certifi-
cate for your CA and the appropriate key, respectively. As you can see, it uses the settings
you entered into the vars file. Now that you have a certificate authority, you can create a
certificate for the server. This certificate is needed so that the client can check whether the
OpenVPN server really is the machine it purports to be. There are three questions you have
to answer. When the script asks for the common name, enter server. When it asks whether
you want to sign the certificate, answer y. Enter y after the 1 out of 1 certificate requests
certified, commit? [y/n] prompt as well.
[root@centos 2.0]# ./build-key-server server
Generating a 2048 bit RSA private key
[…]
Common Name (eg, your name or your server's hostname) [server]:server
[…]
Sign the certificate? [y/n]:y
[…]
1 out of 1 certificate requests certified, commit? [y/n]y
[...]
The rest of the values are taken from the vars file again. This leaves a server.crt and a
server.key in the keys/ subdirectory. The number in the serial file has been incremented,
and in the index file you will find an entry for the certificate you have just created.
Now it is time to generate a certificate for the client. There’s a script for that, too. You
have to call this script for every client that should be accessing the VPN. Remember to
give each client a unique name. You can go with “client1,” “client2,” and so on, or just use
their (ideally) unique hostnames. Any way you do it, you should keep a file somewhere in
which you record each host or person you created a certificate for. Again, answer y when
you are asked whether you want to sign the certificate and when the script asks for com-
mitting the request. As you can see, the name you gave to the script on the command line
ends up in the Common Name entry:
CHAPTER 10 n SETTING UP VIRTUAL PRIVATE NETWORKS
240
[root@centos 2.0]# ./build-key client1
Generating a 2048 bit RSA private key
.......+++
[…]
Common Name (eg, your name or your server's hostname) [client1]:
[…]
Sign the certificate? [y/n]:y
[…]
1 out of 1 certificate requests certified, commit? [y/n]y
The last thing to do is to generate some Diffie-Hellman parameters, which are needed
for the key exchange between the client and server. This is the same as with IPSec; the cli-
ent and the server do authentication with a public key encryption method, and the actual
encryption of the packets in the tunnel is then done with a symmetric key that both sides
negotiate from time to time. Public key encryption could be done for encryption, too, but
symmetric encryption is much faster than its public key counterpart.
[root@centos 2.0]# ./build-dh
Generating DH parameters, 2048 bit long safe prime, generator 2
This is going to take a long time
........+..................................................
[it will]
[root@centos 2.0]#
Let’s take a look at the keys/ directory now. The ca.crt file is needed on all machines,
clients and server, so they can check the identity of each other. The client files are needed
only on the clients, while the server files are needed on the server, as is dh2048.pem. The
rest of the files in there are administrative files that the CA scripts need to work. Now
would be a good time to put the contents of keys/ into your backup plan.
If you need to revoke a key for a client, there are scripts, too. You should read the
README file in /etc/openvpn/easy-rsa/2.0 for more information on the rest of the scripts.
Configuring the Server Side
It is time now to configure the server side of your VPN. There is an example config file in
/usr/share/doc/openvpn-2.1/sample-config-files/, called server.conf. You can copy that
to /etc/openvpn, or you can just start a new config file and use that as a reference. Let’s
begin with a fresh one. Copy ca.crt, server.crt, dh2048.pem, and server.key to /etc/
openvpn or use the respective places in /etc/pki; then you need to rename those files.
Open your editor, and create /etc/openvpn/server.conf. You can call the file any way you
want; it just needs to end in .conf.

CHAPTER 10 n SETTING UP VIRTUAL PRIVATE NETWORKS 241
nCaution If you leave a second .conf file in /etc/openvpn/, the init script will try to start another
instance of OpenVPN with that file.
# listen on the public interface
local 192.168.1.104
port 1194
proto udp
# use a TUNnel interface
dev tun
# X.509 certificates
ca ca.crt
cert server.crt
key server.key # chmod 0600 server.key
dh dh2048.pem
# This is the network for the tunnels
server 10.10.10.0 255.255.255.0
# keep a list of client->IP address records
ifconfig-pool-persist ipp.txt
# Push routes to the client
push "route 10.0.3.0 255.255.255.0"
# Enable compression on the VPN link.
comp-lzo
# drop privileges
user openvpn
group openvpn
persist-key
persist-tun
# Status file
status openvpn-status.log
verb 3
A few directives might need explanation. push "route 10.0.3.0 255.255.255.0" sets a
route on the client that points into the network of your LAN. You need to make sure that
there is a route back to the network that the tunnels are in from your LAN. This should
happen automatically on the router once the TUN interface comes up. comp-lzo enables
compression on the link, which can make the connection faster. You need to set this
on the client, too. user openvpn, group openvpn, and the two persist lines tell the openvpn
daemon to drop privileges after starting. The persist lines are there because the daemon
cannot change network interfaces or read keys anymore after it has dropped privileges.

CHAPTER 10 n SETTING UP VIRTUAL PRIVATE NETWORKS
242
Try to start the server with the following:
service openvpn start
This should create a new TUN interface on your computer with an IP address from
the network you defined in the server configuration:
tun0 Link encap:UNSPEC HWaddr 00-00-00-00-*
inet addr:10.10.10.1 P-t-P:10.10.10.2 Mask:255.255.255.255
UP POINTOPOINT RUNNING NOARP MULTICAST MTU:1500 Metric:1
Once you have everything configured correctly, make sure that openvpn starts when
the machine boots:
chkconfig openvpn on
Configuring the Client
Install the openvpn package first if you haven’t already done so. Again, there is a sample
configuration file for client configuration in the documentation for OpenVPN. But first
you need to copy over ca.crt, client1.crt, and client1.key to your laptop’s /etc/openvpn/
directory.
nNote When you are giving out certificates to many people, you need to find a way to do this securely.
There are several ways to do that. If every user has a home directory on your server and can reach this via
SSH, put the certificates there. You can also use encrypted mail to send out the certificates or think about
putting them behind password-protected HTTPS links.
Start with a fresh client configuration file, called client.conf:
client
dev tun
proto udp
# The server
remote 192.168.1.104 1194
# Try to resolve the remote infinitely
resolv-retry infinite
nobind
user openvpn
CHAPTER 10 n SETTING UP VIRTUAL PRIVATE NETWORKS 243
group openvpn
persist-key
persist-tun
# SSL parameters
ca ca.crt
cert client1.crt
key client1.key
#verify the server
ns-cert-type server
comp-lzo
Most parameters are the same as the ones on the server side. Note that there is no
mention of the LAN’s network parameters—these will get pushed by the server to the cli-
ent side. The ns-cert-type server entry protects against a potential man-in-the-middle
attack; see http://openvpn.net/howto.html#mitm for an in-depth discussion.
To start the client, just run the following:
openvpn /etc/openvpn/client.conf &
and you should see this output:
[root@client openvpn]# openvpn /etc/openvpn/client.conf
[…]
Sat Apr 4 11:37:39 2009 UDPv4 link remote: 192.168.1.104:1194
Sat Apr 4 11:37:39 2009 [server] Peer Connection Initiated with 192.168.1.104:1194
Sat Apr 4 11:37:41 2009 TUN/TAP device tun0 opened
Sat Apr 4 11:37:41 2009 /sbin/ip link set dev tun0 up mtu 1500
Sat Apr 4 11:37:41 2009 /sbin/ip addr add dev tun0 local 10.10.10.6 peer 10.10.10.5
Sat Apr 4 11:37:41 2009 GID set to openvpn
Sat Apr 4 11:37:41 2009 UID set to openvpn
Sat Apr 4 11:37:41 2009 Initialization Sequence Completed
There is a TUN interface now, and there’s a route set to the network of your LAN at
home:
[root@client ~]# ip addr show tun0
6: tun0: <POINTOPOINT,MULTICAST,NOARP,UP,LOWER_UP> mtu 1500 ➥
qdisc pfifo_fast qlen 100
link/[65534]
inet 10.10.10.6 peer 10.10.10.5/32 scope global tun0
[root@client ~]# ip route show 10.0.3.0/24
10.0.3.0/24 via 10.10.10.5 dev tun0
CHAPTER 10 n SETTING UP VIRTUAL PRIVATE NETWORKS
244
You should now be able to ping the gateway or any of the other machines in your
LAN from your laptop. Hey, your VPN works!
Some Security Considerations
If you look closely at the routing table of your computer, you will see that only traffic
between your laptop and your LAN will go through the VPN tunnel. All other traffic is still
routed through your default gateway to the Internet. This might be no problem if you just
want to use the tunnel for connecting to your private LAN at home, because you need
some files from there or need to use the web server in your LAN. When setting up a VPN
for an enterprise, this might be a violation of its security policy, because it might require
outgoing traffic to go through a corporate proxy, for example.
In a case like this, you want the default route to also point to the VPN tunnel you just
built. You have seen that the route to your LAN gets pushed to the client by the OpenVPN
server. OpenVPN can do the same for the default route. The following line in the configu-
ration on the server side will take care of that:
push "redirect-gateway def1"
This opens up a problem, though. When you connect your laptop to the Internet, it
normally receives the name server setup from the Internet service provider you connect
to. When you redirect the default gateway so that all traffic goes through the VPN, you
probably will not be able to reach those DNS servers. OpenVPN can take care of that, but
you need to add the following to the server-side configuration:
push "dhcp-option DNS 10.0.3.2"
Replace 10.0.3.2 with the IP address of the DNS server in your LAN. If you use
Windows on your laptop to connect via OpenVPN, this will set the DNS information auto-
matically. On a CentOS client some scripting is required to do that. Add the following two
lines to your client.conf:
up setdns.sh
script-security 2
script-security 2 allows openvpn to execute scripts, and up sets the script that is run
after the tunnel is created, which is setdns.sh in this case. Then create this script in /etc/
openvpn on the client:
#!/bin/bash
dns=empty
#save old configuration
CHAPTER 10 n SETTING UP VIRTUAL PRIVATE NETWORKS 245
cp /etc/resolv.conf /etc/resolv.conf.orig
# pushed options are in $foreign_options_1 to
# $foreign_options_x, so cycle through them.
for option in ${!foreign_option_*}
do
# Match $option for "dhcp-option DNS" and return
# the remaining of the line which is the nameserver's
# IP address. If no match returns, $dns equals "empty".
eval "dns=\${$option#dhcp-option DNS }"
if [ "$dns" != "empty" ]
then
cat >/etc/resolv.conf <<EOF
nameserver $dns
EOF
exit 0
fi
done
Make the script executable. You could also set a down script, which copies back the
saved DNS configuration, but that doesn’t work the way you configured openvpn. Because
the process is dropping privileges as soon as possible, this script would be run as the user
openvpn, which is not allowed to write in the /etc/ directory.
Now it is time to restart the openvpn client. Your resolver configuration should look
like this:
[root@client ~]# cat /etc/resolv.conf
nameserver 10.0.3.2
[root@client ~]#
You also should be seeing a new default route through your TUN device. The old
default gateway is preserved, but no packets will ever reach that route:
[root@client ~]# route -n
Kernel IP routing table
Destination Gateway Genmask Flags Metric Ref Use Iface
[...]
0.0.0.0 10.10.10.5 128.0.0.0 UG 0 0 0 tun0
128.0.0.0 10.10.10.5 128.0.0.0 UG 0 0 0 tun0
0.0.0.0 172.16.170.2 0.0.0.0 UG 0 0 0 eth0
When the openvpn daemon stops, these two routes will be deleted, so the old default
route works again. You have to manually copy over the old resolver config, though.

CHAPTER 10 n SETTING UP VIRTUAL PRIVATE NETWORKS
246
Doing It the Even Easier Way
If you are running CentOS 5 on your laptop, chances are good that you are running Net-
workManager for connection management. NetworkManager lets you connect to wireless
networks, remembers networks you have already visited, keeps passwords in a password
store, and so on. Several extensions are available for NetworkManager; one of them is an
extension to create and manage OpenVPN connections. Make sure that the EPEL reposi-
tory is enabled, and use Yum to install the extension:
yum install NetworkManager-openvpn
nTip If you are using your laptop to go places and have to connect to different networks during the day or
week, you should be running NetworkManager, because it makes connection management much easier. To
launch it, run service NetworkManager start. If you are running GNOME, a new icon should pop up in
the notification area. If you like NetworkManager, make sure that you use chkconfig NetworkManager on
to start it when the computer boots.
You might need to restart NetworkManager after you install the OpenVPN extension.
To use OpenVPN, click the NetworkManager icon, and select VPN Connections ➤ Con-
figure VPN. Copy ca.crt, client1.crt, and client1.key to your user’s home directory, and
make them readable for the user. Click the Add button to create a new VPN connection.
When asked to choose a VPN connection type, select OpenVPN, and click Create.
Type your gateway—either name or IP address—into the first field (see Figure 10-5).
Use the buttons to select your client certificate, your client key, and your CA certificate.
If your client key has a password, which it doesn’t by default, you can enter it here. Now
click the Advanced button.
As you configured LZO data compression on the server side, you should also config-
ure it here (Figure 10-6). Click OK after you select this box. Now select the IPv4 tab (see
Figure 10-7). Leave Method at Automatic (VPN), or select it if it is different from that. This
setting provides for automatically changing everything the server side pushes to the cli-
ent. If you didn’t change your server-side configuration, NetworkManager takes care of
changing /etc/resolv.conf and sets your default route through the VPN tunnel. There’s
no fiddling with scripts on the client side.
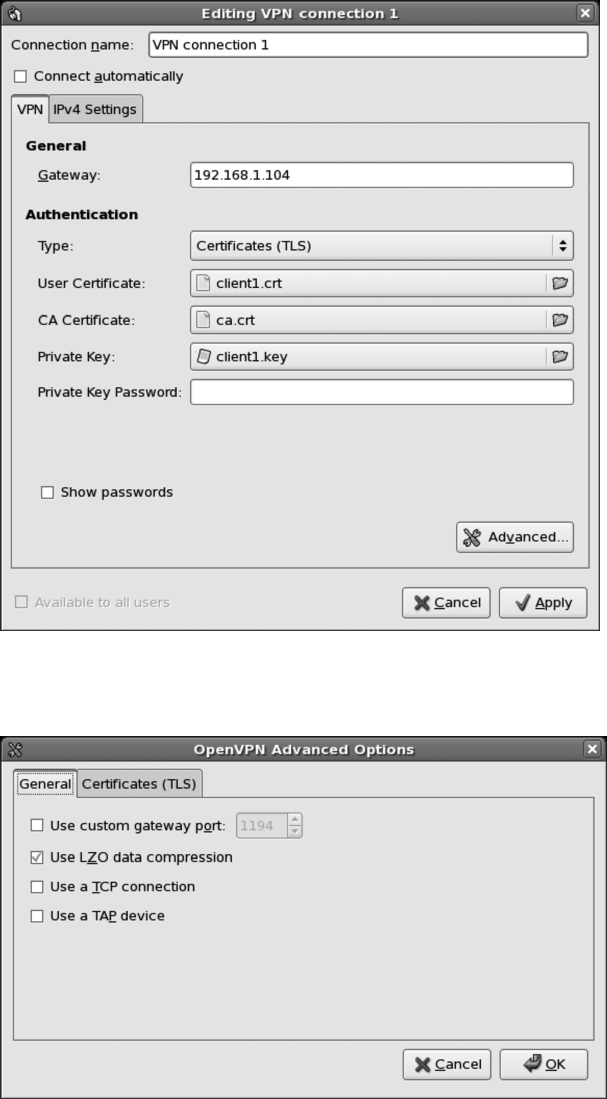
CHAPTER 10 n SETTING UP VIRTUAL PRIVATE NETWORKS 247
Figure 10-5. Configuring authentication
Figure 10-6. Select LZO data compression

CHAPTER 10 n SETTING UP VIRTUAL PRIVATE NETWORKS
248
Figure 10-7. IPv4 settings
Click OK after this, and close all configuration windows. Now click the NetworkMan-
ager button, and choose VPN Connections ➤ VPN Connection 1.
After a short while, you will see that the NetworkManager icon changes and now con-
tains a lock. This means that you are connected to the VPN server. Check your resolver
config and your routing table to see that NetworkManager took care of all changes.
OpenVPN can do a lot more than could be covered here—we could write a complete
book about it (and someone probably already has). There is very good documentation
available at the OpenVPN web site at http://openvpn.org/, and there is a mailing list if you
have questions. Configuration gets a bit more complex if you connect two company sites
with each other. But generally OpenVPN is the Swiss Army knife of VPN solutions, espe-
cially because it is available for many platforms.
CHAPTER 10 n SETTING UP VIRTUAL PRIVATE NETWORKS 249
There are a lot more VPN solutions than the three we covered in this chapter. There
is VTun (http://vtun.sourceforge.net/), for example, and we already talked about Open-
Swan being another IPSec solution that is included in CentOS. There are commercial
VPN solutions, such as the VPNC software by Cisco—for which a NetworkManager exten-
sion is available. People use the Point-To-Point-Tunneling Protocol (PPTP), and there is
also Layer 2 Tunneling Protocol (L2TP).
Summary
In this chapter, you learned what a VPN is. You learned how to set up VPNs with SSH,
with IPSec, and with OpenVPN. You now know when to deploy an SSH VPN and when a
VPN with IPSec or OpenVPN is preferable over the SSH solution. We covered using shared
secrets for VPNs and how to use SSL certificates for OpenVPN solutions. We also looked
into integrating OpenVPN into your desktop by using NetworkManager.
The next chapter is about core builds, which is a way of installing and setting up
CentOS servers without user intervention.

PART 3
Enterprise Features
Although CentOS does have many features that Linux users have come to expect, it also has
some features that set it apart as an enterprise operating system. These features include a
core builds system for customizing and automating installs, high availability, and tools for
system and network monitoring.

253
CHAPTER 11
Using Core Builds
This chapter will be of most use to you if you have had the pleasure of building multiple
servers. We cannot recall the number of times we’ve looked at a customer install checklist
that was a good ten pages long. Every time a server is built, this checklist is followed step-
by-step, and each piece of software is copied over and then installed by hand. Apart from
being extremely time-consuming and error prone, it’s a thankless task. If you get it right,
then what’s the big deal? You had step-by-step instructions, and it’s not that hard. If you
get it wrong or miss a single item on that list from hell, you’re not going to hear the end of
it. The best-case scenario is going back through the same list trying to figure out which bit
you missed. Surely, there has to be a better way.
What Are Core Builds?
Core builds are a great way to install your CentOS systems. In short, they are usually a
customized install media (usually a DVD) that contains additional scripts and software
packages that build a machine to a particular specification. This is considerably better
than using imaging products (such as Partimage or Symantec Ghost) because they take a
byte-for-byte copy of a server’s hard disk. This makes it much more difficult (sometimes
impossible) to restore onto a machine that has different hardware. It also requires one
server image to be maintained for each type of server that you build. For example, you
may have a standard build for your web servers and a different build for a database or an
application server. These different builds may have only subtle changes between them,
such as including a package here or taking away a package there. But they can also be
completely different, having nothing in common with each other.
A core build at its most basic is a standard CentOS DVD image with an Anaconda
kickstart file. A kickstart file is a text file containing instructions to Anaconda, the CentOS
installer. Instructions vary, including how to lay out the hard disk, which keyboard to
install, and what to set the root password to. It also has provisions for selecting packages
and package groups that you want to install. This is effectively a way to preprogram the
answers that you would normally give during the install process. If you’re coming from
a Windows background, the equivalent would be the answer file. If this were all that
CHAPTER 11 ■ USING CORE BUILDS
254
you could do, core builds would still be very useful. They’d boot from DVD, install, and
reboot, and you’d have a machine ready to customize. But wait! There’s more!
What makes the kickstart file so powerful is that you can embed scripts at key stages
of the install process. This means that you can automate a lot of the work that you’d nor-
mally do by hand and have the installer run all of those steps for you. You’ll want to do
most of the work after the install has completed, and here Anaconda does not disappoint.
At this stage you have access to everything on your freshly installed machine. You can
download files from another server, restore files from a backup, or do anything else that
has the potential to be scripted.
What Can’t Core Builds Do?
Part of the beauty of a core build is that it’s a fully automated process. That means
that software that requires manual intervention (such as installing the Sun JDK, which
requires you to accept a license agreement) is not really a good fit. There are also times
when you simply have to provide network information. For example, if you are starting
a network install but the network does not provide DHCP, you will need a way to specify
your IP address and so forth. These can all be circumvented, though. For example, when
installing Java, it is possible to find all the related files on a freshly installed system, put
them in a TAR archive, and then use the archive to automatically install it in your core
build. For the network details, you can provide a script for Anaconda to run right at the
beginning of the install process. This means you can enter information, save it to a text
file, and pull it back in again at a later time for use in your scripts.
So, the only thing core builds cannot do are things that really do require human
interaction. If you do have a tool that simply has to be done by hand, perhaps you can still
benefit from a core build by automating as much of the process as possible. For instance,
the core build could set the machine up and copy the install software for the program
over. That way, all you have to do is actually run the installer rather than going through
the whole setup process.
Why Create a Core Build?
Core builds save time. Once you have a core build, you can kickstart ten or more servers,
and they will all install themselves to perfection. You won’t need to do anything or at the
most very little. You will also be able to ensure that your server configuration is repro-
ducible. They will all have been built from the same scripts, so you can rest assured that
nothing has been forgotten. It’s also a great way to document your systems. What better
documentation can you have than the script that actually builds the machine?

CHAPTER 11 ■ USING CORE BUILDS 255
What Are Kickstart Files?
As mentioned, a kickstart file is a simple text file that Anaconda uses to determine how
it should install a system. We will show the inside of a kickstart file in a moment, but
first we’ll discuss something very important. Few people who create their own kickstart
files do so by hand. When you complete a new system install, as part of the final cleanup
Anaconda creates a kickstart file based on your selections during the install and places it
in the root home directory (/root). This means that if you need to build a new system, by
far the easiest way is to start by installing the system normally first and then hacking the
kickstart file that Anaconda comes up with.
■Note There are lots of funky things you can do with Anaconda and kickstart files. Fortunately, you can
find a complete online manual available at http://www.centos.org/docs/5/html/Installation_
Guide-en-US/ch-kickstart2.html.
Anatomy of a Kickstart File
A kickstart file has a natural order that most people tend to follow. Most are created from
the automatically generated file provided by Anaconda, so this isn’t particularly surprising,
but you might come across some kickstart files “in the wild” that don’t follow this format
for some reason. They will usually still work without any trouble, but if you’re creating
your own, it makes sense to follow the Anaconda standard.
The first part of the kickstart file is called the command section. This is where the
options for the install itself are set. Some are just keywords such as install or upgrade.
Others take options and parameters such as selinux --enforcing. Anything that starts
with a # character is a comment and will be ignored by Anaconda. If the kickstart file
doesn’t contain the information that Anaconda needs during the install, it will prompt
the user for it.
■Note When doing a network install (an install that pulls the CentOS packages from a network resource
rather than from a CD or DVD), if IP address details weren’t specified, Anaconda will attempt to request
an IP address via DHCP. In previous versions of CentOS, if the DHCP request failed, the end user would be
prompted for the network details. In the current version, however, Anaconda’s behavior has been modified so
that instead of prompting for details, the install simply fails. There is a workaround for this, which we’ll cover
in the “network” section of this chapter.
CHAPTER 11 ■ USING CORE BUILDS
256
The second section is the packages section. This is where all the packages you want
to install (and in many cases omit) should go. Although you can (and probably will) end
up tweaking this by hand, it’s much easier to do the hard work in the graphical installer
because you’ll be able to simply select check boxes and let Anaconda worry about writing
out all the details. One thing to be wary of is that if you remove a package that another
package depends on, Anaconda will install the package regardless. This is because, unlike
in previous versions of CentOS where you had to explicitly tell Anaconda to resolve
dependencies with the --resolvedeps option, in CentOS 5 Anaconda will resolve depen-
dencies automatically.
The third section is where you place %pre and %post scripts. The %pre script is executed
as soon as the kickstart file has been read by Anaconda. You can access the network at
this stage, but you won’t be able to use DNS to look up names because the name resolver
hasn’t been configured yet. This section is especially useful for checking hardware or
configuring things in advance of the main install. For example, you could provide net-
work configuration information or supply details for partitioning a hard disk. The %post
script does the opposite of the %pre script. Once the system is fully installed (and before a
reboot), the %post script will be executed. More important, though, is that this script will
be executed from the perspective of the installed machine as if you were working on a
live system. The %post section has a neat little option called --nochroot. This allows you to
execute scripts from the perspective of the installer. This is really handy because it allows
you to copy files from the source media onto the new server. When using this option,
most people will copy or set things up and then run the %post section. This allows you to
do some setup before you finalize your install.
The Command Section
In Chapter 2 we showed how to install a server with a few basic options. As you now know,
Anaconda will have stored those settings for us in a kickstart file for future use. You can
find this file here:
/root/anaconda-ks.cfg
Our kickstart file will probably look at least a little different from yours. For a start,
our time zone is set to Hong Kong, and we’re using a British keyboard layout. Here is the
command section of the kickstart file that Anaconda created:
# Kickstart file automatically generated by anaconda.
install
cdrom
lang en_US.UTF-8
keyboard uk
xconfig --startxonboot
CHAPTER 11 ■ USING CORE BUILDS 257
network --device eth0 --bootproto dhcp --hostname centos
rootpw --iscrypted $1$wAUSiwsP$k..saSPrjzcW77FwDgUpe/
firewall --enabled --port=22:tcp
authconfig --enableshadow --enablemd5
selinux --enforcing
timezone --utc Asia/Hong_Kong
bootloader --location=mbr --driveorder=hda --append="rhgb quiet"
# The following is the partition information you requested
# Note that any partitions you deleted are not expressed
# here so unless you clear all partitions first, this is
# not guaranteed to work
#clearpart --linux --drives=hda
#part /boot --fstype ext3 --size=100 --ondisk=hda
#part pv.2 --size=0 --grow --ondisk=hda
#volgroup VolGroup00 --pesize=32768 pv.2
#logvol swap --fstype swap --name=LogVol01 --vgname=VolGroup00 --size=256 \
--grow --maxsize=512
#logvol / --fstype ext3 --name=LogVol00 --vgname=VolGroup00 --size=1024 --grow
The first line starts with a #, so it is a comment that’s ignored by Anaconda. The
last part of the command section is also commented out, but we will return to that in
a moment. We will give an overview of each of the options used in the command
section. The majority of them are straightforward and don’t require much in the way
of explanation.
install
This tells Anaconda that the kickstart should be used to install a machine. Alternatively,
you could have requested an upgrade, but the requirements for an upgrade kickstart file
are slightly different from ones used for installation. Fortunately, the upgrade kickstart is a
lot simpler; for example, it doesn’t have a %packages section to worry about.
cdrom
This tells Anaconda that you want to source the packages from a CD or DVD. You actu-
ally have quite a few options here because you can also install CentOS (well, at least fetch
the packages) from NFS, FTP, or HTTP. By far the most common are CD/DVD-based and
HTTP-based network installs. This is probably because they are the simplest to use, very
easy to set up, and work well in most computing environments. We will focus on these
two install methods when we look at how we can source our kickstart files and source
files from the network.
CHAPTER 11 ■ USING CORE BUILDS
258
lang
This option sets the language that you want your system to use. There are plenty of lan-
guages to choose from, but you must make sure that you get the language precisely as it
is used in CentOS. By far the easiest way to do this is to make sure that your language of
choice is picked when you do your initial install. That way, Anaconda will have recorded
your choice in the correct format, and you won’t need to make any changes.
keyboard
This one is nice and easy. Simply tell CentOS which keyboard layout should be used by
the system. Again, you must make sure that you use the same name as used internally by
CentOS, and again the easiest way to set this is during the install. If you configured your
server the way you wanted it during the initial install, you’ll probably find that both the
keyboard and language are already correctly set up.
xconfig
This option allows you to specify whether you want the graphical interface (X) to start on
boot. This is really down to personal taste. On one hand, having the full graphical inter-
face available is quite nice, and you can log in and work on the server as you would any
other machine. However, some people are adamant that this takes up too much in the
way of resources that could instead be used to service requests. If your server is going to
be sitting in a data center somewhere or if at least the monitor, keyboard, and mouse are
going to be plugged into your desktop rather than the server, there’s probably little point
starting X when the server initially boots. You can always start it on demand if need be.
network
The network option allows you to specify how CentOS should configure your network
card(s). You can choose automatic configuration through either DHCP or BOOTP, or you
can specify the IP address manually. One thing to watch out for here, unless you have
created a kickstart file for each server or you have a dedicated build environment, is that
chances are you don’t want to assign each server the same address. Otherwise, especially
for servers in situ, when they are rebooted for the first time, they will conflict with the
other server, and this could lead to all sorts of strange network-related errors that may not
obviously point to an IP address conflict.
You have a couple of options here. As already mentioned, you can create customized
kickstart files for each server and then hard-code the IP address into them. This isn’t too
bad if you have only a handful of services, but it will become unmanageable quite quickly
CHAPTER 11 ■ USING CORE BUILDS 259
if you have more than that. You could also use DHCP to assign the IP address initially and
then on reboot configure the IP address by hand. This one requires manual intervention
after the install but is probably the most common method of setting the IP address. If
neither of those takes your fancy, you can of course do anything you like in a script in the
%post section. This could involve looking up the IP address on a remote server or anything
else that you come up with. The network configuration tool that comes with CentOS does
accept command-line arguments, so it is possible to script this quite happily. Of course,
for this to work, the server would need some form of network connectivity to start with,
either a fixed IP that all machines being built use (although that really restricts you to
building one machine at a time) or ideally DHCP.
rootpw
This is another straightforward option. This allows you to specify the password that
should be used for the root account. It can be stored either in plain text or encrypted.
Obviously, plain text isn’t recommended, because it means that anyone who can see the
kickstart file can see the password.
firewall
This is a very flexible option, and it allows you to configure a basic firewall very easily.
Some of the key services such as SSH and HTTP are available as shorthand options. Oth-
ers will need to be specified manually, but that’s easy enough to do. As before, if you have
set this up during the install, this section will already be configured the way you want it.
authconfig
This command sets the various options for authentication. The standard (and hence
the default) is to enable shadow passwords and use MD5 encryption. You can also set
any network authentication services such as Kerberos or enable LDAP support for user
information.
selinux
Deciding whether to use SELinux still comes down to personal taste. For the most
part, it works very well and provides an additional layer of security for your server.
Generally speaking, all the software that comes as part of the CentOS distribution will
work as expected. Third-party software, though, sometimes has trouble with SELinux.
Because of the security benefits, you’re encouraged to use SELinux in enforcing mode,

CHAPTER 11 ■ USING CORE BUILDS
260
but permissive mode is still beneficial because it highlights any potential problems even
though it doesn’t act on them. This option can either enable SELinux (enforcing), disable
it (disabled), or run it in permissive mode (permissive).
If at all possible, you should choose selinux --enforcing.
■Caution Disabling SELinux at this stage will make it extremely difficult to get it to work properly after the
system is installed because of missing file contexts. If you really don’t want to use SELinux, you should install
the system with it enabled, and then switch it to permissive later. This will make switching later between
permissive and enforcing possible.
timezone
This option does exactly what it says on the tin. This sets the default time zone for your
server. In our case, the time zone is set to Hong Kong, and the internal clock is set to UTC.
The recommended practice is that all servers be set to UTC for their base clocks and then
use timezone to determine what time they should actually use for logs and so forth. This is
especially useful on Internet-facing servers where you will need to easily convert between
different time zones such as with web applications and localized “last login time.” For
day-to-day use, this doesn’t make an awful lot of difference, so most people follow the
recommended practice. You need to pick from a list of available time zones, which you
can find under /usr/share/zoneinfo. For example, the time zone for Hong Kong is Asia/
Hong_Kong.
bootloader
This tells Anaconda where you want the boot loader to be installed. Normally it is installed
in the master boot record (MBR) of the first bootable device. In our example, the server has
IDE hard disks, which is why the disk is referred to as hd. On newer systems that use SCSI,
SAS, or SATA drives, the disks will show up as sd. This is just the way CentOS differentiates
between the disks and doesn’t affect how the disks themselves are used.
■Note Make sure that you get this setting right, because without it, the server will not be able to boot after
the installer reboots the machine. If you aren’t sure what to set this to, try completing a manual install on the
machine and take a look at what Anaconda set this to.

CHAPTER 11 ■ USING CORE BUILDS 261
part
This section, the disk partitioning section, is commented out by default in automatically
generated kickstart files. This is because, depending on what’s on the machine before you
do the install, this configuration may or may not work. Generally speaking, going through
the hassle of defining individual disks is not worth it unless you have a specific need to
create partitions of a particular size or you have a corporate standard to which you need
to adhere. A far easier way to do this is to use the autopart option, which like the initial
installer sets up the system with a large root partition (at least 1GB), swap space, and the
relevant boot partition. This is generally fine for most servers, but if you need anything
specific or more complicated (such as software RAID), you will find it far easier to create
the partitions through the graphical installer and then use what Anaconda provides.
■Caution One thing worth mentioning is the clearpart option. Be very, very careful with this! People
have been known to accidentally wipe all of the partitions on their SAN or external USB disk by telling Ana-
conda to clear all the partitions. We know of one company that did this and lost its entire Oracle RAC system.
Be warned, it can and has happened before. If you want to be on the safe side, you can do what we do, and
that is physically remove any devices that you aren’t willing to see wiped clean. This may require a bit more
work when you hook them back up after the install, but at least you won’t accidentally install on the wrong
disk.
%packages Section
Here is an excerpt from our kickstart file:
%packages
@office
@editors
@text-internet
@virtualization
@legacy-network-server
@dns-server
@gnome-desktop
@dialup
@core
@base
@ftp-server
CHAPTER 11 ■ USING CORE BUILDS
262
@network-server
@games
@base-x
@graphics
@web-server
@smb-server
@printing
@mail-server
@server-cfg
@sound-and-video
@news-server
@graphical-internet
bridge-utils
device-mapper-multipath
vnc-server
xorg-x11-server-Xnest
libsane-hpaio
-sysreport
This section is vital for the install (although ignored completely if present during an
upgrade) because it defines what exactly Anaconda should install on your server. This is
the entire package list that was generated based on the installation we did in Chapter 2.
Don’t worry if yours is slightly different, because there may be packages required for our
system (such as hardware support) that your machine doesn’t need.
Every entry in this list must resolve to either a known package group or a package
name. If you include packages or groups that don’t exist, Anaconda will halt the install
and complain about unknown packages. The easiest way to install third-party packages is
to do so during the %post section, although it is possible to customize comps.xml where the
packaging information is stored. This is generally avoided because it tends to be a lot of
effort getting it to work and will need updating again for the next CentOS release.
Package groups all start with an @. These groups are broadly defined based on the
functionality that they provide. For example, @virtualization provides all the packages
needed for virtualization support. This saves you having to figure out what packages you
need and then installing them all individually. As you can imagine, this is a real time-
saver, and it prevents the %packages section from taking up huge amounts of space.
Individual packages that you want to install are just the name of the package with-
out any prefix. This is most often used when you need a particular feature (such as a
VNC server) but you don’t want the rest of the stuff that the group will install. You can
also specifically tell Anaconda not to install a package. You can see that at the end of our
package list, sysreport is listed with a minus in front of it. This will prevent Anaconda
from installing it.

CHAPTER 11 ■ USING CORE BUILDS 263
■Note As mentioned previously, Anaconda will attempt to resolve dependencies automatically. This means
that if one of the groups installs a package that depends on sysreport being installed, Anaconda will install
sysreport despite that you told it not to. The theory is that you’ve told Anaconda what you want your system
to run and then it looks at how to provide that functionality. In CentOS 4, if you removed a package that the
system would depend upon, the install would halt, and you would receive an error message that the package
could not be installed because not all of the dependencies were available. The option resolvedeps told Ana-
conda to remove everything we told it to, but if something we wanted relied upon a package we’d removed,
then Anaconda put it back in. This made sense and is now the default in CentOS 5.
Picking groups and packages by hand is not a fun task and can take a lot of trial and
error. The easiest way is to customize the package list during the install process. This does
mean going through every item and selecting what you do and don’t want, but it is a lot
easier selecting check boxes and reading helpful descriptions than trying to remember
everything and write it out by hand. Of course, once you’ve done that, it is a lot easier to
tweak and work with what Anaconda has provided.
There’s not really much more to say about the %packages section. It does exactly what
you’d expect it to do, and now that it automatically resolves dependencies, one of the big-
gest gotchas has been taken care of. You can be as specific as you like, but we’ve found
that most people prefer to include the groups first and then specifically remove what
they don’t want rather than specifically defining which packages to install. This is mostly
because you can install, say, Apache and then find that SSL or PHP hasn’t been included,
so you need to go back and add them. You might then discover that you didn’t install
MySQL support for PHP. Installing in groups tends to avoid this particular problem and
also helps keep the %packages section easy to read. Because hard disk space usually isn’t at
a premium, it’s better to install a bit more than you need rather than spending hours try-
ing to make sure you have everything you want. Of course, it’s also best practice to install
only what you need, so if you want to follow that or you just want a minimal install, your
best bet is to go through the package list and manually tell Anaconda what you want your
server to be able to do.
The Scripts Section
You’ll find two types of scripts in the scripts section. As already discussed, %pre scripts
run before Anaconda uses the file (and before it processes any included files), and the
%post script runs after the install is complete but before the reboot. The %post script can
be run either from the installer’s perspective (that is, you can still see all the packages and
contents of the install media) or from the new server’s perspective. These two are usually
used in combination with the %post --nochroot script, copying data onto the new server,
and the %post script, installing and configuring it.

CHAPTER 11 ■ USING CORE BUILDS
264
■Caution Currently Anaconda seems to execute these scripts in the order in which they appear in the
kickstart file. However, this is not guaranteed. This behavior could change in the future, although realistically,
it’s not likely to change.
These scripts are usually written in bash, but they can be written in any language
where an interpreter is available. During the %pre and %post --nochroot sections, you are
pretty much restricted to bash and Python. In the %post section, though, you can make
use of any language that you have installed as part of your system such as Perl or Ruby.
As you can imagine, this gives you a tremendous amount of flexibility. Both the %pre and
%post sections potentially have network connectivity, so there is nothing preventing you
from writing scripts that contact remote servers or download and install packages from
another machine.
The network connectivity available during the %pre section depends entirely on what
type of install is being conducted. Under normal circumstances, a DVD-based install will
not activate networking unless something requires it (such as specifying that you want to
use a kickstart file hosted on your web server). This can catch people unaware, because it
is quite common to develop a working kickstart by hosting it on a server and then in the
final version put the kickstart on the DVD, which, if the scripts require networking, will
fail to run correctly. Of course, immediately rerunning it with the known working version,
that is, the one hosted on the web server, shows that nothing is wrong, and the install
completes happily. This little gotcha is definitely one to look out for!
By and large, though, in the %pre section, assuming that you’re using a network-hosted
kickstart file or network-hosted media, you should have access to basic networking.
However, you won’t have access to DNS at this stage, so everything you do must use IP
addresses. In the %post section, you will be able to use DNS but only if you configured
static networking during the install (that is, a fixed IP address). Otherwise, like the %pre
section, DNS won’t be available because the name resolver hasn’t been configured yet.
So, let’s create a couple scripts. We’re going to be using bash to demonstrate the sorts
of things that you might like to do. Of course, you are really limited only by your imagina-
tion and can do far more complex things than we’re attempting here.
■Note In future versions of Anaconda, it will become necessary to place %end markers at the end of your
scripts. This isn’t required yet, but to prevent your scripts spontaneously combusting when you try them on a
future version, it makes sense to start using them now.
CHAPTER 11 ■ USING CORE BUILDS 265
%pre Scripts
The %pre section is optional but is extremely useful in very specific (and usually advanced)
situations such as removing kernel modules or adding some of your own. This isn’t ideal
as an example because it relies on topics that we haven’t covered and doesn’t show how
to use the %include statement, which is very useful. So, this example is a bit contrived, but
it does show how a %pre script can dynamically alter a kickstart file.
This example will configure the server to use a fixed IP address. In a real-world
scenario, your %pre script might have a list of valid IP addresses or perhaps request an
IP address by contacting a remote server. In our example, we’re just going to set the IP
directly. There are two stages to doing this. First, you have to create a %pre script that
will write the necessary configuration to a file, and then you have to modify the kickstart
script to load in that file at the appropriate juncture.
Here is our %pre script:
%pre
#!/bin/sh
# Write out the network configuration to a text file using cat
cat > /tmp/network-config << EOF
network --bootproto=static --ip=192.168.0.2 --netmask=255.255.255.0 \
--gateway=192.168.0.1 --nameserver=192.168.0.1
EOF
This will create a text file called /tmp/network-config with everything up until EOF.
This is a very handy way to create inline configuration files and is quite common in kick-
start scripts. Of course, just because we have a file with that in it doesn’t actually mean
that Anaconda is going to know about it. The %pre script runs completely independently
from Anaconda, but because it runs before Anaconda processes the %include statements,
we can get Anaconda to pull in the changes. Here’s a kickstart file that pulls in our new
network configuration (based on the previous example):
xconfig --startxonboot
%include /tmp/network-config
rootpw --iscrypted $1$wAUSiwsP$k..saSPrjzcW77FwDgUpe/
firewall --enabled --port=22:tcp
When processed by Anaconda during the install process, the ultimate result is that
our kickstart file will look like this:
CHAPTER 11 ■ USING CORE BUILDS
266
xconfig --startxonboot
network --bootproto=static --ip=192.168.0.2 --netmask=255.255.255.0 \
--gateway=192.168.0.1 --nameserver=192.168.0.1
rootpw --iscrypted $1$wAUSiwsP$k..saSPrjzcW77FwDgUpe/
firewall --enabled --port=22:tcp
As you can see, this a handy way of dynamically updating a kickstart file from within
the system. Although you’ll see how to dynamically create the kickstart later in the chapter,
some things aren’t available using this method. For example, the server doesn’t necessar-
ily know the machine’s disk configuration or what hardware is attached to it. Using a %pre
script, you can modify the kickstarts based on local information during the install.
%post Scripts
%post scripts (also optional) are by far the most common form of script in a kickstart file.
They are generally used for fine-tuning and software installation. As discussed, there are
two types of %post script: one that runs chroot and one that doesn’t. We’ll give an example
that uses both to show how they can be used together to great effect. Generally speaking,
%post --nochroot is used to copy files and content from the install media. This isn’t really
much use if you’re using a standard CentOS DVD or you’re installing via HTTP. If, on the
other hand, you’ve created a custom DVD (perhaps for installs where the network is not
available) or you’re using an NFS-based install where additional packages are available, it
is often easier to copy the files over first rather than try to remount or set things up on the
freshly installed machine.
You’ll now copy across the Hello World application from the install DVD that we have
put in a directory called /custom. You will place this in the /tmp/ directory on the server.
You need to do this because once you chroot into the new system, you will no longer be
able to see the contents of the DVD. To copy this directory over, you need to do the fol-
lowing:
%post --nochroot
cp /custom/hello-word.rpm /mnt/sysimage/tmp/
The newly installed system is fully mounted under /mnt/sysimage. This is the exact
filesystem as it will be when the server reboots. The script copies the file from the instal-
lation disc and then places it in the /tmp/ directory. This is important because once
Anaconda chroots into the new server, you won’t be able to see the DVD anymore
because everything will be running under /mnt/sysimage, and hence, you won’t be able to
access the file. Now that you have the file in situ, you can write the %post script to install it:
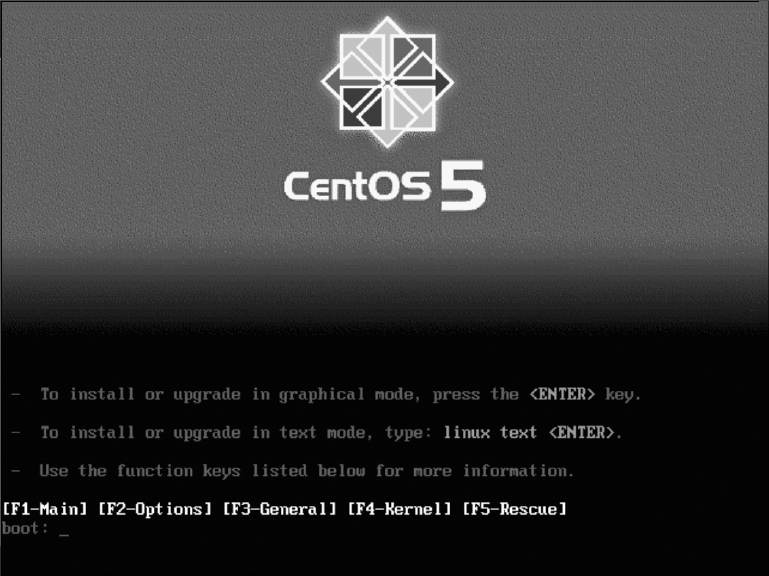
CHAPTER 11 ■ USING CORE BUILDS 267
%post
rpm -Uvh /tmp/hello-world.rpm
That’s it—that’s all you have to do. You have now copied the file to the new server
and then installed it. This is exactly the same as installing it by hand, with the only dif-
ference being that this is much easier and of course completely automated. Because the
package places its files in specific locations on the filesystem, it makes sense that you
have to create the illusion that the server is running from its own disk. If you didn’t do
this, at best RPM would not be able to work out where to place the files, and at worst, it
would place them in the wrong place without you knowing.
Using a Kickstart File on a Web Server
Installing CentOS using a kickstart file that’s located on a web server is very straightfor-
ward, especially if you’re using DHCP. If you’re not using DHCP, you’ll need to specify
your network details on the command line. Although this is slightly more work, it doesn’t
make it any more difficult, as you’ll see in a moment. When you start a CentOS install,
you will see the initial CentOS menu that looks like Figure 11-1.
Figure 11-1. CentOS 5 install boot screen
CHAPTER 11 ■ USING CORE BUILDS
268
If you’re using DHCP, all you need to type is the following:
linux ks=http://192.168.0.1/ks.cfg
Anaconda will then obtain an IP address and try to pull the kickstart file called ks.cfg
from the web server running on 192.168.0.1. All you need to do is change the URL to point
at your kickstart file, and you’re off. If you want to use static IP addressing, that’s also
quite straightforward. Here’s an example:
linux ks=http://192.168.0.1/ks.cfg ip=192.168.0.2 netmask=255.255.255.0 \
gateway=192.168.0.1
This will instruct Anaconda to use those network details to configure the network and
then try to download the kickstart file.
One thing to watch out for, though, is that if Anaconda cannot find that kickstart file
for any reason, it will simply prompt throughout the install process as if a kickstart were
never provided. If this happens, look at virtual terminal 3 (Ctrl+Alt+F3), because this is
where you will find debugging information. This will tell you, for example, whether Ana-
conda was able to find the file or whether something else went wrong.
Apart from that, there is little more to say about kickstart files over HTTP. It is a great
way to manage different kickstart files (perhaps to have several different kickstart-based
installs) and allows you to boot from an unmodified CentOS DVD while still providing
your own customized kickstart file. This gives a great deal of flexibility because you will be
able to modify or update your kickstart files centrally without needing to update anything
in another location. An additional benefit is that you can create dynamic kickstart files,
which as you’ll see can be very powerful indeed.
Dynamically Creating Kickstart Files
Dynamic kickstarts are exactly as they sound. Remember, a kickstart file is just plain text,
and hence any language that can output plain text can be used to generate a working
kickstart file. This allows your web server to generate content on the fly based on where
the machine is connecting from (its IP address) or even the time of day. You can also add
more information by using a custom URL. For example, the following kickstart URL could
be used to tell the remote server which machine is being built:
linux ks=http://192.168.0.1/ks.php?server=web
CHAPTER 11 ■ USING CORE BUILDS 269
In this case, you’d have a PHP script that would look at the content of server and
decide which kickstart file should be returned. You can add as many arguments as you
want, so you could also have this (the \ character shows where a line break has been
added, but normally this would be a single line):
linux ks=http://192.168.0.1/ks.php?server_name=goliath&server_type=database&\
server_location=hk
Your script could analyze this information and determine what to do about it. Perhaps
it will have a profile stored for the server called goliath. Maybe it has different profiles based
on the work the machine has to do (such as database or web server). It can also discover
where the server is or more usually where the server is going to end up. This technique is
really useful because it allows you to start building a centralized and configurable build
system. Of course, it also requires a bit of knowledge on how to write web-based software,
but even a basic PHP script can bring a lot to a kickstart file.
For example, here is a PHP snippet that sets an IP address based on the server’s
name:
<?php
if $_GET['server_name'] == 'goliath' {
$ip = "192.168.0.2"
}
else {
$ip = "192.168.0.3"
}
// Back to the kickstart file
?>
network --bootproto=static --ip=<?php echo($ip);?>
This is just a snippet, but there is really no reason why you couldn’t store the options
for a given server in a database and then set up a script to pull that information back out
on demand. This would allow you to control your kickstart configuration by updating a
database rather than text files. Of course, you could use any source you like to determine
what to put in the kickstart file as long as you ensure that it follows the correct file format
and no required options are left out.
CHAPTER 11 ■ USING CORE BUILDS
270
Installing CentOS over HTTP
Once you start moving to network-based kickstarts, you might decide that you want to
run your installs this way too. There are several benefits in doing this. First, it means you
can install CentOS by using the netinstall disc we discussed way back in Chapter 2. This
file is only 7MB in size, so it’s quick to download and can be burned on a small CD or
even one of the credit card–shaped discs. It also means that you can easily install more
than one machine at once without needing DVDs for each machine you want to build.
This isn’t such a problem when you’re building one or two machines, but it can become
a pain if you want to install a whole classroom full. It also makes it easier when installing
onto blade servers and VMware instances. It is far easier to remotely mount a small 7MB
ISO image (say if you’re working from home or from a different office) and then pull the
files over the local LAN than it is to mount a 3.7GB DVD image and try to install from that!
Last of all, it comes in handy when doing Xen-based virtual machine installs. Xen is able
to use an HTTP-based copy of the CentOS install media, so you can install guests without
needing any physical media.
Setting this up is actually really easy to do. All you have to do is copy the content from
the DVD onto your web server. If you wanted to use the web server we set up in Chapter 5,
we could place the content under /var/www/html/centos/. One way to do this would be (as
root) as follows:
mkdir /tmp/centos
mount /dev/cdrom /tmp/centos/
cp -rfa /tmp/centos/ /var/www/html/centos/
umount /dev/cdrom
rmdir /tmp/centos
That’s it! You’ll now have the entire CentOS install tree on your web server. To view it,
you can visit your web site with http://<yourip>/centos/.
It is possible to install via HTTP without using a kickstart file, so we will show this
method first. When you’ve booted from your CentOS DVD and are at the initial install
screen, you should enter the following:
linux method=http://192.168.0.1/centos/
Obviously you’ll need to replace 192.168.0.1 with your own IP address, but other than
that, this is all you’ll need to do. If you are using static addressing, however (that is, your
network doesn’t support DHCP), then you should follow the instructions for setting your
IP address manually in the kickstart section.
CHAPTER 11 ■ USING CORE BUILDS 271
Updating Your Kickstart File to Install CentOS
via HTTP
Once you’re happy that your server is able to install via HTTP (see the previous section),
then you can update your kickstart file to also use it as an install method. This is easy to
do and requires only a simple change. You need to replace cdrom with the following:
url --url http://192.168.0.1/centos/
Once you’ve saved your changes, you can then use that kickstart file, and it will auto-
matically use content from your web server. You don’t need to specify it in addition to
your kickstart. Once you’ve reached this stage, you can then install from the netinstall
image provided on the CentOS web site.
Summary
This chapter covered the basics of doing a core build, specifically what they are and why
you’d want one. We looked at Anaconda kickstart files and also covered the basic options
available to you and how you can change them. We talked about how to build your pack-
age lists, things to watch out for, and how to create your list as painlessly as possible. We
took a brief look at writing %pre and %post scripts and where and how you might want to
use them. We then got a little bit more advanced and covered how to use kickstart files
that are hosted on the network and then how to use the network to host both the kickstart
file and the CentOS package information.
In the next chapter, we’ll give you a look at a high-availability solution that can help
ensure that even if a server fails, you can keep your vital services up and running.

273
CHAPTER 12
Using High Availability
High availability (HA) may look simple on the surface but is actually pretty hard to do
correctly. It would be possible to devote a complete book to the subject alone. In this
chapter, we will cover the basics just to give you a flavor of how HA works. If you get hun-
gry for more, we are sure that you will find what you are looking for in other sources. First
we’ll go over some of the general theories about HA. Then we’ll discuss the two HA suites
you can use with CentOS. Finally, we will detail how to use these suites to set up a simple
two-node HA cluster.
But before we start with all that, first answer this question: why do you need, or think
you need, HA? From a distance, the basic idea seems very appealing. Having something
to take over when something else breaks—sounds great, right? But this also means that
you need to double a lot of things. And this violates the basic rule of “the simpler, the
better.” Stated differently, adding more complexity increases the chance of something
breaking. That is why you need to make sure that an HA setup will actually solve the
problem you are trying to solve.
One final rule you must know before starting with HA is that if you are going to
implement HA, you really need to test everything. This means not only making sure your
setup works when everything is normal but also that it keeps working as expected when
things go wrong, such as when a component of your HA setup fails. So, you need to test
your setup for all things that could potentially break.
Clustering and High Availability
Although clustering and HA are sometimes used as synonyms, the two are not the same.
Therefore, we’ll explain the relationship between clustering and high availability in this
section.
In a general IT sense, a cluster is a set of devices working together in some way. The
functions that the set of devices are performing doesn’t matter. In most cases, the device
is a computer or, more specifically, a server. But it can be other things as well, such as
storage units, routers, and switches.
CHAPTER 12 ■ USING HIGH AVAILABILITY
274
Basically, you can divide clusters into four types (although some in-between forms of
clustering probably exist). These four types are high-availability clusters, load-balancing
clusters, storage clusters, and high-performance computing (HPC) clusters.
This chapter deals with high-availability clusters. A simple way to define this type
of cluster is that there is a set of devices, and each device performs a specific action. In
the case of a problem, however, one of the other devices in the cluster can take over that
action. In short, each machine in a cluster is a backup for another machine in the cluster.
Load-balancing clusters are used to handle a higher load than a single machine can
deal with. Here there is a set of machines that will perform the same task. In front of these
machines there is usually a device, called a director, that distributes the incoming traffic
between all the machines. So, each machine performs only a certain portion of the total
load received. Web servers are one of the most load-balanced applications.
Storage clusters are sets of devices working together to give you access to data stored
on them. A storage cluster makes sure that the failure of one device does not hamper the
access to your data, and usually all working devices divide the incoming load between
them. There are different ways to build storage clusters; it can be done in the hardware,
with software, or with a combination of both.
Finally, there are the high-performance computing clusters, which are sets of
machines that work together to perform a single set of calculations. This is also called
parallel computing or supercomputing. Instead of having a computer working 10,000
hours on a problem, you let 10,000 computers work on the same problem for an hour. In
the end, the same amount of work is done, but the total processing time is much smaller.
HPC clusters are used a lot these days for any form of calculation that can be broken
down in pieces and then put together again to get the final result. Examples are weather
predictions, nuclear reactions, and the flow of liquids.
As you can see, clustering is a pretty big field with a lot of different areas. So, it is wise
to study the area of clustering you are going to use before implementing it in production.
Theory of HA
Before going into detail on the practical aspects of HA clustering, first we’ll deal with
some theoretical aspects. For reasons of simplicity, in the rest of this chapter we presume
that you are working with a two-node cluster; let’s call the nodes node1 and node2. The two
HA software suites we will be using can handle larger clusters, but adding more nodes
makes everything a bit more complex, so we will stick to just two nodes.
One of the basic requirements in an HA cluster is that both nodes need to be able to
know the status of the other node at every moment. This is because if there is something
wrong with node1, node2 needs to react and perform the necessary steps to make sure
all the provided services of the cluster keep on working. To know the status of the other
node, an HA cluster uses a heartbeat between the nodes; that is, node1 sends a constant
CHAPTER 12 ■ USING HIGH AVAILABILITY 275
stream of data over the network to node2, and vice versa. As soon as a node does not see
this message coming in, it presumes that the other node is no longer available and needs
to start the services running on the failed node. In its simplest form, this heartbeating
is just a single message saying, “OK, I’m still here.” But usually the heartbeat messages
contain more information, such as the status of the different services running on each
node.
The nodes use these heartbeat messages to construct an in-memory overview on the
status of the cluster and make decisions based on the overview. These heartbeat mes-
sages are thus crucial for the cluster to work correctly and therefore need to be made
as redundant as possible. In other words, all possible heartbeat paths that are available
should be used.
The most commonly used heartbeat path is the network. Each HA software suite
probably implements it in its own way, but just make sure to use each available network
connection between the nodes for heartbeating. If there is only one network connection,
you are strongly advised to add at least one more so that at least two network paths are
available. Most cluster suites even recommend setting up a private network between all
nodes solely for heartbeat traffic.
Other heartbeat paths are serial connections, Fibre Channel connections, InfiniBand,
or any link that exists between the two nodes. But the basic rule is always the same. Make
sure you have at least two paths between the nodes that can be used for heartbeating and
preferably a mix of technologies (for example, network and serial). If you don’t do this,
you could end up with a split brain.
Split Brain and Fencing
A split brain in HA cluster terminology refers to the situation in which the two nodes in
the cluster are still operational but both think that the other node is dead. This situation
occurs when all heartbeat paths between the nodes are down and the nodes do not receive
heartbeat messages from each other. In the case of a split brain, each node will start locally
all the services that were running on the other node. In the best-case scenario, you would
just have the web server running on both nodes and nothing breaks. In the worst-case
scenario, you would lose data because both nodes would try to access the same storage at
the same time. Of course, you definitely want to avoid that. Therefore, you must make sure
that the cluster is in a consistent state at all times.
To prevent split brains, HA clusters use a technology called fencing. Fencing makes
sure that when a node thinks the other node is unavailable, the other node is unavailable.
You can make sure the other node is dead usually by pulling the plug on the other node.
Physically powering off a node is the only way to make sure it is really down.
In short, fencing is important as soon as you start using some form of shared data
because you will want to avoid losing data at any price.
CHAPTER 12 ■ USING HIGH AVAILABILITY
276
Resources
Now that you know how an HA cluster keeps track of the status of the other node and
how it prevents a split brain, we can talk about a final component in an HA cluster:
resources. A resource is something that is managed by the HA cluster. This means that
resources include the actual service(s) that you would like to be highly available. But usu-
ally these services have dependencies on other things. So, these things also need to be
managed by the HA cluster and therefore also get defined as resources in the HA cluster.
Common examples of resources are an IP address, a daemon (web server, mail
server, file server, and so on), a storage device, a filesystem, and so on. Most HA cluster
suites use standardized, simple shell scripts to manage these resources. This is to make
the suite less complex, to allow these scripts to be adjusted easily, or to allow you to add
your own scripts. Most suites also come with a set of ready-made scripts so that you don’t
need to create them all on your own.
Usually these resource scripts look like extended init.d scripts (the scripts that are
used to start and stop services at boot and at shutdown). These scripts just have more argu-
ments that they accept to be able to tell the script what resource you want managed by the
script, such as the IP address to enable or disable that points to the clustered service.
Service or Virtual IP Address
Any service that needs to be available on a network needs to have an IP address that
is used to access that service. For normal (nonclustered) services, this usually is the IP
address of the machine on which the service is running. However, this method does not
work anymore when you operate this service using an HA cluster.
In an HA cluster, the service can run on both nodes of the cluster. So, you cannot use
the IP address of the machine to connect to the service since you can’t know on which of
the two nodes the service is running at a certain moment in time. And if you could, you
would need to tell people to use the IP address of the other machine when the service gets
moved from one node to the other. So, you need something that will always point to the
service, no matter where it is running.
This something is what is called a service IP address (SIP) or virtual IP address (VIP). It
is an additional IP address (next to the normal IP addresses of the machines) that is man-
aged by the HA cluster itself and that is always present on the node where the daemon is
running for the service that you want to be HA.
This means that a very basic HA cluster will at least have two resources defined: one
resource that controls a daemon like Apache and one resource that controls the clustered
IP address used to talk to the daemon. This also means that you need to configure the dae-
mon itself to accept incoming connections from the clustered IP address. Most daemons
will listen by default to all IP addresses active on a machine, but some don’t.
For the rest of this chapter, we will use the term SIP to refer to a clustered IP address.
CHAPTER 12 ■ USING HIGH AVAILABILITY 277
HA Cluster Suite Components
Now that we have gone over the basics of HA clustering and introduced some terminol-
ogy, we are almost ready to start talking about the practical side of things. There is just
one final thing that we need to cover, and that is how all the things we talked about pres-
ent themselves in the software of the HA cluster suite.
It is almost impossible to write a single big piece of code that does all the different
aspects that are needed for a working cluster. Therefore, an HA cluster suite is usually
a set of daemons, programs, and scripts working together. Sometimes a single daemon
does more than one task, but that is then accomplished using different threads inside the
daemon. Let’s go over the most important components of an HA cluster suite.
The basis for every cluster is the daemon that keeps track of all the members of a
cluster. It is this daemon that does the actual heartbeating between all the nodes. It also
informs all the other daemons of the cluster suite if there are any changes in the member-
ship of the cluster.
A second important aspect of any cluster is its configuration. This needs to be avail-
able on all nodes and needs to always be up-to-date on all nodes so that if a node dies,
the other node still knows the current configuration of the cluster. To this end, a daemon
is responsible for managing the cluster configuration and making sure that all changes
are propagated to all the nodes that are part of the cluster.
Now that the status of the cluster nodes is managed and the configuration of the
cluster is managed, you can have a third daemon that will manage the different resources
of the cluster. This daemon reads the configuration, and using the current state of the
cluster, it will determine where (on which node) to start certain services. This daemon
also can monitor the state of these resources themselves and put this information into
the configuration so all nodes will know this. Also, when there is a node that appears or
disappears, this daemon will check whether there are services that need to be moved to
other nodes and does this if needed.
Then there are the different scripts that are used to start and stop the individual
resources. These we already mentioned earlier.
Besides this core set of daemons, there is usually some additional software present in
an HA cluster suite. Some suites have a daemon specifically for fencing; other suites see
fencing as a special resource and let the resource manager do the fencing. Some suites
have a special logging daemon that is used by all other components. Sometimes there is
also a daemon that checks whether the cluster nodes can access certain network compo-
nents outside their own network to verify that Internet connectivity is still working, for
example. This information can then be used by the resource manager to determine where
to run a resource. And then there usually is a set of tools to manage the cluster (change
the configuration, report the status, manage resources, and so on).
CHAPTER 12 ■ USING HIGH AVAILABILITY
278
HA Clustering with CentOS
Now that we have gone over all the basics of HA clustering, it is time to introduce the two
clustering suites we will use in this chapter.
The first suite is the Cluster Suite, which is delivered with CentOS. Created and devel-
oped by Red Hat, Cluster Suite consists of elements Red Hat has created or that came
from companies that Red Hat acquired. You can use the complete suite for three types
of clustering, namely, HA clustering, load-balancing clustering, and storage clustering.
As you can imagine, the suite is pretty big and consists of a lot of different components.
You can find the complete documentation of the Cluster Suite at http://www.centos.org/
docs/5/. We recommend that you read this documentation when using the Cluster Suite.
For the rest of this chapter, we will call this suite CCS (for CentOS Cluster Suite).
The other suite that we will use is the Heartbeat/Pacemaker Suite. These packages
are not available from CentOS but can be installed from a third-party repository. The
Heartbeat/Pacemaker Suite consists of two separate projects. First, the Heartbeat proj-
ect has been around for quite a while and is used frequently. In this suite it is used as the
cluster membership layer, since, as the name indicates, it does the heartbeating between
the nodes. You can find more information about Heartbeat at http://linux-ha.org. The
other project is Pacemaker, which is pretty new and which grew from the Heartbeat proj-
ect but is now independent. Pacemaker manages the configuration and the resources in
the cluster. For more information for Pacemaker, take a look at http://www.clusterlabs.
org/wiki/Main_Page. For the rest of this chapter, we will call this suite HPS (for Heartbeat/
Pacemaker Suite).
Preparing Your Cluster
Before we continue with the practical part of this chapter, you first need to set up the two
nodes that you will use. We will presume that these two nodes are installed with CentOS 5
and are fully up-to-date. Call the nodes node1 and node2. Both nodes should be connected
to the Internet because you need to download the HPS suite. We also presume that each
node has two network interfaces and that both these interfaces are configured and con-
nected to a network device. Both nodes need to be able to ping each other over both
network interfaces.
When you install both nodes, you do not need to install any graphical environment
like Gnome or KDE.
For setting up and testing the cluster, disable the firewall and put SELinux in per-
missive mode so that neither will interfere with the testing. When you are finished with
testing and plan on putting the cluster in production mode, we advise you to reenable
both the firewall and SELinux to protect your setup.
CHAPTER 12 ■ USING HIGH AVAILABILITY 279
Installing CCS
Installing CCS is very simple. To install CCS, run the following command:
# yum groupinstall "Clustering"
Here Yum uses a group called Clustering to do the install. This group consists of all
packages that are required to install CCS. And you simply perform this command on both
nodes of your cluster.
Installing HPS
Installing HPS is a bit more work since it doesn’t come with CentOS. There are different
places where you can download HPS. In this chapter, we will use the OpenSUSE build
service HA-Clustering repository to get the HPS packages from. To configure Yum to use
this repository, run this command:
# cd /etc/yum.repos.d/
# wget http://download.opensuse.org/repositories/➥
server:/ha-clustering/RHEL_5/server:ha-clustering.repo
This will download a Yum configuration file that will allow Yum to use this repository.
Now you can use Yum to download and install HPS using this command:
# yum install pacemaker
This will install Pacemaker, Heartbeat, and all the necessary dependencies. You will
need to perform this installation on both nodes.
Configuring CCS
You can set up CCS in three different ways. First, there are a set of command-line tools
that you can use to set up the cluster. Second, there is a GUI tool called system-config-
cluster to create a cluster configuration. Finally, there is a web-based management tool
called Conga. It consists of two daemons. The first one is called ricci. This is a daemon
that runs on every cluster node. The second one is called luci. This daemon is run on
one machine (which needs to be part of the cluster), which provides a web interface that
can be used to manage the cluster. The luci daemon will use the ricci daemons running
on each node to execute all the actions done inside the web interface. For the rest of this
chapter, we will use the Conga environment to configure the cluster.
The central configuration file of CCS is called /etc/cluster/cluster.conf. All of the
tools mentioned work with this file to configure CCS. As a form of backup, this file will
CHAPTER 12 ■ USING HIGH AVAILABILITY
280
also be present on every node of the cluster. This is done by CCS itself and does not need
to be done manually.
When you installed CCS, the two Conga daemons were part of the Clustering group.
The ricci daemon is automatically configured to start at boot during this installation. To
start ricci, you can therefore either reboot or run the following command:
# service ricci start
Starting ricci: [ OK ]
For the luci daemon, you need to choose one host that will run the daemon. We have
selected to run it on node1. Before you can start luci, you need to configure it. You can do
this using the luci_admin init command, like this:
# luci_admin init
Initializing the luci server
Creating the 'admin' user
Enter password:
Confirm password:
Please wait...
The admin password has been successfully set.
Generating SSL certificates...
The luci server has been successfully initialized
You must restart the luci server for changes to take effect.
Run "service luci restart" to do so
This command asks you for a password for the admin user. This is the user who
you will use later to log into the web interface. When the command has finished, luci is
ready to start, but first you need to make sure that luci will start at boot, and then you
can start it:
# chkconfig luci on
# service luci start
Starting luci: Generating https SSL certificates... done
[ OK ]
Point your web browser to https://node1:8084 to access luci
CHAPTER 12 ■ USING HIGH AVAILABILITY 281
If you get the messages, as mentioned earlier, then luci has been started successfully.
Then you can surf to the URL as mentioned to test whether luci is indeed working. luci
assumes that DNS is configured properly for all your nodes. If that isn’t the case, now
is a good time to fix that before continuing with this chapter. Also, when surfing to that
URL, a modern browser will give an error on the SSL certificate used by luci since it is
self-signed. In this case, you can ignore the warning and accept the luci certificate. If all
is working, you then end up with a login prompt. In the next section, you will log in and
make a basic configuration.
Configuring HPS
The configuration of HPS works in layers because HPS consists of two separate applica-
tions that work together. It is not a fully integrated suite like CCS is. The first layer is the
Heartbeat application. The second layer is the pacemaker daemon. You can find all the
configuration files of Heartbeat in the directory /etc/ha.d/. In that directory, you need to
create two files. The first is ha.cf, which is the main configuration file for Heartbeat. This
is the file used in the following example:
# Logging
debug 0
use_logd true
# Misc Options
traditional_compression off
compression bz2
coredumps true
# Communications
udpport 694
bcast eth0
bcast eth1
autojoin any
# Thresholds (in seconds)
keepalive 1
warntime 6
deadtime 10
initdead 60
# Enable pacemaker
crm yes
CHAPTER 12 ■ USING HIGH AVAILABILITY
282
The first section, Logging, specifies how Heartbeat does logging. Here you tell Heart-
beat to use a separate daemon (called logd) and not to log any debug information.
The second section, Misc Options, contains some miscellaneous options. The first
two enable compression of the messages that are sent in the heartbeat packets between
the nodes. You can also let Heartbeat create a core dump if it crashes (they are useful for
debugging).
The next section, Communications, tells what network paths are used to send heartbeat
packets over. The port used by Heartbeat for the heartbeat traffic is 694 (Heartbeat always
uses UDP). For the heartbeating, it uses the interfaces eth0 and eth1. In this case, the
heartbeat traffic is transmitted using the broadcast address, meaning that everything on
the network receives them. Heartbeat also supports using multicast and unicast to trans-
mit the heartbeat traffic. Also specified is that you allow all nodes on the network that use
the same parameters.
In the Thresholds section, you’ll find a set of options that specifies how long Heartbeat
will wait with certain activities or actions. The keepalive option is the interval between
heartbeat messages. The warntime and deadtime options specify how long Heartbeat will
wait to report a change in the state of a node. The initdead is a timeout during the startup
of Heartbeat to allow all nodes to start up before Heartbeat starts checking the status of the
other nodes.
The last section, Enable pacemaker, is to tell Heartbeat to use Pacemaker as a resource
manager. Heartbeat will then also start Pacemaker as part of its own startup process.
The second configuration file of Heartbeat is authkeys. It is used to encrypt the
heartbeat messages so that only nodes that have the same key configured can read each
other’s messages. This is a security feature to prevent an external source from sending
heartbeat messages to the nodes of the cluster and making the cluster do things that you
don’t want. This is the authkeys file we used:
auth 1
1 sha1 somerandomstring
The first tells Heartbeat to use the key with index 1. The second line defines a key
with index 1 that uses the SHA1 hash method and somerandomstring as the key. In your
own cluster, you should change the key to another string. When you create this file, you
need to allow only root to read and write the file. If not, Heartbeat will refuse to start. You
can do this using this command:
# chmod 600 /etc/ha.d/authkeys
CHAPTER 12 ■ USING HIGH AVAILABILITY 283
Now Heartbeat is configured and ready for use so that you can start it. By default
Heartbeat isn’t configured to start at boot. You therefore first configure Heartbeat to start
at boot, and then you start it:
# chkconfig heartbeat on
# service heartbeat start
Starting High-Availability services:
[ OK ]
You can follow the startup of Heartbeat in the log file /var/log/messages. Heartbeat
and Pacemaker are now up and running; in the next section, you will create a basic con-
figuration for the cluster.
Building Clusters Using CCS
In the following sections, you will make cluster configurations using CCS.
Creating a Basic Cluster with CCS
In this section, you will create a simple cluster with CCS. As mentioned earlier, you will
use the luci web interface to do this. So, surf to the URL luci gave you when you started
it, and log in with the admin username and the password you entered. When you have
logged in, click the Cluster tab, and then click Create a New Cluster. Fill in a name for
your cluster, and fill in the hostname of both nodes and their root passwords. Select Use
Locally Installed Packages (you already installed everything needed), and deselect the
Enable Shared Storage Support check box. The result should look like Figure 12-1.
Then click the Submit button. Not much seems to have happened. But the open lock
symbols behind each node should be closed now. This means that luci succeeded in
contacting the ricci daemon on both nodes. Now click Submit again to start with the cre-
ation of the cluster. This can take a while, and in our case we got an error back from luci.
But that was only because the cluster wasn’t started completely. Check /var/log/messages
to follow the startup progress, and when everything is ready, click the Cluster tab again.
You should see something like Figure 12-2.
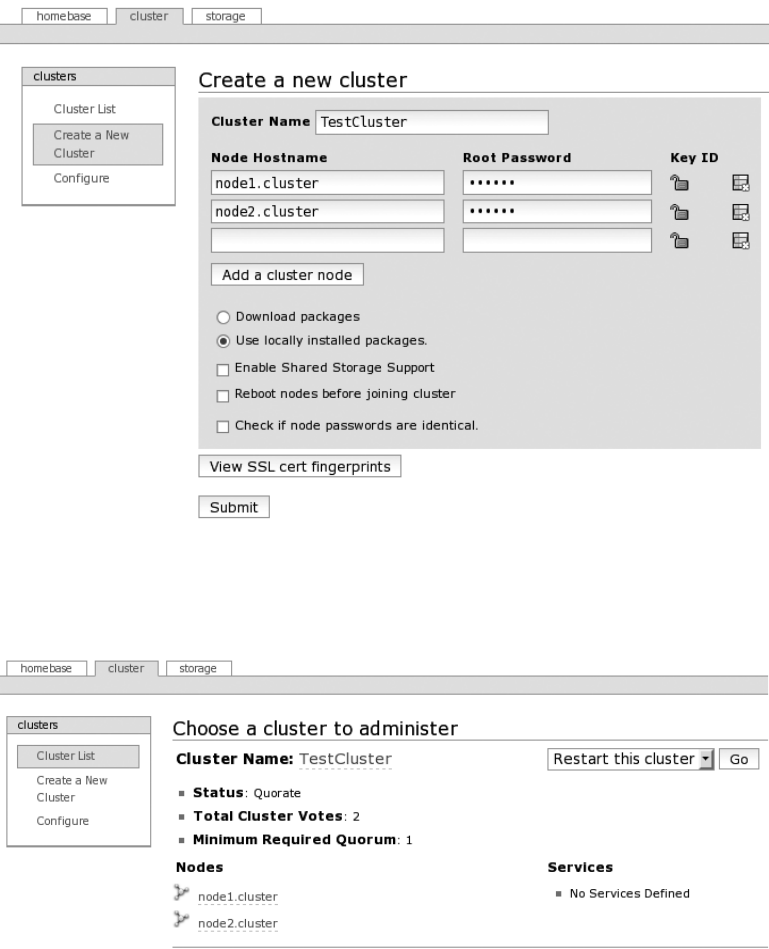
CHAPTER 12 ■ USING HIGH AVAILABILITY
284
Figure 12-1. Creating a new cluster using luci
Figure 12-2. List of available clusters in luci
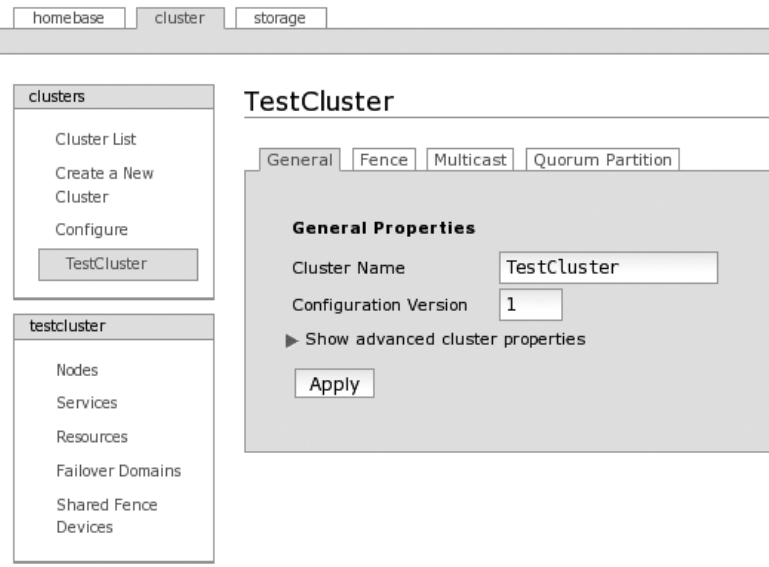
CHAPTER 12 ■ USING HIGH AVAILABILITY 285
Here you can see the cluster you have just created, including the nodes that are part
of it, the status of the cluster, and what services are defined in the cluster (none for the
moment). This means that the cluster is up and running and ready for use. This also
means that the file /etc/cluster/cluster.conf has been created on both nodes.
To continue configuring the cluster, click the cluster name (all green, underlined
pieces of text are links that you can click). You should then end up with Figure 12-3.
Figure 12-3. Overview of a cluster in luci
With the tabs in the center, you can configure the behavior of the cluster. Normally
there should be little need to change something there. In the bottom menu on the left,
you can see all the different objects you can configure in a cluster. The Nodes item speaks
for itself. This can be used to configure, add, or remove nodes. The Service item is an
object that contains one or more resources that together form a certain service and that
is managed by the cluster. The Resources item is a specific instance of a resource script
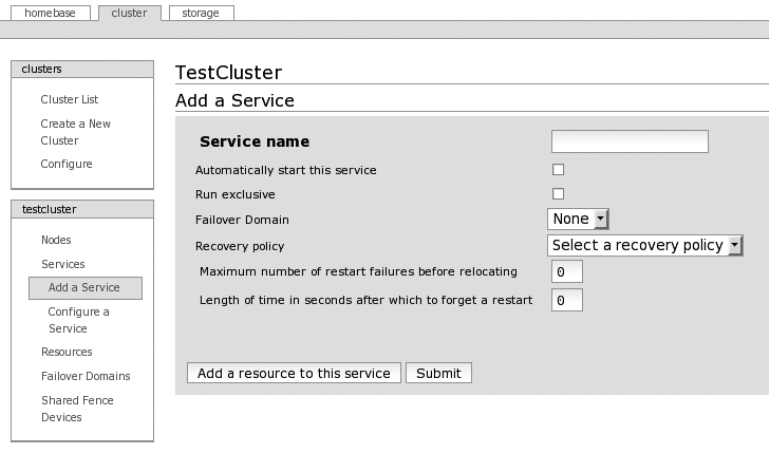
CHAPTER 12 ■ USING HIGH AVAILABILITY
286
that is configured with certain parameters. For example, it can be the IP address resource
script with a specific service IP address for a certain service. Failover Domains is used to
limit where services are run. If you don’t specify a failover domain for a service, it can be
moved to any node inside the cluster. With failover domains, you can control on which
nodes a service can run. Shared Fence Devices includes devices that are used to fence
nodes but that are not node specific, such as a power distribution bar of which the sock-
ets can be switched on or off remotely over the network. This kind of power distribution
bar can have multiple nodes connected to it.
Now let’s create a very simple service that has one service IP address. Click Services
and then Add a Service. You should see something like Figure 12-4.
Figure 12-4. Adding a service using luci
Fill in a name for the service, and choose whether you’d like the service to be started
when the cluster is started. Choose a recovery action, and depending on which recovery
action you chose, fill in the parameters for the failover action. Then click “Add a resource
to this service.” You should get Figure 12-5.
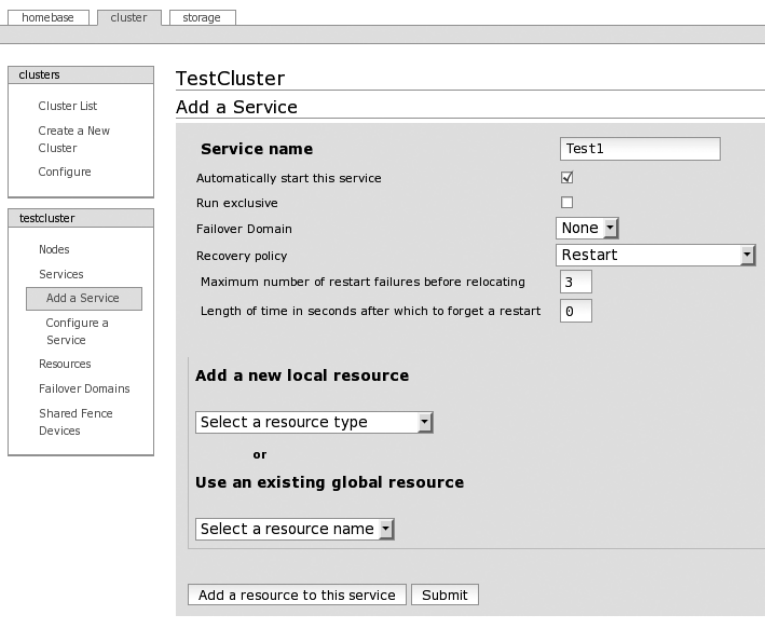
CHAPTER 12 ■ USING HIGH AVAILABILITY 287
Figure 12-5. Adding a resource to a service using luci
From the “Add a new local resource” drop-down box, select IP Address. You can con-
figure the resource. Enter an IP address for this service, and select whether the interface
link should be monitored. Remember, this IP address should be different from the IP
addresses of the nodes. The result should look like Figure 12-6.
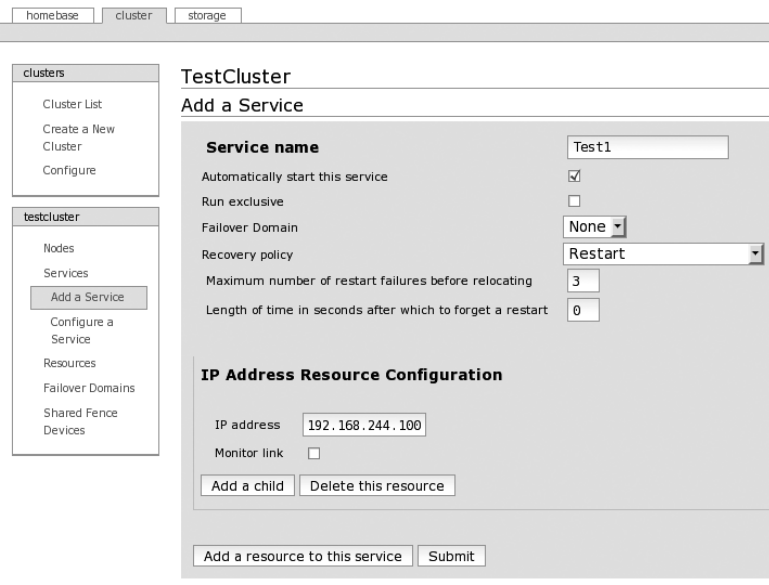
CHAPTER 12 ■ USING HIGH AVAILABILITY
288
Figure 12-6. A service with an IP address resource in luci
To finish, click the Submit button, and confirm that you want to create this service.
The cluster will now be reconfigured, and the service will be started. When this is ready,
click the Services entry in the testcluster menu on the left. You should then see the state
of the service and on which node it is running if it was started. You should now also be
able to ping the service IP address that you configured.
To double-check the cluster configuration, you can check the content of the file /etc/
cluster/cluster.conf, which contains the actual cluster configuration as used by the dif-
ferent daemons.
Advanced Configurations Using CCS
As you have seen, configuring a cluster with CCS is pretty simple using the luci web inter-
face. So, now that you have the basics of how this works, let’s explain a bit more how you
can make certain configurations.
CHAPTER 12 ■ USING HIGH AVAILABILITY 289
When you look back on how you created the service, you can see that you can add
multiple resources to a service and that you can also add child resources to a service. This
is used to determine the order in which resources are started and stopped.
A child resource will start only when its parent resource has been started successfully,
and a child resource will need to be stopped before its parent resource can be stopped.
This method is therefore used when a resource needs something from another resource
to function, just like a filesystem needs a storage device present before it can function. So,
you define the filesystem resource as a child of the storage device resource.
Multiple resources that are part of a service can be viewed as a group of resources. In
this case, there is no explicit order in which the resources are started and stopped. The
order of resources in the service usually does not matter. There is an exception to this
rule: a set of resources have been predefined with a specific order inside the code of CCS.
This order is as follows:
• lvm
• fs
• clusterfs
• netfs
• nfsexport
• nfsclient
• ip
• smb
• script
This means, for example, that an lvm resource is always started before an ip resource
and that an smb resource is always stopped before an fs resource. But remember that the
child-parent relationship mentioned earlier has precedence over this. You can force a
filesystem to be stopped before a service IP address by making the filesystem resource a
child of an IP address resource.
You can find more information about these relationships and ordering in Appendix D
of the Cluster Administration Guide on the CentOS web site.
Another feature in CCS are the failover domains, but they make sense only if you have
a cluster of more than two nodes. Failover domains allow you to limit on which nodes a
certain service can run. You can also look at it as a group of nodes.
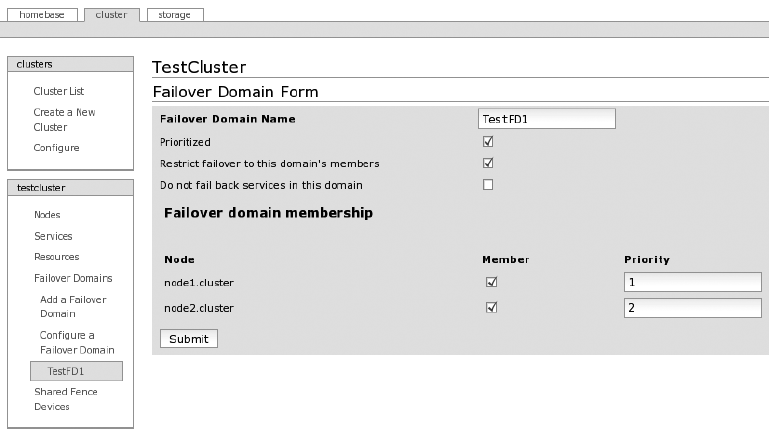
CHAPTER 12 ■ USING HIGH AVAILABILITY
290
For example, you have a cluster of four nodes. Two of the nodes are to run a web
server, the other a database. Then you create two failover domains: one for the web server
that contains the two nodes that will have the web server installed and a second for the
database that contains the two nodes that will run the database. And then when you create
the services, you assign them to the proper failover domain so that the web server service
will run only on the nodes that have a web server and the same for the database service.
Advanced Example with CCS
To finish up this chapter about HA, we’ll show an example of CCS that uses some of the
advanced options mentioned earlier. First we configured a failover domain as shown in
Figure 12-7.
Figure 12-7. Failover domain example using luci
What you can see is that the failover domain is called TestFD1. The prioritization of
nodes is enabled, meaning that you can indicate on which node the services using this
failover domain will run by default. Also, failover is restricted to nodes that are part of the
failover domain, meaning that services in the domain will never run on nodes not part
of the domain. Then you see a list of all nodes in the cluster, if they are a member of the
domain, and their priorities (a lower number is a higher priority). In this example, both
nodes are members of the domain, and node1 has the highest priority.
Then we created a service that uses the failover domain shown earlier. Its configura-
tion looks like Figure 12-8.
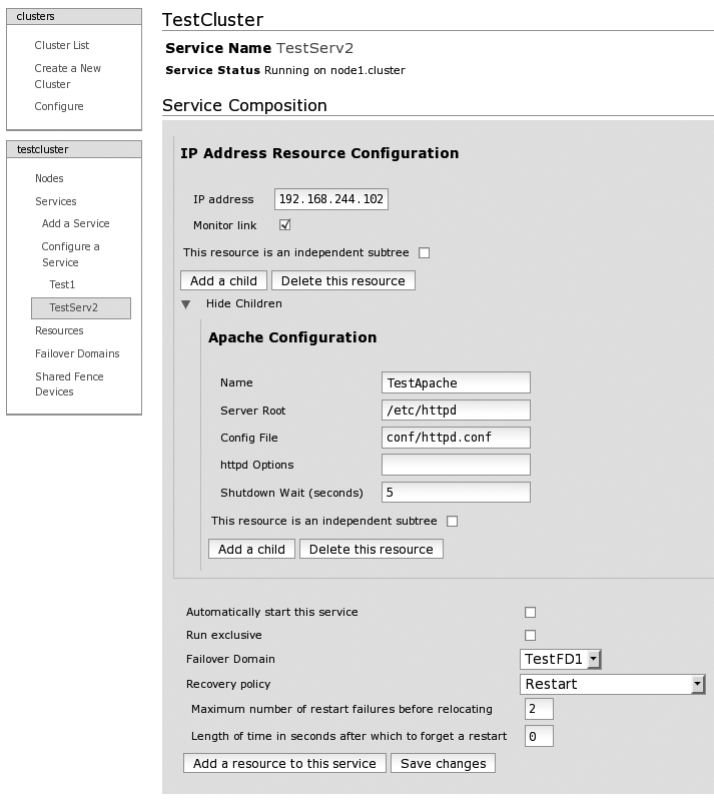
CHAPTER 12 ■ USING HIGH AVAILABILITY 291
Figure 12-8. Advanced service example using luci
This service is called TestServ2 and has two resources. The first resource is an IP
address (192.168.244.102), and the link state of the interface running this IP address will
be monitored. The second resource is a child of the IP address resource, meaning that
it will be started only if the IP address is active, and it needs to be stopped before the IP
address can be removed. The second resource is an Apache web server resource named
TestApache; the server root is located in /etc/httpd, and the config file of Apache is conf/
httpd.conf (the path is relative to the server root). We also specify that when stopping
Apache, the resource will wait five seconds after it has stopped the Apache daemon itself
before continuing.
CHAPTER 12 ■ USING HIGH AVAILABILITY
292
The service will not start automatically. It is part of the failover domain TestFD1. It will
restart if a resource fails, but only two times; then it will relocate the service to another node.
So, this example shows a service that consists of an IP address and a web server. The
web server will be started after the IP address, and the service will start by default on node1.
It will also run only on node1 and node2. This example shows some of the ways to determine
the place and order of resources as explained in the “Advanced Configurations Using CCS”
section.
Building Clusters Using HPS
In the following sections, we will make cluster configurations using HPS.
Creating a Basic Cluster with HPS
In this section, we will show how to create a simple cluster, like the one made in the pre-
vious section with CCS, but this time using HPS. There are three methods to configure
HPS. The first one is using its XML-based configuration and the cibadmin command. But
this isn’t simple or user-friendly since you need to write complete sections of XML. The
second method is using the GUI tool called hb_gui. This is a much friendlier way to con-
figure HPS, but the problem is that the GUI code isn’t updated as much as the rest of HPS
code, so there are some bugs in it, and it could be that the code will disappear from HPS
entirely. The third option is using the crm command. This is a command-line interactive
tool to configure HPS. It’s pretty new and designed to hide the difficult XML configura-
tion. The tool can also be used in script mode if required. The crm tool is also what you
will use in the chapter to configure HPS.
With Heartbeat running, you can use the crm tool to check the current and, of course,
empty configuration like this:
# crm status
============
Last updated: Wed Apr 1 21:29:19 2009
Current DC: node2 (f75fc6cb-6aba-4fd5-a5ee-532d53ebd6c7)
Version: 1.0.2-c02b459053bfa44d509a2a0e0247b291d93662b7
2 Nodes configured.
0 Resources configured.
============
Node: node1 (1e71963e-412a-4359-89a4-c9cb69e1c336): online
Node: node2 (f75fc6cb-6aba-4fd5-a5ee-532d53ebd6c7): online
CHAPTER 12 ■ USING HIGH AVAILABILITY 293
Here you use the crm tool in script mode by directly giving it a command to execute.
You can see that Heartbeat has detected both nodes and they are “online.” But for the
rest, there is no configuration. Let’s change that. You will, like in the previous chapter,
create a simple cluster with only an IP address. To do this, execute the crm command
without any parameters. You should get the following prompt:
# crm
crm(live)#
You are now at the prompt of the crm tool. The (live) part of the prompt means that
you are configuring the current running configuration of HPS. This is then how to config-
ure a service IP address:
crm(live)# configure
crm(live)configure# primitive testip IPaddr2 params ip=192.168.244.101
crm(live)configure# end
There are changes pending. Do you want to commit them? y
crm(live)# status
============
Last updated: Wed Apr 1 21:43:48 2009
Current DC: node2 (f75fc6cb-6aba-4fd5-a5ee-532d53ebd6c7)
Version: 1.0.2-c02b459053bfa44d509a2a0e0247b291d93662b7
2 Nodes configured.
1 Resources configured.
============
Node: node1 (1e71963e-412a-4359-89a4-c9cb69e1c336): online
Node: node2 (f75fc6cb-6aba-4fd5-a5ee-532d53ebd6c7): online
testip (ocf::heartbeat:IPaddr2): Started node1
crm(live)# quit
bye
The first command, configure, enabled the configuration mode in which you can
make changes to the configuration of the cluster. Then you configure a primitive, which
is HPS-speak for a resource using a “primitive” statement. Then you exit the configura-
tion mode using the end command. The crm tool then asks if you want to save the changes
made to the configuration. Then you’re asked again for the status of the cluster, where
you can see that the newly created resource testip has been started and is running on
node1. Finally, you end the crm session using the quit command.
CHAPTER 12 ■ USING HIGH AVAILABILITY
294
The most important line here is the primitive, so we’ll explain it. The first option is
the name for the resource (in this case testip).
The second option specifies the type of resource. This is done by giving the name of
the script that will be used to manage the resource (in this case IPaddr2). You can find
all resource scripts that are included with HPS in the directory /usr/lib/ocf/resource.d/
heartbeat/. If you check the content of that directory, you will see that there are a lot of
premade scripts included.
The third option is called params and means that the following options are parameters
for the resource script used for this resource. The only parameter defined here is ip, and it
is given a value of 192.168.244.101.
You can find more information on how to use the crm tool at http://clusterlabs.org/
wiki/Documentation. On that page, follow the links “CRM command line interface” and
“Example Configurations (with the CRM shell).”
Advanced Configurations Using HPS
You can also group and order services/resources in HPS. For this, HPS has more flexible
and more powerful methods, but they are also more complex.
Without any additional configuration, defined resources in the HPS cluster will run
wherever HPS would like to run them, and HPS will also start and stop the resources in
the order HPS prefers. To limit this behavior, HPS uses a concept of constraints. These are
rules that specify where to run or where to not run a certain resource. The placement of
resources can be based on nodes or other resources. This means that you can specify on
which nodes a certain resource should or shouldn’t run on. You can also specify whether
a resource can or should be run together with another resource or whether a resource
cannot run together with another resource.
Constraints can also be used to determine in which order the resources should be
started and stopped. This can be specified resource per resource, but this can also be
done in what is called resource sets. These resource sets are a simpler notation of normal
order constraints, which is useful if you have a larger set of resources that need to be
started and stopped in order.
Using these three constraint mechanisms (constraining based on node, constraining
based on resource, and constraining based on start order), you should be able to make
resources do what you want them to do. However, you should probably take some time
to think through what exactly you want your resources to do and how to implement these
inside HPS using these mechanisms.
Besides the constraints, HPS offers a couple of special resource types with special
features or ways to simplify common constraint configurations. These special types are
groups, clones, and multistate.
CHAPTER 12 ■ USING HIGH AVAILABILITY 295
A group is just what the name implies; it is a set of resources that belong together.
Resources that are in groups will always be run on the same node. And the resources in
a group will always be started and stopped in the order of how they are defined in the
group. A group is basically a simpler way of using resources and start order constraints.
A clone is a resource that is run multiple times and usually with one clone instance
per node. It was originally made to run an IP address on multiple nodes at the same time
(for load-balancing purposes) but can be used for anything where it seems like it’d be a
handy feature. When you create a clone, you can specify how many copies of the clone
should run in the cluster and how many copies of a clone can run per node. Inside a
clone, you can define one normal resource (a.k.a. primitive) or one group resource.
A multistate is a special version of a clone. With a normal clone, each instance of the
clone is similar to the other instances. With a multistate resource, a clone instance can
be either in a master or in a slave state. These states are just names and can mean what-
ever you would like them to mean. For a multistate resource, you can specify, besides the
normal clone parameters, how many master instances can be in a cluster and in a node.
Multistate resources are, for example, used for replicated setups (database, filesystem,
and so on). The master instance sends its data to the slave instance.
Advanced Setup with HPS
In this section, we will show how to create an advanced setup with HPS using some of the
advanced configuration options available for HPS. Here is the example that was created
using the crm tool:
crm(live)# configure
crm(live)configure# erase
crm(live)configure# primitive ip1 IPaddr2 params ip=192.168.244.101 op monitor \
interval=60s timeout=10s
crm(live)configure# primitive apache1 apache params /
configfile=/etc/httpd/conf/httpd.conf /
op monitor interval=60s timeout=30s
crm(live)configure# primitive pingd pingd params name=pingd multiplier=100 \
dampen=5s host_list="192.168.244.1"
crm(live)configure# group webserver ip1 apache1
crm(live)configure# clone conn pingd meta globally-unique=false clone-max=2 \
clone-node-max=1
crm(live)configure# location node_pref webserver rule 50: #uname eq node1 \
rule pingd: defined pingd
crm(live)configure# end
There are changes pending. Do you want to commit them? y
crm(live)#
CHAPTER 12 ■ USING HIGH AVAILABILITY
296
Let’s go over this line by line. The first two lines enable the configuration mode and
erase the configuration so that you can start with an empty cluster. Then you define three
resources (called primitives by HPS). The first is an IP address resource with the name
ip1 that uses the IPaddr2 script to manage the resource, that uses 192.168.244.101 as the
IP address, and that will be monitored (checked if it is still running) every minute with a
timeout of ten seconds.
The second resource is an Apache resource called apache1. It uses the apache resource
script, it will start Apache with /etc/httpd/conf/httpd.conf as the configuration file, and it
will be monitored every minute with a 30-second timeout.
The third resource is a ping daemon. It checks whether hosts are available and sets
an attribute in the cluster configuration with the result. It is called pingd and uses the
pingd resource script. The attribute that the ping daemon will set is called pingd and will
have the value 100 if it can reach all the nodes listed. It will change the attribute only if
the availability is the same for at least five seconds (this is to prevent a single missed ping
from making a resource move), and the host that it will ping is 192.168.244.1 (multiple
hosts are separated by spaces).
Then a group called webserver is created that has ip1 and apache1 as members. So,
these two resources will always be run on the same node and started in the order as
specified.
Then a clone resource is made that has conn as the name and pingd as the resource.
The globally unique parameter tells HPS that the clone behaves the same on all nodes,
and there will be a maximum of two clones active in the cluster with a limit of one clone
per node. The clone is used to run the ping daemon on all nodes of the cluster because we
want to test the connectivity of each node.
Then a location constraint is created called node_pref for the group webserver. The
constraint has two rules, the first rule has a value of 50 if true, and the rule is #uname eq
node1, meaning that hostname equals node1. This rule makes the group webserver run by
default on node1 since the default score for a node is 0, but node1 will get a score of 50. The
second rule will have the value of the attribute pingd if true, and the rule is defined pingd,
meaning true if attribute pingd exists. This rule makes the group web server run only on
nodes that can reach the host(s) specified in the ping daemon configuration. If no nodes
can reach the host(s) specified, then nothing changes.
Then to finish, the configuration mode is exited, and the changes are applied and
committed. The new configuration is live from that moment.
To conclude, this example behaves almost exactly as the example using CCS. The
only difference is that here the network connectivity is checked using a ping, while with
CCS only the physical state of the interface is checked.
CHAPTER 12 ■ USING HIGH AVAILABILITY 297
Summary
In this chapter, we introduced you to clustering and explained the purpose of HA clusters.
We reviewed the basic theories of how an HA cluster works and how it looks. Then we
introduced you to two HA suites that can be used with CentOS, namely, the CentOS Cluster
Suite and the Heartbeat/Pacemaker Suite. We then showed how to set up a simple cluster
with both suites to give you a feel for how to configure each suite. Then we explained some
of the more advanced configuration options for both HA suites. Finally, we showed you an
advanced example of a cluster using both suites.
For more in-depth knowledge about both cluster suites and more information on
how to configure them, you can refer to the documentation of both suites.

299
CHAPTER 13
Monitoring Your Network
Using Nagios
The concept of network monitoring and the need for it should not be that hard to
understand. When you have machines providing services and they are somehow critical
to you, you will want to know their state and be alerted if a service is no longer available
or is producing some sort of error. That is where monitoring comes into play.
Generally speaking, there are two types of monitoring. First, system monitoring is
where you check statistics about things local to a computer system (CPU usage, available
memory, filesystems, process load, the presence of certain processes, and so on). These
are all things that help monitor the “health” of a computer system. For this to work, you
need a daemon to run locally on each machine that is going to be monitored. The SNMP
protocol provides a common way to get information from other systems and devices.
On Linux systems, you can use the Net-SNMP project to be both an SNMP client and an
SNMP server. But next to SNMP, a lot of monitoring tools provide their own specialized
daemons to get local information from a system. In general, this type of daemon is called
a monitoring agent.
The second type of monitoring is network monitoring. This is where a central
machine checks the status of services available on the network. Does the web server still
return pages? Does the mail server still accept mails? Can files still be retrieved from the
file server? This central monitoring server acts like a special client that speaks to the dif-
ferent services on the network and returns the status to the monitoring server.
Nagios started initially as a network monitoring tool, and system monitoring was
added later. The current version of Nagios (3.0) is capable of monitoring large networks,
and it can do both system monitoring and network monitoring.
How Nagios Works
The Nagios project consists of the Nagios daemon that does all the actual checks and the
web interface that can be used to view the status of everything that is monitored. Then
there is the separate Nagios plug-in project that consists of a large collection of scripts
CHAPTER 13 ■ MONITORING YOUR NETWORK USING NAGIOS
300
that can be used to check specific things (such as HTTP, SMTP, FTP, and so on). So, to
have a functional Nagios setup, you need to have both the Nagios daemon and the Nagios
plug-ins installed on your system.
The Nagios daemon behaves like a scheduler that runs certain scripts at certain
moments. It stores the results of those scripts and will run other scripts if these results
change. All these scripts are, of course, the scripts from the Nagios plug-in project or are
scripts that you have created.
The web interface will visualize the state of all the things it monitors. It can also
change certain runtime aspects of how/when the daemon will do the checks. The web
interface cannot be used to actually change the configuration of Nagios, but there are
third-party projects that do provide a web interface to manage the Nagios configuration.
You can configure Nagios by defining objects (hosts, services, contacts, commands,
and so on) that are linked together. The two most important objects inside Nagios are
hosts and services. A host object is simply the mapping between an IP address and a
name. This name will be used internally in Nagios and will be shown in the web interface.
Usually, the DNS name that is linked to the IP address will be used as the name.
A service object specifies a certain service that is running on a host that Nagios needs
to check. A service object has a link to one host object, and the IP address of this host will
be used as the target for the check. The service object also has one link to a command
object, which contains the actual script that will be executed to perform the check.
When Nagios needs to send an alert, it uses a contact object that is attached to a ser-
vice or a host. This contact object contains information on how to reach that contact and
defines a method for alerting the contact.
Nagios also allows you to put the host, service, and contact objects into groups.
These groups can be used to put related objects together and to simplify the Nagios
configuration.
Finally, time periods are used by Nagios to specify when a check must or must not
be done and when contacts will receive notifications.
There are also a couple of object extensions that are used to add extra information
to an object or to specify certain relations between objects.
So, to summarize, configuring Nagios consists of mapping your network and all its
components to Nagios objects. Nagios will then check all the service objects that exist
in your configuration.
Installing Nagios
As always, the recommended way to install packages in CentOS is to use the yum com-
mand. The CentOS repositories do not contain any Nagios packages, but luckily there are
third-party repositories that have prebuilt Nagios packages for CentOS that you can use.
One of those repositories is RPMforge. Before you enable the RPMforge repository, you
first need to set up the yum-priorities plug-in. yum-priorities makes sure that third-party
CHAPTER 13 ■ MONITORING YOUR NETWORK USING NAGIOS 301
repositories do not replace packages that are also in the CentOS repositories. To enable
this plug-in, first you need to install it:
# yum -y install yum-priorities
Then you enable the RPMforge repository by downloading and installing the
rpmforge-release package, which contains all the needed configuration files. You can find
the correct rpmforge-release package for your system at https://rpmrepo.org/RPMforge/
Using. We used the following:
# rpm -ivh http://packages.sw.be/rpmforge-release/\
rpmforge-release-0.3.6-1.el5.rf.i386.rpm
Then you need to give each repository a priority. To do this, edit each file that ends
with .repo in the directory /etc/yum.repos.d by adding a line like priority=1. The smaller
the number, the higher the priority of that repository. We advise you to give all CentOS
repositories a priority of 1 (these are all present in the CentOS-Base.repo file). For the
RPMforge repository, we used priority 10. This is how the RPMforge repository config file
(called rpmforge.repo) should look:
# Name: RPMforge RPM Repository for Red Hat Enterprise 5 - dag
# URL: http://rpmforge.net/
[rpmforge]
name = Red Hat Enterprise $releasever - RPMforge.net - dag
#baseurl = http://apt.sw.be/redhat/el5/en/$basearch/dag
mirrorlist = http://apt.sw.be/redhat/el5/en/mirrors-rpmforge
#mirrorlist = file:///etc/yum.repos.d/mirrors-rpmforge
enabled = 1
protect = 0
gpgkey = file:///etc/pki/rpm-gpg/RPM-GPG-KEY-rpmforge-dag
gpgcheck = 1
priority=10
Now the system is ready to install Nagios. Use this yum command:
# yum install nagios nagios-plug-ins httpd
This will install Nagios, the Nagios plug-ins, and the Apache web server (so you can
use the web interface). After installation, you will find all the Nagios configuration files
in the directory /etc/nagios. The main configuration file is called nagios.cfg, and all the
files in the /etc/nagios/objects directory contain all the different object definitions. The
file /etc/httpd/conf.d/nagios.conf contains the Nagios configuration for the Apache web
server. In the directory /usr/lib/nagios/cgi you’ll find CGI scripts that form the Nagios
web interface. The /usr/lib/nagios/plugins directory contains all the scripts that Nagios
CHAPTER 13 ■ MONITORING YOUR NETWORK USING NAGIOS
302
uses to do the checks and to send out alerts. The directory /usr/share/nagios contains the
static part of the web interface. All the Nagios log files are located in /var/log/nagios, and
the directory /var/nagios contains all the runtime information from Nagios, such as the
current status of all defined hosts and services.
Initial Setup of Nagios
The packages used to install Nagios contain a basic configuration of Nagios that is almost
ready to start using immediately. There are just a couple of things that still need to be
done before you can start Nagios.
The first step is to edit the file contacts.cfg in the directory /etc/nagios/objects/. In
that file you will find a definition of a contact object. Replace the current e-mail address
nagios@localhost with the e-mail address to which all alerts from Nagios should be sent.
Later you’ll learn how to add contacts and how to control what alerts are sent out.
Next you create a user that is allowed to log in to the web interface (it is password
protected by default). To do this, run the following command:
# htpasswd -c /etc/nagios/htpasswd.users nagiosadmin
New password:
Re-type new password:
Adding password for user nagiosadmin
The nagiosadmin name is the same username as the one in the contact definition in
the previous step. The file /etc/nagios/htpasswd.users is used by the Apache web server
and contains the user’s name and an encrypted password. Remember the password you
use, because you will need it to log in to the web interface.
Now you can start the Nagios daemon and configure it to always start at boot:
# chkconfig nagios on
# service nagios start
Starting nagios: done.
As a final step, start the Apache web server and also configure it to start at boot:
# chkconfig httpd on
# service httpd start
Starting httpd: httpd: Could not reliably determine the server's fully qualified
domain name, using 127.0.0.1 for ServerName
[ OK ]
If you get the same warning about Apache not being able to get the server’s name,
you can ignore it for the moment. Apache (and Nagios) will work fine. When you plan to
put Nagios into production, check Chapter 5 for how to get rid of this warning.
CHAPTER 13 ■ MONITORING YOUR NETWORK USING NAGIOS 303
Now that Nagios and Apache are running, you can surf to http://<hostname>/
nagios/ (replacing <hostname> with the actual hostname or IP address of the host where
you installed Nagios). Then you will get a request for a username and password. Use
nagiosadmin as the user, and use the password you entered previously. You then should
see the Nagios start page. Next, click the Service Detail link in the Monitoring section of
the menu on the left. You then will see a host called localhost with a couple of services
that are selected (Current Load, HTTP, SSH, Swap Usage, and so on). These services will
normally be in the OK state (green background), and the timestamp for the Last Check
field should be fairly recent. If this is the case, then Nagios is running correctly and is
actively checking the defined services.
Nagios Configuration Overview
Now that you have your Nagios setup running, you will probably want to expand what
is being monitored. Before going into detail on how exactly to add hosts and services to
Nagios, we will go over how the configuration of Nagios works, and we’ll introduce some
of the general concepts that are used in the Nagios configuration files.
The main Nagios configuration file is /etc/nagios/nagios.cfg. This is read by the
Nagios daemon when it starts. This file contains the options that relate to the operation
of the Nagios daemon and contains references to other files that contain specific infor-
mation.
The web interface of Nagios is based on CGI scripts, as shown earlier, and these
CGI scripts use the file /etc/nagios/cgi.cfg as the main configuration file. It has options
specific to the operation of the web interface and has a reference to the main Nagios con-
figuration file so that it can find the rest of the Nagios configuration.
The list of options on the main Nagios configuration file and in the CGI configuration
file is pretty long. We won’t go over each option here. Once you have used Nagios for a
while and have a better feeling for how it works, we suggest you go over these files again,
read the comments for each option, and also read the Nagios documentation included
and on the web site. The default settings in these files are OK in most cases.
There are only three options that we want to talk about, and they are all present in the
main Nagios configuration file (nagios.cfg). The first one is resource_file. This resource
file is used to configure user-defined macros. A macro is Nagios-speak for a variable;
macros look like $<macro name>$ and are used a lot in Nagios, mostly with configuration
checks or alert commands. There are 32 user-defined macros available in Nagios, named
$USER1$ through $USER32$. In the configuration that comes with the Nagios packages used
here, the $USER1$ macro is used to point to the directory where the plug-ins are installed.
All the other user-defined macros are still available. For more information about macros
and a complete list of all the available macros, refer to http://nagios.sourceforge.net/
docs/3_0/macros.html.
CHAPTER 13 ■ MONITORING YOUR NETWORK USING NAGIOS
304
The other two options are cfg_file and cfg_dir. Both are used to point to configura-
tion files that contain object definitions. You could put all these definitions inside the
main configuration file, but that would result in one big configuration with no overview
and no structure. Therefore, we advise you to put all your object definitions in separate
files and to put group definitions into logical groups.
There is no general structure on how to do this; it all depends on your specific situa-
tion. A common situation is that all object definitions except those for hosts and services
are in one file based on the type of object (commands, contacts, time periods, and so on).
The host and service object definitions are usually grouped either in a file based on the
environment (production, testing, Linux, Windows, and so on), using the cfg_file option,
or in a directory where each file in that directory represents one host, using the cfig_dir
option.
Like for many other configuration files in Linux, the # character is used to indicate
comments.
Objects and Templates
You already know that Nagios uses objects to define what to check, and you also learned
about the files where you put these object definitions. Now you will see exactly how these
object definitions work.
A good way to learn how to define objects is to take a look at the localhost.cfg file
in the /etc/nagios/objects directory. This file contains the host and service definition
for localhost, a.k.a. the Nagios server, which you have already seen in the Nagios web
interface.
This file starts with the definition of a host object with localhost as the name and
127.0.0.1 as the IP address. Then it defines a host group called linux-servers that has
localhost as a member. Then it defines eight services, such as the service named PING
that is tied to localhost and that uses the check_ping command to do the actual check.
You may notice that all these definitions are pretty short. This is because Nagios
provides a template system in which you can create a template of how a host or service
should look and then use these templates for real hosts and services by just filling in the
specific details for that host or service.
If you look back at the localhost.cfg file, you will see that all host and service defi-
nitions there have the use keyword. This keyword is used to point to a template. For
example, the localhost definition uses template linux-server.
In the included example configuration, all templates are defined in the file templates.
cfg. If you will look in that file, you will see that it contains template definitions for con-
tact, host, and service objects. Let’s use the localhost object as an example of how this
process works. This is the definition of the localhost object:
CHAPTER 13 ■ MONITORING YOUR NETWORK USING NAGIOS 305
define host{
use linux-server
host_name localhost
alias localhost
address 127.0.0.1
}
This object uses the template linux-server and defines the host_name, alias, and
address options. This is then what the linux-server template looks like:
define host{
name linux-server
use generic-host
check_period 24x7
check_interval 5
retry_interval 1
max_check_attempts 10
check_command check-host-alive
notification_period workhours
notification_interval 120
notification_options d,u,r
contact_groups admins
register 0
}
As you can see, this definition looks a lot like the localhost definition, but what makes
this a template is the register option, which is set to 0 here. This tells Nagios that this
object is not a real object but is usable only as a template. You can also see that, besides
other normal options, this template used another template called generic-host. This tem-
plate looks like this:
define host{
name generic-host
notifications_enabled 1
event_handler_enabled 1
flap_detection_enabled 1
failure_prediction_enabled 1
process_perf_data 1
retain_status_information 1
retain_nonstatus_information 1
notification_period 24x7
register 0
}
CHAPTER 13 ■ MONITORING YOUR NETWORK USING NAGIOS
306
This template does not use another template, so the template chain stops here. When
Nagios starts, it will follow the template chain for each object and put all the defined
options together. In this case, that would look like this:
define host{
host_name localhost
alias localhost
address 127.0.0.1
check_period 24x7
check_interval 5
retry_interval 1
max_check_attempts 10
check_command check-host-alive
notification_period workhours
notification_interval 120
notification_options d,u,r
contact_groups admins
notifications_enabled 1
event_handler_enabled 1
flap_detection_enabled 1
failure_prediction_enabled 1
process_perf_data 1
retain_status_information 1
retain_nonstatus_information 1
notification_period 24x7
}
As you can see, using templates makes defining objects a lot simpler and shorter and
means you need to make changes in only one place instead of having to edit each object
separately.
One question you will undoubtedly have is, what happens when an option is defined
in multiple places? The basic rule is that locally defined options replace the ones defined
in the template. So, an option defined in the localhost object will override any others if
that option is present in both the linux-server and generic-host templates. If an option
is defined in the linux-server and generic-host templates but not in the localhost object,
then the value from the linux-server template is used.
You can find more information about this template system in the Nagios documenta-
tion and at http://nagios.sourceforge.net/docs/3_0/objectinheritance.html.
CHAPTER 13 ■ MONITORING YOUR NETWORK USING NAGIOS 307
Basic Nagios Configuration
Now that you know how the configuration of Nagios works and how to use and create
templates, it is time to put this into practice and define a couple of new hosts and services.
In this example, we will show how to add the definitions to monitor a web server. But you
can use this procedure for any type of service as long as there is a plug-in for it or you cre-
ate one yourself.
The first step is to look to see whether a plug-in is available that can check the ser-
vice you want to monitor. For this example, we want to do a ping to the web server to see
whether it can be reached over the network, and we want to do an actual HTTP request to
see whether the web server itself is still running and functioning normally.
The first place to look for plug-ins is in the directories /usr/lib/nagios/plug-ins/ and
/usr/lib/nagios/plug-ins/contrib/. For our example, the check_ping and check_http com-
mands are available. If you can’t find what you need, the second place to look is at http://
www.nagiosexchange.org/, where you will find a lot of contributed plug-ins.
Once you locate the plug-in you want to use, you need to find out exactly how it
works. To do this, run the plug-in with the --help argument. This will show you all the
available options for each plug-in.
Now that you have found a plug-in and know how it works, you can move to the next
step. Define the check command inside Nagios. For this example, both the ping and http
commands are already defined in the file commands.cfg. This is how they look:
# 'check_ping' command definition
define command{
command_name check_ping
command_line $USER1$/check_ping -H $HOSTADDRESS$ -w $ARG1$ -c $ARG2$ -p 5
}
# 'check_http' command definition
define command{
command_name check_http
command_line $USER1$/check_http -I $HOSTADDRESS$ $ARG1$
}
Defining a command is pretty simple, as you can see. It requires only two lines: the
name of the command and the actual command that needs to be executed to run the
check. It also shows an example of how to use macros inside Nagios. The $USER1$ macro
is replaced by the directory where the plug-ins are installed (/usr/lib/nagios/plugins/).
The $HOSTADDRESS$ macro is replaced by the value given for the address option of the host
CHAPTER 13 ■ MONITORING YOUR NETWORK USING NAGIOS
308
for which the check is run. This is normally the IP address of the host. The $ARG1$, $ARG2$,
and so on, macros are replaced by arguments given to the check command in the service
object definition. We will return to this when we show how to create the service objects.
The next step is to create a host object for the web server. To do this, create a new file
in the directory /etc/nagios/objects called webserver.cfg with this content:
define host{
use linux-server
host_name webserver
alias Apache HTTP Server
address 192.168.0.11
hostgroups linux-servers
}
This defines a host using the template linux-server called webserver with the alias
Apache HTTP Server (the alias is shown in the web interface and can be used when sending
out alerts). The address is 192.168.0.11, and it is part of the host group linux-servers. The
template linux-server and the host group linux-servers are already part of the example
configuration included with the Nagios packages.
Moving on, the next step is where you create the service objects for the services you
want to check. As mentioned, you want to do a ping check and an http check. To do this,
add the following lines to the webserver.cfg file:
define service{
use local-service
host_name webserver
service_description PING
check_command check_ping!100.0,20%!500.0,60%
}
define service{
use local-service
host_name webserver
service_description HTTP
check_command check_http!-u /index.html -t 5
}
Both service objects use the local-service template and have webserver as the host.
service_description is a name for the specific service and has to be unique per host.
Finally, the command to use to do the service check is defined. You can also see how
the arguments are given to the command. These arguments come after the name of the
CHAPTER 13 ■ MONITORING YOUR NETWORK USING NAGIOS 309
command to use and are separated by the ! character. In the case of the ping check, two
arguments are given to the command. If you put these arguments together with the com-
mand definition, the following is the actual command executed to perform the check of
the service:
/usr/lib/nagios/plugins/check_ping -H 192.168.0.11 -w 100.0,20% -c 500.0,60% -p 5
The same process is done for the http check, but it has only one argument.
Now that you’ve created all the necessary configurations, the next step is to tell Nag-
ios to use your newly created configuration file webserver.cfg. To do this, edit the main
Nagios configuration file (nagios.cfg), and add this line to it (preferably in the same place
as the other cfg_file options):
cfg_file=/etc/nagios/objects/webserver.cfg
This will tell Nagios to also read the webserver.cfg file and use all of the object defini-
tions that it contains.
The next step is to check the updated Nagios configuration. The Nagios daemon
can run a syntax check on the configuration so you can check whether everything is OK
before you tell Nagios to actually start using it so that you don’t break Nagios. To do this,
run the following command:
# nagios -v /etc/nagios/nagios.cfg
Nagios 3.0.6
Copyright (c) 1999-2008 Ethan Galstad (http://www.nagios.org)
Last Modified: 12-01-2008
License: GPL
Reading configuration data...
Running pre-flight check on configuration data...
Checking services...
Checked 10 services.
Checking hosts...
Checked 2 hosts.
Checking host groups...
Checked 1 host groups.
Checking service groups...
Checked 0 service groups.
CHAPTER 13 ■ MONITORING YOUR NETWORK USING NAGIOS
310
Checking contacts...
Checked 1 contacts.
Checking contact groups...
Checked 1 contact groups.
Checking service escalations...
Checked 0 service escalations.
Checking service dependencies...
Checked 0 service dependencies.
Checking host escalations...
Checked 0 host escalations.
Checking host dependencies...
Checked 0 host dependencies.
Checking commands...
Checked 24 commands.
Checking time periods...
Checked 5 time periods.
Checking for circular paths between hosts...
Checking for circular host and service dependencies...
Checking global event handlers...
Checking obsessive compulsive processor commands...
Checking misc settings...
Total Warnings: 0
Total Errors: 0
Things look okay - No serious problems were detected during the pre-flight check
If the last line of the output says that everything is OK, you can proceed. If not, look at
all the warnings and all the errors shown in the output and fix them before continuing.
The last step is where you tell Nagios to use your updated and checked configuration.
You can do this using the following command:
# service nagios reload
Running configuration check...done.
Reloading nagios configuration...done
Now the new configuration is active, and you should be able to see the new host and
its services in the web interface. It could be that Nagios does not execute the new service
checks immediately. Until it does the checks, you will see PENDING as the status.
You can use this procedure to add checks for any service and host that you want, as
long as there is a plug-in that can check the service.
CHAPTER 13 ■ MONITORING YOUR NETWORK USING NAGIOS 311
Contacts and Notifications
Now that you know how to set up Nagios to check your network, you probably want to be
informed if there are any changes in the state of the things that are being checked. Nagios
does that using notifications. A notification will be sent out if the state of a service or host
changes.
To whom Nagios sends these notifications depends on who is a member of the con-
tact group that is attached to the service for which a notification will be sent out. In the
examples used in this chapter, you can see that all the templates have defined a contact
group called admins, meaning that every contact that is a member of the group admins will
receive the notifications.
If you look in the file /etc/nagios/objects/contacts.cfg, you will see that the contact
nagiosadmin is the only member of the admins group. In the same file, you can also see that
the default e-mail address specified for that user is nagios@localhost. Feel free to change
this if you want notifications to be sent to another e-mail address.
In the example configuration, all notifications will be sent out using e-mail. You can
check that in the templates.cfg file (also present in /etc/nagios/objects) in the generic-
contact template. service_notification_commands and host_notification_commands both
use a command that uses the mail program to send the notifications. But because these
notification commands work like any other command (see the file commands.cfg), you can
send out alerts for anything you can write a script for. Other commonly used notification
methods are SMS messages and pagers, but you can find a lot of other examples on the
Internet.
Now that you know to whom notifications are sent, you still need to know when these
will be sent. This is controlled using the notification_period options present in the host,
service, and contact object definitions. In the example configuration used, these are all
defined in the templates. With this option, a time period is specified that says during
which periods notifications can be sent out. These time periods are defined in the file
timeperiods.cfg.
This time period has to be set both for a host/service and for a contact. The time
period for both the host/service causing the notification and for the contact receiving
the notification must allow the notification to be sent out. This allows you to control
when notifications are sent on two levels. One level is that of the services and hosts
being checked, and the other is that of the contacts being alerted. If the time when the
notification needs to be sent falls outside of either one (or both) of the time periods, no
notification will be sent out about this host/service to this contact.
You can find more information about how notifications work in Nagios at this URL:
http://nagios.sourceforge.net/docs/3_0/notifications.html.
CHAPTER 13 ■ MONITORING YOUR NETWORK USING NAGIOS
312
Advanced Nagios Configuration
In this chapter, we used the example configuration that comes with the Nagios pack-
age to show how to create checks for networked services. With these examples, you can
start setting up Nagios for your own environment. But we have covered only the basics of
what Nagios can do and what features it has. So, in this section, we’ll give you a couple of
pointers on what else is possible and where to find more information.
In the examples shown, we have checked services only over the network (except for
those checks about the Nagios server itself). But Nagios can also be used to check things
locally on systems (disk space, memory usage, CPU usage, and so on). For this, Nagios
uses a special daemon running on each system or SNMP. You can find more details on
how to do this for another Linux system at http://nagios.sourceforge.net/docs/3_0/
monitoring-linux.html, for Windows systems at http://nagios.sourceforge.net/docs/
3_0/monitoring-windows.html, and for systems that provide SNMP access at http://nagios.
sourceforge.net/docs/3_0/monitoring-routers.html.
Nagios can, besides performing checks of services, also accept results for checks
from external sources. These types are called passive checks in Nagios. This feature is
used to forward SNMP traps to Nagios, for example, or to set up distributed monitoring
where multiple Nagios servers send the check results to a central Nagios server. You
can find more information about this at http://nagios.sourceforge.net/docs/3_0/
passivechecks.html.
Another very nice feature of Nagios is the ability to express relations between hosts
and between services. For hosts, there are two kinds of relations that you can specify.
Parent-child relations are used to tell Nagios how all the hosts that it knows about are
connected. This creates a kind of tree structure of the network, and Nagios can use this to
see whether a host is really down or whether it is just unreachable because another host
is down and the network traffic passes through that other host. This is explained in more
detail at http://nagios.sourceforge.net/docs/3_0/networkreachability.html.
A second kind of relationship that you can specify for hosts, as well as for services, is
called a dependency in Nagios. For example, you can use a dependency to express that
a web application needs a database server that is running in order to function. You can
then use this relation to filter alerts, such as not sending an alert about the web applica-
tion when the database is down but sending an alert from the web server hosting that
web application when the database is down.
To conclude, we suggest that you go over the Nagios documentation at http://
nagios.sourceforge.net/docs/3_0/toc.html since it explains everything in great detail.
CHAPTER 13 ■ MONITORING YOUR NETWORK USING NAGIOS 313
Summary
In this chapter, you were introduced to Nagios and how to use it to monitor your network.
We explained how Nagios works and then showed how to install it from the RPMforge
repository. Using the example configuration included in the Nagios package, we showed
how to set up Nagios and start it, and then we explained the basics of how to configure
Nagios. Then we set up a basic example where we let Nagios check some network services.
Finally, we explained how contacts are used to send out notifications from Nagios, and we
reviewed some more advanced options available in Nagios and where to find documenta-
tion about them.
With this chapter, you have reached the end of this book. In the first part, you were
introduced to CentOS, and you got to know the basics about the distribution. In the
second part, you learned how to set up the different production services that come
with CentOS like the Apache web server and the Samba file server. In the final part, you
learned how to set up different enterprise features with CentOS such as high availability
and monitoring.

315
Index
SYMBOLS AND NUMERICS
# (pound) character, 202
* (asterisk) character, 71
; (semicolon) character, 202
200 OK status code, 81
401 Unauthorized status code, 81
404 Not Found status code, 81
500 Internal Error status code, 81
A
A records, 170–171
ABI (application binary interface), 6
absolute paths, 46
access_log log, 100
[accounting] share, 215
Active Directory, 200
Add a new local resource drop-down box,
287
[addons] repository, 63
admin users option, 213
AES (Advanced Encryption Standard), 230
AH (Authentication Header) protocol,
229–230
alias_maps parameter, 135
AllowOverride All command, 95
AllowOverride command, 95
allow-transfer statement, 178
answer file, 253
Apache
certificates
intermediary, 109
overview, 105–108
password protection, removing from
key, 110–111
signing, 108
using, 109–110
configuring
locating configuration files, 92
overview, 91–92
restarting, 94
saving configuration files, 93
ServerAdmin class, 93
ServerName class, 93
testing configuration files, 94
.htaccess files
enabling, 95
overview, 95
password protection, 95–97
user accounts, 97
installing
firewall, 85–87
overview, 85
starting, 88–91
testing, 89–91
overview, 79
performance
compression, 98–99
log files, 100
overview, 97–99
SSL, 104–105
virtual hosts
creating, 103
overview, 100–103
vhosts.d directory, 103–104
web servers
choosing, 84
overview, 80–81
running, 82–83
SSL, 81–82
virtual private servers, 83–84
apache1 resource, 296
application binary interface (ABI), 6
application programming interface (API), 6
[apps] share, 215
asterisk (*) character, 71
AUTH command, 129, 144
authconfig option, 259

nINDEX
316
authenticating mail users
encrypted connections, 139–140
passwords, 141–145
usernames, 141–145
Authentication Header (AH) protocol,
229–230
authkeys file, 282
AuthName statement, 96
authoritative, defined, 165
AuthType statement, 96
AuthUserFile statement, 96
autopart option, 261
B
[base] repository, 63
BDCs (backup domain controllers), 200
BEGIN statement, 108
Berkeley Internet Name Domain. See
BIND
Berkeley Software Distribution (BSD)
license, 8
/bin directory, 48
BIND (Berkeley Internet Name Domain)
configuring to host domains, 170
installing, 165–166
leaving off dot in records, 179–180
overview, 164
primary name server, 165
secondary name server, 165
bind-chroot package, 165–166
BIOS, 18
Blowfish, 230
bl.spamcop.net blacklist, 136
/boot directory, 41, 48
bootloader option, 260
broken_sasl_auth_clients parameter, 142
browseable option, 210, 213
BSD (Berkeley Software Distribution)
license, 8
bug fixes, 6–7
C
caching name servers
BIND, configuring to host domains, 170
CNAME records, 171–172
DNS, making available to other
machines, 168–170
MX records, 172–173
NS records, 173–174
overview, 166–168
A records, 170–171
caching-nameserver package, 166, 170
ca.crt file, 239–240
ca.key file, 239
CAs (certificate authorities), 82, 105, 237
cat command, 60
CCS (CentOS Cluster Suite)
building clusters using
advanced configurations, 288–290
advanced example, 290–292
creating clusters, 283–288
overview, 283
configuring, 279–281
installing, 279
overview, 278
cd command, 55, 57
cdrecord command, 17
cdrom command, 257, 271
CentOS (Community ENTerprise
Operating System)
commands
cat, 60
cd, 57
ls, 54–55
mkdir, 56
nano, 59–60
overview, 53
pwd, 53
rm, 58–59
rmdir, 58
touch, 59
defined, 7–11
Enterprise Linux
ABI/API stability, 6
benefits of, 7
certification, 7
extended support, 4–5
low-risk security updates, 5
overview, 4
updates and bug fixes, 6–7
filesystem layout
/bin directory, 48
/boot directory, 48
command prompt, 51
nINDEX 317
/dev directory, 48
/etc directory, 47
filesystem layout, 46
/home directory, 49
/lib directory, 49
/lost+found directory, 49
/media directory, 49
/mnt directory, 49–50
/opt directory, 50
overview, 45–46
/proc directory, 47
relative and absolute paths, 46
/root directory, 47
/sbin directory, 48
/srv directory, 50
/sys directory, 50
/tmp directory, 50–51
/usr directory, 50
/var directory, 47
installing
checksums, 17
erasing disks securely, 37–39
hardware requirements, 13–14
IP, setting manually, 41–42
ISOs, burning, 17–18
over HTTP, 270–271
overview, 13–15
partition layout, 39
quickly, 18–37
software RAID, 40–41
overview, 3–4, 45
prompt, 52–53
repositories
Nagios packages, 300
official, 63–64
overview, 62
third-party, 64
#CentOS channel, 9
CentOS Cluster Suite. See CCS
centosbook.com domain, 158
[centosplus] repository, 63–64
#CentOS-Social channel, 9
certificate authorities (CAs), 82, 105, 237
certificate bundle, 109
certificate chain, 109
certificates
intermediary, 109
overview, 105–108
password protection, removing from
key, 110–111
signing, 108
using, 109–110
certification, enterprise Linux, 7
cfg_dir option, 304
cfg_file option, 304
check_ping command, 304
checksums, 17
chkconfig command, 88, 121, 186
chroot command, 176, 266
cibadmin command, 292
CIFS (Common Internet File System), 199
clearpart option, 261
clones, defined, 295
cluster nodes, 277
Clustering group, 279
clusters, defined, 273
CNAME records, 171–172
.com domain, 158
.com.hk domain, 159
command prompt, 51
command section, 255
command section, kickstart files
authconfig option, 259
bootloader option, 260
cdrom option, 257
firewall option, 259
install option, 257
keyboard option, 258
lang option, 258
network option, 258–259
overview, 255–257
part option, 261
rootpw option, 259
selinux option, 259–260
timezone option, 260
xconfig option, 258
commercial support, defined, 4
Common Internet File System (CIFS), 199
Communications section, 282
Community ENTerprise Operating
System. See CentOS

nINDEX
318
compression, in Apache, 98–99
comps.xml file, 262
conf directory, 92
conf.d directory, 92
conf/httpd.conf file, 291
configtest command, 94, 104, 110, 185
configuration files
locating, 92
saving, 93
testing, 94
configure command, 293
contact object, defined, 300
contacts, Nagios, 311
contacts.cfg file, 302
[contrib] repository, 63
convenience packages, 166
core builds
installing CentOS over HTTP, 270–271
kickstart files
anatomy of, 255–256
command section, 256–261
dynamically creating, 268–269
overview, 255
%packages section, 261–263
scripts section, 263–267
updating, 271
using on web server, 267–268
limitations of, 254
overview, 253–254
reasons to create, 254
.co.uk domain, 159
crm command, 292, 295
.crt files, 109
CSR file, 107
cups options = raw line, 210
/custom directory, 266
CustomLog class, 103
cyrus-sasl package, 130
cyrus-sasl-lib package, 130
cyrus-sasl-plain package, 130
D
DATA command, 115
.db files, 131
ddns-domainname option, 196
ddns-hostname option, 196
ddns-update-style interim; line, 185
deadtime option, 282
default-lease-time line, 185
defined pingd rule, 296
delegation, 157
dependency, 312
Desktop – Gnome option, 27
/dev directory, 48
/dev/cdrom file, 48
/dev/hdc file, 48
device files, 48
/dev/sda file, 38
/dev/urandom file, 140
DHCP (Dynamic Host Configuration
Protocol)
configuring
extended configuration, 186–187
grouping statements, 189–190
minimal configuration, 184–186
overview, 184
requests, relaying, 191–192
shared networks, 191
static IP addresses, defining, 187–189
DNS, integration with, 194–197
function of, 181–182
installing, 183–184
IP, setting manually, 42
overview, 181
PXE booting, 193–194
quick CentOS install, 25
DHCP acknowledgment packet, 182
dhcp daemon, 194
DHCP discovery packet, 181
dhcp package, 183
DHCP requests, 182
dhcp server, 183
dhcpd daemon, 185, 194
dhcpd.conf file, 195
dhcpd-eval man page, 197
dhcp-options man page, 187
Diffie-Hellman parameters, 233, 240
directors, defined, 274
DISCARD command, 137
disks, securely erasing, 37–39
DNS (Domain Name System)
BIND
installing, 165–166
overview, 164

nINDEX 319
primary name server, 165
secondary name server, 165
caching name server
BIND, configuring to host domains,
170
CNAME records, 171–172
making available to other machines,
168–170
MX records, 172–173
NS records, 173–174
overview, 166–168
A records, 170–171
DHCP integration with, 194–197
history of, 157–159
hosts file, 160–161
master server, 175–177
NSCD, 162–164
nsswitch config file, 161
overview, 155–157
problems with
forgetting dot in record, 179–180
forgetting to increment serial
number, 179
overview, 178
resolver, 160
root DNS servers, 160
slave zone, 177–178
WHOIS system, 159
zone transfers, 178
dnsmasq daemon, 183
dnssec-keygen tool, 195
DocumentRoot class, 102
domain member mode, 201
Domain Name System. See DNS
domain-name option, 189, 191
domain-name-servers option, 191
doublehelix command, 53
Dovecot, 150–154
dovecot command, 153
dsn.rfc-ignorant.org blacklist, 137
Dynamic Host Configuration Protocol.
See DHCP
dyndns key, 196
E
EHLO command, 115, 129
EL. See enterprise Linux
e-mail. See mail
Enable Network Time Protocol box, 34
Enable pacemaker section, 282
Encapsulating Security Payload (ESP)
protocol, 229–230
encrypted connections, 139–140
end command, 293
END statement, 108
Enhanced SMTP mode (ESMTP), 129
enterprise Linux (EL)
ABI/API stability, 6
benefits of, 7
certification, 7
extended support, 4–5
low-risk security updates, 5
overview, 4
updates and bug fixes, 6–7
error_log log, 100
ErrorLog class, 103
ESMTP (Enhanced SMTP mode), 129
ESP (Encapsulating Security Payload)
protocol, 229–230
/etc directory, 47
/etc/aliases file, 123, 138
/etc/alternatives/mta file, 118–119
/etc/certs/ directory, 105
/etc/cluster/cluster.conf file, 279, 285, 288
/etc/dhcpd.conf file, 183–184
/etc/dovecot.conf file, 141, 150
/etc/ha.d/ directory, 281
/etc/hosts file, 60, 161
/etc/httpd/ directory, 92, 96, 104, 291
/etc/httpd/vhosts.d/ directory, 104
/etc/mime.types file, 98
/etc/nagios directory, 301
/etc/nagios/cgi.cfg file, 303
/etc/nagios/htpasswd.users file, 302
/etc/nagios/nagios.cfg file, 303
/etc/named.caching-nameserver.conf file,
168
/etc/nscd.conf file, 163
/etc/nsswitch.conf file, 161
/etc/passwd file, 141–142
/etc/pki directory, 139–140
/etc/pki/dovecot/ directory, 150
/etc/pki/tls/certs directory, 140
/etc/pki/tls/private directory, 140
/etc/postfix directory, 123, 134, 138
/etc/postfix/main.cf file, 124–125, 128, 132

nINDEX
320
/etc/postfix/sasl_passwd file, 131
/etc/resolv.conf file, 167
/etc/sysconfig/dhcpd file, 183
/etc/sysconfig/network file, 183
/etc/sysconfig/network-scripts directory,
183
Exim, 117
extended attributes, 207
extended support, 4
[extras] repository, 64
F
Fedora, 3–4
fencing, 275
Fibre Channel connections, 275
file sharing
CentOS, 200–201
configuring, 202–217
installing, 202
overview, 199–201
setting up, 201
Windows networking, 199–200
File Transfer Protocol (FTP), 113
filename option, 193–194
Files statement, 96
filesystem layout
/bin directory, 48
/boot directory, 48
command prompt, 51
/dev directory, 48
/etc directory, 47
filesystem layout, 46
/home directory, 49
/lib directory, 49
/lost+found directory, 49
/media directory, 49
/mnt directory, 49–50
/opt directory, 50
overview, 45–46
/proc directory, 47
relative and absolute paths, 46
/root directory, 47
/sbin directory, 48
/srv directory, 50
/sys directory, 50
/tmp directory, 50–51
./usr directory, 50
/var directory, 47
firewall configuration, 86
firewall option, 259
firewalls
Apache, 85–88
DHCP, 184
mail setup, 120–121, 148–150
fixed-address line, 188
foo.centosbook.com, 162
force group option, 216
force user option, 216
Free Software Foundation, 8
Freenode IRC network, 9
fs resource, 289
FTP (File Transfer Protocol), 113
G
General Public License (GPL), 3
generic-host template, 305
GET request, 81
getent command, 217
getent group command, 217
getent passwd command, 133, 217
global parameters, 184
[global] section, 203–204, 207, 210,
215–216
GoDaddy, 159
goliath server, 269
gpg-key command, 118
GPL (General Public License), 3
grep command, 128
grouping statements, 189–190
groupinstall command, 69
groups
defined, 295
of packages
installing, 68–69
removing, 70
updating, 70
guest ok = no statement, 210
H
HA (high availability) clustering
CCS
building clusters using, 283–292
configuring, 279–281
installing, 279
cluster suite components, 277

nINDEX 321
HPS
building clusters using, 292–296
configuring, 281–283
installing, 279
overview, 273–274
theory of
fencing, 275
overview, 274–275
resources, 276
SIP addresses, 276
split brain, 275
VIP addresses, 276
hardware ethernet line, 188
hardware requirements, CentOS, 13–14
hb_gui tool, 292
hd disk, 260
heartbeat messages, 275
Heartbeat/Pacemaker Suite. See HPS
HELO command, 129
help argument, 307
high-availability clustering. See HA
clustering
high-performance computing (HPC)
clusters, 274
.hk domain, 159
HKIRC (Hong Kong Internet Registry
Corporation), 159
/home directory, 49
[homes] share, 208, 210
Hong Kong Internet Registry Corporation
(HKIRC), 159
host command, 127, 132, 167–168, 188–189
host www.centosbook.com command, 162
host_notification_commands command,
311
host-name parameter, 189
hosts file, 156, 160–161
HPC (high-performance computing) clus-
ters, 274
HPS (Heartbeat/Pacemaker Suite)
building clusters using
advanced configurations, 294–295
advanced setup, 295–296
creating clusters, 292–294
overview, 292
configuring, 281–283
installing, 279
.htaccess files, 95–97
htpasswd command, 97
.htpasswd file, 96
HTTP, 80–81, 270–271
http check, 309
httpd.conf file, 92
HTTPS, 80
I
i386 architecture, 71
ICANN (Internet Corporation for Assigned
Names and Numbers), 159
.idv.hk domain, 159
ifconfig command, 188
IKE (Internet Key Exchange), 228–229, 232
IMAP (Internet Message Access Protocol)
server, 113
IMAP folders, 146
IMAP4 (Internet Message Access Protocol,
version 4 rev 1), 145
%include statement, 265
inet_interfaces line, 135
InfiniBand, 275
init.d scripts, 202, 276
initscript funtion, 183
install keyword, 255
install option, 257
installing
Apache
firewall, 85–87
overview, 85
starting, 88–91
testing, 89–91
BIND, 165–166
CCS, 279
CentOS over HTTP, 270–271
DHCP, 183–184
groups of packages with Yum, 68–69
HPS, 279
mail servers
configuring firewall, 120–121
overview, 118–120
stating Postfix during boot, 121–123
mod_ssl, 105
packages with Yum, 67–68
Samba, 202
Yum, 64

nINDEX
322
intellectual property (IP), 11
intermediary certificates, 109
Internet, defined, 219
internet, personal, 219
Internet Corporation for Assigned Names
and Numbers (ICANN), 159
Internet Key Exchange (IKE), 228–229, 232
Internet Message Access Protocol (IMAP)
server, 113
Internet Message Access Protocol, version
4 rev 1 (IMAP4), 145
Internet Protocol Security (IPSec), 228–235
intranet, defined, 219
invalid users option, 213
IP (intellectual property), 11
ip resource, 289
IPaddr2 script, 296
ipconfig /flushdns command, 163
IPSec (Internet Protocol Security), 228–235
iptables command, 121
ISOs, burning, 17–18
isos directory, 15
K
Kdump, 33
Kdyndns file, 195
keepalive option, 282
key block, 196
keyboard option, 258
kickstart files
anatomy of, 255–256
command section
authconfig option, 259
bootloader option, 260
cdrom option, 257
firewall option, 259
install option, 257
keyboard option, 258
lang option, 258
network option, 258–259
overview, 256–257
part option, 261
rootpw option, 259
selinux option, 259–260
timezone option, 260
xconfig option, 258
dynamically creating, 268–269
overview, 255
%packages section, 261–263
scripts section
overview, 263–264
%post scripts, 266–267
%pre scripts, 265–266
updating to install CentOS over HTTP,
271
using on web server, 267–268
L
lang option, 258
leases, defined, 181
less command, 186
/lib directory, 49
lifetime value, 233
links command, 91
Linux servers, 84
Linux Standard Base (LSB), 51
linux text command, 18
linux-server template, 305, 308
list command, 72, 88, 122
LiveCD, 15
load-balancing clusters, 274
load printers = yes line, 210
localhost hostname, 26
localhost points, 167
localhost.cfg file, 304
log files, Apache, 100
Logging section, 282
Logical Volume Management (LVM), 25, 48
LOGIN AUTH PLAIN command, 142
LOGIN command, 141
/log/nagios directory, 302
lokkit command-line interface, 228
/lost+found directory, 49
lots/and/lots/of/directories directory, 56
ls command, 54–55, 56
LSB (Linux Standard Base), 51
luci daemon, 279–280, 283
luci_admin init command, 280
LVM (Logical Volume Management), 25, 48
lvm resource, 289
LZO data compression, 246

nINDEX 323
M
MAC (mandatory access control), 31
macros, 303
mail
authenticating users
encrypted connections, 139–140
passwords, 141–145
usernames, 141–145
Postfix
antispam, 136–137
configuring system to receive,
132–133
configuring system to send, 124–132
receiving mails for several domains,
137–139
setting up users to receive, 133–135
retrieving
Dovecot, 150–154
firewall, 148–150
overview, 145–148
servers
caveats, 116–117
choosing, 117–118
installing, 118–123
overview, 114–116
running own, 116–117
Webmail, 152–153
mail command, 131, 172
mail exchanger (MX record), 132, 137,
172–173
MAIL FROM command, 115, 136
mail servers
caveats, 116–117
choosing, 117–118
installing
configuring firewall, 120–121
overview, 118–120
stating Postfix during boot, 121–123
overview, 114–116
running own, 116–117
mail spools, 47
mail transfer agent (MTA), 113
mail user agent (MUA), 113
mail2 command, 172
mailbox_size_limit parameter, 146
maildir command, 146
mailserver command, 173
mailserver2 command, 173
main.cf file, 123
mandatory access control (MAC), 31
marc command, 134
master boot record (MBR), 260
master server, 175–177
master state, 295
master zone, 165
master.cf file, 123
MaxClients option, 99
max-lease-time line, 185
MaxSpareServers option, 100
mbox command, 146
MBR (master boot record), 260
md5 command-line tool, 17
MD5 hash, 15
md5sum command-line tool, 17
/media directory, 49
memory usage, 47
MinSpareServers option, 99–100
mirroring, 40
Misc Options section, 282
mkdir command, 56, 58
/mnt directory, 49–50
/mnt/sysimage file, 266
monitoring agent, 299
mount command, 46
mount point, 46
mounted filesystems, 49
MTA (mail transfer agent), 113
MUA (mail user agent), 113
multistate, 295
MX record (mail exchanger), 132, 137,
172–173
MY_OUTER_IPADDR directive, 226
mydestination parameter, 133, 137
mydomain parameter, 124
myhostname parameter, 124, 128
mynetworks parameter, 136, 139
N
Nagios
configuration
advanced, 312
basic, 307–310
overview, 303–304

nINDEX
324
contacts, 311
initial setup, 302–303
installing, 300–302
notifications, 311
objects, 304–306
overview, 299–300
templates, 304–306
nagios.cfg file, 301
Name Service Caching Daemon (NSCD),
162–164
Name Service Switch (NSS), 216
named command, 169, 177
named.conf file, 175, 178, 195
NameVirtualHost directive, 101
nano command, 59–60
Nero Burning ROM, 17
net tool, 202
NetBIOS, 199
netbios name option, 204
netbooting, 193
Netfilter, 87
.net.uk domain, 159
network booting, 193
network card, 41
network monitoring. See Nagios
network option, 258–259
Network Time Protocol (NTP), 33
NetworkManager class, 246–249
New Compilation Wizard, 17
newaliases command, 135
next-server option, 193–194
nmap package, 151
nmbd daemon, 202
noarch package, 71
node_pref command, 296
node1 node, 274
node2 node, 274
notification_period options, 311
notifications, Nagios, 311
NS records, 173–174
NSCD (Name Service Caching Daemon),
162–164
NSS (Name Service Switch), 216
nsswitch config file, 161
NTP (Network Time Protocol), 33
O
OpenSSH, 223
OpenSSL, 107
OpenSUSE, 279
OpenVPN
client, configuring, 242–244
example of, 237–240
NetworkManager class, 246–249
overview, 235–237
security considerations, 244–245
server side, configuring, 240–242
/opt directory, 50
option broadcast-address statement, 187
option domain-name line, 187
option domain-name-servers option, 187
option host-name parameter, 188
option keyword, 184
option ntp-servers statement, 187
option routers line, 185
option subnet-mask line, 185
option time-offset statement, 187
.org.uk domain, 159
Other ports command, 150
P
pacemaker daemon, 281
packages
groups of
installing, 68–69
removing, 70
updating, 70
installing, 67–68
removing, 70
searching for, 70–73
updating, 69–70
%packages section, 256–257, 261–263
parallel computing, 274
params option, 294
parent-child relations, 312
part option, 261
partition layout, custom, 39
passdb backend option, 210
passive checks, 312
passwd command, 210
passwords
Apache, 95–97, 110–111
mail setup, 141–145

nINDEX 325
paths, defined, 46
PDC (primary domain controller), 200
PEER_OUTER_IPADDR directive, 226
performance improvement
compression, 98–99
log files, 100
overview, 97–99
Perl, 11
PID (process ID), 89
pingd resource script, 296
pinging, 161, 296, 304, 309
PKI (public key infrastructure), 237
PLAIN command, 141
PLAIN LOGIN command, 130
point releases, 7
POP3 (Post Office Protocol 3), 113
port forwarding, 220
positive cache, 162
%post --nochroot script, 263–264, 266
Post Office Protocol 3 (POP3), 113
%post section, 256, 259, 262–263, 266–267
postconf command, 125, 126, 128, 134
postconf manual page, 124
postconf myhostname command, 126
Postfix
antispam, 136–137
configuring system to receive mail,
132–133
configuring system to send mail
directly, 124–127
via Smart Host, 127–132
receiving mails for several domains,
137–139
setting up users to receive mails,
133–135
starting during boot, 121–123
postmap command, 131, 137, 139
postmap /etc/postfix/virtual file, 138
pound (#) character, 202
pppd daemon, 223
%pre section, 256, 264–266
primary domain controller (PDC), 200
primary name server, 164–165
primitive command, 294
primitives, 296
[printers] share, 208, 210
/proc directory, 47
process ID (PID), 89
prompt, 52–53
public key infrastructure (PKI), 237
[public] share, 209–211, 215
PuTTY, 52
pwd command, 53
PXE booting, 193–194
Q
quit command, 293
R
racoon daemon, 228, 230, 233
range line, 185
RCPT TO command, 115
read list option, 213
read only option, 212
realm option, 217
Red Hat Enterprise Linux Advanced Plat-
form (RHEL AP), 9
Red Hat Enterprise Linux (RHEL), 3, 8
register option, 305
REJECT command, 137
relative paths, 46
relayhost option, 126, 128
Remote Desktop, 5
removing packages, 70
repomd files, 62
repositories
CentOS
official, 63–64
overview, 62
third-party, 64
custom
overview, 73
with RPM, 73
without RPM, 73–75
Yum, 62
require valid-user statement, 97
resolvedeps option, 256, 263
resolvers, defined, 160
resource sets, 294
resource_file option, 303
restart command, 163, 186
restarting Apache, 94
retr 5 command, 147

nINDEX
326
retrieving mail
Dovecot, 150–154
firewall, 148–150
overview, 145–148
RHEL (Red Hat Enterprise Linux), 3, 8
RHEL AP (Red Hat Enterprise Linux
Advanced Platform), 9
RHEL source RPMs (SRPMs), 27
RHEL-Desktop, 9
ricci daemon, 279–280
Rijndael, 230, 233
rm command, 58–59
rmdir command, 58
root, defined, 157
/root directory, 47, 59
root DNS servers, 160
root home area, 46
root password, 26
root servers, 160
root user account, 26
rootpw option, 259
rpm command, 73, 118
RPM software packaging system
custom repositories with, 73
custom repositories without, 73–75
overview, 61–62
package names, 71
RPMforge repository, 300
S
Samba
configuring
domain member, 215–217
example of, 203–209
extended stand-alone setup, 214–215
minimal stand-alone setup, 209–212
overview, 202–203
security, 212–213
shares, 212–213
installing, 202
overview, 199–201
setting up, 201
Windows networking
Active Directory, 200
domains, 200
overview, 199
protocols, 199–200
workgroups, 200
Samba 3 branch, 200–201
Samba 4 branch, 200–201
SAN (storage area network), 25
SASL (Simple Authentication and Security
Layer), 130
sasl section, 144
saving configuration files, 93
/sbin directory, 48
scripts section, kickstart files
overview, 263–264
%post scripts, 266–267
%pre scripts, 265–266
script-security 2 line, 244
sd disk, 260
searching for packages, 70–73
secondary name server, 164–165
Secure SHell (SSH), 51–52, 222–228
Secure Sockets Layer (SSL), 81–82, 104–105
Secure WWW, 87
security option, 217
security policy database (SPD), 230
security statement, 210
security updates, low-risk, 5
SELinux, 31, 86, 204
selinux --enforcing option, 255, 260
selinux option, 259–260
semicolon (;) character, 202
Sendmail program, 114, 117, 153
serial number, forgetting to increment, 179
server applications, 47
Server Message Block (SMB), 199
server string line, 210
ServerAdmin class, 92–93
ServerLimit option, 99
ServerName class, 90, 92–93, 102
service (SIP) IP addresses, 276
service command, 85, 94, 185
service dovecot restart command, 150
service object, 300
Service Pack 2 (SP2), 5
service postfix reload command, 127, 135
service_notification_commands
command, 311
setup tool, 85
sha1 command-line tool, 17
SHA1 hash, 15
sha1sum command-line tool, 17
shared networks, 191

nINDEX 327
shell, defined, 51
shred command, 38
signing certificates, 108
Simple Authentication and Security Layer
(SASL), 130
Simple Mail Transfer Protocol (SMTP), 114
SIP (service) IP addresses, 276
slave state, 295
slave zone, 165, 177–178
SMART data, 24
Smart Host, 127–132
SMB (Server Message Block), 199
smb resource, 289
smbcontrol tool, 202
smbd daemon, 202
smbpasswd tool, 211
smbstatus tool, 202
SMTP (Simple Mail Transfer Protocol), 114
smtp3.intermedia.net file, 127
smtpd_sender_restrictions parameter, 136
SMTP-Server entry, 131
software certifications, 7
software RAID, 40–41
software vendors, 7
somerandomstring key, 282
SP2 (Service Pack 2), 5
SPARC systems, 13–14
SPD (security policy database), 230
split brain, 275
SquirrelMail, 152
SRPMs (RHEL source RPMs), 27
/srv directory, 50
SSH (Secure SHell), 51–52, 222–228
ssh -f server command, 226
ssh -X command, 223
sshd configuration, 224–225
SSL (Secure Sockets Layer), 81–82, 104–105
ssl_access_log log, 100
ssl_error_log log, 100
SSLCertificateChainFile file, 109–110
SSLCertificateFile file, 109
SSLCertificateKeyFile file, 109
start command, 163, 186
StartServers option, 99
STARTTLS command, 130, 139
stat command, 147
static IP addresses, 187–189
status command, 89, 186
stop command, 163
stop option, 186
storage area network (SAN), 25
storage clusters, 274
striping, 40
subdomain, defined, 157
subnet statement, 185, 189–190, 192
supercomputing, 274
symmetric encryption, 230
/sys directory, 50
sysreport option, 262
system libraries, 49
system log files, 47
system monitoring, 299
system-config-cluster command, 279
system-config-securitylevel-tui command,
120, 148
system-switch-mail command, 118–119,
122
T
tail command, 186
tcpdump command, 234
templates, 304–306
templates.cfg file, 304
temporary files, 50
TestFD1 domain, 290
[testing] repository, 64
text files, 156
Thresholds section, 282
time periods, defined, 300
time to live (TTL) value, 166
timezone option, 260
TLDs (top-level domains), 157
tls_random_source command, 140
/tmp directory, 50–51, 266
/tmp/network-config file, 265
top-level domains (TLDs), 157
touch command, 59
tree command, 56
TTL (time to live) value, 166
TUN device, 224
U
Ubuntu Desktop, 3
UDP, 236
.uk domains, 159
#uname eq node1 rule, 296

nINDEX
328
uniform resource locators (URLs), 80
United Kingdom keymap, 22
[updates] repository, 63
updating
enterprise Linux, 6–7
groups of packages, 70
kickstart files to install CentOS over
HTTP, 271
packages, 69–70
servers, 65–67
upgrade keyword, 255
upgrade kickstart file, 257
URLs (uniform resource locators), 80
user accounts, Apache, 97
user authentication
encrypted connections, 139–140
passwords, 141–145
usernames, 141–145
useradd command, 210
username map option, 213
<username> tag, 122
/usr directory, 50
/usr/lib/nagios/plug-ins/ directory, 301,
307
/usr/lib/nagios/plug-ins/contrib/
directory, 307
/usr/lib/ocf/resource.d/heartbeat/
directory, 294
/usr/lib/sendmail file, 114
/usr/sbin/sendmail file, 114
/usr/sbin/sendmail.postfix file, 118–119
/usr/share/nagios directory, 302
/usr/share/zoneinfo file, 260
V
valid users option, 213
/var directory, 47
/var/lib/dhcpd/dhcpd.leases file, 183
/var/log/httpd/ directory, 100, 103
/var/log/maillog file, 122, 127
/var/log/messages file, 186, 283
/var/named/chroot file, 166, 176
/var/named/chroot/etc/named.conf file,
170, 177
vars file, 238–239
/var/spool/mail/ directory, 124
/var/spool/postfix directory, 124
/var/www/html directory, 95
/var/www/html/centos/ file, 270
/var/www/html/files file, 46
vhosts.d directory, 103–104
virtual hosts
creating, 103
defined, 80
overview, 100–103
vhosts.d directory, 103–104
virtual IP (VIP) addresses, 276
virtual private networks. See VPNs
virtual private server (VPS), 83–84
Virtualization group, 69
Virtualization options, 27
VPNs (virtual private networks)
defined, 221
OpenVPN
client, configuring, 242–244
example of, 237–240
NetworkManager class, 246–249
overview, 235–237
security considerations, 244–245
server side, configuring, 240–242
overview, 219–221
using IPSec for, 228–235
using SSH for, 222–228
VPS (virtual private server), 83–84
W
warntime option, 282
wbinfo command, 217
web content, 47
web servers
choosing, 84
overview, 80–81
running, 82–83
SSL, 81–82
using kickstart files on, 267–268
VPS, 83–84
Webmail, 152–153
webserver group, 296
webserver.cfg file, 308–309
wget command-line tool, 74, 109
WHOIS system, 155, 159
Wieers, Dag, 73
wildcards, 71–72
winbind daemon, 216–217
winbindd daemon, 202
Windows networking, 199–200

nINDEX 329
workgroup mode, 201, 209
workgroup option, 204
workgroups, 200
writable = no statement, 210
write list option, 213
writeable option, 212
X
X Window system, 222
X11 forwarding, 222
x86_64 package, 71
xclock program, 223
xconfig option, 258
Xen virtual machines, 25
Y
Yum
CentOS repositories
official, 63–64
overview, 62
third-party, 64
custom repositories
overview, 73
with RPM, 73
without RPM, 73–75
defined, 62
groups of packages
installing, 68–69
removing, 70
updating, 70
installing, 64
overview, 61
packages
installing, 67–68
removing, 70
searching for, 70–73
updating, 69–70
repositories, 62
RPM software packaging system, 61–62
updating server, 65–67
Yumex tool, 75–76
yum remove command, 119
Yum tool, 202
Yumex tool, 75–76
Z
zone file, 171
zone transfers, 178