WII_ZeldaTP_CovBkCov The Legend Of Zelda Twilight Princess (Wii Manual)
User Manual: manual pdf -FilePursuit
Open the PDF directly: View PDF ![]() .
.
Page Count: 11
INSTRUCTION BOOKLET
PRINTED IN USA
www.nintendo.com
The Official Seal is your assurance
that this product is licensed or
manufactured by Nintendo. Always
look for this seal when buying
video game systems, accessories,
games and related products.
Ce Sceau Officiel est votre garantie que le
présent produit est agréé ou
manufacturé par Nintendo. Recherchez-le
toujours quand vous achetez des
appareils de jeu vidéo, des accessoires,
des jeux et d'autres produits connexes.
El Sello Oficial es su ratificación de que
este producto tiene licencia o es
manufacturado por Nintendo. Busque
siempre este sello al comprar sistemas
de vídeo juegos, accesorios, vídeo
juegos, y productos relacionados.
NINTENDO OF AMERICA INC.
P.O. BOX 957, REDMOND, WA
98073-0957 U.S.A.
NEED HELP WITH INSTALLATION,
MAINTENANCE OR SERVICE?
Nintendo Customer Service
WWW.NINTENDO.COM
or call 1-800-255-3700
NEED HELP PLAYING A GAME?
Nintendo's game pages, at
www.nintendo.com/games, feature
walkthroughs, frequently-asked questions, and
codes for many of our games. If your answer
isn't there, check out our forums where you can
exchange tips with other gamers online.
For more information about our forums, visit
www.nintendo.com/community.
If you don't have access to the web-site, recorded
tips for many titles are available on Nintendo's
Power Line at
(425) 885-7529
. This may be a
long-distance call, so please ask permission from
whoever pays the phone bill.
BESOIN D’AIDE POUR L’INSTALLATION,
L’ENTRETIEN OU LA RÉPARATION?
Service à la Clientèle de Nintendo
WWW.NINTENDO.COM
ou appelez le
1-800-255-3700
¿NECESITAS AYUDA DE INSTALACION,
MANTENIMIENTO O SERVICIO?
Servicio al Cliente de Nintendo
WWW.NINTENDO.COM
o llame al 1-800-255-3700
¿NECESITAS AYUDA CON UN JUEGO?
Las páginas de juegos de Nintendo, en
www.nintendo.com/games, incluyen instrucciones
paso a paso, preguntas frecuentes y códigos para
muchos de nuestros juegos. Si no encuentras tu
respuesta, visita nuestros foros, donde podrás
intercambiar consejos con otros jugadores en línea.
Para obtener más información sobre nuestros
foros, visita www.nintendo.com/community.
Si no tienes acceso a nuestra página web,
puedes encontrar consejos grabados para
muchos de nuestros juegos a través del Power
Line de Nintendo, llamando al (425) 885-7529.
Esta puede ser una llamada de larga distancia,
así que por favor, pide permiso a la persona
encargada de pagar la factura del teléfono.
BESOIN D’AIDE POUR JOUER?
Sur le site www.nintendo.com/games, des
pages sur les jeux de Nintendo présentent le
déroulement des jeux, des foires aux questions
et des codes pour plusieurs de nos jeux. Si la
réponse que vous cherchez n’y est pas, consultez
nos forums où vous pouvez échanger, en ligne,
des indices avec d’autres joueurs.
Pour obtenir plus d’information sur nos forums en
ligne, visitez www.nintendo.com/community.
Si vous n’avez pas accès au site Web, vous pouvez
obtenir des conseils enregistrés pour de nombreux
jeux, en utilisant la ligne de puissance de Nintendo
au (425) 885-7529. Il peut s’agir d’un interurbain,
demandez donc la permission à la personne
responsable du compte de téléphone.
61603A
Prologue 6
Using the Controller 8
Getting Started 10
The Game Screen 13
Collecting and Equipping Items
18
Link's Actions 20
Items 28
Clues for Your Quest 32
Lure Fishing 36
54
© 2006 Nintendo. All rights, including the copyrights of game, scenario, music and program, reserved by Nintendo. TM, ®
and the Wii logo are trademarks of Nintendo. © 2006 Nintendo. All rights reserved.
WARRANTY & SERVICE INFORMATION
You may need only simple instructions to correct a problem with your product. Try our website at
www.nintendo.com or call our Consumer Assistance Hotline at 1-800-255-3700, rather than going to
your retailer. Hours of operation are 6 a.m. to 7 p.m., Pacific Time, Monday - Sunday (times subject to change). If
the problem cannot be solved with the troubleshooting information available online or over the telephone, you will
be offered express factory service through Nintendo. Please do not send any products to Nintendo without
contacting us first.
HARDWARE WARRANTY
Nintendo of America Inc. ("Nintendo") warrants to the original purchaser that the hardware product shall be free
from defects in material and workmanship for twelve (12) months from the date of purchase. If a defect covered by
this warranty occurs during this warranty period, Nintendo will repair or replace the defective hardware product or
component, free of charge. The original purchaser is entitled to this warranty only if the date of purchase is
registered at point of sale or the consumer can demonstrate, to Nintendo's satisfaction, that the product was
purchased within the last 12 months.
GAME & ACCESSORY WARRANTY
Nintendo warrants to the original purchaser that the product (games and accessories) shall be free from defects in
material and workmanship for a period of three (3) months from the date of purchase. If a defect covered by this
warranty occurs during this three (3) month warranty period, Nintendo will repair or replace the defective
product, free of charge.
SERVICE AFTER EXPIRATION OF WARRANTY
Please try our website at www.nintendo.com or call the Consumer Assistance Hotline at 1-800-255-3700 for
troubleshooting
information and repair or replacement options and pricing. In some instances, it may be necessary
for you to ship the complete product, FREIGHT PREPAID AND INSURED FOR LOSS OR DAMAGE, to Nintendo. Please
do not send any products to Nintendo without contacting us first.
WARRANTY LIMITATIONS
THIS WARRANTY SHALL NOT APPLY IF THIS PRODUCT: (a) IS USED WITH PRODUCTS NOT SOLD OR LICENSED BY
NINTENDO (INCLUDING, BUT NOT LIMITED TO, NON-LICENSED GAME ENHANCEMENT AND COPIER DEVICES, ADAPTERS,
AND POWER SUPPLIES); (b) IS USED FOR COMMERCIAL PURPOSES (INCLUDING RENTAL); (c) IS MODIFIED OR
TAMPERED WITH; (d) IS DAMAGED BY NEGLIGENCE, ACCIDENT, UNREASONABLE USE, OR BY OTHER CAUSES UNRELATED
TO DEFECTIVE MATERIALS OR WORKMANSHIP; OR (e) HAS HAD THE SERIAL NUMBER ALTERED, DEFACED OR REMOVED.
ANY APPLICABLE IMPLIED WARRANTIES, INCLUDING WARRANTIES OF MERCHANTABILITY AND FITNESS FOR A
PARTICULAR PURPOSE, ARE HEREBY LIMITED IN DURATION TO THE WARRANTY PERIODS DESCRIBED ABOVE (12
MONTHS OR 3 MONTHS, AS APPLICABLE). IN NO EVENT SHALL NINTENDO BE LIABLE FOR CONSEQUENTIAL OR
INCIDENTAL DAMAGES RESULTING FROM THE BREACH OF ANY IMPLIED OR EXPRESS WARRANTIES. SOME STATES
DO NOT ALLOW LIMITATIONS ON HOW LONG AN IMPLIED WARRANTY LASTS OR EXCLUSION OF CONSEQUENTIAL OR
INCIDENTAL DAMAGES, SO THE ABOVE LIMITATIONS MAY NOT APPLY TO YOU.
This warranty gives you specific legal rights. You may also have other rights which vary from state to state or
province to province.
Nintendo's address is: Nintendo of America Inc., P.O. Box 957, Redmond, WA 98073-0957 U.S.A.
This warranty is only valid in the United States and Canada.
Manufactured under license from Dolby Laboratories. Dolby, Pro Logic, and the double-D symbol are
trademarks of Dolby Laboratories.
This game is presented in Dolby Pro Logic II. To play games that carry the Dolby Pro Logic II logo in
surround sound, you will need a Dolby Pro Logic II, Dolby Pro Logic or Dolby Pro Logic IIx receiver. These
receivers are sold separately.
Playing video games can make your muscles, joints, skin or eyes hurt. Follow these instructions to
avoid problems such as tendonitis, carpal tunnel syndrome, skin irritation or eyestrain:
• Avoid excessive play. Parents should monitor their children for appropriate play.
• Take a 10 to 15 minute break every hour, even if you don't think you need it.
• If your hands, wrists, arms or eyes become tired or sore while playing or if you feel symptoms such
as tingling, numbness, burning or stiffness, stop and rest for several hours before playing again.
• If you continue to have any of the above symptoms or other discomfort during or after
play, stop playing and see a doctor.
• Some people (about 1 in 4000) may have seizures or blackouts triggered by light flashes or
patterns, and this may occur while they are watching TV or playing video games, even if they have
never had a seizure before.
• Anyone who has had a seizure, loss of awareness, or other symptom linked to an epileptic
condition, should consult a doctor before playing a video game.
• Parents should watch their children play video games. Stop playing and consult a doctor if you or
your child has any of the following symptoms:
Convulsions Eye or muscle twitching Altered vision
Loss of awareness Involuntary movements Disorientation
• To reduce the likelihood of a seizure when playing video games:
1. Sit or stand as far from the screen as possible.
2. Play video games on the smallest available television screen.
3. Do not play if you are tired or need sleep.
4. Play in a well-lit room.
5. Take a 10 to 15 minute break every hour.
Playing video games can cause motion sickness in some players. If you or your child feels dizzy or
nauseous when playing video games, stop playing and rest. Do not drive or engage in other
demanding activity until you feel better.
This Nintendo game is not designed for use with
any unauthorized device. Use of any such device will invalidate your Nintendo product warranty.
Copying of any Nintendo game is illegal and is strictly prohibited by domestic and international
intellectual property laws. “Back-up” or “archival” copies are not authorized and are not necessary to
protect your software. Violators will be prosecuted. REV–E
IMPORTANT LEGAL INFORMATION
WARNING – Seizures
WARNING – Motion Sickness
WARNING –
Repetitive Motion Injuries and Eyestrain
REV–P
PLEASE CAREFULLY READ THE Wii™ OPERATIONS MANUAL COMPLETELY BEFORE USING YOUR
Wii HARDWARE SYSTEM, GAME DISC OR ACCESSORY. THIS MANUAL CONTAINS IMPORTANT
HEALTH AND SAFETY INFORMATION.
IMPORTANT SAFETY INFORMATION: READ THE FOLLOWING WARNINGS BEFORE YOU OR
YOUR CHILD PLAY VIDEO GAMES.
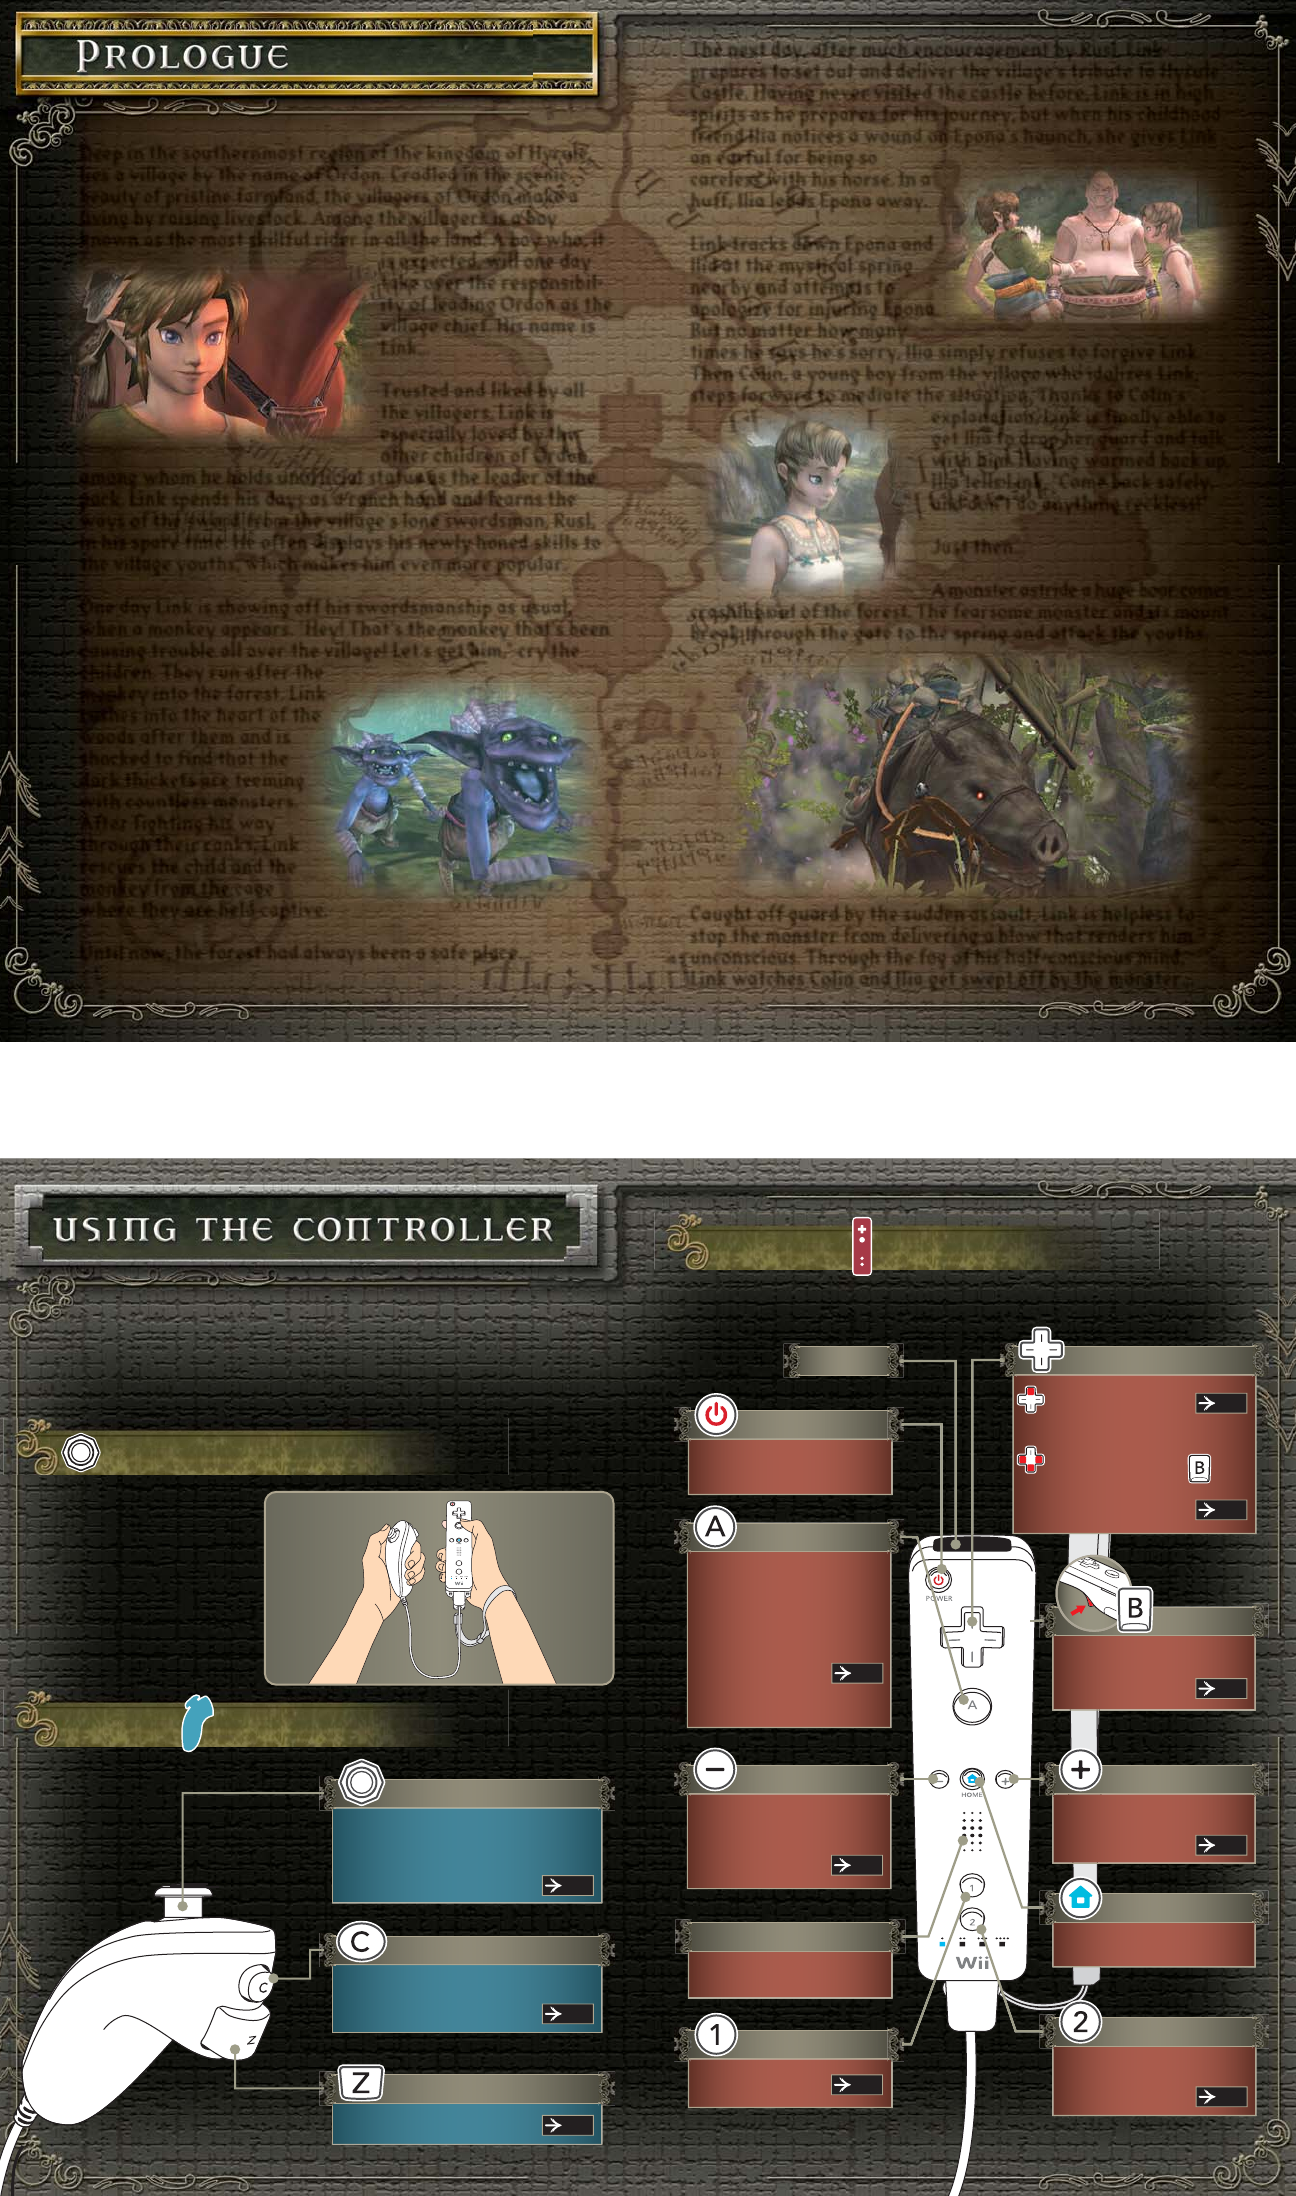
Deep in the southernmost region of the kingdom of Hyrule
lies a village by the name of Ordon. Cradled in the scenic
beauty of pristine farmland, the villagers of Ordon make a
living by raising livestock. Among the villagers is a boy
known as the most skillful rider in all the land. A boy who, it
is expected, will one day
take over the responsibil-
ity of leading Ordon as the
village chief. His name is
Link...
Trusted and liked by all
the villagers, Link is
especially loved by the
other children of Ordon,
among whom he holds unofficial status as the leader of the
pack. Link spends his days as a ranch hand and learns the
ways of the sword from the village's lone swordsman, Rusl,
in his spare time. He often displays his newly honed skills to
the village youths, which makes him even more popular.
One day Link is showing off his swordsmanship as usual,
when a monkey appears. "Hey! That's the monkey that's been
causing trouble all over the village! Let's get him," cry the
children. They run after the
monkey into the forest. Link
rushes into the heart of the
woods after them and is
shocked to find that the
dark thickets are teeming
with countless monsters.
After fighting his way
through their ranks, Link
rescues the child and the
monkey from the cage
where they are held captive.
Until now, the forest had always been a safe place...
The next day, after much encouragement by Rusl, Link
prepares to set out and deliver the village's tribute to Hyrule
Castle. Having never visited the castle before, Link is in high
spirits as he prepares for his journey, but when his childhood
friend Ilia notices a wound on Epona's haunch, she gives Link
an earful for being so
careless with his horse. In a
huff, Ilia leads Epona away.
Link tracks down Epona and
Ilia at the mystical spring
nearby and attempts to
apologize for injuring Epona.
But no matter how many
times he says he's sorry, Ilia simply refuses to forgive Link.
Then Colin, a young boy from the village who idolizes Link,
steps forward to mediate the situation. Thanks to Colin's
explanation, Link is finally able to
get Ilia to drop her guard and talk
with him. Having warmed back up,
Ilia tells Link, "Come back safely,
and don't do anything reckless!"
Just then...
A monster astride a huge boar comes
crashing out of the forest. The fearsome monster and its mount
break through the gate to the spring and attack the youths.
Caught off guard by the sudden assault, Link is helpless to
stop the monster from delivering a blow that renders him
unconscious. Through the fog of his half-conscious mind,
Link watches Colin and Ilia get swept off by the monster...
98
76
This section is devoted to explaining the controller grip and
basic in-game controls for this game. For more detailed
explanations of how to swing and shake the Wii Remote and
Nunchuk, please refer to the individual pages dedicated to
advanced functions, or check the in-game tutorials.
How to Hold the Controllers
Wii Remote
Hold the controllers as
depicted on the right.
Make sure to pass your
hand through the wrist
strap on the Wii
Remote and tighten the
attached cinch before
you start playing.
Nunchuk
Walk/Run/Swim/Jump
Cycle through options
Control Stick
Pointer
Power Button
A Button
B Button
1 Button 2 Button
HOME Button
Plus Button
Minus Button
Speaker
C Button
Z Button
P20
P23
P15
P20
P22
P27
P28
P28
Switch to first-person
perspective
Z-target
Turn the Wii
Remote on/off
Talk/Check/Open/
Pick Up/Throw, etc.
Perform action
displayed at the bottom
of the screen
Select an option
Toggle Items screen
Skip cut scene
(press twice)
Emits sound effects
View map P16
+Control Pad
Talk to Midna
Assign an item
to the B Button
(switch out
assigned item)
Use assigned item
Toggle Collection
screen P18
Toggle HOME Menu
Toggle minimap
on/off P13
Television Settings Check
A map of your immediate
surroundings. Press to
toggle this map display
on or off.
Displays which
actions and selected
items are available to
you by pressing each
direction of .
Enter a name for your
main character and
horse. Point and press
to enter each letter.
After you have entered
your desired name,
click on the END icon
to advance to the TV
Settings Check Screen
and begin
the game.
When you start a new
game, you’ll be asked
to create a save file
on your Wii's internal
memory. Point to Yes
and press to do so.
To save your game, you
need to have at least 1
block of free memory.
Next, the system will
display the Channel
Preview screen. Choose
Start and press .
After the wrist-strap
screen, the game’s title
screen will appear. Press
and to bring up the
Quest Log screen.
1312
1110
T
1
2
3
4
Carefully insert your Legend of Zelda: Twilight Princess
Game Disc into your Wii's Disc Slot. Your Wii console will
turn on. The screen below will appear on your television.
When you have finished reading the warning, press .
*You can insert the Game
Disc even if your Wii console
is already on.
From the Wii Menu, point at the Disc Channel icon with
your Wii Remote and press .
P12
Choosing a Quest Log
When starting a new game…
*You can also select files and
letters by using .
When loading a saved file…
To load a previously saved game, choose a file with game data
already saved in it and select Start to continue playing from
where you left off.
Save Information
The upper window in
the file displays your
current life total, play
time, etc., while the
bottom window displays
important items.
Copy Copy a save file to another Quest Log.
Erase
Start Begin the game.
Delete a save file.
Please note that once a file is deleted, it can never be recovered.
See the Wii Operations Manual when you would like to erase the
data from Wii System Memory.
Main Screen
This is a tool to help you
calibrate your television's
brightness, vertical display
ratio, and horizontal display
ratio. Use the provided
images to fine-tune your
television. When playing in
16:9, remember to set both
the console and your television to 16:9 display mode. For a more
detailed explanation, please consult the Wii Operations Manual.
During the course of your adventure, you'll use your main
screen and several other displays such as the Items screen and
map screen. Let's take a look at their basic layouts.
Your main screen adapts to each situation. It changes to
display special gauges and to tell you what actions are avail-
able to you in a given location.
Life Gauge Action Icon
Action
Action
A gauge that decreases
when you take damage
from an enemy or from
your natural environment
by doing something like
falling from high up.
The item currently
assigned to . Use
this item by
pressing .
Available money.
Rupees
The action currently
assigned to .
Adaptive Command
An action particularly important to the
area you are in.
Minimap
Pressing on the main screen switches you over to the map
screen. Here you can check your current position and destination.
Press on the main screen to access the Items screen.
1716
1514
Special On-Screen Displays
As you progress through the game you'll see several special
displays and gauges. For more information, please refer to the
in-game tutorials. Listed below are a few examples.
Vessel of Light Gauge
When you are carrying the
Vessel of Light, this gauge
displays how many Tears
of Light you have left to find.
Oxygen Gauge
This gauge appears when
you are underwater.
When the gauge empties,
it's game over for you.
About Game Over
When your life gauge runs
out, the game is over. At the
Game Over screen, you will
be asked if you would like to
Retry. Select Yes to retry
from the area you were just exploring.
Select No and you will return to the title screen.
The Items Screen
Assigning and Using Items
P28
Point to the item you want to assign.
You can cycle through items with .
You can also receive an explanation
for individual items by pointing at
them and pressing .
1
2
4
3
Back on the main
screen, swap out
the item assigned
to with those
assigned to .
Press to use the
assigned item.
(You can use some items by pressing
the button to which they are
assigned.)
For more specific explanations on item usage, please refer to
Using Assignable Items.
Bow and Arrow Combinations
On the Items screen, there are
certain items you can combine
with Link's bow and arrows.
For example, after setting the
Hero's Bow to , , , or ,
point to your bombs and press
to create bomb arrows.
Use and
to assign items
to those buttons.
The Map Screen
Field Map
Link's current position and heading
Location of where Link entered the area
Zoom in
Point
Zoom out Zoom in
Zoom out
Slide map around
(when zoomed in)
Slide map around
(when zoomed in)
Position map by
grabbing with
and dragging
Select an area with
(when zoomed out)
Field Map Screen Controls
Position map by
grabbing with
and dragging
Dungeon Map
Dungeon Floor
Dungeon Items
Dungeon Map
Shows a map of every room in
the dungeon.
Compass
Reveals the position of treasure
chests and the current dungeon's boss.
Big Key
Opens door to boss's lair.
Map Legend
Room you are currently in
Room you have been in
Room you have yet to enter
Door
Treasure Chest (visible after
obtaining the compass)
Boss (visible after obtaining
the compass)
Dungeon Map Screen Controls
Change displayed dungeon floor
Select item on the dungeon map – Press for an explanation
When you Z-target a character standing far away, a will
appear over them and you can press to speak with them.
After drawing near an enemy, you
will see a above the enemy. Press
. When you do so, the mark will
change to , indicating that you are
locked on to that enemy. This allows
you to keep focused on one enemy in
the heat of battle.
Use to move Link. (In water, you
control his swimming the same
way.) The farther you tilt , the
faster Link will move in that
direction. When you come to an
area with a gap, Link will auto-
matically attempt to jump it.
Furthermore, if you press while moving, Link will perform a quick
forward roll that allows you to ram into objects in front of you.
Link is capable of all sorts of actions. Master his basic
movements and always keep an eye on the Action Icons
while progressing through the game.
Switch Z-targeting cursor control.
(Press once to lock cursor/Hold to lock cursor.)
Here you can adjust game settings.
Point at the setting you want and
adjust it with . Approve the
changed settings by pressing .
(You can also select settings with .)
Clicking this icon lets you save your
progress. Point to the Quest Log for your
game and press to save. After doing so,
the game will ask you if you want to
“Continue playing the game?” If you select Yes, you will return to the
game. If you select No, you will return to the title screen. With the
exception of certain special events, you can save in this manner any
time you like. However, please be aware that when you load a saved
game and resume playing, you will start from a designated spot within
the area and not your exact previous location.
(For dungeons, this starting point is the entrance to the dungeon.)
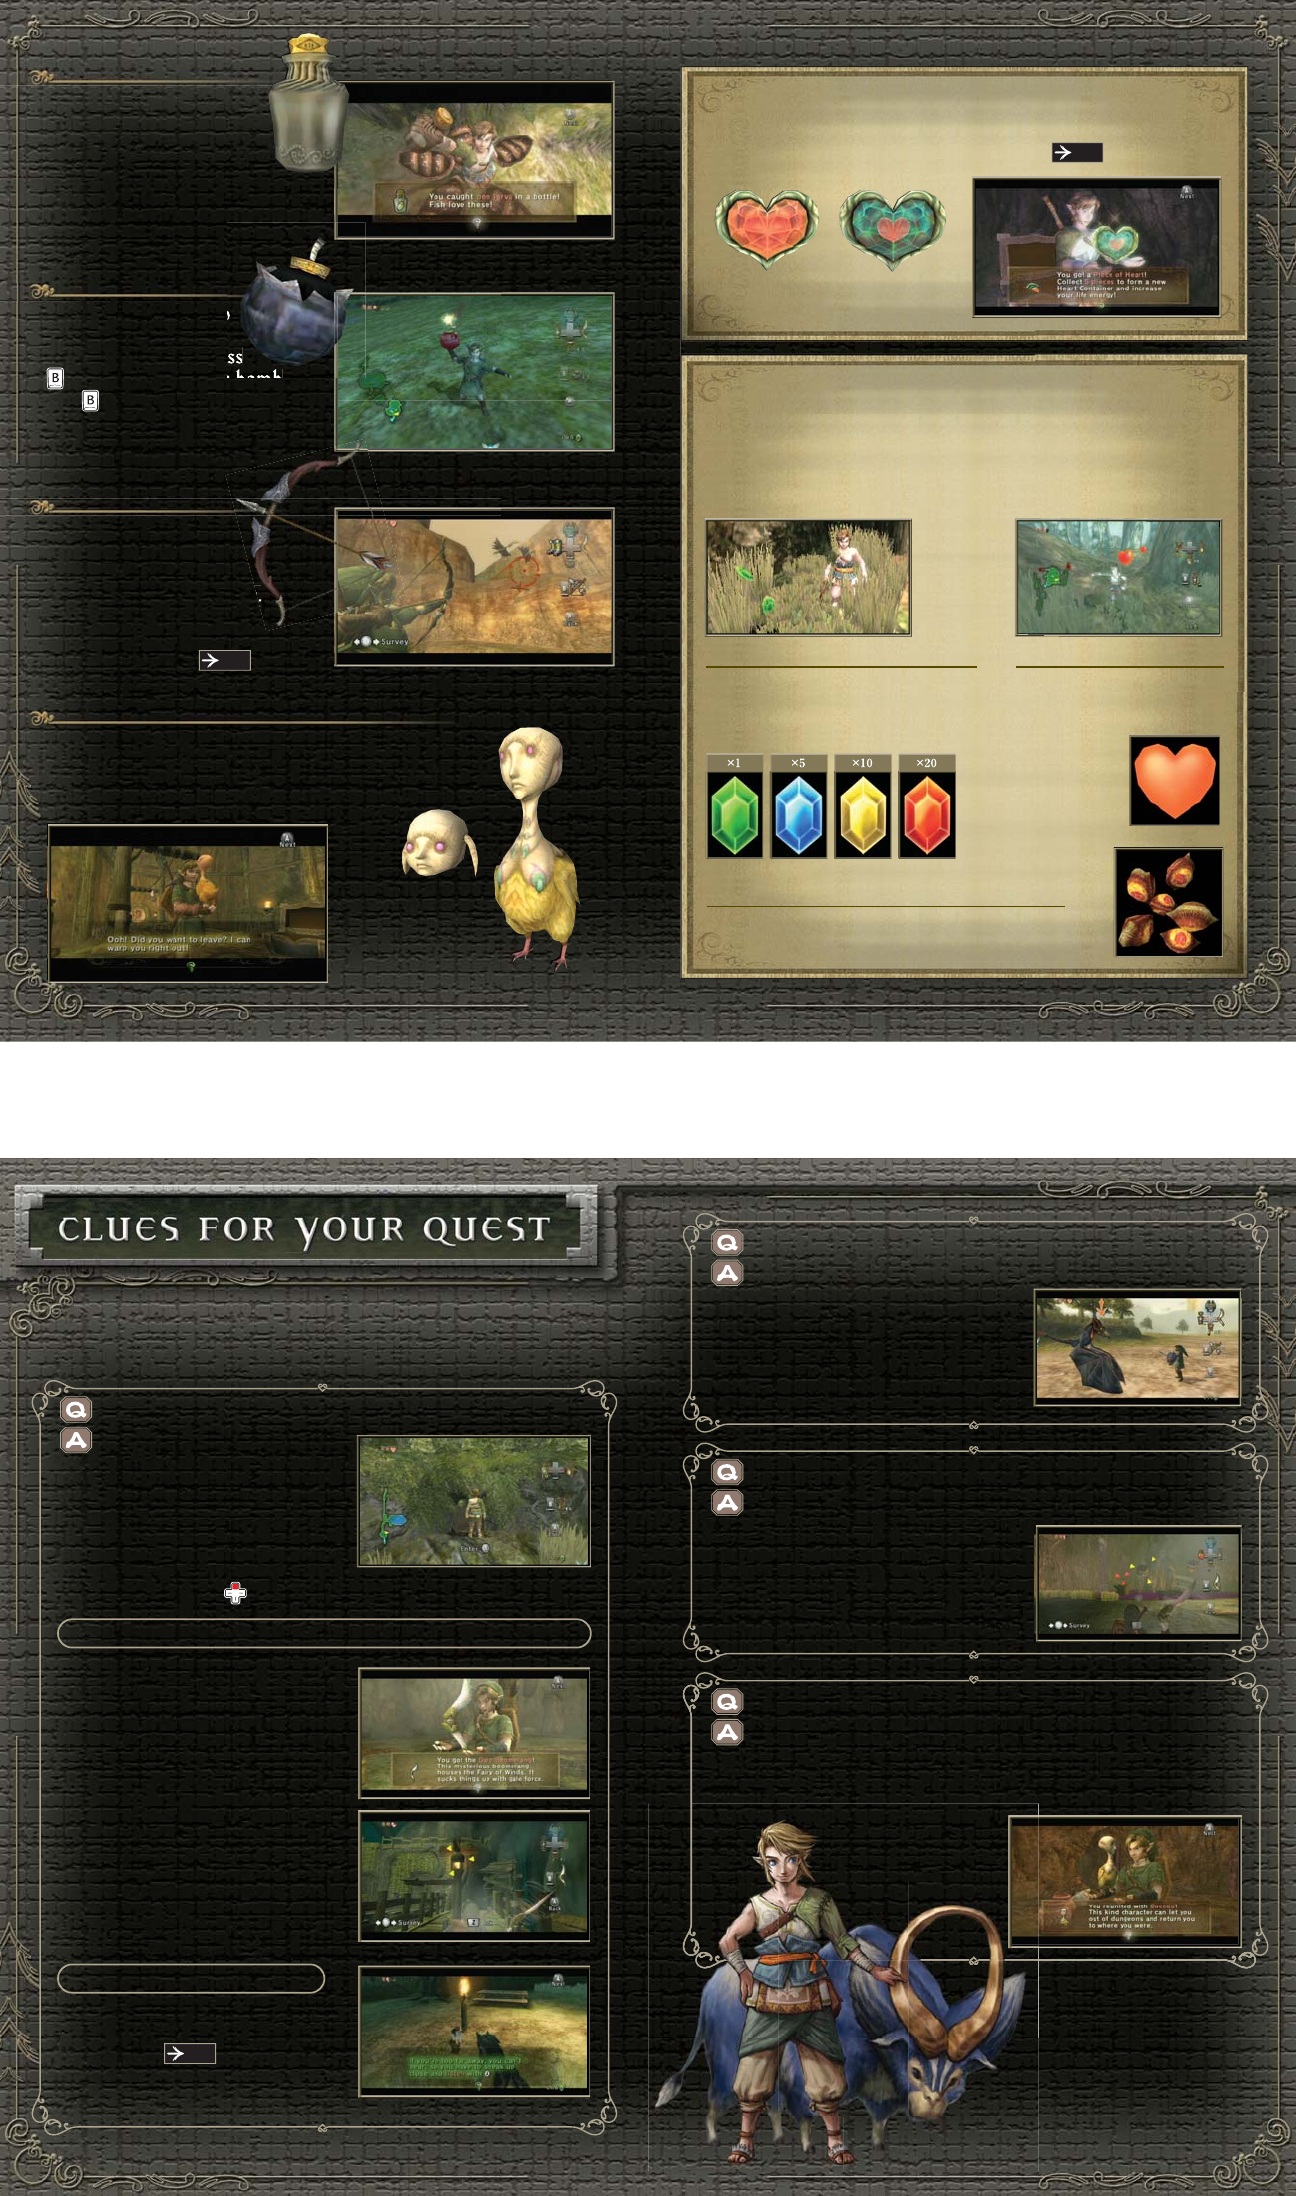
Collect 5 to make a Heart
Container .
2120
1918
Pressing on the main screen switches you over to the Collec-
tion screen. From this screen, you can change your equipment by
pointing to items and pressing . Also, if you point to one of the
icons on the lower left, like Hidden Skills, and press , you will
open a screen with more detailed information regarding that item.
Calibrate your Wii Remote's cursor position. Press and
then follow the on-screen calibration instructions to calibrate.
From the Collection screen, you can access a variety of
equipment information, item information, and records, as well
as save and change game options.
Viewing the Collection Screen
Pieces of Heart
Fused Shadows
Mysterious items that
Midna is after. The
ones you have gathered
are displayed here.
Equipment
Displays your current collection of
equipment. The icons for currently
equipped items are framed in gold.
Gathered Items
As you progress
through the game,
expect to see lots
of new items show
up here.
Fish Journal View your personal fishing records
Golden Bugs View your captured golden bugs
Letters Read received letters
Hidden Skills Review all the skills you have mastered
P31
P13
P27
Save
When the game is saving, please make sure you do not turn off
your Wii console. Doing so may damage the machine.
Options
Lock-on Type
Camera Control Change the camera controls between standard and inverted.
Pointer Control your aiming cursor with/without your Wii Remote.
When you select OFF, you control your aiming cursor with .
Gives you direct access to selected screen.
Icon Shortcuts Turn icon shortcuts on or off. When on, you can access your
Collection, Items, and map screens via your Wii Remote.
Stop moving. Press and hold
Map Screen
Items Screen
Highlight icon
Press
Collection
Screen
Pointer
Settings
While holding down , you will lock on to the enemy and
defend simultaneously.
Walk/Run/Swim/Jump
Z-target / Defend
While engaging the enemy, press to Z-target.
Steady your aim while using items.
While using the bow, slingshot, etc.,
press to Z-target your mark for
greater accuracy.
Talk with people from a distance.
Wielding Your Sword
When you have a sword, you can swing the Wii Remote and
Nunchuk to swing the sword.
Slice
Swing the Wii
Remote gently.
Multiple swings in
a row unleash a
combo attack.
Spin Attack
Swing the Nunchuk
side to side.
Jump Attack
Other Combat Moves
Sidestep
Sidestep
Backflip
Energy Field Multiple Strike Attack
(When Midna is riding on your back)
Hold down Lock on to
enemies Let go of .
*This move attacks all enemies within the
energy field.
Jump Attack
*If you press rapidly after successfully biting an
enemy, you can continue to bite at the enemy.
Pressing triggers your dash while moving, as well as several
other situation-dependent actions. In addition, you can talk to
animals while in beast form with this button.
If you have a sword in hand,
you can attack from atop
your horse. As when you
are standing, swinging your
Wii Remote or Nunchuk
also swings your sword
when you are riding.
Press to expend one dash
icon and make your horse
gallop. While galloping, you
can jump over fences and
small obstacles.
Move around with . When
you tilt toward yourself
lightly, your horse will back
up. Tilt backward firmly
and the horse will neigh and
turn around.
Press while near your horse
to mount up. While mounted
and stationary, press to
dismount from your steed.
Riding Your Horse
There are areas of the land where special whistle grass grows. If you are
near the grass, press to pick up and whistle with the grass. There are
two types of special grass, one for horses and one for hawks. Depending
on the type, you can call your horse to your side or get a hawk to fetch a
hard-to-reach item for you. In the right situation, you might even be able
to get a hawk to aid you in battle.
Press to switch to a
first-person perspective
and use either or point
with the Wii Remote to
look around.
You can move some large
objects and wooden boxes.
Press and hold to grab
the object and then use
to push or pull.
Press to make Link
crawl into small holes
and tight spaces. While
inside a hole, use to
move backward, move
forward, and choose paths.
Pick up, carry, and set down
pots, rocks, etc. Press while
moving and carrying some-
thing to throw it. You can also
throw when you are targeting
something by simply aiming
forward and pressing .
Swinging the Wii Remote
lightly will also cause Link to
throw the item he is carrying.
Depending on the situation, can trigger any of
the following actions.
2524
2322
Multiple Actions
Talk, Check, Open
You can talk with nearby
people, check signs and
suspicious areas, or open
treasure chests and doors.
Pick Up, Throw/Set Down
Enter
Grab Push/Pull
First-Person Perspective
First-Person Perspective
Navigation Pointer
Look Around
Horse Grass Hawk Grass
Grass Whistles
Riding
Gallop
Dash Icons
These indicate the number
of times you are able to
dash. They regenerate over
time when used.
Swing Your Sword
P21
Controls for Wolf Link
In the course of Link's adventure,
you'll sometimes play as Link
transformed into a wolf. While
transformed, certain elements of
the controls change and you
become unable to use items.
Multiple Actions
Attacks
Bite
Swing your Wii
Remote lightly.
Spin Attack
Lightly swing the
Nunchuk from side
to side.
When you want to refill the
lantern's oil, assign the lantern
to . Once you have done that,
set a bottle filled with oil to ,
, or and press that button
to refill.
This boomerang whips up
a breeze to daze distanced
enemies and retrieve items. It
is controlled in the same way
as the slingshot. Additionally,
the boomerang has the ability
to lock on to multiple targets
with .
You can lock on to a target with
for greater accuracy.
You can attach bait to your hook. First, put
some bee larva or a worm in an empty bottle and assign the bottle
to . Once you have your fishing rod assigned to , press the
that you assigned your bait to and you'll attach your bait to your hook.
You can fish in rivers and lakes. When bobber
fishing, press to swing your rod and dip in
your line. (Lure fishing )
Pressing the button you assigned the item to
will set the item to and allow you to use the item by pressing .
Press to put the item away. (Some items can be used by simply
assigning them to .)
When you want to use an assignable item,
first go to the Items screen and assign it
to , , or .
Once you've met up with Midna,
you can call her with and use
her power to perform certain
special actions. Later in the
game, she'll even help you
to warp to different areas.
Also, when Midna wants
to talk to you, an icon of her
will flash on-screen and you
can listen by pressing .
Dig at the ground by pressing . Dig in certain spots and you may
unearth items or find a way through to the other side of a locked
gate. Try using the Sense command before digging for items.
When you press or you
become able to see things
invisible to the naked eye and
catch scent trails. If you are
searching for something, or
just simply think things look
fishy, use the Sense command
and search around.
2928
2726
When prompted by Midna, you
can choose to warp. When
you do so, the map screen pops
up and you can point at your
destination. When you've
selected your preferred
destination, warp by pressing .
Bite into moveable items by
pressing and holding , then
move them around with .
Press to lock on to Midna
Push/Drag
Sense
Dig
Howl
When you are a wolf, you can howl near whistle grass. Do so and a hawk
may come to your aid with a hint about what to do next.
You howl by using three differently toned calls in combination. Try
following the combinations indicated by the blue lines.
Howl
Change the pitch
of your howl
(three different
pitches available)
Talk to Midna
Midna
Long-Distance Leap
Leap by pressing
At specific locations, you
can perform a special
long-distance leap.
Midna's icon flashes
Press
Midna Icon
Warp
Warp Locations
The destinations you can warp
to are set for each area and
increase in number as you
progress through the game.
There are two types of items. The first type needs to be
assigned and have the assigned button pressed in order to be
used. Examples of this are the slingshot and the lantern. Other
items have an instant effect the moment you pick them up.
Using Assignable Items
P15
P36
Fishing Rod
Float your bobber in the water and
shake the Wii Remote up and down,
then wait for a fish to take a nibble.
When you get a bite, swing your Wii
Remote up. Keep it up to pull the fish
out of the water.
How to Attach Bait
Slingshot
This shoots pellets.
Aim for faraway objects.
Crosshairs
Using the Slingshot
Hold down .
Use to look around.
Move your crosshairs with
the Wii Remote to find
your mark.
Let go of .
Gale Boomerang
Use to Lock On.
Lantern
This item burns bright to
light the area around you
and provide you with a fire.
You can use other items
while using the lantern.
Remaining Oil
This gauge shows how much
oil is left in your lantern.
When the gauge empties,
your lantern will go out.
How to Replenish the Lantern's Oil
Talk to everyone! If you are
transformed into a beast, use
your Sense ability and
talk to nearby animals to gather
information.
Are you sure you didn't
overlook something? Check all
over the area thoroughly for
doors, unopened treasure chests,
and new paths. Depending on
where you are in the game, you
might be able to get a hint from
Midna by pressing .
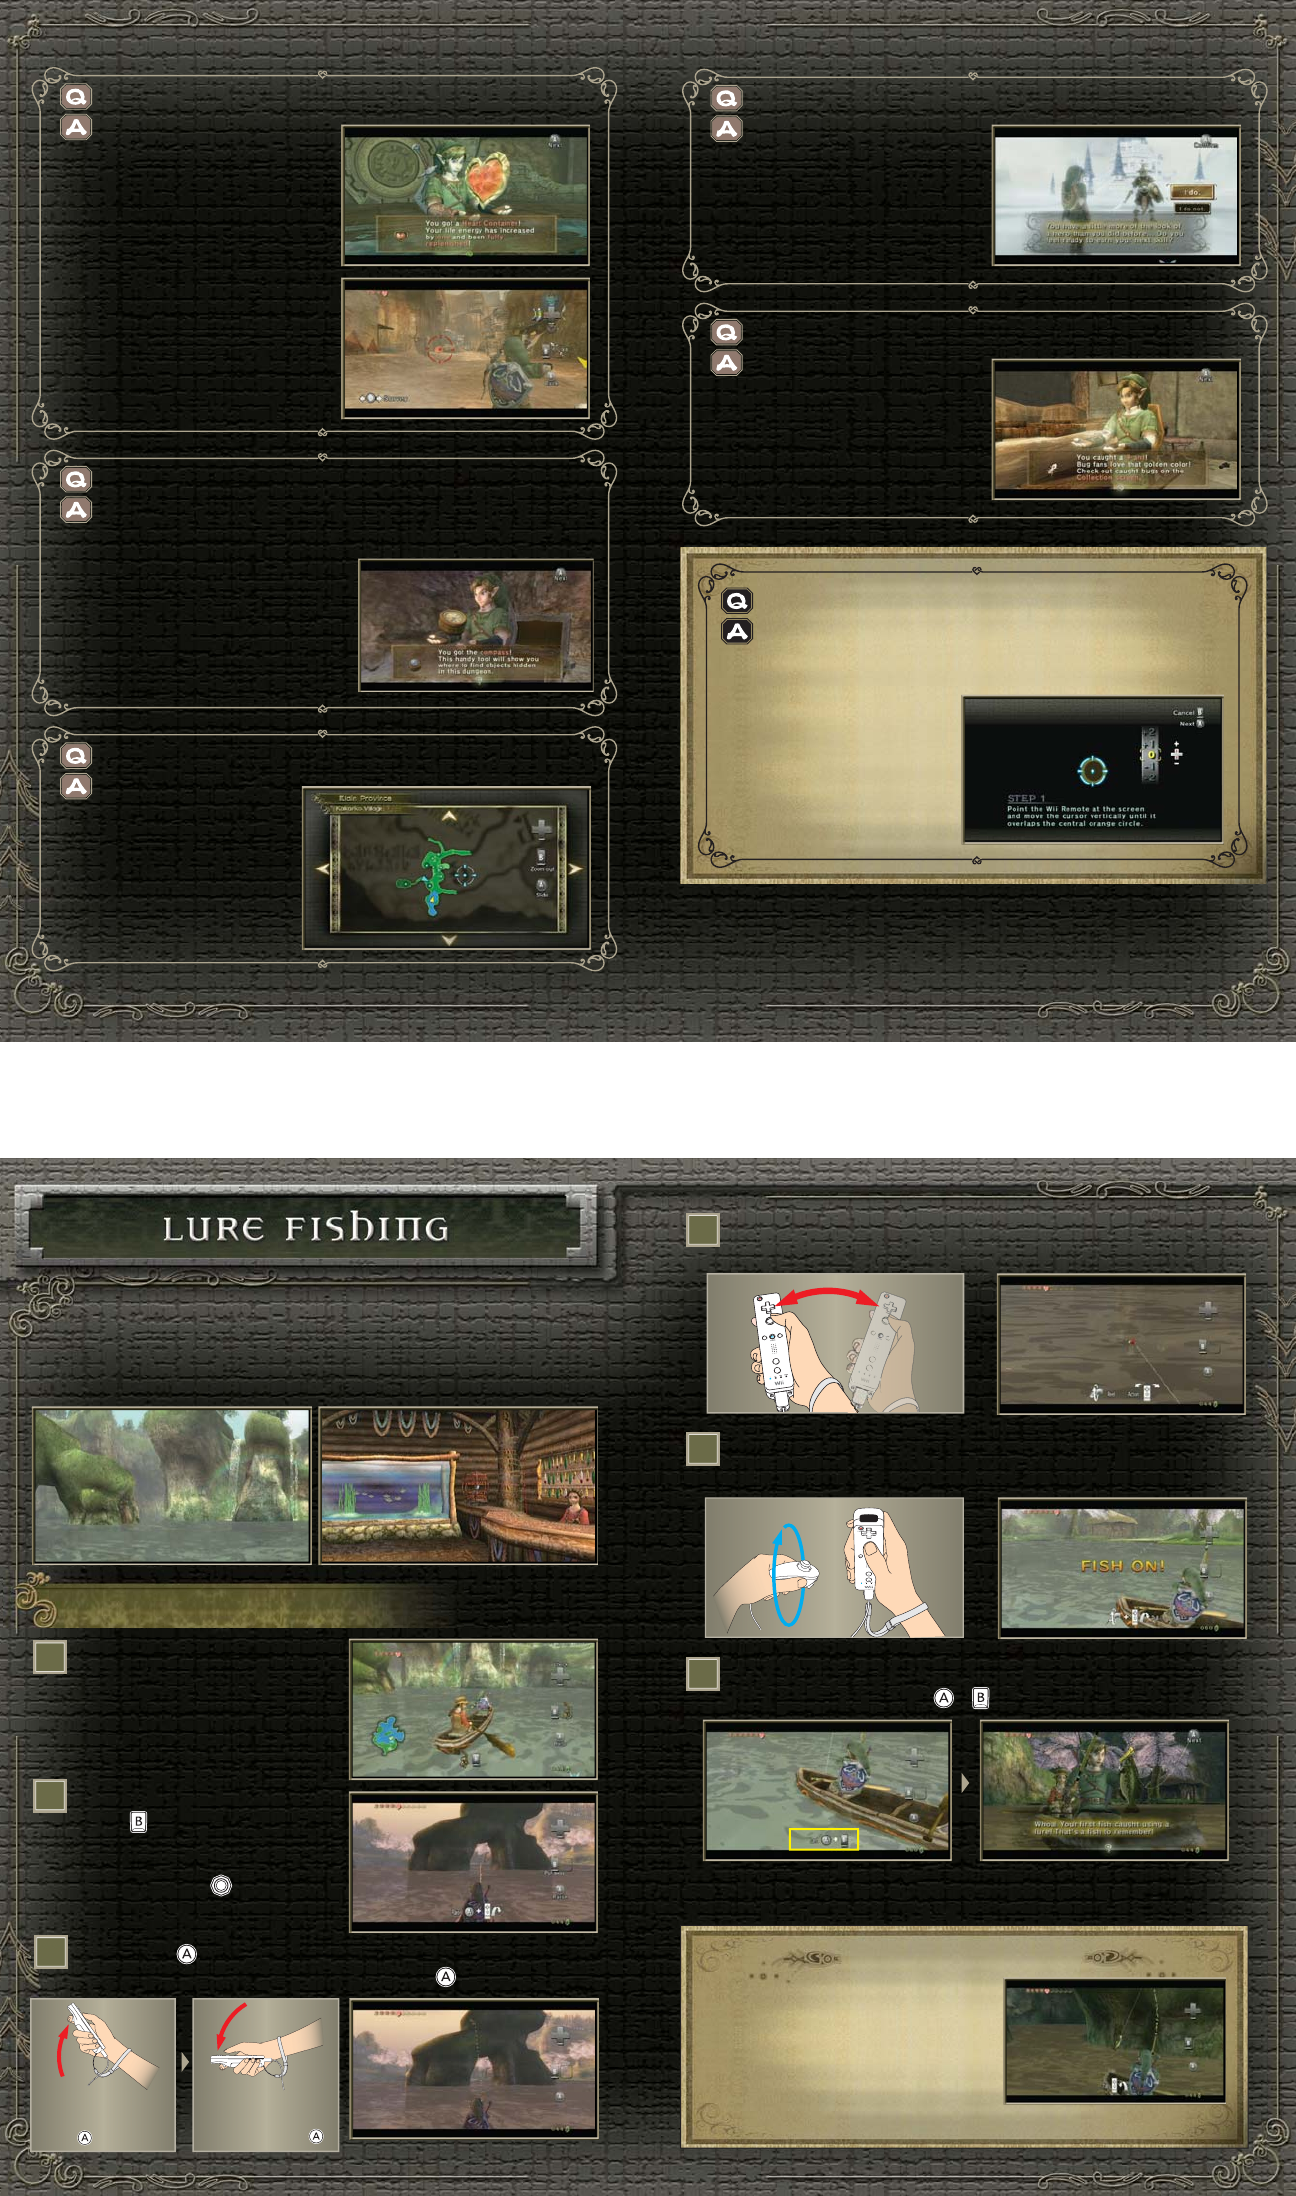
Find a Heart Container or collect 5 Pieces of Heart to
increase the capacity of your life gauge by one heart.
Use the Hero's Bow to
aim at faraway enemies
and cue out-of-reach
switches in the dungeons.
Controls for the Hero's
Bow are the same as the ones
for the slingshot .
You can use bombs to
damage enemies and
break down walls. Press
once to bring out a bomb
and one more time to place
or throw it.
3332
3130
P29
P26
P13
Empty Bottles
You can use empty bottles
to take liquids and other
items around with you. You
can fill them with medicine
that restores your life gauge, oil
for your lantern, fishing bait, or
even fairies you've captured.
Bombs
Hero's Bow
Ooccoo (and Ooccoo Jr.)
Using Ooccoo in a dungeon leaves Ooccoo in the
dungeon, allowing you to warp back to the outside
world. When you want to return to where you
left Ooccoo, use Ooccoo Jr.
Ooccoo
Ooccoo Jr.
Pieces of Heart and Heart Containers
Heart
Container Piece of
Heart
Supplemental Items
Supplemental items appear when you vanquish enemies and
move objects. Their effects are instantaneous and kick in the
moment you pick them up. They are hidden all over, so move
things around and cut down the grass to search for them.
Heart
Refills a little of your
life gauge.
Rupees
Currency you can collect.
The value of each Rupee is
determined by its color.
Pumpkin Seeds
You can use these seeds as ammunition for
your slingshot. You can hold up to 50 at once.
Here are a few hints to help you along your way. If you find
yourself stuck at a puzzle or have trouble defeating a strong
enemy, look here for a little advice.
I'm stuck here and I'm not sure where to go. What should I do?
There are lots of ways to use the items you have.
Have you tried using that new
item you just got? Try using it in
a lot of ways, usual and unusual.
You may be surprised at the results.
As for weapon items...
Items that you can use to attack
enemies, like the boomerang,
aren't just there for fighting.
Try to master all the uses of
these items by adapting them to
your situation and using them
wherever it seems possible.
Gather Information
What advantage does Z-targeting offer me?
By Z-targeting an opponent,
you can maneuver around in battle
without losing sight of your enemy.
You'll find it especially useful
against quick or flying opponents.
You can also speak to people from a
distance by Z-targeting them.
I can't take down this boss... What should I do?
Each boss has its own special
characteristics. While dodging
incoming attacks, take some time to
think up a fighting strategy that is
appropriate for the boss. Don't forget
to search the immediate area for
hearts when your life gauge gets low.
How do I effectively use Ooccoo?
Use Ooccoo in a dungeon and you'll be able to travel back
and forth from the outside world with ease. If you are having
trouble finding hearts in a dungeon or you run out of oil for
your lantern, try using Ooccoo to leave the dungeon so you
can refresh your
supplies and
life gauge.
It’s really easy to lose your way in dungeons. If you get
lost, take a look at your map and plan a route to travel. If
you manage to find a compass,
you'll become able to see the
whereabouts of the boss and
treasure chests within the
dungeon. That information should
help you get through some of the
more puzzling situations you'll face.
Once you've pulled the fish near enough to the boat that the
Land icon appears, press + to haul the fish out of the water.
Hold down while tilting the Wii Remote back, then swing
the Wii Remote forward while releasing to cast your lure.
When you've found your spot,
press to pick up your
fishing rod and decide which
way you are going to cast
your lure with .
3736
3534
I'm always running out of hearts... What should I do?
You can increase the
capacity of your life gauge by
collecting Heart Containers
and Pieces of Heart. Each time
you defeat a dungeon boss, you
will gain one more Heart
Container. Pieces of Heart, on
the other hand, are hidden all
over the world. Search the
dungeons and fields for stray
Pieces of Heart, and remember
that you can even win a few in
certain minigames.
What do I do if I get lost in a dungeon?
I can't find the Tears of Light...
Take a good, long look
at the map. Lots of infor-
mation, including where
the Tears of Light are
located, is recorded on the
map. If you ever get lost,
the first thing you should
do is take out that map.
What about skills?
As you progress through
the game, you'll occasionally
encounter a character who
will teach you advanced sword
skills. Master these skills and
remember to employ them
against strong foes.
There are these weird glowing bugs crawling around...
You might spot some
glowing bugs in the fields and
dungeons of the game. Those
little creatures are called golden
bugs. Something good might
just happen if you collect them.
1
2
3
4
5
6
Once you reach a certain point in the adventure, you will be
able to try your hand at lure fishing at the fishing hole. If you
are feeling worn out or stumped during your adventure, why
not take a breather and try your hand at a little fishing?
Controls for Lure Fishing
Move around in your canoe
and search for a fishing spot.
Swing the Wii remote
down and forward
while releasing
Tilt the Wii Remote
back while holding
down
Once the lure has hit the water, you can use your Wii Remote
to tug the lure around and wait for a fish to bite.
When you hook a fish, tilt the Wii Remote upright and rotate
the Nunchuk as pictured to reel the lure back in.
When you're reeling in a fish, the
fish may jump out of the water to
try and break free. You can
reduce the fish's chances of
escape by tilting the Wii Remote
forward when this happens.
Tips on Lure Fishing
Lots of fish gather around shorelines and boulders.
The pointer doesn't seem to control well.
Access Pointer Settings from the Options screen.
Here you can calibrate the pointer's positioning and
optimal operating distance. If you still have problems with
pointer sensitivity or
accuracy after attempting
calibration, please refer to
your Wii Operations Manual
for further assistance.
3938
DIRECTOR
Eiji Aonuma
SUB-DIRECTORS
Makoto Miyanaga
Yoichi Yamada
Shinichi Ikematsu
Daiji Imai
Koji Kitagawa
Hiromasa Shikata
Kentaro Tominaga
SCRIPT
Aya Kyogoku
Takayuki Ikkaku
LEVEL PLANNING
Ryutaro Kanno
Minoru Narita
Yugo Hayashi
Kosuke Yabuki
Kosono Okina
BOSS BATTLE PLANNING
Kenta Usui
DATA MANAGEMENT
Shigeo Kimura
Hajime Nakamura
PROGRAM DIRECTORS
Toshio Iwawaki
Kazuaki Morita
MAIN PROGRAMMING
Makoto Sasaki
PLAYER PROGRAMMING
Hiroshi Umemiya
UI SYSTEM PROGRAMMING
Nobuo Okajima
Atsushi Sakaguchi
Shigeki Yoshida
ENEMY PROGRAMMING
Takamitsu Kuzuhara
Keigo Nakanishi
Hisashi Okada
Atsushi Yamazaki
OBJECT PROGRAMMING
Kouji Sakai
Norihisa Ashida
NPC PROGRAMMING
Nobuhiro Sumiyoshi
Masayuki Kuwajima
Takashi Yoshimi
Keiji Takahashi
TECHNICAL PROGRAMMING
Kenzo Hayakawa
Kenji Matsutani
CAMERA PROGRAMMING
Masatoshi Ogawa
ART DIRECTOR
Satoru Takizawa
PLAYER DESIGN
Keisuke Nishimori
ENEMY DESIGN LEAD
Yoshiyuki Oyama
ENEMY DESIGN
Yasutomo Nishibe
Takafumi Kiuchi
Rikuto Yoshida
CHARACTER DESIGN LEAD
Satomi Asakawa
CHARACTER DESIGN
Michiko Iwasawa
Tsubasa Sakaguchi
Daisuke Watanabe
Tomomi Marunami
FIELD DESIGN LEAD
Atsushi Miyagi
FIELD DESIGN
Eiji Mukao
Hanako Hisada
Takuro Shimizu
Masahiro Kawanishi
Mizue Suetake
DUNGEON DESIGN
Hiromu Takemura
Shinko Takeshita
Akito Osanai
Kazunori Hashimoto
EFFECT DESIGN
Haruyasu Ito
Yoko Fukuda
UI DESIGN
Tokihiko Toyoda
Mei Ide
MAIN CHARACTER
DESIGN/ILLUSTRATION
Yusuke Nakano
3-D PLAYER ANIMATION
Marumi Nakajo
Yuko Yoshimura
3-D ENEMY/CHARACTER
ANIMATION
Takeshi Yamaguchi
Chikako Nishizaki
Takeshi Arima
Hiroki Motoshiromizu
Mieko Ajima
Kimihiro Ozaki
Hiroki Ishibashi
3-D CINEMA SCENE
ANIMATION
Hiroko Ihara
Satoru Yasumura
Takahiro Koizumi
Katsuki Hisanaga
Kazuhide Hiura
Masayuki Kawakita
3-D ENEMY/CHARACTER
MODELING
Hiroyuki Inoue
Yasutaka Maeki
Masanori Esaki
Takumi Ishii
Kazuhiro Saito
Shunsuke Yamamoto
3-D FIELD/DUNGEON
MODELING
Shunichi Shirai
Sanae Suzuki
Tomoko Kusano
Ritsuko Tanaka
Mizuki Tashima
Mari Fujita
Kyohei Yamaguchi
Mariko Sanefuji
Masami Naito
3-D OBJECT MODELING
Mutsumi Oda
Fumihiro Matsumoto
CINEMA SCENE DIRECTORS
Mitsuhiro Takano
Takumi Kawagoe
CINEMA SCENE PLANNING
Shigeki Yoshida
Daisuke Nobori
Hiroyasu Kuwabara
Hitoshi Kobayashi
Eriko Kimura
Chiaki Aida
Naoki Mori
MOTION CAPTURE
Koichi Natsuyama
Hitomi Hiraki
Miwa Hashiguchi
MUSIC
Toru Minegishi
Asuka Ota
Koji Kondo
SOUND
EFFECTS/PROGRAMMING
Takahiro Watanabe
Yohei Miyagawa
Atsushi Masaki
Mitsuhiro Kida
VOICE
Akira Sasanuma
Akiko Koumoto
Hironori Miyata
Junji Kitajima
Jun Mizusawa
Takeharu Onishi
Juri Takita
Sayaka Aida
Hiromi Hirata
Naomi Wakabayashi
TEASER MUSIC
ORCHESTRATION MUSIC
Mahito Yokota
TEASER MUSIC
ORCHESTRATION
ARRANGEMENT
Michiru Oshima
PROGRESS MANAGEMENT
Keizo Kato
SUPERVISORS
Takashi Tezuka
Toshihiko Nakago
TECHNICAL SUPPORT
Hironobu Kakui
Yoshito Yasuda
Shingo Okamoto
DEBUG
Ryosuke Yamada
Naoki Takami
Super Mario Club
PROGRAMMING SUPPORT
Masato Kimura
Shinichi Sasaki
Masafumi Kawamura
Hideaki Shimizu
Programming Support Group
PACKAGE/MANUAL
Yoshinori Oda
Kazuma Norisada
Fumiyoshi Suetake
PROMOTION
Takeshi Furuta
Toshio Mukai
SPECIAL THANKS
Yuri Adachi
Jin Ikeda
Keijiro Inoue
Keizo Ota
Yoshinori Kiuchi
Shinya Kitai
Keiko Kinoshita
Tomoaki Kuroume
Hiroyasu Sasano
Kaoru Sato
Takao Shimizu
Tadashi Sugiyama
Toshiaki Suzuki
Shinya Takahashi
Masahiro Takeguchi
Takuhiro Douta
Takahiro Hamguchi
Yoshiki Haruhana
Shunsuke Makita
Keisuke Matsui
Yumiko Matsumiya
Shigehiro Kasamatsu
Kiyoshi Koda
Atsushi Nishiwaki
Kunihiro Komtsu
Masaro Sakakibara
Gentaro Takaki
Hiromichi Miyake
Yuji Sawatani
Takafumi Noma
Kei Uramoto
SRD
DIGITALSCAPE Co., Ltd.
JAE
Sanda Heartland Ranch
PRODUCER
Shigeru Miyamoto
EXECUTIVE PRODUCER
Satoru Iwata
N. AMERICAN VERSION
PACKAGE/MANUAL
John Casebeer
LOCALIZATION
MANAGEMENT
Jeff Miller
Leslie Swan
Bill Trinen
LOCALIZATION
Nate Bihldorff
Reiko Ninomiya
Scot Ritchey
PRODUCT TESTING
Shuji Hashimoto
Robert Crombie
Kyle Hudson
Eric Bush
Sean Egan
Thomas Hertzog
Mika Kurosawa
Teresa Lillygren
Tomoko Mikami
Kathy Huguenard
Jeffrey Storbo
