3227fm The Definitive Guide To Linux Network Programming
User Manual:
Open the PDF directly: View PDF ![]() .
.
Page Count: 402 [warning: Documents this large are best viewed by clicking the View PDF Link!]
- Prelims
- Contents at a Glance
- Contents
- Introduction
- Networks and Protocols
- Functions
- Socket Programming
- Protocols, Sessions, and State
- Client-Server Architecture
- Implementing Custom Protocols
- Design Decisions
- Debugging and Development Cycle
- Case Study: A Networked Application
- Securing Network Communication
- Authentication and Data Signing
- Common Security Problems
- Case Study: A Secure Networked Application
- IPv6
- Index

this print for content only—size & color not accurate spine = .767" 400 page count
BOOKS FOR PROFESSIONALS BY PROFESSIONALS®
The Definitive Guide to
Linux Network Programming
Dear Reader,
As experienced developers, we find ourselves challenged by a pervasive
Internet on a daily basis. Our users and customers often need or want some
level of network service within their applications. Whether the goal is to allow
remote monitoring of an application’s health, provide a service to thousands of
users, or even authenticate a user’s identity, network application programming
often seems like a dark art practiced by only the most experienced developers.
We aim, with this book, to help you meet the challenge, and to show you that
network programming can be both enjoyable and easy to learn. We designed
this book to provide you with what we hope is a productive mix of theory and
concrete examples of the major concepts.
From exploring the basics of networking, to creating complex multithreaded
servers, to securing network communications with SSL/TLS, we present you
with precise definitions, clear explanations, and real-world examples. For the
inexperienced network developer familiar with the C language, as well as the
expert looking to pick up some extra tips, we provide information on and
insight into a topic that is so often ignored, and yet sorely in need of attention.
Keir Davis, John Turner, and Nathan Yocom
Keir Davis
US $49.99
Shelve in
Networking
User level:
Intermediate–Advanced
www.apress.com
SOURCE CODE ONLINE
forums.apress.com
FOR PROFESSIONALS BY PROFESSIONALS™
Join online discussions:
Linux Network Programming Davis, Turner,
and Yocom
THE EXPERT’S VOICE®
Keir Davis, John W. Turner,
and Nathan Yocom
The Definitive Guide to
Linux Network
Programming
CYAN
MAGENTA
YELLOW
BLACK
PANTONE 123 CV
ISBN 1-59059-322-7
9 781590 593226
54999
689253 15227 0
John W. Turner
Nathan Yocom
RELATED TITLES
The
Definitive
Guide to

Beginning Portable Shell Scripting:
From Novice to Professional
Peter Seebach
978-1-4302-1043-6
$34.99 | 300 pp | November 2008
Beginning Ubuntu LTS Server Administration:
From Novice to Professional, Second Edition
Sander van Vugt
978-1-4302-1082-5
$39.99 | 424 pp | September 2008
Expert Shell Scripting
Ron Peters
978-1-4302-1841-8
$39.99 | 330 pp | December 2008
Automating Linux and Unix System Administration,
Second Edition
Kirk Bauer and Nathan Campi
978-1-4302-1059-7
$49.99 | 425 pp | December 2008
Beginning OpenOffice 3.0:
From Novice to Professional
Andy Channelle
978-1-4302-1590-5
$39.99 | 450 pp | December 2008
Pro Ubuntu Server Administration
Sander van Vugt
978-1-4302-1622-3
$44.99 | 400 pp | December 2008
Get Your Hands on
Some Hot New Books
from
Apress Whether you’re looking to simply
become more comfortable with
the command line or install and manage
a Linux-based network, Apress has the
open source books you need to get
started and stay on top of the game.
Don’t want to wait for the printed book?
Order the eBook now at http://eBookshop.apress.com!
www.apress.com
Apress books are available at many fine bookstores worldwide.

The Definitive Guide
to Linux Network
Programming
KEIR DAVIS, JOHN W. TURNER, AND NATHAN YOCOM
3227fm.qxd 7/9/04 11:13 AM Page i
The Definitive Guide to Linux Network Programming
Copyright © 2004 by Keir Davis, John W. Turner, Nathan Yocom
All rights reserved. No part of this work may be reproduced or transmitted in any form or by any
means, electronic or mechanical, including photocopying, recording, or by any information
storage or retrieval system, without the prior written permission of the copyright owner and the
publisher.
ISBN (pbk): 1-59059-322-7
Printed and bound in the United States of America 9 8 7 6 5 4 3 2 1
Trademarked names may appear in this book. Rather than use a trademark symbol with every
occurrence of a trademarked name, we use the names only in an editorial fashion and to the
benefit of the trademark owner, with no intention of infringement of the trademark.
Lead Editor: Jim Sumser
Technical Reviewer: Kirk Bauer
Editorial Board: Steve Anglin, Dan Appleman, Ewan Buckingham, Gary Cornell, Tony Davis,
John Franklin, Jason Gilmore, Chris Mills, Steve Rycroft, Dominic Shakeshaft, Jim Sumser,
Karen Watterson, Gavin Wray, John Zukowski
Project Manager: Laura Cheu
Copy Edit Manager and Copy Editor: Nicole LeClerc
Production Manager: Kari Brooks
Production Editor: Janet Vail
Compositor: Molly Sharp, ContentWorks
Proofreader: Linda Seifert
Indexer: James Minkin
Artist: Kinetic Publishing Services, LLC
Cover Designer: Kurt Krames
Manufacturing Manager: Tom Debolski
Distributed to the book trade in the United States by Springer-Verlag New York, Inc., 175 Fifth
Avenue, New York, NY 10010 and outside the United States by Springer-Verlag GmbH & Co. KG,
Tiergartenstr. 17, 69112 Heidelberg, Germany.
In the United States: phone 1-800-SPRINGER, email orders@springer-ny.com, or visit
http://www.springer-ny.com. Outside the United States: fax +49 6221 345229, email
orders@springer.de, or visit http://www.springer.de.
For information on translations, please contact Apress directly at 2560 Ninth Street, Suite 219,
Berkeley, CA 94710. Phone 510-549-5930, fax 510-549-5939, email info@apress.com, or visit
http://www.apress.com.
The information in this book is distributed on an “as is” basis, without warranty. Although every
precaution has been taken in the preparation of this work, neither the author(s) nor Apress shall
have any liability to any person or entity with respect to any loss or damage caused or alleged to
be caused directly or indirectly by the information contained in this work.
The source code for this book is available to readers at http://www.apress.com in the
Downloads section.
3227fm.qxd 7/9/04 11:13 AM Page ii
To the loving memory of my mother, Nancy. And to my lovely wife, Jennifer,
who put up with me throughout this process.Yes, honey, the book is finished.
—Keir
My participation in this project would not have been possible without the love,
encouragement, and support of my family and friends, particularly my parents.
I was encouraged to learn, explore, and question from my earliest days, and my
parents never shied away from providing me the opportunity to do just that.
My contributions to this project are dedicated to my father, William Turner, to
the memory of my mother, Susan Turner, and to my sister, Becki.
—John
For my wonderful wife, Katie, who never loses faith in me; my family for
supporting me; and my daughter, who makes me smile every day.
—Nate
3227fm.qxd 7/9/04 11:13 AM Page iii
3227fm.qxd 7/9/04 11:13 AM Page iv
Contents at a Glance
About the Authors . . . . . . . . . . . . . . . . . . . . . . . . . . . . . . . . . . . . . . . . . . . . . . .xi
About the Technical Reviewer . . . . . . . . . . . . . . . . . . . . . . . . . . . . . . . . . .xiii
Acknowledgments . . . . . . . . . . . . . . . . . . . . . . . . . . . . . . . . . . . . . . . . . . . . . . . . .xv
Introduction . . . . . . . . . . . . . . . . . . . . . . . . . . . . . . . . . . . . . . . . . . . . . . . . . . .xvii
Part One Fundamentals . . . . . . . . . . . . . . . . . . . . . . . . . . . . . . . . . . . . .1
Chapter 1 Networks and Protocols . . . . . . . . . . . . . . . . . . . . . . . . . . . . .3
Chapter 2 Functions . . . . . . . . . . . . . . . . . . . . . . . . . . . . . . . . . . . . . . . . . .41
Chapter 3 Socket Programming . . . . . . . . . . . . . . . . . . . . . . . . . . . . . . . .65
Chapter 4 Protocols, Sessions, and State . . . . . . . . . . . . . . . . . . .85
Part Two Design and Architecture . . . . . . . . . . . . . . . . . . . . . .97
Chapter 5 Client-Server Architecture . . . . . . . . . . . . . . . . . . . . . . .99
Chapter 6 Implementing Custom Protocols . . . . . . . . . . . . . . . . . . .137
Chapter 7 Design Decisions . . . . . . . . . . . . . . . . . . . . . . . . . . . . . . . . .155
Chapter 8 Debugging and Development Cycle . . . . . . . . . . . . . . . . .173
Chapter 9 Case Study: A Networked Application . . . . . . . . . . . .185
Part Three Security . . . . . . . . . . . . . . . . . . . . . . . . . . . . . . . . . . . . . . . .229
Chapter 10 Securing Network Communication . . . . . . . . . . . . . . . . . .231
Chapter 11 Authentication and Data Signing . . . . . . . . . . . . . . . . .261
Chapter 12 Common Security Problems . . . . . . . . . . . . . . . . . . . . . . . .281
Chapter 13 Case Study: A Secure Networked Application . . . . .301
Appendix A IPv6 . . . . . . . . . . . . . . . . . . . . . . . . . . . . . . . . . . . . . . . . . . . . . .341
Index . . . . . . . . . . . . . . . . . . . . . . . . . . . . . . . . . . . . . . . . . . . . . . . . . . . . . . . . . . .361
v
3227fm.qxd 7/9/04 11:13 AM Page v
3227fm.qxd 7/9/04 11:13 AM Page vi
Contents
About the Authors . . . . . . . . . . . . . . . . . . . . . . . . . . . . . . . . . . . . . . . . . . . . . . .xi
About the Technical Reviewer . . . . . . . . . . . . . . . . . . . . . . . . . . . . . . . . . .xiii
Acknowledgments . . . . . . . . . . . . . . . . . . . . . . . . . . . . . . . . . . . . . . . . . . . . . . . . .xv
Introduction . . . . . . . . . . . . . . . . . . . . . . . . . . . . . . . . . . . . . . . . . . . . . . . . . . .xvii
Part One Fundamentals . . . . . . . . . . . . . . . . . . . . . . . . . . . . . . . . 1
Chapter 1 Networks and Protocols. . . . . . . . . . . . . . . . . . . . . . 3
Circuits vs. Packets . . . . . . . . . . . . . . . . . . . . . . . . . . . . . . . . . . . . . . . . . . . . .3
Internetworking . . . . . . . . . . . . . . . . . . . . . . . . . . . . . . . . . . . . . . . . . . . . . . . . . .4
Ethernets . . . . . . . . . . . . . . . . . . . . . . . . . . . . . . . . . . . . . . . . . . . . . . . . . . . . . . . . .6
Ethernet Frames . . . . . . . . . . . . . . . . . . . . . . . . . . . . . . . . . . . . . . . . . . . . . . . . . .7
Addressing . . . . . . . . . . . . . . . . . . . . . . . . . . . . . . . . . . . . . . . . . . . . . . . . . . . . . . . .8
Internet Protocol . . . . . . . . . . . . . . . . . . . . . . . . . . . . . . . . . . . . . . . . . . . . . . .17
User Datagram Protocol . . . . . . . . . . . . . . . . . . . . . . . . . . . . . . . . . . . . . . . . . .25
Transmission Control Protocol . . . . . . . . . . . . . . . . . . . . . . . . . . . . . . . . . .27
The Client-Server Model . . . . . . . . . . . . . . . . . . . . . . . . . . . . . . . . . . . . . . . .31
The Domain Name System . . . . . . . . . . . . . . . . . . . . . . . . . . . . . . . . . . . . . . . . .33
Summary . . . . . . . . . . . . . . . . . . . . . . . . . . . . . . . . . . . . . . . . . . . . . . . . . . . . . . . . . .39
Chapter 2 Functions. . . . . . . . . . . . . . . . . . . . . . . . . . . . . . . . . . . . . . 41
What Is a Socket? . . . . . . . . . . . . . . . . . . . . . . . . . . . . . . . . . . . . . . . . . . . . . . .41
Using Sockets . . . . . . . . . . . . . . . . . . . . . . . . . . . . . . . . . . . . . . . . . . . . . . . . . . .43
Summary . . . . . . . . . . . . . . . . . . . . . . . . . . . . . . . . . . . . . . . . . . . . . . . . . . . . . . . . . .63
vii
3227fm.qxd 7/9/04 11:13 AM Page vii
Chapter 3 Socket Programming . . . . . . . . . . . . . . . . . . . . . . . . . . 65
User Datagram Protocol . . . . . . . . . . . . . . . . . . . . . . . . . . . . . . . . . . . . . . . . . .65
File Transfer . . . . . . . . . . . . . . . . . . . . . . . . . . . . . . . . . . . . . . . . . . . . . . . . . . .73
Error Handling . . . . . . . . . . . . . . . . . . . . . . . . . . . . . . . . . . . . . . . . . . . . . . . . . .83
Summary . . . . . . . . . . . . . . . . . . . . . . . . . . . . . . . . . . . . . . . . . . . . . . . . . . . . . . . . . .84
Chapter 4 Protocols, Sessions, and State. . . . . . . . . . . 85
State vs. Stateless . . . . . . . . . . . . . . . . . . . . . . . . . . . . . . . . . . . . . . . . . . . . .85
Methods for Maintaining State . . . . . . . . . . . . . . . . . . . . . . . . . . . . . . . . . .87
Summary . . . . . . . . . . . . . . . . . . . . . . . . . . . . . . . . . . . . . . . . . . . . . . . . . . . . . . . . . .96
Part Two Design and Architecture . . . . . . . . . . . . . . . 97
Chapter 5 Client-Server Architecture. . . . . . . . . . . . . . . . 99
Client Test Program . . . . . . . . . . . . . . . . . . . . . . . . . . . . . . . . . . . . . . . . . . . . .99
Multiplexing . . . . . . . . . . . . . . . . . . . . . . . . . . . . . . . . . . . . . . . . . . . . . . . . . . .102
Forking . . . . . . . . . . . . . . . . . . . . . . . . . . . . . . . . . . . . . . . . . . . . . . . . . . . . . . . . .108
Multithreading . . . . . . . . . . . . . . . . . . . . . . . . . . . . . . . . . . . . . . . . . . . . . . . . .118
Combining Preforking and Prethreading . . . . . . . . . . . . . . . . . . . . . . . .128
Which Method Should You Choose? . . . . . . . . . . . . . . . . . . . . . . . . . . . . . . .130
Dealing with Large Amounts of Data . . . . . . . . . . . . . . . . . . . . . . . . . . .130
Summary . . . . . . . . . . . . . . . . . . . . . . . . . . . . . . . . . . . . . . . . . . . . . . . . . . . . . . . . .135
Chapter 6 Implementing Custom Protocols . . . . . . . . . . . 137
What Is a Protocol? . . . . . . . . . . . . . . . . . . . . . . . . . . . . . . . . . . . . . . . . . . . .137
Designing a Custom Protocol . . . . . . . . . . . . . . . . . . . . . . . . . . . . . . . . . . .138
Our Chat Protocol . . . . . . . . . . . . . . . . . . . . . . . . . . . . . . . . . . . . . . . . . . . . . .142
Protocol Registration . . . . . . . . . . . . . . . . . . . . . . . . . . . . . . . . . . . . . . . . . .150
Summary . . . . . . . . . . . . . . . . . . . . . . . . . . . . . . . . . . . . . . . . . . . . . . . . . . . . . . . . .153
Contents
viii
3227fm.qxd 7/9/04 11:13 AM Page viii
Chapter 7 Design Decisions. . . . . . . . . . . . . . . . . . . . . . . . . . . . 155
TCP vs. UDP . . . . . . . . . . . . . . . . . . . . . . . . . . . . . . . . . . . . . . . . . . . . . . . . . . . .155
Application Protocol Choices . . . . . . . . . . . . . . . . . . . . . . . . . . . . . . . . . .157
Client-Server Architecture . . . . . . . . . . . . . . . . . . . . . . . . . . . . . . . . . . . .158
Client-Side Considerations . . . . . . . . . . . . . . . . . . . . . . . . . . . . . . . . . . . .161
Server-Side Considerations . . . . . . . . . . . . . . . . . . . . . . . . . . . . . . . . . . . .162
Summary . . . . . . . . . . . . . . . . . . . . . . . . . . . . . . . . . . . . . . . . . . . . . . . . . . . . . . . . .172
Chapter 8 Debugging and Development Cycle . . . . . . . . 173
Tools . . . . . . . . . . . . . . . . . . . . . . . . . . . . . . . . . . . . . . . . . . . . . . . . . . . . . . . . . . .173
Chicken or the Egg . . . . . . . . . . . . . . . . . . . . . . . . . . . . . . . . . . . . . . . . . . . . .177
Debugging . . . . . . . . . . . . . . . . . . . . . . . . . . . . . . . . . . . . . . . . . . . . . . . . . . . . . . .178
Defensive Programming . . . . . . . . . . . . . . . . . . . . . . . . . . . . . . . . . . . . . . . . . .179
Summary . . . . . . . . . . . . . . . . . . . . . . . . . . . . . . . . . . . . . . . . . . . . . . . . . . . . . . . . .183
Chapter 9 Case Study: A Networked Application . . . 185
The Server . . . . . . . . . . . . . . . . . . . . . . . . . . . . . . . . . . . . . . . . . . . . . . . . . . . . .185
The Client . . . . . . . . . . . . . . . . . . . . . . . . . . . . . . . . . . . . . . . . . . . . . . . . . . . . .201
Recommendations for Improvements . . . . . . . . . . . . . . . . . . . . . . . . . . . . . .226
Summary . . . . . . . . . . . . . . . . . . . . . . . . . . . . . . . . . . . . . . . . . . . . . . . . . . . . . . . . .227
Part Three Security . . . . . . . . . . . . . . . . . . . . . . . . . . . . . . . . . . . . 229
Chapter 10 Securing Network Communication. . . . . . . . . . 231
Tunneling . . . . . . . . . . . . . . . . . . . . . . . . . . . . . . . . . . . . . . . . . . . . . . . . . . . . . . .232
Public Key Infrastructure . . . . . . . . . . . . . . . . . . . . . . . . . . . . . . . . . . . . .235
Secure Network Programming Using OpenSSL . . . . . . . . . . . . . . . . . . . . .242
Summary . . . . . . . . . . . . . . . . . . . . . . . . . . . . . . . . . . . . . . . . . . . . . . . . . . . . . . . . .260
Contents
ix
3227fm.qxd 7/9/04 11:13 AM Page ix
Chapter 11 Authentication and Data Signing . . . . . . . . 261
The Old Scenario . . . . . . . . . . . . . . . . . . . . . . . . . . . . . . . . . . . . . . . . . . . . . . .261
The Present-Day Scenario . . . . . . . . . . . . . . . . . . . . . . . . . . . . . . . . . . . . . .262
The PAM Library . . . . . . . . . . . . . . . . . . . . . . . . . . . . . . . . . . . . . . . . . . . . . . . .263
Public Key Authentication . . . . . . . . . . . . . . . . . . . . . . . . . . . . . . . . . . . . .268
Single Sign-on . . . . . . . . . . . . . . . . . . . . . . . . . . . . . . . . . . . . . . . . . . . . . . . . .278
Summary . . . . . . . . . . . . . . . . . . . . . . . . . . . . . . . . . . . . . . . . . . . . . . . . . . . . . . . . .279
Chapter 12 Common Security Problems . . . . . . . . . . . . . . . . . 281
Common Attacks . . . . . . . . . . . . . . . . . . . . . . . . . . . . . . . . . . . . . . . . . . . . . . . . .281
Buffer Overflow . . . . . . . . . . . . . . . . . . . . . . . . . . . . . . . . . . . . . . . . . . . . . . . .282
Secure Coding Practices . . . . . . . . . . . . . . . . . . . . . . . . . . . . . . . . . . . . . . .282
Tools of the Trade . . . . . . . . . . . . . . . . . . . . . . . . . . . . . . . . . . . . . . . . . . . . .297
Summary . . . . . . . . . . . . . . . . . . . . . . . . . . . . . . . . . . . . . . . . . . . . . . . . . . . . . . . . .299
Chapter 13 Case Study: A Secure Networked
Application . . . . . . . . . . . . . . . . . . . . . . . . . . . . . . . . . . 301
The Necessary Decisions . . . . . . . . . . . . . . . . . . . . . . . . . . . . . . . . . . . . . . .301
Code Design and Layout . . . . . . . . . . . . . . . . . . . . . . . . . . . . . . . . . . . . . . . .303
The Code . . . . . . . . . . . . . . . . . . . . . . . . . . . . . . . . . . . . . . . . . . . . . . . . . . . . . . . .304
Analysis . . . . . . . . . . . . . . . . . . . . . . . . . . . . . . . . . . . . . . . . . . . . . . . . . . . . . . . .335
Summary . . . . . . . . . . . . . . . . . . . . . . . . . . . . . . . . . . . . . . . . . . . . . . . . . . . . . . . . .339
Appendix IPv6 . . . . . . . . . . . . . . . . . . . . . . . . . . . . . . . . . . . . . . . . . . . 341
IPv6 Addressing . . . . . . . . . . . . . . . . . . . . . . . . . . . . . . . . . . . . . . . . . . . . . . . .342
IPv6 and Linux . . . . . . . . . . . . . . . . . . . . . . . . . . . . . . . . . . . . . . . . . . . . . . . . .344
Porting to IPv6 . . . . . . . . . . . . . . . . . . . . . . . . . . . . . . . . . . . . . . . . . . . . . . . .345
Future Enhancements . . . . . . . . . . . . . . . . . . . . . . . . . . . . . . . . . . . . . . . . . . . .354
Summary . . . . . . . . . . . . . . . . . . . . . . . . . . . . . . . . . . . . . . . . . . . . . . . . . . . . . . . . .358
Index . . . . . . . . . . . . . . . . . . . . . . . . . . . . . . . . . . . . . . . . . . . . . . . . . . . . . . . . . . 361
Contents
x
3227fm.qxd 7/9/04 11:13 AM Page x
About the Authors
Keir Davis was first exposed to programming at the age of 12, when his father
brought home a Texas Instruments TI-99/4A. Keir has been
programming ever since and now holds a master’s degree
in computer science from the University of North Carolina
at Greensboro. Today, Keir is the owner of Xtern Software
(http://www.xternsoftware.com), a provider of custom software
development services to manufacturers around the world.
Recently married, Keir and his wife, Jennifer, live with
their two dogs, Tess and Maggie, in North Carolina. When
not sitting in front of a computer, Keir enjoys playing
racquetball.
John Turner is an application developer and systems administrator in Detroit,
Michigan, supporting the advertising and marketing campaigns of Fortune 50
clients. With over two decades of computer experience,
John has designed and administered high-availability and
fault-tolerant systems for the automotive, health care, and
advertising industries. He coauthored the Apache Tomcat
Security Handbook and is an Apache Group committer.
He holds a bachelor’s degree in information systems.
John’s industry interests include vintage hardware, open
source, mobile computing, and wireless networking. His out-
side interests include farming, DIY projects, dogs, history,
recycling, tattoos, travel, and music composition.
Nathan Yocom has worn many hats in the IT industry over the years.
He currently works as a software engineer for Bynari, Inc.,
specializing in messaging and groupware software. With a
bachelor’s degree in computer science from Pacific Lutheran
University, Nathan is also the cofounder of XPA Systems
(http://www.xpasystems.com) and author of pGina, an open
source program that simplifies the Windows logon process
by providing for the authentication of a user via many differ-
ent methods.
In his spare time, in addition to playing the guitar and
an occasional round of golf, Nathan enjoys spending time with his wife, Katie.
xi
3227fm.qxd 7/9/04 11:19 AM Page xi
3227fm.qxd 7/9/04 11:13 AM Page xii

About the Technical
Reviewer
Kirk Bauer has been involved in computer program-
ming since 1985. He has been using and administering
UNIX systems since 1994. Although his personal
favorite UNIX variant is Linux, he has administered
and developed on everything from FreeBSD to Solaris,
AIX, and IRIX. He is the author of various open-source
system administration programs such as AutoRPM
and Logwatch.
Bauer has been involved with software development and system/network
administration since his first year at Georgia Tech. He has done work for the
Georgia Tech Residential Network, the Georgia Tech Research Institute, and the
Fermi National Accelerator Laboratory. Bauer was one of the founders and the
CTO of TogetherWeb in 2000, which was purchased in 2003 by Proficient Systems.
He is currently a software architect with Proficient Systems, and continues to
support and develop the collaborative browsing software and Linux-based net-
work appliance created by TogetherWeb, including C++ server software that
provides high scalability, high efficiency, and high reliability.
Kirk graduated from Georgia Tech in 2001 with a bachelor’s degree in
computer engineering. Shortly thereafter, he began work on his first book,
Automating UNIX and Linux Administration, which was published by Apress in
September 2003. He currently lives in Peoria, Arizona, with his wife, Amber, and
their two dogs and four cats.
xiii
3227fm.qxd 7/9/04 11:13 AM Page xiii
3227fm.qxd 7/9/04 11:13 AM Page xiv
Acknowledgments
I wish to thank the wonderful people at Apress for believing in the book and
seeing it through to publication. It’s been a long time coming, but I think that it’s
been worth it. Thanks also to Jim Sumser, our editor. Jim, your positive outlook
and encouragement made all the difference. To Kirk Bauer, our technical editor,
your insight made this a better book. Finally, I wish to thank my wife, Jennifer.
I can’t wait to put this book in your hands so that you can see what I’ve been
working on all this time.
—Keir
I’d like to thank my aunts, Mary Pryde and Ann Turner; my friends Peter, Clarissa,
Carla, Rich, Jessica, Jerry, and Debbie; and especially TreachRS in Boston for
their constant support and for helping me keep it real. Trevor Deason and
Sophia Colpean reminded me of what’s important when it counted. I must also
thank my coauthors, Nate and Keir, who put up with my bad jokes and choppy
schedule, and made it amazingly easy to be a part of this project. The writing
portion is only the beginning. There’s a lot more involved in delivering a book
than the writing, and the team Apress put together for this project rocked the
house. Kirk’s reviews were insightful, concise, and improved every chapter. Jim,
Laura, Nicole, and Janet kept us all focused, organized, and happy, and took care
of the myriad tasks required to actually put a book on the shelf with speed and
enthusiastic aplomb. Thanks, everyone!
—John
I would like to acknowledge the help and support from Apress, whose deter-
mination to publish quality books on great subjects has helped us to make this
book everything we knew it could be. Specifically, I would like to thank Jim Sumser
(editorial director) and Laura Cheu (project manager) for making the DTY team
complete. I would also like to thank the faculty at Pacific Lutheran University’s
Computer Science department for their continual excellence in education and
their unwavering support of their students. Lastly, but most important, my
thanks to my fellow authors and our technical reviewer, whose professionalism
and ability lend great compliment to their character.
—Nathan
xv
3227fm.qxd 7/9/04 11:13 AM Page xv
3227fm.qxd 7/9/04 11:13 AM Page xvi
Introduction
AS DEVELOPERS,WE FIND ourselves challenged by the ubiquity of the Internet on
a daily basis as we often need or want to provide some level of network service
within our applications. Whether our goal is to allow remote monitoring of an
application’s health, enable multiple users to access a centralized service, or
even authenticate a user’s identity prior to giving him access to an application,
network programming is a seemingly dark art practiced by only the most experi-
enced developers. We have written this text to help you meet the challenge, and
to show you that network programming can be both enjoyable and easy to learn.
From exploring the basics of networking, to creating complex multithreaded
servers, to securing network communications, we present you with precise defi-
nitions, clear explanations, and easy-to-read examples. For the inexperienced
network developer familiar with the C language, as well as the expert looking to
pick up some extra tips, we provide information on and insight into a topic that
is so often ignored, and yet sorely in need of attention.
What You Should Read
Depending on your experience with network programming and your reading
style, you may find that a different approach to this text is in order. We have
endeavored to write in a modular manner that presents as much independent
information about each topic as possible without requiring you to have read the
topics before it. However, it is impossible be completely modular, as with any
programming paradigm there are foundational concepts you must understand
before moving along to more advanced topics. What follows is an explanation of
the book’s structure and suggestions as to where you might start to get the most
out of the book.
We have organized the book into three parts and an appendix. The first part
covers the fundamentals of networks and network programming. The second
part discusses different approaches to the design of a network application, and
walks through protocol and advanced application design. The last part details
methods of securing a network application, programming with the OpenSSL
toolkit, and authentication, and discusses a methodology for reducing a network
application’s susceptibility to attack.
xvii
3227fm.qxd 7/9/04 11:13 AM Page xvii
The Beginner: If you do not have any prior experience with networking
concepts, how computers communicate on a local area network, or
what abbreviations such as DNS stand for, then reading from the begin-
ning of the book to the end is highly recommended.
The Novice: If you are familiar with networking concepts but have never
encountered network programming before, then you can probably skip
the first chapter. Starting with the second chapter, you will be intro-
duced to the basic functions used in network programming and can
continue through the book building concepts on top of each other.
The Experienced: Given that you have some experience with network
programming, or you have even written a network application in the
past, starting with the Part Two is highly recommended. Although much
of this information may seem familiar to you, it is important to fully
understand the different approaches to design to make the best deci-
sions when it comes to choosing an architecture that fits your needs.
The Expert: Although it is probably not required, we recommend that
even the most experienced network developer read from Chapter 7 on.
While much of this material may be familiar to an expert, it is vitally
important that you understand the advanced approaches to defensive
programming, security, and methodology.
The Others: We fully recognize that every reader is different. If you don’t
like to read parts, or topics only, we encourage you to read the whole
text, from start to finish. This book is packed with useful information
from cover to cover, and we would like to think that there is something
for everyone, regardless of experience level or learning style.
Chapter Summaries
The following sections detail the topics covered in each chapter.
Part One: Fundamentals
In this part, we will explore and practice the fundamentals of networks and net-
work programming.
Introduction
xviii
3227fm.qxd 7/9/04 11:13 AM Page xviii
Chapter 1: Networks and Protocols
This chapter provides an introduction to the world of networking. We discuss
how packets of information flow between computers on a network, and how
those packets are created, controlled, and interpreted. We look at the protocols
used, how DNS works, how addresses are assigned, and what approaches are
often used in network design.
Chapter 2: Functions
Here you will learn the basic functions used in network programming. We
examine the concept of sockets and how they are used in creating networked
applications. We also present an example of a client-server program to highlight
the use of these basic functions in communicating data from one machine to
another.
Chapter 3: Socket Programming
This chapter discusses more real-world applications of what you learned in
Chapter 2. It is in this chapter that we look at our first UDP client-server pro-
gram example. We also detail the creation of a TCP client-server program for
simple file transfers, highlighting the ease with which just a few basic network
functions allow us to provide network services and applications.
Chapter 4: Protocols, Sessions, and State
This final chapter of Part One takes you through a thorough explanation of the
various methods by which network applications can maintain state. We also walk
through both a stateless (HTTP) and a stateful (POP3) protocol to see how they
differ and where each is beneficial.
Part Two: Design and Architecture
This part covers the different approaches to network application design, and
provides you with a thorough grounding in protocol and advanced application
design.
Introduction
xix
3227fm.qxd 7/9/04 11:13 AM Page xix
Chapter 5: Client-Server Architecture
In this chapter, you will look at the different ways you can handle multiple,
simultaneous clients. We cover the concepts and applications of multiplexing,
multiprocessing servers, and the single-process-per-client approach versus the
process-pool approach. Multithreaded servers are introduced and we look at an
interesting approach used by the Apache 2 Web Server. We also demonstrate how
to handle sending and receiving large amounts of data by using nonblocking
sockets and the select system call.
Chapter 6: Implementing Custom Protocols
This chapter walks you through the creation of a custom protocol. As an exam-
ple, we examine the creation of a protocol for a networked chat application
similar to the popular IRC. We also detail registering a custom protocol with the
operating system.
Chapter 7: Design Decisions
Here we discuss the many considerations a developer must take into account
when creating a network application. There are many decisions to be made,
from whether to use TCP or UDP to choices relating to protocol creation, server
design, scalability, and security. These decisions are discussed in detail, and we
highlight the pros and cons of each to help you make informed decisions.
Chapter 8: Debugging and Development Cycle
This chapter takes you through the many tools and methods that are useful
when creating and maintaining a network application. With coverage of protocol
analysis tools and code analysis tools, this is an important chapter for the new
developer and the “old hand” alike.
Chapter 9: Case Study: A Networked Application
This chapter presents the first of two case studies in the book. This case study
takes you through the creation of a real-world chat application from the ground
up, resulting in an application that implements the protocol discussed in
Chapter 6 and allows many users to chat in a method very similar to the popular
IRC used for Internet chatting today.
Introduction
xx
3227fm.qxd 7/9/04 11:13 AM Page xx
Part Three: Security
This part details methods of securing a network application, programming with
the OpenSSL toolkit, and authentication. We also present a secure programming
methodology that you can use to reduce a network application’s susceptibility to
attack.
Chapter 10: Securing Network Communication
This chapter introduces the concepts of tunneling and public key cryptography.
Discussion of the OpenSSL toolkit leads into examples using OpenSSL to secure
a client-server application with the TLS protocol.
Chapter 11: Authentication and Data Signing
Here you will learn how you can use the PAM stack on your Linux machines to
authenticate users of your applications transparently. We then look at identity
verification through PKI and data signing, including example code for managing
keys on disk and over the network.
Chapter 12: Common Security Problems
This chapter moves away from the API level for a look at the common methods
by which network programs are attacked and what you can do about it. We detail
each method of attack, and then examine ways to approach program design and
implementation to avoid successful attacks.
Chapter 13: Case Study: A Secure Networked Application
This final chapter presents the second of our two case studies. This case study
takes you through the creation of a secure networked application intended for
user authentication first by password, and then using the passwordless data
signing method. We bring the information presented in the entire part together
into an example that has application in the real world.
Appendix: IPv6
The appendix discusses the future of network programming and the move from
the current-day IPv4 to the coming IPv6. It addresses why the move is necessary
and how can you write your code to be capable of using both protocols.
Introduction
xxi
3227fm.qxd 7/9/04 11:13 AM Page xxi
Conventions
Throughout this book, we have used several typographical conventions to help
you better understand our intent. Here are some of the most common:
TIP Tips give you additional information relating to the topic
at hand.
NOTE Notes indicate a piece of information that is important to
understand or know regarding the topic at hand.
CAUTION These indicate a piece of information that it is impor-
tant you understand in order to prevent security problems, errors,
or common mistakes.
We have also adopted a special font for code and user commands. Code
appears as follows:
If ( value == true ) { // do something }
When we provide user commands or command output, we use a similar
font, where bold text indicates what you should type. In the following example,
you type the text “ping 127.0.0.1” at a prompt.
user@host$> ping 127.0.0.1
Feedback
We have made every effort to keep mistakes, typos, and other errors out of this
book, but we are all only human. We would love to hear what you think, where
we could be clearer, or if you find mistakes or misprints. Please feel free to drop
us an e-mail at DTY@apress.com. You can also go to the Downloads area of the
Apress site at http://www.apress.com to download the code from the book.
Introduction
xxii
3227fm.qxd 7/9/04 11:13 AM Page xxii

Part One
Fundamentals
3227c01.qxd 7/8/04 9:09 PM Page 1
3227c01.qxd 7/8/04 9:09 PM Page 2
CHAPTER 1
Networks and Protocols
NETWORKS CAME INTO EXISTENCE AS SOON as there was two of something: two cells,
two animals and, obviously, two computers. While the overwhelming popularity
of the Internet leads people to think of networks only in a computer context, a
network exists anytime there is communication between two or more parties.
The differences between various networks are matters of implementation, as the
intent is the same: communication. Whether it is two people talking or two com-
puters sharing information, a network exists. The implementations are defined
by such aspects as medium and protocol. The network medium is the substance
used to transmit the information; the protocol is the common system that defines
how the information is transmitted.
In this chapter, we discuss the types of networks, the methods for connecting
networks, how network data is moved from network to network, and the proto-
cols used on today’s popular networks. Network design, network administration,
and routing algorithms are topics suitable for an entire book of their own, so out
of necessity we’ll present only overviews here. With that in mind, let’s begin.
Circuits vs. Packets
In general, there are two basic types of network communications: circuit-switched
and packet-switched. Circuit-switched networks are networks that use a dedi-
cated link between two nodes, or points. Probably the most familiar example of a
circuit-switched network is the legacy telephone system. If you wished to make
a call from New York to Los Angeles, a circuit would be created between point A
(New York) and point B (Los Angeles). This circuit would be dedicated—that is,
there would be no other devices or nodes transmitting information on that net-
work and the resources needed to make the call possible, such as copper wiring,
modulators, and more would be used for your call and your call only. The only
nodes transmitting would be the two parties on each end.
One advantage of a circuit-switched network is the guaranteed capacity.
Because the connection is dedicated, the two parties are guaranteed a certain
amount of transmission capacity is available, even though that amount has an
upper limit. A big disadvantage of circuit-switched networks, however, is cost.
Dedicating resources to facilitate a single call across thousands of miles is a costly
proposition, especially since the cost is incurred whether or not anything is trans-
mitted. For example, consider making the same call to Los Angeles and getting an
3
3227c01.qxd 7/8/04 9:09 PM Page 3
answering machine instead of the person you were trying to reach. On a circuit-
switched network, the resources are committed to the network connection and
the costs are incurred even though the only thing transmitted is a message of
unavailability.
A packet-switched network uses a different approach from a circuit-
switched network. Commonly used to connect computers, a packet-switched
network takes the information communicated on the network and breaks it into
a series of packets, or pieces. These packets are then transmitted on a common
network. Each packet consists of identification information as well as its share of
the larger piece of information. The identification information on each packet
allows a node on the network to determine whether the information is destined
for it or the packet should be passed along to the next node in the chain. Once
the packet arrives at its destination, the receiver uses the identification portion
of the packet to reassemble the pieces and create the complete version of the
original information. For example, consider copying a file from one computer in
your office to another. On a packet-switched network, the file would be split into
a number of packets. Each packet would have specific identification information
as well as a portion of the file. The packets would be sent out onto the network,
and once they arrived at their destination, they would be reassembled into the
original file.
Unlike circuit-switched networks, the big advantage of packet-switched
networks is the ability to share resources. On a packet-switched network, many
nodes can exist on the network, and all nodes can use the same network
resources as all of the others, sharing in the cost. The disadvantage of packet-
switched networks, however, is the inability to guarantee capacity. As more and
more nodes sharing the resources try to communicate, the portion of the
resources available to each node decreases.
Despite their disadvantages, packet-switched networks have become the
de facto standard whenever the term “network” is used. Recent developments
in networking technologies have decreased the price point for capacity signifi-
cantly, making a network where many nodes or machines can share the same
resources cost-effective. For the purposes of discussion in this book, the word
“network” will mean a packet-switched network.
Internetworking
A number of different technologies exist for creating networks between com-
puters. The terms can be confusing and in many cases can mean different
things depending on the context in which they’re used. The most common net-
work technology is the concept of a local area network, or LAN. A LAN consists
of a number of computers connected together on a network such that each can
Chapter 1
4
3227c01.qxd 7/8/04 9:09 PM Page 4
communicate with any of the others. A LAN typically takes the form of two or
more computers joined together via a hub or switch, though in its simplest
form two computers connected directly to each other can be called a LAN as
well. When using a hub or switch, the ability to add computers to the network
becomes trivial, requiring only the addition of another cable connecting the
new node to the hub or switch. That’s the beauty of a packet-switched network,
for if the network were circuit-switched, we would have to connect every node
on the network to every other node, and then figure out a way for each node to
determine which connection to use at any given time.
LANs are great, and in many cases they can be all that’s needed to solve a par-
ticular problem. However, the advantages of a network really become apparent
when you start to connect one network to another. This is called internetworking,
and it forms the basis for one of the largest known networks: the Internet.
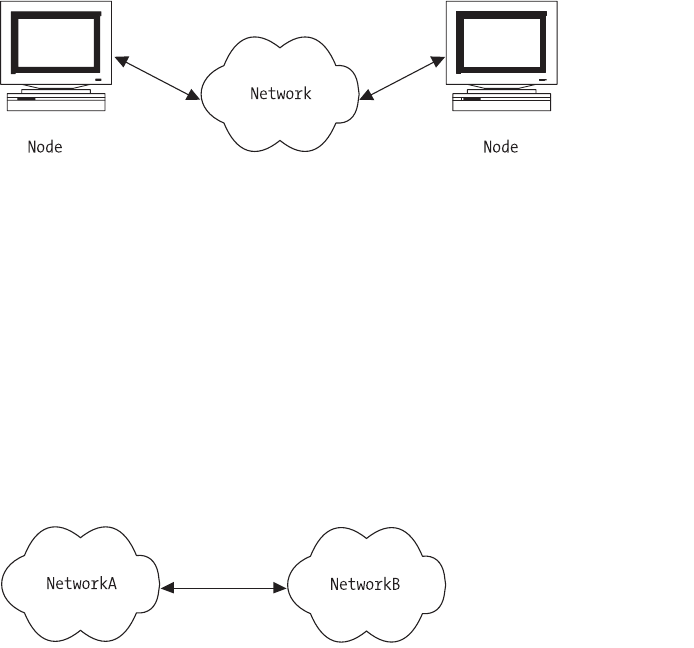
Consider the following diagrams. Figure 1-1 shows a typical LAN.
Figure 1-1. A single network
You can see there are a number of computers, or nodes, connected to a
common point. In networking parlance, this is known as a star configuration.
This type of LAN can be found just about anywhere, from your home to your
office, and it’s responsible for a significant portion of communication activity
every day. But what happens if you want to connect one LAN to another?
As shown in Figure 1-2, connecting two LANs together forms yet another
network, this one consisting of two smaller networks connected together so that
information can be shared not only between nodes on a particular LAN, but also
between nodes on separate LANs via the larger network.
Figure 1-2. Two connected networks
Networks and Protocols
5
3227c01.qxd 7/8/04 9:09 PM Page 5
Because the network is packet-switched, you can keep connecting networks
together forever or until the total number of nodes on the network creates too
much traffic and clogs the network. Past a certain point, however, more involved
network technologies beyond the scope of this book are used to limit the traffic
problems on interconnected networks and improve network efficiency. By using
routers, network addressing schemes, and long-haul transmission technologies
such as dense wavelength division multiplexing (DWDM) and long-haul network
protocols such as asynchronous transfer mode (ATM), it becomes feasible to
connect an unlimited number of LANs to each other and allow nodes on these
LANs to communicate with nodes on remote networks as if they were on the
same local network, limiting packet traffic problems and making network inter-
connection independent of the supporting long-distance systems and hardware.
The key concept in linking networks together is that each local network takes
advantage of its packet-switched nature to allow communication with any num-
ber of other networks without requiring a dedicated connection to each of those
other networks.
Ethernets
Regardless of whether we’re talking about one network or hundreds of networks
connected together, the most popular type of packet-switched network is the
Ethernet. Developed 30 years ago by Xerox PARC and later standardized by
Xerox, Intel, and Digital Equipment Corporation, Ethernets originally consisted
of a single cable connecting the nodes on a network. As the Internet exploded,
client-server computing became the norm, and more and more computers were
linked together, a simpler, cheaper technology known as twisted pair gained
acceptance. Using copper conductors much like traditional phone system wiring,
twisted pair cabling made it even cheaper and easier to connect computers
together in a LAN. A big advantage to twisted pair cabling is that, unlike early
Ethernet cabling, a node can be added or removed from the network without
causing transmission problems for the other nodes on the network.
A more recent innovation is the concept of broadband. Typically used in
connection with Internet access via cable TV systems, broadband works by mul-
tiplexing multiple network signals on one cable by assigning each network signal
a unique frequency. The receivers at each node of the network are tuned to the
correct frequency and receive communications on that frequency while ignoring
communications on all the others.
A number of alternatives to Ethernet for local area networking exist. Some of
these include IBM’s Token Ring, ARCNet, and DECNet. You might encounter one
of these technologies, as Linux supports all of them, but in general the most
common is Ethernet.
Chapter 1
6
3227c01.qxd 7/8/04 9:09 PM Page 6
Ethernet Frames
On your packet-switched Ethernet, each packet of data can be considered a
frame. An Ethernet frame has a specific structure, though the length of the frame
or packet is variable, with the minimum length being 64 bytes and the maximum
length being 1518 bytes, although proprietary implementations can extend the
upper limit to 4096 bytes or higher. A recent Ethernet specification called Jumbo
Frames even allows frame sizes as high as 9000 bytes, and newer technologies
such as version 6 of the Internet Protocol (discussed later) allow frames as large
as 4GB. In practice, though, Ethernet frames use the traditional size in order to
maintain compatibility between different architectures.
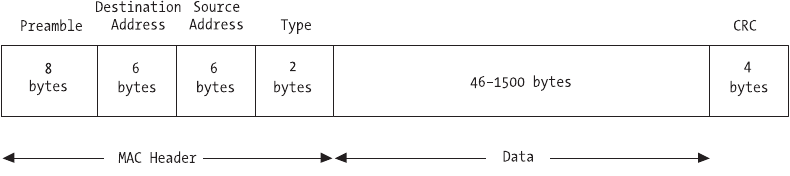
Because the network is packet-based, each frame must contain a source
address and destination address. In addition to the addresses, a typical frame
contains a preamble, a type indicator, the data payload, and a cyclic redundancy
checksum (CRC). The preamble is 64 bits long and typically consists of alternating
0s and 1s to help network nodes synchronize transmissions. The type indicator is
16 bits long, and the CRC is 32 bits. The remaining bits in the packet consist of the
actual packet data being sent (see Figure 1-3).
Networks and Protocols
7
Figure 1-3. An Ethernet frame
The type field is used to identify the type of data being carried by the
packet. Because Ethernet frames have this type indicator, they are known as
self-identifying. The receiving node can use the type field to determine the data
contained in the packet and take appropriate action. This allows the use of mul-
tiple protocols on the same node and the same network segment. If you wanted
to create your own protocol, you could use a frame type that did not conflict
with any others being used, and your network nodes could communicate
freely without interrupting any of the existing communications.
The CRC field is used by the receiving node to verify that the packet of data
has been received intact. The sender computes the CRC value and adds it to the
packet before sending the packet. On the receiving end, the receiver recalculates
the CRC value for the packet and compares it to the value sent by the sender to
confirm the packet was received intact.
3227c01.qxd 7/8/04 9:09 PM Page 7
Addressing
We’ve discussed the concept of two or more computers communicating over a
network, and we’ve discussed the concept of abstracting the low-level concerns of
internetworking so that as far as one computer is concerned, the other computer
could be located nearby or on the other side of the world. Because every packet
contains the address of the source and the destination, the actual physical dis-
tance between two network nodes really doesn’t matter, as long as a transmission
path can be found between them. Sounds good, but how does one computer find
the other? How does one node on the network “call” another node?
For communication to occur, each node on the network must have its
own address. This address must be unique, just as someone’s phone number is
unique. For example, while two or more people might have 555-9999 as their
phone number, only one person will have that phone number within a certain
area code, and that area code will exist only once within a certain country code.
This accomplishes two things: it ensures that within a certain scope each num-
ber is unique, and it allows each person with a phone to have a unique number.
Ethernet Addresses
Ethernets are no different. On an Ethernet, each node has its own address.
This address must be unique to avoid conflicts between nodes. Because
Ethernet resources are shared, every node on the network receives all of the
communications on the network. It is up to each node to determine whether
the communication it receives should be ignored or answered based on the
destination address. It is important not to confuse an Ethernet address with a
TCP/IP or Internet address, as they are not the same. Ethernet addresses are
physical addresses tied directly to the hardware interfaces connected via the
Ethernet cable running to each node.
An Ethernet address is an integer with a size of 48 bits. Ethernet hardware
manufacturers are assigned blocks of Ethernet addresses and assign a unique
address to each hardware interface in sequence as they are manufactured. The
Ethernet address space is managed by the Institute of Electrical and Electronics
Engineers (IEEE). Assuming the hardware manufacturers don’t make a mistake,
this addressing scheme ensures that every hardware device with an Ethernet
interface can be addressed uniquely. Moving an Ethernet interface from one
node to another or changing the Ethernet hardware interface on a node changes
the Ethernet address for that node. Thus, Ethernet addresses are tied to the
Ethernet device itself, not the node hosting the interface. If you purchase a net-
work card at your local computer store, that network card has a unique Ethernet
address on it that will remain the same no matter which computer has the card
installed.
Chapter 1
8
3227c01.qxd 7/8/04 9:09 PM Page 8
Let’s look at an example using a computer running Linux.
[user@host user]$ /sbin/ifconfig eth0
eth0 Link encap:Ethernet HWaddr 00:E0:29:5E:FC:BE
inet addr:192.168.2.1 Bcast:192.168.2.255 Mask:255.255.255.0
UP BROADCAST RUNNING MULTICAST MTU:1500 Metric:1
RX packets:35772 errors:0 dropped:0 overruns:0 frame:0
TX packets:24414 errors:0 dropped:0 overruns:0 carrier:0
collisions:0 txqueuelen:100
RX bytes:36335701 (34.6 Mb) TX bytes:3089090 (2.9 Mb)
Interrupt:5 Base address:0x6000
Using the /sbin/ifconfig command, we can get a listing of the configura-
tion of our eth0 interface on our Linux machine. Your network interface might
have a different name than eth0, which is fine. Just use the appropriate value,
or use the –a option to ifconfig to get a listing of all of the configured interfaces
if you don’t know the name of yours. The key part of the output, though, is the
first line. Notice the parameter labeled HWaddr. In our example, it has a value of
00:E0:29:5E:FC:BE, which is the physical Ethernet address of this node.
Remember that we said an Ethernet address is 48 bits. Our example address has
six hex values. Each hex value has a maximum of 8 bits, or a value range from
00 to FF.
But what does this tell us? As mentioned previously, each hardware manu-
facturer is assigned a 24-bit value by the IEEE. This 24-bit value (3 octets) must
remain consistent across all hardware devices produced by this manufacturer.
The manufacturer uses the remaining 3 octets as a sequential number to create a
unique, 48-bit Ethernet address. Let’s see what we can find out about our
address.
Open a web browser and go to this address: http://standards.ieee.org/
regauth/oui/index.shtml. In the field provided, enter the first 3 octets of our
example address, in this case 00-e0-29 (substitute a hyphen [-] for the colon [:]).
Click Search, and you’ll see a reply that looks like this:
00-E0-29 (hex) STANDARD MICROSYSTEMS CORP.
00E029 (base 16) STANDARD MICROSYSTEMS CORP.
6 HUGHES
IRVINE CA 92718
UNITED STATES
That’s pretty descriptive. It tells us that the hardware manufacturer of our
network interface is Standard Microsystems, also known as SMC. Using the same
form, you can also search by company name. To illustrate how important it is
that these numbers be managed, try searching with a value similar to 00-e0-29,
such as 00-e0-27. Using 27, you’ll find that the manufacturer is Dux, Inc. Thus, as
Networks and Protocols
9
3227c01.qxd 7/8/04 9:09 PM Page 9
each manufacturer is creating their products, they’ll increase the second half of
the Ethernet address sequentially to ensure that each device has a unique value.
In our case, the second half of our address is 5E-FC-BE, which is our hardware
interface’s unique identifier. If the results of your search don’t match the vendor
of your network card, keep in mind that many companies resell products pro-
duced by another or subcontract their manufacturing to someone else.
The Ethernet address can also take on two other special values. In addition
to being the unique address of a single physical interface, it can be a broadcast
address for the network itself as well as a multicast address. The broadcast address
is reserved for sending to all nodes on a network simultaneously. Multicast
addresses allow a limited form of broadcasting, where a subset of network nodes
agrees to respond to the multicast address.
The Ethernet address is also known as the MAC address. MAC stands for
Media Access Control. Because our Ethernet is a shared network, only one node
can “talk” at any one time using the network. Before a node transmits informa-
tion, it first “listens” to the network to see if any other node is using the network.
If so, it waits a randomly chosen amount of time and then tries to communicate
again. If no other node is using the network, our node sends its message and
awaits a reply. If two nodes “talk” at the same time, a collision occurs. Collisions
on shared networks are normal and are handled by the network itself so as not to
cause problems, provided the ratio of collisions to communications does not get
too high. In the case of Ethernets, a collision rate higher than 60 percent is typi-
cally cause for concern. Each MAC address must be unique, so a node about to
transmit can compare addresses to check whether another node is already trans-
mitting. Thus, the MAC address (Ethernet address) helps control the collision
rate and allows nodes to determine if the network is free to use.
Gateways
We’ve discussed that the Internet is a network built by physically connecting
other networks. To connect our networks together, we use a special device called
a gateway. Any Ethernet node can conceivably act as a gateway, though many do
not. Gateways have two or more physical network interfaces and do a particular
job, just as their name implies: they relay packets destined for other networks,
and they receive packets destined for nodes on one of their own networks.
Building on our earlier diagram, here’s how it looks when you connect two
networks together with a gateway (see Figure 1-4).
Chapter 1
10
3227c01.qxd 7/8/04 9:09 PM Page 10
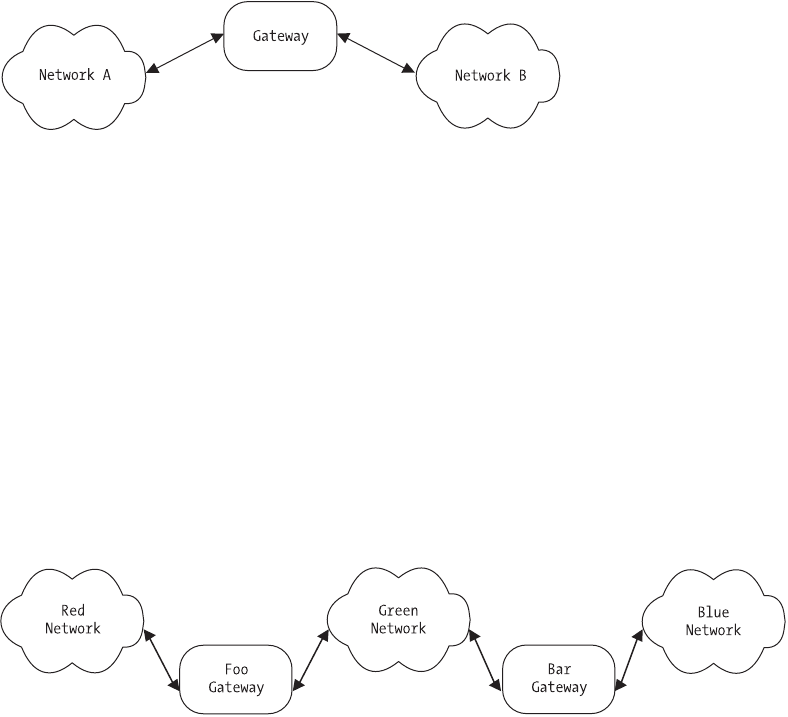
Figure 1-4. Two connected networks with a gateway
Gateways can also be called routers, since they route packets from one net-
work to another. If you consider that all networks are equal, then the notion of
transmitting packets from one to the other becomes a little easier. No longer is
it necessary for our network nodes to understand how to find every other node
on remote networks. Maintaining that amount of ever-changing information on
every computer connected to every network would be impossible. Instead, nodes
on our local network only need to know the address of the gateway. That is, local
nodes only need to know which node is the “exit” or “gate” to all other networks.
The gateway takes on the task of correctly routing packets with foreign destina-
tions to either the remote network itself or another gateway. For example,
consider Figure 1-5, which shows three interconnected networks.
Networks and Protocols
11
Figure 1-5. Multiple networks, multiple gateways
In this diagram, we have three networks: Red, Green, and Blue. There are
two gateways, Foo and Bar. If a node on the Red network wants to send a packet
to a node on the Green or Blue network, it does not need to keep track of the
addresses on either network. It only needs to know that its gateway to any other
network besides its own is Foo. The packets destined for the remote network are
sent to Foo, which then determines whether the packet is destined for the Green
network or the Blue network. If Green, the packet is sent to the appropriate node
on the Green network. If Blue, however, the packet is sent to Bar, because Foo
3227c01.qxd 7/8/04 9:09 PM Page 11
only knows about the Red and Green networks. Any packet for any other net-
work needs to be sent to the next gateway, in this case Bar. This scenario is
multiplied over and over and over in today’s network environment, and it sig-
nificantly decreases the amount of information that each network node and
gateway has to manage.
Likewise, the reverse is true. When the receiver accepts the packet and
replies, the same decision process occurs. The sender determines if the packet is
destined for its own network or a remote network. If remote, then the packet is
sent to the network’s gateway, and from there to either the receiver or yet another
gateway. Thus, a gateway is a device that transmits packets from one network to
another.
Gateways seem simple, but as we’ve mentioned, asking one device to keep
track of the information for every network that’s connected to every other net-
work is impossible. So how do our gateways do their job without becoming
hopelessly buried by information? The gateway rule is critical: network gateways
route packets based on destination networks, not destination nodes.
Thus, our gateways aren’t required to know how to reach every node on
all the networks that might be connected. A particular set of networks might
have thousands of nodes on it, but the gateway doesn’t need to keep track of
all of them. Gateways only need to know which node on their own network will
move packets from their network to some other network. Eventually, the pack-
ets reach their destination network. Since all devices on a particular network
check all packets to see if the packets are meant for them, the packets sent by
the gateway will automatically get picked up by the destination host without
the sender needing to know any specifics except the address of its own gateway.
In short, a node sending data needs to decide one thing: whether the data is
destined for a local network node or remote network node. If local, the data is
sent between the two nodes directly. If remote, the data is sent to the gateway,
which in turn makes the same decision until the data eventually gets picked up
by the recipient.
Internet Addresses
So far, you’ve seen that on a particular network, every device must have a unique
address, and you can connect many networks together to form a larger network
using gateways. Before a node on your network “talks,” it checks to see if anyone
else is “talking,” and if not, it goes ahead with its communication. Your networks
are interconnected, though! What happens if the nodes on your office LAN have
to wait for some node on a LAN in Antarctica to finish talking before they can
talk? Nothing would ever be sent—the result would be gridlock! How do you
handle the need to identify a node with a unique address on interconnected
networks while at the same time isolating your own network from every other
Chapter 1
12
3227c01.qxd 7/8/04 9:09 PM Page 12

network? Unless one of your nodes has a communication for another node on
another network, there should be no communication between networks and no
need for one to know of the existence of the other until the need to communi-
cate exists. You handle the need for a unique address by assigning protocol
addresses to physical addresses in conjunction with your gateways. In our sce-
nario, these protocol addresses are known as Internet Protocol (IP) addresses.
IP addresses are virtual. That is, there is no required correlation between a
particular IP address and its physical interface. An IP address can be moved from
one node to another at will, without requiring anything but a software configura-
tion change, whereas changing a node’s physical address requires changing the
network hardware. Thus, any node on an internet has both a physical Ethernet
address (MAC address) and an IP address.
Unlike an Ethernet address, an IP address is 32 bits long and consists of both
a network identifier and a host identifier. The network identifier bits of the IP
addresses for all nodes on a given network are the same. The common format for
listing IP addresses is known as dotted quad notation because it divides the IP
address into four parts (see Table 1-1). The network bits of an IP address are the
leading octets, and the address space is divided into three classes: Class A,
Class B, and Class C. Class A addresses use just 8 bits for the network portion,
while Class B addresses use 16 bits and Class C addresses use 24 bits.
Table 1-1. Internet Protocol Address Classes
CLASS DESCRIPTION NETWORK BITS HOST BITS
A Networks 1.0.0.0 through 127.0.0.0 824
B Networks 128.0.0.0 through 191.255.0.0 16 16
C Networks 192.0.0.0 through 223.255.255.0 24 8
D Multicast (reserved)
E Reserved for future use
Let’s look at an example. Consider the IP address 192.168.2.1. From Table 1-1,
you can tell that this is a Class C address. Since it is a Class C address, you know
that the network identifier is 24 bits long and the host identifier is 8 bits long. This
translates to “the node with address 1 on the network with address 192.168.2.”
Adding a host to the same Class C network would require a second address with
the same network identifier, but a different host identifier, such as 192.168.2.10,
since every host on a given network must have a unique address.
You may have noticed that the table doesn’t include every possible value.
This is because the octets 0 and 255 are reserved for special use. The octet 0
(all 0s) is the address of the network itself, while the octet 255 (all 1s) is called
Networks and Protocols
13
3227c01.qxd 7/8/04 9:09 PM Page 13

the broadcast address because it refers to all hosts on a network simultaneously.
Thus, in our Class C example, the network address would be 192.168.2.0, and
the broadcast address would be 192.168.2.255. Because every address range
needs both a network address and a broadcast address, the number of usable
addresses in a given range is always 2 less than the total. For example, you would
expect that on a Class C network you could have 256 unique hosts, but you can-
not have more than 254, since one address is needed for the network and another
for the broadcast.
In addition to the reserved network and broadcast addresses, a portion
of each public address range has been set aside for private use. These address
ranges can be used on internal networks without fear of conflicts. This helps
alleviate the problem of address conflicts and shortages when public networks
are connected together. The address ranges reserved for private use are shown in
Table 1-2.
Table 1-2. Internet Address Ranges Reserved for Private Use
CLASS RANGE
A10.0.0.0 through 10.255.255.255
B172.16.0.0 through 172.31.0.0
C192.168.0.0 through 192.168.255.0
If you know your particular network will not be connected publicly, you are
allowed to use any of the addresses in the private, reserved ranges as you wish.
If you do this, however, you must use software address translation to connect
your private network to a public network. For example, if your office LAN uses
192.168.2 as its network, your company’s web server or mail server cannot use
one of those addresses, since they are private. To connect your private network
to a public network such as the Internet, you would need a public address for
your web server or mail server. The private addresses can be “hidden” behind a
single public address using a technique called Network Address Translation
(NAT), where an entire range of addresses is translated into a single public
address by the private network’s gateway. When packets are received by the gate-
way on its public interface, the destination address of each packet is converted
back to the private address. The public address used in this scenario could be
one assigned dynamically by your service provider, or it could be from a range of
addresses delegated to your network, also by your service provider. When a net-
work address range is delegated, it means that your gateway takes responsibility
for routing that address range and receiving packets addressed to the network.
Another IP address is considered special. This IP address is known as the
loopback address, and it’s typically denoted as 127.0.0.1. The loopback address
is used to specify the local machine, also known as localhost. For example, if you
Chapter 1
14
3227c01.qxd 7/8/04 9:09 PM Page 14

were to open a connection to the address 127.0.0.1, you would be opening a
network connection to yourself. Thus, when using the loopback address, the
sender is the receiver and vice versa. In fact, the entire 127.0.0.0 network is
considered a reserved network for loopback use, though anything other than
127.0.0.1 is rarely used.
Ports
The final component of IP addressing is the port. Ports are virtual destination
“points” and allow a node to conduct multiple network communications simul-
taneously. They also provide a standard way to designate the point where a node
can send or receive information. Conceptually, think of ports as “doors” where
information can come and go from a network node.
On Linux systems, the number of ports is limited to 65,535, and many of the
lower port numbers are reserved, such as port 80 for web servers, port 25 for send-
ing mail, and port 23 for telnet servers. Ports are designated with a colon when
describing an IP address and port pair. For example, the address 10.0.0.2:80
can be read as “port 80 on the address 10.0.0.2,” which would also mean “the
web server on 10.0.0.2” since port 80 is typically used by and reserved for web
services. Which port is used is up to the discretion of the developer, provided
the ports are not already in use or reserved. A list of reserved ports and the
names of the services that use them can be found on your Linux system in the
/etc/services file, or at the Internet Assigned Numbers Authority (IANA) site
listed here: http://www.iana.org/assignments/port-numbers. Table 1-3 contains
a list of commonly used (and reserved) ports.
Table 1-3. Commonly Used Ports
PORT SERVICE
21 File Transfer Protocol (FTP)
22 Secure Shell (SSH)
23 Telnet
25 Simple Mail Transfer Protocol (SMTP)
53 Domain Name System (DNS)
80 Hypertext Transfer Protocol (HTTP)
110 Post Office Protocol 3 (POP3)
143 Internet Message Access Protocol (IMAP)
443 Hypertext Transfer Protocol Secure (HTTPS)
Networks and Protocols
15
3227c01.qxd 7/8/04 9:09 PM Page 15
Without ports, a network host would be allowed to provide only one network
service at a time. By allowing the use of ports, a host can conceivably provide
more than 65,000 services at any time using a given IP address, assuming each
service is offered on a different port. We cover using ports in practice when writ-
ing code first in Chapter 2 and then extensively in later chapters.
This version of IP addressing is known as version 4, or IPv4. Because the
number of available public addresses has been diminishing with the explosive
growth of the Internet, a newer addressing scheme has been developed and is
slowly being implemented. The new scheme is known as version 6, or IPv6. IPv6
addresses are 128 bits long instead of the traditional 32 bits, allowing for 2^96
more network nodes than IPv4 addresses. For more on IPv6, consult Appendix A.
Network Byte Order
One final note on IP addressing. Because each hardware manufacturer can
develop its own hardware architecture, it becomes necessary to define a stan-
dard data representation for data. For example, some platforms store integers in
what is known as Little Endian format, which means the lowest memory address
contains the lowest order byte of the integer (remember that addresses are 32-bit
integers). Other platforms store integers in what is known as Big Endian format,
where the lowest memory address holds the highest order byte of the integer.
Still other platforms can store integers in any number of ways. Without stan-
dardization, it becomes impossible to copy bytes from one machine to another
directly, since doing so might change the value of the number.
In an internet, packets can carry numbers such as the source address,
destination address, and packet length. If those numbers were to be corrupted,
network communications would fail. The Internet protocols solve this byte-order
problem by defining a standard way of representing integers called network byte
order that must be used by all nodes on the network when describing binary
fields within packets. Each host platform makes the conversion from its local
byte representation to the standard network byte order before sending a packet.
On receipt of a packet, the conversion is reversed. Since the data payload within
a packet often contains more than just numbers, it is not converted.
The standard network byte order specifies that the most significant byte of
an integer is sent first (Big Endian). From a developer’s perspective, each plat-
form defines a set of conversion functions that can be used by an application to
handle the conversion transparently, so it is not necessary to understand the
intricacies of integer storage on each platform. These conversion functions, as
Chapter 1
16
3227c01.qxd 7/8/04 9:09 PM Page 16
well as many other standard network programming functions, are covered in
Chapter 2.
Internet Protocol
So far, we’ve discussed building a network based on Ethernet. We’ve also discussed
connecting two or more networks together via a gateway, called an internet, and
we’ve covered the basic issues surrounding network and host addressing that
allow network nodes to communicate with each other without conflicts. Yet how
are all of these dissimilar networks expected to communicate efficiently without
problems? What is it that lets one network look the same as any other network?
A protocol exists that enables packet exchanges between networks as if the
connected networks were a single, homogenous network. This protocol is known
as the Internet Protocol, or IP, and was defined by RFC 791 in September 1981.
These interconnected networks are known as internets, not to be confused with
the Internet. The Internet is just one example of a global internet, albeit the most
popular and the most well known. However, this does not preclude the existence
of other internets that use the same technologies, such as IP.
Because IP is hardware independent, it requires a hardware-independent
method of addressing nodes on a network, which is the IP addressing system
already discussed. In addition to being hardware independent and being a
packet-switching technology, IP is also connectionless. IP performs three key
functions in an internet:
• It defines the basic unit of data transfer.
• It performs the routing function used by gateways and routers to
determine which path a packet will take.
• It uses a set of rules that allow unreliable packet delivery.
These rules determine how hosts and gateways on connected networks
should handle packets, whether a packet can be discarded, and what should
happen if things go wrong.
Like the physical Ethernet frame that contains data as well as header infor-
mation, the basic unit of packet transfer used by IP is called the Internet datagram.
This datagram also consists of both a header portion and a data portion. Table 1-4
lists the format of the IP datagram header, along with the size of each field within
the header.
Networks and Protocols
17
3227c01.qxd 7/8/04 9:09 PM Page 17

Table 1-4. IP Datagram Header Format
FIELD SIZE DESCRIPTION
VERS 4 bits The version of IP used to create this
datagram
HLEN 4 bits The length of the datagram header,
measured in 32-bit words
SERVICE TYPE 8 bits Specifies how the datagram should be
handled
TOTAL LENGTH 16 bits The total length of the datagram,
measured in octets
IDENTIFICATION 16 bits A unique integer generated by the
sender that allows accurate datagram
reassembly
FLAGS 3 bits Various control flags, such as whether
the datagram may be fragmented
FRAGMENT OFFSET 13 bits Indicates where in the datagram this
fragment belongs
TIME TO LIVE 8 bits Specifies how long, in seconds, the
datagram is allowed to exist
PROTOCOL 8 bits Specifies which higher-level protocol
was used to create the data in the data
portion of the datagram
HEADER CHECKSUM 16 bits Checksum for the header, recomputed
and verified at each point where the
datagram is processed
SOURCE ADDRESS 32 bits IP address of the sender
DESTINATION ADDRESS 32 bits IP address of the recipient
OPTIONS Variable Any number of various options, typically
used for testing and debugging
PADDING Variable Contains the number of zero bits
needed to ensure the header size is an
exact multiple of 32 bits
Chapter 1
18
3227c01.qxd 7/8/04 9:09 PM Page 18
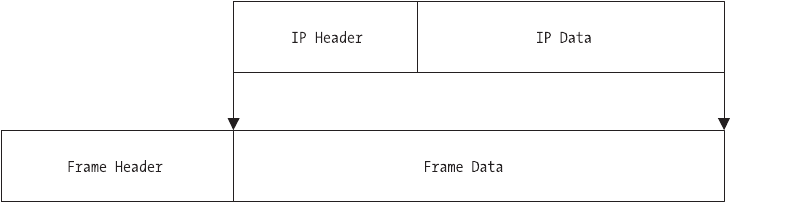
Most of these fields look pretty similar to the description of an Ethernet
frame. What is the relationship between Ethernet frames, or packets, and IP
datagrams? Remember that IP is hardware independent and that Ethernet is
hardware. Thus, the IP datagram format must be independent of the Ethernet
frame specification. In practice, the most efficient design would be to carry one
IP datagram in every Ethernet frame. This concept of carrying a datagram inside
a lower-level network frame is called encapsulation. When an IP datagram is
encapsulated within an Ethernet frame, it means the entire IP datagram,
including header, is carried within the data portion of the Ethernet frame, as
shown in Figure 1-6.
Networks and Protocols
19
Figure 1-6. IP datagram encapsulation in an Ethernet frame
We’ve said that an Ethernet frame has a maximum size of 1500 octets. Yet an
IP datagram has a maximum total length of 16 bits. A 16-bit number can repre-
sent a data size of up to 65,535 octets and could potentially be much higher.
How do we cram 65,535 octets into a network frame that maxes out at 1500? By
using a technique called fragmentation.
Fragmentation is necessary in network protocols because the goal should
be to hide the underlying hardware used to create the network. In our case, it’s
Ethernet, but in practice it could be any number of different systems, past or
future. It wouldn’t make sense to require changes to higher-level protocols every
time someone invented a new hardware network technology, so to be universally
compatible, the designers of IP incorporated the ability to split IP datagrams into
fragments, assigning one fragment per network frame in the most efficient way
possible.
The IP protocol does not guarantee that large datagrams will be delivered
without fragmentation, nor does it limit datagrams to some smaller size. The
sending node determines the appropriate datagram size and performs the frag-
mentation, while the receiving node performs the reassembly. The reassembly is
made possible by the fragment offset field of the datagram header, which tells the
receiver where this particular fragment should go. When the datagram is frag-
mented, each fragment carries a header that is essentially a duplicate of the
3227c01.qxd 7/8/04 9:09 PM Page 19

original datagram header, with some minor changes. The fragment’s header dif-
fers because, if there are more fragments, the “more fragments” flag is set, and
the fragment offset will change on each fragment to prevent overwriting.
Thus, an IP datagram of 4000 octets might get fragmented into three Ethernet
frames, two containing the maximum data size and the third containing what’s
left. On the receiving end, these fragments would be reassembled into the origi-
nal datagram and would be processed. If our physical network had a smaller
frame size than Ethernet, we would get more fragments, and less fragments (or
no fragments at all) with a larger frame size.
NOTE Gateways are responsible for converting packets from one
frame size to another.
Every network has a maximum transfer unit, or MTU. The MTU can be any
size. If your packets are sent from a network with a large MTU value to a network
with a smaller value (or vice versa), the gateway between the two is responsible
for reformatting the packets to comply with each network’s specifications. For
example, say you had a gateway with an Ethernet interface and a Token Ring
interface. The MTU on one network is 1500 octets, while the MTU on the Token
Ring network might be larger or smaller. It is the gateway’s responsibility to
reformat and fragment the packets again when moving from one network to
another. The downside to this is that once fragmented to accommodate the
smaller MTU, the packets aren’t reassembled until they reach their destination.
Thus, the receiving node will receive datagrams that are fragmented according to
the network with the smallest MTU used in the transfer. This can be somewhat
inefficient, since after traversing a network with a small MTU, the packets might
traverse a network with a much larger MTU without being reformatted to take
advantage of the larger frame size. This minor inefficiency is a good trade-off,
however, because the gateways don’t need to store or rebuild packet fragments,
and the packets can be sent using the best path without concern for reassembly
problems for the destination node.
Protocol Layering
So far we’ve discussed the underlying physical hardware of a network, and in the
case of an internet, the protocol used to ensure compatibility between different
networks. More than one protocol exists, however. For example, take the acronym
“TCP/IP.” You already know what “IP” stands for: Internet Protocol. But what
Chapter 1
20
3227c01.qxd 7/8/04 9:09 PM Page 20
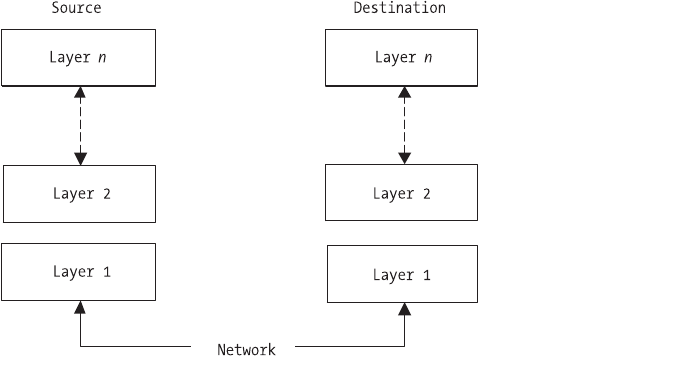
about “TCP”? What about other protocols we use on our networks, such as HTTP
or FTP? How do these protocols relate to each other if they’re not all the same?
It’s practically impossible to create a single protocol that can handle every
issue that might be encountered on a network. Consider security, packet loss,
hardware failure, network congestion, and data corruption. These issues and
more need to be addressed in any networked system, but it can’t be done with
just a single “super” protocol. The solution, then, is to develop a system in which
complementary protocols, each handling a specific task, work together in a stan-
dardized fashion. This solution is known as protocol layering.
Imagine the different protocols involved in network communications
stacked on top of each other in layers. This is also known as a protocol stack or
stack. Each layer in a stack takes responsibility for a particular aspect of sending
and receiving information on a network, with each layer in the stack working in
concert with the other layers (see Figure 1-7).
Figure 1-7. Protocol layers
As shown in Figure 1-7, sending information to another computer means
sending the information “down” through a stack, over the network, and then
“up” through the stack on the receiving node. When the receiving node wishes
to send a response, the roles are reversed: it becomes a sender and the process
is repeated. Each layer on each node is the same. That is, the protocol in layer 3
on the sender is the same protocol in layer 3 on the receiver. Thus, a protocol
layer is designed so that layer nat the destination receives essentially the same
datagram or packet sent by layer nat the source. We say “essentially” because
Networks and Protocols
21
3227c01.qxd 7/8/04 9:09 PM Page 21

datagrams have components like time to live fields that will be changed by each
node involved in the transfer, even though the core data payload should remain
identical from sender to receiver.
Protocol Layer Models
The dominating standard for a protocol layer is from the International
Organization for Standardization (ISO) and is known as the Open Systems
Interconnection reference model, or simply the OSI model. The OSI model
describes seven specific layers: Application, Presentation, Session, Transport,
Network, Data Link, and Physical Hardware. A description of each layer is
shown in Table 1-5.
Table 1-5. OSI Seven-Layer Reference Model
LAYER NAME DESCRIPTION
7 Application Application programs such as web browsers and
file transfer programs
6 Presentation Standard routines such as compression
functions used by layer 7
5 Session Establishes transmission control between two
nodes, regulating which node can transmit and
how long it can transmit
4 Transport Provides additional reliability checks to those
performed by lower layers
3 Network Defines the basic unit of communication across
a network, including addressing and routing
2 Data Link Controls how data is sent between nodes, such
as defining frames and frame boundaries
1 Physical Hardware Controls the physical aspects of a network
connection, such as voltage
Figure 1-8 shows the result of applying the OSI model to our earlier layer
diagram.
Chapter 1
22
3227c01.qxd 7/8/04 9:09 PM Page 22
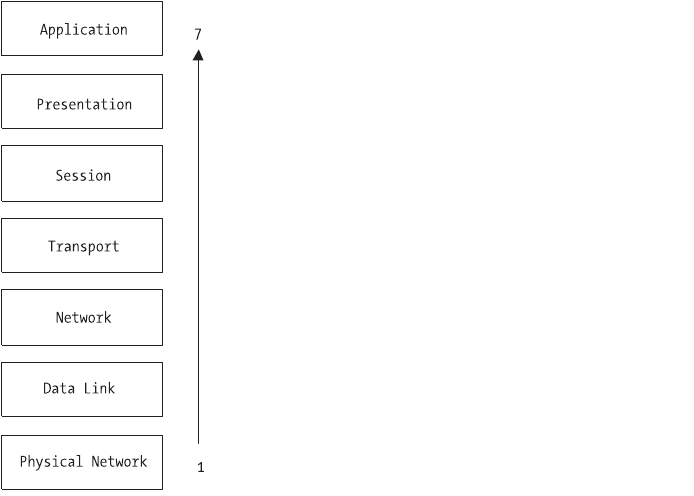
Figure 1-8. The OSI model
In practice, though, the typical protocol stack found in most networked
environments today is known as a TCP/IP stack and, while perfectly compatible
with the OSI model, it is conceptually different. The “TCP” in TCP/IP means
Transmission Control Protocol and will be discussed later in this chapter. Just by
the name alone, you can see that today’s networks require multiple protocols
working together to function.
In a TCP/IP environment, the network transport is relatively simple, while
the nodes on the network are relatively complex. TCP/IP requires all hosts to
involve themselves in almost every network function, unlike some other net-
working protocols. TCP/IP hosts are responsible for end-to-end error checking
and recovery, and also make routing decisions since they must choose the
appropriate gateway when sending packets.
Using our OSI diagram as a basis, a corresponding diagram describing a
TCP/IP stack would look like Figure 1-9.
Networks and Protocols
23
3227c01.qxd 7/8/04 9:09 PM Page 23
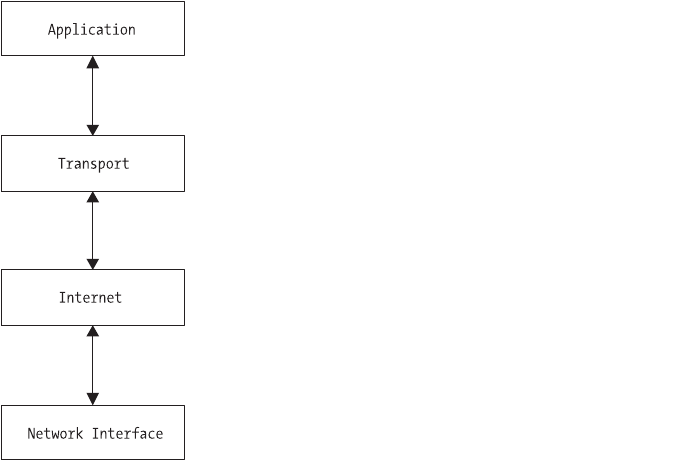
Figure 1-9. The TCP/IP layer model
This diagram shows a TCP/IP stack as having four layers versus the seven
layers in an OSI model. There are fewer layers because the TCP/IP model doesn’t
need to describe requirements that are needed by older networking protocols
like X.25, such as the Session layer. Looking at our TCP/IP stack, we can see
that Ethernet is our Network Interface, IP is our Internet layer, and TCP is our
Transport layer. The Application layer, then, consists of the applications that use
the network, such as a web browser, file transfer client, or other network-enabled
applications.
There are two boundaries in our TCP/IP stack that describe the division
of information among the application, the operating system, and the network.
These boundaries correspond directly to the addressing schemes already dis-
cussed. In the Application layer, the application needs to know nothing other
than the IP address (and port) of the receiver. Specifics such as datagram frag-
mentation, checksum calculations, and delivery verification are handled in the
operating system by the Transport and Internet layers. Once the packets move
from the Internet layer to the Network layer, only physical addresses are used.
At first it would seem like a lookup must be performed to get the physical
address of the receiver when starting communications, but this would be incor-
rect. Remembering the gateway rule, the only physical address that needs to be
known by the sender is the physical address of the destination if the destination
Chapter 1
24
3227c01.qxd 7/8/04 9:09 PM Page 24

is on the same network, or the physical address of the gateway if the destination is
on a remote network.
User Datagram Protocol
At the Internet layer in our TCP/IP protocol stack, the only information avail-
able is the address of the remote node. No other information is available to the
protocol, and none is needed. However, without additional information like a
port number, your receiving node is limited to conducting a single network
communication at any one time. Since modern operating systems allow multi-
ple applications to run simultaneously, you must be able to address multiple
applications on the receiving node simultaneously, instead of just one. If you
consider that each networked application can “listen” on one or more ports,
you can see that by using an IP address and a port, you can communicate with
multiple applications simultaneously, up to any limits imposed by the operat-
ing system and protocol stack.
In the TCP/IP protocol stack, there are two protocols that provide a mecha-
nism that allows applications to communicate with other applications using
ports. One is the Transmission Control Protocol (TCP), which we will discuss in
the next section, and the other is the User Datagram Protocol (UDP). UDP makes
no guarantee of packet delivery. UDP datagrams can be lost, can arrive out of
sequence, can be copied many times, and can be sent faster than the receiving
node can process them. Thus, an application that uses UDP takes full responsi-
bility for controlling message loss, reliability, sequencing, and loss of connection.
This can be both an advantage and a disadvantage to developers, for while UDP
is a lightweight protocol that can be used quickly, the additional application
overhead needed to thoroughly manage packet transfer is often overlooked or
poorly implemented.
TIP When using UDP for an application, make sure to thor-
oughly test your applications in real environments beyond a
low-latency LAN. Many developers choose UDP and test in a LAN
environment, only to find their applications are unusable when
used over a larger TCP/IP network with higher latencies.
UDP datagrams have a simple format. Like other datagrams, UDP data-
grams consist of a header and a data payload. The header is divided into four
fields, each 16 bits in size. These fields specify the source port, the destination
port, the length of the datagram, and a checksum. Following the header is the
data area, as shown in Figure 1-10.
Networks and Protocols
25
3227c01.qxd 7/8/04 9:09 PM Page 25
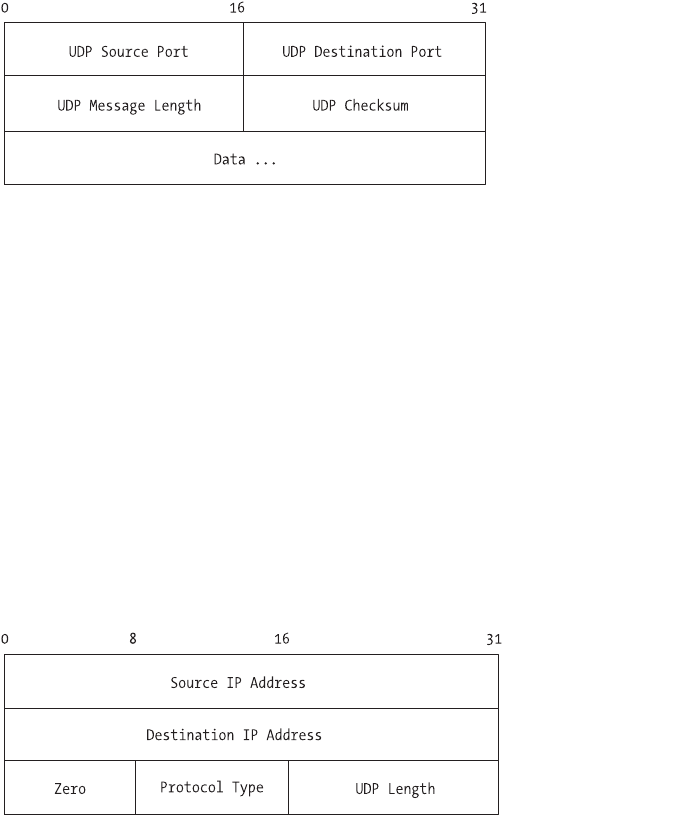
Figure 1-10. The UDP datagram format
The source port is optional. If used, it specifies the port to which replies
should be sent. If unused, it should be set to zero. The length field is the total
number of octets in the datagram itself, header and data. The minimum value
for length is 8, which is the length of the header by itself.
The checksum value is also optional, and if unused should be set to zero.
Even though it’s optional, however, it should be used, since IP doesn’t compute a
checksum on the data portion of its own datagram. Thus, without a UDP check-
sum, there’s no other way to check for header integrity on the receiving node. To
compute the checksum, UDP uses a pseudo-header, which is prepended to the
datagram, followed by an octet of zeros, which is appended, to get an exact multi-
ple of 16 bits. The entire object, pseudo-header and all, is then used to compute
the checksum. The pseudo-header format is shown in Figure 1-11.
Figure 1-11. The UDP pseudo-header
The octet used for padding is not transmitted with the UDP datagram, nor
is the pseudo-header, and neither is counted when computing the length of the
datagram.
A number of network services use UDP and have reserved ports. A list of
some of the more popular services is shown in Table 1-6.
Chapter 1
26
3227c01.qxd 7/8/04 9:09 PM Page 26

Table 1-6. Popular UDP Services
PORT NAME
7echo
13 daytime
37 time
43 whois
53 domain (DNS)
69 tftp
161 snmp
Transmission Control Protocol
The main difference between UDP and TCP is that, like IP, UDP provides no
guarantee of delivery and does not use any method to ensure datagrams are
received in a certain order or are transmitted at a certain rate. TCP, on the other
hand, provides a mechanism known as reliable stream delivery. Reliable stream
delivery guarantees delivery of a stream of information from one network node
to another without duplication or data loss. TCP has a number of features that
describe the interface between it and the application programs that use it:
•Virtual circuit: Using TCP is much like making a phone call. The sender
requests a connection with the receiver. Both ends negotiate the parameters
of the connection and agree on various details defining the connection.
Once the connection is finalized, the applications are allowed to proceed.
As far as the applications are concerned, a dedicated, reliable connection
exists between the sender and the receiver, but this is an illusion. The
underlying transfer mechanism is IP, which provides no delivery guarantee,
but the applications are removed from dealing with IP by the TCP layer.
•Buffered transfer: The TCP layer, independent of the application, deter-
mines the optimal way to package the data being sent, using whatever
packet sizes are appropriate. To increase efficiency and decrease network
traffic, TCP typically waits, if possible, until it has a relatively large amount
of data to send before sending the packet, even if the application is gener-
ating data 1 byte at a time. The receiving TCP layer delivers data to the
receiving application exactly the way it was sent, so a buffer may exist at
each end, independent of the application.
Networks and Protocols
27
3227c01.qxd 7/8/04 9:09 PM Page 27
•Stream orientation: The receiving node delivers data to the receiving
application in exactly the same sequence as it was sent.
•Full duplex: Connections provided by TCP over IP are full duplex, which
means that data can be transmitted in both directions simultaneously via
two independent packet streams. The streams can be used to transfer data
or to send control information or commands back to the sender, and
either stream can be terminated without harming the other.
•Unstructured stream: TCP does not guarantee the structure of the data
stream, even though delivery is guaranteed. For example, TCP does not
honor markers that might exist in a record set sent to or from a database.
It is up to the applications to determine stream content and assemble or
disassemble the stream accordingly on each end of the connection.
Applications do this by buffering incoming packets when necessary and
assembling them in an order that the applications recognize.
The method that TCP uses to guarantee reliable delivery can be described
as confirmation and retransmission. The sender keeps track of every packet that
is sent and waits for confirmation of successful delivery from the receiver before
sending the next packet. The sender also sets an internal timer when each packet
is sent and automatically resends the packet should the timer expire before get-
ting confirmation from the receiver. TCP uses a sequence number to determine
whether every packet has been received. This sequence number is sent on
the confirmation message as well as the packet itself, allowing the sender to
match confirmations to packets sent, in case network delays cause the trans-
mission of unnecessary duplicates.
Even with full duplex, though, having to wait for a confirmation on every
packet before sending the next can be horribly slow. TCP solves this by using a
mechanism called a sliding window. The easiest way to imagine a TCP sliding
window is to consider a number of packets that needs to be sent. TCP considers
a certain number of packets to be a window and transmits all packets in that
window without waiting for confirmation on each one. Once the confirmation
is received for the first packet in the window, the window “slides” to contain the
next packet to be sent, and it is sent. For example, if the window size was 8, then
packets 1 through 8 would be sent. When the confirmation for packet 1 was
received, the window would “slide” so that it covered packets 2 through 9, and
the ninth packet would be sent. A packet that has been transmitted without
confirmation is called an unacknowledged packet. Thus, the total number of
unacknowledged packets allowed is equal to the window size. The advantage to
Chapter 1
28
3227c01.qxd 7/8/04 9:09 PM Page 28
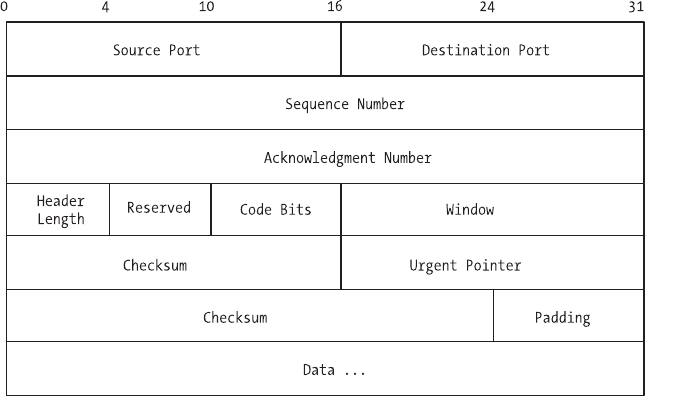
a sliding window protocol is that it keeps the network saturated with packets as
much as possible, minimizing the time spent waiting for confirmation. The win-
dow is matched on the receiving end, so that the receiver “slides” its own window
according to which confirmation messages have been sent.
We noted earlier that TCP connections use what is known as a virtual circuit.
Taking that abstraction further, TCP defines connections as a pair of endpoints,
each endpoint consisting of an integer pair, consisting of the 32-bit integer IP
address and the 16-bit integer port number. This is important, because by defin-
ing an endpoint as an integer pair, a TCP service on a given port number can be
used by multiple connections at the same time. For example, even though a mail
server has only one port 25 on which to receive mail, each sender making a con-
nection offers a different integer pair because the source IP address and source
port are different, allowing multiple concurrent connections on the same receiv-
ing port.
The TCP datagram is also known as a segment. Segments do all of the work:
establishing and closing connections, advertising window sizes, transferring data,
and sending acknowledgments. Figure 1-12 shows a diagram of a TCP segment.
Figure 1-12. The TCP segment format
As with other datagrams, a TCP segment consists of two parts: header and
data. A description of each header field is listed in Table 1-7.
Networks and Protocols
29
3227c01.qxd 7/8/04 9:09 PM Page 29

Table 1-7. TCP Header Fields
NAME SIZE DESCRIPTION
Source port 16 bits The port number of the sending
connection endpoint
Destination port 16 bits The port number of the receiving
connection endpoint
Sequence number 32 bits The position of this segment’s payload in
the sender’s stream
Acknowledgment number 32 bits The octet that the source expects to receive
next
Header length 4 bits The length of the header, in 32-bit
multiples
Reserved 6 bits Reserved for future use
Code bits 6 bits Defines the purpose and content of this
segment (see Table 1-8)
Window 16 bits Specifies the maximum amount of data
that can be accepted
Checksum 16 bits Verifies the integrity of the header
Urgent pointer 16 bits Flag notifying the receiver that the segment
should be handled immediately
Options 24 bits Various options used to negotiate between
endpoints
Padding 8 bits Needed to accommodate an OPTIONS
value of varying length to ensure header
and data end on a 32-bit boundary
Much like the UDP header, the TCP header has fields such as checksum,
source port, destination port, and length. However, the TCP header goes much
farther due primarily to the need to guarantee delivery. The sequence number is
used to indicate the position of the data in a particular segment within the over-
all byte stream being sent. If a byte stream had 100 packets in it, the sequence
number field would be where each segment was numbered, so the receiver
would know how to reassemble the stream.
The acknowledgment number, on the other hand, is used by the sender to
identify which acknowledgment the sender expects to receive next. Thus, the
sequence number refers to the byte stream flowing in the same direction as the
segment, while the acknowledgment number refers to the byte stream flowing
Chapter 1
30
3227c01.qxd 7/8/04 9:09 PM Page 30

in the opposite direction as the segment. This two-way synchronization system
helps ensure that both connection endpoints are receiving the bytes they expect
to receive and that no data is lost in transit.
The code bits field is a special header field used to define the purpose of this
particular segment. These bits instruct the endpoint how to interpret other fields
in the header. Each bit can be either 0 or 1, and they’re counted from left to right.
A value of 111111, then, means that all options are “on.” Table 1-8 contains a list
and description of the possible values for the code bits field.
Table 1-8. Possible Values for Code Bits Header Field
NAME (LEFT TO RIGHT) MEANING
URG Urgent pointer field is valid.
ACK Acknowledgment field is valid.
PSH Push requested.
RST Reset the connection.
SYN Synchronize sequence numbers.
FIN Sender has completed its byte stream.
Even though TCP is a stream-oriented protocol, situations arise when data
must be transmitted out of band. Out-of-band data is sent so that the application
at the other end of the connection processes it immediately instead of waiting
to complete the entire stream. This is where the urgent header field comes into
play. Consider a connection a user wishes to abort, such as a file transfer that
occurs slower than expected. For the abort signal to be processed, the signal
must be sent in a segment out of band. Otherwise, the abort signal would not be
processed until the file transfer was complete. By sending the segment marked
urgent, the receiver is instructed to handle the segment immediately.
The Client-Server Model
Let’s recap. We’ve discussed circuits versus packets; the concept of connecting one
or many networks together via gateways; physical addresses; virtual addresses;
and the IP, UDP, and TCP protocols. We’ve also used the terms “sender,” “source,”
“receiver,” and “destination.” These terms can be confusing, because as you’ve
seen already, a TCP connection is a connection of equals, and in a virtual circuit,
the roles of sender, source, receiver, and destination are interchangeable depend-
ing on what sort of data is being sent. Regardless of which term is used, the
key concept to remember is that applications are present at both endpoints of
Networks and Protocols
31
3227c01.qxd 7/8/04 9:09 PM Page 31
a TCP connection. Without compatible applications at both ends, the data sent
doesn’t end up anywhere, nor can it be processed and utilized. Nevertheless,
changing the terminology between “source” and “destination” to describe every
communication between two endpoints can be pretty confusing. A better model
is to designate roles for each endpoint for the duration of the communication.
The model of interaction on a TCP connection, then, is known as the client-server
model.
In the client-server model, the term “server” describes the application that
offers a service that can be utilized by any other application over the network.
Servers accept connections over a network, perform their service, and respond
with the result. The simplest servers are those that accept a single packet and
respond with a single packet, though in many cases servers are more complex.
Some features common to servers include the ability to accept more than one
request at a time (multiple connections) and the ability to service requests inde-
pendently of other operating system processes such as user sessions.
A “client” is the application sending the request to the server and waiting for
the response. Client applications typically make only one request to a particular
server at any given time, though there is no restriction preventing them from
making simultaneous requests, or even multiple requests to different servers.
There are many different types of client-server applications. The simplest
of them use UDP to communicate, while others use TCP/IP with higher-level
application protocols such as File Transfer Protocol (FTP), Hypertext Transfer
Protocol (HTTP), and Simple Mail Transfer Protocol (SMTP). The specifics of a
client-server system are fairly simple. On the server, the application is started,
after which it negotiates with the operating system for permission to use a par-
ticular port number for accepting requests. Assuming that the application is
allowed to start on the given port, it begins to listen for incoming requests. The
specifics of how to write an application that will listen on a port are covered in
Chapter 2. Once listening, the server executes an endless loop until stopped:
receive request, process request, assemble response, send response, repeat. In
the process, the server reverses the source and destination addresses and port
numbers, so that the server knows where to send the response and the client
also knows that the server has responded.
The client, unlike the server, typically stops sending requests once the server
has responded. At this point, the client itself may terminate, or it may simply go
into a wait state until another request must be sent. Ports are handled differently
on clients than on servers, however. While the server typically uses a reserved
port, clients do not. This is because every client must know how to reach the
server, but the server does not need to know in advance how to reach every
client, since that information is contained in the packets it receives from the
client, in the source address and source port fields. This allows clients to use any
port they wish as their endpoint in the TCP connection with the server. For
example, a web page server is usually found on port 80. Even though the client
must send its requests to the server’s port 80, it can use any available port as its
Chapter 1
32
3227c01.qxd 7/8/04 9:09 PM Page 32
own endpoint, such as port number 9999, 12345, 64400, or anything in between,
as long as it isn’t one of the reserved ports mentioned earlier or a port already in
use by another application. Thus, the two endpoints involved in a web page
request might be 192.168.2.1:80 for the server endpoint and 10.0.0.4:11908 for
the client endpoint. The main requirement for a client is that it knows, through
configuration or some other method, the address and port of the server, since all
other information needed will be sent within the packets.
The Domain Name System
We’ve discussed how it isn’t necessary for every node on every network to store
information about how to reach all of the other nodes on the network. Because
of the gateway rule, a node only needs to know how to reach nodes on its own
network or a gateway. With IP addresses 32 bits long, there are plenty of addresses
to go around (and when we run out, there’s always IPv6, which is covered in
Appendix A). We still have a problem, though. While computers can take advan-
tage of the gateway rule, people can’t. It’s not enough to instruct our computers to
make a connection—we have to specify the other end of the connection, even if
we don’t have to specify exactly how our packets will get there. We still need a sys-
tem people can use to point computers to the other endpoint of our connections,
without requiring them to remember nearly endless lists of numbers.
A system exists that lets us assign easily remembered names to their corre-
sponding IP addresses, without having to remember the addresses themselves.
This system is called the Domain Name System (DNS). You can think of DNS as a
type of phone book for computers. Rather than remember the addresses of every
network node you may want to reach, you instead can assign meaningful names
to those nodes, and use DNS to translate the names that people like to use into
the numbers that computers must use. To contact the other computer, your com-
puter performs a DNS lookup, the result of which is the address of the other
computer. Once the address is known, a connection can be made. Performing a
DNS lookup is much like using a phone book. You know the name of the other
computer, and you want to find the number, or address. You “look up” the name,
and the phone book tells you the number that has been assigned to that name.
From there, you make your call, or in our case, your connection.
How often do new phone books come out? What happens if someone
changes his or her phone number before the new phone book is printed? Just like
people change their phone numbers, computers change their addresses all the
time. Some, in the case of dial-up networks, might change their addresses every
day, or even several times a day. If our name-to-number system required that we
all pass a new phone book around every day, our networks would come to a
standstill overnight, since managing such a database of names and numbers and
keeping it current for the number of computers connected together on today’s
networks is impossible. DNS was designed to be easily updateable, redundant,
Networks and Protocols
33
3227c01.qxd 7/8/04 9:09 PM Page 33

efficient and, above all, distributed, by using a hierarchical format and a method
of delegation. Just like the gateway rule, a DNS server isn’t required to know the
names and addresses of every node on our networks. Instead, it’s only necessary
for a DNS server to know the names and addresses of the nodes it’s managing,
and the names and addresses of the authoritative servers in the rest of the hierar-
chy. Thus, a particular DNS server is delegated the responsibility for a particular
set of addresses and is given the names and addresses of other DNS servers that it
can use if it can’t resolve the name using its own information.
The hierarchical nature of DNS can be seen in the names commonly used
on the Internet. You often hear the phrase dot-com and routinely use domain
names when making connections. The first level of our hierarchy contains what
are known as the top-level domains (TLDs). Table 1-9 contains a list of the more
popular TLDs and their purpose.
Table 1-9. Popular Top-Level Domains
TLD PURPOSE
.com Commercial use
.net Commercial use, though originally for use only by network
service providers
.org Noncommercial use by organizations and individuals
.mil Military use
.edu Educational institution use
.gov Government use
The six domains in Table 1-9 are the original TLDs. In recent years, as the
Internet became more and more popular, other TLDs were created, such as .biz,
.name, .info, .pro, .coop, .aero, and .museum. In addition, every country in the
world is assigned its own TLD, which is a two-letter English designation related
to the country name. For example, the country TLD for the United Stated is .us,
while the country TLD for Ireland is .ie and the country TLD for China is .cn.
Each TLD is managed by a registrar, an organization that handles registration of
domain names within a particular TLD. For some TLDs, such as .com, .net, and
.org, there are many registrars. For others, such as .gov or .mil, there is only one.
A registrar is responsible for managing domain registrations. This means
keeping them current, including accepting new registration requests as well as
expiring those domains that are no longer valid. An example of a domain would
be “apress.com”. Domain names are read right to left, with the leftmost name
typically being the host name or name of a specific network node. Thus, a name
Chapter 1
34
3227c01.qxd 7/8/04 9:09 PM Page 34
such as www.apress.com would be translated as “the network node known as www
within the domain apress within the TLD .com.” Another node within the same
domain might have a name such as www2.apress.com. The actual names used are
up to the discretion of the owner, with the following restrictions:
• Names are restricted to letters and numbers, as well as a hyphen.
• Names cannot begin or end with a hyphen.
• Not including the TLD, names cannot exceed 63 characters.
The TLDs are managed by special domain name servers known as root servers.
The root servers are special servers set up in redundant fashion and spread out
across the Internet. The root servers are updated twice daily by the registrars. As
of this writing, there are 13 root servers. You can see a list of their names, and the
organizations responsible for them, at http://www.root-servers.org. Even though
there are 13 root servers, there are actually more than 13 physical servers. The root
servers are typically set up redundantly in diverse locations to spread out the load,
and in general the closest one to the node making the request is the one that
answers the request. Each root server has a list of the active domains and the
name servers that are responsible for those domains. Remember that DNS is hier-
archical and delegated. The root servers have a list of subordinate domain name
servers, each one responsible for one or many domains such as apress.com or
yahoo.com or google.com. Thus, the root servers for .com have a list of the servers
handling a particular domain. A request for that particular name is handled by
the server responsible, not by the root servers. Further delegation is possible,
because a company or other organization can have its own domain name servers.
Let’s look at an example. You would like to visit the Apress website to down-
load the source code used in this book. Putting everything we’ve discussed so far
in this chapter together, that means your web browser is the client application,
and the web server at Apress is the server application. You know that to make a
successful connection, you need four pieces of information: source address,
source port, destination address, and destination port. You know from your list
of reserved ports that web servers are typically available on port 80, and you
know that your client application can use any port it likes as the source port for
the request, as long as the port isn’t already in use on your own computer. You
also know your own address. Thus, the only thing you need to determine before
making your TCP/IP connection and web page request is the address of the web
server that is accepting requests for the Apress website.
To get the address, you’ll perform a DNS lookup on www.apress.com. Note
that the lookup happens transparently to the user and is performed by the client
application, or the application “making the call.” The goal is to translate the
Networks and Protocols
35
3227c01.qxd 7/8/04 9:09 PM Page 35
name www.apress.com into an address that your web browser can use to make its
network connection. In this case, the name lookup happens in a series of steps:
1. The browser queries one of the root servers for .com and asks for the IP
addresses of the domain name servers (there are usually two, a primary
and a backup) managing the domain named “apress”.
2. The root server consults its database for a name matching “apress” and,
if found, replies with the list of IP addresses of the domain name servers
delegated to handle those requests.
3. The browser queries one of the servers in that list and asks it for the IP
address of the network node with the name of “www”.
4. The domain name server managing the domain named “apress” con-
sults its database for the name “www” and, if found, returns the IP
address associated with that name.
5. If the browser receives an answer from the domain name server with the
IP address for www.apress.com, the browser makes a connection to port
80 at that IP address and requests the web page.
The domain name system is transparent and public. You can make DNS
queries in a number of different ways, from using the host and whois commands
on your Linux system to using any of the web-based query sites. Let’s walk
through the query process for apress.com that we just described, using the com-
mand line. To query the root name servers for information, you use whois:
[user@host user]$ whois apress.com
After the whois command executes, you’ll see output that looks like this:
Domain Name: APRESS.COM
Registrar: NETWORK SOLUTIONS, INC.
Whois Server: whois.networksolutions.com
Referral URL: http://www.networksolutions.com
Name Server: AUTH111.NS.UU.NET
Name Server: AUTH120.NS.UU.NET
Status: ACTIVE
Updated Date: 19-apr-2002
Creation Date: 23-feb-1998
Expiration Date: 22-feb-2007
Registrant:
Apress (APRESS-DOM)
Chapter 1
36
3227c01.qxd 7/8/04 9:09 PM Page 36
2560 Ninth Street
Suite 219
Berkeley, CA 94710
US
Domain Name: APRESS.COM
Administrative Contact, Technical Contact:
Apress (23576335O) wanshun_tam@apress.com
2560 Ninth Street
Suite 219
Berkeley, CA 94710
US
510-549-5930 fax: 123 123 1234
Record expires on 22-Feb-2007.
Record created on 23-Feb-1998.
Database last updated on 18-Jan-2004 22:43:05 EST.
Domain servers in listed order:
AUTH111.NS.UU.NET 198.6.1.115
AUTH120.NS.UU.NET 198.6.1.154
The information is self-explanatory. You see that the registrar used to regis-
ter the domain name is Network Solutions, and you see that the domain was
registered in 1998 and is paid up through 2007. This is the information held at
the TLD level—it still doesn’t tell you the IP address of the web server, which is
what you need. The information you do have, though, includes the names and
IP addresses of the name servers delegated to handle further information for
apress.com, namely auth111.ns.uu.net and auth120.ns.uu.net, with addresses of
198.6.1.115 and 198.6.1.154, respectively. Either one of those name servers can
help you find the address of the web server.
The next step is to use the host command to make a specific request of one
of the name servers. You want the IP address of the machine with the name
www.apress.com:
[user@host user]$ host www.apress.com auth111.ns.uu.net
Using domain server:
Name: auth111.ns.uu.net
Address: 198.6.1.115#53
Aliases:
www.apress.com has address 65.215.221.149
Networks and Protocols
37
3227c01.qxd 7/8/04 9:09 PM Page 37

The host command takes two parameters: the name you want to translate
into an IP address and the name (or address) of the server you want to use to
make the translation. Using one of the name servers returned by the whois query,
you ask for the IP address of the web server, and the name server responds with
the IP address 65.215.221.149. At this point, your web browser would have the
four pieces of information it needs to make a successful TCP/IP connection.
Incidentally, you can see the port information for DNS in the name server’s
reply shown previously. Note the #53 tacked onto the end of the name server’s IP
address. As shown earlier in Table 1-3, the port used by DNS is port 53. The host
command can also be used without specifying the name server as a parameter.
If you just use the name that you want to translate, you’ll get an abbreviated
response with just the IP address, without the other information.
You can use the host command to make all sorts of domain name queries by
using command-line parameters such as –t for type. For example, using a type
of “MX” will return the IP addresses of the machines handling mail for a given
domain name. Using a type of “NS” will return an abbreviated version of the
whois information, listing the name servers themselves. Let’s see which machines
handle mail and name serving for linux.org:
[user@host user]$ host -t mx linux.org
linux.org mail is handled by 10 mail.linux.org.
[user@host user]$ host -t ns linux.org
linux.org name server ns.invlogic.com.
linux.org name server ns0.aitcom.net.
The two queries tell you that mail for addresses in the linux.org domain is
handled by a machine named mail.linux.org. Likewise, the name servers for
linux.org are listed. If you wanted to send mail to someone at linux.org, you
would use the name server information to resolve the name mail.linux.org into
an IP address and make your connection from there. A list of common DNS
record types and their purpose is shown in Table 1-10.
Table 1-10. Common DNS Record Types
TYPE NAME PURPOSE
A Host Address A 32-bit IP address identifying a specific
host.
CNAME Canonical Name A name used as an alias for an A record.
MX Mail Exchanger The name of the host acting as a mail
exchanger for the domain.
NS Name Server The name of an authoritative domain name
server for this domain.
Chapter 1
38
3227c01.qxd 7/8/04 9:09 PM Page 38

Table 1-10. Common DNS Record Types (continued)
TYPE NAME PURPOSE
PTR Pointer A record that points an IP address to a name.
This is the reverse of an A record.
SOA Start of Authority A multiple-field record specifying particulars
for this domain, such as timeouts.
As you can see, DNS information is public information, and you can easily
obtain it once you know what to look for and which commands to use. On your
Linux system, use the man command to get more information on host and whois.
Older systems use a utility called nslookup, which performs essentially the same
functions as host. It’s also possible to have private DNS information, since any
Linux system is capable of acting as a name server. Many companies and organi-
zations use both private, or internal, DNS and public, or external, DNS. Internal
DNS is used for those machines that aren’t available to the public.
Summary
In this chapter, we discussed the basic ingredients for today’s popular network-
ing technologies. Here’s a summary of what we covered:
• In general, networks are either packet-switched or circuit-switched, with
the Internet being an example of a packet-switched network.
• All networks need a common, physical medium to use for communica-
tions, the most popular of which is Ethernet. Ethernet uses a system of
frames containing header and data portions.
• Networks require the use of addressing so that one network node can
find another network node. Addressing takes different forms, from MAC
addresses used to identify physical network hardware interfaces to
IP addresses used to identify virtual software addresses used by the TCP
and IP network protocols.
• The gateway rule means that a node does not need to know how to reach
every other node on a network. It only needs to know how to reach the
nodes on its own network, and how to reach the gateway between its own
network and all other networks.
Networks and Protocols
39
3227c01.qxd 7/8/04 9:09 PM Page 39
• Using a system of protocol layering and encapsulation, IP and TCP “wrap”
and “unwrap” each packet of header and data information as it travels up
or down the protocol stack at each endpoint of the connection.
• TCP/IP networks use the client-server model, in which the source of the
communication is known as the client, and the server is the destination.
The server is the network node providing services consumed by the client.
Depending on whether the communication is a request or a response, the
roles of client and server may change back and forth.
• Because people find it easier to remember names instead of numbers, net-
works use name translation systems to translate familiar names into the
actual IP addresses of the other network nodes. The most popular naming
system is the Domain Name System (DNS), which is a collaborative, dis-
tributed, hierarchical system of managing namespaces where specific
responsibilities for certain domains are delegated from root servers to
subordinate servers.
Chapter 1
40
3227c01.qxd 7/8/04 9:09 PM Page 40

CHAPTER 2
Functions
APPROXIMATELY 20 YEARS AGO,the Advanced Research Projects Agency (ARPA)
tasked a group at the University of California, Berkeley (UC Berkeley), to port
TCP/IP software to the UNIX operating system. A significant part of the project
was creating the interface between the TCP/IP-based network and the net-
worked applications that used it. The group decided that wherever possible, the
interface should use existing UNIX system calls and algorithms, and add new
functions only when absolutely necessary. The interface that resulted from this
project became known as the socket interface, sometimes called the Berkeley
socket interface. The system became known as Berkeley UNIX or BSD UNIX.
While other network interfaces exist, the Berkeley socket interface is consid-
ered the de facto standard and is widely supported and accepted. The Berkeley
socket interface is the interface used by Linux.
What Is a Socket?
Essentially, a socket is an abstraction for network communication, just as a file is
an abstraction for file system communication. Let’s consider the basic network
I/O functions for a Linux system. In general, an application that performs net-
work input and output needs to perform the five basic functions described in
Table 2-1: open, close, read, write, and control.
Table 2-1. Primary Socket Functions
OPERATION EXPLANATION
Open Prepare for input or output operations.
Close Stop previous operations and return resources.
Read Get data and place in application memory.
Write Put data from application memory and send control.
Control (ioctl) Set options such as buffer sizes and connection behavior.
41
3227c02.qxd 7/8/04 9:25 PM Page 41
In a non-networked application, I/O functions are performed on files. A file
is opened, data is read from or written to the file (or both), and then the file is
closed. These functions work by using what is known as a file descriptor. A file
descriptor is a small integer returned by a function that an application can use
for subsequent operations. The system maintains a file descriptor table for each
process. When the process opens a file, a pointer to the internal data structures
for that file is placed in the file descriptor table and the index to the pointer is
returned to the calling function. The application only needs to work with the
descriptor; the operating system will handle the underlying operations by fol-
lowing the pointer in the descriptor table and getting the information it needs.
Thus, when a file is opened, a file descriptor is returned. Other functions use this
file descriptor to perform reads and writes, change file options, and close the file
when finished.
The Berkeley socket interface extends the concept of a file descriptor to
that of a socket descriptor. Like a file, an active socket is identified by an integer
known as its socket descriptor. These descriptors are allocated in the same way
as file descriptors, in the same descriptor table, by process. An application can-
not have a file descriptor and a socket descriptor with the same value.
Let’s continue with the file analogy. When an application creates a file or
begins to work with an existing file, a file descriptor is created. This descriptor is
a pointer to the data structure that describes the file. This data structure might
include the name of the file, the file’s actual location on disk or in memory,
whether the file is read-only or read-write, and the file’s size. Likewise, when an
application creates a socket, a socket descriptor is created that points to a data
structure holding information about that socket. The information, while similar
to that of a file, is network oriented. The socket data structure will include infor-
mation such as the socket type, the local address and port being used by the
socket, and the remote address and port that will receive communications from
the socket. Some of this information may be available immediately, and some of
it may be filled in later by other function calls. If the terms address and port are
unfamiliar to you, don’t worry—we’ll cover those in a moment.
By extending the file/file descriptor concept, the UC Berkeley team made
it easy to visualize communicating across a network. To communicate across
a network, a connection (socket) to the network must be opened. Once it’s
opened, data is read from or written to the socket. When communication is fin-
ished, the connection to the network is closed and the resources used by the
socket are released.
Sockets can be used in two ways. Once created, a socket can wait for an
incoming connection, or it can initiate a connection to another socket on a
remote host, or even its own local host in some cases. A socket used by a client
program to initiate a connection to a server is known as an active socket. A socket
that acts as a server and waits for an incoming connection is known as a passive
socket. Both active and passive sockets are created the same way. The only differ-
ence is how a networked application uses them.
Chapter 2
42
3227c02.qxd 7/8/04 9:25 PM Page 42
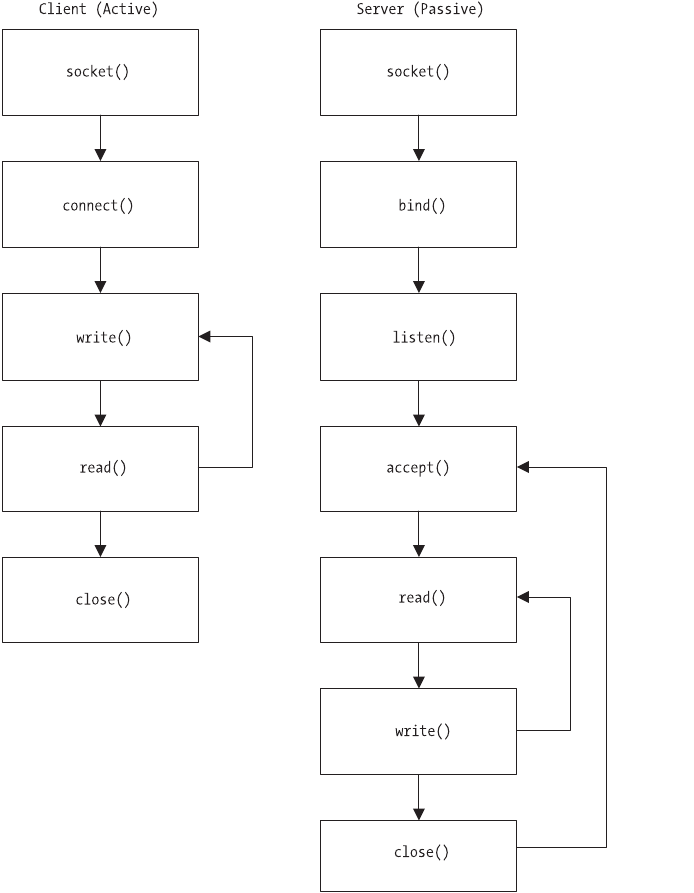
Using Sockets
Let’s take a look at the two ways a socket can be used. Figure 2-1 shows the
sequence of function calls for two simple socket applications: a client and a
server. For the purposes of describing the application flow, the function calls
shown in the diagram are generic. We’ll get into specific uses of the functions,
the parameters used for each one, and other details later.
Figure 2-1. Function call flow
Functions
43
3227c02.qxd 7/8/04 9:25 PM Page 43
On the client side, the application creates the socket with socket(), calls
connect() to connect to the server, and then interacts with the server by using
write() to send requests to the server and read() to read responses from the
server. When the client is finished, it calls close().
On the server side, the application creates the socket with socket(), and then
calls bind() to specify which local address and port to use, and then proceeds to
call listen() to set the length of the connection queue. The connection queue is
the number of requests that the application should hold while waiting for the
server to process any current request. Once the connection queue is set, the
server calls accept() and waits until the next connection request arrives from the
client. When the request arrives, the server uses read() and write() to read the
request and write the response. When finished, the server calls close() to termi-
nate the connection to the client and returns to the accept() function, where it
waits for the next connection request from a client.
Socket Constants
Like any other application programming interface (API), the socket interface
uses a set of predefined symbolic constants and data structure declarations.
These constants and structures help applications specify function parameters
and declare data structures in a consistent way. This increases portability and
eases application maintenance by not requiring a developer to do things a dif-
ferent way for each environment. There are two primary sets of constants used
in the Berkeley socket interface: protocol type constants and address family
constants. In addition, a number of standard data structure declarations are
available, as are the function prototypes themselves. These constants, function
prototypes, and data structures are typically available in header files that can be
incorporated into a program using the #include C preprocessor directive. The
two files that should be included are types.h and socket.h, which are found in
the /usr/include directory. The include statements in your application’s code
would look like this:
#include <sys/types.h>
#include <sys/socket.h>
The #include directives are relative. That is, relative to the include directory,
which in this case is /usr/include. That means the header files can be found in
/usr/include/sys on a typical Linux system.
The protocol type and address family constants consist of two groups each.
In the case of the protocol types, an application can use several different types
of sockets. Address family constants, also known as protocol families, belong to
the Internet address family for all TCP/IP communications, including UDP. This
address family is known as AF_INET. Another option for an address constant is
Chapter 2
44
3227c02.qxd 7/8/04 9:25 PM Page 44

AF_UNIX, which is used when the socket communications will be internal to the
local machine only, not across a network. As you do more network program-
ming, you will probably run into constants known as protocol family constants,
denoted by PF_ instead of AF_. For our purposes, the protocol family constants
and address family constants are the same. That is, wherever you see AF_INET,
you can also use PF_INET, though the AF_ version is preferred and is the one used
by recent versions of the Berkeley socket interface library. In fact, if you review
/usr/include/bits/socket.h, you will see the protocol family constants defined,
and later the address family constants declared as aliases to the protocol family
constants, like this:
#define PF_INET 2 /* IP protocol family. */
#define PF_INET6 10 /* IP version 6. */
#define PF_IPX 4 /* Novell Internet Protocol. */
#define PF_APPLETALK 5 /* Appletalk DDP. */
#define PF_X25 9 /* Reserved for X.25 project. */
#define AF_INET PF_INET
#define AF_INET6 PF_INET6
#define AF_IPX PF_IPX
#define AF_APPLETALK PF_APPLETALK
#define AF_X25 PF_X25
Table 2-2 contains the more commonly used address family constants, also
known as domains, as used with socket().
Table 2-2. Address Family Constants
ADDRESS FAMILY DESCRIPTION
AF_UNIX, AF_LOCAL Communications local to same host
AF_INET IPv4 Internet protocols
AF_INET6 IPv6 Internet protocols
AF_IPX IPX–Novell protocols
AF_NETLINK Kernel user interface
AF_X25 X.25 protocols
AF_AX25 Amateur radio AX.25 protocols
AF_ATMPVC ATM Private Virtual Circuits (PVCs)
AF_APPLETALK AppleTalk protocols
AF_PACKET Low-level packet communications
Functions
45
3227c02.qxd 7/8/04 9:25 PM Page 45

A number of other constants are also available. You can find their definitions
in /usr/include/bits/socket.h.
In addition to the protocol family, a call to socket() takes another constant,
known as the type. There are a number of different type constants that can be
used, as shown in Table 2-3, though the most common are SOCK_STREAM and
SOCK_DGRAM, or TCP and UDP, respectively. UDP connections are connectionless—
that is, UDP packets do not offer any sort of transmission guarantees and do not
arrive in any sort of sequence. TCP connections are connection based, which
means that TCP packets provide transmission guarantees, are assembled in a
certain sequence once they arrive at their destination, and are typically more
reliable than UDP packets.
Table 2-3. Socket Type Constants
TYPE DESCRIPTION
SOCK_STREAM Communications are connection-based, sequenced, reliable,
and two-way.
SOCK_DGRAM Connectionless, unreliable message-type communications
using a fixed length.
SOCK_SEQPACKET Message-type communications with fixed-length packets, but
sequenced and more reliable.
SOCK_RAW Access to raw network protocols.
SOCK_RDM Connectionless but reliable communications, without using a
particular packet order.
SOCK_PACKET Obsolete and should not be used.
Thus, three arguments are needed to use the socket() function call to create
a socket, as shown in Table 2-4.
Table 2-4. Socket Function Arguments
ARGUMENT EXPLANATION
Family Protocol or address family (AF_INET for TCP/IP; AF_UNIX for
internal)
Type Type of service (SOCK_STREAM for TCP; SOCK_DGRAM for UDP)
Protocol The protocol number to use, typically a zero (0) to use the
default for a given family and type
Chapter 2
46
3227c02.qxd 7/8/04 9:25 PM Page 46
A call to socket(), then, for the purposes of opening a connection to another
host and communicating with TCP, would look like this:
mySocket = socket(PF_INET, SOCK_STREAM, 0);
We’ll look at the socket function call in detail later in the chapter.
Address Structure
Before we discuss functions, we should take a look at some building blocks pro-
vided by the socket interface to make network application development a little
easier and a little more standard. The Berkeley socket interface provides a set of
defined C structures that helps you handle different endpoint addresses and
other socket programming duties. Probably the most important structure you
will work with is the sockaddr_in structure. Its purpose is to provide a standard
way of handling endpoint addresses for network communications. The
sockaddr_in structure contains both an IP address and a protocol port number.
The structure looks like this:
struct sockaddr_in {
short sin_family; /* type of address */
u_short sin_port; /* protocol port number */
/* network byte ordered */
u_long sin_addr; /* net address for the remote host */
/* network byte ordered */
char sin_zero[8]; /* unused, set to zero */
};
In sockaddr_in, there is a 2-byte field that identifies the address type or fam-
ily such as PF_INET, then a 2-byte field for the port number, and finally a 4-byte
IP address field. The last field in the structure is unused, and is typically set to 0.
Another structure that you’ll use with your sockets is the linger structure.
linger is a parameter that determines whether a socket waits to see that all data
is read once the other end of the communication closes. The linger structure,
which can be found in socket.h, looks like this:
{
int l_onoff; /* Nonzero to linger on close. */
int l_linger; /* Time to linger. */
};
Functions
47
3227c02.qxd 7/8/04 9:25 PM Page 47
It’s a simple structure, but using it correctly can ensure that your network
communications are completed. The first structure member is an integer that
determines whether the socket should linger. A zero value for l_onoff will keep
the socket from lingering. To keep the socket open until all data is read, set
l_onoff to any nonzero value. The other member of the structure, l_linger, is an
integer that defines the length of time, in seconds, that the socket should linger
before closing.
Last but not least is the servent structure. This structure is important,
because without it you will find it difficult to connect to a server. Many of the
standard TCP/IP services such as FTP, NTP, DNS, and others use standard ports,
regardless of host operating system. These ports are defined in a file called
/etc/services. For example, if you were to look up HTTP in /etc/services, you
would see the following entries:
http 80/tcp www www-http # WorldWideWeb HTTP
http 80/udp www www-http # HyperText Transfer Protocol
If you were developing a web browser, for instance, you could always hard-
code the server’s IP address and port number into your connect() call, but that
wouldn’t be much help. By using specific addresses and ports in your code, you
lock your applications to a certain set of parameters, requiring you to recompile
them should those parameters change. A better programming practice is to use
runtime resources such as DNS and the /etc/services file, allowing your appli-
cation to use dynamic parameters without recompiling. We’ll cover getting the IP
address for a host using the gethostbyname() function later in the chapter. Using
the /etc/services file is done with the servent structure and a function called
getservbyname(). The servent structure, typically found in the netdb.h header file,
looks like this:
struct servent
{
char *s_name; /* Official service name. */
char **s_aliases; /* Alias list. */
int s_port; /* Port number, in network byte order. */
char *s_proto; /* Protocol to use. */
};
Calling getservbyname() with a service name will perform a lookup in
/etc/services and populate the servent structure for you, and allow you to use
the values such as port number elsewhere in your application. We’ll discuss
getservbyname() and several other similar functions later in this chapter.
Chapter 2
48
3227c02.qxd 7/8/04 9:25 PM Page 48
Byte Order Functions
Another problem addressed by the Berkeley socket interface team is number
representation. The TCP/IP protocol specifies the way to represent the binary
integers found in the protocol headers. Binary integers must be specified with
the most significant byte first. This is called network byte order.
Why is this a problem? The TCP/IP specification is for network communi-
cations. It has no bearing on how a particular node on the network represents
numbers internally. Over the years, different operating systems and hardware
platforms have chosen different ways to represent numbers. For example, Big
Endian and Little Endian were explained in the previous chapter. Both are differ-
ent ways to represent numbers. If you try to store a TCP/IP number in network
byte order on a local host whose method of storing integers is different from net-
work byte order, you will run into problems because the values you store will be
scrambled.
The TCP/IP protocol is Big Endian, but it’s not important to understand the
details of the different ways to represent numbers. What’s important is under-
standing that the Berkeley team already took care of this for you by incorporating
several conversion functions into the socket interface. These functions automati-
cally convert short and long integers from network byte order to the local host’s
native byte order, whatever that may be, and back again. These functions operate
on 16-bit and 32-bit integers. The functions are called htons(), ntohs(), htonl(),
and ntohl().
Which function to use should be fairly clear. The functions called “hton” will
convert integers from local host’s native byte order to network byte order. The
functions called “ntoh” will convert integers from network byte order to the local
host’s native byte order, whatever that may be. The functions ending in “s” are for
short integers; the functions ending in “l” are for longs. In some cases, calling
these functions is unnecessary. If you take a look at the servent structure earlier in
this chapter, you’ll note that the U member is already in network byte order, elim-
inating the need for calling htons() before using the value. Some functions and
structures will handle the network-to-local byte transformation for you without
the need for the conversion functions, so if you experience problems with garbled
values, take a quick look and confirm that the values are being returned the way
that’s needed by your application.
Using Socket Functions
Depending on your needs, your application might use only a few of the following
functions, all of them, or even some that aren’t listed here. A number of platform-
specific and third-party libraries are available for working with socket interfaces,
but they all can’t be addressed here. We’ll show you the functions that you’ll find
Functions
49
3227c02.qxd 7/8/04 9:25 PM Page 49
on a typical Linux system, define how they’re used, cover the parameters they
take, explain the values they return, and provide example code.
Core Functions
You can’t have a client without having a server first, so we’ll take a look at the
common functions used to implement a server application.
socket()
socket() is a critical function. Without it, your application cannot communicate
with a network. socket() is used to create a network endpoint, and it returns a
socket descriptor that is used later by other functions.
int socket(int domain, int type, int protocol);
As discussed in previous sections, the domain is one of the values shown in
Table 2-1, such as AF_INET. The type is one of the values shown in Table 2-2, such
as SOCK_STREAM. The protocol can be 0 to use the default that matches the other
two parameters, or you can use IPPROTO_TCP for SOCK_STREAM and IPPROTO_UDP for
SOCK_DGRAM.
socket() returns a –1 if there is an error. Otherwise, the value returned is the
descriptor to the socket.
#include <stdio.h>
#include <sys/types.h>
#include <sys/socket.h>
#include <netdb.h>
const char APRESSMESSAGE[] = "APRESS – For Professionals, by Professionals!\n";
int main(int argc, char *argv[]) {
int simpleSocket = 0;
int simplePort = 0;
/* make sure we have a port number */
if (2 != argc) {
fprintf(stderr, "Usage: %s <port>\n", argv[0]);
exit(1);
}
Chapter 2
50
3227c02.qxd 7/8/04 9:25 PM Page 50
/* create a streaming socket */
simpleSocket = socket(AF_INET, SOCK_STREAM, IPPROTO_TCP);
if (simpleSocket == -1) {
fprintf(stderr, "Could not create a socket!\n");
exit(1);
}
else {
fprintf(stderr, "Socket created!\n");
}
}
The preceding code example doesn’t do much beyond creating a socket, but
we’ll add to it as we progress. The goal is to create a simple server application
that listens on a given port for a connection and sends a text string to the client
when the connection is received. We’ll do the server first, then the client.
bind()
Now that we’ve created our socket, we need to bind it to an address. Simply cre-
ating a socket doesn’t do anything—you have to give it a place to go, much like
creating a file doesn’t do much unless you save it to disk somewhere. The bind()
function is used to bind the socket to a given address once the socket is created.
int bind(int sockfd, struct sockaddr *my_addr, socklen_t addrlen);
The first value bind() needs is our socket descriptor. The second parameter is
a pointer to the sockaddr structure we discussed earlier, while the third parameter
is the length of the sockaddr structure. In this example, we’ll use the constant
INADDR_ANY to signal that we want to bind to all of our local host’s addresses. Let’s
add some more to our server:
/* retrieve the port number for listening */
simplePort = atoi(argv[1]);
/* set up the address structure */
/* use INADDR_ANY to bind to all local addresses */
/* note use of htonl() and htons() */
bzero(&simpleServer, sizeof(simpleServer));
simpleServer.sin_family = AF_INET;
simpleServer.sin_addr.s_addr = htonl(INADDR_ANY);
Functions
51
3227c02.qxd 7/8/04 9:25 PM Page 51
simpleServer.sin_port = htons(simplePort);
/* bind to the address and port with our socket */
returnStatus = bind(simpleSocket,
(struct sockaddr *)&simpleServer,
sizeof(simpleServer));
if (returnStatus == 0) {
fprintf(stderr, "Bind completed!\n");
}
else {
fprintf(stderr, "Could not bind to address!\n");
close(simpleSocket);
exit(1);
}
We’ve created a socket, and we’ve taken that socket and bound it to an
address and a port. Our program still doesn’t do much, so let’s take a look at
listen() and accept() to keep moving.
listen()
The next function we need is listen(). This function tells our socket that we’re
ready to accept connections, and it also specifies a maximum number of con-
nections that can be queued before connections are refused.
int listen(int s, int backlog);
backlog is the value that determines the connection queue. A typical value
for backlog is 5, though it can be larger as needed. Some systems, however, such
as BSD-based systems, limit the value at 5, so if you’re going to port your appli-
cation to other environments besides Linux, don’t rely on backlog being greater
than 5. Note that with Linux versions after 2.2, only completely established sock-
ets are counted in the queue, instead of incomplete connection requests.
We’ll add our call to listen() to our program, which is very easy to do. If our
call to listen() is successful, a value of 0 is returned:
/* tell the socket we are ready to accept connections */
returnStatus = listen(simpleSocket, 5);
if (returnStatus == -1) {
fprintf(stderr, "Cannot listen on socket!\n");
close(simpleSocket);
exit(1);
}
Chapter 2
52
3227c02.qxd 7/8/04 9:25 PM Page 52
accept()
So far, we’ve created our socket, bound it to an address and port, and told our
socket that we’re ready to receive connection requests. Now we need to actually
accept and handle those connection requests, and we do that using the accept()
function.
int accept(int s, struct sockaddr *addr, socklen_t *addrlen);
accept() takes our socket descriptor, a pointer to the address structure, and
the length of the address structure as its parameters. The key thing to remember
with this function is that it will typically run in an endless loop. The only time
you want a network server to stop listening is when you shut it down manually.
Otherwise, your application should be listening and accepting connections con-
stantly. Here’s how this can be done:
while (1) {
/* set up variables to handle client connections */
struct sockaddr_in clientName = { 0 };
int simpleClient = 0;
int clientNameLength = sizeof(clientName);
/* block on accept function call */
simpleChildSocket = accept(simpleSocket,
(struct sockaddr *)&clientName, &clientNameLength);
if (simpleClient == -1) {
fprintf(stderr, "Cannot accept connections!\n");
close(simpleSocket);
exit(1);
}
}
Compared to the functions we’ve already discussed, accept() is slightly dif-
ferent. The first difference is that accept() is a blocking function. That means
your application will wait at the accept() function call until a connection request
is received from a client. This behavior is configurable, but the default blocking
behavior is typically the desired behavior.
The second difference is that the structures passed to accept() are client
related, not server related. As you can see in the preceding example, the second
and third parameters passed to accept() are locations for storing information
about the client, not about the server. When started, the value for the client
Functions
53
3227c02.qxd 7/8/04 9:25 PM Page 53
name is set to 0, as is the length of the name. When a call from accept() returns,
both of the structures should be populated with correct information. On success,
accept() returns a new socket descriptor for the new connection. In the preced-
ing listing, the new socket descriptor is named simpleChildSocket. The original
socket descriptor is unchanged and still able to listen for more connection
requests. Keep in mind that a server can typically handle more than one connec-
tion at a time.
write()
Now that we have our new socket descriptor for our new client connection, it’s
time to do something with it. In this example, we’ll simply send a string of char-
acters back to the client. We’ll do this using the write() function.
ssize_t write(int fd, const void *buf, size_t count);
write() writes up to count bytes of the contents of buf to the designated
descriptor, in this case our child socket.
/* handle the new connection request */
/* write out our message to the client */
write(simpleChildSocket, APRESSMESSAGE, strlen(APRESSMESSAGE));
close()
Lastly, we need to do some cleanup. Use the close() function to close your
sockets:
int close(int fd)
The first thing to do is close our child socket as soon as the write to the
client is done.
close(simpleChildSocket);
}
Remember that even though we’re closing this socket, our accept() function
is a blocking function and is in a loop. As soon as this child socket is closed, our
program will loop back around and wait for another connection. Lastly, assum-
ing our program is done, we close our primary socket:
Chapter 2
54
3227c02.qxd 7/8/04 9:25 PM Page 54
close(simpleSocket);
return 0;
}
Listing 2-1 is the complete listing for our simple server.
Listing 2-1. Simple Server
#include <stdio.h>
#include <sys/types.h>
#include <sys/socket.h>
#include <netdb.h>
const char APRESSMESSAGE[] = "APRESS - For Professionals, By Professionals!\n";
int main(int argc, char *argv[]) {
int simpleSocket = 0;
int simplePort = 0;
int returnStatus = 0;
struct sockaddr_in simpleServer;
if (2 != argc) {
fprintf(stderr, "Usage: %s <port>\n", argv[0]);
exit(1);
}
simpleSocket = socket(AF_INET, SOCK_STREAM, IPPROTO_TCP);
if (simpleSocket == -1) {
fprintf(stderr, "Could not create a socket!\n");
exit(1);
}
else {
fprintf(stderr, "Socket created!\n");
}
Functions
55
3227c02.qxd 7/8/04 9:25 PM Page 55
/* retrieve the port number for listening */
simplePort = atoi(argv[1]);
/* set up the address structure */
/* use INADDR_ANY to bind to all local addresses */
bzero(&simpleServer, sizeof(simpleServer));
simpleServer.sin_family = AF_INET;
simpleServer.sin_addr.s_addr = htonl(INADDR_ANY);
simpleServer.sin_port = htons(simplePort);
/* bind to the address and port with our socket */
returnStatus = bind(simpleSocket,
(struct sockaddr *)&simpleServer,
sizeof(simpleServer));
if (returnStatus == 0) {
fprintf(stderr, "Bind completed!\n");
}
else {
fprintf(stderr, "Could not bind to address!\n");
close(simpleSocket);
exit(1);
}
/* let's listen on the socket for connections */
returnStatus = listen(simpleSocket, 5);
if (returnStatus == -1) {
fprintf(stderr, "Cannot listen on socket!\n");
close(simpleSocket);
exit(1);
}
while (1)
{
struct sockaddr_in clientName = { 0 };
int simpleChildSocket = 0;
int clientNameLength = sizeof(clientName);
/* wait here */
Chapter 2
56
3227c02.qxd 7/8/04 9:25 PM Page 56
simpleChildSocket = accept(simpleSocket,
(struct sockaddr *)&clientName,
&clientNameLength);
if (simpleChildSocket == -1) {
fprintf(stderr, "Cannot accept connections!\n");
close(simpleSocket);
exit(1);
}
/* handle the new connection request */
/* write out our message to the client */
write(simpleChildSocket, APRESSMESSAGE, strlen(APRESSMESSAGE));
close(simpleChildSocket);
}
close(simpleSocket);
return 0;
}
More Socket Functions
A number of other functions can be used with sockets in server-type applications,
as well as two functions used in clients that we haven’t discussed yet. The func-
tions you’ll find in client applications are the connect() function and the read()
function. We’ll discuss those in this section, and then convert our server appli-
cation into a client.
connect()
The connect() function is very similar to the bind() function. It takes a socket
descriptor, a pointer to an address structure, and the size of the address struc-
ture as parameters.
int connect(int sockfd, const struct sockaddr *serv_addr, socklen_t addrlen);
The difference with connect() is that the address used in the second parame-
ter is the address of the server, not the address of the host running the client
Functions
57
3227c02.qxd 7/8/04 9:25 PM Page 57
program, as is the case with a server and bind(). If successful, connect() returns 0.
Otherwise, –1 is returned.
read()
The other client function we’ll need is read(). The opposite of write(), read() will
accept what is sent by the server after our successful connection request.
ssize_t read(int d, void *buf, size_t nbytes);
Using our socket descriptor, read() will accept nbytes of data and store it in
the buffer buf. If the call to read is successful, the actual number of bytes read
will be returned. If end of communication is encountered, 0 is returned.
Otherwise, –1 is returned.
Converting Our Server Application into a Client
Let’s convert our server program to be a client instead, as shown in Listing 2-2.
The two programs will be very similar, the key differences will be the use of
connect(), the use of read(), and the need to call the program with an additional
parameter, the IP address of the server. Note that the port number used as an
argument for the client should match the port number used as an argument for
the server.
Listing 2-2. Simple Client
#include <stdio.h>
#include <sys/types.h>
#include <sys/socket.h>
#include <netdb.h>
int main(int argc, char *argv[]) {
int simpleSocket = 0;
int simplePort = 0;
int returnStatus = 0;
char buffer[256] = "";
struct sockaddr_in simpleServer;
if (3 != argc) {
fprintf(stderr, "Usage: %s <server> <port>\n", argv[0]);
exit(1);
Chapter 2
58
3227c02.qxd 7/8/04 9:25 PM Page 58
}
/* create a streaming socket */
simpleSocket = socket(AF_INET, SOCK_STREAM, IPPROTO_TCP);
if (simpleSocket == -1) {
fprintf(stderr, "Could not create a socket!\n");
exit(1);
}
else {
fprintf(stderr, "Socket created!\n");
}
/* retrieve the port number for connecting */
simplePort = atoi(argv[3]);
/* set up the address structure */
/* use the IP address argument for the server address */
bzero(&simpleServer, sizeof(simpleServer));
simpleServer.sin_family = AF_INET;
inet_addr(argv[2], &simpleServer.sin_addr.s_addr);
simpleServer.sin_port = htons(simplePort);
/* connect to the address and port with our socket */
returnStatus = connect(simpleSocket,
(struct sockaddr *)&simpleServer,
sizeof(simpleServer));
if (returnStatus == 0) {
fprintf(stderr, "Connect successful!\n");
}
else {
fprintf(stderr, "Could not connect to address!\n");
close(simpleSocket);
exit(1);
}
/* get the message from the server */
returnStatus = read(simpleSocket, buffer, sizeof(buffer));
if ( returnStatus > 0 ) {
printf("%d: %s", returnStatus, buffer);
Functions
59
3227c02.qxd 7/8/04 9:25 PM Page 59
} else {
fprintf(stderr, “Return Status = %d \n“, returnStatus);
}
close(simpleSocket);
return 0;
}
Identification Functions
In addition to the core socket interface functions, there are a number of other
functions that can be used to make things easier on the developer. You’ve
already seen the integer conversion functions htons(), htonl(), ntohs(), and
ntohl(). In the client example, we also took advantage of inet_addr(), which is
a function that makes it easy to convert strings into IP addresses that are com-
patible with the sockaddr structure.
What follows are the functions typically used in a socket-oriented program,
along with a description of what they do, how to call them, and what they return.
gethostbyaddr() and gethostbyname()
These two functions perform similar tasks. The first performs a lookup that
returns a host name when given an address. The second does the reverse, per-
forming a lookup that returns an address when given a name.
struct hostent *gethostbyaddr(const char *addr, int len, int type);
struct hostent *gethostbyname(const char *name);
Each function returns a pointer to a structure called the hostent structure.
The hostent structure is similar to the servent structure we discussed earlier.
hostent looks like this:
struct hostent {
char *h_name; /* official name of host */
char **h_aliases; /* NULL-terminated array of alternate */
/* names */
int h_addrtype; /* host address type, typically AF_INET */
int h_length; /* length of address */
char **h_addr_list; /* NULL-terminated list of addresses */
/* returned from name server in network */
/* byte order */
};
Chapter 2
60
3227c02.qxd 7/8/04 9:25 PM Page 60
The members of the structure are self-explanatory. Which functions you
call will determine which members of the structure are populated. Calling
gethostbyaddr() will populate h_name and h_aliases, while calling gethostbyname()
will populate h_add_list and h_addrtype.
Depending on the system configuration, using either of these functions
may or may not make a call to an external host for the information. If the
request can be satisfied by a local file such as /etc/hosts, the hostent structure
will be populated with the information without requiring the use of the network
or a name server. In a Linux environment, this behavior is determined by the
/etc/nsswitch.conf file. Using this file, you can configure name resolution to
happen using a network service like DNS first, and then a local file, or the local
file first, then the network. If your application is making repeated requests for
information on the same host, it may be better to enter the host’s information in
/etc/hosts and configure /etc/nsswitch.conf to use local files for lookup infor-
mation first.
gethostname() and sethostname()
gethostname() returns the name of the current local host where the function call
originates, while sethostname() can be used to set the name of the host.
int gethostname(char *name, int namelen);
int sethostname(const char *name, int namelen);
Only the superuser is allowed to call sethostname(), which usually occurs
during the server’s boot sequence. Anyone can use gethostname(), which may
come in handy if you want to know the name of the server without making a
call to an external name server or other lookup table like the /etc/hosts file, as
discussed previously. In both cases, a successful call returns 0. If an error occurs,
–1 is returned.
getservbyname() and getservbyport()
As discussed earlier in this chapter, getservbyname() returns a pointer to the
servent structure. getservbyport() is a companion function.
struct servent *getservbyname(const char *name, const char *proto);
struct servent *getservbyport(int port, const char *proto);
Which you use will determine which members of the servent structure are
populated. Remember that the port number must be in network byte order. Both
functions return 0 on success or –1 on error.
Functions
61
3227c02.qxd 7/8/04 9:25 PM Page 61

getsockopt() and setsockopt()
getsockopt() and setsockopt() manipulate a socket’s options. A socket has a
number of options that can be used to configure behavior, such keeping connec-
tions alive, setting timeout values, or setting the buffer size.
int getsockopt(int s, int level, int optname, void *optval, socklen_t *optlen);
int setsockopt(int s, int level, int optname,
const void *optval, socklen_t optlen);
You’ve seen one option already, SO_LINGER, which is used with the linger
structure discussed earlier to determine whether a socket should stay open or
not. Depending on the function used, you can either set the socket’s option to
the given constant or you can retrieve the current value of the option for that
socket. Table 2-5 presents a list of the socket options.
Table 2-5. Socket Options
NAME DESCRIPTION
SO_DEBUG Enables recording of debugging information
SO_REUSEADDR Enables local address reuse
SO_REUSEPORT Enables duplicate address and port bindings
SO_KEEPALIVE Keeps connections alive
SO_DONTROUTE Enables routing bypass for outgoing messages
SO_LINGER Linger on close if data present
SO_BROADCAST Enables permission to transmit broadcast messages
SO_OOBINLINE Enables reception of out-of-band data in band
SO_SNDBUF Sets buffer size for output
SO_RCVBUF Sets buffer size for input
SO_SNDLOWAT Sets minimum count for output
SO_RCVLOWAT Sets minimum count for input
SO_SNDTIMEO Sets timeout value for output
SO_RCVTIMEO Sets timeout value for input
SO_ACCEPTFILTER Sets accept filter on listening socket
SO_TYPE Gets the type of the socket (get only)
Chapter 2
62
3227c02.qxd 7/8/04 9:25 PM Page 62
Successful calls to either function return 0 or –1 if an error occurs.
Summary
The Berkeley socket interface provides application developers with a standard
method of referencing network functions, information, and communications. In
this chapter, we discussed the following topics:
• The definition of a socket and a socket descriptor, and the differences
between an active socket and a passive socket
• Which files to include in your program to use the socket interface
• Constants and structures used by the main socket interface functions
• How to create, bind, listen, accept, and write using a socket in a server
application
• How to create, connect, and read using a socket in a client application
• Helper functions that make it easier to deal with integer byte conversion,
structure manipulation, and socket options
Functions
63
3227c02.qxd 7/8/04 9:25 PM Page 63
3227c02.qxd 7/8/04 9:25 PM Page 64
CHAPTER 3
Socket Programming
INCHAPTER 2, WE COVERED THE BASIC functions used in socket programming,
and demonstrated a simple socket server and a simple socket client. Yet while
our server and client programs were functional, they didn’t do all that much.
In this chapter and the following chapters, we’ll go through implementing the
socket interface in real-world scenarios and creating more robust networked
applications step by step.
You’ll remember that in Chapter 1 we discussed two types of network
communications: those that required a connection, and those that did not. Our
simple server and simple client require a connection and use the Transmission
Control Protocol (TCP). Thus, the server and client applications in Chapter 2
use streaming sockets—that is, sockets that require a connection. There are also
datagram sockets, or sockets that don’t require a connection and use the User
Datagram Protocol (UDP). In this chapter, we’ll step through a UDP server and
a UDP client. We’ll also take a look at transferring files back and forth, which is
more involved than just sending strings. Finally, we’ll discuss error handling and
error checking as a key part of any applications you develop.
User Datagram Protocol
In Chapter 2, our client and server programs were based on streaming sockets
and used TCP. There is an alternative to using TCP, and that is UDP, or what is
otherwise known as datagram sockets. Remember from Chapter 1 that a UDP-
based network communication has some particular qualities:
• UDP makes no guarantee of packet delivery.
• UDP datagrams can be lost and arrive out of sequence.
• UDP datagrams can be copied many times and can be sent faster than the
receiving node can process them.
UDP sockets are generally used when the entire communication between the
server and client can exist within a distinct network packet. Some examples of
65
3227c03.qxd 7/8/04 9:26 PM Page 65
UDP-based communications include the Domain Name Service (DNS), Network
Time Protocol (NTP), and the Trivial File Transfer Protocol (TFTP). For example, a
simple DNS lookup request essentially consists of just two pieces of information:
the name or number in the request, and the corresponding answer from the DNS
server in the response (which might even be an error). There’s no need to incur
the overhead of opening a streaming socket and maintaining a connection for
such a simple communication. An NTP request is similar. It consists of a question
(“What time is it?”) and the server’s answer. No ongoing communications are nec-
essary. More information on when to use UDP over TCP, or vice versa, is covered
in Chapter 7.
UDP Server
Like our streaming socket example in Chapter 2, you can’t have a client without
having a server first, so let’s create a simple UDP server. To begin, we’ll set up the
#include statements for the header files that we’ll need.
#include <sys/types.h>
#include <sys/socket.h>
#include <netdb.h>
#include <string.h>
#include <stdio.h>
Next, we define a constant that is 1KB in size. We’ll use this constant to
define the sizes of any message buffers we use.
#define MAXBUF 1024
Our server starts with standard declaration for main(), followed by the initial-
ization of some variables we’ll need. We define a character buffer of size MAXBUF
to hold anything we need to send to or receive from our socket, and we set up
two sockaddr_in structures: one for the server and one for the client. These struc-
tures will hold the metadata about the endpoints in our communication.
int main(int argc, char* argv[])
{
int udpSocket;
int returnStatus = 0;
int addrlen = 0;
struct sockaddr_in udpServer, udpClient;
char buf[MAXBUF];
Chapter 3
66
3227c03.qxd 7/8/04 9:26 PM Page 66
Before we continue, we check to make sure we have the right number of
arguments. The only argument we need for our server is the number of the port
that the server should listen on for client connections. This could easily be a
constant like MAXBUF, but using a command-line argument means our server can
listen on any unused port without recompiling it. If we don’t have the right num-
ber of arguments, we exit.
/* check for the right number of arguments */
if (argc < 2)
{
fprintf(stderr, "Usage: %s <port>\n", argv[0]);
exit(1);
}
Assuming we are good to go, the first thing we should do is create our socket.
Note that this process looks nearly identical to the socket we created in the sim-
ple server shown in Listing 2-1 in the previous chapter, except that in this case,
we’re using SOCK_DGRAM instead of SOCK_STREAM. By using SOCK_DGRAM, we’re creating
a UDP socket instead of a TCP socket.
/* create a socket */
udpSocket = socket(AF_INET, SOCK_DGRAM, 0);
if (udpSocket == -1)
{
fprintf(stderr, "Could not create a socket!\n");
exit(1);
}
else {
printf("Socket created.\n");
}
Next, we populate the sockaddr_in structure reserved for our server with the
information we have. We use INADDR_ANY so that our socket will bind to any of the
local addresses that are configured, and we use the port number that was passed
as an argument. Note the call to htons() when dealing with the port. This ensures
that the integer used for the port number is stored correctly for our architecture.
/* set up the server address and port */
/* use INADDR_ANY to bind to all local addresses */
udpServer.sin_family = AF_INET;
udpServer.sin_addr.s_addr = htonl(INADDR_ANY);
/* use the port passed as argument */
udpServer.sin_port = htons(atoi(argv[1]));
Socket Programming
67
3227c03.qxd 7/8/04 9:26 PM Page 67
Next, we bind to the socket and prepare to receive connections. Our call to
bind() uses the UDP socket descriptor we created previously, as well as a pointer
to our server’s sockaddr_in structure and the size of the structure itself.
/* bind to the socket */
returnStatus = bind(udpSocket, (struct sockaddr*)&udpServer,
sizeof(udpServer));
if (returnStatus == 0) {
fprintf(stderr, "Bind completed!\n");
}
else {
fprintf(stderr, "Could not bind to address!\n");
close(udpSocket);
exit(1);
}
Now that our setup is complete, we use a while loop that will keep our server
running until it receives a signal to terminate from the operating system. The
main loop in our server will listen on its socket for communications from a client.
Remember that UDP is connectionless, so the client will not be making a request
to set up and maintain a connection. Rather, the client will simply transmit its
request or its information, and the server will wait for it. Because UDP does not
guarantee delivery, the server may or may not receive the client’s information.
You’ll notice that we use the recvfrom() function instead of the listen(),
accept(), and read() functions. recvfrom() is a blocking function, much
like accept(). The function will wait on the socket until communications are
received. Because UDP is connectionless, our server has no idea which client
will be sending information to it, and to reply, the server will need to store the
client’s information locally so that it can send a response to the client if neces-
sary. We’ll use the sockaddr_in structure reserved for our client to store that
information.
while (1)
{
addrlen = sizeof(udpClient);
returnStatus = recvfrom(udpSocket, buf, MAXBUF, 0,
(struct sockaddr*)&udpClient, &addrlen);
recvfrom() takes our size constant as one of its arguments. This means that
the maximum amount of information that can be received from a client is lim-
ited to the size of the buffer. Any extra bytes of information that are sent are
discarded. The recvfrom() function returns the total number of bytes received
from the client or –1 if there’s an error.
Chapter 3
68
3227c03.qxd 7/8/04 9:26 PM Page 68
if (returnStatus == -1) {
fprintf(stderr, "Could not receive message!\n");
}
else {
printf("Received: %s\n", buf);
/* a message was received so send a confirmation */
strcpy(buf, "OK");
returnStatus = sendto(udpSocket, buf, strlen(buf)+1, 0,
(struct sockaddr*)&udpClient,
sizeof(udpClient));
if (returnStatus == -1) {
fprintf(stderr, "Could not send confirmation!\n");
}
else {
printf("Confirmation sent.\n");
}
}
}
After receiving information from a client and displaying the message to the
console, our server resets the buffer and sends a confirmation message back.
This way, our client knows that the server got the information and made a reply.
Our response uses the complimentary function to recvfrom(), called sendto().
Much like recvfrom(), sendto() takes our socket descriptor, the message buffer,
and a pointer to the sockaddr_in structure for our client as arguments. The return
from sendto() is the number of bytes sent or –1 if there is an error.
/*cleanup */
close(udpSocket);
return 0;
}
If our server receives a termination signal from the operating system, the
while loop terminates. Before exiting, we clean up our socket descriptor. As you
can see, our UDP server is remarkably similar to our TCP server, except for a
few major differences. First, the socket type is SOCK_DGRAM instead of SOCK_STREAM.
Second, the server has to store information about the client locally to send a
response, since a connection isn’t maintained. Third, the server doesn’t acknowl-
edge receipt of the client’s request unless we provide the code to do it.
Socket Programming
69
3227c03.qxd 7/8/04 9:26 PM Page 69
To run our UDP server, compile it and then run it using a port number as
the only argument. You should see output similar to this:
[user@host projects]$ cc -o simpleUDPServer simpleUDPServer.c
[user@host projects]$ ./simpleUDPServer 8888
Socket created.
Bind completed!
At this point, the server is waiting to receive communications from any
clients that choose to send them.
UDP Client
Now that we have our UDP server, let’s cover a simple UDP client. Like our server,
we’ll start out with the relevant #include directives and a corresponding constant
declaration setting up the maximum size for any message buffers. This constant
should obviously be the same for both the server and the client; otherwise, it’s
possible to lose data.
#include <sys/types.h>
#include <sys/socket.h>
#include <netdb.h>
#include <string.h>
#include <stdio.h>
#define MAXBUF 1024
We use the standard declaration for main and initialize the variables we
need, just like we did for our server. We also check to make sure we have the
right number of arguments. In this case, we need two: the IP address of the
server and the port number that the server is using.
int main(int argc, char* argv[])
{
int udpSocket;
int returnStatus;
int addrlen;
struct sockaddr_in udpClient, udpServer;
char buf[MAXBUF];
Chapter 3
70
3227c03.qxd 7/8/04 9:26 PM Page 70
if (argc < 3)
{
fprintf(stderr, "Usage: %s <ip address> <port>\n", argv[0]);
exit(1);
}
We create our datagram socket and set up our client’s sockaddr_in structure
with the information we have. In this case, we don’t need to declare a specific
port number for our client. The operating system will assign one randomly that
our client can use to send its request. Since the UDP packet the server receives
contains a header field with the source IP address as well as the source port, the
server will have plenty of information to use when sending its response. Once
our information is ready, we bind to the socket and prepare to transmit.
/* create a socket */
udpSocket = socket(AF_INET, SOCK_DGRAM, 0);
if (udpSocket == -1)
{
fprintf(stderr, "Could not create a socket!\n");
exit(1);
}
else {
printf("Socket created.\n");
}
/* client address */
/* use INADDR_ANY to use all local addresses */
udpClient.sin_family = AF_INET;
udpClient.sin_addr.s_addr = INADDR_ANY;
udpClient.sin_port = 0;
returnStatus = bind(udpSocket, (struct sockaddr*)&udpClient,
sizeof(udpClient));
if (returnStatus == 0) {
fprintf(stderr, "Bind completed!\n");
}
else {
fprintf(stderr, "Could not bind to address!\n");
close(udpSocket);
exit(1);
}
Socket Programming
71
3227c03.qxd 7/8/04 9:26 PM Page 71
Before we transmit, we need to set up our message, which in this case is a
simple string. We also need to populate the sockaddr_in structure that we’ll use to
represent the server we want to contact.
/* set up the message to be sent to the server */
strcpy(buf, "For Professionals, By Professionals.\n");
/* server address */
/* use the command-line arguments */
udpServer.sin_family = AF_INET;
udpServer.sin_addr.s_addr = inet_addr(argv[1]);
udpServer.sin_port = htons(atoi(argv[2]));
Everything is set up, so we use the sendto() function to send our request to
the server.
returnStatus = sendto(udpSocket, buf, strlen(buf)+1, 0,
(struct sockaddr*)&udpServer, sizeof(udpServer));
if (returnStatus == -1) {
fprintf(stderr, "Could not send message!\n");
}
else {
printf("Message sent.\n");
If the value we get back from our call to sendto() tells us our request was
sent, our client gets ready to receive the server’s response using the recvfrom()
function.
/* message sent: look for confirmation */
addrlen = sizeof(udpServer);
returnStatus = recvfrom(udpSocket, buf, MAXBUF, 0,
(struct sockaddr*)&udpServer, &addrlen);
if (returnStatus == -1) {
fprintf(stderr, "Did not receive confirmation!\n");
}
else {
buf[returnStatus] = 0;
printf("Received: %s\n", buf);
}
}
Chapter 3
72
3227c03.qxd 7/8/04 9:26 PM Page 72
Assuming we got some information from recvfrom(), we display it to the
screen, clean up, and then exit.
/* cleanup */
close(udpSocket);
return 0;
}
The key difference between a UDP communication and a TCP communi-
cation is that neither the server nor the client has any guarantee that they will
receive anything at all. In our example, we had the server send back a confirma-
tion message, but in the real world, a UDP server wouldn’t do anything but send
back the result of the client’s request. For example, in the case of a network time-
server, a client would request the current time, and the server’s reply would be
the current time, provided no errors occurred. If the client didn’t receive a reply
within a certain time frame, it would typically issue the request again. No confir-
mation messages or other status messages would be sent, and the server would
take no action if the client didn’t receive the response. In a TCP communication,
the TCP layer on the server would resend the response until the client acknowl-
edged receipt. This is different from a UDP communication, where the client and
server applications are wholly responsible for any necessary acknowledgments
or retries.
File Transfer
So far, our socket examples have demonstrated the programming concepts
involved, but haven’t done anything but pass a few strings back and forth. That’s
fine for example purposes, but what about other kinds of data, such as binary
data? As you’ll see in this section, sending binary information is a little different
than sending simple strings.
Now that you’ve seen both a TCP connection and a UDP connection in
action, let’s take a look at what it takes to transfer a file. For this example, we’ll
use TCP (or streaming) sockets. Our server will bind to a particular port and lis-
ten for connections. When a connection is created, the client will send the name
of a file to the server, and then the server will read the name of the file, retrieve
the file from disk, and send that file back to the client.
One key difference in this example from our earlier TCP server is the use of
two sockets instead of one. Why two sockets? With two sockets, our server can
handle the request from a client while still accepting more connections from
other clients. The connections will be put into a queue on a first-come, first-
served basis. If we didn’t use two sockets and were busy handling a request, then
a second client would be unable to connect and would get a “connection refused”
Socket Programming
73
3227c03.qxd 7/8/04 9:26 PM Page 73
error message. By using two sockets, we can let our server handle its response
while lining up other connections to be handled as soon as it’s done, without
returning an error. Note that this is different than servers that can handle more
than one connection at a time.
The Server
Our file transfer server starts out with the familiar #include directives, with one
new one. Because we’re going to be working with files, we need to include fcntl.h,
which contains some constants and other definitions we may need.
#include <fcntl.h>
#include <sys/types.h>
#include <sys/socket.h>
#include <netdb.h>
#include <stdio.h>
In this example, we’re going to hard-code the port number using a constant
called SERVERPORT. We’ll do the same on the client. This could easily be changed
to use an argument from the command line. We’ll also use the same constant
called MAXBUF to define the maximum size of our transfer buffers. When we ini-
tialize our variables, we’ll add a second socket descriptor, giving us two to work
with: socket1 and socket2. We’ll also define two sockaddr_in structures: one for
the server and one for the client.
#define SERVERPORT 8888
#define MAXBUF 1024
int main()
{
int socket1,socket2;
int addrlen;
struct sockaddr_in xferServer, xferClient;
int returnStatus;
First, we create our socket using SOCK_STREAM. We’ll use the first socket
descriptor, socket1, for this. If for some reason we can’t create our socket, we’ll
print an error message and exit.
Chapter 3
74
3227c03.qxd 7/8/04 9:26 PM Page 74

/* create a socket */
socket1 = socket(AF_INET, SOCK_STREAM, 0);
if (socket1 == -1)
{
fprintf(stderr, "Could not create socket!\n");
exit(1);
}
Next, we set up our sockaddr structures, using INADDR_ANY to bind to all of the
local IP addresses and setting the port number to our SERVERPORT constant. After
we’re set up, we make a call to bind() to bind our first socket descriptor to the IP
address and port.
/* bind to a socket, use INADDR_ANY for all local addresses */
xferServer.sin_family = AF_INET;
xferServer.sin_addr.s_addr = INADDR_ANY;
xferServer.sin_port = htons(SERVERPORT);
returnStatus = bind(socket1,
(struct sockaddr*)&xferServer,
sizeof(xferServer));
if (returnStatus == -1)
{
fprintf(stderr, "Could not bind to socket!\n");
exit(1);
}
If our call to bind() is successful, our next step is to tell our program to listen
for requests on the socket using the listen() function. For arguments, we’ll pass
our socket descriptor and the number 5. The second argument defines the back-
log of pending connections that are allowed. In our case, we are telling our socket
that we will allow five connections to be waiting in the queue.
NOTE The behavior of the backlog argument changed with
version 2.2 of the Linux kernel. Previously, the backlog argument
represented the maximum number of connection requests allowed
in the queue.With 2.2 and later, the behavior changed to represent
the maximum number of completed, established sockets allowed
in the queue, not just simple requests.
Socket Programming
75
3227c03.qxd 7/8/04 9:26 PM Page 75
returnStatus = listen(socket1, 5);
if (returnStatus == -1)
{
fprintf(stderr, "Could not listen on socket!\n");
exit(1);
}
At this point, our server is listening on the socket for connections. Our next
step is to build the logic to handle requests. In this control loop, we’ll initialize
some new variables that we’ll use to keep track of our file reads and writes, as
well as a standard file descriptor and a buffer to hold the filename that we’ll be
retrieving for clients. The key part of the loop is the call to accept(). Notice that
we call accept() and pass it our first socket. The value returned by accept(),
though, is the descriptor to yet another socket, socket2. This lets our server
queue up other connections on the first socket while it waits to complete the
one it is handling, up to the maximum limit of the backlog argument (in this
case, five).
for(;;)
{
int fd;
int i, readCounter, writeCounter;
char* bufptr;
char buf[MAXBUF];
char filename[MAXBUF];
/* wait for an incoming connection */
addrlen = sizeof(xferClient);
/* use accept() to handle incoming connection requests */
/* and free up the original socket for other requests */
socket2 = accept(socket1, (struct sockaddr*)&xferClient, &addrlen);
if (socket2 == -1)
{
fprintf(stderr, "Could not accept connection!\n");
exit(1);
}
accept() is a function that will block on a socket if there is no current con-
nection. This is handy for servers, because otherwise the server stops as soon as
Chapter 3
76
3227c03.qxd 7/8/04 9:26 PM Page 76
it started, since there wouldn’t be any connections on the socket. By blocking,
the server waits for connections to come in on the socket.
If we have a connection, the first thing our client will do is send the name of
the file it wants the server to retrieve. So, our first order of business is to read the
filename sent by the client from the socket and store it in the buffer we set aside
for it.
/* get the filename from the client over the socket */
i = 0;
if ((readCounter = read(socket2, filename + i, MAXBUF)) > 0)
{
i += readCounter;
}
if (readCounter == -1)
{
fprintf(stderr, "Could not read filename from socket!\n");
close(socket2);
continue;
}
We set readCounter to the number of bytes read from the socket. This is the
length of the filename. We initially set up the filename variable to be quite large,
because there’s no way for us to know ahead of time which file the client will
request. We want to make sure the filename we receive is only as large as it needs
to be, so we will null-terminate the filename, making the buffer holding the name
the right size so that we can use it later. If we don’t get a filename, we’ll close the
socket and continue listening for other connections. If we do get a filename, we’ll
print a status message to the console so that we can see which files the clients are
requesting. Then we’ll open the file for reading, making sure to set the O_RDONLY
flag to prevent any mishaps, such as overwriting a file or creating an empty file by
mistake. The return from the open() call is a file descriptor.
filename[i+1] = '\0';
printf("Reading file %s\n", filename);
/* open the file for reading */
fd = open(filename, O_RDONLY);
if (fd == -1)
{
fprintf(stderr, "Could not open file for reading!\n");
Socket Programming
77
3227c03.qxd 7/8/04 9:26 PM Page 77
close(socket2);
continue;
}
/* reset the read counter */
readCounter = 0;
By now we’ve hopefully gotten a handle to the file that our client wants. If we
can’t find or read the file for some reason, our server will close the socket and go
back to waiting for another connection. Next, we reset the readCounter, because
we’re going to use it to count how many bytes we read from the disk while retriev-
ing the file. We’ll send the file to the client in chunks, using our MAXBUF constant as
the size of each chunk. Because our files can be of varying sizes, we’ll use nested
loops to keep track of where we are in the transfer. As long as the number of bytes
sent is smaller than the total file size, we’ll know to keep sending.
/* read the file, and send it to the client in chunks of size MAXBUF */
while((readCounter = read(fd, buf, MAXBUF)) > 0)
{
writeCounter = 0;
bufptr = buf;
while (writeCounter < readCounter)
{
readCounter -= writeCounter;
bufptr += writeCounter;
writeCounter = write(socket2, bufptr, readCounter);
if (writeCounter == -1)
{
fprintf(stderr, "Could not write file to client!\n");
close(socket2);
continue;
}
}
}
As before, if we run into any problems writing to the client, we close the
socket and continue listening for other connections. Once our file has been sent,
we’ll clean up the file descriptor and close the second socket. Our server will
loop back and check for more connections on socket1 until it receives a termi-
nation signal from the operating system.
Chapter 3
78
3227c03.qxd 7/8/04 9:26 PM Page 78
close(fd);
close(socket2);
}
close (socket1);
return 0;
}
Once the termination signal is received, we’ll clean up by closing the original
socket (socket1), and exiting.
The Client
Our file transfer client is slightly less complicated than our server. We begin with
the standard #include directives and the same constant declarations that we
used in the server, namely MAXBUF and SERVERPORT.
#include <sys/types.h>
#include <sys/socket.h>
#include <netinet/in.h>
#include <arpa/inet.h>
#include <string.h>
#include <stdio.h>
#include <sys/stat.h>
#include <fcntl.h>
#define SERVERPORT 8888
#define MAXBUF 1024
Next we do the standard setup and initialization, including the creation of a
streaming socket and the population of a sockaddr_in structure for our server.
int main(int argc, char* argv[])
{
int sockd;
int counter;
int fd;
struct sockaddr_in xferServer;
char buf[MAXBUF];
int returnStatus;
Socket Programming
79
3227c03.qxd 7/8/04 9:26 PM Page 79
if (argc < 3)
{
fprintf(stderr, "Usage: %s <ip address> <filename> [dest filename]\n",
argv[0]);
exit(1);
}
/* create a socket */
sockd = socket(AF_INET, SOCK_STREAM, 0);
if (sockd == -1)
{
fprintf(stderr, "Could not create socket!\n");
exit(1);
}
/* set up the server information */
xferServer.sin_family = AF_INET;
xferServer.sin_addr.s_addr = inet_addr(argv[1]);
xferServer.sin_port = htons(SERVERPORT);
/* connect to the server */
returnStatus = connect(sockd,
(struct sockaddr*)&xferServer,
sizeof(xferServer));
if (returnStatus == -1)
{
fprintf(stderr, "Could not connect to server!\n");
exit(1);
}
Once we have a successful connection to our server, our first task is to send
the name of the file we want the server to retrieve for us. This was passed to our
client as a command-line argument.
/* send the name of the file we want to the server */
returnStatus = write(sockd, argv[2], strlen(argv[2])+1);
if (returnStatus == -1)
{
fprintf(stderr, "Could not send filename to server!\n");
exit(1);
}
Chapter 3
80
3227c03.qxd 7/8/04 9:26 PM Page 80
Once our filename is sent to the server, we don’t need to send anything else,
so we call the shutdown() function to set our socket to read-only.
/* call shutdown to set our socket to read-only */
shutdown(sockd, SHUT_WR);
Next, we set up our destination file. If a destination filename was an argu-
ment on our command line, we use that and open it for writing. If no destination
filename was given, we use stdout, denoted by a file descriptor of 1.
/* open up a handle to our destination file to receive the contents */
/* from the server */
fd = open(argv[3], O_WRONLY | O_CREAT | O_APPEND);
if (fd == -1)
{
fprintf(stderr, "Could not open destination file, using stdout.\n");
fd = 1;
}
As long as the server is sending us chunks of the file, read them from the
socket and write them out to the system. In this example, we are writing the
chunks to standard out (stdout). This could be changed easily to use the file-
name we sent to the server.
/* read the file from the socket as long as there is data */
while ((counter = read(sockd, buf, MAXBUF)) > 0)
{
/* send the contents to stdout */
write(fd, buf, counter);
}
if (counter == -1)
{
fprintf(stderr, "Could not read file from socket!\n");
exit(1);
}
close(sockd);
return 0;
}
Socket Programming
81
3227c03.qxd 7/8/04 9:26 PM Page 81
Once all of the chunks have been read from the server, clean up by closing
the socket, and exit.
Example File Transfer Session
Let’s run our file transfer client and server, and look at what the output would be.
First, let’s start the server.
[user@host projects]$ cc –o xferServer xferServer.c
[user@host projects]$ ./xferServer
At this point, the server is listening on all local IP addresses, on port 8888,
which is the value of SERVERPORT. Feel free to change this to anything you like.
Next, we compile and launch the client.
[user@host projects]$ cc –o xferClient xferClient.c
[user@host projects]$ ./xferClient 127.0.0.1 filename > new-filename
The client takes two arguments: the IP address of the server that will be
sending the file and the filename to retrieve. Remember that our client uses
standard out (stdout) to write the file it receives from the server. Because we’re
using stdout, we need to redirect stdout to a new location using our login shell’s
redirection operator, the “>” character. If we don’t redirect stdout to a new loca-
tion, one of two things will happen:
• The file contents that are retrieved will be displayed on the screen.
• The file we retrieve will actually overwrite the file we asked the server to
read if we’re operating in the same directory and our client and server are
running on the same machine.
In our previous example, both programs are running on the same machine
and in the same directory. We don’t want our client’s write process to compete
with the server’s read process, so we use the redirection operator to send the
contents of the retrieved file to another filename altogether. Because our file
might be a binary file, such as an image or executable instead of ASCII text, we
also don’t want the contents sent to the screen. Sending the contents of the file
to the screen is fine if it’s text, but not if it’s a binary file.
Chapter 3
82
3227c03.qxd 7/8/04 9:26 PM Page 82
Error Handling
In all of our examples so far, we’ve been fairly diligent about checking the results
of our function calls. In general, systems return negative numbers when some-
thing goes wrong and positive numbers when something is all right. However, it
is possible, especially in the case of sockets, for a function call to return an error
that isn’t a negative number. These error codes are defined in the errno.h file
on your system. On most Linux systems, for example, this file can be found at
/usr/include/asm/errno.h.
It’s a good idea to check the return value after every single system call.
You’ll save yourself time and effort by checking the values and printing or log-
ging a relevant message to a file or to the console screen. There are a number of
built-in support features that you can use to do this. For example, in the code
you’ve seen so far, we’ve been using the fprintf() function to print our mes-
sages to the standard error device, known as stderr. This device can be easily
redirected using your shell’s redirection operators so that the messages received
by stderr go where you want them to go, such as to a log file or even to mail or
an alphanumeric pager.
Another function that can be used for error logging is the perror() function.
This function behaves more simply than the fprintf() function, because perror()
always uses stderr for its output and doesn’t let you do any formatting of the
error message. With fprintf() and using stderr as the file descriptor, you can
easily include formatted information, such as the values of any relevant vari-
ables that may have caused the problem. These values can be any of the data
types supported by fprintf().
Not only will you save time and effort by checking your error codes, but
you’ll also give your applications a solid foundation for security. It’s well known
that some of the primary exploits used by crackers are basic things like buffer
overflows and unexpected payloads. If you take care in your programs to check
the sizes of buffers and verify the content of variables, and take extra checks to
ensure that the data you send or receive is the data you expect to send or receive,
your applications will be less susceptible to those types of attacks. If you’re
expecting a date, then check to make sure the date is valid before doing anything
with it. If you’re setting up a 5KB buffer to store something, make sure your
applications don’t try to store 6KB of information there, or even 5KB + 1 byte.
One important thing to remember is that not all errors are failure errors,
especially in the case of socket programming. Just because your function call
returned an error doesn’t mean your program can’t continue, whether it’s a server
or a client. Remember that when making network connections over distributed
networks, just about anything can happen. Because just about anything can hap-
pen, it’s normal for some errors to occur, and your programs should determine
which errors can be handled without stopping and which are serious failures.
Socket Programming
83
3227c03.qxd 7/8/04 9:26 PM Page 83
For example, if you develop a server application, and the server can’t do required
operations like creating, binding to, or listening on a socket, then there’s no rea-
son to continue. If, however, the error returned is something expected such as a
transmission error, your program should continue operations. In some cases, like
UDP, your program might not even know a transmission error occurred, whereas
with TCP, your program will know.
Probably the most important thing to know about error handling is that there
is no “right way.” The right way is the way that works for you and your application,
since only you can set the design parameters. However, even though there is no
“right way,” it doesn’t mean that you can ignore error handling. Ignoring errors
will leave your applications unstable and insecure, not to mention difficult to
maintain.
Summary
In this chapter, we covered building a couple of different types of socket appli-
cations. We built both a UDP server and a UDP client, and demonstrated the
difference between using datagram sockets and streaming sockets. Then, using
streaming sockets, we built a server and client capable of transferring any file
that the server could access. This demonstrated how to send binary data instead
of simple strings and stepped through a sample session. Finally, we discussed
error checking and error handling, and explained that good error checking will
not only save you time and effort when developing your applications, but also
help make your applications more stable and more secure.
Chapter 3
84
3227c03.qxd 7/8/04 9:26 PM Page 84
CHAPTER 4
Protocols, Sessions,
and State
INCHAPTER 1, WE PRESENTED an introduction to the concept of protocols—in
particular, protocol layering. Protocol layering lets us develop complementary
protocols and use them together to handle a complex task, instead of trying to
develop a single protocol that does everything everywhere. In this chapter, we’ll
discuss different protocol architectures and methods, and step through real-
world examples to explain them.
As we noted previously, TCP is a connection-oriented protocol. A
complementary protocol to TCP is UDP, which is connectionless. To recap, a
connection-oriented protocol is like a phone call. A connection is made to
another node on the network, and the connection is maintained for the dura-
tion of the conversation between the nodes, until one or the other disconnects
or a network or system error occurs that prevents the conversation from con-
tinuing. A connectionless protocol, instead of being like a phone call, is like
shouting down the street to your neighbor. Your neighbor might hear you, and
might respond, but there are no guarantees. Even if your neighbor does hear
you, she may hear only portions of your communication—the rest may be gar-
bled because of poor conditions, noisy traffic, or other reasons.
State vs. Stateless
There is another aspect of protocol communications beyond whether the com-
munication supports connections or not: the concept of state. Servers that
maintain state are known as stateful servers, and those that do not are known as
stateless servers. If a server maintains state, it means that the server maintains
information about all of the current connections with its clients and the com-
munications sent between them. A server typically needs to maintain state when
the chosen transport protocol is one that does not guarantee delivery, like UDP.
If the transport protocol does not guarantee delivery, it is up to the application
protocol to do so by keeping track of each client’s status and current operations.
Otherwise, the server application has no method to determine if the client
intends to communicate further, is done communicating, is waiting for a
response, or has experienced an error.
85
3227c04.qxd 7/8/04 9:26 PM Page 85
Developing a server that maintains state has advantages. By keeping
information about a client connection on the server, the size of the messages
between server and client can be reduced, allowing the server to respond quickly
to requests. The primary disadvantage of maintaining state on the server is the
risk that the information will become out of sync or incorrect should communi-
cations from the client be lost or corrupted. Essentially, it comes down to how
much control is given to each end of the communication. A centralized, server-
heavy model would be a stateful server, while a decentralized, distributed model
would be a stateless server, requiring clients to keep track of their own informa-
tion, sending it back to the server each time a request was made.
As an example, consider a stateful file server. The client requests a file. The
server begins to deliver the file to the client. However, the file is quite large. Since
the server cannot deliver the file to the client in one transmission due to things
like protocol frame sizes, buffer sizes, and other network restrictions, the file
must be delivered in portions, or chunks, one after the other. The server must
maintain information about which portions of the file have been sent to the
client as well as which portions of the file have been received, to determine
whether the connection to the client can be closed. Because the file resides on
the server, the client does not know the actual size of the file—only the server
can know that, and thus only the server can maintain the state of the file
transfer.
In a stateless file server environment, it would be up to the client to manage
the file transfer. The client application would be responsible for controlling
which portions of the file were sent by the server by specifying the next location
for reading from the disk. The client would also need to specify the filename
with every request, as well as authenticate with every request, since the server
would not be keeping track from request to request.
Some of the most widely used Internet protocols are stateless protocols. The
Hypertext Transfer Protocol (HTTP) is probably the most obvious example of a
stateless protocol. Web servers do not maintain state by default. Each request
from a client over HTTP is considered an atomic request, meaning the request
has to stand by itself and does not have any relation to any previous or future
requests. As far as the web server is concerned, the client making the request has
never made a request before and never will again.
Other Internet protocols are stateful protocols. The popular Post Office
Protocol (POP3) used to retrieve e-mail is an example of a stateful protocol, as
are File Transfer Protocol (FTP) and Simple Mail Transfer Protocol (SMTP). In
these cases, the respective servers are responsible for maintaining the state of
each client connection within the application’s resource space. This is necessary
for various reasons. In the case of POP3, a connection has different states, such as
authentication and transaction status. Each state has a set of server instructions
Chapter 4
86
3227c04.qxd 7/8/04 9:26 PM Page 86

that are allowed, so if the server didn’t keep track of each client’s status, there
would be no way to determine if a certain operation was valid or invalid.
Table 4-1 shows some of the more popular Internet protocols and their
particular properties.
Table 4-1. Internet Protocols and Their Properties
PROTOCOL CONNECTION CONNECTIONLESS STATEFUL STATELESS
HTTP Yes No No Yes
FTP Yes No Yes No
POP3 Yes No Yes No
IMAP Yes No Yes No
SMTP Yes No Yes No
Telnet Yes No Yes No
DNS No Yes No Yes
NTP No Yes No Yes
Keep in mind that these protocols are application protocols. That is, they are
independent of network protocol. In nearly all cases where the protocol requires
a connection, they use TCP over IP as the network protocol. Connectionless pro-
tocols like DNS or NTP typically use UDP.
SMTP and HTTP are probably the most popular protocols in use today. As
you can see from Table 4-1, both require a connection, yet one is stateless and
one is not. To illustrate the differences, we’ll take a walk through both a stateless
protocol and a stateful protocol later in the chapter. Before we do, though, we’ll
discuss different ways of maintaining state should it be needed.
Methods for Maintaining State
There are various methods for maintaining state within a server application.
These methods usually involve keeping a data structure on the server for each
connection and updating that structure as the client’s connection changes state.
For example, on initial connection the data structure is allocated and initialized,
but it might have the authentication state set to false. Once the client authenti-
cates itself, that particular property would be set to true. Depending on the
protocol used, the mechanism used to keep the data structure updated varies.
Protocols, Sessions, and State
87
3227c04.qxd 7/8/04 9:26 PM Page 87
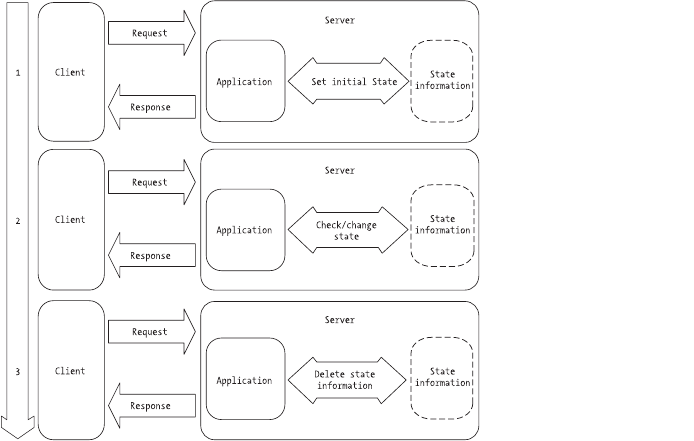
Storing State on the Server
Stateful servers use the concept of sessions to store state. How the state is stored
is dependent on the server. The important thing to remember is that when a
client makes its first connection to the server, the server sets up a session for that
particular client. Within the session context, the server can do any number of
things, mainly storing values that may be needed across client requests. These
values can take the form of information visible to the client (the user), such as
the items in a shopping cart, as well as internal control information used by the
server, such as a list of user preferences and application defaults. The informa-
tion held in the client’s session, such as the current state of the connection, is
typically kept in memory for fast access, but there are servers out there that can
store session data in files or in some other mechanism such as a database. Thus,
one client connection equals one session, and no client request should be able
to access the session of another.
When a stateful server starts a session for a client, the session is said to be
in an initial state. It is up to the client to request a change to that state to issue
commands and instructions to the server, and it is up to the server to determine
if the client’s commands and instructions are valid within the current state. If the
commands are not valid within that particular state, the server sends an error
message or code in reply. Examples of such commands might be instructions to
get ready to accept data from the client, send data to the client, or even to pro-
vide a listing of commands that can be used in the current state. Figure 4-1
shows the flow of a stateful server session.
Figure 4-1. Stateful connection flow diagram
Chapter 4
88
3227c04.qxd 7/8/04 9:26 PM Page 88
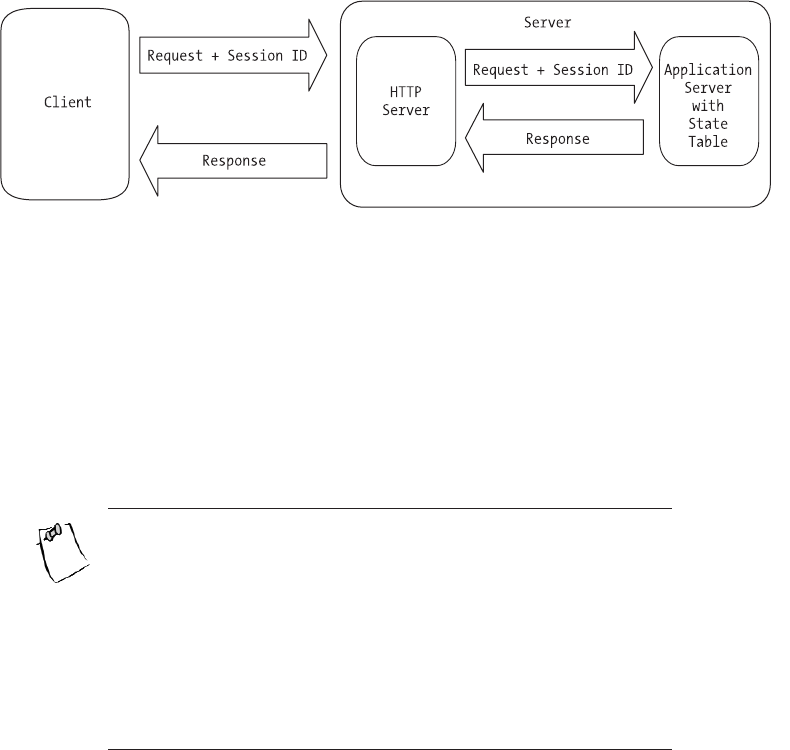
What happens to sessions, though, if the protocol and server used are state-
less? Can a stateless server maintain a session? The answer is yes, but it requires
an additional application layer. For example, HTTP has no concept of state, yet
it’s still possible to maintain sessions when communicating with a web server.
In the case of HTTP, developers typically use an additional application server
layer such as PHP, Active Server Pages (ASP), JavaServer Pages (JSP), Common
Gateway Interface (CGI), or some other mechanism to track sessions. In this
scenario, HTTP is stateless, but the application processing the request isn’t the
web server—it’s some other application called by the web server. The web
server merely passes the request to the application server where the request is
processed and state is maintained in a session. After the response is assembled,
it’s sent back to the web server, which in turn sends the response on to the client.
Figure 4-2 shows how an additional application layer can be used with a state-
less server to maintain session state.
Figure 4-2. Using an additional layer to maintain state
Describing in detail how to use an additional application layer to store state
during a session is beyond the scope of this chapter. Each of the technologies in
use has extensive documentation available for the interested developer. For now,
let’s take a look at the fundamental requirement for maintaining state this way:
the session ID. The session ID is the key to maintaining state when communicat-
ing with a stateless server if the requests are actually handled by an application
other than the server itself.
NOTE Because a session ID is a key to more information on a
server, it can be valuable. In a HTTP request, the session ID as well
as the URL are transmitted in the clear. This makes it possible to
hijack the user’s session by monitoring the network and making
requests using the stolen session ID. To help protect a session, use
an encrypted protocol like HTTPS and store additional informa-
tion as a session value on the server, such as the client’s IP address.
This extra information can be used to verify that each subsequent
request is coming from the expected location.
Protocols, Sessions, and State
89
3227c04.qxd 7/8/04 9:26 PM Page 89
When each session is started, it is assigned a unique ID. This unique ID is
sent with every request and serves as a key or pointer to the resource space allo-
cated to that particular client where state is maintained. Depending on the
application server’s configuration, the session ID can be sent as a cookie or as a
URL parameter. Both cookies and URL parameters are discussed in the next sec-
tion. It’s important to note that even though it is the client that sends the session
ID to the server, the actual application state is maintained on the server, which
also assigns the session ID.
Storing State on the Client
Of course, it is possible to maintain state using the client side of the transaction.
This removes the burden of maintaining the session from the server, but it adds
the burden to each request made by the client. In our stateless file server exam-
ple, it would be up to the client to send additional parameters with each request
(like a filename), how much of the file has already been sent, and which portions
of the file to send next. The most prevalent example of maintaining state on a
client is found in the HTTP protocol.
Figure 4-2 shows how developers can use additional server resources to
maintain state when working with a stateless server. Developers can also main-
tain state on the client in a number of different ways, depending on the protocol.
Let’s consider HTTP. The client for a HTTP transaction is typically a web browser,
in various forms. Some web browsers are automated, such as search engine
robots, while others are text-only like lynx or wget, or graphical like Netscape
or Mozilla. Depending on the client, methods of maintaining state include the
following:
•Using a cookie to store the value of a variable on the client. Originally
called “magic cookies,” cookies reside on the client and are sent to the
server with each request.
•Using hidden form variables to hold values and information. An addi-
tional application layer like PHP, CGI, or JSP can process these hidden
form variables for information.
•Using URL parameters to store variable information. Like form variables,
the information contained in a URL can be parsed and used by a server.
Which method is used is up to the developer, depending on the circumstances
and the requirements of the application.
Chapter 4
90
3227c04.qxd 7/8/04 9:26 PM Page 90
Cookies
Cookies are actually bits of information stored on a client, stored as a simple text
file. In our HTTP example, then, a cookie would be stored and managed by the
web browser. Each cookie is given a name, an expiration time limit, a domain,
and a value. The rules of cookie handling dictate that only the cookies within a
particular domain space are sent to a server. Thus, for the server whose name is
www.apress.com, the only cookies sent by the browser are those within that
domain. The server receives both the cookie’s name and its value.
Cookies have some advantages. They use a minimum of resources, they’re
easy to manage, and they provide a clean interface for maintaining state. The
main disadvantage to cookies is security. Since cookies are text files, they’re visi-
ble to anyone with access to the computer and the right access permissions. All
cookies and their values are visible regardless of the domain assigned to them—
they can’t be hidden, although one domain can’t access the cookies of another.
If you were to keep sensitive data in a cookie, that information could be compro-
mised easily.
The default expiration value for a cookie is the current session. Thus, if the
expiration date is not set, the cookie expires when the session ends. If the expira-
tion date is set to the past, the cookie is deleted. If the expiration date is set to the
future, the cookie is written from memory to disk when the session ends or the
browser shuts down.
Form Variables
HTML forms have a type parameter that can be set to “hidden.” A hidden form
field looks like this:
<FORM NAME="MyForm" METHOD="POST">
<INPUT TYPE="hidden" name="Field1" value="ABC123">
</FORM>
In this code snippet, the form variable Field1 is hidden. A developer can
maintain state by setting the values of these hidden variables to whatever is
expected by the server. Advantages to hidden form fields are that they do not
require additional resources on the client like cookies do, and they are easy to
set and work with. Like cookies, however, hidden form fields are not secure,
and they are hidden only by default. By viewing the source of the HTML page,
the values of the hidden form fields can be seen easily. Another disadvantage to
form fields is the management overhead required. Every time the HTML page is
sent to the browser, the developer must make sure all of the form fields required
Protocols, Sessions, and State
91
3227c04.qxd 7/8/04 9:26 PM Page 91
by the server on later requests are included into the form. Otherwise, the server
will be unable to handle the requests properly.
URL Parameters
The third way to maintain state on the HTTP client is through the use of URL
parameters. The HTTP standard allows you to append variable information
called a query string to any HTTP URL. The information in the query string can
be parsed and used to give your application server the information it needs to
handle your request. Query string parameters, like cookies and form variables,
use a name/value pattern to carry information. For example, to send the con-
tents of two variables to our server, the URL might look like this:
http://host.domain.com/script.cgi?variable1=value1&variable2=value2
Each variable is separated by an ampersand (&) character, with the entire
query string delimited by the question mark (?) character. On receipt, the
server parses the query string and assigns the given values to the variables,
using the information and then forming a response that is sent back to the
client. Note that to maintain state across requests, the response generated by
the server has to include links that are generated with the right state informa-
tion. Otherwise, the state information would exist for only one request. For
example, consider a scenario where a session ID is sent back and forth as a
URL parameter. Since on the initial request the client has no idea what its ses-
sion ID might be, and since the session still has to be initialized, it would be up
to the server to rewrite any URLs contained within the response’s HTML to
append the session ID to any URLs.
So far, we’ve looked at some of the ways that state can be stored on a client,
specifically a HTTP client or web browser. However, it’s important to point out
the difference between maintaining state using HTTP and maintaining state
with an additional application layer. In our previous example, HTTP merely
facilitates the transfer of state information, such as cookies or URL parameters.
None of the state information is processed by the actual web server, but by an
additional layer of software used by the web server. For example, in the URL
parameter code snippet, the program handling the state information would be
script.cgi, known as a CGI script. This script could be written in any number of
languages, such as Perl, Python, or C. The HTTP server would call the CGI pro-
gram and pass it the request string. After processing, the results would be sent
back to the HTTP server and from there back to the HTTP client. Thus, as far as
the web server is concerned, all of the requests are the same and there is no rela-
tionship between any of them.
Chapter 4
92
3227c04.qxd 7/8/04 9:26 PM Page 92
Stateless Server Walk-through
In Chapter 1, we discussed the Domain Name System (DNS) as a way for net-
work nodes to find the addresses of other network nodes. We stepped through
an example request for the IP address of www.apress.com, and we also looked at
how to query the domain name system for other information, such as the host
responsible for handling mail for the linux.org domain. Before we step through
an example stateful server session, let’s expand our DNS example in Chapter 1
and take a look at what happens on the server when it receives a request.
Remember that whether an application maintains state or not does not
determine whether it uses UDP or TCP. DNS is stateless, yet it can use either
UDP or TCP, depending on the implementation. For reference, the DNS protocol
is explained in several RFCs, mainly 1034 and 1035.
In a typical DNS request and response cycle, the information transferred
between server and client is bundled into a single package called a message. That
is, the client sends a query to the server, and then the server looks up the infor-
mation, modifies the original message, and sends the message back to the client.
A DNS message is composed of five pieces of information: a header, a question,
an answer, a pointer to another server, and a section for additional information.
Depending on the circumstances, some of these sections in the message will be
empty.
The header section is always present. It contains fields that in turn specify
which of the remaining message sections have information, and it also specifies
whether the message is a query or a response. When a client makes a request,
the only message section with information is the question, or query, section. The
query section has three portions: the query type, the query class, and the query
domain. For example, when we did a lookup on the mail exchanger for linux.org
in Chapter 1, the query type was MX for “mail exchanger.” The query class was IN
for Internet, and the query domain was linux.org. The other message sections
were empty.
On reply, the server sent us a message that had the requested information.
In this case, the other message sections were filled in. Every section but the
query section has the same format, which is a variable number of DNS resource
records that match the original query. The number of resource records in each
section is specified in the message header. It’s important to remember that with
DNS, a request can be successful even if a specific answer isn’t received, since
one of the message sections can contain a pointer to another domain name
server.
Let’s step through the communication. A DNS client assembles the message
using query information, such as the requested type, the class, and the domain.
In our Chapter 1 example, it was a type of MX and a class of IN, within the domain
linux.org. These three pieces of information go in the query section, and the
message is sent off to the domain name server. On receipt, the server checks to
Protocols, Sessions, and State
93
3227c04.qxd 7/8/04 9:26 PM Page 93
see if it can resolve the query for the client. If it can, it fills in the answer section,
and if possible, the additional information section of the message, and sends the
reply. If the server can’t fulfill the request, it keeps the answer section empty and
instead fills the pointer section with information on which domain servers can
actually fill the request. Then the reply is sent to the client.
When the client receives the response message, it checks to see if there was
an actual answer. If so, it uses the information in the answer section to continue
operations however it was programmed. If not, it uses the information in the
pointer section to make a second request using the same query type, class, and
domain, this time from the server pointed to by the pointer section. This allows
DNS to be extremely flexible, since any server can handle any request. If the
server can’t provide a specific answer to a client, it doesn’t just dump out an
error and continue. Instead, it offers a suggestion or pointer to another domain
name server that it thinks can do a better job of handling the client’s query. Since
all of the information needed by the query itself and the response, whether com-
plete or not, is contained in a single message, there’s no need for the server to
maintain state across requests.
Stateful Server Walk-through
We’ve looked at how it is possible to maintain state using a stateless protocol like
HTTP using various client-side methods. Nevertheless, doing so required addi-
tional software beyond the HTTP server itself. Many server applications are
capable of maintaining their own state information, including mail servers, file
servers, and more. One example of a stateful protocol is the Post Office Protocol,
or POP, also known as POP3. POP3 is a popular protocol for managing an elec-
tronic mailbox. Note that POP3 does not send or receive e-mail—those duties
are delegated to mail transfer agents that use SMTP such as sendmail and qmail.
For reference, the POP3 protocol is defined in RFC 1939. Let’s walk through a
typical POP3 session as a user checks his mailbox and manages the messages
contained in it.
The POP3 protocol requires a TCP connection. So, the first step for a POP3
client is to make a connection to a POP3 server. As soon as the connection is
established, the POP3 server sends a greeting to the client. At this point, a ses-
sion is created for the client. This allocates resources on the server for that
particular client. Once the greeting is sent, the client enters the authorization
state on the server. In the authorization state, the client has to identify itself and
authenticate itself to the server to proceed. Clients can use various authentica-
tion methods with the POP3 protocol. The simplest is a typical username and
password negotiation. The client sends the username and password to the
server, which in turn uses whatever method it is configured to use to determine
whether this particular client should have access. In some cases, a POP3 server
will keep its own database of usernames and passwords, and in other cases, the
Chapter 4
94
3227c04.qxd 7/8/04 9:26 PM Page 94

server will use the operating system’s database of usernames and passwords to
perform the authentication.
Assuming the server can authenticate the client, a file lock is placed on the
user’s mailbox. This prevents multiple connections to the same resource, which
helps to preserve state. Once a lock is achieved on the mailbox, the server per-
forms some processing, such as creating a list of the available messages. As soon
as the server has authenticated the client and obtained a lock on the resources it
needs, the session enters a new state.
The transaction state is where the bulk of communications happens for each
session. It is in this state that the client instructs the server on how to handle
each message using a variety of commands. The list of valid instructions in the
transaction state is shown in Table 4-2.
Table 4-2. Valid Commands in the POP3 Transaction State
COMMAND SERVER RESPONSE
STAT A simple acknowledgement that the client’s instruction was
received.
LIST A list of the message numbers available.
RETR Given the number of a message, the server responds with the
contents of that message.
DELE Given the number of the message as an argument, the server
marks the message for deletion.
As you can see, the number of commands that a client can issue in the
transaction state is limited. Any other commands entered would generate an
error message. Of special interest is the DELE command. When given, this com-
mand doesn’t actually delete message in question, but instead simply marks the
message for deletion. Messages marked for deletion aren’t deleted until the next
state, the update state.
The update state isn’t allowed until the client sends the quit command (QUIT)
to the server. At this point in the session, the server actually deletes any mes-
sages marked for deletion, and on completing this operation, it sends a status
message to the client, releases any locks it may have on resources used during
the session, and shuts down the TCP connection. There are a couple of excep-
tions to the update state. For example, if the quit command is issued while the
client is still in the authorization state, the server will release any resources it
may have locked and shut down the TCP connection without entering the inter-
mediate transaction state; the session will go right from the authorization state
to the update state.
Protocols, Sessions, and State
95
3227c04.qxd 7/8/04 9:26 PM Page 95
Summary
In this chapter, we discussed the difference between stateful and stateless
protocols and applications. Stateful servers store state information across client
requests, while stateless servers do not. Examples of stateless protocols include
HTTP and DNS. Examples of stateful protocols include POP3 and FTP. Key con-
cepts covered in this chapter include the following:
• There is no automatic correlation between state and connection. A
connectionless protocol doesn’t automatically mean a stateless protocol.
• Stateless protocols like HTTP can require a connection.
• Maintaining state uses the concept of sessions, which are accessed using
a session ID.
• There are various ways to maintain state, including storing state infor-
mation on the client instead of storing it on the server.
• Developers can use additional application layers to add state management
to stateless application protocols like HTTP.
Chapter 4
96
3227c04.qxd 7/8/04 9:26 PM Page 96

Part Two
Design and
Architecture
3227c05.qxd 7/8/04 9:27 PM Page 97
3227c05.qxd 7/8/04 9:27 PM Page 98
CHAPTER 5
Client-Server
Architecture
A NETWORK SERVER APPLICATION THAT can handle only one client at a time isn’t
very useful. For example, consider an IRC chat application wherein only one
client could connect to an IRC chat server at a time. How much fun would it be
to chat with yourself? A server is typically required to handle multiple clients
simultaneously.
Handling multiple clients at the same time requires solving several prob-
lems. The first issue is allowing multiple clients to connect and stay connected
simultaneously. In this chapter, we cover three different general strategies for
handling this: multiplexing, forking, and threads. The second issue is one of
resources and how to efficiently utilize the memory and processor(s) available.
The final issue is keeping the server responsive to each of the clients—in other
words, not allowing a client to monopolize the server at the expense of the other
connected clients. This is especially important when large amounts of data are
to be transferred between the client and server.
This chapter will explain the various strategies available to handle multiple
clients. In addition, we’ll build servers of each type. We’ll start off with a client
test program.
Client Test Program
A server isn’t much good without a client program to connect to it. In this chap-
ter we’ll look at and implement several types of servers. To see how they work
we’ll use a client test program. This will help us see how each server type handles
multiple clients.
To test a server you’ll need to open two xterm windows. In the first window,
execute the server that you wish to test. In the second window, execute the client
test program. You should see output in both the server and client windows.
Here’s our test client program, client.c. We’ll use it to test the various server
examples throughout this chapter. First, we include the needed system header
files:
/* client.c */
#include <stdio.h>
99
3227c05.qxd 7/8/04 9:27 PM Page 99
#include <sys/types.h>
#include <sys/socket.h>
#include <netinet/in.h>
#include <string.h>
We’ll use the fork() system call to generate a number of child processes to
simulate multiple clients connecting to the server at the same time. This is the
forward declaration of the process function:
void child_func(int childnum);
This is our main() function. We check the command line to see how many
child processes to create.
int main(int argc, char *argv[])
{
int nchildren = 1;
int pid;
int x;
if (argc > 1) {
nchildren = atoi(argv[1]);
}
Next, we loop and create the specified number of children. We will look at
this later, but if fork() returns 0, then it has returned in the child process, so we
call our child function.
for (x = 0; x < nchildren; x++) {
if ((pid = fork()) == 0) {
child_func(x + 1);
exit(0);
}
}
Once we’ve created all of the children, the parent process waits for them to
finish before returning.
wait(NULL);
return 0;
}
Next, we create our child function. This is where we connect to the server.
Chapter 5
100
3227c05.qxd 7/8/04 9:27 PM Page 100
void child_func(int childnum)
{
int sock;
struct sockaddr_in sAddr;
char buffer[25];
We create our client socket and bind it to a local port.
memset((void *) &sAddr, 0, sizeof(struct sockaddr_in));
sAddr.sin_family = AF_INET;
sAddr.sin_addr.s_addr = INADDR_ANY;
sAddr.sin_port = 0;
sock = socket(AF_INET, SOCK_STREAM, IPPROTO_TCP);
bind(sock, (const struct sockaddr *) &sAddr, sizeof(sAddr));
Then we attempt to connect to whichever server is running on the local
machine.
sAddr.sin_addr.s_addr = inet_addr("127.0.0.1");
sAddr.sin_port = htons(1972);
if (connect(sock, (const struct sockaddr *) &sAddr, sizeof(sAddr)) != 0) {
perror("client");
return;
}
Once connected, we send some characters to the server and read what the
server sends back. We also insert some pauses, using sleep() to keep the clients
from connecting and disconnecting so quickly that we don’t have more than one
connected to a server at the same time.
snprintf(buffer, 128, "data from client #%i.", childnum);
sleep(1);
printf("child #%i sent %i chars\n", childnum, send(sock, buffer,
strlen(buffer), 0));
sleep(1);
printf("child #%i received %i chars\n", childnum,
recv(sock, buffer, 25, 0));
Finally, we close the connection and return.
sleep(1);
close(sock);
}
Client-Server Architecture
101
3227c05.qxd 7/8/04 9:27 PM Page 101
The test client can be compiled with the following command:
$>gcc -o client client.c
This runs the client with five child processes, each connecting to the server.
$>./client 5
Multiplexing
The first strategy for handling multiple connections that we’ll discuss is multi-
plexing. Multiplexing is a way of handling multiple clients in a single server
process. The application allows clients to connect to the server and adds them to
a watch list. This watch list is just an array of socket descriptors. Then the oper-
ating system tells the application which clients (if any) need to be serviced or if a
new client has established a connection.
As an example, think of a restaurant with only one waiter. The waiter is
responsible for attending to all the tables at the same time. As customers come
in and are seated, the waiter adds them to a mental list of tables to check on.
Then, when a table needs attention, he attends to it. Of course, only one table
may be serviced at a time, and the possibility exists of a single table using up all
the waiter’s time.
The select() Function
select() is a system function that allows us to specify a set of descriptors (sock-
ets, in this case) that we are interested in. It is worth noting that select() works
with any descriptor, including files, pipes, FIFOs, etc. The system puts our pro-
gram to sleep, polls the sockets for activity, and wakes the program when an
event occurs at one of the sockets. This keeps us from writing a busy loop and
wasting clock cycles. The select() function prototype looks like this:
#include <sys/select.h>
int select(int n, fd_set *readfds, fd_set *writefds,
fd_set *exceptfds, struct timeval *timeout);
The first parameter specifies the highest numbered descriptor (plus 1) to
watch in the three sets. It is important to remember that you must add 1 to the
highest numbered descriptor in the sets. The reason is that the watch lists are
linear arrays of bit values, with 1 bit for every available descriptor in the system.
What we are really passing to the function is the number of descriptors in the
Chapter 5
102
3227c05.qxd 7/8/04 9:27 PM Page 102
array that it needs to copy. Since descriptors start at 0, the number we pass is the
largest descriptor number plus 1.
Next, we provide three descriptor sets. The first set contains descriptors to
be watched for read events, the second for write events, and the third for excep-
tions or error events. Finally, we provide a timeval that specifies a timeout. If no
event occurs in any of the sets before the timeout, then select() returns a 0. We
can also specify a null pointer for the timeout parameter. In this case, the call will
not return until an event happens on one of the watched descriptors. Otherwise,
it returns the number of descriptors in the three sets.
It is important to note that select() does modify the descriptor sets that are
passed to it. Upon return, the sets will contain only those descriptors that had
some activity. To call select multiple times, we must retain a copy of the original
sets. Other than a socket error, if any error occurs, then –1 is returned.
Four macros are provided to help deal with the descriptor sets. They are
FD_CLR, FD_ISSET, FD_SET, and FD_ZERO. Each takes a pointer to a variable type
fd_set. Except for FD_ZERO, each takes a descriptor as well. It is important to
note that the behavior of these macros is undefined if you pass in a descriptor
that is less than zero or greater than FD_SETSIZE. The macros are prototyped
as follows:
•void FD_SET(int fd, fd_set *set): FD_SET flags a descriptor to be watched.
•void FD_CLR(int fd, fd_set *set): FD_CLR resets the flag set to a descriptor.
•int FD_ISSET(int fd, fd_set *set): After select() returns, FD_ISSET deter-
mines whether a descriptor is flagged or not.
•void FD_ZERO(fd_set *set): FD_ZERO clears the set so that no descriptors are
watched.
A flagged descriptor indicates activity at the socket.
Here is a code fragment example of using select():
int sd; /* our socket descriptor */
fd_set sockreadset;
FD_ZERO(&sockreadset);
FD_SET(sd, &sockreadset);
select(FD_SETSIZE, sockreadset, NULL, NULL, NULL);
if (FD_ISSET(sockreadset))
printf("Socket ready for read.\n");
In this example, the program will wait indefinitely for a read event to occur
on the descriptor whose value is specified in sd.
Client-Server Architecture
103
3227c05.qxd 7/8/04 9:27 PM Page 103
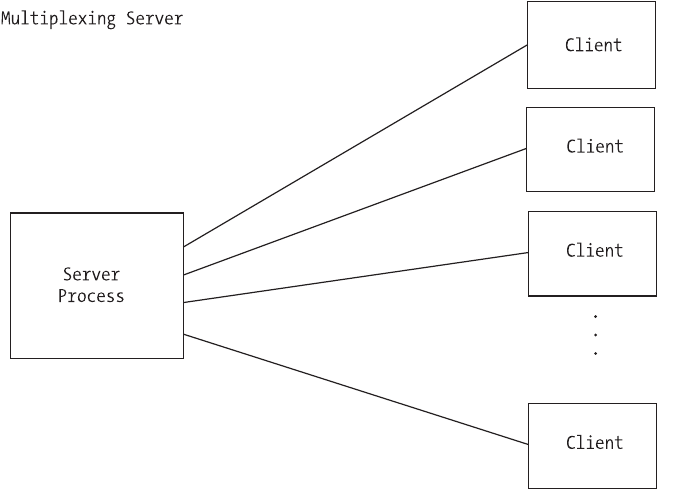
A Multiplexing Server
In our example, the server uses select() to listen for new connections, check
for client disconnects, and read events on existing connections. If a read event
occurs on the server’s listening socket, then a new connection is initiated and
the server calls accept() to get the new socket descriptor. The new descriptor is
then added to the server’s watch set.
On the other hand, if a read event occurs on another socket, then the server
calls recv to retrieve any data sent by the client. If no data is received, then the
client has disconnected, and the server removes the respective descriptor from the
watch set. Otherwise, the data is read and echoed back to the client. Figure 5-1
shows the basic architecture of a multiplexing server.
Figure 5-1. Basic architecture of a multiplexing server
Here is the program (server1.c) to implement the preceding example:
Chapter 5
104
3227c05.qxd 7/8/04 9:27 PM Page 104
/* server1.c */
#include <stdio.h>
#include <sys/ioctl.h>
#include <sys/types.h>
#include <sys/socket.h>
#include <netinet/in.h>
int main(int argc, char *argv[])
Next, we set up the variables that we’ll need. As select() modifies the set
passed to it, we use two variables: one to maintain our state and another to
interact with the select() function. We need to keep the master set separately:
{
struct sockaddr_in sAddr;
fd_set readset, testset;
int listensock;
int newsock;
char buffer[25];
int result;
int nread;
int x;
int val;
Then we create the listening socket. This is the socket that will listen for
incoming connections from the clients.
listensock = socket(AF_INET, SOCK_STREAM, IPPROTO_TCP);
Afterward, we set the socket option SO_REUSEADDR. While debugging, you’ll
be starting and stopping your server often. Linux tends to keep the address and
port that was used by your program reserved. This option allows you to avoid the
dreaded “address in use” error.
val = 1;
result = setsockopt(listensock, SOL_SOCKET, SO_REUSEADDR, &val,
sizeof(val));
if (result < 0) {
perror("server1");
return 0;
}
Client-Server Architecture
105
3227c05.qxd 7/8/04 9:27 PM Page 105
Here, we bind the socket to the listening port. We use the special address
INADDR_ANY to specify that we’ll listen on all IP addresses associated with the
server:
sAddr.sin_family = AF_INET;
sAddr.sin_port = htons(1972);
sAddr.sin_addr.s_addr = INADDR_ANY;
result = bind(listensock, (struct sockaddr *) &sAddr, sizeof(sAddr));
if (result < 0) {
perror("server1");
return 0;
}
We put the socket into “listen” mode so that we can accept incoming
connections:
result = listen(listensock, 5);
if (result < 0) {
perror("server1");
return 0;
}
We initialize our descriptor set using FD_ZERO. Then we add the listening
socket to the set so that the system will notify us when a client wishes to con-
nect. Connection requests are treated as read events on the listening socket:
FD_ZERO(&readset);
FD_SET(listensock, &readset);
Notice that we assign our descriptor set to an alternate variable to be passed
to the select() function. As noted previously, this is because select() will alter
the set we pass, so that upon return, only those sockets with activity are flagged
in the set. Our call to select() signifies that we are interested only in read events.
In a real-world application, we would need to be concerned with errors and pos-
sibly write events. We loop through the entire set of descriptors. FD_SETSIZE is a
constant set in the kernel and is usually 1024. A more efficient server imple-
mentation would keep track of the highest numbered descriptor and not loop
through the entire set. FD_ISSET is used to determine if the descriptor is flagged
as having activity. It returns a nonzero value if the supplied descriptor is set as
having had activity; otherwise, it returns 0.
Chapter 5
106
3227c05.qxd 7/8/04 9:27 PM Page 106
while (1) {
testset = readset;
result = select(FD_SETSIZE, &testset, NULL, NULL, NULL);
if (result < 1) {
perror("server1");
return 0;
}
for (x = 0; x < FD_SETSIZE; x++) {
if (FD_ISSET(x, &testset)) {
If the activity is on the listening socket, then we accept the new connection
and add its socket to our watch set. Otherwise, we read characters from the client.
If the number of characters read is less than or equal to zero, then the client is
assumed to have closed the connection. We close the connection on our side
and remove the descriptor from our watch list. Otherwise, we echo the charac-
ters to the screen and back to the client.
if (x == listensock) {
newsock = accept(listensock, NULL,NULL);
FD_SET(newsock, &readset);
} else {
nread = recv(x, buffer, 25, 0);
if (nread <= 0) {
close(x);
FD_CLR(x, &readset);
printf("client on descriptor #%i disconnected\n", x);
} else {
buffer[nread] = '\0';
printf("%s\n", buffer);
send(x, buffer, nread, 0);
}
}
}
}
}
}
The server can be compiled with a command similar to the example client.
Figure 5-2 shows a sample of the output obtained on executing the program.
Client-Server Architecture
107
3227c05.qxd 7/8/04 9:27 PM Page 107
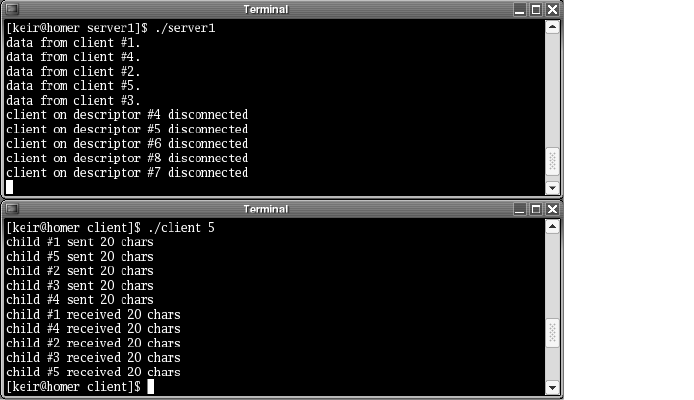
Figure 5-2. Output from a multiplexing server
Notice that, for a brief time, all five clients are connected at the same time.
Forking
In the UNIX environment, the traditional way to handle multiple clients is to
use the fork() system call. When an application calls fork(), an exact duplicate of
the calling program is made, right down to the program counter (PC), and a new
child process is started with that copy. Everything (except the parent’s process ID,
or PID) is copied. This includes the parent’s heap, stack, data space, and all open
descriptors. Then, the system call returns twice: once in the calling program and
the next time in the child process. The return value in the calling program is the
PID of the new child process, while in the child process it is 0.
This can be a little confusing at first. How can a function that is called once
return twice, you ask? If you think carefully about what the fork() call does,
though, it is very logical. Calling fork() makes an exact copy of the program. This
means that when the copy begins execution, it starts at the exact place the call-
ing program was, which is the fork() call.
Let’s see, in a little more detail, the consequences of copying descriptors.
As mentioned previously, when the child process is created, everything is copied
to the child, including all open descriptors. The Linux kernel keeps a reference
count for each descriptor. So, when a child is created, the reference count is
incremented for each copy. As a result, the client must close the descriptor of
the listening socket used by the parent process, and the parent must close the
descriptor of the client socket used by the child process. This will become evident
Chapter 5
108
3227c05.qxd 7/8/04 9:27 PM Page 108

on executing the program server2.c. If close() is not called on these sockets,
the reference count in the kernel will be wrong, resulting in open or stale con-
nections potentially abusing or exhausting system resources as time goes on.
Using the fork() system call to handle multiple clients has several advan-
tages. First, it’s simple. Creating a new process to handle each client is easy to
implement. Second, using a process per client keeps any one client from monop-
olizing the server, because the Linux kernel will preemptively swap the processes
in and out. Third, other child processes won’t be affected if one of the child
processes crashes, because the kernel prevents one process from damaging
memory in another process.
The fork() system call isn’t without its disadvantages, however. The most
notable problem with the multiprocess approach is the lack of shared memory.
Over the years, shared memory solutions (like shmget()) have been made avail-
able for multiprocess applications, but it isn’t as elegant as with a threaded
approach. shmget() is a system call that allows the allocation of a shared memory
segment that can be accessed by multiple processes. The way it works is that the
parent process creates a shared memory segment upon startup. Then, as each
child is created, it inherits the attachment to the shared memory. Even with the
shared memory, access to it must be synchronized with semaphores. Finally,
with large programs, significant resources can be used because everything must
be copied for each child, resulting in slow performance and potential exhaustion
of resources.
CAUTION When using the fork() system call, you must be very
careful to not create zombies. Zombies are child processes that
occur when the parent process exits without calling wait() or
waitpid() on the child process. The kernel keeps the exit informa-
tion for these child processes until the parent process calls wait()
or waitpid() to retrieve it. If the parent exits without retrieving
the exit information, the child processes remain in a zombie state.
Eventually the kernel will clean them up, but it is best to avoid
them in the first place to free up system resources. The simplest way
to handle this issue is by trapping the SIGCHLD signal and calling
waitpid(). This is demonstrated in the forking server in the next
section.
One Process Per Client
The simplest architecture for a multiprocess server is to use one process per
client. The server simply waits for a client to connect and then creates a process
to handle it. From an application design standpoint, this is much less cumber-
some than the multiplexing approach we examined earlier. Each client has a
dedicated process, and the client logic flows linearly without worrying about
Client-Server Architecture
109
3227c05.qxd 7/8/04 9:27 PM Page 109
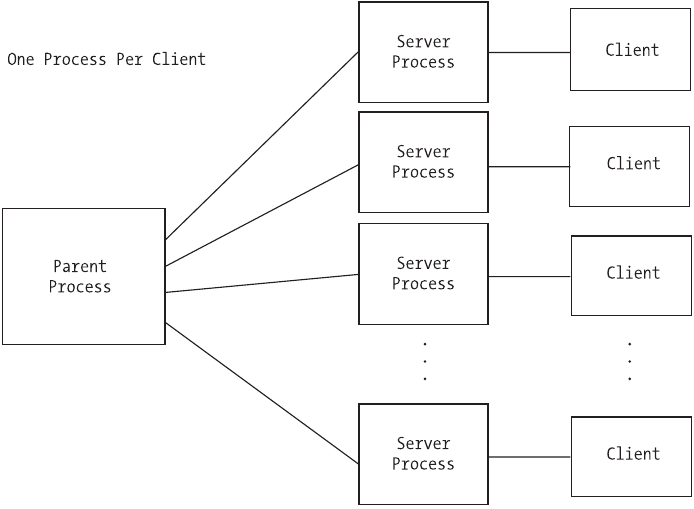
stopping to service other connected clients, as compared to multiplexing, where
a single process must deal with all clients simultaneously.
A Forking Server
In the following program (server2.c), the initial process waits for a client to con-
nect. It then calls fork() to create a new child process to handle the client. Next,
the child process reads the data from the client and echoes it back. Finally, the
connection is closed, and the child exits. Meanwhile, the parent process loops
back to listen for another connection. Figure 5-3 shows the basic architecture for
a multiprocess server.
Figure 5-3. Basic architecture for a multiprocess server
The initial section of the code is similar to the earlier program, server1.c:
/* server2.c */
#include <stdio.h>
#include <sys/ioctl.h>
#include <sys/types.h>
Chapter 5
110
3227c05.qxd 7/8/04 9:27 PM Page 110
#include <sys/socket.h>
#include <netinet/in.h>
To trap the child exits and prevent zombies, we also need the following two
header files:
#include <sys/wait.h>
#include <signal.h>
Here’s our signal handler. It simply calls waitpid() for any exited children.
The reason we call it in a loop is that there may not be a one-to-one correlation
between exited children and calls to our signal handler. POSIX does not allow for
the queuing of signal calls, so our handler may be called once when several chil-
dren have exited and we need to call waitpid() for each one.
void sigchld_handler(int signo)
{
while (waitpid(-1, NULL, WNOHANG) > 0);
}
Next, we declare the variables that we will need.
int main(int argc, char *argv[])
{
struct sockaddr_in sAddr;
int listensock;
int newsock;
char buffer[25];
int result;
int nread;
int pid;
int val;
Then we create the socket that will accept the incoming connections.
listensock = socket(AF_INET, SOCK_STREAM, IPPROTO_TCP);
Here we set our SO_REUSEADDR option.
val = 1;
result = setsockopt(listensock, SOL_SOCKET, SO_REUSEADDR, &val, sizeof(val));
if (result < 0) {
perror(“server2”);
return 0;
}
Client-Server Architecture
111
3227c05.qxd 7/8/04 9:27 PM Page 111
We then bind it to a local port and all addresses associated with the
machine.
sAddr.sin_family = AF_INET;
sAddr.sin_port = htons(1972);
sAddr.sin_addr.s_addr = INADDR_ANY;
result = bind(listensock, (struct sockaddr *) &sAddr, sizeof(sAddr));
if (result < 0) {
perror("server2");
return 0;
}
Afterward, we put the socket into listening mode to listen for incoming
connections.
result = listen(listensock, 5);
if (result < 0) {
perror("server2");
return 0;
}
Before we start looping, we install our signal handler.
signal(SIGCHLD, sigchld_handler);
We then call accept() and allow it to block waiting for connection requests
from clients. After accept returns, we call fork() to create a new process. If it
returns 0, then we are in the child process; otherwise, the PID of the new child
is returned.
while (1) {
newsock = accept(listensock, NULL, NULL);
if ((pid = fork()) = = 0) {
Once in the child process, we close the listening socket. Remember that all
descriptors are copied from the parent process to the child. The child process
does not need the listening socket any longer, so we close the child’s reference
on that socket. However, the socket will remain open in the parent process. Next,
we read characters from the client and echo them to the screen. Finally, we send
the characters back to the client, close the socket, and exit the child process:
printf("child process %i created.\n", getpid());
close(listensock);
Chapter 5
112
3227c05.qxd 7/8/04 9:27 PM Page 112

nread = recv(newsock, buffer, 25, 0);
buffer[nread] = '\0';
printf("%s\n", buffer);
send(newsock, buffer, nread, 0);
close(newsock);
printf("child process %i finished.\n", getpid());
exit(0);
}
This line is only reached in the parent process. Since the child process has a
copy of the client socket, the parent process closes its reference here to decrease
the kernel reference count. The socket will remain open in the child process:
close(newsock);
}
}
The server can be compiled with a command similar to the example client.
Figure 5-4 shows sample output obtained on executing the preceding program.
The client was run with five child processes.
Figure 5-4. Output from a multiprocess server
Client-Server Architecture
113
3227c05.qxd 7/8/04 9:27 PM Page 113
Preforking: Process Pools
While the preceding strategy is simple to implement, there is a performance
penalty to be paid. Creating a copy of a running process is expensive (in terms of
time as well as resources), especially for large applications. As clients start con-
necting in large numbers, there can be a noticeable delay in launching the child
process.
One strategy to mitigate the startup costs for a process is to fork a number
of processes into a “process pool” when the application starts. This is called pre-
forking, and it restricts all of the costs associated with creating a child process to
the initialization section of the application. When a client connects, the process
to handle it has already been created. Using this method, accept() is not called
in the parent process, but in each child process. Unlike the previous example,
the listening socket descriptor will not be closed in the child process. In fact,
all of the children will be calling accept() on the same listening socket. When a
client connects, the kernel chooses one of the children to handle the connection.
Since the child is already running, there is no process creation delay.
Example: Apache Web Server
The original Apache Web Server (prior to version 2), http://httpd.apache.org,
uses process pools. However, it takes them one step further by making the
process pool size dynamic. In the Apache configuration file, you are able to
specify the number of initial children, the maximum number of children, the
minimum number of idle children, and the maximum number of idle children.
The initial and maximum number of children is pretty straightforward.
Specifying the minimum and maximum number of idle children allows the
server to handle sudden spikes in usage. The parent process continually checks
on the child processes to see how many are idle. It then terminates extra chil-
dren or creates new children depending on the settings. Using configuration
settings, the server can be finely tuned for maximum performance.
Apache version 2 takes this even a step further by introducing thread pools.
Thread pools are similar to process pools in that you generate the handlers to
deal with connecting clients during the initialization of the application, but you
are creating threads instead of processes. We’ll talk about thread pools in the sec-
tion “Prethreading: Thread Pools.”
A Preforking Server
In the following program (server3.c), the parent server process uses a loop to
create the specified number of child processes. On execution, we can pass in the
number of children to fork, on the command line. The parent server process then
Chapter 5
114
3227c05.qxd 7/8/04 9:27 PM Page 114
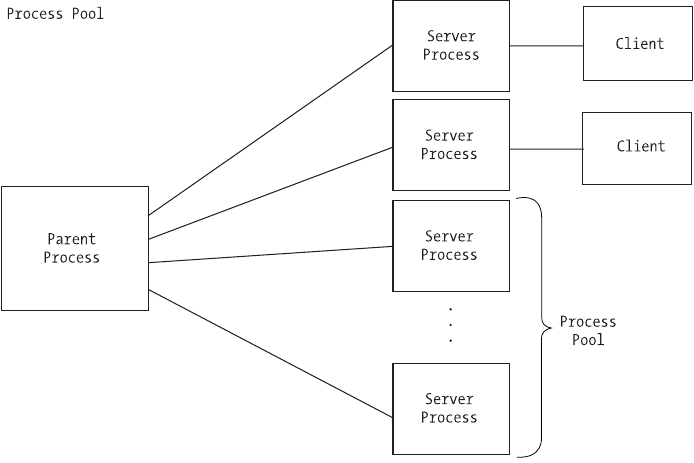
calls wait() to keep it from returning before any of its children. If we don’t insert
this call, the parent process will end immediately. Each child then calls accept on
the same listening socket and waits for a client connection. When a connection is
made, the operating system chooses one of the children to signal using a “first in,
first out” methodology. That child receives the data from the client and echoes it
back. Finally, the connection is closed, and the child calls accept() again to wait
for another client. Figure 5-5 shows the basic architecture for process pools.
Figure 5-5. Basic architecture for process pools
The initial section is again similar to the earlier programs, except that we
check the command line to see how large a process pool to create:
/* server3.c */
#include <stdio.h>
#include <sys/ioctl.h>
#include <sys/types.h>
#include <sys/socket.h>
#include <netinet/in.h>
int main(int argc, char *argv[])
{
Client-Server Architecture
115
3227c05.qxd 7/8/04 9:27 PM Page 115
First, we declare the variables that we will need.
struct sockaddr_in sAddr;
int listensock;
int newsock;
char buffer[25];
int result;
int nread;
int pid;
int nchildren = 1;
int x;
int val;
Then, we check the command line to see how many processes will be in our
process pool. If nothing is specified, then we create only one listening process.
if (argc > 1) {
nchildren = atoi(argv[1]);
}
We create the socket that will listen for incoming connections.
listensock = socket(AF_INET, SOCK_STREAM, IPPROTO_TCP);
Again, we set the SO_REUSEADDR option.
val = 1;
result = setsockopt(listensock, SOL_SOCKET, SO_REUSEADDR, &val, sizeof(val));
if (result < 0) {
perror("server3");
return 0;
}
Next, we bind it to a local port and all addresses associated with the machine.
sAddr.sin_family = AF_INET;
sAddr.sin_port = htons(1972);
sAddr.sin_addr.s_addr = INADDR_ANY;
result = bind(listensock, (struct sockaddr *) &sAddr, sizeof(sAddr));
if (result < 0) {
perror("server3");
return 0;
}
Chapter 5
116
3227c05.qxd 7/8/04 9:27 PM Page 116
Now we put it into listening mode.
result = listen(listensock, 5);
if (result < 0) {
perror("server3");
return 0;
}
We create the specified number of child processes for the process pool using
the fork() system call:
for (x = 0; x < nchildren; x++) {
if ((pid = fork()) == 0) {
Each child process calls accept on the same listening socket. When a client
connects, the system will choose the next child in line to notify:
while (1) {
newsock = accept(listensock, NULL,NULL);
Once a client connects, we read characters it sends, echo them to the screen
and client, and close the connection:
printf("client connected to child process %i.\n", getpid());
nread = recv(newsock, buffer, 25, 0);
buffer[nread] = '\0';
printf("%s\n", buffer);
send(newsock, buffer, nread, 0);
close(newsock);
printf( "client disconnected from child process %i.\n", getpid());
}
}
}
This tells the parent process to wait until all of the children have been com-
pleted, before continuing. Of course, none of the children in this example will
ever be completed:
wait(NULL);
}
Figure 5-6 shows a sample of the output obtained on executing the program.
The client was run with five child processes.
Client-Server Architecture
117
3227c05.qxd 7/8/04 9:27 PM Page 117
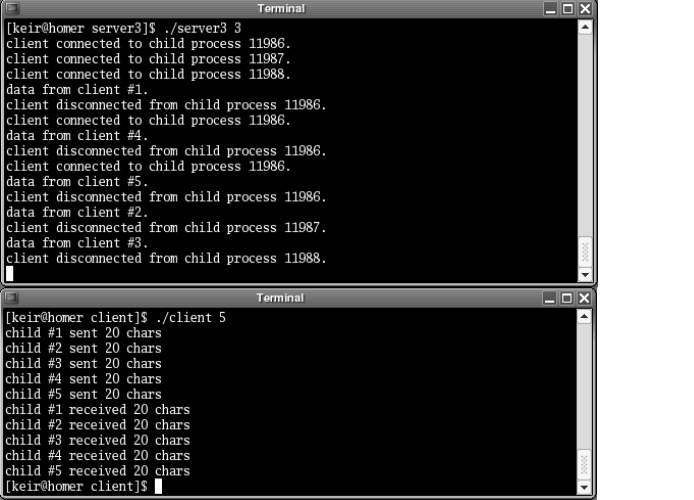
Figure 5-6. Output from a preforking server
Notice that the processes are used in the order in which they called accept().
Since we have more clients than processes in the process pool, earlier processes
are reused for new clients once they become free.
Multithreading
More recently, using threads has become the preferred method for handling
multiple clients. Threads are lightweight processes that share the main memory
space of the parent process. Because of this, they use fewer resources than a
multiprocess application, and they enjoy a faster context-switch time. How-
ever, multithreaded applications are not as stable as multiprocess applications.
Because of the shared memory if, say, a buffer overrun occurs in one thread, it
can impact other threads. In this way, one bad thread can bring down the entire
server program. This isn’t the case with multiprocess applications, where the
memory in each process is protected from alteration from another process by
the operating system. This keeps an errant process from corrupting the memory
of another process.
Chapter 5
118
3227c05.qxd 7/8/04 9:27 PM Page 118
Before moving on, let’s talk a little more about shared memory in multi-
threaded server applications. If not handled correctly, the shared memory can
be a double-edged sword. Remember that global variables will be shared by all
threads. This means that to keep client-specific information, you must take
advantage of the thread-local storage mechanisms provided by your thread
library. These allow you to create “thread-global” values that aren’t shared
between threads.
If you do have global variables that need to be shared between threads, it is
very important to use the synchronization objects like mutexes to control access
to them. Without synchronization objects, you can run into very strange behav-
iors and even unexplained program crashes. Most often this occurs when one
thread is writing to a variable when another is reading or writing to the same
variable. This situation can cause memory corruption, and it may not show
itself immediately but will eventually cause problems. Multithreaded appli-
cations are hard enough to debug, so synchronize access to all global variables
and structures.
The version of POSIX threads distributed with most flavors of Linux was
developed by Xavier Leroy. His website, http://pauillac.inria.fr/~xleroy/
linuxthreads, has more information. In addition, there are many other resources
on the Internet for references on pthread programming. You can find a new
thread library based on GNU’s pth library at http://oss.software.ibm.com/
developerworks/opensource/pthreads.
As with the multiprocess strategy, using one thread per client is the simplest
multithreaded server architecture. Again, the client logic in each thread does not
have to stop to service other connected clients, but is free to focus on one client.
One caveat, though, is that the maximum number of threads allowed on a sys-
tem is far less than the maximum number of processes. With a server that needs
to maintain a large number of persistent connections, you may want to consider
using one of the other architectures presented in this chapter.
A Multithreaded Server
Note the multithreaded server’s similarity to the multiprocess model. In the
following program (server4.c), the parent server process waits for client connec-
tions. When a connection occurs, the server creates a new thread and passes the
new socket descriptor to it. The new thread then reads data from the client and
echoes it back. Finally, the connection is closed, and the thread exits. Mean-
while, the parent process loops and waits for another connection. Figure 5-7
shows the basic architecture for a multithreaded server.
Client-Server Architecture
119
3227c05.qxd 7/8/04 9:27 PM Page 119
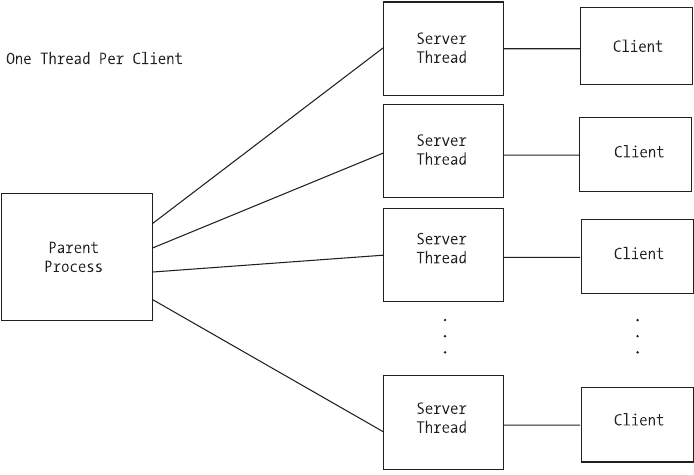
Figure 5-7. Basic architecture for a multithreaded server
Again, the initial section of the code is similar to that in the previous
programs:
/* server4.c */
#include <stdio.h>
#include <sys/ioctl.h>
#include <sys/types.h>
#include <sys/socket.h>
#include <netinet/in.h>
#include <pthread.h>
void* thread_proc(void *arg);
int main(int argc, char *argv[])
{
First, we declare the variables that we will need.
Chapter 5
120
3227c05.qxd 7/8/04 9:27 PM Page 120
struct sockaddr_in sAddr;
int listensock;
int newsock;
int result;
pthread_t thread_id;
int val;
Next, we create the socket that will listen for incoming connections.
listensock = socket(AF_INET, SOCK_STREAM, IPPROTO_TCP);
Now we set the SO_REUSEADDR socket option.
val = 1;
result = setsockopt(listensock, SOL_SOCKET, SO_REUSEADDR, &val, sizeof(val));
if (result < 0) {
perror("server4");
return 0;
}
Then, we bind it to a local port and all addresses associated with the
machine.
sAddr.sin_family = AF_INET;
sAddr.sin_port = htons(1972);
sAddr.sin_addr.s_addr = INADDR_ANY;
result = bind(listensock, (struct sockaddr *) &sAddr, sizeof(sAddr));
if (result < 0) {
perror("server4");
return 0;
}
We then put the socket into listening mode.
result = listen(listensock, 5);
if (result < 0) {
perror("server4");
return 0;
}
Client-Server Architecture
121
3227c05.qxd 7/8/04 9:27 PM Page 121
As in server2.c, we call accept() and let it block until a client tries to connect:
while (1) {
newsock = accept(listensock, NULL,NULL);
Once a client connects, a new thread is started. The descriptor for the new
client socket is passed to the thread function. Since the descriptor is passed to
the function instead of being copied, there will be no need for the parent thread
to close the descriptor:
result = pthread_create(&thread_id, NULL, thread_proc, (void *) newsock);
if (result != 0) {
printf("Could not create thread.\n");
}
Since the parent thread will be in a continuous loop, there will be no need
to ever join one of the child threads. Therefore, we call pthread_detach() to keep
zombies from occurring. A zombie is a process (or thread, in this case) that has
returned and is waiting for its parent to check its return value. The system will
keep the zombies around until the return value is checked, so they just take up
resources. In our example, we aren’t interested in the thread’s return value, so
we tell the system by calling pthread_detach(). Then, we call sched_yield() to give
the new thread a chance to start execution by giving up the remainder of the
parent’s allotted time-slice.
pthread_detach(thread_id);
sched_yield();
}
}
void* thread_proc(void *arg)
{
int sock;
char buffer[25];
int nread;
In our thread function, we cast the passed argument back to a socket
descriptor. Notice that we don’t close the listening socket as we did in server2.c.
In a threaded server, the descriptors aren’t copied to the child process, so we
don’t have an extra listening socket descriptor in the child. Next is the familiar
routine: read characters, echo them to the screen and client, and close the
connection.
Chapter 5
122
3227c05.qxd 7/8/04 9:27 PM Page 122
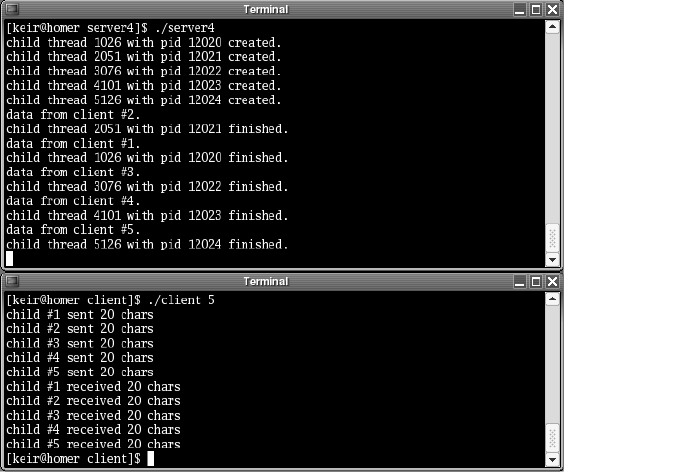
printf("child thread %i with pid %i created.\n", pthread_self(),
getpid());
sock = (int) arg;
nread = recv(sock, buffer, 25, 0);
buffer[nread] = '\0';
printf("%s\n", buffer);
send(sock, buffer, nread, 0);
close(sock);
printf("child thread %i with pid %i finished.\n", pthread_self(),
getpid());
}
The server can be compiled with the following command. Notice that we are
linking with the pthread library. This is the library that gives us the threading
capabilities.
gcc -o server4 -lpthread server4.c
Figure 5-8 shows a sample of the output obtained on executing the program.
The client was run with five child processes.
Figure 5-8. Output from a multithreaded server
Notice that, for a short time, all of the clients are connected at the same time.
Client-Server Architecture
123
3227c05.qxd 7/8/04 9:27 PM Page 123
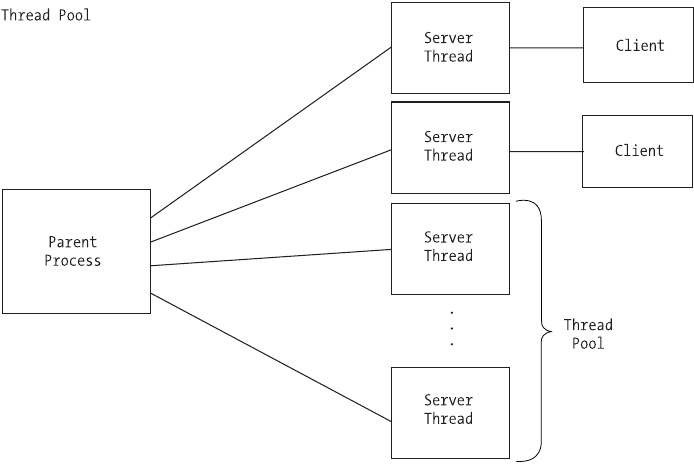
Thread pools operate in a very similar manner to process pools. Our strategy
is to create a certain number of threads when the application initializes. We then
have a pool of threads to handle incoming client connections, and we avoid the
costs associated with waiting to create a thread when the request is made. In
addition, with shared memory, it is much easier to implement dynamic thread
pools in which we can resize our thread pool at runtime depending on the load
requirements.
On the downside, if one thread crashes, it can bring down the entire server
application. This is due to the fact that all of the threads, including the main appli-
cation process, use the same memory space and resources (for example, file
descriptors). So, for example, if one of the threads encounters a buffer overrun
problem, it can corrupt memory being used by another thread. This is not the
case with multiple processes, because the operating system prevents one process
from writing over the memory in another process. Great care must be taken
when designing a multithreaded server to prevent an errant thread from affect-
ing the others.
Figure 5-9 shows the basic architecture for a prethreaded server application.
Figure 5-9. Basic architecture for a prethreaded server application
Chapter 5
124
3227c05.qxd 7/8/04 9:27 PM Page 124
In the following program (server5.c), the number of threads in the pool is
passed in on the command line. The parent process then uses a loop to spawn
the requested number of threads, passing the descriptor of the listening socket.
It then calls pthread_join() to keep it from returning before any of its threads.
If we didn’t insert this call, the parent process would end immediately and cause
all its threads to return. Each thread then calls accept on the same listening
socket and waits for a client connection. When a connection is made, the oper-
ating system chooses one of the threads to signal using a “first in, first out”
methodology. This thread receives the data from the client and echoes it back.
Finally, the connection is closed, and the thread calls accept() again to wait for
another client.
These lines are very similar to the section in the program server3.c:
/* server5.c */
#include <stdio.h>
#include <sys/ioctl.h>
#include <sys/types.h>
#include <sys/socket.h>
#include <netinet/in.h>
#include <pthread.h>
void* thread_proc(void *arg);
int main(int argc, char *argv[])
{
First, we declare the variables that we will need.
struct sockaddr_in sAddr;
int listensock;
int result;
int nchildren = 1;
pthread_t thread_id;
int x;
int val;
We check the command line to see how many threads should be in our
thread pool. If none is specified, then we will create a single thread.
if (argc > 1) {
nchildren = atoi(argv[1]);
}
Client-Server Architecture
125
3227c05.qxd 7/8/04 9:27 PM Page 125
Next, we create the socket that will listen for incoming connections.
listensock = socket(AF_INET, SOCK_STREAM, IPPROTO_TCP);
Then, we set the SO_REUSEADDR option.
val = 1;
result = setsockopt(listensock, SOL_SOCKET, SO_REUSEADDR, &val, sizeof(val));
if (result < 0) {
perror("server5");
return 0;
}
We bind it to a local port and to all addresses associated with the machine.
sAddr.sin_family = AF_INET;
sAddr.sin_port = htons(1972);
sAddr.sin_addr.s_addr = INADDR_ANY;
result = bind(listensock, (struct sockaddr *) &sAddr, sizeof(sAddr));
if (result < 0) {
perror("server5");
return 0;
}
We now put it into listening mode.
result = listen(listensock, 5);
if (result < 0) {
perror("server5");
return 0;
}
Afterward, we create our pool of threads. Notice that we pass the descriptor
for the listening socket instead of the client:
for (x = 0; x < nchildren; x++) {
result = pthread_create(&thread_id, NULL, thread_proc,
(void *) listensock);
if (result != 0) {
printf("Could not create thread.\n");
}
sched_yield();
}
Chapter 5
126
3227c05.qxd 7/8/04 9:27 PM Page 126
Here, we call pthread_join(). This has the same effect that calling wait() did
in server3.c. It keeps the parent thread from continuing until the child threads
are finished:
pthread_join (thread_id, NULL);
}
void* thread_proc(void *arg)
{
int listensock, sock;
char buffer[25];
int nread;
listensock = (int) arg;
while (1) {
Each thread calls accept() on the same listening socket descriptor. Just as
in server3.c, when a client connects, the kernel will choose a thread in which
accept() returns:
sock = accept(listensock, NULL, NULL);
Once accept() returns, we read the data from the client and echo it back.
Then we close the connection.
printf("client connected to child thread %i with pid %i.\n",
pthread_self(), getpid());
nread = recv(sock, buffer, 25, 0);
buffer[nread] = '\0';
printf("%s\n", buffer);
send(sock, buffer, nread, 0);
close(sock);
printf("client disconnected from child thread %i with pid %i.\n",
pthread_self(), getpid());
}
}
The server can be compiled with the following command:
gcc -o server5 -lpthread server5.c
This will run the server with five threads in the thread pool:
./server5 5
Client-Server Architecture
127
3227c05.qxd 7/8/04 9:27 PM Page 127
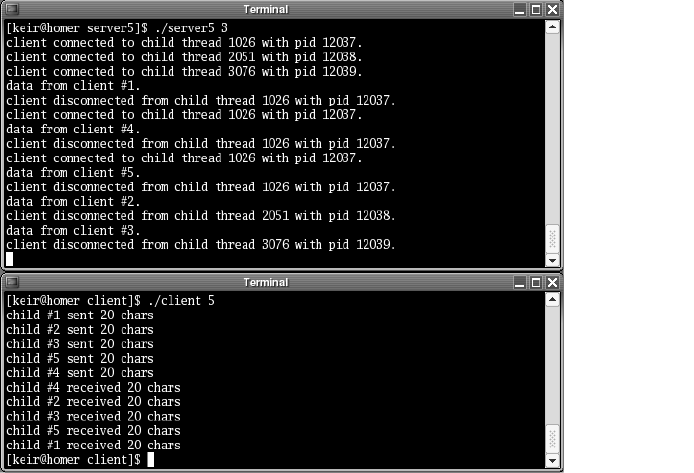
Figure 5-10 shows a sample of the output obtained on executing the
program. The client was run with five child processes.
Figure 5-10. Output from a prethreaded server
Notice that the threads are used in the order in which they called accept().
Since we have more clients than threads in the thread pool, earlier threads are
reused for new clients once they become free.
Combining Preforking and Prethreading
Starting with version 2 of the Apache Web Server, the Apache Project
(http://httpd.apache.org) implemented a hybrid of the preforking and
prethreading strategies. What the group hoped to achieve was the speed
of prethreading combined with the stability of preforking.
As mentioned earlier in the chapter, a multiprocess server doesn’t crash
when one of the child processes crashes, but it suffers from slower context
switching. Multithreaded servers, on the other hand, do crash when one of
the child threads crashes, but have faster context switching. The developers at
Apache have combined the two approaches to increase the benefits while mini-
mizing the drawbacks. Figure 5-11 shows this hybrid architecture.
Chapter 5
128
3227c05.qxd 7/8/04 9:27 PM Page 128
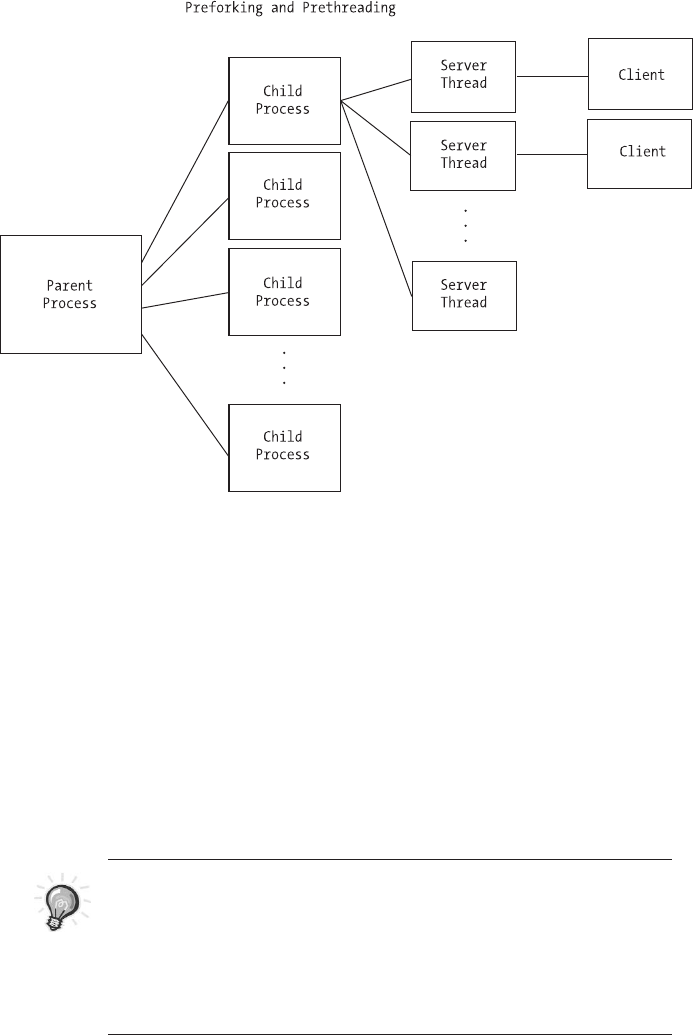
Figure 5-11. Combining preforking with prethreading
The way it works is by preforking a number of server processes. However,
these processes do not handle client connections. Instead, each child process
spawns a finite number of threads. The threads handle client connections. Thus,
when dealing with multiple clients, the server enjoys fast context-switching. As
for crashes, if a thread crashes, it takes out only other threads from the same
child process instead of the whole web server. Apache also provides a setting
that sets a number of requests that a process handles before it is terminated and
a new process (with child threads) is created. This ensures that resource leaks in
any one process will be cleaned up periodically.
TIP Don’t forget about multiplexing. Multiplexing can be added
to a multiprocess or multithreaded server to increase scalability.
Using this strategy, you can handle very large numbers of simulta-
neous users because each process or thread can handle more than
one client.You can even combine all three and have a multiprocess,
multithreaded server with multiplexing.
Client-Server Architecture
129
3227c05.qxd 7/8/04 9:27 PM Page 129
Which Method Should You Choose?
Your choice of method should be made based on the requirements of the server
you want to develop and the available resources in the environment in which the
server will run. Multiplexing is ideal for a low-volume server to which clients will
not stay connected for a long period of time. The danger with a multiplexing
server is that any one client might monopolize the server’s time and cause it to
stop responding to the other connected clients. In addition, a multiplexing server
cannot take advantage of symmetric multiprocessing (SMP) capabilities. The rea-
son is that a multiplexing server consists of a single process and, since a process
cannot be spread across multiple CPUs, the server will only ever use one CPU.
For ease of implementation, you can’t beat one process or thread per client.
Processes win in stability, while threads win in context-switch time, resource use,
and shared memory. Here, you must determine whether you need to coordinate
the actions of clients. In a web server, for example, the clients are autonomous.
So, the lack of shared memory isn’t really a concern. On the other hand, if you’re
designing a multiuser enterprise application, then coordinating clients can be
very important, and shared memory is essential. Of course, while using process
pools can help with the context switching, when a client connects, it will still
suffer from the lack of simple shared memory.
Table 5-1 summarizes the pros and cons of each method.
Dealing with Large Amounts of Data
In practice, the data transmitted between the client and the server is much larger
than that dealt with in the examples earlier in this chapter. Such large amounts
of data generate a few issues. First, large amounts of data will be broken up in
the underlying transport layer. IP has a maximum packet size of 65,536 bytes,
but even smaller amounts of data may be broken up depending on buffer avail-
ability. This means that when you call recv(), for example, it may not return all
of the data the first time, and subsequent calls may be required. Second, while
you are sending or receiving large amounts of data, you require your user inter-
face to be responsive. In this section, we will address these issues.
Nonblocking Sockets
The first step to carry out large-sized data transfers is to create nonblocking
sockets. By default, whenever we create a socket, it will be a blocking socket. This
means that if we call recv() and no data is available, our program will be put to
sleep until some data arrives. Calling send() will put our program to sleep if there
is not enough outgoing buffer space available to hold all of the data we want to
send. Both conditions will cause our application to stop responding to a user.
Chapter 5
130
3227c05.qxd 7/8/04 9:27 PM Page 130

Client-Server Architecture
131
Table 5-1. Method Pros and Cons
METHOD CODE SHARED NUMBER OF FREQUENCY OF LENGTH OF STABILITY CONTEXT RESOURCE SMP
COMPLEXITY MEMORY CONNECTIONS NEW CONNECTIONS CONNECTIONS SWITCHING USE AWARE
Multiplexing Yes Small N/A Low No
Forking Simple Large High Yes
Threading Simple Yes Fast Medium Yes
Preforking High Yes
Prethreading Yes Fast Medium Yes
Complex Fast YesSimilar to
threading,
but
depends on
how much
preforking
is done
One client
will crash
only its
parent
process, not
the whole
server.
Good for
long or short
connections.
Can handle new
connections
quickly if pools
are large
enough.
Depends
on pool
sizes
Yes, but
only
within
each
process
Preforking
plus
prethreading
One client
can crash
the server.
Good for long or
short
connections.
Can handle new
connections quickly
if the thread pool is
large enough.
Depends on
the size of
the thread
pool
Only complex
if using a
dynamic pool
Not as
fast as
threads
One client
cannot
crash the
server.
Good for long or
short
connections.
Can handle new
connections quickly
if the process pool is
large enough.
Depends on
the size of
the process
pool
Only
through
shmget()
Can be
complex if
using a
dynamic pool
and shared
memory
One client
can crash
the server.
Better for longer
connections.
Reduces thread
start penalty.
Time is required for
a new thread to
start.
Large, but
not as large
as forking
Not as
fast as
threads
One client
cannot
crash the
server.
Better for longer
connections.
Reduces start
penalty.
Time is required for
a new process to
start.
Only
through
shmget()
One client
can crash
the server.
Good for long or
short
connections.
Can handle new
connections quickly.
Can be very
complex
and difficult
to follow
3227c05.qxd 7/8/04 9:27 PM Page 131
Creating a nonblocking socket involves two steps. First, we create the socket
as we would usually, using the socket function. Then, we use the following call to
ioctl():
unsigned long nonblock = 1;
ioctl(sock, FIONBIO, &nonblock);
With a nonblocking socket, when we call recv() and no data is available, it
will return immediately with EWOULDBLOCK. If data is available, it will read what it
can and then return, telling us how much data was read. Likewise with send(),
if there is no room in the outgoing buffer, then it will return immediately with
EWOULDBLOCK. Otherwise, it will send as much of our outgoing data as it can before
returning the number of bytes sent. Keep in mind that this may be less than the
total number of bytes we told it to send, so we may need to call send again.
The select() call from the section on multiplexing is the second step to carry
out large-sized data transfers. As mentioned earlier, we use select() to tell us
when a socket is ready for reading or writing. In addition, we can specify a time-
out, so that in case a socket is not ready for reading or writing within a specified
time period, select() will return control to our program. This allows us to be
responsive to a user’s commands while still polling the socket for activity.
Putting It All Together
Combining nonblocking sockets with select() will allow us to send and receive
large amounts of data while keeping our application responsive to the user, but
we still need to deal with the data itself. Sending large amounts of data is rela-
tively easy because we know how much we need to send. Receiving data, on
the other hand, can be a little harder unless we know how much data to expect.
Because of this, we will need to build into our communications protocol either
a method to tell the receiving program how much data to expect or a fixed data
segment size.
Communicating the expected size of the data to the receiver is fairly simple.
In fact, this strategy is used by HTTP, for example. The sender calculates the size
of the data to send and then transmits that size to the receiver. The receiver then
knows exactly how much data to receive.
Another option is to use a fixed-sized segment. In this way, we will always
send the same amount of data in each segment sent to the receiver. Because of
this, the sender may need to break up data into multiple segments or fill under-
sized segments. Therefore, care must be taken in determining the segment size.
If our segment size is too large, then it will be broken up in the transport and will
be inefficient. If it is too small, then we will incur a lot of underlying packet over-
head by sending undersized packets. The extra work on the sending side pays
off on the receiving side, however, because the receiving is greatly simplified.
Chapter 5
132
3227c05.qxd 7/8/04 9:27 PM Page 132

Since the receiver is always receiving the same amount of data in each segment,
buffer overruns are easily preventable. Using fixed sizes can be a little more com-
plex on the sending side, but simpler on the receiving side.
Finally, here is some code that demonstrates sending data using nonblock-
ing sockets and select(). The strategy for receiving data is very similar.
int mysend(int sock, const char *buffer, long buffsize)
{
NOTE This code does not deal with the Big Endian/Little Endian
issue. It sends a buffer of bytes in the order provided. If you will be
dealing with clients and servers that use differing byte orders, then
you will need to take care in how the data is formatted before send-
ing with this function.
First, we declare some variables that we’ll need.
fd_set fset;
struct timeval tv;
int sockStatus;
int bytesSent;
char *pos;
char *end;
unsigned long blockMode;
Then, we set the socket to nonblocking. This is necessary for our send but
can be removed if we are already using nonblocking sockets.
/* set socket to non-blocking */
blockMode = 1;
ioctl(sock, FIONBIO, &blockMode);
Now we set up a variable to keep our place in the outgoing buffer and a vari-
able to point to the end of the buffer.
pos = (char *) buffer;
end = (char *) buffer + buffsize;
Next, we loop until we get to the end of the outgoing buffer.
while (pos < end) {
Client-Server Architecture
133
3227c05.qxd 7/8/04 9:27 PM Page 133
We send some data. If send() returns a negative number, then an error has
occurred. Note that 0 is a valid number. Also, we want to ignore an error of
EAGAIN, which signifies that the outgoing buffer is full. Our call to select() will
tell us when there is room again in the buffer.
bytesSent = send(sock, pos, end - pos, 0);
if (bytesSent < 0) {
if (bytesSent == EAGAIN) {
bytesSent = 0;
} else {
return 0;
}
}
We update our position in the outgoing buffer.
pos += bytesSent;
If we are already to the end of the buffer, then we want to break out of the
while loop. There is no need to wait in the select() because we are already done.
if (pos >= end) {
break;
}
Next, we get our watch list ready for select(). We also specify a timeout of
5 seconds. In this example, we treat a timeout as a failure, but you could do
some processing and continue to try and send. It is important to use select()
here because if the outgoing buffer is full, then we end up with a tight busy-wait
loop that can consume far too many CPU cycles. Instead, we allow our process
to sleep until buffer space is available or too much time has lapsed without
space becoming available.
FD_ZERO(&fset);
FD_SET(sock, &fset);
tv.tv_sec = 5;
tv.tv_usec = 0;
sockStatus = select(sock + 1, NULL, &fset, &fset, &tv);
if (sockStatus <= 0) {
return 0;
}
}
return 1;
}
Chapter 5
134
3227c05.qxd 7/8/04 9:27 PM Page 134
Summary
In this chapter, we looked at the different ways to handle multiple, simultaneous
clients. First, we examined how to handle multiple clients in a single server
process by using multiplexing. Then, we moved on to multiprocessing servers
and the single process per client versus a process pool. Next, we introduced mul-
tithreaded servers. Much like multiprocess servers, multithreaded servers can be
either a one-thread-per-client or a thread-pooled architecture. Afterward, we
looked at an interesting approach used by the Apache Web Server version 2, in
which multiprocessing is combined with multiple threads. We closed the chapter
by covering how to handle sending and receiving large amounts of data by using
nonblocking sockets and the select() system call.
In the next chapter, we’ll examine what’s involved in implementing a custom
protocol.
Client-Server Architecture
135
3227c05.qxd 7/8/04 9:27 PM Page 135
3227c05.qxd 7/8/04 9:27 PM Page 136
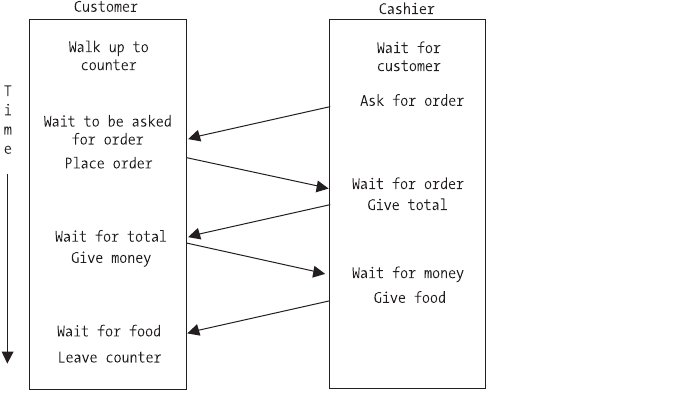
CHAPTER 6
Implementing Custom
Protocols
WHEN DEVELOPING A CLIENT-SERVER application, you have to make protocol choices
at two levels. First, you must choose a transport protocol. The most common
types are TCP and UDP. We will look at that decision in Chapter 7. The second
choice is at the application level. Some common application protocols include
HTTP, FTP, and SMTP.
In this chapter we’ll cover application protocols and how to design our own
to be used in the chat application we develop in Chapter 9. Finally, we’ll examine
how to register our custom protocol with the system.
What Is a Protocol?
A protocol is a set of rules that the client and server each follow for communi-
cation to take place. We use protocols in real life all the time. For instance,
consider going to a fast-food restaurant for lunch. The protocol we follow looks
something like Figure 6-1.
Figure 6-1. Fast-food restaurant protocol
137
3227c06.qxd 7/8/04 9:27 PM Page 137
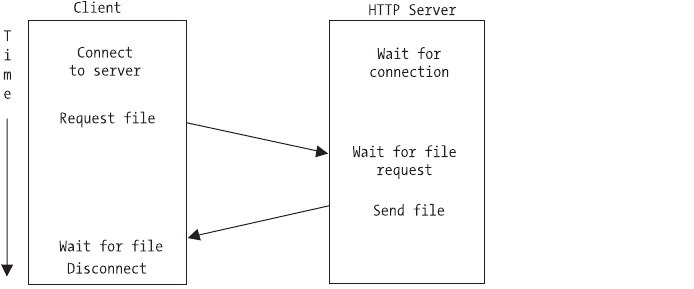
First, we approach the counter and wait to be asked for our order. After we
are asked, we place our order and wait to be given a total to pay. Once the total is
provided, we pay and wait for our food to be delivered. After receiving the food,
we leave the counter.
Now, compare this to Figure 6-2, which shows the HTTP protocol steps. In
this case, the client is requesting a file instead of a hamburger, but the idea is the
same. Most protocols consist of a “conversation” between the client and the
server, with the client making requests that the server fulfills.
Figure 6-2. HTTP protocol
Designing a Custom Protocol
Designing a custom protocol for your client and server to communicate involves
figuring out what services that the client will need to request and how the server
will respond. The following sections outline some considerations when design-
ing a custom application protocol.
What Will the Message Format Be?
Traditionally, client-server protocols have been text-based and, therefore, the
format was based on delimiters. For example, in SMTP, each command is ter-
minated by a carriage return/linefeed pair. In addition, each command line
consists of a command followed by a space and then any parameters.
Text-based protocol messages also depend on context sensitivity. By that,
we mean that the ordering of the parameters in a message is important, espe-
cially when using delimiters. When parsing a command, the application will first
Chapter 6
138
3227c06.qxd 7/8/04 9:27 PM Page 138
look at which command it is. Then, once the command is determined, the appli-
cation knows how many parameters to expect. So, for example, if a command
should have two parameters, then the delimiter can occur in the second para-
meter without being interpreted as a delimiter. This is very convenient when the
delimiter is a space.
If you decide upon a binary protocol, then the format will be even more
important. For example, you will need to address the Big Endian/Little Endian
problem in addition to differing data type sizes on different client-server hard-
ware architectures.
Our message format will be similar to the one used by the IRC protocol. This
protocol is described in RFC 1459—you can find it by performing a quick Google
search for “IRC+RFC”. The basic format for a message is a command followed by
one or more parameters. Each of the parameters is separated by a space, and the
entire command is terminated by a carriage return/linefeed pair.
We will also make use of context sensitivity. Messages sent via chat frequently
contain spaces. On those commands that messages are sent, we will make the
message be the last parameter. In this way, we won’t have to worry about the
spaces because the parser will know that it’s already on the final parameter and
won’t be looking for more delimiters.
The client commands consist only of alpha characters. The server has two
types of messages that will be sent to clients: replies to client commands and
independent messages. A reply to a client command will be a numeric code
followed by a space and then a user-friendly description. These are used only
to signify the success or failure of the client command. Independent messages
from the server will follow the same format rules as client commands. With the
server following these rules, the client will immediately know whether a partic-
ular message is a reply to a command or an independent message. It simply
checks to see if the command starts with a numeric identifier or an alpha
sequence.
Will the Server Be Passive or Active?
If the server is passive, then it will only ever act when prompted by the client.
Communication is initiated only by the client through the submission of a com-
mand. Once the server has executed the command and provided a response, it
simply waits for the client to submit another request. This is how traditional
client-server protocols were designed. For example, SMTP, POP, and HTTP all
work this way.
If it is active, then it may need to communicate information to the client
without the client asking for anything. In this case, the server is not only waiting
for the client to submit a request, but also may send a message to the client on
Implementing Custom Protocols
139
3227c06.qxd 7/8/04 9:27 PM Page 139
its own. Therefore, the client must always be open to receiving messages from
the server, even when it hasn’t submitted a command. A chat server is a good
example of an active server. Once a client is connected, the server may relay
messages to it from other users without the client requesting anything.
Our server will be active. When chatting with other users, the server can
have a message to deliver to the client at any time. Because of this, we need to
not only be able to send requests to the server, but also be prepared to receive
both responses to our requests and independent messages. In this case, the
messages from the server will need to be marked in such a way that we know
whether they are responses to a request or messages from another user.
Will the Server Handle Multiple Requests?
Most traditional protocols (SMTP, HTTP, POP, etc.) are set up to only handle one
request from a client at a time. This means that once a client submits a com-
mand, it must wait for the server to respond before submitting another. Note
that this is a different issue than whether the server can handle requests from
multiple clients. We looked at solutions to that in Chapter 5.
If the client can send a request before the server has completed a previous
request, then a mechanism for identifying the requests is needed. Usually each
message is stamped with a unique identifying number so that when the server
provides a response, the client will need to know which request has been fulfilled.
An interesting implementation of extending a traditional protocol to handle
multiple requests is described in RFC 1854: SMTP Service Extension for Command
Pipelining. (You can find it on the Web by doing a Google search for “RFC+1854”.)
In this case, while the server can handle multiple requests from a client, it
responds to the requests in order. This eliminates the need for any identifying
numbers for the commands/responses, but it does require the client to match
up the responses with the corresponding command.
For our chat server, the client will need to make only one request at a time.
This application does not have to do the extensive calculations or data gathering
that would necessitate allowing the client to queue requests. Each request made
by the client will have an immediate success/failure reply from the server.
Will the Protocol Be Sessioned or Sessionless?
This concept was covered in Chapter 4, but it’s important in the design of a
custom protocol. Recall that with a sessionless protocol, state is not maintained
between client requests as it is with a sessioned protocol.
We will use a sessioned protocol for our chat server. Once we go through the
login procedure with the client, the server will retain the client’s nickname and
Chapter 6
140
3227c06.qxd 7/8/04 9:27 PM Page 140
associate it with the connection. A good reason for this has to do with the nick-
names. When a client logs in, it will request to be known by a certain nickname in
the virtual room. This nickname needs to be unique to the room and, as such, will
be checked against the nicknames already in use. Once a nickname is accepted,
the user is logged in and the nickname is tied to the connection (session).
If we used a sessionless protocol, then the nickname would need to be
transmitted with each message sent. In this case, it would be impossible to pre-
vent two clients from using the same nickname in the same virtual room. This
would make conversations very confusing indeed!
Will the Protocol Use Plain Text or Binary?
We will cover this topic in more detail in Chapter 7. Each has its advantages and
disadvantages. For example, while text is human-readable, which is easier to
debug for example, it usually consumes more bandwidth than a comparable
binary format.
For our protocol, plain text will be the best choice. We won’t send any com-
plicated objects or files—just text messages. Also, it will make the application
much easier to debug, as you’ll see in Chapter 8. Because we’ve chosen plain
text, however, we’ll need to decide upon a very specific layout to each text mes-
sage so that it can be easily parsed.
How Will Authentication Be Handled?
Security has become an increasingly important issue for network applications.
One aspect of security is authenticating a user. This involves not only verifying
that the user is authorized to connect to the server, but also ensuring that the
user is who she says she is. We discuss this topic in greater detail in Part Three
of this book.
For our purposes, we’ll allow anyone to connect to the chat server as long
as that person provides a unique nickname. Therefore, our authentication will
be very simple and consist of the client submitting a nickname for approval.
What About Privacy?
Another issue to address is privacy. When a client and server are communicating,
it is easy for someone to eavesdrop on the conversation. When implementing a
protocol, you must decide whether or not encryption is applicable. We discuss
this topic in greater detail in Part Three of this book.
Implementing Custom Protocols
141
3227c06.qxd 7/8/04 9:27 PM Page 141

In our simple example, we won’t provide any kind of encryption for the client-
server communication. All commands and responses will be sent in plain text.
Our Chat Protocol
In this section, we will design a protocol to be used in the chat application we
develop in Chapter 9. The client will need to be able to log into a server with a
nickname and send text messages to other clients connected to the server. There
will be two types of messages: public and private. When a client sends a public
message, it will be relayed to each of the other clients that is connected to the
“virtual room.” A private message will be sent only to the user specified. Finally,
a user may quit and leave the room.
In addition, we will adopt IRC’s notion of a room operator. The first person
to log into the server will be designated as an operator. An operator has three
extra commands available. First, an operator can make another user an operator.
Second, an operator can kick a user out of the room. And third, an operator can
set the topic for the room.
Client Commands
In this section, we will cover each of the client commands as well as the possible
server responses. Table 6-1 summarizes these commands.
Table 6-1. Client Commands
COMMAND DESCRIPTION
JOIN Used when the client connects to join the room and set its nickname.
MSG Posts a message to the entire room.
PMSG Sends a private message to a single user.
OP Gives room operator privileges to another user. This can be used only
by a room operator.
KICK Kicks a user out of the room and disconnects him. This can be used
only by a room operator.
TOPIC Sets the topic for the room. This can be used only by a room operator.
QUIT Used when the client wishes to disconnect.
Chapter 6
142
3227c06.qxd 7/8/04 9:27 PM Page 142
The following sections describe each command in more detail. Note that a
client may have only one outstanding command at a time, so neither the com-
mand nor the responses have any kind of identifying number.
JOIN
The first command that a client issues after connection is the JOIN command.
Its syntax is as follows:
JOIN <NICKNAME>
The client sends the JOIN command and the nickname that the user would
like to use. Because our commands are space delimited, a nickname cannot con-
tain a space. In addition, the nickname must not be currently used by any other
client. The server will respond with one of the following:
100 OK
200 NICKNAME IN USE
201 INVALID NICKNAME
999 UNKNOWN ERROR
In our protocol, the server response 100 will always mean that the command
was executed successfully. Any other response is an error code. Each error code
is followed by a short description of the error. We’ll reserve code 999 for an error
for which we didn’t plan.
MSG
This is the command for a public message, and it has the following syntax:
MSG <ROOM MESSAGE>
Notice that the only parameter is the message itself. A message submitted
with this command will be relayed to every other client connected to the server.
Remember, too, that we use a carriage return/linefeed to signify the end of a
command. Because of this, we need to be careful to not allow them within the
ROOM MESSAGE. We can, however, have spaces in the message. Since the MSG com-
mand takes only a single parameter, everything up to the carriage return/linefeed
will be considered the message.
Implementing Custom Protocols
143
3227c06.qxd 7/8/04 9:27 PM Page 143
The server can respond with one of the following:
100 OK
999 UNKNOWN ERROR
Since this command is very general in nature, it will most likely always be
successful. However, to allow for future uses, it is always good to leave open the
possibility for failure.
PMSG
This is the command for a private message. It has the following syntax:
PMSG <NICKNAME> <MESSAGE>
Since this is a private message intended for a single user, we specify not only
the message, but also the nickname of the recipient. Remember that the NICKNAME
cannot contain spaces, but the MESSAGE may. Since the message is the last para-
meter and we know that the PMSG command only takes two parameters, we will
consider everything after the NICKNAME up to the carriage return to be the MESSAGE.
The server can respond with one of the following:
100 OK
202 UNKNOWN NICKNAME
999 UNKNOWN ERROR
The return codes here are the same as for MSG, but with one addition. If the
message is sent to a nickname that is not in the room, then error 202 is returned.
OP
This is the command for giving another user operator privileges. It can be exe-
cuted only by someone who already has operator status. It has the following
syntax:
OP <NICKNAME>
The only parameter for this command is a NICKNAME. The server can respond
with the following:
Chapter 6
144
3227c06.qxd 7/8/04 9:27 PM Page 144
100 OK
202 UNKNOWN NICKNAME
203 DENIED
999 UNKNOWN
Besides the responses that you’ve already seen, a denied response is possi-
ble. Remember that only a client with operator status can make another user an
operator. If a client that is not an operator executes the OP command, error 203
will be returned.
KICK
Operators also have the ability to kick another client out of the room. The KICK
command has the following syntax:
KICK <NICKNAME>
The only parameter for this command is a NICKNAME. The server can respond
with the following:
100 OK
202 UNKNOWN NICKNAME
203 DENIED
999 UNKNOWN
The responses for this command are the same as for OP. The command will
succeed if the client executing it is an operator and the NICKNAME is known.
TOPIC
Another operator-only command allows the client to change the topic in the
room. The topic is for informational purposes only and simply tells the users
logging on what the users in the room are talking about. For instance, the topic
might be “Network Programming on Linux” and the users would be helping each
other with their Linux network programming.
When a topic is set, it is relayed to all clients connected to the server. In
addition, after a client successfully logs in, the current room topic is sent. The
syntax for the TOPIC command is
TOPIC <TOPIC NAME>
Implementing Custom Protocols
145
3227c06.qxd 7/8/04 9:27 PM Page 145

The only parameter for this command is a TOPIC NAME. Note that because
the TOPIC command takes only one parameter, the TOPIC NAME may contain
spaces. The server can respond with the following:
100 OK
203 DENIED
999 UNKNOWN
The responses for this command are similar to the other operator-only
commands.
QUIT
Finally, we have a message that the client uses to disconnect from the server.
When the server receives this command, it will relay it to all of the remaining
connected clients. Its syntax is as follows:
QUIT
No parameters are required, and the server has only two responses available:
100 OK
999 UNKNOWN
Server Messages
Since we’re going to have an active server, it can send out messages to the clients
at any time. Table 6-2 summarizes these messages.
Table 6-2. Server Messages
MESSAGE DESCRIPTION
JOIN Tells the client that a user has joined the room
MSG Relays a message that was posted to the room
PMSG Relays a private message to the client to which it was sent
OP Tells the client that a user has been given operator status
KICK Tells the client that a user has been kicked out of the room
TOPIC Tells the client that the topic for the room has been set/changed
QUIT Tells the client that another user has left the room
Chapter 6
146
3227c06.qxd 7/8/04 9:27 PM Page 146
Notice that the commands in Table 6-1 are the same as the commands
that the client can send. Each one relays a successful client command to each
of the other connected clients. The following sections cover each message and
its syntax.
JOIN
The JOIN message is sent to all connected clients to tell them that a new user has
joined the room. In addition, it is used when a client first connects to send the
list of clients already connected. A JOIN message will be sent for each client that
is in the room at the time a client connects. Its syntax is as follows:
JOIN <NICKNAME>
The only parameter is the NICKNAME of the new user. Upon receiving this mes-
sage, the client can update its list of who is in the room. Usually, a chat program
will provide this list graphically to the user at all times.
MSG
The MSG message is sent to all connected clients when a client posts a message to
the room. It has the following syntax:
MSG <NICKNAME> <ROOM MESSAGE>
Note that the server version of the MSG message has two parameters. In
addition to the message that was posted, the NICKNAME of the user that posted the
message is sent. The client can then use this information to communicate to
the user who is saying what.
PMSG
The PMSG is sent to a single client when a private message has been posted. It has
the following syntax:
PMSG <NICKNAME> <MESSAGE>
Like MSG, PMSG has two parameters. The first parameter is the NICKNAME of the
client that sent the private message and the second is the message itself.
Implementing Custom Protocols
147
3227c06.qxd 7/8/04 9:27 PM Page 147
OP
The OP message is sent to all connected clients to inform them that a user has
been given room operator privileges. Most chat clients choose to use this infor-
mation to highlight that nickname in the room user list. The OP message is also
used in conjunction with the JOIN message when a client first connects to tell the
joining client which members of the room are operators. It has the following
syntax:
OP <NICKNAME>
This message has a single parameter that indicates which user was given the
room operator status.
KICK
When a room operator kicks out another user, the server will send a KICK mes-
sage to all of the connected clients. This lets them know two things: first, that
they can remove that user from their list of users in the room, and second, that
the user was kicked out rather than leaving on his or her own. It has the follow-
ing syntax:
KICK <KICKED NICKNAME> <OP NICKNAME>
The KICK message has two parameters, both of them nicknames. The first
parameter is the NICKNAME of the user that was kicked out of the room. The sec-
ond parameter identifies the room operator who did the kicking.
TOPIC
Room operators are the only users who are able to set the topic for the room.
When the topic is set, all connected clients get a TOPIC message to let them know
what the topic is. The client application will usually display this to the user
somewhere on the screen. The TOPIC message has the following syntax:
TOPIC <OP NICKNAME> <TOPIC>
The TOPIC message has two parameters. Not only is the new TOPIC specified,
but also the nickname of the operator that set the topic is specified.
Chapter 6
148
3227c06.qxd 7/8/04 9:27 PM Page 148
QUIT
When a user leaves the room, either by issuing a QUIT command or by becoming
disconnected in some way, the server will send a QUIT message to all remaining
connected clients. This allows them to update their list of those room members.
It has the following syntax:
QUIT <NICKNAME>
The QUIT message has a single parameter that specifies which user left
the room.
Our Chat Protocol in Action
Now we will put it all together and see what a typical client-server session would
look like. Here is an example session. The client commands are in bold. The line
numbers are for the discussion that follows and are not part of the protocol.
1: JOIN madchatter
2: 100 OK
3: TOPIC topdog Linux Network Programming
4: JOIN topdog
5: OP topdog
6: JOIN lovetochat
7: JOIN linuxlover
8: JOIN borntocode
9: MSG hi all!
10: 100 OK
11: MSG topdog welcome madchatter.
12: OP madchatter
13: MSG linuxlover hi mad!
14: MSG lovetochat hi!
15: MSG borntocode sup chatter.
16: PMSG lovetochat linuxlover is getting a bit too obnoxious and topdog won't
do anything.
17: PMSG lovetochat no prob. i'll take care of it.
18: 100 OK
19: KICK linuxlover
20: 100 OK
21: PMSG lovetochat he's gone.
22: 100 OK
23: PMSG lovetochat thanks!
...
Implementing Custom Protocols
149
3227c06.qxd 7/8/04 9:27 PM Page 149
After connecting, we issue the JOIN command as seen in line 1. The server
then checks to make sure that our nickname is valid and not used. We get the
success response in line 2. Next, we start to receive messages from the server
telling us the room topic in line 3 and the current members of the room in lines
4, 6, 7, and 8. Note that in line 5, we are told that topdog is a room operator.
In line 9, our client issues a command to post a message to the room, and
we get the success response in line 10. We get messages that relay two com-
mands issued by topdog. First, we get a message that topdog posted to the entire
room, and second, we are informed that we have been given room operator
privileges. These are shown on lines 11 and 12.
In lines 13 and 14, we get three more messages from the server. Each is a
message posted to the entire room.
In line 16, we get a private message from lovetochat. In line 17, our client
issues the PMSG command to respond. We get the success reply from the server on
line 18.
On line 19, we issue the KICK command and kick linuxlover out of the room.
Notice that while we get a success response on line 20, we get no further mes-
sage from the server about the KICK. The server will send out the KICK messages
to all of the other connected clients, but not to the client that did the kicking.
Finally, in lines 21, 22, and 23, we have a couple of private messages.
Protocol Registration
Once we’ve created a custom application protocol, we’ll want to register it
with the system so that others know about it. Registering it with the system
publishes the fact that this protocol exists and informs others which communi-
cations port that it uses. One big advantage here is that if the port number of the
protocol needs to change, then it has to be updated in only one place, and the
applications don’t need to be recompiled. In Linux, this information is stored in
the file /etc/services. Once the protocol is registered with the system, we can
use the functions getservent(), getservbyname(), and getservbyport() to read the
entries of this file from our application.
The /etc/services File
The services file is a text file of the form
service-name port/protocol [aliases ...] #comment
Chapter 6
150
3227c06.qxd 7/8/04 9:27 PM Page 150
For example, to see the entries for the SMTP protocol, open a terminal and
type the following:
cat /etc/services | grep smtp
You may see something similar to the following displayed:
smtp 25/tcp mail
smtp 25/udp mail
smtps 465/tcp #SMTP over SSL (TLS)
Notice that we get two entries for SMTP on port 25: one for TCP and one for
UDP. Even though SMTP uses only TCP for transport, it is common practice to
register both TCP and UDP when adding an entry for an application protocol. In
addition, notice that the SMTP entries each have an alias named MAIL. As you’ll
see in next section, the port numbers can be looked up using a name, and you
can supply either the name of the protocol or one of its aliases. Finally, you’ll see
that we have an entry for secure SMTP using the TLS protocol.
If we wanted to register the chat protocol we developed in this chapter with
the system, we can do that in the services file. First, we need to give our protocol
a name. Let’s use “apress-chat”. Next, we need to decide on a port. Let’s use 5296.
With that information, we can add the following entries to the /etc/services file:
apress-chat 5296/tcp
apress-chat 5296/udp
The port numbers and transport protocol information for our chat protocol
are now registered with the system and can be retrieved with the functions
described in the next section.
Service Entry Functions
The system provides a set of functions for reading the entries of the services file
in a uniform manner. The getservent(), getservbyname(), and getservbyport()
functions each return a pointer to a servent structure. The structure is defined
as follows:
struct servent {
char•s_name /* official service name */
char•*s_aliases /* alias list */
int s_port /* port number */
char s_proto /* protocol to use */
};
Implementing Custom Protocols
151
3227c06.qxd 7/8/04 9:27 PM Page 151
To use these functions, you’ll need to include the <netdb.h> header file.
setservent()
The setservent() function opens the services file and rewinds the file pointer to
the beginning. This allows you to call getservent() repeatedly to iterate over the
service entries. The setservent() function has the following signature:
void setservent(int stayopen);
If stayopen is true, then the file will not be closed between calls to the
getserv* functions.
getservent()
The getservent() function returns a structure that contains the service infor-
mation for the next entry in the services file. It returns NULL if the end of the file
has been reached. The getservent() function has the following signature:
struct servent *getservent(void);
endservent()
Once you have the services file open using setservent(), you close it by calling
endservent(). Its signature looks like this:
void endservent(void);
getservbyname()
The getservbyname() function searches the services file for an entry that matches
the provided name and protocol (i.e., TCP/UDP). You can search all protocols by
specifying a NULL for proto. The function signature looks like this:
struct servent *getservbyname(const char *name, const char *proto);
For example, to search for the SMTP entry, you would call it as follows:
struct servent *s = getservbyname("smtp", NULL);
Chapter 6
152
3227c06.qxd 7/8/04 9:27 PM Page 152
getservbyport()
Finally, you can search the services file entries by port number and protocol.
Again, you can provide NULL for the protocol if you don’t care whether it is TCP
or UDP. The function is declared as follows:
struct servent *getservbyport(int port, const char *proto);
For example, to search for the entry that uses port 80 (HTTP), you would call
it like this:
struct servent *s = getservbyport(80, NULL);
Summary
In this chapter, we examined what an application protocol is and covered some of
the considerations you must take into account when designing one from scratch.
Then we laid the foundation for the chat application we’ll create in Chapter 9 by
developing the protocol that it will use.
In the next chapter, we’ll look at considerations for client-server communi-
cations and techniques for server development.
Implementing Custom Protocols
153
3227c06.qxd 7/8/04 9:27 PM Page 153
3227c06.qxd 7/8/04 9:27 PM Page 154
CHAPTER 7
Design Decisions
IN THIS CHAPTER,WE’LL LOOK at some of the considerations you must make when
developing a client-server application. First, we’ll examine the TCP and UDP
transport protocols. In the last chapter, we covered developing a custom appli-
cation protocol. In this chapter we’ll weigh the costs and benefits of using an
existing protocol versus developing one from scratch and whether or not we
should use plain text or binary. We’ll then look at client-server architecture and
examine two- and three-tier architectures.
Finally, we’ll focus on client-specific and server-specific considerations, in
turn. Client-specific considerations include building a monolithic client versus a
modular one. As for server-specific considerations, we’ll consider daemonizing,
privilege dropping, chroot() jails, and various logging options.
TCP vs. UDP
As you’ll remember from Chapter 3, the TCP and UDP protocols are two ways to
transmit data over the lower-level IP protocol. Here we’ll compare and contrast
these protocols so that you can choose which one will serve your particular
application best.
Reliability
TCP is reliable, in that if a packet is lost it will be resent. If the packet ultimately
can’t be delivered, you’ll be notified via an error condition.
UDP isn’t reliable. If a packet is lost between the sender and receiver, the
sender will not receive any kind of notification. This isn’t always a problem. For
example, if you’re sending a heartbeat notification, it usually isn’t a problem
when one packet is lost. The application monitoring the heartbeat won’t take
action unless several packets are lost.
If your application requires instant notification when a packet is lost, then
choose TCP. Otherwise, you might consider UDP.
155
3227c07.qxd 7/8/04 9:30 PM Page 155
Packet Ordering
TCP provides automatic ordering of packets to ensure that the receiving appli-
cation is handed data in the order in which it was sent.
UDP doesn’t provide automatic ordering. The packets arrive in whatever
order they happen to be delivered by the intermediate network. This doesn’t
have to be a problem. You can add sequence numbers to your packets, or the
order may not even be an issue. For example, a time-of-day server sends packets
that are self-contained; packet ordering isn’t an issue in this case.
If your application sends small, self-contained packets, then UDP may be a
good choice. If your application sends larger pieces of information, then it’s very
convenient to use TCP instead of developing your own ordering scheme.
Flow Control
TCP provides automatic flow control to keep from flooding the receiver with
packets; UDP does not. If you will be sending large amounts of data using UDP,
then you will need to build some kind of flow-control mechanism into your
application.
Full Duplex
TCP is full duplex. This means that an application can send and receive data on
the same connected TCP port. In TCP, the protocol must keep multiple buffers
and keep track of what is coming and going.
UDP is inherently full duplex. Since no connection is ever made on a
UDP port, you can both send and receive on that port because each packet is
independent.
Overhead
TCP has more protocol overhead than UDP. To provide the previously described
services, the TCP protocol must perform connect/disconnect handshaking,
maintain buffers, track packet delivery, and more.
UDP does not need to do any of this. It simply sends the packet on its way
or receives a packet that has arrived.
Chapter 7
156
3227c07.qxd 7/8/04 9:30 PM Page 156
TCP vs. UDP Conclusion
TCP and UDP each have their place. In fact, some applications use a combi-
nation of the two. For example, a lot of online multiplayer games use TCP for
data transfer and UDP for things like a client heartbeat or to send opponent
position updates.
TCP is generally a good choice, though, even with its associated overhead.
Most of the overhead is in the connection. Therefore, if your application stays
connected for any length of time, then the cost is mitigated. In addition, if you’re
sending any quantity of data, then it’s cheaper to use TCP’s built-in reliability,
ordering, and flow control instead of building your own.
UDP is a good choice if you’re sending small amounts of self-contained data,
especially if you’re sending it to many different places. Since no connection is
made, it’s very inexpensive, unlike TCP, which has to go through an entire three-
way handshake for each connection.
Application Protocol Choices
When you choose the application protocol, you have two important choices to
make. First, you’ll need to decide whether to create the protocol from scratch or
use an existing protocol. Second, if you create a protocol from scratch, you’ll
need to determine whether it should be plain text or binary.
Established vs. Custom
Choosing an established protocol can greatly simplify your development process.
The protocol will have already been developed and tested. It will give you a
framework in which you can work, and you can draw upon the experiences of
others who have used it for applications.
When choosing an existing protocol, however, you must pay attention to
how the protocol works and whether or not it will fit with your application. For
example, some have chosen to use the HTTP protocol. The two most prominent
examples are the Simple Object Access Protocol (SOAP) and the Internet Printing
Protocol (IPP). SOAP is from the World Wide Web Consortium (W3C) and is
described at http://www.w3.org/2000/xp/Group. IPP is described in RFCs 2565,
2567, 2568, and 2569. In both instances, the protocols are for applications where
a client is requesting services from the server. For this, HTTP works well. For a
chat program, though, HTTP does not work very well. A chat program requires
that either the client or the server be able to send commands at any time.
Design Decisions
157
3227c07.qxd 7/8/04 9:30 PM Page 157
Creating a protocol ensures that it does exactly what you need and want, but
it requires more development time and testing. Of course, you’ll be the only one
to ever use your custom protocol, too, so you can’t look at other implementations
for guidance.
Binary vs. ASCII
The choice between binary and plain text involves determining which is better
for your particular application. Each has its benefits and detriments.
Plain text is easier to debug because it is generally human readable. In fact,
most Internet standard protocols are plain text. Plain text also deals with cross-
platform issues. Most platforms read and interpret byte-length text in the same
way. Platforms do not generally handle binary data in the same manner. No
doubt you’ve heard of the Big Endian/Little Endian issue (this was covered in
Chapter 2).
On the other hand, binary transmission can be much more efficient. Consider
sending an image via SMTP, for example. SMTP mandates that the contents of the
e-mail message be plain text. In order to work around this, binary objects such as
images are encoded in Base64 or some other binary-to-text encoding scheme.
Each increases the size of the resulting data by around one-third to one-half.
Client-Server Architecture
An important design decision involves the overall architecture of your client-
server application. This determines where the application logic and application
data will reside. In this section we’ll look at the two most prevalent architectures:
two-tier and three-tier.
Two-Tier Architecture
The two-tier architecture is traditionally how client-server applications were
built. As you can see in Figure 7-1, this architecture consists of a client compo-
nent and a single server component. With this style of application, the majority
of application logic resides in the client, and the server is usually a simple
provider of services and data.
Chapter 7
158
3227c07.qxd 7/8/04 9:30 PM Page 158
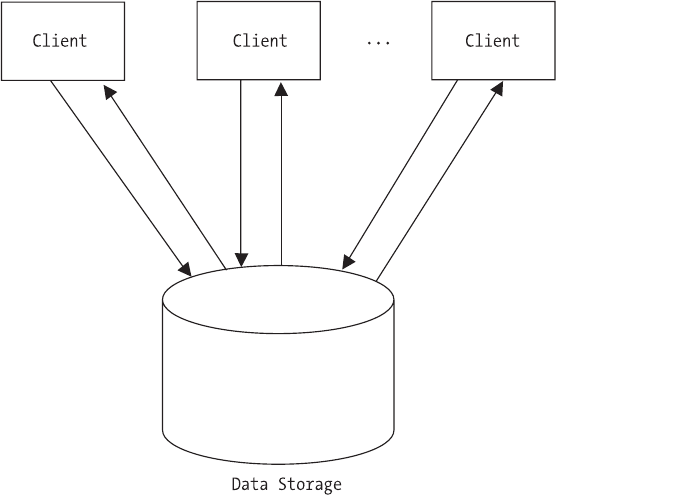
Figure 7-1. Two-tier architecture
While it’s simple to implement, you can immediately see drawbacks to this
design. First, scalability will be a concern. Since each client is independently
accessing the data from the server, coordination can be slow. Second, anytime
the application logic changes, a new client must be distributed. This can cause
many problems for end users. Finally, the client is usually manipulating the
application data directly. This can cause extensibility issues when, in the future,
you would like to write a different client that works with the same server.
Three-Tier Architecture
Today, most large-scale network applications are designed using the three-tier
architecture. In Figure 7-2, you can see that, in addition to the client component
and single server component in the two-tier architecture, there is another mid-
dle server component. In this case, the application logic resides in the middle
layer and the application data in the data layer.
Design Decisions
159
3227c07.qxd 7/8/04 9:30 PM Page 159
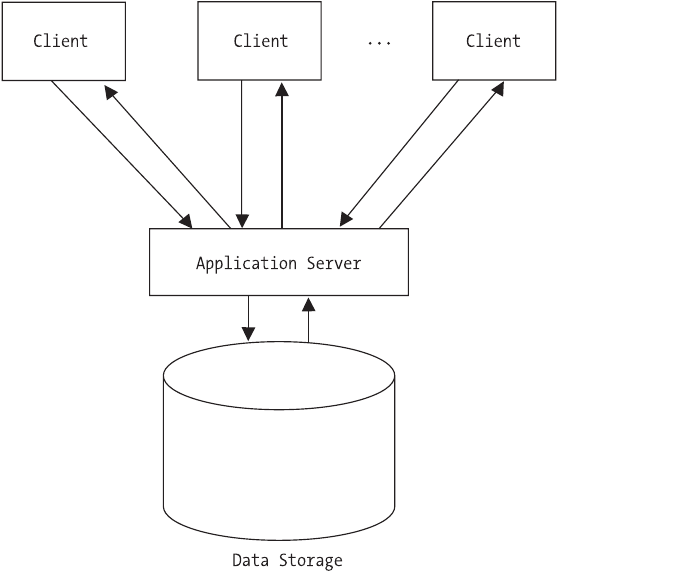
Figure 7-2. Three-tier architecture
While this architecture is somewhat more complex to implement, you obtain
definite improvements over the two-tier design. First, you’ll achieve a much
higher level of scalability. The middle layer can coordinate data access and effi-
ciently submit requests to the data layer. Second, you can alter application logic
without necessarily requiring the distribution of a new client. Finally, other
clients can easily be developed that use the services of the middle layer without
worrying about the underlying application data being improperly accessed or
manipulated. Three-tier architectures typically use two different types of clients:
thick and thin.
Thick Clients
A thick client contains at least some of the application logic. This can range
from data validation to more complex logic involving the overall process itself.
In a two-tier architecture, all of the clients are thick clients. In a three-tier
Chapter 7
160
3227c07.qxd 7/8/04 9:30 PM Page 160

architecture, the clients are thick clients to a varying degree, and you can make
a client as thick as desired.
Thin Clients
A thin client contains no application logic. Currently, the most popular form for
a thin client is a web-based application. The user only needs a web browser to
access the application. All application logic and data manipulation is performed
by the server.
Client-Side Considerations
When developing your client-server application, keep in mind how (and by
whom) the client will be developed. Traditional Internet servers tend to force
the user to develop a monolithic client. Some newer servers, such as database
servers, provide a client API to ease the development of a client.
Monolithic Client
A monolithic client, as shown in Figure 7-3, handles the network communications,
application protocol management, and user interaction, all in the main applica-
tion. Most Internet standard protocol clients are built in this way. Remember that
protocols like HTTP, SMTP, POP3, and FTP are text based. Therefore, the client
need only send and receive text streams to communicate with the server. While
this means that the application is very easy to debug, it can add to the overall
complexity of the client application. For example, the client developer will need
to understand the application protocol and be able to implement it.
Figure 7-3. Monolithic client architecture
Many libraries have been developed to cope with this issue. For example,
the libspopc (http://brouits.free.fr/libspopc) library provides encapsulation of
Design Decisions
161
3227c07.qxd 7/8/04 9:30 PM Page 161
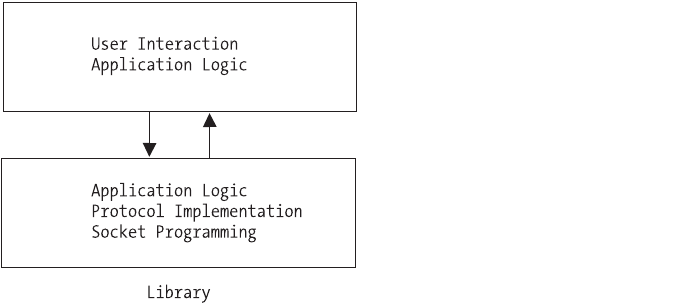
the POP3 protocol. It provides a high-level API for accessing a POP3 server with-
out the client creating sockets or knowing the POP3 protocol.
Modular Client
A modular client, as shown in Figure 7-4, uses an external library provided by
the server developer. This library encapsulates the network communications and
application protocols. The client, therefore, must only worry about the user inter-
action. This makes it very easy for someone to develop a client. In addition, you
can change the application protocol without changing any of the client code.
Figure 7-4. Modular client architecture
An example of this type is the database client. Most database servers come
with a set of client libraries. These libraries handle all of the underlying socket
communications as well as the application-level communication.
Server-Side Considerations
In this section, we’ll examine four very useful server-side considerations. First,
we’ll look at the common practice of daemonizing your server. Next, we’ll look at
system logging. Servers should always provide a log of their activities, and we’ll
describe how to use the system logger. We’ll then cover security by looking at
how to do “privilege dropping” and chroot() jails. Both techniques are useful for
creating a safe server process.
Chapter 7
162
3227c07.qxd 7/8/04 9:30 PM Page 162
Daemonizing
When you’re writing a network server, quite often it’s a good idea to make it a
daemon. A daemon is a program that runs in the background and isn’t attached
to any terminal. Normally, when you execute a program, it’s attached to the
active terminal. Its standard input, output, and error streams are connected to
the terminal, and if the terminal is closed then the program is terminated.
Now, you may be familiar with using the ampersand (&) to start an appli-
cation in the background from a shell. This is not the same as a daemon. While
this does work in certain cases, it is not usable from an rc script during system
boot, which is when most daemons are started.
Daemons are designed to be run without direct user interaction and to exe-
cute as long as the system is running. Some well-known examples of daemons
are cron (program scheduler), httpd (web server), and named (DNS server). To
create your own daemon, you must follow a strict set of rules.
1. Call the fork() system call and allow the parent to exit. This initially
detaches your program from the calling shell and returns control to it.
In addition, this call ensures that while your process is a member of a
process group, it is not the process group leader.
2. Call setsid(). The setsid() system call creates a new process group and
a new session group. It then makes your process the only member and
leader of both groups. This sets up the following situation: your process
is a session group leader, a process group leader, and you have no con-
trolling terminal.
3. Call fork() again and allow the parent to exit. Now the session group
and process group leader has exited. Since our process is not a leader, it
cannot possibly ever have a controlling terminal.
4. One of the issues with a long-running process is that it could acciden-
tally keep a directory in use. Worse still, that directory could be on an
NFS mount or some other remote resource. To prevent that from hap-
pening, the next step is to execute chdir("/"). This changes our working
directory to the root directory. Now, this isn’t an absolute. We could also
change the directory to the location where the daemon’s files reside. We
simply need to make sure that we choose a safe location that won’t
interfere with the normal system operation.
Design Decisions
163
3227c07.qxd 7/8/04 9:30 PM Page 163
5. Next, we call umask(0). This clears the file-mode creation mask since we
can’t be sure of what it is at this point. When we called fork(), we inher-
ited whatever the current mask happened to be at the time. If we’re
creating files in our process, this allows us to specify exactly what mode
will be used.
6. Finally, we need to close any open file descriptors. It is unknown at this
point which descriptors we may have inherited through fork(). At the
very least, we need to close descriptors 0, 1, and 2. These are stdin,
stdout, and stderr. If you want to be thorough, you can call sysconf()
with the _SC_OPEN_MAX parameter. This will return the total number of
descriptors that a process can have. With this value, you can loop
through and close each in turn.
Now that we’ve gone through the process of starting a daemon, we’ll look at
the actual code required. We’ll create a daemonizing function that can be called
from main() in any program to turn it into a daemon. Hang on to this example,
because we’ll build on it in the following sections.
First, we include the needed system header files.
#include <unistd.h>
#include <sys/types.h>
Now for the function:
int daemonize()
{
pid_t pid;
long n_desc;
int i;
Here is our first fork() call. This initially detaches the process from the
terminal. Note that the parent exits.
if ((pid = fork()) != 0) {
exit(0);
}
Now we make the call to setsid().
setsid();
Chapter 7
164
3227c07.qxd 7/8/04 9:30 PM Page 164
We are now the process group and session group leader. In addition, we
have no controlling terminal. We call fork() again for good measure and have
the parent exit. This ensures that we cannot regain a controlling terminal.
if ((pid = fork()) != 0) {
exit(0);
}
Next, we change the current directory to the root directory and clear the file
mode mask.
chdir("/");
umask(0);
Finally, we close all available file descriptors and return success.
n_desc = sysconf(_SC_OPEN_MAX);
for (i = 0; i < n_desc; i++) {
close(i);
}
return 1;
}
Logging
An important feature of any server is the ability to log events. This is very helpful
to the person who is responsible for administering the server program. The
information contained in the log can inform the user of not only the server
activity, but also problems that the server encounters.
One strategy is to open a file and write events to it. A lot of server applications
allow you to specify the log location in a configuration file. The only requirement
is that your application has the appropriate permissions to write to the specified
file. Many server applications choose this route, and it is trivial, so we won’t dis-
cuss it here.
Another option is to use the system logging facility. Linux keeps a central
log file called messages that is usually located in /var/log. This file contains all
messages relayed through the syslog facility. We will now look at how to use
syslog and expand on our daemonizing example.
Design Decisions
165
3227c07.qxd 7/8/04 9:30 PM Page 165
To use syslog, we first open a connection to the logger by calling openlog().
Its signature is as follows:
#include <syslog.h>
void openlog(const char *ident, int option, int facility);
The first parameter is an identifying string that is prepended to each log
message. Usually, this is the name of the program that is doing the logging. The
second parameter is one or more of the following options OR’d together:
•LOG_CONS: This instructs syslog to write the log message to the console if
the logger is unavailable for some reason.
•LOG_NDELAY: This creates an immediate connection to the logger. Normally,
the connection won’t be made until the first log message is sent.
•LOG_PERROR: This causes the log message to be sent to stderr in addition to
the system logger.
•LOG_PID: This also prepends the program’s process identifier to the log
message.
The final parameter identifies to the logger the type of program that it is
logging. This is referenced in the syslog configuration and can be used to treat
certain programs’ messages differently. The value is one of the following:
•LOG_AUTHPRIV: A security/authorization message.
•LOG_CRON: A clock daemon, usually cron and at.
•LOG_DAEMON: A general system daemon.
•LOG_FTP: The FTP daemon.
•LOG_KERN: For kernel messages.
•LOG_LPR: The printer daemon.
•LOG_MAIL: The mailer daemon.
•LOG_NEWS: The news daemon.
•LOG_SYSLOG: Internal messages from the syslog daemon.
Chapter 7
166
3227c07.qxd 7/8/04 9:30 PM Page 166
•LOG_USER: For general user-level messages. This is what you would use
most often.
•LOG_UUCP: Messages from the UUCP daemon.
The call to openlog() isn’t strictly required, but without it, you do not have
the opportunity to specify the identity of your program or the options.
Next, we can send messages to the logger with syslog(). Its signature is as
follows:
void syslog(int priority, const char *format, ...);
If you’ll notice, it is very similar to printf(). In fact, after specifying the
priority, the remaining parameters behave exactly like printf(). The possible pri-
ority values are as follows:
•LOG_EMERG: Indicates that the system is in an unusable state
•LOG_ALERT: Indicates that some kind of immediate action is required
•LOG_CRIT: A critical message
•LOG_ERR: An error message
•LOG_WARNING: Indicates a warning
•LOG_NOTICE: Specifies that something important but normal has occurred
•LOG_INFO: A simple informational message
•LOG_DEBUG: A debug message
Finally, when your program is finished using the system logger, it calls
closelog(). This is its signature:
void closelog();
Now, let’s expand our example from the daemonizing section to write a
message to the system log. First, we need to add the header file for syslog to the
#includes.
#include <syslog.h>
Design Decisions
167
3227c07.qxd 7/8/04 9:30 PM Page 167
Next, we create a main() function that calls our daemonize() function.
int main(int argc, char **argv)
{
daemonize();
Finally, we add the calls to the system logger to log a “Hello World!” message
from our program.
openlog("test_daemon", LOG_PID, LOG_USER);
syslog(LOG_INFO, "%s", "Hello World!");
closelog();
return 1;
}
You can now compile and execute the test program. After it runs, you can
execute the following to see the entry that was created. Note that you may need
to be root.
cat /var/log/messages | grep test_daemon
You should see something similar to the following output:
Dec 14 11:14:00 homer test_daemon[19366]: Hello World!
Privilege Dropping
In Linux, every process is associated with a user and must operate under the
access rights for that user. When you write a server application, it is a good idea
to have it run under a nonprivileged user. That way, if the application is hacked,
damage to the system is minimal. Imagine the damage that could be caused if
the server were run as root and was hacked.
On the other hand, sometimes your application needs to be able to do
something that only a superuser can do. For example, the chroot() jail we dis-
cuss next can be used only by a superuser. Another frequent need is to bind to
a port that is less than 1024. For example, a web server would need to bind to
port 80. This can be done only by root or by a superuser.
To achieve both of these goals, we employ a process called privilege drop-
ping. When our server application is started, we execute it as root (or setuid
root). Then we do whatever we need to do as root and give up the superuser
privilege for the remainder of the application.
Chapter 7
168
3227c07.qxd 7/8/04 9:30 PM Page 168
The command for changing the associated user ID is setuid(). Its signature
is as follows:
#include <unistd.h>
int setuid(uid_t uid);
When a process with superuser privileges executes this command, it sets
all three user IDs (real,effective, and saved) to the specified ID. Afterward, it is
impossible for the process to regain superuser privileges.
Note that the setuid() command requires the uid of the user. When writing
a server, you’ll want the user to be able to specify which uid the server should
run under. To provide maximum flexibility, you should allow the user to specify
either the numeric user ID or the username. If the username is provided, then
you can use the getpwid() command to retrieve the uid for the given username.
Its signature is as follows:
#include <pwd.h>
#include <sys/types.h>
struct passwd *getpwnam(const char *name);
The setppuid() command returns a pointer to a passwd structure if the user-
name is valid. Otherwise, it returns NULL. The passwd structure is defined as
follows:
struct passwd {
char *pw_name;
char *pw_passwd;
uid_t pw_uid;
gid_t pw_gid;
char *pw_gecos;
char *pw_dir;
char *pw_shell;
};
It is also worth noting that Linux keeps track of a file system user ID as well.
Sometimes it is useful to keep a higher privilege for the main process, but drop
privileges for disk access. The setfsuid() command accomplishes this, but it is
not required if the calling process is associated with superuser privileges. In that
case, the fsuid is set automatically by setuid.
Now, let’s look at this in action. We’ll use our daemonize() function, but pro-
vide a new main(). First, we add the following to our list of #includes:
#include <pwd.h>
Design Decisions
169
3227c07.qxd 7/8/04 9:30 PM Page 169
Here’s our new main() function:
int main(int argc, char **argv)
{
We then declare a structure pointer to be used with the getpwnam() function.
We also hard-code the username that we will be using for the privilege dropping.
You will want to either create a user called “nopriv” or change the string to an
existing nonprivileged user on your system. In practice, you will want to make
this a user-specified parameter.
struct passwd *pws;
const char *user = "nopriv";
Now we attempt to retrieve the user ID associated with our nonprivileged
user. If the getpwnam() function returns a NULL, then the username was not found.
pws = getpwnam(user);
if (pws == NULL) {
printf ("Unknown user: %s\n", user);
return 0;
}
Next, we call our daemonize() function and drop our privileges.
daemoniz();
setuid(pws->pw_uid);
Finally, we set up an endless loop so that we can observe the effects of
setuid().
while (1) {
sleep(1);
}
return 1;
}
Compile the program as daemon2 and execute it as the superuser. You can use
the following command to see that the setuid() call worked:
ps -ajx | grep daemon2
Chapter 7
170
3227c07.qxd 7/8/04 9:30 PM Page 170
You should see something similar to the following output:
1 27996 27995 27995 ? -1 S 502 0:00 ./daemon2
27959 27998 27997 27350 pts/2 27997 S 0 0:00 grep daemon2
Notice that the grep command is associated with user ID 0, which is the
superuser, but the daemon2 process is associated with user ID 502, which is the
nopriv user on this particular system. You can stop the daemon2 process by send-
ing it the term signal. In this case, it would be
kill -TERM 27996
Next, experiment with running this program as a user other than the supe-
ruser or “nopriv.” Log in as a different user or use the su command to assume
another user. Then execute the preceding program. Notice that when you look
at the process with ps, the setuid call does not change the user ID. The call to
setuid() will fail, and the process will continue to run under the user you are
logged in as.
chroot() Jails
Another means for securing a server involves limiting its access to the file
system. The Linux file system hierarchy starts with "/" or the root directory.
The chroot() command allows you to redefine where the root directory is for a
particular process. This is called a chroot() jail.
For example, let’s say that we have created a user ID called myserv for our
server to run under, and we’ve given it a home directory, /home/myserv. We can
change the root directory for our server to /home/myserv. This means that the
server can only access files that are under /home/myserv. If the server changes the
directory to "/", it will still be in the /home/myserv directory, although if it queries
for the current directory it will be returned as "/".
Only root or a superuser can execute the chroot() command. So, if you are
employing privilege dropping, remember to chroot() before dropping your privi-
leges. The signature for chroot() is as follows:
#include <unistd.h>
int chroot(const char *path);
One very important point to remember about the chroot() command is that
it does not change the current directory. This means that if you call chroot(), the
server still has access to the current directory, even if it is outside of the chroot()
Design Decisions
171
3227c07.qxd 7/8/04 9:30 PM Page 171
jail! Therefore, it is advisable to call chdir("/") immediately after calling chroot().
This will ensure that the server is in the jail.
Summary
In this chapter, we covered some of the considerations that you need to make
when designing a networked application. First, we looked at choosing between
the TCP and UDP transport protocols. Next, we looked at application protocols.
Here, the issues are whether to use an established protocol or roll your own,
and whether to use binary or plain-text transmission. Then, we looked at overall
client-server architecture before moving on to client-specific issues. Finally, we
looked at server-specific issues that included daemonizing the server, the system
logger, privilege dropping, and chroot() jails.
In the next chapter we’ll look at the client-server development process and
debugging.
Chapter 7
172
3227c07.qxd 7/8/04 9:30 PM Page 172

CHAPTER 8
Debugging and
Development Cycle
DEBUGGING CLIENT-SERVER NETWORK applications poses some unique challenges.
You need to debug not only the programs themselves, but also the communi-
cation between them. In this chapter, we will first look at some tools to help with
the debugging process. Next, we will address another unique issue with client-
server programming: which do you develop first, the client or the server? Then
we will examine the overall process of debugging a client-server network appli-
cation. Finally, we will discuss defensive programming techniques.
Tools
Debugging applications is not an easy thing to do. Debugging applications talk-
ing to each other is even harder. In this section, we will cover some tools that can
aid in debugging your network applications.
NOTE Some of the examples in this section refer to the chat appli-
cation presented in Chapter 9. It may be useful to revisit this section
after examining the chat application and trying some of these tools
yourself.
netstat
netstat is a tool used to list the socket activity on a particular machine. By
default, it shows both client and server connected sockets along with other use-
ful information. You can use the -l option to show unconnected sockets in the
LISTEN state. If you invoke it as root or superuser you can also see the process
173
3227c08.qxd 7/8/04 9:30 PM Page 173
that owns the socket by invoking the -p option. Here is a sample entry for a web
server using netstat -lp:
Proto Recv-Q Send-Q Local Address Foreign Address State PID/Program Name
tcp 0 0 *:http *:* LISTEN 2933/httpd
Proto is the protocol of the socket. This can be tcp, udp, or unix. Recv-Q is the
number of bytes in the receive queue. These are bytes that have been received
from the network, but the application bound to the socket has not yet read
them. Send-Q shows the number of bytes that have been sent but have not been
acknowledged. Local Address displays the local address and port to which the
socket is bound. If the address is an asterisk (*), then it is bound to all local
interface addresses. If the port number has an entry in the services file, then
the service name is displayed; otherwise, the port number will be shown.
Foreign Address displays the same information as Local Address, but for the
remote socket. State shows the state of the socket. In our example, it is in the
LISTEN state because the web server is waiting for connections. Other common
states include ESTABLISHED, TIME_WAIT, and CLOSED. The man page for netstat
describes all of the possible states. Finally, PID/Program Name shows the process
ID and program associated with the socket.
netstat is useful for debugging both clients and servers. For servers, you
can verify that they are listening on the correct address/port combination. This
is helpful in finding errors where you have forgotten to use htons() when assign-
ing the port number. In addition, you can see how many clients are connected to
your server and what state the sockets are in. For the client, it is sometimes use-
ful to know the local port number that has been assigned to the socket it is
using.
Ethereal
Ethereal (http://www.ethereal.com) is a GUI tool that allows you to capture and
examine data packets on your network. In the past, tools like tcpdump were used
for this purpose. While tcpdump still has a use on servers without X Windows,
Ethereal is much more flexible and allows you to easily see the packets and their
contents in a visual way. It has support for many protocols and will automati-
cally decode these for you. In addition, it can read dump files from tcpdump as
well as files from some commercial sniffing tools.
Ethereal is a valuable tool for debugging your client-server network appli-
cation. If you are already using one of the supported protocols (like HTTP), then
Chapter 8
174
3227c08.qxd 7/8/04 9:30 PM Page 174
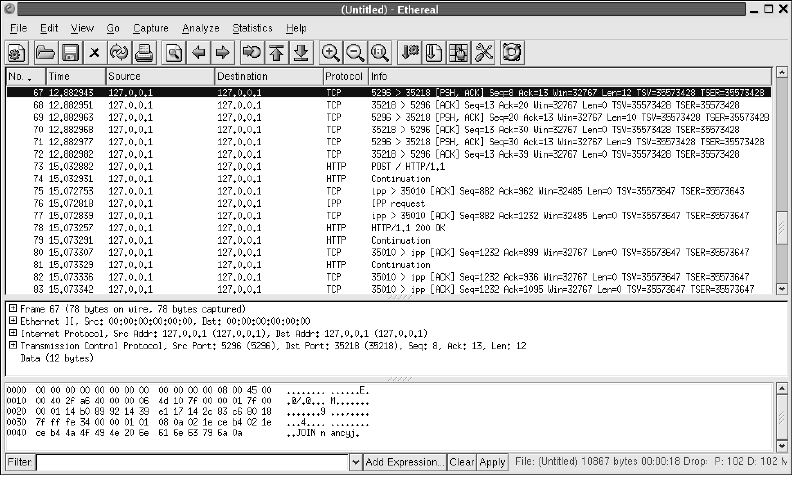
it can easily show you the conversation between the client and server. If you are
using a custom protocol like the one we use in Chapter 9, Ethereal can still help,
because our protocol is text based. Figure 8-1 shows the contents of a JOIN com-
mand that the chat client sent to the chat server.
Figure 8-1. An Ethereal session
As you can see in the window just above the Filter box, the command
JOIN n ancyj can be readily discerned from the remainder of the packet. Of
course, if you are using a binary protocol it will be a little more difficult to pick
out the contents of the packet.
There are some caveats to using Ethereal, though. First, you must be root or
superuser to execute Ethereal. It must place the network device in promiscuous
mode, and this is allowed only by root or superuser. Second, it will not help you
if you are encrypting the communication between your client and server. All
you will see is garbage. Finally, if you are trying to look at client-server commu-
nication on machines other than the one on which you are running Ethereal,
Debugging and Development Cycle
175
3227c08.qxd 7/8/04 9:30 PM Page 175
make sure that you are using a hub and not a switch to connect these comput-
ers. Ethereal works by grabbing all network packets, even those not destined for
your machine. A switch prevents this from happening.
netcat
netcat (or nc) is an extremely flexible tool not only for helping to debug your
client or server, but also for development. netcat is capable of sending or receiv-
ing any kind of data over TCP or UDP. Built in the UNIX tool tradition, it is highly
scriptable and can take input from the command line or stdin. Output is sent to
stdout, with errors to stderr.
Here is an example session using netcat with stdin to connect to the chat
server presented in Chapter 9. The server messages are in bold.
[chatsrv]$ nc 127.0.0.1 5296
JOIN nancyj
100 OK
JOIN linuxguy
OP linuxguy
JOIN nancyj
TOPIC Everything Linux!
MSG linuxguy hi!
100 OK
MSG nancyj linuxguy hi!
JOIN madchatter
As you can see, it is very easy to connect to a server and exercise it for
debugging purposes. For debugging clients, nc can act as a server. In this mode,
you can see what the client sends and manually send responses to the client.
gdb
While not strictly for network application development, gdb must be mentioned
for completeness. It is invaluable for debugging applications under Linux. If its
command-line nature is daunting, then try DDD (http://www.gnu.org/software/
ddd). It is an excellent GUI front-end for gdb.
Figure 8-2 shows a DDD session with the chat server presented in Chapter 9.
You can see that you can set breakpoints visually. Also, you have the ability to
hover over a variable to see the current value.
Chapter 8
176
3227c08.qxd 7/8/04 9:30 PM Page 176
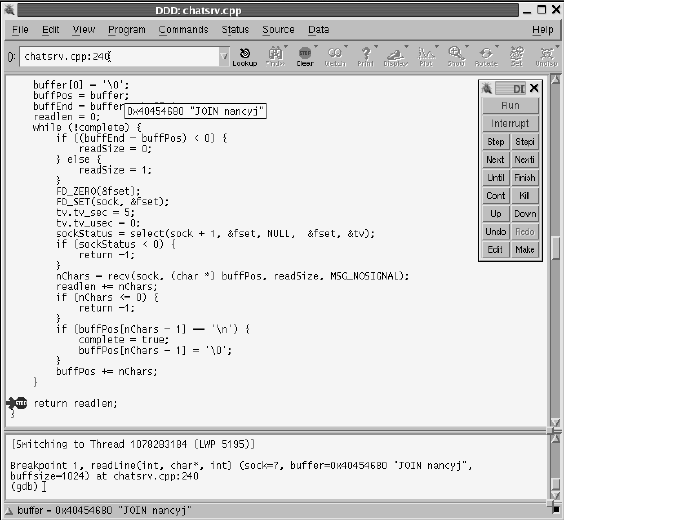
Figure 8-2. A DDD session
Chicken or the Egg
A question that comes up quite often in network programming is this: “Which
do you write first, the client or the server?” The answer really depends on the
application being built, but usually it’s “Both!” One of the significant factors is
the choice of a plain-text or binary communication protocol. Let’s look at each
in turn.
If you choose a plain-text protocol, then you can develop either the client or
the server and use netcat to simulate the missing piece. For example, the server
for the chat application presented in Chapter 9 was completely developed and
tested using netcat before a line of client code was written. Since netcat can also
be used to simulate a server, the chat client could have been developed first.
Why wasn’t it? In the case of the chat application, all of the application logic is
housed in the server. The client is simply a means to execute the commands and
display the results. In fact, many different clients (GUI, text based, etc.) could be
developed to use the same chat server. Using netcat, each of the commands
could be easily tested independent of the client.
Debugging and Development Cycle
177
3227c08.qxd 7/8/04 9:30 PM Page 177
For a binary protocol, a tool like netcat isn’t an option. In this situation,
it’s usually easiest to use a “bootstrap” strategy. This means that you write just
enough of the server and the client to get them talking to each other using your
basic protocol. Then, you add commands and features one by one into both the
server and client. In this case, neither is written “first”—they are developed in
parallel. Now, there is nothing that says this approach can’t be used with an
application using a plain-text protocol. In that case, you can use either
approach.
Debugging
Effective debugging tends to be learned through experience. There are, however,
some strategies that can be employed to help with the debugging process. In this
section we will look at debug statements and source code analyzers.
Debug Statements
One of the simplest ways to see what is going on inside your program as it runs
is to add debug output statements. You add lines of code like this:
#ifdef DEBUG
printf("Accepting client connection.\n");
#endif
to strategic areas of your program. Of course, you may want to put in more infor-
mation than that—variable values, for example. Then you add a line like this:
#define DEBUG
to a common header file and comment it out when you don’t want the debug-
ging output. If you’re using gcc, you can use the -D switch instead as follows:
gcc -D DEBUG -o myserver myserver.cpp
Not only can debug output statements help you document your program flow
and variable values, but also they can be used to keep track of the “discussion”
between a client and server. The output can expose errors in the conversation
between client and server. It can also show whether any command parameters
are incorrect or out of bounds. If you are using a text-based protocol, you can
simply log the commands that are sent and received. If your protocol is binary,
then you will want to write a small function to convert it into a human-readable
form for logging.
Chapter 8
178
3227c08.qxd 7/8/04 9:30 PM Page 178
Source Code Analyzers
Another strategy for debugging is to use a source code analyzer. Even though
your program may compile without any warnings or errors, there can be subtle
problems lurking. Analyzers use sets of rules that describe common program-
ming pitfalls and potential mistakes. They then apply these rules to your source
code and give you warnings about possible problems. You can then investigate
further and determine whether or not a change is necessary.
The most famous source code analyzer is lint. lint has been available on
UNIX systems for many years, but it was too difficult to use to garner widespread
use. A free reimplementation of lint is called Splint (http://www.splint.org). The
Splint project aims to be an easier-to-use, more thorough lint.
One drawback to Splint is that it works only with C code. There are several
commercial lint-like products available that also work with C++ code. Two
of the more popular are Gimpel’s FlexeLint (http://www.gimpel.com) and
Parasoft’s CodeWizard (http://www.parasoft.com). In addition to the standard
checks, CodeWizard even has rules corresponding to Scott Meyers’s Effective
C++ books.
Defensive Programming
Creating a network application, especially one for the Internet, carries with it
added responsibilities. You must take great care when coding the server and
client to keep malicious users and programs from wreaking havoc with your
application. In addition to crashing your application, security can also be com-
promised. Here we will focus on the stability aspects; the security issues are
covered in Chapter 12. In this section we will look at four key areas that you
should consider when writing your network application.
Respect Buffer Limits
One of the most common errors in network applications is the buffer overflow.
A buffer overflow condition exists when data is written beyond the limit of the
allocated memory.
Figure 8-3 shows the layout for a stack record. Note that the memory for the
local variables will be written from bottom to top. An overflow usually occurs
when data submitted from a client exceeds the amount expected by the server.
The return address for the function can be overwritten, causing the application
to behave in an undefined manner. Furthermore, part of the overflowing data
can be interpreted as machine instructions that can be executed using the per-
missions of the process. This is called stack smashing.
Debugging and Development Cycle
179
3227c08.qxd 7/8/04 9:30 PM Page 179
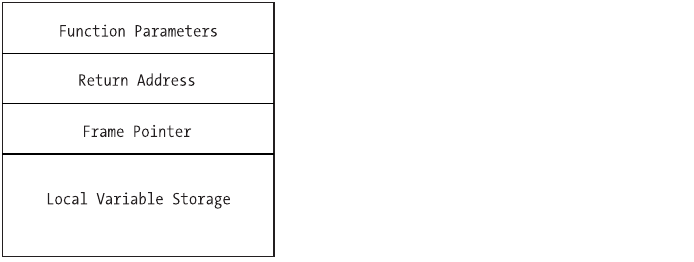
Figure 8-3. Layout of a stack record
After the return address is overwritten, your application’s behavior is unde-
fined. In the best case, it will crash, but in the worst case, it will continue to
function erratically. A buffer overflow is a very hard bug to diagnose and fix.
The best place to find and fix buffer issues is during development. Many tools
are available for use during testing that can point out memory management
issues. The two most popular are Electric Fence and Valgrind.
Electric Fence (http://perens.com/FreeSoftware) was developed by Bruce
Perens and was one of the earliest solutions available. It works by redefining
malloc() and free(). You simply compile a special version of your application
that links against Electric Fence and start testing. It will halt your program when-
ever a memory error is encountered.
Valgrind (http://valgrind.kde.org) has become extremely popular of late. It
takes a different approach from Electric Fence in that it isn’t a library replacement
for malloc() and free(); rather, it’s a full execution environment that simulates an
x86 CPU. As such, it doesn’t require you to recompile your program with a special
library. In addition to memory errors, Valgrind can help with optimization. It’s
actively developed and also has an excellent extension capability.
Even if you think you’ve found all of the buffer overflow problems during
development, it’s possible for one to slip through. Next, we’ll look at two of the
most popular solutions for runtime overflow protection. Both employ the tech-
nique of altering the stack record generated by the compiler to check for overflows.
StackGuard (http://www.immunix.org/stackguard.html) is a special version of
the GCC compiler. It works by modifying the stack record that is generated for a
function to contain not only the return address, but also a “canary” value. Then,
when the function completes, a check is made for the canary value. If the value
has been altered, StackGuard assumes that a buffer overflow has occurred and
execution stops. While this can be harsh, it is better than allowing the overflow to
occur.
Chapter 8
180
3227c08.qxd 7/8/04 9:30 PM Page 180

Stack-Smashing Protector (http://www.research.ibm.com/trl/projects/
security/ssp) uses the same basic approach as StackGuard, but adds reordering
of local function pointers in the stack. This prevents the altering of local pointers
to gain access to arbitrary memory locations.
CAUTION Using one of these runtime solutions is not a replacement
for good, solid defensive programming.While these solutions may
keep your program from having a buffer overflow, your program
will be shut down unceremoniously, resulting in frustrated users.
You can find more information on the security aspects of buffer overflows,
including safe library functions, in Chapter 12.
Expect the Unexpected
Another common failure in client-server applications is receiving unexpected
information. This can be in the form of a malformed command or a command
parameter that is outside of the expected boundaries. In either case, it is very
important to validate the command as it is being read from the network. Once
again, different strategies are employed depending on whether you are using a
plain-text or binary protocol. We will look at each in turn.
For a plain-text protocol, you will typically employ some kind of grammar
that specifies a valid command. So, the first step in validating the command is
to verify that it is grammatically correct. This can be done either by creating a
handmade parser or by using parser-generator tools such as lex and yacc. Then,
each parameter should be checked to make sure that it falls within an accepted
range. As soon as an irregularity is detected, an error message should be returned,
the remainder of the command ignored, and perhaps even the connection ter-
minated. Otherwise, you run the risk of the application failing in an unexpected
manner.
When you use a binary protocol, even more care must be taken. This is
because you are generally storing the incoming data directly into structs or
class variables, and an inadvertent buffer overflow can occur. The grammar in a
binary protocol is implicit, but values should be checked for validity as they are
received. If a problem is detected, then an error message should be returned
immediately and the remainder of the command discarded. Again, perhaps the
connection should even be closed.
Debugging and Development Cycle
181
3227c08.qxd 7/8/04 9:30 PM Page 181
Limit Collateral Damage
Even if a catastrophic error occurs and your application crashes, you need to
limit the collateral damage. This can be accomplished in two key ways: running
as a nonprivileged user and using chroot() jails.
The first and most important way to limit collateral damage is to not run
your application as root or superuser. Too often, an exploitable area is found in a
server process that runs as root, and the exploiter is then able to gain root privi-
leges. If you must have root privileges (for example, to bind to a port under 1024),
then drop those privileges as soon as they are no longer needed. We covered priv-
ilege dropping and how to do it in Chapter 7.
For a server application, the best way to run it is with its own nonprivileged
user. This shields the application from affecting anything else in the system.
Once you have more than one server running under the same user, there is the
possibility for them to hurt each other.
The other key way to prevent collateral damage is to use a chroot() jail. This
was also covered in Chapter 7. A chroot() jail will ensure that a crashing process
cannot harm files outside of its own area. Because the chroot() command requires
root or superuser privileges, you must use it in conjunction with privilege drop-
ping for maximum safety.
The security aspects of limiting a process’s permissions are covered in
Chapter 12.
Fail Gracefully, But Not Silently
When (not if) your application fails, great care must be taken to have it fail
gracefully. And while your application should fail gracefully, it should not fail
silently. Leaving around information to help determine the cause of failure is
very important.
What does it mean for an application to fail gracefully? First and foremost,
it means that Linux should not be the one shutting down your application and
dumping core. Your application should catch the fatal error and shut itself down.
This gives it a chance to notify those to which it is connected (clients or server)
and release system resources, such as socket descriptors.
One way to ensure that your application fails gracefully is to check return
values from system calls. This is very important. Always check return values,
even for functions that you don’t think will ever fail, because sometimes they
will, and it will be very hard to track down the reason for the failure. In addition,
your own functions should all return status codes, if possible. Checking the
return codes will allow you to react to a failure and stop the program, if neces-
sary, before the system does it for you.
Chapter 8
182
3227c08.qxd 7/8/04 9:30 PM Page 182

NOTE It is not always possible for a function to return a value.
This is common in GUI applications when you are usually provid-
ing callback functions to a framework. In this case, it is sometimes
helpful to store success/failure in global structures.
If you are using C++, then another way to ensure that your application fails
gracefully is to use try...catch blocks. Use them liberally in your main() function
so that if any of your other functions fail outside of a try...catch block, then the
outer catch will be called.
After your application fails, you will want to be able to determine the cause
of the failure. This is where not failing silently comes into play. After the appli-
cation successfully determines a failure, it should record as much information
as possible about what was going on at the time. This should most definitely
include the date and time of the failure, and it can include important variable
values, such as the failed return value. For networking applications, it is also
helpful to include the last communication buffer.
Summary
In this chapter, we explored various debugging tools and methods. In addition,
we covered how to program defensively to help with stability and in troubleshoot-
ing problems.
In the next chapter, we will look at how to code a real-world chat application.
Debugging and Development Cycle
183
3227c08.qxd 7/8/04 9:30 PM Page 183
3227c08.qxd 7/8/04 9:30 PM Page 184
CHAPTER 9
Case Study: A
Networked Application
IN THIS CHAPTER,we will bring together everything we’ve talked about in
Parts One and Two and build a chat application. It will be written in C++ and
consist of both a server and a GUI client. The server will be multithreaded as
described in Chapter 5 and will use the chat protocol developed in Chapter 6.
The Server
The server has no user interface and would be a good candidate for a daemon,
although we won’t complicate it with our daemonize function from Chapter 7 here.
The basic architecture of the server is that it will spawn a thread for each client
that connects. It will have a global list of the connected clients, and each thread
will relay server messages to that list. The list will be protected from simultaneous
modification by means of a mutex. The main loop for each thread will first check
to see if the client has sent a command. If it has, it is dealt with and a return code
is sent. Then the thread checks to see if there are any pending messages to be
sent to the client. This loop continues until the client disconnects or the user has
been kicked out of the room.
First, we include the system headers and signify that we will be using the
Standard Template Library (STL) namespace.
/* chatsrv.cpp */
#include <iostream>
#include <string>
#include <map>
#include <vector>
#include <stdio.h>
#include <sys/ioctl.h>
#include <sys/types.h>
#include <sys/socket.h>
#include <netinet/in.h>
#include <netinet/tcp.h>
#include <pthread.h>
using namespace std;
185
3227c09.qxd 7/8/04 9:31 PM Page 185
Next, we define a couple of constants. First, we signify that the server will
listen on port 5296, and we set the maximum line length to be 1024 bytes.
/* #define's */
#define LISTEN_PORT 5296
#define MAX_LINE_BUFF 1024
Here we define two structures. The first will help us keep track of each
connected client. We have two flags: one to signify whether the user is a room
operator and the other to signify that the user was kicked out of the room.
Finally, we have a vector of strings. This will contain a list of messages that are
being relayed to the client.
/* Structures */
struct client_t {
bool opstatus;
bool kickflag;
vector<string> outbound;
};
The second structure is for holding the client commands. We will parse
the command into this structure for easier handling. The maximum number of
operands for any command is two.
struct cmd_t {
string command;
string op1;
string op2;
};
Now we declare some global variables. First, we have a mutex to synchronize
access to the room topic. Then, we have the room topic variable. Next, we have a
mutex to synchronize access to the client list. We are using an STL map keyed on
username to hold our list of connected users. Each entry is a client_t structure.
/* Globals */
pthread_mutex_t room_topic_mutex;
string room_topic;
pthread_mutex_t client_list_mutex;
map<string, client_t> client_list;
Here are our forward declarations for the functions we will use:
Chapter 9
186
3227c09.qxd 7/8/04 9:31 PM Page 186
/* Forward declarations */
void* thread_proc(void *arg);
int readLine(int sock, char *buffer, int buffsize);
cmd_t decodeCommand(const char *buffer);
int join_command(const cmd_t &cmd, string &msg);
int msg_command(const cmd_t &cmd, const string &nickname, string &msg);
int pmsg_command(const cmd_t &cmd, const string &nickname, string &msg);
int op_command(const cmd_t &cmd, const string &nickname, string &msg);
int kick_command(const cmd_t &cmd, const string &nickname, string &msg);
int topic_command(const cmd_t &cmd, const string &nickname, string &msg);
int quit_command(const string &nickname, string &msg);
This is our main() function. We start by declaring some variables for the
sockets and threading.
/* main */
int main(int argc, char *argv[])
{
struct sockaddr_in sAddr;
int listensock;
int newsock;
int result;
pthread_t thread_id;
int flag = 1;
Next, we create our listening socket and set the socket option SO_REUSEADDR.
This will keep us from getting “address in use” errors when we stop and start our
server.
listensock = socket(AF_INET, SOCK_STREAM, IPPROTO_TCP);
setsockopt(listensock, IPPROTO_TCP, SO_REUSEADDR, (char *) &flag,
sizeof(int));
Now we bind the socket to all available addresses and our listening port.
sAddr.sin_family = AF_INET;
sAddr.sin_port = htons(LISTEN_PORT);
sAddr.sin_addr.s_addr = INADDR_ANY;
result = bind(listensock, (struct sockaddr *) &sAddr, sizeof(sAddr));
if (result < 0) {
perror("chatsrv");
return 0;
}
Case Study: A Networked Application
187
3227c09.qxd 7/8/04 9:31 PM Page 187
We then set the socket to listening mode.
result = listen(listensock, 5);
if (result < 0) {
perror("chatsrv");
return 0;
}
If everything has succeeded so far, we go ahead an initialize our mutexes.
This must be done only once and before any of the threads use them.
pthread_mutex_init(&room_topic_mutex, NULL);
pthread_mutex_init(&client_list_mutex, NULL);
This is our main loop. We accept incoming connections and start a new
thread for each client.
while (1) {
newsock = accept(listensock, NULL ,NULL);
result = pthread_create(&thread_id, NULL, thread_proc, (void *) newsock);
if (result != 0) {
printf("could not create thread.\n");
return 0;
}
pthread_detach(thread_id);
sched_yield();
}
return 1;
}
Next, we define our thread procedure. We start by declaring some variables.
void* thread_proc(void *arg)
{
int sock;
char buffer[MAX_LINE_BUFF];
int nread;
int flag = 1;
bool joined = false;
bool quit = false;
string nickname;
struct cmd_t cmd;
string return_msg;
Chapter 9
188
3227c09.qxd 7/8/04 9:31 PM Page 188

map<string, client_t>::iterator client_iter;
int status;
string outstring;
Then we grab the socket that was passed to us by the main() function.
Immediately, we turn off Nagle’s algorithm and set the socket to nonblocking.
/* Retrieve socket passed to thread_proc */
sock = (int) arg;
/* Turn off Nagle's algorithm*/
setsockopt(sock, IPPROTO_TCP, TCP_NODELAY, (char *) &flag, sizeof(int));
/* Set socket to nonblocking */
ioctl(sock, FIONBIO, (char *) &flag);
NOTE Nagle’s algorithm is enabled by default in Linux. It attempts
to group undersized outgoing packets in order to send them out at
once. This can introduce delays by forcing outgoing packets to wait,
and it can really cause problems with a client-server application.
Since our chat application will send many small packets, we turn
off Nagle’s algorithm to prevent those delays.
This is our main thread loop. We basically check for commands from the
client and then relay any waiting server commands back. We start by calling our
readLine() function, which we describe later. It returns a negative value if an
error occurred on the socket. If this happens, then we want to remove the client
from the room.
while (!quit) {
/* Get any commands that the client has sent */
status = readLine(sock, buffer, MAX_LINE_BUFF);
if (status < 0) {
/* If we've lost the client then process it as a QUIT. */
if (joined) {
quit_command(nickname, return_msg);
}
return arg;
readLine() returns a positive value if a command was received. If so, then we
check to see what the command was.
} else if (status > 0) {
Case Study: A Networked Application
189
3227c09.qxd 7/8/04 9:31 PM Page 189
First, we call decodeCommand(), which we describe later. It fills our cmd_t
structure to make it easier to determine what the client is requesting.
cmd = decodeCommand(buffer);
If the client has issued a command without joining the room, then we set
the return message to an error.
if (!joined && cmd.command != "JOIN") {
return_msg = "203 DENIED - MUST JOIN FIRST";
} else {
Otherwise, we check to see if they have already joined. They can’t join twice, so if
they have, we send an error.
if (cmd.command == "JOIN") {
if (joined) {
return_msg = "203 DENIED - ALREADY JOINED";
} else {
If the preceding checks pass, then we send the command off to the
join_command() function. It will check to make sure the nickname is unique
and valid. If it accepts the join, then it returns a positive value and we set our
joined flag and nickname. Each of the command handlers also sets the return
message with the outcome of the command.
status = join_command(cmd, return_msg);
if (status > 0) {
joined = true;
nickname = cmd.op1;
}
}
Next, we have handlers for the remaining commands. Notice that on the
QUIT command we set our joined flag to false and QUIT to true. This ends the
main loop. For the KICK command, we can’t do this. The reason is that the client
doing the kicking is usually not the one being kicked. That is why we have the
kicked flag in the global client list.
} else if (cmd.command == "MSG") {
msg_command(cmd, nickname, return_msg);
} else if (cmd.command == "PMSG") {
pmsg_command(cmd, nickname, return_msg);
Chapter 9
190
3227c09.qxd 7/8/04 9:31 PM Page 190
} else if (cmd.command == "OP") {
op_command(cmd, nickname, return_msg);
} else if (cmd.command == "KICK") {
kick_command(cmd, nickname, return_msg);
} else if (cmd.command == "TOPIC") {
topic_command(cmd, nickname, return_msg);
} else if (cmd.command == "QUIT") {
quit_command(nickname,return_msg);
joined = false;
quit = true;
} else {
return_msg = "900 UNKNOWN COMMAND";
}
}
Now we send the return message with the status of the command to the
client.
return_msg += "\n";
send(sock, return_msg.c_str(), return_msg.length(), 0);
}
We send any pending server commands to the client. First, we make sure the
client has joined the room. Otherwise, there won’t be any server commands and
we can skip the entire section.
/* Send any pending server commands to the client. */
if (joined) {
Before checking the client list for outgoing commands, we need to lock the
client list mutex. This keeps two threads from modifying the list at the same time.
pthread_mutex_lock(&client_list_mutex);
Once we have the mutex lock, we send any messages that are available and
clear the list.
for (int i = 0; i < client_list[nickname].outbound.size(); i++) {
outstring = client_list[nickname].outbound[i] + "\n";
send(sock, outstring.c_str(), outstring.length(), 0);
}
client_list[nickname].outbound.clear();
Case Study: A Networked Application
191
3227c09.qxd 7/8/04 9:31 PM Page 191
Here is where we checked to see if this client has been kicked out of the
room. If it has, then we remove it from the client list and set quit to true.
if (client_list[nickname].kickflag == true) {
client_iter = client_list.find(nickname);
if (client_iter != client_list.end()) {
client_list.erase(client_iter);
}
quit = true;
}
Since we are done with the client list, we unlock the mutex so that other
threads may access it.
pthread_mutex_unlock(&client_list_mutex);
}
With a tight loop like this, it is a good idea to voluntarily give up your time
slice. This keeps any one thread from hogging the processor.
sched_yield();
}
When the quit flag is set to true, we exit the loop, close the socket, and exit
the thread.
close(sock);
return arg;
}
That’s all there is to the main logic of the server. Now we’ll go over the helper
functions used in the preceding code.
First, let’s look at the readLine() function. Commands from the client are
terminated with a newline character. This function will read up to a newline and
then return. First, we set up some needed variables.
int readLine(int sock, char *buffer, int buffsize)
{
char *buffPos;
char *buffEnd;
int nChars;
int readlen;
bool complete = false;
Chapter 9
192
3227c09.qxd 7/8/04 9:31 PM Page 192
fd_set fset;
struct timeval tv;
int sockStatus;
int readSize;
unsigned long blockMode;
Next, we check to see if there is even anything to read. If not, then we will
return right away.
FD_ZERO(&fset);
FD_SET(sock, &fset);
tv.tv_sec = 0;
tv.tv_usec = 50;
sockStatus = select(sock + 1, &fset, NULL, &fset, &tv);
if (sockStatus <= 0) {
return sockStatus;
}
Otherwise, we initialize the supplied buffer and set pointers for the current
buffer position and the end of the buffer.
buffer[0] = '\0';
buffPos = buffer;
buffEnd = buffer + buffsize;
readlen = 0;
This is the main loop for reading the data. First, we make sure that we aren’t
overrunning our buffer space. If not, then we set up to read a character.
while (!complete) {
if ((buffEnd - buffPos) < 0) {
readSize = 0;
} else {
readSize = 1;
}
Now we call select() to make sure that there is something to read. This also
allows us to escape if the client suddenly disconnects or if the client is sending
data too slowly. We set a timeout of 5 seconds for getting data from the client.
FD_ZERO(&fset);
FD_SET(sock, &fset);
tv.tv_sec = 5;
tv.tv_usec = 0;
Case Study: A Networked Application
193
3227c09.qxd 7/8/04 9:31 PM Page 193
sockStatus = select(sock + 1, &fset, NULL, &fset, &tv);
if (sockStatus < 0) {
return -1;
}
Next, we receive the character and check to see if it is a newline. If it is, then
we are done. Otherwise, we add it to the buffer and loop.
nChars = recv(sock, (char *) buffPos, readSize, MSG_NOSIGNAL);
readlen += nChars;
if (nChars <= 0) {
return -1;
}
if (buffPos[nChars - 1] == '\n') {
complete = true;
buffPos[nChars - 1] = '\0';
}
buffPos += nChars;
}
Finally, we return the size of the string we read.
return readlen;
}
The next helper function decodes a string received from the client into our
cmd_t structure. It basically separates the buffer based on the space being the
delimiter. Since we can have at most two operands for a command, after it finds
the second space it places the remaining text from the buffer into the second
operand. This works perfectly for our commands such as PMSG, where the second
operand can contain spaces. It also works well enough for the MSG command,
which has only one operand. If the message contains spaces, we just concate-
nate the two operands, in the msg_command() function.
cmd_t decodeCommand(const char *buffer)
{
struct cmd_t ret_cmd;
int state;
state = 0;
for (int x = 0; x < strlen(buffer); x++) {
if (buffer[x] == ' ' && state < 2) {
state++;
} else {
Chapter 9
194
3227c09.qxd 7/8/04 9:31 PM Page 194
switch (state) {
case 0: ret_cmd.command += toupper(buffer[x]);
break;
case 1: ret_cmd.op1 += buffer[x];
break;
default: ret_cmd.op2 += buffer[x];
}
}
}
return ret_cmd;
}
This function handles the JOIN command and, if successful, adds the user to
the client_list map.
int join_command(const cmd_t &cmd, string &msg)
{
int retval;
map<string, client_t>::iterator client_iter;
First, we do a preliminary check on the nickname. If the nickname has a
space in it, then it will have been separated into op1 and op2. Therefore, if op2 is
not an empty string, then the nickname is invalid.
if (cmd.op1.length() == 0 || cmd.op2.length() > 0) {
msg = "201 INVALID NICKNAME";
return 0;
} else {
Next, we check to make sure that a room member isn’t already using the
nickname. Before checking the client_list map, we need to lock the mutex.
Otherwise, another thread could be looking at the same time for the same
nickname, and both threads would think that the name isn’t taken. The mutex
ensures that only one thread may examine the client list at a time.
pthread_mutex_lock(&client_list_mutex);
client_iter = client_list.find(cmd.op1);
If the nickname isn’t already in use, we add the client to the room. First,
though, we check to see if this is the first user in the room. If so, then that user
automatically becomes a room operator. Notice that we’re implicitly adding the
user to the room by taking advantage of the fact that an STL map will create a
new entry for us if one doesn’t exist.
Case Study: A Networked Application
195
3227c09.qxd 7/8/04 9:31 PM Page 195
if (client_iter == client_list.end()) {
if (client_list.size() == 0) {
client_list[cmd.op1].opstatus = true;
} else {
client_list[cmd.op1].opstatus = false;
}
client_list[cmd.op1].kickflag = false;
Now we cycle through the other users in the room, if there are any. We do
three things here. First, we tell the other users that a new person has joined the
room. Second, we gather the names of the users already in the room to relay to
the new user. Third, we tell the new user which existing users are room opera-
tors. Notice that the server commands are added to the clients’ outbound
message queues. They will then be sent to the client in the main loop.
for (client_iter = client_list.begin();
client_iter != client_list.end(); ++client_iter) {
/* Tell other clients that a new user has joined */
if ((*client_iter).first != cmd.op1) {
(*client_iter).second.outbound.push_back("JOIN " + cmd.op1);
}
/* Tell the new client which users are already in the room */
client_list[cmd.op1].outbound.push_back("JOIN " +
(*client_iter).first);
/* Tell the new client who has operator status */
if ((*client_iter).second.opstatus == true) {
client_list[cmd.op1].outbound.push_back("OP " +
(*client_iter).first);
}
}
Finally, we send the room’s topic to the new user and return a success code.
/* Tell the new client the room topic */
pthread_mutex_lock(&room_topic_mutex);
client_list[cmd.op1].outbound.push_back("TOPIC * " + room_topic);
pthread_mutex_unlock(&room_topic_mutex);
msg = "100 OK";
retval = 1;
If the nickname is in use, then we send the failure notice.
} else {
msg = "200 NICKNAME IN USE";
Chapter 9
196
3227c09.qxd 7/8/04 9:31 PM Page 196
retval = 0;
}
pthread_mutex_unlock(&client_list_mutex);
}
return retval;
}
Next, we handle the MSG command. This is a simple function, because all it
does is relay the message to all connected clients by adding it to their outbound
queues.
int msg_command(const cmd_t &cmd, const string &nickname, string &msg)
{
map<string, client_t>::iterator client_iter;
pthread_mutex_lock(&client_list_mutex);
for (client_iter = client_list.begin();
client_iter != client_list.end(); client_iter++) {
(*client_iter).second.outbound.push_back("MSG " + nickname + " " +
cmd.op1 + " " + cmd.op2);
}
pthread_mutex_unlock(&client_list_mutex);
msg = "100 OK";
return 1;
}
Handling a private message is almost as easy. First, we check to make sure
that the recipient exists and, if so, add the message to their outbound queue.
int pmsg_command(const cmd_t &cmd, const string &nickname, string &msg)
{
map<string, client_t>::iterator client_iter;
pthread_mutex_lock(&client_list_mutex);
client_iter = client_list.find(cmd.op1);
if (client_iter == client_list.end()) {
msg = "202 UNKNOWN NICKNAME";
} else {
(*client_iter).second.outbound.push_back("PMSG " + nickname + " " +
cmd.op2);
msg = "100 OK";
}
Case Study: A Networked Application
197
3227c09.qxd 7/8/04 9:31 PM Page 197
pthread_mutex_unlock(&client_list_mutex);
return 1;
}
Our next function handles the OP command.
int op_command(const cmd_t &cmd, const string &nickname, string &msg)
{
map<string, client_t>::iterator client_iter;
pthread_mutex_lock(&client_list_mutex);
client_iter = client_list.find(nickname);
We first get the client list entry for the user issuing the OP command. If we
can’t find that entry, then something is wrong.
if (client_iter == client_list.end()) {
msg = "999 UNKNOWN";
} else {
In this case, we first need to verify that the client issuing the command is a
room operator.
if ((*client_iter).second.opstatus == false) {
msg = "203 DENIED";
} else {
If the verification succeeds, we then check to make sure that the target of the
OP command is valid.
client_iter = client_list.find(cmd.op1);
if (client_iter == client_list.end()) {
msg = "202 UNKNOWN NICKNAME";
} else {
Finally, we set the operator status flag on the recipient and notify the room
members of the new room operator.
(*client_iter).second.opstatus = true;
for (client_iter = client_list.begin();
client_iter != client_list.end(); client_iter++) {
(*client_iter).second.outbound.push_back("OP " + cmd.op1);
}
Chapter 9
198
3227c09.qxd 7/8/04 9:31 PM Page 198
msg = "100 OK";
}
}
}
pthread_mutex_unlock(&client_list_mutex);
return 1;
}
The KICK command causes a user to be forcibly removed from the room.
int kick_command(const cmd_t &cmd, const string &nickname, string &msg)
{
map<string, client_t>::iterator client_iter;
We first get the client list entry for the user issuing the OP command. If we
can’t find that entry, then something is wrong.
pthread_mutex_lock(&client_list_mutex);
client_iter = client_list.find(nickname);
if (client_iter == client_list.end()) {
msg = "999 UNKNOWN";
} else {
Next, we verify that the caller is a room operator.
if ((*client_iter).second.opstatus == false) {
msg = "203 DENIED";
} else {
Then, we validate the target of the KICK command.
client_iter = client_list.find(cmd.op1);
if (client_iter == client_list.end()) {
msg = "202 UNKNOWN NICKNAME";
} else {
Finally, we set the kick flag on the user being removed and notify everyone
in the room about what happened. The kick flag will be picked up in the main
loop, and the client will be disconnected.
(*client_iter).second.kickflag = true;
for (client_iter = client_list.begin();
client_iter != client_list.end(); client_iter++) {
Case Study: A Networked Application
199
3227c09.qxd 7/8/04 9:31 PM Page 199
(*client_iter).second.outbound.push_back("KICK " + cmd.op1
+ " " + nickname);
}
msg = "100 OK";
}
}
}
pthread_mutex_unlock(&client_list_mutex);
return 1;
}
Room operators have the ability to set the topic for the room. This function
handles the TOPIC command. It is very similar to the other operator-only
commands.
int topic_command(const cmd_t &cmd, const string &nickname, string &msg)
{
map<string, client_t>::iterator client_iter;
pthread_mutex_lock(&client_list_mutex);
client_iter = client_list.find(nickname);
if (client_iter == client_list.end()) {
msg = "999 UNKNOWN";
} else {
if ((*client_iter).second.opstatus == false) {
msg = "203 DENIED";
} else {
pthread_mutex_lock(&room_topic_mutex);
room_topic = cmd.op1;
if (cmd.op2.length() != 0) {
room_topic += " " + cmd.op2;
}
for (client_iter = client_list.begin();
client_iter != client_list.end(); client_iter++) {
(*client_iter).second.outbound.push_back("TOPIC " + nickname
+ " " + room_topic);
}
pthread_mutex_unlock(&room_topic_mutex);
msg = "100 OK";
}
}
Chapter 9
200
3227c09.qxd 7/8/04 9:31 PM Page 200
pthread_mutex_unlock(&client_list_mutex);
return 1;
}
Finally, we need to handle the QUIT command. We remove the client from the
client_list map and notify the others in the room that the client has left.
int quit_command(const string &nickname, string &msg)
{
map<string, client_t>::iterator client_iter;
pthread_mutex_lock(&client_list_mutex);
client_iter = client_list.find(nickname);
if (client_iter == client_list.end()) {
msg = "999 UNKNOWN";
} else {
client_list.erase(client_iter);
for (client_iter = client_list.begin(); client_iter != client_list.end();
client_iter++) {
(*client_iter).second.outbound.push_back("QUIT " + nickname);
}
msg = "100 OK";
}
pthread_mutex_unlock(&client_list_mutex);
return 1;
}
The server can be compiled as follows:
g++ -o chatsrv chatsrv.cpp -lpthread
A good way to test the server is with the netcat application we talked about
in Chapter 8. You can connect to the server and manually issue the commands
to see how the server responds.
The Client
Figure 9-1 shows what our GUI client looks like.
Case Study: A Networked Application
201
3227c09.qxd 7/8/04 9:31 PM Page 201
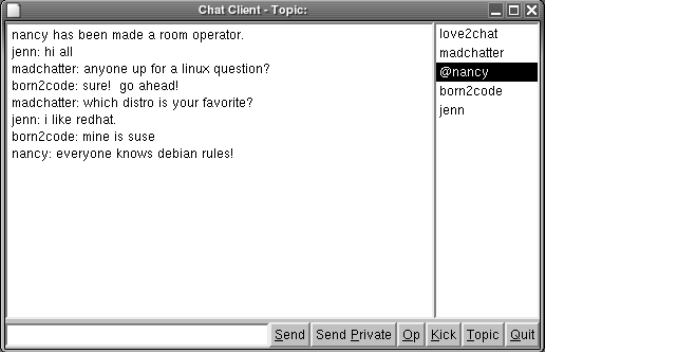
Figure 9-1. GUI client
For the client, we are using Trolltech’s Qt GUI toolkit. Most Linux distribu-
tions install the noncommercial version of Qt, but you can download it from
http://www.trolltech.com. Due to the nature of GUI programs, it is easier to split
the source code among several files, unlike the server. We will have the follow-
ing files:
•chatcli.h: This file will contain non-GUI declarations.
•chatcli.cpp: This file will contain our main() function, as well as functions
for connecting and reading socket data.
•logindlg.h: This file will contain declarations for our login dialog box.
•logindlg.cpp: This file will contain the implementation for our login
dialog box.
•chatwin.h: This file will contain the declarations for our main window.
•chatwin.cpp: This file will contain the implementation for our main win-
dow. The bulk of the GUI handling is in this file.
•Makefile: This is our makefile for building the client.
Chapter 9
202
3227c09.qxd 7/8/04 9:31 PM Page 202
chatcli.h
We start our main header file off by including the STL string header and setting
up our maximum line length.
/* chatcli.h */
#ifndef CHATCLI_H
#define CHATCLI_H
#include <string>
using namespace std;
/* #define's */
#define MAX_LINE_BUFF 1024
Next, we define our command structure. This is the same structure that the
server used.
/* Structures */
struct cmd_t {
string command;
string op1;
string op2;
};
Finally, we have prototypes for our functions in the main source file. Notice
that we have a only few functions. The bulk of the communication functions will
be in our main window class.
/* Function Declarations */
int connectAndJoin(string host, int port, string nickname);
int readLine(int sock, char *buffer, int buffsize);
cmd_t decodeCommand(const char *buffer);
#endif
Case Study: A Networked Application
203
3227c09.qxd 7/8/04 9:31 PM Page 203
chatcli.cpp
Our main source file starts by including all of the familiar system header files for
socket communication as well as header files needed by the Qt library. In addi-
tion, we include the classes used for our login dialog box and the main window.
/* chatcli.cpp */
#include <unistd.h>
#include <sys/ioctl.h>
#include <sys/types.h>
#include <sys/socket.h>
#include <netinet/tcp.h>
#include <netinet/in.h>
#include <arpa/inet.h>
#include <netdb.h>
#include <string>
#include <qapplication.h>
#include <qmessagebox.h>
#include "logindlg.h"
#include "chatwin.h"
#include "chatcli.h"
using namespace std;
Next, we declare a global variable for our client socket. This makes it easily
accessible from the GUI source files.
/* Global Variables */
int client_socket;
Our main() function starts by initializing the QApplication object.
int main(int argc, char **argv)
{
cLoginDlg *logindlg;
string host;
int port;
string nickname;
QApplication app(argc, argv);
Next, we display the login dialog box so that the user may specify the host and
port of the chat server, as well as the nickname she’d like to use. If the user clicks
Chapter 9
204
3227c09.qxd 7/8/04 9:31 PM Page 204
the Connect button, then we attempt to connect using our connectAndJoin()
utility function. If it fails, it displays the error and we display the login dialog
box again.
do {
logindlg = new cLoginDlg(NULL);
if (logindlg->exec() == QDialog::Rejected) {
delete logindlg;
return 0;
}
host = logindlg->hostEdit->text().ascii();
port = atoi(logindlg->portEdit->text().ascii());
nickname = logindlg->nickEdit->text().ascii();
} while (connectAndJoin(host, port, nickname) == 0);
If the connection succeeds, we initialize and display the chat window. Then
we enter Qt’s main event loop.
cChatWin *chatwin = new cChatWin();
chatwin->client_socket = client_socket;
app.setMainWidget(chatwin);
chatwin->setCaption("Chat Test");
chatwin->show();
app.connect(&app, SIGNAL(lastWindowClosed()), &app, SLOT(quit()));
int res = app.exec();
return res;
}
Our first utility function accomplishes two tasks. First, it attempts to connect
to the chat server. Second, if the connection succeeds, it tries to join the chat
room with the provided nickname.
int connectAndJoin(string host, int port, string nickname)
{
sockaddr_in sAddr;
hostent *dotaddr = NULL;
int flag = 1;
string joinString;
char buff[MAX_LINE_BUFF];
cmd_t cmd;
Here we create our client socket.
client_socket = socket(AF_INET, SOCK_STREAM, IPPROTO_TCP);
Case Study: A Networked Application
205
3227c09.qxd 7/8/04 9:31 PM Page 205
Next, we initialize our sockaddr_in structure and use gethostbyname()
in case the user provided us with a host name instead of an IP address. If the
gethostbyname() function fails, we set the address to "0.0.0.0", which will
surely fail to connect.
bzero(&sAddr, sizeof(sockaddr_in));
sAddr.sin_family = AF_INET;
sAddr.sin_addr.s_addr = INADDR_ANY;
sAddr.sin_port = htons(port);
dotaddr = gethostbyname(host.c_str());
if (dotaddr) {
bcopy((const void *) dotaddr->h_addr_list[0],
(void *) &sAddr.sin_addr.s_addr, dotaddr->h_length);
} else {
sAddr.sin_addr.s_addr = inet_addr("0.0.0.0");
}
Once we have the IP address of the server, we try to connect.
/* Connect to server */
if (connect(client_socket, (const sockaddr *) &sAddr, sizeof(sAddr)) != 0) {
QMessageBox::critical(NULL, "Connection Failed", "Unable to connect.");
close(client_socket);
return 0;
}
After connecting, we turn off Nagle’s algorithm and set the socket to non-
blocking. We left the socket as blocking until now because it simplifies the
connect() call. Otherwise, we would need to call select() and poll the socket
for connection success.
/* Turn off Nagle's algorithm*/
setsockopt(client_socket, IPPROTO_TCP, TCP_NODELAY, (char *) &flag,
sizeof(int));
/* Set socket to nonblocking */
ioctl(client_socket, FIONBIO, (char *) &flag);
Now that we are connected and the socket options are set, we send our JOIN
command to the server with the nickname the user specified.
joinString = "JOIN " + nickname + "\n";
send(client_socket, joinString.c_str(), joinString.length(), 0);
readLine(client_socket, buff, MAX_LINE_BUFF, 0);
cmd = decodeCommand(buff);
Chapter 9
206
3227c09.qxd 7/8/04 9:31 PM Page 206
Next, we examine the response and return success or notify the user that the
operation failed.
if (cmd.command == "100") {
return 1;
} else if (cmd.command == "200") {
QMessageBox::critical(NULL, "Nickname In Use",
"The nickname you've chosen is already in use.");
close(client_socket);
return 0;
} else if (cmd.command == "201") {
QMessageBox::critical(NULL, "Invalid Nickname",
"The nickname you've chosen is invalid.");
close(client_socket);
return 0;
} else {
QMessageBox::critical(NULL, "Unknown Error",
"An unknown error has occurred.");
close(client_socket);
return 0;
}
}
The next two functions should look familiar. They are nearly identical to
those used in the server. We have made a slight modification to the readLine()
function, though. In this version we’ve added a timeout parameter. Some of the
calls to readLine() need to be blocking, and this lets us determine which ones are.
int readLine(int sock, char *buffer, int buffsize, int timeout)
{
char *buffPos;
char *buffEnd;
int nChars;
int readlen;
bool complete = false;
fd_set fset;
struct timeval tv;
int sockStatus;
int readSize;
unsigned long blockMode;
FD_ZERO(&fset);
FD_SET(sock, &fset);
Case Study: A Networked Application
207
3227c09.qxd 7/8/04 9:31 PM Page 207
if (timeout > 0) {
tv.tv_sec = 0;
tv.tv_usec = timeout;
sockStatus = select(sock + 1, &fset, NULL, &fset, &tv);
} else {
sockStatus = select(sock + 1, &fset, NULL, &fset, NULL);
}
if (sockStatus <= 0) {
return sockStatus;
}
buffer[0] = '\0';
buffPos = buffer;
buffEnd = buffer + buffsize;
readlen = 0;
while (!complete) {
if ((buffEnd - buffPos) < 0) {
readSize = 0;
} else {
readSize = 1;
}
FD_ZERO(&fset);
FD_SET(sock, &fset);
tv.tv_sec = 5;
tv.tv_usec = 0;
sockStatus = select(sock + 1, &fset, NULL, &fset, &tv);
if (sockStatus < 0) {
return -1;
}
nChars = recv(sock, (char *) buffPos, readSize, MSG_NOSIGNAL);
readlen += nChars;
if (nChars <= 0) {
return -1;
}
if (buffPos[nChars - 1] == '\n') {
complete = true;
buffPos[nChars - 1] = '\0';
}
buffPos += nChars;
}
return readlen;
}
Chapter 9
208
3227c09.qxd 7/8/04 9:31 PM Page 208
cmd_t decodeCommand(const char *buffer)
{
struct cmd_t ret_cmd;
int state;
state = 0;
for (int x = 0; x < strlen(buffer); x++) {
if (buffer[x] == ' ' && state < 2) {
state++;
} else {
switch (state) {
case 0: ret_cmd.command += toupper(buffer[x]);
break;
case 1: ret_cmd.op1 += buffer[x];
break;
default: ret_cmd.op2 += buffer[x];
}
}
}
return ret_cmd;
}
logindlg.h
This is the header file for our login dialog box. It declares the derived class and
the edit controls that will hold the user’s values.
/* logindlg.h */
#ifndef LOGINDLG_H
#define LOGINDLG_H
#include <qdialog.h>
#include <qlineedit.h>
class cLoginDlg : public QDialog
{
Q_OBJECT
public:
cLoginDlg(QWidget *parent);
~cLoginDlg();
Case Study: A Networked Application
209
3227c09.qxd 7/8/04 9:31 PM Page 209
public:
QLineEdit *hostEdit;
QLineEdit *portEdit;
QLineEdit *nickEdit;
};
#endif
logindlg.cpp
This file contains the implementation of the login dialog box. Here we add the
widgets to the dialog box and set up signal handlers for the buttons.
/* logindlg.cpp */
#include <qvbox.h>
#include <qhbox.h>
#include <qlabel.h>
#include <qpushbutton.h>
#include "logindlg.h"
cLoginDlg::cLoginDlg(QWidget *parent) : QDialog(parent, "", true)
{
this->setCaption("Connect");
this->setMinimumHeight(110);
this->setMinimumWidth(200);
QVBox *main = new QVBox(this);
main->setSpacing(3);
main->setMargin(3);
main->setMinimumHeight(104);
main->setMinimumWidth(200);
QHBox *row1 = new QHBox(main);
row1->setSpacing(3);
QLabel *hostLabel = new QLabel("Host", row1);
hostEdit = new QLineEdit(row1);
QHBox *row2 = new QHBox(main);
row2->setSpacing(3);
QLabel *portLabel = new QLabel("Port", row2);
portEdit = new QLineEdit(row2);
QHBox *row3 = new QHBox(main);
Chapter 9
210
3227c09.qxd 7/8/04 9:31 PM Page 210
row3->setSpacing(3);
QLabel *nickLabel = new QLabel("Nickname", row3);
nickEdit = new QLineEdit(row3);
QHBox *row4 = new QHBox(main);
row4->setSpacing(10);
QPushButton *connButton = new QPushButton("Connect", row4);
this->connect(connButton, SIGNAL(clicked()), this, SLOT(accept()));
QPushButton *cancelButton = new QPushButton("Cancel", row4);
this->connect(cancelButton, SIGNAL(clicked()), this, SLOT(reject()));
}
Finally, we have the destructor for the dialog box. Since Qt takes care of
destroying all of the widget objects, we have an empty implementation.
cLoginDlg::~cLoginDlg()
{
}
chatwin.h
This file contains the declaration for our main chat window class. First, we
include some Qt header files.
/* chatwin.h */
#ifndef CHATWIN_H
#define CHATWIN_H
#include <qmainwindow.h>
#include <qtextedit.h>
#include <qlineedit.h>
#include <qlistbox.h>
#include <qtimer.h>
Next, we subclass Qt’s QMainWindow class.
class cChatWin : public QMainWindow
{
Q_OBJECT
public:
cChatWin();
~cChatWin();
Case Study: A Networked Application
211
3227c09.qxd 7/8/04 9:31 PM Page 211
Our member variables include the socket we used to connect to the server,
the window containing the room chat, the text widget the user will enter dia-
logue into, and the list of users in the room.
public:
int client_socket;
QTextEdit *chatEdit;
QLineEdit *msgEdit;
QListBox *userList;
Here we define event handlers for the window. We have functions to handle
all of the button clicks as well as a timer that we use to check for commands
from the server.
protected slots:
void sendButtonClicked();
void privButtonClicked();
void opButtonClicked();
void kickButtonClicked();
void topicButtonClicked();
void quitButtonClicked();
void timerFired();
protected:
QTimer *theTimer;
};
#endif
chatwin.cpp
This file contains all the code for the main chat window. It is the only means that
the user has to interact with the server. We not only relay the user’s commands,
but also check with the server for commands that need to be displayed to the
user. First, we include the necessary header files.
/* chatwin.cpp */
#include <sys/socket.h>
#include <qvbox.h>
#include <qpushbutton.h>
#include <qmessagebox.h>
Chapter 9
212
3227c09.qxd 7/8/04 9:31 PM Page 212
#include <qapplication.h>
#include <qinputdialog.h>
#include "chatcli.h"
#include "chatwin.h"
Next, we have our constructor. Here, we create the chat window. Since this is
specific to Qt, we won’t go into the details.
cChatWin::cChatWin() : QMainWindow(0, "", WDestructiveClose)
{
this->setCaption("Chat Client");
QVBox *main = new QVBox(this);
main->setSpacing(3);
main->setMinimumHeight(300);
main->setMinimumWidth(400);
this->setCentralWidget(main);
QHBox *row1 = new QHBox(main);
row1->setMinimumHeight(280);
chatEdit = new QTextEdit(row1);
chatEdit->setMinimumWidth(300);
chatEdit->setReadOnly(true);
userList = new QListBox(row1);
userList->setMinimumWidth(100);
userList->setMaximumWidth(100);
QHBox *row2 = new QHBox(main);
msgEdit = new QLineEdit(row2);
msgEdit->setMinimumWidth(250);
QPushButton *sendButton = new QPushButton("&Send", row2);
this->connect(sendButton, SIGNAL(clicked()), this,
SLOT(sendButtonClicked()));
QPushButton *privButton = new QPushButton("Send &Private", row2);
this->connect(privButton, SIGNAL(clicked()), this,
SLOT(privButtonClicked()));
QPushButton *opButton = new QPushButton("&Op", row2);
this->connect(opButton, SIGNAL(clicked()), this, SLOT(opButtonClicked()));
QPushButton *kickButton = new QPushButton("&Kick", row2);
this->connect(kickButton, SIGNAL(clicked()), this,
SLOT(kickButtonClicked()));
QPushButton *topicButton = new QPushButton("&Topic", row2);
this->connect(topicButton, SIGNAL(clicked()), this,
SLOT(topicButtonClicked()));
Case Study: A Networked Application
213
3227c09.qxd 7/8/04 9:31 PM Page 213
QPushButton *quitButton = new QPushButton("&Quit", row2);
this->connect(quitButton, SIGNAL(clicked()), this,
SLOT(quitButtonClicked()));
In addition to building the main window, we set up a QTimer. We will use the
timer to check if the server has sent any commands on a regular basis. In this
case, we will check every 0.25 seconds.
theTimer = new QTimer(this);
this->connect(theTimer, SIGNAL(timeout()), this, SLOT(timerFired()));
theTimer->start(250, true);
}
Since Qt takes care of destroying its own widgets, our destructor is empty.
cChatWin::~cChatWin()
{
}
Here we have our first user-interface handler. This member function is
called whenever the user clicks the Send button. We start off with some useful
variable declarations.
void cChatWin::sendButtonClicked()
{
string send_string;
char buffer[MAX_LINE_BUFF];
cmd_t cmd;
int status;
Next, we check to make sure that the user entered some text to send. If not,
then we return. We won’t send an empty message.
if (msgEdit->text() == "") {
return;
}
Now, we build our message string to send to the server. Notice that the
command is terminated with a newline.
send_string = "MSG " + string::basic_string(msgEdit->text().ascii()) + "\n";
Chapter 9
214
3227c09.qxd 7/8/04 9:31 PM Page 214
We send the command and wait for a reply. The next data from the server
will be the success or failure of this command. Notice that we pass 0 as the last
readLine() parameter. This tells the readLine() function to block until the server
sends a reply. If we don’t do this, there is a chance that this call could return
nothing and our response will be picked up by the timer event. We need to han-
dle the response here.
send(client_socket, send_string.c_str(), send_string.length(), 0);
status = readLine(client_socket, buffer, MAX_LINE_BUFF, 0);
if (status < 0) {
theTimer->stop();
QMessageBox::critical(NULL, "Lost Connection",
"The server has closed the connection.");
this->close();
return;
}
Once the server has sent a response, we decode the command and check for
success. If an error occurred, we tell the user.
cmd = decodeCommand(buffer);
if (cmd.command != "100") {
QMessageBox::critical(NULL, "Unknown Error",
"An unknown error has occurred.");
return;
}
Finally, we clear the text box so the user can enter more text.
msgEdit->setText("");
}
The next member function is called when the user clicks the Send Private
button. This is the private message command.
void cChatWin::privButtonClicked()
{
string send_string;
char buffer[MAX_LINE_BUFF];
cmd_t cmd;
int status;
string username;
Case Study: A Networked Application
215
3227c09.qxd 7/8/04 9:31 PM Page 215
To send a private message, the user must enter some text and select a room
member.
if (msgEdit->text() == "") {
return;
}
if (userList->currentText() == "") {
QMessageBox::critical(NULL, "Private Message",
"You must select a user before sending a private message.");
return;
}
Room operators are denoted in the room list with an at sign (@) prefix. If the
user is sending a private message to a room operator, then we need to strip the
leading @.
username = userList->currentText().ascii();
if (username[0] == '@') {
username = username.substr(1);
}
Next, we build the PMSG command. In addition to the message, we also send
the name of the user for whom the message is intended.
send_string = "PMSG " + username + " "
+ string::basic_string(msgEdit->text().ascii()) + "\n";
send(client_socket, send_string.c_str(), send_string.length(), 0);
status = readLine(client_socket, buffer, MAX_LINE_BUFF, 0);
if (status < 0) {
theTimer->stop();
QMessageBox::critical(NULL, "Lost Connection",
"The server has closed the connection.");
this->close();
return;
}
cmd = decodeCommand(buffer);
After decoding the response, we check for success or failure. If we suc-
ceeded, then we clear the text box. Otherwise, we report the error to the user.
if (cmd.command == "100") {
msgEdit->setText("");
Chapter 9
216
3227c09.qxd 7/8/04 9:31 PM Page 216
return;
} else if (cmd.command == "202") {
QMessageBox::critical(NULL, "Unknown User",
"The user specified is not in the room.");
return;
} else {
QMessageBox::critical(NULL, "Unknown Error",
"An unknown error has occurred.");
return;
}
}
Our next handler is called whenever the user clicks the Op button. This
command promotes a user to operator status in the room.
void cChatWin::opButtonClicked()
{
string send_string;
char buffer[MAX_LINE_BUFF];
cmd_t cmd;
int status;
string username;
Just like the previous function for the Send Private button, this command
requires the user to select a room member from the list.
if (userList->currentText() == "") {
QMessageBox::critical(NULL, "Op Error",
"You must select a user before making them an operator.");
return;
}
Next, we save a call to the server by checking our list to see if the user is
already an operator.
username = userList->currentText().ascii();
if (username[0] == '@') {
username = username.substr(1);
QMessageBox::critical(NULL, "Op Error",
"User is already a room operator.");
return;
}
Case Study: A Networked Application
217
3227c09.qxd 7/8/04 9:31 PM Page 217
Otherwise, we send the OP command.
send_string = "OP " + username + "\n";
send(client_socket, send_string.c_str(), send_string.length(), 0);
status = readLine(client_socket, buffer, MAX_LINE_BUFF, 0);
if (status < 0) {
theTimer->stop();
QMessageBox::critical(NULL, "Lost Connection",
"The server has closed the connection.");
this->close();
return;
}
cmd = decodeCommand(buffer);
After decoding the response, we check the return code. If it was successful, we
simply return. Note that we do not need to update our member list to reflect the
new operator. The server will send out a command to all clients (including us),
informing them of the newly made operator. This will be handled in timerFired()
function.
if (cmd.command == "100") {
return;
If an error occurred, we report it to the user.
} else if (cmd.command == "202") {
QMessageBox::critical(NULL, "Unknown User",
"The user specified is not in the room.");
return;
} else if (cmd.command == "203") {
QMessageBox::critical(NULL, "Denied",
"Only room operators may op other users.");
return;
} else {
QMessageBox::critical(NULL, "Unknown Error",
"An unknown error has occurred.");
return;
}
}
This member function is called whenever the user clicks the Kick button.
void cChatWin::kickButtonClicked()
{
Chapter 9
218
3227c09.qxd 7/8/04 9:31 PM Page 218
string send_string;
char buffer[MAX_LINE_BUFF];
cmd_t cmd;
int status;
string username;
Just like the previous two functions, we need the user to select a room
member.
if (userList->currentText() == "") {
QMessageBox::critical(NULL, "Kick Error",
"You must select a user before kicking them out.");
return;
}
If the room member is an operator, then we need to strip out the leading @in
the username.
username = userList->currentText().ascii();
if (username[0] == '@') {
username = username.substr(1);
}
Next, we send the KICK command.
send_string = "KICK " + username + "\n";
send(client_socket, send_string.c_str(), send_string.length(), 0);
status = readLine(client_socket, buffer, MAX_LINE_BUFF, 0);
if (status < 0) {
theTimer->stop();
QMessageBox::critical(NULL, "Lost Connection",
"The server has closed the connection.");
this->close();
return;
}
Finally, we decode the response from the server. If successful, we return. Just
like the previous OP command handler, we don’t need to remove the kicked-out
user here. The server will relay a command to inform us that it has happened.
We’ll handle it in the timerFired() function.
cmd = decodeCommand(buffer);
if (cmd.command == "100") {
return;
Case Study: A Networked Application
219
3227c09.qxd 7/8/04 9:31 PM Page 219
If an error occurred, then report it to the user.
} else if (cmd.command == "202") {
QMessageBox::critical(NULL, "Unknown User",
"The user specified is not in the room.");
return;
} else if (cmd.command == "203") {
QMessageBox::critical(NULL, "Denied",
"Only room operators may kick out other users.");
return;
} else {
QMessageBox::critical(NULL, "Unknown Error",
"An unknown error has occurred.");
return;
}
}
Another command available to the user changes the topic of the room. The
room topic is displayed in the chat window’s title bar. When the user clicks the
Topic button, this function is called.
void cChatWin::topicButtonClicked()
{
string send_string;
char buffer[MAX_LINE_BUFF];
cmd_t cmd;
int status;
bool ok;
First, we ask the user to enter the new topic.
QString topic = QInputDialog::getText("Chat Client", "Enter the new topic:",
QLineEdit::Normal, QString::null, &ok, this );
If the user clicks Cancel or enters a blank topic, we simply return.
if (ok == false || topic.isEmpty()) {
return;
}
Otherwise, we send the TOPIC command to the server.
send_string = "TOPIC " + string::basic_string(topic.ascii()) + "\n";
send(client_socket, send_string.c_str(), send_string.length(), 0);
Chapter 9
220
3227c09.qxd 7/8/04 9:31 PM Page 220
status = readLine(client_socket, buffer, MAX_LINE_BUFF, 0);
if (status < 0) {
theTimer->stop();
QMessageBox::critical(NULL, "Lost Connection",
"The server has closed the connection.");
this->close();
return;
}
cmd = decodeCommand(buffer);
If the command succeeded, we return. Again, the server will send a com-
mand to tell all connected clients that the topic has been changed. We will
retrieve that command in the timerFired() function.
if (cmd.command == "100") {
return;
} else if (cmd.command == "203") {
QMessageBox::critical(NULL, "Denied",
"Only room operators may change the topic.");
return;
} else {
QMessageBox::critical(NULL, "Unknown Error",
"An unknown error has occurred.");
return;
}
}
Our final handler is called when the user clicks the Quit button.
void cChatWin::quitButtonClicked()
{
string send_string;
char buffer[MAX_LINE_BUFF];
cmd_t cmd;
int status;
The QUIT command requires no parameters. We send it all by itself.
send_string = "QUIT\n";
send(client_socket, send_string.c_str(), send_string.length(), 0);
status = readLine(client_socket, buffer, MAX_LINE_BUFF, 0);
if (status < 0) {
theTimer->stop();
Case Study: A Networked Application
221
3227c09.qxd 7/8/04 9:31 PM Page 221
QMessageBox::critical(NULL, "Lost Connection",
"The server has closed the connection.");
this->close();
return;
}
cmd = decodeCommand(buffer);
Whenever we don’t receive a successful return code, we inform the user.
if (cmd.command != "100") {
QMessageBox::critical(NULL, "Unknown Error",
"An unknown error has occurred.");
}
Either way, though, we close the chat window. Closing the main window will
also end the program.
this->close();
}
Our final member function is called by a QTimer event. In it we process all
commands that the server has sent us.
void cChatWin::timerFired()
{
int status;
char buffer[MAX_LINE_BUFF];
cmd_t cmd;
string str;
First, we set up a loop to read the command list line by line.
/* Get any commands that the server has sent */
while ((status = readLine(client_socket, buffer, MAX_LINE_BUFF, 100)) != 0) {
Since we could get many commands from the server, we call processEvents()
to keep the GUI responsive to the user while we are processing.
qApp->processEvents();
if (status < 0) {
QMessageBox::critical(NULL, "Lost Connection",
"The server has closed the connection.");
this->close();
Chapter 9
222
3227c09.qxd 7/8/04 9:31 PM Page 222
return;
} else if (status > 0) {
cmd = decodeCommand(buffer);
If we successfully retrieve the next command, we start to match it against
the list of commands that we support. If we get a JOIN command, then we add
the name of the new room member to our member list.
if (cmd.command == "JOIN") {
userList->insertItem(cmd.op1.c_str());
str = cmd.op1 + " has joined the room.\n";
The MSG command posts a message to the entire room. If we get one, we add
it to the chat window along with the username of who sent it.
} else if (cmd.command == "MSG") {
str = cmd.op1 + ": " + cmd.op2 + "\n";
chatEdit->append(str.c_str());
A private message is not sent to the whole room and is not added to the chat
window. Instead, we inform the user through a message box.
} else if (cmd.command == "PMSG") {
str = cmd.op1 + " has sent you a private message:\n\n";
str += cmd.op2;
QMessageBox::information(NULL, "Private Message", str.c_str());
When a user has been made a room operator, we designate that in our room
list by prefixing their username with @. In addition, we add the notification string
to the chat window.
} else if (cmd.command == "OP") {
QListBoxItem *itm = userList->findItem(cmd.op1.c_str(),
Qt::ExactMatch);
if (itm != NULL) {
userList->changeItem("@" + itm->text(),
userList->index(itm));
}
str = cmd.op1 + " has been made a room operator.\n";
chatEdit->append(str.c_str());
If a user has been kicked out of the room, we remove the user from our
member list and add the notification to the chat window.
Case Study: A Networked Application
223
3227c09.qxd 7/8/04 9:31 PM Page 223
} else if (cmd.command == "KICK") {
QListBoxItem *itm = userList->findItem(cmd.op1.c_str(),
Qt::ExactMatch);
if (itm != NULL) {
userList->removeItem(userList->index(itm));
} else {
str = "@" + cmd.op1;
itm = userList->findItem(str.c_str(), Qt::ExactMatch);
if (itm != NULL) {
userList->removeItem(userList->index(itm));
}
}
str = cmd.op1 + " was kicked out of the room by "
+ cmd.op2 + "\n";
chatEdit->append(str.c_str());
When a room operator changes the topic, we add the notification to the chat
window and change the title bar text.
} else if (cmd.command == "TOPIC") {
if (cmd.op1 != "*") {
str = "The topic has been changed to \"" + cmd.op2
+ "\" by " + cmd.op1 + "\n";
chatEdit->append(str.c_str());
}
str = "Chat Client - Topic: " + cmd.op2;
this->setCaption(str.c_str());
When a user leaves the room, we remove the user from the member list and
add the notification to the chat window.
} else if (cmd.command == "QUIT") {
QListBoxItem *itm = userList->findItem(cmd.op1.c_str(),
Qt::ExactMatch);
if (itm != NULL) {
userList->removeItem(userList->index(itm));
} else {
str = "@" + cmd.op1;
itm = userList->findItem(str.c_str(), Qt::ExactMatch);
if (itm != NULL) {
userList->removeItem(userList->index(itm));
}
}
Chapter 9
224
3227c09.qxd 7/8/04 9:31 PM Page 224
str = cmd.op1 + " has left the room.\n";
chatEdit->append(str.c_str());
}
}
}
After we process all of the pending messages, we start the timer again.
theTimer->start(250, true);
}
Makefile
Here is the makefile used to build the chat client. Notice that we have to do
a couple of extra steps to preprocess our window classes so that the event-
handling mechanism is built.
CC = g++
INCDIR = -I $(QTDIR)/include
LDFLAGS = -L $(QTDIR)/lib -lqt-mt
all: chatcli
chatcli: chatcli.o chatwin.o logindlg.o moc_chatwin.o moc_logindlg.o
$(CC) -o chatcli $(LDFLAGS) chatcli.o chatwin.o logindlg.o moc_chatwin.o \
moc_logindlg.o
chatcli.o: chatcli.cpp
$(CC) -c $(INCDIR) chatcli.cpp
chatwin.o: chatwin.cpp chatwin.h moc_chatwin.cpp
$(CC) -c $(INCDIR) chatwin.cpp
moc_chatwin.o: moc_chatwin.cpp
$(CC) -c $(INCDIR) moc_chatwin.cpp
moc_chatwin.cpp: chatwin.h
$(QTDIR)/bin/moc chatwin.h -o moc_chatwin.cpp
logindlg.o: logindlg.cpp logindlg.h moc_logindlg.cpp
$(CC) -c $(INCDIR) logindlg.cpp
Case Study: A Networked Application
225
3227c09.qxd 7/8/04 9:31 PM Page 225
moc_logindlg.o: moc_logindlg.cpp
$(CC) -c $(INCDIR) moc_logindlg.cpp
moc_logindlg.cpp: logindlg.h
$(QTDIR)/bin/moc logindlg.h -o moc_logindlg.cpp
clean: FORCE
rm -f *.o
rm -f moc_*
FORCE:
To build the chat client, ensure that your QTDIR environment variable is set to
point to the Qt directory. Then type
make
The client can be run by typing
./chatcli
Recommendations for Improvements
While we’ve built a working chat client and server, here are a few suggestions for
further improvements:
• Convert the server to a daemon, put it in a chroot() jail, and implement
system logging.
• When a user sends a private message, open a private chat window. This
will allow the users to privately chat in a more fluid manner. Any messages
sent in this window will be considered private messages. When the client
receives a private message, you will need to determine if a private message
window exists and send the message to it. If not, then open a new private
message window.
• Use colors to dress up the messages in the chat window. Use different
colors for server notifications and chat messages.
Chapter 9
226
3227c09.qxd 7/8/04 9:31 PM Page 226
• Allow for multiple rooms to exist. This will require modifications to the
protocol, server, and client. You might also have a configurable list of
rooms that always exist in addition to allowing users to create rooms.
Summary
In this chapter, we implemented a working chat server and client using the
protocol described in Chapter 6.
In Part Three of this book, we will look at security and authentication.
Case Study: A Networked Application
227
3227c09.qxd 7/8/04 9:31 PM Page 227
3227c09.qxd 7/8/04 9:31 PM Page 228

Part Three
Security
3227c10.qxd 7/8/04 9:31 PM Page 229
3227c10.qxd 7/8/04 9:31 PM Page 230
CHAPTER 10
Securing Network
Communication
AT THE HEART OF NETWORK PROGRAMMING is the need to transfer information from
one place to another. When this transfer is done between processes on the same
host or between hosts on a private network, then we don’t need to be so con-
cerned about network security—the main considerations are general protocol
design and endpoint security through authorization. However, with the rise of
the Internet, it has become necessary to consider what happens to the informa-
tion as it is passed between computers, routers, and other networks. The advent
of semipublic networks has created a need for network security. Thus, protocol
design has taken on a new dimension as it has become necessary to consider not
only how the information should be packaged, transferred, and interpreted, but
also how to ensure that only authorized parties can access the information.
Because of the physical design of current-day networks and the nature of the
TCP/IP standard, any computer situated between the sender and recipient of a
data packet on the network can see, or “sniff,” that packet. A packet on the wire
contains information intended to ensure proper delivery of itself to a host or
address. However, it has no provisions to prevent someone from reading that
information and the enclosed data. The TCP/IP standards even permit such data
and information to be manipulated and changed in some circumstances. This
potentially results in preventing the data from being received or altering informa-
tion that could otherwise be used to verify the authenticity of the data enclosed.
There are many tools available for GNU/Linux dedicated to sniffing, all of
which require root access, as the network device must be put into promiscuous
mode. In nonpromiscuous mode (which is the default), a network adapter checks
the address of each packet to determine whether it should read the whole packet
or send it along, and it reads only those packets that are addressed to it. By con-
trast, putting the device into promiscuous mode causes the adapter to read each
and every packet on the wire. Tools such as Ethereal (http://www.ethereal.com)
make this a point-and-click process, providing easy-to-use filters, packet analysis,
and even the ability to follow a session automatically. Using such a tool, it is pos-
sible for an unauthorized person to gain access to insecure data. For example,
monitoring an entire telnet session, to see everything from the initial login and
password to the commands and output of the session itself.
231
3227c10.qxd 7/8/04 9:31 PM Page 231
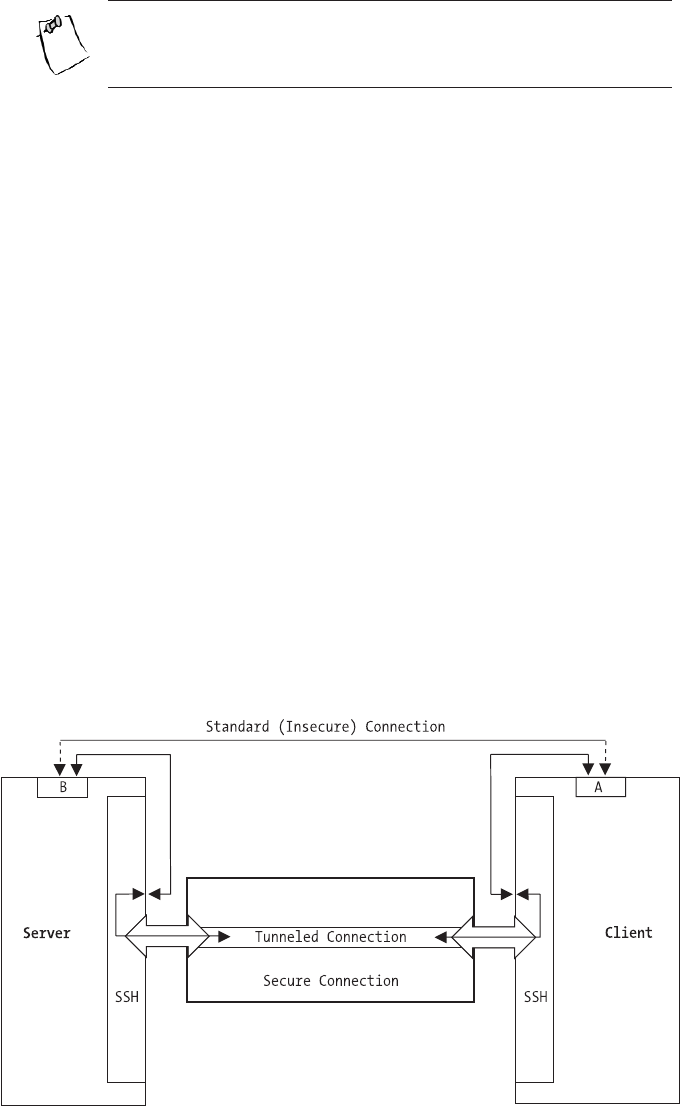
NOTE It is important to note that sniffing has many legitimate uses
for such things as fault analysis, network intrusion detection, etc.
Capturing passwords from telnet sessions is bad enough, but extend the
same process to sniffing web-browsing sessions at an online store where credit
cards are processed or tax information is recorded, and it’s easy to see how vital
it is to have secure communication. We know that we have to secure our appli-
cation somehow, but this seems like a rather big problem. The good news is that
this isn’t a new problem. There are several large projects and standards already
in place to help. In this chapter, we’ll examine the following options:
• Securing existing protocols using tunneling
• The Public Key Infrastructure standard and the concept of asymmetric
cryptography
• Creating a secure network application using the OpenSSL library
Tunneling
Tunneling allows a secure connection between a client and server to be made
first, then other network connections are forwarded, or “tunneled,” over that sin-
gle secure connection, as shown in Figure 10-1.
Figure 10-1. Tunneling over a secure connection
Chapter 10
232
3227c10.qxd 7/8/04 9:31 PM Page 232
This is the first option in making communication secure and is a solution for
applications, or protocols, that are already fully developed and widely used, as
adding security at the program level, post design, is an extremely disruptive task.
Tunneling is how most virtual private networks (VPNs) work. By employing tun-
neling, the application does not have to change, but the information is relayed
inside a secure channel. The drawback is that the server and client must each
connect to themselves to use the tunnel, which makes logging or filtering access
by remote address much harder, if not impossible. Tunneling can be done in sev-
eral ways, using either of two common packages: OpenSSH or Stunnel.
Tunneling with OpenSSH
The OpenSSH project (http://www.openssh.org) is an ongoing effort to implement
the Secure Shell (SSH) protocol under a BSD license. The SSH protocol allows
secure remote shell access and file transfer (similar to FTP), and was intended as
a replacement for the older and insecure methods of remote administration and
access such as RCP, RSH, and FTP. The SSH protocol allows automatic forwarding
(meaning tunneling) of the X protocol, as well as tunneling of arbitrary TCP (and,
just recently, UDP) connections. As a result of its design, the SSH protocol suite
can be used to curb network attacks, prevent eavesdropping, and so on.
Once SSH is installed, tunneling a connection over SSH requires either a
username/password pair or a predefined public/private-key pair for authenti-
cation on the server. Tunneling can be specified in the SSH configuration file or
on the command line. The man page for SSH (from OpenSSH) says it best:
-L port:host:hostport Specifies that the given port on the local (client) host is
to be forwarded to the given host and port on the remote side. This works by
allocating a socket to listen to port on the local side, and whenever a connec-
tion is made to this port, the connection is forwarded over the secure channel,
and a connection is made to host on port hostport from the remote machine.
Port forwardings can also be specified in the configuration file. Only root can
forward privileged ports. IPv6 addresses can be specified with an alternative
syntax: port/host/hostport.
The -R flag operates in the same manner; however, it tunnels the remote
port to the local machine, which is the opposite of the -L flag.
Let’s take an insecure application, for example telnet, and tunnel it over
an SSH connection. Be sure that the SSH server is set up, and that a telnet server
exists on the same machine. After verifying that we can connect to the server
with SSH, we try the following command:
$ssh username@server -L 6699:server:23
Securing Network Communication
233
3227c10.qxd 7/8/04 9:31 PM Page 233

We replace username in the preceding command with our username and
server with the fully qualified host name (or IP address) of our server. After log-
ging in, we’ll be given a prompt. Well, that’s great, but to enjoy the benefits of
port forwarding, or redirecting a local port to a remote port, we’ll now have to
open another terminal window and telnet to localhost:6699. What if we just
wanted to forward the port and push it to the background for use at any time?
By adding the -N and -f flags, we can accomplish just that. The -f option forces
SSH into the background, and the -N flag tells it not to execute any remote com-
mands after connecting and authenticating:
$ ssh username@server -L 6699:server:23 -N -f
We run the preceding command, and then run
$ telnet localhost 6699
We should now be able to log in over a telnet connection to the server. The
benefit, now, is that the connection is secure, and despite the fact that we’re
using a plain-text client-server protocol, we’re doing so over an encrypted con-
nection that can’t be sniffed.
TIP For it to be truly useful, we would configure our OpenSSH
server to allow forwarding only particular ports and setup keys to
allow passwordless forwarding for authorized individuals.While
beyond the scope of this text, this technique is a well-documented
method of configuration using the authorized_keys file and its
configuration syntax.
Tunneling with Stunnel
Stunnel (http://www.stunnel.org) is the second option used to implement tun-
neling. Stunnel uses the OpenSSL (http://www.openssl.org) libraries to implement
a Secure Sockets Layer/Transport Layer Security (SSL/TLS) encrypted channel,
thus tunneling arbitrary TCP (as yet, not UDP) connections between a client and
server in much the same way (although through a different protocol) as SSH did
in the previous example.
The major difference in using Stunnel is that its sole use is for forwarding
an insecure connection over a secure channel, whereas SSH is capable of doing
so in addition to its main functionality. An advantage to Stunnel’s use of the
SSL/TLS library is the availability of client software that already knows and speaks
the SSL/TLS protocols. For instance, a common use of Stunnel is to provide SSL
Chapter 10
234
3227c10.qxd 7/8/04 9:31 PM Page 234
capabilities to an IMAP or POP e-mail server that otherwise could not support
SSL. In this case, the e-mail server can do its job without worrying about encryp-
tion, while most available e-mail clients support SSL connectivity already.
Providing SSL encryption to a non-SSL-enabled IMAP mail service is as easy
as this:
$ stunnel -d imaps -r localhost:imap
This command basically says “accept connections on port IMAPS (as listed in
/etc/services), and send the decrypted data to port imap on server localhost.”
Stunnel requires a signed SSL certificate, which can be generated and “self-
signed” with the OpenSSL toolkit (as demonstrated later in this section), or a
certificate can be purchased through several companies on the Internet.
Public Key Infrastructure
The Public Key Infrastructure (PKI) defines a standard for security using
asymmetric encryption. This standard is at the core of most current-day secure
communication methods. To understand its uses, we must first examine some
key terms and concepts.
Symmetric Key Cryptography
Prior to the PKI standard, there was only one kind of encryption: symmetric key
cryptography (also known as secret key cryptography). Symmetric key cryptogra-
phy employs a mathematical function that uses a single unique key for both
encryption and decryption. This operation results in obfuscated, or encrypted,
data, making it necessary to reverse the process before the data can be used.
As the need for secure communication grew, a basic flaw in symmetric
cryptography became clear: key distribution. Encrypted data, while statistically
impossible to decrypt, was only as strong as the integrity, or security, of the key
that was used to encrypt it.
This is best demonstrated, as is often the case in writing about cryptography
and security, with an “Alice and Bob” example. Consider a real-world situation
involving our key players, Alice and Bob. Alice has a message she wants only Bob
to be able to read. She uses a mathematical function and a secret key (let’s say
she used the name of her dog, “Fido”) to encrypt the message. She then sends
the encrypted message to Bob. However, before Bob can read the message, he
needs to know what key Alice used to encrypt it. Effectively, this brings us back
to square one, Alice must somehow communicate her key to Bob in a way that
prevents others from knowing it. Whether she conveys it to him verbally, sends
Securing Network Communication
235
3227c10.qxd 7/8/04 9:31 PM Page 235
him a registered letter, or gives it to him on a floppy disk, there is a chance that
the key could be compromised and the message decrypted by someone else.
Asymmetric Key Cryptography
The answer to the key distribution problem is provided by asymmetric key cryp-
tography (also known as public key cryptography). With this technique, two keys
are used. One key, used to encrypt the data, is made public. This key can be used
only to encrypt data, not to decrypt it. Therefore, this key can be shared with
anyone or any program wishing to provide secure data. The second key, called
the private key, is used for decryption of the data encrypted with the public key.
Asymmetrical key cryptography is at the core of the PKI standard. Using
this method of cryptography, anyone can encrypt data, but only the intended
recipient, who holds the correct private key, can read it. This makes secure
communication much easier to handle. In the initiation of a PKI session, the
host and client exchange public keys. Each encrypts a small handshake mes-
sage with the other’s public key, as a test, and decrypts the corresponding
message from the other for verification.
Let’s again consider our friend Alice’s predicament. This time around she has
learned her lesson, so she and Bob first trade public keys. Alice then encrypts her
message with Bob’s public key and sends the result along to Bob. Bob, being the
only person who has the corresponding private key, can now decrypt the message
safely. Likewise, Bob can respond by encrypting his own message with Alice’s
public key. In this way, the piece of information needed to read an encrypted
message never has to be transmitted or endangered.
Asymmetric key cryptography makes it possible to share a public key with-
out risk of compromising secure communication. However, an attack known as
the man-in-the-middle attack exposes another problem: key-validity. In this
attack, the attacker intercepts the first message and sends its own public key to
each. By doing this, each person thinks that the attacker is the other person. The
end result is a stream of decrypted traffic that the attacker can read, modify,
and use.
In Alice and Bob’s world, this means the introduction of a new character to
our unfolding drama—let’s call him Charlie. In the previous example, say that
Charlie was to get a copy of both Alice and Bob’s public keys. This in itself is no
danger, as messages can’t be decrypted by a public key. However, if Charlie then
makes sure he’s in a position to intercept messages being passed between Alice
and Bob, then he can pretend to be Bob when speaking with Alice, and likewise
he can pretend to be Alice when speaking with Bob. Figure 10-2 illustrates how
the man-in-the-middle attack works.
Chapter 10
236
3227c10.qxd 7/8/04 9:31 PM Page 236

Figure 10-2. Man-in-the-middle attack
Certificates
To prevent a man-in-the-middle attack, the PKI standard includes the use of cer-
tificates. A certificate is used to confirm that certain data has been sent by the
person or organization that claims to have sent it. It contains a digital signature
that is applied and verified with asymmetric cryptography by a trusted third
party. As a result, a client and server exchange public keys as well as certificates
(often combined as a single item) when a session is initiated. These can then be
verified by the trusted third party that signed them.
Let’s return to Alice and Bob’s story one more time to see the whole picture
of the PKI standard. This time around, when Bob and Alice exchange their public
keys, they also provide the name of a third person, Dan. Dan has received a copy
of both Bob and Alice’s public keys as well, he has taken other steps to verify
their authenticity, and both Alice and Bob trust Dan. Now, when Alice receives
Bob’s public key, she looks at it and sees that Dan has also signed it, so she
knows that Bob is who he says he is. Likewise, when Bob sees that Alice’s key has
been verified by Dan, he knows that she is in fact Alice, and not that annoying
eavesdropper Charlie.
In this way, both a client and server can establish the other’s authenticity
with digital signatures, as well as guarantee, through asymmetric cryptography
and certificates, that only the intended recipient can decrypt the encrypted data.
The usual practice is that only servers provide certificates, to prove their identity,
as typical client-server communication requires only that the client be assured
of the server’s identity. A common example is HTTPS, the HTTP-over-SSL stan-
dard that is used by many popular web servers and browsers. When connecting
to a secure website, such as an e-commerce site, the browser will validate the
server’s certificate to ensure that any private data is being shared only with the
intended server. In this case, the server that is used to verify certificates is typi-
cally one of a few trusted signing authorities known to both parties.
Securing Network Communication
237
3227c10.qxd 7/8/04 9:31 PM Page 237
The decision to use client certificates or not is one of protocol and design. It
really depends on the nature of the application and the usage thereof. A general
rule of thumb is that if only particular clients are to connect, they should also
use certificates, whereas if any number of clients are expected and allowed to
connect, client certificates are unnecessary.
Creating Certificates
Some of the examples in this section make extensive use of PKI certificates. This
requires that we have a certificate available for the example program. To create
this certificate and provide a better introduction to PKI, let’s examine how we
can create a certificate using the OpenSSL toolkit (http://www.openssl.org).
Creating a Certificate Authority
A certificate is typically signed by a trusted third party known as a certificate
authority, or CA. However, using the OpenSSL toolkit, it is possible to create our
own CA while creating a self-signed certificate for use in testing. To do this, we
must first create a root-level private key and a root certificate request. OpenSSL
includes a command-line utility called openssl that functions as a tool for work-
ing with OpenSSL’s cryptographic capabilities. We begin with the following:
$ openssl req -newkey rsa:2048 -keyout root_key.pem -out root_request.pem
This generates a new key using the RSA standard with a key size of 2048 bits,
puts the private key into the file root_key.pem, and puts a certificate request into
the file root_request.pem. The preceding commands should result in output simi-
lar to the following:
Generating a 2048 bit RSA private key
..........................................+++
..............................+++
writing new private key to 'root_key.pem'
Enter PEM pass phrase:
Verifying - Enter PEM pass phrase:
-----
You are about to be asked to enter information that will be incorporated
into your certificate request.
What you are about to enter is what is called a Distinguished Name or a DN.
There are quite a few fields but you can leave some blank
For some fields there will be a default value,
If you enter '.', the field will be left blank.
-----
Chapter 10
238
3227c10.qxd 7/8/04 9:31 PM Page 238

Country Name (2 letter code) [AU]:US
State or Province Name (full name) [Some-State]:Maine
Locality Name (eg, city) []:Portland
Organization Name (eg, company) [Internet Widgits Pty Ltd]:Somecompany Inc.
Organizational Unit Name (eg, section) []:IT/IS
Common Name (eg, YOUR name) []:Nathan
Email Address []:nate@yocom.org
Please enter the following 'extra' attributes
to be sent with your certificate request
A challenge password []:
An optional company name []:
We should choose a pass phrase to protect our private key, as without the
pass phrase our private key cannot be used to sign anything. As we are creating a
test certificate, the other fields may be left blank. To avoid entering a password
to run your application later, be sure to leave the challenge password, under the
extra attributes, blank.
We now have two files in our directory, root_key.pem, which holds the
encrypted private key, and root_request.pem, which contains our certificate
request. We go on to actually generate a certificate with the following:
$ openssl x509 -req -in root_request.pem -signkey root_key.pem \
-out root_certificate.pem
This command uses the x509 processor to sign the key and output our root
certificate as root_certificate.pem. Output from this should be similar to this:
Signature ok
subject=/C=US/ST=Maine/L=Portland
/O=SomecompanyInc./OU=IT/IS/CN=Nathan
/emailAddress=nate@yocom.org
Getting Private key
Enter pass phrase for root_key.pem:
TIP x509 is a common standard for dealing with certificates.
The pass phrase being requested is the one you assigned to the private key
earlier. If you enter this incorrectly, you will get an error message stating “Unable
to load private key,” as your private key cannot be read without this pass phrase.
Securing Network Communication
239
3227c10.qxd 7/8/04 9:31 PM Page 239
To keep things simple, we can now combine our information into a single
file (OpenSSL is smart enough to handle files with multiple types of information
in them).
$ cat root_certificate.pem root_key.pem > root.pem
This completes the first step in creating a certifying authority. We now have a
root-level certificate that we can use to create and sign a CA certificate. The pro-
cedure now is similar to that used previously. First, we generate the CA’s private
key and certificate request:
$ openssl req -newkey rsa:2048 -keyout CA_key.pem -out CA_request.pem
Then we process the request with x509 and create our actual CA certificate:
$ openssl x509 -req -in CA_request.pem -CA root.pem -CAkey root.pem \
-CAcreateserial -out CAcert.pem
This time we provide root.pem as the certificate to use for signing, as well as
the key, because we combined both these sets of data into one file. The output
from both these commands should resemble those from the previous commands.
We again combine our information into one file:
$ cat CAcert.pem CA_key.pem root_certificate.pem > CA.pem
We now have our CA certificate and can generate self-signed server and
client certificates with it.
Creating a Server Certificate
In creating a private key and certificate request for our server certificate, we
don’t want to be prompted for a password on every connection, so we generate
an unencrypted private key of length 2048 bits with the genrsa command:
$openssl genrsa 2048 > server_key.pem
We then use this key and generate a certificate request as we have before:
$ openssl req -new -key server_key.pem -out server_request.pem
You are about to be asked to enter information that will be incorporated
into your certificate request.
Chapter 10
240
3227c10.qxd 7/8/04 9:31 PM Page 240

What you are about to enter is what is called a Distinguished Name or a DN.
There are quite a few fields but you can leave some blank
For some fields there will be a default value,
If you enter '.', the field will be left blank.
-----
Country Name (2 letter code) [AU]:US
State or Province Name (full name) [Some-State]:California
Locality Name (eg, city) []:Almeda
Organization Name (eg, company) [Internet Widgits Pty Ltd]:Secure Servers Inc.
Organizational Unit Name (eg, section) []:
Common Name (eg, YOUR name) []:Joe Admin
Email Address []:
Please enter the following 'extra' attributes
to be sent with your certificate request
A challenge password []:
An optional company name []:
Note that this time we are not asked for a password, as the private key in
server_key.pem is not encrypted. We now process the certificate request with the
CA key and certificate:
$ openssl x509 -req -in server_request.pem -CA CA.pem -CAcreateserial \
-CAkey CA.pem -out server_certificate.pem
We will then be asked for the password we used to encrypt our CA’s private
key. We have all the information we need spread across several files. We combine
things one last time:
$ cat server_certificate.pem server_key.pem CAcert.pem \
root_certificate.pem > server.pem
We can now use the server.pem file as a certificate for our OpenSSL example.
CAUTION It is important to note that because we combined infor-
mation and included a plain-text private key in the same file as
our certificate, this file should remain accessible only to the process
using it, as our private key is vital to the security of the application.
Should another server get hold of the private key, it could effectively
masquerade as us with no way for a client to tell the difference.
Securing Network Communication
241
3227c10.qxd 7/8/04 9:31 PM Page 241
Secure Network Programming Using OpenSSL
So you’ve seen how to secure existing, insecure applications with tunneling, but
how do you design a secure network application so that you don’t have to use
tunneling? Again, you have several options. One of these options is to use the
OpenSSL library, a cryptography toolkit, to secure your application. OpenSSL is
based on the SSLeay library developed by Eric A. Young and Tim J. Hudson. In
addition to SSL and TLS implementations, the OpenSSL library contains crypto-
graphic routines, random number generators, and large number, or BIGNUM,
math support. This all-in-one approach, combined with its open source nature,
makes OpenSSL an easy to use library for securing any network application.
Using the OpenSSL library first requires an examination of the structures
and functions that make the library work. Once you fully understand these, we’ll
continue on to discuss the methods used to create network servers and clients
with the OpenSSL library. After we’ve created a couple of example servers and
clients, it’s important that we also look at the use of threading in conjunction
with the OpenSSL library. The remainder of this chapter will deal with these
issues in the order mentioned.
OpenSSL Functions and Structures
The OpenSSL libraries (libcrypto and libssl) adhere to a pretty standard Linux
familiar method of naming functions and parameters. The library itself is written
in a mix of C and assembler, and as such easily integrates into a C program. The
library’s well-defined and discrete functions also make it an easy candidate for
wrapping in a simple C++ class for inclusion in C++ projects.
The library’s main header files are openssl/ssl.h and openssl/err.h. These
include the declarations for most of the functions that we will be concerned with
in this section. Each function name includes a prefix that identifies the type of
object the function operates on. SSL_ functions deal with the SSL * structure
and the SSL and TLS standards, SSL_CTX_ functions deal with the CTX * structure
that describes the context of a connection, and this continues. Each of these is
described in the openssl/ssl.h header file.
The second header file, openssl/err.h, contains declarations for the built-in
error handling and reporting capabilities of the library. This includes not only a
host of defined errors and their descriptions, but also custom ERR_ functions for
converting the result of a library function into a human-readable string and even
putting that string into different contexts, such as printing to a file. Let’s walk
through the steps necessary to use the library and the basic structures that are
required.
Chapter 10
242
3227c10.qxd 7/8/04 9:31 PM Page 242
Library Initialization
The first thing that an application using the OpenSSL library must do is initialize
the internal state of the library. While it is possible to initialize only those parts
pertaining to the algorithms and structures we are going to use, the library
provides a simple one-call solution that will set things up regardless of how we
choose to use the library: OpenSSL_add_all_algorithms(). By first calling this func-
tion, we can then safely continue and call other library functions, and use library
structures.
While not required, it is also quite desirable to initialize the library’s error-
handling capabilities and strings. This is done through a one-time call to
SSL_load_error_strings().After calling this function, we can then use the ERR_
functions in the library to change an error number into a human-readable
message.
Library Structures
The four main structures that our applications will deal with are SSL_METHOD,
SSL_CTX, SSL, and BIO. In almost every case, we will use pointers to these struc-
tures to interact with the OpenSSL library. As such, an examination of where
each structure applies is in order. Briefly, these structures are as follows:
•SSL_METHOD: Indicates the PKI encryption method to use for communication.
•SSL_CTX: Defines the context of a server’s communication, including the
SSL_METHOD of choice, applicable certificates, and so on.
•BIO: A stackable input/output interface for reading/writing data to/from
multiple sources using multiple methods.
•SSL: This structure maintains the data necessary for the library to operate
on a given connection securely. There is typically a 1:1 relationship
between the number of SSL * structures in use and the number of open
connections.
SSL_METHOD
The SSL_METHOD structure is used to set the internal state of the library for
particular types of encryption methods. We will use this structure to indicate to
Securing Network Communication
243
3227c10.qxd 7/8/04 9:31 PM Page 243
OpenSSL what standard of communication we want to use. The available stan-
dards correspond to the various standards for the SSL and TLS standards defined
by RFC. As of this writing, the OpenSSL toolkit supports SSLv1, SSLv2, SSLv3,
SSLv23 (version 3 with fallback to 2), and TLSv1. TLSv1 is the newest and is con-
sidered the safest.
Because the value we choose for our SSL_METHOD affects the library at a very
basic level, it is important that we first define the method we want to use prior to
any other connection setup or initiation. The following code example illustrates
creating an SSL_METHOD structure variable and initializing it such that the OpenSSL
library knows we want to communicate using a TLSv1 connection.
SSL_METHOD *my_ssl_method;
my_ssl_method = TLSv1_method();
SSL_CTX
It is our duty to provide OpenSSL with the information it may need later in the
game by giving as much information about our configuration as possible. We
provide this information through the SSL_CTX layer. After deciding what method
and standard of communication we will use for encryption, we need to provide a
context for what we are doing. This context essentially allows us to provide sane
default values for many of the things the OpenSSL library must do.
The first piece of context we must provide is the SSL_METHOD we have chosen.
This base information allows us to create a new context with
SSL_CTX *my_ssl_ctx;
my_ssl_ctx = SSL_CTX_new(my_ssl_method);
Now that we have created a base context, we can add more information for
the library’s use. In the case of a process that will act as a server, a common piece
of information provided is the location of the private key and certificate files. To
add this information to our context, we use SSL_CTX_use_certificate_file() and
SSL_CTX_use_PrivateKey_file() and provide proper arguments for context, file
location, and file type. These functions can also be used in client processes to
add client certificates when needed.
The following example shows how to add the file server.pem from the current
directory to our previously created context. In this example, the server.pem file is
a PEM-encoded file that includes both our private key and server certificate.
SSL_CTX_use_certificate_file(my_ssl_ctx,"server.pem",SSL_FILETYPE_PEM);
SSL_CTX_use_PrivateKey_file(my_ssl_ctx,"server.pem",SSL_FILETYPE_PEM);
Chapter 10
244
3227c10.qxd 7/8/04 9:31 PM Page 244
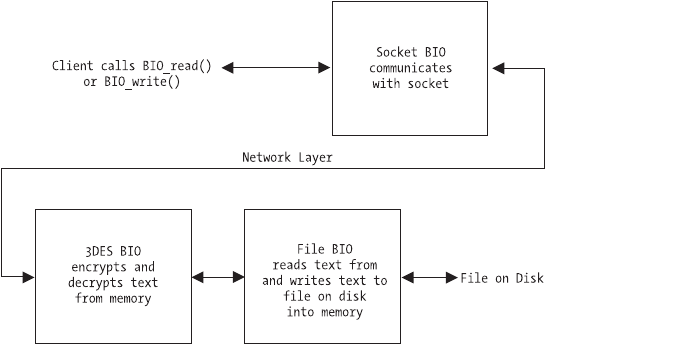
The context information can also be used in our program to verify infor-
mation that may have been provided by the user. For instance, if the user had
provided paths for certificate and key files that were added to the context in our
previous example, we would want to verify that the private key the user gave
does in fact match the certificate. The SSL_CTX interface gives us the ability to do
this with SSL_CTX_check_private_key(). By calling this function and providing our
context, we can verify that the private key works and won’t fail on us when we
communicate later:
if(SSL_CTX_check_private_key(my_ssl_ctx))
// The key works
else
// The key is wrong
This gives us the opportunity to catch errors before they occur, and prevent
potentially dangerous security situations. Also note that all SSL_CTX structures cre-
ated with SSL_CTX_new() should be released with a call to SSL_CTX_free(SSL_CTX *)
when they are no longer of use.
BIO
The BIO structure is the base layer used for input and output. This can be the
communication between a client and server process, reading an encrypted file
from disk, or reading from and writing to a memory buffer. BIOs are stackable
and flexible, allowing a programmer to create one BIO that does input/output to a
socket, another that encrypts/decrypts with the 3DES algorithm, and yet another
that reads from and writes to a file. By stacking these three BIOs, it is then possi-
ble, with a single read or write call, to have a 3DES-encoded file read directly from
disk and over the socket in plain-text form or vice versa, as shown in Figure 10-3.
Figure 10-3. BIO stacking
Securing Network Communication
245
3227c10.qxd 7/8/04 9:31 PM Page 245

NOTE A feature of the BIO layer worth noting is the ability to use
one BIO for reading and another for writing, allowing for methods
of communication that do not require a bidirectional pipe.
SSL
The SSL structure abstracts some of the dirty work of connection handling for
us. An SSL structure should be created for each connection within a context and
is used to communicate on that connection, set connection options, and handle
connection state.
The first step in creating an SSL structure is to associate it with a context.
This allows the individual connections to inherit the default values and settings
we associated with the context earlier. The SSL_new() function takes an SSL_CTX
argument and returns a new SSL structure for use, as demonstrated here:
SSL *my_ssl;
my_ssl = SSL_new(my_ssl_ctx);
However, our newly created SSL structure is still not associated with any
particular connection. We will explore other methods of doing this later in the
chapter, but for now let’s assume we already have a file descriptor, file_descriptor,
which points to a socket connection. We can use the SSL_set_fd function to
associate our SSL structure with this connection:
SSL_set_fd(my_ssl,file_descriptor);
It is now important that we handshake with the other side of the connection.
This allows the SSL or TLS connection to be negotiated and established, ensur-
ing that future communication with this SSL structure is secure. On the server
side of the connection, we use SSL_accept(), which is analogous to the BSD
socket call accept() in that it waits for either an error condition or the handshake
from the client. On the client side, we use SSL_connect() to initiate the hand-
shake with the server.
// Server Side
if(SSL_accept(my_ssl) <= 0)
// Some error occurred
else
// Connection is made and secure
Chapter 10
246
3227c10.qxd 7/8/04 9:31 PM Page 246
// Client Side
if(SSL_connect(my_ssl) <= 0)
// Some error occurred
else
// Connection is made and secure
With the handshake process complete, we can now use the SSL structure to
read and write data, report on connection status, and so forth. For instance, we
can output the version of SSL and the type of cipher used on the connection
with the SSL_get_version() and SSL_get_cipher() functions:
printf("[%s,%s]\n",SSL_get_version(my_ssl),SSL_get_cipher(my_ssl));
Similarly, we can use the SSL_write() and SSL_read() functions to read and
write data on the connection. These functions follow the semantics and defini-
tion of their socket-level counterparts read() and write() nearly identically.
The exception is that the SSL_ functions require an SSL structure as the first
argument.
Closing a connection requires another handshake process initiated by
the SSL_shutdown() function. Both ends of the connection must make this call
before the connection can be cleanly severed. It is important to check any error
conditions returned by calls to SSL_read() or SSL_write() (as well as other data
input/output functions) to see if a read/write error occurred because the other
side requested a shutdown handshake. This can be done as follows:
if( SSL_get_shutdown(my_ssl) & SSL_RECEIVED_SHUTDOWN )
SSL_shutdown(my_ssl); // Make our handshake call to close cleanly
else
// Some other error occurred
The SSL_get_shutdown() function checks the current state of the SSL structure
and uses the logical AND operation to evaluate whether an SSL_shutdown() call
was made from the other side of the connection, thereby allowing us to cleanly
close the connection. Once you are done with an SSL structure, it is important
that it be released before being reused or going out of scope. Releasing the SSL
structure is done by calling SSL_free(SSL *). Note that this function decrements
a reference count on the structure and only releases the underlying memory if
that count reaches zero.
With an understanding of the basic steps and structures necessary, we can
move on to creating a server that uses the OpenSSL library’s functions and struc-
tures. First, we will examine the use of a method called file descriptor association.
Securing Network Communication
247
3227c10.qxd 7/8/04 9:31 PM Page 247
File Descriptor Association
One of the easiest ways to incorporate OpenSSL into the design of an application
is through file descriptor association. With this technique, you create, open, and
connect sockets using the common methods, obtaining a file descriptor that ref-
erences the connected socket. You can then initialize and create an SSL reference
on top of that file descriptor. Because this does not change the method you
make a connection with, it is the easiest and fastest method to implement for
beginners, as well as to modify an existing code base. Examination of a simple
server/client example will help to make this clearer.
The Server
We will start with a simple server example. Our server will listen for a single con-
nection at a time and will respond to each connection by writing the text "Hello
there! Welcome to the SSL test server." to the client.
We start by defining the different variables we will need, including one for
each of the three basic SSL structures, and initializing the OpenSSL library as we
discussed in our overview previously. Note that we also put our message into a
memory buffer here.
int my_fd,client_fd;
struct sockaddr_in server, client;
int client_size;
int error = 0, wrote = 0;
char buffer[] = "Hello there! Welcome to the SSL test server.\n\n";
SSL_METHOD *my_ssl_method;
SSL_CTX *my_ssl_ctx;
SSL *my_ssl;
OpenSSL_add_all_algorithms();
SSL_load_error_strings();
Following the outline provided in our overview, we now decide to use the
TLSv1-encrypted communication standard and set up our context with a server
certificate. Note the call to ERR_print_errors_fp(), which outputs the last error
from the OpenSSL library to the given file handle, in this case standard error.
After our context is initialized and set up, we check the private key chosen to
ensure it and the certificate match with SSL_CTX_check_private_key().
my_ssl_method = TLSv1_server_method();
if( ( my_ssl_ctx = SSL_CTX_new(my_ssl_method) ) == NULL ) {
Chapter 10
248
3227c10.qxd 7/8/04 9:31 PM Page 248

ERR_print_errors_fp(stderr);
exit(-1);
}
if( !SSL_CTX_check_private_key(ssl_ctx) ) {
fprintf(stderr,"Private key does not match certificate\n");
exit(-1);
}
We then use standard socket library calls to bind() to port 5353 and listen for
new connections, entering an endless listen loop and accepting new connec-
tions one at a time.
myFd = socket(PF_INET, SOCK_STREAM, 0);
server.sin_family = AF_INET;
server.sin_port = htons(5353);
server.sin_addr.s_addr = INADDR_ANY;
bind(my_fd, (struct sockaddr *)&server, sizeof(server));
listen(my_fd, 5);
for( ;; ) {
client_size = sizeof(client);
bzero(&client,sizeof(client));
client_fd = accept(my_fd, (sockaddr *)&client, (socklen_t *)&client_size);
CAUTION To keep the code sparse and readable in our examples,
the return values from socket calls such as bind() and accept() are
not evaluated or checked for correct behavior. In a real-world sce-
nario, you should always check these values to prevent potentially
insecure, if not unhealthy, behavior.
For each connection established, we create a new SSL structure within the
program’s context.
if((my_ssl = SSL_new(my_ssl_ctx)) == NULL) {
ERR_print_errors_fp(stderr);
exit(-1);
}
We can now associate the newly created SSL structure with our client
socket and file descriptor using SSL_set_fd(). Following that, we make a call to
SSL_accept() to handle the server side of our initial SSL handshake. Finally, we
output to standard out the version and cipher in use by the connection that has
Securing Network Communication
249
3227c10.qxd 7/8/04 9:31 PM Page 249
been established. To do this, we use the functions SSL_get_version() and
SSL_get_cipher().
SSL_set_fd(my_ssl,client_fd);
if(SSL_accept(my_ssl) <= 0) {
ERR_print_errors_fp(stderr);
exit(-1);
}
printf("[%s,%s]\n",SSL_get_version(my_ssl),SSL_get_cipher(my_ssl));
Now we enter a for loop and write the contents of buffer, which contains
our welcome string, out to the client using SSL_write(). We check the return
value of SSL_write() for errors and simply shut down and move to the next con-
nection if there are any problems. Note the call to SSL_free() to ensure we have
released any underlying memory retained by the SSL structure, followed by a call
to close the client socket connection.
for(wrote = 0; wrote < strlen(buffer); wrote += error) {
error = SSL_write(my_ssl,buffer+wrote,strlen(buffer)-wrote);
if(error <= 0)
break;
}
SSL_shutdown(serverSSL);
SSL_free(my_ssl);
close(client_fd);
We close our outside (and infinite) loop, and although execution will never
get there, we call SSL_CTX_free() to ensure that we release any used memory.
This is simply good programming practice and has no effect on the actual per-
formance of the server as it stands. However, if we were to change things to not
use an infinite loop, having this already in would eliminate a lot of time hunting
down a memory leak.
}
SSL_CTX_free(my_ssl_ctx);
The server is now put together and working, but before we can test it, we
need a client.
The Client
The client side of this pair is quite simple. Much of the SSL code is the same,
regardless of which side of the connection you are on, which is yet another
Chapter 10
250
3227c10.qxd 7/8/04 9:31 PM Page 250
feature of OpenSSL programming. Again, we begin with the declaration of
the variables we will need for our socket operations, as well as our triumvirate
of OpenSSL structures. We clear space in the buffer we want to read into,
initialize OpenSSL, choose our TLSv1 method, and create a context and SSL
structure.
SSL_METHOD *my_ssl_method;
SSL_CTX *my_ssl_ctx;
SSL *my_ssl;
int my_fd;
struct sockaddr_in server;
int error = 0, read_in = 0;
char buffer[512];
memset(buffer,'\0',sizeof(buffer));
OpenSSL_add_all_algorithms();
SSL_load_error_strings();
my_ssl_method = TLSv1_client_method();
if((my_ssl_ctx = SSL_CTX_new(my_ssl_method)) == NULL) {
ERR_print_errors_fp(stderr);
exit(-1);
}
if((my_ssl = SSL_new(my_ssl_ctx)) == NULL) {
ERR_print_errors_fp(stderr);
exit(-1);
}
Note the lack of any certificate-handling code. As our server model is one in
which any client can connect, we do not need to load any client certificates. A
public/private-key pair will be generated on the fly for our client process when
the connection is established to ensure bidirectional security.
We now move on to creating our socket, connecting to the server, and asso-
ciating our SSL connection with SSL_set_fd(). Once associated, we can initiate
the secure handshake process with the call to SSL_connect() and output some
information about the connection with SSL_get_version() and SSL_get_cipher().
my_fd = socket(AF_INET, SOCK_STREAM, 0);
bzero(&server,sizeof(server));
server.sin_family = AF_INET;
server.sin_port = htons(5353);
Securing Network Communication
251
3227c10.qxd 7/8/04 9:31 PM Page 251
inet_aton("127.0.0.1",&server.sin_addr);
bind(my_fd, (struct sockaddr *)&server, sizeof(server));
connect(my_fd,(struct sockaddr *)&server, sizeof(server));
SSL_set_fd(my_ssl,my_fd);
if(SSL_connect(my_ssl) <= 0) {
ERR_print_errors_fp(stderr);
exit(-1);
}
printf("[%s,%s]\n",SSL_get_version(my_ssl),SSL_get_cipher(my_ssl));
Next is the task of using SSL_read() to read data from the server into our
memory buffer. Notice that we check the return value of SSL_read() on a contin-
ual basis to ensure that a read error has not occurred during the process of
reading any data from the server.
for( read_in = 0; read_in < sizeof(buffer); read_in += error ) {
error = SSL_read(my_ssl,buffer+read_in,sizeof(buffer) - read_in);
if(error <= 0)
break;
}
As we are not looking for any particular end of string, and we know our server
sends SSL_shutdown() when it has sent everything it has to send, we know that our
for loop used for reading will break out when the server sends SSL_shutdown(),
which causes our SSL_read() to return an error. As a result, we need to handle our
half of the shutdown handshake by calling SSL_shutdown() ourselves, then releas-
ing the memory used by our context, SSL structure, and finally, closing the socket
connection. The last things we do are print the message the server sent and close
the process itself.
SSL_shutdown(my_ssl);
SSL_free(my_ssl);
SSL_CTX_free(my_ssl_ctx);
close(my_fd);
printf("%s",buffer);
This finishes out the code necessary to connect to a TLS-aware server and
read a string of text as sent by that server.
At this point, it is important to understand that we could use a different
method for creating our server and client—a method that relies on the OpenSSL
Chapter 10
252
3227c10.qxd 7/8/04 9:31 PM Page 252
structure BIO for the connection handling rather than the socket-level calls used
by our file descriptor method. Let’s examine the BIO method.
BIO Connection Handling
While using the file descriptor association method may be easy to incorporate
into an existing code base, or as a means of transition, there exists another way
of connection handling. By using the underlying BIO framework of the OpenSSL
library, it is possible to create both a client and a server that require no standard
socket code (although this still happens at a lower level).
This is a major advantage when writing an application that will communi-
cate only with a SSL or TLS counterpart, and it has the added benefit of being
cross-platform. Code that does all connection handling with the OpenSSL library
will work on any platform for which the OpenSSL library is available, including
the many varying types and forms of Linux, UNIX, and other operating systems,
such as Windows and Mac OS X. A modification of the previous examples, sub-
stituting the use of BIO structures for socket functions, helps us clarify this.
The Server
Using the BIO layer to handle incoming connections is very similar in style to
that of the standard BSD bind() and accept() functions. We start by declaring our
variables and setting up our SSL context, certificates, and so forth. Note that we
impart only new information here to keep the discussion as clean as possible.
BIO *server_bio,*client_bio;
Now, where we would have begun the process of creating a socket and bind-
ing it to a port and so on, we do the same with the BIO functions provided by
OpenSSL, namely BIO_new_accept() and BIO_do_accept(). The former sets up a
socket on the given port and prepares the process to listen on that port. The latter
has two functions. The first time it is called, it results in the process being bound,
similar to the bind() function call. The second time we call BIO_do_accept(), it
acts as the accept() function call would, by blocking until the next incoming
connection is present and available. This is shown in our code by the fact that
the second call is inside the server’s for loop.
if((server_bio = BIO_new_accept("5353")) == NULL) {
ERR_print_errors_fp(stderr);
exit(-1);
}
Securing Network Communication
253
3227c10.qxd 7/8/04 9:31 PM Page 253
if(BIO_do_accept(server_bio) <= 0) {
ERR_print_errors_fp(stderr);
exit(-1);
}
for(;;) {
if(BIO_do_accept(server_bio) <= 0) {
ERR_print_errors_fp(stderr);
exit(-1);
}
One thing that becomes apparent is that there is no return from our call to
BIO_do_accept() that would provide a way to manipulate the connection. This
is because the call results in a new BIO structure being created and placed on a
stack in the passed BIO structure. To get a “handle” to the incoming connection,
we need to pop a BIO off of the stack with BIO_pop().
client_bio = BIO_pop(server_bio);
We then create a new SSL structure to communicate on this connection with
SSL_new() and use SSL_set_bio() to associate the new SSL structure with our new
connection. Note that we provide the same BIO for both the read and write por-
tions of the SSL connection.
if((my_ssl = SSL_new(my_ssl_ctx)) == NULL) {
ERR_print_errors_fp(stderr);
exit(-1);
}
SSL_set_bio(my_ssl,client_bio,client_bio);
Now that we have an SSL structure that corresponds to our connection, the
remaining code is identical to that of our file descriptor example. Note that a
new BIO structure was created when we accepted the incoming connection, but
we do not have to explicitly release that structure. This is handled instead by the
SSL_free() function, which releases all underlying structures associated with the
given connection. However, should the server ever exit the infinite for loop, we
do need to release the BIO structure we created with BIO_new_accept() by calling
SSL_BIO_free().
SSL_BIO_free(server_bio);
As the implementation details of a connection are abstracted from us,
regardless of whether we use a method such as is provided by the BIO layer or the
Chapter 10
254
3227c10.qxd 7/8/04 9:31 PM Page 254
previously discussed file descriptor association, it is possible to test this server
with the previous section’s client. However, we can also create a client that uses
BIO functions for connection handling.
The Client
Much like its server counterpart, the client uses BIO functions to connect
instead of using socket functions. These functions are BIO_new_connect() and
BIO_do_connect(). Once we have initialized OpenSSL and so forth, we make
successive calls to these functions to create a new connection with our BIO *
my_bio. We then associate the resulting BIO with our SSL structure and com-
mence communicating exactly as in the file descriptor example.
if((my_bio = BIO_new_connect("127.0.0.1:5353")) == NULL) {
ERR_print_errors_fp(stderr);
exit(-1);
}
if(BIO_do_connect(my_bio) <=0) {
ERR_print_errors_fp(stderr);
exit(-1);
}
SSL_set_bio(my_ssl,my_bio,my_bio);
This shows what minimal changes are necessary to move from a file descrip-
tor and socket–based framework to one using the more cross-platform BIO layer
handling.
Thread-safe Programming with OpenSSL
While we now have at our disposal a couple of different methods for setting up
and using the OpenSSL library in a server or client process, it is important that
we not dive right into the creation of a real-world example. First, we must exam-
ine the issues that arise when using OpenSSL in the real world, for instance, with
threading.
The use of OpenSSL in a multithreaded program is possible—however, a
set of callbacks must be initialized for OpenSSL to ensure thread safety. By using
callbacks like this, the OpenSSL library remains cross-platform by not requiring
a specific threading framework be used. Also, by using these callbacks, OpenSSL
can manage its own internal thread safety and we will not have to worry about
protecting calls into the library with our own thread-management code.
Securing Network Communication
255
3227c10.qxd 7/8/04 9:31 PM Page 255

The required callbacks include a set each for static and dynamic thread allo-
cation. The choice of which to use is highly dependent on the library itself and
how it was compiled. It is recommended that callbacks for both methods be pro-
vided to produce code that is compatible with both older and newer versions of
the OpenSSL library.
TIP A callback is a function defined in our program that is pro-
vided for use by a library. The library can then call our function to
perform tasks that only we know how to do.
Static Allocation
In providing callbacks for static allocation, we know that OpenSSL will use only
a set number of threads for mutual exclusion. This being the case, we create a
linear array of mutexes, and only two callback functions are necessary. The
OpenSSL library tells us that it will use no more than CRYPTO_num_locks()
mutexes, so we can initialize our mutex array with that many values.
pthread_mutex_t *mutex_buffer;
mutex_buffer = (pthread_mutex_t *) malloc(CRYPTO_num_locks() *
sizeof(pthread_mutex_t));
for(i=0; i<CRYPTO_num_locks(); i++)
pthread_mutex_init(&mutex_buffer[i],NULL);
We can then take a look at the two callback functions needed. These are
defined as follows:
static unsigned long (callback)(void);
static void (callback)(int mode, int id, const char *file, int line);
The first of these returns an unsigned long number that should uniquely
identify the calling thread from all other threads. The second is a callback for
locking and unlocking the given thread. For us, implementing the first function
is a simple matter of returning the result of a call to pthread_self().
static unsigned long thread_id_function(void) {
return ((unsigned long) pthread_self());
}
The second callback is a bit more involved, as it performs two actions. If the
first argument, mode, logically ANDed with the OpenSSL-defined CRYPTO_LOCK
Chapter 10
256
3227c10.qxd 7/8/04 9:31 PM Page 256
evaluates as true, then we should lock the idth thread in our linear array.
Otherwise, we should unlock the same thread. This behavior is easily captured
with an if...else structure as follows:
static void locking_function(int mode, int id, const char *file, int line) {
if(mode & CRYPTO_LOCK)
pthread_mutex_lock(&mutex_buffer[id]);
else
pthread_mutex_unlock(&mutex_buffer[id]);
}
Note that we make no use of the third or fourth parameters to this function.
These are provided by OpenSSL so that we can log from where the call to this
callback takes place to better troubleshoot potential problems. As our imple-
mentation is relatively simple, we ignore these parameters.
All that remains now is to actually register the callbacks with the
library. To register our functions, we use CRYPTO_set_id_callback() and
CRYPTO_set_locking_callback(). Note that deregistering callbacks simply requires
calling these functions again and providing a NULL parameter.
CRYPTO_set_id_callback(thread_id_function);
CRYPTO_set_locking_callback(locking_function);
Dynamic Allocation
Unlike when using static allocation, in dynamic allocation we are not provided
with a maximum for the number of mutexes that may be used by the library. As
a result, the library requires that we create a structure to hold a mutex, thereby
providing the library a method for receiving, storing, and passing any given
mutex. This structure is called CRYPTO_dynlock_value, and we define it as follows:
struct CRYPTO_dynlock_value {
pthread_mutex_t mutex;
};
We now have to provide three callback functions for the library, one each for
creation, destruction, and modification of any given mutex. In the same order,
these are defined as follows:
static struct CRYPTO_dynlock_value * (callback) (const char *, int);
static void (callback) (struct CRYPTO_dynlock_value *, const char *, int);
static void (callback) (int, struct CRYPTO_dynlock_value *, const char *, int);
Securing Network Communication
257
3227c10.qxd 7/8/04 9:31 PM Page 257
As with the static allocation callbacks, the const char * and last int parame-
ters to these functions are the filename and line number of the calling functions
in the OpenSSL library, thus we ignore them.
The first function we implement is responsible for creating and initializing a
new mutex, and then returning that mutex in the form of a CRYPTO_dynlock_value
structure. We first allocate memory for the structure, initialize the mutex it con-
tains, and then return a pointer to the freshly allocated memory, thereby
completing the implementation of our first callback:
static struct CRYPTO_dynlock_value *dyn_create_func(const char *file, int line)
{
struct CRYPTO_dynlock_value *value;
value = (struct CRYPTO_dynlock_value *) malloc(sizeof(struct
CRYPTO_dynlock_value));
pthread_mutex_init(&value->mutex,NULL);
return value;
}
Next, we implement the function responsible for destroying a mutex. In our
case, this simply takes the form of calling pthread_mutex_destroy() on the mutex
and releasing any allocated memory back to the heap:
static void dyn_destroy_func(struct CRYPTO_dynlock_value *l,
const char *file, int line)
{
pthread_mutex_destroy(&l->mutex);
free(l);
}
The last function that we require is nearly identical to the locking function in
our static allocation. The only difference is in how it references the mutex that
should be (un)locked. Instead of using an offset into a linear array, we are given
the CRYPTO_dynlock_value containing the mutex. We again check the mode for the
CRYPTO_LOCK flag and take the appropriate action:
static void dyn_lock_func(int mode, struct CRYPTO_dynlock_value *l,
const char *file, int line)
{
if(mode & CRYPTO_LOCK)
pthread_mutex_lock(&l->mutex);
Chapter 10
258
3227c10.qxd 7/8/04 9:31 PM Page 258
else
pthread_mutex_unlock(&l->mutex);
}
Our last step is to register our callbacks with the library. Again, this involves
a call per callback:
CRYPTO_set_dynlock_create_callback(dyn_create_func);
CRYPTO_set_dynlock_lock_callback(dyn_lock_func);
CRYPTO_set_dynlock_destroy_callback(dyn_destroy_func);
Removing these callbacks also requires recalling each with a NULL argument.
By registering the callbacks for both the dynamic and static allocation methods,
we can be assured that the OpenSSL library functions we use will operate in a
thread-safe manner.
Compiling and Running the Example
All the client and server examples in this chapter have been compiled and tested
with OpenSSL 0.9.7c and GCC 3.3.1-r5, although there is nothing that technically
requires these versions over others. Compilation requires that the crypto and ssl
libraries from the OpenSSL kit be linked in with
$ gcc -o server server.c -lcrypto -lssl
$ gcc -o client client.c -lcrypto -lssl
Running the server examples requires a PEM-style certificate. Details
on generating such a certificate can be found in the earlier section “Creating
Certificates.” Running the examples requires that the certificate be in the same
directory as the server executable. Execution should begin with the server:
$ ./server
to be followed by running the client (doing so in another terminal is recom-
mended) with
$./client
An example using the thread-safety code discussed in the last section, as
well as proper error-condition handling, is included as part of Chapter 13 when
we bring everything together into a single real-world example.
Securing Network Communication
259
3227c10.qxd 7/8/04 9:31 PM Page 259
Summary
Looking back, you can see that you now have at your disposal several methods of
enhancing the security of your programs. In this chapter, we discussed the vari-
ous methods of tunneling existing protocols over an encrypted connection and
the role of PKI in encrypting communication. We put together server and client
programs that used two different methods of secure communication provided
through the OpenSSL library. Lastly, we discussed some caveats, such as thread
safety.
Looking ahead, we move on in the next chapter to discuss methods of user
authentication and data verification.
Chapter 10
260
3227c10.qxd 7/8/04 9:31 PM Page 260
CHAPTER 11
Authentication and
Data Signing
THE PREVIOUS CHAPTER SHOWED you some of the basics of secure communication
and how to keep data secure while it is being transmitted and received. However,
how do you verify the authenticity of a person on either side of the equation?
Public Key Infrastructure handles this when you are talking about a server or
client that anyone can use, but to restrict access to a resource, you need to also
be able to verify that a person is who they say they are.
The solution to this problem has been around in one form or another since
the Internet was first comprised of a few computers connected over local cable:
authentication. This is also possible with PKI in that a person or entity will have
two pieces of information. One piece will be semipublic, in that it is not passed
around left and right, but it is well known and verifiable. The other piece is a
token that only one person will know or have access to. In PKI, these are known
as a public key and private key pair; in authentication terms, these are known as
username and password.
The Old Scenario
The /etc/passwd method of user authentication is still the most prevalent and
accepted method of checking a user’s identity while logging into a Linux system
locally. In this method, user information is stored in plain-text format using the file
/etc/passwd. This information includes username, home directory, user ID, group
ID, shell, and sometimes password (otherwise the password is in /etc/shadow).
When a user logs in, the system encrypts the password he’s attempted to use and
compares it with the encrypted password on the system. If they match, the user
is granted access. If they don’t match, the user is provided with a set number of
opportunities to fix any mistakes. Encryption of passwords is through a one-way
hash function, and then on some systems, an MD5 sum is calculated to make
comparisons even faster.
261
3227c11.qxd 7/9/04 11:14 AM Page 261
As networks have expanded, computer usage has changed, and it has
become necessary to maintain a list of users and their tokens in a method
accessible to multiple machines. Otherwise, users would have to keep track of
usernames and passwords for every machine they used, which is difficult and,
let’s face it, more work than any user wants to do (or should be expected to do in
a secure manner).
As a result, Sun Microsystems created Sun Yellow Pages (YP) and later
renamed it as Network Information Services (NIS) for trademark reasons. An NIS
server stores information known to all machines on the network, such as login
names, passwords, home directories, etc. An NIS server can serve “maps” to
clients. One of these maps can be an /etc/passwd-style file. When a user attempts
to log onto a client machine, the client checks the username and password
against the local /etc/passwd file and, transparently, against the NIS server’s
/etc/passwd map. This allows an administrator to concentrate her work on a
single resource while allowing access to multiple machines.
The Present-Day Scenario
The growth of networks has continued and, as a result, businesses, schools, and
organizations often have to manage several thousand accounts at a time. This
increase in size, in addition to the call for integration with things like web pages,
has called for some innovations in the storage of user accounts and data. Many
administrators find themselves replicating data into multiple locations and for-
mats to account for all the applications and uses of account data. Others have
begun working on consolidated solutions.
Central directory storage has taken a few forms, the most prevalent being
Lightweight Directory Access Protocol (LDAP). Servers such as OpenLDAP
(http://www.openldap.org) that support this protocol are in use for companywide
directories, e-mail services, class registries and, of course, as authentication
sources. Being open source and easily available makes OpenLDAP a popular
choice for adding LDAP functionality to applications. Applications written for
the Web in PHP or Perl, or stand-alone applications in C/C++, can use LDAP
to provide a sign-on or login service. This is popular for institutions wishing to
provide integrated and easy-to-use account management features. It is through
services like LDAP that an administrator can provide a website for account
creation, password changing, and account and password deletion, and have
changes reflected instantaneously across multiple systems.
Chapter 11
262
3227c11.qxd 7/9/04 11:14 AM Page 262
The creation of new storage methods and services created a need to revamp
the login process to account for new authentication methods. From this effort
came Pluggable Authentication Modules (PAM). By writing the authentication
process so that the back-end used a set of plug-ins that could be individually
stacked and configured, the developers who created PAM provided a flexible
manner for future generations of authentication management. It is now possible
for developers to link against the PAM library and have an application that
authenticates users in the same manner, transparently, that the operating sys-
tem itself would use—whether this is using the /etc/passwd file, LDAP, NIS, or
anything else. It is also possible to develop custom PAM modules that provide
everything from custom login and logout functionality to strong password
choice enforcement. PAM modules for LDAP, Oracle, MySQL, and others already
exist and are actively maintained and developed.
The PAM Library
Using the PAM library to create an application that uses PAM for authentication
is relatively straightforward. By making an application PAM-aware, it is possible
to harness the power of PAM authentication, session management, and pass-
word handling. Using a combination of the SSL code from the previous chapter
and the following PAM sample, it is possible to create a server that can authenti-
cate clients using any means that PAM allows, including LDAP.
Most GNU/Linux distributions today include PAM by default. The configura-
tion of PAM is fairly simple, as everything is typically maintained in a single file,
/etc/pam.conf. While it is beyond the scope of this book to discuss the configura-
tion of PAM, it is necessary to have PAM installed and working for the examples
to compile and run correctly.
The Conversation Function
Using the PAM library in an application is a little different than some libraries,
as not only will we make calls into the library, but also the library will call a func-
tion in our code. This function is called a conversation function. PAM uses this
function as a method of communicating with our program. This facilitates the
ability to provide information in the form of usernames, passwords, and so forth,
without PAM having to know how to interact with the user directly. Figure 11-1
shows how our application interacts with PAM.
Authentication and Data Signing
263
3227c11.qxd 7/9/04 11:14 AM Page 263
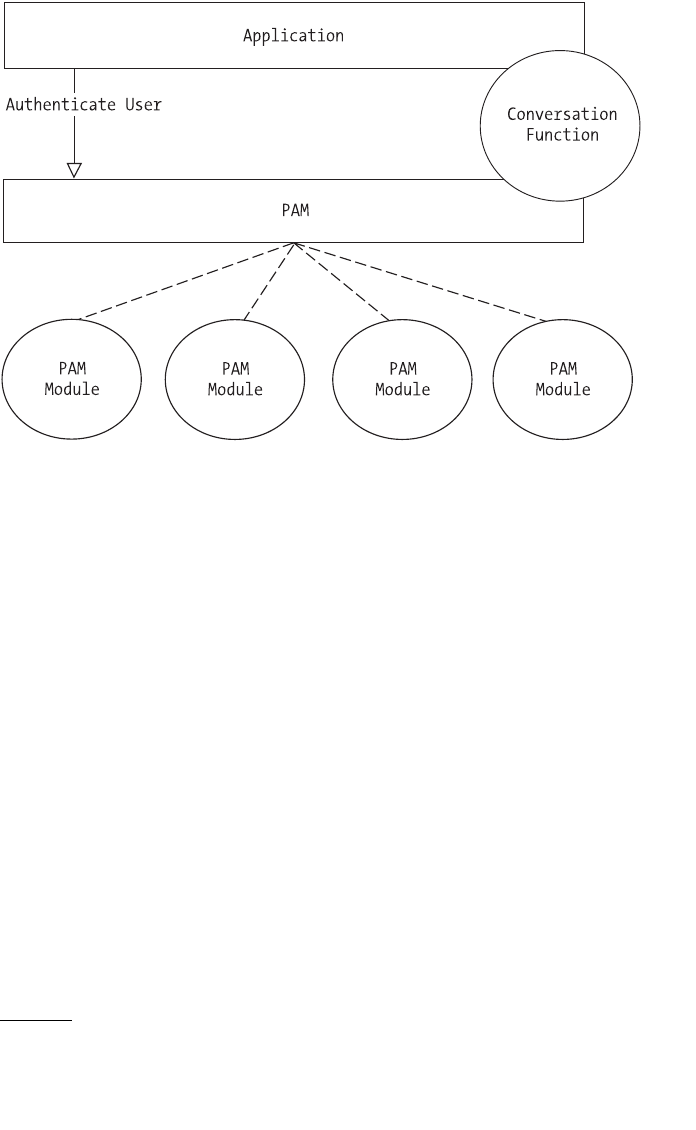
Figure 11-1. An application interacts with PAM through a callback conversation
function.
To use the functionality provided by PAM, it is necessary to first include the
PAM application header file security/pam_appl.h.
#include <security/pam_appl.h>
We can then move on to examining the conversation function definition:
int (callback)(int, const struct pam_message **, struct pam_response **, void *);
The first argument functions as a counter, indicating the number of entries
in the pam_message array that is given as the second parameter.1The pam_response
array will contain our 1:1 reply to each message in the second parameter. The
last parameter is provided so that we can pass our own data through to the con-
versation function. This last parameter is often used to pass a username and
password so that a visual prompt need not be made.
Chapter 11
264
1. Documentation on all the messages and the PAM architecture in general is available at
http://www.kernel.org/pub/linux/libs/pam/Linux-PAM-html.
3227c11.qxd 7/9/04 11:14 AM Page 264
As it is possible that we would want different conversations to be called,
PAM provides a structure that we must use to give it the conversation functions.
We first define our own conversation definition, and then we create a pam_conv
structure to hold it:
int my_conv(int, const struct pam_message **, struct pam_response **, void *);
static struct pam_conv conv = {
my_conv,
NULL
};
We can now examine the implementation of my_conv. First, we make sure we
have something to process. This involves two steps: checking to see that there is
at least one message to handle and then allocating enough memory for our
responses. If either of these steps should fail, we will return one of two errors:
PAM_CONV_ERR to indicate there were no messages or PAM_SYSTEM_ERR if we do not
have enough memory.
int my_conv(int num_msg,const struct pam_message **msg,
struct pam_response *response, void *appdata_ptr) {
struct pam_response *reply_with = NULL;
int num_replies;
char buffer[80];
if (num_msg <= 0)
return PAM_CONV_ERR;
reply_with = (struct pam_response *)calloc(num_msg,
sizeof(struct pam_response));
if (reply_with == NULL)
return PAM_SYSTEM_ERR;
If we get this far without any errors, then we can begin handling messages
from PAM. We do this by looping over the passed messages using the passed
number as a limit:
for( num_replies = 0; num_replies < num_msg; num_replies++ ) {
Inside this loop, we need to determine which type of message we are
dealing with. For this example, the only two types we are concerned with are
PAM_PROMPT_ECHO_OFF and PAM_PROMPT_ECHO_ON. In the former case, we should
prompt the user for a password, and in the latter case we are to prompt the user
for her username. To maintain simplicity for this example, we will not actually
Authentication and Data Signing
265
3227c11.qxd 7/9/04 11:14 AM Page 265
turn the echo off. If the message type is not one of these two, we clean up the
memory allocated and return an error indicating we don’t know how to handle
whatever PAM has given us with PAM_CONV_ERR. Note that the result of our actions
is stored in the response array we allocated previously, ordered identically to that
of the requests.
if( msg[num_replies]->msg_style == PAM_PROMPT_ECHO_OFF ) {
reply_with[num_replies].resp_retcode = PAM_SUCCESS;
printf("What is your password? ");
scanf("%s",buffer);
reply_with[num_replies].resp = (char *)strdup(buffer);
} else if( msg[num_replies]->msg_style == PAM_PROMPT_ECHO_ON ) {
reply_with[num_replies].resp_retcode = PAM_SUCCESS;
printf("What is your username? ");
scanf("%s",buffer);
reply_with[num_replies].resp = (char *)strdup(buffer);
} else {
free(reply_with);
return PAM_CONV_ERR;
}
}
It is important to note that in this example we have not done any strong
checking to be sure that buffer is not overrun or that the responses are within
valid range, both of which could be used as attacks against an application. For a
truly robust system, these exploits must be guarded against. The last thing we
need to do in the conversation function is supply the responses we have format-
ted and return PAM_SUCCESS:
*response = reply_with;
return PAM_SUCCESS;
}
Creating a PAM-Aware Application
In this example application, we will use PAM to authenticate a username and
password pair through whatever means the PAM “login” service dictates.
int main(int argc, char *argv[]) {
pam_handle_t *pamh=NULL;
int ret;
int authenticated = 0;
Chapter 11
266
3227c11.qxd 7/9/04 11:14 AM Page 266
Using the previous section’s conversation function, our application has what
we need for PAM to communicate with us, but we have not yet done anything to
tell PAM that, or to perform the actions we want. Thus we begin our main func-
tion by calling
if( (ret = pam_start("login", NULL, &conv, &pamh)) == PAM_SUCCESS )
if( (ret = pam_authenticate(pamh, 0)) == PAM_SUCCESS )
if( (ret = pam_acct_mgmt(pamh, 0)) == PAM_SUCCESS )
authenticated = 1;
The call to pam_start initializes the PAM library, having it read /etc/pam.conf
and set things up. The first argument is the name of the service we want to use
(this is any valid service from pam.conf), the second should be NULL, the third is
a pointer to the pam_conv structure that holds our conversation function, and the
last is a pam_handle_t structure, which we will need for future calls into the
library. As long as this call returns PAM_SUCCESS, we can continue.
We then call pam_authenticate, which does exactly what its name implies.
PAM first calls our conversation function to retrieve the username and password
of the user to authenticate, and then issues calls in each of the modules in the
stack according to the rules in /etc/pam.conf. If the username and password are
authenticated, pam_authenticate returns PAM_SUCCESS.
While we could stop at this point, knowing that the user has provided a user-
name and password that are valid on this system, we call pam_acct_mgmt. This
gives PAM the opportunity to ensure that the authenticated account is not only
valid, but also allowed to access this system. Situations such as expired accounts
can result in successful authentication but a failure from pam_acct_mgmt. If this
also returns PAM_SUCCESS, then we know the user has provided a valid username
and password, and that the user is allowed access to this system. We then set our
authenticated flag to indicate that the user is valid and is allowed access to the
system. Using that flag, we can indicate our results to the user:
if(authenticated)
printf("Authenticated\n");
else
printf("Not Authenticated\n");
The last thing a PAM-aware application needs to do is end the PAM session
with a call to pam_end. We call pam_end and supply the PAM session handle and the
last known return status of PAM, exiting with the return value of pam_end:
if( pam_end(pamh,ret) != PAM_SUCCESS ) {
pamh = NULL;
printf("Failed to release pam...\n");
exit(1);
Authentication and Data Signing
267
3227c11.qxd 7/9/04 11:14 AM Page 267

}
if( ret == PAM_SUCCESS )
return 0;
else
return 1;
}
Compiling and Running the Program
The sample PAM-aware application can be compiled using gcc with the follow-
ing command:
$ gcc –o pamtest pamtest.c -lpam
The resulting binary, pamtest, must be run as root to work and have access to
the appropriate modules in PAM. Upon execution, it should prompt for a user-
name and password and state whether or not that account is authenticated (as
dictated by the rules in /etc/pam.conf).
Public Key Authentication
Using the PAM library as shown in the previous section allows us to verify a user
based on his username and password. However, it is sometimes necessary and
desirable to access a resource without having to provide a password every time.
In this case, it is possible to apply the same concepts of PKI that we used for data
transmission authentication to the authentication of a person. For example, the
OpenSSH utility allows a user to generate a public and private key, and upload
the public key to the server. Once the key is uploaded, when the user connects to
the server, SSH sees both keys and attempts to verify whether they match. If they
do, then the user is authenticated. Although this can be seen as reducing secu-
rity to the same level as that of the private key (unless the private key is itself
encrypted), this is a common compromise between security and accessibility.
TIP By using the ssh-agent tool included with OpenSSH, it is pos-
sible to create encrypted private keys, yet only require the user to
enter his password once in order to use them, thereby mitigating
the security concerns of an unencrypted private key while allowing
a mostly passwordless method of accessing resources.
Chapter 11
268
3227c11.qxd 7/9/04 11:14 AM Page 268
Using Signed Data for Authentication
One method used to verify that a public and private key match is to use a known
piece of data. We first use the private key to sign a piece of known data. Once
signed, the corresponding public key can be used to verify that signature mathe-
matically (due to the tightly coupled relationship between the two). If the
signature is verifiable, then the keys are a pair and the holder of the private key
may be considered authenticated.
To look at this in further detail, we revisit the OpenSSL library, which pro-
vides PKI functions for key management, storage, and data signing. We will use
RSA keys for the purpose of our examples; however, it should be noted that DSA
and other formats are possible with similar, if not the same, library functions. In
all cases, the general methodology is the same.
Creating and Destroying Keys
When working with RSA keys in the OpenSSL library, we need to ensure that we
have included the necessary library header file, openssl/rsa.h.
We can then look at creating a key using the library function
RSA_generate_key(). As defined in the library, this function looks like this:
RSA *RSA_generate_key(int num, unsigned long e,
void (*callback)(int,int,void*),void *cb_arg);
The modulus used to create the key is passed as the first argument, and the
public exponent used is the second argument. The third and fourth arguments
are used should we want OpenSSL to call back into our code during the creation
of a key (as it can be a time-consuming task) to report progress. The third argu-
ment specifies the callback, and the fourth gives us the chance to pass arbitrary
data we may want during a callback. For our purposes, we will not use these
arguments, so we pass NULL for each.
The result of a call to this function is an RSA structure containing the new
RSA keys, both public and private. While we can access the individual members
of this structure, it is better practice to treat this as a “black box” structure and
instead use the key-handling functions provided by OpenSSL. We finish by creat-
ing a key with a 2048-bit modulus, using the well-known F4 public exponent:
RSA *new_key = RSA_generate_key(2048,RSA_F4,NULL,NULL);
Now that we have a key, it is important to verify that some inherent weak-
nesses do not exist and that the key stands up to some internal tests. This is
Authentication and Data Signing
269
3227c11.qxd 7/9/04 11:14 AM Page 269
easily done using the RSA_check_key() function, which returns 1 if the key passes
and an error otherwise:
if(RSA_check_key(new_key) == 1)
// Key is Good
else
// Key failed
It is also important that we properly destroy this key when we are no longer
using it. We will discuss storage of the key on disk in the next section, but we
should not allow the key to remain in memory any longer than necessary. This
prevents other processes running with the same or higher permission from dis-
cerning key values by examining our process’s stack and heap. Destruction of a
key involves a single call to
RSA_free(this_key);
Key Storage
Storing keys on disk involves changing the format that the key is in. Once again,
the OpenSSL library comes to our rescue with several functions that do this for
us. We use a common format called PEM (derived from its original intention,
and standing for, Privacy Enhanced Mail). The PEM interface to OpenSSL is kept
in the openssl/pem.h include. We will use one function each for writing private
keys, reading private keys, writing public keys, and reading public keys. Following
the OpenSSL standard, functions that return an integer value return 0 on error
and nonzero otherwise.
Public Keys
As public keys require no extra security, all we have to do is provide OpenSSL
with a file pointer with which to write the PEM data:
int PEM_write_RSA_PUBKEY(FILE *,RSA *);
While reading the same data back from disk, we simply provide the file to
read from and call
RSA * PEM_read_RSA_PUBKEY(FILE *, RSA **, (void)(callback),void *);
Chapter 11
270
3227c11.qxd 7/9/04 11:14 AM Page 270

As we don’t need the password callback in the third argument, or the appli-
cation data in the last argument, we specify NULL for both. We also have the
option of providing NULL as the second argument and the function will create,
populate, and return a new RSA structure for us, making our call look like this:
RSA *my_key = PEM_read_RSA_PUBKEY(my_file_p,NULL,NULL,NULL);
Private Keys
Private keys require a little more security than their public counterparts, as any-
one or any process that can read the private key file can effectively impersonate
the user who owns that key. This added security is applied in the form of a pass-
word that is required to both encrypt and decrypt the data as it is written to or
read from disk. When using the OpenSSL private key functions, this password
can be supplied as an argument to the function, with the use of a callback func-
tion, or it can be ignored completely to create an unencrypted key file.
When writing a private RSA key, we use the PEM_write_RSAPrivateKey()
function:
int PEM_write_RSAPrivateKey(FILE *, RSA *, const EVP_CIPHER *,
unsigned char *, int, (password callback), void *);
The first and second arguments are familiar, as they are identical to the
public key function counterpart. The third argument allows us to choose a spe-
cific encryption format, and the fourth is a buffer where we could provide the
password. The fifth argument is needed to specify the number of bytes in the
previous argument’s string, followed by the callback function parameter and the
application data parameter. If we specify NULL for the type of encryption, the
remaining arguments are ignored and the key is written unencrypted:
PEM_write_RSAPrivateKey(my_file_p,my_key,NULL,NULL,0,NULL,NULL);
Alternatively, if we wanted to use the Blowfish cipher to encrypt the data on
disk, with the password “mypass,” we would call
PEM_write_RSAPrivateKey(my_file_p,my_key,EVP_bf_ecb(),"mypass",7,NULL,NULL);
TIP A full list of EVP_CIPHER types is available in the
openssl/evp.h file.
Authentication and Data Signing
271
3227c11.qxd 7/9/04 11:14 AM Page 271

If we wanted to use the callback function, we would define it as
int pass_callback_function(char *buffer, int length, int rwflag, void *args);
Our implementation of this would require that we place the password as
provided by the user into buffer, ensuring not to overwrite its boundary (speci-
fied by length). The rwflag indicates whether we are reading or writing PEM
data—0 for reading and nonzero for writing. Finally, we would have to return a
0 value on error and nonzero otherwise.
Reading a RSA private key from disk involves calling
PEM_read_RSAPrivateKey(), defined as follows:
RSA * PEM_read_RSAPrivateKey(FILE *, RSA **, (callback), void *);
In similar fashion to the public key counterpart, this function can create
and populate a new RSA key if the second argument is NULL. The third and fourth
arguments again provide us with a chance to give either a callback and user data
or a password to OpenSSL. If the callback parameter is NULL, then the fourth
argument is assumed to be a NULL-terminated C-style string, which will be used
as the password for decryption.
To read the first key we wrote, which we did without encryption, we can sim-
ply do this:
RSA *my_key = PEM_read_RSAPrivateKey(my_file_p,NULL,NULL,NULL);
We could make the same call to open our encrypted file as well, and
OpenSSL would provide its own default password prompt. Or, we can provide
the password we used as such:
RSA *my_key = PEM_read_RSAPrivateKey(my_file_p,NULL,NULL,"mypass");
CAUTION It is important to note that when reading a private key
from disk, a new RSA key structure is created; however, the public
key members of that structure are invalid.We need to either provide
this object when reading a public key to have those members ini-
tialized or avoid using functions that operate on its public key
members.
Chapter 11
272
3227c11.qxd 7/9/04 11:14 AM Page 272

Transmitting Keys
The use of PKI would be severely limited without the ability to transmit keys
between processes. Doing this over the network is possible in a couple of differ-
ent ways. OpenSSL provides a method for doing so through a BIO (and therefore
through a BIO stack), or we can encode and transmit the data ourselves. The for-
mer is probably the easiest, but it doesn’t allow us to transmit the keys over a
TLS/SSL connection we may have established with the methods we examined in
the previous chapter, and while the latter involves some custom code, it allows
for us to be more flexible.
Transmitting keys through a BIO stack involves using a set of functions that
are nearly identical to those used for reading keys from and writing keys to disk:
RSA * PEM_read_bio_RSAPrivateKey(BIO *bp, RSA **x, pem_password_cb *cb, void *u);
int PEM_write_bio_RSAPrivateKey(BIO *bp, RSA *x, const EVP_CIPHER *enc, unsigned
char *kstr, int klen, pem_password_cb *cb, void *u);
RSA * PEM_read_bio_RSA_PUBKEY(BIO *bp, RSA **x, pem_password_cb *cb, void *u);
int PEM_write_bio_RSA_PUBKEY(BIO *bp, RSA *x);
Other than the addition of _bio_ to the name, and the first argument being
aBIO structure, these functions are equivalent to their FILE * counterparts as
described in the previous section.
Transmitting keys through a custom method allows us a bit more flexibility,
but it requires that we do some handling of the key itself first. While we could
conceivably use the members of the RSA structure and send each member indi-
vidually, this creates a dependency on a single definition of the structure and
may invalidate our code if future versions of OpenSSL do things differently.
Instead, we need to encode the RSA structure for transmission. We could encode
to the plain-text format PEM, which is how we stored the structure on disk previ-
ously. However, to save ourselves overhead, we can instead encode to a format
called DER, which is a binary-level format. This allows us to send the minimum
amount of data necessary.
TIP It is also possible to use DER coding when reading or writing
keys to disk with the _read_ and _write_ functions, such as
DER_write_RSA_PUBKEY().
Authentication and Data Signing
273
3227c11.qxd 7/9/04 11:14 AM Page 273

NOTE We do not discuss transmitting a private key using custom
methods.While it is possible to do so with a similar algorithm, the
concept of PKI cryptography relies on the safety and security of the
private key, which should, in a perfect world, never be broadcast or
transmitted by any means.
We encode an RSA public key using the i2d_RSAPublicKey() function:
int i2d_RSAPublicKey(RSA *, char **);
The first argument is the key we want to encode, followed by the buffer we
want to encode into. To provide a buffer of sufficient size, we first need to know
how large the encoded key will be. Providing a NULL buffer causes this function to
return that size in bytes:
int buffer_size = i2d_RSAPublicKey(my_key,NULL);
char *buffer = malloc(buffer_size);
Now that we have a buffer of sufficient size, we encode with a second call,
providing the buffer to write the result into:
i2d_RSAPublicKey(my_key,&buffer);
We can now transmit our buffer however we would like, according to our
own protocol. It is important that we provide both the buffer and the buffer’s
size to whatever process is responsible for decoding, however, as the reverse
process requires both as arguments. To decode a DER-encoded buffer, we use
d2i_RSAPublicKey():
RSA * d2i_RSAPublicKey(RSA **, char **, int);
We have the option of providing an existing RSA key structure (perhaps one
we already had the private key in) as the first argument or specifying NULL and
having the function return a new structure. The second argument is a pointer to
the buffer containing the DER-encoded key, and the last argument is the size of
that buffer in bytes. We can now decode our RSA key with
RSA *decoded_key = d2i_RSAPublicKey(NULL,&buffer,buffer_size);
Chapter 11
274
3227c11.qxd 7/9/04 11:14 AM Page 274

Signing Data
With the ability to create and manage keys, we can now examine the use of keys
for authentication purposes. The first step is to agree upon some piece of known
data. Often this is something as simple as the user’s login name or perhaps a
constant string of text. For our example, we will use a null-terminated ASCII
string: "Known Data".
CAUTION Using known data for signature verification is sufficient
when we are already communicating over an encrypted and secure
link. However, if we were to perform the same verification over a
plain-text link, or if we did not trust the link we have created, then
it is more advisable that the server provide a random value that the
client must then encrypt with the private key for verification. This
prevents an attacker from replaying the encrypted form of our
known data after watching a single session.
To sign and verify data with our key, we use the EVP interface provided by
OpenSSL and defined in openssl/evp.h. This interface is an abstraction of the
details involved in signature handling for any type of key structure. Use of this
interface is predicated on two structures: EVP_MD_CTX and EVP_PKEY.
The first of these structures is similar in function to the SSL_CTX structure we
used it handling the context of an SSL connection. We use the EVP_MD_CTX struc-
ture to describe the context of a generic operation on a key using the EVP family of
functions. The second structure, EVP_PKEY, is an abstraction of a PKI key. Rather
than having to use a different set of functions for each family of key structures
(RSA, DSA, etc.), we instead use this structure to provide our key in its current
form to the EVP_ family of functions.
We create a new EVP_PKEY with the EVP_PKEY_new() function:
EVP_PKEY *pkey = EVP_PKEY_new();
We then associate our RSA key with the EVP_PKEY with this function:
int EVP_PKEY_set1_RSA(EVP_PKEY *,RSA *);
The first argument is the EVP_PKEY structure to be associated with the key
provided in the second argument. Assuming we had already created an RSA key
structure called my_rsa_key, we call this function to associate the two:
EVP_PKEY_set1_RSA(pkey,my_rsa_key);
Authentication and Data Signing
275
3227c11.qxd 7/9/04 11:14 AM Page 275

CAUTION As with most other OpenSSL library functions, the
EVP_PKEY_set1_RSA() function returns an integer value. This value
is 0 if an error has occurred and is nonzero otherwise. For the sake
of clarity in our examples, we do not check these return values.
However, it is vital to the security of your software that you do so in
real-world code. Demonstration of handling errors raised by these
and other functions in the OpenSSL library is included in Chapter 13.
Unlike the EVP_PKEY structure, our EVP_MD_CTX does not require its own initial-
ization. Instead, this is taken care of when we call the Init function for the
operation we want to perform. In our case, this is the function:
int EVP_SignInit(EVP_MD_CTX *, const EVP_MD *);
The first argument we supply is our EVP_MD_CTX which, after a successful call,
will be initialized. The second argument defines what method of hashing we
want to use. The processes of signing and verification are actually performed on
a hash of the original. Our example uses the EVP_md5() hash. Also available are
EVP_md2(), EVP_md4(), EVP_sha(), EVP_sha1(), EVP_dss(), and many others. So we
begin the process of data signing by calling
EVP_MD_CTX my_evp;
EVP_SignInit(&my_evp, EVP_md5());
Now we can begin passing in data that is to be signed. We use the function
int EVP_DigestUpdate(EVP_MD_CTX *, const void *, int);
The first argument is the context we initialized with EVP_SignInit(), followed
by a buffer containing the data to sign. The last argument tells the function
how many bytes are in the data buffer we provide. We could call this function
as many times as necessary to provide all the data (should it be from multiple
sources, formats, or buffers) for signing. In our case, a single call with the con-
stant string "Known Data" will suffice:
EVP_SignUpdate(&my_evp,"Known Data",10);
We need to create a buffer to place the signed data in. The size of this buffer
is different depending on the type of key in use, and in our case it is guaranteed
to be no larger than RSA_size(RSA *) bytes, so we create a buffer with a call to
malloc():
unsigned char *signed_buffer = (unsigned char *) malloc(RSA_size(my_rsa_key));
Chapter 11
276
3227c11.qxd 7/9/04 11:14 AM Page 276
We can now call the function:
int EVP_SignFinal(EVP_MD_CTX *, unsigned char *, unsigned int *, EVP_PKEY *);
Again, the first argument is the context we started with. The second argu-
ment is where we provide our buffer for the results of the signing. The third
argument gives the function the size of the buffer when it is called, and upon
return this will hold the actual number of bytes written to the buffer. The final
argument is the EVP_PKEY structure that contains the key we want to sign the data
with. We finish out the process by signing our data, reporting the number of
bytes in the signed data, and freeing the EVP_PKEY structure we created with
EVP_PKEY_new() earlier:
unsigned int signed_length;
signed_length = RSA_size();
EVP_SignFinal(&my_evp,signed_buffer,&signed_length,pkey);
printf("There are %d bytes in the signed data",signed_length);
EVP_PKEY_free(pkey);
Verifying Signed Data
The verification process for signed data is very similar to that of signing. Again,
we use the EVP_ interface provided by OpenSSL, and again we need a context and
an EVP_PKEY abstraction layer. Given the signed buffer and its size in signed_buffer
and signed_length, respectively, the only difference in process is in which EVP_
functions we use. We start with
int EVP_VerifyInit(EVP_MD_CTX *, EVP_MD *);
which is identical in structure to its EVP_SignInit() counterpart, although it sets
up the EVP interface to do the reverse of the signing process to verify a signature.
Once initialized, we provide the signed data to
int EVP_VerifyUpdate(EVP_MD_CTX *, const unsigned char *, unsigned int);
This function also takes the same type of arguments as its EVP_SignUpdate()
counterpart and updates the internal buffer of the EVP interface for later verifi-
cation. As with its counterpart, we could call this function as many times as
necessary to provide all the signed data we may have created. And finally, we call
int EVP_VerifyFinal(EVP_MD_CTX *, const unsigned char *, unsigned int, EVP_PKEY *);
Authentication and Data Signing
277
3227c11.qxd 7/9/04 11:14 AM Page 277
This function takes our context, unsigned (known) data and length, and the
key to use for verification. The return value of this function indicates whether
the signature is successfully verified or not. Unlike other OpenSSL functions, a
return value of 1 indicates success, while anything else indicates an error.
Putting this all together, we use the following code:
EVP_VerifyInit(&my_evp,EVP_md5());
EVP_VerifyUpdate(&my_evp,u_signed,u_length);
if(EVP_VerifyFinal (&my_evp,signd,s_length,pkey))
// Signature verified, user authenticated
else
// Signature failed
And we now have a method at our disposal that can be used independent of
passwords for positive identification of a user. We will use this method in
Chapter 13 when we examine a real-world example in detail.
With our examination of authentication methods and styles in this chapter,
it is important to understand why centralization is an underlying theme in each.
While it would be easy for an application to design and maintain its own user
base, it seems that administrators are always seeking to centralize this informa-
tion in an effort to achieve single sign-on.
Single Sign-on
The concept of single sign-on is to permit network users to use a single user-
name and password (or similar authentication tokens) to access different
machines and resources available on the network. While single sign-on across
multiple protocols became possible with the development of PAM and services
like LDAP, they were only feasible within the *nix platform. Institutions that
maintained systems running the Microsoft Windows operating system in addi-
tion to various *nix platforms had to maintain two sets of usernames and
passwords. As heterogeneous setups, or environments where multiple oper-
ating systems and platforms are being used, have become more common, the
GNU/Linux and open source software (OSS) community has come onto the
scene with software that provides true single sign-on capabilities. We describe
some of these in this section.
The Samba project (http://www.samba.org), which began as an implementa-
tion of the Common Internet File System (CIFS) protocol for file sharing with the
Microsoft Windows operating system, has expanded to include code allowing it
to appear as a Windows Domain Server to a Windows network. This allows Linux
machines to be integrated into a Windows Domain or Active Directory structure,
as well as allowing Windows machines to be integrated into a Linux framework.
Chapter 11
278
3227c11.qxd 7/9/04 11:14 AM Page 278
The pGina project (http://pgina.xpasystems.com) provides an alternative to
Samba by replacing the login portion of the Microsoft Windows NT/2000/XP
operating system. The replacement login code makes use of a framework similar
in intention to PAM in that it uses plug-ins to provide limitless authentication
possibilities. Also like PAM, the framework for creating plug-ins for pGina is
open source and freely available. Currently, the most prevalent use of pGina,
using an LDAP plug-in, is to authenticate a machine running Microsoft Windows
against a non-Microsoft LDAP server. Plug-ins have also been created for PAM,
NIS, POP, RSA SecurID, and Slashdot, and the list appears to be growing.
AcctSync (http://acctsync.sourceforge.net) is a little different, as it doesn’t
perform authentication itself, but it does attempt to automatically synchro-
nize account information between an LDAP server and a local Microsoft
Windows account registry. As stated by the group’s website,
The LDAP Account Sync Project’s goal is create a user and group account sys-
tem synchronized between Windows and UNIX Systems. This is not
authorization, but rather synchronization of the account information and
passwords.
Summary
Our examination in this chapter has taken us through past, current, and future
methods of user authentication; coverage of the uses of the PAM library; and an
in-depth look at PKI key management code. We looked at creating an applica-
tion that can use PAM to do user authentication for us, and we covered creating
code that would let us verify a user’s authenticity through RSA keys.
In the next chapter, we will break from our examination of third-party
libraries and authentication, and instead take a look at practices and method-
ologies for safe programming used to help avoid insecure code.
Authentication and Data Signing
279
3227c11.qxd 7/9/04 11:14 AM Page 279
3227c11.qxd 7/9/04 11:14 AM Page 280
CHAPTER 12
Common Security
Problems
LET’S TAKE A STEP BACK for a moment and move away from our discussion and
analysis of things at the API level. Instead, let’s look at our programming prac-
tices, how to include security as a priority, and what choices are available to us.
It’s important to remember that programming is very much an expressive
art, allowing the same functionality or goal to be achieved through many dif-
ferent methods and means. While there’s no single method that’s definitively
considered secure, there are a series of guidelines we can follow to ensure we’ve
taken all possible precautions. Before examining those guidelines, let’s examine
the common attacks we’re protecting against.
Common Attacks
Attacks on a system or program are often separated into different categories:
• Information retrieval
• Network mapping
• Denial of service
• Exploitation
The first two are often attacks against a system at the operating system and
TCP/IP stack level. The goal of these attacks is to use information gathered dur-
ing the attack to determine potentially sensitive information for future attacks in
the denial of service or exploitation category. This includes the type of operating
system running, the existence of network services which are attached to open
ports and their versions, the existence of trust level networks or other machines
which may be potential targets and so on.
The denial of service attack, often referred to as DoS or DDoS (for distributed
denial of service), is intended to flood the victim with a large number of requests,
packets, connections, and so on, in such a manner as to prevent proper access to
the system. Under certain situations, DoS attacks expose security flaws that arise
281
3227c12.qxd 7/8/04 9:33 PM Page 281
through the mismanagement of high volumes of activity. While this type of
attack is also usually at the operating system and TCP/IP stack level, it can also
take the form of persistent connections, malformed client messages, and other
things that network servers must handle properly to prevent the attack from
succeeding.
The last category of attacks is the most dangerous. As its name infers, an
exploitation attack attempts to exploit a mistake in a network server’s code and
gain control over the program or system. Gaining control of a program in this
manner is typically done through a method called a buffer overflow. A buffer
overflow is the most prevalent exploitation attack.
Buffer Overflow
The prevalence of the buffer overflow is in direct correlation to the prevalence of
its cause: bounds checking errors. When a program fails to adequately check the
boundaries for array operations, such as string copying, expansion, etc., it is pos-
sible that data will be written beyond the end of the array and into the programs
stack, where through some creativity it could be executed.
When a C program calls a function, the arguments as well as the address to
return execution to when the function returns are all pushed onto the stack. If
that return address is overwritten with a new address during execution, the pro-
gram will dutifully return from the function right into execution of the data that
was written to the stack by an attacker. While this doesn’t seem it would be very
simple (and it isn’t), careful examination of a server’s code, combined with the
execution environment properties, makes this kind of attack very much possible
and extremely effective.
Secure Coding Practices
Thankfully, there are some steps we can take to mitigate the risk of these attacks
being successful against our server code. In this section, we will show that some
of these steps are direct responses to attack scenarios (such as protocol design),
while others are simply guidelines that prevent us from falling into a situation
where mistakes can happen.
Functions to Avoid and Their Alternatives
The first and best method for ensuring you do not fall into the buffer overflow
trap is proper bounds checking. This seems at first to be relatively simple, until
you consider the number of library functions you use throughout your code
without considering their behavior in out-of-bounds conditions. The most
Chapter 12
282
3227c12.qxd 7/8/04 9:33 PM Page 282

common area for these functions to show up is in string handling, including
functions such as gets(), sprintf(), vsprintf(), strcpy(), and so on.
None of these functions has an argument to specify the size of the buffer
they are operating on. As such, consider the following code:
char buffer[10];
strcpy(buffer,"This is much longer than 10 bytes");
Although buffer is only 10 bytes in size, the strcpy() function will continue
to write data into buffer[11], buffer[12], and so on. While this example may only
cause our code to crash when run, it is not all that different from the method
many network servers use to copy strings sent by a client into a buffer. This opens
the door for the client to overflow the buffer, overwrite the stack, and gain con-
trol of the server.
The solution to this is to use the strncpy() function instead. The function,
defined as
char *strncpy(char *dest, const char *src, size_t n);
allows us to specify the maximum size in bytes that should be copied. If the
maximum is reached before a NULL character is found in the src string, then
copying stops and the call returns.
NOTE When using strncpy(), if a NULL character is not encoun-
tered, the destination buffer may not be null terminated, which can
cause problems if you use other string functions later.You should
always leave an extra byte at the end of the buffer to be set to NULL
to prevent these problems from arising.
Other string handling functions also have alternatives that let you specify a
boundary condition in bytes. Table 12-1 shows some of the common functions
and their safer alternatives.
Table 12-1. Unsafe Functions and Their Safe Alternatives
UNSAFE FUNCTION SAFE FUNCTION
sprintf() snprintf()
strcpy() strncpy()
strcmp() strncmp()
strcasecmp() strncasecmp()
scanf() fscanf()
Common Security Problems
283
3227c12.qxd 7/8/04 9:33 PM Page 283

When an alternative function doesn’t exist already, it’s worth considering
creating your own. For instance, if a safe version of strcpy() didn’t exist, creation
of our own wouldn’t be overly complicated:
size_t our_strncpy(char *dest, const char *src, size_t bytes) {
size_t x = 0;
if(!dest || !src) return 0;
for(x=0;x<bytes;x++) {
dest[x] = src[x];
if(src[x] == '\0')
return x;
}
return x;
}
This simple function copies data one byte at a time from the source buffer to
the destination, returning the total number of bytes copied when finished. The
for loop inside this function is limited by the byte parameter, which ensures that
we do not go beyond the end of the destination buffer.
TIP Using our custom strcpy() function still poses a risk if the
source buffer is not null-terminated and is smaller than the desti-
nation. In this case, we will read beyond the limits of the source
buffer.While this may result in abnormal termination or other
problems, it is not likely to result in a security exploit.We could add
a fourth parameter that limits the length of the source buffer to
prevent this or simply ensure that all strings provided are null-
terminated.
Another common function used by developers is the strcmp() function used
for string comparison. While safer versions that limit length like strncmp() exist,
the return of these functions is actually one of three cases. When the strings are
identical, the function will return 0, but if there is a difference, the function will
return either –1 or 1 depending on which string’s ASCII value is higher. It is easy
to make the mistake of writing a string comparison function like this:
if(!strcmp(password_buffer,"mypassword")) { // password is correct }
This will work when the strings are equivalent. However, if the strcmp()
function was to return a –1 this would still evaluate to true. As a result, a properly
crafted (or guessed) invalid password may work as if it was the correct password.
Chapter 12
284
3227c12.qxd 7/8/04 9:33 PM Page 284
To avoid this, we can implement our own bounds-safe function, which returns
true (1) if the strings are equal and false (0) if they are not:
int is_strequal(const char *a, int a_len, const char *b, int b_len,int limit) {
int x=0;
if(limit) {
if(limit > a_len || limit > b_len)
return 0;
} else {
if(a_len != b_len)
return 0;
}
if(limit) {
for(x=0;x<a_len && x<b_len && x<limit;x++)
if(a[x] != b[x]) return 0;
} else {
for(x=0;x<a_len && x<b_len;x++)
if(a[x] != b[x]) return 0;
}
return 1;
}
We accept five arguments into our function, only the last of which is
optional. The first four arguments provide the strings we are comparing and
each string’s buffer length. The last argument allows us to limit the comparison
to a subset of characters. If the limit value is 0, then our function will compare
the entire strings as well as their length (we make the assumption that if we are
comparing full strings and the lengths are different, then they are not equal). We
could now replace our strcmp() call with this:
if(is_strequal(password_buffer,strlen(password_buffer),
"mypassword",10,0))) { // password is correct }
As these examples have shown, it is not overly difficult to implement safe
replacements for commonly used functions. Should the safety of a library func-
tion ever be in question, we should always consider whether implementing the
same functionality (or at least the portion we need) is worth the added effort and
support. For instance, the memcpy() function has no “safe” alternative, which
means that our only option is to ensure its proper use, perhaps via a wrapper, or
to implement our own function.
The danger with memcpy() is mostly in proper use of the third parameter,
which indicates the number of bytes to copy from the source buffer into the
destination. So long as we always use a value that is less than or equal to the size
Common Security Problems
285
3227c12.qxd 7/8/04 9:33 PM Page 285
of our destination buffer, we are safe. For instance, a safe use of the function is as
follows:
char dest_buff[1024];
char source_buff[2048];
memcpy(dest_buff,source_buff,1024);
This will copy the first 1024 bytes from source_buff into dest_buff. However,
a potentially unsafe usage is
memcpy(dest_buff,source_buff,strlen(source_buff));
This is intended to copy the entire string in source_buff, but if that string is
larger than 1024 bytes, we have just overflowed our destination buffer and pro-
vided a potential means for exploitation. In this case, it is probably better to
ensure the proper use of the function throughout the code, or to wrap the func-
tion. Implementing our own function would not be too difficult, but the memcpy()
function in the library is written at a low enough level that we may be sacrificing
some significant performance improvements should we choose not to use it.
Error Handling
Another place we can modify our coding practice to proactively prevent security
problems is in error handling. Almost all socket and glibc library functions pro-
vide some method for determining whether they succeeded or not—usually
through a return value. Additionally, we have full control over our internal func-
tion design, so we can make sure we design our functions so that they can do
the same.
The rule with error handling is simple: always do it. We need to check every
return value, parameter, and result to ensure that calls to library functions are
succeeding, that our data is conformant to our protocol, and that we are always
working with the expected type of data. The best method to make error handling
easier is to use wrapper functions.
For each library function that we call, we will actually call our own wrapper
function, in which we can handle all the dirty work of verifying things. This way,
our main code remains readable, while ensuring that any errors are caught right
away and not left to wreak havoc later in our program.
For example, first we define a function for reporting an error condition to
the user. We call this function report_error() and define it as follows:
void report_error(const char *msg, const char *file, int line_no,
int use_perror, int exit);
Chapter 12
286
3227c12.qxd 7/8/04 9:33 PM Page 286

We will display the message provided in msg, along with the file and line
number the error occurs on, which are given in the file and line_no arguments.
If the use_perror flag is set, then we will use the standard library function
perror(const char *) to display the error; otherwise, we will output just the text
provided. Lastly, if the exit flag is set, then we exit the program instead of return-
ing. Our implementation then looks like this:
void report_error(const char *msg, const char *file,
int line_no, int use_perror, int exit) {
if(!use_perror) {
fprintf(stderr,"[%s:%d] %s\n",file,line_no,msg);
} else {
fprintf(stderr,"[%s:%d] ",file,line_no);
perror(msg);
}
if(exit) {
exit(-1);
}
}
TIP If we were using a multithreaded program, we might con-
sider using the pthread_exit() call instead of the system call
exit() in our report_error() function. This would allow us to quit
the active thread instead of causing the entire program to exit.
Now that we can tell the user what has happened, let’s look at wrapping
some library functions to use this. For instance, let’s wrap the socket() function
with our own wrapper called w_socket(). Our function takes the same arguments
that the library function takes making its definition:
int w_socket(int domain, int type, int protocol);
Then, when implementing this function, we check the result of the call to
the library function socket(). If the return value is –1, then an error has occurred
and the error is stored in the errno standard used by perror(). If an error occurs,
then we call our error notification function report_error() and have it exit. If no
error occurs, then we pass the return from the library function back, and our
program can continue. In this way, our program can simply call w_socket() and
expect that any error conditions are handled safely.
Common Security Problems
287
3227c12.qxd 7/8/04 9:33 PM Page 287

int w_socket(int domain, int type, int protocol) {
int socket_return;
socket_return = socket(domain,type,protocol);
if(socket_return == -1)
report_error("socket error:",__FILE__,__LINE__,1,1);
else
return socket_return;
}
By writing wrappers like this for each of our library calls, we can better man-
age erroneous situations without obfuscating our code beyond a readable state.
NOTE We can extend this concept further by using macros. For the
sake of simplicity, our examples do not do this; however, we could
rename our w_socket function to w_socket_func, add parameters
for the __FILE__ and __LINE__ arguments, and use this:
#define w_socket(domain,type,protocol)
(w_socket_func((domain),(type),(protocol),__FILE__,__LINE))
This would result in the actual line of code that called w_socket()
being used for the report_error() call, rather than always being
the same.
Memory Management
Another area that can benefit greatly from custom wrapper functions is memory
management. Many programmers do not check the return value from function
calls like malloc(), nor do they track the amount of memory that is currently in
use. While we could go as far as to implement our own garbage collection, our
major concern is avoiding error conditions, so we concentrate on doing so with
special wrappers.
Our main goal is to check the return from all memory allocation attempts.
Our secondary goal is to monitor the amount of memory being used to simplify
identifying memory leak conditions.
The first wrapper we write is to allocate memory. Although we use the two-
argument calloc() internally for its ability to zero memory, we require only a
single argument indicating the amount of memory needed in bytes. If allocation
succeeds, we return a pointer to the memory allocated, and we increment a
Chapter 12
288
3227c12.qxd 7/8/04 9:33 PM Page 288
global counter of memory in use. If allocation fails, we use the report_error()
function we wrote in the last section to tell the user what has happened and exit
our process.
void * w_malloc(size_t bytes) {
void *memory = NULL;
memory = calloc(bytes,1);
if(memory) {
global_memory_counter += bytes;
return memory;
} else {
report_error("Memory allocation error, out of memory.",
__FILE__,__LINE__,0,1);
}
}
This wrapper function helps us to ensure that we won’t be operating on
invalid or nonallocated pointers, allowing us to allocate memory throughout our
program without having to worry about further error checking. However, where
this wrapper falls short is when we go to free the allocated memory. As the man
page for the free() library call states, a call to free() on memory not allocated
with malloc() or calloc(), or on memory previously free()’d, results in “unde-
fined behavior.”
To avoid this situation, which can also be the cause of security vulnerabilities
if not only stability problems, we extend our wrapper to include the maintenance
of a list of addresses that have been allocated. This way, when we go to free the
memory, we can first verify that it was actually allocated by us and has not
already been freed.
To accomplish this maintenance, we add a simple linked list based on a
structure memory_list defined as follows:
typedef struct memory_list {
void *address;
size_t size;
memory_list *next;
memory_list *prev;
} memory_list;
As we allocate memory, we create a new memory_list item, and then add it
to the list of allocated items using its built-in next pointer. We maintain the
start of the list in a global pointer memory_list_head, which is NULL when there are
Common Security Problems
289
3227c12.qxd 7/8/04 9:33 PM Page 289
no items in the list. Our allocation wrapper with the added list management
looks like this:
void * w_malloc(size_t bytes) {
void *memory = NULL;
memory_list *new_item = NULL;
memory = calloc(bytes,1);
new_item = calloc(1,sizeof(struct memory_list));
if(memory) {
if(new_item == NULL) {
report_error_q("Memory allocation error, no room for memory list item."
,__FILE__,__LINE__,0);
}
global_memory_counter += bytes + sizeof(struct memory_list);
new_item->address = memory;
new_item->size = bytes;
new_item->next = NULL;
new_item->prev = NULL;
if(memory_list_head) {
new_item->next = memory_list_head;
memory_list_head->prev = new_item;
memory_list_head = new_item;
} else {
memory_list_head = new_item;
}
return memory;
} else {
report_error_q("Memory allocation error, out of memory.",
__FILE__,__LINE__,0);
return NULL;
}
}
This version of our wrapper is significantly more complex, and actually con-
sumes more memory than we need allocated for the normal operation of our
program. However, we gain the simplicity of not needing any additional code to
check for error conditions or zero memory, or deal with double frees.
We can now move on to our wrapper for the free() function. The only
error condition possible here is that we are given an invalid address to free. An
invalid address is an address that does not exist in our linked list of memory
addresses, or a NULL address. We first ensure that the address is valid, and then
Chapter 12
290
3227c12.qxd 7/8/04 9:33 PM Page 290

we can free the memory used by that address and remove its entry from our list
while updating our global count of allocated memory. Our implementation
takes the following form:
void w_free(void *f_address) {
memory_list *temp = NULL,*found = NULL;
if(f_address == NULL)
return;
for(temp=memory_list_head;temp!=NULL;temp = temp->next) {
if(temp->address == f_address) {
found = temp;
break;
}
}
if(!found) {
report_error_q("Unable to free memory not previously allocated",
__FILE__,__LINE__,0); // Report this as an error
}
global_memory_count -= found->size + sizeof(struct memory_list);
free(f_address);
if(found->prev)
found->prev->next = found->next;
if(found->next)
found->next->prev = found->prev;
if(found == memory_list_head)
memory_list_head = found->next;
free(found);
}
TIP Both of our wrapper functions operate on a global list. If our
code was multithreaded, it would be important to ensure exclusive
access to the list when adding or removing items using some sort of
mutex (such as pthread_mutex).
Common Security Problems
291
3227c12.qxd 7/8/04 9:33 PM Page 291

Worst-Case Scenarios
Other than being careful to avoid buffer mishaps, and wrapping functions to
provide full error and return type checking, there are only a few things we can do
in our code to bolster security. However, we can take a few steps to ensure that
even a successful attack will not result in a compromise of an entire system
(although it may mean a compromise in our ability to provide the service our
program is for).
Changing Permissions
The first step we can take is to change who we are running as. If the only reason
our program needs to be run as root is to open privileged ports, or perform some
initialization, then after the ports are open or the initialization is complete we
no longer need to be operating as root. We can use the system calls setuid() and
setgid() to change the user ID and group ID we are running as, allowing us to
shed root privileges. This way, should our program be compromised and execute
arbitrary code, the operating system itself will prevent our process from doing
anything overly nasty. This topic is discussed in finer detail in Chapter 7.
These functions are defined as
int setuid(uid_t uid);
int setgid(gid_t gid);
Each returns 0 when successful and –1 when not, and each accepts a single
argument that indicates the desired uid or gid number to change to. This lends
itself well to using our report_error() function to let the user know if something
has gone wrong.
CAUTION We do not use the seteuid() or setegid() functions, as
each of these allows for returning to the previous privilege level,
which does not provide much in the way of security should an
attacker manage to exploit our code.
Changing Root
Another way that we can prevent damage from an exploit is by changing root.
Also called chroot (as the function name chroot() would imply), this action
results in the root path /being redefined. For instance, if we wanted all disk I/O
Chapter 12
292
3227c12.qxd 7/8/04 9:33 PM Page 292

to take place in the /etc/myprogram/ directory and its subdirectories, we could
chroot() to /etc/myprogram/. From that point forward, all paths would be
resolved with /etc/myprogram/ acting as /. So the path /etc/passwd would actually
be /etc/myprogram/etc/passwd. This topic is discussed in finer detail in Chapter 7.
The system function chroot() is defined as
int chroot(const char *path);
and is available on most Linux systems. The function takes the path to chroot()
to as an argument, and returns 0 on success and –1 on error. This function also
conforms to the errno standard, and we could use report_error() to output any
error information.
CAUTION The process calling chroot() should always use the
chdir() function to change to the new root first. Otherwise, the
process can escape the chroot() by using relative paths to ".".
Using chroot(), we avoid what is known as a directory transversal attack,
whereby the attacker uses a flaw in the logic of the program or otherwise
provides a path intended to result in an exploit or information retrieval. For
instance, if our program was responsible for file transfers, and we were told to
read the file /etc/passwd, we could code against this by not allowing paths that
start with "/". But what about the path "./../etc/passwd"? If our program was
run in a commonly known location, parsing all possible paths safely could be
difficult. By running in a chroot() jail, we prevent the ability to access anything
above the base directory we specify.
Shared Memory and Variable Scope
A major security concern comes into play when we first consider the design of
our server. We have many options, as discussed earlier in our text, but we always
have to decide which of the three methods of processing we will use: single
process, forking, or multithreading. While the first method poses little more
risk than we have already discussed, the latter two introduce another level of
concern.
Anytime we decide to delegate processing to multiple tasks, whether they be
forked or threaded, we must also consider what, if any, communication or data
needs to be shared between them. For instance, do we need to collect statistics
in our child processes or threads? Do we need information that only sibling
processes or threads will have? Do we need to modify our parent process or
master thread’s state at all?
Common Security Problems
293
3227c12.qxd 7/8/04 9:33 PM Page 293
If the answer to any of these questions is yes, then we need to deal with
some method of sharing data between processes and threads. While it is beyond
the scope of this humble text to describe all the available methods, we should
examine a very important aspect of a shared data situation.
Consider a forking process that uses a shared memory segment. A shared
memory segment is a single address in memory shared by more than one process,
usually created with a system call similar to shmget(). Now, if we intended the use
of this shared data segment as a method of updating some common statistical
information—say, the number of connections we had serviced—then we can look
at some pseudo-code to see where a race condition may exist:
child process 1 reads shared memory to get current tally
child process 2 reads shared memory to get current tally
child process 2 increments tally and writes it to shared memory
child process 1 increments tally and writes it to shared memory
In the end, despite having serviced two connections, our tally is incre-
mented by only one. Expand this type of problem into one where the shared
memory is used for something like process management, authentication, or
string handling in general, and you can see that we have once again opened the
door for a potential buffer overflow, if not DDoS, attack. The same problem and
potential race condition exists with data shared globally between threads.
To avoid these problems, it is best to first consider carefully each use of
shared memory, including variables at the global scope. While this may often be
the most convenient method of handling some things, if it puts us in a danger-
ous situation that we could avoid simply by changing our design to use things at
a more localized scope, then we must consider that more work may be in order.
If we cannot avoid the complications of shared memory by design, then we must
consider alternative solutions. The most popular solutions are semaphores for
forking and mutexes for threading.
Both semaphores and mutexes embody a concept called mutual exclusion.
In other words, each can be consider an atomic (uninterruptible) operation that
can be used to ensure that all other processes or threads are excluded from
entering a critical section of code until there is no other process or thread in that
section. In both cases, a process or thread makes a function call that blocks if
there is another process or thread in the critical section and returns when access
to the critical section is safe.
The mutex method most commonly available is in the pthread threading
library. From this library, included via pthread.h, we can access a set of functions
and data types meant for mutex handling:
int pthread_mutex_init(pthread_mutex_t *,const pthread_mutex_attr_t *);
int pthread_mutex_lock(pthread_mutex_t *);
Chapter 12
294
3227c12.qxd 7/8/04 9:33 PM Page 294
int pthread_mutex_trylock(pthread_mutex_t *);
int pthread_mutex_unlock(pthread_mutex_t *);
int pthread_mutex_destroy(pthread_mutex_t *);
Each function returns 0 on success and a nonzero error code on error. The
only exception to this is the pthread_mutex_init() function, which always returns
0. All the functions accept a common data type, pthread_mutex_t, which repre-
sents the mutex that we want to operate on. We first create a default mutex and
initialize it with pthread_mutex_init():
pthread_mutex_t my_mutex;
pthread_mutex_init(&my_mutex,NULL);
Although there are several types of mutexes available to us, the default
type is more than sufficient, so we pass a NULL as the second argument to
pthread_mutex_init(). For more information on the different available attributes
and their effect, see the man page for pthread_mutex_init(). Now that we have
initialized the mutex, we can use it to implement critical sections of code. To
take our pseudo-code from earlier as an example, it would translate to some-
thing like this in each process:
pthread_mutex_lock(&my_mutex);
shared_tally++;
pthread_mutex_unlock(&my_mutex);
When we call the pthread_mutex_lock(), it will try to lock the mutex. If the
mutex is already locked, then it will block until it can unlock the mutex. This
way, only one thread at a time is allowed to execute the increment statement at
a time, thereby ensuring that the shared data is correctly managed. Once we are
done in the critical section, we unlock the mutex with pthread_mutex_unlock(),
allowing other threads to gain access. Once we are done with the mutex, or as
our program is exiting, we destroy the mutex with pthread_mutex_destroy():
pthread_mutex_destroy(&my_mutex);
If we want to do something while we wait for a critical section to be
free, we
can use the pthread_mutex_trylock() function to determine whether
or not
the mutex is locked. The function returns immediately with a value of
EBUSY
if
the mutex
is already locked; otherwise, it locks the mutex exactly as
pthread_mutex_lock(). This allows us to “busy loop” on the mutex, rather than
blocking:
while(pthread_mutex_trylock(&my_mutex) == EBUSY) {
// do something while we wait
Common Security Problems
295
3227c12.qxd 7/8/04 9:33 PM Page 295
}
// Our critical section starts here
shared_tally++;
pthread_mutex_unlock(&my_mutex);
Unless absolutely necessary, this method of handling is not recommended,
as it requires that the thread continue to use valuable CPU and system resources.
It is instead recommended that a one-time action take place before blocking.
This allows us to take some action should we recognize we are going to block,
but it does not require that we loop on a potentially infinite value. For instance,
if we were trying to trace the source of a deadlock, we could use code like the
following:
if(pthread_mutex_trylock(&my_mutex) == EBUSY)
fprintf(stdout, "my_mutex is currently locked, waiting for lock.\n");
pthread_mutex_lock(&my_mutex);
fprintf(stdout,"achieved lock on my_mutex\n");
shared_tally++;
pthread_mutex_unlock(&my_mutex);
This allows us to note when we will have to block, but it is much less inten-
sive than doing the same thing within a while loop.
Random Number Generation
To truly represent good security and reduce the risk of someone penetrating the
encryption used in our examples, it is important to have a good source of ran-
domness, or entropy. OpenSSL provides for this with its RAND_* interfaces. By
using data from things like the local file system, user input, and network activity,
the pseudo-random number generator, or PRNG, within OpenSSL needs to be
seeded. To seed the PRNG, you must provide some data that OpenSSL will
assume to contain entropy. You can do this in several ways:
RAND_load_file(const char *filename, long bytes);
RAND_seed(const void *buf, int num);
The RAND_seed() function allows you to specify a buffer of any type and size
for entropy, while RAND_load_file() allows you to specify a file that contains
entropy. In recent years, /dev/random has become increasingly popular in *nix
systems as a file that the kernel maintains with as much entropy gathered from
the system as possible. So to read 2048 bytes from /dev/random and seed the
PRNG with the result requires only a single line:
RAND_load_file("/dev/random",2048);
Chapter 12
296
3227c12.qxd 7/8/04 9:33 PM Page 296

If our code was to require random number generation without the added
weight of the OpenSSL library, there are some system calls available on Linux
systems that provide pseudo-random number generation. These are namely
rand() and srand(), although many other derivatives such as srand48() and
drand48() also exist depending on the precision necessary. While these functions
can be useful for some applications, it is important to note that they do not pro-
vide enough statistical randomness to be considered “secure” when used for
encryption.
TIP You must ensure when you use the system call rand() or its
derivatives to retrieve a random number that you initialize and
seed the random number generator at least once.Without a seed, or
if we were to always use the same seed, the generator would pump
out the same list of numbers each time. A common method for
seeding is to call srand(time(NULL)); to seed on the current time.
Tools of the Trade
Although we may take all the necessary precautions and review our code care-
fully, we are but human after all, and mistakes happen. As a result, we also look
to the tools of our trade to help us spot potential weaknesses and problems in
our code.
The first place we see this is in the compiler. If our code does not compile
without warnings, then we need to examine those sections of code called into
question carefully. Similarly, we can look to several available tools and projects
that do some extended checking, both for common and less common mistakes
we may make, as well as tools that try to ensure extended safety through other
methods.
Compiler Add-ons
When RedHat Linux 5.1 came out, buffer overflow attacks had become a
prevalent method of attack on network daemons. As a result, Immunix
(http://www.immunix.com) created a patch for the GCC compiler that manipu-
lated the method of data storage, changed the order of variable declarations,
and performed other such actions, each intended to make buffer overflow
attacks less effective. While still only available for the 2.xseries of GCC, a patch
for the latest compilers that builds on these ideas is now available from IBM at
Common Security Problems
297
3227c12.qxd 7/8/04 9:33 PM Page 297

http://www.trl.ibm.com/projects/security/ssp. Once the patch is installed,
compiling your code with the -fstack-protector option results in code
that is much more resistant, if not totally so, to buffer overflow and stack
smashing–style attacks.
Code Analysis Tools
In addition to tools that enable the compiler to do some automatic protection,
there are tools available that scan code looking for known security vulnerabili-
ties, commonly misused functions, and other potentially unsafe situations.
While none of these tools can (or does) claim 100 percent accuracy, it simply
cannot hurt to have another opinion (if you can call the output of a program an
“opinion”) as to where things may be unsafe.
NOTE We will use one of these analysis tools in the following chap-
ter to examine our practical example.
Flawfinder
The first tool we will examine is called Flawfinder
(http://www.dwheeler.com/flawfinder).
This tool scans C/C++ source code
for commonly misused functions (strcpy(), strcat(), etc.) as well as for
common argument-passing mistakes (passing bytes instead of character count,
for instance). Recursive scanning is built in, so running the tool on a directory
will cause it to recursively scan all files and directories in the given directory.
Flawfinder outputs a list (in either plain-text or HTML format) of potential hits,
where a hit is a potential misuse or unsafe section of code. The results are
ranked by severity and output from the highest severity down.
Splint
Splint (http://www.splint.org) is an extended version of the popular source
code–auditing tool Lint. As with Flawfinder, Splint scans C/C++ source code for
common mistakes, potentially unsafe string manipulation, and other potential
security problems. Splint also supports annotation, allowing you to modify
Splint’s behavior by commenting your code in particular ways. This allows you to
ignore what you know to be false positives, to always report particular types of
problems, and so on.
Chapter 12
298
3227c12.qxd 7/8/04 9:33 PM Page 298
Summary
Keep in mind that there is no single method of programming or design that
eliminates all potential security vulnerabilities, and no piece of software should
ever be considered 100-percent secure. Network-aware software is built from
extremely complex state machines incorporating not just the code we write, but
also the libraries we depend on, the operating system, and the ever-unknown
third party that uses the network itself. However, given the proper tools and
knowledge of where and how security comes into play, you can take a proactive
approach to ensuring data and software security.
In this chapter, we have shown that the following basic steps, at least, help in
such an effort:
• Know the common methods of attack.
• Know the commonly misused or dangerous functions and their
alternatives.
• Use proper error handling and return value management.
• Use memory management techniques to reduce or eliminate leakage or
overflows.
• Don’t retain privileges or disk access that is not needed
(chroot()/setuid()).
• Use proper mutual exclusion handling for global scope and shared data.
• Ensure a minimum of entropy for pseudo-random numbers when using
encryption.
• Make use of common analysis tools and add-ons to spot mistakes.
Common Security Problems
299
3227c12.qxd 7/8/04 9:33 PM Page 299
3227c12.qxd 7/8/04 9:33 PM Page 300
CHAPTER 13
Case Study: A Secure
Networked Application
AN EXAMINATION OF ALL THE CONCEPTS in this section is best supported by a single
example that uses those concepts in a real-world context. Let’s look at a net-
worked application that requires the utmost security: an authentication server.
Our server will listen for incoming connections, negotiate a TLSv1 compliant
encrypted connection, and then authenticate a user by one of two means, PAM
or PKI. If the connecting user requests PAM authentication, then she sends her
username and password, which are then checked using the server-side PAM
implementation. If authentication is successful, the client will generate a PKI
key pair and send the public portion to the server for future authentication. After
the user is authenticated once by PAM, all future authentication attempts will be
processed using PKI signature verification and the keys generated during the
PAM authentication.
First, we will lay out the decisions we make in creating such an application,
and then we will walk through the design of our code and finally through the
code itself. To close out the chapter, we will examine improvements that could
be made, and present the output from some security-auditing tools and explain
how they apply to our security plan.
The Necessary Decisions
As with any networked program, we have a variety of decisions to make before
we can even begin developing code. These decisions come about as the answers
to several questions, such as “What process model will the server use?” and
“How will we ensure communication security?”
Process Method
We have the option of writing any variation on a forking or multithreaded
server—however, only a subset of these options actually falls within reasonable
consideration. We must consider that we will be calling into and, even more
301
3227c13.qxd 7/9/04 11:15 AM Page 301
important, be called back into from, the PAM library. The PAM library docu-
mentation (for Linux PAM) indicates that the library itself can be considered
thread-safe so long as a single thread operates on a single PAM handle at a time.
The documentation goes on to warn, though, that individual PAM modules may
themselves not be thread-safe. This tells us that while it might be possible to
interact with PAM in a threaded application, it may be safest to avoid the
potential issues, which limits our options to those of the forking variety.
The rest of the decision lies in design. We could choose to create a prefork-
ing server that handles its own connection pool dynamically in a model similar
to that adopted by the Apache Web Server, or we could choose to go with the
simpler 1:1 use of a postforking server. For the sake of clarity, we choose the lat-
ter, forking a single process to handle each incoming connection. This has the
drawback of not scaling overly well, but our requirements are slim, and the ben-
efit of clarity in process handling can be seen as a sufficient enough gain to
outweigh the added performance of a preforking design.
Security Model
Because we have the luxury of designing this application from the ground up, we
can include in that design certain decisions that affect how security is handled
as part of the big picture. This addition to the design is called a security model.
We start our model by stating some of the decisions we have made to ensure
as safe a code base as is reasonable:
• We will use wrapper functions for memory management to ensure proper
allocation and deallocation in a safe and secure manner.
• We will check the return of all possible API functions, especially those in
the OpenSSL and network libraries, to ensure proper behavior. If a return
value indicates an error condition, the calling process will report the error
and exit to avoid potentially harmful conditions.
• We will use, whenever possible, “safe” versions of the commonly known
“unsafe” functions, including strncpy() in place of strcpy() and others
like it.
• We will use the open source tool Flawfinder to audit and review our code
once we have written it.
With these items in mind and laid out as part of our design, we will move on
to the remainder of our code design before finally starting to create the code for
our program.
Chapter 13
302
3227c13.qxd 7/9/04 11:15 AM Page 302
Code Design and Layout
With our security model in place, we can examine more mundane things, such
as how and where we will store our code, how we will compile and test, and how
we will run our final program.
File Layout
The layout we have selected is relatively simple, which is mostly the result of the
simplicity of the application itself. We have chosen to use a simple directory lay-
out, including a directory each for the client code, the code common to both the
server and client, and the server code itself. This allows us to share code between
the server and client, and to avoid the unnecessary complication of rewriting
and adapting the same code multiple times.
In the common directory are three files: common.c, common.h, and Makefile.
The first file contains all the common code that will be used by both the server
and client, including the PKI management, wrapper functions, and so on. The
second file includes declarations for each available function and is included in
both the server and client code. In the client and server directories are three
files that follow the same convention but for client- and server-specific code.
Structuring the directory in this way allows us to simply type make in the top-
level directory and automatically build the client, server, and common code.
The Protocol
As discussed in earlier chapters, it is important that we have thought out and
designed our protocol ahead of time. In our example, this is relatively simple. We
define our control messages as follows:
•REQUEST_KEY_AUTH
•REQUEST_PASS_AUTH
•SERVER_AUTH_SUCCESS
•SERVER_AUTH_FAILURE
Each of these will be an unsigned integer. The message REQUEST_KEY_AUTH is
sent by the client at the start of a session to indicate that it would like to authen-
ticate the user with the PKI signature verification. This is followed by sending
the username, the size of the signed data in bytes, and the signed data itself.
Case Study: A Secure Networked Application
303
3227c13.qxd 7/9/04 11:15 AM Page 303
The server then responds with either SERVER_AUTH_SUCCESS or SERVER_AUTH_FAILURE
according to the result of the verification.
The message REQUEST_PASS_AUTH is sent by the client at the start of the session
to indicate that it would like to authenticate the user via PAM. This is followed by
sending the username and password of the user. The server will then respond
with SERVER_AUTH_SUCCESS or SERVER_AUTH_FAILURE according to the result of the
authentication. If the result is successful, the client then sends the public por-
tion of a new RSA key by first sending the number of bytes in the DER-encoded
key and then sending the encoded key itself.
Encapsulation
The last item in our design is related to encapsulation. While we are not using
object-oriented programming (OOP), in that we are using the C language and
not C++, we can benefit from some of the concepts incorporated by OOP. As we
design our code, we try to encapsulate each “task” that we determine must be
performed into its own independent function. For instance, we can list some of
the functions our code will have to perform already:
• Authenticate a username and password with PAM.
• Verify signed data with PKI signature verification.
• Send data over a TLSv1 connection.
For each of these tasks, we will create a single function that does not require
any of the others whenever possible. Some interdependence is a given; however,
the more independent each function is, the more likely it is that we will be able
to benefit from it later on.
The Code
With our design completed, we move on to writing the code itself. Developing a
network server and client pair can seem a little like the chicken and the egg—
which should we do first? We will start by writing the client utility in full, and
then test it incrementally as we begin to implement the server.
Common Code Library
The common code is stored in the common/ subdirectory in both common.c and
common.h. Other than the inserted commentary, these files are shown in their
Chapter 13
304
3227c13.qxd 7/9/04 11:15 AM Page 304
entirety. Note that for the sake of clarity, all in-code comments have been
removed. A fully commented copy of the code is available electronically as
described in the introduction to this text.
common.h
These first lines of code are a commonly used trick to prevent a recursive
#include directive:
#ifndef COMMON_CODE_H
#define COMMON_CODE_H
By first checking for the definition of something and then immediately
defining it, we can ensure that the contents of this file are included only once.
#include <stdlib.h>
#include <stdio.h>
#include <string.h>
#include <openssl/ssl.h>
#include <openssl/err.h>
#include <openssl/evp.h>
#include <openssl/rand.h>
#include <sys/types.h>
#include <sys/socket.h>
#include <netdb.h>
#include <ctype.h>
#include <arpa/inet.h>
#include <termios.h>
#include <unistd.h>
#include <pwd.h>
Both our server and client use many of the same system libraries and APIs,
including the standard string-handling functions, the OpenSSL libraries, and the
socket APIs. This lends itself to including each of these in the common code.
#define ENTROPY_SIZE 512
#define byte_t char
#define REQUEST_KEY_AUTH 10
#define REQUEST_PASS_AUTH 11
#define SERVER_AUTH_SUCCESS 1
#define SERVER_AUTH_FAILURE 2
#define SSL_ERROR 0
Case Study: A Secure Networked Application
305
3227c13.qxd 7/9/04 11:15 AM Page 305
Next, we define the number of bytes our processes should seed the pseudo-
random number generator (PRNG) with using ENTROPY_SIZE. We then define a
custom data type, byte_t, to be synonymous with the built-in char. Often this
type of definition is generated automatically with scripts or build tools. This
allows code to operate on the byte level without having to maintain custom data
type information on a per-platform basis. Lastly, we define a set of unsigned
integers that we will use for our protocol messages.
void report_error_q(const char *msg, const char *file,
int line_no, int use_perror);
void report_error(const char *msg, const char *file, int line_no, int
use_perror);
typedef struct memory_list {
void *address;
size_t size;
struct memory_list *next;
struct memory_list *prev;
} memory_list;
void *w_malloc(size_t bytes);
void w_free(void *f_address);
void w_free_all(void);
void w_memory_init(void);
memory_list *memory_list_head;
unsigned long global_memory_count;
void openssl_init(void);
void openssl_destroy(void);
char *ssl_read_string(SSL *my_ssl,size_t limit);
void ssl_write_string(SSL *my_ssl,const char *message);
unsigned int ssl_read_uint(SSL *my_ssl);
void ssl_write_uint(SSL *my_ssl,unsigned int value);
byte_t ssl_read_byte(SSL *my_ssl);
int ssl_read_bytes(SSL *my_ssl,void *buf,unsigned int limit);
void ssl_write_byte(SSL *my_ssl,byte_t this_byte);
void ssl_write_bytes(SSL *my_ssl, void *message, unsigned int length);
const char *network_get_ip_address(SSL *my_ssl);
RSA * key_create_key(void);
void key_destroy_key(RSA *);
Chapter 13
306
3227c13.qxd 7/9/04 11:15 AM Page 306
unsigned int key_buffer_size(RSA *);
unsigned int key_sign_data(RSA *,const char *,unsigned int,char *,unsigned int);
int key_write_priv(RSA*, char *);
RSA *key_read_priv(char *);
void key_net_write_pub(RSA *,SSL *);
int key_verify_signature(RSA *, char *,unsigned int,char *,unsigned int);
int key_write_pub(RSA*, char *);
RSA *key_net_read_pub(SSL *);
RSA *key_read_pub(char *);
#endif
We then finish the file by declaring the report_error_q() and report_error()
functions that we will use to report erroneous conditions and exit the program,
as well as each of our memory wrapper functions, the wrapper functions for
management of the OpenSSL library, the wrapper functions we will use to send
and receive data, and finally the wrapper functions we will use for our PKI key
management.
common.c
We begin our common code by including the common header file with
#include "common.h"
The first function we implement in our common code is report_error(). This
function reports the given message, filename, and line number either by out-
putting them to the stderr file descriptor or by using the perror() function. This
function is identical to that discussed in the previous chapter, except this func-
tion does not exit. Instead, we also implement a function called report_error_q(),
which is a wrapper for report_error() that also exits. This eliminates the need for
another argument and allows us to report potentially dangerous conditions
without having to exit.
void report_error(const char *msg, const char *file, int line_no, int use_perror)
{
fprintf(stderr,"[%s:%d] ",file,line_no);
if(use_perror != 0) {
perror(msg);
} else {
fprintf(stderr, "%s\n",msg);
}
}
Case Study: A Secure Networked Application
307
3227c13.qxd 7/9/04 11:15 AM Page 307
void report_error_q(const char *msg, const char *file, int line_no, int use_perror) {
report_error(msg,file,line_no,use_perror);
exit(EXIT_FAILURE);
}
We continue with our implementations of wrappers for the malloc() and
free() calls. These are identical to those we looked at in the previous chapter
and require no further explanation.
void * w_malloc(size_t bytes) {
void *memory = NULL;
memory_list *new_item = NULL;
memory = calloc(bytes,1);
new_item = calloc(1,sizeof(struct memory_list));
if(memory) {
if(new_item == NULL) {
report_error_q("Memory allocation error, no room for memory list item.",
__FILE__,__LINE__,0);
}
global_memory_count += bytes + sizeof(struct memory_list);
new_item->address = memory;
new_item->size = bytes;
new_item->next = NULL;
new_item->prev = NULL;
if(memory_list_head) {
new_item->next = memory_list_head;
memory_list_head->prev = new_item;
memory_list_head = new_item;
} else {
memory_list_head = new_item;
}
return memory;
} else {
report_error_q("Memory allocation error, out of memory.",
__FILE__,__LINE__,0);
return NULL;
}
}
void w_free(void *f_address) {
memory_list *temp = NULL,*found = NULL;
if(f_address == NULL)
return;
Chapter 13
308
3227c13.qxd 7/9/04 11:15 AM Page 308
for(temp=memory_list_head;temp!=NULL;temp = temp->next) {
if(temp->address == f_address) {
found = temp;
break;
}
}
if(!found) {
report_error_q("Unable to free memory not previously allocated",
__FILE__,__LINE__,0); // Report this as an error
}
global_memory_count -= found->size + sizeof(struct memory_list);
free(f_address);
if(found->prev)
found->prev->next = found->next;
if(found->next)
found->next->prev = found->prev;
if(found == memory_list_head)
memory_list_head = found->next;
free(found);
}
To complete our collection of memory management wrappers, we add two
more functions. First, we add the function w_free_all(), which walks the list of
allocated memory and deallocates the memory itself as well as the associated
memory in the list. This provides us with a catchall function we can call to
ensure that memory we may have neglected to free is returned to the heap. The
next function, w_memory_init(), is to be called prior to using any of the other
memory wrapper functions. This function initializes the global variables that the
w_malloc() and w_free() functions use and registers the w_free_all() function to
be called at program termination by using the atexit() system call. After a call to
w_memory_init(), anytime our program exits normally, by either returning 0 or
calling exit(EXIT_SUCCESS), the w_free_all() function is called to ensure we clean
up all allocated memory.
void w_free_all(void) {
memory_list *temp = NULL;
while(memory_list_head) {
free(memory_list_head->address);
Case Study: A Secure Networked Application
309
3227c13.qxd 7/9/04 11:15 AM Page 309
temp = memory_list_head->next;
free(memory_list_head);
memory_list_head = temp;
}
}
void w_memory_init(void) {
static int state = 0;
if(state != 0)
return;
state = 1;
memory_list_head = NULL;
global_memory_count = 0;
atexit(w_free_all);
}
The next wrapper functions we implement are openssl_init() and
openssl_destroy(). These functions allow us to encapsulate the necessary steps in
loading and unloading the OpenSSL library, as we discussed in Chapter 10. The
openssl_init() function also takes on the process of seeding the PRNG within
OpenSSL by reading ENTROPY_SIZE bytes from the kernel device /dev/random. We
also register the openssl_destroy() function with a call to atexit() to ensure that
our process cleans up after itself upon exiting.
void openssl_init(void) {
static int state = 0;
int bytes_read = 0;
if(state != 0)
return;
state = 1;
atexit(openssl_destroy);
OpenSSL_add_all_algorithms();
SSL_load_error_strings();
printf("Seeding PRNG with /dev/random, this may take a moment... ");
fflush(stdout);
if((bytes_read = RAND_load_file("/dev/random",ENTROPY_SIZE)) != ENTROPY_SIZE)
{
report_error_q("Seeding PRNG failed",__FILE__,__LINE__,0);
}
printf("Done\n");
Chapter 13
310
3227c13.qxd 7/9/04 11:15 AM Page 310
fflush(stdout);
}
void openssl_destroy(void) {
EVP_cleanup();
ERR_free_strings();
}
In our quest to encapsulate things, the process of sending and receiving
data is an easy target. We implement the functions ssl_read_string() and
ssl_write_string() as wrappers for the code necessary to read and write a NULL-
terminated character string over our encrypted connection using the OpenSSL
library.
The ssl_read_string() function takes the connection to read from and a
maximum limit for the number of characters to read as arguments, and returns
a newly allocated character array containing the result of the read. If the limit is
reached, or an error occurs, the string is truncated with a NULL character and
returned as is; otherwise, the string is read until a terminating NULL character is
read from the connection. We need to ensure that the string returned is later
freed with a call to w_free() by the calling function.
char *ssl_read_string(SSL *my_ssl,size_t limit) {
char * buffer = NULL;
char this_one;
int error = 0, read_in = 0;
buffer = w_malloc(limit);
while(read_in < limit) {
error = SSL_read(my_ssl,&this_one,1);
if(error > 0) {
buffer[read_in++] = this_one;
if(this_one == '\0') return buffer;
} else {
return buffer;
}
}
buffer[limit-1]='\0';
return buffer;
}
Our ssl_write_string() function takes the connection to write to and the
string to write as arguments, and returns nothing. We walk over the string we are
writing, sending as much as we can with each call to SSL_write().
Case Study: A Secure Networked Application
311
3227c13.qxd 7/9/04 11:15 AM Page 311
void ssl_write_string(SSL *my_ssl,const char *message) {
int ret_val = 0, bytes_written = 0;
int bytes_to_write;
bytes_to_write = strlen(message) + 1;
while(bytes_written < bytes_to_write) {
ret_val = SSL_write(my_ssl, message + bytes_written,
bytes_to_write - bytes_written);
if(ret_val <= 0) {
break;
} else {
bytes_written += ret_val;
}
}
}
We continue by wrapping more functions around the SSL_write() and
SSL_read() functions, for reading and writing unsigned integer values, as well as
raw data. We will use these functions for our protocol, for which we need to be
able to send and receive unsigned integers, as well as for our PKI code, as we will
need to be able to send and receive the raw DER-encoded keys and signed data.
unsigned int ssl_read_uint(SSL *my_ssl) {
unsigned int value = 0;
if(ssl_read_bytes(my_ssl,&value,sizeof(unsigned int)) != -1) {
value = ntohl(value);
return value;
} else
return 0;
}
void ssl_write_uint(SSL *my_ssl,unsigned int value) {
unsigned int to_write = 0;
to_write = htonl(value);
ssl_write_bytes(my_ssl,&to_write,sizeof(unsigned int));
}
byte_t ssl_read_byte(SSL *my_ssl) {
byte_t this_byte;
if(SSL_read(my_ssl,&this_byte,sizeof(byte_t)) != 1)
return '\0';
else {
return this_byte;
}
Chapter 13
312
3227c13.qxd 7/9/04 11:15 AM Page 312
}
int ssl_read_bytes(SSL *my_ssl,void *buf,unsigned int limit) {
byte_t *my_buf = NULL;
unsigned int x = 0;
my_buf = (byte_t *)buf;
for(;x<limit;x++) {
my_buf[x] = ssl_read_byte(my_ssl);
}
return 0;
}
void ssl_write_byte(SSL *my_ssl,byte_t this_byte) {
SSL_write(my_ssl,&this_byte,1);
}
void ssl_write_bytes(SSL *my_ssl, void *message, unsigned int length) {
int ret_val = 0, bytes_written = 0;
byte_t *buffer = NULL;
buffer = (byte_t *)message;
while(bytes_written < length) {
ret_val = SSL_write(my_ssl,
buffer + bytes_written,
length - bytes_written);
if(ret_val <= 0)
break;
else
bytes_written += ret_val;
}
}
With our SSL wrappers complete, we move on to wrapping other things. The
network_get_ip_address() function takes an SSL connection as an argument and
returns the IP address of the connected client as a character string. This function
is used only by the server, but it is of general enough use that we put it here in
our common code library.
const char *network_get_ip_address(SSL *my_ssl) {
struct sockaddr_in addr;
int sizeof_addr = 0;
int clientFd = 0;
Case Study: A Secure Networked Application
313
3227c13.qxd 7/9/04 11:15 AM Page 313
clientFd = SSL_get_fd(my_ssl);
sizeof_addr = sizeof(addr);
getpeername(clientFd, (struct sockaddr *) &addr, &sizeof_addr);
return(const char *) inet_ntoa(addr.sin_addr);
}
The last set of wrappers in our common code base encapsulates the actions
we will need to perform to fulfill the PKI portion of our goal. We begin by creat-
ing the function key_create_key(), which will create and validate a new RSA key.
Afterward, we move on to create the complementary method key_destroy_key(),
which will destroy and free the associated memory for a given RSA key. The last
of the general-purpose PKI functions is key_buffer_size(), which wraps the
RSA_size() OpenSSL function, returning the number of bytes necessary to store
data signed with the given key.
RSA * key_create_key(void) {
RSA *new_key = NULL;
new_key = RSA_generate_key(2048,RSA_F4,NULL,NULL);
if(new_key) {
if(RSA_check_key(new_key) == 1)
return new_key;
else
return NULL;
}
return NULL;
}
void key_destroy_key(RSA *this_key) {
if(this_key)
RSA_free(this_key);
}
unsigned int key_buffer_size(RSA *this_key) {
return RSA_size(this_key);
}
With the general wrappers out of the way, we move on to wrap the code nec-
essary to perform the PKI signature and verification processes. The first of these,
key_sign_data(), performs the signing process on the given data with the
pro-
vided key and returns the result in the provided buffer that is passed by reference.
The unsigned integer that is returned indicates the number of bytes in the signa-
ture itself.
Chapter 13
314
3227c13.qxd 7/9/04 11:15 AM Page 314
unsigned int key_sign_data(RSA *this_key,const char *original,
unsigned int orig_size,char *signd,unsigned int signd_length) {
EVP_MD_CTX my_evp;
EVP_PKEY * pkey;
unsigned int signed_length = 0;
if(this_key == NULL)
return 0;
pkey = EVP_PKEY_new();
EVP_PKEY_set1_RSA(pkey,this_key);
signed_length = signd_length;
EVP_SignInit(&my_evp, EVP_md5());
EVP_SignUpdate (&my_evp,original, orig_size);
EVP_SignFinal (&my_evp,signd, &signed_length,pkey);
EVP_PKEY_free(pkey);
return signed_length;
}
The signature verification process is encapsulated in the function,
key_verify_signature(), which takes both a signed and an unsigned buffer as
arguments. If the signature is verified with the passed key, then the function
returns 0; otherwise, it returns –1.
int key_verify_signature(RSA *this_key, char *signd,unsigned
int s_length,char * u_signed,unsigned int u_length) {
EVP_MD_CTX my_evp;
EVP_PKEY * pkey;
int retval = 0;
if(this_key == NULL)
return -1;
pkey = EVP_PKEY_new();
EVP_PKEY_set1_RSA(pkey,this_key);
EVP_VerifyInit(&my_evp,EVP_md5());
EVP_VerifyUpdate(&my_evp,u_signed,u_length);
retval = EVP_VerifyFinal (&my_evp,signd,s_length,pkey);
EVP_PKEY_free(pkey);
if(retval)
return 0;
Case Study: A Secure Networked Application
315
3227c13.qxd 7/9/04 11:15 AM Page 315
else
return -1;
}
We finish our common code with a few more key management wrapper
functions. These functions handle reading and writing both the public and pri-
vate portions of keys to and from both disk and the network (with the exception
of private keys, which should not be transmitted over the network). When public
keys are transmitted over the network, they are encoded in the DER format and
decoded at the receiving end of the connection. When stored on disk, both the
public and private keys are stored in the PEM format.
int key_write_priv(RSA *this_key, char *filename) {
FILE *store_file = NULL;
int retval = 0;
store_file = fopen(filename,"w");
if(!store_file)
return -1;
retval = PEM_write_RSAPrivateKey(store_file,this_key,NULL,NULL,0,NULL,NULL);
fclose(store_file);
if(retval)
return 0;
else
return -1;
}
RSA *key_read_priv(char *filename) {
FILE *store_file = NULL;
RSA *this_key = NULL;
store_file = fopen(filename,"r");
if(!store_file)
return NULL;
this_key = PEM_read_RSAPrivateKey(store_file,NULL,NULL,NULL);
fclose(store_file);
return this_key;
}
void key_net_write_pub(RSA *this_key,SSL *my_ssl) {
Chapter 13
316
3227c13.qxd 7/9/04 11:15 AM Page 316
unsigned int buf_size;
unsigned char *buf,*next;
buf_size = i2d_RSAPublicKey(this_key,NULL);
ssl_write_uint(my_ssl,buf_size);
buf = next = (unsigned char *)w_malloc(buf_size);
i2d_RSAPublicKey(this_key,&next);
ssl_write_bytes(my_ssl,buf,buf_size);
w_free(buf);
}
RSA *key_net_read_pub(SSL *my_ssl) {
RSA *this_key = NULL;
unsigned int len = 0;
unsigned char *temp = NULL,*buff;
len = ssl_read_uint(my_ssl);
buff = temp = (unsigned char *)w_malloc(len);
ssl_read_bytes(my_ssl,temp,len);
this_key = d2i_RSAPublicKey(NULL,&temp,len);
w_free(buff);
return this_key;
}
int key_write_pub(RSA *this_key, char *filename ) {
FILE *store_file = NULL;
int retval = 0;
store_file = fopen(filename,"w");
if(!store_file)
return -1;
retval = PEM_write_RSA_PUBKEY(store_file,this_key);
fclose(store_file);
if(retval)
return 0;
else
return -1;
}
RSA *key_read_pub(char *filename) {
FILE *store_file = NULL;
RSA *this_key = NULL;
store_file = fopen(filename,"r");
Case Study: A Secure Networked Application
317
3227c13.qxd 7/9/04 11:15 AM Page 317
if(!store_file)
return NULL;
this_key = PEM_read_RSA_PUBKEY(store_file,NULL,NULL,NULL);
fclose(store_file);
return this_key;
}
With the conclusion of our key management wrappers, our common code
base is complete. All of the code remaining is highly specific to one side of the
connection or the other and should therefore be implemented in the corre-
sponding file. We continue by looking at the code for the client process.
The Client
The code for the client process is stored in the client/ directory in both
auth_client.h and auth_client.c.
auth_client.h
This file declares all of the functions we will use within the client that are specific
to the client and are defined in auth_client.c.
#ifndef AUTH_CLIENT_H
#define AUTH_CLIENT_H
SSL * ssl_client_connect(const char *host, const char *port);
const char *getUsername(void);
const char *getUsersHome(const char *username);
int haveServerKey(const char *host,const char *username);
RSA *getServerKey(const char *host,const char *username);
void writePrivKey(const char *host, const char *username, RSA *my_key);
const char *getUserPassword(void);
#endif
auth_client.c
This file contains all of the code specific to the client. When compiled, the binary
auth_client begins execution at the main() function defined herein:
Chapter 13
318
3227c13.qxd 7/9/04 11:15 AM Page 318
#include "common.h"
#include "auth_client.h"
The function ssl_client_connect() takes a host name and port as arguments,
and if it is successful, it returns a new SSL connection to that host on the speci-
fied port. This encapsulates all the code necessary to initiate and negotiate that
connection, such that upon successful return, communication can begin imme-
diately over the returned connection. We implement this function using the BIO
method of connection handling, making our code slightly easier to read and
more portable.
SSL * ssl_client_connect(const char *host, const char *port) {
SSL_METHOD *my_ssl_method;
SSL_CTX *my_ssl_ctx;
SSL *my_ssl;
BIO *my_bio;
char *host_port;
host_port = w_malloc(strlen(host) + strlen(port) + 2);
sprintf(host_port,"%s:%s",host,port);
my_ssl_method = TLSv1_client_method();
if((my_ssl_ctx = SSL_CTX_new(my_ssl_method)) == NULL) {
return NULL;
}
if((my_ssl = SSL_new(my_ssl_ctx)) == NULL) {
SSL_CTX_free(my_ssl_ctx);
return NULL;
}
if((my_bio = BIO_new_connect(host_port)) == NULL) {
SSL_free(my_ssl);
w_free(host_port);
return NULL;
}
if(BIO_do_connect(my_bio) <=0) {
SSL_free(my_ssl);
BIO_free(my_bio);
w_free(host_port);
return NULL;
}
SSL_set_bio(my_ssl,my_bio,my_bio);
if(SSL_connect(my_ssl) <= 0) {
SSL_free(my_ssl);
Case Study: A Secure Networked Application
319
3227c13.qxd 7/9/04 11:15 AM Page 319
w_free(host_port);
return NULL;
}
w_free(host_port);
return my_ssl;
}
When providing a username to the server, we could simply prompt the user
for the username. However, for our purposes it would seem that assuming the
username of the person who ran the client would provide for an interesting
divergence into extending an application. As a result, we implement the function
getUsername(), which uses the glibc functions getpwent() and getuid() to locate
and return our username in the NSS passwd database.
const char *getUsername(void) {
static char *username_buffer = NULL;
uid_t my_uid;
struct passwd *current_pwent = NULL;
my_uid = getuid();
current_pwent = getpwent();
if(username_buffer != NULL) {
w_free(username_buffer);
username_buffer = NULL;
}
while(current_pwent && !username_buffer) {
if(current_pwent->pw_uid == my_uid) {
username_buffer = (char *)w_malloc(strlen(current_pwent->pw_name) + 1);
strncpy(username_buffer,current_pwent->pw_name,
strlen(current_pwent->pw_name) + 1);
}
current_pwent = getpwent();
}
endpwent();
return username_buffer;
}
We need a place to store the private portion of generated PKI keys. We have
decided to implement this by storing the files in the user’s home directory. As a
result, we also need a way to determine the user’s home directory path. We could
examine the environment for the HOME variable, but this is unreliable. Instead, we
Chapter 13
320
3227c13.qxd 7/9/04 11:15 AM Page 320
take the same approach as our getUsername() function and create a function
getUsersHome() that searches the passwd database for our user’s home directory.
const char *getUsersHome(const char *username) {
static char *home_buffer = NULL;
struct passwd *current_pwent = NULL;
current_pwent = getpwent();
if(home_buffer != NULL) {
w_free(home_buffer);
home_buffer = NULL;
}
while(current_pwent) {
if(strcasecmp(username,current_pwent->pw_name) == 0) {
home_buffer = (char *)w_malloc(strlen(current_pwent->pw_dir) + 1);
strncpy(home_buffer,current_pwent->pw_dir,
strlen(current_pwent->pw_dir) + 1);
}
current_pwent = getpwent();
}
endpwent();
return home_buffer;
}
Now that we have a method for finding the user’s home directory and for
getting the user’s username, we need a function to write a given private key to
the user’s home directory. We wrap our call to key_write_priv() from our com-
mon code with our writePrivKey() function, which first builds the path to the
private key by concatenating the user’s home directory, a dot (.) to make it a
hidden file, and the host name we are connected to.
void writePrivKey(const char *host, const char *username, RSA *my_key) {
char *file_path = NULL;
const char *user_home = NULL;
if((user_home = getUsersHome(username)) == NULL) {
report_error_q("Unable to find user's home directory",__FILE__,__LINE__,0);
}
file_path = (char *)w_malloc(strlen(host) + strlen(user_home) + 15);
strncpy(file_path,user_home,strlen(user_home));
strncat(file_path,"/.",2);
Case Study: A Secure Networked Application
321
3227c13.qxd 7/9/04 11:15 AM Page 321
strncat(file_path,host,strlen(host));
strncat(file_path,".priv",strlen(".priv"));
if(key_write_priv(my_key,file_path) != 0) {
report_error_q("Unable to write private key to file",__FILE__,__LINE__,0);
}
}
When our client first starts, it needs to decide whether it should authenticate
via PAM (password) or with PKI. This is done by first checking to see if we have a
private key corresponding to the server we are connected to. To do this check,
we implement the function haveServerkey(), which returns 0 if we do and –1 if
we do not have a private key for use with the given host.
int haveServerKey(const char *host,const char *username) {
char *file_path = NULL;
const char *user_home = NULL;
FILE *key_file = NULL;
if((user_home = getUsersHome(username)) == NULL) {
report_error_q("Unable to find user's home directory",__FILE__,__LINE__,0);
}
file_path = (char *)w_malloc(strlen(host) + strlen(user_home) + 15);
strncpy(file_path,user_home,strlen(user_home));
strncat(file_path,"/.",2);
strncat(file_path,host,strlen(host));
strncat(file_path,".priv",strlen(".priv"));
if((key_file = fopen(file_path,"r")) == NULL) {
w_free(file_path);
return -1;
}
else {
fclose(key_file);
w_free(file_path);
return 0;
}
}
With the ability to determine whether or not we have a key for the
current host, we also need to read that key from disk. We do this through the
Chapter 13
322
3227c13.qxd 7/9/04 11:15 AM Page 322
getServerKey() function, which returns an RSA key whose private structures are
instantiated with our private key data and is sufficient for data signing.
RSA *getServerKey(const char *host, const char *username) {
char *file_path = NULL;
const char *user_home = NULL;
RSA *my_key = NULL;
if((user_home = getUsersHome(username)) == NULL) {
report_error_q("Unable to find user's home directory",__FILE__,__LINE__,0);
}
file_path = (char *)w_malloc(strlen(host) + strlen(user_home) + 15);
strncpy(file_path,user_home,strlen(user_home));
strncat(file_path,"/.",2);
strncat(file_path,host,strlen(host));
strncat(file_path,".priv",strlen(".priv"));
my_key = key_read_priv(file_path);
w_free(file_path);
return my_key;
}
The last bit of functionality we want to encapsulate before we begin imple-
menting the main() function is the ability to prompt the user for a password.
Prompting a user for input can be relatively easy; however, when a user types a
password, we should turn off the echo in his terminal (or at least attempt to),
so that his password is not shown on the screen for any passing eyes to see.
Therefore, we combine turning off the terminal echo and the prompt into a
single function, getUserPassword(), which returns the password the user enters.
const char *getUserPassword(void) {
struct termios terminal_setup, old_terminal_setup;
static char *password_buffer[2048];
char *newline = NULL;
memset(password_buffer,'\0',2048);
tcgetattr(STDIN_FILENO, &terminal_setup);
old_terminal_setup = terminal_setup;
terminal_setup.c_lflag &= ~ECHO;
terminal_setup.c_lflag |= ECHONL;
tcsetattr(STDIN_FILENO, TCSAFLUSH, &terminal_setup);
Case Study: A Secure Networked Application
323
3227c13.qxd 7/9/04 11:15 AM Page 323
printf("Password: ");
fflush(stdout);
fgets((char *)password_buffer, 2048, stdin);
tcsetattr(STDIN_FILENO, TCSANOW, &old_terminal_setup);
while((newline = strstr((char *)password_buffer,"\n")) != NULL) {
*newline = '\0';
}
return (char *)password_buffer;
}
Between the common code base and the encapsulation functions before
this, we can now implement the body of the client fairly quickly. We have
decided to implement our client in the main() function rather than as another
wrapper as follows:
int main(int argc, char *argv[]) {
SSL *ssl_connection = NULL;
const char *host = NULL, *port = NULL;
const char *username = NULL;
char *response = NULL;
char *signed_data_buffer = NULL;
unsigned int signed_data_buffer_size = 0;
RSA *my_rsa_key = NULL;
First, we check to ensure that we were given two arguments at runtime, one
for the host name and one for the port:
if(argc != 3) {
fprintf(stderr, "Usage: %s host port\n",argv[0]);
exit(EXIT_FAILURE);
}
We then call our initialization wrappers for memory management purposes
and for the OpenSSL library:
w_memory_init();
openssl_init();
Next, we store the arguments given to us on the command line, and then
call getUsername() to get the user’s username. We make sure to validate the user-
name before continuing by checking to ensure it is not NULL:
Chapter 13
324
3227c13.qxd 7/9/04 11:15 AM Page 324
host = argv[1];
port = argv[2];
username = getUsername();
if(username == NULL) {
report_error_q("Unable to determine the username of this process.",
__FILE__,__LINE__,0);
}
With our arguments stored and the necessary (up to this point) information
gathered, we can try to connect to the server. We call our wrapper function
ssl_client_connect() and verify that it returns a valid SSL pointer. If it does not,
we report the error as reported by the OpenSSL library and quit:
if((ssl_connection = ssl_client_connect(host,port)) == NULL) {
report_error_q(ERR_error_string(ERR_get_error(),NULL),__FILE__,__LINE__,0);
}
At this point, we have connected to the server successfully, so we now need
to determine which course of action to take. Either we have a private key and do
PKI verification or we prompt the user for his password and do PAM authenti-
cation. We call our haveServerKey() function to determine which of these actions
to take. If we are to do PKI authentication, we first send the control message
REQUEST_KEY_AUTH, followed by the username. We then read the private key from
disk, sign a data buffer containing our username, and send the result. Once the
server has received all this, it will attempt to verify the signed data and will
return either SERVER_AUTH_SUCCESS or SERVER_AUTH_FAILURE, which we read with
ssl_read_uint().
If we are to do password authentication, we first send the control message
REQUEST_PASS_AUTH, followed by the user’s username and password (retrieved
with a call to getUserPassword()). We then read the server’s response with
ssl_read_uint(). If the response is SERVER_AUTH_SUCCESS, we generate and send
the public portion of a new RSA key, and then write the private portion to disk
for future authentication.
if(haveServerKey(host,username) == 0) {
ssl_write_uint(ssl_connection,REQUEST_KEY_AUTH);
ssl_write_string(ssl_connection,username);
my_rsa_key = getServerKey(host,username);
if(my_rsa_key == NULL) {
report_error_q("Key file exists, but data is invalid",
Case Study: A Secure Networked Application
325
3227c13.qxd 7/9/04 11:15 AM Page 325
__FILE__,__LINE__,0);
}
signed_data_buffer = (char *)w_malloc(key_buffer_size(my_rsa_key));
signed_data_buffer_size =
key_sign_data(my_rsa_key,username,strlen(username),signed_data_buffer,
key_buffer_size(my_rsa_key));
ssl_write_uint(ssl_connection,signed_data_buffer_size);
ssl_write_bytes(ssl_connection,signed_data_buffer,signed_data_buffer_size);
if(ssl_read_uint(ssl_connection) == SERVER_AUTH_SUCCESS) {
printf("Server responded with SERVER_AUTH_SUCCESS\n");
} else {
printf("Server responded with SERVER_AUTH_FAILURE\n");
}
w_free(response);
} else {
ssl_write_uint(ssl_connection,REQUEST_PASS_AUTH);
ssl_write_string(ssl_connection,username);
ssl_write_string(ssl_connection,getUserPassword());
if(ssl_read_uint(ssl_connection) == SERVER_AUTH_SUCCESS) {
printf("Server responded with SERVER_AUTH_SUCCESS, sending PKI Key\n");
my_rsa_key = key_create_key();
if(!my_rsa_key) {
report_error("Error creating RSA key.",__FILE__,__LINE__,0);
}
key_net_write_pub(my_rsa_key,ssl_connection);
writePrivKey(host,username,my_rsa_key);
} else {
printf("Server responded with SERVER_AUTH_FAILURE\n");
}
}
We finish by closing the connection with the server, freeing the memory
used by the connection, and returning 0. Remember that at initialization we reg-
istered a couple of things to be called at exit time that will now run and ensure
OpenSSL and our memory wrapper list are destroyed properly.
SSL_shutdown(ssl_connection);
SSL_free(ssl_connection);
return 0;
}
Chapter 13
326
3227c13.qxd 7/9/04 11:15 AM Page 326
With our client code complete, we need to implement a large portion of the
server before we can begin testing. We continue by examining the code specific
to the server.
The Server
Our server code resides in the server/ directory, and consists of the files
auth_server.c and auth_server.h. These files contain the code that is specific
to the server portion of our example and build into the binary executable
auth_server.
auth_server.h
We begin our server code by preventing circular #includes and including the
main PAM header with
#ifndef AUTH_SERVER_H
#define AUTH_SERVER_H
#include <security/pam_appl.h>
Remember that our server will be using the PAM library in addition to the
OpenSSL library. As a result, we need to make sure we include the pam_appl.h file
from the PAM project.
SSL *get_connection(char *port);
int pam_authenticate_user(const char *,const char *);
int auth_conv(int, const struct pam_message **, struct pam_response **, void *);
void child_process(SSL *my_ssl);
int auth_conv(int num_msg,const struct pam_message **msg,
struct pam_response **response, void *appdata_ptr);
typedef struct auth_struct {
const char *username;
const char *password;
} auth_struct;
#endif
In addition to our conversation function (declared as auth_conv() previ-
ously), we define the auth_struct structure as a means by which we can pass our
Case Study: A Secure Networked Application
327
3227c13.qxd 7/9/04 11:15 AM Page 327
conversation function the username and password for the user we are trying to
authenticate. As a result of the conversation function being a callback, we do not
have access to any data not defined in the local scope of the callback itself. PAM
resolves this by allowing us to pass a void *, which is then provided unchanged
as an argument to the callback, giving us a chance to access something in our
own heap from the callback function.
auth_server.c
We begin our server code by including both the common header file and our
server specific header with
#include "common.h"
#include "auth_server.h"
The function pam_authenticate_user() is our wrapper function for PAM
authentication. We pass it a username and password, and it will return either
1 for success or –1 for failure. This function takes care of setting up the interface
with PAM, calling into PAM, and verifying the results PAM provides.
int pam_authenticate_user(const char *username,const char *password) {
struct auth_struct buffer;
static struct pam_conv myauthconv = {
auth_conv,
NULL
};
pam_handle_t *pamh=NULL;
int ret = 0, authenticated = 0;
buffer.username = username;
buffer.password = password;
myauthconv.appdata_ptr = &buffer;
if(username && password) {
authenticated =
(ret = pam_start("login", NULL, &myauthconv, &pamh)) == PAM_SUCCESS &&
(ret = pam_authenticate(pamh, 0)) == PAM_SUCCESS &&
(ret = pam_acct_mgmt(pamh, 0)) == PAM_SUCCESS;
pam_end(pamh,ret);
}
if(authenticated)
Chapter 13
328
3227c13.qxd 7/9/04 11:15 AM Page 328
return 1; // Authenticated
else
return -1; // Not
}
The function auth_conv() is the callback function, or conversation function,
which PAM will call when we call pam_authenticate() in our pam_authenticate_user()
function. We walk the array of responses that we must provide, and copy the user-
name and password that were provided as the optional appdata_ptr argument
into the responses where appropriate.
int auth_conv(int num_msg,const struct pam_message **msg,
struct pam_response **response, void *appdata_ptr) {
struct pam_response *reply_with = NULL;
int num_replies;
struct auth_struct *user_data;
user_data = (struct auth_struct *) appdata_ptr;
if(num_msg <= 0)
return PAM_CONV_ERR;
reply_with = (struct pam_response *)calloc(num_msg, sizeof(struct pam_response));
if(reply_with == NULL)
return PAM_SYSTEM_ERR;
for(num_replies = 0; num_replies < num_msg; num_replies++)
{
if(msg[num_replies]->msg_style == PAM_PROMPT_ECHO_OFF)
{
reply_with[num_replies].resp_retcode = PAM_SUCCESS;
reply_with[num_replies].resp = strdup(user_data->password);
}
else if(msg[num_replies]->msg_style == PAM_PROMPT_ECHO_ON)
{
reply_with[num_replies].resp_retcode = PAM_SUCCESS;
reply_with[num_replies].resp = strdup(user_data->username);
}
else
{
free(reply_with);
return PAM_CONV_ERR;
}
Case Study: A Secure Networked Application
329
3227c13.qxd 7/9/04 11:15 AM Page 329
}
*response = reply_with;
return PAM_SUCCESS;
}
We implement a unique wrapper function called get_connection() for our
server. This function, upon being called for the first time, will set up the BIO
sockets for listening and prepare to accept incoming connections, and then
return the first incoming connection as a new SSL pointer. Subsequent calls will
return subsequent connections, such that repeated calls result in returning each
connection as it comes in, since it blocks until a connection is available. This
wrapper allows us to drop it in a for loop later and handle connections as they
arrive on an individual basis.
SSL *get_connection(char *port) {
SSL *my_ssl = NULL;
static SSL_CTX *my_ssl_ctx = NULL;
static SSL_METHOD *my_ssl_method = NULL;
static BIO *server_bio = NULL;
BIO *client_bio = NULL;
if (port && !server_bio) {
my_ssl_method = TLSv1_server_method();
if ((my_ssl_ctx = SSL_CTX_new(my_ssl_method)) == NULL) {
report_error_q("Unable to setup context.",__FILE__,__LINE__,0);
}
SSL_CTX_use_certificate_file(my_ssl_ctx,"server.pem",SSL_FILETYPE_PEM);
SSL_CTX_use_PrivateKey_file(my_ssl_ctx,"server.pem",SSL_FILETYPE_PEM);
if (!SSL_CTX_check_private_key(my_ssl_ctx)) {
report_error_q("Private key does not match certificate",
__FILE__,__LINE__,0);
}
if ((server_bio = BIO_new_accept(port)) == NULL) {
report_error_q(ERR_error_string(ERR_get_error(),NULL),
__FILE__,__LINE__,0);
}
if (BIO_do_accept(server_bio) <= 0) {
report_error_q(ERR_error_string(ERR_get_error(),NULL),
__FILE__,__LINE__,0);
}
}
if (port == NULL) {
SSL_CTX_free(my_ssl_ctx);
Chapter 13
330
3227c13.qxd 7/9/04 11:15 AM Page 330
BIO_free(server_bio);
} else {
if (BIO_do_accept(server_bio) <= 0) {
report_error_q(ERR_error_string(ERR_get_error(),NULL),
__FILE__,__LINE__,0);
}
client_bio = BIO_pop(server_bio);
if ((my_ssl = SSL_new(my_ssl_ctx)) == NULL) {
report_error_q(ERR_error_string(ERR_get_error(),NULL),
__FILE__,__LINE__,0);
}
SSL_set_bio(my_ssl,client_bio,client_bio);
if (SSL_accept(my_ssl) <= 0) {
report_error_q(ERR_error_string(ERR_get_error(),NULL),
__FILE__,__LINE__,0);
}
}
return my_ssl;
}
The child_process() function is actually where the server performs its
duties. It is this function that each child process is directed to after forking. The
switch() statement determines what action the client has requested, and the two
cases REQUEST_KEY_AUTH and REQUEST_PASS_AUTH are handled in a complementary
manner to the client (when the client is to write, the server reads, and vice
versa).
void child_process(SSL *my_ssl) {
char *username = NULL, *password = NULL,*key_file = NULL;
RSA *users_key = NULL;
int authenticated = 0;
int string_size = 0;
unsigned int signed_size = 0;
byte_t *signed_buffer = NULL;
w_memory_init();
switch (ssl_read_uint(my_ssl)) {
case SSL_ERROR:
report_error_q(ERR_error_string(ERR_get_error(),NULL),__FILE__,__LINE__,0);
break;
case REQUEST_KEY_AUTH:
Case Study: A Secure Networked Application
331
3227c13.qxd 7/9/04 11:15 AM Page 331
username = ssl_read_string(my_ssl,1024);
string_size = strlen(username) +
strlen(network_get_ip_address(my_ssl)) + 10;
key_file = w_malloc(string_size);
snprintf(key_file,string_size,"%s.%s.pub",username,
network_get_ip_address(my_ssl));
users_key = key_read_pub(key_file);
w_free(key_file);
signed_size = ssl_read_uint(my_ssl);
signed_buffer = (byte_t *)w_malloc(signed_size);
if(ssl_read_bytes(my_ssl,signed_buffer,signed_size) != 0)
report_error_q("Error reading signed data from client",
__FILE__,__LINE__,0);
if(key_verify_signature(users_key,signed_buffer,signed_size,
username,strlen(username)) == 0) {
ssl_write_uint(my_ssl,SERVER_AUTH_SUCCESS);
printf("(%s) User %s authenticated via
PKI\n",network_get_ip_address(my_ssl),username);
} else {
ssl_write_uint(my_ssl,SERVER_AUTH_FAILURE);
printf("(%s) User %s failed via PKI\n",
network_get_ip_address(my_ssl),username);
}
break;
case REQUEST_PASS_AUTH:
username = ssl_read_string(my_ssl,1024);
password = ssl_read_string(my_ssl,1024);
authenticated = pam_authenticate_user(username,password);
printf("(%s) User %s %s via PAM\n",network_get_ip_address(my_ssl),
username,authenticated ? "authenticated" : "failed");
if(authenticated) {
ssl_write_uint(my_ssl,SERVER_AUTH_SUCCESS);
users_key = key_net_read_pub(my_ssl);
string_size = strlen(username) +
strlen(network_get_ip_address(my_ssl)) + 10;
key_file = w_malloc(string_size);
snprintf(key_file,string_size,"%s.%s.pub",username,
network_get_ip_address(my_ssl));
key_write_pub(users_key,key_file);
w_free(key_file);
} else {
ssl_write_uint(my_ssl,SERVER_AUTH_FAILURE);
}
Chapter 13
332
3227c13.qxd 7/9/04 11:15 AM Page 332
break;
}
if(users_key) {
key_destroy_key(users_key);
}
SSL_shutdown(my_ssl);
SSL_free(my_ssl);
exit(EXIT_SUCCESS);
}
Because our server is designed to fork, the majority of the work is actually
performed in the child_process() function, and our main() function is quite
short and to the point. We first check our arguments, using the first argument as
the port number to listen on, and then go into an infinite loop. Within the loop,
we retrieve a connection and fork, and immediately after the child process
begins it uses the daemon() system call to ensure that it does not become defunct
and force the parent process to wait for it. This allows the parent process to con-
tinue on to the next connection almost immediately. Each child process then
enters the child_process() function and handles the connection appropriately.
int main(int argc, char *argv[]) {
char *port = NULL;
SSL *my_ssl = NULL;
int my_pid = 0;
if (argc != 2) {
fprintf(stderr, "Usage: %s port\n",argv[0]);
exit(EXIT_FAILURE);
}
openssl_init();
port = argv[1];
for (;;) {
my_ssl = get_connection(port);
my_pid = fork();
if (my_pid == 0) {
child_process(my_ssl);
daemon(0,0);
} else {
Case Study: A Secure Networked Application
333
3227c13.qxd 7/9/04 11:15 AM Page 333

waitpid(my_pid,NULL,0);
}
}
return 0;
}
Running the Client and Server
With our implementation complete, we can now move on to running and using
our client and server programs. First, we build all the code by running
make
within our top-level directory. Once it’s built, we need to open two terminals. In
one, we run the server as root (su – first if necessary), and in the other, we run
the client as any valid user on the system.
NOTE The makefiles for this sample are included with the book’s
files, which are available for download from the Downloads area of
the Apress website (http://www.apress.com).
We run the server with
$ ./server/auth_server 9091
which will run the server and have it listen on port 9091. To run the server we
must ensure there is a private key and certificate in the current directory named
server.pem. These can be created using the methods discussed in Chapter 10. We
can then run the client with
$ ./client/auth_client localhost 9091
The client should connect and prompt us for our password. Once we enter
the password for the user who ran the client, the server should authenticate us
and a PKI key should be traded. In the client’s terminal, we should now be able
to see the private key with
$ ls ~/.localhost.priv
Chapter 13
334
3227c13.qxd 7/9/04 11:15 AM Page 334
Likewise, we should be able to see the public key in our current directory
(where the server was run from) as [username].127.0.0.1.pub, where [username] is
the name of the user who ran the client. If the same user runs the client again,
the server should come back with success and we will not be prompted for our
password, as authentication was done through the PKI verification process.
Analysis
With all the code in place, it’s time to analyze our own code and look for weak-
nesses, things that we may want to change in the future, and so on. First we’ll
examine the result of running a tool such as Flawfinder on the source. Then we’ll
look at some things we can do with our code in the future to enhance its value.
Flawfinder Audit
We run the Flawfinder tool from the top-level directory with
$ flawfinder .
Flawfinder will then run recursively on that directory and examine all our
source files automatically. The result of the run is something like the following:
Flawfinder version 1.24, (C) 2001-2003 David A. Wheeler.
Number of dangerous functions in C/C++ ruleset: 128
Examining ./client/auth_client.c
Examining ./client/auth_client.h
Examining ./common/common.h
Examining ./common/common.c
Examining ./server/auth_server.h
Examining ./server/auth_server.c
./client/auth_client.c:29: [4] (buffer) sprintf:
Does not check for buffer overflows. Use snprintf or vsnprintf.
./client/auth_client.c:154: [2] (misc) fopen:
Check when opening files - can an attacker redirect it (via symlinks),
force the opening of special file type (e.g., device files), move
things around to create a race condition, control its ancestors, or change
its contents?.
./client/auth_client.c:213: [2] (buffer) char:
Statically-sized arrays can be overflowed. Perform bounds checking,
use functions that limit length, or ensure that the size is larger than
the maximum possible length.
Case Study: A Secure Networked Application
335
3227c13.qxd 7/9/04 11:15 AM Page 335
…
…
...
Number of hits = 54
Number of Lines Analyzed = 1373 in 1.13 seconds (2172 lines/second)
Not every hit is necessarily a security vulnerability.
There may be other security vulnerabilities; review your code!
As the tag line says, not all the hits the tool finds are necessarily security holes,
but it would be wise for us to check each to ensure proper usage and function.
For instance, the first hit indicates that we used the sprintf() function rather
than its safer alternative, snprintf(). If we look at the code itself, we see this:
host_port = w_malloc(strlen(host) + strlen(port) + 2);
sprintf(host_port,"%s:%s",host,port);
As a result of allocating space according to the length of the strings we later
use as arguments to sprintf(), we are not at risk here. However, if we want to be
extra safe, we could change the sprintf() call to snprintf() as follows:
snprintf(host_port,strlen(host) + strlen(port) + 1,"%s:%s",host,port);
This would appropriately avoid bounds overflow. Examination of the other
hits reveals that they are also of the same quality. Valid warnings indicate where
we may be unsafe, but examination reveals we have used things in a sane
manner.
Future Improvements and Enhancements
There are places in particular situations where our example may fall short.
Anytime you complete a project, you should review where and how it may be
extended or enhanced to be more flexible, to be more appropriate, or to other-
wise extend its own value.
Architecture Independence
Much of our example code relies on some assumptions about architecture. The
functions ssl_read_uint() and ssl_write_uint() will not work if they are run
where sizeof(unsigned integer) is different on each machine. It would be more
Chapter 13
336
3227c13.qxd 7/9/04 11:15 AM Page 336
flexible to send the smallest number of bytes possible to provide the necessary
value and cast it up to the proper data type depending on architecture.
Likewise, the ssl_read_byte() and ssl_write_byte() functions make some
assumptions about the basic data type that has a sizeof() == 1. On systems
where the basic type char is more than a single byte, our server will not work cor-
rectly. Instead, the byte_t data type we defined in common.h should be changed to
reflect a native data type that is a single byte in size. In commercial or large code
bases, this is often done via scripts at compile time or through runtime examina-
tion of data types.
Process Model
While our 1:1 process/connection model is adequate for basic to moderate
usage, it will not scale well. As the number of connections grows, so will the
number of active processes using memory and system resources. A switch to a
preforked setup would alleviate this in part by allowing for some control over the
total number of processes in action at a time.
Additionally, our main process does not daemonize with a call to daemon().
It would be advisable to have our main process daemonize and change root
to a protected directory. This way, we could protect potential path transversal
attacks. As an offshoot of doing this, we could also look at redirecting our output
on the server side from standard out to a logging utility such as syslog(). See the
discussion of this in Chapter 7.
Avoiding Potential DDoS Attacks
The one area of security in which our example is lacking is protection from the
potential of a DoS-style attack. All of our read functions, such as ssl_read_string(),
are blocking, meaning that if a client was to connect and simply not send any-
thing, a process would be started and stay around in a busy loop. If this happened
enough within a small amount of time, it could exhaust system resources.
It is prudent to look at changing the design of our communication wrappers
to include a timeout in some manner, although doing so with nonblocking SSL is
probably the easiest. Information on using the SSL_read() and SSL_write() func-
tions in a nonblocking manner is available in their respective man pages.
Additionally, when we perform a code review (a special thanks here to our
book’s excellent technical reviewer), other flaws may become apparent. For
instance, in the function key_net_read_pub(), we first receive the size of the key
from the network, and then allocate a buffer of that size. A malicious client could
Case Study: A Secure Networked Application
337
3227c13.qxd 7/9/04 11:15 AM Page 337

send us any value for that size and effectively cause us to allocate more memory
than is reasonable or possible, causing our code to enter into undefined territory
and thereby create some serious security concerns. It would be advisable to
revise the code to include a sane limit for such allocation cases, either as a
#define in the code, or as a configuration or compilation option.
Additional Security Concerns
As we mentioned in the last chapter, using a known sequence of data to verify a
PKI key signature is not the safest of methods. Because our server and client
examples operate over an already encrypted link, the risk of doing this is mini-
mized. However, to increase the security and applicability of our examples, it is
highly recommended that rather than using known data, the server would gener-
ate a random set of data that the client would then sign with the private key and
send back. In this way, a man-in-the-middle attack or replay attack is less effec-
tive (if at all) in penetrating our security and masquerading as a particular user.
TIP A replay attack involves an attacker recording the data sent
to the server by the client and attempting to connect to the server
and resend the same data in the hopes that the server will respond
identically. When this attack is successful, the client can then
impersonate a user whose session the attacker has recorded and
potentially negate all of our security precautions.
General Enhancement
The other place our server and client could be enhanced is in their abilities and
protocol. It might be useful to add a method and protocol by which the client
could have the server remove a public key or vice versa. We could also extend the
PKI system to store both the private and public keys locally for the client, and
reuse that key for access to other systems. Additionally, we could store the pri-
vate keys in an encrypted manner by asking the user for a password each time
(while still upholding our desire to not pass a password over the wire), which
would allow the user to access the server without having to implicitly trust the
root account on the client machine. Such enhancements greatly rely on the exact
use of the system and how best to make the system interact with the user.
Chapter 13
338
3227c13.qxd 7/9/04 11:15 AM Page 338
Summary
Our real-world example pulls together many of the ideas and topics we discussed
in previous chapters. In this chapter, you saw how to put safe and secure pro-
gramming practices into play, how to secure a communications channel, and
how to authenticate users. We looked at the decisions that were required to
design a program of real-world proportions, and we developed a protocol design
of our own to solve the needs our program addresses. Combining all the tech-
niques from this section and those from earlier in the text will result in extremely
reliable, secure server and client implementations for whatever your needs
may be.
Case Study: A Secure Networked Application
339
3227c13.qxd 7/9/04 11:15 AM Page 339
3227c13.qxd 7/9/04 11:15 AM Page 340
APPENDIX
IPv6
INCHAPTER 1, WE DISCUSSED the Internet Protocol (IP) and IP addressing. Each
IP address is 32 bits long, with a network portion and a host portion. The 32-bit
version of IP addressing traces back to RFC 760, circa 1980, and is known as
Internet Protocol version 4, or IPv4.
When originally proposed, 32 bits seemed like plenty. There was no con-
sensus that a 32-bit address space wouldn’t be enough to handle the number of
devices using a particular network. However, with the Internet explosion in the
early 1990s, and along with it PDAs, cell phones, homes with several computers,
laptops, businesses with a computer for every employee, and more servers than
anyone cares to count, it soon became obvious to various groups that a 32-bit
address space might not be enough. Contributing to the address shortage was
the early practice of allocating huge address spaces to corporations and govern-
ment entities, whether they needed that many addresses or not. Over time,
many address spaces have been wasted. For example, a large company might
have been assigned a Class A address space such as 10.0.0.0. A Class A address
space has 16,777,214 hosts. Unless that organization had over 16 million network
nodes, most of the address space would be wasted, since traffic for the entire
space would be routed to the organization, making it impossible for a node out-
side the organization to use an address in that space.
A solution was needed to allow for the explosive growth of the Internet and
the future scarcity of IP addresses. To increase the size of the address space, a
new addressing scheme was proposed: Internet Protocol version 6, or IPv6. The
IPv6 space is 128 bits, compared to 32 bits for IPv4. Described in RFC 2460, IPv6
offers several benefits over IPv4:
•Expanded address space: As just mentioned, IPv6 offers 128 bits instead of
32 bits.
•Simplified header format: IPv4-specific fields have been deleted or made
optional.
•Support for extensions and options: Header changes allow for more effi-
cient packet forwarding and more flexible limits on header field length.
341
3227A.qxd 7/9/04 11:03 AM Page 341
•Flow labeling: Packets can be labeled as requiring special handling as
requested by the sender.
•Privacy and authentication features: Data integrity, authentication, and
other security capabilities are built in.
Like IPv4, IPv6 is a layer 3 protocol. For a refresher on layer 3, see the
“Protocol Layer Models” section of Chapter 1 and Figure 1-8.
A full discussion about the IPv6 address space, the various address types
(some of which are unused and exist only for research and experimentation pur-
poses), IPv6 routing, and IPv6 subnetting is beyond the scope of this appendix.
In this appendix, we present an overview of IPv6 addressing, how to determine
if your Linux system is ready for IPv6 communications, how to use the IPv6 ver-
sions of the functions presented in Chapter 2, and we briefly cover some issues
that you need to consider when porting an IPv4 application to IPv6.
IPv6 Addressing
IPv6 addresses are 128 bits long, or four times as large as the IPv4 address
space. At 32 bits, the IPv4 address space is 2^32, or 4,294,967,296, possible
addresses (a little over 4 billion). In contrast, the IPv6 address space is 2^128,
or 340,282,366,920,938,463,463,374,607,431,768,211,456 (3.4 ×10^38) possible
addresses. To put that into perspective, the IPv6 address space provides for
approximately 6.5 ×10^23 addresses for every square meter of the Earth’s surface.
It’s pretty difficult for humans to manage 3.4 ×10^38 addresses, and each
address would be a number with up to 39 digits, like this one:
340282366920938463463374607431768211455
Obviously, a different method is needed. If we take the number and repre-
sent it in hexadecimal instead, we can represent each number with 4 bits,
knocking our address down to 32 characters:
0xffffffffffffffffffffffffffffffff
This still isn’t very convenient. The designers of IPv6 chose a format that
uses a colon (:) as a separator between each 16-bit block and removes the stan-
dard hexadecimal flag, 0x. That leaves eight 16-bit blocks:
ffff:ffff:ffff:ffff:ffff:ffff:ffff:ffff
A usable address, then, might look like this:
2ffe:ffff:0100:f232:0210:a4ff:fcd3:8188
Chapter 1
342
3227A.qxd 7/9/04 11:03 AM Page 342

That’s still a bit unwieldy, so let’s remove the leading zeros in each block:
2ffe:ffff:100:f232:210:a4ff:fcd3:8188
And still further, we can replace blocks containing only zeros with ::. For
example, an address of 2ffe:dede:0100:f101:0:0:0:1 can be written like this:
2ffe:dede:100:f101::1. In IPv4, the localhost (or loopback) address is 127.0.0.1.
In IPv6, the same address would be 0000:0000:0000:0000:0000:0000:0000:0001 or
simply ::1. Also like IPv4, there are certain special addresses, such as the “any”
address. In IPv4 format, this address would be 0.0.0.0. In IPv6 format, it would
be 0000:0000:0000:0000:0000:0000:0000:0000 or simply ::.
There’s even a way to create an IPv6 address out of a given IPv4 address.
These addresses are known as 6to4 addresses. Let’s look at an example, using a
reserved Class C address, with a subnet of /24: 192.168.10.1/24. We want to
convert this IPv4 address into a compatible IPv6 address using the 6to4 method
defined in RFC 3056.
NOTE Converting an IPv4 address into an IPv6 address is not the
same as assigning an IPv6 address. Converting an address from one
format to another is typically only useful in a tunneling situation,
where you don’t have an IPv6 network, but you have IPv6 applica-
tions at each endpoint. For example, you could connect two IPv6
networks using a pre-existing IPv4 network without having to con-
vert the IPv4 network to IPv6. For more information on this,
consult RFC 3056.
First, all such addresses begin with 2002. The next 32 bits are the IPv4
address, in hexadecimal format. So far, our example IPv4 address in IPv6 format
looks like this:
2002:c0a8:0a01
The c0a8 is equal to the 192.168 portion of our IPv4 address, and 0a01 is 10.1.
The next 16 bits are for our subnet identifier, and the remaining 64 bits denote
the interface ID. We stated earlier that our subnet was a /24, or a subnet mask
of 255.255.255.0. By default, we have a single IPv6 interface, so our final IPv6-
formatted IPv4 address looks like this:
2002:c0a8:0a01:24:0000:0000:0000:0001
which can also be written as
2002:c0a8:0a01:24::1
IPv6
343
3227A.qxd 7/9/04 11:03 AM Page 343
Remember, the 2002 portion of the address flags a particular IPv6 address
type, denoting an embedded IPv4 address, also known as a 6to4 address.
IPv6 and Linux
Before you can use IPv6 on your Linux system, you must determine if your sys-
tem is IPv6-capable and, if it is capable, if it is ready for IPv6 communications.
Modern Linux kernels (2.4.xand up) include IPv6 support, but your system may
not have it enabled. If possible, avoid 2.2.xkernels, as their IPv6 implementa-
tions are no longer current. The kernel support for IPv6 is a module, which can
be loaded on demand or loaded on startup automatically. To determine if your
system is ready for IPv6, check for the existence of if_inet6 in /proc/net:
[user@host projects]$ test –f /proc/net/if_inet6 && echo "Ready for IPv6"
If you don’t see the “ready” message, you’ll need to load the IPv6 kernel
module. Use the modprobe command to do this:
[user@host projects]$ modprobe ipv6
Assuming you didn’t receive an error message, check your system again:
[user@host projects]$ test –f /proc/net/if_inet6 && echo "Ready for IPv6"
Ready for IPv6
[user@host projects]$
You can also check your IPv6 status using /sbin/lsmod, like so:
[user@host projects]$ /sbin/lsmod |grep ipv6
which, if your system is ready to go, should give you output that looks like this:
ipv6 160768 -1
Remember that if you just used modprobe to load the IPv6 module, the next
time you reboot your system, the module won’t be loaded. This will cause prob-
lems for any IPv6 applications you have set to run as services, and it will prevent
you from working with IPv6 until you load the module again. You can tell your
system to load the IPv6 module automatically, on demand, by modifying
/etc/modules.conf and adding the following line to it:
alias net-pf-10 ipv6
Chapter 1
344
3227A.qxd 7/9/04 11:03 AM Page 344
With this addition to the modules.conf file, your system will load the IPv6
module the first time an application requires it and keep it loaded until a reboot.
After a reboot, it will stay unloaded until needed again.
Now that we’ve loaded the IPv6 module, let’s check back with our earlier
discussion on IPv6 addressing. We said that the IPv6 equivalent of the IPv4 local-
host address of 127.0.0.1 was 0000:0000:0000:0000:0000:0000:0000:0001 or simply
::1. Since this is true, we should be able to use a utility like /bin/ping to ping our
own system using the IPv6 version. Let’s try it:
[user@host projects]$ ping ::1
ping: unknown host ::1
[user@host projects]$
Unless something deeper is wrong, it looks like ping doesn’t support our
IPv6 addressing scheme. That’s because, like our own applications, the typical
network tools included with a distribution only support IPv4, as is the case with
ping. To work with IPv6, we need to use the IPv6 versions of the tools. Typically,
the IPv6-enabled versions of network tools (and functions) simply append the
number 6 to their name. For example, while we would use ping for IPv4, we
would use ping6 for IPv6. With that in mind, let’s try our experiment again, this
time using ping6:
[user@host projects]$ ping6 –c 5 ::1
PING ::1(::1) 56 data bytes
64 bytes from ::1: icmp_seq=1 ttl=64 time=0.034 ms
64 bytes from ::1: icmp_seq=2 ttl=64 time=0.031 ms
64 bytes from ::1: icmp_seq=3 ttl=64 time=0.029 ms
64 bytes from ::1: icmp_seq=4 ttl=64 time=0.026 ms
64 bytes from ::1: icmp_seq=5 ttl=64 time=0.026 ms
--- ::1 ping statistics ---
5 packets transmitted, 5 received, 0% packet loss, time 3996ms
rtt min/avg/max/mdev = 0.026/0.029/0.034/0.004 ms
[user@host projects]$
That looks much better! This output shows that our system is ready to send
and receive IPv6 traffic on its local interface, known as ::1.
Porting to IPv6
In Chapter 2, we presented the socket and network support functions used
when developing network-enabled applications. As you’ve already seen in the
preceding ping experiment, incorporating support for IPv6 into applications
IPv6
345
3227A.qxd 7/9/04 11:03 AM Page 345
isn’t transparent. If you don’t explicitly implement IPv6 in your applications,
they will only support IPv4. As the use of IPv6 continues to grow, it will proba-
bly end up the default at some point in the future, but for now the default is
IPv4. If you want IPv6, you have to take special steps when developing your
applications.
The main issues you need to consider when using IPv6 are as follows:
• Supporting the larger IPv6 address space in your socket address structures
• Handling name-to-address and address-to-name conversions in a manner
that works for both IPv4 and IPv6
• Supporting the larger IPv6 address in user interface properties such as text
boxes
You don’t need to be concerned with changing the flow of your applications.
Whether you use IPv4 or IPv6, the logical flow of socket applications, as shown
in Figure 2-1 in Chapter 2, is the same. Moreover, you don’t need to use different
function calls for the foundation functions like socket(), bind(), accept(), and
listen(). These functions support both IPv4 and IPv6, using the socket address
structures to determine which address space is being used. For example, refer-
ring back to the “Socket Constants” section of Chapter 2, you see the following,
from /usr/include/bits/socket.h:
#define PF_INET6 10 /* IP version 6. */
#define AF_INET6 PF_INET6
As you can see, we can easily instruct our socket() function to use IPv6 by
changing the address family, like this:
/* create a streaming IPv4 socket */
V4Socket = socket(PF_INET, SOCK_STREAM, IPPROTO_TCP);
/* create a streaming IPv6 socket */
V6Socket = socket(PF_INET6, SOCK_STREAM, IPPROTO_TCP);
Once we start using the PF_INET6 address family, the only thing left to do is
handle the larger IPv6 address. Our original IPv4 addresses were handled by the
sockaddr_in structure, and as you might guess by now, IPv6 addresses are han-
dled by a structure called sockaddr_in6, which looks like this:
struct sockaddr_in6 {
sa_family_t sin6_family; /* AF_INET6 */
Chapter 1
346
3227A.qxd 7/9/04 11:03 AM Page 346
in_port_t sin6_port; /* Transport layer port # */
uint32_t sin6_flowinfo; /* IPv6 flow information */
struct in6_addr sin6_addr; /* IPv6 address */
uint32_t sin6_scope_id; /* IPv6 scope-id */
};
Once we’ve switched to the PF_INET6 address family and the new
sockaddr_in6 structure, we’re just about finished porting to IPv6. A few minor
issues remain, such as handling the differences when using the gethostbyname()
and gethostbyaddr() functions with IPv6, which we will discuss later as we go
through our examples.
IPv6 Server
Let’s take a look at the simple TCP server that we discussed in Chapter 2. It was
originally set up to use IPv4; here, we port it to IPv6. We start out with our standard
declarations and setup as shown originally, but this time we use sockaddr_in6:
#include <stdio.h>
#include <sys/types.h>
#include <sys/socket.h>
#include <netdb.h>
const char APRESSMESSAGE[] = "APRESS - For Professionals, By Professionals!\n";
int main(int argc, char *argv[]) {
int simpleSocket = 0;
int simplePort = 0;
int returnStatus = 0;
struct sockaddr_in6 simpleServer;
Next, we do our check for the right number of arguments, and if everything
is OK, we go ahead and get a socket descriptor. Note that we make another
change for IPv6, this time using the PF_INET6 address family in our socket() call.
if (2 != argc) {
fprintf(stderr, "Usage: %s <port>\n", argv[0]);
exit(1);
}
IPv6
347
3227A.qxd 7/9/04 11:03 AM Page 347
simpleSocket = socket(PF_INET6, SOCK_STREAM, IPPROTO_TCP);
if (simpleSocket == -1) {
fprintf(stderr, "Could not create a socket!\n");
exit(1);
}
else {
fprintf(stderr, "Socket created!\n");
}
We continue with our server by retrieving the port number to use for receiv-
ing client connections and setting up our new IPv6 address structure.
/* retrieve the port number for listening */
simplePort = atoi(argv[1]);
/* set up the address structure */
/* use INADDR_ANY to bind to all local addresses */
bzero(&simpleServer, sizeof(simpleServer));
simpleServer.sin_family = PF_INET6;
simpleServer.sin_port = htons(simplePort);
Unlike our IPv4 server, we have to use a special function to convert the
string representation of our address to the binary representation that the
sockaddr_in6 structure will use. Remember that localhost in IPv6 format is ::1.
inet_pton(PF_INET6, "::1", &(simpleServer.sin6_addr));
Once our address and port are set up, we bind to the socket and continue
into our primary processing loop.
/* bind to the address and port with our socket */
returnStatus = bind(simpleSocket,
(struct sockaddr *)&simpleServer,
sizeof(simpleServer));
if (returnStatus == 0) {
fprintf(stderr, "Bind completed!\n");
}
else {
fprintf(stderr, "Could not bind to address!\n");
Chapter 1
348
3227A.qxd 7/9/04 11:03 AM Page 348
close(simpleSocket);
exit(1);
}
/* let's listen on the socket for connections */
returnStatus = listen(simpleSocket, 5);
if (returnStatus == -1) {
fprintf(stderr, "Cannot listen on socket!\n");
close(simpleSocket);
exit(1);
}
while (1)
{
struct sockaddr_in6 clientName = { 0 };
int simpleChildSocket = 0;
int clientNameLength = sizeof(clientName);
/* wait here */
simpleChildSocket = accept(simpleSocket,
(struct sockaddr *)&clientName,
&clientNameLength);
if (simpleChildSocket == -1) {
fprintf(stderr, "Cannot accept connections!\n");
close(simpleSocket);
exit(1);
}
/* handle the new connection request */
/* write out our message to the client */
write(simpleChildSocket, APRESSMESSAGE, strlen(APRESSMESSAGE));
close(simpleChildSocket);
}
close(simpleSocket);
return 0;
}
IPv6
349
3227A.qxd 7/9/04 11:03 AM Page 349
As you can see, we’ve made very few changes. We change to using the
PF_INET6 address family in our call to socket(), and we change our address struc-
tures to use the IPv6 versions instead of the IPv4 versions. Other than that, the
code is the same as our IPv4 server from Chapter 2.
To run our IPv6 server, compile it, and then run it using a port number as
the only argument. You should see output similar to this:
[user@host projects]$ cc -o ip6Server ip6Server.c
[user@host projects]$ ./ip6Server 9999
Socket created.
Bind completed!
To stop the server, use Ctrl+C. Once we port the client from Chapter 2 to
IPv6, we’ll be able to run them together and make our connection.
IPv6 Client
Like our server, our simple TCP client also needs to be ported to IPv6 to match.
We start out with the same setup as the original IPv4 version, changing our
address structure to the IPv6 version.
#include <stdio.h>
#include <sys/types.h>
#include <sys/socket.h>
#include <netdb.h>
int main(int argc, char *argv[]) {
int simpleSocket = 0;
int simplePort = 0;
int returnStatus = 0;
char buffer[256] = "";
struct sockaddr_in6 simpleServer;
if (3 != argc) {
fprintf(stderr, "Usage: %s <server> <port>\n", argv[0]);
exit(1);
}
Chapter 1
350
3227A.qxd 7/9/04 11:03 AM Page 350
For our call to socket(), we use the PF_INET6 address family and then continue
with our setup of the sockaddr_in6 structure.
/* create a streaming socket */
simpleSocket = socket(PF_INET6, SOCK_STREAM, IPPROTO_TCP);
if (simpleSocket == -1) {
fprintf(stderr, "Could not create a socket!\n");
exit(1);
}
else {
fprintf(stderr, "Socket created!\n");
}
/* retrieve the port number for connecting */
simplePort = atoi(argv[2]);
/* set up the address structure */
/* use the IP address argument for the server address */
bzero(&simpleServer, sizeof(simpleServer));
simpleServer.sin_family = PF_INET6;
We use the same conversion function as our server to handle our address.
inet_pton(PF_INET6, argv[1], &(simpleServer.sin6_addr));
simpleServer.sin_port = htons(simplePort);
/* connect to the address and port with our socket */
returnStatus = connect(simpleSocket,
(struct sockaddr *)&simpleServer,
sizeof(simpleServer));
if (returnStatus == 0) {
fprintf(stderr, "Connect successful!\n");
}
else {
fprintf(stderr, "Could not connect to address!\n");
close(simpleSocket);
exit(1);
}
IPv6
351
3227A.qxd 7/9/04 11:03 AM Page 351
/* get the message from the server */
returnStatus = read(simpleSocket, buffer, sizeof(buffer));
if ( returnStatus > 0 ) {
printf("%d: %s", returnStatus, buffer);
} else {
fprintf(stderr, “Return Status = %d \n“, returnStatus);
}
close(simpleSocket);
return 0;
}
Once we do our setup and have our socket, the rest of the client code is the
same as the IPv4 version in Chapter 2.
To run our IPv6 client, compile it, and then run it using the IPv6 version of
the localhost address, as well as the port number you used when starting the
server. You should see output similar to this:
[user@host projects]$ cc -o ip6Client ip6Client.c
[user@host projects]$ ./ip6Client ::1 9999
Socket created!
Connect successful!
46: APRESS - For Professionals, By Professionals!
[user@host projects]$
Porting existing applications to IPv6 is not difficult. Once the address family
is changed and the appropriate address structure is used, the normal rules and
processes for TCP connections apply.
Address Conversion Functions
Several of the functions explained in Chapter 2 included informational and reso-
lution functions such as getservbyname(), getservbyport(), and gethostbyname().
An application can use these functions to get information about the connection
or service in question. This information can be used at runtime to set application
parameters such as which port to use for connections or what IP address resolves
to a particular host name. With IPv6, many of these functions have been consoli-
dated into two new resolution functions: getnameinfo() and getaddrinfo().
Chapter 1
352
3227A.qxd 7/9/04 11:03 AM Page 352
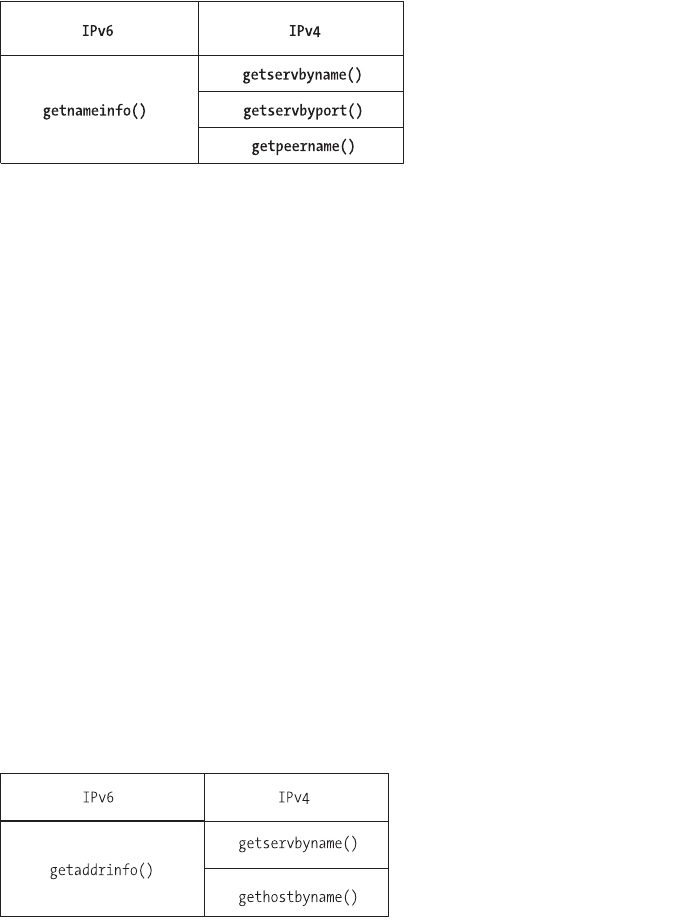
getnameinfo()
This function is used for protocol-independent resolution of addresses to names.
As shown in Figure A-1, it combines the functionality of gethostbyaddr() and
getservbyport().
Figure A-1. The getnameinfo() function
getnameinfo() takes a number of parameters, like a pointer to a sockaddr
structure and pointers to buffers that can hold the values returned by the
function.
int getnameinfo(const struct sockaddr *sa, socklen_t salen,
char *host, size_t hostlen,
char *serv, size_t servlen, int flags);
When called, a host name or service name is not required and can be
replaced by NULL, but one of them must be provided. The flags argument can be
used to modify the values returned by a successful cal to getnameinfo(), such as
returning only the host name portion of a fully-qualified domain name (FQDN).
getaddrinfo()
This function is used for protocol-independent resolution of names to addresses.
It is the reverse of getnameinfo(). As shown in Figure A-2, it combines the func-
tionality of several functions such as getservbyname() and gethostbyname().
Figure A-2. The getaddrinfo() function
IPv6
353
3227A.qxd 7/9/04 11:03 AM Page 353
getaddrinfo() is thread-safe and takes a number of parameters, such as a
pointer to a sockaddr structure. If the call to getaddrinfo() completes success-
fully, it creates one or more socket address structures that can be used by
connect() and bind(). Since getaddrinfo() is protocol independent, it can be
used for both IPv4 and IPv6 communications.
int getaddrinfo(const char *node, const char *service,
const struct addrinfo *hints,
struct addrinfo **res);
getaddrinfo() has two companion functions, freeaddrinfo() and
gai_strerro().
void freeaddrinfo(struct addrinfo *res);
const char *gai_strerror(int errcode);
The freeaddrinfo() function is used to free up the addrinfo structure when
your application is done with it. For reporting errors, getaddrinfo() uses its own
error function called gai_strerror() instead of the typical perror().
Future Enhancements
Back in Chapter 2, we discussed the sockaddr_in structure. This structure sup-
ports IPv4, but not IPv6. As we noted in the previous two sections, the IPv6
version of the structure is known as sockaddr_in6 and looks like this:
struct sockaddr_in6 {
sa_family_t sin6_family; /* AF_INET6 */
in_port_t sin6_port; /* Transport layer port # */
uint32_t sin6_flowinfo; /* IPv6 flow information */
struct in6_addr sin6_addr; /* IPv6 address */
uint32_t sin6_scope_id; /* IPv6 scope-id */
};
At first glance, the easiest thing to do to port an application to IPv6 would be
to change the code to use sockaddr_in6 instead of sockaddr_in, as we did with our
IPv4 client and server earlier in this section. But what happens, then, if you want
to use IPv4 as well as IPv6? By switching the structures, you end up splitting your
application into an IPv4 version and an IPv6 version. This is workable, but it isn’t
the optimal solution. Fortunately, there’s a better way. Instead of trying to deter-
mine which structure to use when, and instead of maintaining two versions of
Chapter 1
354
3227A.qxd 7/9/04 11:03 AM Page 354
the same application, you can use a special structure specifically designed for
portability, the sockaddr_storage structure:
/* Structure large enough to hold any socket address (with the historical
exception of AF_UNIX). We reserve 128 bytes. */
#if ULONG_MAX > 0xffffffff
# define __ss_aligntype __uint64_t
#else
# define __ss_aligntype __uint32_t
#endif
#define _SS_SIZE 128
#define _SS_PADSIZE (_SS_SIZE - (2 * sizeof (__ss_aligntype)))
struct sockaddr_storage
{
__SOCKADDR_COMMON (ss_); /* Address family, etc. */
__ss_aligntype __ss_align; /* Force desired alignment. */
char __ss_padding[_SS_PADSIZE];
};
The sockaddr_storage structure uses 128 bytes and is designed to be large
enough to hold any socket address. By using this new structure, you can hide the
particulars of whether the address space is IPv4 or IPv6, while still allowing the
application to use either. By using sockaddr_storage along with the IPv4-compatible
functions getnameinfo() and getaddrinfo(), you can create applications that are
ready for either IPv4 or IPv6.
Let’s tweak our IPv6 client so that it can handle either an IPv4 or an IPv6
connection. The changes are fairly simple. We start out with our standard
declarations.
#include <stdio.h>
#include <sys/types.h>
#include <sys/socket.h>
#include <netdb.h>
int main(int argc, char *argv[]) {
int simpleSocket = 0;
int simplePort = 0;
int returnStatus = 0;
char buffer[256] = "";
IPv6
355
3227A.qxd 7/9/04 11:03 AM Page 355
The next thing we need to do is declare our addrinfo structure, because this
version of our client must handle either an IPv4 address or IPv6 address. We set
up our structure like this:
struct addrinfo hints, *res;
bzero(&hints, sizeof(struct addrinfo));
hints.ai_family = PF_UNSPEC;
hints.ai_socktype = SOCK_STREAM;
We use two addrinfo structures. Of special note here is the use of PF_UNSPEC
to set ai_family in the first structure. This is a special constant that means the
address family is unspecified. The first structure, called hints, is used to set our
protocol preferences. The second addrinfo structure, called res, is used to con-
tain a linked list of all the possible addresses on this host. This is used because a
given host can have more than one IP address, whether the IP version is 4 or 6.
For our purposes, we’re using only localhost.
Next, we do a standard arguments check, and then we populate our addrinfo
structure using the getaddrinfo() function we’ve already discussed. For the argu-
ments to getaddrinfo(), we use the server’s IP address and the server’s port
number from our command line, and we pass it pointers to our addrinfo
structure.
if (3 != argc) {
fprintf(stderr, "Usage: %s <server> <port>\n", argv[0]);
exit(1);
}
/* setup the address structure */
returnStatus = getaddrinfo(argv[1], argv[2], &hints, &res);
if(returnStatus) {
fprintf(stderr, "getaddrinfo: %s\n", gai_strerror(returnStatus));
exit(1);
}
As noted previously, we need to remember to use getaddrinfo()’s special
error function, gai_strerror(), instead of the typical perror(). Our next step is to
create our socket. This is a change from our earlier client code, because instead
Chapter 1
356
3227A.qxd 7/9/04 11:03 AM Page 356
of using our command-line arguments directly, we use the values from our
addrinfo structure that were filled in by getaddrinfo().
/* create the socket */
simpleSocket = socket(res->ai_family, res->ai_socktype, res->ai_protocol);
if (simpleSocket == -1) {
fprintf(stderr, "Could not create a socket!\n");
exit(1);
}
else {
fprintf(stderr, "Socket created!\n");
}
Next, we take our socket and make our connection to the server. As before,
we use the values in our addrinfo structure.
/* connect to the address and port with our socket */
returnStatus = connect(simpleSocket, res->ai_addr, res->ai_addrlen);
if (returnStatus == 0) {
fprintf(stderr, "Connect successful!\n");
}
else {
fprintf(stderr, "Could not connect to address!\n");
close(simpleSocket);
exit(1);
}
Then we read the message from the server, just as we did in our earlier client
examples.
/* get the message from the server */
returnStatus = read(simpleSocket, buffer, sizeof(buffer));
if ( returnStatus > 0 ) {
printf("%d: %s", returnStatus, buffer);
} else {
fprintf(stderr, "Return Status = %d \n", returnStatus);
}
IPv6
357
3227A.qxd 7/9/04 11:03 AM Page 357
Finally, we close our socket and clean up, remembering to use getad-
drinfo()’s companion function, freeaddrinfo(), to clean up our structure.
close(simpleSocket);
freeaddrinfo(res);
return 0;
}
That is all that’s needed to handle either IPv4 or IPv6 addresses. You can
test your multiaddress client using the IPv4 server from Chapter 2, and the IPv6
server from this appendix. For example, take the server example from Chapter 2
and start it on port 8888. Take the IPv6 server from this appendix and start it on
port 9999. Using the new multiaddress client, we can run a test like this:
[user@host projects]$ cc -o multiClient multiClient.c
[user@host projects]$./multiClient 127.0.0.1 8888
Socket created!
Connect successful!
46: APRESS - For Professionals, By Professionals!
[user@host projects]$ ./multiClient ::1 9999
Socket created!
Connect successful!
46: APRESS - For Professionals, By Professionals!
[user@host projects]$
In the tests just shown, we make our first connection using the IPv4-style
127.0.0.1 (localhost), while our second connection is done using the IPv6-style
::1. As you can see, using the same version of our client and our addrinfo struc-
ture, we’re able to connect to either an IPv4 server or an IPv6 server.
Summary
IPv6 is the next-stage IP addressing scheme. Using four times as many bits (128)
as the current standard, IPv6 offers nearly limitless growth as well as advanced
features such as improved routing, authentication and privacy features, and the
ability to extend header information to take advantage of future needs. IPv6
addresses are backward compatible with IPv4 addresses.
Chapter 1
358
3227A.qxd 7/9/04 11:03 AM Page 358
Porting an existing IPv4 application to use IPv6 is not difficult, but a devel-
oper should remember some key points when doing the port:
• Each system running the application needs to support IPv6, and the IPv6
support must be enabled.
• The user interfaces for the application must accommodate the larger
address values that are possible with IPv6.
• Using getaddrinfo() and getnameinfo() can provide name and address
conversions for both IPv4 and IPv6 without being specific to either.
• If it’s using IPv4 and IPv6, the application should accommodate both and
use a portable structure for storing address and port information.
IPv6
359
3227A.qxd 7/9/04 11:03 AM Page 359
3227A.qxd 7/9/04 11:03 AM Page 360
Symbols and Numbers
@ (at sign) prefix, 216, 219, 223
: (colon), in IPv6 addresses, 342
6to4 addresses, 343
A
accept() function, 53–54, 76–77, 249
AcctSync project, 279
acknowledgment number, 30–31
active servers, 139–140
active sockets, 42
address conversion functions, 352–354
address family constants, 44–45
addresses, 8–17
broadcast, 10, 14
Ethernet, 8–10
Internet Protocol, 12–17
IPv6, 342–344
loopback, 14–15
MAC, 10
multicast, 10
addrinfo structures, 356–357
Advanced Research Projects Agency
(ARPA), 41
ai_family constant, 356
Apache Project, 128
Apache Web Server, 114, 128
appdata_ptr argument, 329
application programming interface
(API), 44
application protocols, 87, 137–153
binary vs. ASCII, 158
client commands and, 142–146
design considerations for, 138–142,
155–172
established vs. custom, 157–158
example of using, 149–150
registration of, 150–153
server messages and, 146–149
TCP vs. UDP, 155–157
applications
case studies, 185–227, 301–339
chat, 142–150, 185–227
debugging, 173–177, 178–179
PAM-aware, 266–268
secure, 301–339
See also client-server applications
architecture
client-server, 99–135, 158–161
forking server, 110
multiplexing server, 104
multiprocess server, 110
multithreaded server, 120
prethreaded server, 124
process pool, 115
three-tier, 159–161
two-tier, 158–159
architecture independence, 336–337
arguments
backlog, 52, 75
socket function, 46
ASCII protocol
binary protocol vs., 158
message format, 138–139
ASP (Active Server Pages), 89
asymmetric key cryptography, 236–237
asynchronous transfer mode (ATM), 6
at sign (@) prefix, 216, 219, 223
atomic requests, 86
attacks, 281–282
denial of service, 281–282, 337–338
exploitation, 282
information retrieval, 281
man-in-the-middle, 236–237
network mapping, 281
replay, 338
auth_client.c file, 318–327
auth_client.h file, 318
auth_conv() function, 329
authentication, 261–279
custom protocols and, 141
old scenario of, 261–262
361
Index
3227index.qxd 7/9/04 11:46 AM Page 361
PAM library and, 263–268
present-day scenario of, 262–263
public key, 268–278
single sign-on and, 278–279
user name and password in, 261
See also security
authentication servers, 301
authoritative servers, 34
authorization state, 94
authorized_keys file, 234
auth_server.c file, 328–334
auth_server.h file, 327–328
auth_struct structure, 327
B
backlog argument, 52, 75
Berkeley socket interface, 41, 42, 47
See also sockets
Big Endian format, 16, 49, 133
binary protocol
ASCII protocol vs., 158
bootstrap strategy and, 178
command validation in, 181
message format, 139
bind() function, 51–52, 68, 75, 249
binding sockets, 51–52
BIO connection handling, 253–255
clients and, 255
servers and, 253–255
BIO stack, 273
BIO structure, 243, 245–246
BIO_do_accept function, 253–254
BIO_do_connect function, 255
BIO_new_accept function, 253, 254
BIO_new_connect function, 255
BIO_pop function, 254
blocking functions, 53, 68
Blowfish cipher, 271
bootstrap strategy, 178
bounds checking, 282–283
broadband, 6
broadcast addresses, 10, 14
buffer overflows
defensive programming and, 179–181
security problems and, 282
buffered transfer, 27
byte_t data type, 337
C
cabling, twisted pair, 6
callback conversion function, 264, 272
calloc() function, 288, 289
case studies
networked application, 185–227
secure networked application,
301–339
certificate authority (CA), 238–240
certificates, 237–241
creating a certificate authority,
238–240
creating a server certificate, 240–241
CGI (Common Gateway Interface), 89,
92
chat application, 142–150
case study, 185–227
client commands, 142–146
creating the server for, 185–201
GUI client for, 201–226
registering, 150–153
server messages, 146–149
session example, 149–150
chatcli.cpp file, 202, 204–209
chatcli.h file, 202, 203
chatwin.cpp file, 202, 212–225
chatwin.h file, 202, 211–212
chdir("/") command, 163
child function, 100–101
child_process() function, 331, 333
chroot() command, 171–172, 182,
292–293
chroot() jails, 171–172, 182, 226
CIFS protocol, 278
circuit-switched networks, 3–4
classes, IP address, 13
client chat protocol commands,
142–146
See also chat application
client test program, 99–102
client_list map, 195
clients
BIO connection handling, 255
client-server model and, 32–33
converting servers into, 58–60
creating with UDP, 70–73
file descriptor association, 250–253
file transfer, 79–82
Index
362
3227index.qxd 7/9/04 11:46 AM Page 362
handling multiple, 99–135
IPv6 setup on, 350–352
modular, 162
monolithic, 161–162
networked application, 201–226
OpenSSL and, 250–253, 255
secure networked application,
318–327
socket functions, 57–60
storing state on, 90–92
test program for, 99–102
thick vs. thin, 160–161
client-server applications, 155–172
architecture for, 158–161
case studies of, 185–227, 301–339
client-side considerations, 161–162
debugging, 173–177, 178–179
defensive programming of, 179–183
PAM-aware, 266–268
programming order for, 177–178
protocol choices for, 157–158
security for, 231–260
server-side considerations, 162–172
TCP vs. UDP protocols in, 155–157
client-server architecture, 99–135
choosing methods for, 130
client test program, 99–102
combining strategies for, 128–129
data quantity issues and, 130,
132–134
forking and, 108–118
method pros and cons, 131
multiplexing and, 102–108
multithreading and, 118–128
nonblocking sockets and, 130,
132–134
one process per client, 109–113
preforking and, 114–118
three-tier architecture, 159–161
two-tier architecture, 158–159
client-server model, 32–33
client-side considerations, 161–162
modular clients, 162
monolithic clients, 161–162
client_t structure, 186
close() function, 54–57
closelog() function, 167
closing sockets, 54–57
cmd_t structure, 194
code analysis tools, 298
code bits header field, 31
code design and layout, 303–304
encapsulation, 304
file layout, 303
protocol, 303–304
CodeWizard program, 179
coding practices, 282–297
case study related to, 303–335
client process and, 318–327
code design and layout, 303–304
common code library and, 304–318
error handling and, 286–288
memory management and, 288–291
random number generation and,
296–297
safe vs. unsafe functions and,
282–286
server process and, 327–334
shared memory and, 293–296
tools for analyzing, 298
worst-case scenarios and, 292–293
writing code, 304–335
collateral damage, 182
collisions, 10
commands
client chat protocol, 142–146
See also specific commands
common.c file, 303, 304, 307–318
common code library, 304–318
Common Gateway Interface (CGI), 89,
92
common.h file, 303, 304, 305–307
Common Internet File System (CIFS)
protocol, 278
communications
connection-based, 46
connectionless, 46
network, 3–4
compilation process, 259
compiler add-ons, 297–298
confirmation and retransmission, 28
connect() function, 57–58, 206
connectAndJoin() utility function, 205
connection queue, 44
connection-based communications, 46,
85
connectionless communications, 46, 85
const char * parameter, 258
constants, socket, 44–47
context sensitivity, 139
Index
363
3227index.qxd 7/9/04 11:46 AM Page 363
conversion function, 263–266
cookies, 90, 91
core socket functions, 50–57
accept(), 53–54
bind(), 51–52
close(), 54–57
listen(), 52
socket(), 50–51
write(), 54
CRYPTO_dynlock_value() function, 257,
258
cryptography
asymmetric key, 236–237
symmetric key, 235–236
CRYPTO_LOCK flag, 258
CRYPTO_num_locks() mutexes, 256
CRYPTO_set_id_callback() function, 257
CRYPTO_set_locking_callback()
function, 257
custom protocols, 137–153
client commands and, 142–146
design considerations for, 138–142
established protocols vs., 157–158
example of using, 149–150
registration of, 150–153
server messages and, 146–149
cyclic redundancy checksum (CRC), 7
D
daemon programs, 163–165, 185
daemon() system call, 333, 337
daemonize() function, 168, 169, 170
data payload, 7
data signing, 269–278
creating/destroying keys, 269–270
key storage, 270–272
signing data, 275–277
transmitting keys, 273–274
verifying signed data, 277–278
data transfers
data quantity issues and, 130,
132–134
See also file transfers
datagram sockets, 65
DDD interface, 176–177
debug output statements, 178
debugging applications, 173–177,
178–179
debug statements for, 178
Ethereal tool for, 174–176
gdb tool for, 176
netcat tool for, 176
netstat tool for, 173–174
source code analyzers for, 179
decodeCommand() function, 190
defensive programming, 179–183
expecting the unexpected, 181
failing gracefully, 182–183
limiting collateral damage, 182
respecting buffer limits, 179–181
DELE command, 95
delegated addresses, 14
delegation, 34
denial of service (DoS) attacks, 281–282,
337–338
dense wavelength division multiplexing
(DWDM), 6
DER coding, 273, 274, 312
design considerations, 155–172
application protocol, 157–158
client-server architecture, 158–161
client-side considerations, 161–162
server-side considerations, 162–172
TCP vs. UDP protocol, 155–157
/dev/random file, 296
distributed denial of service (DDoS)
attack, 281, 337–338
DNS (Domain Name System), 33–39
DNS lookup, 33, 35–36
host name, 34–35
messages, 93–94
name restrictions, 35
query process, 36–39
record types, 38–39
registrars, 34
top-level domains, 34–35
UDP-based communications and, 66
DoS & DDoS attacks, 281–282, 337–338
dotted quad notation, 13
dynamic allocation, 257–259
E
Electric Fence tool, 180
encapsulation, 19, 304
encryption, password, 261
endservent() function, 152
errno.h file, 83
Index
364
3227index.qxd 7/9/04 11:46 AM Page 364
error handling
coding practices and, 286–288
socket programming and, 83–84
ERR_ functions, 243
ERR_print_errors_fp() function, 248
/etc/passwd file, 261, 262
/etc/services file, 150–151
Ethereal tool, 174–176, 231
Ethernet, 6
addresses, 8–10
frames, 7, 19
EVP interface, 275
EVP_CIPHER types, 271
EVP_MD_CTX structure, 275, 276
EVP_PKEY_new() function, 275, 277
EVP_PKEY_set1_RSA() function, 276
EVP_PKEY structure, 275, 277
EVP_SignInit() function, 276
EVP_VerifyInit() function, 277
EVP_VerifyUpdate() function, 277
exit() system call, 287
exploitation attack, 282
F
failing gracefully, 182–183
FD_CLR macro, 103
FD_ISSET macro, 103
FD_SET macro, 103
FD_ZERO macro, 103
file descriptor, 42
file descriptor association, 248–253
clients and, 250–253
servers and, 248–250
file layout, 303
File Transfer Protocol (FTP), 32, 86
file transfers, 73–82
clients and, 79–82
example of, 82
servers and, 74–79
state and, 86
See also data transfers
fixed-size segments, 132–133
Flawfinder tool, 298, 335–336
FlexeLint program, 179
flow control, 156
for loop, 284, 330
fork() system call, 100, 108–109, 117, 163
forking, 108–118
fork() system call and, 108–109
one process per client, 109–113
preforking method and, 114–118
pros and cons of, 131
forking server, 110–113
basic architecture for, 110
code example for, 110–113
sample output from, 113
form variables, 90, 91–92
fprintf() function, 83
fragment offset field, 19
fragmentation, 19–20
frames, Ethernet, 7, 19
free() function, 289, 290–291, 308
freeaddrinfo() function, 354, 358
-fstack-protector option, 298
FTP (File Transfer Protocol), 32, 86
full duplex, 28
functions
blocking, 53, 68
core socket interface, 50–60
error handling, 83–84
identification, 60–63
primary, 41
safe vs. unsafe, 282–286
socket, 41–42, 49–63
See also specific functions
G
gai_strerro() function, 354, 356
gateways, 10–12, 20
GCC compiler patch, 297–298
gdb tool, 176
genrsa command, 240
getaddrinfo() function, 353–354, 355,
356, 357, 358, 359
get_connection() function, 330
gethostbyaddr() function, 60–61
gethostbyname() function, 60–61, 206
gethostname() function, 61
getnameinfo() function, 353, 355, 359
getpwent() function, 320
getpwid() command, 169
getpwnam() function, 170
getservbyname() function, 61, 152
getservbyport() function, 61, 152
getservent() function, 152
getServerKey() function, 323
getsockopt() function, 62–63
getuid() function, 320
Index
365
3227index.qxd 7/9/04 11:46 AM Page 365
getUsername() function, 324
getUserPassword() function, 323, 325
getUsersHome() function, 321
global variables, 119, 294
GUI client application, 201–226
H
haveServerKey() function, 322, 325
headers
IP datagram, 18
TCP header fields, 30
UDP pseudo-header, 26
hidden form variables, 90, 91–92
hints addrinfo structure, 356
host command, 36, 37–38
host identifier, 13
host name, 34–35
hton1() function, 49
htons() function, 49, 67, 174
HTTP (Hypertext Transfer Protocol), 32
stateless servers and, 86, 89, 90–92
HTTPS (HTTP-over-SSL), 237
I
i2d_RSAPublicKey() function, 274
icotl() system call, 132
identification socket functions, 60–63
gethostbyaddr() and
gethostbyname(), 60–61
gethostname() and sethostname(), 61
getservbyname() and
getservbyport(), 61
getsockopt() and setsockopt(), 62–63
if...else structure, 257
ifconfig command, 9
Immunix, 297
information retrieval attack, 281
initial state, 88
Institute of Electrical and Electronics
Engineers (IEEE), 8
International Organization for
Standardization (ISO), 22
Internet
internetworking and, 5
IP addresses and, 12–17
Internet Assigned Numbers Authority
(IANA), 15
Internet datagram, 17–20
encapsulation, 19
fragmentation, 19–20
header format, 18
Internet protocols
properties of, 87
stateful vs. stateless, 86–87
internets, 17
internetworking, 5
IP (Internet Protocol), 17–25
datagram, 17–20
encapsulation, 19
fragmentation, 19–20
functions performed by, 17
protocol layering and, 20–25
IP addresses, 12–17
description of, 13–15
network byte order and, 16–17
ports and, 15–16
versions of, 16
IPP (Internet Printing Protocol), 157
IPv6 (Internet Protocol version 6),
341–359
address conversion functions,
352–354
addressing overview, 342–344
benefits over IPv4, 341–342
client setup, 350–352
converting IPv4 addresses to, 343
future enhancements, 354–358
Linux and, 344–345
porting to, 345–354
server setup, 347–350
summary of, 358–359
IRC protocol messages, 139
J
JOIN command, 143, 175, 195, 206, 223
join_command() function, 190
JOIN message, 147
JSP (Java Server Pages), 89
Jumbo Frames, 7
K
key_buffer_size() function, 314
key_create_key() function, 314
key_destroy_key() function, 314
Index
366
3227index.qxd 7/9/04 11:46 AM Page 366
key_net_read_pub() function, 337
keys
creating/destroying, 269–270
private, 271–272
public, 270–271
storage of, 270–272
transmitting, 273–274
key_sign_data() function, 314–315
key_verify_signature() function, 315
key_write_priv() function, 321
KICK command, 145, 190, 199, 219
KICK message, 148
L
LANs (local area networks), 4–6
connecting, 5–6
star configuration, 5
last int parameter, 258
LDAP (Lightweight Directory Access
Protocol), 262, 279
Leroy, Xavier, 119
libcrypto library, 242
libspopc library, 161
libssl library, 242
linger structure, 47–48
lint source code analyzer, 179
Linux
IPv6 and, 344–345
Windows and, 278
LIST command, 95
listen() function, 52, 75
Little Endian format, 16, 49, 133
local area networks. See LANs
localhost, 14
logging events, 165–168
daemonize() function and, 168
specifying parameters for, 166–167
login dialog box, 209–211
logindlg.cpp file, 202, 210–211
logindlg.h file, 202, 209–210
loopback address, 14–15
M
MAC addresses, 10
macros
descriptor sets and, 103
error handling and, 288
MAIL alias, 151
main() function, 100, 168, 183, 187
Makefile, 202, 225–226, 303, 334
malloc() function, 276, 288, 289, 308
man command, 39
man-in-the-middle attack, 236–237
MAXBUF constant, 74, 78, 79
memcpy() function, 285–286
memory issues
buffer overflows and, 179–181
multiprocess servers and, 109
multithreaded server applications
and, 119
secure coding practices and, 288–291
shared memory and, 293–296
memory management, 288–291
messages
DNS, 93
formats for, 138–139
log file, 165
private, 215–216, 226
server chat protocol, 146–149
See also specific messages
Meyers, Scott, 179
modprobe command, 344
modular clients, 162
modules.conf file, 345
monolithic clients, 161–162
MSG command, 143–144, 194, 197, 223
MSG message, 147
msg_command() function, 194
MTUs (maximum transfer units), 20
multicast addresses, 10
multiplexing, 102–108
increasing scalability with, 129
pros and cons of, 131
select() function and, 102–103
server architecture for, 104–108
multiplexing server, 104–108
basic architecture for, 104
code example for, 105–107
sample output from, 108
multiprocess servers, 109–113
basic architecture for, 110
multiplexing added to, 129
sample output from, 113
shared memory issues and, 109
multithreaded servers, 119–128
basic architecture for, 120
code example for, 120–123
Index
367
3227index.qxd 7/9/04 11:46 AM Page 367
multiplexing added to, 129
prethreading method and, 124–128
sample output from, 123
shared memory issues and, 119
multithreading, 118–128
multithreaded servers and, 119–123
prethreaded servers and, 124–128
pros and cons of, 131
mutexes
destroying, 258, 295
locking/unlocking, 191–192, 195, 295
pthread method, 294–296
mutual exclusion, 294
N
Nagle’s algorithm, 189
NAT (Network Address Translation), 14
netcat tool, 176, 177
netstat tool, 173–174
network applications. See client-server
applications
network byte order, 16–17, 49
network identifier, 13
Network Information Services (NIS), 262
network mapping attack, 281
network security. See security
networked application case study,
185–227
GUI client code, 201–226
recommendations for improvements,
226–227
server code, 185–201
See also secure networked
application case study
network_get_ip_address() function, 313
networks, 3
addresses on, 8–17
circuit-switched, 3–4
client-server, 32–33
collisions on, 10
connecting, 5–6, 10–12
domain name system on, 33–39
Ethernet, 6–7
gateways for, 10–12
LAN, 4–6
maximum transfer units for, 20
packet-switched, 4
protocol layering for, 20–25
security on, 231–260
NICKNAME parameter, 143, 144, 145,
147, 148
NIS servers, 262
nonblocking sockets, 130, 132–134
code example for, 133–134
fixed-sized segments and, 132–133
steps for creating, 132
nonprivileged users, 182
nonpromiscuous mode, 231
nslookup command, 39
ntoh1() function, 49
ntohs() function, 49
NTP (Network Time Protocol), 66
NULL buffer, 274
O
object-oriented programming (OOP),
304
one process per client, 109–113
one thread per client, 119
OP command, 144–145, 198, 199, 218
OP message, 148
open() function, 77
open source software (OSS) community,
278
Open Systems Interconnection (OSI)
model, 22–23
OpenLDAP servers, 262
openlog() function, 166, 167
OpenSSH project, 233–234
OpenSSH utility, 268
OpenSSL libraries, 234, 242–259
BIO connection handling, 253–255
compiling/running examples, 259
data signing, 269–278
file descriptor association, 248–253
functions, 242–247
header files, 242
initialization, 243
random number generation, 296–297
structures, 243–247
thread-safe programming, 255–259
OpenSSL toolkit, 235, 238, 244
openssl utility, 238, 268
openssl/err.h header file, 242
openssl/evp.h header file, 271, 275
openssl/pem.h header file, 270
openssl/rsa.h header file, 269
openssl/ssl.h header file, 242
Index
368
3227index.qxd 7/9/04 11:46 AM Page 368
OpenSSL_add_all_algorithms()
function, 243
openssl_destroy() function, 310
openssl_init() function, 310
options, socket, 62
OSI (Open Systems Interconnection)
model, 22–23
out-of-band data, 31
out-of-bounds conditions, 282–283
P
packet ordering, 156
packet size, 130
packet sniffing, 231
packet-switched networks, 4
PAM (Pluggable Authentication
Modules), 263–268
compiling and running, 268
conversion function, 263–266
creating PAM-aware applications,
266–268
PAM library and, 263–268
pam_acct_mgmt() function, 267
pam_appl.h file, 327
pam_authenticate() function, 267, 329
pam_authenticate_user() function, 328,
329
PAM_CONV_ERR message, 265, 266
pam_conv structure, 265, 267
pam_end() function, 267
pam_handle_t structure, 267
pam_message array, 264
PAM_PROMPT_ECHO_OFF message,
265
PAM_PROMPT_ECHO_ON message,
265
pam_response array, 264
pam_start() function, 267
PAM_SUCCESS message, 266, 267
PAM_SYSTEM_ERR message, 265
pamtest command, 268
parser-generator tools, 181
pass phrase, 239
passive servers, 139
passive sockets, 42
passwd structure, 169
passwords
authentication via, 261
encryption of, 261
PEM interface, 270
PEM_read_RSAPrivateKey() function,
272
PEM_write_RSAPrivateKey() function,
271
PEM_write_RSA_PUBKEY() function,
270
permissions, 292
perror() function, 83
PF_INET6 address family, 346–347, 350,
351
PF_UNSPEC address info structure, 356
pGina project, 279
ping utility, 345
PKI standard, 235–241
asymmetric key cryptography and,
236–237
certificates and, 237–241
public key and private key pair, 261
symmetric key cryptography and,
235–236
plain text protocol, 141
command validation in, 181
netcat tool and, 177
PMSG command, 144, 194, 216
PMSG message, 147
POP3 (Post Office Protocol), 86, 94
ports
client vs. server., 32–33
commonly used, 15
IP addresses and, 15–16
IPv6 setup and, 345–352
POSIX threads, 119
preamble, 7
preforking, 114–118
prethreading with, 128–129, 131
process pools and, 114–118
pros and cons of, 131
See also forking
preforking server, 114–118
Apache Web Server example of, 114
code example for, 115–117
process pool architecture and, 115
sample output from, 118
prethreaded servers, 124–128
basic architecture for, 124
code example for, 125–127
sample output from, 128
prethreading, 124–128
preforking with, 128–129, 131
Index
369
3227index.qxd 7/9/04 11:46 AM Page 369
pros and cons of, 131
thread pools and, 124–128
privacy issues
custom protocols and, 141–142
private chat messages and, 215–216,
226
private keys, 236, 241, 271–272
privilege dropping, 168–171
PRNG (pseudo-random number
generator), 296, 306
process method, 301–302
process pools, 114–118
basic architecture for, 115
preforking servers and, 114–118
process/connection model, 337
processEvents() function, 222
programming
debugging, 173–177, 178–179
defensive, 179–183
order of, 177–178
socket, 65–84
thread-safe, 255–259
promiscuous mode, 231
protocol family constants, 45
protocol layering, 20–25
description of, 21–22
OSI model of, 22–23
TCP/IP model of, 23–24
protocol overhead, 156
protocol stack, 21
protocol type constants, 44
protocols
application, 87, 137–153
code design and, 303–304
custom, 137–153
explained, 137–138
Internet, 86–87
IP, 17–25
plain text, 141
registration of, 150–153
sessioned, 140–141
TCP, 27–31
transport, 137
UDP, 25–27
pseudo-header, 26
pseudo-random number generator
(PRNG), 296, 306
pthread threading library, 294
pthread_detach system call, 122
pthread_exit() system call, 287
pthread_join system call, 125, 127
pthread_mutex_destroy function, 258,
295
pthread_mutex_init() function, 295
pthread_mutex_lock() function, 295
pthread_mutex_trylock() function, 295
pthread_mutex_unlock() function, 295
pthread_self() function, 256
public key authentication, 268–278
creating and destroying keys,
269–270
key storage, 270–272
signing data, 275–277
transmitting keys, 273–274
verifying signed data, 277–278
public key cryptography, 236–237
Public Key Infrastructure. See PKI
standard
public keys, 236, 270–271
Q
QApplication object, 204
Qt GUI toolkit, 202
QTDIR environment variable, 226
QTimer event, 214, 222
queries, DNS, 36–39
query strings, 92
QUIT command, 95, 146, 221
QUIT message, 149
R
RAND_* interfaces, 296
rand() system call, 297
RAND_load_file() function, 296
RAND_seed() function, 296
random number generation, 296–297
read() function, 58
readCounter setting, 77, 78
readLine() function, 189, 192, 207, 215
record types, DNS, 38–39
recursive #include directive, 305
recv() function, 130
recvfrom() function, 68–69, 72–73
RedHat Linux 5.1, 297
registering protocols, 150–153
/etc/services file and, 150–151
service entry functions and, 151–153
Index
370
3227index.qxd 7/9/04 11:46 AM Page 370
registrars, 34
reliability, TCP vs. UDP, 155
reliable stream delivery, 27
replay attack, 338
report_error() function, 286, 287, 289,
292, 307
report_error_q() function, 307
REQUEST_KEY_AUTH message, 303,
325, 331
REQUEST_PASS_AUTH message, 304,
325, 331
requests, handling multiple, 140
res addrinfo structure, 356
RETR command, 95
ROOM MESSAGE parameter, 143, 147
room operators, 142, 198, 216
root changes, 292–293
root servers, 35
root_key.pem file, 238, 239
root_request.pem file, 238, 239
routers, 11
RSA_check_key() function, 270
RSA_generate_key() function, 269
RSA_size() function, 314
running security examples, 259
runtime overflow protection, 180–181
S
Samba project, 278
/sbin/ifconfig command, 9
scalability, increasing, 129
sched_yield system call, 122
secret key cryptography, 235–236
secure networked application case
study, 301–339
analysis, 335–336
client code, 318–327
code design and layout, 303–304
code writing process, 304–334
common code library, 304–318
decision-making process, 301–302
future
improvements/enhancements,
336–338
running the programs, 334–335
security concerns, 337–338
server code, 327–334
See also networked application case
study
security, 231–299
attacks and, 281–282, 337–338
authentication and, 261–279
buffer overflow and, 282
case study related to, 301–339
code analysis tools and, 298
coding practices and, 282–297
common problems with, 281–299
compiler add-ons and, 297–298
custom protocols and, 141
data signing and, 269–278
error handling and, 286–288
memory management and, 288–291
OpenSSL and, 242–259
overview of considerations on, 232
permissions and, 292
PKI standard and, 235–241
random number generation and,
296–297
root changes and, 292–293
running examples of, 259
safe vs. unsafe functions and,
282–286
shared memory and, 293–296
single sign-on and, 278–279
summary points about, 299
tools used for, 297–298
tunneling and, 232–235
worst-case scenarios and, 292–293
security model, 302
security/pam_appl.h header file, 264
segments
fixed-size, 132–133
shared memory, 294
TCP datagram, 29–31
select() function, 102–103, 132, 193
self-identifying frames, 7
send() function, 130, 132
Send Private button, 215, 217
sendfile() function, 65
sendto() function, 69, 72
sequence number, 28, 30
servent structure, 48
server certificate, 240–241
server chat protocol messages, 146–149
See also chat application
server.pem file, 241, 244
SERVER_AUTH_FAILURE message, 304,
325
Index
371
3227index.qxd 7/9/04 11:46 AM Page 371
SERVER_AUTH_SUCCESS message, 304,
325
server_key.pem file, 241
SERVERPORT constant, 74, 79
servers
authentication, 301
authoritative, 34
BIO connection handling, 253–255
chat protocol messages, 146–149
chroot() jails and, 171–172
client-server model and, 32–33
converting into clients, 58–60
creating with UDP, 66–70
daemonizing, 163–165
file descriptor association, 248–250
file transfer, 74–79
forking, 110–113
handling multiple clients, 99–135
handling multiple requests, 140
IPv6 setup on, 347–350
logging feature of, 165–168
multiplexing, 104–108
networked application, 185–201
OpenSSL and, 248–250, 253–255
passive vs. active, 139–140
preforking, 114–118
privilege dropping on, 168–171
root servers, 35
secure networked application,
327–334
stateful vs. stateless, 85–87
storing state on, 88–90
test program for, 99–102
server-side considerations, 162–172
chroot() command, 171–172
daemonizing servers, 163–165
logging events, 165–168
privilege dropping, 168–171
services file, 151–153
sessioned protocol, 140–141
sessionless protocol, 140, 141
sessions
session IDs and, 89–90
stateful servers and, 88–90
setfsuid() command, 169
setgid() command, 292
sethostname() function, 61
setppuid() command, 169
setservent() function, 152
setsid() system call, 163
setsockopt() function, 62–63
setuid() command, 169, 170, 171, 292
shared memory
multiprocess servers and, 109
multithreaded server applications
and, 119
security issues and, 293–296
shared memory segment, 294
shmget() system call, 109, 294
shutdown() function, 81
SIGCHILD signal, 109
signing data. See data signing
single sign-on, 278–279
sliding window, 28–29
SMTP (Simple Mail Transfer Protocol),
32, 86
sniffing, 231, 232
snprintf() function, 336
SOAP (Simple Object Access Protocol),
157
sockaddr_in6 structure, 346–347, 348,
350, 351, 354
sockaddr_in structure, 47, 206, 346, 354
sockaddr_storage structure, 355
SOCK_DGRAM constant, 46, 67, 69
socket descriptor, 42
socket() function, 50–51, 346, 350, 351
socket interface, 41
socket type constants, 46
sockets, 41–63
active vs. passive, 42
address structures, 47–48
binding to addresses, 51–52, 187
blocking functions, 53, 68
closing, 54–57
constants, 44–47
core functions, 50–60
datagram, 65
error handling, 83–84
explanation of, 41–42
file transfer with, 73–82
identification functions, 60–63
IPv6 setup, 356–358
methods for using, 43–44
network byte order, 49
nonblocking, 130, 132–134
options, 62
primary functions, 41
programming, 65–84
socket descriptor, 42
Index
372
3227index.qxd 7/9/04 11:46 AM Page 372
streaming, 65
UDP and, 65–73
SOCK_STREAM constant, 46, 74
SO_REUSEADDR socket option, 105,
111, 116, 121, 126, 187
source code analyzers, 179
Splint source code analyzer, 179, 298
sprintf() function, 336
srand() system call, 297
SSH (Secure Shell) protocol, 233
ssh-agent tool, 268
SSL certificates, 235
SSL structure, 243, 246–247
SSL/TLS protocols, 234
SSL_accept() function, 246, 249
SSL_BIO_free() function, 254
SSL_client_connect() function, 319, 325
SSL_connect() function, 246, 251
SSL_CTX structure, 243, 244–245
SSL_CTX_check_private_key() function,
245, 248
SSL_CTX_free() function, 250
SSL_CTX_use_certificate_file() function,
244
SSL_CTX_use_PrivateKey_file()
function, 244
SSL_free() function, 247, 250, 254
SSL_get_cipher() function, 247, 250, 251
SSL_get_shutdown() function, 247
SSL_get_version() function, 247, 250,
251
SSL_load_error_strings() function, 243
SSL_METHOD structure, 243–244
SSL_new() function, 246, 254
SSL_read() function, 247, 252, 312, 337
SSL_read_byte() function, 337
SSL_read_string() function, 311, 337
SSL_read_uint() function, 325, 336
SSL_set_bio() function, 254
SSL_set_fd() function, 246, 249, 251
SSL_shutdown() function, 252
SSL_write() function, 247, 250, 312, 337
SSL_write_byte() function, 337
SSL_write_string() function, 311–312
SSL_write_uint() function, 336
stack smashing, 179
StackGuard, 180
stacks, 21
Stack-Smashing Protector, 181
standard out (stdout), 81, 82
Standard Template Library (STL)
namespace, 185
star configuration, 5
STAT command, 95
state
authorization, 94
described, 85
maintaining, 87–95
storing, 88–92
transaction, 95
update, 95
stateful servers, 85–87
file transfers on, 86
flow diagrams of, 88, 89
maintaining state on, 88–90
sessions and, 88–90
walk-through on, 94–95
stateless servers, 85–87
file transfers on, 86
maintaining state on, 90–92
walk-through on, 93–94
static allocation, 256–257
stderr device, 83
stdout (standard out), 81, 82
storing keys, 270–272
strcmp() function, 284–285
strcpy() function, 283, 284
stream orientation, 28
streaming sockets, 65
strncpy() function, 283
Stunnel, 234–235
Sun Yellow Pages (YP), 262
switch() statement, 331
symmetric key cryptography, 235–236
symmetric multiprocessing (SMP), 130
syslog utility, 165–168, 337
T
TCP (Transmission Control Protocol),
27–31
client-server model and, 32
flow control and, 156
full duplexity of, 156
header fields, 30–31
interface features, 27–28
packet ordering and, 156
protocol overhead of, 156
reliable stream delivery, 27, 28, 155
segment format, 29
Index
373
3227index.qxd 7/9/04 11:46 AM Page 373
sliding window, 28–29
socket programming with, 65
TCP/IP stack and, 23–25
UDP compared to, 155–157
virtual circuits, 27, 29
TCP/IP stack, 23–25
tcpdump tool, 174
text-based protocol
binary protocol vs., 158
message format, 138–139
TFTP (Trivial File Transfer Protocol), 66
thick clients, 160–161
thin clients, 161
thread pools, 114, 124
threading method. See multithreading
threads, 118
thread-safe programming, 255–259
dynamic allocation, 257–259
static allocation, 256–257
three-tier architecture, 159–161
timeout parameter, 103
timerFired() function, 218, 219, 221
timeval specification, 103
TLSv1-encrypted standard, 248
TOPIC command, 145–146, 200, 220
TOPIC message, 148
TOPIC NAME parameter, 146
top-level domains (TLDs), 34–35
transaction state, 95
Transmission Control Protocol. See TCP
transmitting keys, 273–274
transport protocols, 137
try...catch blocks, 183
tunneling, 232–235
OpenSSH, 233–234
Stunnel, 234–235
twisted pair cabling, 6
two-tier architecture, 158–159
type indicator, 7
U
UDP (User Datagram Protocol), 25–27
client creation, 70–73
flow control and, 156
format, 25–26
full duplexity of, 156
packet ordering and, 156
popular services using, 27
protocol overhead of, 156
pseudo-header, 26
reliability of, 155
server creation, 66–70
socket programming with, 65–73
TCP compared to, 155–157
tip on using, 25
unacknowledged packets, 28
unexpected information, 181
UNIX operating system, 41
unsigned long number, 256
unstructured stream, 28
update state, 95
urgent header field, 31
URL parameters, 90, 92
use_perror flag, 287
user authentication. See authentication
User Datagram Protocol. See UDP
V
Valgrind tool, 180
variables, global, 119, 294
verifying signed data, 277–278
virtual circuits, 27, 29
virtual private networks (VPNs), 233
virtual rooms, 142
W
wait() system call, 109
waitpid() system call, 109, 111
watch list, 102
web browsers, 91
w_free() function, 309, 311
w_free_all() function, 309
while loop, 68
whois command, 36
Windows
integration of Linux with, 278
pGina login replacement for, 279
w_malloc() function, 309
w_memory_init function, 309
World Wide Web Consortium (W3C),
157
worst-case scenarios, 292–293
changing permissions, 292
Index
374
3227index.qxd 7/9/04 11:46 AM Page 374
changing root, 292–293
wrapper functions
error handling and, 286–288
examples of using, 307–318
memory management and, 288–291,
302, 307, 309
OpenSSL library and, 310, 312–313
write() function, 54
writePrivKey() function, 321
X
x509 standard, 239
Z
zombies
forking and, 109, 111
multithreading and, 122
Index
375
3227index.qxd 7/9/04 11:46 AM Page 375
3227index.qxd 7/9/04 11:46 AM Page 376
3227index.qxd 7/9/04 11:46 AM Page 377

forums.apress.com
FOR PROFESSIONALS BY PROFESSIONALS™
JOIN THE APRESS FORUMS AND BE PART OF OUR COMMUNITY. You’ll find discussions that cover topics
of interest to IT professionals, programmers, and enthusiasts just like you. If you post a query to one of our
forums, you can expect that some of the best minds in the business—especially Apress authors, who all write
with The Expert’s Voice™—will chime in to help you. Why not aim to become one of our most valuable partic-
ipants (MVPs) and win cool stuff? Here’s a sampling of what you’ll find:
DATABASES
Data drives everything.
Share information, exchange ideas, and discuss any database
programming or administration issues.
INTERNET TECHNOLOGIES AND NETWORKING
Try living without plumbing (and eventually IPv6).
Talk about networking topics including protocols, design,
administration, wireless, wired, storage, backup, certifications,
trends, and new technologies.
JAVA
We’ve come a long way from the old Oak tree.
Hang out and discuss Java in whatever flavor you choose:
J2SE, J2EE, J2ME, Jakarta, and so on.
MAC OS X
All about the Zen of OS X.
OS X is both the present and the future for Mac apps. Make
suggestions, offer up ideas, or boast about your new hardware.
OPEN SOURCE
Source code is good; understanding (open) source is better.
Discuss open source technologies and related topics such as
PHP, MySQL, Linux, Perl, Apache, Python, and more.
PROGRAMMING/BUSINESS
Unfortunately, it is.
Talk about the Apress line of books that cover software
methodology, best practices, and how programmers interact with
the “suits.”
WEB DEVELOPMENT/DESIGN
Ugly doesn’t cut it anymore, and CGI is absurd.
Help is in sight for your site. Find design solutions for your
projects and get ideas for building an interactive Web site.
SECURITY
Lots of bad guys out there—the good guys need help.
Discuss computer and network security issues here. Just don’t let
anyone else know the answers!
TECHNOLOGY IN ACTION
Cool things. Fun things.
It’s after hours. It’s time to play. Whether you’re into LEGO®
MINDSTORMS™ or turning an old PC into a DVR, this is where
technology turns into fun.
WINDOWS
No defenestration here.
Ask questions about all aspects of Windows programming, get
help on Microsoft technologies covered in Apress books, or
provide feedback on any Apress Windows book.
HOW TO PARTICIPATE:
Go to the Apress Forums site at http://forums.apress.com/.
Click the New User link.
BOB_Forums7x925 8/18/03 Page 378
