Think2019 5250 TM1 SDK HOL Instructions
User Manual:
Open the PDF directly: View PDF ![]() .
.
Page Count: 49


2
Table of Contents
Disclaimer ............................................................................................................................................... 3
Getting ready .......................................................................................................................................... 5
What to expect ........................................................................................................................................ 6
Introducing TM1’s OData compliant RESTful API .................................................................................. 7
A first peek at TM1’s RESTful API ....................................................................................................... 7
Explore the REST API .......................................................................................................................... 9
Working with TM1’s REST API using OpenAPI (a.k.a. Swagger) tooling .......................................... 11
Building Web Apps that consume TM1’s REST API .............................................................................. 13
Common tasks for every REST client application ............................................................................. 13
Validating assumptions against the metadata of the REST API ................................................... 13
Authenticating with the service .................................................................................................... 14
Making yourself known to the server by providing a hint in the session context ......................... 14
Our first HTML/JavaScript client application: TM1Top “Lite” .......................................................... 15
Consuming data in a HTML/JavaScript client application: TM1MDXSimple .................................... 15
Consuming TM1’s REST API in Excel (VBA) .......................................................................................... 17
Let’s get set up to write some VBA code .......................................................................................... 17
The VBA TM1 REST API ‘library’ ....................................................................................................... 20
Class: TM1User ............................................................................................................................. 21
Class: TM1Thread ......................................................................................................................... 22
Class: TM1Session ........................................................................................................................ 25
Class: TM1API ............................................................................................................................... 27
The Utilities module .......................................................................................................................... 28
Bringing it all together ...................................................................................................................... 30
Now let’s run the code! ..................................................................................................................... 33
Building a model using the REST API ................................................................................................... 34
Setting up a new TM1 server ............................................................................................................ 34
Building the model using the REST API ............................................................................................ 35
Getting ready to do some coding .................................................................................................. 35
Getting familiar with what’s there already ................................................................................... 36
Bringing it all together into the builder app .................................................................................. 38
Having a look at the results .......................................................................................................... 43
Processing Logs using the REST API .................................................................................................... 47
We Value Your Feedback! ..................................................................................................................... 49

3
Disclaimer
IBM’s statements regarding its plans, directions, and intent are subject to change or withdrawal
without notice at IBM’s sole discretion. Information regarding potential future products is intended
to outline our general product direction and it should not be relied on in making a purchasing
decision.
The information mentioned regarding potential future products is not a commitment, promise, or
legal obligation to deliver any material, code or functionality. Information about potential
future products may not be incorporated into any contract.
The development, release, and timing of any future features or functionality described for our
products remains at our sole discretion I/O configuration, the storage configuration, and the
workload processed. Therefore, no assurance can be given that an individual user will achieve
results like those stated here.
Information in these presentations (including information relating to products that have not yet been
announced by IBM) has been reviewed for accuracy as of the date of initial publication and could
include unintentional technical or typographical errors. IBM shall have no responsibility to update
this information. This document is distributed “as is” without any warranty, either express or
implied. In no event, shall IBM be liable for any damage arising from the use of this information,
including but not limited to, loss of data, business interruption, loss of profit or loss of
opportunity. IBM products and services are warranted per the terms and conditions of the
agreements under which they are provided.
IBM products are manufactured from new parts or new and used parts.
In some cases, a product may not be new and may have been previously installed. Regardless, our
warranty terms apply.”
Any statements regarding IBM's future direction, intent or product plans are subject to change
or withdrawal without notice.
Performance data contained herein was generally obtained in controlled,
isolated environments. Customer examples are presented as illustrations of how those
customers have used IBM products and the results they may have achieved. Actual performance,
cost, savings or other results in other operating environments may vary.
References in this document to IBM products, programs, or services does not imply that IBM intends
to make such products, programs or services available in all countries in which IBM operates or does
business.
Workshops, sessions and associated materials may have been prepared by independent session
speakers, and do not necessarily reflect the views of IBM. All materials and discussions are provided
for informational purposes only, and are neither intended to, nor shall constitute legal or other
guidance or advice to any individual participant or their specific situation.

4
It is the customer’s responsibility to insure its own compliance with legal requirements and to obtain
advice of competent legal counsel as to the identification and interpretation of any relevant laws and
regulatory requirements that may affect the customer’s business and any actions the customer may
need to take to comply with such laws. IBM does not provide legal advice or represent or warrant
that its services or products will ensure that the customer follows any law.
Information concerning non-IBM products was obtained from the suppliers of those products, their
published announcements or other publicly available sources. IBM has not tested those products
about this publication and cannot confirm the accuracy of performance, compatibility or any other
claims related to non-IBM products. Questions on the capabilities of non-IBM products should be
addressed to the suppliers of those products. IBM does not warrant the quality of any third-party
products, or the ability of any such third-party products to interoperate with IBM’s products. IBM
expressly disclaims all warranties, expressed or implied, including but not limited to, the
implied warranties of merchantability and fitness for a purpose.
The provision of the information contained herein is not intended to, and does not, grant any right or
license under any IBM patents, copyrights, trademarks or other intellectual property right.
IBM, the IBM logo, ibm.com and [names of other referenced IBM products and services used in the
presentation] are trademarks of International Business Machines Corporation, registered in many
jurisdictions worldwide. Other product and service names might be trademarks of IBM or other
companies. A current list of IBM trademarks is available on the Web at "Copyright and trademark
information" at: www.ibm.com/legal/copytrade.shtml.
© 2019 International Business Machines Corporation. No part of this document may be reproduced
or transmitted in any form without written permission from IBM.
U.S. Government Users Restricted Rights — use, duplication or disclosure restricted by GSA ADP
Schedule Contract with IBM.

5
Getting ready
NOTE: You can skip this page unless instructed otherwise by the lab instructor.
To be able to give you the best experience possible, and to allow us, authors, to be able to make last
minute changes to the setup, samples and instructions for this Hands-On Lab, and because in our
experience there is always something that we want to change last minute😉, we’ve build in a ‘get
out of jail free card’.
As such, and only you are asked to do so by the lab instructor, there are a couple of steps that need
to be executed to get ready your machine ready for this lab.
1 – Grabbing the latest files for the update
The latest versions of the files needed on your Windows VM, and the sources you’ll be working with
in this lab, are made available in a Git repository on github.com.
Open a command box and execute the following command to grab the content of this repository:
git clone https://github.com/hubert-heijkers/think2019-5250
Now let’s go to the folder holding the actual update:
cd think2019-5250\vmupdate
2 – Updating the Virtual Machine
Next, we’ll execute a little batch file that updates a bunch of files and does some set up needed for
the lab later. This update can be executed by typing the following command in the command box:
vmupdate.bat
Your VM is now up to date. You can now find the latest version of this document here:
C:\HOL-TM1SDK\Documents
Having an electronic copy of the instructions, most notably the Word document, might come in
handy later when you’ll be ‘writing’ some code;-).
That’s all, enjoy the lab!

6
What to expect
If the ‘Getting ready’ section didn’t geek you out, you are in the right place!
As the title of the lab already implies the focus will be on APIs, most notably TM1 Server’s REST API,
as part of the broader Planning Analytics Software Development Kit (SDK).
First, you’ll find an introduction to TM1 Server’s, OData compliant, REST API. This is the API that
we’ll end up reusing throughout the remainder of this lab.
The remainder of the main sections, dealing with various topics and usages of this API, you can pick
and choose from and work through in any order you’d prefer. We’ll be touching on:
1) Consuming the REST API directly from within an HTML page
2) Showing you how to consume the REST API from within Pax
3) Writing some ‘real’ code using one of the many programming languages out there
HTML, with JavaScript, is arguably the most know/common place of consuming REST APIs so in this
section we’ll show you how to write a simple, TM1Top equivalent, HTML page that runs directly in a
browser. Just provide it with the URL to your TM1 server and off you go.
As for Planning Analytics for Excel, which, unlike Perspectives, doesn’t have access to the ‘classic’
VBA API for TM1, it instead provides you with the hooks to use TM1’s REST API directly from within
VBA instead. The section on PAx describes how to set it up and introduces a couple of concepts
which make working with the REST API easy and that you could use and apply in your own work. And
obviously this section wouldn’t be complete without us showing you how you can use this yourself.
While JavaScript and VBA are fun, there are many other applications, utilities and services one can
think of, especially for a, functional database, service like TM1, that would rather be written in on of
the many other programming languages out there. One language that is gaining a lot of traction out
there is Go, or Golang, which we’ll use in this lab to build the final couple of examples showing;
1) how somebody, using an OData compliant database as the source as well, could, only using
the server’s OData compliant REST API, to build a complete model from scratch
2) how you can keep an eye on what is going on in the system by trailing the message log,
inspecting the messages being writing in it and acting on them if so required
With that, hoping this meets your expectations for this lab, let’s dig in!

7
Introducing TM1’s OData compliant RESTful API
TM1 Servers, as of version 10.2 RP2 (May 2014), expose an OData compliant, RESTful API. This was
the first, public, version of a RESTful API for TM1 server. Now, many releases and fix packs later,
having broadened as well as hardened the implementation of it, it is ready for prime time, so much
so, just in case anybody still doubts this, that this is THE TM1 server API going forward.
Now you might wonder what the being “OData compliant” is all about. Well, OData builds on a strong
foundation with very clear protocol semantics, URL conventions, a concise metadata definition and
a, JSON based, format. OData, albeit coming from a strong data driven background, is all but limited
to exposing data in a web friendly way. In laymen’s terms, it is set of specifications which we obey by
that specify how a service describes what is available to a consumer, how a consumer needs to
formulate a request for such server and how the service formats the response to such request.
OData, short for Open-Data, has been developed over a number of years and the latest version, v4
errata 3, is an OASIS standard. The OData standard has also made it to ISO standard in the
meantime as well. For more information about the OData standard and the documents describing it
please visit the OData.org website at: http://www.odata.org. For a quick introduction to the OData
standard have a look at the ‘Understanding OData in 6 steps’ webpage.
A first peek at TM1’s RESTful API
Let’s start with having a look at the metadata of the TM1 server first.
1) Start Google Chrome.
2) Retrieve the metadata document by typing the following URL in the address bar:
http://tm1server:8000/api/v1/$metadata
The metadata for the TM1 server will be shown in your browser. It’s an XML document formatted
according to the CSDL specification which is part of the OData standard. It describes all the types,
entity and complex types, all entity sets and relationships between entity and complex types in the
service. For example, the ‘Dimension’ entity is described as (excluding most documentation
annotations and some of the properties):
<EntityType Name="Dimension">
<Key>
<PropertyRef Name="Name"/>
</Key>
<Annotation Term="Core.Description">
<String>Represents a single dimension on a TM1 server.</String>
</Annotation>
<Property Name="Name" Type="Edm.String" Nullable="false" />
<Property Name="UniqueName" Type="Edm.String" />
<Property Name="AllLeavesHierarchyName" Type="Edm.String" />
<Annotation Term="Core.Revisions">
<Collection>
<Record>
<PropertyValue Property="Version">
<String>11.0.0</String>
</PropertyValue>
<PropertyValue Property="Kind">
<EnumMember>Core.RevisionKind/Added</EnumMember>
</PropertyValue>
</Record>
</Collection>
</Annotation>
</Property>
<Property Name="Attributes" Type="tm1.Attributes" />

8
<NavigationProperty Name="Hierarchies" Type="Collection(tm1.Hierarchy)"
Partner="Dimension" ContainsTarget="true" />
...
</EntityType>
This is telling us that one of the types that the service exposes is a ‘Dimension’ and that it has a
couple of properties among which is its Name, UniqueName and a set of Hierarchies. The Name is
the property that uniquely identifies a Dimension, and as such is declared to be the key. And since in
this lab you’ll be working with the latest and greatest TM1 Server, version 11.5, this (pre-release)
version now has support for alternate hierarchies! This lab assumes you know what alternate
hierarchies are, but if you don’t, just think about them as separate hierarchies rolling up,
consolidating if you will, the same set of leaf elements. And after adding a second alternate
hierarchy you’ll notice a, system maintained, ‘all leaves’ hierarchy show up as well. This hierarchy
contains a flat list of all the leaves introduced/used across all alternate hierarchies. Please take not
of the fact that not all leaves need to be used in all alternate hierarchies although in a typical case
they would be. The new ‘AllLeavesHierarchyName’ property of a dimension, as the name already
implies, can be used to overwrite the default “All Leaves” name of this all leaves hierarchy. And note
the Core.Revisions annotation associated with the AllLeavesHierarchyName property, it conveys the
fact that this property got added in version 11.0.0.
As you scan the metadata document you’ll see all the types available and how they relate to each
other and it is this metadata document that consumers of the service will use to understand what is
available in the API.
By the way, for those that, like me, favor JSON over XML, if you have a recent enough version of TM1
server, we have gone ahead and added support for the OData CSDL JSON format which is being
introduced in the forthcoming v4.01 version of the OData specification. To retrieve the JSON version
of the metadata document simply request is using the Accept header or by explicitly adding the
system query option $format as in:
http://tm1server:8000/api/v1/$metadata?$format=application/json, which, again looking
at a simplified version of the Dimension entity type, would result in:
"Dimension": {
"$Kind": "EntityType",
"$Key": [
"Name"
],
"@Core.Description": "Represents a single dimension on a TM1 server.",
"Name": {},
"UniqueName": {
"$Nullable": true,
},
"AllLeavesHierarchyName": {
"$Nullable": true,
"@Core.Revisions": [
{
"Version": "11.0.0",
"Kind": "Added"
}
]
},
"Attributes": {
"$Type": "tm1.Attributes",
"$Nullable": true
},
"Hierarchies": {
"$Kind": "NavigationProperty",
9
"$Type": "tm1.Hierarchy",
"$Collection": true,
"$Partner": "Dimension",
"$ContainsTarget": true
},
...
}
Let’s be a consumer for a sec and, knowing what’s available in the service, start retrieving some data
from the service. While on the topic, let’s look at the list of the ‘Dimensions’ available and, while at it,
lets ignore those ‘control’ dimensions (those dimensions starting with the ‘}’ character).
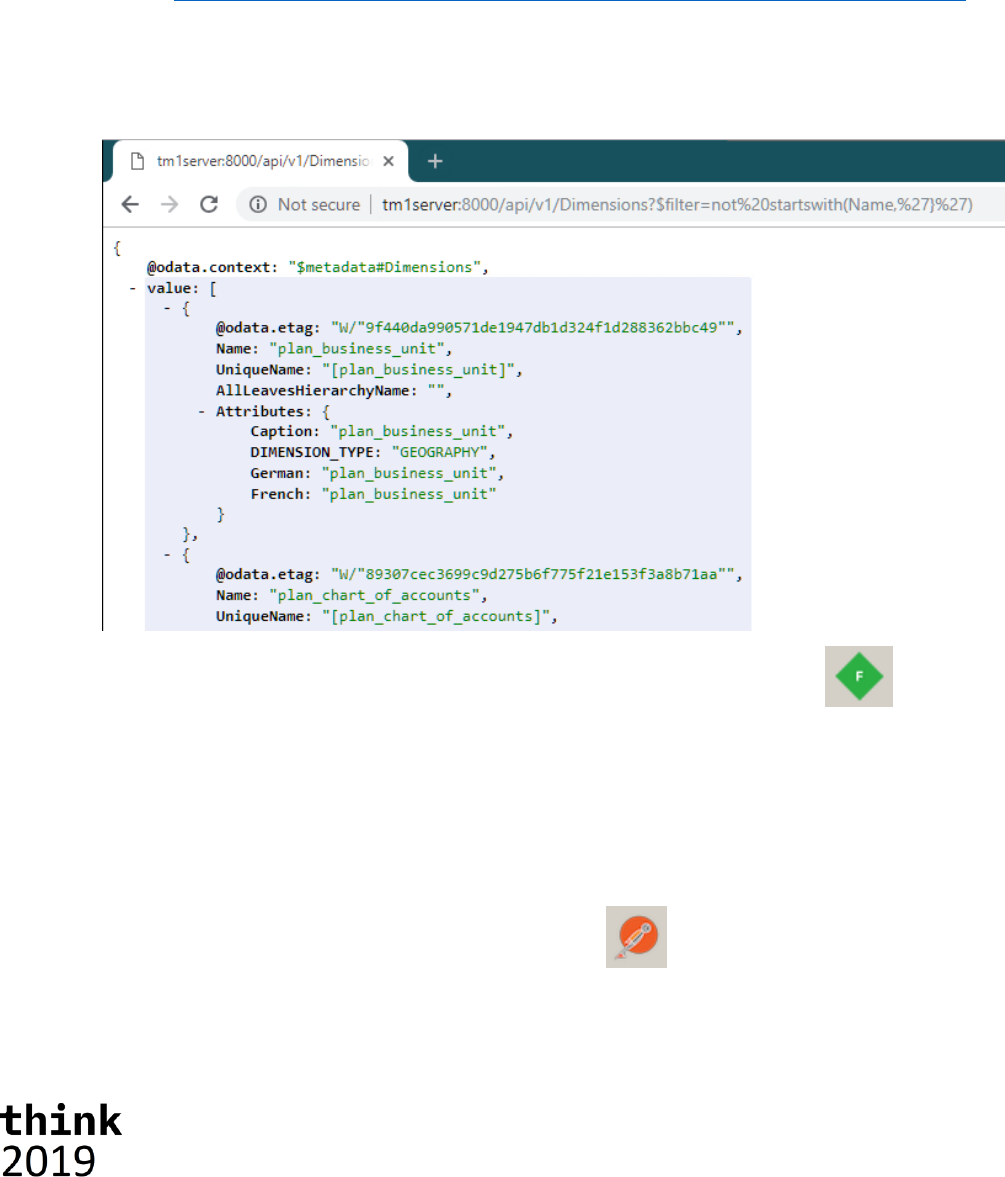
3) Retrieve those dimensions not being control dimensions by typing the following URL:
http://tm1server:8000/api/v1/Dimensions?$filter=not startswith(Name,'}')
4) If this is the first time you are accessing a secured resource, you’ll be challenged for a
username and password. If this happens use the infamous “admin” and “apple” pair.
You’ll get the list of dimensions available shown in your browser nicely formatted because we
installed the JSONView plug-in for Chrome.
If you want to see what went over ‘the wire’ you can start Fiddler, by clicking the icon in the
taskbar. Once Fiddler is up it’ll start recording HTTP traffic and you can look at the requests going to
and the responses returned by the server. This way you’ll see for example that the JSON going over
the wire is pretty compact and that we, provided the client supports it, apply compression to the
response.
Explore the REST API
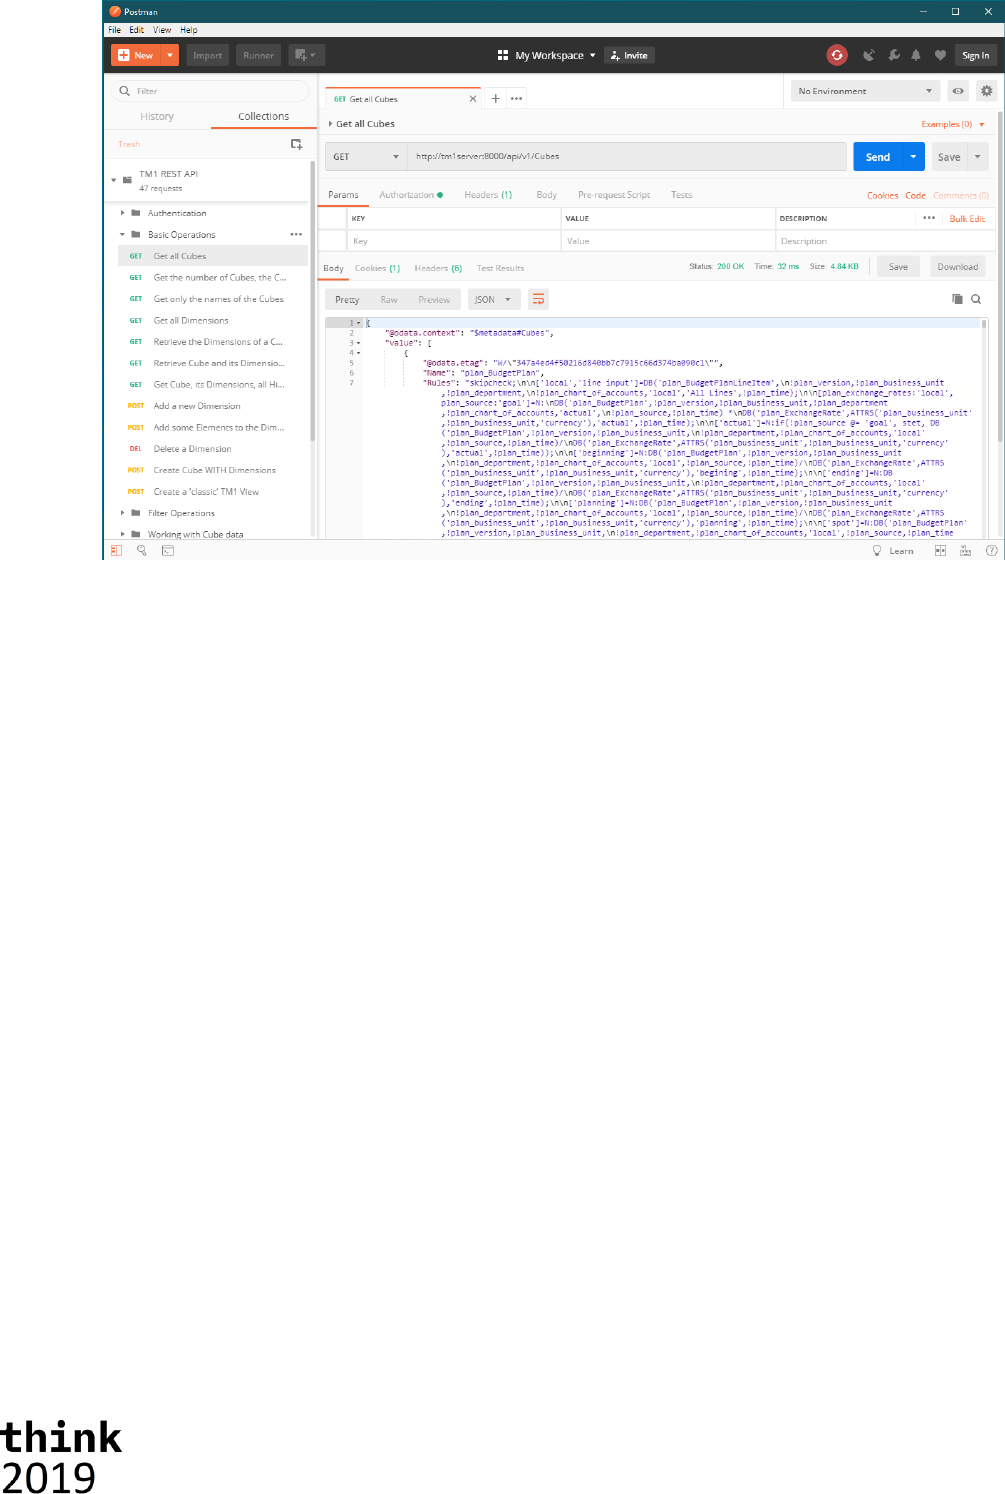
Ok, it’s time for some more examples. To make it easier to interact with our, any for that matter,
HTTP/REST based service we use Postman. Click on the icon in the taskbar to start Postman.
10
After starting Postman you’ll find, under the Collections tab on the left, a collection named ‘TM1
REST API’. A couple of sets of example requests have been included in this collection to give you an
initial feel of what the REST API can do for you and how it works.
Note: If you don’t see the ‘TM1 REST API’ collection, not to worry, hit the ‘Import’ button on the top,
and either select, using ‘Choose Files’ or drop the ‘TM1 REST API.json.postman_collection’ file,
which you can find in the ‘C:\HOL-TM1SDK\postman_collections’ folder, to get it added.
After selecting an example, you can see the definition of the request on the right. Hitting the ‘Send’
button will execute the request after which the response will be shown to you in the output window.
Don’t forget to look at the Cookies and Headers tabs in the output pane to see what more is being
send forth and back between the client, Postman in this case, and the TM1 Server.
Note: if you haven’t logged on, read: authenticated, yet, as the infamous ‘admin’ user with the, even
better known, ‘apple’ password, you might see ‘401 Unauthorized’ as a response to you attempting
to execute any of these requests. Go to the ‘Authorization’ tab, select ‘Basic Auth’ as the
authentication type, fill in the well-known user name and password and hit the ‘Preview Request’
button to update the headers on the request to include the appropriate Authorization header.
Postman is a very convenient tool to test requests. If you haven’t done so already, we’d advise you
to download and install it in your environment and have a go. Want the collection of tests from this
lab? Don’t hesitate to contact any of the presenters and we’ll send it to you. Have fun!
11
Working with TM1’s REST API using OpenAPI (a.k.a. Swagger) tooling
OData is not the only attempt to ‘standardize’, especially the metadata side of, REST APIs. Others
have been gaining popularity as well. Swagger, with the forming of the, broadly industry backed,
Open API Initiative, seems to have gotten the upper hand here. The OData Technical Committee has
been working with Swagger, now OpenAPIs, for its JSON based CSDL format but, given limited
expressiveness and support for some key OData constructs, hasn’t led to any alignment between
two metadata format definitions. However the OData TC is preparing a document describing, based
on all the interactions and experiences of members that have a need to support both, how to best
map, albeit lossy, OData CSDL into an OpenAPI description.
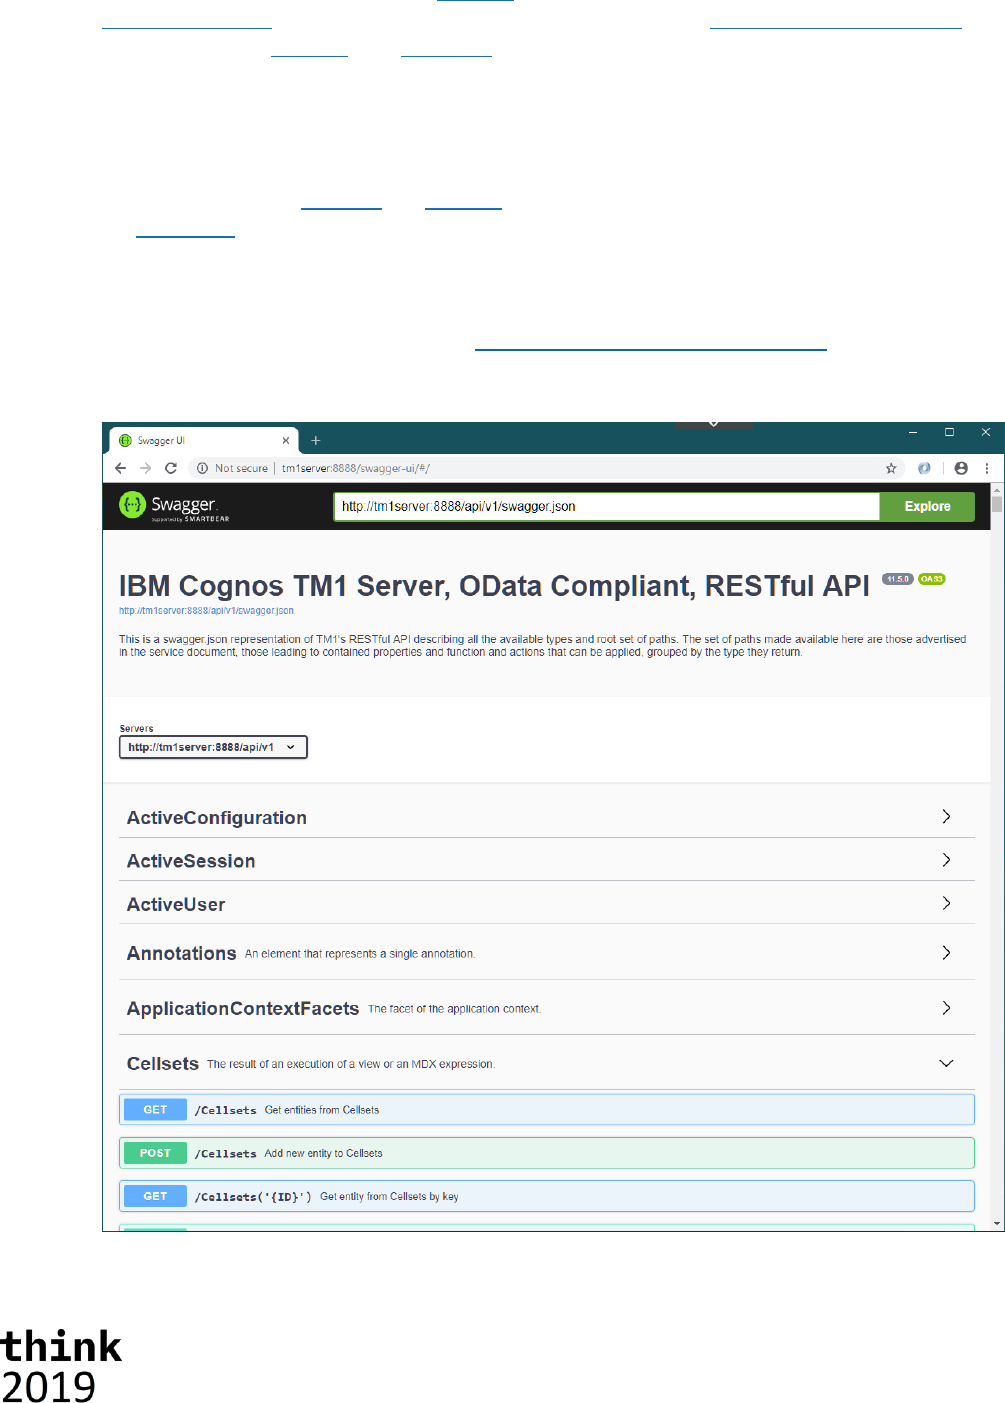
One great thing about OpenAPI and Swagger is the community and tooling around it, most notably
the swagger-ui. On the IBM developerWorks community for TM1 SDK you can find an article named
‘Using Swagger with TM1 server’s, OData compliant, RESTful API’. So even though there is no loss-
less translation from the OData CSDL to an OpenAPI/Swagger definition, you can, if you are
interested in using Swagger UI, follow this article to set things up, which we, for this lab, did for you.
Simply open your browser and point it at: http://tm1server:8888/swagger-ui. The Swagger UI
pops up and connects thru the NGINX proxy, that makes it appear as if our TM1 server itself has
support for Swagger, to our TM1 server directly.

12
Note the http://tm1server:8888/api/v1/swagger.json link at the top of the screen, which the
Swagger UI uses, and therefore you can use directly as well, to retrieve the swagger definition for
TM1’s REST API.
You can expand and collapse the sections in the interface. Clicking on any of the operations will
expand the form for that operation and will tell you about the potential parameters in the request
and the metadata about the information send and/or retrieved using that operation.
Note that not everything is necessarily exposed thru this interface, Swagger has its restrictions when
it comes to metadata descriptions in comparison to OData and, for one, can’t express the recursive
nature of operations on types like OData can. If you had a specific need however to expose some of
the missing functionality explicitly in a Swagger based environment, then you could update the
swagger.json file that we provided here and update it accordingly to your own liking.
Having issues or additional questions using Swagger UI, don’t hesitate to reach out to any of the lab
instructors for further information or a helping hand.

13
Building Web Apps that consume TM1’s REST API
A lot a people when they see ‘REST API’ associate it with an API that is to be used from within a web
page, or, more specifically, an API that is called from within JavaScript embedded an HTML page.
And, as with many things HTML and JavaScript, there are many ways to do the right thing so, to
illustrate how one could use TM1’s REST API from within a web client application, we included two,
single page, standalone, not pretty but functional, sample applications.
1) A TM1Top “Lite” showing, as the name suggests, the sessions/threads currently active
2) A simply MDX query execution page showing how one can retrieve data using an MDX query
For the implementation of these samples we choose to use the jQuery JavaScript library, most
notably for making asynchronous HTTP (AJAX) requests and to process/query our metadata XML.
Note: We are not having you write any code here, the provided examples are complete and
functional, but feel free to play around with them, change the code, create derivative work if you feel
comfortable doing so. The source files, us using the NGINX installation we referred to in the
OpenAPIs/Swagger portion earlier, can be found in: C:\nginx\html.
Let’s dig in!
Common tasks for every REST client application
Most applications, not just HTML/JavaScript based once, will typically end up dealing with some
common aspects of working with a, RESTful or not, service API. TM1 server, as a service, is no
different. You’ll notice that the sample applications we’ll be looking at in this section share some
code that deals with the most common tasks;
- Validating the version of and availability of features through the API’s metadata
- Support of authentication methods over and above the build in basic authentication
- Providing a session context with a request to identify individual threads of operation
Let’s have a look at each of these, keeping in mind it is more about what we are trying to accomplish
and what the communication is with the service, using the REST API.
Validating assumptions against the metadata of the REST API
Metadata, describing the service, helps, in our case OData compliant, clients to consume any OData
compliant service. However, in the TM1 case, where the available resources describe an API to
maintain a TM1 model and manage the service, that set is stable. In other words you will typically
write clients knowing that the service you’ll be communicating with is indeed TM1 server and your
code will be written with that in mind. You might, nevertheless, have the need to look at the
metadata to:
- Validate you are talking to TM1
- Validate that you are working with a server of a certain version
- Validate that some functionality is available
In the TM1Top “Lite” example you’ll see an example of this, in this case we choose to validate that
the Session entity type, which we introduced in version 10.2.2.5, is available in the version of the
server that we are talking too and, based on the conclusion, interact with the server accordingly.
To do this validation we need to do two things:
1) Retrieve the metadata document from the server (using the ./$metdata resource)
2) Apply an ‘xpath’ query against the metadata XML to retrieve the information we want

14
The retrieval of the metadata document is done by querying the $metadata resource which is
expected to be located at the, provided, service root path of the service, which in our test
environment is ‘/api/v1/’ which in turn, relative to where the sample is ran, results in the following
URL for the metadata document: http://tm1server:8888/api/v1/$metadata.
On successful retrieval of the metadata document, an XML document complying to the OData CSDL
specification, that metadata is passed to the initMetadata function which, using jQuery’s xpath
library, executes an xpath query retrieving all entity types names ‘Session’ which, by definition, can
at most return one such element. The xpath query being:
edmx:Edmx/edmx:DataServices/edm:Schema/edm:EntityType[@Name='Session']
If it finds at least one it concludes sessions are supported in this version, otherwise it presumes we
are dealing with an older version of the server that only had the list of threads available.
If you have a recent enough version, and you knew what version of the server you’d need to take
advantage of some feature/functionality, you can now also check the Core.SchemaVersion
annotation, applied to the Schema itself. This annotation specifies the version of the server with
which this version of the metadata was released (hence: this can be an older version then the action
version of the server you are running with if no changes to the metadata happened since), and as
such can be used to validate if certain capabilities are available or not as well.
Authenticating with the service
Most services out there require some form of authentication to make the service aware of who the
user is that is requesting the service to perform certain operations. While other services and none
browser based applications would have to handle everything authentication related, browsers
typically will deal with basic authentication for you (read: pop up a little dialog to type in your user
name and password) and windows based browser will even deal with Windows Integrated
Authentication (a.k.a. Negotiate) for you if that’s what the service indicates it requires.
While working with TM1 server, using the REST API, this is no different. If a user hasn’t
authenticated yet, the server will respond with a 401 Unauthorized status code indicating what
forms of authentication it supports. If it indicates it accepts basic or Negotiate, the browser will take
the appropriate next steps, prompting the user for his credentials if so required, and complete the
authentication and retrying the request once again.
If, on the other hand, authentication is set up to use CAM, or more recently OIDC, then the browser
leaves the handling of the 401 Unauthorized response up to the client application. In the code for
the sample applications a basic implementation of how these modes of authentication can be
supported, to give you an idea of what’s involved and hooks as to how to implement your handler.
If you want to learn more about handling these security modes have a look at the ‘Using CAM
Authentication with TM1’s, OData compliant, REST API’ article on developerWorks TM1 SDK
community.
Making yourself known to the server by providing a hint in the session context
If you’ve ever used TM1Top, or top like utility, with TM1 you might have noticed that there is such a
thing as a ‘context’ which some clients, like Architect, set so you can identify the threads that are
representing a connection from Architect to the server. With the REST API the actual HTTP
connections come and the only ‘stable’ factor identifying a logical connection is a session. The REST
API allows you however to set the session context, a context which subsequently will be attached to
every connection, and therefore thread, that is established for that session. This context can be
updated as well, however keep in mind it is a session context and therefore will get applied to all
connections associated with such session.
15
In our examples we will keep things simple and simply pass the title of our application as the context
on every request. Note however that if you run both applications in parallel in the same browser (not
necessarily the same window) that they might end up sharing the same session, because the
browser ends up sharing the session cookie between the two, and as such that the context will
continuously be overwritten by the last application that makes a request to the server;-!
Now that covered some of the most important basics it’s time to look at the actual apps themselves!
Our first HTML/JavaScript client application: TM1Top “Lite”
This example, single page, web application is, as the name suggests, a web version of the TM1Top
utility, build solely using the REST API. Two important differences, apart from functionality;
- The user needs to be logged on to the TM1 Server
- If the user is not an administrator on the TM1 Server, he/she will only see his/her own
threads and sessions!
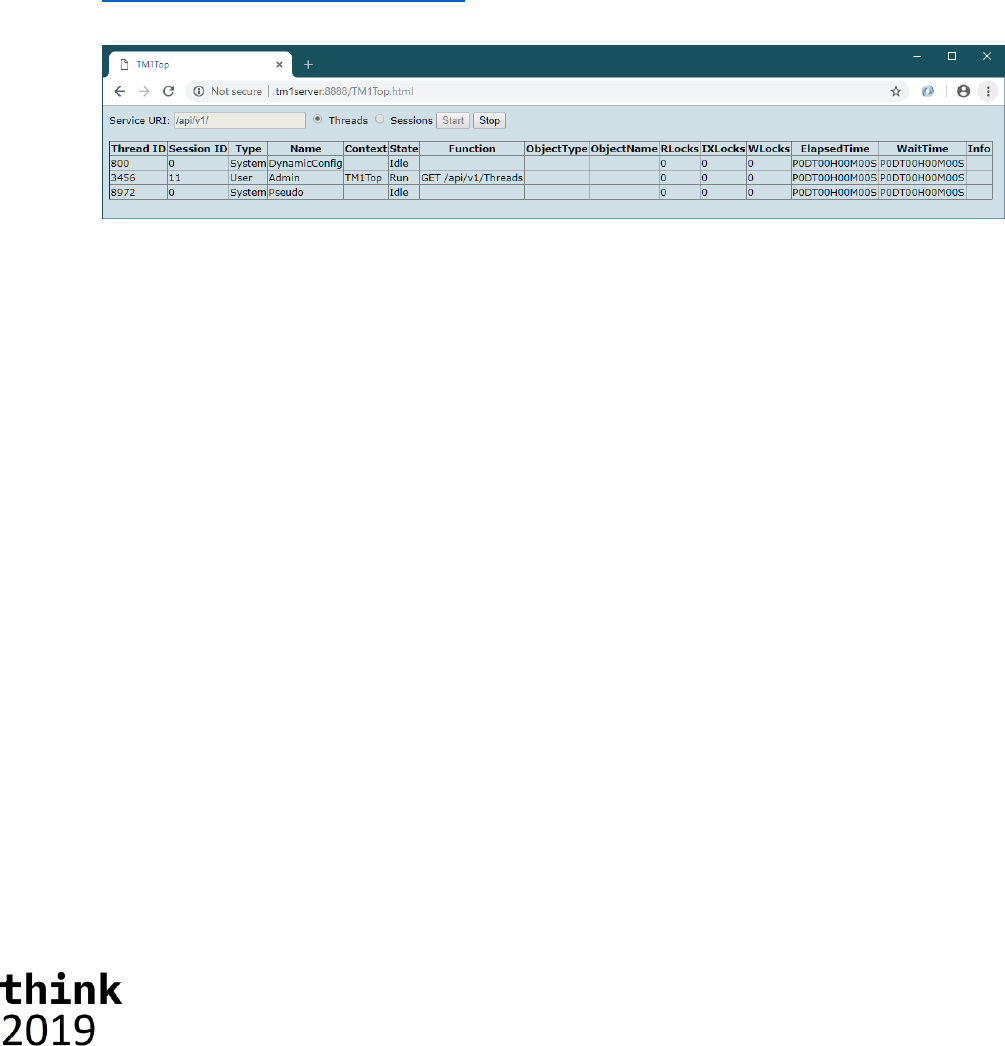
You can open and start the application by going to the following URL in your browser:
http://tm1server:8888/TM1Top.html. Once the web page has opened an you’ve hit the Start
button you should see a screen which looks like:
If you’ve withstood looking at the code thus far, this might be the time to do it, right-click anywhere
in the web page and select ‘View page source’ from the pop-up menu.
Apart from the common portions we discussed in the previous section you’ll find methods that deal
with building the table that is shown, functions that start, iterate and stop the retrieval of the
information shown in the table. The shape of the table shown is controlled by the Threads and
Sessions radio buttons at the top. Threads mode is the view that people are accustom to that have
used TM1Top before, the Sessions oriented view groups the active threads by session and as such
give you a slightly different view of what’s going on, apart from excluding the system threads.
Note: in the Sessions view threads can move between sessions! This is due to the fact how the HTTP
based infrastructure works. Especially in cases where there is a proxy in-between, effectively in the
setup we have here as well when using port 8888, which is a proxy port on the NGINX server we are
running, multiple connections to such proxy get ‘multiplexed’ onto a, typically as small as possible,
set of connections to the actual, so called back-end, service, resulting in ‘idle’ connections being
reused for other clients and therefore sessions.
In the previous section we spoke about session context. Note that in the screenshot above you see
‘TM1Top’ mentioned as the context of the connection on which our app retrieves the list of Threads,
using the REST API (hence the GET /api/v1/Threads function designation).
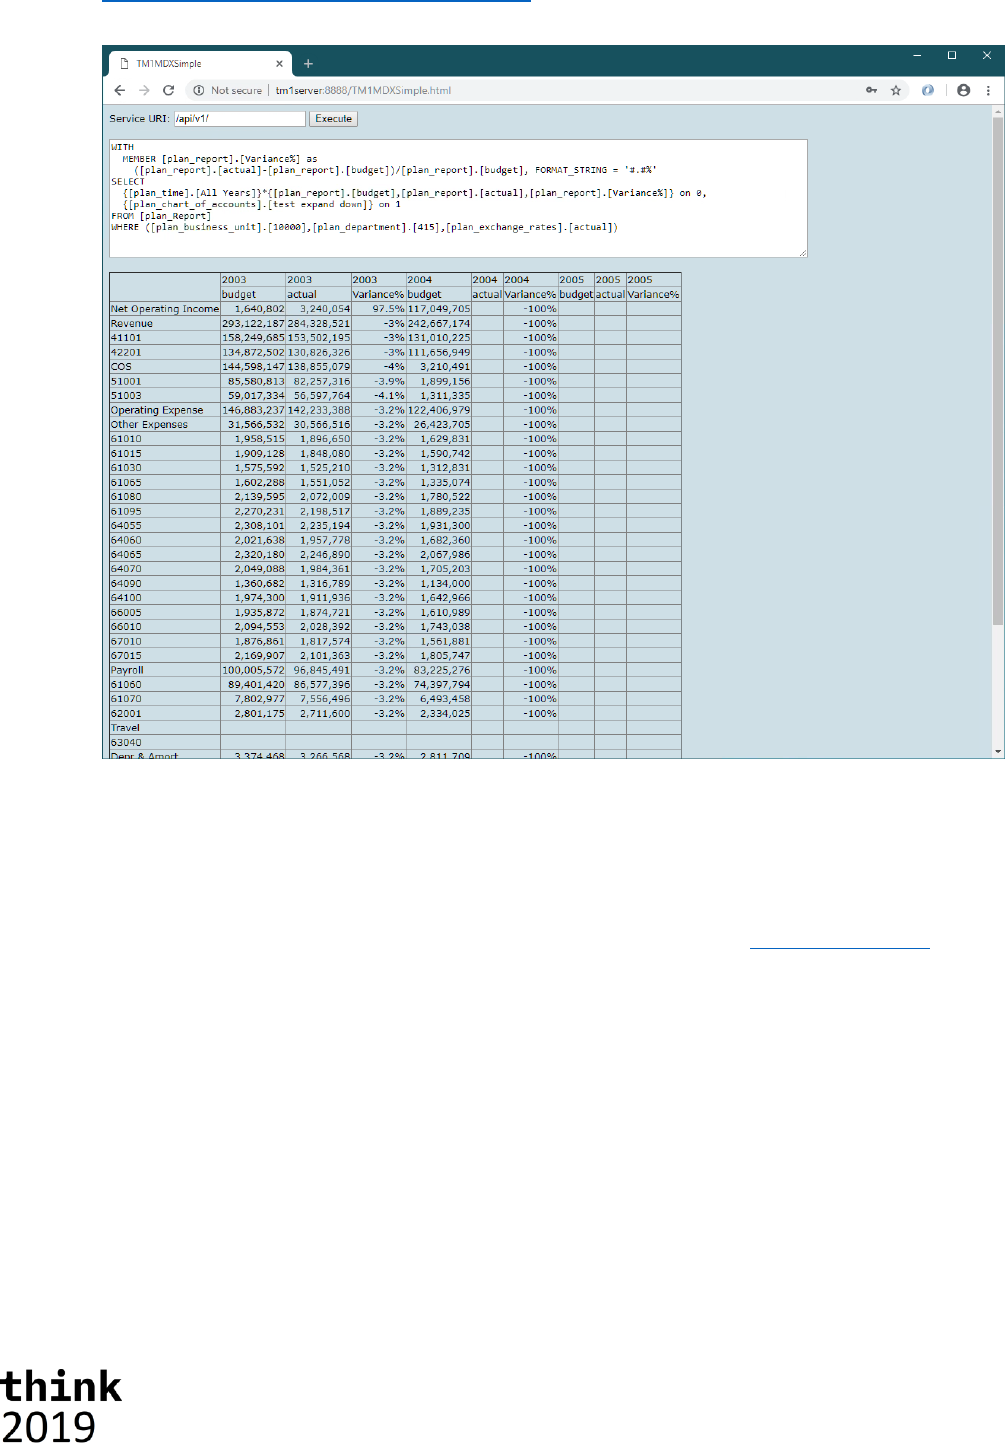
Consuming data in a HTML/JavaScript client application: TM1MDXSimple
The second, single page web application we included here is, as the name suggest, a (very) simply
‘MDX sample application’, which allows the user to type in an MDX query and subsequently have it
executed by the TM1 server after which the result is represented in a simple HTML table.
16
You can run this application by going to the following URL in your browser:
http://tm1server:8888/TM1MDXSimple.html. After opening this web page and having executed
the sample MDX query that the app starts up with you’ll see a screen that looks like this:
This application shares the common portions we discussed earlier. The main reason for showing this
example is not so much that you can draw a grid with data retrieved from TM1 Server, rather than
the fact that you can, as long as you can express your data needs by means of an MDX query (or as a
traditional TM1 view for that matter), that you can retrieve that data programmatically and act on
that data.
Note that the format of the data returned by the REST API, based on the OData JSON Format in our
case, is therefore JSON (read: JavaScript Object Notation) based and therefore returned as the value
of the parameter of the function called on successful execution of the request (in the code here
named _data). The returned data can therefore immediately be used in the script without any
additional processing (read: the conversion of the returned JSON is into JavaScript objects has
already taken place under the covers).
HTML/JavaScript is only one of the many ways to consume TM1’s REST API. In the next section,
we’ll show you how to consume this API from within VBA in Excel, with Planning Analytics for Excel
(PAx) installed and later we’ll show you how to build applications that connect to TM1 using the
REST API using the Go(lang) programming language.
17
Consuming TM1’s REST API in Excel (VBA)
In this section we will demonstrate how one can access and consume TM1 Server’s, OData
compliant, REST API in VBA. You will learn how to issue a request, marshal the results and process
the information returned by, for example, displaying it in an Excel Worksheet.
This exercise, although not required, presumes that IBM Planning Analytics for Microsoft Excel (PAx)
add-in is installed, as it allows for an already existing connection to a TM1 Server to be utilized and
which avoids us from having to do additional code to manage HTTP connections to the TM1 server
ourselves and, if you already have a connection open to the TM1 server, avoids having multiple
connections from a single client.
Note: PAx has a dependency on Planning Analytics Workspace, which it shares components with,
and as such an instance of Planning Analytics Local has been installed on a separate, Linux, VM as
part of the lab environment you are working with. We won’t be using PAW directly in this Hands-on
Lab but if you want to give it a quick test drive simply go to: http://pawl.
Let’s get set up to write some VBA code
Let’s get ready to write some code. Start Excel 2013 by either selecting it from the starting menu or
clicking the Excel icon in the taskbar.
The goal of this exercise to show how one interacts with the TM1 server, using the REST API. To kick
things off we’ll add buttons which, after clicking, will execute one of the example functions that
retrieve information from the TM1 server and, in these examples, simply show them in the sheet.
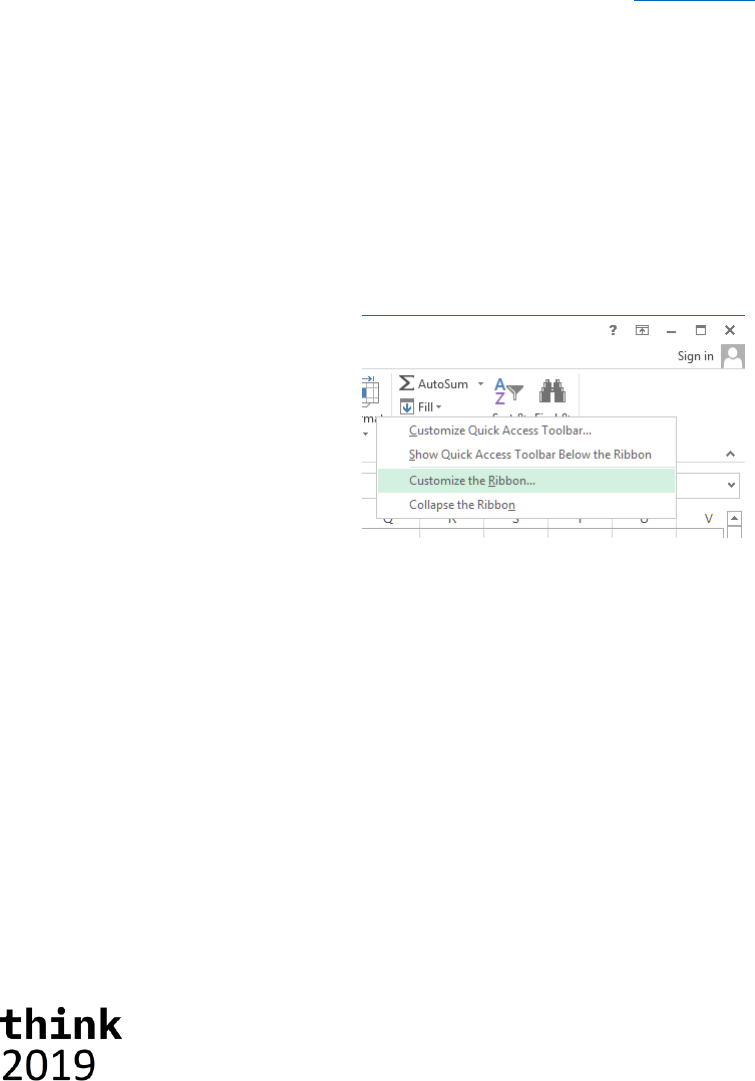
To be able to add a button to the current worksheet the Developer ribbon must be available first. To
get the Developer ribbon to display, right click on an empty portion on the existing ribbon (as shown
below) and select “Customize the Ribbon”.
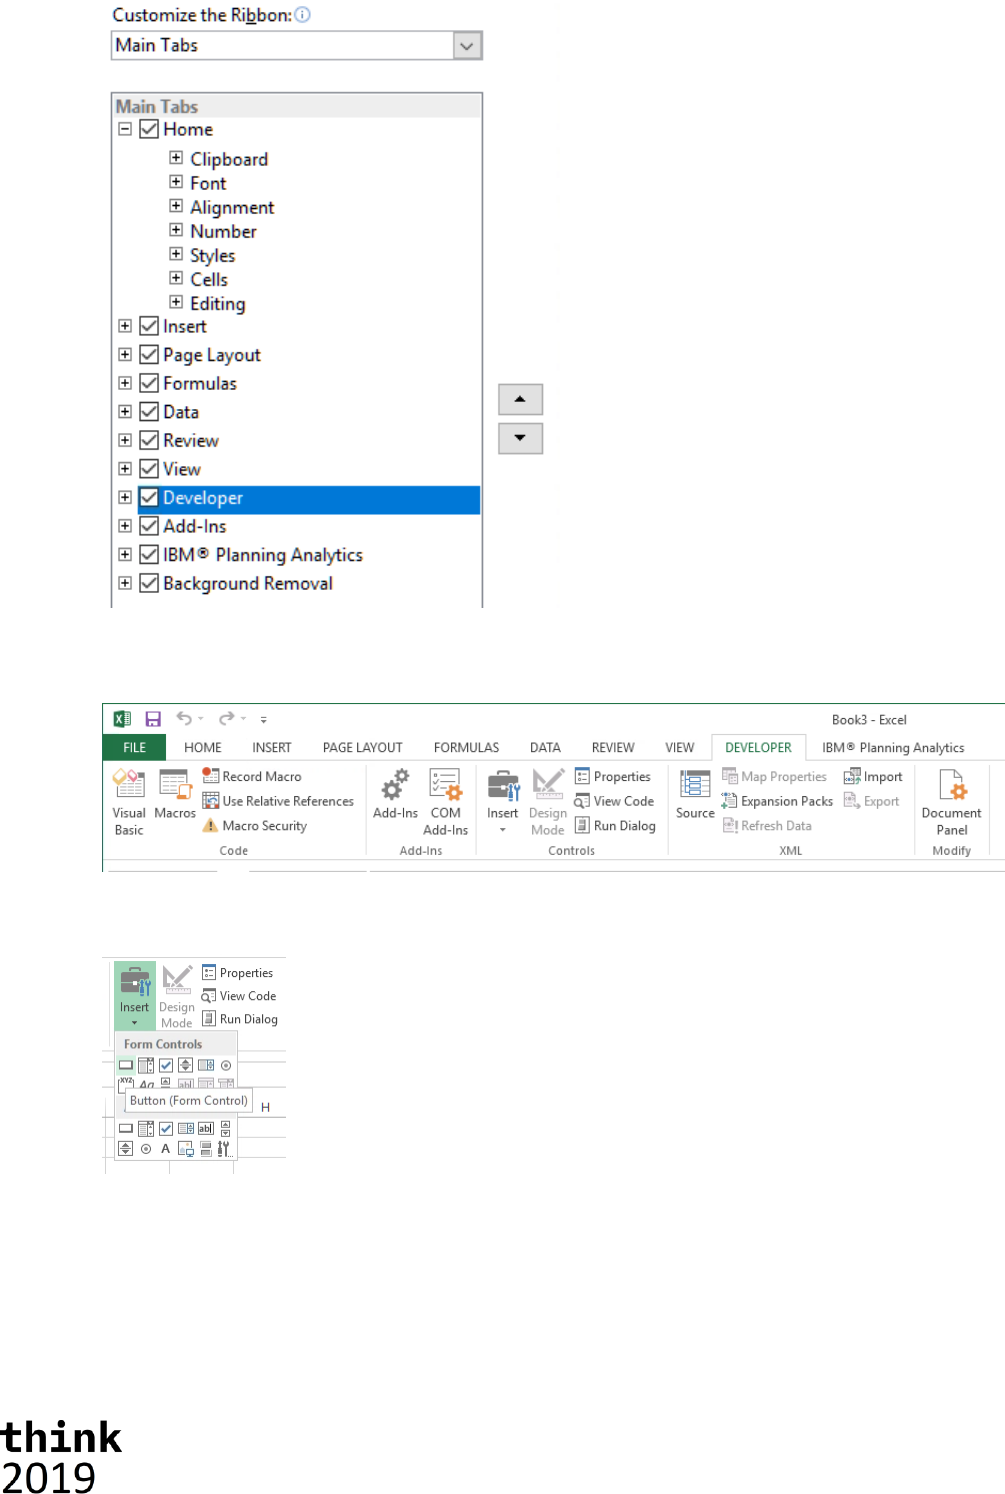
In the upcoming dialog look in the list to the right for “Developer” and check the checkbox next to it.
18
Click OK to accept the change and close the dialog.
Now that the Developer ribbon is available, let’s activate it to add a button to the Workbook.
Now let’s insert a button and assign a macro, a macro for which we’ll write the code a bit later, to it.
To add a button, click on the Insert icon and choose a button control.
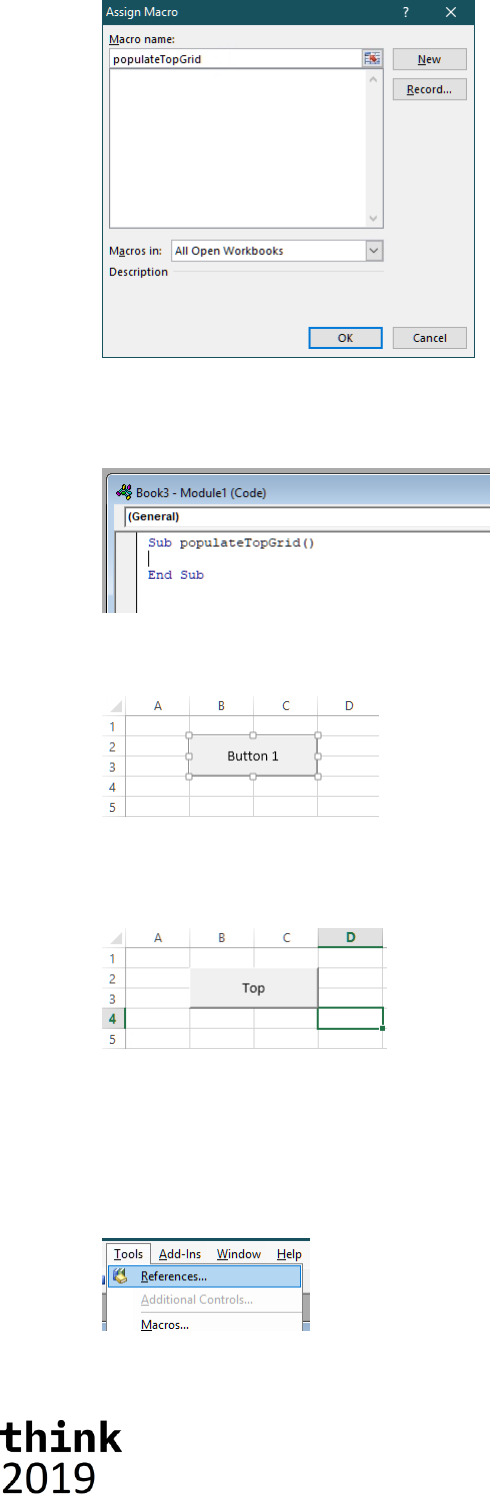
After drawing the button on the Workbook (recommended within A1 and C3), a dialog called “Assign
Macro” will show.
Replace the existing text with “populateTopGrid” and click on “New”.
19
The Visual Basic for Applications (VBA) developer environment will open and show that a new
module has been added to the Workbook. The code editor will show, that a new Macro has been
added called Sub populateTopGrid.
Use ALT+Tab or the taskbar in order to switch back to the Excel Workbook. In Sheet1 of the
Workbook the button will appear in the area drawn.
After adding the button, it will be in edit mode, which allows for the button caption to be modified.
The suggested new caption is “Top”. When clicking out of the button into a cell, the button will go to
run mode. In case needed, right clicking on the button will bring it back into edit mode.
In our examples we’ll be making use of the dictionary object, which is defined/provided within the
Microsoft Scripting Runtime library, to which we’ll have to add a reference next.
To add the reference to the library switch back to the VBA developer environment. Note: if you
closed the developer environment you can re-opened it by using the ALT+F11 from the Workbook.
In the “Tools” menu, click on “References…”
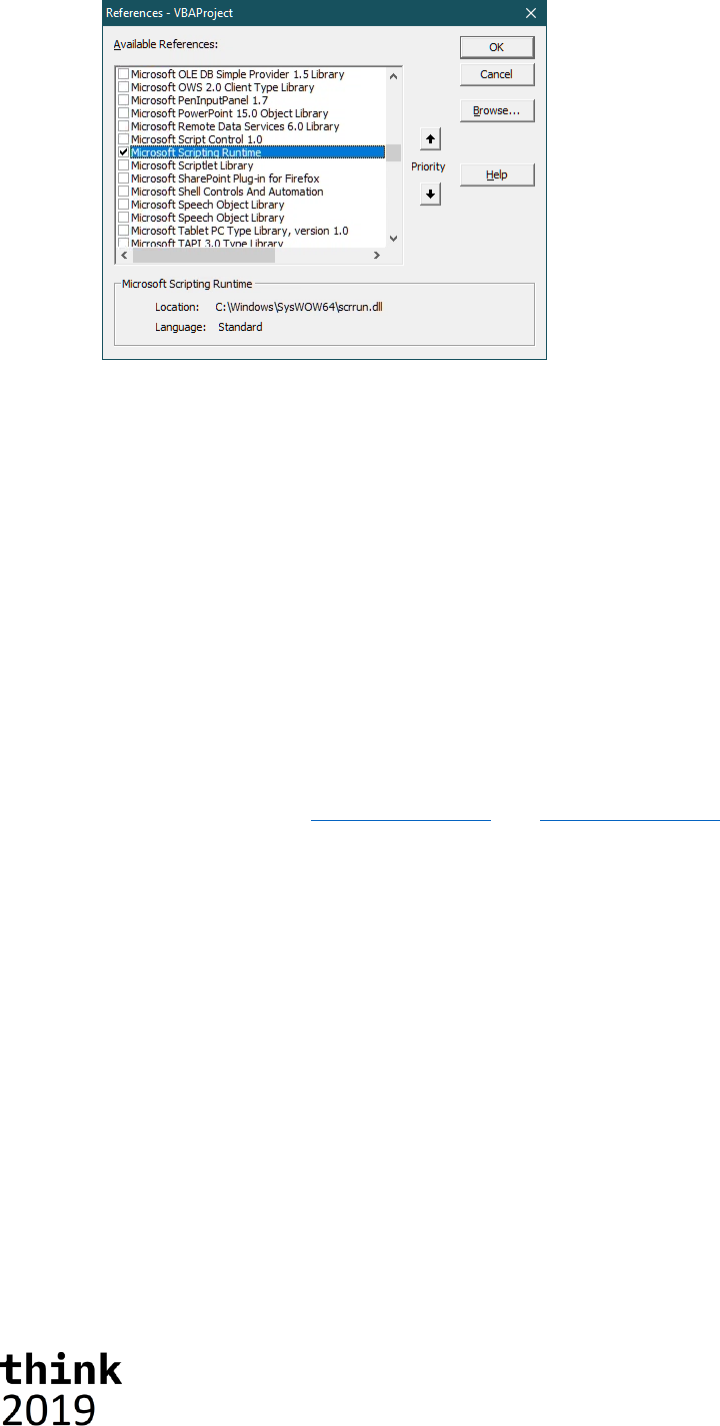
20
In the list of Available References find “Microsoft Scripting Runtime” and check the checkbox next to
the name as outlined in the screenshot below.
Click OK to accept the change and close the dialog.
Now we are ready to write some code that will execute when we press this button.
While writing our sample, and in some of the library code we’ll be supplying, you’ll see comments.
Note that comment lines in VBA start with a single quote ('). These lines are meant to be
documentation of the code and you do not need copy/type them for the sample to work.
One last word of advice before we get going. Save your work and save it frequently! In Microsoft
Excel CTRL+S, clicking on the disk icon in the toolbar or choosing the menu item File -> Save, will
save the Workbook. Please keep in mind that during code execution (e.g. running code by pressing
F5) or in debug mode, when the code execution has been paused, none of the methods of saving will
work.
The VBA TM1 REST API ‘library’
In our code we’ll use TM1 server’s, OData compliant, REST API to request and retrieve information.
Any data that we’d end up sending to the server and data that we we’ll receive from the server will
be formatted using the OData JSON Format. The OData JSON Format, as the name suggest, itself is
based on JSON (JavaScript Object Notation). Instead of directly working with JSON objects, which
one could if one desired to do so, we opted for introducing a marshalling library that we’ll use to help
us translate the server’s responses into objects that we’ll then subsequently use in our code.
Note that the library that we’ll be building/providing is by no means meant to be a complete
representation of the TM1 server’s REST API, nor production quality and as such is provided only,
as-is, to support the examples in this lab. Maybe it’ll turn out to be a good starting point for one.
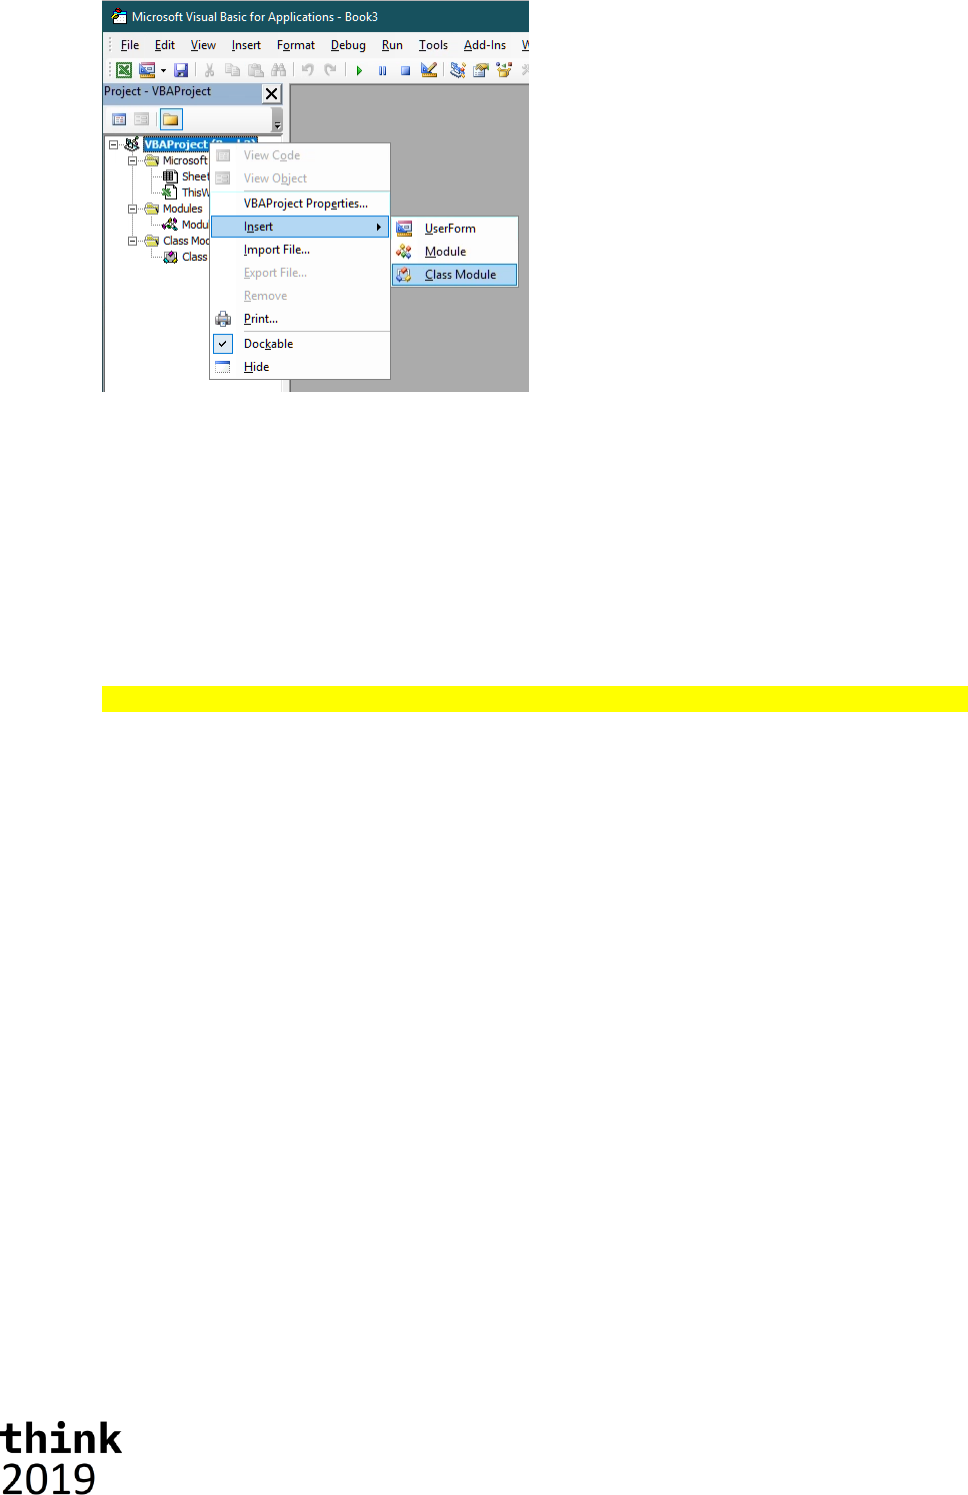
Let’s start building the library by inserting classes that represent the types, defined in the REST API,
that we’ll end up dealing with in our example code which are; Session, Thread and User.
For each of these we’ll insert a new class by going to the Project overview on the left-hand side of
the VBA development environment and right click on “VBAProject (Book3)”, select “Insert” and then
“Class Module”, as shown in the following screenshot:
21
A new class module is now available. In the properties window (press F4 if you don’t see the
properties window yet) of the module (bottom left of the development environment), change the
name of the class from Class1 to the name of the class that we’ll be creating, for example, our first
class, TM1User.
Class: TM1User
The TM1User class represents a User in the TM1 Server. For simplicity, and because we don’t need
anything more in this lab example, we only gave a user a Name and FriendlyName property. The
Name happens to be the unique identifier for a user whereas the friendly name is the name we’ll use
to display in our workbook later.
NOTE: All code snippets used in this exercise can be found here: C:\HOL-TM1SDK\PAx\VBA-Code
Now that we have the class module for a TM1User, add the following code to it:
Option Explicit
Private m_Name As String
Private m_FriendlyName As String
Public Function Deserialize(oAPI As tm1api, JSON As Object) As Boolean
Deserialize = False
If Not JSON.Properties Is Nothing And JSON.Properties.Count > 0 Then
Dim propCount As Integer
propCount = JSON.Properties.Count
Dim iProp As Integer
For iProp = 0 To propCount - 1
Dim propertyName As String
propertyName = JSON.Properties.GetKeys().Item(iProp)
Select Case propertyName
Case "Name"
m_Name = JSON.Properties.Item(propertyName).Value
Case "FriendlyName"
m_FriendlyName = JSON.Properties.Item(propertyName).Value

22
'User has more properties but we'll stick with the once we need
'for this example
End Select
Next iProp
Deserialize = True
End If
End Function
Public Property Get Name() As String
Name = m_Name
End Property
Public Property Get FriendlyName() As String
FriendlyName = m_FriendlyName
End Property
The key function here is the Deserialize function. This function contains the logic of converting (read:
unmarshaling) the JSON body of an entity, in this case a User entity, returned by the server into the
TM1User object on which this function is called upon.
Note the reference to the TM1API type as a parameter to the Deserialize function. We’ll be defining
this class a bit later, after the classes representing the entity types that we support in our sample.
We also added Property methods (a.k.a. getters) for every property we declared in the class. If you
wanted to safe yourself some time you could simply make the properties themselves public, and
remove the m_, but that breaks with object-oriented encapsulation rules. Nice side effect here is
that all our objects, until we’d add functions or subs that would allow making changes, are read-only
after having been marshalled.
This is the pattern in all our classes representing (entity) types in the server’s REST API.
Now let’s create another class module by, once again, right clicking on “VBAProject (Book3)” in the
Project overview, selecting “Insert” and then “Class Module”, and rename this class as TM1Thread.
Class: TM1Thread
The TM1Thread class represents an active thread, or an active connection, in the TM1 Server. Any
user with an active connection, irrespective of the API that is being used, has a thread associated to
it. If that user is having the server perform some form of operation that we will be able to retrieve
information about that operation as well as well as any locks that thread might be holding, how long
that operation has been running, how much time the user has been waiting to get a lock, etc.
Add the following code to the TM1Thread class:
Option Explicit
Private m_ID As Long
Private m_ThreadType As String
Private m_Name As String
Private m_Context As String
Private m_State As String
Private m_FunctionName As String
Private m_ObjectType As String
Private m_ObjectName As String
Private m_RLocks As Integer

23
Private m_IXLocks As Integer
Private m_WLocks As Integer
Private m_ElapsedTime As String
Private m_WaitTime As String
Private m_Info As String
Private m_Session As TM1Session
Public Function Deserialize(oAPI As tm1api, JSON As Object) As Boolean
Deserialize = False
If Not JSON.Properties Is Nothing And JSON.Properties.Count > 0 Then
Dim propCount As Integer
propCount = JSON.Properties.Count
Dim iProp As Integer
For iProp = 0 To propCount - 1
Dim propertyName As String
propertyName = JSON.Properties.GetKeys().Item(iProp)
Select Case propertyName
Case "ID"
m_ID = JSON.Properties.Item(propertyName).Value
Case "Type"
m_ThreadType = JSON.Properties.Item(propertyName).Value
Case "Name"
m_Name = JSON.Properties.Item(propertyName).Value
Case "Context"
m_Context = JSON.Properties.Item(propertyName).Value
Case "State"
m_State = JSON.Properties.Item(propertyName).Value
Case "Function"
m_FunctionName = JSON.Properties.Item(propertyName).Value
Case "ObjectType"
m_ObjectType = JSON.Properties.Item(propertyName).Value
Case "ObjectName"
m_ObjectName = JSON.Properties.Item(propertyName).Value
Case "RLocks"
m_RLocks = JSON.Properties.Item(propertyName).Value
Case "IXLocks"
m_IXLocks = JSON.Properties.Item(propertyName).Value
Case "WLocks"
m_WLocks = JSON.Properties.Item(propertyName).Value
Case "ElapsedTime"
m_ElapsedTime = JSON.Properties.Item(propertyName).Value
Case "WaitTime"
m_WaitTime = JSON.Properties.Item(propertyName).Value

24
Case "Info"
m_Info = JSON.Properties.Item(propertyName).Value
Case "Session"
Set m_Session =
oAPI.DeserializeSession(JSON.Properties.Item(propertyName))
End Select
Next iProp
Deserialize = True
End If
End Function
Public Property Get ID() As Long
ID = m_ID
End Property
Public Property Get ThreadType() As String
ThreadType = m_ThreadType
End Property
Public Property Get Name() As String
Name = m_Name
End Property
Public Property Get Context() As String
Context = m_Context
End Property
Public Property Get State() As String
State = m_State
End Property
Public Property Get FunctionName() As String
FunctionName = m_FunctionName
End Property
Public Property Get ObjectType() As String
ObjectType = m_ObjectType
End Property
Public Property Get ObjectName() As String
ObjectName = m_ObjectName
End Property
Public Property Get RLocks() As Integer
RLocks = m_RLocks
End Property
Public Property Get IXLocks() As Integer
IXLocks = m_IXLocks
End Property
Public Property Get WLocks() As Integer
WLocks = m_WLocks
End Property

25
Public Property Get ElapsedTime() As String
ElapsedTime = m_ElapsedTime
End Property
Public Property Get WaitTime() As String
WaitTime = m_WaitTime
End Property
Public Property Get Info() As String
Info = m_Info
End Property
Public Property Get Session() As TM1Session
Set Session = m_Session
End Property
I’m guessing you can start to see a pattern, even though this is only the second class. The key
function once again is the Deserialize function, reading all the properties in the JSON body of the
Thread entity into and setting the associated properties of the TM1Thread object on which this
function is called upon.
In the next class, the TM1Session class, we’ll take it one step up and introduce composition to be
able to deal with responses from the server that have not only references but complete entities (or
subset of their properties) expanded in the response. These properties are referred to as navigation
properties in the metadata. So, let’s create another class named TM1Session.
Class: TM1Session
The TM1Session class represents an active session in the TM1 Server. Every connection made over
HTTP, and therefore by definition targeting the REST API, that doesn’t carry a TM1SessionId cookie
on the request headers, is assigned a new session. These sessions, represented by a value stored in
a cookie named TM1SessionId, are associated with the user that logs in on a connection associated
to the session, and can be shared across multiple connections. Sessions, as the association to a user
already suggests, are intended to be per user.
Note that while the notion of a session only got introduced with the support of the HTTP protocol in
order to serve the REST API, sessions can exist for connections created by older APIs as well and
can be shared with connections across all APIs.
Also note that while a session can be active there doesn’t need to be an active HTTP connection
associated to it and as such there might not be any threads at a given point in time.
Once again, another class module needs to get added to the project. Right click on the VBA Project
(Book1), select “Insert…” and then “Class Module”.
Now let’s add some code to the TM1Session class here:
Option Explicit
Private m_ID As Long
Private m_Context As String
Private m_User As TM1User
Private m_Threads As Collection
Public Function Deserialize(oAPI As tm1api, JSON As Object) As Boolean
Deserialize = False

26
If Not JSON.Properties Is Nothing And JSON.Properties.Count > 0 Then
Dim propCount As Integer
propCount = JSON.Properties.Count
Dim iProp As Integer
For iProp = 0 To propCount - 1
Dim propertyName As String
propertyName = JSON.Properties.GetKeys().Item(iProp)
Select Case propertyName
Case "ID"
m_ID = JSON.Properties.Item(propertyName).Value
Case "Context"
m_Context = JSON.Properties.Item(propertyName).Value
Case "User"
Set m_User = oAPI.DeserializeUser(JSON.Properties.Item(propertyName))
Case "Threads"
Set m_Threads =
oAPI.DeserializeThreadCollection(JSON.Properties.Item(propertyName))
End Select
Next iProp
Deserialize = True
End If
End Function
Public Property Get ID() As Long
ID = m_ID
End Property
Public Property Get Context() As String
Context = m_Context
End Property
Public Property Get User() As TM1User
Set User = m_User
End Property
Public Property Get Threads() As Collection
Set Threads = m_Threads
End Property
Here the Deserialize once again reads the properties of the Session but notice that for the so-called
navigation properties, properties that reference other properties that are related, it uses Deserialize
functions, in this case for user and a collection of threads, the User and Threads properties
respectively. These deserialize functions we will define in a minute in an API wrapper class.
Note that we don’t try to be smart here and share instances to the same User for example by
keeping a list of all users that we might have seen already, which we could, as we know that users

27
are entities, and entities have keys and, given they come from the same entity set, they can be
indexed accordingly. This is more food for thought of a future, more professional, VBA library.
So now that we have our classes representing the entities lets create an API class that contains the
API level functions that we want to expose and use in our API library. Add a new class named
TM1API.
Class: TM1API
As mentioned already, the TM1API class is the class in which we’ll define the functions that we’ll use
to de-serialize the responses we’ll get from our request(s) to the TM1 Server, returning us the
objects, or collections thereof, that are being returned by the server.
Add the following code to the TM1API class:
Option Explicit
Public Function DeserializeSessionCollection(JSON As Object) As Collection
Dim oSessions As New Collection
If Not JSON.Members Is Nothing Then
Dim itemCount As Integer
itemCount = JSON.Members.Count
Dim iItem As Integer
For iItem = 0 To itemCount - 1
Dim Session As TM1Session
Set Session = DeserializeSession(JSON.Members.Item(iItem))
If Not Session Is Nothing Then
oSessions.Add Session
End If
Next iItem
End If
Set DeserializeSessionCollection = oSessions
End Function
Public Function DeserializeThreadCollection(JSON As Object) As Collection
Dim oThreads As New Collection
If Not JSON.Members Is Nothing Then
Dim itemCount As Integer
itemCount = JSON.Members.Count
Dim iItem As Integer
For iItem = 0 To itemCount - 1
Dim thread As TM1Thread
Set thread = DeserializeThread(JSON.Members.Item(iItem))
If Not thread Is Nothing Then
oThreads.Add thread
End If
Next iItem
End If
Set DeserializeThreadCollection = oThreads

28
End Function
Public Function DeserializeSession(JSON As Object) As TM1Session
Dim oSession As New TM1Session
If oSession.Deserialize(Me, JSON) Then
Set DeserializeSession = oSession
End If
End Function
Public Function DeserializeThread(JSON As Object) As TM1Thread
Dim oThread As New TM1Thread
If oThread.Deserialize(Me, JSON) Then
Set DeserializeThread = oThread
End If
End Function
Public Function DeserializeUser(JSON As Object) As TM1User
Dim oUser As New TM1User
If oUser.Deserialize(Me, JSON) Then
Set DeserializeUser = oUser
End If
End Function
The functions in this class all get passed a JSON array, in the cases of collections, or a JSON object
in the case of individual entity instances, and return an object, or collection of objects, representing
the response of the server.
The Utilities module
Now that we have our library that’ll help us deal with TM1 Server’s REST API, for as much as we’ll be
using it in this example, we’ll need to add some utility functions for maintaining the connection to
TM1. Luckily Planning Analytics for Excel (PAx) has us pretty much covered, what remains to be done
is merely talk to PAx to have it send our requests to the TM1 server.
In the Project overview on the left-hand side of the VBA development environment, right click on
“VBAProject (Book3)”, select “Insert” and then “Module”.
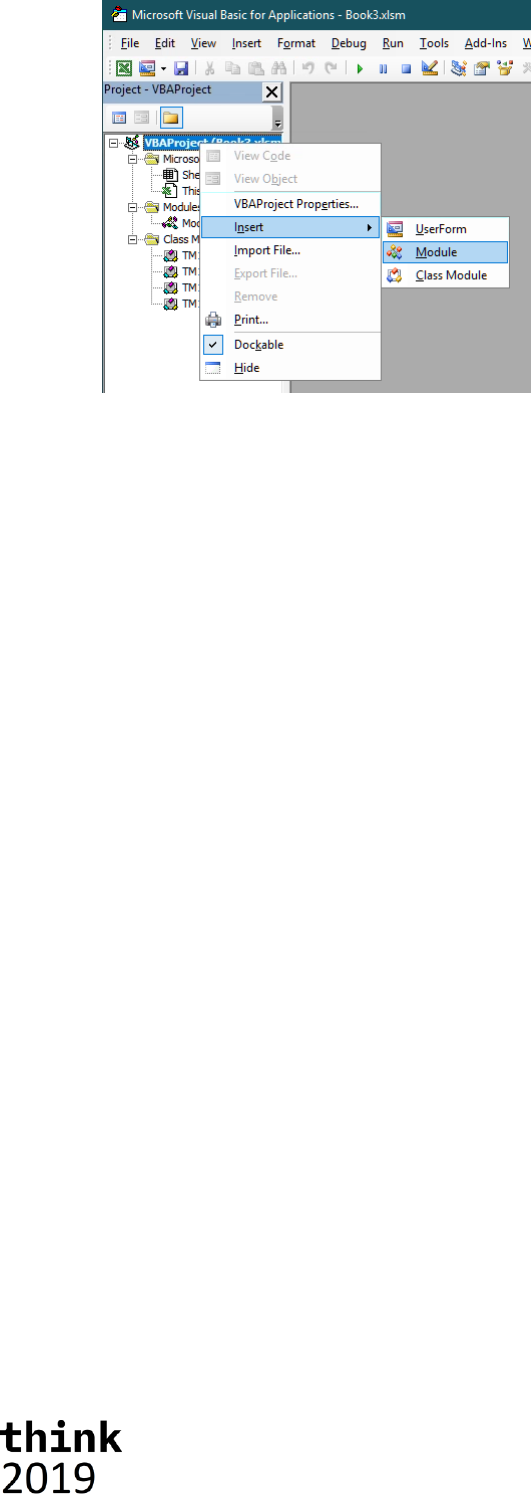
29
Rename the newly created model to “Utilities” and add the following code:
Option Explicit
Dim m_oCOAutomation As Object
Dim m_oCAFE As Object
'Returns the instance of the Cognos Office Automation Object.
Public Property Get CognosOfficeAutomationObject()
On Error GoTo Handler:
'Fetch the object if we don't have it yet.
If m_oCOAutomation Is Nothing Then
Set m_oCOAutomation =
Application.COMAddIns("CognosOffice12.Connect").Object.AutomationServer
End If
Set CognosOfficeAutomationObject = m_oCOAutomation
Exit Property
Handler:
'<Place error handling here. Remember you may not want to display a message
'box if you are running in a scheduled task>
End Property
'Returns the instance of the Cognos Office Reporting Object.
Public Property Get Reporting()
On Error GoTo Handler:
'Fetch the object if we don't have it yet.
If m_oCAFE Is Nothing Then
Set m_oCAFE = CognosOfficeAutomationObject.Application("COR", "1.1")
End If
Set Reporting = m_oCAFE
Exit Property
Handler:
MsgBox "Error"
Err.Clear
End Property

30
As the comments in the code above already suggest these are simply two utility classes that help us
retrieve references to the Cognos Office Automation and Reporting objects, used by PAx, which we’ll
tab into to help us dispatch our requests to the TM1 server.
Bringing it all together
Now that we have the code to wrap what the TM1 Server will throw at us, and the help from PAx to
connect us to the TM1 Server, sharing the session it already has with that server, we now need the
final snippet of code that, when pressing the button which we added earlier on to our sheet already,
asks PAx to send a request to the TM1 Server, de-serialize the response and, in this case, show the
returned information in the Workbook on Sheet1.
This part of the code should go into the already existing module with the name “Module1”. If you
closed that module you can open it again by double clicking on “Module1” in the project overview.
There is existing code in this module, which was created when the button was added to the sheet.
Complement the code with the code below.
Option Explicit
Sub populateTopGrid()
Dim oAPI As New tm1api
Dim oSheet As Worksheet
Dim bScreenupdating As Boolean
Dim request As String
Dim response As Object
'get a reference to the first worksheet
Set oSheet = ThisWorkbook.Sheets("Sheet1")
'remember screenupdating property and turn it off to avoid flickering
bScreenupdating = Application.ScreenUpdating
Application.ScreenUpdating = False
'the request URL will be sent to the server
request = "/tm1/Planning
Sample/api/v1/Threads?$expand=Session($expand=User($select=Name,FriendlyName))"
'sending the request to the server
Set response = Reporting.ActiveConnection.Get(request)
'checking for a response
If Not response Is Nothing Then
'the response contains a collection wrapped in a JSON object and stored
'in a 'value' property
If Not response.Properties Is Nothing And response.Properties.Count() > 0 Then
Dim threadsJSON As Object
Set threadsJSON = response.Properties.Item("value")
Dim threadsCollection As Collection
Set threadsCollection = oAPI.DeserializeThreadCollection(threadsJSON)
'print the headers for the columns
With oSheet.Cells(5, 1)
.Value = "SessionID"
.Font.Bold = True

31
.Font.Color = RGB(150, 0, 0)
End With
With oSheet.Cells(5, 2)
.Value = "User"
.Font.Bold = True
.Font.Color = RGB(150, 0, 0)
End With
With oSheet.Cells(5, 3)
.Value = "TheadID"
.Font.Bold = True
.Font.Color = RGB(150, 0, 0)
End With
With oSheet.Cells(5, 4)
.Value = "Type"
.Font.Bold = True
.Font.Color = RGB(150, 0, 0)
End With
With oSheet.Cells(5, 5)
.Value = "Name"
.Font.Bold = True
.Font.Color = RGB(150, 0, 0)
End With
With oSheet.Cells(5, 6)
.Value = "Context"
.Font.Bold = True
.Font.Color = RGB(150, 0, 0)
End With
With oSheet.Cells(5, 7)
.Value = "State"
.Font.Bold = True
.Font.Color = RGB(150, 0, 0)
End With
With oSheet.Cells(5, 8)
.Value = "Function"
.Font.Bold = True
.Font.Color = RGB(150, 0, 0)
End With
With oSheet.Cells(5, 9)
.Value = "Object Type"
.Font.Bold = True
.Font.Color = RGB(150, 0, 0)
End With
With oSheet.Cells(5, 10)
.Value = "Object Name"
.Font.Bold = True
.Font.Color = RGB(150, 0, 0)
End With
With oSheet.Cells(5, 11)
.Value = "RLocks"
.Font.Bold = True
.Font.Color = RGB(150, 0, 0)
End With
With oSheet.Cells(5, 12)
.Value = "IXLocks"
.Font.Bold = True
.Font.Color = RGB(150, 0, 0)
End With
With oSheet.Cells(5, 13)
.Value = "WLocks"
.Font.Bold = True
.Font.Color = RGB(150, 0, 0)

32
End With
With oSheet.Cells(5, 14)
.Value = "Elapsed Time"
.Font.Bold = True
.Font.Color = RGB(150, 0, 0)
End With
With oSheet.Cells(5, 15)
.Value = "Wait Time"
.Font.Bold = True
.Font.Color = RGB(150, 0, 0)
End With
With oSheet.Cells(5, 16)
.Value = "Info"
.Font.Bold = True
.Font.Color = RGB(150, 0, 0)
End With
'print the details for the individual threads
Dim threadCount As Integer
threadCount = threadsCollection.Count
Dim iThread As Long
For iThread = 1 To threadCount
Dim oThread As TM1Thread
Set oThread = threadsCollection.Item(iThread)
Dim oSession As TM1Session
Set oSession = oThread.Session()
If Not oSession Is Nothing Then
oSheet.Cells(5 + iThread, 1) = oSession.ID
Dim oUser As TM1User
Set oUser = oSession.User()
If Not oUser Is Nothing Then
oSheet.Cells(5 + iThread, 2) = oUser.FriendlyName
End If
Else
oSheet.Cells(5 + iThread, 1).ClearContents
oSheet.Cells(5 + iThread, 2).ClearContents
End If
oSheet.Cells(5 + iThread, 3) = oThread.ID
oSheet.Cells(5 + iThread, 4) = oThread.ThreadType
oSheet.Cells(5 + iThread, 5) = oThread.Name
oSheet.Cells(5 + iThread, 6) = oThread.Context
oSheet.Cells(5 + iThread, 7) = oThread.State
oSheet.Cells(5 + iThread, 8) = oThread.FunctionName
oSheet.Cells(5 + iThread, 9) = oThread.ObjectType
oSheet.Cells(5 + iThread, 10) = oThread.ObjectName
oSheet.Cells(5 + iThread, 11) = oThread.RLocks
oSheet.Cells(5 + iThread, 12) = oThread.IXLocks
oSheet.Cells(5 + iThread, 13) = oThread.WLocks
oSheet.Cells(5 + iThread, 14) = oThread.ElapsedTime
oSheet.Cells(5 + iThread, 15) = oThread.WaitTime
oSheet.Cells(5 + iThread, 16) = oThread.Info
Next iThread
'setting the columns to autofit
oSheet.Columns("A:P").AutoFit
End If
End If
33
'resetting screenupdating
Application.ScreenUpdating = bScreenupdating
End Sub
Hopefully the comments in the code speak for themselves, high level, we compose a simple request,
pass it off to PAx to dispatch it to our TM1 server of choice, encoded in the URL, retrieve and validate
the result and convert the result to something presentable in the grid. Easy enough not?
Now let’s run the code!
Once the workbook has been saved, the code is now ready for execution. Since the function name
from the button assignment has been re-used, the button is now tied to the newly coded Macro.
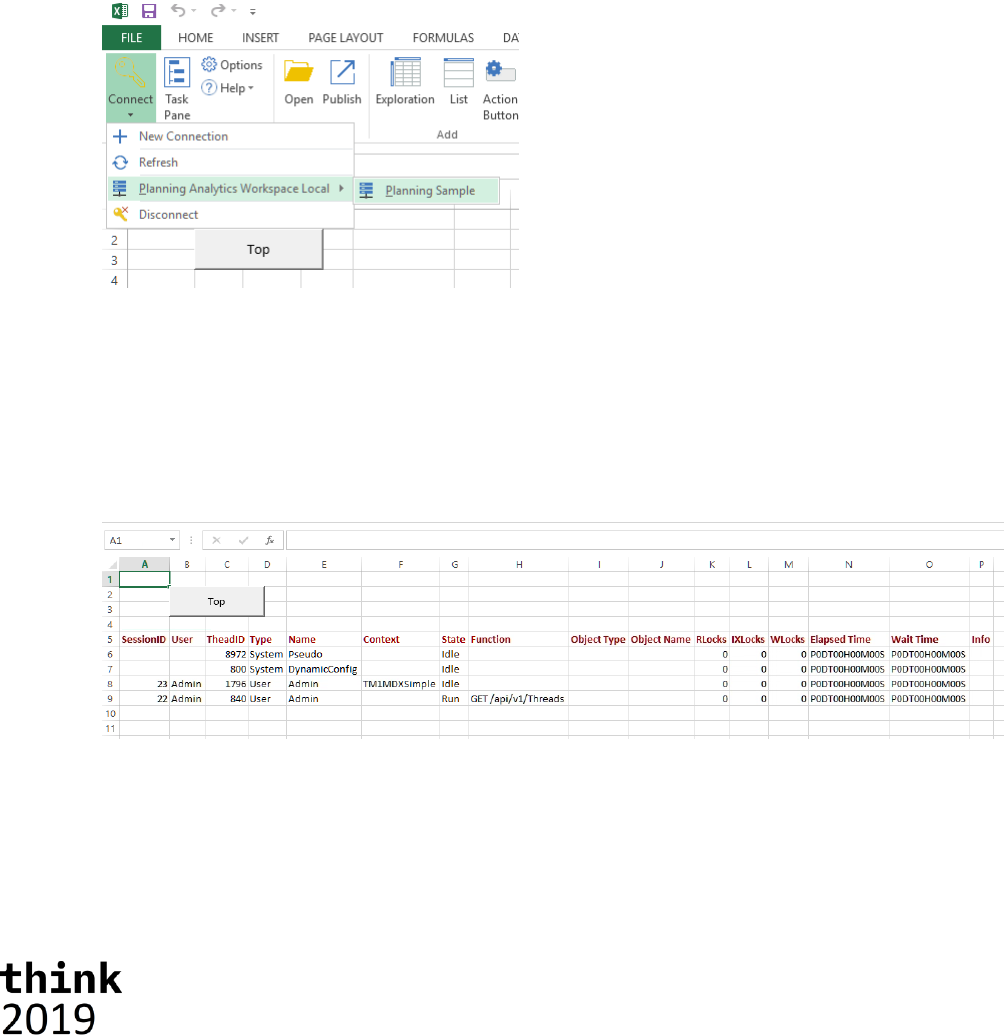
To test out our code let’s switch back to the Workbook. But before clicking on the button, please
active the “IBM® Planning Analytics” ribbon and connect to the Planning Sample database using the
“Connect” icon.
PS please note by the time you got to this section you might have additional TM1 servers up and
running and showing up in the list next to “Planning Sample”.
If you are connection to the Planning Sample database for the first time from Excel you’ll be
prompted with the Planning Analytics login page. Simply log in as ‘admin’ with password ‘apple’.
After clicking on the ‘Top’ button on the sheet, a grid should be displayed, showing thread
information, like what TM1Top would show, coming from the Planning Sample server.
Once again, the complete code for this sample, and some bonus features, can be found here:
C:\HOL-TM1SDK\PAx.

34
Building a model using the REST API
Consuming data and metadata thru the REST API is one, and likely what most consumers will end up
doing but it doesn’t stop there. Obviously, one can create, update and delete objects, like
dimensions and cubes, as well.
In this chapter you build an application, using the Go programming language (a.k.a. Golang), that
creates all the artifacts that make up you model and, subsequently loads data, sales data in this
case, into the Sales cube that you’ll be creating.
The data source for this exercise is the NorthWind database, hosted on the OData.org website. This
database is exposed as an OData compliant service as well.
The goal of this exercise is to learn as much about OData as it is about TM1’s REST API itself. By the
end of this chapter you’ll hopefully start to see resemblances and patterns in requests being used as
a result of either of these services being OData compliant, and have seen how relatively easy it is to
integrate TM1, just as any other service with an OData compliant RESTful API, into any application.
In this chapter, you will:
- Set up a new TM1 Server on your machine named “NorthWind”
- Written a portion of an application, named ‘builder’, that will create the model
- Ran the application and validated that the model got created successfully
Let’s get started!
Setting up a new TM1 server
One of the things we can’t do, yet, is create a completely new model (read: server). So, we’ll start
with doing that the old fashion way, which means:
- Creating a data directory that is going to contain all the data for our model
- Create a tm1s.cfg file in that directory with the configuration for our new model
- Create a shortcut to start the new TM1 server representing our new model
- Start it!
On our lab VM machine we are storing the data for our TM1 models in the C:\HOL-TM1SDK\models
folder. We are going to call our new service ‘NorthWind’ as per the data source name, so we’ll start
with creating a new directory in the C:\HOL-TM1SDK\models folder called ‘NorthWind’.
To be able to start a new TM1 server the only thing we need is a tm1s.cfg file containing the
minimum set of configuration settings to stand up such server. In the NorthWind folder you’ll find
that tm1s.cfg containing the following configuration:
[TM1S]
ServerName=NorthWind
DataBaseDirectory=.
HTTPPortNumber=8088
HTTPSessionTimeoutMinutes=180
PortNumber=12222
UseSSL=F
IntegratedSecurityMode=1
EnableNewHierarchyCreation=T
The most important things in here, apart from the server name, is the HTTPPortNumber, instructing
the server what port to use to host the REST API on, the EnableNewHierarchyCreation set to True,
telling the server it should run with support for Alternate Hierarchies turned on, and lastly, the
UseSSL setting which we’ve set to False implying that we’ll not be using SSL on our connections
35
which, for our REST API, implies we’ll be using HTTP instead of HTTPS. Note that in normal
installation you would not turn SSL off and, preferably, you’d always use your own certificate, as
opposed to using the once provided with the install that everybody that has TM1 have as well (read:
don’t really add much protection).
Now that we have a data folder and the configuration down, we’ll have to start our newly configured
server. To do so we added a shortcut on the desktop named “TM1 NorthWind”. Go ahead and double
click it and start our new server, empty, TM1 server.
Note: If at any point in time, while working thru the later parts of this chapter, you need a ‘reset’, for
example if you end up building only a part of your model and wanted to start from scratch again, just
stop the TM1 Server, remove all the files from the NorthWind folder with the exception of the
tm1s.cfg file, and start the server again.
Building the model using the REST API
Now that we have a server up and running it is time to create some dimensions, create a cube and
load some data into that cube. For that you’ll be creating an application, written in Go, that does
exactly that. And, to make it easy for you, we’ve already gone ahead, created a project and wrote the
code that would help you implement this application, including the skeleton of the application itself.
Getting ready to do some coding
So, before we’ll write some code let’s get familiar with the project and learn how to build and run it.
In this lab you’ll be working with Go, a.k.a. Golang, which has built in support for dependency
management, building, testing etc. All the files Go works with need to be organized in places where it
knows where to find them. The root of all those locations is the so called GOPATH. On the lab VM the
GOPATH is set to ‘C:\go-workspace’. The sources and their dependencies, that Go manages the
organization of, all reside under the ‘src’ subfolder and once it’s done building and installing an
application, the binary for that application ends up in the ‘bin’ subfolder.
The source for our project, named ‘builder’, can be found in the github.com\hubert-
heijkers\GoThink2019 repository therefore can be found here:
C:\go-workspace\src\github.com\hubert-heijkers\GoThink2019\builder
Whereas the ‘builder’ app, read: builder.exe, will end up being put into:
C:\go-workspace\bin
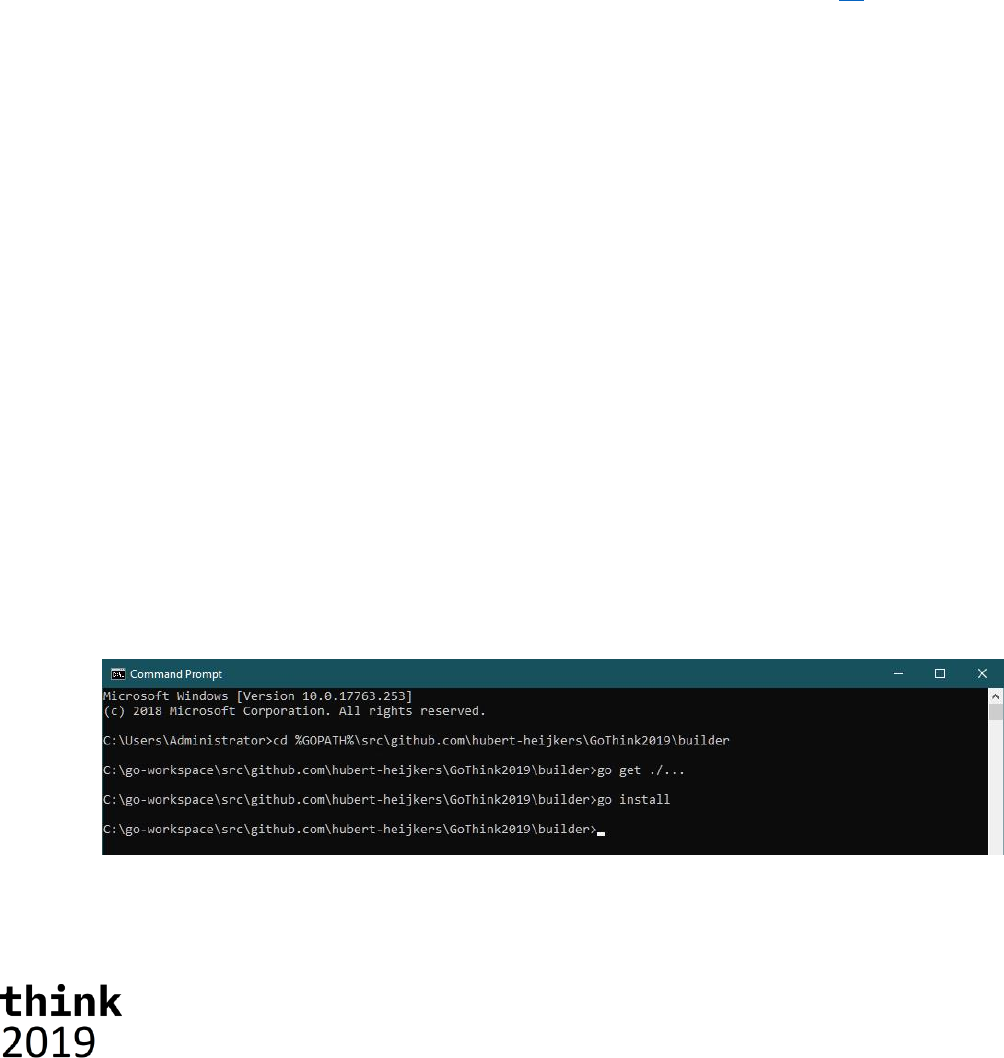
Now let’s go ahead and open a command box and change the directory to builder folder.
cd C:\go-workspace\src\github.com\hubert-heijkers\GoThink2019\builder
or
cd %GOPATH%\src\github.com\hubert-heijkers\GoThink2019\builder
The code that has been written and you are going to write, directly or indirectly, has dependencies
on some third-party packages. Before we can compile anything, we need to get those dependencies.
Go has us covered here, so let’s do that right here, using the following command:

36
go get ./...
And, while we are at it, let’s build the application as well, and have it ‘installed’ in the bin folder,
using:
go install
Congratulations, you’ve built your first Go app. Now go and have a peek in the go bin folder, C:\go-
workspace\bin. It contains the binary for your application, builder.exe.
Getting familiar with what’s there already
Before we start coding let’s have a peek at the code that’s
already provided. If you look in builder source folder, you’ll
notice there are folders that representing a separate
‘package’ in Go speak.
Note: All code in these packages was written with this
example in mind. Shortcuts have been taken, error
checking is ignored, and assumptions made as such, and
therefore this code is by no means meant to be complete or
‘production’ quality, yet is purely to demonstrate the
principals involved.
OData package:
This package implements OData specific extensions on top
of the build in http package. For starters, it implements
wrappers for the GET and POST methods, adding some
OData specifics to the request as well as error checking.
The IterateCollection function, given the URL to a
collection valued OData resource, iterates that collection in
one or more roundtrips, building on OData semantics.
NorthWind package:
Go has built in support for marshalling of structures from
and to JSON. In this package you’ll find the structures
describing both entity types and responses, with their
JSON mapping, we’ll end up consuming from the
NorthWind service. If you are interested in taking a look at the metadata for the NorthWind service
then, as you did with the TM1 server earlier already, query the metadata document by, like with the
TM1 server, adding $metadata to the service root URL as in:
http://services.odata.org/V4/Northwind/Northwind.svc/$metadata.
TM1 package:
Using the same JSON mapping as mentioned above, the TM1 package describes those meta data
entity types (Cube, Dimension, Hierarchy, Element, Edge etc.). Only specifying those properties that
we’ll end up using, from TM1’s REST API, needed by code that we are writing to build our NorthWind
model.
Note: Currently there is a difference in JSON encoding of a collection of references being received
from the server and a collection of references being sent, which for now still requires the
@odata.bind annotation. This is changing in an upcoming v4.01 version of the OData specification,
but until then two separate types will be required, making it all very inconvenient to mix and match.
In the code we do not use the components to define the dimension, only in consumption cases, but
rather specify edges, that use the bind notation.
37
Processes package:
This is the package in which the code resides that does the actual processing of the source data and
generates the definitions of the dimensions as well as loading data into the model.
The Products, Customers and Employees dimensions all follow the same pattern, they iterate the
collections of categories expanded with products, customers and employees, and generate the
dimension structures for the dimension representing them. Products and customer dimensions each
have one hierarchy, while for the Employees dimension we create two hierarchies, one hierarchy
based on geography and another one based on the age generation. Have a look at the source data.
Categories expanded with products:
http://services.odata.org/V4/Northwind/Northwind.svc/Categories?$select=CategoryID
,CategoryName&$orderby=CategoryName&$expand=Products($select=ProductID,ProductName
;$orderby=ProductName)
Customers:
http://services.odata.org/V4/Northwind/Northwind.svc/Customers?$orderby=Country%20
asc,Region%20asc,%20City%20asc&$select=CustomerID,CompanyName,City,Region,Country
Employees:
http://services.odata.org/V4/Northwind/Northwind.svc/Employees?$select=EmployeeID,
LastName,FirstName,TitleOfCourtesy,City,Region,Country,BirthDate&$orderby=Country%
20asc,Region%20asc,City%20asc
Note that we are using $select, $expand and $orderby to select just the data we are interested in
and have the data source order them before returning them so we can build on that order.
The Time dimension applies a different logic. It requests the first and the last order by requesting
the orders collection, ordering them by order data, both ascending and descending, and then only
asking for the first order to be returned. Using the order date from these two orders we know the
date range for which it subsequently creates a time dimension with one hierarchy containing years,
quarters, months and days and additional hierarchies for years, quarters and months. Want to find
out yourself what the first and last order dates are then follow the following links:
First order date:
http://services.odata.org/V4/Northwind/Northwind.svc/Orders?$select=OrderDate&$ord
erby=OrderDate%20asc&$top=1
Last order date:
http://services.odata.org/V4/Northwind/Northwind.svc/Orders?$select=OrderDate&$ord
erby=OrderDate%20desc&$top=1
The measures dimension is not driven by source data, it simply builds a simple flat dimension with
three elements: Quantity, Unit Price and Revenue. Later we’ll see that we’ll define a rule in which we
calculate the, average to be exact, Unit Price from Revenue and Quantity.
This leaves us with loading the data into the TM1 server. From a consuming the source OData service
it is, once again, simply iterating a collection, in this case the collection of orders but expanded with
the order details. The processing code doesn’t generate a dimension structure this time but, in this
case, we choose to build the JSON payload for the Update request directly into the processor. On the
other hand, we don’t need to collect all the data needed to be loaded but, because we can, we
choose to send an update request per chunk of orders that we receive from the source.
Note that this might not be the typical thing to do as you may want to make all these update logically
as one transaction. In that case one could compose one large payload and POST one update action
request to the server. Alternatively, one could also compose a text file with the data, upload it as a
blob to the server, write a TI to process the data contained in the and execute that TI process.

38
Bringing it all together into the builder app
Alright, now that we have all the basic ingredients for building the model taken care of, lets write the
code that brings it all together. All the code that needs to be written, and don’t worry we don’t
expect you to know how to write Go code, we’ll give to you as snippets that need to go into the
main.go file. Note that all the snippets contain the comments from the provided skeletons as well,
so you don’t need to type them and know where the code should go;-). Open up the main.go file in
either Notepad++ or Visual Studio Code, whatever suits you best.
You’ll see that we provided the skeleton for three functions that we’ll have to implement, the main
logic and two functions that contain the logic of creating a dimension and cube respectively.
The createDimension function
Let’s start with the createDimension function. The createDimension function is the function that
makes the appropriate REST API request that, given a specification, using the structures defined in
the tm1 package, result in the dimension being created in the TM1 server. In our example, we will
define and associate values to the built-in Caption attribute for those elements for which we’d like to
show a friendlier name or representation then the name of the element. To do this we, at least
currently, need three REST requests, notably:
- A POST of the dimension specification to create the dimension
- A POST of the attribute definition to associate the ‘Caption’ attribute with the elements
- An Update action to update the Caption values for the elements in the dimension
Note that the last step, setting attribute values could arguably be done thru updates to the
LocalizedAttributes collection of localized attribute values. However, that to date requires a request
per element and locale we are setting values for. We therefore chose to update the element attribute
cube, the one containing the ‘default’ values for the attribute, directly using the Update action.
So, let’s start filling in the skeleton. The dimension definition is passed to the function so first thing
we need is a JSON representation of it. The first thing we’ll therefore do is marshal the dimension
definition into JSON:
// Create a JSON representation for the dimension
jDimension, _ := json.Marshal(dimension)
That’s all we need to POST to our TM1 server to get the dimension created as in:
// POST the dimension to the TM1 server
fmt.Println(">> Create dimension", dimension.Name)
resp := client.ExecutePOSTRequest(tm1ServiceRootURL+"Dimensions", "application/json",
string(jDimension))
Note that ExecutePOSTRequest returns irrespective of the result of executing the request itself, so
we’ll have to validate the actual status code that the server responded with. If the request was
successful, and the dimension was created successfully, then the server responds with a ‘201
Created’ status. All other status codes indicate something didn’t go as expected. Let’s add the code
to validate just that and break of the process if it failed, while logging the response from the server.
// Validate that the dimension got created successfully
odata.ValidateStatusCode(resp, 201, func() string {
return "Failed to create dimension '" + dimension.Name + "'."
})
resp.Body.Close()
Next, we’ll add the ‘Caption’ attribute by posting the attribute definition, which we in lined as the
payload for the request here, to the dimension hierarchy’s ElementAttributes collection:
// Secondly create an element attribute named 'Caption' of type 'string'

39
fmt.Println(">> Create 'Caption' attribute for dimension", dimension.Name)
resp = client.ExecutePOSTRequest(tm1ServiceRootURL +
"Dimensions('"+dimension.Name+"')/Hierarchies('"+dimension.Name+"')/ElementAttributes",
"application/json", `{"Name":"Caption","Type":"String"}`)
Again, we’ll test if the request was successful and that the attribute got created successfully:
// Validate that the element attribute got created successfully as well
odata.ValidateStatusCode(resp, 201, func() string {
return "Creating element attribute 'Caption' for dimension '" + dimension.Name +
"'."
})
resp.Body.Close()
Now that the Caption attribute has been created, we can associate Caption values with the elements
in the newly created dimension. As mentioned, before we will do so by making an update against the
element attributes cube, associate with the dimension.
// Now that the caption attribute exists let’s set the captions accordingly for this
// we'll simply update the }ElementAttributes_DIMENSION cube directly, updating the
// default value. Note: TM1 Server doesn't support passing the attribute values as
// part of the dimension definition just yet (should shortly), so for now this is the
// easiest way around that. Alternatively, one could have updated the attribute
// values for elements one by one by POSTing to or PATCHing the LocalizedAttributes
// of the individual elements.
fmt.Println(">> Set 'Caption' attribute values for elements in dimension", dimension.Name)
resp = client.ExecutePOSTRequest(tm1ServiceRootURL +
"Cubes('}ElementAttributes_"+dimension.Name+"')/tm1.Update", "application/json",
dimension.GetAttributesJSON())
The payload that in this request is generated based on a map of captions that we keep track of in the
dimension definition but, is formatted for and update request against the element attributes cube.
After the update we’ll, once again, make sure that the update of the caption values succeeded.
// Validate that the update executed successfully (by default an empty response is
expected, hence the 204).
odata.ValidateStatusCode(resp, 204, func() string {
return "Setting Caption values for elements in dimension '" + dimension.Name + "'."
})
resp.Body.Close()
The createCube function
The createCube function makes the appropriate REST API request that, given the specification for a
cube, result in the cube to be created in the TM1 server. This only requires one REST request,
notably:
- A POST of the cube specification to create the cube
The function takes a cube name, the list of dimensions spanning the cube and the rules that need to
be set on the cube.
First, we’ll create a collection of dimension IDs, read: OData IDs, that we’ll need to pass to the cube
definition. We’ll do so by simply converting the dimensions array to a string array with these IDs.
// Build array of dimension ids representing the dimensions making up the cube
dimensionIds := make([]string, len(dimensions))
for i, dim := range dimensions {
dimensionIds[i] = "Dimensions('" + dim.Name + "')"
}
Now we’ll pass these IDs into a structure defined in the tm1 package, which we will subsequently
use to marshal into the JSON specification:

40
// Create a JSON representation for the cube
jCube, _ := json.Marshal(tm1.CubePost{Name: name, DimensionIds: dimensionIds, Rules:
rules})
This JSON specification we subsequently POST to our TM1 server to get the cube created using:
// POST the dimension to the TM1 server
fmt.Println(">> Create cube", name)
resp := client.ExecutePOSTRequest(tm1ServiceRootURL+"Cubes", "application/json",
string(jCube))
We obviously want to validate that the cube got created successfully before continuing. Once again
we expect the server to respond with a 201 – created. All other status code, indicate something
didn’t go as expected. Let’s add the code to validate just that:.
// Validate that the cube got created successfully
odata.ValidateStatusCode(resp, 201, func() string {
return "Failed to create cube '" + name + "'."
})
resp.Body.Close()
The function ends with returning the OData id, which in services that follow convention (which TM1
does) is equal to the canonical URL of the resource, to the newly created cube.
The main function
Now that we got all the ingredients for our application lets write the main function, the function that
gets executed when our application is started. If you look at the skeleton of the function as provided
you’ll see that it starts by initializing a couple of variables that get loaded from ‘environment’
variables which themselves get initialized by loading them from the “.env” file.
The steps in the getting ready portion made sure you have a “.env” file in the right location, the
go/bin folder in this case, and that it has the correct values to initialize these variables, in this
particular case the service root URLs for both the source, our NorthWind database hosted on
odata.org, and our target, the TM1 server that you created at the beginning of this exercise.
First, we’ll create an instance of an http client which we use to execute our HTTP requests. In this
case we’ll use one that we extended ourselves in our OData package, which allows us to generically
take care of some of the OData specifics when making HTTP requests to an OData service. We also
need to make sure that once we’ve been authenticated to a service that any cookies, in TM1’s case
the TM1SessionId cookie representing our session, are retained for the duration of our session. To
do so we’ll have to initialize a so-called cookie jar as well. Note that this is a very common pattern in
any http library in any language you’ll end up using. With initializing some form of cookie storage, it is
often very hard, if not impossible, to retain/manage your session. Here is the code you need to inject
to do exactly that:
// Create the one and only http client we'll be using, with a cookie jar enabled to keep
reusing our session
client = &odata.Client{}
cookieJar, _ := cookiejar.New(nil)
client.Jar = cookieJar
Next, we’ll make sure that we connect to the TM1 server. We’ll write out this first request here as
we’ll have to add credentials to authenticate with our server and thereby trigger the server to give us
the session cookie for the authenticated user. The request we’ll use is a simple request for purely
the server version. You can do this in a browser directly to by following this URL:
http://tm1server:8088/api/v1/Configuration/ProductVersion/$value

41
Note the /$value at the end of the URL. This, OData defined, path segment instructs the server to
return the value for the property, in this case the product version, in raw, text in this case, format. In
this case:
11.2.00000.11111
We don’t use this value for anything other than dumping it out to the console to show which version
of TM1 server we are working with but, one could envision using this value to validate a minimal
version required or even, as a shortcut instead of evaluating the $metadata document as one should,
make some chooses as to what to support or how to implement knowing what version it was. So
here is the code we need to set up the request, set the authentication header, in this case we are
using authentication mode 1 which translates into basic HTTP authentication, execute the request
and, after checking we got a 200 – OK status, dump the content of the response, the server version,
to the console:
// Validate that the TM1 server is accessable by requesting the version of the server
req, _ := http.NewRequest("GET", tm1ServiceRootURL+"Configuration/ProductVersion/$value",
nil)
// Since this is our initial request we'll have to provide a user name and
// password, also conveniently stored in the environment variables, to authenticate.
// Note: using authentication mode 1, TM1 authentication, which maps to basic
// authentication in HTTP[S]
req.SetBasicAuth(os.Getenv("TM1_USER"), os.Getenv("TM1_PASSWORD"))
// We'll expect text back in this case but we'll simply dump the content out and
// won't do any content type verification here
req.Header.Add("Accept", "*/*")
// Let's execute the request
resp, err := client.Do(req)
if err != nil {
// Execution of the request failed, log the error and terminate
log.Fatal(err)
}
// Validate that the request executed successfully
odata.ValidateStatusCode(resp, 200, func() string {
return "Server responded with an unexpected result while asking for its version
number."
})
// The body simply contains the version number of the server
version, _ := ioutil.ReadAll(resp.Body)
resp.Body.Close()
// which we'll simply dump to the console
fmt.Println("Using TM1 Server version", string(version))
Once again, after having executed this request the server also returns a new cookie, named
TM1SessionId, which got stored in the cookie jar we created earlier. Note that, especially in
browsers, if you end up writing code in JavaScript for example like the TM1Top example earlier, you
will not have direct access to these cookies and will depend on the underlying http client to handle
these correctly.
Alright, now that we know we can establish a connection to our TM1 server and are authenticated
let’s run some of our ‘processes’ to create some dimensions to being with. You might recall that the
createDimension function returned the dimension definition which we’ll need to pass to the
createCube function later. So, lets create an array of dimensions to store the dimension we create.

42
Creating the dimensions themselves has become ‘as simple as’ calling the function that generates
the specification for it, as described earlier, and passing that definition to the createDimension
function that we wrote just now. The only parameters we’ll pass to those generation functions are
the http client we are using, the service root URL from our data source, the NorthWind database in
our case, and the name of the dimension to be generated. In code this looks like:
// Now let's build some Dimensions. The definition of the dimension is based on data
// in the NorthWind database, a data source hosted on odata.org which can be queried
// using its OData complaint REST API.
var dimensions [5]*tm1.Dimension
dimensions[0] = createDimension(proc.GenerateProductDimension(client,
datasourceServiceRootURL, productDimensionName))
dimensions[1] = createDimension(proc.GenerateCustomerDimension(client,
datasourceServiceRootURL, customerDimensionName))
dimensions[2] = createDimension(proc.GenerateEmployeeDimension(client,
datasourceServiceRootURL, employeeDimensionName))
dimensions[3] = createDimension(proc.GenerateTimeDimension(client,
datasourceServiceRootURL, timeDimensionName))
dimensions[4] = createDimension(proc.GenerateMeasuresDimension(client,
datasourceServiceRootURL, measuresDimensionName))
Now that we have the dimension, we need to create a cube, which we’ll do using the createCube
function you wrote a little earlier. This function takes a name, the set of dimensions representing the
dimensions spanning the cube, and a set of rules to be used by the cube. The set of dimensions we
created above, the only remaining thing is the rules. As you might have seen in the measures
dimension generation code already, we create three measures, Quantity, Unit Price and Revenue.
Even though the data from the orders we’ll be loading has Quantity and Unit Price, there is no easy
way to aggregate those if we incrementally load data the way we do. We therefore store Quantity
and Revenue, as a simple multiplication of Quantity * Unit Price, and we’ll add a rule that calculates
our Unit Price later on, an average in this case. We’ll also add a feeder to make sure that Unit Price
doesn’t get suppressed if null/empty suppression is request. The rules we’ll be using are:
UNDEFVALS;
SKIPCHECK;
['UnitPrice']=['Revenue']\['Quantity'];
FEEDERS;
['Quantity']=>['UnitPrice'];
Ok, now that we have everything let’s have the server create that cube!
// Now that we have all our dimensions, let's create cube
createCube(ordersCubeName, dimensions[:],
"UNDEFVALS;\nSKIPCHECK;\n\n['UnitPrice']=['Revenue']\\['Quantity'];\n\nFEEDERS;\n['Quantity
']=>['UnitPrice'];")
Now that we have a cube, we can start loading data into it. This we’ll do using the LoadOrderData
function, implemented in the processes packages as discussed earlier. We’ll again simply pass the
service root URLs, the cube and dimension names on to the function. Needless to say, that this load
function was written with this particular target cube in mind, but we wanted to keep the names for
both cube and dimensions configurable, while not reusing or building on anything that happened
necessarily before in the same process. Here is how to call that load function:
// Load the data in the cube
proc.LoadOrderData(client, datasourceServiceRootURL, tm1ServiceRootURL, ordersCubeName,
dimensions[0], dimensions[1], dimensions[2], dimensions[3], dimensions[4])

43
That concludes the code writing portion of this exercise. Your Visual Studio Code environment has
been set up to ‘auto-complete’ the list of imports required based on the code (Go does not retain –
read: it is invalid to have an unreferenced import – any libraries referenced as imports in code) but
just in case it didn’t, or you decided to use an alternative way of editing your code, please verify that
the list of imports, at the top of the main.go file that you have been editing, includes the following
list of libraries:
import (
"encoding/json"
"fmt"
"io/ioutil"
"log"
"net/http"
"net/http/cookiejar"
"os"
"github.com/hubert-heijkers/GoThink2019/builder/helpers/odata"
proc "github.com/hubert-heijkers/GoThink2019/builder/processes"
"github.com/hubert-heijkers/GoThink2019/builder/tm1"
"github.com/joho/godotenv"
)
Make sure your sources are saved and then go back to the console window you opened earlier and
build and install your app by typing:
go install
After successful compilation of the code you can now run the app. Open another console window
and go to the bin folder with the binaries by typing:
cd %GOPATH%\bin
which should take you to C:\go-workspace\bin. In this folder you now find builder.exe and the .env
file that was dropped there while we got ready for the lab. Type:
builder
And your application should fire up and, after telling you which version of TM1 you are using, start
firing requests to the NorthWind database and TM1 server to build your model. All the requests, the
request payloads in case of POST requests and the responses from GET requests are dumped out to
the console for you to see what really happens under the covers. Once it’s done processing
everything successfully you should see a last line like this one in your output:
>> Done!
If you get an error message that you can’t resolve yourself, please ask one of the instructors in the
room for help.
Having a look at the results
A quick way to have a peek at the cube and dimensions we created is by simply querying them and
visually validating the returned JSON. Try executing the following request:
http://tm1server:8088/api/v1/Cubes('Sales')/Dimensions?$select=Name&$expand=Hierar
chies($select=Name;$expand=Members($filter=Parent%20eq%20null;$select=Name;$expand
=Children($select=Name;$expand=Children($select=Name;$expand=Children($select=Name
;$expand=Children($select=Name))))))&$format=application/json;odata.metadata=none
Notice that we are using the Cube’s dimensions collection to limit the set of dimensions to just those
referenced by the cube. You’ll also notice that we are specifying the $format query option, as
defined in the OData specification. This query options overwrites the ‘Accept’ header. In this case we

44
add the ‘odata.metadata’ parameter, which defaults to minimal, to none here to minimize any
additional information one doesn’t need in the response. In this case it only removes a couple of
etag annotations but, when requesting entities without including their key properties, which often
happens in the TM1 case when choosing the, ironically, more descriptive, unique names, the
odata.id annotations will be removed as well. This can be handy in keeping responses readable and
small.
Lastly, you’ll notice that, once at the member level, we’ll first filter the members to just the roots, by
checking if the parent is equal to null or not, and then expand the children collection, a collection of
members as well, recursively, ending up with effectively a hierarchical representation of the member
tree of every hierarchy in this case.
Note: If you studied the OData specification you might wonder why don’t use a $level here. Well, the
answer is that TM1, as is, doesn’t, as least not yet, support $level in $expand constructs. Therefore,
we recursively expand enough times to cover the maximum depth used across all dimensions in the
model in this example request.
And while we are learning more about our newly created model, let’s take a closer look at the Time
dimension specifically using the following request:
http://tm1server:8088/api/v1/Dimensions('Time')?$select=Name&$expand=Hierarchies($
count;$select=Name;$expand=Elements($select=Name;$filter=Parents/$count%20eq%200;$
expand=Components($select=Name;$expand=Components($select=Name;$expand=Components(
$select=Name)))))&$format=application/json;odata.metadata=none
This time we traverse the Elements (graph) of the hierarchy, once again filtering them initially to only
the roots, this time by checking if number of parents is zero, and then expand the components
recursively.
Want to play a bit more with this newly created model? You can now use any of the tools we
discussed earlier and connect them to your newly created server and have a look at what is there.
Architect not supporting hierarchies and all, and no longer installed by default with TM1 server,
Planning Analytics Workspace would be the obvious place to go, which you can by pointing your
browser at http://pawl. Having a quick peek at the newly created model, and more particularly our
Sales cube, might render a view like this:
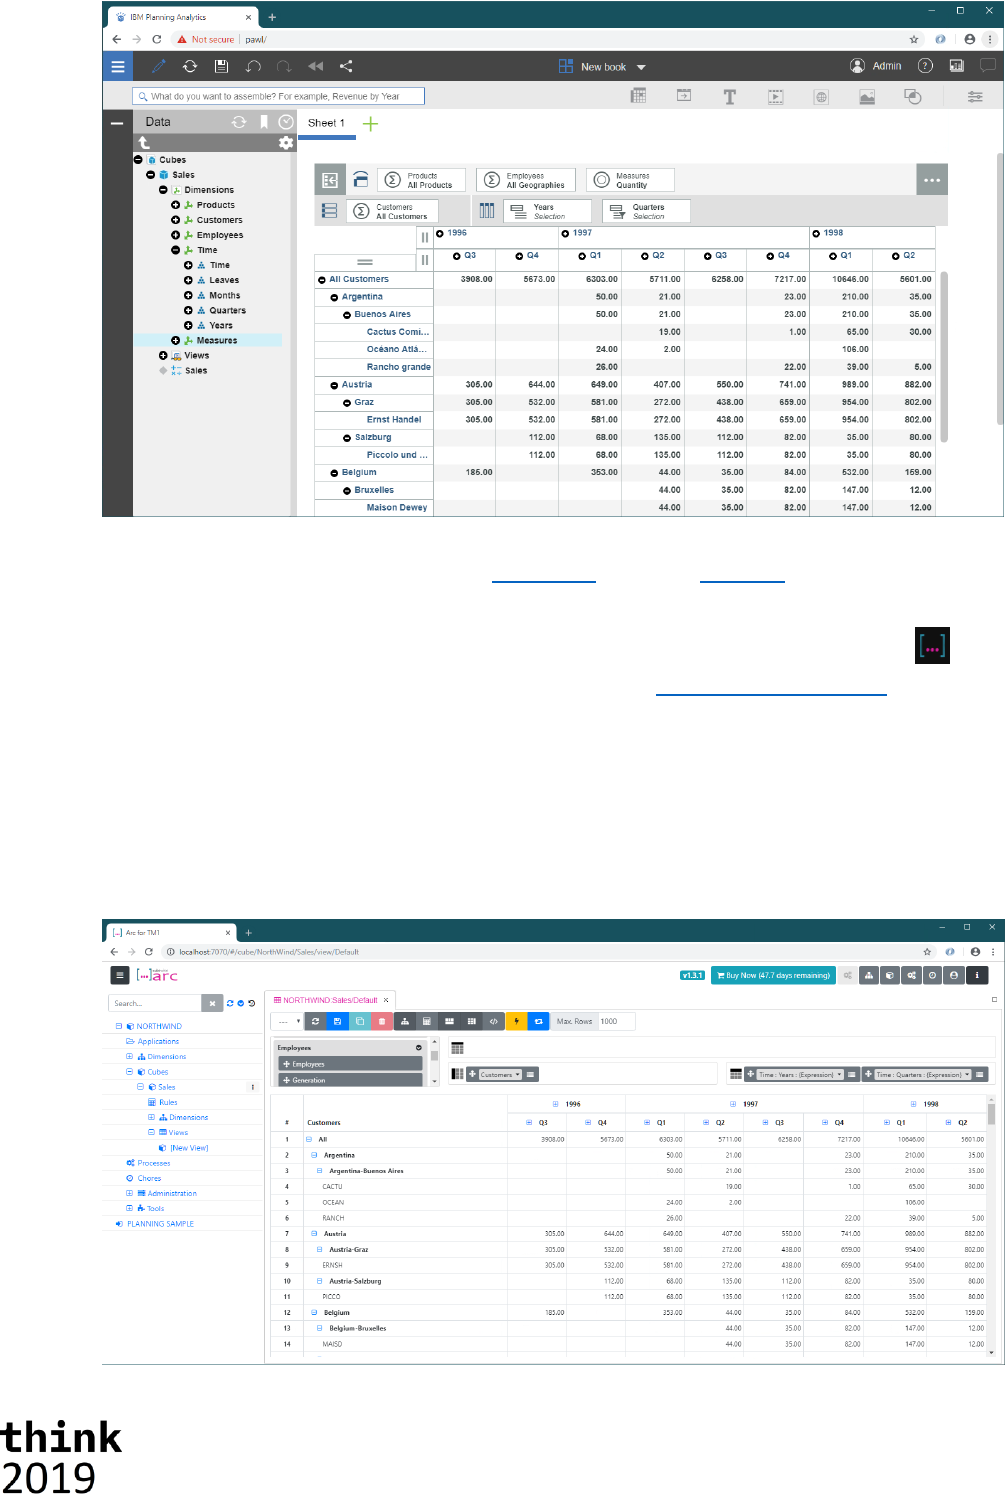
45
However, for those more developer types among us, those diehard Architect fans, your lab
environment is set up with a trial version of Arc for TM1, curtesy of cubewise. Arc, like many other
tool/utilities developed by the TM1 partner community, is built on the TM1 server’s REST API.
If you want to have a quick peek at our newly created model using Arc, op it by clicking the icon
in the taskbar on your machine or by pointing your browser at http://localhost:7070.
The list of available data sources should now contain our newly created NorthWind database. Click
on NORTHWIND, login using user admin (no password), and look for the Sales cube we just create
and create a new view. Drag in a couple of hierarchies, in the example below we dragged both the
Years and Quarters hierarchies of the Time dimension to the columns and the Customer hierarchy to
rows (make sure you don’t select too many members of each hierarchy as by default Arc will select
all members) and execute the view by pressing the lightning button. After the query has executed
you should see a result like this:

46
We hope that this exercise was helpful and has given you enough insights to start envisioning how
you could programmatically use TM1 server’s, OData compliant, REST API to build tools, utilities and
applications that interact with TM1.
Note: The complete version of the main.go file is also provided in the
%GOPATH%/src/github.com/hubert-heijkers/GoThink2019/_output/builder folder. Feel free
to copy that version over to the %GOPATH%/src/github.com/hubert-
heijkers/GoThink2019/builder folder and save time.
If you want to look at the result without having to build it yourself, or if for some reason you wouldn’t
be able to build it, a copy of the NorthWind model can also be found here:
%GOPATH%/src/github.com/hubert-heijkers/GoThink2019/_output/NorthWind.

47
Processing Logs using the REST API
If you made it here you’ve learned already how to use and manipulate data and metadata in a TM1
server. So now its, time permitting, time for a more advanced topic.
In this chapter we’ll discuss a second app called the ‘watcher’, once again written in Go. This app
will ‘monitor’ the transaction log in this case and will dump any new changes recorded in it to the
console.
The goal of this example is to make you familiar with the support, for now on our transaction and
message logs, of deltas. For more specifics about delta and the odata.track-changes preference,
see the OData Protocol document, specifically section 11.3 Requesting Changes.
This application, which we provide the code for, is building on the some of the helper code from the
example in the previous example, most notably the TM1 and OData helper packages. The TM1 server
we are targeting in this example is the server you just build in the previous chapter.
Ok, let’s have a look at the code.
You might have noticed there were a couple of additional structures and functions in the TM1 and
OData packages.
The OData package has a TrackCollection function, arguably the most interesting function in this
example. The TrackCollection function, like the IterateCollection, iterates the collection specified by
the URL. However, there are two differences. It adds the odata.track-changes preference in the
request, by means of the ‘Prefer’ header which, as a result of this header being added, will trigger
the service, in this case TM1, to add a so called delta link, using the odata.deltaLink annotation, to
the end of the payload, containing the URL that can be used at a later point in time to retrieve any
changes/deltas to the collection requested in the initial request. The TrackCollection continues
requesting changes after the specified interval, a duration, passed to the function.
In the TM1 package you might have noticed that there was already a TransactionLogEntry and
TransactionLogEntriesRequest representing the TransactionLogEntry entity and a response that
returns a collection of this entity. These are used to unmarshal the response from the TM1 server on
any of these requests.
The sample itself only contains one single file, the main.go file. The main function in this file is pretty
much the same as the one you wrote for the builder app in the previous chapter with the exception
of the last couple of lines. This is where the TrackCollection function is called with the URL to the
transaction log entries. Note that we are asking the server to only return those entries for the Sales
cube we created earlier, and to repeat it every second. Lastly the processTransactionLogEntries is
being passed as the function to be called with the response of any of the requests, which is the only
other function in our main source file.
Want to have a quick peek at what such result looks like? Execute the following request in a browser:
http://tm1server:8088/api/v1/TransactionLogEntries?$filter=Cube%20eq%20'Sales'
Note that the transaction log contains process messages as well, but those records don’t have a
value for the Cube property. As a result of filtering for the ‘Sales’ cube the process messages are
filtered out too.
The processTransactionLogEntries function, which is very similar to the process function in our
dimension build processes in our previous builder sample, unmarshals the response from the server,
iterates the entries in the collection and builds a nicely readable representation and prints it to the

48
console. It returns any next link or delta link that is in the response, note there, as per the OData
conventions always either a next link or a delta link, never both.
To build the application, like before, go to your console window, make sure you are now in the
‘watcher’ folder and use Go to build and install your app by typing:
go install
After the successful compilation of the code you can now run the app. Open another console window
and go to the bin folder with the binaries by typing:
cd %GOPATH%\bin
which should take you to C:\go-workspace\bin. In this folder you now find watcher.exe and the
.env file that was dropped there while we got ready for the lab. Type:
watcher
And your application should fire up and, after telling you which version of TM1 you are using, start
showing you any transaction log entries your server already has followed by any new changes as
they are coming in.
One way of testing is to open Architect once again and make some changes to the data in the Sales
cube. If you spread data, you’ll see multiple changes happen as the transaction log records the leaf
level changes.
Now that you have this app you could start after creating the new server in the previous chapter but
before running the builder. Once you start the builder, you’ll see transaction flow in while the builder
is loading and writing them. Pretty cool eh?
As mentioned earlier, TM1 supports tracking changes on both transaction log and message log. If
you are interested in processing message log entries as they happen, you could use this sample as
the base for writing that message log processor. Want to react to users logging in or out? Want to
write the message log, or transaction log, entries to a database? It has all become relatively easy to
do this in real time. An example you can try and play with is available on github here:
https://github.com/Hubert-Heijkers/tm1-log-tracker. Feel free to have a go at it and
customize it to your own liking.

49
We Value Your Feedback!
• Don’t forget to submit your Think 2019 session and speaker feedback! Your
feedback is very important to us – we use it to continually improve the conference.
• Access the Think 2019 agenda tool to quickly submit your surveys from your
smartphone, laptop or conference kiosk.
