| ThoughtSpot Thought Spot Administration Guide 5.1
User Manual:
Open the PDF directly: View PDF ![]() .
.
Page Count: 503 [warning: Documents this large are best viewed by clicking the View PDF Link!]
- Table of Contents
- Introduction to administration
- Login credentials for administration
- Architecture components
- Data Caching
- Authentication
- Data and object security
- Performance considerations
- About installation and upgrades
- Set your ThoughtSpot locale
- Test network connectivity between nodes
- Set the relay host for SMTP (email)
- Set up a fiscal calendar year
- Configure SSL
- Configure SAML
- Enable Active Directory based access
- About LDAP integration
- Configure LDAP for Active Directory
- Add the SSL certificate for LDAP
- Test the LDAP configuration
- Sync users and groups from LDAP
- Configure NAS file system
- Set up monitoring
- Configure support services
- Network ports
- Configure load balancing and proxies
- Customize ThoughtSpot Help
- Customize look and feel
- Enable SearchIQ
- Slack integration
- Load and manage data
- Configure casing
- Load CSV files with the UI
- How to view a data schema
- Schema planning concepts
- Data types
- Constraints
- Sharding
- Chasm traps
- Overview of schema building
- Connect with TCL and create a schema
- How to write a SQL script
- Schema creation examples
- Upload and run a SQL script
- How to change a schema
- Convert column data type
- Import CSV files with tsload
- Use a script to load data
- Delete a data source
- Delete or change a table in TQL
- About data modeling
- Change a table's data model
- Edit the system-wide data model
- Overview of data modeling settings
- Set column name, description, and type
- Set ADDITIVE or AGGREGATION
- Hide a column or define a synonym
- Set columns to exclude from SpotIQ analyses
- Manage suggestion indexing
- Add a geographical data setting
- Set number, date, and currency formats
- Change the Attribution Dimension
- Set entity categories for SearchIQ
- Link tables using relationships
- Join a table or view to another data source
- Delete a relationship
- About stickers
- Simplify search with worksheets
- Edit or rename worksheet
- Create a formula in a worksheet
- Add a filter to a worksheet
- How the worksheet join rule works
- Change the join rule or RLS setting for a worksheet
- Join a worksheet to another data source
- Modify joins within a worksheet
- Delete a worksheet or table
- Understand groups and privileges
- Create, edit, or delete a group
- Add, edit, or delete a user
- Job management (scheduled pinboards)
- Scheduled pinboards management
- Overview of security features
- System security
- Data security
- Share tables and columns
- Share worksheets
- Share a pinboard
- Security for SpotIQ functions
- Revoke access (unshare)
- About row level security (RLS)
- How rule-based RLS works
- Set row level security rules
- ThoughtSpot Lifecycle
- System administration
- Send logs when reporting problems
- Set up recording for Replay Search
- Introduction to monitoring
- Overview board
- Understand system boards and pinboards
- Cluster Summary
- Relational Data Cache
- Relational Search Engine
- Critical Alerts
- Space Utilization
- Monthly Active Users
- Monthly Ad-hoc Searches
- Monthly Pinboard Views
- Top Users Last Month
- Top Pinboards Last Month
- Configuration Events
- About deprecated boards
- Related information
- Data board
- Cluster Manager board
- Alerts and Events board
- System worksheets
- System pinboards
- Understand the backup strategies
- Understand backup/snapshot schedules
- Work with snapshots
- Understand backup modes
- Create a manual backup
- Configure periodic backups
- About restore operations
- About troubleshooting
- Get your configuration and logs
- Upload logs to ThoughtSpot Support
- Network connectivity issues
- Check the timezone
- Browser untrusted connection error
- Characters not displaying correctly
- Clear the browser cache
- Cannot open a saved answer that contains a formula
- Data loading too slowly
- Search results contain too many blanks
- Introduction
- Log in to the Linux shell using SSH
- Log in credentials
- Using the JavaScript API
- About SAML
- Configure SAML
- Configure CA SiteMinder
- Configure Active Directory Federated Services
- Initialize the Identity Provider Metadata
- Initialize the Service Provider Metadata
- Test the ADFS Integration
- About the REST API
- Related information
- Calling the REST API
- REST API pagination
- Use the REST API to get data
- Use the Embedded Search API to pull data from ThoughtSpot
- Use the Data Push API
- Understand embedding
- Embed pinboard or visualization
- Authentication flow with embed
- Full application embedding
- Configure trusted authentication
- About Runtime Filters
- Apply a Runtime Filter
- Runtime Filter Operators
- Customize the application style
- Upload application logos
- Set chart and table visualization fonts
- Choose a background color
- Select chart color palettes
- Change the footer text
- Public API reference
- pinboarddata API
- metadata API
- Public API reference
- user API
- group API
- Keyword reference
- TQL reference
- tsload flag reference
- tscli command reference
- Date and time formats reference
- Row level security rules reference
- Formula function reference
- Alerts code reference
- User action code reference
- Error code reference
- Metadata Errors (100 - 499)|
- Data Service Errors (500 - 699)
- Dependency Errors (700 - 799)
- Admin Service Errors (800 - 899)
- Permissions Errors (900 - 999)
- Import Data Errors (1000 - 1099)
- Scheduled Jobs Errors (1100 - 1199)
- User Admin Service Errors (1200 - 1399)
- Session Service Errors (1400 - 1599)
- Data Management Service Errors (1600 - 1799)
- Cluster Status Service Errors (1800 - 1899)
- Callosum API Errors (9000 - 9199)
- Common Errors (10000 - 10099)
- Falcon Errors (10600 - 10699)
- Data Errors (11000 - 11099)
- Report Generation Errors (12000 - 13000)
- More Metadata Errors (13000 - 13099)
- Loading Errors (30000 - 30099)
- Timely Errors (60000 - 64999)
- Frequently asked questions

Application Integration GuideApplication Integration Guide
Version 5.1 February 07, 2019

Copyright for ThoughtSpot publications. © 2019 ThoughtSpot, Inc. All rights
reserved.
ThoughtSpot, Inc. 1 Palo Alto Square
Building 1, Suite 200
Palo Alto, CA 94306
All rights reserved. This product is protected by U.S. and international copyright
and intellectual property laws. ThoughtSpot is a trademark of ThoughtSpot, Inc. in
the United States and/or other jurisdictions. All other marks and names mentioned
herein may be trademarks of their respective companies.

Table of Contents
Introduction to administrationIntroduction to administration .................................................................................................................................................................................................... 77
Login credentials for administrationLogin credentials for administration.................................................................................................................................................................................. 88
Understand the architectureUnderstand the architecture
Architectural componentsArchitectural components ...................................................................................................................................................................................................... 1010
Data cachingData caching .............................................................................................................................................................................................................................................. 1111
Authentication frameworksAuthentication frameworks .................................................................................................................................................................................................. 1313
Data and object securityData and object security .......................................................................................................................................................................................................... 1414
Performance considerationsPerformance considerations .............................................................................................................................................................................................. 1616
Installation and setupInstallation and setup
About installation and upgradesAbout installation and upgrades .................................................................................................................................................................................. 1818
Set your localeSet your locale.......................................................................................................................................................................................................................................... 2121
Test connectivity between nodesTest connectivity between nodes................................................................................................................................................................................ 2323
Set the relay host for SMTPSet the relay host for SMTP ................................................................................................................................................................................................ 2424
Set up a fiscal calendar yearSet up a fiscal calendar year.............................................................................................................................................................................................. 2626
Configure SSLConfigure SSL .......................................................................................................................................................................................................................................... 2727
Configure SAMLConfigure SAML.................................................................................................................................................................................................................................... 2929
Enable Active Directory based accessEnable Active Directory based access................................................................................................................................................................ 3030
Integrate LDAPIntegrate LDAP
About LDAP integrationAbout LDAP integration .................................................................................................................................................................................................... 3232
Configure LDAP for Active DirectoryConfigure LDAP for Active Directory.............................................................................................................................................................. 3333
Add the SSL certificate for LDAPAdd the SSL certificate for LDAP........................................................................................................................................................................ 3535
Test the LDAP configurationTest the LDAP configuration ...................................................................................................................................................................................... 3636
Sync users and groups from LDAPSync users and groups from LDAP.................................................................................................................................................................. 3737
Configure NAS file systemConfigure NAS file system .................................................................................................................................................................................................... 4040
Set up monitoringSet up monitoring................................................................................................................................................................................................................................ 4242
Configure support servicesConfigure support services .................................................................................................................................................................................................. 4343
Network portsNetwork ports............................................................................................................................................................................................................................................ 4848
Configure load balancing and proxiesConfigure load balancing and proxies ................................................................................................................................................................ 5454
Customize ThoughtSpot HelpCustomize ThoughtSpot Help.......................................................................................................................................................................................... 5656
Customize look and feelCustomize look and feel............................................................................................................................................................................................................ 5858
Enable SearchIQEnable SearchIQ.................................................................................................................................................................................................................................... 6161
Add the Slack integrationAdd the Slack integration........................................................................................................................................................................................................ 6363
Load and manage dataLoad and manage data
ThoughtSpot Application Integration Guide
February 07, 2019
support@thoughtspot.com i

Introduction to data managementIntroduction to data management.............................................................................................................................................................................. 6464
Configure casingConfigure casing .................................................................................................................................................................................................................................. 6666
Load CSV files with the UILoad CSV files with the UI...................................................................................................................................................................................................... 6767
How to view a data schemaHow to view a data schema................................................................................................................................................................................................ 7171
Plan the schemaPlan the schema
About schema planningAbout schema planning .................................................................................................................................................................................................... 7575
Data typesData types.............................................................................................................................................................................................................................................. 7878
ConstraintsConstraints............................................................................................................................................................................................................................................ 8080
ShardingSharding.................................................................................................................................................................................................................................................... 8383
Chasm trapsChasm traps........................................................................................................................................................................................................................................ 8888
Build the schemaBuild the schema
Schema building overviewSchema building overview ............................................................................................................................................................................................ 9090
Connect with TQL and create a schemaConnect with TQL and create a schema ................................................................................................................................................ 9292
How to write a SQL scriptHow to write a SQL script .............................................................................................................................................................................................. 9494
Schema creation examplesSchema creation examples.......................................................................................................................................................................................... 9696
Upload an SQL scriptUpload an SQL script........................................................................................................................................................................................................ 101101
Change the schemaChange the schema
How to change a schemaHow to change a schema .......................................................................................................................................................................................... 103103
Convert column data typeConvert column data type.......................................................................................................................................................................................... 107107
Load bulk dataLoad bulk data
Import CSV files with tsloadImport CSV files with tsload.................................................................................................................................................................................... 111111
Use a script to load dataUse a script to load data.............................................................................................................................................................................................. 113113
Delete a data sourceDelete a data source
Delete a data source (table)Delete a data source (table) .................................................................................................................................................................................... 118118
Delete or change a table in TQLDelete or change a table in TQL ...................................................................................................................................................................... 121121
Improve search with modelingImprove search with modeling
About data modelingAbout data modeling.................................................................................................................................................................................................................. 122122
Change a table's data modelChange a table's data model ........................................................................................................................................................................................ 123123
Edit the system-wide data modelEdit the system-wide data model............................................................................................................................................................................ 125125
Data model settingsData model settings
Overview of the settingsOverview of the settings................................................................................................................................................................................................ 128128
Set column name, description, and typeSet column name, description, and type ............................................................................................................................................ 130130
Set additive and aggregate valuesSet additive and aggregate values................................................................................................................................................................ 132132
Hide a column or define a synonymHide a column or define a synonym .......................................................................................................................................................... 135135
Set columns to exclude from SpotIQ analysesSet columns to exclude from SpotIQ analyses.......................................................................................................................... 137137
Manage suggestion indexingManage suggestion indexing ................................................................................................................................................................................ 138138
Add a geographical data settingAdd a geographical data setting...................................................................................................................................................................... 143143
Set number, date, currency formatsSet number, date, currency formats .......................................................................................................................................................... 146146
ThoughtSpot Application Integration Guide
February 07, 2019
support@thoughtspot.com ii

Change the Attribution Dimension settingChange the Attribution Dimension setting ........................................................................................................................................ 151151
Set entity categories for SearchIQSet entity categories for SearchIQ ................................................................................................................................................................ 153153
Link tables using relationshipsLink tables using relationships
Link tables using relationshipsLink tables using relationships............................................................................................................................................................................ 155155
Delete a relationshipDelete a relationship............................................................................................................................................................................................................ 158158
Use stickersUse stickers.............................................................................................................................................................................................................................................. 160160
Simplify search with worksheetsSimplify search with worksheets
Create and use worksheetsCreate and use worksheets.............................................................................................................................................................................................. 163163
Edit a worksheetEdit a worksheet................................................................................................................................................................................................................................ 168168
Create a formula in a worksheetCreate a formula in a worksheet .............................................................................................................................................................................. 170170
Create worksheet filtersCreate worksheet filters ........................................................................................................................................................................................................ 173173
How the worksheet join rule worksHow the worksheet join rule works ...................................................................................................................................................................... 178178
Change join rule or RLS for a worksheetChange join rule or RLS for a worksheet .................................................................................................................................................... 180180
Create a join relationshipCreate a join relationship...................................................................................................................................................................................................... 182182
Modify joins between worksheet tablesModify joins between worksheet tables........................................................................................................................................................ 185185
Delete a worksheet or tableDelete a worksheet or table ............................................................................................................................................................................................ 187187
Manage users and groupsManage users and groups
Understand groups and privilegesUnderstand groups and privileges ........................................................................................................................................................................ 190190
Create, edit, or delete a groupCreate, edit, or delete a group .................................................................................................................................................................................... 195195
Add, edit, or delete a userAdd, edit, or delete a user.................................................................................................................................................................................................. 200200
Manage jobsManage jobs
Job management (scheduled pinboards)Job management (scheduled pinboards).................................................................................................................................................... 204204
Scheduled pinboards managementScheduled pinboards management .................................................................................................................................................................... 206206
SecuritySecurity
Overview of security featuresOverview of security features........................................................................................................................................................................................ 208208
System SecuritySystem Security ................................................................................................................................................................................................................................ 209209
Data securityData security
Data securityData security .................................................................................................................................................................................................................................. 211211
Share tables and columnsShare tables and columns ........................................................................................................................................................................................ 216216
Share worksheetsShare worksheets .................................................................................................................................................................................................................. 218218
Share a pinboardShare a pinboard...................................................................................................................................................................................................................... 220220
Security for SpotIQ functionsSecurity for SpotIQ functions................................................................................................................................................................................ 224224
Revoke access (unshare)Revoke access (unshare) ............................................................................................................................................................................................ 225225
Row level security (RLS)Row level security (RLS)
About row level security (RLS)About row level security (RLS) ............................................................................................................................................................................ 228228
How Rule-Based RLS worksHow Rule-Based RLS works.................................................................................................................................................................................. 230230
Set Rule-Based RLSSet Rule-Based RLS .......................................................................................................................................................................................................... 234234
ThoughtSpot LifecycleThoughtSpot Lifecycle ............................................................................................................................................................................................................ 237237
ThoughtSpot Application Integration Guide
February 07, 2019
support@thoughtspot.com iii

System administrationSystem administration
Overview of System administrationOverview of System administration...................................................................................................................................................................... 241241
Send logs when reporting problemsSend logs when reporting problems .................................................................................................................................................................. 242242
Set up recording for Replay SearchSet up recording for Replay Search .................................................................................................................................................................... 244244
MonitoringMonitoring
Introduction to monitoringIntroduction to monitoring.................................................................................................................................................................................................. 248248
Overview boardOverview board .................................................................................................................................................................................................................................. 250250
Data boardData board.................................................................................................................................................................................................................................................. 260260
Cluster Manager boardCluster Manager board .......................................................................................................................................................................................................... 262262
Alerts and Events boardAlerts and Events board........................................................................................................................................................................................................ 265265
System worksheetsSystem worksheets...................................................................................................................................................................................................................... 267267
System pinboardsSystem pinboards .......................................................................................................................................................................................................................... 269269
Backup and restoreBackup and restore
Understand the backup strategiesUnderstand the backup strategies........................................................................................................................................................................ 271271
Understand backup/snapshot schedulesUnderstand backup/snapshot schedules .................................................................................................................................................. 273273
Work with snapshotsWork with snapshots.................................................................................................................................................................................................................. 277277
Work with backupsWork with backups
Understand backup modesUnderstand backup modes .................................................................................................................................................................................... 280280
Create a manual backupCreate a manual backup.............................................................................................................................................................................................. 282282
Configure periodic backupsConfigure periodic backups.................................................................................................................................................................................... 284284
About restore operationsAbout restore operations ............................................................................................................................................................................................ 287287
TroubleshootingTroubleshooting
About troubleshootingAbout troubleshooting.............................................................................................................................................................................................................. 288288
Get your configuration and logsGet your configuration and logs................................................................................................................................................................................ 289289
Upload logs to ThoughtSpot SupportUpload logs to ThoughtSpot Support.............................................................................................................................................................. 292292
Network connectivity issuesNetwork connectivity issues............................................................................................................................................................................................ 293293
Check the timezoneCheck the timezone .................................................................................................................................................................................................................... 294294
Browser untrusted connection errorBrowser untrusted connection error .................................................................................................................................................................. 295295
Characters not displaying correctlyCharacters not displaying correctly .................................................................................................................................................................... 296296
Clear the browser cacheClear the browser cache ...................................................................................................................................................................................................... 297297
Cannot open a saved answer that contains a formulaCannot open a saved answer that contains a formula............................................................................................................ 299299
Data loading too slowlyData loading too slowly.......................................................................................................................................................................................................... 301301
Search results contain too many blanksSearch results contain too many blanks ...................................................................................................................................................... 302302
IntroductionIntroduction .................................................................................................................................................................................................................................................... 303303
Log in to the Linux shell using SSHLog in to the Linux shell using SSH .......................................................................................................................................................................... 304304
Log in credentialsLog in credentials.................................................................................................................................................................................................................................. 305305
ThoughtSpot Application Integration Guide
February 07, 2019
support@thoughtspot.com iv

Get the JavaScript APIGet the JavaScript API.................................................................................................................................................................................................................. 307307
SAMLSAML
About SAMLAbout SAML ............................................................................................................................................................................................................................................ 309309
Configure SAMLConfigure SAML................................................................................................................................................................................................................................ 310310
Configure CA SiteMinderConfigure CA SiteMinder .................................................................................................................................................................................................... 311311
Active DirectoryActive Directory
Configure Active Directory Federated ServicesConfigure Active Directory Federated Services........................................................................................................................ 314314
Initialize the Identity Provider MetadataInitialize the Identity Provider Metadata................................................................................................................................................ 315315
Initialize the Service Provider MetadataInitialize the Service Provider Metadata................................................................................................................................................ 316316
Test the ADFS IntegrationTest the ADFS Integration.......................................................................................................................................................................................... 317317
REST APIREST API
About the REST APIAbout the REST API .................................................................................................................................................................................................................... 318318
Calling the REST APICalling the REST API.................................................................................................................................................................................................................. 320320
REST API paginationREST API pagination.................................................................................................................................................................................................................. 324324
Use the REST API to get dataUse the REST API to get data ...................................................................................................................................................................................... 327327
Use the Embedded Search APIUse the Embedded Search API.................................................................................................................................................................................. 330330
Use the Data Push APIUse the Data Push API............................................................................................................................................................................................................ 331331
Embed ThoughtSpotEmbed ThoughtSpot
Understand embeddingUnderstand embedding ........................................................................................................................................................................................................ 335335
Embed pinboard or visualizationEmbed pinboard or visualization.............................................................................................................................................................................. 339339
Authentication flow with embedAuthentication flow with embed................................................................................................................................................................................ 344344
Full application embeddingFull application embedding.............................................................................................................................................................................................. 346346
Configured trusted authenticationConfigured trusted authentication.......................................................................................................................................................................... 349349
Runtime FiltersRuntime Filters
About Runtime FiltersAbout Runtime Filters................................................................................................................................................................................................................ 352352
Apply a Runtime FilterApply a Runtime Filter .............................................................................................................................................................................................................. 354354
Runtime Filter OperatorsRuntime Filter Operators ...................................................................................................................................................................................................... 356356
Style CustomizationStyle Customization
Customize the application styleCustomize the application style ................................................................................................................................................................................ 357357
Upload application logosUpload application logos .................................................................................................................................................................................................... 359359
Set chart and table visualization fontsSet chart and table visualization fonts ............................................................................................................................................................ 360360
Choose a background colorChoose a background color............................................................................................................................................................................................ 363363
Select chart color palettesSelect chart color palettes ................................................................................................................................................................................................ 364364
Change the footer textChange the footer text ............................................................................................................................................................................................................ 366366
API ReferenceAPI Reference
IntroductionIntroduction .............................................................................................................................................................................................................................................. 367367
pinboarddata APIpinboarddata API ............................................................................................................................................................................................................................ 368368
ThoughtSpot Application Integration Guide
February 07, 2019
support@thoughtspot.com v

metadata APImetadata API.......................................................................................................................................................................................................................................... 371371
session APIsession API................................................................................................................................................................................................................................................ 378378
user APIuser API.......................................................................................................................................................................................................................................................... 380380
group APIgroup API .................................................................................................................................................................................................................................................... 390390
Keyword referenceKeyword reference .............................................................................................................................................................................................................................. 392392
TQL referenceTQL reference.............................................................................................................................................................................................................................................. 399399
tsload flag referencetsload flag reference.......................................................................................................................................................................................................................... 409409
tscli command referencetscli command reference............................................................................................................................................................................................................ 412412
Date and time formats referenceDate and time formats reference.................................................................................................................................................................................... 434434
Row level security rules referenceRow level security rules reference................................................................................................................................................................................ 437437
Formula function referenceFormula function reference .................................................................................................................................................................................................... 449449
Alert codes referenceAlert codes reference ...................................................................................................................................................................................................................... 464464
User action codes referenceUser action codes reference ................................................................................................................................................................................................ 471471
Error codes referenceError codes reference...................................................................................................................................................................................................................... 473473
Frequently asked questionsFrequently asked questions .................................................................................................................................................................................................. 499499
ThoughtSpot Application Integration Guide
February 07, 2019
support@thoughtspot.com vi

Introduction to administration
ThoughtSpot enables you to access and analyze your data through a search-based user interface. You
can create your searches on the fly by typing into a search bar, like you do when using an internet
search engine. ThoughtSpot makes it easy to see your data, get your questions answered, create
interactive graphs, and customize pinboards. You do not need to understand how the data is stored or
know SQL to do these things.
ThoughtSpot gives administrators the ability to modify data properties to meet business needs, for
example by providing search synonyms for common terms, boosting the importance of a column in
search results, or formatting how the data appears. Collaboration and security features make it easy for
you to protect sensitive data and for users to share information safely with others.
To perform the actions in this guide, you need administrative access.
Introduction to administration
February 07, 2019
ThoughtSpot Application Integration Guide Page 7

Login credentials for administration
Summary:Summary: You need administrative access to perform the actions
discussed in this guide.
You can access ThoughtSpot via SSH at the command prompt and from a Web browser.
Administrative access
Each ThoughtSpot appliance comes pre-built with three default users. You should talk with a
ThoughtSpot Customer Success Engineer or ThoughtSpot support, to get the password for each user.
The default users are:
TypeType UsernameUsername DescriptionDescription
Shell user admin Used for work that requires sudo or root privileges. Does not exist
for application login. Logs for this user are found in /usr/local/
scaligent/logs logs
Shell user thoughtspot Used for command line work that does not require sudo or root
privileges. For example, these users can use tsload ,tql , and
check the cluster status. This user cannot login to the application.
Logs for this user are found under /tmp .
Application
user
tsadmin Access through a Web browser.
Both the admin and thoughtspot user can SSH into the appliance. Once on the appliance, either
user can do any of the following:
•tscli
•tsload
•tql
The thoughtspot user is restricted to tscli commands that do not require sudo or root privileges.
SSH to the appliance
To perform basic administration such as checking network connectivity, starting and stopping services,
and setting up email, log in remotely as the Linux administrator user “admin”. To log in with SSH from
any machine, you can use the command shell or a utility like Putty.
In the following procedure, replace <hostname_or_IP> with the hostname or IP address of a node in
ThoughtSpot. The default SSH port (22) will be used.
1. Log in to a client machine and open a command prompt.
2. Issue the SSH command, specifying the IP address or hostname of the ThoughtSpot
instance:
Login credentials for administration
February 07, 2019
ThoughtSpot Application Integration Guide Page 8

ssh admin@<hostname_or_IP>
3. Enter the password for the admin user.
Log in to the ThoughtSpot application
To set up and explore your data, access the ThoughtSpot application from a standard Web browser
using a username and password.
Before accessing ThoughtSpot, you need:
• The Web address (IP address or server name) for ThoughtSpot.
• A network connection.
• A Web browser.
• A username and password for ThoughtSpot.
Supported Web browsers include:
BrowserBrowser VersionVersion Operating SystemOperating System
Google Chrome 20 and above Windows 7 or greater, Linux, MacOS
Mozilla Firefox 14 and above Windows 7 or greater, Linux, MacOS
Internet Explorer 11 Windows 7 or greater
Tip:Tip: While Internet Explorer is supported, using it is not recommended. Depending
on your environment, you can experience performance or UI issues when using IE.
To log in to ThoughtSpot from a browser:
1. Open the browser and type in the Web address for ThoughtSpot:
http://<hostname_or_IP>
2. Enter your username and password and click Enter NowEnter Now.
Login credentials for administration
February 07, 2019
ThoughtSpot Application Integration Guide Page 9
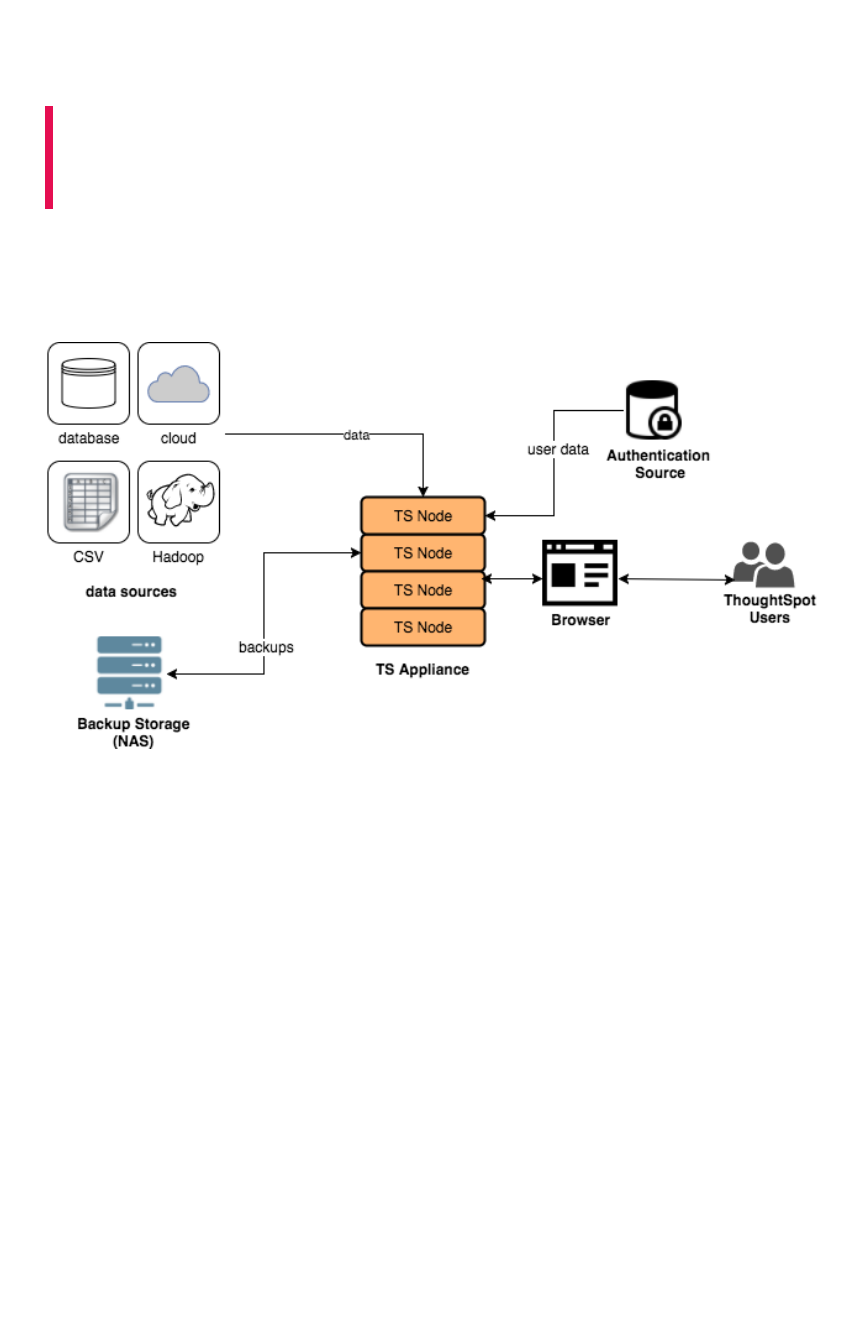
Architecture components
Summary:Summary: To implement ThoughtSpot it is important to understand
where it sits within your overall analytics architecture and how it
provides data to end users.
ThoughtSpot consists of a cluster of one or more nodes, acting together to provide analytic answers to
business questions. As such, there are only a few integration points with ThoughtSpot on your network.
The major components in the a ThoughtSpot cluster are:
ThoughtSpot can handle a wide variety of different data sources. ThoughtSpot does all analysis against
data in memory to help achieve fast results across millions and billions of records of data. ThoughtSpot
caches the data in order to process it.
The ThoughtSpot appliance can be a physical appliance that ThoughtSpot ships, one or more AWS
instances that are clustered together, or one or more VMware instances that are clustered together.
From an external interface, regardless of the appliance type, the appliance appears to be a single
instance.
For authentication (logging in), some source of user information is required. These define the login
requirements and access control groups. Users will access the data from a supported browser to view
saved content or perform searched-based analytics. Finally, it is recommended that you have some sort
of networked attached storage for storing backups in case of hardware failure.
Architecture components
February 07, 2019
ThoughtSpot Application Integration Guide Page 10
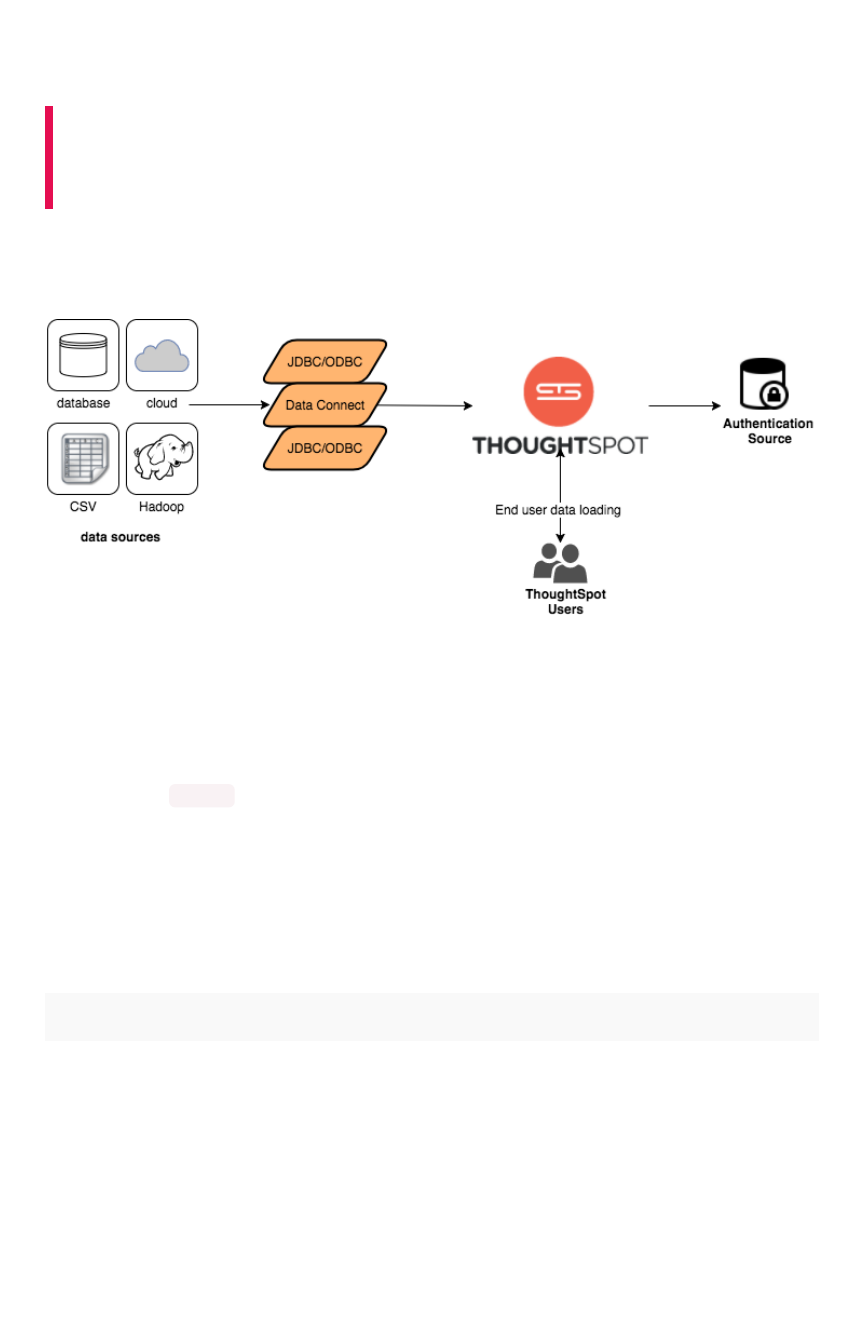
Data Caching
Summary:Summary: ThoughtSpot does all analysis against data in memory to
help achieve fast results across millions and billions of records of
data.
ThoughtSpot caches data as relational tables in memory. The tables can be sourced from different data
sources and joined together. ThoughtSpot has four ways to get data into the cluster:
ThoughtSpot provides a JDBC and ODBC driver that can be used to write data to ThoughtSpot. This is
useful for customers who already have an existing ETL process or tool and want to extend it to populate
the ThoughtSpot cache.
Data Connect is a ThoughtSpot add-on that connects to a wide variety of data sources and pulls data
into ThoughtSpot.
You can use the tsload command line tool to bulk load delimited data with very high throughput.
Finally, individual users can upload smaller (< 50MB) spreadsheets or delimited files.
Which approach you use depends on your environment and data needs.
The following table shows the tradeoffs between different data caching options. Many implementations
use a variety of approaches. For example, a solution with a large amount of initial data and smaller daily
increments might use tsload to load the initial data and then use the JDBC driver with an ETL tool for
incremental loads.
JDBC/ODBCJDBC/ODBC Data ConnectData Connect tsloadtsload
Data Caching
February 07, 2019
ThoughtSpot Application Integration Guide Page 11

• Have an ETL load,
for example, Infor-
matica, SSIS, and
so forth.
• Have available re-
sources to create
and manage ETL.
• Have smaller daily
loads.
• Purchased as an add-on.
• Source data is well formed
for ThoughtSpot or it can be
modified prior to being
loaded.
• Have smaller daily loads.
• Initial data
load.
• When JDBC/
ODBC and
Data Connect
are not op-
tions.
• When there
are large re-
curring daily
loads.
• Higher
throughput but
can add I/O
costs.
Data Caching
February 07, 2019
ThoughtSpot Application Integration Guide Page 12

Authentication
Summary:Summary: ThoughtSpot provides LDAP/AD, SAML, and ThoughtSpot
login to authenticate users.
ThoughtSpot provides three ways to authenticate users LDAP/AD, SAML, and ThoughtSpot login. In
general, ThoughtSpot recommends that you use LDAP/AD or SAML if possible since ThoughtSpot
provides only basic authentication with no restrictions on passwords, timeouts, failed logins, etc.
The table below shows each of the options and the items to consider for each.
SAMLSAML LDAP/ADLDAP/AD ThoughtSpotThoughtSpot
• Use SAML for
single sign-on
authentication.
• Can redirect
from
ThoughtSpot
to SAML lo-
gins.
• Recommended
for portal inte-
gration.
• Option to sync
users and
groups if
stored in
LDAP/AD.
• Configuration.
• Users authenticate
against LDAP or AD.
• Option to sync users and
groups with ThoughtSpot
to manage group mem-
bership.
• User created and
managed in
ThoughtSpot.
• No enterprise pass-
word control (expi-
ration, password
strength, etc.).
• Only recommended
when SAML and
LDAP are not op-
tions.
All users and groups must be known to ThoughtSpot. If you are using LDAP/AD or SAML and don’t
create users in ThoughtSpot, a user is created when the user first logs in. However, this user is assigned
to the All group and will only see content available for all users.
Groups are the primary way that security is managed. Groups are not automatically created. You can
create groups and users manually or you need to automate the assignment from a source system.
ThoughtSpot has an assignment script that works with most LDAP / AD stores. It also has public APIs
that you can use to sync users and groups between source systems and your ThoughtSpot appliance.
Authentication
February 07, 2019
ThoughtSpot Application Integration Guide Page 13

Data and object security
Summary:Summary: Understand how to secure your data and other key
information in ThoughtSpot.
ThoughtSpot provides these features for protecting data security:
• Object security
• Row level security
• Column level security
• System privileges
Object Security
Object security is the ability for users to see content within ThoughtSpot. Objects can be tables, columns
in tables, worksheets, pinboards, and saved answers.
Users gain access to objects when an object owner share-answers with them. Owners can share with
individual users or with entire groups, giving access to anyone within that group. Owners can share with
edit or view options.
Currently, you cannot restrict someone who has had content shared with them from sharing with others.
Also, a user who belongs in a group can automatically share with anyone else in the group. This has
implications on setting up privileges and applying row level security.
Row level security (RLS)
Row level security controls what data a user can see in each shared piece of content. Even if a user has
access to a worksheet, for example, they can only see rows from the tables they have been given
permission to see.
RLS is applied at the table level and automatically applied every time. Also, in queries where there are
tables with table filters, all joins are always enforced, to avoid accidentally allowing users access to data
they shouldn’t see. RLS requires three things:
• A table filter with a column (possibly in a joined table) that can be used to determine who can
see a row, for example, account id or tenant id.
• A group that can be associated with the row of data by name. For example, if the column is
account_id and has values of 1,2,3, users can be assigned to groups group_1 ,
group_2 ,group_3 and then only see their data.
• Users must be assigned to the given group. If they are not assigned to a group that has
access, they do not see any data.
Administrative users can always see all rows of data since RLS is not applied for these users.
RLS supports a hierarchy of groups allowing you to give access to some users across multiple groups.
Keep in mind that users within a group can share with one another group. This means that putting
everyone into a company group for RLS means they can share with anyone in the company.
Data and object security
February 07, 2019
ThoughtSpot Application Integration Guide Page 14

Column level security (CLS)
Column level security means only allowing users to see certain columns in a table. This can be
accomplished by only sharing certain columns with groups of users from a table.
However, most of the time users are given access to worksheets instead of columns. There is currently
no way to only share certain worksheet columns with certain groups. If you need this capability, you
must create different worksheets with the columns you want.
Also, note that because someone can share with anyone in a group they belong to, that means they
could potentially share restricted columns. For example, assume that HR has a column with salary
information in a worksheet that only HR has access to. An HR person could create an answer with the
salary information and share with someone outside of HR. That person would now have access to the
salary information.
System privileges
System privileges refer to what a user can do in ThoughtSpot. For example, can they upload or
download data or share with all users. These privileges are defined on a group level and inherit
downwards. So, if Group A had child groups Group B and Group C, then any privilege given to Group A
is also available to Group B and Group C. What this often means is that separate sets of groups are
required to manage privileges.
Data and object security
February 07, 2019
ThoughtSpot Application Integration Guide Page 15

Performance considerations
Summary:Summary: Make sure you understand the performance considerations
in your installation.
ThoughtSpot is configured and licensed by memory availability. However, there are other considerations
that will impact the performance of your solution. It’s important to understand these considerations prior
to implementation, since some solutions will perform better than others.
Each node in a ThoughtSpot cluster has been found to perform ideally with less than 250GB of data and
fewer than 0.5 billion total rows of data. For schemas that are particularly complex, performance is
increased with even fewer rows of data per node. Ways to reduce the total amount of data and rows of
data include limiting the amount of data (number of years, etc.) or combining long, but narrow tables
together.
The performance information related on this page apply to a typical 1TB 4 node cluster.
Data Boundaries
Total rows in a result of a join can also have an impact. In general, it is recommended that you have
fewer than 10 billion rows in a many-to-many join. Keep in mind these other boundaries:
DescriptionDescription BoundaryBoundary
Max number of rows that can be downloaded 10M (default is 1M)
Size in CSV format 1 TB per appliance
Total number of rows across all tables 1B per appliance
Many-to-Many (Generic) join cardinality 10B per appliance
Load frequency Once every hour
Worksheet Boundaries
Worksheets must have less than 1000 columns. For aggregated worksheets, you should keep in mind
the following:
• Number of columns should be less than 50
• Number of rows should be less than 10 millions
You can use an ETL process to circumvent these limitations. Speak with ThoughtSpot Customer
Support to learn more.
Performance considerations
February 07, 2019
ThoughtSpot Application Integration Guide Page 16

Aggregated worksheets and joins
To be able to join an aggregated worksheet with a base table, your installation must be configured to
allow the behavior. The aggregated worksheet cannot have more than 5 tables involved. Moreover, the
number of rows in the final aggregated worksheet cannot be greater than 1000.
Chasm Trap worksheets
For chasm trap scenarios (two or more fact tables joined via a shared dimension) the following
boundaries are recommended:
DescriptionDescription BoundaryBoundary
Max number of fact tables in a worksheet 5
Max number of shared dimensions 2
Max number of rows in
non
co-sharded shared dimension table of chasm trap 1B
Max number of rows in co-sharded shared dimension table of chasm trap 1B
Row level security Boundaries
Max number of unique RLS rules with search data suggestions should not exceed 15K.
Data Connect Boundaries
The maximum number of connections should be less than or equal to 25.
Scheduled pinboards
For scheduled pinboards, ideal performance is to have 50 or fewer scheduled pinboard jobs.
Performance considerations
February 07, 2019
ThoughtSpot Application Integration Guide Page 17

About installation and upgrades
Your ThoughtSpot application software is already installed for you in a ThoughtSpot appliance (this is
true for both physical and virtual appliances). The ThoughtSpot software is updated by ThoughtSpot
Support. ThoughtSpot Support will contact you to schedule an update when one becomes available.
As administrator, you are responsible for setting up and configuring ThoughtSpot. This guide explains
how. It will also assist you in troubleshooting some common problems, finding additional resources, and
contacting ThoughtSpot.
Display your current configuration
To perform the set up and configuration, you must first learn how to gain administrative access.
1. Log into the ThoughtSpot cluster as the admin user.
2. Use the tscli feature subcommand to display your current configuration.
About installation and upgrades
February 07, 2019
ThoughtSpot Application Integration Guide Page 18

$ tscli feature get-all-config
+---------------------------------+----------
+---------------+
| NAME | STATUS | CONFIGUR
ATION |
+---------------------------------+----------
+---------------+
| Firewall | Disabled
| |
| Saml | Disabled
| |
| Ldap | Disabled
| |
| CustomBranding | Disabled
| |
| CustomBrandingFontCustomization | Disabled
| |
| DataConnect | Disabled
| |
| RLS | Enabled
| |
| Callhome | Enabled
| |
| SSHTunnel | Enabled
| |
| Fileserver | Disabled
| |
+---------------------------------+----------
+---------------+
Related information
The following tasks are available needed:
•Set your locale
•Test connectivity between nodes
•Set the relay host for SMTP
•Set up a fiscal calendar year
•Configure SSL
•Configure SAML
•Integrate LDAP
•Configure NAS file system
•Set up monitoring
•Configure support services
•Network ports
•Configure load balancing and proxies
•Customize look and feel
About installation and upgrades
February 07, 2019
ThoughtSpot Application Integration Guide Page 19


Set your ThoughtSpot locale
Summary:Summary: You can change the language displayed in the application.
The language the ThoughtSpot UI displays is based off of the locale in a user’s profile. The locale
preferences control the language and data formats (date and number formats) by geographic locations.
In addition to American English (
en-US
), ThoughtSpot supports:
LocaleLocale LanguageLanguage
da-DK
Dansk (beta)
de-DE
Deutsche
en-CA
English (Canada)
en-GB
English (United Kingdom)
en-US
English (United States)
es-US
Español (latín)
es-ES
Español (España - beta)
fr-CA
Français (Canada)
fr-FR
Français (France)
it-IT
Italiano (beta)
nl-NL
Nederland (beta)
nb-NO
Norsk (beta)
pt-BR
Português (Brazil)
pt-PT
Português (Portugal - beta)
fi-FI
Suomi (beta)
sv-SE
Svenska (beta)
zh-CN
中文(简体)
ja-JP
日本語
Date and number formats change to reflect your locale. So, if you set Japanese as your default locale in
your profile settings, then the interface will update to reflect that after you refresh your page.
Keywords, operators, and error messages are included in the translated material. (A keyword reference
for all supported languages is included in this documentation under “Keywords in Other Languages”.)
Set your ThoughtSpot locale
February 07, 2019
ThoughtSpot Application Integration Guide Page 21
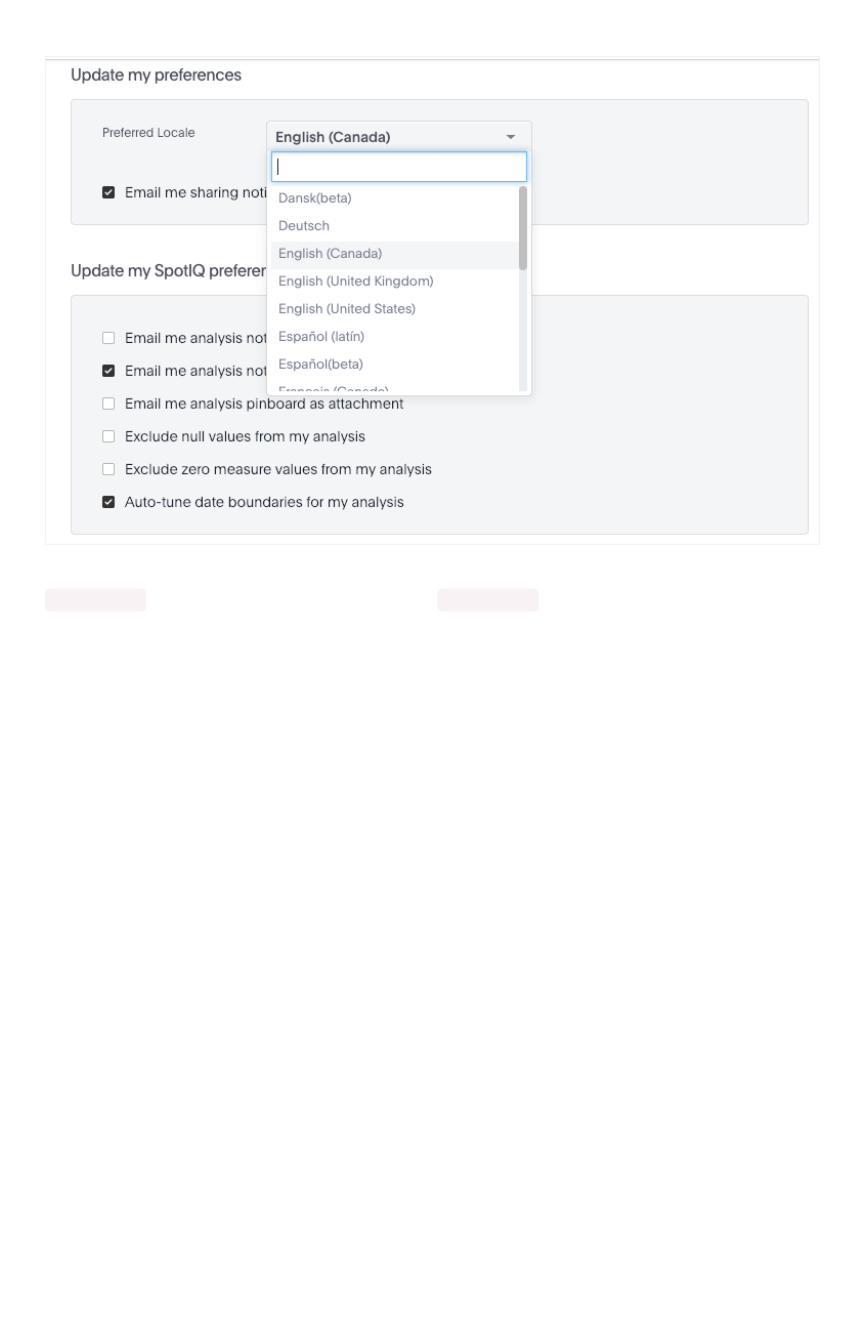
Formulas, however, are
not translated
. Also, all metadata remains as user inputted.
For example, if you are using ThoughtSpot in the US, the number formatting should look like this:
xxx,xxx.xx . And in Europe, it should look like this: xxx.xxx,xx .
Set your ThoughtSpot locale
February 07, 2019
ThoughtSpot Application Integration Guide Page 22

Test network connectivity between
nodes
Summary:Summary: Verify your network is properly configured for the
application.
This procedure tests the network connectivity between the ThoughtSpot nodes, and to the LAN. If you
can perform these steps successfully, the network settings on ThoughtSpot are correct.
1. Log in to the Linux shell using SSH.
2. Ping each of the other nodes in the cluster.
3. Ping another machine that exists outside of the cluster, for example, a machine that you will
use to stage data to be loaded.
If you cannot perform these tests successfully, there is a problem with the network setup. If the tests fail,
check Network connectivity issues.
Test network connectivity between nodes
February 07, 2019
ThoughtSpot Application Integration Guide Page 23
Set the relay host for SMTP (email)
Summary:Summary: To enable alert emails, you'll need to set up a relay host for
SMTP traffic.
ThoughtSpot uses emails for sending critical notifications to ThoughtSpot Support. A relay host for
SMTP traffic routes the alert and notification emails coming from ThoughtSpot through an SMTP email
server.
Set up the relay Host
To set up a relay host:
1. Log in to the Linux shell using SSH.
2. Issue the setup command, providing the IP address of the relay host:
$ tscli smtp set-relayhost <IP_address>
3. Verify your settings:
$ tscli smtp show-relayhost
4. Verify that email is working.
Configure an email to receive alerts
ThoughtSpot sends alerts to the email address specified during installation. If no email address was
entered, no alerts are sent. You should add an email to receive alerts by issuing:
$ tscli monitoring set-config --email <your_email>
To send to multiple emails, provide a comma-separated list with no spaces.
Verify the relay with an email
Check if the email settings are working properly by using this procedure.
1. Log in to the Linux shell using SSH.
2. Try sending an email to yourself by issuing:
Set the relay host for SMTP (email)
February 07, 2019
ThoughtSpot Application Integration Guide Page 24

$ echo | mail -s Hello <your_email>
3. If you receive the email at the address(es) you supplied, email is working correctly.
Set the relay host for SMTP (email)
February 07, 2019
ThoughtSpot Application Integration Guide Page 25

Set up a fiscal calendar year
Summary:Summary: You can customize your fiscal calendar to start in month
other than January.
By default, the application’s fiscal calendar in January. If your company’s calendar year starts in another
month, setting a fiscal calendar quarter makes the ThoughtSpot date searches reflect your fiscal year.
Date formulas with the fiscal option specified will also reflect the fiscal year you set here.
When you set a custom fiscal year, you will designate the month on which your company’s fiscal year
begins. All the date language will then reflect your change, so if someone searches for this quarterthis quarter or q3q3,
the answer will conform to the fiscal quarter in use. When you make this change, existing pinboards also
change to reflect the custom fiscal calendar. Because of this, if you make this change after your users
have been using ThoughtSpot for any period of time, you should alert them of the change you will be
making and how it affects previous saved searches.
Contact ThoughtSpot Support, so they can help you set the custom fiscal year.
Set up a fiscal calendar year
February 07, 2019
ThoughtSpot Application Integration Guide Page 26

Configure SSL
Summary:Summary: SSL provides authentication and data security
You should use SSL (secure socket layers) for sending data to and from ThoughtSpot. SSL provides
authentication and data security. This section applies to both SSL to enable secure HTTP and secure
LDAP.
About SSL
Many IT departments require SSL for their applications that access data. To use SSL with ThoughtSpot,
you’ll need your company’s own SSL certificate. The certificate is issued per domain, so if you want to
use SSL for both HTTP and LDAP, you will need two separate certificates - one for the HTTP domain
and one for the LDAP domain.
If you do not have an SSL certificate:
• Check with your IT department to see if they already have an SSL certificate you can use.
• If not, you will need to obtain the certificate from an issuing authority.
• Alternatively, you may disable SSL if you don’t want the security it provides by using the
command tscli ssl off .
There are many SSL vendors to choose from. Check with your existing Web hosting provider first, to see
if they can provide the certificate for you.
When you apply for the SSL certificate, you may specify a SAN, wildcard, or single domain certificate.
Any of these can work with ThoughtSpot.
Configure SSL for web traffic
This procedure shows how to add SSL (secure socket layers) to enable secure HTTP (HTTPS) in
ThoughtSpot. To set up SSL, you will need:
• The SSL certificate
• The private key
To install the SSL certificate:
1. Follow the instructions from your certifying authority to obtain the certificate. This is usually
sent via email or available by download.
2. Copy the certificate and key files to ThoughtSpot:
$ scp <key> <certificate> admin@<IP_address>:<path>
3. Log in to the Linux shell using SSH.
4. Change directories to where you copied the certificate:
Configure SSL
February 07, 2019
ThoughtSpot Application Integration Guide Page 27
$ cd <path>
5. Issue the tscli command to install the certificate:
$ tscli ssl add-cert <key> <certificate>
6. To test that the certificate was installed correctly, Log in to the ThoughtSpot application.
You should see that the application’s URL begins with https:// .
Set the recommended TLS version
There are a couple of security vulnerabilities due to SSL certificates supporting older versions of TLS
(Transport Layer Security). This procedure shows you how to set the recommended TLS version to avoid
these vulnerabilities.
The PCI (Payment Card Industry) Data Security Standard and the FIPS 140-2 Standard require a
minimum of TLS v1.1 and recommends TLS v1.2.
ThoughtSpot supports SSL v3, TLS v1.0, and TLS v1.1 for backwards compatibility. However, the
recommended version is TLS v1.2. Therefore, to set the recommended TLS version:
1. Enable your web browser to support TLS v1.2. This can be done in your browser’s advanced
settings.
2. Log in to the Linux shell using SSH..
3. Issue the following command:
tscli ssl set-min-version 1.2
This will block all usage of older versions.
Configure SSL
February 07, 2019
ThoughtSpot Application Integration Guide Page 28

Configure SAML
Summary:Summary: You can use the Security Assertion Markup Language
(SAML) to authenticate users
You can set up SAML through the shell on ThoughtSpot using a tscli based configurator.
Prerequisites
Before configuring SAML, you will need this information:
• IP of the server where your ThoughtSpot instance is running.
• Port of the server where your ThoughtSpot instance is running.
• Protocol, or the authentication mechanism for ThoughtSpot.
• Unique service name that is used as the unique key by IDP to identify the client.
It should be in the following format: urn:thoughtspot:callosum:saml
• Allowed skew time, which is the time after authentication response is rejected and sent back
from the IDP. It is usually set to 86400.
• The absolute path to the idp-meta.xml file. This is needed so that the configuration persists
over upgrades.
• This configurator also checks with the user if internal authentication needs to be set or not.
This internal authentication mechanism is used to authenticate tsadmin , so set it to true if
you do not know what it does.
Use tscli to configure SAML
Use this procedure to set up SAML on ThoughtSpot for user authentication. Note that this configuration
persists across software updates, so you do not need to reapply it if you update to a newer release of
ThoughtSpot.
1. Log in to the Linux shell using SSH.
2. Execute the command to launch the interactive SAML configuration:
tscli saml configure
3. Complete the configurator prompts with the information you gathered above.
4. When the configuration is complete, open a Web browser and go to the ThoughtSpot login
page. It should now show the Single Sign On option.
Configure SAML
February 07, 2019
ThoughtSpot Application Integration Guide Page 29
Enable Active Directory based access
Summary:Summary: ThoughtSpot supports enabling Active Directory (AD)
based access individually on each node where the commands are
run.
Enable Active Directory based access on a
ThoughtSpot node
ThoughtSpot supports enabling Active Directory (AD) based access individually on each node where the
commands are run. There is no provision to enable AD access for the whole cluster with a single
command. To enable AD access on a cluster, you need to run these commands on each individual node
and on any additional nodes added to the cluster.
The command to enable system AD user access is:
tscli sssd enable --user <USER> --domain <DOMAIN>
You will then be prompted for password credentials.
Note:Note: The user must have permission to join a computer or VM to the domain.
Set sudoers AD Group on a local node
Just like enabling AD based access on a node, setting sudo AD group applies only on the node where
the command is run, and is not set for the whole cluster.
The command to allow sudo permissions for AD group:
tscli sssd set-sudo-group <ACTIVE_DIRECTORY_GROUP_NAME>
Clear sudoers AD Group on a local node
Clearing sudo AD group only applies on the node where command is run, and is not set for the whole
cluster.
The command to clear sudo permissions for the AD group:
Enable Active Directory based access
February 07, 2019
ThoughtSpot Application Integration Guide Page 30
tscli sssd clear-sudo-group <ACTIVE_DIRECTORY_GROUP_NAME>
Disable AD based access on a local node
Currently ThoughtSpot supports disabling AD based access individually on each node where the
commands are run. There is no provision to disable AD access for the whole cluster with a single
command. To disable AD access on a cluster, run these commands on each individual node and any
additional nodes added to the cluster.
Command to disable system AD user access is:
tscli sssd disable
Note:Note: Running this command will also remove the AD group from sudoers list.
Related Information
•sssd in the tscli command reference
Enable Active Directory based access
February 07, 2019
ThoughtSpot Application Integration Guide Page 31

About LDAP integration
Summary:Summary: You authenticate users against an LDAP server.
Some companies use LDAP (Lightweight Directory Access Protocol) to manage user authentication.
Using LDAP provides security and makes user management more centralized. You can choose to
authenticate users against an LDAP server, against ThoughtSpot, or both.
ThoughtSpot supports both anonymous and non-anonymous LDAP integration. Non-anonymous LDAP
binding is more rigorous than anonymous authentication, but it should help you track what your users
are querying and keep a log trace for auditing purposes.
If you have been using ThoughtSpot with users you created manually, and you now want to transition to
LDAP, please contact ThoughtSpot Support. They can assist you in migrating existing users to their
LDAP equivalents.
ThoughtSpot supports LDAP with Active Directory.
About LDAP integration
February 07, 2019
ThoughtSpot Application Integration Guide Page 32

Configure LDAP for Active Directory
Summary:Summary: Use this procedure to set up integration with LDAP using
Active Directory.
Before you configure LDAP for Active Directory, collect this information:
• URL to connect to Active Directory.
For example, ldap://192.168.2.48:389
• Default LDAP domain.
The default domain is the domain under which users who want to be authenticated against
Active Directory reside. When a user logs in with a username, the default domain is added to
the username before sending it to the LDAP server. If users reside in multiple domains, you
can still designate one of them as the default. Users belonging to a non-default domain will
have to explicitly qualify their username when they log in, for example:
username@ldap1.thoughtspot.com .
• Whether you will use SSL.
If yes, you’ll need the certificate from the issuing authority.
• LDAP search base.
This prompt adds the search base information that allows ThoughtSpot to find user properties
such as email and displayname from LDAP.
• Automatically add LDAP users in ThoughtSpot?
If you choose ‘yes’ for this, when a user is authenticated against LDAP, if that user does not
exist in ThoughtSpot, then the user is automatically created. When users are created in this
way, their passwords exist only in LDAP and are not stored in ThoughtSpot.
In order to log in to ThoughtSpot, the user has to exist in ThoughtSpot independent of
whether that user is authenticated against LDAP or against ThoughtSpot’s internal
authentication. If you choose ‘no’ for this, users who will authenticate against LDAP have to
be manually created with a dummy password as a placeholder in ThoughtSpot before they
can log in. The username you specify when creating the LDAP authenticated user manually in
ThoughtSpot has to be domain qualified, for example: username@ldap1.thoughtspot.com .
• Also use ThoughtSpot internal authentication?
If you choose ‘yes’ for this, when a user logs in, ThoughtSpot will first attempt to authenticate
the user against LDAP. If that attempt fails, it will then attempt to authenticate the user against
ThoughtSpot. If either of these succeed, then the user is successfully logged in. This option is
useful in scenarios where some users are not in LDAP and are created only in ThoughtSpot.
You do not need to create a user called tsadmin on your LDAP server. Internal authentication can be
used for tsadmin . To configure LDAP:
1. Log in to the Linux shell using SSH.
2. Run the command to configure LDAP:
Configure LDAP for Active Directory
February 07, 2019
ThoughtSpot Application Integration Guide Page 33
$ tscli ldap configure
3. Answer the prompts using the information you collected. For example:
Choose the LDAP protocol:
[1] Active Directory
Option number: 1
Configuring Active Directory
URL to connect to Active Directory. (Example: ldap://19
2.168.2.100:389): ldap://192.168.2.100:389
Default domain (Example: ldap.thoughtspot.com): ldap.th
oughtspot.com
Use SSL (LDAPS) (y/n): n
LDAP search base (Example: cn=Users): cn=Users
Automatically add LDAP users in ThoughtSpot (y/n): y
Also use ThoughtSpot internal authentication (y/n): y
4. If you are using SSL, Add the SSL certificate for LDAP.
5. If you want to remove the LDAP configuration, issue:
$ tscli ldap purge-configuration
Configure LDAP for Active Directory
February 07, 2019
ThoughtSpot Application Integration Guide Page 34
Add the SSL certificate for LDAP
Summary:Summary: Install the certificate to support LDAPS
When you set up LDAP, you specified whether or not to use SSL for LDAP (LDAPS). If using SSL, you
must install the LDAP SSL certificate. Before you can add the SSL certificate, you must Configure LDAP
for Active Directory.
You must have the SSL certificate before you start. For more information on obtaining an SSL certificate,
see Configure SSL (secure socket layers).
To add the SSL certificate for LDAP:
1. Follow the instructions from your certifying authority to obtain the certificate. This is usually
sent via email or available by download.
2. Copy the certificate to ThoughtSpot:
$ scp <certificate> admin@<IP_address>:<path>
3. Log in to the Linux shell using SSH.
4. Change directories to where you copied the certificate:
$ cd <path>
5. Run the command to configure SSL for LDAP, designating an alias for this certificate using
the <name> parameter:
$ tscli ldap add-cert <name> <certificate>
Add the SSL certificate for LDAP
February 07, 2019
ThoughtSpot Application Integration Guide Page 35

Test the LDAP configuration
Summary:Summary: This procedure allows you to test the LDAP connection
you created.
After configuring LDAP, you can test to make sure it is working by issuing a command.
1. Log in to the Linux shell using SSH.
2. Issue the LDAP testing command, supplying the information for the LDAP server you
configured, as in this example:
$ ldapsearch -x -h 192.168.2.61 -p 389 -D "testuser@lda
p.thoughtspot.com" -W -b "dc=ldap,dc=thoughtspot,dc=co
m" cn
3. Supply the LDAP password when prompted.
4. If the connection works, you’ll see a confirmation message.
Test the LDAP configuration
February 07, 2019
ThoughtSpot Application Integration Guide Page 36

Sync users and groups from LDAP
Summary:Summary: Use this procedure to synchronize your ThoughtSpot
system with an LDAP server.
Before synchronizing users and groups, you will need this information:
• IP address and port of the server where your ThoughtSpot instance is running. This hostport
is needed in the following format http(s)://<host>:<port> or http(s)://<domain> .
• Administrator login username and password for your ThoughtSpot instance.
• URL of the LDAP server, or hostport.
For example, ldap://192.168.2.48:389
• Login username and password for the LDAP system.
An example username would be moo_100@ldap.thoughtspot.com
• Distinguished Name (DN) for the base to start searching for users in the LDAP system.
For example, DC=ldap,DC=thoughtspot,DC=com
• Location of the Python synchronization script, in case you want to modify it or create your
own: /usr/local/scaligent/release/callosum/utilities/ldap_sync_python_api/
syncUsersAndGroups.py
There are two ways for you to fetch users and groups from LDAP and populate them into your
ThoughtSpot system:
• Run the synchronization script in interactive mode, which will walk you through the process
(shown here).
• Create your own Python script by using the ThoughtSpot Python APIs. If you need details on
the Python APIs, contact ThoughtSpot Support. If you choose this method, you can run the
script periodically using a cron job.
To run the LDAP sync script in interactive mode:
1. Log in to the Linux shell using SSH.
2. Run the command to start the script:
python syncUsersAndGroups.py interactive
3. Answer the prompts using the information you collected above. For example:
Sync users and groups from LDAP
February 07, 2019
ThoughtSpot Application Integration Guide Page 37

Complete URL of TS server in format "http(s)://<hos
t>:<port>": http://10.77.145.24:8088
Disable SSL authentication to TS server (y/n): y
Login username for ThoughtSpot system: admin
Login password for ThoughtSpot system: 12345
Complete URL of server where LDAP server is running in
format ldap(s)://<host>:<port>: ldap://192.168.2.48:389
Login username for LDAP system: moo_100@ldap.thoughtspo
t.com
Login password for LDAP system: 12345
Syncs user and groups between LDAP and TS systems (y/
n): y
Delete entries in ThoughtSpot system that are not curre
ntly in LDAP tree being synced (y/n): n
Distinguished name for the base to start searching grou
ps in LDAP System: DC=ldap,DC=thoughtspot,DC=com
Scope to limit the search to (choice number)
0:base Searching only the entry at the base DN
1:one Searching all entries on level under the base DN
- but not including the base DN
2:tree Searching of all entries at all levels under an
d including the specified base DN: 2
Filter string to apply the search to: (|(CN=TestGroupAl
pha)(CN=TestGroupBeta))
Answering this prompt is optional. If left blank, the default value of '(CN=*)' will be used.
Apply sync recursively, i.e. Iterates through group mem
bers and creates member groups, users and relationships
in a recursive way. (y/n): n
This prompt is asking if you would like to include group members even if they do not belong
to the current sub tree that is being synced.
4. Alternatively, to input your own shorthand script commands:
Issue the Python script commands, supplying all of the above information, following this
format example:
Sync users and groups from LDAP
February 07, 2019
ThoughtSpot Application Integration Guide Page 38

python syncUsersAndGroups.py script \
–-ts_hostport <ts_hostport> \
--disable_ssl \
--ts_uname <ts_username> \
--ts_pass <ts_password> \
--ldap_hostport '<ldap_hostport>' \
--ldap_uname '<ldap_username>' \
--ldap_pass '<ldap_password>' \
--sync \
--purge \
--basedn 'DC=ldap,DC=thoughtspot,DC=com' \
--filter_str '(|(CN=TestGroupAlpha)(CN=TestGroupBet
a))' \
--include_nontree_members
The bottom half of the above command example targets sub trees under the DC called
TestGroupAlpha and TestGroupBeta, and iterates through them recursively to create/sync
users, groups, and their relationships in the ThoughtSpot system. It also deletes any other
entities created in the ThoughtSpot system from this LDAP system that are not currently
being synced.
Sync users and groups from LDAP
February 07, 2019
ThoughtSpot Application Integration Guide Page 39

Configure NAS file system
Summary:Summary: You can use network attached storage to support backup/
restore and data loading.
Some operations, like backup/restore and data loading, require you to either read or write large files. You
can mount a NAS (network attached storage) file system for these operations. Currently, ThoughtSpot
does not have an option for direct attached storage. Your NAS storage can use whichever drive format
you would like.
This procedure shows you how to mount a NAS file system for storing or accessing large files. The file
system will be mounted at the same location on each node in the cluster automatically. When any node
is restarted, the file system will be mounted again automatically, if it can be found.
When supplying a directory for writing or reading a backup, you can specify the mount point as the
directory to use. Likewise, you can stage data there for loading.
Backups are written by the Linux user admin . If that user does not have permission to write to the NAS
file system, you could write the backups to disk (for example /export/sdc1 ,/export/sdd1 ,
/export/sde1 , or /export/sdf1 ) and then set up a cron job that executes as root user and copies
the backup to the NAS device every night, then deletes it from the directory.
Do not send the periodic backups or stage files on /export/sdb1 since it is a name node. It is used
internally by Hadoop Distributed File System (HDFS) and if this drive fills up, it can cause serious
problems. Do not allow backups or data files to accumulate on ThoughtSpot. If disk space becomes
limited, the system will not function normally.
1. Log in to the Linux shell using SSH.
2. Mount the directory to the file system, by issuing the appropriate command:
• For an NFS (Network File System) directory:
tscli nas mount-nfs
--server <server_NFS_address>
--path_on_server <path>
--mount_point <target>
--options vers=<version>, sec=<security schem
e>, <OPTIONS>
Note:Note: Other command-line options are available to forward to the
command (default: noexec).
• For a CIFS (Common Internet File System) directory:
Configure NAS file system
February 07, 2019
ThoughtSpot Application Integration Guide Page 40

tscli nas mount-cifs
--server <server_CIFS_address>
--path_on_server <path>
--mount_point <target>
--username <user>
--password <password>
--uid <uid>
--gid <gid>
--options <OPTIONS>
Note:Note: Other command-line options are available to forward to the
mount.cifs command (default: noexec).
3. Use the mounted file system as you wish, specifying it by referring to its mount point.
4. When you are finished with it, you may optionally unmount the NAS file system:
tscli nas unmount --dir <directory>
Configure NAS file system
February 07, 2019
ThoughtSpot Application Integration Guide Page 41
Set up monitoring
Summary:Summary: Setting up monitoring is a one time operation.
To configure monitoring of your cluster, set up the frequency of heartbeat and monitoring reports and an
email address to receive them.
1. Log in to the Linux shell using SSH.
2. Issue the tscli command to set up monitoring:
tscli monitoring set-config
--email <email>
--heartbeat_interval <heartbeat_interval>
--report_interval <report_interval>
The parameters are:
•--email <email> is a comma separated list (no spaces) of email addresses
where the cluster will send monitoring information.
•--heartbeat_interval <heartbeat_interval> is the heartbeat email
generation interval in seconds. Must be greater than 0.
•--report_interval <report_interval> sets the cluster report email
generation interval in seconds. Must be greater than 0.
3. To view your settings and verify that they have been applied, issue:
tscli monitoring show-config
You should see information like:
Monitoring Configuration:
Alert Email: dev-alerts@thoughtspot.com
Heartbeat Interval: 900 sec
Report Interval: 21600 sec
4. After the heartbeat interval has passed, check your email to verify that emails are being
delivered.
5. If you don’t receive any emails, verify that email is working.
Set up monitoring
February 07, 2019
ThoughtSpot Application Integration Guide Page 42

Configure support services
Summary:Summary: Set up and configure ThoughtSpot support services for
your installation.
There are several configurations you can set up in your installation to ensure your company’s support
from ThoughtSpot works smoothly.
Set up a reverse tunnel for support
You can set up a reverse tunnel to allow ThoughtSpot Support to get access to your ThoughtSpot
instance, to perform support-related activities. This setup is a much simpler, more secure, and scalable
than the alternative option of using a virtual meeting room.
Granting remote support access can streamline troubleshooting activities, since it enables your support
agent to work directly in a secure setting. The remote tunnel enables SSH and HTTP access to your by
ThoughtSpot Support. This access can be granted and revoked easily, so you can enable it for a
troubleshooting session, and then disable it again. Before doing this procedure, make sure your
company’s security policies allow reverse tunneling.
Before you can do this procedure, your networking team needs to open port 22 in your firewall
outgoing rules.
To enable remote support:
1. Contact ThoughtSpot and open a support ticket for making the appropriate reverse tunnel
settings on our end. Provide the cluster name of the cluster for which you want to enable
remote support.
2. After the ticket is completed, continue with the remaining steps in this procedure to make the
settings on your side.
3. Log into the Linux shell using SSH.
4. Issue the command to configure the destination for the remote tunnel.
You only need to do this once, when you are enabling the tunnel for the very first time. After
that, this setting persists when you start and stop the remote tunnel.
$ tscli support set-remote --addr tunnel.thoughtspot.co
m --user ubuntu
5. Test that the setting is configured:
$ tscli support show-remote
6. Enable the remote tunnel:
Configure support services
February 07, 2019
ThoughtSpot Application Integration Guide Page 43
$ tscli support start-remote
7. Contact ThoughtSpot and test the setup with your ThoughtSpot Support contact.
8. After your remote session with ThoughtSpot Support, turn the remote tunnel off, until you
need to use it again:
$ tscli support stop-remote
You can repeat the steps to start and stop the remote tunnel as needed for future support
operations.
9. Ensure that the remote tunnel is disabled:
$ tscli support show-remote
Configure a secure file server
ThoughtSpot Support uses a secure file server to provide new releases and to receive logs and
troubleshooting files that you upload. The secure server connection is also required if you want to enable
the optional statistics collection using the call home feature.
Before you can upload a file to the secure file server, obtain your user name and password for logging in
to the secure file server. You can get these from ThoughtSpot Support.
Configuring the connection to the file server is a one time operation. You do not need to reconfigure the
connection unless your password changes. Note that you can do a one time override of the user and
password you used to configure the connection. This is done by passing a different user and password
on the command line when uploading or downloading a file.
To configure the connection to the secure file server:
1. Log in to the Linux shell using SSH.
2. Issue the command to configure the file server:
$ tscli fileserver configure --user <user_name> [--pass
word <password>]
If you do not supply the --password parameter, you are prompted to enter it.
Configure support services
February 07, 2019
ThoughtSpot Application Integration Guide Page 44
Call home with cluster usage data
“Call home” data is metadata and usage data from your ThoughtSpot cluster. This data allows
ThoughtSpot’s Support team to troubleshoot your cluster. They use the data to see basic usage
information over time for your ThoughtSpot instance. ThoughtSpot’s “call home” functionality
intermittently sends a call home bundle of statistics to a ThoughtSpot S3 server via HTTPS. The data is
encrypted at rest on the server.
By default, call home is enabled on your cluster. You can disable call home in by doing the following:
1. Log into the ThoughtSpot server as admin user.
2. Use the tscli command to disable.
$ tscli callhome disable
Designate a support contact
A support contact person can answer questions for about data and searching at your company. If the
person can’t answer a question that person should submit system and software-related questions to
ThoughtSpot Support. Your designated support contact should have an available email and phone
number.
To designate the custom support contact:
1. Log in to the Linux shell using SSH.
2. Issue the tscli command to set the email address:
$ tscli support set-admin-email <email_address>
3. Issue the tscli command to set the phone number:
$ tscli support set-admin-phone <phone_number>
4. If you need to reset both of these to the default (ThoughtSpot Support), issue:
$ tscli support rm-admin-email
$ tscli support rm-admin-phone
Configure support services
February 07, 2019
ThoughtSpot Application Integration Guide Page 45
Manage the feedback contact
Users in ThoughtSpot may be asked for feedback for new or BETA features in the system. By default,
feedback goes directly to ThoughtSpot support. Alternatively, you can send feedback to someone in
your company, this is useful if you are using ThoughtSpot embedded.
Your designated feedback contact should have an available email. To designate the custom feedback
contact, do the following:
1. Log in to the Linux shell using SSH.
2. To set the feedback email address, do the following:
$ tscli support set-feedback-email <email_address>
3. Verify the email address was set:
$ tscli support show-feedback-email
If you need to reset the email to the default (ThoughtSpot support), issue:
$ tscli support rm-feedback-email
You can also choose not to send feedback out of your system at all by doing the following:
$ tscli support set-feedback-email ' '
How users find your company’s support
contact
After you set the custom support contact information, here’s where your users will see it:
• In the Help Center, when a user selects Contact SupportContact Support.
Configure support services
February 07, 2019
ThoughtSpot Application Integration Guide Page 46
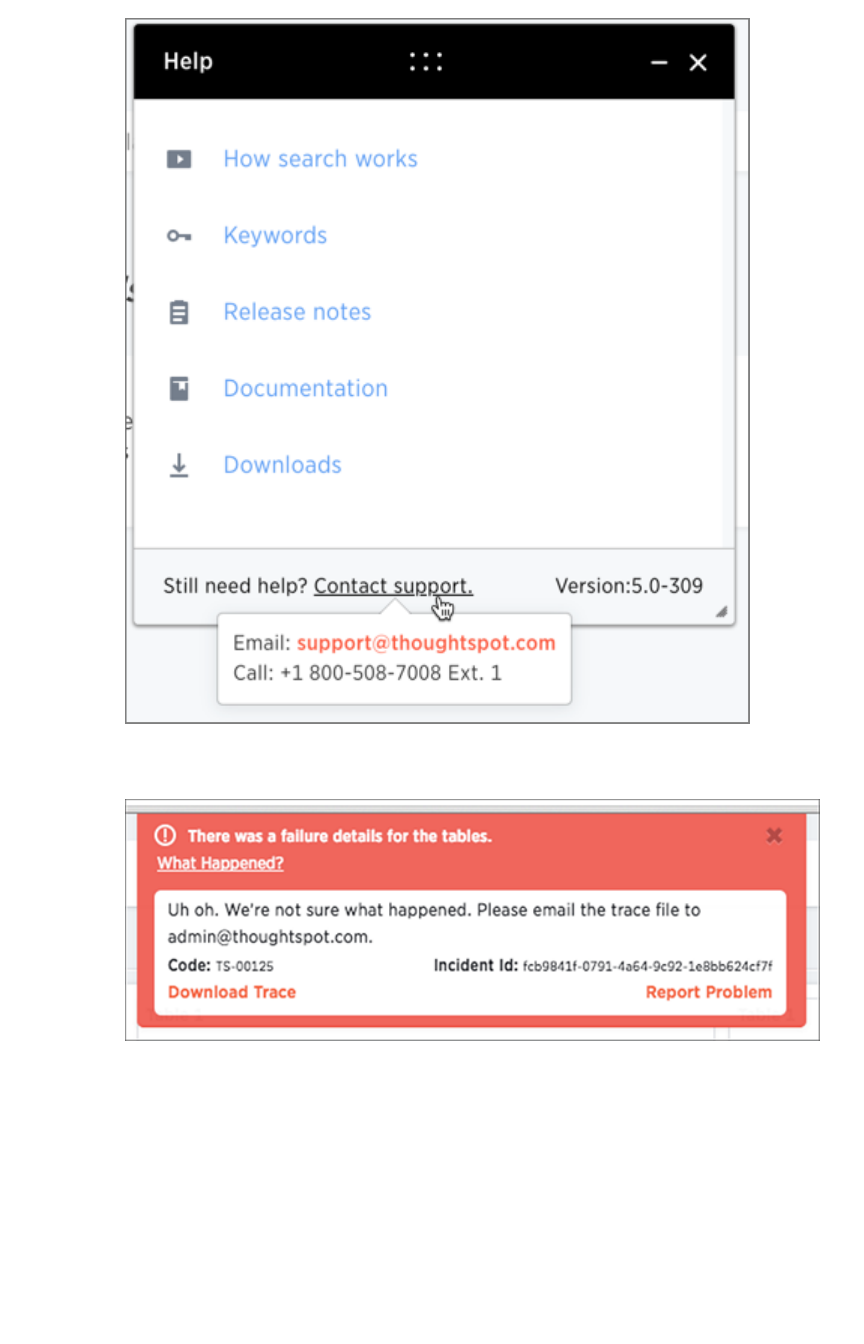
• In error messages, when a user selects What Happened?What Happened?
Configure support services
February 07, 2019
ThoughtSpot Application Integration Guide Page 47

Network ports
Summary:Summary: Lists the required and optional ports for an installation.
For regular operations and for debugging, there are some ports you will need to keep open to network
traffic from end users. Another, larger list of ports must be kept open for network traffic between the
nodes in the cluster.
Required ports for operations and debugging
The following ports need to be opened up to requests from your user population. There are two main
categories: operations and debugging.
PortPort ProtocolProtocol ServiceService
NameName
DirectionDirection SourceSource DestinationDestination DescriptionDescription
22 SSH SSH bidirectional Administrators
IP addresses
All nodes Secure shell access.
Also used for scp (se-
cure copy).
80 HTTP HTTP bidirectional All users IP
addresses
All nodes Hypertext Transfer
Protocol for website
traffic.
443 HTTPS HTTPS bidirectional All users IP
addresses
All nodes Secure HTTP.
12345 TCP Simba bidirectional Administrators
IP addresses
All nodes Port used by ODBC
and JDBC drivers
when connecting to
ThoughtSpot.
2201 HTTP Orion
master
HTTP
bidirectional Administrator
IP addresses
All nodes Port used to debug
the cluster manager.
2101 HTTP Oreo
HTTP
bidirectional Administrator
IP addresses
All nodes Port used to debug
the node daemon.
4001 HTTP Falcon
worker
HTTP
bidirectional Administrator
IP addresses
All nodes Port used to debug
the data cache.
4251 HTTP Sage
master
HTTP
bidirectional Administrator
IP addresses
All nodes Port used to debug
the search engine.
Network ports
February 07, 2019
ThoughtSpot Application Integration Guide Page 48

Network Ports
This reference lists the potential ports to open when setting up your security group.
Required ports for inter-cluster operation
Internally, ThoughtSpot uses static ports for communication between services in the cluster. Do not
close these ports from inter-cluster network communications. In addition, a number of ports are
dynamically assigned to services, which change between runs. The dynamic ports come from the range
of Linux dynamically allocated ports (20K+).
PortPort ProtocolProtocol Service NameService Name DirectionDirection SourceSource Dest.Dest. DescriptionDescription
80 TCP nginx inbound All nodes All
nodes
Primary app HTTP
port (nginx)
443 TCP Secure nginx inbound All nodes All
nodes
Primary app
HTTPS port (nginx)
2100 RPC Oreo RPC port bidirectional All nodes All
nodes
Node daemon
RPC
2101 HTTP Oreo HTTP port bidirectional Admin IP
addresses
and all
nodes
All
nodes
Node daemon
HTTP
2181 RPC Zookeeper servers
listen on this port
for client connec-
tions
bidirectional All nodes All
nodes
Zookeeper servers
listen on this port
for client connec-
tions
2200 RPC Orion master RPC
port
bidirectional All nodes All
nodes
Internal communi-
cation with the
cluster manager
2201 HTTP Orion master
HTTP port
bidirectional Admin IP
addresses
and all
nodes
All
nodes
Port used to de-
bug the cluster
manager
2210 RPC Cluster stats ser-
vice RPC port
bidirectional All nodes All
nodes
Internal communi-
cation with the
stats collector
2211 HTTP Cluster stats ser-
vice HTTP port
bidirectional Admin IP
addresses
and all
nodes
All
nodes
Port used to de-
bug the stats col-
lector
Network ports
February 07, 2019
ThoughtSpot Application Integration Guide Page 49

PortPort ProtocolProtocol Service NameService Name DirectionDirection SourceSource Dest.Dest. DescriptionDescription
2230 RPC Callosum stats
collector RPC port
bidirectional All nodes All
nodes
Internal communi-
cation with the BI
stats collector
2231 HTTP Callosum stats
collector HTTP
port
bidirectional Admin IP
addresses
and all
nodes
All
nodes
Port used to de-
bug the BI stats
collector
2240 RPC Alert manager bidirectional All nodes All
nodes
Port where alerting
service receives
alert events
2888 RPC Ports used by
Zookeeper servers
for communication
between them-
selves
bidirectional All nodes All
nodes
Ports used by
Zookeeper servers
for communication
between them-
selves
3888 RPC Ports used by
Zookeeper servers
for communication
between them-
selves
bidirectional All nodes All
nodes
Ports used by
Zookeeper servers
for communication
between them-
selves
4000 RPC Falcon worker
RPC port
bidirectional All nodes All
nodes
Port used by data
cache for commu-
nication between
themselves
4001 HTTP Falcon worker
HTTP port
bidirectional Admin IP
addresses
and all
nodes
All
nodes
Port used to de-
bug the data
cache
4021 RPC Sage metadata
service port (ex-
ported by Tomcat)
bidirectional Admin IP
addresses
and all
nodes
All
nodes
Port where search
service contacts
metadata service
for metadata
4201 HTTP Sage auto com-
plete server HTTP
interface port
bidirectional Admin IP
addresses
and all
nodes
All
nodes
Port used to de-
bug the search
service
4231 HTTP Sage index server
HTTP port
bidirectional Admin IP
addresses
and all
nodes
All
nodes
Port used to de-
bug the search
service
Network ports
February 07, 2019
ThoughtSpot Application Integration Guide Page 50

PortPort ProtocolProtocol Service NameService Name DirectionDirection SourceSource Dest.Dest. DescriptionDescription
4232 RPC Sage index server
metadata sub-
scriber port
bidirectional All nodes All
nodes
Port used for
search service in-
ternal communica-
tion
4233 RPC Sage index server
RPC port
bidirectional All nodes All
nodes
Port used for
search service in-
ternal communica-
tion
4241 HTTP Sage auto com-
plete server HTTP
port
bidirectional Admin IP
addresses
and all
nodes
All
nodes
Port used to de-
bug the search
service
4242 RPC Sage auto com-
plete server RPC
port
bidirectional All nodes All
nodes
Port used for
search service in-
ternal communica-
tion
4243 RPC Sage auto com-
plete server meta-
data subscriber
port
bidirectional All nodes All
nodes
Port used for
search internal
communication
4251 RPC Sage master RPC
port
bidirectional All nodes All
nodes
Port used for
search service in-
ternal communica-
tion
4405 RPC Diamond (graphite)
port
bidirectional All nodes All
nodes
Port used for com-
munication with
monitoring service
4500 RPC Trace vault service
RPC port
bidirectional All nodes All
nodes
Trace collection
for ThoughtSpot
services
4501 HTTP Trace vault service
HTTP port
bidirectional Admin IP
addresses
and all
nodes
All
nodes
Debug trace col-
lection
4851 RPC Graphite manager
RPC port
bidirectional All nodes All
nodes
Communication
with graphite man-
ager
4852 HTTP Graphite manager
HTTP port
bidirectional Admin IP
addresses
and all
nodes
All
nodes
Debug graphite
manager
Network ports
February 07, 2019
ThoughtSpot Application Integration Guide Page 51

PortPort ProtocolProtocol Service NameService Name DirectionDirection SourceSource Dest.Dest. DescriptionDescription
4853 RPC Elastic search
stack (ELK) man-
ager RPC port
bidirectional All nodes All
nodes
Communication
with log search
service
4853 HTTP Elastic search
stack (ELK) man-
ager HTTP port
bidirectional Admin IP
addresses
and all
nodes
All
nodes
Debug log search
service
5432 Postgres Postgres database
server port
bidirectional All nodes All
nodes
Communication
with Postgres
database
8020 RPC HDFS namenode
server RPC port
bidirectional All nodes All
nodes
Distributed file
system (DFS)
communication
with clients
8080 HTTP Tomcat bidirectional All nodes All
nodes
BI engine commu-
nication with
clients
8787 HTTP Periscope (UI) ser-
vice HTTP port
bidirectional All nodes All
nodes
Administration UI
back end
8888 HTTP HTTP proxy server
(tinyproxy)
bidirectional All nodes All
nodes
Reverse SSH tun-
nel
11211 Mem-
cached
Memcached serv-
er port
bidirectional All nodes All
nodes
BI engine cache
12345 ODBC Simba server port bidirectional All nodes All
nodes
Port used for ETL
(extract, transform,
load)
50070 HTTP HDFS namenode
server HTTP port
bidirectional All nodes All
nodes
Debug DFS meta-
data
50075 HTTP HDFS datanode
server HTTP port
bidirectional All nodes All
nodes
Debug DFS data
Required ports for inbound and outbound cluster access
ThoughtSpot uses static ports for inbound and outbound access to a cluster.
PortPort ProtocolProtocol ServiceService
NameName
DirectionDirection SourceSource Dest.Dest. DescriptionDescription
22 SCP SSH bidirectional ThoughtSpot
Support
All
nodes
Secure shell access.
Network ports
February 07, 2019
ThoughtSpot Application Integration Guide Page 52

PortPort ProtocolProtocol ServiceService
NameName
DirectionDirection SourceSource Dest.Dest. DescriptionDescription
80 HTTP HTTP bidirectional ThoughtSpot
Support
All
nodes
Hypertext Transfer Protocol
for website traffic.
443 HTTPS HTTPS bidirectional ThoughtSpot
Support
All
nodes
Secure HTTP.
12345 TCP Simba bidirectional ThoughtSpot
Support
All
nodes
Port used by ODBC and JD-
BC drivers when connecting
to ThoughtSpot.
PortPort ProtocolProtocol ServiceService
NameName
DirectionDirection SourceSource DestinationDestination DescriptionDescription
443 HTTPS HTTPS outbound All nodes 208.83.110.20 For transferring files to
thoughtspot.egnyte.com (IP
address 208.83.110.20).
25
or
587
SMTP SMTP
or Se-
cure
SMTP
outbound All nodes
and
SMTP re-
lay (pro-
vided by
customer)
All nodes Allow outbound access for
the IP address of whichever
email relay server is in use.
This is for sending alerts to
ThoughtSpot Support.
389
or
636
TCP LDAP
or
LDAPS
outbound All nodes
and
LDAP
server
(provided
by cus-
tomer)
All nodes Allow outbound access for
the IP address of the LDAP
server in use.
Required ports for IPMI (Intelligent Platform Management Interface)
ThoughtSpot uses static ports for out-of-band IPMI communications between the cluster and
ThoughtSpot Support.
PortPort ProtocolProtocol ServiceService
NameName
DirectionDirection SourceSource Dest.Dest. DescriptionDescription
80 HTTP HTTP bidirectional ThoughtSpot
Support
All
nodes
Hypertext Transfer Protocol
for website traffic.
Related information
EC2 Best Practices
Network ports
February 07, 2019
ThoughtSpot Application Integration Guide Page 53
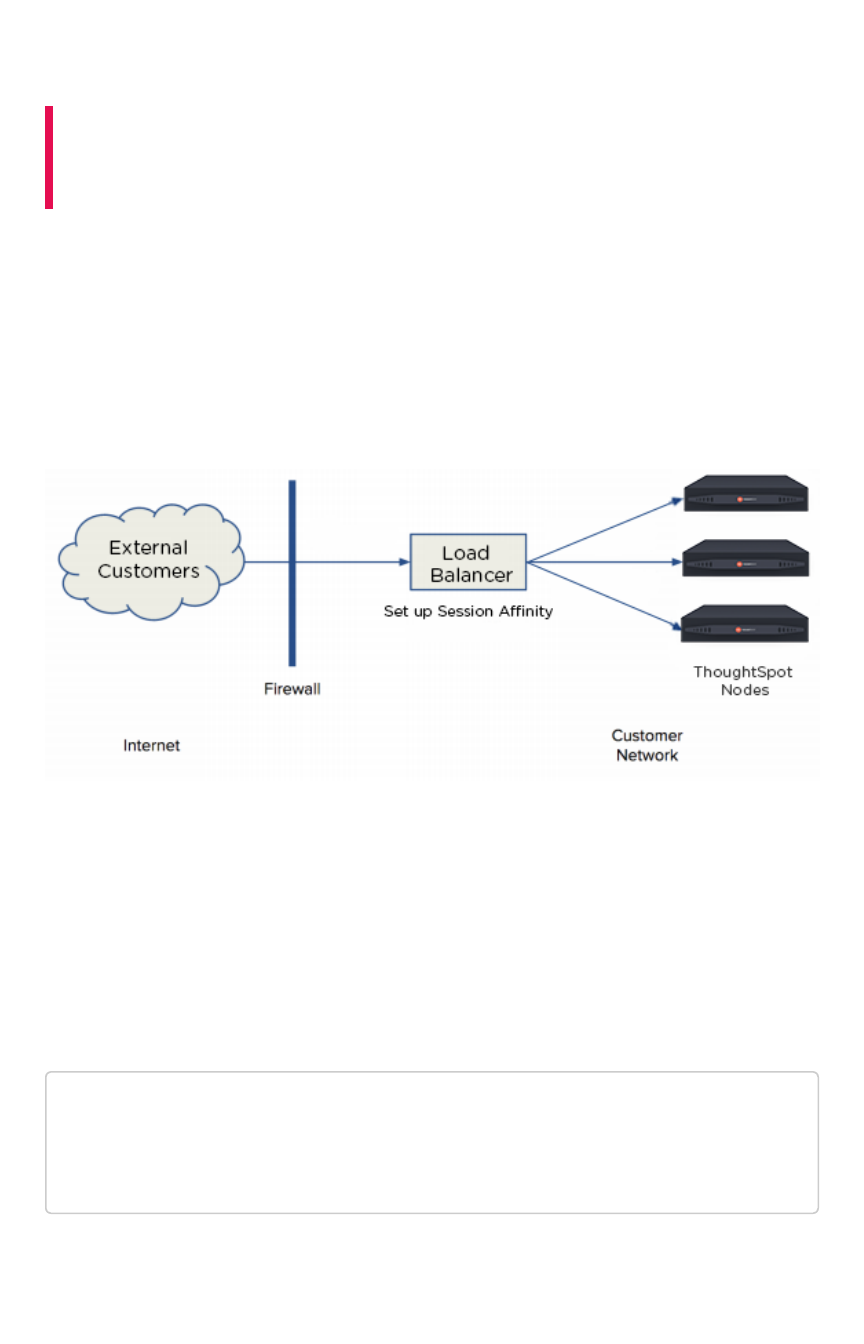
Configure load balancing and proxies
Summary:Summary: A load balancer is needed in front of a server group in
order to direct traffic to individual servers in a way that maximizes
efficiency.
Here are some of the best practices and guidelines for a typical implementation with ThoughtSpot. Your
experience may differ depending on your environment and preference.
Load balance across ThoughtSpot nodes
The following shows a network architectural diagram which includes a load balancer for ThoughtSpot
nodes.
The load balancer is an appliance in your infrastructure that routes traffic automatically to nodes to
provide failover. You can also place a load balancer or proxy in front of the ThoughtSpot appliance if
you’d like external network users to access the system.
The best way to load balance across all ThoughtSpot nodes in a cluster is to map one domain name
(FQDN) to all the IPs in the cluster in a round robin fashion.
For example, if you want to use a DNS server based load balancing, then you can define multiple “A”
resource records (RR) for the same name.
Below is an example of how you could set that up
thoughtspot.customer.com IN A 69.9.64.11
thoughtspot.customer.com IN A 69.9.64.12
thoughtspot.customer.com IN A 69.9.64.13
thoughtspot.customer.com IN A 69.9.64.14
The example indicates that IP addresses for the domain thoughtspot.customer.com are 69.9.64.11,
69.9.64.12, 69.9.64.13, and 69.9.64.14.
Configure load balancing and proxies
February 07, 2019
ThoughtSpot Application Integration Guide Page 54

Session Affinity
Session Affinity refers to directing requests to the same application server for the time it takes to
complete a task.
In order for session affinity to work on ThoughtSpot, HTTPS (an SSL certificate) has to be installed on
the load balancer level. If it is installed outside of the load balancer, session affinity may not occur and
the ThoughtSpot system will fail.
Web proxies
You can access ThoughtSpot through any standard web proxy server. Web proxies are fairly universal
regardless of the application they are proxying. However, ThoughtSpot doesn’t use any new protocols,
like SPDY or HTTP/2, which may have a dependency on the proxy. Instead, ThoughtSpot is commonly
placed behind a web HTTP/HTTPS proxy.
Additionally, the proxy can round robin across multiple nodes in the ThoughtSpot backend. You can
essentially use the web proxy as a load balancer. Therefore, your session will carry over if the proxy
round robins between the ThoughtSpot backends as long as the URL doesn’t change.
Configure load balancing and proxies
February 07, 2019
ThoughtSpot Application Integration Guide Page 55
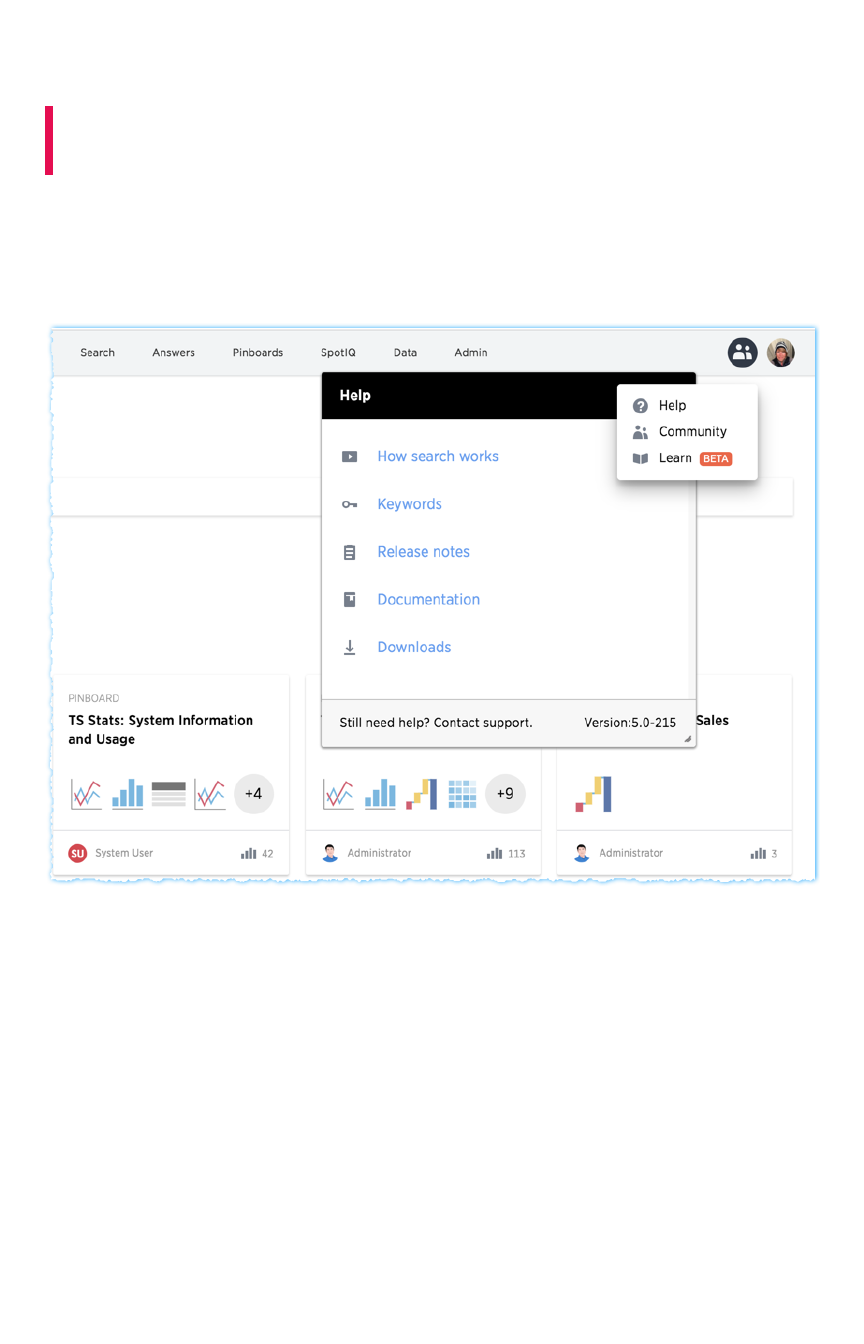
Customize ThoughtSpot Help
Summary:Summary: You customize ThoughtSpot Help to be specific to your
data, examples, and documentation.
You can customize the Help for your ThoughtSpot application to tailor it to your organization.
Configuring these Help settings sets system-wide defaults for all your users.
When your ThoughtSpot users click the Help icon, they see a list of links.
As an administrator, you can add your own links to this list. This allows you to include documentation
specific to your company, such as information about the data available in ThoughtSpot, where to get
support internally, or company-specific training.
Customize ThoughtSpot Help
February 07, 2019
ThoughtSpot Application Integration Guide Page 56
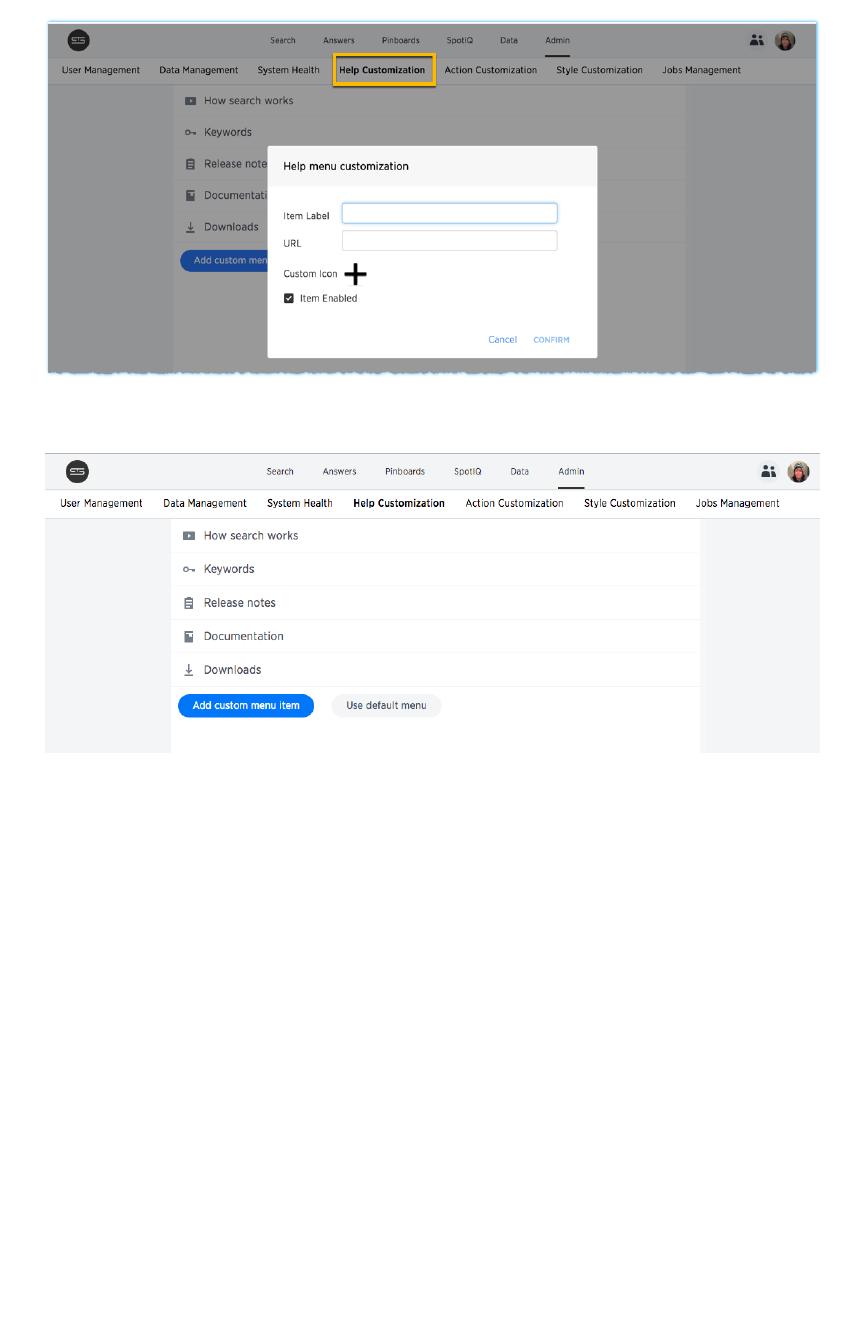
You can also edit existing links, change icons, or remove items from the help listing altogether.
Customize ThoughtSpot Help
February 07, 2019
ThoughtSpot Application Integration Guide Page 57
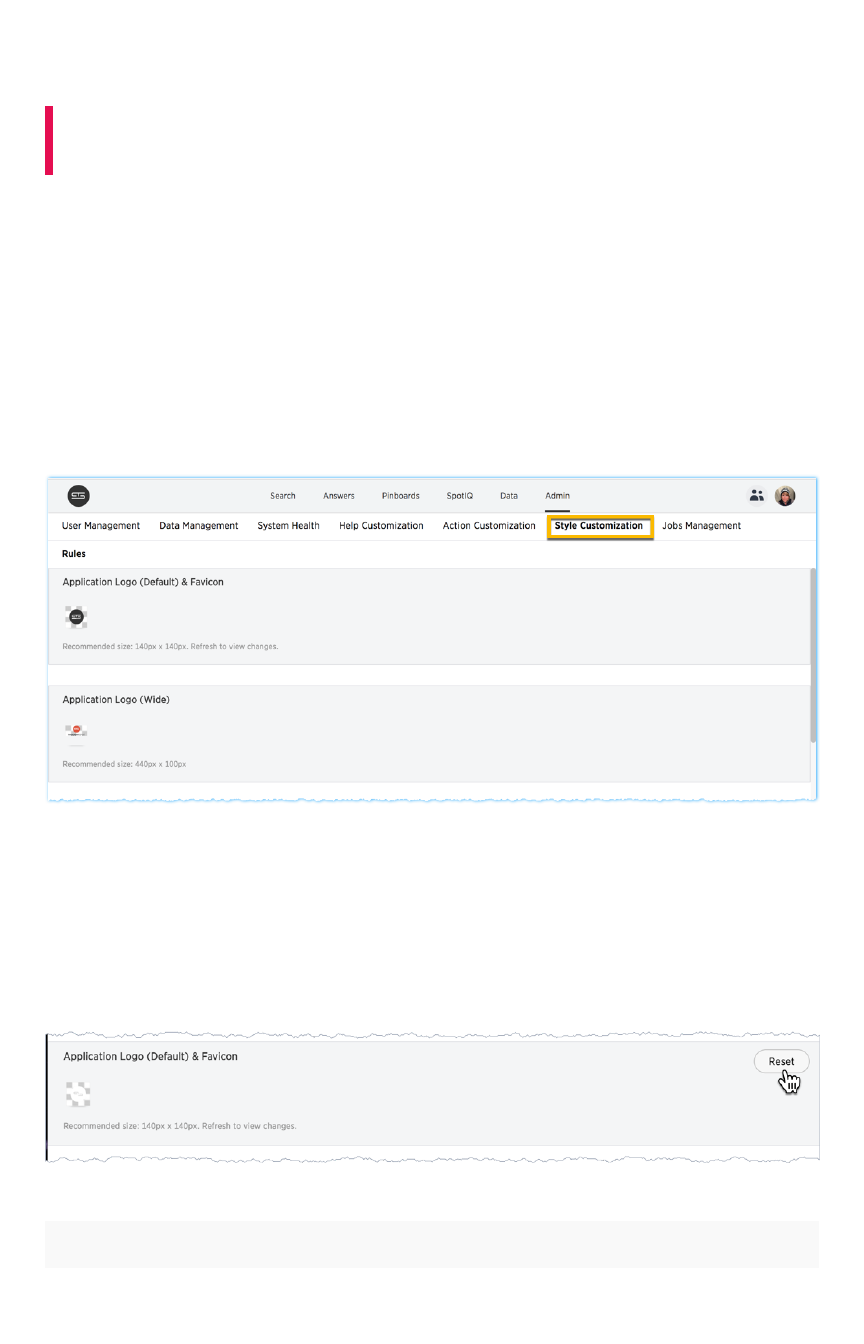
Customize look and feel
Summary:Summary: You can brand the ThoughtSpot application for your
company.
You can customize the look and feel of the ThoughtSpot application for your company. Configuring
these settings sets system-wide defaults for all your users.
Style customization is enabled by default. You can configure your cluster to disable this functionality.
Contact support@thoughtspot.com for information about disabling this feature.
Where to customize styles
A user with administrative rights can view and access the customization on the AdminAdmin page.
Use the Style CustomizationStyle Customization page to access the configuration settings.
General guidelines for customization
Your changes take effect either immediately or with browser refresh. You can revert your changes by
using the ResetReset button which displays when your cursor moves to the right of any setting.
The table below lists the style customizations you can configure.
SettingSetting DescriptionDescription
Customize look and feel
February 07, 2019
ThoughtSpot Application Integration Guide Page 58

ApplicationApplication
LogoLogo
(Default) &(Default) &
FaviconFavicon
Sets a default application and favicon logo. This should be 140 pixels square.
ApplicationApplication
Logo (Wide)Logo (Wide)
This logo should be 440 x 100 pixels.
ChartChart
VisualizationVisualization
FontsFonts
Set a font for chart labels. You can specify any Web Open Font Format (`WOFF`) file.
TableTable
VisualizationVisualization
FontsFonts
Set a font for table labels. You can specify any Web Open Font Format (`WOFF`) file.
EmbeddedEmbedded
ApplicationApplication
BackgroundBackground
Set the background for an embedded ThoughtSpot instance. This is only used if you
are embedding ThoughtSpot in another application.
Chart ColorChart Color
PalettesPalettes
Set the default palette for all charts. To set a value, however over a color value and
enter a HEX value or select one from the chart. Individual users can still customize
their own chart colors. They can use the **Reset colors** option on a chart to clear
their changes.
Footer textFooter text Define a footer to appear with the ThoughtSpot application.
Page titlePage title Sets the title for the browser tab.
How to specify fonts
You can set your systems default fonts by specifying either or both of the Chart Visualization FontsChart Visualization Fonts and
Table Visualization FontsTable Visualization Fonts values. To set this values, your font must be defined in a Web Open Font
Format ( WOFF ) file.
Changes to chart and table defaults apply only to charts and features created
after
you configure a
value. If you change table fonts, older tables retain their previous fonts. Some settings can be overridden
on a per-object level. Users cannot configure their own defaults.
To set a new font:
Customize look and feel
February 07, 2019
ThoughtSpot Application Integration Guide Page 59

1. Make sure you have a WOFF file available for your font.
2. Select the label you want to change.
3. Press the ++ button.
The system displays the Custom FontCustom Font dialog.
4. Press the Custom FontCustom Font field.
The system displays the file finder.
5. Add the WOFF file you want.
The file appears in the font dialog
6. Press SaveSave to change the font.
How to specify the behavior or clickable links in
data
There is a system-wide setting which determines what happens when a user clicks on a link within the
data. When your data includes URLs, they display as clickable links in ThoughtSpot tables. By default,
clicking on a link opens the URL in a separate tab. But there is a system-wide setting that can be
changed to open the links within the context in which they appear.
Changing this setting opens the links:
Link type Opens in
Link in search result table in ThoughtSpot Same browser tab as ThoughtSpot appli-
cation
Link in table embedded in an iFrame Same iFrame that contains the table
Link in full ThoughtSpot application embedded in an
iFrame
Same iFrame that contains the application
Customize look and feel
February 07, 2019
ThoughtSpot Application Integration Guide Page 60
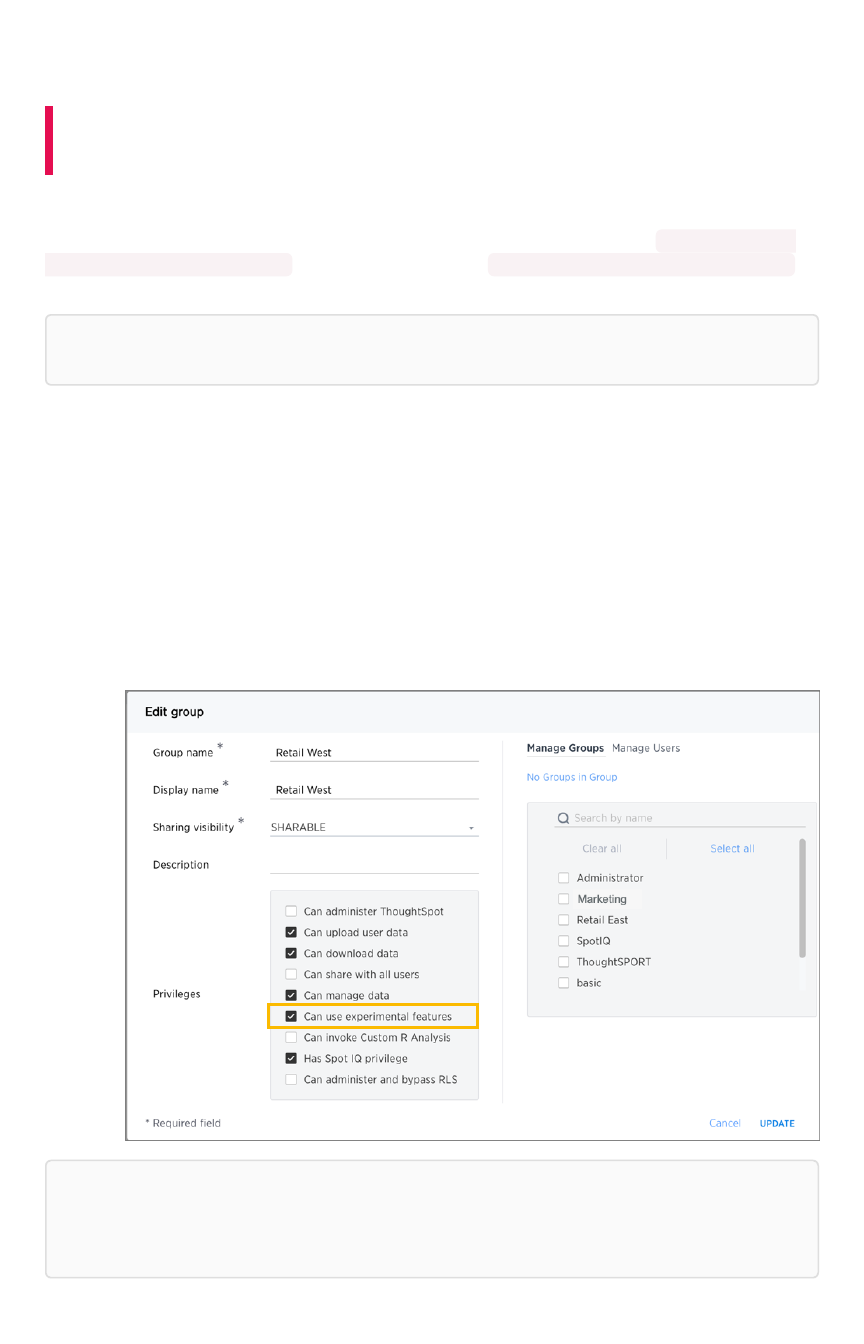
Enable SearchIQ
Summary:Summary: Enable SearchIQ to provide natural language search for
some or all of your users.
SearchIQ is a different search experience that understands more natural, speech-like search language
than the original ThoughtSpot search or Search+Search+. For example, you can search for What was my top
selling product last month? , instead of having to type top 1 product by sales last month .
You can also speak your search using the voice-to-text capability of your operating system.
Note:Note: SearchIQ is turned off by default, you can have ThoughtSpot Support enable it for you.
Users can easily teach SearchIQ their language as they use it. Over time, SearchIQ gets smarter about
how to interpret terms that don’t come directly from keywords, column names, or data values. In order to
give it time to learn, the best practice recommendation is to enable SearchIQ for a small group of users
initially. Over time you can roll it out to larger groups as SearchIQ learns what your users search for the
most.
To enable SearchIQ on a ThoughtSpot instance:
1. Call ThoughtSpot Support and ask them to turn on SearchIQ for your ThoughtSpot instance.
2. Grant the Can use experimental featuresCan use experimental features privilege to any group that should have access to the
SearchIQ search experience.
Note:Note: Because the SearchIQ search experience is very different from the original ThoughtSpot
search experience, you should give your new users some orientation on it, so they know what to
expect.
Enable SearchIQ
February 07, 2019
ThoughtSpot Application Integration Guide Page 61


Slack integration
Working with ThoughtSpot, you can configure your installation to work with Slack. Users can use the
integration, called SpotSpot, to make queries or view charts. Any users with administrative rights can apply a
spot sticker to specific objects. Then, the object is available through Slack.
The first time a user messages Spot, it returns a link to log into ThoughtSpot. Once a user logs in, the
user’s Slack and ThoughtSpot account are associated. Actions a user makes from Slack are tied to the
user’s permissions and authorization.
Spot workflow for administration
Here are the high level steps:
1. Work with support@thoughtspot.com to install the Spot Slack bot on your cluster.
2. Log into ThoughtSpot.
3. Label answers, pinboards, and other objects with the spot sticker.
4. Start Spot Bot.
5. Register Spot bot with your company’s Slack instance.
6. Register your Spot Slack account to ThoughtSpot.
Related Information
Relevant tscli commands are here, but these will not work until Spot is enabled by ThoughtSpot
Support. Support will work with you to install Spot, and then provide the rest of the workflow to you,
including tscli command usage.
Slack integration
February 07, 2019
ThoughtSpot Application Integration Guide Page 63

Load and manage data
Summary:Summary: There are several methods of loading data into
ThoughtSpot. This section describes each method and why you might
choose it above the others. Consider setting up data-cleansing tasks
alongside data-load tasks to make the most of your ThoughtSpot
cluster's capacity
The fastest and easiest way to load a new table is by importing it using the Web browser. This is best for
one time data loads of small tables which do not have complex relationships to other tables. This
method is limited to tables that are under 50 MB (megabytes) in size.
Using ThoughtSpot Loader, you can script recurring loads and work with multi-table schemas.
If your data already exists in another database with the schema you want to use in ThoughtSpot, you can
pull the schema and data in using the ODBC or JDBC driver.
These are the methods you can use to load data, along with the benefits of each method:
MethodMethod DescriptionDescription BenefitsBenefits
Load data
from the
ThoughtSpot
UI
Use the ThoughtSpot Web interface to
upload an Excel or CSV (comma separat-
ed values) file from your local machine.
Easy way to do a one-time data load of
a small file (under 50MB).End users can
upload their own data and explore it
quickly.
Use
ThoughtSpot
Data Con-
nect. For de-
tails, see the
ThoughtSpot
Data Connect
Guide
This is a premium feature, available at
additional cost. Use ThoughtSpot Data
Connect to connect directly to external
data sources and pull in tables and
columns from them. You can also set up
recurring loads to keep the data fresh.
Easy way to connect to multiple
sources of data directly and set up re-
curring loads. You won’t need to define
a schema to accept the data loads, be-
cause this is done automatically for
you.
Import with
the
ThoughtSpot
Loader
(tsload)
Use TQL and tsload to load data directly
into the back end database that
ThoughtSpot uses.
Best way to load large amounts of data
or a schema with multiple tables.Can
be scripted and used for recurring data
loads, such as monthly sales results or
daily logs. Can be integrated with an
ETL solution for automation.
Use the
ODBC/JDBC
driver to con-
nect to
ThoughtSpot
Use the ODBC or JDBC client with your
ETL tool. For information, see the
ThoughtSpot Data Integration Guide.
Make use of an established ETL
process and tool(s).Connect to
ThoughtSpot using third party tools like
SSIS. You don’t need to define a
schema to accept the data load.
If you’re uploading data through the Web interface, you can use a native Excel file. If you want to use a
CSV (comma separated values) or delimited file, or you are loading using ThoughtSpot Loader, you’ll
need to create CSV files with the data to be loaded first.
Load and manage data
February 07, 2019
ThoughtSpot Application Integration Guide Page 64

Note:Note: End users will almost always work with worksheets and data they upload.
Related Information
•Load CSV files with the UI
•Append data through the UI
•Schema planning concepts
•Overview of schema building
•Import CSV files with tsload
•How to view a data schema
Load and manage data
February 07, 2019
ThoughtSpot Application Integration Guide Page 65

Configure casing
Summary:Summary: You can set the type of case sensitivity you would like to
see reflected in the ThoughtSpot display.
Before you load your data, you should consider the type of casing you would like your data to reflect.
The case sensitivity for source data strings is preserved in the display. So, the visual display of results is
identical to the input case that is loaded.
Note:Note: The casing will remain lowercase in other parts of the application, such as when you ask
a question or filter.
It is important to note that string casings aren’t applied globally, but by column. So datasets will have
different string casings as long as they’re in different columns. Tables that are already compacted will
keep their lowercase format. In these cases, to get the specific string case that you want, you would
have to truncate related tables and reload them.
To take advantage of case configuration, you need to have ThoughtSpot Support enable it on your
cluster for you. In addition, title casing should be disabled for string casing to properly work.
Configure casing
February 07, 2019
ThoughtSpot Application Integration Guide Page 66

Load CSV files with the UI
Summary:Summary: The simplest way to load data is to upload a CSV or Excel
file from the ThoughtSpot Web interface.
Loading data through the Web browser is recommended for smaller tables (under 50MB) with simple
relationships between them. This method is recommended for small, one time data loads. Using this
method, the data schema is created for you automatically.
Any user who belongs to a group that has the privilege Has administration privilegesHas administration privileges or Can upload userCan upload user
datadata can upload their own data from the browser.
Your data should be in a CSV (comma separated values) before you load it. A CSV file is a text file made
up of data fields separated by a delimiter and optionally enclosed with an enclosing character. If your
data contains multiple tables, you’ll have a separate CSV for each table.
Formatting the CSV
Your ETL (extract, transform, load) process will typically generate CSV files. You can also create a CSV
file from a Microsoft Excel spreadsheet by opening the spreadsheet in Excel, choosing Save AsSave As and
selecting CSV.
A CSV file contains a delimiter that marks the separation between fields in the data. The delimiter is
usually comma, but it can be any character. The file also contains fields optionally enclosed with double
quotes. Use these guidelines when creating the CSV file:
• If the CSV contains column headers, they must match the column names in the database
exactly.
• Often a |(pipe) or tab is used as the delimiter, because it may be less likely to occur within
the data values.
• When a field contains a double quote, it must be escaped with the character specified in the
escape character argument in tsload .
• When a field contains the delimiter, the field must be enclosed in double quotes.
ThoughtSpot supports a wide range of date and timestamp formats in the CSV file. Blank values in user
uploaded CSV files are interpreted as NULL values. These include the values (case insensitive):
•NULL
•\N
•NA
•N/A
• [space]
If you are appending data to an existing schema or table, columns in the CSV file must be in the same
order as defined in the target table.
If you are loading a fact table that joins to dimension tables, you must load the fact table first, and then
the dimension tables. The joining key must be a single column of unique values in the dimension table.
NULL values in the fact table cannot be joined.
Load CSV files with the UI
February 07, 2019
ThoughtSpot Application Integration Guide Page 67
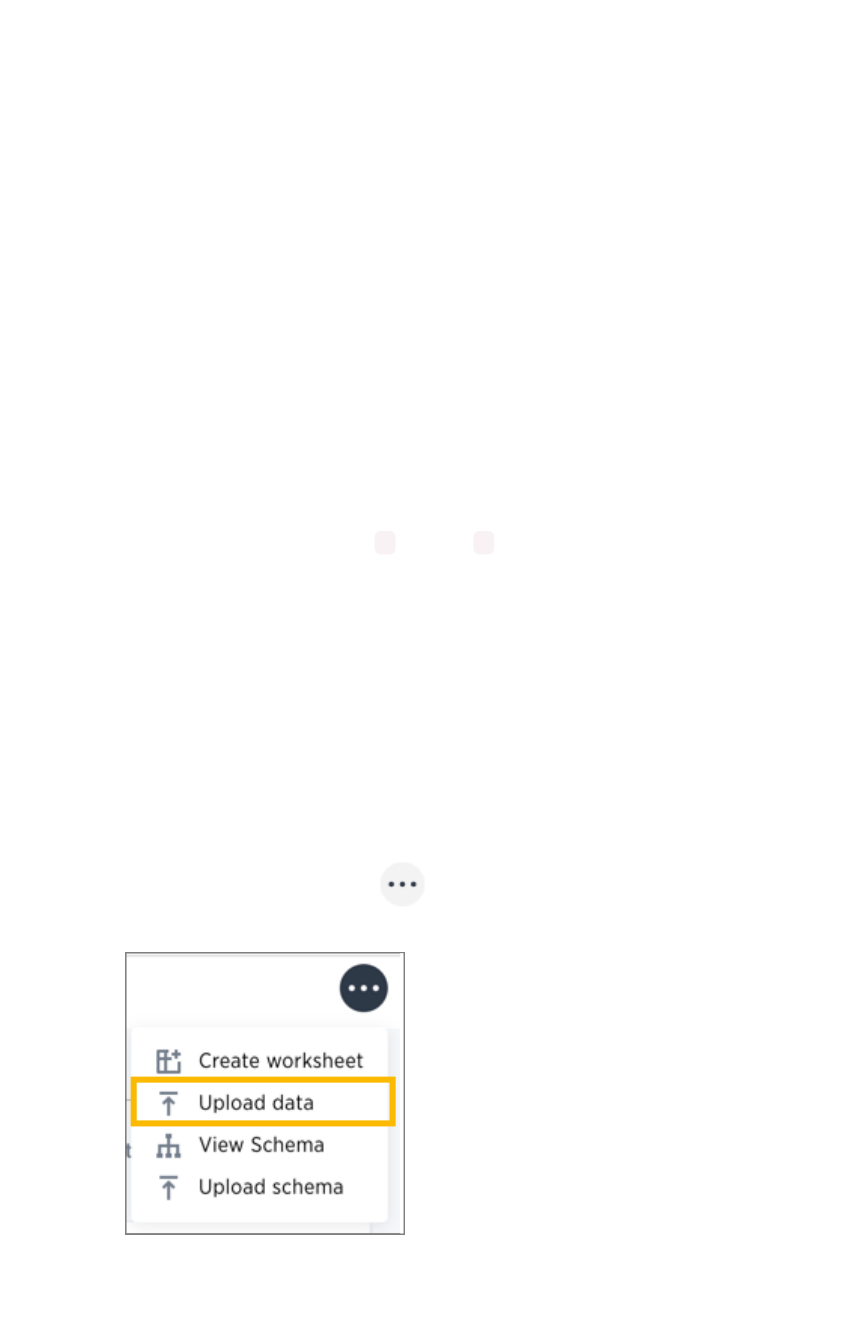
Create a CSV file
The first step in loading data is to obtain or create one or more CSV files that contain the data to be
loaded into ThoughtSpot. CSV is a common format for transferring data between databases.
ThoughtSpot requires this format.
Most applications such as Microsoft Excel or Google Sheets can output CSV formatted files. If your
source is an Excel spreadsheet or Google Sheet:
1. Save, export, or download the file in CSV format. The exact procedure you use will depend on
the source application.
2. Review the file’s format before uploading it to ThoughtSpot.
Your source data may be in another database. If this is the case, your company’s ETL
(extract, transform, load) process will typically generate CSV files. If your source is another
database:
3. Connect to the source database.
4. Extract each table you wish to import into ThoughtSpot as a CSV file.
The column delimiter should be a ,(comma), |(pipe), or tab.
For general information about CSV files and the rules for creating them, see the Comma-
separated_values on Wikipedia.
Load the CSV File
Any user who belongs to a group that has the privilege Has administration privilegesHas administration privileges or Can upload userCan upload user
datadata can upload their own data from the browser. To load the CSV or Excel file into ThoughtSpot:
1. Log into ThoughtSpot from a browser.
2. Click DataData, on the top navigation bar.
3. Click the the ellipses icon (3 dots) , in the upper right corner, and select Upload DataUpload Data.
4. Upload the CSV or Excel file by doing one of these options:
a. Click on Browse your filesBrowse your files and select the file.
Load CSV files with the UI
February 07, 2019
ThoughtSpot Application Integration Guide Page 68
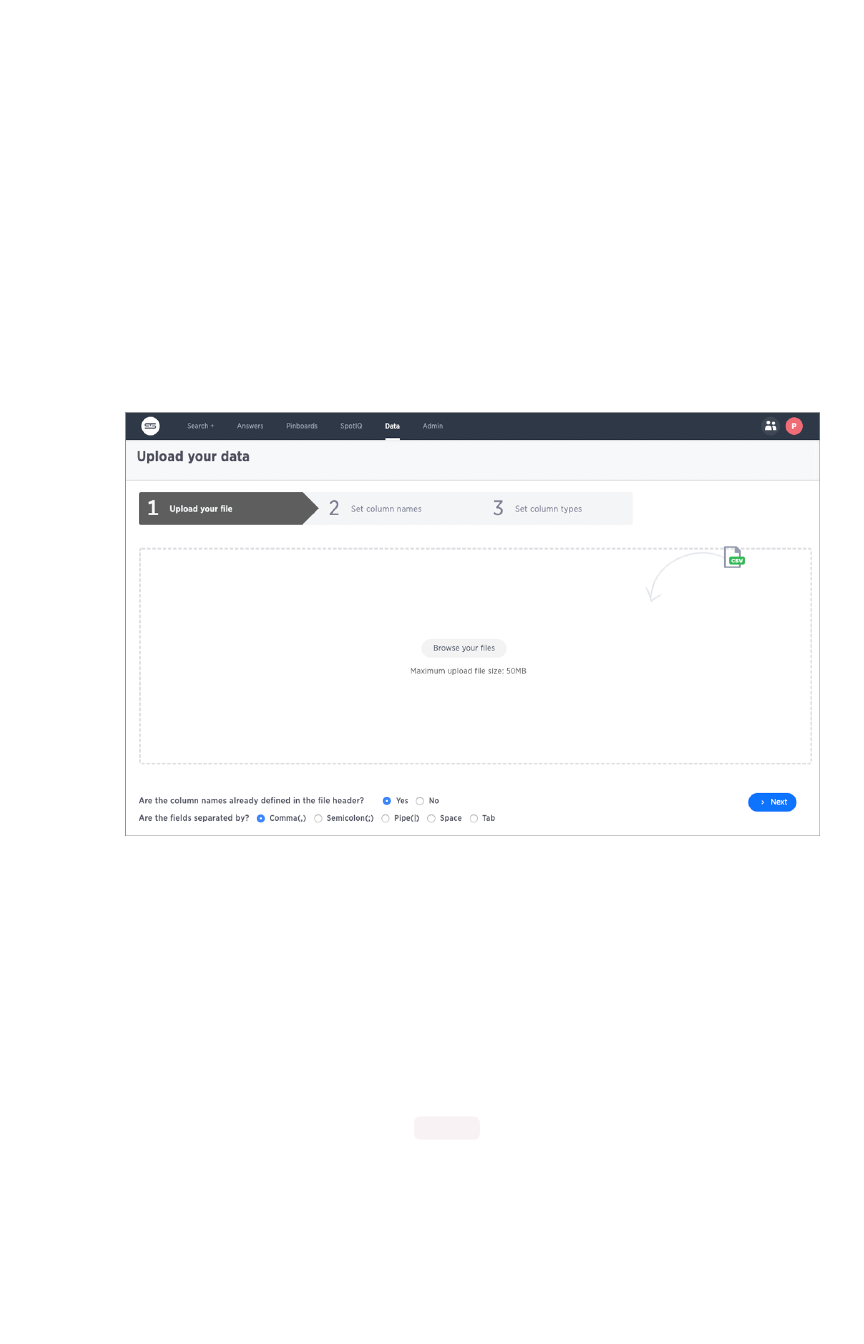
b. Drag and drop the file into the drop area.
5. Answer the question Are the column names already defined in the file header?Are the column names already defined in the file header?
6. Answer the question Are the fields separated by?Are the fields separated by? Click NextNext.
7. Click on the column header names to change them to more useful names, if you’d like. Click
NextNext.
8. Review the automatically generated data types for each column, and make any changes you
want.
There are four data types: Text, Integer, Decimal, and Date.
9. Click ImportImport.
When an upload is complete, the system reports the results and offers you some further
actions.
• Click Link to Existing DataLink to Existing Data if you want to link the data you uploaded to the data in
another table or worksheet.
• Click SearchSearch if you want to begin a new search.
• Click Auto analyzeAuto analyze if you want to use the SpotIQ feature to find insights in your new
data.
Append to an existing table
You can append data to your existing system tables through the ThoughtSpot application, even if the
tables were initially loaded using Data Connect or tsload . The CSV file must have the same structure
as the table it is being loaded into, including number and type of columns, in the same order as the
target table.
To append data into ThoughtSpot:
1. Log in to ThoughtSpot from a browser.
2. Click DataData on the top navigation bar.
Load CSV files with the UI
February 07, 2019
ThoughtSpot Application Integration Guide Page 69
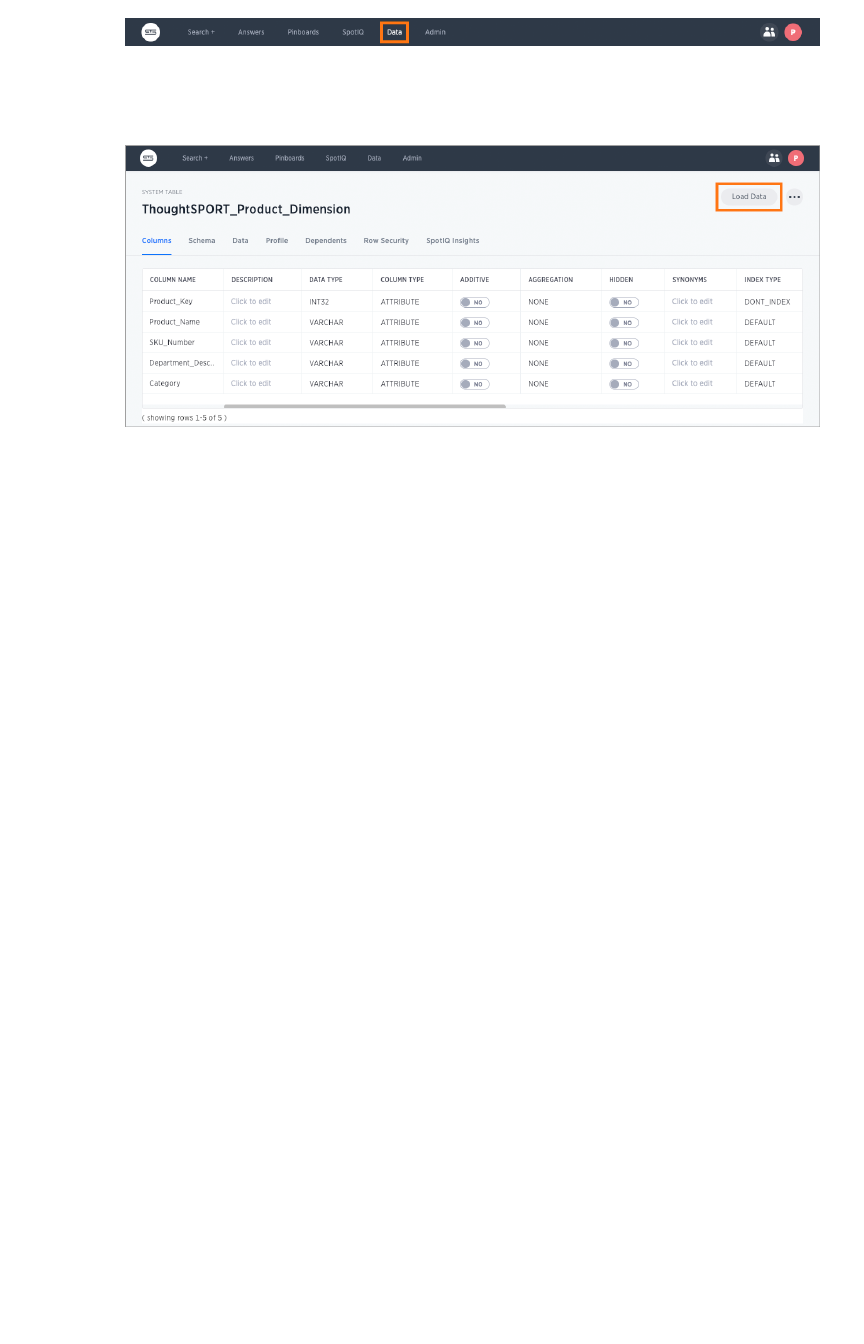
3. Click the name of the table you would like to append data to.
4. Click the Load DataLoad Data button.
5. Upload the CSV or Excel file by doing one of these options:
• Click Browse your filesBrowse your files and select the file.
• Drag and drop the file into the drop area.
6. Answer the question Are the column names already defined in the file header?Are the column names already defined in the file header?.
7. For the question Do you want to append to the existing data or overwrite it?Do you want to append to the existing data or overwrite it?, select AppendAppend.
8. Answer the question Are the fields separated by?Are the fields separated by?, and click NextNext.
9. Click UploadUpload.
10. Click Link to existing dataLink to existing data if you want to link the data you uploaded to the data in another
table or worksheet. Or click Ask a questionAsk a question if you want to begin a new search.
Load CSV files with the UI
February 07, 2019
ThoughtSpot Application Integration Guide Page 70
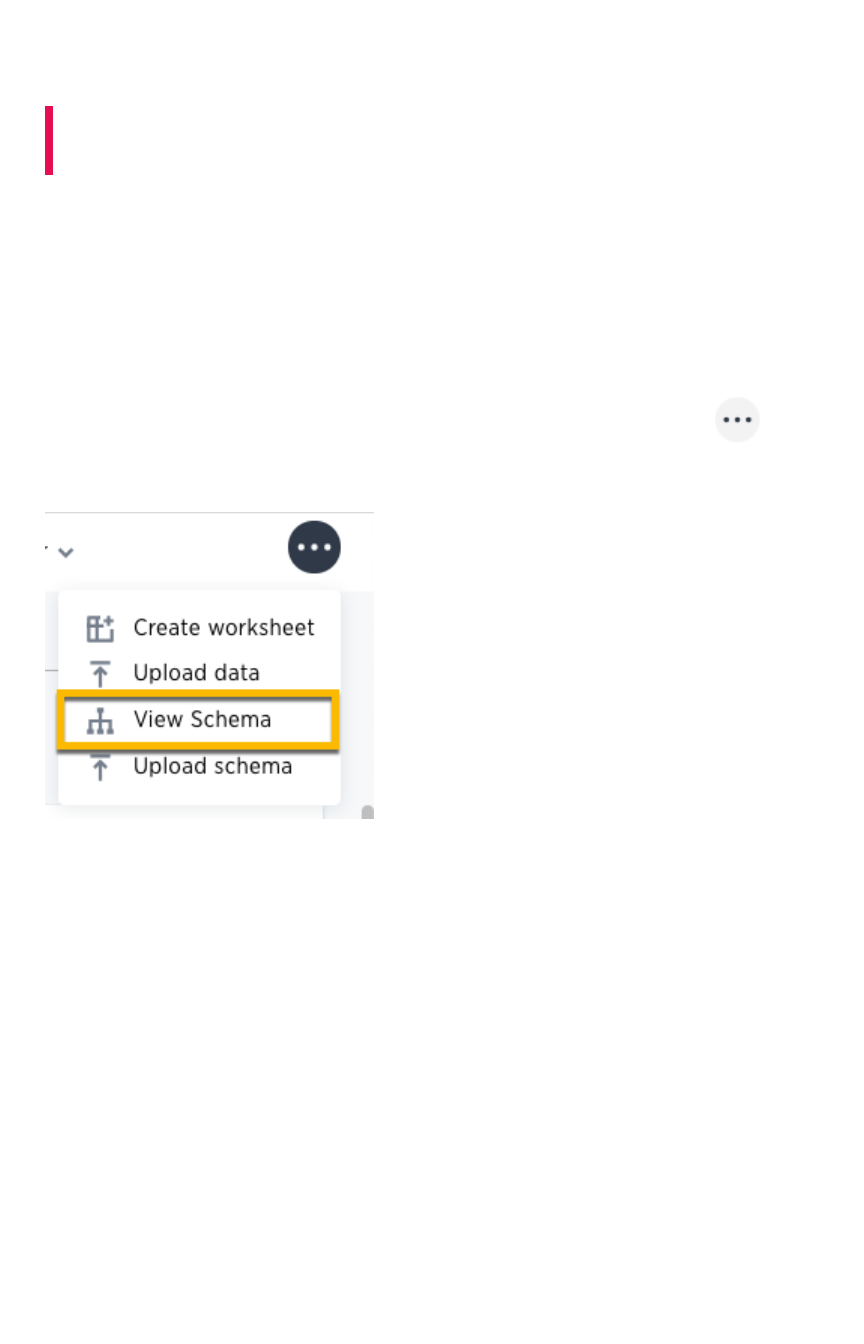
How to view a data schema
Summary:Summary: Use the schema viewer to see tables and worksheets and
their relationships.
ThoughtSpot offers a schema viewer that lets you see your database schema in the web browser. The
Schema Viewer is interactive, so you can configure it to show just what you want to see.
You need AdminAdmin privileges to use the Schema ViewerSchema Viewer.
Bringing up the Schema Viewer
You can bring up the Schema Viewer from the DataData screen. Click the ellipses icon (3 dots) , and
select View SchemaView Schema.
When viewing the schema, you can filter the tables shown similarly to how you filter data sources. The
list of tables, worksheets, and imported data on the left includes only those objects you want to see.
Clicking on one of the objects brings it to the middle of the viewer and highlights it. You can drag the
objects around in the viewer.
How to view a data schema
February 07, 2019
ThoughtSpot Application Integration Guide Page 71

Why to use the Schema Viewer
You can use the Schema Viewer to find out information like:
• What is the relationship between two tables? What tables make up this
• worksheet, and how are they joined?
The schema viewer shows joins between tables, join directionality, and join type (whether they are
Foreign Key to Primary Key, relationship joins, or joins defined by users through the web interface). Use
the TableTable list to find a specific table or worksheet.
How the Schema Viewer shows joins
You can use the Schema Viewer to review your schema and ensure that it was modeled using best
practices. For example, joins are shown in separate colors that indicate their type:
• Red is used for generic relationships
• Green is used for primary key/foreign key joins
When viewing a worksheet, you’ll also be able to see whether an inner, left outer, right outer, or full outer
join was used between each of the joined tables.
A good rule to follow is “Keep it Green”. This means that you’ll get better results from PK/FK joins rather
than from using generic relationships. You should only use generic relationships when the tables being
joined have a many-to-many rather than a PK/FK structure. If you find tables that have been joined using
a generic relationship, but could have used a PK/FK join, you should drop the relationship and create a
PK/FK join instead. To do this, you need to use the ALTER TABLE…DROP RELATIONSHIP statement in
TQL. Then use ALTER TABLE…ADD FOREIGN KEY to create the PK/FK join.
How to view a data schema
February 07, 2019
ThoughtSpot Application Integration Guide Page 72

Worksheet view
Worksheets are often based on more than one table. The worksheet schema will show schemas for the
tables behind the worksheet, as well as the joins between tables
that were created as a part of the
worksheet
.
Click on a worksheet, to see it in the Schema Viewer. If the schema view is not showing the schema
behind the worksheet, double click the tab on the top right of the worksheet object.
The worksheet view shows the following information:
• All tables in the worksheet, and the relationships between these tables.
• Source columns for all columns of a worksheet.
• Keys and definitions for each relationship, as well as join paths and types.
• Columns that are derived from formulas.
• Correct join paths for newly created chasm trap worksheets. Existing chasm
• trap worksheets created prior to ThoughtSpot version 4.4 will not show the correct join paths.
How to view a data schema
February 07, 2019
ThoughtSpot Application Integration Guide Page 73

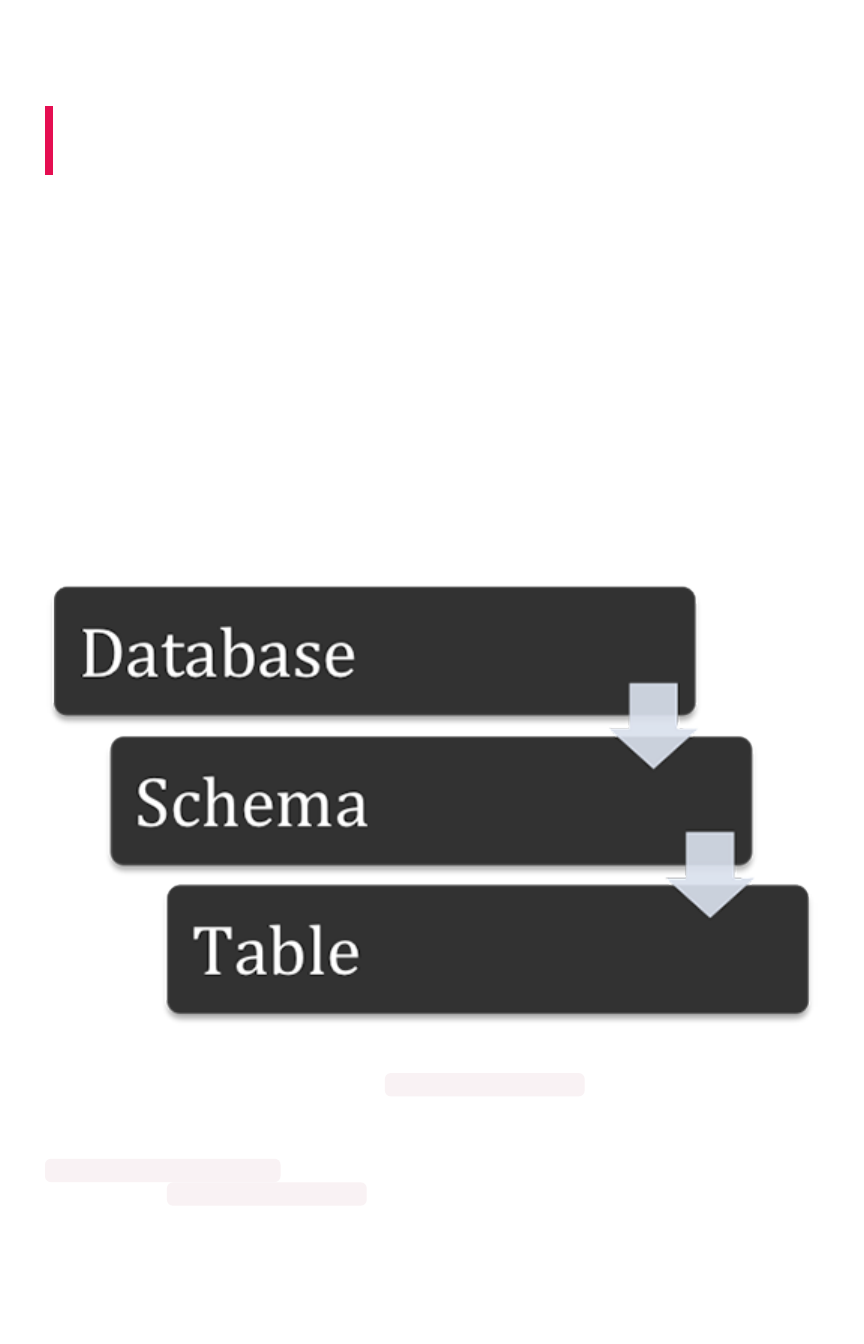
Schema planning concepts
Summary:Summary: Considerations in creating a schema for the ThoughtSpot
Loader.
Before you can load data with ThoughtSpot Loader, you must create a schema to receive it, using the
SQL command line interface (TQL).
The TQL syntax is similar to the SQL used in other relational databases, but with some important
differences. You’ll use DDL (data definition language) to create the schema into which you’ll load the
data. You’ll probably want to put all your DDL statements into a text file, which you’ll use as a script for
creating the schema.
Before writing your TQL script, you need to understand some basic ThoughtSpot concepts.
About databases and schemas
ThoughtSpot organizes objects in a hierarchical namespace. Databases contain schemas, which contain
tables.
ThoughtSpot can contain one or more databases, and each database can have multiple schemas. If you
do not specify a schema, the default schema ( falcon_default_schema ) is used automatically. This
makes it easier to add tables to the database without the need to explicitly create a schema.
If you do create an additional schema, you must refer to its objects using the syntax
<schemaname>.<objectname> . If you do not qualify the schema when referencing its objects, the
default schema ( falcon_default_schema ) will always be assumed.
By default, ThoughtSpot creates an internal database to host tables corresponding to data that is
imported by users from a Web browser.
Schema planning concepts
February 07, 2019
ThoughtSpot Application Integration Guide Page 75

Review the structure of your data
The schema you create to hold the data needs to be a good fit for your data. First, familiarize yourself
with the tables you want to load, and understand their structure. Make note of this information for each
table:
• The column names and data types
• Type of table (fact or dimension)
• Primary key column(s)
• The size of the table on disk
• Any other tables it can be joined with (foreign keys)
Here’s what you’ll need to take into account in your TQL for creating each table, based on these
properties:
Table typeTable type TableTable
sizesize
To beTo be
joinedjoined
withwith
Schema recommendationsSchema recommendations
Fact Any Small di-
mension
table(s)
Sharded. Foreign key references the primary key in the dimen-
sion table.
Fact Any Large di-
mension
table(s)
Sharded on the same distribution key as the dimension table it
will be joined with. Foreign key references the primary key in the
dimension table.
Fact Any Another
fact table
Sharded on the same distribution key as the fact table it will join
with. Many-to-many relationship defines how the tables will be
joined.
Dimension under
50MB
Fact
table(s)
Replicated (not sharded). Has a primary key.
Dimension over
50MB
Fact
table(s)
Distributed dimension table, sharded on the same distribution
key as the fact table it will be joined with. Primary key must be
the same as the distribution key.
Where to go next
•Data typesData types
ThoughtSpot supports the common data types. Compare these with the data types you want
to load, and do any necessary conversion ahead of loading the data.
•ConstraintsConstraints
Constraints include primary keys, foreign keys, and relationships. Relationships allow you to
create a generic relationship for use when you want to join tables that don’t have a primary
key/foreign key relationship.
•ShardingSharding
For the best performance, you should split (or shard) very large tables across nodes. If you
have a large dimension table, you might choose to co-shard it with the fact table it will be
Schema planning concepts
February 07, 2019
ThoughtSpot Application Integration Guide Page 76

joined with.
•Chasm trapsChasm traps
In a complex schema, you may have a fact table with no relationship to another fact table,
except that each contains a foreign key to a shared dimension table. This is known as a
chasm trap, and ThoughtSpot can handle it!
Schema planning concepts
February 07, 2019
ThoughtSpot Application Integration Guide Page 77

Data types
Summary:Summary: ThoughtSpot supports the common data types.
Before you import data, compare the data types you want to load with these supported data types.
Then, convert your data before loading it. Typically, you would export the data, transform it to meet
these type rules, and then load the data. This is known as an extract-transform-load process.
Supported data types
The tables you create to receive the data must have the same number of columns and data types as the
data you will be loading. Choose a data type for each column from the list of supported data types:
DataData Supported data typesSupported data types DetailsDetails
Character VARCHAR(*n*) Specify the maximum number of characters, as
in VARCHAR(255) . The size limit is 1GB for
VARCHAR values.
Floating point DOUBLE or FLOAT DOUBLE is recommended. DOUBLE has a range
of 1.7E +/- 308 (15 digits).
Boolean BOOL Can be true or false .
Integer INT or BIGINT INT holds 32 bits. BIGINT holds 64 bits. INT
has a range of –2,147,483,648 to
2,147,483,647 .BIGINT range is
–9,223,372,036,854,775,808 to
9,223,372,036,854,775,807 .
Date or time DATE ,DATETIME ,
TIMESTAMP ,TIME
DATETIME ,TIMESTAMP , and TIME are stored
at the granularity of seconds. TIMESTAMP is
identical to DATETIME , but is included for syn-
tax compatibility.
Warning:Warning: There is a 1GB limitation on the number of characters for VARCHAR. If you have any
VARCHAR data that exceeds this limit, the entire load will fail.
Geographical data types
For geographical data types, use VARCHAR. For latitude and longitude, you can use either VARCHAR or
DOUBLE . After loading the data, designate it as a geographical data type when you Edit the system-wide
data model. Wherever abbreviations or codes are used, they are the same as what the USPS (United
States Postal Service) recognizes.
These data types can be designated as geographical data, which enables them to be visualized using
the Geo chart types:
Data types
February 07, 2019
ThoughtSpot Application Integration Guide Page 78

• Countries, for example:
• United States
•long name : United States
•name_sort : United States of America
•abbreviation : U.S.A.
•adm0_a3 : USA
•adm0_a3_is : USA
•adm0_a3_us : USA
•admin : United States of America
•brk_a3 : USA
•brk_name : United States
•formal_en : United States of America
•iso_a2 : US
•iso_a3 : USA
•iso_n3 : 840
•COUNTY for counties in the United States, for example:
• santa clara county
• pike county, ohio
• pike county, OH
•STATE_PROVINCE for states in the United States, for example:
•name : California
•US Postal Service abbreviation : CA
•LATITUDE which must be used with LONGITUDE , for example:
• 37.421023
• 1.282911
•LONGITUDE which must be used with LATITUDE
• 122.142103
• 103.848865
•ZIP_CODE for zip codes and zip codes +4 in the United States
•po_name : MT MEADOWS AREA
•ZIP : “00012”
•zip2 : 12
• Other Sub-nation Regions which are administrative regions found in countries other than the
United States, for example:
• bremen
• normandy
• west midlands
Important:Important: You cannot upload your own custom boundaries.
Data types
February 07, 2019
ThoughtSpot Application Integration Guide Page 79

Constraints
Summary:Summary: Constraints allow you to build relationships and join tables.
Constraints include primary keys, foreign keys, and relationships. Relationships allow you to create a
generic relationship for use when you want to join tables that don’t have a primary key/foreign key
relationship.
Primary keys
When a primary key is selected for a table, it impacts data loading behavior. When a new row is added:
• If another row already exists with same primary key, it is updated with the values in the new
row.
• If a row with the same primary key does not exist already, the new row is inserted into the
table.
This behavior is referred to as “upsert” because it does an INSERT or an UPDATE , depending on
whether a row with the same primary key already exists.
Note that ThoughtSpot does not check for primary key violations across different shards of the table.
Therefore, you need to shard the table on the primary key columns if you require this “upsert” behavior.
Foreign key relationships
Foreign key relationships tell ThoughtSpot how two tables can be joined. These relationships are only
used for joining the tables, and not for referential integrity constraint checking.
The directionality of primary key - foreign key relationships is important. The foreign key relationship is
defined on the fact table and references the primary key(s) in the dimension table. So you can think of
the fact table as the source and the dimension table as the target. In the schema viewer, you’ll notice
that the arrow that represents a PK/FK join points to the dimension table.
If you use primary and foreign keys, when users search the data from the search bar, tables are
automatically joined. For example, assume there are two tables:
• revenue, which is a fact table
• region, which is a dimension table
There is a foreign key on the fact table on regionid which points to the id in the region dimension
table. When a user types in “revenue by region”, the two tables will be joined automatically.
Foreign keys have to match the primary key of the target table they refer to. So if there are multiple
columns that make up the primary key in the target table, the foreign key must include all of them, and in
the same order.
Constraints
February 07, 2019
ThoughtSpot Application Integration Guide Page 80

Generic relationships (many-to-many)
You may have a schema where there is a fact table that you want to join with another fact table. If there
isn’t a primary key/foreign key relationship between the tables, you can use many-to-many to enable
this. You can do this by using the RELATIONSHIP syntax to add a link between them, that works
similarly to the WHERE clause in a SQL join clause.
Note:Note: Using generic relationships is not a best practice. In cases where you have two fact
tables you want to join, it is better to find a way to create a bridge table between them, so you
have a chasm trap. Look at your two fact tables to see if they share some common data that you
could use to create a dimension table between them. For example a date or product dimension
could be use to join an inventory fact table with a sales fact table. This is best done in your ETL
process, before bringing the data into ThoughtSpot.
Note:Note: A many-to-many implementation does not protect from over counting in some searches.
If you plan to use it, make sure your searches don’t include aggregation or count searches that will
count one value multiple times, because it satisfies the join condition for multiple rows.
This is a special kind of relationship, that applies to specific data models and use cases. For example,
suppose you have a table that shows wholesale purchases of fruits, and another table that shows retail
fruit sales made, but no inventory information. In this case, it would be of some use to see the wholesale
purchases that led to sales, but you don’t have the data to track a single apple from wholesale purchase
through to sale to a customer.
In a many-to-many relationship, the value(s) in a table can be used to join to a second table, using an
equality condition (required) and one or more range conditions (optional). These conditions act like the
WHERE clause in a SQL JOIN clause. They are applied using AND logic, such that all conditions must be
met for a row to be included.
To use a many-to-many relationship, you need to follow a few rules:
• There must be one equality condition defined between the two tables.
• Each table must be sharded on the same key that will be used for the equality condition.
• There can optionally be one or more range conditions defined.
This example shows the TQL statements that create the two fact tables and the relationship between
them.
Constraints
February 07, 2019
ThoughtSpot Application Integration Guide Page 81

TQL> CREATE TABLE "wholesale_buys" (
"order_number" VARCHAR(255),
"date_ordered" DATE,
"expiration_date" DATE,
"supplier" VARCHAR(255),
"fruit" VARCHAR(255),
"quantity" VARCHAR(255),
"unit_price" DOUBLE
) PARTITION BY HASH (96) KEY ("fruit");
TQL> CREATE TABLE "retail_sales" (
"date_sold" DATE,
"location" VARCHAR(255),
"vendor" VARCHAR(255),
"fruit" VARCHAR(255),
"quantity" VARCHAR(255),
"sell_price" DOUBLE
) PARTITION BY HASH (96) KEY ("fruit");
TQL> ALTER TABLE "wholesale_buys" ADD RELATIONSHIP WITH "retai
l_sales" AS "wholesale_buys"."fruit" = "retail_sales"."fruit" a
nd ("wholesale_buys"."date_ordered" < "retail_sales"."date_sol
d" and "retail_sales"."date_sold" < "wholesale_buys"."expiratio
n_date");
Constraints
February 07, 2019
ThoughtSpot Application Integration Guide Page 82

Sharding
Summary:Summary: Sharding partitions very large tables into smaller, faster,
more easily managed parts called data shards.
ThoughtSpot tables can be replicated or sharded. Replicated tables exist in their entirety, the complete
data set, on each node. Sharded tables consist of a single data set divided into multiple tables or shards.
The shards have identical schemas but different sets of data.
When to use sharding
By default, ThoughtSpot tables are replicated, you must explicitly shard tables. Sharding your tables
impacts the total amount of memory used by the table as well as its performance.
For example, you might shard a large table of sales data. So, you could divide a single sales table into
shards each of which contains only the data falling within a single year. These shards are then
distributed across several nodes. Requests for sales data are dispersed both by the year and the
location of the shard in the node cluster. No single table or node is overloaded, and so the performance
of a query and the system load are both improved.
To optimize ThoughtSpot performance, you should
shard
very large fact tables whenever possible. If you
have a large dimension table, you might choose to shard it along with the fact table it is joined with.
Sharding both the fact and dimension table is known as
co-sharding
.
Table sizes and sharding recommendations
Number of rows per shard 5-10 million
Maximum 10 million rows per shard
Maximum number of shards ~ 80% of CPU cores
Example
Number of rows in table 1.1 billion
CPUS in cluster 256
HASH (128) ~50% of total CPUs
8.6 million rows per shard
Sharding
February 07, 2019
ThoughtSpot Application Integration Guide Page 83

How to shard
Sharding is a type partitioning and is sometimes called
Horizontal partitioning
. The term sharding is
particular to situations where data is distributed not only among tables but across nodes in a system. To
create a sharded table add the add PARTITION BY HASH ( ) clause to your CREATE TABLE
statement.
TQL> CREATE TABLE ...
...PARTITION BY HASH (96) KEY ("customer_id");
The HASH parameter determines the number of shards and the KEY parameter the sharding key. The
recommended number of shards depends upon the number of nodes in your cluster:
Number of NodesNumber of Nodes Number of ShardsNumber of Shards
1 32
2 64
3 96
4-12 128
13-24 256
25-36 384
37-48 512
49-60 640
61-72 768
If you omit the PARTION BY HASH statement or if the HASH parameter is 1 (one), the table is
unsharded. This also means the table physically exists in its entirety on each node.
If you want to use the primary key for sharding, specify that the table is to be partitioned by HASH on
the primary key, as in this example:
Sharding
February 07, 2019
ThoughtSpot Application Integration Guide Page 84

TQL> CREATE TABLE "supplier" (
"s_suppkey" BIGINT,
"s_name" VARCHAR(255),
"s_address" VARCHAR(255),
"s_city" VARCHAR(255),
"s_phone" VARCHAR(255),
CONSTRAINT PRIMARY KEY ("s_suppkey")
) PARTITION BY HASH (96) KEY ("s_suppkey");
The system does not use primary keys as sharding keys by default. If you specify the PARTION BY
HASH statement with a HASH greater than 1 (one)
but omit the KEY parameter
ThoughtSpot shards the
table randomly. This is not recommended; avoid this by always ensuring you specify the KEY parameter
with a HASH greater than 1 (one).
How to choose a shard key
When you shard a large table, you select a
shard key
from the table. This key exists in every shard. You
can use any data type that is valid for use as the primary key as the shard key. Choosing a shard key
plays an important role in the number of shards and the size of any single shard.
A shard key should contain a value that has a good distribution (roughly the number of rows with each
value in that column). This value is typically part of the primary key, but it can include other columns. For
example:
CREATE TABLE "sales_fact"
("saleid" int,
"locationid" int,
"vendorid" int,
"quantity" int,
"sale_amount" double,
"fruitid" int,
CONSTRAINT
PRIMARY KEY("saleid,vendorid"))
PARTITION BY HASH(96)
KEY ("saleid");
Notice the shard key contains the saleid value that is also part of the primary key. When creating a
shard key use these guidelines.
• Include one or more values of the table’s primary key in the shard key.
This prevents scenarios where the data with the same primary key ends up in different shards
and nodes because the shard key changed.
• If you expect to join two tables that are both sharded, make sure both tables use the same
shard key.
Sharding
February 07, 2019
ThoughtSpot Application Integration Guide Page 85

This guideline ensures better join performance. So, for example, if you have two tables and
the primary keys are:
PRIMARY KEY("saleid,vendorid") on A PRIMARY KEY("saleid,custerid") on B
You should use saleid for your shared key when you shard both table A and B.
• Choose a shard key so that the data is distributed well across the keys.
For example, suppose the table you want to shard has a primary key made up of
saleid ,custid ,and locationid . If you have 10K sales but 400 locations, and 2000
customers, you would not want to use the locationid in your shard key if 5k sales were
concentrated in just 2 locations. The result would be data in fewer shards and degrade your
performance. Instead, your shard key may be custid ,and locationid .
• Choose a shard key that results in a wide variety of keys.
For example, suppose the table you want to shard has a primary key made up of
saleid ,productid ,and locationid . Suppose the table has 10K sales, 40 locations, and
200 products. If the sales are evenly distributed across locations you would not want to use
the locationid in your shard key. Instead, saleid and productid would be the better
choice as it results in a wider variety of keys.
As mentioned in the previous section, it is possible to simply use the primary key as a shard key. It isn’t a
good idea to use shard keys outside of the primary key. The reason is that it, with a non-primary shard
key, it is possible to get two versions of a record if the shard key for a record changes, but the primary
key doesn’t. A second version reults because, in the absence of a unique shard key, the system create a
secondary record rather than doing a SQL MERGE ( upsert ).
Sharded dimension tables
In a typical schema, you’d have a sharded fact table with foreign keys to small dimension tables. These
small dimension tables are replicated in their entirety and distributed on every node. This works best
where dimension tables under 50MB in size.
If you have a large dimension table, replicating it and distributing it can impact the performance of your
ThoughtSpot System. In this case, you want to shard the dimension tables and distribute it the same
way as the fact table it joins to.
When sharding both a fact and its dimension table (known as co-sharding) keep in mind the guidance for
creating a shard key. Only shard dimension tables if the dimension table is large (over 50MB) and the join
between the fact and dimension tables use the same columns. Specifically, the tables must:
• be related by a primary key and foreign key
• be sharded on the same primary key/foreign key
• have the same number of regions (or shards)
If these requirements are met, ThoughtSpot automatically co-shards the tables for you. Co-sharded
tables are always joined on the sharding key. Data skew can develop if a very large proportion of the
rows have the same sharding key.
This example shows the CREATE TABLE statements that meet the criteria for sharding both a fact table
and its dimension table:
Sharding
February 07, 2019
ThoughtSpot Application Integration Guide Page 86

TQL> CREATE TABLE products_dim (
"id" int,
"prod_name" varchar(30),
"prod_desc" varchar(100),
PRIMARY KEY ("id")
)
PARTITION BY HASH (96) KEY ("id")
;
TQL> CREATE TABLE retail_fact (
"trans_id" int,
"product_id" int,
"amount" double,
FOREIGN KEY ("product_id") REFERENCES products_dim ("id")
)
PARTITION BY HASH (96) KEY ("product_id")
;
If a dimension table is joined to multiple fact tables, all of the fact tables must be sharded in the same
way as the dimension table. Self-joins are not supported.
Joining two sharded fact tables
You can also join two sharded fact tables with different shard keys, this is known as
non co-sharded
tables. It may take a while to join two tables sharded on different keys since a lot of data redistribution is
required. Therefore, ThoughtSpot recommends that you use a common shard key for two fact tables.
You are not limited by the column connection or relationship type.
Sharding
February 07, 2019
ThoughtSpot Application Integration Guide Page 87

Chasm traps
Summary:Summary: A chasm trap occurs when two many-to-one joins
converge on a single table.
In a complex schema, you may have a fact table with no relationship to another fact table, except that
each contains a foreign key to a shared dimension table. This is known as a chasm trap, and
ThoughtSpot can handle it!
Understand how chasm traps occur
A fact table, just as it sounds, stores facts about your business. If you are selling apples, the sales fact
table has facts about these apples.
SaleIDSaleID AppleTypeIDAppleTypeID StoreIDStoreID Units SoldUnits Sold
4 55 2 12
8 34 33 3
10 09 09 1
Dimension tables describe the attributes that are interesting to analyze. For example, the apple table
might look like this.
AppleTypeIDAppleTypeID ColorColor NameName UseUse
55 Red Red Delicious Snack
34 Green Granny Smith Cooking
09 Yellow Golden Snack
As you can imagine, in a business you might have several fact tables that access dimension tables. So,
an apple business may record waste as well as sales.
TimeIDTimeID AppleTypeIDAppleTypeID StoreIDStoreID Units WastedUnits Wasted
4 55 2 2
8 34 33 43
10 09 09 11
Both the sales and waste tables are facts that reference the apple dimension table.
Chasm traps
February 07, 2019
ThoughtSpot Application Integration Guide Page 88
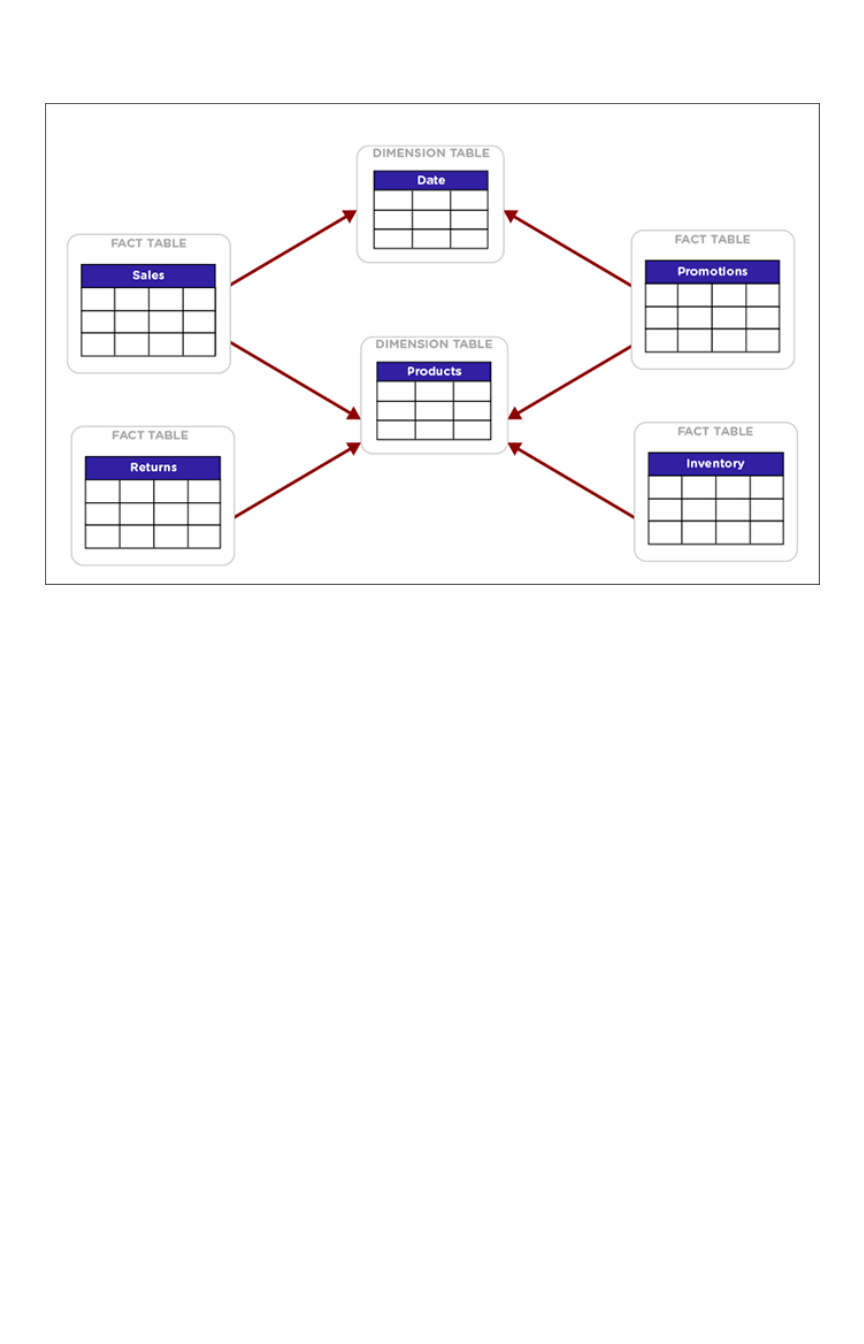
A chasm trap in a data schema can introduce problems of over counting if you join the two fact tables
through their shared dimension table. This diagram shows a typical complex schema with several tables
that are related over a chasm trap:
Examples of use cases where a chasm trap could occur when attribution analysis compare campaign
data with purchase data, where all they have in common is that both contain a customer identifier that is
a foreign key to a customer dimension table. Chasm traps also occur, for example, in cost of sales
analysis when wholesale orders data is only related to the retail sales data through a shared products
dimension table.
In many databases, joining tables across a chasm trap creates a
Cartesian product
or
cross join
. That is
each row from the first fact table is joined to each row from the second table. A Cartesian product
causes over counting when computing counts and aggregates. ThoughtSpot protects you from this kind
of over counting.
There are still just a few things to look out for when using a schema that contains chasm traps:
• The tables should be joined to the dimension table via an equi-join (i.e. a primary key/foreign
key relationship). They cannot be joined using a range of values.
• Review the column setting called Attribution Dimension. You may need to change this setting
if some of the columns in the shared dimension table should not be used for attribution when
combining fact tables.
• Tables that will be joined across a chasm trap do not need to be co-sharded. They will be
joined appropriately automatically in the most efficient way.
Chasm trap limitations
Join information in What am I Looking At?What am I Looking At? does not appear for searches on a worksheet containing a
chasm trap or on base tables that are related over a chasm trap.
Chasm traps
February 07, 2019
ThoughtSpot Application Integration Guide Page 89

Overview of schema building
Summary:Summary: Before you can load data into ThoughtSpot, you must build
a database schema to receive it.
You can build a schema by writing a SQL script that creates the objects in your schema. ThoughtSpot
provides the ThoughtSpot SQL Command Line (TQL) for creating, viewing, and managing a schema
using SQL. Your script can use any statements that are supported in ThoughtSpot SQL Command Line
(TQL). The TQL syntax is similar to the SQL used in other relational databases, but with some important
differences.
You’ll use DDL (data definition language) to create the schema into which you’ll load the data. You’ll
probably want to put all your DDL statements into a text file, which you’ll use as a script for creating the
schema.
Upload the script through the browser
You can upload an your SQL script directly through the browser in the ThoughtSpot application. You can
edit the script or add to it right within the browser, too. The steps to build a schema through the browser
are:
1. Write a SQL script to create the schema
2. Import a schema (use the SQL editor)
Use TQL on the SQL command line
You can choose to run your SQL script within the Linux shell instead. You can run TQL in interactive
command line mode, or you can write a script and use TQL to run it. The SQL syntax in ThoughtSpot is
called TQL for ThoughtSpot SQL. The ThoughtSpot SQL Command Line (TQL) runs in an interactive
mode. To invoke TQL Log in to the Linux shell using SSH and type tql . At the prompt, type hor
help to see a list of supported commands.
The steps to build a schema using TQL include:
1. Connect to the database with the ThoughtSpot SQL Command Line (TQL).
2. Write a SQL script to create the schema.
3. Type your SQL commands on the command line, terminating each command with a
semicolon (;).
Commands can span multiple lines. ThoughtSpot supports a limited number of SQL
commands, plus some custom SQL extensions. For example, you can specify the number of
shards and the distribution key as part of the CREATE TABLE syntax. A full list of supported
SQL in TQL is available in the TQL reference.
Where to go next
•Connect with TCL and create a schemaConnect with TCL and create a schema
Having examined the structure of the data to be loaded and become familiar with the
ThoughtSpot SQL Command Line (TQL), you are now ready to create the schema.
•Write a SQL script to create the schemaWrite a SQL script to create the schema
Overview of schema building
February 07, 2019
ThoughtSpot Application Integration Guide Page 90

Using a SQL script to create your schema is a recommended best practice. This makes it
easier to adjust the schema definitions and recreate the schema quickly, if needed.
•Schema creation examplesSchema creation examples
These examples demonstrate the steps involved in creating a schema using the ThoughtSpot
SQL Command Line (TQL). After the schema is created, you can load data into it with
ThoughtSpot Loader.
•Upload and run a SQL script)Upload and run a SQL script)
You can run a SQL script to create your database schema through the browser, without
having to log in to the shell on the ThoughtSpot instance. You can edit the script and run it
directly in the browser to create the schema.
Overview of schema building
February 07, 2019
ThoughtSpot Application Integration Guide Page 91
Connect with TCL and create a schema
To perform administrative tasks directly in the database, you will use the ThoughtSpot SQL Command
Line (TQL). TQL supports many, but not all, common SQL commands.
Connect with TQL
Before connecting with TQL, you will need:
• Access to your ThoughtSpot instance Linux shell from a client machine.
• The administrator OS login.
To connect to TQL:
1. Log in to the Linux shell using SSH.
2. Invoke TQL:
$ tql
TQL>
3. Enter your SQL command, followed by a semicolon ( ;).
Enter a SQL script
Having examined the structure of the data to be loaded and become familiar with the ThoughtSpot SQL
Command Line (TQL), you are now ready to create the schema.
This method is a good way to get familiar with TQL and how to create database objects, but when
creating a schema in a production system, you will most likely Write a SQL script to create the schema.
To create the schema directly in TQL:
1. Connect to the database with the ThoughtSpot SQL Command Line (TQL).
2. If the database you will be using does not exist, create it now:
TQL> CREATE DATABASE my_database;
3. Connect to the database:
TQL> USE my_database;
4. If you wish to use a schema other than the default one, create it now:
Connect with TCL and create a schema
February 07, 2019
ThoughtSpot Application Integration Guide Page 92

TQL> CREATE SCHEMA my_schema;
5. Issue a CREATE TABLE command for each table you will create, using the information in Plan
the schema.
Tip:Tip: Foreign key declaration within a CREATE TABLE will show the table created even
if there are problems with the foreign key. Therefore, it is good practice to also issue a
separate ALTER TABLE ADD CONSTRAINT FOREIGN KEY command.
Connect with TCL and create a schema
February 07, 2019
ThoughtSpot Application Integration Guide Page 93

How to write a SQL script
Summary:Summary: Using a SQL script to create your schema is a
recommended best practice. This makes it easier to adjust the
schema definitions and recreate the schema quickly, if needed.
The schema creation script is a text file that contains all the SQL commands to create your schema.
Comments should be enclosed in the comment tags /* and */.
Enclose all object names (schema, table, and column) in double quotes and any column values in single
quotes in your scripts. Object names that are also reserved words in SQL, or that contain special
characters (any character other than alphanumeric or _ ), must be surrounded by double quotes. If you
see the error message “Error parsing SQL. Check SQL input.”, you should check for object names
without double quotes in your script.
If you are working in a schema other than the default schema, object names must be fully qualified, as in
"<schema_name>"."<object_name>" .
If your schema includes constraints to define relationships between tables (foreign key, or the
RELATIONSHIP syntax), it is recommended that your script first creates all the tables, and then at the
end, creates the relationships between them using the ADD CONSTRAINT syntax. This makes it easier to
troubleshoot the script and make changes.
If TQL is run using the flag --allow_unsafe , your statements will always execute without this warning.
Note that when running TQL from a script, you will need to decide what behavior you want if the script
contains changes that affect dependent objects. If you want the script to run even if objects with
dependencies are affected, run it using this flag, for example:
cat safest_script_ever.sql | tql --allow_unsafe
1. Open a new file in a text editor.
2. Type in the command to create the database, if it does not already exist:
CREATE database <db_name>;
3. Type in the command to specify the database to use:
USE database <db_name>;
4. Type in the command to create the schema, if you don’t want to use the default schema:
5. Type in each of the CREATE TABLE statements, with its column definitions, primary key
constraints, and sharding specification (if any).
6. At the end of your script, optionally type in the ALTER TABLE statements to add foreign keys
to use in joining the tables.
7. Save the file.
How to write a SQL script
February 07, 2019
ThoughtSpot Application Integration Guide Page 94

8. Run the script using one of these methods:
•Import a schema (use the SQL editor).
•Log in to the shell, copy your script to your ThoughtSpot instance using scp, and
pipe it to TQL:
$ cat create-schema.sql | tql
How to write a SQL script
February 07, 2019
ThoughtSpot Application Integration Guide Page 95

Schema creation examples
Summary:Summary: Simple examples that illustrate how to use the TQL and the
ThoughtSpot Loader.
These examples demonstrate the steps involved in creating a schema using the ThoughtSpot SQL
Command Line (TQL). After the schema is created, you can load data into it with ThoughtSpot Loader.
Simple schema creation example
The example creates a database ( tpch ) with two tables ( customer ,transaction ). The example
does not create a schema explicitly. So it will use the default schema (falcon_default_schema).
In this example:
• The table customer has a primary key called customer_id. The table
customer_transactions has a primary key called transaction_id.
• The customer table is unsharded.
• The customer_transactions table is sharded into 96 shards using the transaction_id
column.
• Both tables have referential integrity on customer_id .
Schema creation examples
February 07, 2019
ThoughtSpot Application Integration Guide Page 96

$tql
TQL> CREATE DATABASE tpch;
TQL> USE tpch;
TQL> CREATE TABLE customer (
name VARCHAR(100),
address VARCHAR(255),
zipcode INT,
customer_id INT,
CONSTRAINT PRIMARY KEY (customer_id)
);
TQL> CREATE TABLE customer_transactions (
transaction_id INT,
customer_id INT,
amount DOUBLE,
transaction_date DATETIME,
CONSTRAINT PRIMARY KEY (transaction_id),
CONSTRAINT FOREIGN KEY (customer_id) REFERENCES
customer(customer_id)
) PARTITION BY HASH (96) KEY (transaction_id);
Schema creation examples
February 07, 2019
ThoughtSpot Application Integration Guide Page 97

More complex schema creation example
The example uses a custom schema called sample_schema to hold the tables. Because of this, every
table reference has to be schema qualified.
Schema creation examples
February 07, 2019
ThoughtSpot Application Integration Guide Page 98

$ tql
TQL> CREATE DATABASE "sample_db";
TQL> USE "sample_db";
TQL> CREATE SCHEMA "sample_schema";
TQL> CREATE TABLE "sample_schema"."customer" (
"c_custkey" BIGINT,
"c_name" VARCHAR(255),
"c_address" VARCHAR(255),
"c_city" VARCHAR(255),
"c_nation" VARCHAR(255),
"c_region" VARCHAR(255),
"c_phone" VARCHAR(255),
CONSTRAINT PRIMARY KEY ("c_custkey")
);
TQL> CREATE TABLE "sample_schema"."supplier" (
"s_suppkey" BIGINT,
"s_name" VARCHAR(255),
"s_address" VARCHAR(255),
"s_city" VARCHAR(255),
"s_nation" VARCHAR(255),
"s_region" VARCHAR(255),
"s_phone" VARCHAR(255),
Schema creation examples
February 07, 2019
ThoughtSpot Application Integration Guide Page 99

CONSTRAINT PRIMARY KEY ("s_suppkey")
);
TQL> CREATE TABLE "sample_schema"."lineorder" (
"lo_orderkey" BIGINT,
"lo_linenumber" BIGINT,
"lo_custkey" BIGINT,
"lo_partkey" BIGINT,
"lo_suppkey" BIGINT,
"lo_orderdate" DATE,
"lo_orderpriority" VARCHAR(255),
"lo_shippriority" VARCHAR(255),
"lo_quantify" BIGINT,
"lo_extendprice" BIGINT,
"lo_ordtotalprice" BIGINT,
"lo_discount" BIGINT,
"lo_commitdate" DATE,
CONSTRAINT PRIMARY KEY ("lo_orderkey","lo_linenumber"),
CONSTRAINT FOREIGN KEY ("lo_custkey") REFERENCES "sample_sche
ma"."customer" ("c_custkey"),
CONSTRAINT FOREIGN KEY ("lo_suppkey") REFERENCES "sample_sche
ma"."supplier" ("s_suppkey")
) PARTITION BY HASH (96) KEY (lo_orderkey);
Schema creation examples
February 07, 2019
ThoughtSpot Application Integration Guide Page 100
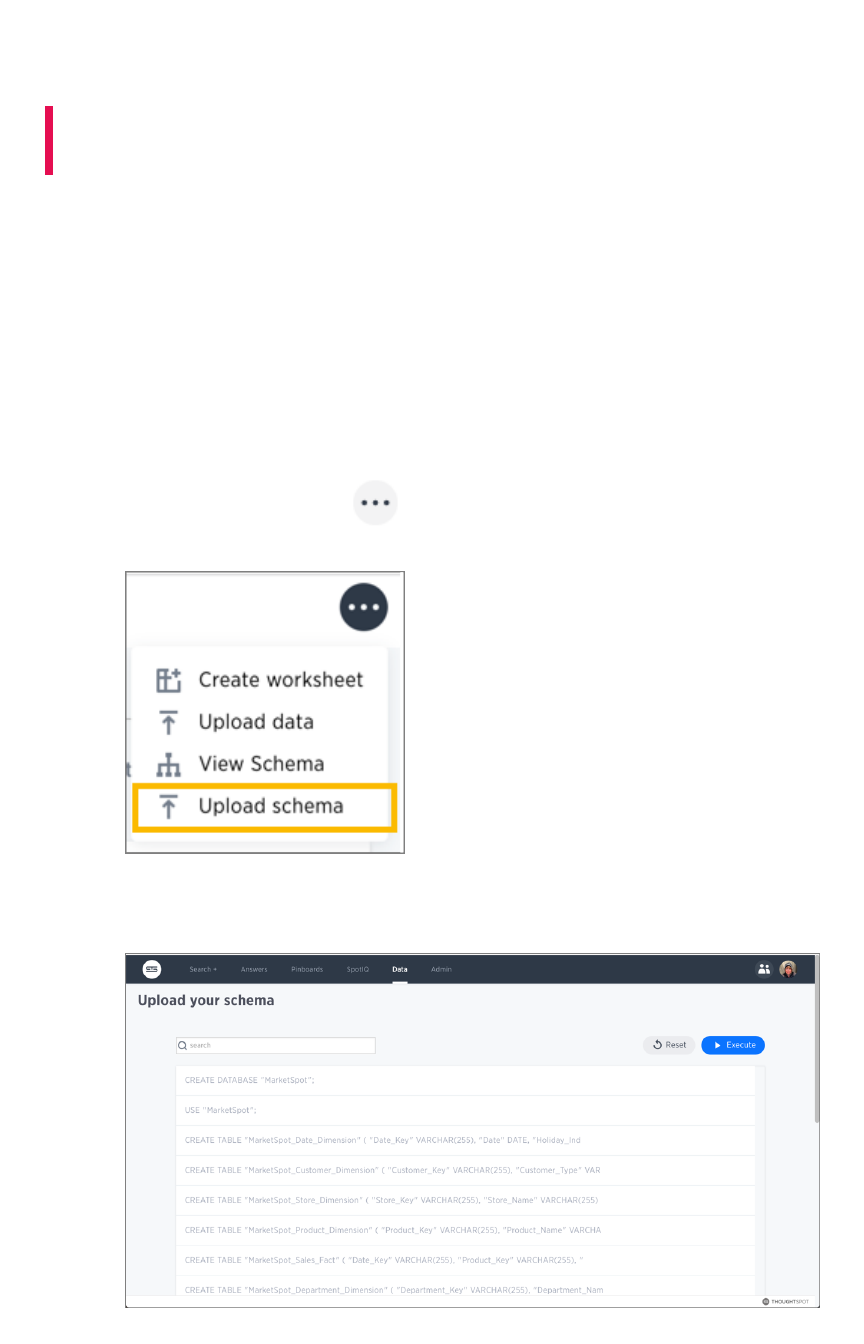
Upload and run a SQL script
Summary:Summary: Importing a schema through the Web browser makes it
possible to run your SQL script without needing to have a Linux login.
You can run a SQL script to create your database schema through the browser, without having to log in
to the shell on the ThoughtSpot instance. You can edit the script and run it directly in the browser to
create the schema. You can use this capability in any of these ways:
•Create the SQL script ahead of time, and use the browser to run it.
• Use the editor to type your SQL directly into the browser.
• Use the browser SQL interface as an interactive SQL editor, for example to test an existing
script or make changes to an existing schema.
1. Log into ThoughtSpot from a browser.
2. Click DataData, on the top navigation bar.
3. Click the ellipses icon (3 dots) , and select Upload schemaUpload schema.
4. Drag and drop your SQL file into the browser, or choose Browse Your FilesBrowse Your Files to locate it.
5. You’re now in the SQL editor. Use it to view your script and make any changes.
Upload and run a SQL script
February 07, 2019
ThoughtSpot Application Integration Guide Page 101

6. When ready, run your script by clicking the ExecuteExecute button.
7. If there are any errors, correct them and run the script again.
Upload and run a SQL script
February 07, 2019
ThoughtSpot Application Integration Guide Page 102

How to change a schema
Summary:Summary: After you've created a schema and loaded data, you may
find yourself wishing you'd set things up a little differently. You can
make changes to the schema, such as changing the primary key,
relationships to other tables, and sharding.
Making changes to a schema after data has been loaded and users have created worksheets or
pinboards on the tables requires care, so that you don’t lose the relationship between the objects
created in ThoughtSpot and the underlying tables. If you follow the procedures here, your tables will
retain their relationships to the objects created on top of them.
Tip:Tip: Always take a snapshot of your database before making any schema changes. This
snapshot allows you to revert back to the prior state if you make an error, or something doesn’t
work as you expected after the schema change.
Change the primary key for a table
Use this procedure to change the primary key for a table. But use it with caution, particularly if you are
changing to a primary key for which values are not unique.
You can change the primary key of a table without having to TRUNCATE it first and reload the data.
However, changing the primary key could result in data deletion. This is because of the upsert behavior
which is applied when multiple rows have the same primary key. This is very important to understand
ahead of time, if you are considering changing to a primary key for which values are not unique.
To change the primary key, first remove any existing primary key, and then define a new one (if any). You
do not need to truncate the tables to do this operation beginning in version 3.2. Any dependent objects
(pinboards or worksheets) will remain intact.
To change the primary key of a table:
1. Create a manual snapshot.
2. Connect to the database with the ThoughtSpot SQL Command Line (TQL).
3. Drop the existing primary key (if any), by issuing a command like this example:
TQL> ALTER TABLE "cart"
DROP CONSTRAINT
PRIMARY KEY;
Dropping a primary key can impact existing worksheets, answers, and pinboards. The system
warns you if dropping a primary key impacts other objects. To continue, use the --
allow_unsafe flag.
4. Add a new primary key, if desired:
How to change a schema
February 07, 2019
ThoughtSpot Application Integration Guide Page 103
TQL> ALTER TABLE "cart"
ADD CONSTRAINT
PRIMARY KEY ("owner_id");
5. Test that any dependent objects (pinboards, worksheets, etc.) are still working correctly.
6. Delete the snapshot you created earlier using the command:
tscli snapshot delete <name>
Change a relationship between tables
Use this procedure to remove a relationship between tables or define a new one. This operation works
for both kinds of relationships: foreign key or generic relationship.
To change a relationship between two tables, first remove any existing relationship, and then define the
new relationship (if any). You do not need to truncate the tables to do this operation. Any dependent
objects (pinboards or worksheets) will remain intact.
To change the relationship between tables:
1. Create a manual snapshot.
2. Connect to the database with the ThoughtSpot SQL Command Line (TQL).
3. Issue the command to drop the existing relationship
Before dropping a relationship TQL checks for and then warns of any dependent objects. To
continue with the drop any way, use the --allow_unsafe flag. The following examples
illustrate several different types of drop operations.
Drop a foreign key by name, if it was given a name when it was defined:
TQL> ALTER TABLE
"sales_fact"
DROP CONSTRAINT
"FK_PO_number";
Drop a relationship by name, if it was given a name when it was defined:
TQL> ALTER TABLE "fruit_dim"
DROP RELATIONSHIP "REL_dates";
Drop the foreign key relationship explicitly, if it doesn’t have a name, by referencing the two
tables that are joined. This drops all foreign keys between the two tables:
How to change a schema
February 07, 2019
ThoughtSpot Application Integration Guide Page 104
TQL> ALTER TABLE "shipments"
DROP CONSTRAINT
FOREIGN KEY "orders";
Drop all generic relationships between two tables:
TQL> ALTER TABLE "wholesale_buys"
DROP RELATIONSHIP
WITH "retail_sales";
4. Define a new relationship, if you want to, using ALTER TABLE...ADD CONSTRAINT...
5. Test that any dependent objects (pinboards, worksheets, etc.) are still working correctly.
6. Delete the snapshot you created earlier using the command:
tscli snapshot delete <name>
Change sharding on a table
You can change the sharding on a table or remove it altogether (creating a replicated table) using this
procedure. This procedure preserves the data within the table.
This procedure reshards a table. This is also called redistributing or repartitioning. You can use this
method to reshard a table without losing its data or metadata. This means that worksheets and
pinboards built on top of the table will continue to work.
You can use these steps to do any of these operations:
• shard a table that was previously replicated.
• change a replicated table to a sharded table.
• change the number of shards to use for a sharded table.
To change the sharding on a table:
1. Create a manual snapshot.
2. Connect to the database with the ThoughtSpot SQL Command Line (TQL).
3. Issue the command to change the sharding using this syntax:
TQL> ALTER TABLE <table>
[SET DIMENSION | SET FACT
[PARTITION BY HASH
[(<shards>)]
[KEY(<column>)]]]
For example:
How to change a schema
February 07, 2019
ThoughtSpot Application Integration Guide Page 105
• To make a sharded table into a dimension table (replicated on every node), use:
ALTER TABLE "products"
SET DIMENSION;
• To make a dimension table into a sharded (fact) table or change the number of
shards, use:
ALTER TABLE "sales"
SET FACT PARTITION BY HASH (96)
KEY ("productID");
4. Test that any dependent objects (pinboards, worksheets, etc.) are still working correctly.
5. Delete the snapshot you created earlier using the command:
tscli snapshot delete <name>
How to change a schema
February 07, 2019
ThoughtSpot Application Integration Guide Page 106

Convert column data type
Summary:Summary: You can convert the data in a column from one data type
to another by issuing a TQL command.
There are some details you should be aware of when doing a data type conversion.
Data type conversion behavior
When converting from one data type to another, any values that can not be converted will be set to
NULL. If errors occur during data type conversion, the operation is aborted. However, you may choose
to force the conversion despite the errors. You can start TQL in allow_unsafe mode to continue with the
data conversion, at your own risk, of course! To start TQL in unsafe mode, issue this command:
tql --allow_unsafe
Multiple columns of a single table can be converted using a single TQL command. The behavior is
transactional. So for example, you would issue a command like this example:
ALTER TABLE products
MODIFY COLUMN product_id int,
MODIFY COLUMN supplier VARCHAR(4);
Also note that changing data type has implications on the primary key and sharding enforcement. For
example, changing the data type of a column that is part of the sharding key would lead to a
redistribution of data. Then imagine that the sharding key column contained the text values 00100 ,
0100 , and 100 , which all map to same integer value. If this type of a column is changed from a
VARCHAR to an INT , then it would be subject to the upsert behavior on primary keys. So, in this
example, only one of the three rows would be preserved.
Be aware that data type conversion will preserve the data in the underlying database table, but there is
no guarantee that any objects built on top of it (worksheets or pinboards) will be preserved. This is
because you might make a data type change that makes a chart built on top of the table invalid (for
example a growth chart would be invalidated if the date column it depends on were changed to a
varchar column).
Supported data type conversions
In general, the data type conversions that make logical sense are supported. But there are a few
nuances you should be aware of:
• When you convert from INT to BOOL , zero is converted to false, and all non-zero values are
converted to true.
• When you convert from BOOL to INT , true gets converted to 1, and false gets converted to
Convert column data type
February 07, 2019
ThoughtSpot Application Integration Guide Page 107

0.
• When you convert from DOUBLE to INT , the value gets rounded.
• When you convert from INT to DOUBLE , the value gets rounded.
• When you convert from DATETIME to DATE , the date part of value is preserved and the time
part is dropped.
• When you convert from DATE to DATETIME , the time gets added as 00:00:00 . The date
part of the value is preserved.
• When you convert from DATETIME to TIME , the time part of the value is preserved.
• Conversion from TIME to DATETIME is not supported.
Date and time conversions
Some data type conversion require a format string. These include:
• conversion from DATE /TIME /DATETIME
• conversion to DATE /TIME /DATETIME
For these types of conversions, you’ll use a special syntax using parsinghint and the date format
specifications supported in the strptime library function.
For the example, first create a table with a timestamp stored as a VARCHAR :
CREATE TABLE fruit_sales
(time_of_sale VARCHAR(32));
INSERT INTO fruit_sales
VALUES ('2015-12-29 13:52:39');
Now, convert the column from a VARCHAR to DATETIME , using the format %Y-%m-%d %H:%M:%S :
ALTER TABLE fruit_sales
MODIFY COLUMN time_of_sale DATETIME
[parsinghint="%Y-%m-%d %H:%M:%S"]
Finally, convert the column back to VARCHAR:
ALTER TABLE fruit_sales
MODIFY COLUMN time_of_sale VARCHAR(32);
String to boolean conversions
String to boolean conversions have format strings, too. You’ll use parsinghint as you do for date and
time conversions. You can choose among these approaches:
Convert column data type
February 07, 2019
ThoughtSpot Application Integration Guide Page 108

OPTION 1: Specify string values for both true and false.OPTION 1: Specify string values for both true and false. Any non-matching values get converted to null.
In this example, “100” gets converted to true, and “0” gets converted to false. “-1” gets converted to
null.
ALTER TABLE db
MODIFY COLUMN s bool [parsinghint="100_0"];
OPTION 2: Specify a string value for true.OPTION 2: Specify a string value for true. Any non-matching value gets converted to false. In this
example, “100” gets converted to true, “-1” and “0” get converted to false.
ALTER TABLE db
MODIFY COLUMN s bool [parsinghint="100_"];
Option 3: Specify a string value for false.Option 3: Specify a string value for false. Any non-matching value get converted to true. In this example,
“-1” and “100” get converted to true, and “0” gets converted to false.
ALTER TABLE db
MODIFY COLUMN s bool [parsinghint="_0"];
String to boolean conversions
When converting from a string to a boolean, you must specify a string for true and false. By default, a
string to boolean conversion generates true for true ,false for false .
ALTER TABLE db
MODIFY COLUMN b varchar(32);
But you may override the default strings that get generated by using parsinghint , as in this example:
ALTER TABLE db
MODIFY COLUMN b varchar(32) [parsinghint="tr_fa"];
Change the Data Type of a Column
When you issue the TQL command to convert a column from one data type to another, the conversion is
handled automatically. However, you’ll need to ensure that any visualizations built on top of the table
display correctly.
Convert column data type
February 07, 2019
ThoughtSpot Application Integration Guide Page 109

You should always take a snapshot of your database before making any schema changes. This will allow
you to revert back to the prior state if you make an error, or something doesn’t work as you expected
after the schema change.
When changing a data type in an existing table, be aware that answers and pinboards created on top of
that table (or worksheets that include it) may change. This is because charts and aggregations depend
upon the data type. So for example changing from INTEGER to VARCHAR could break charts that used
the numeric data type INTEGER to calculate an average or a total. Because of this, use caution, and
check all dependent objects before and after changing the data type, to ensure that they display as
intended.
To change the data type of a column:
1. Connect to the database with the ThoughtSpot SQL Command Line (TQL).
2. Issue the command to change the data type using this syntax:
TQL> ALTER TABLE <table>
MODIFY COLUMN <column> <new_data_type>;
For example:
ALTER TABLE fact100
MODIFY COLUMN product_id int;
Convert column data type
February 07, 2019
ThoughtSpot Application Integration Guide Page 110

Import CSV files with tsload
Summary:Summary: The tsload command is a common way to import data
from a CSV file.
Use ThoughtSpot Loader ( tsload ) to load data from a CSV text file into an existing table in
ThoughtSpot. ThoughtSpot Loader ( tsload ) is a common way to import data. When using tsload ,
you can load larger datasets and make the loading process repeatable through scripting. The tsload
command accepts flags that enable you to specify column and row separators, date or timestamp
formats, null value representations, and similar parameters. Many of these options have defaults that you
can override.
Before importing data, you need to Build the schema.
To use ThoughtSpot Loader, type the command tsload followed by the appropriate flags. You can see
the list of the flags it accepts in the ThoughtSpot Loader flag reference or by issuing tsload -help .
tsload supports both full and incremental data loads. For incremental loads, an upsert (insert or update)
is performed. If an incoming row has the same primary key as an existing row, it updates the existing row
with the new values.
You can integrate tsload into your ETL environment for more automated data loads. Most ETL tools
provide the ability to write target data into files and support scripted post-transformation actions that can
include loading data into ThoughtSpot. This procedure describes manually loading data, but the tsload
commands could be saved as a script:
1. Log in to the Linux shell using SSH.
2. Change to the directory where your CSV files are staged.
3. Use the following syntax to invoke tsload , specifying the appropriate flags and your data
source file:
$ tsload --target_database=my_database
--target_table=my_table --alsologtostderr
--empty_target --source_file=my_file.csv --v 1
--field_separator="separator_char"
This example imports the CSV file ssbm_customer.csv into the table CUSTOMER:
$ tsload --target_database=SAMPLE_DB
--target_table=CUSTOMER --alsologtostderr
--empty_target --source_file=ssbm_customer.csv
--v 1 --field_separator "|"
4. Once the processing begins, you’ll see messages to indicate the progress and then two
summary messages after the load is complete.
Import CSV files with tsload
February 07, 2019
ThoughtSpot Application Integration Guide Page 111

Started processing data row
Source has 32 data rows, ignored row count 0
Waiting for rows to commit...(please wait)
Source summary
--------------
Data source: ssbm_customer.csv
Source data format: csv
Header row?: no
Tokenizer Options: escape_char: "" fiel
d_separator: "|" enclosing_char: "\""
Date format: %Y%m%d
Date time format: %Y%m%d %H:%M:%S
Flexible mode?: no
Load summary
------------
Target table: CUSTOMER
Should empty target?: yes
Status: Successful
Rows total: 32
Rows successfully loaded: 30
Rows failed to load: 0
Rows duplicate/omitted: 2
% of Rows successfully loaded: 93.75 %
Load Rate (MB/s): 0.00 MB/s
Load Rate (Rows/s): 3.53 Rows/s
Start time (Wallclock): Tue Jan 29 09:09:07
End time (Wallclock): Tue Jan 29 09:09:08
Total load time = 1.13 seconds = 0.02 minutes = 0.00 ho
urs
Data size = 50 bytes = 0.06 KB = 0.00 MB
5. In the load summary, be sure to check the Rows duplicate/omittedRows duplicate/omitted number. This indicates the
number of rows (if any) that were omitted from loading because they did not satisfy the table
constraints. A common cause of this would be a duplicate primary key. If any rows were
omitted, review your CSV file, make the required adjustments, and then load it again.
6. Once your file has been loaded properly, repeat this process to load data from any additional
CSV files.
Import CSV files with tsload
February 07, 2019
ThoughtSpot Application Integration Guide Page 112

Use a script to load data
Summary:Summary: Learn how to load one or files in bulk with a script.
If you need to load data from multiple CSV files, create a script to automate the process. You can also
use a similar script to automate recurring data feeds.
Understand how to create a script
The data loading script is a text file that contains all the calls to tsload for loading the data from your
CSV files.
The example script shown here uses the cat command to read the data file, and pipes it to tsload .
When creating and testing your script, you may wish to replace each cat with cat -10 , to load only
the first ten lines of each file. This allows you to quickly run a test of your script. When the test succeeds
for all the data files, you can then remove each -10 , so the complete files will load when you run the
script again.
1. Log in to the Linux shell using SSH.
2. Navigate to the directory that contains your CSV files and open a new file in a text editor.
3. Type in the commands to load the data.
This example shows commands to load three files:
Use a script to load data
February 07, 2019
ThoughtSpot Application Integration Guide Page 113

cat Players.csv | tsload
--target_database baseball --target_table "players"
--empty_target --field_separator ","
--max_ignored_rows 10 --bad_records_file bad_record
s.txt
--has_header_row --alsologtostderr --null_value ""
cat AllstarFull.csv | tsload
--target_database baseball --target_table "allstarfu
ll"
--empty_target --field_separator ","
--max_ignored_rows 10 --bad_records_file bad_record
s.txt
--has_header_row --alsologtostderr --null_value ""
cat Appearances.csv | tsload
--target_database baseball --target_table "appearanc
es"
--empty_target --field_separator ","
--max_ignored_rows 10 --bad_records_file bad_record
s.txt
--has_header_row --alsologtostderr --null_value ""
4. Save the file.
5. Run the script:
$ ./load_baseball_data.sh
Loading data efficiently
If you have a very large data file that takes a long time to load, you can reduce the load time by splitting
it up into multiple files and loading them in parallel using multiple invocations of tsload . If the size of
any of your data files is greater than 50 million rows, running tsload in parallel can reduce the load
time significantly.
• Split up your large data file into multiple smaller files.
• Stage the data files in a location accessible to the node on which you’ll run the script. Usually
you’ll use an NAS mounted file system.
• Create a script to load the files (see example below).
• Run the script to load the files. You will make your script multi-threaded by invoking multiple
loader threads (between 1 and 5 are recommended).
Use a script to load data
February 07, 2019
ThoughtSpot Application Integration Guide Page 114

To optimize the load time even further, determine what the bottleneck is and adjust your process
accordingly. If the disk I/O for reading the data files is the bottleneck, you can stage the data files on
separate NAS mounted file systems and reference them accordingly in your script. If the CPU on the
machine you’re using to run the load script is the bottleneck, you can split the load script into the same
number of parts as you have nodes in your ThoughtSpot instance, place one script on each node, and
run them in parallel. Make sure the other nodes are able to access the data files where they are staged.
Running the load script on separate nodes will put the data on all the nodes, just as when you run the
script on a single node. Running the script on all the nodes at the same time just lets you take advantage
of CPU power of each node for hashing data files.
For example, suppose you have 30 days of data in 30 files, one for the data collected on each day. Each
day’s data file contains 10 million rows, for a total of 300 million rows of data. You want to load the
whole month of data. For this example we’ll have 5 loader processes, each one handling 6 days of data.
Here is a sample script you could use the load the data files in parallel:
Use a script to load data
February 07, 2019
ThoughtSpot Application Integration Guide Page 115

/* Script load_script.sh, loads 30 days of data in parallel */
#!/bin/bash
pidlist=""
cat day1.csv day2.csv day3.csv day4.csv day5.csv day6.csv | tsl
oad
--target_database sales --target_table SALES_FACT --max_ignore
d_rows 10
--bad_records_file ./SALES_FACT.bad --date_format %Y-%m-%d
--date_time_format "%Y-%m-%d %H:%M:%S" --source_data_format del
imited
--field_separator "|" --null_value "" --enclosing_character
"\""
--boolean_representation 1_0 &
pidlist="$pidlist $!" &
cat day7.csv day8.csv day9.csv day10.csv day11.csv day12.csv |
tsload
--target_database sales --target_table SALES_FACT --max_ignore
d_rows 10
--bad_records_file ./SALES_FACT.bad --date_format %Y-%m-%d
--date_time_format "%Y-%m-%d %H:%M:%S" --source_data_format del
imited
--field_separator "|" --null_value "" --enclosing_character
"\""
--boolean_representation 1_0 &
pidlist="$pidlist $!" &
cat day13.csv day14.csv day15.csv day16.csv day17.csv day18.cs
v | tsload
--target_database sales --target_table SALES_FACT --max_ignore
d_rows 10
--bad_records_file ./SALES_FACT.bad --date_format %Y-%m-%d
--date_time_format "%Y-%m-%d %H:%M:%S" --source_data_format del
imited
--field_separator "|" --null_value "" --enclosing_character
"\""
--boolean_representation 1_0 &
pidlist="$pidlist $!" &
Use a script to load data
February 07, 2019
ThoughtSpot Application Integration Guide Page 116
cat day19.csv day20.csv day21.csv day22.csv day23.csv day24.cs
v | tsload
--target_database sales --target_table SALES_FACT --max_ignore
d_rows 10
--bad_records_file ./SALES_FACT.bad --date_format %Y-%m-%d
--date_time_format "%Y-%m-%d %H:%M:%S" --source_data_format del
imited
--field_separator "|" --null_value "" --enclosing_character
"\""
--boolean_representation 1_0 &
pidlist="$pidlist $!" &
cat day25.csv day26.csv day27.csv day28.csv day29.csv day30.cs
v | tsload
--target_database sales --target_table SALES_FACT --max_ignore
d_rows 10
--bad_records_file ./SALES_FACT.bad --date_format %Y-%m-%d
--date_time_format "%Y-%m-%d %H:%M:%S" --source_data_format del
imited
--field_separator "|" --null_value "" --enclosing_character
"\""
--boolean_representation 1_0 &
pidlist="$pidlist $!" &
wait $pidlist
Call your script using a command like:
nohup bash ./load_script.sh > master_log.txt &
tail -f master_log.txt
Constructing your script in this way will execute all the commands in the background, and output to the
file master_log.txt . You’ll see a running status as the commands in the script execute. After the
script completes, you can check the log file for detailed information, such as the number of rows that
loaded successfully.
Use a script to load data
February 07, 2019
ThoughtSpot Application Integration Guide Page 117
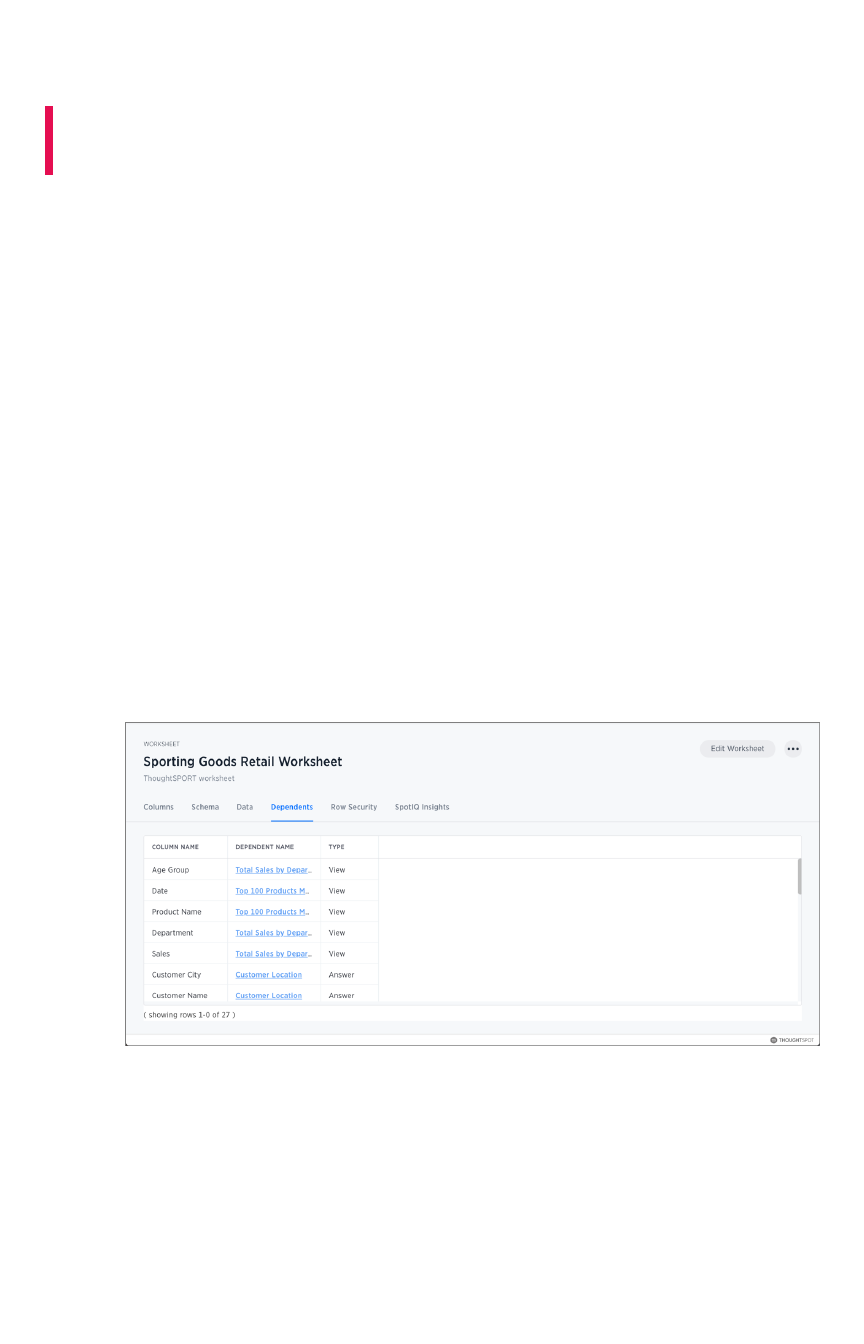
Delete a data source
Summary:Summary: How to prepare for and delete a data source using the
ThoughtSpot application.
There are two separate ways to delete a data source, through the browser or through TQL describes the
dependency checking that occurs when deleting or changing a table using TQL. When you want to
delete a data source, you first need to handle any dependent objects that have been built on top of it.
You can easily see these dependencies, and choose how to handle them before deleting the data
source.
Check data source dependencies
You can see all of the dependencies for any data source (worksheet or table) on the DataData page.
To view dependent objects for a data source:
1. Click DataData on the top navigation bar.
2. Click the name of the data source whose dependencies you want to view.
3. Click DependentsDependents.
You will see a list of the names of the dependent objects (worksheets and pinboards), and the
columns they use from that data source. You can use this information to determine the impact
of changing the structure of the data source or to see how widely it is used.
4. Click on a dependent object to modify or delete it.
If you want to remove the dependency by modifying the dependent object, you’ll need to
remove all search terms or columns that refer back to the data source you are trying to delete.
5. When all dependencies have been removed, you will be able to go back and delete the data
source.
Delete a data source
February 07, 2019
ThoughtSpot Application Integration Guide Page 118
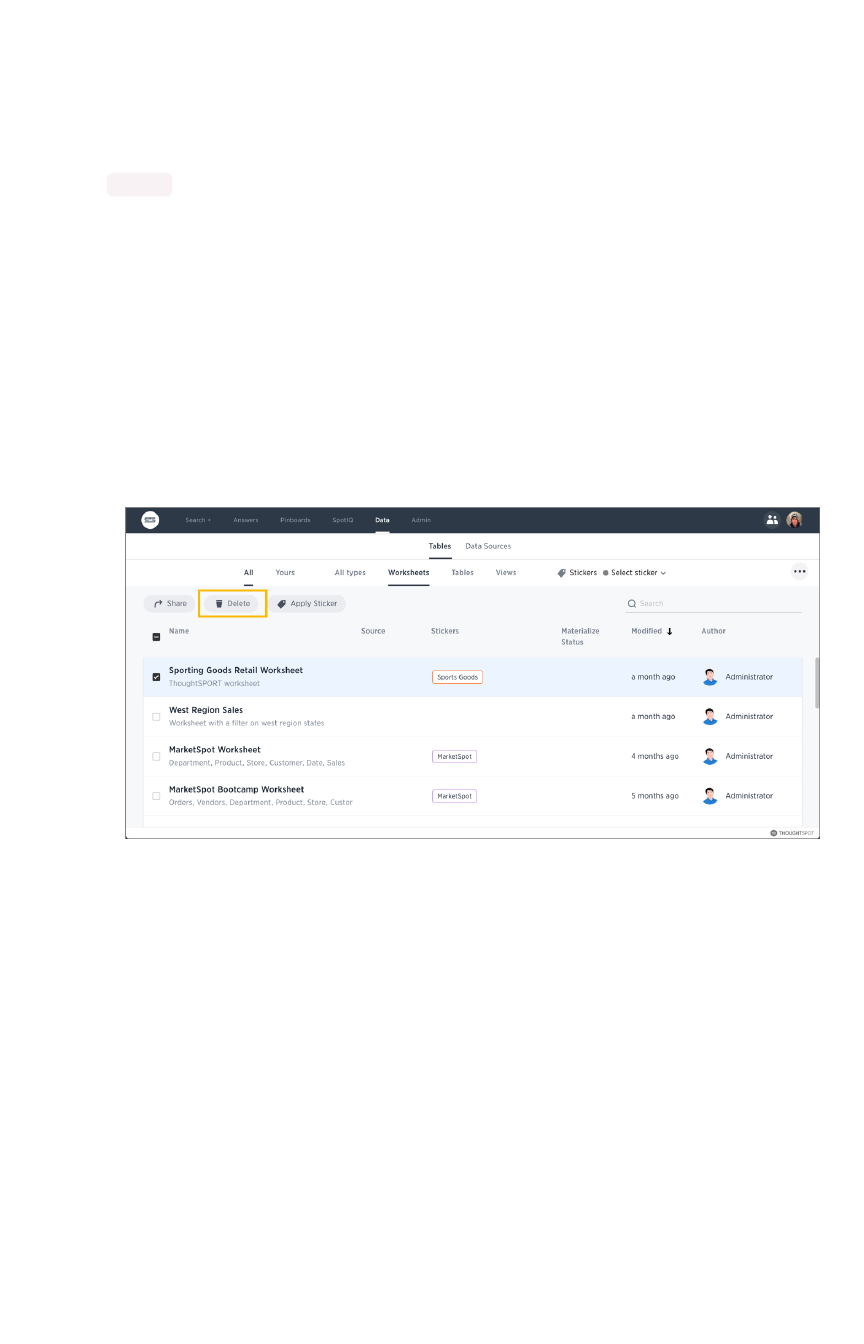
Delete a data source
You can delete data sources from the browser, as long as they were not created by an administrator
through tsload or Data Connect.
You can delete data sources from the browser if they were created from the browser. These types of
data sources include:
• Data imported from the browser.
• Worksheets.
ThoughtSpot checks for dependencies whenever you try to delete a table or worksheet.
1. Click DataData on the top navigation bar.
2. Check the box next to the name of the data source you want to delete.
3. Click the delete icon.
4. If you attempt to delete a data source with dependent objects, the operation will be blocked.
You will see a list of dependent objects with links.
Delete a data source
February 07, 2019
ThoughtSpot Application Integration Guide Page 119
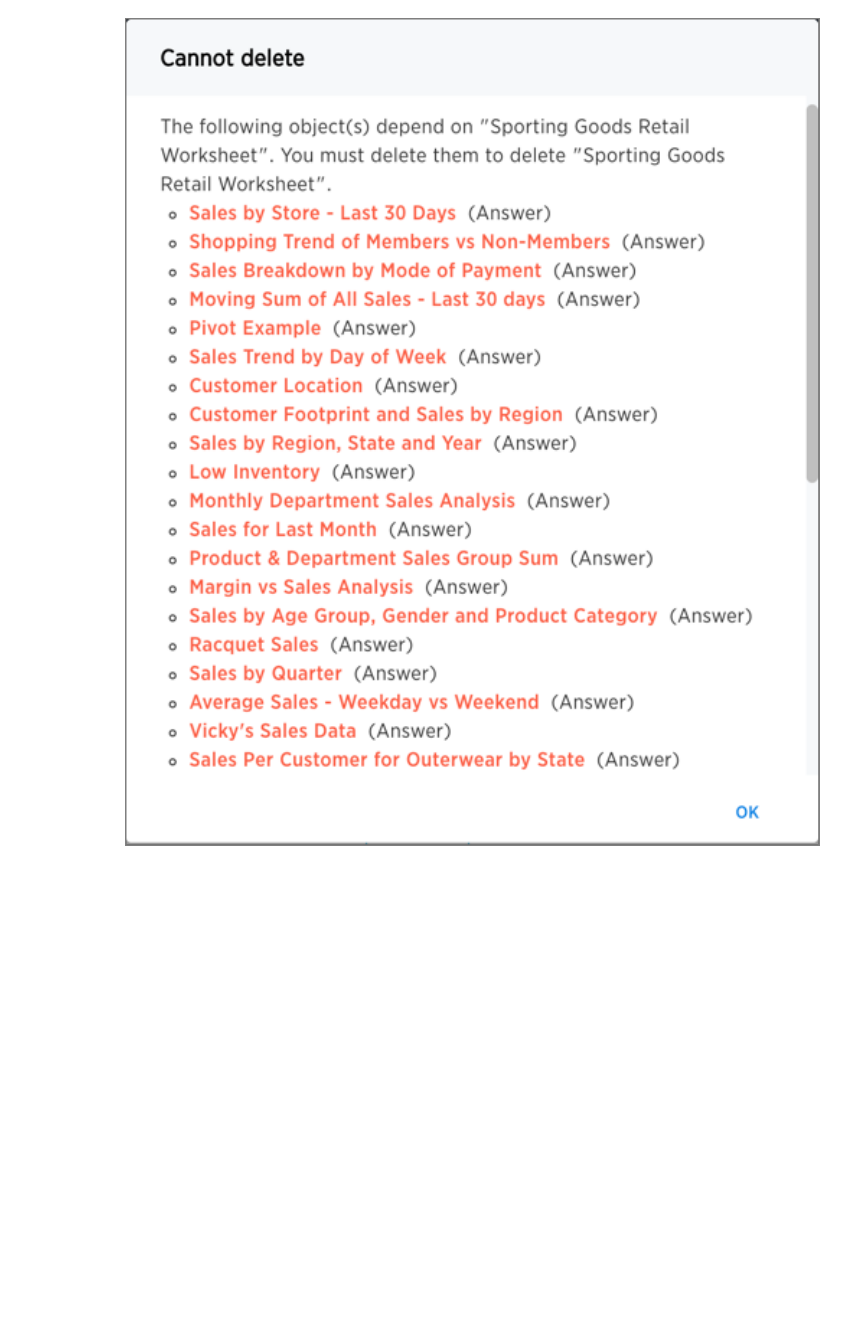
5. Click on a dependent object to modify or delete it.
If you want to remove the dependency by modifying the dependent object, you’ll need to
remove all search terms or columns that refer back to the data source you are trying to delete.
6. When all dependencies have been removed, you will be able to go back and delete the data
source.
Delete a data source
February 07, 2019
ThoughtSpot Application Integration Guide Page 120

Delete or change a table in TQL
Summary:Summary: You can delete a data source in the web browser or using
ThoughtSpot SQL Command Line (TQL).
When you enter a TQL statement, the system warns you of possible dependency consequences with a
prompt asking if you’d like to proceed. This should make you feel safe issuing TQL commands, even
commands like dropping a table.
If TQL is run using the flag --allow_unsafe , your statements will always execute without this warning.
Note that when running TQL from a script, you will need to decide what behavior you want if the script
contains changes that affect dependent objects. If you want the script to run even if objects with
dependencies are affected, run it using this flag, for example:
cat safest_script_ever.sql | tql --allow_unsafe
If you do not run the script using the flag, it will fail if any of its commands might cause problems with
dependent objects.
TQL actions with possible dependency consequences include:
• Change, add, or remove a primary key.
• When changing or adding a primary key, if the key in question is not unique in the
data it may cause deletion of rows, because of upserts occurring when duplicate
primary keys are found.
• When changing or removing a primary key, incoming foreign key relationships will
be broken.
• Change a column datatype.
• Add a relationship or foreign key.
• Drop a relationship or foreign key constraint.
• Change or add a sharding key.
• Drop a table, schema, or database.
When issuing one of the above commands, you will see a warning message similar to this:
TQL> ALTER TABLE table1
DROP CONSTRAINT PRIMARY KEY;
WARNING: This operation will break the Foreign Key relationshi
p “products”
with table “sales”, which will break 34 user-visible visualizat
ions and
2 Worksheets. We recommend taking a snapshot before performing
this operation.
Do you wish to proceed? (yes/no).
Delete or change a table in TQL
February 07, 2019
ThoughtSpot Application Integration Guide Page 121

About data modeling
Summary:Summary: Modeling, tagging, and adding links between your data
sources can make the data even easier to search.
Data modeling allows you to define metadata and other aspects of your data. For example, you can give
data columns search friendly names or predefine how they can be explored and aggregated. Metadata
include such information as Column NamesColumn Names, Column VisibilityColumn Visibility, ColumnColumn and Data DefinitionData Definition, Column RankColumn Rank
and so forth.
When you load data, ThoughtSpot has defaults for data modeling metadata. After loading data, you can
start searching your data without doing any data modeling, creating relationships, or tagging. However,
since you know your data best, you can customize the modeling settings. Putting some thought into
these will make the data even easier and more intuitive to search for your end users.
User interfaces for modeling data
Data modeling is a very lightweight process compared to what you may have experienced in other tools.
You can configure the model for an individual data table or you can view and configure all the system
data using a modeling file. Editing the data model file requires that you have administrative privileges.
The model file contains a row for each column in your data set. It isn’t unusual to have tens of thousand
of rows in this file. This means editing this file is equivalent to editing all the tables at once. When you
add new data to your system, this file expands to accommodate the new data columns you have added.
Both of these methods, have the same effect, they improve search. Moreover, while they have different
effects of scale, they use the same mechanisms to accomplish these effects.
Modeling topics
The following topics explain how to model your data:
•Change a table’s data modelChange a table’s data model
Explains how to make modeling settings for a table you’ve just loaded, or to make a quick
change to existing settings.
•Edit the system-wide data modelEdit the system-wide data model
Explains how to define a default data model to use for data system-wide.
•Data modeling settingsData modeling settings
Explains the possible data model settings and their accepted values. These are the same for a
table or the system.
•Link tables using relationshipsLink tables using relationships
Linked tables can be searched together or combined into a worksheet for easy searching.
Tables that have no relationship between their columns can not be combined in a single
search.
•About stickersAbout stickers
You can create stickers to make it easier for people to find data sources and pinboards.
About data modeling
February 07, 2019
ThoughtSpot Application Integration Guide Page 122
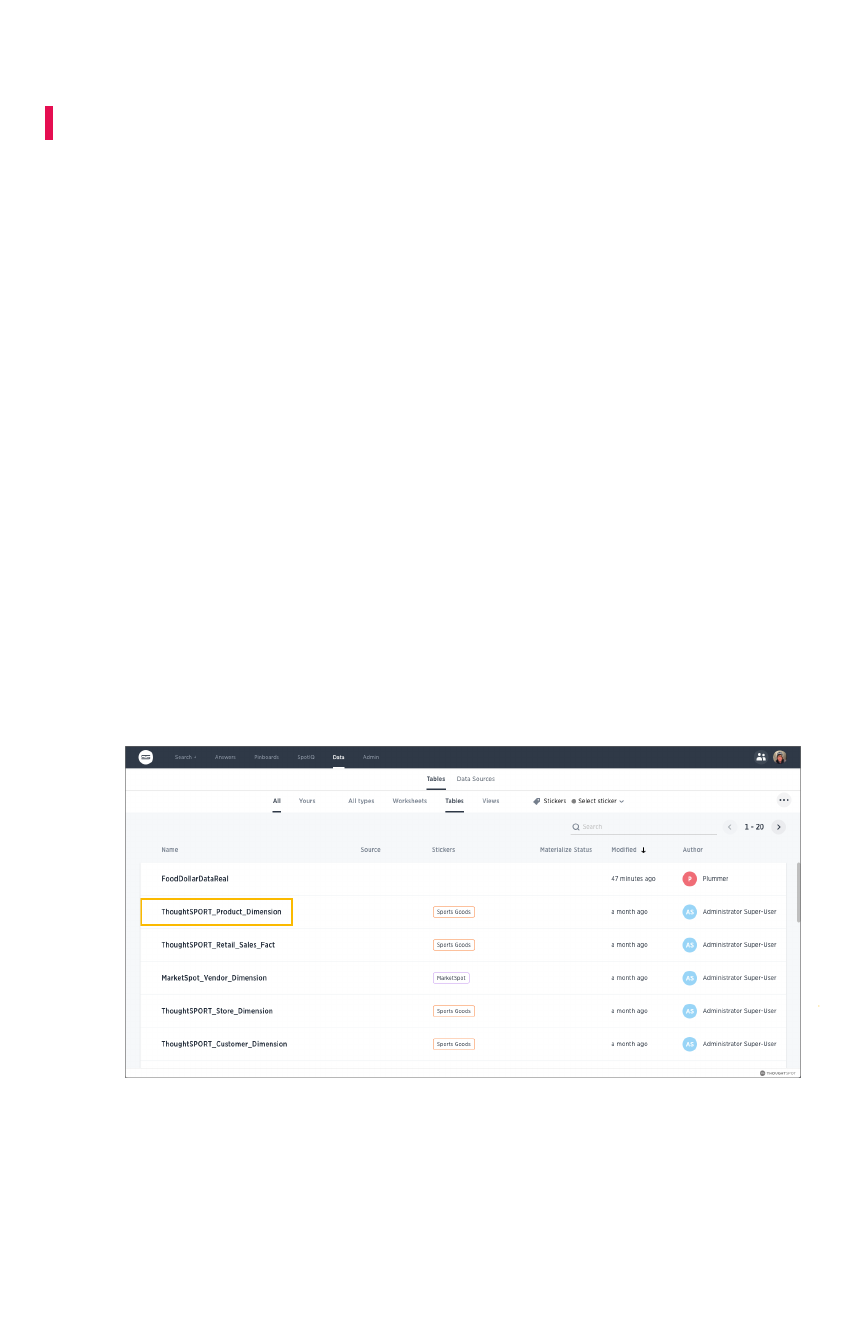
Change a table's data model
Summary:Summary: You can adjust the data model for a newly loaded table.
To make modeling settings for a data source you’ve just loaded, or to make a quick change to existing
settings, use the ThoughtSpot web interface. You can adjust the ColumnsColumns settings from the data
management listing.
You can change all the same data model settings here as in the model file. This method is easier and
faster, unless you need to make many settings in bulk. In that case, using the model file is
recommended.
About data sources
You can change the data modeling settings for base TablesTables, WorksheetsWorksheets, and ViewsViews. Worksheets will
inherit the data modeling settings from the tables upon which they are based. However, if you make
further changes to a base table
after
you’ve created worksheets on it, the new data model changes will
not propagate up. You will need to make any new data model changes directly to the worksheets (if you
want them).
Change the data model for a data source
1. Click DataData on the top navigation bar.
2. Click on a data source you own or can edit.
This brings up the ColumnsColumns screen, where you’ll make your modeling settings.
3. Modify one or more column settings.
Descriptions of the possible settings are listed in Data modeling settings.
4. Save your changes.
Change a table's data model
February 07, 2019
ThoughtSpot Application Integration Guide Page 123


Edit the system-wide data model
Summary:Summary: Edit the modeling file to edit your data settings.
When you load data, ThoughtSpot uses defaults for data modeling metadata. You change these defaults
using the data modeling file if you have access to the ADMIN > Data ManagementADMIN > Data Management page. This means
editing this file allows you to navigate and edit all your system’s data columns at once, in bulk. When you
(or your users) add new data to your system, this file changes as it expands to accommodate new data
columns.
Tip:Tip: If you just want to change a subset of your data, use the Change a table’s data model
instead.
Overview of the modeling process
The data formats you use in your system are controlled by the modeling file, an Excel file. To make these
changes you download the model file, change the model, and upload your changes back into the
system.
In each row of the modeling file, all the data properties corresponding to a column from your data are
listed. You can modify many of these properties by typing in the new value. Remember these important
guidelines when editing the model file:
• Do not modify any value in a column which contains DoNotModifyDoNotModify in the field under the
column heading.
• Make sure to keep the file in the same format as it had when you downloaded it.
The model file contains a row for each column in your data set. It isn’t unusual to have tens of thousand
of rows in this file. You can change all or a subset of rows. You can edit the file to leave the heading
rows and only those rows you want to change. This can make the file more convenient to work with.
The model file must be saved as UTF-8 encoded. If your model file includes multi-byte characters, make
sure you save it in the correct format or you won’t be able to upload it after making your changes.
Download the model file
Before you can make changes to the model file, you need to download it. Then, you edit it using
Microsoft Excel, vi/vim, or a similar text editing tool.
To obtain the model file:
1. Log in to ThoughtSpot from a browser as an Administrator user.
2. Click on the adminadmin tab in the top navigation bar.
3. Click on Data ManagementData Management.
4. Click Download model.xlsDownload model.xls.
Edit the system-wide data model
February 07, 2019
ThoughtSpot Application Integration Guide Page 125
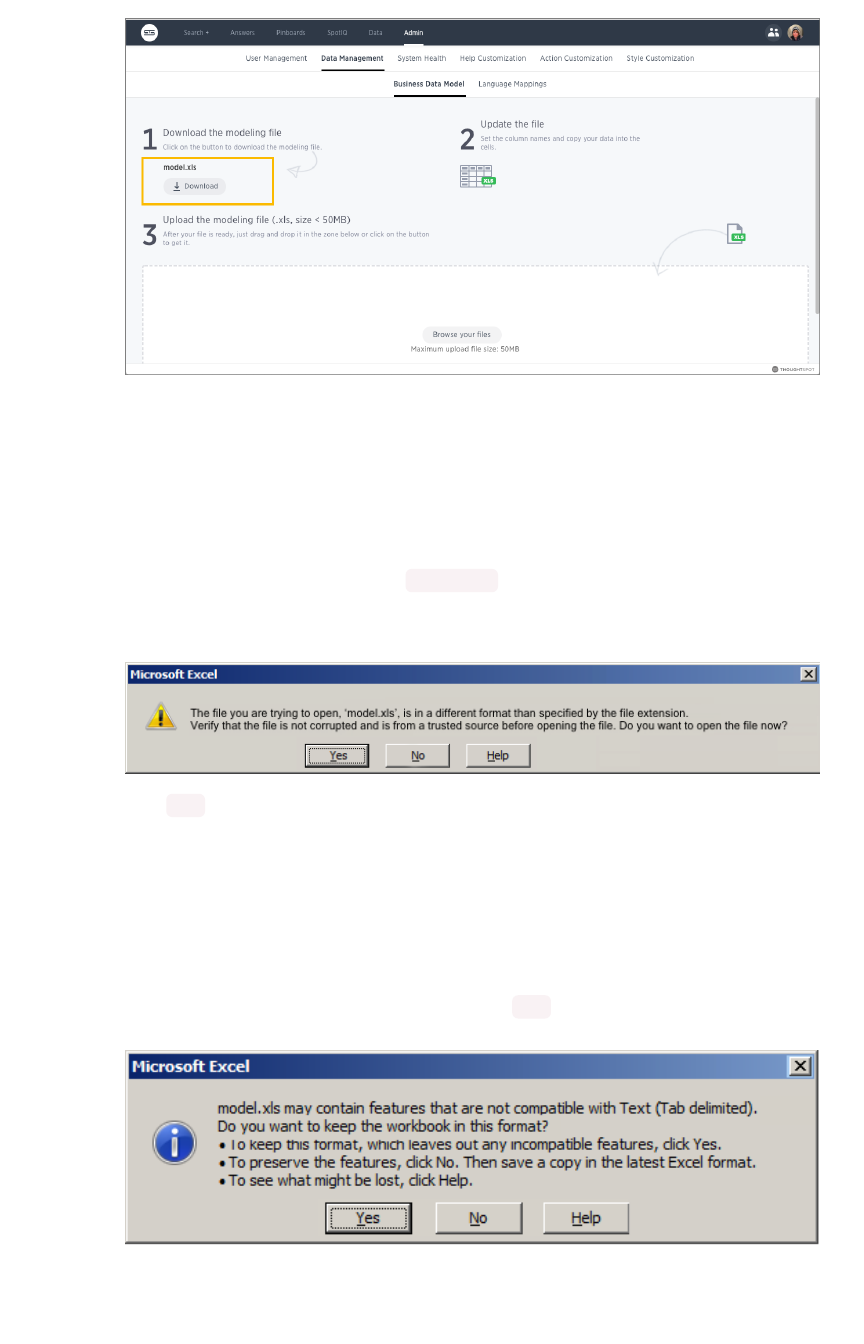
Edit the file and change the settings
You’ll make changes to the settings using this procedure. To see a list of the changes you can make, see
Data modeling settings. You can edit any of the values in the model file, except for those where the
words DoNotModifyDoNotModify appear below the column header. To make changes in the model file:
1. Open the model file you downloaded ( model.xls ) in Excel, vi/vim, or a text editor.
If you are using Excel, you may see a warning message.
Click YES to proceed.
2. Find the column you want to modify.
Descriptions of the meanings of the columns are listed in Data modeling settings.
3. Select the value you want to change.
4. Type in the new value.
5. After making all your changes, save the model file.
If you are using Excel, you will see a message. Click YES to save the file.
Edit the system-wide data model
February 07, 2019
ThoughtSpot Application Integration Guide Page 126

The model file must be saved as UTF-8 encoded. If your model file includes multi-byte
characters, edit the file using vi or vim to ensure the file is saved in the correct format.
Otherwise, you won’t be able to upload it after making your edits.
Upload the edited file
After you have made changes to the modeling file, you must upload it back to ThoughtSpot before the
changes will take effect. To upload the model file:
1. Log in to ThoughtSpot from a browser as an Administrator user.
2. Click on the AdminAdmin icon, on the top navigation bar.
3. Click on Data ManagementData Management.
4. Click Browse your filesBrowse your files to upload the model.xls file, or drag and drop it in the zone.
If you receive an error message upon uploading the file, check that it does not include any
multi-byte characters (for example, Japanese or other multi-byte language characters). If it
does, you’ll need to download the file again and make your edits using vi or vim.
If you choose to remove all the rows you have not changed from the model file before
uploading it. If you upload a model file that includes only the changed rows, you won’t lose
any of the pre-existing model file settings. This is a good option if your model file is causing
an error on upload, but you aren’t sure where in the model file the problem is.
As soon as the file is uploaded, ThoughtSpot performs any necessary re-indexing for you automatically.
Your new settings will be reflected within a few minutes.
Related information
•Data modeling settings
•Change a table’s data model
Edit the system-wide data model
February 07, 2019
ThoughtSpot Application Integration Guide Page 127

Overview of data modeling settings
You can change these settings in two ways, both of which change the model. If you want to make a few
small changes, you should make them in the ThoughtSpot application . If you want to make many
changes you should edit the modeling file. Whether you are changing data modeling settings using the
modeling file or the Web interface, the settings and their accepted values are the same.
Modeling settings
This index lists the editable data modeling settings.
SettingSetting
namename
DescriptionDescription
Column
Name
Sets the name of the column to be used in searches.
Description Adds a text description of what the column contains.
Data Type Read only. Shows the column’s data type.
Column
Type
Sets the type of column, either ATTRIBUTE or MEASURE .
Additive Controls the type of aggregations that will be available for a column.
Aggregation Sets the default aggregation type for a column.
Hidden Sets the visibility of a column.
Synonyms Adds synonyms that can be used in the search bar to refer to a column.
SpotIQ
Preference
Excludes specified columns from SpotIQ analyses. By Default, all columns are includ-
ed in SpotIQ.
Index Type Sets the type of index that will be created for a column.
Geo Config Enables a column to be used in GeoMap visualizations.
Index Prior-
ity
Changes the priority of a column in search suggestions.
Format Pat-
tern
Specifies the format to use for numeric values or dates that show in the column.
Currency
Format
Specifies the format to use when showing the currencies in a column.
Attribution
Dimension
Only applies to tables that join over a Chasm Trap. Designates whether the tables de-
pend on this column for attribution.
Overview of data modeling settings
February 07, 2019
ThoughtSpot Application Integration Guide Page 128

SettingSetting
namename
DescriptionDescription
Entity Cate-
gory
Specifies how to categorize the data in the column by entity type. By default, ENTI-
TY TYPE is not set. Entity categories support SearchIQ so that when you type a nat-
ural question, ThoughtSpot better knows how to interpret it. For example, if you ask
“who are the top performers?” ThoughtSpot will first choose columns set with PER-
SON from which to return answers. If you ask “when was the movie Jurassic Park re-
leased?”, columns set to TIME will be used to answer the “when” part of the ques-
tion, and so forth.
Data modeling for worksheets
For worksheets, only some of the settings can be modified, whether you are using the modeling file or
the Web interface. The editable settings for worksheets are:
• Name
• Description
• Synonyms
If you want to change any of the settings that cannot be modified in a worksheet, you need to make your
changes to the underlying table instead, and they will be reflected in all worksheets that use the table.
Related information
•Model the data for searching
•Add a geographical data setting for a column
Overview of data modeling settings
February 07, 2019
ThoughtSpot Application Integration Guide Page 129

Set column name, description, and type
Summary:Summary: Modeling includes setting basic information for a data
column such as its name, description, and type.
Basic information for a data column is its NAMENAME, DESCRIPTIONDESCRIPTION, and TYPETYPE. All of these can influence
how a user experiences your data. For example, the DESCRIPTIONDESCRIPTION appears as a “tip” when a user
hovers over a column. So it is the means for helping users understand where the data comes from.
Change the column name
Column NameColumn Name (UI)/ColumnNameColumnName (model file) is the name that displayed to users for that column in
ThoughtSpot. The column name is what users type to add that column to their search. Change the text
that is shown for the column names in ThoughtSpot to make the names more meaningful to users.
The model file contains a row for each column in your data set. It isn’t unusual to have tens of thousand
of rows in this file. You can change all or a subset of rows. You can edit the file to leave the heading
rows and only those rows you want to change. This can make the file more convenient to work with.
The default is the name you gave the column when you defined the table in the database or imported the
CSV file from the browser.
1. Find the column name you want to change.
2. Type in the new column name.
3. Save your changes.
Change column description
DescriptionDescription (UI)/ColumnDescriptionColumnDescription (model file) an optional description for the corresponding column.
You can provide a description for a specific column, to provide additional information for users about the
data it contains. When a user hovers over the column, a tooltip will show this description.
To create a column description:
1. Find the column description you want to change.
2. Enter a new description.
3. Repeat for all columns where you want to add a description.
4. Save your changes.
Change column type
Column TypeColumn Type (UI)/ColumnTypeColumnType (model file) describes the kind of data a column stores. This is set
automatically upon defining the table, but in some cases, you may want to change the type. There are
two types of columns:
•ATTRIBUTE contains a property, like name, address, or id number.
•MEASURE contains a numeric value that can be compared in a meaningful way using math,
such as a count or measurement.
Set column name, description, and type
February 07, 2019
ThoughtSpot Application Integration Guide Page 130

When a new table is created, the default column type is set according to the Data TypeData Type (UI)/DataTypeDataType
(model file) defined for each column. By default, columns with the numeric data types ( FLOAT ,DOUBLE ,
INT , or BIGINT ) are assigned the type MEASURE . Columns with VARCHAR ,BOOL , or date/time data
types are assigned the type ATTRIBUTE .
Usually the default setting for column type works fine. But occasionally you’ll need to change a
MEASURE to an ATTRIBUTE . Examples of numeric values for which mathematical operations are not
meaningful include:
• ID numbers
• Key values that are primarily used for joining tables
• Product number or SKU
• Sports team member jersey number
• Year, when separate from a date (e.g. 1999, 2000)
To change the column type:
1. Find the column type you want to change.
2. Change it to either MEASURE or ATTRIBUTE .
3. Save your changes.
Related information
•Model the data for searching
•Hide column or define a column synonym
Set column name, description, and type
February 07, 2019
ThoughtSpot Application Integration Guide Page 131

Set ADDITIVE or AGGREGATION
Summary:Summary: You can allow aggregate on MEASURE columns and some
ATTRIBUTE columns.
Aggregation is grouping many units or parts into a new value. In data, aggregation gathers multiple input
values and calculates an summary value from them. You then use this aggregated value to do an
analysis.
Every summary value results from a data aggregation function. An example aggregation function would
be average or minimum. You can control how aggregation works in your data.
Making an ATTRIBUTE column ADDITIVE
Your data may contain a column with a numeric data type that you have defined as an ATTRIBUTE
rather than a MEASURE . For example, you may have ATTRIBUTE column with an INTEGER data type
that represents age. Typically, these columns have an ADDITIVEADDITIVE setting of NO . Within a search result
that contains data from this column, the options for each column on the left side of the screen includes:
• UNIQUE COUNT OFUNIQUE COUNT OF
• TOTAL COUNT OFTOTAL COUNT OF
To display extended aggregate view options, you must set ADDITIVEADDITIVE to YES on these ATTRIBUTE
columns. This option is only possible on columns that have a numeric data type ( FLOAT ,DOUBLE or
INTEGER ) or a date data type ( DATE ,DATETIME ,TIMESTAMP , or TIME ). After you make this change,
these additional view options area-charts offered:
• TOTAL OFTOTAL OF
• AVG OFAVG OF
• STD DEVIATION OFSTD DEVIATION OF
• VARIANCE OFVARIANCE OF
• TOTAL COUNT OFTOTAL COUNT OF
• UNIQUE COUNT OFUNIQUE COUNT OF
• MIN OFMIN OF
• MAX OFMAX OF
Set ADDITIVE or AGGREGATION
February 07, 2019
ThoughtSpot Application Integration Guide Page 132

To change this setting:
1. Find the column whose ADDITIVEADDITIVE setting you want to change
2. Select the ADDITIVEADDITIVE toggle.
3. Change the value to one of these:
•YES or NO , if using the Web interface.
•TRUE or FALSE , if using the model file.
4. Save your changes.
Change Aggregation
Both MEASURE columns and ATTRIBUTE columns support AGGREGATIONAGGREGATION operations. To aggregate a
column without having to enter the aggregation type explicitly in your searches every time, you can set a
default AggregationAggregation for that column. Setting this default can make combining data more intuitive and
faster.
ATTRIBUTE columns have AGGREGATIONAGGREGATION(UI)/AggregationTypeAggregationType (model file) values with default
aggregate type of NONENONE. You can change AGGREGATIONAGGREGATION to one of the supported aggregation types.
To extend the available aggregation actions, set ADDITIVEADDITIVE on these columns to YES (TRUE ).
Aggregate typeAggregate type DescriptionDescription
NONENONE Does no aggregation. This is the default for ATTRIBUTE type columns.
SUMSUM Adds the values together and returns the total. This is the default for MEASURE
type columns.
AVERAGEAVERAGE Calculates the average of all the values.
MINMIN Calculates the minimum value.
MAXMAX Calculates the maximum value.
Set ADDITIVE or AGGREGATION
February 07, 2019
ThoughtSpot Application Integration Guide Page 133

Aggregate typeAggregate type DescriptionDescription
STD_DEVIATIONSTD_DEVIATION Calculates the standard deviation of all the values.
VARIANCEVARIANCE Calculates the variance of all the values.
COUNTCOUNT Calculates the total number of values.
COUNT_DISTINCTCOUNT_DISTINCT Calculates the total number of distinct values.
Keep in mind that not all MEASURE data should be aggregated. Consider a table containing data about
athletes on a sports team. The data contains some numerical values, including points scored, salaries,
and jersey numbers for each of the players. Because jersey number is an INTEGER, it would become a
column of type MEASURE (not ATTRIBUTE ). So it will aggregate, by default. But you may want to make
its aggregation type NONENONE instead. This ensures that search results that include jersey number will not
attempt to compare or aggregate those values in a way that is not meaningful.
To set this value.
1. Find the column whose default aggregation type you want to change
2. Select its AggregationAggregation. If using the modeling file, use the AggregationTypeAggregationType setting.
3. Select the new default aggregation type.
4. Save your changes.
Related information
Model the data for searching
Set ADDITIVE or AGGREGATION
February 07, 2019
ThoughtSpot Application Integration Guide Page 134

Hide a column or define a synonym
Summary:Summary: Hide a column from users or make it easier to find by
assigning a synonym.
You can hide columns from users in ThoughtSpot without dropping them from the database. It is
common to hide a column when its data contains identifier columns that are used to join tables, but
which do not have any meaning to users.
Alternatively, rather than hiding a column, you can make it easier to find by creating synonyms for it. This
is helpful, for example, when different departments refer to the data using different terminology.
Hide a column
As the number of columns in the dataset increases, the search experience requires more effort. Users
have to navigate through larger numbers of columns to choose the correct one. There might also be
some columns in the dataset that you don’t want to expose to the users.
Change the HIDDENHIDDEN (UI)/HideHide (model file) setting to hide a column. By default, all columns in a data
source ware shown in ThoughtSpot. To hide these columns, set the HIDDENHIDDEN setting to YES .
1. Find the HIDDENHIDDEN (UI)/HideHide (model file) setting for a column.
2. Set its value to YES .
3. Save your changes.
Create synonyms for a column
When users search a data source, they might try typing different words to try to retrieve a particular
column. This could be due to different groups in your organization using different terms for the same
data. Or maybe your users just intuitively use different words when searching for that item. Using
synonyms allows them to access the data even if the term they choose isn’t the same as the actual
column name.
You can set column synonyms for columns in tables, user imported data, and worksheets. The returned
table or chart uses the
actual column name
, but the search bar reflects the term the user typed in (the
synonym).
To create a column description:
1. Find the column for which you want to add synonyms.
2. Select its SynonymsSynonyms.
3. Type in a comma separated list of the synonyms you want to add.
If a synonym is more than one word, it must be enclosed in double quotes. If you are using
the Web interface, you would type:
profit,"gross profit"
Hide a column or define a synonym
February 07, 2019
ThoughtSpot Application Integration Guide Page 135


Set columns to exclude from SpotIQ
analyses
Summary:Summary: You can specify columns to exclude from SpotIQ analyses.
SpotIQ is a ThoughtSpot feature that provides users with insights about their data by automatically
surfacing interesting characteristics (trends, correlations, outliers, and so on).
If you have access to tables, worksheets, and views for data modeling purposes, you can specify
columns to exclude from SpotIQ analyses. By default, all columns are
included
in SpotIQ analyses.
Exclude columns from SpotIQ analyses
To specify columns to exclude from SpotIQ analyses:
1. Click DataData in the top menu, and choose TablesTables, WorksheetsWorksheets, or ViewsViews.
2. Click on the name of your data source.
3. On the ColumnsColumns tab, find the COLUMN NAMES you want to exclude from SpotIQ analyses,
and scroll to the right to find SPOTIQ PREFERENCE .
4. Use the drop-down menu to set the SPOTIQ PREFERENCE to EXCLUDEEXCLUDE for each column you
want to exclude.
5. Click SAVE CHANGESSAVE CHANGES in the upper right.
Include columns in SpotIQ analyses
By default, all columns are included in SpotIQ analyses.
If you have previously set some columns to EXCLUDE and you want to re-set these to be included, do
the following.
1. Click DataData in the top menu, and choose TablesTables, WorksheetsWorksheets, or ViewsViews.
2. Click on the name of your data source.
3. On the ColumnsColumns tab, find the COLUMN NAMES you want to set back to include in SpotIQ
analyses, and scroll to the right to find SPOTIQ PREFERENCE .
4. Use the drop-down menu to set the SPOTIQ PREFERENCE to DEFAULTDEFAULT for each column you
want to include.
5. Click SAVE CHANGESSAVE CHANGES in the upper right.
Related information
•SpotIQ tutorial
•Overview of data modeling settings
Set columns to exclude from SpotIQ analyses
February 07, 2019
ThoughtSpot Application Integration Guide Page 137

Manage suggestion indexing
Summary:Summary: ThoughtSpot dynamically indexes Search bar suggestions
for column names and values.
When a user searches in the SearchSearch bar, ThoughtSpot supplies the user with suggestions for column
names and their column values. The COLUMN NAMECOLUMN NAME and any SYNONYMSSYNONYMS appear in SearchSearch
suggestions. A column’s INDEX TYPEINDEX TYPE controls whether and how ThoughtSpot suggests column values.
Additionally, ThoughtSpot uses a column’s INDEX PRIORITYINDEX PRIORITY value to determine where to rank a
column’s name and values in the search suggestions. These values impact the dynamically calculated
usage based ranking (UBR)
,
Example of Search suggestion behavior
The example below illustrates how searching for promotion_last_name t causes the system to
suggest several ways of completing the tin the search:
The system is suggesting the synonym type (callout A) for a column in the Promotion table. It is also
suggesting a value of theil (callout B) for the Promotion_Last Name column. If you look in the DataData
> Tables> Tables page, you’ll see there is a type synonym for the Promotion_Type column which is using
default indexing.
Manage suggestion indexing
February 07, 2019
ThoughtSpot Application Integration Guide Page 138

Managing search suggestions through INDEX TYPEINDEX TYPE and INDEX PRIORITYINDEX PRIORITY is important. Properly
configured suggestions can decrease “noise” in the suggestion list. Increasing the visibility of important
columns is helpful for new or intermittent ThoughtSpot users.
Understand the default indexing behavior
ThoughtSpot has a system default INDEX TYPEINDEX TYPE behavior for search suggestions. This system default is
configured on your cluster and applies to all worksheets and tables. You can override this default
behavior on a per-column basis.
The system behavior when the INDEX TYPEINDEX TYPE is DEFAULTDEFAULT is as follows:
• With two exceptions, the system indexes all columns using their COLUMN NAMECOLUMN NAME value. The
exceptions are columns with COLUMN TYPECOLUMN TYPE of MEASURE and columns with DATA TYPEDATA TYPE of
DATE .
• Columns that contain data values with large amount of free-form strings, that is, a length is
greater than 50 words, are indexed as PREFIX_ONLY by default.
Warning:Warning: If a column has a very large free text values, ThoughtSpot recommends
you keep DEFAULT or set DONT_INDEX. Other settings indexing on these values may
generate confusing suggestions.
• Short strings (like a firstname column) are indexed using PREFIX_AND_SUBSTRING by
default, which indexes both prefix and substrings.
• If a column is using has a
cardinality
– the number of unique column values – greater than 10
million, it is not indexed.
If a column’s INDEX TYPEINDEX TYPE is
not
DEFAULTDEFAULT and the column’s cardinality is greater than 30 million,
ThoughtSpot does not index the column.
High cardinality and performance
A column’s cardinality can impact indexing. If you have a column with a very high cardinality and a very
high number of rows, indexing these values can impact your ThoughtSpot performance. ThoughtSpot
Support recommends you turn off indexing of primary key columns on extremely large tables (> 10
million rows) in your cluster.
Manage suggestion indexing
February 07, 2019
ThoughtSpot Application Integration Guide Page 139

High cardinality is relative to other considerations. In some cases, columns with fewer than 10 million
rows but with columns containing long strings can cause performance problems with memory. If you
have concerns or questions, your ThoughtSpot Customer Success Engineer can help you determine
appropriate cardinality thresholds for your ThoughtSpot installation.
Configure your own cluster defaults
If you need to, you can work with ThoughtSpot Support or your Customer Success Engineer to configure
new cluster defaults.
Override the system default on a column
You can change a column’s INDEX TYPEINDEX TYPE in the Data > Tables > ColumnsData > Tables > Columns page or in the IndexIndex value in
the modeling file.
The values you can set for INDEX TYPEINDEX TYPE are:
Index typeIndex type DescriptionDescription
DEFAULT The default behavior applies to all ATTRIBUTE columns that are
not DATE types. PREFIX_AND_SUBSTRING for short values and
PREFIX_ONLY for long values and free-form text.
DONT_INDEX Prevents indexing on the column values. The column doesn’t ap-
pear in search suggestions.
PREFIX_AND_SUBSTRING Allows full indexing such that prefix and sub-string search both
work for the column values.
PREFIX_AND_WORD_SUBSTRING Allows indexing such that only prefix search works for each word
of a multi-word string, for the column values.
PREFIX_ONLY Allows indexing such that only prefix search works for the column
values.
Consider a column in which there are four values ThoughtSpot ,Thought ,Spot and Thought
Spot . If you search for sp , depending on the setting for indexing, the column value search result
suggestions will vary:
Index field valueIndex field value Search bar suggestionsSearch bar suggestions
DEFAULT ThoughtSpot ,Spot and Thought Spot
DONT_INDEX No suggestions.
PREFIX_AND_SUBSTRING ThoughtSpot ,Spot and Thought Spot
PREFIX_ONLY Spot
PREFIX_AND_WORD_SUBSTRING Spot and Thought Spot
To change a value in the application UI:
Manage suggestion indexing
February 07, 2019
ThoughtSpot Application Integration Guide Page 140
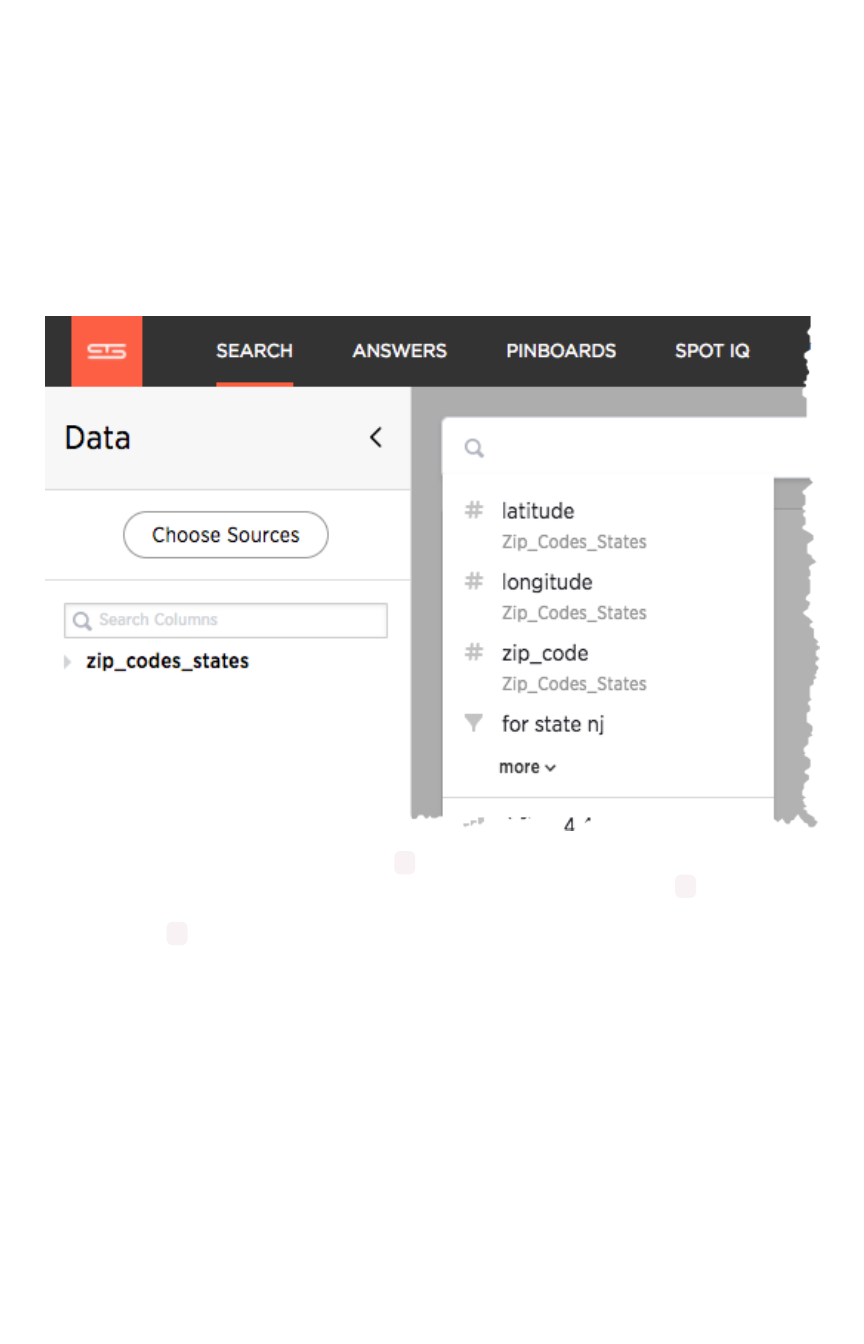
1. Open a worksheet or table from the DataData page.
2. Find the column whose index type you want to modify.
3. Set its INDEX TYPEINDEX TYPE.
4. Save your changes.
If you are using the model file, locate the IndexIndex cell, and enter the INDEX TYPEINDEX TYPE you want to use.
Change a column’s suggestion priority
A column’s INDEX PRIORITYINDEX PRIORITY determines the order or rank in which it and its values appear in the search
dropdown.
By default, the INDEX PRIORITYINDEX PRIORITY value is set to 1for all columns. You can push a column up in the
order (increase the rank) by increasing its INDEX PRIORITYINDEX PRIORITY value. A higher value (like 2) will cause the
corresponding column and its values to appear higher up in the search dropdown than columns with
lower value (like 1).
Manage suggestion indexing
February 07, 2019
ThoughtSpot Application Integration Guide Page 141
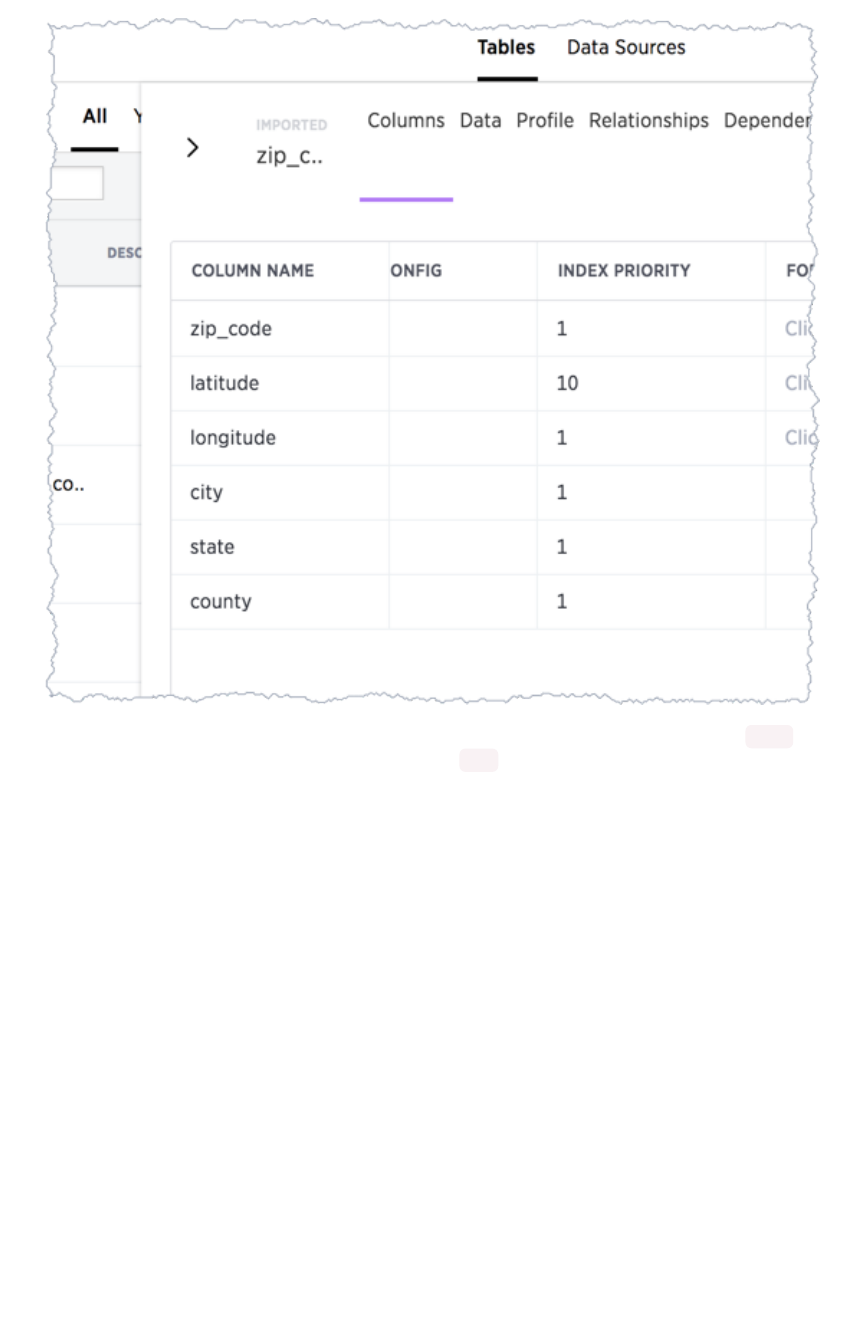
You should only use numbers between 1-10 in the INDEX PRIORITYINDEX PRIORITY field.Use a value between 8-10 for
important columns to improve their search ranking. Use 1-3 for low priority columns.
To change a value in the application UI:
1. Open a worksheet or table from the DataData page.
2. Find the column whose index type you want to modify.
3. Change the INDEX PRIORITYINDEX PRIORITY to a number between 1 and 10.
4. Save your changes.
If you are using the model file, locate the IndexIndex cell, and enter the priority you want to use.
Related information
•Model the data for searching
•Usage based rankings (UBR).
Manage suggestion indexing
February 07, 2019
ThoughtSpot Application Integration Guide Page 142
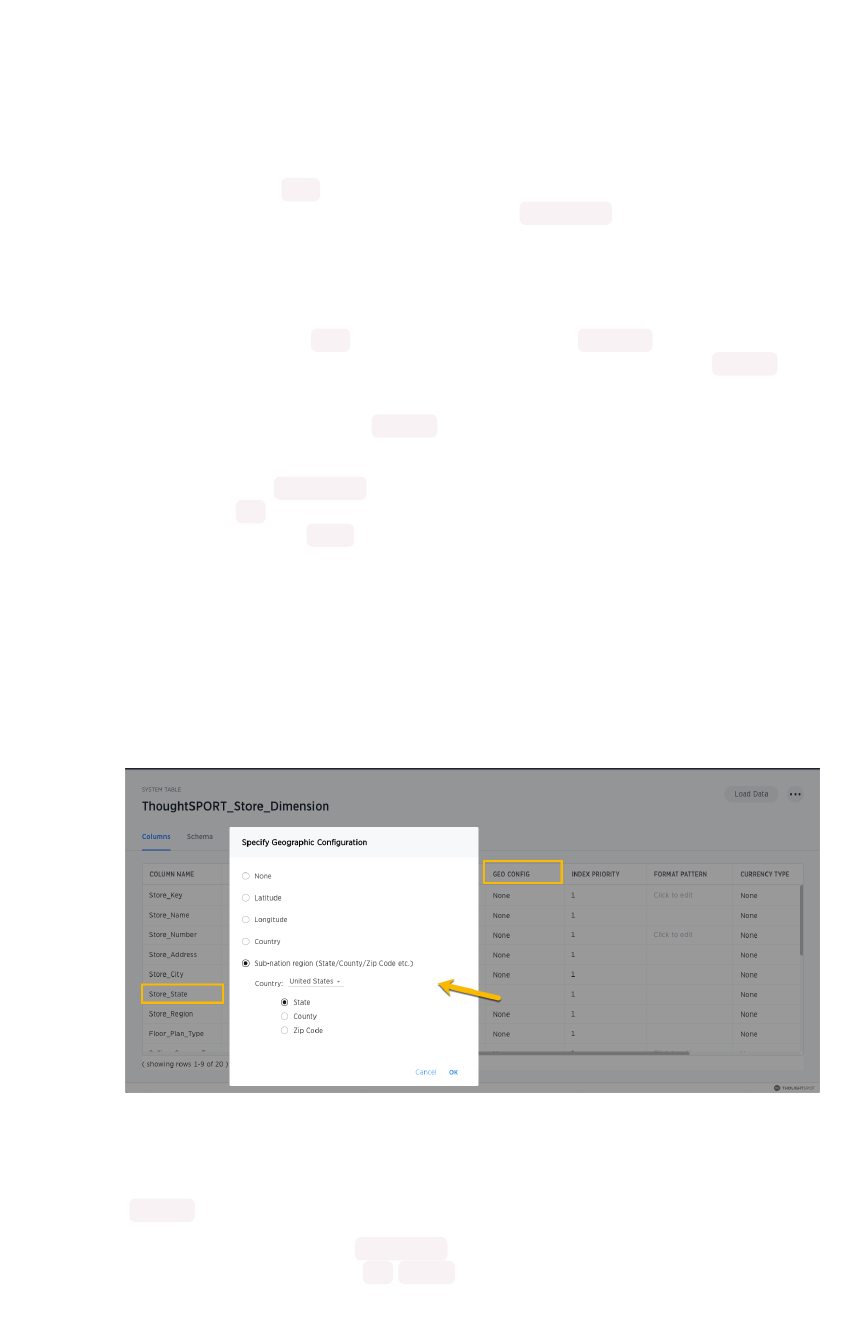
Add a geographical data setting
Certain attribute columns that contain location data can be used to create GeoMaps. ThoughtSpot
supports Latitude, Longitude, Zip Code, US States, US Counties, Countries, and select international
sub-nation regions.
You can designate a column as Geo by editing the GEO CONFIGGEO CONFIG column in the table ColumnsColumns page.
You cannot edit the geo configuration column information in the model.xls file.
Guidelines for geographic columns
Columns that can be designated as Geo columns need to contain text ( VARCHAR ) data unless they
contain latitude/longitude data. Latitude and longitude columns can contain numeric data ( DOUBLE ) or
text.
If you are using a column with the data type DOUBLE for latitude and longitude, you will also need to
change the following settings for those columns:
• set Column TypeColumn Type to ATTRIBUTE
• set AdditiveAdditive to NO
• set Aggregation TypeAggregation Type to NONE
For information these settings, see Set ADDITIVE or AGGREGATION.
How to edit geographic columns
1. Find the GEO CONFIGGEO CONFIG for the column that contains the geographical data.
2. Select the column to display the Specify Geographic ConfigurationSpecify Geographic Configuration dialog.
3. Change the value to the appropriate GEO CONFIGGEO CONFIG, depending on the kind of geo data the
column contains.
If your data includes latitude and/or longitude columns that are stored as a numeric data type
(DOUBLE ), make these changes for those columns:
a. Change the TypeType to ATTRIBUTE .
b. Change ADDITIVEADDITIVE to NO /FALSE .
Add a geographical data setting
February 07, 2019
ThoughtSpot Application Integration Guide Page 143

4. Save your changes.
List of geotypes
GeoTypeGeoType DescriptionDescription Type: ExampleType: Example
COUNTRY_REGION Countries • name: United States
• long name: United States
• name_sort: United States
of America
• abbreviation: U.S.A.
• adm0_a3: USA
• adm0_a3_is: USA
• adm0_a3_us: USA
• admin: United States of
America
• brk_a3: USA
• brk_name: United States
• formal_en: United States of
America
• iso_a2: US
• iso_a3: USA
• iso_n3: 840
COUNTY Counties in the United States • santa clara county
• pike county, ohio
• pike county, OH
STATE_PROVINCE States in the United States • name: California
• US Postal Service abbrevi-
ation: CA
LATITUDE Must be used with LONGITUDE • 37.421023
• 1.282911
LONGITUDE Must be used with LATITUDE • −122.142103
• 103.848865
ZIP_CODE Zip codes and zip codes +4 in the
United States
• po_name: MT MEADOWS
AREA
• ZIP: "00012"
• zip2: 12
Other Sub-nation
Regions
Administrative regions found in coun-
tries other than the United States
• bremen
• normandy
• west midlands
Add a geographical data setting
February 07, 2019
ThoughtSpot Application Integration Guide Page 144


Set number, date, and currency formats
Summary:Summary: Explains how to set key formats for column values.
You can set number, date, and currency display formats. These formats define how these value types
display in tables and charts.
Number formats
You can set a format for how numbers are displayed in tables and charts. For example, you can display
numbers with a different number of digits after the decimal point, based on the data modeling setting
Format PatternFormat Pattern. You can use any of the supported number formats for delimiters and number of digits to
show using Java Decimal Notation. Currency symbols are not supported.
The system has default values which are:
#,### For integer data types INT and BIGINT . As you can see, these can only contain
numbers, alpha characters are not permitted.
#,###.00 for decimal data types DOUBLE and FLOAT .
These are some examples of formats you can use:
Stored ValueStored Value Format PatternFormat Pattern Display ValueDisplay Value
12345.6789 #,##0.## 12,345.68
12345.6789 #,##0.### 12,345.679
12345.6789 #,##0.00000 12,345.68
12345.6789 #,##0 12,345
12345.6789 #,##0.00 12,345.68
12345 #,##0.## 12,345
12345 #,##0.00 12,345.00
You can change the date format used to display a column’s values for a single table or, by editing the
data model, for the entire ThoughtSpot instance. Editing the data model file requires that you have
administrative privileges.
1. Decide if the change is for a table or the entire instance.
2. Find the Format PatternFormat Pattern for the column.
This is either a column in a single table or a column in the data modeling file.
Set number, date, and currency formats
February 07, 2019
ThoughtSpot Application Integration Guide Page 146

3. In the column, enter the format you want to use.
4. Save your changes.
If you are using a data-modeling file you’ll need to upload the new file to your installation.
Profile-based number formatting
Number formatting is set by default based on your ThoughtSpot profile’s Preferred localePreferred locale setting. You
can set this value to accommodate your geographic locations.
For example, if you are using ThoughtSpot in the US, the number formatting should look like this:
xxx,xxx.xx . And in Europe, it should look like this: xxx.xxx,xx .
Date formats
Format PatternFormat Pattern (UI)/ Format PatternFormat Pattern (model file) formats for how dates are displayed in tables and charts.
For example, you can display dates in a standard European or US format based on the data modeling
setting Format PatternFormat Pattern. These are some examples of formats you can use:
Format maskFormat mask DescriptionDescription
YYYY or yyyy four digit year such as 2017
YY or yy last two digits of year such as 17
Mmonth with no leading zero 1-12
MM Two digit month 01 -12
MMM Three letter month such as Jan
Set number, date, and currency formats
February 07, 2019
ThoughtSpot Application Integration Guide Page 147

Format maskFormat mask DescriptionDescription
DDay of year without a leading zero 0-365
DD Day of year with up to one leading zero 01 -365
DDD Day of year with up to two leading zeroes 001 -365
dDay of month with no leading zero 1-31
dd Two digit day of month 01 -31
HH Two digit 24 hour representation of hour 00 -23
hh Two digit 12 hour representation of hour 01 -12
H24 hour representation of hour with no leading zero 0-23
h12 hour representation of hour with no leading zero 1-12
mm Minutes 00 -59
mMinutes with no leading zero 0-59
ss Seconds 00 -59
sSeconds with no leading zero 0-59
aAM/PM indicator
Valid delimiters include most non-alphabet characters. This includes but is not limited to:
•\(forward slash)
•/(backward slash)
•|(pipe symbol)
•:(colon)
•-(dash)
•_(underscore)
•=(equal sign)
Examples of valid format masks you can produce for display are as follows:
•MM/dd/yyyy
•MMM
•DD/MM/yyyy
•MM/dd/yyyy HH:mm
•DD/MM/yyyy HH:mm
To change the date format used to display a column’s values for a single table or, by editing the data
model, for the entire ThoughtSpot instance.
1. Decide if the change is for a table or the entire instance.
2. Find the Format PatternFormat Pattern for the column.
This is either a column in a single table or a column in the data modeling file.
Set number, date, and currency formats
February 07, 2019
ThoughtSpot Application Integration Guide Page 148

3. In the column, enter the format you want to use.
4. Save your changes.
If you are using a data-modeling file you’ll need to upload the new file to your installation.
Set currency format
You can set a format for how currencies are displayed in tables and charts when using the ThoughtSpot
Data API or embedding. For example, you can display currencies in a standard European Euro or US
Dollar format based on the data modeling setting Currency TypeCurrency Type.
You can change the currency format used to display a column’s values for a single table. When you
specify the currency type of your data in the ColumnsColumns settings, your currency data will only display the
correct format and currency code in the embedded use case. Currency specific symbols are available in
the non-embedded use case as well, but they are not localized.
All users are treated as if they are in en-US locale unless they are in embed mode and their browser
configuration tells ThoughtSpot that they are in some other locale. For example, 100 Polish Zloty
appears as 100zł to a user in Poland, but without localization enabled, it appears as PLN 100 .
This subtle difference can be seen when you use the REST API. See the ThoughtSpot Application
Integration Guide for more information on the API.
1. Find the Currency TypeCurrency Type for the column whose display format you want to change.
2. Click on it to open the Specify Currency TypeSpecify Currency Type menu.
3. Select one of the following ways you would like to change the format.
OptionOption DescriptionDescription
InferInfer
FromFrom
BrowserBrowser
Your currency data will be modeled upon the locale of your browser setting.
Set number, date, and currency formats
February 07, 2019
ThoughtSpot Application Integration Guide Page 149

OptionOption DescriptionDescription
From aFrom a
columncolumn
Your currency data will be modeled upon the existing currency information in
the selected column This option is disabled if there is no VARCHAR column to
choose from.
SpecifySpecify
ISOISO
CodeCode
Your currency data will be modeled upon your selection from the available cur-
rency code choices.
4. Click OkOk to save your changes.
Related information
Model the data for searching
Set number, date, and currency formats
February 07, 2019
ThoughtSpot Application Integration Guide Page 150
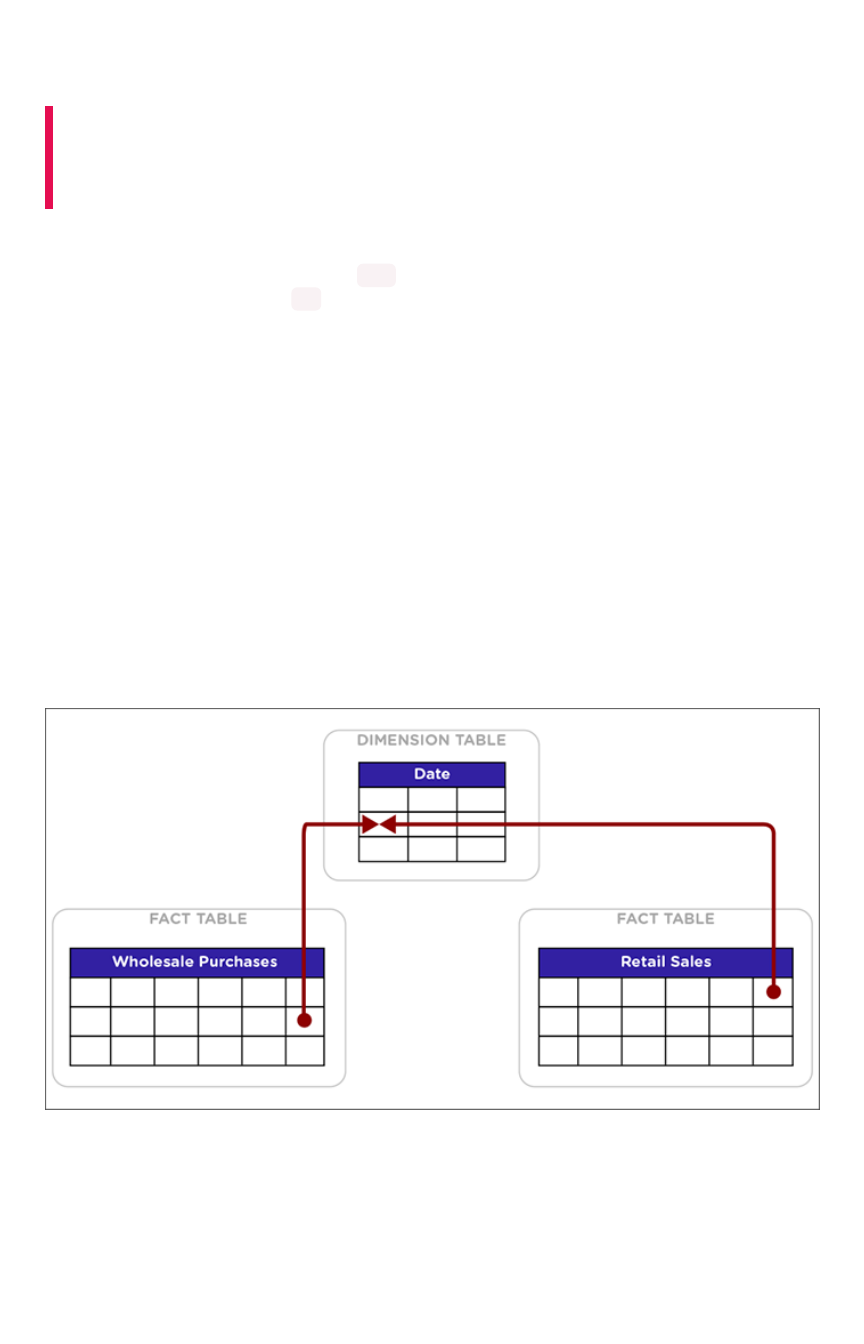
Change the Attribution Dimension
Summary:Summary: The **Attribution Dimension** setting applies only to tables
that are related through a chasm trap. If your schema does not
include these, you can ignore this setting.
The Attribution DimensionAttribution Dimension setting only applies to tables that join over a Chasm Trap. By default, the
attribution dimension setting will be set to YES , but you can override that by setting the column’s
attribution dimension property to NO , as described here.
Understand chasm traps and attribute
dimension
In the classic chasm trap, two fact tables are related through a shared dimension table. When the two
fact tables are joined, the shared column(s) in the dimension table are used to attribute rows in one fact
table to match with rows in the other fact table.
Usually, all goes well using this method. But sometimes an incorrect or illogical attribution can result.
This can happen because the column chosen is not meaningful for performing this attribution. If you are
seeing unexpected results in searches that include tables across a chasm trap, this setting is for you.
Below is an example of a column that is not an attribution dimension. Suppose you have two fact tables,
Wholesale Purchases and Retail Sales, that share a common dimension Date.
In this example, the date column in the Date dimension should not be used for attribution, since
unrelated rows in both of the fact tables could share the same row in the Date table. Why? Because if
Sally bought oranges wholesale on April 25, 2005 and made a retail sale of apples on the same day,
there is no logical relationship between those two events. Combining the two events using the date they
share will not create any meaningful information.
If matching rows in two fact tables over a chasm trap depends on the values in a column contained in a
dimension table, that column is known as an attribution dimension.
Change the Attribution Dimension
February 07, 2019
ThoughtSpot Application Integration Guide Page 151
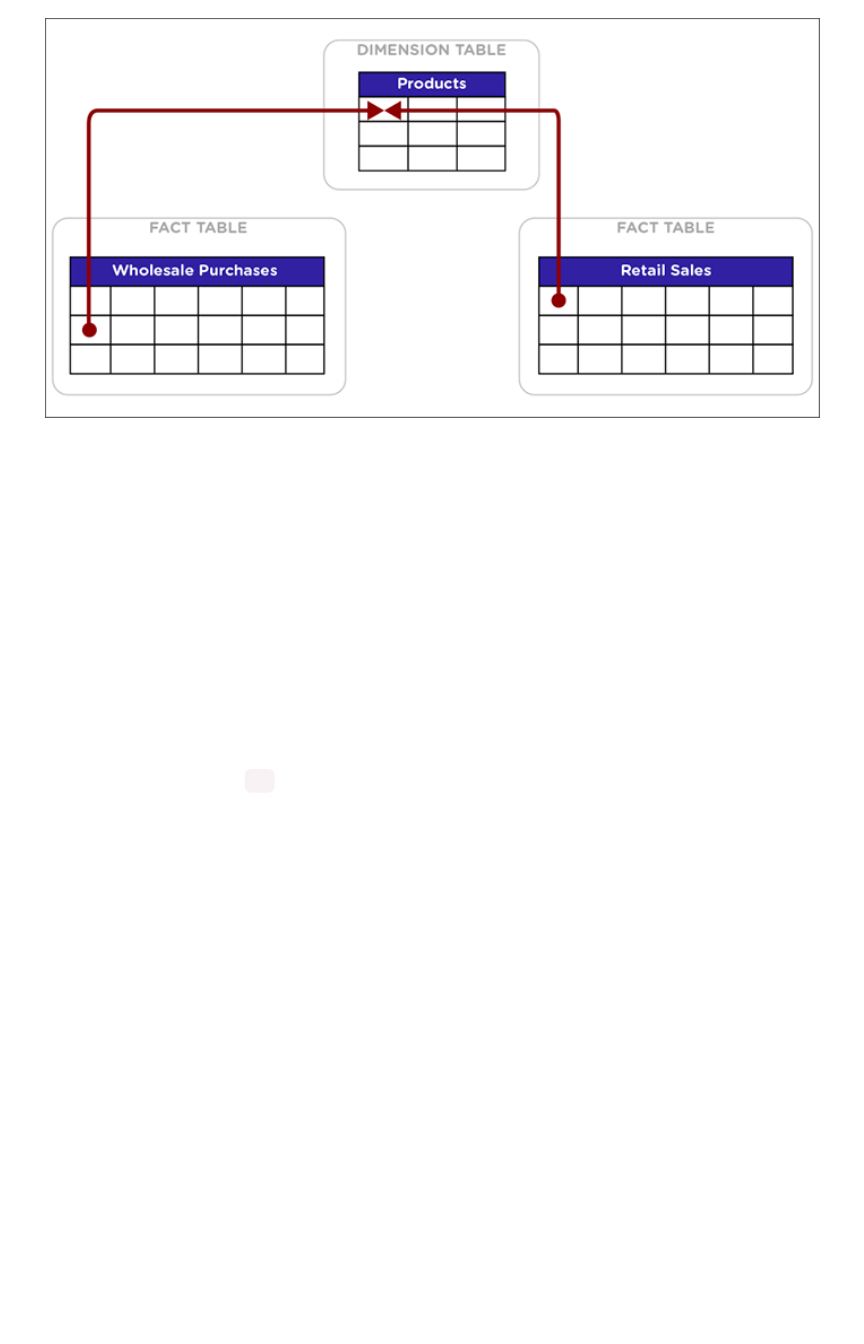
In this example, the Product ID column in the Products dimension table is an attribution dimension. For
rows where the Product ID in the Wholesale Purchases and in the Retail Sales tables is a match, those
rows are logically related in a meaningful way. They can be combined in charts and reports to produce a
logical, expected outcome.
How to set attribute dimension
You cannot configure this setting in the model file. You can only configure it on a table-by-table basis. To
designate a column as not being an attribution dimension (i.e. not producing any meaningful attribution
across a chasm trap):
1. Find the column that is not an attribution dimension.
2. Select its Attribution DimensionAttribution Dimension.
3. Set the value to NO . If you’re using the modeling file, set it to FALSEFALSE.
4. Save your changes.
Related information
Model the data for searching
Change the Attribution Dimension
February 07, 2019
ThoughtSpot Application Integration Guide Page 152

Set entity categories for SearchIQ
Summary:Summary: You can specify a per column entity category to help
SearchIQ.
SearchIQ is a search experience that allows you to ask more natural questions, similar to the way you
might talk to a person.
If you have access to tables and worksheets for data modeling purposes, you can specify columns entity
types for different columns in your data sources which support the SearchIQ user experience.
About Entity Categories
CategoryCategory DescriptionDescription
PERSON Contains data that represents a person, relevant to questions about “who?”
PLACE Contains data that represents a location, relevant to questions about “where?”
TIME Contains data that represents a date or time, relevant to questions about
“when?”
PRODUCT Contains data that represents a product
ZIP_CODE Contains zip code data, relevant to questions like “where?” or “what zip code?”
LAT_LONG Contains data that represents geographical positioning, relevant to questions like
“where?”
COMPANY_ORG Contains data that represents a company or organization
NUM_TYPES Contains numerical data
Set Entity Categories
To specify entity categories:
1. Click DataData in the top menu, and choose TablesTables or WorksheetsWorksheets.
2. Click on the name of your table or worksheet.
3. On the ColumnsColumns tab, find the COLUMN NAMES for which you want to specify entity
categories, and scroll to the right to find ENTITY CATEGORY .
4. Use the drop-down menu to set the ENTITY CATEGORY to the type you want.
5. Click SAVE CHANGESSAVE CHANGES in the upper right.
Set entity categories for SearchIQ
February 07, 2019
ThoughtSpot Application Integration Guide Page 153


Link tables using relationships
You can link tables by creating relationships between their columns. Linked tables can be searched
together or combined into a worksheet for easy searching. Tables that have no relationship between
their columns can not be combined in a single search.
There are two ways to create relationships between tables:
1. Create a constraint using TQL.
2. Create a relationship through the web interface.
The two methods create the same kind of relationship both from an end user perspective and an
administrative perspective. When creating a relationship between two tables, the columns that form the
link must be the exact same data type. For example, a column of type INT32 to another INT32
column.
Both types of relationships exist within the database. You can also generate a script through TQL that
contains all relationships, whether create via the web interface or in TQL.
Relationships created through either method can be managed either via TQL or by going to the
RelationshipsRelationships page when viewing data in the Date ModelingDate Modeling section in the ThoughtSpot application. You
can view, modify, or delete relationships in either place.
You may create relationships using a mixture of TQL and the web interface, but the relationships you
create cannot form a circular relationship, or “cycle”. If you attempt to create a relationship that would
complete a cycle, you will see a message saying that the relationship could not be added because it
conflicts with another existing relationship.
Link tables using relationships
February 07, 2019
ThoughtSpot Application Integration Guide Page 155

Join a table or view to another data
source
Summary:Summary: Learn how to define joins between a table or view and
another table, view, or worksheet
Joining a table or view to another table, view, or worksheet creates a relationship that allows them to be
searched together. Choose a column to join on that both tables contain (e.g. employee ID or product
key). This process creates a generic join between the table or view and the other table, view, or
worksheet on the column you specify.
If you want to create a primary key/foreign key relationship, you need to use TQL rather than the web
interface.
You must have either the Can administrator ThoughtSpotCan administrator ThoughtSpot or the Can manage dataCan manage data privilege to create a
join relationship. If you’re not an administrator, you also need edit permissions on the table, view, or
worksheet.
When creating a join between the columns in two data sources, the columns being linked must have the
same data type, with the same meaning. That is, they must represent the same data. Normally, you’ll
make this kind of link from a fact table column to a column in a dimension table that uniquely identifies a
logical entity in your data such as Employee ID for a person, Product ID for a product, or Date Key for a
specific date in a date lookup table.
To create a relationship through the Web interface:
1. To find your table or view, click DataData in the top menu, and choose TablesTables or ViewsViews.
2. Click on the name of your table or view.
3. Click SchemaSchema. You will see the list showing existing joins.
4. Click the + Add Join+ Add Join button on the upper right side of the screen.
5. Use the Map source to destinationMap source to destination dialog to choose the destination table, view, or worksheet
you want to join to.
Join a table or view to another data source
February 07, 2019
ThoughtSpot Application Integration Guide Page 156
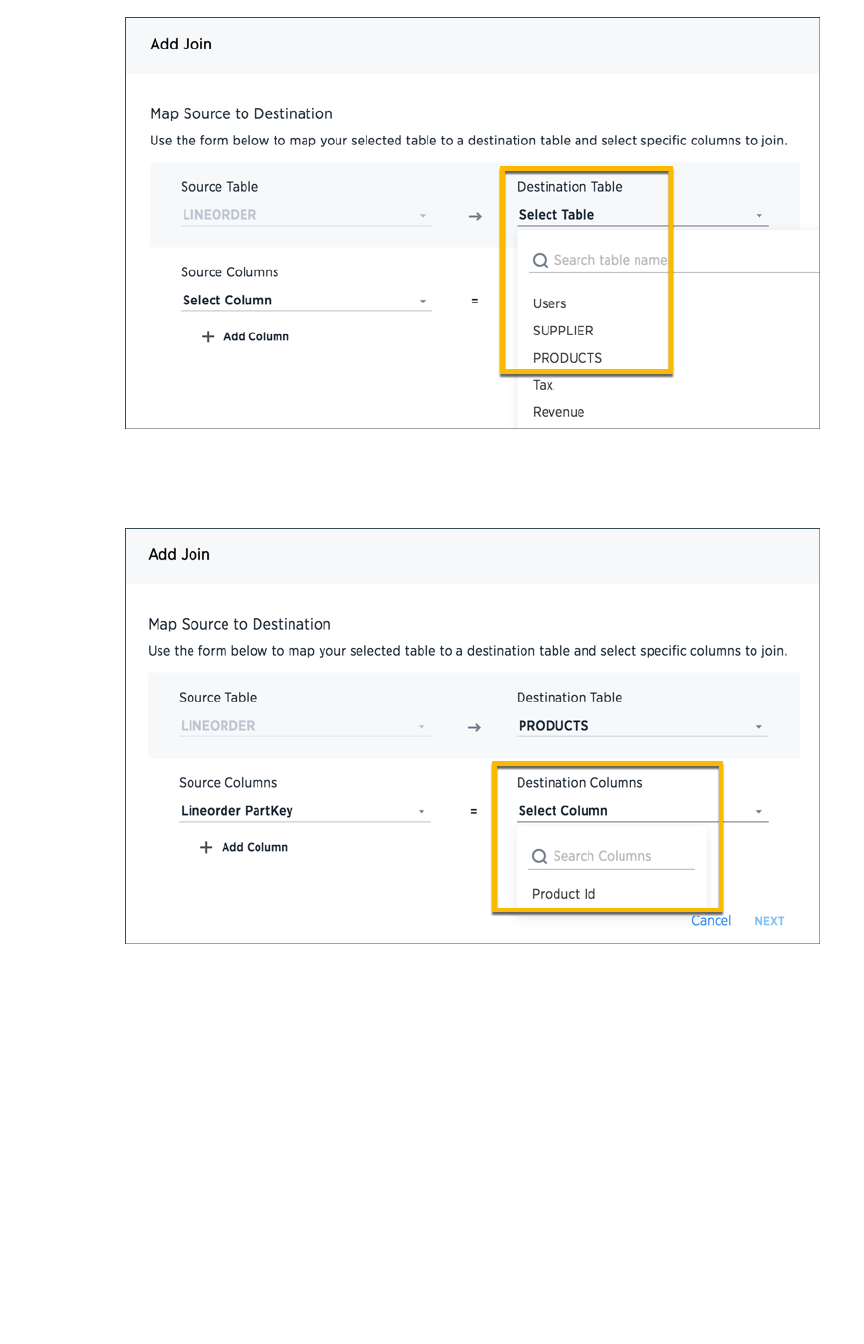
6. Choose the columns you want to join on from the table or view (source) and destination table,
view, or worksheet. Click NextNext.
7. Give your join a name and description and click ADD JOINADD JOIN.
8. Repeat these steps until all the joins you want to make have been created.
After creating the join, you may change its name and description by clicking the edit icon. If you want to
change the data source or column being joined, you’ll need to delete the join and create a new one.
Related Information
•Constraints
Join a table or view to another data source
February 07, 2019
ThoughtSpot Application Integration Guide Page 157
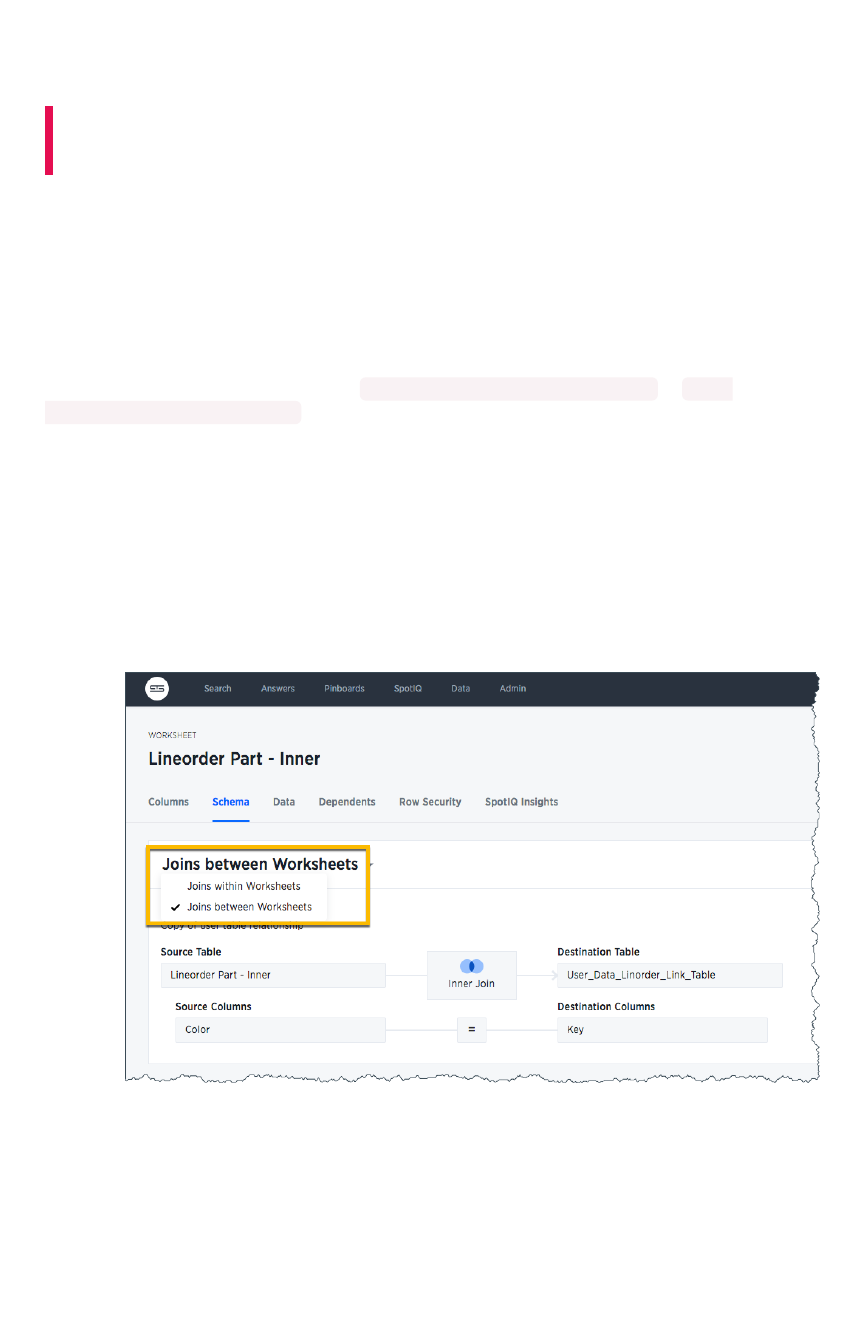
Delete a relationship
Summary:Summary: You can delete relationship (link) between tables through
the application or TQL.
You must have either the Can administrator ThoughtSpotCan administrator ThoughtSpot or the Can manage dataCan manage data privilege to delete a
relationship. If you’re not an administrator, you also need edit permissions on the table, view, or
worksheet.
If you created a relationship (join or link) between tables using the Web interface, you can also delete it
from the Web interface. But if the relationship was created using TQL, you must also use TQL to delete
it.
To delete a relationship using TQL, use an ALTER TABLE...DROP CONSTRAINT... or ALTER
TABLE...DROP RELATIONSHIP... statement.
To delete a relationship from the Web interface:
1. Click DataData on the top navigation bar.
2. Click on the name of the data source you from which you want to remove the relationship.
3. Click SchemaSchema. You will see the list showing existing joins.
If this is a worksheet, you will need to click on Joins within worksheetsJoins within worksheets and choose JoinsJoins
between worksheetsbetween worksheets.
4. Find the relationship you want to delete, and click the Delete iconDelete icon.
Delete a relationship
February 07, 2019
ThoughtSpot Application Integration Guide Page 158


About stickers
Summary:Summary: Stickers enable you to create categories for classification
of objects, including pinboards, answers, data sources, and
worksheets.
You can create stickers to make it easier for people to find data sources and pinboards. Stickers are
global in scope. This means that everyone can see the stickers and use them to tag objects. They can
also filter lists of objects by sticker. Stickers are often used to designate subject areas, such as sales,
HR, and finance, but you can use them any way you like.
Keep in mind these permissions when working with stickers:
• Only administrators can create stickers.
• Anyone can apply a sticker.
• Anyone can filter by a sticker.
Create a sticker
Only administrator users can create stickers. Anyone can apply the stickers you create, or use them as
filters when selecting from a list of sources or pinboards.
To create a sticker:
1. Navigate to the Manage DataManage Data or PinboardsPinboards screen using the icons in the top navigation bar.
2. Choose the currently selected sticker, scroll to the bottom of the list, and click + Add+ Add.
3. Type the name for the new sticker.
4. You can change the name of a sticker by clicking the edit icon next to its name.
About stickers
February 07, 2019
ThoughtSpot Application Integration Guide Page 160

5. You can change the color of a sticker by clicking the color circle next to its name.
Apply a sticker
Only administrators create stickers, but anyone with edit privileges can tag an object with a sticker.
To tag an object with a sticker:
1. From the top menu, choose Answers, Pinboards, or Data.
2. Find the item(s) you want to tag in the list, and check the box next to its name.
3. Click the apply sticker icon and choose one from the list. You can apply as many stickers as
you like to an object.
About stickers
February 07, 2019
ThoughtSpot Application Integration Guide Page 161
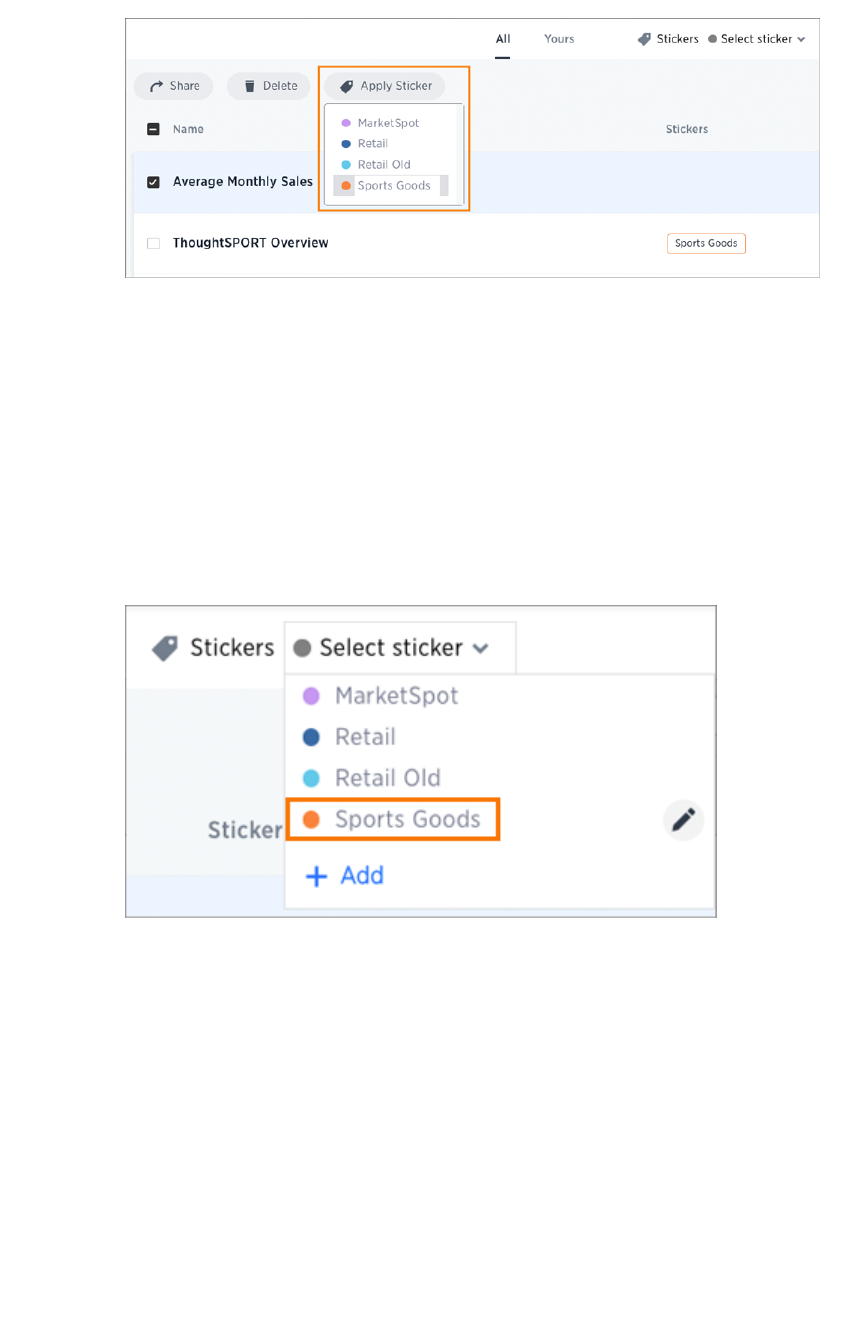
Filter by stickers
Whenever you are selecting objects from a list, you can filter by sticker to find what you’re looking for.
Anyone can use stickers to filter lists of pinboards or data sources. You can also filter by sticker when
selecting data sources.
To filter by sticker:
1. From the top menu, choose AnswersAnswers, PinboardsPinboards, or DataData.
2. Click Select stickerSelect sticker, and select the name of the sticker you want to filter by.
About stickers
February 07, 2019
ThoughtSpot Application Integration Guide Page 162

Simplify search with worksheets
Summary:Summary: Worksheets are flat tables created by joining columns from
a set of one or more tables or imported datasets.
After modeling the data, create worksheets to make searching easier. For example, a sales executive
might need to search for information about retail sales. The required data could be contained in several
tables (sales, customers, products, stores, etc.), with foreign key relationships between them. An
administrator who is familiar with the data model can create a retail sales worksheet, that combines all of
the related fact and dimension tables into a single, easy-to-use view, and share it with the sales
executive. This provides access to the data without requiring an understanding of how it is structured.
Guidelines for worksheets
Users are often unfamiliar with tables and how they are related to one another. A worksheet groups
multiple related tables together in a logical way. You might use a worksheet for these reasons:
• To pre-join multiple tables together.
• To give a user or group access to only part of the underlying data.
• To include a derived column using a formula.
• To rename columns to make the data easier to search.
• To build in a specific filter or aggregation.
• To give users a filtered set of data to search.
Typically, you create one worksheet for each set of fact and dimension tables. For example, you may
have a sales fact table and an inventory fact table. Each of these fact tables shares common dimensions
like date, region, and store. In this scenario, you would create two worksheets: sales and inventory. The
following diagram depicts the workflow for creating the sales worksheet.
Simplify search with worksheets
February 07, 2019
ThoughtSpot Application Integration Guide Page 163
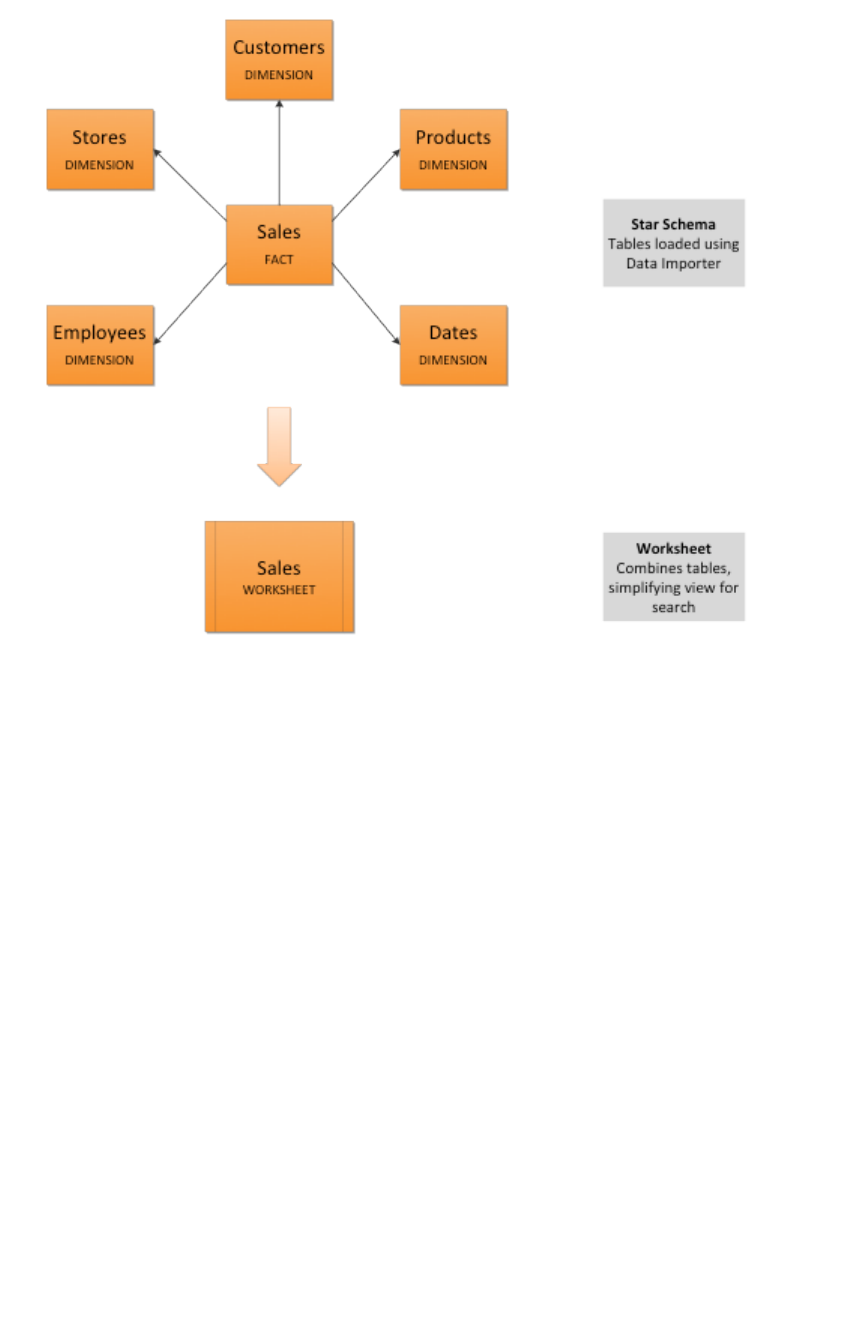
The process for creating a worksheet is:
1. Decide which tables to use for the worksheet.
2. Create a new worksheet.
3. Add sources (tables) to the worksheet.
4. Choose the worksheet join rule.
5. Select the columns to include.
6. Optionally modify the join types within the worksheet.
7. Optionally create formulas.
8. Optionally create worksheet filters.
9. Save the worksheet.
10. Share the worksheet with groups or users.
Create a worksheet
Create a worksheet to make the data easy for users to search. This process includes adding a new
worksheet, after which you will choose the data sources to include in it.
To create a new worksheet:
1. Click on DataData, on the top navigation bar.
Simplify search with worksheets
February 07, 2019
ThoughtSpot Application Integration Guide Page 164
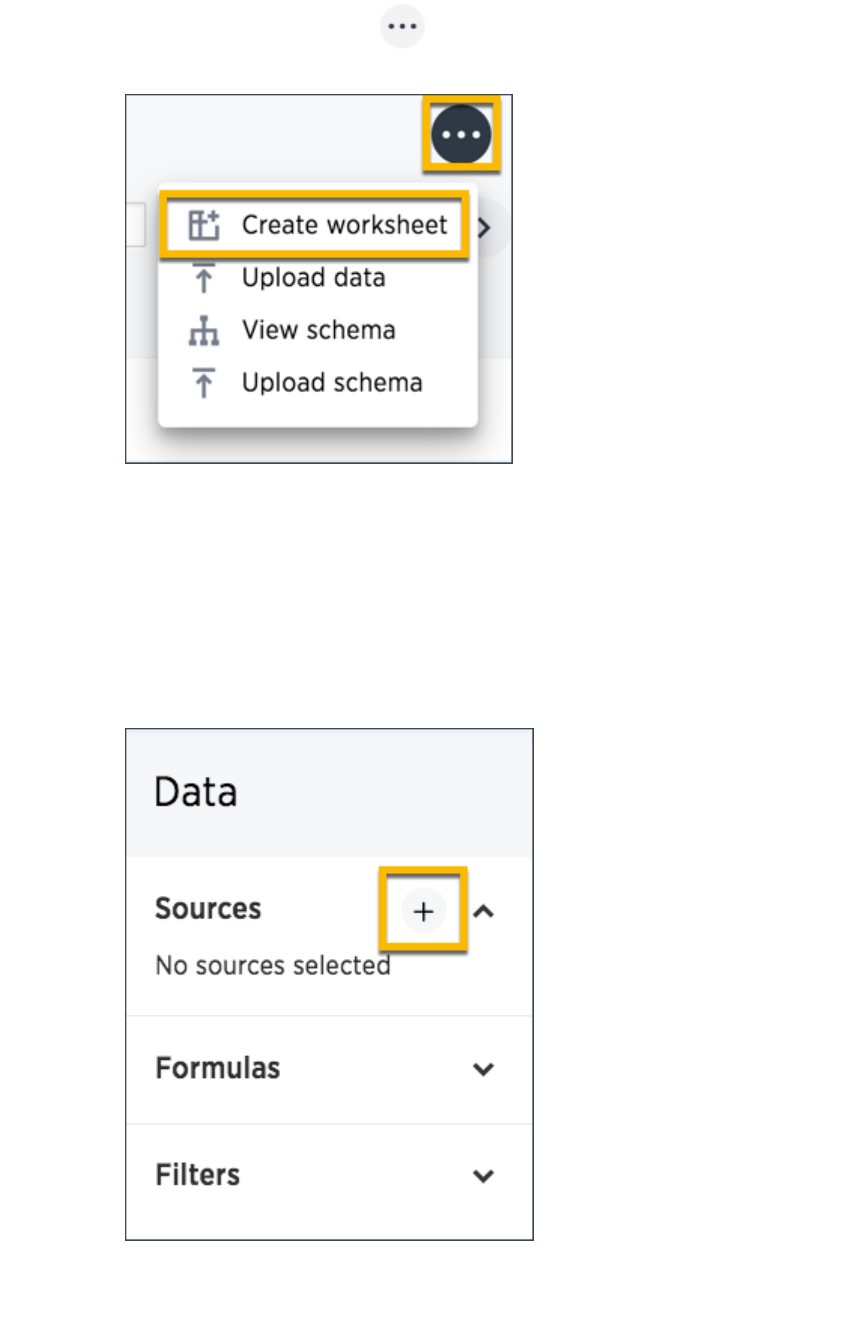
2. Click the the ellipses icon (3 dots) , and select Create worksheetCreate worksheet.
Add sources and columns to a worksheet
After creating a worksheet, you need to add the sources that contain the data. Sources is another name
for tables. The sources you choose are typically related to one another by foreign keys.
To add the sources to the worksheet:
1. Click on the + icon+ icon.
2. Check the box next to each of the sources you want to include in the worksheet.
Simplify search with worksheets
February 07, 2019
ThoughtSpot Application Integration Guide Page 165
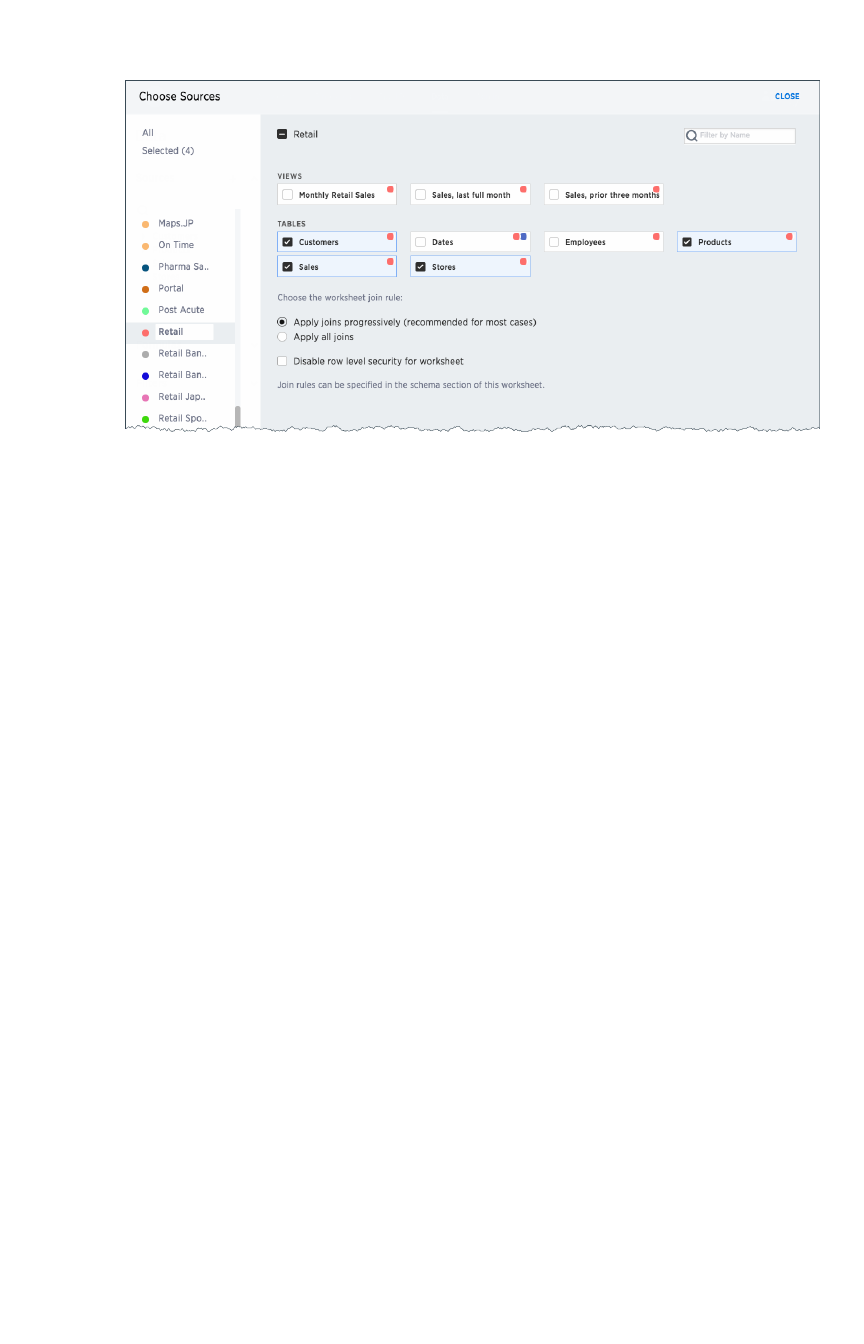
Note that the list of sources only shows the data sources on which you have view or edit
privileges.
3. If you want to see what the data inside the sources looks like, click Explore all dataExplore all data.
4. Choose the worksheet join rule.
5. If you want to disable Row Level Security, for this worksheet, check the checkbox to disable
it.
6. Click CLOSECLOSE to save your changes.
7. Expand the table names under ColumnsColumns to select the columns to add to the worksheet.
a. To add all of the columns from a table, click on the table name and click + Add+ Add
ColumnsColumns.
b. To add a single column, double click on its name.
c. To add multiple columns, Ctl+click on each column you want to add and click ++
Add ColumnsAdd Columns.
Note that once you add a column, non-related tables (i.e. those without a primary/foreign key
relationship) become hidden. If you are working with two tables that should be related, but are
not, you can add a relationship between them.
8. Optionally modify the join types within the worksheet.
9. Optionally create formulas.
10. Optionally create worksheet filters.8. Click on the worksheet title to name it, and then SaveSave it.
11. Click on each column name to give it a more user-friendly name for searching. You can tab
through the list of columns to rename them quickly.
12. If you want to add a prefix to the name of several columns, select them, click the Add PrefixAdd Prefix
button, and type in the prefix.
Simplify search with worksheets
February 07, 2019
ThoughtSpot Application Integration Guide Page 166
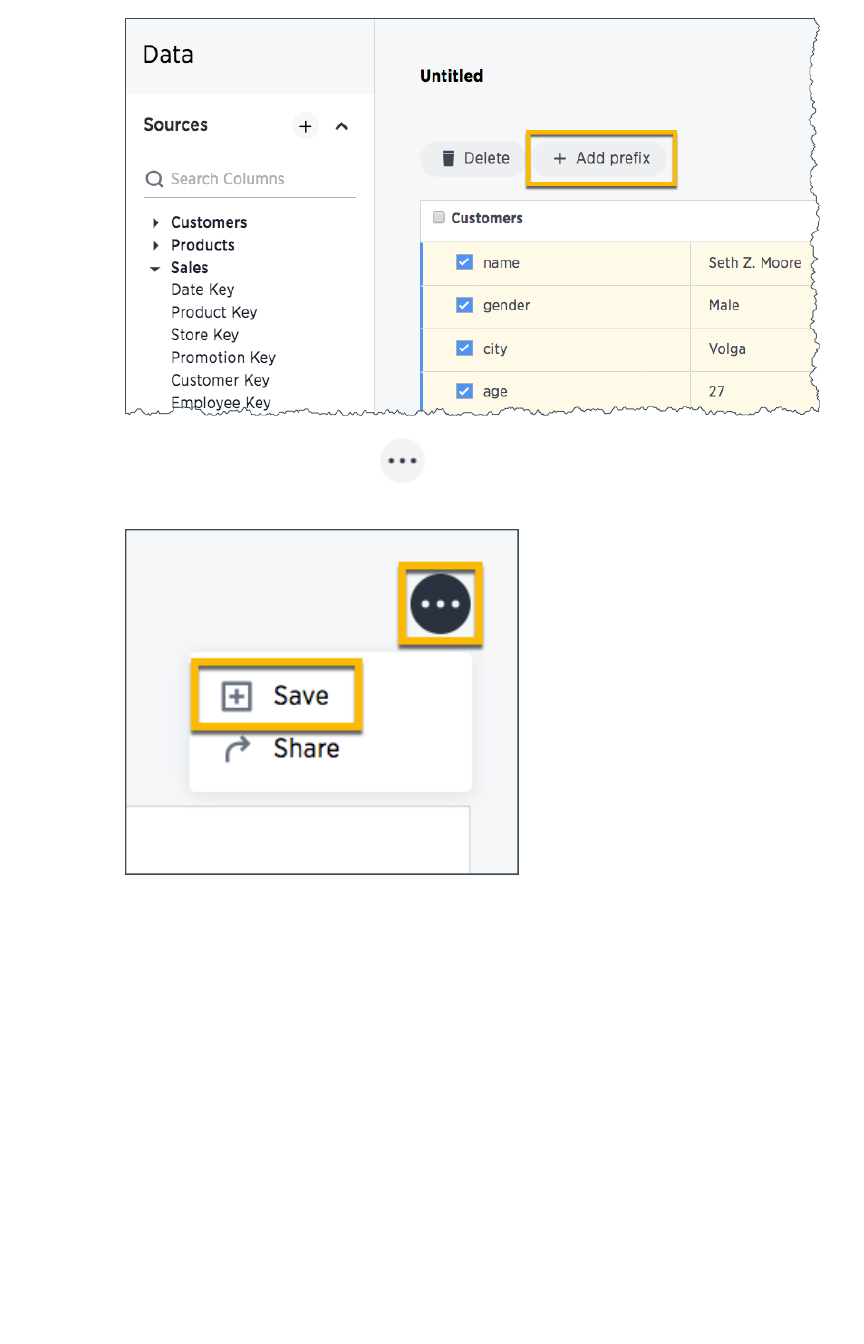
13. Click the the ellipses icon (3 dots) , and select SaveSave.
14. Share your worksheet, if you want other people to be able to use it.
Where to go next
•How the worksheet join rule worksHow the worksheet join rule works
Use the worksheet join rule to specify when to apply joins when a search is done on a
worksheet. You can either apply joins progressively, as each search term is added
(recommended), or apply all joins to every search.
Simplify search with worksheets
February 07, 2019
ThoughtSpot Application Integration Guide Page 167
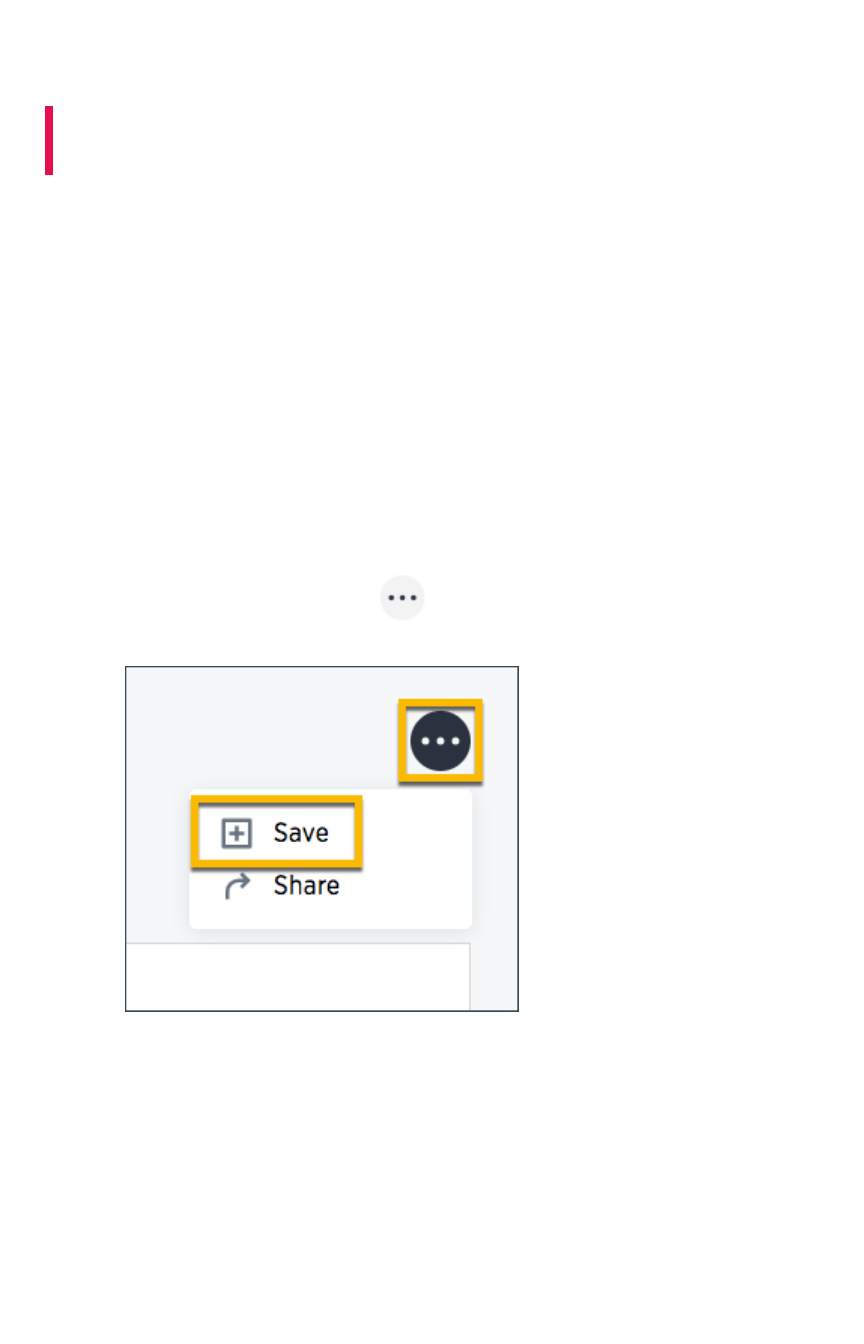
Edit or rename worksheet
Summary:Summary: A worksheet can be edited by anyone with the proper
permissions.
If you created a worksheet, or you have edit permissions on it, you can make changes such as adding
sources and columns, adding or editing formulas, changing relationships, and changing column names.
You can also rename a worksheet or change its description.
Edit a worksheet
To edit a worksheet:
1. Click on DataData on the top navigation bar.
2. Click on the name of the worksheet you want to edit.
3. Click the EditEdit button in the upper right hand side of the screen.
4. Make your changes to the worksheet.
5. Click the the ellipses icon (3 dots) , and select SaveSave.
Rename a worksheet or table
You can change a worksheet or table name from the ThoughtSpot application.
To change the name of a worksheet or table:
1. Click on DataData, on the top navigation bar.
2. Find the worksheet or table you want to rename and click on its name.
3. Click the current name, and enter a new name.
Edit or rename worksheet
February 07, 2019
ThoughtSpot Application Integration Guide Page 168


Create a formula in a worksheet
Summary:Summary: You can define formulas and use them to create derived
columns in worksheets.
You create formulas by combining standard functions and operators, column names, and constant
values.
Anyone who can create a worksheet can add a formula to it. Formulas are not reusable; the formula you
create is associated only with the worksheet it belongs to. A complete list of available formulas and
examples of each is available in the Formula function reference.
You can create a formula in a worksheet by using the Formula Builder. When you do this, the result of
the formula gets added to the worksheet as a column. Use these steps to create a formula:
1. Create a new worksheet, or edit an existing one.
2. Click the ++ button next to FormulasFormulas.
d
3. Type your formula in the Formula Builder.
Create a formula in a worksheet
February 07, 2019
ThoughtSpot Application Integration Guide Page 170
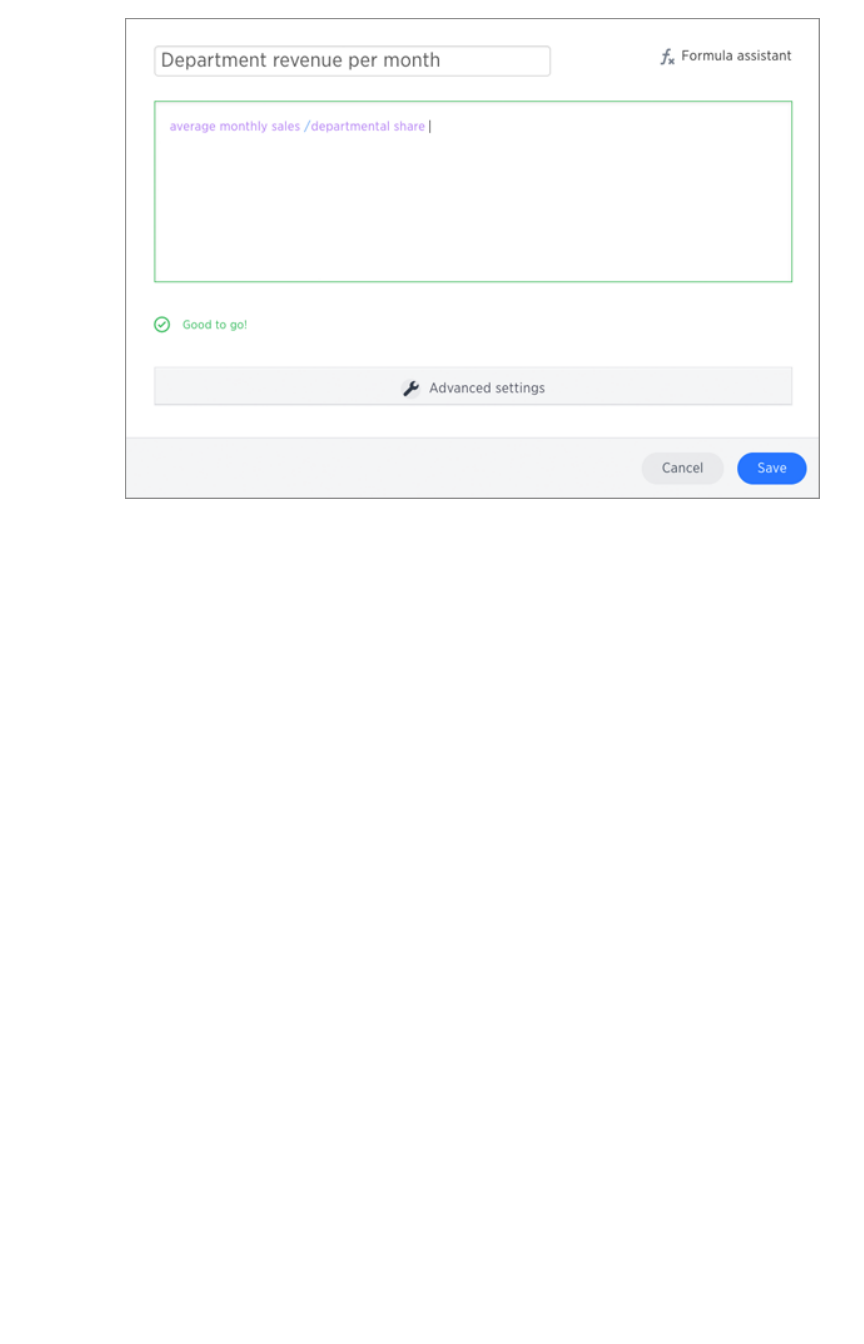
Note:Note: Formulas elements are color coded by type and can include the formula operators and
functions (blue), the names of columns (purple), and/or constants (black).
4. If you want to change what your formula returns, use the Advanced settingsAdvanced settings.
Depending on your formula, you may be able to change:
• Data type
• ATTRIBUTE or MEASURE
• Aggregation type
Create a formula in a worksheet
February 07, 2019
ThoughtSpot Application Integration Guide Page 171
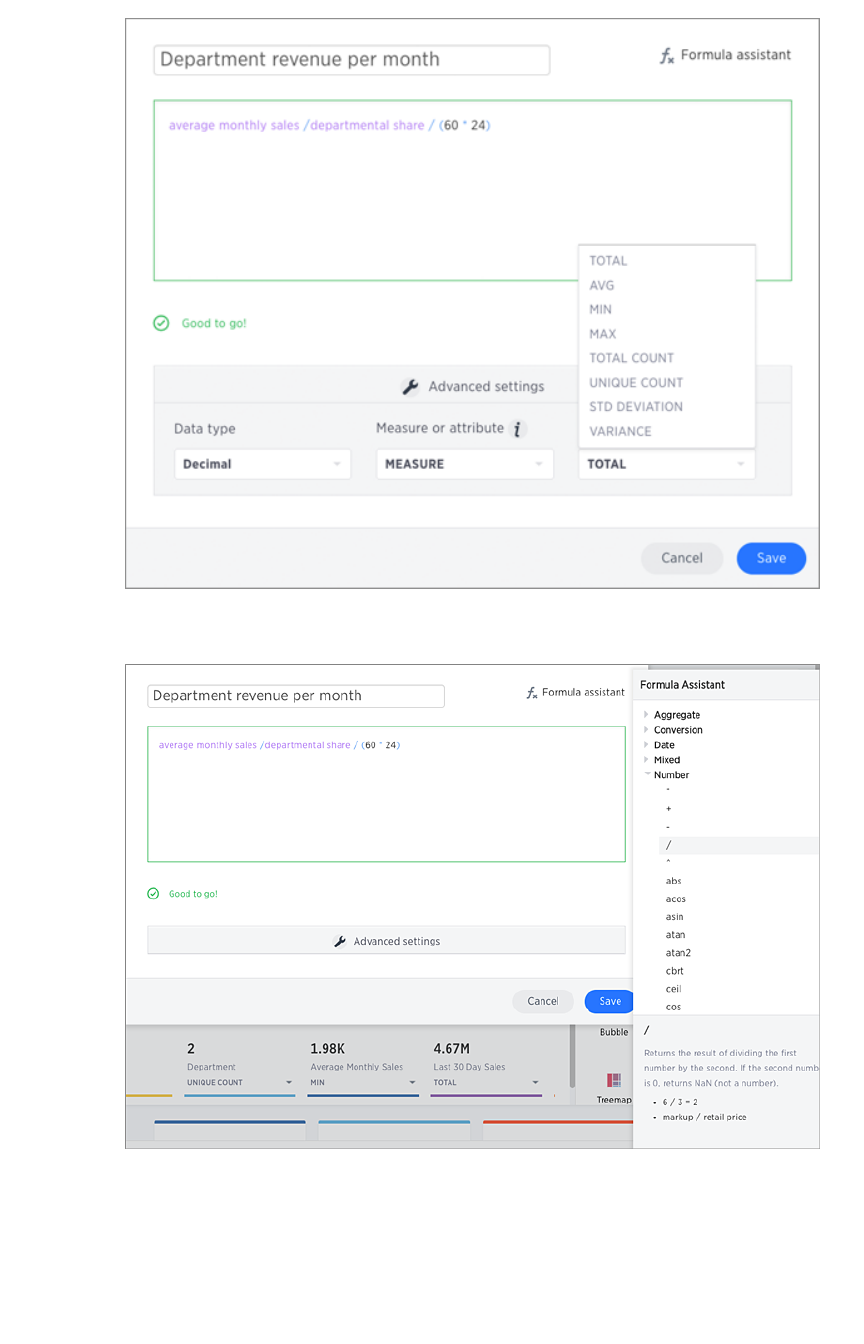
5. You can see a list of formula operators with examples by clicking on Formula Assistant.Formula Assistant.
6. Name the formula by clicking on its title and typing the new name. Click SaveSave.
Create a formula in a worksheet
February 07, 2019
ThoughtSpot Application Integration Guide Page 172
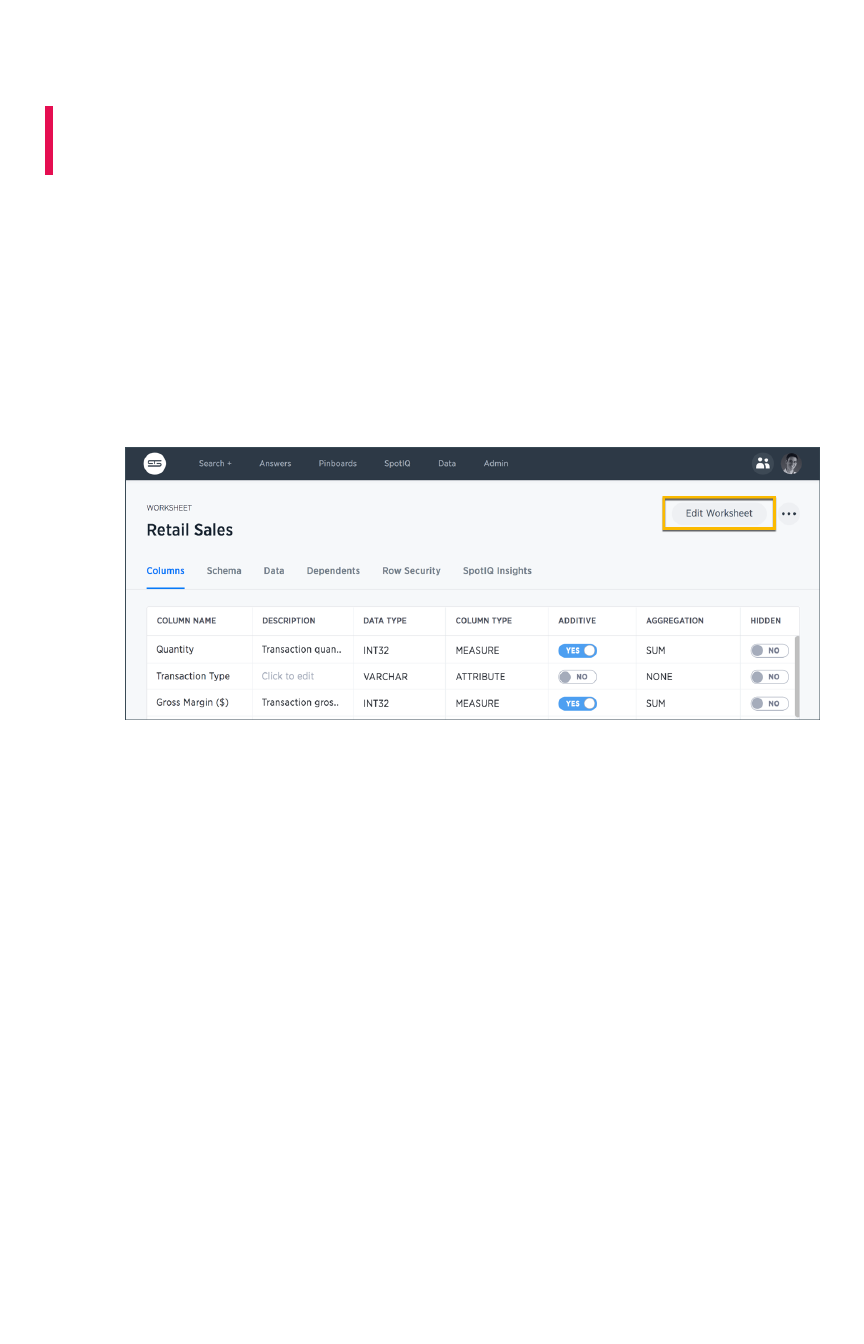
Add a filter to a worksheet
Summary:Summary: You can add a filters to a worksheet to limit the data users
can access from the worksheet.
Beginning in ThoughtSpot version 5.0, you can add filters to a worksheet to limit the data it contains.
This is useful when you have underlying tables that store more data than is necessary for the types of
analyses the worksheet is intended for. You can also use worksheet filters to provide data security, when
you want different groups of users to be able to see different data without relying on row level security.
To add a filter to a worksheet:
1. Click DataData in the top menu bar, find your worksheet, and click on its name.
2. Click the Edit WorksheetEdit Worksheet button.
3. Click FiltersFilters on the left menu and click ++.
Add a filter to a worksheet
February 07, 2019
ThoughtSpot Application Integration Guide Page 173
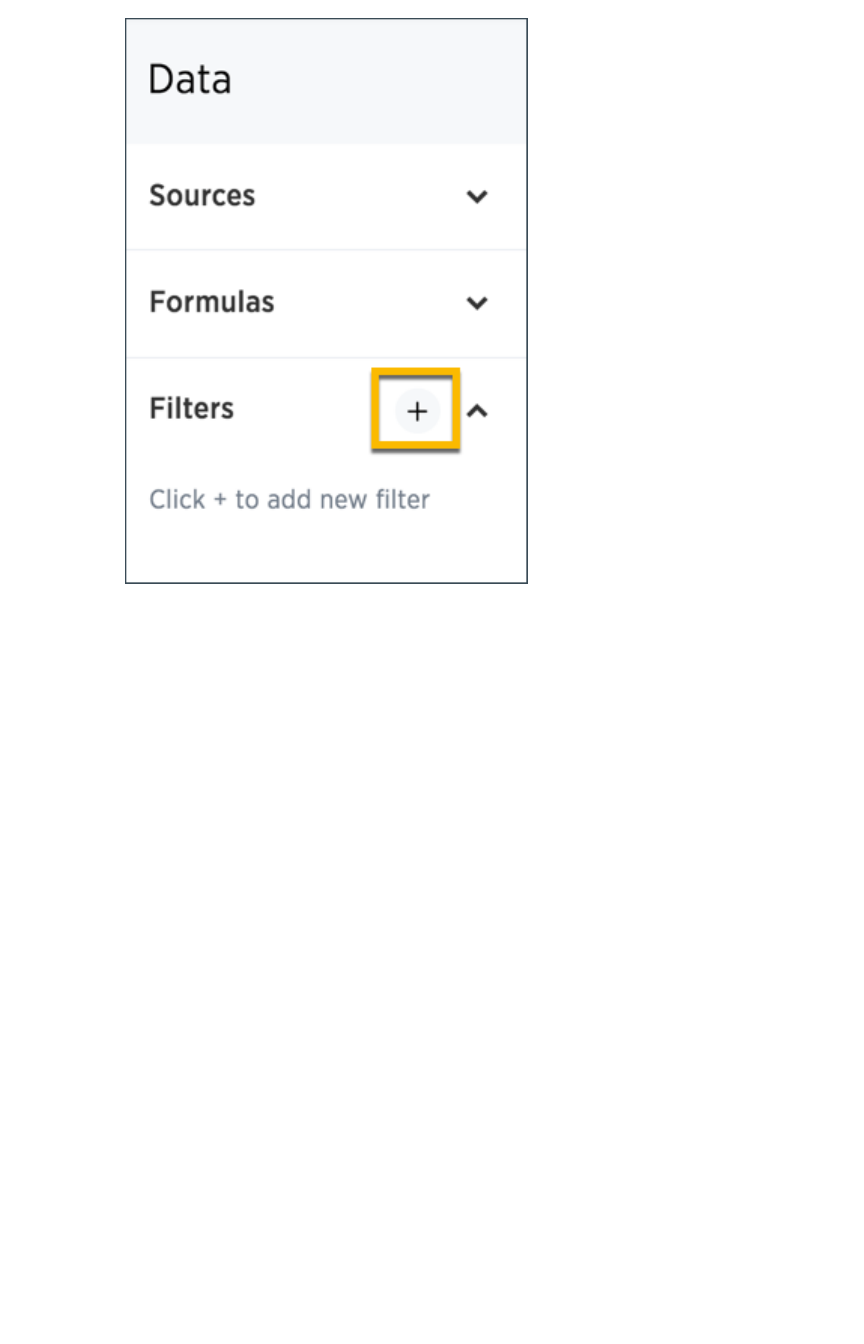
4. Choose the column you want to filter on.
Add a filter to a worksheet
February 07, 2019
ThoughtSpot Application Integration Guide Page 174
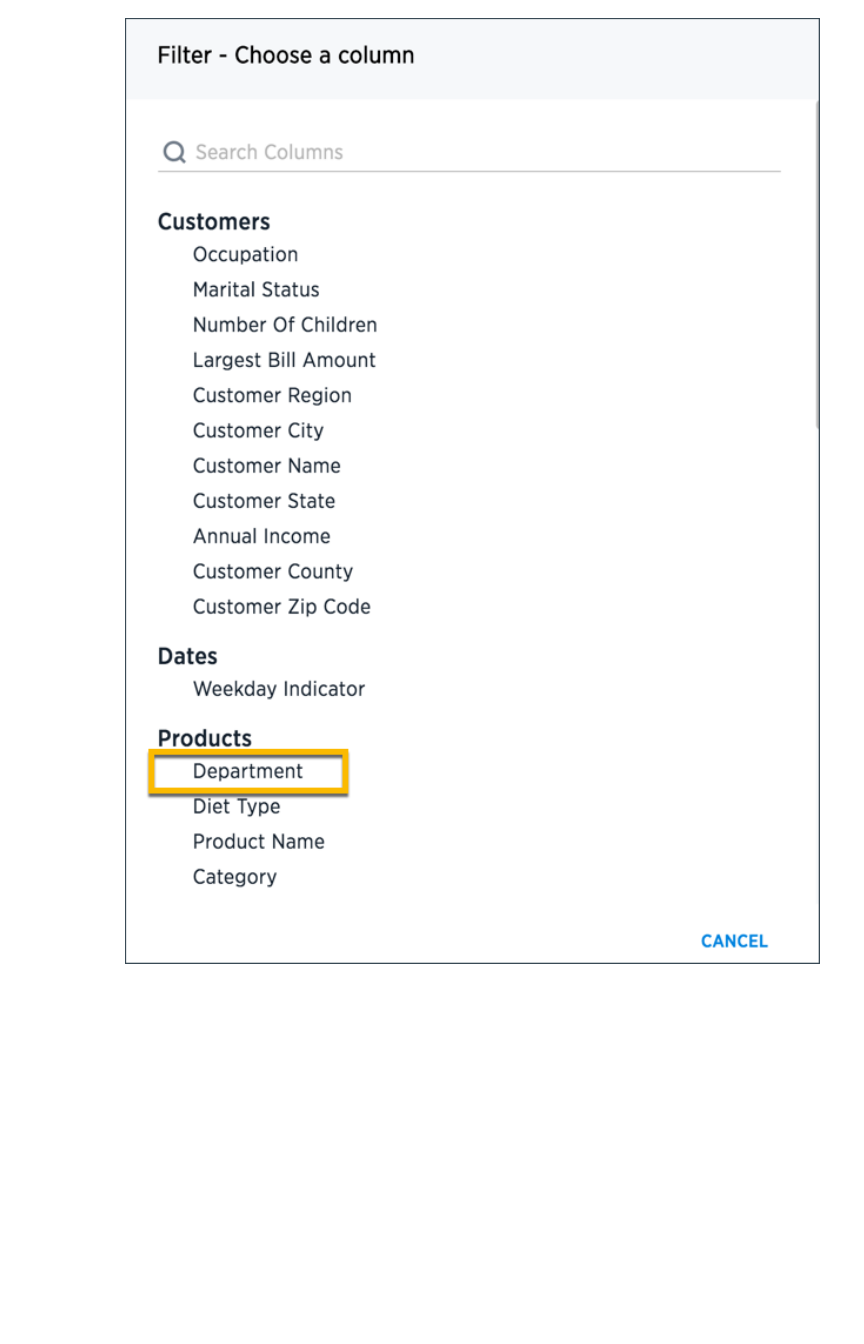
5. Select the values to include in your answer.
Add a filter to a worksheet
February 07, 2019
ThoughtSpot Application Integration Guide Page 175
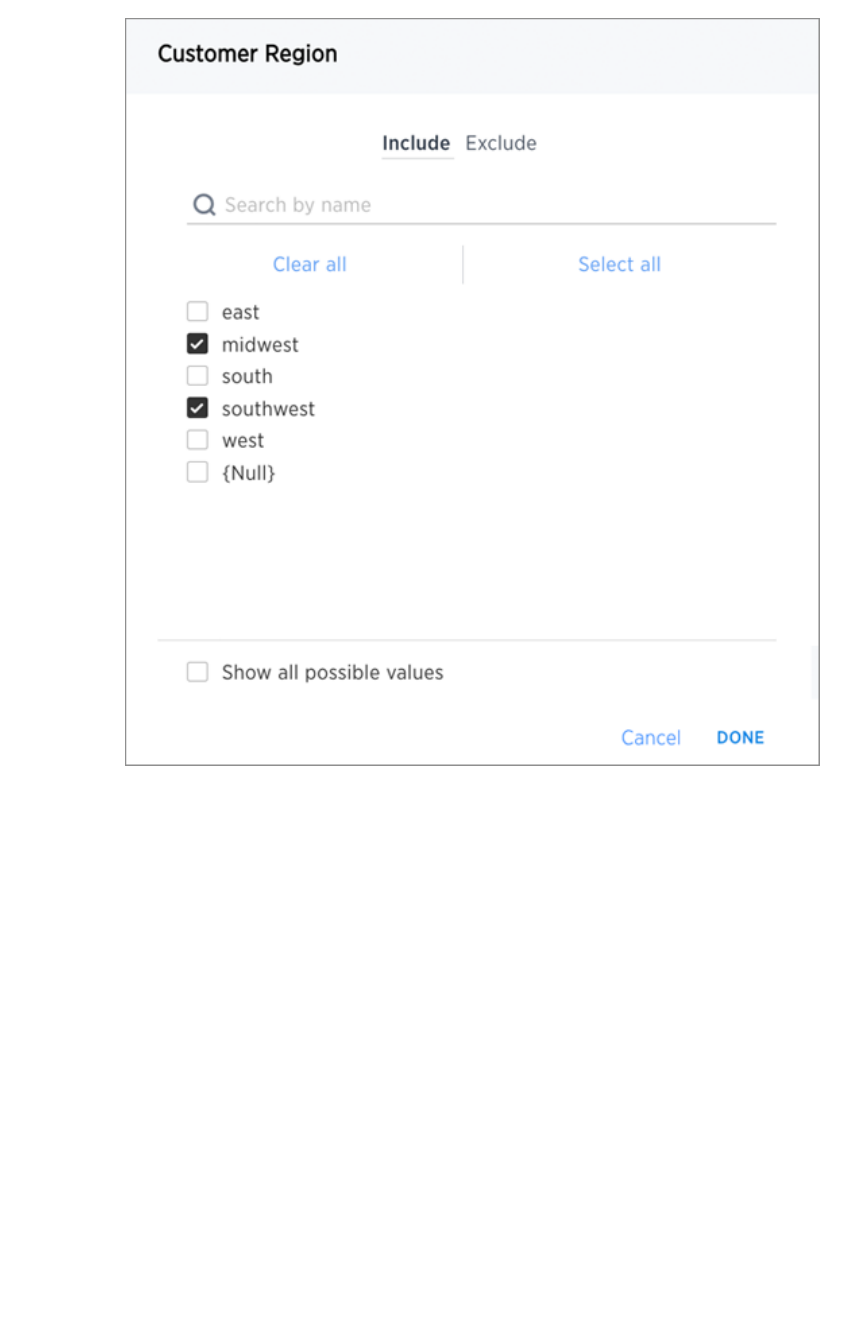
6. If you want to exclude values, click ExcludeExclude and choose values to exclude.
Add a filter to a worksheet
February 07, 2019
ThoughtSpot Application Integration Guide Page 176
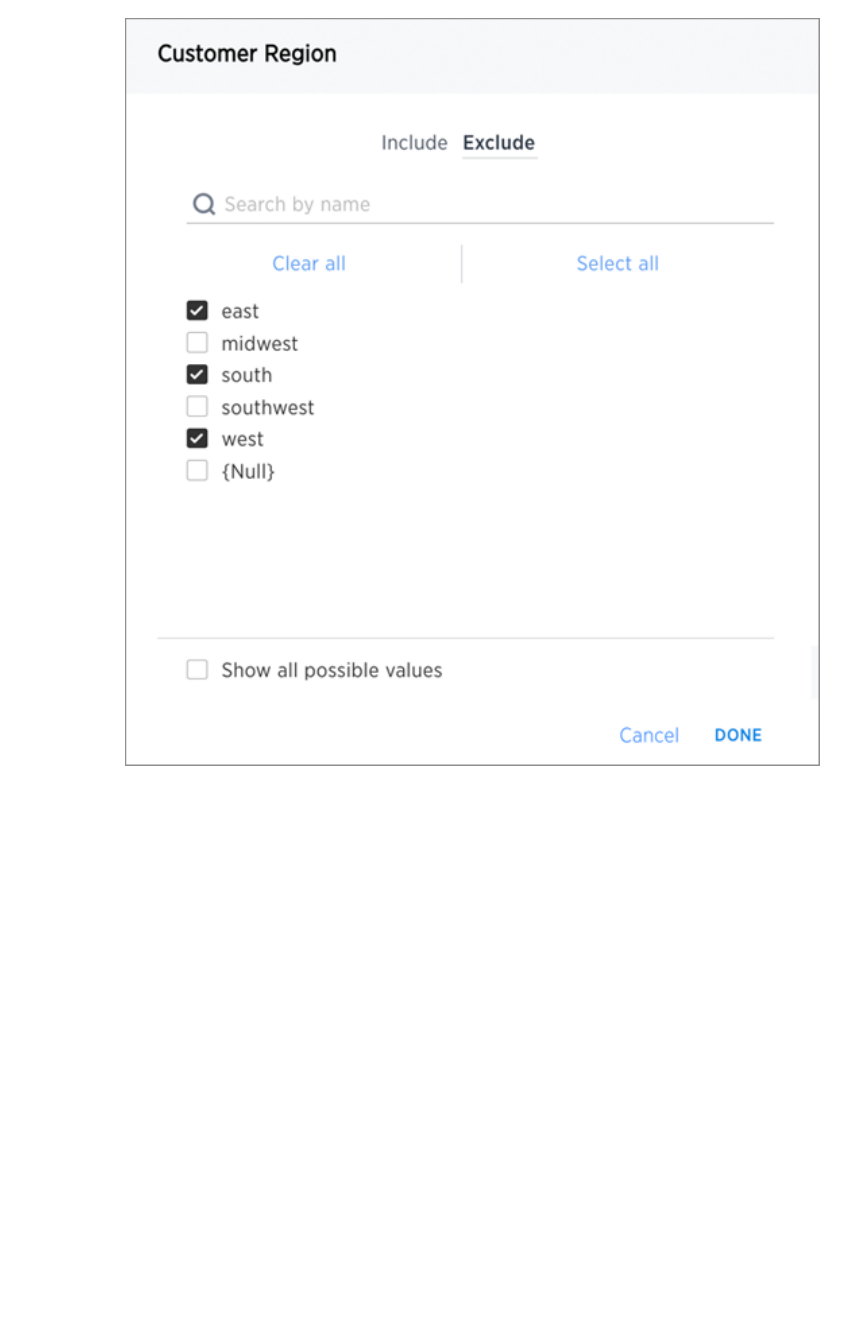
7. Click ADD FILTERADD FILTER.
If there are too many values, you can use the filter search bar to find the ones you want.
Add a filter to a worksheet
February 07, 2019
ThoughtSpot Application Integration Guide Page 177

How the worksheet join rule works
Use the worksheet join rule to specify when to apply joins when a search is done on a worksheet. You
can either apply joins progressively, as each search term is added (recommended), or apply all joins to
every search.
Understand progressive joins
Often, a worksheet includes several dimension tables and a fact table. With progressive joins, if your
search only includes terms from the fact table, you’ll see all of the rows that satisfy your search. But as
you add terms from dimension tables, the total number of rows shown may be reduced, as the joins to
each dimension table are applied. It works like this:
• If you choose Apply joins progressively (recommended for most cases)Apply joins progressively (recommended for most cases), joins are only applied
for tables whose columns are included in the search.
• If you choose Apply all joinsApply all joins, all possible joins are applied, regardless of which tables are
included in the search.
When using Apply joins progressivelyApply joins progressively, the number of rows in a search using the worksheet depends on
which tables are part of the search. The worksheet acts like a materialized view. This means that it
contains the results of a defined query in the form of a table. So if a particular dimension table is left out
of the search, its joins are not applied.
Rule-Based Row Level Security (RLS) with
worksheets
With Rule-Based RLS, you need to protect every table that contains any sensitive data. To do this, you’ll
grant access by creating explicit row level security rules on each of the underlying tables which contain
data that row level security should apply to.
When creating the row level security rules for a table that’s part of a worksheet, you aren’t limited to
referencing only the columns in that table. You can specify columns from other tables in the worksheet
as well, as long as the tables are joined to the table you’re creating the rule on. Then, when creating a
worksheet on top of them, the behavior is consistent regardless of the worksheet join rule you choose.
Users will never be able to see data they should not, regardless of what their search contains.
Imagine you have a worksheet that contains a Sales fact table, and Customer and Product
dimensions that are joined on Customer SSN and Product Code columns. In order to secure the
Sales table, you can use Customer Name from the Customer column to create a row level security
rule.
How joins are applied with chasm traps
When working with worksheets and row level security, you need to understand how joins are applied.
This is particularly important with chasm trap schemas. For chasm trap schemas, if row level security is
only set on one of the tables, people could see data they should not see if the scope of their search does
not include that table. (this protects them from having people see the wrong things if they have chasm
trap).
How the worksheet join rule works
February 07, 2019
ThoughtSpot Application Integration Guide Page 178

For chasm trap
worksheets
, progressive and non-progressive joins do not apply. There is an entirely
different methodology for how worksheet joins on a chasm trap schema work with row level security. So
you can safely ignore that setting.
How the worksheet join rule works
February 07, 2019
ThoughtSpot Application Integration Guide Page 179

Change the join rule or RLS setting for a
worksheet
Summary:Summary: As long as you have permissions to edit a worksheet, you
can always go into it and set a different join or RLS rule.
If you find that the charts and tables built on a worksheet contain a large number of null values (which
display as {blank} in the web browser), you can fix this by changing the internal joins for the
worksheet.
If you have the Can administer ThoughtSpotCan administer ThoughtSpot privilege or the Can manage dataCan manage data plus edit privilege on a
worksheet, you can edit the worksheet and change its RLS or other key settings.
Change/configure a worksheet
Before working through this procedure, make sure you are familiar with how the following affect data:
•internal worksheet joins
•worksheet join rule
•row level security (RLS)
To configure these values for a worksheet:
1. Click on DataData on the top navigation bar and then on WorksheetsWorksheets.
2. Click on the name of the worksheet you want to edit from the list.
3. Click the Edit WorksheetEdit Worksheet button in the upper right hand side of the screen.
4. Click on the + icon+ icon next to SourcesSources.
5. Scroll to the bottom of the page.
6. Configure the worksheet join rule and RLS setting as needed.
7. Click CLOSECLOSE.
Change the join rule or RLS setting for a worksheet
February 07, 2019
ThoughtSpot Application Integration Guide Page 180

8. Click the the ellipses icon (3 dots) , and select SaveSave.
Change the join rule or RLS setting for a worksheet
February 07, 2019
ThoughtSpot Application Integration Guide Page 181
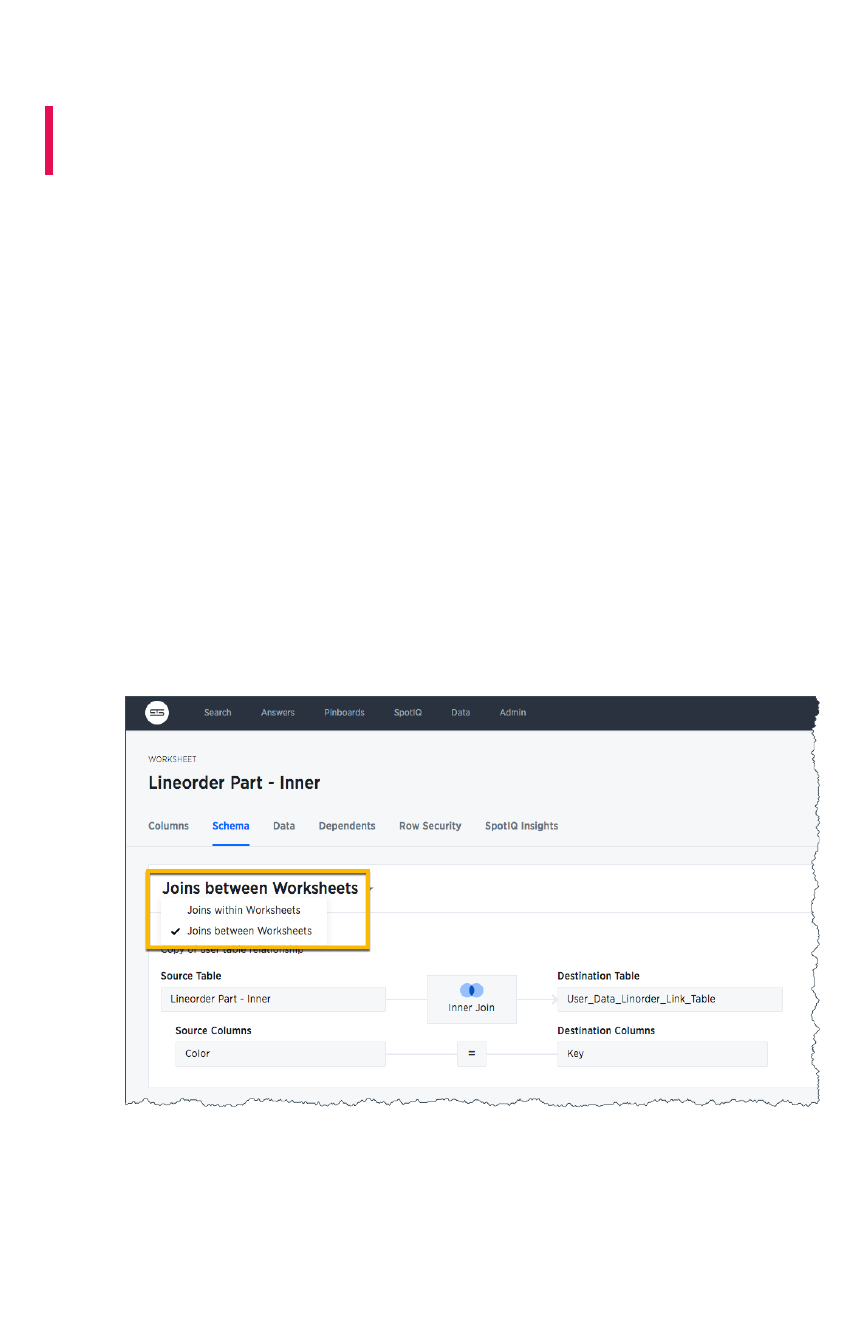
Join a worksheet to another data source
Summary:Summary: Learn how to define joins between a worksheet and a
table, view, or other worksheet
Joining a worksheet to a table, view, or another worksheet creates a relationship that allows them to be
searched together. Choose a column to join on that both data sources contain (e.g. employee ID or
product key). This process creates a generic join between the worksheet and the other table, view, or
worksheet on the column you specify.
You must have either the Can administer ThoughtSpotCan administer ThoughtSpot privilege or the Can manage dataCan manage data privilege to
create a join relationship. If you’re not an administrator, you also need edit permissions on the table,
view, or worksheet.
When creating a join between the columns in two data sources, the columns being linked must have the
same data type, with the same meaning. That is, they must represent the same data.
To create a relationship through the Web interface:
1. To find your worksheet, click DataData in the top menu, and choose WorksheetsWorksheets.
2. Click on the name of your worksheet.
3. Click SchemaSchema. You will see the list showing existing joins within the worksheet.
4. To view the joins between the worksheet and other data sources, click on Joins withinJoins within
worksheetsworksheets and choose Joins between worksheetsJoins between worksheets.
5. Click the + Add Join+ Add Join button on the upper right side of the screen.
Join a worksheet to another data source
February 07, 2019
ThoughtSpot Application Integration Guide Page 182
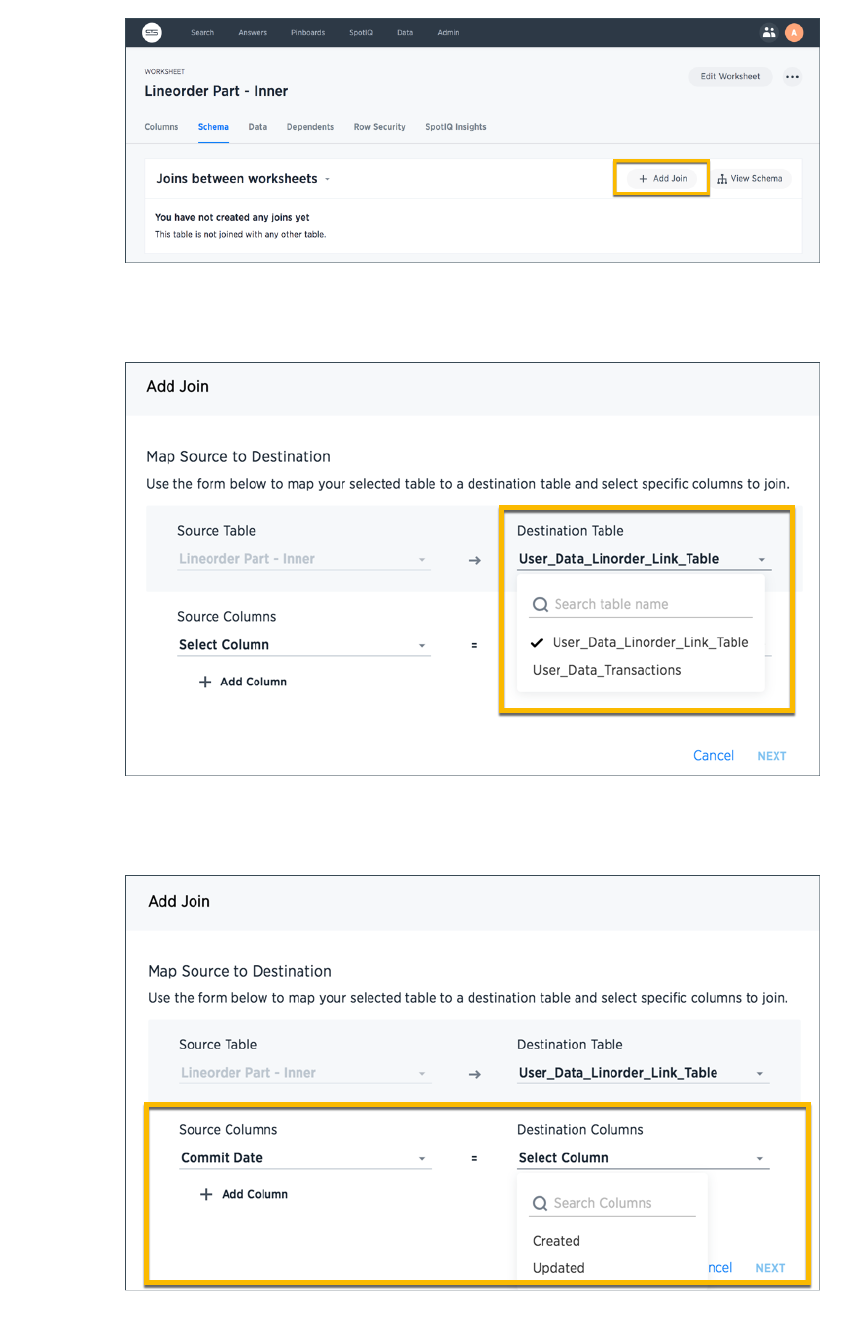
6. Use the Map source to destinationMap source to destination dialog to choose the destination table, view, or worksheet
you want to join to.
7. Choose the columns you want to join on from the worksheet (source) and destination data
source. Click NextNext.
Join a worksheet to another data source
February 07, 2019
ThoughtSpot Application Integration Guide Page 183

8. Give your join a name and description and click ADD JOINADD JOIN.
9. Repeat these steps until all the joins you want to make have been created.
After creating the join, you may change its name and description by clicking the edit icon. If you want to
change the data source or column being joined, you’ll need to delete the join and create a new one.
Related Information
•Constraints
Join a worksheet to another data source
February 07, 2019
ThoughtSpot Application Integration Guide Page 184
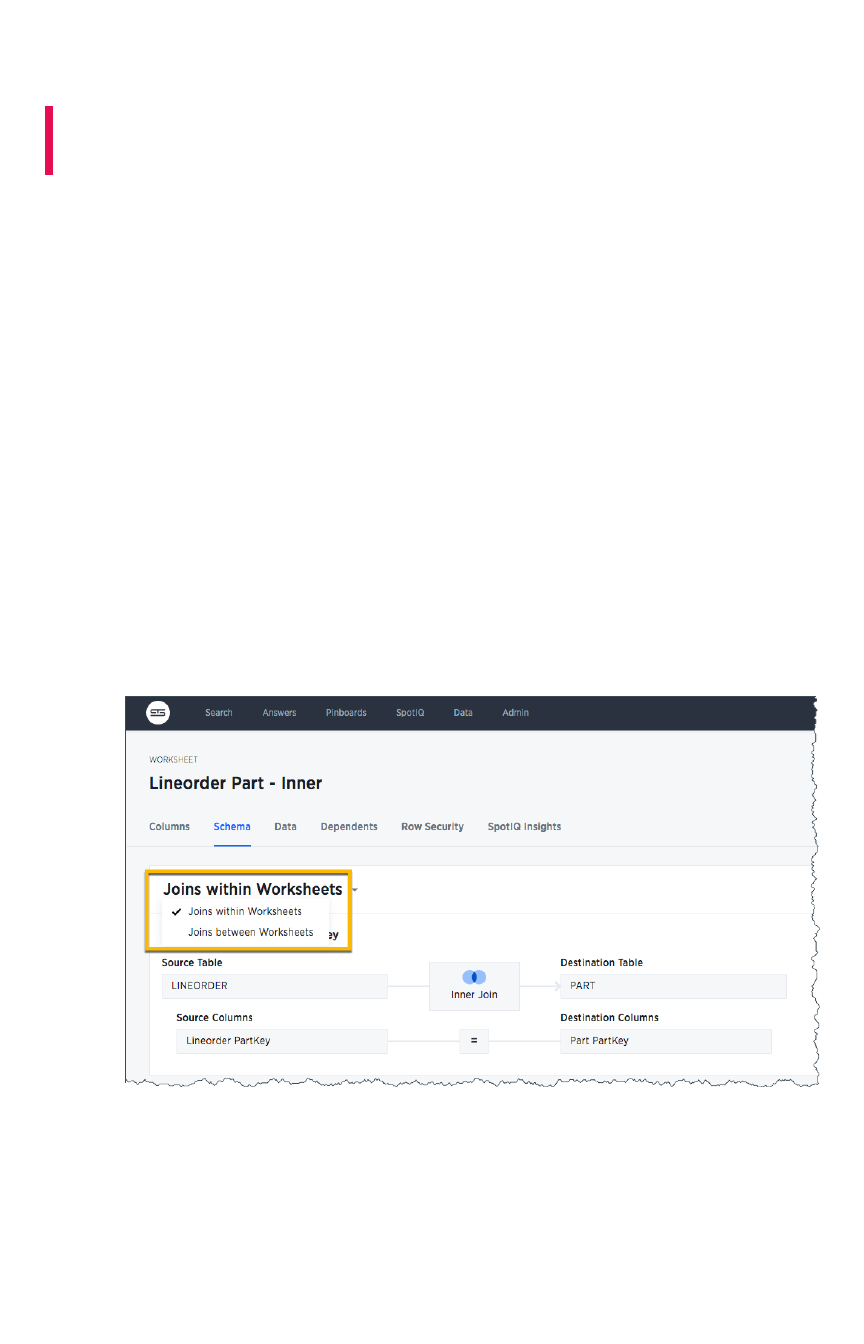
Modify joins within a worksheet
Summary:Summary: Learn how to change the join type between the tables
within a worksheet
When you create a worksheet, you select a join rule. The join rule works together with the joins defined
within the worksheet determine how the tables that make up the worksheet are joined, and how those
joins behave when searching on the worksheet.
Beginning in ThoughtSpot version 5.0, you aren’t limited to just one join rule for the entire worksheet.
You can define different types of joins for each join between tables in a worksheet. Be default, each of
these individual table joins uses an inner join. But you can override this at the individual join level.
You must have either the Can administer ThoughtSpotCan administer ThoughtSpot privilege or the Can manage dataCan manage data privilege to
modify joins within worksheets.
To modify the join types within a worksheet:
1. To find your worksheet, click DataData in the top menu, and choose WorksheetsWorksheets.
2. Click on the name of your worksheet.
3. Click SchemaSchema. You will see the list showing existing joins within the worksheet. The joins
shown here include all the joins between the underlying tables, whether created using TQL or
in the browser.
If you don’t see the joins within the worksheet, make sure Joins within worksheetsJoins within worksheets is chosen.
4. Find the join you want to modify and click the EditEdit icon. Note that the fact table is always the
left table, and it is shown on the left side.
Modify joins within a worksheet
February 07, 2019
ThoughtSpot Application Integration Guide Page 185
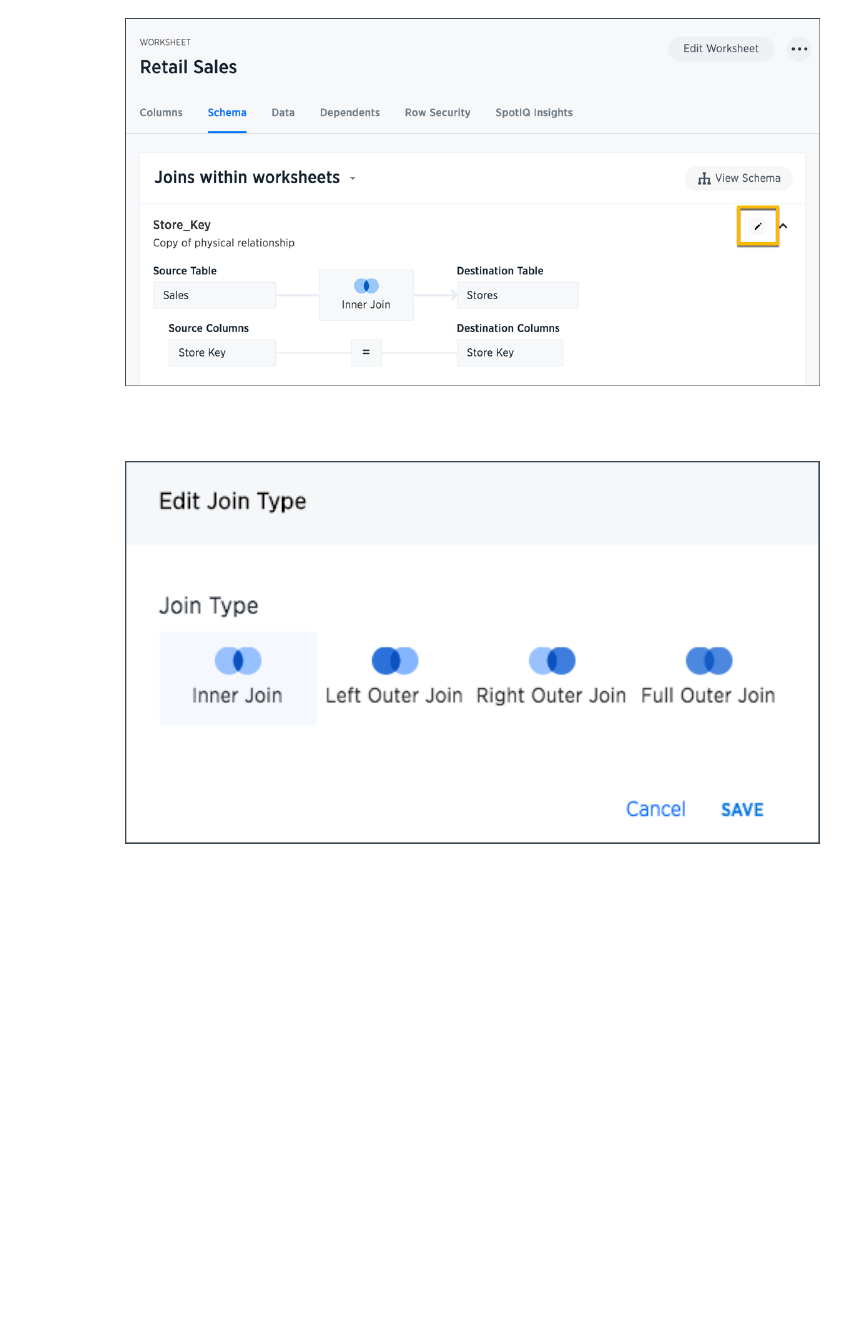
5. Select the join type to use for this relationship in the worksheet and click SaveSave.
Now these two tables will be joined using the type you selected, in the context of this worksheet.
Related Information
•Join rule
•Create joins using TQL
•Create join relationships in the browser
Modify joins within a worksheet
February 07, 2019
ThoughtSpot Application Integration Guide Page 186
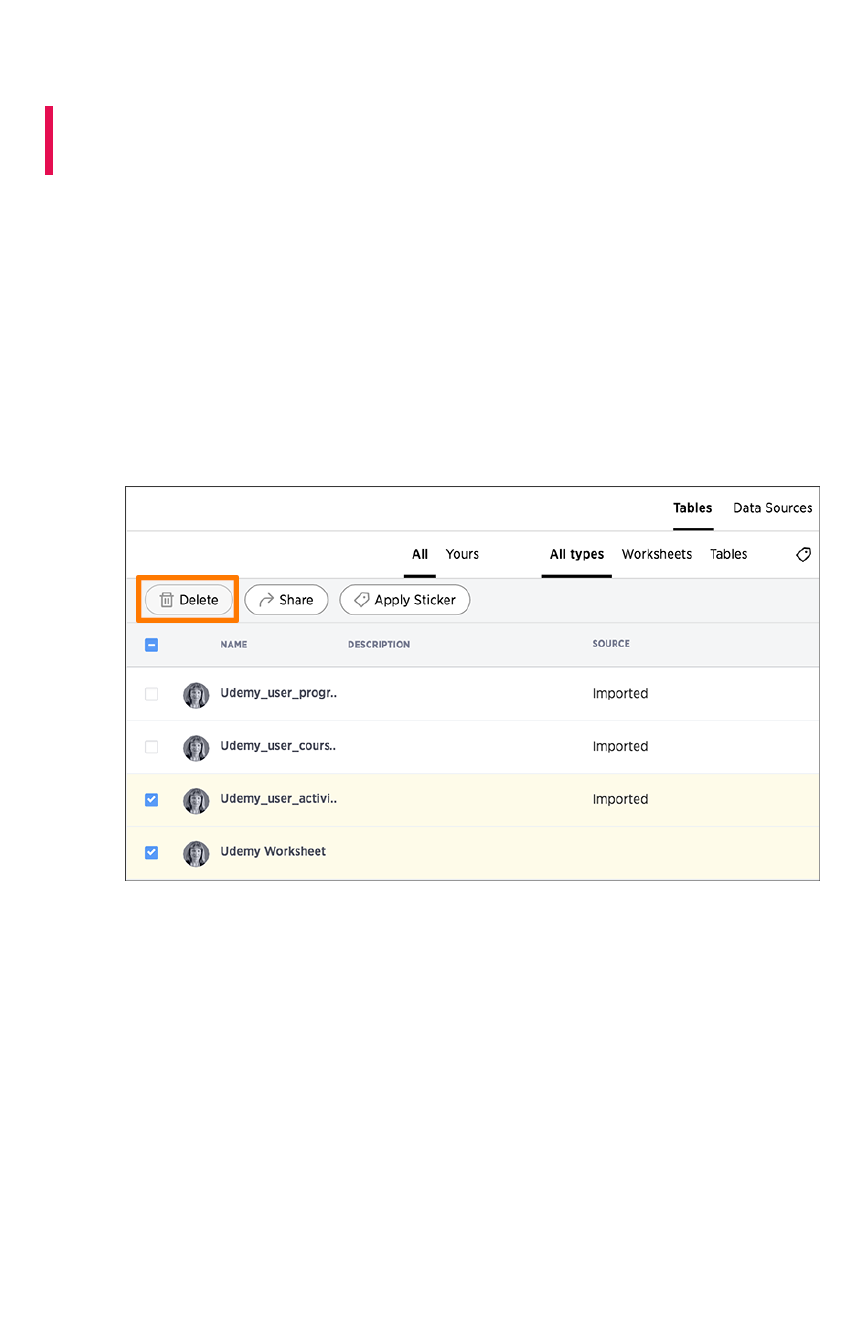
Delete a worksheet or table
Summary:Summary: When you try to delete a worksheet or table, you'll see a
message listing any dependent objects that must be removed first.
ThoughtSpot checks for dependencies whenever you try to remove a table or worksheet. A list of
dependent objects is shown, and you can click on them to delete them or remove the dependency. Then
you’ll be able to remove the table or worksheet.
To delete a worksheet or table:
1. Click on DataData, on the top navigation bar.
2. Find the worksheet or table you want to remove in the list, and check the box next to its
name.
3. Click the DeleteDelete icon.
If you are attempting to delete a data source with dependent objects, the operation will be
blocked. You will see a warning, with a list of dependent objects with links.
4. Click on the link for an object to modify or delete it.
When all its dependencies are removed, you will be able to delete the data source.
Delete a worksheet or table
February 07, 2019
ThoughtSpot Application Integration Guide Page 187

5. You can also click on the name of a worksheet or table and then click DependentsDependents, to see a
list of dependent objects with links.
The DependentsDependents list shows the names of the dependent objects (worksheets and pinboards),
and the columns they use from that source. You can use this information to determine the
impact of changing the structure of the data source or to see how widely used it is. Click on a
dependent object to modify or delete it.
Delete a worksheet or table
February 07, 2019
ThoughtSpot Application Integration Guide Page 188
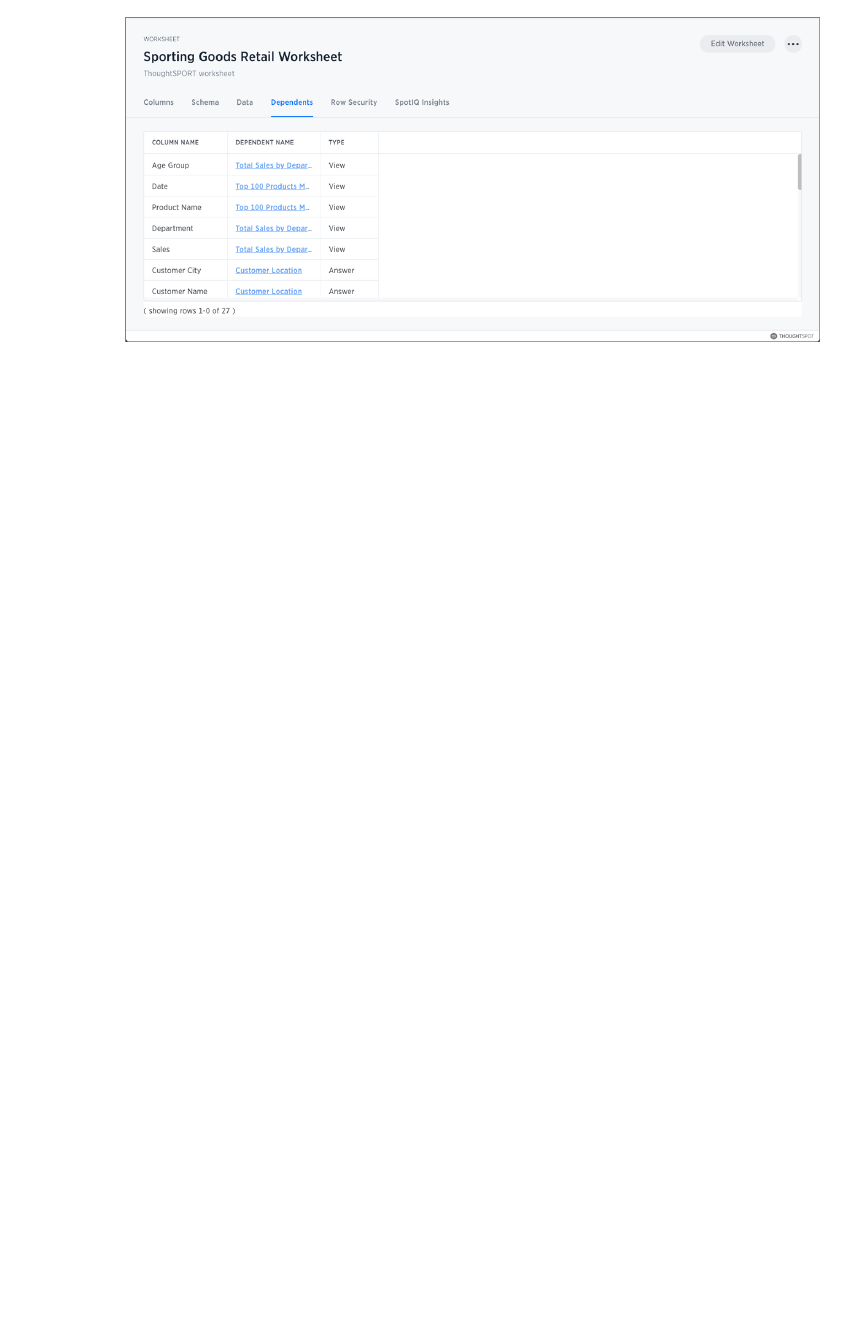
Delete a worksheet or table
February 07, 2019
ThoughtSpot Application Integration Guide Page 189

Understand groups and privileges
Summary:Summary: Creating groups and assigning users to them makes
privilege management easier.
Before people can log in and use ThoughtSpot, you need to create a username, a password, and a
membership in one or more groups for them.
This page describes manual creation of users, groups, and privileges, but you can also manage users
through LDAP or SAML. For information on setting up SAML authentication, see the
ThoughtSpot
Application Integration Guide
.
Privileges and groups
Privileges determine what kinds of actions users are allowed to do. You assign privileges to groups.
Then, you create users and assign them to groups. This is how you grant users access to different
capabilities in ThoughtSpot.
Each group includes a set of privileges for its users. The privileges a group has determine the actions
that its members are allowed to do. If a user belongs to more than one group, they will have the highest
level of the privileges from all the groups they belong to. Plan your groups so that you can use them to
assign a common set of privileges to multiple users. Good planning will pay off in ease of administration
and a better search experience.
There is a default group called AllAll, which includes every user in ThoughtSpot. When you create a new
user, they will be added to the AllAll group automatically. You cannot delete the AllAll group or remove
members from it.
You can also have a hierarchy of groups. That is, groups can belong to (that is, be children of) other
groups. When using group hierarchies, permissions are inherited from the parent group. So if you’re a
member of a sub-group, you would automatically have the privileges of the parent group.
List of privileges
Here are the different privileges, and the capabilities they enable:
PrivilegePrivilege DescriptionDescription
Can administerCan administer
ThoughtSpotThoughtSpot
Can manage Users and Groups and has view and edit access to all data.
Users with this privilege can also download a saved answer.
Can upload user dataCan upload user data Can upload their own data from the application's DataData page using ActionsActions
> Upload data> Upload data.
Can download dataCan download data Can download data from search results and pinboards.
Can share with allCan share with all
usersusers
Can see the names of and share with users outside of the groups the user
belongs to. Members of groups with this privilege can also share with
groups marked as NOT SHAREABLENOT SHAREABLE.
Understand groups and privileges
February 07, 2019
ThoughtSpot Application Integration Guide Page 190

PrivilegePrivilege DescriptionDescription
Can manage dataCan manage data Can create a worksheet. Can also create an aggregated worksheet from
the results of a search by selecting Save as worksheetSave as worksheet. Can also use
ThoughtSpot Data Connect, if it is enabled on your cluster.
Can use experimentalCan use experimental
featuresfeatures
Can access trial and experimental features that ThoughtSpot makes avail-
able to early adopters.
Can invoke Custom RCan invoke Custom R
AnalysisAnalysis
Can access R scripts to further explore search answers. Includes options
to invoke R scripts on visualizations, create and share custom scripts, and
share the results of R analysis as answers and pinboards.
Can schedule pin-Can schedule pin-
boardsboards
Can create pinboard schedules and edit their own scheduled jobs.
Can administer andCan administer and
bypass RLSbypass RLS Users in groups with this privilege (directly or via group inheritance):
• Are exempt from row-level security (RLS) rules.
• Can add/edit/delete existing RLS rules.
• Can check or uncheck Bypass RLS on a worksheet.
Your installation configuration may enable or disable the availability of this
privilege. By default, it is enabled. Administrators or groups with the privi-
lege Can administer ThoughtSpotCan administer ThoughtSpot can grant this privilege.
Typically, the ALLALL group has a common set of privileges applies such as the Can upload user dataCan upload user data and/
or Can download dataCan download data privileges.
Privileges are additive, meaning that if a user belongs to more than one group, they will have the highest
level of privileges from among the groups they are a member of. They are also inherited from the parent,
so that a sub-group gets all the same privileges of its parent, all the way up the group hierarchy.
If you add the privilege Has administration privilegesHas administration privileges to a group, note that all users in that group will be
able to see all the data in ThoughtSpot. Administrators can see all data sources, and Row level security
does not apply to them.
Permissions to see and edit tables, worksheets, and pinboards are set when you share them with users
and groups, as described in the topic Data security.
Understand groups and privileges
February 07, 2019
ThoughtSpot Application Integration Guide Page 191

The following table shows the intersection of user privilege and ability:
Can administer
ThoughtSpot
YYYYYYYYY2YYYYYYY
Can upload user
data
NNNYNYNNY3Y4NNNNNN
Can download da-
ta
NNNNYYNNNY4NNNNNN
Can manage data Y Y Y Y N Y N N Y4Y4Y5Y N Y N N
Can share with all
users
NNNNNYYNNY4NNNNNN
Can Auto-Analyze
(SpotIQ privilege)
NNNNNNNNNY4NNNNNY
Can Administer
and Bypass RLS
NNNNNNNNYNNNNNNN
None NNNNNYNNNY4NNNNNN
Create/Edit WSCreate/Edit WS
Create ViewCreate View
Modify Col. Props.Modify Col. Props.11
Upload DataUpload Data
Download DataDownload Data
Share within GroupShare within Group
Share with all usersShare with all users
Manage RLS rulesManage RLS rules
CrUD RelationshipsCrUD Relationships
Read RelationshipsRead Relationships
See Hidden ColsSee Hidden Cols
Join with Upload DataJoin with Upload Data
Schema ViewerSchema Viewer
Use Data ConnectUse Data Connect
Use SchedulerUse Scheduler
Use Auto-AnalyzeUse Auto-Analyze
Understand groups and privileges
February 07, 2019
ThoughtSpot Application Integration Guide Page 192

Table notes:
1. Applies to non-owners only.
2. Any tables.
3. Author of at least one table in relationship.
4. Only when read permission for columns used in the relationship.
5. With edit permission.
Create/Edit WSCreate/Edit WS
Create ViewCreate View
Modify Col. Props.Modify Col. Props.11
Upload DataUpload Data
Download DataDownload Data
Share within GroupShare within Group
Share with all usersShare with all users
Manage RLS rulesManage RLS rules
CrUD RelationshipsCrUD Relationships
Read RelationshipsRead Relationships
See Hidden ColsSee Hidden Cols
Join with Upload DataJoin with Upload Data
Schema ViewerSchema Viewer
Use Data ConnectUse Data Connect
Use SchedulerUse Scheduler
Use Auto-AnalyzeUse Auto-Analyze
Understand groups and privileges
February 07, 2019
ThoughtSpot Application Integration Guide Page 193

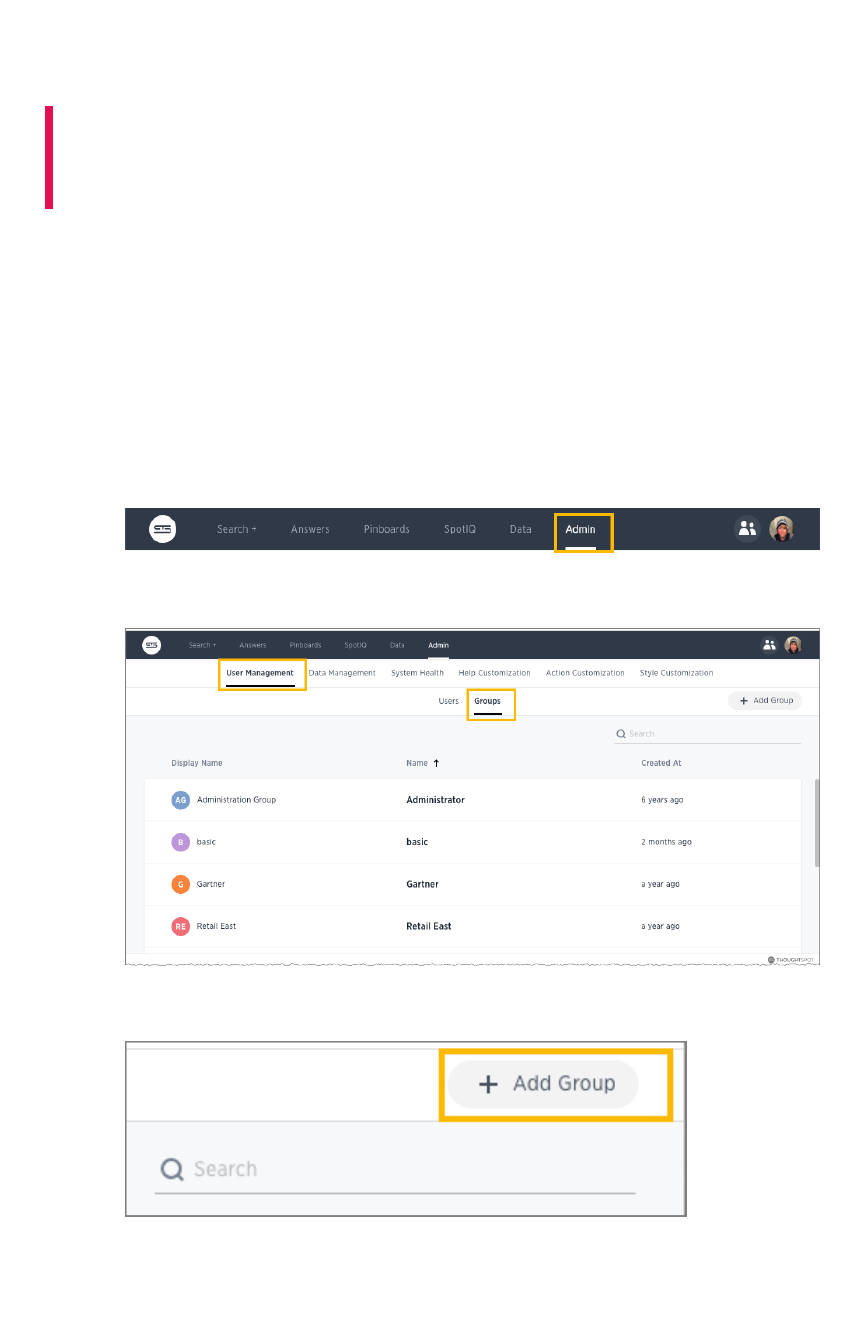
Create, edit, or delete a group
Summary:Summary: Good planning when creating groups and assigning
privileges will pay off in ease of administration and a better search
experience.
Before adding users, create the groups they will belong to. Each group includes a set of privileges for its
users.
Create a group
To create a group and add privileges for the group:
1. Log into ThoughtSpot from a browser.
2. Click on the AdminAdmin icon, on the top navigation bar.
3. In the AdminAdmin panel, click on User ManagementUser Management and GroupsGroups.
4. Click the + Add Group+ Add Group button on the upper right hand side of the list of groups.
5. Enter the details for the new group:
Create, edit, or delete a group
February 07, 2019
ThoughtSpot Application Integration Guide Page 195
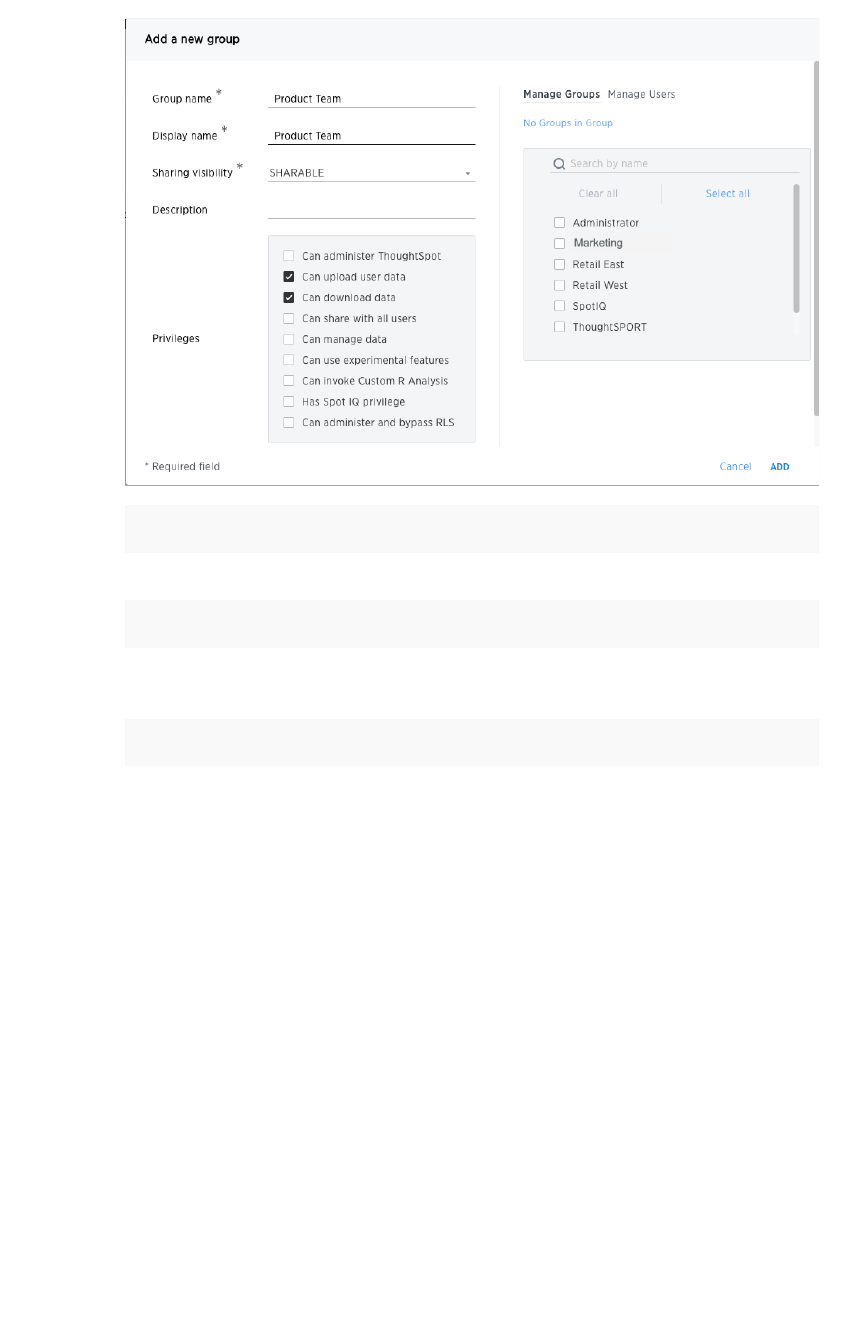
FieldField DescriptionDescription
Group nameGroup name Enter a unique name for the group.
Display nameDisplay name Name of the group as it appears in ThoughtSpot.
SharingSharing
visibilityvisibility
Indicate whether objects can be shared with this group. When set to
SHAREABLESHAREABLE, this group is an option in the ShareShare dialog.
DescriptionDescription Optionally enter a description.
PrivilegesPrivileges
Check the privileges you want to grant to the group. If you add the privi-
lege Has administration privilegesHas administration privileges to a group, all users in that group can
see all the data in ThoughtSpot. Administrators can always see all data
sources, and Row level security does not apply to them.
6. Click the Manage GroupsManage Groups tab if you want to add sub-groups.
Find the groups you want to add in the list, or search for them by name. Check the box next
to each group you want to add to the group.
7. Click the Manage UsersManage Users tab if you want to add users.
Find the users you want to add in the list, or search for them by name. Check the box next to
each user you want to add to the group.
8. Click AddAdd to create the group.
Create, edit, or delete a group
February 07, 2019
ThoughtSpot Application Integration Guide Page 196
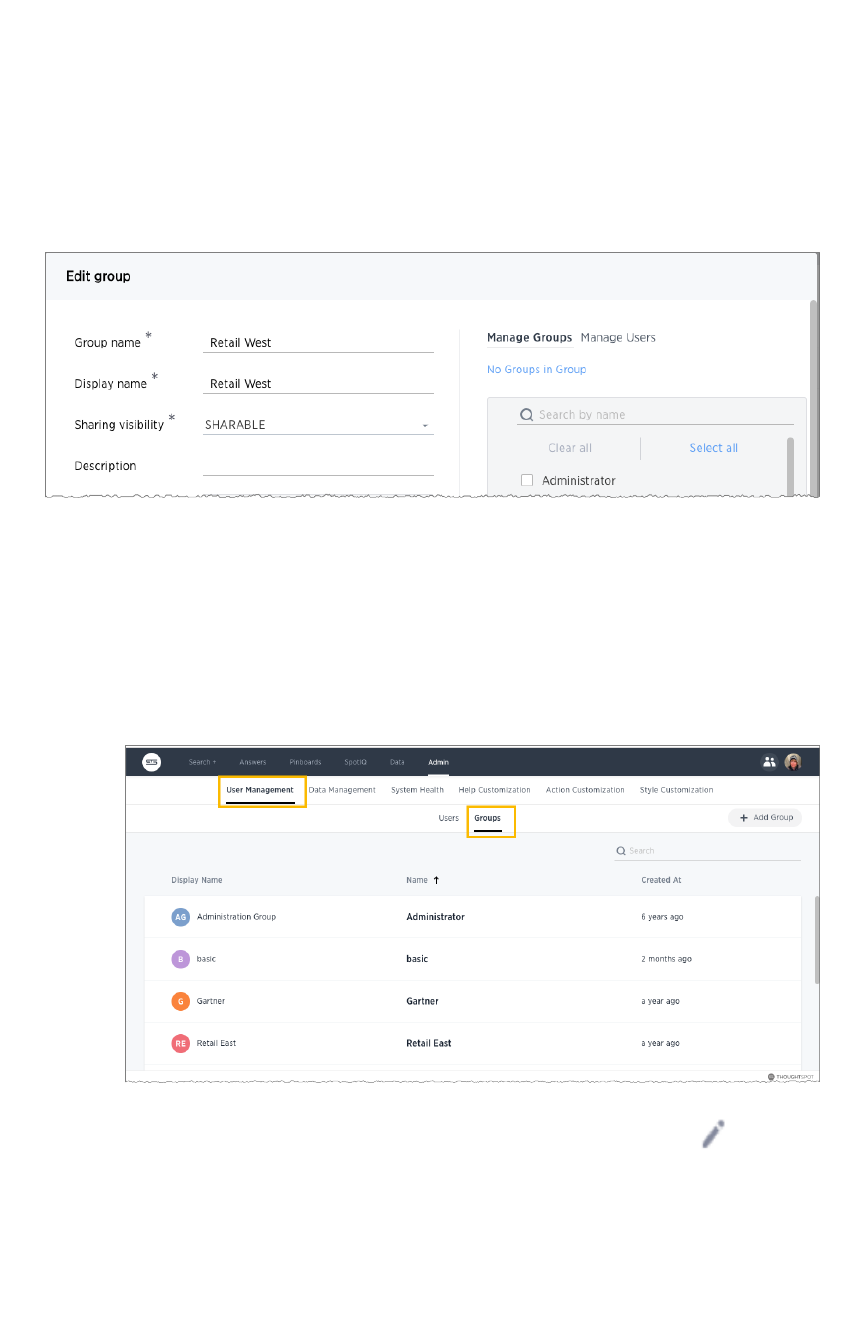
Edit a group or delete a group
After adding a group, you can always go in and edit its settings to add or revoke privileges. The new
settings will apply to all the group members. When editing a group, keep in mind that only sub-groups
appear in a group:
The No Groups in GroupNo Groups in Group only indicates there are no children in this group’s hierarchy. There may be a
parent. This group inherits all the privileges of any parent group it may have. Keep this in mind when
adding users.
To edit or delete an existing group:
1. Log into ThoughtSpot from a browser.
2. Click on the AdminAdmin icon, on the top navigation bar.
3. In the AdminAdmin panel, click on User ManagementUser Management and GroupsGroups.
4. Find the group you want to edit in the list and click its name, or the edit icon .
If you don’t see the name of the group, try searching for it. You can also delete a group from
this page by clicking the DeleteDelete icon. Deleting a group does not delete its users.
5. Make your changes and click UpdateUpdate.
Create, edit, or delete a group
February 07, 2019
ThoughtSpot Application Integration Guide Page 197
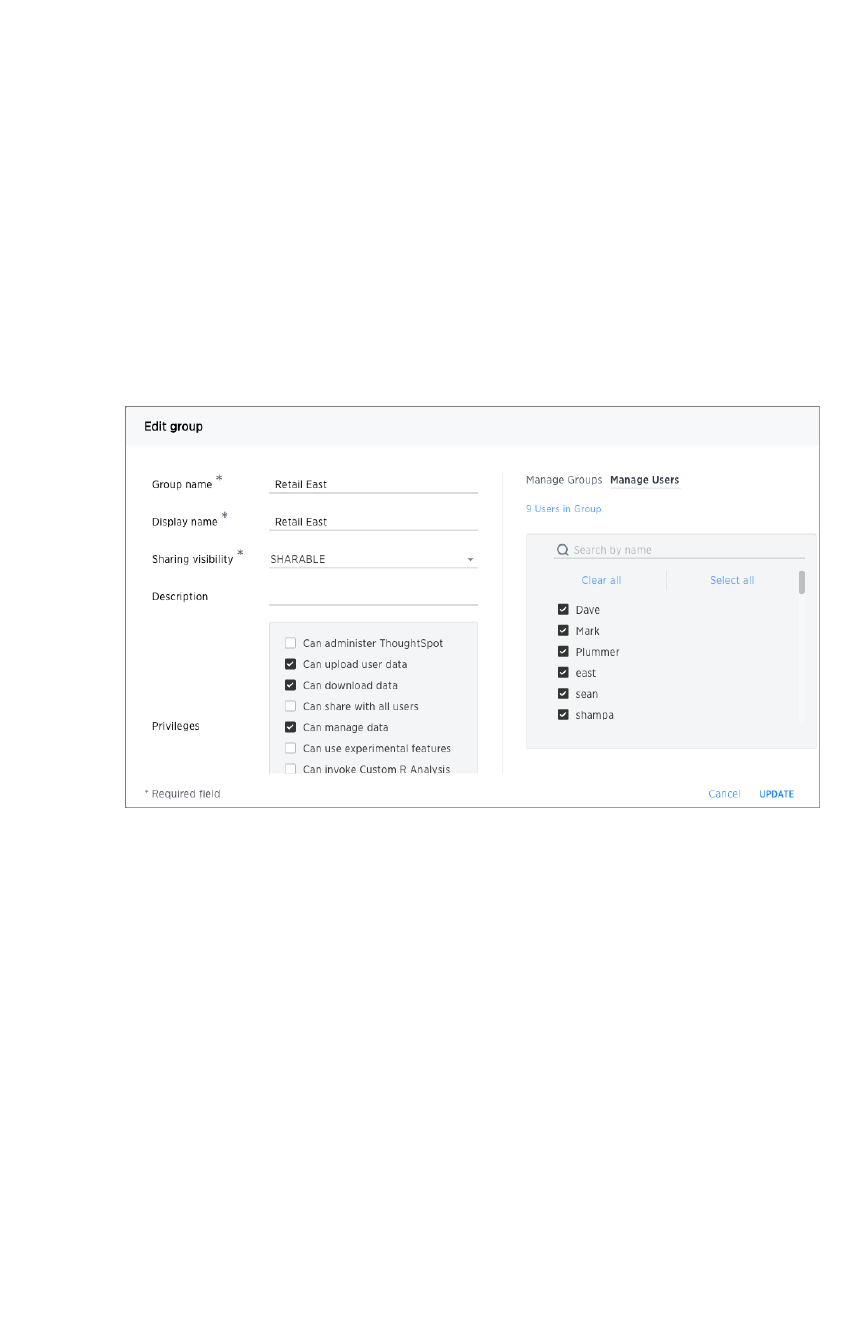
List the group members
The system shows you the first 15 users in your group. To identify if other users are present, you must
search for the specific user name.
1. Click AdminAdmin from the top navigation bar.
The system displays the AdminAdmin panel.
2. Select User ManagementUser Management.
3. Click on a group to edit it.
The system displays the Edit groupEdit group dialog.
4. Choose Manage UsersManage Users.
The first 100 users which are in the group are listed. The group could maintain more, you have
to search for a specific user to find others.
Add multiple users to a group
You can add multiple users to a group using one button. To add multiple users to a group:
1. Log into ThoughtSpot from a browser.
2. Click on the AdminAdmin icon, on the top navigation bar.
3. In the AdminAdmin panel, click on User ManagementUser Management and UsersUsers.
Create, edit, or delete a group
February 07, 2019
ThoughtSpot Application Integration Guide Page 198
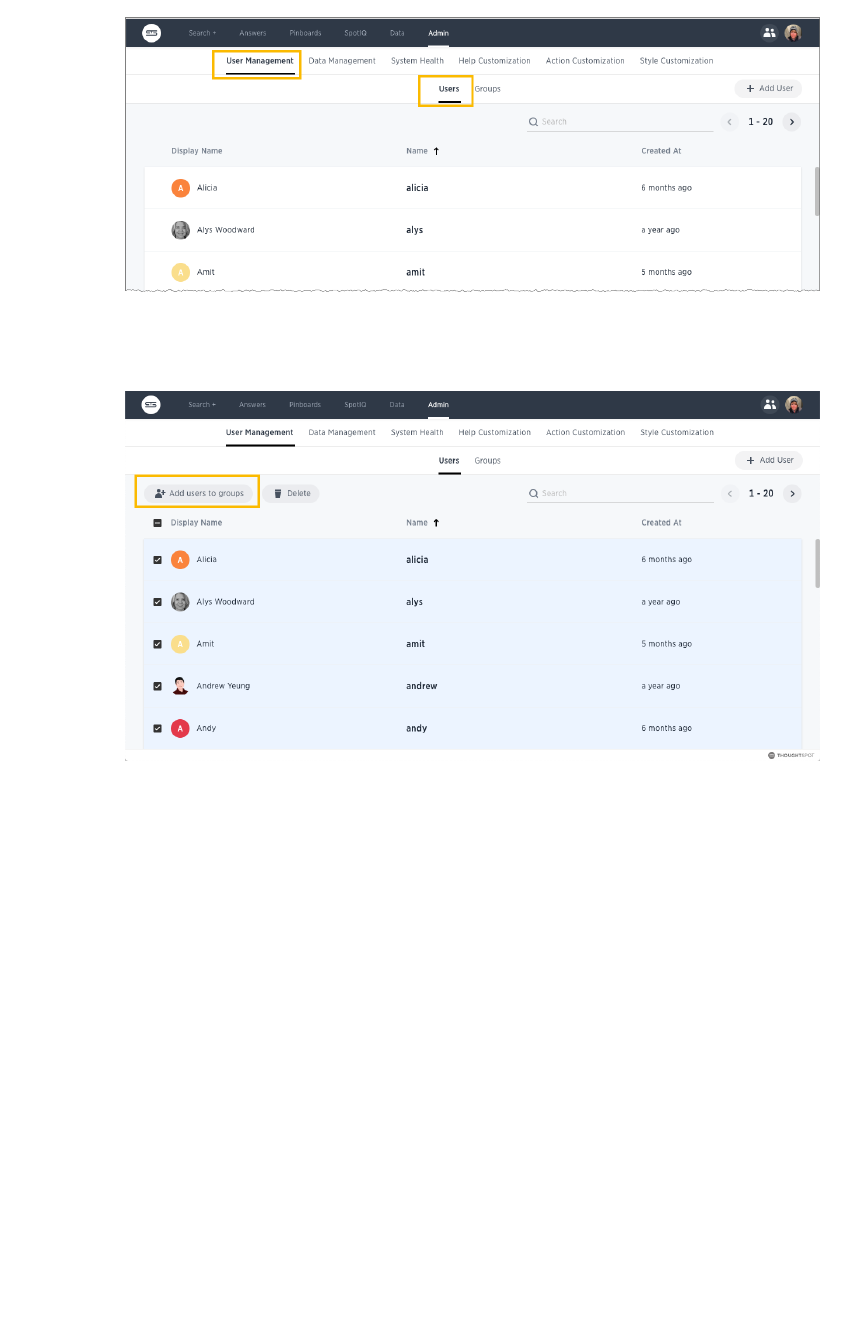
4. Select the users you would like to add to the same group from the list.
5. Click the Add Users to GroupsAdd Users to Groups button on the top of the list of users.
Create, edit, or delete a group
February 07, 2019
ThoughtSpot Application Integration Guide Page 199
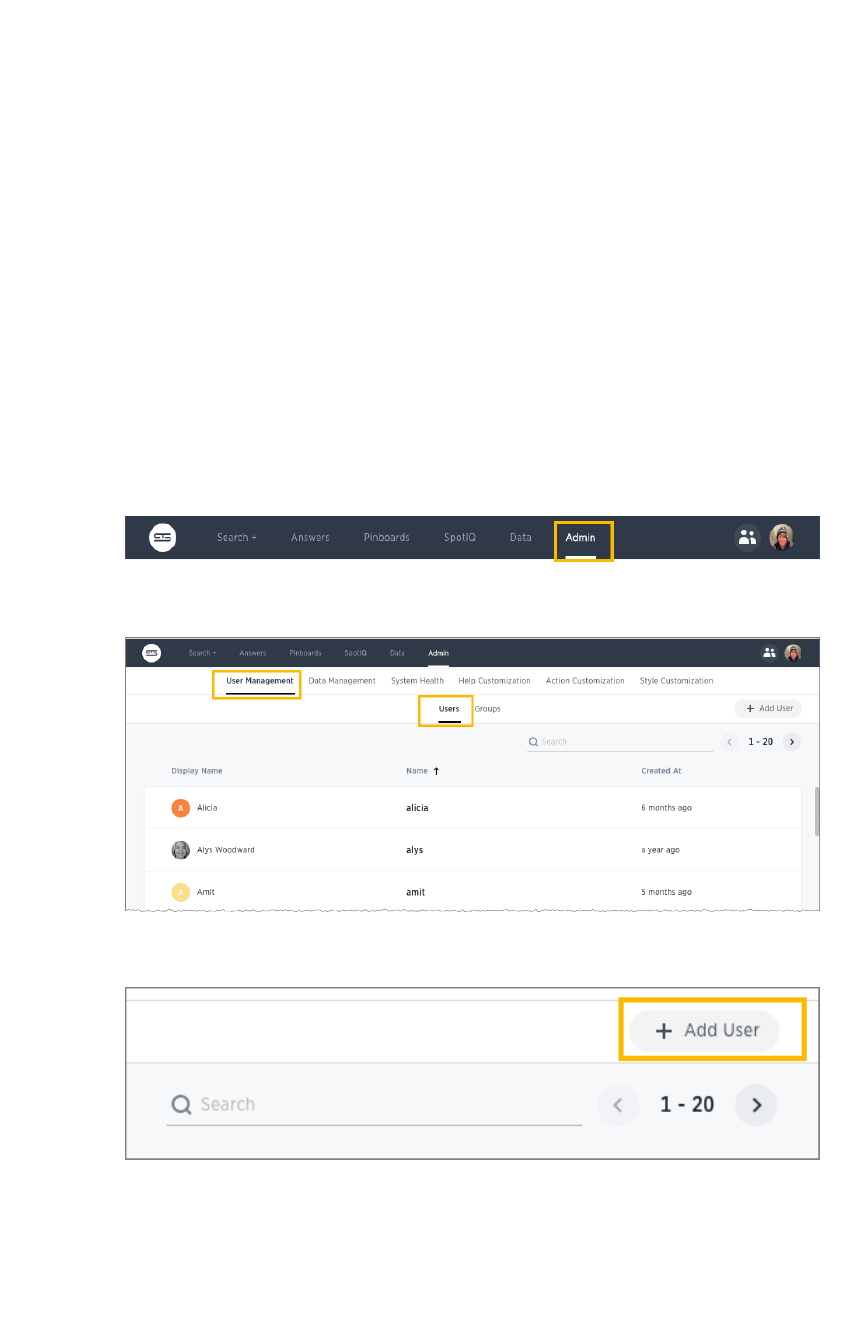
Add, edit, or delete a user
You will create a user account for each unique person who will access ThoughtSpot, either manually or
through LDAP. If a user has access through LDAP, that user’s information is managed via your LDAP
installation. If you create a user manually in ThoughtSpot, you manage that user in ThoughtSpot.
You can edit manually created users through the interface. If a manually-created user forgets their
password, you can reset it by editing the user. If you have forgotten the admin password, please call
ThoughtSpot Support.
Create a user through the interface
This procedure shows how to creating a user manually. When you create a user, you can assign group
memberships. The group’s privileges and permissions apply to all of its members. Any user you create
will be added to the group AllAll automatically.
1. Log into ThoughtSpot from a browser.
2. Click on the AdminAdmin icon, on the top navigation bar.
3. In the AdminAdmin panel, click on User ManagementUser Management and UsersUsers.
4. Click the + Add User+ Add User button on the upper right hand side of the list of groups.
5. Enter the details for the new user:
Add, edit, or delete a user
February 07, 2019
ThoughtSpot Application Integration Guide Page 200
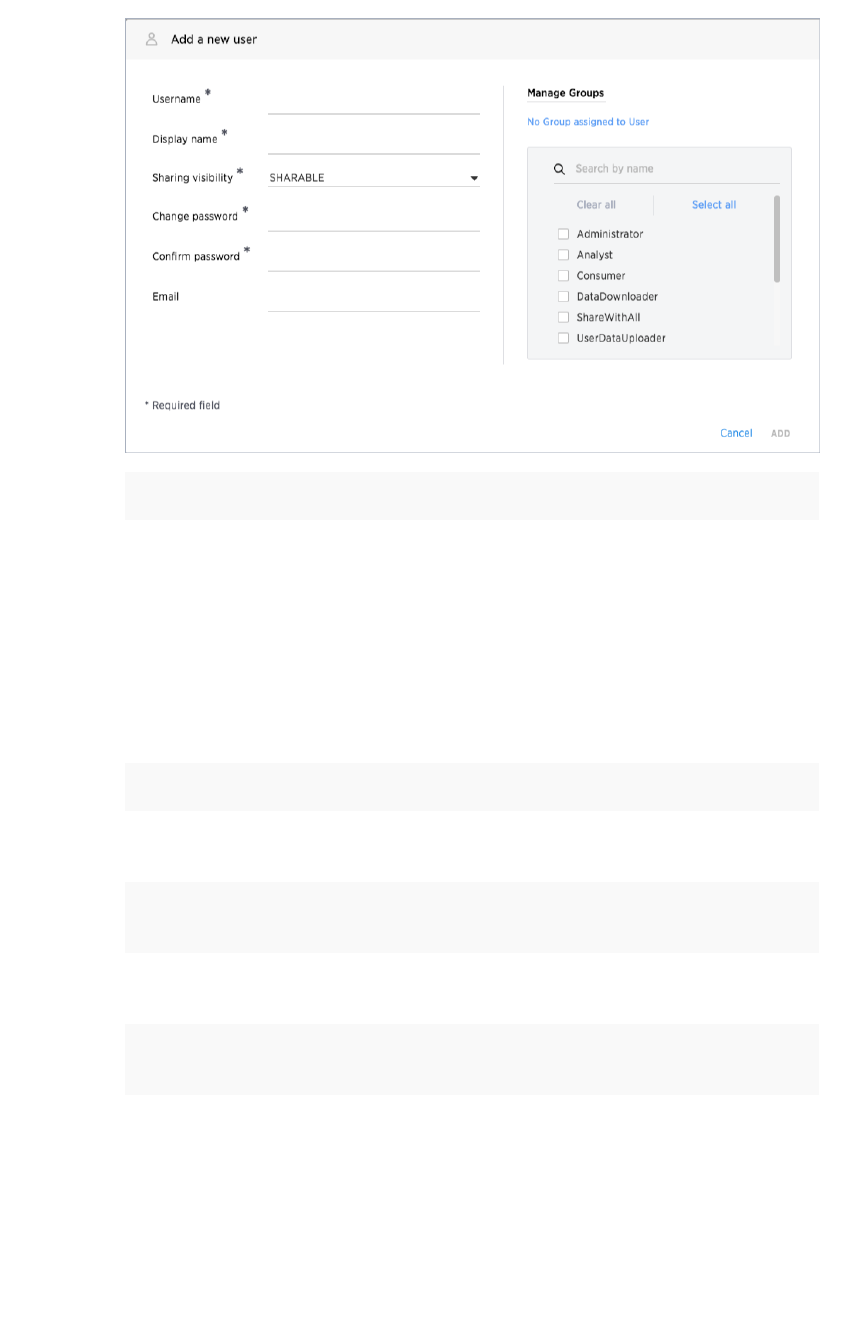
FieldField DescriptionDescription
UsernameUsername
A login name for the user. Usernames must be unique and lowercase.
If you are using Active Directory to authenticate users, and your LDAP
configuration requires users to be created manually (i.e. they are not
created automatically in ThoughtSpot upon authentication), the user-
name you specify has to be domain qualified (e.g. user-
name@ldap.thoughtspot.com ), and you must enter a dummy pass-
word.
Display nameDisplay name A unique name for the user (usually their first and last name).
SharingSharing
visibilityvisibility
Indicate whether objects can be shared with this user. When set to
SHAREABLESHAREABLE, this user is an option in the ShareShare dialog.
ChangeChange
passwordpassword
A password.
ConfirmConfirm
passwordpassword
Enter the password again.
Email addressEmail address The user's email address. This is used for notification when another
user shares something with them.
Add, edit, or delete a user
February 07, 2019
ThoughtSpot Application Integration Guide Page 201

ManageManage
groupsgroups Select all the groups the user will belong to. If you add the user to a
group that has the privilege Has administration privilegesHas administration privileges, note that they
will be able to see all the data in ThoughtSpot.
When you create a new user, the groups they belong to define the
user's:
• Privileges, the actions they are allowed to do, which are de-
fined when you Add a group and set security privileges.
• Permissions, the data they can access and view, which is
defined when you Data security.
Administrators can see all data sources, and Row level security does
not apply to them.
6. Click AddAdd to create the user.
Edit or delete a user
After a user has been created, you can always go back and change their settings, for example to change
their group memberships or change their password. You can also change their name as long as it
remains unique
As an administrator, you can edit a user and change the groups the user belongs to. You can also edit a
user to reset a user’s password by entering and confirming the new password. This is useful if a user has
forgotten their password, or to effectively disable an account.
To edit an existing user:
1. Log into ThoughtSpot from a browser.
2. Click on the AdminAdmin icon, on the top navigation bar.
3. In the AdminAdmin panel, click on User ManagementUser Management and UsersUsers.
4. Find the user you want to edit in the list and click on its name or the edit icon . If you
don’t see the name of the user, try searching for it.
Add, edit, or delete a user
February 07, 2019
ThoughtSpot Application Integration Guide Page 202

You can also delete a user from this page by clicking the DeleteDelete icon.
5. Make your changes and click SaveSave.
Add, edit, or delete a user
February 07, 2019
ThoughtSpot Application Integration Guide Page 203

Job management (scheduled pinboards)
Summary:Summary: All jobs on your cluster will appear on the Jobs
Management page. You can also view jobs for individual pinboards
under the pinboard Actions dropdown.
The Jobs ManagementJobs Management page found on the AdminAdmin section in the ThoughtSpot web application allows you
to create and manage jobs, namely scheduled pinboards. Scheduled pinboards should help with
preparing for recurrent meetings, when reviewing the same pinboard is necessary. They should also be
useful when you have metrics you want to monitor at a consistent interval, like daily or monthly sales
targets.
You can get pinboards emailed to you on a regular basis and do analysis offline. This introduces an
additional format for you to consume and share pinboards with others, including those who don’t have a
ThoughtSpot account.
Contact ThoughtSpot Support if scheduled pinboards is not enabled on your cluster, or you can run the
command tscli scheduled-pinboards to enable it yourself.
Scheduled pinboard creators
Administrators and users with can schedule pinboard privilege can schedule and manage pinboard jobs.
These scheduled pinboard creators must have at least edit-only and view-only rights to the pinboard
they want to share.
Warning:Warning: It is recommended that admins carefully choose who to give can schedule pinboard
privilege to, since there is a possible security hole where a user with limited access can get a
pinboard email with all access data.
Row level security
The scheduled pinboards respect row level security rules. This means if the recipients are users in
ThoughtSpot, then they can only see data based on their own access to the pinboard. If the user does
not have at least view-only access to the pinboard, then they will not see anything in the email. However,
if the recipients are from outside of the cluster, then they will have access to the dataset of the pinboard
based on the sender’s permissions.
Scheduled pinboard formats
The pinboard visualizations are attached to the scheduled email as CSV or PDF files. Saved
configurations such as pinboard filters are applied to the attachments. Refer to the table to see how the
pinboard data is represented in each file format.
Job management (scheduled pinboards)
February 07, 2019
ThoughtSpot Application Integration Guide Page 204

CSVCSV PDFPDF
The CSV file gets data only for table visualizations. The PDF file gets data for all visu-
alizations.
The email has n CSV attachments, where there are n table visu-
alizations in the pinboard.
The email has only one attach-
ment file, which includes every vi-
sualization on its own page.
Table visualizations have all data rows that they’re supposed to
have.
Table visualizations include only
the first 100 rows.
In the case of a corrupted pinboard: no email is sent. An error
message indicating failure to export data is visible on the Ad-
min Jobs Management page.
In the case of a corrupted pin-
board: the PDF attachment has
empty/error screenshots.
In the case of a corrupted visualization: an email with the visu-
alizations whose data can be exported is sent. An error mes-
sage indicating visualization export error is visible on the Jobs
Management page.
In the case of a corrupted visual-
ization: the PDF attachment has
empty/error slots for the corrupted
visualizations.
The size of each email is limited to 25 MB, which matches most email services size limitations.
And the total number of recipients for a scheduled pinboard job cannot exceed the default of 1000.
Related information
For information on creating a pinboard, see the Schedule a pinboard job.
Job management (scheduled pinboards)
February 07, 2019
ThoughtSpot Application Integration Guide Page 205
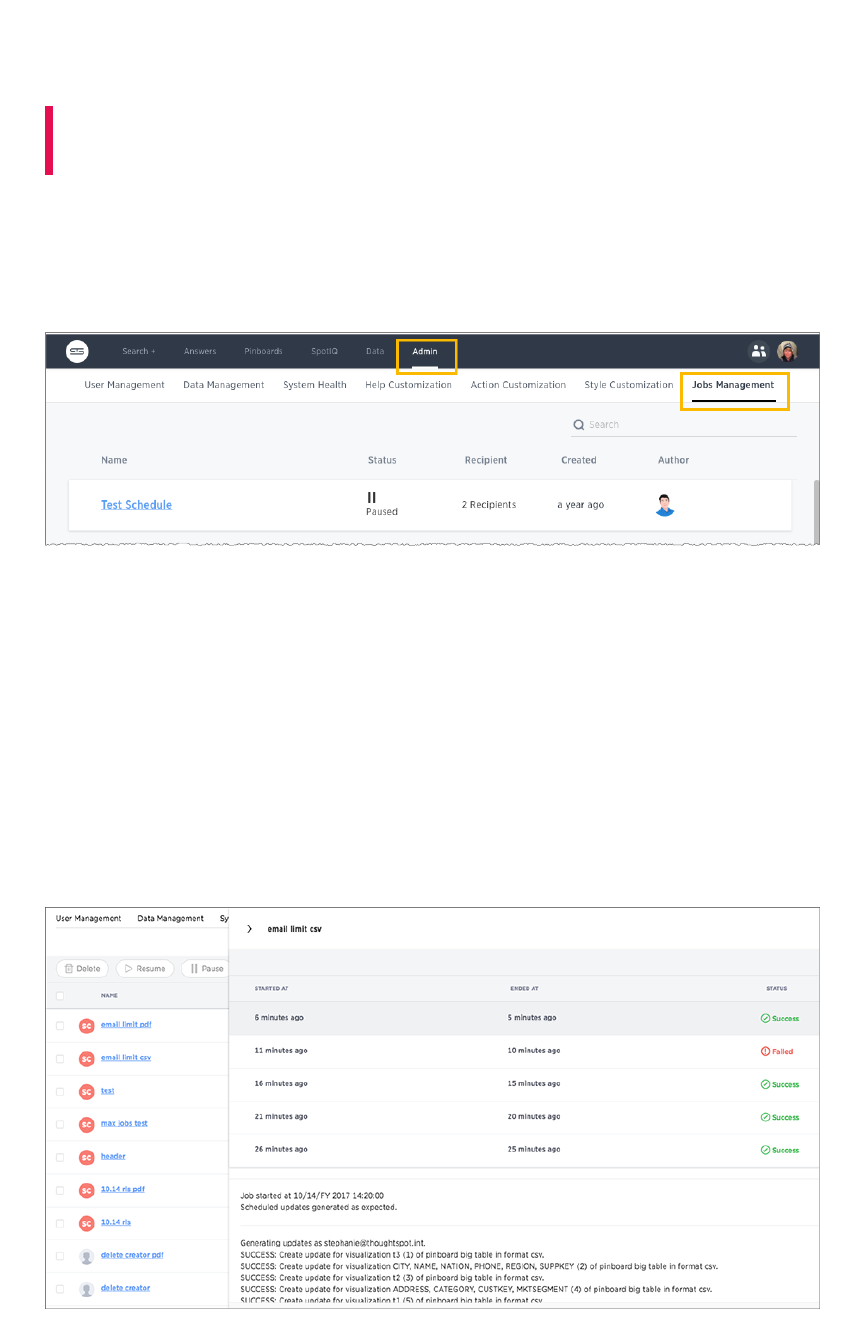
Scheduled pinboards management
Summary:Summary: You can manage all scheduled pinboards on the Jobs
Management page under Admin.
Users who are not admins, but have can schedule pinboard privilege, can only view pinboard schedules
they’ve created. You can select specific jobs and choose to pause, resume, edit, or delete them. You
can have up to 50 scheduled jobs on your cluster at time. Contact ThoughtSpot Support if you’d like to
increase this limit.
Bulk actions
Select the scheduled pinboards and use the DeleteDelete, ResumeResume, and PausePause buttons to perform these bulk
actions. Deleting a pinboard will also delete any schedules linked to it.
Job statuses
Clicking on the row of a job will open a detailed view of every generated update of that job. You can see
the start and end times of the job, as well as the status. Clicking on a job will show more information
about the status updates.
Scheduled pinboards management
February 07, 2019
ThoughtSpot Application Integration Guide Page 206
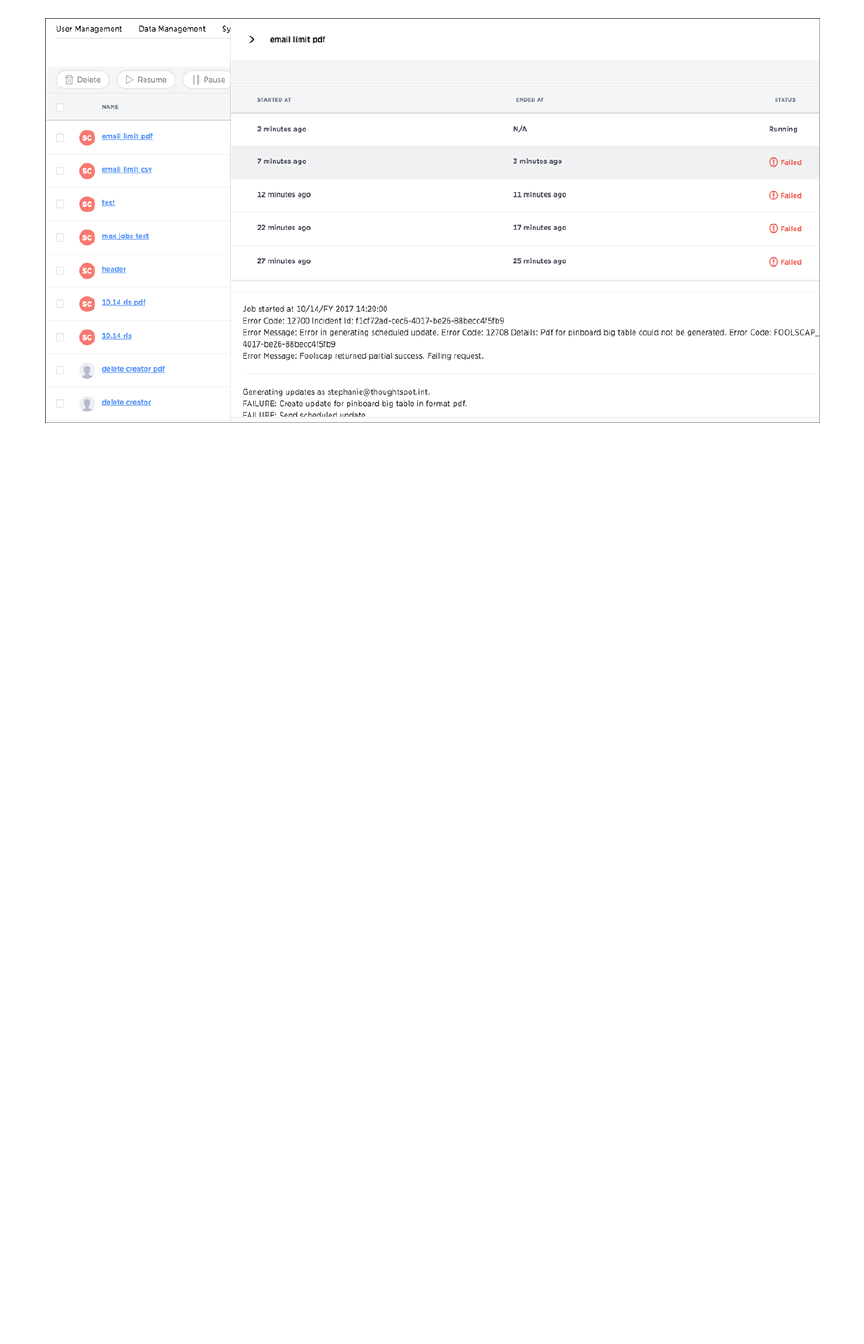
Pinboard links
Click the scheduled pinboard name link to jump to a Edit schedule page, where you can edit the
schedule configurations.
You can also click on the pinboard link provided in the scheduled pinboard emails to jump to the
pinboard in ThoughtSpot. In order to have the link direct you to the correct URL, you must first configure
front end host and port access. Contact ThoughtSpot Support to configure these settings.
Scheduled pinboards management
February 07, 2019
ThoughtSpot Application Integration Guide Page 207

Overview of security features
There are several aspects of security, including access and permissions, data security and privacy, and
security from an IT perspective.
•System Security refers to audit logs and security policies.
•Data Security refers to which users can see which data in the ThoughtSpot application, and
includes:
•Users and Groups
•Privileges
•Table and columns sharing
•Row level security
•Worksheet sharing
•Pinboard sharing
• Network Security refers to ports for external traffic and traffic within the cluster. Some ports
must remain open for handling network requests from outside the ThoughtSpot instance. To
see a list of network ports that must remain open to outside traffic, and for inter-cluster
communication, review the information in Network ports.
Overview of security features
February 07, 2019
ThoughtSpot Application Integration Guide Page 208

System security
Summary:Summary: System security refers to audit logs and security policies.
ThoughtSpot includes a number of management tools, monitoring applications, and automated
processes to support system security. System security includes managing access and privileges, audit
logs, security policies, and Linux OS installed package updates.
Audit logs
There are several ways you can view audit log information in ThoughtSpot. You can see recent events in
the Control Center or view more detailed audit logs using tscli. Administrators can view audit logs of
configuration changes users have made to ThoughtSpot in these ways:
• Monitor events from the Control Center.
• Generate audit log reports through the tscli command.
You can access an audit log of cluster events through tscli. You can also access information on cluster
updates, configurations, data loading and metadata events.
Use the tscli event list command to return an audit list of events from the cluster. The syntax is:
tscli event list
[--include <all|config|notification>]
[--since <hours,minutes,days>
| --from <yyyymmdd-HH:MM>
--to <yyyymmdd-HH:MM>]
[--detail]
[--summary_contains
<'string1'| 'string2' ...>]
[--detail_contains
<'string1'| 'string2' ...>]
[--attributes
<key1='value1'|
key2='value2' ...>]
Optional parameters are:
ParameterParameter DescriptionDescription
--include Specifies the type of events to include, and can be all ,config , or no-
tification .
--detail Returns the events in a detail format rather than a tabular summary, which
is the default.
System security
February 07, 2019
ThoughtSpot Application Integration Guide Page 209

ParameterParameter DescriptionDescription
--summary_con-
tains <'string1' |
'string2' ...>
Specifies a string to check for in the event summary. Enclose strings in sin-
gle quotes, and separate multiple strings with &pipe;. Events that match all
specified strings will be returned.
--detail_contains
<'string1'|
'string2' ...>
Specifies a string to check for in the detail. Enclose strings in single
quotes, and separate multiple strings with |(pipe symbol). Events that
match all specified strings will be returned.
--attributes
<key1='value1'
&pipe; key2='val-
ue2' ...>
Specifies attributes to match as key=value pairs. Separate multiple attrib-
utes with |(pipe symbol). Events that match all specified key/value pairs
will be returned. Put single quotes around the value(s).
And a time window made up of either:
•--since <hours,minutes,days> is a time in the past for where the event audit begins,
ending at the present time. Specify a human readable duration string, e.g. 4h (4 hours), 30m
(30 minutes), 1d (1 day).
Or both:
•--from <yyyymmdd-HH:MM> is a timestamp for where to begin the event audit. It must be of
the form: yyyymmdd-HH:MM.
•--to <yyyymmdd-HH:MM> is a timestamp for where to end the event audit. It must be of the
form: yyyymmdd-HH:MM.
To get audit logs:
1. Log in to the Linux shell using SSH.
2. Issue the tscli event list command, with the desired parameters, for example:
$ tscli event list
--include config
--since 24 hours
Security policies
Security policies are the principles and processes ThoughtSpot uses in development to ensure a product
that conforms to security standards. Security policies ensure a secure product with each release. When
a release is in development, each build is tested using Qualys Network Security and Vulnerability
Management Suite. Issues and vulnerabilities are fixed proactively, based on the results.
The ThoughtSpot Engineering and ThoughtSpot Support teams are notified of Common Vulnerabilities
and Exposures (CVEs), so they can patch OS packages proactively as well. You can view installed
packages along with their version numbers at any time, in order to see if you require an update to
ThoughtSpot.
Whenever a CVE is identified, and an OS package needs to be updated, the next patch release will
include the patch or update. You can view installed Linux packages at any time, along with the version
numbers of the installed packages.
System security
February 07, 2019
ThoughtSpot Application Integration Guide Page 210

Data security
Summary:Summary: Data security refers to which users can see which data in
the ThoughtSpot application.
Sharing and security privileges govern what data a user can access and what they can do with the data.
Admins can use privileges to regulate access to information and provide a personalized user experience.
Users, groups, and privileges
Data security applies to users and groups. Users can be managed manually or through LDAP. Each user
can have membership in one or more groups. Admins can make security settings that determine what
users are allowed to do in ThoughtSpot. These settings are applied at the group level.
The following table shows the intersection of user privilege and ability:
Data security
February 07, 2019
ThoughtSpot Application Integration Guide Page 211

The following table shows the intersection of user privilege and ability:
Can administer
ThoughtSpot
YYYYYYYYY2YYYYYYY
Can upload user
data
NNNYNYNNY3Y4NNNNNN
Can download da-
ta
NNNNYYNNNY4NNNNNN
Can manage data Y Y Y Y N Y N N Y4Y4Y5Y N Y N N
Can share with all
users
NNNNNYYNNY4NNNNNN
Can Auto-Analyze
(SpotIQ privilege)
NNNNNNNNNY4NNNNNY
Can Administer
and Bypass RLS
NNNNNNNNYNNNNNNN
None NNNNNYNNNY4NNNNNN
Create/Edit WSCreate/Edit WS
Create ViewCreate View
Modify Col. Props.Modify Col. Props.11
Upload DataUpload Data
Download DataDownload Data
Share within GroupShare within Group
Share with all usersShare with all users
Manage RLS rulesManage RLS rules
CrUD RelationshipsCrUD Relationships
Read RelationshipsRead Relationships
See Hidden ColsSee Hidden Cols
Join with Upload DataJoin with Upload Data
Schema ViewerSchema Viewer
Use Data ConnectUse Data Connect
Use SchedulerUse Scheduler
Use Auto-AnalyzeUse Auto-Analyze
Data security
February 07, 2019
ThoughtSpot Application Integration Guide Page 212

Table notes:
1. Applies to non-owners only.
2. Any tables.
3. Author of at least one table in relationship.
4. Only when read permission for columns used in the relationship.
5. With edit permission.
Create/Edit WSCreate/Edit WS
Create ViewCreate View
Modify Col. Props.Modify Col. Props.11
Upload DataUpload Data
Download DataDownload Data
Share within GroupShare within Group
Share with all usersShare with all users
Manage RLS rulesManage RLS rules
CrUD RelationshipsCrUD Relationships
Read RelationshipsRead Relationships
See Hidden ColsSee Hidden Cols
Join with Upload DataJoin with Upload Data
Schema ViewerSchema Viewer
Use Data ConnectUse Data Connect
Use SchedulerUse Scheduler
Use Auto-AnalyzeUse Auto-Analyze
Data security
February 07, 2019
ThoughtSpot Application Integration Guide Page 213

Security model for sharing objects
You can share with groups and with individual users. Sharing of tables can be defined at the table,
column, or row level. This provides flexibility in modeling your data security policy. Security and sharing
settings apply to several different types of objects, each of which has its own security default settings
and rules.
Object typeObject type DescriptionDescription Default security modelDefault security model
Tables The source data tables
that have been loaded
using ThoughtSpot
Loader.
Administrator users have access to source ta-
bles. They can share a table with other users or
groups. See [Share tables and columns](share-
source-tables.html#)
Columns The columns in the
source data tables
that have been loaded
using ThoughtSpot
Loader.
Administrator users have access to columns in
the source tables. They can share selected
columns with other users or groups. See [Share
tables and columns](share-source-tables.html#)
Rows The rows in the source
data tables that have
been loaded using
ThoughtSpot Loader.
All rows in the source tables are shared with all
users by default.
Imported data Data that was import-
ed using a Web
browser.
Only the user who imported the data (and any
user with administrator privileges) has access to
it by default. They can share a table (or selected
columns) with other users or groups. See [Share
tables and columns](share-source-tables.html#)
Worksheets A worksheet created
using a Web browser.
Only the creator of the worksheet (and any user
with administrator privileges) has access to it by
default. They can share a worksheet with other
users or groups. See [Share worksheets](share-
worksheets.html)
Pinboards A pinboard of saved
search results.
Anyone who can view a pinboard can share it.
See [Share a pinboard](share-pinboards.html)
Understanding SHAREABLE
When you share an object, only the users and groups that have SHAREABLESHAREABLE set for the Sharing visibilitySharing visibility
option appear on the dialog.
Data security
February 07, 2019
ThoughtSpot Application Integration Guide Page 214

Only users in the AdministratorsAdministrators group or users with AdminAdmin privileges can share with groups marked as
NOT SHAREABLENOT SHAREABLE. Members of a group with Can share with all usersCan share with all users authorization can also share with
groups marked as NOT SHAREABLENOT SHAREABLE.
Users in groups marked NOT SHAREABLENOT SHAREABLE cannot share objects among themselves. In multi-tenant
scenarios, admins can create groups that bring together portions of two non-share groups so that they
can share. For example, the members of group C can share even if they belong to other groups that
cannot.
Row level security
ThoughtSpot includes robust row level security, which allows you to filter all objects users see based on
conditions you set at the level of row values in base data tables.
You may find it useful to create groups for RLS. To prevent these groups from appearing in the ShareShare
dialog, create a NOT SHAREABLENOT SHAREABLE group with a single user and an RLS group with another single user
(1-to-1).
Related information
•Revoke access (unshare)
•Row level security
Data security
February 07, 2019
ThoughtSpot Application Integration Guide Page 215
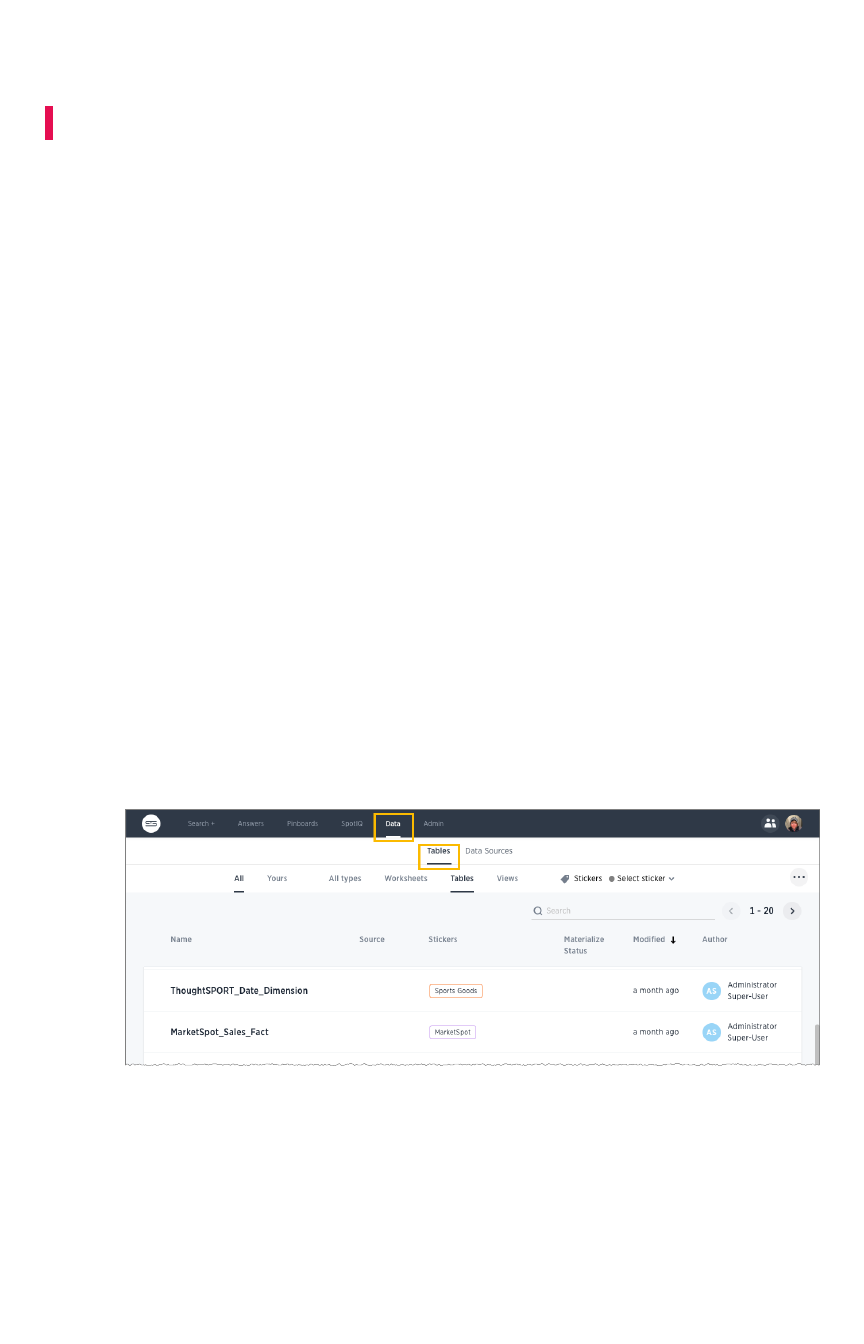
Share tables and columns
Summary:Summary: You can share an entire table, or only some of its columns.
By default, when data is loaded using the ThoughtSpot Loader, ODBC, or JDBC, it is only visible to
administrators. Data imported from a Web browser is visible to administrators and the user who
uploaded it. Administrators and owners can share Can ViewCan View or Can EditCan Edit privileges on tables with other
users, who can further share them with others.
Permissive or strict sharing
Use caution when sharing tables, because any objects created from them will have dependencies on the
tables and their underlying structure. Objects created from tables can include worksheets, answers, and
pinboards. This means that if a user wants to drop or modify a table, any object that depends upon it
must be edited or removed first, to remove the dependency.
For this reason, it is a best practice to only grant the EditEdit permission on tables to a small number of
users. If you want to prevent shares from also revealing the columns regardless of where it appears
(worksheets, answers, and pinboards), you can ask ThoughtSpot Customer Support to enable a stricter
behavior.
How to share
Share a table or imported data by following these steps:
1. Click DataData in the top navigation bar.
2. Click on TablesTables.
3. Select one or more tables to share, and click the ShareShare icon.
4. Select Entire TableEntire Table or Specific ColumnsSpecific Columns.
Share tables and columns
February 07, 2019
ThoughtSpot Application Integration Guide Page 216

5. If you selected Specific ColumnsSpecific Columns, select the column to share.
6. Click ++ and select the users and groups with whom you want to share.
7. Configure the level of access by selecting from the dropdown list. You can select:
• Can ViewCan View to provide read-only access. This enables viewing the table data and
defining worksheets on the table.
• Can EditCan Edit to allow modification. This enables renaming, modifying, or deleting the
entire table and adding or removing its columns.
8. Click Add and SaveAdd and Save.
9. Click DoneDone.
Share tables and columns
February 07, 2019
ThoughtSpot Application Integration Guide Page 217

Share worksheets
Summary:Summary: You can share worksheets with users or with groups.
Sharing a worksheet allows users to select it as a data source and
search it.
When you share a worksheet, all of its columns are shared. Sharing a worksheet does not share the
underlying tables. If you want to share the underlying tables, see Share tables and columns. A worksheet
can be shared by the owner of the worksheet, or by an administrator. Users can start searching a
worksheet as soon as the worksheet is shared with them.
To share a pinboard:
1. Click DataData on the top navigation bar and choose WorksheetsWorksheets.
2. Select one or more worksheets to share, and click the ShareShare icon.
3. Click + Add users or groups+ Add users or groups and select users or groups that you want to share with.
Share worksheets
February 07, 2019
ThoughtSpot Application Integration Guide Page 218

4. Configure the level of access by selecting from the dropdown list. You can select:
• Can ViewCan View to provide read-only access. Enables viewing the worksheet and
searching on it.
• Can EditCan Edit to allow modification. Enables renaming, modifying filters, or deleting the
worksheet and adding or removing its columns. To add columns to a worksheet a
user needs access to the underlying table.
5. Click Add and SaveAdd and Save.
6. Click DoneDone.
Share worksheets
February 07, 2019
ThoughtSpot Application Integration Guide Page 219

Share a pinboard
Summary:Summary: Whenever you view a pinboard you have the option of
sharing it with others.
When you share a pinboard what you are really sharing is a live link to the pinboard, when you click
Share with…Share with…. So whenever someone else views it, they will see the most recently saved version with the
most recent data. You do not have to be an administrator or the owner to share saved pinboards. Any
user can share them, based on the access levels the user has.
To share a pinboard:
1. Configure it to look as you’ll want it to appear when shared.
2. From within a pinboard, click the ellipses icon (3 dots) , and select ShareShare.
Alternatively, select the pinboard you want to share from the list of pinboards and click ShareShare.
(The profile picture or avatar for the owner of each pinboard is shown in the list.)
Share a pinboard
February 07, 2019
ThoughtSpot Application Integration Guide Page 220
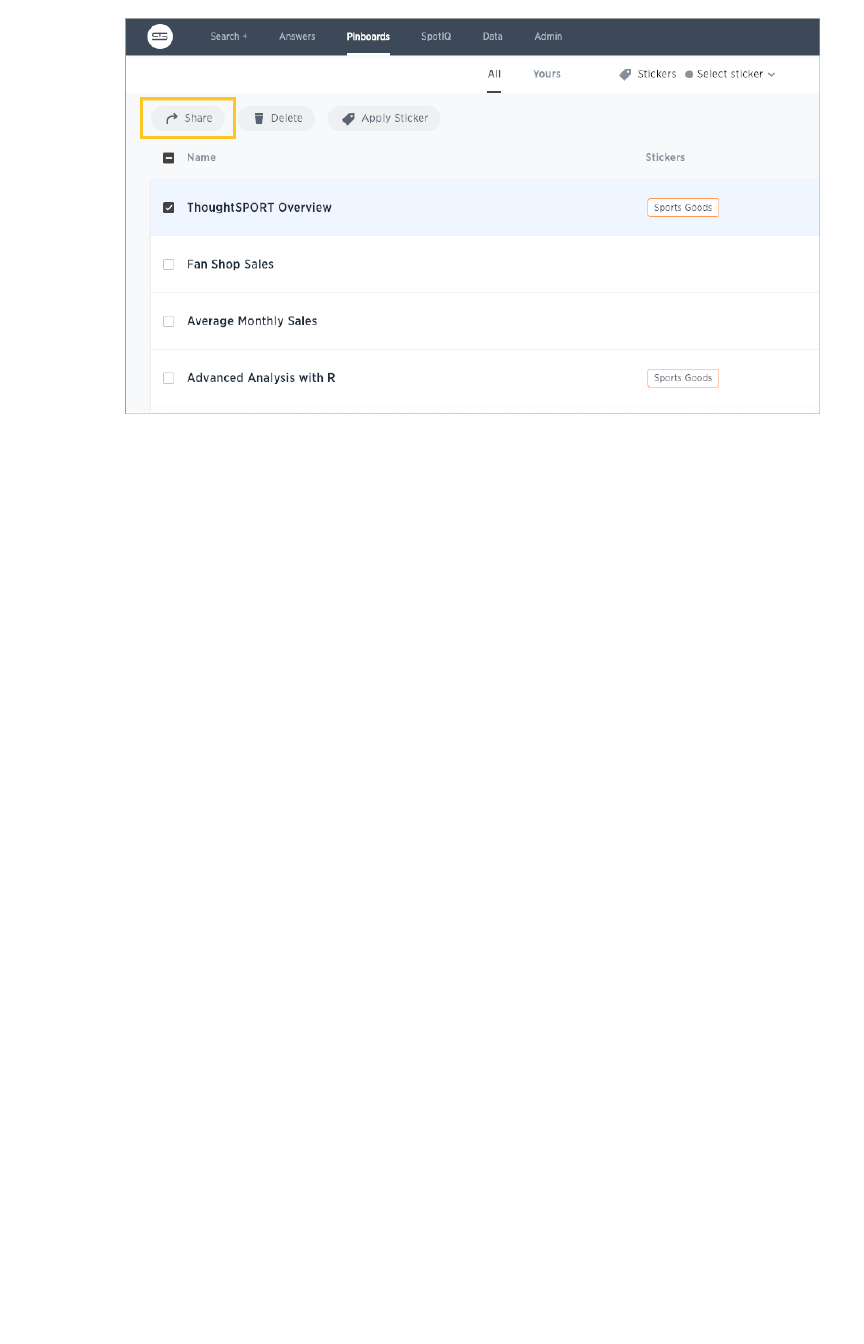
3. Click the plus (++) at the bottom of the Share dialog, and select users or groups with whom you
want to share.
Share a pinboard
February 07, 2019
ThoughtSpot Application Integration Guide Page 221

4. Configure the level of access by selecting from the dropdown next to each user or group.
Available options are based on your own access level. For example, if you have only ViewView
access, you will not have an option to share as EditEdit. You can select:
• Can ViewCan View to provide read-only access. If the person doesn’t have access to the
underlying data, they can only view a shared pinboard. If they change anything on
the pinboard, their changes are not saved. In order to persist the changes, the user
would need to make a copy of the modified pinboard.
• Can EditCan Edit to allow modification. Enables renaming or deleting the shared pinboard.
If a person with edit privileges modifies a shared pinboard, their changes will be
saved to it.
5. Click AddAdd to save your changes, then click DoneDone.
Share a pinboard
February 07, 2019
ThoughtSpot Application Integration Guide Page 222
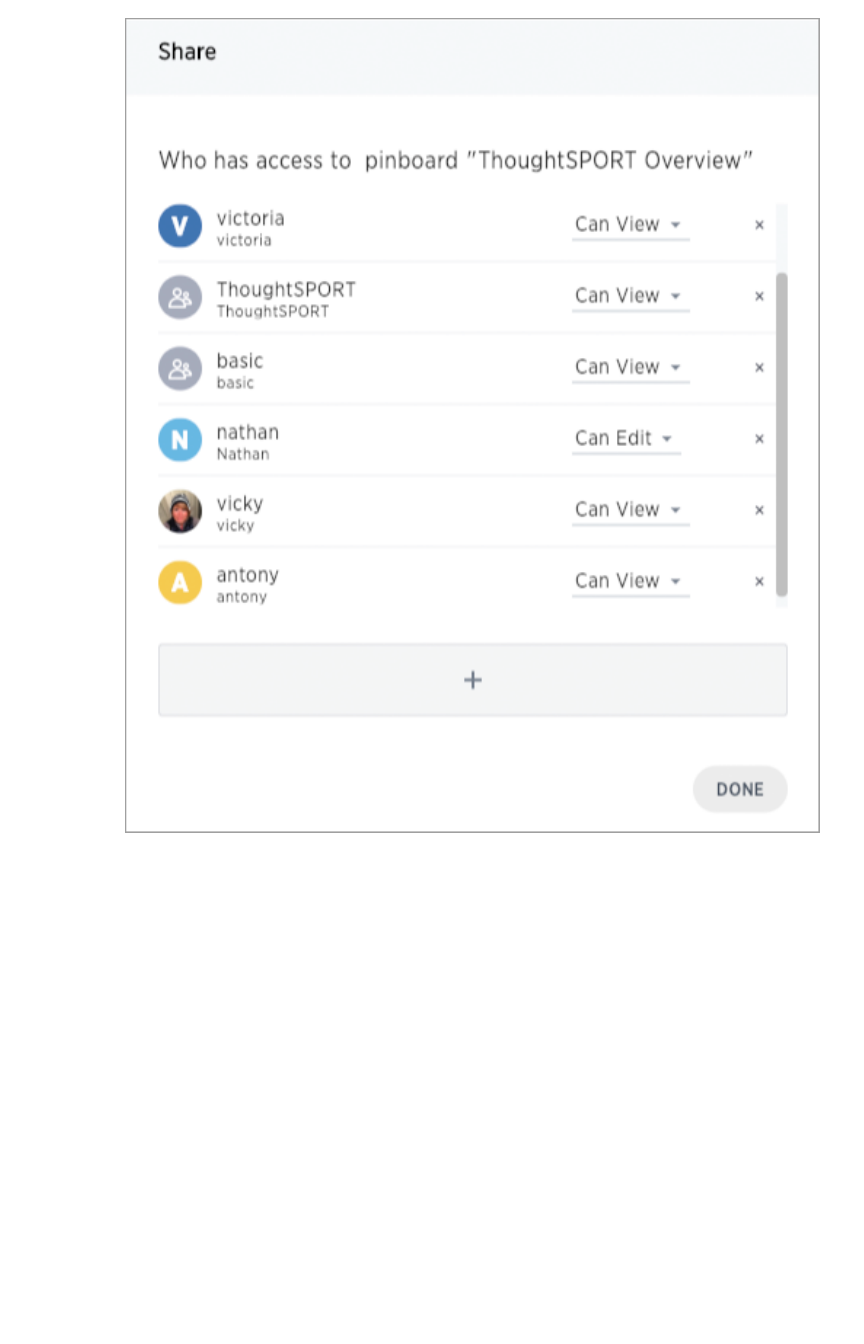
Share a pinboard
February 07, 2019
ThoughtSpot Application Integration Guide Page 223

Security for SpotIQ functions
SpotIQ is a feature in ThoughtSpot that automatically generates insights into system data. The feature
works on all the data in your system, search queries, saved answers, and pinboards. Because SpotIQ
uses the same data security model as other data in the system, there is no need to build a new schema
or security model to support it.
SpotIQ automatically generates insights into data when a user requests them. These requests can be run
immediately or users can schedule regular analysis. SpotIQ requests for insights can put additional load
on your system depending on the amount of data being analyzed and how frequently users make use of
it.
Users are required to have the Has Spot IQ privilegeHas Spot IQ privilege to use this feature. Users without this privilege
cannot view insights unless the users that generated the insights add them to a pinboard and share the
pinboard with others.
You may want to restrict access to a subset of your users or even to a subset of your managers. To
restrict access to this feature:
1. Create a group called SpotIQUsersSpotIQUsers.
2. Grant this group Has Spot IQ privilegeHas Spot IQ privilege.
3. Enable users to this group.
Security for SpotIQ functions
February 07, 2019
ThoughtSpot Application Integration Guide Page 224
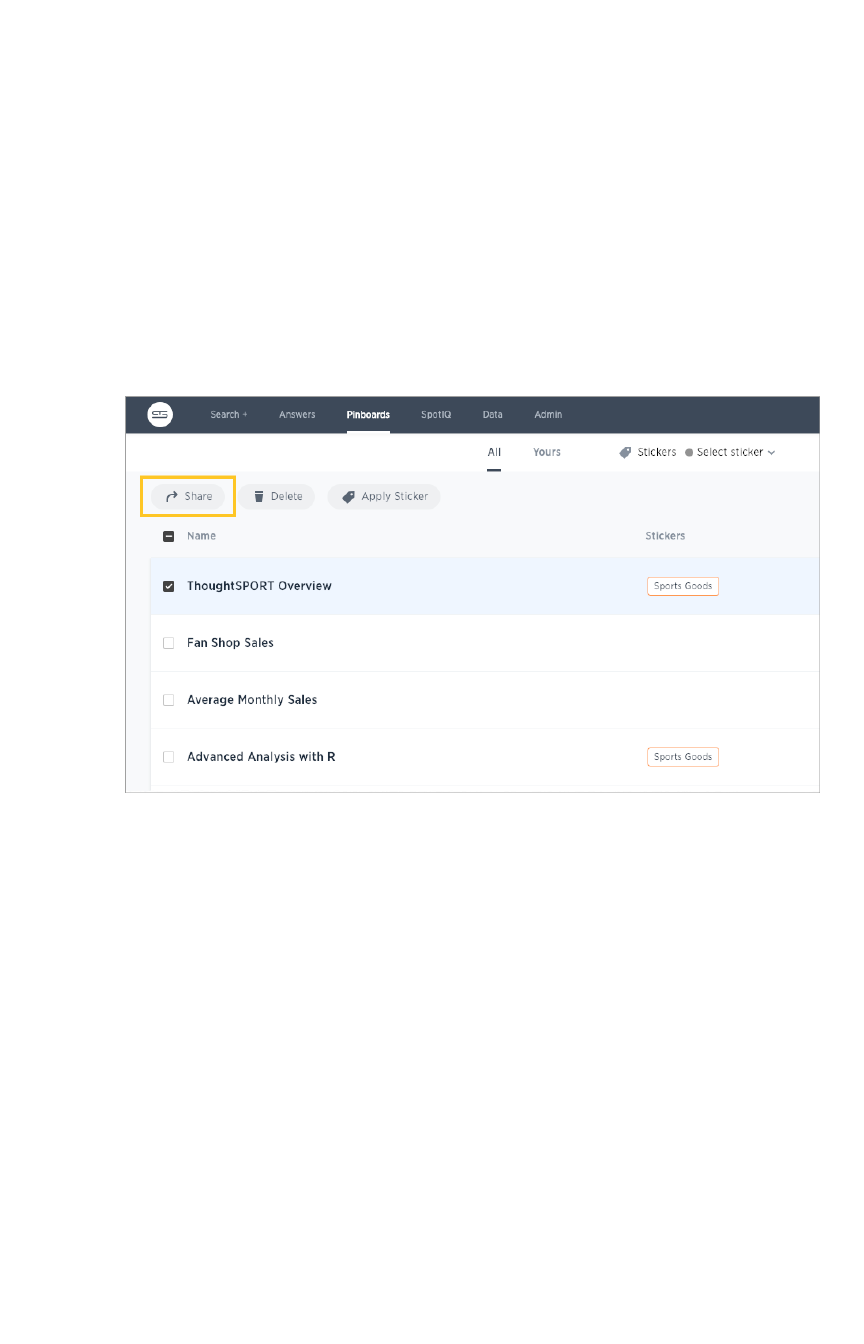
Revoke access (unshare)
You may need to revoke access to an object (table, worksheet, or pinboard) that you have previously
shared. Unsharing an object is very similar to sharing it.
To unshare one or more objects:
1. Go to the area where the object(s) you want to unshare is located. From the top menu bar:
• If the object is a table or worksheet, click DataData.
• If the object is a pinboard, click PinboardsPinboards.
• If the object is an answer, click AnswersAnswers.
2. Find the object(s) in the list, and check the corresponding box(es).
3. Click the ShareShare icon.
4. Click the XX next to the users and groups that you want to remove from sharing.
Revoke access (unshare)
February 07, 2019
ThoughtSpot Application Integration Guide Page 225
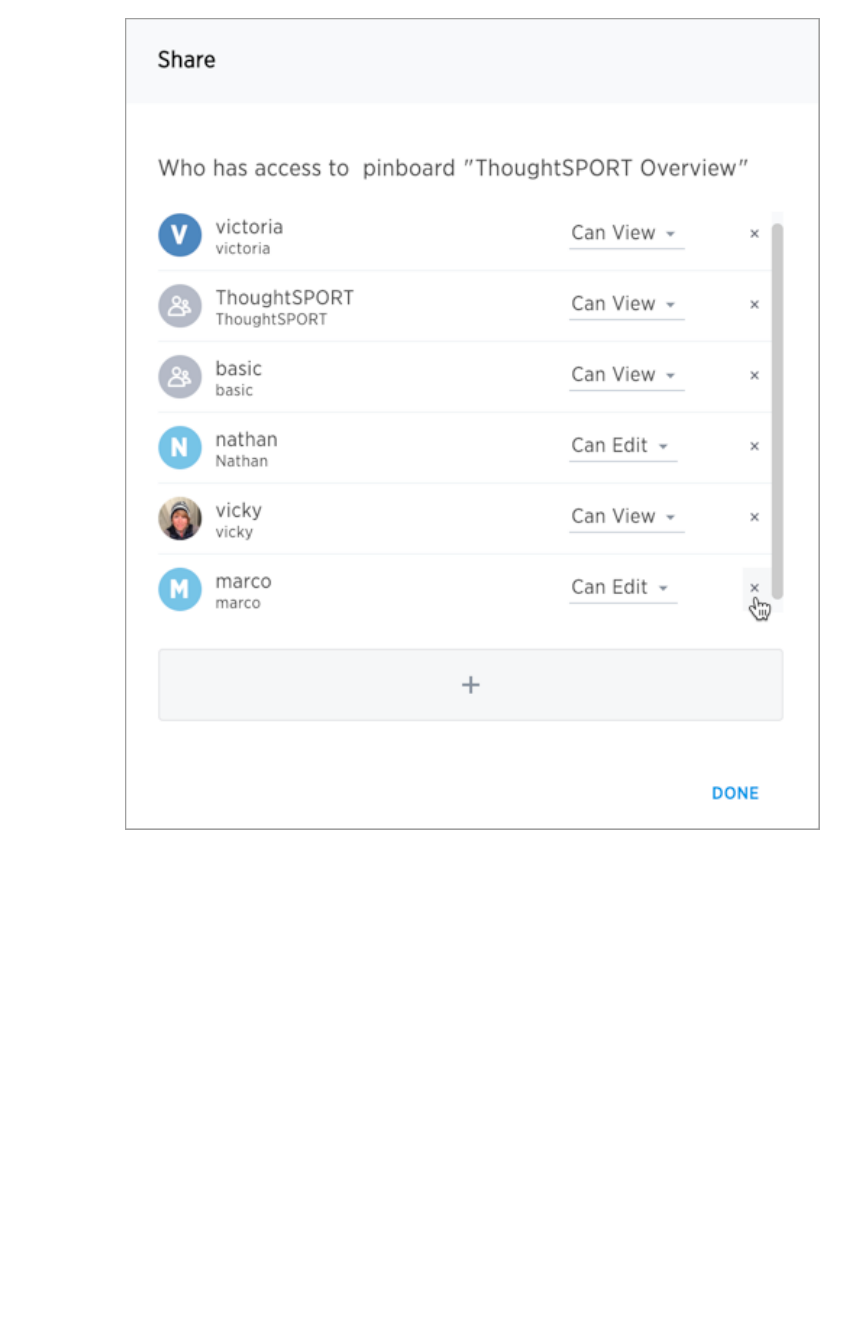
5. Click SaveSave, and then click DoneDone.
Revoke access (unshare)
February 07, 2019
ThoughtSpot Application Integration Guide Page 226
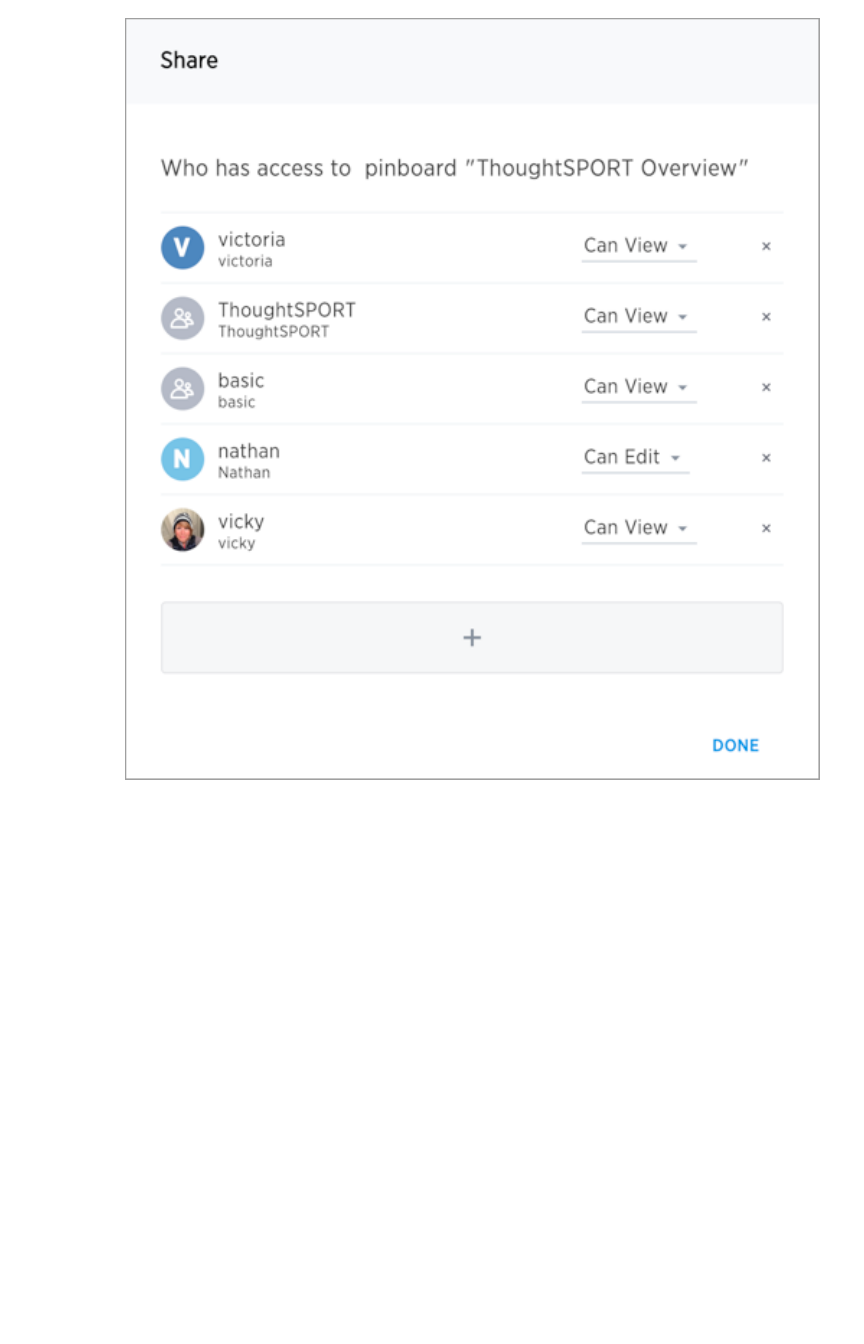
Revoke access (unshare)
February 07, 2019
ThoughtSpot Application Integration Guide Page 227

About row level security (RLS)
Summary:Summary: Using row level security, you can restrict data that appears
in search results and pinboards by group.
Row level security (RLS) allows you to restrict a group’s access to table row data. You do this by
creating a
rule
that associates a filter with a group. When a group member searches, views an answer, or
otherwise works with data, ThoughtSpot evaluates the rules and prevents the display of the restricted
data. Users see only the data they are permitted to see.
How does RLS impact user interactions?
The security rules apply to objects shared with users individually or via groups they are a member of. The
rules restrict the visible data when users:
• view a table
• view a worksheet derived from the table
• search for data in the worksheet or table
• view answers from restricted data &endash; either that they’ve created or that were shared
with them
• interact with pinboards from restricted data &endash; either that they’ve created or that were
shared with them
Search suggestions also fall under row-level security. If a user would not have access to the row data,
then values from the row do not appear in SearchSearch suggestions.
Why use RLS?
RLS allows you to set up flexible rules that are self-maintaining. An RLS configuration can handle
thousands of groups. There are several reasons you might want to use row level security:
ReasonReason ExampleExample
Hide sensitive data from groups who
should not see it.
In a report with customer details, hide potential cus-
tomers (those who have not yet completed their pur-
chase) from everyone except the sales group.
Filter tables to reduce their size, so that
only the relevant data is visible.
Reduce the number of rows that appear in a very large
table of baseball players, so that players who are no
longer active are not shown except to historians.
Enable creation of a single pinboard or
visualization, which can display different
data depending on the group who is ac-
cessing it.
Create one sales pinboard that shows only the sales in
the region of the person who views it. This effectively
creates a personalized pinboard, depending on the view-
er's region.
About row level security (RLS)
February 07, 2019
ThoughtSpot Application Integration Guide Page 228

Related information
• To continue learning about RLS, see How rule-based RLS works.
• SearchSearch suggestions relies on compile indices to present suggestions to users from your data.
See Manage suggestion indexing to learn how to configure suggestions.
About row level security (RLS)
February 07, 2019
ThoughtSpot Application Integration Guide Page 229

How rule-based RLS works
Summary:Summary: Use rule-based RLS to restrict a group's access to data.
Users see only accessible row data.
Row level security works at the group level and is configured on tables. A table’s RLS rules also apply to
any objects with data from that table. So, searches, answers, worksheets, and pinboards that rely on a
table’s data fall under RLS rules.
Worksheet queries and RLS
You cannot set RLS rules on worksheets, only on tables. However, administrators can disable RLS on
worksheets that are derived from tables with RLS rules. Once RLS rules are disabled, users with access
to the worksheet can see all its data.
By default, worksheet queries only take into account RLS rules on tables whose columns appear in the
query. Other related tables that may underly the worksheet are ignored. This means that not all RLS rules
on underlying tables are applied when a user queries a worksheet.
You can configure a stricter application of RLS rules to take into account RLS rules from all the tables
underlying the worksheet. This is recommended if you have key dimension tables that worksheets rely
on but that are not necessarily regularly accessed through query. To do this, contact ThoughtSpot
Customer Support.
Privileges that allow users to set, or be exempt
from, RLS
Users in the AdministratorsAdministrators group or with the Has administration privilegeHas administration privilege have full access to everything
in the system. As a result:
• Row level security does not apply to them.
• They can create, edit, and delete RLS rules.
• They can also disable RLS rules on individual worksheets.
If your installation has enabled the Can Administer and Bypass RLSCan Administer and Bypass RLS privilege, administrators can also
grant Can Administer and Bypass RLSCan Administer and Bypass RLS to groups. Members of groups with Can Administer and BypassCan Administer and Bypass
RLSRLS:
• Are exempt from row-level security (RLS) rules.
• Can add/edit/delete existing RLS rules.
• Can check or uncheck Bypass RLS on a worksheet.
This behavior is true regardless of whether the privilege is from a direct group membership or indirect
(through a group hierarchy).
Examples of RLS rules
An RLS rule evaluates against two system variables:
How rule-based RLS works
February 07, 2019
ThoughtSpot Application Integration Guide Page 230
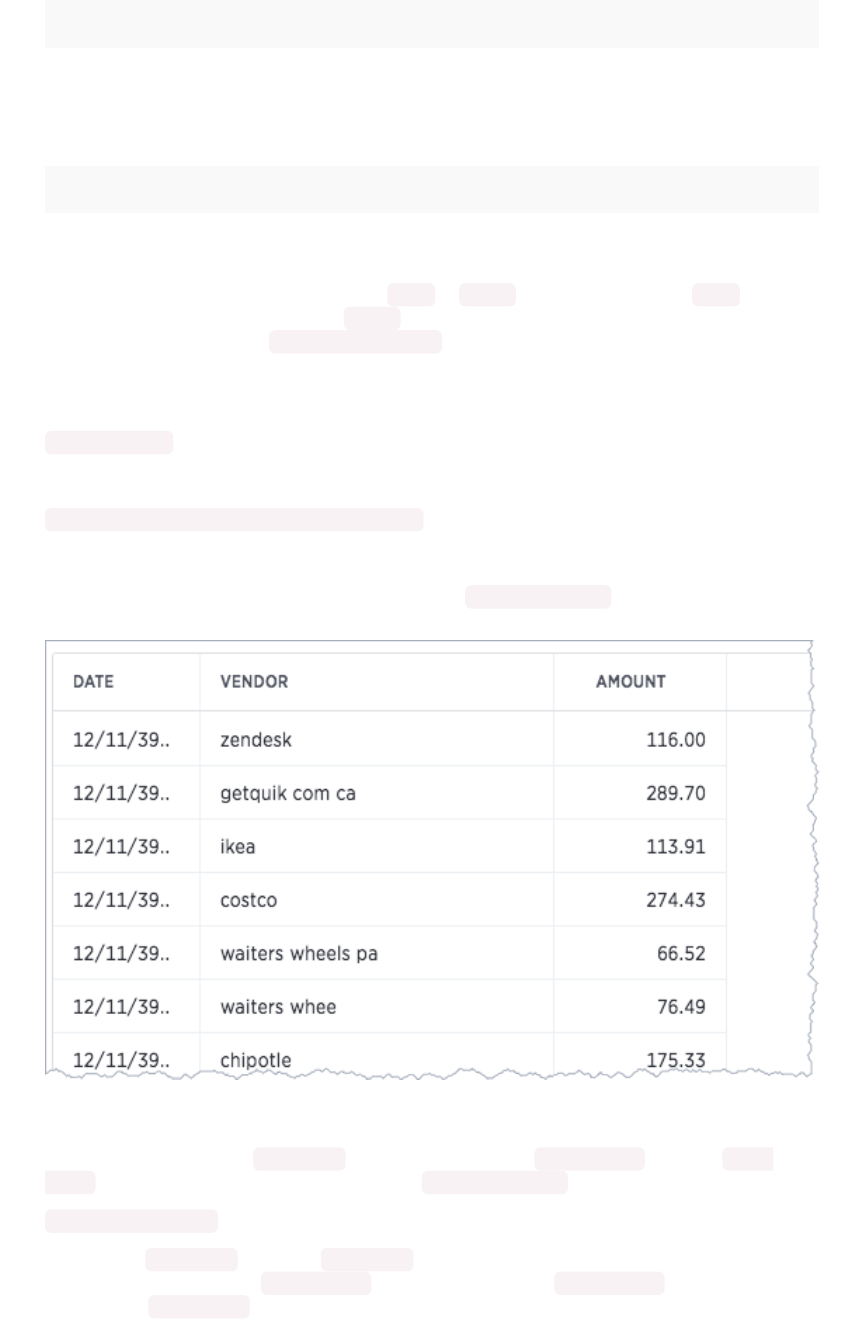
Function Description Examples
ts_groups Returns a list of all the groups the current logged
in user belongs to. For any row, if the expression
evaluates to true for any of the groups, the user
can see that row.
ts_groups = 'east'
ts_username Returns the user with the matching neame. ts_username != 'mark'
ThoughtSpot filters a table’s rows by evaluating a rule against the authenticated user.
A rule is an expression that returns a boolean, TRUE or FALSE . If the rule evaluates to TRUE , a user
can see that row. If the rule evaluates to FALSE for the user, then the user cannot view the data and
instead they see the message No data to display .
Rule expression can be implicit or explicit. And rules may or may not contain logic. A simple implicit RLS
rule has the format:
COLUMN_FILTER = ts_groups= ts_groups
An example of an explicit rule that contains logic would be:
if ( COLUMN_FILTER ) then true else false
Rules can also reference tables other than the table you are securing.
Consider a simple RLS rule example. Your company has vendor-purchase table such as:
You want to give your vendors the ability to see trends in company purchases. You give vendor
personnel access to ThoughtSpot
and
add them to self-titled vendor groups. So, all users from the
Starbucks vendor are in the Starbucks group and all users from round table are in the Round
Table group. Then, you set a Row securityRow security on the vendor-purchase table as follows:
VENDOR = ts_groups
Only users in Starbucks group see starbucks data and so forth. Rules ignore case inconsistencies
and spaces are evaluated so round table in the data matches the Round table group but not a
group named RoundTable .
How rule-based RLS works
February 07, 2019
ThoughtSpot Application Integration Guide Page 231

Rules can be simple or they can incorporate logic such as if/then rules. For example, vendors should
see their own data but your accounts payable group needs to see all the vendor data:
VENDOR = ts_groups or 'Accounts Payable' = ts_groups
This rule continues to work as you add data from new vendor or team members to Accounts Payable .
In this way, a well-written rule is
self maintaining
, meaning you don’t have to revisit the rule as your
system changes.
You can also create rules that reference tables other than the table you are securing. For example, if you
have a sales table and store dimension table, you can use attributes from the store table to
secure the sales table.
Multiple rules and multiple group membership
You can define multiple rules on table. In this case, ThoughtSpot treats the rules as additive. That is, they
are applied using an OR operator. If any of the rules evaluate to true for a user on a row, that row’s
data is visible.
If a user is a member of multiple groups, the user can see all the rows that are visible to all of their
groups. The most permissive policy is used.
Members of groups with Can Administer and Bypass RLSCan Administer and Bypass RLS are exempt from row-level security (RLS)
rules. This is true regardless of whether the group membership is direct or indirect (through a group
hierarchy).
Best practices for using Rule-Based Row Level
Security
Use these best practices for Rule-Based Row Level Security:
• Use ShareShare as the first level of data access.
Non-administrative users and groups have no way to access any data without first having it
shared with them. So, only share what you need.
When you share, share worksheets. This is a general best practice. Worksheets simplify the
data environment for end users; they only need to choose among a few sources, rather than
many tables. Also, one worksheet can also combine data from several tables.
• Set row level security wherever you want to keep data secure.
It is always a possible that a particular search only includes data from a single table, and a
user will see something they shouldn’t. So, protect your data by setting row level security
wherever you want to keep data secure.
• Explicitly grant access for users that should see all rows.
As soon as you define a rule on a table for one group, you prevent access by all others
outside of that group hierarchy. Subsequent rules should specifically add groups that need
access.
• Keep in mind that multiple rules on a table are additive with or .
If you are concerned with security, start with very limited access. Then, expand the access as
needed.
• Keep rules simple.
How rule-based RLS works
February 07, 2019
ThoughtSpot Application Integration Guide Page 232

Complex rules can impact the system performance. So, err on the side of simple rules rather
than complex rules with a lot of logic.
Related information
• To learn the procedure you follow for setting a rule, Set RLS rules
• For a list of operators and functions you can use to build RLS rules see Row level security
rules reference.
• For information on bypassing rules on a worksheet, see Change inclusion, join, or RLS for a
worksheet.
How rule-based RLS works
February 07, 2019
ThoughtSpot Application Integration Guide Page 233
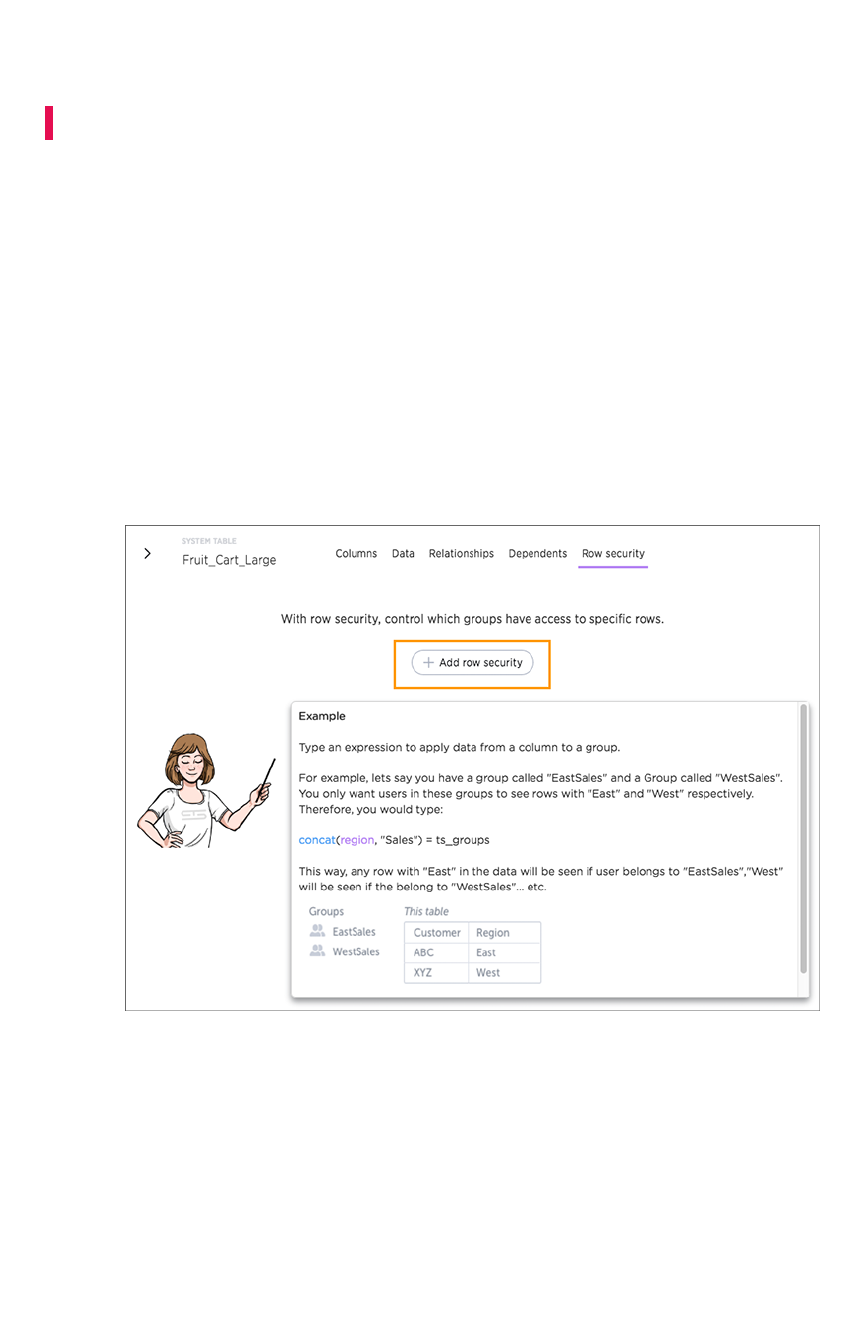
Set row level security rules
Summary:Summary: Explains the process for setting RLS rules.
When rule-based row level security (RLS) is set, it prevents users from seeing data they shouldn’t in
tables and the objects derived from them. You must have administrative rights on ThoughtSpot to set
RLS rules.
Before you create a rule, make sure you have read How rule-based RLS works.
Create a rule on a table
You can set RLS rules
only
on tables. To set up rule-based row level security, do the following:
1. Click DataData, and double-click on a table.
2. Click Row securityRow security.
3. Click + Add row security+ Add row security.
The system displays the Rule Builder.
Set row level security rules
February 07, 2019
ThoughtSpot Application Integration Guide Page 234

You define row level security by creating an expression that gets evaluated for every row and
group combination. This powerful feature can be used with up to thousands of groups.
4. Open the Rule Builder.
5. Give your rule a name.
6. Enter an expression for your rule.
The rule gets evaluated against an authenticated user for every row and group combination. If
the rule evaluates to true, the user can’t see that row’s data. Use the variable ts_groupsts_groups to
refer to the group name.
You can see a list of available operators by clicking on Rule AssistantRule Assistant.
Set row level security rules
February 07, 2019
ThoughtSpot Application Integration Guide Page 235
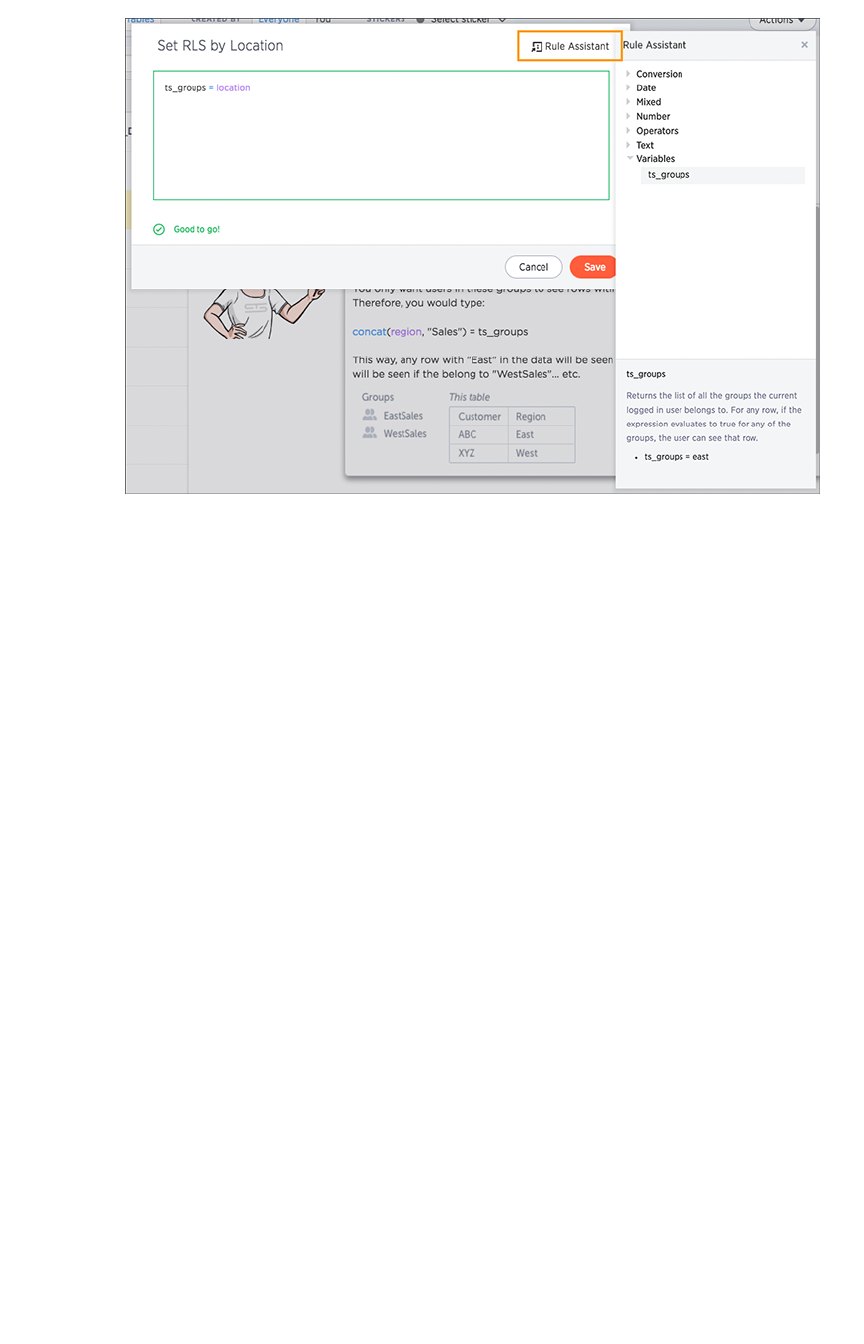
As you type, ThoughtSpot suggests formula syntax, variables, and column names. If you can’t
remember the exact column name or variable you want to use, the suggestions can help.
When your expression is valid, a green indicator appears at the bottom of the Rule Builder.
7. Click SaveSave.
The rule you created is listed in the rules. You can edit the rule or add more rules by clicking + Add+ Add.
Test your rule with restricted and unrestricted
users
To test your rule, log in as users in different groups. Search within the table for data both that you test
user can and can’t access. Make sure your test users are seeing the appropriate rows.
Related information
• Administrators can bypass the RLS rules set on a the table at the worksheet level. See how to
“Change inclusion, join, or RLS for a worksheet in this documentation for more information.
• For a list of operators and functions you can use to build RLS rules see Row level security
rules reference.
Set row level security rules
February 07, 2019
ThoughtSpot Application Integration Guide Page 236

ThoughtSpot Lifecycle
Summary:Summary: This topic covers security processes for the entire lifecycle
of a ThoughtSpot deployment from development, release, installation,
upgrades, to software patching.
Overview
A ThoughtSpot deployment consists of the following high level software systems:
• Operating System (OS) and software packages installed on the OS
• Third-party software
• ThoughtSpot application services (binaries and configuration)
Operating System
All ThoughtSpot physical appliances, virtual machines (VMs) and public cloud images come pre-installed
with CentOS 7. The CentOS distribution of Linux is owned by RedHat and closely tracks versions of
RedHat Enterprise Linux (RHEL).
ThoughtSpot uses the minimal install of CentOS 7 with the addition of a few software packages (e.g.
Python) needed for ThoughtSpot operations. The most notable change to the installation is to the Linux
kernel, which is sourced from the current long term stable kernel version instead of the default included
in CentOS 7 (kernel-lt package). To list all the installed packages, see Checking Package Versions below.
Third-Party Software (Middleware)
Third party software used includes Java, Boost C++ libraries, Google protocol buffers, etc. These are
software components necessary for operation of the ThoughtSpot application. ThoughtSpot only uses
software licensed for distribution.
Development and Release Process
ThoughtSpot releases its software as a tarball containing all the ThoughtSpot application (binaries and
configuration), third-party software, and an operating system image. Installation or update using this
release tarball on appliances, VMs, or cloud instances updates each of these components.
Operating System
Building the operating system image including software packages is a multi-step process:
1. Begin with the set of packages in the base OS image and our added packages.
2. Configure all installation to only use official public RedHat repositories.
3. For each package, install the current stable version including any security patches.
ThoughtSpot Lifecycle
February 07, 2019
ThoughtSpot Application Integration Guide Page 237

4. Bring up the image on all supported platforms for stability and performance testing along with
the ThoughtSpot application stack. Success criteria: no OS impact on stability or
performance.
5. Scan the Operating System and ThoughtSpot application stack using Qualys scans with
additional modules enabled: Vulnerability Management, Web App Scanning.
6. Review all vulnerabilities found. Success criteria is zero severity 4+ vulnerabilities.
7. Assuming all above testing and exit criteria are met, the OS image is considered qualified.
Third-Party Software
Third-party software is periodically sourced from the upstream distribution of each software component.
Unlike OS and ThoughtSpot application, this changes less frequently and on an as needed basis, when
any new security vulnerability or stability issue is discovered in the library. The list of all third-party
software as well as licensing details are here.
ThoughtSpot Application
ThoughtSpot follows industry standard best practices for writing robust software. Every code change is
reviewed by at least one engineer. Our engineering team consists of senior engineers from Enterprise
software and web companies.
ThoughtSpot uses a small number of proven programming languages powering some of the largest
enterprises in the world. ThoughtSpot tracks stability, performance, and reliability of our software and
services aggressively. The ThoughtSpot platform is trusted by dozens of global F2000 organizations.
Protection of Source Code
Source code is private and not shared publicly, e.g. all distribution to customers is in binary or minified
format to discourage reverse engineering.
Automated Tools
We use automated tools and infrastructure like Jenkins, Kubernetes, AWS, partnering with the teams
behind these systems so as to adopt best practices. For example, all our automation runs through
Jenkins, which is managed by CloudBees (the company behind Jenkins) using an enterprise license with
regular security patching, and so on. We upgrade our automation tools regularly.
Independent Testing
Independent testing is done outside of the product team by pre sales and post sales before promoting to
production. Some areas are tested by third party testers.
Security Hardening
Starting 4.5.1.5, we have also taken specific steps to incorporate most of CIS standard
recommendations towards hardening.
ThoughtSpot Lifecycle
February 07, 2019
ThoughtSpot Application Integration Guide Page 238

Installation and Upgrade Process
ThoughtSpot is installed or updated from a release tarball which contains the ThoughtSpot application
(binaries and configuration), third-party software, and Operating System image.
Operating System Image Installation
Installing ThoughtSpot on any node (VM, cloud instance, appliance) automatically updates the operating
system and required packages on the node. No Internet or repository access is required for this, the
update is applied directly from the release tarball.
Specifically, all nodes running ThoughtSpot are required to have two root partitions on their boot drive of
which one of them is booted from at any given time. During installation or update, the Operating System
image contained in the release tarball is copied into the second currently-unused root partition and the
system switches to it through a reboot.
Checking OS Package Versions
The following command run from any ThoughtSpot node will indicate versions of all installed packages:
rpm -qa
Upgrades
ThoughtSpot patches the Operating System at the time of upgrades. The exact same process used
during installation is also applied during upgrades. The previous OS image on a node gets replaced by
the new image carried in the release tarball.
Only some releases may patch the Operating System, not all. Typically, all major and minor releases (e.g.
4.4, 4.5, 4.5.1, 5.0) upgrade OS patches, whereas only some patch releases (e.g. 4.4.1.4) contain OS
patches.
Distributed Clusters and Failure Handling
On distributed clusters, individual nodes receive the OS image from the release tarball individually.
Initially, the new image is deployed on a single node only. When that node is deemed healthy following
the update and a rich set of tests, the image is made available to remaining nodes in the cluster.
If a node fails to patch, then ThoughtSpot support will modify the upgrade workflow to either retry the
patching or skip and exclude the node.
Third-Party Software
Installation or upgrade of ThoughtSpot deployments automatically upgrades all third-party software to
the version included in the release tarball.
ThoughtSpot Lifecycle
February 07, 2019
ThoughtSpot Application Integration Guide Page 239

Security Scanning and Patching Process
The ThoughtSpot Security team continuously scans security bulletins for new vulnerabilities discovered
in included OS packages (e.g., Linux Kernel, libc) and third party software (e.g., Java). Additionally,
weekly scans are done for all release branches using Qualys with the following additional modules
enabled: Vulnerability Management, Web App Scanning. The security scans discover vulnerabilities at all
layers: OS, third-party software, as well as ThoughtSpot application binaries and configuration.
Additionally, ThoughtSpot periodically scans all source code for third-party software as well as
ThoughtSpot’s proprietary code base for vulnerabilities or unsafe usage using SourceClear.
Once a critical new vulnerability is found (severity 4 or 5), ThoughtSpot includes the corresponding patch
in the next patch release for all supported release branches. Consult ThoughtSpot documentation or
support to find out if you are on an active or supported release branch.
Once a new patch release with a critical security vulnerability is available, customers are encouraged to
upgrade their deployment quickly.
Latency
We recommend customers to wait for the next regular release for receiving security patches. However,
should a critical vulnerability be discovered in the interim, ThoughtSpot can push out a new patch
release containing the required patches, if available upstream.
ThoughtSpot targets a three week or less cadence for generating patch releases for all supported
release branches. Timeline for the new release and patching depends on availability of the patch
upstream (e.g., not all vulnerabilities in Linux are immediately fixed) and qualification (ThoughtSpot
qualifies each build on each supported cloud and on-prem platform). If a fix is unavailable upstream at
the moment, customers and ThoughtSpot support can work together to identify potential workarounds.
Storage Security
Encryption at Rest
• On-prem: Not supported yet
• Cloud: Supported on AWS,GCP,Azure
Secure Erase
Current erase guide
ThoughtSpot Lifecycle
February 07, 2019
ThoughtSpot Application Integration Guide Page 240

System administration
System administration includes applying upgrades, backing up and restoring the cluster, snapshotting,
and adding or removing nodes.
Administration tools
Use these tools to perform administrative actions:
•tscli: an administrative command line interface.
•tsload: a command for loading data directly into the database.
•TQL: a command line SQL interface to interact with databases.
System administration
February 07, 2019
ThoughtSpot Application Integration Guide Page 241
Send logs when reporting problems
You can generate a log bundle which you can then send to ThoughtSpot Support or you can send logs
direct to your administrator.
Generate log bundle
Before you can send a log bundle to ThoughtSpot Support, you must Connect to the ThoughtSpot
Support file server. This is a one-time setup operation.
To generate a log bundle:
1. Log in to the Linux shell using SSH.
2. Issue the command to generate the log bundle:
tscli callhome generate-bundle
--d <directory> --since <num_of_daysd>
Note:Note: Don’t forget to include dafter your specified number of days. For example, 30d .
3. Change directories to the directory where you wrote the log bundle.
4. Issue the command to send the log bundle to ThoughtSpot Support:
tscli fileserver upload
--file_name <file>
--server_dir_path <path>
Send a log to the administrator
Alternately, you can easily send log files directly to your administrator with a single click. When
ThoughtSpot encounters a problem, a red bar displays in the browser with an error message. You can
use the Report ProblemReport Problem option to complete this task.
Click Report ProblemReport Problem in the bottom right corner of the error message.
Send logs when reporting problems
February 07, 2019
ThoughtSpot Application Integration Guide Page 242
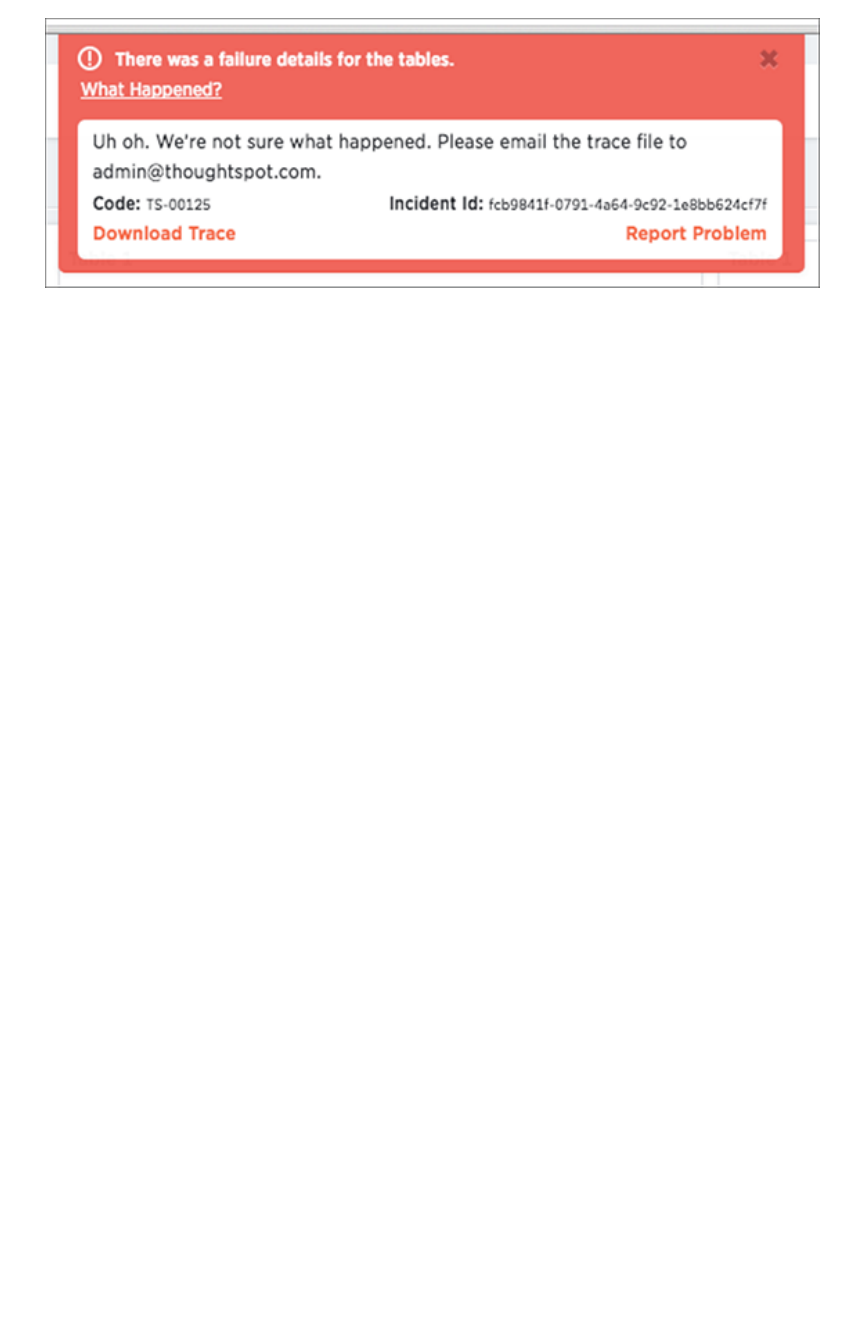
The logs will be sent to your administrator as an email attachment from your email account. Your
administrator then has the option to followup with ThoughtSpot, if necessary.
Send logs when reporting problems
February 07, 2019
ThoughtSpot Application Integration Guide Page 243
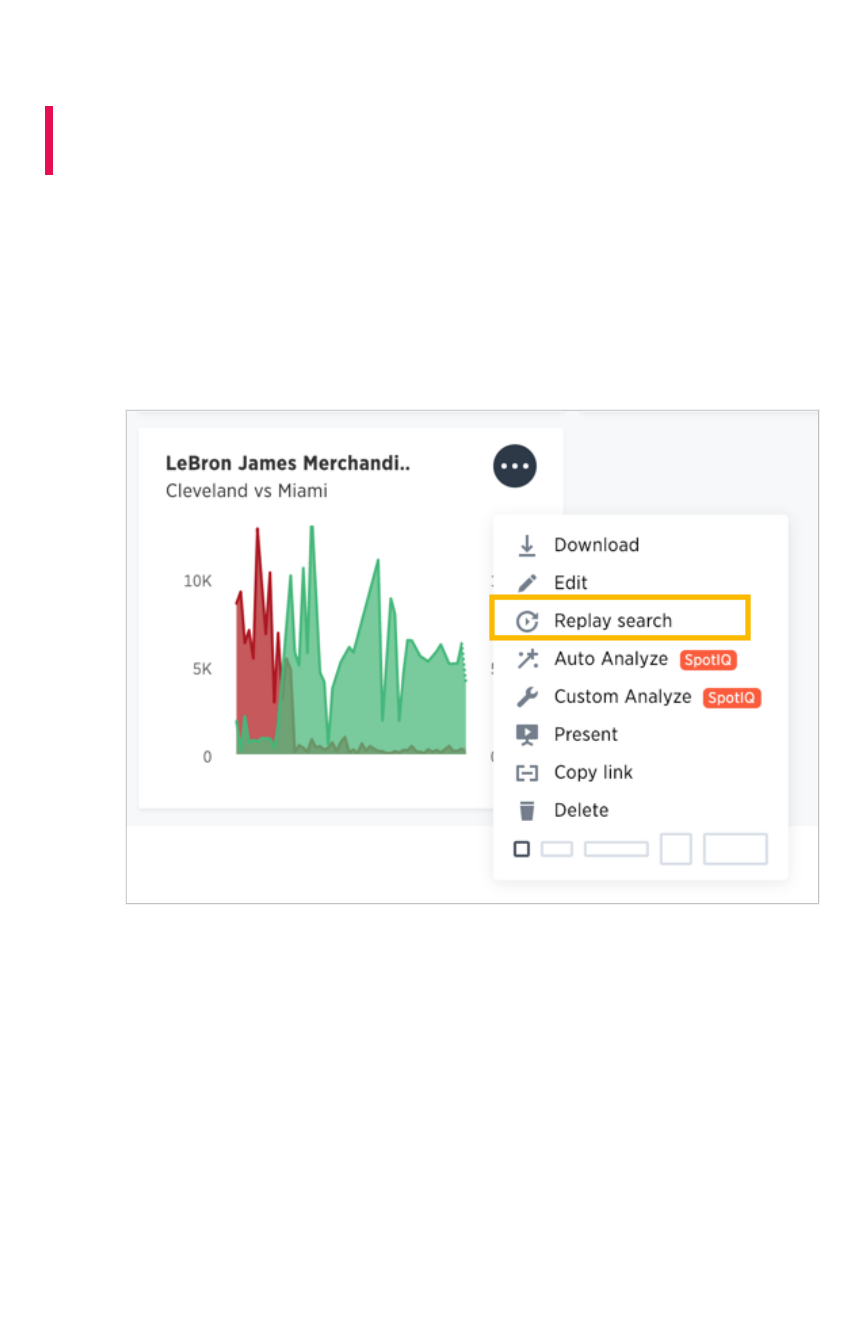
Set up recording for Replay Search
Summary:Summary: You can use the recording to create training for your users
on how to search your own data.
Recording a search replay requires administrator privileges and a Firefox browser. You must override
some of your browser security settings in order to use the ThoughtSpot application to make the
recording. This is a one time setup operation. If you do not wish to do this, you can replay the search
and record it using QuickTime, Camtasia, or another screen cam recording tool.
To record a search replay using ThoughtSpot:
1. While viewing a chart or table in ThoughtSpot, click the Replay SearchReplay Search icon.
2. Click the Record ReplayRecord Replay button.
If you do not see the button, you must log in as a user with administrator privileges.
Set up recording for Replay Search
February 07, 2019
ThoughtSpot Application Integration Guide Page 244

A message will display, showing a URL and a domain or an IP address.
3. Make note of both of these items.
4. Open a new browser tab and go to the URL shown in the message ( for example,
“about:config”).
Depending on which browser and version you are using, you may need to access the browser
configurations through a menu or by typing in a different URL. Check your own browser help
section for information on how to access the browser configuration settings, if necessary.
You may see a message warning that you are about to override the browser settings.
5. If you trust yourself, click “I’ll be careful, I promise!”.
Set up recording for Replay Search
February 07, 2019
ThoughtSpot Application Integration Guide Page 245
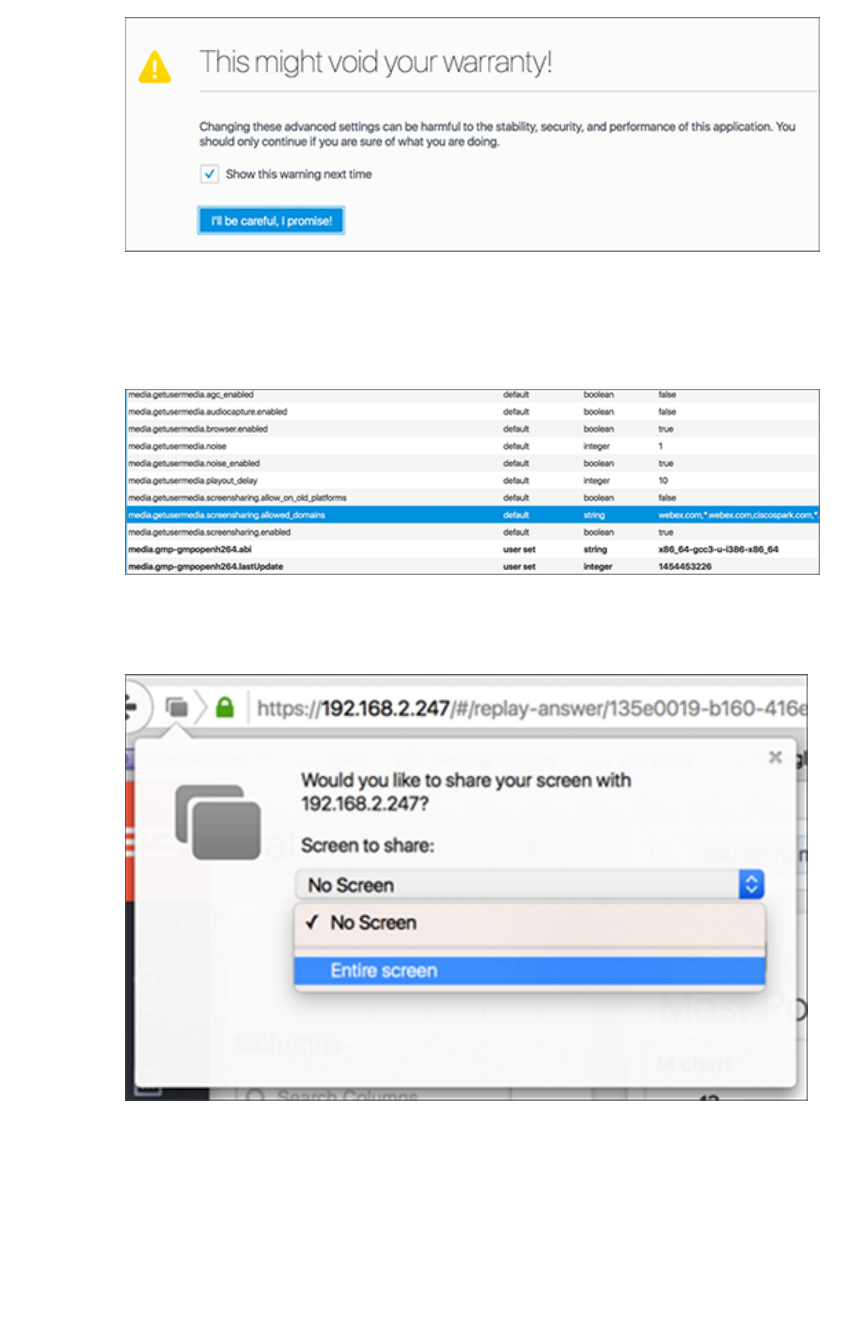
6. Find the setting for media.getusermedia.screensharing.allowed_domainsmedia.getusermedia.screensharing.allowed_domains, and add the domain
used by ThoughtSpot.
This domain will be the same one you made note of from the Cannot record screenCannot record screen message.
7. If you see a message asking if you’d like to share your screen with the IP address or domain
name of ThoughtSpot, select Entire screenEntire screen.
8. When the search replay has been recorded, you’ll see a confirmation. Select DownloadDownload.
Set up recording for Replay Search
February 07, 2019
ThoughtSpot Application Integration Guide Page 246
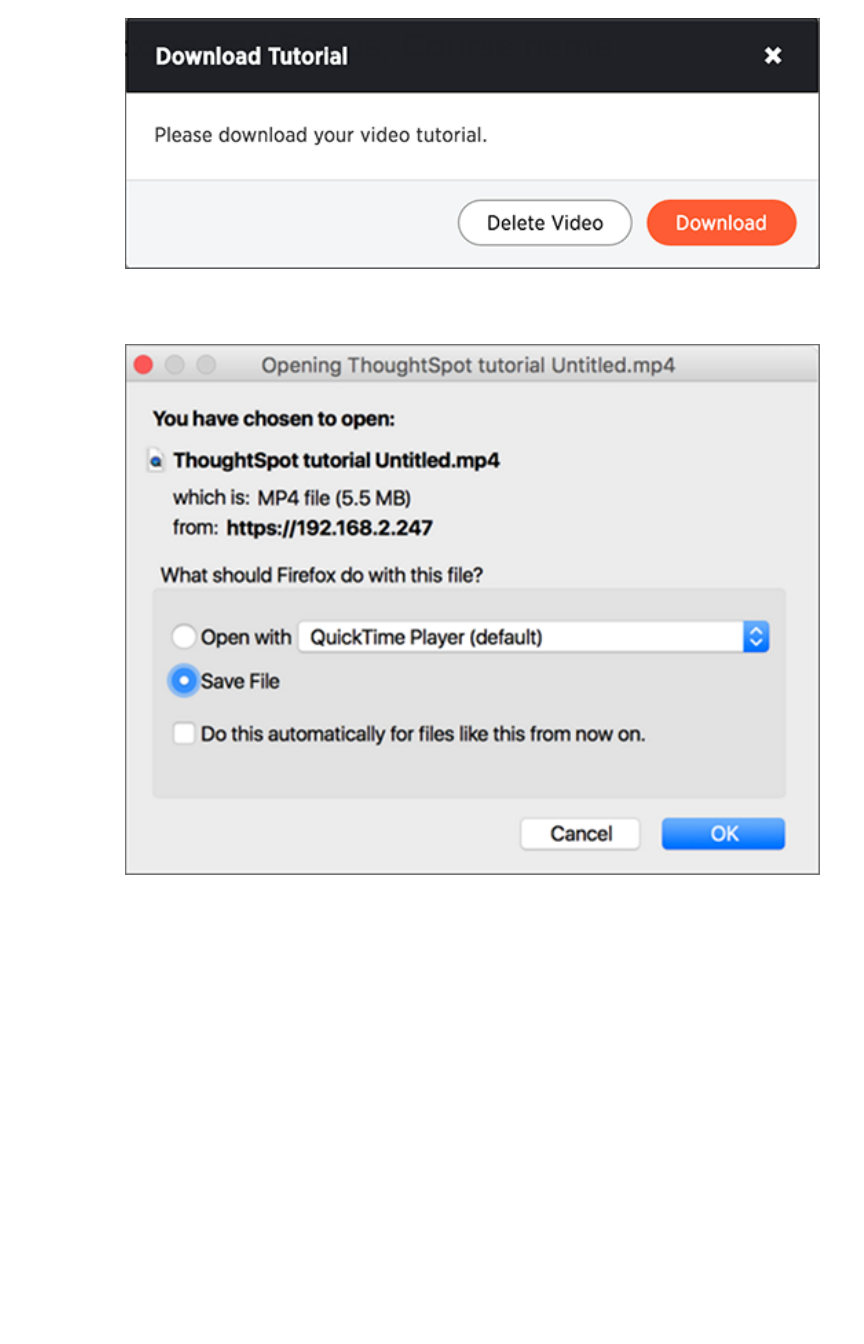
9. Save the recording on your computer by selecting Save FileSave File and clicking OKOK.
Set up recording for Replay Search
February 07, 2019
ThoughtSpot Application Integration Guide Page 247
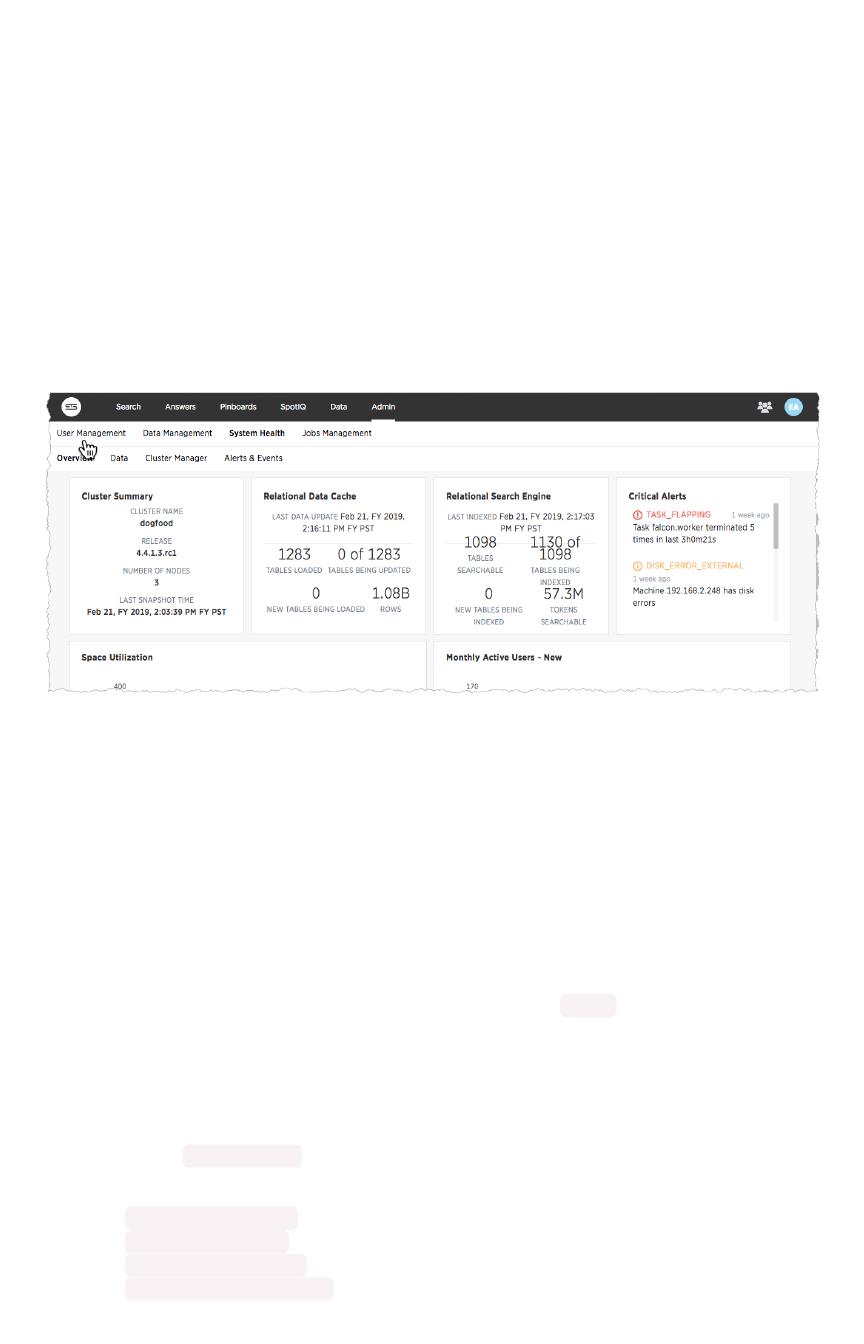
Introduction to monitoring
System monitoring tools in ThoughtSpot include an Admin > System HealthAdmin > System Health page and system logs.
Additionally, ThoughtSpot provides several worksheets and out-of-the-box system monitoring
pinboards. From these worksheets, you can create your own custom visualizations and pinboards. This
page introduces these features and directs you towards more detailed information.
System Health center
The ThoughtSpot application includes a System HealthSystem Health center, for easy monitoring of usage, alerts,
events and general cluster health. You view the System Health Center by choosing the AdminAdmin icon and
then selecting System HealthSystem Health.
Only users with administrative privileges can view the System HealthSystem Health center. However, administrative
users can present to others the information that displays in the System HealthSystem Health center.
Administrators can also create their own, custom boards that reflect system data in ways that are
meaningful to specific departments or groups. For more information, see the following documentation:
•Health Overview board
•Data board
•Cluster Manager board
•Alerts and Events board
•System worksheets
•System pinboards
Much of the data presented by these boards is also available through tscli commands.
Log files
Many of the administration commands output logging information to log files. The logs get written into
the fixed directory /export/logs , with a sub-directory for each subsystem. The individual log
directories are the following:
•/export/logs/orion
•/export/logs/oreo
•/export/logs/hadoop
•/export/logs/zookeeper
Introduction to monitoring
February 07, 2019
ThoughtSpot Application Integration Guide Page 248

You can also view additional topics that also touch on log files throughout the documentation.
System monitoring notifications
You can configure ThoughtSpot to send emails to addresses you specify with monitoring reports and a
cluster heartbeat. Follow these steps to Set up monitoring.
Introduction to monitoring
February 07, 2019
ThoughtSpot Application Integration Guide Page 249
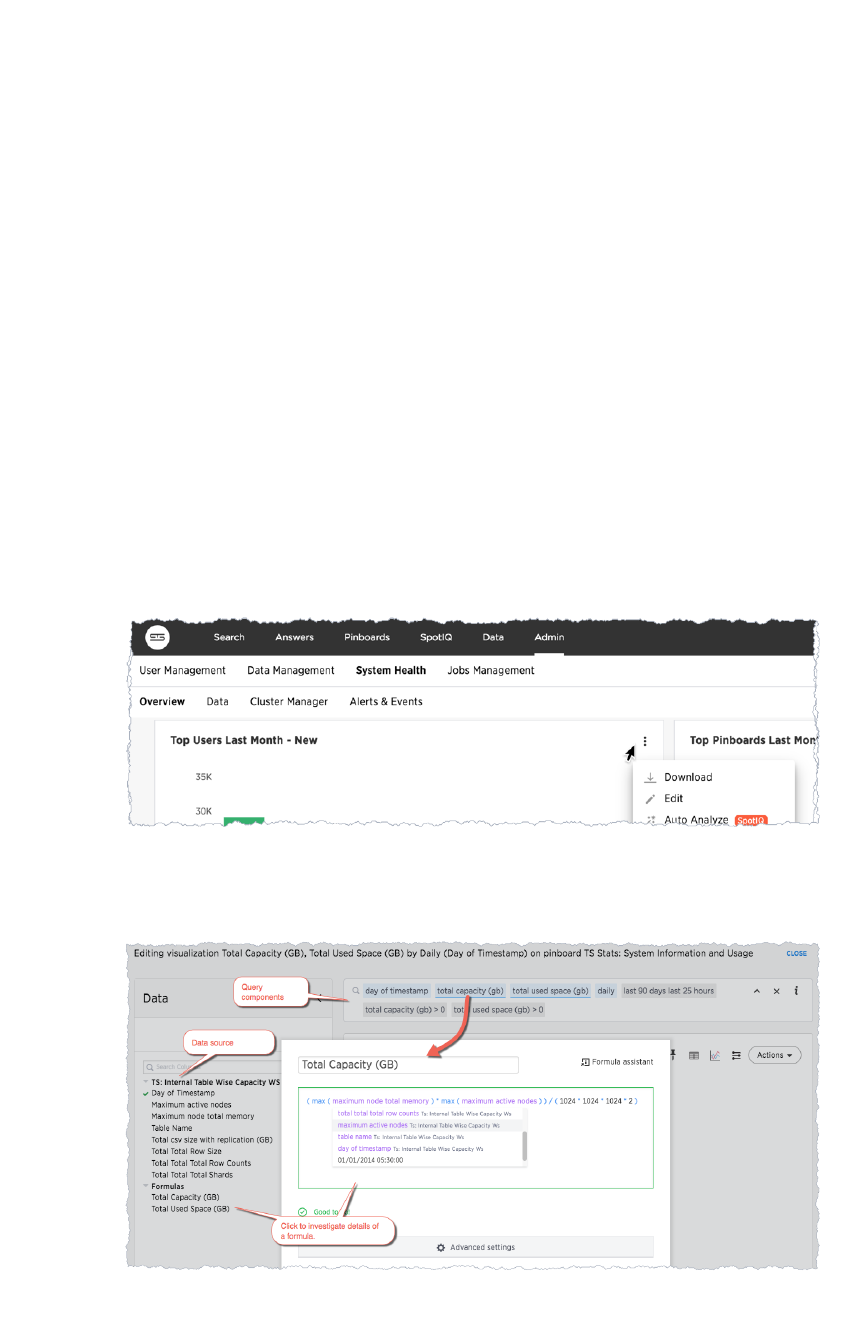
Overview board
The OverviewOverview pinboard summarizes essential information about your cluster and its users. Choose
Admin > System Health > OverviewAdmin > System Health > Overview to see this pinboard.
Understand system boards and pinboards
The OverviewOverview page includes system panels and standard ThoughtSpot
answers
. The system charts are
generated in real time and rely on internal system data. The answers rely on underlying system
worksheets which are available to ThoughtSpot administrators. The information in these worksheets is
updated hourly from internal tables that collect monitoring statistics.
Each answer has a menu. You can present or copy the links to the system charts. The answers have a
subset of the ThoughtSpot answer menu. You can use the menu to do additional actions such as
download the answer or present information about your ThoughtSpot cluster. While you can interact with
and change the search, you cannot save changes to the underlying query.
You can also interact with the answers, drilling into them to explore the detail as with any other pinboard
answer.
To find out how a particular answer was created, do the following:
1. Select EditEdit from the panel menu.
This displays a SearchSearch bar.
2. Investigate the components of the search as you would normally.
Overview board
February 07, 2019
ThoughtSpot Application Integration Guide Page 250

Cluster Summary
This system panel contains basic information about your cluster. The NUMBER OF NODESNUMBER OF NODES is the
number of installed nodes. This doesn’t reflect the active nodes which may be more or less.
This summary includes the LAST SNAPSHOT TIMELAST SNAPSHOT TIME it reflects whether regular snapshots of your cluster
are collected. This value should update regularly in real time. If you do not see it change or empty, you
should check your cluster snapshot policy using the tscli command:
$ tscli snapshot-policy show
schedule {
period {
number: 1
unit: HOUR
}
retention_policy {
bucket {
time {
number: 1
unit: HOUR
}
capacity: 3
}
bucket {
time {
number: 4
unit: HOUR
}
capacity: 2
}
}
offset_minutes_from_sunday_midnight: 0
}
enabled: false
You can see this policy is disabled, which is a problem. Production clusters should enable the default
snapshot policy. When you show or enable the snapshot policy, you’ll see your tscli command
reflected in the Configuration EventsConfiguration Events panel on this same page.
Relational Data Cache
This section reports real-time information about tables in your cluster. Worksheet data is not included.
Overview board
February 07, 2019
ThoughtSpot Application Integration Guide Page 251

ValueValue DescriptionDescription
TABLES LOADEDTABLES LOADED Number of currently loaded tables.
TABLES BEING UPDATEDTABLES BEING UPDATED Number of table loads in-progress.
NEW TABLES BEING LOADEDNEW TABLES BEING LOADED Number of tables being loaded for the first time.
ROWSROWS Number of rows combined across all tables in ThoughtSpot.
Relational Search Engine
ValueValue DescriptionDescription
TABLES SEARCHABLETABLES SEARCHABLE Tables that are indexed and can be searched.
TABLES BEING INDEXEDTABLES BEING INDEXED Total of in-progress table indexing.
NEW TABLES BEING INDEXEDNEW TABLES BEING INDEXED Total of first-time, in-progress table indexing.
TOKENS SEARCHABLETOKENS SEARCHABLE Number of
tokens
of all table (combined) indexed in ThoughtSpot.
Critical Alerts
Displays critical and warning alerts. This includes when an alert was generated and from which service
and machine. Administrators can get a custom report by issuing a tscli alert list on the
appliance:
tscli alert list --since 4w
The critical alerts you can encounter in this display are the following:
•TASK_FLAPPING
MsgMsg: Task {{.Service}}.{{.Task}} terminated {{._actual_num_occurrences}}
times in last {{._earliest_duration_str}}
This alert is raised when a task is crashing repeatedly. The service is evaluted across the
whole cluster. So, if a service crashes 5 times in a day across all nodes in the cluster, this
alert is generated.
•OREO_TERMINATED
MsgMsg: Oreo terminated on machine {{.Machine}}
This alert is raised when the Oreo daemon on a machine terminates due to an error. This
typically happens due to an error accessing Zookeeper, HDFS, or a hardware issue.
•HDFS_DISK_SPACE
Overview board
February 07, 2019
ThoughtSpot Application Integration Guide Page 252

MsgMsg: HDFS has less than {{.Perc}}% space free
Raised when a HDFS cluster is low on total available disk space.
•ZK_INACCESSIBLE
MsgMsg: Zookeeper is not accessible
Raised when Zookeeper is inaccessible.
•PERIODIC_BACKUP_FLAPPING
MsgMsg: Periodic backup failed {{._actual_num_occurrences}} times in last
{{._earliest_duration_str}}
This alert is raised when a periodic backup failed repeatedly.
•PERIODIC_SNAPSHOT_FLAPPING
MsgMsg: Periodic snapshot failed {{._actual_num_occurrences}} times in last
{{._earliest_duration_str}}
This alert is raised when periodic snapshot failed repeatedly.
•APPLICATION_INVALID_STATE_EXTERNAL
MsgMsg: {{.Service}}.{{.Task}} on {{.Machine}} at location {{.Location}}
Raised when Application raises invalid state alert.
The possible alert types are CRITICAL ,WARNING ,ERROR , and INFO . For a full reference, see the
Alert code reference.
Space Utilization
The Space UtilizationSpace Utilization chart is one of the available charts for you to use when checking the cluster
overview. This line chart displays the total capacity and estimated used capacity over time.
Overview board
February 07, 2019
ThoughtSpot Application Integration Guide Page 253
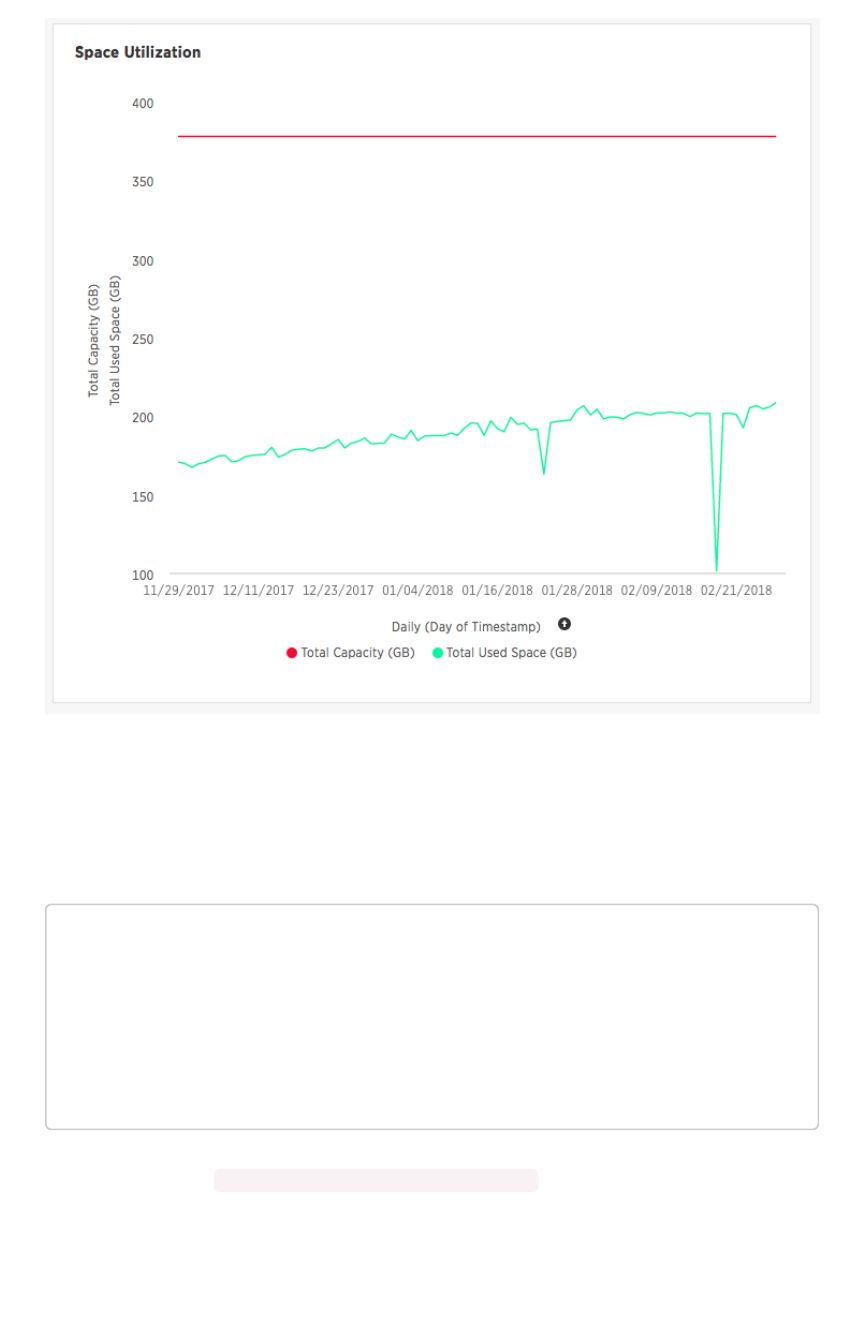
The x-axis is by time and the y-axis measures the size in GB. You can zoom in and see daily or hourly
utilization data. So, in the Space UtilizationSpace Utilization chart above, the green line shows the amount of capacity in
use in the system, while the red line shows the total capacity. An increase in the red line at the end of a
time period indicates the addition of extra hardware, resulting in increased capacity.
The query for this answer is the following:
day of timestamp
total capacity (gb)
total used space (gb)
daily
last 90 days last 25 hours
total capacity (gb) > 0
total used space (gb) > 0
The chart relies on the TS: Internal Table Wise Capacity WS worksheet. It tracks total used
space, which consists of raw uncompressed data, including replication.
Overview board
February 07, 2019
ThoughtSpot Application Integration Guide Page 254

Monthly Active Users
This chart shows the number of active users in the system over the last four months and current month.
An active user is defined as a user who has logged in at least once in the defined time interval, in this
case months.
The query for this answer is the following:
monthly
last 4 months this month
active users
user != {null}
This query relies on the TS: BI server worksheet.
Monthly Ad-hoc Searches
Number of ad-hoc searches (queries) issued per month. An ad-hoc query is defined as any search or
change to a search that builds a new answer (result). An ad-hoc search can also be generated through
SpotIQ or another UI/API interaction.
ThoughtSpot considers all of the following as ad-hoc searches (queries):
• User edits tokens (boxed terms) in the search bar.
• User opens an existing saved answer and makes changes to tokens in the search bar.
• User opens an existing saved pinboard, edits a visualization, and makes change to the search
tokens.
• Searches initiated by an API call for data with runtime filters
It is not considered a search (query) in this context if a user opens an existing saved aggregated
worksheet and makes changes to its underlying query.
The query for this answer is the following:
ad-hoc search
user action = 'answer_pinboard_context' 'answer_saved' 'answe
r_unsaved'
monthly
last 4 months this month
This answer relies on data from the TS: BI Server worksheet.
Overview board
February 07, 2019
ThoughtSpot Application Integration Guide Page 255

Monthly Pinboard Views
Number of times a saved pinboard is viewed by a user. These scenarios are considered pinboard views:
• User opens an existing saved pinboard.
• User opens an embedded pinboard from a URL.
• Pinboard data is accessed using the an API.
These scenarios are not considered pinboard views:
• A user opens SpotIQ tab pinboards.
• A user opens admin tab pinboards.
• The system loads a pinboard on the homepage.
• The system loads the ‘learn how to use ThoughtSpot’ pinboard.
The query underlying this answer is:
pinboard views
user action = 'pinboard_embed_view' 'pinboard_tspublic_no_runti
me_filter' 'pinboard_tspublic_runtime_filter' 'pinboard_view'
monthly
last 4 months this month
The query uses the TS: BI Server data source.
Top Users Last Month
This answer shows the top ThoughtSpot users ranked by number of actions the users performed in the
last 30 days. The possible user actions include:
answer_unsaved User makes a change to tokens in the search
bar.
answer_saved User opens an existing saved answer and makes
changes to tokens in the search bar.
answer_pinboard_context User opens an existing saved pinboard, edits a
context viz and makes a change to tokens in the
search bar.
answer_aggregated_worksheet User opens an existing saved aggregated work-
sheet and makes changes to tokens in the
search bar.
answer_upgrade Requests made for the sole purpose of upgrade.
pinboard_view User opens an existing saved pinboard.
Overview board
February 07, 2019
ThoughtSpot Application Integration Guide Page 256

pinboard_filter User adds, removes or applies values to a pin-
board filter.
pinboard_ad_hoc User drills down in a pinboard viz.
data_chart_config Request for new data being generated following
a chart config change.
data_show_underlying_row Request to show underlying data for a data
row(s).
data_export Request to export data.
pinboard_tspublic_runtime_filter Request to TSPublic/pinboarddata with runtime
filters.
answer_aggregated_worksheet_save User updates aggregated worksheet.
answer_add_new_filter User adds a filter using the UI.
data_show_underlying_viz Request to show underlying data for a data
row(s).
answer_view User opens an existing, saved answer.
answer_viz_context_view User opens an existing saved pinboard, edits a
context viz.
pinboard_insight_view User opens SpotIQ tab pinboards.
pinboard_admin_view User opens admin tab pinboards.
pinboard_embed_view User opens embed pinboard from a URL.
pinboard_homepage_view On loading of homepage pinboard.
pinboard_learn_view On loading learn pinboard.
pinboard_tspublic_no_runtime_filter Request to TSPublic/pinboard data without run-
time filters.
The query underlying this answer is:
top 10
ranked by user actions
user action != 'invalid'
user != {null}
user
last 30 days today
The query uses the TS: BI Server data source.
Overview board
February 07, 2019
ThoughtSpot Application Integration Guide Page 257

Top Pinboards Last Month
This answer shows the top ThoughtSpot users ranked by number of pinboard actions the user
performed in the last 30 days. The possible user actions include:
• User opens an existing saved pinboard (‘pinboard_view’).
• User opens an embedded pinboard from a URL (‘pinboard_embed_view’ ).
• Pinboard data is accessed using an API (‘pinboard_tspublic_no_runtime_filter’ or
‘pinboard_tspublic_runtime_filter’).
The query underlying this answer is:
top 10
ranked by pinboard views
user action = 'pinboard_embed_view' 'pinboard_tspublic_no_runti
me_filter' 'pinboard_tspublic_runtime_filter' 'pinboard_view'
pinboard != {null}
pinboard
last 30 days today
The query uses the TS: BI Server data source.
Configuration Events
This system answer displays recent events that changed the configuration of the system. This panel
displays configuration events related to:
Cluster ConfigurationCluster Configuration Reports configuration actions from the `tscli` and `tql` commands.
Metadata ManagementMetadata Management Events related to metadata such as column names, column visibility,
column and data definition, column rank and so forth.
User ManagementUser Management Events related to creating, updating, or adding new users and groups.
For a more detailed list, including the user that issued a command, you can use the tscli event list
command. Administrators can ssh into the cluster and specify a time period or even a type of
command to include.
Overview board
February 07, 2019
ThoughtSpot Application Integration Guide Page 258

[admin@testsystem ~]$ tscli event list --since 3d
+-------------------------------+-----------------------
+----------------------------+
| DATE | USER
| SUMMARY |
+-------------------------------+-----------------------
+----------------------------+
| 2018-03-06 11:57:10 -0800 PST |eadmin@thoughtspot.int | User
Management: User |
| | | "gues
t_1" updated |
| 2018-03-06 11:48:10 -0800 PST |admin | tscl
i node ls |
| 2018-03-06 11:17:04 -0800 PST |eadmin@thoughtspot.int | Metad
ata Management: |
| | | Metad
ata object "Number of |
| | | Oppor
tunity |
| | | AE an
d Stage" of type |
...
About deprecated boards
There are a number of deprecated boards on this page. They are there to support older installations that
relied on them. New installations, should not use or rely on deprecated boards. Older installations that
have used these boards in some way, should use the new boards and remove any dependencies.
Related information
tscli logs command
Overview board
February 07, 2019
ThoughtSpot Application Integration Guide Page 259
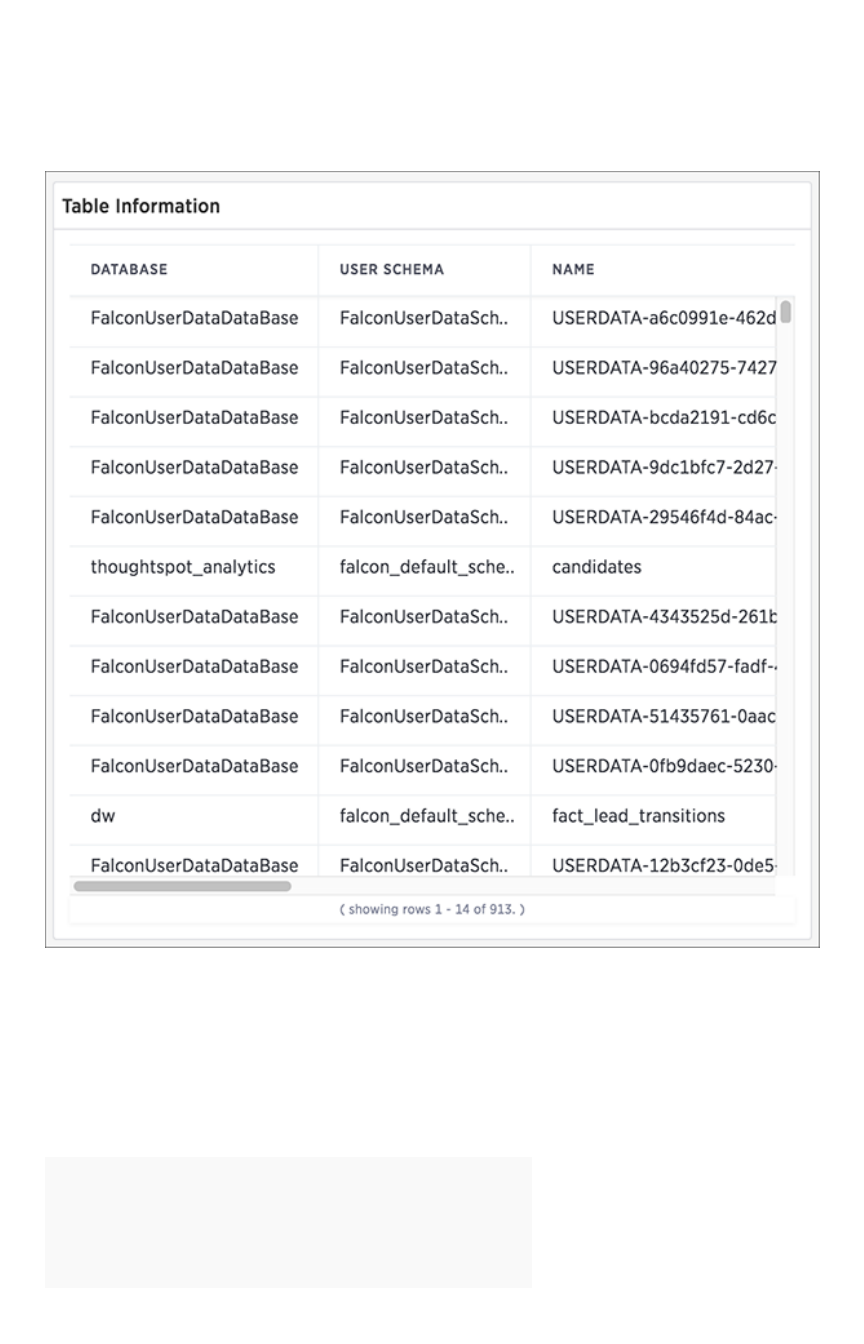
Data board
The DataData page shows all the stored tables with details on the last update time, time taken for auto-
indexing, number of rows, and so forth.
You can click on a column name to sort by table name. This table information is based on an underlying
system data, you can present it or copy the link, but you cannot access the underlying query.
Database Status
The Database StatusDatabase Status column can have the following possible values:
StatusStatus MeaningMeaning
READY
The data has been loaded.
Data board
February 07, 2019
ThoughtSpot Application Integration Guide Page 260

StatusStatus MeaningMeaning
IN PROGRESS The data is still being loaded.
STALE The data is not up to date.
ERROR The table is invalid. Call Customer Support.
Replication Status
The ReplicatedReplicated column indicates if the table has been replicated or sharded. This can be used in
conjunction with the Total ShardsTotal Shards column to see how your data is distributed.
If the table is replicated on a multi node system, the Used Capacity (MB)Used Capacity (MB) column will indicate the total
space used on all nodes. a 10MB table replicated on a 4 node system will show 40MB used capacity for
example.
Search Status
The Search StatusSearch Status column can have the following possible values:
StatusStatus MeaningMeaning
READY
The data is up to date and searchable.
NOT READY
The data is not ready to be searched.
DELETING INDEX
The table has already been deleted, but the index still exists due to the
latency between the database and search engine.
INDEXING DISABLED Either too many tokens exist in a column for it to be indexed, or index-
ing has been disabled manually.
CREATING INDEX The index is being created.
UPDATING INDEX A change has been made to indexing or the data, and the index is be-
ing updated to reflect it.
Data board
February 07, 2019
ThoughtSpot Application Integration Guide Page 261
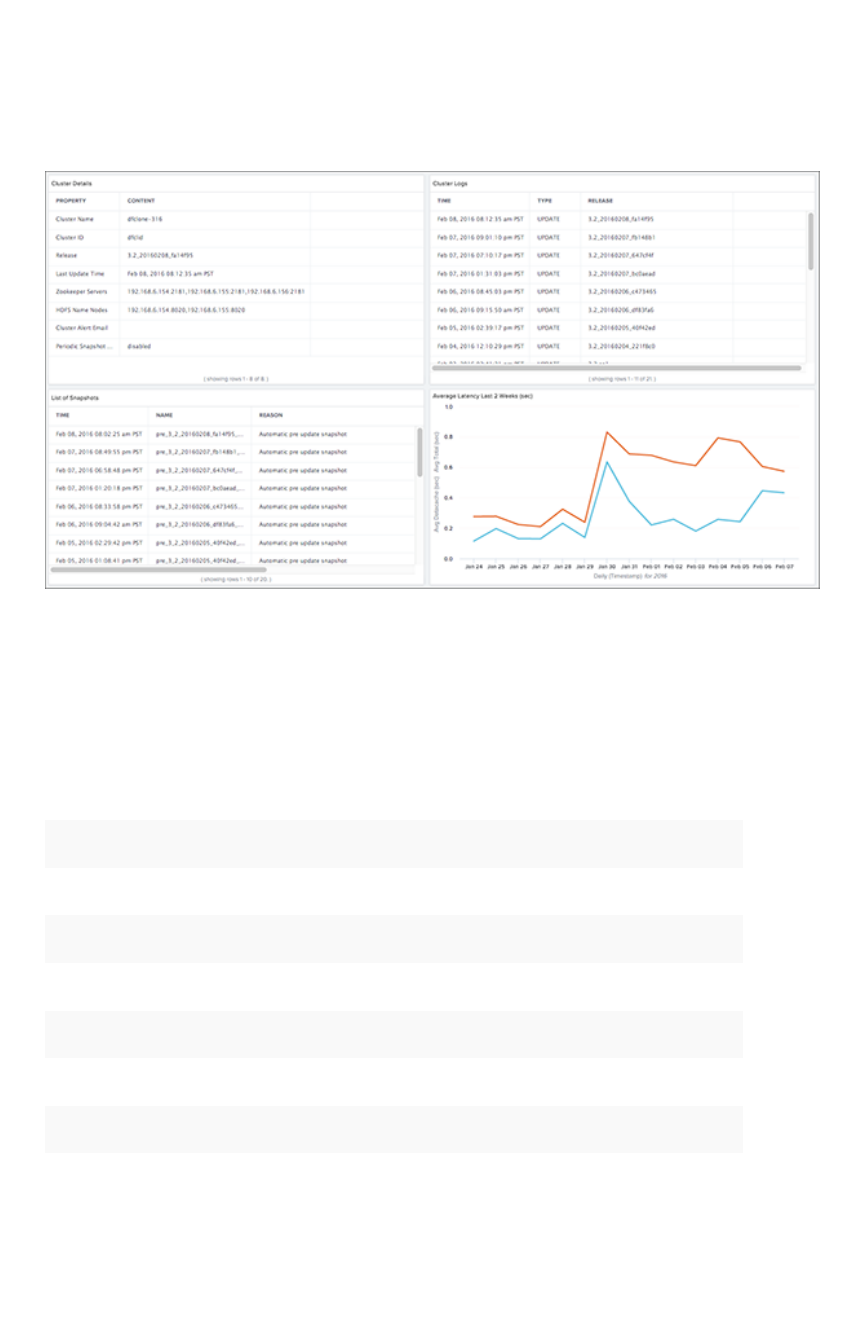
Cluster Manager board
The Cluster ManagerCluster Manager section show detailed information about a cluster including latency over time,
snapshot status, installed release, node functions, and logs.
Only the Average Latency Last 2 Weeks (sec)Average Latency Last 2 Weeks (sec) panel contains a standard ThoughtSpot visualization. The
other visualizations rely on internal queries that are not accessible. You can, however, PresentPresent or CopyCopy
linklink on them.
Cluster Details
The fields on this visualization has the following meaning:
FieldField DescriptionDescription
Cluster NameCluster Name The name of the cluster defined at installation time.
Cluster IDCluster ID The ID of the cluster set at installation time.
Last Update TimeLast Update Time Last time the cluster was updated.
ReleaseRelease Version of the current release.
Zookeeper ServersZookeeper Servers IP addresses of the Zookeeper servers.
HDFS Name NodesHDFS Name Nodes Control nodes for Hadoop Distributed File System (HDFS).
Cluster Logs
The fields on this visualization has the following meaning:
Cluster Manager board
February 07, 2019
ThoughtSpot Application Integration Guide Page 262

FieldField DescriptionDescription
TimeTime A timestamp indicating when an action occurred.
TypeType Type of action.
ReleaseRelease Identifies the full release number.
You can also use the tscli logs command to review log data from your cluster.
List of Snapshots
This visualization shows the snapshots
and the backups
taken on the cluster. The fields on this
visualization has the following meaning:
FieldField DescriptionDescription
TimeTime A timestamp indicating when a snapshot or backup happened
occurred.
NameName Name of the snapshot file. These files are stored in the `/usr/lo-
cal/scaligent/backup` directory on your cluster.
ReasonReason Identifies the reason the snapshot/backup was created. You
should see several period snapshots if your cluster is configured
properly. You may also see evidence here of manual backups.
For example, you should be sure your cluster is backed up be-
fore major events such as upgrades. Email sup-
port@thoughtspot.com if you don't see evidence your cluster is
periodically creating snapshots.
SizeSize Size of the backup in gigabytes.
Average Latency Last 2 Weeks (sec)
This visualization relies on the TS: BI Server worksheet to display the average database latency over
the last 15 days. The database latency measures how long it takes for a search to return data from
ThoughtSpot - this does not include the time taken to send the answer back to the client, it measures
internal processing time. You can use the visualization menu to drill down to its underlying query:
average datacache (sec)
average total (sec)
daily
last 15 days
for database latency (us) > 0
Cluster Manager board
February 07, 2019
ThoughtSpot Application Integration Guide Page 263


Alerts and Events board
The Alerts and EventsAlerts and Events section shows notifications, alerts, and an audit trail of cluster configuration
changes.
Alerts
The fields on this answer have the following meaning:
FieldField DescriptionDescription
TimeTime When the alert was sent.
TypeType The ID of the event.
MessageMessage The text of the alert message.
For a full reference of possible alerts, see the Alert code reference.
Configuration Events
This system answer displays recent events that changed the configuration of the system. This list can
contain the same types of information available on the Admin System Health > OverviewAdmin System Health > Overview page. This
answer displays the TimeTime, the UserUser that performed the action, and a SummarySummary of the action.
Alerts and Events board
February 07, 2019
ThoughtSpot Application Integration Guide Page 265

Notification events
This answer displays notifications of data loads. The display the TimeTime, the UserUser that performed the
action, and a SummarySummary of the action. Notifications are kept for 90 days before being discarded.
Related information
Alert code reference
Alerts and Events board
February 07, 2019
ThoughtSpot Application Integration Guide Page 266
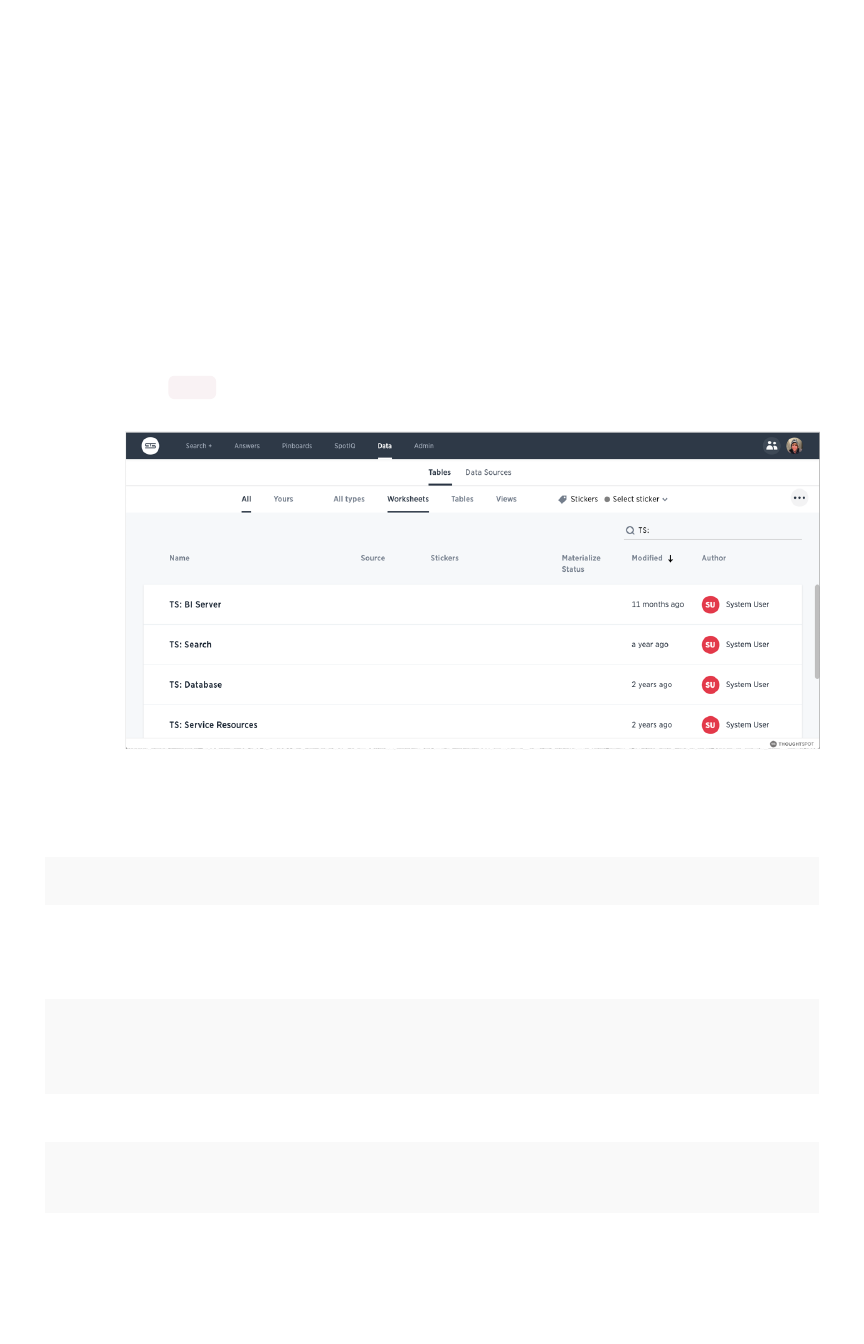
System worksheets
Most of the monitoring information in System HealthSystem Health are sourced from system worksheet which
administrators can view, but not modify. The underlying tables are protected system tables that cannot
be accessed directly. However, administrators can create new, custom monitoring reports from the
worksheets.
List the system worksheets
To list the system worksheets:
1. Go to the DataData tab.
2. Choose AllAll and WorksheetsWorksheets.
3. Enter TS: in the search field.
Summary of the worksheets
WorksheetWorksheet DescriptionDescription
TS: BI Server Contains data related to the systems associated with underlying
the ThoughtSpot BI server. This includes database latency,
browser clients, size of responses, and more.
TS: Database Contains information related to the database cache and queries
run on the database. For example, you could use this worksheet
to see data on the query errors returned by the database.
TS: Internal Capacity WS Describes cluster memory capacity by node over time.
TS: Internal Table Wise
Capacity WS
Describes memory capacity by node, table name, shard count,
and CSV replication over time.
TS: Metrics Contains metrics by cluster and host over time.
System worksheets
February 07, 2019
ThoughtSpot Application Integration Guide Page 267

TS: Search Contains data related to the number of searches (queries) run in
the system. This contains information such as uptime, host, and
timestamps.
TS: Service Resources Contains data related to cluster nodes including page faults,
memory usage, memory failures, and more.
TS: Table Info Describes the named tables by timestamp, row count, row
shards, and row size.
TS: Table Row Counts Describes the named tables by timestamp and row count.
TS: Table Row Counts and
Shards
Describes the named tables by timestamp, row count, row
shards, and row size.
TS: Table Row Size Describes the named tables by timestamp and row size.
TS: Table Shards Describes the named tables by timestamp and shard count.
System worksheets
February 07, 2019
ThoughtSpot Application Integration Guide Page 268
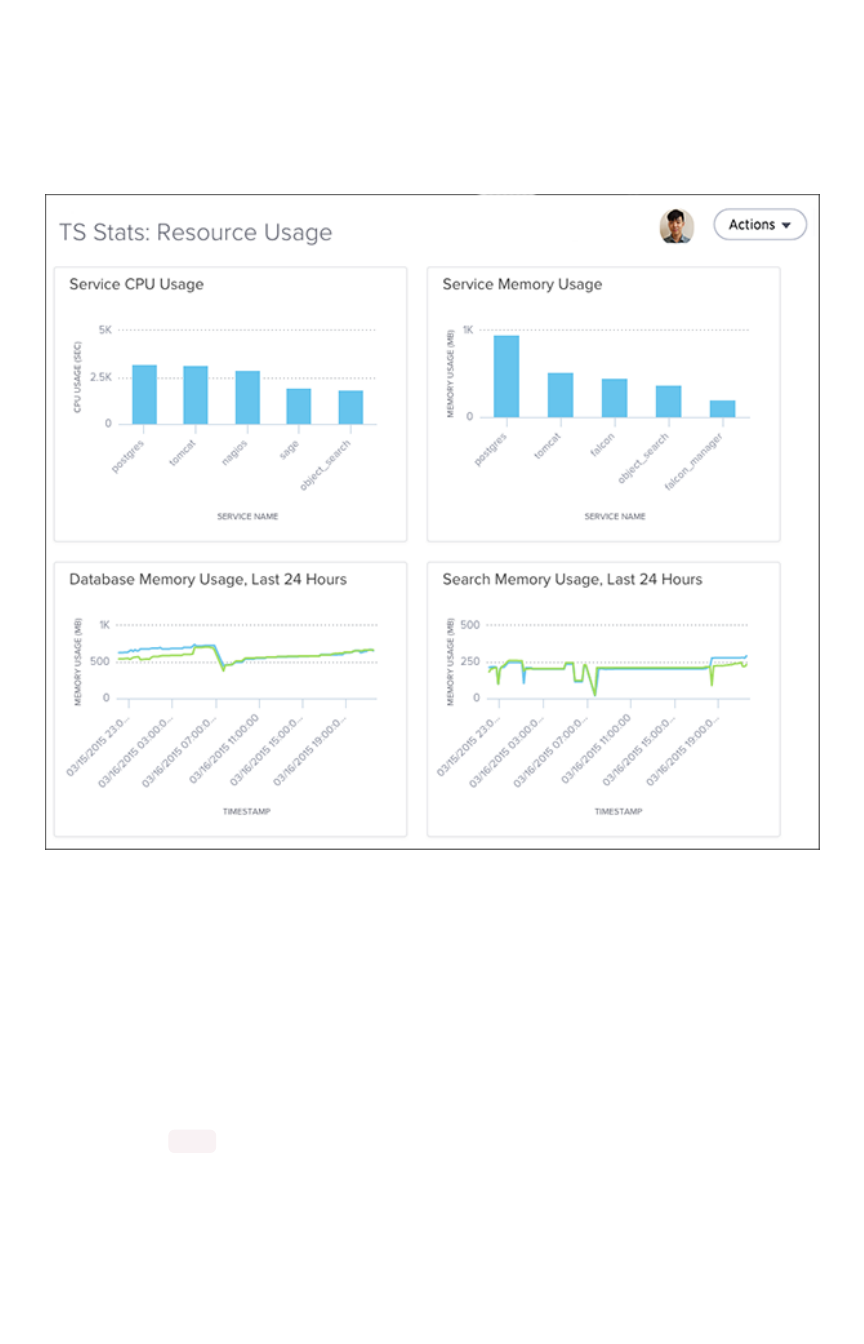
System pinboards
There are several system monitoring pinboards in ThoughtSpot that provide answers for system status
and resource usage questions. The information in these pinboards are updated hourly from internal data
sources that collect monitoring statistics.
Only users with administrative privilege can view the monitoring pinboards. They are based on
worksheets, which administrators can view, but not modify. However, you can create new monitoring
pinboards from the worksheets.
List system pinboards
To list these system pinboards:
1. Go to the PinboardsPinboards tab.
2. Choose AllAll.
3. Enter TS: in the search field.
System pinboards
February 07, 2019
ThoughtSpot Application Integration Guide Page 269
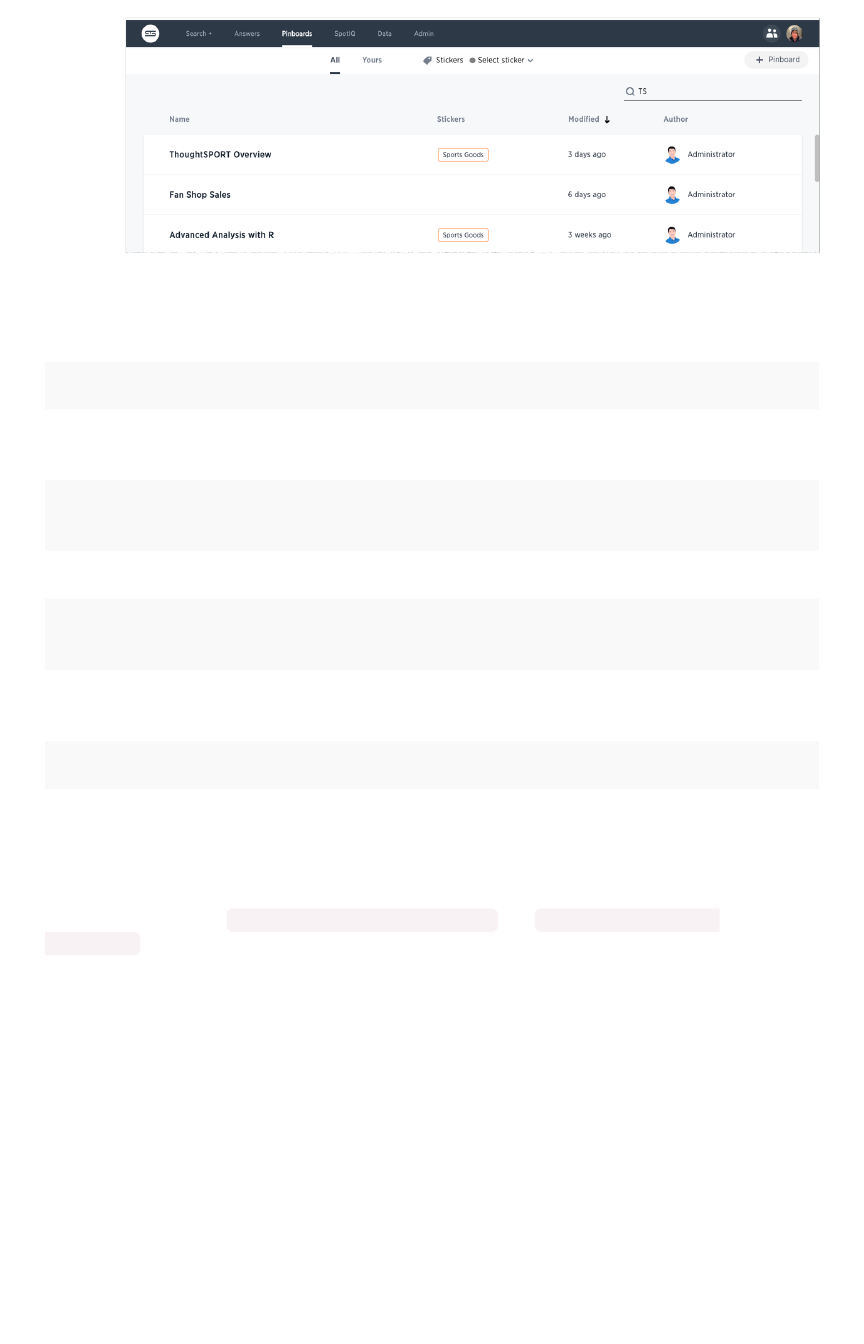
Summary of system pinboards
PinboardPinboard DescriptionDescription
Learn how to use
ThoughtSpot
Contains search replays created in the system.
TS Stats: Alert Detail Combines alerts, notification events, and configuration events
boards.
TS Stats: Cluster Detail Contains cluster details, logs, snapshots, and latency data.
TS Stats: System Informa-
tion and Usage
Replicates the **Admin > System Health > Overview** page.
TS Stats: Latency Visual-
izations
Latency on servers and
impression
counts. This data comes
from the `TS: BI Server` worksheet.
TS Stats: Table Status Replicates the **Data** board.
About deprecated boards
The deprecated boards ( TS status: Usage - Deprecated and TS StaTS: Queries --
Deprecated ) are there to support older installations. New installations, should not use or rely on
deprecated boards. Older installations that have used these boards in some way, should use the new
boards and remove any dependencies.
System pinboards
February 07, 2019
ThoughtSpot Application Integration Guide Page 270

Understand the backup strategies
This section discusses three strategies for backing up your ThoughtSpot cluster.
Snapshots
A snapshot is a point-in-time image of your running cluster. Snapshots are both taken on and restored to
a cluster while it is running. Each cluster has a periodic snapshot configuration enabled by default. This
configuration instructs the system to periodically take snapshots. Creation of a snapshot takes about 20
seconds. Once taken, a snapshot is persisted on disk in the cluster’s HDFS.
You can also create a snapshot manually. You should create a snapshot before making any changes to
the environment, loading a large amount of new data, or changing the structure of a table. A snapshot
may only be restored to the same cluster on which it was taken. The cluster software release version
must match the snapshot release version.
If you need to move data between clusters or restore to a cluster that was updated to a new release,
contact ThoughtSpot Support.
Backups
A backup is a procedure that stores a snapshot outside of a ThoughtSpot cluster. Backups are stored in
a directory on a local or network file system. You can store all of the data associated with a snapshot or
a portion of that data or only metadata. There is no default configuration enabled for backing up a
cluster. You can configure on yourself or you can take backups manually. Backing up periodically
protects your company from losing data and/or user work.
You can use a backup to restore a cluster to a prior state, a differently configured appliance, or move the
backup from an appliance to a virtual cluster or vice versa.
Offline backup cluster
The most robust strategy for backup and recovery requires having a backup cluster offline that is kept in
sync with the production cluster. Then, if the production cluster fails, the backup cluster can be drafted
to take its place with minimal loss of work and disruption to operations.
Details on this architecture and instructions on setting it up are available in the ThoughtSpot Disaster
Recovery Guide, which you can request from ThoughtSpot.
Choosing when to use a strategy
Depending on your situation and your goals, you can choose to use a snapshot or a backup. This table
should help you decide:
SnapshotSnapshot BackupBackup
Understand the backup strategies
February 07, 2019
ThoughtSpot Application Integration Guide Page 271

Used toUsed to To restore to a cluster to particular point
in time.
• Restore a cluster to a prior
state.
• Move a cluster to a different
HW appliance.
• Move a cluster to VM appli-
ance.
• Removal of a node.
• Restoring to a cluster running
a different release from the
one where the backup was
taken.
StoredStored In the cluster's HDFS Outside the cluster on either local or
NAS disk.
AdvantagesAdvantages • Can be taken on or restored
to a running cluster
• Creation and restore is fast
• Very stable medium.
• Can be used to recover from
data loss or corruption, even
if your cluster was destroyed.
• Can be typed as full, light-
weight, or dataless.
LimitationsLimitations • Includes all data, state, and
metadata etc. created be-
tween snapshot creation and
restore.
• Are lost if the HDFS name
node fails, you lose multiple
disks at once, or the entire
cluster is destroyed
• Can only restored to the clus-
ter they were taken from
• Backups require deleting the
existing cluster first.
• You are responsible for vali-
dating your backup configu-
ration as viable for restoring a
cluster.
• Best practice recommends
you to maintain multiple
backups.
• Are typically large in size.
</ul> </td> </tr> </table>
You should never restore
from a snapshot or backup
yourself, instead contact
ThoughtSpot Support for
help.
Understand the backup strategies
February 07, 2019
ThoughtSpot Application Integration Guide Page 272

Understand backup/snapshot schedules
Summary:Summary: Explains how schedules and gives examples.
You can schedule periodic snapshots and backups. For snapshots, ThoughtSpot comes configured with
a strongly recommended periodic snapshot policy. For backups, there is no such policy but you may
want to create one or several of your own configurations. This section helps to understand existing
schedules and how to configure new schedules.
Configuration format
ThoughtSpot uses a protocol buffer configuration file to hold snapshot and backup policies. There are
slight differences between the configuration of snapshots and backups. You’ll read more about these
later. However, the file format defines a schedule structure which is the same for both snapshots and
backups. The following example shows the schedule format:
schedule {
period {
number: integer
unit: MINUTE | HOUR | DAY
}
retention_policy {
bucket {
time {
number: integer
unit: MINUTE | HOUR | DAY
}
capacity: integer
}
}
offset_minutes_from_sunday_midnight: integer
}
The schedule has the following components:
period Specifies the frequency in the chosen unit . You can
specify the unit as MINUTE ,HOUR , or DAY .
retention_policy Specifies retention intervals. Retention is on a first-in-
first-out (FIFO) basis. So, the oldest result is always
discarded. You can specify the unit as MINUTE ,
HOUR , or DAY . You can specify multiple retention
buckets and they can have different retention policies.
Understand backup/snapshot schedules
February 07, 2019
ThoughtSpot Application Integration Guide Page 273

offset_minutes_from_sunday_midnight Determines the minute within the hour you’d like exe-
cution to start. Setting this to zero is equivalent to
midnight.
Work through an example schedule
In this section, you work through an example schedule. This is a working example that is the actual
default snapshot schedule set on every ThoughtSpot instance.
schedule {
period {
number: 1
unit: HOUR
}
retention_policy {
bucket {
time {
number: 1
unit: HOUR
}
capacity: 3
}
bucket {
time {
number: 4
unit: HOUR
}
capacity: 2
}
}
offset_minutes_from_sunday_midnight: 0
}
Under this policy, a snapshot is taken every hour starting at midnight. You can see that by combining the
period of 1 hour with the midnight offset of 0.
Understand backup/snapshot schedules
February 07, 2019
ThoughtSpot Application Integration Guide Page 274

schedule {
period {
number: 1
unit: HOUR
}
...
}
offset_minutes_from_sunday_midnight: 0
}
Using this frequency, a total of 24 snapshots are taken in a day.
1234567891011121314…24
If you were to specify a number of 2, the frequency changes. The first execution would start at midnight
but subsequent executions would happen every 2 hours as shown here:
2 4 6 8 10 12 14 … 24
You use the retention_policy to control how many snapshots are kept. In this example, the first
bucket retains a snapshot every three hours.
retention_policy {
bucket {
time {
number: 1
unit: HOUR
}
capacity: 3
}
...
}
When the fourth hour comes along, the snapshot from first hour is discarded as per FIFO behavior. So in
the 4th hour, you’ll have the snapshots from hours 2, 3, and 4 in this retention bucket.
1D 2R 3R 4R 5 6 7 8 9 10 11 12 13 14 … 24
The second bucket retains the snapshot taken at four hour intervals.
Understand backup/snapshot schedules
February 07, 2019
ThoughtSpot Application Integration Guide Page 275

retention_policy {
...
bucket {
time {
number: 4
unit: HOUR
}
capacity: 2
}
}
It retains two of these four-hour-interval snapshots at any one time. By hour 9 during the day, you have
the snapshots from hour 4 and hour 8 in this second bucket.
1234R5678R91011121314…24
Consider what you will have in the first bucket in hour 9? The first bucket will have the snapshots from
hour 9, 8, and 7.
At the end of the day, in the first bucket, you will have 22, 23, and 24th snapshot. While in the second
bucket, you will have the 20th hour and the 24th hour snapshots.
1 … 12 13 14 15 16 17 18 19 20R 21 22R 23R 24R
What if you changed the period frequency to every 2 hours? What would you have retained in your
buckets at hour 24?
1 … 12 14 16 18R 20R 22R 24R
As you can see, when defining a policy it can be helpful to graphically represent the frequency you
configure. Then, determine which time blocks are important to retain before determining your retention
bucket.
Understand backup/snapshot schedules
February 07, 2019
ThoughtSpot Application Integration Guide Page 276

Work with snapshots
Summary:Summary: A snapshot is a point-in-time image of your running cluster
you can use to restore the cluster back to a specific point in time.
In this section, you learn how to work with the default snapshot configuration that is enabled on ever
cluster and how to take manual snapshots of your own.
Create a manual snapshot
You should create a snapshot before making any changes to the environment, loading a large amount of
new data, or changing the structure of a table. You can have up to 20 manual snapshots at a time, after
which, you have to clear one before you are able to create another. If you need to delete a snapshot,
contact ThoughtSpot Support.
Note:Note: When you upgrade, all existing snapshots from the previous version of ThoughtSpot will
become manual snapshots.
Taking a snapshot is fast, about 20 seconds. It happens invisibly in the background of a running cluster.
If you would like to restore from a snapshot instead, contact ThoughtSpot Support.
To create a snapshot:
1. Log in to the Linux shell using SSH.
2. Initiate a snapshot, providing a name and reason for creating it: Snapshot names must be 44
characters or less.
$ tscli snapshot create <name> <reason> <ttl>
3. Check that the snapshot was created:
$ tscli snapshot ls
Configure periodic snapshots
By default, each ThoughtSpot cluster is configured to take automatic, periodic snapshots of your cluster.
This section explains how to learn more about the periodic snapshots in your cluster.
The default snapshot policy is enabled for every cluster. You can use the tscli snapshot-policy
show command to display the current policy for periodic snapshots.
Work with snapshots
February 07, 2019
ThoughtSpot Application Integration Guide Page 277

[admin@dogfood1 ~]$ tscli snapshot-policy show
schedule {
period {
number: 1
unit: HOUR
}
retention_policy {
bucket {
time {
number: 1
unit: HOUR
}
capacity: 3
}
bucket {
time {
number: 4
unit: HOUR
}
capacity: 4
}
bucket {
time {
number: 1
unit: DAY
}
capacity: 4
}
bucket {
time {
number: 1
unit: WEEK
}
capacity: 2
}
}
offset_minutes_from_sunday_midnight: 0
}
enabled: true
This policy starts at midnight on Sunday. It retains the snapshots from the last three 4-hour intervals and
two snapshots from two of the previous 4 hour intervals. That means, there are 7 periodic snapshots
retained overall. For detailed information about understanding the schedule, see Understand backup/
snapshot schedules.
Work with snapshots
February 07, 2019
ThoughtSpot Application Integration Guide Page 278

You shouldn’t change this default policy unless instructed to by support. If you have to adjust it for some
reason, you can use, tscli snapshot-policy update command. This opens the current policy in an
editor. Your policy should never retain more than 20 snapshots at any point in time. Exceeding this
number can impact cluster performance.
You cannot delete the snapshot policy. However, you can disable the policy by executing the tscli
snapshot-policy disable command. And you can re-enable it by running, tscli snapshot
enable-policy .
Warning:Warning: Backups rely on the snapshot system. For this reason, you should never disable the
periodic snapshot system. For example, if you have disabled the periodic snapshots and periodic
backups are enabled, then the periodic backup may use a very outdated snapshot or it may fail all
together.
To check your current periodic snapshot policy:
1. Log in to the Linux shell using SSH.
2. Enter tscli snapshot-policy show to view the policy.
Work with snapshots
February 07, 2019
ThoughtSpot Application Integration Guide Page 279

Understand backup modes
A backup is a procedure that stores a snapshot outside of a ThoughtSpot cluster. You can use a backup
to restore a cluster to a prior state, a differently configured appliance, or move it to from an appliance to
a virtual cluster or vice versa. Other advanced administrative operations also use backups.
You can create a manual backup or configure an automated, periodic backup A backup stores snapshot
outside of a ThoughtSpot cluster. For manual backups, the system creates a backup using the named
snapshot you specify. For periodic backups, the system uses the most recent snapshot to create the
backup.
Warning:Warning: You should never disable the periodic snapshot system as backups rely on it. For
example, if you have disabled the periodic snapshots system and periodic backups are enabled,
then the periodic backup may use a very outdated snapshot or it may fail all together.
Backups are usually stored on a NAS (network attached storage) file system but you can store them on a
local disk as well. When creating a backup, ThoughtSpot copies a release tarball and several supporting
files to a disk you specify. Storing these supporting files takes about 10 GB of extra space beyond the
backup itself. The final backup image is smaller because these extra files are removed after the backup
completes successfully. So, make sure you have enough disk space both to
take
a backup and store the
result. Use the tscli storage df command to identify the amount of space available.
You can create a backup using one of three modes, full, lightweight or dataless.
Full backups
Full backups are entire backups of the cluster with all data, whether loaded from the web interface or
from tsload . This is the best mode for restoring a cluster and all your data. Once a FULL backup is
created, you can move them between clusters, even if the cluster configuration is different. Full backups
can be as large as 20 GB in addition to the 5 GB of additional files. Some installations can exceed these
limits, this is why it is important to test your backup configuration.
Before creating a manual backup or configuring automated backups, make sure there is enough disk
space on the target disk. Consider an example, where you want to store three backups. If the backup
itself takes 18GB, you need about 18 + 5 = 23 GB of free disk space. Don’t forget that the backup size
can grow over time, so you should occasionally check to ensure you are not in danger of running out of
disk space to store backups.
Lightweight backups
Lightweight backups contain everything that makes up a cluster so they contain the following:
• Cluster configuration (SSH, LDAP, etc.)
• In-memory data cache
• All data that is stored unencrypted in HDFS
• Data uploaded by users
• Metadata for the data store
• Users, groups and permissions
Understand backup modes
February 07, 2019
ThoughtSpot Application Integration Guide Page 280

• Objects created by users (pinboards, worksheets, and formulas) with their shares and
permissions.
• Data model and row-level security rules.
Data loaded through ThoughtSpot Loader ( tsload ), ODBC/JDBC drivers, and Data Connect is
excluded. The expectation is that data loaded via tsload is from external sources and so can be re-
loaded after the cluster is restored. An exception is if these mechanisms were used to load data into
tables that were first created through CSV import (that is, a user first loaded the tables via the GUI). In
this case, the data, like the tables they were loaded into, are saved.
Dataless backups
A dataless backup saves a backup of the schema (metadata), with no data. Dataless backups allow you
to send a copy of your cluster metadata to ThoughtSpot Support for troubleshooting without
compromising data security and privacy. The size of a dataless backup is usually within 10’s of
megabytes provided you do not have customized binaries.
When restoring from a dataless backup, you must supply the correct release tarball, since this type of
backup does not include the software release.
Understand backup modes
February 07, 2019
ThoughtSpot Application Integration Guide Page 281

Create a manual backup
Use this procedure when you want to manually create a backup. If you would like to restore from a
backup, contact ThoughtSpot Support.
You create a manual backup from an existing snapshot. So, you must identify an existing snapshot to
use or take a new snapshot first. The time required to take a backup depends on the data size. Taking a
backup does not take long, and happens in the background while the cluster is running.
1. Log in to the Linux shell using SSH.
2. Create a manual snapshot or find a snapshot you want to use. To find a snapshot you want to
back up use the following command:
$ tscli snapshot ls
--------------------------------------------------------
-------------------
Name : pre330
Reason : pre3.3.0
Hdfs snapshot : pre330
Start : Wed May 4 18:07:32 2016
End : Wed May 4 18:08:23 2016
Size(Full) : 13.24 GB
Size(LW) : 4.96 GB
Size(Dataless): 39.76 MB
--------------------------------------------------------
-------------------
...
3. Make sure you have enough room on the target disk.
In addition to the size of the snapshot, you will need 10 to 12 GB of disk space. This is
because the process requires space for temporary files. You can use the df command to
check disk size.
$ df -h
4. Create the backup, designating the type of backup, the snapshot name, and a directory:
Choose the mode of backup you want to create, either full, lightweight, or dataless. The
destination directory is created for you; do not specify an existing directory. The BASE value
is the name
Create a manual backup
February 07, 2019
ThoughtSpot Application Integration Guide Page 282

$ tscli backup create [-h]
[--mode {full|light|dataless}]
[--type {full}]
[--base snapshot_name>]
[--storage_type {local|nas}][--remote]
<name> <directory>
5. Check that the backup was created:
$ tscli backup ls
Create a manual backup
February 07, 2019
ThoughtSpot Application Integration Guide Page 283

Configure periodic backups
You can configure ThoughtSpot to backup automatically at specified times. The policy allows you to
control the type, frequency, retention periods (first-in-first-out), and output location for a periodic
backup.
A periodic backup uses the same steps as creating a backup manually. However, you do not need to
specify a snapshot name, the system uses the most recent backup. You can backup to a local file
system or mount a NAS (network attached storage) file system to hold the backup. A NAS is
recommended. Make sure you have adequate space to store the number of backups you want to
archive.
The format for a policy includes the following:
name: "name_for_backup"
param {
mode: FULL | DATALESS | LIGHTWEIGHT
type: STANDALONE
}
schedule {
period {
number: integer
unit: MINUTE | HOUR | DAY
}
retention_policy {
time {
number: integer
unit: MINUTE | HOUR | DAY
}
capacity: integer
}
}
offset_minutes_from_sunday_midnight: integer
}
directory: "NAME"
storage_type: NAS | LOCAL
Before creating a policy, make sure you have read Understand backup/snapshot schedules for
information on configuring a schedule element. In addition, you must specify:
ElementElement DescriptionDescription
mode The backup mode. FULL backups are necessary for restoring a cluster. See
Work with backups for details on each backup mode.
type Currently, only STANDALONE is supported.
Configure periodic backups
February 07, 2019
ThoughtSpot Application Integration Guide Page 284

ElementElement DescriptionDescription
directory The location on the disk to place the backup.
storage_type The type of storage you are using. NAS storage is recommended for FULL
backups.
Backups cannot start when another backup is still running. So, choose a reasonable frequency for the
mode in you policy. For example, a FULL backup takes longer than a DATALESS backup. Consider the
load on the system when configuring. Do not backup up when the system would experience a heavy
load. For example, you may want to take FULL backups late in the evening or on weekends.
The retention system deletes the oldest stored backup and the corresponding snapshot on a first-in first-
out basis (FIFO). This means that if you set a bucket retention of 1 the system stores a single backup at
any one time. The system deletes the older backup after the new full backup is successful.
To configure periodic backups:
1. Log in to the Linux shell using SSH.
2. Find a directory with enough disk space to support the retention_policy number you
configure.
You can use df -h to see free disk space and tscli snapshot ls to view existing
snapshots and their size on disk.
3. Use the tscli backup-policy create command.
The command opens a vi editor for you to configure the backup policy.
4. Write and save the file to store your configuration.
By default, newly created policies are automatically enabled. To disable a policy, use the
tscli backup-policy disable command.
5. Verify the policy using the tscli backup periodic-config <name> command.
Doing more with backup
The following table lists some additional backup commands you can use.
ToTo CommandCommand
List present backup policies. tscli backup-policy ls
Show a backup policy. tscli backup-policy show <name>
Check the status of a policy. tscli backup-policy status <name>
Change an existing policy. tscli backup-policy update <name>
Disable or enable an existing policy. tscli backup-policy disable or enable
Delete a policy tscli backup-policy delete <name>
Configure periodic backups
February 07, 2019
ThoughtSpot Application Integration Guide Page 285

Finally, you can time a crontab job with your periodic backup configuration to move a backup to
longer term storage. Simply create a crontab job that moves the backup to a location outside of the
directory defined in the periodic schedule.
Configure periodic backups
February 07, 2019
ThoughtSpot Application Integration Guide Page 286

About restore operations
When restoring to a running cluster that where the ThoughtSpot software was not updated, you’ll usually
use a snapshot. But in the case where you’ve updated the cluster to a new release, the configuration has
changed significantly, or you’re restoring to a different cluster, you’ll need to restore from a backup.
Restoring from backup require that you first delete the old cluster. Changes to a cluster that require
restoring from a backup instead of a snapshot include:
• Removal of a node.
• Restoring to a different cluster from the one where the snapshot/backup was taken.
• Restoring to a cluster running a different release from the one where the snapshot/backup
was taken.
You should never restore from a snapshot or backup yourself. To perform a restore from a snapshot or
backup, contact ThoughtSpot Support.
About restore operations
February 07, 2019
ThoughtSpot Application Integration Guide Page 287

About troubleshooting
The information here provides very basic troubleshooting. For more detailed troubleshooting, Contact
ThoughtSpot.
•Get your configuration and logsGet your configuration and logs
For troubleshooting on specific incidents or cluster problems, getting a log bundle can help.
•Network connectivity issuesNetwork connectivity issues
If network connectivity to and from ThoughtSpot is not working, try using these steps to find
and correct the issue.
•Check the timezoneCheck the timezone
ThoughtSpot comes configured with the timezone where it is to be installed.
•Browser untrusted connection errorBrowser untrusted connection error
If you are not using a SSL certificate for authentication, users will see an untrusted connection
error in their browser when accessing ThoughtSpot. The error looks slightly different
depending upon the Web browser being used.
•Characters not displaying correctlyCharacters not displaying correctly
Your CSV files are more likely to load smoothly if they are encoded with UTF-8. If you’re
having problems with some characters rendering incorrectly, you can convert the files to
UTF-8 encoding before loading the data.
•Clear the browser cacheClear the browser cache
You might occasionally see unexpected behavior that is due to the Web browser caching
information from ThoughtSpot. In this case, clearing the browser cache and reloading the
page should resolve the problem.
•Cannot open a saved answer that contains a formulaCannot open a saved answer that contains a formula
•Data loading too slowlyData loading too slowly
Some tables may take an unusually long time to load due to a high data version issue. This
issue normally arises when ThoughtSpot completes an upgrade or the system is recovering
after a crash.
•Search results contain too many blanksSearch results contain too many blanks
If you find that your search results contain too many blanks when your data source is a
worksheet, there is a simple adjustment you can make to fix this.
About troubleshooting
February 07, 2019
ThoughtSpot Application Integration Guide Page 288

Get your configuration and logs
For troubleshooting on specific incidents or cluster problems, two things are important. Understanding
your current configuration and getting a log bundle.
Check your configuration
1. Log into the ThoughtSpot cluster as the admin user.
2. Use the tscli feature subcommand to display your current configuration.
$ tscli feature get-all-config
+---------------------------------+----------
+---------------+
| NAME | STATUS | CONFIGUR
ATION |
+---------------------------------+----------
+---------------+
| Firewall | Disabled
| |
| Saml | Disabled
| |
| Ldap | Disabled
| |
| CustomBranding | Disabled
| |
| CustomBrandingFontCustomization | Disabled
| |
| DataConnect | Disabled
| |
| RLS | Enabled
| |
| Callhome | Enabled
| |
| SSHTunnel | Enabled
| |
| Fileserver | Disabled
| |
+---------------------------------+----------
+---------------+
How to get logs
There are two ways to get logs:
Get your configuration and logs
February 07, 2019
ThoughtSpot Application Integration Guide Page 289

• When ThoughtSpot encounters a problem, a red bar displays in the browser with an error
message. You can click on What Happened?What Happened? in the error message for more details. To
download related logs, click Download TraceDownload Trace. Send the logs as an email attachment to the
support contact that is provided. Clicking Report ProblemReport Problem will also send the logs as an email
attachment to your administrator.
• You can generate a log bundle using the tscli command tscli logs collect if you are
comfortable with Linux. The command lets you specify which logs to collect and from what
time periods.
Usage for this command is:
tscli logs collect
--include <selector | glob>
[--exclude <selector | glob>]
[--since <hours,minutes,days>
| --from <yyyymmdd-HH:MM>
--to <yyyymmdd-HH:MM>]
[--out <path>]
[--maxsize <size_in_MB_or_GB>]
[--sizeonly]
The full list of all selectors is:
•all collects all of the logs listed from the system and the ThoughtSpot
application.
•system collects all system logs, e.g. syslog, upstart, mail logs, etc.
•ts collects all logs from the ThoughtSpot application. This includes falcon, sage,
orion core (cluster management), etc.
•orion collects all orion logs including cluster management, hdfs, zookeeper, etc.
Detailed syntax and options are listed in the tscli command reference.
Examples
Here are some examples of usage for the command tscli logs collect :
To collect all logs from the past day to the default location ( /tmp/logs.tar.gz ):
Get your configuration and logs
February 07, 2019
ThoughtSpot Application Integration Guide Page 290

$ tscli logs collect --include all --since 1d
In this example, all is a selector for all the available logs.
In most cases, you’ll probably use the selector ts to only capture logs for the ThoughtSpot application:
$ tscli logs collect --include ts --since 2d
For debugging cluster management issues, use a command like this one, which collects logs for system
and orion from the past 2 hours. The output is written to /tmp/debug.tar.gz as specified using --out :
$ tscli logs collect --include system,orion --since 2h --out /t
mp/debug.tar.gz
This command collects logs from a specific time window:
$ tscli logs collect --include system,orion --from 20150520-1
2:00:00 --to 20150522-12:30:00
Advanced usage alert! You can also use --include and --exclude to specify filesystem paths as a
glob pattern. This works like the Linux find(1) command. Pass all the entries in --include starting with
/to find(1), and all entries in --exclude which are not selectors to find(1) using the -not -path
flag.
$ tscli logs collect --include system,orion --exclude *hadoo
p*,*zookeeper* --since 2h
The above command collects all system and all orion logs, but excludes hadoop (hdfs) and zookeeper
logs. See Upload logs to ThoughtSpot Support about using a secure file sever to collect log files or other
files needed for troubleshooting. You can easily send log files to this file serve directly from the
ThoughtSpot instance.
Get your configuration and logs
February 07, 2019
ThoughtSpot Application Integration Guide Page 291

Upload logs to ThoughtSpot Support
ThoughtSpot Support uses a secure file sever to collect log files or other files needed for
troubleshooting. You can easily send log files to this file serve directly from the ThoughtSpot instance.
Metrics collection
ThoughtSpot collects the diagnostic information from your system on an ongoing basis: there is no time
needed to collect diagnostic information after a problem is reported. These metrics allow for:
• Our support team can begin working to remediate any issue with you at once.
• Metrics provides direct visibility to the ThoughtSpot team on your system’s limits. Therefore,
our Support team can proactively identify critical threshold issues and work to prevent
failures. Metrics also help reduce SLA times as the team can debug much faster.
• ThoughtSpot can tune search algorithms by studying search history and schema.
• ThoughtSpot analyzes expensive and complex query patterns to look for performance
optimizations.
Finally, the metrics pipeline allows ThoughtSpot to identify application-use patterns that contribute to
performance bottlenecks with specific browsers and help your team prevent or alleviate them.
Other log uploads
Before you can upload a file to the secure file server:
1. Configure the connection to the file server.
2. Obtain the directory path on the file server.
The server directory path for uploading a file is formatted like this example: /Shared/
support/<customer_name> . If you do not know the customer name, contact ThoughtSpot Support.
You can upload files directly to the file server using this procedure:
1. Log in to the Linux shell using SSH.
2. Navigate to the directory where the file to be uploaded is located.
3. Issue the command to upload the file, specifying the file name and directory path:
$ tscli fileserver upload --file_name <file> --server_d
ir_path <path>
When your upload succeeds, you will see a confirmation message.
Upload logs to ThoughtSpot Support
February 07, 2019
ThoughtSpot Application Integration Guide Page 292

Network connectivity issues
If network connectivity to and from ThoughtSpot is not working, try using these steps to find and correct
the issue.
To troubleshoot network connectivity for ThoughtSpot:
1. Make sure that the network cables are connected correctly.
2. Check that the network cable is connecting the nodes to the network switch.
3. Try replacing the cable with a cable from a known working system to rule out a bad cable or
switch connectivity issues.
4. Make sure the eth0 interface is connected to the network by issuing: ethtool eth0 The
port that’s currently connected will have “link detected” in the last line of the output.
5. If the networking settings have been reconfigured, reboot each of the nodes.
Network connectivity issues
February 07, 2019
ThoughtSpot Application Integration Guide Page 293

Check the timezone
ThoughtSpot comes configured with the timezone where it is to be installed. Data is imported based on
the timezone of the node from which tsload or tql is run. To see the timezone your ThoughtSpot
node is running under, log into the server as the thoughtspot user and run the date command:
[thoughtspot@ts.server etc]$ date
Tue Feb 20 09:07:04 PST 2018
To see the current timezone used by the ThoughtSpot application, choose Admin > Cluster ManagerAdmin > Cluster Manager and
review the Cluster DetailsCluster Details:
The timezones should match.
Sometimes the timezone that is listed by date is not the active timezone for the ThoughtSpot
application and the application needs to be reset. If you need to change the timezone, contact
ThoughtSpot Support and they will change the timezone for you. You may need to change the timezone
if you move the server between data centers.
Check the timezone
February 07, 2019
ThoughtSpot Application Integration Guide Page 294

Browser untrusted connection error
If you are not using a SSL certificate for authentication, users will see an untrusted connection error in
their browser when accessing ThoughtSpot. The error looks slightly different depending upon the Web
browser being used.
ThoughtSpot uses secure HTTP (the HTTPS protocol) for communication between the browser and
ThoughtSpot. By default there is no SSL certificate for authentication. This must be added by the site
administrator. If the site administrator has not added the certificate, the browser warns the user.
BrowserBrowser WarningWarning
Google Chrome The site’s security certificate is not trusted!
Mozilla Firefox This Connection is Untrusted
If you see the warning message, choose one of the following options:
• Ask the site administrator to install the certificate.
• Ask the site administrator to turn off SSL using this command in the shell on the ThoughtSpot
instance:
$ tscli ssl off
• You can choose to ignore the message, and access ThoughtSpot without SSL.
Browser untrusted connection error
February 07, 2019
ThoughtSpot Application Integration Guide Page 295
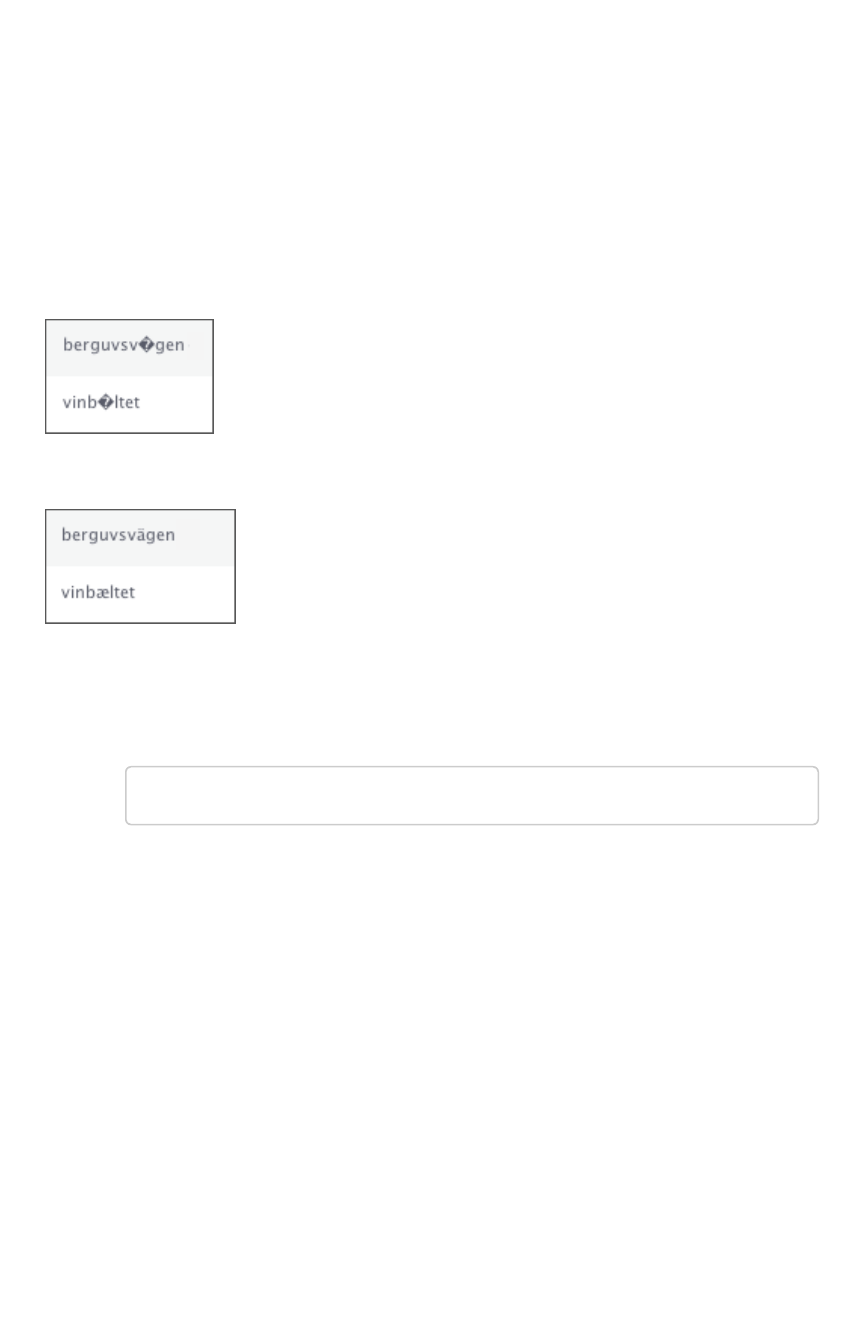
Characters not displaying correctly
Your CSV files are more likely to load smoothly if they are encoded with UTF-8. If you’re having problems
with some characters rendering incorrectly, you can convert the files to UTF-8 encoding before loading
the data.
You might see unexpected characters in your data, especially characters whose ASCII values are at the
high and low end of possible values. Some examples of characters that can appear incorrectly are: æ, ñ,
ä, í, ö.
If this happens, your data will look like this:
Instead of displaying correctly like this:
To encode your data as UTF-8:
1. On Windows, open your CSV file in Notepad. Save the file as CSV with the Unicode option.
2. On Linux or MacOS, issue a command like:
$ iconv -f -t UTF-8 <in_file>.csv > <out_file>.csv
3. Reload the data.
4. Attempt to import it again.
Characters not displaying correctly
February 07, 2019
ThoughtSpot Application Integration Guide Page 296

Clear the browser cache
You might occasionally see unexpected behavior that is due to the Web browser caching information
from ThoughtSpot. In this case, clearing the browser cache and reloading the page should resolve the
problem. You can usually resolve these situations by clearing the browser cache:
• During a ThoughtSpot session, the browser suddenly displays a white screen and reloading
does not fix the problem. This is due to a self-signed SSL certificate that has timed out during
the session.
• When accessing the Help Center, you see a login screen. This is due to a problem during
automatic authentication in the Help Center, after which the bad login gets cached by the
browser.
To resolve any of these situations, clear the browser cache:
1. Clear the browser cache.
This works a little differently on individual browser versions and operating systems. For
example, when using Chrome, to get to the browser cache settings, navigate to:
chrome://settings/clearBrowserData
2. Click Clear browsing dataClear browsing data.
This is the name of the button on Chrome. The name may vary slightly on other browsers.
3. Reload the page.
Clear the browser cache
February 07, 2019
ThoughtSpot Application Integration Guide Page 297
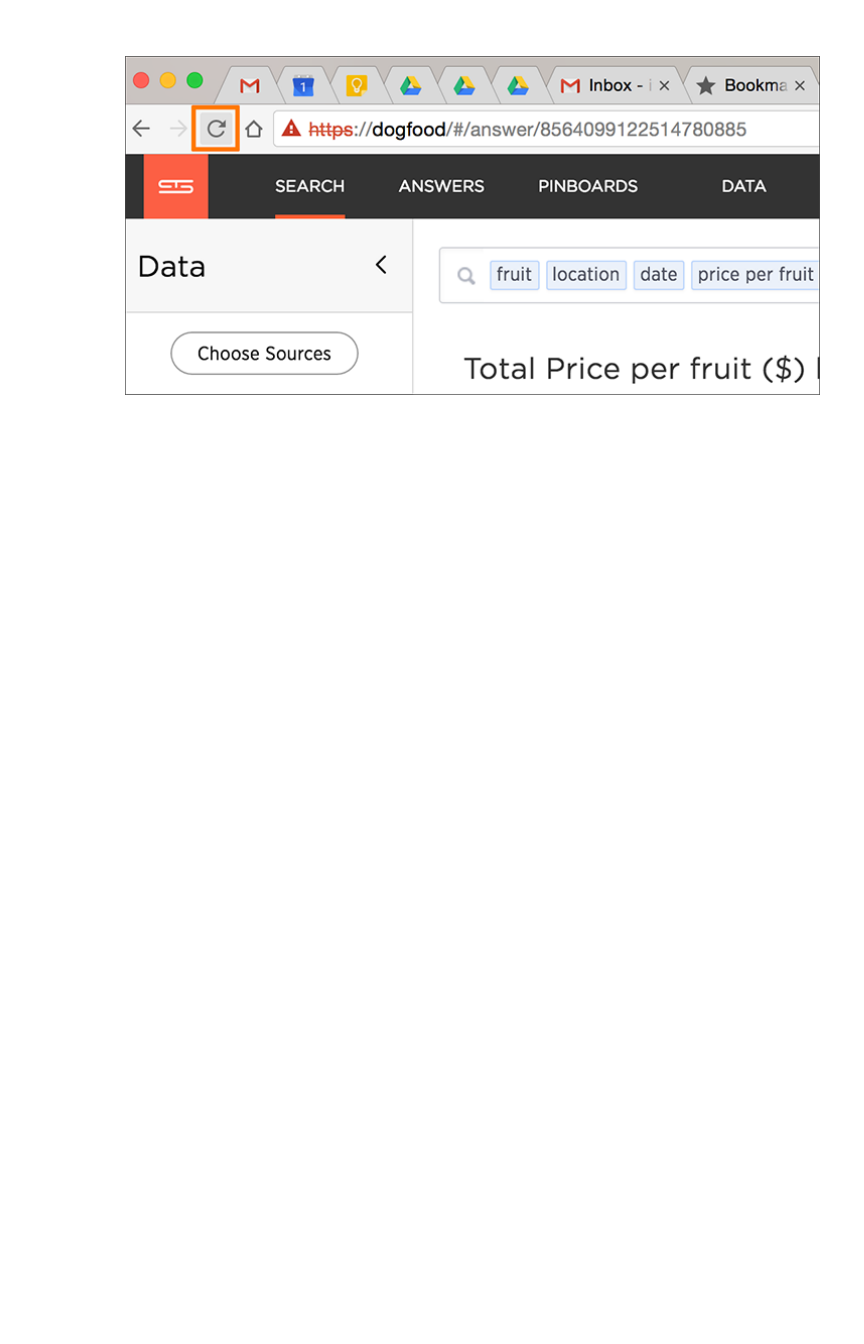
For example, on Chrome you would click the ReloadReload icon:
Now the problem should be fixed, and the page will appear as expected.
Clear the browser cache
February 07, 2019
ThoughtSpot Application Integration Guide Page 298
Cannot open a saved answer that
contains a formula
When working with formulas, keep in mind the data types they return. You may occasionally see
unexpected results, or even be unable to open a saved answer, due to problems with data types and
formulas.
In this scenario, “data type” refers the data type as defined in the column definition when creating the
schema (INT, TIMESTAMP, VARCHAR, etc.).
When you define a formula, both the data type it returns is set automatically. This can lead to problems,
if you build another formula that uses the output of the first formula as input. This can be hard to
understand, so an example will be helpful.
Suppose you have created a worksheet that contains a formula called “weekday” defined as:
day_of_week(date)
The output of that formula is the day of the week (Monday, Tuesday, etc.) returned as a text string
(VARCHAR, ATTRIBUTE).
Then suppose you create an answer using the worksheet as a source. And in the answer, you create
another formula on top of the formula column in the worksheet. This formula is supposed to return the
day of the week that is two days after the given day of the week:
weekday + 2
In this case, you have effectively created a formula on top of another formula. This works fine, so long as
the data types in the worksheet formula can work in the answer formula. If not, you may not be able to
save the answer, or open it once it has been saved. Here, the second formula you created does not
work, because it is invalid. It is trying to subtract a number from a text string.
If you encounter this issue, you will need to open the worksheet and edit its formula so that it returns the
type expected by the formula that was built on top of it. In this case, a numeric data type.
You must change the underlying worksheet column to use day_number_of_week instead of
day_of_week. This is because day_number_of_week returns a numeric data type.
Here are the steps to resolve an issue like this:
1. Open the underlying worksheet that contains the formula whose output data type you need to
change.
2. Click on the formula name to edit the formula.
Cannot open a saved answer that contains a formula
February 07, 2019
ThoughtSpot Application Integration Guide Page 299

3. In the Formula Builder, modify the formula, so that it returns the expected data type.
There are data type conversion formulas available to make this easier. To view them and their
syntax, open the Formula AssistantFormula Assistant, and expand the section called ConversionConversion.
4. Make your changes, and saving the formula by clicking SaveSave.
5. Save the worksheet by clicking SaveSave.
6. Now you will be able to open the answer that was created on top of the worksheet.
Cannot open a saved answer that contains a formula
February 07, 2019
ThoughtSpot Application Integration Guide Page 300
Data loading too slowly
Some tables may take an unusually long time to load due to a high data version issue. This issue
normally arises when ThoughtSpot completes an upgrade or the system is recovering after a crash.
The data version is the number of loads that have been historically applied to a table. Every completed
load increments the version number of the table by one. ThoughtSpot would need to process each
version of the table during restoration, which could increase the time it takes to build the table.
There are a few steps you can take to check for a high data version issue and fix it. To improve data
loading speed, run the following command to find the number of tables that are building and their names
tscli cluster status --mode table
You may notice that a few small tables are taking up a lot of time to be built. This could simply be due to
the deceivingly large size of the table. There is also the chance it could be due to a high data version
issue. To determine if this is a high data version issue, check the size of the table by running the
following command:
echo 'show statistics for server;' | tql
If there is a large number of rows in the table, go on to shard the table. If the table has a small number of
rows, then the slow loading speed is caused by a high data version issue, and you do not have to shard
the table. Use the compact table functionality to trim the table down to its actual size:
tql> compact table <table name>;
Data loading too slowly
February 07, 2019
ThoughtSpot Application Integration Guide Page 301

Search results contain too many blanks
If you find that your search results contain too many blanks when your data source is a worksheet, there
is a simple adjustment you can make to fix this.
If you find that the charts and tables built on a worksheet contain a large number of null values (which
display as {blank} in the web browser), you can fix this by changing the inclusion rule for the worksheet.
An inclusion rule that specifies Exclude Empty Rows (Inner Join)Exclude Empty Rows (Inner Join) will reduce the number of null values in
the result. Imagine a worksheet that includes data about a retail grocery store. There are rows in the
worksheet from these source tables:
Table NameTable Name DescriptionDescription
sales Fact table with sales made per product per store.
products Dimension table with information about every product.
stores Dimension table with information about every store.
When creating the worksheet, suppose you choose Include Empty Rows (Left Outer Join)Include Empty Rows (Left Outer Join) for the
inclusion rule and Progressive JoinsProgressive Joins for the join rule. In this case, if you type “product name” in your
search, you’ll see a list of all the products that exist. Suppose you then add “store name” to your search.
You will see a lot of null ({blank}) values in the result. This happens because the columns “store name”
and “product name” are joined through the fact table, “sales”. So for every product that has never been
sold in a particular store, you’ll see {blank} in the “store name” column. This may be what you want to
see, in which case, you can leave the worksheet as is, and choose ExcludeExclude for the {blank} values in your
table or chart, whenever you don’t want to see them.
However, in may cases, including all the {blank} values could confuse end users. So if you encounter this
problem, you can edit the worksheet, and change the inclusion rule to Exclude Empty Rows (Inner Join)Exclude Empty Rows (Inner Join).
Now when searching for “store name” and “product name” on the worksheet, users will not be
overwhelmed by null values. They’ll only see the rows where a particular product has been sold in a
particular store.
Search results contain too many blanks
February 07, 2019
ThoughtSpot Application Integration Guide Page 302

Introduction
This guide explains how to integrate ThoughtSpot with other applications, including authentication,
embedding, and APIs. For information on how to integrate with other data sources for loading data, refer
to the Data Integration Guide.
Here are the top level topics on application integration:
•Log in to the Linux shell using SSH
•Login credentials
•Using the JavaScript API
•SAML
•REST API
•Emdbed ThoughtSpot
•Runtime Filters
•Style Customization
•API Reference
Introduction
February 07, 2019
ThoughtSpot Application Integration Guide Page 303

Log in to the Linux shell using SSH
To perform basic administration such as checking network connectivity, starting and stopping services,
and setting up email, log in remotely as the Linux administrator user “admin”. To log in with SSH from a
client machine, you can use the command shell or a utility like Putty.
In the following procedure, replace <hostname_or_IP> with the hostname or IP address of a node in
ThoughtSpot. The default SSH port (22) will be used.
1. Log in to a client machine and open a command prompt.
2. Issue the SSH command, specifying the IP address or hostname of the ThoughtSpot
instance:
ssh admin@<hostname_or_IP>
3. Enter the password for the admin user.
Log in to the Linux shell using SSH
February 07, 2019
ThoughtSpot Application Integration Guide Page 304

Log in credentials
You can access ThoughtSpot via SSH at the command prompt and from a Web browser.
Administrative access
Each ThoughtSpot appliance comes pre-built with three default users. You should talk with a
ThoughtSpot Customer Success Engineer or ThoughtSpot support, to get the password for each user.
The default users are:
TypeType UsernameUsername DescriptionDescription
Shell user admin Used for work that requires sudo or root privileges. Does not exist
for application login. Logs for this user are found in /usr/local/
scaligent/logs logs
Shell user thoughtspot Used for command line work that does not require sudo or root
privileges. For example, these users can use tsload ,tql , and
check the cluster status. This user cannot login to the application.
Logs for this user are found under /tmp .
Application
user
tsadmin Access through a Web browser.
Both the admin and thoughtspot user can SSH into the appliance. Once on the appliance, either
user can do any of the following:
•tscli
•tsload
•tql
The thoughtspot user is restricted to tscli commands that do not require sudo or root privileges.
SSH to the appliance
To perform basic administration such as checking network connectivity, starting and stopping services,
and setting up email, log in remotely as the Linux administrator user “admin”. To log in with SSH from
any machine, you can use the command shell or a utility like Putty.
In the following procedure, replace <hostname_or_IP> with the hostname or IP address of a node in
ThoughtSpot. The default SSH port (22) will be used.
1. Log in to a client machine and open a command prompt.
2. Issue the SSH command, specifying the IP address or hostname of the ThoughtSpot
instance:
ssh admin@<hostname_or_IP>
Log in credentials
February 07, 2019
ThoughtSpot Application Integration Guide Page 305

3. Enter the password for the admin user.
Log in to the ThoughtSpot application
To set up and explore your data, access the ThoughtSpot application from a standard Web browser
using a username and password.
Before accessing ThoughtSpot, you need:
• The Web address (IP address or server name) for ThoughtSpot.
• A network connection.
• A Web browser.
• A username and password for ThoughtSpot.
Supported Web browsers include:
BrowserBrowser VersionVersion Operating SystemOperating System
Google Chrome 20 and above Windows 7 or greater, Linux, MacOS
Mozilla Firefox 14 and above Windows 7 or greater, Linux, MacOS
Internet Explorer 11 Windows 7 or greater
Tip:Tip: While Internet Explorer is supported, using it is not recommended. Depending
on your environment, you can experience performance or UI issues when using IE.
To log in to ThoughtSpot from a browser:
1. Open the browser and type in the Web address for ThoughtSpot:
http://<hostname_or_IP>
2. Enter your username and password and click Enter NowEnter Now.
Log in credentials
February 07, 2019
ThoughtSpot Application Integration Guide Page 306

Using the JavaScript API
The ThoughtSpot JavaScript API (JS API) allows you to use your ThoughtSpot instance within your own
Web application. The JS API has methods that allow you to:
• Authenticate to ThoughtSpot.
• Embed visualizations from ThoughtSpot in your Web page using iframes.
• Use the ThoughtSpot REST API to get data from ThoughtSpot and use it in your Web page.
You can download the ThoughtSpot JavaScript library from our secure storage server.
Note:Note: To use the JS API in your Web page, you must have the access and permissions to
update the code of the web page or application.
Browser Support
The JS API works in the following browsers:
BrowserBrowser VersionsVersions
Internet Explorer 11
Firefox 38 or later
Google Chrome 47 or later
Safari 9 or later
Internet Explorer 10Internet Explorer 10
Microsoft introduced a compatibility mode in Internet Explorer 10, which displays your page using the
version of Internet Explorer that is most compatible with the current page. Since we do not support any
version below 11, this feature can sometimes break the code. There are two ways to force the emulation
of Internet Explorer to the most up to date version:
• Add a Custom Response Header
This is the recommended approach since it is more robust, offers more control, and has a
lower risk of introducing a bug to your code. The header name should be set to “X-UA-
Compatible” and the value should be set to “IE=Edge”. The response header should be based
on the server it is set on and the technology being used.
• Add a Meta Tag
The following meta tag should be added to your header: <meta http-equiv="X-UA-
Compatible" content="IE=Edge" \> . This tag must be the first tag in the header section of
the page.
Using the JavaScript API
February 07, 2019
ThoughtSpot Application Integration Guide Page 307

Cross-Origin HTTP Requests (CORS)
Collecting user credentials from one application (domain) and sending them to another (such as
ThoughtSpot) can present security vulnerabilities such as a phishing attack. Cross-origin or cross-
domain verification closes this vulnerability.
When you use the JavaScript API, your client makes a call from your own Web page, portal, or
application to ThoughtSpot. The domains of your client and ThoughtSpot will be different. So, you’ll
need to enable cross-origin HTTP requests from your client application to the ThoughtSpot application.
This protects your data, so that another actor cannot use the same URL to embed the visualization in its
own Web pages.
Your cluster’s CORS configuration controls which domains are allowed to use your client code to
authorize users. It also prevents other people from copying your code and running it on their site. For
example, if your Web site is hosted on the domain example.com , you would enable CORS for that
domain. Similarly, if you want to test your code locally, you’ll also need to add the origin for your local
server as well, for example: http://localhost:8080. Though, it is a good idea to disable the
localhost access after your testing is complete.
To enable CORS between your client applications and your ThoughtSpot instance. , you must work with
ThoughtSpot Support.
Using the JavaScript API
February 07, 2019
ThoughtSpot Application Integration Guide Page 308

About SAML
ThoughtSpot can be set up with Security Assertion Markup Language (SAML) to enable Single Sign On
(SSO). SAML can be configured in several ways, including with CA SiteMinder.
For basic instructions on configuring SAML, use one of these procedures:
•Configure SAML, for instructions to configure SAML in ThoughtSpot.
•Configure SAML with CA SiteMinder, for configuring SAML specifically with CA SiteMinder.
About SAML
February 07, 2019
ThoughtSpot Application Integration Guide Page 309

Configure SAML
ThoughtSpot can use Security Assertion Markup Language (SAML) to authenticate users. You can set up
SAML through the shell on the ThoughtSpot instance using a tscli based configurator.
Before configuring SAML, you will need this information:
• IP of the server where your ThoughtSpot instance is running.
• Port of the server where your ThoughtSpot instance is running.
• Protocol, or the authentication mechanism for ThoughtSpot.
• Unique service name that is used as the unique key by IDP to identify the client.
It should be in the following format: urn:thoughtspot:callosum:saml
• Allowed skew time, which is the time after authentication response is rejected and sent back
from the IDP. It is usually set to 86400.
• The absolute path to the idp-meta.xml file. This is needed so that the configuration persists
over upgrades.
• This configurator also checks with the user if internal authentication needs to be set or not.
This internal authentication mechanism is used to authenticate tsadmin , so set it to true if
you do not know what it does.
Use this procedure to set up SAML on ThoughtSpot for user authentication. Note that this configuration
persists across software updates, so you do not need to reapply it if you update to a newer release of
ThoughtSpot.
1. Log in to the Linux shell using SSH.
2. Execute the command to launch the interactive SAML configuration:
tscli saml configure
3. Complete the configurator prompts with the information you gathered above.
4. When the configuration is complete, open a Web browser and go to the ThoughtSpot login
page. It should now show the Single Sign On option.
Configure SAML
February 07, 2019
ThoughtSpot Application Integration Guide Page 310

Configure CA SiteMinder
Summary:Summary: CA SiteMinder can be used as an Identity Provider for
single sign on to ThoughtSpot.
Before configuring CA SiteMinder, you must configure SAML in ThoughtSpot. Use this procedure to set
up CA SiteMinder for use with ThoughtSpot:
1. Configure the Local Identity Provider Entity as follows:
SectionSection EntryEntry
Entity Location Local
Entity Type SAML2 IDP
Entity ID Any (Relevant ID)
Entity Name Any (Relevant name)
Description Any (Relevant description)
Base URL https://<FWS_FQDN> where FWS_FQDN is the fully-qualified do-
main name for the host serving SiteMinder Federation Web Ser-
vices
Signing Private Key
Alias
Select the correct private key alias or import one if not done al-
ready
Signed Authentica-
tion Requests Re-
quired
No
Supported NameID
format
Optional
2. Create the Remote SP Entity, either via a metadata import or manually. To configure the
Remote SP entity manually, select Create EntityCreate Entity. Create ThoughtSpot as a Remote Entity with
following details:
SectionSection EntryEntry
Entity Location Remote
New Entity Type SAML2 SP
Entity ID Your cluster
Entity Name Any (relevant name)
Configure CA SiteMinder
February 07, 2019
ThoughtSpot Application Integration Guide Page 311

SectionSection EntryEntry
Description Any (relevant description)
Assertion Con-
sumer Service
URL
(Relevant URL)
Verification Certifi-
cate Alias
Select the correct certificate or import one if not done already. This
is used to verify the signature in incoming requests
Supported
NameID Format
Optional
3. You will now configure the Federation Partnership between CA SiteMinder (the IDP) and
ThoughtSpot (the Remote SP) in CA SiteMinder. Log in to CA SiteMinder.
4. Navigate to FederationFederation -> Partnership Federation -> Create PartnershipPartnership Federation -> Create Partnership (SAML 2 IDP -> SPSAML 2 IDP -> SP).
5. Click Configure PartnershipConfigure Partnership and fill in the following values:
SectionSection EntryEntry
Add Partnership Name Any (relevant name)
Description Any (relevant description)
Local IDP ID Select Local IDP ID
Remote SP ID Select Remote SP ID
Base URL Will be pre-populated
Skew Time Any per environment requirement
User Directories and Search Order Select required Directories in required search order
6. Click Configure AssertionConfigure Assertion and fill in the following values:
SectionSection EntryEntry
Name ID
Format
Optional
Name ID
Type
User Attribute
Value Should be the name of the user attribute containing the email address or
user identifier. For example, ‘mail’
7. Click Configure SSO and SLOConfigure SSO and SLO and fill in the following values:
Configure CA SiteMinder
February 07, 2019
ThoughtSpot Application Integration Guide Page 312

SectionSection EntryEntry
Add Authentication URL This should be the URL that is protected by SiteMinder
SSO Binding Select SSO Binding supported by the SP, typically the
HTTP-Post
Audience (Relevant audience)
Transaction Allowed Optional
Assertion Consumer Ser-
vice URL
This should be pre-populated using the information from
the SP entity
8. Continue to Partnership ActivationPartnership Activation and select ActivateActivate.
Configure CA SiteMinder
February 07, 2019
ThoughtSpot Application Integration Guide Page 313

Configure Active Directory Federated
Services
You can configure Active Directory Federated Services (AD FS) to work with ThoughtSpot. This
procedure outlines the basic prerequisites and steps to set up AD FS.
•Configure SAML in ThoughtSpot.
• Install AD FS 2.0.
• Make sure you can run AD FS 2.0 Federation Server Configuration Wizard from the AD FS 2.0
Management Console.
• Make sure that DNS name of your Windows Server is available at your service provider (SP)
and vice versa. You can do this by running the command nslookup on both machines,
supplying the DNS of the other server.
AD FS 2.0 supports SAML 2.0 in IdP (Identity Provider) mode and can be easily integrated with the SAML
Extension for both SSO (Single Sign-On) and SLO (Single Log Out).
After completing the prerequisites, use these procedures to configure AD FS for use with ThoughtSpot.
1. Initialize IdP metadata.
2. Initialize the Service Provider metadata.
3. Test your ADFS integration.
Configure Active Directory Federated Services
February 07, 2019
ThoughtSpot Application Integration Guide Page 314

Initialize the Identity Provider Metadata
Summary:Summary: This procedure shows how to initialize the Identity Provider
(IdP) metadata for AD FS.
This is one part of the configuration procedure for setting up ThoughtSpot to work with AD FS for
authentication. You should also refer to the overview of the entire process of integrating with AD FS.
To initialize the IdP metadata on AD FS:
1. Download the AD FS 2.0 IdP metadata from the AD FS server. You can reference this file by
its URL, which looks like:
https://<adfsserver>/FederationMetadata/2007-06/Federat
ionMetadata.xml
2. Log in to the Linux shell using SSH.
3. Change directories to the SAML directory:
$ cd /usr/local/scaligent/release/production/orion/tomc
at/callosum/saml
4. Replace the contents of the file idp-meta.xml with the metadata of the IdP that you
downloaded. Do not change the name of the file.
5. Contact ThoughtSpot support for help restarting ThoughtSpot’s Tomcat instance.
6. Next, Initialize the Service Provider Metadata.
Initialize the Identity Provider Metadata
February 07, 2019
ThoughtSpot Application Integration Guide Page 315

Initialize the Service Provider Metadata
Summary:Summary: This procedure shows how to initialize the Service Provider
(SP) metadata for AD FS.
This is the second part of the configuration procedure for setting up ThoughtSpot to work with AD FS for
authentication. You should also refer to the overview of the entire process of integrating with AD FS.
To initialize the Service Provider metadata on AD FS:
1. Open the AD FS 2.0 Management Console.
2. Select Add Relying Party TrustAdd Relying Party Trust.
3. Select Import data about the relying party from a fileImport data about the relying party from a file.
4. Upload the metadata.xml file that you downloaded from ThoughtSpot earlier.
5. Select Next.Next. The wizard may complain that some of the content of the metadata is not
supported. You can safely ignore this warning.
6. In the Ready to Add TrustReady to Add Trust section, make sure that the tab endpoints contains multiple
endpoint values. If not, verify that your metadata was generated with the HTTPS protocol
URLs.
7. Leave the Open the Edit Claim Rules dialogOpen the Edit Claim Rules dialog checkbox checked. Click NextNext.
8. Select Add RuleAdd Rule.
9. Choose Send LDAP Attributes as ClaimsSend LDAP Attributes as Claims and click Next.Next.
10. For NameIDNameID enter “Claim rule name”
11. For Attribute storeAttribute store, choose “Active Directory”.
12. For LDAP AttributeLDAP Attribute choose “SAM-Account-Name”.
13. For Outgoing claim typeOutgoing claim type, choose “Name ID”.
a. If you are using ADFS 3.0, you might need to configure the Name ID as a Pass
Through claim.
14. Finish the wizard and confirm the claim rules window.
15. Open the provider by double-clicking it.
16. Select the AdvancedAdvanced tab and change Secure hash algorithmSecure hash algorithm to “SHA-1”.
17. Your Service Provider is now registered.
18. Test the ADFS Integration.
Initialize the Service Provider Metadata
February 07, 2019
ThoughtSpot Application Integration Guide Page 316

Test the ADFS Integration
After setting up the AD FS integration, test to make sure it is working properly. To test your AD FS
integration, go to ThoughtSpot login page using a Web browser and try to login with SAML.
Test the ADFS Integration
February 07, 2019
ThoughtSpot Application Integration Guide Page 317

About the REST API
Summary:Summary: The purpose of the REST API is to get data out of
ThoughtSpot so you can use it in a Web page, portal, or application.
When using the REST API, authentication is achieved through SAML. After authentication, use the POST
method to call a URL for the desired visualization or pinboard. A JSON (JavaScript Object Notation)
representation of the data will be returned.
Authentication
Before you can use the REST API, you must authenticate to ThoughtSpot using SAML with the
JavaScript API.
Cross Domain Verification
You’ll need to enable cross domain verification when using the REST API. This protects your data, so
that another website cannot use a URL to get data from ThoughtSpot. The procedure for enabling the
JavaScript API includes information on how to enable this.
REST API capabilities
Use a POST method to access the URL, which calls the REST API. The data is returned as a JSON
string. When using this method, you’ll need to extract the data from the JSON file and render it on your
Web page, portal, or application.
You can use the REST API to do things like:
• Generate dynamic picklists on your Web page.
• Display a single value.
• Retrieve the data to populate a visualization drawn by your own renderer.
• Pull data directly from ThoughtSpot
Remember that the data you retrieve from ThoughtSpot is live data, so whenever the Web page is
rendered, the current value(s) will be shown.
Direct Search-to-Embed API
The Direct Search-to-Embed API enables searching directly from an external application or web page to
pull data from ThoughtSpot. This feature was introduced in ThoughtSpot 5.0. When using it, you can
access data stored in ThoughtSpot directly. You do not need to save a search result to a pinboard and
then reference it using the visualization’s URL.
Public API reference
You can find more information on our public APIs in the Reference guide.
About the REST API
February 07, 2019
ThoughtSpot Application Integration Guide Page 318

Calling the REST API
To call the REST API, you’ll specify a URL using the POST method, passing the ID numbers of the
objects from which you want to obtain data.
Specify the pinboard or visualization example
For a pinboard, you’ll append the ID of your pinboard as a parameter, like this example:
https://<thoughtspot_server>/callosum/v1/tspublic/v1/pinboardda
ta?id=7752fa9e-db22-415e-bf34-e082c4bc41c3
To retrieve data from a specific visualization within a pinboard, you would append the ID number of the
visualization using the vizid parameter:
https://<thoughtspot_server>/callosum/v1/tspublic/v1/pinboardda
ta?id=7752fa9e-db22-415e-bf34-e082c4bc41c3&vizid=%5B1e99d70f-c1
dc-4a52-9980-cfd4d14ba6d6%5D
Remember:Remember: You must add brackets around the vizid parameter. The URL encoding for open bracket is
%5B , and the URL encoding for close bracket is %5D .
Object Format for Returned Data
When you parse the returned JSON data you can see that there is one object for every viz on the
pinboard. The objects are named according to the corresponding vizid.
Calling the REST API
February 07, 2019
ThoughtSpot Application Integration Guide Page 320
If you make a call to a specific viz on a pinboard, it will return just one object. The JSON object format
for the data that is returned from ThoughtSpot is:
{
vizId1 : {
name: “Viz name”,
:[[2-d array of data values], [], [] …..[]],
columnNames:[col1, col2, …. ],
samplingRatio: n
},
vizId2 : {
.
}
}
Each object contains four components:
1. An array of column headers.
2. An array of data.
3. The name given to the specific viz.
4. And a sampling ratio. The sampling ratio tells you the percentage of total data returned. 1
would mean all data in the viz was returned in the API call.
The columnNames array contains a list of all column headers. And the data array contains a list of
other arrays. Each sub array represents a new row of data.
Calling the REST API
February 07, 2019
ThoughtSpot Application Integration Guide Page 321
The REST API supports filtering the data returned via parameters that you pass within the URL. These
are called Runtime Filters.
Example
The following example shows a JavaScript function that calls the REST API, gets the results back, and
retrieves a single value from the JSON results:
Calling the REST API
February 07, 2019
ThoughtSpot Application Integration Guide Page 322

/**
* Generates headline by making a data API call.
*
* @param void
* @return void
*/
function generateHeadline(filters) {
var pinboardId = "0aa0839f-5d36-419d-b0db-10102131dc37";
var vizId = "67db30e8-06b0-4159-a748-680811d77ceb";
var myURL = "";
if (filters === void 0) {
myURL = "http://192.168.2.55:443/callosum/v1/tspublic/v
1/" +
"pinboarddata?id=" + pinboardId + "&" +
"vizid=%5B" + vizId + "%5D";
} else {
var query = getQueryString(filters);
myURL = "http://192.168.2.55:443/callosum/v1/tspublic/v
1/" +
"pinboarddata?id=" + pinboardId + "&" + +
"vizid=%5B" + vizId + "%5D&" + query;
}
var jsonData = null;
var xhr = new XMLHttpRequest();
xhr.open("POST", myURL, true);
xhr.withCredentials = true;
xhr.onreadystatechange = function() {
var headline = document.getElementById("embeded-headlin
e");
if (xhr.readyState == 4 && xhr.status == 200) {
jsonData = JSON.parse(xhr.responseText);
headline.innerHTML = jsonData[vizId].data[0][0];
} else {
headline.innerHTML = "Error in getting data !!!";
}
};
xhr.send();
}
Calling the REST API
February 07, 2019
ThoughtSpot Application Integration Guide Page 323
REST API pagination
Summary:Summary: You can paginate the JSON response that is called from
the REST API. The order of the data is retained from page to page.
Given the ability to paginate, you can quickly populate tables and make new REST calls every time you
go to the next page of the data on the table. There is significant load time if you want to populate the
data table with many rows (greater than 1000) from the REST API.
To paginate results in your API response, you’ll need to add new parameters to the query:
PageSize determines the number of rows to be included.
{
"name": "pagesize",
"description": PageSize: The number of rows.",
"defaultValue": "-1",
"type": "integer"
}
Offset determines the starting point.
{
"name": "offset",
"description": Offset: The starting point",
"defaultValue": "-1",
"type": "integer"
}
PageNumber is an alternate way to determine the offset. You must make a call with pageNumber = 1
first. Then you can access any page. Calling with pageNumber != 1 as the initial call will fail.
pageNumber = 0 is not a valid value.
REST API pagination
February 07, 2019
ThoughtSpot Application Integration Guide Page 324

{
"name": "pagenumber",
"description": PageNumber: This is an alternate way to set
offset. This is 1-based
indexing. Offset = (pageNumber - 1) * pageSi
ze.
"defaultValue": "-1",
"type": "integer"
}
FormatType is the JSON format type.
{
"name": "formattype",
"description": FormatType: This sets the JSON format type.
Values that are allowed are
FULL and COMPACT.
"defaultValue": "COMPACT",
"type": "string"
}
COMPACT is the default type, and is formatted as follows: ['col1', 'col2'] [1, 'a'] . While FULL
is formatted like this: {'col1': 1 'col2': 'a'}
Example
The following example shows ThoughtSpot data that is being populated in a table:
REST API pagination
February 07, 2019
ThoughtSpot Application Integration Guide Page 325

/**
* Sample response for Page-1.
*/
{
"totalRowCount": 1500,
"pageSize": 100,
"pageNumber": 1
"data":
[
{
"key1": "value1",
"key2": "value2",
},
{
"key1": "value1",
"key2": "value2",
},
]
}
REST API pagination
February 07, 2019
ThoughtSpot Application Integration Guide Page 326
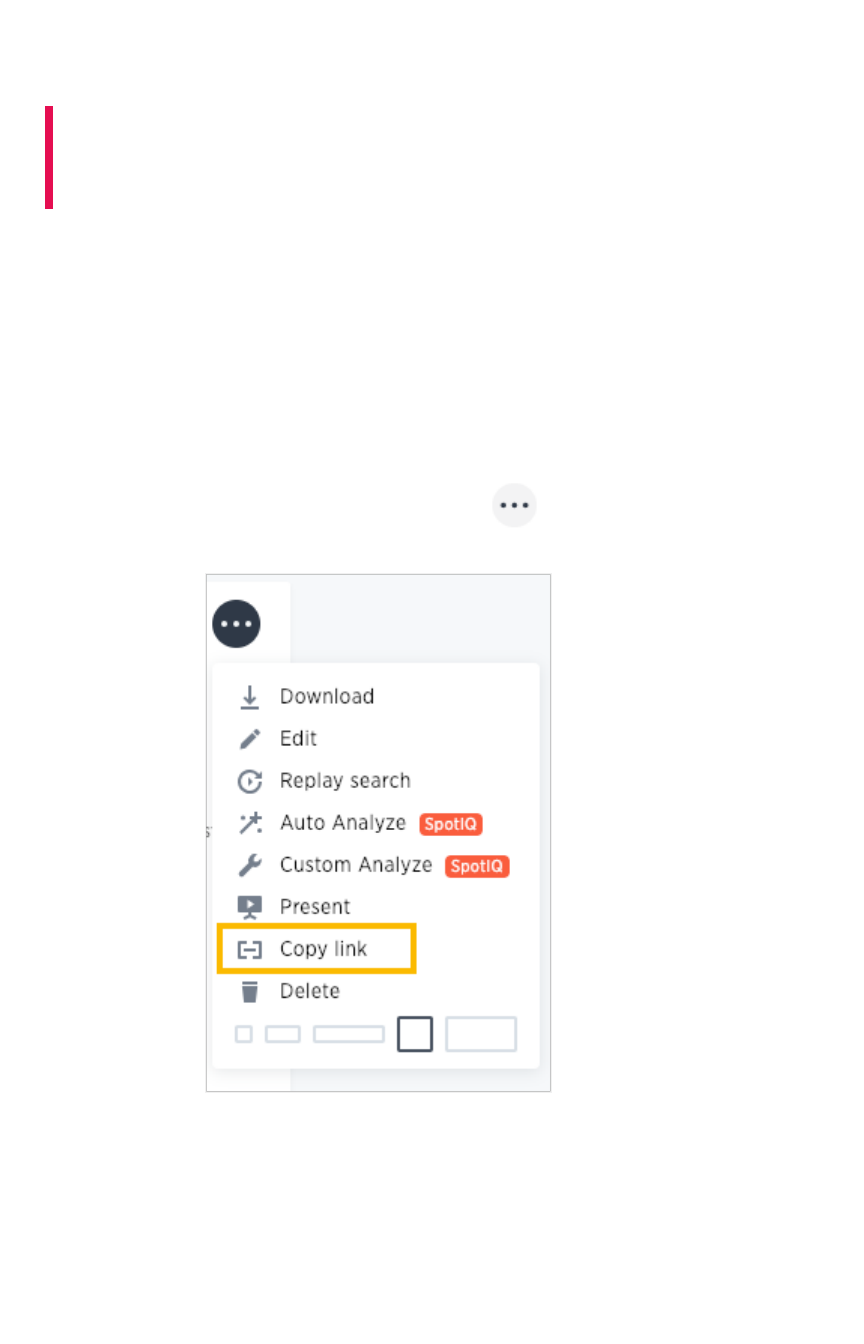
Use the REST API to get data
Summary:Summary: This procedure shows how to use the REST API to get
data out of ThoughtSpot, so you can use it in a Web page, portal, or
application.
Data retrieved using the REST API is returned as JSON (JavaScript Object Notation).
Before you can use the REST API, you need to enable the JavaScript API (JS API) and authenticate to
ThoughtSpot.
Use this procedure to construct the URL you will use to call the REST API:
1. Log in to ThoughtSpot from a browser.
2. Navigate to the pinboard from which you want to get data. If it doesn’t exist yet, create it now.
3. Find the ID number of the object you want to get the data from. If the object is:
• A pinboard, click ellipses icon (3 dots) the and select Copy LinkCopy Link.
• A visualization, click the Copy LinkCopy Link icon in the upper right corner of the table or
chart.
Use the REST API to get data
February 07, 2019
ThoughtSpot Application Integration Guide Page 327
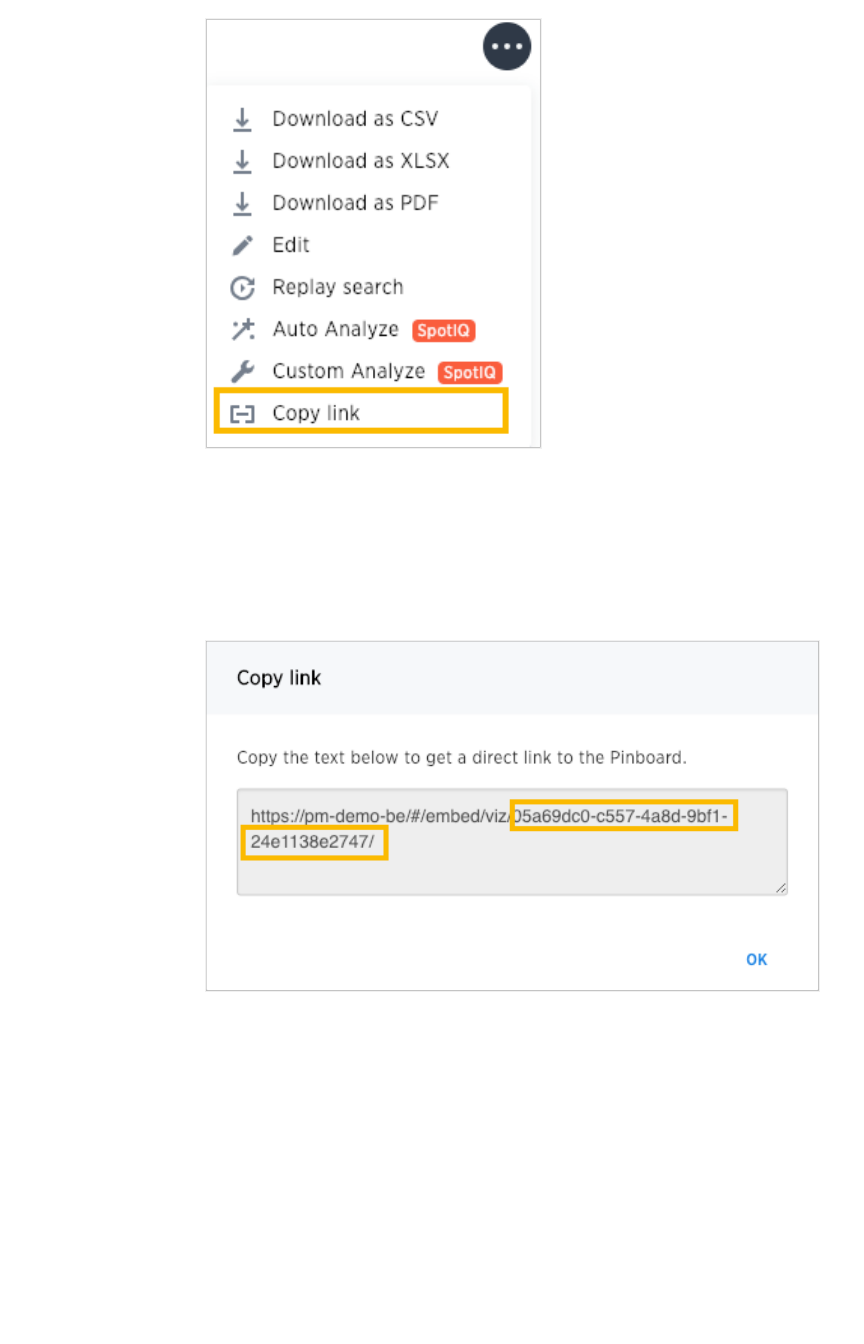
4. Copy the ID number from the link shown. Paste it somewhere so that you can use it later to
construct the URL to use when calling the REST API.
If the object is:
• A pinboard, copy the identifier that appears after “viz/”. Omit the trailing “/”.
• A visualization (table or chart), copy the identifier that appears after “viz/”. This is
the visualization ID.
Use the REST API to get data
February 07, 2019
ThoughtSpot Application Integration Guide Page 328
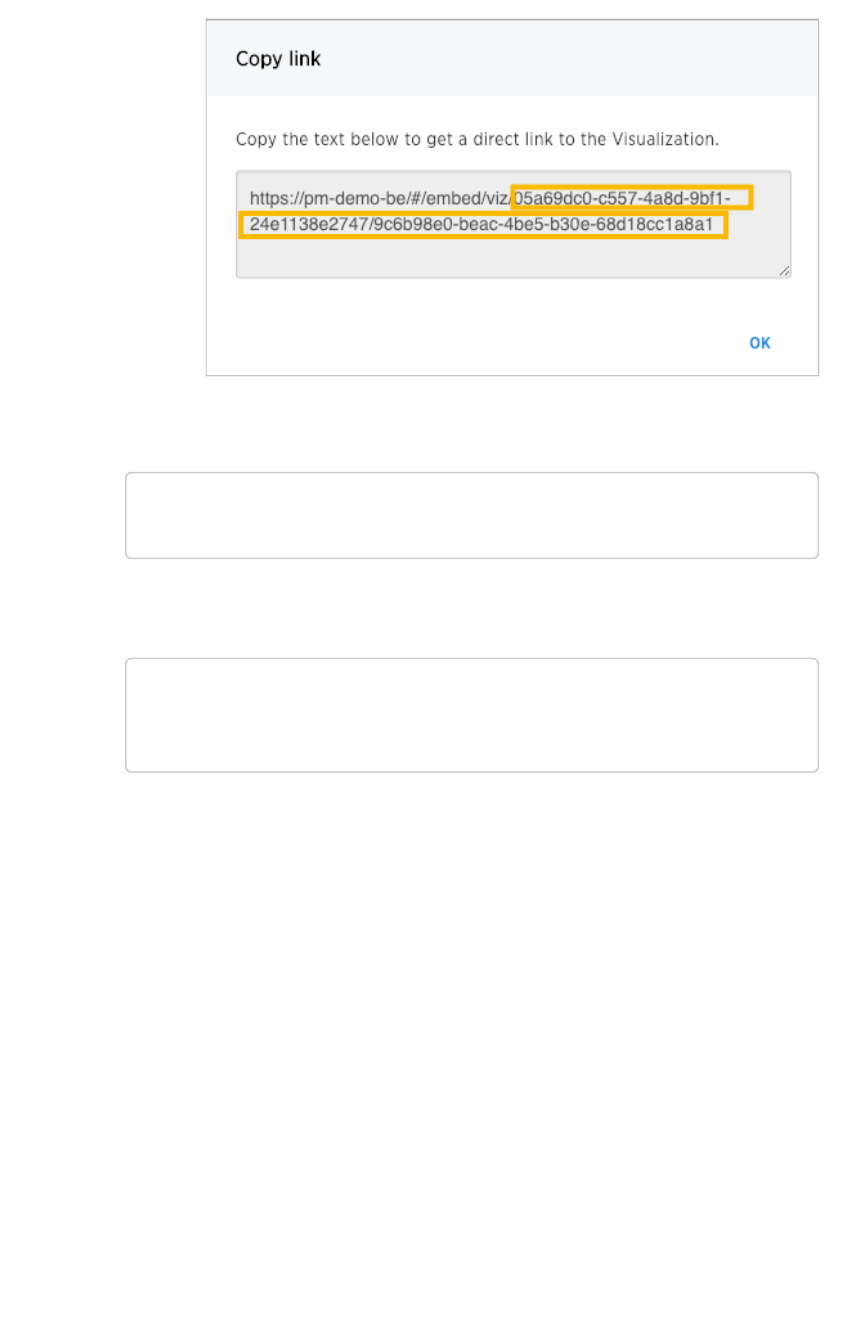
5. Construct the URL as follows: For a pinboard, the URL takes the form:
https://<thoughtspot_server>/callosum/v1/tspublic/v1/pi
nboarddata?id=<pinboard_id>
For a visualization, the URL takes the form:
https://<thoughtspot_server>/callosum/v1/tspublic/v1/pi
nboarddata?id=<pinboard_id>&vizid=%5B<visualization_i
d>%5D
6. If you want to apply any filters to the data that will be returned, apply Runtime Filters.
7. Now your URL is complete, and you can use it to access the data directly via the HTTP POST
method. The REST API returns the data formatted as JSON.
8. Retrieve the data from the JSON and display it in your Web page, Web portal, or application.
Use the REST API to get data
February 07, 2019
ThoughtSpot Application Integration Guide Page 329

Use the Embedded Search API to pull
data from ThoughtSpot
Summary:Summary: This procedure shows how to use the Embedded Search
API to get data from ThoughtSpot
The Embedded Search API enables searching directly from an external application or web page to pull
data from ThoughtSpot. This feature was introduced in ThoughtSpot 5.0. When using it, you can access
data stored in ThoughtSpot directly. You do not need to save a search result to a pinboard and then
reference it using the visualization’s URL.
This embedded search is useful when you want to allow an application to pull data directly from
ThoughtSpot in an ad hoc fashion.
To have the Embedded Search API functionality turned on, contact ThoughtSpot Support.
Data retrieved using the Embedded Search API is returned as JSON (JavaScript Object Notation). You
will need to parse the JSON to get the data values you need, generally using JavaScript in the receiving
application.
Use this procedure to construct the call to the Embedded Search API:
1. Enable the JavaScript API (JS API) on the receiving page of the target application.
2. Authenticate to ThoughtSpot on the receiving page of the target application.
3. Embed the ThoughtSpot application in your own web page or application.
4. To subscribe to results for all the searches the user does in the embedded ThoughtSpot
application, use the API JavaScript function subscribeToData( ). This will allow your page to
listen for data coming from ThoughtSpot.
Now when a user searches, the iFrame will send data to the subscription. The parent web
page or application receives the data as JSON, and can do whatever you want with it.
5. You can set up your web page or application to display or otherwise act on the data it
receives from the subscription.
6. To test it out, do a search in the embedded ThoughtSpot application to retrieve the data. Your
application should act on the data in the way you set it up to do so.
Use the Embedded Search API to pull data from ThoughtSpot
February 07, 2019
ThoughtSpot Application Integration Guide Page 330

Use the Data Push API
Summary:Summary: This procedure shows how to use the Data Push API to
send data from ThoughtSpot to another application
The Data Push API allows you to open a web page in the context of the ThoughtSpot application. This
third party web page will then have access to the results of the ThoughtSpot search from which it was
invoked. This is useful when you want to initiate an action in another application based on the result of a
search in ThoughtSpot. The Data Push API was introduced in ThoughtSpot 5.0.
An example of pushing data to another system to trigger an action would be where you do a search to
find customers who are coming due for renewal of their contract in the next month. You could then
trigger an action that brings up a web page from an external billing system. The billing system could be
set up to read the data (list of names, emails, products, and renewal dates) from ThoughtSpot. The
billing system might then add the price, generate an invoice for each customer, and send it out via email.
To have the Data Push API functionality turned on, contact ThoughtSpot Support.
The DataPush API makes the data available to the external application formatted as JSON (JavaScript
Object Notation). You will need to parse the JSON to get the data values you need using JavaScript in
the receiving application.
Create an Custom Action
To create a Custom Action, you must have the Can administrator ThoughtSpotCan administrator ThoughtSpot privilege.
Use this procedure to create an Custom Action in ThoughtSpot:
1. Log in to ThoughtSpot from a browser.
2. Choose AdminAdmin and then Action CustomizationAction Customization.
3. Click the Add custom action itemAdd custom action item button.
4. Fill in the details for your custom action:
• Item Label: Clicking the menu item with the name you provide here will initiate the
data push to the other system. This menu item will appear under the three dot
menu of a search result.
• URL: The URL of the target page in the external web page or application.
• Window size: The size of the window that will display the external web page or
application in ThoughtSpot.
Use the Data Push API
February 07, 2019
ThoughtSpot Application Integration Guide Page 331
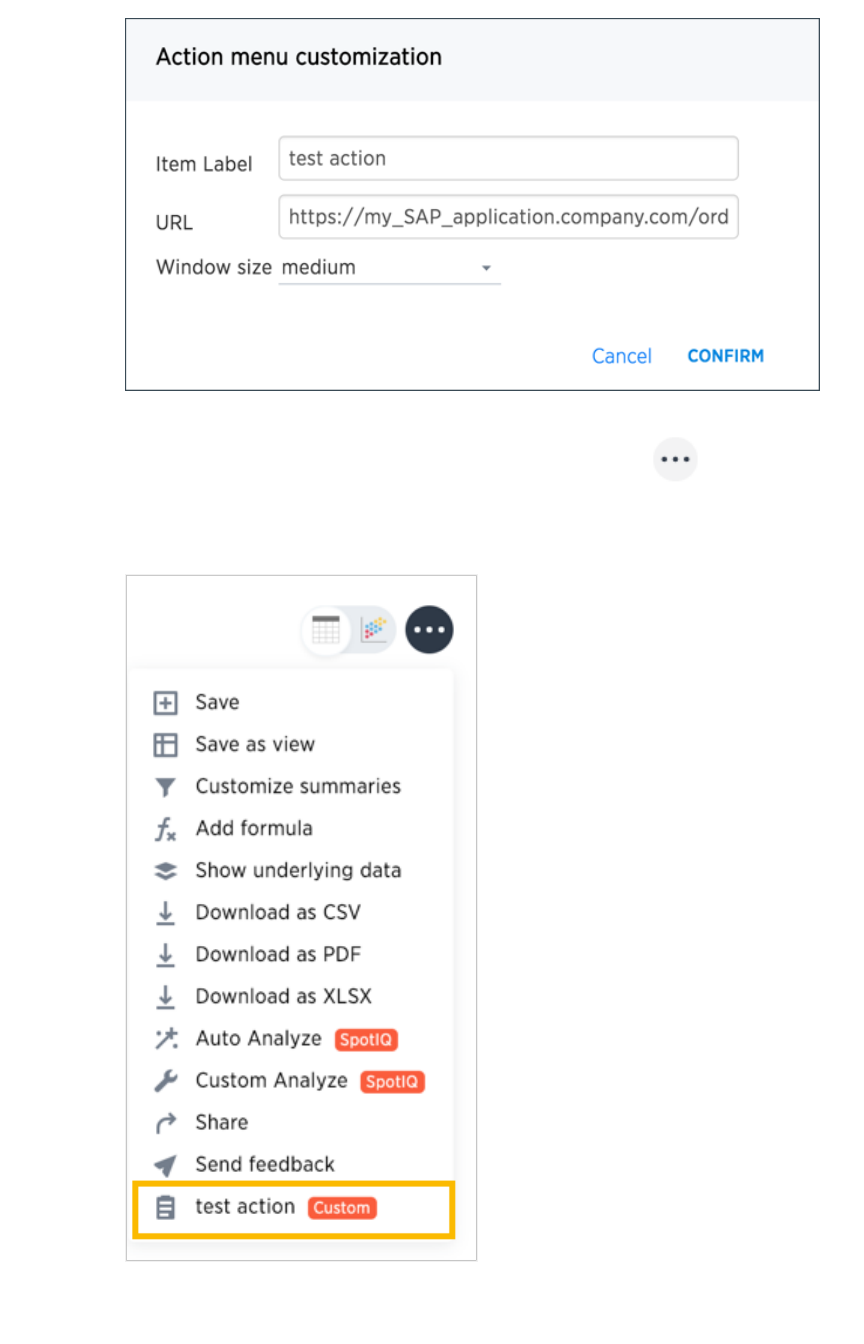
5. Now when a user is viewing a search result, they’ll have the option to use the Custom Action
you created. To initiate the action, they’ll click the ellipses icon (3 dots) , and select
Your Action NameYour Action Name. You’ll notice a CustomCustom tag next to your action name to indicate that this is
something custom built, and not a ThoughtSpot action.
6. When a user clicks your action, they’ll see the web page you entered as the URL for your
custom action.
Use the Data Push API
February 07, 2019
ThoughtSpot Application Integration Guide Page 332
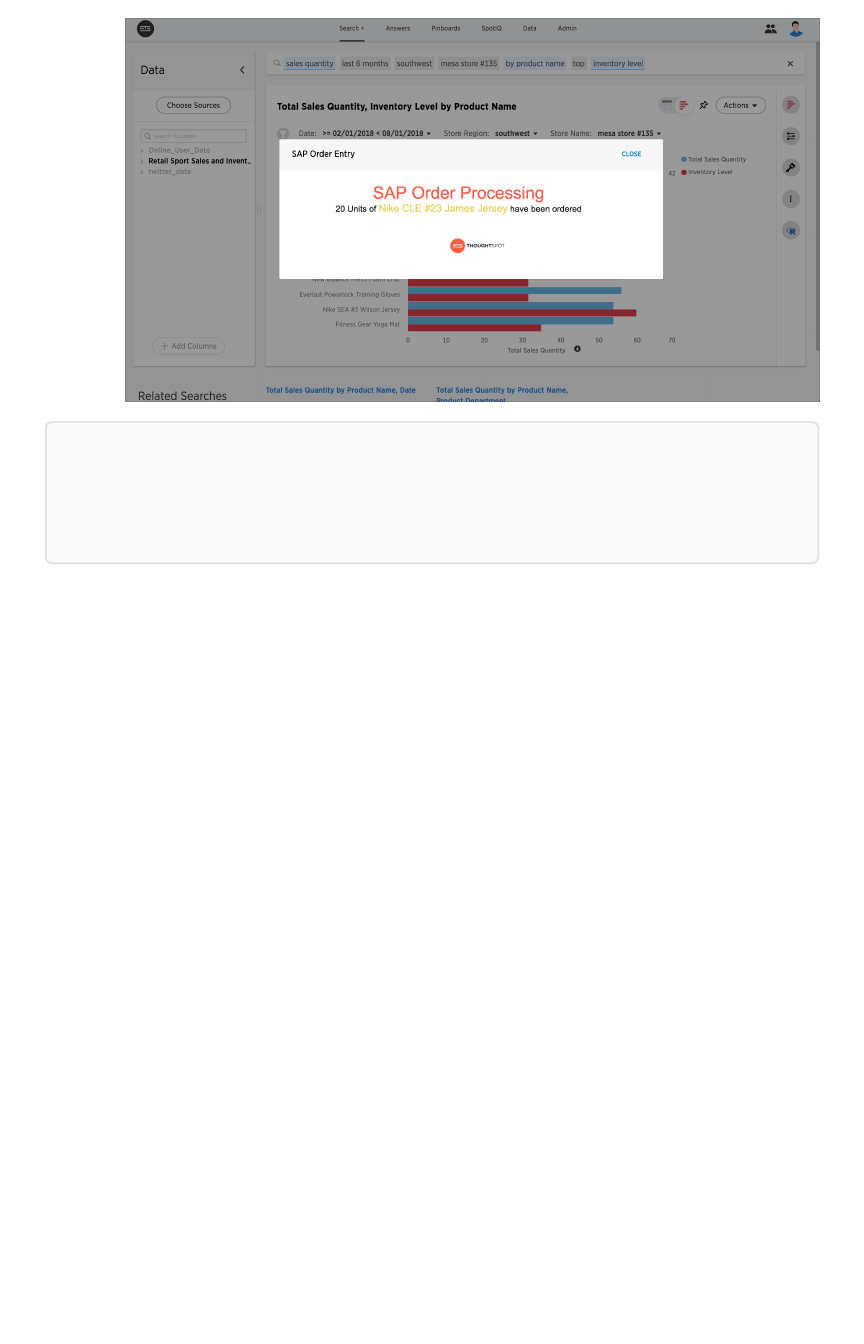
Note:Note: In order for your action to work correctly, the answer from which the user selected the
action needs to have the correct search terms which your application or web page is expecting to
receive. There is no way to guarantee this, other to train your users on the purpose of your action,
and what’s required for it to run.
Sample application
Here is a sample application you can use to try out the Data Push API:
Use the Data Push API
February 07, 2019
ThoughtSpot Application Integration Guide Page 333

<!doctype html><!doctype html>
<html lang="en">
<script src="https://ajax.googleapis.com/ajax/libs/angularjs/
1.6.9/angular.min.js"></script>
<script type="text/javascript" src="api/api.js"></script>
<body>
<script>
varvar app == angular.module("latestData", []);
app.controller("dataCtrl", ['$scope','$window', functifuncti
onon($scope, $window) {
$scope.currentData==undefinedundefined;
$scope.showData==falsefalse;
$scope.displayData == functionfunction() {
$scope.showData == truetrue;
};
functionfunction currentDataCallback(event) {
$scope.currentData == event;
}
$window.onload == functionfunction(){
$window.thoughtspot.getCurrentData(currentDataC
allback);
};
}]);
</script>
<div ng-app ="latestData" ng-controller="dataCtrl">
<button class="get-data" ng-click="displayData()">Clic
k here for latest exported data</button>
<div class="display-data" ng-if="showData"> </div>
</div>
</body>
</html>
Use the Data Push API
February 07, 2019
ThoughtSpot Application Integration Guide Page 334

Understand embedding
Embedding allows you to embed all or part of ThoughtSpot in another client application. This page
provides an explanation of what you must consider when embedding ThoughtSpot
Decide what to embed and where
The type of embedding your company requires can help you determine what type of embedding to use.
For example, you may simply need a single chart displayed as a wallboard or you may want your
customers to access reports on their own data. The first example could require modifying a single HTML
page while the later example may require working with a development team and several different
workflows in a browser application.
Regardless of the simplicity or complexity of your client application, its infrastructure must allow for
loading and calling the ThoughtSpot JS library. This library allows you to authenticate to ThoughtSpot
and load specific objects.
There are different methods for embedding ThoughtSpot into a client application:
TypeType DescriptionDescription
Full Embeds the entire ThoughtSpot application including menu bars. Full navi-
gation is supported.
Page-level Embeds pages without the menus bars or page-level navigation. This is
useful where you want to limit the inclusion to a portion of ThoughtSpot.
For example, you may only embed the SearchSearch or the AnswersAnswers page.
Object-level Embed a single visualization in your application. Content is created in
ThoughtSpot and then that content is embedded. The content is rendered
within an iframe . This returns a JSON object that includes the underlying
data.
You can also use the ThoughtSpot data APIs to request data from ThoughtSpot.
Configuration requirements for embedding
Only Extended Enterprise installation can use ThoughtSpot’s embed functionality. ThoughtSpot
Enterprise installations must also work with ThoughtSpot Support to enable embed before using this
functionality.
Optional settings for embedding
There are some settings that apply to embedding which ThoughtSpot Support or your other
ThoughtSpot technical contact can make for you.
One of these involves what happens when a user clicks on a link within the data. When your data
includes URLs, they display as clickable links in ThoughtSpot tables. By default, clicking on a link opens
the URL in a separate tab. But there is a system-wide setting that can be changed to open the links
within the context in which they appear.
Changing this setting opens the links:
Understand embedding
February 07, 2019
ThoughtSpot Application Integration Guide Page 335

Link type Opens in
Link in search result table in ThoughtSpot Same browser tab as ThoughtSpot appli-
cation
Link in table embedded in an iFrame Same iFrame that contains the table
Link in full ThoughtSpot application embedded in an
iFrame
Same iFrame that contains the application
Choose an authentication methodology
You can control which type of authentication you use between your client application and ThoughtSpot.
No Authentication
You can simply not set up authentication. This would require the user to
already be logged into
ThoughtSpot
before interacting with your client application. This is typically only useful when testing your
client. You would not use this in your production environment.
SAML
Before you can embed all or part of ThoughtSpot, you must authenticate to ThoughtSpot using SAML
with the the public REST API call. After authentication, a URL is provided to call the desired visualization
and populate it into an iframe .
You must configure SAML on your ThoughtSpot instance before using this method.
Trusted authentication service
A ThoughtSpot installation can enable support for token-based authentication service. This allows an
installation to use a central authentication service rather than using ThoughtSpot to authenticate. In this
architecture, ThoughtSpot provides the service with a token that allows it to authenticate on behalf of
users.
A trusted authenticator application or service obtains a token from ThoughtSpot. This token is used to
obtain trust from other, third-party client applications that need access to ThoughtSpot. In the scenario
below, the trust authenticator forwards requests for ThoughtSpot data from client applications to
ThoughtSpot.
Understand embedding
February 07, 2019
ThoughtSpot Application Integration Guide Page 336

A user already logged into client-application interacts with a ThoughtSpot embed point which causes the
following processes:
1. The client-side application requests a user token from the trusted authenticator.
2. The trusted authenticator requests user token from ThoughtSpot.
3. ThoughtSpot verifies the authenticator and returns a user token.
4. The authenticator returns the user token to the client.
5. The client forwards the user token to ThoughtSpot.
6. ThoughtSpot validates the token and returns information commensurate with that
authenticated user’s authorization.
Plan for Cross-Origin HTTP Requests (CORS)
Collecting user credentials from one application (domain) and sending them to another (such as
ThoughtSpot) can present security vulnerabilities such as a phishing attack. Cross-origin or cross-
domain verification closes this vulnerability.
When embedding, you must enable CORS between your client application domain and the ThoughtSpot
domain. This protects your data, so that another actor cannot use the same URL to embed the
visualization in its own Web pages.
Decide if you need to change the feedback
email
ThoughtSpot has an automated feature that collects feedback from users and sends it to
support@thoughtspot.com . Depending on what and how you embed, user actions with your
embedded application can trigger feedback. You can continue to forward feedback in this manner or
direct the feedback to another email. To learn how to change the feedback email, see Manage the
feedback contact.
Understand embedding
February 07, 2019
ThoughtSpot Application Integration Guide Page 337

Remove the ThoughtSpot branded footer
The ThoughtSpot footer appears by default in the ThoughtSpot application. It also appears with an
embed application that encompasses an individual pinboard or a full application. In embed applications
that are have a single visualization, you can ask your ThoughtSpot support engineer to disable the
footer.
Understand embedding
February 07, 2019
ThoughtSpot Application Integration Guide Page 338

Embed pinboard or visualization
The page explains, through an example, how to embed a visualization (table or chart) or pinboard from
ThoughtSpot in your own static Web page, portal, or application.
To build this sample, you need to have access to a text editor and a ThoughtSpot instance with a
visualization. You should also have some experience working with Javascript.
Get the link for an entire pinboard or single
visualization
This procedure assumes the pinboard with the visualization you want to embed already exists. If the
pinboard or visualization doesn’t exist, create it now before continuing.
1. Log in to ThoughtSpot from a browser.
2. Navigate to a visualization on the PinboardPinboard tab.
3. Open a pinboard.
4. Copy the URL for the entire pinboard and for a single visualization.
If the object is a pinboard, click the ellipses icon (3 dots) > Copy LinkCopy Link.
The format for the link is: <protocol>:<host>:<port>/#/embed/viz/<pinboardID>
Embed pinboard or visualization
February 07, 2019
ThoughtSpot Application Integration Guide Page 339
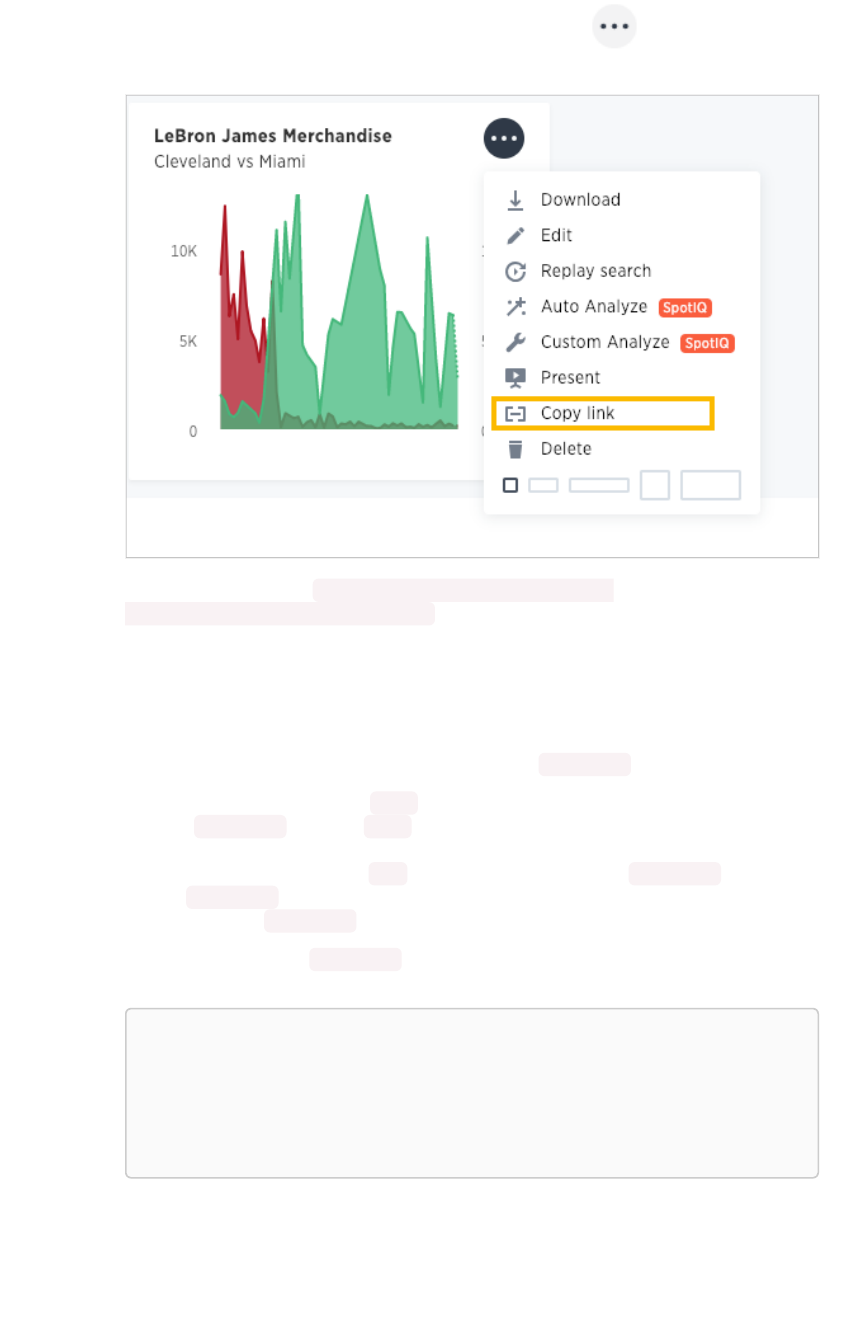
For a vizualization in a pinboard, click the ellipses icon (3 dots) > Copy LinkCopy Link.
The format for the link is: <protocol>:<host>:<port>/#/embed/
viz/<pinboardID>/<vizualizationId>
Edit the test.html
You need to edit the page in your application or web page where you want to embed a ThoughtSpot
pinboard or visualization. For this example, you’ll get a copy of the test.html file.
1. Create an empty directory called test .
2. Save the test.html file to the test directory.
3. Download the ThoughtSpot JavaScript library.
4. Place the Javascript library in an api directory co-located with the test.html file.
5. Edit the test.html file in your favorite editor.
6. Scroll down to the Variables section (about line 37).
Here are the fields in the test.html file you need to edit.
var protocol = "THOUGHSPOT_PROTOCOL";
var hostPort = "HOST_PORT";
var pinboardId = "PINBOARD_ID";
var vizualizationId = "VIZUALIZATON_ID";
7. Edit each variable in the section and replace it with the IDs you copied from the pinboard.
For example, your URL may look similar to the following:
Embed pinboard or visualization
February 07, 2019
ThoughtSpot Application Integration Guide Page 340

http://172.18.202.35:8088/#/embed/viz/061457a2-27bc-43a9-9754-0cd873691bf0/
9985fccf-b28d-4262-b54b-29619a38348e
This is a link copied from an individual visualization, the result in the file is:
var protocol = "http";
var hostPort = "172.18.202.35:8088";
var pinboardId = "061457a2-27bc-43a9-9754-0cd873691bf
0";
var vizualizationId = "9985fccf-b28d-4262-b54b-29619a38
348e";
The protocol ( http or https ) of your client and your ThoughtSpot instance should match.
You’ll use this identifier in the next part.
8. Save your changes and close the test.html file.
Enable CORS for your client domain
You must work with ThoughtSpot support to enable CORS between your client application domain and
the ThoughtSpot domain. If you don’t do this, you will receive an error message when test.html
attempts to load the embedded objects.
The test infrastructure uses Python’s simplehttpserver which runs, by default as localhost:8000 ,
this is information ThoughtSpot support will need. You can also just copy the test directory to an
existing web server. If you do this, you’ll need to DNS for the server when you contact Support.
Test the example page
You are almost ready to view your embedded pinboard and visualization. The fastest way to run a
webserver and test the code is using Python’s simplehttpserver . If you have Python on your system
you already have the simplehttpserver .
1. Log into ThoughtSpot.
In production, you would have added authentication code to your client. You haven’t done
that with this system. So, before you test, you’ll login to the ThoughtSpot. Successfully
logging in causes the system to create a session and an authentication key. Your browser has
this information and so when you load the test.html page in another tab, you won’t need
to authenticate again.
2. Change to your test directory.
3. Start the simplehttpserver web server.
python -m SimpleHTTPServer 8000
4. Open your browser’s DeveloperDeveloper tools.
Embed pinboard or visualization
February 07, 2019
ThoughtSpot Application Integration Guide Page 341
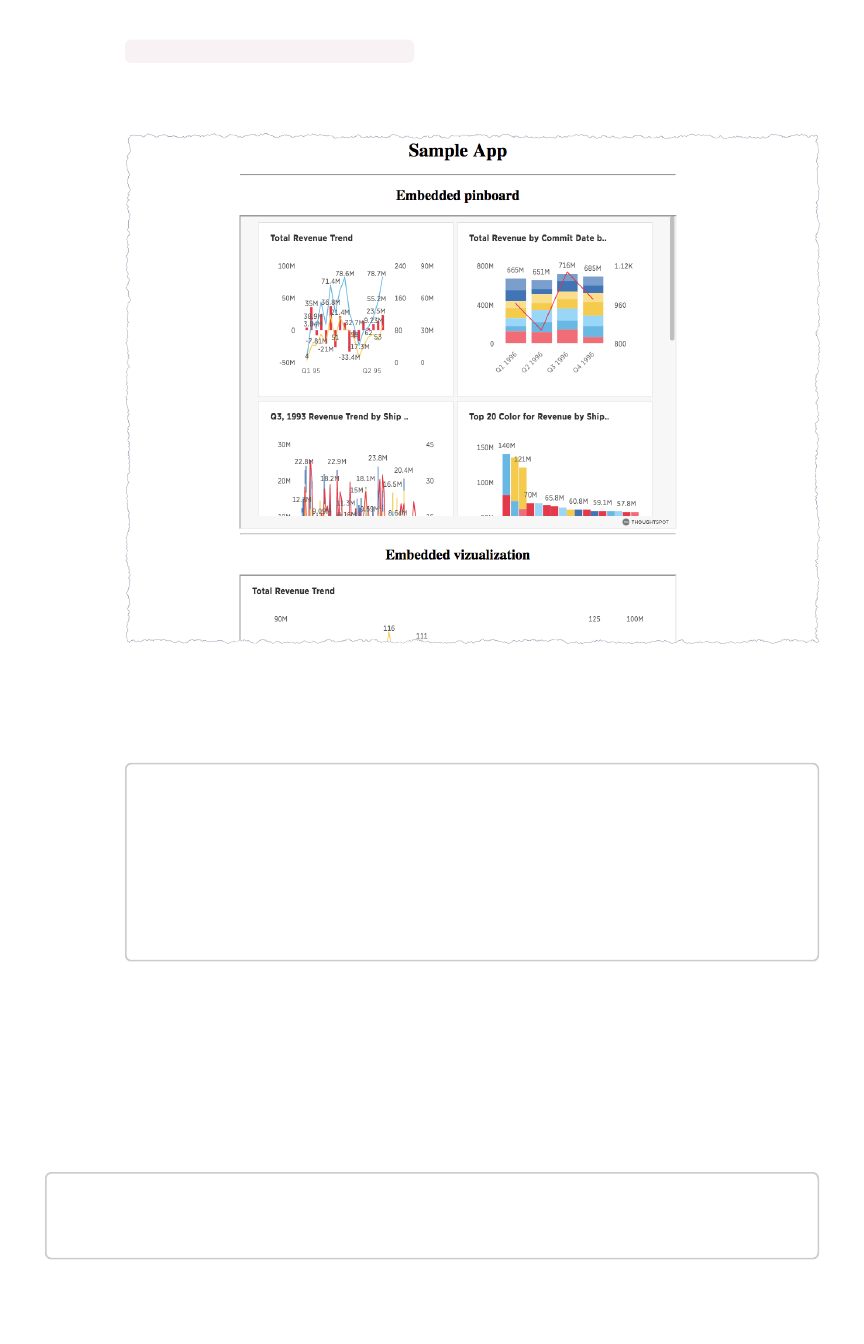
5. Navigate to the test page in your browser.
http://localhost:8000/test.html
You should see something similar to the following:
6. Check the browser console.
Success is appears in the console with a message similar to this:
test.html:60 Initialization successful.
test.html:113 http://172.18.202.35:8088/#/embed/viz/061
457a2-27bc-43a9-9754-0cd873691bf0
test.html:129 http://172.18.202.35:8088/#/embed/viz/061
457a2-27bc-43a9-9754-0cd873691bf0/9985fccf-b28d-4262-b54
b-29619a38348e
Troubleshooting embeds
If your embeds don’t load, open the developer tools on your browser. Look for errors in the page
loading, usually on the ConsoleConsole tab. If you see an error similar to:
No 'Access-Control-Allow-Origin' header is present on the reque
sted resource.
Embed pinboard or visualization
February 07, 2019
ThoughtSpot Application Integration Guide Page 342


Authentication flow with embed
If your ThoughtSpot system is configured for Security Assertion Markup Language (SAML) you can
enable Single Sign On (SSO) for your embed application.
Place the JS API library in the <head> section of the HTML on your Web page. Ensure that the JS API
script tag is the first script loaded in the page. You can see examples of this
Authenticate when the window is initialized
Your web page needs to authenticate by calling window.thoughtspot.initialize and waiting for the
onInitializationCallback to be called before embedding any ThoughtSpot visualizations or making
any ThoughtSpot REST API calls.
The JS API call window.thoughtspot.initialize can cause the entire Web page to be re-directed to
your Identity Provider (IDP). This order implies that you may not execute any of your application logic
before window.thoughtspot.initialize has called your callback.
Any redirection could interfere with your application logic. So, don’t embed any static ThoughtSpot
visualizations in your HTML. In other words, you should generate the ThoughtSpot visualizations
dynamically after window.thoughtspot.initialize has called your callback.
The onAuthExpiration is only available if you have at least one ThoughtSpot visualization iframe in
your web page.
Example of code flow
To authenticate with SSO.
1. Download the ThoughtSpot JavaScript library.
2. Include the library file into your web page’s <head> section:
<head>
<script type=”text/javascript” src=”<protocol><your.tho
ughtspot.domain>/js/api/api.min.js”>
...
</head>
3. From your application code, authenticate to ThoughtSpot by calling to the
window.thoughtspot.initialize method.
For example:
Authentication flow with embed
February 07, 2019
ThoughtSpot Application Integration Guide Page 344

<script type=”text/javascript”>
thoughtspotHost = <hostname_or_ip_w/o_http>
function setUpThoughtSpotAPI() {
window.thoughtspot.initialize(
function(isUserAuthenticatedToThoughtSpot)
{
if (isUserAuthenticatedToThoughtSpo
t) {
// load an embedded ThoughtSpot
visualization or
// make a ThoughtSpot data API c
all
} else {
// the current user into your sy
stem is not authenticated
// into your ThoughtSpot instanc
e, case in any other way suitable
// to your application logic. D
o NOT call setUpThoughtSpotAPI again
// here as that could create an
infinite cycle.
}
},
function() {
// the user got logged out from Thought
Spot, possibly because
// their session with ThoughtSpot expir
ed, you can call setUpThoughtSpotAPI()
// again to re-authenticate the user o
r handle this case in any other way
// suitable to your application logic.
},
thoughtspotHost
);
}
</script>
4. Work with ThoughtSpot support to enable CORS between your client application domain and
the ThoughtSpot domain.
When this value is changed, the nginx service is restarted automatically to reflect the
change.
Now, you’re ready to either embed a visualization or use the REST API to get data from ThoughtSpot
and display it within your Web page or application.
Authentication flow with embed
February 07, 2019
ThoughtSpot Application Integration Guide Page 345

Full application embedding
Summary:Summary: Full embedding allows users to create ThoughtSpot
content in an embedded environment.
Fully embedding ThoughtSpot content gives your users the ability to:
• create answers and pinboards
• share objects with users
• upload data and refresh uploaded data
• relate uploaded data with existing worksheets
This is useful for supplying the full search experience into an iframe with different navigation views and
toggle options. However, there are limitations. Users won’t be able to:
• create worksheets or views.
• modify profiles.
• view the Help Center.
Before you try the technique, make sure you have read, Understand embedding in this section.
A single page with the full application
embedded
The following sample embed.html demonstrates how you might full embed app the application.
Full application embedding
February 07, 2019
ThoughtSpot Application Integration Guide Page 346

<!doctype html><!doctype html>
<html lang="en" style="height: 100%; width: 100%">
<head>
<meta http-equiv="X-UA-Compatible" content="IE=edge"/>
<meta name="viewport" content="width=device-width">
<meta charset="utf-8">
<title>ThoughtSpot Embed App</title>
<script type="text/javascript" src="api/api.min.js"></scr
ipt>
<script type="text/javascript">
functionfunction updateIframeUrl(id) {
varvar iframeUrl == "/?embedApp=true#/";
ifif (id ====== 'homepage') {
iframeUrl == "/?embedApp=true#/";
} elseelse ifif (id ====== 'search') {
iframeUrl == "/?embedApp=true#/answer";
} elseelse ifif (id ====== 'answerList') {
iframeUrl == "/?embedApp=true#/answers";
} elseelse ifif (id ====== 'pinboardList') {
iframeUrl == "/?embedApp=true#/pinboards";
} elseelse ifif (id ====== 'data') {
iframeUrl == "/?embedApp=true#/data/tables";
}
document.getElementById('ts-embed').setAttribute('sr
c', iframeUrl);
}
functionfunction onCallback(event) {
console.log(event.data);
}
window.thoughtspot.subscribeToAlerts("http://localhos
t:8000", onCallback);
</script>
</head>
<body style="height: 100%; width: 100%">
<button onclick="updateIframeUrl('homepage')">Homepage</b
utton>
<button onclick="updateIframeUrl('search')">Search</butto
n>
<button onclick="updateIframeUrl('answerList')">Answer li
st</button>
<button onclick="updateIframeUrl('pinboardList')">Pinboar
d list</button>
<button onclick="updateIframeUrl('data')">Data</button>
Full application embedding
February 07, 2019
ThoughtSpot Application Integration Guide Page 347

<iframe id="ts-embed" src="/?embedApp=true#/" height="8
0%" width="80%"></iframe>
</body>
</html>
The function updateIframeUrl(id) reflects the logic to change the src URL of the iframe when your
users clicks on different navigation buttons.
Hide the ThoughtSpot navigation bar
To hide the primary navigation, configure this:
• Make sure the app is in an <iframe/> .
• Set the embedApp flag as true. This flag determines if the application is embedded.
• Set the primaryNavHidden flag as true (the default). This flag determines navigation
visibility.
If either flag is false , the primary navigation will appear.
Error messages and full embed
ThoughtSpot can disable error messages within the ThoughtSpot iFrame and provide APIs to you to
access those messages, and display them in your UI appropriately. This is done by suppressing error
messages in the UI, and passing their details along to window.postMessage function, which your parent
app can listen to. Hidden messages can be viewed in the console logs. Contact ThoughtSpot Support if
you would like to enable this feature.
Additional notes
Here are some additional notes about the full embed feature:
• Call thoughtspot.<customerURL>.com/#/answer and use that to access the search
functionality.
• Call thoughtspot.<customerURL>.com/#/pinboards and use that to access saved
pinboards.
• Use SAML for authentication against ThoughtSpot within the iFrame.
Full application embedding
February 07, 2019
ThoughtSpot Application Integration Guide Page 348
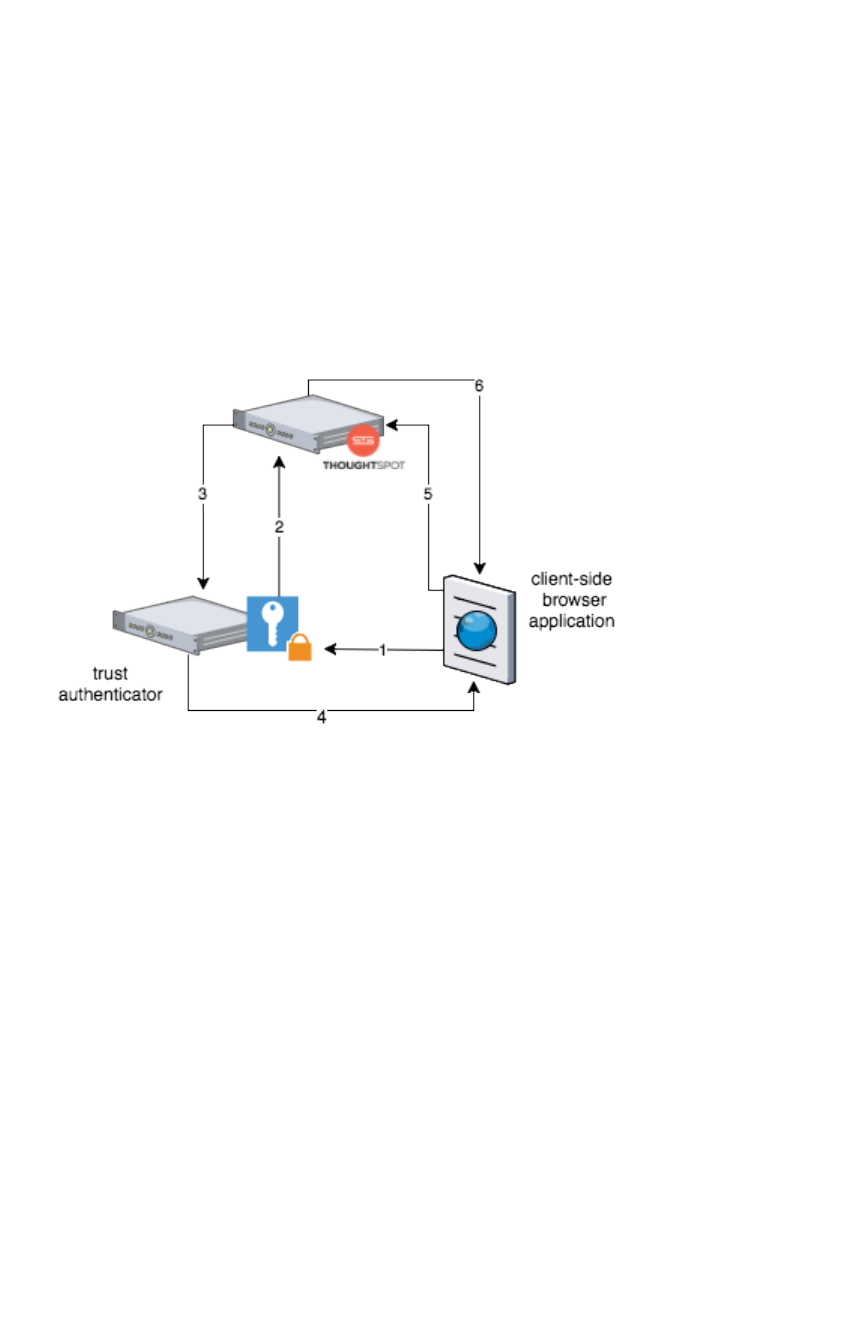
Configure trusted authentication
If your organization has a trusted authentication server, you can use this server to authenticate users of
the embedded ThoughtSpot application. After authenticating a user, the trusted authenticator server or
service obtains an authentication token from ThoughtSpot on the user’s behalf. In this way, the user
need only authenticate once, with the trusted authentication server.
How users are authenticated
In the scenario below, the trust authenticator forwards requests for ThoughtSpot data from client
applications to ThoughtSpot.
A user already logged into client-application interacts with a ThoughtSpot embed point which launches
the following sequence:
1. The client-side application requests a user token from the trusted authenticator.
This trusted authenticator server was previously configured as an authenticated server.
2. The trusted server authenticates the user and requests a token from ThoughtSpot on the
user’s behalf.
3. ThoughtSpot verifies the authenticator server’s request and returns a user token.
4. The authenticator returns the user token to the client which it uses to complete the user
request.
5. The client forwards the request together with the user token to ThoughtSpot.
6. ThoughtSpot validates the token and returns information commensurate with that
authenticated user’s authorization.
Enable trusted authentication and get a token
1. Log into the ThoughtSpot server.
2. Enable trusted authentication and generate an authenticate token. (service secret) – used to
identify the server to ThoughtSpot.
Configure trusted authentication
February 07, 2019
ThoughtSpot Application Integration Guide Page 349

[admin@ourthoughtspot ~]$ tscli tokenauthentication ena
ble
Token generated. Copy the GUID in the box.
########################################
# b0cb26a0-351e-40b4-9e42-00fa2265d50c #
########################################
Override added successfully
Tokens are like any other password, you should store them securely and protect knowledge of them. At
any point in time, your installation can have a single authentication token. Repeated calls to enable
overwrite the existing token and return a new one. To disable a token and not overwrite it:
tscli tokenauthentication disable
Once generated, tokens do not expire.
Trusted authentication call
1. User in another application or web page requests access to embedded ThoughtSpot.
This is a REST request for an embedded ThoughtSpot Eobject, page, or the entire application.
Your trusted authenticator server intercepts the request. Your server application must
determine at minimum:
• if the requestor is itself authenticated with your server
• which user ( username ) is making the request
• what is being requested, an object, page, or the entire ThoughtSpot application
It is also important the the username is a match for a username on the ThoughtSpot
application.
2. The trusted web server requests a authentication token on the user’s behalf from
ThoughtSpot.
POST https://<thoughtspot>/callosum/v1/session/auth/token
This post takes the following parameters:
ParameterParameter DescriptionDescription
secret_key A required formData parameter containing a string which is the au-
thentication token provide by the ThoughtSpot server.
username A required formData parameter containing a string which is the user's
username on ThoughtSpot.
Configure trusted authentication
February 07, 2019
ThoughtSpot Application Integration Guide Page 350

access_level A required formData parameter containing one of FULL or RE-
PORT_BOOK_VIEW .
id An optional formData parameter containing a ThoughtSpot object
identifier. This is only required if you specified REPORT_BOOK_VIEW for
the access_level parameter.
3. The trusted authenticator server is responsible for managing this token.
The token can be managed in any way you see fit. Tokens expire in XXX minutes/hours/day.
4. The trusted authenticator server returns token to the original requestor.
5. Client completes the user’s request providing the token along with the request.
For example, if the customer was requesting a specific object:
https://THOUGHTSPOT_URL/?authtoken=TOKEN_VALUE/#/embed/viz/REPORTBOOK_ID/ID
If you are using ThoughtSpot embed with objects or pages, you must request reauthenticate
requests for each new object.
Configure trusted authentication
February 07, 2019
ThoughtSpot Application Integration Guide Page 351
About Runtime Filters
Runtime filters allow you to filter an answer or pinboard through parameters you pass in the URL to filter
the data that is returned. You can use them with the data API or with embedding of answers or
pinboards.
Capabilities of Runtime Filters
Runtime Filters provide ability to filter data at the time of retrieval using Embedding or the REST API. This
is done by providing filter information through the URL query parameters.
This example shows the URL to access a pinboard with a filter. Here the Runtime Filter is operating on
the column “Color” and will only return values that are equal (EQ) to “red”.
http://10.77.144.40:8088/?col1=Color&op1=EQ&val1=red#
/pinboard/e36ee65e-64be-436b-a29a-22d8998c4fae
This example shows the URL for a REST API call with a filter. Here the Runtime Filter is operating on the
column Category and returning values that are equal to mfgr%2324 .
http://10.77.144.40:8088/callosum/v1/tspublic/v1/pinboarddata?
id=e36ee65e-64be-436b-a29a-22d8998c4fae&col1=Category
&op1=EQ&val1=mfgr%2324
ThoughtSpot will try to find a matching column from the pinboard or visualization being accessed, using
the col field as name . You can add any number of filter sets by incrementing the parameters (e.g.
col2 ,op2 , and val2 , etc.) For operators that support more than one value you can pass
val1=foo&val1=bar , etc.
If the pinboard or answer you’re filtering already has one or more filters applied, the Runtime Filter(s) will
act as an AND condition. This means that the data returned must meet the conditions of all filters -
those supplied in the runtime filter, and those included in the pinboard or visualization itself.
Supported Data Types
You can use runtime filters on these data types:
•VARCHAR
•INT64
•INT32
•FLOAT
•DOUBLE
•BOOLEAN
•DATE
•DATE_TIME
•TIME
About Runtime Filters
February 07, 2019
ThoughtSpot Application Integration Guide Page 352

Note that for DATE and DATE_TIME values, you must specify the date in epoch time (also known as
POSIX or Unix time).
Example Uses
You can use Runtime Filters alongside the REST API and Embedding to create dynamic controls in your
Web portal. For example, you could use the REST API to get a list of possible filters for a visualization.
Then use that data to populate a select list on your Web portal. When a user makes a selection, you
would then pass it as a Runtime Filter, and the result returned will apply the filter.
Limitations of runtime filters
Runtime Filters do not work directly on top of tables. You need to create a worksheet if you want to use
Runtime Filters. This means that the pinboard or visualization on which you apply a runtime filter must be
created on top of a worksheet.
If the worksheet was created from an answer (i.e. it is an aggregated worksheet), Runtime Filters will only
work if the answer was formed using a single worksheet. If the answer from which the worksheet was
created includes raw tables or joins multiple worksheets, you won’t be able to use Runtime Filters on it.
This is because of the join path ambiguity that could result.
Runtime Filters do not allow you to apply “having” filters using a URL.
You cannot apply a Runtime Filter on a pinboard or visualization built on tables whose schema includes
a chasm trap. See the ThoughtSpot Administrator Guide for details on chasm traps and how
ThoughtSpot handles them.
About Runtime Filters
February 07, 2019
ThoughtSpot Application Integration Guide Page 353
Apply a Runtime Filter
Runtime filters allow you to apply filters to the data returned by the APIs or the visualization or pinboard
you’re embedding. Before you apply a filter, make sure understand their limitations.
The filters are specified in the called URL as parameters. Before you can use runtime filter(s), you need to
do these procedures:
1. Enable the JavaScript API (JS API) and authenticate to ThoughtSpot.
2. Use the Data API or Visualization Embedding to retrieve the answer or pinboard you want to
use.
Now you are ready to add a runtime filter to your Data API call or Embedded object:
1. Obtain the URL you are using to embed the visualization or call the REST API.
2. Paste the URL it into a text editor.
3. Append the runtime filter to the URL, using the runtime filter operators to get the data you
want. The format for the runtime filter is:
• For Embedding a pinboard:
http://<thoughtspot_server>:<port>/
?**col1=<column_name\>&op1=<operator\>&val1=<valu
e\>**
#/pinboard/<pinboard_id>
• For Embedding a visualization:
http://<thoughtspot_server>:<port>/
?**col1=<column_name\>&op1=<operator\>&val1=<valu
e\>**
#/pinboard/<pinboard_id>/<visualization_id>
• For the REST API with a pinboard:
http://<thoughtspot_server>:<port>
/callosum/v1/tspublic/v1/pinboarddata
?id=<pinboard_id>
&**col1=<column_name\>&op1=<operator\>&val1=<valu
e\>**
• For the REST API with a visualization:
Apply a Runtime Filter
February 07, 2019
ThoughtSpot Application Integration Guide Page 354

http://<thoughtspot_server>:<port>
/callosum/v1/tspublic/v1/pinboarddata
?id=<pinboard_id>&vizid=%5B<visualization_id>%5D
&**col1=<column_name\>&op1=<operator\>&val1=<valu
e\>**
4. To add additional filters on a particular column, you can specify multiple values by separating
them with &(ampersand) as in the example:
val1=foo&val1=bar
You can also use the IN operator for multiple values, as shown in this example:
col1=<column_name>&op1=IN&val1=<value>&val1=<value>
5. Add additional filters by incrementing the number at the end of each parameter in the RuntimeRuntime
FilterFilter for each filter you want to add, for example, col2 ,op2 ,val2 and so on.
This example passes multiple variables to a single column as well as multiple columns. It shows that
data values are returned as epoch.
col1=region&op1=IN&val1=midwest&val1=south&val1=northeast
&col2=date&op2=BET&val2=<epoch_start>&val2=<epoch_end>
Apply a Runtime Filter
February 07, 2019
ThoughtSpot Application Integration Guide Page 355

Runtime Filter Operators
This list contains all the filter operators you can use with Runtime Filters.
OperatorOperator DescriptionDescription Number of ValuesNumber of Values
EQ equals 1
NE does not equal 1
LT less than 1
LE less than or equal to 1
GT greater than 1
GE greater than or equal to 1
CONTAINS contains 1
BEGINS_WITH begins with 1
ENDS_WITH ends with 1
BW_INC_MAX between inclusive of the higher value 2
BW_INC_MIN between inclusive of the lower value 2
BW_INC between inclusive 2
BW between non-inclusive 2
IN is included in this list of values multiple
Runtime Filter Operators
February 07, 2019
ThoughtSpot Application Integration Guide Page 356

Customize the application style
Summary:Summary: Style Customization allows you to change the overall style
of your ThoughtSpot interface.
Using style customization you can create a uniform ThoughtSpot experience that matches with your
company’s look and feel. To re-brand the interface, you can use the style customization option found on
the Admin section in the ThoughtSpot web application. It lets you change the logo, application
background color, chart color palettes, and footer text. For help with chart and table visualization fonts,
contact ThoughtSpot support.
This is especially useful if you’re using the ThoughtSpot APIs for embedding visualizations from
ThoughtSpot in your own web portal or application. You can make the visualizations match the look and
feel of the portal or application in which they are embedded. For more information on using the APIs, see
the ThoughtSpot Application Integration Guide.
Style customization is enabled by default beginning in ThoughtSpot version 5.0. To disable style
customization, contact ThoughtSpot Support. The ThoughtSpot logo in the middle of the page is
automatically removed when Style Customization is enabled.
Change style customization
Make changes to the style of your ThoughtSpot interface in the Style CustomizationStyle Customization page. This option
gives you defined, yet impactful capabilities for re-branding the interface, so having some understanding
of typography and color schemes would be helpful.
To re-brand the interface:
1. Log in to ThoughtSpot from a browser.
2. Click on the AdminAdmin icon, on the top navigation bar.
3. In the AdminAdmin panel, click on Style CustomizationStyle Customization.
Customize the application style
February 07, 2019
ThoughtSpot Application Integration Guide Page 357

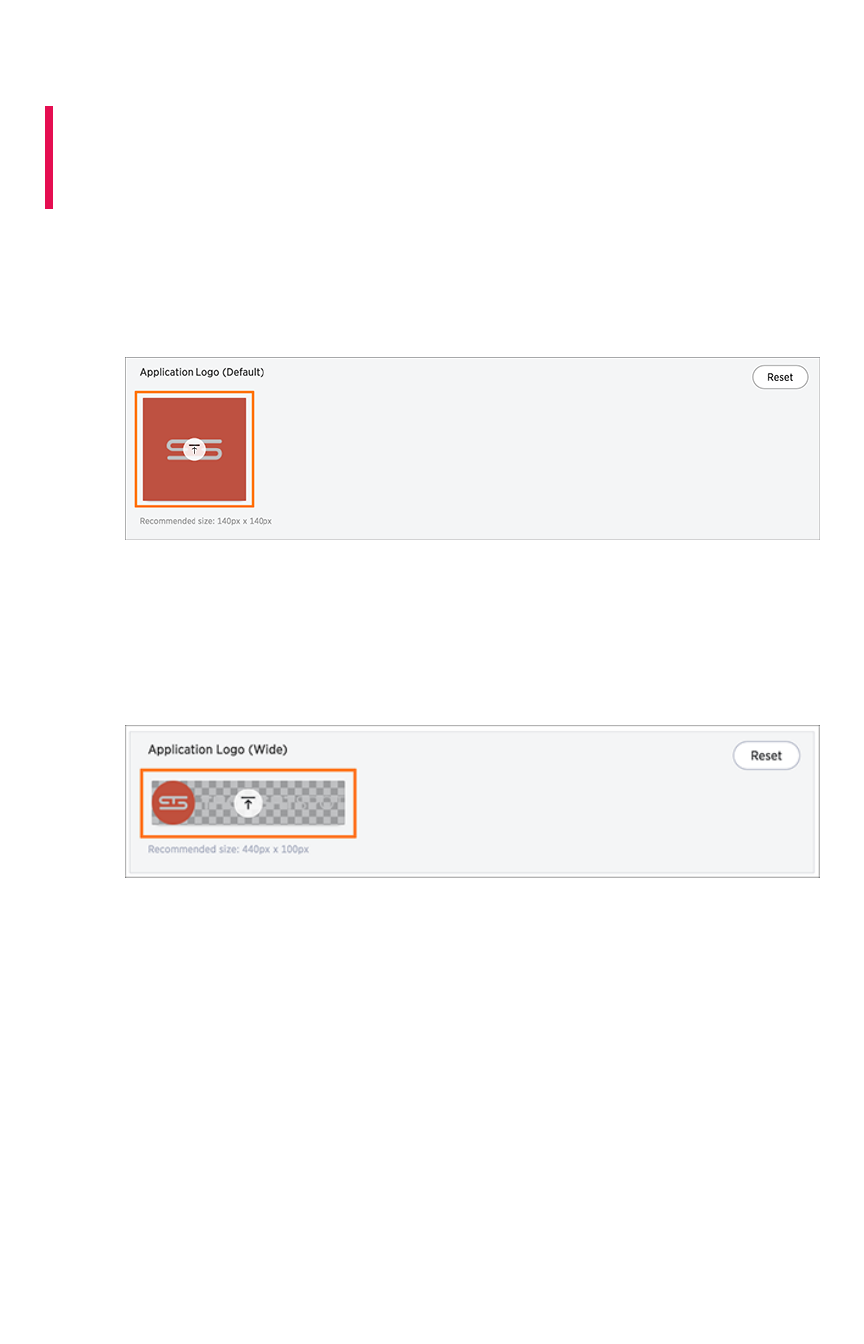
Upload application logos
Summary:Summary: You can replace the ThoughtSpot logo, wherever it
appears in the ThoughtSpot web application, with your own company
logo.
To upload your own default and wide application logos:
1. Click on the default icon under Application Logo (Default)Application Logo (Default) to browse for and select your own
default logo.
Your icon image should be a square, and the recommended size is 140px by 140px. The
accepted file formats are jpg, jpeg, and png. This logo will appear on the top left of the
interface.
2. Next click on the wide icon under Application Logo (Wide)Application Logo (Wide) to browse for and select your own
wide logo.
The recommended size is 440px by 100px. The accepted file formats are jpg, jpeg, and png.
This logo will appear on the login screen. You may need to test a few versions to make sure it
appears correctly.
3. Click the ResetReset button on the upper right hand side of the sections if you would like to bring
back the default logos.
Upload application logos
February 07, 2019
ThoughtSpot Application Integration Guide Page 359
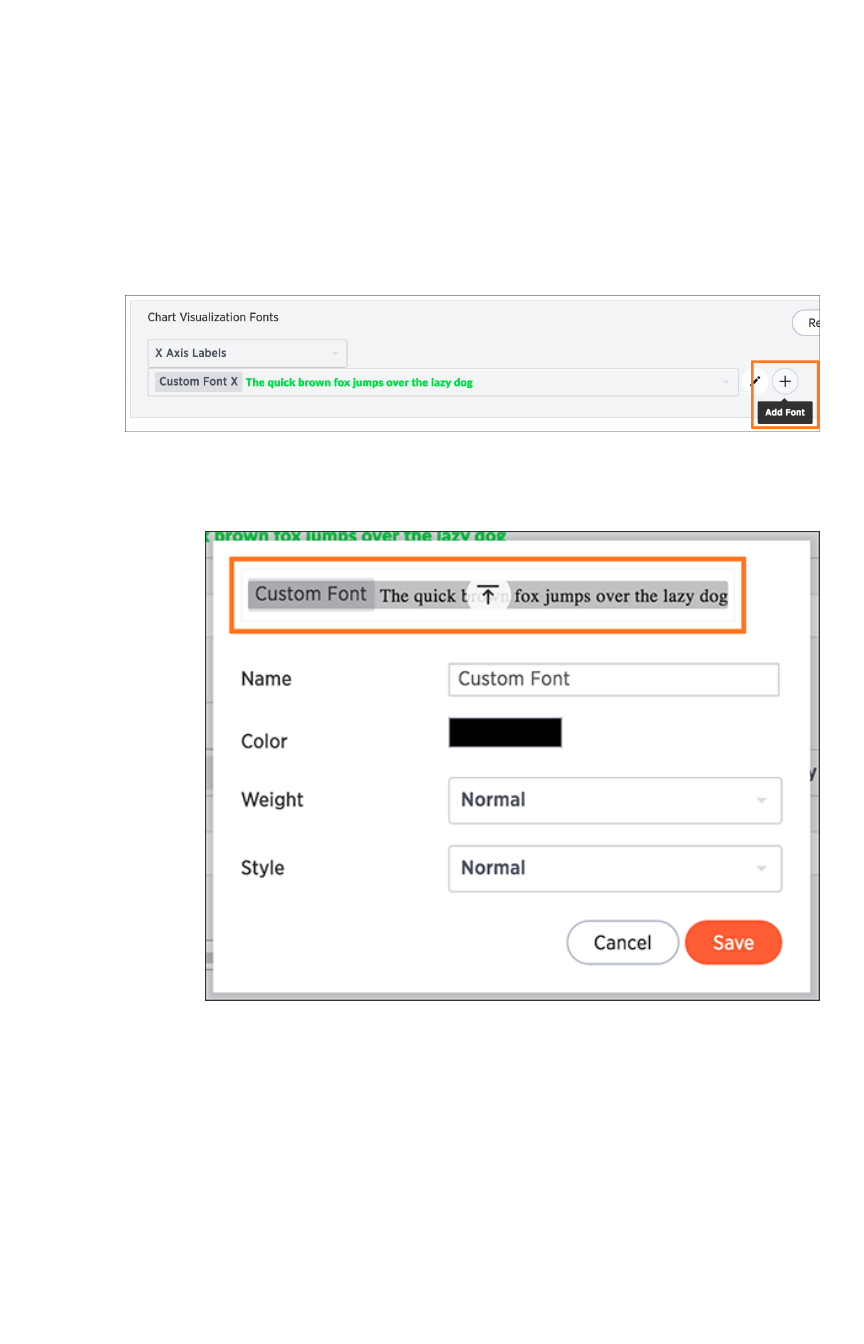
Set chart and table visualization fonts
You can add and edit fonts to customize the appearance of your charts and tables. Be careful though,
since the interface may become unreadable depending on how you change the default font, font weight,
or font style. It is therefore suggested that you use the default font settings.
If you are confident in your knowledge of font visualizations, you can set your chart and table
visualization fonts by following the steps below:
1. Click on the Add NewAdd New button under Chart Visualization FontsChart Visualization Fonts.
2. In the add new font menu, select the details for the font:
a. Upload your custom font.
Only WOFF font types are supported.
b. Use the color menu to choose the font color.
Set chart and table visualization fonts
February 07, 2019
ThoughtSpot Application Integration Guide Page 360
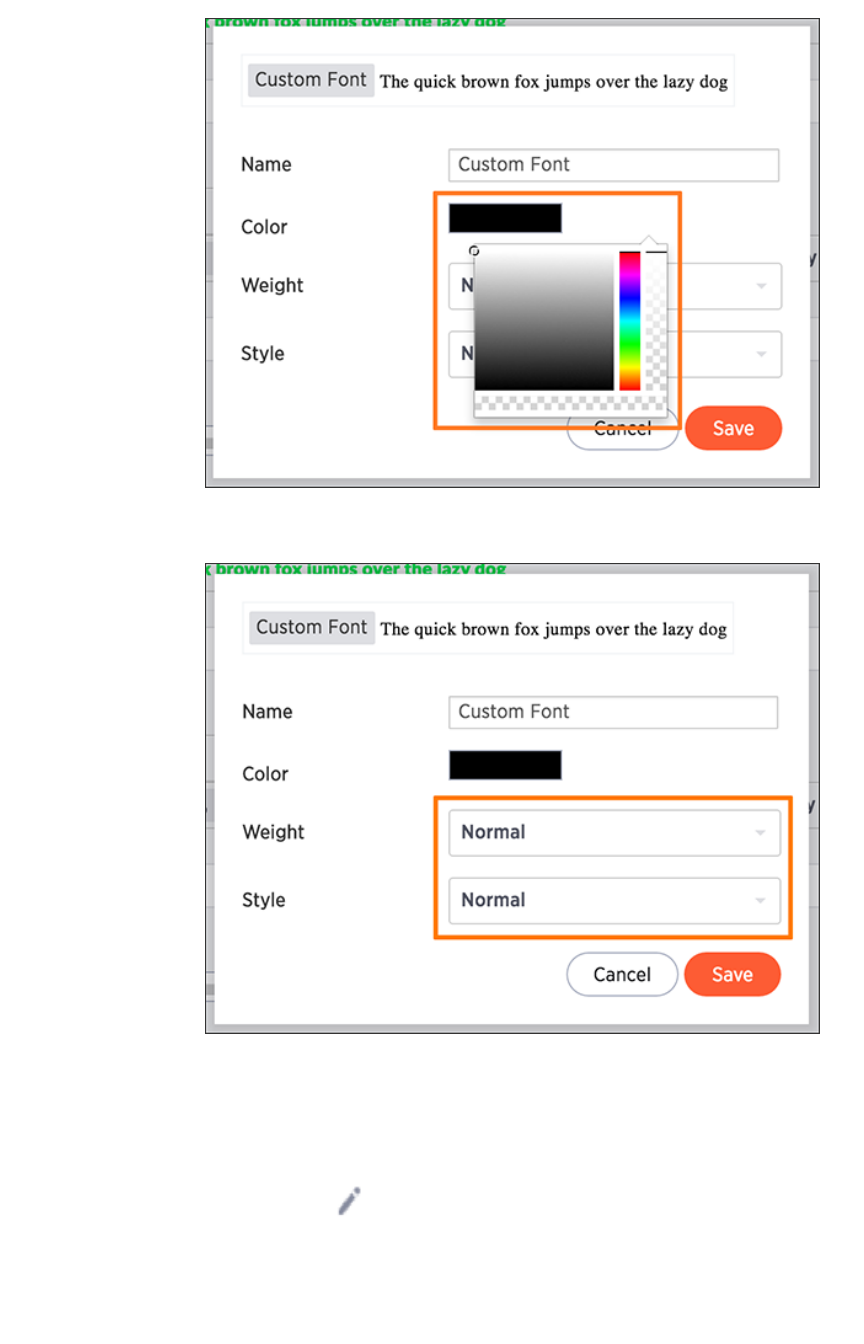
c. Choose the font weight and style from the drop down menus.
The font weight choices are normal, bold, and light. The style choices are normal,
italic, and oblique.
d. Click SaveSave.
3. Click on the Edit FontEdit Font icon to make changes to the font you just uploaded or to a pre-
existing font.
Set chart and table visualization fonts
February 07, 2019
ThoughtSpot Application Integration Guide Page 361
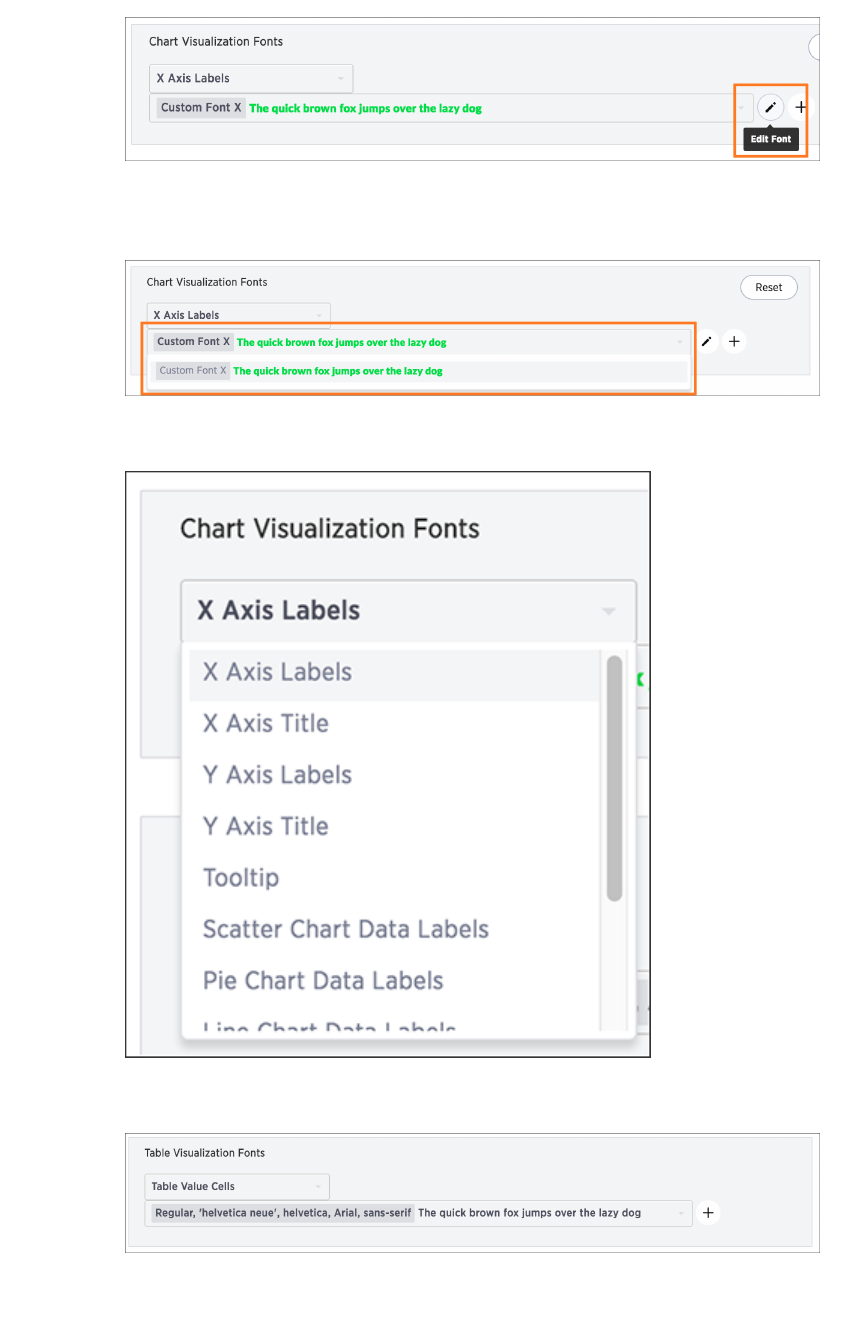
4. Make any changes to the details of the font in the edit menu and click SaveSave.
5. Click the custom font drop down to choose your custom font.
6. Click the chart label drop down to choose where you would like to apply your custom font.
7. The same steps can be followed to set your Table Visualization FontsTable Visualization Fonts.
8. Click the ResetReset button on the upper right hand side of the sections if you would like to bring
back the default fonts.
Set chart and table visualization fonts
February 07, 2019
ThoughtSpot Application Integration Guide Page 362
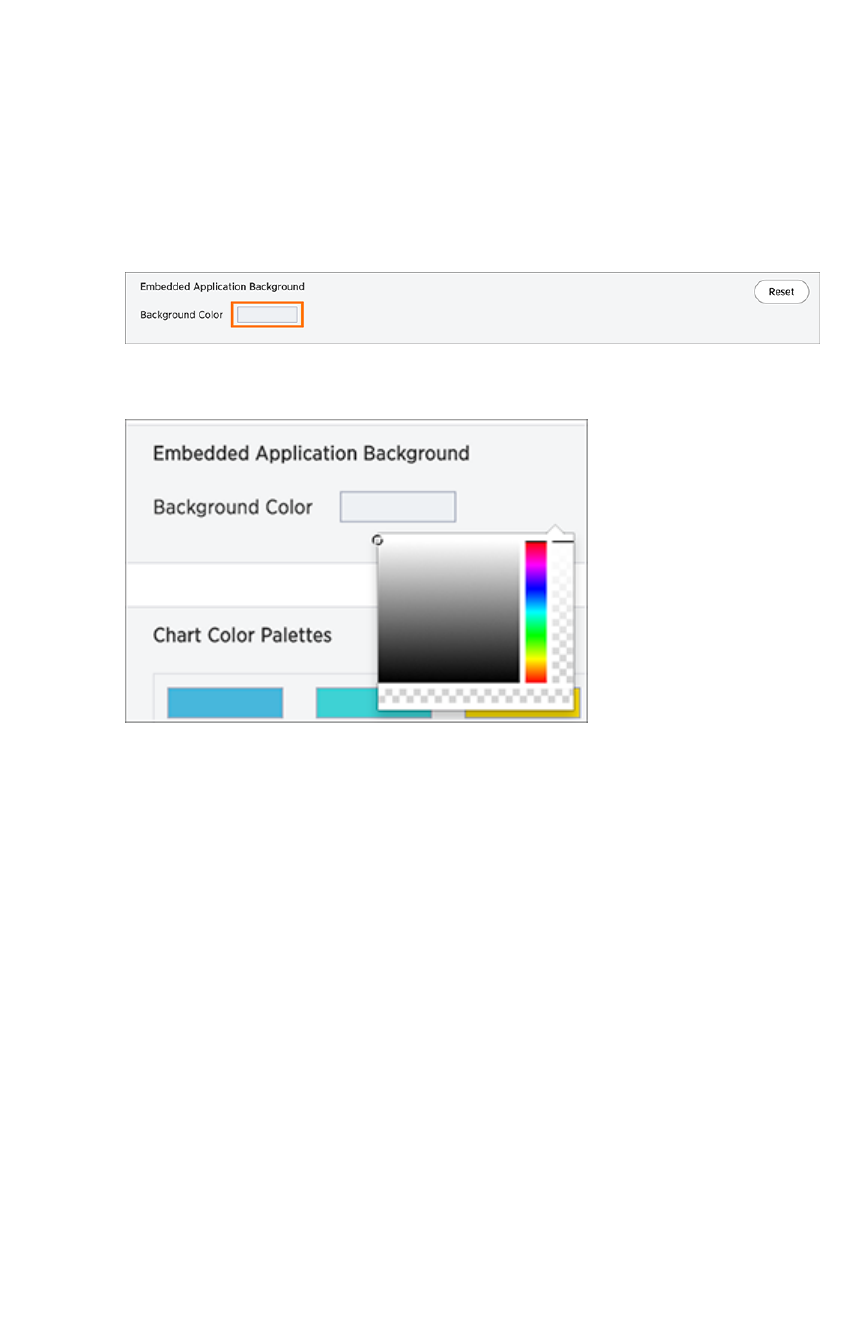
Choose a background color
You can change the background color to match with your company’s theme. The custom background
color is in effect when using the API to embed visualizations and pinboards.
This feature is only applicable when embedding ThoughtSpot in an external web portal or application. To
choose a background color:
1. Click the background color box under Application BackgroundApplication Background.
2. Use the color menu to choose your new background color.
3. Click the ResetReset button on the upper right hand side of the section if you would like to bring
back the default color.
Choose a background color
February 07, 2019
ThoughtSpot Application Integration Guide Page 363

Select chart color palettes
You can change the color palettes that are used to create your charts. Although it is suggested that you
stick with the default settings, it is possible to create your own appealing color palettes if done correctly.
To select the chart color palettes:
1. Navigate to the Chart Color PalettesChart Color Palettes section at the bottom of the Style CustomizationStyle Customization page.
2. Click on the color you would like to change in the primary color palette, and use the color
menu to choose your new color.
All of the colors in the primary color palette are used in a chart before any from the secondary
palette are used. Therefore, the primary palette usually consists of primary colors.
3. Click on the color you would like to change in the secondary color palette, and use the color
menu to choose your new color.
Select chart color palettes
February 07, 2019
ThoughtSpot Application Integration Guide Page 364

The colors from the secondary color palette are used once all of the colors have been
exhausted from the primary palette. Therefore, the secondary palette usually consists of
secondary colors.
4. Click the ResetReset button on the upper right hand side of the section if you would like to bring
back the default color palettes.
Select chart color palettes
February 07, 2019
ThoughtSpot Application Integration Guide Page 365
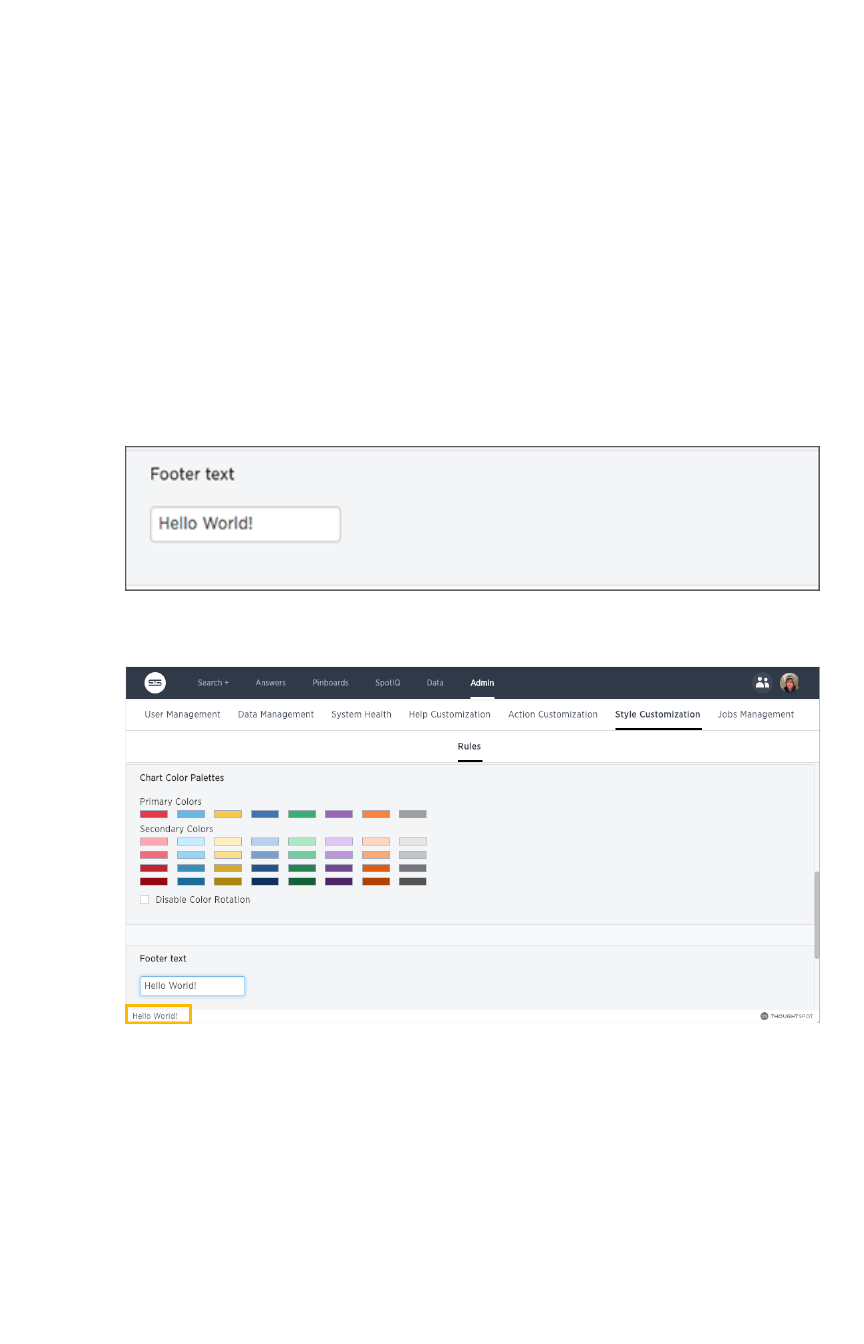
Change the footer text
The ThoughtSpot footer appears by default in the ThoughtSpot application. It also appears with an
embed application that encompasses an individual pinboard or a full application. In embed applications
that are have a single visualization, you can ask your ThoughtSpot support engineer to disable the
footer.
While you cannot remove the footer, you can customize it by adding a company-specific message.
Add a message to the application footer
You can change the footer text to reflect your company’s message. To change the footer text:
1. Click the text box under Footer textFooter text.
2. Enter your new text message.
Your new text message will automatically be displayed in the footer.
3. Click the ResetReset button on the upper right hand side of the section if you would like to bring
back the default footer text.
Change the footer text
February 07, 2019
ThoughtSpot Application Integration Guide Page 366

Public API reference
This reference details all the public ThoughtSpot APIs. The descriptions are aimed to help you solve
specific use cases, such as syncing users and groups, or fetching visualization headers. The following
public APIs are available:
•pinboarddata API
•metadata API
•session API
•user API
•group API
See About the REST API for information on how to call and use the REST APIs.
Public API reference
February 07, 2019
ThoughtSpot Application Integration Guide Page 367

pinboarddata API
Gets the pinboard data from the ThoughtSpot system. Returns one object if you make a call to a specific
visualization on a pinboard.
• Public namespace: Data
• Current URL path: /tspublic/v1/pinboarddata
Parameters
ParameterParameter DescriptionDescription
id GUID id of the pinboard query string.
vizid Optional GUID ids of the visualizations query string.
batchsize An integer defining the query batch size. The system default is -1 .
pagenumber
An integer providing another way to specify an offset. The system default is -1 . Al-
ternate way to set offset. This is:
1-based indexingOffset = (pageNumber - 1) * batchSize query integer
offset An integer specifying the query offset. The system default is -1 .
formattype A string specifying the format type. Valid values are COMPACT or FULL JSON. The
system default is COMPACT .
HTTP Status Codes
• 200 Gets the data of a pinboard/visualization.
• 400 Invalid pinboard id.
Response example:
Curl
curl -X POST --header 'Content-Type: application/json' --heade
r 'Accept: application/json' 'https://<instance>/callosum/v1/ts
public/v1/pinboarddata?batchsize=-1&pagenumber=-1&offset=-1&for
mattype=COMPACT'
pinboarddata API
February 07, 2019
ThoughtSpot Application Integration Guide Page 368
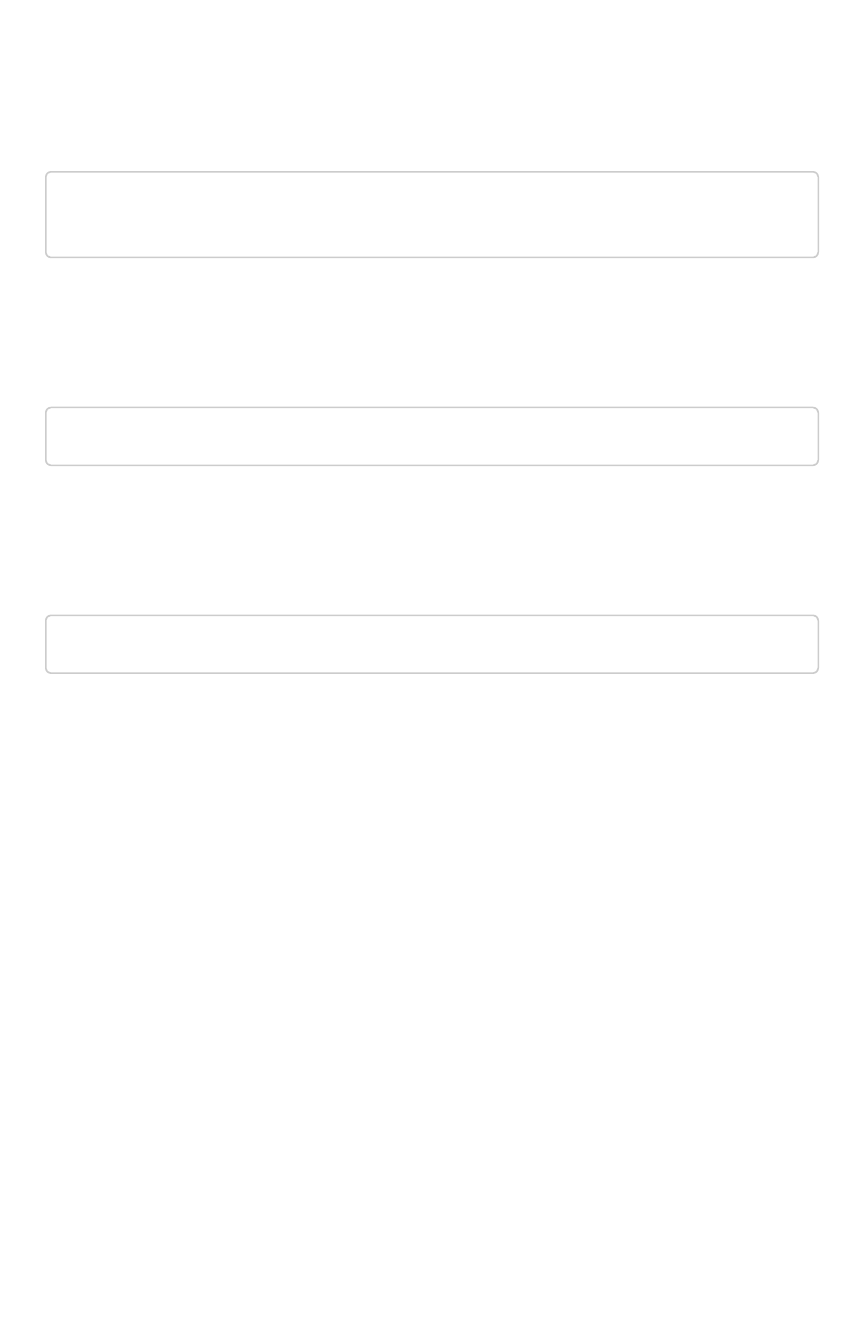
Request URL
https://<instance>/callosum/v1/tspublic/v1/pinboarddata?batchsi
ze=-1&pagenumber=-1&offset=-1&formattype=COMPACT
Response Body
no content
Response Code
400
pinboarddata API
February 07, 2019
ThoughtSpot Application Integration Guide Page 369

Response Headers
{
"x-callosum-incident-id": "2ff9d2e4-c928-4192-8250-8450de264a
b7",
"x-callosum-trace-id": "2e551b8d-d3f4-4cf1-af90-a49bb246ad9
2",
"date": "Sun, 19 Feb 2017 03:39:41 GMT",
"x-callosum-request-time-us": "11536",
"server": "nginx",
"pragma": "no-cache",
"cache-control": "no-store, no-cache, must-revalidate, max-ag
e=0, post-check=0, pre-check=0",
"content-security-policy": "script-src 'self'",
"connection": "keep-alive",
"content-length": "0",
"x-callosum-ip": "192.168.2.247",
"content-type": null
}
pinboarddata API
February 07, 2019
ThoughtSpot Application Integration Guide Page 370

metadata API
These two APIs work with metadata for objects in the system.
GET /tspublic/v1/metadata/listobjectheaders
Lists the metadata object headers in the repository
Parameters
ParameterParameter DescriptionDescription
type A string specifying the metadata object type. Valid values for this field are:
•REPORT_BOOK
•QUESTION_ANSWER_BOOKPINBOARD_ANSWER_BOOK
•QUESTION_ANSWER_SHEET
•PINBOARD_ANSWER_SHEET
•LOGICAL_COLUMN
•LOGICAL_TABLE
•LOGICAL_RELATIONSHIP
•TAG
•DATA_SOURCE
subtypes List of sub-types of metadata object. This setting applies to the LOGI-
CAL_TABLE type. Valid values are:
•ONE_TO_ONE_LOGICAL
•WORKSHEET
•PRIVATE_WORKSHEET
•USER_DEFINED
•AGGR_WORKSHEET
category A string specifying the metadata object category. Valid values are ALL or
MY .
sort Sort order of returned headers. Valid values - DEFAULT
•NAME
•DISPLAY_NAME
•AUTHOR
•CREATED
•MODIFIED
sortascending A boolean flag specifying sort order. A null value defines default order. True
signifies ascending order. False signifies descending order.
offset An integer specifying the batch offset to fetch page of headers. A value of
-1 implies first page.
metadata API
February 07, 2019
ThoughtSpot Application Integration Guide Page 371
ParameterParameter DescriptionDescription
batchsize An integer specifying the batch size. The system default is unspecified, a
value of -1 implies no pagination.
tagname A JSON string array containing a set of tag names to filter headers by.
pattern A string specifying a object name pattern to match. Use %for wildcard
match.
skipids A string identifying the object metadata GUIDs to exclude.
fetchids A string identifying the object metadata GUIDs to fetch.
auto_created A boolean specifying whether to list auto created objects only. A value of
null signifies return all.
HTTP Status Code
•200 Gets the visualization headers.
Request URL
https://<instance>/callosum/v1/tspublic/v1/metadata/listobjecth
eaders
For example:
curl -X GET --header 'Accept: application/json' --header 'X-Req
uested-By: ThoughtSpot'
'https://<instance>/callosum/v1/tspublic/v1/metadata/listob
jectheaders?category=ALL&sort=DEFAULT&offset=-1'
For example:
metadata API
February 07, 2019
ThoughtSpot Application Integration Guide Page 372

[
{
"id": "6715f768-8930-4180-9a3d-1efdbfaa8e7f",
"name": "Headline Pinboard",
"author": "59481331-ee53-42be-a548-bd87be6ddd4a",
"created": 1519940021267,
"modified": 1519945210514,
"modifiedBy": "59481331-ee53-42be-a548-bd87be6ddd4a",
"owner": "6715f768-8930-4180-9a3d-1efdbfaa8e7f",
"isAutoCreated": false,
"isAutoDelete": false
},
{
"id": "262abdac-b00f-4f5f-ad33-fcf10154184f",
"name": "Empty Pinboard",
"author": "59481331-ee53-42be-a548-bd87be6ddd4a",
"created": 1519945152030,
"modified": 1519945152030,
"modifiedBy": "59481331-ee53-42be-a548-bd87be6ddd4a",
"owner": "262abdac-b00f-4f5f-ad33-fcf10154184f",
"isAutoCreated": false,
"isAutoDelete": false
},
{
"id": "327f4d60-c502-43b0-b1d4-c73df5031a2e",
"name": "Charts Pinboard",
"author": "59481331-ee53-42be-a548-bd87be6ddd4a",
"created": 1519880454269,
"modified": 1519945014529,
"modifiedBy": "59481331-ee53-42be-a548-bd87be6ddd4a",
"owner": "327f4d60-c502-43b0-b1d4-c73df5031a2e",
"isAutoCreated": false,
"isAutoDelete": false
},
...snip...,
{
"id": "e82fe65a-7ac0-4282-a783-7a35c01b8dbd",
"name": "Broken Pinboard",
"author": "59481331-ee53-42be-a548-bd87be6ddd4a",
"created": 1455598191207,
"modified": 1455598218094,
"modifiedBy": "59481331-ee53-42be-a548-bd87be6ddd4a",
"owner": "e82fe65a-7ac0-4282-a783-7a35c01b8dbd",
"isAutoCreated": false,
"isAutoDelete": false
metadata API
February 07, 2019
ThoughtSpot Application Integration Guide Page 373
}
]
Response Code
200
Response Headers
{
"x-callosum-trace-id": "c8008291-c074-45cf-b88a-371253166b5
b",
"date": "Tue, 27 Mar 2018 17:38:54 GMT",
"content-encoding": "gzip",
"x-callosum-request-time-us": "11694",
"transfer-encoding": "chunked",
"x-nginx-localhost": "172.18.231.12",
"x-callosum-ip": "172.18.231.12",
"connection": "keep-alive",
"x-ua-compatible": "IE=edge",
"x-callosum-incident-id": "791eb139-5fd1-478a-9002-35a81b0dd4
aa",
"pragma": "no-cache",
"server": "ThoughtSpot",
"vary": "Accept-Encoding",
"content-type": "application/json",
"cache-control": "no-store, no-cache, must-revalidate, max-ag
e=0, post-check=0, pre-check=0",
"content-security-policy": "script-src 'self'"
}
GET /tspublic/v1/metadata/listvizheaders
Gets the visualization headers from the ThoughtSpot system. The expected output includes a list of
objects, each with information about the visualizations of the given pinboard.
metadata API
February 07, 2019
ThoughtSpot Application Integration Guide Page 374
Parameters
ParameterParameter DescriptionDescription
id A string specifying the GUID of a particular answer (reportbook).
HTTP Status Code
•200 Gets the visualization headers.
•400 Invalid pinboard GUID.
Request URL
https://<instance>/callosum/v1/tspublic/v1/metadata/listvizhead
ers
For example:
curl -X GET --header 'Accept: application/json' --header 'X-Req
uested-By: ThoughtSpot' 'http://172.18.231.12:8088/callosum/v1/
tspublic/v1/metadata/listvizheaders?id=327f4d60-c502-43b0-b1d
4-c73df5031a2e'
Response Body
An array where each response has these first class citizens:
•size (String enumeration)
•vizType (String enumeration)
•id (GUID)
•name (String)
•author (GUID)
•created (Epoch)
•modified (Epoch)
•modifiedBy (GUID)
•owner (GUID)
For example:
metadata API
February 07, 2019
ThoughtSpot Application Integration Guide Page 375

[
{
"size": "m",
"vizType": "CHART",
"title": {
"value": {
"text": "Line chart- horizontal 900-1200 - data labels"
}
},
"id": "8fbf93e6-54ba-4a20-b2bb-4afe8dca5321",
"name": "1177d886-27fd-4dff-a617-8defadd27a6b::6e87081a-fc4
c-4bd9-b1e0-cfe145868498 Pinboard Ref",
"author": "59481331-ee53-42be-a548-bd87be6ddd4a",
"created": 1519880461956,
"modified": 1519945014529,
"modifiedBy": "59481331-ee53-42be-a548-bd87be6ddd4a",
"owner": "6f403a20-fe68-43e7-a0bf-a4e706740361"
},
...snip...
{
"size": "ls",
"vizType": "CHART",
"title": {
"value": {
"text": "Percent as chart"
}
},
"id": "eb59aa25-1d2b-44f4-b5b4-b390105d56a8",
"name": "b8c26ea1-b341-4a18-871b-cc67a6bb237f::80cd5837-d5a
7-491d-a3dc-490dfb3dbb0f Pinboard Ref",
"author": "59481331-ee53-42be-a548-bd87be6ddd4a",
"created": 1519932657762,
"modified": 1519945014529,
"modifiedBy": "59481331-ee53-42be-a548-bd87be6ddd4a",
"owner": "6f403a20-fe68-43e7-a0bf-a4e706740361"
}
]
Response Code
200
metadata API
February 07, 2019
ThoughtSpot Application Integration Guide Page 376

Response Headers
{
"x-callosum-trace-id": "c0c84945-be03-414c-80c3-47b1b094980
3",
"date": "Tue, 27 Mar 2018 17:46:47 GMT",
"content-encoding": "gzip",
"x-callosum-request-time-us": "35402",
"transfer-encoding": "chunked",
"x-nginx-localhost": "172.18.231.12",
"x-callosum-ip": "172.18.231.12",
"connection": "keep-alive",
"x-ua-compatible": "IE=edge",
"x-callosum-incident-id": "4ed1364c-b018-43a8-8486-ee954cd3da
e3",
"pragma": "no-cache",
"server": "ThoughtSpot",
"vary": "Accept-Encoding",
"content-type": "application/json",
"cache-control": "no-store, no-cache, must-revalidate, max-ag
e=0, post-check=0, pre-check=0",
"content-security-policy": "script-src 'self'"
}
metadata API
February 07, 2019
ThoughtSpot Application Integration Guide Page 377

Public API reference
This object has two POST calls, one for login and one for logout .
POST /tspublic/v1/session/login
This call takes a APPLICATION_FORM_URLENCODED payload containing a username , a password , and
an optional rememberme flag. If you do not supply the optional flag, the system uses the default false
value.
Inputs
ParameterParameter DescriptionDescription
username Username of the user to log in as.
password Password of the user to log in as.
rememberme A flag indicating if the user session needs to be remembered. Defaults to
false .
Returns
No object is returned.
Status Codes
CodeCode DescriptionDescription
204 On successful login.
401 On failure to login
POST /tspublic/v1/session/logout
This call logs a user out of an existing session.
Returns
No object is returned.
Public API reference
February 07, 2019
ThoughtSpot Application Integration Guide Page 378

Status Codes
CodeCode DescriptionDescription
204 On successful logout.
401 On failure or when unauthorized to call.
Public API reference
February 07, 2019
ThoughtSpot Application Integration Guide Page 379

user API
• Public namespace: Configuration
POST /tspublic/v1/user/ownership
Transfers ownership of
all
objects from one user to another. You cannot transfer objects to or from the
system user or the administrative user.
Parameters
ParameterParameter DescriptionDescription
fromUserName
Username to transfer from. You cannot specify the system user or an ad-
ministrative user.
toUserName
Username to transfer to. You cannot specify the system user or an admin-
istrative user.
HTTP Status Code
• 200
• 400
Request URL
https://<instance>/callosum/v1/tspublic/v1/user/transfer/owners
hip
Curl example:
ccurl -X POST --header 'Content-Type: application/json' --heade
r 'Accept: application/json' --header 'X-Requested-By: ThoughtS
pot' 'https://<instance>/callosum/v1/tspublic/v1/user/transfer/
ownership?fromUserName=Auser&toUserName=Buser'
user API
February 07, 2019
ThoughtSpot Application Integration Guide Page 380

Response Object Format
no content
Response Code
200
Response Headers
{
"x-callosum-incident-id": "d28fd603-bd7e-414f-882b-794d74c4b4
69",
"x-callosum-trace-id": "55453051-5fb5-4139-8d24-adcc0b1b24f
2",
"date": "Thu, 15 Mar 2018 22:21:47 GMT",
"x-callosum-request-time-us": "970213",
"server": "ThoughtSpot",
"status": "204",
"strict-transport-security": "max-age=31536000; includeSubDom
ains",
"pragma": "no-cache",
"cache-control": "no-store, no-cache, must-revalidate, max-ag
e=0, post-check=0, pre-check=0",
"content-security-policy": "script-src 'self'",
"x-ua-compatible": "IE=edge",
"content-type": null
}
POST /tspublic/v1/user/sync
API to synchronize principal from external system with ThoughtSpot system. This API is for users and
groups. It should help to keep ThoughtSpot users and groups automatically synchronized with your
external database.
user API
February 07, 2019
ThoughtSpot Application Integration Guide Page 381

Specifically, you will have to make a call to /tspublic/v1/user/sync containing all users and groups
present in the external database. If the call succeeds, then it is guaranteed that the users and groups in
ThoughtSpot match those specified in the list of objects passed to /tspublic/v1/user/sync . This
means that:
• Objects (users or groups) present in ThoughtSpot, but not present in the list passed to a sync
call will be deleted.
• Objects present in ThoughtSpot, and present in the list passed to a sync call will be updated
such that the object attributes in ThoughtSpot match those present in the list. This includes
group membership.
• Objects not present in ThoughtSpot, and present in the list will be created in ThoughtSpot.
The returned object represents the changes that were made in ThoughtSpot.
ParameterParameter DescriptionDescription
applyChanges A boolean flag to indicate whether to sync the users and groups to the system,
and apply the difference evaluated. You can use this API to validate a difference
before applying changes.
password A string specifying a password.
principals A string specifying a list of principal objects.
remoteDeleted This is boolean flag that indicates whether to remove deleted users/groups.
When true, this flag removes any deleted users or groups.boolean
HTTP Status Code
• 200
Request URL
https://<instance>/callosum/v1/tspublic/v1/user/sync
Curl example:
curl -X POST --header 'Content-Type: application/x-www-form-url
encoded' --header 'Accept: application/json' -d 'applyChanges=f
alse' 'https://<instance>/callosum/v1/tspublic/v1/user/sync'
user API
February 07, 2019
ThoughtSpot Application Integration Guide Page 382
Response Object Format
{
'usersAdded': ['username1','username2'],
'usersDeleted': ['username3'],
'usersUpdated': ['username4'],
'groupsAdded': ['groupname1'],
'groupsDeleted': ['groupname2','groupname3'],
'groupsUpdated': ['groupname4']
}
Response Code
415
Response Headers
{
"x-callosum-incident-id": "645499d1-d0cf-4b3b-bbdc-4296abb9a3
26",
"x-callosum-trace-id": "19f7ad7d-226a-4e88-a301-405f8512595
9",
"date": "Sun, 19 Feb 2017 03:55:52 GMT",
"x-callosum-request-time-us": "4545",
"server": "nginx",
"pragma": "no-cache",
"cache-control": "no-store, no-cache, must-revalidate, max-ag
e=0, post-check=0, pre-check=0",
"content-security-policy": "script-src 'self'",
"connection": "keep-alive",
"content-length": "0",
"x-callosum-ip": "192.168.2.247",
"content-type": null
}
user API
February 07, 2019
ThoughtSpot Application Integration Guide Page 383
POST /tspublic/v1/user/updatepassword
Changes the password of a user
Parameters
ParameterParameter DescriptionDescription
name Name of the user .
password String to represent the new user password.
currentpassword String to represent the current user password.
Request URL
https://<instance>/callosum/v1/tspublic/v1/user/updatepassword
Curl example:
curl -X POST --header 'Content-Type: application/x-www-form-url
encoded' --header 'Accept: application/json' --header 'X-Reques
ted-By: ThoughtSpot' -d 'name=guest¤tpassword=test&password=foo
barfoobar' 'https://<instance>/callosum/v1/tspublic/v1/user/upd
atepassword'
GET /tspublic/v1/user/list
API to get a list of all users, groups, and their inter-dependencies in the form of principal objects. This
API is for users and groups.
One principal object contains the following properties (* denotes required properties):
user API
February 07, 2019
ThoughtSpot Application Integration Guide Page 384
PropertyProperty DescriptionDescription
name
String to represent the name of the principal.
This field, in conjunction with whether the object is a user or group, is used
to identify a user/group. Consequently, this field is required to be unique
(unique for users and groups separately. I.e. you can have user “x” and
group “x”).
displayName String to represent the display name of the principal.
description String to describe the principal.
mail String to represent the email address of the user. This field should be popu-
lated only in case of user not group. It is ignored in the case of groups.
principalTypeEnum
The value of this field should be one of the following:
•LOCAL_USER User created in the ThoughtSpot system and the
validation of the user is done through password saved in the
ThoughtSpot database.
•LOCAL_GROUP Groups created in the ThoughtSpot system.
password String to represent the password of the user. This field should be only pop-
ulated in case of user not group. It is ignored in the case of groups. Also
password is only required if the user is of LOCAL_USER type. Password is
only required when the user is created for the first time. In subsequent up-
date of the user password is not updated even if it changes in the source
system.
groupNames List of group names that a principal belongs to directly. Groups and users
can belong to other groups.
HTTP Status Code
• 200
Request URL
https://<instance>/callosum/v1/tspublic/v1/user/list
Curl example:
user API
February 07, 2019
ThoughtSpot Application Integration Guide Page 385
curl -X GET --header 'Accept: application/json' 'https://<insta
nce>/callosum/v1/tspublic/v1/user/list'
Response Body format
[
{
"name": "Group 1",
"displayName": "Group Display Name 1",
"description": "Group Description 1",
"principalTypeEnum": "LOCAL_GROUP",
"groupNames": []
},
{
"name": "Test Name",
"displayName": "Test DisplayName",
"principalTypeEnum": "LOCAL_USER"
"password": "password_123",
"groupNames": ["Group 1"]
}
]
user API
February 07, 2019
ThoughtSpot Application Integration Guide Page 386

Response Body example
user API
February 07, 2019
ThoughtSpot Application Integration Guide Page 387

[
{
"name": "Sales Executives",
"displayName": "Sales Executives",
"description": "",
"created": 1481827712854,
"modified": 1481827713052,
"principalTypeEnum": "LOCAL_GROUP",
"groupNames": []
},
{
"name": "Operations Demo",
"displayName": "Operations Demo",
"description": "",
"created": 1436491036553,
"modified": 1436498598655,
"principalTypeEnum": "LOCAL_GROUP",
"groupNames": []
},
{
"name": "Sales Directors",
"displayName": "Sales Directors",
"description": "",
"created": 1481827747555,
"modified": 1485805361837,
"principalTypeEnum": "LOCAL_GROUP",
"groupNames": []
},
{
"name": "Product",
"displayName": "Product",
"description": "",
"created": 1409250574242,
"modified": 1477525172084,
"principalTypeEnum": "LOCAL_GROUP",
"groupNames": []
},
{
"name": "Sales Development",
"displayName": "Sales Development",
"description": "",
"created": 1481831987186,
"modified": 1481831987382,
"principalTypeEnum": "LOCAL_GROUP",
"groupNames": [
user API
February 07, 2019
ThoughtSpot Application Integration Guide Page 388
"Sales"
]
}
]
Response Code
200
Response Headers
{
"x-callosum-incident-id": "1be6e07b-b7aa-4531-8597-8852760757
f0",
"x-callosum-trace-id": "e92c54ca-d5f1-44a6-ab8e-f6871bb0da8
b",
"date": "Sun, 19 Feb 2017 04:14:13 GMT",
"content-encoding": "gzip",
"x-callosum-request-time-us": "19720",
"server": "nginx",
"vary": "Accept-Encoding",
"content-type": "application/json",
"pragma": "no-cache",
"cache-control": "no-store, no-cache, must-revalidate, max-ag
e=0, post-check=0, pre-check=0",
"transfer-encoding": "chunked",
"content-security-policy": "script-src 'self'",
"connection": "keep-alive",
"x-callosum-ip": "192.168.2.247",
"x-ua-compatible": "IE=edge"
}
user API
February 07, 2019
ThoughtSpot Application Integration Guide Page 389

group API
POST v1/group/addprivilege
Adds a DATADOWNLOADING or USERDATAUPLOADING privilege to the system default ALL_GROUP . All
users in the system are always part of ALL group. By default, this group does not have either
permission.
All the data sources which the ALL_GROUP has permissions to are downloadable when
DATADOWNLOADING is set.
Parameters
ParameterParameter DescriptionDescription
privilege A string representing the privilege to add. You can set `DATADOWNLOAD-
ING` or `USERDATAUPLOADING` privilege.
groupNames A string representing the name of the group to add the privilege to. Only
`ALL_GROUP` is accepted.
Return codes
• 200
• 204 Success
• 401 Failure/unauthorized
Request URL
https://<instance>/callosum/v1/tspublic/v1/group/addprivilege
POST v1/group/removeprivilege
Removes a privilege from a group.
Parameters
ParameterParameter DescriptionDescription
privilege A string representing the privilege to remove. You can set `DATADOWN-
LOADING` or `USERDATAUPLOADING` privilege.
group API
February 07, 2019
ThoughtSpot Application Integration Guide Page 390

ParameterParameter DescriptionDescription
groupNames A string representing the name of the group to remove the privilege from.
Only `ALL_GROUP` is accepted.
Return codes
• 200
• 204 Success
• 401 Failure/unauthorized
Request URL
https://<instance>/callosum/v1/tspublic/v1/group/addprivilege
group API
February 07, 2019
ThoughtSpot Application Integration Guide Page 391

Keyword reference
You can use keywords when asking a question to help define your search. This reference lists the
various keywords. You can also see this list of keywords and examples from within the help center.
Keywords in Other Languages
Currently, we offer the following keyword translations.
日本語 中文 (简体)Deutsche Español
(latín)
Español
(España)
Français
(Canada)
Français
(France)
Português
(Brasil)
Português
(Portugal)
Italiano
Dansk Suomi Svenska Norsk Nederland
Also, see the topic on how to set locale preferences in your user profile to control language, date, and
number formats on the ThoughtSpot UI.
General
KeywordKeyword ExamplesExamples
top • toptop sales rep by count sales for average revenue > 10000
•sales rep average revenue for each region toptop
bottom • bottombottom revenue average
•bottombottom revenue by state
•customer by revenue for each sales rep bottombottom
n
top 10top 10 sales rep revenue
n
bottom 25bottom 25 customer by revenue for each sales rep
sort by • revenue by state sort bysort by average revenue
•revenue by customer sort bysort by region
Date
KeywordKeyword ExamplesExamples
after order date afterafter 10/31/2014
Keyword reference
February 07, 2019
ThoughtSpot Application Integration Guide Page 392

KeywordKeyword ExamplesExamples
before order date beforebefore 03/01/2014
between … and ... order date betweenbetween 01/30/2012 and 01/30/2014
daily year-over-year growth of revenue by order date daily year-over-yeardaily year-over-year
daily shipments by region dailydaily
day
count mondaymonday restaurant
day of week revenue by day of weekday of week last 6 months
day of week
count shipments MondayMonday
n
days for each month sales last 2 days for each month2 days for each month
n
days for each quar-
ter
revenue last 15 days for each quarter15 days for each quarter
n
days for each week total sold last 2 days for each week2 days for each week
n
days for each year revenue last 300 days for each year300 days for each year
growth of … by … dai-
ly
growth ofgrowth of sales byby order date dailydaily
growth of … by …
monthly
growth ofgrowth of sales byby date shipped monthlymonthly sales > 24000
growth of … by …
quarterly
growth ofgrowth of sales byby date shipped quarterlyquarterly
growth of … by …
weekly
growth ofgrowth of sales byby receipt date weeklyweekly for pro-ski2000
growth of … by …
yearly
growth ofgrowth of sales byby date closed yearlyyearly
growth of … by ... growth ofgrowth of sales byby order date
n
hours for each day sales last 2 hours for each day2 hours for each day
last day by customers last day bylast day by referrer
last month by customers last month bylast month by day
last
n
days visitors last 7 dayslast 7 days
last
n
quarters visitors last 2 quarterslast 2 quarters by month by campaign
last
n
weeks visitors last 10 weekslast 10 weeks by day
Keyword reference
February 07, 2019
ThoughtSpot Application Integration Guide Page 393

KeywordKeyword ExamplesExamples
last quarter customers last quarterlast quarter sale > 300
last week customers last weeklast week by store
last year top 10 customers last yearlast year by sale by store for region west
last
n
years visitors last 5 yearslast 5 years by revenue for sum revenue > 5000
month to date sales by product month to datemonth to date sales > 2400
month year
commission by sales rep February 2014February 2014
month
commission JanuaryJanuary
month revenue by monthmonth last year
monthly year-over-
year
growth of revenue by receipt date monthly year-over-yearmonthly year-over-year
monthly commission > 10000 monthlymonthly
n
months for each
quarter
cost last 2 months for each quarter2 months for each quarter
n
months for each
year
last 8 months for each year8 months for each year
n
days ago sales 2 days ago2 days ago
n
months ago sales 2 months ago2 months ago by region
n
months visitors last 6 months6 months for homepage visits > 30 by month
n
quarters ago sales 4 quarters ago4 quarters ago by product name contains deluxe
n
weeks ago sales 4 weeks ago4 weeks ago by store
n
years ago sales 5 years ago5 years ago by store for region west
n
years opportunities next 5 years5 years by revenue
next day shipments next daynext day by order
next month appointments next monthnext month by day
next
n
days shipments next 7 daysnext 7 days
next
n
months openings next 6 monthsnext 6 months location
next
n
quarters opportunities next 2 quartersnext 2 quarters by campaign
next
n
weeks shipments next 10 weeksnext 10 weeks by day
Keyword reference
February 07, 2019
ThoughtSpot Application Integration Guide Page 394

KeywordKeyword ExamplesExamples
next quarter opportunities next quarternext quarter amount > 30000
next week shipments next weeknext week by store
next year opportunities next yearnext year by sales rep
quarter to date sales by product quarter to datequarter to date for top 10 products by
sales
quarterly year-over-
year
growth of revenue by date shipped quarterly year-over-yearquarterly year-over-year
quarterly sales quarterlyquarterly for each product
n
quarters for each
year
last 2 quarterslast 2 quarters for each year
today sales todaytoday by store
week to date sales by order date week to dateweek to date for pro-ski200
week revenue by weekweek last quarter
weekly year-over-year growth of revenue by date shipped weekly year-over-yearweekly year-over-year
weekly revenue weeklyweekly
n
weeks for each
month
sales last 3 weeks for each month3 weeks for each month
n
weeks for each
quarter
last 2 weeks for each quarter2 weeks for each quarter
n
weeks for each year last 3 weeks for each year3 weeks for each year
year to date sales by product year to dateyear to date
year
revenue by product 20142014 product name contains snowboard
yearly shipments by product yearlyyearly
yesterday sales yesterdayyesterday for pro-ski200 by store
Time
KeywordKeyword ExamplesExamples
detailed ship time detaileddetailed
Keyword reference
February 07, 2019
ThoughtSpot Application Integration Guide Page 395

KeywordKeyword ExamplesExamples
last minute count homepage views last minutelast minute
last hour count unique visits last hourlast hour
n
minutes count visitors last 30 minutes30 minutes
n
hours count visitors last 12 hours12 hours
hourly visitors by page name hourlyhourly
n
minutes
ago
sum inventory by product 10 minutes ago10 minutes ago
n
hours ago sum inventory by product by store 2 hours ago2 hours ago
Text
KeywordKeyword ExamplesExamples
begins with product name begins withbegins with 'pro'
contains product name contains "alpine" description containscontains "snow shoe"
ends with product name ends withends with 'deluxe'
not begins
with
product name not beginsnot begins with "tom's"
not contains product color not contains 'tan' product color not containsnot contains 'red'
not ends
with
product name not ends withnot ends with "trial"
similar to course name similar tosimilar to 'hand'
not similar
to
course name not similar tonot similar to 'hand'
Keyword reference
February 07, 2019
ThoughtSpot Application Integration Guide Page 396

Number
FunctionFunction ExamplesExamples
sum sumsum revenue
average averageaverage revenue by store
count countcount visitors by site
max maxmax sales by visitor by site
min minmin revenue by store by campaign for cost > 5000
standard
deviation
standard deviationstandard deviation revenue by product by month for date after
10/31/2010
unique
count
unique countunique count visitor by product page last week
variance variancevariance sale amount by visitor by product for last year
Comparative
FunctionFunction ExamplesExamples
all allall
between... and revenue betweenbetween 0 andand 1000
vs, versus revenue east vsvs west
>sum sale amount by visitor by product for last year
sale amount >> 2000
<unique count visitor by product by store for sale
amount << 20
>= count calls by employee lastname >=>= m
<= count shipments by city latitude <=<= 0
=unique count visitor by store purchased products == 3
for last 5
days
!= sum sale amount region != canada region !=!= mexico
Keyword reference
February 07, 2019
ThoughtSpot Application Integration Guide Page 397

Location
KeywordKeyword ExamplesExamples
near revenue store name county nearnear san francisco
near... within
n
miles|km|meters revenue store name county nearnear alameda withinwithin 5050
milesmiles
farther than
n
miles|km|meters
from
average hours worked branch farther thanfarther than 80 km80 km from
scarborough
Location keywords only work for searches where the data source includes latitude/longitude data.
Period
KeywordKeyword ExampleExample
quarter (
date
)quarterquarter (purchase date)
quarter of year (
date
)quarter of yearquarter of year (purchase date)
month of quarter (
date
)month of quartermonth of quarter (purchase date)
week of year (
date
)week of yearweek of year (ship date)
week of quarter (
date
)week of quarterweek of quarter (ship date)
week of month (
date
)week of monthweek of month (ship date)
day of year (
date
)day of yearday of year (ship date)
day of quarter (
date
)day of quarterday of quarter (ship date)
day (
date
)dayday (ship date)
day of month (
date
)day of monthday of month (order date)
day of week (
date
)day of weekday of week (order date)
hour (
datetime
)hourhour (timestamp)
Keyword reference
February 07, 2019
ThoughtSpot Application Integration Guide Page 398
TQL reference
TQL is the ThoughtSpot language for entering SQL commands. This reference lists TQL commands you
can use to do things like creating a schema or verifying a data load.
About using TQL
You can use TQL either through the ThoughtSpot application’s web interface or the command line
interface in the Linux shell.
Use --query_results_apply_top_row_count <number> flag to limit the number of result rows
returned by a query. For example:
$ tql --query_results_apply_top_row_count 100
As a best practice, you should enclose object names (database, schema, table, and column) in double
quotes, and column values in single quotes. When referring to objects using fully qualified object names,
the syntax is:
"database"."schema"."table"
To get help on SQL when using TQL, enter help on the command line.
You can use TQL to view and modify schemas and data in tables. Remember to add a semicolon after
each command. Commands are not case sensitive but are capitalized here for readability.
Note:Note: Worksheets and pinboards in ThoughtSpot are dependent upon the data in the
underlying tables. Use caution when modifying tables directly. If you change or remove a schema
on which those objects rely, the objects could become invalid.
View schemas and data
SyntaxSyntax DescriptionDescription
SHOW DATABASES Lists all available databases.
Examples:
SHOW DATABASES;
TQL reference
February 07, 2019
ThoughtSpot Application Integration Guide Page 399

SyntaxSyntax DescriptionDescription
USE <database>
Switches the context to the specified database. This is required if queries
do not use fully qualified names (database.schema.table) for specifying ta-
bles.
Examples:
USE "fruit_database";
SHOW SCHEMAS
Lists all schemas within the current database. For example:
SHOW SCHEMAS;
SHOW TABLES Lists all tables within the current database by schema. For example:
SHOW TABLES;
SHOW TABLE
<table>
Lists all the columns for a table. For example:
SHOW TABLE "locations";
SCRIPT SERVER Generates the TQL schema for all tables in all databases on the server. For
example:
SCRIPT SERVER;
SCRIPT DATABASE
<database>
Generates the TQL schema for all tables in a database. For example:
SCRIPT DATABASE "fruit_database";
SCRIPT TABLE
<table>
Generates the TQL schema for a table. For example:
SCRIPT TABLE "vendor";
TQL reference
February 07, 2019
ThoughtSpot Application Integration Guide Page 400

SyntaxSyntax DescriptionDescription
SELECT
<cols_or_expr>
FROM
<table_list>
[WHERE <predi-
cates>]
[GROUP BY <ex-
pr>]
[ORDER BY <ex-
pr>]
Shows specified set of table data.
If you do not specify the TOP number of rows to select, the top 50 rows will
be returned by default. The number of rows to return can be set using the
TQL command line flag:
--query_results apply_top_row_count
You can use the following aggregation functions:
•sum
•count
•count distinct
•stddev
•avg
•variance
•min
•max
You can use the following date functions:
•absyear
•absmonth
•absday
•absquarter
•date
•time
For example:
SELECT TOP 10 "quantity" FROM "sales_fact";
SELECT COUNT(*) FROM "vendor";
SELECT "vendor", SUM("quantity") FROM "sales_fact" GROUP BY
"vendor";
SELECT "vendor", SUM("amount") FROM "vendor", "sales_fact"
WHERE "sales_fact"."vendorid" = "vendor"."vendorid"
AND "amount" > 100 GROUP BY "vendor" ORDER BY "amount"
DESC;
SELECT "vendor", SUM("quantity") FROM "sales_fact"
GROUP BY "vendor" LIMIT 10;
TQL reference
February 07, 2019
ThoughtSpot Application Integration Guide Page 401

Schema creation
SyntaxSyntax DescriptionDescription
CREATE DATABASE
<data-
base>
Creates a database. For example:
CREATE DATABASE "fruit_database";
CREATE SCHEMA
<schema>
Creates a schema within the current database. For example:
CREATE SCHEMA "fruit_schema";
CREATE TABLE
<table> (<column_def-
initions>
[<con-
straints>]) [PARTI-
TION BY HASH (<num-
ber>) [KEY
("<col-
umn>")]])
Creates a table with the specified column definitions and constraints.
Use PARTITION BY HASH to shard a table across all nodes. If no KEY
is specified, the table will be randomly sharded.
Do not specify relationship constraints ( FOREIGN KEY or RELATION-
SHIP ) in the CREATE TABLE statement. Instead, define these using AL-
TER TABLE statements at the end of your TQL script, after creating your
tables. This method guarantees that tables are created before they are
referenced in the constraint definitions. For example:
CREATE TABLE "vendor" ("vendorid" int, "name" var-
char(255));
CREATE TABLE "sales_fact" ("saleid" int, "locationid" int,
"vendorid" int,
"quantity" int, "sale_amount" double, "fruitid" int,
CONSTRAINT PRIMARY KEY("saleid")) PARTITION BY HASH(96) KEY
("saleid");
Schema modification
SyntaxSyntax DescriptionDescription
DROP DATABASE
<data-
base>
Drops a database and all of its schemas and tables. For example:
DROP DATABASE "fruit_database";
TQL reference
February 07, 2019
ThoughtSpot Application Integration Guide Page 402

SyntaxSyntax DescriptionDescription
DROP SCHEMA
<schema>
Drops a schema within the current database, and drops all of the tables in
the schema. For example:
DROP SCHEMA "fruit_schema";
DROP TABLE
<table>
Drops a table. For example:
DROP TABLE "location";
TRUNCATE TABLE
<table> Removes all data from a table, but preserves its metadata, including all
GUIDs, relationships, etc. This can be used to force a new schema for a
table without losing the metadata.
However, this operation removes all existing data from the table and must
be used with caution. You must reload the data following a TRUNCATE , or
all dependent objects (worksheets and pinboards) in ThoughtSpot will be-
come invalid. For example:
TRUNCATE TABLE "location";
ALTER TABLE
<table>
ADD|DROP|RENAME
COLUMN
<column>
Alters a table to add, drop, or rename a column.
When you add a column to an existing table, you must provide a default
value to use for existing rows. For example:
ALTER TABLE "cart" ADD COLUMN "nickname" varchar(255) DE-
FAULT 'no
nickname';
ALTER TABLE "cart" DROP COLUMN "nickname";
ALTER TABLE "cart" RENAME COLUMN "nickname" TO "shortname";
ALTER TABLE
<table> DROP CON-
STRAINT PRIMARY
KEY;
Drops the primary key from a table.
Note that if you then add a new primary key, the same upsert behavior will
be applied as with adding any primary key. This can result in data deletion,
so make sure you understand how the upsert will affect your data ahead of
time. For example:
ALTER TABLE "sales" DROP CONSTRAINT PRIMARY KEY;
ALTER TABLE "sales" ADD CONSTRAINT PRIMARY KEY ("PO_num-
ber");
TQL reference
February 07, 2019
ThoughtSpot Application Integration Guide Page 403

SyntaxSyntax DescriptionDescription
ALTER TABLE
<table> DROP [FOR-
EIGN KEY| RELA-
TIONSHIP]
<name>;
Drops the named foreign key or relationship between two tables. For ex-
ample:
ALTER TABLE "sales_fact" DROP CONSTRAINT FOREIGN KEY
"FK_PO_number";
ALTER TABLE "fruit_dim" DROP RELATIONSHIP "REL_dates";
ALTER TABLE
<table> DROP [CON-
STRAINT FOREIGN
KEY
[<table_name>] |
RELATIONSHIP
[WITH
<table_name>];
You must use this syntax when dropping relationships between tables cre-
ated before ThoughtSpot version 3.2. This is because relationships could
not be named in older versions.
Drops the foreign key or relationship between two tables where you cannot
reference it by relationship name. If the relationship was created without a
name, use:
• the name of the referenced table, for a foreign key.
• the name of the related table, for a relationship.
If you drop a foreign key without specifying the referenced table, all foreign
keys from the table you are altering will be dropped.
Examples:
ALTER TABLE "shipments" DROP CONSTRAINT FOREIGN KEY "or-
ders";
ALTER TABLE "wholesale_buys" DROP RELATIONSHIP WITH "re-
tail_sales";
Drops all relationships that have wholesale_buys as a source.
ALTER TABLE "wholesale_buys" DROP RELATIONSHIP;
Drops all foreign keys from wholesale_buys.
ALTER TABLE "wholesale_buys" DROP CONSTRAINT FOREIGN KEY;
TQL reference
February 07, 2019
ThoughtSpot Application Integration Guide Page 404

SyntaxSyntax DescriptionDescription
ALTER TABLE
<table> [SET DI-
MENSION | SET
FACT [PARTITION BY
HASH
[(<shards>)]
[KEY(<column>)]]]
Changes the partitioning on a table by doing one of:
• re-sharding a sharded table
• changing a replicated table to a sharded table
• changing a sharded table to a replicated (unsharded) table
By default, ThoughtSpot does not shard dimension tables.
To change the partitioning on a table, or to change a dimension table to a
sharded table, use ALTER TABLE...SET FACT PARTITION BY HASH...;
To make a sharded table into a dimension table (replicated on every node),
use ALTER TABLE...SET DIMENSION; command.
Examples of this statement:
ALTER TABLE "sales_fact" SET FACT PARTITION BY HASH (96) KEY
("PO_number");
ALTER TABLE "fruit_dim" SET DIMENSION;
ALTER TABLE
<table> MODIFY
COLUMN <column>
<new_data_type>;
Changes the data type of a column. This can have implications on sharding
and primary key behavior. See About data type conversion. For example:
ALTER TABLE fact100 MODIFY COLUMN product_id int;
Modify data
SyntaxSyntax DescriptionDescription
INSERT INTO
<table> VALUES ...
Inserts values into a table. Only use this for testing. Do not use INSERT on
a production system. For example:
INSERT INTO "vendor" VALUES ('helen rose', 'jacob norse',
'eileen ruff',
'manny gates');
ALTER TABLE
<table> SET LOAD
PRIORITY <value>
<new_da-
ta_type>;
Sets the load priority for a table. Load priority determines the order in
which a table is loaded on a cluster restart. You can set any value from
1-100 . The system default for all tables is 50 . For example:
ALTER TABLE 'sales_facts' SET LOAD PRIORITY 1;
TQL reference
February 07, 2019
ThoughtSpot Application Integration Guide Page 405

SyntaxSyntax DescriptionDescription
UPDATE <table>
... SET ...
[WHERE ...]
Updates rows in a table that match optionally provided predicates. Predi-
cates have the form column = value connected by the AND keyword.
Sets the column values to the specified values. For example:
UPDATE "location" SET "borough" = 'staten island', "city" =
'new york'
WHERE "borough" = 'staten isl' AND city = 'NY';
DELETE FROM
<table> [WHERE...]
Deletes rows from a table that match optionally provided predicates. Predi-
cates have the form column = value connected by the AND keyword.
For example.
DELETE FROM "vendor" WHERE "name" = 'Joey Smith' AND "ven-
dorid" =
'19463';
Constraints and relationships
Constraints and relationships in ThoughtSpot are used to define the relationships between tables (i.e.
how they can be joined). However, constraints are not enforced, as they would be in a transactional
database. You can define the following constraints when creating a table with CREATE TABLE , or add
them to an existing table using the ADD CONSTRAINT syntax:
SyntaxSyntax DescriptionDescription
PRIMARY KEY Designates a unique, non-null value as the primary key for a table. This can
be one column or a combination of columns. If values are not unique, an
upsert will be performed if a row includes a primary key that is already pre-
sent in the data. Some examples: </p>
CREATE TABLE "schools" ( "schoolID" varchar(15), "schoolName"
varchar(255), "schoolCity" varchar(55), "schoolState" var-
char(55), "schoolNick"
varchar(55), CONSTRAINT PRIMARY KEY ("schoolID") ) ;
ALTER TABLE "cart" ADD CONSTRAINT PRIMARY KEY ("cart_id");
ALTER TABLE "cart" DROP CONSTRAINT PRIMARY KEY "cart_id";
TQL reference
February 07, 2019
ThoughtSpot Application Integration Guide Page 406

SyntaxSyntax DescriptionDescription
FOREIGN KEY
Defines a relationship where the value(s) in the table are used to join to a
second table. Uses an equality operator. The foreign key must match the
primary key of the table that is referenced in number, column type, and or-
der of columns.
When creating a foreign key, give it a name. You can reference the foreign
key name later, if you want to remove it.
Examples of this statement:
ALTER TABLE "batting" ADD CONSTRAINT "FK_player" FOREIGN KEY
("playerID")
REFERENCES "players" ("playerID");
ALTER TABLE "batting" ADD CONSTRAINT "FK_lg_team" FOREIGN
KEY ("lgID" ,"teamID")
REFERENCES "teams" ("lgID" ,"teamID");
ALTER TABLE "shipment" ADD CONSTRAINT "FK_PO_vendor" FOREIGN
KEY ("po_number",
"vendor") REFERENCES "orders" ("po_number", "vendor");
ALTER TABLE "shipment" DROP CONSTRAINT "FK_PO_vendor";
RELATIONSHIP
Defines a relationship where the value(s) in the table can be used to join to
a second table, using an equality condition (required) and one or more
range conditions (optional). These conditions act like a WHERE clause
when the two tables are joined. They are applied using AND logic, such
that all conditions must be met for a row to be included.
You may add multiple relationships between tables. When creating a rela-
tionship, give it a name. You can reference the relationship name later, if
you want to remove it.
Examples of this statement:
ALTER TABLE "wholesale_buys" ADD RELATIONSHIP "REL_fruit"
WITH
"retail_sales" AS "wholesale_buys"."fruit" = "re-
tail_sales"."fruit" AND
("wholesale_buys"."date_order" < "retail_sales"."date_sold"
AND
"retail_sales"."date_sold" < "wholesale_buys"."expire_date");
ALTER TABLE "wholesale_buys" DROP RELATIONSHIP "REL_fruit";
Data types
ThoughtSpot supports a simplified list of data types:
TQL reference
February 07, 2019
ThoughtSpot Application Integration Guide Page 407

SyntaxSyntax DescriptionDescription ExamplesExamples
Character • VARCHAR(
n
) Specify the maximum number of characters, as
in VARCHAR(255). The size limit is 1GB for VAR-
CHAR values.
Floating point • DOUBLE
• FLOAT
DOUBLE is recommended.
Boolean • BOOL Can be true or false .
Integer • INT
• BIGINT
INT holds 32 bits.
BIGINT holds 64 bits.
Date or time • DATE
• DATETIME
• TIMESTAMP
• TIME
DATETIME, TIMESTAMP, and TIME are stored
at the granularity of seconds
.
TIMESTAMP is identical to DATETIME, but is in-
cluded for syntax compatibility.
TQL reference
February 07, 2019
ThoughtSpot Application Integration Guide Page 408

tsload flag reference
For recurring data loads and for scripting loads, use tsload (the ThoughtSpot Loader). This reference
section lists all the flags that can be used to modify the behavior of tsload .
General tsload flags
FlagFlag DescriptionDescription NotesNotes
--target_database <data-
base>
Specifies the pre-existing
target database into which
tsload should load the data.
--target_schema <schema> Specifies the target schema. Default is “falcon_default_schema”.
--target_table <table> Specifies the tables that you
want to load into the data-
base.
The tables must exist in the database speci-
fied by --target_database .
--empty_target Specifies that any data in
the target table is to be re-
moved before the new data
is loaded.
If supplied, any rows that exist in the table
specified by --target_database and --
target table will be deleted before this
data load. To perform an “upsert” on the ex-
isting data, omit this flag or specify --
noempty_target .
--max_ignored_rows <num-
ber>
Specifies the maximum
number of rows that can be
ignored if they fail to load.
If the number of ignored rows exceeds this
limit, the load will be aborted.
--bad_records_file
<path_to_file>/<file_name>
Specifies the file to use for
storing rows that failed to
load.
Input rows that do not conform to the de-
fined schema in ThoughtSpot will be ignored
and inserted into this file.
--date_format <date_for-
matmask>
Specifies the format string
for date values.
The default format is yearmonthday e.g.
“Dec 30th, 2001” and is represented as
20011230 . Use the date format specifica-
tions supported in the strptime library func-
tion.
--date_time_format
<date_formatmask>
<time_formatmask>
Specifies the format string
for datetime values.
The default is yearmonthday
hour:minute:second e.g. Dec 30th, 2001
1:15:12 and is represented as 20011230
01:15:12. Use the datetime format specifica-
tions supported in the strptime library func-
tion.
--time_format <time_for-
matmask>
Specifies the format string
for time values.
The default is hour:minute:second. Use the
time format specifications supported in the
strptime library function.
tsload flag reference
February 07, 2019
ThoughtSpot Application Integration Guide Page 409

FlagFlag DescriptionDescription NotesNotes
--v=[0|1|2|3 Specifies the verbosity of
log messages.
Provide a value for verbosity level. By de-
fault, verbosity is set to the minimum, which
is 0. This value is similar to a volume control.
At higher levels your log receives more mes-
sages and that log more frequently. This is
used for debugging. You should not change
this value unless instructed by ThoughtSpot
Support.
--skip_second_fraction Skips fractional seconds
when loading data.
If supplied, the upserts logic may be affect-
ed, especially if the date time being loaded
is a primary key, and the data has millisec-
ond granularity. Load the data twice, once
as a string with a primary key, and again
with second granularity date time. There is
no support to store fractional seconds in the
ThoughtSpot system.
File loading tsload flags
The following flags are used when loading data from an input file:
FlagFlag DescriptionDescription NotesNotes
--source_file
<path_to_file>/<file_name>
Specifies the location of the
file to be loaded.
--source_data_format
[csv|delimited]
Specifies the data file for-
mat.
Optional. The default is csv.
--field_separator "<delim-
iter>"
Specifies the field delimiter
used in the input file.
-- trailing_field_separa-
tor
Specifies that the field sepa-
rator appears after every
field, including the last field
per row.
Example row with trailing field separator:
a,b,c,The default is false.
--null_value "<null_repre-
sentation>"
Specifies how null values
are represented in the input
file.
These values will be converted to NULL up-
on loading.
--date_converted_to_epoch
[true|false]
Specifies whether the “date”
or “datetime” values in the
input file are represented as
epoch values.
--boolean_representation
[true_false | 1_0 | T_F |
Y_N]
Specifies the format in
which boolean values are
represented in the input file.
The default is T_F. You can also use this flag
to specify other values. For example, if your
data used Y for true and NULL for false, you
could specify: --boolean_representa-
tion Y_NULL
tsload flag reference
February 07, 2019
ThoughtSpot Application Integration Guide Page 410

FlagFlag DescriptionDescription NotesNotes
--has_header_row Indicates that the input file
contains a header row.
If supplied, column names in the header row
are used to match column names in the tar-
get table in ThoughtSpot. If not supplied, the
first row of the file is loaded as data, the
same as all subsequent rows.
--escape_character "<char-
acter>"
Specifies the escape char-
acter used in the input file.
If no value is specified, the default is “(dou-
ble quotes).
--enclosing_character
"<character>"
Specifies the enclosing
character used in the input
file.
If the enclosing character is double quotes,
you need to escape it, as in this example:
--enclosing_character "\""
--use_bit_boolean_values
= [true | false]
Specifies how boolean val-
ues are represented in the
input file.
If supplied, the input CSV file uses a bit for
boolean values, i.e. the false value is repre-
sented as 0x0 and true as 0x1. If omitted or
set to false, boolean values are assumed to
be T_F, unless you specify something else
using the flag --boolean_representa-
tion [true_false | 1_0 | T_F | Y_N] .
tsload flag reference
February 07, 2019
ThoughtSpot Application Integration Guide Page 411

tscli command reference
The tscli command line interface is an administration interface for the ThoughtSpot instance. Use
tscli to take snapshots (backups) of data, apply updates, stop and start the services, and view
information about the system. This reference defines each subcommand and what you can accomplish
with it.
The command returns 0 upon success and a non-zero exit code upon failure. Because the tscli
command is typically running a command on multiple codes, an error may be called at different points.
As much as possible, the command attempts to save errors to the stderr directory as configured on a
node.
How to use the tscli command
The tscli command has the following syntax:
tscli [-h] [--helpfull] [--verbose] [--noautoconfig]
[--autoconfig] [--yes] [--cluster <cluster>]
[--zoo <zookeeper>] [--username username] [--identit
y_file identity_file]
{access,alert,backup,backup-policy,callhome,cassandr
a,cluster,command,dr-mirror,etl,event,feature,fileserver,firewa
ll,hdfs,ipsec,ldap,logs,map-tiles,monitoring,nas,node,patch,rpa
ckage,saml,scheduled-pinboards,smtp,snapshot,snapshot-policy,sp
ot,sssd,ssl,storage,support,tokenauthentication}
The tscli command has several subcommands such as alert ,backup , and so forth. You issue a
subcommand using the following format:
tscli [subcommand ]
Subcommands have their own additional options and actions such as tscli backup create or
tscli backup delete for example. To view help for a subcommand:
tscli [subcommand] -h
A subcommand itself may have several options.
tscli subcommands
This section lists each subcommand and its syntax.
tscli command reference
February 07, 2019
ThoughtSpot Application Integration Guide Page 412
access
tscli access [-h] {list} ...
Use this subcommand to do the following:
•tscli access list Lists objects by last access time.
alert
tscli alert [-h] {count,info,list,off,on,refresh,silence,statu
s,unsilence} ...
Use this subcommand to do the following:
•tscli alert info Lists all alerts.
•tscli alert list Lists the generated alerts.
•tscli alert off Disables all alerts from the cluster in the cluster’s timezone.
•tscli alert on Enables alerts from the cluster.
•tscli alert silence --name <alert_name>
Silences the alert with
alert_name
. For example, DISK_ERROR. Silenced alerts are still
recorded in postgres, however emails are not sent out.
•tscli alert status Shows the status of cluster alerts.
•tscli alert unsilence-name
alert_name
Unsilences the alert with
alert_name
. For example, DISK_ERROR .
backup
tscli backup [-h] {create,delete,ls,restore} ...
Use this subcommand to do the following:
•tscli backup create [-h] [--mode {full,light,dataless}] [--type
{full,incremental}] [--base BASE] [--storage_type {local,nas}] [--remote]
name out
Pulls a snapshot and saves it as a backup where:
•--mode {full,light,dataless}
tscli command reference
February 07, 2019
ThoughtSpot Application Integration Guide Page 413

Mode of backups. To understand these diffrent modes see Understand backup
modes.
•--type {full,incremental} Type of backup.(Incremental incremental is not
implemented yet) (default: full)
•--base BASE
Based snapshot name for incremental backup. (Not Implemented yet) (default:
None)
•--storage_type {local,nas}
Storage type of output directory. (default: local)
•--remote
Take backup through orion master. (default: True)
•tscli backup delete * name *Deletes the named backup.
•tscli backup ls List all backups taken by the system.
•tscli backup restore Restore cluster using backup.
backup-policy
tscli backup-policy [-h] {create,delete,disable,enable,ls,sho
w,status,update} ...
Use this subcommand to do the following:
•tscli backup-policy create Prompts an editor for you to edit the parameters of the
backup policy.
•tscli backup-policy delete
name
Deletes the backup policy with
name
.
•tscli backup-policy disable
name
Disables the policy
name
.
•tscli backup-policy enable
name
Enables the policy
name
.
•tscli backup-policy ls List backup policies.
•tscli backup-policy show
name
Show the policy
name
.
•tscli backup-policy status
name
Enables the policy
name
.
•tscli backup-policy update * name *Prompts an editor for you to edit the policy
name
.
callhome
tscli callhome [-h] {disable,enable,generate-bundle} ...
Use this subcommand to do the following:
•tscli callhome disable Turns off the periodic call home feature.
•tscli callhome enable --customer_name
customer_name
`
Enables the “call home” feature, which sends usage statistics to ThoughtSpot This feature is
enabled by default.
tscli command reference
February 07, 2019
ThoughtSpot Application Integration Guide Page 414

The parameter
customer_name
takes the form Shared/*`customer_name`*/stats .
•tscli callhome generate-bundle –d
directory
--since
DAYS
•--d D Dest folder where tar file will be created. (default: None)
•--since
DAYS
Grab callhome data from this time window in the past. Should be a human
readable duration string, e.g. 4h (4 hours), 30m (30 minutes), 1d (1 day).
(default: None) Generates a tar file of the cluster metrics and writes it to the
specified directory where
DAYS
is how far back you’d like to generate the tar file
from in days. For example, 30 . If this parameter is not specified, the command
will collect the stats from the last 7days by default.
cassandra
tscli cassandra [-h] {backup,restore} ...
Use this subcommand to do the following:
•tscli cassandra backup Take a backup of cassandra
•tscli cassandra restore Restore cassandra from a backup
cluster
tscli cluster [-h] {abort-reinstall-os,check,create,get-confi
g,load,reinstall-os,report,restore,resume-reinstall-os,resume-u
pdate,set-config,set-min-resource-spec,show-resource-spec,star
t,status,stop,update,update-hadoop} ...
Use this subcommand to do the following:
•tscli cluster abort-reinstall-os Abort in-progress reinstall.
•tscli cluster check --includes {all,disk,zookeeper,hdfs,orion-cgroups,orion-
oreo} Check the status nodes in the cluster.
You must specify a component to check.
•tscli cluster create
release
Creates a new cluster from the release file specified by
release
. This command is used by
ThoughtSpot Support when installing a new cluster, for example, tscli cluster create
2.0.4.tar.gz
•tscli cluster get-config Get current cluster network and time configuration. Prints
JSON configuration to stdout. If for some reason the system cannot be connected to all
interfaces, the command returns an error but continues to function.
•tscli cluster load Load state from given backup onto existing cluster
•tscli cluster reinstall-os Reinstall OS on all nodes of the cluster.
•tscli cluster report Generate cluster report.
•tscli cluster restore --release
release_tarball backupdir
`
tscli command reference
February 07, 2019
ThoughtSpot Application Integration Guide Page 415
Restores a cluster using the backup in the specified directory
backupdir
. If you’re restoring
from a dataless backup, you must supply the release tarball for the corresponding software
release.
•tscli cluster resume-reinstall-os Resume in-progress reinstall.
•tscli cluster resume-update Resume in-progress updates.
•tscli cluster set-config Set cluster network and time configuration. Takes JSON
configuration from stdin.
•tscli cluster set-min-resource-spec Sets min resource configuration of the cluster
•tscli cluster show-resource-spec Prints default or min.
•tscli cluster start Start cluster.
•tscli cluster status Gives the status of the cluster, including release number, date last
updated, number of nodes, pending tables time, and services status.
•tscli cluster stop Pauses the cluster (but does not stop storage services).
•tscli cluster update Update existing cluster.
•tscli cluster update-hadoop Updates Hadoop/Zookeeper on the cluster.
command
tscli command [-h] {run} ...
Command to run a command on all nodes.
tscli command run [-h] [--nodes
NODES
] --dest_dir
DEST_DIR
[--copyfirst
COPYFIRST
] [--timeout
TIMEOUT
]
command
•--nodes
NODES
Space separated IPs of nodes where you want to run the command.
(default: all )
•--dest_dir
DEST_DIR
Directory to save the files containing output from each nodes.
(default: None)
•--copyfirst
COPYFIRST
Copy the executable to required nodes first. (default: False )
•--timeout
TIMEOUT
Timeout waiting for the command to finish. (default: 60 )
dr-mirror
tscli dr-mirror [-h] {start,status,stop} ...
•tscli dr-mirror start Starts a mirror cluster which will continuously recover from a
primary cluster.
•tscli dr-mirror status Checks whether the current cluster is running in mirror mode.
•tscli dr-mirror stop Stops mirroring on the local cluster.
etl
tscli etl [-h] {change-password,disable-lw,download-agent,enabl
e-lw,show-lw} ...
tscli command reference
February 07, 2019
ThoughtSpot Application Integration Guide Page 416

•tscli etl change-password --admin_username
admin_user
--username
Informatica_user
`
Changes the Informatica Cloud account password used by ThoughtSpot Data Connect.
Required parameters are:
•--admin_username
admin_user
specifies the Administrator username for
ThoughtSpot.
•--username
Informatica_user
specifies the username for the Informatica
Cloud.
•tscli etl disable-lw Disables ThoughtSpot Data Connect.
•tscli etl download-agent Downloads the ThoughtSpot Data Connect agent to the
cluster.
•tscli etl enable-lw [-h] --username
USERNAME
--thoughtspot_url
THOUGHTSPOT_URL
--admin_username
ADMIN_USERNAME
[--groupname
GROUPNAME
]
--org_id
ORG_ID
[--pin_to
PIN_TO
] [--proxy_host
PROXY_HOST
] [--
proxy_port
PROXY_PORT
] [--proxy_username
PROXY_USERNAME
] [--max_wait
MAX_WAIT
]
You should contact ThoughtSpot Support for assistance in setting this up. Required
parameters are:
•--username
USERNAME
Username for Informatica Cloud (default: None)
•--thoughtspot_url
THOUGHTSPOT_URL
URL to reach thoughtspot. (default:
None)
•--admin_username
ADMIN_USERNAME
Admin username for ThoughtSpot
(default: None)
•--groupname
GROUPNAME
•--org_id
ORG_ID
specifies the Informatica id of the organization (company).
For ThoughtSpot, this is 001ZFA .org_id shouldn’t include the prefix Org . For
example, if on Informatica cloud, the orgid is Org003XYZ , then use only
•--pin_to
PIN_TO
specifies the IP address to pin to. If you specify an IP to pin
to, that node becomes sticky to the Informatica agent, and will always be used.
Defaults to the public IP address of the localhost where this command was run.
•--proxy_host
PROXY_HOST
Proxy server host for network access (default: )
•--proxy_port
PROXY_PORT
Proxy server port (default: )
•--proxy_username
PROXY_USERNAME
Proxy server username (default: )
•--max_wait
MAX_WAIT
Maximum time in seconds to wait for Data Connect
agentto start (default: None)
•tscli etl show-lw Shows the status of ThoughtSpot Data Connect. It also returns the
Informatica username and OrgId.
event
tscli event [-h] {list} ...
This subcommand has the following actions:
tscli event list [-h] [--include
INCLUDE
] [--since
SINCE
] [--from
FROM
] [--to
TO
] [--limit
LIMIT
] [--detail] [--summary_contains
SUMMARY_CONTAINS
] [--
detail_contains
DETAIL_CONTAINS
] [--attributes
ATTRIBUTES
]
tscli command reference
February 07, 2019
ThoughtSpot Application Integration Guide Page 417

•--include
INCLUDE
Options are all, config, notification. Default config. (default: config)
•--since
SINCE
Grab events from this time window in the past. Should be a human
readable duration string, e.g. 4h (4 hours), 30m (30 minutes), 1d (1 day). (default: None)
•--from
FROM
Begin timestamp, must be of the form: yyyymmdd-HH:MM (default: None)
•--to
TO
End timestamp, must be of the form: yyyymmdd-HH:MM (default: None)
•--limit
LIMIT
Max number of events to fetch. (default: 0)
•--detail Print events in detail format. This is not tabular. Default is a tabular summary.
(default: False)
•--summary_contains
SUMMARY_CONTAINS
Summary of the event will be checked for this
string. Multiple strings to check for can be specified by separating them with |(event
returned if it matchesALL). Put single quotes around the param value to prevent undesired
glob expansion (default: None)
•--detail_contains
DETAIL_CONTAINS
Details of the event will be checked for this string.
Multiple strings to check for can be specified by separating them with |(event returned if it
matches ALL). Put single quotes around the param value to prevent undesired glob expansion
(default: None)
•--attributes
ATTRIBUTES
Specify attributes to match as key=value. Multiple attributes to
check for can be specified by separating them with |(event returned if it matches ALL). Put
single quotes around the param value to prevent undesired glob expansion (default: None)
feature
tscli feature [-h] {get-all-config} ...
This subcommand has the following actions:
tscli feature get-all-config Gets the configured features in a cluster. The command will return a
list of features, such as custom branding, Data Connect, and call home, and tell you whether they are
enabled or disabled.
fileserver
tscli fileserver [-h] {configure,download-release,purge-confi
g,show-config,upload} ...
This subcommand has the following actions:
•tscli fileserver configure [-h] --user
USER
[--password
PASSWORD
]
Configures the secure file server username and password for file upload/download and the
call home feature. You only need to issue this command once, to set up the connection to the
secure file server. You only need to reissue this command if the password changes. The
parameter
PASSWORD
is optional. If a password is not specified, you will be prompted to
enter it.
•tscli fileserver download-release [-h] [--user
USER
] [--password
PASSWORD
]
release
Downloads the specified release file and its checksum. Specify the
release by number, to the second decimal point (e.g. 3.1.0, 3.0.5, etc.). You may optionally
specify the --user and --password to bypass the credentials that were specified when
configuring the file server connection with tscli fileserver configure . Before using this
command for the first time, you need to set up the file server connection using tscli
tscli command reference
February 07, 2019
ThoughtSpot Application Integration Guide Page 418

fileserver configure .
•tscli fileserver purge-config Removes the file server configuration.
•tscli fileserver show-config Shows the file server configuration.
•tscli fileserver upload [-h] [--user
USER
] [--password
PASSWORD
] --
file_name
FILE_NAME* –server_dir_path *SERVER_DIR_PATH`
Uploads the file specified to the directory specified on the secure file server. You may
optionally specify the --user and --password to bypass the credentials that were
specified when configuring the file server connection with tscli fileserver configure .
Before using this command for the first time, you need to set up the file server connection
using tscli fileserver configure .
Accepts these flags
•--user
USER
Username of fileserver (default: None)
•--password
PASSWORD
Password of fileserver (default: None). This is required
and the command prompts you for it if you do not supply it.
•--file_name
FILE_NAME
Local file that needs to be uploaded (default: None)
•--server_dir_path
SERVER_DIR_PATH
Directory path on fileserver. (default:
None) The
SERVER_DIR_PATH
parameter specifies the directory to which you want
to upload the file. It is based on your customer name, and takes the form
/Shared/support/* customer_name *.
firewall
tscli firewall [-h] {close-ports,disable,enable,open-ports,stat
us} ...
•tscli firewall close-ports
Closes given ports through firewall on all nodes. Takes a list of ports to close, comma
separated. Only closes ports which were previously opened using “open-ports”. Ignores ports
which were not previously opened with “open-ports” or were already closed.
•tscli firewall disable Disable firewall.
•tscli firewall enable Enable firewall.
•tscli firewall open-ports --ports
ports
Opens given ports through firewall on all nodes. Takes a list of ports to open, comma
separated. Ignores ports which are already open. Some essential ports are always kept open
(e.g. ssh ), they are not affected by this command or by close-ports .
•tscli firewall status Shows whether firewall is currently enabled or disabled.
hdfs
tscli hdfs [-h] {leave-safemode} ...
This subcommand has the following actions:
tscli command reference
February 07, 2019
ThoughtSpot Application Integration Guide Page 419

tscli hdfs leave-safemode Command to get HDFS namenodes out of safemode.
ipsec
tscli ipsec [-h] {disable,enable,status} ...
This subcommand has the following actions:
tscli ipsec disable Disable IPSec tscli ipsec enable Enable IPSec tscli ipsec status
Show IPSec status on all nodes
ldap
tscli ldap [-h] {add-cert,configure,purge-configuration} ...
This subcommand has the following actions:
•tscli ldap add-cert
name certificate
Adds an SSL certificate for LDAP. Use only if LDAP has been configured without SSL and you
wish to add it. Use *name *to supply an alias for the certificate you are installing.
•tscli ldap configure
Configures LDAP using an interactive script. You can see detailed instructions for setting up
LDAP in About LDAP integration.
•tscli ldap purge-configuration Purges (removes) any existing LDAP configuration.
logs
tscli logs [-h] {collect,runcmd} ...
This subcommand has the following actions:
•tscli logs collect [-h] [--include
INCLUDE
] [--exclude
EXCLUDE
] [--
since
SINCE
] [--from
FROM
] [--to
TO
] [--out
OUT
] [--maxsize
MAXSIZE
] [--sizeonly] [--nodes
NODES
]
Extracts logs from the cluster. Does not include any logs that have been deleted due to log
rotation.
These parameters have the following values:
•--include
INCLUDE
tscli command reference
February 07, 2019
ThoughtSpot Application Integration Guide Page 420

Specifies a comma separated list of logs to include. Each entry is either a
“selector” or a glob for matching files.Selectors must be among: all ,orion ,
system ,ts . Anything starting with /is assumed to be a glob pattern and
interpreted via find(1) . Other entries are ignored. Put single quotes around the
param value to prevent undesired glob expansion (default: all )
•--exclude
EXCLUDE
Comma separated list of logs to exclude. Applies to the list selected by –include.
Params are interpreted just like in –include (default: None)
•--since
SINCE
Grab logs from this time window in the past. Should be a human readable duration
string, e.g. 4h (4 hours), 30m (30 minutes), 1d (1 day). (default: None)
•--from
FROM
Timestamp where collection begins, must be of the form:
yyyymmdd-HH:MM (default: None)
•--to
TO
Timestamp where collection ends, must be of the form: yyyymmdd-
HH:MM (default: None)
•--out
OUT
Tarball path for dumping logs from each node (default: /tmp/
logs.tar.gz )
•--maxsize
MAXSIZE
Only fetch logs if size is smaller that this value. Can be
specified in megabytes/gigabytes, e.g. 100MB, 10GB. (default: None)
•--sizeonly Do not collect logs. Just report the size. (default: False)
•--nodes
NODES
Comma separated list of nodes from where to collect logs. Skip
this to use all nodes. (default: None)
•tscli logs runcmd [-h] --cmd CMD [--include
INCLUDE
] [--exclude
EXCLUDE
] [--since SINCE] [--from
FROM
] [--to
TO
] [--outfile
OUTFILE
]
[--outdir
OUTDIR
] [--cmd_infmt
CMD_INFMT
] [--cmd_outfmt
CMD_OUTFMT
] [--
nodes
NODES
]
Runs a Unix command on logs in the cluster matching the given constraints. Results are
reported as text dumped to standard out, the specified output file, or as tarballs dumped into
the specified directory.
•--cmd
CMD
Unix-Command to be run on the selected logs. Use single quotes to escape
spaces etc. Language used to specify CMDSTR has following rules.
• A logfile and its corresponding result file can be referred by keywords
SRCFILE &DSTFILE . eg. cp SRCFILE DSTFILE
• Without any reference to DSTFILE in CMDSTR, > DSTFILE will be
appended to CMDSTR for output redirection. eg du -sch SRCFILE
gets auto- transtalted to du -sch SRCFILE > DSTFILE
• Without any reference to SRCFILE, content of log is streamed to
CMDSTR via pipe. eg. tail -n100 | grep ERROR gets auto-
transtalted to cat SRCFILE | tail -n100 | grep ERROR >
DSTFILE (default: None)
•--include
INCLUDE
tscli command reference
February 07, 2019
ThoughtSpot Application Integration Guide Page 421

Comma separated list of logs to include,each entry is either a “selector” or a glob
for matching files.Selectors must be among: all ,orion ,system ,ts .
Anything starting with / is assumed to be a glob pattern and interpreted via
find(1) . Other entries are ignored. TIP: put single quotes around the param
value to prevent undesired glob expansion (default: all)
•--exclude
EXCLUDE
Comma separated list of logs to exclude. Applies to the list selected by --
include . Params are interpreted just like in --include (default: None)
•--since
SINCE
Grab logs from this time window in the past. Should be a human readable duration
string, e.g. 4h (4 hours), 30m (30 minutes), 1d (1 day). (default: None)
•--from
FROM
Timestamp where collection begins, must be of the form:
yyyymmdd-HH:MM (default: None)
•--to
TO
Timestamp where collection ends, must be of the form: yyyymmdd-
HH:MM (default: None)
•--outfile
OUTFILE
File path for printing all the results. By default printed to
stdout (default: None)
•--outdir
OUTDIR
Directory path for dumping results with original dir structure
from each node. Used as an alternative to printing output to outfile/stdout (default:
None)
•--cmd_infmt
CMD_INFMT
Specify if the inputfile should be compressed/
uncompressed before running CMD .C=compressed, U=uncompressed. Don’t
use this flag if CMD works on both (default: None)
•--cmd_outfmt
CMD_OUTFMT
Specify if
OUTFILE
generated by CMD will be
compressed/uncompressed. C=compressed, U=uncompressed. Don’t use this
flag if output file will be of same format as input file (default: None)
•--nodes
NODES
Comma separated list of nodes where to run command. Skip
this to use all nodes. (default: None)
map-tiles
tscli map-tiles [-h] {disable,enable,status} ...
This subcommand supports the following actions:
•tscli map-tiles enable [-h] [--online] [--offline] [--tar TAR] [--md5 MD5]
Enables ThoughtSpot’s map tiles, which are used when constructing geomap charts. If you
don’t have interest access, you must download the map tiles tar and md5 files. Then you
must append the following to the tscli command.
•--online Download maptiles tar from internet. (default: True)
•--offline Using maptiles tar from local disk. (default: False)
•--tar
TAR
Specified tar file for map-tiles. (default: )
•--md5
MD5
Specified md5 file for map-tiles. (default: )
tscli command reference
February 07, 2019
ThoughtSpot Application Integration Guide Page 422
•tscli map-tiles disable Disable map-tiles functionality.
•tscli map-tiles status Check whether map-tiles is enabled.
monitoring
tscli monitoring [-h] {set-config,show-config} ...
This subcommand has the following actions:
•tscli monitoring set-config [-h] [--email EMAIL] [--clear_email] [--
heartbeat_interval HEARTBEAT_INTERVAL] [--heartbeat_disable] [--
report_interval REPORT_INTERVAL] [--report_disable] Sets the monitoring
configuration.
•--email
EMAIL
Comma separated list (no spaces) of email addresses where the
cluster will send monitoring information.
•--clear_email Disable emails by clearing email configuration. (default: False)
•--heartbeat_interval
HEARTBEAT_INTERVAL
Heartbeat email generation
interval in seconds. Should be greater than 0.
•--heartbeat_disable Disable heartbeat email generation. (default: False)
•--report_interval
REPORT_INTERVAL
Cluster report email generation interval
in seconds. Should be greater than 0.
•--report_disable Disable cluster report email generation. (default: False)
•tscli monitoring show-config Shows the monitoring configuration.
nas
tscli nas [-h] {ls,mount-cifs,mount-nfs,unmount} ...
This subcommand has the following actions:
•tscli nas ls [-h] List mounts managed by NAS mounter service.
•tscli nas mount-cifs [-h] --server
SERVER
[--path_on_server
PATH_ON_SERVER
] --mount_point
MOUNT_POINT
--username
USERNAME
--
password
PASSWORD
[--uid
UID
] [--gid
GID
] [--options
OPTIONS
]
Mounts a CIFS device on all nodes.
•--server
SERVER
IP address or DNS name of CIFS service. For example,
10.20.30.40 (default: None)
•--path_on_server
PATH_ON_SERVER
Filesystem path on the CIFS server to
mount (source). For example: /a (default: /)
•--mount_point
MOUNT_POINT
tscli command reference
February 07, 2019
ThoughtSpot Application Integration Guide Page 423

Directory on all cluster nodes where the NFS filesystem should be mounted
(target). This directory does not need to already exist. If this directory already
exists, a new directory is not created and the existing directory is used for
mounting. For example: /mnt/external (default: None)
•--username
USERNAME
Username to connect to the CIFS filesystem as (default:
None)
•--password
PASSWORD
CIFS password for --username (default: None)
•--uid
UID
UID
that will own all files or directories on the mounted filesystem when the server
does not provide ownership information. See man mount.cifs for more details.
(default: 1001 )
•--gid
GID
Gid that will own all files or directories on the mounted filesystem when the server
does not provide ownership information. See man mount.cifs for more details.
(default: 1001 )
•--options
OPTIONS
Other command-line options to forward to mount.cifs
command (default: noexec )
•tscli nas mount-nfs [-h] --server SERVER [--protocol PROTO --path_on_server
PATH_ON_SERVER] --mount_point MOUNT_POINT [--options OPTIONS]
Mounts a NFS device on all nodes. Parameters are:
•--server SERVER IP address or DNS name of NFS service. For example,
10.20.30.40 (default: None)
•--path_on_server PATH_ON_SERVER Filesystem path on the NFS server to
mount (source). For example: /a/b/c/d (default: /)
•--mount_point MOUNT_POINT
Directory on all cluster nodes where the NFS filesystem should be mounted
(target). This directory does not need to already exist. If this directory already
exists, a new directory is not created and the existing directory is used for
mounting. For example: /mnt/external (default: None)
•--options OPTIONS Command-line options to forward to mount command
(default: noexec ).
•--protocol PROTO One of nfs or nfs4 . The default is nfs .
•tscli nas unmount [-h] --dir
DIR
Unmounts all devices from the specified
DIR
(directory) location. This command returns an
error if nothing is currently mounted on this directory via tscli nas mount (default: None)
node
tscli node [-h] {check,ls,reinstall-os,resume-reinstall-os,stat
us} ...
This subcommand has the following actions:
tscli command reference
February 07, 2019
ThoughtSpot Application Integration Guide Page 424

•tscli node check [-h] [--select {reinstall-preflight}] [--secondary
SECONDARY
]
Run checks per node. Takes the following parameters:
•--select {reinstall-preflight} Select the type of node check (default:
reinstall-preflight )
•--secondary
SECONDARY
Secondary drive for reinstall-preflight (default:
sdd )
•tscli node ls [-h] [--type {all,healthy,not-healthy}] Filter by node state
(default: all )
•tscli node reinstall-os [-h] [--secondary
SECONDARY
] [--cluster] Reinstall
OS on a node. This takes the following parameters:
•--secondary
SECONDARY
Secondary drive to be used to carry to reinstall
(default: sdd )
•--cluster Is the node part of a cluster (default: False )
•tscli node resume-reinstall-os Resume in-progress reinstall
patch
tscli patch [-h] {apply,ls,resume-apply,resume-rollback,rollbac
k} ...
This subcommand has the following actions:
•tscli patch apply [-h] [
release
]
Apply the patch on an existing cluster. Takes the following parameters:
•
release
The relative path to the patch tar ball
•tscli patch ls [-h] [--applied] [--rolled_back] [--service SERVICE] [--md5
MD5] [--history] Lists the patches currently applied. This takes the following parameters:
•--applied Show only the patches applied since last full release (default: ` False` )
•--rolled_back Show only the patches rolled back since last full release (default:
` False` )
•--service SERVICE Show patches filtered by service (default: ` None` )
•--md5 MD5 Shows the details of the patch specified (default: ` None` )
•--history Shows the history of all patch apply/rollback release (default: ` False` )
•tscli patch resume-apply [-h]
Resume patch apply
•tscli patch resume-rollback [-h]
Resume patch roll-backup
•tscli patch rollback [-h]
Rollback the patch from an existing cluster
tscli command reference
February 07, 2019
ThoughtSpot Application Integration Guide Page 425
rpackage
tscli rpackage [-h] {add,delete,list} ...
Manages R packages available to SpotIQ.
•tscli rpackage add [-h] [--repo
REPO
] [--timeout
TIMEOUT
] [--dest_dir
DEST_DIR
] [--nodes
NODES
]
package_name
Command to add an R
package_name
to the cluster. This command has the following options:
•--repo
REPO
Specify the url of a specific repo to download packages
•--timeout
REPO
Timeout waiting for the R Package to be installed (default: 60)
•--dest_dir
REPO
Directory where output of this command will be placed
(default: None)
•--nodes
NODES
Space separated IPs of nodes where you want to run the
command. (default: all).
•tscli rpackage add [-h] [--timeout
TIMEOUT
] [--dest_dir
DEST_DIR
] [--
nodes
NODES
]
package_name
Command to delete an installed R package from the
cluster. This command has the following options:
•--timeout
REPO
Timeout waiting for the R Package to be removed (default: 60)
•--dest_dir
REPO
Directory where output of this command will be placed
(default: None)
•--nodes
NODES
Space separated IPs of nodes where you want to run the
command. (default: all).
•tscli rpackage list [-h] [--detailed] List all R packages installed on the cluster.
saml
tscli saml [-h] {configure,purge-configuration}
This subcommand has the following actions:
•tscli saml configure [-h] Configures SAML. To see a list of prerequisites refer to
Configure SAML.
•tscli saml purge-configuration Purges any existing SAML configuration.
scheduled-pinboards
tscli scheduled-pinboards [-h] {disable,enable}
tscli command reference
February 07, 2019
ThoughtSpot Application Integration Guide Page 426

This subcommand has the following actions:
•tscli scheduled-pinboards disable [-h] Disable scheduled pinboards for this cluster.
•tscli scheduled-pinboards enable [-h] Enables scheduled pinboards, which is
disabled in prod clusters by default.
Note:Note: When you enable scheduled pinboards, you should also configure a whitelist of intended
email domains. Contact ThoughtSpot Support for help configuring a whitelist.
smtp
tscli smtp [-h] {remove-mailfromname,remove-mailname,remove-rel
ayhost,remove-saslcredentials,reset-canonical-mapping,set-canon
ical-mapping,set-mailfromname,set-mailname,set-relayhost,set-sa
slcredentials,show-canonical-mapping,show-mailfromname,show-mai
lname,show-relayhost}
This subcommand takes supports the following actions:
•tscli smtp remove-mailfromname Removes current cluster mailfromname
•tscli smtp remove-mailname Removes current cluster mailname
•tscli smtp remove-relayhost Removes current cluster relayhost
•tscli smtp remove-saslcredentials Clears SASL credentials and disables SMTP AUTH
•tscli smtp reset-canonical-mapping Deletes the current postmap mapping.
•tscli smtp set-canonical-mapping [-h]
new_key new_value
Sets a new Postmap
mapping.
•tscli smtp set-mailfromname
mailfromname
Sets the name, an email address, from
which email alerts are sent, for the cluster.
•tscli smtp set-mailname
mailname
Sets the mailname, a domain, where email alerts
are sent, for the cluster.
•tscli smtp set-relayhost [-h] [--force FORCE] relayhost Sets the Relay Host for
SMTP (email) sent from the cluster.
•--force
FORCE
Set even if relay host is not accessible. (default: False )
•tscli smtp set-saslcredentials Sets SASL credentials and enables SMTP AUTH
•tscli smtp show-canonical-mapping Shows the current postmap mapping.
•tscli smtp show-mailfromname Shows the mailname, from which email alerts are sent, for
the cluster.
•tscli smtp show-mailname Shows the mailname, where email alerts are sent, for the
cluster.
•tscli smtp show-relayhost Shows the for SMTP (email) sent from the cluster. If there is
no Relay Host configured, the command returns NOT FOUND .
tscli command reference
February 07, 2019
ThoughtSpot Application Integration Guide Page 427

snapshot
tscli snapshot [-h] {backup,create,delete,ls,pin,restore,unpi
n,update-ttl}
Learn more about snapshots and backups see the Understand the backup strategies documentation.
This subcommand supports the following actions:
•tscli snapshot backup [-h] [--mode {full,light,dataless}] [--type
{full,incremental}] [--base
BASE
] [--storage_type {local,nas}] [--remote]
name out
Pull snapshot out as a backup. This takes the following parameters:
•--mode {full,light,dataless} Mode of backups. (default: full )
•
name
Name of snapshot to pull out as a backup. To list all snapshots, run tscli
snapshot ls .
•
out
Directory where backup will be written, must not already exist.
•--type {full,incremental} Type of backup.(Incremental backup is not
implemented yet) (default: full )
•--base
BASE
Based snapshot name for incremental backup. (Not Implemented
yet) (default: None)
•--storage_type {local,nas} Storage type of output directory. (default:
local )
•--remote Take backup through Orion master. (default: True )
•tscli snapshot create [-h]
name reason ttl
Creates a new snapshot with the
name
and
reason
provided. This command does not
accept .(periods), but does accept -(dashes). The ttl parameters is the number of
days after which this snapshot will be automatically deleted. A value of -1 disables
automatic deletion.
•tscli snapshot pin [-h]
name
Pins a snapshot so it cannot be deleted or garbage
collected.
•tscli snapshot delete [-h]
name
Deletes the named snapshot.
•tscli snapshot ls [-h] List available snapshots.
•tscli snapshot restore [-h] [--allow_release_change] [--only_service_state]
name
Restore cluster to an existing snapshot. This takes the following parameters:
•--allow_release_change Allow restoration to a snapshot at a different release.
(default: False )
•--only_service_state Restore only service state. (default: False )
•tscli snapshot unpin [-h]
name
Unpin a snapshot so it can be deleted or garbage
collected.
•tscli snapshot update-ttl [-h] [--disable
DISABLE
]
name ttl
Updates manual snapshot garbage collection policy.
tscli command reference
February 07, 2019
ThoughtSpot Application Integration Guide Page 428

•name Specifies which snapshot to update.
•ttl Extends the manual snapshot ttl (time-to-live) value. Use a positive value
to increase ttl . Use negative value to decrease it.
•--disable
DISABLE
Disable manual snapshot garbage collection. Setting this
value to True will override any ttl value. (default: False)
snapshot-policy
tscli snapshot-policy [-h] {disable,enable,show,update}
This subcommand supports the following actions:
•tscli snapshot-policy disable [-h] Disable snapshot policy.
•tscli snapshot-policy enable -h Enable specified snapshot policy.
•tscli snapshot-policy show [-h] Show snapshot policy.
•tscli snapshot-policy update [-h] [--config
CONFIG
]Update periodic snapshot
config. This takes the following parameter:
•--config
CONFIG
Text format of periodic backup policy config (default: None)
spot
tscli spot [-h] {enable} ...
Enables Spot integration. This subcommand supports the following actions:
tscli spot enable [-h] --token
TOKEN
--thoughtspot_url
THOUGHTSPOT_URL
[--
cache_timeout
CACHE_TIMEOUT
]
•--token
TOKEN
Slack authroization token for Spot bot. This is required. You receive this
token when your Slack administrator adds the Spot application.
•--thoughtspot_url
THOUGHTSPOT_URL
URL for the ThoughtSpot application. This is
required.
•--cache_timeout
CACHE_TIMEOUT
Internal cache timeout (default: 60000 )
ssl
tscli ssl [-h] {add-cert,clear-min-tls-version,off,on,rm-cert,s
et-min-tls-version,status,tls-status} ...
This subcommand supports the following actions:
•tscli ssl add-cert [-h]
key certificate
Adds an SSL certificate, key pair.
•tscli ssl clear-min-tls-version [-h] Clears any customizations for the minimum TLS
version to support.
tscli command reference
February 07, 2019
ThoughtSpot Application Integration Guide Page 429

•tscli ssl off
Disables SSL. Disabling SSL will stop users from seeing a security warning when accessing
ThoughtSpot from a browser if there is no SSL certificate installed.
•tscli ssl on [-h] If SSL is enabled and there is no certificate, users will see a security
warning when accessing ThoughtSpot from a browser.
•tscli ssl rm-cert Removes the existing SSL certificate, if any.
•tscli ssl set-min-tls-version [-h] {1.0,1.1,1.2} Sets the minimum supported TLS
version. Sets the minimum SSL version to be supported by the ThoughtSpot application.
Please ensure that client browsers are enabled for this version or newer.
•tscli ssl status Shows whether SSL authentication is enabled or disabled.
•tscli ssl tls-status [-h] Prints the status of TLS support.
sssd
tscli sssd {enable, disable, set-sudo-group, clear-sudo-group}
...
This subcommand uses system security services daemon (SSSD), and has the following actions:
•tscli sssd enable --user
USER
--domain
DOMAIN
Enables system Active Directory (AD) user access on a single node. You will be prompted for
password credentials. The user must have permission to join a computer or VM to the
domain.
•tscli sssd disable
Disables system AD based access on a local node. Running this command will also remove
the AD group from sudoers list.
•tscli sssd set-sudo-group
ACTIVE_DIRECTORY_GROUP_NAME
Allows sudo permissions for AD group.
•tscli sssd clear-sudo-group
ACTIVE_DIRECTORY_GROUP_NAME
Clears any set AD sudo group.
For more about setting up Active Directory access, see Enable Active Directory based access.
storage
tscli storage [-h] {gc,df} ...
This subcommand supports the following actions:
•tscli storage gc [-h] [--log_age
LOG_AGE
] [--force] [--localhost_only]
Garbage collect unused storage. Before issuing this command, you must stop the cluster
using tscli cluster stop . After garbage collection has completed, you can restart the
cluster with tscli cluster start . The command frees space in these directories:
tscli command reference
February 07, 2019
ThoughtSpot Application Integration Guide Page 430

•/tmp
•/usr/local/scaligent/logs/
•/export/logs/orion
•/export/logs/oreo
•/export/logs/hadoop
•/export/logs/zookeeper
•cores
Accepts these optional flags:
•--log_age
LOG_AGE
Delete logs older than these many hours. Use a non-zero value ideally. A zero value
will cause all temporary files to be deleted, including say those which are just
temporarily closed while they are being passed from one component to the next.
(default: 4)
•--force Forces deletion of all logs and temporary files regardless of age. This
must only be run on a stopped cluster. (default: False)
•--localhost_only If used, only the logs on the localhost will be removed. If not
specified, the command acts on the entire cluster.
•tscli storage df [--mode disk|hdfs]
Checks the disk usage on the relevant mounts. Returns output similar to the Linux system
command df -h <directory> .
support
tscli support [-h]
{bundle,restart-remote,rm-admin-email,rm-admin-phone,rm-feedbac
k-email,set-admin-email,set-admin-phone,set-debug-ui-password,s
et-feedback-email,set-remote,show-admin-email,show-admin-phon
e,show-feedback-email,show-remote,start-remote,stop-remote} ...
This subcommand supports the following actions:
•tscli support bundle [-h] [--include INCLUDE] [--exclude EXCLUDE] [--
list_selectors] [--since SINCE] [--from FROM] [--to TO] [--out OUT] [--nodes
NODES]
•--include
INCLUDE
Comma separated list of selectors to include, each entry is
either a “selector” or a glob for matching files. To see the list of valid selectors, run
this command with --list_selectors . You may also specify: “ all to get all
selectors and logs, and “basic” to get only the basic selectors. Selectors may also
be selectors meant for logs collect: all, orion, system, ts, or the name of a service.
Anything starting with / is assumed to be a glob pattern and interpreted via find(1).
Other entries are ignored. TIP: put single quotes around the param value to prevent
undesired glob expansion. Use “all” to collect all selectors and all logs (default:
all_but_logs)
tscli command reference
February 07, 2019
ThoughtSpot Application Integration Guide Page 431

•--exclude
EXCLUDE
Comma separated list of selectors to exclude. Applies to
the list selected by --include . Params are interpreted just like in --include .
Use the special keyword “logs” to exclude logs collection all together. (default:
None)
•--list_selectors List the selectors available for --include and --exclude ,
and then exit. (default: False )
•--since
SINCE
Grab logs from this time window in the past. Should be a
human readable duration string, e.g. 4h (4 hours), 30m (30 minutes), 1d (1 day).
(default: None)
•--from
FROM
Timestamp where collection begins, must be of the form:
yyyymmdd-HH:MM (default: None)
•--to
TO
Timestamp where collection ends, must be of the form: yyyymmdd-
HH:MM (default: None)
•--out
OUT
Tarball path for dumping the support bundle (default: /tmp/
support_bundle.tar.gz )
•--nodes
NODES
Comma separated list of nodes from where to collect logs. Skip
this to use all nodes. (default: None)
•tscli support restart-remote Restarts remote support.
•tscli support rm-admin-email Removes the email address for contacting the customer
administrator. Replaces it with the default ThoughtSpot Support email address.
•tscli support rm-feedback-email Removes the email address for product feedback.
Replaces it with the default ThoughtSpot Support email address.
•tscli support rm-admin-phone Removes the phone number for contacting the customer
administrator. Replaces it with the default ThoughtSpot Support phone number.
•tscli support rm-feedback-email Removes the email for sending feedback out of the
system. If you would like to set a blank email address, issue the command tscli support
set-feedback-email ' ' .
•tscli support set-admin-email
email
Sets the email address for contacting the
customer administrator. If you would like to display a blank email address, issue the
command tscli support set-admin-email ' ' .
•tscli support set-feedback-email
email
Sets the email address for sending
feedback. If you would like to display a blank email address, issue the command tscli
support set-feedback-email ' ' .
•tscli support set-admin-phone
phone_number
Sets the phone number for contacting
the customer administrator. Specify a phone number using any value (e.g. +1 800-508-7008
Ext. 1 ). If you would like to display a blank phone number, issue the command tscli
support set-admin-phone .
•tscli support set-remote [-h] [--addr
ADDR
] [--user
USER
]Configures the
cluster for remote support through SSH tunneling, where
ADDR
is the address of support,
e.g. t unnel.thoughtspot.com , and
USER
is the support username.
•tscli support show-admin-email Shows the email address for customer administrator, if
set.
•tscli support show-feedback-email Shows the email address for product feedback, if
set.
•tscli support show-admin-phone Shows the phone number for customer administrator, if
set.
•tscli support show-remote Shows the status and configuration of remote support.
•tscli support start-remote Starts remote support.
•tscli support stop-remote Stops remote support.
tscli command reference
February 07, 2019
ThoughtSpot Application Integration Guide Page 432

tokenauthentication
tscli cli tokenauthentication [-h] {disable,enable}
•tscli cli tokenauthentication enable Generates a token.
•tscli cli tokenauthentication disable Purges token login configuration.
tscli command reference
February 07, 2019
ThoughtSpot Application Integration Guide Page 433

Date and time formats reference
This is a references for the date and time contexts and formats you can use with ThoughtSpot. You
define data formats in specific contexts and, depending on the context, your choices in data formatting
differ. You must understand date and time when you load data in these contexts:
• using data upload from the browser
• through tsload command
• through data connect or another extract, transform, load (ETL) tool
Data loading formats do not change how data is displayed in tables and charts.
The context where you
can control
date and time formats is data modeling. Data modeling controls how
data is displayed in search and their resulting answers.
Data loading formats via tsload
When loading via the tsload command you must specify date and timestamp formats using the
format specifications defined in thestrptime library function. Data is imported based on the timezone of
the node from which tsload is run.
For date data types, the default format is %Y%m%d which translates to yearmonthday For example,
Dec 30th, 2001 is represented as 20011230 . For time and datetime data types, the default is
%Y%m%d %H:%M:%S which translates to yearmonthday hour:minute:second , for example, Dec
30th, 2001 1:15:12 is represented as 20011230 01:15:12 .
Data modeling formats for browser data upload
These date and time formats are supported in a CSV file when uploading via the browser. You cannot
specify the date format; ThoughtSpot will pick the format that fits your data best:
• 1/30/2014
• 2014-01-30
• 2014-1-30
• 30-Jan-2014
• 2014-Jan-30
• 2014-01-30 10:32 AM
• 2014-01-30 14:52
• 2014-01-30 10:32:22
• 2014-01-30 10:32:22 AM
• 2014-01-30 10:32:22.0
• 2014-01-30 10:32:22.0 AM
• 2014-01-30 10:32:22.000
• 2014-01-30 10:32:22.000 AM
• 1/30/2014
• 30-Jan-14
• 01-Mar-02 (assumes 2002)
• 30/1/2014 10:32 AM
• 30/1/2014 14:52
• 30/1/2014 10:32:22
• 30/1/2014 10:32:22 AM
• 30/1/2014 10:32:22.0
• 30/1/2014 10:32:22.0 AM
Date and time formats reference
February 07, 2019
ThoughtSpot Application Integration Guide Page 434

• 30/1/2014 10:32:22.000
• 30/1/2014 10:32:22.000 AM
• 30-Jan-14 10:32 AM
• 30-Jan-14 14:52
• 30-Jan-14 10:32:22
• 30-Jan-14 10:32:22 AM
• 30-Jan-14 10:32:22.0
• 30-Jan-14 10:32:22.0 AM
• 30-Jan-14 10:32:22.000
• 30-Jan-14 10:32:22.000 AM
• Fri Jan 30 2014 3:26 PM
• Fri Jan 30 2014 13:46
• Fri Jan 30 2014 10:32:22
• Fri Jan 30 2014 10:32:22 AM
• Fri Jan 30 2014 10:32:22.0
• Fri Jan 30 2014 10:32:22.0 AM
• Fri Jan 30 2014 10:32:22.000
• Fri Jan 30 2014 10:32:22.000 AM
• 14:52
• 10:32 AM
• 10:32:22
• 10:32:22 AM
• 10:32:22.0
• 10:32:22.000
• 10:32:22.0 AM
• 10:32:22.000 AM
Data loading formats via data connect or
another ETL tool
Data that is loaded via ETL arrives through ODBC or JDBC connection. After you extract the data from
the source and before you load it into ThoughtSpot, you must transform any date or timestamp into a
valid format for ThoughtSpot. Once transformed, no explicit data masking is required. See the data
integration guide for more details of loading data via ODBC and JDBC.
Data modeling formats
A user with administrative rights can configure data modeling for data on one or all files. You can set
number, date, and currency display formats. These formats define how these value types display in
tables and charts. See the Admin Guide for more information about data modeling settings. The
following format strings are available for use:
Format maskFormat mask DescriptionDescription
YYYY or yyyy four digit year such as 2017
YY or yy last two digits of year such as 17
Mmonth with no leading zero 1-12
MM Two digit month 01 -12
Date and time formats reference
February 07, 2019
ThoughtSpot Application Integration Guide Page 435

Format maskFormat mask DescriptionDescription
MMM Three letter month such as Jan
DDay of year without a leading zero 0-365
DD Day of year with up to one leading zero 01 -365
DDD Day of year with up to two leading zeroes 001 -365
dDay of month with no leading zero 1-31
dd Two digit day of month 01 -31
HH Two digit 24 hour representation of hour 00 -23
hh Two digit 12 hour representation of hour 01 -12
H24 hour representation of hour with no leading zero 0-23
h12 hour representation of hour with no leading zero 1-12
mm Minutes 00 -59
mMinutes with no leading zero 0-59
ss Seconds 00 -59
sSeconds with no leading zero 0-59
aAM/PM indicator
Valid delimiters include most non-alphabet characters. This includes but is not limited to:
•\(forward slash)
•/(backward slash)
•|(pipe symbol)
•:(colon)
•-(dash)
•_(underscore)
•=(equal sign)
Examples of valid format masks you can produce for display are as follows:
•MM/dd/yyyy
•MMM
•DD/MM/yyyy
•MM/dd/yyyy HH:mm
•DD/MM/yyyy HH:mm
Date and time formats reference
February 07, 2019
ThoughtSpot Application Integration Guide Page 436

Row level security rules reference
ThoughtSpot allows you to create row level security rules using expressions. If an expression evaluates
to “true” for a particular row and group combination, that group will be able to see that row. This
reference lists the various operators and functions you can use to create rules.
For information on how to use the row level security functions and operators, see About Rule-Based
Row Level Security. There is a special variable called ts_groups, which you can use when creating row
level security rules. It fetches a list of the groups that the currently logged in user belongs to. For each
row, f the expression in the rule evaluates to ‘true’ for any one of these groups, that row will be shown to
the user.
You can also see this list of operators and examples from within the Rule Builder by selecting RuleRule
AssistantAssistant.
Conversion functions
These functions can be used to convert data from one data type to another. Conversion to or from date
data types is not supported.
FunctionFunction DescriptionDescription ExamplesExamples
to_bool Returns the input as a boolean (true or false). to_bool (0) = false
to_bool (married)
to_date Accepts a date represented as an integer or text
string, and a second string parameter that can
include strptime date formatting elements. Re-
places all the valid strptime date formatting ele-
ments with their string counterparts and returns
the result. Does not accept epoch formatted
dates as input.
to_date (date_sold, '%Y-
%m-%d')
to_double Returns the input as a double. to_double ('3.14') = 3.14
to_double (revenue * .01)
to_integer Returns the input as an integer. to_integer ('45') + 1 =
46
to_integer (price + tax -
cost)
to_string Returns the input as a text string. To convert a
date to a string, specify the date format you
want to use.
to_string (45 + 1) = '46'
to_string (revenue -
cost)
to_string
(date,('%m/%d/%y'))
Row level security rules reference
February 07, 2019
ThoughtSpot Application Integration Guide Page 437

Date functions
FunctionFunction DescriptionDescription ExamplesExamples
add_days Returns the result of
adding the specified
number of days to
the given date.
add_days (01/30/2015, 5) = 02/04/
2015
add_days (invoiced, 30)
date Returns the date
portion of a given
date.
date (home visit)
day Returns the number
(1-31) of the day for
the given date.
day (01/15/2014) = 15
day (date ordered)
day_number_of_quarter Returns the number
of the day in a quar-
ter for a given date.
Add an optional
second parameter
to specify whether a
'fiscal' or 'calendar'
year is used to cal-
culate the result.
Default is 'calendar'.
(In examples, start
of fiscal year is set
to May 01.)
day_number_of_quarter (01/30/2015)
= 30
day_number_of_quarter (01/30/2015,
'fiscal') = 91
day_number_of_week Returns the number
(1-7) of the day in a
week for a given
date with 1 being
Monday and 7 being
Sunday.
day_number_of_week(01/15/2014) = 3
day_number_of_week (shipped)
Row level security rules reference
February 07, 2019
ThoughtSpot Application Integration Guide Page 438

FunctionFunction DescriptionDescription ExamplesExamples
day_number_of_year Returns the number
(1-366) of the day in
a year from a given
date. Add an option-
al second parameter
to specify whether a
'fiscal' or 'calendar'
year is used to cal-
culate the result.
Default is 'calendar'.
(In examples, start
of fiscal year is set
to May 01.)
day_number_of_year (01/30/2015) =
30
day_number_of_year ( 01/30/2015,
'fiscal' ) = 275
day_number_of_year (invoiced)
day_of_week Returns the day of
the week for the giv-
en date.
day_of week (01/30/2015) = Friday
day_of_week (serviced)
diff_days Subtracts the sec-
ond date from the
first date and returns
the result in number
of days, rounded
down if not exact.
diff_days (01/15/2014, 01/17/2014)
= -2
diff_days (purchased, shipped)
diff_time Subtracts the sec-
ond date from the
first date and returns
the result in number
of seconds.
diff_time (01/01/2014, 01/01/2014)
= -86,400
diff_time (clicked, submitted)
hour_of_day Returns the hour of
the day for the given
date.
hour_of_day (received)
is_weekend Returns true if the
given date falls on a
Saturday or Sunday.
is_weekend (01/31/2015) = true
is_weekend (emailed)
month Returns the month
from the given date.
month (01/15/2014) = January
month (date ordered)
Row level security rules reference
February 07, 2019
ThoughtSpot Application Integration Guide Page 439

FunctionFunction DescriptionDescription ExamplesExamples
month_number Returns the number
(1-12) of the month
from a given date.
Add an optional
second parameter
to specify whether a
'fiscal' or 'calendar'
year is used to cal-
culate the result.
Default is 'calendar'.
(In examples, start
of fiscal year is set
to May 01.)
month_number (09/20/2014) = 9
month_number ( 09/20/2014, 'fiscal'
) = 5
month_number (purchased)
month_number_of_quarter Returns the month
(1-3) number for the
given date in a quar-
ter. Add an optional
second parameter
to specify whether a
'fiscal' or 'calendar'
year is used to cal-
culate the result.
Default is 'calendar'.
(In examples, start
of fiscal year is set
to May 01.)
month_number_of_quarter (02/20/
2018) = 2
month_number_of_quarter (02/20/
2018,'fiscal' ) = 1
now Returns the current
timestamp.
now ()
quarter_number Returns the number
(1-4) of the quarter
associated with the
given date. Add an
optional second pa-
rameter to specify
'fiscal' or 'calendar'
dates. Default is
'calendar'. (In exam-
ples, start of fiscal
year is set to May
01.)
quarter_number ( 04/14/2014) = 2
quarter_number ( 04/14/2014, 'fis-
cal' ) = 4
quarter_number ( shipped )
Row level security rules reference
February 07, 2019
ThoughtSpot Application Integration Guide Page 440

FunctionFunction DescriptionDescription ExamplesExamples
start_of_month Returns MMM yyyy
for the first day of
the month. Your in-
stallation configura-
tion can override
this setting so that it
returns a different
format such as MM/
dd/yyyy . Speak
with your
ThoughtSpot admin-
istrator for informa-
tion on doing this.
start_of_month ( 01/31/2015 ) = Jan
FY 2015
start_of_month (shipped)
start_of_quarter Returns the date for
the first day of the
quarter for the given
date. Add an option-
al second parameter
to specify whether a
'fiscal' or 'calendar'
year is used to cal-
culate the result.
Default is 'calendar'.
(In examples, start
of fiscal year is set
to May 01.)
start_of_quarter ( 04/01/2014) =
Apr 2014
start_of_quarter ( 04/01/2014, 'fis-
cal') = Feb 2014
start_of_quarter (sold)
start_of_week Returns the date for
the first day of the
week for the given
date.
start_of_week ( 06/01/2015 ) = 05/
30/2015 Week
start_of_week (emailed)
start_of_year Returns the date for
the first day of the
year for the given
date. Add an option-
al second parameter
to specify whether a
'fiscal' or 'calendar'
year is used to cal-
culate the result.
Default is 'calendar'.
(In examples, start
of fiscal year is set
to May 01.)
start_of_year (04/01/2014) returns
Jan 2014
start_of_year (04/01/2014, 'fis-
cal') returns May 2013
start_of_year (joined)
time Returns the time
portion of a given
date.
time (3/1/2002 10:32) = 10:32
time (call began)
Row level security rules reference
February 07, 2019
ThoughtSpot Application Integration Guide Page 441

FunctionFunction DescriptionDescription ExamplesExamples
week_number_of_month Returns the week
number for the given
date in a month.
week_number_of_month(03/23/2017) =
3
week_number_of_quarter Returns the week
number for the given
date in a quarter.
Add an optional
second parameter
to specify whether a
'fiscal' or 'calendar'
year is used to cal-
culate the result.
Default is 'calendar'.
(In examples, start
of fiscal year is set
to May 01.)
week_number_of_quarter (04/03/2017)
= 1
week_number_of_quarter (04/03/2017,
'fiscal') = 10
week_number_of_year Returns the week
number for the given
date in a year. Add
an optional second
parameter to specify
whether a 'fiscal' or
'calendar' year is
used to calculate
the result. Default is
'calendar'. (In exam-
ples, start of fiscal
year is set to May
01.)
week_number_of_year (01/17/2014) =
3
week_number_of_year ( 01/17/2014,
'fiscal') = 38
year Returns the year
from a given date.
Add an optional
second parameter
to specify whether a
'fiscal' or 'calendar'
year is used to cal-
culate the result.
Default is 'calendar'.
(In examples, start
of fiscal year is set
to May 01. Per stan-
dard convention, the
fiscal year is defined
by the year-end
date.)
year (01/15/2014) = 2014
year (12/15/2013, 'fiscal' ) = 2014
year (date ordered)
Row level security rules reference
February 07, 2019
ThoughtSpot Application Integration Guide Page 442

Mixed functions
These functions can be used with text and numeric data types.
FunctionFunction DescriptionDescription ExamplesExamples
!= Returns true if the first value is not
equal to the second value.
3 != 2 = true
revenue != 1000000
<Returns true if the first value is less
than the second value.
3 < 2 = false
revenue < 1000000
<= Returns true if the first value is less
than or equal to the second value.
1 <= 2 = true
revenue <= 1000000
=Returns true if the first value is equal to
the second value.
2 = 2 = true
revenue = 1000000
>Returns true if the first value is greater
than the second value.
3 > 2 = true
revenue > 1000000
>= Returns true if the first value is greater
than or equal to the second value.
3 >= 2 = true
revenue >= 1000000
greatest Returns the larger of the values. greatest (20, 10) = 20
greatest (q1 revenue, q2 revenue)
least Returns the smaller of the values. least (20, 10) = 10
least (q1 revenue, q2 revenue)
Number functions
FunctionFunction DescriptionDescription ExamplesExamples
*Returns the result of multiplying
both numbers.
3 * 2 = 6
price * taxrate
+Returns the result of adding both
numbers.
1 + 2 = 3
price + shipping
-Returns the result of subtracting
the second number from the first.
3 - 2 = 1
revenue - tax
/Returns the result of dividing the
first number by the second.
6 / 3 = 2
markup / retail price
Row level security rules reference
February 07, 2019
ThoughtSpot Application Integration Guide Page 443

FunctionFunction DescriptionDescription ExamplesExamples
^Returns the first number raised to
the power of the second.
3 ^ 2 = 9
width ^ 2
abs Returns the absolute value. abs (-10) = 10
abs (profit)
acos Returns the inverse cosine in de-
grees.
acos (0.5) = 60
acos (cos-satellite-angle)
asin Returns the inverse sine (speci-
fied in degrees).
asin (0.5) = 30
asin (sin-satellite-angle)
atan Returns the inverse tangent in
degrees.
atan (1) = 45
atan (tan-satellite-angle)
atan2 Returns the inverse tangent in
degrees.
atan2 (10, 10) = 45
atan2 (longitude, latitude)
cbrt Returns the cube root of a num-
ber.
cbrt (27) = 3
cbrt (volume)
ceil Returns the smallest following in-
teger.
ceil (5.9) = 6
ceil (growth rate)
cos Returns the cosine of an angle
(specified in degrees).
cos (63) = 0.45
cos (beam angle)
cube Returns the cube of a number. cube (3) = 27
cube (length)
exp Returns Euler’s number (~2.718)
raised to a power.
exp (2) = 7.38905609893
exp (growth)
exp2 Returns 2 raised to a power. exp2 (3) = 8
exp2 (growth)
floor Returns the largest previous inte-
ger.
floor (5.1) = 5
floor (growth rate)
ln Returns the natural logarithm. ln (7.38905609893) = 2
ln (distance)
log10 Returns the logarithm with base
10.
log10 (100) = 2
log10 (volume)
log2 Returns the logarithm with base 2
(binary logarithm).
log2 (32) = 5
log2 (volume)
mod Returns the remainder of first
number divided by the second
number.
mod (8, 3) = 2
mod ( revenue , quantity )
Row level security rules reference
February 07, 2019
ThoughtSpot Application Integration Guide Page 444

FunctionFunction DescriptionDescription ExamplesExamples
pow Returns the first number raised to
the power of the second number.
pow (5, 2) = 25
pow (width, 2)
random Returns a random number be-
tween 0 and 1.
random ( ) = .457718
random ( )
round Returns the first number rounded
to the second number (the de-
fault is 1).
round (35.65, 10) = 40
round (battingavg, 100)
safe_divide Returns the result of dividing the
first number by the second. If the
second number is 0, returns 0 in-
stead of NaN (not a number).
safe_divide (12, 0) = 0
safe_divide (total_cost,
units)
sign Returns +1 if the number is
greater than zero, -1 if less than
zero, 0 if zero.
sign (-250) = -1
sign (growth rate)
sin Returns the sine of an angle
(specified in degrees).
sin (35) = 0.57
sin (beam angle)
spherical_distance Returns the distance in km be-
tween two points on Earth.
spherical_distance
(37.465191, -122.153617,
37.421962, -122.142174) =
4,961.96
spherical_distance (start_lat-
itude, start_longitude,
start_latitude, start_longi-
tude)
sq Returns the square of a numeric
value.
sq (9) = 81
sq (width)
sqrt Returns the square root. sqrt (9) = 3
sqrt (area)
tan Returns the tangent of an angle
(specified in degrees).
tan (35) = 0.7
tan (beam angle)
Row level security rules reference
February 07, 2019
ThoughtSpot Application Integration Guide Page 445

Operators
OperatorOperator DescriptionDescription ExamplesExamples
and Returns true when both conditions
are true, otherwise returns false.
(1 = 1) and (3 > 2) = true
lastname = 'smith' and state
='texas'
Note:Note: Not available for row level
security (RLS) formulas.
if…then…else Conditional operator. if (3 > 2) then 'bigger' else
'not bigger'
if (cost > 500) then 'flag' else
'approve'
ifnull Returns the first value if it is not null,
otherwise returns the second.
ifnull (cost, 'unknown')
isnull Returns true if the value is null. isnull (phone)
not Returns true if the condition is false,
otherwise returns false.
not (3 > 2) = false
not (state = 'texas')
or Returns true when either condition is
true, otherwise returns false.
(1 = 5) or (3 > 2) = true
state = 'california' or state
='oregon'
Text functions
FunctionFunction DescriptionDescription ExamplesExamples
concat Returns the one or more values
as a concatenated text string.
Be sure to use single quotes
instead of double quotes
around each of the strings.
concat ( 'hay' , 'stack' )
= 'haystack'
concat (last_name ,
first_name )
contains Returns true if the first string
contains the second string,
otherwise returns false.
contains ('broomstick',
'room') = true
contains (product, 'trial
version')
Row level security rules reference
February 07, 2019
ThoughtSpot Application Integration Guide Page 446

FunctionFunction DescriptionDescription ExamplesExamples
edit_distance Accepts two text strings. Re-
turns the edit distance (mini-
mum number of operations re-
quired to transform one string
into the other) as an integer.
Works with strings under 1023
characters.
edit_distance ('attorney',
'atty') = 4
edit_distance (color,
'red')
edit_distance_with_cap Accepts two text strings and
an integer to specify the upper
limit cap for the edit distance
(minimum number of opera-
tions required to transform one
string into the other). If the edit
distance is less than or equal
to the specified cap, returns
the edit distance. If it is higher
than the cap, returns the cap
plus 1. Works with strings un-
der 1023 characters.
edit_distance_with_cap
('pokemon go', 'minecraft
pixelmon', 3) = 4
edit_distance_with_cap
(event, 'burning man', 3)
similar_to Accepts a document text string
and a search text string. Re-
turns true if relevance score
(0-100) of the search string
with respect to the document
is greater than or equal to 20.
Relevance is based on edit dis-
tance, number of words in the
query, and length of words in
the query which are present in
the document.
similar_to ('hello world',
'hello swirl') = true
similar_to (current team,
drafted by)
similarity Accepts a document text string
and a search text string. Re-
turns the relevance score
(0-100) of the search string
with respect to the document.
Relevance is based on edit dis-
tance, number of words in the
query, and length of words in
the query which are present in
the document. If the two
strings are an exact match, re-
turns 100.
similarity ('where is the
burning man concert', 'burn-
ing man') = 46
similarity (tweet1, tweet2)
spells_like Accepts two text strings. Re-
turns true if they are spelled
similarly and false if they are
not. Works with strings under
1023 characters.
spells_like ('thouhgtspot',
'thoughtspot') = true
spells_like (studio, dis-
tributor)
Row level security rules reference
February 07, 2019
ThoughtSpot Application Integration Guide Page 447

FunctionFunction DescriptionDescription ExamplesExamples
strlen Returns the length of the text. strlen ('smith') = 5
strlen (lastname)
strpos Returns the numeric position
(starting from 0) of the first oc-
currence of the second string
in the first string, or -1 if not
found.
strpos ('haystack_with_nee-
dles', 'needle') = 14
strpos (complaint,
'lawyer')
substr Returns the portion of the giv-
en string, beginning at the lo-
cation specified (starting from
0), and of the given length.
substr ('persnickety', 3,
7) = snicket
substr (lastname, 0, 5)
Variables
These variables can be used in your expressions.
Function Description Examples
ts_groups Returns a list of all the groups the current logged
in user belongs to. For any row, if the expression
evaluates to true for any of the groups, the user
can see that row.
ts_groups = 'east'
ts_username Returns the user with the matching neame. ts_username != 'mark'
Row level security rules reference
February 07, 2019
ThoughtSpot Application Integration Guide Page 448
Formula function reference
ThoughtSpot allows you to create derived columns in worksheets using formulas. You create these
columns by building formulas using the Formula AssistantFormula Assistant. An individual formula is constructed from
n
combination of operators and functions.
This reference lists the various operators and functions you can use to create formulas.
Operators
OperatorOperator DescriptionDescription ExamplesExamples
and Returns true when both conditions
are true, otherwise returns false.
(1 = 1) and (3 > 2) = true
lastname = 'smith' and state
='texas'
Note:Note: Not available for row level
security (RLS) formulas.
if…then…else Conditional operator. if (3 > 2) then 'bigger' else
'not bigger'
if (cost > 500) then 'flag' else
'approve'
ifnull Returns the first value if it is not null,
otherwise returns the second.
ifnull (cost, 'unknown')
isnull Returns true if the value is null. isnull (phone)
not Returns true if the condition is false,
otherwise returns false.
not (3 > 2) = false
not (state = 'texas')
or Returns true when either condition is
true, otherwise returns false.
(1 = 5) or (3 > 2) = true
state = 'california' or state
='oregon'
Aggregate functions (group aggregate)
These functions can be used to aggregate data.
FunctionFunction DescriptionDescription ExamplesExamples
average Returns the average of all the values of a
column.
average (revenue)
Formula function reference
February 07, 2019
ThoughtSpot Application Integration Guide Page 449

FunctionFunction DescriptionDescription ExamplesExamples
average_if Returns the average of all the columns that
meet a given criteria.
average_if(city =
"San Francisco", rev-
enue)
count Returns the number of rows in the table
containing the column.
count (product)
count_if Returns the number of rows in the table
containing the column.
count_if(region
=’west’, region)
cumulative_average Takes a measure and one or more attribut-
es. Returns the average of the measure, ac-
cumulated by the attribute(s) in the order
specified.
cumulative_average
(revenue, order date,
state)
cumulative_max Takes a measure and one or more attribut-
es. Returns the maximum of the measure,
accumulated by the attribute(s) in the order
specified.
cumulative_max (rev-
enue, state)
cumulative_min Takes a measure and one or more attribut-
es. Returns the minimum of the measure,
accumulated by the attribute(s) in the order
specified.
cumulative_min (rev-
enue, campaign)
cumulative_sum Takes a measure and one or more attribut-
es. Returns the sum of the measure, accu-
mulated by the attribute(s) in the order
specified.
cumulative_sum (rev-
enue, order date)
group_aggregate Takes a measure and, optionally, attributes
and filters. These can be used to aggregate
measures with granularities and filters dif-
ferent from the terms/columns used in the
search. Especially useful for comparison
analysis.
This formula takes the form: group_aggre-
gate (< aggregation (measure) >, < group-
ings >, < filters >)
Lists can be defined with {} and optional list
functions query_groups or query_fil-
ters , which by default specify the lists or
filters used in the original search. Plus (+) or
(-) can be used to add or exclude specific
columns for query groups.
group_aggregate (sum
(revenue) , {ship
mode, date} , {} )
group_aggregate (sum
(revenue) , {ship
mode , date},
{day_of_week (date) =
'friday'} )
group_aggregate (sum
(revenue) ,
query_groups() ,
query_filters() )
group_aggregate (sum
(revenue) ,
query_groups() +
{date} , query_fil-
ters() )
Formula function reference
February 07, 2019
ThoughtSpot Application Integration Guide Page 450

FunctionFunction DescriptionDescription ExamplesExamples
group_average Takes a measure and one or more attribut-
es. Returns the average of the measure
grouped by the attribute(s).
group_average (rev-
enue, customer re-
gion, state)
group_count Takes a measure and one or more attribut-
es. Returns the count of the measure
grouped by the attribute(s).
group_count (revenue,
customer region)
group_max Takes a measure and one or more attribut-
es. Returns the maximum of the measure
grouped by the attribute(s).
group_max (revenue,
customer region)
group_min Takes a measure and one or more attribut-
es. Returns the minimum of the measure
grouped by the attribute(s).
group_min (revenue,
customer region)
group_stddev Takes a measure and one or more attribut-
es. Returns the standard deviation of the
measure grouped by the attribute(s).
group_stddev (rev-
enue, customer region)
group_sum Takes a measure and one or more attribut-
es. Returns the sum of the measure
grouped by the attribute(s).
group_sum (revenue,
customer region)
group_unique_count Takes a measure and one or more attribut-
es. Returns the unique count of the mea-
sure grouped by the attribute(s).
group_unique_count
(product , supplier)
group_variance Takes a measure and one or more attribut-
es. Returns the variance of the measure
grouped by the attribute(s).
group_variance (rev-
enue, customer region)
max Returns the maximum value of a column. max (sales)
max_if Returns the maximum value among
columns that meet a criteria.
max_if( (revenue >
10) , customer region
)
min Returns the minimum value of a column. min (revenue)
min_if Returns the minimum value among columns
that meet a criteria.
min_if( (revenue <
10) , customer region
)
Formula function reference
February 07, 2019
ThoughtSpot Application Integration Guide Page 451

FunctionFunction DescriptionDescription ExamplesExamples
moving_average Takes a measure, two integers to define the
window to aggregate over, and one or more
attributes. The window is (current -
Num1…Current + Num2) with both end
points being included in the window. For
example, “1,1” will have a window size of 3.
To define a window that begins before Cur-
rent, specify a negative number for Num2.
Returns the average of the measure over
the given window. The attributes are the or-
dering columns used to compute the mov-
ing average.
moving_average (rev-
enue, 2, 1, customer
region)
moving_max Takes a measure, two integers to define the
window to aggregate over, and one or more
attributes. The window is (current -
Num1…Current + Num2) with both end
points being included in the window. For
example, “1,1” will have a window size of 3.
To define a window that begins before Cur-
rent, specify a negative number for Num2.
Returns the maximum of the measure over
the given window. The attributes are the or-
dering columns used to compute the mov-
ing maximum.
moving_max (com-
plaints, 1, 2, store
name)
moving_min Takes a measure, two integers to define the
window to aggregate over, and one or more
attributes. The window is (current -
Num1…Current + Num2) with both end
points being included in the window. For
example, “1,1” will have a window size of 3.
To define a window that begins before Cur-
rent, specify a negative number for Num2.
Returns the minimum of the measure over
the given window. The attributes are the or-
dering columns used to compute the mov-
ing minimum.
moving_min (defects,
3, 1, product)
moving_sum Takes a measure, two integers to define the
window to aggregate over, and one or more
attributes. The window is (current -
Num1…Current + Num2) with both end
points being included in the window. For
example, “1,1” will have a window size of 3.
To define a window that begins before Cur-
rent, specify a negative number for Num2.
Returns the sum of the measure over the
given window. The attributes are the order-
ing columns used to compute the moving
sum.
moving_sum (revenue,
1, 1, order date)
Formula function reference
February 07, 2019
ThoughtSpot Application Integration Guide Page 452

FunctionFunction DescriptionDescription ExamplesExamples
stddev Returns the standard deviation of all values
of a column.
stddev (revenue)
stddev_if Returns a standard deviation values filtered
to meet a specific criteria.
stddev_if( (revenue >
10) , (revenue/10.0) )
sum Returns the sum of all the values of a col-
umn.
sum (revenue)
sum_if Returns sum values filtered by a specific
criteria.
sum_if(region=’west’,
revenue)
unique count Returns the number of unique values of a
column.
unique count (cus-
tomer)
unique_count_if Returns the number of unique values of a
column provided it meets a criteria.
unique_count_if( (rev-
enue > 10) , order
date )
variance Returns the variance of all the values of a
column.
variance (revenue)
variance_if Returns the variance of all the values of a
column provided it meets a criteria..
variance_if( (revenue
> 10) , (revenue/
10.0) )
Conversion functions
These functions can be used to convert data from one data type to another. Conversion to or from date
data types is not supported.
FunctionFunction DescriptionDescription ExamplesExamples
to_bool Returns the input as a boolean (true or false). to_bool (0) = false
to_bool (married)
to_date Accepts a date represented as an integer or text
string, and a second string parameter that can
include strptime date formatting elements. Re-
places all the valid strptime date formatting ele-
ments with their string counterparts and returns
the result. Does not accept epoch formatted
dates as input.
to_date (date_sold, '%Y-
%m-%d')
to_double Returns the input as a double. to_double ('3.14') = 3.14
to_double (revenue * .01)
Formula function reference
February 07, 2019
ThoughtSpot Application Integration Guide Page 453

FunctionFunction DescriptionDescription ExamplesExamples
to_integer Returns the input as an integer. to_integer ('45') + 1 =
46
to_integer (price + tax -
cost)
to_string Returns the input as a text string. To convert a
date to a string, specify the date format you
want to use.
to_string (45 + 1) = '46'
to_string (revenue -
cost)
to_string
(date,('%m/%d/%y'))
Date functions
FunctionFunction DescriptionDescription ExamplesExamples
add_days Returns the result of
adding the specified
number of days to
the given date.
add_days (01/30/2015, 5) = 02/04/
2015
add_days (invoiced, 30)
date Returns the date
portion of a given
date.
date (home visit)
day Returns the number
(1-31) of the day for
the given date.
day (01/15/2014) = 15
day (date ordered)
day_number_of_quarter Returns the number
of the day in a quar-
ter for a given date.
Add an optional
second parameter
to specify whether a
'fiscal' or 'calendar'
year is used to cal-
culate the result.
Default is 'calendar'.
(In examples, start
of fiscal year is set
to May 01.)
day_number_of_quarter (01/30/2015)
= 30
day_number_of_quarter (01/30/2015,
'fiscal') = 91
day_number_of_week Returns the number
(1-7) of the day in a
week for a given
date with 1 being
Monday and 7 being
Sunday.
day_number_of_week(01/15/2014) = 3
day_number_of_week (shipped)
Formula function reference
February 07, 2019
ThoughtSpot Application Integration Guide Page 454

FunctionFunction DescriptionDescription ExamplesExamples
day_number_of_year Returns the number
(1-366) of the day in
a year from a given
date. Add an option-
al second parameter
to specify whether a
'fiscal' or 'calendar'
year is used to cal-
culate the result.
Default is 'calendar'.
(In examples, start
of fiscal year is set
to May 01.)
day_number_of_year (01/30/2015) =
30
day_number_of_year ( 01/30/2015,
'fiscal' ) = 275
day_number_of_year (invoiced)
day_of_week Returns the day of
the week for the giv-
en date.
day_of week (01/30/2015) = Friday
day_of_week (serviced)
diff_days Subtracts the sec-
ond date from the
first date and returns
the result in number
of days, rounded
down if not exact.
diff_days (01/15/2014, 01/17/2014)
= -2
diff_days (purchased, shipped)
diff_time Subtracts the sec-
ond date from the
first date and returns
the result in number
of seconds.
diff_time (01/01/2014, 01/01/2014)
= -86,400
diff_time (clicked, submitted)
hour_of_day Returns the hour of
the day for the given
date.
hour_of_day (received)
is_weekend Returns true if the
given date falls on a
Saturday or Sunday.
is_weekend (01/31/2015) = true
is_weekend (emailed)
month Returns the month
from the given date.
month (01/15/2014) = January
month (date ordered)
Formula function reference
February 07, 2019
ThoughtSpot Application Integration Guide Page 455

FunctionFunction DescriptionDescription ExamplesExamples
month_number Returns the number
(1-12) of the month
from a given date.
Add an optional
second parameter
to specify whether a
'fiscal' or 'calendar'
year is used to cal-
culate the result.
Default is 'calendar'.
(In examples, start
of fiscal year is set
to May 01.)
month_number (09/20/2014) = 9
month_number ( 09/20/2014, 'fiscal'
) = 5
month_number (purchased)
month_number_of_quarter Returns the month
(1-3) number for the
given date in a quar-
ter. Add an optional
second parameter
to specify whether a
'fiscal' or 'calendar'
year is used to cal-
culate the result.
Default is 'calendar'.
(In examples, start
of fiscal year is set
to May 01.)
month_number_of_quarter (02/20/
2018) = 2
month_number_of_quarter (02/20/
2018,'fiscal' ) = 1
now Returns the current
timestamp.
now ()
quarter_number Returns the number
(1-4) of the quarter
associated with the
given date. Add an
optional second pa-
rameter to specify
'fiscal' or 'calendar'
dates. Default is
'calendar'. (In exam-
ples, start of fiscal
year is set to May
01.)
quarter_number ( 04/14/2014) = 2
quarter_number ( 04/14/2014, 'fis-
cal' ) = 4
quarter_number ( shipped )
Formula function reference
February 07, 2019
ThoughtSpot Application Integration Guide Page 456

FunctionFunction DescriptionDescription ExamplesExamples
start_of_month Returns MMM yyyy
for the first day of
the month. Your in-
stallation configura-
tion can override
this setting so that it
returns a different
format such as MM/
dd/yyyy . Speak
with your
ThoughtSpot admin-
istrator for informa-
tion on doing this.
start_of_month ( 01/31/2015 ) = Jan
FY 2015
start_of_month (shipped)
start_of_quarter Returns the date for
the first day of the
quarter for the given
date. Add an option-
al second parameter
to specify whether a
'fiscal' or 'calendar'
year is used to cal-
culate the result.
Default is 'calendar'.
(In examples, start
of fiscal year is set
to May 01.)
start_of_quarter ( 04/01/2014) =
Apr 2014
start_of_quarter ( 04/01/2014, 'fis-
cal') = Feb 2014
start_of_quarter (sold)
start_of_week Returns the date for
the first day of the
week for the given
date.
start_of_week ( 06/01/2015 ) = 05/
30/2015 Week
start_of_week (emailed)
start_of_year Returns the date for
the first day of the
year for the given
date. Add an option-
al second parameter
to specify whether a
'fiscal' or 'calendar'
year is used to cal-
culate the result.
Default is 'calendar'.
(In examples, start
of fiscal year is set
to May 01.)
start_of_year (04/01/2014) returns
Jan 2014
start_of_year (04/01/2014, 'fis-
cal') returns May 2013
start_of_year (joined)
time Returns the time
portion of a given
date.
time (3/1/2002 10:32) = 10:32
time (call began)
Formula function reference
February 07, 2019
ThoughtSpot Application Integration Guide Page 457

FunctionFunction DescriptionDescription ExamplesExamples
week_number_of_month Returns the week
number for the given
date in a month.
week_number_of_month(03/23/2017) =
3
week_number_of_quarter Returns the week
number for the given
date in a quarter.
Add an optional
second parameter
to specify whether a
'fiscal' or 'calendar'
year is used to cal-
culate the result.
Default is 'calendar'.
(In examples, start
of fiscal year is set
to May 01.)
week_number_of_quarter (04/03/2017)
= 1
week_number_of_quarter (04/03/2017,
'fiscal') = 10
week_number_of_year Returns the week
number for the given
date in a year. Add
an optional second
parameter to specify
whether a 'fiscal' or
'calendar' year is
used to calculate
the result. Default is
'calendar'. (In exam-
ples, start of fiscal
year is set to May
01.)
week_number_of_year (01/17/2014) =
3
week_number_of_year ( 01/17/2014,
'fiscal') = 38
year Returns the year
from a given date.
Add an optional
second parameter
to specify whether a
'fiscal' or 'calendar'
year is used to cal-
culate the result.
Default is 'calendar'.
(In examples, start
of fiscal year is set
to May 01. Per stan-
dard convention, the
fiscal year is defined
by the year-end
date.)
year (01/15/2014) = 2014
year (12/15/2013, 'fiscal' ) = 2014
year (date ordered)
Formula function reference
February 07, 2019
ThoughtSpot Application Integration Guide Page 458

Mixed functions
These functions can be used with text and numeric data types.
FunctionFunction DescriptionDescription ExamplesExamples
!= Returns true if the first value is not
equal to the second value.
3 != 2 = true
revenue != 1000000
<Returns true if the first value is less
than the second value.
3 < 2 = false
revenue < 1000000
<= Returns true if the first value is less
than or equal to the second value.
1 <= 2 = true
revenue <= 1000000
=Returns true if the first value is equal to
the second value.
2 = 2 = true
revenue = 1000000
>Returns true if the first value is greater
than the second value.
3 > 2 = true
revenue > 1000000
>= Returns true if the first value is greater
than or equal to the second value.
3 >= 2 = true
revenue >= 1000000
greatest Returns the larger of the values. greatest (20, 10) = 20
greatest (q1 revenue, q2 revenue)
least Returns the smaller of the values. least (20, 10) = 10
least (q1 revenue, q2 revenue)
Number functions
FunctionFunction DescriptionDescription ExamplesExamples
*Returns the result of multiplying
both numbers.
3 * 2 = 6
price * taxrate
+Returns the result of adding both
numbers.
1 + 2 = 3
price + shipping
-Returns the result of subtracting
the second number from the first.
3 - 2 = 1
revenue - tax
/Returns the result of dividing the
first number by the second.
6 / 3 = 2
markup / retail price
Formula function reference
February 07, 2019
ThoughtSpot Application Integration Guide Page 459

FunctionFunction DescriptionDescription ExamplesExamples
^Returns the first number raised to
the power of the second.
3 ^ 2 = 9
width ^ 2
abs Returns the absolute value. abs (-10) = 10
abs (profit)
acos Returns the inverse cosine in de-
grees.
acos (0.5) = 60
acos (cos-satellite-angle)
asin Returns the inverse sine (speci-
fied in degrees).
asin (0.5) = 30
asin (sin-satellite-angle)
atan Returns the inverse tangent in
degrees.
atan (1) = 45
atan (tan-satellite-angle)
atan2 Returns the inverse tangent in
degrees.
atan2 (10, 10) = 45
atan2 (longitude, latitude)
cbrt Returns the cube root of a num-
ber.
cbrt (27) = 3
cbrt (volume)
ceil Returns the smallest following in-
teger.
ceil (5.9) = 6
ceil (growth rate)
cos Returns the cosine of an angle
(specified in degrees).
cos (63) = 0.45
cos (beam angle)
cube Returns the cube of a number. cube (3) = 27
cube (length)
exp Returns Euler’s number (~2.718)
raised to a power.
exp (2) = 7.38905609893
exp (growth)
exp2 Returns 2 raised to a power. exp2 (3) = 8
exp2 (growth)
floor Returns the largest previous inte-
ger.
floor (5.1) = 5
floor (growth rate)
ln Returns the natural logarithm. ln (7.38905609893) = 2
ln (distance)
log10 Returns the logarithm with base
10.
log10 (100) = 2
log10 (volume)
log2 Returns the logarithm with base 2
(binary logarithm).
log2 (32) = 5
log2 (volume)
mod Returns the remainder of first
number divided by the second
number.
mod (8, 3) = 2
mod ( revenue , quantity )
Formula function reference
February 07, 2019
ThoughtSpot Application Integration Guide Page 460

FunctionFunction DescriptionDescription ExamplesExamples
pow Returns the first number raised to
the power of the second number.
pow (5, 2) = 25
pow (width, 2)
random Returns a random number be-
tween 0 and 1.
random ( ) = .457718
random ( )
round Returns the first number rounded
to the second number (the de-
fault is 1).
round (35.65, 10) = 40
round (battingavg, 100)
safe_divide Returns the result of dividing the
first number by the second. If the
second number is 0, returns 0 in-
stead of NaN (not a number).
safe_divide (12, 0) = 0
safe_divide (total_cost,
units)
sign Returns +1 if the number is
greater than zero, -1 if less than
zero, 0 if zero.
sign (-250) = -1
sign (growth rate)
sin Returns the sine of an angle
(specified in degrees).
sin (35) = 0.57
sin (beam angle)
spherical_distance Returns the distance in km be-
tween two points on Earth.
spherical_distance
(37.465191, -122.153617,
37.421962, -122.142174) =
4,961.96
spherical_distance (start_lat-
itude, start_longitude,
start_latitude, start_longi-
tude)
sq Returns the square of a numeric
value.
sq (9) = 81
sq (width)
sqrt Returns the square root. sqrt (9) = 3
sqrt (area)
tan Returns the tangent of an angle
(specified in degrees).
tan (35) = 0.7
tan (beam angle)
Text functions
FunctionFunction DescriptionDescription ExamplesExamples
concat Returns the one or more values
as a concatenated text string.
Be sure to use single quotes
instead of double quotes
around each of the strings.
concat ( 'hay' , 'stack' )
= 'haystack'
concat (last_name ,
first_name )
Formula function reference
February 07, 2019
ThoughtSpot Application Integration Guide Page 461

FunctionFunction DescriptionDescription ExamplesExamples
contains Returns true if the first string
contains the second string,
otherwise returns false.
contains ('broomstick',
'room') = true
contains (product, 'trial
version')
edit_distance Accepts two text strings. Re-
turns the edit distance (mini-
mum number of operations re-
quired to transform one string
into the other) as an integer.
Works with strings under 1023
characters.
edit_distance ('attorney',
'atty') = 4
edit_distance (color,
'red')
edit_distance_with_cap Accepts two text strings and
an integer to specify the upper
limit cap for the edit distance
(minimum number of opera-
tions required to transform one
string into the other). If the edit
distance is less than or equal
to the specified cap, returns
the edit distance. If it is higher
than the cap, returns the cap
plus 1. Works with strings un-
der 1023 characters.
edit_distance_with_cap
('pokemon go', 'minecraft
pixelmon', 3) = 4
edit_distance_with_cap
(event, 'burning man', 3)
similar_to Accepts a document text string
and a search text string. Re-
turns true if relevance score
(0-100) of the search string
with respect to the document
is greater than or equal to 20.
Relevance is based on edit dis-
tance, number of words in the
query, and length of words in
the query which are present in
the document.
similar_to ('hello world',
'hello swirl') = true
similar_to (current team,
drafted by)
similarity Accepts a document text string
and a search text string. Re-
turns the relevance score
(0-100) of the search string
with respect to the document.
Relevance is based on edit dis-
tance, number of words in the
query, and length of words in
the query which are present in
the document. If the two
strings are an exact match, re-
turns 100.
similarity ('where is the
burning man concert', 'burn-
ing man') = 46
similarity (tweet1, tweet2)
Formula function reference
February 07, 2019
ThoughtSpot Application Integration Guide Page 462

FunctionFunction DescriptionDescription ExamplesExamples
spells_like Accepts two text strings. Re-
turns true if they are spelled
similarly and false if they are
not. Works with strings under
1023 characters.
spells_like ('thouhgtspot',
'thoughtspot') = true
spells_like (studio, dis-
tributor)
strlen Returns the length of the text. strlen ('smith') = 5
strlen (lastname)
strpos Returns the numeric position
(starting from 0) of the first oc-
currence of the second string
in the first string, or -1 if not
found.
strpos ('haystack_with_nee-
dles', 'needle') = 14
strpos (complaint,
'lawyer')
substr Returns the portion of the giv-
en string, beginning at the lo-
cation specified (starting from
0), and of the given length.
substr ('persnickety', 3,
7) = snicket
substr (lastname, 0, 5)
Formula function reference
February 07, 2019
ThoughtSpot Application Integration Guide Page 463

Alerts code reference
This reference identifies the messages that can appear in the System Health > Overview > Critical AlertsSystem Health > Overview > Critical Alerts
and in the AlertsAlerts dashboard.
Informational alerts
TASK_TERMINATED
MsgMsg: Task {{.Service}}.{{.Task}} terminated on machine {{.Machine}}
TypeType: INFO
This alert is raised when a task terminates.
DISK_ERROR
MsgMsg: Machine {{.Machine}} has disk errors
TypeType: INFO
Raised when a machine has disk errors.
ZK_AVG_LATENCY
MsgMsg: Average Zookeeper latency is more than {{.Num}} msec
TypeType: INFO
Raised when average Zookeeper latency is above a threshold.
ZK_MAX_LATENCY
MsgMsg: Max Zookeeper latency is more than {{.Num}} msec
TypeType: INFO
Raised when max Zookeeper latency is above a threshold.
ZK_MIN_LATENCY
MsgMsg: Min Zookeeper latency is more than {{.Num}} msec
TypeType: INFO
Raised when min Zookeeper latency is above a threshold.
ZK_OUTSTANDING_REQUESTS
MsgMsg: Number of outstanding Zookeeper requests exceeds {{.Num}}
TypeType: INFO
Alerts code reference
February 07, 2019
ThoughtSpot Application Integration Guide Page 464

Raised when there are too many outstanding Zookeeper requests.
ZK_NUM_WATCHERS
MsgMsg: Number of Zookeeper watchers exceeds {{.Num}}
TypeType: INFO
Raised when there are too many Zookeeper watchers.
MASTER_ELECTION
MsgMsg: {{.Machine}} elected as Orion Master
TypeType: INFO
Raised when a new Orion Master is elected.
PERIODIC_BACKUP
MsgMsg: {{.Process}} periodic backup for policy {{.Name}} failed.
TypeType: INFO
Raised when periodic backup fails.
PERIODIC_SNAPSHOT
MsgMsg: {{.Process}} periodic snapshot {{.Name}} failed.
TypeType: INFO
Raised when a periodic snapshot fails.
HDFS_CORRUPTION
MsgMsg: HDFS root directory is in a corrupted state.
TypeType: INFO
Raised when HDFS root directory is corrupted.
APPLICATION_INVALID_STATE
MsgMsg: {{.Service}}.{{.Task}} on {{.Machine}} at location {{.Location}}
TypeType: INFO
Raised when Application raises invalid state alert.
UPDATE_START
MsgMsg: Starting update of ThoughtSpot cluster {{.Cluster}}
TypeType: INFO
Raised when update starts.
Alerts code reference
February 07, 2019
ThoughtSpot Application Integration Guide Page 465

UPDATE_END
MsgMsg: Finished update of ThoughtSpot cluster {{.Cluster}} to release {{.Release}}
TypeType: INFO
Raised when update completes.
Errors
TIMELY_JOB_RUN_ERROR
MsgMsg: Job run {{.Message}}
TypeType: ERROR
Raised when a job run fails.
TIMELY_ERROR
MsgMsg: Job manager {{.Message}}
TypeType: ERROR
Raised when a job manager runs into an inconsistent state.
Warnings
DISK_SPACE
MsgMsg: Machine {{.Machine}} has less than {{.Perc}}% disk space free
TypeType: WARNING
Raised when a disk is low on available disk space. Valid only in the 3.2 version of ThoughtSpot.
ROOT_DISK_SPACE
MsgMsg: Machine {{.Machine}} has less than {{.Perc}}% disk space free on root partition
TypeType: WARNING
Raised when a machine is low on available disk space on root partition.
BOOT_DISK_SPACE
MsgMsg: Machine {{.Machine}} has less than {{.Perc}}% disk space free on boot partition
TypeType: WARNING
Raised when a machine is low on available disk space on boot partition.
Alerts code reference
February 07, 2019
ThoughtSpot Application Integration Guide Page 466

UPDATE_DISK_SPACE
MsgMsg: Machine {{.Machine}} has less than {{.Perc}}% disk space free on update
partition
TypeType: WARNING
Raised when a machine is low on available disk space on update partition.
EXPORT_DISK_SPACE
MsgMsg: Machine {{.Machine}} has less than {{.Perc}}% disk space free on export
partition
TypeType: WARNING
Raised when a machine is low on available disk space on export partition.
HDFS_NAMENODE_DISK_SPACE
MsgMsg: Machine {{.Machine}} has less than {{.Perc}}% disk space free on HDFS namenode
drive
TypeType: WARNING
Raised when a machine is low on available disk space on HDFS namenode drive.
MEMORY
MsgMsg: Machine {{.Machine}} has less than {{.Perc}}% memory free
TypeType: WARNING
Raised when a machine is low on free memory.
OS_USERS
MsgMsg: Machine {{.Machine}} has more than {{.Num}} logged in users
TypeType: WARNING
Raised when a machine has too many users logged in.
OS_PROCS
MsgMsg: Machine {{.Machine}} has more than {{.Num}} processes
TypeType: WARNING
Raised when a machine has more too many processes.
SSH
MsgMsg: Machine {{.Machine}} doesn't have an active SSH server
Alerts code reference
February 07, 2019
ThoughtSpot Application Integration Guide Page 467

TypeType: WARNING
Raised when a machine has more than 600 processes.
DISK_ERROR_EXTERNAL
MsgMsg: Machine {{.Machine}} has disk errors
TypeType: WARNING
Raised when more than 2 disk errors happen in a day.
ZK_FD_COUNT
MsgMsg: Zookeeper has more than {{.Num}} open file descriptors
TypeType: WARNING
Raised when there are too many open Zookeeper files.
ZK_EPHEMERAL_COUNT
MsgMsg: Zookeeper has more than {{.Num}} ephemeral files
TypeType: WARNING
Raised when there are too many Zookeeper ephemeral files.
HOST_DOWN
MsgMsg: {{.Machine}} is down
TypeType: WARNING
Raised when a host is down.
TASK_UNREACHABLE
MsgMsg: {{.ServiceDesc}} on {{.Machine}} is unreachable over HTTP
TypeType: WARNING
Raised when a task is unreachable over HTTP.
TASK_NOT_RUNNING
MsgMsg: {{.ServiceDesc}} is not running
TypeType: WARNING
Raised when a service task is not running on any machine in the cluster.
Alerts code reference
February 07, 2019
ThoughtSpot Application Integration Guide Page 468

Critical alerts
TASK_FLAPPING
MsgMsg: Task {{.Service}}.{{.Task}} terminated {{._actual_num_occurrences}} times in last
{{._earliest_duration_str}}
TypeType: CRITICAL
This alert is raised when a task is crashing repeatedly. The service is evaluted across the whole cluster.
So, if a service crashes 5 times in a day across all nodes in the cluster, this alert is generated.
OREO_TERMINATED
MsgMsg: Oreo terminated on machine {{.Machine}}
TypeType: CRITICAL
This alert is raised when the Oreo daemon on a machine terminates due to an error. This typically
happens due to an error accessing Zookeeper, HDFS, or a hardware issue.
HDFS_DISK_SPACE
MsgMsg: HDFS has less than {{.Perc}}% space free
TypeType: CRITICAL
Raised when a HDFS cluster is low on total available disk space.
ZK_INACCESSIBLE
MsgMsg: Zookeeper is not accessible
TypeType: CRITICAL
Raised when Zookeeper is inaccessible.
PERIODIC_BACKUP_FLAPPING
MsgMsg: Periodic backup failed {{._actual_num_occurrences}} times in last
{{._earliest_duration_str}}
TypeType: CRITICAL
This alert is raised when a periodic backup failed repeatedly.
PERIODIC_SNAPSHOT_FLAPPING
MsgMsg: Periodic snapshot failed {{._actual_num_occurrences}} times in last
{{._earliest_duration_str}}
TypeType: CRITICAL
Alerts code reference
February 07, 2019
ThoughtSpot Application Integration Guide Page 469

This alert is raised when periodic snapshot failed repeatedly.
APPLICATION_INVALID_STATE_EXTERNAL
MsgMsg: {{.Service}}.{{.Task}} on {{.Machine}} at location {{.Location}}
TypeType: CRITICAL
Raised when Application raises invalid state alert.
Alerts code reference
February 07, 2019
ThoughtSpot Application Integration Guide Page 470

User action code reference
This reference identifies the user action codes that can appear in the System HealthSystem Health pages and in logs or
other reports.
answer_unsaved User makes a change to tokens in the search
bar.
answer_saved User opens an existing saved answer and makes
changes to tokens in the search bar.
answer_pinboard_context User opens an existing saved pinboard, edits a
context viz and makes a change to tokens in the
search bar.
answer_aggregated_worksheet User opens an existing saved aggregated work-
sheet and makes changes to tokens in the
search bar.
answer_upgrade Requests made for the sole purpose of upgrade.
pinboard_view User opens an existing saved pinboard.
pinboard_filter User adds, removes or applies values to a pin-
board filter.
pinboard_ad_hoc User drills down in a pinboard viz.
data_chart_config Request for new data being generated following
a chart config change.
data_show_underlying_row Request to show underlying data for a data
row(s).
data_export Request to export data.
pinboard_tspublic_runtime_filter Request to TSPublic/pinboarddata with runtime
filters.
answer_aggregated_worksheet_save User updates aggregated worksheet.
answer_add_new_filter User adds a filter using the UI.
data_show_underlying_viz Request to show underlying data for a data
row(s).
answer_view User opens an existing, saved answer.
answer_viz_context_view User opens an existing saved pinboard, edits a
context viz.
pinboard_insight_view User opens SpotIQ tab pinboards.
User action code reference
February 07, 2019
ThoughtSpot Application Integration Guide Page 471

pinboard_admin_view User opens admin tab pinboards.
pinboard_embed_view User opens embed pinboard from a URL.
pinboard_homepage_view On loading of homepage pinboard.
pinboard_learn_view On loading learn pinboard.
pinboard_tspublic_no_runtime_filter Request to TSPublic/pinboard data without run-
time filters.
User action code reference
February 07, 2019
ThoughtSpot Application Integration Guide Page 472

Error code reference
Summary:Summary: List of error codes and messages.
This section lists error codes that can appear in ThoughtSpot, with summary information and actions to
take. Error codes and messages are shown in ThoughtSpot when something goes wrong. These
messages can appear in the application and in logs.
When you see an error code, you will also see a message with a brief summary of what has happened. If
there is a remediation action you can take, it will be listed in this references. If there is no action listed,
please contact ThoughtSpot Support.
Tip:Tip: Only the base code number is listed for each error. So keep this in mind when searching
through these codes. For example, error code TS-00125 is simply listed as 125.
Metadata Errors (100 - 499)|
CodeCode SeveritySeverity SummarySummary DetailsDetails ActionAction
TS-00100 INFO Success. {1} has
been added to {2}.
\# {1} – name of vi-
sualization \# {2} –
{name/link to pin-
board}
None None
TS-00101 ERROR Failure adding {1} to
{2}
Visualization could
not be added to {2}
\# {1} – name of vi-
sualization \# {2} –
name/link to pin-
board
None
TS-00102 ERROR Failure adding {1} to
{2} due to corruption
{1} could not be
added to {2} as the
pinboard has one or
more invalid visual-
izations
Please try again after
removing the invalid
visualization(s) from
{2} \# {1} – name of vi-
sualization \# {2} –
name/link to pinboard
TS-00103 INFO Success. Visualiza-
tion has been delet-
ed from {1}. 1 –
name/link to pin-
board
None None
Error code reference
February 07, 2019
ThoughtSpot Application Integration Guide Page 473

TS-00104 ERROR Failure deleting visu-
al from {1}
Visualization could
not be deleted from
the pinboard. 1 –
name/link to pin-
board
None
TS-00105 ERROR Failure deleting visu-
al from {1} due to
corruption
Visualization could
not be deleted from
{1} as the pinboard
has one or more in-
valid visualizations.
1 – name/link to pin-
board
Please try again after
removing the invalid
visualization(s) from
the pinboard
TS-00106 INFO Success. {1} created
successfully. 1 –
name/link to pin-
board
None None
TS-00107 ERROR Failure creating {1}.
1 – name/link to pin-
board
Uh oh. We’re not
sure what hap-
pened. Please email
the trace file to {ad-
minEmail}.
None
TS-00108 INFO Sticker created suc-
cessfully.
None None
TS-00109 ERROR Failure creating the
sticker.
Uh oh. We’re not
sure what hap-
pened. Please email
the trace file to {ad-
minEmail}.
None
TS-00110 INFO Sticker deleted suc-
cessfully.
None None
TS-00111 ERROR Failure deleting
sticker.
Uh oh. We’re not
sure what hap-
pened. Please email
the trace file to {ad-
minEmail}.
None
TS-00112 INFO Pinboards deleted
successfully.
None None
TS-00113 ERROR Failure deleting pin-
boards
Uh oh. We’re not
sure what hap-
pened. Please email
the trace file to {ad-
minEmail}.
None
TS-00114 INFO Answers deleted
successfully.
None None
Error code reference
February 07, 2019
ThoughtSpot Application Integration Guide Page 474

TS-00115 ERROR Failure deleting an-
swers
Uh oh. We’re not
sure what hap-
pened. Please email
the trace file to {ad-
minEmail}.
None
TS-00116 INFO Tables deleted suc-
cessfully.
None None
TS-00117 ERROR Failure deleting ta-
bles
Uh oh. We’re not
sure what hap-
pened. Please email
the trace file to {ad-
minEmail}.
None
TS-00118 INFO Relationship created
successfully.
None None
TS-00119 ERROR Failure creating rela-
tionship
Uh oh. We’re not
sure what hap-
pened. Please email
the trace file to {ad-
minEmail}.
None
TS-00120 INFO Relationship updat-
ed successfully.
None None
TS-00121 ERROR Failure updating the
relationship
Uh oh. We’re not
sure what hap-
pened. Please email
the trace file to {ad-
minEmail}.
None
TS-00122 INFO Relationship deleted
successfully.
None None
TS-00123 ERROR Failure deleting the
relationship
Uh oh. We’re not
sure what hap-
pened. Please email
the trace file to {ad-
minEmail}.
None
TS-00124 ERROR Failure fetching de-
tails for table
Uh oh. We’re not
sure what hap-
pened. Please email
the trace file to {ad-
minEmail}.
None
TS-00125 ERROR Failure fetching de-
tails for the tables
Uh oh. We’re not
sure what hap-
pened. Please email
the trace file to {ad-
minEmail}.
None
Error code reference
February 07, 2019
ThoughtSpot Application Integration Guide Page 475

TS-00126 ERROR Failure fetching de-
tails for datasource
Uh oh. We’re not
sure what hap-
pened. Please email
the trace file to {ad-
minEmail}.
None
TS-00127 ERROR Failure fetching de-
tails for datasources
Uh oh. We’re not
sure what hap-
pened. Please email
the trace file to {ad-
minEmail}.
None
TS-00128 ERROR Failure fetching de-
tails for metadata
items
Uh oh. We’re not
sure what hap-
pened. Please email
the trace file to {ad-
minEmail}.
None
TS-00129 ERROR Failure opening the
answer
Uh oh. We’re not
sure what hap-
pened. Please email
the trace file to {ad-
minEmail}.
None
TS-00130 ERROR Failure opening the
pinboard
Uh oh. We’re not
sure what hap-
pened. Please email
the trace file to {ad-
minEmail}.
None
TS-00131 ERROR Failure opening the
worksheet
Uh oh. We’re not
sure what hap-
pened. Please email
the trace file to {ad-
minEmail}.
None
TS-00132 INFO Table saved suc-
cessfully.
None None
TS-00133 ERROR There was a prob-
lem saving the table
Uh oh. We’re not
sure what hap-
pened. Please email
the trace file to {ad-
minEmail}.
None
TS-00134 INFO Visualization update
successful
None None
TS-00135 ERROR Visualization failed
to update
Uh oh. We’re not
sure what hap-
pened. Please email
the trace file to {ad-
minEmail}.
None
Error code reference
February 07, 2019
ThoughtSpot Application Integration Guide Page 476

TS-00136 INFO {1} saved 1 – name
of answer
None None
TS-00137 ERROR {1} could not be
saved 1 – name of
answer
Uh oh. We’re not
sure what hap-
pened. Please email
the trace file to {ad-
minEmail}.
None
TS-00138 INFO {1} saved 1 - name
of pinboard / link
None None
TS-00139 ERROR {1} could not be
saved 1 - name of
pinboard / link
Uh oh. We’re not
sure what hap-
pened. Please email
the trace file to {ad-
minEmail}.
None
TS-00140 INFO {1} saved 1 – name
of worksheet
None None
TS-00141 ERROR {1} could not be
saved 1 – name of
worksheet
Uh oh. We’re not
sure what hap-
pened. Please email
the trace file to {ad-
minEmail}.
None
TS-00142 INFO {1} saved 1 – name
of answer
None None
TS-00143 ERROR {1} could not be
saved
Uh oh. We’re not
sure what hap-
pened. Please email
the trace file to {ad-
minEmail}. 1 – name
of answer
None
TS-00144 INFO {1} saved 1 – name/
link to pinboard
None None
TS-00145 ERROR {1} could not be
saved
Uh oh. We’re not
sure what hap-
pened. Please email
the trace file to {ad-
minEmail}. 1 – name
of pinboard
None
TS-00146 INFO Worksheet saved None None
TS-00147 ERROR Worksheet could not
be saved
Uh oh. We’re not
sure what hap-
pened. Please email
the trace file to {ad-
minEmail}.
None
Error code reference
February 07, 2019
ThoughtSpot Application Integration Guide Page 477

TS-00148 INFO Sticker updated None None
TS-00149 ERROR The sticker could
not be updated
Uh oh. We’re not
sure what hap-
pened. Please email
the trace file to {ad-
minEmail}.
None
TS-00150 INFO Successfully as-
signed sticker
None None
TS-00151 ERROR The sticker could
not be assigned
Uh oh. We’re not
sure what hap-
pened. Please email
the trace file to {ad-
minEmail}.
None
TS-00152 INFO Successfully unas-
signed sticker
None None
TS-00153 ERROR The sticker could
not be unassigned
Uh oh. We’re not
sure what hap-
pened. Please email
the trace file to {ad-
minEmail}.
None
TS-00154 ERROR Failed to fetch meta-
data list
Uh oh. We’re not
sure what hap-
pened. Please email
the trace file to {ad-
minEmail}.
None
TS-00155 ERROR Failed to fetch table
list
Uh oh. We’re not
sure what hap-
pened. Please email
the trace file to {ad-
minEmail}.
None
TS-00156 ERROR Failed to fetch rela-
tionship list
Uh oh. We’re not
sure what hap-
pened. Please email
the trace file to {ad-
minEmail}.
None
TS-00157 ERROR Failed to fetch an-
swer list
Uh oh. We’re not
sure what hap-
pened. Please email
the trace file to {ad-
minEmail}.
None
Error code reference
February 07, 2019
ThoughtSpot Application Integration Guide Page 478

TS-00158 ERROR Failed to fetch pin-
board list
Uh oh. We’re not
sure what hap-
pened. Please email
the trace file to {ad-
minEmail}.
None
TS-00159 ERROR Failed to fetch work-
sheet list
Uh oh. We’re not
sure what hap-
pened. Please email
the trace file to {ad-
minEmail}.
None
TS-00160 ERROR Failed to fetch ag-
gregated worksheet
list
Uh oh. We’re not
sure what hap-
pened. Please email
the trace file to {ad-
minEmail}.
None
TS-00161 ERROR Failed to fetch im-
ported data list
Uh oh. We’re not
sure what hap-
pened. Please email
the trace file to {ad-
minEmail}.
None
TS-00162 ERROR Failed to fetch sys-
tem table list
Uh oh. We’re not
sure what hap-
pened. Please email
the trace file to {ad-
minEmail}.
None
TS-00163 ERROR Failed to DB view
list
Uh oh. We’re not
sure what hap-
pened. Please email
the trace file to {ad-
minEmail}.
None
TS-00164 ERROR Failed to fetch data
source list
Uh oh. We’re not
sure what hap-
pened. Please email
the trace file to {ad-
minEmail}.
None
TS-00165 ERROR Failed to fetch col-
umn list
Uh oh. We’re not
sure what hap-
pened. Please email
the trace file to {ad-
minEmail}.
None
TS-00166 ERROR Failed to label list Uh oh. We’re not
sure what hap-
pened. Please email
the trace file to {ad-
minEmail}.
None
Error code reference
February 07, 2019
ThoughtSpot Application Integration Guide Page 479

TS-00167 ERROR Failed to fetch an-
swer
Uh oh. We’re not
sure what hap-
pened. Please email
the trace file to {ad-
minEmail}.
None
TS-00168 ERROR Failed to fetch work-
sheet
Uh oh. We’re not
sure what hap-
pened. Please email
the trace file to {ad-
minEmail}.
None
TS-00169 INFO Aggregated work-
sheet {1} created 1 –
name of aggregated
worksheet
None None
TS-00170 ERROR Failure creating Ag-
gregated Work-
sheet.
Uh oh. We’re not
sure what hap-
pened. Please email
the trace file to {ad-
minEmail}.
None
TS-00171 INFO {1} updated 1 –
name of aggregated
worksheet
None None
TS-00172 ERROR {1} failed to update
1 – name of aggre-
gated worksheet
Uh oh. We’re not
sure what hap-
pened. Please email
the trace file to {ad-
minEmail}.
None
TS-00173 ERROR {1} failed to update
1 – name of the for-
mula
Uh oh. We’re not
sure what hap-
pened. Please email
the trace file to {ad-
minEmail}.
None
TS-00174 ERROR Comments cannot
be fetched
Failed to save client
state
None
TS-00175 ERROR Comment cannot be
created
Uh oh. We’re not
sure what hap-
pened. Please email
the trace file to {ad-
minEmail}.
None
TS-00176 ERROR Comment cannot be
updated
Uh oh. We’re not
sure what hap-
pened. Please email
the trace file to {ad-
minEmail}.
None
Error code reference
February 07, 2019
ThoughtSpot Application Integration Guide Page 480

TS-00177 ERROR Comment cannot be
deleted
Uh oh. We’re not
sure what hap-
pened. Please email
the trace file to {ad-
minEmail}.
None
TS-00178 INFO Rule saved success-
fully
None None
TS-00179 ERROR Rule could not be
saved
We're not sure what
happened. Please
email the trace file
to {adminEmail}.
None
TS-00180 INFO Rule deleted suc-
cessfully
None None
TS-00181 ERROR Rule could not be
deleted
We're not sure what
happened. Please
email the trace file
to {adminEmail}.
None
TS-00182 INFO Item deleted suc-
cessfully.
None None
TS-00183 ERROR Item could not be
deleted.
We're not sure what
happened. Please
email the trace file
to {adminEmail}.
None
TS-00184 INFO Related link created
successfully.
None None
TS-00185 ERROR Related link could
not be created.
Uh oh. We're not
sure what hap-
pened. Please click
'Report Problem' to
email a report to
your administrator,
{adminEmail}.
None
TS-00186 INFO Related link updated
successfully.
None None
TS-00187 ERROR Related link could
not be updated.
Uh oh. We're not
sure what hap-
pened. Please click
'Report Problem' to
email a report to
your administrator,
{adminEmail}.
None
TS-00188 INFO Related link deleted
successfully.
None None
Error code reference
February 07, 2019
ThoughtSpot Application Integration Guide Page 481

TS-00189 ERROR Related link could
not be deleted.
Uh oh. We're not
sure what hap-
pened. Please click
'Report Problem' to
email a report to
your administrator,
{adminEmail}.
None
TS-00190 INFO Related link detail
fetched successful-
ly.
None None
TS-00191 ERROR Related link detail
could not be
fetched.
Uh oh. We're not
sure what hap-
pened. Please click
'Report Problem' to
email a report to
your administrator,
{adminEmail}.
None
Data Service Errors (500 - 699)
CodeCode SeveritySeverity SummarySummary DetailsDetails ActionAction
TS-00500 ERROR Failed to fetch
leaf level data
Failed to fetch leaf level data. None
TS-00501 ERROR Failed to fetch
excel data
Failed to fetch excel data. None
TS-00502 ERROR Failed to fetch vi-
sualization data
Failed to fetch visuzliation data. None
TS-00503 ERROR Failed to fetch vi-
sualizations data
Failed to fetch data for visualizations. None
TS-00504 ERROR Failed to fetch
chart data
Failed to fetch table data. None
TS-00505 ERROR Failed to fetch
table data
Failed to fetch table data. None
TS-00506 ERROR Failed to fetch
worksheet data
Failed to fetch worksheet data. None
TS-00507 ERROR Failed to fetch
filter data
Failed to fetch filter data. None
TS-00508 ERROR Failed to fetch
headline data
Failed to fetch filter data. None
Error code reference
February 07, 2019
ThoughtSpot Application Integration Guide Page 482

CodeCode SeveritySeverity SummarySummary DetailsDetails ActionAction
TS-00509 ERROR Failed to fetch
natural query
Failed to fetch natural query. None
TS-00510 INFO File upload suc-
cessful
None None
TS-00511 ERROR Failed to upload
file
Failed to upload None
TS-00512 ERROR The pinboard da-
ta could not be
exported to pdf.
Uh oh. We’re not sure what happened. Please
click ‘Report Problem’ to email a report to your
administrator, {adminEmail}.
None
Dependency Errors (700 - 799)
CodeCode SeveritySeverity SummarySummary DetailsDetails ActionAction
TS-00700 ERROR Failure fetching table depen-
dents
Failed to fetch dependents for the
table.
None
TS-00701 ERROR Failure fetching column de-
pendents
Failed to fetch dependents for the
column.
None
TS-00702 ERROR Failure fetching incomplete
items
Failed to fetch incomplete items. None
Admin Service Errors (800 - 899)
CodeCode SeveritySeverity SummarySummary DetailsDetails ActionAction
TS-00800 ERROR Failure fetching MemCache
stats
Failed to fetch MemCache
stats.
None
TS-00801 ERROR Failure MemCache Clear Failed to clear MemCache. None
TS-00802 ERROR Failure searching from Mem-
Cache
Failed to search from Mem-
Cache.
None
TS-00803 ERROR Failure fetching Loggers Failed to fetch Loggers. None
TS-00804 ERROR Failure setting LogLevel Failed to set Log Level. None
TS-00805 ERROR Failure getting debug info Failed to get debug info. None
TS-00806 INFO Memcache cleared successfully None None
Error code reference
February 07, 2019
ThoughtSpot Application Integration Guide Page 483

CodeCode SeveritySeverity SummarySummary DetailsDetails ActionAction
TS-00807 INFO Log level set successfully None None
TS-00808 ERROR Failed to report problem None None
TS-00809 INFO Problem reported successfully None None
Permissions Errors (900 - 999)
CodeCode SeveritySeverity SummarySummary DetailsDetails ActionAction
TS-00900 ERROR Failure fetching table permis-
sions
Failed to fetch table permis-
sions.
None
TS-00901 ERROR Failure fetching answer permis-
sions
Failed to fetch answer permis-
sions.
None
TS-00902 ERROR Failure fetching pinboard per-
missions
Failed to fetch pinboard per-
missions.
None
TS-00903 ERROR Failure getting metadata per-
missions
Failed to get metadata permis-
sions.
None
Import Data Errors (1000 - 1099)
CodeCode SeveritySeverity SummarySummary DetailsDetails ActionAction
TS-01000 ERROR Data caching failed Data caching failed. None
TS-01001 ERROR Read Columns failed. Failed to read columns. None
TS-01002 ERROR Failed to read keys. Failed to read keys. None
TS-01003 ERROR Failed to read relationships. Failed to read relationships. None
TS-01004 ERROR Failed to load data. Failed to load data. None
TS-01005 ERROR Failed to create table. Failed to create table. None
TS-01006 ERROR Failed to fetch data rows. Failed to fetch data rows. None
TS-01007 ERROR Failed to delete files. Failed to fetch data rows. None
TS-01008 ERROR Failed to abort create table. Failed to abort create table. None
TS-01009 ERROR Failed to create schema. Failed to create schema. None
Error code reference
February 07, 2019
ThoughtSpot Application Integration Guide Page 484

CodeCode SeveritySeverity SummarySummary DetailsDetails ActionAction
TS-01010 ERROR Failed to fetch table models. Failed to fetch table models. None
TS-01011 ERROR Failed to fetch sample values. Failed to fetch sample values. None
Scheduled Jobs Errors (1100 - 1199)
CodeCode SeveritySeverity SummarySummary DetailsDetails ActionAction
TS-01100 INFO The list of jobs. None Please click ‘Report Problem’ to email a re-
port to your administrator.
TS-01110 INFO Successfully creat-
ed job.
None None
TS-01111 ERROR The job could not
be created.
None Please click ‘Report Problem’ to email a re-
port to your administrator.
TS-01112 INFO Successfully up-
dated job.
None None
TS-01113 ERROR The job could not
be updated.
None Please click ‘Report Problem’ to email a re-
port to your administrator.
TS-01114 INFO Successfully delet-
ed jobs.
None None
TS-01115 ERROR The job could not
be deleted.
None Please click ‘Report Problem’ to email a re-
port to your administrator.
TS-01116 INFO The job was
paused.
None None
TS-01117 ERROR The job could not
be paused.
None Please click ‘Report Problem’ to email a re-
port to your administrator.
TS-01118 INFO The job was re-
sumed
None None
TS-01119 ERROR The job could not
be resumed.
None Please click ‘Report Problem’ to email a re-
port to your administrator.
User Admin Service Errors (1200 - 1399)
CodeCode SeveritySeverity SummarySummary DetailsDetails ActionAction
TS-01200 ERROR Failed to fetch users list Failed to fetch users list None
Error code reference
February 07, 2019
ThoughtSpot Application Integration Guide Page 485

CodeCode SeveritySeverity SummarySummary DetailsDetails ActionAction
TS-01201 ERROR Failed to fetch groups list Failed to fetch groups list None
TS-01202 ERROR Failed to fetch users and groups
list
Failed to fetch users and
groups list
None
TS-01203 ERROR Successfully created user Successfully created user None
TS-01204 ERROR Failed to create user Failed to create user None
TS-01205 ERROR Successfully created group Successfully created group None
TS-01206 ERROR Failed to create group Failed to create group None
TS-01207 ERROR Successfully updated user Successfully updated user None
TS-01208 ERROR Failed to update user Failed to update user None
TS-01209 ERROR Successfully updated users Successfully updated users None
TS-01210 ERROR Failed to update users Failed to update users None
TS-01211 ERROR Successfully updated group Successfully updated group None
TS-01212 ERROR Failed to update group Failed to update group None
TS-01213 ERROR Successfully updated password Successfully updated password None
TS-01214 ERROR Failed to update password Failed to update password None
TS-01215 ERROR Successfully deleted users Successfully deleted users None
TS-01216 ERROR Failed to delete users Failed to delete users None
TS-01217 ERROR Successfully deleted groups Successfully deleted groups None
TS-01218 ERROR Failed to delete groups Failed to delete groups None
TS-01219 ERROR Successfully assigned users to
groups
Successfully assigned users to
groups
None
TS-01220 ERROR Failed to assign users to groups Failed to assign users to groups None
TS-01221 ERROR Failed to fetch profile pic Failed to fetch profile pic None
TS-01222 INFO Successfully uploaded profile
pic
None None
TS-01223 ERROR Failed to upload profile pic Failed to upload profile pic None
TS-01224 ERROR Successfully assigned groups to
group
Failed to assign user to group None
Error code reference
February 07, 2019
ThoughtSpot Application Integration Guide Page 486

CodeCode SeveritySeverity SummarySummary DetailsDetails ActionAction
TS-01228 ERROR Successfully created role Successfully created role None
TS-01229 ERROR Failed to create role Failed to create role None
TS-01230 ERROR Successfully deleted role Successfully deleted role None
TS-01231 ERROR Failed to delete role Failed to delete role None
TS-01232 ERROR Successfully updated role Successfully updated role None
TS-01233 ERROR Failed to update role Failed to update role None
Session Service Errors (1400 - 1599)
CodeCode SeveritySeverity SummarySummary DetailsDetails ActionAction
TS-01400 ERROR Failed to fetch session
info
Failed to fetch session info None
TS-01401 ERROR Failed to login Uh oh. We’re not sure what happened.
Please email the trace file to {adminE-
mail}.
None
TS-01402 ERROR Failed to logout Failed to logout None
TS-01403 ERROR Failed to save client
state
Failed to save client state None
TS-01404 ERROR Failed to fetch login con-
fig
Failed to fetch login config None
TS-01405 ERROR Failed to fetch slack
config
Failed to fetch slack config None
TS-01406 ERROR Health check failed Health check failed None
TS-01407 ERROR Failed to fetch health
portal token
Failed to fetch health portal token None
TS-01408 ERROR The health portal release
name could not be re-
trieved
Uh oh. We’re not sure what happened.
Please email the trace file to {adminE-
mail}.
None
Error code reference
February 07, 2019
ThoughtSpot Application Integration Guide Page 487

Data Management Service Errors (1600 - 1799)
CodeCode SeveritySeverity SummarySummary DetailsDetails ActionAction
TS-01600 ERROR Failed to fetch data
source types
Failed to fetch data source types None
TS-01601 ERROR Failed to fetch data
source sample values
Failed to fetch data source sample
values
None
TS-01602 ERROR Failed to delete data
source
Failed to delete data source None
TS-01603 ERROR Failed to execute DDL Failed to execute DDL None
TS-01604 ERROR Failed to update sched-
ule
Failed to update schedule None
TS-01605 ERROR Failed to reload tasks Failed to reload tasks None
TS-01606 ERROR Failed to stop tasks Failed to stop tasks None
TS-01607 ERROR Failed to get creation
DDL
Failed to get creation DDL None
TS-01608 ERROR Failed to load from data
source
Failed to load from data source None
TS-01609 ERROR Failed to create connec-
tion to data source
Failed to create connection to data
source
None
TS-01610 ERROR Failed to create data
source
Failed to create data source None
TS-01611 ERROR Failed to connect to data
source
Failed to connect to data source None
TS-01612 ERROR Failed to get data source
connection field info
Failed to get data source connection
field info
None
TS-01613 ERROR Failed to get connection
list for data source
Failed to get connection list for data
source
None
TS-01614 ERROR Failed to get connection
attributes for data source
Failed to get connection attributes for
data source
None
TS-01615 ERROR Failed to get connections
to data source
Failed to get connections to data
source
None
Error code reference
February 07, 2019
ThoughtSpot Application Integration Guide Page 488

CodeCode SeveritySeverity SummarySummary DetailsDetails ActionAction
TS-01616 ERROR Failed to fetch data
source config
Failed to fetch data source config None
TS-01617 ERROR Failed to parse sql. Failed to parse sql. None
TS-01618 ERROR Failed to execute sql. Failed to execute sql. None
TS-01619 INFO Successfully created
connection to data
source
None None
TS-01620 INFO Successfully updated da-
ta upload schedule
None None
TS-01621 ERROR Failed to execute sql. Please check the failing command,
executed {1} statements successfully.
None
TS-01622 ERROR Lightweight data-cache
disabled
Lightweight data-cache disabled None
TS-01623 INFO Selected tables were
queued for loading.
Selected tables were queued for load-
ing.
None
TS-01624 ERROR DataType conversion er-
ror.
No mapping found for source
datatype to ThoughtSpot datatype.
None
TS-01625 INFO Successfully reload task
started.
None None
TS-01626 INFO Successfully connected
to data source.
None None
TS-01627 INFO Successfully created data
source.
None None
TS-01628 INFO Successfully stopped the
tasks.
None None
TS-01629 INFO Successfully deleted the
connection.
None None
TS-01630 ERROR There was an error delet-
ing this connection.
None None
TS-01631 INFO Successfully executed
the DDL.
None None
Error code reference
February 07, 2019
ThoughtSpot Application Integration Guide Page 489

Cluster Status Service Errors (1800 - 1899)
CodeCode SeveritySeverity SummarySummary DetailsDetails ActionAction
TS-01800 WARNING Failed to fetch cluster information from search
service.
None None
TS-01801 WARNING Failed to fetch table detail information from
search service.
None None
TS-01802 WARNING Failed to fetch cluster information from data-
base service.
None None
TS-01803 WARNING Failed to fetch table detail information from
databse service.
None None
TS-01804 WARNING Failed to fetch cluster information from cluster
management service.
None None
TS-01805 WARNING Failed to fetch detail information from cluster
management service.
None None
TS-01806 WARNING Failed to fetch log from cluster management
service.
None None
TS-01807 WARNING Failed to fetch snapshot list from cluster man-
agement service.
None None
TS-01808 WARNING Failed to fetch cluster information from alert
management service.
None None
TS-01809 WARNING Failed to fetch cluster information from event
service.
None None
TS-01810 WARNING Failed to fetch alerts information from alert
management service.
None None
TS-01811 WARNING Failed to fetch events information from alert
management service.
None None
TS-01812 INFO Thanks for your feedback! None None
TS-01813 WARNING Sorry! Unable to submit the feedback at this
moment!
None None
TS-01814 INFO Successfully exported objects. File can be
found at {1}.
None None
TS-01815 ERROR Sorry! Unable to export objects at this moment! What hap-
pened? {1}.
None
Error code reference
February 07, 2019
ThoughtSpot Application Integration Guide Page 490

CodeCode SeveritySeverity SummarySummary DetailsDetails ActionAction
TS-01816 INFO Successfully imported objects None None
TS-01817 ERROR Sorry! Unable to import objects at this moment! What hap-
pened? {1}.
None
TS-01818 INFO Successfully deleted data source object(s). None None
Callosum API Errors (9000 - 9199)
CodeCode SeveritySeverity SummarySummary DetailsDetails ActionAction
TS-09000 ERROR The data you are
trying to delete
has some depen-
dencies
Some objects depend on the data
you are trying to delete
delete the de-
pendencies
before delet-
ing this data.
TS-09001 ERROR Uh oh. We’re not
sure what hap-
pened.
Please email the trace file to {ad-
minEmail}.
None
TS-09002 ERROR Could not autho-
rize user
Try logging in again None
TS-09003 ERROR Uh oh. We’re not
sure what hap-
pened.
Please email the trace file to {ad-
minEmail}.
None
TS-09004 WARNING Still loading data,
come back soon
None None
TS-09005 ERROR Uh oh. We’re hav-
ing trouble getting
data for this re-
quest.
Please email the trace file to {ad-
minEmail}.
None
TS-09006 ERROR Uh oh. We’re hav-
ing trouble getting
data for this re-
quest.
Please email the trace file to {ad-
minEmail}.
None
TS-09007 ERROR Uh oh. We’re hav-
ing trouble getting
data for this re-
quest.
Please email the trace file to {ad-
minEmail}.
None
TS-09008 ERROR Something went
wrong with your
search
Uh oh. We’re not sure what hap-
pened. Please email the trace file
to {adminEmail}.
None
Error code reference
February 07, 2019
ThoughtSpot Application Integration Guide Page 491

CodeCode SeveritySeverity SummarySummary DetailsDetails ActionAction
TS-09009 ERROR The calculation
engine has timed
out. Please try
again.
Please email the trace file to {ad-
minEmail}.
None
TS-09010 ERROR Cannot open Ob-
ject
Object cannot be opened due to
errors in some of its dependencies
None
TS-0Blink
Generated
Errors
(9500 -
9599)
TS-09500 WARNING Cannot connect
to the calculation
engine. Please try
again soon.
None None
TS-09501 WARNING The calculation
engine has timed
out. Please try
again.
None None
TS-09502 WARNING Cannot connect
to the search en-
gine. Please try
again soon.
None None
TS-09503 WARNING The search en-
gine has timed
out. Please try
again.
None None
TS-09504 ERROR Cannot open {1} {1} cannot be opened due to er-
rors in the following dependencies
1 - Type of the object Table/An-
swer/Pinboard etc.
None
TS-09505 WARNING We’re still index-
ing this data, try
again soon
None None
TS-09506 ERROR Object is not pre-
sent in the system
{1} is not present in the system 1 -
Type of the object Table/Answer/
Pinboard etc.
None
TS-09507 ERROR ThoughtSpot is
unreachable.
Please try again
soon
None None
Error code reference
February 07, 2019
ThoughtSpot Application Integration Guide Page 492

Common Errors (10000 - 10099)
CodeCode SeveritySeverity SummarySummary DetailsDetails ActionAction
TS-10000 ERROR A system er-
ror has oc-
curred
Uh oh. We’re not sure what happened.
Please contact your administrator.
None
TS-10001 ERROR Connection
failed
The metadata store is not reachable. Please contact
your administra-
tor
TS-10002 ERROR The input is
invalid
Input from the client to the server is in-
valid.
Please contact
your administra-
tor
TS-10003 ERROR Unfortunately,
you can’t do
that
You are not authorized to perform {1}. #
{1} – action user is not authorized for
Please request
access from
your administra-
tor
TS-10004 ERROR The user
could not be
authorized
User {0} is not authorized to perform
{1}. # {0} – name of the user # {1} – ac-
tion user is not authorized for
Please request
access from
your administra-
tor
TS-10005 ERROR The base ob-
ject is miss-
ing
An underlying object referenced by this
object is missing in store.
Please contact
your administra-
tor
TS-10006 ERROR The connec-
tion to
Zookeeper
has failed
Zookeeper is not reachable. Please contact
your administra-
tor
TS-10007 ERROR There’s in-
valid parame-
ter(s)
Invalid parameter values: {0}. Please contact
your administra-
tor
TS-10008 ERROR The user can-
not be found
User {0} not found in store. # {0} –
name of the user
Please contact
your administra-
tor
TS-10009 ERROR Cannot add
group
This group already belongs to the
group you are trying to add it to.
None
Error code reference
February 07, 2019
ThoughtSpot Application Integration Guide Page 493

Falcon Errors (10600 - 10699)
CodeCode SeveritySeverity SummarySummary DetailsDetails ActionAction
TS-10603 ERROR Falcon query cancelled None None
Data Errors (11000 - 11099)
CodeCode SeveritySeverity SummarySummary DetailsDetails ActionAction
TS-11001 ERROR Invalid row None None
TS-11002 ERROR Invalid table/query re-
sultset
None None
TS-11003 ERROR Invalid column identifier None None
TS-11004 ERROR Invalid visualization
identifier
None None
TS-11005 ERROR No data Query execution resulted in no data. None
TS-11006 ERROR Query execution failed Error in query execution to Falcon. None
TS-11007 ERROR Answer data generation
failed
Error in Answer data generation for
Sage input.
None
TS-11008 ERROR Data export failed None None
TS-11009 ERROR Data generation failed Error in data generation in Callosum. None
Report Generation Errors (12000 - 13000)
CodeCode SeveritySeverity SummarySummary DetailsDetails ActionAction
TS-12700 ERROR Error while exporting data file. None None
TS-12701 ERROR Invalid input. The definition of the job is in-
valid.
None
TS-12702 ERROR No author provided. None None
TS-12703 ERROR No pinboard provided. None None
Error code reference
February 07, 2019
ThoughtSpot Application Integration Guide Page 494

CodeCode SeveritySeverity SummarySummary DetailsDetails ActionAction
TS-12704 ERROR No recipients provided. None None
TS-12705 ERROR This format is not supported. None None
TS-12706 ERROR No job name provided. None None
TS-12707 ERROR No job description provided. None None
TS-12708 ERROR Pinboard data export error. None None
TS-12709 ERROR Visualization data export error. None None
TS-12710 ERROR User data unavailable. None None
TS-12711 ERROR Configuration information un-
available.
None None
TS-12712 ERROR There are too many recipients. The max number of recipients is
1000.
None
TS-12713 ERROR Attachment size limit exceeded. None None
TS-12714 ERROR Recipient domain is not
whitelisted.
None None
More Metadata Errors (13000 - 13099)
CodeCode SeveritySeverity SummarySummary DetailsDetails ActionAction
TS-13001 ERROR Schema creation
failed
Error creating database
schema.
None
TS-13002 ERROR Views creation
failed
Error creating view. None
TS-13003 ERROR The object can-
not be found in
store
Object with Id: {0} of
type: {1} not found. #
{0} – identity of the ob-
ject # {1} – type of ob-
ject
None
TS-13004 ERROR The object is in
an invalid state
Oject with Id: {0} of
type: {1} in invalid state.
# {0} – identity of the
object # {1} – type of
object
None
Error code reference
February 07, 2019
ThoughtSpot Application Integration Guide Page 495

CodeCode SeveritySeverity SummarySummary DetailsDetails ActionAction
TS-13005 ERROR Object already
exists
Object with Id: {0} of
type: {1} already exists.
# {0} – identity of the
object # {1} – type of
object
None
TS-13006 ERROR Invalid object
type
Invalid type: {0} provid-
ed. # {1} – type of ob-
ject
None
TS-13007 ERROR Invalid Sage
question
Insufficient or invalid in-
put from Sage: {0}. #
{0} – the invalid input
None
TS-13008 ERROR Invalid Sage
question
Input from from Sage –
missing columns of
type: {0}. # {0} – column
type
None
TS-13009 ERROR Invalid Sage
question
Invalid input from Sage
– invalid expression:
{0}. # {0} – the invalid
expression
None
TS-13010 ERROR Sending logical
metadata to
Sage failed
Sending logical meta-
data to Sage failed due
to: {0}. # {0} – reason
for failure
None
TS-13011 ERROR Answer genera-
tion failed
Answer generation
failed due to: {0}. # {0} –
reason for failure
None
TS-13012 ERROR Worksheet gen-
eration failed
Worksheet generation
failed due to: {0}. # {0} –
reason for failure
None
TS-13013 ERROR Service provider
unavailable
Service provider un-
available: {0}. # {0} –
provider details
None
TS-13015 ERROR Physical model
not loaded
None None
TS-13016 ERROR Invalid physical
schema proto
Inconsistency in physi-
cal schema from Fal-
con: {0}. # {0} – error
details
None
TS-13017 ERROR Invalid duplicate
columns
Duplicate columns: {0}.
# {0} – List of duplicate
column identities
None
Error code reference
February 07, 2019
ThoughtSpot Application Integration Guide Page 496

CodeCode SeveritySeverity SummarySummary DetailsDetails ActionAction
TS-13018 ERROR Cyclic relation-
ship
Detected cycles: {0}. #
{0} – cycle details
None
TS-13019 WARNING Older physical
schema version
received
Schema update for old-
er version: {0} received
and ignored. # {0} – re-
ceived version number
None
TS-13020 ERROR Invalid relation-
ship
Attempted to create in-
valid relationship: {0}. #
{0} – relationship details
None
TS-13022 ERROR Invalid filter val-
ues: {values}
None None
TS-13023 ERROR Creating relation-
ship failed.
None None
TS-13024 ERROR Deleting schema
failed.
None None
TS-13025 ERROR Expression vali-
dation failed.
None None
TS-13026 INFO Load schedule
successfully dis-
abled.
None None
TS-13027 ERROR Load schedule
could not be dis-
abled.
None None
TS-13028 ERROR Objects fetched
from the connec-
tion are invalid
for editing data-
source.
None To proceed with editing
the datasource, please
edit the connection below
to fetch valid source ob-
jects.
TS-13029 INFO Successfully
edited data
source connec-
tion.
None None
TS-13030 ERROR Connection test
failed.
None Please verify connection
attributes.
Error code reference
February 07, 2019
ThoughtSpot Application Integration Guide Page 497

Loading Errors (30000 - 30099)
CodeCode SeveritySeverity SummarySummary DetailsDetails ActionAction
TS-30000 ERROR Table is not ready (data loading in progress). None None
Timely Errors (60000 - 64999)
CodeCode SeveritySeverity SummarySummary DetailsDetails ActionAction
TS-60000 ERROR Failed to initialize. None None
Error code reference
February 07, 2019
ThoughtSpot Application Integration Guide Page 498

Frequently asked questions
Where can I find the version of ThoughtSpot I am using?
Users with administrative privileges can see this displayed on the Admin > System Health > OverviewAdmin > System Health > Overview
page.
I’m not seeing certain columns/values in the drop-down, why?
It could be the index has not built with the latest data or something is causing the column to be dropped.
• Verify the the column is available using the DataData page.
• View the table columns and check the INDEX TYPEINDEX TYPE value. If it is set to DONT_INDEX , change
it.
• Check the column’s INDEX PRIORITYINDEX PRIORITY &emdash. make sure it is 1.
To learn more about modeling data see modeling data in this documentation.
How do I track progress of current index build?
If you are an administrator, you can use the Admin > System Health > OverviewAdmin > System Health > Overview page to see the number
of tables currently being indexed. You can also review the
How do I display the features used in my cluster configuration?
1. Log into the ThoughtSpot cluster as the admin user.
2. Use the tscli feature subcommand to display your current configuration.
Frequently asked questions
February 07, 2019
ThoughtSpot Application Integration Guide Page 499

$ tscli feature get-all-config
+---------------------------------+----------
+---------------+
| NAME | STATUS | CONFIGUR
ATION |
+---------------------------------+----------
+---------------+
| Firewall | Disabled
| |
| Saml | Disabled
| |
| Ldap | Disabled
| |
| CustomBranding | Disabled
| |
| CustomBrandingFontCustomization | Disabled
| |
| DataConnect | Disabled
| |
| RLS | Enabled
| |
| Callhome | Enabled
| |
| SSHTunnel | Enabled
| |
| Fileserver | Disabled
| |
+---------------------------------+----------
+---------------+
Is it possible to create a max(date) filed and set it to filter?
If you have a date field in my set of data and want to return the most recent set of data based on specific
date. To do this:
1. Create a formula called Max Date , for example:
date = group_max ( date_to_filter_by )
2. In the search bar, filter your dates by this formula for example:
max date = true
Frequently asked questions
February 07, 2019
ThoughtSpot Application Integration Guide Page 500

This returns only those fields that pass the filter.
Frequently asked questions
February 07, 2019
ThoughtSpot Application Integration Guide Page 501
