| ThoughtSpot Thought Spot Application Integration Guide 5.1
User Manual:
Open the PDF directly: View PDF ![]() .
.
Page Count: 93
- Table of Contents
- Introduction
- Log in to the Linux shell using SSH
- Log in credentials
- Using the JavaScript API
- About SAML
- Configure SAML
- Configure CA SiteMinder
- Configure Active Directory Federated Services
- Initialize the Identity Provider Metadata
- Initialize the Service Provider Metadata
- Test the ADFS Integration
- About the REST API
- Related information
- Calling the REST API
- REST API pagination
- Use the REST API to get data
- Use the Embedded Search API to pull data from ThoughtSpot
- Use the Data Push API
- Understand embedding
- Embed pinboard or visualization
- Authentication flow with embed
- Full application embedding
- Configure trusted authentication
- About Runtime Filters
- Apply a Runtime Filter
- Runtime Filter Operators
- Customize the application style
- Upload application logos
- Set chart and table visualization fonts
- Choose a background color
- Select chart color palettes
- Change the footer text
- Public API reference
- pinboarddata API
- metadata API
- Public API reference
- user API
- group API

Application Integration GuideApplication Integration Guide
Version 5.1 February 08, 2019

Copyright for ThoughtSpot publications. © 2019 ThoughtSpot, Inc. All rights
reserved.
ThoughtSpot, Inc. 1 Palo Alto Square
Building 1, Suite 200
Palo Alto, CA 94306
All rights reserved. This product is protected by U.S. and international copyright
and intellectual property laws. ThoughtSpot is a trademark of ThoughtSpot, Inc. in
the United States and/or other jurisdictions. All other marks and names mentioned
herein may be trademarks of their respective companies.

Table of Contents
IntroductionIntroduction ............................................................................................................................................................................................................................................................ 33
Log in to the Linux shell using SSHLog in to the Linux shell using SSH .................................................................................................................................................................................. 44
Log in credentialsLog in credentials.......................................................................................................................................................................................................................................... 55
Get the JavaScript APIGet the JavaScript API.......................................................................................................................................................................................................................... 77
SAMLSAML
About SAMLAbout SAML .................................................................................................................................................................................................................................................... 99
Configure SAMLConfigure SAML.................................................................................................................................................................................................................................... 1010
Configure CA SiteMinderConfigure CA SiteMinder ........................................................................................................................................................................................................ 1111
Active DirectoryActive Directory
Configure Active Directory Federated ServicesConfigure Active Directory Federated Services............................................................................................................................ 1414
Initialize the Identity Provider MetadataInitialize the Identity Provider Metadata.................................................................................................................................................... 1515
Initialize the Service Provider MetadataInitialize the Service Provider Metadata.................................................................................................................................................... 1616
Test the ADFS IntegrationTest the ADFS Integration.............................................................................................................................................................................................. 1717
REST APIREST API
About the REST APIAbout the REST API ........................................................................................................................................................................................................................ 1818
Calling the REST APICalling the REST API...................................................................................................................................................................................................................... 2020
REST API paginationREST API pagination...................................................................................................................................................................................................................... 2424
Use the REST API to get dataUse the REST API to get data.......................................................................................................................................................................................... 2727
Use the Embedded Search APIUse the Embedded Search API...................................................................................................................................................................................... 3030
Use the Data Push APIUse the Data Push API................................................................................................................................................................................................................ 3131
Embed ThoughtSpotEmbed ThoughtSpot
Understand embeddingUnderstand embedding ............................................................................................................................................................................................................ 3535
Embed pinboard or visualizationEmbed pinboard or visualization.................................................................................................................................................................................. 3939
Authentication flow with embedAuthentication flow with embed.................................................................................................................................................................................... 4444
Full application embeddingFull application embedding.................................................................................................................................................................................................. 4646
Configured trusted authenticationConfigured trusted authentication.............................................................................................................................................................................. 4949
Runtime FiltersRuntime Filters
About Runtime FiltersAbout Runtime Filters.................................................................................................................................................................................................................... 5252
Apply a Runtime FilterApply a Runtime Filter .................................................................................................................................................................................................................. 5454
Runtime Filter OperatorsRuntime Filter Operators .......................................................................................................................................................................................................... 5656
Style CustomizationStyle Customization
Customize the application styleCustomize the application style .................................................................................................................................................................................... 5757
Upload application logosUpload application logos ........................................................................................................................................................................................................ 5959
ThoughtSpot Application Integration Guide
February 08, 2019
support@thoughtspot.com i

Set chart and table visualization fontsSet chart and table visualization fonts ................................................................................................................................................................ 6060
Choose a background colorChoose a background color................................................................................................................................................................................................ 6363
Select chart color palettesSelect chart color palettes .................................................................................................................................................................................................... 6464
Change the footer textChange the footer text ................................................................................................................................................................................................................ 6666
API ReferenceAPI Reference
IntroductionIntroduction .................................................................................................................................................................................................................................................. 6767
pinboarddata APIpinboarddata API ................................................................................................................................................................................................................................ 6868
metadata APImetadata API.............................................................................................................................................................................................................................................. 7171
session APIsession API.................................................................................................................................................................................................................................................... 7878
user APIuser API.............................................................................................................................................................................................................................................................. 8080
group APIgroup API ........................................................................................................................................................................................................................................................ 9090
ThoughtSpot Application Integration Guide
February 08, 2019
support@thoughtspot.com ii

Introduction
This guide explains how to integrate ThoughtSpot with other applications, including authentication,
embedding, and APIs. For information on how to integrate with other data sources for loading data, refer
to the Data Integration Guide.
Here are the top level topics on application integration:
•Log in to the Linux shell using SSH
•Login credentials
•Using the JavaScript API
•SAML
•REST API
•Emdbed ThoughtSpot
•Runtime Filters
•Style Customization
•API Reference
Introduction
February 08, 2019
ThoughtSpot Application Integration Guide Page 3

Log in to the Linux shell using SSH
To perform basic administration such as checking network connectivity, starting and stopping services,
and setting up email, log in remotely as the Linux administrator user “admin”. To log in with SSH from a
client machine, you can use the command shell or a utility like Putty.
In the following procedure, replace <hostname_or_IP> with the hostname or IP address of a node in
ThoughtSpot. The default SSH port (22) will be used.
1. Log in to a client machine and open a command prompt.
2. Issue the SSH command, specifying the IP address or hostname of the ThoughtSpot
instance:
ssh admin@<hostname_or_IP>
3. Enter the password for the admin user.
Log in to the Linux shell using SSH
February 08, 2019
ThoughtSpot Application Integration Guide Page 4

Log in credentials
You can access ThoughtSpot via SSH at the command prompt and from a Web browser.
Administrative access
Each ThoughtSpot appliance comes pre-built with three default users. You should talk with a
ThoughtSpot Customer Success Engineer or ThoughtSpot support, to get the password for each user.
The default users are:
TypeType UsernameUsername DescriptionDescription
Shell user admin Used for work that requires sudo or root privileges. Does not exist
for application login. Logs for this user are found in /usr/local/
scaligent/logs logs
Shell user thoughtspot Used for command line work that does not require sudo or root
privileges. For example, these users can use tsload ,tql , and
check the cluster status. This user cannot login to the application.
Logs for this user are found under /tmp .
Application
user
tsadmin Access through a Web browser.
Both the admin and thoughtspot user can SSH into the appliance. Once on the appliance, either
user can do any of the following:
•tscli
•tsload
•tql
The thoughtspot user is restricted to tscli commands that do not require sudo or root privileges.
SSH to the appliance
To perform basic administration such as checking network connectivity, starting and stopping services,
and setting up email, log in remotely as the Linux administrator user “admin”. To log in with SSH from
any machine, you can use the command shell or a utility like Putty.
In the following procedure, replace <hostname_or_IP> with the hostname or IP address of a node in
ThoughtSpot. The default SSH port (22) will be used.
1. Log in to a client machine and open a command prompt.
2. Issue the SSH command, specifying the IP address or hostname of the ThoughtSpot
instance:
ssh admin@<hostname_or_IP>
Log in credentials
February 08, 2019
ThoughtSpot Application Integration Guide Page 5

3. Enter the password for the admin user.
Log in to the ThoughtSpot application
To set up and explore your data, access the ThoughtSpot application from a standard Web browser
using a username and password.
Before accessing ThoughtSpot, you need:
• The Web address (IP address or server name) for ThoughtSpot.
• A network connection.
• A Web browser.
• A username and password for ThoughtSpot.
Supported Web browsers include:
BrowserBrowser VersionVersion Operating SystemOperating System
Google Chrome 20 and above Windows 7 or greater, Linux, MacOS
Mozilla Firefox 14 and above Windows 7 or greater, Linux, MacOS
Internet Explorer 11 Windows 7 or greater
Tip:Tip: While Internet Explorer is supported, using it is not recommended. Depending
on your environment, you can experience performance or UI issues when using IE.
To log in to ThoughtSpot from a browser:
1. Open the browser and type in the Web address for ThoughtSpot:
http://<hostname_or_IP>
2. Enter your username and password and click Enter NowEnter Now.
Log in credentials
February 08, 2019
ThoughtSpot Application Integration Guide Page 6

Using the JavaScript API
The ThoughtSpot JavaScript API (JS API) allows you to use your ThoughtSpot instance within your own
Web application. The JS API has methods that allow you to:
• Authenticate to ThoughtSpot.
• Embed visualizations from ThoughtSpot in your Web page using iframes.
• Use the ThoughtSpot REST API to get data from ThoughtSpot and use it in your Web page.
You can download the ThoughtSpot JavaScript library from our secure storage server.
Note:Note: To use the JS API in your Web page, you must have the access and permissions to
update the code of the web page or application.
Browser Support
The JS API works in the following browsers:
BrowserBrowser VersionsVersions
Internet Explorer 11
Firefox 38 or later
Google Chrome 47 or later
Safari 9 or later
Internet Explorer 10Internet Explorer 10
Microsoft introduced a compatibility mode in Internet Explorer 10, which displays your page using the
version of Internet Explorer that is most compatible with the current page. Since we do not support any
version below 11, this feature can sometimes break the code. There are two ways to force the emulation
of Internet Explorer to the most up to date version:
• Add a Custom Response Header
This is the recommended approach since it is more robust, offers more control, and has a
lower risk of introducing a bug to your code. The header name should be set to “X-UA-
Compatible” and the value should be set to “IE=Edge”. The response header should be based
on the server it is set on and the technology being used.
• Add a Meta Tag
The following meta tag should be added to your header: <meta http-equiv="X-UA-
Compatible" content="IE=Edge" \> . This tag must be the first tag in the header section of
the page.
Using the JavaScript API
February 08, 2019
ThoughtSpot Application Integration Guide Page 7

Cross-Origin HTTP Requests (CORS)
Collecting user credentials from one application (domain) and sending them to another (such as
ThoughtSpot) can present security vulnerabilities such as a phishing attack. Cross-origin or cross-
domain verification closes this vulnerability.
When you use the JavaScript API, your client makes a call from your own Web page, portal, or
application to ThoughtSpot. The domains of your client and ThoughtSpot will be different. So, you’ll
need to enable cross-origin HTTP requests from your client application to the ThoughtSpot application.
This protects your data, so that another actor cannot use the same URL to embed the visualization in its
own Web pages.
Your cluster’s CORS configuration controls which domains are allowed to use your client code to
authorize users. It also prevents other people from copying your code and running it on their site. For
example, if your Web site is hosted on the domain example.com , you would enable CORS for that
domain. Similarly, if you want to test your code locally, you’ll also need to add the origin for your local
server as well, for example: http://localhost:8080. Though, it is a good idea to disable the
localhost access after your testing is complete.
To enable CORS between your client applications and your ThoughtSpot instance. , you must work with
ThoughtSpot Support.
Using the JavaScript API
February 08, 2019
ThoughtSpot Application Integration Guide Page 8

About SAML
ThoughtSpot can be set up with Security Assertion Markup Language (SAML) to enable Single Sign On
(SSO). SAML can be configured in several ways, including with CA SiteMinder.
For basic instructions on configuring SAML, use one of these procedures:
•Configure SAML, for instructions to configure SAML in ThoughtSpot.
•Configure SAML with CA SiteMinder, for configuring SAML specifically with CA SiteMinder.
About SAML
February 08, 2019
ThoughtSpot Application Integration Guide Page 9

Configure SAML
ThoughtSpot can use Security Assertion Markup Language (SAML) to authenticate users. You can set up
SAML through the shell on the ThoughtSpot instance using a tscli based configurator.
Before configuring SAML, you will need this information:
• IP of the server where your ThoughtSpot instance is running.
• Port of the server where your ThoughtSpot instance is running.
• Protocol, or the authentication mechanism for ThoughtSpot.
• Unique service name that is used as the unique key by IDP to identify the client.
It should be in the following format: urn:thoughtspot:callosum:saml
• Allowed skew time, which is the time after authentication response is rejected and sent back
from the IDP. It is usually set to 86400.
• The absolute path to the idp-meta.xml file. This is needed so that the configuration persists
over upgrades.
• This configurator also checks with the user if internal authentication needs to be set or not.
This internal authentication mechanism is used to authenticate tsadmin , so set it to true if
you do not know what it does.
Use this procedure to set up SAML on ThoughtSpot for user authentication. Note that this configuration
persists across software updates, so you do not need to reapply it if you update to a newer release of
ThoughtSpot.
1. Log in to the Linux shell using SSH.
2. Execute the command to launch the interactive SAML configuration:
tscli saml configure
3. Complete the configurator prompts with the information you gathered above.
4. When the configuration is complete, open a Web browser and go to the ThoughtSpot login
page. It should now show the Single Sign On option.
Configure SAML
February 08, 2019
ThoughtSpot Application Integration Guide Page 10

Configure CA SiteMinder
Summary:Summary: CA SiteMinder can be used as an Identity Provider for
single sign on to ThoughtSpot.
Before configuring CA SiteMinder, you must configure SAML in ThoughtSpot. Use this procedure to set
up CA SiteMinder for use with ThoughtSpot:
1. Configure the Local Identity Provider Entity as follows:
SectionSection EntryEntry
Entity Location Local
Entity Type SAML2 IDP
Entity ID Any (Relevant ID)
Entity Name Any (Relevant name)
Description Any (Relevant description)
Base URL https://<FWS_FQDN> where FWS_FQDN is the fully-qualified do-
main name for the host serving SiteMinder Federation Web Ser-
vices
Signing Private Key
Alias
Select the correct private key alias or import one if not done al-
ready
Signed Authentica-
tion Requests Re-
quired
No
Supported NameID
format
Optional
2. Create the Remote SP Entity, either via a metadata import or manually. To configure the
Remote SP entity manually, select Create EntityCreate Entity. Create ThoughtSpot as a Remote Entity with
following details:
SectionSection EntryEntry
Entity Location Remote
New Entity Type SAML2 SP
Entity ID Your cluster
Entity Name Any (relevant name)
Configure CA SiteMinder
February 08, 2019
ThoughtSpot Application Integration Guide Page 11

SectionSection EntryEntry
Description Any (relevant description)
Assertion Con-
sumer Service
URL
(Relevant URL)
Verification Certifi-
cate Alias
Select the correct certificate or import one if not done already. This
is used to verify the signature in incoming requests
Supported
NameID Format
Optional
3. You will now configure the Federation Partnership between CA SiteMinder (the IDP) and
ThoughtSpot (the Remote SP) in CA SiteMinder. Log in to CA SiteMinder.
4. Navigate to FederationFederation -> Partnership Federation -> Create PartnershipPartnership Federation -> Create Partnership (SAML 2 IDP -> SPSAML 2 IDP -> SP).
5. Click Configure PartnershipConfigure Partnership and fill in the following values:
SectionSection EntryEntry
Add Partnership Name Any (relevant name)
Description Any (relevant description)
Local IDP ID Select Local IDP ID
Remote SP ID Select Remote SP ID
Base URL Will be pre-populated
Skew Time Any per environment requirement
User Directories and Search Order Select required Directories in required search order
6. Click Configure AssertionConfigure Assertion and fill in the following values:
SectionSection EntryEntry
Name ID
Format
Optional
Name ID
Type
User Attribute
Value Should be the name of the user attribute containing the email address or
user identifier. For example, ‘mail’
7. Click Configure SSO and SLOConfigure SSO and SLO and fill in the following values:
Configure CA SiteMinder
February 08, 2019
ThoughtSpot Application Integration Guide Page 12

SectionSection EntryEntry
Add Authentication URL This should be the URL that is protected by SiteMinder
SSO Binding Select SSO Binding supported by the SP, typically the
HTTP-Post
Audience (Relevant audience)
Transaction Allowed Optional
Assertion Consumer Ser-
vice URL
This should be pre-populated using the information from
the SP entity
8. Continue to Partnership ActivationPartnership Activation and select ActivateActivate.
Configure CA SiteMinder
February 08, 2019
ThoughtSpot Application Integration Guide Page 13

Configure Active Directory Federated
Services
You can configure Active Directory Federated Services (AD FS) to work with ThoughtSpot. This
procedure outlines the basic prerequisites and steps to set up AD FS.
•Configure SAML in ThoughtSpot.
• Install AD FS 2.0.
• Make sure you can run AD FS 2.0 Federation Server Configuration Wizard from the AD FS 2.0
Management Console.
• Make sure that DNS name of your Windows Server is available at your service provider (SP)
and vice versa. You can do this by running the command nslookup on both machines,
supplying the DNS of the other server.
AD FS 2.0 supports SAML 2.0 in IdP (Identity Provider) mode and can be easily integrated with the SAML
Extension for both SSO (Single Sign-On) and SLO (Single Log Out).
After completing the prerequisites, use these procedures to configure AD FS for use with ThoughtSpot.
1. Initialize IdP metadata.
2. Initialize the Service Provider metadata.
3. Test your ADFS integration.
Configure Active Directory Federated Services
February 08, 2019
ThoughtSpot Application Integration Guide Page 14

Initialize the Identity Provider Metadata
Summary:Summary: This procedure shows how to initialize the Identity Provider
(IdP) metadata for AD FS.
This is one part of the configuration procedure for setting up ThoughtSpot to work with AD FS for
authentication. You should also refer to the overview of the entire process of integrating with AD FS.
To initialize the IdP metadata on AD FS:
1. Download the AD FS 2.0 IdP metadata from the AD FS server. You can reference this file by
its URL, which looks like:
https://<adfsserver>/FederationMetadata/2007-06/Federat
ionMetadata.xml
2. Log in to the Linux shell using SSH.
3. Change directories to the SAML directory:
$ cd /usr/local/scaligent/release/production/orion/tomc
at/callosum/saml
4. Replace the contents of the file idp-meta.xml with the metadata of the IdP that you
downloaded. Do not change the name of the file.
5. Contact ThoughtSpot support for help restarting ThoughtSpot’s Tomcat instance.
6. Next, Initialize the Service Provider Metadata.
Initialize the Identity Provider Metadata
February 08, 2019
ThoughtSpot Application Integration Guide Page 15

Initialize the Service Provider Metadata
Summary:Summary: This procedure shows how to initialize the Service Provider
(SP) metadata for AD FS.
This is the second part of the configuration procedure for setting up ThoughtSpot to work with AD FS for
authentication. You should also refer to the overview of the entire process of integrating with AD FS.
To initialize the Service Provider metadata on AD FS:
1. Open the AD FS 2.0 Management Console.
2. Select Add Relying Party TrustAdd Relying Party Trust.
3. Select Import data about the relying party from a fileImport data about the relying party from a file.
4. Upload the metadata.xml file that you downloaded from ThoughtSpot earlier.
5. Select Next.Next. The wizard may complain that some of the content of the metadata is not
supported. You can safely ignore this warning.
6. In the Ready to Add TrustReady to Add Trust section, make sure that the tab endpoints contains multiple
endpoint values. If not, verify that your metadata was generated with the HTTPS protocol
URLs.
7. Leave the Open the Edit Claim Rules dialogOpen the Edit Claim Rules dialog checkbox checked. Click NextNext.
8. Select Add RuleAdd Rule.
9. Choose Send LDAP Attributes as ClaimsSend LDAP Attributes as Claims and click Next.Next.
10. For NameIDNameID enter “Claim rule name”
11. For Attribute storeAttribute store, choose “Active Directory”.
12. For LDAP AttributeLDAP Attribute choose “SAM-Account-Name”.
13. For Outgoing claim typeOutgoing claim type, choose “Name ID”.
a. If you are using ADFS 3.0, you might need to configure the Name ID as a Pass
Through claim.
14. Finish the wizard and confirm the claim rules window.
15. Open the provider by double-clicking it.
16. Select the AdvancedAdvanced tab and change Secure hash algorithmSecure hash algorithm to “SHA-1”.
17. Your Service Provider is now registered.
18. Test the ADFS Integration.
Initialize the Service Provider Metadata
February 08, 2019
ThoughtSpot Application Integration Guide Page 16

Test the ADFS Integration
After setting up the AD FS integration, test to make sure it is working properly. To test your AD FS
integration, go to ThoughtSpot login page using a Web browser and try to login with SAML.
Test the ADFS Integration
February 08, 2019
ThoughtSpot Application Integration Guide Page 17

About the REST API
Summary:Summary: The purpose of the REST API is to get data out of
ThoughtSpot so you can use it in a Web page, portal, or application.
When using the REST API, authentication is achieved through SAML. After authentication, use the POST
method to call a URL for the desired visualization or pinboard. A JSON (JavaScript Object Notation)
representation of the data will be returned.
Authentication
Before you can use the REST API, you must authenticate to ThoughtSpot using SAML with the
JavaScript API.
Cross Domain Verification
You’ll need to enable cross domain verification when using the REST API. This protects your data, so
that another website cannot use a URL to get data from ThoughtSpot. The procedure for enabling the
JavaScript API includes information on how to enable this.
REST API capabilities
Use a POST method to access the URL, which calls the REST API. The data is returned as a JSON
string. When using this method, you’ll need to extract the data from the JSON file and render it on your
Web page, portal, or application.
You can use the REST API to do things like:
• Generate dynamic picklists on your Web page.
• Display a single value.
• Retrieve the data to populate a visualization drawn by your own renderer.
• Pull data directly from ThoughtSpot
Remember that the data you retrieve from ThoughtSpot is live data, so whenever the Web page is
rendered, the current value(s) will be shown.
Direct Search-to-Embed API
The Direct Search-to-Embed API enables searching directly from an external application or web page to
pull data from ThoughtSpot. This feature was introduced in ThoughtSpot 5.0. When using it, you can
access data stored in ThoughtSpot directly. You do not need to save a search result to a pinboard and
then reference it using the visualization’s URL.
Public API reference
You can find more information on our public APIs in the Reference guide.
About the REST API
February 08, 2019
ThoughtSpot Application Integration Guide Page 18


Calling the REST API
To call the REST API, you’ll specify a URL using the POST method, passing the ID numbers of the
objects from which you want to obtain data.
Specify the pinboard or visualization example
For a pinboard, you’ll append the ID of your pinboard as a parameter, like this example:
https://<thoughtspot_server>/callosum/v1/tspublic/v1/pinboardda
ta?id=7752fa9e-db22-415e-bf34-e082c4bc41c3
To retrieve data from a specific visualization within a pinboard, you would append the ID number of the
visualization using the vizid parameter:
https://<thoughtspot_server>/callosum/v1/tspublic/v1/pinboardda
ta?id=7752fa9e-db22-415e-bf34-e082c4bc41c3&vizid=%5B1e99d70f-c1
dc-4a52-9980-cfd4d14ba6d6%5D
Remember:Remember: You must add brackets around the vizid parameter. The URL encoding for open bracket is
%5B , and the URL encoding for close bracket is %5D .
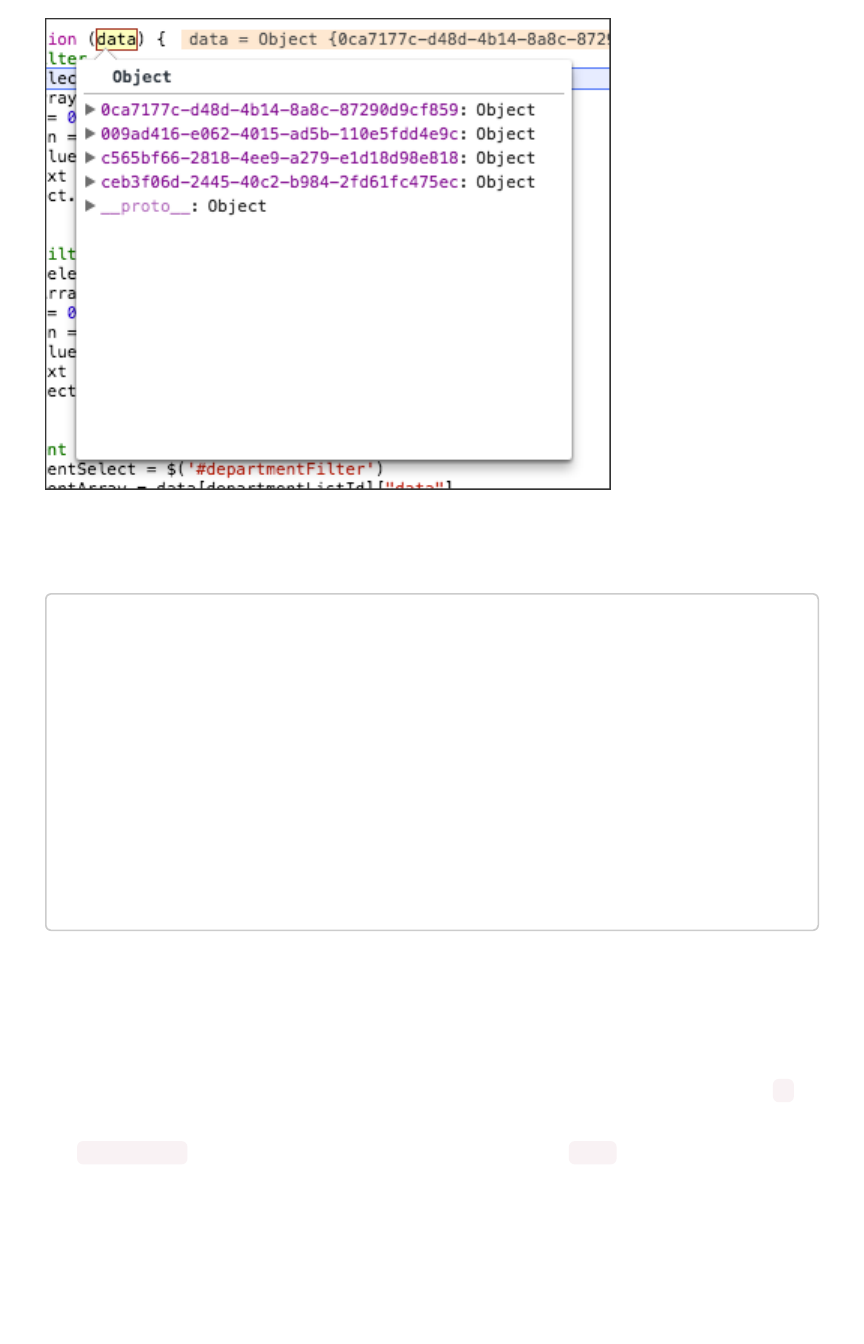
Object Format for Returned Data
When you parse the returned JSON data you can see that there is one object for every viz on the
pinboard. The objects are named according to the corresponding vizid.
Calling the REST API
February 08, 2019
ThoughtSpot Application Integration Guide Page 20
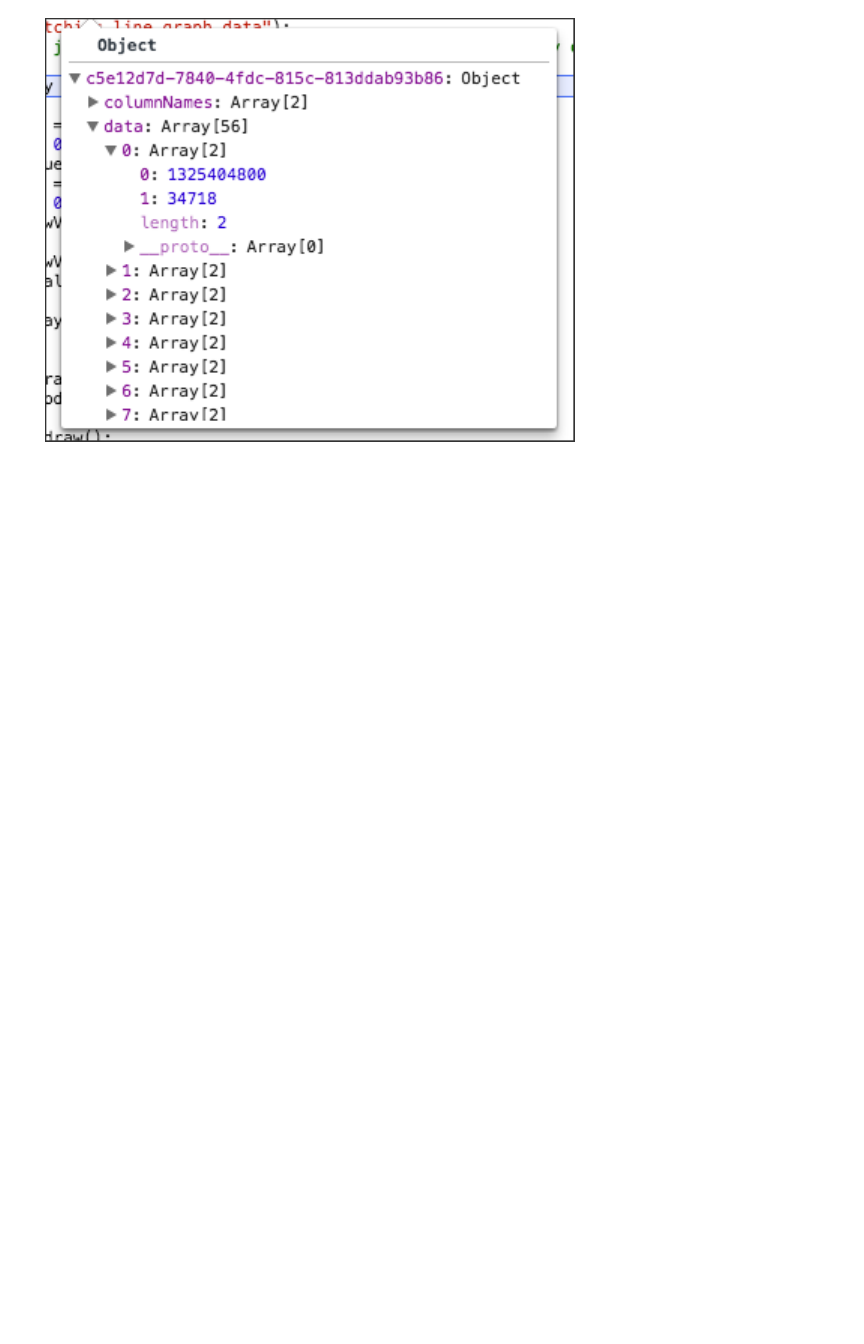
If you make a call to a specific viz on a pinboard, it will return just one object. The JSON object format
for the data that is returned from ThoughtSpot is:
{
vizId1 : {
name: “Viz name”,
:[[2-d array of data values], [], [] …..[]],
columnNames:[col1, col2, …. ],
samplingRatio: n
},
vizId2 : {
.
}
}
Each object contains four components:
1. An array of column headers.
2. An array of data.
3. The name given to the specific viz.
4. And a sampling ratio. The sampling ratio tells you the percentage of total data returned. 1
would mean all data in the viz was returned in the API call.
The columnNames array contains a list of all column headers. And the data array contains a list of
other arrays. Each sub array represents a new row of data.
Calling the REST API
February 08, 2019
ThoughtSpot Application Integration Guide Page 21
The REST API supports filtering the data returned via parameters that you pass within the URL. These
are called Runtime Filters.
Example
The following example shows a JavaScript function that calls the REST API, gets the results back, and
retrieves a single value from the JSON results:
Calling the REST API
February 08, 2019
ThoughtSpot Application Integration Guide Page 22

/**
* Generates headline by making a data API call.
*
* @param void
* @return void
*/
function generateHeadline(filters) {
var pinboardId = "0aa0839f-5d36-419d-b0db-10102131dc37";
var vizId = "67db30e8-06b0-4159-a748-680811d77ceb";
var myURL = "";
if (filters === void 0) {
myURL = "http://192.168.2.55:443/callosum/v1/tspublic/v
1/" +
"pinboarddata?id=" + pinboardId + "&" +
"vizid=%5B" + vizId + "%5D";
} else {
var query = getQueryString(filters);
myURL = "http://192.168.2.55:443/callosum/v1/tspublic/v
1/" +
"pinboarddata?id=" + pinboardId + "&" + +
"vizid=%5B" + vizId + "%5D&" + query;
}
var jsonData = null;
var xhr = new XMLHttpRequest();
xhr.open("POST", myURL, true);
xhr.withCredentials = true;
xhr.onreadystatechange = function() {
var headline = document.getElementById("embeded-headlin
e");
if (xhr.readyState == 4 && xhr.status == 200) {
jsonData = JSON.parse(xhr.responseText);
headline.innerHTML = jsonData[vizId].data[0][0];
} else {
headline.innerHTML = "Error in getting data !!!";
}
};
xhr.send();
}
Calling the REST API
February 08, 2019
ThoughtSpot Application Integration Guide Page 23

REST API pagination
Summary:Summary: You can paginate the JSON response that is called from
the REST API. The order of the data is retained from page to page.
Given the ability to paginate, you can quickly populate tables and make new REST calls every time you
go to the next page of the data on the table. There is significant load time if you want to populate the
data table with many rows (greater than 1000) from the REST API.
To paginate results in your API response, you’ll need to add new parameters to the query:
PageSize determines the number of rows to be included.
{
"name": "pagesize",
"description": PageSize: The number of rows.",
"defaultValue": "-1",
"type": "integer"
}
Offset determines the starting point.
{
"name": "offset",
"description": Offset: The starting point",
"defaultValue": "-1",
"type": "integer"
}
PageNumber is an alternate way to determine the offset. You must make a call with pageNumber = 1
first. Then you can access any page. Calling with pageNumber != 1 as the initial call will fail.
pageNumber = 0 is not a valid value.
REST API pagination
February 08, 2019
ThoughtSpot Application Integration Guide Page 24

{
"name": "pagenumber",
"description": PageNumber: This is an alternate way to set
offset. This is 1-based
indexing. Offset = (pageNumber - 1) * pageSi
ze.
"defaultValue": "-1",
"type": "integer"
}
FormatType is the JSON format type.
{
"name": "formattype",
"description": FormatType: This sets the JSON format type.
Values that are allowed are
FULL and COMPACT.
"defaultValue": "COMPACT",
"type": "string"
}
COMPACT is the default type, and is formatted as follows: ['col1', 'col2'] [1, 'a'] . While FULL
is formatted like this: {'col1': 1 'col2': 'a'}
Example
The following example shows ThoughtSpot data that is being populated in a table:
REST API pagination
February 08, 2019
ThoughtSpot Application Integration Guide Page 25

/**
* Sample response for Page-1.
*/
{
"totalRowCount": 1500,
"pageSize": 100,
"pageNumber": 1
"data":
[
{
"key1": "value1",
"key2": "value2",
},
{
"key1": "value1",
"key2": "value2",
},
]
}
REST API pagination
February 08, 2019
ThoughtSpot Application Integration Guide Page 26
Use the REST API to get data
Summary:Summary: This procedure shows how to use the REST API to get
data out of ThoughtSpot, so you can use it in a Web page, portal, or
application.
Data retrieved using the REST API is returned as JSON (JavaScript Object Notation).
Before you can use the REST API, you need to enable the JavaScript API (JS API) and authenticate to
ThoughtSpot.
Use this procedure to construct the URL you will use to call the REST API:
1. Log in to ThoughtSpot from a browser.
2. Navigate to the pinboard from which you want to get data. If it doesn’t exist yet, create it now.
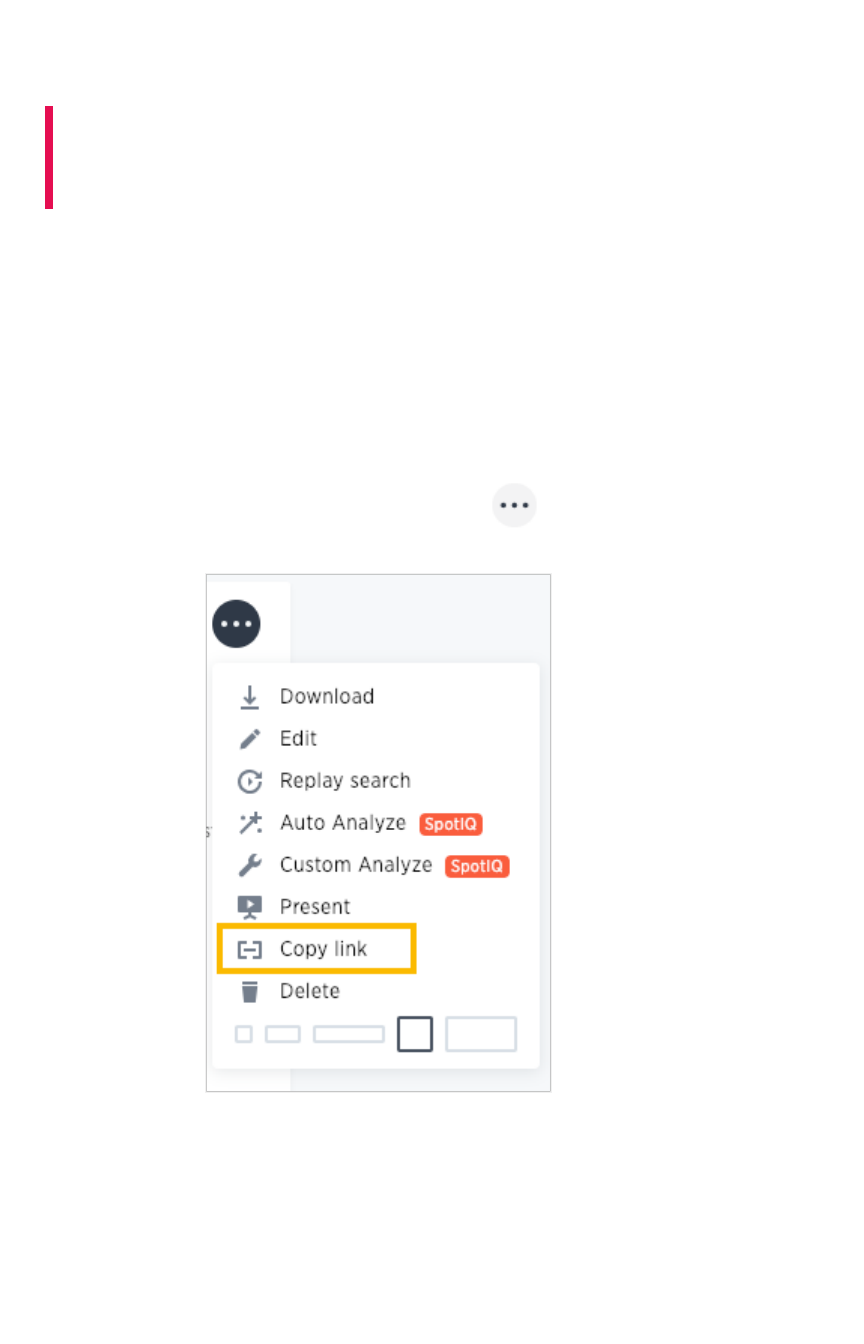
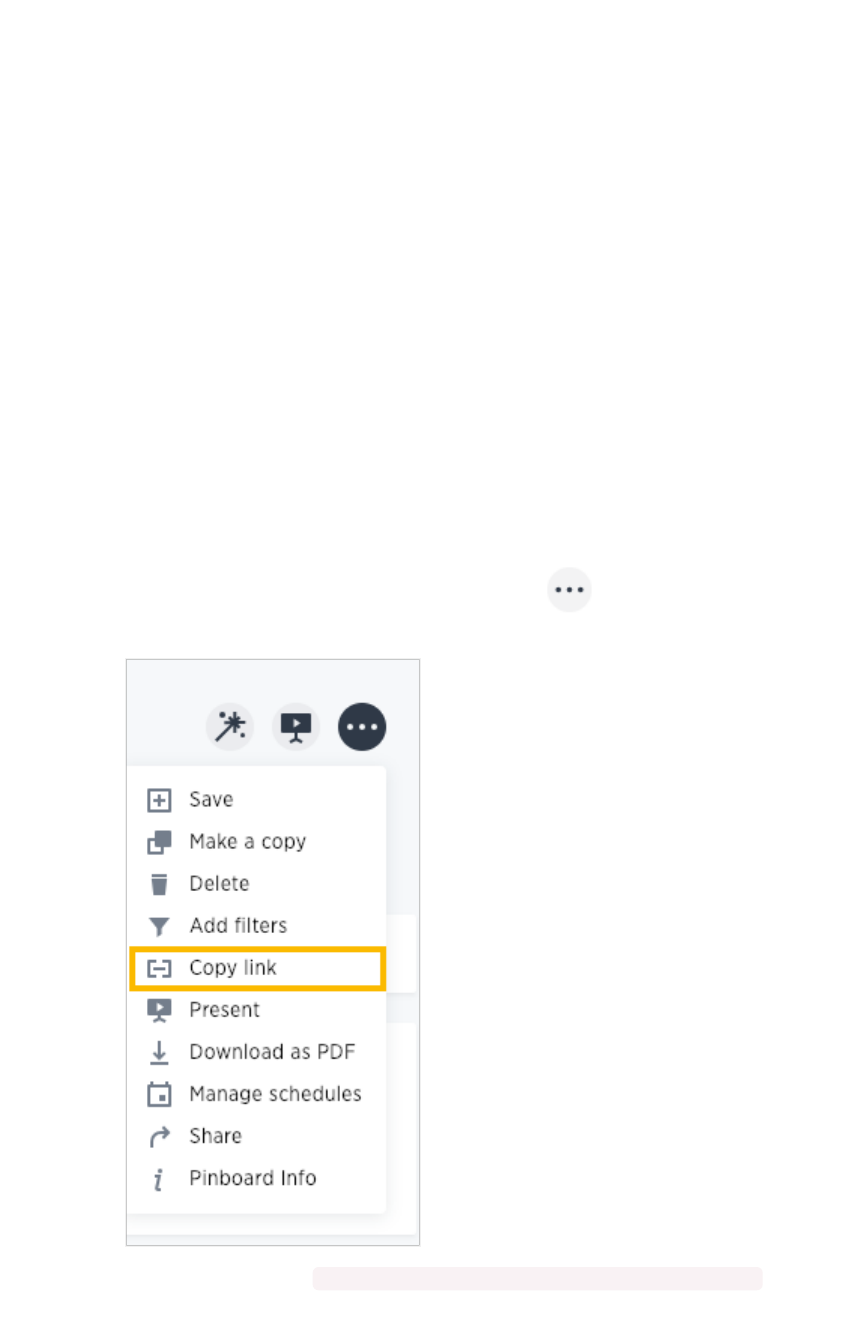
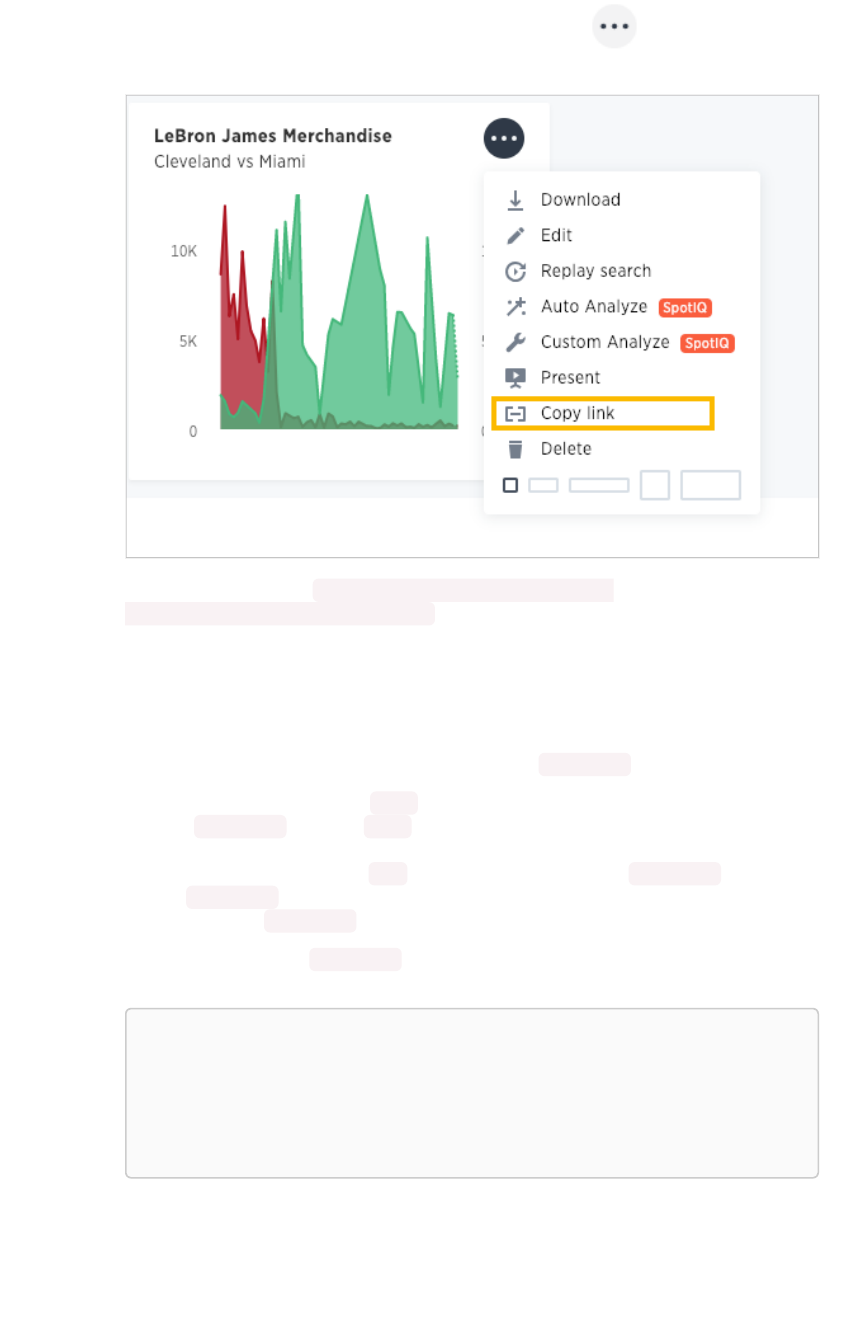
3. Find the ID number of the object you want to get the data from. If the object is:
• A pinboard, click ellipses icon (3 dots) the and select Copy LinkCopy Link.
• A visualization, click the Copy LinkCopy Link icon in the upper right corner of the table or
chart.
Use the REST API to get data
February 08, 2019
ThoughtSpot Application Integration Guide Page 27
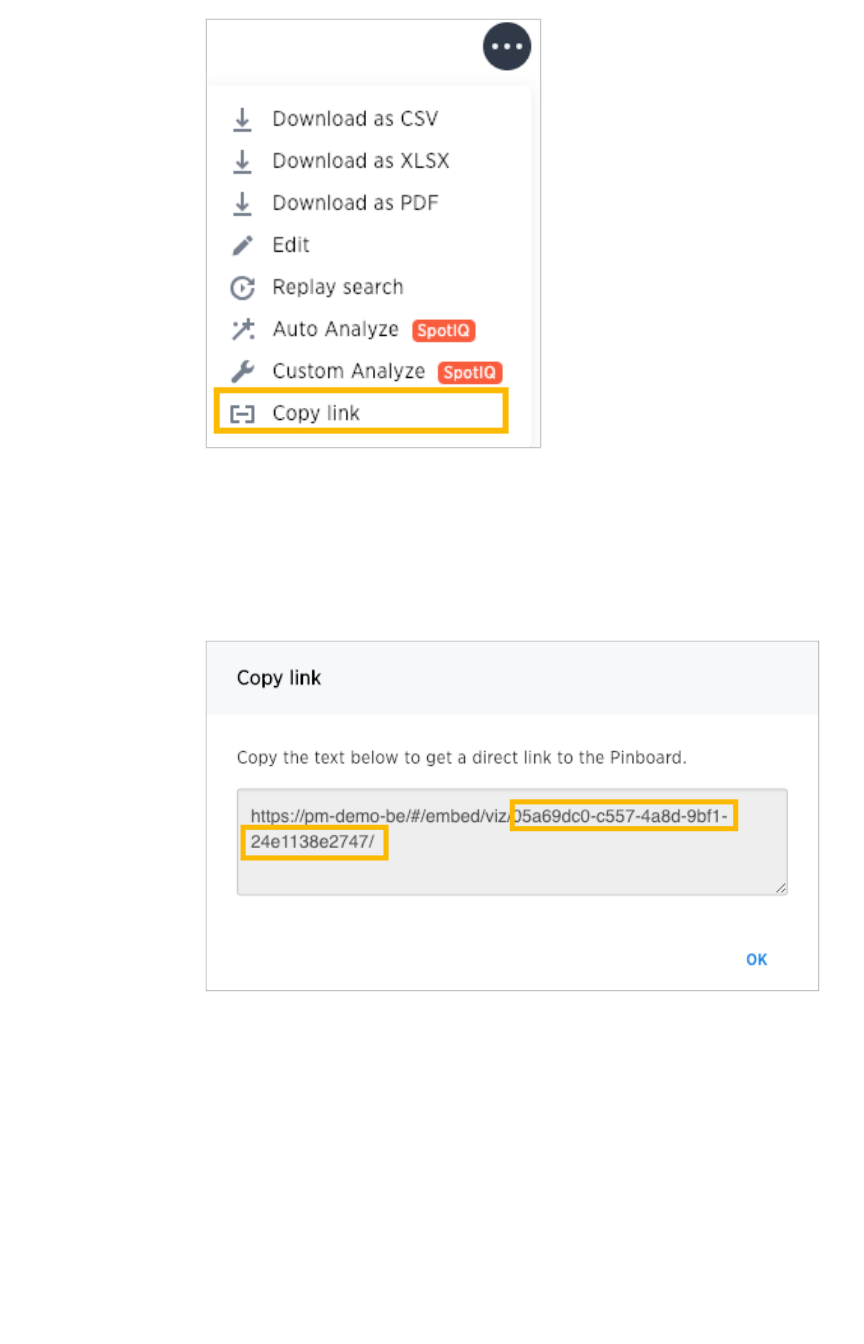
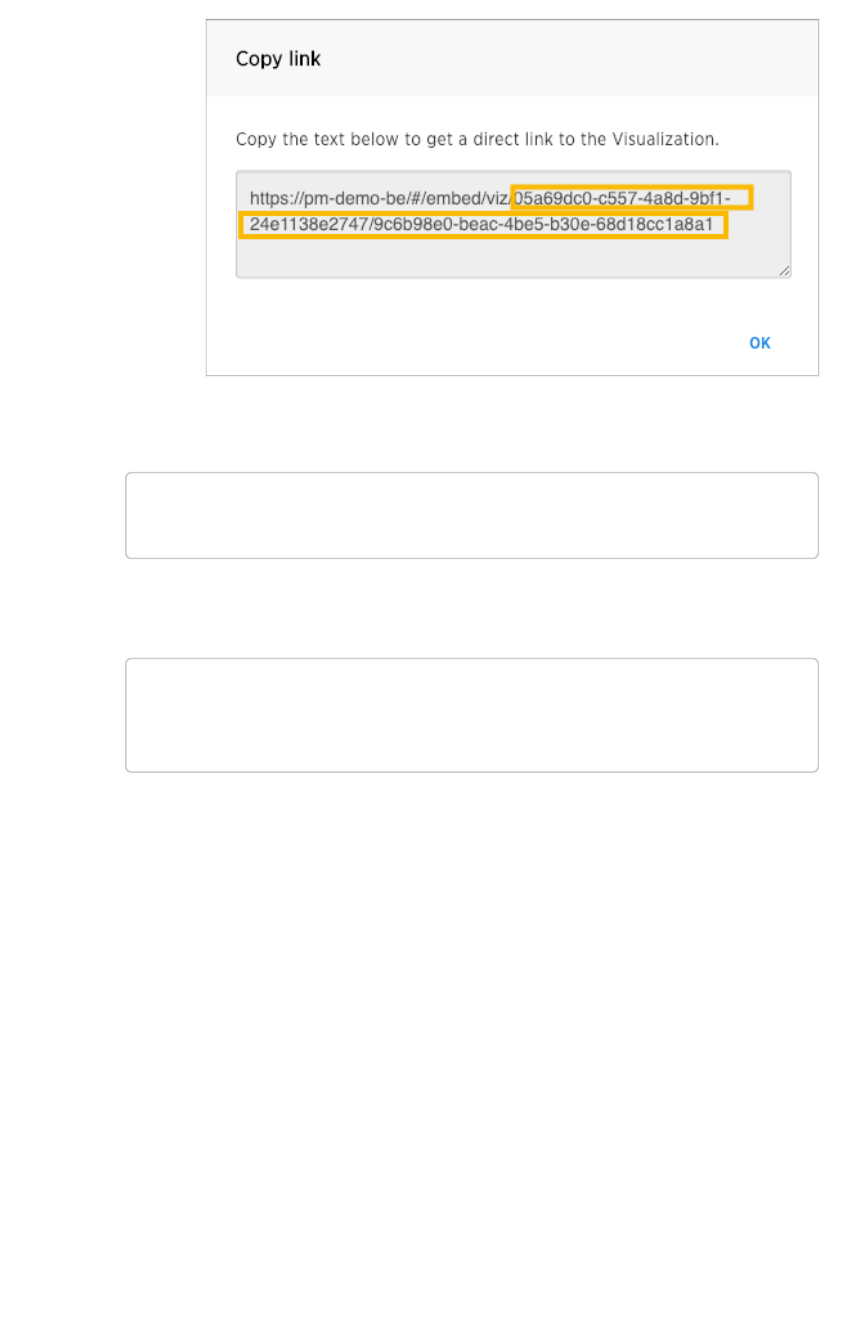
4. Copy the ID number from the link shown. Paste it somewhere so that you can use it later to
construct the URL to use when calling the REST API.
If the object is:
• A pinboard, copy the identifier that appears after “viz/”. Omit the trailing “/”.
• A visualization (table or chart), copy the identifier that appears after “viz/”. This is
the visualization ID.
Use the REST API to get data
February 08, 2019
ThoughtSpot Application Integration Guide Page 28
5. Construct the URL as follows: For a pinboard, the URL takes the form:
https://<thoughtspot_server>/callosum/v1/tspublic/v1/pi
nboarddata?id=<pinboard_id>
For a visualization, the URL takes the form:
https://<thoughtspot_server>/callosum/v1/tspublic/v1/pi
nboarddata?id=<pinboard_id>&vizid=%5B<visualization_i
d>%5D
6. If you want to apply any filters to the data that will be returned, apply Runtime Filters.
7. Now your URL is complete, and you can use it to access the data directly via the HTTP POST
method. The REST API returns the data formatted as JSON.
8. Retrieve the data from the JSON and display it in your Web page, Web portal, or application.
Use the REST API to get data
February 08, 2019
ThoughtSpot Application Integration Guide Page 29

Use the Embedded Search API to pull
data from ThoughtSpot
Summary:Summary: This procedure shows how to use the Embedded Search
API to get data from ThoughtSpot
The Embedded Search API enables searching directly from an external application or web page to pull
data from ThoughtSpot. This feature was introduced in ThoughtSpot 5.0. When using it, you can access
data stored in ThoughtSpot directly. You do not need to save a search result to a pinboard and then
reference it using the visualization’s URL.
This embedded search is useful when you want to allow an application to pull data directly from
ThoughtSpot in an ad hoc fashion.
To have the Embedded Search API functionality turned on, contact ThoughtSpot Support.
Data retrieved using the Embedded Search API is returned as JSON (JavaScript Object Notation). You
will need to parse the JSON to get the data values you need, generally using JavaScript in the receiving
application.
Use this procedure to construct the call to the Embedded Search API:
1. Enable the JavaScript API (JS API) on the receiving page of the target application.
2. Authenticate to ThoughtSpot on the receiving page of the target application.
3. Embed the ThoughtSpot application in your own web page or application.
4. To subscribe to results for all the searches the user does in the embedded ThoughtSpot
application, use the API JavaScript function subscribeToData( ). This will allow your page to
listen for data coming from ThoughtSpot.
Now when a user searches, the iFrame will send data to the subscription. The parent web
page or application receives the data as JSON, and can do whatever you want with it.
5. You can set up your web page or application to display or otherwise act on the data it
receives from the subscription.
6. To test it out, do a search in the embedded ThoughtSpot application to retrieve the data. Your
application should act on the data in the way you set it up to do so.
Use the Embedded Search API to pull data from ThoughtSpot
February 08, 2019
ThoughtSpot Application Integration Guide Page 30

Use the Data Push API
Summary:Summary: This procedure shows how to use the Data Push API to
send data from ThoughtSpot to another application
The Data Push API allows you to open a web page in the context of the ThoughtSpot application. This
third party web page will then have access to the results of the ThoughtSpot search from which it was
invoked. This is useful when you want to initiate an action in another application based on the result of a
search in ThoughtSpot. The Data Push API was introduced in ThoughtSpot 5.0.
An example of pushing data to another system to trigger an action would be where you do a search to
find customers who are coming due for renewal of their contract in the next month. You could then
trigger an action that brings up a web page from an external billing system. The billing system could be
set up to read the data (list of names, emails, products, and renewal dates) from ThoughtSpot. The
billing system might then add the price, generate an invoice for each customer, and send it out via email.
To have the Data Push API functionality turned on, contact ThoughtSpot Support.
The DataPush API makes the data available to the external application formatted as JSON (JavaScript
Object Notation). You will need to parse the JSON to get the data values you need using JavaScript in
the receiving application.
Create an Custom Action
To create a Custom Action, you must have the Can administrator ThoughtSpotCan administrator ThoughtSpot privilege.
Use this procedure to create an Custom Action in ThoughtSpot:
1. Log in to ThoughtSpot from a browser.
2. Choose AdminAdmin and then Action CustomizationAction Customization.
3. Click the Add custom action itemAdd custom action item button.
4. Fill in the details for your custom action:
• Item Label: Clicking the menu item with the name you provide here will initiate the
data push to the other system. This menu item will appear under the three dot
menu of a search result.
• URL: The URL of the target page in the external web page or application.
• Window size: The size of the window that will display the external web page or
application in ThoughtSpot.
Use the Data Push API
February 08, 2019
ThoughtSpot Application Integration Guide Page 31
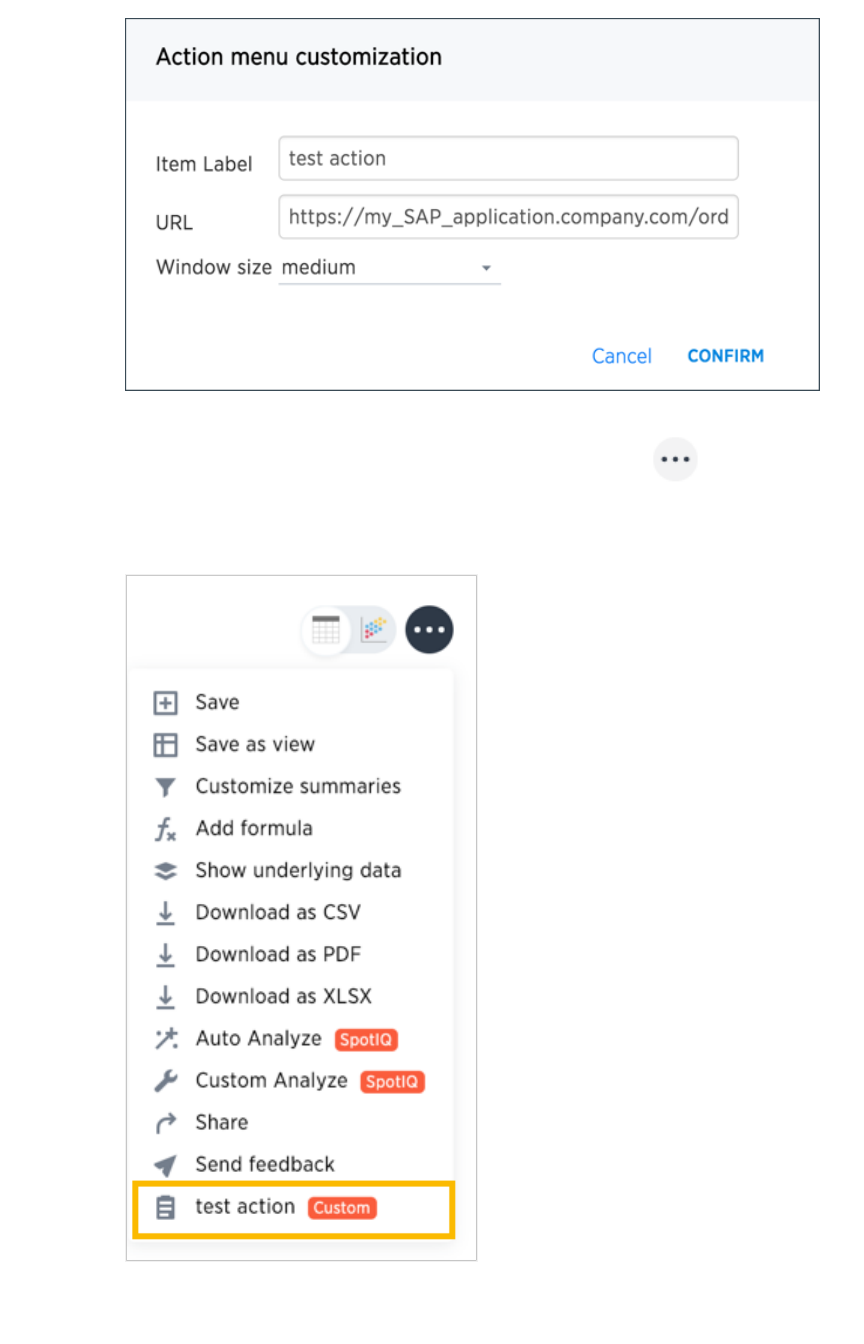
5. Now when a user is viewing a search result, they’ll have the option to use the Custom Action
you created. To initiate the action, they’ll click the ellipses icon (3 dots) , and select
Your Action NameYour Action Name. You’ll notice a CustomCustom tag next to your action name to indicate that this is
something custom built, and not a ThoughtSpot action.
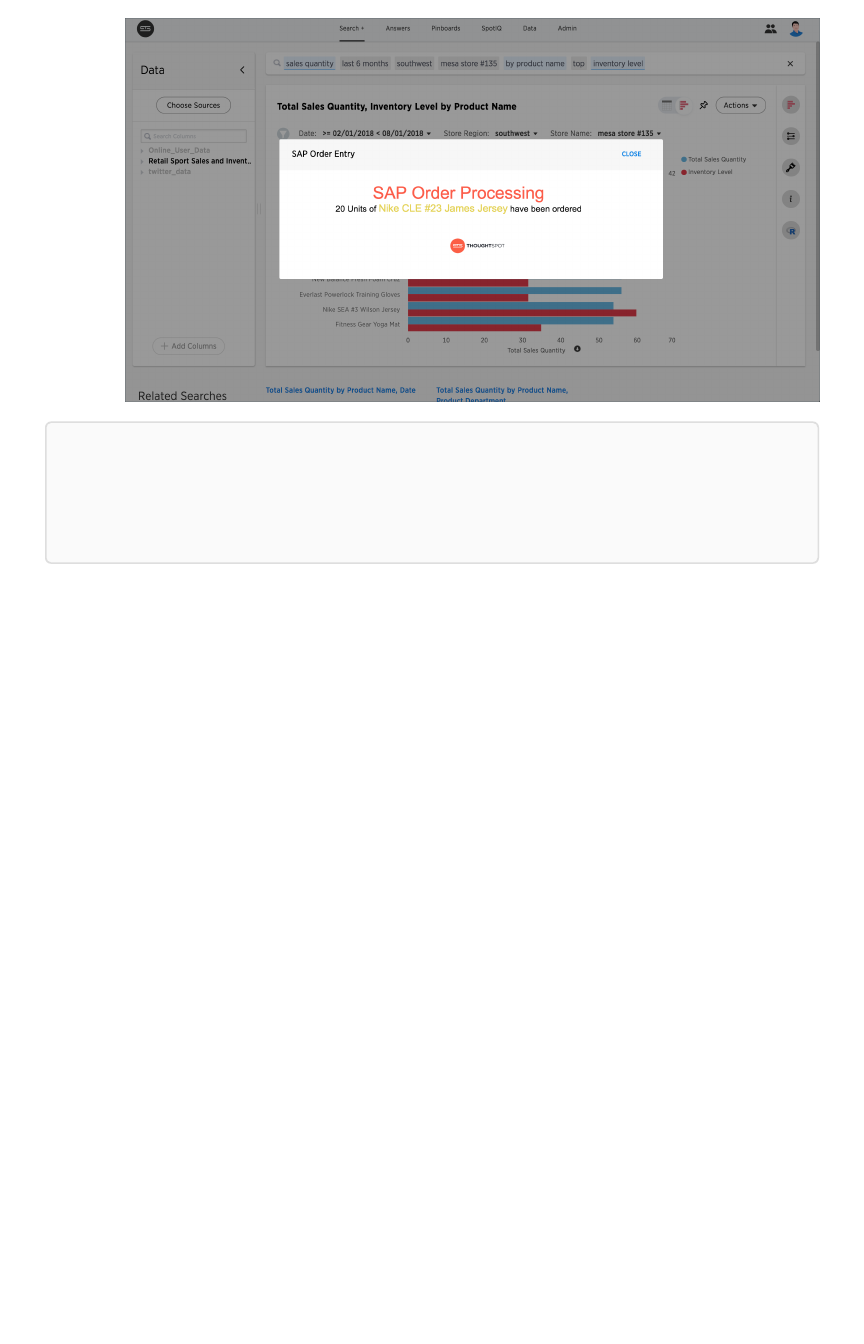
6. When a user clicks your action, they’ll see the web page you entered as the URL for your
custom action.
Use the Data Push API
February 08, 2019
ThoughtSpot Application Integration Guide Page 32
Note:Note: In order for your action to work correctly, the answer from which the user selected the
action needs to have the correct search terms which your application or web page is expecting to
receive. There is no way to guarantee this, other to train your users on the purpose of your action,
and what’s required for it to run.
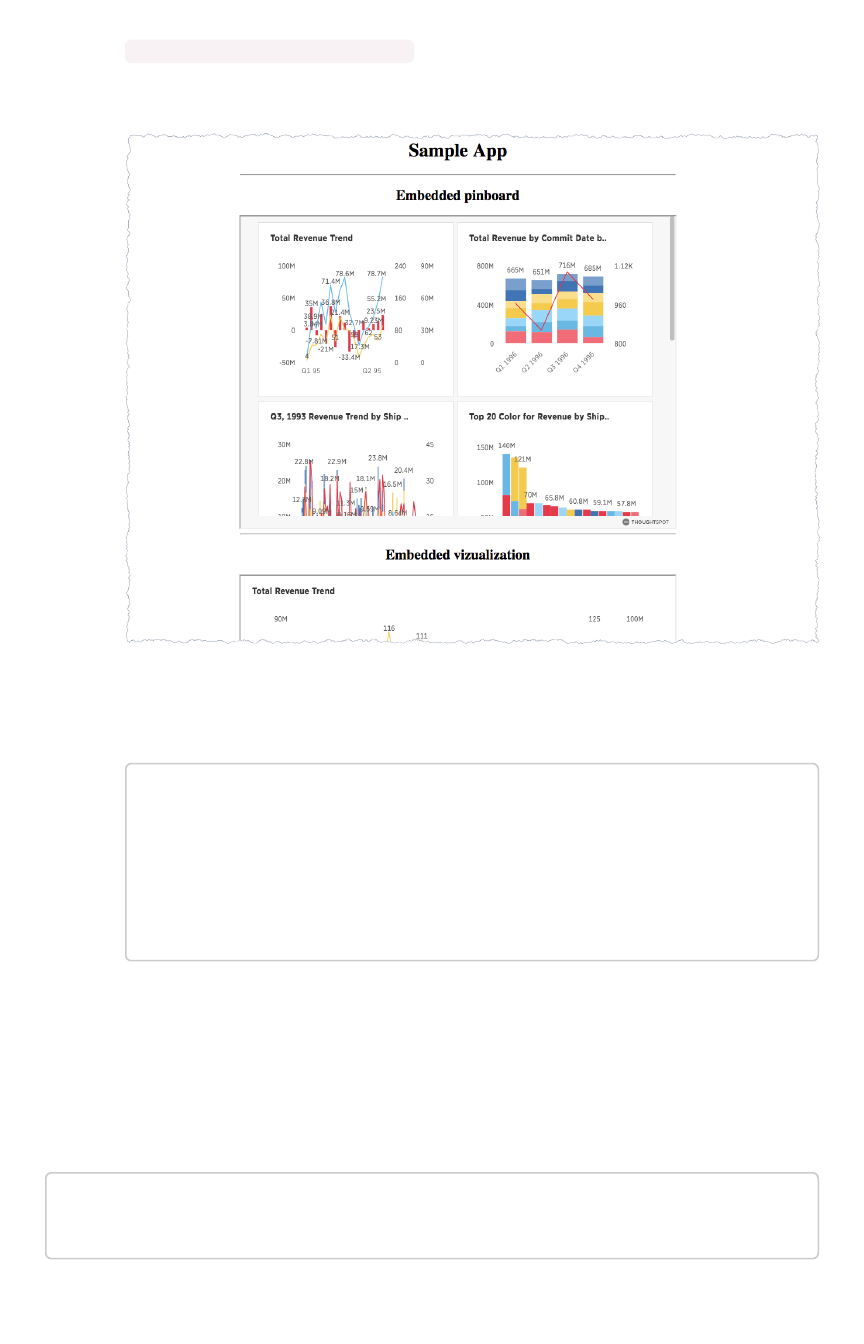
Sample application
Here is a sample application you can use to try out the Data Push API:
Use the Data Push API
February 08, 2019
ThoughtSpot Application Integration Guide Page 33

<!doctype html><!doctype html>
<html lang="en">
<script src="https://ajax.googleapis.com/ajax/libs/angularjs/
1.6.9/angular.min.js"></script>
<script type="text/javascript" src="api/api.js"></script>
<body>
<script>
varvar app == angular.module("latestData", []);
app.controller("dataCtrl", ['$scope','$window', functifuncti
onon($scope, $window) {
$scope.currentData==undefinedundefined;
$scope.showData==falsefalse;
$scope.displayData == functionfunction() {
$scope.showData == truetrue;
};
functionfunction currentDataCallback(event) {
$scope.currentData == event;
}
$window.onload == functionfunction(){
$window.thoughtspot.getCurrentData(currentDataC
allback);
};
}]);
</script>
<div ng-app ="latestData" ng-controller="dataCtrl">
<button class="get-data" ng-click="displayData()">Clic
k here for latest exported data</button>
<div class="display-data" ng-if="showData"> </div>
</div>
</body>
</html>
Use the Data Push API
February 08, 2019
ThoughtSpot Application Integration Guide Page 34

Understand embedding
Embedding allows you to embed all or part of ThoughtSpot in another client application. This page
provides an explanation of what you must consider when embedding ThoughtSpot
Decide what to embed and where
The type of embedding your company requires can help you determine what type of embedding to use.
For example, you may simply need a single chart displayed as a wallboard or you may want your
customers to access reports on their own data. The first example could require modifying a single HTML
page while the later example may require working with a development team and several different
workflows in a browser application.
Regardless of the simplicity or complexity of your client application, its infrastructure must allow for
loading and calling the ThoughtSpot JS library. This library allows you to authenticate to ThoughtSpot
and load specific objects.
There are different methods for embedding ThoughtSpot into a client application:
TypeType DescriptionDescription
Full Embeds the entire ThoughtSpot application including menu bars. Full navi-
gation is supported.
Page-level Embeds pages without the menus bars or page-level navigation. This is
useful where you want to limit the inclusion to a portion of ThoughtSpot.
For example, you may only embed the SearchSearch or the AnswersAnswers page.
Object-level Embed a single visualization in your application. Content is created in
ThoughtSpot and then that content is embedded. The content is rendered
within an iframe . This returns a JSON object that includes the underlying
data.
You can also use the ThoughtSpot data APIs to request data from ThoughtSpot.
Configuration requirements for embedding
Only Extended Enterprise installation can use ThoughtSpot’s embed functionality. ThoughtSpot
Enterprise installations must also work with ThoughtSpot Support to enable embed before using this
functionality.
Optional settings for embedding
There are some settings that apply to embedding which ThoughtSpot Support or your other
ThoughtSpot technical contact can make for you.
One of these involves what happens when a user clicks on a link within the data. When your data
includes URLs, they display as clickable links in ThoughtSpot tables. By default, clicking on a link opens
the URL in a separate tab. But there is a system-wide setting that can be changed to open the links
within the context in which they appear.
Changing this setting opens the links:
Understand embedding
February 08, 2019
ThoughtSpot Application Integration Guide Page 35

Link type Opens in
Link in search result table in ThoughtSpot Same browser tab as ThoughtSpot appli-
cation
Link in table embedded in an iFrame Same iFrame that contains the table
Link in full ThoughtSpot application embedded in an
iFrame
Same iFrame that contains the application
Choose an authentication methodology
You can control which type of authentication you use between your client application and ThoughtSpot.
No Authentication
You can simply not set up authentication. This would require the user to
already be logged into
ThoughtSpot
before interacting with your client application. This is typically only useful when testing your
client. You would not use this in your production environment.
SAML
Before you can embed all or part of ThoughtSpot, you must authenticate to ThoughtSpot using SAML
with the the public REST API call. After authentication, a URL is provided to call the desired visualization
and populate it into an iframe .
You must configure SAML on your ThoughtSpot instance before using this method.
Trusted authentication service
A ThoughtSpot installation can enable support for token-based authentication service. This allows an
installation to use a central authentication service rather than using ThoughtSpot to authenticate. In this
architecture, ThoughtSpot provides the service with a token that allows it to authenticate on behalf of
users.
A trusted authenticator application or service obtains a token from ThoughtSpot. This token is used to
obtain trust from other, third-party client applications that need access to ThoughtSpot. In the scenario
below, the trust authenticator forwards requests for ThoughtSpot data from client applications to
ThoughtSpot.
Understand embedding
February 08, 2019
ThoughtSpot Application Integration Guide Page 36

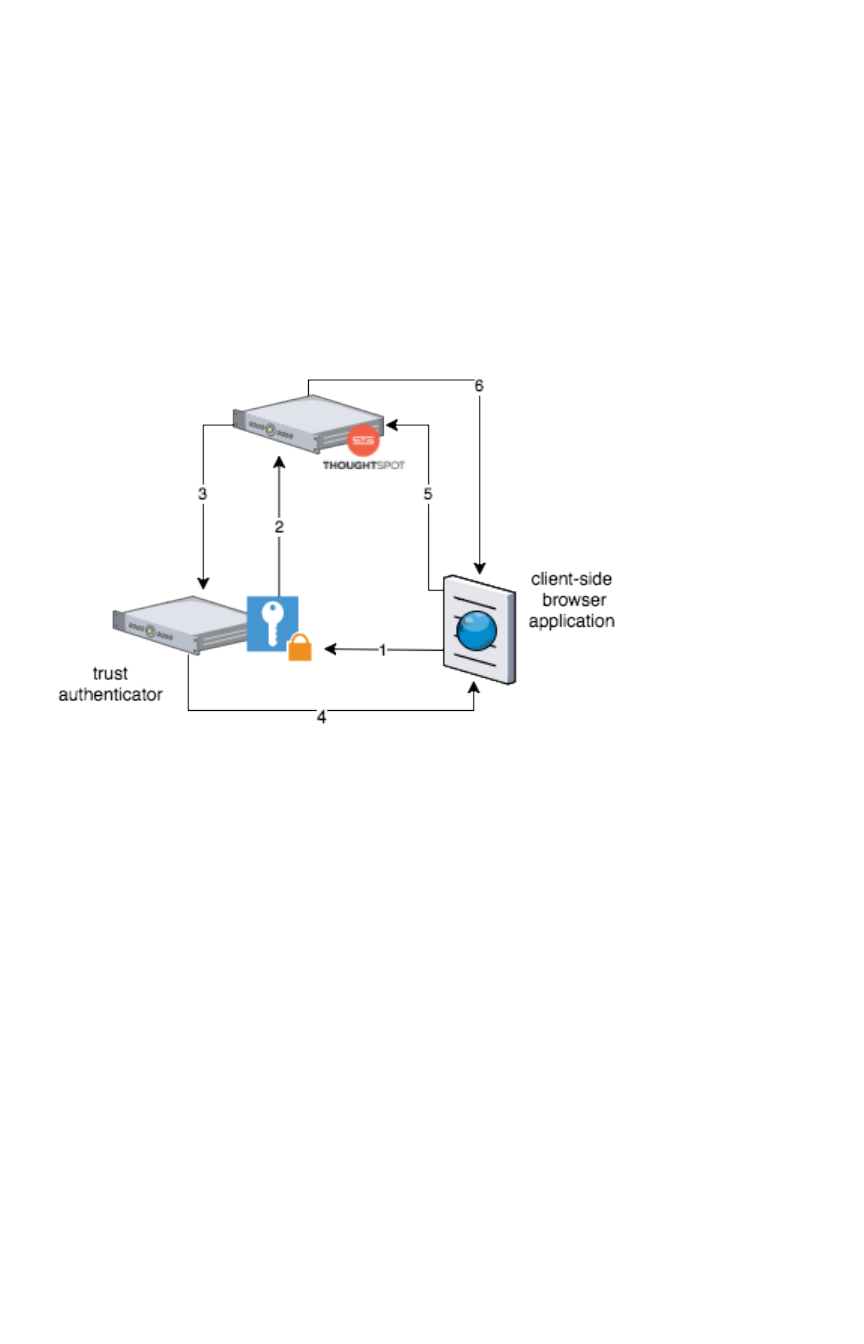
A user already logged into client-application interacts with a ThoughtSpot embed point which causes the
following processes:
1. The client-side application requests a user token from the trusted authenticator.
2. The trusted authenticator requests user token from ThoughtSpot.
3. ThoughtSpot verifies the authenticator and returns a user token.
4. The authenticator returns the user token to the client.
5. The client forwards the user token to ThoughtSpot.
6. ThoughtSpot validates the token and returns information commensurate with that
authenticated user’s authorization.
Plan for Cross-Origin HTTP Requests (CORS)
Collecting user credentials from one application (domain) and sending them to another (such as
ThoughtSpot) can present security vulnerabilities such as a phishing attack. Cross-origin or cross-
domain verification closes this vulnerability.
When embedding, you must enable CORS between your client application domain and the ThoughtSpot
domain. This protects your data, so that another actor cannot use the same URL to embed the
visualization in its own Web pages.
Decide if you need to change the feedback
email
ThoughtSpot has an automated feature that collects feedback from users and sends it to
support@thoughtspot.com . Depending on what and how you embed, user actions with your
embedded application can trigger feedback. You can continue to forward feedback in this manner or
direct the feedback to another email. To learn how to change the feedback email, see Manage the
feedback contact.
Understand embedding
February 08, 2019
ThoughtSpot Application Integration Guide Page 37

Remove the ThoughtSpot branded footer
The ThoughtSpot footer appears by default in the ThoughtSpot application. It also appears with an
embed application that encompasses an individual pinboard or a full application. In embed applications
that are have a single visualization, you can ask your ThoughtSpot support engineer to disable the
footer.
Understand embedding
February 08, 2019
ThoughtSpot Application Integration Guide Page 38
Embed pinboard or visualization
The page explains, through an example, how to embed a visualization (table or chart) or pinboard from
ThoughtSpot in your own static Web page, portal, or application.
To build this sample, you need to have access to a text editor and a ThoughtSpot instance with a
visualization. You should also have some experience working with Javascript.
Get the link for an entire pinboard or single
visualization
This procedure assumes the pinboard with the visualization you want to embed already exists. If the
pinboard or visualization doesn’t exist, create it now before continuing.
1. Log in to ThoughtSpot from a browser.
2. Navigate to a visualization on the PinboardPinboard tab.
3. Open a pinboard.
4. Copy the URL for the entire pinboard and for a single visualization.
If the object is a pinboard, click the ellipses icon (3 dots) > Copy LinkCopy Link.
The format for the link is: <protocol>:<host>:<port>/#/embed/viz/<pinboardID>
Embed pinboard or visualization
February 08, 2019
ThoughtSpot Application Integration Guide Page 39
For a vizualization in a pinboard, click the ellipses icon (3 dots) > Copy LinkCopy Link.
The format for the link is: <protocol>:<host>:<port>/#/embed/
viz/<pinboardID>/<vizualizationId>
Edit the test.html
You need to edit the page in your application or web page where you want to embed a ThoughtSpot
pinboard or visualization. For this example, you’ll get a copy of the test.html file.
1. Create an empty directory called test .
2. Save the test.html file to the test directory.
3. Download the ThoughtSpot JavaScript library.
4. Place the Javascript library in an api directory co-located with the test.html file.
5. Edit the test.html file in your favorite editor.
6. Scroll down to the Variables section (about line 37).
Here are the fields in the test.html file you need to edit.
var protocol = "THOUGHSPOT_PROTOCOL";
var hostPort = "HOST_PORT";
var pinboardId = "PINBOARD_ID";
var vizualizationId = "VIZUALIZATON_ID";
7. Edit each variable in the section and replace it with the IDs you copied from the pinboard.
For example, your URL may look similar to the following:
Embed pinboard or visualization
February 08, 2019
ThoughtSpot Application Integration Guide Page 40

http://172.18.202.35:8088/#/embed/viz/061457a2-27bc-43a9-9754-0cd873691bf0/
9985fccf-b28d-4262-b54b-29619a38348e
This is a link copied from an individual visualization, the result in the file is:
var protocol = "http";
var hostPort = "172.18.202.35:8088";
var pinboardId = "061457a2-27bc-43a9-9754-0cd873691bf
0";
var vizualizationId = "9985fccf-b28d-4262-b54b-29619a38
348e";
The protocol ( http or https ) of your client and your ThoughtSpot instance should match.
You’ll use this identifier in the next part.
8. Save your changes and close the test.html file.
Enable CORS for your client domain
You must work with ThoughtSpot support to enable CORS between your client application domain and
the ThoughtSpot domain. If you don’t do this, you will receive an error message when test.html
attempts to load the embedded objects.
The test infrastructure uses Python’s simplehttpserver which runs, by default as localhost:8000 ,
this is information ThoughtSpot support will need. You can also just copy the test directory to an
existing web server. If you do this, you’ll need to DNS for the server when you contact Support.
Test the example page
You are almost ready to view your embedded pinboard and visualization. The fastest way to run a
webserver and test the code is using Python’s simplehttpserver . If you have Python on your system
you already have the simplehttpserver .
1. Log into ThoughtSpot.
In production, you would have added authentication code to your client. You haven’t done
that with this system. So, before you test, you’ll login to the ThoughtSpot. Successfully
logging in causes the system to create a session and an authentication key. Your browser has
this information and so when you load the test.html page in another tab, you won’t need
to authenticate again.
2. Change to your test directory.
3. Start the simplehttpserver web server.
python -m SimpleHTTPServer 8000
4. Open your browser’s DeveloperDeveloper tools.
Embed pinboard or visualization
February 08, 2019
ThoughtSpot Application Integration Guide Page 41
5. Navigate to the test page in your browser.
http://localhost:8000/test.html
You should see something similar to the following:
6. Check the browser console.
Success is appears in the console with a message similar to this:
test.html:60 Initialization successful.
test.html:113 http://172.18.202.35:8088/#/embed/viz/061
457a2-27bc-43a9-9754-0cd873691bf0
test.html:129 http://172.18.202.35:8088/#/embed/viz/061
457a2-27bc-43a9-9754-0cd873691bf0/9985fccf-b28d-4262-b54
b-29619a38348e
Troubleshooting embeds
If your embeds don’t load, open the developer tools on your browser. Look for errors in the page
loading, usually on the ConsoleConsole tab. If you see an error similar to:
No 'Access-Control-Allow-Origin' header is present on the reque
sted resource.
Embed pinboard or visualization
February 08, 2019
ThoughtSpot Application Integration Guide Page 42


Authentication flow with embed
If your ThoughtSpot system is configured for Security Assertion Markup Language (SAML) you can
enable Single Sign On (SSO) for your embed application.
Place the JS API library in the <head> section of the HTML on your Web page. Ensure that the JS API
script tag is the first script loaded in the page. You can see examples of this
Authenticate when the window is initialized
Your web page needs to authenticate by calling window.thoughtspot.initialize and waiting for the
onInitializationCallback to be called before embedding any ThoughtSpot visualizations or making
any ThoughtSpot REST API calls.
The JS API call window.thoughtspot.initialize can cause the entire Web page to be re-directed to
your Identity Provider (IDP). This order implies that you may not execute any of your application logic
before window.thoughtspot.initialize has called your callback.
Any redirection could interfere with your application logic. So, don’t embed any static ThoughtSpot
visualizations in your HTML. In other words, you should generate the ThoughtSpot visualizations
dynamically after window.thoughtspot.initialize has called your callback.
The onAuthExpiration is only available if you have at least one ThoughtSpot visualization iframe in
your web page.
Example of code flow
To authenticate with SSO.
1. Download the ThoughtSpot JavaScript library.
2. Include the library file into your web page’s <head> section:
<head>
<script type=”text/javascript” src=”<protocol><your.tho
ughtspot.domain>/js/api/api.min.js”>
...
</head>
3. From your application code, authenticate to ThoughtSpot by calling to the
window.thoughtspot.initialize method.
For example:
Authentication flow with embed
February 08, 2019
ThoughtSpot Application Integration Guide Page 44

<script type=”text/javascript”>
thoughtspotHost = <hostname_or_ip_w/o_http>
function setUpThoughtSpotAPI() {
window.thoughtspot.initialize(
function(isUserAuthenticatedToThoughtSpot)
{
if (isUserAuthenticatedToThoughtSpo
t) {
// load an embedded ThoughtSpot
visualization or
// make a ThoughtSpot data API c
all
} else {
// the current user into your sy
stem is not authenticated
// into your ThoughtSpot instanc
e, case in any other way suitable
// to your application logic. D
o NOT call setUpThoughtSpotAPI again
// here as that could create an
infinite cycle.
}
},
function() {
// the user got logged out from Thought
Spot, possibly because
// their session with ThoughtSpot expir
ed, you can call setUpThoughtSpotAPI()
// again to re-authenticate the user o
r handle this case in any other way
// suitable to your application logic.
},
thoughtspotHost
);
}
</script>
4. Work with ThoughtSpot support to enable CORS between your client application domain and
the ThoughtSpot domain.
When this value is changed, the nginx service is restarted automatically to reflect the
change.
Now, you’re ready to either embed a visualization or use the REST API to get data from ThoughtSpot
and display it within your Web page or application.
Authentication flow with embed
February 08, 2019
ThoughtSpot Application Integration Guide Page 45

Full application embedding
Summary:Summary: Full embedding allows users to create ThoughtSpot
content in an embedded environment.
Fully embedding ThoughtSpot content gives your users the ability to:
• create answers and pinboards
• share objects with users
• upload data and refresh uploaded data
• relate uploaded data with existing worksheets
This is useful for supplying the full search experience into an iframe with different navigation views and
toggle options. However, there are limitations. Users won’t be able to:
• create worksheets or views.
• modify profiles.
• view the Help Center.
Before you try the technique, make sure you have read, Understand embedding in this section.
A single page with the full application
embedded
The following sample embed.html demonstrates how you might full embed app the application.
Full application embedding
February 08, 2019
ThoughtSpot Application Integration Guide Page 46

<!doctype html><!doctype html>
<html lang="en" style="height: 100%; width: 100%">
<head>
<meta http-equiv="X-UA-Compatible" content="IE=edge"/>
<meta name="viewport" content="width=device-width">
<meta charset="utf-8">
<title>ThoughtSpot Embed App</title>
<script type="text/javascript" src="api/api.min.js"></scr
ipt>
<script type="text/javascript">
functionfunction updateIframeUrl(id) {
varvar iframeUrl == "/?embedApp=true#/";
ifif (id ====== 'homepage') {
iframeUrl == "/?embedApp=true#/";
} elseelse ifif (id ====== 'search') {
iframeUrl == "/?embedApp=true#/answer";
} elseelse ifif (id ====== 'answerList') {
iframeUrl == "/?embedApp=true#/answers";
} elseelse ifif (id ====== 'pinboardList') {
iframeUrl == "/?embedApp=true#/pinboards";
} elseelse ifif (id ====== 'data') {
iframeUrl == "/?embedApp=true#/data/tables";
}
document.getElementById('ts-embed').setAttribute('sr
c', iframeUrl);
}
functionfunction onCallback(event) {
console.log(event.data);
}
window.thoughtspot.subscribeToAlerts("http://localhos
t:8000", onCallback);
</script>
</head>
<body style="height: 100%; width: 100%">
<button onclick="updateIframeUrl('homepage')">Homepage</b
utton>
<button onclick="updateIframeUrl('search')">Search</butto
n>
<button onclick="updateIframeUrl('answerList')">Answer li
st</button>
<button onclick="updateIframeUrl('pinboardList')">Pinboar
d list</button>
<button onclick="updateIframeUrl('data')">Data</button>
Full application embedding
February 08, 2019
ThoughtSpot Application Integration Guide Page 47

<iframe id="ts-embed" src="/?embedApp=true#/" height="8
0%" width="80%"></iframe>
</body>
</html>
The function updateIframeUrl(id) reflects the logic to change the src URL of the iframe when your
users clicks on different navigation buttons.
Hide the ThoughtSpot navigation bar
To hide the primary navigation, configure this:
• Make sure the app is in an <iframe/> .
• Set the embedApp flag as true. This flag determines if the application is embedded.
• Set the primaryNavHidden flag as true (the default). This flag determines navigation
visibility.
If either flag is false , the primary navigation will appear.
Error messages and full embed
ThoughtSpot can disable error messages within the ThoughtSpot iFrame and provide APIs to you to
access those messages, and display them in your UI appropriately. This is done by suppressing error
messages in the UI, and passing their details along to window.postMessage function, which your parent
app can listen to. Hidden messages can be viewed in the console logs. Contact ThoughtSpot Support if
you would like to enable this feature.
Additional notes
Here are some additional notes about the full embed feature:
• Call thoughtspot.<customerURL>.com/#/answer and use that to access the search
functionality.
• Call thoughtspot.<customerURL>.com/#/pinboards and use that to access saved
pinboards.
• Use SAML for authentication against ThoughtSpot within the iFrame.
Full application embedding
February 08, 2019
ThoughtSpot Application Integration Guide Page 48
Configure trusted authentication
If your organization has a trusted authentication server, you can use this server to authenticate users of
the embedded ThoughtSpot application. After authenticating a user, the trusted authenticator server or
service obtains an authentication token from ThoughtSpot on the user’s behalf. In this way, the user
need only authenticate once, with the trusted authentication server.
How users are authenticated
In the scenario below, the trust authenticator forwards requests for ThoughtSpot data from client
applications to ThoughtSpot.
A user already logged into client-application interacts with a ThoughtSpot embed point which launches
the following sequence:
1. The client-side application requests a user token from the trusted authenticator.
This trusted authenticator server was previously configured as an authenticated server.
2. The trusted server authenticates the user and requests a token from ThoughtSpot on the
user’s behalf.
3. ThoughtSpot verifies the authenticator server’s request and returns a user token.
4. The authenticator returns the user token to the client which it uses to complete the user
request.
5. The client forwards the request together with the user token to ThoughtSpot.
6. ThoughtSpot validates the token and returns information commensurate with that
authenticated user’s authorization.
Enable trusted authentication and get a token
1. Log into the ThoughtSpot server.
2. Enable trusted authentication and generate an authenticate token. (service secret) – used to
identify the server to ThoughtSpot.
Configure trusted authentication
February 08, 2019
ThoughtSpot Application Integration Guide Page 49

[admin@ourthoughtspot ~]$ tscli tokenauthentication ena
ble
Token generated. Copy the GUID in the box.
########################################
# b0cb26a0-351e-40b4-9e42-00fa2265d50c #
########################################
Override added successfully
Tokens are like any other password, you should store them securely and protect knowledge of them. At
any point in time, your installation can have a single authentication token. Repeated calls to enable
overwrite the existing token and return a new one. To disable a token and not overwrite it:
tscli tokenauthentication disable
Once generated, tokens do not expire.
Trusted authentication call
1. User in another application or web page requests access to embedded ThoughtSpot.
This is a REST request for an embedded ThoughtSpot Eobject, page, or the entire application.
Your trusted authenticator server intercepts the request. Your server application must
determine at minimum:
• if the requestor is itself authenticated with your server
• which user ( username ) is making the request
• what is being requested, an object, page, or the entire ThoughtSpot application
It is also important the the username is a match for a username on the ThoughtSpot
application.
2. The trusted web server requests a authentication token on the user’s behalf from
ThoughtSpot.
POST https://<thoughtspot>/callosum/v1/session/auth/token
This post takes the following parameters:
ParameterParameter DescriptionDescription
secret_key A required formData parameter containing a string which is the au-
thentication token provide by the ThoughtSpot server.
username A required formData parameter containing a string which is the user's
username on ThoughtSpot.
Configure trusted authentication
February 08, 2019
ThoughtSpot Application Integration Guide Page 50

access_level A required formData parameter containing one of FULL or RE-
PORT_BOOK_VIEW .
id An optional formData parameter containing a ThoughtSpot object
identifier. This is only required if you specified REPORT_BOOK_VIEW for
the access_level parameter.
3. The trusted authenticator server is responsible for managing this token.
The token can be managed in any way you see fit. Tokens expire in XXX minutes/hours/day.
4. The trusted authenticator server returns token to the original requestor.
5. Client completes the user’s request providing the token along with the request.
For example, if the customer was requesting a specific object:
https://THOUGHTSPOT_URL/?authtoken=TOKEN_VALUE/#/embed/viz/REPORTBOOK_ID/ID
If you are using ThoughtSpot embed with objects or pages, you must request reauthenticate
requests for each new object.
Configure trusted authentication
February 08, 2019
ThoughtSpot Application Integration Guide Page 51

About Runtime Filters
Runtime filters allow you to filter an answer or pinboard through parameters you pass in the URL to filter
the data that is returned. You can use them with the data API or with embedding of answers or
pinboards.
Capabilities of Runtime Filters
Runtime Filters provide ability to filter data at the time of retrieval using Embedding or the REST API. This
is done by providing filter information through the URL query parameters.
This example shows the URL to access a pinboard with a filter. Here the Runtime Filter is operating on
the column “Color” and will only return values that are equal (EQ) to “red”.
http://10.77.144.40:8088/?col1=Color&op1=EQ&val1=red#
/pinboard/e36ee65e-64be-436b-a29a-22d8998c4fae
This example shows the URL for a REST API call with a filter. Here the Runtime Filter is operating on the
column Category and returning values that are equal to mfgr%2324 .
http://10.77.144.40:8088/callosum/v1/tspublic/v1/pinboarddata?
id=e36ee65e-64be-436b-a29a-22d8998c4fae&col1=Category
&op1=EQ&val1=mfgr%2324
ThoughtSpot will try to find a matching column from the pinboard or visualization being accessed, using
the col field as name . You can add any number of filter sets by incrementing the parameters (e.g.
col2 ,op2 , and val2 , etc.) For operators that support more than one value you can pass
val1=foo&val1=bar , etc.
If the pinboard or answer you’re filtering already has one or more filters applied, the Runtime Filter(s) will
act as an AND condition. This means that the data returned must meet the conditions of all filters -
those supplied in the runtime filter, and those included in the pinboard or visualization itself.
Supported Data Types
You can use runtime filters on these data types:
•VARCHAR
•INT64
•INT32
•FLOAT
•DOUBLE
•BOOLEAN
•DATE
•DATE_TIME
•TIME
About Runtime Filters
February 08, 2019
ThoughtSpot Application Integration Guide Page 52

Note that for DATE and DATE_TIME values, you must specify the date in epoch time (also known as
POSIX or Unix time).
Example Uses
You can use Runtime Filters alongside the REST API and Embedding to create dynamic controls in your
Web portal. For example, you could use the REST API to get a list of possible filters for a visualization.
Then use that data to populate a select list on your Web portal. When a user makes a selection, you
would then pass it as a Runtime Filter, and the result returned will apply the filter.
Limitations of runtime filters
Runtime Filters do not work directly on top of tables. You need to create a worksheet if you want to use
Runtime Filters. This means that the pinboard or visualization on which you apply a runtime filter must be
created on top of a worksheet.
If the worksheet was created from an answer (i.e. it is an aggregated worksheet), Runtime Filters will only
work if the answer was formed using a single worksheet. If the answer from which the worksheet was
created includes raw tables or joins multiple worksheets, you won’t be able to use Runtime Filters on it.
This is because of the join path ambiguity that could result.
Runtime Filters do not allow you to apply “having” filters using a URL.
You cannot apply a Runtime Filter on a pinboard or visualization built on tables whose schema includes
a chasm trap. See the ThoughtSpot Administrator Guide for details on chasm traps and how
ThoughtSpot handles them.
About Runtime Filters
February 08, 2019
ThoughtSpot Application Integration Guide Page 53

Apply a Runtime Filter
Runtime filters allow you to apply filters to the data returned by the APIs or the visualization or pinboard
you’re embedding. Before you apply a filter, make sure understand their limitations.
The filters are specified in the called URL as parameters. Before you can use runtime filter(s), you need to
do these procedures:
1. Enable the JavaScript API (JS API) and authenticate to ThoughtSpot.
2. Use the Data API or Visualization Embedding to retrieve the answer or pinboard you want to
use.
Now you are ready to add a runtime filter to your Data API call or Embedded object:
1. Obtain the URL you are using to embed the visualization or call the REST API.
2. Paste the URL it into a text editor.
3. Append the runtime filter to the URL, using the runtime filter operators to get the data you
want. The format for the runtime filter is:
• For Embedding a pinboard:
http://<thoughtspot_server>:<port>/
?**col1=<column_name\>&op1=<operator\>&val1=<valu
e\>**
#/pinboard/<pinboard_id>
• For Embedding a visualization:
http://<thoughtspot_server>:<port>/
?**col1=<column_name\>&op1=<operator\>&val1=<valu
e\>**
#/pinboard/<pinboard_id>/<visualization_id>
• For the REST API with a pinboard:
http://<thoughtspot_server>:<port>
/callosum/v1/tspublic/v1/pinboarddata
?id=<pinboard_id>
&**col1=<column_name\>&op1=<operator\>&val1=<valu
e\>**
• For the REST API with a visualization:
Apply a Runtime Filter
February 08, 2019
ThoughtSpot Application Integration Guide Page 54
http://<thoughtspot_server>:<port>
/callosum/v1/tspublic/v1/pinboarddata
?id=<pinboard_id>&vizid=%5B<visualization_id>%5D
&**col1=<column_name\>&op1=<operator\>&val1=<valu
e\>**
4. To add additional filters on a particular column, you can specify multiple values by separating
them with &(ampersand) as in the example:
val1=foo&val1=bar
You can also use the IN operator for multiple values, as shown in this example:
col1=<column_name>&op1=IN&val1=<value>&val1=<value>
5. Add additional filters by incrementing the number at the end of each parameter in the RuntimeRuntime
FilterFilter for each filter you want to add, for example, col2 ,op2 ,val2 and so on.
This example passes multiple variables to a single column as well as multiple columns. It shows that
data values are returned as epoch.
col1=region&op1=IN&val1=midwest&val1=south&val1=northeast
&col2=date&op2=BET&val2=<epoch_start>&val2=<epoch_end>
Apply a Runtime Filter
February 08, 2019
ThoughtSpot Application Integration Guide Page 55

Runtime Filter Operators
This list contains all the filter operators you can use with Runtime Filters.
OperatorOperator DescriptionDescription Number of ValuesNumber of Values
EQ equals 1
NE does not equal 1
LT less than 1
LE less than or equal to 1
GT greater than 1
GE greater than or equal to 1
CONTAINS contains 1
BEGINS_WITH begins with 1
ENDS_WITH ends with 1
BW_INC_MAX between inclusive of the higher value 2
BW_INC_MIN between inclusive of the lower value 2
BW_INC between inclusive 2
BW between non-inclusive 2
IN is included in this list of values multiple
Runtime Filter Operators
February 08, 2019
ThoughtSpot Application Integration Guide Page 56

Customize the application style
Summary:Summary: Style Customization allows you to change the overall style
of your ThoughtSpot interface.
Using style customization you can create a uniform ThoughtSpot experience that matches with your
company’s look and feel. To re-brand the interface, you can use the style customization option found on
the Admin section in the ThoughtSpot web application. It lets you change the logo, application
background color, chart color palettes, and footer text. For help with chart and table visualization fonts,
contact ThoughtSpot support.
This is especially useful if you’re using the ThoughtSpot APIs for embedding visualizations from
ThoughtSpot in your own web portal or application. You can make the visualizations match the look and
feel of the portal or application in which they are embedded. For more information on using the APIs, see
the ThoughtSpot Application Integration Guide.
Style customization is enabled by default beginning in ThoughtSpot version 5.0. To disable style
customization, contact ThoughtSpot Support. The ThoughtSpot logo in the middle of the page is
automatically removed when Style Customization is enabled.
Change style customization
Make changes to the style of your ThoughtSpot interface in the Style CustomizationStyle Customization page. This option
gives you defined, yet impactful capabilities for re-branding the interface, so having some understanding
of typography and color schemes would be helpful.
To re-brand the interface:
1. Log in to ThoughtSpot from a browser.
2. Click on the AdminAdmin icon, on the top navigation bar.
3. In the AdminAdmin panel, click on Style CustomizationStyle Customization.
Customize the application style
February 08, 2019
ThoughtSpot Application Integration Guide Page 57

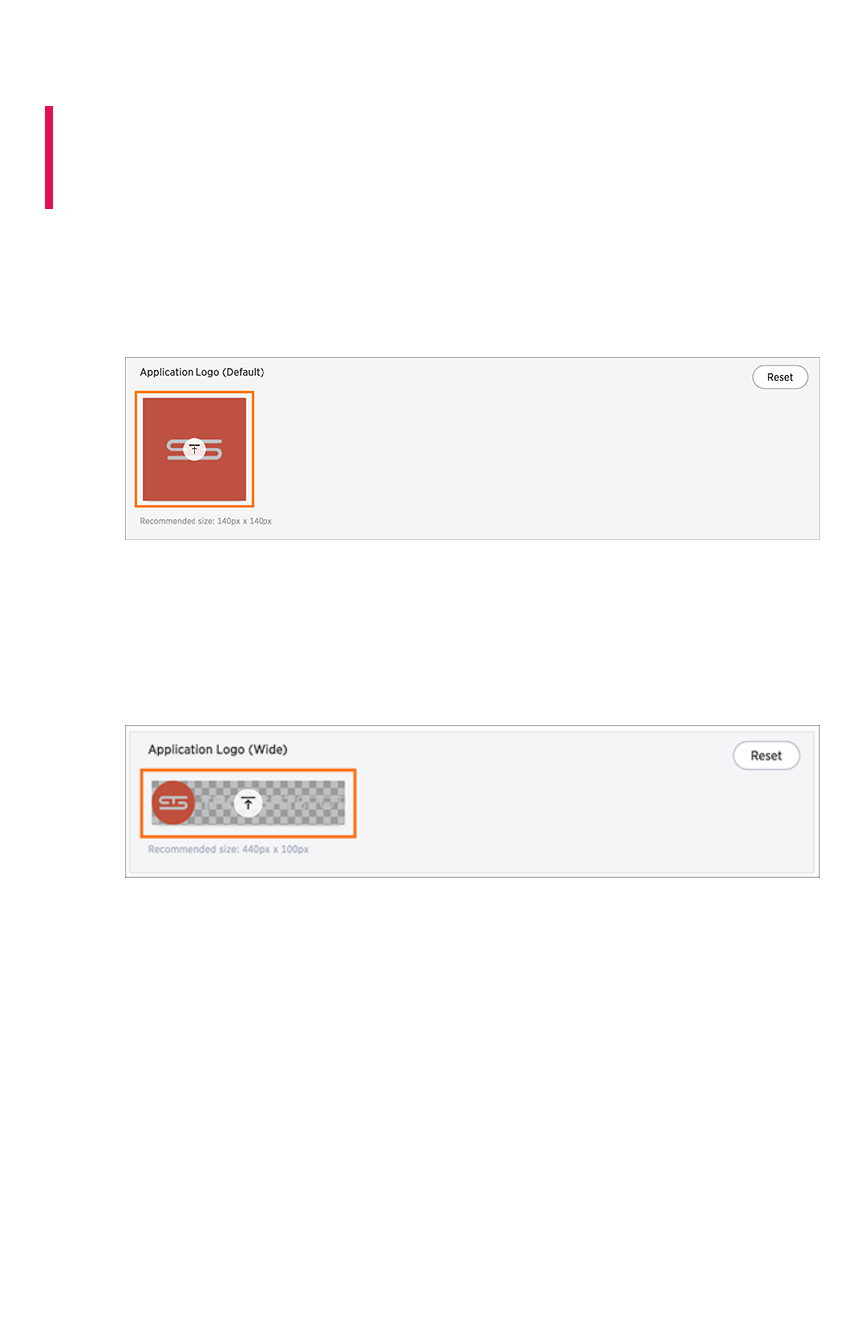
Upload application logos
Summary:Summary: You can replace the ThoughtSpot logo, wherever it
appears in the ThoughtSpot web application, with your own company
logo.
To upload your own default and wide application logos:
1. Click on the default icon under Application Logo (Default)Application Logo (Default) to browse for and select your own
default logo.
Your icon image should be a square, and the recommended size is 140px by 140px. The
accepted file formats are jpg, jpeg, and png. This logo will appear on the top left of the
interface.
2. Next click on the wide icon under Application Logo (Wide)Application Logo (Wide) to browse for and select your own
wide logo.
The recommended size is 440px by 100px. The accepted file formats are jpg, jpeg, and png.
This logo will appear on the login screen. You may need to test a few versions to make sure it
appears correctly.
3. Click the ResetReset button on the upper right hand side of the sections if you would like to bring
back the default logos.
Upload application logos
February 08, 2019
ThoughtSpot Application Integration Guide Page 59
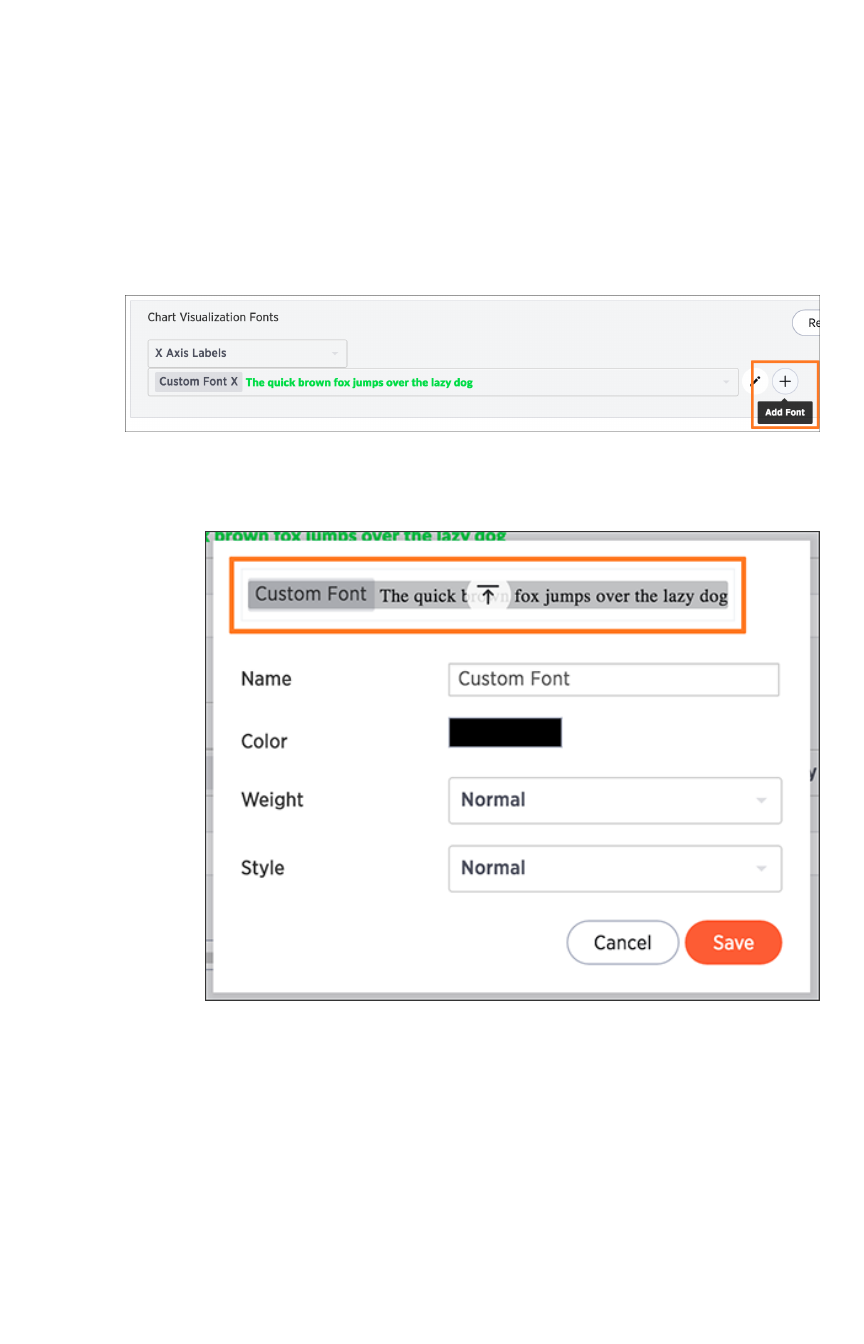
Set chart and table visualization fonts
You can add and edit fonts to customize the appearance of your charts and tables. Be careful though,
since the interface may become unreadable depending on how you change the default font, font weight,
or font style. It is therefore suggested that you use the default font settings.
If you are confident in your knowledge of font visualizations, you can set your chart and table
visualization fonts by following the steps below:
1. Click on the Add NewAdd New button under Chart Visualization FontsChart Visualization Fonts.
2. In the add new font menu, select the details for the font:
a. Upload your custom font.
Only WOFF font types are supported.
b. Use the color menu to choose the font color.
Set chart and table visualization fonts
February 08, 2019
ThoughtSpot Application Integration Guide Page 60
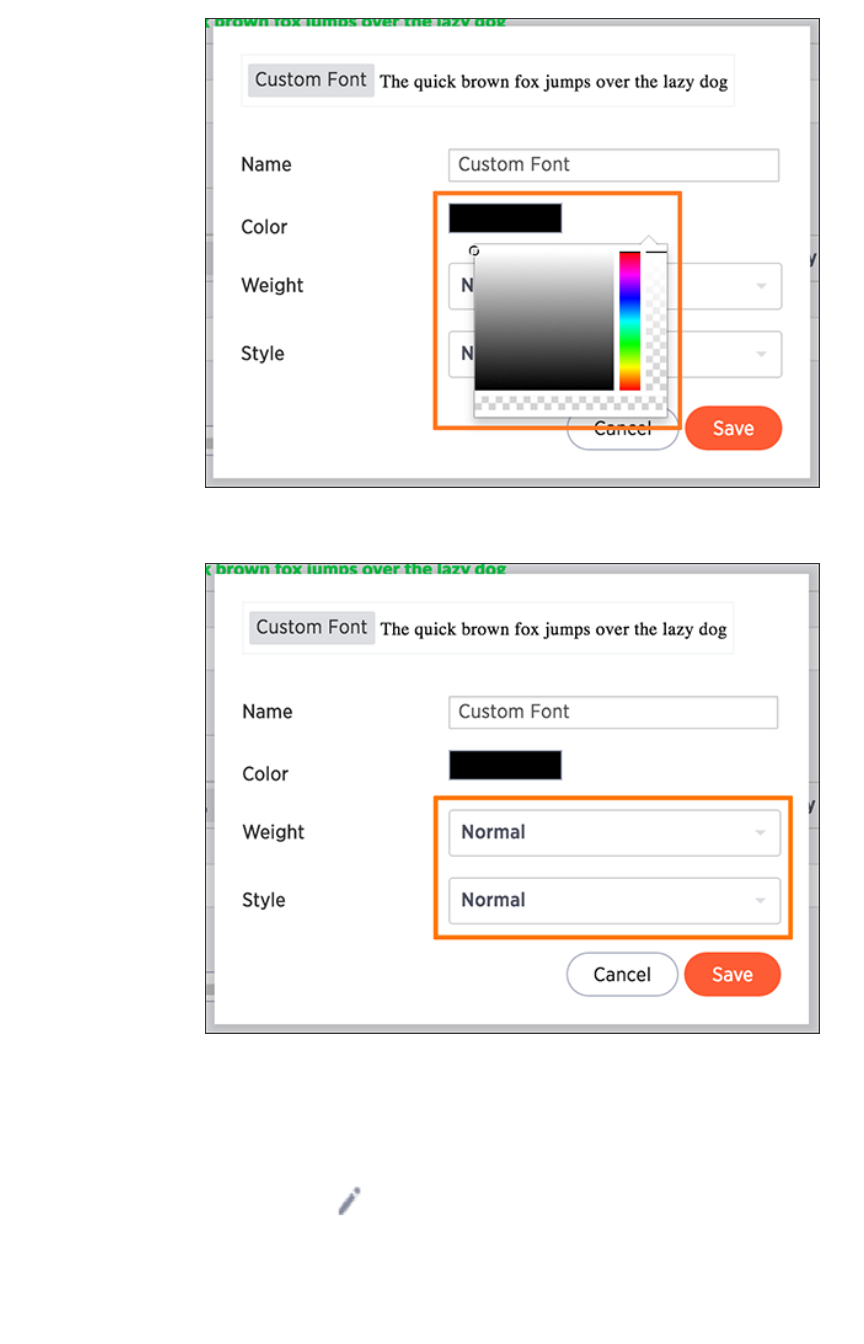
c. Choose the font weight and style from the drop down menus.
The font weight choices are normal, bold, and light. The style choices are normal,
italic, and oblique.
d. Click SaveSave.
3. Click on the Edit FontEdit Font icon to make changes to the font you just uploaded or to a pre-
existing font.
Set chart and table visualization fonts
February 08, 2019
ThoughtSpot Application Integration Guide Page 61
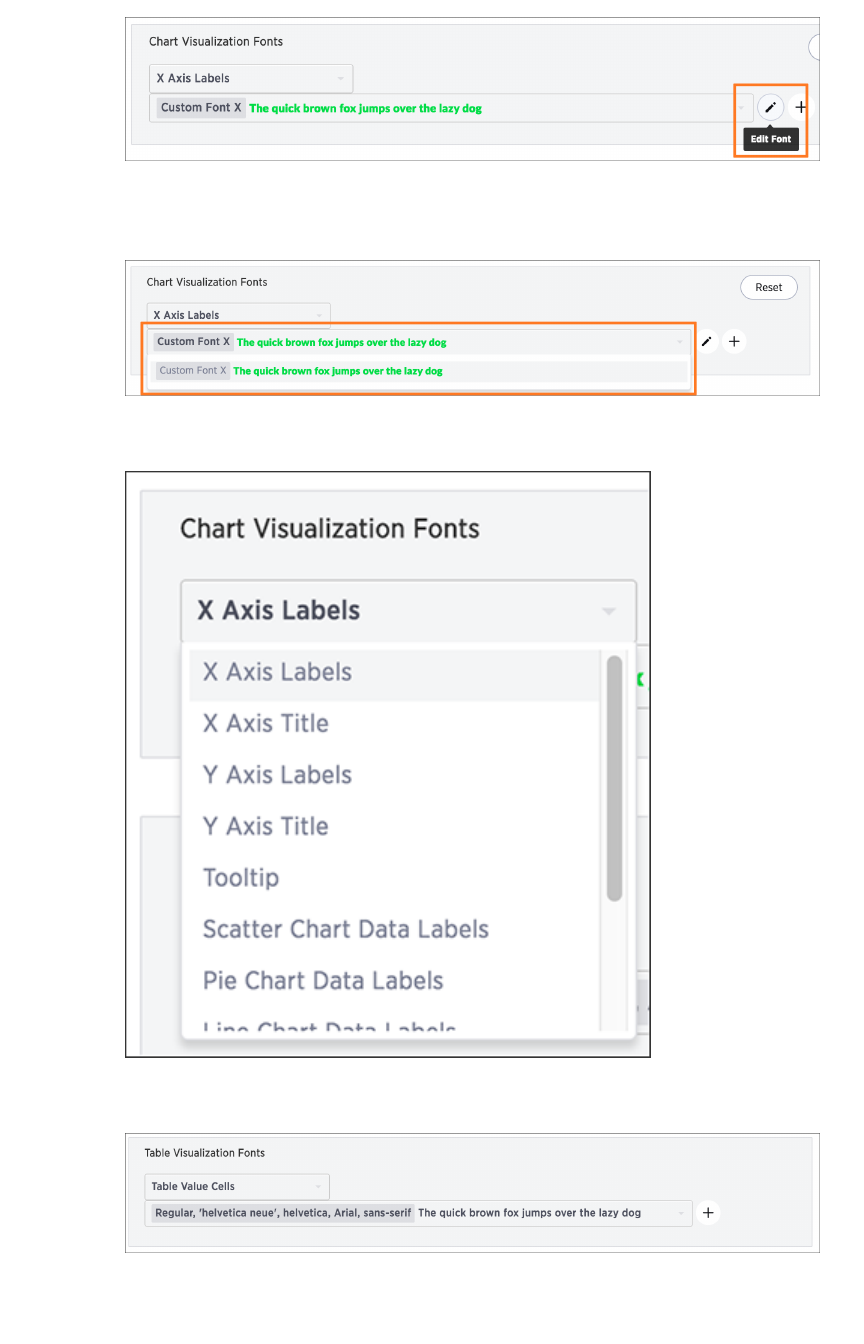
4. Make any changes to the details of the font in the edit menu and click SaveSave.
5. Click the custom font drop down to choose your custom font.
6. Click the chart label drop down to choose where you would like to apply your custom font.
7. The same steps can be followed to set your Table Visualization FontsTable Visualization Fonts.
8. Click the ResetReset button on the upper right hand side of the sections if you would like to bring
back the default fonts.
Set chart and table visualization fonts
February 08, 2019
ThoughtSpot Application Integration Guide Page 62
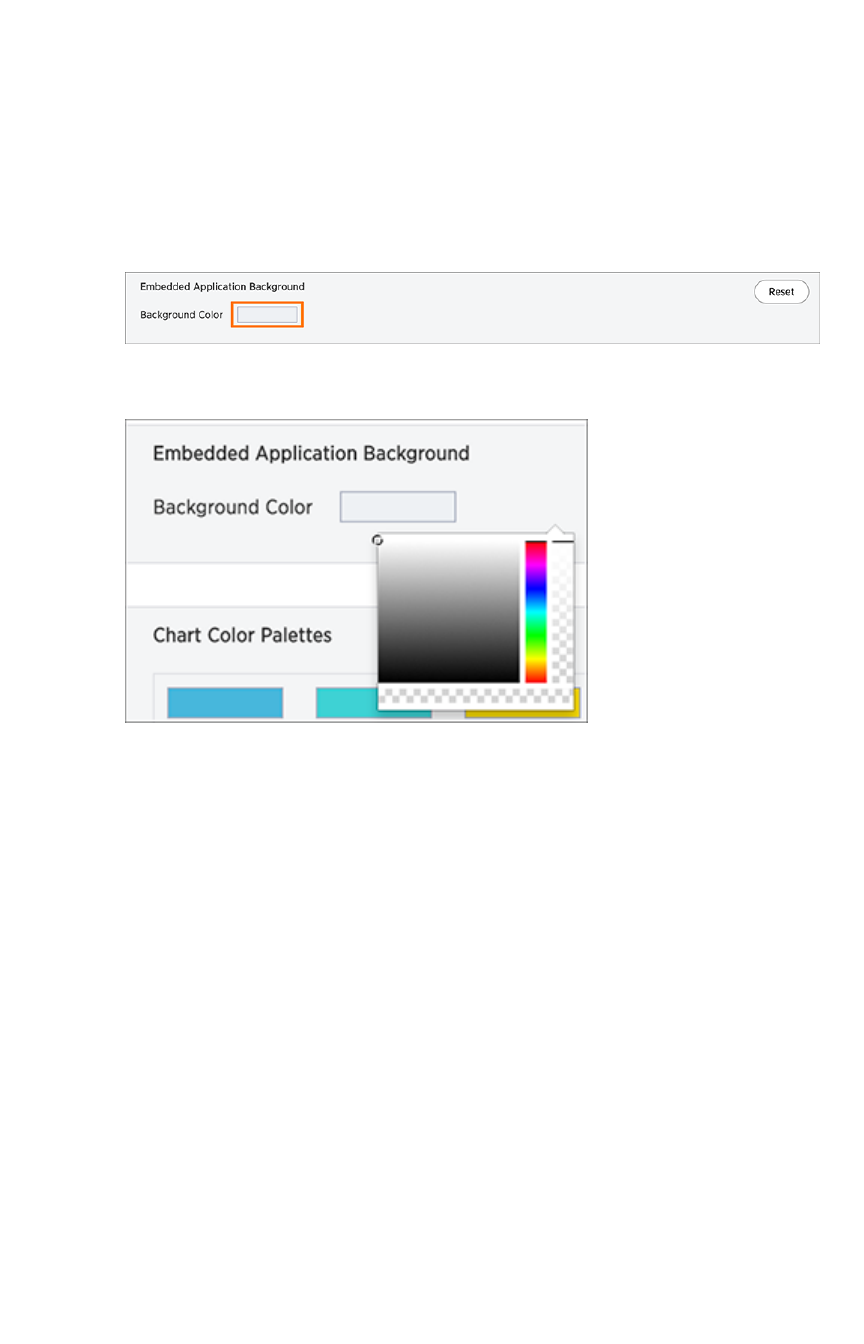
Choose a background color
You can change the background color to match with your company’s theme. The custom background
color is in effect when using the API to embed visualizations and pinboards.
This feature is only applicable when embedding ThoughtSpot in an external web portal or application. To
choose a background color:
1. Click the background color box under Application BackgroundApplication Background.
2. Use the color menu to choose your new background color.
3. Click the ResetReset button on the upper right hand side of the section if you would like to bring
back the default color.
Choose a background color
February 08, 2019
ThoughtSpot Application Integration Guide Page 63
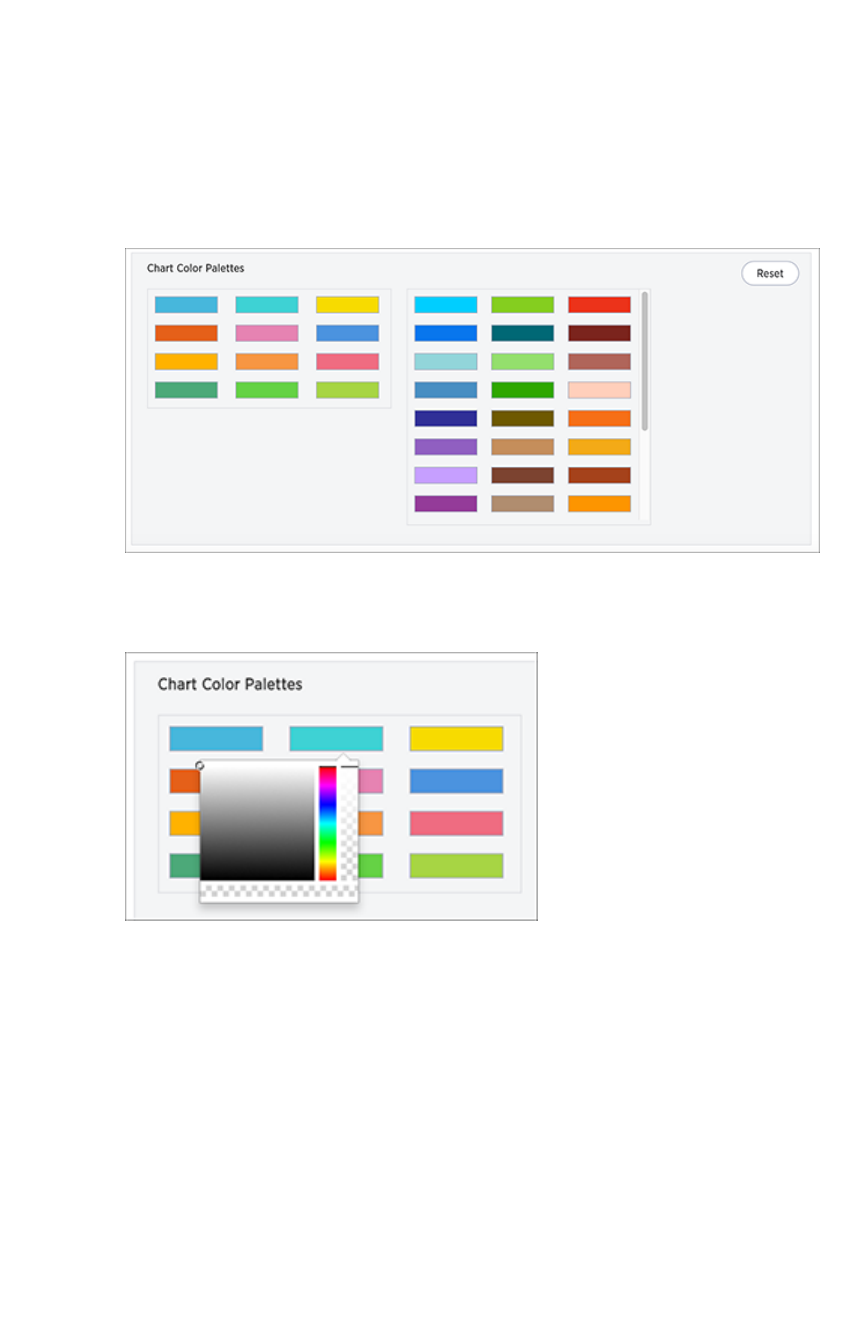
Select chart color palettes
You can change the color palettes that are used to create your charts. Although it is suggested that you
stick with the default settings, it is possible to create your own appealing color palettes if done correctly.
To select the chart color palettes:
1. Navigate to the Chart Color PalettesChart Color Palettes section at the bottom of the Style CustomizationStyle Customization page.
2. Click on the color you would like to change in the primary color palette, and use the color
menu to choose your new color.
All of the colors in the primary color palette are used in a chart before any from the secondary
palette are used. Therefore, the primary palette usually consists of primary colors.
3. Click on the color you would like to change in the secondary color palette, and use the color
menu to choose your new color.
Select chart color palettes
February 08, 2019
ThoughtSpot Application Integration Guide Page 64

The colors from the secondary color palette are used once all of the colors have been
exhausted from the primary palette. Therefore, the secondary palette usually consists of
secondary colors.
4. Click the ResetReset button on the upper right hand side of the section if you would like to bring
back the default color palettes.
Select chart color palettes
February 08, 2019
ThoughtSpot Application Integration Guide Page 65
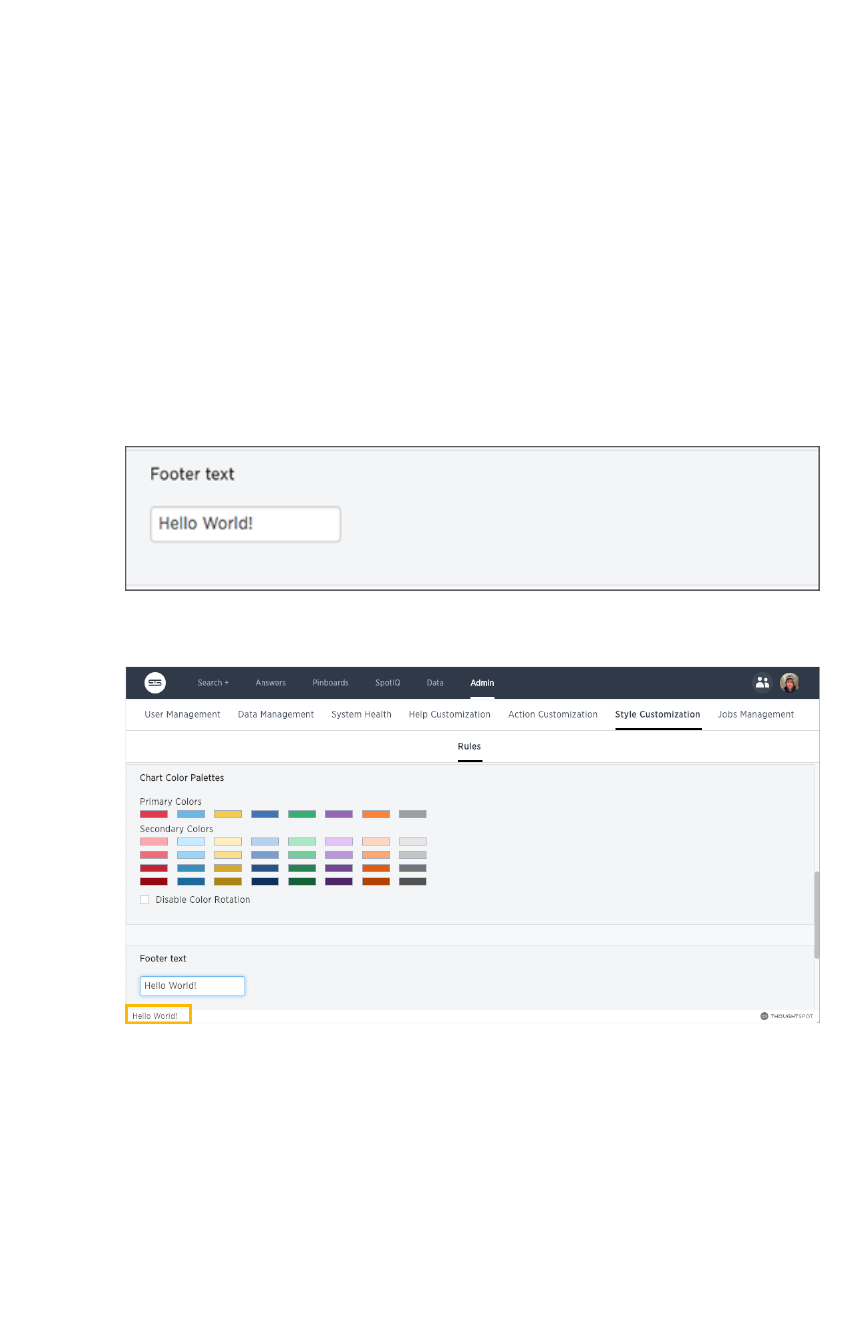
Change the footer text
The ThoughtSpot footer appears by default in the ThoughtSpot application. It also appears with an
embed application that encompasses an individual pinboard or a full application. In embed applications
that are have a single visualization, you can ask your ThoughtSpot support engineer to disable the
footer.
While you cannot remove the footer, you can customize it by adding a company-specific message.
Add a message to the application footer
You can change the footer text to reflect your company’s message. To change the footer text:
1. Click the text box under Footer textFooter text.
2. Enter your new text message.
Your new text message will automatically be displayed in the footer.
3. Click the ResetReset button on the upper right hand side of the section if you would like to bring
back the default footer text.
Change the footer text
February 08, 2019
ThoughtSpot Application Integration Guide Page 66

Public API reference
This reference details all the public ThoughtSpot APIs. The descriptions are aimed to help you solve
specific use cases, such as syncing users and groups, or fetching visualization headers. The following
public APIs are available:
•pinboarddata API
•metadata API
•session API
•user API
•group API
See About the REST API for information on how to call and use the REST APIs.
Public API reference
February 08, 2019
ThoughtSpot Application Integration Guide Page 67

pinboarddata API
Gets the pinboard data from the ThoughtSpot system. Returns one object if you make a call to a specific
visualization on a pinboard.
• Public namespace: Data
• Current URL path: /tspublic/v1/pinboarddata
Parameters
ParameterParameter DescriptionDescription
id GUID id of the pinboard query string.
vizid Optional GUID ids of the visualizations query string.
batchsize An integer defining the query batch size. The system default is -1 .
pagenumber
An integer providing another way to specify an offset. The system default is -1 . Al-
ternate way to set offset. This is:
1-based indexingOffset = (pageNumber - 1) * batchSize query integer
offset An integer specifying the query offset. The system default is -1 .
formattype A string specifying the format type. Valid values are COMPACT or FULL JSON. The
system default is COMPACT .
HTTP Status Codes
• 200 Gets the data of a pinboard/visualization.
• 400 Invalid pinboard id.
Response example:
Curl
curl -X POST --header 'Content-Type: application/json' --heade
r 'Accept: application/json' 'https://<instance>/callosum/v1/ts
public/v1/pinboarddata?batchsize=-1&pagenumber=-1&offset=-1&for
mattype=COMPACT'
pinboarddata API
February 08, 2019
ThoughtSpot Application Integration Guide Page 68

Request URL
https://<instance>/callosum/v1/tspublic/v1/pinboarddata?batchsi
ze=-1&pagenumber=-1&offset=-1&formattype=COMPACT
Response Body
no content
Response Code
400
pinboarddata API
February 08, 2019
ThoughtSpot Application Integration Guide Page 69

Response Headers
{
"x-callosum-incident-id": "2ff9d2e4-c928-4192-8250-8450de264a
b7",
"x-callosum-trace-id": "2e551b8d-d3f4-4cf1-af90-a49bb246ad9
2",
"date": "Sun, 19 Feb 2017 03:39:41 GMT",
"x-callosum-request-time-us": "11536",
"server": "nginx",
"pragma": "no-cache",
"cache-control": "no-store, no-cache, must-revalidate, max-ag
e=0, post-check=0, pre-check=0",
"content-security-policy": "script-src 'self'",
"connection": "keep-alive",
"content-length": "0",
"x-callosum-ip": "192.168.2.247",
"content-type": null
}
pinboarddata API
February 08, 2019
ThoughtSpot Application Integration Guide Page 70

metadata API
These two APIs work with metadata for objects in the system.
GET /tspublic/v1/metadata/listobjectheaders
Lists the metadata object headers in the repository
Parameters
ParameterParameter DescriptionDescription
type A string specifying the metadata object type. Valid values for this field are:
•REPORT_BOOK
•QUESTION_ANSWER_BOOKPINBOARD_ANSWER_BOOK
•QUESTION_ANSWER_SHEET
•PINBOARD_ANSWER_SHEET
•LOGICAL_COLUMN
•LOGICAL_TABLE
•LOGICAL_RELATIONSHIP
•TAG
•DATA_SOURCE
subtypes List of sub-types of metadata object. This setting applies to the LOGI-
CAL_TABLE type. Valid values are:
•ONE_TO_ONE_LOGICAL
•WORKSHEET
•PRIVATE_WORKSHEET
•USER_DEFINED
•AGGR_WORKSHEET
category A string specifying the metadata object category. Valid values are ALL or
MY .
sort Sort order of returned headers. Valid values - DEFAULT
•NAME
•DISPLAY_NAME
•AUTHOR
•CREATED
•MODIFIED
sortascending A boolean flag specifying sort order. A null value defines default order. True
signifies ascending order. False signifies descending order.
offset An integer specifying the batch offset to fetch page of headers. A value of
-1 implies first page.
metadata API
February 08, 2019
ThoughtSpot Application Integration Guide Page 71
ParameterParameter DescriptionDescription
batchsize An integer specifying the batch size. The system default is unspecified, a
value of -1 implies no pagination.
tagname A JSON string array containing a set of tag names to filter headers by.
pattern A string specifying a object name pattern to match. Use %for wildcard
match.
skipids A string identifying the object metadata GUIDs to exclude.
fetchids A string identifying the object metadata GUIDs to fetch.
auto_created A boolean specifying whether to list auto created objects only. A value of
null signifies return all.
HTTP Status Code
•200 Gets the visualization headers.
Request URL
https://<instance>/callosum/v1/tspublic/v1/metadata/listobjecth
eaders
For example:
curl -X GET --header 'Accept: application/json' --header 'X-Req
uested-By: ThoughtSpot'
'https://<instance>/callosum/v1/tspublic/v1/metadata/listob
jectheaders?category=ALL&sort=DEFAULT&offset=-1'
For example:
metadata API
February 08, 2019
ThoughtSpot Application Integration Guide Page 72

[
{
"id": "6715f768-8930-4180-9a3d-1efdbfaa8e7f",
"name": "Headline Pinboard",
"author": "59481331-ee53-42be-a548-bd87be6ddd4a",
"created": 1519940021267,
"modified": 1519945210514,
"modifiedBy": "59481331-ee53-42be-a548-bd87be6ddd4a",
"owner": "6715f768-8930-4180-9a3d-1efdbfaa8e7f",
"isAutoCreated": false,
"isAutoDelete": false
},
{
"id": "262abdac-b00f-4f5f-ad33-fcf10154184f",
"name": "Empty Pinboard",
"author": "59481331-ee53-42be-a548-bd87be6ddd4a",
"created": 1519945152030,
"modified": 1519945152030,
"modifiedBy": "59481331-ee53-42be-a548-bd87be6ddd4a",
"owner": "262abdac-b00f-4f5f-ad33-fcf10154184f",
"isAutoCreated": false,
"isAutoDelete": false
},
{
"id": "327f4d60-c502-43b0-b1d4-c73df5031a2e",
"name": "Charts Pinboard",
"author": "59481331-ee53-42be-a548-bd87be6ddd4a",
"created": 1519880454269,
"modified": 1519945014529,
"modifiedBy": "59481331-ee53-42be-a548-bd87be6ddd4a",
"owner": "327f4d60-c502-43b0-b1d4-c73df5031a2e",
"isAutoCreated": false,
"isAutoDelete": false
},
...snip...,
{
"id": "e82fe65a-7ac0-4282-a783-7a35c01b8dbd",
"name": "Broken Pinboard",
"author": "59481331-ee53-42be-a548-bd87be6ddd4a",
"created": 1455598191207,
"modified": 1455598218094,
"modifiedBy": "59481331-ee53-42be-a548-bd87be6ddd4a",
"owner": "e82fe65a-7ac0-4282-a783-7a35c01b8dbd",
"isAutoCreated": false,
"isAutoDelete": false
metadata API
February 08, 2019
ThoughtSpot Application Integration Guide Page 73

}
]
Response Code
200
Response Headers
{
"x-callosum-trace-id": "c8008291-c074-45cf-b88a-371253166b5
b",
"date": "Tue, 27 Mar 2018 17:38:54 GMT",
"content-encoding": "gzip",
"x-callosum-request-time-us": "11694",
"transfer-encoding": "chunked",
"x-nginx-localhost": "172.18.231.12",
"x-callosum-ip": "172.18.231.12",
"connection": "keep-alive",
"x-ua-compatible": "IE=edge",
"x-callosum-incident-id": "791eb139-5fd1-478a-9002-35a81b0dd4
aa",
"pragma": "no-cache",
"server": "ThoughtSpot",
"vary": "Accept-Encoding",
"content-type": "application/json",
"cache-control": "no-store, no-cache, must-revalidate, max-ag
e=0, post-check=0, pre-check=0",
"content-security-policy": "script-src 'self'"
}
GET /tspublic/v1/metadata/listvizheaders
Gets the visualization headers from the ThoughtSpot system. The expected output includes a list of
objects, each with information about the visualizations of the given pinboard.
metadata API
February 08, 2019
ThoughtSpot Application Integration Guide Page 74
Parameters
ParameterParameter DescriptionDescription
id A string specifying the GUID of a particular answer (reportbook).
HTTP Status Code
•200 Gets the visualization headers.
•400 Invalid pinboard GUID.
Request URL
https://<instance>/callosum/v1/tspublic/v1/metadata/listvizhead
ers
For example:
curl -X GET --header 'Accept: application/json' --header 'X-Req
uested-By: ThoughtSpot' 'http://172.18.231.12:8088/callosum/v1/
tspublic/v1/metadata/listvizheaders?id=327f4d60-c502-43b0-b1d
4-c73df5031a2e'
Response Body
An array where each response has these first class citizens:
•size (String enumeration)
•vizType (String enumeration)
•id (GUID)
•name (String)
•author (GUID)
•created (Epoch)
•modified (Epoch)
•modifiedBy (GUID)
•owner (GUID)
For example:
metadata API
February 08, 2019
ThoughtSpot Application Integration Guide Page 75

[
{
"size": "m",
"vizType": "CHART",
"title": {
"value": {
"text": "Line chart- horizontal 900-1200 - data labels"
}
},
"id": "8fbf93e6-54ba-4a20-b2bb-4afe8dca5321",
"name": "1177d886-27fd-4dff-a617-8defadd27a6b::6e87081a-fc4
c-4bd9-b1e0-cfe145868498 Pinboard Ref",
"author": "59481331-ee53-42be-a548-bd87be6ddd4a",
"created": 1519880461956,
"modified": 1519945014529,
"modifiedBy": "59481331-ee53-42be-a548-bd87be6ddd4a",
"owner": "6f403a20-fe68-43e7-a0bf-a4e706740361"
},
...snip...
{
"size": "ls",
"vizType": "CHART",
"title": {
"value": {
"text": "Percent as chart"
}
},
"id": "eb59aa25-1d2b-44f4-b5b4-b390105d56a8",
"name": "b8c26ea1-b341-4a18-871b-cc67a6bb237f::80cd5837-d5a
7-491d-a3dc-490dfb3dbb0f Pinboard Ref",
"author": "59481331-ee53-42be-a548-bd87be6ddd4a",
"created": 1519932657762,
"modified": 1519945014529,
"modifiedBy": "59481331-ee53-42be-a548-bd87be6ddd4a",
"owner": "6f403a20-fe68-43e7-a0bf-a4e706740361"
}
]
Response Code
200
metadata API
February 08, 2019
ThoughtSpot Application Integration Guide Page 76

Response Headers
{
"x-callosum-trace-id": "c0c84945-be03-414c-80c3-47b1b094980
3",
"date": "Tue, 27 Mar 2018 17:46:47 GMT",
"content-encoding": "gzip",
"x-callosum-request-time-us": "35402",
"transfer-encoding": "chunked",
"x-nginx-localhost": "172.18.231.12",
"x-callosum-ip": "172.18.231.12",
"connection": "keep-alive",
"x-ua-compatible": "IE=edge",
"x-callosum-incident-id": "4ed1364c-b018-43a8-8486-ee954cd3da
e3",
"pragma": "no-cache",
"server": "ThoughtSpot",
"vary": "Accept-Encoding",
"content-type": "application/json",
"cache-control": "no-store, no-cache, must-revalidate, max-ag
e=0, post-check=0, pre-check=0",
"content-security-policy": "script-src 'self'"
}
metadata API
February 08, 2019
ThoughtSpot Application Integration Guide Page 77

Public API reference
This object has two POST calls, one for login and one for logout .
POST /tspublic/v1/session/login
This call takes a APPLICATION_FORM_URLENCODED payload containing a username , a password , and
an optional rememberme flag. If you do not supply the optional flag, the system uses the default false
value.
Inputs
ParameterParameter DescriptionDescription
username Username of the user to log in as.
password Password of the user to log in as.
rememberme A flag indicating if the user session needs to be remembered. Defaults to
false .
Returns
No object is returned.
Status Codes
CodeCode DescriptionDescription
204 On successful login.
401 On failure to login
POST /tspublic/v1/session/logout
This call logs a user out of an existing session.
Returns
No object is returned.
Public API reference
February 08, 2019
ThoughtSpot Application Integration Guide Page 78

Status Codes
CodeCode DescriptionDescription
204 On successful logout.
401 On failure or when unauthorized to call.
Public API reference
February 08, 2019
ThoughtSpot Application Integration Guide Page 79

user API
• Public namespace: Configuration
POST /tspublic/v1/user/ownership
Transfers ownership of
all
objects from one user to another. You cannot transfer objects to or from the
system user or the administrative user.
Parameters
ParameterParameter DescriptionDescription
fromUserName
Username to transfer from. You cannot specify the system user or an ad-
ministrative user.
toUserName
Username to transfer to. You cannot specify the system user or an admin-
istrative user.
HTTP Status Code
• 200
• 400
Request URL
https://<instance>/callosum/v1/tspublic/v1/user/transfer/owners
hip
Curl example:
ccurl -X POST --header 'Content-Type: application/json' --heade
r 'Accept: application/json' --header 'X-Requested-By: ThoughtS
pot' 'https://<instance>/callosum/v1/tspublic/v1/user/transfer/
ownership?fromUserName=Auser&toUserName=Buser'
user API
February 08, 2019
ThoughtSpot Application Integration Guide Page 80

Response Object Format
no content
Response Code
200
Response Headers
{
"x-callosum-incident-id": "d28fd603-bd7e-414f-882b-794d74c4b4
69",
"x-callosum-trace-id": "55453051-5fb5-4139-8d24-adcc0b1b24f
2",
"date": "Thu, 15 Mar 2018 22:21:47 GMT",
"x-callosum-request-time-us": "970213",
"server": "ThoughtSpot",
"status": "204",
"strict-transport-security": "max-age=31536000; includeSubDom
ains",
"pragma": "no-cache",
"cache-control": "no-store, no-cache, must-revalidate, max-ag
e=0, post-check=0, pre-check=0",
"content-security-policy": "script-src 'self'",
"x-ua-compatible": "IE=edge",
"content-type": null
}
POST /tspublic/v1/user/sync
API to synchronize principal from external system with ThoughtSpot system. This API is for users and
groups. It should help to keep ThoughtSpot users and groups automatically synchronized with your
external database.
user API
February 08, 2019
ThoughtSpot Application Integration Guide Page 81

Specifically, you will have to make a call to /tspublic/v1/user/sync containing all users and groups
present in the external database. If the call succeeds, then it is guaranteed that the users and groups in
ThoughtSpot match those specified in the list of objects passed to /tspublic/v1/user/sync . This
means that:
• Objects (users or groups) present in ThoughtSpot, but not present in the list passed to a sync
call will be deleted.
• Objects present in ThoughtSpot, and present in the list passed to a sync call will be updated
such that the object attributes in ThoughtSpot match those present in the list. This includes
group membership.
• Objects not present in ThoughtSpot, and present in the list will be created in ThoughtSpot.
The returned object represents the changes that were made in ThoughtSpot.
ParameterParameter DescriptionDescription
applyChanges A boolean flag to indicate whether to sync the users and groups to the system,
and apply the difference evaluated. You can use this API to validate a difference
before applying changes.
password A string specifying a password.
principals A string specifying a list of principal objects.
remoteDeleted This is boolean flag that indicates whether to remove deleted users/groups.
When true, this flag removes any deleted users or groups.boolean
HTTP Status Code
• 200
Request URL
https://<instance>/callosum/v1/tspublic/v1/user/sync
Curl example:
curl -X POST --header 'Content-Type: application/x-www-form-url
encoded' --header 'Accept: application/json' -d 'applyChanges=f
alse' 'https://<instance>/callosum/v1/tspublic/v1/user/sync'
user API
February 08, 2019
ThoughtSpot Application Integration Guide Page 82

Response Object Format
{
'usersAdded': ['username1','username2'],
'usersDeleted': ['username3'],
'usersUpdated': ['username4'],
'groupsAdded': ['groupname1'],
'groupsDeleted': ['groupname2','groupname3'],
'groupsUpdated': ['groupname4']
}
Response Code
415
Response Headers
{
"x-callosum-incident-id": "645499d1-d0cf-4b3b-bbdc-4296abb9a3
26",
"x-callosum-trace-id": "19f7ad7d-226a-4e88-a301-405f8512595
9",
"date": "Sun, 19 Feb 2017 03:55:52 GMT",
"x-callosum-request-time-us": "4545",
"server": "nginx",
"pragma": "no-cache",
"cache-control": "no-store, no-cache, must-revalidate, max-ag
e=0, post-check=0, pre-check=0",
"content-security-policy": "script-src 'self'",
"connection": "keep-alive",
"content-length": "0",
"x-callosum-ip": "192.168.2.247",
"content-type": null
}
user API
February 08, 2019
ThoughtSpot Application Integration Guide Page 83

POST /tspublic/v1/user/updatepassword
Changes the password of a user
Parameters
ParameterParameter DescriptionDescription
name Name of the user .
password String to represent the new user password.
currentpassword String to represent the current user password.
Request URL
https://<instance>/callosum/v1/tspublic/v1/user/updatepassword
Curl example:
curl -X POST --header 'Content-Type: application/x-www-form-url
encoded' --header 'Accept: application/json' --header 'X-Reques
ted-By: ThoughtSpot' -d 'name=guest¤tpassword=test&password=foo
barfoobar' 'https://<instance>/callosum/v1/tspublic/v1/user/upd
atepassword'
GET /tspublic/v1/user/list
API to get a list of all users, groups, and their inter-dependencies in the form of principal objects. This
API is for users and groups.
One principal object contains the following properties (* denotes required properties):
user API
February 08, 2019
ThoughtSpot Application Integration Guide Page 84

PropertyProperty DescriptionDescription
name
String to represent the name of the principal.
This field, in conjunction with whether the object is a user or group, is used
to identify a user/group. Consequently, this field is required to be unique
(unique for users and groups separately. I.e. you can have user “x” and
group “x”).
displayName String to represent the display name of the principal.
description String to describe the principal.
mail String to represent the email address of the user. This field should be popu-
lated only in case of user not group. It is ignored in the case of groups.
principalTypeEnum
The value of this field should be one of the following:
•LOCAL_USER User created in the ThoughtSpot system and the
validation of the user is done through password saved in the
ThoughtSpot database.
•LOCAL_GROUP Groups created in the ThoughtSpot system.
password String to represent the password of the user. This field should be only pop-
ulated in case of user not group. It is ignored in the case of groups. Also
password is only required if the user is of LOCAL_USER type. Password is
only required when the user is created for the first time. In subsequent up-
date of the user password is not updated even if it changes in the source
system.
groupNames List of group names that a principal belongs to directly. Groups and users
can belong to other groups.
HTTP Status Code
• 200
Request URL
https://<instance>/callosum/v1/tspublic/v1/user/list
Curl example:
user API
February 08, 2019
ThoughtSpot Application Integration Guide Page 85

curl -X GET --header 'Accept: application/json' 'https://<insta
nce>/callosum/v1/tspublic/v1/user/list'
Response Body format
[
{
"name": "Group 1",
"displayName": "Group Display Name 1",
"description": "Group Description 1",
"principalTypeEnum": "LOCAL_GROUP",
"groupNames": []
},
{
"name": "Test Name",
"displayName": "Test DisplayName",
"principalTypeEnum": "LOCAL_USER"
"password": "password_123",
"groupNames": ["Group 1"]
}
]
user API
February 08, 2019
ThoughtSpot Application Integration Guide Page 86

Response Body example
user API
February 08, 2019
ThoughtSpot Application Integration Guide Page 87

[
{
"name": "Sales Executives",
"displayName": "Sales Executives",
"description": "",
"created": 1481827712854,
"modified": 1481827713052,
"principalTypeEnum": "LOCAL_GROUP",
"groupNames": []
},
{
"name": "Operations Demo",
"displayName": "Operations Demo",
"description": "",
"created": 1436491036553,
"modified": 1436498598655,
"principalTypeEnum": "LOCAL_GROUP",
"groupNames": []
},
{
"name": "Sales Directors",
"displayName": "Sales Directors",
"description": "",
"created": 1481827747555,
"modified": 1485805361837,
"principalTypeEnum": "LOCAL_GROUP",
"groupNames": []
},
{
"name": "Product",
"displayName": "Product",
"description": "",
"created": 1409250574242,
"modified": 1477525172084,
"principalTypeEnum": "LOCAL_GROUP",
"groupNames": []
},
{
"name": "Sales Development",
"displayName": "Sales Development",
"description": "",
"created": 1481831987186,
"modified": 1481831987382,
"principalTypeEnum": "LOCAL_GROUP",
"groupNames": [
user API
February 08, 2019
ThoughtSpot Application Integration Guide Page 88

"Sales"
]
}
]
Response Code
200
Response Headers
{
"x-callosum-incident-id": "1be6e07b-b7aa-4531-8597-8852760757
f0",
"x-callosum-trace-id": "e92c54ca-d5f1-44a6-ab8e-f6871bb0da8
b",
"date": "Sun, 19 Feb 2017 04:14:13 GMT",
"content-encoding": "gzip",
"x-callosum-request-time-us": "19720",
"server": "nginx",
"vary": "Accept-Encoding",
"content-type": "application/json",
"pragma": "no-cache",
"cache-control": "no-store, no-cache, must-revalidate, max-ag
e=0, post-check=0, pre-check=0",
"transfer-encoding": "chunked",
"content-security-policy": "script-src 'self'",
"connection": "keep-alive",
"x-callosum-ip": "192.168.2.247",
"x-ua-compatible": "IE=edge"
}
user API
February 08, 2019
ThoughtSpot Application Integration Guide Page 89

group API
POST v1/group/addprivilege
Adds a DATADOWNLOADING or USERDATAUPLOADING privilege to the system default ALL_GROUP . All
users in the system are always part of ALL group. By default, this group does not have either
permission.
All the data sources which the ALL_GROUP has permissions to are downloadable when
DATADOWNLOADING is set.
Parameters
ParameterParameter DescriptionDescription
privilege A string representing the privilege to add. You can set `DATADOWNLOAD-
ING` or `USERDATAUPLOADING` privilege.
groupNames A string representing the name of the group to add the privilege to. Only
`ALL_GROUP` is accepted.
Return codes
• 200
• 204 Success
• 401 Failure/unauthorized
Request URL
https://<instance>/callosum/v1/tspublic/v1/group/addprivilege
POST v1/group/removeprivilege
Removes a privilege from a group.
Parameters
ParameterParameter DescriptionDescription
privilege A string representing the privilege to remove. You can set `DATADOWN-
LOADING` or `USERDATAUPLOADING` privilege.
group API
February 08, 2019
ThoughtSpot Application Integration Guide Page 90

ParameterParameter DescriptionDescription
groupNames A string representing the name of the group to remove the privilege from.
Only `ALL_GROUP` is accepted.
Return codes
• 200
• 204 Success
• 401 Failure/unauthorized
Request URL
https://<instance>/callosum/v1/tspublic/v1/group/addprivilege
group API
February 08, 2019
ThoughtSpot Application Integration Guide Page 91
