Thumbkeyboard User Manual Software V3
User Manual:
Open the PDF directly: View PDF ![]() .
.
Page Count: 36
- 1. The Procedure to Configure Keypad
- 2.Key Types
- 3. Applications
- Product List
- SMKD92 Gamepad
- SMKD82 Leftpad
- 44
- (Tools pad)
- //
- 48 (Type A)
- / /
- 46 (Type B)
- SMKD72 Numpad
- /
- 44 (Type C)
- /
- 89
- SMKD62 Split-Keyboard
- /

Thumbkeyboard Software User Manual
Software for AE-SMKD Series Keyboard
.
.
Make Your Fingers More Usable
II
1. The procedure to configure keypad .............................................................................................. 1
2.Key Types ........................................................................................................................................ 5
2.0 Normal Key .......................................................................................................................... 6
2.1 Fn-Shift ................................................................................................................................ 8
2.2 Mouse-Key .......................................................................................................................... 8
2.3 Combination Key ................................................................................................................. 9
2.4 Burst Key ............................................................................................................................. 9
2.5 Round-Robin Key ............................................................................................................... 10
2.6 Continue Key ..................................................................................................................... 10
2.7 Jitter Key ............................................................................................................................ 11
2.8 Special Functions ............................................................................................................... 11
2.9 Disable Key ........................................................................................................................ 12
3. Applications ................................................................................................................................. 13
3.1 How to switch Profiles(configurations) ............................................................................. 13
3.1.1 Keypad Command ( hotkey ) .................................................................................. 13
3.1.2 Define one Mode key ............................................................................................. 13
3.2 Fn1-shift and Fn2-shift to expand keys ............................................................................. 14
3.3 Shortcut keypad Tools ....................................................................................................... 15
3.3.1 Combination Key Type ............................................................................................ 15
3.3.2 Two-Key-Click feature. ............................................................................................ 16
3.4 ProgrammableDelay-Macro (Gaming Feature) ................................................................. 21
3.4.1 Macro Instruction ................................................................................................... 21
3.4.2 Edit one Delay-Macro ............................................................................................. 22
3.4.3 Delay-Macro Examples ........................................................................................... 26
III
3.5 How to expand more keys ................................................................................................. 30
Method 1: Fn1/Fn2-shift .............................................................................................. 30
Method 2: 4 Profiles ..................................................................................................... 30
Method 3 : Two-Key-Click ............................................................................................ 30
3.6 One click output chars ....................................................................................................... 31
Method 1: the Type of Combination Key (1~2 char + Shift/Ctrl/Alt/Win) ...................... 31
Method 2: the Type of Burst key (1~3 char) .................................................................... 32
Method 3: Two-Key-Burst (1~6 char) .............................................................................. 32
Method 4: Delay-Macro (1~31 char) ............................................................................... 32
Product List ..................................................................................................................................... 33
1
1. The Procedure to Configure Keypad
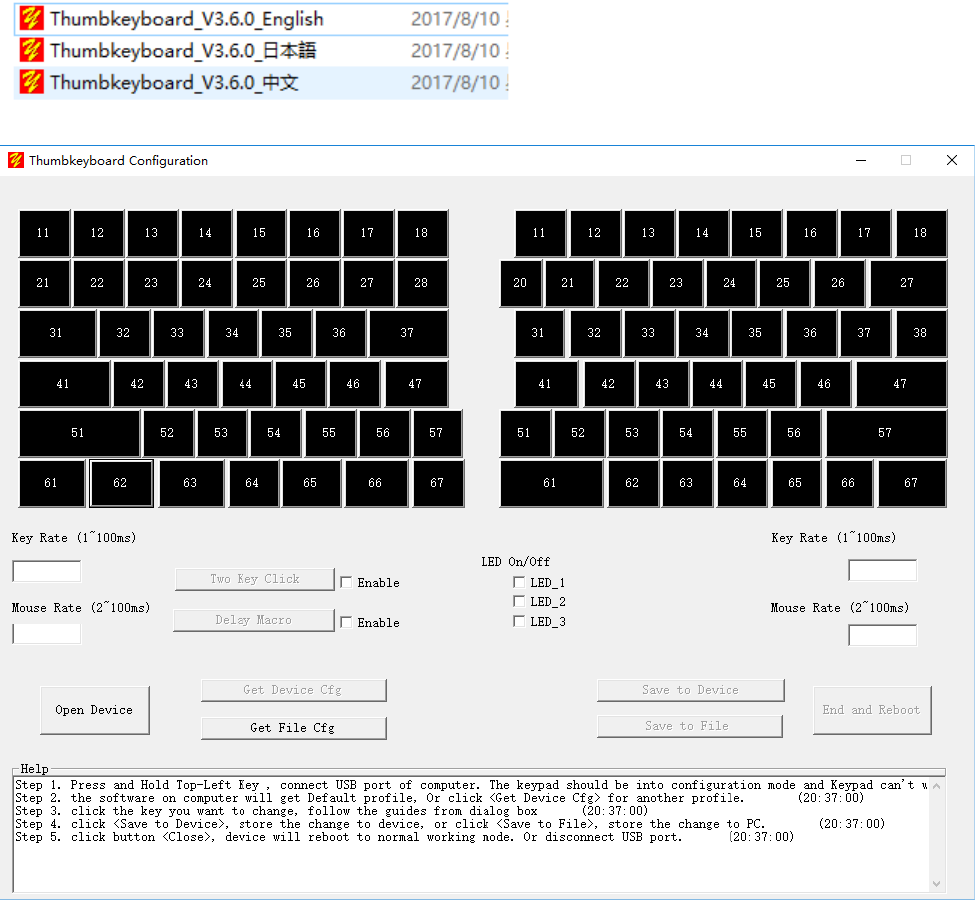
Step 1: Download latest software from product website, and run it.
Please download the latest software from website
Every Key has one Location ID, eg. Key12, Key62. The first number is row, second number is column.
Key12 means the key located at row 1, col 2.
Key62 means the key located at row 6, col 2.
2
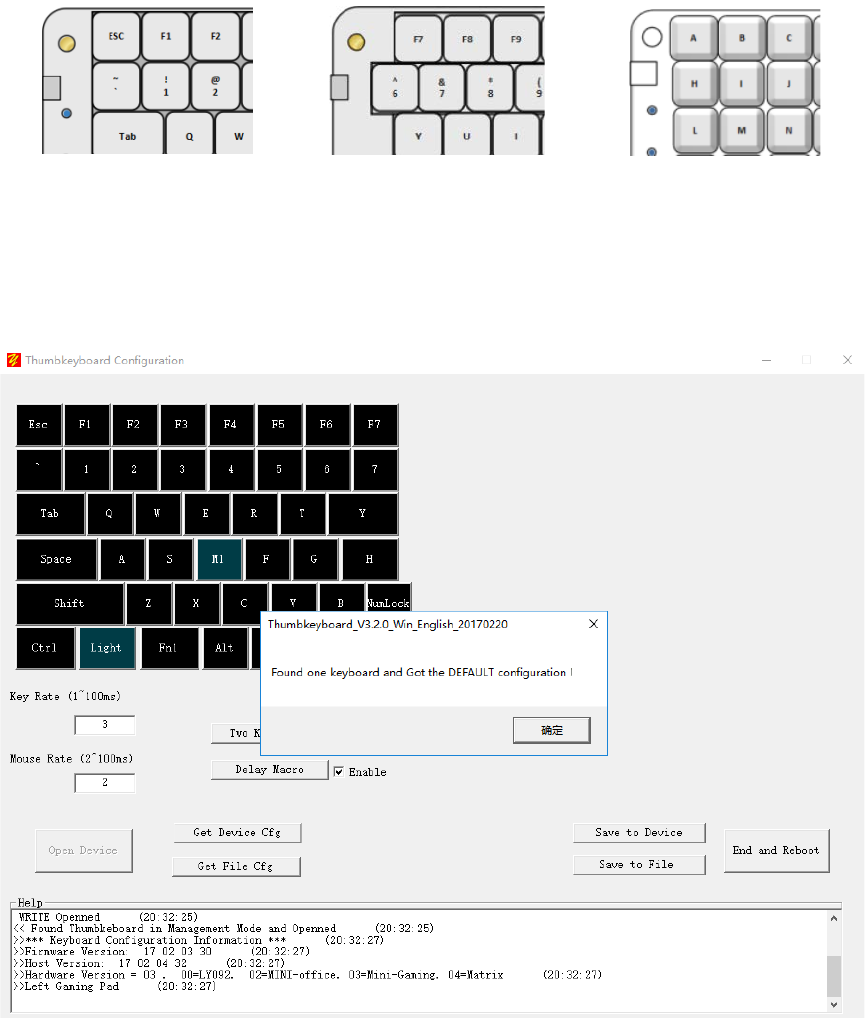
Step 2: Change the keypad to Configuration Mode.
Press and hold the top-left key, then plug the end of USB cable. The keypad will change to configuration mode.
Esc key, Leftpad F7 key , Rightpad A key, Numpad
The software of Thumbkeyboard Configuration will pop up one message, found one keypad, And got the default
profile(configuration) from keypad.
Notes: the software canconfigure only one keypad at one time.
3
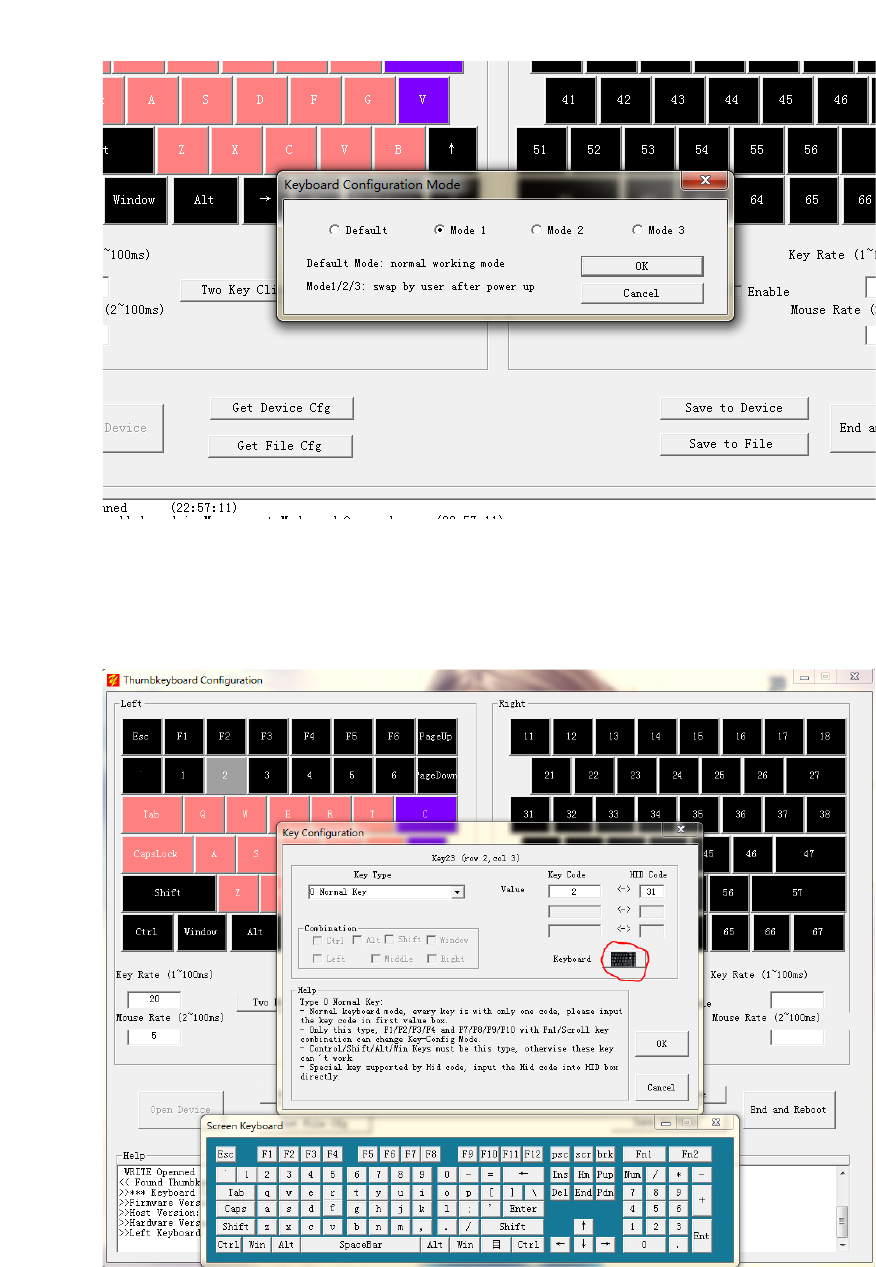
Step 3: Click <Get Device Cfg> and select one Cfg Mode which you will change it.
(Or, Click <Get File Cfg> to get one copy from computer, which can recover the configuration.)
Step 4: Click the key you want to change and change it following the guide.
4
When configuring one keypad, user can use the screen keyboard to input the key code. Click ‘Keyboard’ button
can pop up the window above.
Thumbkeyboard supports all Hid code. If one key was not in 104 keyboard, user can input the HID code directly.
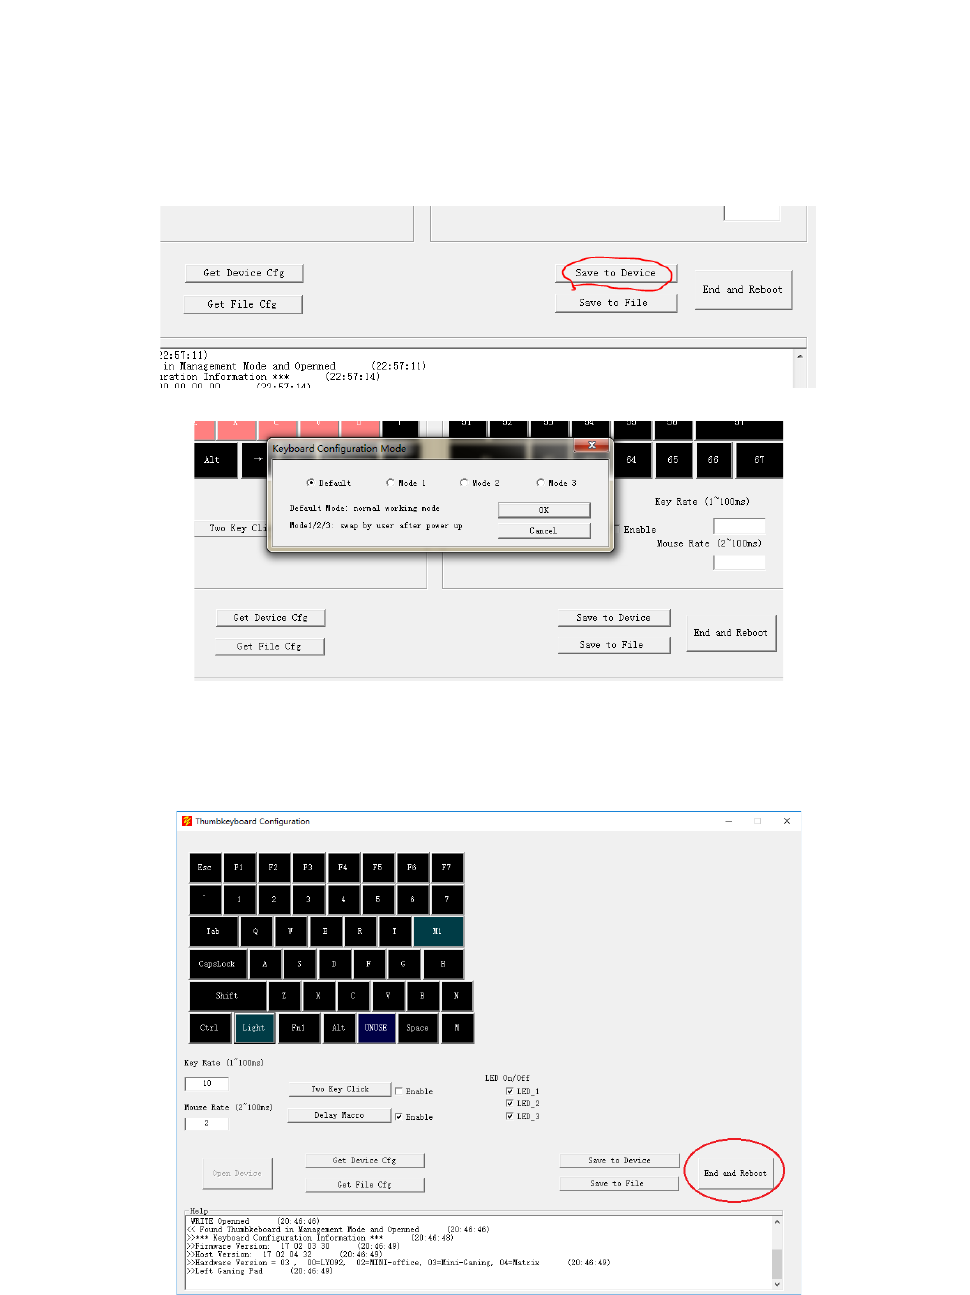
Step 5: Click <Save to Device>, save the change into keypad.( Or click <Save to File > as one copy)
Step 6: Click “End and Reboot”, end configuration and reboot the keypad. The keypad will reboot and change to
Normal Working Mode. Verify your change and change the keycap location at last.
5
2.Key Types
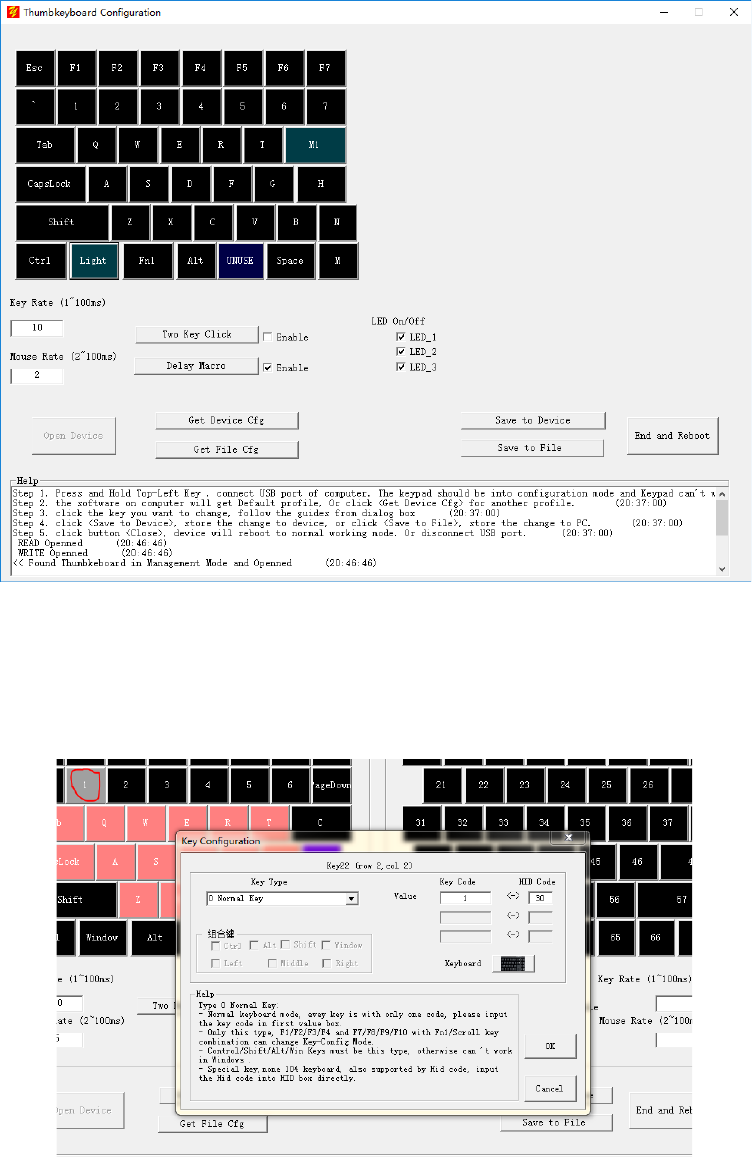
The Main Window and Key Configuration
The main window includes left keypad and right keypad. User can click the key button to change keypad. Click the
key, “1”, will pop up one dialog box as below.
6
Thumbkeyboard support 9 key types, different key type with different feature.
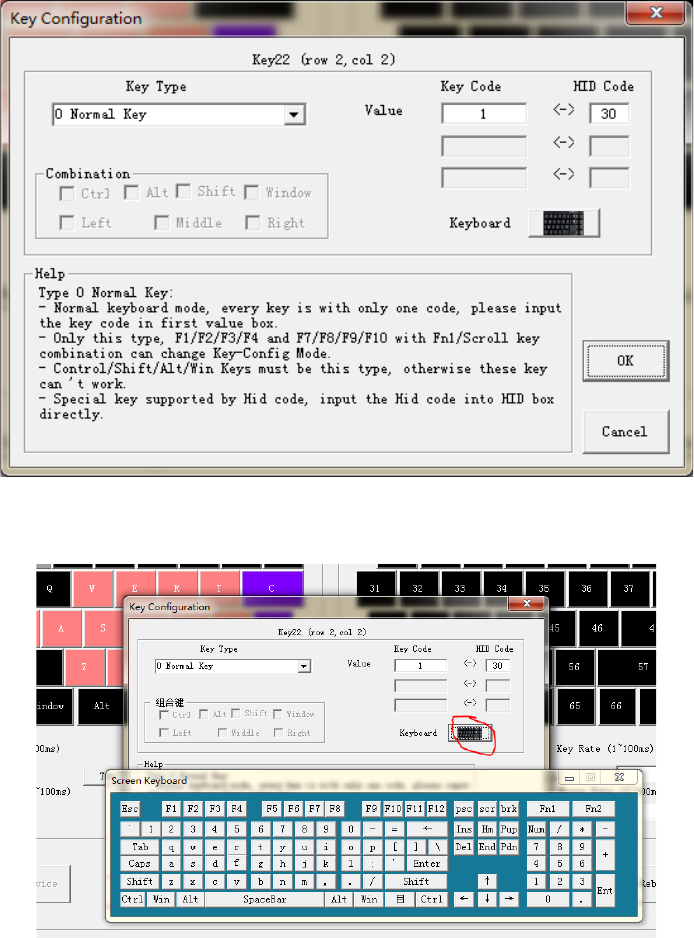
2.0 Normal Key
The key act as normal 104 keyboard which support standard feature of keyboard. Click one key will report one
HID code to computer.
- Normal keyboard mode, every key is with only one code, please input the key code in first value box.
- Only this type, F1/F2/F3/F4 and F7/F8/F9/F10 with Fn1/Scroll key combination can change Key-Config Mode.
- Control/Shift/Alt/Win Keys must be this type, otherwise these keys can’t work.
- Special keysupported by Hid code, input the Hid code into HID box directly.
7
User can input Key value by Screen Keyboard.
8
2.1 Fn-Shift
Fn1 and Fn2 are new Shift keys, which provide the similar function as shift. User can define new shift-value at here.
Every Key location can configure 3 key code as below
Fn1 = Scroll , Fn2 = Num Fn1 + a -> 1 Fn2 + a -> F1
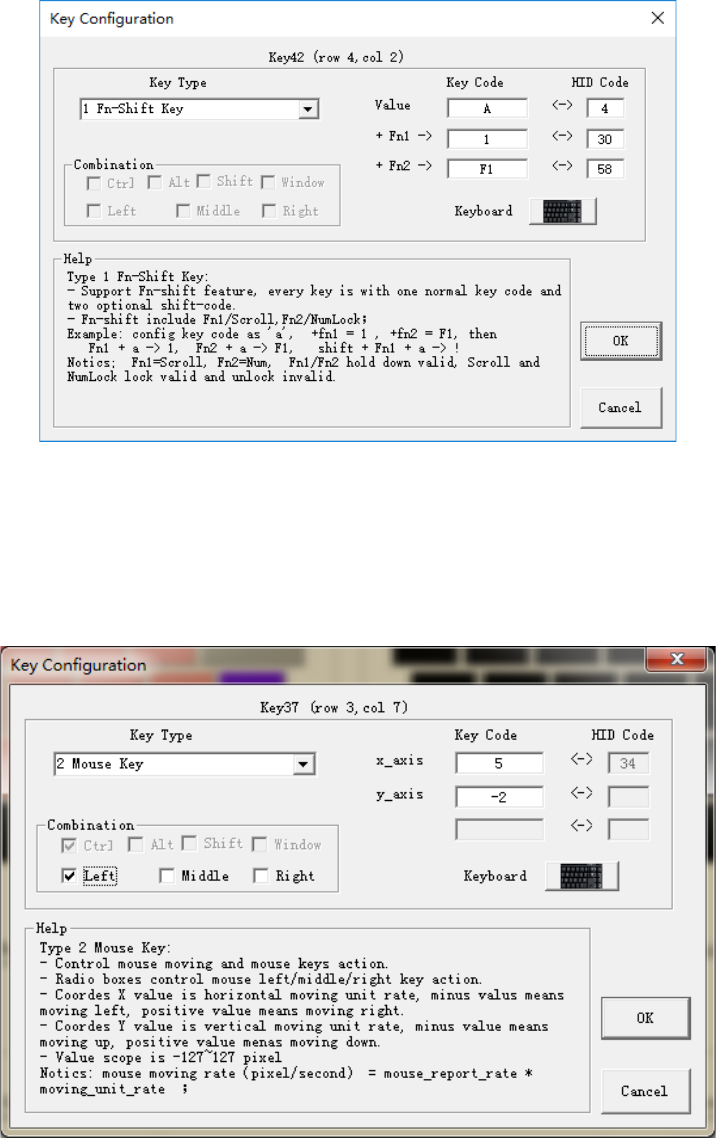
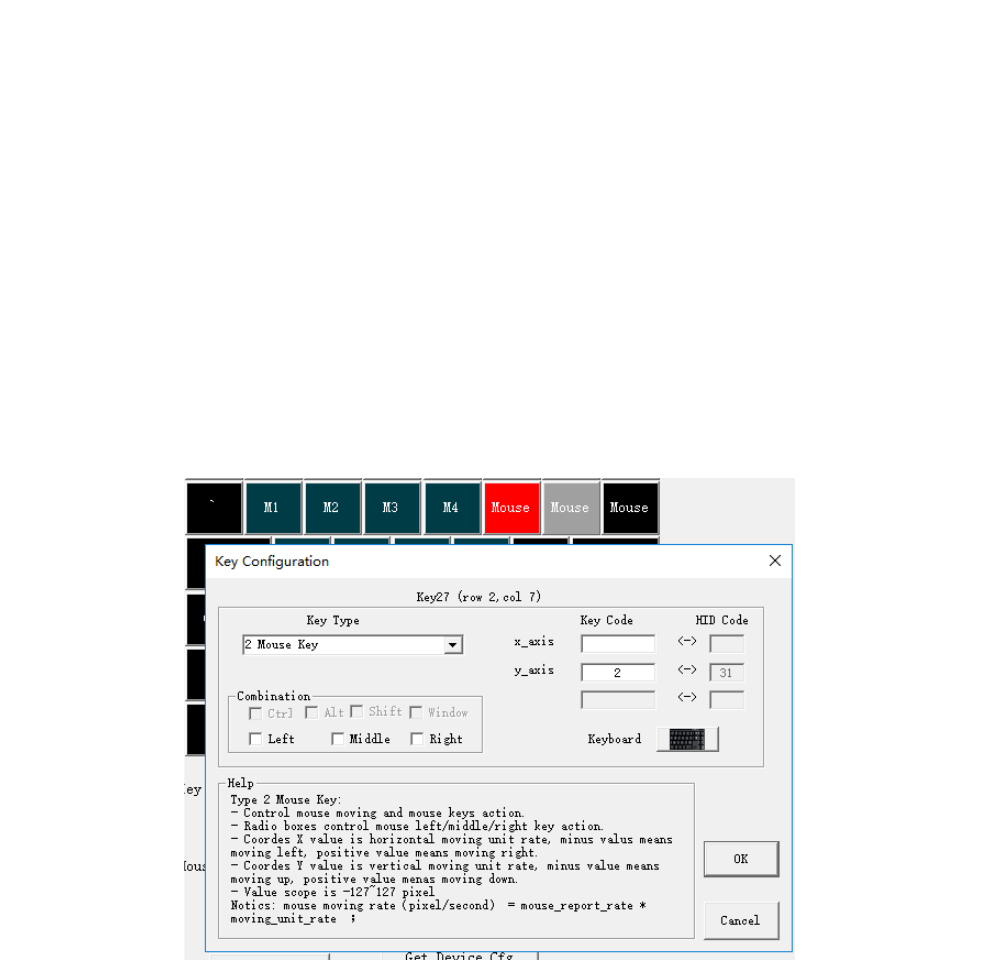
2.2 Mouse-Key
Mouse-Key act as one mouse, control mouse moving, and push down or up Left/Right/Middle button.
9
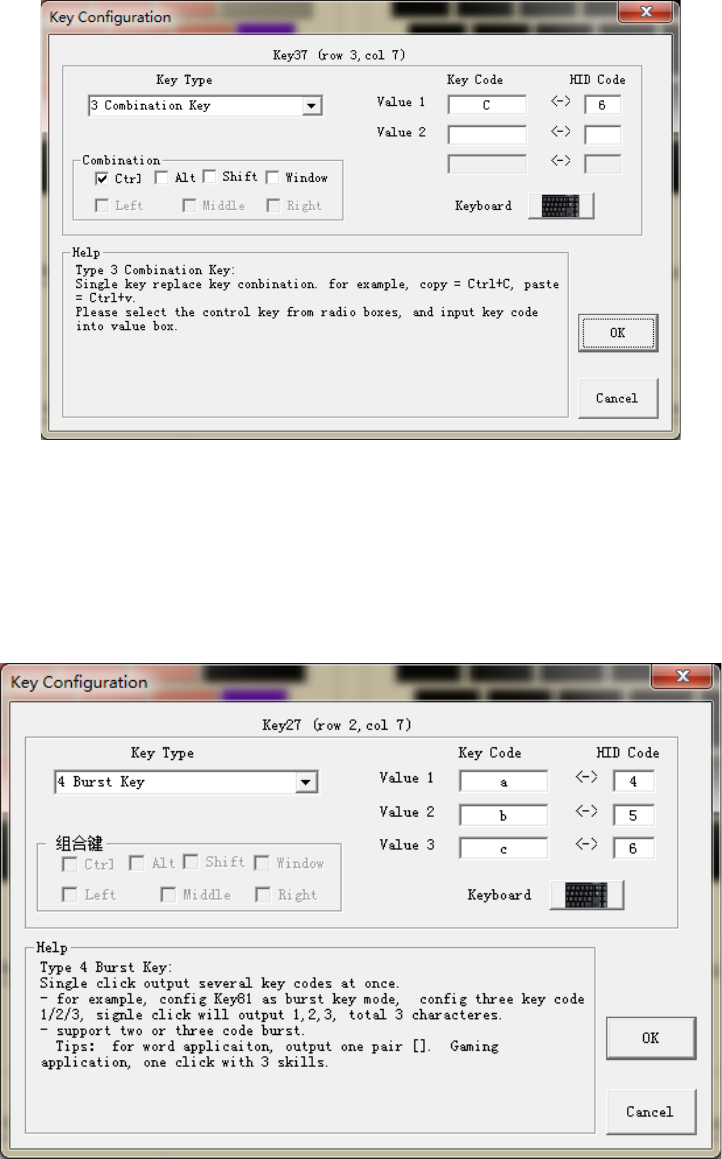
2.3 Combination Key
This Key Type supports combination key by single key. For example, one click output Ctrl+C, shift+9+0, etc.
Check the function keys, include ctrl/alt/shift/window.
Input the key code at Value1, Value2 by Screen keyboard.
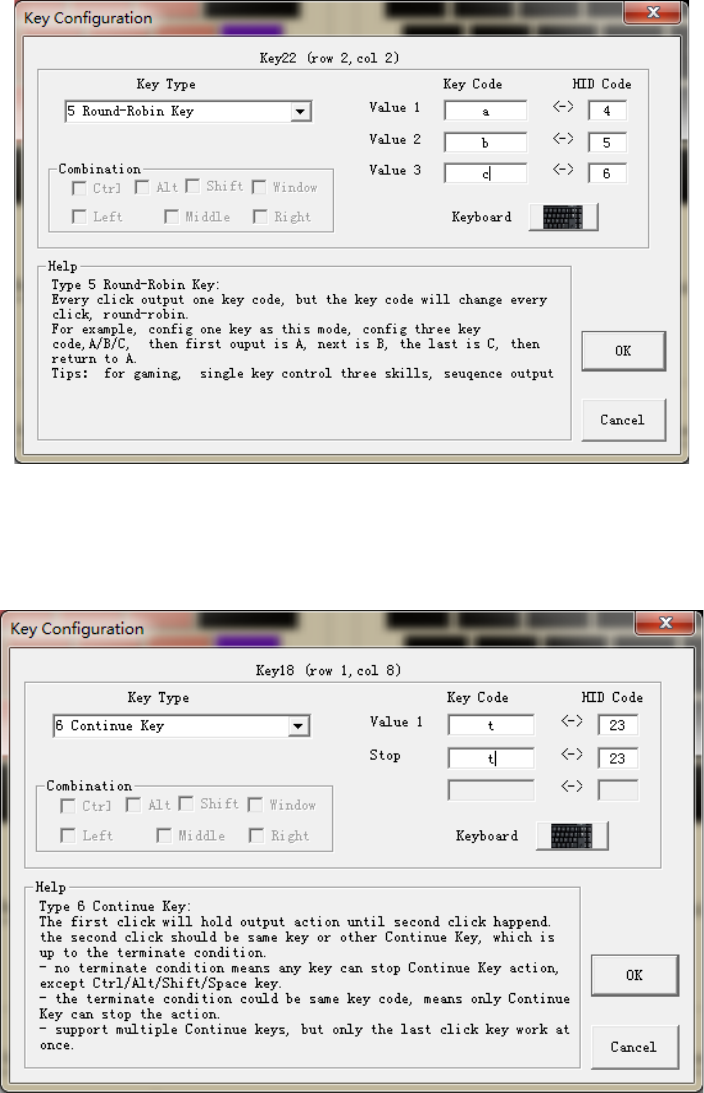
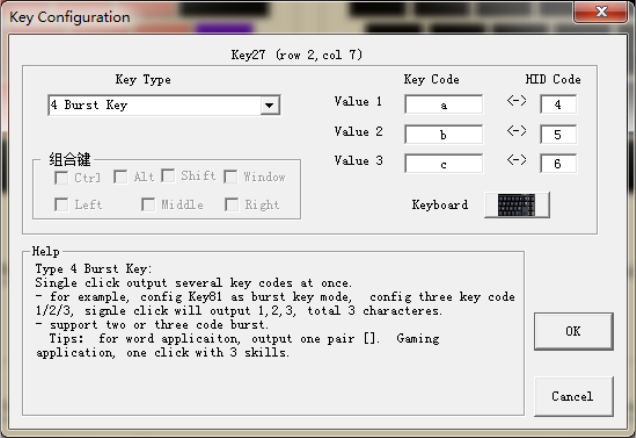
2.4 Burst Key
One click output 2 or 3 key codes. For example, one click output ‘[‘ +’]’, abc , 123, etc.
Eg. Click key27 will output abc, total 3 chars.
10
2.5 Round-Robin Key
It’s one feature for gaming application.
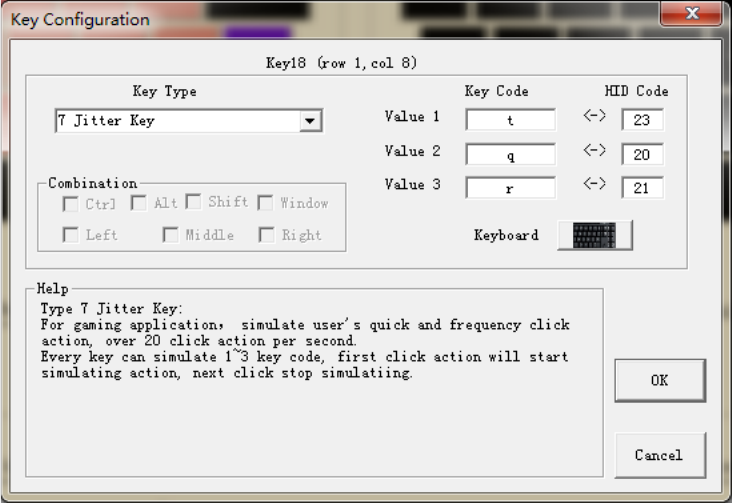
2.6 Continue Key
It’s one feature for gaming application.
11
2.7 Jitter Key
It’s one feature for gaming application.
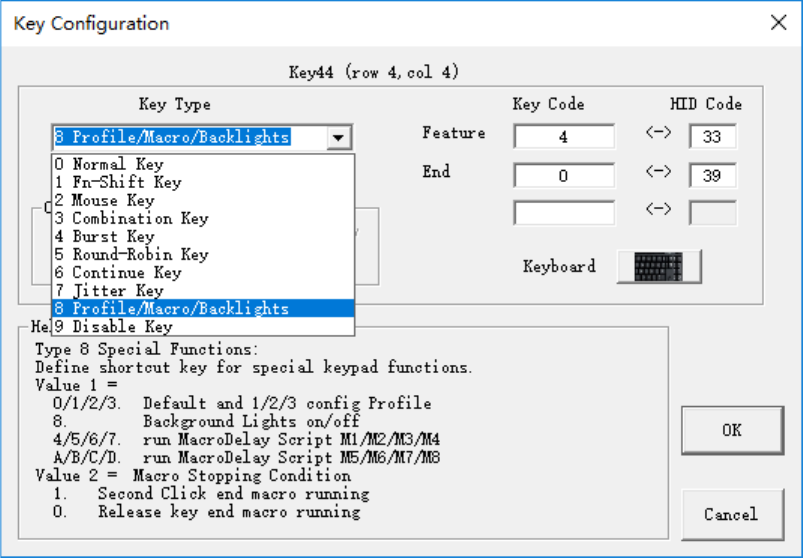
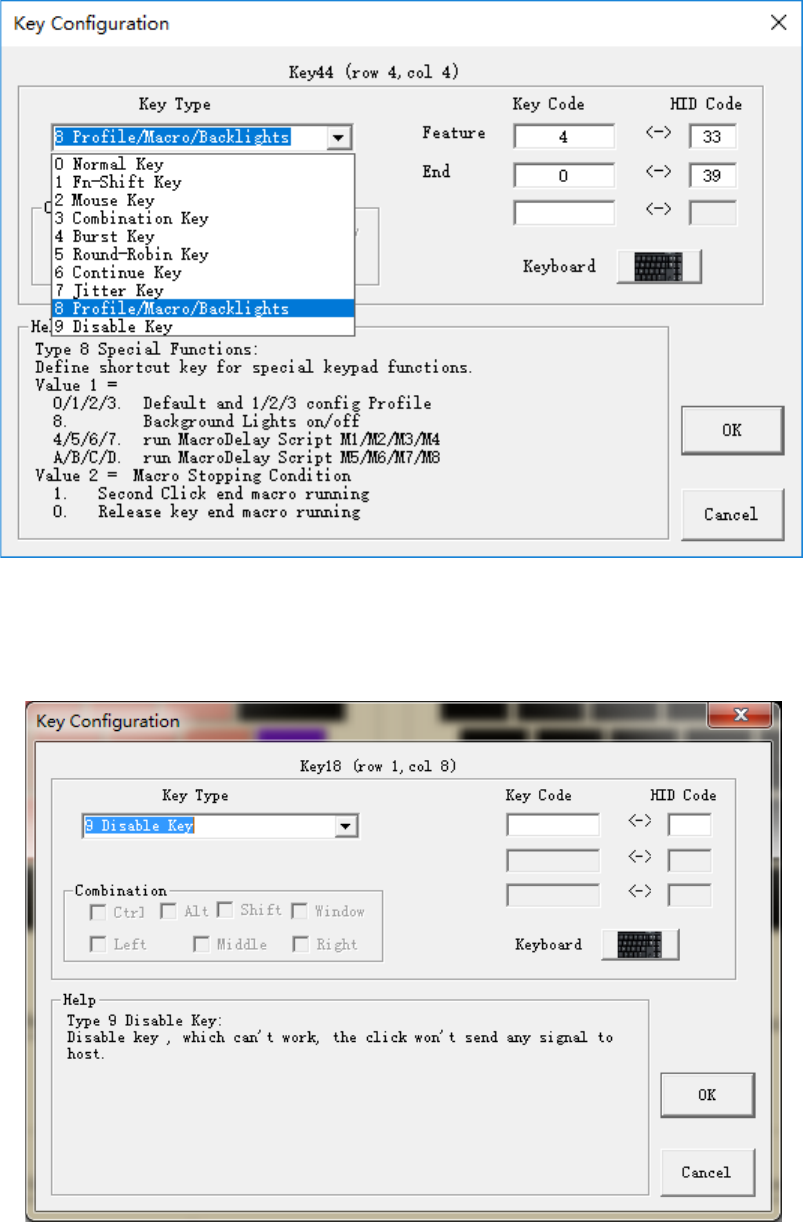
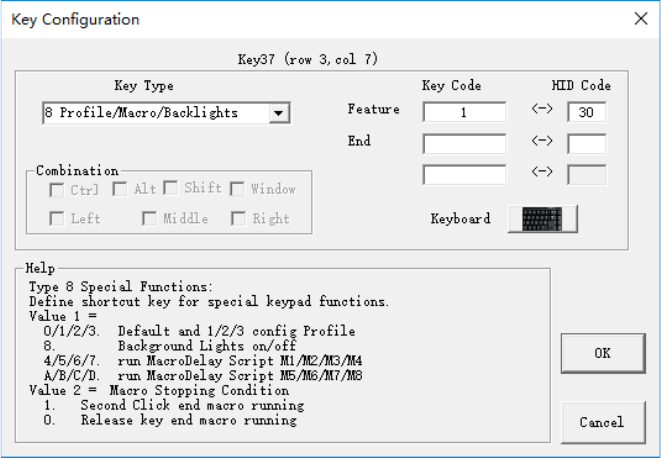
2.8 Special Functions
Define shortcut key, the feature ID as below.
Feature:
0. Switch to default configuration mode
1/2/3. Switch to configuration mode 1/2/3
8. Backlights on/off
4/5/6/7. MacroDelay Script M1/M2/M3/M4
A/B/C/D. MacroDelay Script M5/M6/M7/M8
End condition:
It’s only for MacroDelay feature, which define how to end the macro running.
1. Second click will stop the macro running, or end by END commands.
2. Release key will stop the macro running.
12
2.9 Disable Key
Disable one key. For example, disable Window Key in gaming application.
13
3. Applications
3.1 How to switch Profiles(configurations)
There are 4 profiles in Thumbkeyboard, named Default Cfg Mode, Cfg Mode 1/2/3. One profile is one key-map.
The Default Cfg is the key map after keypad power on, user uses this map normally.
Cfg Mode 1/2/3 is special configuration for different application, such as software coding, Gaming, Drawing, or as
one copy of Default Cfg.
3.1.1 Keypad Command ( hotkey )
The keypad command below can switch profiles.
Fn1 + F1: default Cfg Mode(Left keypad) Fn1 + F7: default Cfg (right keypad)
Fn1 + F2: Cfg Mode 1 Fn1 + F8: Cfg Mode 1
Fn1 + F3: Cfg Mode 2 Fn1 + F9: Cfg Mode 2
Fn1 + F4: Cfg Mode 3 Fn1 + F10: Cfg Mode 3
Notes: the keypad should support Fn1/Scroll key. User can define one Fn1 key if the default hasn’t.
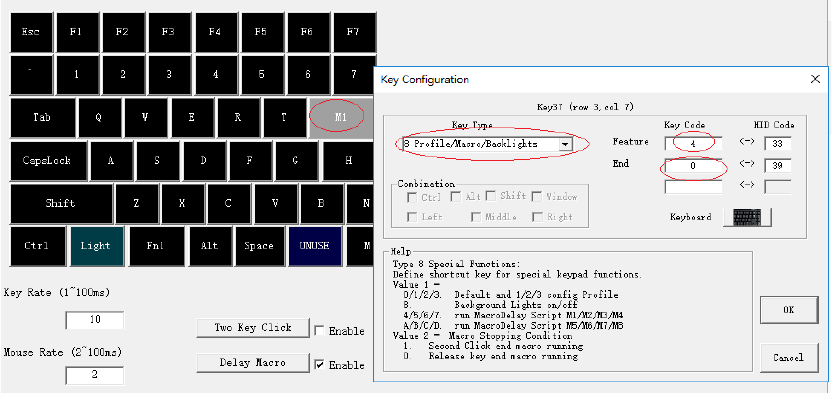
3.1.2 Define one Mode key
User can define one dedicated mode key to switch profiles based Key Type 8 Profile/Macro/Backlights .
14
For example:
Key37 as one Mode key to switch profiles. User should define key37 in every profile.
The default configuration : Key37 = No. 1 switch to profile 1;
Configuration 1 (profile 1): Key37 = No. 2 switch to profile 2;
Configuration 2 (profile 2): Key37 = No. 3 switch to profile 3;
Configuration 3 (profile 3): Key37 = No. 0 switch to the default configuration;
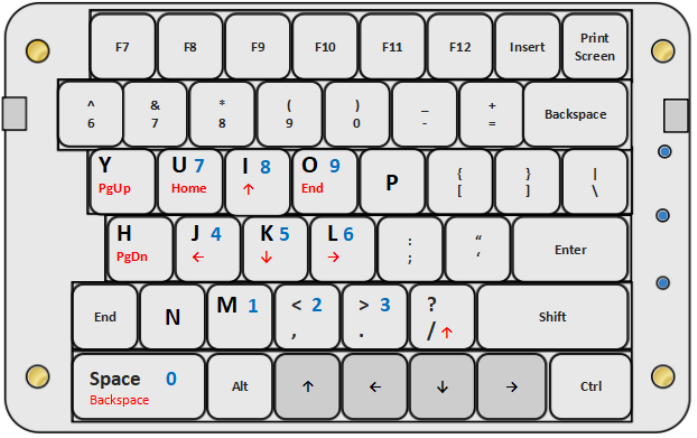
3.2 Fn1-shift and Fn2-shift to expand keys
Fn1 and Fn2 are new shift which can expand keys. Every key location supports both Fn1 and Fn2 shift.
For example: expand Edit keys on right-pad by Fn1-shift, and one Num-pad by Fn2-shift.
Fn1-Shift: Page Up/Home/Up/End/Backspace
Page Down/Left/Down/Right
Fn2-Shift: Num Pad
Notes:
Fn1 = Scroll, Fn1 is shift mode, Scroll is Lock mode.
Fn2 = Num, Fn2 is shift mode, Num is Lock mode.
15
3.3 Shortcut keypad Tools
User can define the keypad as one shortcut keypad tools. There’s two ways to define combination keys. The
type of Combination Key, and Two-Key-Click.
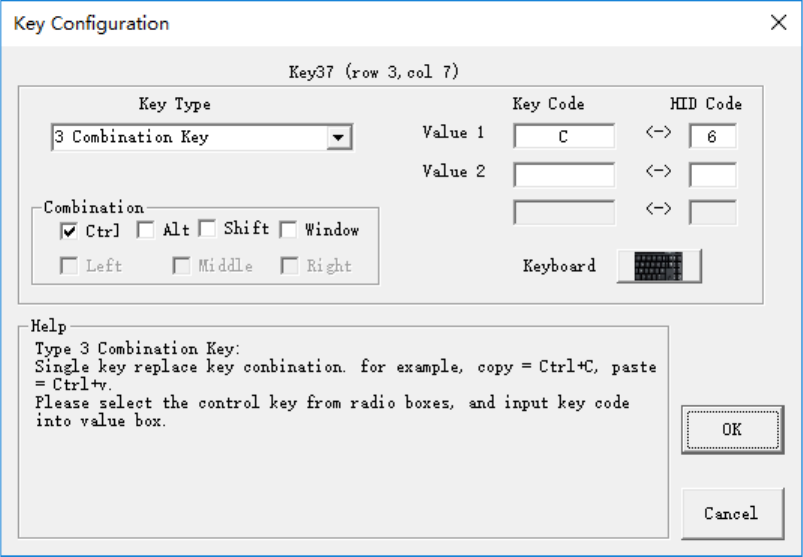
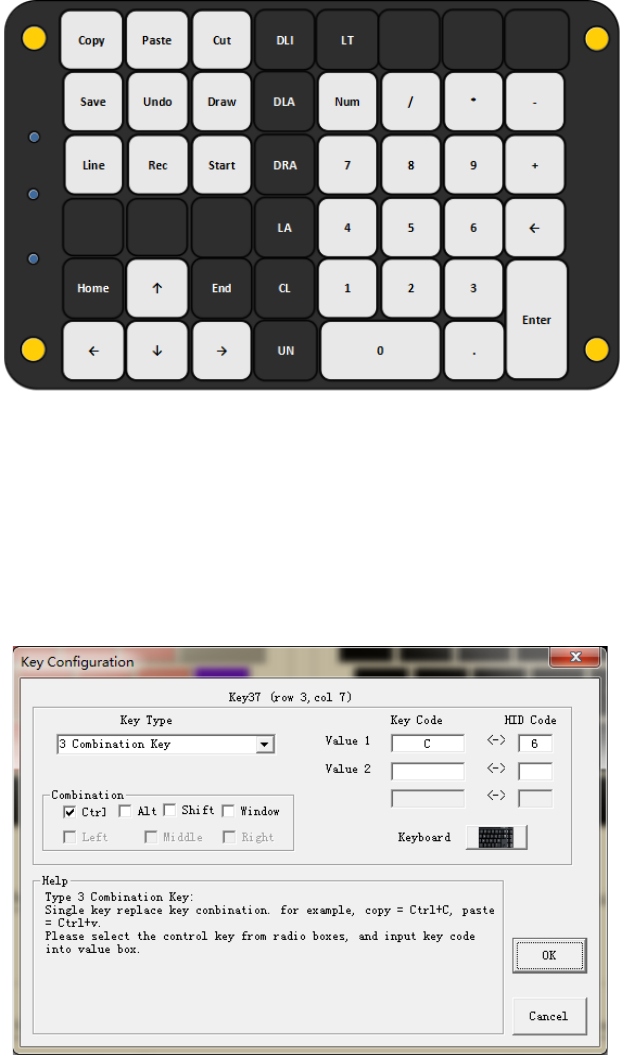
3.3.1 Combination Key Type
Every key of Thumbkeyboard can be configured as one shortcut key, and all 4 profiles support this feature. One
keypad supports 43(Key) x 4 (profiles) = 172 shortcut definition.
Example: Key37 = Ctrl+C (copy)
16
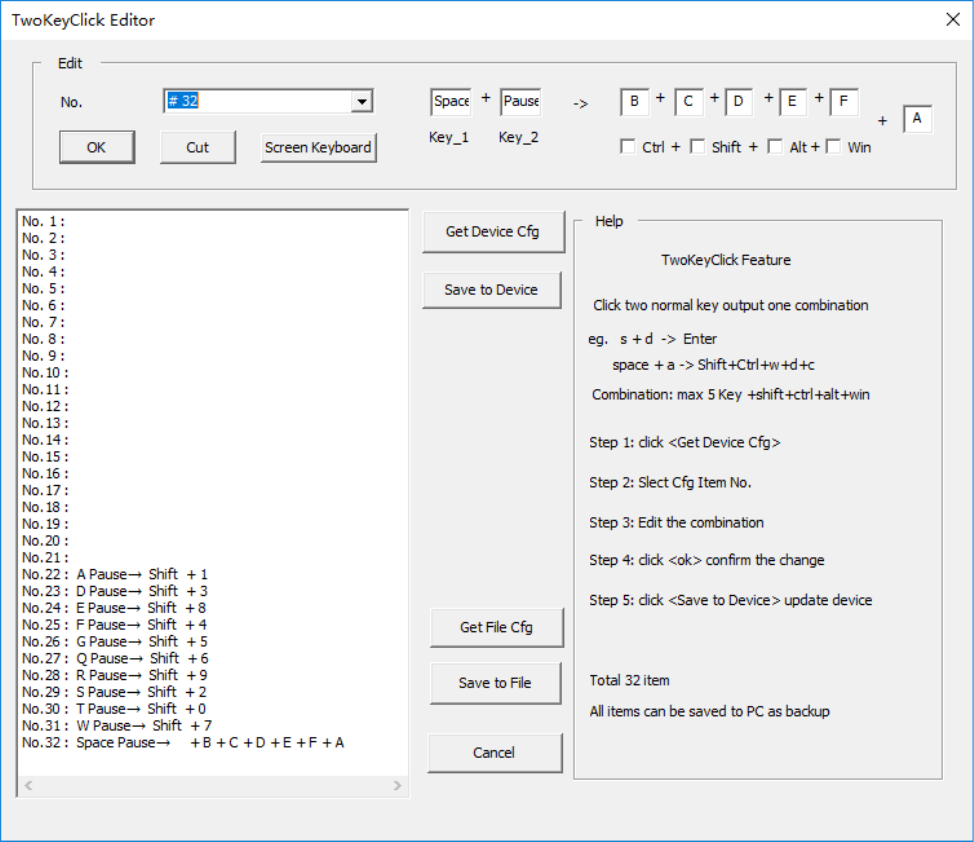
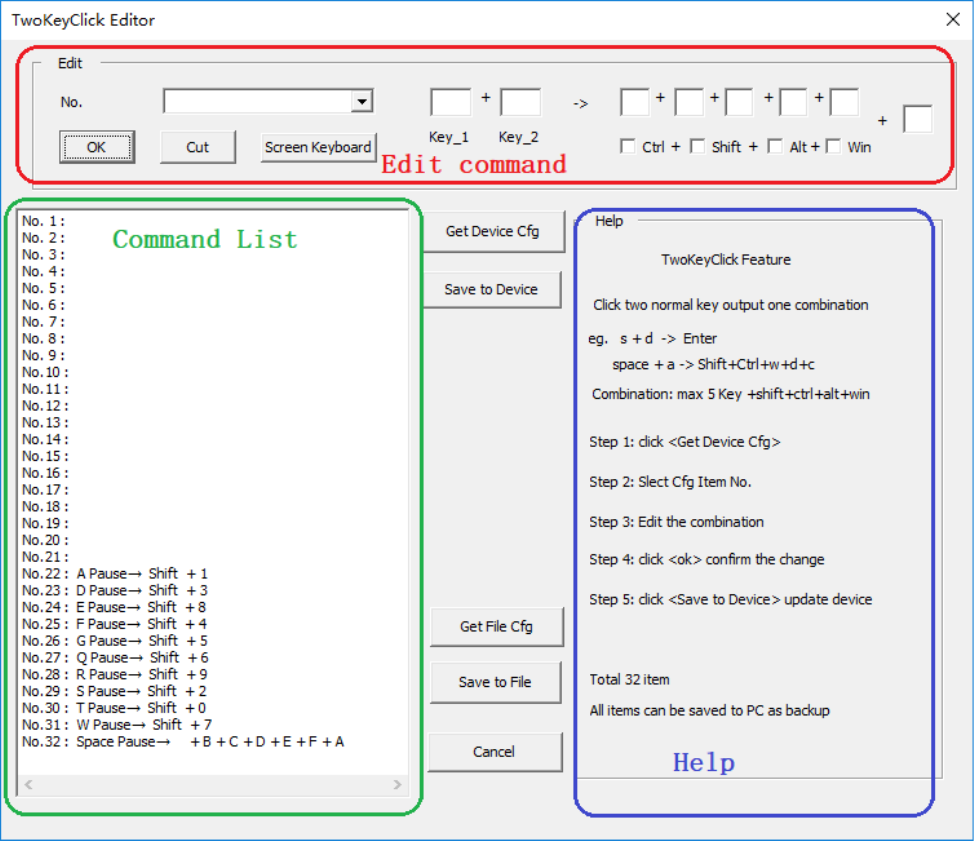
3.3.2 Two-Key-Click feature.
This feature is one multiple shift function. Pressing two keys, the keypad will report one combination keyor one
char to PC, max 6 char, or 5 char + shift/ctrl/alt/win. There’s two ways to trigger the definition. One way is two
normal key trigger it, another way is that define one burst key to trigger it.
Example:
s + d -> Enter
Pause + a -> shift +1
Pause + s -> shift + 2
Space + f -> Esc
17
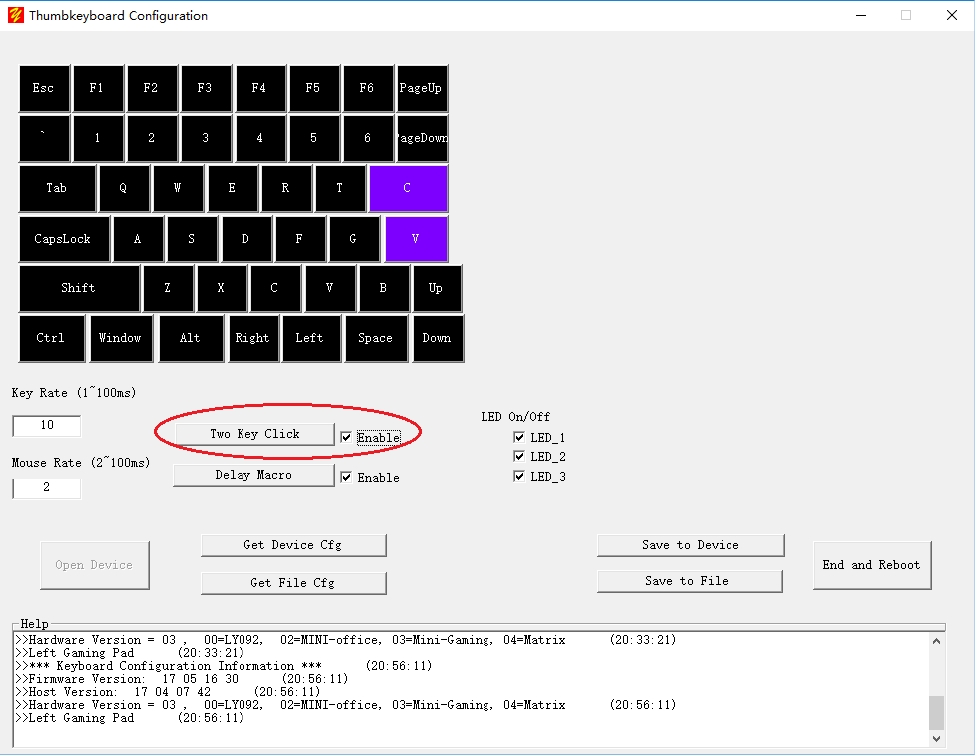
Figure. Two-Key-Click Editor
Step 1: Enable Two-Key-Click feature
Notes: Every profile has one selection to enable/disable Two-Key-Click feature.
18
Step 2: Got the configuration in device
Click the button <Two Key Click> will pop up the window of editor, and loaded configuration.
19
Step 3: Edit one command
Select the number of command and edit it . Click <ok> can finish it.
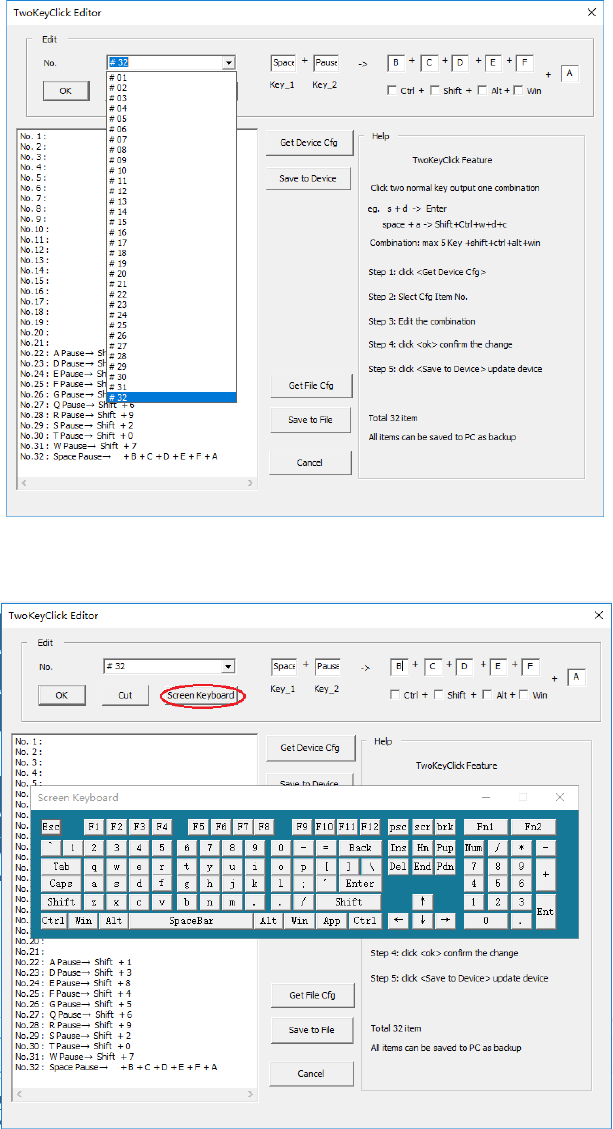
Figure. Select No.32
Input the char by Screen Keyboard
20
Step 4: Finish the configuration and save to device
Click <Save to Device> save all configuration to device.
Step 5: Verify the configuration
Close Editor windows, and click <End and Reboot>.
Verify all commands.
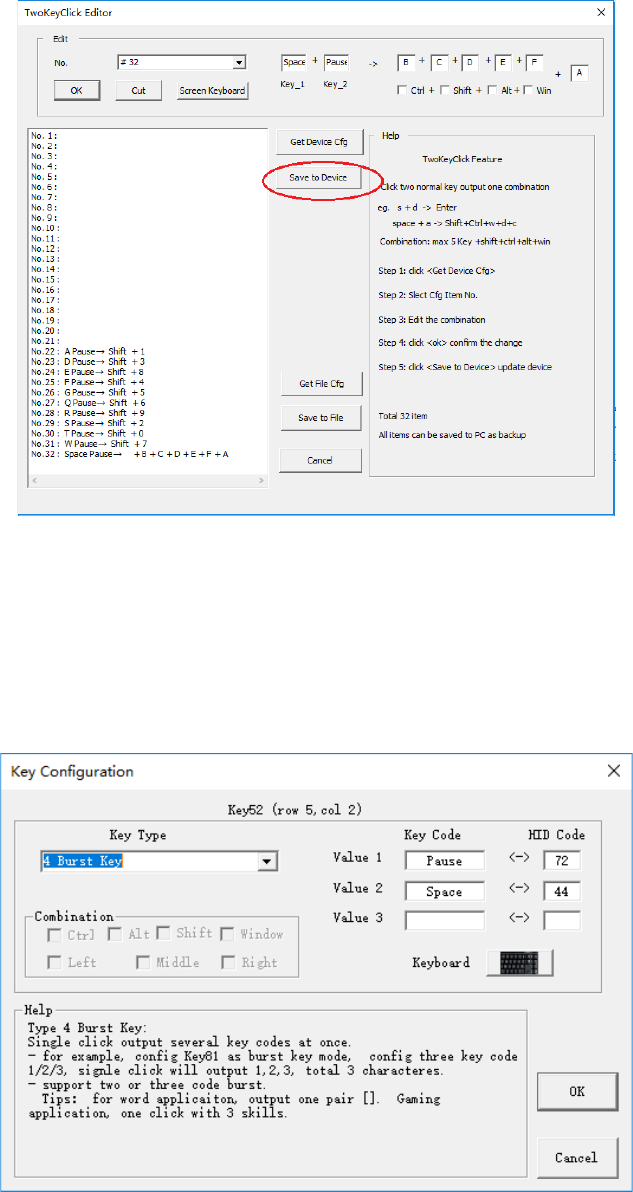
One key trigger two-key-click command
One key also can trigger two-key-click command as below. Define one key as Burst Key, one click output two char.
Example: Key52 = pause+Space -> bcdefa
21
3.4 ProgrammableDelay-Macro (Gaming Feature)
Thumbkeyboard supports total 8 Delay-Macro Scripts, named M1/M2/M3/M4 and M5/M6/M7/M8. Split
keyboard supports 4 Delay-Macro Scripts. Every Delay-Macro supports 32 key-actions.
Example:
01# Press Shift+H + 40 (ms) ; press shift + h, and delay 40ms
02# Press E + 40 (ms) ; press e, and delay 40ms
03# Press L + 40 (ms) ; press l, and delay 40ms
04# Press P + 40 (ms) ; press p, and delay 40ms
05# Release + 40 (ms) ; release p, and delay 40ms
06# End + 40 (ms) ; the end, free all key
This macro will output one word, Help.
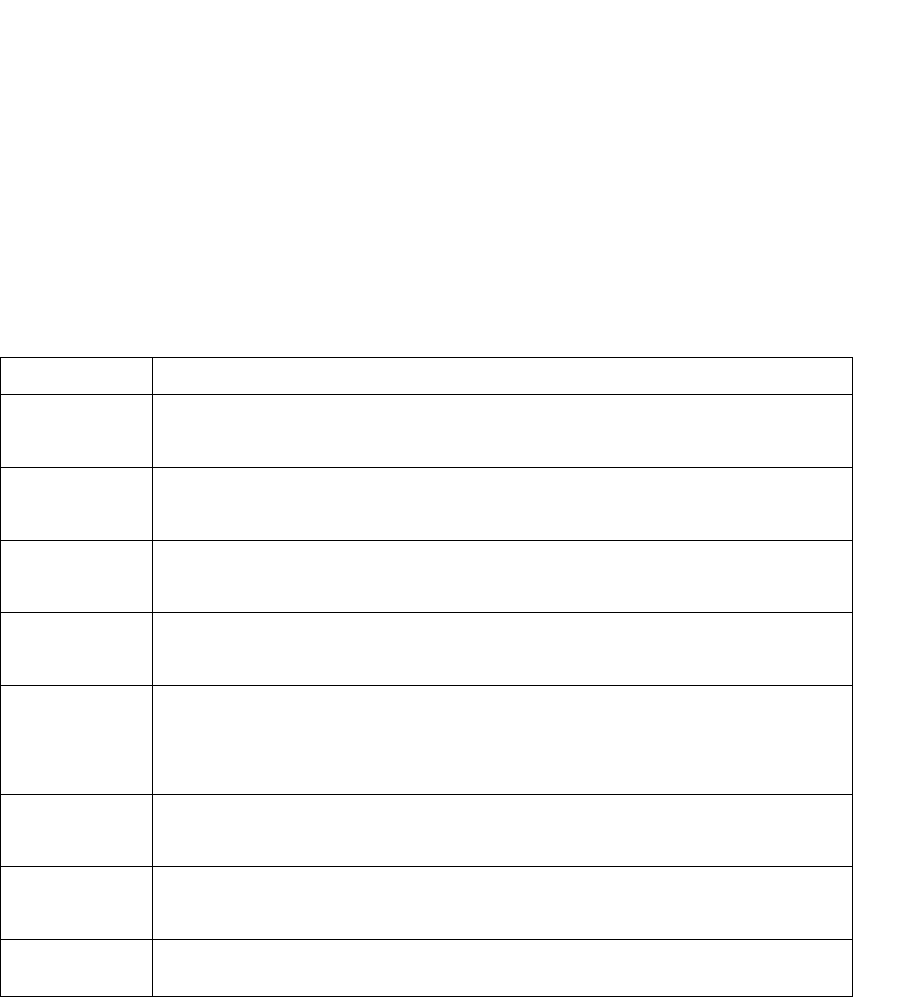
3.4.1 Macro Instruction
Command Description
Press One key down, and hold some time.
Eg. Press shift+h +40ms ;
Release One key up, and delay some time
Eg. Release +40ms
Delay Delay some time, 1ms ~ 63999ms
Eg. Delay 2000ms
Goto Jump to one instruction and running, scope 0~31
Eg. Goto 0 ; jump to the first instruction of Delay-Macro
Keydown One button down, and delay some time. If the button was mouse key,
Keydown command can control mouse moving or click.
Eg. Keydown key26 +2ms; the button(row 2,col 6) press down
Keyup One button up , and delay some time
Eg. Keyup key26 +2ms; the button(row 2,col 6) release
End End macro, and release all key and button
Eg. End +30ms ; end running, and delay 30ms
Nop Null, just pass
22
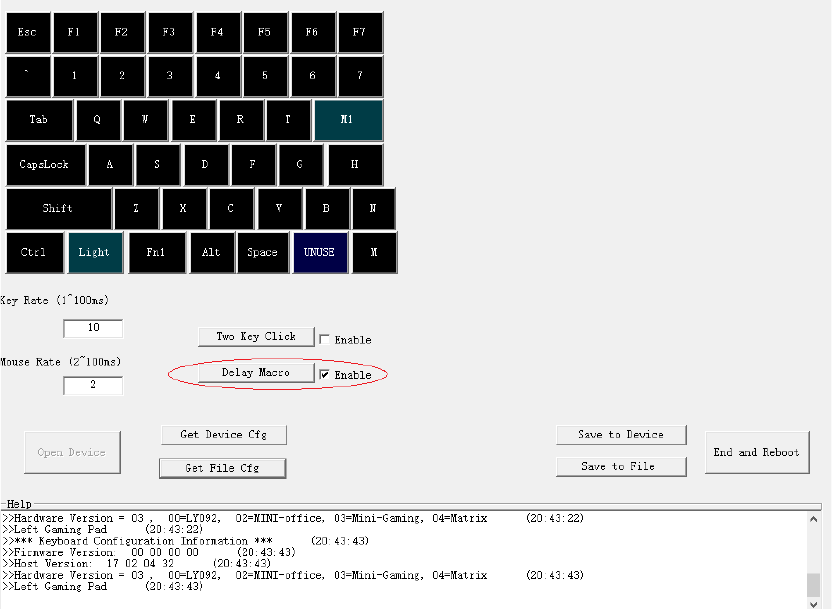
3.4.2 Edit one Delay-Macro
Step1: Enable Delay-Macro Feature, and click the button (Delay Macro) to edit one script.
Every profile has one switch to enable/disable Delay-Macro feature.
Click the button<Delay Macro>, User can start Delay-Macro editor.
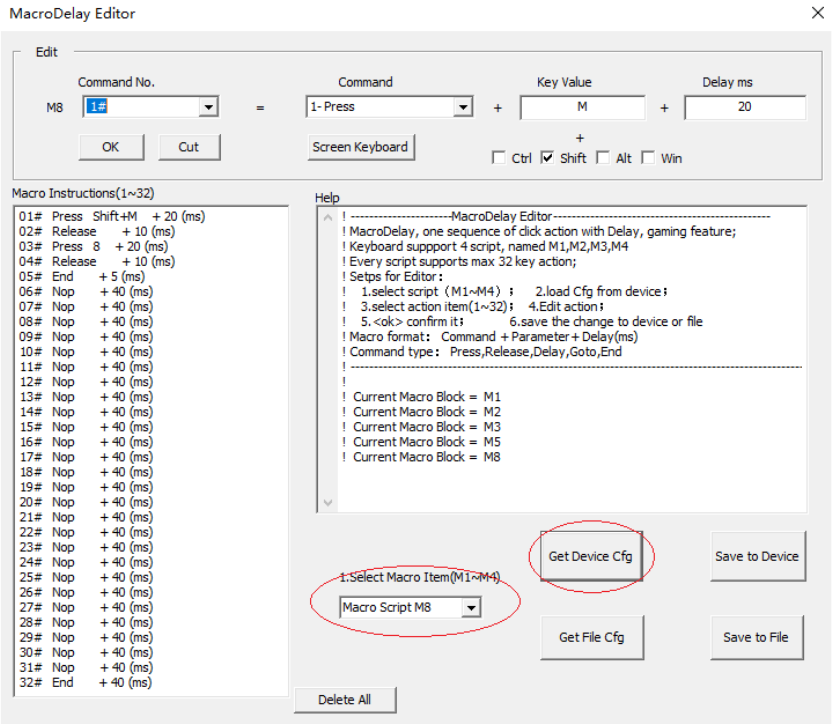
23
Step2: Select Delay-Macro Script and Load it from the device.
User can select one script from M1~M8. And click “Get Device Cfg” load it from device.
User can select one script from M1~M8. And click “Save to Device” save it to device.
24
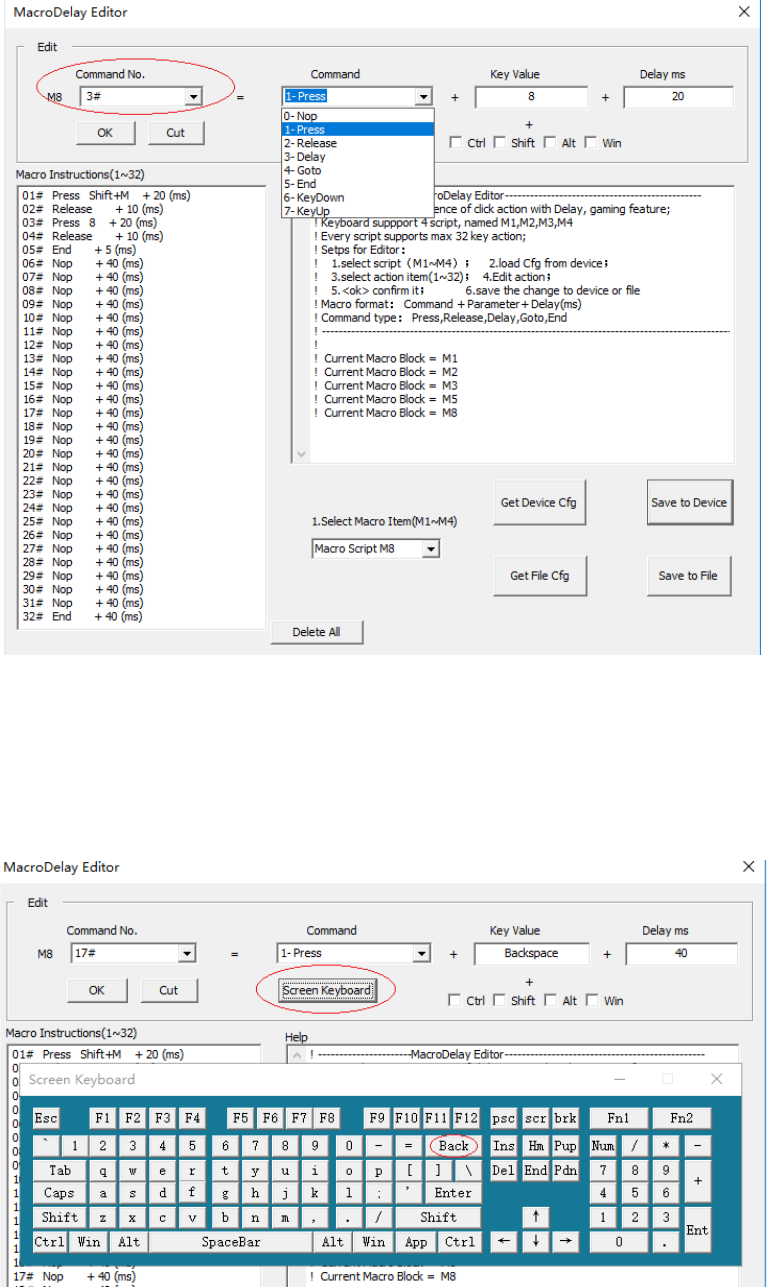
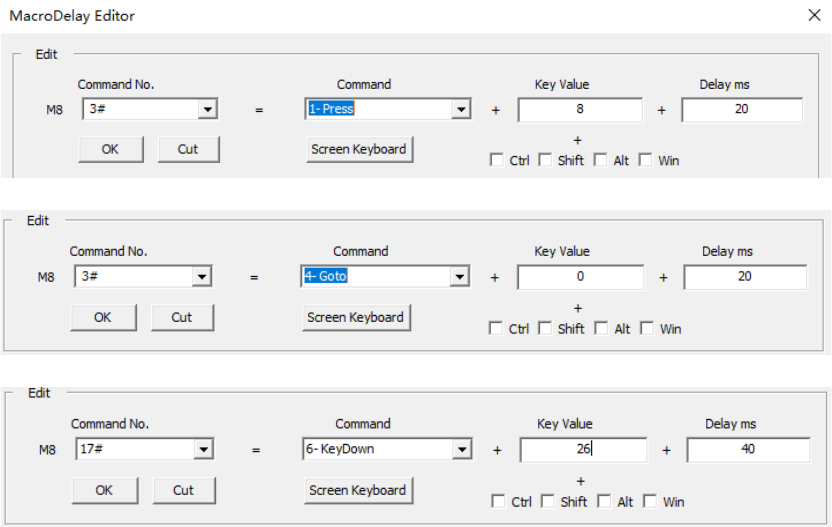
Step 3: Edit one command
1. Select one command from Command No. list, which user wants to change.
2. Select one instruction from Command list. Thecommand list includes Nop/Press/Release /Delay/Goto/
Keydown/Keyup, and End.
3. Input the parameter in the next window, “Key Value”, different instruction with different parameters. User can
use “Screen Keyboard” to select key code.
25
4. Set one delay time at last window, the unit is ms, 1000ms = 1 second. Every key action should be with one
delay time.
5. Click “OK” confirm the change.
“Cut” can delete one command.
“Delete All” can delete all commands.
6. “Save to Device” save the macro script to device according selected macro item.
Example:
Every Macro script should end with one END instruction, otherwise will continue to run next macro script.
26
Step 4: Define one key to trigger Delay-Macro
User can select one key to trigger Delay-Macro.
1. Select one key and click it.
2. Select Key Type 8
3. Input the value to select macro script. 4/5/6/7 or A/B/C/D
4. Configure the End mode how to end macro, release-end, or second-click-end.
At last, click “Save to Device” and “End and Reboot”
3.4.3 Delay-Macro Examples
Example: Go!Go! Go!Go! Go!Go! …
01# Press Shift+G + 40 (ms)
02# Release + 40 (ms)
03# Press O + 40 (ms)
04# Release + 40 (ms)
05# Press Shift+1 + 10 (ms)
06# Release + 40 (ms)
07# Delay + 1000 (ms) ; delay 1 second
08# Goto 0 + 10 (ms) ; jump to the beginning
Example: 2w
01# Press 2 + 20 (ms) ; key down, 2
02# Release + 10 (ms) ; key up , 2
03# Press W + 20 (ms) ; key down, w
04# Release + 10 (ms) ; key up, w
05# End + 5 (ms)
27
Example: Here is Delay Macro Demo
01# Press Shift+H + 40 (ms)
02# Press E + 40 (ms)
03# Press R + 40 (ms)
04# Press E + 40 (ms)
05# Press Space + 40 (ms)
06# Press I + 40 (ms)
07# Press S + 40 (ms)
08# Press Space + 40 (ms)
09# Press Shift+D + 40 (ms)
10# Press E + 40 (ms)
11# Press L + 40 (ms)
12# Press A + 40 (ms)
13# Press Y + 40 (ms)
14# Press Space + 40 (ms)
15# Press Shift+M + 40 (ms)
16# Press A + 40 (ms)
17# Press C + 40 (ms)
18# Press R + 40 (ms)
19# Press O + 40 (ms)
20# Press Space + 40 (ms)
21# Press Shift+D + 40 (ms)
22# Press E + 40 (ms)
23# Press M + 40 (ms)
24# Press O + 40 (ms)
25# Press Space + 40 (ms)
26# Release + 40 (ms)
27# Nop + 40 (ms)
28# Press Space + 40 (ms)
29# Press Shift+M + 40 (ms)
30# Press 4 + 40 (ms)
31# Release + 40 (ms)
32# End + 40 (ms)

28
Example: 16 buttons press down ,and keep 500ms.
01# KeyDown Key25 + 2 (ms)
02# KeyDown Key22 + 2 (ms)
03# KeyDown Key23 + 2 (ms)
04# KeyDown Key24 + 2 (ms)
05# KeyDown Key32 + 2 (ms)
06# KeyDown Key33 + 2 (ms)
07# KeyDown Key34 + 2 (ms)
08# KeyDown Key35 + 2 (ms)
09# KeyDown Key42 + 2 (ms)
10# KeyDown Key43 + 2 (ms)
11# KeyDown Key44 + 2 (ms)
12# KeyDown Key45 + 2 (ms)
13# KeyDown Key52 + 2 (ms)
14# KeyDown Key53 + 2 (ms)
15# KeyDown Key54 + 2 (ms)
16# KeyDown Key55 + 2 (ms)
17# Delay + 500 (ms) ; delay 500ms, keep buttons down
18# End + 500 (ms) ; end macro, release all keys and buttons, delay 500ms
29
Example: control mouse moving.
01# KeyDown Key26 + 400 (ms)
02# KeyUp Key26 + 200 (ms)
03# KeyDown Key27 + 200 (ms)
04# KeyUp Key27 + 200 (ms)
05# KeyDown Key28 + 400 (ms)
06# KeyUp Key28 + 400 (ms)
07# KeyDown Key17 + 200 (ms)
08# KeyUp Key17 + 40 (ms)
09# Goto 0 + 40 (ms)
Key26/27/28/17 are mouse moving Left/down/right/up. User can configure it at main window. This feature can
control game-role turn around only one click.
Example: define one key to control mouse
30
3.5 How to expand more keys
Keypad is half of normal keyboard, only with 43/44 key on board. But there’s 3 ways to expand more keys.
Method 1: Fn1/Fn2-shift
Fn1 and Fn2 are new shift which can expand keys. All key location supports this feature. .
For example: expand Edit keys on right-pad by Fn1-shift, and one Num-pad by Fn2-shift.
Please refer chapter “3.2 Fn1-shift and Fn2-shift to expand keys”.
Method 2: 4 Profiles
There are 4 profiles in keypad, named Default Cfg Mode, Cfg Mode 1/2/3. One profile is one key-map.
Please refer chapter “3.1 How to switch Profiles(configurations) ”.
Method 3 : Two-Key-Click
Two-Key-Click is one multiple shift function. Pressing two keys, the keypad will report one combination key or one
char to PC, max 6 char, or 5 char + shift/ctrl/alt/win. There’s two ways to trigger the definition. One way is
two normal key trigger it, another way is that define one burst key to trigger it.
Total 32 commands for Two-Key-Click.
Please refer chapter” 3.3.2 Two-Key-Click feature. ”.
31
3.6 One click output chars
One key implement keys combination, only one hand can finish the keyboard action, which will be convenient for
some jobs, such as drawing , layout, etc.
Example: one tools for CAD layout
Method 1: the Type of Combination Key (1~2 char + Shift/Ctrl/Alt/Win)
Key Type, Combination Key, supports combination key by single key. For example, one click output Ctrl+C,
shift+9+0, etc.. Output 1~2 char + Ctrl/Alt/Shift/Win. All key location supports this feature.
Check the function keys, include ctrl/alt/shift/window.
Input the key code at Value1, Value2 by Screen keyboard.
32
Method 2: the Type of Burst key (1~3 char)
One click output 1~3 chars. For example, one click output ‘[‘ +’]’, abc , 123, etc. All key location supports this
feature.
Example: Click key27 will output abc, total 3 chars.
Method 3: Two-Key-Burst (1~6 char)
Two-Key-Burst is one multiple shift function. Pressing two keys, the keypad will report one combination key or one
char to PC, max 6 char, or 5 char + shift/ctrl/alt/win. There’s two ways to trigger the definition. One way is
two normal key trigger it, another way is that define one burst key to trigger it.
Please refer chapter” 3.3.2 Two-Key-Click feature. ”.
Method 4: Delay-Macro (1~31 char)
Thumbkeyboard supports total 8 Delay-Macro Scripts, named M1/M2/M3/M4 and M5/M6/M7/M8. Split
keyboard supports 4 Delay-Macro Scripts. Every Delay-Macro supports 32 key-actions, which means one macro
can output 31 chars(END command is the last action).
Please refer the chapter” 3.4 Programmable Delay-Macro (Gaming Feature)” .
33
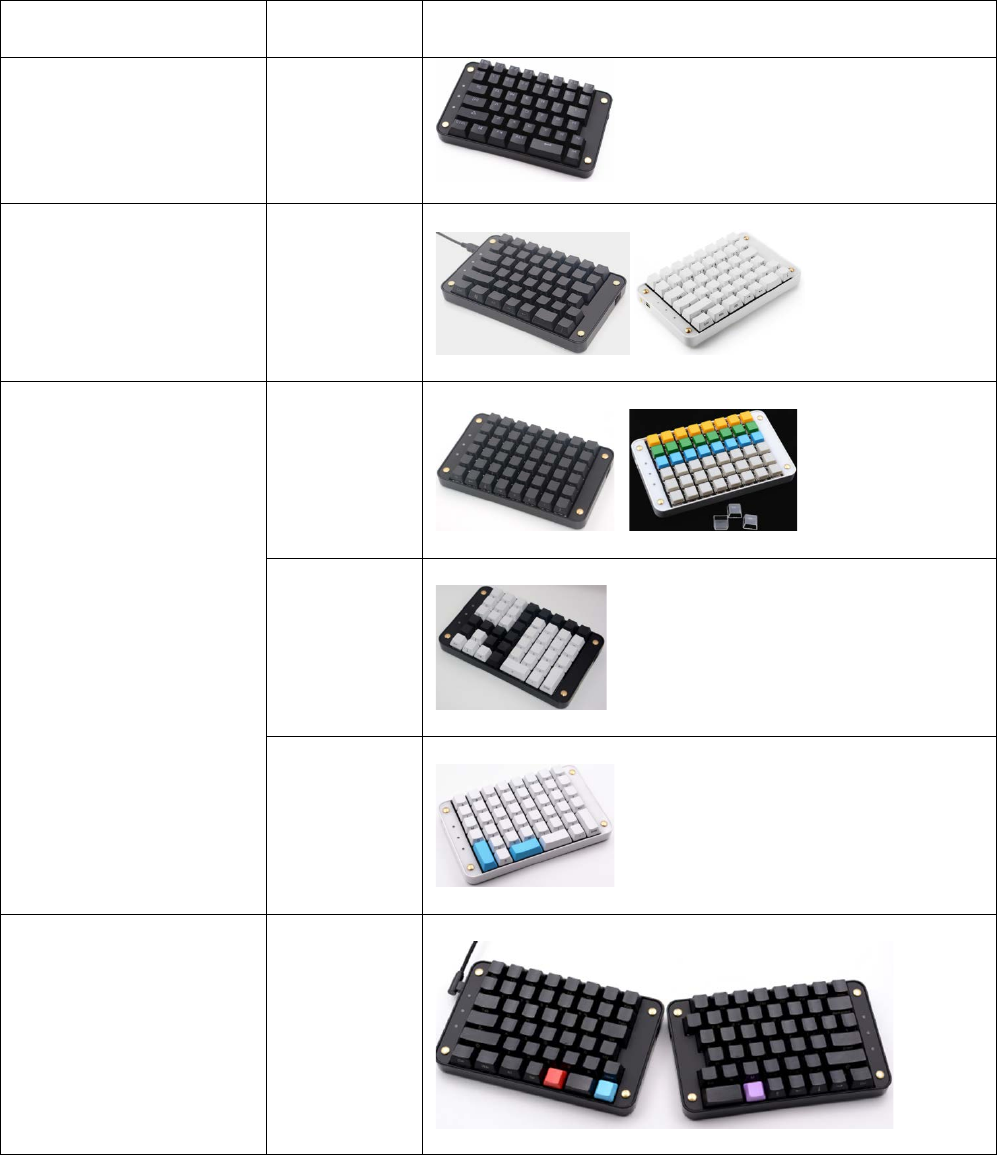
Product List
Series Name Keys PIC
SMKD92 Gamepad 43
SMKD82 Leftpad
(Tools pad)
44
SMKD72 Numpad
48 (Type A)
46 (Type B)
44 (Type C)
SMKD62 Split-Keyboard 89
