IBM BigFix: Console Operators Guide Tivoli Endpoint Manager Operators PDF
User Manual:
Open the PDF directly: View PDF ![]() .
.
Page Count: 270 [warning: Documents this large are best viewed by clicking the View PDF Link!]
- Contents
- Chapter 1. Accessing the console
- Chapter 2. Fixlets and Tasks
- Chapter 3. Actions
- Chapter 4. Sites
- Chapter 5. Domains
- Chapter 6. Operators
- Chapter 7. Roles
- Chapter 8. LDAP Directories
- Chapter 9. Client Computers
- Chapter 10. Computer Groups
- Chapter 11. Analyses
- Chapter 12. Baselines
- Chapter 13. Relays and Servers
- Chapter 14. Activating the license counting process
- Chapter 15. Client-Relay-Server Authentication
- Chapter 16. Displays and Reports
- Chapter 17. Menus
- Chapter 18. The Dialogs
- About the BigFix Console
- Action: Computers
- Action History Tab
- Action List and Document
- Action Parameter
- Action Progress Report
- Action Script Tab
- Action Settings
- Action Site Signing Key
- Action: Summary
- Action: Target
- Add Comment
- Add Custom Setting
- Add Files to Site
- Add LDAP User
- Add User
- Analysis List and Document
- Applicable Computers Tab
- Applicability tab
- Assign User Management Rights
- Baseline Component Applicability Tab
- Baseline List and Document
- Change Password
- Change Private Key Password
- Comments
- Component Applicability Tab
- Components Tab
- Computer: Action History
- Computer: Applicable Tasks
- Computer Group: Action History
- Computer Group: Applicable Analyses
- Computer Group: Relevant Baselines
- Computer Group: Computers
- Computer Group: Description
- Computer Group: Relevant Fixlet Messages
- Computer Group List and Document
- Computer Group: Reporting Computers
- Computer Group: Applicable Tasks
- Computer List and Document
- Computer: Management Rights
- Computer: Relevant Baselines
- Computer: Relevant Fixlet Messages
- Computer Subscriptions Tab
- Computer: Summary
- Connect to Database
- Console Operator: Assigned Roles Tab
- Console Operator: Details Tab
- Create Role
- Help for the BigFix Console
- Console Operator: Administered Computers
- Console Operator: Issued Actions
- Console Operator List and Document
- Create Analysis
- Create Analysis Description Tab
- Create Analysis Properties Tab
- Create Analysis Relevance Tab
- Create Automatic Computer Group
- Create Custom Site
- Create Fixlet or Task
- Description Tab
- Details Tab
- Edit Actions Tab
- Edit Baseline
- Edit Components Tab
- Edit Computer Settings
- Edit Description Tab
- Edit Fixlet Message
- Edit Processing Instruction
- Edit Properties Tab
- Edit Relevance Tab
- Edit Script Element
- Edit Settings for Computer
- Edit Task
- Enter Private Key
- Execution Tab
- Find
- Fixlet and Task: List and Document
- Fixlet List and Document
- Import Content
- Launch Web Reports
- Main Console Window
- Manage Properties
- Manual Computer Groups
- Messages tab
- Modify Custom Site Subscriptions
- Offer tab
- Operator Permissions Tab
- Post-Action tab
- Post-Execution Action Script Tab
- Pre-Execution Action Script tab
- Preferences
- Recent Comments
- Results Tab
- Role Computer Assignments Tab
- Role Details Tab
- Role LDAP Groups Tab
- Role Operators Tab
- Role Sites Tab
- Security Warning
- Settings Tab
- Site Details Tab
- Site List and Document
- Site Properties
- Success Criteria tab
- Take action
- Take multiple actions
- Target Tab
- Task List and Document
- Users Tab
- View action info
- Visualization Parameters: Colorization
- Visualization Parameters: Computers
- Visualization Parameters: General
- Visualization Tool
- Appendix. Support
- Notices

IBM BigFix
Version 9.2
Console Operator’s Guide
IBM

IBM BigFix
Version 9.2
Console Operator’s Guide
IBM

Note
Before using this information and the product it supports, read the information in “Notices” on page 257.
This edition applies to version 9, release 3, modification level 0 of IBM BigFix and to all subsequent releases and
modifications until otherwise indicated in new editions.
© Copyright IBM Corporation 2010, 2015.
US Government Users Restricted Rights – Use, duplication or disclosure restricted by GSA ADP Schedule Contract
with IBM Corp.

Contents
Chapter 1. Accessing the console ... 1
Console authentication using Windows session
credentials ............... 1
Introducing the BigFix console user interface ... 2
A sample console operator's workflow...... 5
Chapter 2. Fixlets and Tasks ...... 9
Introducing Fixlets and Tasks ......... 9
Differences between Fixlets and tasks...... 10
Viewing Fixlets and Tasks ......... 10
Monitoring Fixlets and Tasks ........ 11
Commenting on Fixlets and Tasks ....... 13
Creating or Customizing Fixlets and Tasks .... 13
Hiding Fixlets and Tasks .......... 16
Viewing Relevance Expressions........ 19
Introducing Relevance ........... 20
Chapter 3. Actions.......... 23
Taking actions ............. 24
Taking a default action as part of the deployment
of a Fixlet or a task ........... 24
Taking multiple actions ......... 26
Taking a custom action ......... 27
Monitoring an action taken ......... 28
Viewing the details of an action run ...... 30
Running commands on actions ........ 32
Adding a comment ............ 33
Making an offer using a custom action ..... 33
Chapter 4. Sites ........... 35
Introducing Sites ............ 35
Selecting Sites ............. 35
Subscribing with a Masthead ....... 36
Subscribing with the Licensing Dashboard ... 36
Viewing Site Properties .......... 36
Restricting Computers ........... 38
Restricting Readers ............ 39
Creating Custom Sites ........... 39
Canceling a Subscription .......... 41
Adding Files to Sites ........... 41
Viewing and Deleting Site Files........ 43
Chapter 5. Domains ......... 45
Introducing Domains ........... 45
Domain Sites .............. 48
Selecting Domains ............ 50
Navigating Domains ........... 50
Minimizing the Domain Panel ........ 55
Deleting Domains ............ 56
Chapter 6. Operators......... 59
Introducing Operators ........... 59
Adding Console Operators ......... 59
Adding Local Operators .......... 59
Monitoring Operators ........... 61
Chapter 7. Roles .......... 63
Introducing Roles ............ 63
Creating Roles ............. 63
Assigning Roles ............. 64
Chapter 8. LDAP Directories ..... 65
Adding LDAP Directories ......... 65
Adding Active Directory .......... 66
Adding LDAP Operators .......... 68
Associating an LDAP group ......... 70
Chapter 9. Client Computers ..... 73
Introducing Client Computers ........ 73
Running actions on the computers....... 73
Monitoring Computer Status ........ 73
Grouping Computers ........... 75
Commenting on Computers ......... 76
Creating Retrieved Properties ........ 76
Creating Client Dashboards ......... 77
Locking Computers............ 79
Removing Computers ........... 80
Chapter 10. Computer Groups..... 81
Introducing Computer Groups ........ 81
Creating Manual Computer Groups ...... 81
Creating Automatic Computer Groups ..... 82
Commenting on Computer Groups ...... 83
Removing Computer Groups ........ 83
Chapter 11. Analyses ........ 85
Introducing Analyses ........... 85
Viewing Analyses ............ 85
Monitoring Analyses ........... 86
Commenting on Analyses ......... 87
Creating Analyses ............ 87
Editing Analyses ............ 88
Hiding Analyses............. 89
Chapter 12. Baselines ........ 91
Introducing Baselines ........... 91
Viewing Baselines ............ 91
Monitoring Baselines ........... 92
Commenting on Baselines ......... 92
Creating or Customizing Baselines....... 93
Hiding Baselines............. 94
Chapter 13. Relays and Servers .... 97
Understanding Relays ........... 97
Relay requirements ............ 97
Setting Up Relays ............ 98
Using Relays .............. 98
Automatic Relays ............ 99
© Copyright IBM Corp. 2010, 2015 iii
Manually Assigning Multiple Clients ...... 99
Manually Assigning Single Clients....... 99
Adjusting the BigFix Server and Relays..... 100
Dynamic bandwidth throttling ....... 100
Chapter 14. Activating the license
counting process.......... 103
Prerequisites.............. 103
Categorizing the clients .......... 104
Displaying the current license metrics ..... 106
Distributing the site mapping file....... 107
Generating the license tags ......... 108
Troubleshooting ............ 108
Limitations .............. 109
Chapter 15. Client-Relay-Server
Authentication ........... 111
Client Authentication ........... 111
Authenticating relays ........... 111
Handling the key exchange......... 112
Manual key exchange .......... 112
Revoking Client Certificates ........ 112
Re-registering a revoked client........ 113
Mailboxing .............. 114
Chapter 16. Displays and Reports .. 115
Web Reports.............. 115
Viewing Dashboards ........... 117
Baseline Synchronization Dashboard..... 117
Deployment Health Checks Dashboard and
Deployment Overview Dashboard ..... 119
License Overview Dashboard ....... 121
Maintenance Windows Dashboard ..... 122
Visualizing Data ............ 124
Chapter 17. Menus ......... 127
File Menu .............. 127
Edit Menu .............. 127
View Menu .............. 129
Go Menu ............... 130
Tools Menu .............. 130
Help Menu .............. 132
Chapter 18. The Dialogs ....... 133
About the BigFix Console ......... 133
Action: Computers ........... 134
Action History Tab ........... 136
Action List and Document ......... 137
Action Parameter ............ 138
Action Progress Report .......... 138
Action Script Tab ............ 139
Action Settings ............. 141
Action Site Signing Key .......... 142
Action: Summary ............ 143
Action: Target ............. 145
Add Comment ............. 146
Add Custom Setting ........... 147
Add Files to Site ............ 147
Add LDAP User ............ 148
Add User............... 148
Analysis List and Document ........ 149
Applicable Computers Tab ......... 150
Applicability tab ............ 151
Assign User Management Rights ....... 152
Baseline Component Applicability Tab ..... 153
Baseline List and Document ........ 153
Change Password ............ 155
Change Private Key Password........ 155
Comments .............. 155
Component Applicability Tab ........ 157
Components Tab ............ 158
Computer: Action History ......... 159
Computer: Applicable Tasks ........ 159
Computer Group: Action History....... 160
Computer Group: Applicable Analyses ..... 161
Computer Group: Relevant Baselines ..... 161
Computer Group: Computers ........ 162
Computer Group: Description ........ 163
Computer Group: Relevant Fixlet Messages ... 164
Computer Group List and Document ..... 164
Computer Group: Reporting Computers .... 166
Computer Group: Applicable Tasks ...... 167
Computer List and Document ........ 167
Computer: Management Rights ....... 169
Computer: Relevant Baselines ........ 169
Computer: Relevant Fixlet Messages...... 170
Computer Subscriptions Tab ........ 171
Computer: Summary ........... 173
Connect to Database ........... 175
Console Operator: Assigned Roles Tab ..... 176
Console Operator: Details Tab ........ 177
Create Role .............. 178
Help for the BigFix Console ........ 179
Console Operator: Administered Computers ... 179
Console Operator: Issued Actions....... 180
Console Operator List and Document ..... 180
Create Analysis............. 182
Create Analysis Description Tab ....... 183
Create Analysis Properties Tab ....... 184
Create Analysis Relevance Tab........ 185
Create Automatic Computer Group ...... 186
Create Custom Site ........... 187
Create Fixlet or Task ........... 188
Description Tab............. 189
Details Tab .............. 190
Edit Actions Tab ............ 193
Edit Baseline ............. 195
Edit Components Tab .......... 196
Edit Computer Settings .......... 197
Edit Description Tab ........... 198
Edit Fixlet Message ........... 198
Edit Processing Instruction ......... 199
Edit Properties Tab ........... 200
Edit Relevance Tab ........... 201
Edit Script Element ........... 203
Edit Settings for Computer ......... 204
Edit Task ............... 205
Enter Private Key ............ 206
Execution Tab ............. 207
Find ................ 209
iv IBM BigFix: Console Operator’s Guide
Fixlet and Task: List and Document ...... 210
Fixlet List and Document ......... 212
Import Content............. 213
Launch Web Reports ........... 213
Main Console Window .......... 214
Manage Properties............ 215
Manual Computer Groups ......... 217
Messages tab ............. 217
Modify Custom Site Subscriptions ...... 219
Offer tab ............... 220
Operator Permissions Tab ......... 221
Post-Action tab ............. 223
Post-Execution Action Script Tab ....... 224
Pre-Execution Action Script tab ....... 225
Preferences .............. 226
Recent Comments ............ 228
Results Tab .............. 228
Role Computer Assignments Tab ....... 229
Role Details Tab ............ 230
Role LDAP Groups Tab .......... 231
Role Operators Tab ........... 232
Role Sites Tab ............. 232
Security Warning ............ 233
Settings Tab .............. 234
Site Details Tab............. 235
Site List and Document .......... 236
Site Properties ............. 238
Success Criteria tab ........... 239
Take action .............. 240
Take multiple actions ........... 242
Target Tab .............. 243
Task List and Document.......... 244
Users Tab............... 246
View action info ............ 247
Visualization Parameters: Colorization ..... 249
Visualization Parameters: Computers ..... 250
Visualization Parameters: General ...... 251
Visualization Tool ............ 252
Appendix. Support ......... 255
Notices .............. 257
Trademarks .............. 259
Terms and conditions for product documentation 260
Contents v
vi IBM BigFix: Console Operator’s Guide

Chapter 1. Accessing the console
The console is the visible face of BigFix, used by the operator to monitor and
repair networked computers running the BigFix client. To begin using the console,
you must be authorized. There are two kinds of console user:
vOperators, who manage the day-to-day operation of the program, including
Fixlet management and action deployment, subject to the management rights
assigned by a site administrator or master operator.
vMaster Operators, who are operators with the added authority to assign
management rights to other console operators. Master operators can also:
– Create new computer settings, which allow clients to be labeled for various
groupings.
– Create or edit retrieved properties, which are used to filter and sort
computers.
– Change the BigFix client heartbeat, to optimize the program's performance.
– Subscribe or unsubscribe from sites.
– Create custom actions (if that option was selected for this deployment).
When you have your credentials, you are ready to operate the console:
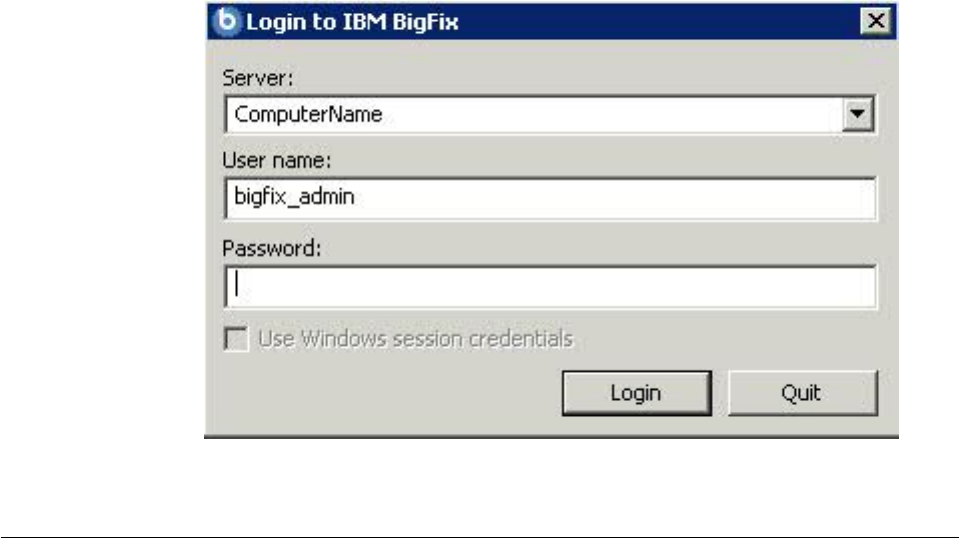
1. Start the console by double-clicking its desktop icon or select it from the
Programs menu: Start / Programs / IBM BigFix / IBM BigFix Console.
2. Log in to the console using one of the following notations for the username:
username
username@domain
domain\user
3. After you initialize the action site, the console opens and begins to import
Fixlet. After it finishes, it forwards the Fixlets to the installed clients, which
evaluate them and return the results. This process can take a few minutes.
Console authentication using Windows session credentials
You can log in to the BigFix console using your Windows Active Directory user
credentials if the following conditions are met:
vYou integrated BigFix with the Active Directory domain as explained in “Adding
Active Directory” on page 66.
vThe system where the BigFix console is installed belongs to the Active Directory
domain.
vYour user ID is defined as:
– BigFix operator with the necessary authorizations to use the console.
– Active Directory domain user on the system where the console is installed.
Note: If you want to enable SSL, specify the Generic LDAP option and, if your
environment contains child domains, the port number 3268 which points to the
Global catalog.
If these conditions are satisfied, when you access the console, the login window is
automatically populated with your domain credentials and you can click Login to
enter the console.
© Copyright IBM Corp. 2010, 2015 1
Note: This authentication method is valid only for BigFix servers running on
Windows operating systems.
Introducing the BigFix console user interface
The Main Console window for BigFix has a panel on the left containing buttons
and navigation trees called the Domain Panel. It is designed to group content into
collections pertaining to specific operator domains, such as software patching,
malware protection, power management, and so on. After a domain has been
chosen and topics are selected from the navigation tree, a list of related content is
shown on the right. From this list, specific items can be selected for a more
detailed view in the Work Area beneath the list. Here is a simplified breakdown of
some of the features you might encounter in a typical session:
Domain Panel
This vertical panel on the left provides a high-level view of the extensive
content, allowing you to quickly subdivide the information by major IT
functions. Within each domain, this panel presents navigation trees that
make it easy to zoom in on Fixlet, reports, analyses, and other content.
This panel might be subdivided into sections, depending on the style of
the domain. Some of these sections might include:
Content Filters
If it exists, this section is at the top and provides various content
filters and reports that are a part of the selected domain. Click the
disclosure icon to the left (either a triangle or a plus sign) to
produce a navigation tree to refine your choices.
General Content
This section lets you navigate all the content in the domain. The
content might include Fixlet, tasks, actions, analyses, and
computers, all collected from various sites. Click the disclosure
icon to the left (either a triangle or a plus sign) to open up the tree.
Domain Buttons
At the bottom of the Domain Panel, these buttons represent the set of
domains that are currently available to you. When you subscribe to a site,
it is automatically entered into the correct domain. If a new domain is
2IBM BigFix: Console Operator’s Guide
required, a button for it is added to this group. At the bottom of the
buttons is a control that allows you to adjust the number of buttons to
display.
Console Toolbar
This toolbar allows you to navigate back and forth through the items you
have selected from the Domain navigation tree. These Back and Forward
buttons act like their counterparts in a browser, and are an important
method for navigating through your content. In addition there are buttons
that allow you to display items you might have hidden and items that are
not currently relevant to any of your clients (this allows you to view all the
available content for research or cloning purposes). There is also a refresh
button that reloads content from the database for the console display.
List Panel
This is a listing of the items specified by the content filters and the
navigation trees in the Domain Panel. You can sort this list by clicking the
column headers and you can rearrange the headers by dragging them left
or right. In addition, you can right-click the headers to see a pop-up menu
containing a list of all the possible fields. Check those you want to use as
headers.
Context Menu
This is the menu that opens when you right-click any item in a list.
Different lists have different context menus.
Work Area Toolbar
This bar contains context-sensitive buttons that can run various actions
based on the content of the current work area. It also contains two icons,
upper right, that let you maximize or detach a specific document.
Detaching allows you to examine more than one document at a time.
Work Area
Below the List Panel and the Work Area Toolbar is the Work Area. When
you click an item from the List Panel, the console opens a detailed
document in this window. The following list describes, for example, the
elements of a Fixlet:
Document tabs
Each type of document has a unique set of tabs to go along with it.
For a Fixlet, the tabs include items such as Description, Details,
Applicable Computers, and Action History.
Fixlet When a Fixlet is opened from the list, the default Description tab is
selected and the Fixlet document explains the issue in plain
English.
Action Button
A Fixlet document typically contains at least one Action,
represented by a link in the Work Area (also available from the
Take Action button in the Work Area Toolbar). Click it to deploy
the Action across your network.
Below is a screen shot from a typical session. A subset of Fixlets and Tasks have
been selected from the Domain navigation tree, and the user is viewing the
description of a Task opened from the list panel:
Domain Panel Console Toolbar List Panel Context Menu
Chapter 1. Accessing the console 3
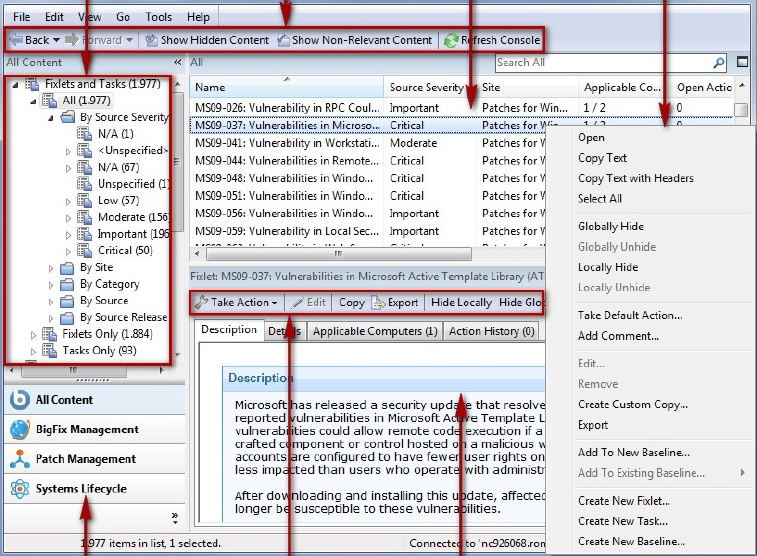
Domain Buttons Work Area Toolbar Work Area
In general, your workflow proceeds first from the Domain Panel to the List Panel.
After selecting an item from that list, you follow the instructions in the Work Area
to complete the task.
How you proceed depends on the content type. Fixlet describe problems that have
been discovered on one or more clients. Analyses present you with information
collected from the clients on your network. The computer branch of the tree allows
you to examine specific clients under your control.
For example, if you select Fixlets from the Domain Panel, a list of the relevant
Fixlets is shown in the List Panel. Select one from the list and it is shown in the
Work Area below. The Fixlet document presents you with a short, clear explanation
of a problem that is currently affecting your clients. If you want, you can inspect
the underlying code used in the relevance expression and the proposed actions by
clicking the Details tab. When you have decided to deploy the action to the
affected computers, click the action (represented by a button in the Work Area
Toolbar or a hyperlink in the Work Area) and follow the prompts. After deploying
the action, the affected clients are remediated and no longer report the problem. At
that point, the Fixlet is removed from the relevant Fixlet list.
You can set preferences that govern how responsive and secure you want your
network to be. To adjust the default values, select Preferences from the File menu.
4IBM BigFix: Console Operator’s Guide
A sample console operator's workflow
BigFix is a powerful and feature-packed program that might seem overwhelming
to a new user. However, when you understand the typical workflow, the operation
becomes straightforward and intuitive. Let's run through a sample session:
1. Start up the BigFix Console.
2. From the Domain Panel on the left, click the button labeled All Content, which
lets us view all subscribed sites. Then click the Fixlets and Tasks item at the
top of the Domain panel. This then displays a list of the Fixlet and Tasks that
are currently applicable to your network in the List Panel to the right.
3. From the List Panel, click a Fixlet of interest. The corresponding document
opens in the Work Area below the list. This is the text of the Fixlet, which gives
you the information you need to decide on deployment, along with the specific
actions to take.
Chapter 1. Accessing the console 5
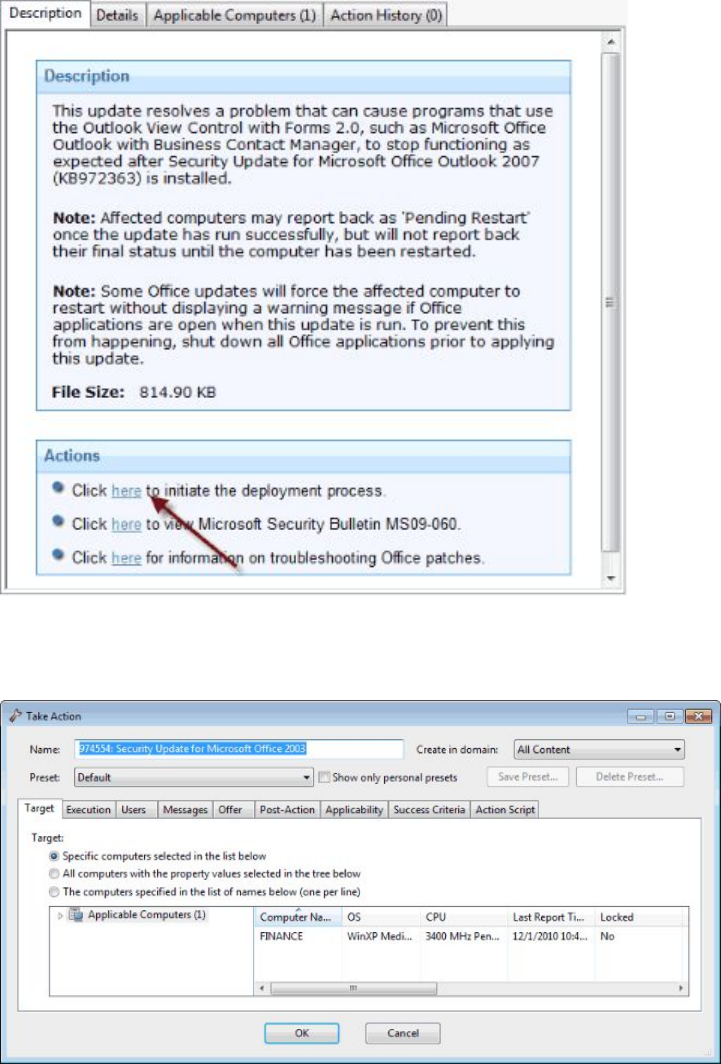
4. At the bottom of the message you find one or more links that initiate actions to
fix the affected computers. Click the action that seems most appropriate. A
Take Action dialog box opens.
5. Use the Target tab to select any subset of affected computers you want to target
with the action. There are several techniques for deploying actions:
Specific computers selected in the list below
The first targeting button lets you select the computers you want from
the panel below right, which lists all those computers for which the
Fixlet is currently relevant. The right-click menu allows you to select all
the computers in the list. This technique limits the Fixlet action to the
specified list.
6IBM BigFix: Console Operator’s Guide
All computers with the property values selected in the tree below
Choose the second button to take actions on computers with a set of
specified properties. Until the expiration of the action period, whenever
a computer satisfies the given properties it is targeted. As with all
actions, only the affected computers actually receive the action.
The computers specified in the list of names below
Choose the third button to specify a list of computers.
6. Use the rest of the tabs to prepare your action, including execution schedules,
client messages, extra scripting and more, then click the OK button. For more
information, see the article on the Take Action dialog.
7. When you supply your password, the Fixlet action is deployed throughout
your network, and is applied specifically to each computer that needs it, subject
to any filters you put in place.
This is the process that you use for typical computer maintenance and remediation.
As you explore the interface, you will discover that it can also help you remediate
security issues, inventory your computers, manage your users, and maintain a
detailed audit trail of every patch and upgrade. As varied as these tasks are, they
are all accomplished with a similar workflow. You should experiment to learn
more about the power of this interface.
Chapter 1. Accessing the console 7
8IBM BigFix: Console Operator’s Guide
Chapter 2. Fixlets and Tasks
Introducing Fixlets and Tasks
Fixlets and Tasks are central to BigFix. Using Relevance statements, they target
specific computers, remediating only those BigFix Clients affected by an issue.
They are both packaged with an Action script that can resolve the issue with a
simple mouse-click.
Fixlets and Tasks differ mainly in how they get resolved.
vA Fixlet is triggered by a Relevance clause that detects a vulnerability. When an
Action is invoked to remediate the vulnerability, the Fixlet automatically loses
relevance and is thus no longer applicable on that specific BigFix Client. As a
Fixlet Action propagates through your network, you can track its progress with
the Console, Web Reports, and the Visualization Tool. When every BigFix Client
in your network has been remediated, the Fixlet is no longer relevant and it is
removed from the list. If the issue returns, the Fixlet is shown again in the list,
ready to address the issue again.
vA Task comes with one or more Action scripts that help you adjust settings or
run maintenance tasks. It generally stays relevant after its Action script has been
run. Tasks are designed for reapplication and as a consequence, they are often
persistent.
Both Fixlets and Tasks might have a Default Action, allowing you to simply click
from the list to deploy it. They can both be grouped into Baselines, allowing higher
levels of automation. If you create a Baseline of Fixlets or Tasks which all contain
default Actions, you can turn the tedious chores of maintaining a corporate policy
or common operating environment into a single-click operation. In typical
operation, Fixlet relevance contributes to the overall baseline relevance; Task
relevance does not. Similarly, Actions created from a Baseline can be composed of
both Fixlet and Task Actions, and typically only the relevance of the Fixlet Actions
contributes to the decision to run the group. These are defining features of Fixlets
and Tasks. The following table summarizes the differences:
Fixlet message Task
Relevance interpretation: Machine is in remediable
state
Action is available to run in
this context
To establish success of
remediation:
Relevance becomes false Action runs to completion
Contributes to Baseline
Relevance?
Yes No
Contributes to Group Action
execution?
Yes No
At any time, you can open a Fixlet or Task to inspect the underlying Relevance
expressions that are used to target the Clients, as well as the Action scripts that are
designed to address the issue. The language is human-readable to give you a high
degree of confidence in both the applicability of the trigger and efficacy of the
remedial Action. You can also see exactly which computers in your network are
© Copyright IBM Corp. 2010, 2015 9

affected by each Fixlet or Task. When propagated, you can then view the progress
and ultimate history of each Action taken on a Client-by-Client basis.
Differences between Fixlets and tasks
If you look at the details in the Fixlet and task definition on the BigFix console,
you see the same entries. What makes the difference between the two are the scope
and the default behavior.
For what concerns the scope:
vFixlets are used for fixing lack of compliance to enforced rules, in a few words, a
Fixlet takes a known "broken" condition and fixes it.
vTasks are configuration items to run, in other words, a task takes a
"not-necessarily broken condition" and changes it to something else that is
"not-necessarily fixed".
For example:
vA Fixlet would be Update AntiVirus definition.
vA task would be Run Antivirus scan.
For what concerns the default behaviour:
vWhen a Fixlet finishes it's action script, it checks the relevance to make sure it
has gone from true, the Fixlet is relevant, to false, whatever was broken is now
fixed, and reports back Fixed when it is done.
vWhen a task finishes its action script, it does not check the relevance again. If all
the lines in the action script completed then the client considers that action
successful and reports back Complete. For this reason, as a best practice, you are
suggested to set success criteria for the action run by the task to ensure that the
task run and that it was successful.
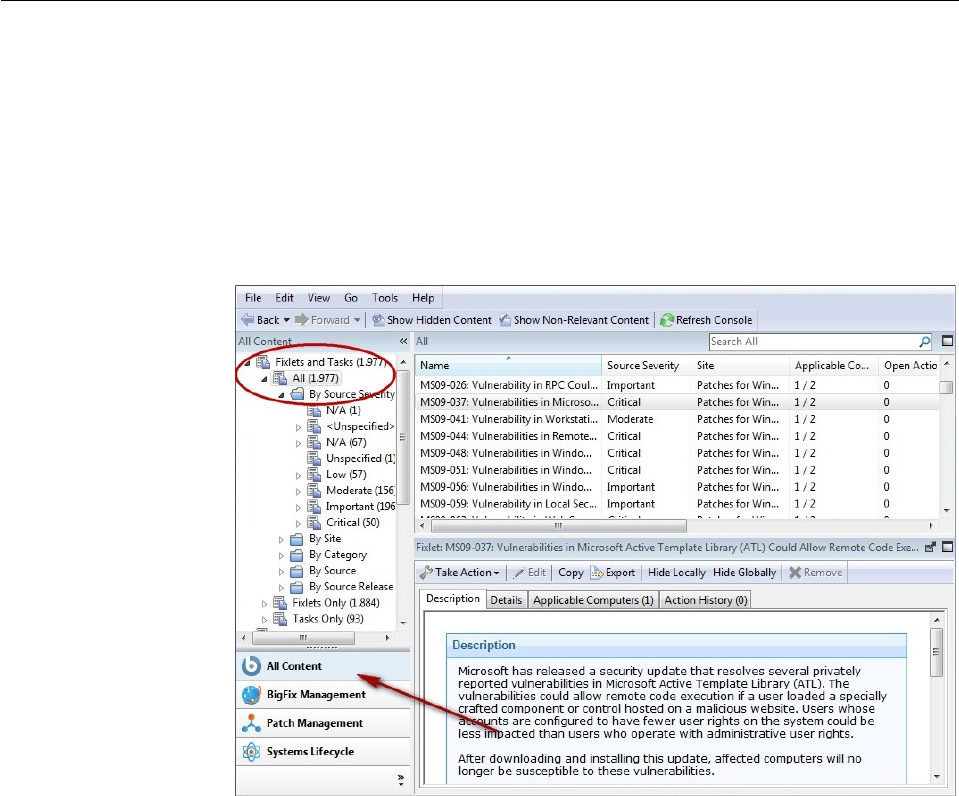
Viewing Fixlets and Tasks
To display a Fixlet or Task,
1. From the navigation tree in the Domain Panel, click the icon labeled Fixlets and
Tasks.
2. From the resulting List Panel on the right, click an item to open it.
The body of the Fixlet message is shown in the Work Area (click the Description
tab if not already selected).
10 IBM BigFix: Console Operator’s Guide
When selected, each Fixlet or Task has a window of its own.
Each Fixlet or Task comes with four tabs in the Work Area:
vDescription: This is a page providing a descriptive explanation of the problem
and one or more Actions to fix it. The Actions are represented by links at the
bottom of the description page. Click an Action to open the Take Action dialog,
which allows you to further target or schedule the Action. If you accidentally
click an Action hyperlink, before the actual deployment, you always get a
chance to modify (or cancel) the Action.
vDetails: This dialog contains the Fixlet/Task properties such as category, security
ID, download size, source, severity, and date. It also lists the code behind the
Relevance expressions and the Actions. At the bottom of this dialog there is a
text box for you to enter a comment that remains attached to this item.
vApplicable Computers: This is a filter/list of all the computers targeted by the
selected Fixlet or Task. You can filter the list by selecting items from the folders
on the left, and sort the list by clicking the column headers.
vAction History: This is a filter/list of any Actions that have been deployed from
this Fixlet or Task. If the item is new, there are no Actions in the list. Like the
other filter/lists in the Console, you can filter the Actions using the left panel,
and sort them by clicking the column headers above the right-hand list.
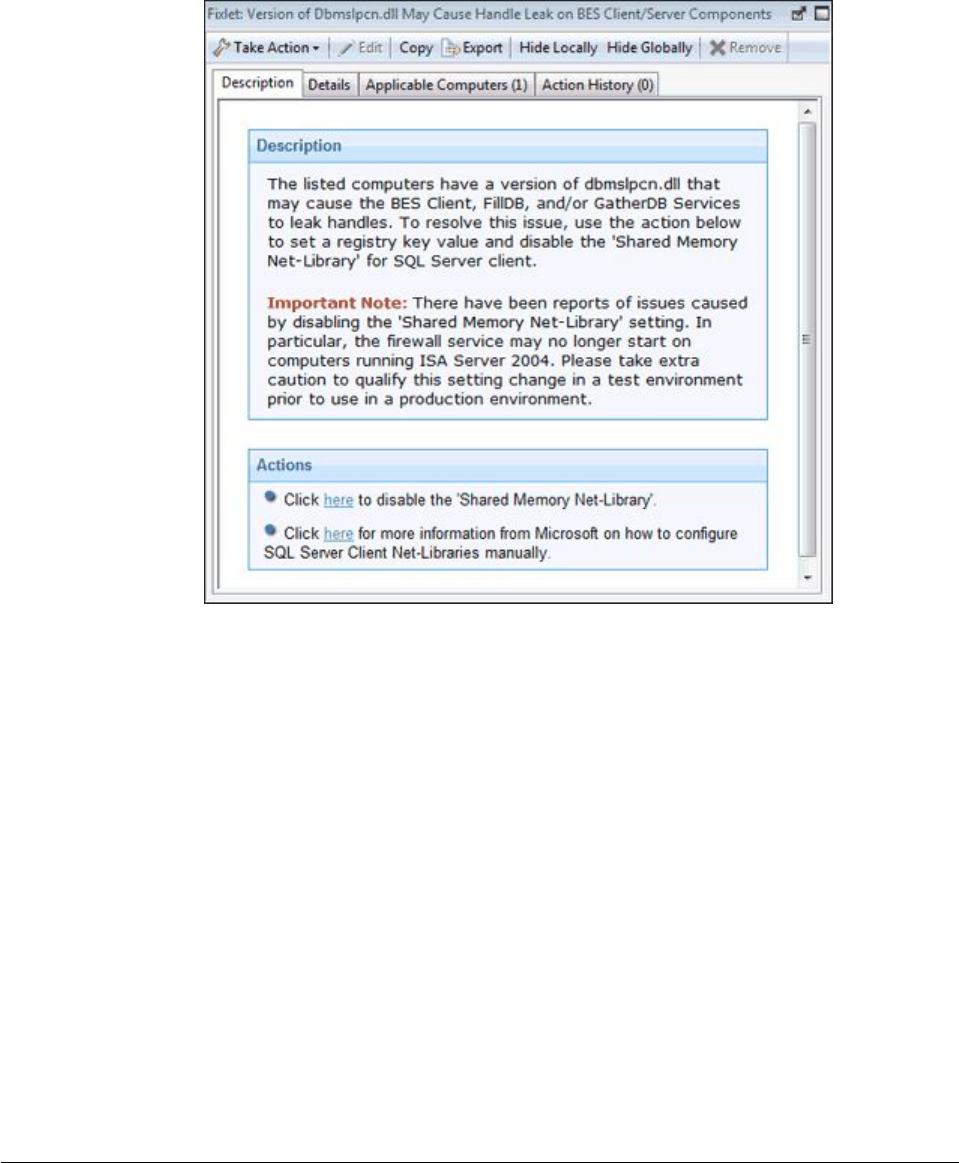
Monitoring Fixlets and Tasks
When a Fixlet or Task becomes relevant somewhere in your network, BigFix adds
it to the list available under the Fixlets and Tasks icon in the Domain Panel
navigation tree. You can filter this list by opening the icon and clicking the
subcategories underneath. Each icon represents data groupings that you can use to
Chapter 2. Fixlets and Tasks 11
narrow down the items in the List Panel on the right. Then, in the listing area
itself, you can sort the items by clicking a column heading.
The list headers include the following information:
vName: The name assigned to the Fixlet message by the author.
vID: A numerical ID assigned to the Fixlet message by the author.
vSource Severity: A measure of how serious a Fixlet message is, assigned by the
Fixlet author. Typical values are Critical, Important, Moderate, or Low.
vSite: The name of the site that is generating the relevant Fixlet message.
vApplicable Computer Count: The number of BigFix Clients in the network
currently affected by the Fixlet message.
vOpen Action Count: Number of distinct actions open for the given Fixlet
message.
vCategory: The type of Fixlet message, such as a security patch or update.
vUnlocked Computer Count: The number of unlocked computers affected by the
Fixlet.
vDownload Size: The size of the remedial file or patch that the action downloads.
vSource: The name of the source company that provided the Fixlet information.
vSource ID: An identification number assigned to the Fixlet to relate it back to its
source.
vSource Release Date: The date this Fixlet message was released.
For example, you might filter the Fixlet list by opening the Source Severity folder
and selecting Important to filter out less urgent Fixlet messages.
Then you could sort the Fixlet messages by Applicable Computer Count (which
shows the number of affected computers) to find which Fixlet messages are
relevant to the greatest number of computers. If you do not see one of the columns
listed above, right-click in the Fixlet header and select it from the pop-up menu.
12 IBM BigFix: Console Operator’s Guide
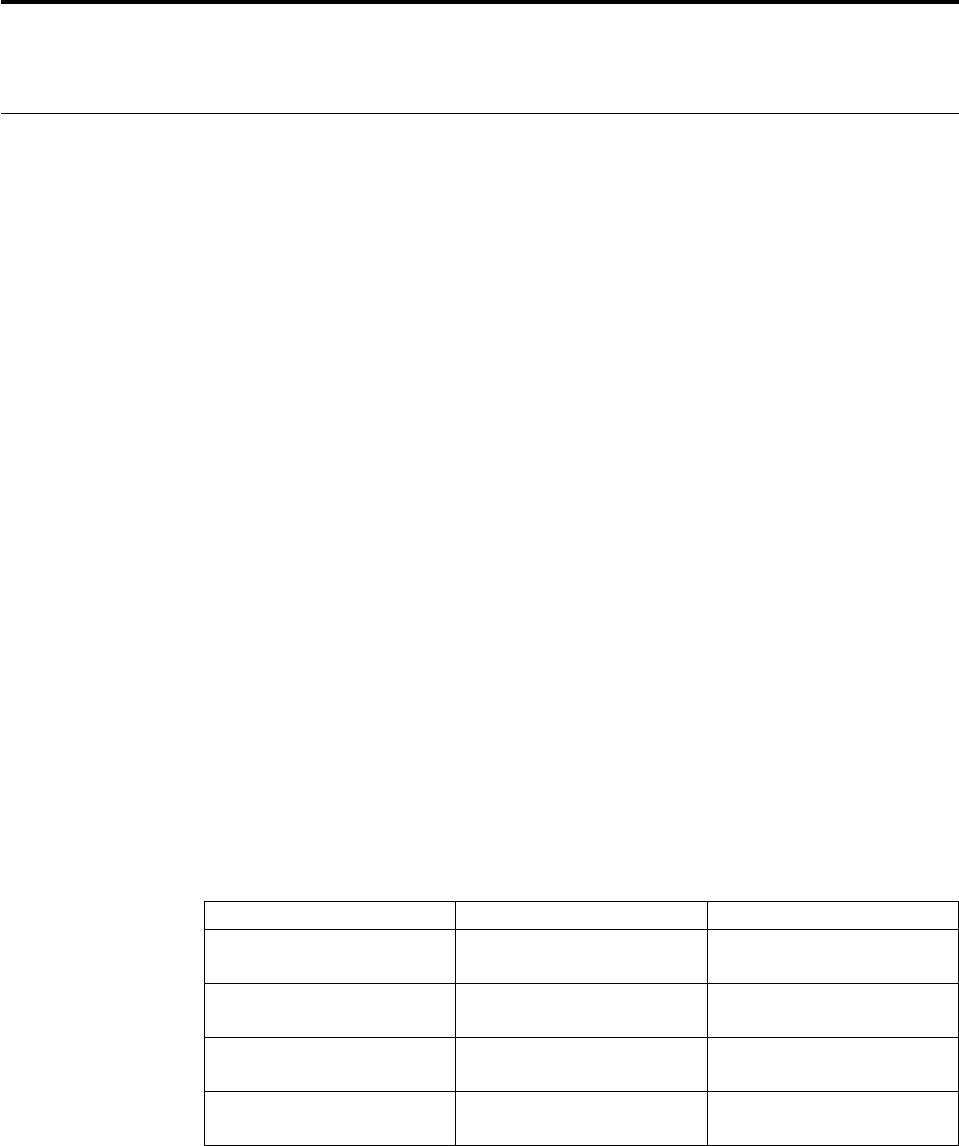
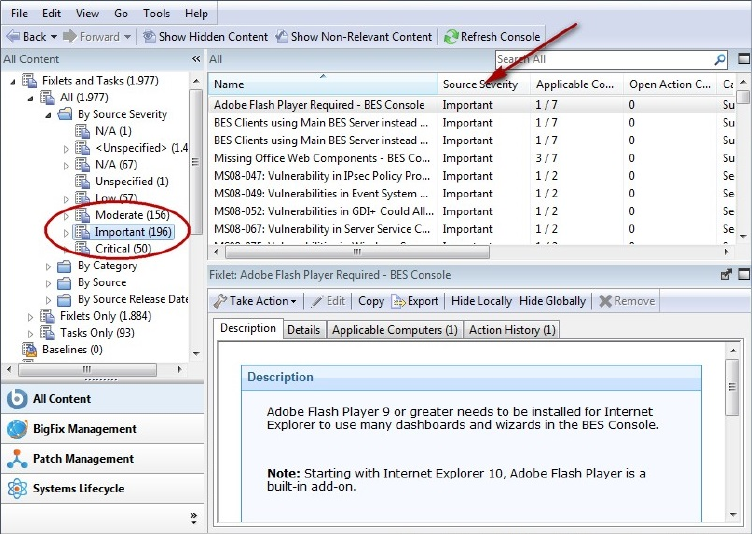
Commenting on Fixlets and Tasks
You can attach a comment to a Fixlet or Task that other operators can read.
1. From the Domain Panel, select Fixlets and Tasks from the navigation tree.
2. Select a Fixlet or Task from the List Panel on the right by clicking it.
3. From the document panel below, select the Details tab and scroll to the bottom.
4. Type your comment into the text box and click the Add Comment Button.
Your comment is name- and time-stamped for other operators to view it. In
addition to Fixlets and Tasks, you can attach comments to Actions, Computers, and
Analyses.
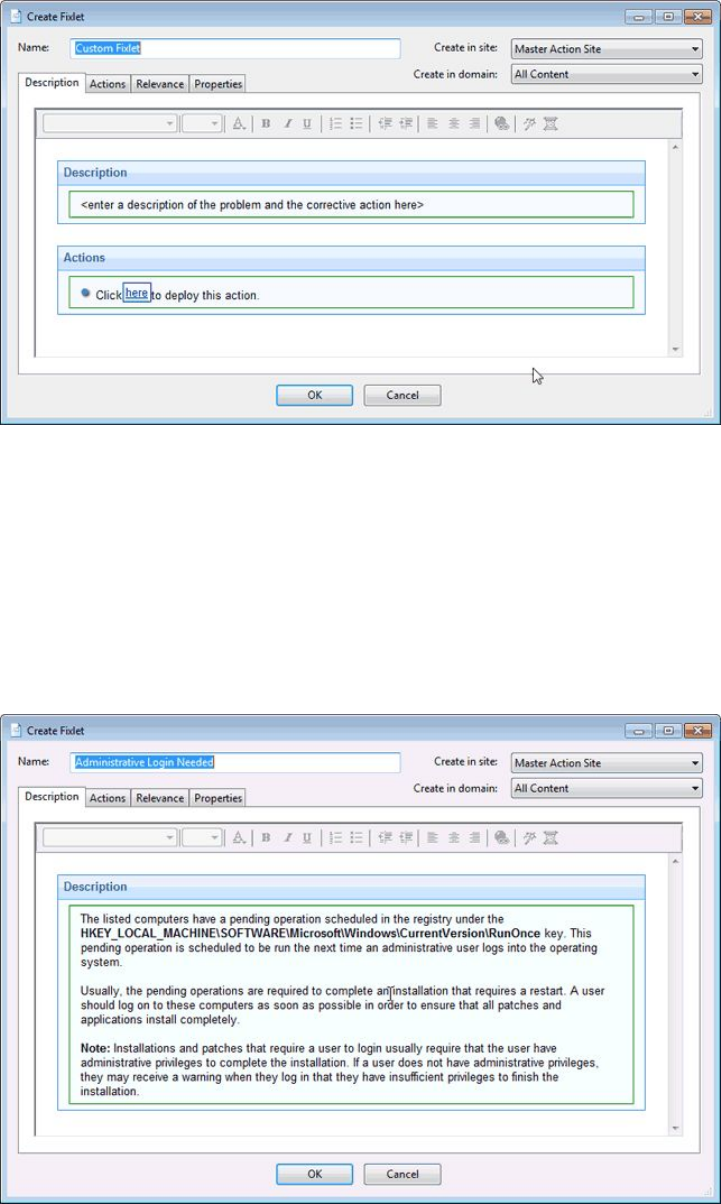
Creating or Customizing Fixlets and Tasks
To create your own custom Fixlet or Task message from scratch,
Chapter 2. Fixlets and Tasks 13
1. Select Tools > Create New Fixlet or Task. This opens a creation dialog with
blank fields for you to fill in.
Note: To remove incorrect characters from the dialog, right-click the window,
select Encoding and select the appropriate language. Close and reopen the
window.
Note: The maximum length for Fixlet or Task names is 255 characters.
You might also want to customize a Fixlet or Task. You can do this by cloning
and modifying an existing one. To do this, first select the desired Fixlet or Task
from the List Panel, then select Edit > Create Custom Copy (or right-click the
item and select Create Custom Copy from the context menu). The appropriate
creation dialog opens, but this time it is filled with the original content.
Either way, the Create dialog provides the same options. Enter the name of
your customized message in the top left text box. This serves as the title when
14 IBM BigFix: Console Operator’s Guide
the Fixlet or Task is displayed. You can use the name for sorting and filtering,
so create a consistent naming convention to make your content more
manageable.
2. Choose the Site and Domain to host it from the drop-down menus, upper
right.
Next, click through each of the tabs to further define your Fixlet or Task.
3. Description: Enter your descriptive text in this box. You can use the text
manipulation toolbar at the top of the dialog to enhance the formatting.
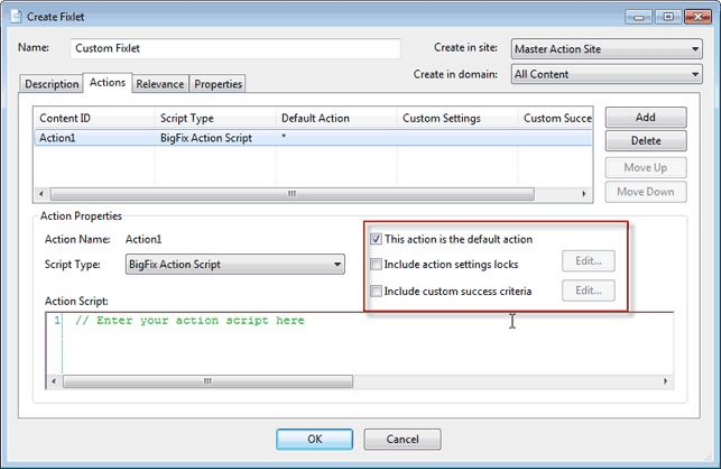
4. Actions: Define your action in this dialog. Use the buttons at the right to add,
delete, or change the position of the action. Below that is an area to customize
the properties of the action. Choose the Script Type from the drop-down menu.
Below that is a text box where you can enter a new action script or modify the
original.
There are three check boxes you can use to modify the action:
vThis action is the default action. Click this box to create a default action.
vInclude action settings locks. Click Edit to the right of this check box to
customize the action setting locks, including start time, end time, day
exclusions, and more. This panel also includes failure and reapplication
behaviors.
vInclude custom success criteria, which allows you to specify the conditions
that define the success of the action.
5. Relevance: Leave the default of applying to All computers, or click a different
button and enter a condition or a relevance statement in the dialog below. This
is how you target your Fixlet or Task to relevant computers. For more
information about the relevance language, see the Inspector Libraries.
Chapter 2. Fixlets and Tasks 15
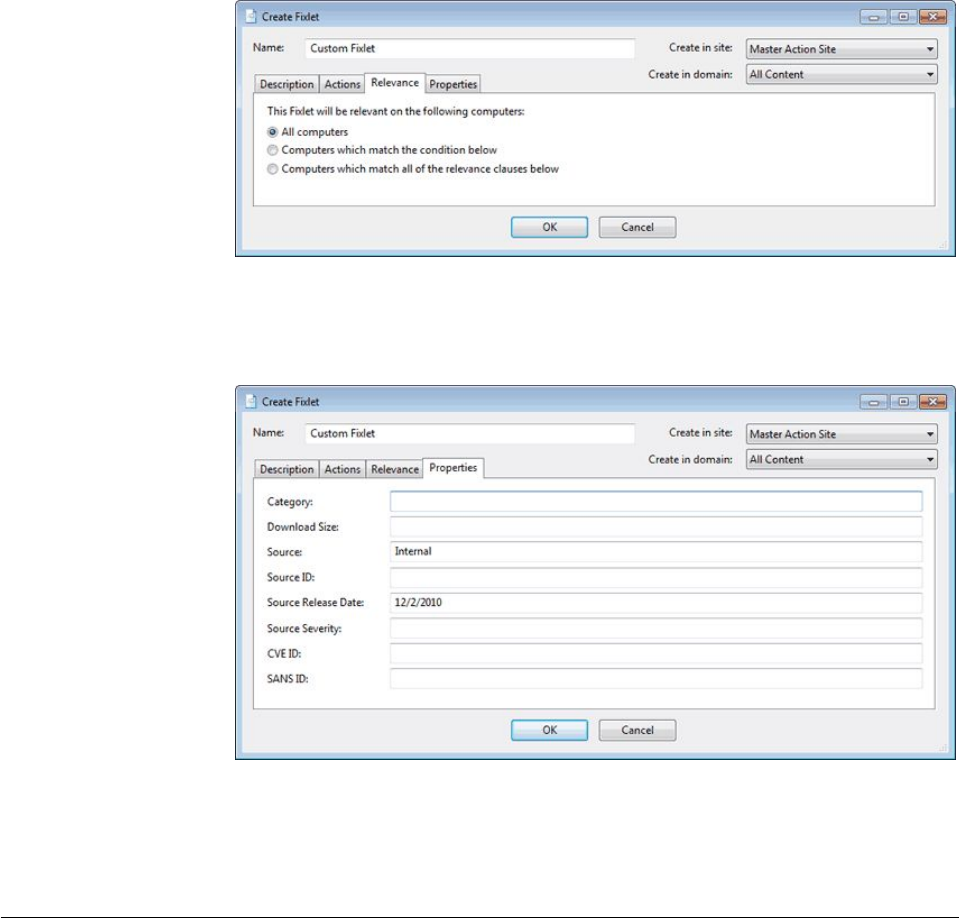
6. Properties: Set the properties of your Fixlet or Task, including the category,
download size, date, severity, and more. You can also include the SANS
(SysAdmin, Audit, Network, Security) or CVE (Common Vulnerabilities and
Exposures) ID numbers.
7. When you are satisfied with your definitions, click OK. Because your Fixlet or
Task must be propagated, you are prompted for your private key password.
When you enter it and click OK, it is sent to all the Clients, which evaluate it
for relevance and report back their status. You can then follow the deployment
of your new content in real-time from the Console.
Hiding Fixlets and Tasks
You can hide a Fixlet or Task with the following procedure:
1. From any Fixlet or Task List Panel, select the messages you want to hide.
2. Right-click the desired item and select Globally or Locally Hide from the
pop-up menu (or select Edit > Hiding > Globally/Locally Hide).
16 IBM BigFix: Console Operator’s Guide
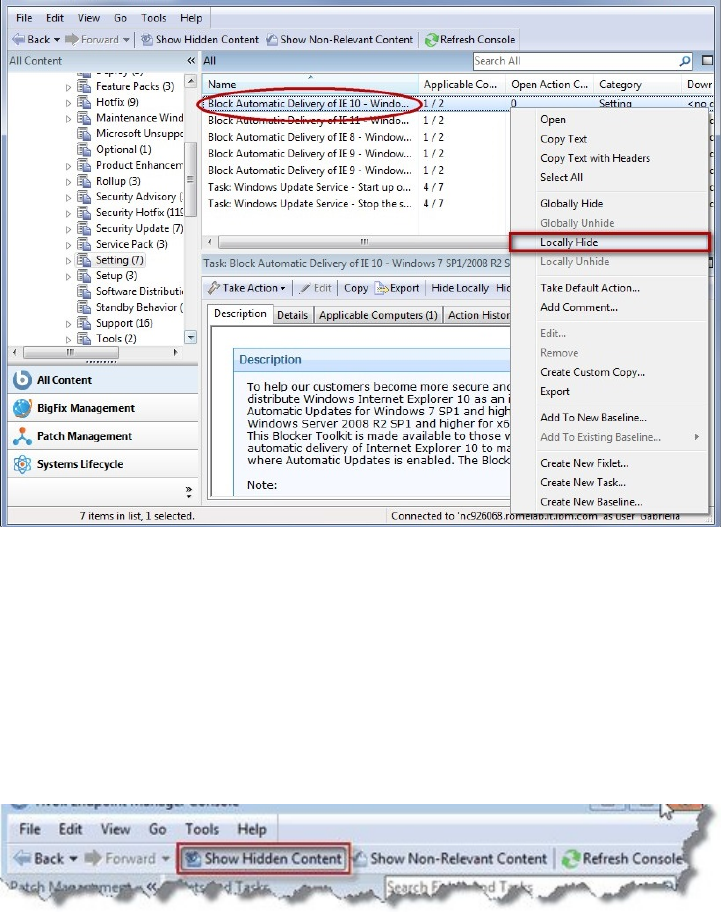
The selected Fixlet or Task is no longer displayed in the list. If you chose to hide
the item locally, it is still visible to other Console users. If you are a master
operator, you can hide a Fixlet or Task globally to hide it also from all non-master
users.
Fixlet or Tasks that are hidden are still available and you can restore or "unhide"
them at any time. Here is how:
1. Click the Show Hidden Content button in the Console Toolbar. All content,
including hidden content, is listed if this button is selected.
2. A single Fixlet or Task can be unhidden by clicking it from a list. In the
resultant Work Area you see an Unhide button. Click it to return the item to its
normal state.
Chapter 2. Fixlets and Tasks 17
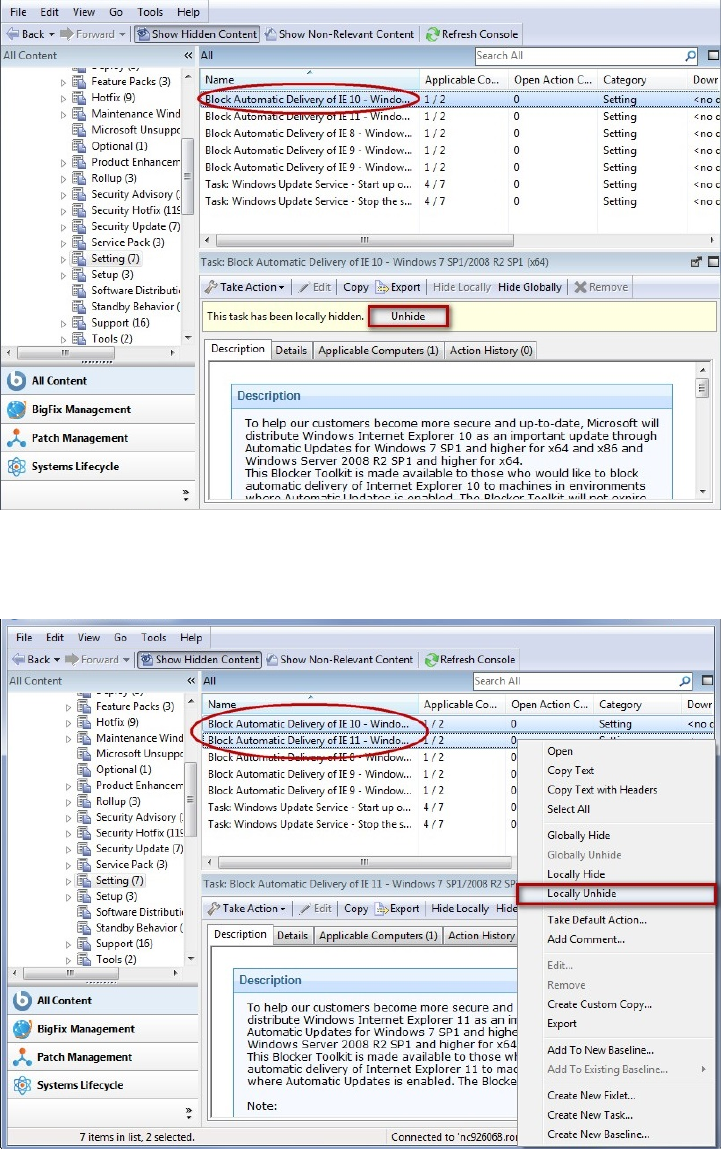
3. Multiple Fixlets or Tasks can be unhidden by selecting them, right-clicking the
group, and choosing Unhide from the context menu, or select multiple items
and select Edit > Hiding > Globally/Locally Unhide.
Generally speaking, it is not necessary to hide Fixlets or Tasks, because you can
simply ignore them. One important reason to hide them is if you have your own
policy that must take precedence. For example, a Fixlet message might suggest that
it is a good idea to install a particular security update, but you might be aware of
reasons why it must not be applied to your network. In this case, hiding the Fixlet
18 IBM BigFix: Console Operator’s Guide
removes it from the user interface, so you can focus on other content. A master
operator can also hide Fixlets and Tasks that must not be applied by ordinary
operators.
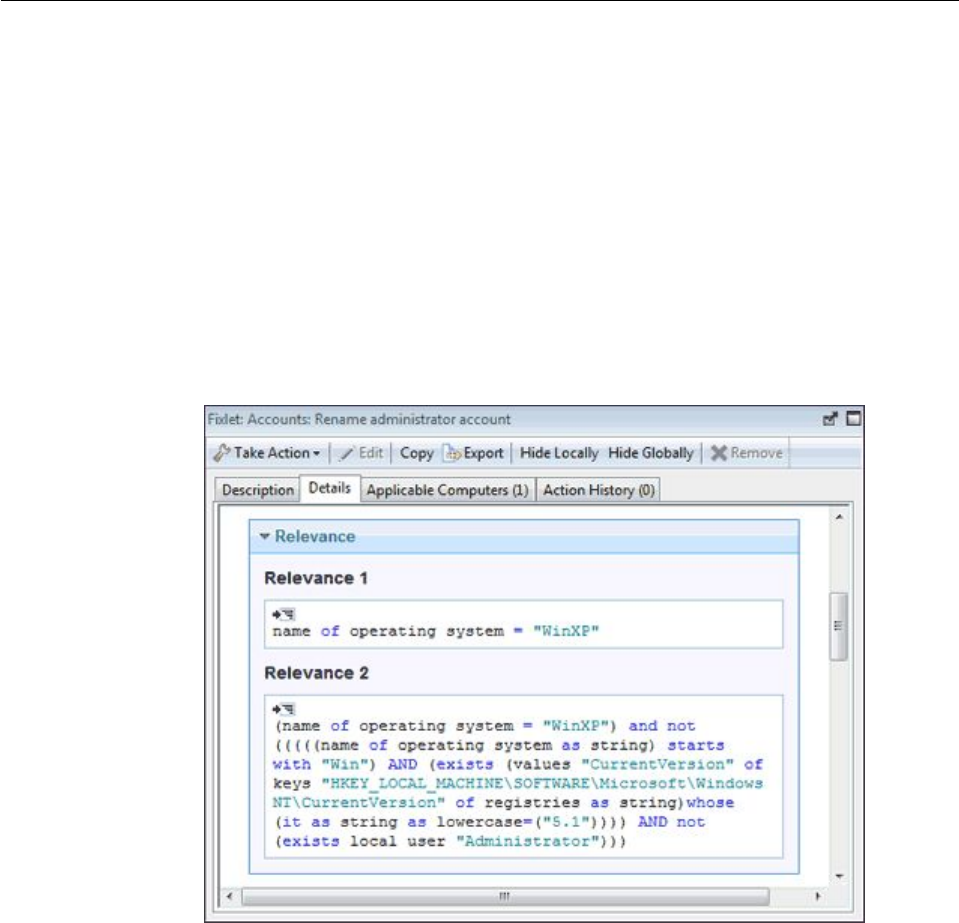
Viewing Relevance Expressions
When a Fixlet message becomes relevant to some computer in your network, you
might want to know exactly what triggered it, and what action is suggested. This
is easy to investigate, because these items are written in the Relevance Language,
which is a human-readable language for probing and acting on computers.
To view Relevance Expressions:
1. Click a Fixlet message from any Fixlet List Panel to open a detailed Fixlet
document in the Work Area below.
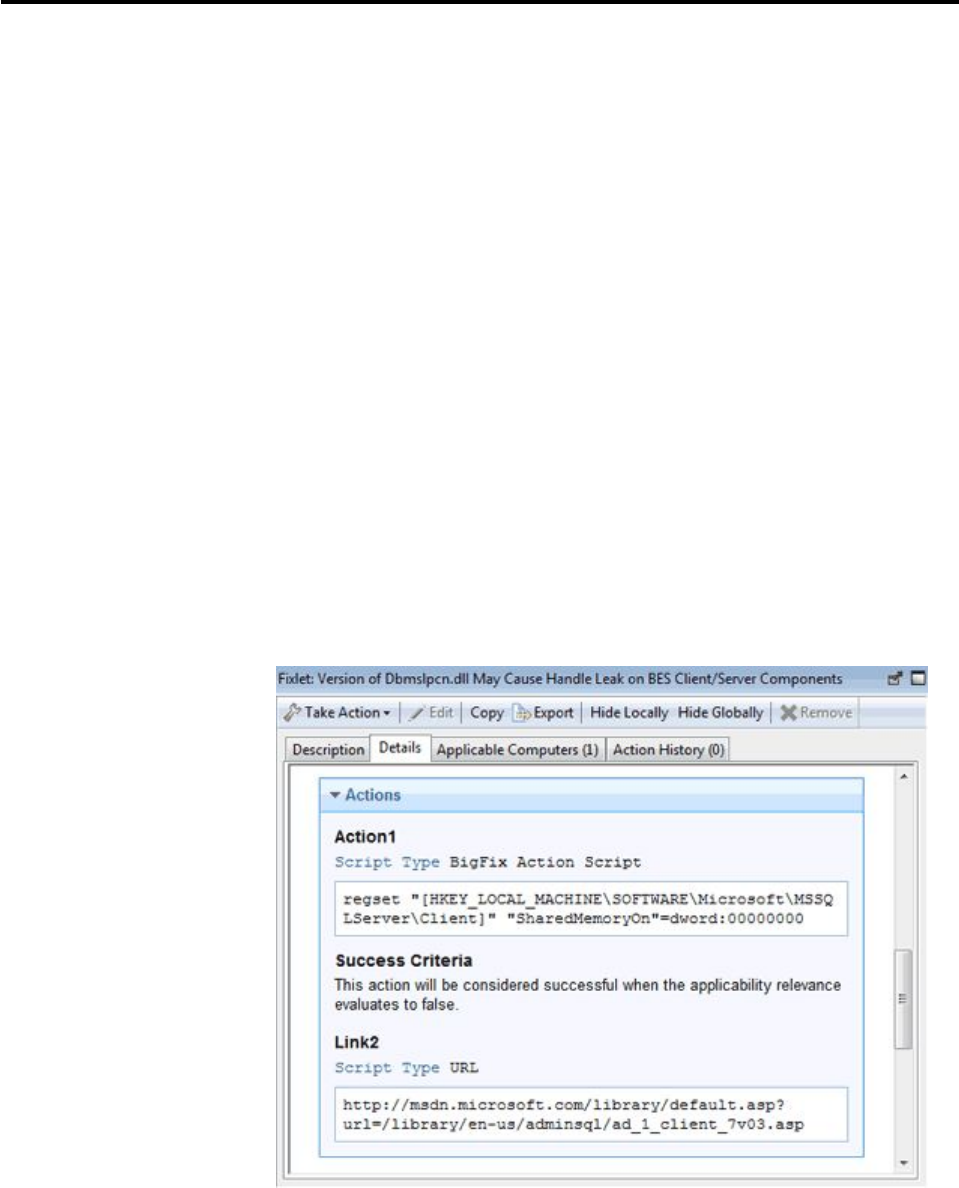
2. Select the Details tab.
This opens a page listing various Properties and below that, the Relevance clauses
and Action scripts:
This window shows you how the computer is interrogated and why it has been
triggered as relevant. Typically there are multiple Relevance clauses that are all
ANDed together to determine if a given IBM Endpoint Manager Client is affected.
Scroll down to view the Action script.
Chapter 2. Fixlets and Tasks 19

Introducing Relevance
To quickly and non-invasively inspect various aspects of a computer, the
Relevance Language was created. This human-readable language is at the heart of
the program and allows Fixlet authors to target actions to just those computers that
need the fix -- and no others. You can be confident that only broken machines are
being fixed.
The Relevance Language can query an exhaustive set of computer properties, and
do it quickly. Most Console operators rely on other users to write Fixlet messages,
and so their exposure to the Relevance Language is not critical to operating the
Console. However, as a power user, you can customize the Console with short
lines of code from the Relevance Language (called Relevance Expressions) which
grant you an unprecedented amount of control over the BigFix Client computers
on the network.
A typical Relevance Expression might be:
vendor name of processor
This expression returns the name of the manufacturer of the CPU (Intel or AMD,
for example), which can then be used to determine relevance.
You can use Relevance Expressions to create retrieved properties, which you can
then use to organize and filter the Clients in the network. For example, here are
some possible properties that might be useful to know about your BigFix Client
computers:
Table 1. Properties of the IBM BigFix Client computers
Property name Relevance Expression Result
Pentium family name of main
processor contains "Pentium"
True if the processor is a
Pentium.
Small drive Total space of drive "c:" <
2000000000
True if the drive is smaller
than 2GB.
Bad clock absolute value (now -
apparent registration server
time) > 1 hour
True if the clock is off by
more than one hour.
IE Version file version of application
"iexplore.exe" of the registry
Version number of Internet
Explorer on a Windows
computer.
Mailto App application of key
"HKEY_CLASSES_ROOT\
mailto" of the registry
On a Windows computer, the
name of the app that handles
mailto requests from a
browser.
Running Word exists running application
whose (name of it as
lowercase is "winword.exe")
True if Word is running on a
Windows IBM Endpoint
Manager Client computer.
Bios date date of Bios BIOS date on a Windows
computer, if it exists.
Processors number of processors The total number of
processors in the IBM
Endpoint Manager Client
computer.
20 IBM BigFix: Console Operator’s Guide
Use the Manage Properties dialog to see how these custom properties work. Click
the Add New button, supply the property name, and type in the Relevance
Expression in the text box.
There are thousands of useful Retrieved Properties — far too many to list here. For
a more extensive list of retrieved properties, check the Support Website. For an
in-depth discussion of Relevance, see the Relevance Language Reference.
Chapter 2. Fixlets and Tasks 21
22 IBM BigFix: Console Operator’s Guide
Chapter 3. Actions
Actions are scripts that run on selected targets. They are used to fix policy
violation and security exposures and to run configuration steps. Fixlet, tasks, and
baselines depend on actions to run their remediation mission.
Actions are triggered by a console operator using a take action command. They can
be run independently or as part of Fixlets, tasks, or baselines.
An action is described using a proprietary language, the action language. For more
information about the action language, see Introducing the action language the
IBM BigFix: Action Guide.
Actions can be used in synergy with relevance expressions to customize a specific
solution for specific BigFix Clients.
There are two types of actions:
Default actions
They are optionally included in Fixlet and tasks at authoring stage. They
run automatically on relevant targets when the Fixlet or the task is
deployed.
You can view the information about the default action, if any defined, in
the Details tab of the Fixlet message or task.
You must run the Take Action command to deploy the related Fixlet or
task. You can still customize on the fly the action when you run the Take
Action command. Depending on the number of Fixlets or tasks that you
want to submit concurrently, one or more than one, you can:
v“Taking a default action as part of the deployment of a Fixlet or a task”
on page 24
© Copyright IBM Corp. 2010, 2015 23

v“Taking multiple actions” on page 26
Custom actions
They are used to fix problems or to address issues that are not covered by
the default action or to customize the action for your specific environment.
Custom actions override default actions. To create and submit a custom
action you must run the “Taking a custom action” on page 27 command.
Note: Actions cannot be automatically undone. If you need this capability you
must code it in the action itself.
These are the activities that you can run against actions from the BigFix console:
v“Taking actions”
v“Monitoring an action taken” on page 28
v“Viewing the details of an action run” on page 30
v“Running commands on actions” on page 32
v“Adding a comment” on page 33
v“Making an offer using a custom action” on page 33
Taking actions
At the heart of the BigFix is the ability to take actions to apply policy or fix one or
many computers. This topic describes how to do it.
These are the different ways to deploy an action:
v“Taking a default action as part of the deployment of a Fixlet or a task”
v“Take multiple actions” on page 242
v“Taking a custom action” on page 27
Whatever type of take action you choose, this is what happens after you clicked
OK to take the action:
1. The console sends the request to the server.
2. The server stores the action to the op site folder associated with the console
operator who issued it, or the actionsite folder, if the action was issued by the
master operator.
3. The server propagates the action to the computers selected in the Target tab of
the action or to all computers managed by the operator who issued the action.
4. On the computers the applicability of the action is evaluated. If the relevance
expression described in the action is evaluated true then the action is
applicable.
5. If the action is applicable to that computer, the action is pulled from the server
folder down to the computer and it is run.
The computer is added to the Computers tab and the status of the action
running on the computer is updated up to completion.
Taking a default action as part of the deployment of a Fixlet or
a task
You deploy a Fixlet or a task by taking the action that it contains. Follow the
instructions provided in this topic to see how to do it.
1. Click on a relevant Fixlet or task, the content of the selected object is displayed
in the Work area below.
24 IBM BigFix: Console Operator’s Guide
2. You can run the action associated to the Fixlet or to the task in one of these
ways:
vRight-click a relevant Fixlet or a task and choose Take Default Action from
the pop-up menu.
vClick a relevant Fixlet or task and select Take Default Action in the Work
Area toolbar.
vClick a relevant Fixlet or task and select the Description tab. Scroll down to
see the suggested actions. Click the link related to the action that you want
to run.
Note: These options are available only if the selected Fixlet or task contains a
default action.
The Take action dialog opens.
Chapter 3. Actions 25

3. In that dialog you can review and, if needed, update the action values. For
more information about the values that you can set in its input fields and tabs,
see “Take action” on page 240.
4. When you finish editing, click OK to deploy the action.
5. Enter your authentication password and click OK.
Taking multiple actions
This topic describes how to deploy a set of Fixlets or tasks in a single grouping
using the Take multiple actions command.
As a requirement, each Fixlet or task involved in the group must have associated a
default action.
These is how you can accomplish this task:
1. Right-click a selected group of tasks or Fixlets containing default actions.
2. Select Take Default Action. The Take Multiple Actions dialog opens.
26 IBM BigFix: Console Operator’s Guide
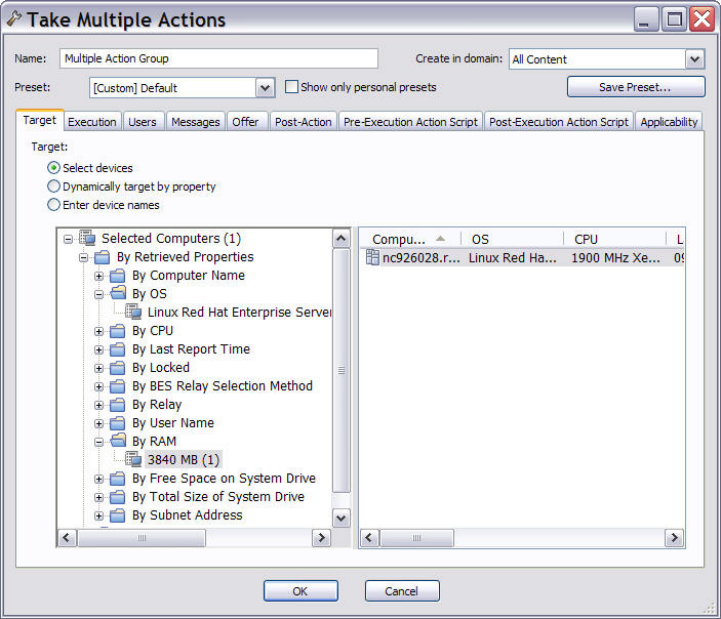
3. In this dialog, specify how the selected actions must be deployed to the
computers in your network. The input fields contained in the dialog are the
same as those contained in the “Take action” on page 240 display with the
exception of the following additional fields:
Run all members actions of action group regardless of errors
This field belongs to the Execution tab and specifies whether the action
run should stop if an error occurs for one or more object of the group
or not.
Pre-Execution Action Script tab
Lets you specify an Action Script to run before the group of Actions is
deployed.
Post-Execution Action Script
Lets you specify an Action Script to run after the group of Actions is
deployed.
4. When you finish editing, click OK to deploy the action.
5. Enter your authentication password and click OK. A progress dialog opens to
keep you informed about the stage of the deployment.
Note: The difference between grouping Fixlets or tasks and creating a baseline
containing the same set of object is that the objects contained in the baseline are
bound in sequence.
Taking a custom action
This topic describes how to create and take a custom action in one shot using the
Take custom action command.
Chapter 3. Actions 27
These is how you can accomplish this task:
1. Log on to the Console as an Operator with Custom Content permissions.
2. Either select Tools in the main toolbar and then choose Take Custom Action or
right-click with the mouse on an item in the action List panel and select Take
Custom Action. The Take Action dialog opens.
3.
4. Fill in the input fields as it is described in “Take action” on page 240.
5. When you finish editing, click OK to deploy the action.
6. Enter your authentication password and click OK.
Monitoring an action taken
This topic explains how you can keep track of the progression of the deployment
of an action taken.
After actions have been scheduled, the BigFix server attempts to signal individual
computers that there are actions waiting for them. Ideally, the BigFix client gathers
the action information from the action site and runs it immediately. More typically
however, some computers are powered off and others are mobile and undocked at
the time of the deployment. As soon as these computers are powered on or docked
to the network, the remedial actions are applied to them as well.
At any time you can see the status of the actions taken from the BigFix console.
You can:
Monitor the overall state of the action
You can see it in the State column of the Actions List panel.
28 IBM BigFix: Console Operator’s Guide
The state can be:
Open The action is active on one or more computers. It remains open
until its expiration date elapses, or an operator stops it.
Stopped
The action was stopped by an operator. It remains stopped until its
expiration date elapses or it is removed.
Expired
The expiration date for the action expired. An action expired
cannot be removed.
Monitor the status of the action on selected computers
You can see it in the Computers tab of the selected action .
To access this dialog:
1. Click the Action icon in the navigation tree.
2. Select an action in the Actions List Panel. Information about the action
is displayed in the Work Area.
3. Select the Computers tab in the Work Area.
For information about the different statuses, see “Action: Computers” on
page 134.
Monitor the action progression on a computer
You can see the result of each step of the action run on a specific computer.
This is shown in the View Action Info dialog.
Chapter 3. Actions 29
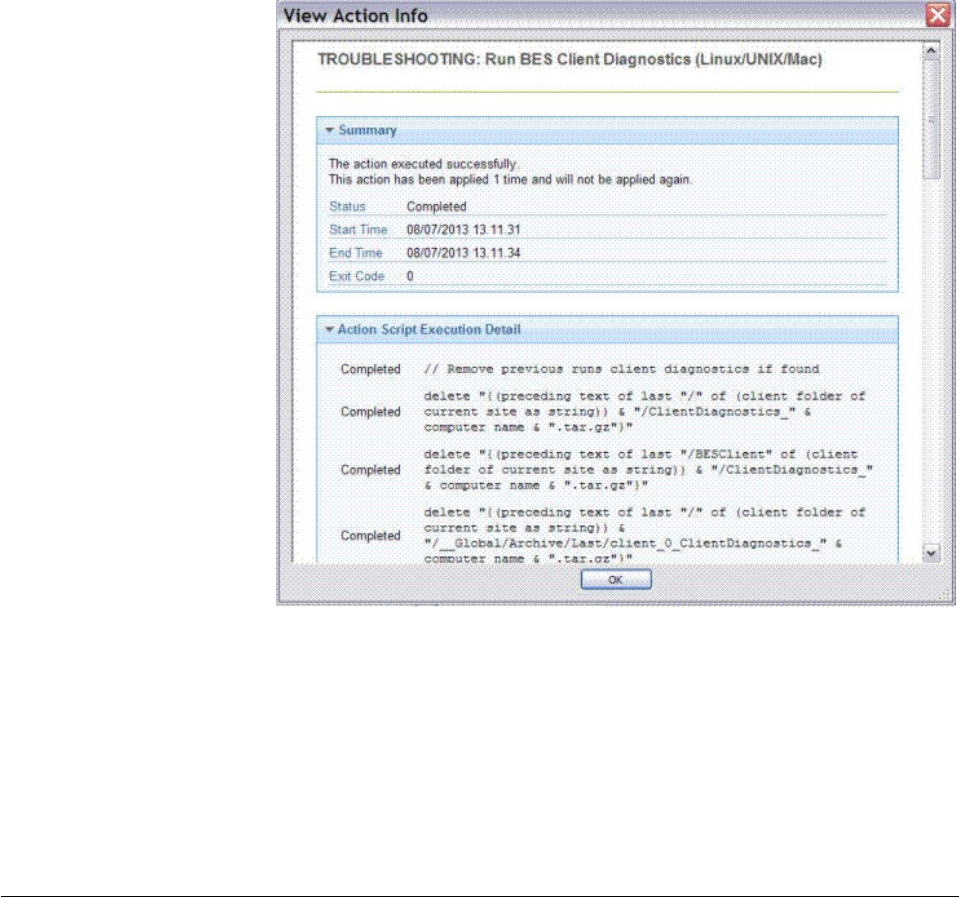
To access this dialog:
1. Click the Action icon in the navigation tree.
2. Select an action in the Actions List Panel.
3. Select the Computers tab in the Work Area.
4. Right-click any computer in the list.
5. Either select Show Action Info from the context menu or select Show
Action Info from the Edit menu.
For information about the values in this panel, see “View action info” on
page 247.
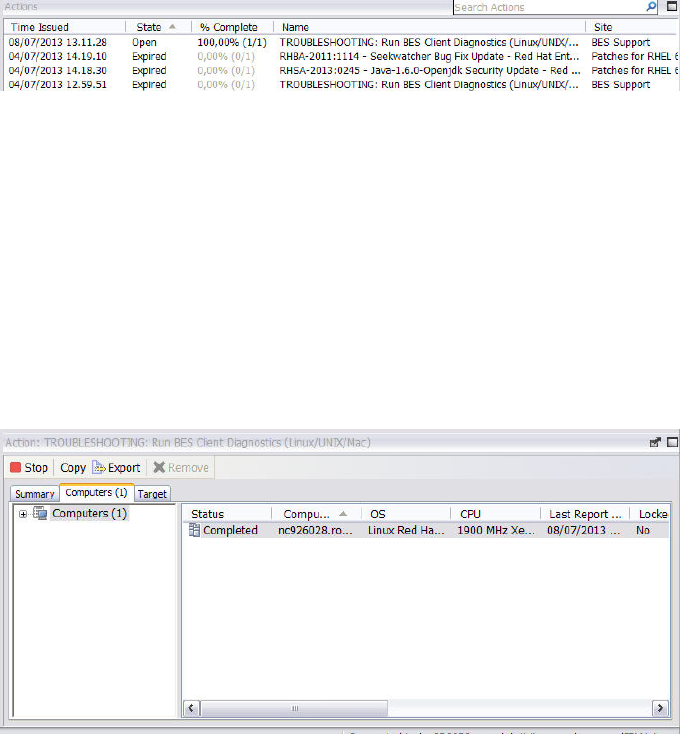
Viewing the details of an action run
Follow the indications provided in this topic to see the details about an action that
is being deployed.
To view this information do the following:
1. Click on the Actions icon in the Domain Panel navigation tree.
2. Click an action in the List Panel. The details about the action run are displayed
in the Work Area beneath.
30 IBM BigFix: Console Operator’s Guide
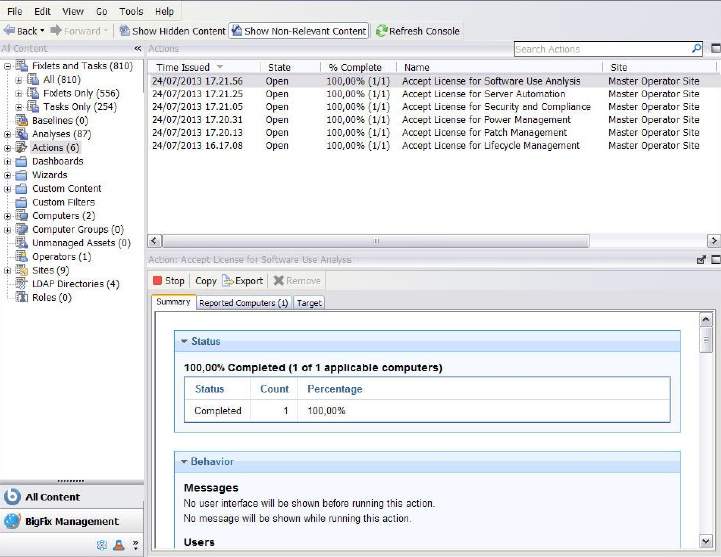
There are three tabs in an action document. They are:
Summary
This tab summarizes the action, with sections on the status of the action
and the progress of the download. It displays information about the
behavior of the Action, including:
vProgress of the download
vAction ID
vUsers
vRun options
vPost actions
vRelevance clause
vText of the action script
vSuccess criteria
At the bottom of this dialog there is a text box where you can insert a
comment that can be viewed by other operators accessing the same
content site.
For more information about the content of this tab see “Action:
Summary” on page 143.
Computers
It shows the computers affected by the specified action and the states of
the action on each of them.The deployed action progresses through a
series of well-defined stages on a given computer.
For information about the values displayed in this tab and the status of
the action on a computer across the different stages, see “Action:
Computers” on page 134.
Target It shows the targeting method and the subset of computers that was
Chapter 3. Actions 31
originally targeted by the action. The content of this tab is read-only
and it can be static or dynamic depending on the targeting method
specified when the action was taken, explicitly from a list or indirectly
by retrieved property.
For more information about targeting methods and their results, see
“Action: Target” on page 145.
Running commands on actions
This topic explains how and which commands you can run on actions.
Do the following to get to the available commands:
1. Click the Actions icon in the Domain Panel navigation tree.
2. Click the action in the List Panel. At the top of the Work Area there is a toolbar
with four icons:
Stop Click this button to halt the deployment of an action that has already
been triggered but has not expired yet.
This command completes the run on the computers where the action
has already started and prevents the action from running on the
computers where the action has not yet started to run, for example
because of computer unavailability, lack of network connectivity or
gather frequency.As an alternative, you can stop an action by
right-clicking the action and choosing Stop Action from the pull-down
menu or by selecting Stop Action from the Edit menu.
Note: You must enter your password to confirm the action halt.
Copy Click this button to create on the fly a copy of the action to deploy. A
Take Action panel is opened to allow you to customize the copy and
trigger it.
32 IBM BigFix: Console Operator’s Guide
Note: There is no way to modify the targeting or scheduling of an
action after the deployment is initiated. If you want to modify an action
that has been deployed but has not finished running, you must first
stop the action as it is described here and then start a new action with
the desired characteristics.
Export Click this button to save a copy of this action. Later on you can import
the edited action as a custom action and run it.
Remove
Click this button to delete this action from the database. You can
remove an action only when it is stopped.
The commands that cannot be run on an action in its current state are greyed
out
Adding a comment
BigFix Console operators can make comments on most of the BigFix objects. This
topic describes how to add a comment to an action.
Run these steps to create a comment for an action:
1. Click the Actions icon in the Domain Panel navigation tree.
2. Right-click an action and select Add Comment.
3. Type your comment into the dialog box that opens.
Similarly, you can attach comments to tasks, Fixlet, computers, and analyses. These
comments can include keywords or operating notes. This is a freeform field, so
you can make up your own rules for commenting.
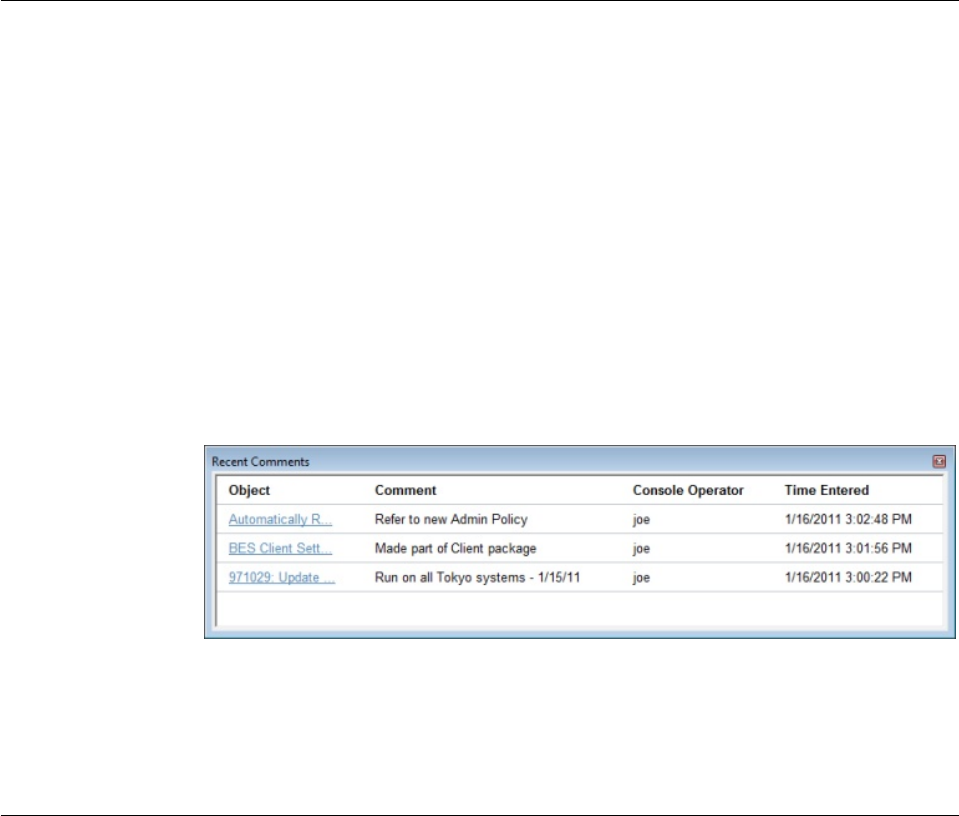
To view an aggregated list of all comments, select View Recent Comments from
the Tools menu.
This dialog lists all the comments created to date, sorted by timestamp, with the
most recent comments at the top. The name of the console operator responsible for
the comment is listed next to the description. Each comment contains a link that
opens the original object in the main window, allowing you to view the description
and other aspects of the object.
Making an offer using a custom action
Follow the instructions provided in this topic if you want to offer to users a set of
downloads that they can select at their own discretion. This capability is also
referred to as self-provisioning.
Chapter 3. Actions 33
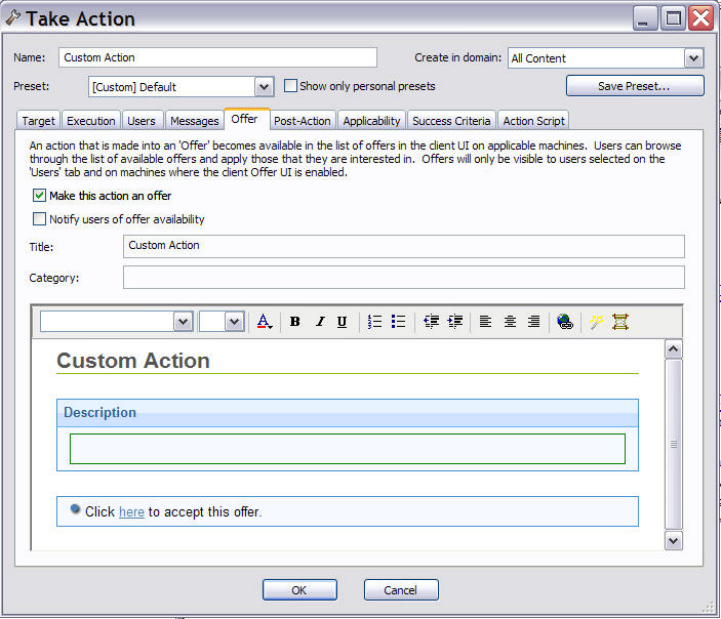
These offerings are delivered as a type of custom action, so they include all the
targeting and scheduling capabilities that you would expect from a typical action.
Important: These actions run with elevated permissions, so this can be used to
allow non-privileged users the ability to trigger specifically-approved actions that
run with higher permissions.
To advertise such an offer, follow these steps:
1. In the main toolbar select Tools.
2. Select Take Custom Action. The Take Action dialog opens.
3. Click the Offer tab.
For more information about the values that you can set in its input fields and
tabs, see “Offer tab” on page 220.
4. Click the other tabs in the Take Action dialog to further customize the action
that will advertise your offering.
5. When you are ready to deploy your offering, click OK.
6. Your action offer is distributed to all the computers that have been specifically
targeted. This select group of users is then presented with your offer and
prompted to accept it on their own schedule.
Note: This tab is available also when taking a default action as it is described in
“Taking a default action as part of the deployment of a Fixlet or a task” on page
24.
34 IBM BigFix: Console Operator’s Guide

Chapter 4. Sites
Introducing Sites
Sites are collections of Fixlet messages that are created internally by you, by IBM,
or by other vendors. You subscribe to a Site and agree on a schedule for
downloading the latest batch of Fixlet messages.
You can view and manage your collection of Sites by navigating to them and
opening them in the Domain Panel. You can add a new Site subscription by
acquiring a Masthead file from a vendor or from IBM. Sites are generally devoted
to a single topic, such as security or the maintenance of a particular piece of
software or hardware. However, several sites might share characteristics and are
then grouped into Domains, which are designed to be in accordance with the
typical job duties of your various Console managers. For example, the person in
charge of patching and maintaining a common operating environment finds
Support sites and Patching sites for various operating systems all bundled in the
Patch Management Domain.
You can set up your own custom Site and populate it with Fixlets that you have
developed specifically for your own network. You and other operators can then
send and receive the latest in-house patches and quickly deploy them to the
appropriate locations and departments.
Selecting Sites
Upon installation, the program is automatically set up to subscribe to certain
management and maintenance sites. Depending on the terms of your license, you
might have subscriptions to other sites as well. This means that content from those
Sites automatically flows into your enterprise and is evaluated for relevance on all
computers running the BigFix Client. These sites, in turn are automatically
registered with an appropriate Domain, providing a simple way to divide the
content into functional sections.
Subscribing to Sites from the License Overview dialog
1. Select the License Overview node from the BigFix Management domain. The
License Overview dialog appears, listing available sites.
2. Click the enable button associated with the site to which you want to subscribe.
3. Enter your password to subscribe to the site. The new site will now be listed in
the Manage Sites node of the domain panel.
4. Open the Manage Sites node and select your newly subscribed site.
5. From the site dialog, click the Computer Subscriptions tab to assign the site to
the appropriate computers.
6. From the Operator Permissions tab, select the operators you want to associate
with this site and their level of permission.
7. Click Save Changes when you are done.
Note: If you change your license, you will need to resubscribe to your Fixlet sites.
Although your new license is associated with your old one, only the Support site
will be automatically renewed.
© Copyright IBM Corp. 2010, 2015 35

Subscribing with a Masthead
To subscribe to a site using a masthead file, follow these steps:
1. First, find an appropriate Site masthead file, which has an extension of .efxm.
There are several ways to do this:
vFixlet Sites: IBM might post links list to new Sites as they become available.
vFixlet Subscriptions: Sometimes a Fixlet message might offer a subscription.
Just click the Fixlet action to initiate the subscription.
vDownload Mastheads: You can also subscribe to a Site by downloading a
masthead file from a vendor's website.
2. When the masthead is saved to your computer, you can activate it in one of
two ways.
vDouble-click the masthead, or
vSelect Add External Site Masthead from the Tools menu, browse to the
folder containing the masthead, and click Open.
3. You are prompted for your private key password. Type it in and click OK.
The masthead is propagated to all Clients, which immediately begin to evaluate
the Fixlet messages from the new site.
Subscribing with the Licensing Dashboard
You can also subscribe to a Fixlet Site by using the Licensing Dashboard in BigFix
Management, found in the Domain Panel:
1. Open the BigFix Management domain and scroll to the top to view the
associated dashboards.
2. From the Licensing Dashboard, select the sites you want to subscribe to.
Viewing Site Properties
After initiating a subscription, you can inspect its properties and signing
authorities. This can be useful when tracking down the origin of a particular Fixlet
message or action. Here is how:
vClick the site from the Domain Panel on the left.
The Site Properties are shown in the Work Area, detailing information about the
site publisher and the URL from which the content has been gathered.
36 IBM BigFix: Console Operator’s Guide
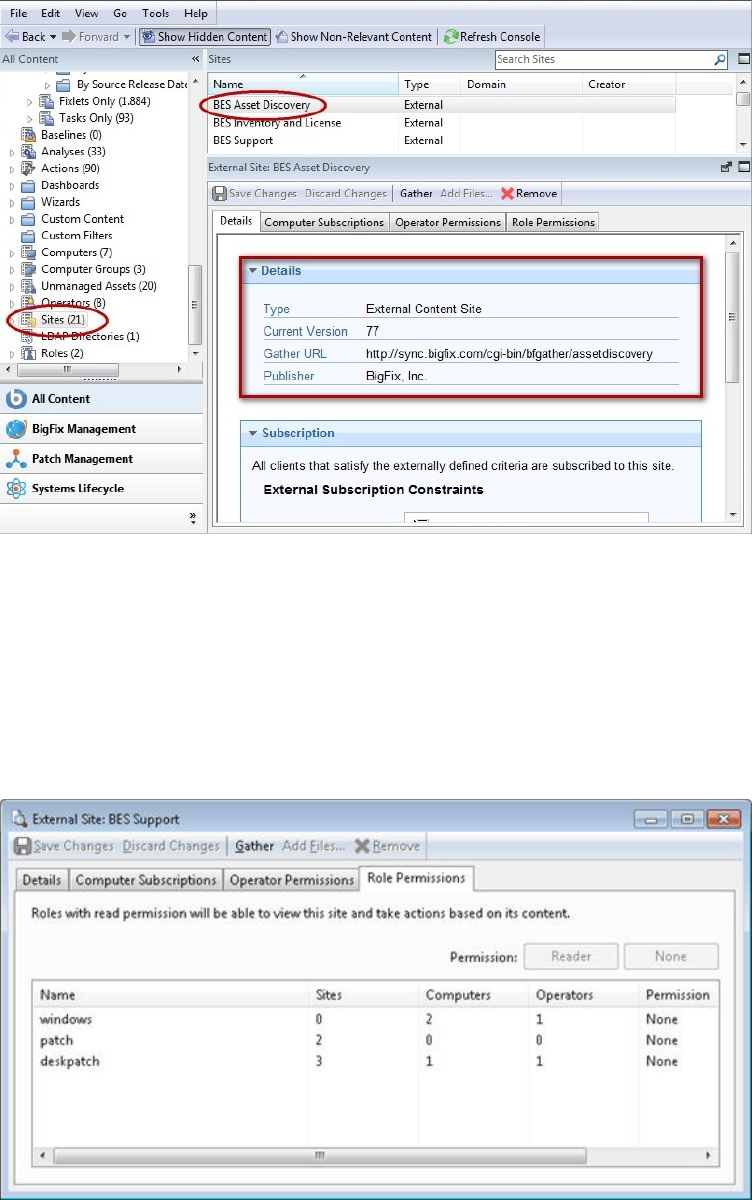
Depending on its type, a site might have other properties as well. You can assign a
site to a specific set of computers. A custom site allows you to assign operator
permissions for owning, writing, and reading a Site. External sites (except essential
support sites) can have restrictions placed on both computers and operators,
allowing a Master Operator to fine-tune the domain of a Site.
You can also assign roles to any site, allowing you to select pre-created directory
access roles and grant them read privileges to the site. To access these extra
properties, click the Role Permissions tab.
Click a role from the list, and use the buttons to assign or deny reader permissions.
Chapter 4. Sites 37
Restricting Computers
There might be occasions where a BigFix Client or a group of Clients is storing
redundant Fixlet messages, typically due to an overlap in site content. In addition,
some BigFix Clients might collect superfluous Fixlet messages, as when a Linux
machine retrieves Windows Fixlets. This poses no problem to the operation of the
program, which knows to ignore irrelevant or redundant Fixlet messages, but it
might consume Client disk space. The Site Subscription dialog lets you narrow
down the number of clients subscribed to the selected external Site. Here is how:
1. Select the desired site from the Domain Panel.
2. Select the Computer Subscriptions tab. You have several choices for selecting
computers.
vAll computers. Click this button to automatically subscribe all Clients to this
site. This is the default action.
vNo computers. Click here to unsubscribe all Clients.
vComputers subscribed via ad-hoc custom site subscription actions. If you
choose a custom site, this option is also available to flexibly assign computers
on ad-hoc basis by creating an Action to subscribe relevant computers to the
site.
vComputers which match the condition below. Click here and then create a
condition that must evaluate to TRUE for the IBM Endpoint Manager Client
to be subscribed to the site. The default is to parse computer names, but the
pull-down list contains several properties that you can use as useful
subscription criteria. Press the plus sign to add more criteria. You can
combine conditions by ANDing or ORing them.
3. When you are satisfied with how your computers subscribe to this site, click
Save Changes from the Work Area Toolbar. Enter your private password to
propagate the subscription request to your network.
38 IBM BigFix: Console Operator’s Guide
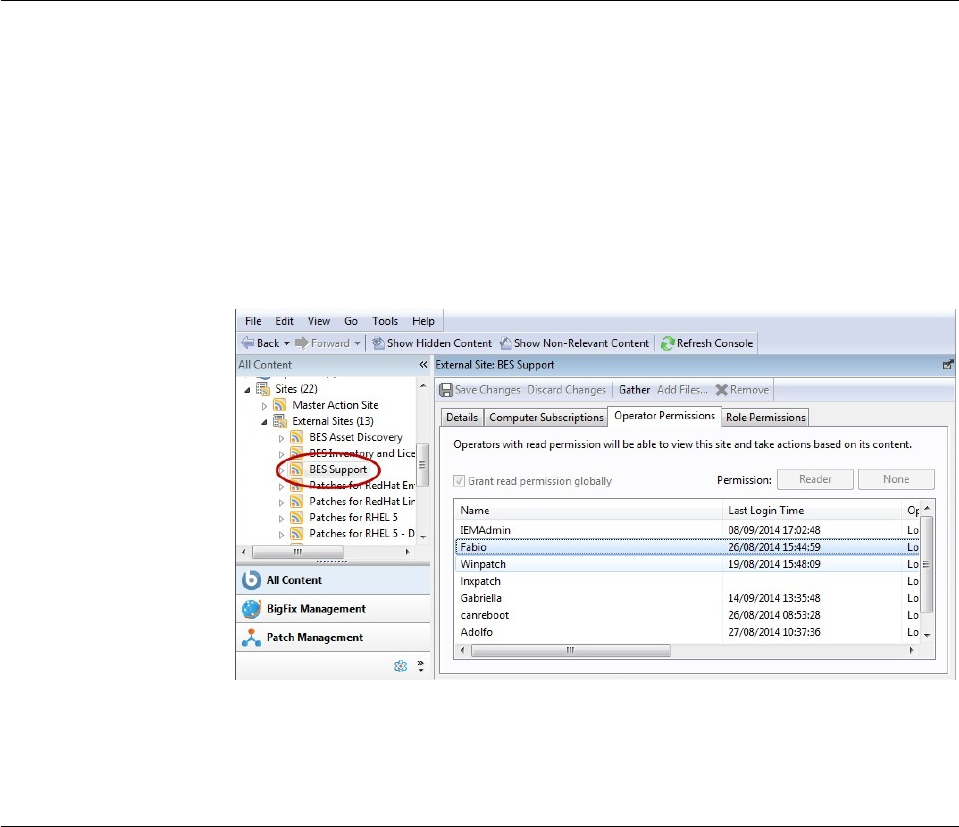
Restricting Readers
Restrictions can be placed on Sites to limit access. As with operator permissions on
Custom Sites, you can restrict both the operators and computers of most external
Sites.
Not all operators need to know about all sites, and some sites might be most easily
managed by a single operator, such as an appointed Anti-Virus Czar or the Finance
IT Manager. If you have Master Operator privileges, you can limit how many
Non-Master Operators are able to view any specified Site. Here is how:
1. Select the desired site from the Domain Panel.
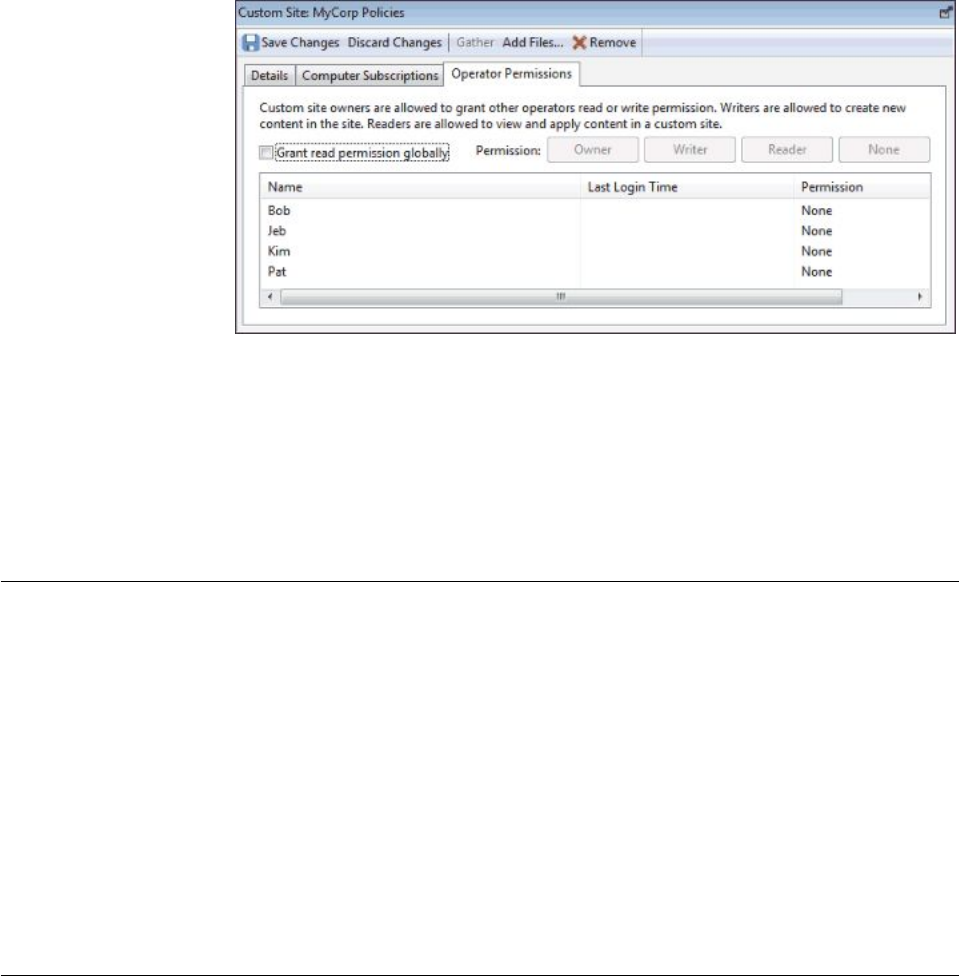
2. The site properties are shown in the Work Area. Click Operator Permissions.
3. You can click the box to Grant read permission globally. Otherwise, clear the
box and set permissions on a user-by-user basis.
4. When you are satisfied with your selections, click OK.
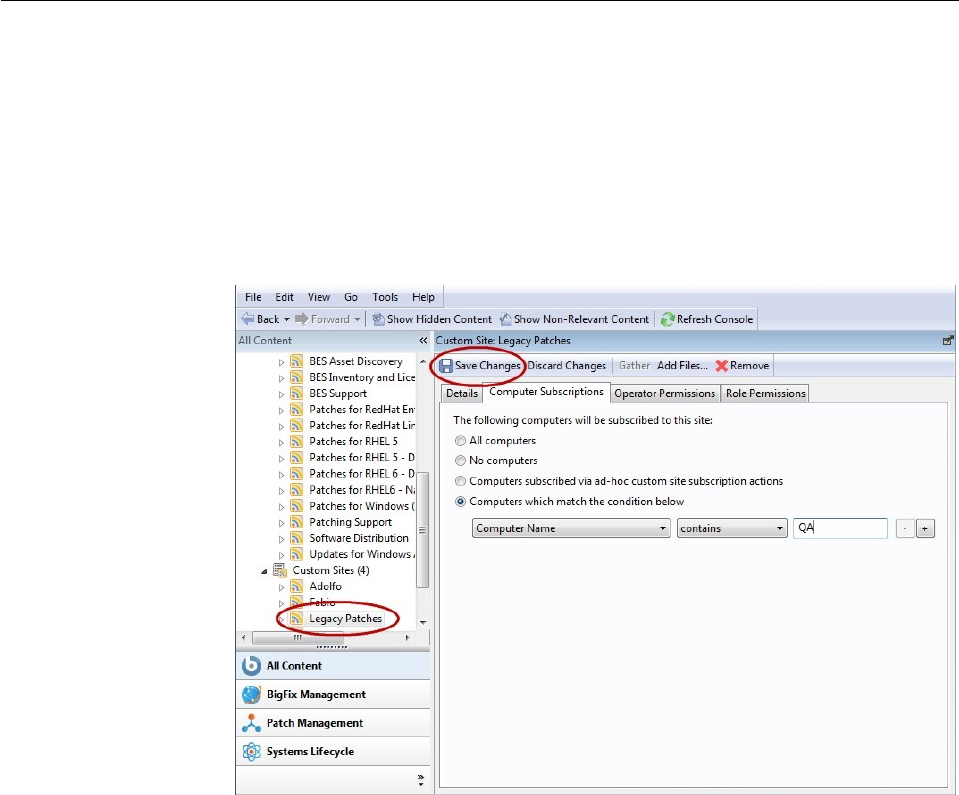
Creating Custom Sites
You can create a Custom Site to host your own Fixlet messages that are pertinent
to your network. Here is how:
1. Select Tools > Create Custom Site.
2. You are prompted for a name for your custom site. Enter a name and click OK.
3. From the Domain panel, find your site under Sites > Custom and click it to
describe your site.
Chapter 4. Sites 39
From the Details tab, enter a description of your site. From the Domain
pull-down menu, select a Domain to house your site.
4. From the Computer Subscriptions tab, indicate which subset of your BigFix
Client computers you want to subscribe to this site.
There are several choices:
vAll Computers. Click this button to automatically subscribe all Clients to this
site.
vNo Computers. Click this button if you are not yet ready to subscribe any
computers.
vComputers subscribed via ad-hoc custom site subscription actions. This
choice requires you to create an Action to subscribe relevant computers to
the site.
40 IBM BigFix: Console Operator’s Guide
vComputers which match the condition below. This choice allows you to
describe a set of criteria that must all evaluate to TRUE before a BigFix
Client is subscribed. From the pull-down menu, you can select from dozens
of properties to test for inclusion.
5. From the Operator Permissions tab, you can grant specific access permissions
to specific operators.
There are several options:
vGrant read permission globally. Click this button to provide read
permission to all operators.
vOr click specific Operators from the list and assign them specific rights, such
as Owner, Writer, Reader, or None.
6. Click the Save Changes button above the work area to complete the
description of your site. You must enter your password to propagate your new
custom site.
Canceling a Subscription
You can try out different Site subscriptions for your organization, because no
actions are ever taken without your approval. Nevertheless, if you find that a
subscription is not useful, you can cancel it by removing the site from the domain
in which it is located, as follows:
1. In the Domain Panel, expand the icon containing Sites. From the External or
Custom icon, select the site you want to delete.
2. Open the site and from the Work Area Tool bar, click the Remove button.
3. Click Yes on the confirmation dialog, and enter your password to complete the
site removal.
Note: You cannot unsubscribe from the BigFix Support site because it is needed to
upgrade and manage licensing issues in the Console program.
Adding Files to Sites
Starting with version 8.1, you can add files to a Site. These can be as simple as text
and utility files or as powerful as Dashboards and Domains (described at the end
of this section). Files can be added to the master action site, custom sites, and
operator sites, but you must have write permissions for the site. This means that
only master operators can add files to the master action site, custom-site writers
Chapter 4. Sites 41
can only add files to custom sites and non-master operators can only add files to
their own operator site. There are several useful things you can accomplish using
this feature:
vPlace utility files on all clients subscribed to a site
vShare custom dashboards with multiple console users
vShare custom domains with multiple console users
Here is how to add files to a site:
1. Select Tools > Add Files to Site. You can also navigate to the domain tree node
for the site you want, right-click the Files subnode, and choose Add Files from
the context menu. The Add Files dialog opens.
2. If you get to this dialog through the domain tree, your site is already selected.
Otherwise, select the site you want from the Add to site pull-down.
3. Click the Browse button and then select all the files you want to add from the
file-picker dialog. You can select multiple files and you can click the Browse
button multiple times to add more files.
4. Check the Send to clients box if you want to deploy this file to all the clients
that subscribe to the selected site.
5. When you are satisfied with the set of files you have selected, click Add files
to finish.
There are a few restrictions on which files can be added:
vAll file names in the site must be unique. In case of conflict, you are asked if
you want to overwrite the existing file.
vFiles with a .fxf extension cannot be added, because the client treats those files
as Fixlet documents. Attempts to add files of this type cause an error.
vFiles starting with "__" (double underline) cannot be added, because they are
reserved for special site metadata. Attempts to add files of this type cause an
error.
vIf you attempt to add a large file (over 100 KB) and Send to clients is checked, a
warning dialog opens. This is to notify you of a possible spike in network traffic
if you proceed.
Some files are interpreted differently, according to their file extension:
vojo: A site file with the extension .ojo is loaded as a dashboard and is visible to
all readers of the site. The dashboard is also visible in the Dashboards subnode
of the site node in the domain tree.
42 IBM BigFix: Console Operator’s Guide
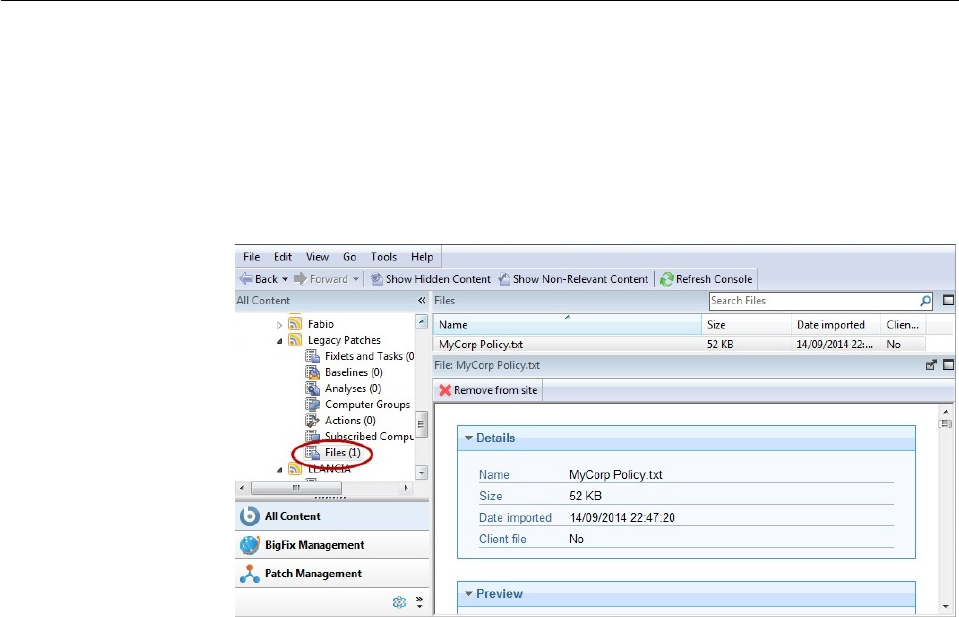
vBESDomain: A site file with the extension .BESDomain is loaded as a domain
visible to all readers of the site and is shown in the list of domains in the
domain bar.
vbfa: A site file with the extension .bfa is treated as a BigFix archive file created
by the bfarchive tool. The archive is unpacked, and all files are added.
Viewing and Deleting Site Files
After adding files to a site as described in Adding Files to Sites, you can view or
delete these files. The site files you created can be selected directly from the
Domain tree:
1. Open the site of interest in the domain tree.
2. Click the Files node. The List Panel displays the files of interest. Click one to
display it in the work area below.
3. The column headers in this list include:
vName: The name of your site file
vSize: The size of the file
vDate imported: The date that the file was imported to the site
vClient file: Whether the file is downloaded by clients subscribed to the site
4. Click any file in this list to display informational details and a preview.
5. Click Remove from site if you want to delete this file from the site.
Alternatively, you can select Edit > Remove. The same permissions used to add
files are required to delete them.
Chapter 4. Sites 43
44 IBM BigFix: Console Operator’s Guide
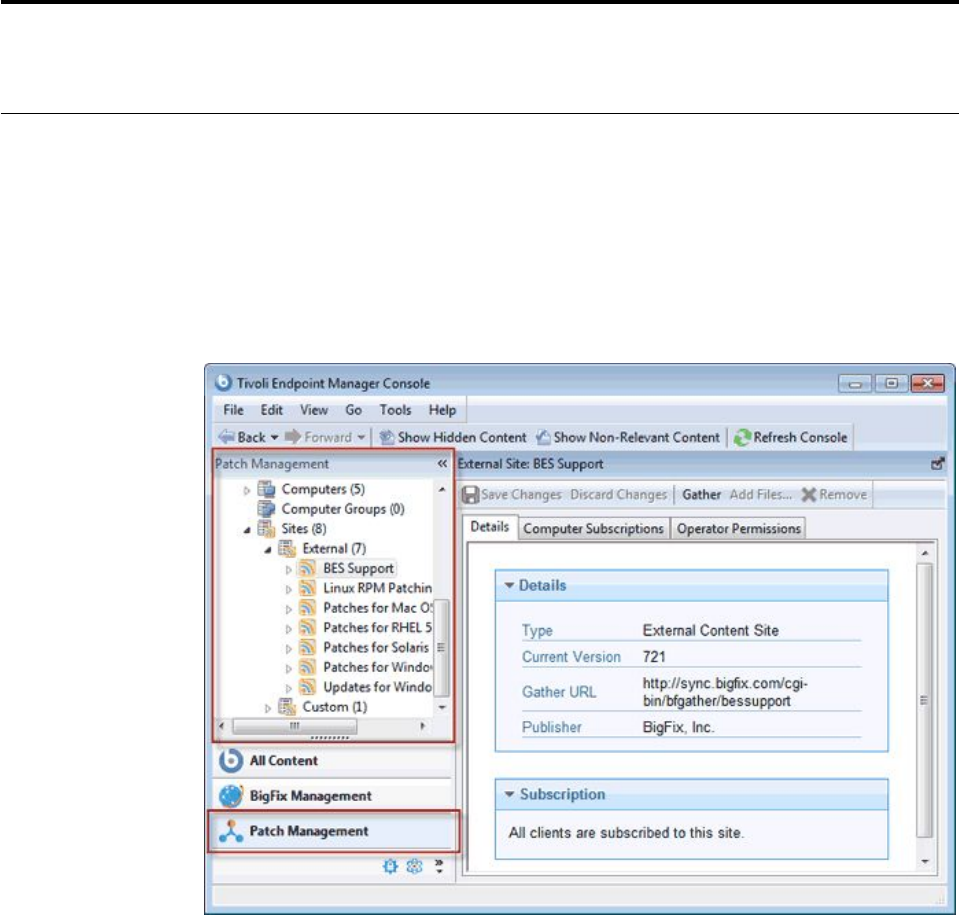
Chapter 5. Domains
Introducing Domains
Domains represent the major organizing principle in the BigFix Console. Domains
contain a set of related sites, such as Patch Management for various operating
systems. Domains are reflect the tasks of specific Console Operators, such as Patch
Management, AntiVirus Management, Power Management, and so on.
Domains are located on the leftmost panel of the Console.
Select the Domain you want from the buttons at the bottom of the panel. The
contents of the domain are then displayed. Some Domains have extra structure,
such as Content Filters that allow you to narrow down the viewable content by
Vendor.
Generally there is a Domain Overview, to help you understand the extent of the
content.
© Copyright IBM Corp. 2010, 2015 45
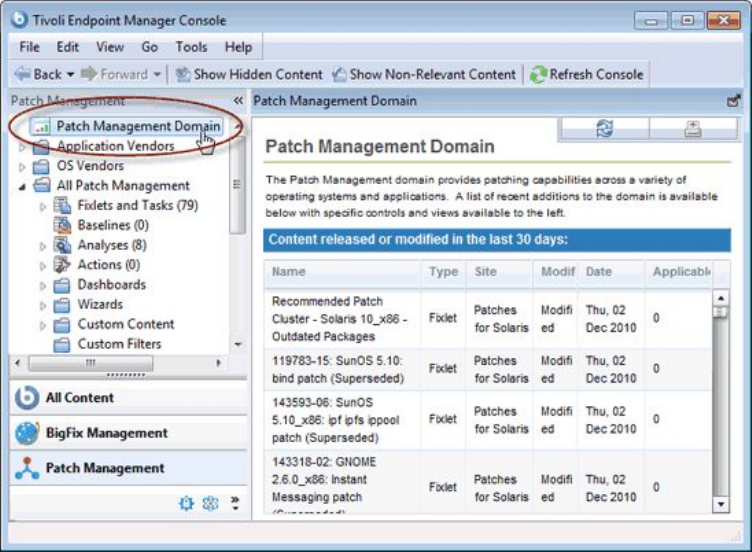
This particular overview shows you at a glance what new Fixlets, Analyses, Tasks,
and so on. have recently been added to the Domain.
In the General Content section, the information available can be further broken
down by opening the various topics, content types and folders. For most topics
here, a single click causes the contents to be shown in the List Panel, top right. On
items with a disclosure icon (plus/minus or triangle icon), you can click it to open
up filtering options. Drill down through any folders to reach a leaf node that
represents a subset of the original topic. Now, in the List Panel, only the specified
subset is displayed.
46 IBM BigFix: Console Operator’s Guide
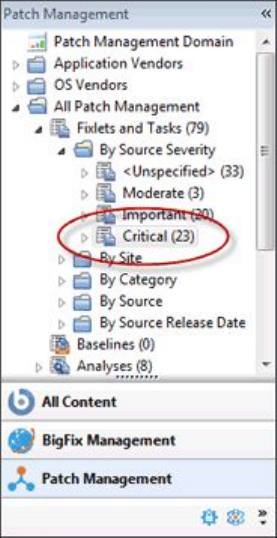
Here the Fixlets and Tasks have been opened to disclose the Source Severity
folder. Within that folder, only the Critical Fixlets have been selected, making the
resulting List Panel shorter and easier to deal with.
In general, there is a Sites section that you can open to examine the sites
individually should you need. Different domains have different structures, so
explore them.
Chapter 5. Domains 47

Domain Sites
Domains are composed of related sites, grouped together for convenience and
because they share a similar structure. You can easily examine the Sites that
comprise a Domain.
Find the Sites heading and click the disclosure icon, opening the navigation tree to
External and Custom sites. Click the disclosure icon next to External to view the
various Sites. Each site is clickable so you can examine its top-level properties.
48 IBM BigFix: Console Operator’s Guide
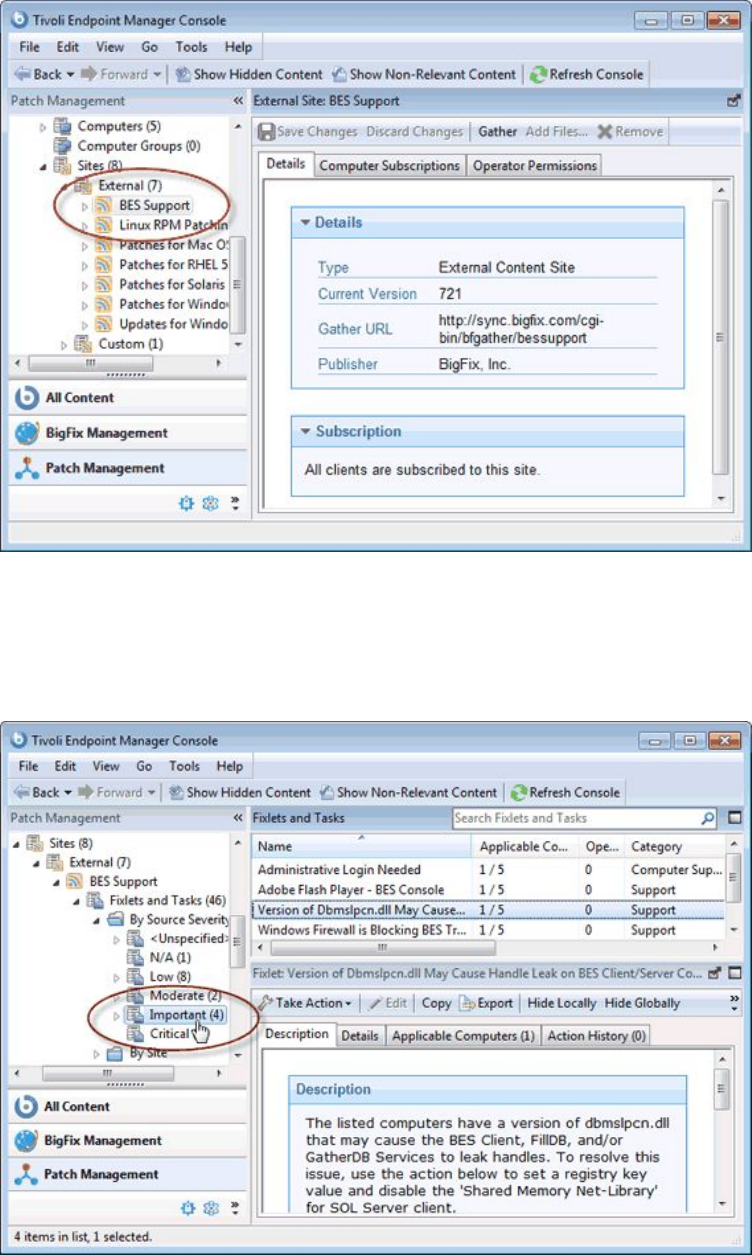
Click the disclosure icon next to the site icon to examine subsets of the data. You
can continue to drill down until you reach a leaf node, allowing you to examine
specific subsets of each site. When you reach the subset you want, the content is
displayed in the List Panel.
Chapter 5. Domains 49
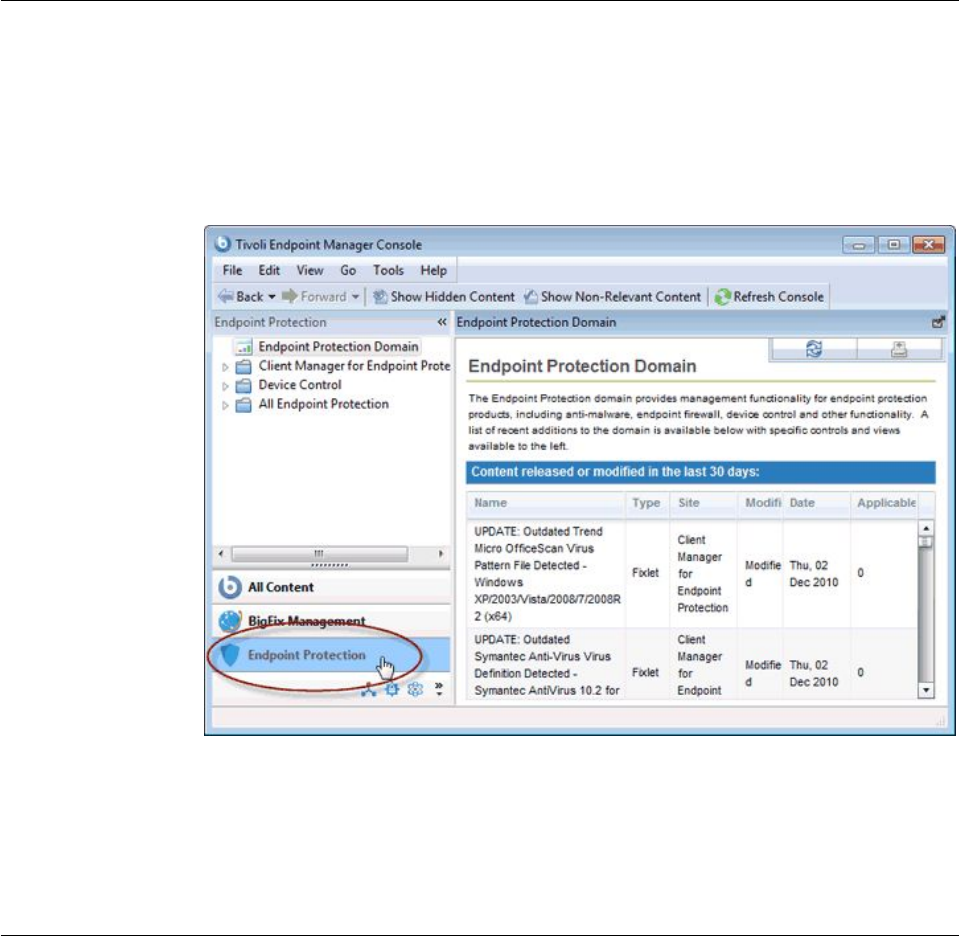
Selecting Domains
You typically have several Domains available to you, each covering a group of
related tasks that fall into the purview of a specified Console Operator. As you add
sites to your Console, they find their way into the appropriate Domains, and create
new Domains when needed. The Domain Panel is on the left side of the Console,
and buttons corresponding to the Domains are shown at the bottom of that panel.
Depending on the Domain you click, an overview is typically displayed in the
Work Area. It shows a list of the most recent additions to the content for a quick
appraisal.
At the bottom of the button list is a pull-out menu that lets you adjust the number
of buttons you want to display.
Navigating Domains
Domains are a logical collection of sites that all have similar purposes and
structure. As a consequence, each Domain reflects a unique structure and displays
its contents appropriately. Nevertheless, all sites have certain similarities in how
they manage content, and a simple domain is sufficient to explore most of their
options and how to navigate amongst them. The example used here is Patch
Management.
50 IBM BigFix: Console Operator’s Guide
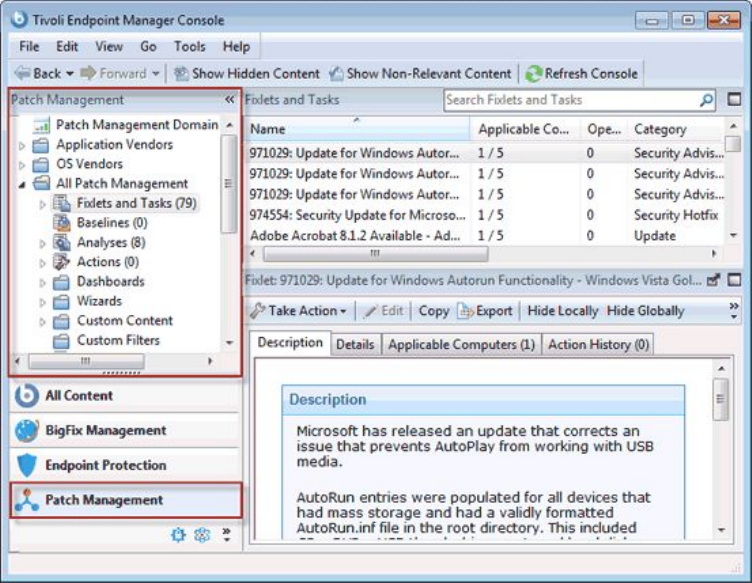
Click the Domain button to view it in the Domain Panel. For this example, there
are two folders, Application Vendors and OS Vendors that act as domain content
filters. Not all domains have such filters, but they are fairly common when there is
a benefit to grouping the information into logical partitions. Here, there is a way to
group the content based either on the software vendor (such as Adobe, Mozilla,
and so on.) or the OS vendor (Mac, Windows, Linux, and so on.). You can click the
disclosure icon (either a plus-minus icon or a rotating triangle icon, depending on
your operating system) or double-click the tree node itself to open it up and
explore its subheaders.
Chapter 5. Domains 51
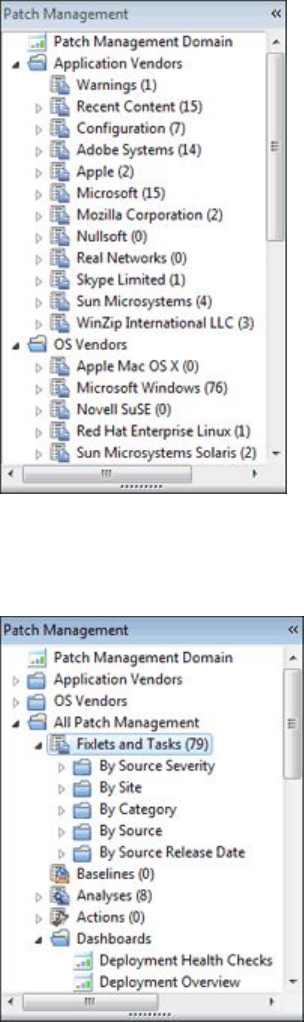
Below any domain filters, you find a more generic presentation of the domain
content.
Notice the icon labeled All Patch Management. This icon represents the main
content of this domain, and is composed of a union of Fixlets and Tasks combined
from all the sites that make up this domain. You can open this category and drill
down by sources or severity. Under the Source Severity folder is a breakdown of
the content that allows you to select only critical, important, or other categories of
Fixlet severity to concentrate on. Click these icons once to view all the content that
fits this criteria in the List Panel to the right.
52 IBM BigFix: Console Operator’s Guide
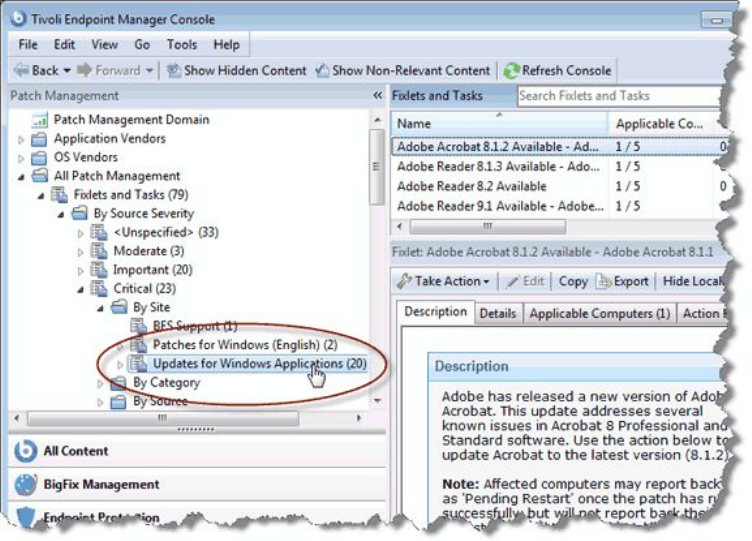
Double-click to open the icon for further filtering of the content. For example,
under Source Severity > Critical you can filter the resulting set of critical Fixlets
by Site. Finally, at the leaf node, you can click an icon to produce a list of the
severity- and site-filtered content in the List Panel. As you drill down, you are
ANDing the various filters, producing a smaller and more targeted set at each
level.
All of these navigation icons work in the same way. A single click highlights the
particular category and a double click opens it for further refinement. In general,
each icon can be a destination or the head of a new tree to examine. When you
click it, the particular subset of data implied by that icon opens in the List Panel to
the right. The drill-down ends at an ultimate leaf node, where all the possible
fields have been exhaustively ANDed together. Note that there are many ways to
achieve the same subset of leaf items. because the field criteria are simply ANDed
together, it does not matter which order you choose.
Chapter 5. Domains 53
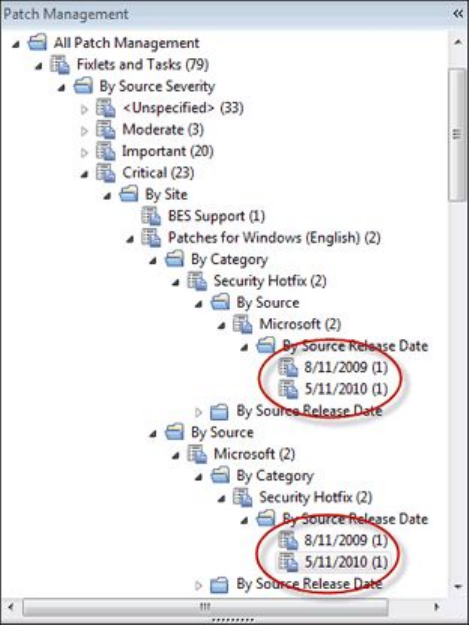
Note that Fixlets, Tasks, Analyses, Actions, Baselines, Computers, and Computer
Groups are almost always represented in the main navigation tree of any given
Domain. Other content, such as filters, custom content, and custom sites are often
represented as well. As the Operator responsible for a Domain, you should find it
easy to see the overall structure at a glance. You soon become familiar with drilling
down to filter and narrow your selections.
54 IBM BigFix: Console Operator’s Guide
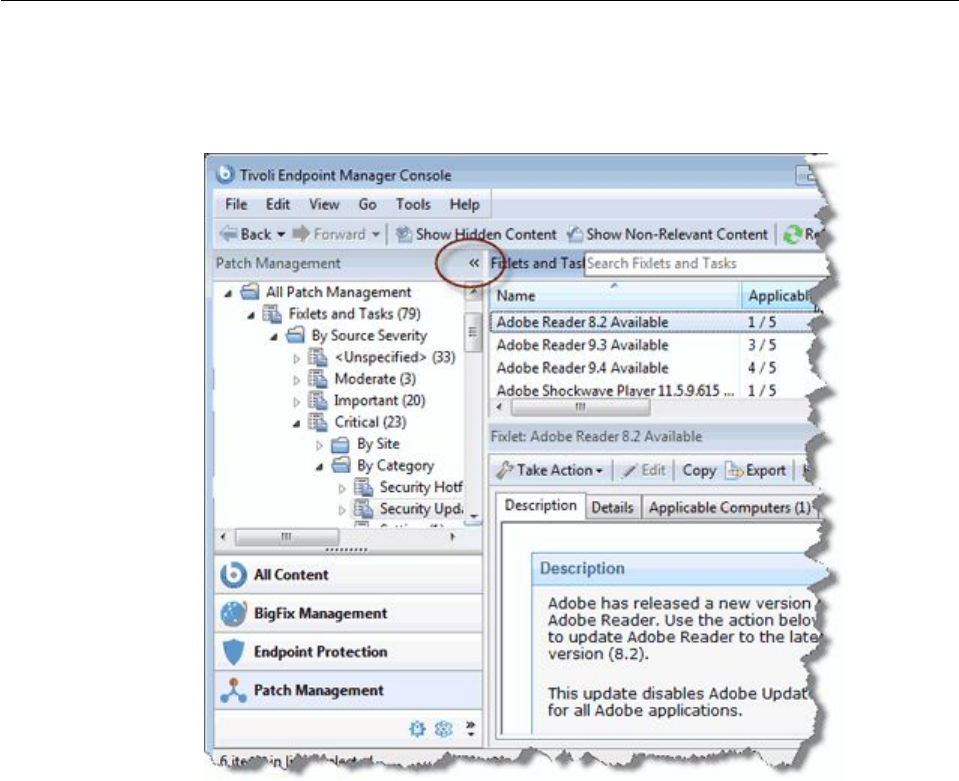
Minimizing the Domain Panel
If you need more panel space, you can minimize the Domain Panel by clicking the
minimize icon at the upper right of the panel.
This reduces the panel to a small stub at the left of the Console window. To restore
the Domain Panel, click the stub.
Chapter 5. Domains 55

Deleting Domains
A domain can be deleted when all of its constituent sites have been deleted. In the
Domain Panel, find the icon for the collection of sites.
56 IBM BigFix: Console Operator’s Guide
Open the site icon, and navigate to External sites. Double-click each site in turn
and use the Remove button at the top of the Work Area to delete all of the sites
that exist there. Do the same for any Internal sites. The domain is no longer visible.
Chapter 5. Domains 57
58 IBM BigFix: Console Operator’s Guide

Chapter 6. Operators
Introducing Operators
When you install BigFix, you also set up specific personnel to act as Operators.
There are three classes of operator:
vThe Site Administrator is responsible for installing and maintaining the BigFix
components, as well as managing the certificates and keys. Only the
Administrator can create new users.
vThe Console Master Operators can assign management rights to other
operators.
vThe Console Operators are the day-to-day managers of their own domains, but
they cannot assign management rights.
Often these administrative roles overlap and one person might be assigned
multiple duties.
Adding Console Operators
You can create accounts for new console operators, assigning them roles or
granting them permissions to view or manage specific computers and sites. You
can create local operators or select predefined operators from LDAP or Active
Directory servers.
You can add single operators at any time by selecting the Tools > Create Operator
item or by right clicking in the operators work area and selecting Create Operator
as described in “Adding Local Operators.”
If you are using Active Directory or some kind of LDAP, you can add previously
defined users by selecting the Tools > Add LDAP Operator item or by right
clicking in the operators work area and selecting Add LDAP Operator as
described in “Adding LDAP Operators” on page 68.
You can also associate an LDAP group to an existing role, in this way, with just
one click, you add an operator for each user specified in the LDAP group and you
associate that operator to the role. For more information about this capability, see
“Associating an LDAP group” on page 70.
Note: For LDAP operator and LDAP Group an Active Directory or LDAP
directory must first be added to IBM Endpoint Manager.
Adding Local Operators
You can create accounts for operators that access the console using the local BigFix
account.
To add a local operator perform the following steps:
1. Click the Tools > Create Operator menu item or right click in the operators
work area and select Create Operator. The Add User dialog appears.
© Copyright IBM Corp. 2010, 2015 59
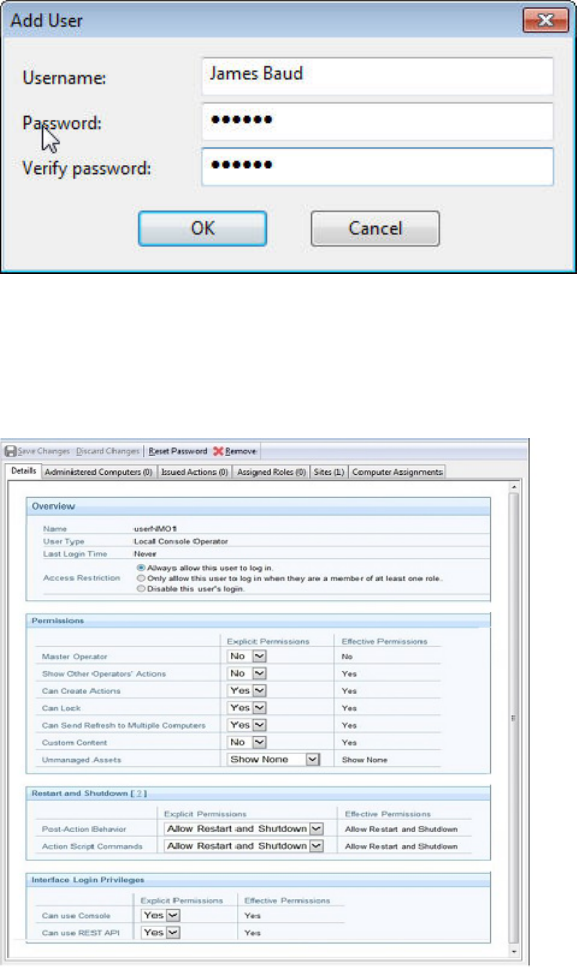
2. Enter the Username of the person you want to designate as a publisher or
operator.
3. Create a Password and retype it for confirmation. When you give the keys to
your operators, they can change their passwords if they want.
4. Click OK. The Console Operator window opens.
5. From the Details tab, assign operator permissions.
You also decide to influence the ability of the operator to trigger restart and
shutdown as Post-Action or to include them in BigFix Action Scripts.
Depending on the configuration that you set for a specific operator for
shutdown and restart, the radio button in the Take action panel might be
disabled for that operator. This configuration has no effect on actions with
type other than BigFix Action Script.
You can also set permissions to access the BigFix Console and REST API.
6. From the Administered Computers tab, assign the desired computers to this
operator.
7. From the Assigned Role tab, select the roles to apply to this operator.
8. From the Sites tab, assign the sites you want this operator to have access to.
60 IBM BigFix: Console Operator’s Guide
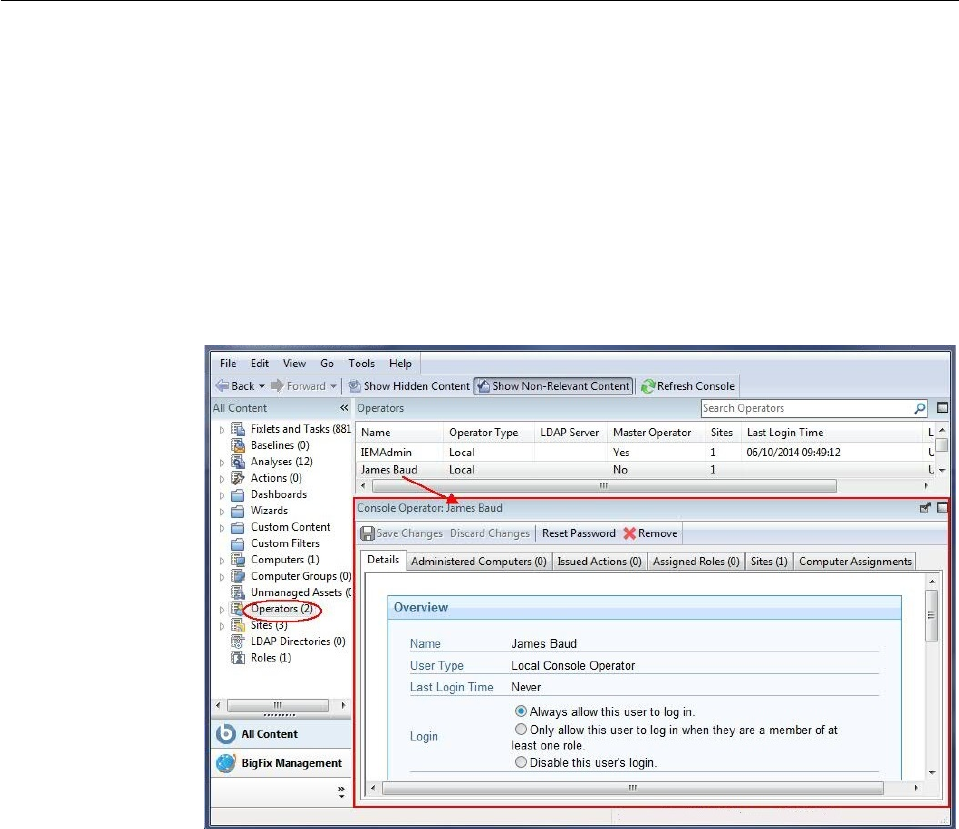
9. From the Computer Assignments tab, specify the properties that must be
matched by the computers that the operator can manage. For master
operators, the assigned computers are always all the computers irrespective of
the computers being assigned.
10. To save the changes click Save Changes.
At any time, you can also convert a local operator to an LDAP operator. To do so,
follow these steps:
1. From any list of local operators, right click on the operator you want to
convert.
2. From the context menu, select Convert to LDAP Operator.
Monitoring Operators
If you are a master Operator (you must have a correctly authorized user name
created with the BigFix Administration Tool), you can monitor what other
operators are doing and what computers they are authorized to administer.
Each operator is represented by, among other attributes, a Name, User Type and
Login type. To view the list of Console Operators, select the All Content Domain
and then click the node labeled Operators from the Domain Panel. In the List
Panel on the right, all the current Operators are listed.
Click any operator from the List Panel to open the Operator work area.
There are several tabs to choose from:
vDetails: Describes the operator by name and type and lets you select a login
type. This is also where you can view and alter operator permissions.
vAdministered Computers: Presents a list of computers that are currently
assigned to the selected console operator.
vIssued Actions: Presents a list of actions that have been issued by the selected
console operator.
Chapter 6. Operators 61
vAssigned Roles: Displays the currently assigned roles, and lets you reassign
them.
vSites: Displays the sites currently assigned to this operator, and lets you reassign
them. If the site is a custom site, you can also set Read/Write/Owner
permissions.
vComputer Assignments: Lists the properties that must be matched by the
computers that the operator can manage. If you specify a property to be
matched, any time a computer is changed to match that property, it is added to
the list of computers assigned to the operator. On the other hand, if a computer
is changed not to match that property, that computer is removed from the list.
This tab is available only for not-master operators.
62 IBM BigFix: Console Operator’s Guide
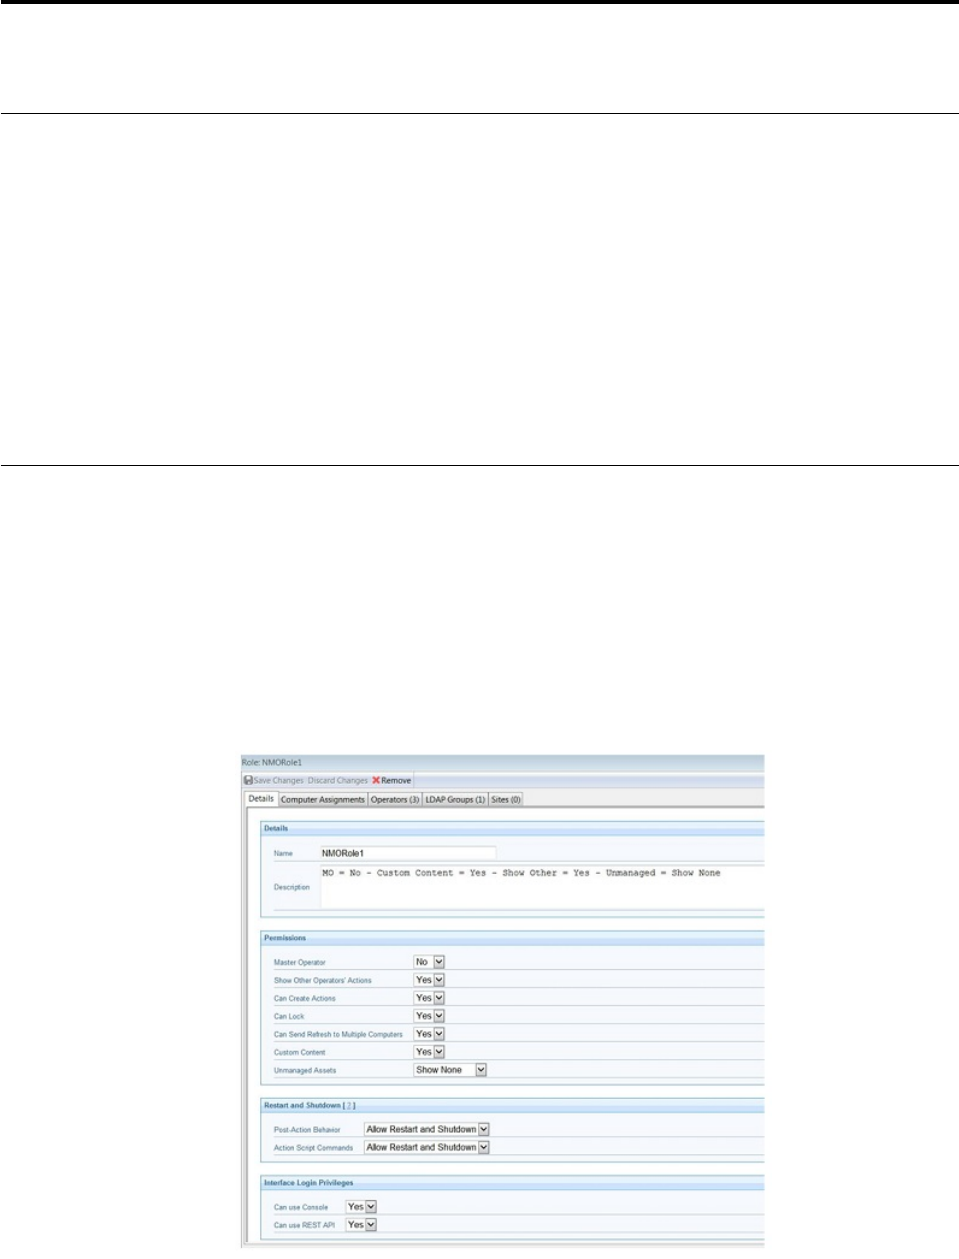
Chapter 7. Roles
Introducing Roles
Roles provide a powerful tool to help you organize and grant complex
permissions. Like groups, roles can have various members defined, but each role
includes implicit permissions.
You may have already assigned permissions to your console operators, so when
you also assign a role to that user you will effectively expand their permissions.
When permissions conflict, the highest level will be selected.
To view the available roles, select All Content from the domain panel and select
the node labeled Roles. From the list that appears, select the computers, operators,
groups and sites that you want to associate with the role.
Creating Roles
You can create roles to define a set of permissions that can be shared by various
operators. Roles allow you to create a generic category of permissions. You can
then associate individual operators, computers, groups and sites to the role.
To create a role, perform the following steps:
1. Click Tools > Create Role or right click in the Roles work area and select
Create Role. The Create Role dialog appears and prompts you for a name.
2. Enter a descriptive name for your role. The role panel appears.
3. Enter a short description of the role and then set the permission levels
associated, the restart and shutdown ability associated to this role and the
permissions to access the BigFix Console and REST API.
© Copyright IBM Corp. 2010, 2015 63
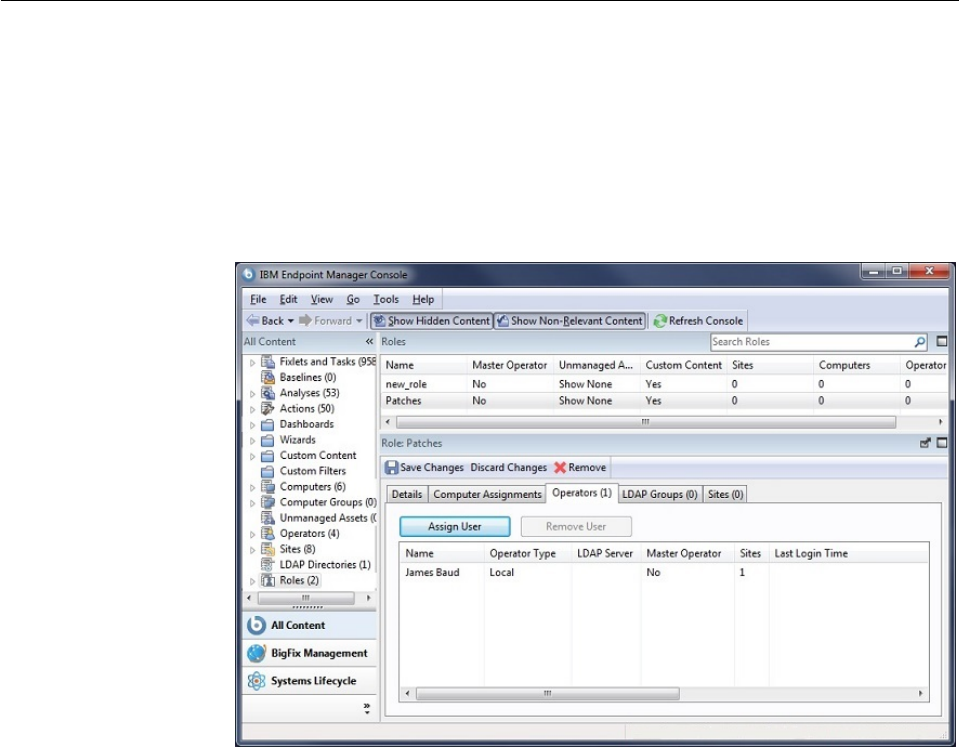
4. Set the computer assignments, operators, LDAP groups and sites by clicking
the various tabs.
5. Make sure to click Save Changes when you're done.
Assigning Roles
Once you have created a role and set its permissions, you can assign console
operators, client computers, LDAP groups and Fixlet sites to that role.
To accomplish this task, perform the following steps:
1. Click All Content in the domain panel and then select the node labelled Roles.
The list of currently defined roles is displayed.
2. Click the role to which you want to associate objects. The Role dialog opens.
3. Click on the tabs to assign specific objects to the role. Each tab contains a
button to add or assign objects to the role.
4. Click the Add or Assign button to bring up a dialog that lets you select one or
more items to associate to the specified role. In the case where permissions
conflict, the least restrictive permissions have priority.
5. Make sure to click Save Changes when you're done.
64 IBM BigFix: Console Operator’s Guide
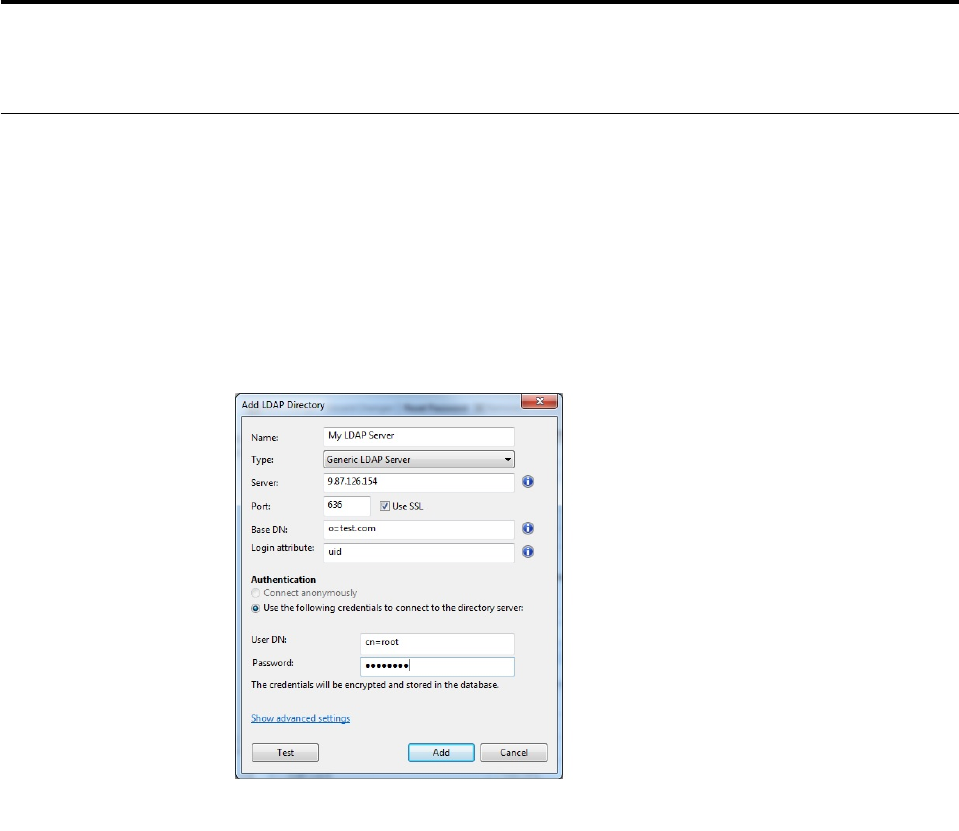
Chapter 8. LDAP Directories
Adding LDAP Directories
You can add Lightweight Directory Access Protocol (LDAP) associations to BigFix.
That allows you and other users to log in to the console using those credentials.
The same advantage applies also to Web Reports.
To add an existing LDAP domain to the console, follow these steps:
1. From the Tool menu, select Add LDAP Directory or right click in the work
area and then select Add LDAP Directory. The Add LDAP Directory dialog
appears.
2. Provide a name and from the Type pull-down, make sure Generic LDAP
Server is selected. Note that no global catalog option is available on generic
LDAP servers.
3. Fill in the information pertaining to your LDAP installation. Under Server,
enter the host name or IP Address of the server.
4. Enter the port number, typically 636 if you are using Secure Sockets Layer
(SSL).
5. Enter the base distinguished name (Base DN), of the form dc=example,dc=com.
6. Click the button to connect anonymously or to use credentials. If you choose
to connect using credentials, enter your User DN and password.
7. Click Test to ensure you have entered your information correctly and a
connection can be made to your LDAP.
8. If you want to include user or group filters, click the Show advanced settings
link. After specified, all further LDAP searches will be subject to the
appropriate filter.
9. Click Add to complete the LDAP setup.
Your LDAP Server is now configured and available for use in the console.
© Copyright IBM Corp. 2010, 2015 65

Adding Active Directory
You can use Microsoft Active Directory (AD) to handle authentication on IBM
BigFix. That allows you and other users to log in to the console using your Active
Directory credentials, taking advantage of your existing authentication policies. The
same advantage applies also to Web Reports.
Note: To integrate the Linux BigFix server with Active Directory you must
configure the Kerberos protocol, downloaded as a prerequisite with the Linux
BigFix server installation. For additional information, see the IBM Endpoint
Manager: Configuration GuideIntegrating Linux Server with Active Directory.
To add an existing Active Directory to the console, follow these steps:
1. From the Tool menu, select Add LDAP Directory. The Add LDAP Directory
dialog appears.
2. Provide a name for the Active Directory and from the Type pull-down, make
sure Microsoft Active Directory is selected.
3. Under Server, enter the host name, IP Address or fully qualified domain name
of the server.
4. To access an entire Active Directory forest, click This is a global catalog server.
5. Click the button to connect as the root server service user or to use
credentials. If you choose to connect using credentials, enter your Active
Directory Username and Password.
6. Click Test to make sure you have entered your information correctly and a
connection can be made to your Active Directory server.
7. Click Add to complete the Active Directory setup.
Note: When you add an LDAP Server as Microsoft Active Directory, ensure that
on the LDAP server you have defined the UserPrincipalName attribute
corresponding to the User logon name of each user. This attribute value is used on
the BigFix Console for each user authentication.
66 IBM BigFix: Console Operator’s Guide
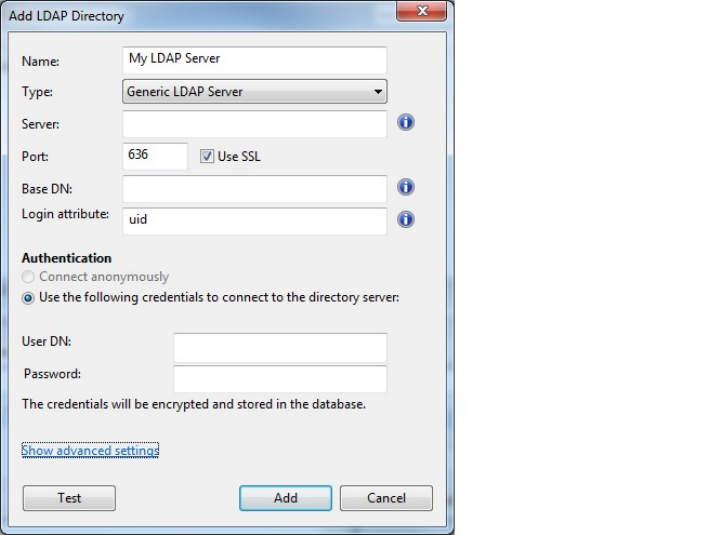
To add an existing Active Directory running over SSL, you must perform the
following steps:
1. Select Generic LDAP Server as server type.
2. If the server is a global catalog server, specify as port number 3269.
3. Click the Show advanced settings link. The user filter and group filter options
are displayed:
Chapter 8. LDAP Directories 67
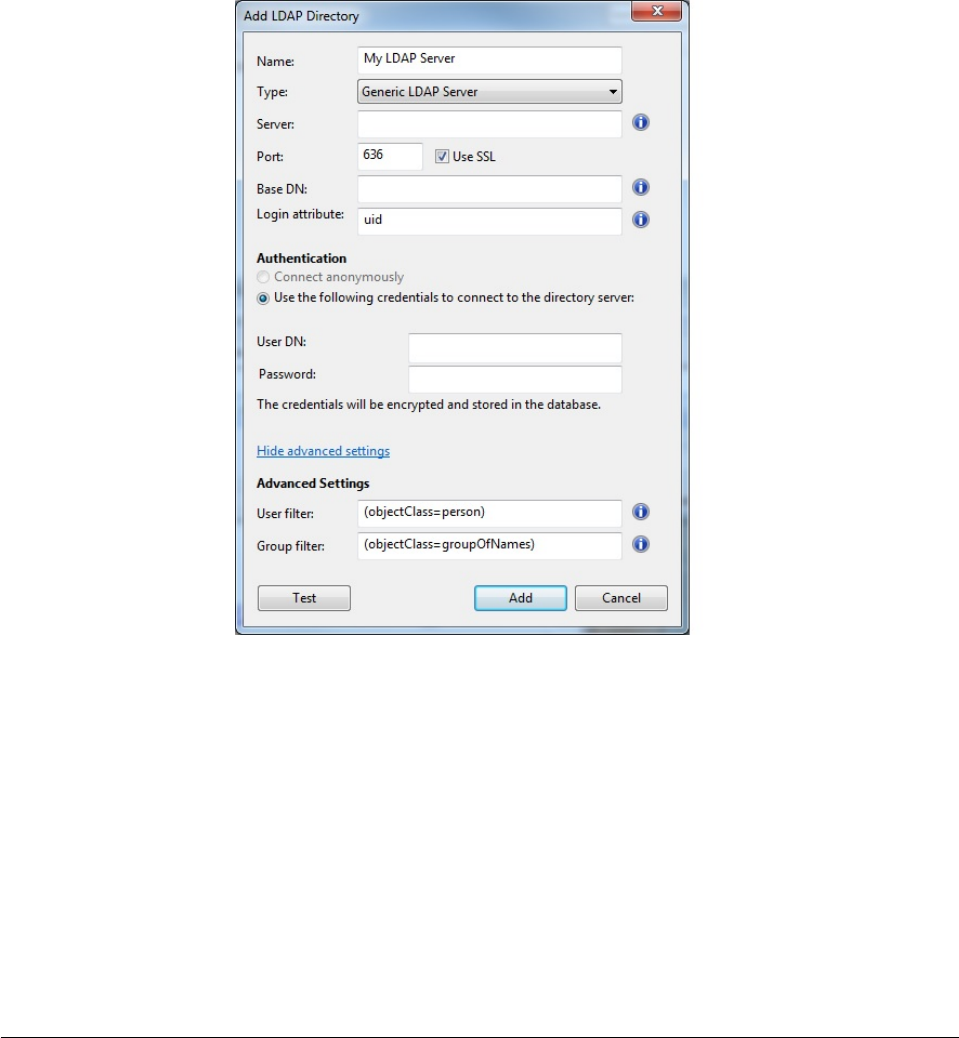
4. Enter UserPrincipalName in Login attribute.
Note: The UserPrincipalName attribute cannot be one of the following formats:
domain/user, domain.com/user, or user.
5. Enter (objectClass=user) in User filter
6. Enter (objectClass=group) in Group filter.
7. Click Use the following credentials to connect to the directory server and
enter your Active Directory Username and Password.
8. Click Test to ensure you have entered your information correctly and a
connection can be made to your Active Directory server.
9. Click Add to complete the Active Directory setup.
Your Active Directory Server is now configured and available for use in the
console.
Adding LDAP Operators
You can create accounts for operators to access the console by using an existing
Active Directory or LDAP account. When you select this option, an operator with
the same name as the one specified in the LDAP directory, is added to the
operators node in the Domain Panel on the BigFix console. These operators can
then log in as usual, using one of the following notations:
username
username@domain
domain\username
68 IBM BigFix: Console Operator’s Guide

The permissions assigned to that user in the LDAP directory are not inherited by
the newly created operator. You must either assign the needed permissions to the
operator or assign the operator to an existing role.
To add an LDAP operator, complete the following steps:
1. Ensure that the needed Active Directory or LDAP directory is added to the
BigFix environment.
2. Click the Tools > Add LDAP Operator menu item or right click in the work
area and then select Add LDAP Operator. The Add LDAP User dialog
appears.
3. You can query and filter the users defined on the specified LDAP server using
the Search field and the two radio buttons.
4. When you find the user to add as LDAP operator, select it and click Add. The
Console Operator panel opens.
Chapter 8. LDAP Directories 69

5. From the Details tab assign operator permissions.
You can decide to give the operator the ability to trigger restart and shutdown
as Post-Action or to include them in BigFix Action Scripts. Depending on the
configuration that you set for a specific operator for shutdown and restart, the
radio button in the Post Action tab of the Take Action panel might be disabled
for that operator. This configuration has no effect on actions with action script
type other than BigFix Action Script.
You can also set permissions to access the BigFix Console and REST API.
6. The Administered Computers tab lists the computers managed by this
operator.
7. From the Assigned Role tab, select the roles that you want to assign or
unassign this operator to.
8. From the Sites tab, assign the sites that you want this operator to have access
to or unassign them.
9. From the Computer Assignments tab, specify the properties that must be
matched by the computers that the operator can manage.
10. To save the changes click Save Changes.
At any time, you can also convert a local operator to an LDAP operator. To do this,
follow these steps:
1. From any list of local operators, right click on the operator you want to
convert.
2. From the context menu, select Convert to LDAP Operator.
Associating an LDAP group
You can associate LDAP users or groups, that have been defined in an existing
Active Directory or LDAP directory, to console operators or roles.
To add such a group perform the following steps:
1. Ensure that the needed Active Directory or LDAP directory is added to the
BigFix environment.
2. Create a role to accept your new group by selecting Tools > Create Role or
right click in the work area and then select Create Role.
Enter a name for your group and click OK.
3. The Role panel appears.
70 IBM BigFix: Console Operator’s Guide
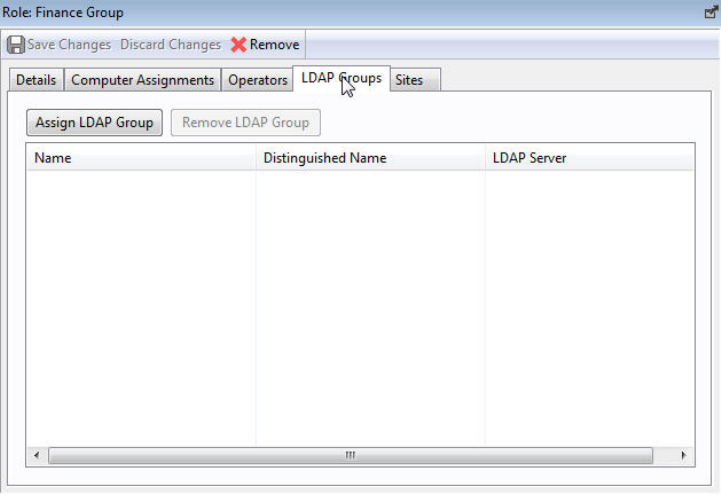
Click the LDAP Groups tab.
4. Select the LDAP group that you want to assign to this role and click Assign
LDAP Group.
5. To save the changes click Save Changes.
When you assign an LDAP group to a role, any user from that group can then log
in to the console. Only those users who actually log in will be provisioned with
accounts and thus end up in the list of operators. This avoids the creation of
unnecessary accounts. Operators are granted the highest privileges resulting from
the sum of all their roles and permissions. For instance, if a user has access to
computer set A and sites X from role 1, and computer set B and sites Y from role 2,
they will have permissions for Sites X and Y across both computer sets A and B.
Chapter 8. LDAP Directories 71
72 IBM BigFix: Console Operator’s Guide

Chapter 9. Client Computers
Introducing Client Computers
Client Computers represent those computers in your network running the BigFix
Client. When the client software is installed, you have a high level of control over
these machines, allowing you to maintain common operating environments, roll
out the latest patches, detect spyware, view and summarize properties, create
reports, and much more.
Client computers can have settings applied to handle a multiplicity of features,
including the ability to define and organize corporate departments. Client
computers can be automatically grouped according to these settings or other
computer properties, allowing you to target specialized remediation to distinct
domains. Settings are used to define Relays, bandwidth, idle time, buffers, and
much more.
The Computers icon in the Domain Panel navigation tree in the main interface lets
you quickly see your network, with the ability to filter and sort large numbers of
computers by dozens of properties.
The Visualization Tool allows you to quickly monitor large, globally distributed
networks, and follow remediation deployments and compliance, corporate-wide.
Web Reports allow operators with access to a browser to view audit trails and
generate listings and graphical reports with just a few mouse-clicks.
Running actions on the computers
You can perform the following actions on the computers:
Send Refresh
If you right-click any computer and select Send Refresh, the computer
information displayed is refreshed.
Send Wake on LAN Request
If you right-click any computer and select Send Wake on LAN Request,
the computer is powered on.
Send Client Alert Request
If you right-click any computer and select Send Client Alert Request, the
computer that is sleeping in deep mode is woken up and performs a full
cycle to go through all the content before going back to sleep again if
nothing has changed.
Monitoring Computer Status
BigFix can be used to analyze the computers in your network. Using the Relevance
Language, you can query any BigFix Client and get a real-time response. This can
be invaluable for analyzing trends and potential problem areas on your network.
To view the computers in your network, sorted and filtered by various properties,
follow these steps:
© Copyright IBM Corp. 2010, 2015 73
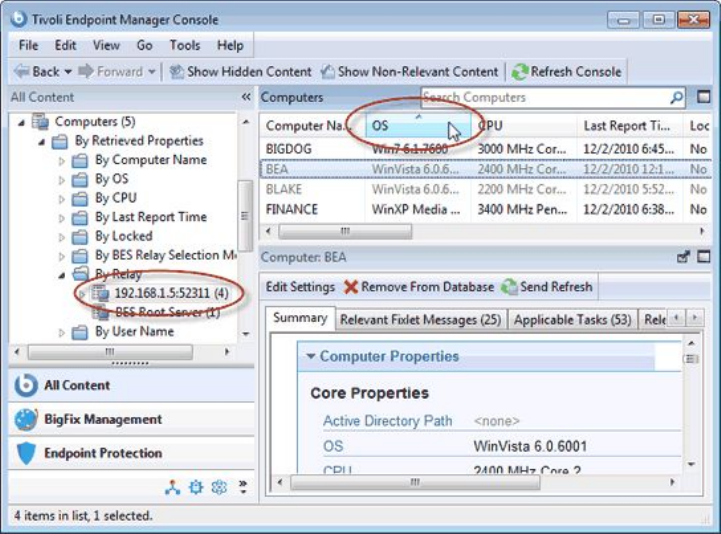
1. Select the Computers icon in the Domain Panel navigation tree. Your
networked Client computers are shown in the List Panel, ready to be sorted
and filtered by various properties.
2. Click By Retrieved Properties (in the navigation tree under the Computers
icon) and open folders to filter the list.
Click the desired column headers in the resulting List Panel to sort the list.
Click again to reverse the sort order.
The folder names and column headers represent important, continuously updated
properties of your networked computers, called retrieved properties. To view the
Relevance Expressions that define the column headers:
1. Select Manage Properties from the Tools menu. A dialog opens, initially listing
the default properties that come predefined by IBM Endpoint Manager, such as
OS, CPU, Computer Name, and so on.
2. Click a retrieved property. In the text box underneath, you can view the
Relevance Expressions that are used to define this column.
74 IBM BigFix: Console Operator’s Guide
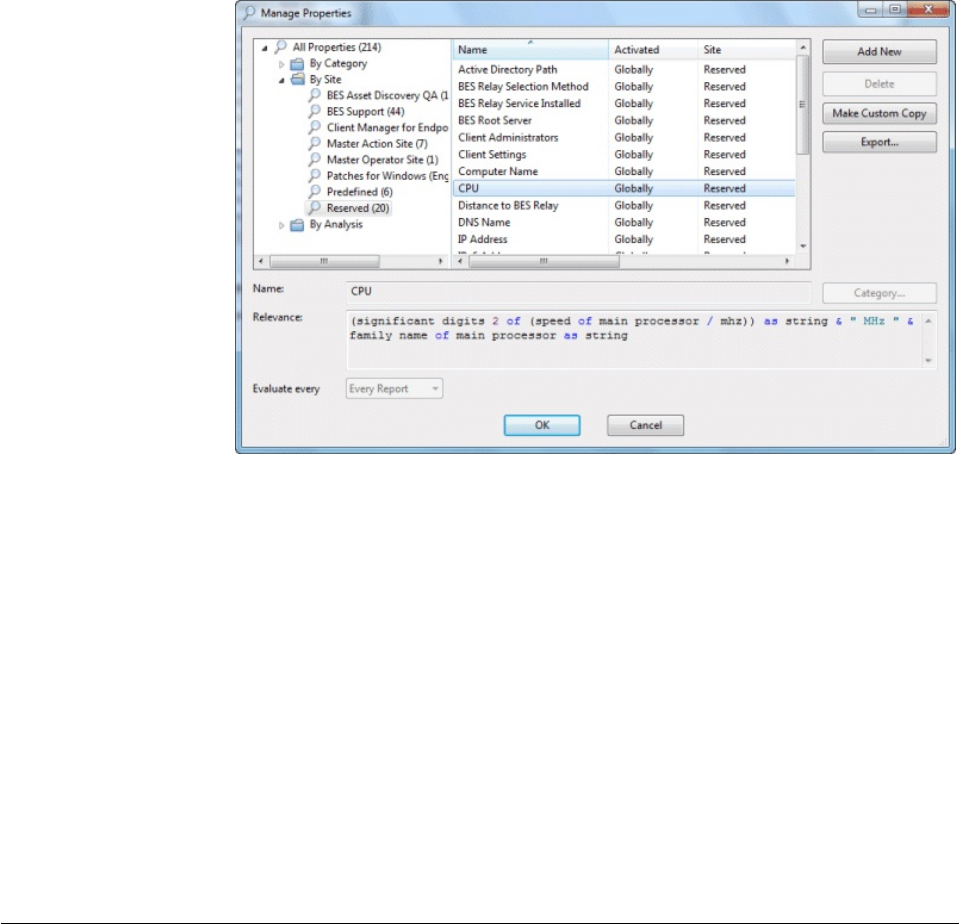
For example, the column heading CPU is generated by the following Relevance
Expression:
(significant digits 2 of (speed of main processor / mhz)) as string & "Mhz" &
family name of main processor...
That is, CPU is a concatenation of relevance expressions and strings that
produces an output like:
2800 Mhz Pentium 4
3. Each property has an evaluation period. The shorter the period, the more often
the client evaluates it. This makes the Console more up-to-date, but it might
impact client performance. Make sure long periods are allocated to
time-consuming or slowly changing Relevance evaluations.
You can quickly select which properties to display by right-clicking the column
headers of any Computer List Panel. A pop-up menu is displayed that allows you
to check or uncheck the properties you want to display. Notice that when you
delete a property from the headers, it is also removed from the navigation tree
under the Computers tab.
Grouping Computers
The BigFix Console allows you to group your computers to target them more
efficiently. You might want to group your development computers, for example, to
make sure you do not interfere with certain legacy software projects. There are
several ways to group computers, but the two most common techniques are
Manual Grouping and Automatic Grouping. Manual groups are static, but
automatic groups can change dynamically, depending on the current values of the
inclusion properties.
When grouped, you have provided yourself with a simple way to filter and
separate your networked computers. Open the Computers icon in the Domain
Panel navigation tree and select the folder named By Group. Then you can select
the group or groups you want to list. Alternatively, you can click the Computer
Groups icon and select groups under that icon as well.
Chapter 9. Client Computers 75

Whenever a list of computers is presented, you should find the By Group folder.
For example, when you click an Action button in a Fixlet or Task, you see the
Relevant Computers icon, listing just those computers that are affected by the
selected Fixlet. Open the By Group folder to narrow down the list of computers to
just the selected groups.
Note: A computer can belong to more than one group.
Commenting on Computers
You can attach a comment to a BigFix Client Computer, which other operators can
read.
1. Select the Computers icon in the Domain Panel navigation tree and open it if
you want to choose one of the Computer subcategories to narrow down your
list.
2. Select a computer from the List Panel on the right by clicking it.
3. From the document panel below, select the Summary tab.
4. Scroll to the bottom of the page, type your comment into the text box, and click
the Add Comment Button.
Your comment is name- and time-stamped for other operators to view it. As well
as Computers, you can attach comments to Fixlets, Tasks, Actions, and Analyses.
Creating Retrieved Properties
You can collect information from BigFix Clients by defining various retrieved
properties. A large range of computer attributes can be monitored as retrieved
properties. There are several reasons why you might want to create some custom
retrieved properties of your own:
vWhen you create a retrieved property it can be used as a filter in all subsequent
computer listings, allowing you to control data sets that might otherwise be
difficult to visualize.
vYour newly-created properties are added to the column headers of computer
listings, allowing you to sort on their values.
vRetrieved properties can be used to fine-tune the targeting of Fixlet actions.
vRetrieved properties can also be used and charted in Web Reports.
BigFix includes a predefined set of retrieved properties, which are sufficient to
group computers by many frequently requested criteria. There are times, however,
when you might want even more control over how your Clients are grouped and
sorted.
To create a custom retrieved property, follow these steps:
1. Choose Tools > Manage Properties. The Manage Properties dialog is displayed.
76 IBM BigFix: Console Operator’s Guide
You can filter the properties by using the left filter panel to select a subset of
the properties to view on the right.
2. If you cannot find what you want in this list, create a new property: click Add
New, type in the name of your new retrieved property and create a Relevance
Expression to evaluate. This can access hardware characteristics, registry
entries, and even data in specific files on the client computers. After you define
the new property, the Clients automatically compute the value of the
corresponding relevance expression and return it to the Database.
3. Click the OK button.
Note: Some of these properties are aimed at specific operating systems and return
a blank string for other operating systems. If more than one result is retrieved for a
property, the entire list is retrieved.
Creating Client Dashboards
You can create custom BigFix Client Dashboards, similar to those in the Console.
Dashboards are HTML files with embedded Relevance clauses that can analyze the
local computer and print out the current results. Clients with a dashboard have an
extra tab to display the resulting report.
To create a Client Dashboard, you must create a new folder named __UISupport
(note the two leading underscores) in the __BESData folder. This is a subfolder of
the BES Client folder, so the final pathname looks like:
Program Files/BigFix Enterprise/BES Client/__BESData/__UISupport
Place the Dashboard file (named _dashboard.html) and any accompanying
graphics files into this folder. The next time the Client starts up, it incorporates
these files into its interface, adding a tab labeled Dashboard. When the user clicks
this tab, the Dashboard calculates the latest values of each Relevance clause and
displays them.
Chapter 9. Client Computers 77
The Relevance statements are embedded in the HTML inside special tags with the
form:
<?relevance statement ?>
For example, to find and print the time, use the following:
<?relevance now ?>
When the Client displays the page containing this statement, it evaluates the
Relevance clause "now" and substitutes the value for the tag. The following sample
HTML prints out the word "Date:" and then the current date and time:
<html>
<body>
Date: <?relevance now ?>
</body>
</html>
To allow the user to refresh the Relevance evaluation, add this line to the file:
<html>
<body>
Date: <?relevance now ?>
<A href="cid:load?page=_dashboard.html">Refresh</A>
</body>
</html>
This link, labeled Refresh, causes the page to reload. When it does, it reevaluates
the relevance clauses. It is easy to see how you would add other Relevance
expressions to this page. For example, to print out the OS and the computer name,
add these two lines:
<html>
<body>
Date: <?relevance now ?>
Operating System: <?relevance name of operating system ?>
Computer Name:<?relevance computer name ?>
<A href="cid:load?page=_dashboard.html"> Refresh </A>
</body>
</html>
You can use style sheets to format the output. You can even use the default
style-sheet, offer.css for some preset formatting. Here is an example of a
Dashboard with a title, a header, a refresh link, and a section of retrieved property
values:
<html>
<head>
<link type="text/css" rel="stylesheet" ref="offer.css"></link>
<title> Dashboard Example</title>
</head>
<body>
<div class="header">
<div class="headerTitle">
<font size="6"><?relevance computer name ?></font></div>
<div class="headerCategory">
<font size="1">(Last updated: <?relevance now ?>)</font><BR>
<div>
<font size="1"><a href="cid:load?page=_dashboard.html">Refresh</a></font>
</div>
</div>
</div>
<div class="section">
<div class="sectionHeader">Computer Information</div>
<div class="subsection">
<table>
78 IBM BigFix: Console Operator’s Guide

<tr><td valign="top"> OS: </td>
<td><?relevance operating system ?></td></tr>
<tr><td valign="top"> RAM: </td>
<td><?relevance (size of ram)/1048576 ?> MB</td></tr>
<tr><td valign="top"> DNS Name: </td>
<td><?relevance dns name ?></td></tr>
</table>
</div>
</div>
</body>
</html>
To learn more about Relevance expressions, see the Relevance Language Reference.
Locking Computers
You can change the locked status of any BigFix Client in the network. This lets
you exclude specific computers or groups of computers from the effects of Fixlet
actions. This could be useful, for example, if you want to exclude certain
development computers from any changes or updates. It also provides a powerful
technique for testing new Fixlet actions on a limited set of unlocked computers,
while keeping the rest of the network locked down. Client computers can be
locked forever (until explicitly unlocked) or for a defined period of time.
Changes are made to the locked status of a Client by sending an action. As a
consequence, the Console operator must supply correct authentication to lock or
unlock any computer. Even though a Client is locked, there is still a subset of
actions that can be accepted by the client. These include clock changes and unlock
actions as well as actions from the BES Support site.
To lock or unlock a computer, follow these steps:
1. Click the Computers icon in the Domain Panel navigation tree to open the List
Panel of networked BigFix Client computers.
2. Select the computers that you want to lock.
3. Right-click and select Edit Computer Settings from the menu, or select Edit
Computer Settings from the Edit menu. The Edit Settings dialog opens.
Chapter 9. Client Computers 79
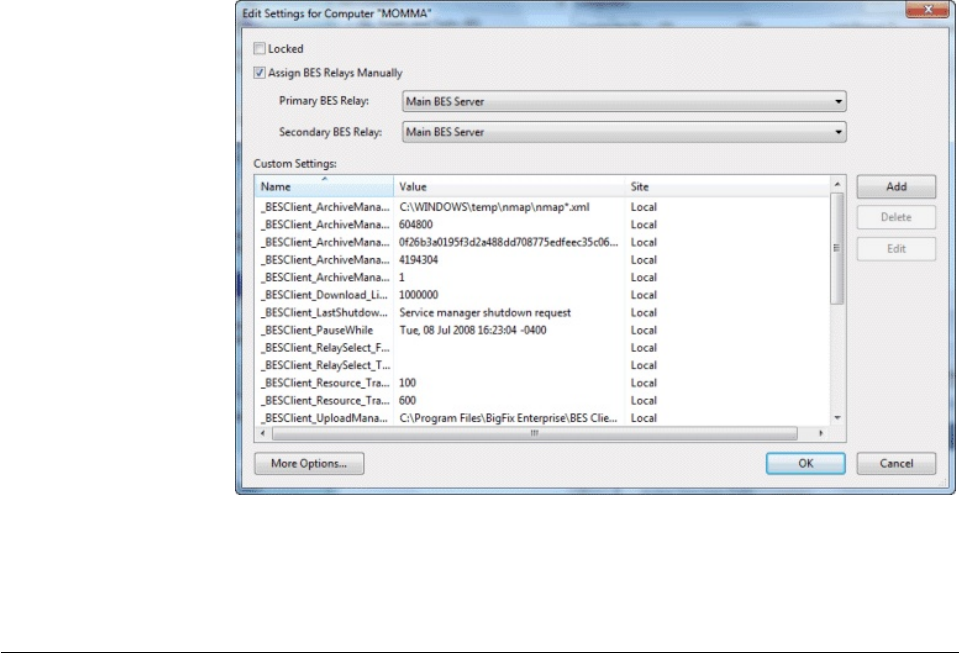
4. Click the checkbox to either lock or unlock the computer.
Although the Console does not provide an explicit interface for setting an
expiration date on the lock, you can create a custom Action to do so. For more
information, see the Action Guide.
Removing Computers
This feature allows you to remove computers that are no longer reporting in, such
as decommissioned computers. When you remove a computer from the database,
you do not need to uninstall or unsubscribe the client. If the client gets reactivated
and reports back to the Console, the computer is included in the database with its
old information intact. Until then, the client is not listed in the Console.
To remove a computer from the database, follow this procedure:
1. Click the Computers icon in the Domain Panel navigation tree to see a list of
Clients in the List Panel.
2. Right-click a Computer in the list and select Remove from Database from the
context menu (or select Remove from the Edit menu).
3. Confirm the removal in the subsequent dialog.
This computer is no longer visible in the Console unless reactivated by the BigFix
Client itself.
80 IBM BigFix: Console Operator’s Guide
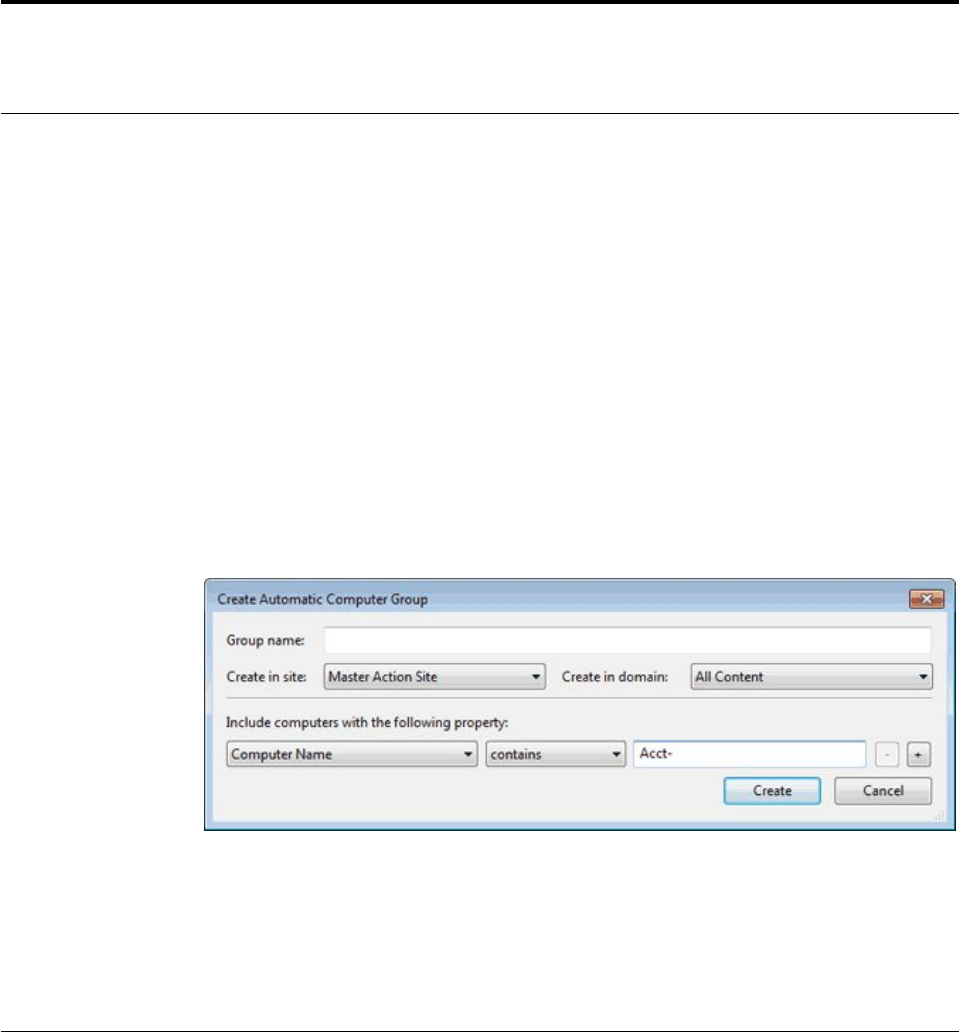
Chapter 10. Computer Groups
Introducing Computer Groups
Grouping your BigFix Client computers can simplify the maintenance of large
networks. There are many ways to group computers, from simple manual selection
to more flexible automatic grouping.
A simple grouping technique is to manually select members of a group from the
listing in the Computers List Panel. For a quick look at a manual selection, click
View as Group from the right-click context menu. This opens an Ad-Hoc
Computer Group document in the Work Area where you can quickly analyze
various properties of the group. Ad-hoc groups are temporary, but you can create
persistent groups by choosing Add to Manual Group from the same context menu.
These techniques are simple, but in a network with many thousands of computers,
they can be tedious.
A more powerful technique is to define criteria for Automatic Grouping. From the
Tools menu, select Create New Automatic Computer Group.
Here you can define membership in a group based on the values of specific
computer properties. You could, for example, group computers by IP address
ranges, operating systems, applications, and thousands of other criteria using
Relevance expressions. Groups created this way have the benefit of automatic
enrollment and expulsion, so that a computer that is repurposed to a different task
or department automatically switches groups without operator intervention.
Creating Manual Computer Groups
To Manually create a computer group, follow this procedure:
1. Click the Computers icon in the Domain Panel navigation tree and in the
resulting List Panel, shift- and ctrl-click to select the computers you want to
group together.
2. Right-click the computers you choose and select Add to Manual Group from
the menu.
3. From the Select Manual Computer Group dialog, you can choose to add your
selected computers to an existing group or create a new group for them.
© Copyright IBM Corp. 2010, 2015 81
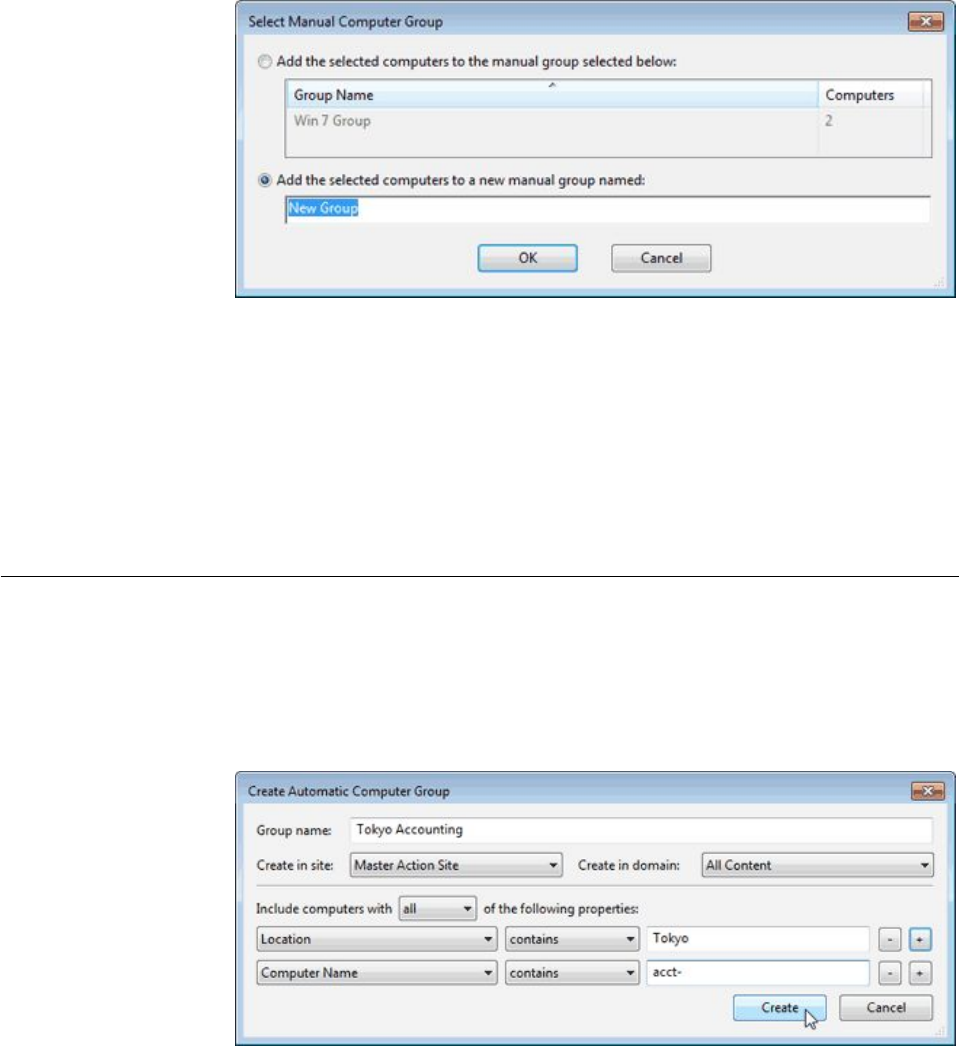
Select an existing group or name a new one and click OK.
This computer group is added under the Computer Group icon in the Domain
Panel navigation tree and helps you to subdivide your networked computers down
into more reasonably sized chunks.
Groups use a global scope grouping mechanism that allows any operator with
management rights on the device to edit membership. While manual groups are
shared by operators with rights over the machine, dynamic groups have their own
scope.
Creating Automatic Computer Groups
To create a group that automatically enlists computers, follow this procedure:
1. Click Tools > Create New Automatic Group.
2. From the Create New Automatic Computer Group dialog, enter the name of
your group and select the site and domain you want it to be located in.
3. Enter a property, a relation, and a value into the three boxes at the bottom of
the dialog. For example, to create a group that automatically enlists Windows
computers, select OS contains Win. Click the + button to add new properties
that you can AND (include all properties) or OR (include any properties)
together to identify group membership.
4. When you are finished, click Create to propagate the group settings.
You now have a new Automatic Computer Group that is listed under the
Computer Groups icon in the Domain Panel navigation tree and can be used to
subdivide your network into more workable chunks. Unlike Manual Groups,
82 IBM BigFix: Console Operator’s Guide
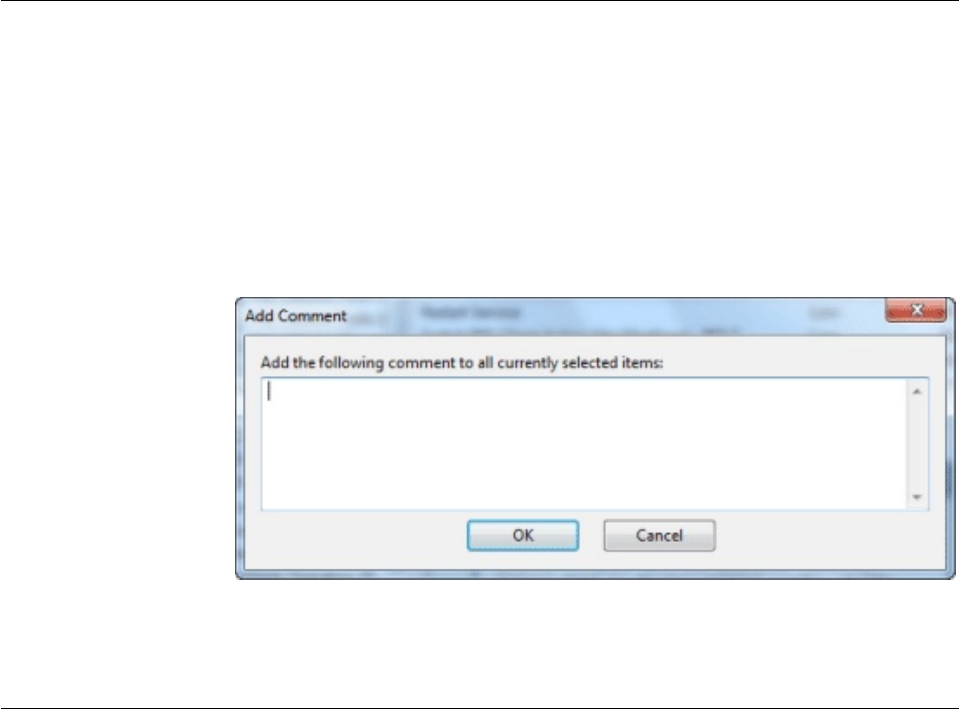
which are statically defined, Automatic Groups change their population depending
on the evaluation of the group properties.
Commenting on Computer Groups
You can attach a comment to a Computer Group, which other operators can read.
1. Open the Computer Groups icon in the Domain Panel navigation tree and
choose one of the categories under the icon to narrow down your list.
2. Select a computer group from the resulting List Panel on the right by clicking
it.
3. From the document panel below, select the Description tab.
4. Scroll to the bottom of the page, type your comment into the text box and click
the Add Comment Button.
Your comment is name- and time-stamped for other operators to view it. As well
as Computer Groups, you can attach comments to Fixlets, Tasks, Actions, and
Analyses.
Removing Computer Groups
To remove a computer from BigFix administration, follow this procedure:
1. Click the Computer Groups icon in the Domain Panel navigation tree.
2. Right-click a Computer Group from the resultant List Panel and select Remove
from the context menu (or select Remove Computer Group from the Edit
menu).
This computer group is deleted from the list.
Chapter 10. Computer Groups 83
84 IBM BigFix: Console Operator’s Guide

Chapter 11. Analyses
Introducing Analyses
An Analysis is a collection of property expressions that allow an Operator to view
and summarize various properties of BigFix Client computers across a network.
The collection is grouped together to be labeled, edited, and activated against
groups of computers to allow the results to be displayed together. For example,
suppose you have a custom application deployed in your network, and you want
to create an analysis to give you important information about the state of your
machines relative to that custom application. You might build an analysis with
several properties, such as:
vIs the custom application installed?
vWhat is the version of the custom application?
vIs the application currently running?
With an analysis composed of these properties, operators can activate the analysis
against groups of machines to get visibility into the state of the network as it
pertains to the custom application.
There are several pre-made Analyses that examine important aspects of your
networked computers, including their hardware, applications, and
Server/Relay/Client relationships.
Studying these default Analyses can be instructive when you want to make your
own or customize existing ones. Custom Analyses can help you monitor aspects of
your network that are vital to your company's operation.
The Retrieved Properties that underlie each Analysis are created using Relevance
expressions. For example, to make sure you have fully deployed the most recent
IBM Endpoint Manager Client software, you might use an expression such as
version of client. This simple expression is evaluated on every computer where
the analysis is targeted, allowing you to see explicitly which version of the IBM
Endpoint Manager Client is running on each computer, or to view a summary of
how many machines are running each version.
Analyses are targeted with yet another Relevance statement, which might be as
simple as TRUE, which would include all connected Clients. Generally, you want
to narrow the scope with a Relevance statement such as name of operating system
as lowercase starts with "win", which would limit the Analysis to Windows
computers only.
Viewing Analyses
To display an Analysis,
1. Click the Analyses icon in the Domain Panel navigation tree.
2. Click an entry in the resulting Analysis List Panel.
The body of the Analysis is shown in the Work Area below the list (click the
Description tab if not already selected).
© Copyright IBM Corp. 2010, 2015 85
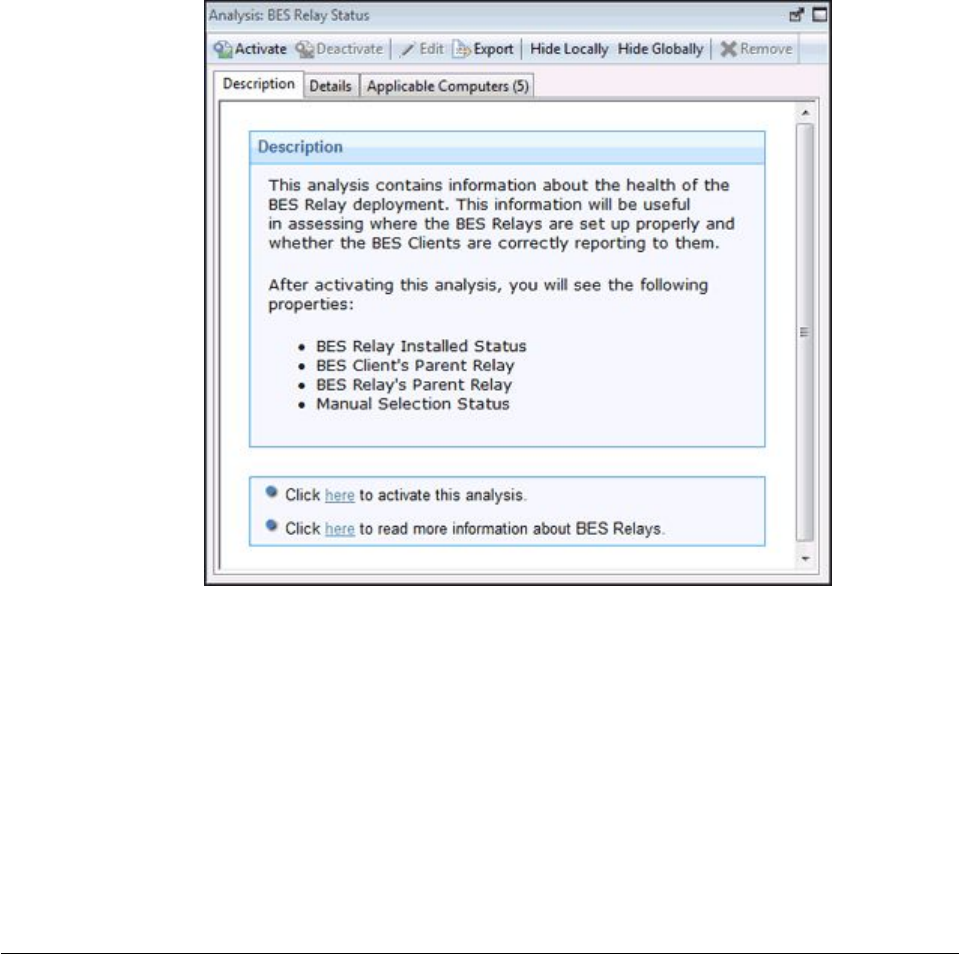
The Analysis display region has several tabs:
vDescription: This is an HTML page providing a description of the analysis.
vDetails: This panel provides a property-by-property listing of the chosen
analysis, as well as the Relevance statement that is being used to target the
chosen computers. At the bottom is a text box for entering a comment that to be
attached to this analysis.
vResults: This dialog lists the actual results of the analysis, which can be filtered
and sorted by the pre-assigned properties (this tab is only available if the
Analysis is activated).
vApplicable Computers: This is a filter/list of all the computers where the
selected analysis is applicable. You can filter the list by selecting items from the
folders on the left, and sort the list by clicking the column headers.
Monitoring Analyses
When an analysis is activated, BigFixr adds it to the list displayed by the Analyses
icon in the Domain Panel navigation tree. The Analysis List Panel contains entries
that can be sorted by the following column headers:
vName: The name assigned to the Analysis by the author.
vStatus: The activation state of the Analysis.
vSite: The name of the site that is generating the relevant Analysis.
vApplicable Computer Count: The number of IBM Endpoint Manager Clients in
the network currently being analyzed.
vActivated By: The name of the Console operator who activated this analysis.
vTime Activated: The date and time the analysis was activated.
86 IBM BigFix: Console Operator’s Guide
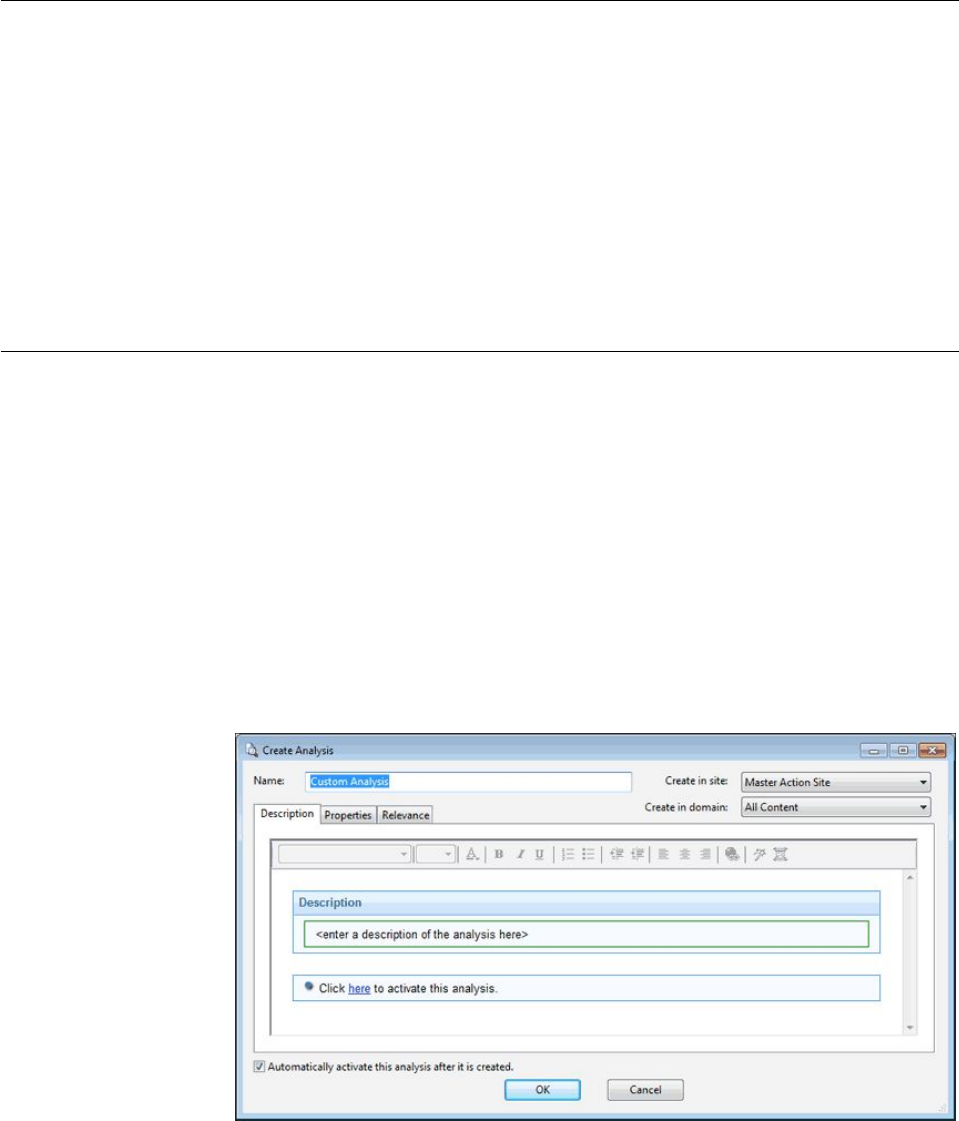
As with all the icons in the Domain Panel navigation tree, you can filter this list by
opening the Analyses icon and selecting any of the icons beneath it. Each icon you
click narrows down the list of Analyses on the right. Then, in the listing area itself,
you can sort the Analyses by clicking a column heading.
For example, you might filter the list by opening the Activated Analyses sub-icon,
then opening the Activated By folder and selecting a specific Operator to see the
subset of analyses that have been activated by that Operator.
Commenting on Analyses
You can attach a comment to an Analysis that other operators can read:
1. Select the Analyses icon in the Domain Panel navigation tree and choose one of
the subcategories underneath it to narrow down your list.
2. Select an Analysis from the resultant List Panel on the right by clicking it.
3. In the Work Area below, select the Details tab. Scroll to the bottom of this
dialog to the comments text box.
4. Type your comment into the text box and click the Add Comment button.
Your comment is name- and time-stamped for other operators to view it. As well
as Analyses, you can attach comments to Fixlets, Tasks, Actions, and Computers.
Creating Analyses
Analyses allow you to create and track specified properties of your managed
BigFix Clients. These properties can be extracted from any subset of your network,
which simplifies the process of managing inventory, licensing, security, and
policies. Using Web Reports, you can view a history of each analysis.
Analyses are also the only way for Non-Master Operators to create retrieved
properties, because they do not have access to the Manage Properties Dialog.
To create your own custom Analysis, follow these steps:
1. Select Tools > Create New Analysis
2. This opens the Create Analysis dialog with a text box for entering the name of
your new Analysis.
Chapter 11. Analyses 87
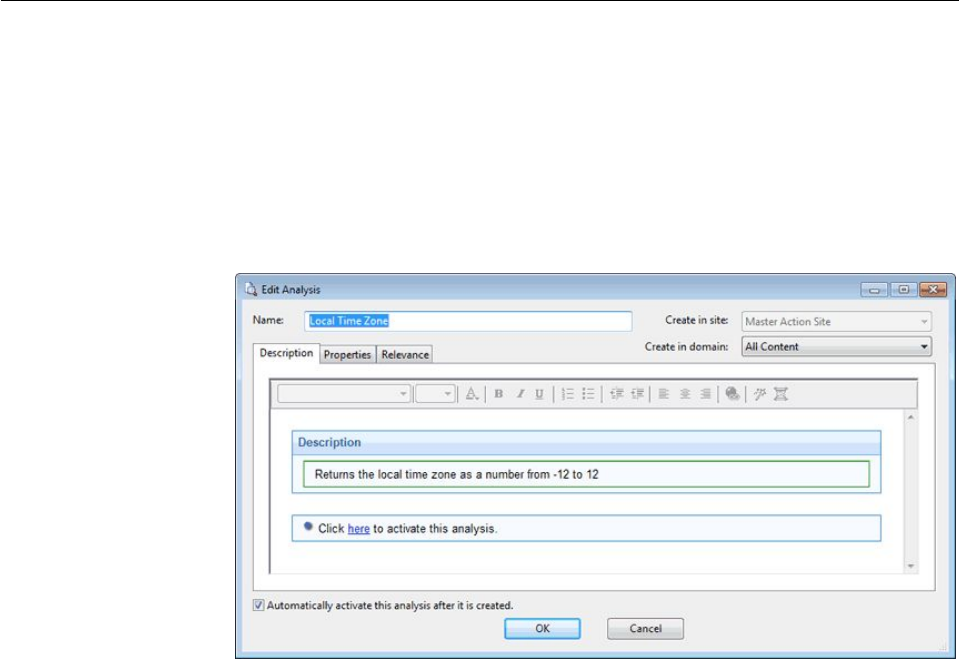
Because you can use the name for sorting and filtering, create a consistent
naming convention to make your Analyses more accessible. Enter the name and
then select the host site and domain for the Analysis from the drop-down
menus at the right. The dialog contains three tabs. Click through each tab to
define your Analysis:
vDescription: In this dialog, you can enter the text that describes your
Analysis. You can choose from the text editing tools at the top of the text box
to create your custom content.
vProperties: Add the retrieved properties that form the core of your Analysis
by clicking the Add Property button, then providing a name and a Relevance
expression that is evaluated to create the returned property value.
vRelevance: Enter another Relevance expression that determines which
computers are selected for this Analysis.
3. Check the box at the bottom of the dialog if you want to automatically activate
the Analysis. When you are satisfied with your Analysis definitions, click OK.
4. Your Analysis must be propagated, so you are prompted for your private key
password. When you enter it and click OK, your Analysis is sent to all the
Clients, which evaluate it for relevance and report back their status. You can
now monitor specific properties of your networked Clients from the Console.
Editing Analyses
To edit an Analysis, follow these steps:
1. Open the Analyses icon in the Domain Panel navigation tree, and select My
Analyses as a filter. In the resultant List Panel, select the Analysis you want to
edit. Note that not all Analyses are editable.
2. Select Edit > Edit Custom Analysis (or right-click the Analysis and select Edit
from the pop-up menu).
3. This opens the Edit Analysis dialog.
Edit the Name of the Analysis and then select the hosting site and domain
from the pull-down menus. Below this, there are three tabs. Click through each
tab to customize your Analysis:
vDescription: Edit the description of the Analysis, explaining the properties
that are being analyzed.
vProperties: This is the core part of the Analysis.
88 IBM BigFix: Console Operator’s Guide
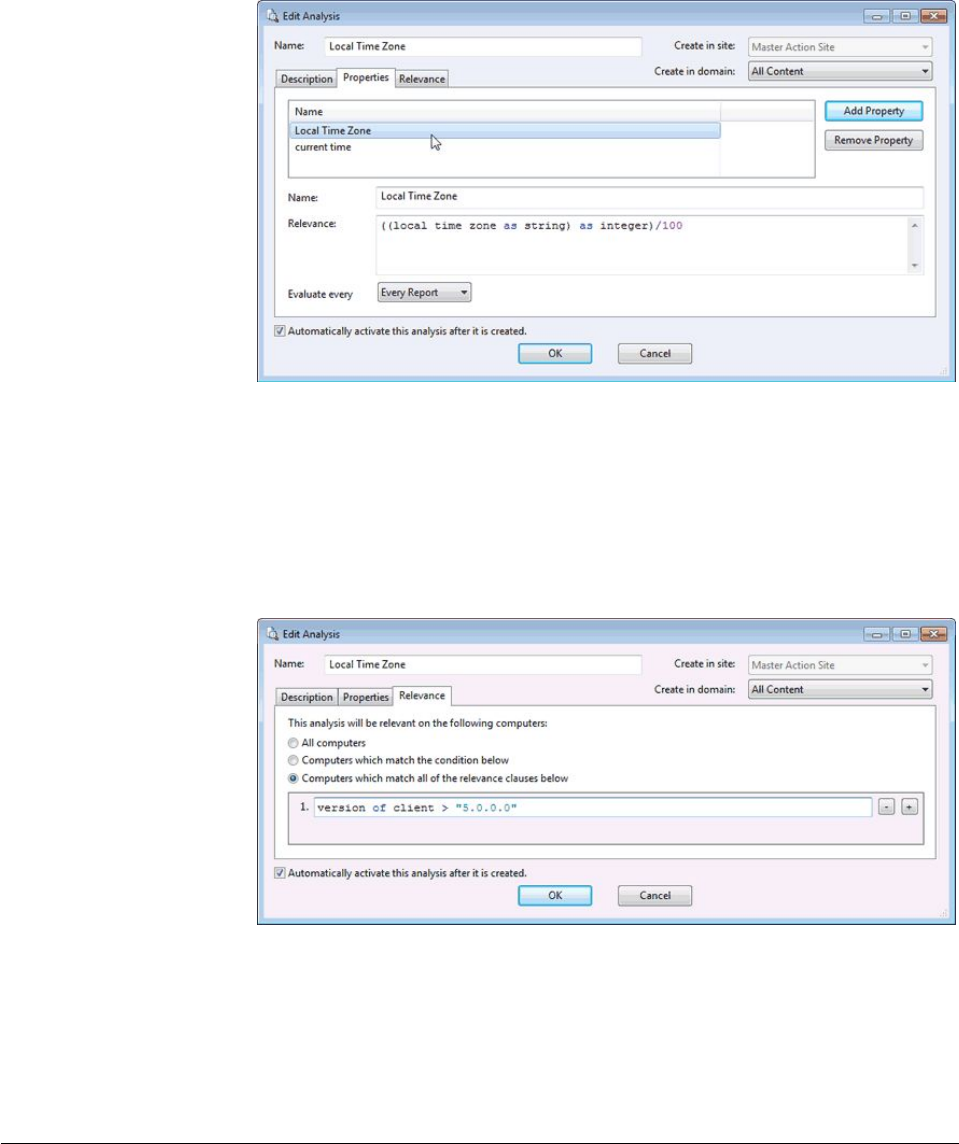
Click Add Property or choose an existing property and the relevance box
becomes editable. If you are adding a new property, enter its name and
relevance to define it. Otherwise, edit the existing text. The Relevance clause
is evaluated to provide the retrieved property value. You can add more
properties, or click the Remove Property button to delete the highlighted
one.
vRelevance: Here is where you define a Relevance statement to target specific
computers for your Analysis.
Select All computers or enter an expression that targets a subset of your
networked Clients. Otherwise, you can set specific conditions or relevance
clauses to limit the application of the Analysis.
4. When you are satisfied with your edits, click OK.
5. Your Analysis must be propagated, so you are prompted for your private key
password. When you enter it and click OK, your edited Analysis is sent to all
the Clients.
Hiding Analyses
You can hide an Analysis with the following procedure:
1. From any Analysis List Panel, select the Analysis you want to hide.
Chapter 11. Analyses 89
2. Right-click the Analysis and select either Globally Hide Analysis or Locally
Hide Analysis from the context menu (or select these same choices from the
Edit menu).
The selected Analysis is no longer displayed in the Analysis list. If you chose to
hide the Analysis locally, it is still visible to other Console users. If you are a
master operator, you can hide an Analysis globally, to have it also hidden from all
non-master users.
Items that are hidden are still available and you can restore or unhide them at any
time. Here is how:
1. Click the Show Hidden Content icon in the Console toolbar.
2. Right-click the Analysis you want to restore and select the appropriate action
from the pop-up menu. You can unhide or switch the hiding scope between
global and local.
90 IBM BigFix: Console Operator’s Guide
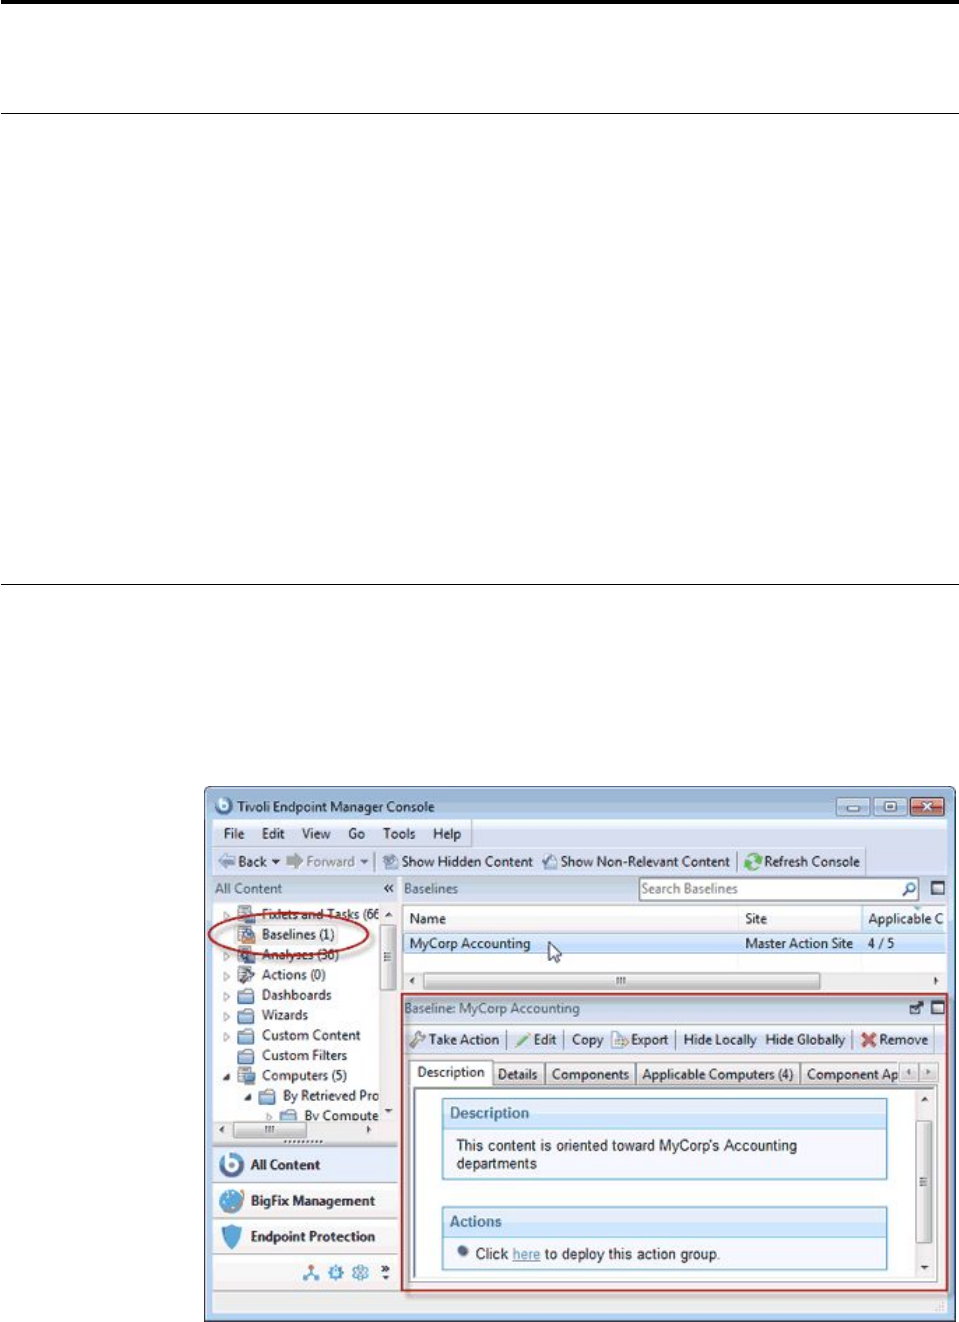
Chapter 12. Baselines
Introducing Baselines
Baselines are collections of Fixlet messages and Tasks. They provide a powerful
way to deploy a group of Actions across an entire network with a single
command.
Baselines provide a way to maintain a common operating environment, making
sure that all users in any given domain have the same software, patches, and
drivers. Baselines are easy to set up, by selecting the Fixlet messages, Tasks, and
other Baselines that you want to be a part of the group. To limit the scope of a
Baseline, a Relevance expression can be used to target any subset of your network,
using IP addresses, computer names, operating systems, and many other qualifiers.
For example, you might make a Baseline named "All critical hotfixes," and
populate it with all the current critical hotfixes available in the Fixlet list. Or you
might create one named "Finance department baseline," to keep that particular
group of computers updated with the latest financial programs, financial tables,
updates, and patches.
Viewing Baselines
Baselines allow you to group Fixlet messages and Tasks into a group for simple,
one-click deployment. To display an existing Baseline, click the Baselines icon in
the Domain Panel navigation tree. From the resulting List Panel, click an item. The
body of the Baseline is shown in the Work Area below.
© Copyright IBM Corp. 2010, 2015 91

The Baseline display region has several tabs:
vDescription: This is typically an HTML page providing a descriptive explanation
of the problem and an action to fix it.
vDetails: This tab lists the Baseline Properties, a section detailing the code behind
the Relevance expressions and the Baseline actions, along with other Baseline
properties. Scroll to the bottom to enter a comment as a note for yourself or
other Console operators.
vComponents: This tab lists the components, namely the Fixlet messages, Tasks,
and other Baselines that are grouped into this Baseline. Because Baselines make
a copy of the components, it is possible for one of these copies to get out of sync
with the underlying Fixlet or Task that spawned it. If this happens, a message is
displayed saying that the source differs from the copy and allowing you to
synchronize with the current source.
vApplicable Computers: This is a filter/list of all the computers targeted by the
selected Baseline. You can filter the list by selecting items from the folders on the
left, and sort the list by clicking the column headers.
vComponent Applicability: This is a filter/list of the various components of the
Baseline. It displays the number of computers where the Baseline is currently
applicable and, after a slash, the number where it is not. Double-click an item in
the list to display it for inspection.
vAction History: This is a filter/list of any Actions that have been deployed from
this Baseline. If the Baseline is new, there are no Actions in the list. Like the
other filter/lists in the Console, you can filter the actions using the left panel,
and sort them by clicking the column headers.
Monitoring Baselines
When Baselines become relevant somewhere in your network, the BigFix Console
adds them to the list of Baselines to be displayed under the Baselines icon in the
Domain Panel navigation tree. You can filter this list by opening the icon and
selecting one of the subsets. In the resulting List Panel on the right, you can sort
the Baselines by clicking one of the column headings, which might include the
following fields:
vName: The name assigned to the Baseline by the author.
vID: A numerical ID assigned to the Baseline by the author.
vSite: The name of the site that is generating the relevant Baseline.
vApplicable Computer Count: The number of BigFix Clients in the network
currently targeted by the Baseline.
vOpen Action Count: The number of actions open for the given Baseline.
If you do not see one of the columns listed above, right-click in the Baseline header
and select it from the pop-up menu.
Commenting on Baselines
You can attach a comment to a Baseline, which other operators can read.
1. Select the Baselines icon in the Domain Panel navigation tree and open it if
you want to choose one of the Baseline subcategories to narrow down your list.
2. Select a Baseline from the List Panel on the right by clicking it.
3. From the document panel below, select the Details tab and scroll to the bottom
of the page.
92 IBM BigFix: Console Operator’s Guide
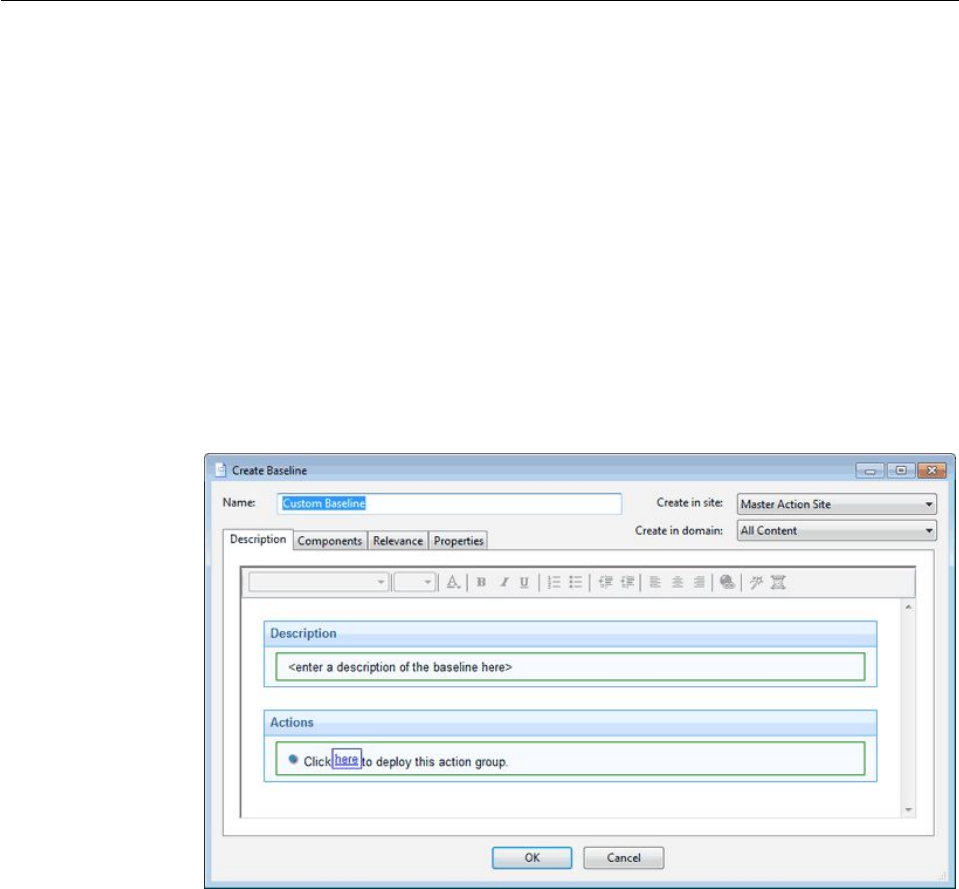
4. Type your comment into the text box and click the Add Comment Button.
Your comment is name- and time-stamped for other operators to view it. As well
as Baselines, you can attach comments to Fixlets, Actions, Computers, and
Analyses.
Creating or Customizing Baselines
Baselines allow you to gather multiple Fixlets and Tasks into groups that can be
applied immediately to any set of target computers. The name Baseline was chosen
to suggest a minimal set of conditions that could be applied across your network
to ensure compliance with corporate guidelines. To create your own custom
Baseline from scratch, follow these steps:
vIn a Fixlet or Task list, highlight one or more items and select Add To New
Baseline from the context menu. You can also select Create New Baseline from
the Tools menu.
To clone off a Baseline and customize it, first select the Baseline in any list, then:
vSelect Edit > Create Custom Baseline Copy (or right-click the Baseline and
select Create Custom Copy from the pop-up menu).
Either way, this opens a dialog with four tabs.
At the top of the dialog, you can specify the name of your custom Baseline as well
as the Site and Domain that will host the Baseline. Click through each of the tabs
below to define your Baseline:
vDescription: This dialog lets you describe your custom Baseline as an HTML
page. Edit the text, using the text toolbar at the top of the window.
vComponents: You can add or customize the components of a Baseline. To add a
new component, click the add components to group link. From the resulting
dialog, you can select new Fixlet messages, Tasks, and other Baselines to add to
the existing Baseline group.
Chapter 12. Baselines 93

In the example above, the two added components have been expanded to show
their relevance. The check box Baseline will be relevant on applicable
computers where this component is relevant is used to tell whether the related
component (Task or Fixlet) makes the baseline relevant on those computers
where that component is relevant. The default value is unchecked for Tasks and
checked for Fixlets.
Note: If the associated Action Group is relevant and is scheduled to start at a
later time, it starts even if it becomes no-relevant afterwards.
vRelevance: Enter your relevance statement here, or modify the existing relevance
statement. This allows you to further constrain your Baseline to specific
computers. By default, this Relevance statement is TRUE, which leaves the job of
targeting to the individual Fixlets and Tasks that make up the Baseline. For more
information about the relevance language, see the Inspector Libraries.
vProperties: Customize the properties of your Baseline, or accept the original
properties. Because you have customized the Baseline, update the source fields
to reflect the new authorship. There are fields here that specify the category,
download size, source information, and the CVE/SANS ID codes.
When you are satisfied with your Baseline modifications, click OK. Because your
customized Baseline must be propagated, you are prompted for your private key
password. When you enter it and click OK, your Baseline is sent to all networked
Clients, which evaluate it for relevance and report back their status. You can now
follow the deployment of your own custom Baselines from the Console.
Hiding Baselines
You can hide a Baseline with the following procedure:
1. From any Baseline List Panel, select the Baseline you want to hide.
2. Right-click the Baseline and select Globally or Locally Hide Baseline from the
pop-up menu (or from the Edit menu).
94 IBM BigFix: Console Operator’s Guide
The selected Baselines are no longer displayed in the Baseline list. If you chose to
hide the Baseline locally, it is still visible to other Console users. If you are a
Master Operator, you can hide a Baseline globally, to hide it also from all
non-master users.
Items that are hidden are still available and you can restore or unhide them at any
time. Here is how:
1. Click the Show Hidden Content button in the Console toolbar.
2. Click the Baselines icon in the Domain Panel navigation tree, which now
shows all the hidden content.
3. From the List Panel, choose a Baseline and choose Edit > Hiding >
Locally/Globally Unhide or right-click and choose the same option from the
context menu. You can also open the hidden Baseline and click the Unhide
button in the Work Area below.
Generally it is not necessary to hide Baselines, because you can simply ignore
them. The main reason for hiding a Baseline is if you think that the message is not
relevant to your network and you want to avoid viewing the Baseline every time
you launch the Console.
Chapter 12. Baselines 95
96 IBM BigFix: Console Operator’s Guide

Chapter 13. Relays and Servers
Understanding Relays
Relays are optional network components that can significantly improve the
performance of your installation. Downloads and patches, which are often large
files, represent by far the greatest fraction of the program's bandwidth. Relays are
designed to take over the bulk of the download burden from the BigFix Server.
Rather than downloading patches directly from a Server, Clients can instead be
instructed to download from designated Relays, significantly reducing both server
load and client/server network traffic. Relays help in the upstream direction as
well, compiling and compressing data received from the Clients before passing it
on to the Server. Any Windows 200x, Windows 7, Vista, or XP-based client can
serve as a Relay. Several other operating systems can support relays as well, such
as Solaris, and some variants of Linux. See the support site for the latest
information.
A Relay simultaneously resolves two bottlenecks:
vRelieves the Load on BigFix Servers. This Server has many duties, among them
the difficult job of distributing patches and other files. A Relay can be set up to
ease this burden, so that the Server does not need to distribute the same files to
every Client. Instead, the file is sent once to the Relay, which in turn distributes
it to several Clients. The overhead on the Server is reduced, on average, by the
ratio of relays to clients.
vReduces Congestion on Low-Bandwidth Connections. If you have a BigFix
Server communicating with a dozen computers in a remote office over a slow
VPN, designate one of those computers as a Relay. Then, instead of sending
patches over the VPN to every BigFix Client independently, the BigFix Server
only sends a single copy to the Relay. That Relay, in turn, distributes the file to
the other computers in the remote office over its own fast LAN. This effectively
removes the VPN bottleneck for remote groups on your network.
Note: Relays also work well to reduce total network usage when used on
subnets connected through switches on your LAN. Ask IBM Software Support
for more details.
Assigning Relays is simple, and Clients can be configured to automatically
discover and link to them. The program enables the Clients to discover their
nearest relays, or they can be configured manually.
Relay requirements
A Relay takes over most of the download tasks of the BigFix Server. If several
Clients simultaneously request files from a Relay, a significant amount of the
computer's resources might be used to serve those files. Other than that, the duties
of the Relay are not too demanding. The requirements for a Relay computer vary
widely depending on three main factors:
vThe number of connected Clients that are downloading files.
vThe size of each download.
vThe period of time allotted for the downloads.
© Copyright IBM Corp. 2010, 2015 97

The Relay system requirements are similar to those for a workgroup file server. A
computer with 1 GHZ CPU, 256 MB RAM, and 5 GB of free space on the hard
drive can act as a Relay for as many as one thousand computers, if the Console
operator distributes the file downloads over an appropriate length of time. Here
are some further requirements and recommendations:
vThe Relay can only be installed on computers running under Windows 200x, 7,
Vista, or XP as well as Red Hat Enterprise Linux 4/5/6/7, and Solaris 10.
vThe Relay can be installed on an ordinary workstation, but if several Clients
simultaneously download files, it might slow the computer down.
vWorkgroup file servers and other server-quality computers that are always
turned on are good candidates for installing a Relay.
Setting Up Relays
To set up a Relay, you must designate a Windows 200x, Windows 7, Vista, or XP
client computer to take over some server duties. When a Relay has been set up,
computers in the network can automatically find them and connect to them (or
you can manually assign BigFix Clients to point to specified relays).
This significantly reduces the client/server communication necessary for patch
application and management. Clients start to download from these designated
relays, minimizing the load on thin connections to the BigFix Server. The Clients
also upload their status information to the Relay, which compiles and compresses
it before passing it on up to the server.
To configure a client computer as a Relay, follow these steps:
1. Open Fixlets and Tasks from the Domain Panel and select Tasks Only.
2. Double-click the task labeled Install BigFix Relay. A task window opens below.
Make sure the Description tab is selected. There are three choices for where to
place the Relay installation folder:
vInstall to a given path. This option allows you to specify a path for the Relay
installation folder.
vInstall on the drive with most free space. This action lets you automatically
choose the most capacious drive for the installation folder.
vInstall to the default location. This is the recommend action. It automatically
finds the optimal location for the installation folder.
After the relays have been created, Clients can be made to automatically discover
and connect to them, always seeking the Relay that is the fewest hops away.
If you need to manually configure your Clients, you must notify each computer to
use a specific relay to point to, as described in Using Relays.
Using Relays
When you have set up a Relay you must direct IBM Endpoint Manager Clients on
your network to gather from that relay, instead of from your Server. IBM Endpoint
Manager can automatically assign your relays for you. This is not without risks
(see the Administrator's Guide or visit the support site for more information), but
it can be a good idea for two reasons:
vClients can determine which relays are the fewest number of hops away, so your
topology is optimized.
98 IBM BigFix: Console Operator’s Guide

vYour network configuration is constantly shifting as laptops dock and undock,
as computers start up or shut down, or as new hardware is added or removed.
Clients can dynamically assess your configuration to maintain the most efficient
connections as your network changes.
Note: On relay systems, do not assign as primary relay the relay that is local to
the endpoint.
Automatic Relays
Here is how you can ensure that your BigFix Client computers are automatically
signing up to the nearest relays:
1. Click the Computers icon in the Domain Panel to display a filter/list of BigFix
Client computers.
2. Select the set of computers that you want to automatically connect to the
optimal Relay.
3. Right-click the highlighted computers and select Edit Computer Settings from
the pop-up menu.
4. Check the box labeled Relay Selection Method.
5. Select the button labeled Automatically Locate Best Relay.
6. Click the OK button.
Manually Assigning Multiple Clients
You can select all the computers (or any given subset) of the local network to
gather from a specified relay. The procedure is different for setting a single
computer or multiple computers. Here is how to set multiple computers to point to
a relay:
1. Click the Computers icon in the Domain Panel to display a list of BigFix Client
computers.
2. Select the set of computers that you want to connect to the BigFix Relay. You
can use the filter panel on the left to narrow down the computer list.
3. Right-click the highlighted computers and select Edit Computer Settings from
the pop-up menu.
4. Check the box labeled Primary Relay.
5. Select the name of a Relay from the pull-down menu.
6. Click the OK button.
Manually Assigning Single Clients
Here is how to set a single computer to point to a relay:
1. Click the Computers icon in the Domain Panel to display a filter/list of BigFix
Client computers.
2. Right-click the single computer that you want to connect to the BigFix Relay.
3. Select Edit Computer Settings from the pop-up menu.
4. Check the box labeled Assign Relays Manually.
5. From the Primary Relay pull-down menu, select a Relay.
6. Click the OK button.
Chapter 13. Relays and Servers 99

Adjusting the BigFix Server and Relays
To get the best performance from BigFix, you might need to adjust the server and
the relays. There are two important ways of adjusting the flow of data throughout
your network, throttling and caching:
Throttling Outgoing Download Traffic
Throttling allows you to set the maximum data rate for the BigFix Server.
Here is how to change the data rate:
1. Open Fixlets and Tasks icon in the Domain Panel navigation tree and
then click Tasks Only.
2. In the find window above the Tasks List, type "throttle" to search for
the appropriate Task.
3. From the resulting list, click the task labeled Server Setting: Throttle
Outgoing Download Traffic. A task window opens below. Make sure
the Description tab is selected. There are three choices:
vSet the limit on total outgoing download traffic. This choice allows
you to directly set the maximum number of kilobytes per second you
want to grant to the server.
vDisable the setting. This option lets you open the download traffic
on the BigFix Server to full throttle.
vGet more information. This option opens a browser window with
more detailed information about bandwidth throttling.
4. If you select a throttle limit, then from the subsequent Take Action
dialog you can select a set of computers to throttle. Click OK to
propagate the task.
Download Cache Size
BigFix Servers and Relays maintain a cache of the downloads most recently
requested by Clients, helping to minimize bandwidth requirements.
1. Open Fixlets and Tasks icon in the Domain Panel navigation tree and
then click Tasks Only.
2. In the find window above the Tasks List, type "cache" to search for the
appropriate Task.
3. From the resulting list, click the task labeled Relay / Server Setting:
Download Cache Size. A task window opens below. Make sure the
Description tab is selected. Select the link to change the download
cache size on the listed computers. This list might include Relays as
well as the BigFix Server.
4. Enter the number of megabytes to cache. The default is 1024 MB, or
one gigabyte.
5. From the subsequent Take Action dialog, select a set of computers and
click OK.
Dynamic bandwidth throttling
When a large download becomes available, each link in your deployment might
have unique bandwidth issues. There are server-to-client, server-to-relay, and
relay-to-client links to consider, and each might require individual adjustment. As
explained elsewhere, it is possible to simply set a maximum value (throttle) for the
data rates, and for this there are broad-based policies you can follow. You might,
for example, throttle a BigFix Client to 2Kb/s if it is more than three hops from a
100 IBM BigFix: Console Operator’s Guide
Relay. However, the optimal data rates can vary significantly, depending on the
current hierarchy and the network environment.
A better technique is to use dynamic bandwidth throttling, which monitors and
analyzes overall network capacity. Whereas normal throttling simply specifies a
maximum data rate, dynamic throttling adds a “busy time” percentage. This is the
fraction of the bandwidth that you want to allocate when the network is busy. For
example, you could specify that downloads do not use any more than 10% of the
available bandwidth whenever the program detects existing network traffic.
Dynamic throttling also provides for a minimum data rate, in the case the busy
percentage is too low to be practical.
When you enable dynamic throttling for any given link, the program monitors and
analyzes the existing data throughput to establish an appropriate data rate. If there
is no competing traffic, the throughput is set to the maximum rate. In the case of
existing traffic, the program throttles the data rate to the specified percentage or
the minimum rate, whichever is higher. You must enable dynamic throttling on
both the server and the client side to have it work correctly.
You control dynamic bandwidth throttling with computer settings. There are four
basic settings for each link:
DynamicThrottleEnabled
This setting defaults to zero (disabled). Any other value enables dynamic
throttling for the given link.
DynamicThrottleMax
This setting usually defaults to the maximum unsigned integer value,
which indicates full throttle. Depending on the link, this value sets the
maximum data rate in bits or kilobits per second.
DynamicThrottleMin
This setting defaults to zero. Depending on the link, this value sets the
minimum data rate in bits or kilobits per second. This value places a lower
limit on the percentage rate given below.
DynamicThrottlePercentage
This setting defaults to 100%, which has the same effect as normal
(non-dynamic) throttling.. It represents the fraction of the maximum
bandwidth you want to use when the network is busy. It typically has a
value between five and ten percent, to prevent it from dominating existing
network traffic. (A zero for this setting is the same as 100%.).
As with any other setting, you can create or edit the dynamic bandwidth settings
by right-clicking an item (or group of items) in any computer list and choosing
Edit Computer Settings from the context menu.
The specific variable names include:
The BigFix server and relay settings:
_BESRelay_HTTPServer_DynamicThrottleEnabled
_BESRelay_HTTPServer_DynamicThrottleMaxKBPS
_BESRelay_HTTPServer_DynamicThrottleMinKBPS
_BESRelay_HTTPServer_DynamicThrottlePercentage
The BigFix Client settings:
_BESClient_Download_DynamicThrottleEnabled
_BESClient_Download_DynamicThrottleMaxBytesPerSecond
_BESClient_Download_DynamicThrottleMinBytesPerSecond
_BESClient_Download_DynamicThrottlePercentage
Chapter 13. Relays and Servers 101
The Gathering settings:
_BESGather_Download_DynamicThrottleEnabled
_BESGather_Download_DynamicThrottleMaxBytesPerSecond
_BESGather_Download_DynamicThrottleMinBytesPerSecond
_BESGather_Download_DynamicThrottlePercentage
Note: For any of these settings to take effect, you must restart the affected services
(Server, Relay, or Client).
If you set a Server and its connected Client to differing maximums or minimums,
the connection chooses the smaller value of the two.
102 IBM BigFix: Console Operator’s Guide
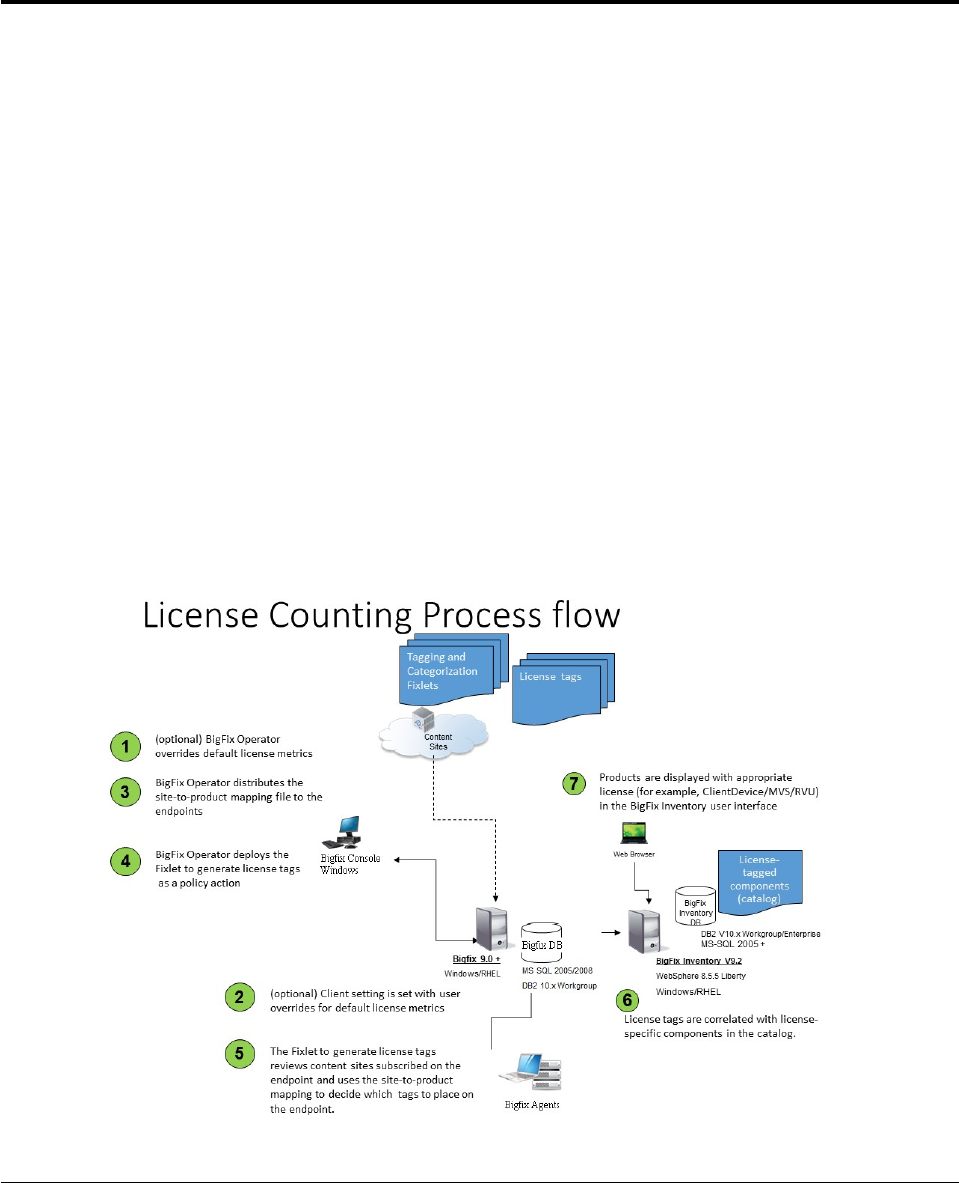
Chapter 14. Activating the license counting process
Currently, the association of the clients to one or more products is manually
performed by the IBM BigFix Inventory (*) user.
To enable the IBM BigFix Inventory scanner to automatically provide this
association, the administrator can activate the following license counting process
by:
vOptionally categorizing the metric of the clients, as described in “Categorizing
the clients” on page 104.
vDistributing the licensed products information to the clients, as described in
“Distributing the site mapping file” on page 107.
vGenerating the correct license tags on each client, as described in “Generating
the license tags” on page 108.
Note: (*) The concepts and procedures described in the following sections apply to
both IBM BigFix Inventory and IBM License Metric Tool (ILMT).
The following diagram shows the license counting process.
Prerequisites
Before activating the license counting process, ensure that you meet the following
requirements:
vYour BigFix server version must be 9.0 or later.
vThe agent version of your subscribed computers must be 8.2 or later.
Figure 1. License counting process
© Copyright IBM Corp. 2010, 2015 103
vThe ActiveX option of Internet Explorer on the computer where the console is
installed as follows:
1. Go to Tools > Internet Options > Security tab
2. Select the Internet zone.
3. Click Custom Level.
4. Locate Initialize and script ActiveX controls not marked as safe for
scripting.
5. Set it to Prompt.
This local Internet Explorer setting allows you to run the Distribute site
mapping file Fixlet.
Categorizing the clients
When you categorize the clients, you assign to the clients non-default metrics for
each selected product, from the licensed ones.
The result of this operation is the value of the following client setting:
_BESClient_LicenseType_productname
Based on the client operating system, the default metric for the products is rigidly
determined.
The following table displays this mapping:
Table 2. Mapping between the client platform and the product default metric
OS type OS name example Default metric
Supported UNIX Solaris, HP-UX, AIX RVU
Supported Linux SLES, RHEL, Debian,
Ubuntu, Centos
RVU
Supported Microsoft
Windows Server
Windows 2008, Windows
2012
RVU
Supported Microsoft
Windows non-Server
Windows 7, Windows 8,
Windows 10
ClientDevice
Supported Mac OS X Leopard, Lion, Yosemite ClientDevice, unless the
operating system name
allows to clearly distinguish
if it is a MAC server. In this
case, the default metric is
RVU.
For example, if the client is a Red Hat Enterprise Linux (RHEL), the default metric
for all its products is RVU.
The administrator can override the default metric for one or more products.
The possible values for all of the metric are: RVU, MVS, ClientDevice.
To set the metric to RVU, MVS, or ClientDevice, the administrator runs the Fixlet
Categorize RVU Clients, Categorize MVS Clients, or Categorize ClientDevice
Clients.
104 IBM BigFix: Console Operator’s Guide
To categorize the clients, you must complete these steps from the BigFix console:
1. Go to Sites > External Sites > BES Support.
2. Select Fixlets and Tasks.
3. Depending on your needs, select in the Fixlets and Tasks pane:
vCategorize ClientDevice clients to override the default license type of
selected products to ClientDevice.
vCategorize MVS clients to override the default license type of selected
products to MVS.
vCategorize RVU clients to override the default license type of selected
products to RVU.
Example, to override to MVS the license type used by the products:
vProtection
vCompliance_Payment_Card_Industry_Add-on
vPatch
see the following panel.
Chapter 14. Activating the license counting process 105

Displaying the current license metrics
An analysis is a collection of property expressions that a console operator uses to
view and summarize properties of client computers.
In this case, the License Overrides analysis displays the following information for
each client computer:
vIts license default metric.
vThe lists of products for every overridden metric, distinguished by metric.
vThe License Override Status Boolean flag.
Figure 2. Categorize MVS clients
106 IBM BigFix: Console Operator’s Guide
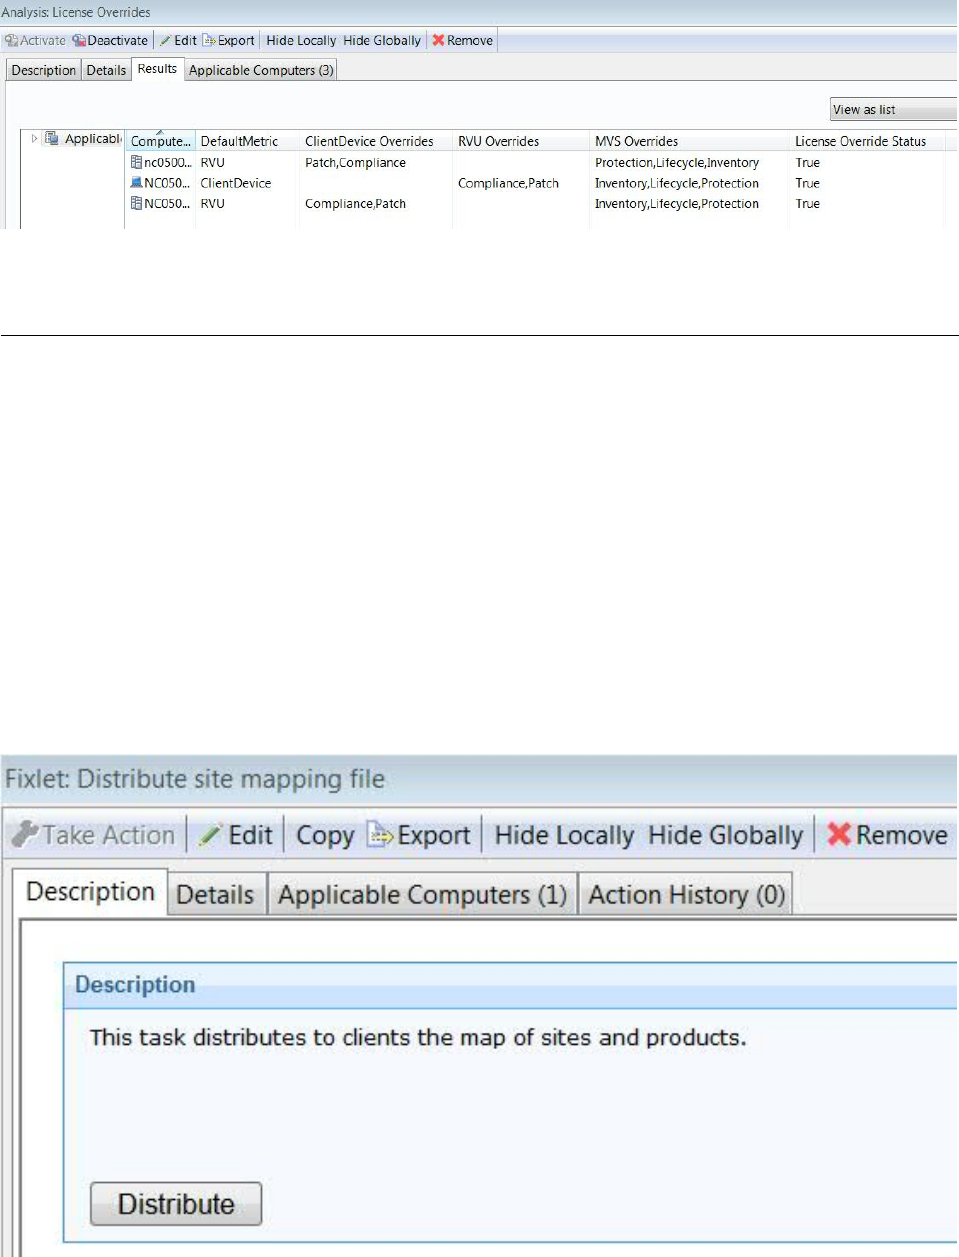
Distributing the site mapping file
The Distribute site mapping file Fixlet is responsible for updating the licensed
products and their related sites on the clients.
The site mapping file must be available on the clients before generating the license
tags.
To distribute this file, you must complete the following steps:
1. Go to Sites > External Sites > BES Support.
2. Select Fixlets and Tasks.
3. Select Distribute site mapping file in the Fixlets and Tasks pane. This action
immediately distributes a mapping file, which maps sites and products, to the
subscribed computers. Repeat this action when you install new products.
Figure 3. License Overrides analysis
Figure 4. Distribute site mapping file fixlet
Chapter 14. Activating the license counting process 107
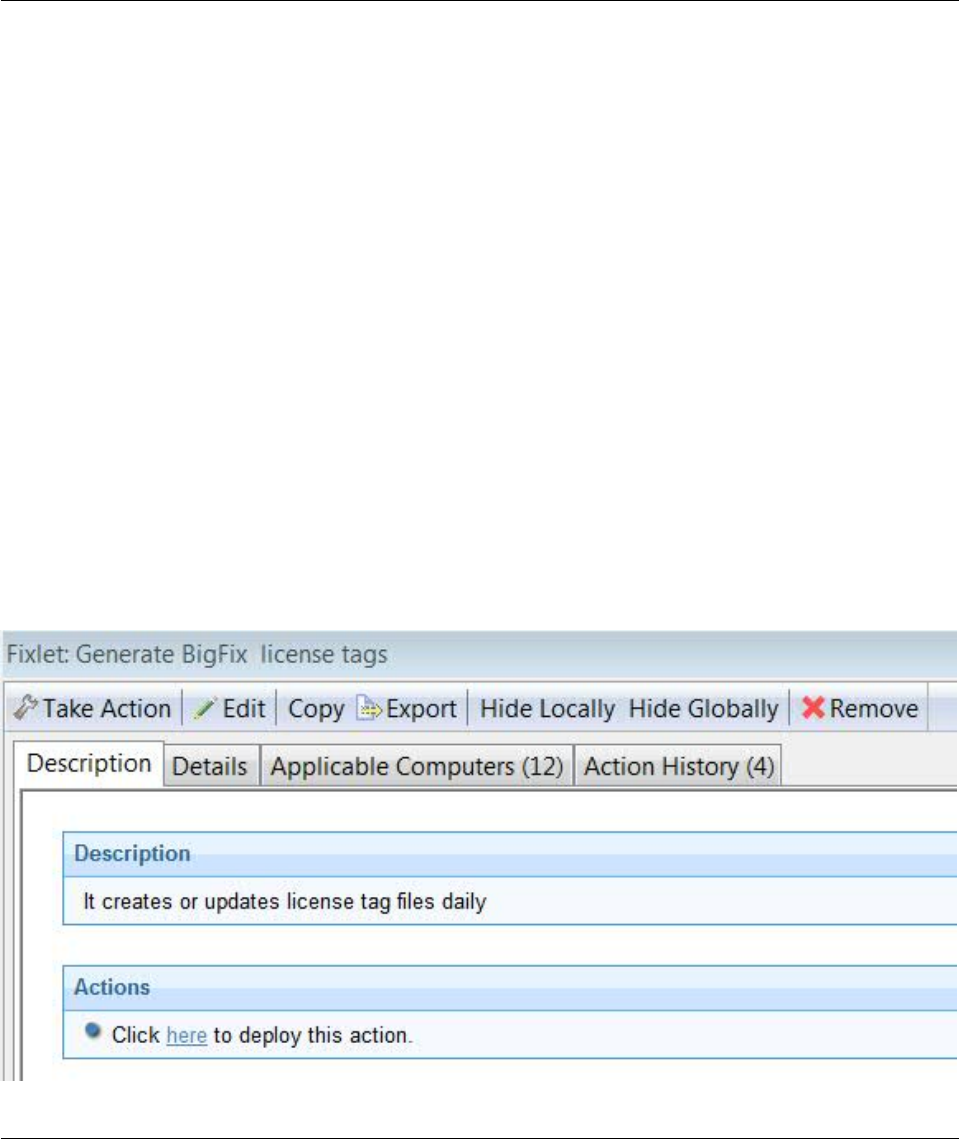
Generating the license tags
vRun the Distribute site mapping file Fixlet before generating the license tags.
The Generate BigFix license tags Fixlet is responsible for updating the license tag
of the product for each site to which the clients are subscribed.
If the client has no site subscription, then it will store tags for all licensed products.
Each tag reflects the product name, the metric (default or overridden by the user)
and the agent version. It is located in the appropriate directory. The previously
installed client tags, related to the platform agent, are kept hidden when the Fixlet
completes successfully and are no longer displayed by the IBM BigFix Inventory
console.
To generate the license tags, you must complete the following steps:
1. Go to Sites > External Sites > BES Support.
2. Select Fixlets and Tasks.
3. Select Generate BigFix license tags in the Fixlets and Tasks pane. This action
creates the license tags on the subscribed computers.
Note: The Fixlet Generate BigFix license tags must be run manually the first time;
then it is scheduled to run daily.
Troubleshooting
If IBM BigFix Inventory misinterprets the license tags that were specified on the
BigFix client computer, the endpoint is not correctly classified and the manual
classification is required in IBM BigFix Inventory.
The following figure shows what you see in the IBM BigFix Inventory console.
Figure 5. Generate BigFix license tags Fixlet
108 IBM BigFix: Console Operator’s Guide
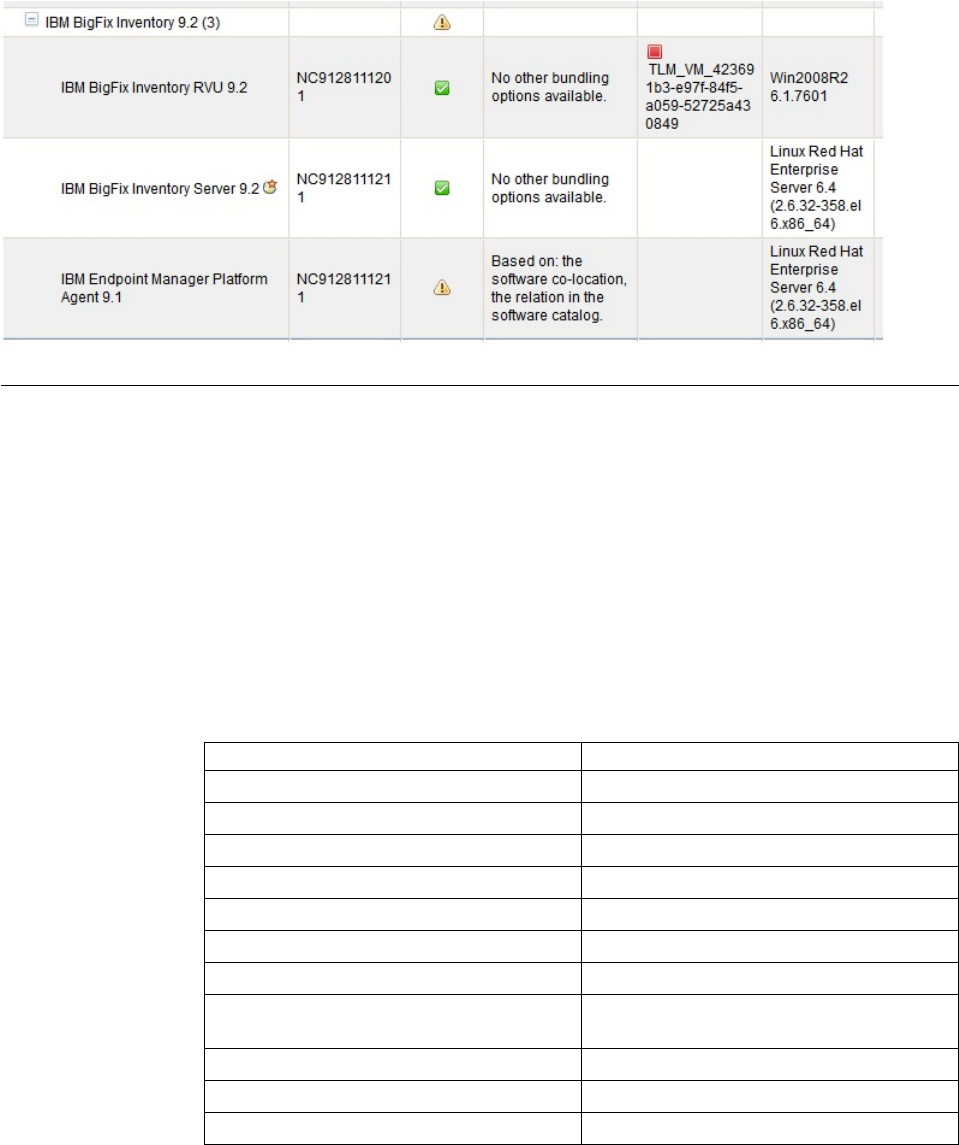
The presence of the third row indicates that an incorrect license classification
occurred.
In this case, contact the IBM Software Support team.
Limitations
If running a BigFix server version 9.2 or earlier versions, the product names
displayed by the License Overview dashboard are different from the names
displayed by the LCP tool.
This mismatch does not occur on a BigFix server version 9.5.
The names used by the LCP tool are those used by the IBM BigFix Inventory and
comply with the rebranding initiative.
Refer to the right column of the following table for the names displayed by the
LCP tool.
Table 3. Names displayed if running a BigFix server version 9.2 or earlier
Name in the License Overview dashboard Name in the LCP tool
Patch_Management Patch
Lifecycle_Management Lifecycle
Power_Management Lifecycle
Server_Automation Lifecycle
Tivoli_Remote_Control Lifecycle
Software_Use_Analysis Inventory
Security_and_Compliance Compliance
PCI_DSS_Security_and_Compliance Compliance_Payment_Card_Industry_Add-
on
Core_Protection_Module_(Trend) Protection
Trend_Micro_Data_Protection Protection_DLP_Add-on
Starter_Kit_for_Lifecycle_Management Starter_Kit_for_Lifecycle
The products not mentioned in the table will be ignored.
Figure 6. Incorrect license classification
Chapter 14. Activating the license counting process 109
110 IBM BigFix: Console Operator’s Guide

Chapter 15. Client-Relay-Server Authentication
Client Authentication
Client Authentication (introduced in version 9) extends the security model used by
BigFix to encompass trusted client reports and private messages. This feature is not
backward-compatible, and clients prior to version 9.0 will not be able to
communicate with an authenticating relay or server.
Note: Some of the security options of the Client Authentication feature, can also be
defined by setting the minimumSupportedClient service as described in
Additional administration commands for Windows system, or Running the BigFix
Administration Tool for Linux systems.
The original security model has two central capabilities:
vClients trust content from server. All commands and questions that clients
receive are signed by a key that is verified against a public key installed on the
client.
vClients can submit private reports to server. The client can choose to encrypt
reports that it sends up to the server, so that no attacker can interpret what is
contained in the report. This feature is disabled by default, and is switched on
with a setting.
Client Authentication extends the security model to provide the mirror image of
these two capabilities:
vServer can trust reports from clients (non-repudiation). Clients sign every
report that they submit to the server, which is able to verify that the report does
not come from an attacker.
vServer can send private data to clients (mailboxing). The server can encrypt
data that it sends to an individual client, so that no attacker can interpret the
data.
Communication using an authenticated relay is a two-way trusted and private
communication channel that uses SSL to encrypt all communications. However,
communication between a non-authenticating relay and its children is not
encrypted unless it is an encrypted report or a mailboxed action or file.
This level of security is useful for many purposes. Your company may have
security policies that require authenticating relays on your internet-facing nodes, in
your DMZ, or any network connection that you do not totally trust. With
authentication, you can prevent clients that haven’t yet joined your deployment
from getting any information about the deployment.
Authenticating relays
Relays can be configured as authenticating relays to authenticate agents. This way,
only trusted agents can gather site content or post reports. Use authenticating relay
configuration for an internet-facing relay in the DMZ.
© Copyright IBM Corp. 2010, 2015 111

A relay configured to authenticate agents only performs SSL communication with
child agents or relays that present an SSL certificate issued and are signed by the
server during a key exchange.
To configure an authenticating relay, set the client setting
_BESRelay_Comm_Authenticating to 1or use the related task in the BES Support
site. To configure an open relay again, set _BESRelay_Comm_Authenticating to 0or
use the related task in the BES Support site. The default value is (0), open relay.
Handling the key exchange
When an agent tries to register and does not have a key and certificate, it
automatically tries to perform a key exchange with its selected relay. If the relay is
a non-authenticating relay, it forwards the request up the relay chain to the server,
which signs a certificate for the agent. This certificate can later be used by the
agent when connecting to an authenticating relay.
Authenticating relays deny these automatic key exchange operations. The
following is a typical scenario:
When you deploy a new BigFix 9.2 environment or upgrade an existing BigFix
environment to 9.2 all agents automatically perform the key exchange with their
relays. If the administrator configures the internet facing relay as an authenticating
relay, the existing agents already have the certificate and work correctly. No further
action is required. When you connect new agents to the authenticating relay they
do not work, until the manual key exchange procedure is run on them.
Manual key exchange
If an agent does not have a certificate and can only reach an authenticating relay
on the network, connected through the internet, you can manually run the
following command on the agent so it can perform the key exchange with an
authenticating relay:
BESClient -register <password> [http://<relay>:52311]
The client includes the password in its key exchange with the authenticating relay,
which verifies it before forwarding the key exchange to its parent.
You can configure the password as:
vA single password in the client setting _BESRelay_Comm_KeyExchangePassword on
the relay.
vA newline-delimited list of one-time passwords stored in a file named
KeyExchangePasswords in the relay storage directory (value StoragePath of
HKLM\Software\WOW6432Node\BigFix\Enterprise Server\BESReports).
Revoking Client Certificates
After a client authenticates, you can revoke its certificate if you have any reason to
doubt its validity. When you do, that client is no longer authenticated for trusted
communication. It is removed from the console and a revocation list is updated
and collected by all relays, so that the client’s key can no longer be used to
communicate with authenticating relays.
To revoke a computer:
112 IBM BigFix: Console Operator’s Guide
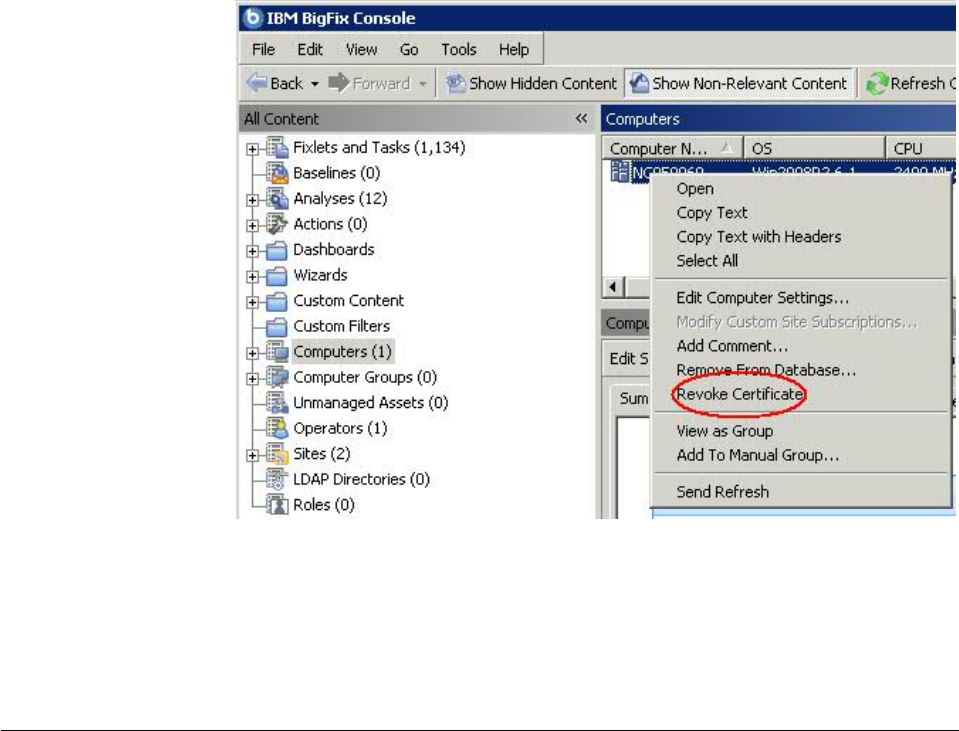
1. Right-click a computer in any list of computers.
2. From the pop-up menu, click Revoke Certificate.
3. From the confirmation dialog click OK if you are sure you want to remove the
computer certificate.
This sends revocations down to the relays. After revoked, that client can no longer
use its private key to gather content from the authenticating relays. The revoked
client disappears from the computer list in the console.
Re-registering a revoked client
The client revoke procedure removes a client from the console and updates a client
certificate revocation list.
Clients can automatically get a new certificate if they can connect to any non
authenticating relay.
If such a relay is unavailable you must complete the following manual cleanup to
register the client again:
1. Stop the client.
2. Delete the KeyStorage client directory and the client computer ID.
3. Complete the manual key exchange procedure.
4. Start the client.
At the end of this procedure the client gets a fresh certificate and a new client
computer ID.
Chapter 15. Client-Relay-Server Authentication 113
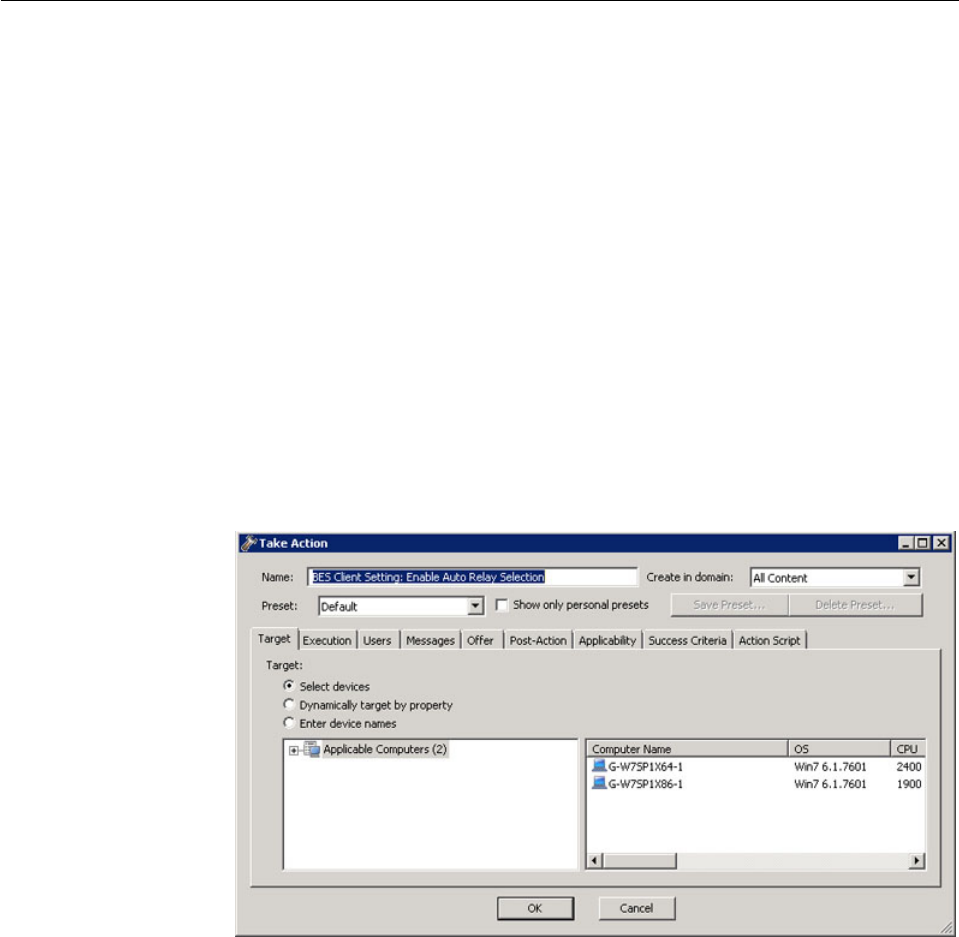
Mailboxing
With Client Mailboxing you can send an encrypted action to any given client,
instead of broadcasting it to all clients. This improves efficiency, since the client
doesn’t need to qualify every action, and it minimizes network traffic. As a
consequence,
vClients are only interrupted when they are targeted.
vClients don't have to process actions that are not relevant to them for reporting,
evaluating, gathering, and action processing.
Privacy is assured because the message is encrypted specifically for each recipient;
only the targeted client can decrypt it.
A client's mailbox is implemented as a specialized action site, and each client is
automatically subscribed to it. The client knows to scan for actions in this site as
well as the master site and operator sites.
To send an encrypted action directly to a client mailbox, follow these steps:
1. Open the Take Action dialog (available from the Tools menu and various other
dialogs).
2. Click the Target tab.
3. Click Select devices or Enter device names. Mail-boxing is only available when
you specify a static list of clients. Dynamically targeted computers will not be
encrypted and will instead be sent in the open to the master site or a specific
operator site. If you select target clients with versions prior to 9.0, the action
will also go into the master or operator site.
4. Click OK. Actions targeted by computer ID or name will now be encrypted
and sent to the client mailbox.
The identifier of the operator who deploys the action is included with the action.
Before a client takes the action, it first determines if it is currently administered by
that operator. If not, it refuses to run the action.
114 IBM BigFix: Console Operator’s Guide
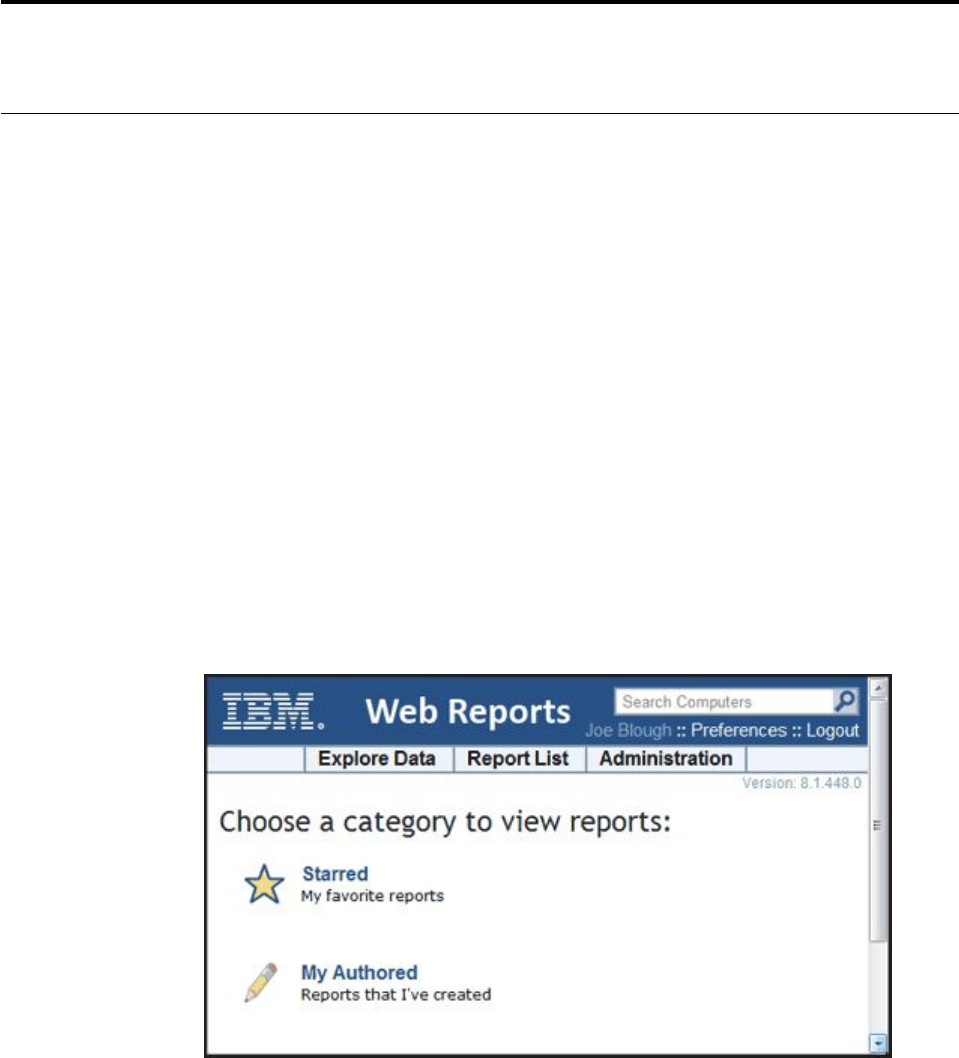
Chapter 16. Displays and Reports
Web Reports
The Web Reports program can monitor, print, or archive the status of the local
database. It allows you to get an overview of your relevant Fixlet messages and
any subsequent remediation efforts. You can create charts summarizing the number
of administered computers in your network and your overall vulnerability status.
In addition, you find comprehensive statistics and a list of the most common issues
detected. You can drill down into these commonly relevant Fixlet messages at any
time to see them in greater detail.
Web Reports also has the ability to read the databases of other BigFix Servers and
aggregate the data. This offers you a top-level view of a large or far-flung
enterprise with multiple database servers. Aggregation servers allow you to view
information from multiple networks with hundreds of thousands of computers.
You can view the data in the database from several different points of view and
save or print the output. You might also export the output to Excel for further
manipulation. These features are provided by the BigFix Web Reports program,
which can be run at any time from the desktop by selecting Tools > Launch Web
Reports. You must supply your credentials to log in. When you do, you are shown
the introductory panel:
There are three main links at the top of the panel.
vExplore Data: Click this link to look at a group of predefined reports and charts
that you can easily filter and customize. This section provides you with an
instant overview of the most basic data managed by BigFix, including
Computers, Actions, Operators, and more.
vReport List: Click this link to get a look at basic reports organized around your
Fixlet content. Create and customize reports with a simple, intuitive interface.
Some commonly-requested reports are built-in, such as Operating System
Distribution and Vulnerability Trends. Select them for display by clicking their
titles in the list. You can create your own custom reports and save them as either
© Copyright IBM Corp. 2010, 2015 115
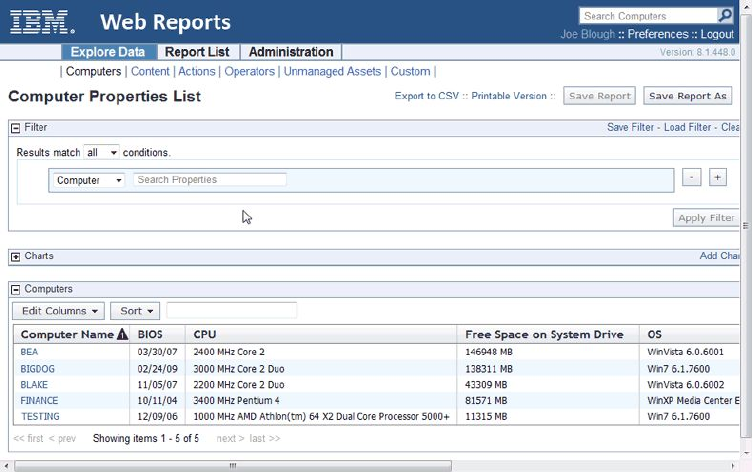
public or private (viewable only by you). Your public reports are added to the
reports list; your private reports are only available when you log in with a
correct password.
vAdministration: Click this link to gain access to various administrative
functions, including scheduling activities, managing filters, operators, database
settings, and users.
In addition, there are two report categories to get you started.
vStarred: This link takes you directly to favorite reports that you have flagged as
starred.
vMy Authored: This link takes you to a list of those reports you personally
created.
Depending on your configuration, there might be more categories available from
this startup panel.
Here is a snippet of a typical report, summarizing the computers in your network
by their properties. To produce this report, simply click Report List then select
Computer Properties List.
Web Reports can be viewed at any time from the Console under Tools > Launch
Web Reports.
Any Web Report server can be set up to aggregate data from the other BigFix
Servers. Talk to your Site Administrator about setting up an aggregation server.
Refer them to the Administrator's Guide for further information.
The Web Reports interface is very rich and its complete documentation is beyond
the scope of this guide. For more in-depth information, see the Web Reports Guide.
116 IBM BigFix: Console Operator’s Guide

Viewing Dashboards
Dashboards are list of reports that update in real time and provide you with
high-level views of your BigFix network.
Click the All Content domain to see all dashboards that are available in your
environment in the Domain Panel navigation tree under Dashboards. If you select
a specific content site, you see only the dashboards available with that content site.
These reports access the database to provide you with timely and compact views
of your network.
To run a dashboard, select it from the Dashboards icon in the Domain Panel
navigation tree. The dashboard is shown in the Work Area on the right.
When you install the BigFix Console, you get the following set of dashboards:
v“Baseline Synchronization Dashboard”
v“Deployment Health Checks Dashboard and Deployment Overview Dashboard”
on page 119
v“License Overview Dashboard” on page 121
v“Maintenance Windows Dashboard” on page 122
Baseline Synchronization Dashboard
Use the Baseline Synchronization dashboard to make sure that your baselines,
source Fixlets, and actions are in sync. Ensuring that your baseline components are
in sync with the source Fixlets prevents issues when you deploy actions across an
entire network.
This sample scenario shows how strategic the use of this dashboard can be.
Assume, for example, that you created and tested a new set of baselines when a
vendor reports that there was an error with some of their patches. For this reason
new Fixlets, replacing those containing the patches in error, are released by BigFix.
It can be time consuming to check which of your baselines were affected. By using
the Baseline Synchronization Dashboard, you can, with just a few clicks, view
which of your baselines are out-of-sync and automatically update their content if
necessary.
Note: This dashboard also displays all the actions that are from an out-of-sync
baseline, giving you the option to close them and issue them again.
Run the following steps to access the Baseline Synchronization Dashboard:
1. Click the All Content domain in the Domain Panel.
2. Select the Dashboards icon in the Domain Panel navigation tree.
3. Select BES Support.
4. Click Baseline Synchronization Dashboard. The dashboard opens.
Chapter 16. Displays and Reports 117
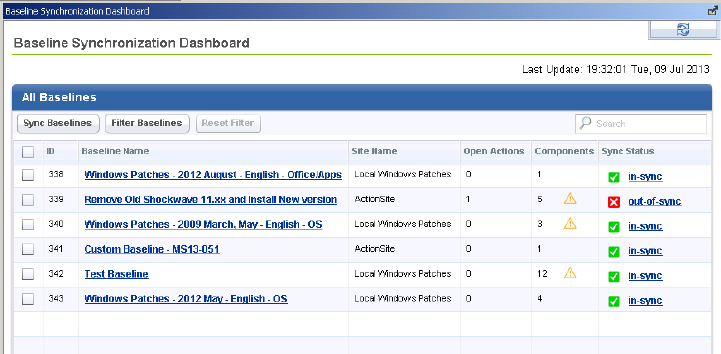
The dashboard shows the following information for each baseline:
vID
vBaseline name
vSite name
vNumber of open actions
vNumber of baseline components
vSynchronization status
The exclamation mark icon in the components column highlights that the baseline,
even though in sync, might have a misconfiguration within its members. Such
misconfiguration might cause problems if not corrected. Hovering over the icon
you see the detail of the misconfiguration. For example, these might be causes of
misconfiguration:
vSome component relevance is out-of-sync.
vSome components do not have source Fixlets.
vSome component actions do not have any source actions.
vNo components exist in the baseline.
vThis baseline contains components that have no action selected.
From this dashboard you can:
Search for a specific baseline
You can search for a specific baseline by specifying its ID, name, or site
name in the Search field.
Filter baselines to limit the out-of-sync baselines in the dashboard
You can filter the baselines that you want to display in the dashboard by
clicking Filter Baselines. You can select any of the following conditions:
vRelevance is out-of-sync.
vAction out-of-sync.
vSource Fixlet ID or name.
The baselines can match either any or all of the conditions that you
selected. After selecting the conditions, click Apply.
Reset the out-of-synch baseline filter
You can view all the baselines, without any filtering, by clicking Reset
Filter.
118 IBM BigFix: Console Operator’s Guide
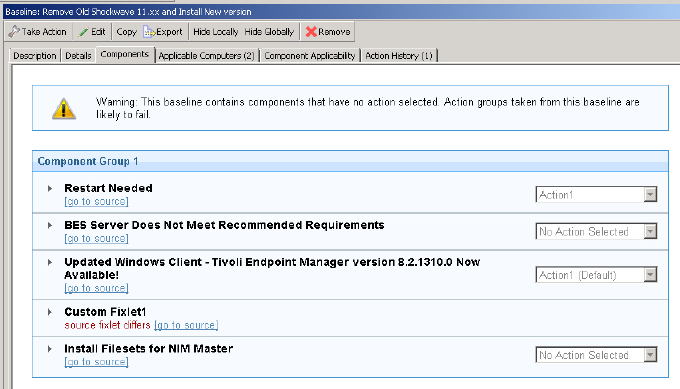
View the synchronization status of the baseline components
To know which Fixlets have parts that are out-of-sync with respect to the
source Fixlet, click Sync Status beside each out-of-sync baseline.
The Baseline Components List dialog displays the sync status of each
component in detail.
Synchronize baselines
A baseline is out-of-sync when the baseline component's relevance or
action is different from that of the source Fixlet. To synchronize a baseline
means to update the baseline components to match the source Fixlets’
relevance.
In the Baseline Synchronization Dashboard, select the out-of-sync baselines
and click Sync Baselines.
Deployment Health Checks Dashboard and Deployment
Overview Dashboard
Use the Deployment Health Checks Dashboard and the Deployment Overview
Dashboard to manage and monitor the health of your BigFix environment.
The dashboards track important health indicators for Relay Health, Console
Health, Server Health, Client Health, and Deployment Optimization. For each of
these checks you see:
vA description
vSpecific deployment details
vSeverity of High, Medium, or Low
vStatus of Passed, Warning, or Failed
vRemediation steps
BigFix Console administrators should regularly review this dashboard and
remediate any failure as described in the check.
Run the following steps to access the Deployment Health Checks Dashboard:
1. Click the All Content domain in the Domain Panel.
2. Select the Dashboards icon in the Domain Panel navigation tree.
3. Select BES Support.
4. Click Deployment Health Checks Dashboard. The dashboard opens.
Chapter 16. Displays and Reports 119
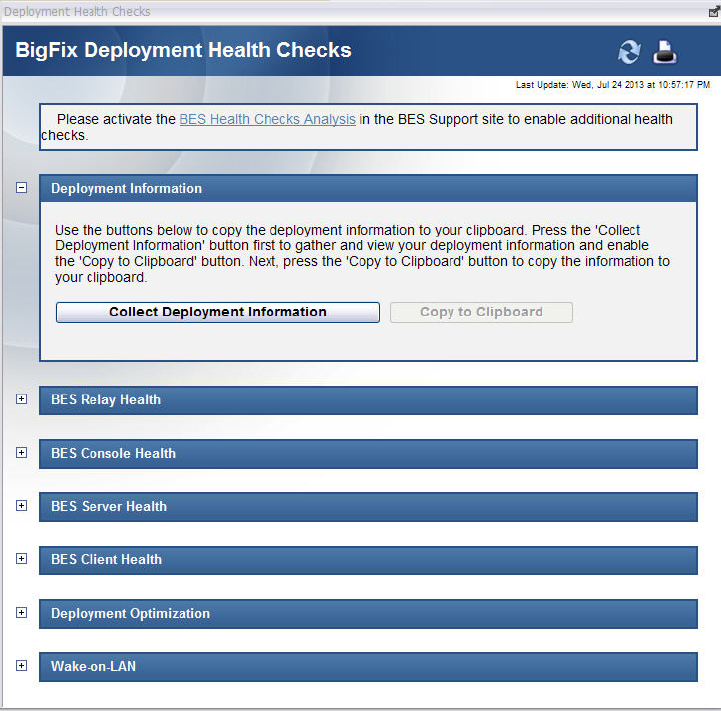
Run the following steps to access the Deployment Overview Dashboard:
1. Click the All Content domain in the Domain Panel.
2. Select the Dashboards icon in the Domain Panel navigation tree.
3. Select BES Support.
4. Click Deployment Overview Dashboard. The dashboard opens.
120 IBM BigFix: Console Operator’s Guide
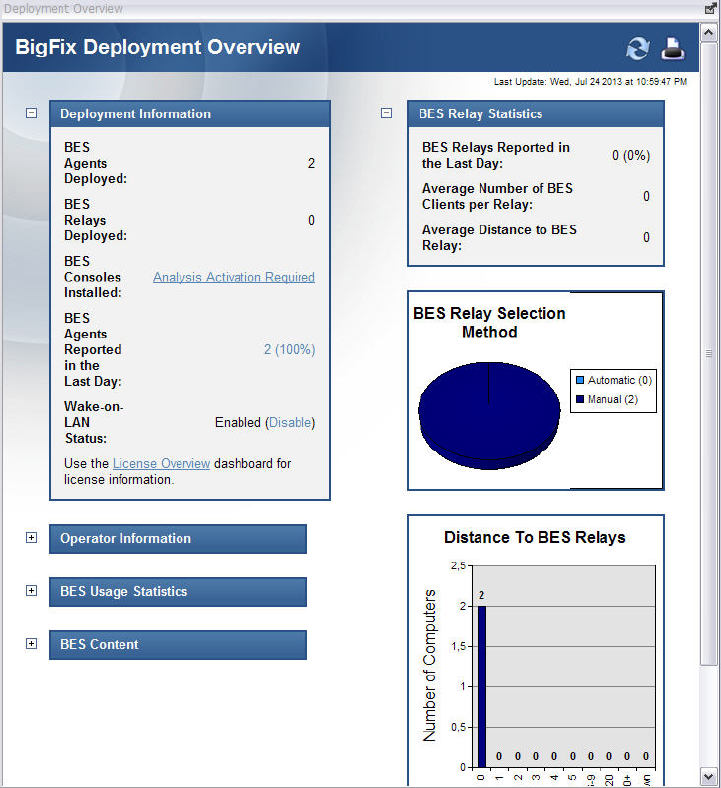
License Overview Dashboard
Use the License Overview dashboard to subscribe to content sites.
When you add subscriptions to content sites, content automatically flows from
these sites into your environment and is evaluated for relevance on all computers
running the BigFix Client.
The list of available content sites that you see in this dashboard is strictly related to
the license of BigFix that you purchased. When you buy BigFix, you receive a
license number that defines which products in the BigFix suite you purchased. This
information is used by the product to populate, at installation time, the License
Overview Dashboard with the subscriptions to only the products in the suite that
you purchased.
With the exception of the content related to the BigFix platform, for which you are
automatically subscribed at installation time, you must manually add subscriptions
from the License Overview Dashboard to the other content sites covered by your
license. This means that even though your license includes, for example, the BigFix
Chapter 16. Displays and Reports 121
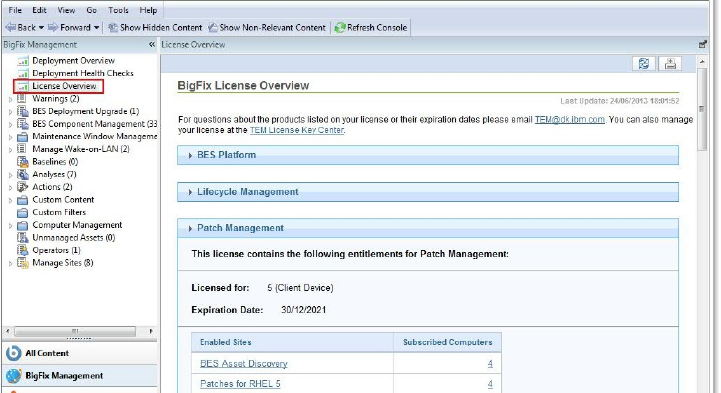
for Patch product, you still need to access the License Overview Dashboard and
add subscriptions to the Patch content sites available to start using the BigFix for
Patch functions.
Run the following steps to access the License Overview Dashboard:
1. Click the BigFix Management domain in the Domain Panel.
2. Click License Overview Dashboard. The dashboard opens.
3. Scroll down the dashboard to review the content sites that you already
subscribed to and those that are available but for which you have not yet
added subscriptions.
For more information about how to use the License Overview Dashboard and
the information it contains, see Post-installation steps in the Installation Guide.
Maintenance Windows Dashboard
Use the Maintenance Window dashboard to define time periods during which
BigFix can run actions; mainly maintenance activities.
Client locking allows computers or groups of computers to be excluded from
running actions. Client locking can be useful, for example, if specific development
computers must be excluded from changes or updates. It also provides a technique
for testing new actions on a limited set of unlocked computers, while keeping the
network locked down.
With the Maintenance Window dashboard, you can set and enforce maintenance
windows for BigFix Clients. You can use the Maintenance Window dashboard and
tasks to change or remove the maintenance window. You can use the Maintenance
Window Analysis also to see the current maintenance window for your computers.
Run the following steps to enforce a maintenance window on a computer or on a
group of computers:
1. Click the All Content domain in the Domain Panel.
2. Select the Dashboards icon in the Domain Panel navigation tree.
3. Select BES Support.
4. Click Maintenance Windows Dashboard. The dashboard opens.
122 IBM BigFix: Console Operator’s Guide
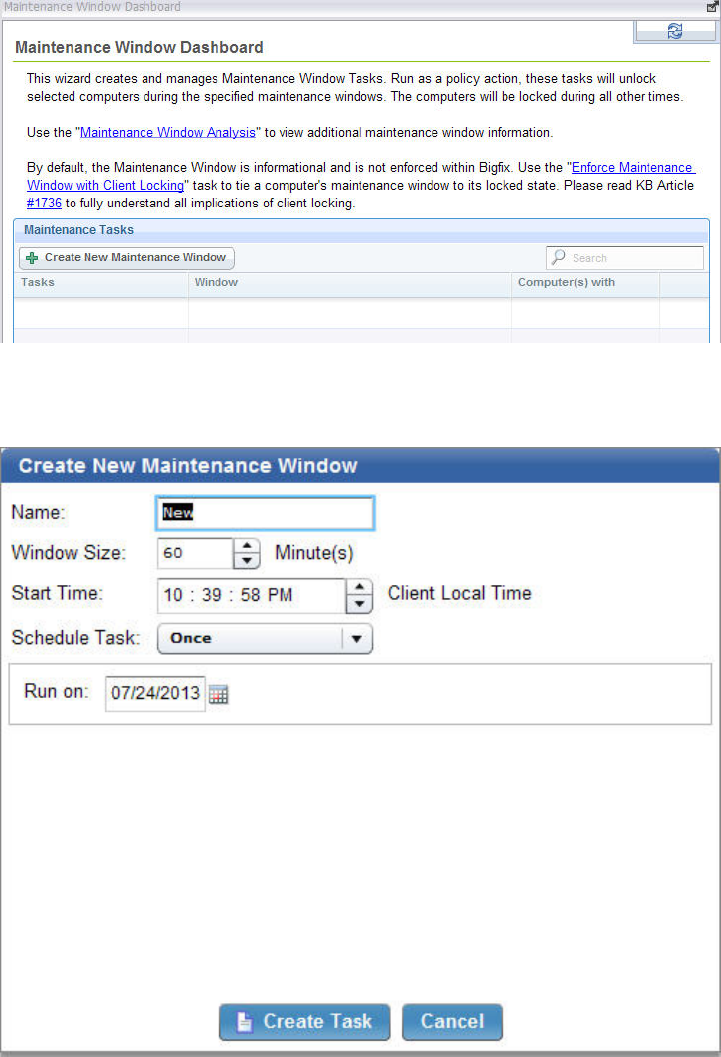
5. Click Create New Maintenance Window to set a new Maintenance Window.
After you create a maintenance window, you can see it under Maintenance
Tasks.
6. Use the "Enforce Maintenance Window with Client Locking" task to set a
maintenance window on a computer. The computer is unlocked when it is in
the maintenance window and locked for the remainder of the time. Each
computer can have only one active maintenance window at any time. The
"Enforce Maintenance Window with Client Locking" task overrides a previous
locking or unlocking action for the selected computers. Similarly, any locking or
unlocking action that is taken on the selected computers later overrides the
effects of a previous "Enforce Maintenance Window with Client Locking" task
run.
Chapter 16. Displays and Reports 123
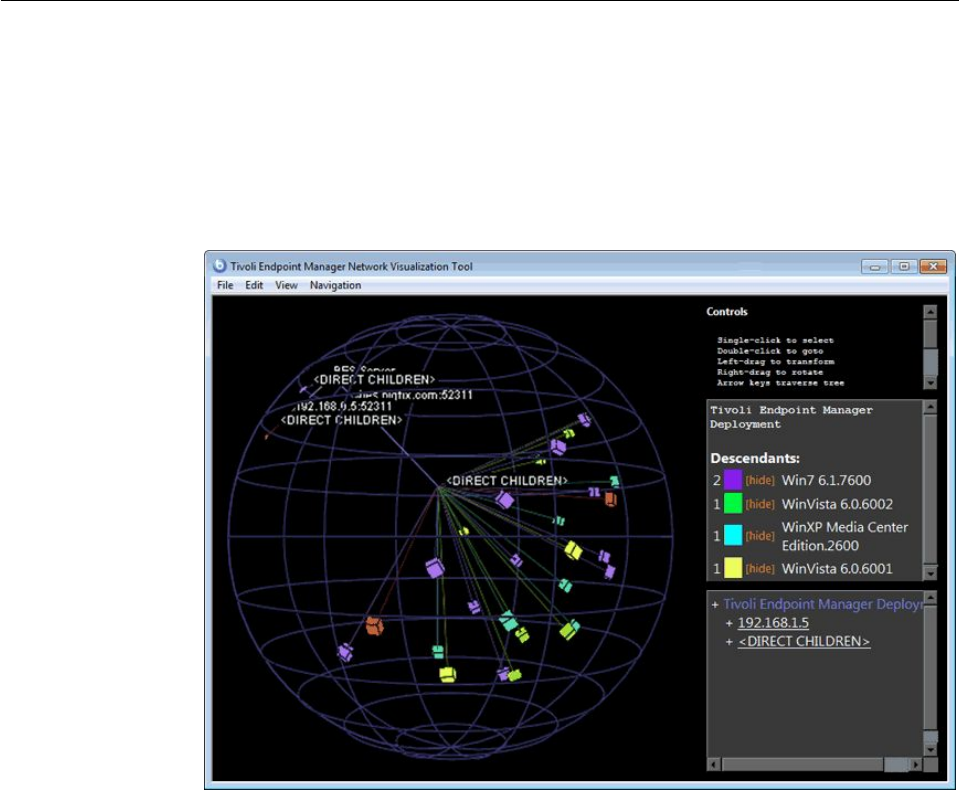
Note: Alternatively you can lock or unlock a computer, by running the
following steps:
a. Right-clicking on the computer.
b. Selecting Edit Computer Settings
c. Clicking the check mark to lock or unlock the computer.
7. Click the maintenance tasks to apply the maintenance window to computers.
8. After a maintenance window is set on a computer, it returns true or false in the
"Maintenance Window" property.
Visualizing Data
The Visualization Tool allows you to view and manipulate data across your entire
managed network. It lets you visualize various hierarchical relationships in your
network, using an interactive 3D sphere to map the data.
The Visualization Tool makes it possible to view a real-time graphical network
map showing Fixlet relevance, Action status, and Retrieved Properties.
As an example, you could view all computers that are currently unpatched for
MS04-011 across an enterprise network, displayed as an Active Directory hierarchy.
Then you could watch the clients change from red to green as they get patched in
real-time across your network. As another example, you could view all Clients that
are currently using Microsoft Office, colored according to version.
Or you can create your own hierarchy. You could assign settings on all your
machines named 'city', 'building', and 'floor'. You could then create a dynamic
setting called 'location' that concatenates these properties:
124 IBM BigFix: Console Operator’s Guide
set setting location = (value of setting 'city' & ';' & value of setting 'building' & ';' &
value of setting 'floor')
Specify a semi-colon as the delimiter of this setting to visualize your computers as
a location-based hierarchy, from each networked city down to the floor of every
building.
To create your own custom view of the data, follow these steps:
1. Select Tools > Launch Visualization Tool...
2. There are three tabs in the Visualization Parameters dialog:
vGeneral: Specify the desired display hierarchy from among Relays, Active
Directory, IP Address, or Retrieved Property.
vColorization: Indicate how you want to color-code the client nodes. You can
base your color scheme on Fixlet Relevance, Baseline Relevance, Retrieved
Properties, Action Status, or a custom Relevance clause.
vComputers: Limit the computers you want to display, using Active Directory
and Retrieved Properties as filters. To show all the computers under IBM
Endpoint management, click Show all computers.
3. Click OK to generate your customized visualization of your network.
4. A graph of your network, mapped onto a 3D sphere, is displayed. You can now
use the Controls listed in the upper right corner to change your view of the
data.
5. Double-click a computer node to bring it to the forefront. Drag the elements in
the graph to tweak the viewpoint.
6. You can continuously rotate the model by selecting View > Spin Mode.
7. Use the Navigation menu to move through the hierarchy, from each selected
computer to its sibling, parent or child.
Chapter 16. Displays and Reports 125
126 IBM BigFix: Console Operator’s Guide
Chapter 17. Menus
File Menu
The File Menu offers the following commands:
Import Import .bes files, which can be default Tasks,
Actions, Baselines, or other content that you
might have created or customized.
Export Export a Task, Action, Fixlet, Baseline, and
so on. that you or another Console user can
subsequently import. Exporting provides a
useful mechanism for creating customized
content. Simply export the content, edit it
with any text editor, and then import the
customized version.
Preferences... Set refresh, BigFix Client heartbeat,
colorizing, caching, and other persistent
Console preferences.
Change Database Password... Change the sign-in password for the
currently connected user.
Exit Quit the program.
Edit Menu
The Edit Menu offers the following commands:
Table 4. Edit menu
Command Description
Cut Cut text and put in clipboard. This
command is for use in the various text
boxes that the Console uses for data input.
Copy Text Copy text and put it in the clipboard.
Copy Text with Headers Copy text, including any associated headers,
and put it in the clipboard.
Paste Insert the contents of the clipboard. This
option is only activated when there is an
editable text box on the panel.
Select All Select all items in the current window.
Depending on the window, this can be text
from the Work Area or items in the List
Panel.
© Copyright IBM Corp. 2010, 2015 127

Table 4. Edit menu (continued)
Command Description
Hiding > Remove the selected objects, Fixlets, Tasks,
Baselines, or Analyses, from the List Panel.
The object itself is not actually deleted, and
can be retrieved by clicking Show Hidden
Content in the Console Toolbar. These
options only become available when you
click objects in the List Panel. Alternatively,
you can right-click the objects and select
hiding options from the context menu.
There are four options
Globally Hide: This hides the object across
all Consoles.
Globally Unhide: Relist the selected objects
(either Fixlets, Tasks, Baselines, or
Analyses). To find the object, click the Show
Hidden Content button.
Locally Hide: Hide the object on the current
Console only; other Consoles still display
the object. The object itself is not actually
deleted, and can be retrieved by clicking the
Show Hidden Content button and selecting
it from the navigation tree.
Locally Unhide: After clicking the Show
Hidden Content button, you can choose to
unhide locally hidden content with this
command.
Create Custom Object Copy... Create a customized clone of the currently
selected object (Fixlet, Task, Baseline,
Computer Group, or Analysis). For each
copy, you can create a header name and
compose a message to describe the
associated actions. You can also customize
or add relevance expressions to refine the
targeting of the Fixlet or Task.
Remove... Remove a customized object (including a
Fixlet, Task, Baseline, Computer Group,
Analysis or Site File) from its list.
Confirming this choice permanently
removes the customized object from the list.
Edit Custom Object... Edit the Message, Action, Relevance, and
Properties of a customized object (Fixlet,
Task, Baseline, Computer Group, or
Analysis).
128 IBM BigFix: Console Operator’s Guide

Table 4. Edit menu (continued)
Command Description
Groups > Manage groups of computers. This item
expands to include:
View as Group: Create an ad-hoc group
from a selected set of computers. You can
then view the Fixlets, Tasks, Baselines,
Actions, and Analyses that pertain to this
particular group.
Add to Manual Group...: Add the selected
computers to a named group. You can either
attach the computer to an existing group or
create a new named group. You must
supply a password to propagate the new
group name to the selected clients.
Remove From Manual Group: Remove a
computer from the specified group. First,
select the group from the navigation tree on
the left, then select a computer from the list.
You must supply a password to propagate
the change.
Stop Action Stop the selected actions.
Assign User Management Rights... Opens a display that lets you grant and
revoke management rights on a
computer-by-computer basis.
Find... Opens a dialog that prompts you for a
search field and search string. You can
search for fields that either contain or do
not contain the search string. In addition,
for objects that can be hidden, such as
Fixlets, Tasks, Baselines, or Analyses, you
can search based on visibility.
View Menu
The View Menu offers the following commands:
Show Hidden Content Allow hidden content, including Fixlet
messages, Tasks, Analyses, and so on. to be
viewed. Content can be hidden locally (on
this Console only) or globally (on all
Consoles). To view this content, select this
item or click the button in the Console
Toolbar with the same name. From the
navigation tree, all content becomes visible
and you can select hidden items to unhide
them if you choose.
Chapter 17. Menus 129
Show Non-Relevant Content Allow non-relevant content, such as Fixlet
messages and Tasks, to be viewed. Typically
the BigFix operates by displaying only those
items that are relevant to your network.
Thus, out of the thousands of available
Fixlets, for example, only a few are brought
to your attention for remediation. When an
item has been remediated across your entire
network, it is no longer relevant and is no
longer shown. This menu item allows you to
examine these items, which can be useful if
you want to clone or repurpose one for your
own uses.
Show Status Bar Display the number of relevant messages
and the connected database in the status bar
at the bottom of the Console window. Select
this menu item to toggle its state.
Refresh Fetch the latest information from the BigFix
database. Typically, your information is
updated automatically based on a schedule
determined by your administrator (and by
your choice in the Preferences dialog).
Because refreshing causes a database access,
use it with restraint.
Go Menu
The Go Menu allows you to quickly select Domains and to change the focus area
of the Console. It offers the following commands:
All Content Open the top-level Domain that contains a
combination of all Domains.
Other Domain Names Open the specified Domain. The next few
entries in this menu include the various
Domains you created, depending on the
specific Fixlet sites you are subscribed to.
Current List Move the focus of the Console to the List
Panel at the top right of the Console.
Current Document Move the focus of the Console to the current
document in the Work Area at the bottom
right of the Console.
Tools Menu
The Tools Menu offers the following commands:
Take Custom Action... Run a custom command, targeted to any
subset of BigFix Client computers.
Create New Fixlet... Create a custom Fixlet message, complete
with targeting and actions.
130 IBM BigFix: Console Operator’s Guide

Create New Task... Create a custom Task, similar to a Fixlet
message, but used by the Console operator
to install software, update settings, or
establish other local policies.
Create New Baseline... Create a custom Baseline, allowing you to
establish a grouping of Tasks, Fixlet
messages, and other Baselines that can be
applied with a single click to any grouping
of computers.
Create New Analysis... Create a custom analysis, based on the
specified properties of the BigFix Client
computers.
Create New Automatic Computer Group... Create an automatically defined grouping of
computers, based on various client
properties, such as name, CPU, IP Address,
and so on.
Create New Manual Computer Group... Manually create a computer group which
you can populate from any computer list.
Add External Site Masthead... Start a new Subscription to a Fixlet site. This
command opens a browser window for you
to select a masthead file, typically with an
extension of .efxm.
Add Files to Site... Add text, utility, domain, or dashboard files
to the sites you author.
Add LDAP Directory... Add an existing Lightweight Directory
Access Protocol (LDAP) or Active Directory
(AD) domain to the Console.
Create Custom Site... Create a custom site containing your own
content. You can create custom Fixlets,
Tasks, Analyses, and so on.
Create Operator... Create a local operator with password
protection.
Add LDAP Operator... Add a Console operator from the list of
users on your existing LDAP Server.
Create Role... Create a Role with associated permissions
over computers and sites. Roles can also
include LDAP Groups, allowing you to add
multiple potential users at once.
Create Custom Filter... Create a named filter that allows you to find
specific custom content, based on various
properties. The objects available to filter
include Fixlet messages, Tasks, Analyses,
Computers, and more.
Manage Properties... Create and manage properties to retrieve
from your Clients, using Relevance clauses.
These properties are included in the column
headers on client listings. There is a default
set of properties, but you can add or delete
them. Properties are used to filter or select
subsets of Clients for Fixlet action
deployment.
Chapter 17. Menus 131

View Recent Comments View the list of comments made by the
Console operators, sorted from most recent
to oldest. This list includes all comments,
regardless of the underlying object.
Launch Web Reports... Provide access to data reports, which are
collected from various BigFix Servers and
aggregated into a set of HTML reports
summarizing the history and status of Fixlet
messages and actions across extended
networks of computers.
Launch Visualization Tool... Run a tool to visualize the hierarchy of your
installation, from the servers down through
the relays to the client computers.
Help Menu
The Help Menu offers the following commands:
Contents Provide integrated help.
Visit support.bigfix.com Launch a browser to view the support site.
Customer Feedback Options Allow us to learn from your experience.
Click the button to participate in an
anonymous survey to help us learn more
about how people use the program. This
information is used to improve your
experience.
About IBM Endpoint Manager Console... Display the version number of the program,
along with a URL for support.
132 IBM BigFix: Console Operator’s Guide
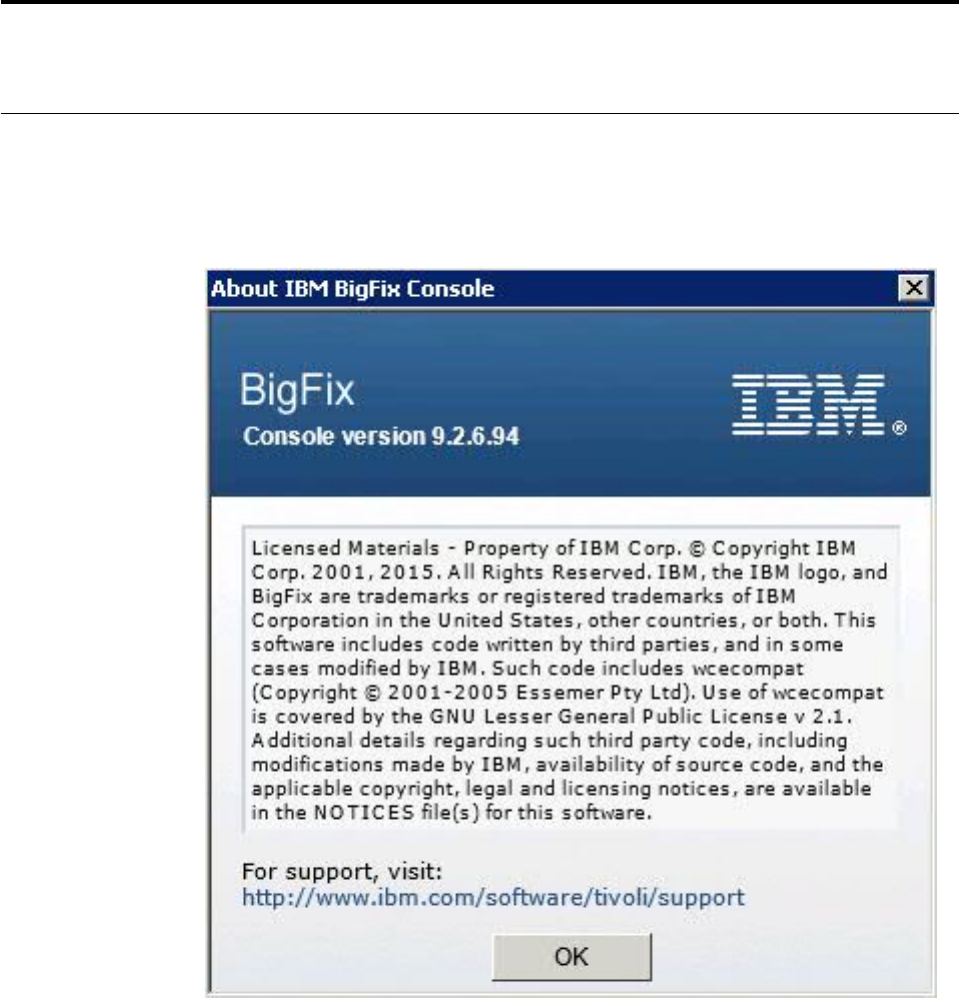
Chapter 18. The Dialogs
About the BigFix Console
The About dialog displays the version of the BigFix Console. It also includes a
URL for technical support.
This dialog is available by selecting:
vHelp > About IBM BigFix Console
© Copyright IBM Corp. 2010, 2015 133
Action: Computers
The Computers tab of the Action document shows the number of computers
affected by the specified action along with the current status of each.
To view this information for a specific action:
1. Click the Action icon in the navigation tree.
2. Select that specific action in the List Panel. Information about the action is
displayed in the Work Area.
3. Select the Computers tab in the Work Area.
In the Computers tab there is a navigation tree on the left where you see the
number of computers affected by the specified action and you can filter list by
narrowing down for easier analysis. A filtered list shows the computers targeted by
the action, along with the current status of each. The list can be sorted by clicking
the appropriate header. You can view more detailed information about a targeted
computer by double-clicking the computer in the list.
The Targets tab shows the set of computers that was originally targeted by the
action, the Computers tab, instead, shows:
vThe status of the action on each of the selected targets, regardless of whether
they responded or not, if the action was originally targeted to specific
computers.
vThe status of the action on the target that actually responded, if the action was
originally targeted by properties.
Note: The Computers tab is renamed Reported Computers tab if the targeting
method selected in the Target tab of the Take Action dialog was set to
Dynamically targeted by properties.
The deployed action progresses through a series of well-defined stages on a given
computer. These are the statuses of the action on a computers across the various
stages:
Cancelled
The user has canceled the action.
134 IBM BigFix: Console Operator’s Guide
Constrained
The action has been constrained by a Relevance statement set in the
Execution tab of the Take Action dialog.
Download Failed
The action failed to complete the download.
Error The action has resulted in an error.
Evaluating
The action is still evaluating its relevance.
Expired
The action has passed its expiration date.
Failed The action has failed to run correctly.
Fixed The action has completed, resolving the issue.
Invalid Signature
The action cannot run due to an invalid signature.
Locked
The computer is locked and cannot run the action.
Not Relevant
The action is not relevant on this client.
Not Reported
The action has not reported its success or failure.
Offers Disabled
Offers cannot be presented on the specified client, so the action will never
run.
Pending Downloads
The action is waiting for downloads.
Pending Login
The action is waiting for the user to log in for a user-assisted action.
Pending Message
The action is waiting for the user to accept the action message.
Pending Offer Acceptance
The action is waiting for the user to accept the offer.
Pending Restart
The action is waiting for a client computer restart.
Postponed
The action has been postponed by the client.
Running
The action is currently running.
Waiting
The action is waiting for a user response.
Chapter 18. The Dialogs 135
Action History Tab
The Action History tab lists the deployment history of the actions associated with
the selected Fixlet, Task, or Baseline document.
To see something in this dialog, you must have issued an Action. The Action
History list can be sorted by clicking the headers, which include the ID, Time
Issued, State, % Complete (based on the number of Clients reporting success),
Name, Site, Issued By, and Type.
This dialog is available by selecting a Fixlet, Task, or Baseline icon from the
Domain Panel navigation tree, clicking an item from the List Panel, and clicking
the Action History tab in the Work Area below the list.
136 IBM BigFix: Console Operator’s Guide
Action List and Document
This is the main panel about actions. It displays in the List Panel all the actions
that were deployed in the content site and shows in the Work Area the Action
document containing the details of the action highlighted in the list.
At the top of the Action document you find a description of the action. Below that
is a toolbar presenting you with options to Stop, Copy, Export, or Remove the
action. For more information about these commands, see “Running commands on
actions” on page 32.
There are three tabs in an Action document. They are:
vSummary: An HTML display of various action attributes, including Status,
Behavior (Message, Users, Execution, Post-Action), Relevance, Success Criteria,
and Action Script. At the bottom of the page is a text box for entering a
comment. For more information about this tab and its content, see “Action:
Summary” on page 143.
vComputers: It shows the number and the list of relevant computers affected by
the specified action along with the current status of the action on each of them.
A filter in the left panel allows you to narrow down the list of computers in the
right panel. For more information about this tab and its content, see “Action:
Computers” on page 134.
vTarget: Shows what subset of computers was originally targeted by the action.
For more information about this tab and its content, see “Action: Target” on
page 145.
Chapter 18. The Dialogs 137

Action Parameter
This dialog box makes a request for extra information required by certain Actions
or group of Actions before execution. Typically there is a prompt with a text box
for you to supply a parameter.
Click OK to continue the Action deployment. This typically opens the Take Action
dialog, where you can further specify deployment options.
An Action Parameter dialog is opened only when you click an Action link in a
Fixlet that requires extra information before final targeting.
Action Progress Report
This dialog box shows the progress of an action as it is applied across the Fixlet
network.
First, it shows the progress of any downloads (patches, updates, and so on.). If
there are files to download, it displays the name of the downloaded file, the total
number of bytes, the current amount downloaded, the transfer rate, and the
estimated time to completion.
138 IBM BigFix: Console Operator’s Guide

The Actions can go through several states as they are collected, evaluated, and run
by the clients. These states include:
vRunning: The Action is currently running.
vEvaluating: The Action is still evaluating its relevance.
vFailed: The Action has failed to run correctly.
vCancelled: The user has canceled the Action.
vDownload Failed: The Action failed to complete the download.
vLocked: The computer is locked and cannot run the action.
vOffers Disabled: Offers cannot be presented on the specified client, so the
Action will never run.
vWaiting: The Action is waiting for a user response.
vPending Downloads: The Action is waiting for downloads.
vPending Restart: The Action is waiting for a restart from the Client computer.
vPending Message: The Action is waiting for the user to accept the Action
message.
vPending Login: The Action is waiting for the user to log in for a user-assisted
Action.
vPending Offer Acceptance: The Action is waiting for the user to accept the offer.
vConstrained: The Action has been constrained by a Relevance statement set in
the Execution tab of the Take Action Dialog.
vExpired: The Action has passed its expiration date.
vPostponed: The Action has been postponed by the Client.
vInvalid Signature: The Action cannot run due to an invalid signature.
vNot Relevant: The Action is not relevant on this Client.
vNot Reported: The Action has not reported its success or failure.
vError: The Action has resulted in an error.
vFixed: The Action has completed, resolving the issue.
Action Script Tab
In general you are recommended to use the action script provided with the Fixlet
or task, however, sometime it might be useful to align the action script to your
environment and business needs. The Action Script tab of the Take Action dialog
allows you to modify the action script.
Chapter 18. The Dialogs 139
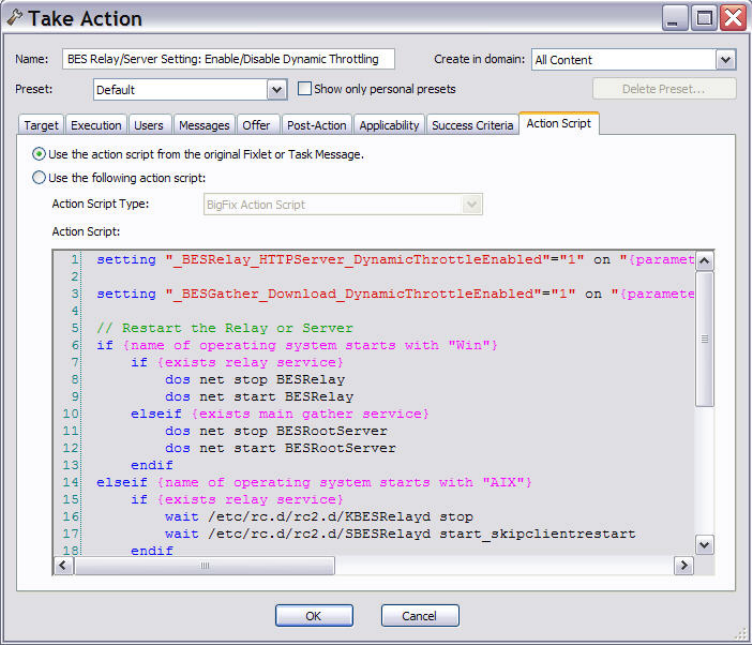
To access this tab:
1. Select a Fixlet message or a task from any list.
2. Click an action button.
3. In the Take Action dialog, select the Action Script tab.
There are two buttons in this dialog:
Use the action script from the original Fixlet or task message
This is the default for most Fixlet actions, and is the recommended option.
Use the following action script
You can select one of the following options and either modify the existing
script or enter a new script in the text area. Select the type of action script
that you want to use for this script:
BigFix Action Script
This is the BigFix standard scripting language for actions. For more
information about the action language, see Introducing the action
language.
AppleScript
This is Apple's scripting language for controlling computer
resources.
sh The action is a shell script to be run by a Linux or a UNIX or a bsd
shell.
Note: By default, actions cannot be undone. Make sure to test your action on a
small scale before you deploy it in your entire network.
140 IBM BigFix: Console Operator’s Guide
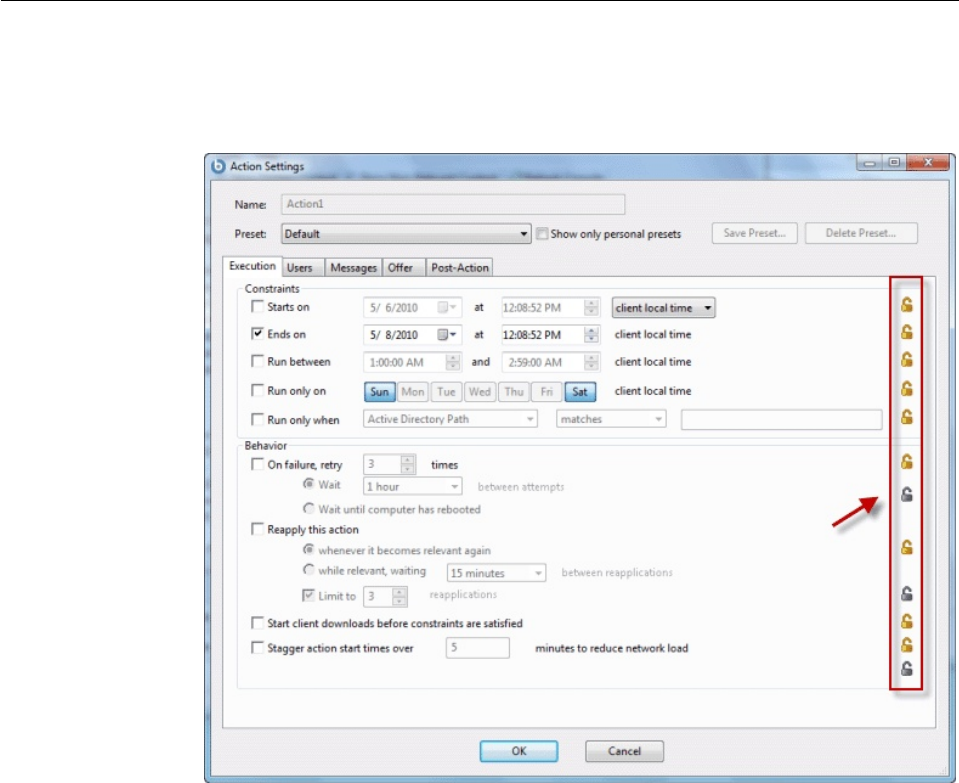
Action Settings
The Action Settings dialog lets you apply lockable Action Settings to a new or
customized Fixlet message, Task, or Baseline.
Using the lock icons to the right of the screen, you can lock the individual items
under each of the tabs of this dialog to force the action to be run with the selected
constraints.
vAt the top of this dialog is the Name of the Action. Depending on the context it
might be editable, if you want to rename it or add extra information to it.
Below the Name box are some buttons that allow you to save or re-use your
Action values:
vPreset: This is a pull-down menu with the names of your existing presets, if any.
Click one to automatically fill out your Action settings.
vShow only personal presets: Check this box to limit the presets to your own
personal presets.
vSave Preset: After creating custom settings for an Action, you can save them for
later re-use.
vDelete Preset: Select a preset and then click this button to delete it.
This body of the dialog contains several tabs, including:
vExecution: This tab allows you to set constraints on the Action, including
starting and ending dates and run windows. You can also set up retry counts (in
Chapter 18. The Dialogs 141
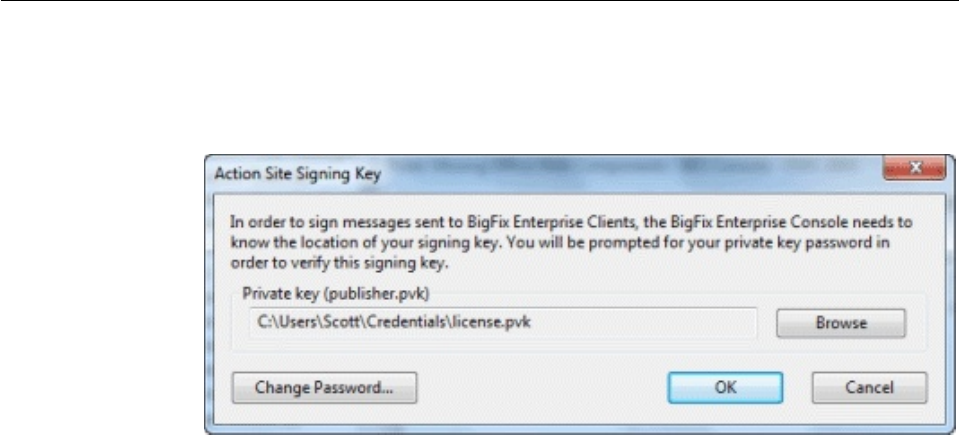
case the Action fails or reverts) and allow the deployment to be distributed over
a period of time to minimize the network load.
vUsers: Allows you to specify whether or not you require a logged-on user (or
specified group of users) to be present before running the Action.
vMessages: Specify informative messages to be displayed on the targeted Clients,
along with options for user interaction.
vOffer: This tab allows you to convert this Action into an Offer, which triggers
the display of an HTML user interface on select Clients. The user has the option
to select these Offers from a list.
vPost-Action: Specify a follow-up behavior for the Action, such as a restart or
shutdown, including appropriate warning messages.
To lock or unlock any of the items under these tabs, simply click the lock icons to
the right.
When you have finished specifying your Action settings, click OK. Before the
Console can issue the Action, you must enter your password . When you do, a
progress dialog opens to keep you informed about the deployment.
This dialog is available when you create or customize a Fixlet message, Task, or
Baseline. For Tasks and Fixlet messages, select the Actions tab, check the box next
to Include action settings locks, and click the Edit button to see this dialog. When
creating or customizing a Baseline, click the Components tab, check the box next
to Use custom action settings, and click the set action settings link.
Action Site Signing Key
This dialog allows you to manage the location of your private key (.pvk), or to
change the password for your Action signing key.
The Console operator must obtain a private key (publisher.pvk or license.pvk) from
the Site Administrator, who must first create it using the BigFix Administrator
Tool. When these keys have been created, the Site Administrator gives them to
authorized personnel, who can then propagate Actions. To sign an action, the
authorized Console operator must browse to the appropriate private key (typically
stored on a removable disk or memory stick) and provide a password.
You can see this dialog by selecting Tools > Manage Signing Key.
142 IBM BigFix: Console Operator’s Guide
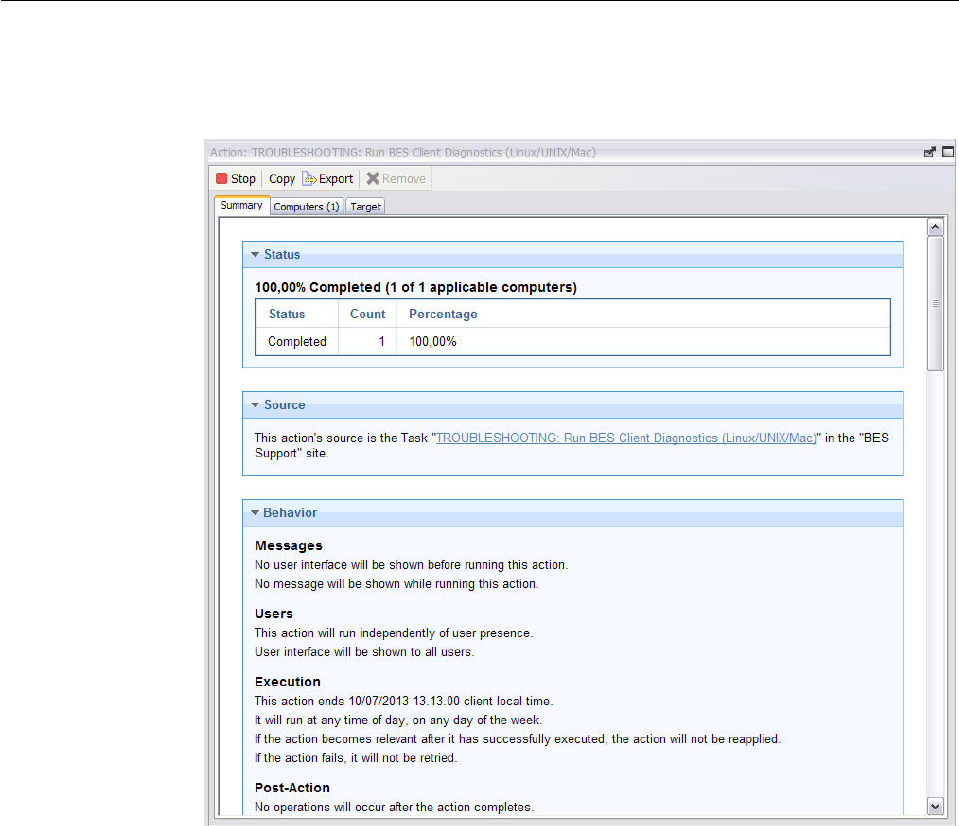
Action: Summary
The Summary tab of the Action document shows various attributes of the selected
action. These settings were created when the action was initially specified.
To view this information for a specific action:
1. Click the Action icon in the navigation tree.
2. Select that specific action from the List Panel. Information about the action is
displayed in the Work Area.
3. In the Work Area, click the Summary tab.
In the Summary tab you see the following information:
Status It shows the number of applicable targets grouped by completion status of
the action. This status can be not reported, or are Waiting, or Running, or
Completed.
Source
If this action was originated by a Fixlet, this section contains a link to the
Fixlet and the name of the content site involved.
Behavior
It displays action settings including:
Messages
Describes any messages to be displayed either before or during the
execution of the specified action.
Chapter 18. The Dialogs 143
Users Lists the requirements for user intervention in the action. Allows a
user interface to be presented to select user groups.
Execution
Contains information about the execution of the action, including
ending time, reapplication, and what happens if the action fails.
Post-Action
Provides information about what happens, including restarting or
shutting down after the application of the action.
Details
This section displays information about the action run and the relevance
expressions and the action scripts it used:
ID The ID of the action. This is the unique identifier for that action
run.
Domain
The name of the domain hosting this action.
Type Either single or multiple action, depending on how the action was
issued. For more details, see “Taking actions” on page 24.
State The overall state of the action as it deploys. These are the possible
states:
open The action is active on one or more computers. It remains
open until its expiration date elapses, or an operator stops
it.
stopped
The action was stopped by an operator. It remains stopped
until its expiration date elapses or it is removed.
expired
The expiration date for the action expired. An action
expired cannot be removed.
Issued The date of issuance and the operator who issued the action.
Relevance
This is a full listing of the relevance statement that determines the
targeting of this action. For information about the Relevance
language, see Introducing the Relevance languagethe IBM BigFix:
Relevance Language Guide.
Action Script
This is a listing of the script that is run if this action is relevant to
the client computer. For information about the action language, see
Introducing the action languagethe IBM BigFix: Action Guide.
Success Criteria
The criteria used to determine the successful conclusion of the
action.
Comments
This is a text box that allows you to view or attach a comment to the
action. This messages can be seen by all operators having access to the
content site that the action belongs to.
144 IBM BigFix: Console Operator’s Guide
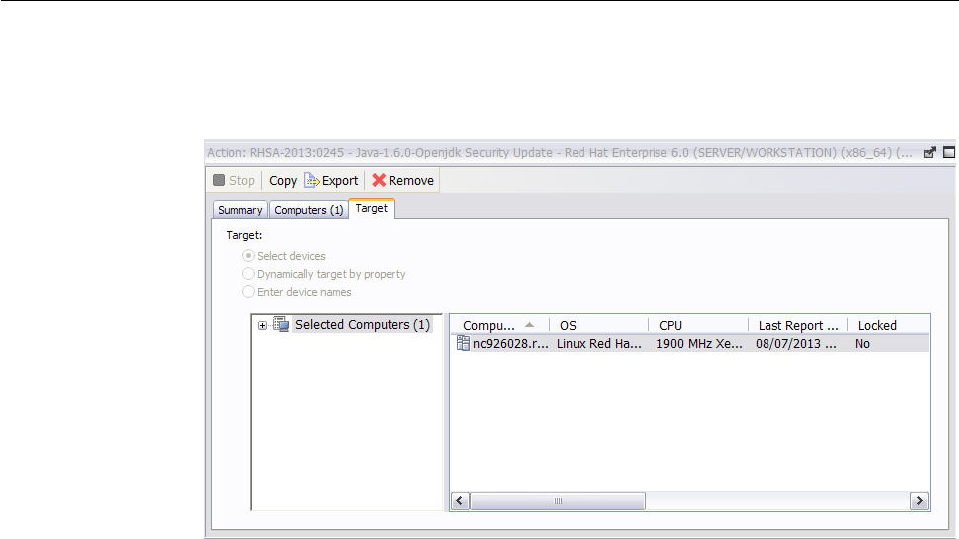
Action: Target
The Target tab of the Action document presents a read-only display of the
computers targeted by the specified action.
To view this information for a specific action:
1. Click the Action icon in the navigation tree.
2. Select that specific action in the List Panel. Information about the action is
displayed in the Work Area.
3. Select the Targets tab in the Work Area.
The dialog shows which computers are currently targeted by the Action. The
original targeting was set when the action was deployed in the Target tab of the
“Take action” on page 240 dialog. Depending on the targeting method, indicated
by three read-only radio buttons at the top of this dialog, the this list of computers
can be static or dynamic.
Selected devices
If this option was specified, the computers in the list are those relevant to
the action, those that satisfied the relevance expression set in the
Applicability tab of the “Take action” on page 240 dialog. This is the
default behavior.
Dynamically targeted by properties
If this option was specified, the action selects any BigFix Client computer
with the retrieved property specified, for example any computer with
Linux Red Hat Enterprise Server 6.1 installed.
Chapter 18. The Dialogs 145
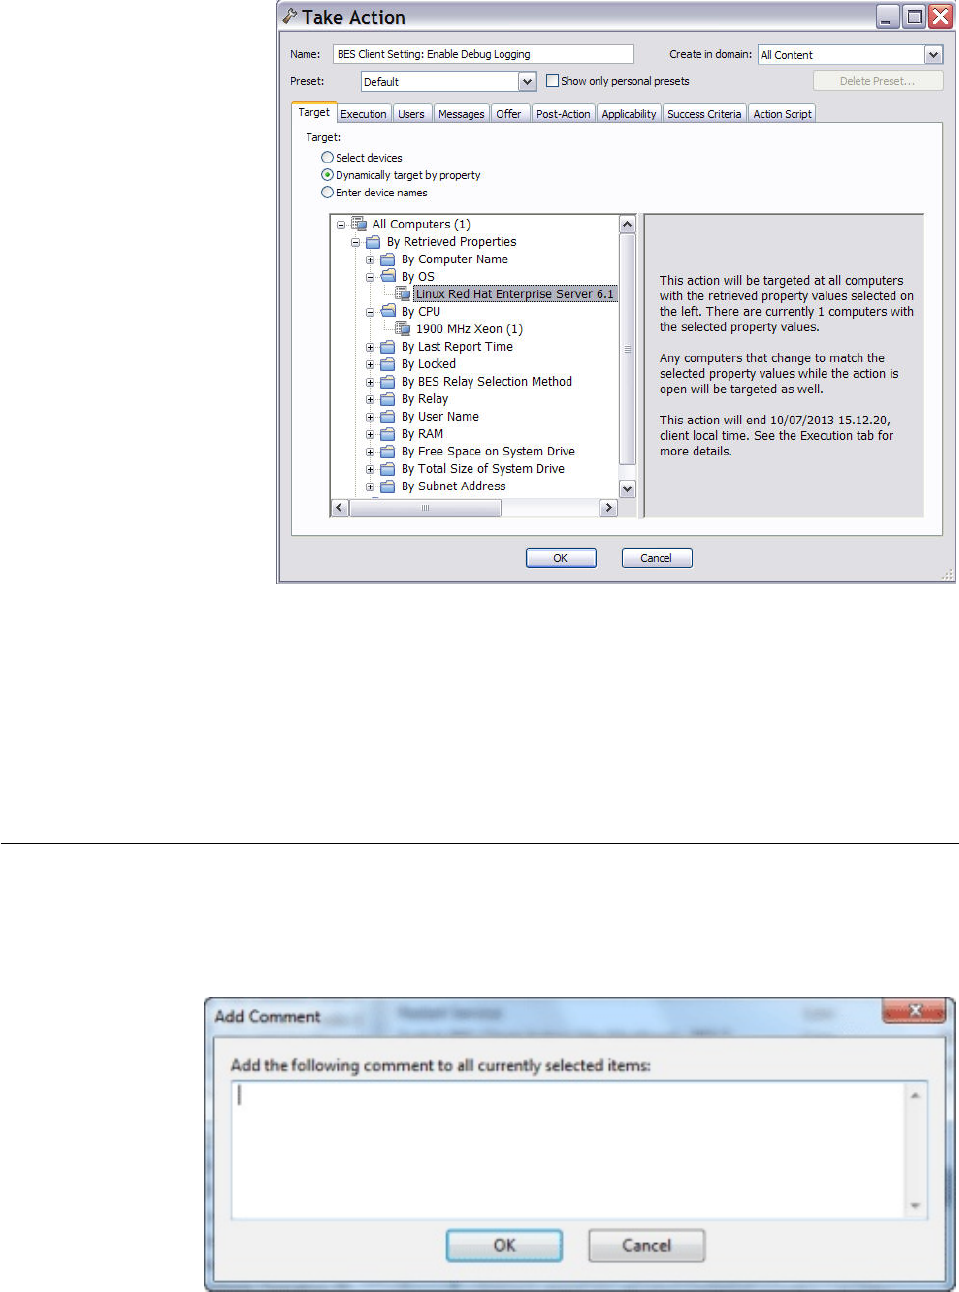
This search runs when the Take action is triggered, then it is evaluated
again on timely basis until the action expires. The action expiration time
was set in the Execution tab when the Take action was triggered. If new
computers satisfying the property are found, they are added to the list of
targets and the action is run on them too. when this targeting method is
selected, The Computers tab is renamed Reported Computers.
Enter device names
If this option was specified, you see a list of computers that were manually
selected for this action when the Take action was triggered.
Add Comment
The Add Comment dialog lets you attach an explanatory comment to Fixlet
messages, Tasks, Baselines, Actions, Computers, Computer Groups, and Analyses.
146 IBM BigFix: Console Operator’s Guide
The comment you enter here is displayed in the Description or Summary tab when
you open one of the associated items in the workspace.
This dialog is available by right-clicking an item from the List Panel and selecting
Add Comment from the context menu.
Add Custom Setting
This dialog box lets you create a custom Name/Value setting that applies to the
selected computer.
Type a name for the variable in the first input box, and type the value of the
variable in the second box. This can be useful for naming or otherwise attaching
text or numeric values to a computer or set of computers.
This dialog is available from the Edit Computer Settings dialog. Right-click a
computer from any listing, select Edit Computer Settings from the pop-up menu,
and then click the Add button.
Add Files to Site
This dialog lets you add files to any site that you can author. These can be
anything from simple text files to functional dashboards.
Chapter 18. The Dialogs 147
Select a site from the Add to site pulldown, Browse for the files to add, and then
click Add files.
To distribute the files to every client, click the Send to clients box.
For more information, see Adding Files to Sites.
This dialog is available by selecting Tools > Add Files to Site...
Add LDAP User
LDAP users can be added through the Console.
Select or search for the user's name. Click Add.
This dialog is presented when you select Tools > Add LDAP Operator.
Add User
Local users can be added through the Console with password protection.
Enter the user's name and password plus verification. Click OK.
This dialog is presented when you select Tools > Create Operator.
148 IBM BigFix: Console Operator’s Guide
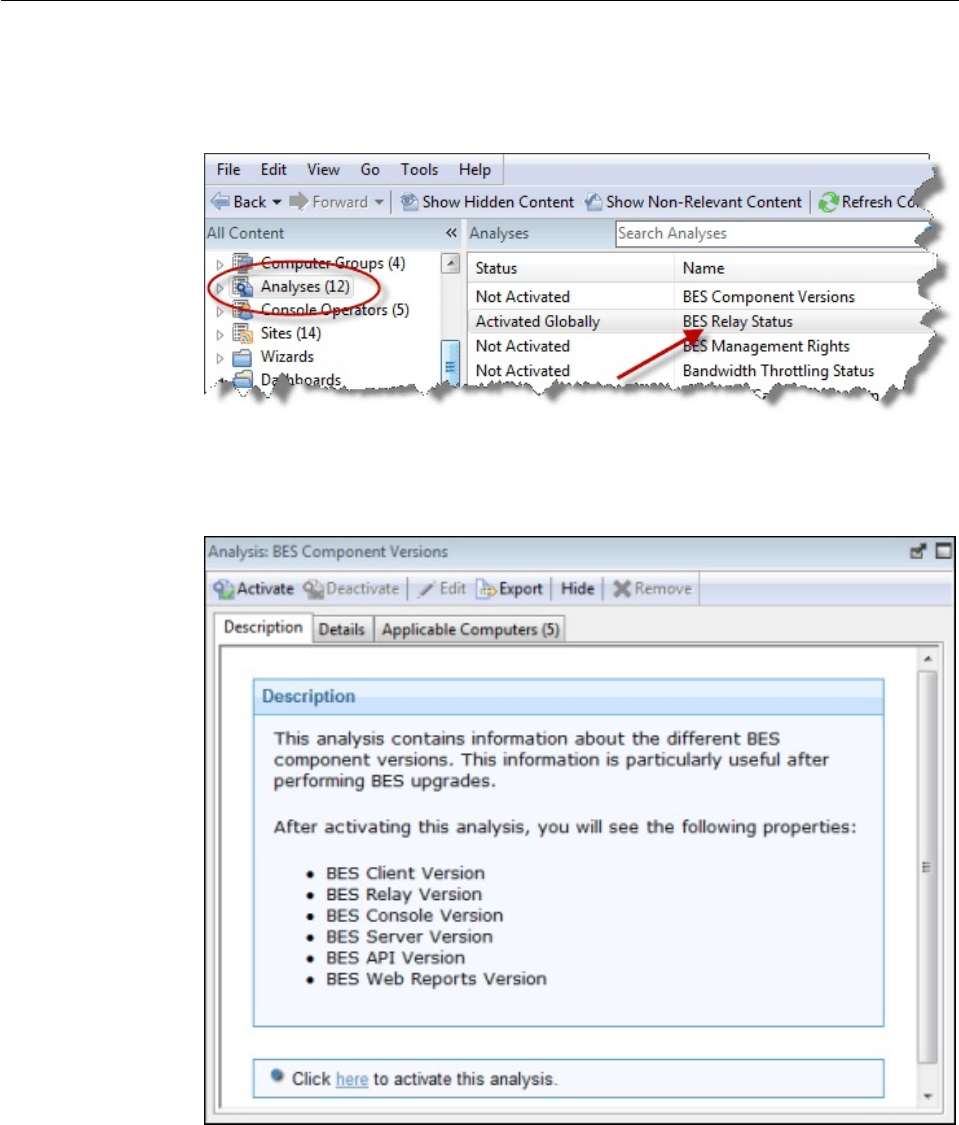
Analysis List and Document
A list of Analyses is displayed when you click Analyses, or any of its child nodes,
from the Domain Panel navigation tree.
An Analysis document is displayed in the Work Area of the Console when you
click an item from this list.
At the top of the Analysis document is the name of the analysis. There is a toolbar
at the top of the window, with the following choices:
vActivate: Start the specified Analysis. This option is only available if the
Analysis is currently deactivated.
vDeactivate: Stop the specified Analysis. This option is only available if the
Analysis is currently activated.
Chapter 18. The Dialogs 149
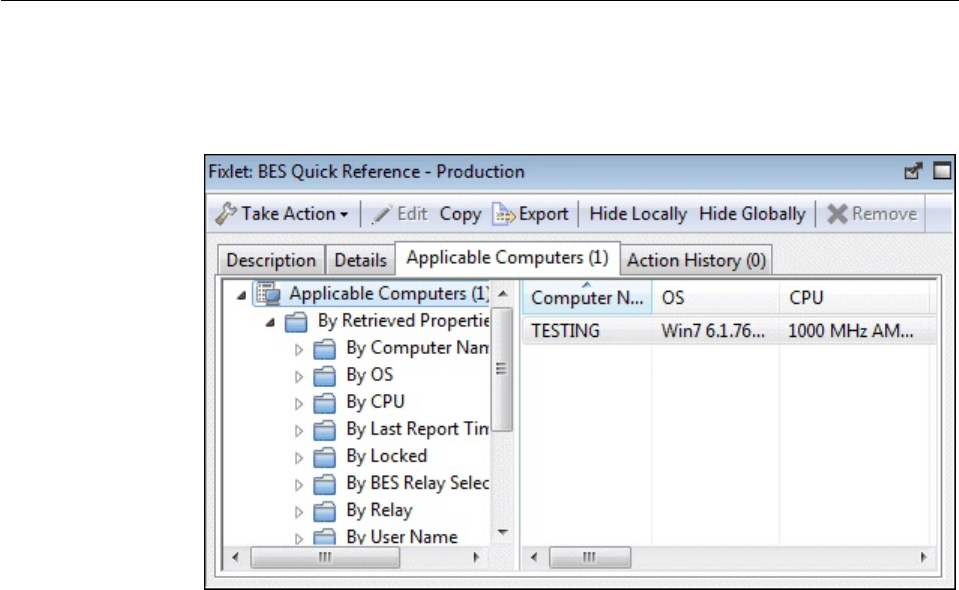
vEdit: Make changes to this Analysis. This option is only available if this is a
custom Analysis.
vExport: Save a copy of this Analysis to import it into a different Console or
deployment or to edit it in an external editor.
vHide Globally: Hide this Analysis from all Consoles.
vHide Locally: Hide this Analysis from the local Console only.
vRemove: Delete the Analysis. This option is only available for custom Analyses.
There are several tabs in an Analysis document. They include:
vDescription: An HTML page describing the Analysis, along with a link to
activate or deactivate the Analysis.
vDetails: An HTML page listing the various Analysis attributes, including
Properties and Relevance. At the bottom of the page is a text box for entering a
Comment attached to the Analysis.
vResults: A dialog displaying the results of the Analysis. This tab is only visible
for an activated Analysis.
vApplicable Computers: A list of the Clients where this Analysis is applicable.
This is a typical filter/list panel for computers; click a filter in the left panel to
narrow down the list of computers in the right panel.
To display an Analysis list, click the Analyses icon (or any of its child nodes) in
the Domain Panel navigation tree.
An Analysis document is opened whenever you open an item in an Analysis list.
Applicable Computers Tab
The Applicable Computers tab displays all the networked computers that are
affected by the currently selected Fixlet, Task, Analysis, or Baseline object.
This is a /list view with a filter panel on the left, allowing you to narrow down
the displayed list of computers. To do this, open a retrieved property or group
from the left panel and select a value to filter the list.
150 IBM BigFix: Console Operator’s Guide
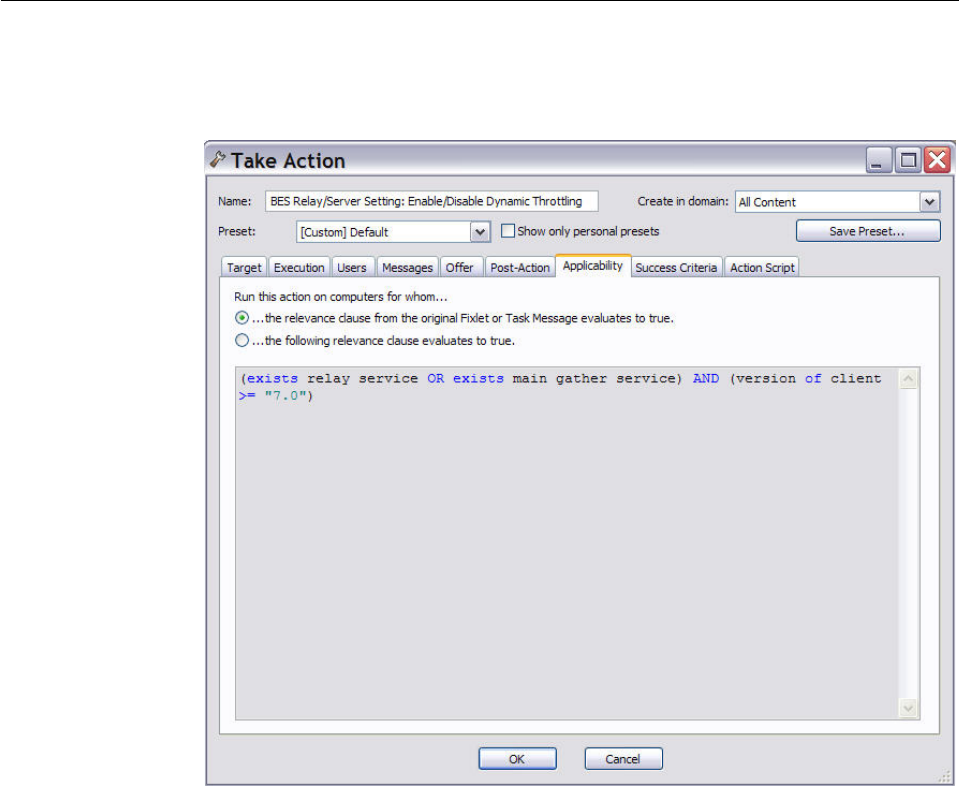
Like other lists in the Console, you can sort it by clicking the column headers. You
can add or remove header properties by right-clicking in the header row.
This dialog is available by opening a Fixlet, Task, Analysis, or Baseline from the
List Panel and clicking the Applicable Computers tab in the Work Area below.
Applicability tab
In the Applicability tab you can specify the criteria to use to judge the relevance
of a Fixlet action.
This tab is available from several different dialogs:
v“Take action” on page 240
v“Take multiple actions” on page 242
v“Edit Computer Settings” on page 197
It is strongly recommended that you use the original Relevance expression, but
you might want to customize it to better suit your needs. Select:
...the relevance clause from the original Fixlet or Task Message evaluates to true.
To confirm the relevance expression set in the default action.
...the following relevance clause evaluates to true.
To modify the existing relevance expression or to specify a new relevance
expression to suite your needs. For more information about the Relevance
language, see Introducing the Relevance language.
Chapter 18. The Dialogs 151

Assign User Management Rights
The Assign User Management Rights dialog lets you choose which computers an
operator can manage.
This dialog displays the current set of computers that can be managed by the
selected Console operator and lets you add or delete computers from that set.
There are two buttons in this dialog:
vAdd: Add new computers to the set of computers that the operator can manage.
This opens a standard filter/list box of the computers on your network. Use the
values of the retrieved properties to filter down the group of computers for this
operator. The use of retrieved properties, including custom properties, makes it
simple to group computers. For example, you might want to group computers
by their operating system or cpu type. Or you might create a special computer
setting, like department or location, and use that to group management rights to
the selected operator. Or there might be computers using particular applications
that you want to assign to specialists in your organization.
vDelete: This button lets you remove computers from the set of computers that
the operator can manage. It opens a dialog that lets you choose which retrieved
property filters you want to delete. (If a single filter was defining the rights,
when you select Delete, it does so without opening this dialog.)
This dialog is available by selecting Operators from the Domain Panel navigation
tree, right-clicking any operator in the List Panel, and choosing Assign User
Management Rights from the context menu (or choose Assign User Management
Rights from the Edit menu). You must have logged in with Administrator rights to
view this tab.
152 IBM BigFix: Console Operator’s Guide
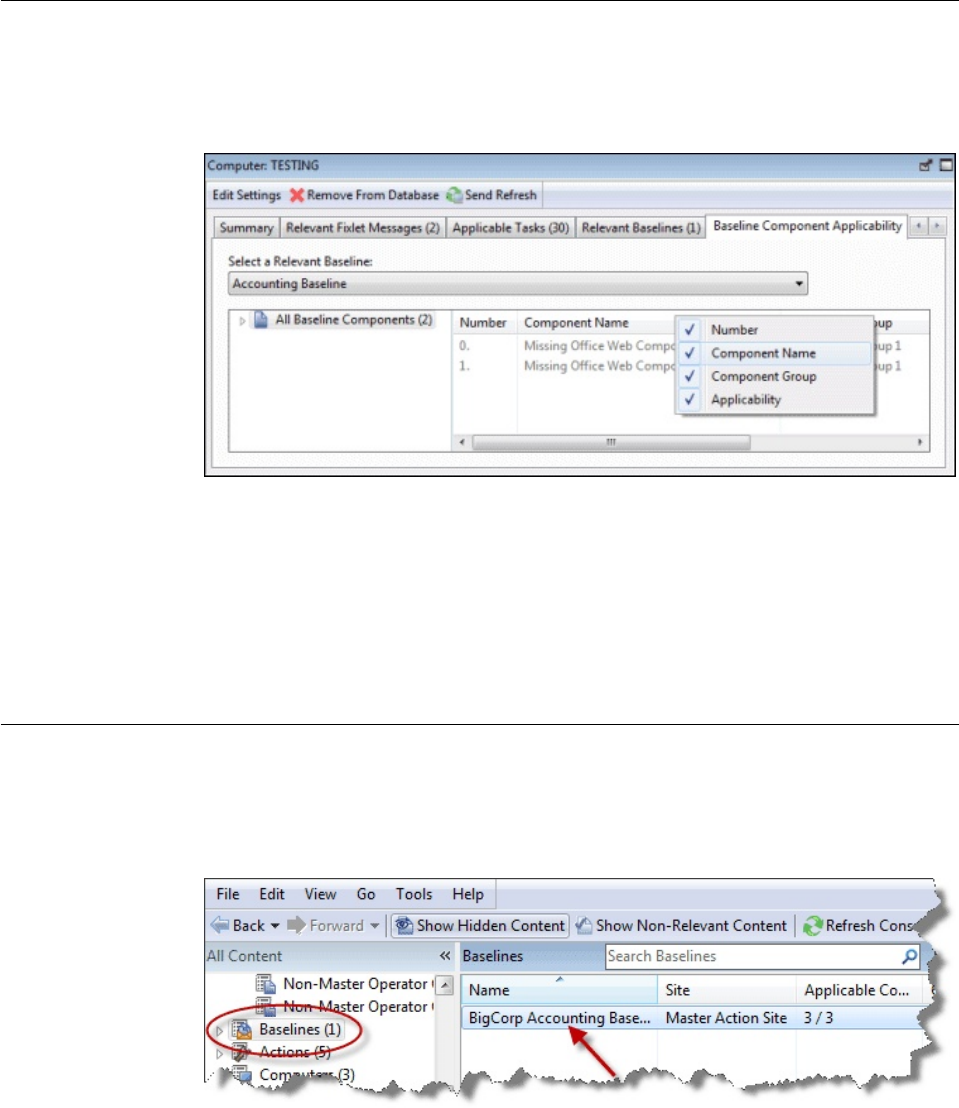
Baseline Component Applicability Tab
The Baseline Component Applicability tab of the Computer document displays a
list of Baseline Components that are applicable to the selected computer.
The components are listed by their number as defined in the Baseline, the name of
the component, the group it is associated with, and whether or not it is relevant to
the specified computer. Right-click the header to see what fields are available to
display and sort by.
This dialog is available by selecting Computers from the Domain Panel navigation
tree, clicking a computer from the List Panel, and clicking the Baseline
Component Applicability tab.
Baseline List and Document
A list of Baselines is displayed when you click Baselines, or any of its child nodes,
from the Domain Panel navigation tree.
A Baseline document is displayed in the Work Area of the Console when you click
an item from this list.
Chapter 18. The Dialogs 153
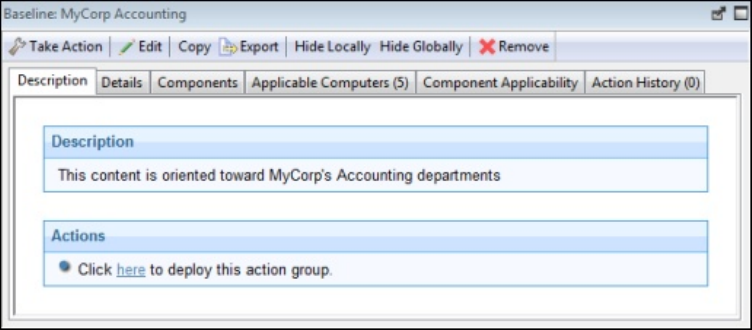
At the top of the Baseline document you find the Baseline name and a toolbar
containing several tools:
vTake Action: Click this button to run the default Actions in this Baseline Group.
vEdit: Open the Edit Baseline dialog to make changes to this Baseline.
vCopy: Open the Create Baseline dialog to make and edit a copy of this Baseline.
vExport: Save this Baseline to import into another Console or deployment or to
edit it in an external editor.
vHide Locally: Hide this Baseline from the Local Console.
vHide Globally: Hide this Baseline from all Consoles. It can be retrieved later by
clicking the Show Hidden Content button on the Console toolbar.
vRemove: Delete this Baseline from the database.
There are several tabs in a Baseline document. They include:
vDescription: An HTML page describing the Baseline and a set of Actions
(implemented as links) that are designed to address the problem described.
vDetails: An HTML page describing the Properties and Relevance clauses behind
the Baseline. At the bottom of the page is a text box to enter a comment to
attach to the Baseline.
vComponents: Lists the Fixlet messages and Tasks that have been grouped into
this Baseline.
vApplicable Computers: Shows which subset of computer components this
Baseline targets. This tab also indicates the current count of Applicable
Computers for instant viewing.
vComponent Applicability: Lists the numbered components of the Baseline. In
the Applicable Computer column, displays the number of computers where the
Baseline component is applicable and following the slash, the total number of
computers where the Baseline is applicable.
vAction History: Shows the history of any Actions that have been invoked by this
Baseline. This tab also indicates the current count of executed Actions for easy
viewing.
To display a Baseline list, click the Baseline icon (or any of its child nodes) in the
Domain Panel navigation tree.
A Baseline document opens whenever you click an item in a Baseline list.
154 IBM BigFix: Console Operator’s Guide
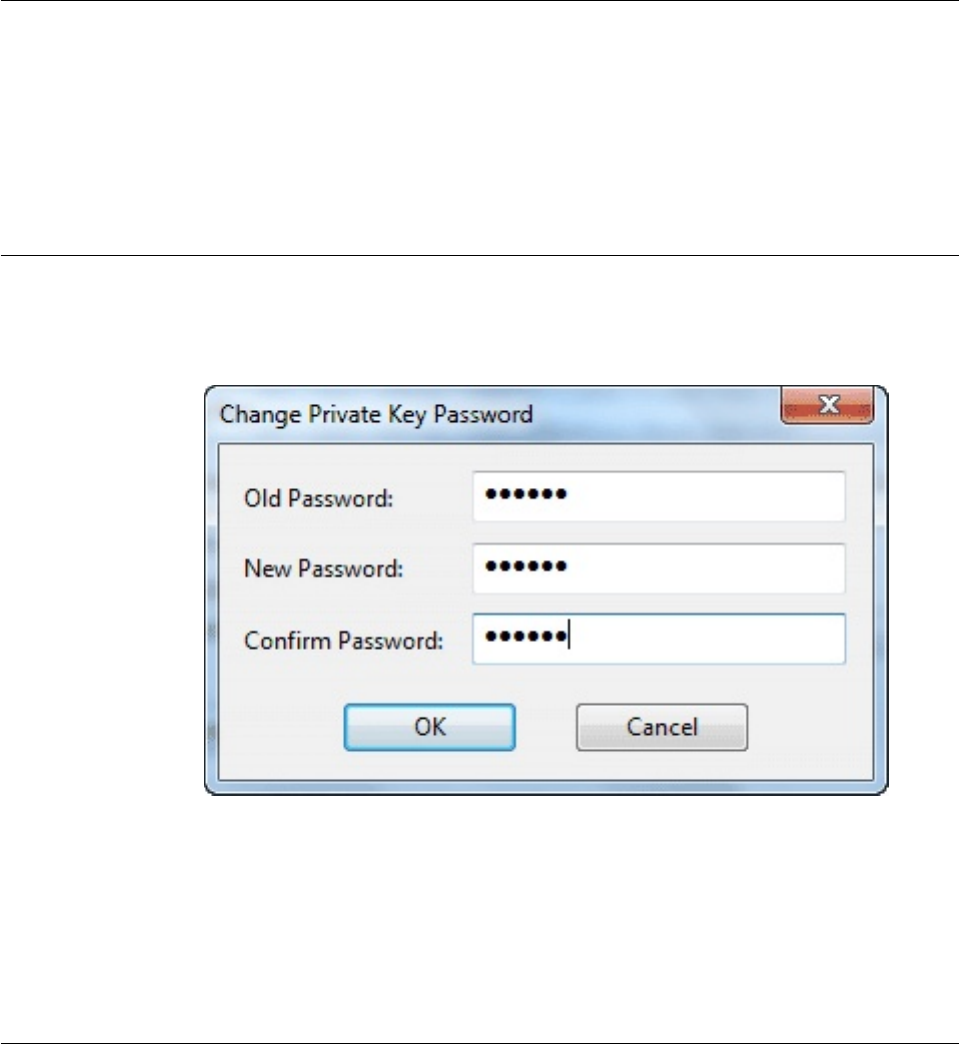
Change Password
The BigFix Console allows you to change the password if you have the correct
authorization. Enter the current password, then enter and validate the new
password.
Note: This dialog is not available if you are using NT Authentication.
This dialog is available when you select File > Change Password.
Change Private Key Password
The BigFix Console allows you to change your private key password.
Enter your current password, then enter and validate the new password.
The value assigned to the password is encrypted, if the server is a Windows
system, or obfuscated, if the server is a Linux system, immediately after you click
the OK button.
This dialog is available when you select Tools > Manage Signing Key > Change
Password.
Comments
BigFix Console Operators can make comments on most of the BigFix objects,
including Fixlets, Tasks, Actions, Computers, and so on. These comments can be
created whenever an object like a Fixlet is selected and displayed in the main
window. Here is how to create a comment for a Fixlet message:
1. Click the Fixlets and Tasks icon in the Domain Panel navigation tree.
2. Right-click a Fixlet and select Add Comment.
Chapter 18. The Dialogs 155
|
|
|
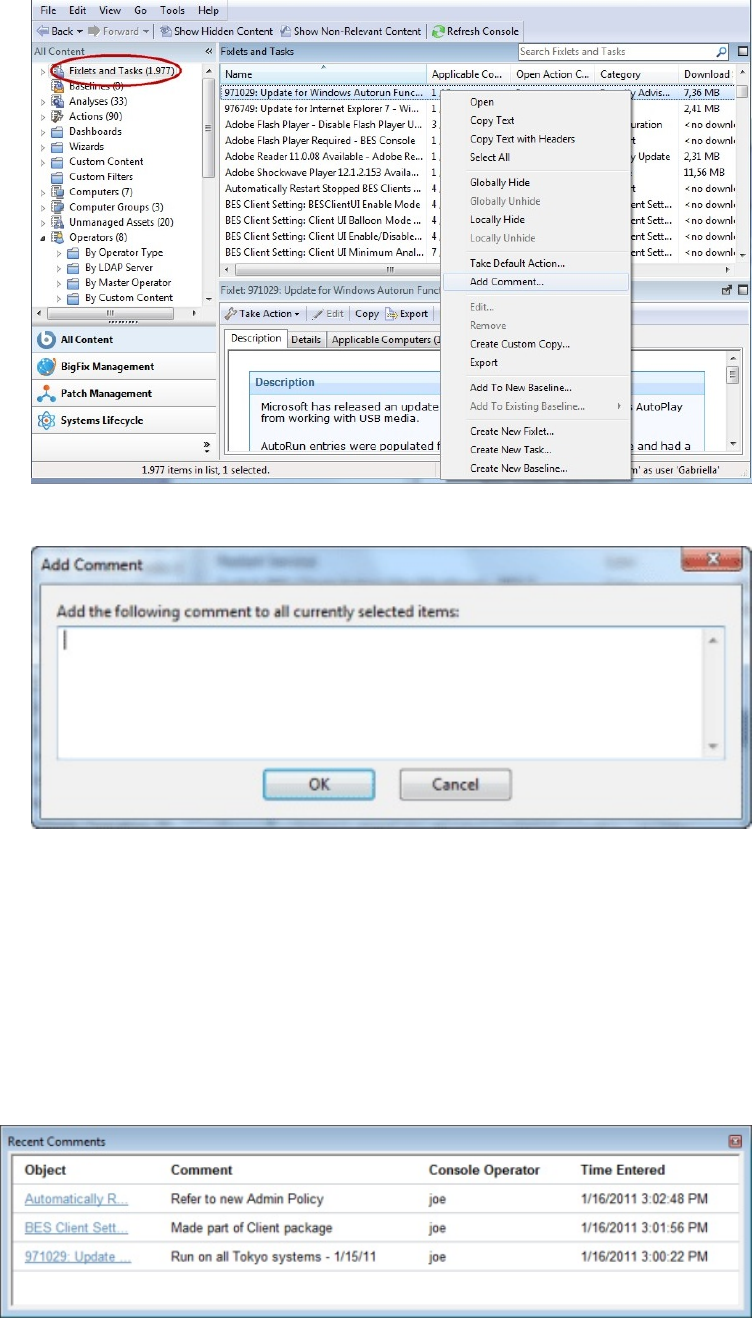
3. Type your comment into the dialog box that opens.
4. Alternatively, you can double-click a Fixlet message, select the Details tab, and
enter your comment at the bottom of the page.
Similarly, you can attach comments to Tasks, Actions, Computers, and Analyses.
These comments can include keywords or operating notes. You might want to have
special information about certain computers, or usage pointers for special Tasks.
This is a free-form field, so you can make up your own rules for commenting.
To view an aggregated list of all comments, select View Recent Comments from
the Tools menu.
156 IBM BigFix: Console Operator’s Guide
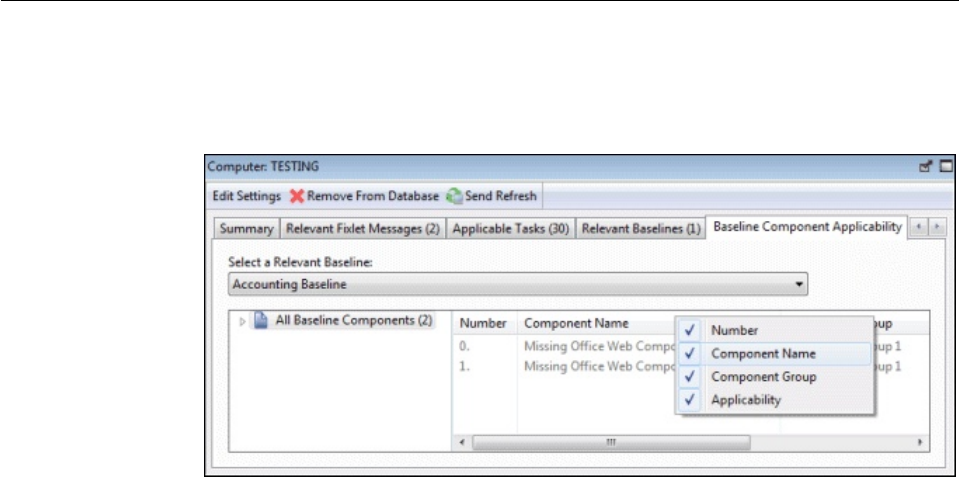
This dialog lists all the comments created to date, sorted by time-stamp, with the
most recent comments at the top. The name of the Console Operator responsible
for the comment is listed next to the description. Each comment contains a link
that opens the original object in the main window, allowing you to view the
description and other aspects of the object.
Component Applicability Tab
The Component Applicability tab of the Baseline document displays a list of how
many computers have been targeted by the specific component.
The components are numbered, corresponding to their order under the
Components tab.
Following the number is the name of the component and then the Applicable
Computer Count. This column is composed of multiple numbers in a form like
'35/50 (4 unknown)'. The first number is the count of computers where the
component is applicable, the second is the total number of computers targeted by
the Baseline.
This dialog is available by choosing the Baseline icon in the Domain Panel
navigation tree, opening an item from the resulting List Panel, and clicking the
Component Applicability tab.
Chapter 18. The Dialogs 157

Components Tab
The Components tab of the Baseline document displays a list of all the component
Fixlet messages and Tasks that have been grouped into this particular Baseline.
Click the links beneath each component to view the source Fixlet or Task, or to see
the actual code behind the Relevance statements and Action scripts.
The components of a Baseline are copies of the original Fixlet or Task, not pointers.
As such, if the underlying Fixlet or Task changes, the Baseline might become out of
sync with the original. If this happens, the message Source Fixlet differs is shown
in the component listing.
This dialog is available by choosing the Baseline icon in the Domain Panel
navigation tree, opening an item from the resulting List Panel, and clicking the
Components tab.
158 IBM BigFix: Console Operator’s Guide

Computer: Action History
The Action History tab provides a listing of all the actions that have been
deployed on the specified computer.
Note that unlike the general action list for all computers available from the main
Actions Tab, this list contains only actions targeted to the selected computer.
The Action History list has options similar to any Action List Panel.
To view more information about a particular action, double-click it. This opens the
corresponding Action document in the Work Area.
This dialog is available by choosing the Computers icon from the Domain Panel
navigation tree and then clicking a computer from the list. Then click the Action
History tab in the Computer document window.
Computer: Applicable Tasks
The Applicable Tasks tab of the Computer document lists all the Tasks that are
relevant to the selected computer.
This filter list is updated in real-time, refreshing its display as Tasks are
reevaluated. You can filter the list by clicking items in the left pane, and sort the
tasks by clicking the appropriate headers.
Chapter 18. The Dialogs 159
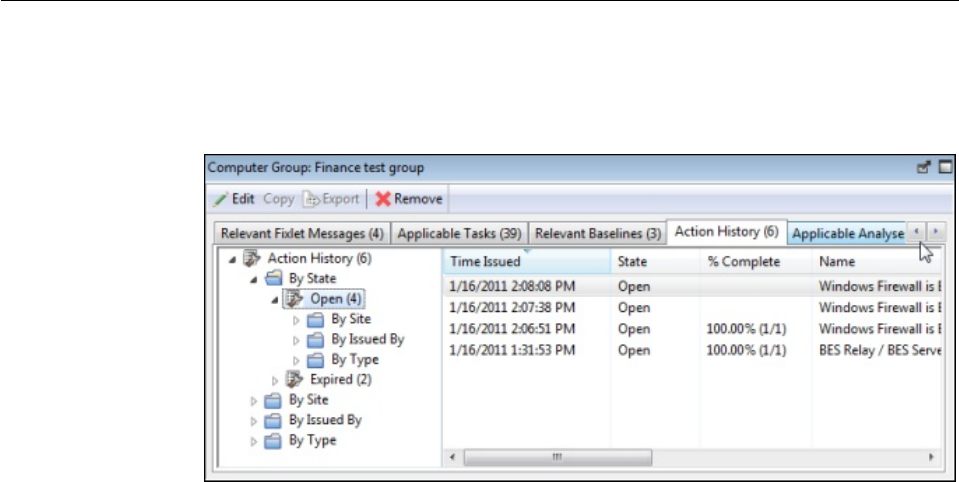
This dialog has the same options as any Task List Panel.
This dialog is available by clicking the Computers icon in the Domain Panel
navigation tree and then clicking a computer from the resulting List Panel. Then
click the Applicable Tasks tab in the Computer document window.
Computer Group: Action History
The Action History tab of the Computer Group document provides a historical
listing of all the actions that target any member of the specified computer group.
This dialog has the same options as any Action History List Panel, but contains
only those Actions that are targeted to the selected Computer Group.
To view more information about a particular Action, double-click it. This opens the
corresponding Action document in the bottom panel.
This dialog is available by clicking the Computer Groups icon in the Domain
Panel navigation tree and clicking a Computer Group from the resulting List Panel.
Then click the Action History tab in the Computer Group Work Area.
160 IBM BigFix: Console Operator’s Guide
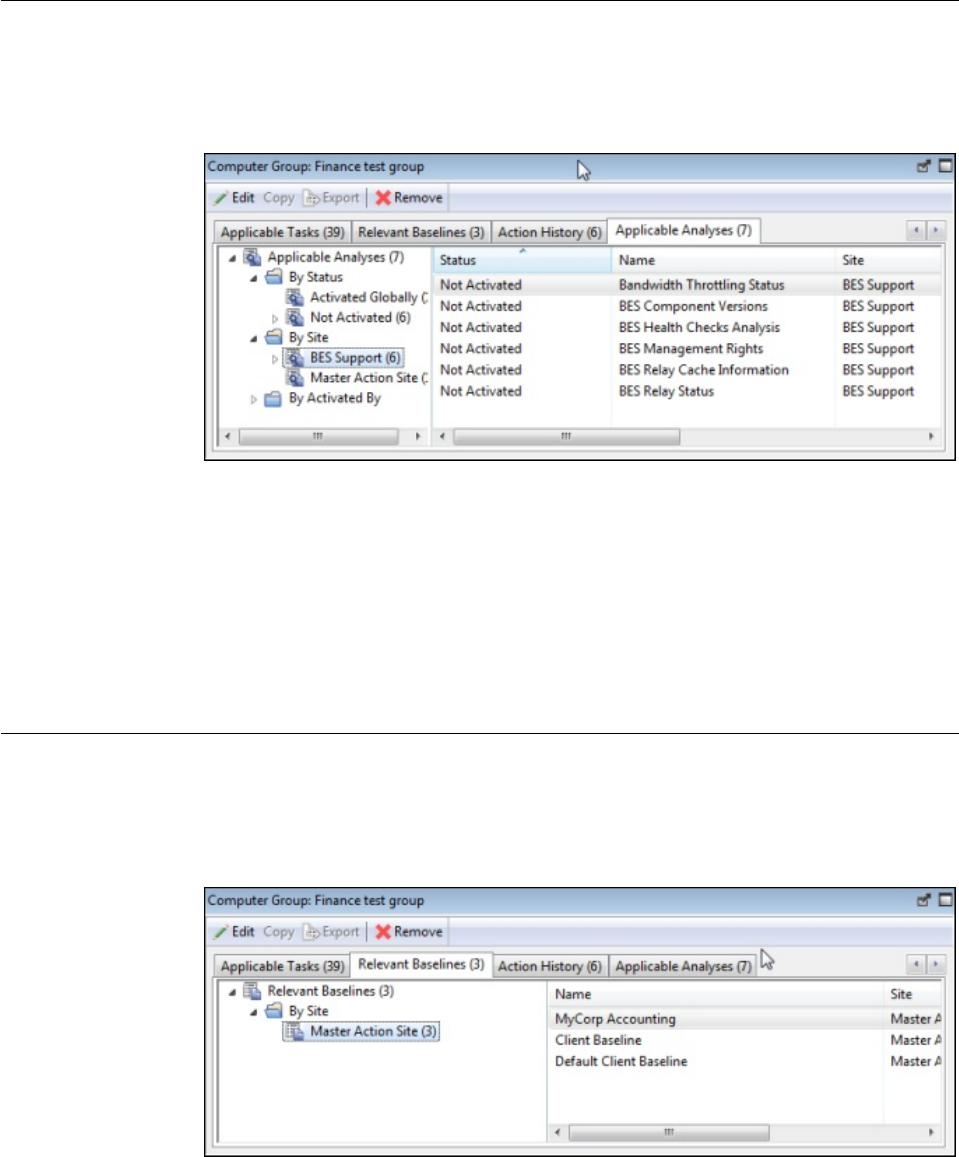
Computer Group: Applicable Analyses
The Applicable Analyses tab of the Computer Group document provides a listing
of all the Analyses applicable to this group and allows you to filter them.
This dialog has the same options as any Analyses List Panel.
To view more information about a particular Analysis, click it. This opens the
corresponding Applicable Analyses document in the bottom panel.
This dialog is available by clicking the Computer Groups icon in the Domain
Panel navigation tree and clicking a Computer Group from the resulting List Panel.
Then click the Applicable Analyses tab in the Computer Group document
window.
Computer Group: Relevant Baselines
The Relevant Baselines tab of the Computer Group document provides a listing
of all the Baselines that have been deployed on the specified Computer Group.
This dialog has the same options as any Baseline List Panel, but contains only
Baselines targeted to the selected Computer Group.
To view more information about a particular Baseline, double-click it. This opens
the corresponding Relevant Baseline document in the Work Area.
Chapter 18. The Dialogs 161
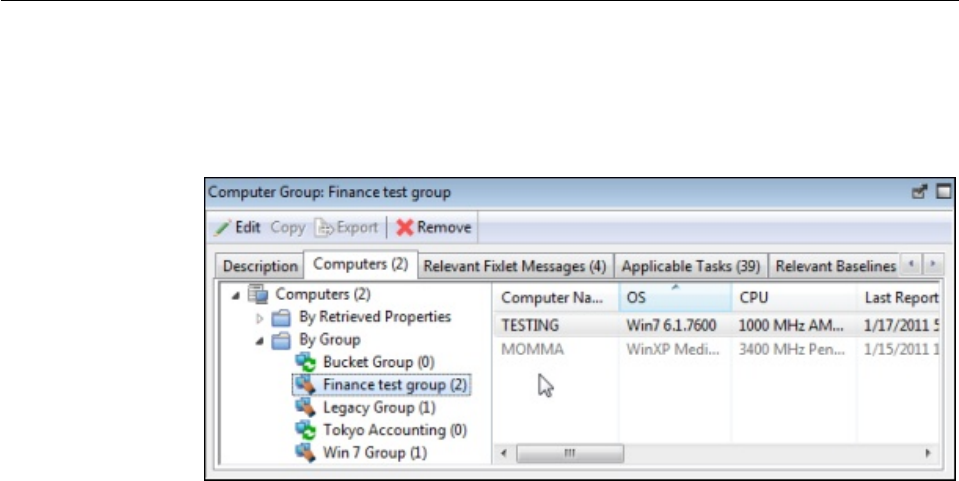
This dialog is available by clicking the Computer Groups icon in the Domain
Panel navigation tree and clicking a Computer Group from the List Panel. Then
click the Relevant Baselines tab in the Computer Group Work Area.
Computer Group: Computers
The Computers tab of the Computer Group document provides a listing of all the
computers that have been manually selected to be a part of the specified Computer
Group.
This dialog is displayed only for Manual Computer Groups. It has options similar to
other Computer lists, but contains only computers belonging to the selected
Manual Computer Group. Note that the number of reporting computers is
available in the tab itself, for viewing at a glance.
To view more information about a particular Computer, double-click it. This opens
the corresponding Computer document in the bottom panel.
This dialog is available by clicking the Computer Groups icon in the Domain
Panel navigation tree and clicking a Manual Computer Group from the List Panel.
Then click the Computers tab in the Computer Group Work Area.
162 IBM BigFix: Console Operator’s Guide
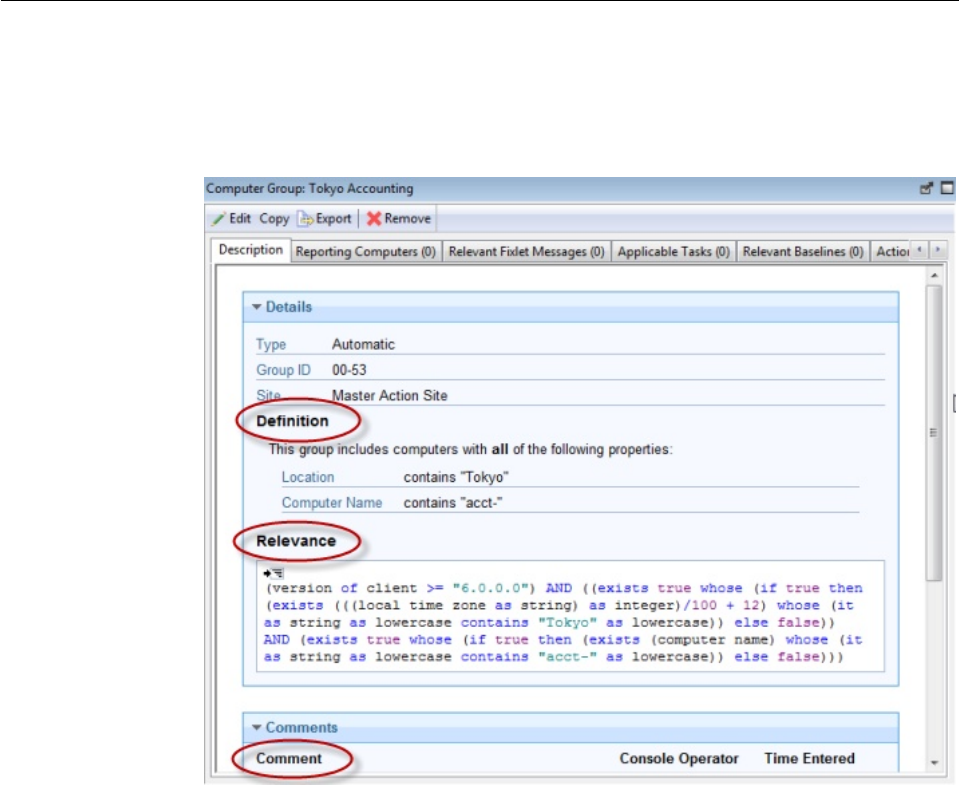
Computer Group: Description
The Description tab of the Computer Group document provides information
about a selected Computer Group. Below is the dialog for an Automatic Computer
Group.
It contains different information depending on whether the group is Automatic or
Manual:
Automatic Computer Groups contain several sections:
vGroup Definition: This is a listing of the properties that specify the inclusion of
a computer into the group. Each is a clause of the form <property>
<relationship> <value>. For example, OS contains "win", creates an Automatic
Computer Group consisting of Windows machines.
vTargeting Relevance: This is the full Relevance expression that implements the
property evaluation described above. Click show indented relevance to see a
formatted version of the expression.
vComments: This is a text box to enter a comment that is attached to the
Computer Group for other operators to view.
Manual Computer Groups only contain a Comment box. The information you
enter here is attached to this Computer Group and become available to other
Console operators.
This dialog is available by clicking the Computer Groups icon in the Domain
Panel navigation tree and clicking a Computer Group from the List Panel. Then
click the Description tab in the Computer Group document window.
Chapter 18. The Dialogs 163
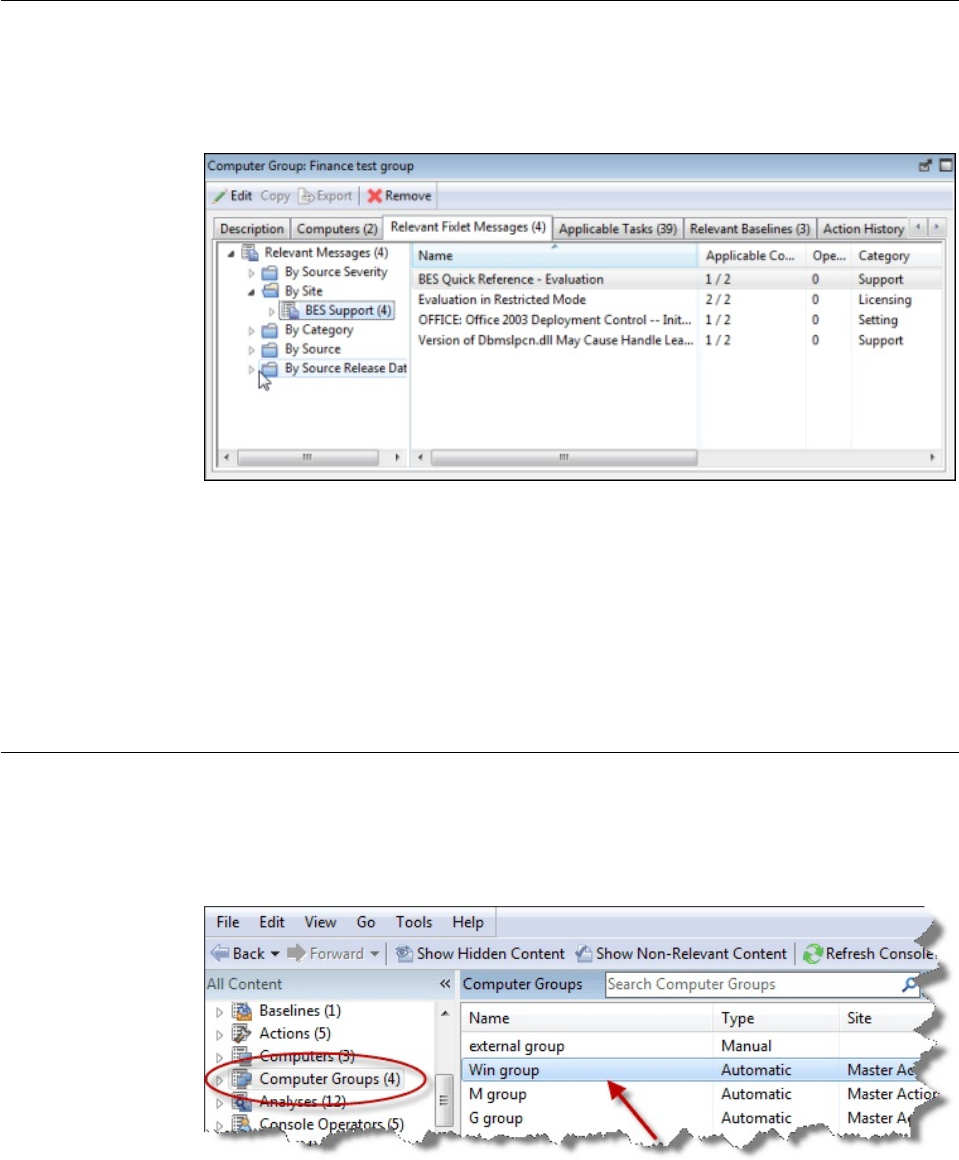
Computer Group: Relevant Fixlet Messages
The Relevant Fixlets tab of the Computer Group document provides a listing of
all the Fixlet messages that have been targeted to the specified Computer Group.
This dialog has the same options as any Fixlet List Panel, but contains only those
Fixlet messages targeted to the selected Computer Group.
To view more information about a particular Fixlet message, double-click it. This
opens the corresponding Relevant Fixlet message document in the Work Area.
This dialog is available by clicking the Computer Groups icon in the Domain
Panel navigation tree and clicking a Computer Group from the List Panel. Then
click the Relevant Fixlets tab in the Computer Group Work Area.
Computer Group List and Document
A list of Computer Groups is displayed when you click Computer Groups, or any
of its child nodes, from the Domain Panel navigation tree.
A Computer Group document is displayed in the Work Area of the Console when
you click any item from this list.
164 IBM BigFix: Console Operator’s Guide
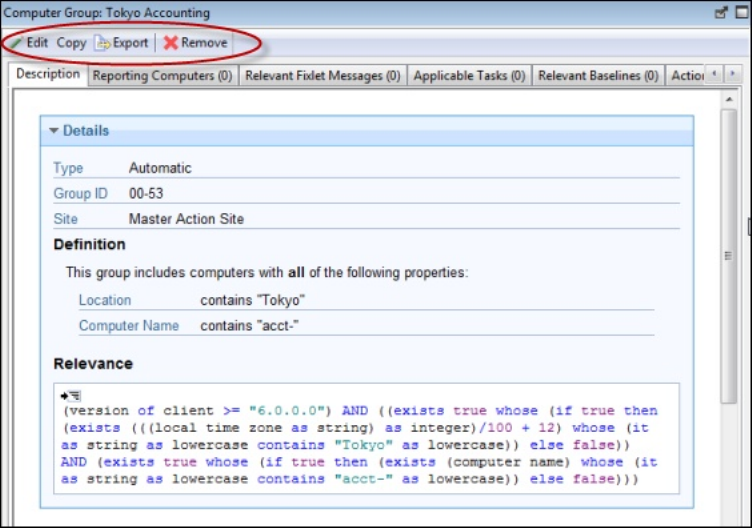
At the top of the Computer Group document is the name of the group. Under that
is the Computer Group toolbar. It includes:
vEdit: Open up a dialog that allows you to edit the criteria for this group.
vCopy: Create a copy of this group and edit it.
vExport: Save this group for editing by an external editor.
vRemove: Delete this group from the list.
There are several tabs in a Computer Group document, and they might differ
according to the group type. They include:
vDescription: For an Automatic group, this tab displays the Group Definition (as
a list of property-associated Relevance expressions), the Targeting Relevance
clause that implements the group definition, and a comment box. For a Manual
group, this tab displays a comment box only.
vReporting Computers: Only displayed for Automatic groups, this tab is a list of
the computers that are currently considered members of the group, based on
properties and Relevance. This is a filter/list panel, allowing you to narrow
down the list by selecting from the filtering folders on the left side.
vComputers: Only displayed for Manual groups, this tab is a list of the
computers that have been manually selected to be members of the group. This is
a filter/list panel, allowing you to narrow down the list by selecting from the
filtering folders on the left side.
vRelevant Fixlet Messages: Lists all the Fixlet messages that apply to this
Computer Group.
vApplicable Tasks: Lists all the Tasks that apply to this Computer Group.
vRelevant Baselines: Lists all the Baselines that apply to this Computer Group.
vAction History: Lists all the Actions that target any member of this computer
group.
vApplicable Analyses: Lists all the Analyses and allows you to filter them by
Computer Group.
Chapter 18. The Dialogs 165
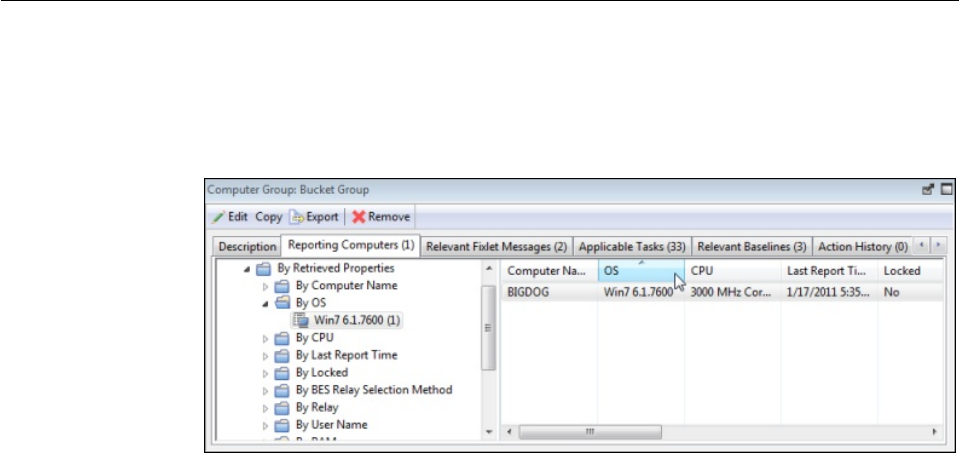
To display a Computer Group list, click the Computer Groups icon (or any of its
child nodes) in the Domain Panel navigation tree.
A Computer Group document is opened whenever you click an item in a
Computer Group list.
Computer Group: Reporting Computers
The Reporting Computers tab of the Computer Group document provides a
listing of all the computers that have been automatically chosen to be a part of the
specified Computer Group because of their property values.
This dialog is displayed only for Automatic Computer Groups. It has the same
options as any Computer List Panel, but contains only computers reporting to the
selected Computer Group.
To view more information about a particular Reporting Computer, double-click it.
This opens the corresponding Computer document in the Work Area.
This dialog is available by clicking the Computer Groups icon in the Domain
Panel navigation tree and clicking an Automatic Computer Group from the List
Panel. Then click the Reporting Computers tab in the Computer Group Work
Area.
166 IBM BigFix: Console Operator’s Guide
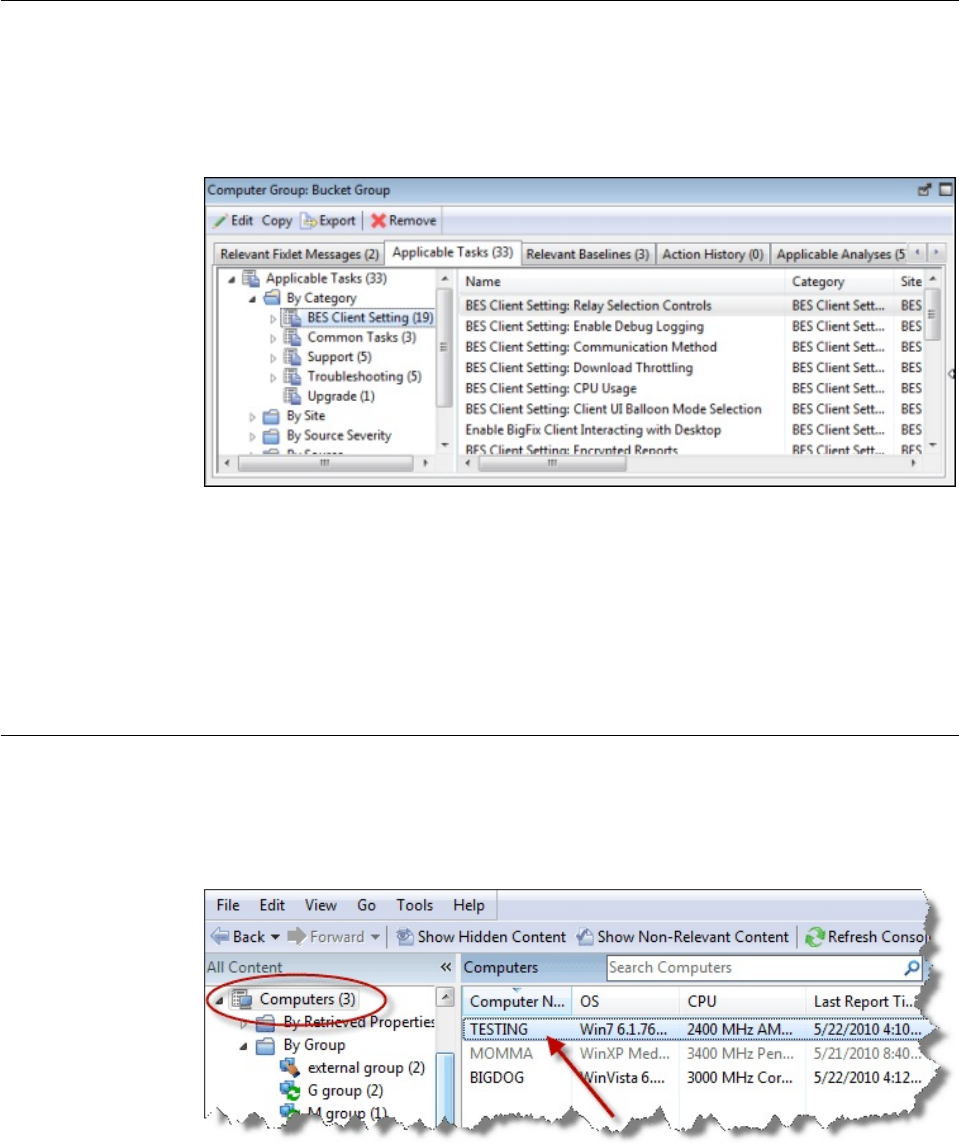
Computer Group: Applicable Tasks
The Applicable Tasks tab of the Computer Group document provides a listing of
all the Tasks that are applicable to one or more computers in the specified
Computer Group.
This dialog has the same options as any Task list. Click any header to sort the list.
To view more information about a particular Task, double-click it. This opens the
corresponding Task document in the Work Area.
This dialog is available by clicking the Computer Groups icon in the Domain
Panel navigation tree and clicking a Computer Group from the List Panel. Then
click the Applicable Tasks tab in the Computer Group Work Area.
Computer List and Document
A list of Computers is displayed when you click Computers, or any of its child
nodes, from the Domain Panel navigation tree.
A Computer document is displayed in the bottom window of the Console when
you click any item from this list. Click the Summary tab to see essential
information about this computer.
Chapter 18. The Dialogs 167
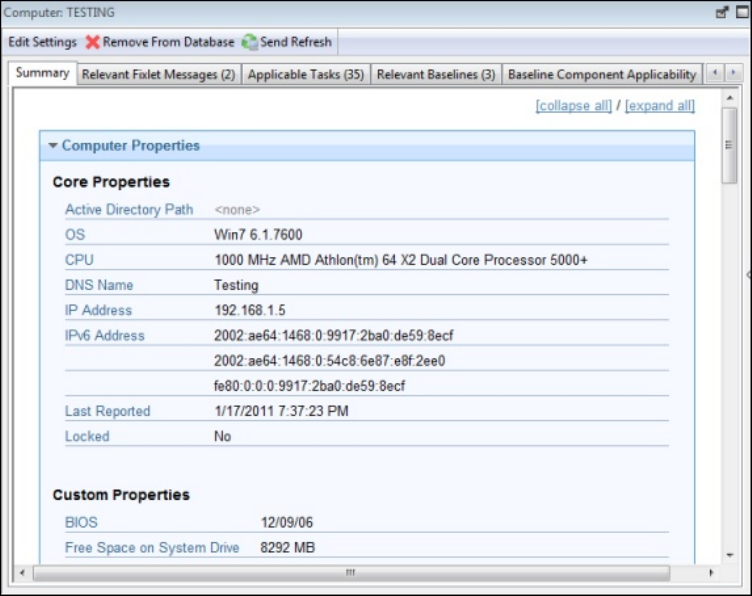
Here you find the name, information about the processor, and operating system.
Scroll down to see more information, including how many Fixlet messages are
relevant to this computer and how many actions are open.
There are several tabs in a Computer document. They include:
vSummary: Displays a list of properties that are being retrieved from this
computer, as well as the Client Relay Status, Group Memberships, Custom Sites,
Settings, and Comments.
vRelevant Fixlet Messages: A list of the Fixlet messages that are currently
relevant on this computer. These can be narrowed down using the filter tree in
the left panel, then sorted by clicking the column headers. The current number
of relevant messages is indicated in the tab itself, so you can see it at a glance.
vApplicable Tasks: Lists the Tasks that apply to this computer. The current
number of tasks is indicated in the tab.
vRelevant Baselines: Lists the Baseline items (Fixlets and Tasks) that have been
assigned to this computer. The current number of baselines is indicated in the
tab.
vBaseline Component Applicability: Shows which components of specified
Baselines are applicable to this computer.
vAction History: Shows which Actions have been applied to this computer. The
current number of Actions is indicated in the tab.
vManagement Rights: Displays the names of the authorized operators for this
computer. The current number of operators is indicated in the tab.
A computer list is displayed when you click the Computers icon (or any of its
child nodes) in the Domain Panel navigation tree.
168 IBM BigFix: Console Operator’s Guide
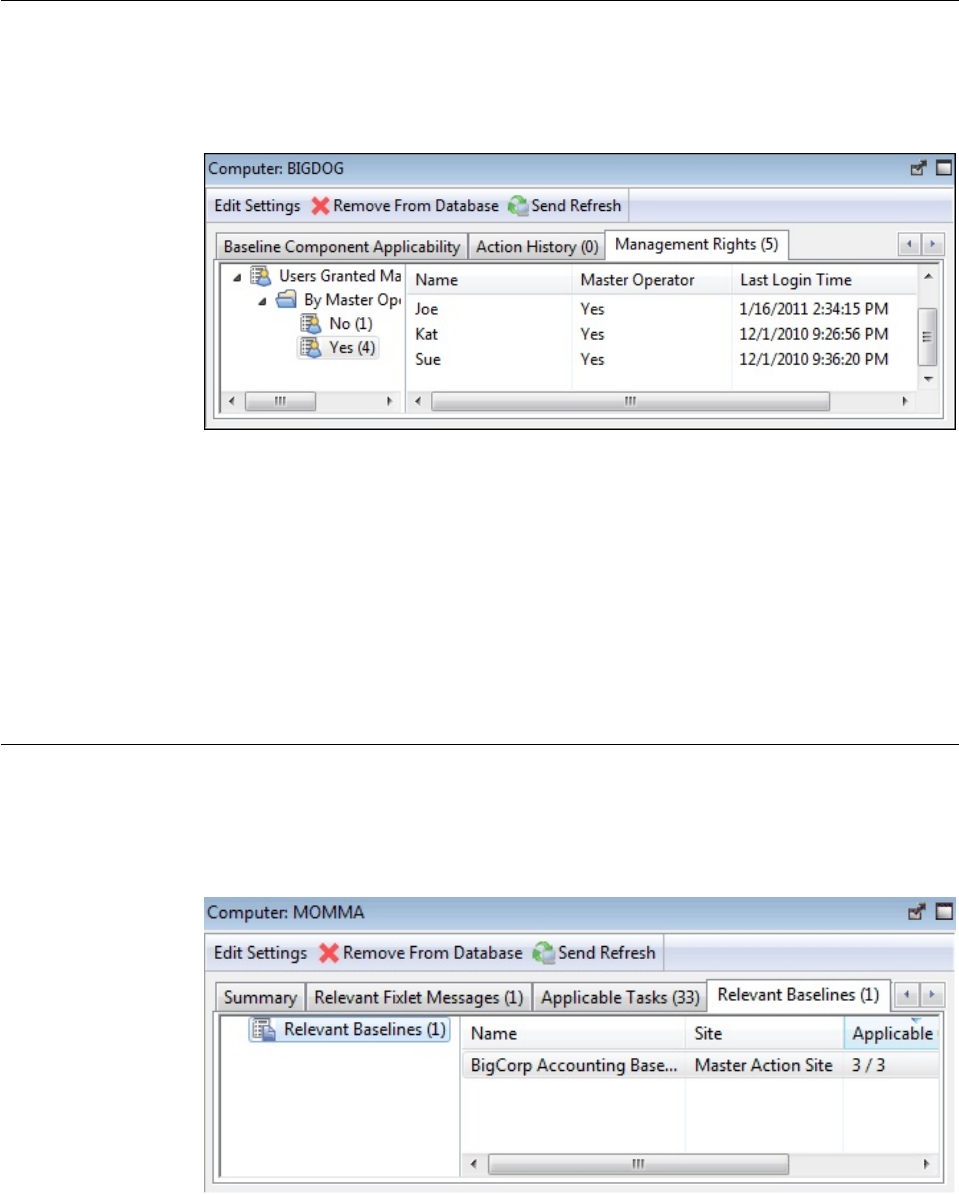
A Computer document is opened whenever you click an item in any list of
Computers.
Computer: Management Rights
The Management Rights tab of the Computer dialog lists the operators who are
currently granted management rights to apply actions to the specified computer.
You can filter this list by using the filter tree in the left panel. The list has three
headers that you can use to sort the list:
vName: The name of the Console operator who has been granted rights.
vMaster Operator: A Yes or No flag that indicates if the rights manager is also a
Master Operator.
vLast Login Time: The last time this operator logged in to the BigFix System
This dialog is available by clicking the Computers icon in the Domain Panel
navigation tree and then clicking a computer in the resulting List Panel. Then click
the Management Rights tab in the Work Area below.
Computer: Relevant Baselines
The Relevant Baselines tab of the Computer document lists all the Baselines that
are applicable to the selected computer.
This filter/list is updated in real-time, refreshing its display as Baselines are
reevaluated. The number of Baselines that are currently relevant is listed in the tab
Chapter 18. The Dialogs 169
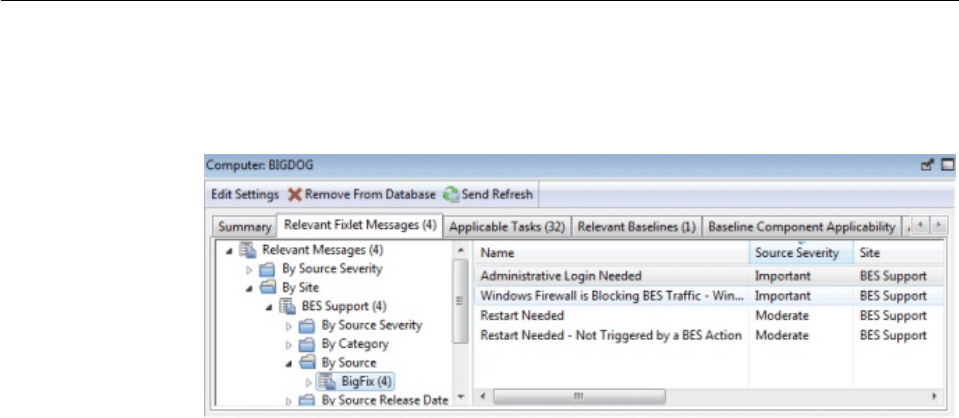
itself for easy viewing. Because Baselines contain content such as Fixlets that are
targeted to computers based on relevance, different Baselines might apply to
different computers, depending on current applicability.
This dialog has the same options as any Baseline List Panel, and can be sorted by
the same headers. You can open and view individual Baselines by double-clicking
them from this list.
This dialog is available by clicking an item in any Computer list. Then click the
Relevant Baselines tab in the Computer Work Area.
Computer: Relevant Fixlet Messages
The Relevant Fixlet Messages tab of the Computer document lists all the Fixlet
messages that are relevant to the selected computer.
This filter list is updated in real-time, refreshing its display as Fixlet messages are
reevaluated. The number of Baselines that are currently relevant is listed in the tab
itself for easy viewing.
This dialog has the same options as any Fixlet List Panel and can be sorted by the
same headers.
This dialog is available by clicking the Computers icon in the Domain Panel
navigation tree and clicking a computer from the List Panel. Then click the
Relevant Fixlet Messages tab in the Computer Work Area.
170 IBM BigFix: Console Operator’s Guide

Computer Subscriptions Tab
The Computer Subscriptions tab of the Sites document lets you establish criteria
for subscribing Clients to the specified site.
There are three buttons available for external sites.
vAll computers. Subscribe all available clients to the specified site.
vNo computers. Do not subscribe any clients to the site.
vComputers which match... Set criteria for subscription based on client
properties. This is a flexible technique to subscribe only those computers that
satisfy the properties you specify in a property / operator / value trio. You can
select any or all from the pull-down menu to OR or AND the criteria together.
Use the plus button to add another criterion and the minus button to delete one.
For custom sites, there is another button.
vComputers subscribed via ad-hoc custom site subscription actions. With this
option all computers start out unsubscribed. To subsequently subscribe a
computer, you must display the list of computers (click Computers from the
Domain Panel navigation tree) and then right-click the set of computers you
want. From the context menu, select Modify Custom Site Subscriptions.
Chapter 18. The Dialogs 171
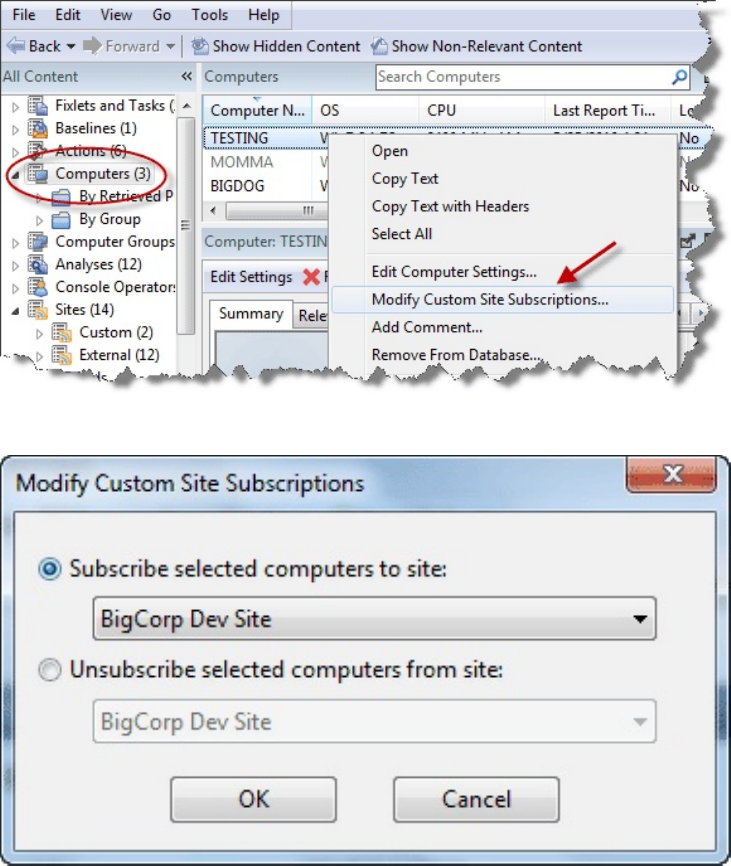
From the resulting dialog, select sites to subscribe or unsubscribe.
Only those sites where the ad-hoc option has been set are available for
subscription in the pull-down menu. Note that this dialog also allows you to
unsubscribe computers from an ad-hoc grouping.
This dialog is available by clicking the Sites icon in the Domain Panel navigation
tree, clicking an item from the resulting List Panel, and then clicking the Computer
Subscriptions tab.
172 IBM BigFix: Console Operator’s Guide
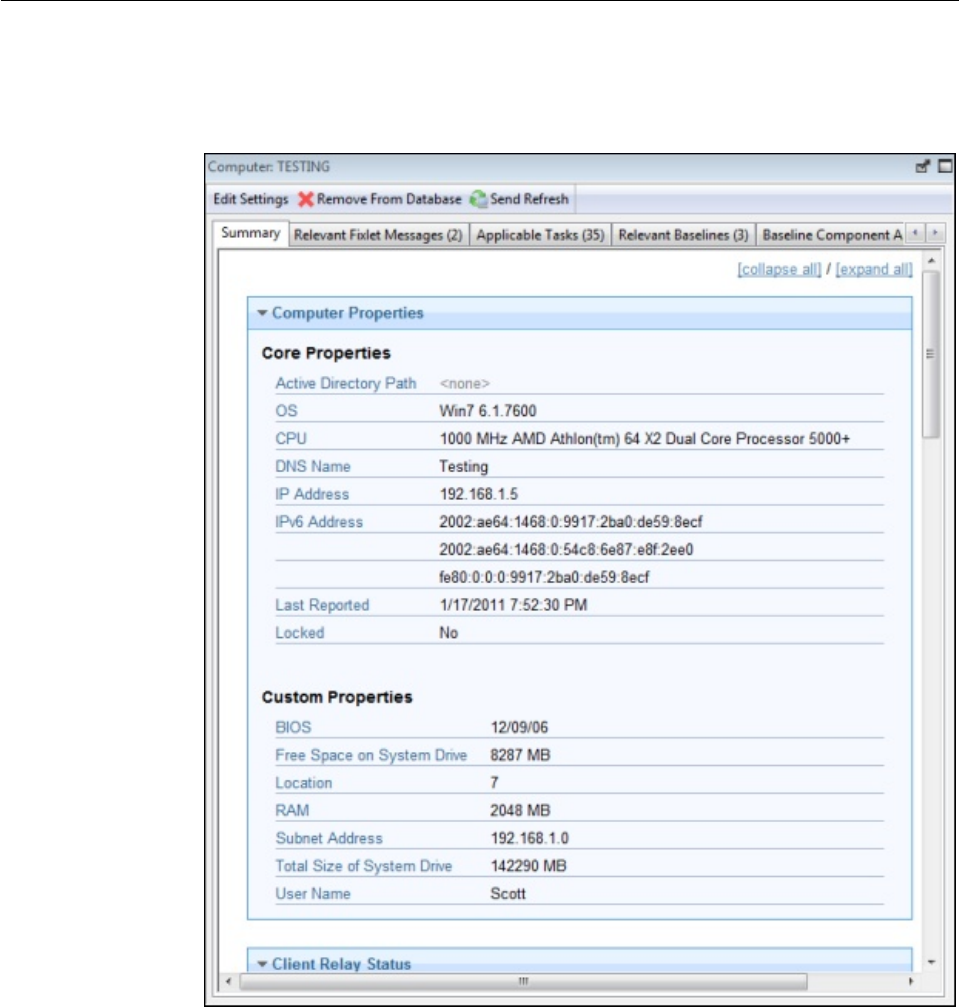
Computer: Summary
The Computer Summary tab lists several items of interest, including Properties,
Relay status, Grouping, Custom Sites, Settings, and more.
The Properties section of the Summary lists various properties of the given
computer, derived from Relevance Expressions. These properties help you define
subsets, sorting fields, reports, and grouping criteria for the various client
computers under your administration.
The default properties include, but are not limited to:
Core Properties
vActive Directory Path: The position of the BigFix Client within the Active
Directory hierarchy.
vOS: The operating system of the given computer.
vCPU: The speed and type of CPU.
Chapter 18. The Dialogs 173
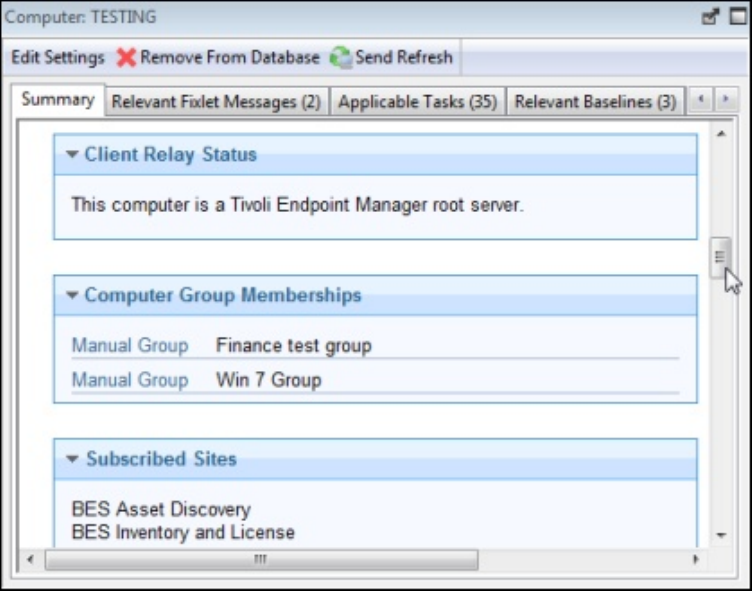
vDNS Name: The name of the computer.
vIP Address: The current IP Address of the computer.
vIPv6 Address: The version 6 IP Addresses of the computer
vLast Reported: The time that the computer last reported.
vLocked: The locked status (Yes or No) of each computer.
Custom Properties
vBIOS: The version and date of the Basic Input/Output System.
vFree Space on System Drive: How much space is available on drive C of the
given computer.
vRAM: The amount of RAM in the given computer.
vSubnet Address: The subnet IP Address of the given computer.
vTotal Size of System Drive: The total size of the drive containing the operating
system on the given computer.
vUser Name: The name of the BigFix Client user.
You can find out more about these predefined properties in the sections on
computer properties and Relevance Expressions.
Scroll down to see the other sections of the Computer Summary.
vClient Relay Status identifies the status of the chosen computer as a Server,
Relay, or Client.
vComputer Group Membership lists any groups, automatic or manual, that this
computer is a member of.
vSubscribed Sites lists any Sites that this computer is subscribed to, including
external sites, operator sites, and custom sites.
174 IBM BigFix: Console Operator’s Guide
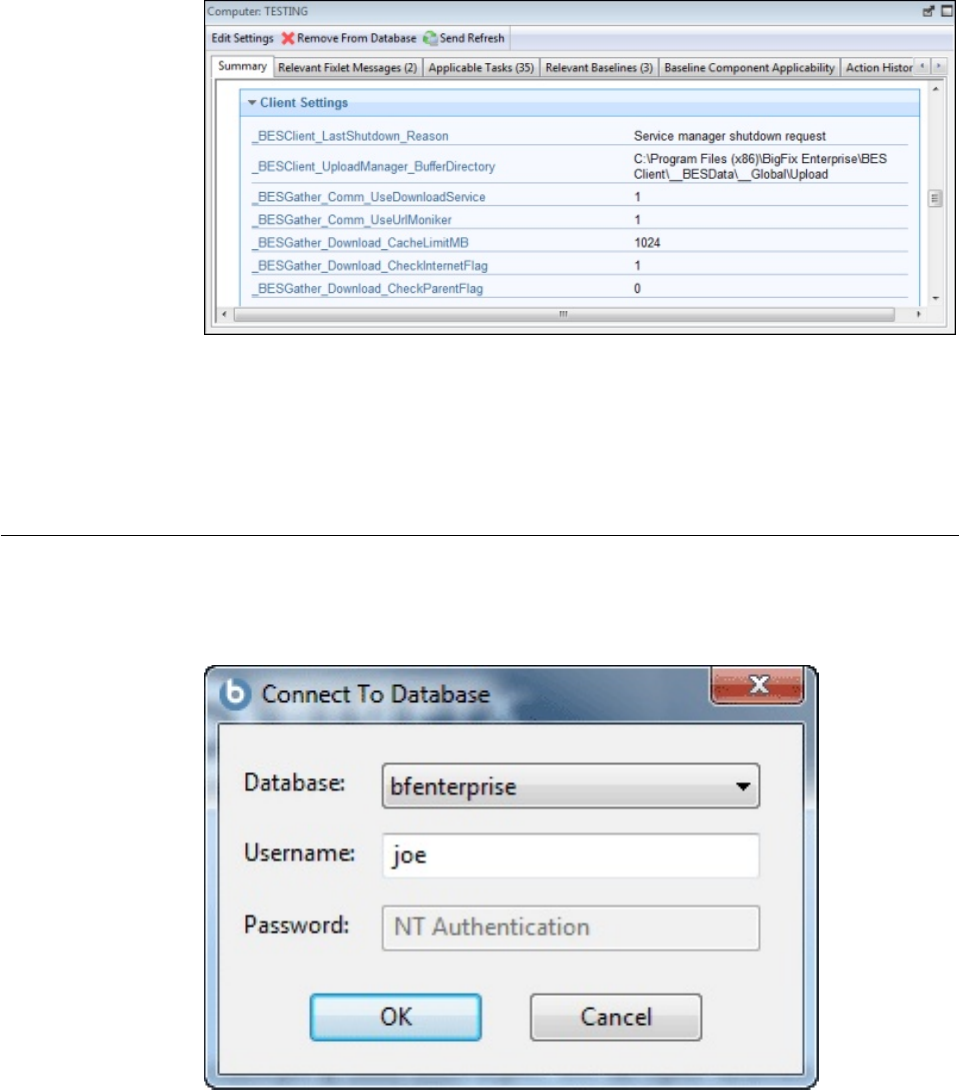
The following sections contain a list of Settings for this computer, including Client,
Relay, Server, Gather, and WebReport settings and the versions of the BigFix
software running on this computer.
At the bottom of the page is a text box where you can enter comments that to be
attached to this computer for future reference.
This dialog is available by clicking the Computers icon in the Domain Panel
navigation tree and clicking a computer from the right-hand List Panel. Then click
the Summary tab in the Computer Work Area.
Connect to Database
The Connect to Database dialog opens when you start the BigFix Console.
It lets you select which Database you want to manage.
Database: Select a database from the pull-down menu.
Chapter 18. The Dialogs 175
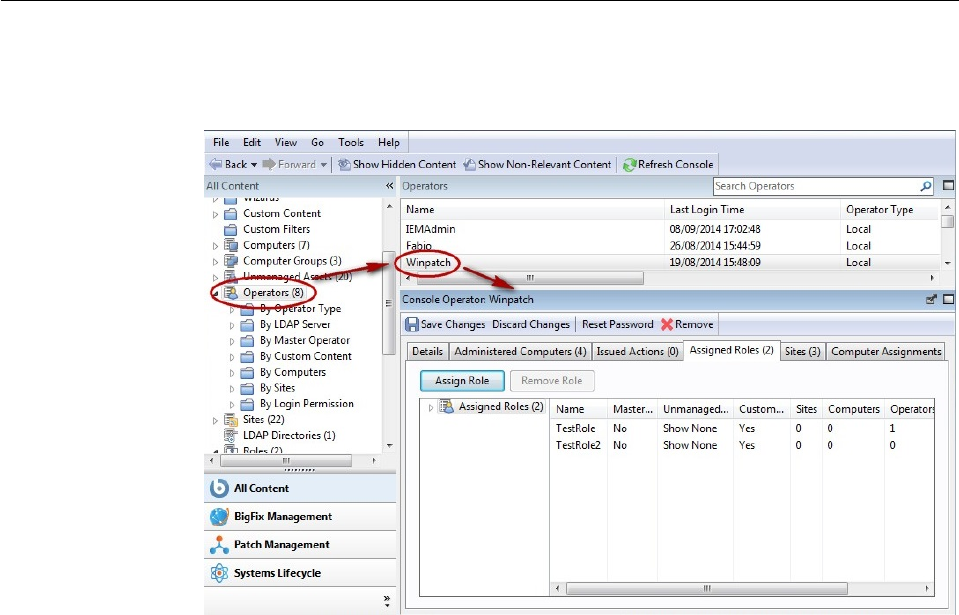
Username: Enter the user name that allows you to access the database. The set of
allowed users is maintained by the BigFix Site Administrator using the BigFix
Administration Tool.
Password: Enter the password that corresponds to the user name above. In some
cases, NT will authenticate for the user. If this is the case, the password box is
grayed out.
This dialog is available when launching the BigFix Console.
Console Operator: Assigned Roles Tab
The Assigned Roles tab of the Operators window allows you to associate roles
with the specified Console operator.
Click Assign Role to bring up a dialog with your currently unassigned roles listed
for selection. You can also delete roles from this operator by selecting them from
the list and clicking Remove Role.
Make sure to click Save Changes before you dismiss this window.
This dialog is presented when you select someone from the Operator list or when
you create an operator from scratch with one of the Operator creation commands
available in the Tools menu.
176 IBM BigFix: Console Operator’s Guide

Console Operator: Details Tab
The Details tab of the Operators window lets you define the permissions for each
operator in your purview. Select an operator from a list and then click the Details
tab.
From this interface, you can grant a user Master Operator permissions. You can
also determine whether or not you want to show this operator the issued actions
of other operators, whether you want this operator to run actions or reboot on
computers, create custom content, and see unmanaged assets. You can also set
permissions to access the BigFix Console and REST API.
Make sure to click Save Changes before you dismiss this window.
This dialog is presented when you select someone from the Operator list or when
you create an operator from scratch with one of the Operator creation commands
available in the Tools menu.
Chapter 18. The Dialogs 177
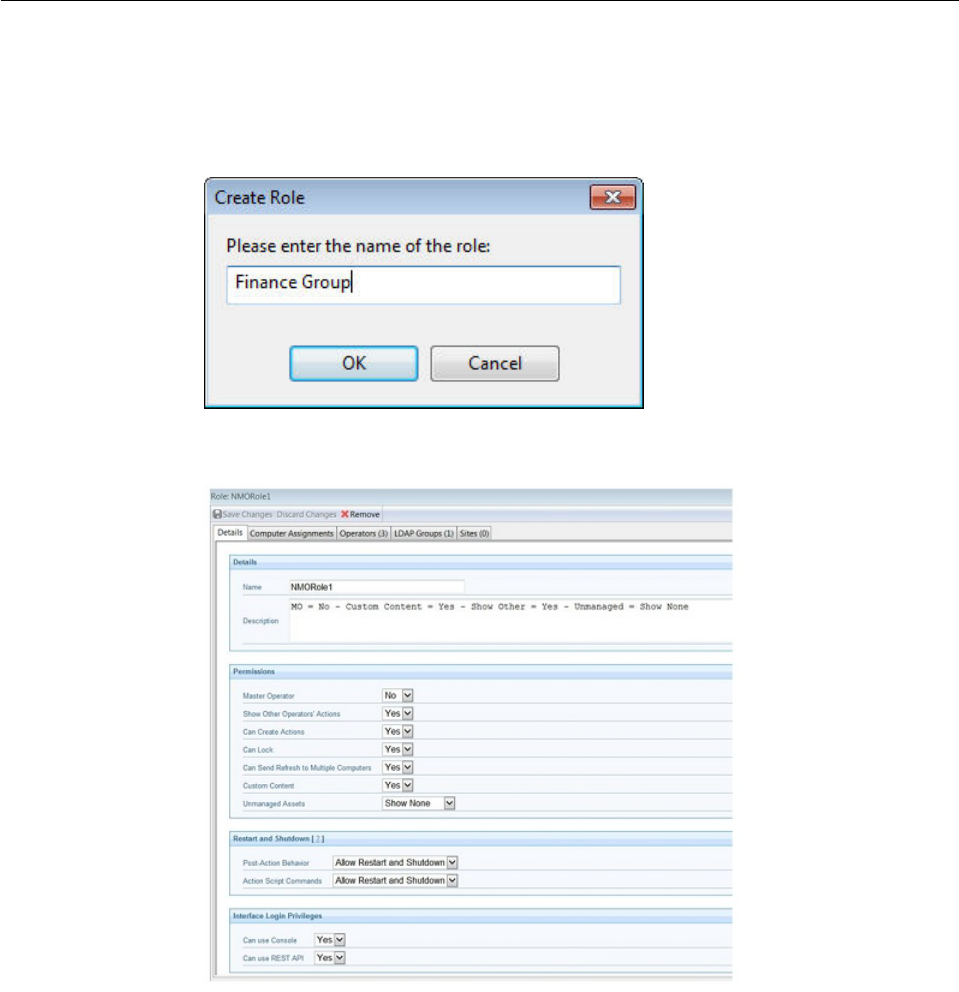
Create Role
This dialog allow you to add Roles to the Console that can then be shared by other
Operators. To start specifying a role, select Tools > Create Role and enter a name
for the role.
The rest of the definition happens through a tabbed document interface.
Set the basic permissions for the role through the Details tab. Decide which
computers will be associated with this role using the Computer Assignments tab.
You can select specific users who will assume this role through the Operators tab.
You can also add entire groups of users with the LDAP Groups tab. Finally, you
can assign specific sites to be the purview of this role with the Sites tab.
This dialog is presented when you select Tools > Create Role.
178 IBM BigFix: Console Operator’s Guide
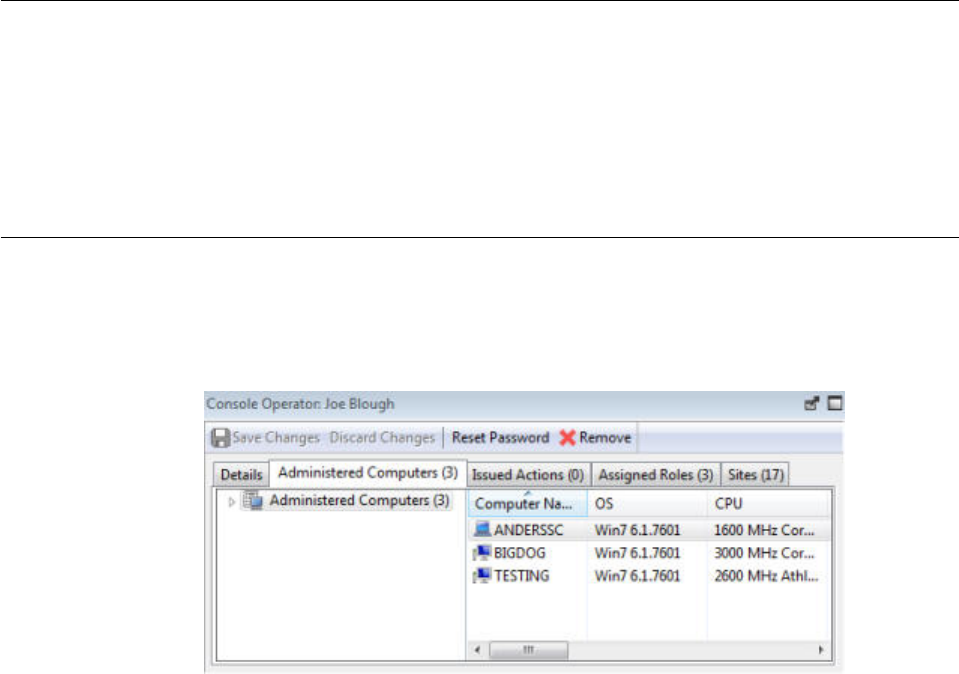
Help for the BigFix Console
Show the help files for the BigFix Console. These online files provide a tutorial, a
description of the program, and a full-text search capacity. To get started, click
here.
This dialog is available by selecting:
vHelp > Contents
Console Operator: Administered Computers
The Administered Computers tab of the Console Operator document displays a
filter/list of all the computers administered by the selected operator.
Note that the number of computers is displayed in the tab itself for viewing at a
glance. As with any Computer List Panel, you can filter and sort it by retrieved
properties and groups. This means you can use your own custom-created
properties or groupings to parcel out administrative rights. You might use a
retrieved property, for example, to match up specific applications to experts in
your organization. Or you could connect departmental IT managers to their own
domains, automatically.
This list is similar to other computer lists in the Console, but it is specific to the
selected operator, letting you focus on one person at a time.
This dialog is available by clicking an operator from any Console Operator list and
selecting the Administered Computers tab.
Chapter 18. The Dialogs 179
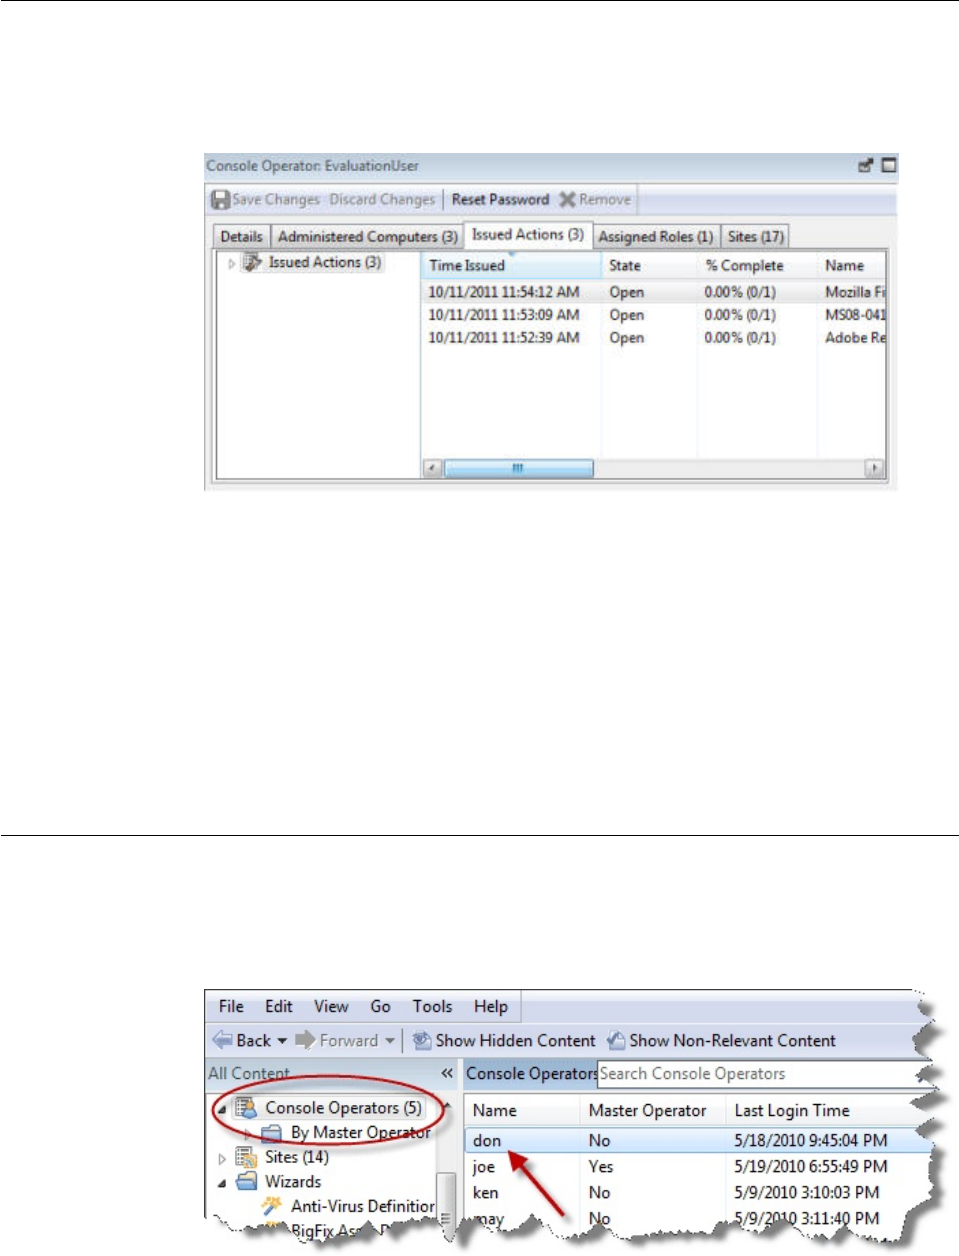
Console Operator: Issued Actions
The Issued Actions tab of the Console Operator document displays a filter/list of
all the Actions that have been deployed by the selected operator.
At the top of the dialog is the name of the operator. As with any Action list, you
can filter and sort it by various properties, including State (open, expired) and Site.
The current number of issued actions for this operator is displayed in the tab itself
for easy viewing.
This list is similar to other Action lists in the Console, but it is specific to the
selected operator, letting you focus on one person at a time. This interface also
allows you to stop an action if it hasn't completed. Right-click the action you want
to stop and select Stop Action from the pop-up menu.
This dialog is available by clicking an operator from any Console Operator list and
selecting the Issued Actions tab.
Console Operator List and Document
A list of Operators is displayed when you click Console Operators, or any of its
child nodes, from the Domain Panel navigation tree.
A Console Operator document is displayed in the Work Area of the Console when
you click any item from this list.
180 IBM BigFix: Console Operator’s Guide
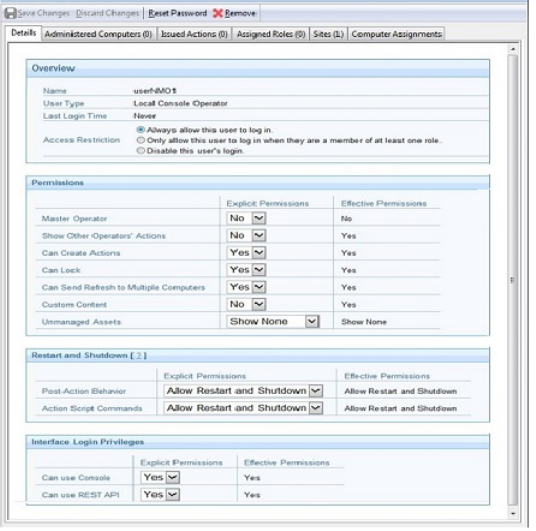
At the top of the Console Operator document is the name of the operator. The tabs
underneath display at a glance how many computers are being administered by
this operator and how many actions this operator has issued.
The tabs in a Console Operator document include:
vDetails: A window outlining the permissions for this operator, including master
operator, showing other operator actions, permissions to create action, to lock
computers, to send refreshes to computers, to manage custom content and list
unmanaged assets.
You also decide to influence the ability of the operator to trigger restart and
shutdown as Post-Action or to include them in BigFix Action Scripts. Depending
on the configuration that you set for a specific operator for shutdown and
restart, the radio button in the Take action panel might be disabled for that
operator. This configuration has no effect on actions with type other than BigFix
Action Script.
You can also set permissions to access the BigFix Console and REST API.
vAdministered Computers: A typical filter/list window containing all the
computers under this operator's administration.
vIssued Actions: Shows what Fixlet actions have been applied by this Console
Operator.
vAssigned Roles: Lists those roles associated with this operator.
vSites: Lists those sites that can be administered by this operator.
To display this Console Operator list, click the Console Operators icon (or any of
its child nodes) in the Domain Panel navigation tree, then select an operator to
view. After making any changes, make sure to click the Save Changes button.
Chapter 18. The Dialogs 181
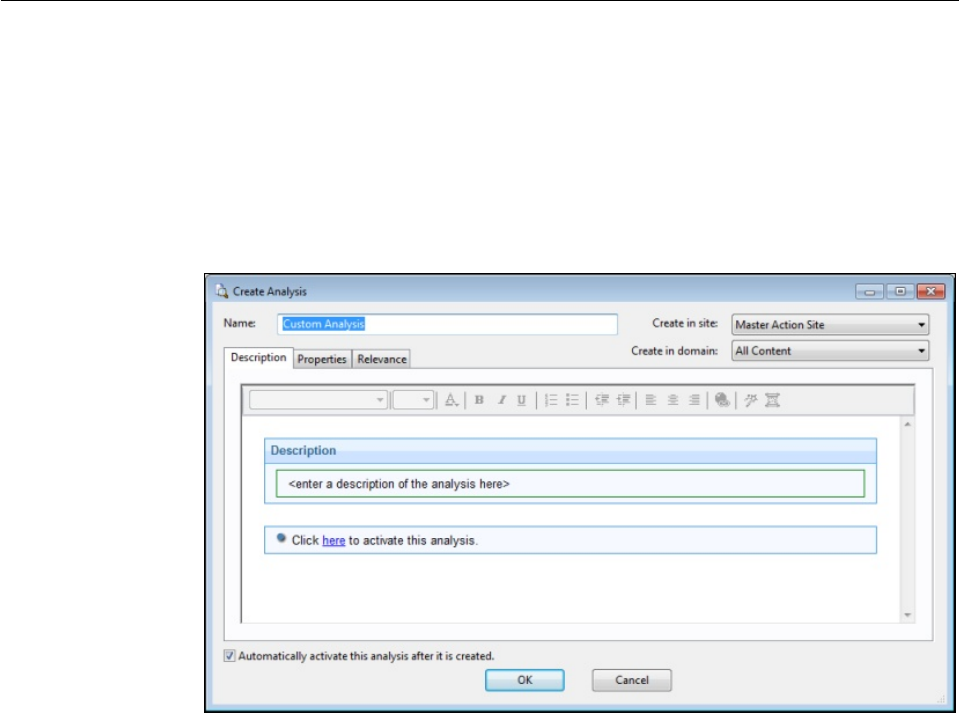
Create Analysis
The Create Analysis dialog lets you deploy your own custom Analyses to monitor
and audit properties across your managed network. You can create an Analysis
from scratch or you can edit an existing custom Analysis by selecting it from the
list and choosing Edit > Edit Custom Analysis.
To create an original Analysis, choose Tools > Create New Analysis. The Create
Analysis dialog opens.
There are three items at the top to help you identify your Analysis:
vName: Enter the name of your custom Analysis.
vCreate in site: From the pull-down menu, select a site (typically the Master
Action Site) to host the Analysis.
vCreate in domain: From the pull-down menu, select the Domain you want to
house the Analysis.
Beneath these data fields, there are three tabs:
vDescription: Create a user-readable title and message to accompany the Analysis
you want to run. This is an HTML page, and you can use the text editing tools
at the top to adjust the look of your Analysis.
vProperties: Specify retrieved client properties for your Analysis. Click the Add
Property button, enter a name and a relevance clause. You can also specify an
evaluation period for this property.
vRelevance: Specify the target client computers for your custom Analysis using a
Relevance clause. The Analysis is applied to all computers where the Relevance
clause evaluates to TRUE.
At the bottom of this dialog is a check box:
vAutomatically activate this analysis after it is created: Check this box if you
want to immediately propagate this Analysis when clicking the OK button.
Leaving this blank lets you describe your Analysis without actually activating it.
182 IBM BigFix: Console Operator’s Guide

You can create a new Analysis by selecting Tools > Create New Analysis, or by
right-clicking in the Analysis window and selecting Create New Analysis from the
context menu.
You can edit your existing custom Analyses by right-clicking on them and selecting
Edit from the pop-up menu.
Create Analysis Description Tab
The Description tab of the Create Analysis dialog lets you define the html page
for your custom Analysis.
Enter the description of your custom Analysis in the first box. You can customize
the second box as well, but the existing text is quite standard.
You can create a new Analysis by selecting Tools > Create New Analysis, or you
can edit a custom Analysis by right-clicking it and selecting Edit Custom Analysis
from the context menu. To clone and edit an existing Analysis, first right-click it,
select Export from the context menu to save it, then select File > Import to bring it
back in for editing.
Chapter 18. The Dialogs 183
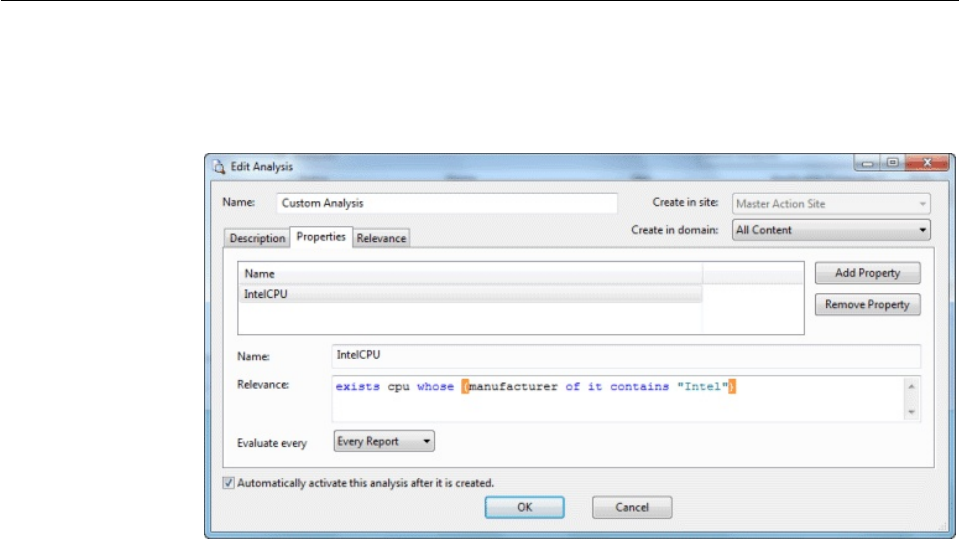
Create Analysis Properties Tab
The Properties tab of the Create Analysis dialog lets you define the properties you
want to analyze.
This is the customized heart of the Analysis, and is not the same as the Properties
tab of the Fixlet, Task, or Baseline dialogs.
There are two buttons in the Property tab:
vAdd Property. Click this button to add a new property to the Analysis. When
you do, the text areas below becomes editable and you can define the property.
vRemove Property. Highlight a retrieved property from this list to the left and
click Remove Property to delete this item from the Analysis.
After clicking the Add Property button, you must enter a Name for the property
and a Relevance statement to retrieve the information. For example, you might
want to retrieve the names of the administrators for each client. You might name
the property "Client Admins" and use a Relevance expression like "names of
administrators of client".
You can also set the schedule for the analysis from the Evaluate every pull-down
menu. The default is to update the property value whenever a report is requested.
But you can also set it to any regular period between 5 minutes and 30 days.
You can create a new Analysis by selecting Tools > Create New Analysis, or you
can edit a custom Analysis by right-clicking it and selecting Edit Custom Analysis
from the pop-up menu or from the Edit menu.
184 IBM BigFix: Console Operator’s Guide
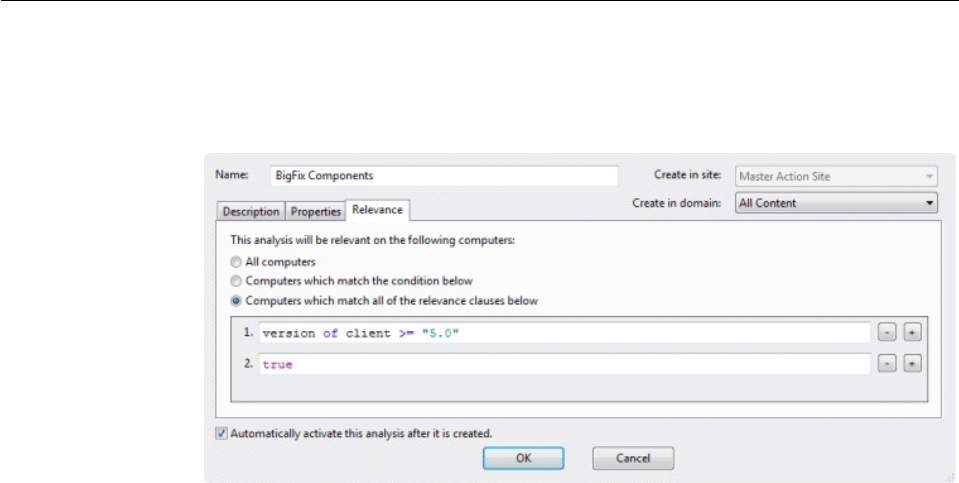
Create Analysis Relevance Tab
The Relevance tab of the Create Analysis dialog lets you define a relevance clause
to determine the applicability of your custom Analysis to specific computers.
You can choose from three relevance options:
vAll computers: This is the default choice and analyzes the properties you specify
on all of the IBM Endpoint Manager Clients in your network.
vComputers which match the condition below: When you select this choice, you
can select from several pre-defined properties to identify a subset of Clients for
analysis.
vComputers with match all of the relevance clauses below: This choice lets you
specify a computer with a custom relevance statement. This is the most powerful
of the available choices, and lets you easily narrow down the computers to
analyze.
You can create a new Analysis by selecting Tools > Create New Analysis, or you
can edit a custom Analysis by right-clicking it and selecting Edit Custom Analysis
from the context menu. To clone and edit an existing Analysis, first right-click it,
select Export from the context menu to save it, then select File > Import to bring it
back in for editing.
Chapter 18. The Dialogs 185
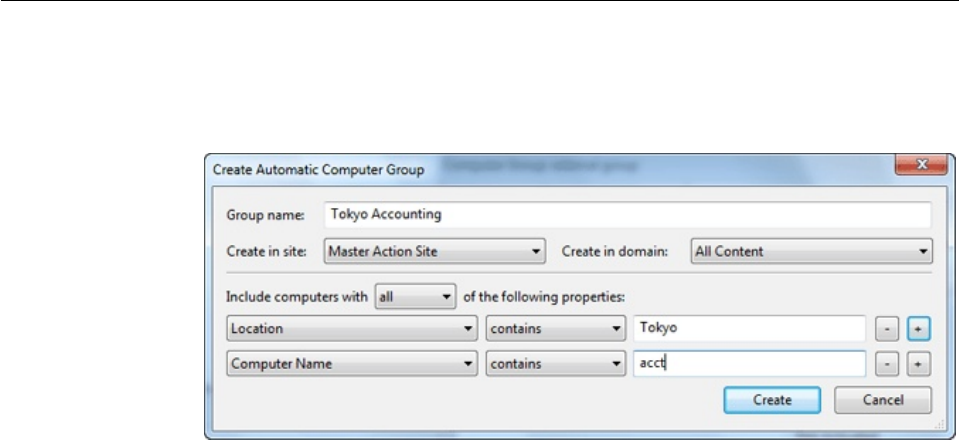
Create Automatic Computer Group
This dialog allows you to create rules that automatically enlist specific computers
in a group.
It has the following parts:
vComputer Group Name: This is a text box to enter the name of your group.
This is listed in the name column of any computer group listing.
vCreate in site: This is a pull-down menu listing the site you want to host the
computer group.
vCreate in domain: This is a pull-down menu listing the domain you want to
host the computer group.
vInclude computers with [any/all of] the following property: This option lets
you specify a condition that must evaluate to true before the computer becomes
a member of the group. If there is more than one condition, this option includes
a pull-down menu allowing you to use any or all of the conditions listed. Three
fields are used to define a condition:
–The retrieved property: select a property from the pull-down list containing
dozens of pre-defined retrieved properties. Note that there are two other
options at the top of this list.
- Select Relevance Expression from the top of the list, select is true or is
false from the relationship pulldown and then click the Edit Relevance
button to define a custom relevance expression to base your group on.
- Select Group Membership from the property list, select the desired
membership option, and then select a manual group from the pull-down
list to the right.
–The relationship: Select from the four available comparison operators:
contains, equals, does not contain, and does not equal. Depending on the
particular retrieved property, there might be other relationships available.
–The value: Enter a value to be compared to the value of the retrieved
property. If the comparison is true, the Baseline becomes relevant on the
specified computer. For example, to create a group that automatically enlists
Windows computers, enter OS contains Win.
There are two buttons used to edit the list of conditions:
–Plus (+): Click this button to add a new condition to the list. When there are
two or more conditions, notice that the radio button above includes a
pull-down menu allowing you to trigger on any or all of the conditions in the
list.
186 IBM BigFix: Console Operator’s Guide
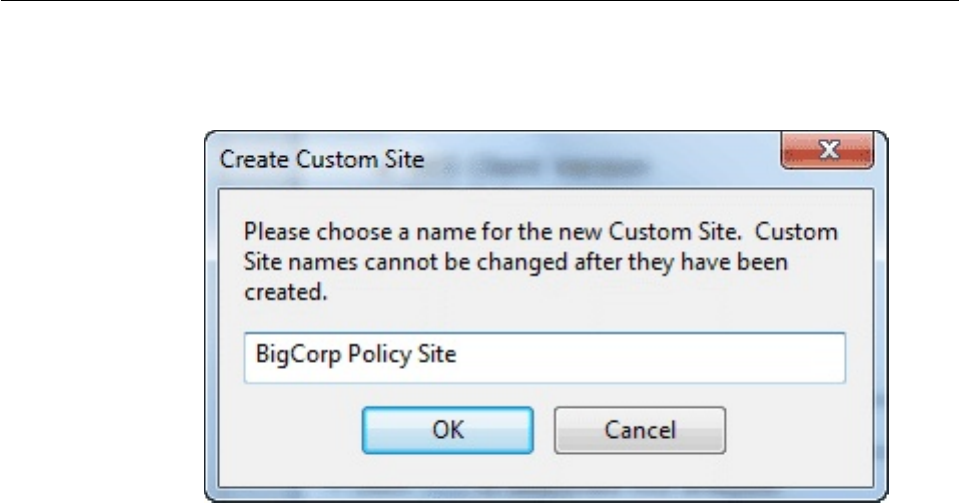
–Minus (-): Click this button to delete the condition associated with it.
Click OK and enter your password to propagate the new Automatic Computer
Group to be listed in the Computer Groups tab.
This dialog is available by clicking Create New Automatic Group from right-click
context menu in the Computer Groups tab or select Tools > Create New
Automatic Group.
Create Custom Site
This dialog lets you name your own Custom Site.
Enter the name of your site and click OK. This opens the Custom Site dialog,
where you can finish defining your site.
To create a custom site, select Tools > Create Custom Site.
Chapter 18. The Dialogs 187
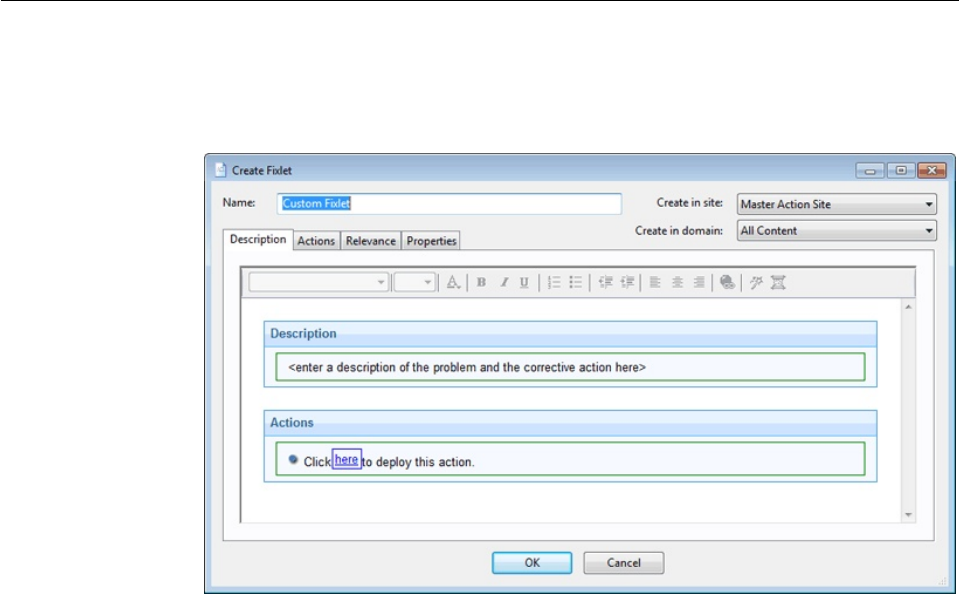
Create Fixlet or Task
The Create Fixlet and Create Task dialogs are similar and allow you to create or
customize a Fixlet or Task.
There are several tabs to help you define or edit your Fixlet or Task.
vDescription: Enter your descriptive text in this box. You can use the text
manipulation toolbar at the top of the dialog to enhance the formatting.
vActions: Define your action in this dialog. Use the buttons at the right to add,
delete, or change the position of the action. Below that is an area to customize
the properties of the action. Choose the Script Type from the drop-down menu.
Below that is a text box where you can enter a new action script or modify the
original. There are three check boxes you can use to modify the action:
–This action is the default action. Click this box to create a default action.
–Include action settings locks. Click the Edit box to the right of this check box
to customize the action setting locks, including start time, end time, day
exclusions, and more. This panel also includes failure and reapplication
behaviors.
–Include custom success criteria, which allows you to specify the conditions
that define the success of the action.
vRelevance: Leave the default of applying to All computers, or click a different
button and enter a condition or a relevance statement in the dialog below. This
is how you target your Fixlet or Task to relevant computers. For more
information about the relevance language, see the Inspector Libraries.
vProperties: Set the properties of your Fixlet or Task, including the category,
download size, date, severity, and more. You can also include the SANS
(SysAdmin, Audit, Network, Security) or CVE (Common Vulnerabilities and
Exposures) ID numbers.
You can create a custom Fixlet or Task by selecting Tools > Create New Fixlet or
Task, or you can edit an existing Fixlet or Task by right-clicking it from the List
Panel and then selecting Create Custom Copy from the context menu.
188 IBM BigFix: Console Operator’s Guide
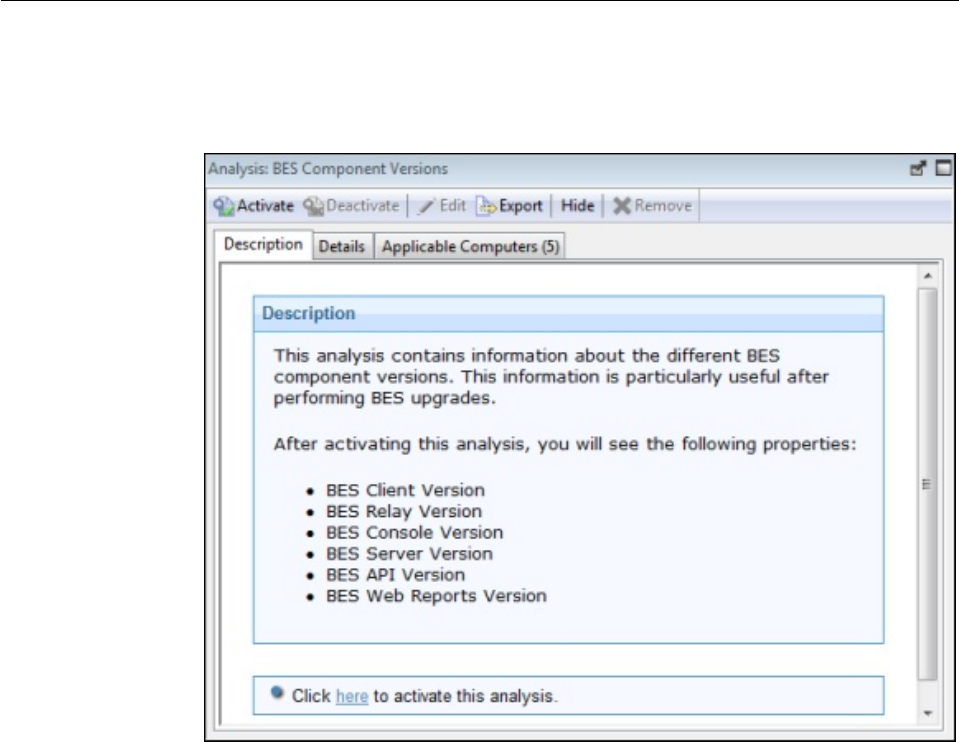
Description Tab
The Description tab provides an English-language description of the selected
Fixlet, Task, Analysis, or Baseline.
It typically provides one or more actions (in the form of links) that can be run to
install a patch, change a registry, update an application, run an analysis, and so on.
Click the link to deploy the action or analysis across your network. For Fixlet
messages, when an Action completes, the initiating Fixlet usually disappears
because the problem no longer pertains. Tasks, Baselines, and Analyses, on the
other hand, continue to stay activated until you terminate them.
This dialog is available by clicking a Fixlet, Task, Analysis, or Baseline icon in the
Domain Panel navigation tree, selecting an item from the List Panel, and clicking
the Description tab.
Chapter 18. The Dialogs 189
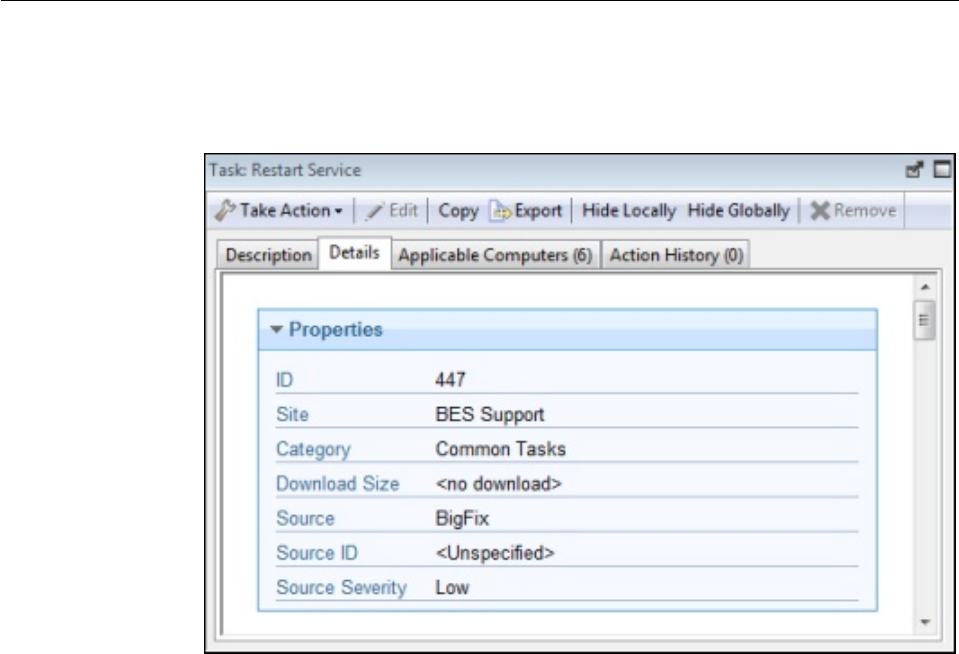
Details Tab
The Details tab shows you the mechanics behind the selected Fixlet, Task,
Analysis, or Baseline object.
It includes several sections describing various aspects of the Fixlet message:
vProperties: As seen above, this section lists various properties of the Fixlet, Task,
or Baseline, including Category, Download Size, Severity, and more. These
properties are defined manually when the object is created.
vRelevance: This section displays the Relevance expressions that are used to
determine the relevance of an individual Fixlet message or Task.
190 IBM BigFix: Console Operator’s Guide
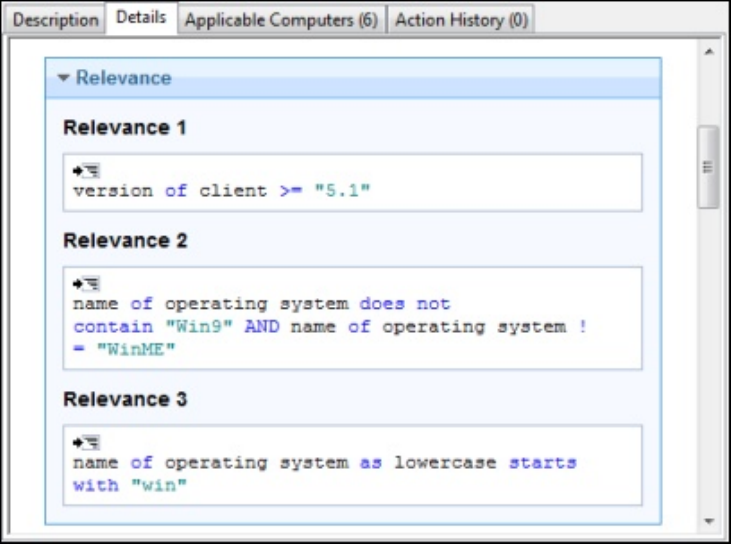
This example has multiple statements that must all be true for the item to be
considered Relevant to any particular BigFix Client. For a Baseline, this is an
'envelope' expression that determines the overall relevance of the group. Only if
the group is applicable is the relevance of the constituent Tasks and Fixlets
analyzed. This is the core information for an Analysis, which evaluates the
Relevance expression and retrieves that value.
vActions: This section displays the code to be run if an action is deployed from
either a Fixlet or a Task.
Chapter 18. The Dialogs 191
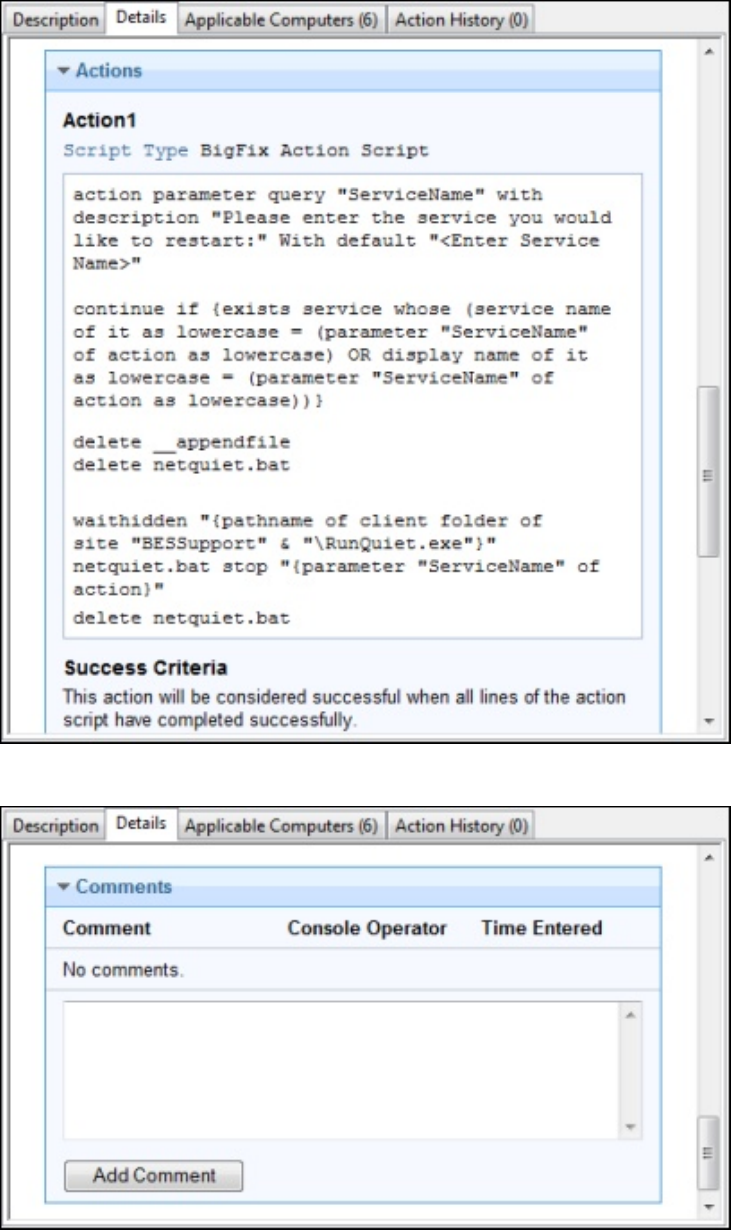
vComment: This section lets you attach comments to the Fixlet, Task, or Baseline.
192 IBM BigFix: Console Operator’s Guide
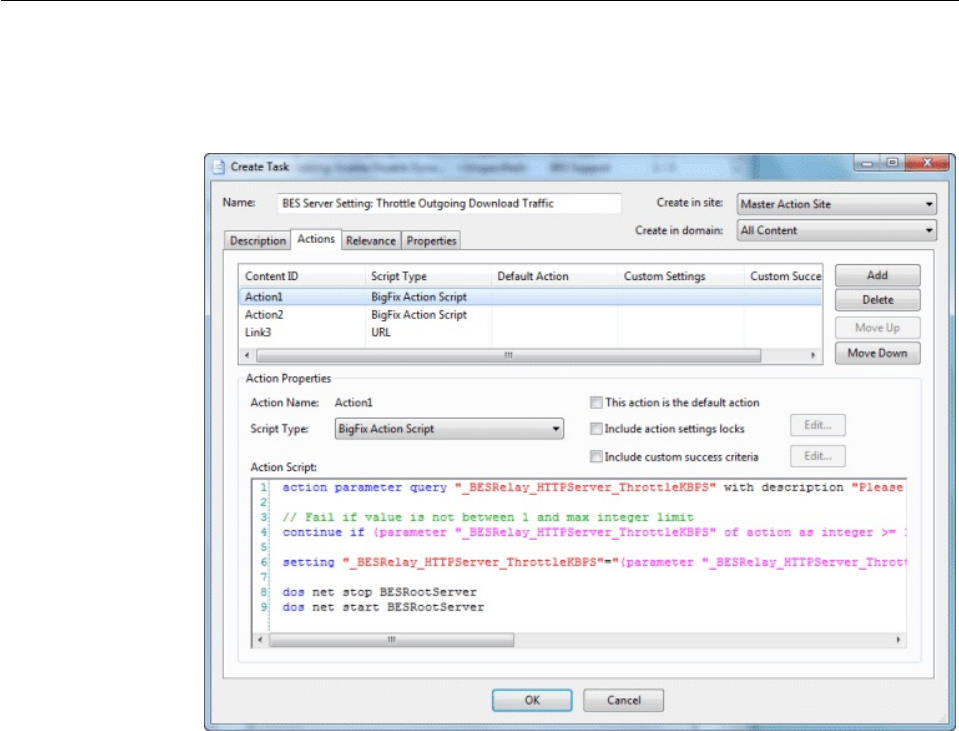
This dialog is available by clicking a Fixlet, Task, Analysis, or Baseline icon in the
Domain Panel navigation tree, selecting an item from the resulting List Panel, and
clicking the Details tab.
Edit Actions Tab
The Actions tab of the Creation/Edit dialogs lets you create Actions for your new
or customized Fixlet or Task object.
The Actions you create here become the clickable links in the finished Task or
Fixlet, and they are deployed on the appropriate computers of your network. The
Actions are listed in their display order at the top of the dialog. To the right of the
list is a set of buttons:
vAdd: Click this button to create a new Action. It creates a new numbered entry
in the top list and opens a blank text box for you to write your Action script.
vDelete: Select an item from the list and click this button to Delete it.
vMove Up: Moves the selected Action up in the list, meaning that it is displayed
earlier.
vMove Down: Moves the selected Action down in the list, meaning that it is
displayed later.
For each Action, you can edit the type, certain settings, and the script itself.
Chapter 18. The Dialogs 193
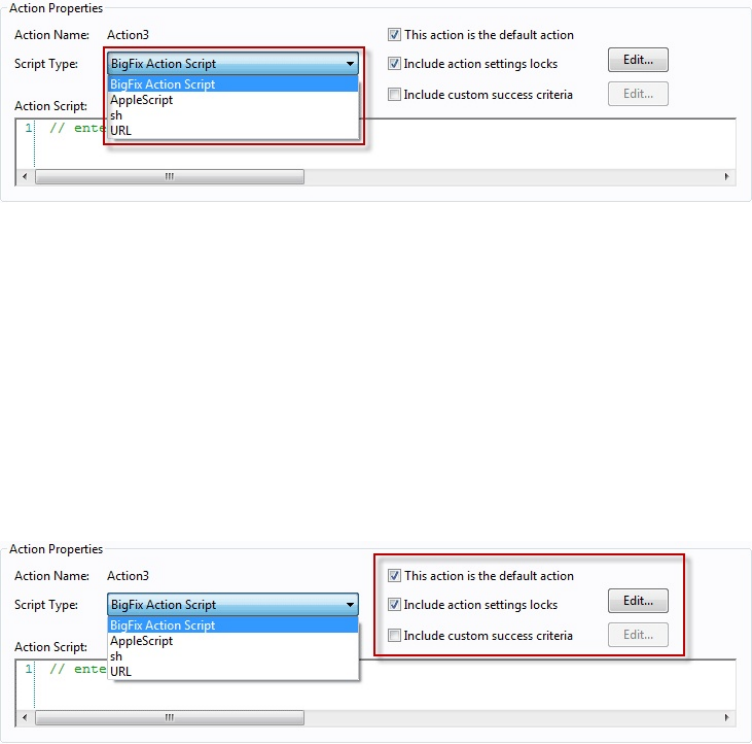
Select an Action Script Type from the pull-down menu. Among the choices are:
vBigFix Action Script: This is a cross-platform scripting language, and is the
default scripting type.
vAppleScript: This is the scripting language of choice for managing Macintosh
computers.
vsh: This is shell script as used by a UNIX system.
vURL: This is a URL pointing to an appropriate script or informational web page.
When an Action is created as a URL, it is listed as a numbered Link.
There are some more properties you can use to modify any Action.
Check one or more of the following boxes to customize each action:
vThis Action is the default Action: Check this box to make the selected Action
the default for this group of Actions. Default Actions must be failsafe and
simple, making it reasonable to launch them unattended or to group them for
simultaneous deployment.
vInclude Action Settings Locks: Check this box to use custom settings and locks,
including display messages, users, execution behavior, and post-actions. Click
the Edit button to open the Action Settings dialog with a lock next to each item.
Click the locks to keep these values from being changed.
vInclude Custom Success Criteria: Typically a Fixlet is designed so that
completing an Action makes it fail the initial Relevance test. Because this test is
typically triggered by a vulnerability, its failure indicates successful remediation,
therefore causing the Fixlet to disappear from the Console. However, you can
select other criteria to establish success by checking this box. Click the Edit
button to open the Action Success Criteria dialog and key in your alternative
criteria.
In the bottom text box, enter the actual text of the Action Script. The style varies
depending on the script type you chose in the previous section. Because they can
be potentially distributed to hundreds of thousands of computers, it is always
advisable to test and test again.
194 IBM BigFix: Console Operator’s Guide
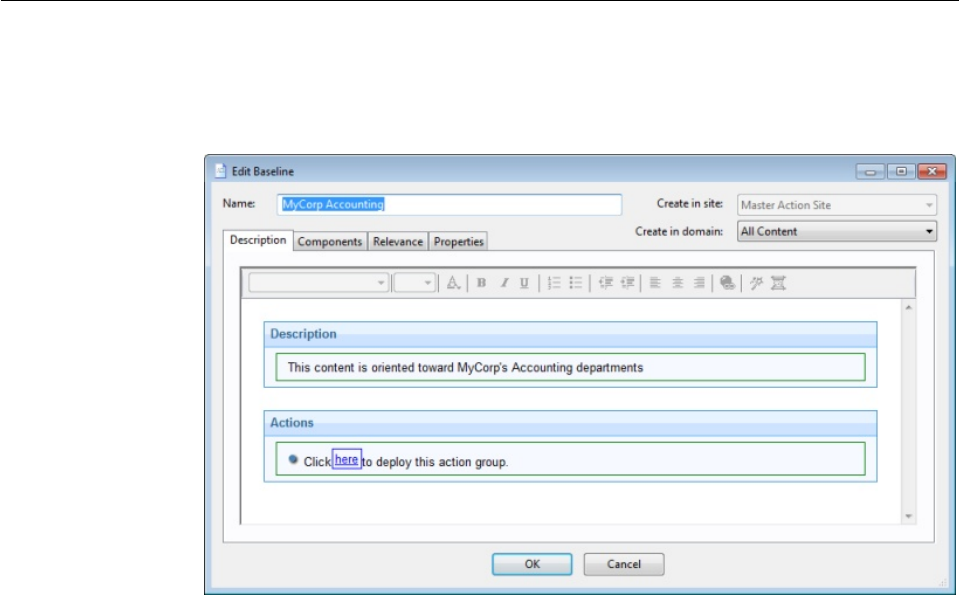
This dialog is available by clicking the Fixlet, Task, or Baseline icon in the Domain
Panel navigation tree. Right-click an item in the resulting List Panel and select
Create Custom Copy from the context menu.
Alternatively, select the Create item you want from the Tools menu.
Edit Baseline
The Edit Baseline dialog. Baselines are groups of Fixlet messages, Tasks, and other
Baselines that you want to run with a single mouse-click.
For example, a Baseline might be created to group all your application patches or
security issues together to ensure a common operating environment. You can create
a Baseline from scratch, or clone or edit an existing Baseline.
When you select this interface, you are presented with a dialog with three input
items at the top:
vName: Enter the name of your Baseline.
vCreate in site: From the pull-down menu, select a host site.
vCreate in domain: From the pull-down menu, select a host domain.
Beneath these data fields, there are four tabs:
vDescription: Create a user-readable title and description for the Baseline you
want to deploy.
vComponents: Specify the components, namely the Fixlet messages, Tasks, and
other Baselines, that you want to group into this Baseline.
vRelevance: Create a relevance clause to target this Baseline to just the subset of
computers you want. Because each component of your Baseline has its own
Relevance clause, the default Relevance is set to TRUE.
vProperties: Specify certain properties for your Baseline, including category,
source, severity, and date.
To create a new Baseline from scratch, select the following:
Chapter 18. The Dialogs 195
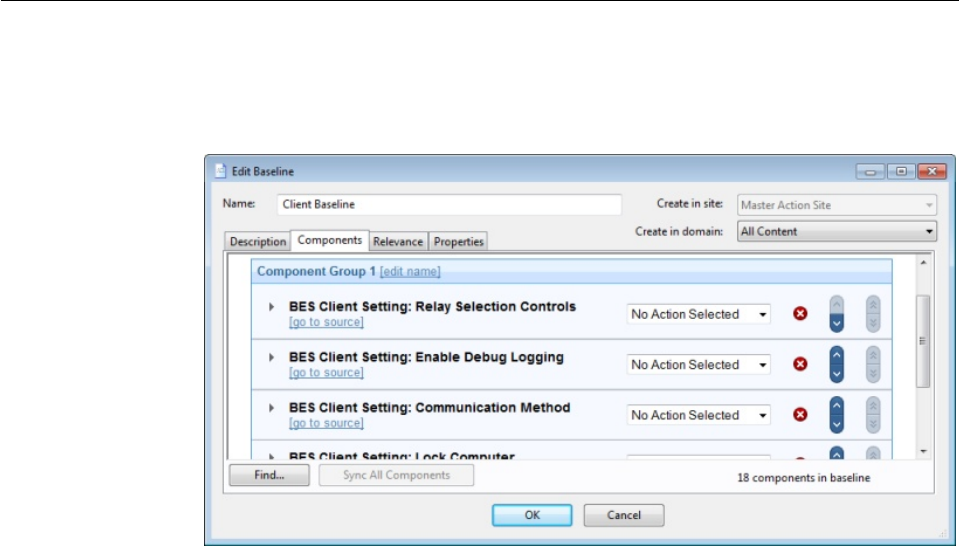
vTools > Create New Baseline
You can also customize an existing Baseline by selecting it from any Baseline list
and then choosing:
vEdit > Create Custom Copy
Alternatively, right-click in a Baseline list and select Create Custom Copy or
Create New Baseline from the context menu. Similarly, you can edit an existing
custom Baseline by selecting Edit Custom Baseline from the right-click context
menu.
Edit Components Tab
The Components tab of the Edit Baseline dialog lets you specify a group of Fixlet
messages and Tasks that you want to add to your Baseline.
Click the link to add components to group and then select Fixlets, Tasks, and other
Baselines to place into your group. Use the edit name link to name the group. You
can place all your components into a single group or click the add new component
group link to add structure to your Baseline. Click the red X to delete the
associated component, and use the up (^) and down (v) arrows to change the
order of the components in the list.
Check the box next to Use custom action settings if you want to modify the
Baseline Action settings. Click the set action settings link to open the Action
Settings dialog.
The components of a Baseline are copies of the original Fixlet or Task, not pointers.
As such, if the underlying Fixlet or Task changes, the Baseline might become out of
sync with the original. If this happens, the message Source Fixlet differs is shown
in the component listing.
At the bottom of this dialog, there is a Find command that opens a dialog for you
to enter a search string and options such as match whole word, match case, and
search direction. It allows you to easily search through the components of your
Baseline.
196 IBM BigFix: Console Operator’s Guide
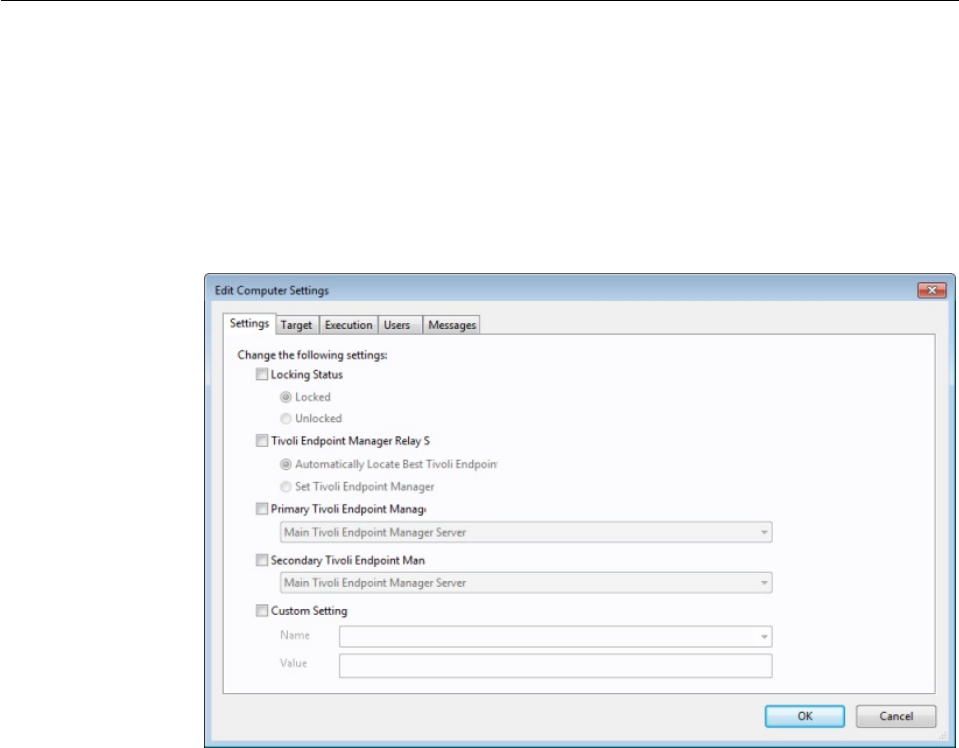
There is also a Sync All Components button. This forces all of your Baseline
components to sync up with the latest versions of their sources, in case they have
changed.
To create a new Baseline from scratch, select the following:
vTools > Create New Baseline
You can also customize an existing Baseline by selecting it from any Baseline list
and then selecting:
vEdit > Create Custom Copy
Alternatively, right-click in a Baseline list and select Create Custom Copy or
Create New Baseline from the context menu.
Edit Computer Settings
The Edit Computer Settings dialog allows BigFix Console operators to change
certain computer attributes on a single or specified set of computers, including
locking, making the client a Relay, pointing to Relays, and creating custom settings.
Note: If you select multiple targets, then you select their settings, and modify the
value of the password in some of their fields, for each target the product will
manage the modification according to what is supported by the level of the Client.
There are five tabbed dialogs on this panel to target and customize the settings for
a selected group of Clients:
vSettings: Displays a group of controls to edit computer settings, such as the
locked status, relays, and custom variables.
vTarget: Displays a filter/list of computers that can be edited, filtered, sorted, and
grouped for specifically targeted settings.
vExecution: As with other Actions, you can limit the activation of the settings to
any schedule, keeping in mind that the Action might take some time to deploy.
Chapter 18. The Dialogs 197
|
|
|

When applied, the settings remain until removed. You can also specify certain
user interactions and add extra targeting based on the contents of retrieved
properties.
vUsers: Allows you to specify whether or not you want a user to be logged on
before activating the settings.
vMessages: Allows you to issue a message to the BigFix Client before activating
the settings.
When multiple computers are selected, this dialog is available by right-clicking and
selecting Edit Computer Settings from the context menu (or select Edit Computer
Settings from the Edit menu).
Edit Description Tab
The Description tab of the Creation/Edit dialogs lets you describe your new or
customized Fixlet, Task, Analysis, or Baseline object.
vEnter a custom Description for the body of your descriptive message. Click the
description in the HTML page to modify it.
vBelow the Description box is the text describing the Actions you can attach to
this Fixlet, Task, or Baseline. The Action is a clickable link in the Description
page. Click the text to modify it, although the default text is usually sufficient.
Note: For an Analysis, this link activates the retrieval of the specified
Properties. Activation involves the running of an Action, but in the case of an
Analysis, it is a benign Action that creates a property that can be read by the
Console.
This dialog is available by clicking the Fixlet, Task, or Baseline icon in the Domain
Panel navigation tree. Right-click an item in the resulting List Panel and select the
appropriate Create option from the context menu.
Alternatively, select the Create item from the Tools menu.
Edit Fixlet Message
The Edit Fixlet Message dialog allows you to create your own custom Fixlet
messages. You can create a Fixlet message from scratch or clone an existing one
and customize it. To create an original Fixlet, choose Tools > Create New Fixlet.
You are presented with a dialog with three text boxes at the top:
vName: Enter the name of your custom Fixlet message.
vCreate in site: From the pull-down menu, select the BigFix site you want to host
it.
vCreate in domain: From the pull-down menu, select the Domain you want to
host this Task.
Beneath these data fields, there are four tabs:
vDescription: Create a user-readable title and description for the Fixlet you want
to deploy. If you are cloning an existing Fixlet, the original title and description
is the default. This is an HTML page, and you can use the toolbar at the top to
alter fonts and formatting.
vActions: Specify the actions for your custom Fixlet to run.
198 IBM BigFix: Console Operator’s Guide
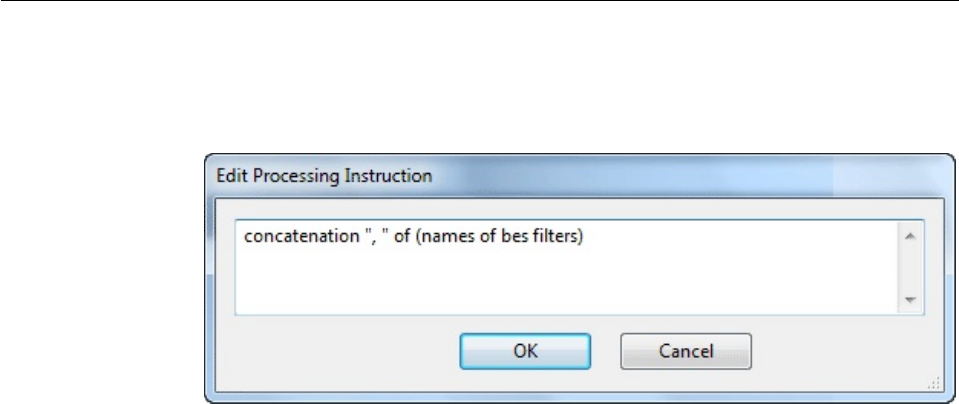
vRelevance: Create a relevance clause to target this Fixlet to a subset of
computers you choose. For a cloned Fixlet, the original relevance clause is the
default. You can replace or modify the relevance clause to suit your network
needs.
vProperties: Specify certain properties for your Fixlet, including Category,
Download Size, Source, Severity, and Date.
To create a new Fixlet message from scratch, select the following:
vTools > Create New Fixlet
You can also customize an existing Fixlet message by selecting it from any Fixlet
list and then selecting:
vEdit > Create Custom Copy
Alternatively, right-click in a Fixlet list and select Create Custom Copy or Create
New Fixlet Message from the pop-up menu.
Edit Processing Instruction
The Edit Processing Instruction dialog lets you write a Relevance Expression that
can be embedded into the text portion of a Fixlet, Task, Analysis, or Baseline.
You can enter the expression as straight text, HTML, or Presentation (XML) style.
This dialog is available whenever you create a new or custom Fixlet, Task,
Baseline, or Analysis. In the description tag, enter your text, and then from the
toolbar at the top, click the magic wand . This opens the Edit Processing
Instruction dialog.
Chapter 18. The Dialogs 199

Edit Properties Tab
The Properties tab of the Creation/Edit dialogs lets you assign certain important
properties to your new or customized Fixlet, Task, or Baseline object.
There are a series of text fields that you can use to describe the various possible
properties:
vCategory: There are many categories you can file your Fixlet, Task, or Baseline
objects under, including the standard ones such as Setting, Update, Support, and
more. If you want, you can create new settings also for your particular
installation.
vDownload Size: If a download is associated with your Fixlet, Task, or Baseline,
you can enter the size here. This allows you to sort, filter, and keep track of the
bandwidth requirements of your various custom-designed objects.
vSource: This is the source of the Fixlet, Task, or Baseline. For a custom object,
this is typically a name chosen by the BigFix Administrator, usually Internal.
vSource ID: This is an ID associated with the source described above. For an
Internal source, the ID is typically blank.
vSource Release Date: Enter the release date of this Fixlet, Task, or Baseline to
manage these objects by age.
vSource Severity: Enter the severity of the Fixlet, Task, or Baseline, typically from
a list including Low, Moderate, Important, and Critical.
vCVE ID: Enter the ID for the Common Vulnerabilities and Exposures standard,
if any.
vSANS ID: Enter the ID for the System Administration, Networking, and
Security standard, if any.
This dialog is available by clicking the Fixlet, Task, or Baseline icon in the Domain
Panel navigation tree. Right-click an item in the resulting List Panel and select
Create Custom Copy from the context menu.
Alternatively, select the Create item from the Tools menu.
200 IBM BigFix: Console Operator’s Guide
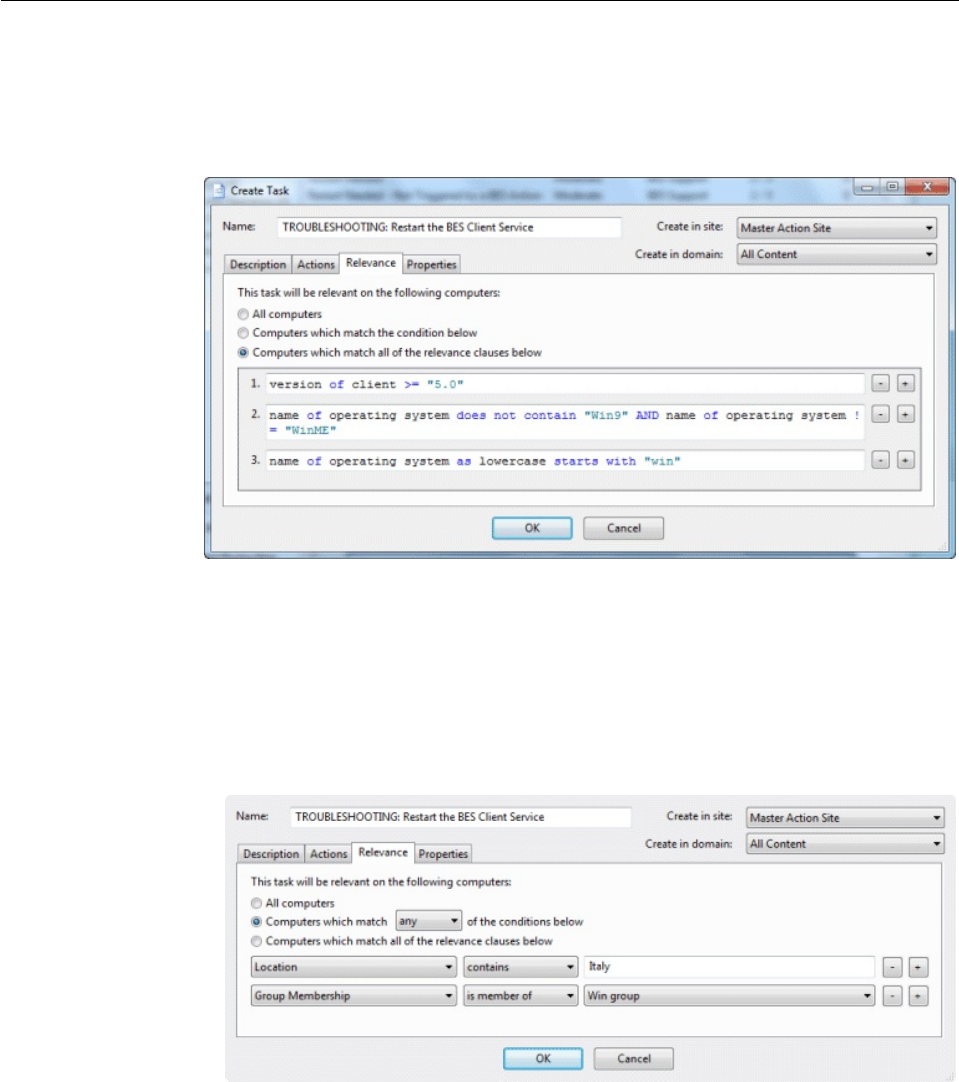
Edit Relevance Tab
The Relevance tab of the Creation/Edit dialogs lets you create a relevance
expression to fine-tune the deployment of your custom Fixlet, Task, Analysis, or
Baseline object.
There are several ways to specify a set of computers:
vAll computers: The default is to include all the networked IBM Endpoint
Manager Clients for this particular Fixlet, Task, Analysis, or Baseline --
regardless of relevance.
vComputers that match [any/all of] the conditions below: This option lets you
specify a condition that must evaluate to true before the computer triggers the
Fixlet, Task, Analysis, or Baseline.
If there is more than one condition, this option includes a pull-down menu
allowing you to select any (ORing the conditions) or all (ANDing the
conditions). Three fields are used to define each condition:
–The retrieved property: select a property from the pull-down list containing
the pre-defined retrieved properties. Note that there are two other options at
the top of this list.
- Select Relevance Expression from the top of the list, select is true or is
false from the relationship pull-down list and then click the Edit Relevance
button to define a custom relevance expression to base your group on.
Chapter 18. The Dialogs 201

- Select Group Membership from the property list, select a membership
option and then select a manual group from the pull-down list to the right.
–The relationship: select from the four available comparison operators:
contains, equals, does not contain, and does not equal. Depending on the
particular retrieved property, there might be other relationships available.
–The value: Enter a value to be compared to the value of the retrieved
property. If the comparison is true, the Baseline becomes relevant on the
specified computer. For example, to create a group that automatically enlists
Windows computers, enter OS contains Win.
There are two buttons used to edit the list of conditions:
–Plus (+): Click this button to add a new condition to the list. When there are
two or more conditions, notice that the radio button above includes a
pull-down menu allowing you to trigger on any or all of the conditions in the
list.
–Minus (-): Click this button to delete the condition associated with it.
vComputers on which the relevance clause below is true: Click this button to
enter a custom Relevance expression to be evaluated on each IBM Endpoint
Manager Client.
If the relevance expression evaluates to true, the Fixlet, Task, or Baseline
becomes relevant to that particular client and the Console reflects that status. In
the case of multiple relevance statements, they must all be TRUE (they are
ANDed together) for the Task or Fixlet to become relevant.
A complete discussion of relevance expressions is beyond the scope of this
documentation. For more information, see the Relevance Language Reference and
the various Inspector Guides. For some instructive examples, make custom
copies of available Support Fixlets and examine their relevance statements.
This dialog is available by clicking the Fixlet, Task, Analysis, or Baseline icon in the
Domain Panel navigation tree. Right-click the item in the resulting List Panel and
select Create Custom Copy from the context menu.
Alternatively, select the Create item from the Tools menu.
202 IBM BigFix: Console Operator’s Guide
Edit Script Element
The Edit Script Element dialog lets you create a small script to accompany a new
or custom Fixlet, Task, Baseline, or Analysis.
Enter the text of your action, and click OK. For more information about Action
scripts see the Action Language Reference.
This dialog is available whenever you create a new or custom Fixlet, Task,
Baseline, or Analysis. In the description tag, enter your text, and then from the
toolbar at the top, insert the Script icon . This opens the Edit Script Element
dialog.
Chapter 18. The Dialogs 203
Edit Settings for Computer
The Edit Settings for Computer dialog allows the IBM Endpoint Manager Console
operator to alter the settings for a selected computer. (For more settings, or to
apply settings to multiple computers, see Edit Computer Settings).
There are several ways you can customize the settings of a computer:
vLocked. Check this box to lock the computer.
vAssign Relays Manually. Relays can be automatically assigned. Clear this box to
select automatic discovery (the recommended setting). If you want to manually
specify a particular relay for this IBM Endpoint Manager Client, check this box
and select the relays you want from the pull-down menus below.
–Primary Relay Server: Select the name of the primary Relay from the
pull-down menu. The selected computer now points to this relay for Fixlet
downloads instead of connecting directly to the IBM Endpoint Manager
Server.
–Secondary Relay Server: Select the name of the secondary Relay from the
pull-down menu. If the primary relay is unavailable, then this secondary
relay takes over the job of providing Fixlet downloads.
Custom Settings: This list box contains custom named variables that can be
assigned to each computer. This is a valuable technique for organizing a network
of computers, and can help to identify individual computers as well as groups. The
list of settings in this box can be sorted by clicking the appropriate header:
vName: This column contains the assigned custom variable names, for example,
"depts."
vValue: This column lists the values of the named variables, for example, "human
resources."
vSite: As applied by the Console Operator, these named variables are a part of
the "local" site. These variables can also be set by other Fixlet sites, in which case
their site name is shown here.
204 IBM BigFix: Console Operator’s Guide
Note: The values assigned to passwords using the settings _Enterprise
Server_ClientRegister_ProxyPass and, for Linux only,
_BESServer_Database_Password, are encrypted, if the computer is a Windows
system, or obfuscated, if the computer is a Linux system, immediately after you
click the OK button.
There are three buttons to the right of the list:
vAdd: Click this button to add a new custom variable to the list.
vDelete: Click this button to delete the selected variable from the list.
vEdit: Click this button to edit the selected named variable. This places the cursor
in the value field of the chosen setting for editing.
Finally, there is a More Options button at the bottom of the dialog, which expands
on these functions and opens the Edit Computer Settings dialog.
This dialog is available by selecting the Computers icon in the Domain Panel
navigation tree, right-clicking a single computer from the resulting List Panel, and
selecting Edit Computer Settings from the pop-up menu.
Edit Task
The Edit / Create Task dialog allows you to create a Task from scratch or clone an
existing Task and customize it.
To create an original Task, choose Tools > Create New Task Message. You are
presented with a dialog with some text boxes at the top:
vName: Enter the name of your custom Task.
vCreate in site: From the pull-down menu, select the site you wanr to host this
Task.
Chapter 18. The Dialogs 205
|
|
|
|
|
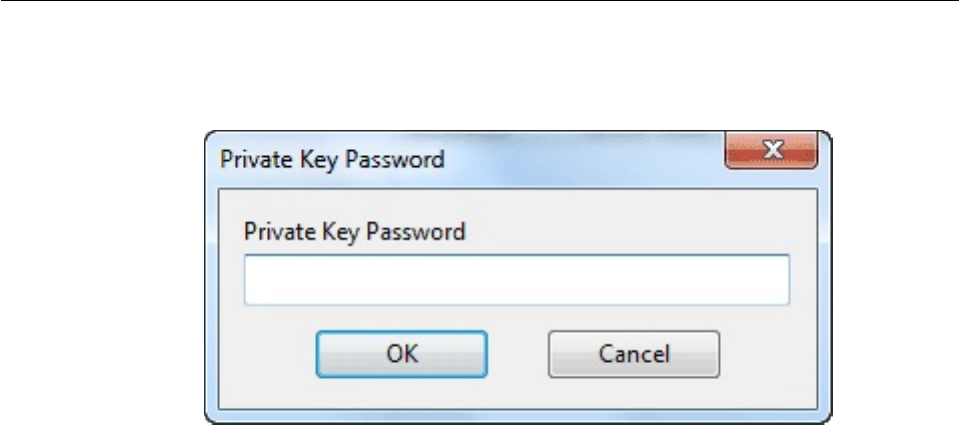
vCreate in domain: From the pull-down menu, select the Domain you want to
host this Task.
Beneath these data fields, there are four tabs:
vDescription: Create a user-readable title and description for the Task you want
to deploy. If you are cloning an existing Task, the original title and description is
the default. This is an HTML page, and you can use the toolbar at the top to
alter fonts and formatting.
vActions: Specify the actions for your custom Task to run.
vRelevance: Create a relevance clause to target this Task to a subset of computers.
For a cloned Task, the original relevance clause is the default. You can replace or
modify the relevance clause to suit your network needs.
vProperties: Specify certain properties for your Task, including Category,
Download Size, Source, Severity, and Date.
To create a new Task from scratch, select the following:
vTools > Create New Task
You can also customize an existing Task by selecting it from any Task list and then
choosing:
vEdit > Create Custom Copy
Alternatively, right-click in a Task list and select Create Custom Copy or Create
New Task from the pop-up menu.
Enter Private Key
The Enter Private Key dialog requests a password.
Type in the publisher password that you were given by your Site Administrator.
This dialog is displayed whenever an action is deployed, to ensure that only
authorized personnel are allowed to update computers in the network.
206 IBM BigFix: Console Operator’s Guide
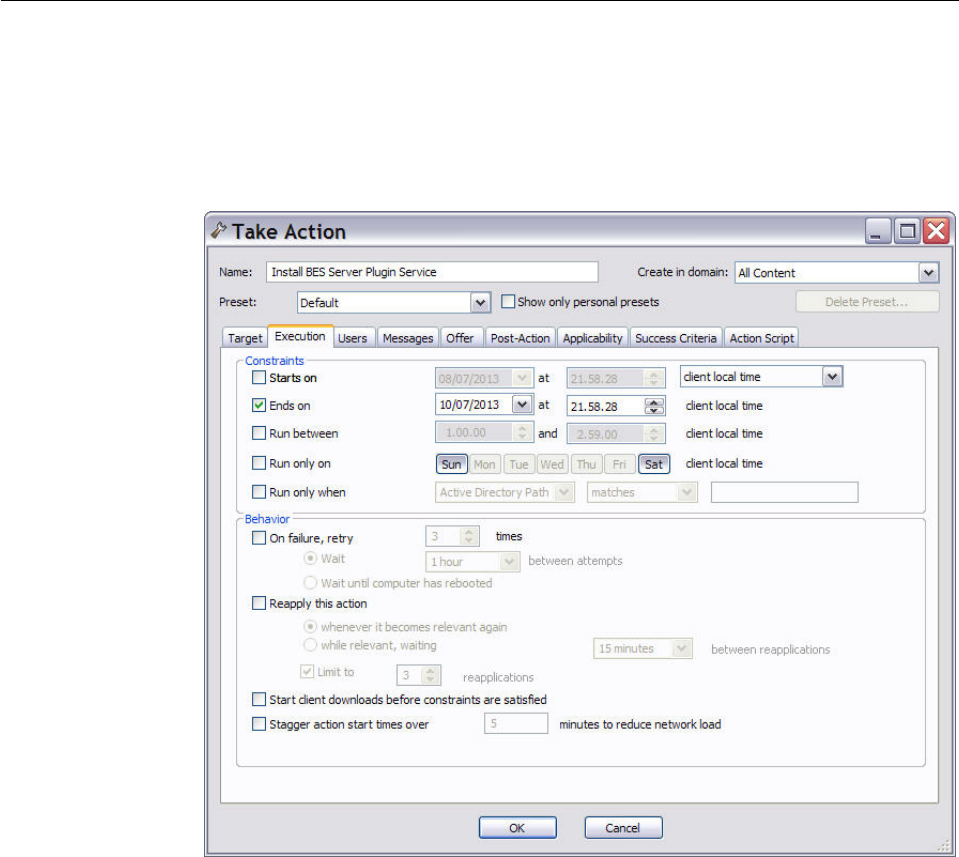
Execution Tab
The Execution tab can be found in various action dialogs. In this tab you can set
the schedule, time interval, and the recovery options that must be satisfied when
deploying the action.
Use the settings in this tab to ease the traffic load in your network.
This tab is available from several different dialogs:
v“Take action” on page 240
v“Take multiple actions” on page 242
v“Action Settings” on page 141
v“Edit Computer Settings” on page 197
In the Constraints section of this dialog you can schedule actions and restrict the
target computers, in particular:
Starts on [date] [time]
Defines a date and time when the action can first be run. You can choose
from Local Client time or Universal time from the pull-down menu. The
choice you make here affects all of the scheduling constraints. Note that
UTC is only available for version 8.0 or later.
Ends on [date] [time]
It defines the action’s expiration date and time.
Chapter 18. The Dialogs 207
Run between [time] [time]
Defines a period of time during which the action can be run.
Note: Pending actions are run even if the time period has expired. For
example a baseline might start according to the specified time limit and all
the actions it contains are run independently from the specified time
period during which the actions can be run.
Run only on [Sun,Mon,Tue,Wed,Thu,Fri,Sat]
Defines specific days of the week to run the action.
Run only when [Property] [Operator] [Value]
It filters clients by their retrieved properties. Select a Property and an
Operator from the pull-down menus, then select a value for comparison.
The value entered must form a valid relevance expression.
In the Behavior section of this dialog you can manage failed actions and recurrent
relevance. The BigFix Client can retry any action that is unsuccessful and reapply
any action that succeeds and then subsequently fails. This capability allows you to
automatically implement continuing policies minimizing the network load and the
operator intervention. You can set the following behaviour:
On failure, retry XX times
It sets the maximum number of retries upon action failure. The default
value is 3 retries. After selecting this checkbox, choose one condition
among the following:
Wait XX between attempts
The Client waits a time interval of XX before retrying the action.
The default time interval is 1 hour.
Wait until computer has rebooted
The Client waits to reboot before rerunning the action.
Reapply this action
It applies again the action if the target is no more compliant to the policy
set by the relevance expression. After selecting this checkbox, choose one
condition among the following:
Whenever it becomes relevant again
It reapplies the action as soon as the relevance expression evaluates
again to true
While relevant, waiting XX between reapplications
Instead of immediately reapplying the action upon relevance, it
specifies a period of time to wait between attempted
reapplications.
Limit to XX reapplications
It continues to apply the action the given maximum number of
times, while it remains relevant. The default values is 3 times. It
counts the number of attempts after the original, so a limit of 3
actually involves 4 attempts.
Start client downloads before constraints are satisfied
The software downloads starts before the Client has satisfied the execution
constraints. Select this option if you want to ensure that the download is
available for execution as soon as the desired time frame begins.
Stagger action start times over MM minutes to reduce network load
It forces the program to space out the running of actions. This option can
208 IBM BigFix: Console Operator’s Guide
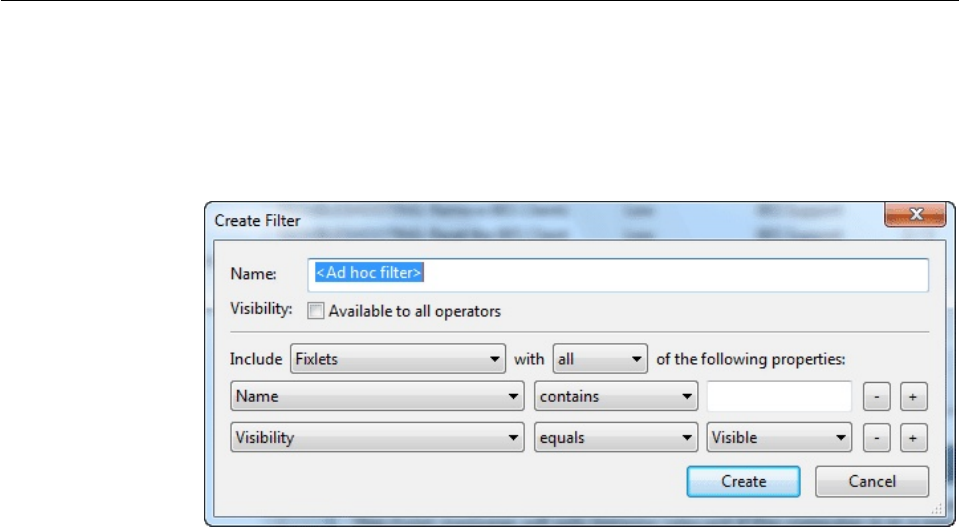
reduce the load on the network, in the case of bandwidth-intensive actions,
and is useful to help relays in effectively servicing hundreds of attached
Clients.
Find
You can find information in any of the lists (Fixlets, Tasks, Actions, and so on.)
whenever the focus is on that list. To do this, you create a Find Filter. For example,
to find a particular word in the Fixlet list, click anywhere in the Fixlet List Panel
and press Ctrl-F (or select Find from the Edit menu).
There are several sections in the Filter dialog:
Name: Provide a name for your Find Filter in the Name box.
Visibility: This box lets you keep the Filter to yourself or share it with other users.
Include: This section lets you define the scope of the Find. Choose from Fixlets,
Actions, Tasks, or any of the other main categories of content. You can choose to
include all (AND the properties) or any (OR the properties) of the following items.
Two properties have been pre-arranged for you, but you can add or delete from
these default choices. As with other property choices using IBM Endpoint Manager,
there is a {field} {operator} {search string} triad to define. Here the defaults allow
you to select a Name containing a value and a Visibility. Because Fixlets, Tasks,
and Analyses can be hidden, the visibility field allows you to search through these
items depending on whether they are Visible, Locally Hidden, or Globally
Hidden.
When you have finished defining your Find Filter, click the Create button. Your
custom filter is placed in the All Content Domain, under the Custom Filters folder.
To make changes, right-click it and select Edit from the context menu.
This dialog is available by selecting one of the main content categories (Fixlet
Messages, Tasks, Actions, and so on.) the icon in the Domain Panel navigation tree
to establish the focus, then pressing Ctrl-F or selecting Find from the Edit menu.
Chapter 18. The Dialogs 209
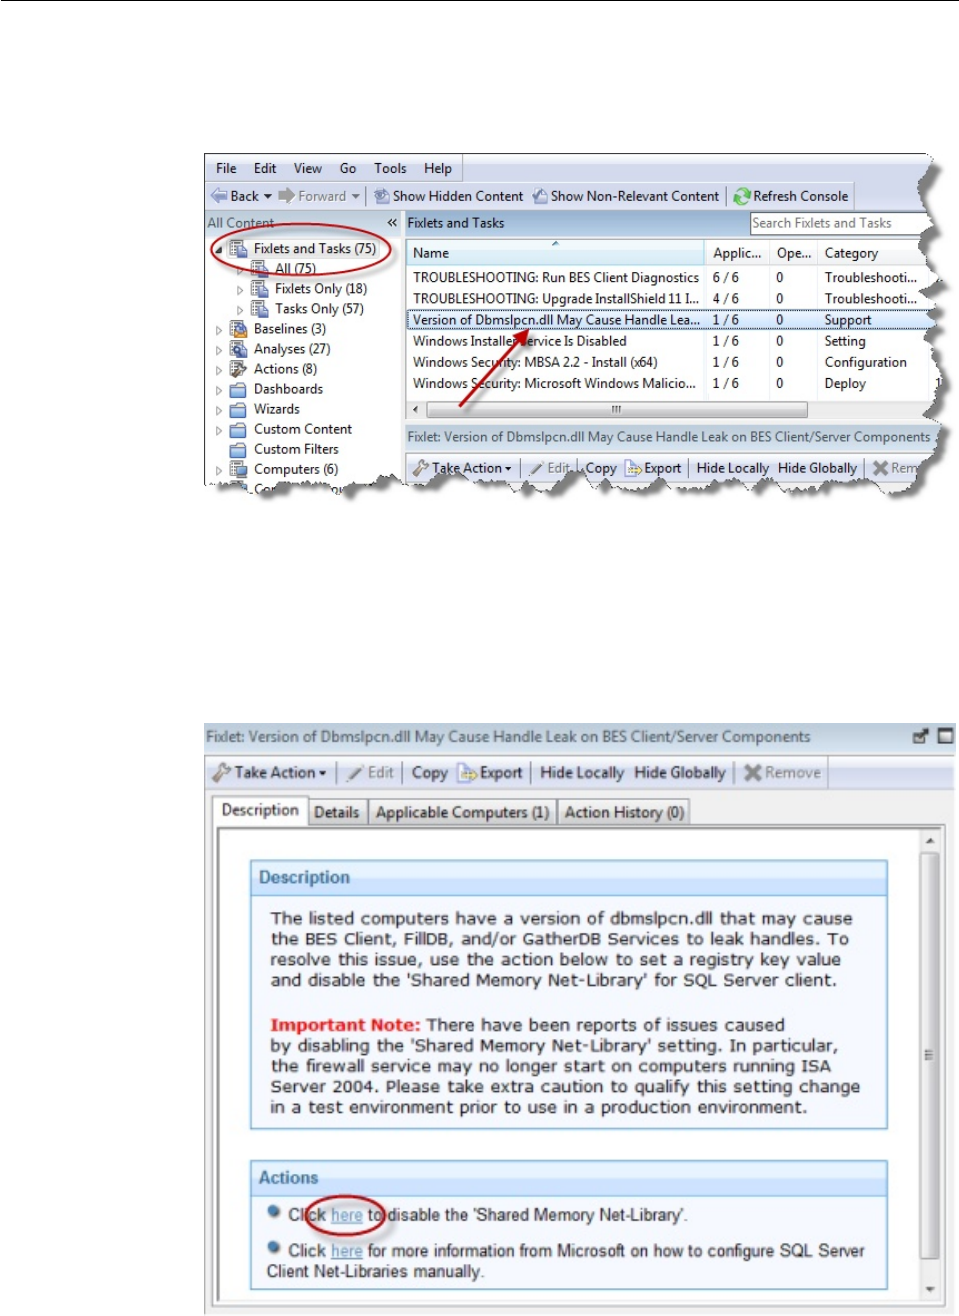
Fixlet and Task: List and Document
A list is created whenever you click Fixlets and Tasks from the Domain Panel
navigation tree.
This list incorporates both Fixlets and Tasks, which you can filter by opening the
icon and clicking any of the child nodes beneath it. The List Panel on the right
now contains all the currently relevant Fixlets and Tasks, narrowed down by the
filters. A Fixlet or Task document is displayed in the Work Area of the Console
when you click any item in the list. It displays a description and typically a set of
links to deploy Actions.
210 IBM BigFix: Console Operator’s Guide
Fixlet and Tasks have the same basic tools and tabs available because they are
similar objects. The main difference between the two is that a Fixlet is triggered by
a vulnerability, whereas a Task is designed for ongoing maintenance. Both of them
use Relevance clauses to target client computers and both use Action scripts to
accomplish their goals. You can get a separate listing of each by clicking the All
Tasks or All Fixlets node in the navigation tree.
At the top of each document you find the name of the Fixlet or Task. Beneath that
is a toolbar containing the following tools:
vTake Action: This tool provides a pull-down menu of Actions. Select an action
from the menu to deploy it to your network.
vEdit: Lets you edit the Fixlet or Task. This tool is only available for custom
Fixlets or Tasks.
vCopy: Lets you copy or clone the Fixlet or Task to customize what it does.
vExport: Allows you to export the Fixlet or Task for editing in an external editor,
or for copying to another Console or deployment.
vHide Locally: Hides the Fixlet or Task on this version of the Console.
vHide Globally: Hides the Fixlet or Task on all networked Consoles.
vRemove: Deletes this Fixlet or Task (only available for Custom Fixlets or Tasks).
There are several tabs for this document. They include:
vDescription: An HTML page describing the Fixlet or Task and a set of Actions
(implemented as links) that address the problem described. You can search any
of the HTML interfaces in the Console by pressing Ctrl-F and then entering your
search string.
vDetails: An HTML page describing the Properties, Relevance clauses, and Action
scripts associated with the Fixlet or Task. At the bottom of the page is a text box
to enter a comment to be attached to the message.
vApplicable Computers: Shows which subset of computers is targeted by the
Action.
vAction History: Shows the history of any Actions that were invoked by this
Fixlet or Task.
To display a Fixlet or Task list, click the Fixlets and Tasks icon in the Domain
Panel navigation tree.
A Fixlet or Task document is opened whenever you open an item in the resulting
list.
Chapter 18. The Dialogs 211
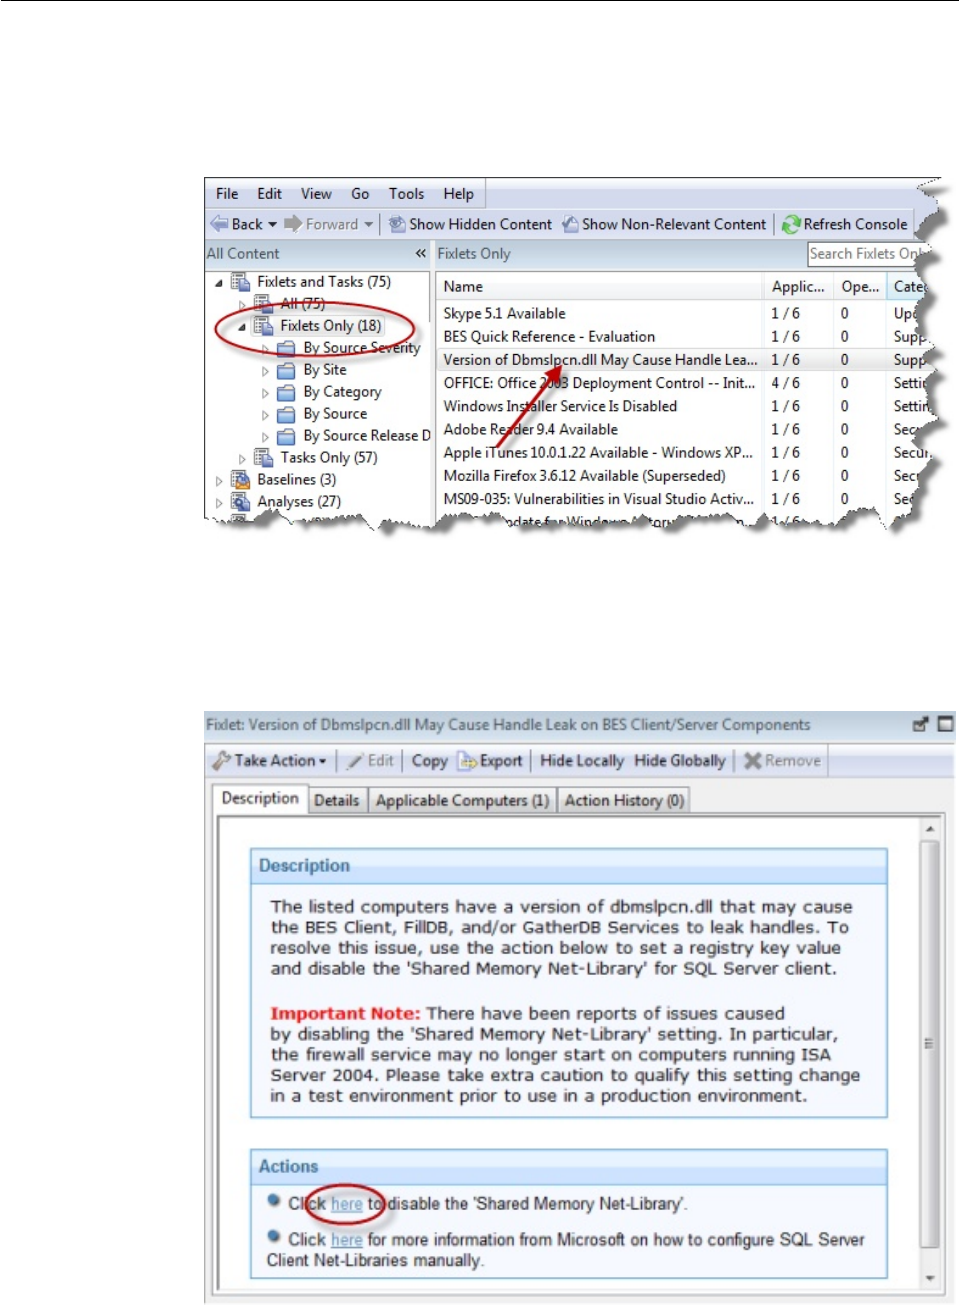
Fixlet List and Document
A list is created whenever you click Fixlets and Tasks from the Domain Panel
navigation tree. This list incorporates both Fixlets and Tasks, which you can filter
by opening the Fixlet and Tasks icon and clicking All Fixlet Messages beneath it.
The List Panel on the right now contains all the currently relevant Fixlets. A Fixlet
document is displayed in the Work Area of the Console when you click any
message in the list. As well as a description, it includes clickable links called
Actions.
212 IBM BigFix: Console Operator’s Guide

At the top of the Fixlet document you find the Fixlet name. Beneath that is a
toolbar containing the following tools:
vTake Action: This tool runs the default action of the Fixlet.
vEdit: This option lets you edit the Fixlet. This tool is only available for custom
Fixlets that you created yourself.
vCopy: This option lets you copy or clone the Fixlet to customize what it does.
vExport: This tool allows you to export the Fixlet for editing in an external editor.
vHide Locally: Hides the Fixlet on this version of the Console.
vHide Globally: Hides the Fixlet on all Consoles.
vRemove: Deletes this Fixlet (only available for Custom Fixlets).
There are several tabs in a Fixlet document. They include:
vDescription: An HTML page describing the Fixlet and a set of Actions
(implemented as links) that address the problem described. You can search any
of the HTML interfaces in the Console by pressing Ctrl-F and then entering your
search string.
vDetails: An HTML page describing the Properties, Relevance clauses and Action
scripts associated with the Fixlet. At the bottom of the page is a text box to enter
a comment to be attached to the Fixlet message.
vApplicable Computers: Shows which subset of computers is targeted by the
action.
vAction History: Shows the history of any actions that were invoked by this
Fixlet message.
To display a Fixlet list, click the Fixlets icon under the Fixlets and Tasks icon in
the Domain Panel navigation tree.
A Fixlet document is opened whenever you open an item in a Fixlet list.
Import Content
The Import dialog allows you to import .bes files that you exported or that were
sent to you by another operator.
IBM Endpoint Manager files might contain groups of Fixlet messages, Tasks,
Actions, or Baselines. When you open them, a Create dialog is displayed, together
with the expected features for each content type. For more information, see the
associated creation dialogs for the selected content.
This dialog is available by selecting Import from the File menu.
Launch Web Reports
The Web Reports dialog provides access to network information, which is collected
from the BigFix Servers and aggregated into a set of HTML reports. These include
summaries of the history and status of Fixlet messages and Actions across
extended networks of computers. These reports can be used to track software
deployments and compliance across a global network of independent LANs. To
start, select Tools > Launch Web Reports.
Web Reports is a stand-alone program that is not described in this Guide. For more
information, see the Web Reports Guide.
Chapter 18. The Dialogs 213

This dialog is available by selecting:
vTools > Launch Web Reports.
Main Console Window
The Main Console Window has a panel on the left containing buttons and
navigation trees called the Domain Panel. Choose an item from the Domain Panel
to open the related List Panel on the right. From this list, specific items can be
opened in the Work Area below. Here are the main parts:
vDomain Panel: This panel provides a high-level view of the IBM Endpoint
Manager content, allowing you to quickly subdivide the information by major IT
functions. Within each domain, this panel presents navigation trees that make it
easy to zoom in on Fixlet Messages, Reports, Analyses, and other content.
vDomain Buttons: At the bottom of the Domain Panel, these buttons represent
the set of Domains that are currently available to you. When you subscribe to a
site, it is automatically entered into the correct domain. If a new domain is
required, a button for it is added to this group. At the bottom of the buttons is a
control that allows you to adjust the number of buttons to display.
vConsole Toolbar: This toolbar allows you to navigate back and forth through the
items you have selected from the Domain navigation tree. In addition, there are
buttons that allow you to display items you might have hidden and items that
are not currently relevant to any of your Clients (this allows you to view all the
available content for research or cloning purposes). There is also a refresh button
that re-evaluates content for the Console display.
vList Panel: This is a listing of the items specified by the content filters and the
navigation trees in the Domain Panel. You can sort this list by clicking the
column headers and you can rearrange the headers by dragging them left or
right. In addition, you can right-click the headers to see a pop-up menu
containing a list of all the possible fields. Check those you want to use as
headers.
vContext Menu: This is the menu that opens when you right-click any item in a
list. Different lists have different context menus.
vWork Area Toolbar: This bar contains context-sensitive buttons that can run
various actions based on the content of the current work area.
vWork Area: Below the List Panel and the Work Area Toolbar is the Work Area.
When you double-click an item from the List Panel, the Console opens a
detailed document in this window.
Domain Panel Console Toolbar List Panel Context Menu
214 IBM BigFix: Console Operator’s Guide
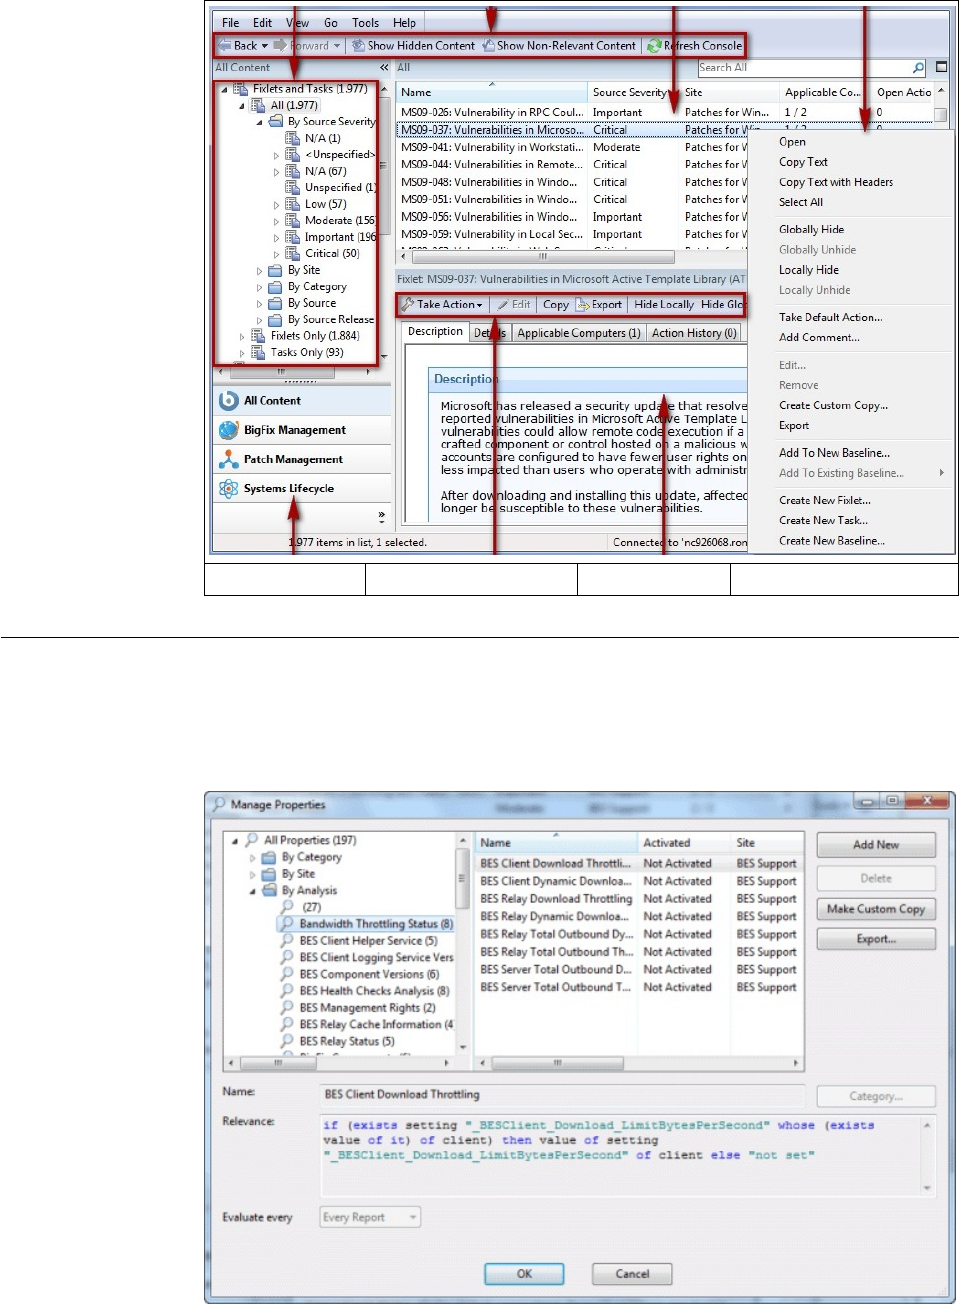
Domain Buttons Work Area Toolbar Work Area
Manage Properties
The Manage Properties dialog contains a list of computer properties that are
retrieved on a regular schedule from each BigFix Client.
Chapter 18. The Dialogs 215
This allows the Console operator to monitor specific aspects of all managed clients.
These properties can also form the basis of the client filters (and column headers)
in the Console whenever client computers are listed. In addition, these properties
can be used to target computers for Fixlet messages or actions.
There are several properties listed as defaults in the top panel, but if you are a
Master Operator, you can add to these (and delete others) by using the buttons on
the right:
vAdd New: To add a property, click this button, and the bottom part of the dialog
becomes editable. Supply a name (that to be used for filtering and sorting) and
then fill in a Relevance Expression in the text box below.
vDelete: To delete a property, highlight it in the list and then click this button.
vMake Custom Copy: You can clone and customize any property by selecting it
in the list and then clicking this button.
vExport: To export a property as an XML (.bes) file for sharing with other users,
click the button and then specify a filename for export.
Below this panel are two text fields. They display the existing property name and
relevance expression. For reserved properties, these fields are display-only. Many
of the properties, however, are available for editing.
vName: Displays the existing name of a property, or allows you to enter a name
for a new Property. If you make this name available, it is integrated into the
interface for filtering, sorting, and targeting. This field also allows you to rename
a property.
vRelevance: This text box displays the relevance expression that is evaluated to
produce the retrieved property.
For each of these properties, there is an optional evaluation period:
vEvaluate Every: Choose a time period, from 5 minutes to one month, which
controls how often the Property is evaluated. You might want to set a long
period for time-consuming property evaluations or a short period for more
urgent properties. The default is Every Report, which revaluates the properties
with each report.
NOTE: Some of the properties (such as the IP Address and the relay status) are
essential to the correct functioning of the Console. They are marked as Reserved,
and cannot be renamed or deleted.
This dialog is available by selecting Tools > Manage Properties...
216 IBM BigFix: Console Operator’s Guide

Manual Computer Groups
This dialog allows you to manually group your computers to target them
simultaneously.
To choose the computers you want to group, select them from the Computers List
Panel. Right-click and select Add to Manual Group from the context menu. In the
dialog that opens, you can add these computers to a pre-existing group, or define a
new group. There are two buttons for these choices:
vAdd the selected computers to the manual group selected below: Click a group
and click OK.
vAdd the selected computers to a new manual group named: Type in a new
group name and click OK.
NOTE: A computer can belong to more than one group. You can also define
groups automatically, by using properties or Relevance statements to indicate their
group status.
This dialog is available by clicking the Computers icon in the Domain Panel
navigation tree, selecting computers from the Computer List Panel, and then
right-clicking and selecting Add to Manual Group from the context menu.
Messages tab
Ordinarily, the system applies actions in the background, without involving any
users. In the Messages tab you can select to alert the user with a specific message,
and to offer certain interactive features on the message display, including the
ability to see more information about the proposed action and to cancel the
proposed action.
Chapter 18. The Dialogs 217
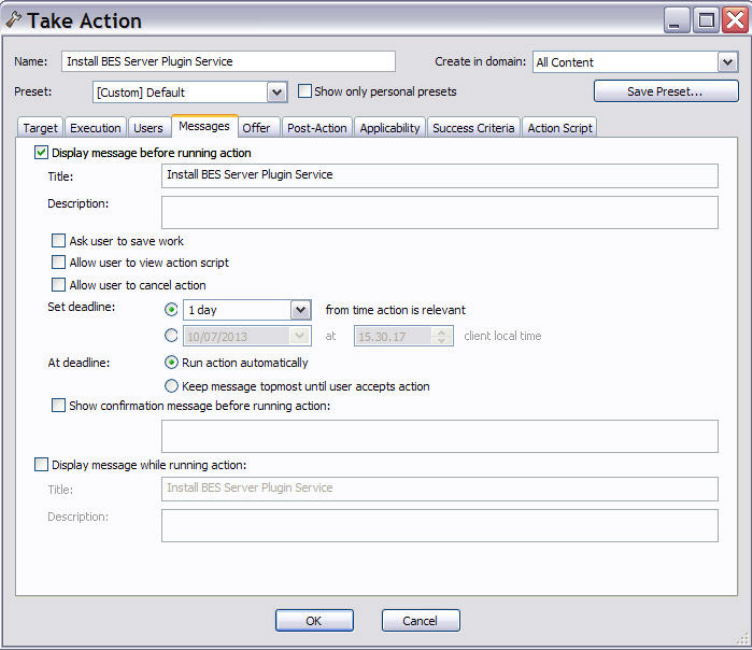
This tab is available from several different dialogs:
v“Take action” on page 240
v“Take multiple actions” on page 242
v“Action Settings” on page 141
v“Edit Computer Settings” on page 197
You can select to display a message to the users before running the action or while
the action runs or both. The default is to show no message. If you click on Display
message before running action, in addition to the title and the text of the message,
you can specify the following behaviors:
Ask user to save work
Includes a prompt asking users to save their work before the action is
invoked.
Allow user to view action script
Allows the user to look over the script before accepting the action.
Note: This option is disabled in the Take Multiple Action dialog.
Allow user to cancel action
Grants the user the right to cancel the action.
Set Deadline
Extends the user a grace period after the action becomes relevant. For
example, this ability could be helpful to allow the user to prepare for an
upgrade. Select:
218 IBM BigFix: Console Operator’s Guide
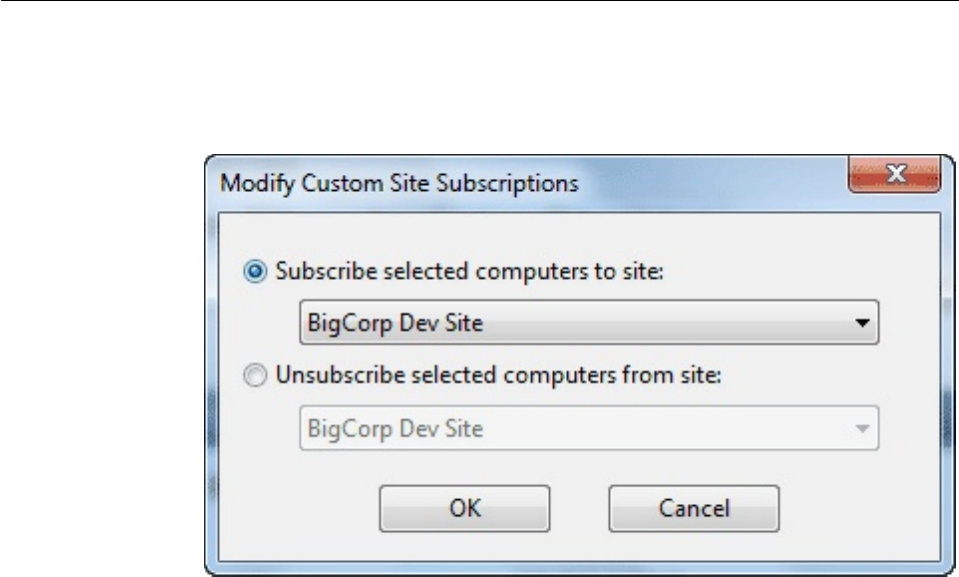
time_period from time action is relevant
To grant the user a specified grace period starting when the action
becomes relevant.
date at time client local time
To set the deadline to a specific date and time using the timezone
specified in the Execution tab, which can be either the local client
timezone or the Universal Time Zone.
At deadline
When the deadline arrives you can select to Run action automatically or
to Keep message topmost until user accepts action to keep the message
on top until the user clicks to accept the action.
Show confirmation message before running action
Displays a final confirmation message to the user before running the
action.
Modify Custom Site Subscriptions
The Modify Custom Site Subscriptions dialog lets you subscribe or unsubscribe
any specified group of computers to any of your ad-hoc enabled custom sites.
To prepare a custom site for this type of ad-hoc subscription, you must first open
the custom site, select the Computer Subscriptions tab, and click the button
labeled Computers subscribed via ad-hoc custom site subscription actions. Do
not forget to Save Changes using the toolbar.
Now, when you open Computers in the List Panel, right-click to bring up the
context menu and choose Modify Custom Site Subscriptions. This dialog opens
and those custom sites that have been enabled for ad-hoc subscriptions are
available for subscription from the pull-down menu. If the site is already
subscribed to a custom site, this dialog also lets you unsubscribe it.
Chapter 18. The Dialogs 219

This dialog is available by right-clicking an item from any Computer list and
selecting Modify Custom Site Subscriptions from the context menu. For this
menu choice to be available, you must have first set up a Custom Site with
subscribers.
Offer tab
In the Offer tab you can advertise a list of actions (typically optional patches or
updates) to the BigFix Client user.
This tab is available from several different dialogs:
v“Take action” on page 240
v“Take multiple actions” on page 242
v“Action Settings” on page 141
v
Use the information in this tab to let an operator, which is allowed to manage the
targeted Clients, choose the actions from the offering list. Offers are limited to
version 7.0 Clients or later.
In this tab you see the following options:
Make this action an offer
Check this box to advertise the given action to users.
Notify user of offer availability
220 IBM BigFix: Console Operator’s Guide
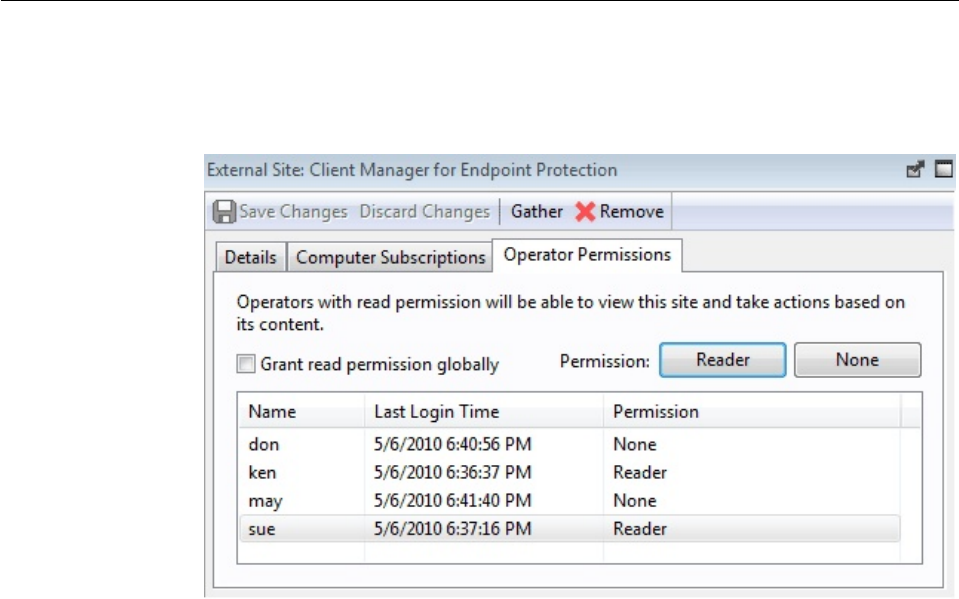
Title Enter a descriptive title for your action. This advertisement is presented to
users who have to decide whether to take advantage of the offer or not so
use a effective and easy to understand description.
Category
Enter a category for this offering. This is a user-defined field for
bookkeeping purposes, and you can use any scheme that makes sense to
your particular deployment. For example, one company might want
offering categories like Installers and Uninstallers; another might want
Applications and Updates.
HTML box
Enter a description of the action in the box provided. The description will
be presented to users. You can change fonts, sizes, styles, numbering, and
formatting to customize the description.
Operator Permissions Tab
The Operator Permissions tab of the Site document lets Master Operators specify
site permissions for other operators.
This dialog is available to Master Operators and Non-Master Operators who have
Site Ownership permissions.
Not all operators need to know about all sites, and some sites can be most easily
managed by a single operator, such as the Anti-Spyware Czar. This interface lets
you attach a Fixlet site to a single operator or group of operators. You can also
remove operators from this list at any time.
This interface only affects the reader status of Non-Master Operators. For an
external site, there is a check box and two buttons:
vGrant read permission globally: Check this box to allow read access to all
operators.
vReader: Select an operator from the list and then click this button to grant read
permission to that operator.
Chapter 18. The Dialogs 221
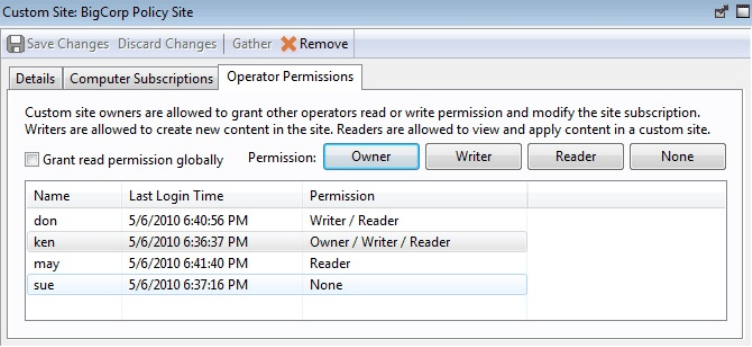
vNone: Select an operator from the list and click this button to deny read
permission to the specified operator.
For a custom site, which can be owned and edited, there are two extra permission
buttons.
As before, you select an operator from the list and then click buttons to grant
permissions. The two extra buttons are:
vOwner: This grants the greatest permission to the operator who can then assign
reader and writer permissions.
vWriter: This button allows an operator to edit the site.
This dialog is available by clicking the Sites icon in the Domain Panel navigation
tree, selecting a Site from the resulting List Panel, and then clicking the Operator
Permissions tab.
222 IBM BigFix: Console Operator’s Guide
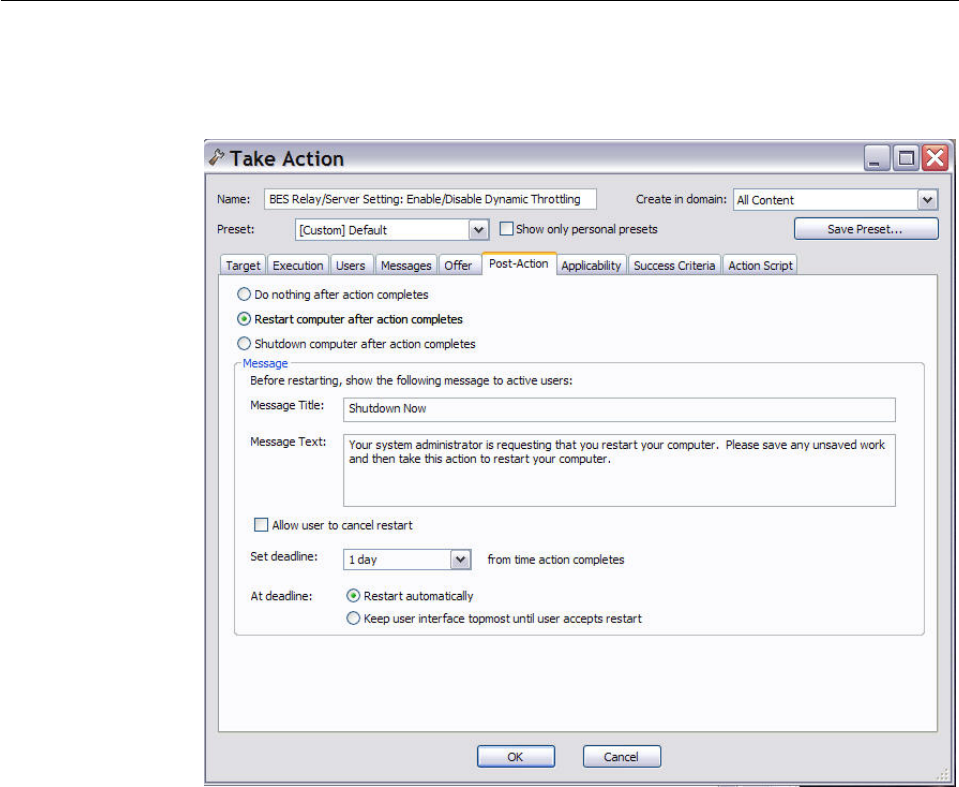
Post-Action tab
In the Post-Action tab you can set to restart or shut down the client computer after
the action has completed
This tab is available from several different dialogs:
v“Take action” on page 240
v“Take multiple actions” on page 242
v“Action Settings” on page 141
Among the various settings that you can specify in this tab you find:
Allow user to cancel restart
This gives the user a dialog box where they can cancel the proposed
restart.
Set deadline
This gives the user the option to delay the restart/shutdown for the
specified time frame after the action completed. Typically, restarts are
needed to complete an installation, so they should not be postponed for
too long a time.
At deadline
Click one of these buttons to specify what the deadline action is. You can
choose to automatically restart, or to keep a dialog box on the screen until
the user is ready.
Chapter 18. The Dialogs 223
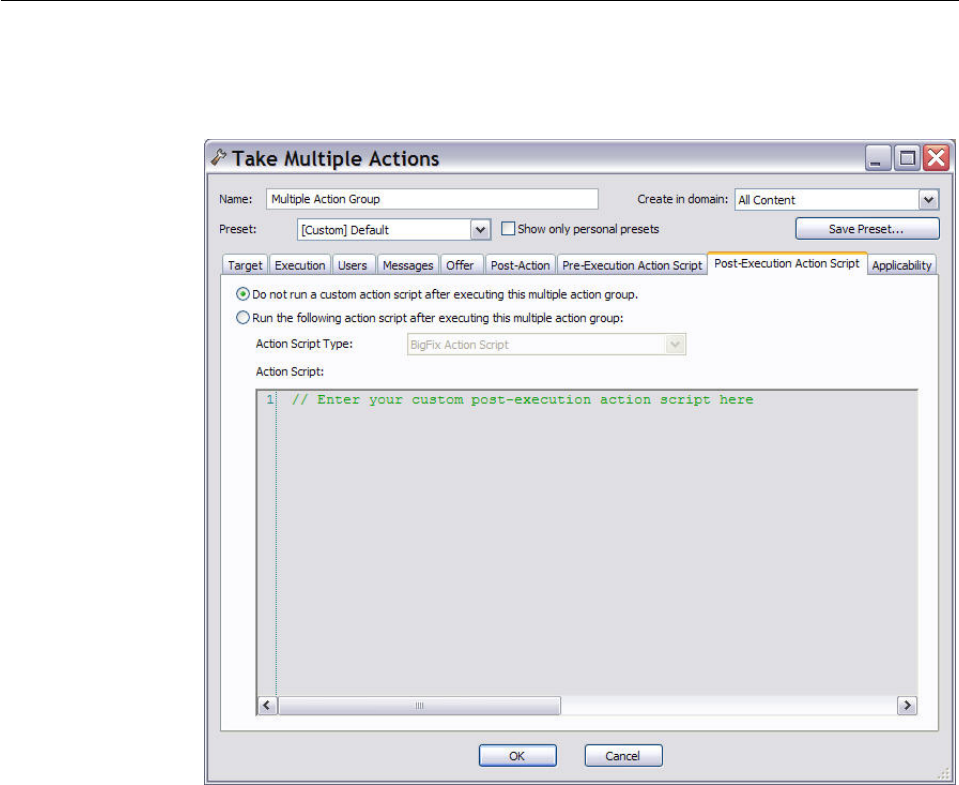
Post-Execution Action Script Tab
In the Pre-Execution Action Script tab of the Take Multiple Actions dialog you
can create an action script that runs after the chosen set of actions is run.
This tab is available from several different dialogs:
v“Take action” on page 240 when deploying a baseline
v“Take multiple actions” on page 242
There are two buttons in this dialog:
Do not run a custom action script after executing this multiple action group
This is the default for most Fixlet actions, and is the recommended option.
Run the following action script after executing this multiple action group
You can select one of the following options and either modify the existing
script or enter a new script in the text area. Select the type of action script
that you want to use for this script:
BigFix Action Script
This is the IBM Endpoint Manager standard scripting language for
actions. For more information about the action language, see
Introducing the action language.
AppleScript
This is Apple's scripting language for controlling computer
resources.
224 IBM BigFix: Console Operator’s Guide
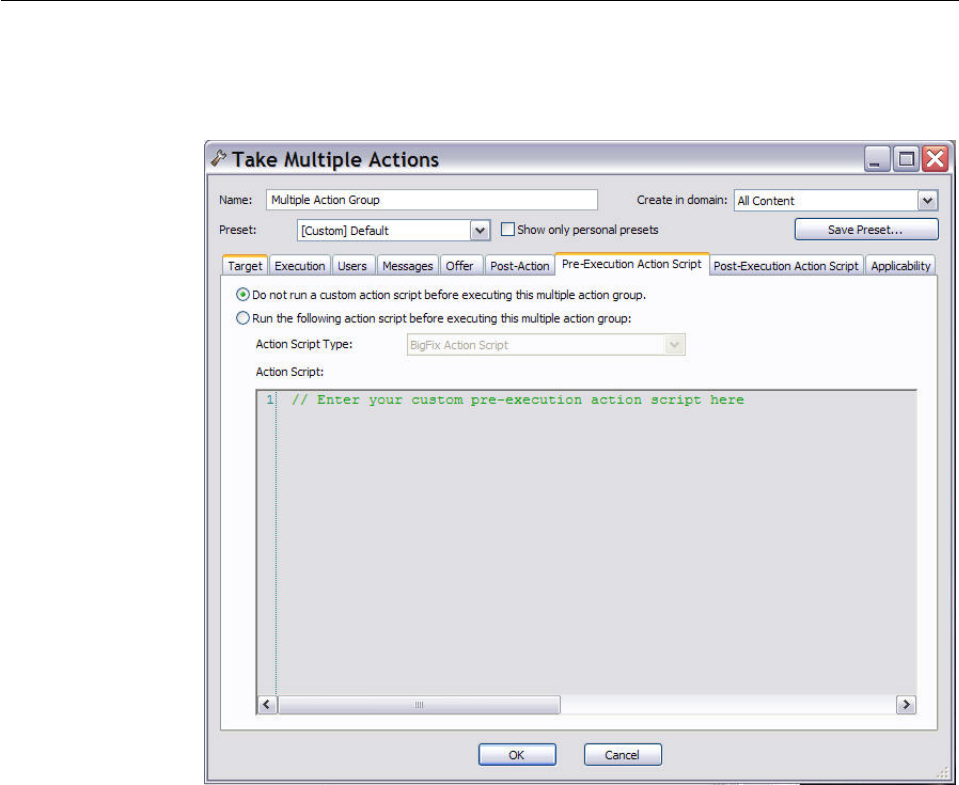
sh The action is a shell script to be run by a Linux or a UNIX or a bsd
shell.
Note: By default, actions cannot be undone. Make sure to test your action on a
small scale before you deploy it in your entire network.
Pre-Execution Action Script tab
In the Pre-Execution Action Script tab of the Take Multiple Actions dialog you
can create an action script that runs before the chosen set of actions is run.
This tab is available from several different dialogs:
v“Take action” on page 240 when deploying a baseline
v“Take multiple actions” on page 242
There are two buttons in this dialog:
Do not run a custom action script before executing this multiple action group
This is the default for most Fixlet actions, and is the recommended option.
Run the following action script before executing this multiple action group
You can select one of the following options and either modify the existing
script or enter a new script in the text area. Select the type of action script
that you want to use for this script:
Chapter 18. The Dialogs 225
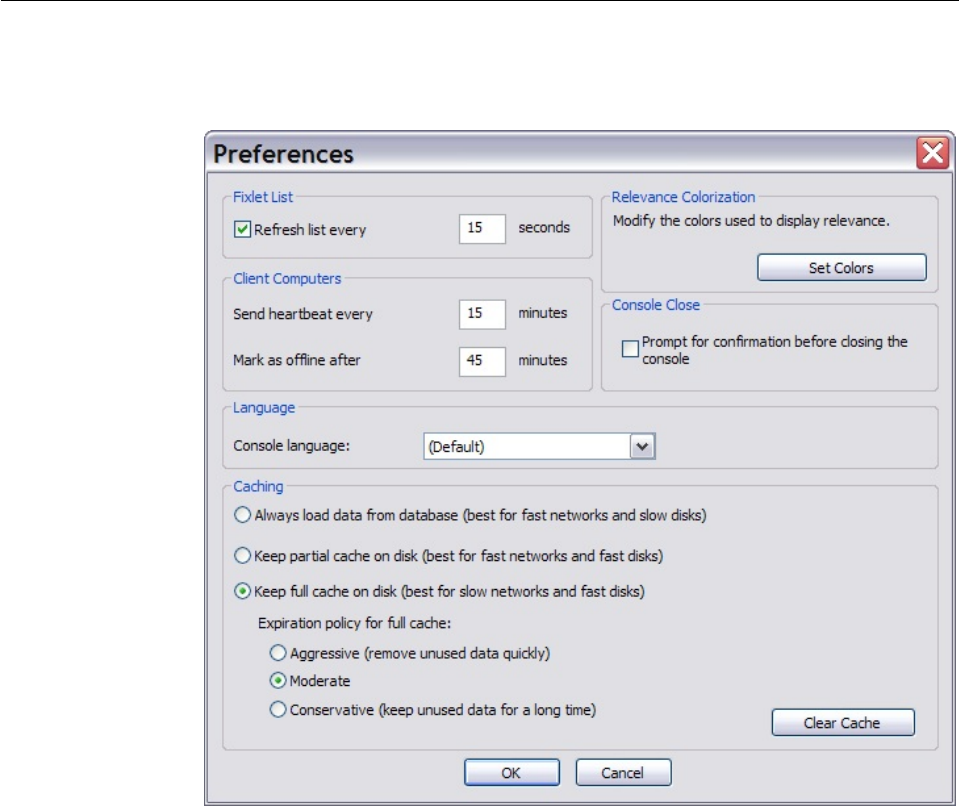
BigFix Action Script
This is the BigFix standard scripting language for actions. For more
information about the action language, see Introducing the action
language.
AppleScript
This is Apple's scripting language for controlling computer
resources.
sh The action is a shell script to be run by a Linux or a UNIX or a bsd
shell.
Note: By default, actions cannot be undone. Make sure to test your action on a
small scale before you deploy it in your entire network.
Preferences
The Preferences dialog lets you adjust certain system-wide parameters.
There are several sections in the Preferences dialog:
Fixlet List
vRefresh list every XX seconds: Controls how often the Fixlet display is updated.
The default setting causes the BigFix Database to be queried every 15 seconds.
More frequent updates cause more network traffic, but less frequent updates
226 IBM BigFix: Console Operator’s Guide
increase the response time. As the BigFix Database increases in size, a longer
refresh rate might be desirable. 15 seconds provides a good balance between
latency and bandwidth concerns.
Client Computers
vSend heartbeat every XX minutes: Controls how often the BigFix Client
computers check in with the BigFix Server to update their status. Each time a
BigFix Client sends a heartbeat, it includes any retrieved property values that
have changed. 15 minutes is the default value.
vMark as offline after XX minutes: Controls how long to wait after the last
heartbeat before a computer is declared to be offline. The default is 50 minutes.
Relevance Colorization
vModify the colors used to display relevance: Whenever Relevance expressions
are viewed, the text can be colored for easier reading. Click the Set Colors
button to open an interface allowing you to customize your personal color
scheme.
Console Close
vPrompt for confirmation before closing the console: This preference provides a
yes/no prompt every time you exit the Console.
Language
vConsole Language: If you want to change the Console language, select the
language and then restart the Console.
Cache options
vAlways load data from database: If you do not want to leave information
cached on your Console computer, click this option. This causes all data to be
loaded freshly from the database each time you open the Console.
vKeep partial cache on disk: This option caches everything except retrieved
property results. The Console still caches Fixlet and Action results, which are
then written out upon exiting.
vKeep full cache on disk: With this option, retrieved properties can be stored
locally along with Fixlet and Action results. The more properties you keep in the
cache, the more expensive it is to maintain, so the caching policy determines
how long the Console runs before it clears items out of its cache.
Expiration policy. If you have selected the full caching option above, you must
also set an expiration policy to periodically purge the cache:
vAggressive: This policy purges unused data rapidly, purging any items that
were not accessed in the previous Console session.
vModerate: This policy is intermediate between aggressive and conservative.
vConservative: This policy allows data to remain for a long time between purges,
whether or not is has been recently accessed.
vClear Cache: Click this button to clear the current cache when the Console is
next run.
This dialog is available by selecting:
vFile > Preferences
Chapter 18. The Dialogs 227
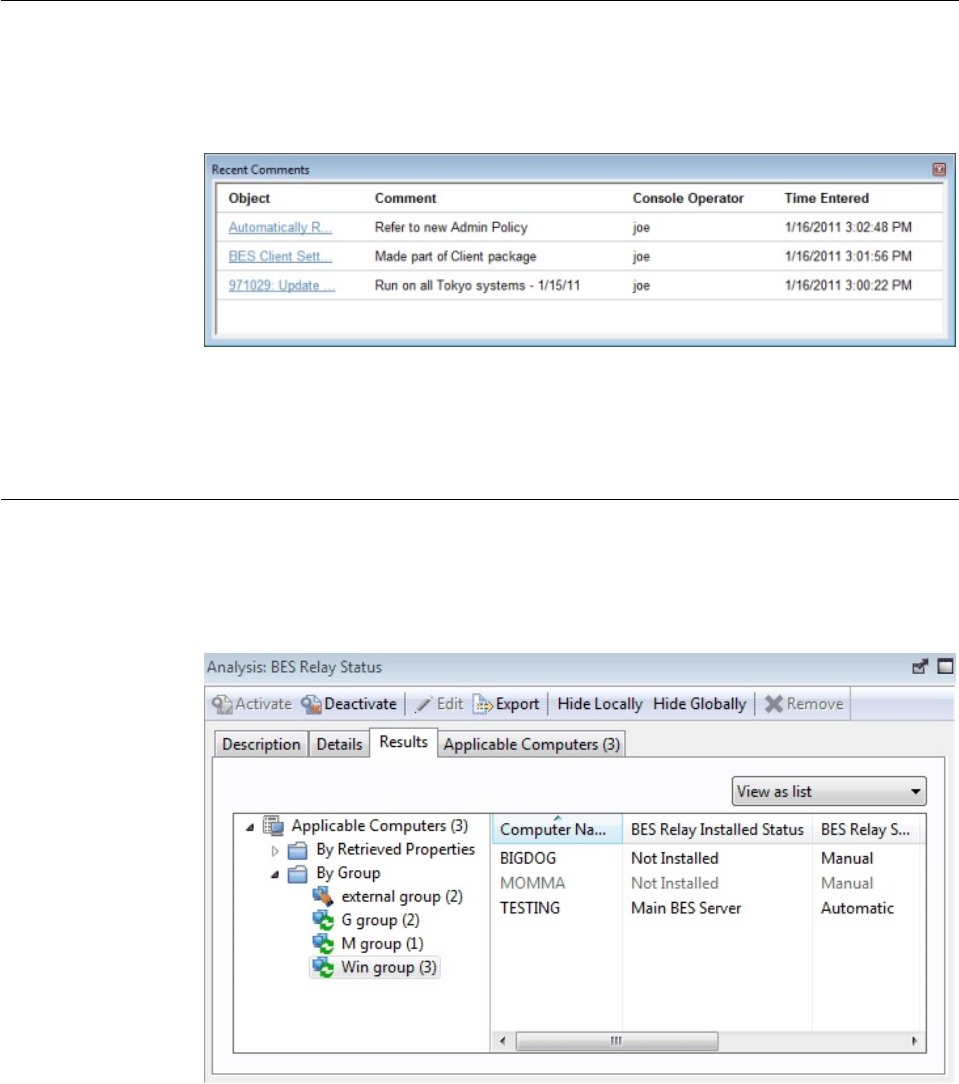
Recent Comments
This dialog presents a list of comments that have been attached to Fixlet messages,
Tasks, Baselines, Actions, and Computers.
It compiles all the Comments from each of these interfaces for viewing in one
place.
You can view the current comments by selecting Tools > View Recent Comments.
Results Tab
The Results tab of the Analysis document displays a list of targeted computers
and the results of the analysis for each one.
The format of this display depends on the selected View, either list or summary.
The list view is shown above.
When viewed as a list, each specified retrieved property has a corresponding
header and the value of each property is displayed beneath it. If there is more than
one value for a property, then <multiple results> is displayed. You can sort this list
by the headers or use the folders in the left-hand panel to filter the results. This
allows you to manage large sets of computers by their retrieved properties.
228 IBM BigFix: Console Operator’s Guide
When viewed as a summary, each property has its own section, with response
counts and percentages for each value of the property.
This dialog is available whenever you select an activated Analysis from an
appropriate list.
Role Computer Assignments Tab
The Computer Assignments tab of the Roles window allows you to add a set of
computers to a role.
Click the Add button to include computers, defined by properties or groups, as a
part of this role's definition. Make sure to click Save Changes before you dismiss
this window.
Chapter 18. The Dialogs 229
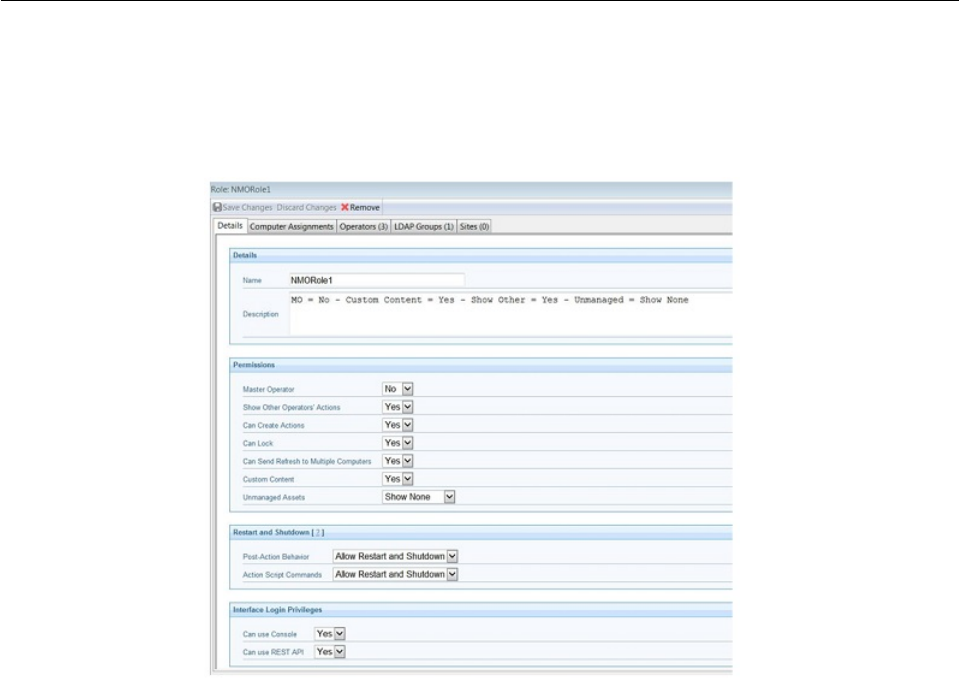
This dialog is presented when you select a role from the Roles list or when you
create a role from scratch with Tools > Create Role.
Role Details Tab
Roles can be created and defined through the Console. You can create a role by
selecting Tools > Create Role. You can modify an existing role by clicking on an
item in a Roles List, which is available when you select Roles from the Domain
panel.
The Roles Detail tab lets you describe the role and set permissions. In particular,
you can give this role Master Operator permissions with the appropriate
pull-down menu. If you want this role to be able to create and edit custom sites,
use the Custom Content pull-down. If you want this role to be able to follow the
actions of other operators, select Yes from Show Other Operator's Actions.
To run actions on computers set Can Create Actions to Yes. If you set to No, you
can still view computers and create Fixlets or analyses.
To lock computers set Can Lock to Yes.
If you want to allow this role to view Unmanaged Assets, select that option from
the appropriate pull-down.
To influence the ability of the operator to trigger restart and shutdown as
Post-Action, assign a value to Post Action Behavior.
To influence the ability of the operator to include restart and shutdown in actions
with type BigFix Action Scripts, assign a value to Action Scripts Commands.
You can also set permissions to access the BigFix Console and REST API.
This dialog is presented when you select a role from any list of roles.
230 IBM BigFix: Console Operator’s Guide
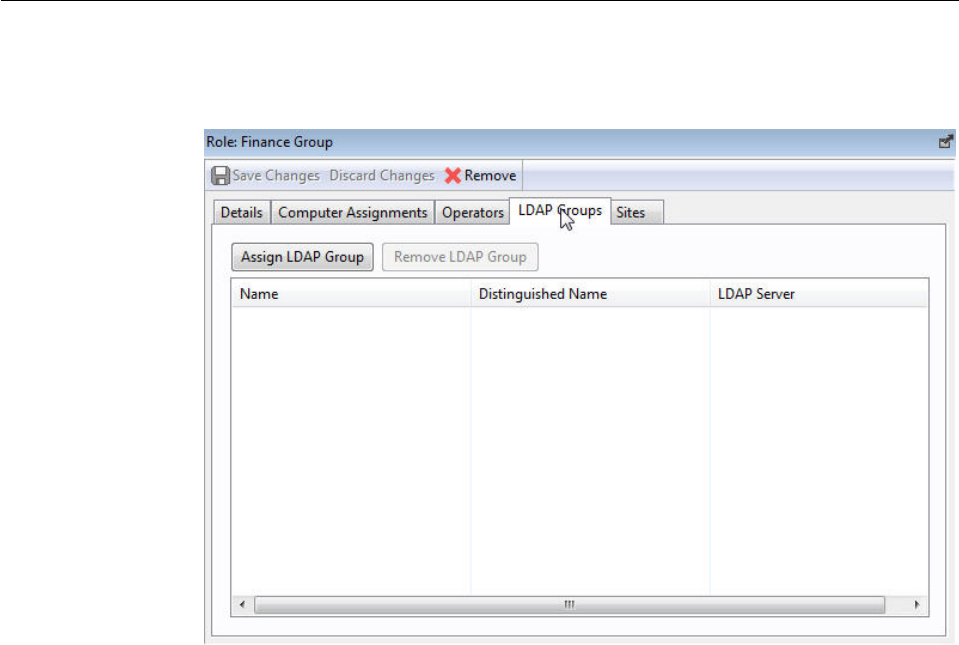
Role LDAP Groups Tab
The LDAP Group tab of the Roles window allows you to associate an LDAP
Group to the Role definition.
Click Assign LDAP Group to bring up a dialog with your currently unassigned
LDAP Groups listed for selection. You can also delete groups by selecting their
name and clicking Remove LDAP Group.
Make sure to click Save Changes before you dismiss this window.
This dialog is presented when you select a role from the Roles list or when you
create a role from scratch with Tools > Create Role.
Chapter 18. The Dialogs 231
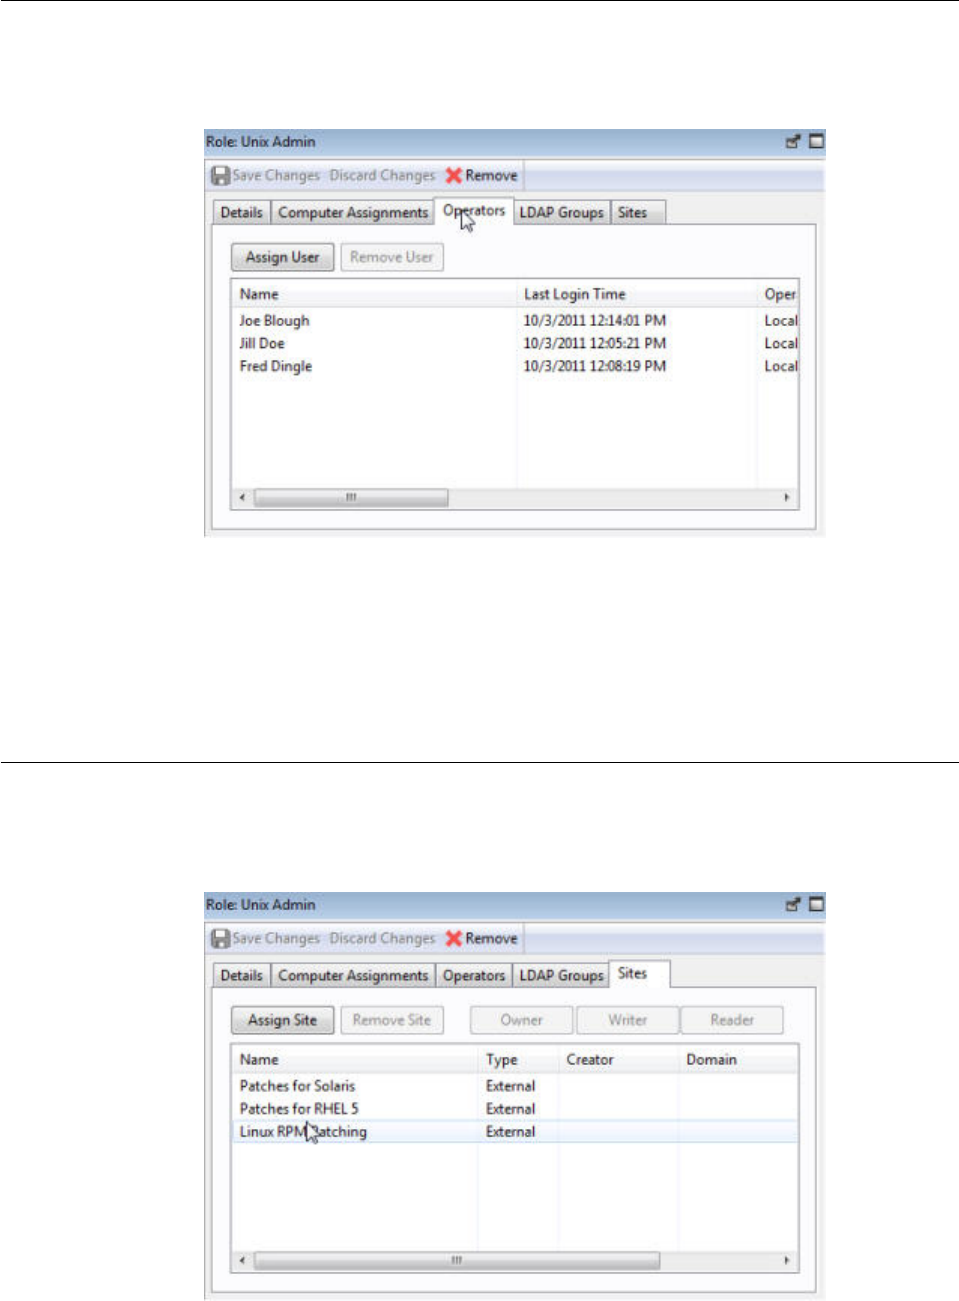
Role Operators Tab
The Operators tab of the Roles window allows you to associate specific local or
LDAP-defined users with the given role.
Click the Assign User button to bring up the list of currently unassigned users.
You can delete users from this role by selecting their names and clicking Remove
User.
Make sure to click Save Changes before you dismiss this window.
This dialog is presented when you select a role from the Roles list or when you
create a role from scratch with Tools > Create Role.
Role Sites Tab
The Sites tab of the Roles window allows you to associate content sites with a
given role.
232 IBM BigFix: Console Operator’s Guide
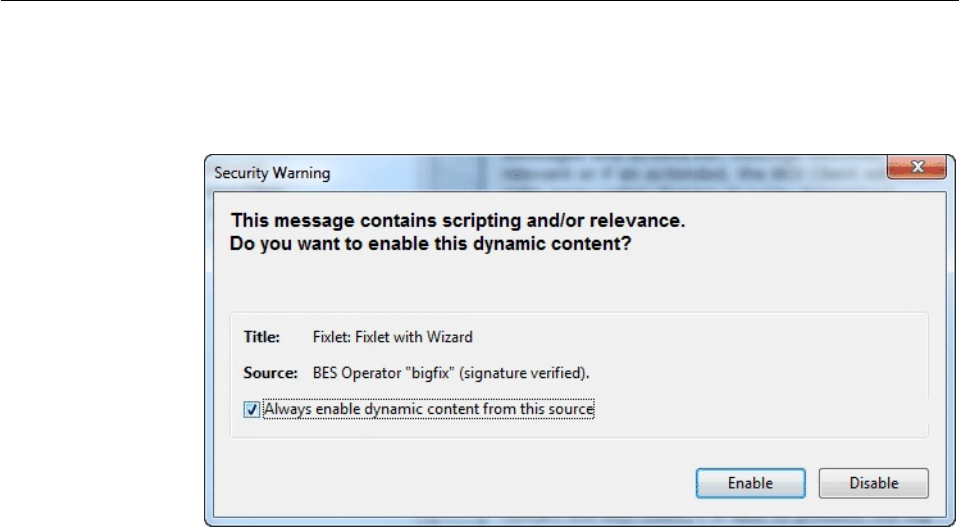
You can add various sites by clicking the Assign Site button. Then, for a custom
site, you can assign owners and writers to this role.
Make sure to click Save Changes before you dismiss this window.
This dialog is presented when you select a role from the Roles list or when you
create a role from scratch with Tools > Create Role.
Security Warning
The Security Warning dialog alerts you about scripting or relevance statements
embedded in text.
Whenever the Console detects that an embedded Relevance clause or a script is
about to be displayed, this warning pops up. Unlike Action scripts, which require
a password before they can be run, embedded scripts are run automatically and
thus require scrutiny. In general, if you created these scripts from a custom site,
you can click the checkbox to allow dynamic scripting to always be enabled.
If you are uncertain about the source of the embedded script, click Disable.
This dialog is displayed whenever content containing a Relevance statement or a
script is about to be displayed.
Chapter 18. The Dialogs 233

Settings Tab
The Settings tab of the Edit Computer Settings dialog allows the administrator to
apply certain settings to multiple targeted computers, including locking, relays,
and custom variables.
It includes the following controls:
vLocking Status. Check this box to either lock or unlock the targeted computers.
You might want to lock a computer because it is currently being used in
program development, it is in the middle of a lengthy process, or because it is
running specialized software. While a computer is locked, no actions are run on
it.
–Locked. Click this button to lock the computer.
–Unlocked. Unlock the targeted computers.
vRelay Selection Method. Choose an automatic or manual Relay method.
–Automatically Locate Best Relay. Select this button to automate the process
of selecting a Relay. This is the recommended setting.
–Set Relays Manually. Force a manual selection of the BigFix Relays.
vPrimary Relay. Select a primary Relay. Check the box and select a computer
from the pull-down menu. Any attached Clients then gather Fixlet downloads
from this relay rather than directly from the IBM Endpoint Manager Server.
vSecondary Relay. Select a secondary Relay. Check the box and select a computer
from the pull-down menu. Any attached Clients then gather Fixlet downloads
from this relay if the primary relay is unavailable.
vCustom Setting. This feature allows the BigFix Master Operator to create named
variables that can be associated with the targeted computers.
–Name. Type the name of a variable to be associated with all targeted
computers, for example, "department."
234 IBM BigFix: Console Operator’s Guide
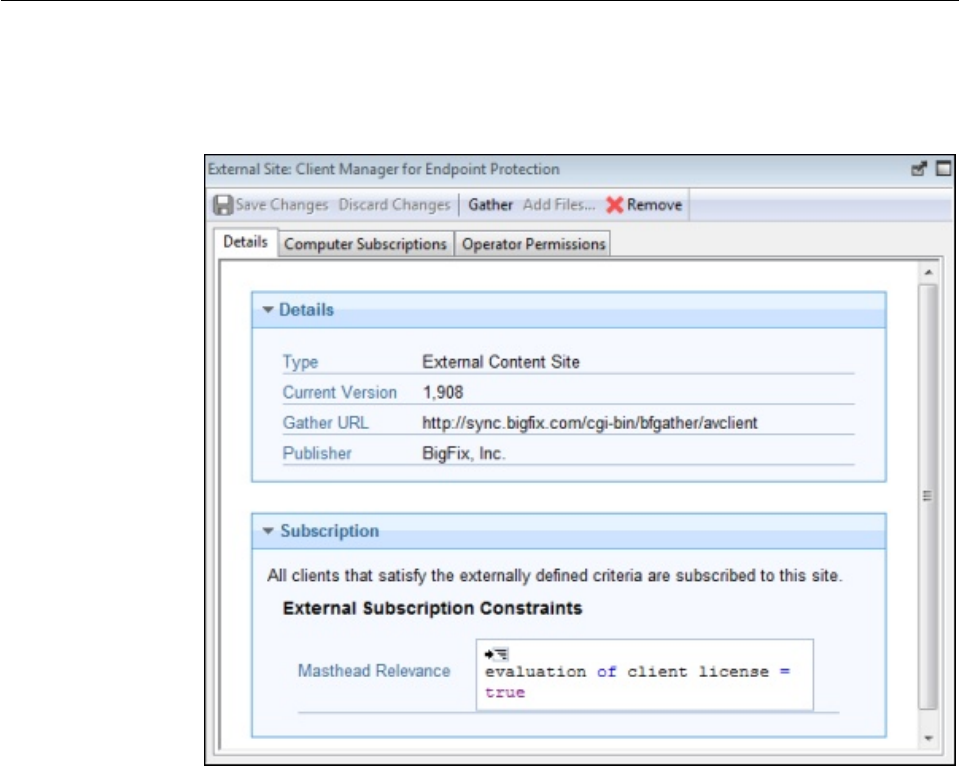
–Value. Enter the value of the above-named variable, for example, "payroll."
When multiple computers are selected, this dialog is available by right-clicking and
selecting Edit Computer Settings from the context menu.
Site Details Tab
The Details tab of the Site document provides you with information about the site
and the subscription criteria.
The Details group provides information about the version, publisher, and URL of
the site.
The Subscription group provides information about how the criteria are used to
select clients for subscription to the site.
This dialog is available by clicking the Site icon in the Domain Panel navigation
tree, selecting a Site from the resulting List Panel, and clicking the Details tab from
the document in the Work Area below.
Chapter 18. The Dialogs 235

Site List and Document
A list of Sites is displayed when you click Sites, or any of its child nodes, from the
Domain Panel navigation tree.
A Site document is displayed in the Work Area of the Console when you click any
item from this list. If you open the Sites icon, you can filter the sites to either
Custom or External types. Click an external site from the list to open it in the Work
Area below.
At the top is a toolbar with four buttons:
vSave Changes: This button is grayed out for an external site.
vDiscard Changes: This button is grayed out for an external site.
236 IBM BigFix: Console Operator’s Guide
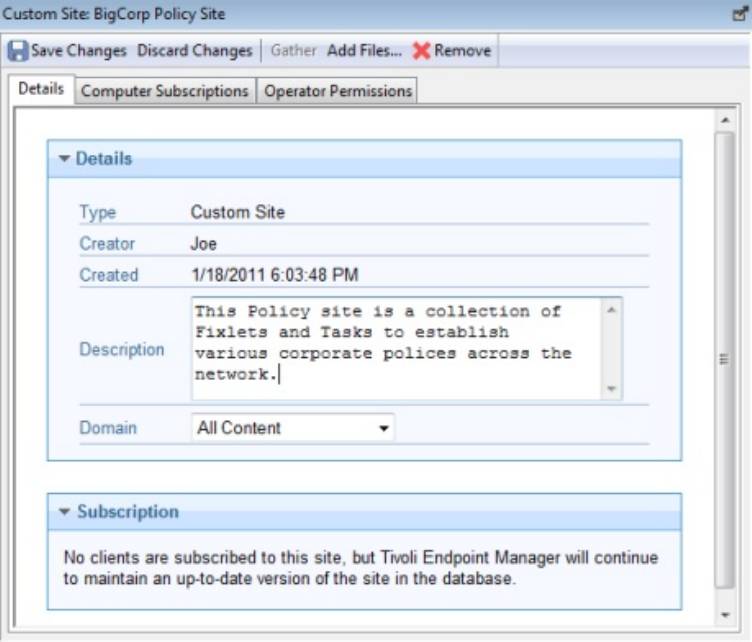
vGather: This button gathers the contents of the site.
vRemove: This button allows you to remove the site from the Console.
Beneath the toolbar are three tabs:
vDetails: This read-only tab displays the version, URL, and publisher of the site.
vComputer Subscriptions: This tab lets you specify which Clients are subscribed
to this site.
vOperator Permissions: This tab lets you attach Operators to the site as owners,
writers, or readers.
You can also create and edit your own Custom sites. If you have any custom sites,
click one from the list to view or edit it.
The document for a Custom Site is similar to that for an External site, with added
abilities to edit the site. The toolbar has the same four buttons:
vSave Changes: After making edits to your Custom Site, click this button to
record your changes.
vDiscard Changes: This button clears all the changes you made.
vGather: Because the contents of a custom site are typically stored locally, this
tool might be grayed-out.
vRemove: This button allows you to entirely remove the site from the Console.
Beneath the toolbar are the same three tabs:
vDetails: This tab allows you to view or edit the description of your custom site
and to select the Domain you want to host the site.
Chapter 18. The Dialogs 237
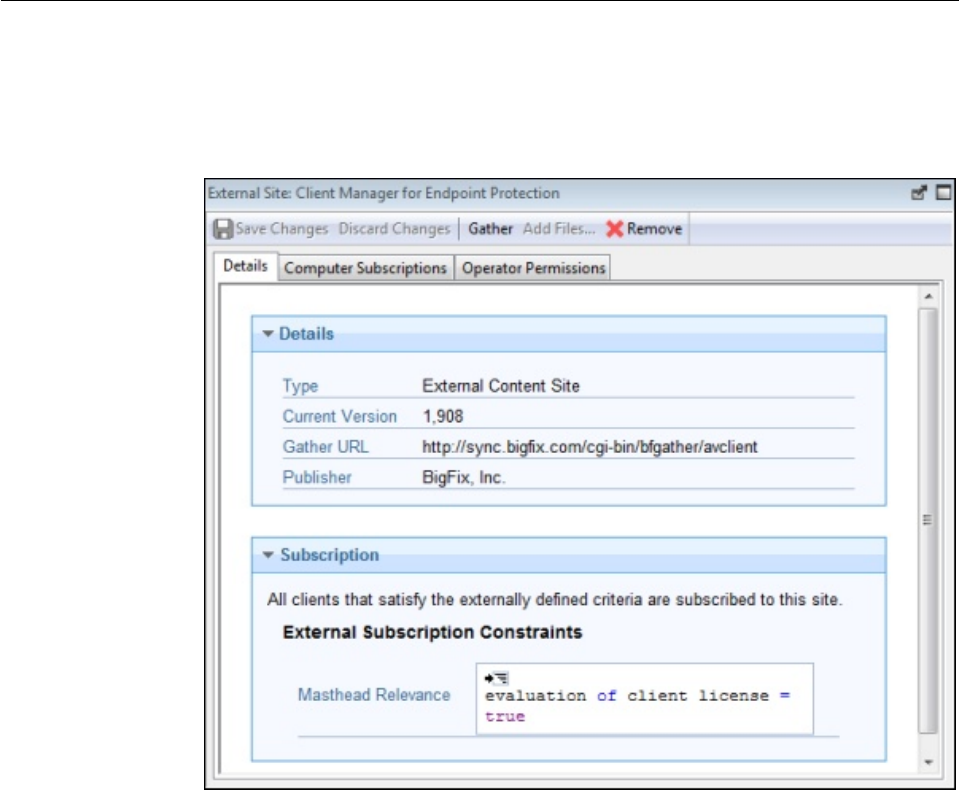
vComputer Subscriptions: This tab lets you specify which Clients are subscribed
to this site.
vOperator Permissions: This tab lets you attach Operators to the site as owners,
writers, or readers.
To view the Site list, click the Sites Icon (or any of its child nodes) in the Domain
Panel navigation tree. Open the icon to narrow down the list to either Custom or
External sites.
To view a Site Document, click any item in a site list.
To create a custom site, select Tools > Create Custom Site.
Site Properties
The Site Properties dialog displays information about the selected Fixlet site,
including the name of the Site publisher and the URL from which the content is
gathered.
The tabs in this dialog include:
vDetails: This tab displays the Site type (internal, external), the version, and
information about the publisher and subscriptions.
vComputer Subscriptions: This dialog allows you to narrow down the list of
computers that subscribe to the chosen site. By eliminating superfluous or
irrelevant Fixlet subscriptions, you can reduce the disk-storage requirements of
your client computers.
238 IBM BigFix: Console Operator’s Guide
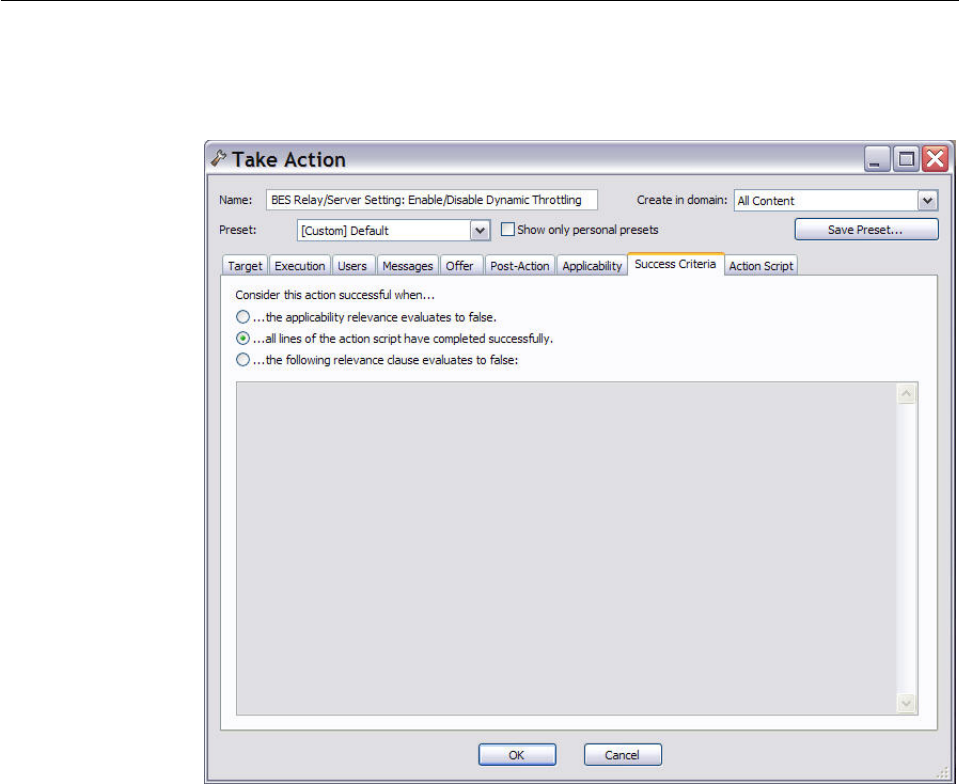
vOperator Permissions: This is a list of the operators and their permission levels.
For an external site, you can typically only grant read access, but for a custom
site you can grant ownership, write or read permission.
This dialog is available by clicking the Sites icon in the Domain Panel navigation
tree and then clicking an item from the resulting List Panel. The Site information
opens in the Work Area below.
Success Criteria tab
In the Success Criteria tab you can define the conditions under which the action is
considered to be successful.
This dialog is available by selecting a Fixlet message or task from any list, then
clicking an action button. From the “Take action” on page 240 dialog, select the
Success Criteria tab.
Select one of the following options:
The applicability relevance evaluates to false
This is the default success criteria, requiring that the Relevance statement
that made the action applicable is no longer TRUE. Because the Relevance
statement notices a problem and the action fixes it, this is generally
sufficient to establish success.
All lines of the action script have completed successfully
You can make success dependent on completing all steps of the action
script.
Chapter 18. The Dialogs 239
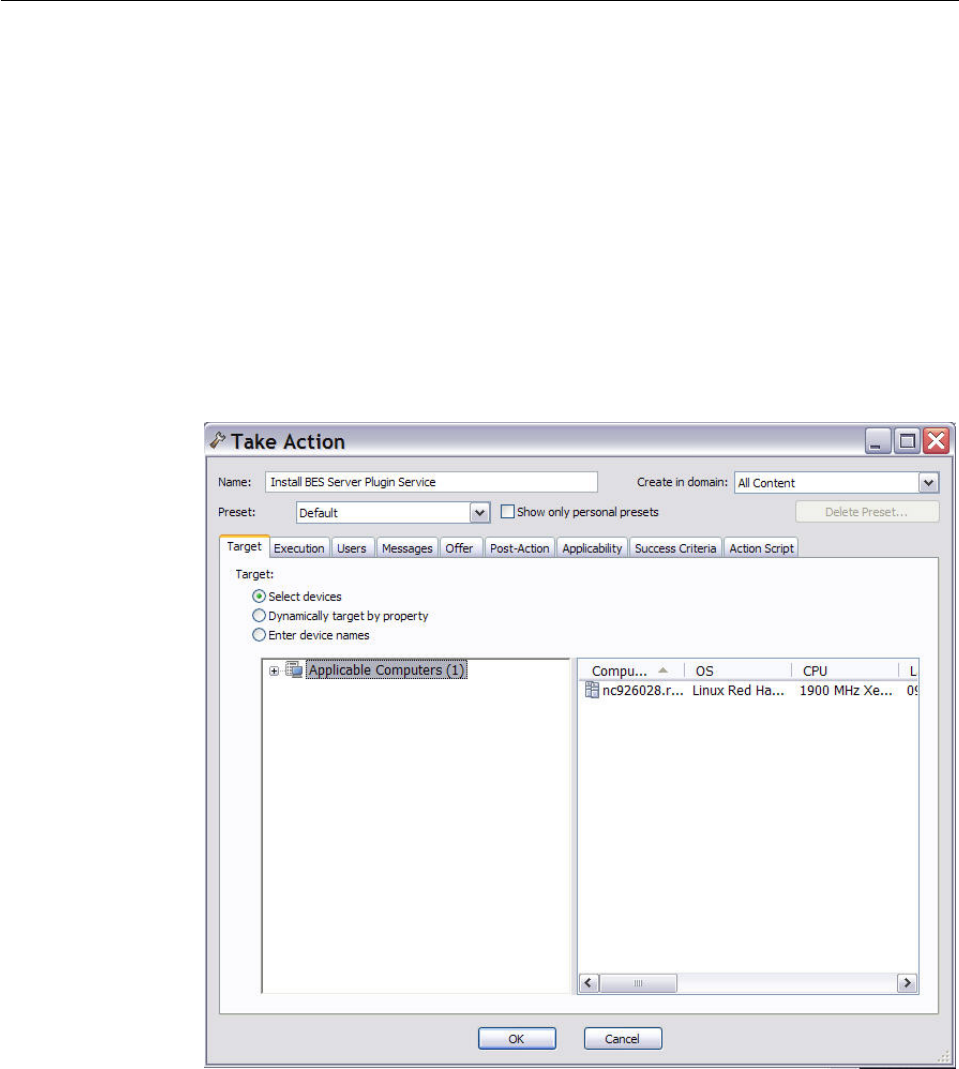
The following relevance clause evaluates to false
You can use a special Relevance clause to ensure that the action has
accomplished it goals. In this case a text box below becomes editable and
you can create or revise an existing Relevance clause.
Take action
Use the Take Action dialog to run deploy a Fixlet, a task or a baseline.
The Take Action dialog is similar to the Take Multiple Actions dialog, but issues
only a single action.
You can access this dialog in one of these ways:
vRight-click a relevant Fixlet message or a task and choose Take Default Action
from the pop-up menu.
vClick a relevant Fixlet message or task and select Take Default Action in the
Work Area toolbar.
vClick a relevant Fixlet message or task and select the Description tab. Scroll
down to see the suggested actions. Click the link related to the action that you
want to run.
Using the input fields and tabs contained in the dialog you can specify exactly
how the selected action is to be deployed to the computers in your network. These
are the fields and the tabs contained in the dialog:
Name Is the name of the action.
240 IBM BigFix: Console Operator’s Guide
Create in domain
Represents the domain where you want to store your custom action. All
Content is the top-level domain, and it includes objects from all domains.
Preset Specifies a preset customized action. There are two built-in presets
available, Default and Policy. Select Policy if you want to set no expiration
date for the action. You can also save your current input as a preset,
private or public, for later use.
Target tab
Contains the list of targets for the action. You can select the targets of the
action from the provided list, or use properties to filter a list or specify a
list of target computers. If you click Select devices you must select the
specific targets in the list. For more information about this tab, see “Action:
Target” on page 145.
Execution tab
Contains the time constraints and retry behavior for the action run and
failure. For more information about this tab, see “Execution Tab” on page
207.
Users tab
Contains the settings to run the action based on which and if specific users
are logged on the computer. For more information about this tab, see
“Users Tab” on page 246.
Messages tab
Contains messages to display before or while the action runs. For more
information about this tab, see “Messages tab” on page 217.
Offer tab
Specifies whether or not to advertise the existence of programs or patches
that your networked Clients can choose to use. This grants extra control to
your users to customize their setup. For more information about this tab,
see “Offer tab” on page 220.
Post-action tab
Lists the activities that must be done to complete the action, including
restart or shutdown. For more information about this tab, see “Post-Action
tab” on page 223.
Applicability tab
Contains the relevance clause that determines the applicability of the
action. For more information about the Relevance language, see
Introducing the Relevance language. For more information about this tab,
see “Applicability tab” on page 151.
Success criteria tab
Specifies what is intended as successful outcome for the action. This tab
lets you use different criteria to determine when a problem has been fixed.
For more information about this tab, see “Success Criteria tab” on page
239.
Action script tab
Contains a script describing the action to run. The script is written using
the action language. An operator needs Custom Authoring permissions to
edit the action script. For more information about the action language, see
Introducing the action language. For more information about this tab, see
“Action Script Tab” on page 139
Chapter 18. The Dialogs 241

When you decide to run the action, click OK and enter your password. A progress
dialog is displayed to keep you informed about the deployment of the action. You
can also monitor how the action is being processed following the instructions
provided in “Monitoring an action taken” on page 28.
Take multiple actions
In the Take multiple actions dialog you specify the settings for deploying a set of
Fixlets or tasks in a single grouping.
As a requirement, each Fixlet or task involved in the group must have associated a
default action.
These is how you can accomplish this task:
1. Right-click a selected group of tasks or Fixlets containing default actions.
2. Select Take Default Action. The Take Multiple Actions dialog opens.
3. In this dialog, specify how the selected actions must be deployed to the
computers in your network. The input fields contained in the dialog are the
same as those contained in the “Take action” on page 240 display with the
exception of the following additional fields:
Run all members actions of action group regardless of errors
This field belongs to the Execution tab and specifies whether the action
run should stop if an error occurs for one or more object of the group
or not.
Pre-Execution Action Script tab
Lets you specify an Action Script to run before the group of Actions is
deployed.
242 IBM BigFix: Console Operator’s Guide

Post-Execution Action Script
Lets you specify an Action Script to run after the group of Actions is
deployed.
4. When you finish editing, click OK to deploy the action.
5. Enter your authentication password and click OK. A progress dialog opens to
keep you informed about the stage of the deployment.
Target Tab
The Target tab can be found in various Action dialogs.
When an Action becomes relevant, the Console operator can target a subset of
users to receive the action.
There are three radio buttons at the top of this dialog:
vSpecific Computers selected in the list below. When you select this button,
only those Clients highlighted in the computer list receive the actions. This is the
default behavior. Note that you can filter this computer list by selecting items
from the tree view in the left panel. When you click OK, the selection of
computers in this list is frozen, the retrieved values are not reevaluated before
the action is deployed. Thus, if a computer is affected by this problem in the
future, it is not covered by this option. It trigger sthe same Fixlet, but requires
you to target it again.
vAll Computers with the Retrieved Properties values selected in the tree below.
This button causes continued evaluation of IBM Endpoint Manager Client
computers for relevance if they match the selected properties. Unlike the
scenario described above, if a new computer is affected by this problem in the
future, it is automatically updated. You can also filter this set of relevant
computers using the retrieved property panel on the left. Because of the
open-ended nature of this function, you might want to use the Execution tab to
define an expiration date.
vThe computers specified in the list of names below. This button allows you to
enter (or paste) a list of specific computers. Format the list with computer names
(as displayed in the Console), separated by newlines.
These options grant you great power over the deployment of Fixlet actions. Think
carefully about your choices here. The first button is the safest, because it describes
a static set of computers that you want to target. The second choice is more
powerful, because it continues to evaluate and automatically deploy relevant
Chapter 18. The Dialogs 243
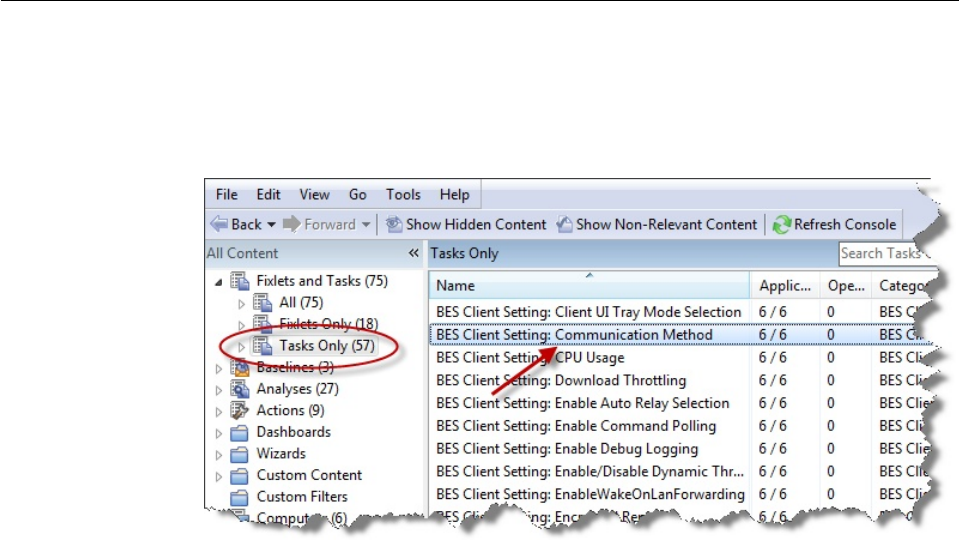
actions, but it could also have long-term consequences that you should consider.
The third choice allows you to deploy to a specific list of computers, for fine-grain
control over your deployment.
This tab is available from several different dialogs:
Take Action, Take Multiple Actions and Edit Computer Settings.
Task List and Document
A list is created whenever you click Fixlets and Tasks from the Domain Panel
navigation tree. This list incorporates both Fixlets and Tasks, which you can filter
by opening the Fixlet and Tasks icon and clicking All Tasks beneath it.
The List Panel on the right now contains all the currently relevant Tasks. The Task
document is displayed in the Work Area of the Console when you click any item
in the list.
244 IBM BigFix: Console Operator’s Guide
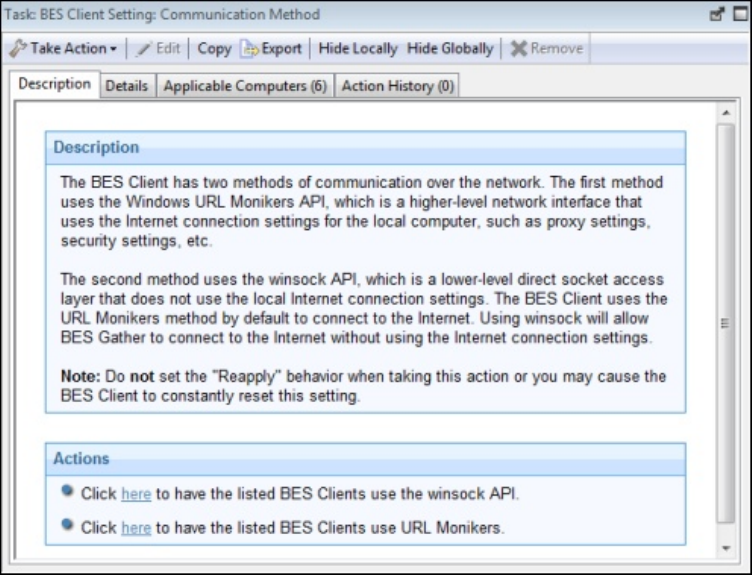
At the top of the Task document is the name. Beneath that is a toolbar with the
following tools:
vTake Action: This tool runs the default action of the Fixlet.
vEdit: This option lets you edit the Fixlet. This tool is only available for custom
Fixlets that you created yourself.
vCopy: This option lets you copy or clone the Fixlet to customize what it does.
vExport: This tool allows you to export the Fixlet for editing in an external editor.
vHide Locally: Hides the Fixlet on this version of the Console.
vHide Globally: Hides the Fixlet on all Consoles.
vRemove: Deletes this Fixlet (only available for Custom Fixlets).
There are several tabs in a Task document. They include:
vDescription: A text version of the Task, describing the problem and offering one
or more Action buttons or links to resolve the issue. You can search any of the
HTML interfaces in the Console by pressing Ctrl-F and then entering your
search string.
vDetails: A list of the properties, Relevance statements, and Actions that
constitute the Task.
vApplicable Computers: Lists the subset of computers that are targeted by the
Task.
vAction History: Shows the history of the Action deployment. This list is empty
unless the Action associated with the Task has already been triggered.
To display a Task list, click the Tasks icon under the Fixlets and Tasks icon in the
Domain Panel navigation tree.
A Task document is opened whenever you open an item in a Task list.
Chapter 18. The Dialogs 245
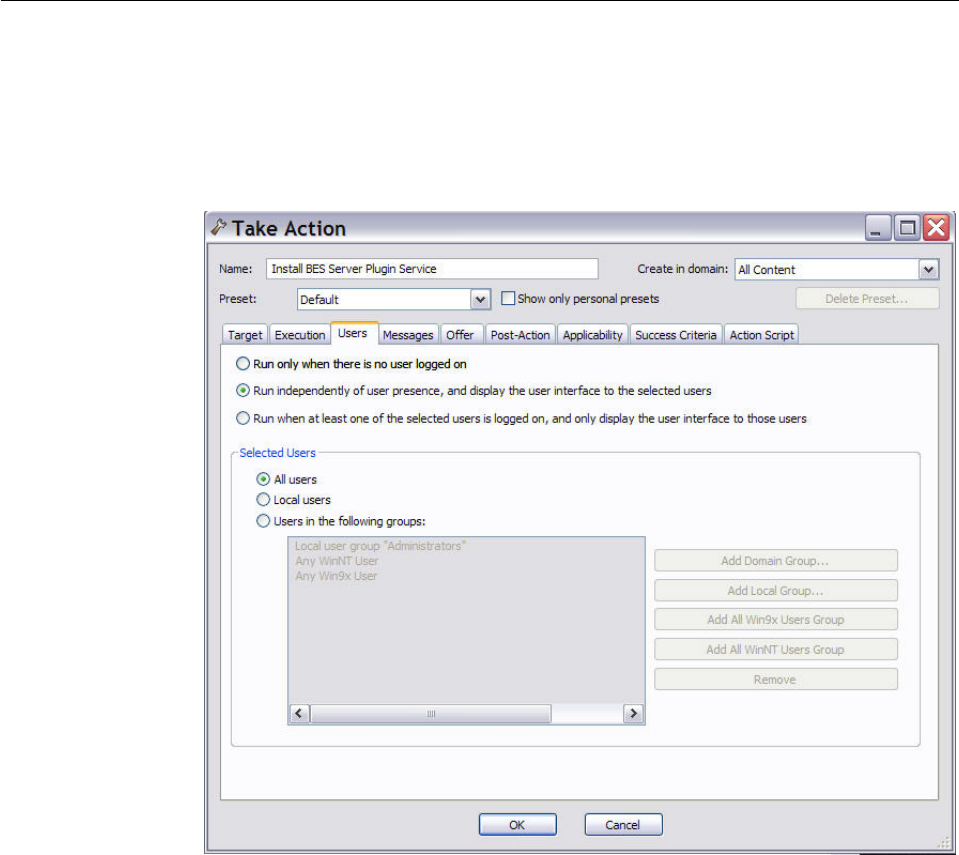
Users Tab
The Users tab can be found in various action dialogs. In this tab you can fine tune
the delivery of actions based on the presence of users.
For example, you can target long installations to just those computers where the
users have logged off, ensuring that no downtime is incurred by the installation.
This tab is available from several different dialogs:
v“Take action” on page 240
v“Take multiple actions” on page 242
v“Action Settings” on page 141
v“Edit Computer Settings” on page 197
You can select one of the following options:
Run only when there is no user logged on
Choose this option for long installations that might happen overnight, but
only on logged-off clients.
Run independently of user presence, and display the user interface to the
specified users
This can be useful for critical patches or small, silent updates. You can
specify a set of users that are allowed to view the IBM Endpoint Manager
Client interface.
246 IBM BigFix: Console Operator’s Guide

Run when at least one of the specified users is logged on, and only display the
user interface to those users
Choose this option when the action requires feedback or intervention from
specific groups of users.
You can also select users and user’s group to interact with the user interface. Select
one of the following values:
All users
Click this button to select all users.
Local users
Select only local NT-Vista users .
Users in the following groups
Select users from the group below:
Add Domain Group
Add an Windows NT Domain group of users.
Add Local Group
Add a local Windows NT or Vista group to the set of users.
Add All Win9x Users Group
Add users who are logged in to Windows 9x Clients.
Add All WinNT Users Group
Add users who are logged in as Windows NT users.
Remove
Remove the selected user group from the list.
View action info
This dialog is available from any open Action document. Select the Computers tab
in the Work Area, right-click any computer in the list, and either select Show
Action Info from the context menu or select Show Action Info from the Edit
menu.
The View Action Info dialog displays information about a specific action for a
given computer.
Chapter 18. The Dialogs 247
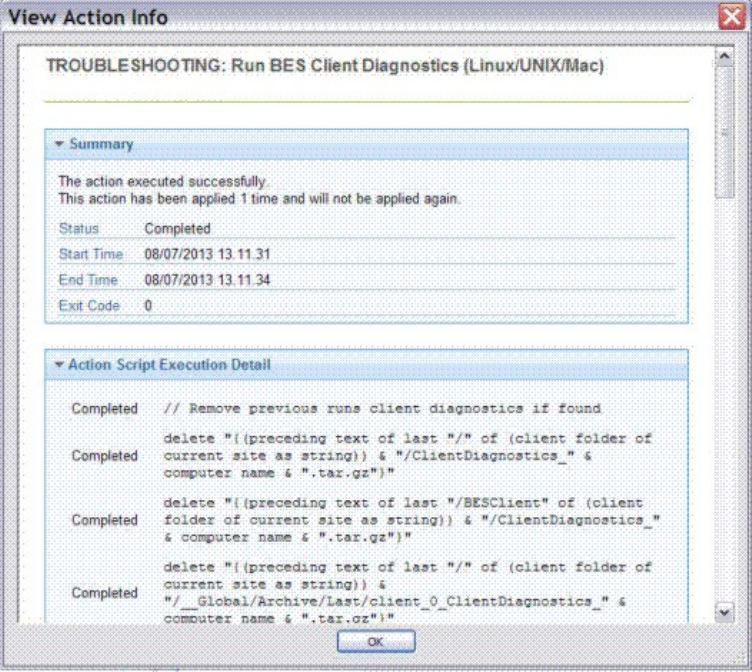
Title Shows the title of the Fixlet or task that initiated the action.
Summary
A summation of the action deployment for this computer. It includes the
current Status, the Start and End Time for the run of the action, and any
Exit Code that might be returned by the action.
Action Script Execution Detail
The result of each step included in the triggered action.
248 IBM BigFix: Console Operator’s Guide
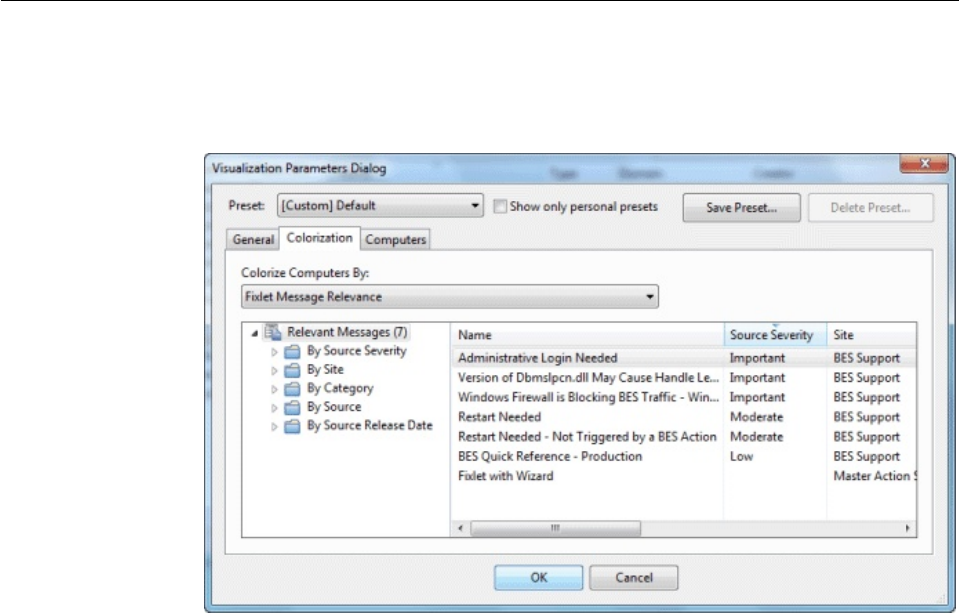
Visualization Parameters: Colorization
The Colorization tab of the Visualization Parameters dialog lets you customize the
colors for a graphical representation of your network.
This tab offers four different ways to color the data, available from the main
pull-down menu:
vNo colorization: Select this option to have every computer displayed as white.
vFixlet Message Relevance: Color each computer based on the Relevance
(applicable or non-applicable) of specific Fixlet messages. Specify the Fixlet
message in the filter/list box below.
vBaseline Relevance: Color each computer based on the Relevance (applicable or
non-applicable) of specific Baseline groups. Specify the Baselines in the filter/list
box below.
vRetrieved Property: Select the colors of the BigFix Client computers based on
the specified retrieved property.
vAction Status: Base the colors of the computers on the current status (completed,
open, expired) of a specified action. Specify the Action in the filter/list box
below.
vRelevance Clause: Color each computer based on a Relevance Clause, as
specified in the text box below.
This dialog is available by selecting Tools > Launch Visualization Tool >
Colorization.
Chapter 18. The Dialogs 249
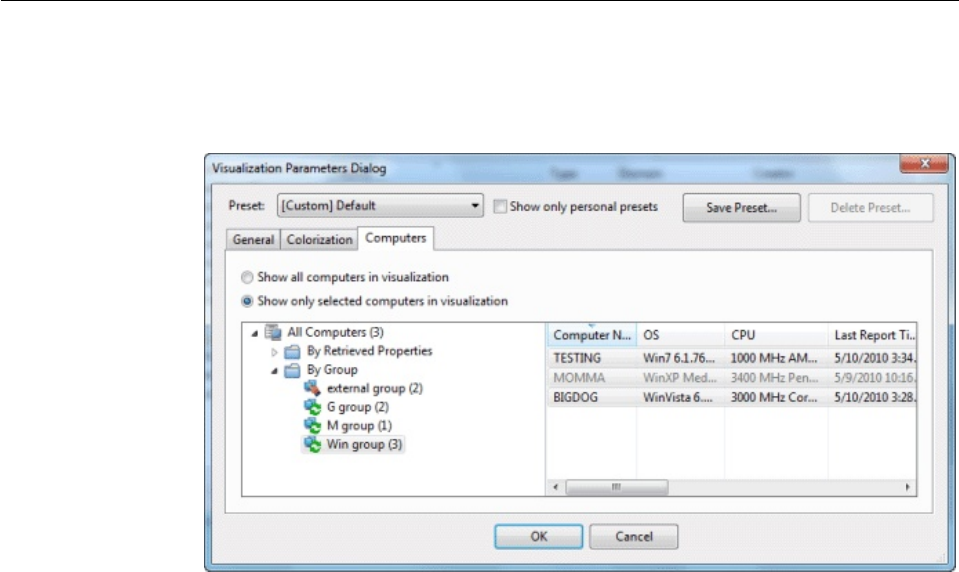
Visualization Parameters: Computers
The Computers tab of the Visualization Parameters dialog lets you limit the
number of computers to be graphed.
This tab has two buttons to make your selection easy.
vShow all computers in visualization: This is the default option, allowing all
Clients to be displayed
vShow only selected computers in visualization: This option opens a computer
filter/list allowing you to specify any subset of computers in your network by
retrieved properties or groupings.
This dialog is available by selecting Tools > Launch Visualization Tool >
Computers.
250 IBM BigFix: Console Operator’s Guide
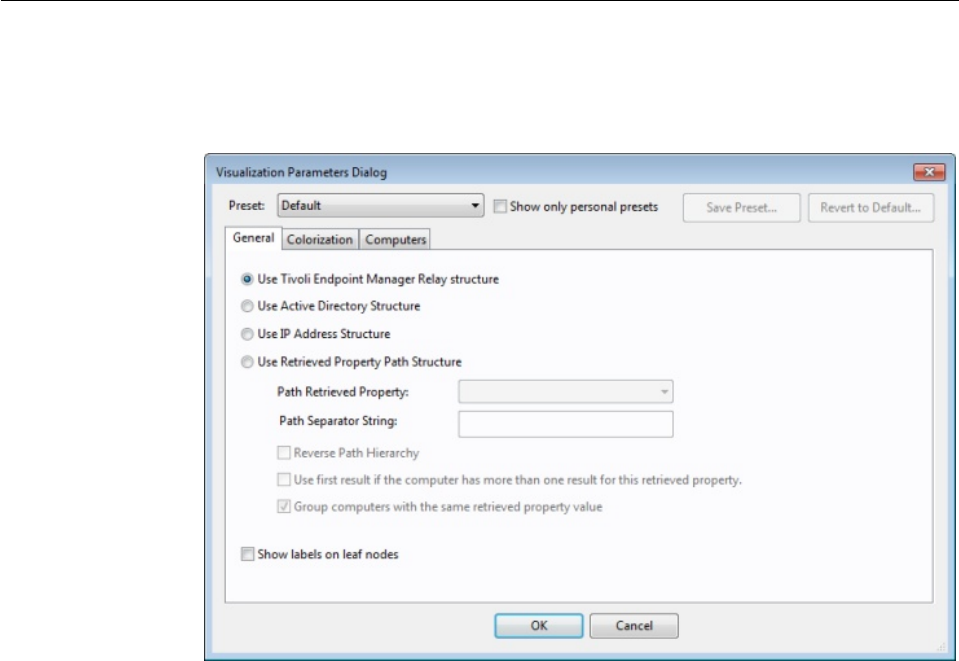
Visualization Parameters: General
The General tab of the Visualization Parameters dialog helps you to customize a
graphical representation of your network.
There are several ways to represent the data:
vUse Relay structure: Display the network tree from the BigFix Relay point of
view. This is the default view.
vUse Active Directory Structure: Use the Active Directory to map out the
network tree for visualization.
vUse IP Address Structure: Use the IP architecture to map out the network tree.
vUse Retrieved Property Path Structure: Use standard or custom properties of
the client computers to map out a custom network tree. If you select this option,
you must specify the path-style property that you want from the section below:
–Path Retrieved Property: This pull-down menu lists the available BigFix
Client properties. Select one of these to define the network graph. A
path-style property has a separator string to delimit the parts of the path. For
example, if you use an IP address as a path, you would select a period as a
separator. Another example is an actual directory path, where the delimiter is
a backslash. You can also create your own custom paths by concatenating
fields with your own chosen separator.
–Path Separator String: Enter the delimiter you want to use to parse the path
specified above. For example, to create a hierarchy from a directory path, use
'\' as a separator string.
–Reverse Path Hierarchy: Check this box if your chosen path-style property
has the most significant part on the right instead of the left.
–Use first result if the computer has more than one result for this retrieved
property: Many properties return a list, rather than a single item. These
values can be ignored, or you can check this box to have the first element in
the list used for the network map.
Chapter 18. The Dialogs 251
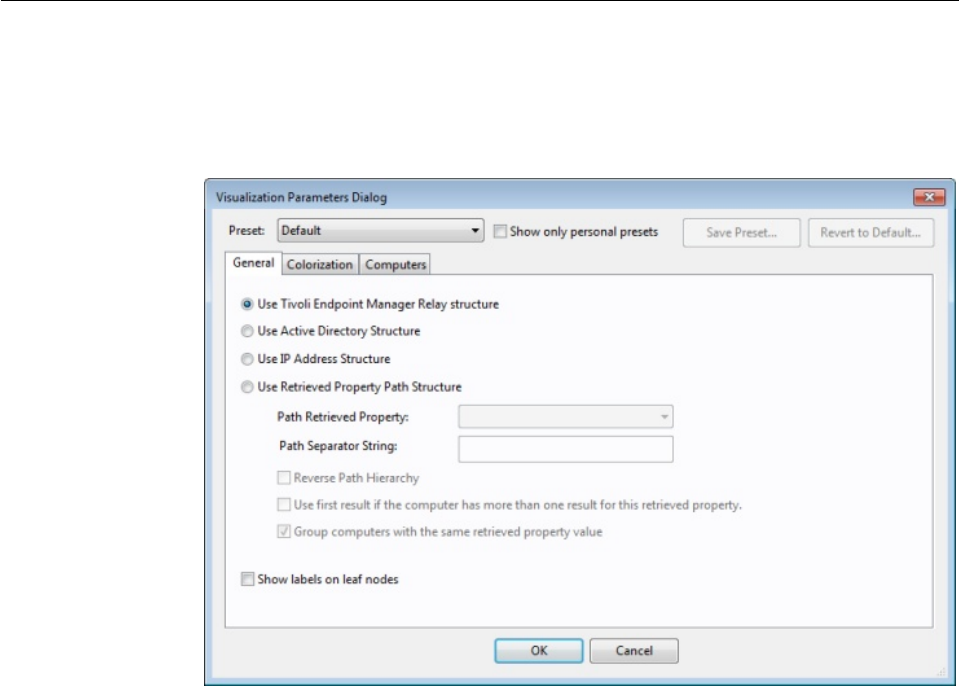
–Group computers with the same retrieved property value: This option
creates easy-to-visualize groups from computers sharing the same property.
vShow labels on leaf nodes: Check this box if you want to display labels next to
the computers at the leaf nodes of the network tree.
This dialog is available by selecting Tools > Launch Visualization Tool...
Visualization Tool
The Visualization tool allows administrators to view and manipulate data from
their network. To start this tool, Select Launch Visualization Tool from the Tools
menu. A dialog opens allowing you to set certain parameters:
This dialog allows you to load and save your preset preferences to customize
individual views of your network. The presets are managed with a simple
interface:
vPreset: Select a named set of options from this pull-down menu of
previously-defined preferences.
vShow only personal presets: Check this box to filter down the list of presets to
just those you personally created.
vSave Preset: Click this button to save the current set of preferences as a named
preset.
252 IBM BigFix: Console Operator’s Guide

You can choose to make your presets private, or you can share them with other
Operators. Later, if you want to change the parameters of this preset, open it,
make the changes, and save it with the same name. You are asked to confirm the
update.
vDelete Preset: Deletes the currently selected preset.
Below the Preset interface, there are three tabbed areas:
vGeneral: Describe the network hierarchy according to the specified structure.
vColorization: Set up a coloring scheme for the display.
vComputers: Select all computers or a specified subset.
Before running the tool, your options are checked for completeness. If they pass,
the Visualization tool runs with these values.
With this panel, you can display network locations, relay hierarchies, Active
Directory domains, and other administrator-defined hierarchies. The tool is
3-dimensional and you can rotate the graph to better visualize the network.
Chapter 18. The Dialogs 253
The tool makes it possible to view a real-time graphical network map showing
Fixlet message status, Action status, Retrieved Property information, and much
more. For example, you could view all computers that are currently unpatched for
a specific Fixlet across your enterprise, and watch the clients change from red to
green as the patch is propagated.
This dialog is available by selecting Tools > Launch Visualization Tool. You must
enable hardware acceleration and OWC, if you have not done so already.
254 IBM BigFix: Console Operator’s Guide

256 IBM BigFix: Console Operator’s Guide

Notices
This information was developed for products and services that are offered in the
USA.
IBM may not offer the products, services, or features discussed in this document in
other countries. Consult your local IBM representative for information on the
products and services currently available in your area. Any reference to an IBM
product, program, or service is not intended to state or imply that only that IBM
product, program, or service may be used. Any functionally equivalent product,
program, or service that does not infringe any IBM intellectual property right may
be used instead. However, it is the user's responsibility to evaluate and verify the
operation of any non-IBM product, program, or service.
IBM may have patents or pending patent applications covering subject matter
described in this document. The furnishing of this document does not grant you
any license to these patents. You can send license inquiries, in writing, to:
IBM Director of Licensing
IBM Corporation
North Castle Drive, MD-NC119
Armonk, NY 10504-1785
United States of America
For license inquiries regarding double-byte character set (DBCS) information,
contact the IBM Intellectual Property Department in your country or send
inquiries, in writing, to:
Intellectual Property Licensing
Legal and Intellectual Property Law
IBM Japan Ltd.
19-21, Nihonbashi-Hakozakicho, Chuo-ku
Tokyo 103-8510, Japan
The following paragraph does not apply to the United Kingdom or any other
country where such provisions are inconsistent with local law:
INTERNATIONAL BUSINESS MACHINES CORPORATION PROVIDES THIS
PUBLICATION "AS IS" WITHOUT WARRANTY OF ANY KIND, EITHER
EXPRESS OR IMPLIED, INCLUDING, BUT NOT LIMITED TO, THE IMPLIED
WARRANTIES OF NON-INFRINGEMENT, MERCHANTABILITY OR FITNESS
FOR A PARTICULAR PURPOSE. Some states do not allow disclaimer of express or
implied warranties in certain transactions, therefore, this statement may not apply
to you.
This information could include technical inaccuracies or typographical errors.
Changes are periodically made to the information herein; these changes will be
incorporated in new editions of the publication. IBM may make improvements
and/or changes in the product(s) and/or the program(s) described in this
publication at any time without notice.
Any references in this information to non-IBM websites are provided for
convenience only and do not in any manner serve as an endorsement of those
© Copyright IBM Corp. 2010, 2015 257
websites. The materials at those websites are not part of the materials for this IBM
product and use of those websites is at your own risk.
IBM may use or distribute any of the information you supply in any way it
believes appropriate without incurring any obligation to you.
Licensees of this program who wish to have information about it for the purpose
of enabling: (i) the exchange of information between independently created
programs and other programs (including this one) and (ii) the mutual use of the
information which has been exchanged, should contact:
IBM Corporation
2Z4A/101
11400 Burnet Road
Austin, TX 78758 U.S.A.
Such information may be available, subject to appropriate terms and conditions,
including in some cases, payment of a fee.
The licensed program described in this document and all licensed material
available for it are provided by IBM under terms of the IBM Customer Agreement,
IBM International Program License Agreement or any equivalent agreement
between us.
Any performance data contained herein was determined in a controlled
environment. Therefore, the results obtained in other operating environments may
vary significantly. Some measurements may have been made on development-level
systems and there is no guarantee that these measurements will be the same on
generally available systems. Furthermore, some measurements may have been
estimated through extrapolation. Actual results may vary. Users of this document
should verify the applicable data for their specific environment.
Information concerning non-IBM products was obtained from the suppliers of
those products, their published announcements or other publicly available sources.
IBM has not tested those products and cannot confirm the accuracy of
performance, compatibility or any other claims related to non-IBM products.
Questions on the capabilities of non-IBM products should be addressed to the
suppliers of those products.
All statements regarding IBM's future direction or intent are subject to change or
withdrawal without notice, and represent goals and objectives only.
All IBM prices shown are IBM's suggested retail prices, are current and are subject
to change without notice. Dealer prices may vary.
This information is for planning purposes only. The information herein is subject to
change before the products described become available.
This information contains examples of data and reports used in daily business
operations. To illustrate them as completely as possible, the examples include the
names of individuals, companies, brands, and products. All of these names are
fictitious and any similarity to the names and addresses used by an actual business
enterprise is entirely coincidental.
COPYRIGHT LICENSE:
258 IBM BigFix: Console Operator’s Guide

This information contains sample application programs in source language, which
illustrate programming techniques on various operating platforms. You may copy,
modify, and distribute these sample programs in any form without payment to
IBM, for the purposes of developing, using, marketing or distributing application
programs conforming to the application programming interface for the operating
platform for which the sample programs are written. These examples have not
been thoroughly tested under all conditions. IBM, therefore, cannot guarantee or
imply reliability, serviceability, or function of these programs. The sample
programs are provided "AS IS", without warranty of any kind. IBM shall not be
liable for any damages arising out of your use of the sample programs.
Each copy or any portion of these sample programs or any derivative work, must
include a copyright notice as follows:
Portions of this code are derived from IBM Corp. Sample Programs.
© Copyright IBM Corp. _enter the year or years_. All rights reserved.
Trademarks
IBM, the IBM logo, and ibm.com are trademarks or registered trademarks of
International Business Machines Corp., registered in many jurisdictions worldwide.
Other product and service names might be trademarks of IBM or other companies.
A current list of IBM trademarks is available on the web at www.ibm.com/legal/
copytrade.shtml.
Adobe, Acrobat, PostScript and all Adobe-based trademarks are either registered
trademarks or trademarks of Adobe Systems Incorporated in the United States,
other countries, or both.
IT Infrastructure Library is a registered trademark of the Central Computer and
Telecommunications Agency which is now part of the Office of Government
Commerce.
Intel, Intel logo, Intel Inside, Intel Inside logo, Intel Centrino, Intel Centrino logo,
Celeron, Intel Xeon, Intel SpeedStep, Itanium, and Pentium are trademarks or
registered trademarks of Intel Corporation or its subsidiaries in the United States
and other countries.
Linux is a trademark of Linus Torvalds in the United States, other countries, or
both.
Microsoft, Windows, Windows NT, and the Windows logo are trademarks of
Microsoft Corporation in the United States, other countries, or both.
ITIL is a registered trademark, and a registered community trademark of The
Minister for the Cabinet Office, and is registered in the U.S. Patent and Trademark
Office.
UNIX is a registered trademark of The Open Group in the United States and other
countries.
Java™and all Java-based trademarks and logos are trademarks or registered
trademarks of Oracle and/or its affiliates.
Notices 259

Cell Broadband Engine is a trademark of Sony Computer Entertainment, Inc. in the
United States, other countries, or both and is used under license therefrom.
Linear Tape-Open, LTO, the LTO Logo, Ultrium, and the Ultrium logo are
trademarks of HP, IBM®Corp. and Quantum in the U.S. and other countries.
Terms and conditions for product documentation
Permissions for the use of these publications are granted subject to the following
terms and conditions.
Applicability
These terms and conditions are in addition to any terms of use for the IBM
website.
Personal use
You may reproduce these publications for your personal, noncommercial use
provided that all proprietary notices are preserved. You may not distribute, display
or make derivative work of these publications, or any portion thereof, without the
express consent of IBM.
Commercial use
You may reproduce, distribute and display these publications solely within your
enterprise provided that all proprietary notices are preserved. You may not make
derivative works of these publications, or reproduce, distribute or display these
publications or any portion thereof outside your enterprise, without the express
consent of IBM.
Rights
Except as expressly granted in this permission, no other permissions, licenses or
rights are granted, either express or implied, to the publications or any
information, data, software or other intellectual property contained therein.
IBM reserves the right to withdraw the permissions granted herein whenever, in its
discretion, the use of the publications is detrimental to its interest or, as
determined by IBM, the above instructions are not being properly followed.
You may not download, export or re-export this information except in full
compliance with all applicable laws and regulations, including all United States
export laws and regulations.
IBM MAKES NO GUARANTEE ABOUT THE CONTENT OF THESE
PUBLICATIONS. THE PUBLICATIONS ARE PROVIDED "AS-IS" AND WITHOUT
WARRANTY OF ANY KIND, EITHER EXPRESSED OR IMPLIED, INCLUDING
BUT NOT LIMITED TO IMPLIED WARRANTIES OF MERCHANTABILITY,
NON-INFRINGEMENT, AND FITNESS FOR A PARTICULAR PURPOSE.
260 IBM BigFix: Console Operator’s Guide
Notices 261
IBM®
Printed in USA
