Toshiba E165 205 Printing Guide
User Manual:
Open the PDF directly: View PDF ![]() .
.
Page Count: 256 [warning: Documents this large are best viewed by clicking the View PDF Link!]
- Software License Agreement
- Preface
- Lineup of Our Manuals
- Before Reading This Manual
- CONTENTS
- OVERVIEW
- INSTALLING CLIENT SOFTWARE
- Installing Client Software for Windows
- About client software for windows
- Planning for installation
- Installation procedure list for Windows client software
- Installing client software for USB printing
- Installing client software for Raw TCP/LPR printing
- Installing client software for IPP printing
- Installing client software for Novell printing
- Installing client software for Novell iPrint
- Uninstalling client utilities software
- Installing Client Software for Macintosh
- Installing Client Software for UNIX
- Installing Client Software for Windows
- PRINTING
- TROUBLESHOOTING
- APPENDIX
- INDEX

MULTIFUNCTIONAL DIGITAL SYSTEMS
Printing Guide

2 Software License Agreement
Software License Agreement
INSTALLING OR OTHERWISE USING THIS SOFTWARE PRODUCT CONSTITUTES YOUR ACCEP-
TANCE OF THE FOLLOWING TERMS AND CONDITIONS (UNLESS A SEPARATE LICENSE IS PRO-
VIDED BY THE SUPPLIER OF APPLICABLE SOFTWARE IN WHICH CASE SUCH SEPARATE LICENSE
SHALL APPLY). IF YOU DO NOT ACCEPT THESE TERMS, YOU MAY NOT INSTALL OR USE THIS
SOFTWARE, AND YOU MUST PROMPTLY RETURN THE SOFTWARE TO THE LOCATION WHERE
YOU OBTAINED IT.
THE SOFTWARE INSTALLED ON THIS PRODUCT INCLUDES NUMEROUS INDIVIDUAL SOFTWARE
COMPONENTS, EACH HAVING ITS OWN APPLICABLE END USER LICENSE AGREEMENT (“EULA”).
INFORMATION RELATING TO THE EULAS MAY BE FOUND IN AN ELECTRONIC FILE INCLUDED ON
THE USER DOCUMENTATION CD-ROM INCLUDED HEREWITH; HOWEVER, ALL SOFTWARE AND
DOCUMENTATION DEVELOPED OR CREATED BY OR FOR TOSHIBA TEC CORPORATION (“TTEC”)
ARE PROPRIETARY PRODUCTS OF TTEC AND ARE PROTECTED BY COPYRIGHT LAWS, INTERNA-
TIONAL TREATY PROVISIONS, AND OTHER APPLICABLE LAWS.
Grant of License
This is a legal agreement between you, the end-user (“You”), and TTEC and its suppliers. This software,
fonts (including their typefaces) and related documentation (“Software”) is licensed for use with the system
CPU on which it was installed (“System”) in accordance with the terms contained in this Agreement. This
Software is proprietary to TTEC and/or its suppliers.
TTEC and its suppliers disclaim responsibility for the installation and/or use of this Software, and for the
results obtained by using this Software. You may use one copy of the Software as installed on a single Sys-
tem, and may not copy the Software for any reason except as necessary to use the Software on a single
System. Any copies of the Software shall be subject to the conditions of this Agreement.
You may not, nor cause or permit any third party to, modify, adapt, merge, translate, reverse compile,
reverse assemble, or reverse engineer the Software. You may not use the Software, except in accordance
with this license. No title to the intellectual property in the Software is transferred to you and full ownership is
retained by TTEC or its suppliers. Source code of the Software is not licensed to you. You will be held legally
responsible for any copyright infringement, unauthorized transfer, reproduction or use of the Software or its
documentation.
Term
This license is effective until terminated by TTEC or upon your failure to comply with any term of this Agree-
ment. Upon termination, you agree to destroy all copies of the Software and its documentation.
You may terminate this license at any time by destroying the Software and its documentation and all copies.
Disclaimer of Warranty
THIS SOFTWARE IS PROVIDED “AS IS” WITHOUT WARRANTY OF ANY KIND, EITHER EXPRESS OR
IMPLIED, INCLUDING, BUT NOT LIMITED TO, THE IMPLIED WARRANTIES OF MERCHANTABILITY,
FITNESS FOR A PARTICULAR PURPOSE, TITLE, AND NON-INFRINGEMENT. TTEC AND ITS SUPPLI-
ERS DISCLAIM ANY WARRANTY RELATING TO THE QUALITY AND PERFORMANCE OF THE SOFT-
WARE. IF THE SOFTWARE PROVES DEFECTIVE, YOU (AND NOT TTEC OR ITS SUPPLIERS) SHALL
BE RESPONSIBLE FOR THE ENTIRE COST OF ALL NECESSARY SERVICING, REPAIR OR CORREC-
TION. TTEC AND ITS SUPPLIERS DO NOT WARRANT THAT THE FUNCTIONS CONTAINED IN THE
SOFTWARE WILL MEET YOUR REQUIREMENTS OR THAT THE OPERATION OF THE SOFTWARE
WILL BE UNINTERRUPTED OR ERROR FREE.
ALL INFORMATION CONTAINED HEREIN THAT IS PROVIDED BY TTEC AND ITS AFFILIATES PURSU-
ANT TO A EULA IS PROVIDED “AS IS” WITHOUT WARRANTY OF ANY KIND, EITHER EXPRESS OR
IMPLIED.

Software License Agreement 3
Limitation of Liability
IN NO EVENT WILL TTEC OR ITS SUPPLIERS BE LIABLE TO YOU FOR ANY DAMAGES, WHETHER IN
CONTRACT, TORT, OR OTHERWISE (EXCEPT PERSONAL INJURY OR DEATH RESULTING FROM
NEGLIGENCE ON THE PART OF TTEC OR ITS SUPPLIERS), INCLUDING WITHOUT LIMITATION ANY
LOST PROFITS, LOST DATA, LOST SAVINGS OR OTHER INCIDENTAL, SPECIAL OR CONSEQUEN-
TIAL DAMAGES ARISING OUT OF THE USE OR INABILITY TO USE THE SOFTWARE, EVEN IF TTEC
OR ITS SUPPLIERS HAVE BEEN ADVISED OF THE POSSIBILITY OF SUCH DAMAGES, NOR FOR
THIRD PARTY CLAIMS.
U.S. Government Restricted Rights
The Software is provided with RESTRICTED RIGHTS. Use, duplication or disclosure by the U.S. Govern-
ment is subject to restrictions set forth in subdivision (b) (3) (ii) or (c) (i) (ii) of the Rights in Technical Data
and Computer Software Clause set forth in 252.227-7013, or 52.227-19 (c) (2) of the DOD FAR, as appropri-
ate. Contractor/Manufacturer is TOSHIBA TEC Corporation, 6-78, Minami-cho, Mishima-shi, Shizuoka-ken,
411-8520, Japan.
General
You may not sublicense, lease, rent, assign or transfer this license or the Software. Any attempt to subli-
cense, lease, rent, assign or transfer any of the rights, duties or obligations hereunder is void. You agree that
you do not intend to, and will not ship, transmit (directly or indirectly) the Software, including any copies of
the Software, or any technical data contained in the Software or its media, or any direct product thereof, to
any country or destination prohibited by the United States Government. This license shall be governed by
the laws of Japan or, at the election of a Supplier of TTEC concerned with a dispute arising from or relating
to this Agreement, the laws of the Country designated from time to time by the relevant Supplier of TTEC. If
any provision or portion of this Agreement shall be found to be illegal, invalid or unenforceable, the remain-
ing provisions or portions shall remain in full force and effect.
YOU ACKNOWLEDGE THAT YOU HAVE READ THIS LICENSE AGREEMENT AND THAT YOU UNDER-
STAND ITS PROVISIONS. YOU AGREE TO BE BOUND BY ITS TERMS AND CONDITIONS. YOU FUR-
THER AGREE THAT THIS LICENSE AGREEMENT CONTAINS THE COMPLETE AND EXCLUSIVE
AGREEMENT BETWEEN YOU AND TTEC AND ITS SUPPLIERS AND SUPERSEDES ANY PROPOSAL
OR PRIOR AGREEMENT, ORAL OR WRITTEN, OR ANY OTHER COMMUNICATION RELATING TO THE
SUBJECT MATTER OF THIS LICENSE AGREEMENT.
TOSHIBA TEC Corporation, 6-78, Minami-cho, Mishima-shi, Shizuoka-ken, 411-8520, Japan.

4 Software License Agreement

Preface 5
Preface
Thank you for purchasing the TOSHIBA multifunctional digital system e-STUDIO165/205.
This Printing Guide is a manual for the e-STUDIO165/205 when the following option is
installed:
yNetwork Printer Kit
With this option, this equipment can be used as a network printer when print data are sent from
client computers to this equipment. This Printing Guide describes how to install client software
required for the various printing functions of this equipment, and how to configure the printing
environments. This manual also describes how to print documents under Windows, Macintosh
or UNIX environments and how to manage print jobs.
For the setup information of each client computer and a network server to use this equipment as
a network printer, see the Network Administration Guide for Printing Functions. For the gen-
eral descriptions of your computer, application software and networks, see a manual attached
on each product.
Be sure to read this manual before you use the printing functions. Keep this manual handy and
retain it for future reference.
6 Lineup of Our Manuals
Lineup of Our Manuals
These manuals are provided for the operation of the e-STUDIO165/205. Select and read the
manual best suited to your needs.
Operator’s Manual for Copying Functions
This manual describes the basic operations, mainly copying functions,
of this equipment. It also describes safety precautions to ensure cor-
rect and safe use of this equipment. Be sure to read this before you
use the equipment.
Quick Start Guide for Printing Functions
This manual describes the operation of the equipment when the Net-
work Printer Kit (optional) is installed on it. This also explains about the
accessories, conditions required for network systems, connecting
method of the network, general description of network settings and
troubleshooting.
Network Administration Guide for Printing Functions (PDF)
This manual is only for the equipment on which the Network Printer Kit
(optional) is installed. This provides you with setup procedures by the
type of platforms or networks you are utilizing, and also setup proce-
dures for network servers to enable various network services.
Setup Guide for Printing Functions (PDF)
This manual is only for the equipment on which the Network Printer Kit
(optional) is installed. The manual consists of the following 2 parts:
Settings Using Control Panel:
This part describes the printer-related settings using the [PRINTER]
and [USER FUNCTIONS] buttons on the control panel of this equip-
ment.
Settings Using TopAccess:
This manual describes how to set up this equipment from your com-
puter through a network using a web-based utility TopAccess. This also
explains about functions to check the current status of this equipment.
Printing Guide (PDF) (This manual)
This manual is only for the equipment on which the Network Printer Kit
(optional) is installed. This describes how to install client software for
printing data to your computer. This also describes how to print data
sent from your computer to this equipment.

Lineup of Our Manuals 7
To read manuals of PDF (Portable Document Format) files
Viewing and printing this operator‘s manual of PDF files require that you install Adobe Reader or
Adobe Acrobat Reader on your PC. If Adobe Reader or Adobe Acrobat Reader is not installed
on your PC, download and install it from the website of Adobe Systems Incorporated.
Network Fax Guide (PDF)
This manual is only for the equipment on which the Fax Kit (optional),
the External Keyboard (optional) and the Network Printer Kit (optional)
are installed. This explains about the network Fax functions, which
enable Fax transmissions from a client computer through a network.
8 Before Reading This Manual
Before Reading This Manual
Precautions in this manual
To ensure correct and safe use of this equipment, this operator's manual describes safety pre-
cautions according to the three levels shown below.
You should fully understand the meaning and importance of these items before reading this
manual.
Other than the above, this manual also describes information that may be useful for the opera-
tion of this equipment with the following signage:
Trademarks
yThe official name of Windows 98 is Microsoft Windows 98 Operating System.
yThe official name of Windows Me is Microsoft Windows Me Operating System.
yThe official name of Windows 2000 is Microsoft Windows 2000 Operating System.
yThe official name of Windows XP is Microsoft Windows XP Operating System.
yThe official name of Windows Server 2003 is Microsoft Windows Server 2003 Operating
System.
yMicrosoft, Windows, Windows NT, and the brand names and product names of other
Microsoft products are trademarks of Microsoft Corporation in the US and other countries.
yApple, AppleTalk, Macintosh, Mac, TrueType, and LaserWriter are trademarks of Apple
Computer Inc. in the US and other countries.
yPostscript is a trademark of Adobe Systems Incorporated.
yNetscape is a trademark of Netscape Communications Corporation.
yIBM, AT and AIX are trademarks of International Business Machines Corporation.
yNOVELL, NetWare, and NDS are trademarks of Novell, Inc.
yOther company names and product names in this manual are the trademarks of their respec-
tive companies.
©2006 TOSHIBA TEC CORPORATION All rights reserved
This manual is protected by copyright laws. No part of this manual shall be duplicated or repro-
duced without the permission of TOSHIBA TEC CORPORATION. TOSHIBA TEC CORPORA-
TION shall not be liable in terms of granting patents for any use of information contained in this
manual by third parties.
Indicates a potentially hazardous situation which, if not avoided, could result
in death, serious injury, or serious damage, or fire in the equipment or sur-
rounding assets.
Indicates a potentially hazardous situation which, if not avoided, may result in
minor or moderate injury, partial damage of the equipment or surrounding
assets, or loss of data.
Indicates information to which you should pay attention when operating the
equipment.
Describes handy information that is useful to know when operating the equip-
ment.
Pages describing items related to what you are currently doing. See these
pages as required.

CONTENTS 9
CONTENTS
Software License Agreement ......................................................................2
Preface...........................................................................................................5
Lineup of Our Manuals ................................................................................6
Before Reading This Manual .......................................................................8
Chapter 1 OVERVIEW
Features and Functions .............................................................................12
About the Client CD-ROM ..........................................................................13
For Windows............................................................................................13
For Macintosh..........................................................................................14
For UNIX..................................................................................................14
Acceptable Media Types............................................................................15
Types of paper ........................................................................................15
To print on envelopes.............................................................................. 16
Chapter 2 INSTALLING CLIENT SOFTWARE
Installing Client Software for Windows ....................................................20
About client software for windows ...........................................................20
Planning for installation ...........................................................................20
Installation procedure list for Windows client software ............................26
Installing client software for USB printing ................................................27
Installing client software for Raw TCP/LPR printing ................................36
Installing client software for IPP printing..................................................63
Installing client software for Novell printing ............................................. 74
Installing client software for Novell iPrint...............................................104
Uninstalling client utilities software ........................................................105
Installing Client Software for Macintosh ................................................111
About client software for Macintosh.......................................................111
Planning for installation .........................................................................111
Installation procedure list for Maintosh client software ..........................112
Installing the printer on Mac OS 8.6/9.x ................................................113
Installing the printer on Mac OS X 10.2.4 to Mac OS X 10.4.x..............119
Installing Client Software for UNIX .........................................................138
Installation procedure list for UNIX client software ................................138
Setting up the CUPS .............................................................................138
Chapter 3 PRINTING
Printing from Windows ............................................................................154
Before using the printer driver ...............................................................154

10 CONTENTS
Printing from application ........................................................................ 161
Setting up print options..........................................................................163
Printing with extended print functionality ...............................................190
Printing from Macintosh ..........................................................................205
Printing from application on Mac OS 8.6 to 9.x .....................................205
Printing from application on Mac OS X 10.2.4 to Mac OS X 10.4.x ......218
Printing from UNIX ...................................................................................238
Printing from an application ...................................................................238
Chapter 4 TROUBLESHOOTING
When Printing Cannot Be Performed ..................................................... 240
Printer Driver Errors.................................................................................241
Printer driver installation error messages ..............................................241
Printer driver general errors...................................................................242
Chapter 5 APPENDIX
Managing Fonts with Font Manager .......................................................246
Installing Font Manager.........................................................................246
Searching fonts .....................................................................................246
Installing fonts in Windows ....................................................................247
Uninstalling fonts in Windows................................................................247
Removing fonts from the computer .......................................................247
Displaying font preview..........................................................................248
Creating a font group.............................................................................248
Sorting fonts in the list ...........................................................................248
Internal Fonts List ....................................................................................250
Internal PCL fonts list ............................................................................250
Internal PS fonts list...............................................................................251
INDEX .......................................................................................................................................253

1.OVERVIEW
This section describes the overview of the printing functions.
Features and Functions .........................................................................................12
About the Client CD-ROM ......................................................................................13
For Windows .....................................................................................................................................13
For Macintosh ...................................................................................................................................14
For UNIX ...........................................................................................................................................14
Acceptable Media Types.........................................................................................15
Types of paper ..................................................................................................................................15
To print on envelopes........................................................................................................................16

1OVERVIEW
12 Features and Functions
Features and Functions
Extensive client platform support
This equipment supports printing from IBM-compatible PC, Macintosh, and UNIX workstations.
Not all features are supported on all platforms, however.
Various port options
You can map this equipment to print to an IPP, Raw TCP, or LPR port.
Multiple job types
Job Types refer to the way this equipment handles a print job.
yNormal mode requires no special handling and is the most frequently used printing mode.
yOverlay Image File prints a document element, such as text or graphics, to a file for superim-
posing on other documents.
Sophisticated document layout and assembly options
You can choose whether to print your document as you have set it up in the application, or to
impose printer-driven document layout options such as printing in Book Format or printing Multi-
ple Pages per Sheet.
Additionally, the printer drivers provide the ability to print the front cover and back cover on differ-
ent media.
Watermark and image overlay support
Watermarks are a great way to subtly convey useful information about your printed documents.
Common watermarks are “Confidential,” “Draft,” and “Original.” Several watermarks have been
pre-defined for use with your documents, or you can create and save your own custom water-
marks.
Watermarks consist of text. Image Overlays can be any combination of text, graphics or other
document elements.
Printing watermarks consumes fewer resources than using Image Overlays, so you should use
watermarks wherever possible, particularly when printing speed is an issue.
As for watermark printing and overlay image printing, the data in the computer are used. 3 stan-
dard watermarks are provided for these features.
The printing features are available only when the Network Printer Kit is installed.

About the Client CD-ROM 13
About the Client CD-ROM
For Windows
The contents of the Client Utilities CD-ROM for printing:
Client software installer
y[Client Utilities CD-ROM]:\Client\setup.exe
This is the setup program to install the printer drivers on your computer.
PCL6 printer drivers
y[Client Utilities CD-ROM]:\9X_ME\PCL6\<language>\
This includes the setup files to install the PCL6 printer driver on the Windows 98/Me for each
language version by Add Printer Wizard or Plug and Play.
y[Client Utilities CD-ROM]:\NT\PCL6\<language>\
This includes the setup files to install the PCL6 printer driver on the Windows NT 4.0 for each
language version by Add Printer Wizard.
y[Client Utilities CD-ROM]:\W2K_XP_2003\PCL6\<language>\
This includes the setup files to install the PCL6 printer driver on the Windows 2000/XP/
Server 2003 for each language version by Add Printer Wizard or Plug and Play.
PS3 printer drivers (PostScript)
y[Client Utilities CD-ROM]:\9X_ME\PS\<language>\
This includes the setup files to install the PS3 printer driver on the Windows 98/Me for each
language version by Add Printer Wizard or Plug and Play.
y[Client Utilities CD-ROM]:\NT\PS\<language>\
This includes the setup files to install the PS3 printer driver on the Windows NT 4.0 for each
language version by Add Printer Wizard.
y[Client Utilities CD-ROM]:\W2K_XP_2003\PS\<language>\
This includes the setup files to install the PS3 printer driver on the Windows 2000/XP/Server
2003 for each language version by Add Printer Wizard or Plug and Play.
Further information about user software for Windows is described in next chapter.
P.20 “About client software for windows”
The Font Manager is provided in the Client Utilities CD-ROM that comes with the Network
Printer Kit.

1OVERVIEW
14 About the Client CD-ROM
For Macintosh
The contents of the Client Utilities CD-ROM for printing:
Macintosh PPD files
y[Client Utilities CD-ROM]:MacPPD:OS9:<language>
This includes the PPD file for Apple LaserWriter8 to enable printing from Macintosh on the
Mac OS 8.6, Mac OS 9.x, and Mac OS X 10.1/10.2 Classic Mode
y[Client Utilities CD-ROM]:MacPPD:OSX
This includes the PPD file for Apple LaserWriter8 to enable printing from Macintosh on the
Mac OS 8.6, Mac OS 9.x, and Mac OS X 10.1/10.2 Classic Mode, the PPD file to enable
printing from Macintosh on the Mac OS X 10.2.4 to Mac OS X 10.4.x.
Further information about user software for Macintosh is described in next chapter.
P.111 “About client software for Macintosh”
For UNIX
The contents of the Client Utilities CD-ROM for printing:
CUPS PPD files
y[Client Utilities CD-ROM]/Admin/CUPS/
This includes the CUPS PPD files for UNIX.
Further information about user software for UNIX is described in next chapter.
P.138 “About CUPS”
Acceptable Media Types 15
Acceptable Media Types
This section explains about the media types acceptable for printing documents with this equip-
ment. The media types, which are acceptable for printing data from client computers to this
equipment, are the same as the ones acceptable for copying with this equipment, except for
envelopes. Envelopes can be used only for printing data from client computers.
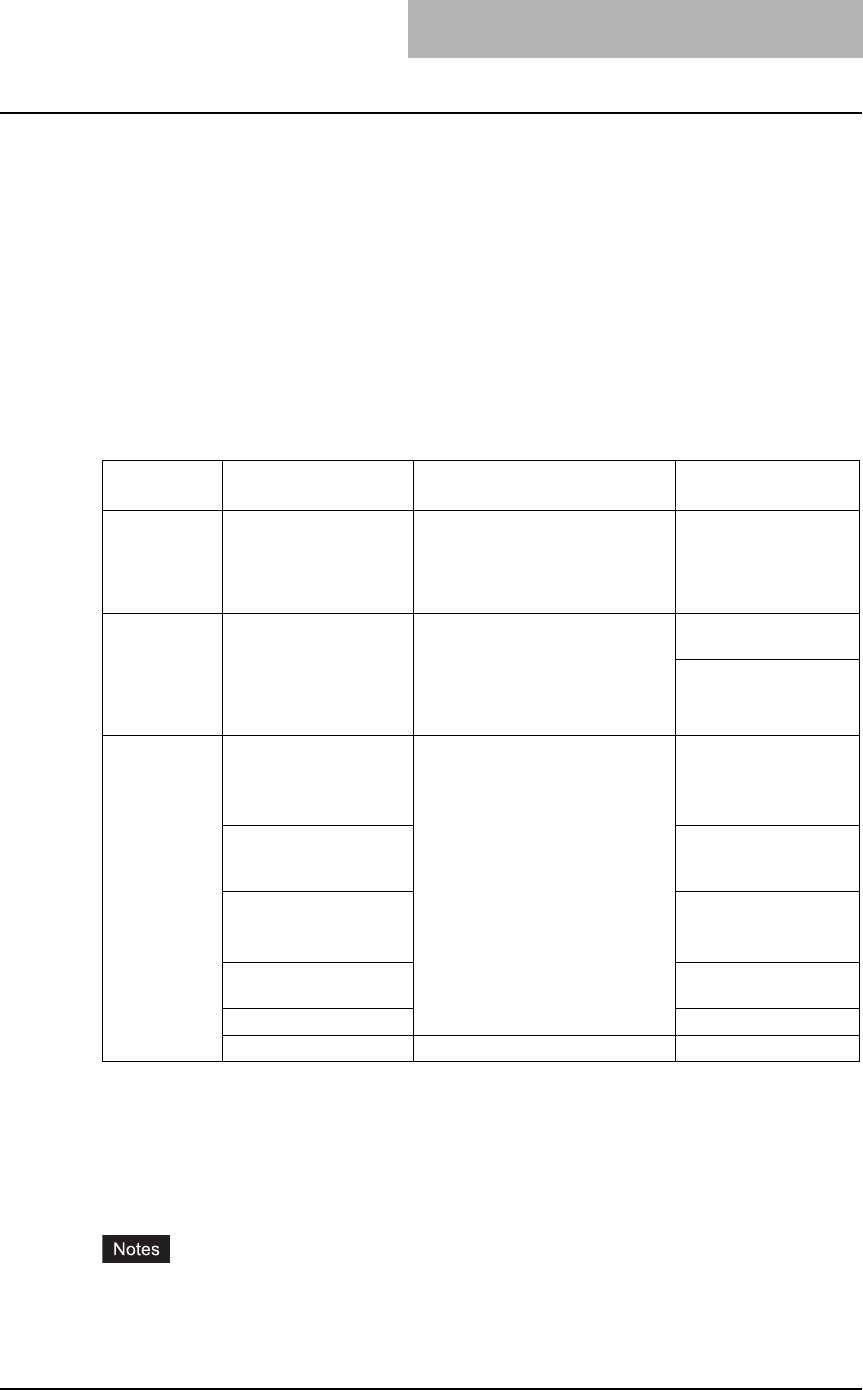
Types of paper
The media types and paper sizes shown in the table below are acceptable for the drawers of this
equipment, the Paper Feed Unit (optional) and the Paper Feed Pedestal (optional).
Acceptable types of paper for copying and printing data sent
from client computers
*1 “Maximum sheet capacity” refers to the maximum number of sheets acceptable when TOSHIBA-recom-
mended paper is used. For TOSHIBA-recommended paper, see the Operator’s Manual for Copying
Functions.
*2 The paper of 50 to 63 g/m2 (13 to 16 lb.) Bond can be used if it is set on the bypass tray one by one.
*3 Automatic duplex printing is not available.
*4 Be sure to use the overhead transparencies that TOSHIBA recommends. When transparencies other
than the TOSHIBA-recommended ones are used, this could cause an equipment malfunction.
yYou cannot mix various paper sizes in one drawer.
y"LT format" is a standard size used in North America.
Feeder Media type Paper size Maximum sheet
capacity *1
Drawers of the
equipment
and Paper
Feed Unit
(optional)
Plain paper
(64 - 80 g/m2)/(17-20 lb.
Bond)
A/B format:
A3, A4, A4-R, B4, B5, B5-R,
FOLIO
LT format:
LD, LG, LT, LT-R, COMP, 13"LG
250 sheets
(64 g/m2)/(17 lb. Bond)
250 sheets
(80 g/m2)/(20 lb. Bond)
Drawers of the
Paper Feed
Pedestal
(optional)
Plain paper
(64 - 80 g/m2)/(17-20 lb.
Bond)
A/B format:
A3, A4, A4-R, A5-R, B4, B5, B5-R,
FOLIO
LT format:
LD, LG, LT, LT-R, ST-R, COMP,
13"LG
550 sheets
(64 g/m2)/(17 lb. Bond)
550 sheets
(80 g/m2)/(20 lb. Bond)
Bypass tray Plain paper
(64 - 80 g/m2)/(17-20 lb.
Bond)*2
A/B format:
A3, A4, A4-R, A5-R, B4, B5, B5-R,
FOLIO
LT format:
LD, LG, LT, LT-R, ST-R, COMP,
13"LG
100 sheets
(64 g/m2)/(17 lb. Bond)
100 sheets
(80 g/m2)/(20 lb. Bond)
THICK PAPER 1
(81 - 105 g/m2)/(21-28
lb. Bond)*3
1 sheet
(81 - 105 g/m2)/(21-28
lb. Bond)
THICK PAPER 2
(106 - 163 g/m2)/(29 lb.
Bond – 90 lb. Index)*3
1 sheet
(106 - 163 g/m2)/(29 lb.
Bond – 90 lb. Index)
Tracing paper
(75 g/m2)/(20 lb.)*3
1 sheet
Sticker labels*3 1 sheet
Transparencies*3, *4 A4 only/LT only 1 sheet
1OVERVIEW
16 Acceptable Media Types
Abbreviations for LT format sizes:
LT: Letter, LD: Ledger, LG: Legal, ST: Statement, COMP: Computer, SQ: Square
Acceptable types of envelopes (printed from client computers)
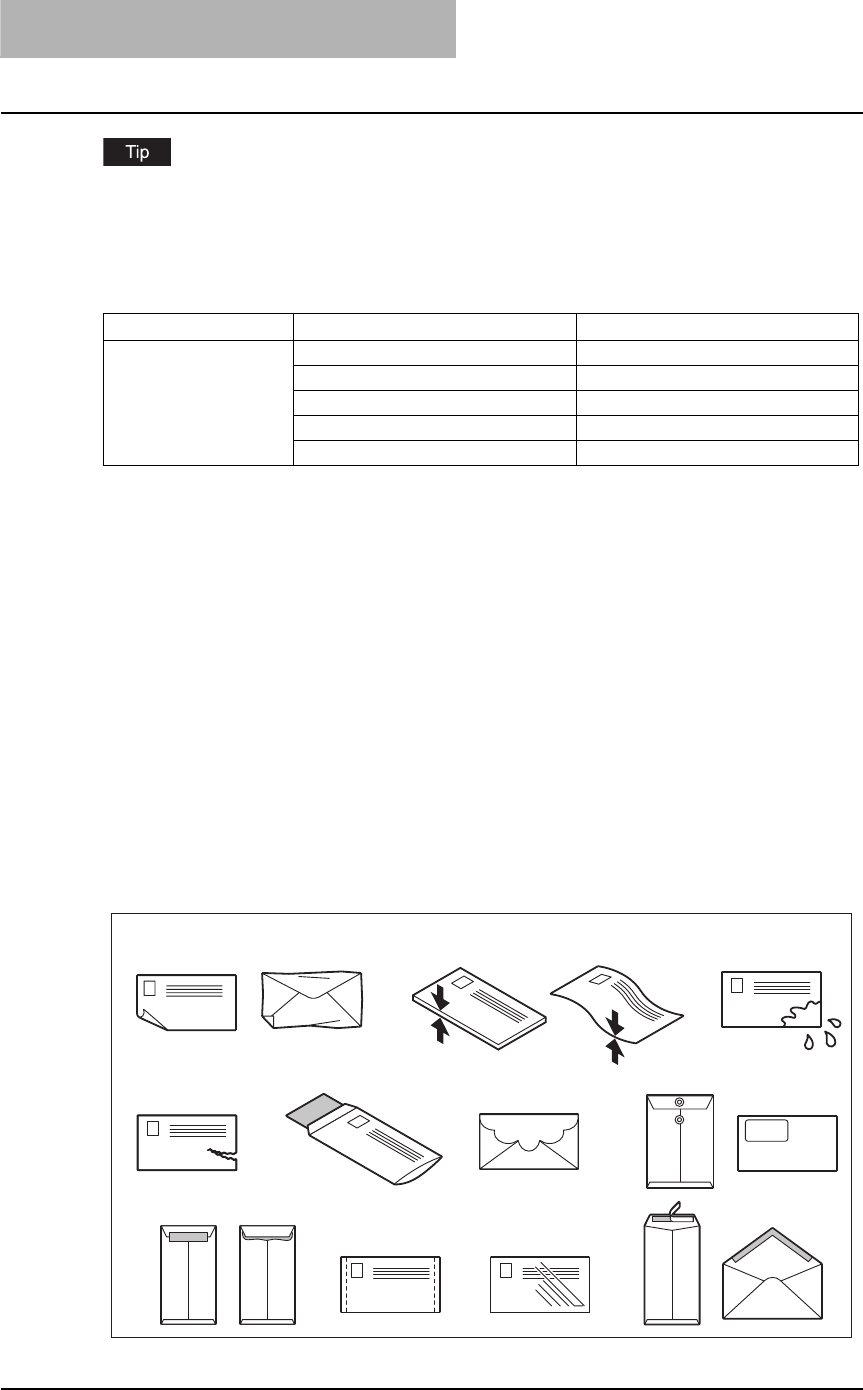
To print on envelopes
Envelopes not acceptable
Do not use the following envelopes or misfeeding or damage to the equipment could result:
* See illustrations below with the number corresponding to the following item number:
1. Badly curled, wrinkled or folded envelopes
2. Extremely thick or thin envelopes
3. Wet or damp envelopes
4. Torn envelopes
5. Envelopes which include the contents
6. Non-standard size envelopes (ones with a special shape)
7. Envelopes with eyelets or windows
8. Sealed envelopes with paste or tape
9. Partly-opened or perforated envelopes
10. Envelopes with special coating on the surface
11. Envelopes with glue or double-sided adhesive tape
Paper source Size Recommended envelopes
Bypass tray COM10 (4 1/8” x 9 1/2”) Westvaco Columbian CO138
Monarch (3 7/8” x 7 1/2”) Mailwell No. 553
DL (110 mm x 220 mm) -
CHO-3 (120 mm x 235 mm) -
YOU-4 (105 mm x 235 mm) -
2
5 6
8
7
3
4
91110
1
Acceptable Media Types 17
Printing procedure
Printing on envelopes is available only when Windows computers are used.
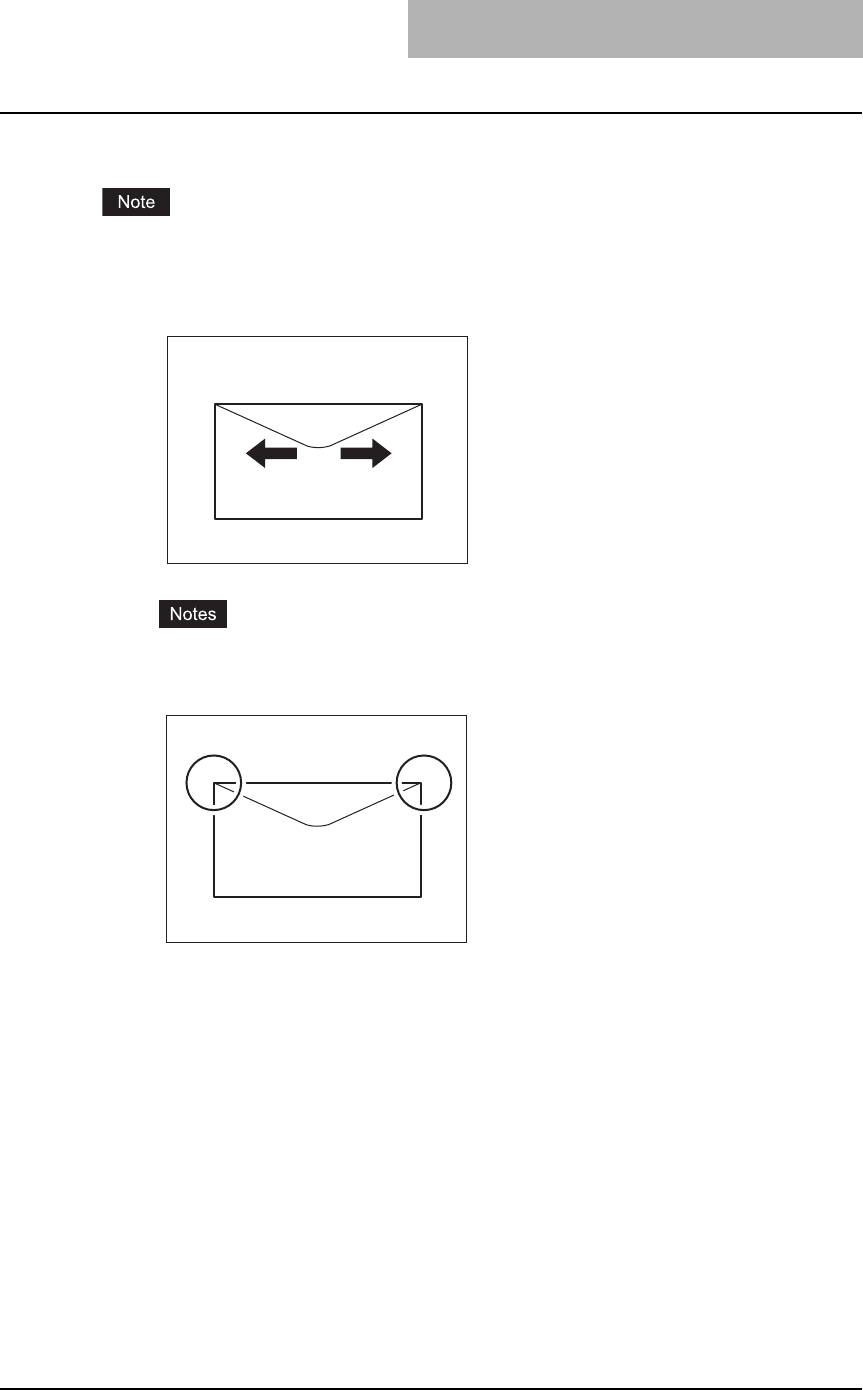
1
Place a single envelope on a flat clean surface, and then press it
with your hands in the direction of the arrows to let the air out of it.
yIf the edges of the envelope are bent, straighten them.
yPress the flaps of the envelope well to prevent them from becoming rolled up.
1OVERVIEW
18 Acceptable Media Types
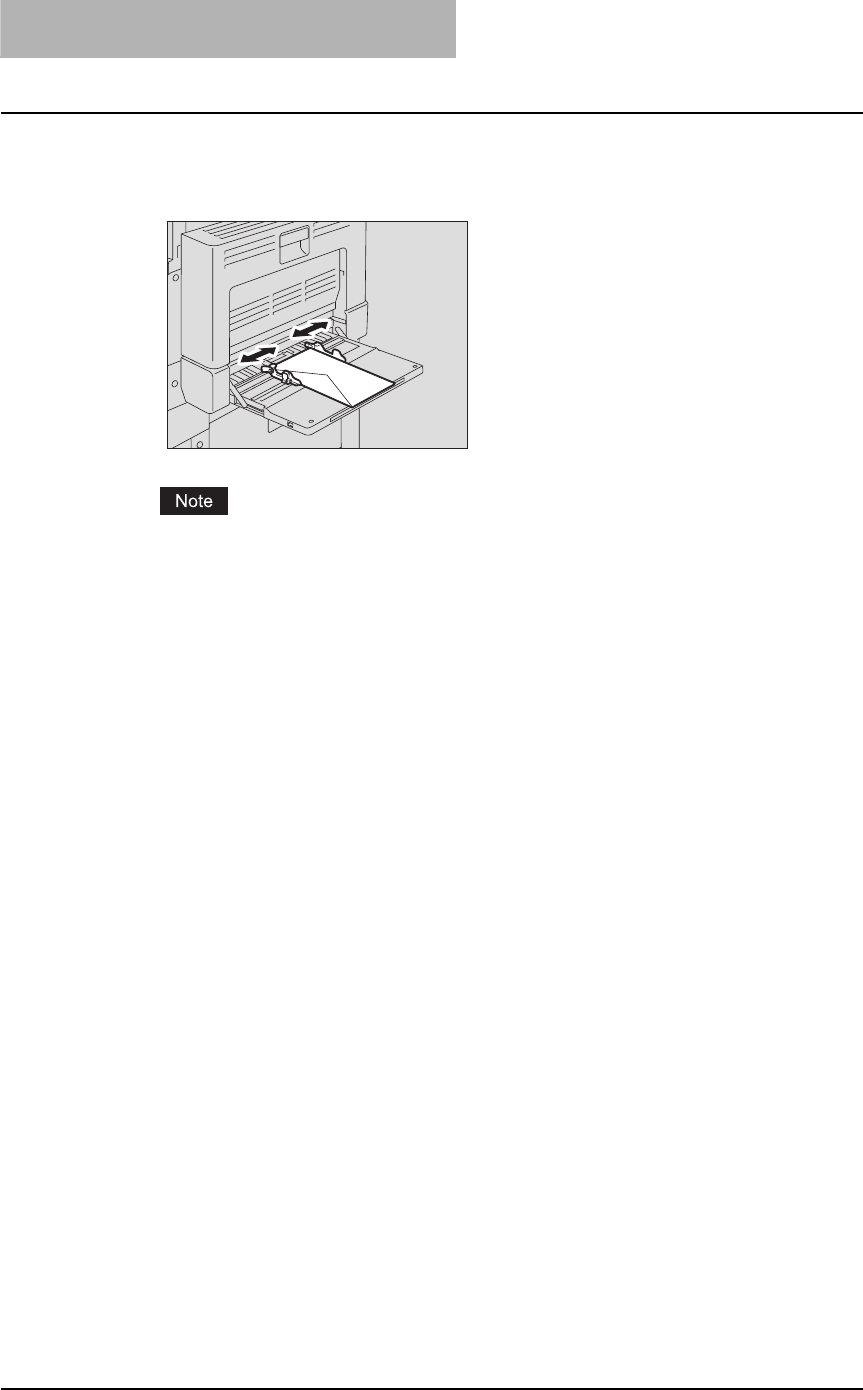
2
Place the envelope face down and horizontally on the bypass tray.
Then align the side guides to the size of the envelope.
Place the envelope with the flap in front.
Do not print on the back side of the envelope. This could create an envelope jam or stain-
ing, or even contaminate the inside of this equipment.
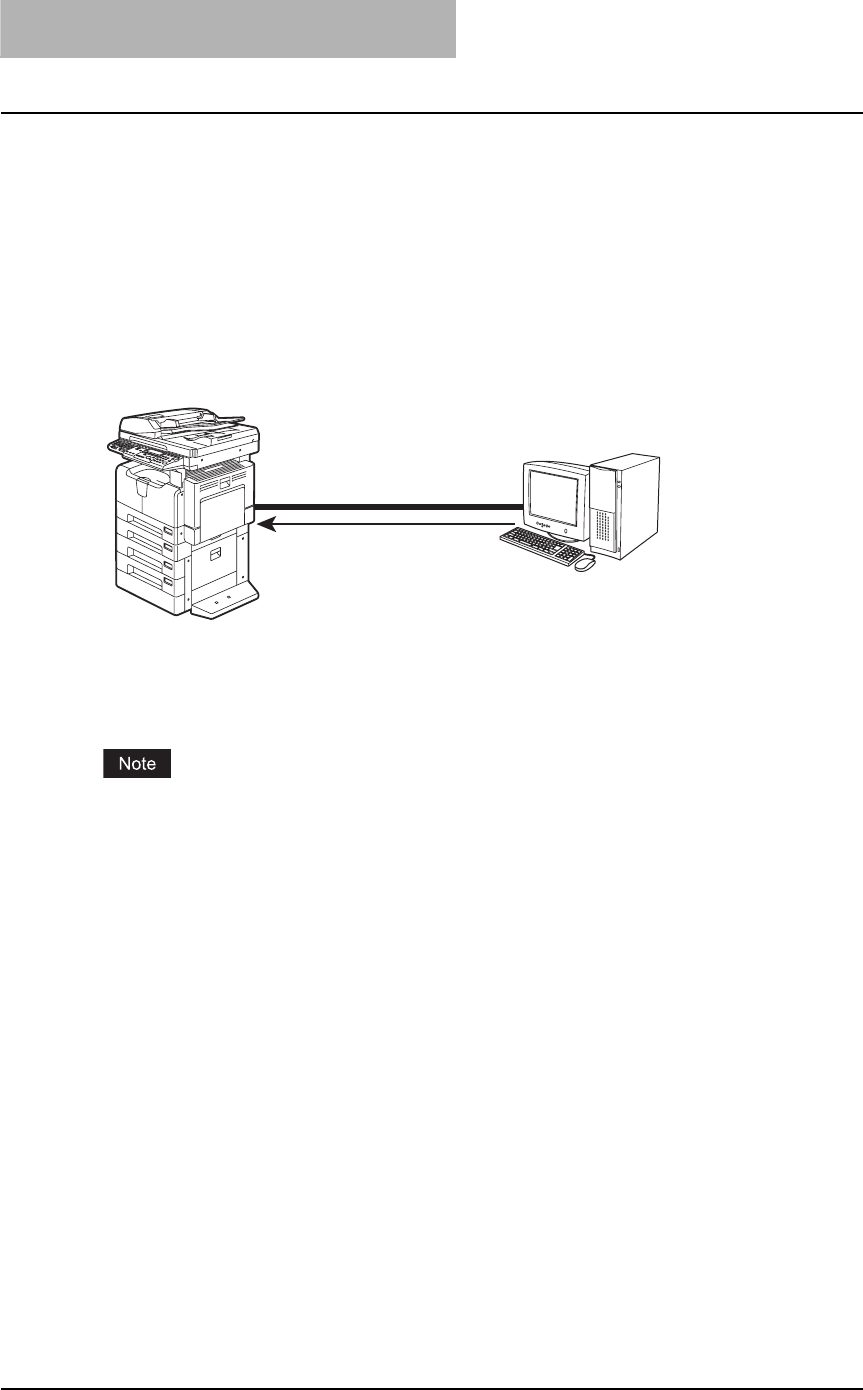
3
The client computer selects the type of the envelope placed on the
bypass tray, and then printing starts.
Printing on envelopes is available only when Windows computers are used. For the
printing procedure from Windows computers, see the following page:
P.154 “Printing from Windows”

2.INSTALLING CLIENT SOFTWARE
This section describes the instructions on how to install the client software on Windows, Macintosh, or UNIX.
Installing Client Software for Windows.................................................................20
About client software for windows.....................................................................................................20
Planning for installation .....................................................................................................................20
Installation procedure list for Windows client software......................................................................26
Installing client software for USB printing..........................................................................................27
Installing client software for Raw TCP/LPR printing..........................................................................36
Installing client software for IPP printing ...........................................................................................63
Installing client software for Novell printing .......................................................................................74
Installing client software for Novell iPrint.........................................................................................104
Uninstalling client utilities software..................................................................................................105
Installing Client Software for Macintosh............................................................. 111
About client software for Macintosh ................................................................................................ 111
Planning for installation ................................................................................................................... 111
Installation procedure list for Maintosh client software.................................................................... 112
Installing the printer on Mac OS 8.6/9.x .......................................................................................... 113
Installing the printer on Mac OS X 10.2.4 to Mac OS X 10.4.x ....................................................... 119
Installing Client Software for UNIX......................................................................138
Setting up the CUPS .......................................................................................................................138
Installation procedure list for UNIX client software..........................................................................138

2 INSTALLING CLIENT SOFTWARE
20 Installing Client Software for Windows
Installing Client Software for Windows
This section provides instructions for configuring the printing systems on Windows computers.
About client software for windows
Printer drivers
Printer drivers are software components that enable application programs to interact with the
printer. The e-STUDIO205 Series comes with two printer drivers, PCL6 and PS3 (PostScript)
printer drivers. These printer drivers offer document print, layout and assembly functions that
are not available with many applications.
Font manager
This utility allows you to install and manage the TrueType fonts that are corresponding to the
internal PS fonts on the equipment.
Font Manager is provided in the Client Utilities CD-ROM.
Planning for installation
This section will help you to plan an installation suited to your environment. Before installing the
client software, read this section.
Before installing client software
Before installing the client software, confirm the followings to perform an appropriate installation.
— When same printer drivers have been installed
Before updating the printer drivers, please delete the printer drivers.
P.105 “Uninstalling client utilities software”
Type of printer drivers
yPCL6 printer driver — for printing gray scale documents that use TrueType fonts, such as a
Microsoft Word.
yPS3 printer driver — for high-graphical-content documents that use PostScript fonts and
graphics, such as Adobe PageMaker.

Installing Client Software for Windows 21
System requirements
To install the printer drivers and other client software on a Windows workstation, the following is
required.
yDisplay resolution
1024 x 768 dots or more
yDisplay color
High Color (16bit) or higher is recommended
yCPU
Pentium 133 MHz minimum (Pentium 266 MHz or faster recommended)
yMemory
64MB for Windows 98
96MB for Windows Me and Windows NT 4.0
128MB for Windows 2000/XP/Server 2003
The applicable computers depend on the printing systems:
yRaw TCP/LPR printing
Windows NT 4.0 Service Pack 6a (LPR printing only)
Windows 2000 Service Pack 4
Windows XP Service Pack 1
Windows Server 2003
yIPP printing
Windows 98
Windows Me
Windows 2000 Service Pack 4
Windows XP Service Pack 1
Windows Server 2003
2 INSTALLING CLIENT SOFTWARE
22 Installing Client Software for Windows
About installation procedure
Please find the installation procedure suited to your environment from the following:
P.22 “USB connection”
P.22 “Local area network over TCP/IP”
P.23 “IPP printing”
P.24 “Novell printing”
— USB connection
Available for: Windows Me, Windows 2000, Windows XP, Windows Server 2003
This equipment supports the USB 2.0 Full Speed connection. When this equipment is con-
nected to your computer with the USB cable, you must install the printer drivers using the Win-
dows Plug and Play functions.
P.27 “Installing client software for USB printing”
USB printing is not supported by Windows NT 4.0.
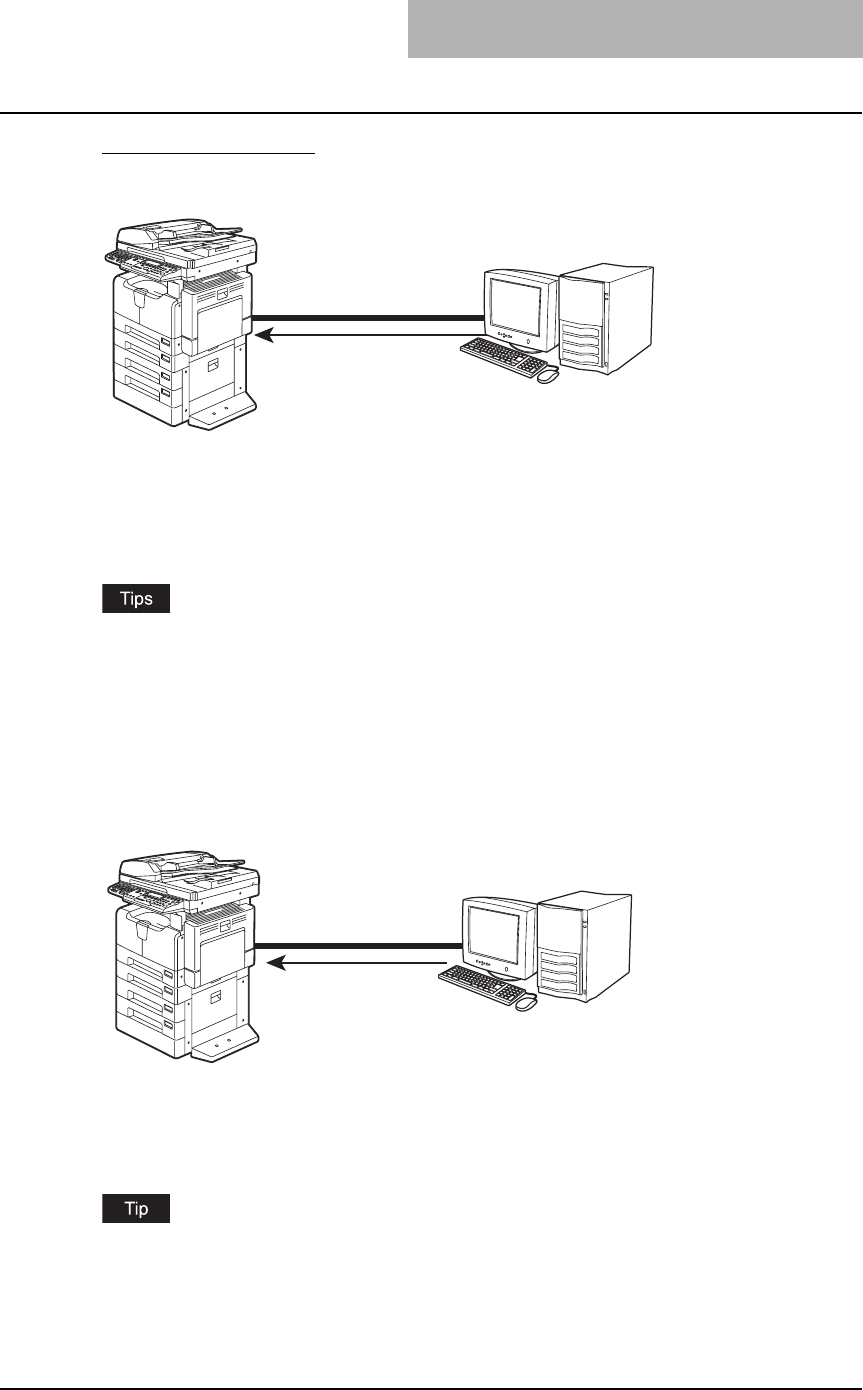
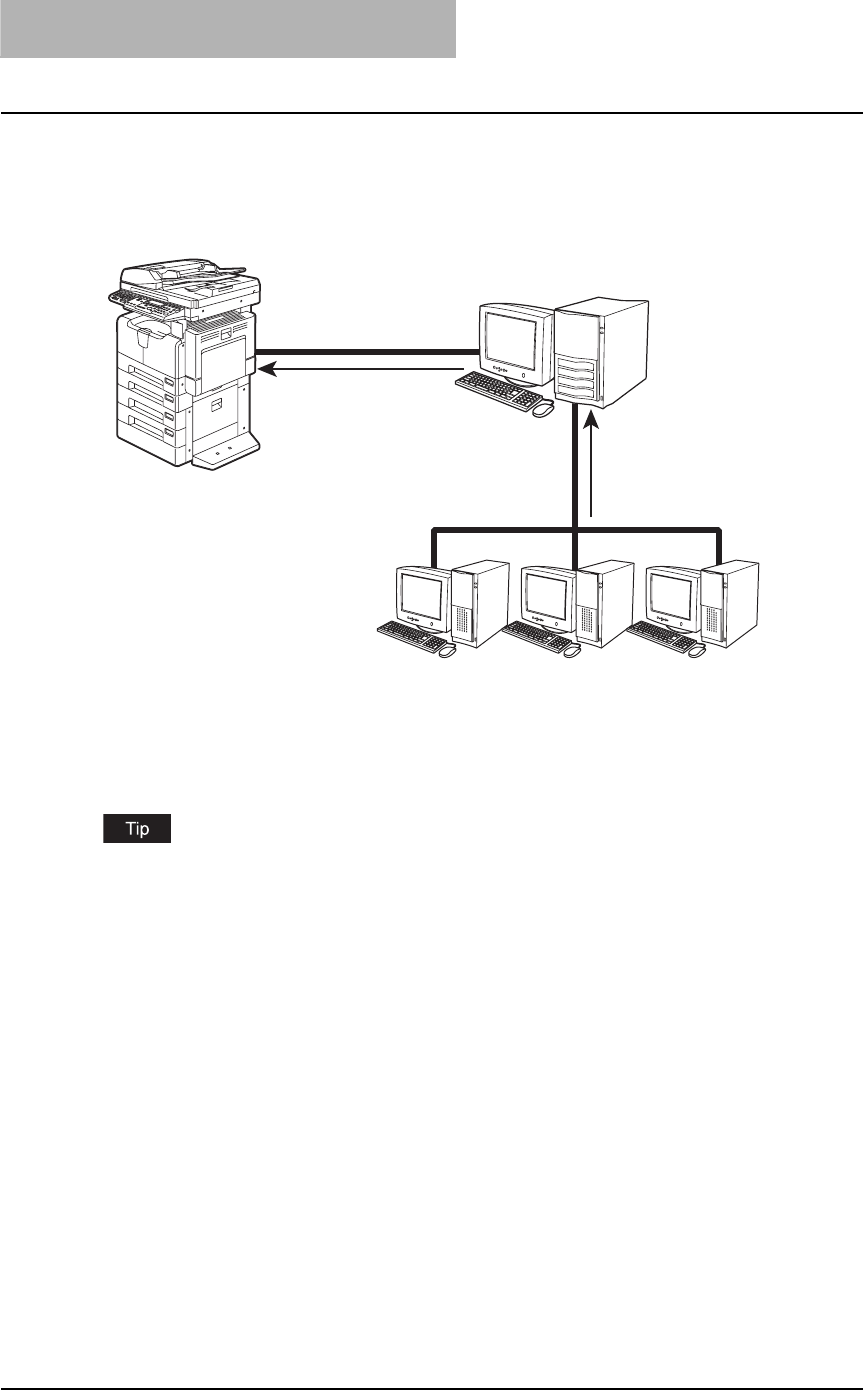
— Local area network over TCP/IP
When this equipment is connected to your computer in the local area network over TCP/IP, vari-
ous printing methods are available such as:
yRaw TCP/LPR Printing (for Windows 2000/XP/Server 2003)
yLPR Printing (for Windows NT 4.0)
Some of them are applicable to your environments, the printing methods generally recom-
mended are decided by the Windows version.
yWindows 2000, Windows XP, Windows Server 2003 — Raw TCP/LPR Printing
yWindows NT 4.0 — LPR Printing
If you have no advance for an installation from your administrator, check these printing methods
whether they are suited to your network environments.
Connecting with USB
Setting up the USB Printer
Connection
Windows Me
Windows 2000
Windows XP
Windows Server 2003
Installing Client Software for Windows 23
Raw TCP/LPR printing
Available for:Windows NT 4.0, Windows 2000, Windows XP, Windows Server 2003
This equipment allows you to connect using LPR which is available for Windows NT 4.0, and
Raw TCP or LPR which is available for Windows 2000, Windows XP, and Windows Server 2003.
If you use Windows 2000, Windows XP, or Windows Server 2003, Raw TCP printing may be
suitable.
P.36 “Installing client software for Raw TCP/LPR printing”
yTo print with a Raw TCP connection, this equipment must be configured to enable Raw TCP
Print Service. Ask your administrator if the Raw TCP Print Service is enabled.
yTo print with a LPR connection, this equipment must be configured to enable LPD Print Ser-
vice. Ask your administrator if the LPD Print Service is enabled.
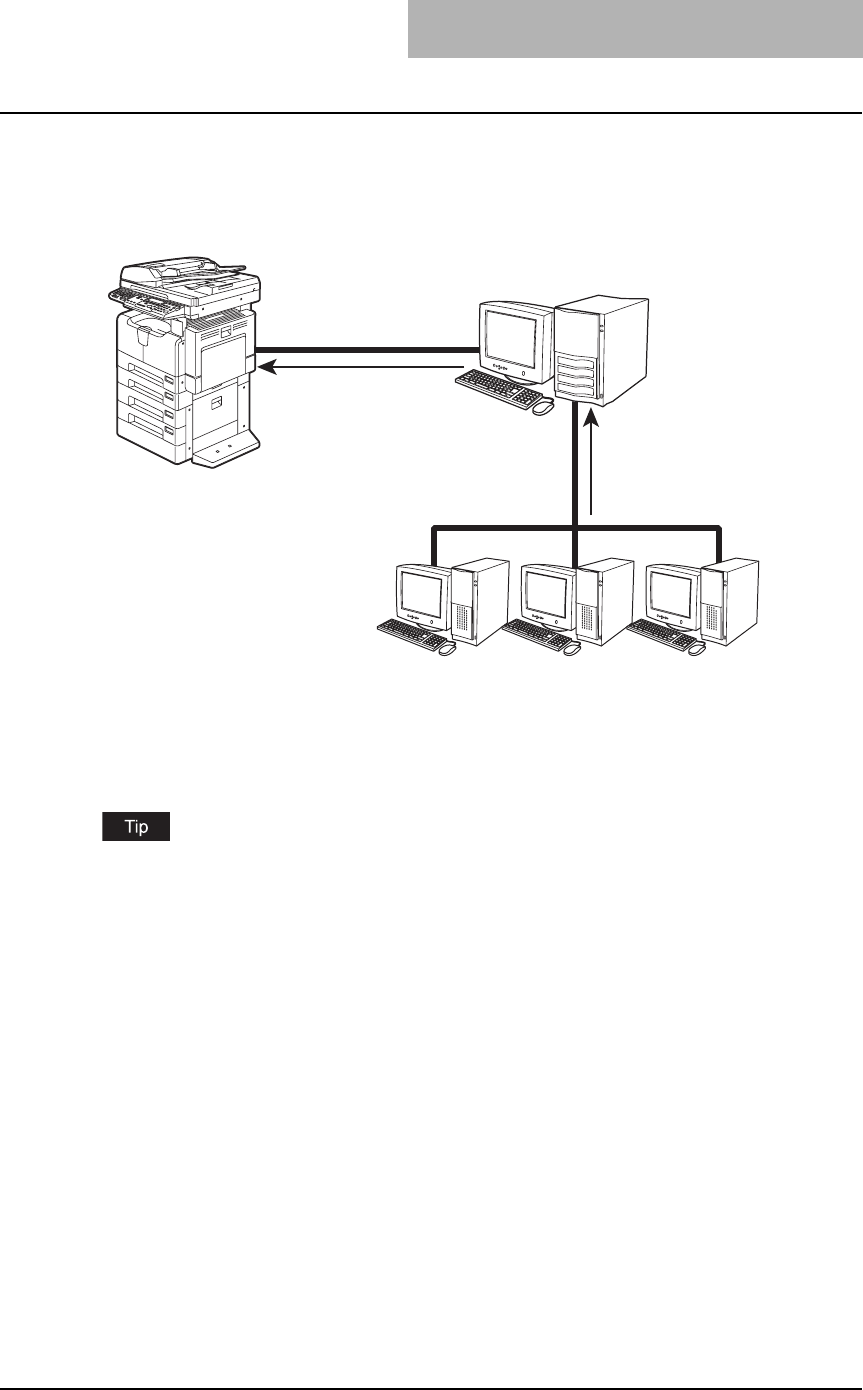
— IPP printing
Available for: Windows 98, Windows Me, Windows 2000, Windows XP, Windows Server 2003
If you print to this equipment over the Internet, you can use IPP printing under Windows 98, Win-
dows Me, Windows 2000, Windows XP, and Windows Server 2003. This allows you to print to
this equipment from anywhere on the Internet.
P.63 “Installing client software for IPP printing”
To print with an IPP connection, this equipment must be configured to enable the IPP Print Ser-
vice and must be connected to the Internet. Ask your administrator if the IPP Print Service is
enabled.
Windows NT 4.0
Windows 2000
Windows XP
Windows Server 2003
Connecting over TCP/IP Network
Setting up the Raw TCP
or LPR printer connection
Windows 98
Windows Me
Windows 2000
Windows XP
Windows Server 2003
Connecting over TCP/IP Network or Internet
Setting up the IPP
printer connection
2 INSTALLING CLIENT SOFTWARE
24 Installing Client Software for Windows
— Novell printing
Available for: Windows 98, Windows Me, Windows NT 4.0, Windows 2000, Windows XP, Win-
dows Server 2003
When this equipment is configured to manage printing with NetWare 5.1/6.5 over TCP/IP or IPX/
SPX, you can print through the NetWare print server from Windows 98/Me, Windows NT 4.0,
Windows 2000, Windows XP, and Windows Server 2003. In this case, install the printer driver
and set up the SMB printer connection to a print queue created in the NetWare server.
P.74 “Installing client software for Novell printing”
To print with a Novell connection, the NetWare server must be configured for printing and this
equipment must be configured to enable NetWare Print Service. Ask your administrator if the
NetWare Print Service is enabled.
Setting up the Novell
printer connection
Setting up the SMB
printer connection
to Novell print queue
NetWare 5.1
NetWare 6.5
Windows Me
Windows NT 4.0
Windows 98
Windows 2000
Windows XP
Windows Server 2003
Connecting with a NetWare Environment over TCP/IP or IPX/SPX Network
Installing Client Software for Windows 25
— Novell iPrint
Available for: Windows 98, Windows Me, Windows NT 4.0, Windows 2000, Windows XP, Win-
dows Server 2003
When this equipment is configured to manage iPrint with NetWare 6.x over TCP/IP, you can print
through the NetWare print server from Windows 98/Me, Windows NT 4.0, Windows 2000, Win-
dows XP, and Windows Server 2003. In this case, install the printer driver using iPrint Client
from the NetWare server.
P.104 “Installing client software for Novell iPrint”
To print with a Novell iPrint, the NetWare server must be configured for iPrint and this equipment
must be configured to enable NetWare Print Service. Ask your administrator if the NetWare Print
Service is enabled.
Setting up the Novell
iPrint connection
Setting up the iPrint
printer connection
using iPrint Client
NetWare 6.5
Windows Me
Windows NT 4.0
Windows 98
Windows 2000
Windows XP
Windows Server 2003
Connecting with a Novell iPrint Environment over TCP/IP Network
2 INSTALLING CLIENT SOFTWARE
26 Installing Client Software for Windows
Installation procedure list for Windows client software
The following table shows the procedure list to install printer drivers.
*1 By selecting the discovered equipment, the printer port is automatically set.
Printing OS Means to install
USB printing Windows Me
P.27 “Windows Me”
Plug and Play
Windows 2000
P.31 “Windows 2000”
Windows XP/Server 2003
P.34 “Windows XP/Server 2003”
Raw TCP/LPR
printing
Windows 2000/XP/Server 2003
P.37 “Windows 2000/XP/Server 2003”
Installer*1
Windows 2000/XP/Server 2003
P.50 “Windows 2000/XP/Server 2003”
Add Printer Wizard
Windows NT 4.0
P.47 “Windows NT 4.0”
Installer
Windows NT 4.0
P.58 “Windows NT 4.0”
Add Printer Wizard
IPP printing Windows 98/Me
P.63 “Windows 98/Me”
Add Printer Wizard
Windows 2000/XP/Server 2003
P.68 “Windows 2000/XP/Server 2003”
Novell printing Windows 98/Me, Windows NT 4.0, Windows 2000/XP
P.75 “Installation for Novell printing using the installer”
Installer
Windows 98/Me
P.80 “Windows 98/Me”
Point and Print
Windows NT 4.0/2000/ XP/Server 2003
P.84 “Windows NT 4.0/2000/XP/Server 2003”
Windows 98/Me
P.87 “Windows 98/Me”
Add Printer Wizard
Windows NT 4.0
P.94 “Windows NT 4.0”
Windows 2000/ XP/Server 2003
P.99 “Windows 2000/XP/Server 2003”
Novell iPrint Windows 98/Me/NT 4.0/2000/ XP/Server 2003
P.104 “Installing client software for Novell iPrint”
NetWare server
Uninstalling When installed using the installer
P.105 “When installed using the installer”
When installed using Add Printer Wizard
P.109 “When installed using Add Printer Wizard”

Installing Client Software for Windows 27
Installing client software for USB printing
This section describes how to set up the printer drivers when this equipment is connected with
USB cable.
To set up the printer drivers for USB printing, you must install the printer drivers by Plug and Play
functions instead of installing the client software using the installer in the Client Utilities CD-
ROM.
When this equipment is connected to a USB port of Windows Me, Windows 2000, Windows XP,
or Windows Server 2003 computers, the Plug and Play Wizard automatically starts.
yTopAccess is not available when this equipment is connected using only the USB cable.
yThe Font Manager is available to install and manage the TrueType fonts on your computer.
To install the Font Manager, you must install it from the Client Utilities CD-ROM.
P.246 “Installing Font Manager”
USB printing is not supported by Windows NT 4.0.
Installation for USB printing by Plug and Play
The procedure to install the printer driver for USB printing by Plug and Play differs depending on
the version of Windows used.
P.27 “Windows Me”
P.31 “Windows 2000”
P.34 “Windows XP/Server 2003”
— Windows Me
Installing the printer driver for USB printing by Plug and Play
1
Power on this equipment and your computer.
2
Insert the Client Utilities CD-ROM into the CD-ROM drive.
When inserting the Client Utilities CD-ROM, the installer may automatically start. Click
[Cancel] to exit the installer and continue the operation.
3
Connect the USB cable to this equipment and your computer.
The Add New Hardware Wizard dialog box appears.
On Windows Me, usually the USB port driver must be automatically installed when you
connect the USB cable to your computer. However, the USB port driver sometimes can-
not be installed automatically. In that case, click [Back] in the displayed dialog box and
then click [Next] to install the USB port driver again.
2 INSTALLING CLIENT SOFTWARE
28 Installing Client Software for Windows
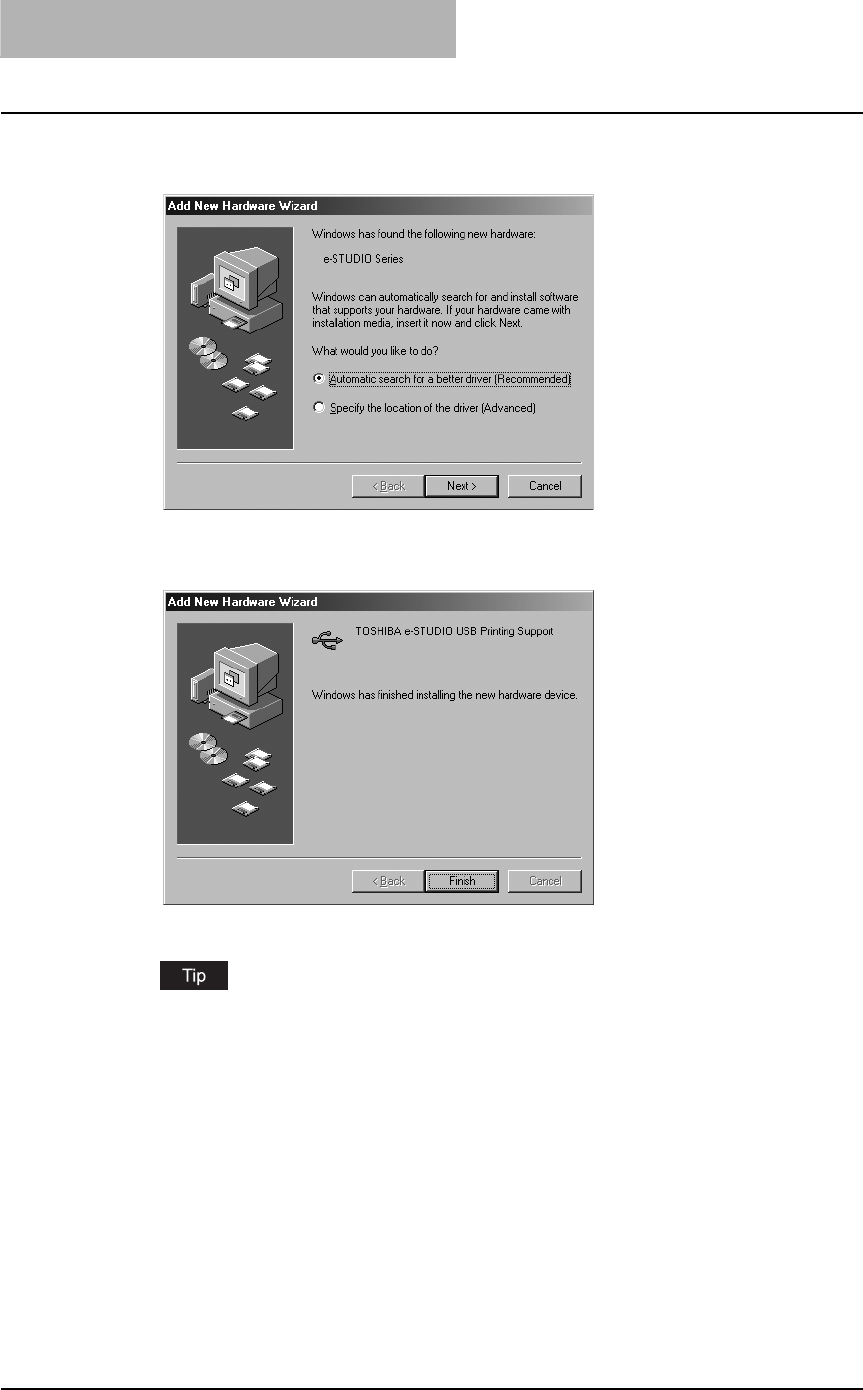
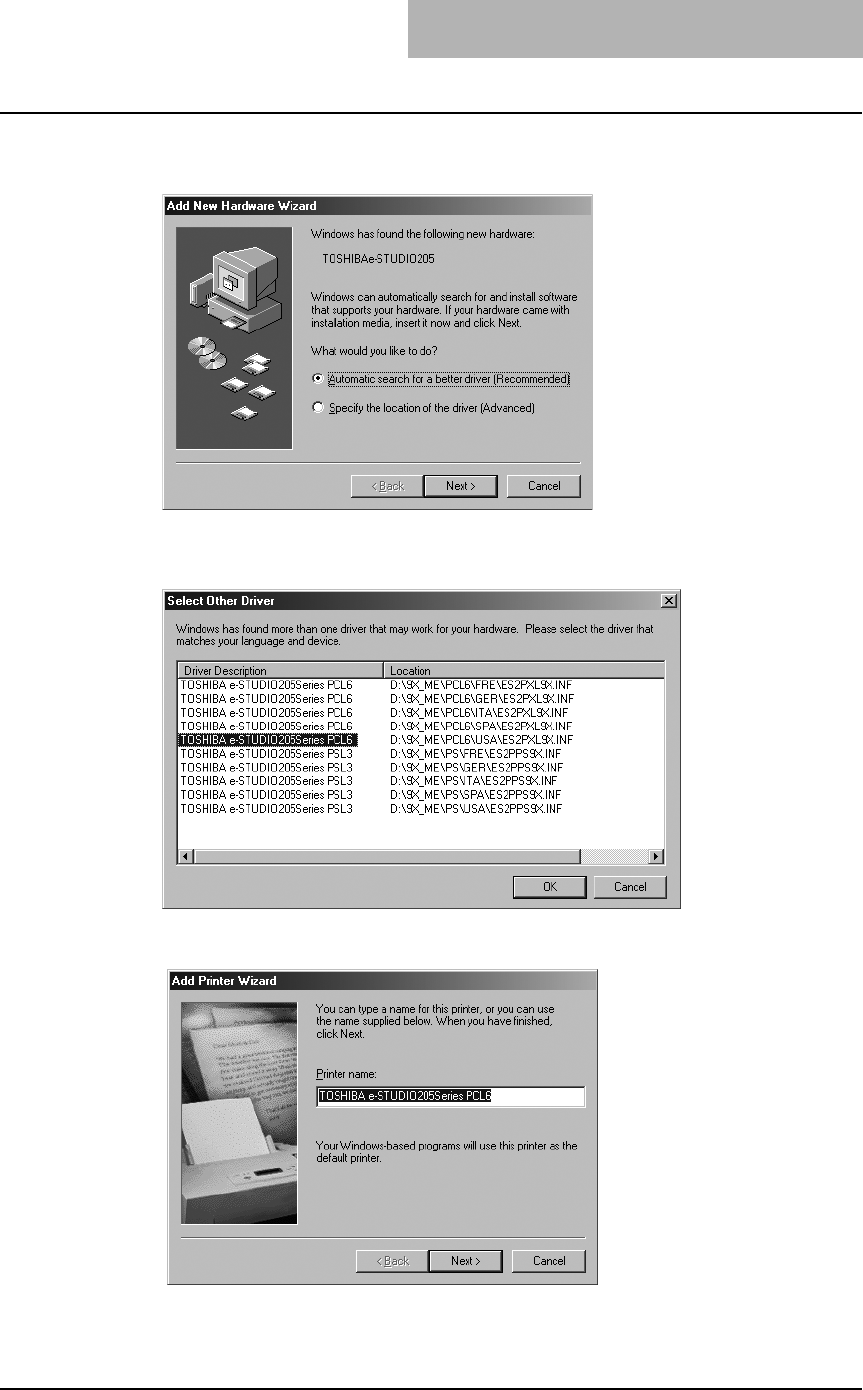
4
Select “Automatic search a better driver (Recommended)” and
click [Next].
The dialog box showing installation of the new hardware device appears.
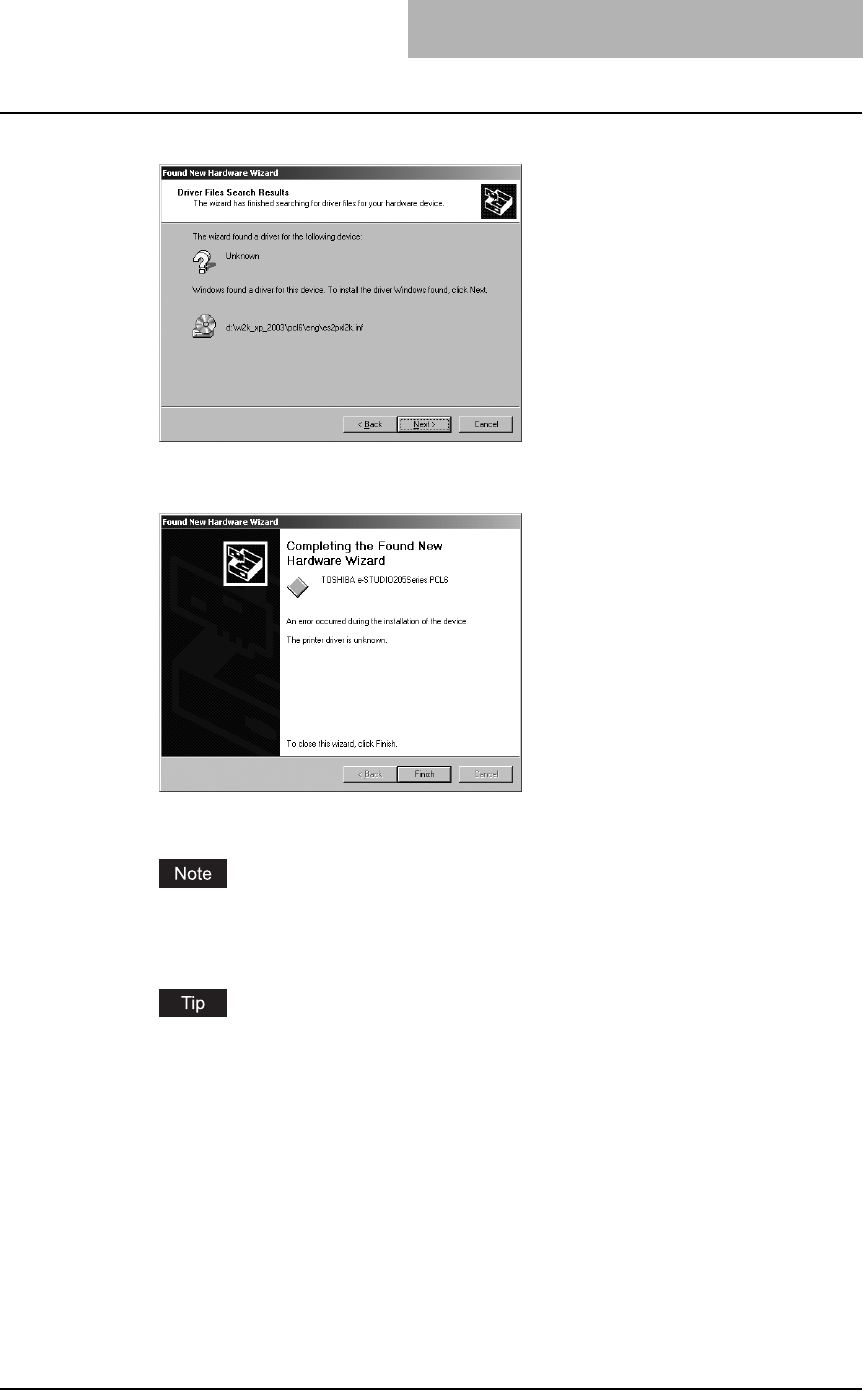
5
Click [Finished].
The dialog box showing detection of TOSHIBA e-STUDIO205 appears.
If a network printer driver for e-STUDIO165/205 has already been installed in your com-
puter, steps 6 and 7 are skipped. In this case, the same type of USB printer driver as that
of network printer driver will be installed.
Installing Client Software for Windows 29
6
Select “Automatic search a better driver (Recommended)” and
click [Next].
The Select Other Driver dialog box appears.
7
Select the desired printer driver and click [OK].
8
Change the name if desired and click [Next].
2 INSTALLING CLIENT SOFTWARE
30 Installing Client Software for Windows
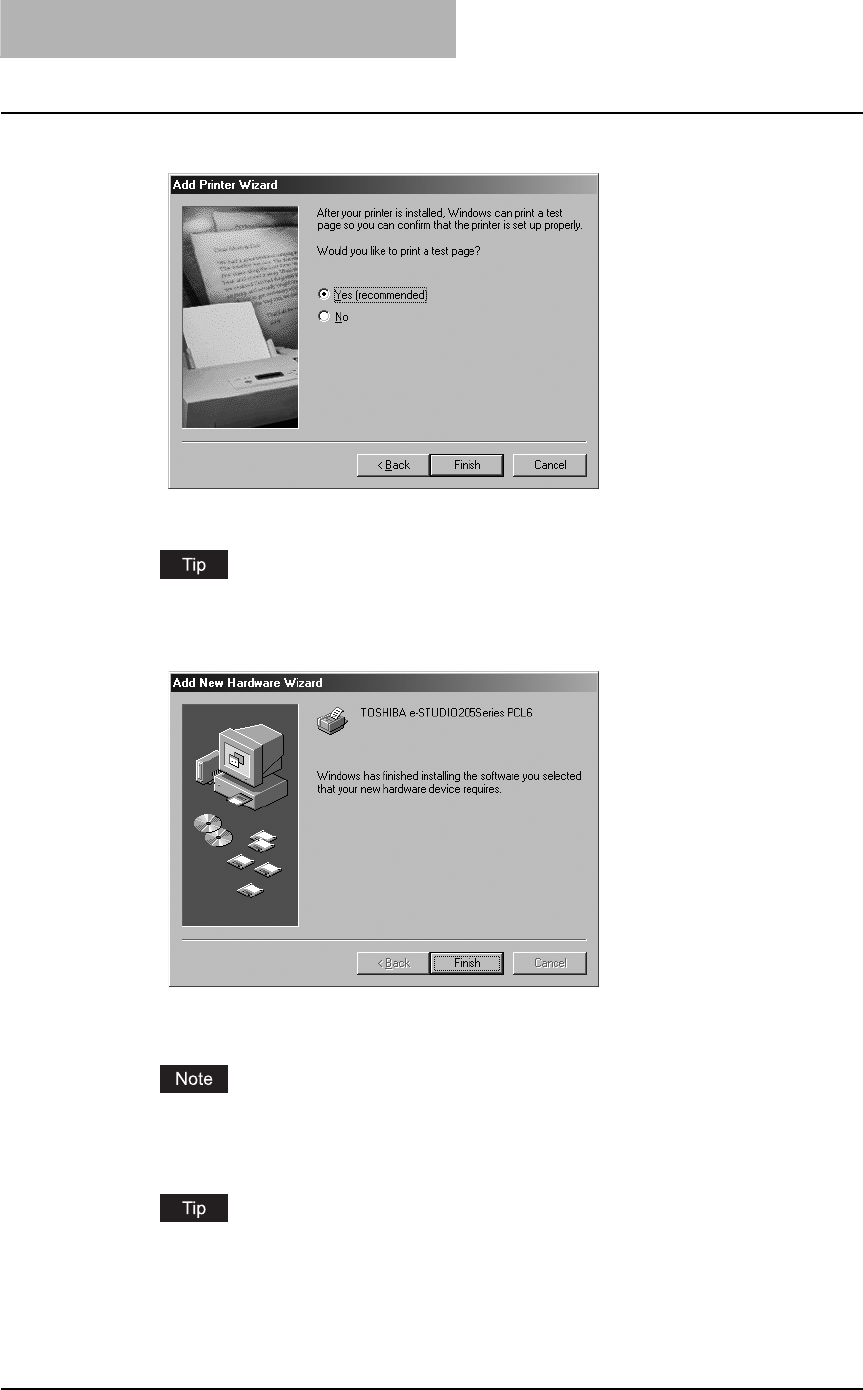
9
Select "Yes (recommended)" to print a test page and click [Finish].
Start copying files.
The printer test printing message will be is displayed.
10
Click [Finish].
11
The installation is completed.
Before using the printer driver for printing, please configure the installed options of the
equipment and department code (if required) on the printer driver.
P.154 “Before using the printer driver”
When a printer driver (e.g. PCL6) is installed by means of the above procedure, the
“USB001 Virtual print port” is created. If you want to install a second driver (e.g. PS3),
use “Add Printer Wizard” and add the printer driver in the Client Utility CD-ROM to this
port. (To start the wizard: Click [Start] and select [Printers] in [Settings], and then double-
click the [Add Printers] icon.)
Installing Client Software for Windows 31
— Windows 2000
Installing the printer driver for USB printing by Plug and Play
You must log into Windows as a user who has the “Administrators” or “Power Users” privilege
when using Windows 2000.
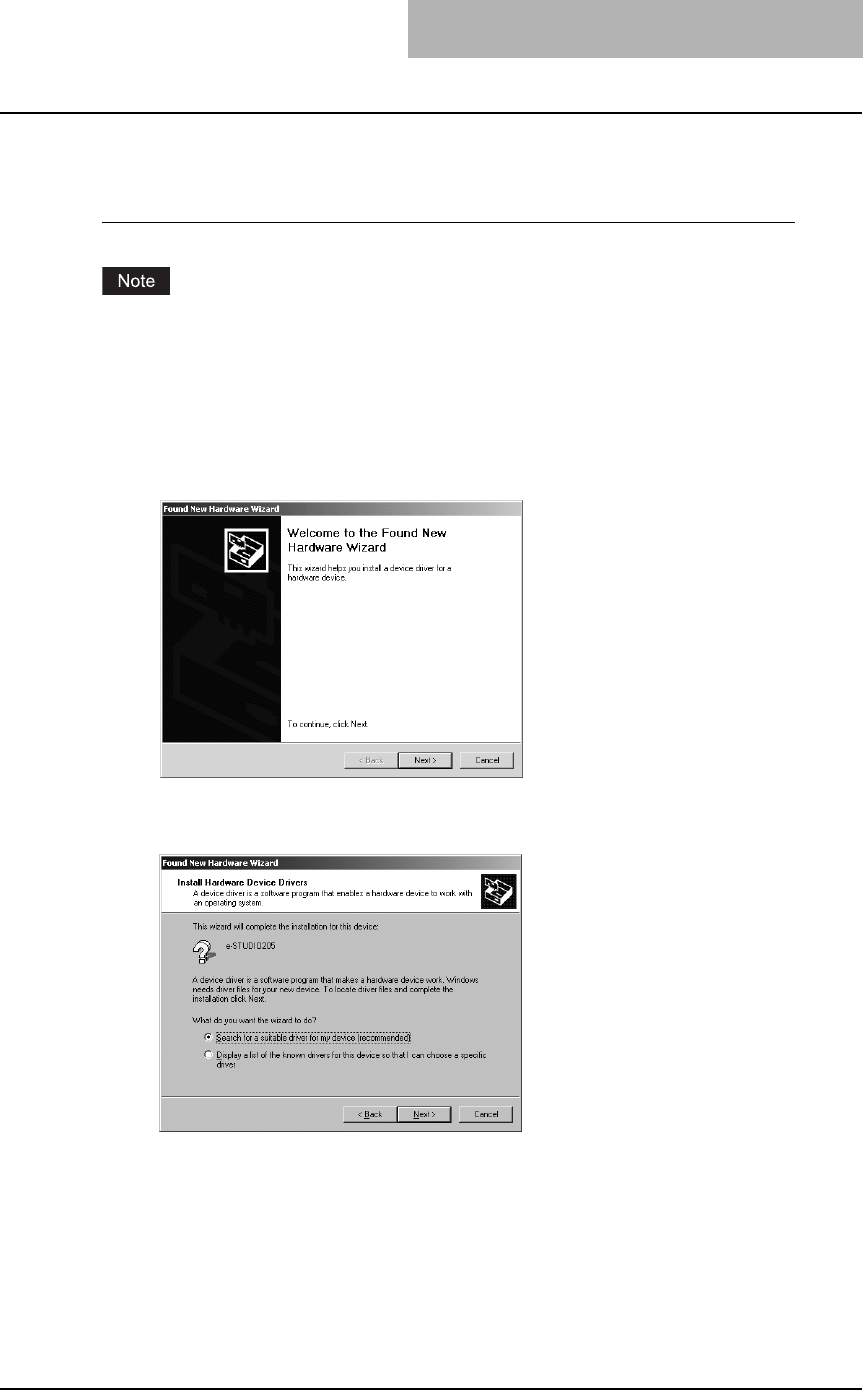
1
Power on this equipment and your computer.
2
Connect the USB cable to this equipment and your computer.
The Found New Hardware Wizard dialog box appears.
3
Click [Next].
4
Select "Search for a suitable driver for my device (recommended)"
and click [Next].
5
Insert the Client Utilities CD-ROM into the CD-ROM drive.
When inserting the Client Utilities CD-ROM, the installer may automatically start. Click
[Cancel] to exit the installer and continue the operation.
2 INSTALLING CLIENT SOFTWARE
32 Installing Client Software for Windows
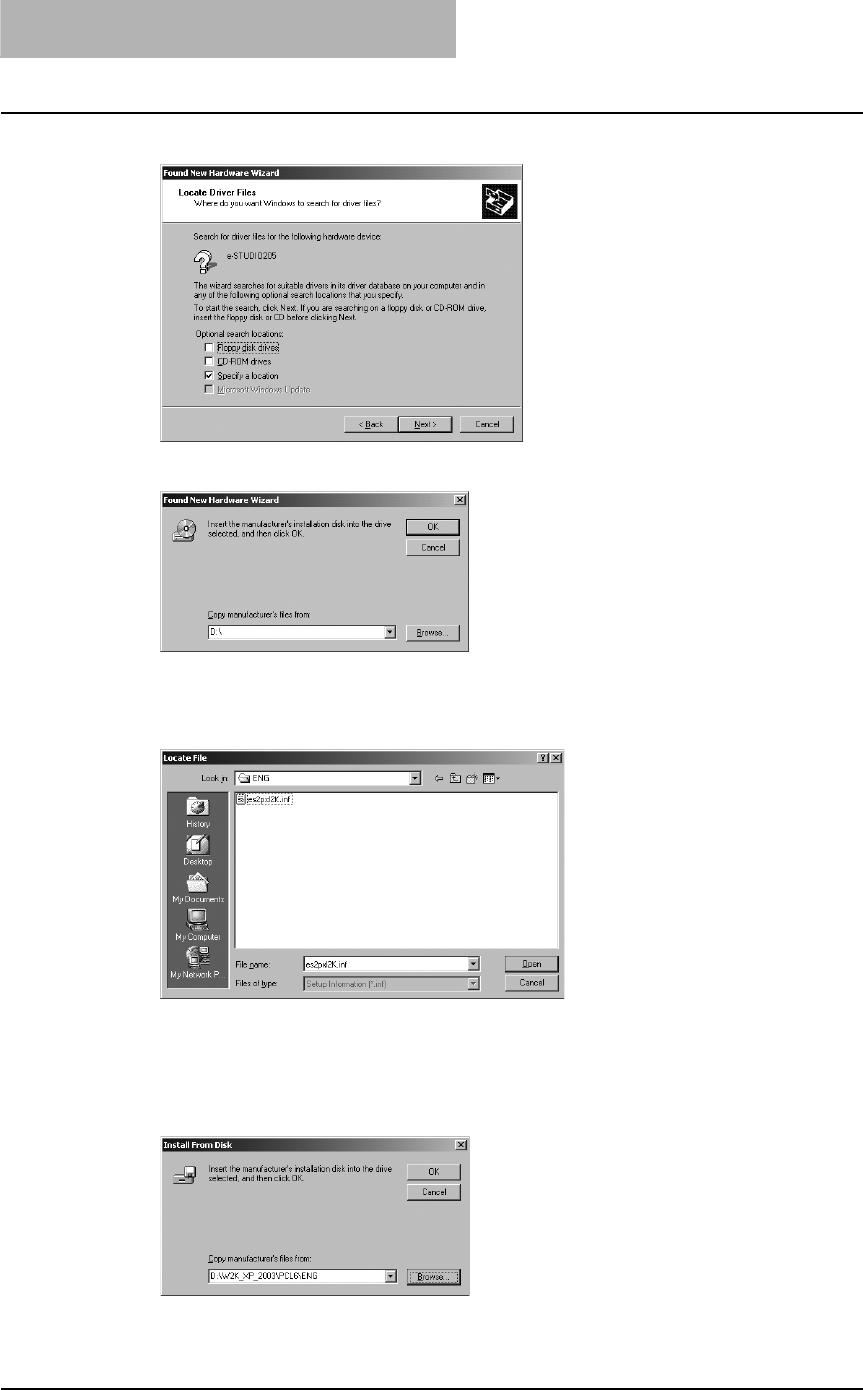
6
Select only “Specify a location” and click [Next].
7
Click [Browse].
The Locate File dialog box appears.
8
Locate the directory where the printer driver for Windows 2000 is
located, select a inf file, and click [Open].
yTo install the PCL6 printer driver, locate
"[CD-ROM drive]:\W2K_XP_2003\PCL6\<language>".
yTo install the PS3 printer driver, locate
"[CD-ROM drive]:\W2K_XP_2003\PS\<language>".
9
Click [OK].
Installing Client Software for Windows 33
10
Check [Next].
It starts copying files.
11
Click [Finish].
12
The installation is completed.
Before using the printer driver for printing, please configure the installed options of the
equipment and department code (if required) on the printer driver.
P.154 “Before using the printer driver”
When a printer driver (e.g. PCL6) is installed by means of the above procedure, the
“USB001 Virtual print port” is created. If you want to install a second driver (e.g. PS3),
use “Add Printer Wizard” and add the printer driver in the Client Utility CD-ROM to this
port. (To start the wizard: Click [Start] and select [Printers] in [Settings], and then double-
click the [Add Printers] icon.)
2 INSTALLING CLIENT SOFTWARE
34 Installing Client Software for Windows
— Windows XP/Server 2003
Installing the printer driver for USB printing by Plug and Play
The following describes an installation on Windows XP. The procedure is the same when Win-
dows Server 2003 is used.
You must log into Windows as a user who has the “Administrators” or “Power Users” privilege
when using Windows XP or Windows Server 2003.
1
Power on this equipment and your computer.
2
Connect the USB cable to this equipment and your computer.
The Found New Hardware Wizard dialog box appears.
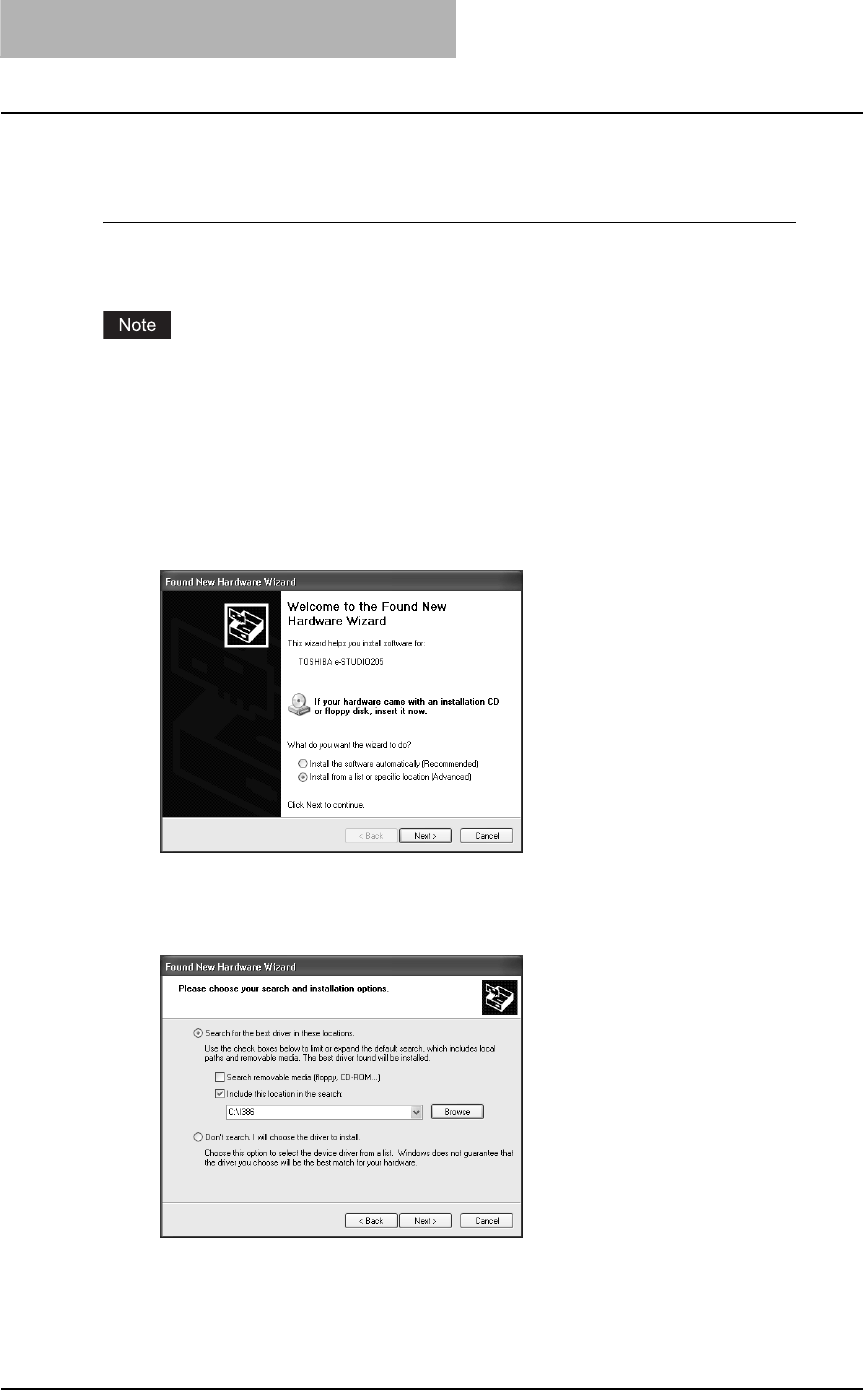
3
Select "Install from a list or specific location (Advanced)" and click
[Next].
4
Select “Search for the best driver in these locations.” and check
only the “Include this location in the search” check box. Then click
[Browse].
The Browse For Folder dialog box appears.
5
Insert the Client Utilities CD-ROM into the CD-ROM drive.
When inserting the Client Utilities CD-ROM, the installer may automatically start. Click
[Cancel] to exit the installer and continue the operation.
Installing Client Software for Windows 35
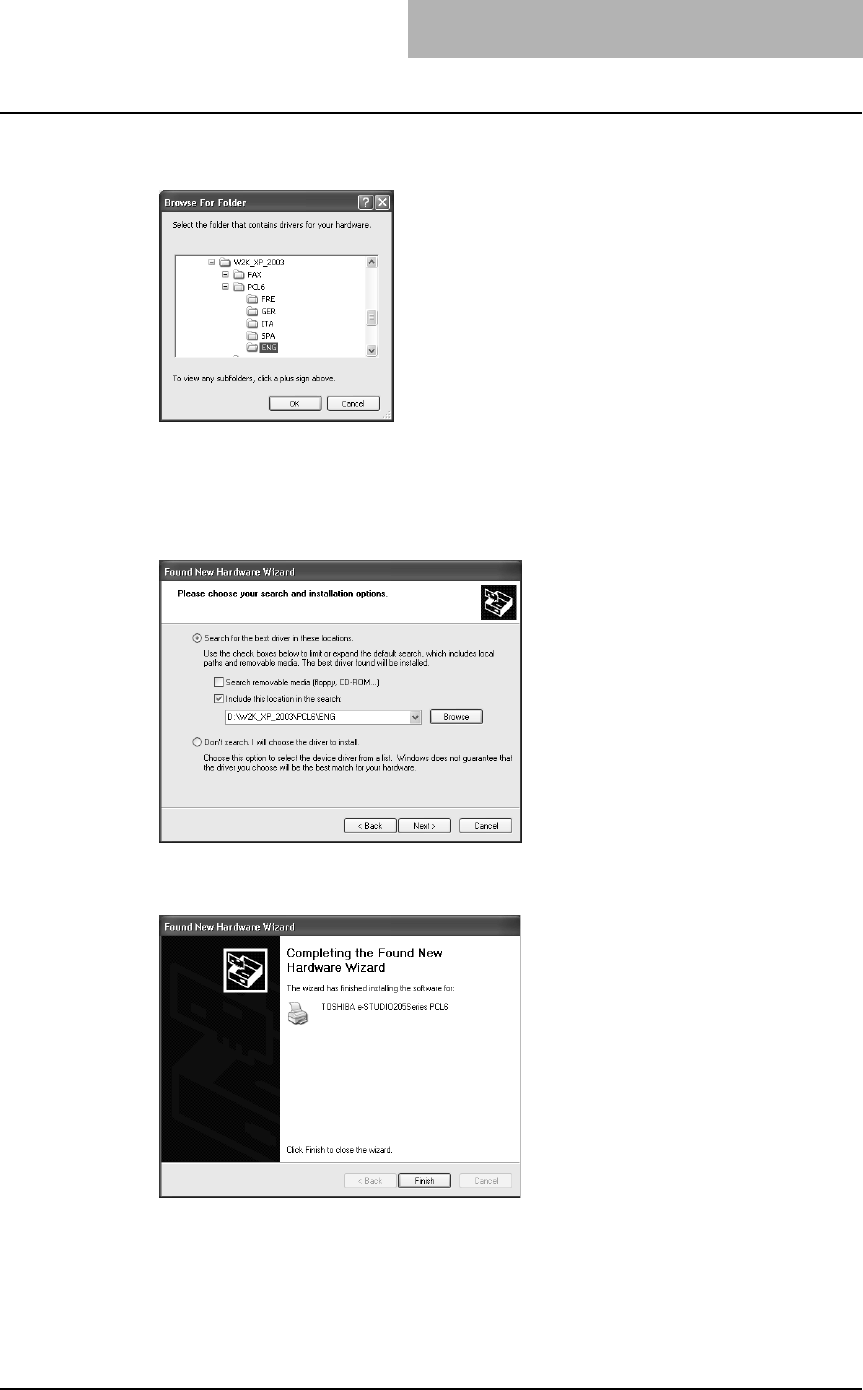
6
Locate the directory where the printer driver for Windows XP/
Server 2003 is located and click [OK].
yTo install the PCL6 printer driver, locate
"[CD-ROM drive]:\W2K_XP_2003\PCL6\<language>".
yTo install the PS3 printer driver, locate
"[CD-ROM drive]:\W2K_XP_2003\PS\<language>".
7
Click [Next].
It starts copying files.
8
Click [Finish].

2 INSTALLING CLIENT SOFTWARE
36 Installing Client Software for Windows
9
The installation is completed.
Before using the printer driver for printing, please configure the installed options of the
equipment and department code (if required) on the printer driver.
P.154 “Before using the printer driver”
When a printer driver (e.g. PCL6) is installed by means of the above procedure, the
“USB001 Virtual print port” is created. If you want to install a second driver (e.g. PS3),
use “Add Printer Wizard” and add the printer driver in the Client Utility CD-ROM to this
port. (To start the wizard: Click [Start] and select [Printers and Faxes], and then double-
click the [Add Printers] icon.)
Installing client software for Raw TCP/LPR printing
This section describes how to set up the printer drivers for Raw TCP/LPR printing which is avail-
able for the local area network over TCP/IP.
There are Two ways to set up the printer drivers for Raw TCP/LPR printing:
yUsing the installer in the Client Utilities CD-ROM
You can set up the printer drivers for Raw TCP/LPR printing by installing the printer drivers
using the installer in the Client Utilities CD-ROM.
P.37 “Installation for Raw TCP/LPR printing using the installer”
yUsing Add Printer Wizard
When you want to install the printer drivers without using the installer, or when you want to
install the same printer driver for another equipment, install the printer drivers using the Add
Printer Wizard.
P.50 “Installation for Raw TCP/LPR Printing by Add Printer Wizard”
The Font Manager is available to install and manage the TrueType fonts on your computer. To
install the Font Manager, you must install it from the Client Utilities CD-ROM.
P.246 “Installing Font Manager”
yBefore operating the following setup, check with your system administrator to make sure of
the following:
- This equipment is connected to the network and turned on.
- The TCP/IP setting is correct on this equipment and your computer.
yRaw TCP Printing is only available for Windows 2000, Windows XP, and Windows Server
2003.
yLPR Printing is only available for Windows NT 4.0, Windows 2000, Windows XP, and Win-
dows Server 2003.
Installing Client Software for Windows 37
Installation for Raw TCP/LPR printing using the installer
Install the client software using the installer in the Client Utilities CD-ROM.
P.37 “Windows 2000/XP/Server 2003”
P.47 “Windows NT 4.0”
— Windows 2000/XP/Server 2003
The following describes an installation on Windows 2000. The procedure is the same when Win-
dows XP or Windows Server 2003 is used.
P.37 “Installing the client software using the installer for Windows 2000/XP/Server 2003”
You must log into Windows as a user who has the “Administrators” or “Power Users” privilege
when using Windows 2000, Windows XP, or Windows Server 2003.
Installing the client software using the installer for Windows 2000/XP/Server 2003
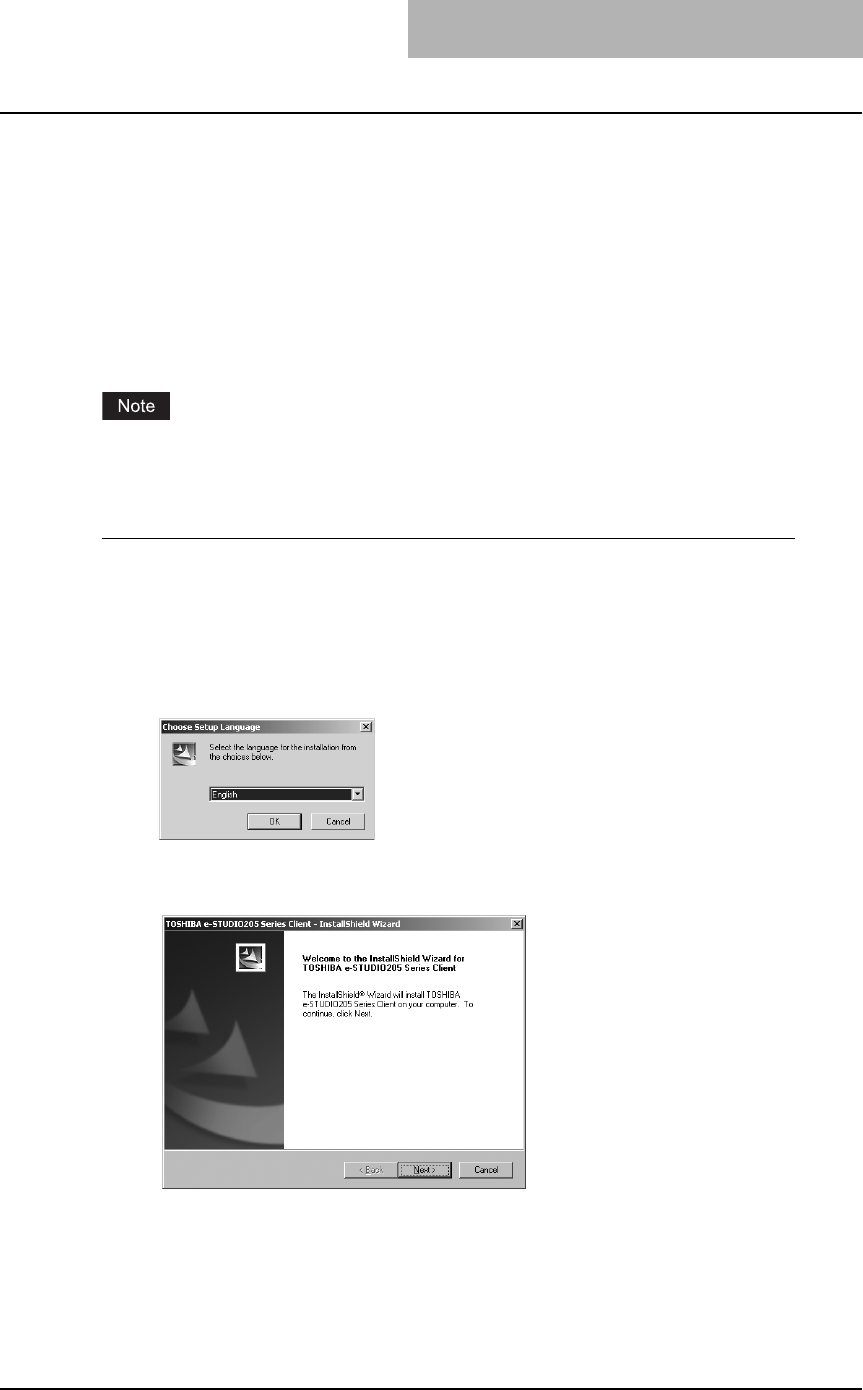
1
Insert the Client Utilities CD-ROM into the CD-ROM drive.
yThe installer automatically starts and the Choose Setup Language dialog box
appears.
yWhen the installer does not automatically start, double-click “Setup.exe” in the Client
Utilities CD-ROM.
2
Select your language and click [OK].
The Welcome to the InstallShield wizard screen is displayed.
3
Click [Next].
The License Agreement screen is displayed.
2 INSTALLING CLIENT SOFTWARE
38 Installing Client Software for Windows
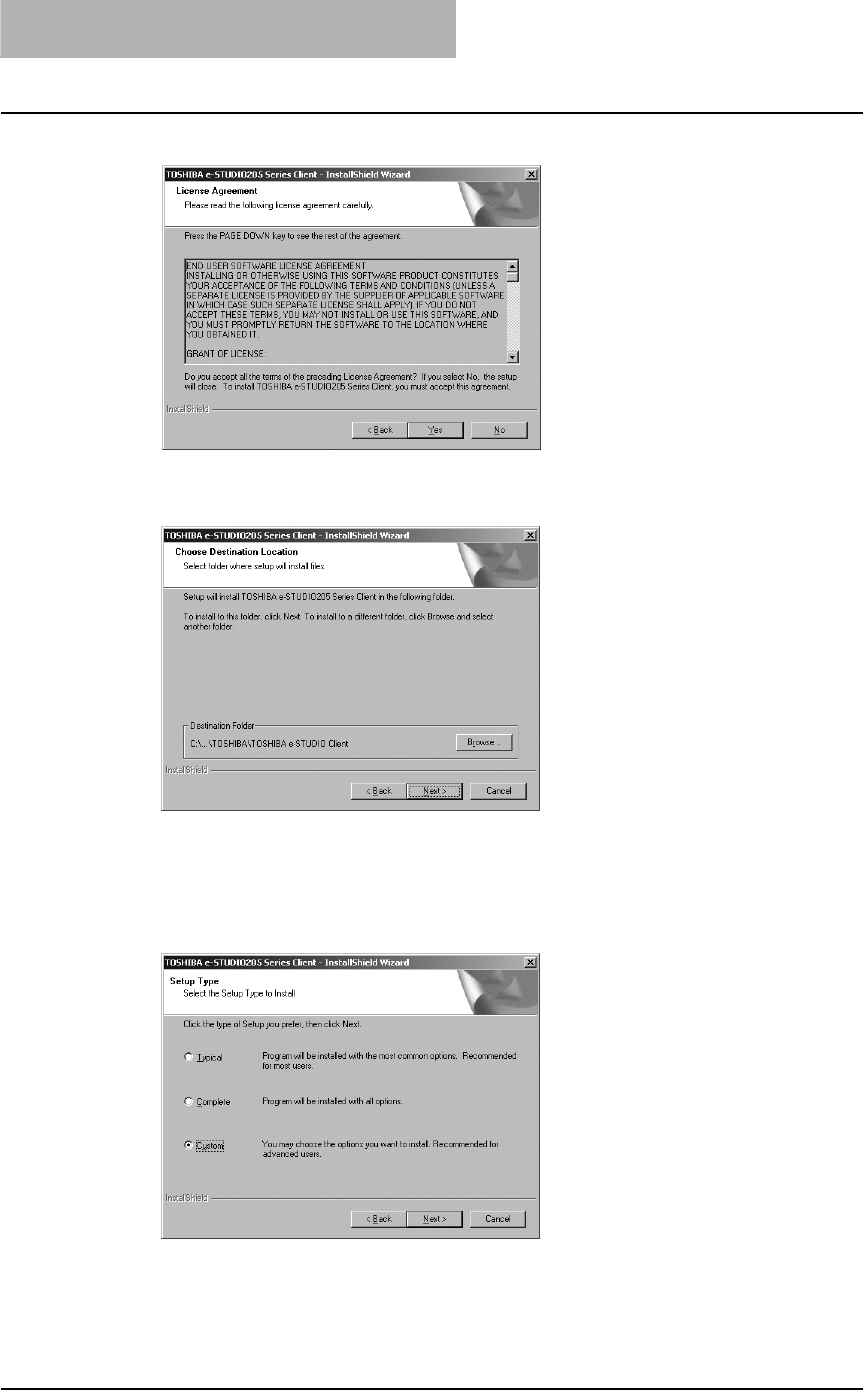
4
Please read the license agreement carefully and click [Yes].
The Choose Destination Location screen is displayed.
5
Click [Next].
If you want to change where the programs are installed, click [Browse]. In the dialog box
appears, select the folder and click [OK].
The Setup Type screen is displayed.
6
Select “Custom” and click [Next].
The Select Components screen is displayed.
Installing Client Software for Windows 39
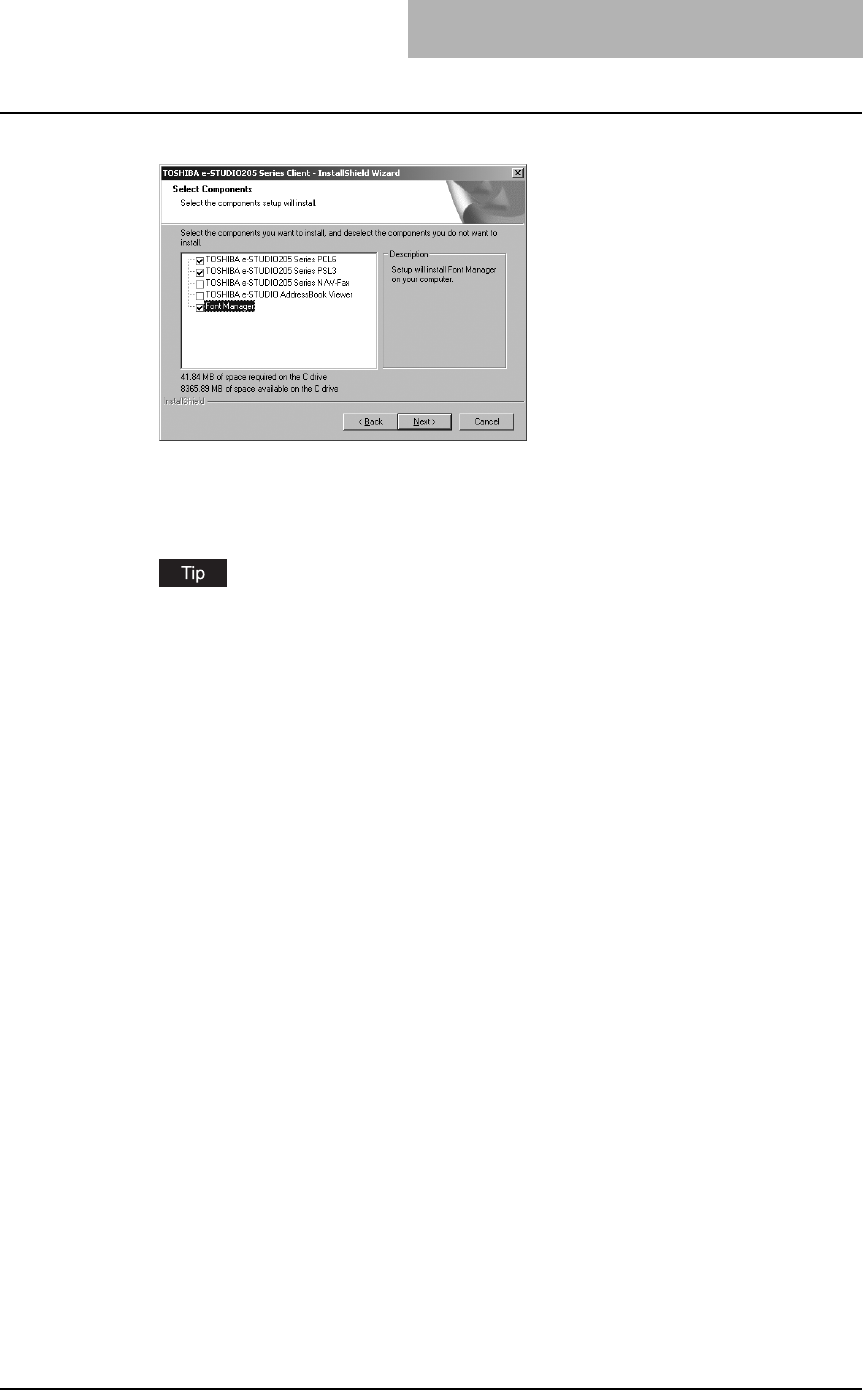
7
Check the software that you want to install and click [Next].
TOSHIBA e-STUDIO205 Series PCL6 — Check this to install the PCL6 printer driver.
TOSHIBA e-STUDIO205 Series PSL3 — Check this to install the PS3 printer driver
The Select Port screen is displayed.
The names of other software are displayed in the Select Components dialog box. (You
can install them as required.)

2 INSTALLING CLIENT SOFTWARE
40 Installing Client Software for Windows
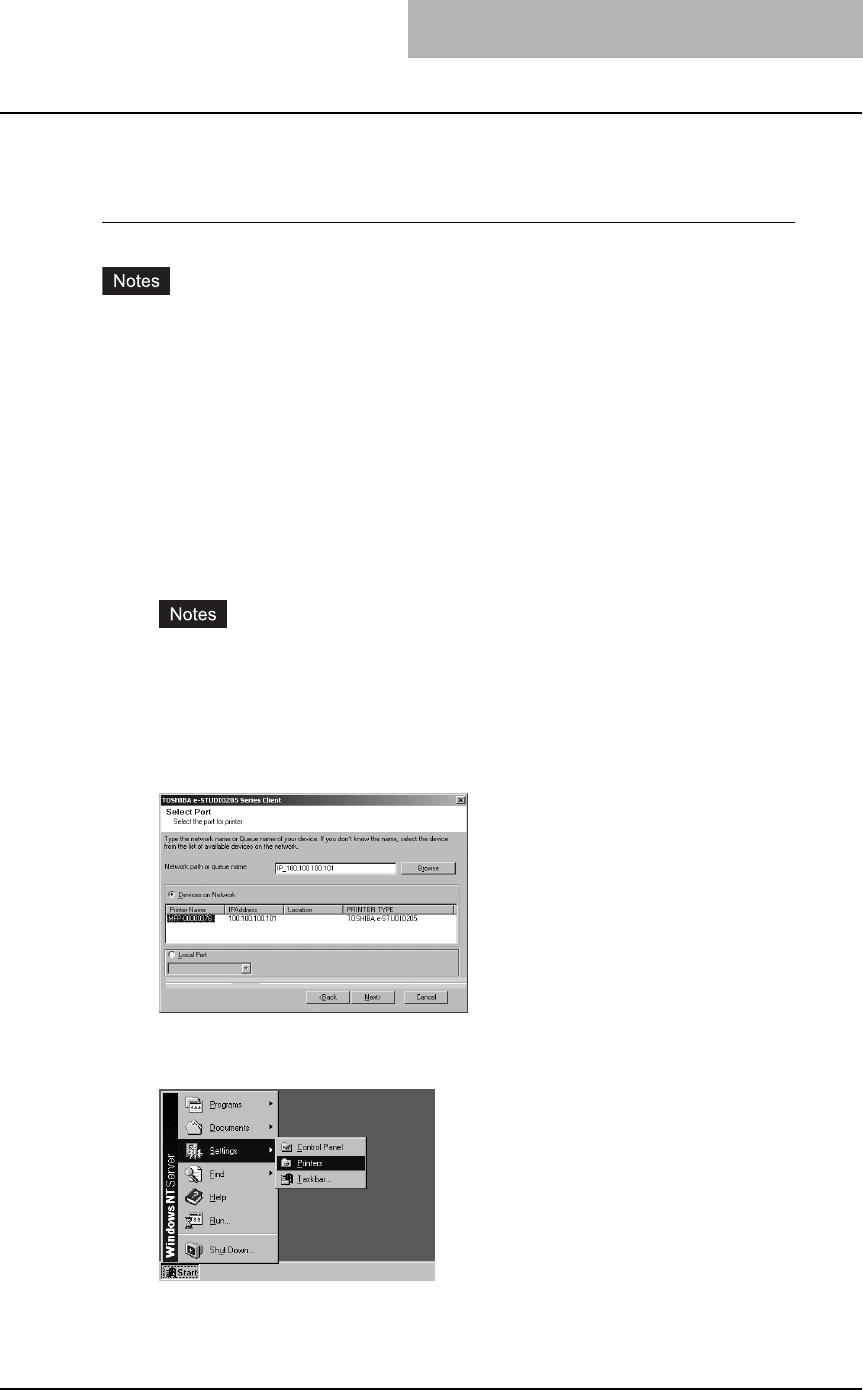
8
Since the installer detects this equipment and the name of this
equipment is displayed at “Devices on Network”, select it and then
click [Next].
The Select Program Folder screen is displayed.
If this equipment is not properly connected in your network, the message that the installer
cannot discover this equipment is displayed.
If you want manually to configure the port for printing, click [Continue].
Then, select “LPT1:” in the drop down box at “Local Port” and click [Next].
After selecting the port “LPT1:”, follow the steps described below to complete installation.
However, in this case, you need to manually configure the Raw TCP port after the com-
pletion of installation.
Installing Client Software for Windows 41
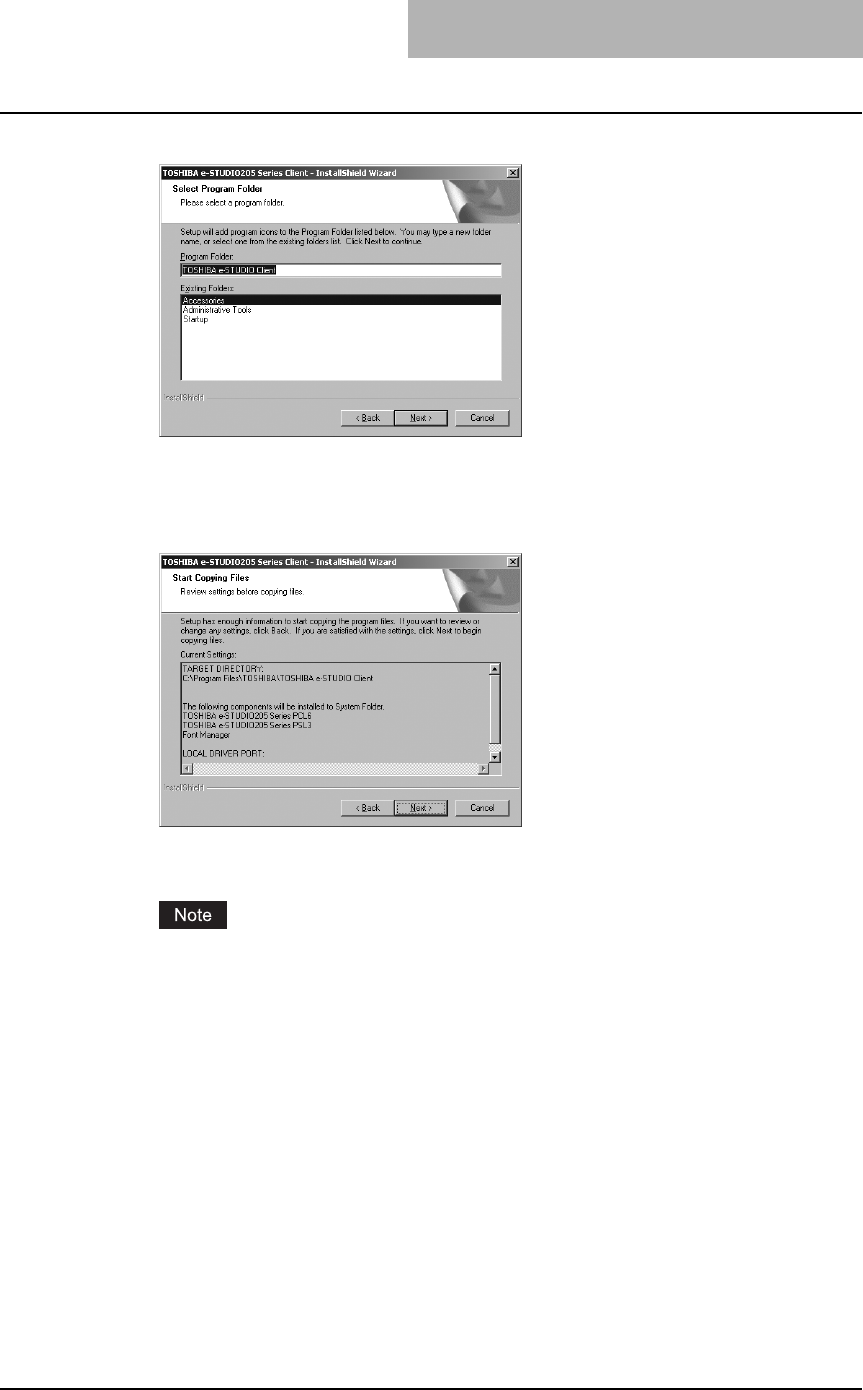
9
Click [Next].
If you want to change the program folder, rename the folder in the “Program Folder” field.
The Start Copying Files screen is displayed.
10
Click [Next].
Starts copying files and the InstallShield Wizard Complete screen appears when this is
completed.
If the Digital Signature Not Found dialog box is displayed while files are being copied.
Click [Yes] to continue the installation.
2 INSTALLING CLIENT SOFTWARE
42 Installing Client Software for Windows
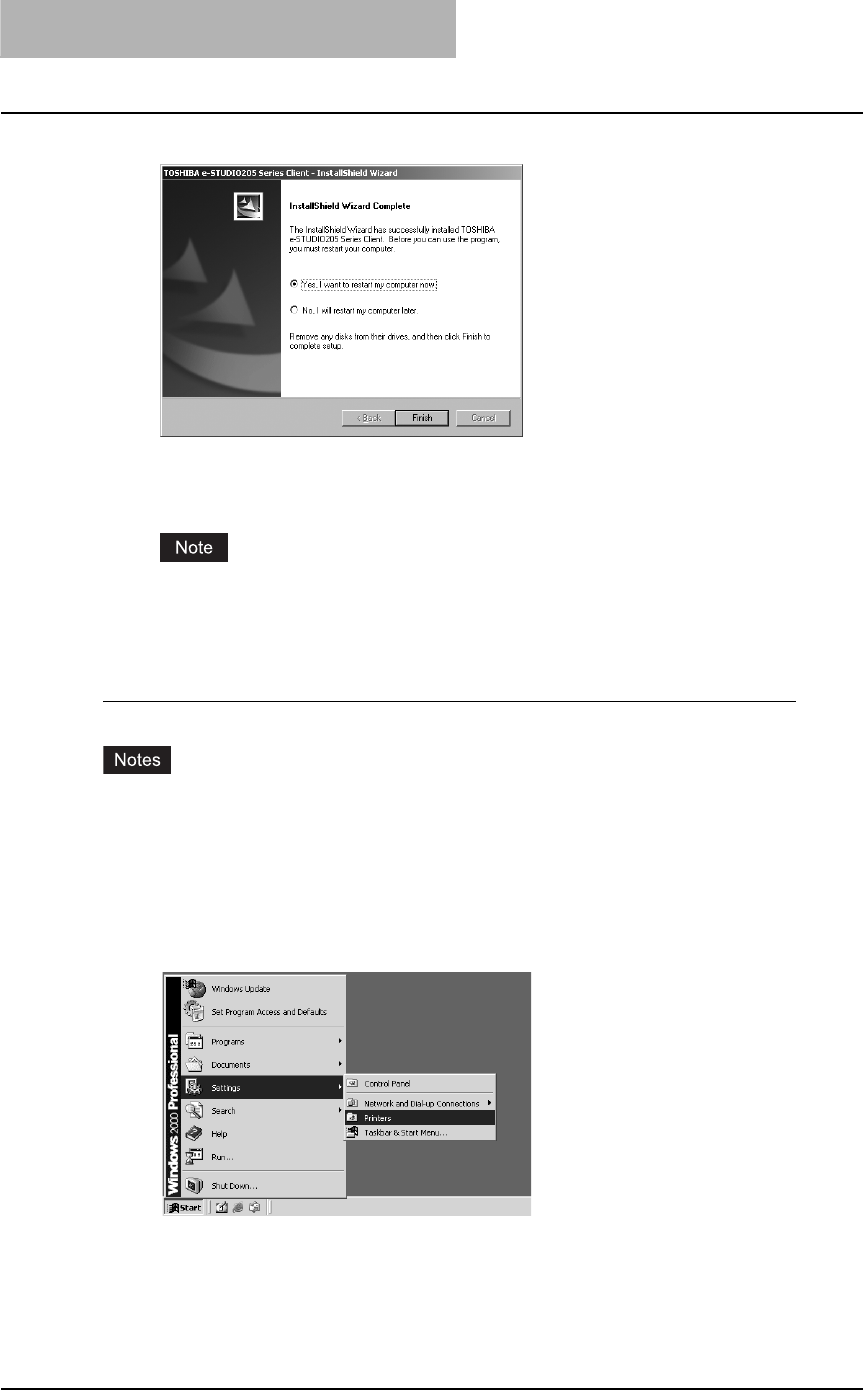
11
Click [Finish].
The installation is completed.
The Installer may ask you to restart your computer. If it does, select “Yes, I want to restart
my computer now.” and click [Finish] to restart your computer.
When you select “LPT1:” in the Select Port screen, you need to configure the Raw TCP
port. Proceed to the following page:
P.42 “Configuring the Raw TCP/LPR port for Windows 2000/XP/Server 2003”
Configuring the Raw TCP/LPR port for Windows 2000/XP/Server 2003
yThis configuration is not necessary when the installer automatically discovers this equip-
ment. Manually configure the Raw TCP/LPR port only when you manually select “LPT1:”
port at “Local Port” in the Select Port screen.
yThe procedure to configure the Raw TCP or LPR port differs depending on the version of
Windows used.
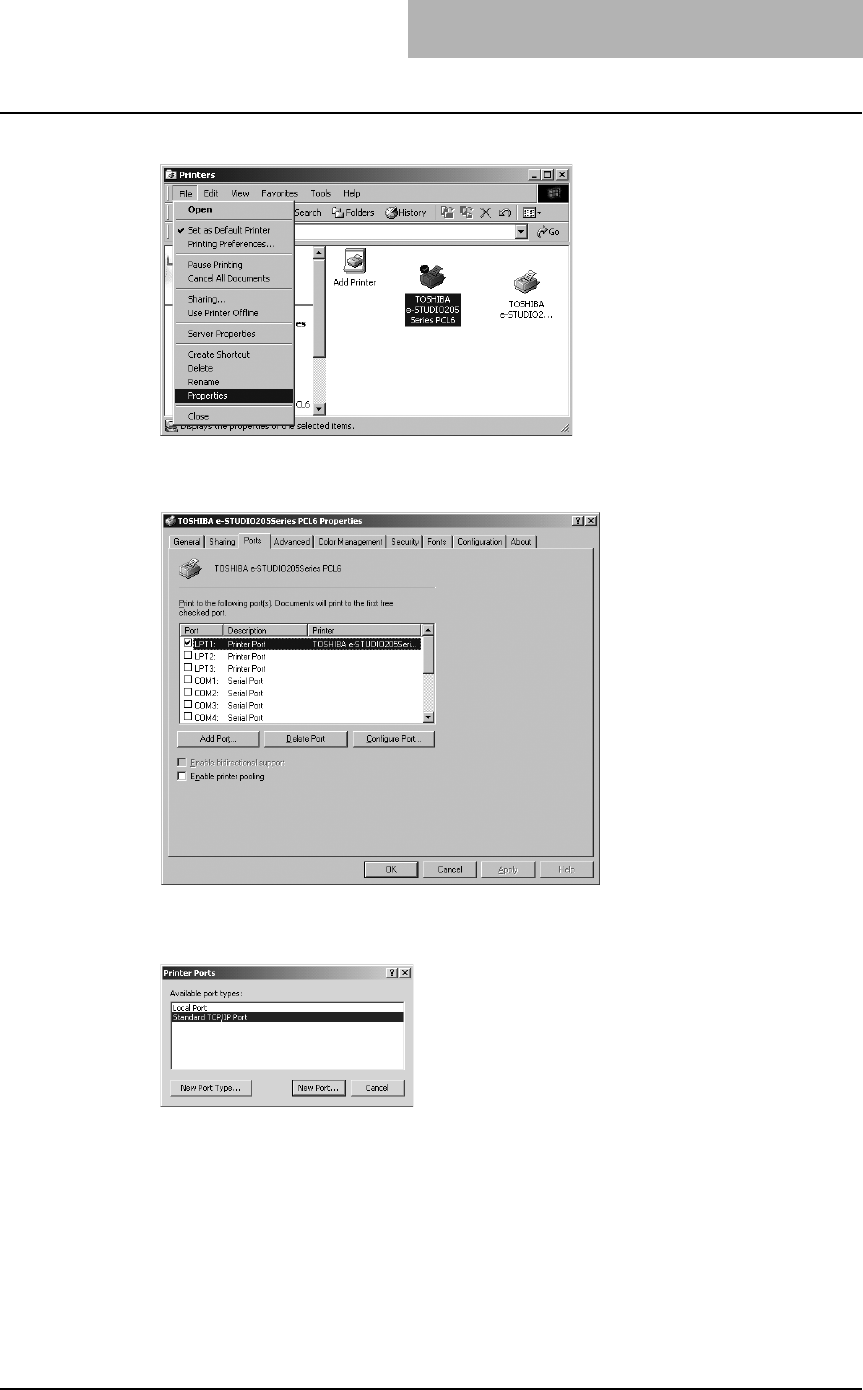
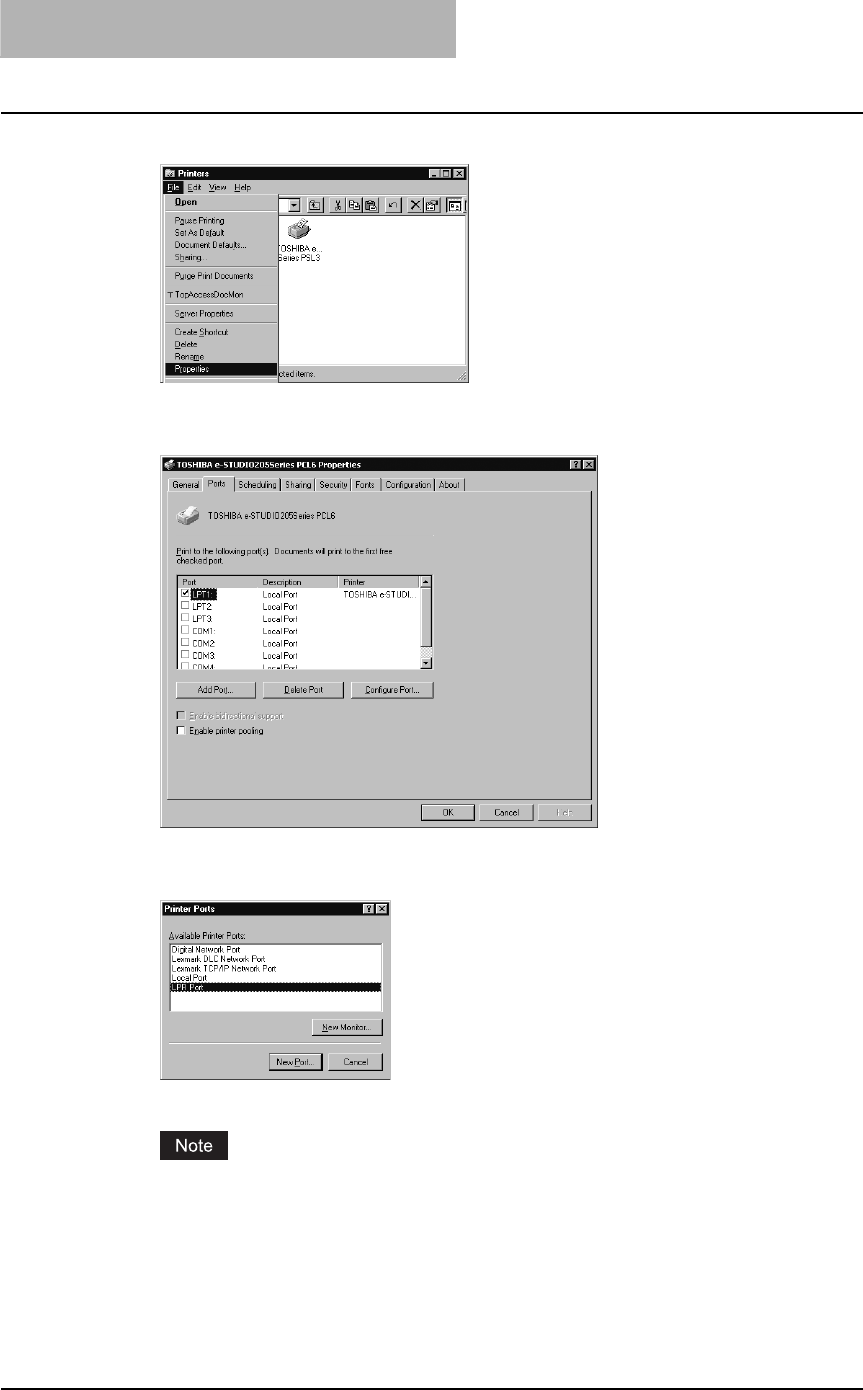
1
Click [Start], select [Settings], and click [Printers] to open the Print-
ers folder.
If you are using the Windows XP or Windows Server 2003, click [Start] and [Printers and
Faxes] to open the Printers and Faxes folder.
Installing Client Software for Windows 43
2
Select the printer driver and select [Properties] in the [File] menu.
The printer driver properties dialog box appears.
3
Display the [Ports] tab and click [Add Port].
The Printer Ports dialog box appears.
4
Select “Standard TCP/IP Port” and click [New Port...].
The Add Standard TCP/IP Printer Port Wizard dialog box appears.
2 INSTALLING CLIENT SOFTWARE
44 Installing Client Software for Windows
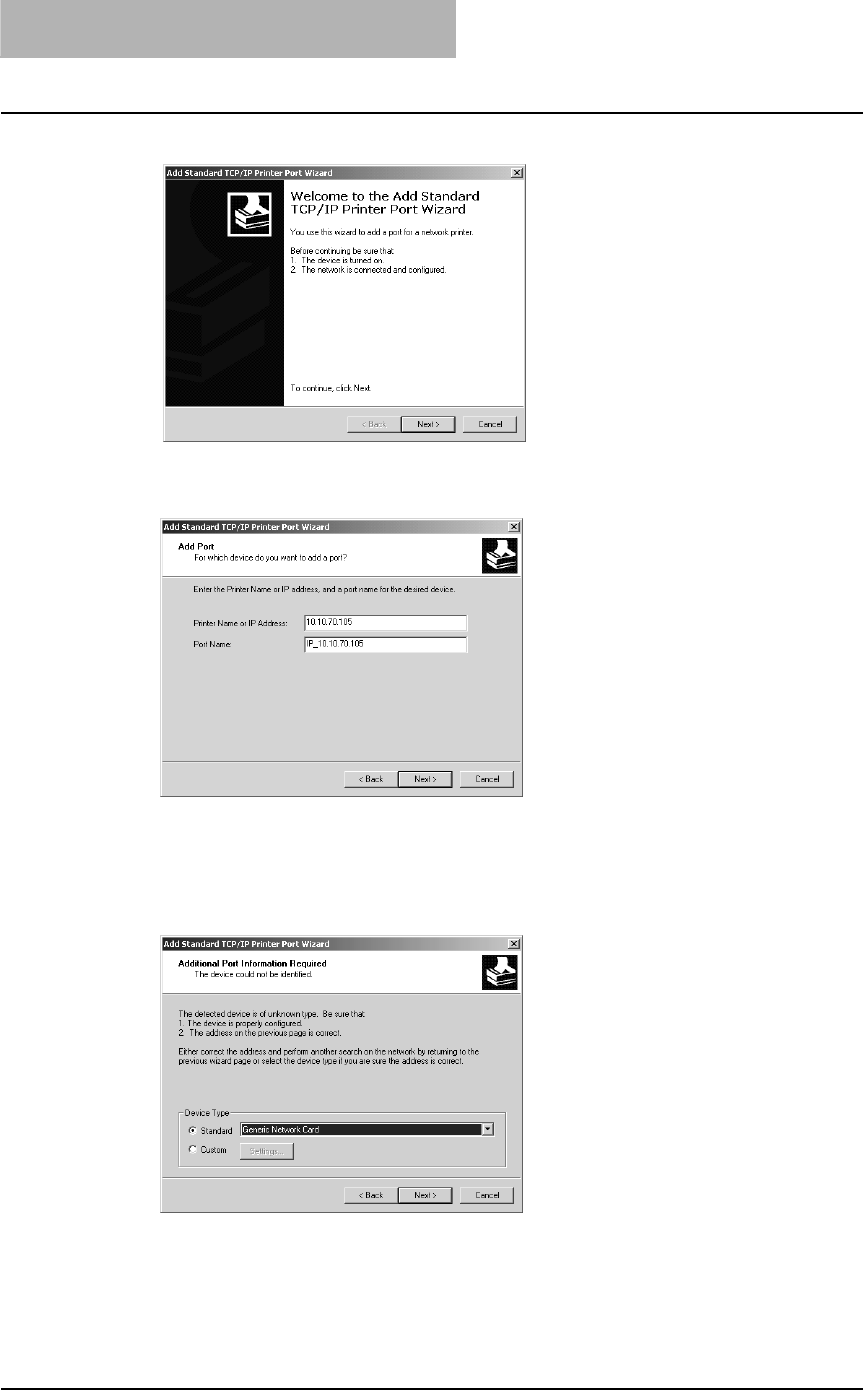
5
Click [Next].
6
Enter the IP address of this equipment in the “Printer Name or IP
Address” field and click [Next].
yIf your network uses a DNS or WINS server, enter the printer name of this equipment
provided from DNS or WINS in the “Printer Name or IP Address” field.
yIn the “Port Name” field, the port name is automatically entered according to the IP
address or DNS name entered in the “Printer Name or IP Address” field.
7
Select “Standard” and click [Next].
Installing Client Software for Windows 45
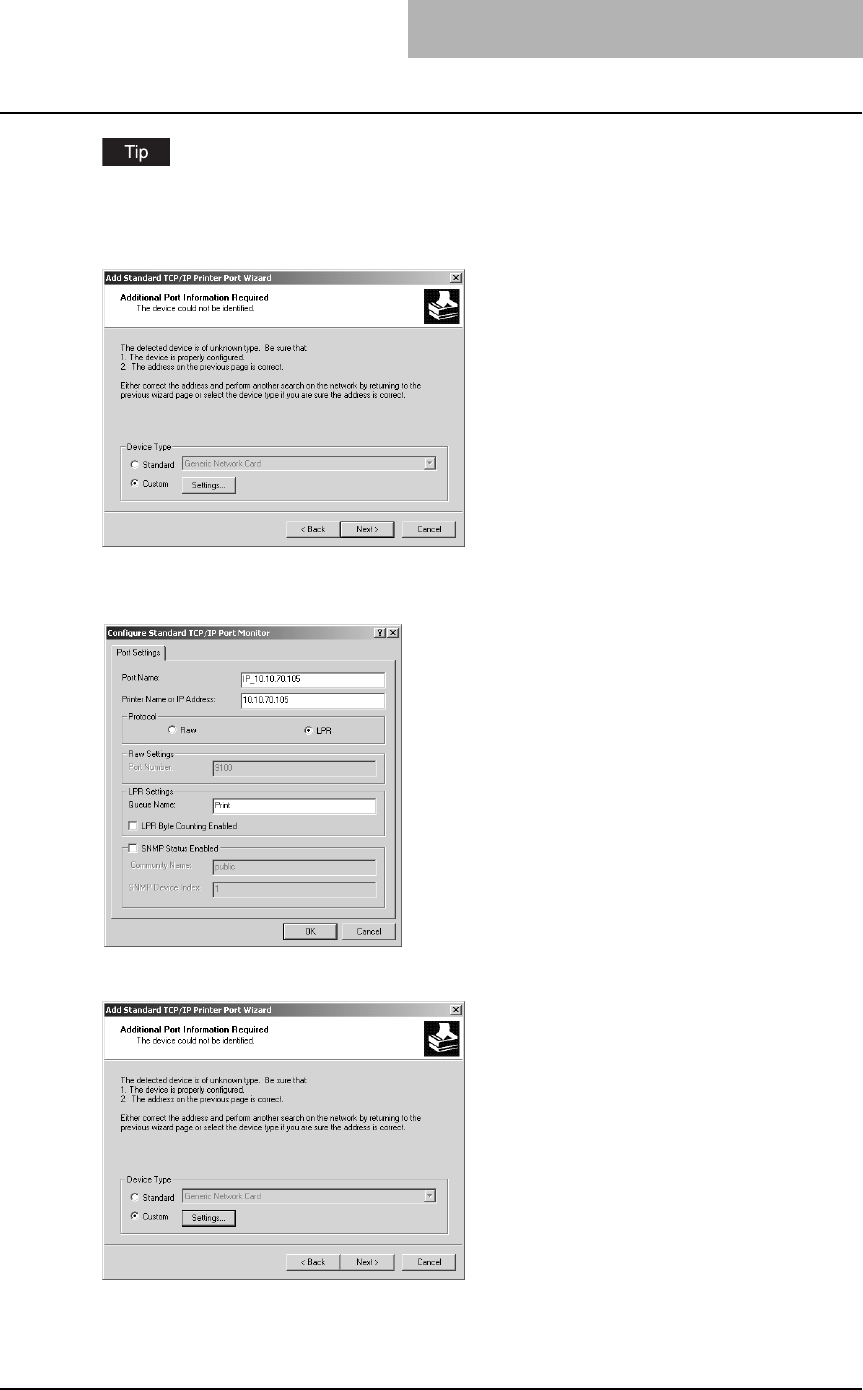
When the LPD Print setting is enabled, you can also configure LPR printing. When you want to
configure LPR printing, follow the procedure below.
Select “Custom” and click [Settings].
Select “LPR” at the “Protocol” option, enter “Print” in the “Queue Name” field at the “LPR Set-
tings” option, and then click [OK].
Click [Next].
2 INSTALLING CLIENT SOFTWARE
46 Installing Client Software for Windows
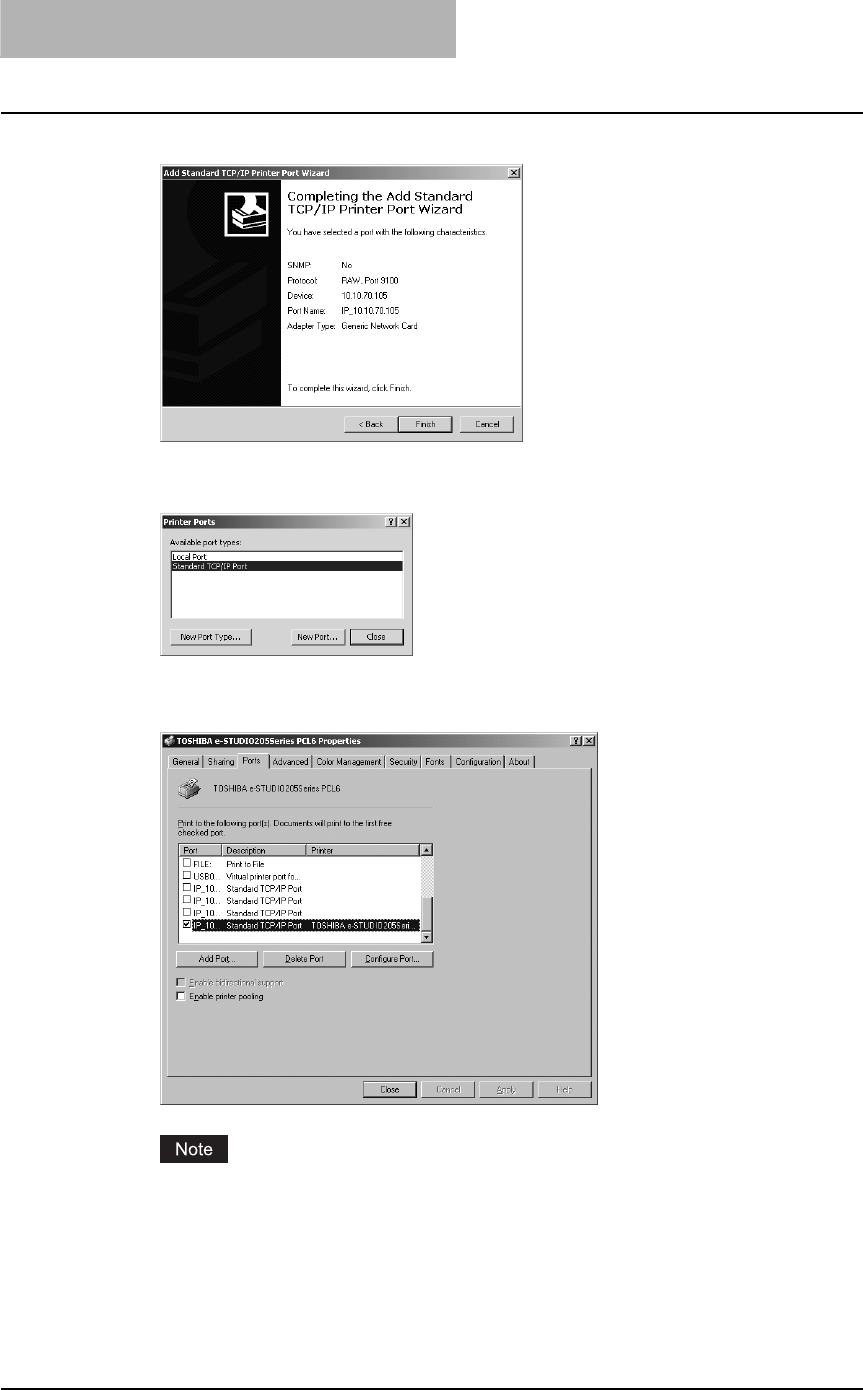
8
Click [Finish].
The screen returns to the Printer Ports dialog box.
9
Click [Close] to close the Printer Ports dialog box.
10
Make sure the created Raw TCP or LPR port is checked in the “Print
to the following port(s)” list and click [Close].
Before using the printer driver for printing, please configure the installed options of the
equipment and department code (if required) on the printer driver.
P.154 “Before using the printer driver”
Installing Client Software for Windows 47
— Windows NT 4.0
Configuring the LPR port for Windows NT 4.0
yYou must log into Windows as a user who has the “Administrators” or “Power Users” privi-
lege when using Windows NT 4.0.
yThe procedure to configure the Raw TCP or LPR port differs depending on the version of
Windows used.
1
Install the client software using the installer in the Client Utilities
CD-ROM.
The procedure how to Install the client software is basically the same as for Windows
2000/XP/Server 2003. Please see to the following page for installation. Then, proceed to
the next step to configure the LPR port:
P.37 “Installing the client software using the installer for Windows 2000/XP/Server
2003”
yThe installer discovers this equipment and the following screen is displayed: In this
screen, click “Local Port” and select “LPT:1” in the drop down box. Then click [Next].
The subsequent installation procedure is the same as for Windows 2000/XP/Server
2003.
yEven if you click [Next] without selecting “Local Port” and continue the installation pro-
cedure, Windows NT 4.0 is not correctly installed.
2
After installing the client software, click [Start], select [Settings],
and click [Printers] to open the Printers folder.
2 INSTALLING CLIENT SOFTWARE
48 Installing Client Software for Windows
3
Select the printer driver and select [Properties] in the [File] menu.
The printer driver properties dialog box appears.
4
Display the [Ports] tab and click [Add Port].
The Printer Ports dialog box appears.
5
Select “LPR Port” and click [New Port...].
The Add LPR compatible printer dialog box appears.
If “LPR Port” is not listed, make sure the TCP/IP Printing Service is installed on your Win-
dows NT 4.0. “LPR Port” is not listed unless the TCP/IP Printing Service is installed.
Installing Client Software for Windows 49
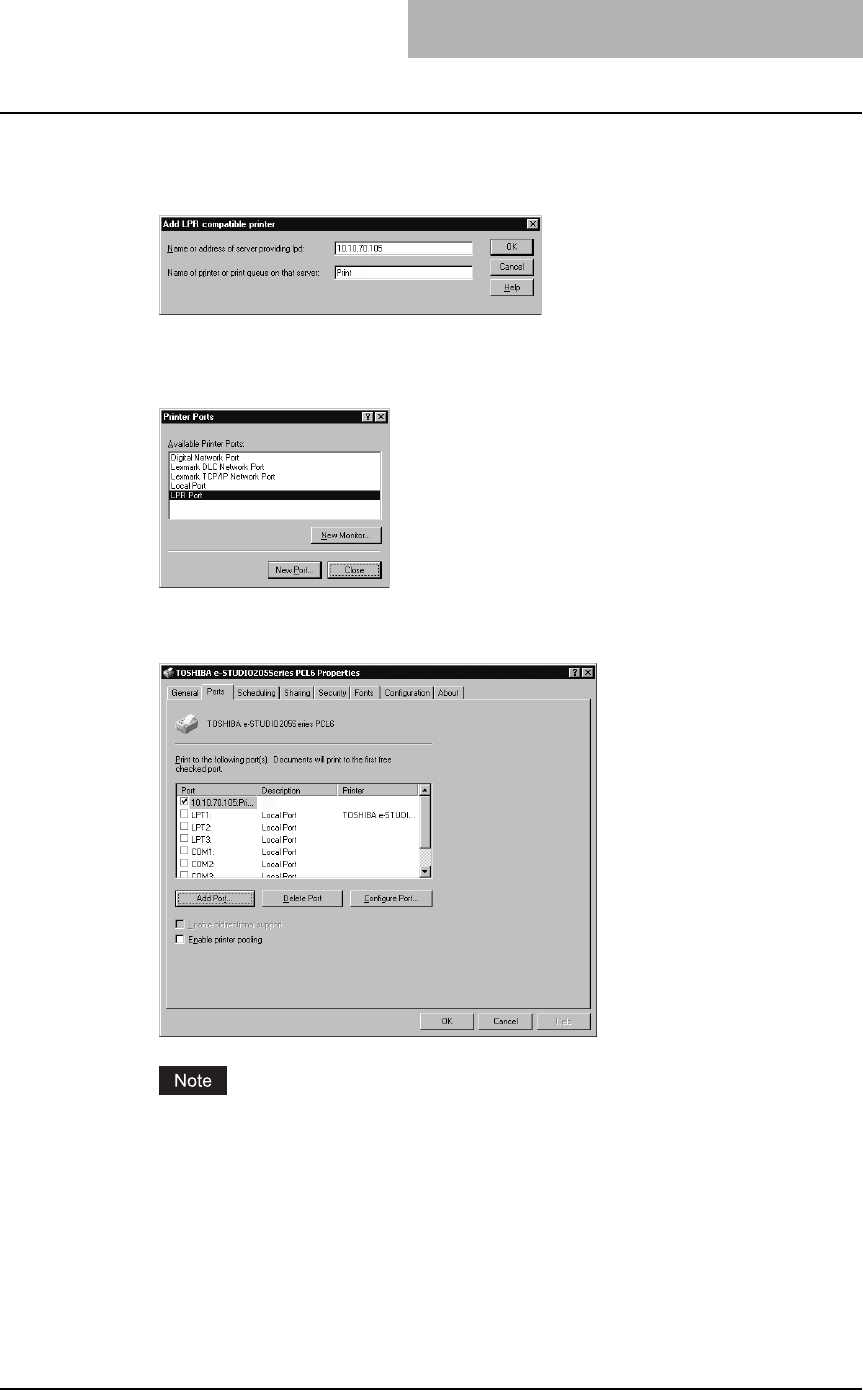
6
Enter the IP address of this equipment in the “Name or address of
server providing lpd” field and “Print” in the “Name of printer or
print queue on that server” field, and click [OK].
When your network uses DNS or WINS server, enter the printer name of this equipment
provided from DNS or WINS in the “Name or address of server providing lpd” field.
7
Click [Close] to close the Printer Ports dialog box.
8
Make sure the created LPR port is checked in the “Print to the fol-
lowing port(s)” list and click [OK] to save settings.
Before using the printer driver for printing, please configure the installed options of the
equipment and department code (if required) on the printer driver.
P.154 “Before using the printer driver”
2 INSTALLING CLIENT SOFTWARE
50 Installing Client Software for Windows
Installation for Raw TCP/LPR Printing by Add Printer Wizard
The procedure to install the printer driver for Raw TCP/LPR printing by Add Printer Wizard dif-
fers depending on the version of the Windows being used.
P.50 “Windows 2000/XP/Server 2003”
P.58 “Windows NT 4.0”
The Font Manager is available to install and manage the TrueType fonts on your computer. To
install the Font Manager, you must install it from the Client Utilities CD-ROM.
P.246 “Installing Font Manager”
— Windows 2000/XP/Server 2003
Installing the printer driver for Raw TCP/LPR printing by Add Printer Wizard
The following describes an installation on Windows 2000. The procedure is the same when
Windows XP or Windows Server 2003 is used.
You must log into Windows as a user who has the “Administrators” or “Power Users” privilege
when using Windows 2000, Windows XP or Windows Server 2003.
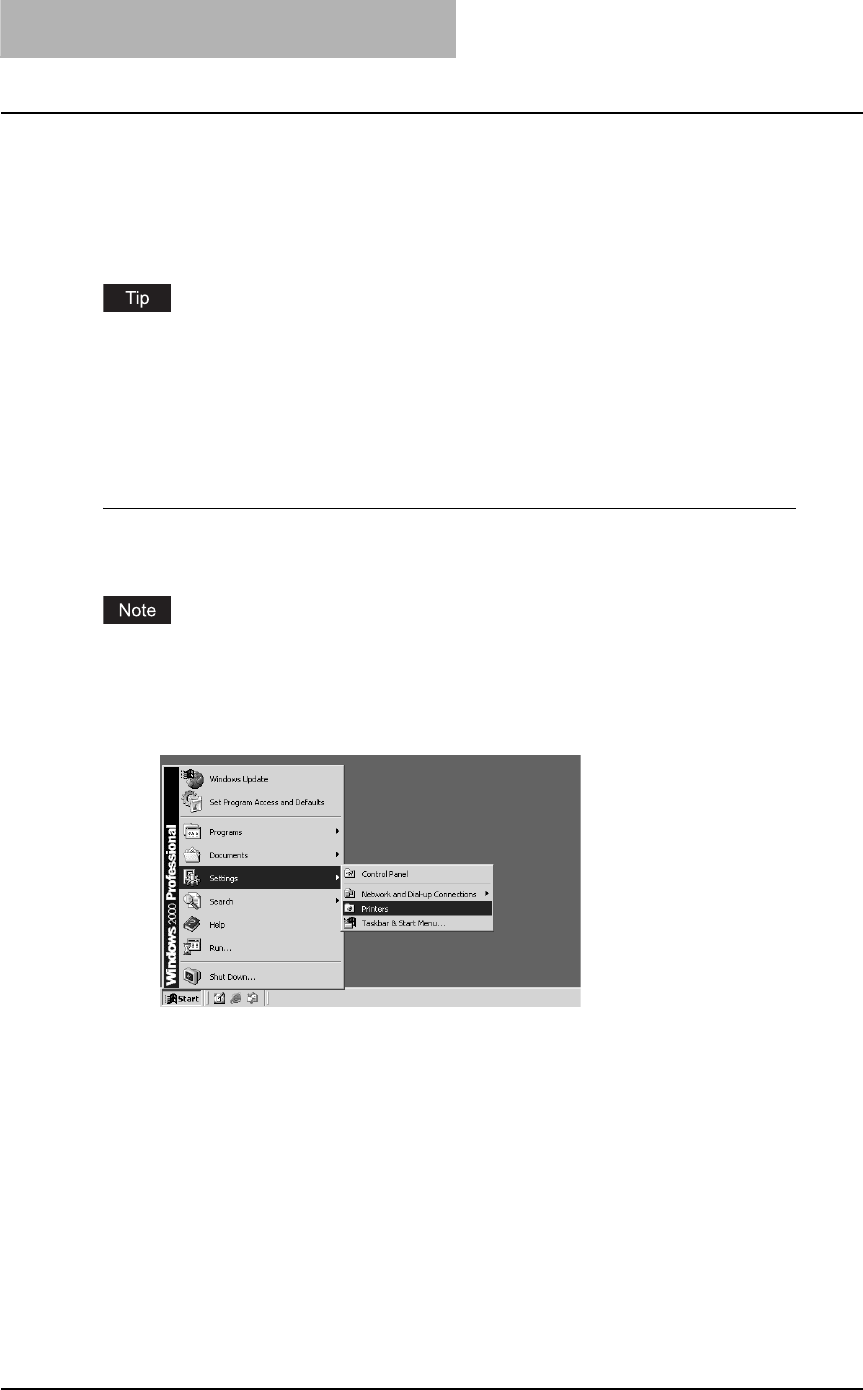
1
Click [Start] and select [Printers] in [Settings] (Windows 2000) or
select [Printers and Faxes] (Windows XP/Server 2003).
The Printers folder is opened.

Installing Client Software for Windows 51
2
Double-click the [Add Printer] icon.
yWhen using the Windows XP/Server 2003, click [Add a printer] in the Printer Tasks
menu.
yThe Add Printer Wizard dialog box appears.
3
Click [Next].
4
Select “Local printer”, uncheck the “Automatically detect and
install my Plug and Play printer”, and click [Next].
2 INSTALLING CLIENT SOFTWARE
52 Installing Client Software for Windows
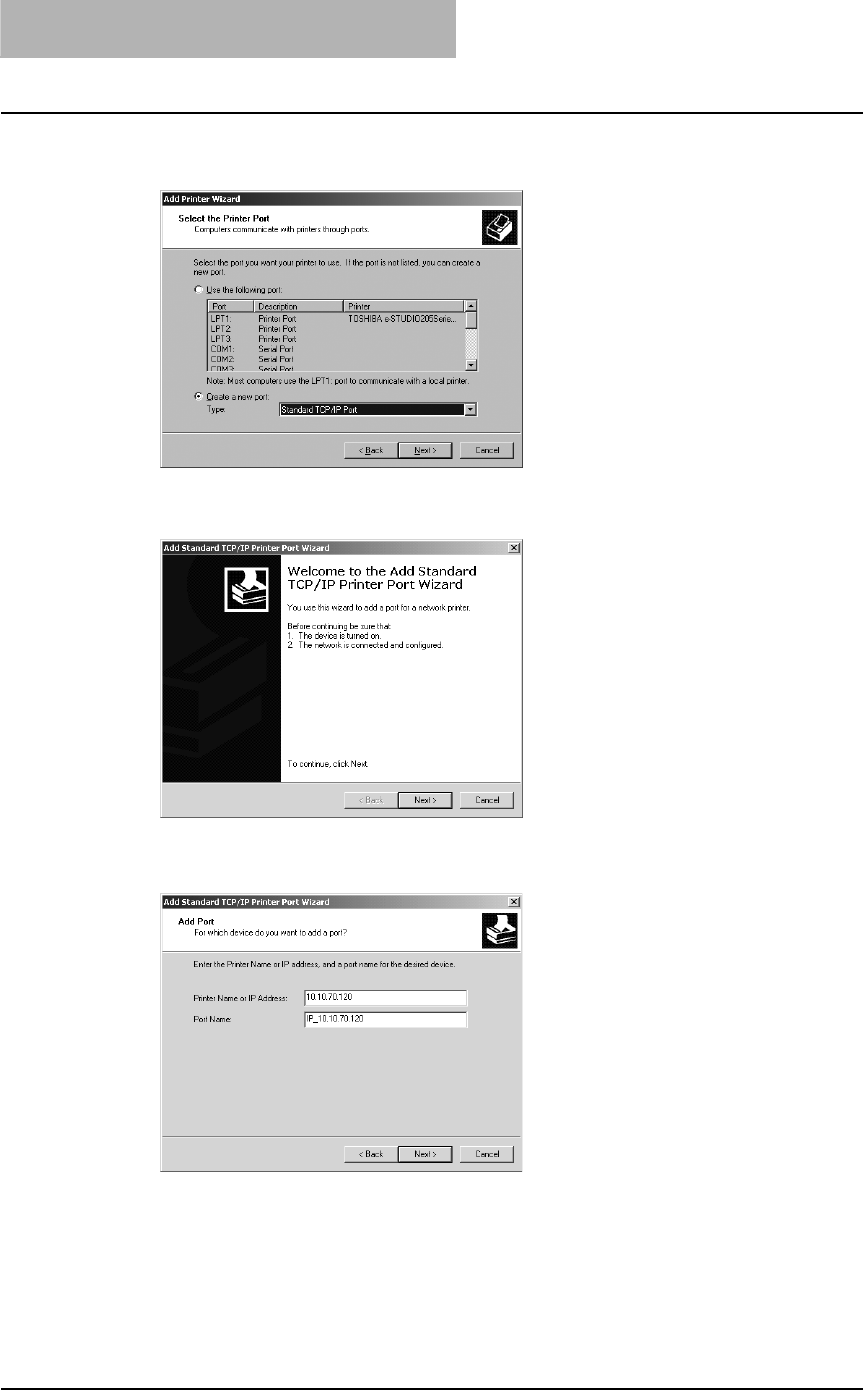
5
Select “Create a new port” and select “Standard TCP/IP Port” in the
“Type” drop down box. Then click [Next].
The Add Standard TCP/IP Printer Port Wizard dialog box appears.
6
Click [Next].
7
Enter the IP address of this equipment in the “Printer Name or IP
Address” field and click [Next].
yIf your network uses a DNS or WINS server, enter the printer name of this equipment
provided from DNS or WINS in the “Printer Name or IP Address” field.
yIn the “Port Name” field, the port name is automatically entered according to the IP
address or DNS name entered in the “Printer Name or IP Address” field.
Installing Client Software for Windows 53
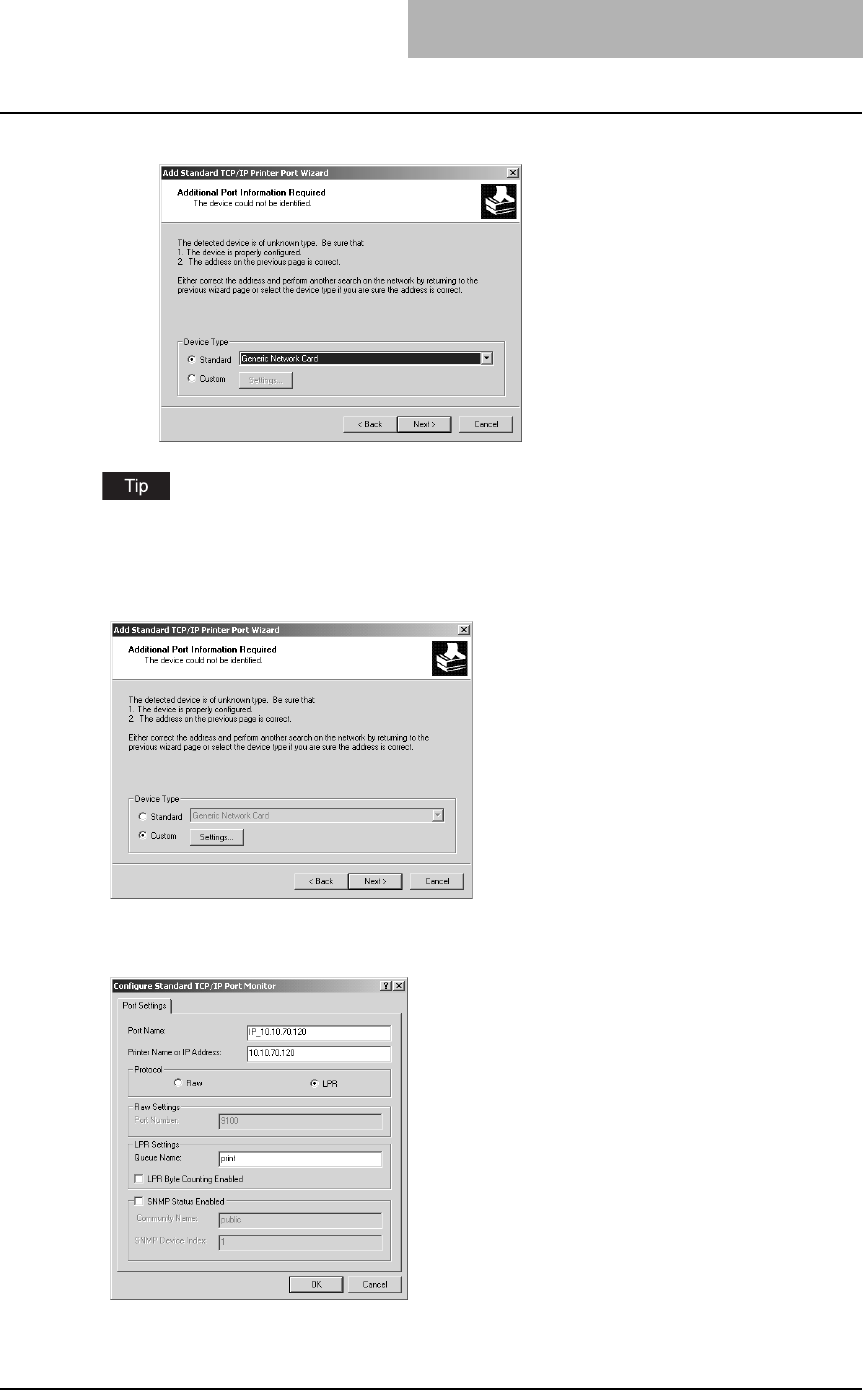
8
Select “Standard” and click [Next].
When the LPD Print setting is enabled, you can also configure LPR printing. When you want to
configure LPR printing, follow the procedure below.
Select “Custom” and click [Settings].
Select “LPR” at the “Protocol” option, enter “Print” in the “Queue Name” field at the
“LPR Settings” option, and then click [OK].
2 INSTALLING CLIENT SOFTWARE
54 Installing Client Software for Windows
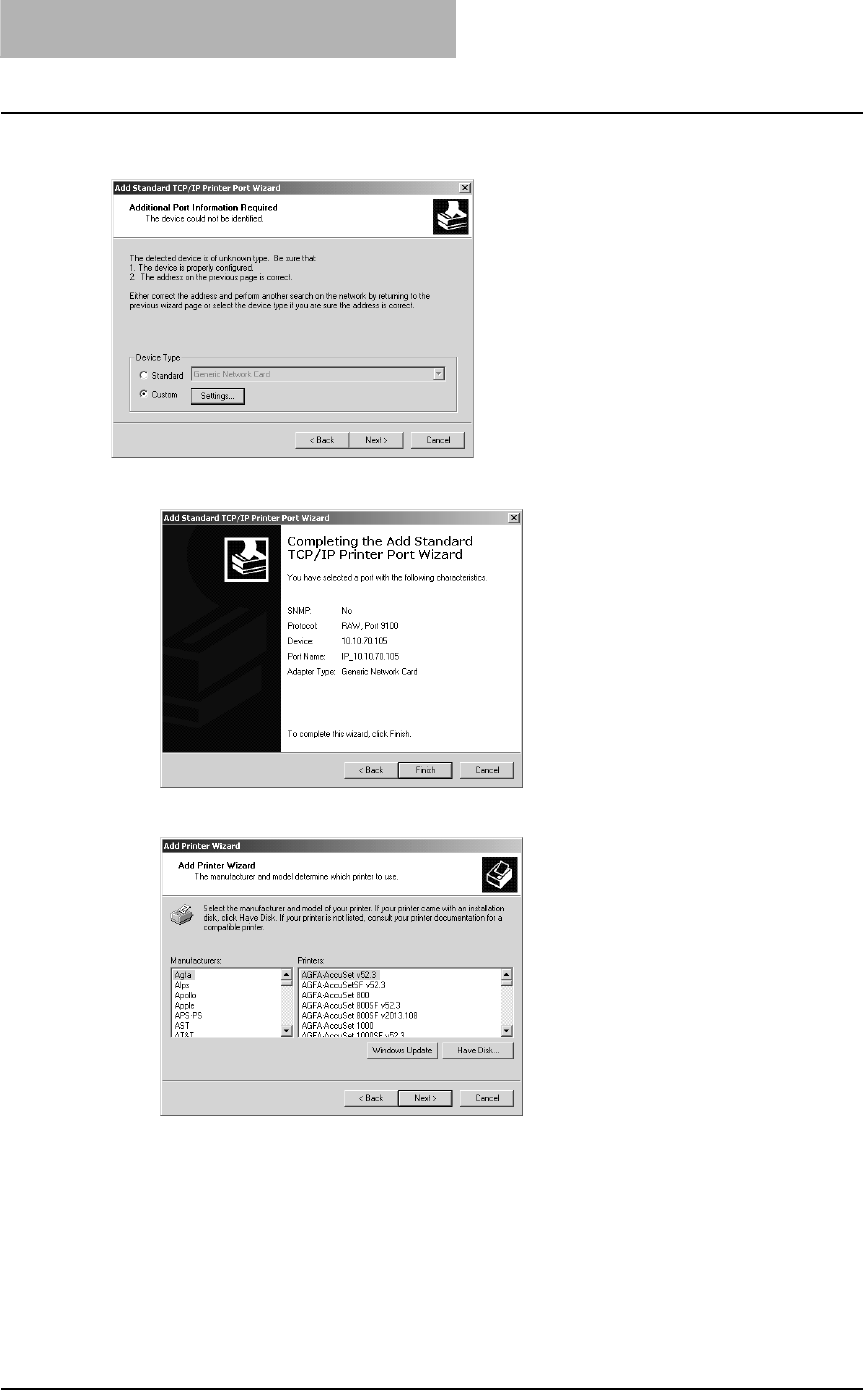
9
Click [Finish].
10
Click [Have Disk...].
The Install From Disk dialog box appears.
Click [Next].
Installing Client Software for Windows 55
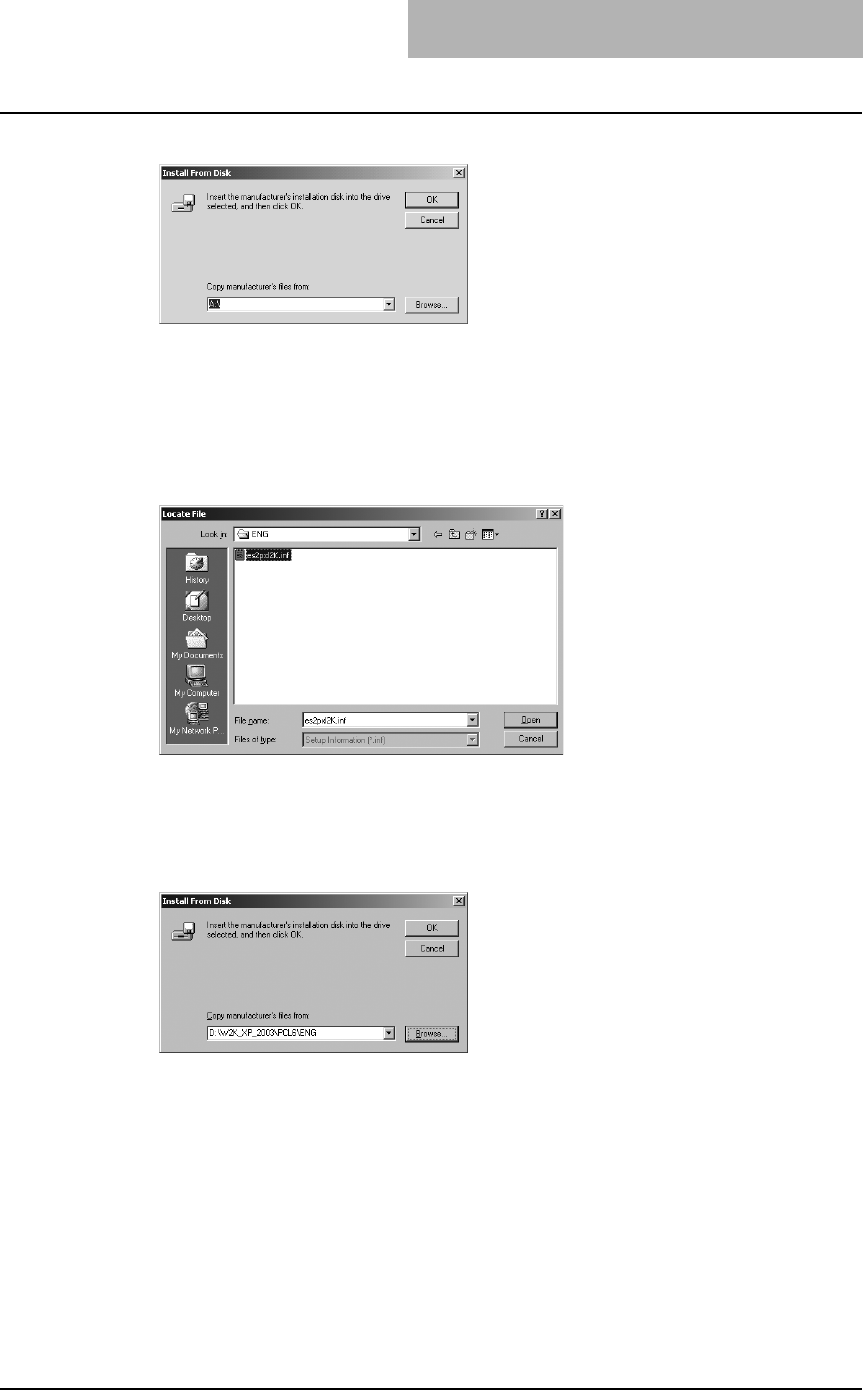
11
Click [Browse...].
The Locate File dialog box appears.
12
Insert the Client Utilities CD-ROM into the CD-ROM drive.
When inserting the Client Utilities CD-ROM, the installer may automatically start. Click
[Cancel] to exit the installer and continue the operation.
13
Locate the directory where the printer driver for Windows 2000/XP/
Server 2003 is located and click [Open].
yTo install the PCL6 printer driver, locate
"[CD-ROM drive]:\W2K_XP_2003\PCL6\<language>".
yTo install the PS3 printer driver, locate
"[CD-ROM drive]:\W2K_XP_2003\PS\<language>".
14
Click [OK].

2 INSTALLING CLIENT SOFTWARE
56 Installing Client Software for Windows
15
Select the printer driver and click [Next].
If the same printer driver has been installed, the following dialog box appears. If it
appears, select “Replace existing driver” and click [Next].
16
Change the name if desired and click [Next].
If any printer drivers have installed on the computer, select whether using this printer as a
default printer.

Installing Client Software for Windows 57
17
Select whether this printer is shared or not, and click [Next].
18
Select "Yes" to print a test page and click [Next].
19
Click [Finish].
Start copying files.
20
The installation is completed.
Before using the printer driver for printing, please configure the installed options of the
equipment and department code (if required) on the printer driver.
P.154 “Before using the printer driver”
2 INSTALLING CLIENT SOFTWARE
58 Installing Client Software for Windows
— Windows NT 4.0
Installing the printer driver for LPR printing by Add Printer Wizard
You must log into Windows NT 4.0 as a user who has the “Administrators” or “Power Users” priv-
ilege.
1
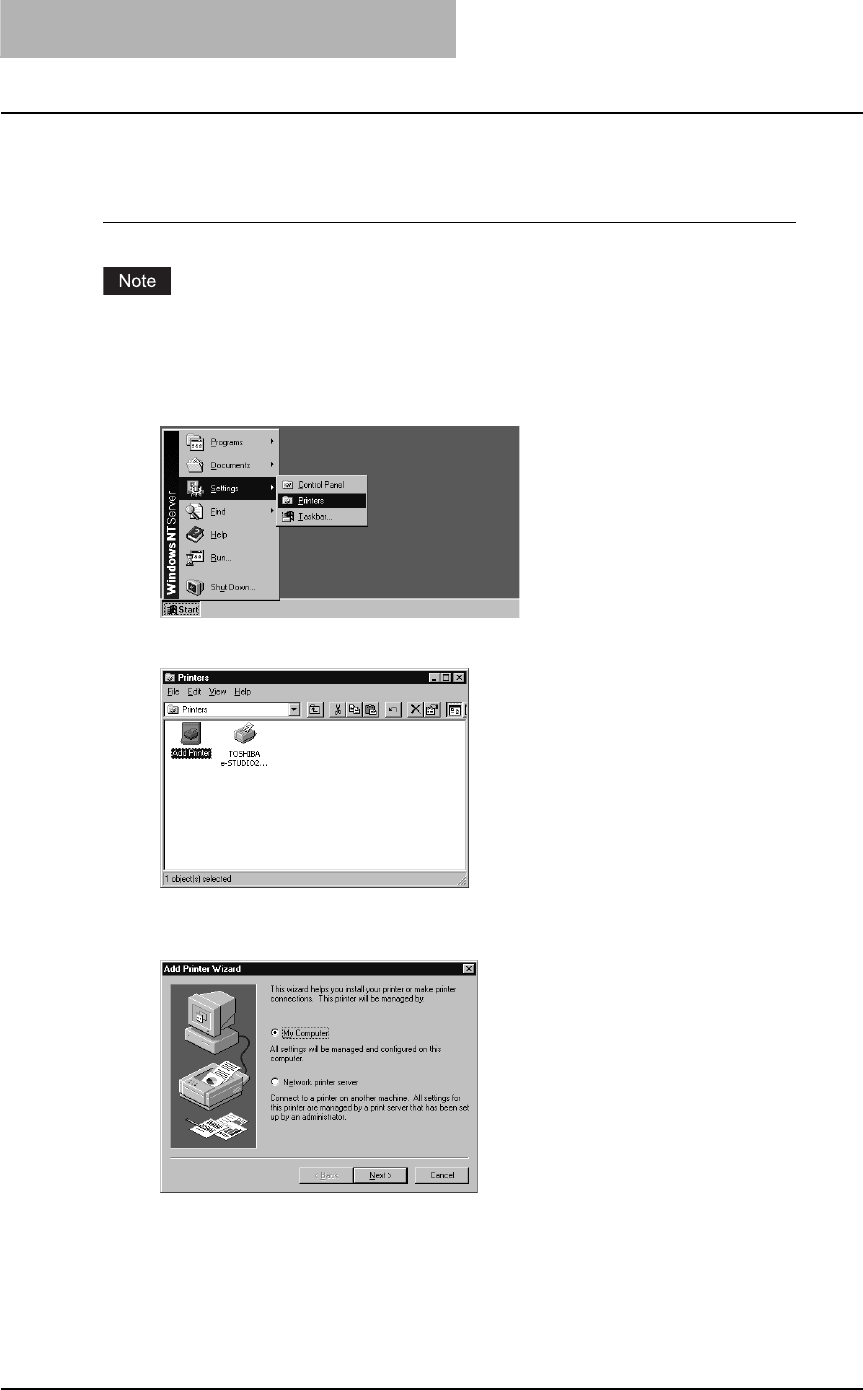
Click [Start], select [Settings], and click [Printers] to open the Print-
ers folder.
2
Double-click the [Add Printer] icon.
The Add Printer Wizard dialog box appears.
3
Select “My Computer” and click [Next].
Installing Client Software for Windows 59
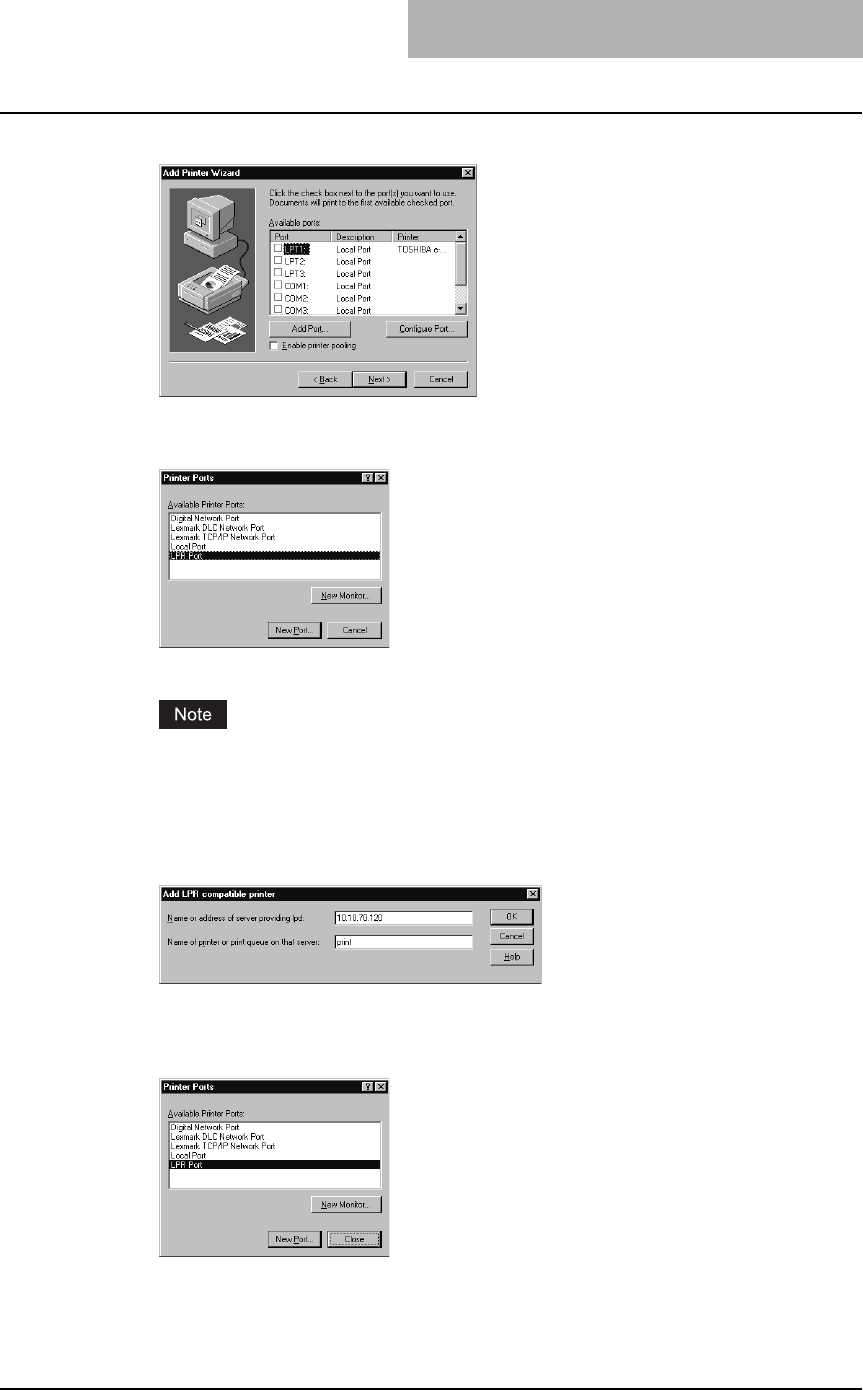
4
Click [Add Port...].
The Printer Ports dialog box appears.
5
Select “LPR Port” and click [New Port...].
The Add LPR compatible printer dialog box appears.
If “LPR Port” is not listed, make sure the TCP/IP Printing Service is installed on your Win-
dows NT 4.0. “LPR Port” is not listed unless the TCP/IP Printing Service is installed.
6
Enter the IP address of this equipment in the “Name or address of
server providing lpd” field and “Print” in the “Name of printer or
print queue on that server” field, and click [OK].
When your network uses DNS or WINS server, enter the printer name of this equipment
provided from DNS or WINS in the “Name or address of server providing lpd” field.
7
Click [Close] to close the Printer Ports dialog box.
2 INSTALLING CLIENT SOFTWARE
60 Installing Client Software for Windows
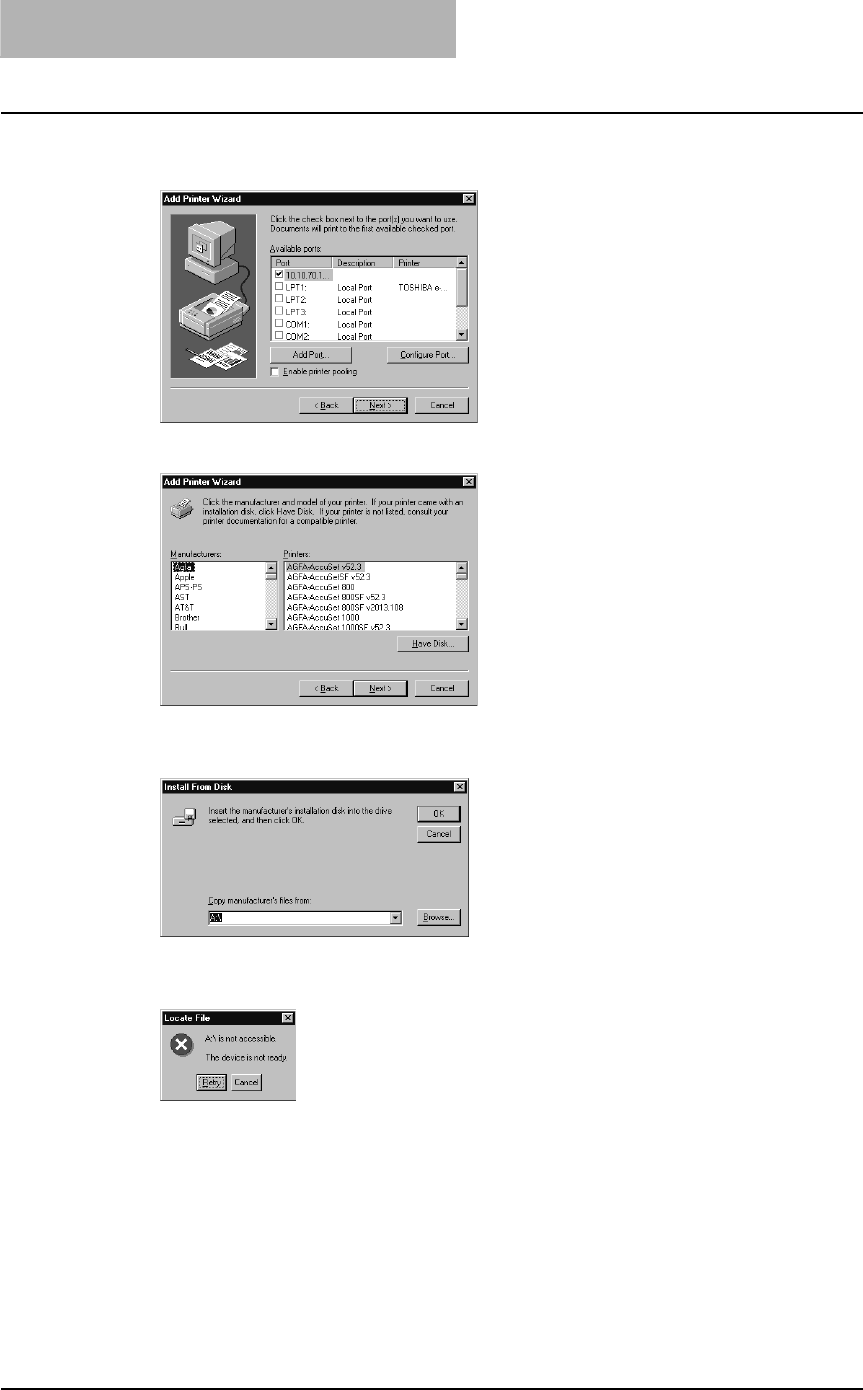
8
Make sure that the created LPR Port is selected in the “Available
ports” list and click [Next].
9
Click [Have Disk...].
The Install From Disk dialog box appears.
10
Click [Browse...].
The “A:\ is not accessible” message appears.
11
Click [Cancel].
The Locate File dialog box appears.
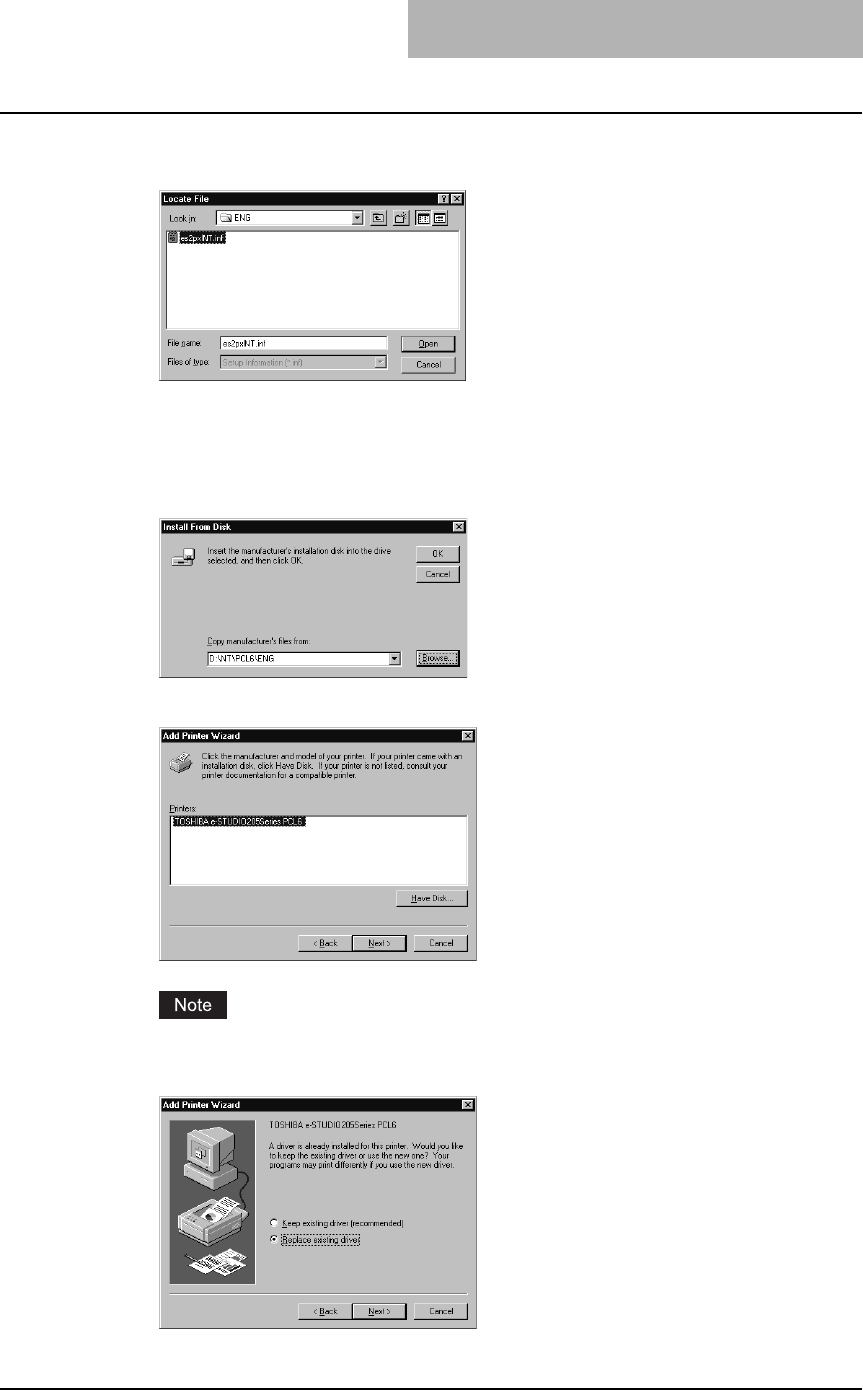
12
Insert the Client Utilities CD-ROM into the CD-ROM drive.
When inserting the Client Utilities CD-ROM, the installer may automatically start. Click
[Cancel] to exit the installer and continue the operation.
Installing Client Software for Windows 61
13
Locate the directory where the printer driver for Windows NT 4.0 is
located and click [Open].
yTo install the PCL6 printer driver, locate
"[CD-ROM drive]:\NT\PCL6\<language>".
yTo install the PS3 printer driver, locate
"[CD-ROM drive]:\NT\PS\<language>".
14
Click [OK].
15
Select the printer driver and click [Next].
If the same printer driver has been installed, the following dialog box appears. If it
appears, select “Replace existing driver” and click [Next].

2 INSTALLING CLIENT SOFTWARE
62 Installing Client Software for Windows
16
Change the name if desired and click [Next].
If any printer drivers have installed on the computer, select whether using this printer as a
default printer.
17
Select whether this printer is shared or not, and click [Next].
When you select “Shared”, you can also select the operating systems of printer drivers
that you want to install for clients. If you select any operating systems, repeat the
procedure from Step 9 to 15 to install the printer drivers for selected operating systems.
18
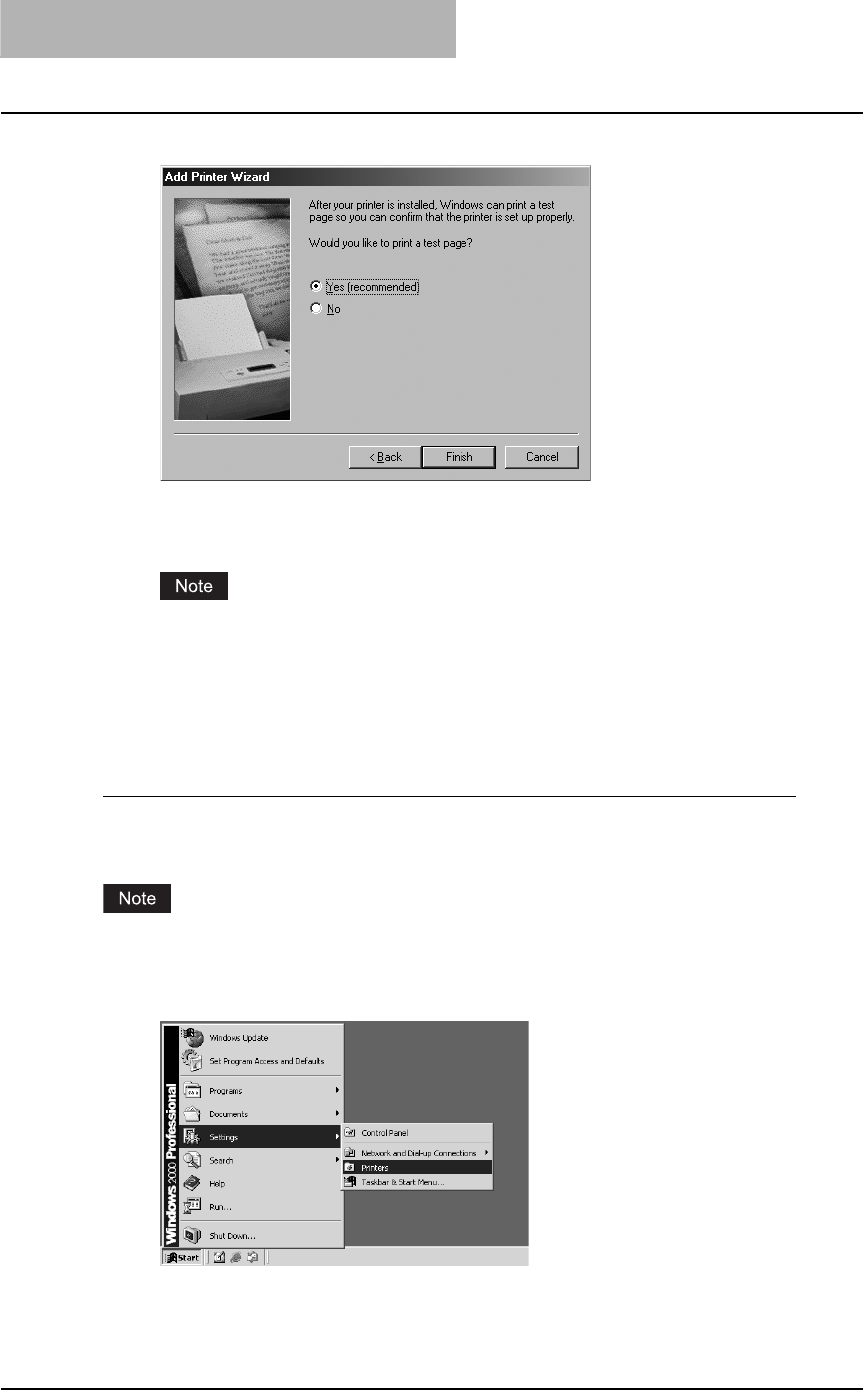
Select "Yes (recommended)" to print a test page and click [Finish].
19
The installation is completed.
Before using the printer driver for printing, please configure the installed options of the
equipment and department code (if required) on the printer driver.
P.154 “Before using the printer driver”

Installing Client Software for Windows 63
Installing client software for IPP printing
This section describes how to set up the printer drivers for IPP printing which is available for
Internet connection.
To set up the printer drivers for IPP printing, install the printer drivers by Add Printer Wizard, and
then install the other software that you require.
The Font Manager is available to install and manage the TrueType fonts on your computer. To
install the Font Manager, you must install it from the Client Utilities CD-ROM.
P.246 “Installing Font Manager”
yBefore installing the printer driver for IPP printing, check with your system administrator to
make sure of the following:
- This equipment is connected to the network and turned on.
- The TCP/IP setting is correct on this equipment and your computer.
yIPP Printing is only available for Windows 98, Windows Me, Windows 2000, Windows XP,
and Windows Server 2003.
Installation for IPP printing by Add Printer Wizard
— Windows 98/Me
Installing the printer driver for IPP printing by Add Printer Wizard
The following describes an installation on Windows 98. The procedure is the same when Win-
dows Me is used.
Note that, before installing the printer driver, you need to install the IPP client on your computer
by executing the “wpnpins.exe” as explained below.
1
Copy the “wpnpins.exe” to the desktop.
yFor Windows 98: Download “wpnpins.exe” from the following URL:
http://www.microsoft.com/windows98/downloads/contents/WUPreviews/IPP/
yFor Windows Me: Copy “wpnpins.exe” from your Windows Me CD-ROM.
[CD-ROM drive]: \add-ons\IPP
2
Double-click the “wpnpins.exe”.
The Internet Printer Installation dialog box appears.
3
Click [OK] to restart your computer.
2 INSTALLING CLIENT SOFTWARE
64 Installing Client Software for Windows
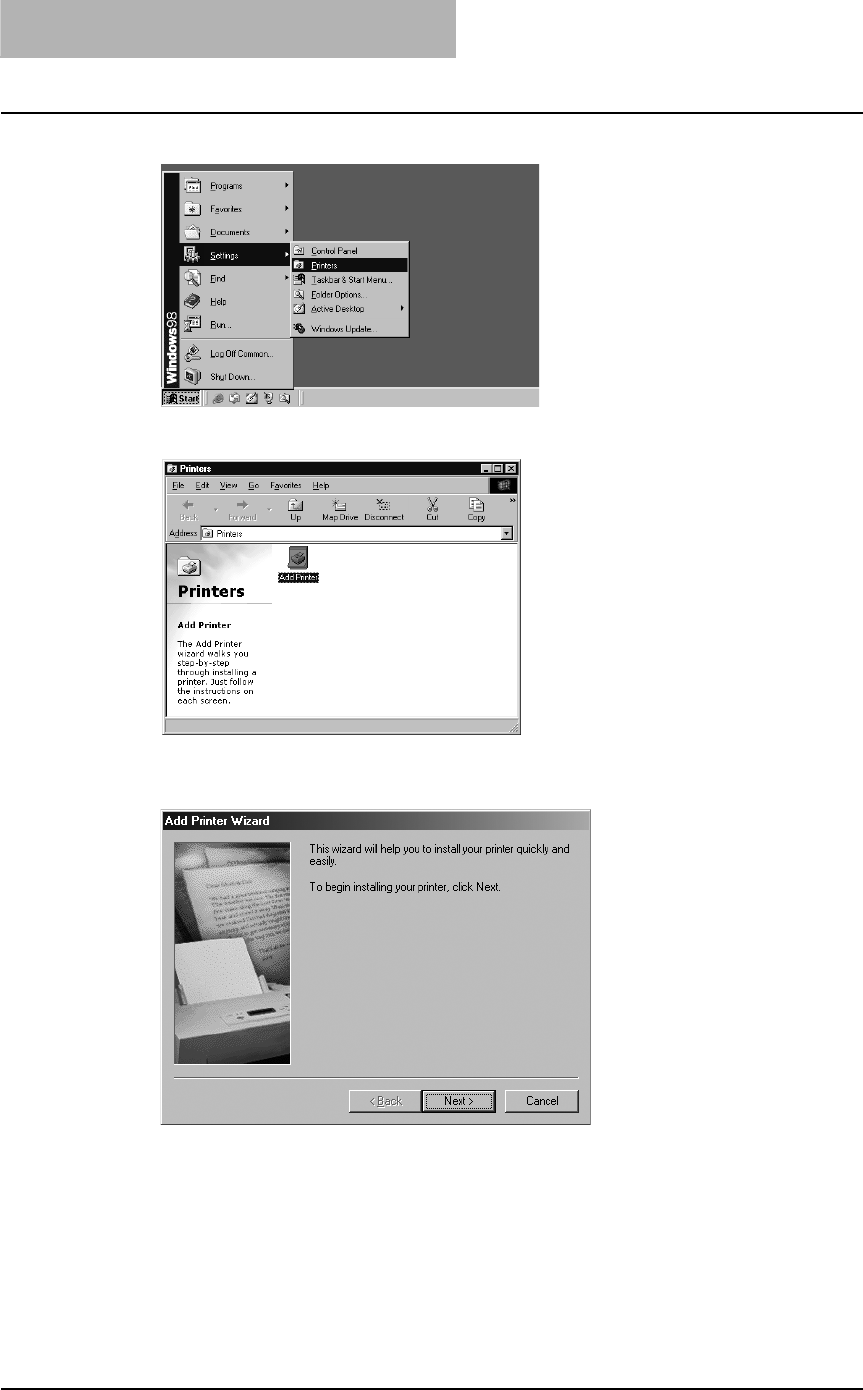
4
Click [Start] and select [Printers] in [Settings].
5
Double-click the [Add Printer] icon.
The Add Printer Wizard dialog box appears.
6
Click [Next].
Installing Client Software for Windows 65
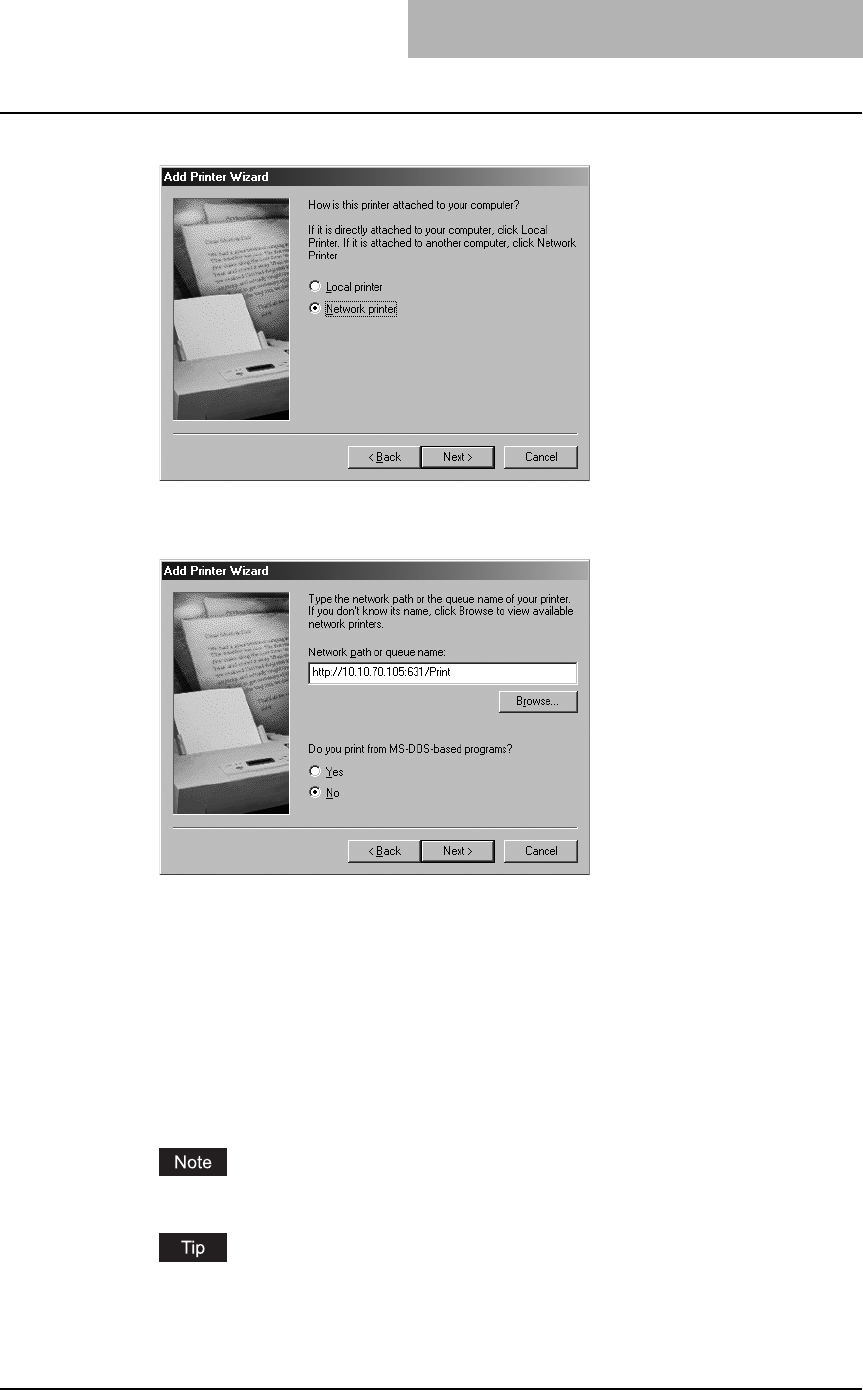
7
Select “Network printer” and click [Next].
8
Enter “http://[IP address]:631/Print” in the “Network path or queue
name:” field.
yEnter the IP address of this equipment instead of [IP address].
Example: IP address = 10.10.70.105
http://10.10.70.105:631/Print
yIf your network uses a DNS or WINS server, enter the printer name of this equipment
provided from DNS or WINS instead of [IP address].
Example: Print Server Name = Mfp-00c67861
http://Mfp-00c67861:631/Print
yWhen you connect from the Internet, enter the FQDN of this equipment provided from
DNS instead of [IP address].
Example: URL = mfp_00c67861.toshiba.com
http://mfp_00c67861.toshiba.com:631/Print
“P” for “Print” in the “Network path or queue name:” field must be capitalized.
If an administrator has enabled the IPP Port 80 Enabled option on this equipment, you
can exclude the port number from the “Network path or queue name:” field . (i.e. “http://
192.168.255.48/Print”)
2 INSTALLING CLIENT SOFTWARE
66 Installing Client Software for Windows
9
Click [Next].
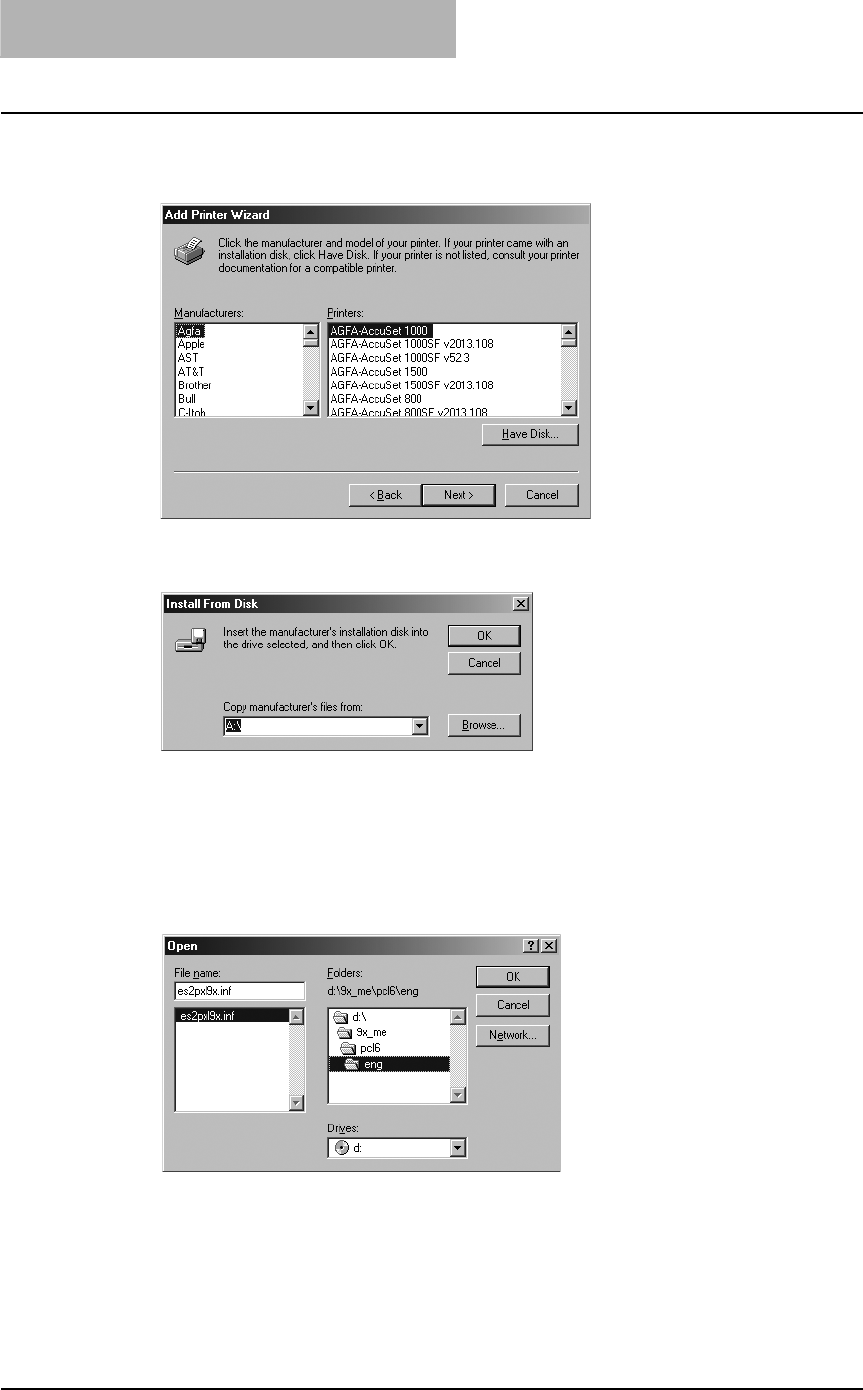
10
Click [Have Disk...].
The Install From Disk dialog box appears.
11
Click [Browse...].
The Open dialog box appears.
12
Insert the Client Utilities CD-ROM into the CD-ROM drive.
When inserting the Client Utilities CD-ROM, the installer may automatically start. Click
[Cancel] to make the installer exit and continue the operation.
13
Locate the directory where the printer driver for Windows 98/Me is
located, select the inf file, and click [OK].
yTo install the PCL6 printer driver for Windows 98/Me, locate "[CD-ROM
drive]:\9X_ME\PCL6\<language>".
yTo install the PS3 printer driver for Windows 98/Me locate "[CD-ROM
drive]:\9X_ME\PS\<language>".
Installing Client Software for Windows 67
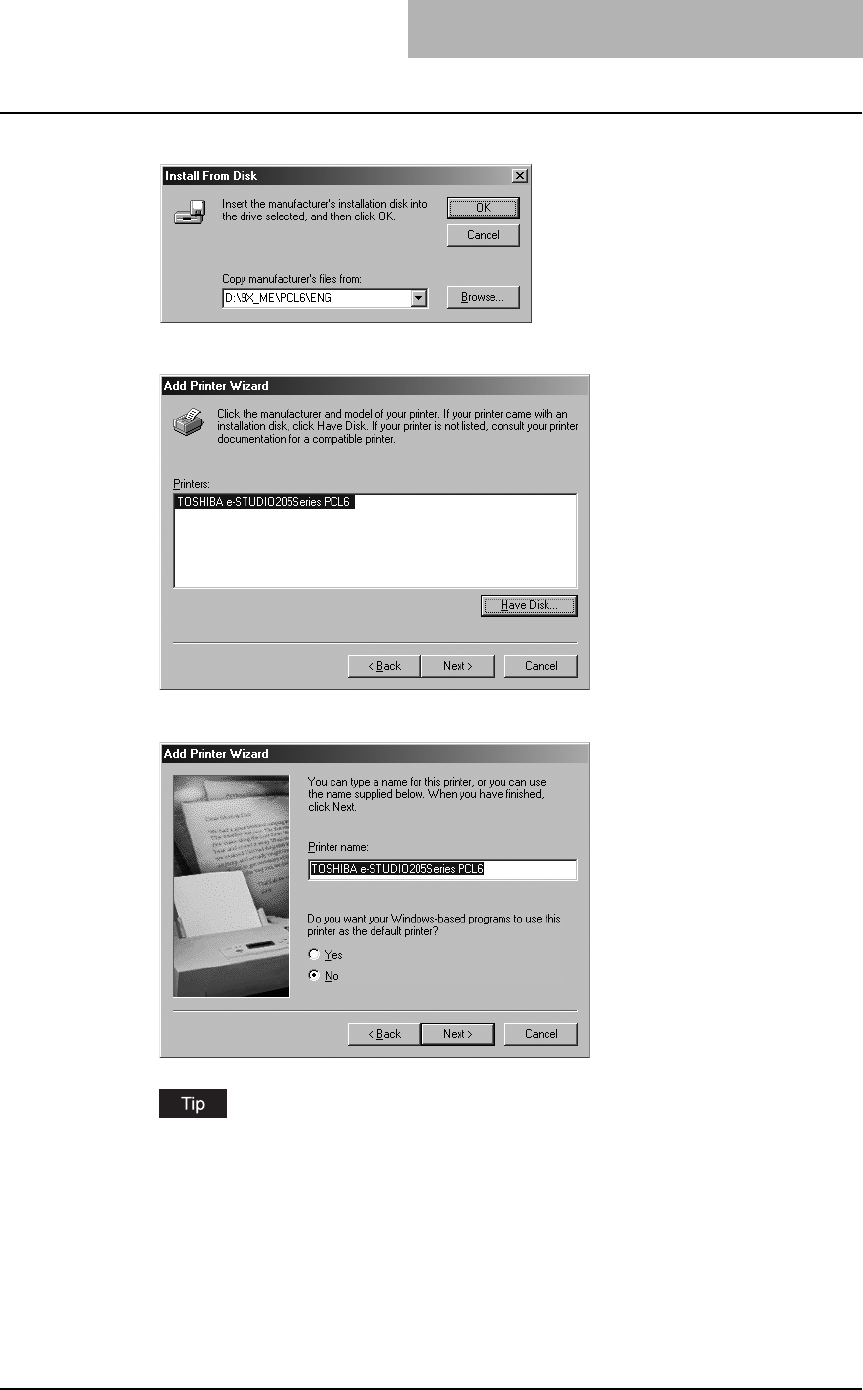
14
Click [OK].
15
Select the printer driver and click [Next].
16
Change the name if desired and click [Next].
If any printer drivers have been installed on your computer, select whether you use this
printer as the default printer.
2 INSTALLING CLIENT SOFTWARE
68 Installing Client Software for Windows
17
Select "Yes (recommended)" to print a test page and click [Finish].
Start copying files.
18
The installation is completed.
Before using the printer driver for printing, please configure the installed options of the
equipment and department code (if required) on the printer driver.
P.154 “Before using the printer driver”
— Windows 2000/XP/Server 2003
Installing the printer driver for IPP printing by Add Printer Wizard
The following describes an installation on Windows 2000. The procedure is the same when
Windows XP or Windows Server 2003 is used.
You must log into Windows as a user who has the “Administrators” or “Power Users” privilege.
1
Click [Start] and select [Printers] in [Settings] (Windows 2000) or
select [Printers and Faxes] (Windows XP/Server 2003).
The Printers folder is opened.
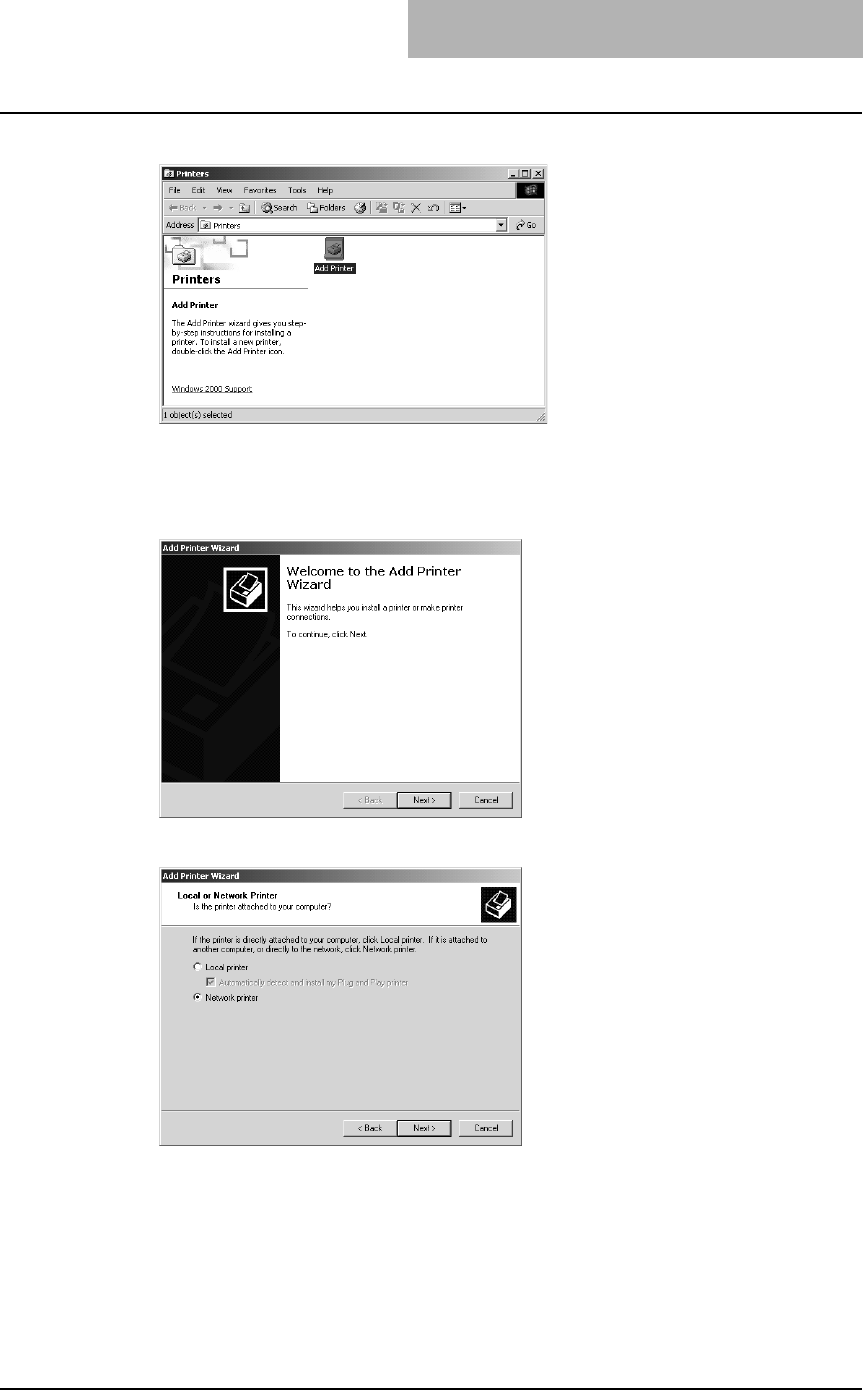
Installing Client Software for Windows 69
2
Double-click the [Add Printers] icon.
yWhen using the Windows XP/Server 2003, click [Add a printer] in the Printer Tasks
menu.
yThe Add Printer Wizard dialog box appears.
3
Click [Next].
4
Select “Network printer” and click [Next].
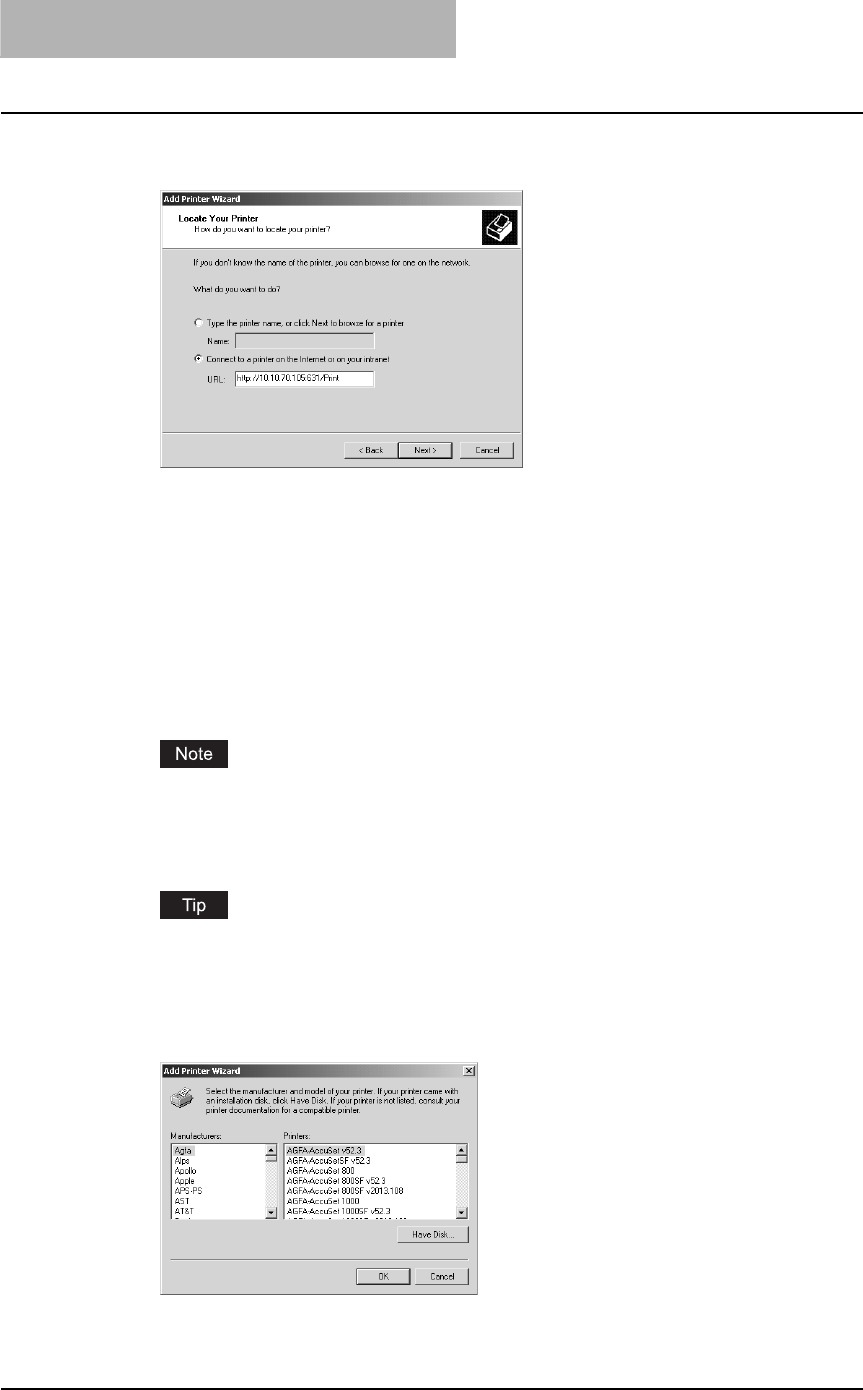
2 INSTALLING CLIENT SOFTWARE
70 Installing Client Software for Windows
5
Select “Connect to a printer on the Internet or on your intranet”,
and enter “http://[IP address]:631/Print” in the “URL” field.
yEnter the IP address of this equipment instead of [IP address].
Example: IP address = 10.10.70.105
http://10.10.70.105:631/Print
yIf your network uses a DNS or WINS server, enter the printer name of this equipment
provided from DNS or WINS instead of [IP address].
Example: Print Server Name = Mfp-00c67861
http://Mfp-00c67861:631/Print
yWhen you connect from the Internet, enter the FQDN of this equipment provided from
DNS instead of [IP address].
Example: URL = mfp_00c67861.toshiba.com
http://mfp_00c67861.toshiba.com:631/Print
“P” for “Print” in the IPP URL must be capitalized. When you are using on Windows XP,
the IPP port can be created by entering “print” (non-capitalized) in the IPP URL, but the
print job cannot be sent to the equipment. In that case, delete the IPP port and then cre-
ate the IPP port correctly again.
If an administrator has enabled the IPP Port80 Enabled option on this equipment, you
can exclude the port number from the URL. (i.e. “http://192.168.255.48/Print”)
6
Click [Next].
7
Click [Have Disk...].
The Install From Disk dialog box appears.

Installing Client Software for Windows 71
8
Click [Browse...].
The Locate File dialog box appears.
9
Insert the Client Utilities CD-ROM into the CD-ROM drive.
When inserting the Client Utilities CD-ROM, the installer may automatically start. Click
[Cancel] to exit the installer and continue the operation.
10
Locate the directory where the printer driver for your Windows ver-
sion is located, select the inf file, and click [Open].
yTo install the PCL6 printer driver for Windows 2000/XP/Server 2003,
locate "[CD-ROM drive]:\W2K_XP_2003\PCL6\<language>".
yTo install the PS3 printer driver for Windows 2000/XP/ Server 2003,
locate "[CD-ROM drive]:\W2K_XP_2003\PS\<language>".
11
Click [OK].
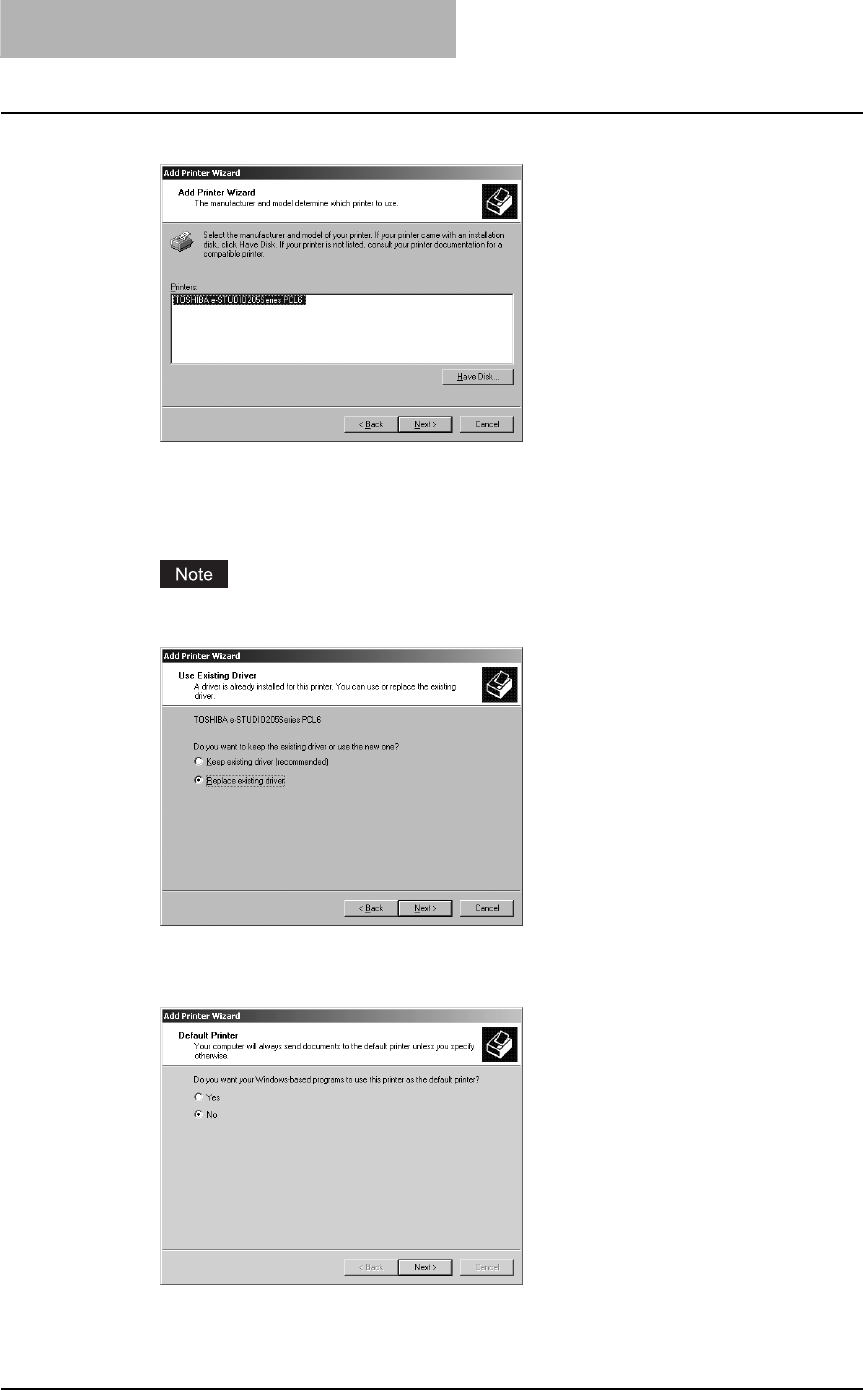
2 INSTALLING CLIENT SOFTWARE
72 Installing Client Software for Windows
12
Select the printer driver and click [NEXT].
yIf any other printer driver(s) had already been installed on your computer, the Default
Printer screen is displayed. Continue to next step.
yIf no printer driver had been installed on your computer, the complete screen is dis-
played. Skip to step 14.
If the same printer driver has been installed, the following dialog box appears. If it
appears, select “Replace existing driver” and click [Next].
13
Select whether using this printer as a default printer and click
[Next].


2 INSTALLING CLIENT SOFTWARE
74 Installing Client Software for Windows
Installing client software for Novell printing
This section describes how to install the client software for Novell printing on NetWare print
server environments.
There are three ways to set up the printer drivers for Novell printing:
yUsing the installer in the Client Utilities CD-ROM
When you insert the Client Utilities CD-ROM into your CD-ROM drive, the installer automati-
cally starts. You can install printer drivers and other client software using the installer. If you
want to install printer drivers as well as other client software, this method is convenient.
P.75 “Installation for Novell printing using the installer”
yUsing Point and Print
You can install the printer driver by double-clicking network queues on the NetWare. If the
NetWare has been set up for NDPS, printer drivers can be downloaded from the system so
that the Client Utilities CD-ROM is not required.
P.80 “Installation for Novell printing by Point and Print”
yUsing Add Printer Wizard
When you want to install the printer drivers without connecting to the equipment using Point
and Print, install the printer drivers using the Add Printer Wizard.
P.87 “Installation for Novell printing by Add Printer Wizard”
The Font Manager is available to install and manage the TrueType fonts on your computer. To
install the Font Manager, you must install it from the Client Utilities CD-ROM.
P.246 “Installing Font Manager”
Before installing the printer driver for Novell printing, check with your system administrator to
make sure of the following:
- This equipment is connected to the network and turned on.
- The NetWare server is configured correctly and running on your network.
- The IPX/SPX or TCP/IP, and NetWare settings are correct on this equipment.
Before installing the client software for Novell printing, please make sure following network ser-
vices and protocols are installed on your computer:
Windows 98/ME
yTCP/IP protocol (Required only when using the NetWare in the TCP/IP network.)
yIPX/SPX-compatible protocol (Required only when using the NetWare in the IPX/SPX net-
work.)
yClient for NetWare Network
yService for NetWare Directory Service (Required only when using the NetWare server in
NDS mode.)
Windows NT 4.0
yTCP/IP protocol (Required only when using the NetWare in the TCP/IP network.)
yNWLink IPX/SPX Compatible Transport protocol (Required only when using the NetWare in
the IPX/SPX network.)
yNWLink NetBIOS protocol (Required only when using the NetWare in the IPX/SPX network.)
yGateway (and Client) Services for NetWare
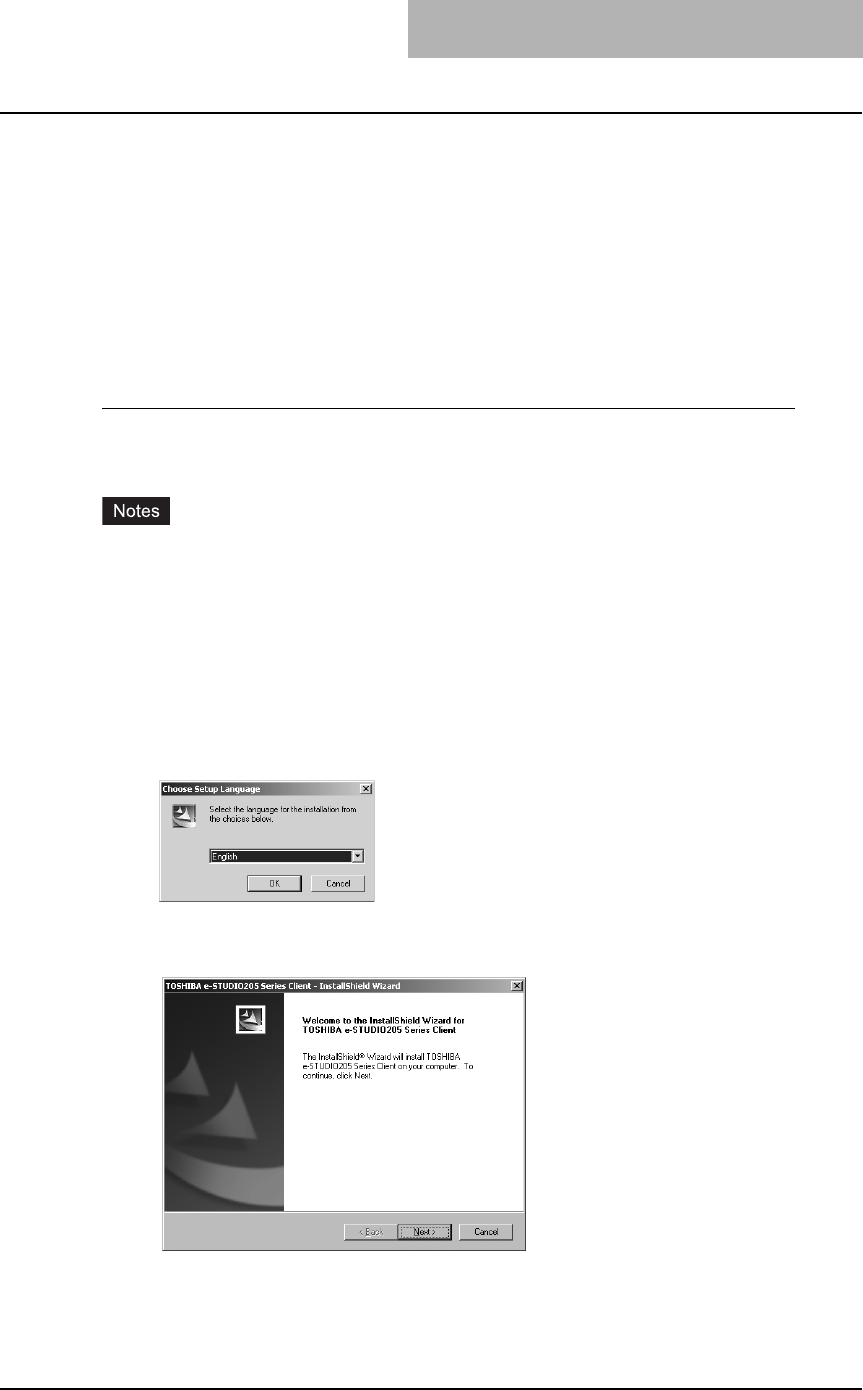
Installing Client Software for Windows 75
Windows 2000/XP/Server 2003
yNWLink IPX/SPX/NetBIOS Compatible Transport Protocol (Required only when using the
NetWare in the IPX/SPX network.)
yGateway (and Client) Services for NetWare
Installation for Novell printing using the installer
You can install the client software and set up the Novell printing using the installer in the Client
Utilities CD-ROM.
Installing the client software for Novell printing using the installer
The following describes an installation on Windows 2000. The procedure is the same when
other versions of Windows are used.
yYou must log into Windows as a user who has the “Administrators” or “Power Users” privi-
lege when using Windows NT 4.0, Windows 2000, Windows XP, or Windows Server 2003.
yYou have an appropriate privilege to access the NetWare server.
1
Insert the Client Utilities CD-ROM into the CD-ROM drive.
yThe installer automatically starts and the Choose Setup Language dialog box
appears.
yIf the installer does not automatically start, double-click “Setup.exe” in the Client Utili-
ties CD-ROM.
2
Select your language and click [OK].
The License Agreement screen is displayed.
3
Click [Next].
The License Agreement screen is displayed.

2 INSTALLING CLIENT SOFTWARE
76 Installing Client Software for Windows
4
Please read the license agreement carefully and click [Yes].
The Choose Destination Location screen is displayed.
5
Click [Next].
If you want to change where the programs are installed, click [Browse]. In the dialog box
appears, select the folder and click [OK].
The Setup Type screen is displayed.
6
Select “Custom” and click [Next].
The Select Components screen is displayed.

Installing Client Software for Windows 77
7
Check the software that you want to install and click [Next].
TOSHIBA e-STUDIO205 Series PCL6 — Check this to install the PCL6 printer driver.
TOSHIBA e-STUDIO205 Series PSL3 — Check this to install the PS3 printer driver
The Select Port screen is displayed.
The names of other software are displayed in the Select Components dialog box. (You
can install them as required.)
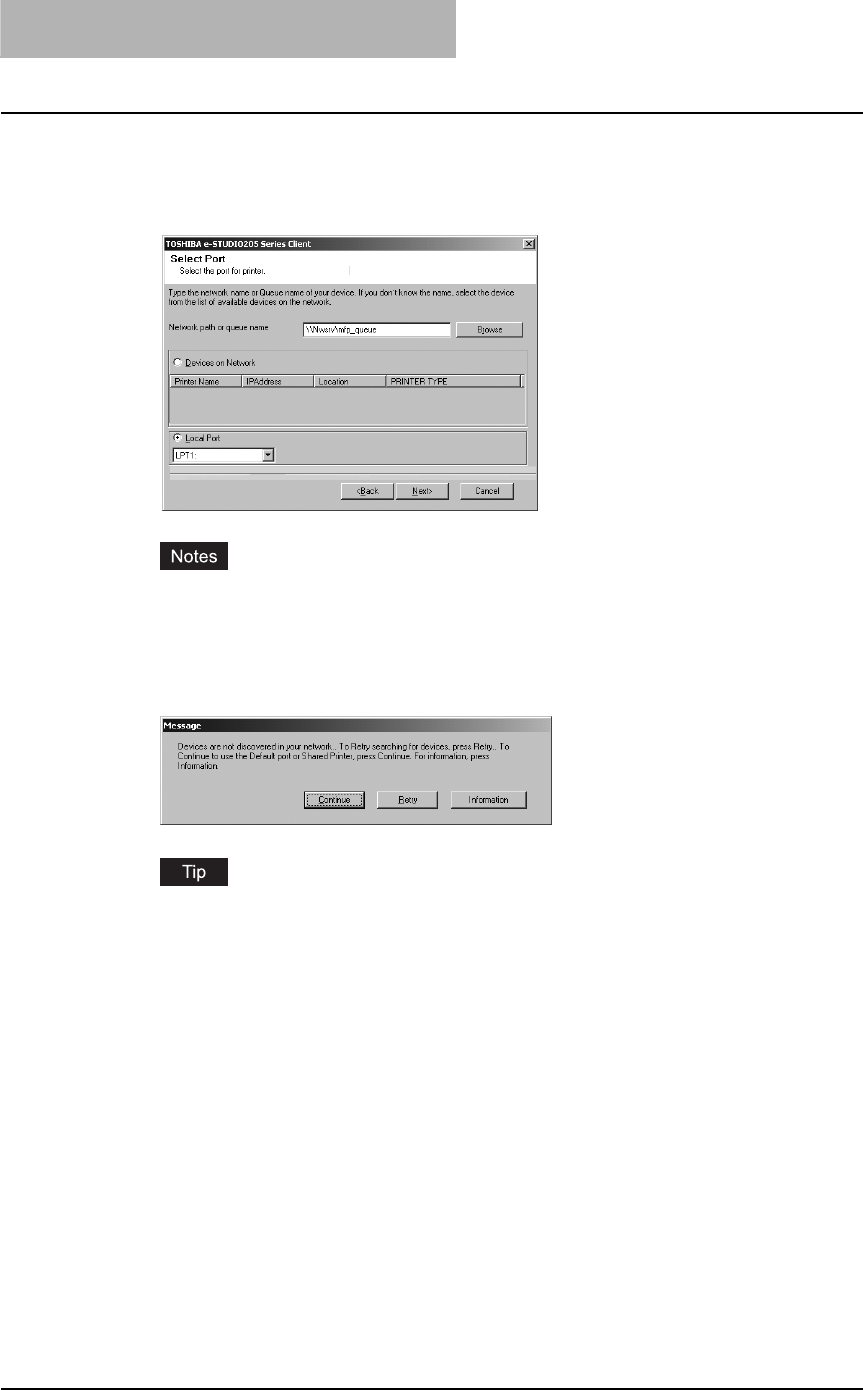
2 INSTALLING CLIENT SOFTWARE
78 Installing Client Software for Windows
8
Enter “\\<NetWare file server name>\<queue name>” in the “Net-
work path or queue name” field, and click [Next].
Example: NetWare file server name=Nwsrv, queue name=mfp_queue
\\Nwsrv\mfp_queue
yEven if this equipment is automatically discovered and displayed in the “Devices on
Network” field, select “Local Port” and enter queue the as explained here. If you click
[Next] without selecting “Local Port” and continue the installation procedure, it will not
be correctly performed.
yIf the following dialog box appears, click [Continue] to proceed the operation.
The queue for this equipment should be set up by an administrator. If you do not know
the queue for this equipment, ask your administrator.
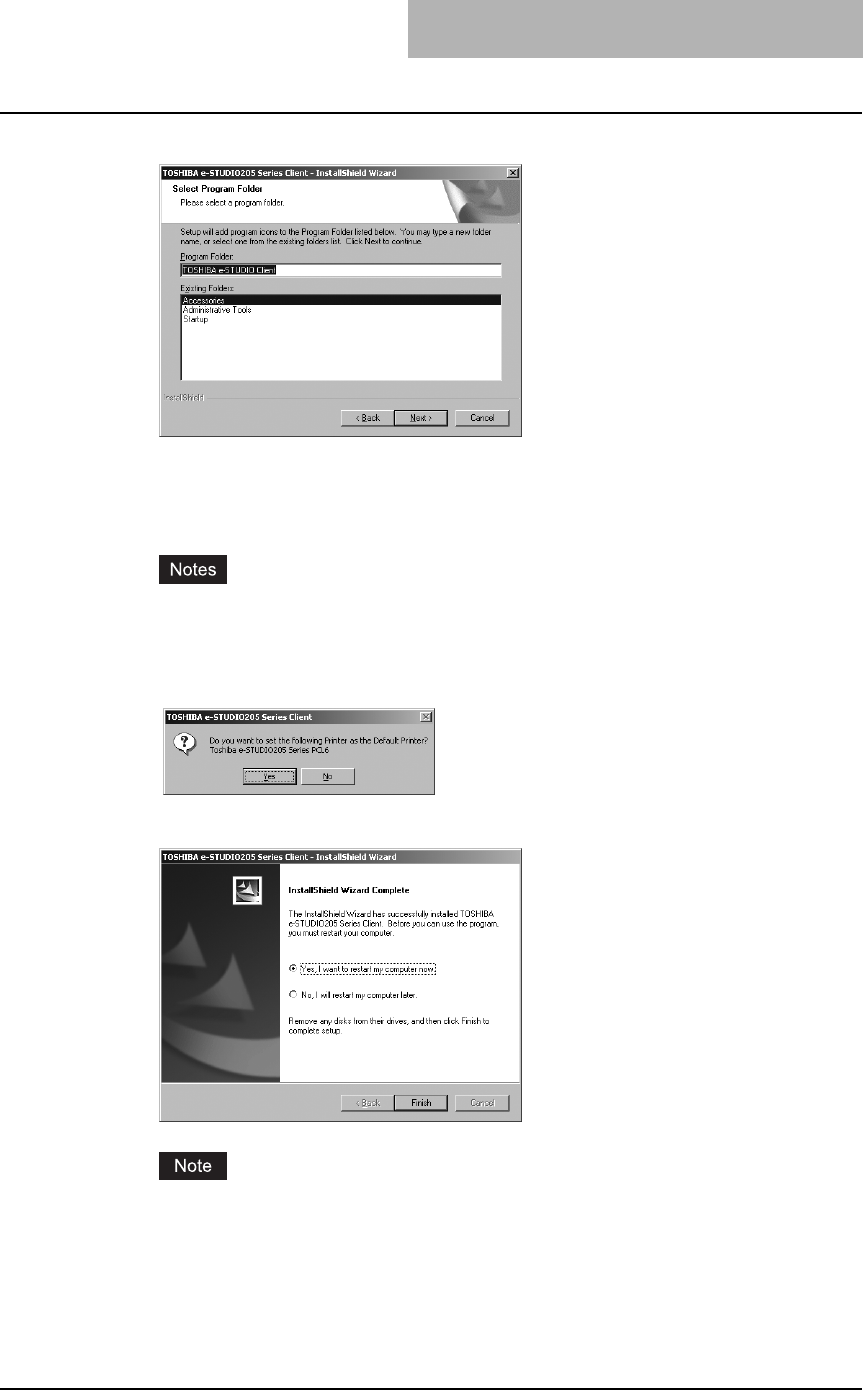
Installing Client Software for Windows 79
9
Click [Next].
yIf you want to change the program folder, rename the folder in the “Program Folder”
field.
yStarts copying files and the InstallShield Wizard Complete screen is displayed when
copying files are completed.
yIf the Digital Signature Not Found dialog box appears while copying files. Click [Yes]
to continue the installation.
yIf the following message appears, click [Yes] to set the indicated printer driver to be
the default printer driver, or click [No] to not change the default printer driver.
10
Click [Finish].
The Installer may ask you to restart your computer. If it does, select “Yes, I want to
restart my computer now.” and click [Finish] to restart your computer.

2 INSTALLING CLIENT SOFTWARE
80 Installing Client Software for Windows
11
The installation is completed.
Before using the printer driver for printing, please configure the installed options of the
equipment and department code (if required) on the printer driver.
P.154 “Before using the printer driver”
Installation for Novell printing by Point and Print
The procedure to install the printer driver for Novell printing by Point and Print differs depending
on the version of Windows used.
P.80 “Windows 98/Me”
P.84 “Windows NT 4.0/2000/XP/Server 2003”
— Windows 98/Me
Installing the printer drivers for Novell printing by Point and Print
1
Open the NetWare queue for the equipment in the network with
Windows Explorer, and double-click a queue.
When the NetWare has been set up for the Bindery mode, open the NetWare file server
and double-click the queue for the equipment.
When the NetWare has been set up for the NDS or NDPS mode, browse the NDS tree
and context, and double-click the queue for the equipment.
The Printers dialog box appears.
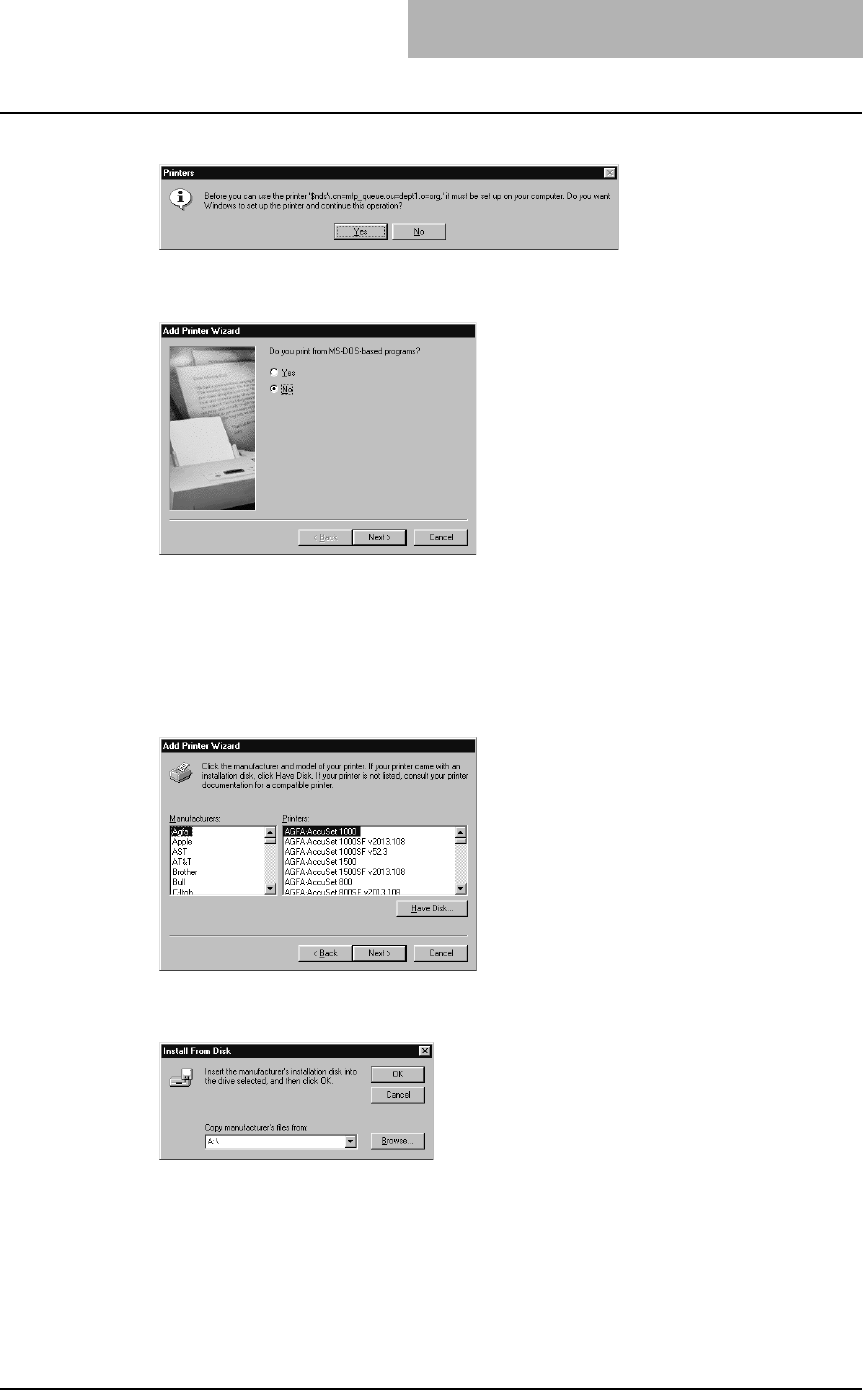
Installing Client Software for Windows 81
2
Click [Yes].
The Add Printer Wizard dialog box appears.
3
Select whether printing MS-DOS-based programs and click [Next].
yWhen using the NetWare in NDPS mode and the printer drivers for each Operating
System are installed to a NDPS broker, the printer driver is automatically installed.
Skip to Step 10.
yUnless using the NetWare in NDPS mode and printer drivers for each Operating Sys-
tem are installed to a NDPS broker, the Add Printer Wizard dialog box appears. Con-
tinue to the next step.
4
Click [Have Disk...].
The Install From Disk dialog box appears.
5
Click [Browse...].
The Open dialog box appears.
6
Insert the Client Utilities CD-ROM into the CD-ROM drive.
When inserting the Client Utilities CD-ROM, the installer may automatically start. Click
[Cancel] to exit the installer and continue the operation.
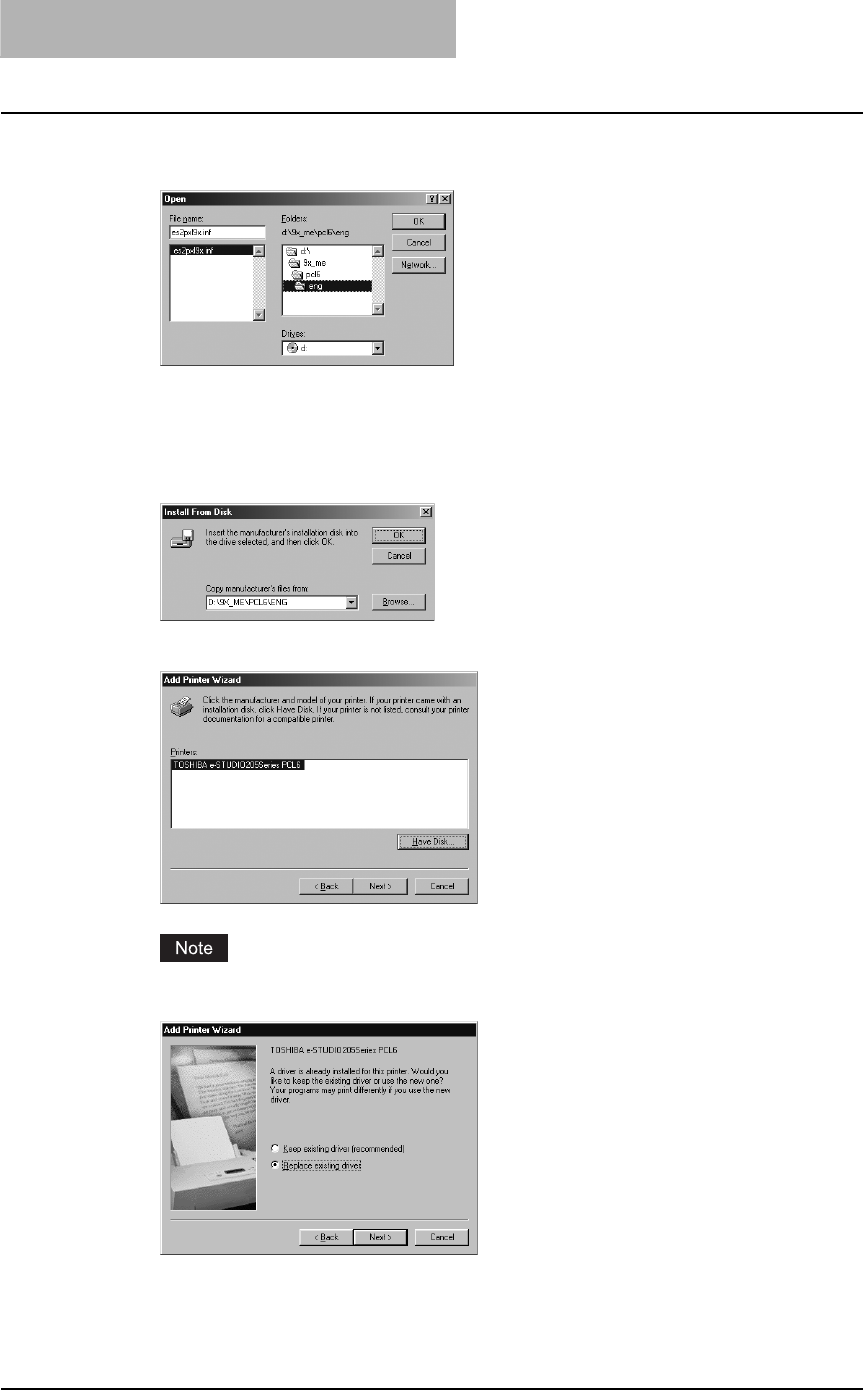
2 INSTALLING CLIENT SOFTWARE
82 Installing Client Software for Windows
7
Locate the directory where the printer driver for Windows 98/Me is
located and click [OK].
yTo install the PCL6 printer driver, locate
"[CD-ROM drive]:\9X_ME\PCL6\<language>".
yTo install the PS3 printer driver, locate
"[CD-ROM drive]:\9X_ME\PS\<language>".
8
Click [OK].
9
Select the printer driver and click [Next].
If the same printer driver has been installed, the following dialog box appears. If it
appears, select “Replace existing driver” and click [Next].
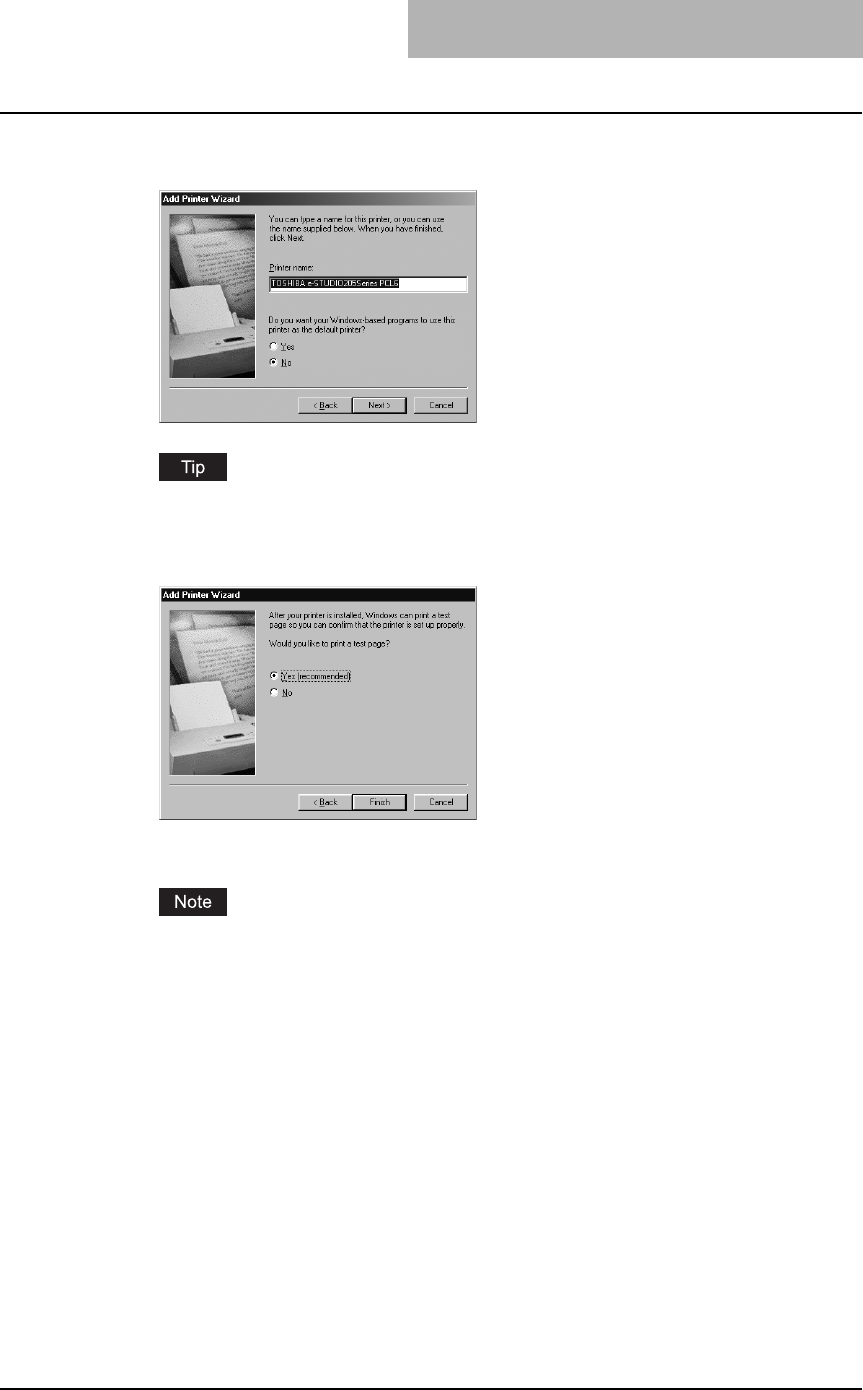
Installing Client Software for Windows 83
10
Change the name if desired, select whether you are using this
printer as a default printer, and click [Next].
If any printer drivers have installed on the computer, select whether using this printer as a
default printer.
11
Select “Yes” to print a test page and click [Finish].
12
The printer driver is installed.
Before using the printer driver for printing, please configure the installed options of the
equipment and department code (if required) on the printer driver.
P.154 “Before using the printer driver”
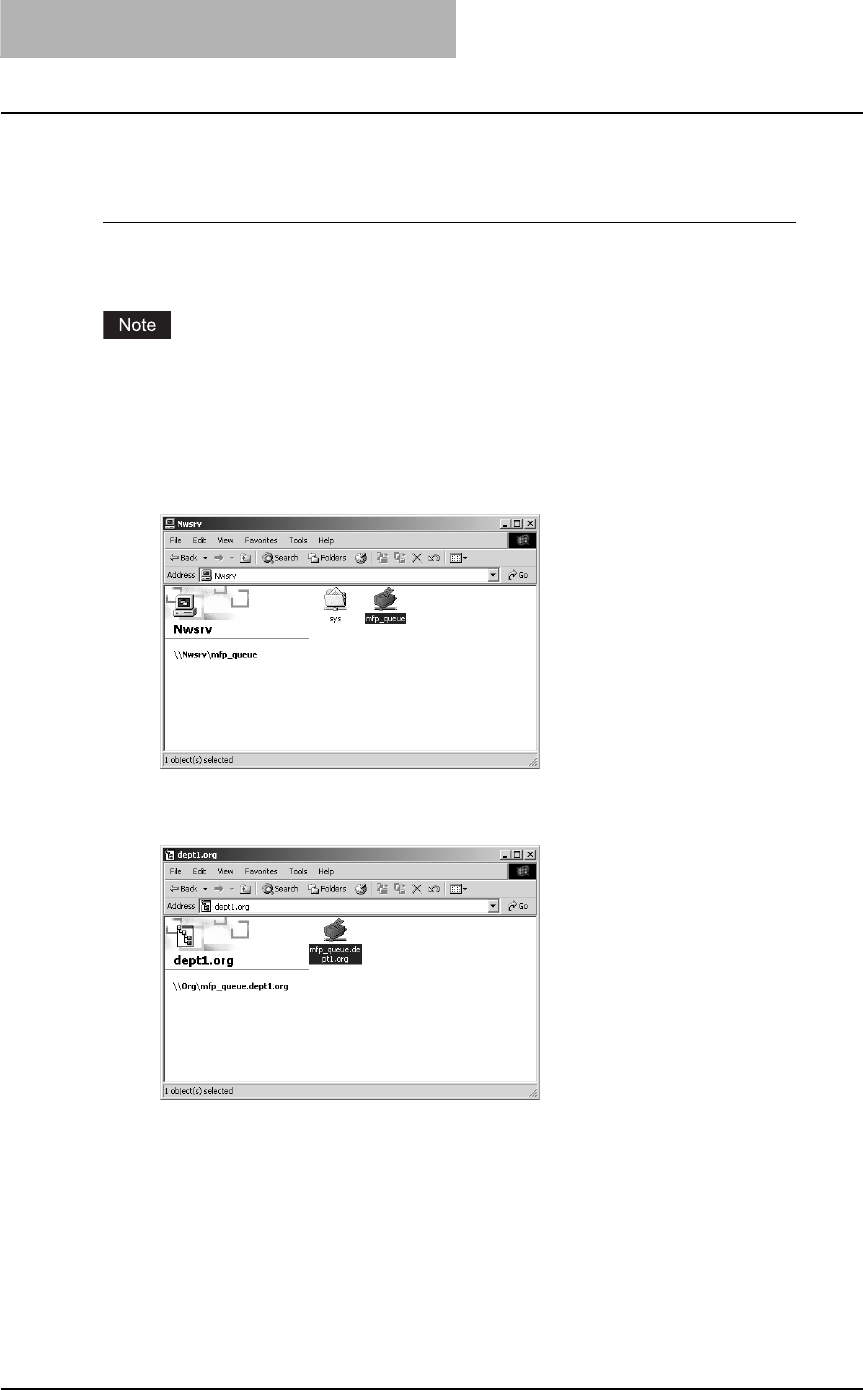
2 INSTALLING CLIENT SOFTWARE
84 Installing Client Software for Windows
— Windows NT 4.0/2000/XP/Server 2003
Installing the printer drivers for Novell printing by Point and Print
The following describes an installation on Windows 2000. The procedure is the same when
Windows NT 4.0, Windows XP, or Windows Server 2003 is used.
You must log into Windows as a user who has the “Administrators” or “Power Users” privilege
when using Windows NT 4.0, Windows 2000, Windows XP, or Windows Server 2003.
1
Open the NetWare queue for the equipment in the network with
Windows Explorer, and double-click a queue.
When the NetWare has been set up for the Bindery mode, open the NetWare file server
and double-click the queue for the equipment.
When the NetWare has been set up for the NDS or NDPS mode, browse the NDS tree
and context, and double-click the queue for the equipment.
The Printers dialog box appears.
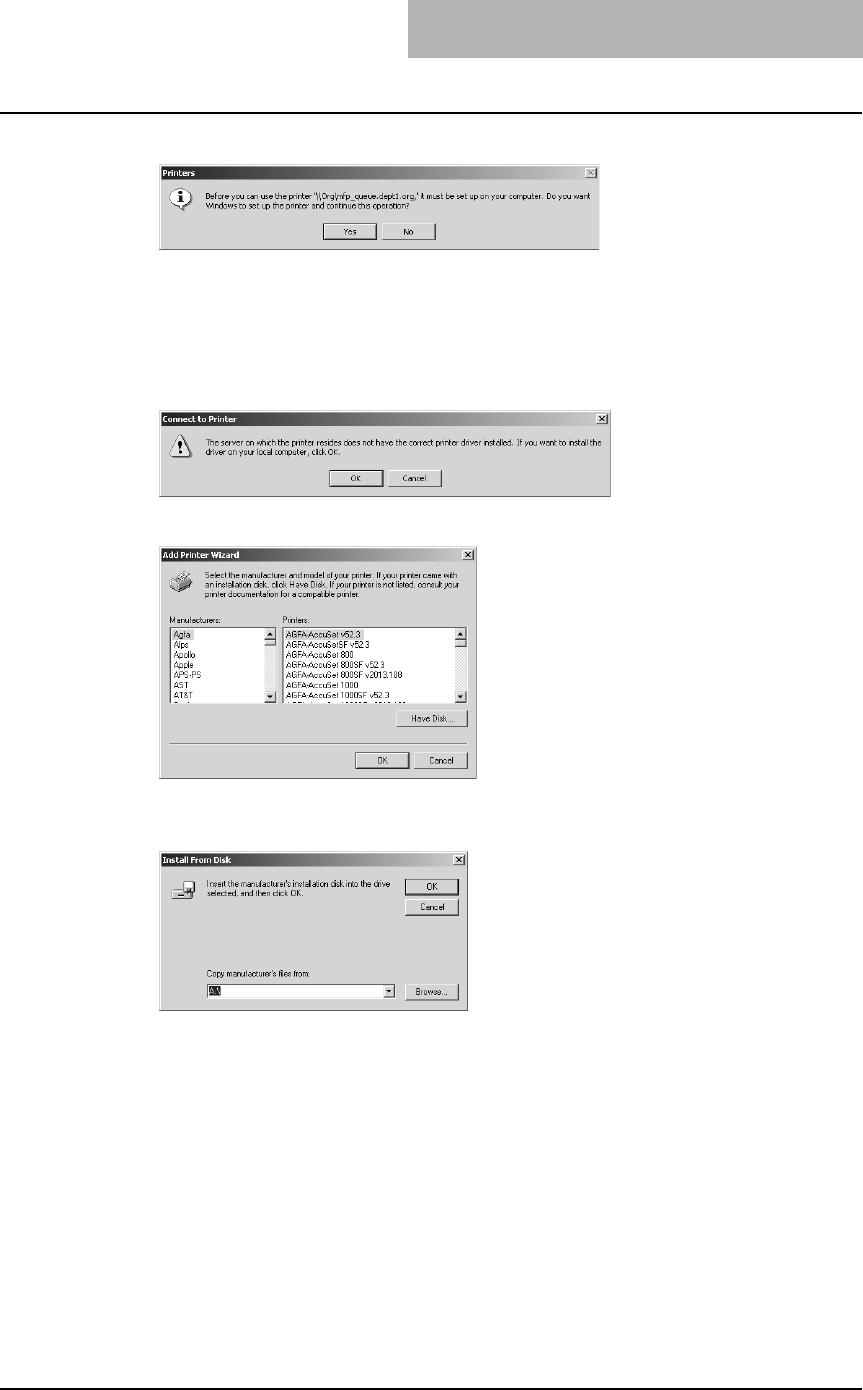
Installing Client Software for Windows 85
2
Click [Yes].
yWhen using the NetWare in NDPS mode and the printer drivers for each Operating
System are installed to a NDPS broker, the printer driver is automatically installed.
yUnless using the NetWare in NDPS mode and printer drivers for each Operating Sys-
tem are installed to a NDPS broker, the Add Printer Wizard dialog box appears. Con-
tinue to the next step.
3
Click [OK].
4
Click [Have Disk...].
The Install From Disk dialog box appears.
5
Click [Browse...].
The Locate File dialog box appears.
6
Insert the Client Utilities CD-ROM into the CD-ROM drive.
When inserting the Client Utilities CD-ROM, the installer may automatically start. Click
[Cancel] to exit the installer and continue the operation.
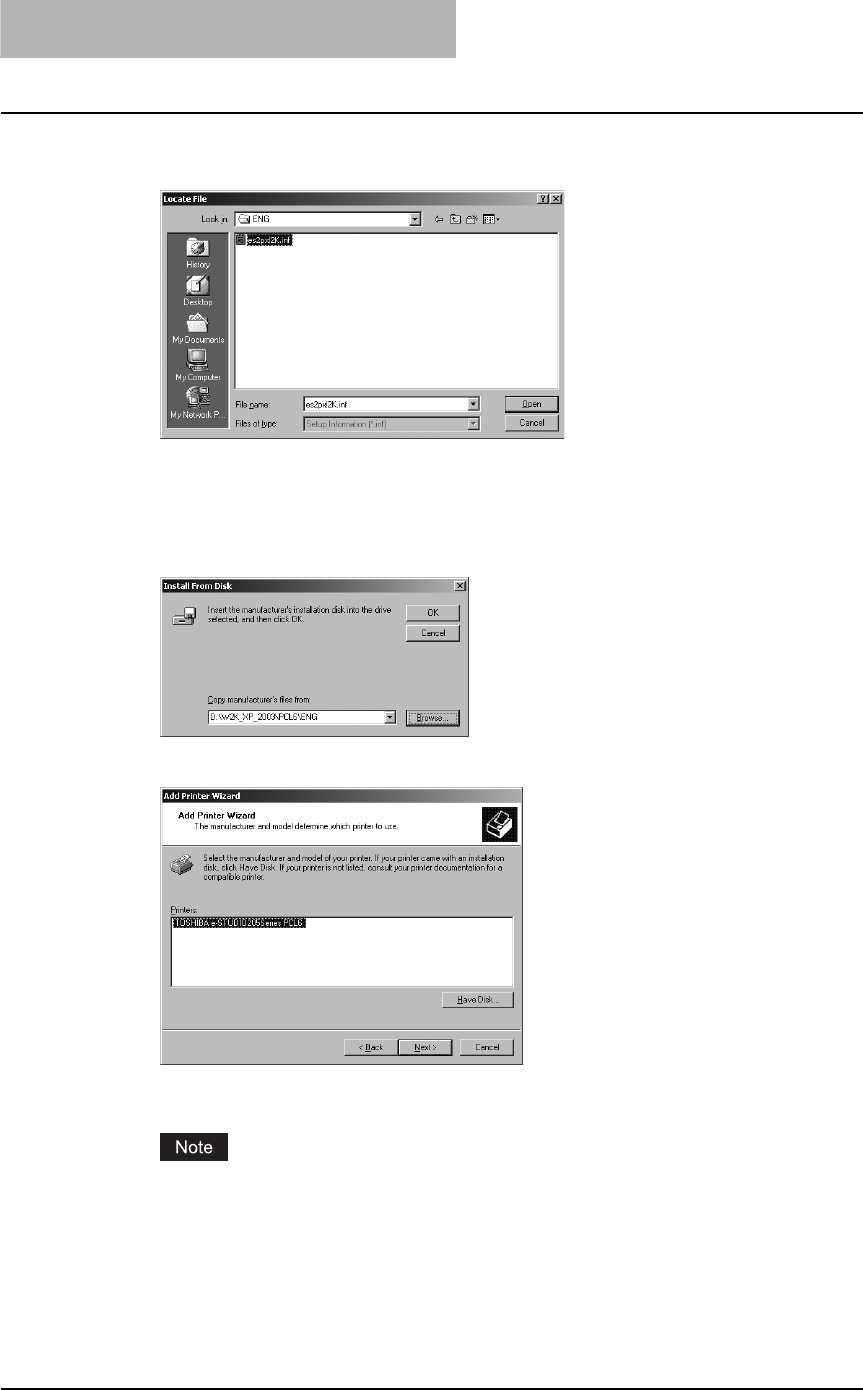
2 INSTALLING CLIENT SOFTWARE
86 Installing Client Software for Windows
7
Locate the directory where the printer driver for Windows 2000/XP/
Server 2003 is located and click [Open].
yTo install the PCL6 printer driver, locate
"[CD-ROM drive]:\W2K_XP_2003\PCL6\<language>".
yTo install the PS3 printer driver, locate
"[CD-ROM drive]:\W2K_XP_2003\PS\<language>".
8
Click [OK].
9
Select the printer driver and click [OK].
10
The installation is completed.
Before using the printer driver for printing, please configure the installed options of the
equipment and department code (if required) on the printer driver.
P.154 “Before using the printer driver”
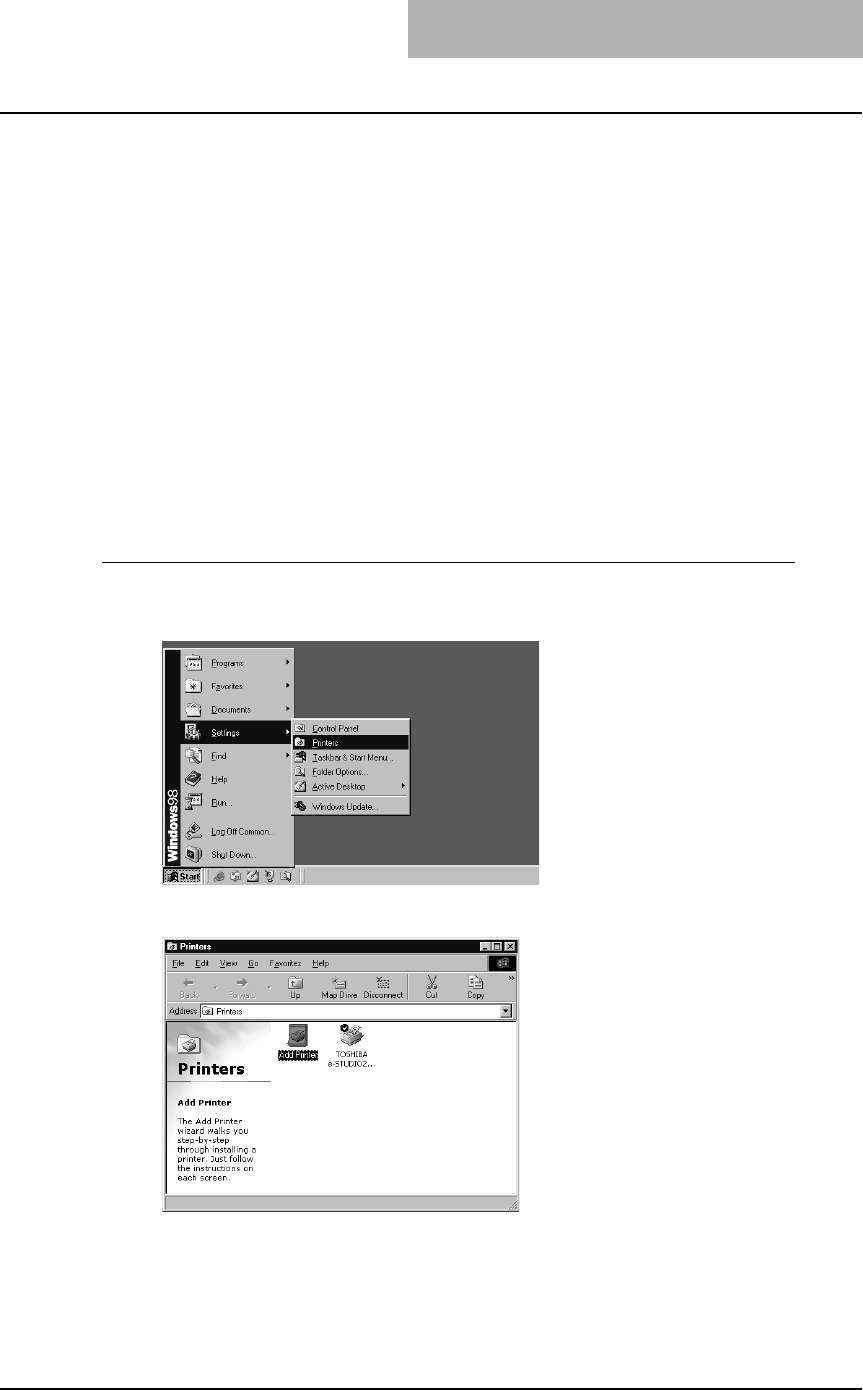
Installing Client Software for Windows 87
Installation for Novell printing by Add Printer Wizard
The procedure to install the printer driver for Novell printing by Add Printer Wizard differs
depending on the version of the Windows being used.
P.87 “Windows 98/Me”
P.94 “Windows NT 4.0”
P.99 “Windows 2000/XP/Server 2003”
— Windows 98/Me
The following describes an installation on Windows 98. The procedure is the same when Win-
dows Me is used.
The installation procedure consists of the following two parts:
yInstalling the printer driver for Novell printing by Add Printer Wizard
P.87 “Installing the printer driver for Novell printing by Add Printer Wizard”
yConfiguring the port for Novell printing
P.91 “Configuring the port for Novell printing”
Installing the printer driver for Novell printing by Add Printer Wizard
1
Click [Start], select [Settings], and click [Printers] to open the Print-
ers folder.
2
Double-click the [Add Printer] icon.
The Add Printer Wizard dialog box appears.
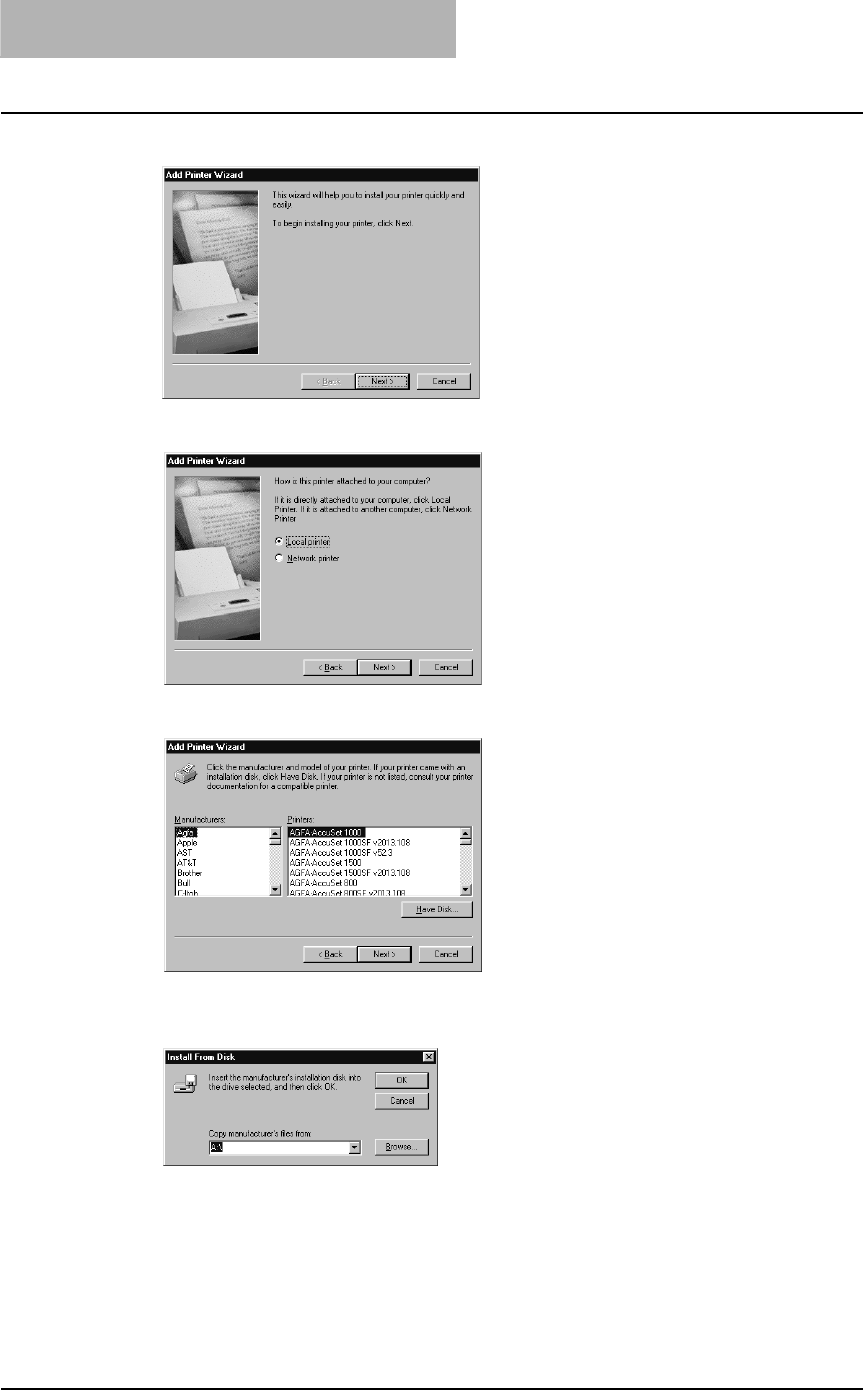
2 INSTALLING CLIENT SOFTWARE
88 Installing Client Software for Windows
3
Click [Next].
4
Select “Local printer” and click [Next].
5
Click [Have Disk...].
The Install From Disk dialog box appears.
6
Click [Browse...].
The Open dialog box appears.
7
Insert the Client Utilities CD-ROM into the CD-ROM drive.
When inserting the Client Utilities CD-ROM, the installer may automatically start. Click
[Cancel] to exit the installer and continue the operation.
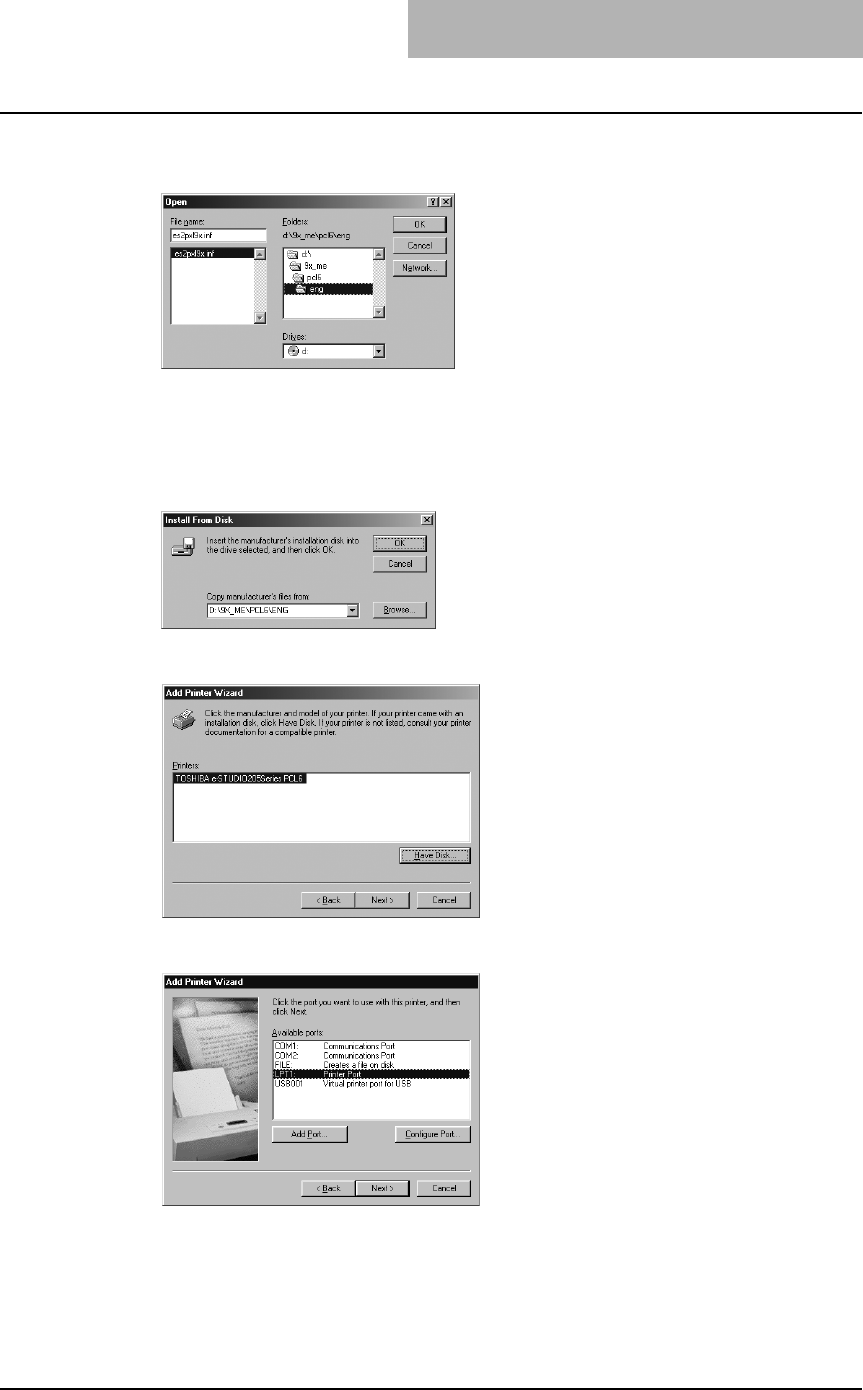
Installing Client Software for Windows 89
8
Locate the directory where the printer driver for Windows 98/Me is
located and click [OK].
yTo install the PCL6 printer driver, locate
"[CD-ROM drive]:\9X_ME\PCL6\<language>".
yTo install the PS3 printer driver, locate
"[CD-ROM drive]:\9X_ME\PS\<language>".
9
Click [OK].
10
Select the printer driver and click [Next].
11
Select “LPT1:” and click [Next].
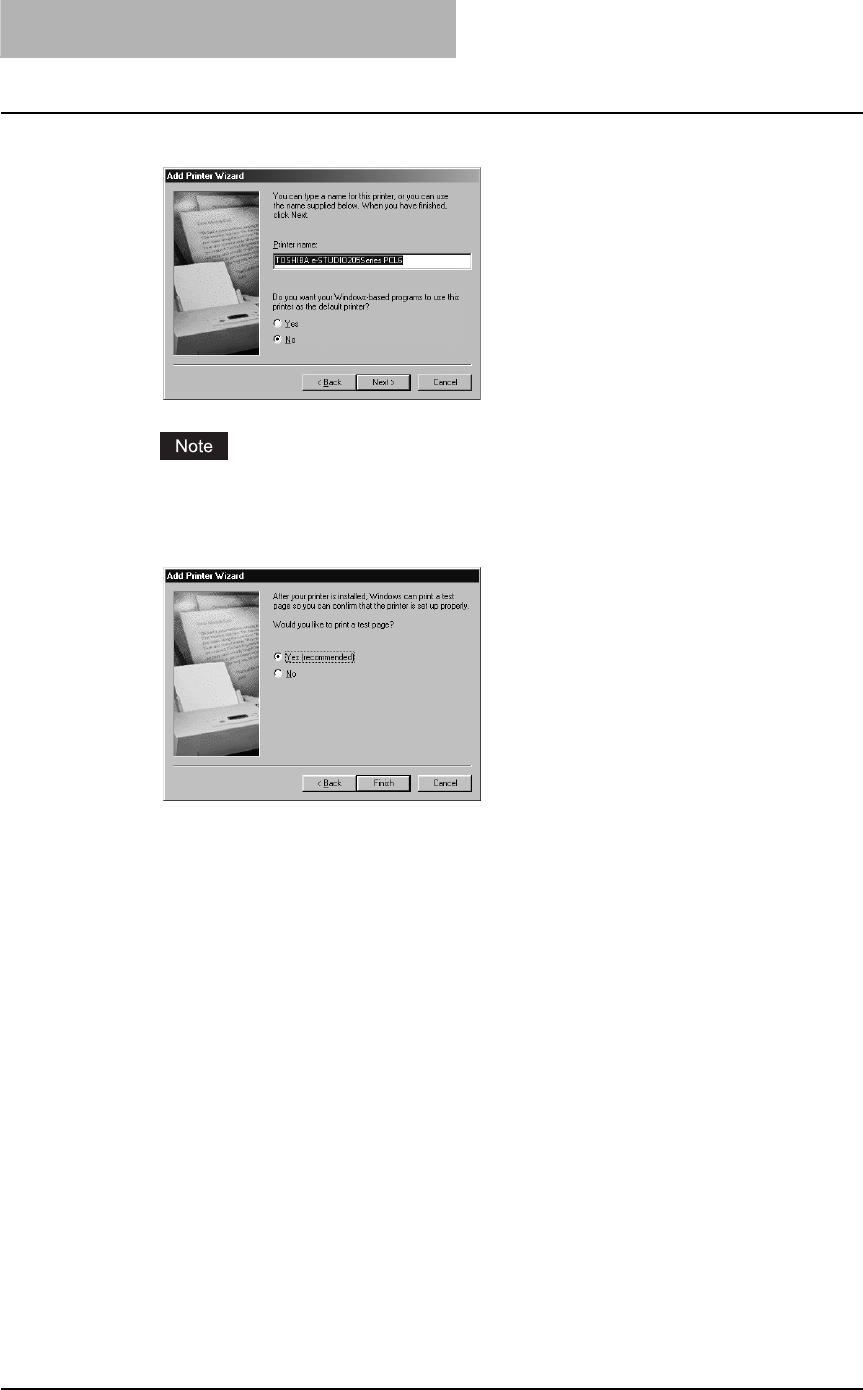
2 INSTALLING CLIENT SOFTWARE
90 Installing Client Software for Windows
12
Change the name if desired and click [Next].
If any printer drivers have installed on the computer, select whether using this printer as a
default printer.
13
Select "Yes (recommended)" to print a test page and click [Finish].
Start copying files.
14
The installation is completed. Proceed to the following port config-
uration procedure.
P.91 “Configuring the port for Novell printing”
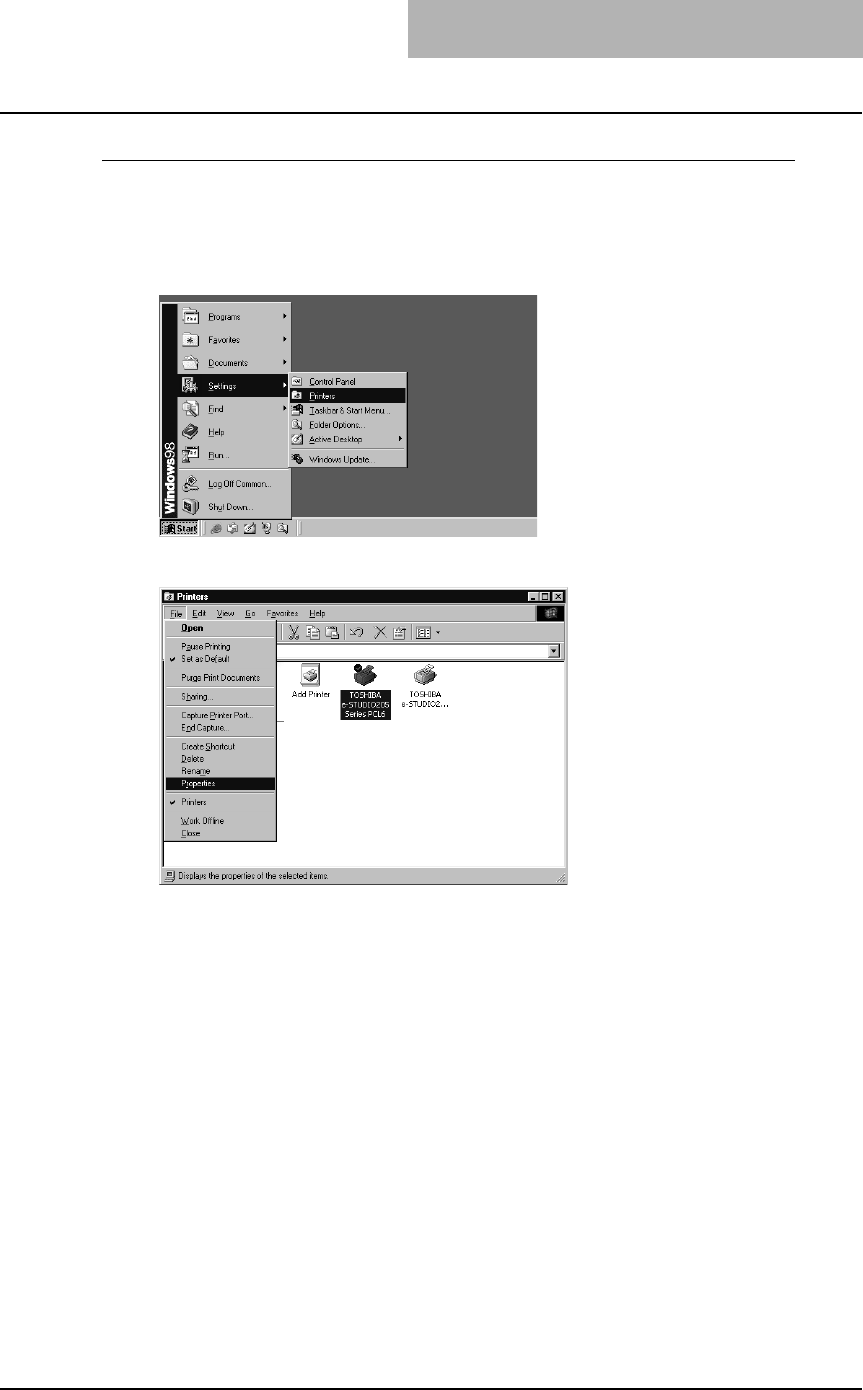
Installing Client Software for Windows 91
Configuring the port for Novell printing
In succession to the above printer driver installation procedure, configure the port for Novell
printing as follows:
1
Click [Start], select [Settings], and click [Printers] to open the Print-
ers folder.
2
Select the printer driver and select [Properties] in the [File] menu.
The printer driver properties dialog box appears.
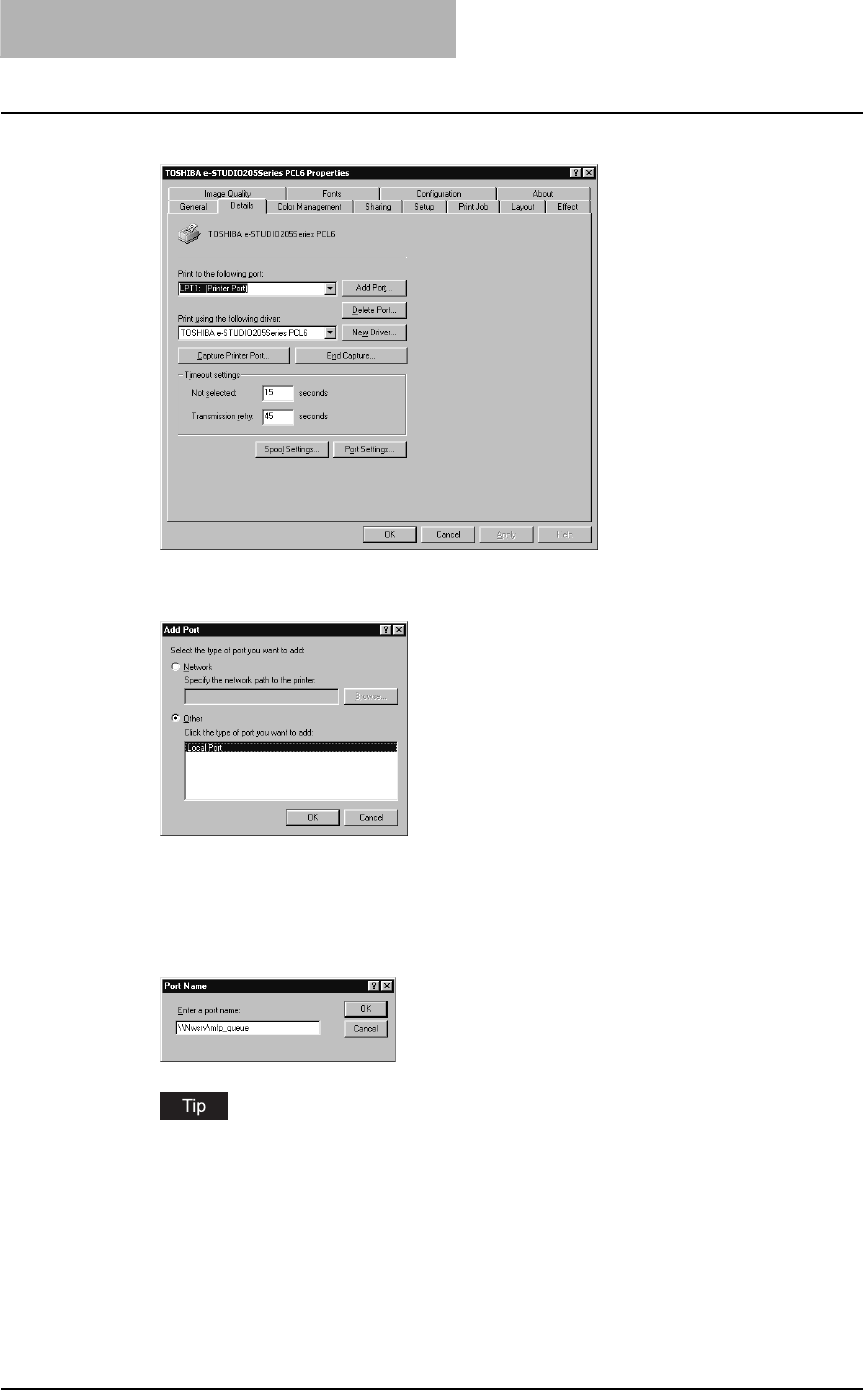
2 INSTALLING CLIENT SOFTWARE
92 Installing Client Software for Windows
3
Display the [Details] tab and click [Add Port].
The Add Port dialog box appears.
4
Select “Other” and “Local Port”, and click [OK].
The Port Name dialog box appears.
5
Enter “\\<NetWare file server name>\<queue name>” in the “Enter a
port name” field, and click [OK].
Example: NetWare file server name=Nwsrv, queue name=mfp_queue
\\Nwsrv\mfp_queue
The queue for this equipment should be set up by an administrator. If you do not know
the queue for this equipment, ask your administrator.

Installing Client Software for Windows 93
6
Click [OK] to save settings.
7
The port configuration is completed.
Before using the printer driver for printing, please configure the installed options of the
equipment and department code (if required) on the printer driver.
P.154 “Before using the printer driver”

2 INSTALLING CLIENT SOFTWARE
94 Installing Client Software for Windows
— Windows NT 4.0
Installing the printer driver for SMB printing by Add Printer Wizard
You must log into Windows NT 4.0 as a user who has the “Administrators” or “Power Users” priv-
ilege.
1
Click [Start], select [Settings], and click [Printers] to open the Print-
ers folder.
2
Double-click the [Add Printer] icon.
The Add Printer Wizard dialog box appears.
3
Select “My Computer” and click [Next].
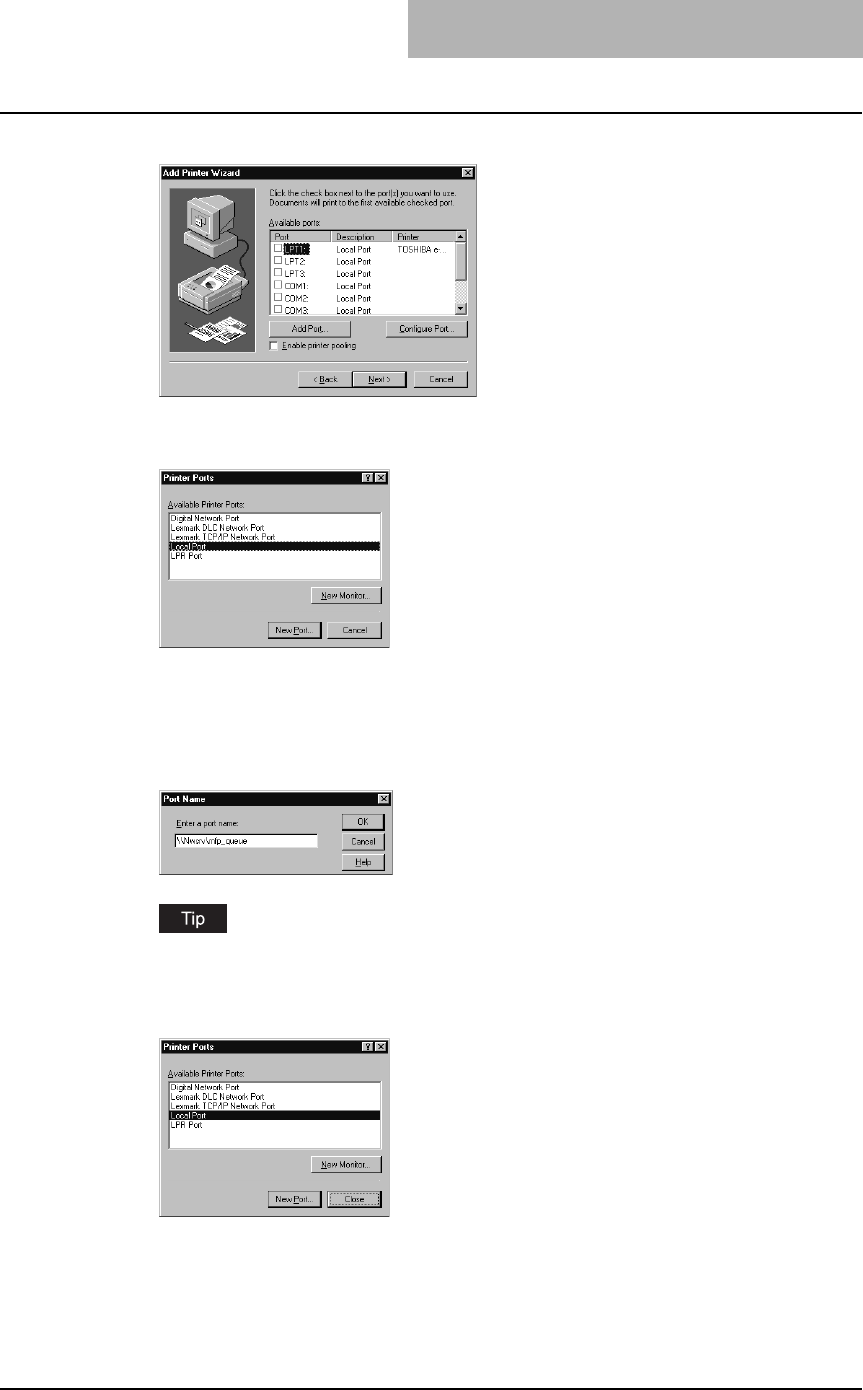
Installing Client Software for Windows 95
4
Click [Add Port...].
The Printer Ports dialog box appears.
5
Select “Local Port” and click [New Port...].
The Port Name dialog box appears.
6
Enter “\\<NetWare file server name>\<queue name>” in the “Enter a
port name” field, and click [OK].
Example: NetWare file server name=Nwsrv, queue name=mfp_queue
\\Nwsrv\mfp_queue
The queue for this equipment should be set up by an administrator. If you do not know
the queue for this equipment, ask your administrator.
7
Click [Close].
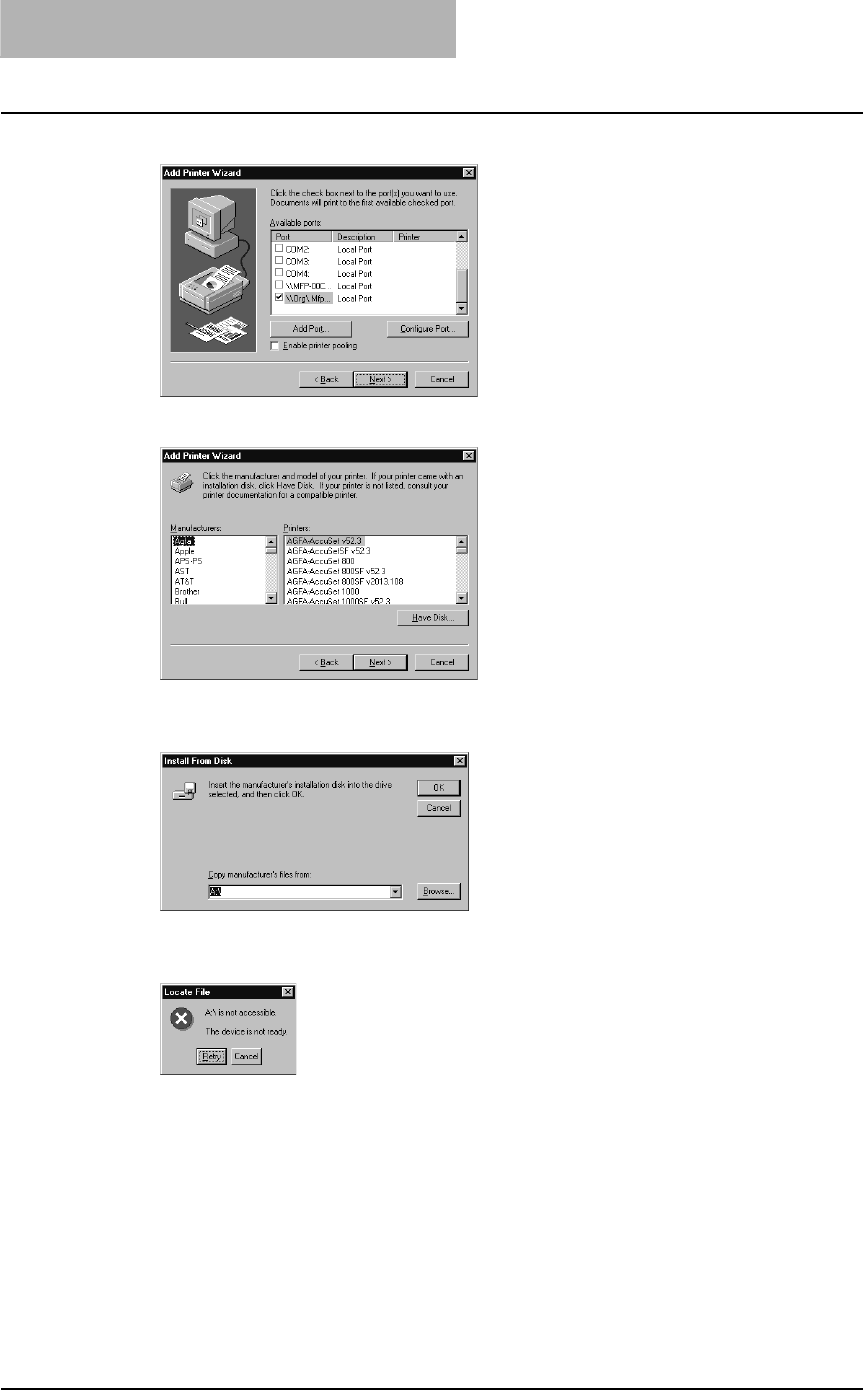
2 INSTALLING CLIENT SOFTWARE
96 Installing Client Software for Windows
8
Make sure the created port is selected and click [Next].
9
Click [Have Disk...].
The Install From Disk dialog box appears.
10
Click [Browse...].
The “A:\ is not accessible” message appears.
11
Click [Cancel].
The Locate File dialog box appears.
12
Insert the Client Utilities CD-ROM into the CD-ROM drive.
When inserting the Client Utilities CD-ROM, the installer may automatically start. Click
[Cancel] to exit the installer and continue the operation.
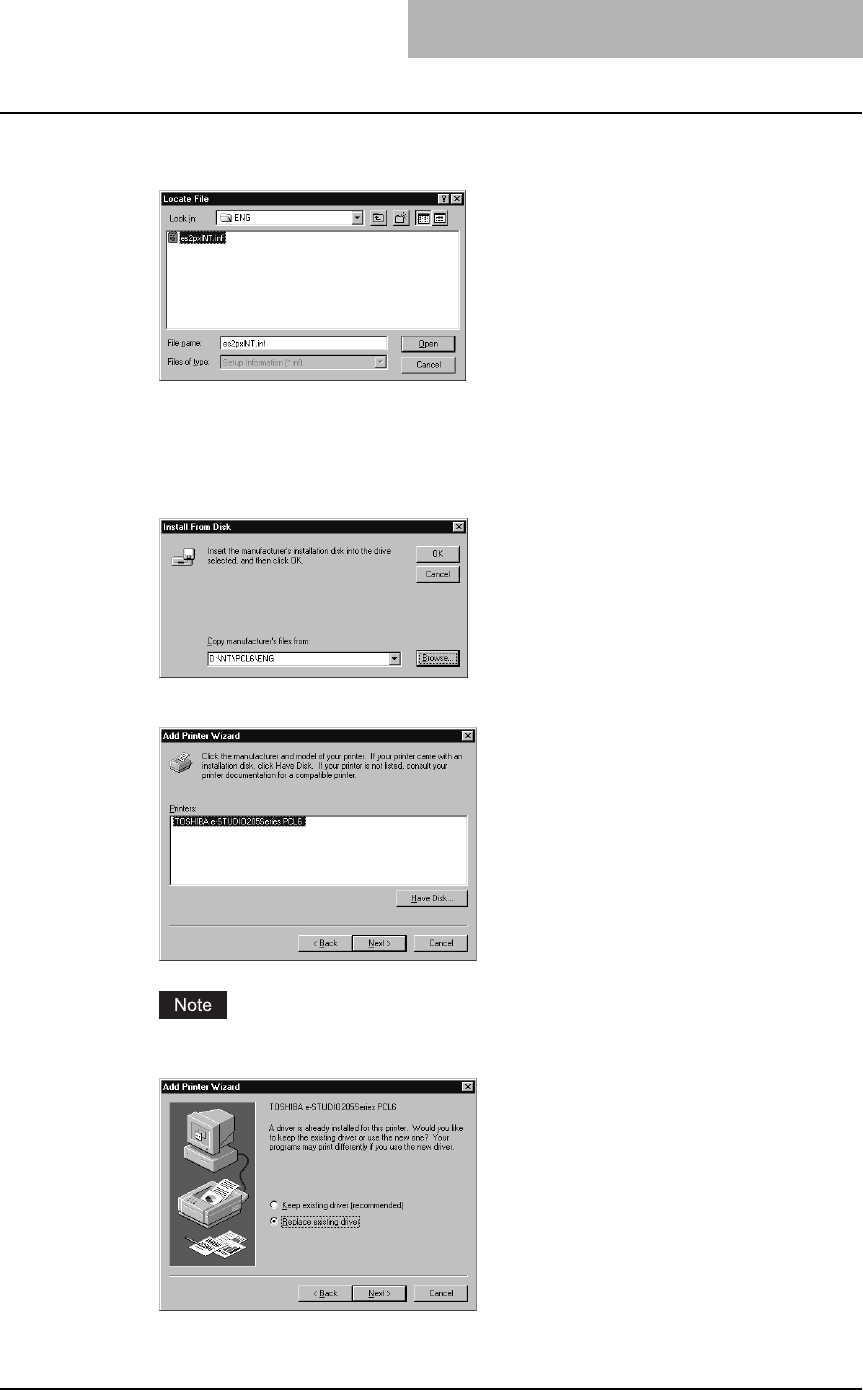
Installing Client Software for Windows 97
13
Locate the directory where the printer driver for Windows NT 4.0 is
located and click [Open].
yTo install the PCL6 printer driver, locate
"[CD-ROM drive]:\NT\PCL6\<language>".
yTo install the PS3 printer driver, locate
"[CD-ROM drive]:\NT\PS\<language>".
14
Click [OK].
15
Select the printer driver and click [Next].
If the same printer driver has been installed, the following dialog box appears. If it
appears, select “Replace existing driver” and click [Next].
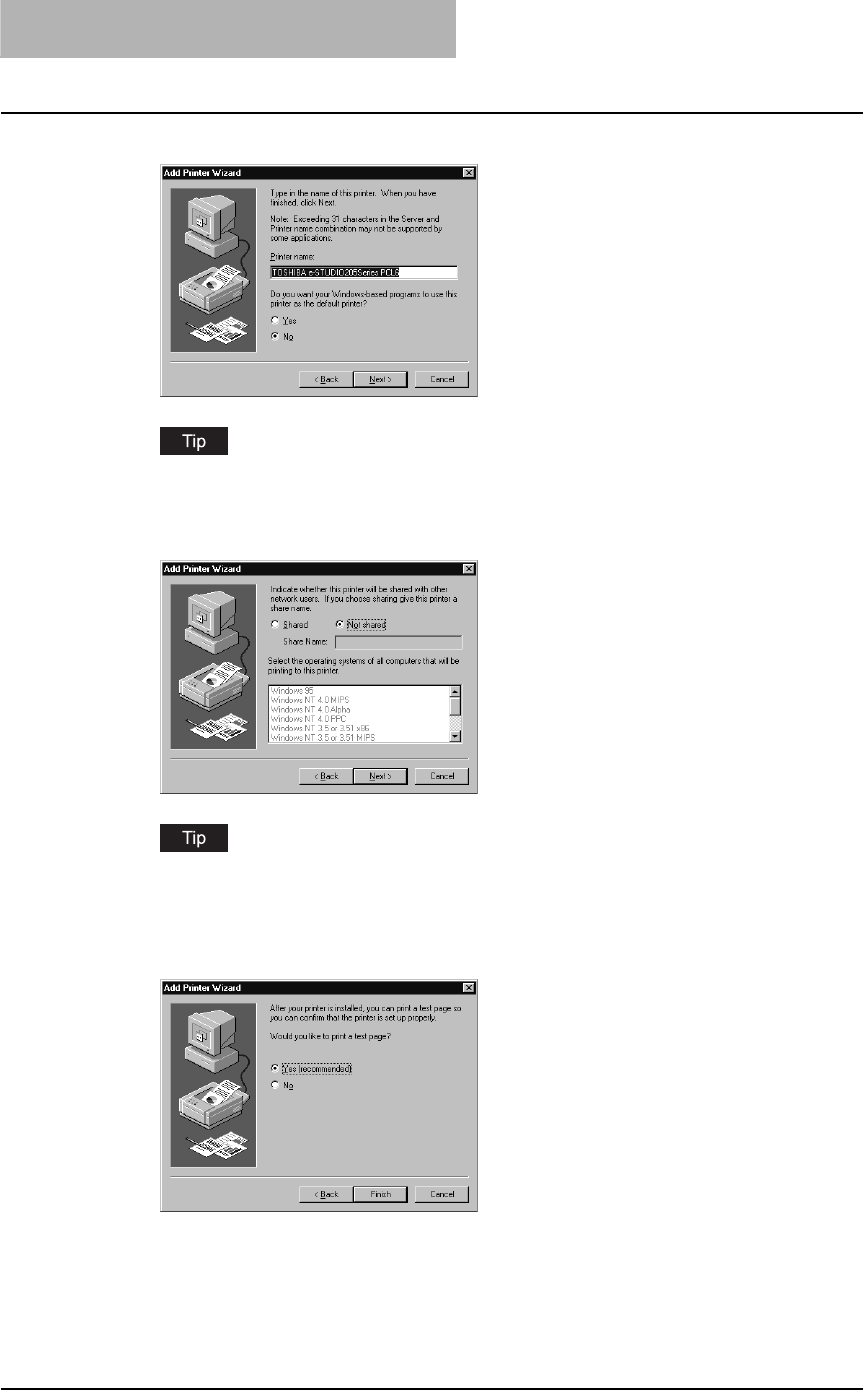
2 INSTALLING CLIENT SOFTWARE
98 Installing Client Software for Windows
16
Change the name if desired and click [Next].
If any printer drivers have installed on the computer, select whether using this printer as a
default printer.
17
Select whether this printer is shared or not, and click [Next].
When you select “Shared”, you can also select the operating systems of printer drivers
that you want to install for clients. If you select any operating systems, repeat the proce-
dure from Step 9 to 15 to install the printer drivers for selected operating systems.
18
Select "Yes (recommended)" to print a test page and click [Finish].

Installing Client Software for Windows 99
19
The installation is completed.
Before using the printer driver for printing, please configure the installed options of the
equipment and department code (if required) on the printer driver.
P.154 “Before using the printer driver”
— Windows 2000/XP/Server 2003
Installing the printer driver for Novell printing by Add Printer Wizard
The following describes an installation on Windows 2000. The procedure is the same when
Windows XP or Windows Server 2003 is used.
You must log into Windows as a user who has the “Administrators” or “Power Users” privilege
when using Windows 2000, Windows XP or Windows Server 2003.
1
Click [Start] and select [Printers] in [Settings] (Windows 2000) or
select [Printers and Faxes] (Windows XP/Server 2003).
The Printers folder is opened.
2
Double-click the [Add Printer] icon.
yWhen using the Windows XP/Server 2003, click [Add a printer] in the Printer Tasks
menu.
yThe Add Printer Wizard dialog box appears.
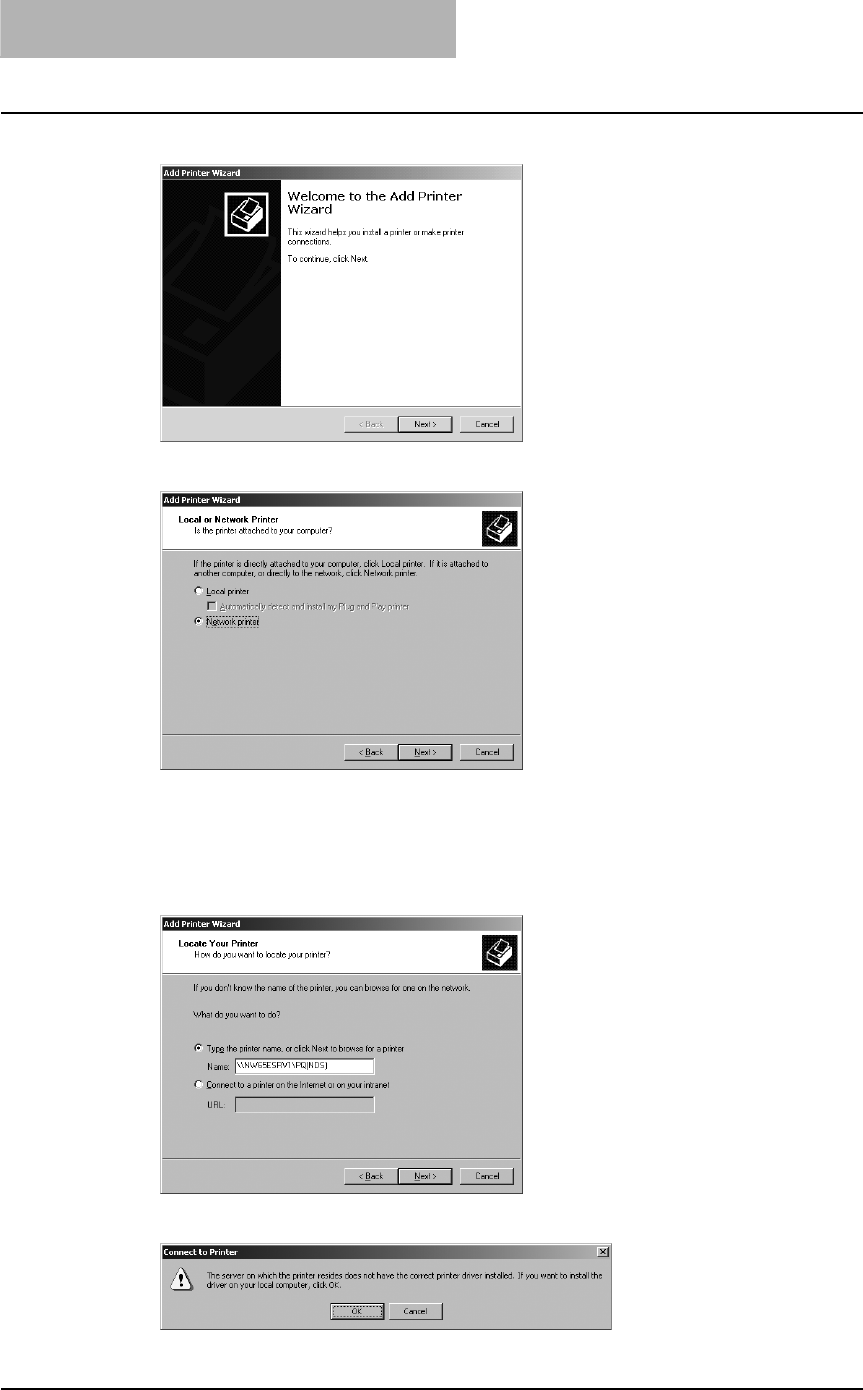
2 INSTALLING CLIENT SOFTWARE
100 Installing Client Software for Windows
3
Click [Next].
4
Select “Network printer” and click [Next].
5
Select “Type the printer name, or click Next to browse for a printer”
and enter “\\<NetWare file server name>\<queue name>” in the
“Name” field. Then click [Next].
Example: NetWare file server name= NW65ESRV1, queue name= PQ(NDS)
\\ NW65ESRV1\ PQ(NDS)
6
Click [OK].
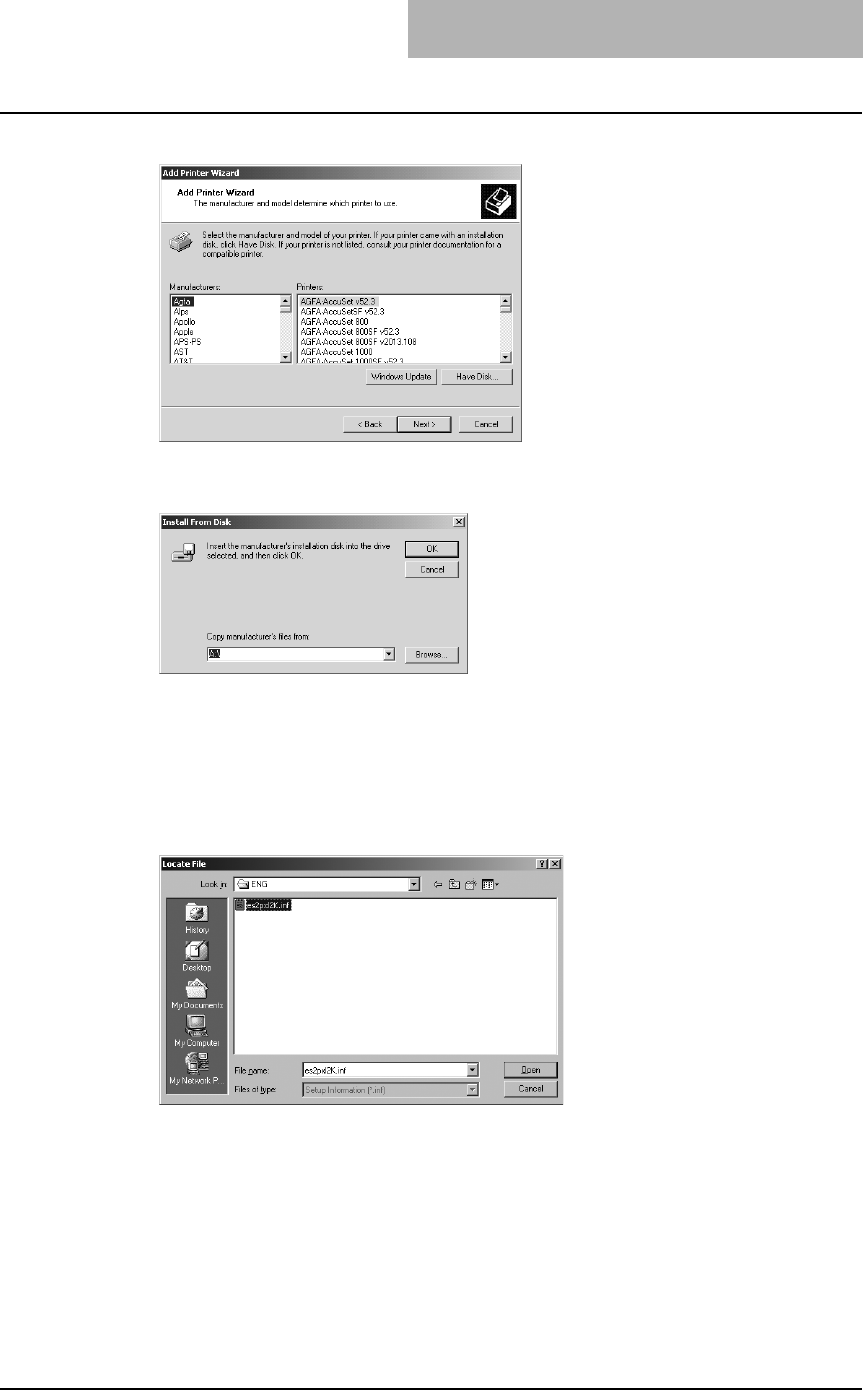
Installing Client Software for Windows 101
7
Click [Have Disk...].
The Install From Disk dialog box appears.
8
Click [Browse...].
The Locate File dialog box appears.
9
Insert the Client Utilities CD-ROM into the CD-ROM drive.
When inserting the Client Utilities CD-ROM, the installer may automatically start. Click
[Cancel] to exit the installer and continue the operation.
10
Locate the directory where the printer driver for Windows 2000/XP/
Server 2003 is located and click [Open].
yTo install the PCL6 printer driver, locate
"[CD-ROM drive]:\W2K_XP_2003\PCL6\<language>".
yTo install the PS3 printer driver, locate
"[CD-ROM drive]:\W2K_XP_2003\PS\<language>".
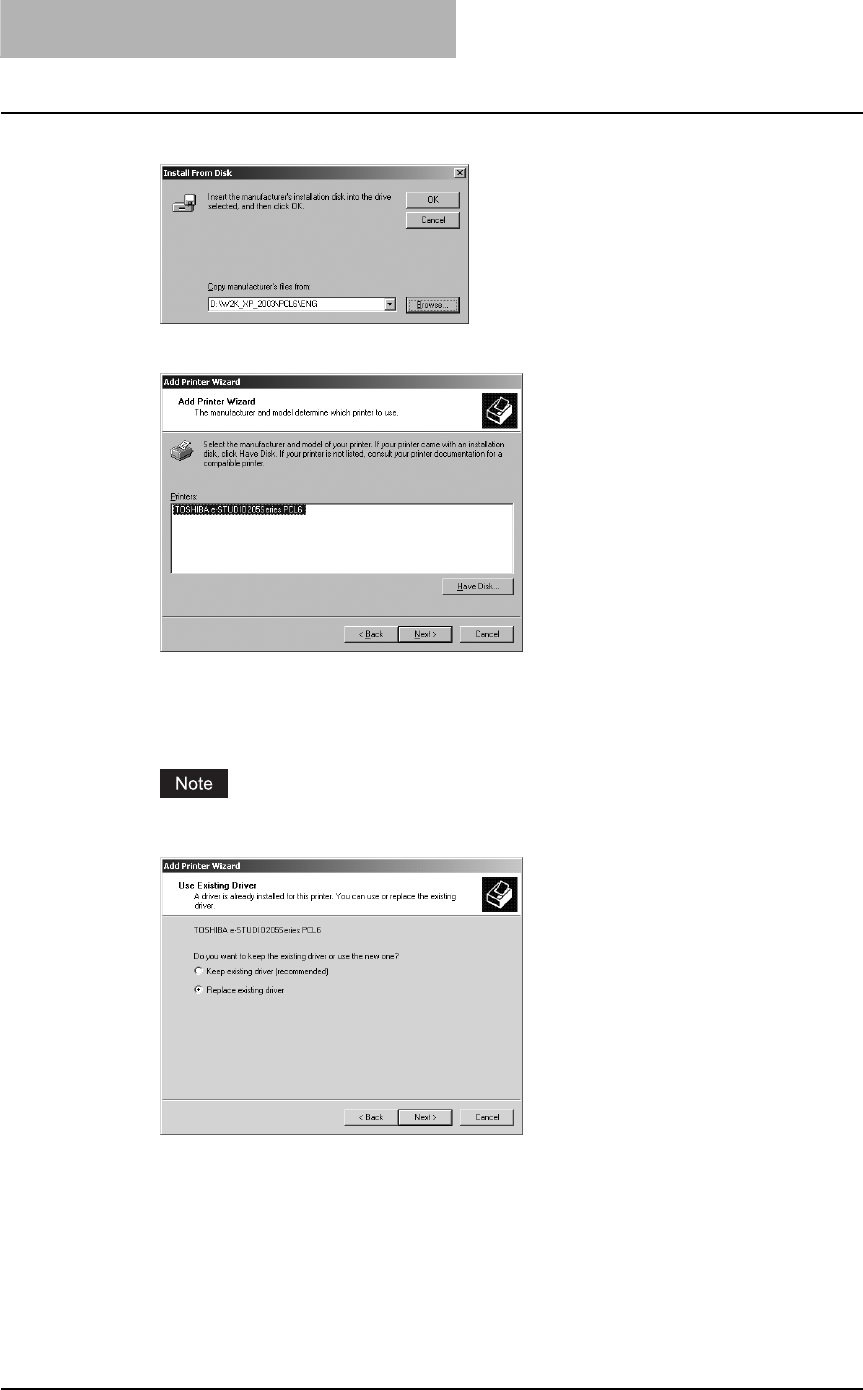
2 INSTALLING CLIENT SOFTWARE
102 Installing Client Software for Windows
11
Click [OK].
12
Select the printer driver and click [Next].
yIf any other printer driver(s) had already been installed on your computer, the Default
Printer screen will be displayed. Continue to next step.
yIf no printer driver had been installed on your computer, the complete screen is dis-
played. Skip to step 14.
If the same printer driver has been installed, the following dialog box appears. If it
appears, select “Replace existing driver” and click [Next].
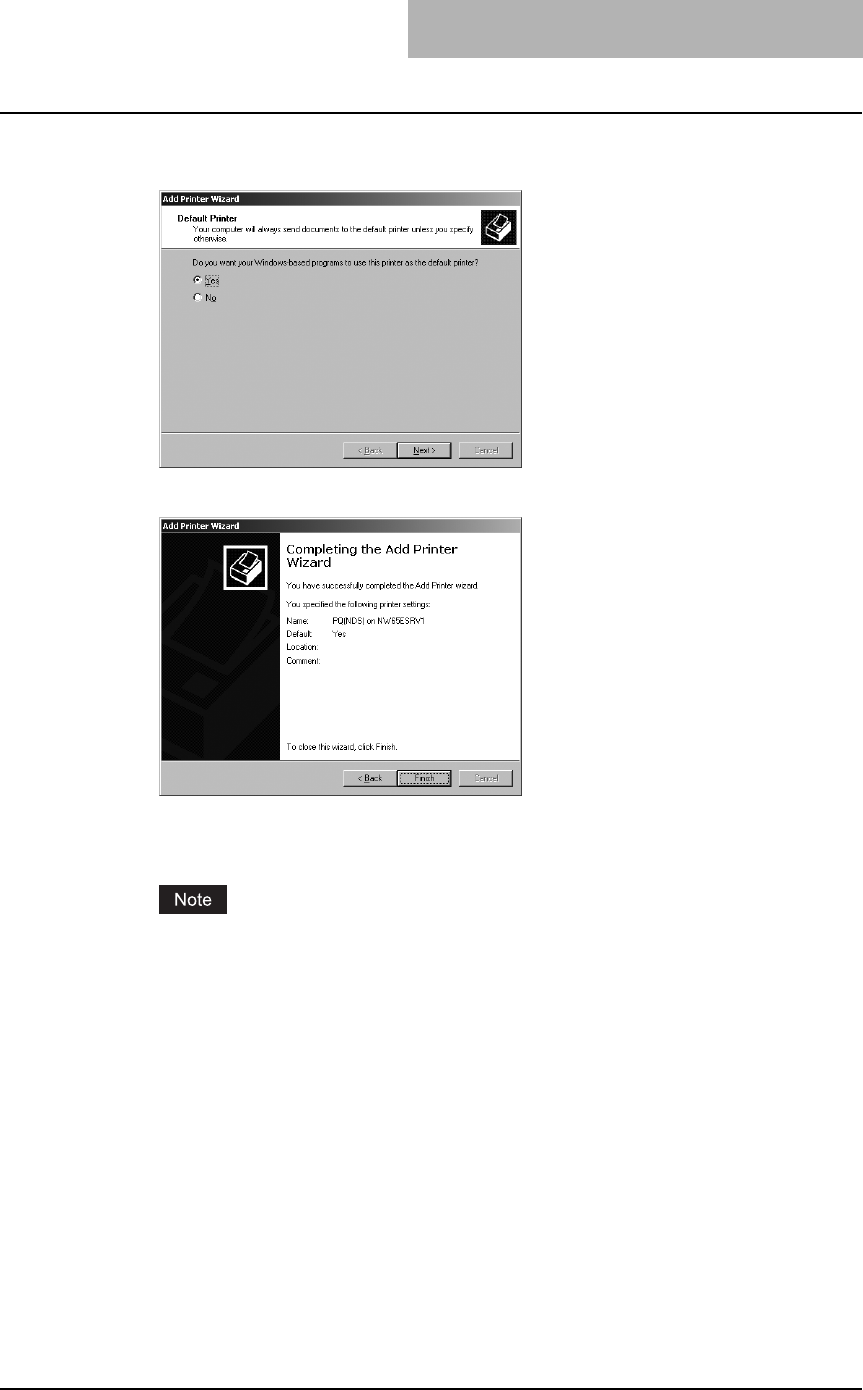
Installing Client Software for Windows 103
13
Select whether using this printer as a default printer and click
[Next].
14
Click [Finish].
Start copying files.
15
The installation is completed.
Before using the printer driver for printing, please configure the installed options of the
equipment and department code (if required) on the printer driver.
P.154 “Before using the printer driver”

2 INSTALLING CLIENT SOFTWARE
104 Installing Client Software for Windows
Installing client software for Novell iPrint
This section describes how to install the printer drivers for Novell iPrint.
yTo set up the iPrint in the client computers, the NetWare server must be configured for iPrint
first. For more information about setting up the NetWare server for Novell iPrint, please see
Network Administration Guide.
yBefore installing the printer driver for Novell iPrint, please make sure the following environ-
ments are satisfied in your computer.
- Microsoft Internet Explorer 5.0 or later or Netscape 4.76 is installed (iPrint is not sup-
ported on Netscape 6)
- JavaScript must be enabled on the web browser.
Installing the printer driver for Novell iPrint
To install the printer driver for Novell iPrint on the client computer, download and install the iPrint
Client and printer driver from the NetWare server.
1
Start the your web browser and enter the following URL in the
address bar.
http://<IP address or DNS for NDPS Manager>/ipp
If you do not know the IP address or DNS for NDPS Manager, please ask your network
administrator.
2
If the iPrint Client is not installed on your computer, you are
prompted to install it.
3
Click the printer that you want to install from the list of available
printers that is displayed in the iPrint web page.
The selected printer driver is installed on your computer.
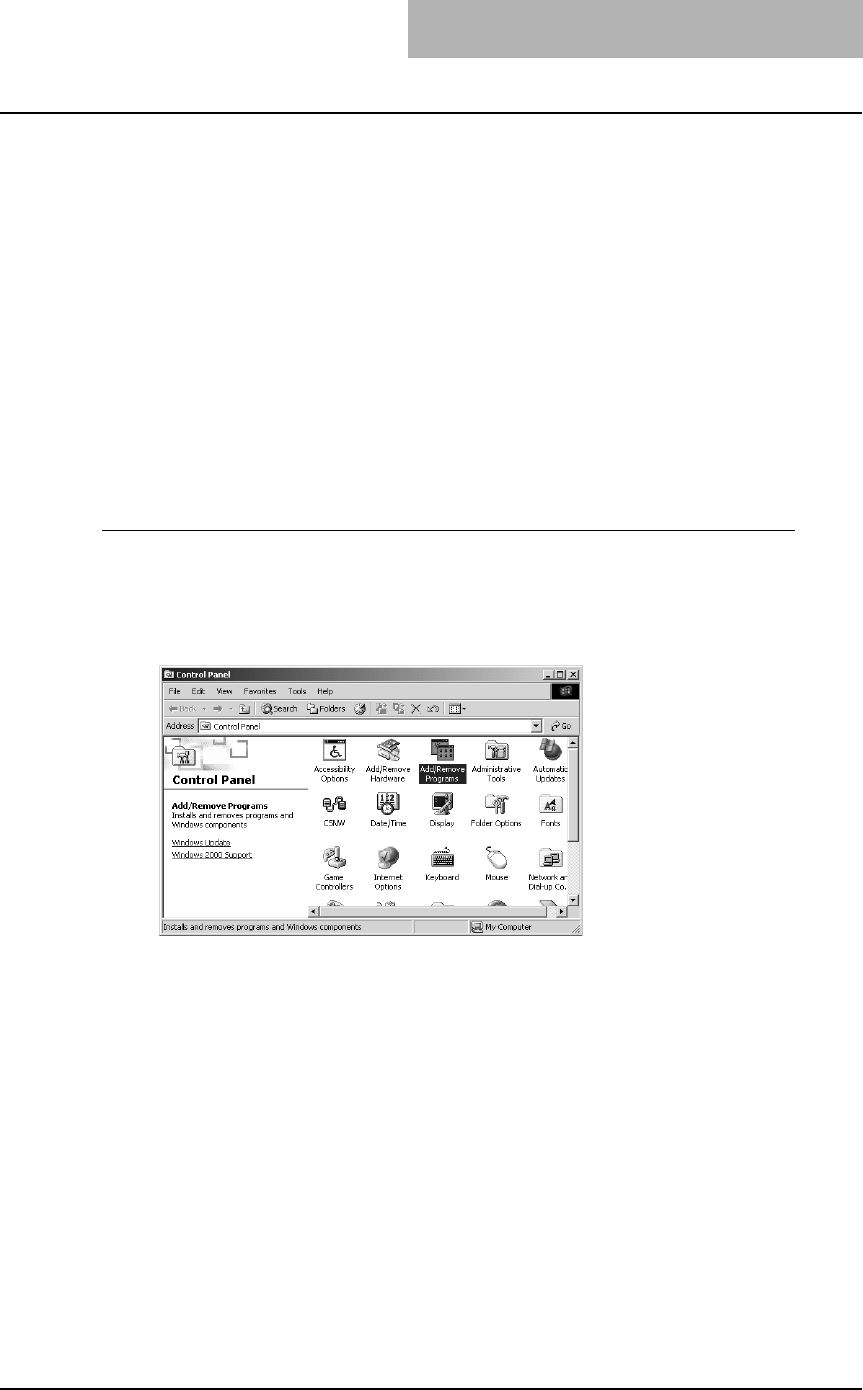
Installing Client Software for Windows 105
Uninstalling client utilities software
The following instructions describe how to uninstall the client software. The uninstallation proce-
dure is different how you installed the client software.
P.105 “When installed using the installer”
P.109 “When installed using Add Printer Wizard”
When installed using the installer
When the client software was installed using the Installer in the Client Utilities CD-ROM, you can
delete all files using the Add/Remove Programs function.
You can uninstall all client software that have installed from the Client Utilities CD-ROM, or you
can uninstall only the components that you want to remove.
P.105 “Uninstalling all client utilities software”
P.107 “Uninstalling only the components that you want to remove”
Uninstalling all client utilities software
The following describes an installation on Windows 2000. The procedure is the same when
other versions of Windows are used.
1
Open “Control Panel” and double-click the “Add/Remove Pro-
grams” icon.
The Add/Remove Programs dialog box appears.
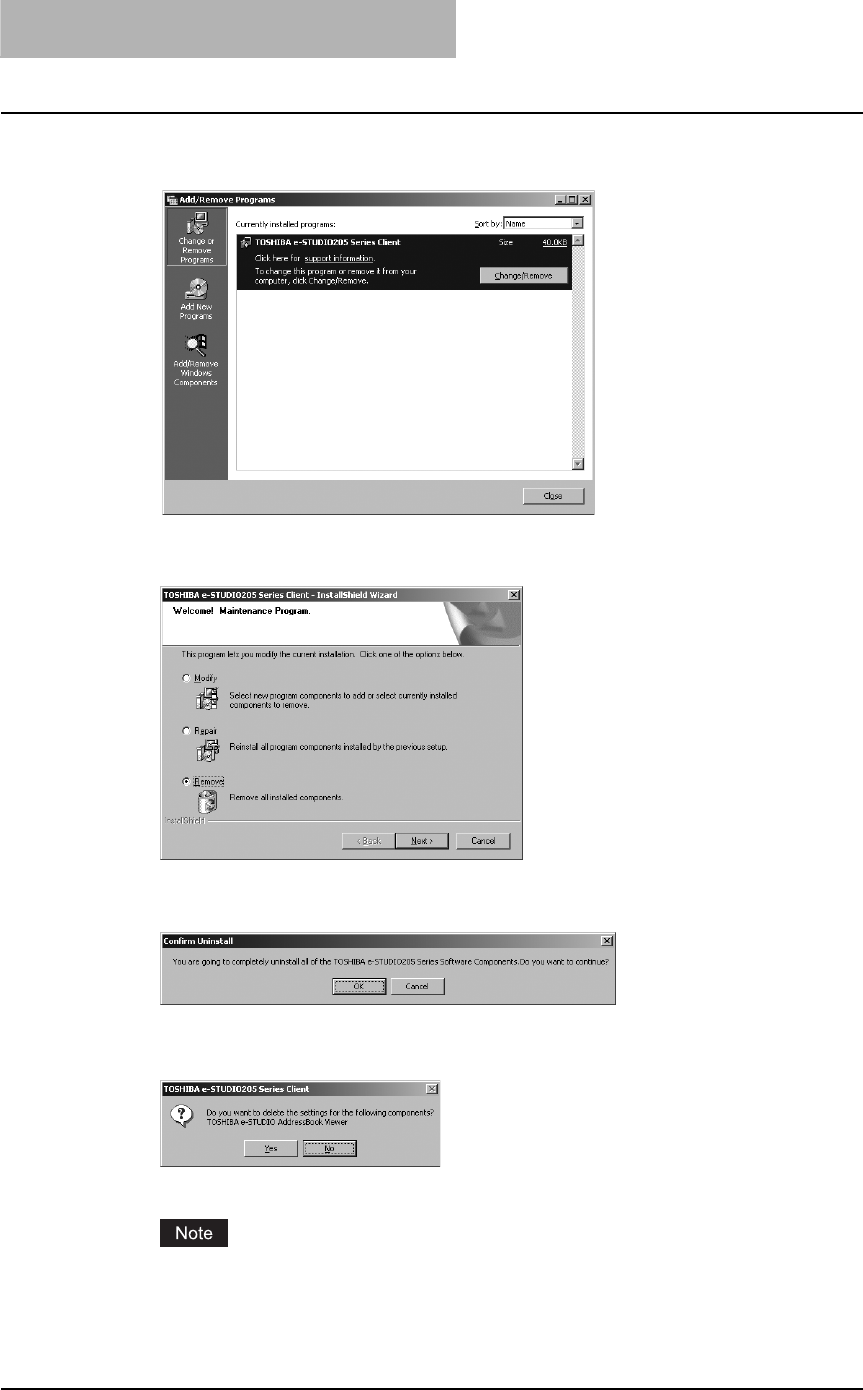
2 INSTALLING CLIENT SOFTWARE
106 Installing Client Software for Windows
2
Select “TOSHIBA e-STUDIO205 Series Client” and click [Change/
Remove].
The InstallShield Wizard dialog box appears.
3
Select “Remove” and click [Next].
The Confirm Uninstall dialog box appears.
4
Click [OK].
5
Click [Yes] to delete the setting files, if the following dialog box
appears.
Deleting files starts.
If you want to re-install the client software later, click [No] to keep the setting files. You
can restore the data and settings when you re-install the client software.
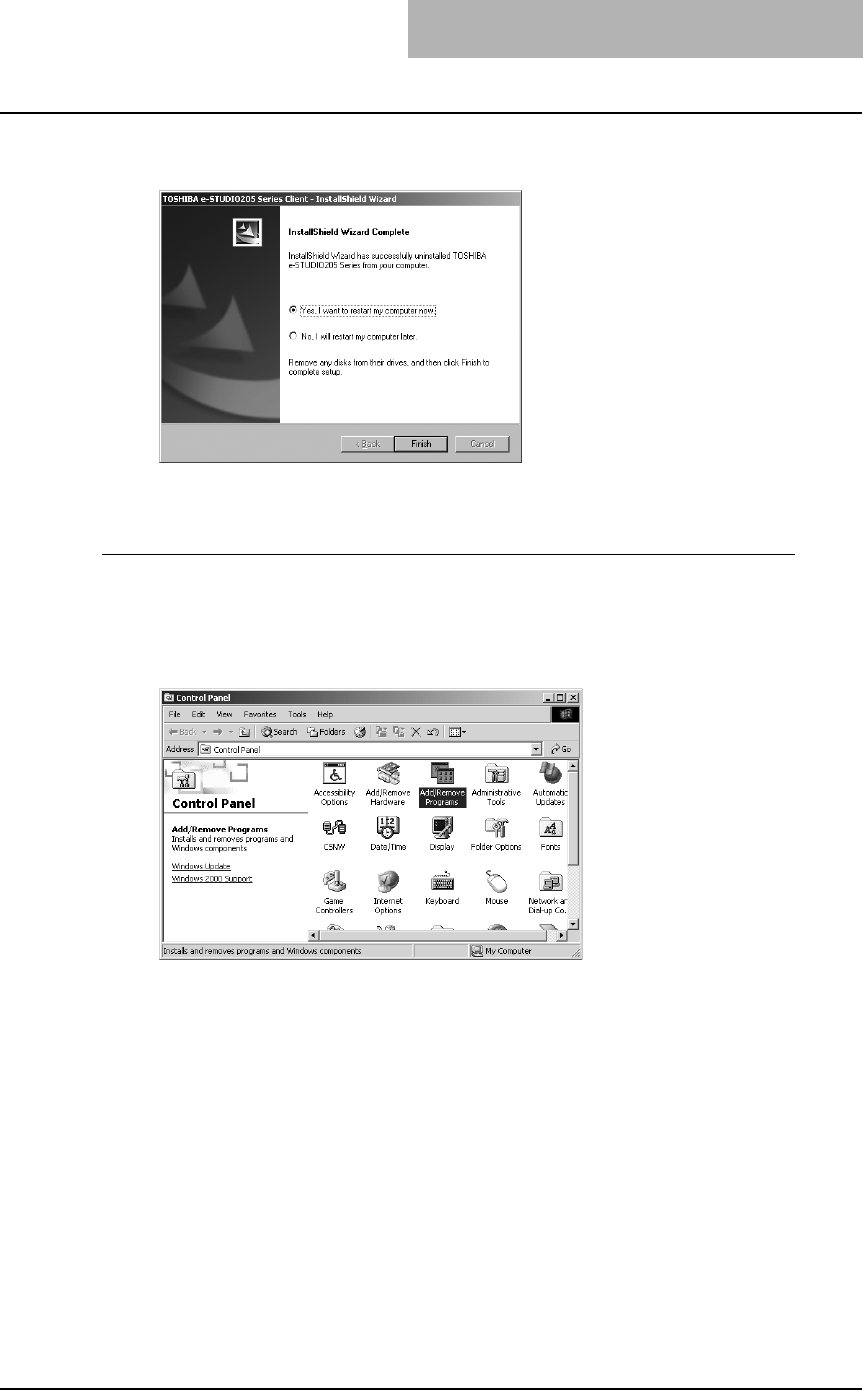
Installing Client Software for Windows 107
6
Select “Yes, I want to restart my computer now.” and click [Finish]
to restart your computer.
Some files may be deleted after restarting the computer.
Uninstalling only the components that you want to remove
The following describes an installation on Windows 2000. The procedure is the same when
other versions of Windows are used.
1
Open “Control Panel” and double-click the “Add/Remove Pro-
grams” icon.
The Add/Remove Programs dialog box appears.
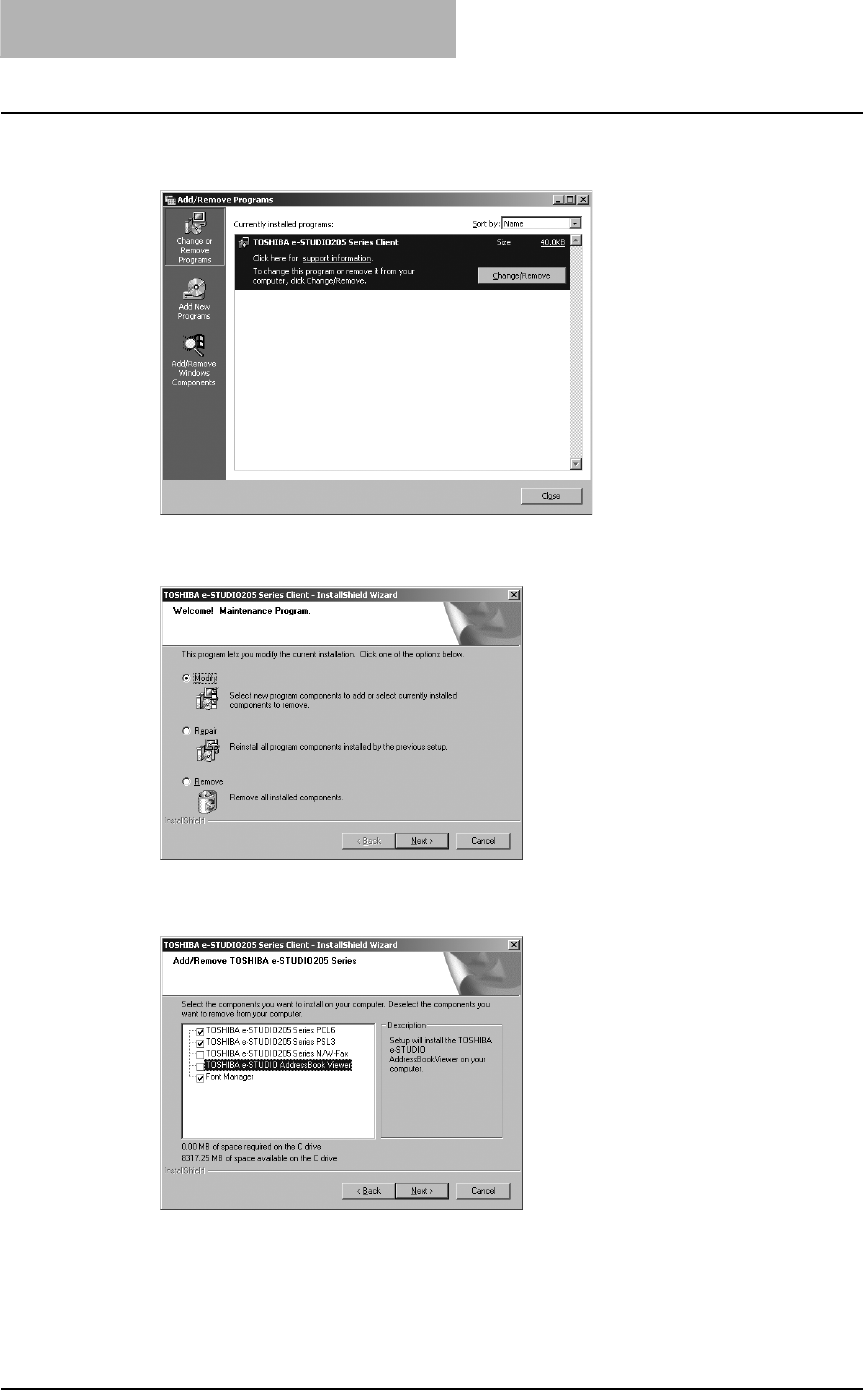
2 INSTALLING CLIENT SOFTWARE
108 Installing Client Software for Windows
2
Select “TOSHIBA e-STUDIO205 Series Client” and click [Change/
Remove].
The InstallShield Wizard dialog box appears.
3
Select “Modify” and click [Next].
4
Uncheck the components that you want to uninstall and click
[Next].
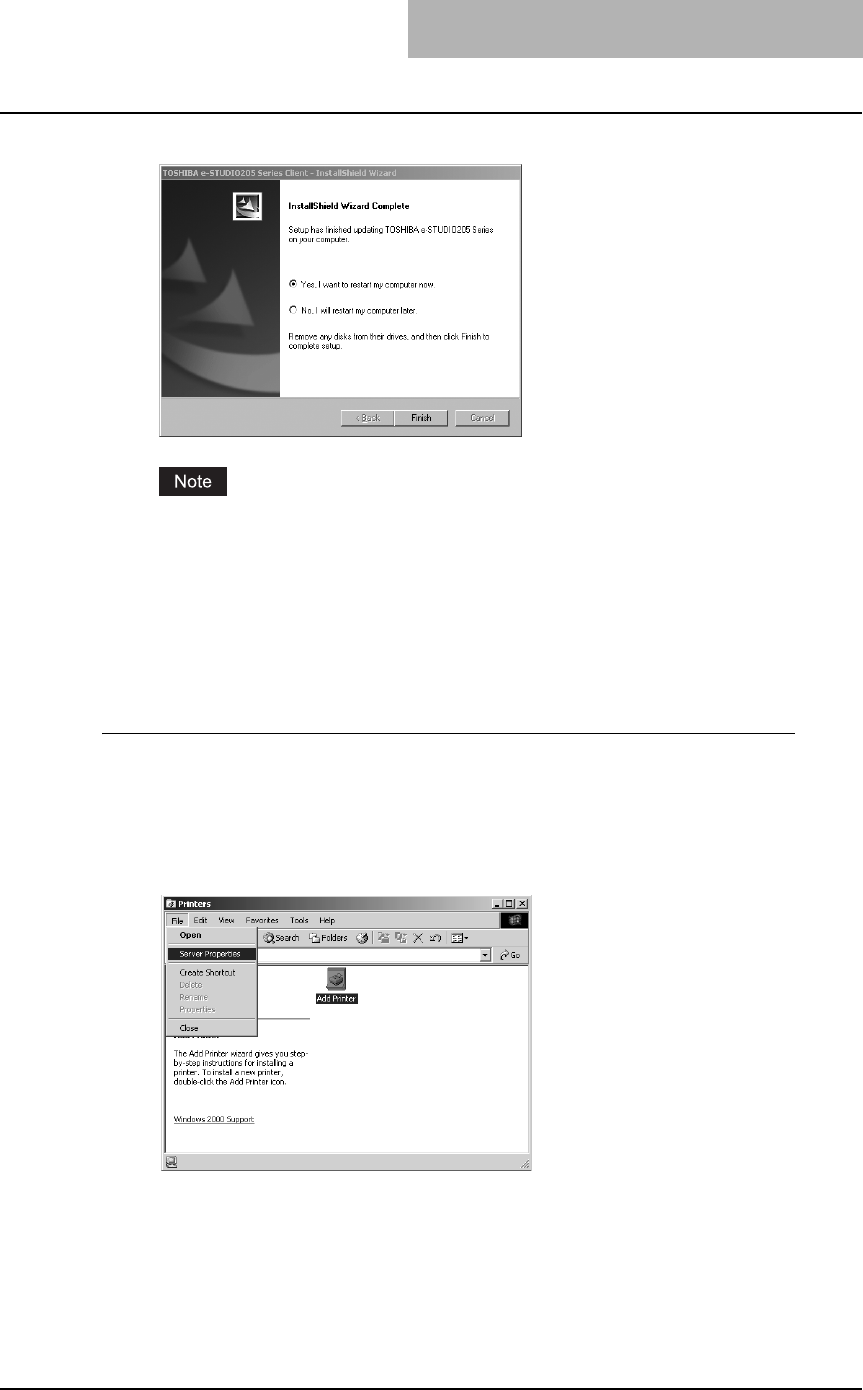
Installing Client Software for Windows 109
5
Click [Finish].
The Installer may ask you to restart your computer. If it does, select “Yes, I want to
restart my computer now.” and click [Finish] to restart your computer.
When installed using Add Printer Wizard
If only printer drivers are installed by Add Printer Wizard or Point and Print, you can uninstall
them by deleting the printer icons from the Printers folder.
Deleting printer drivers
1
Open “Printers” folder, select the printer icon that you want to
delete, and press the [Delete] key.
yWhen using Windows 98/Me or Windows NT 4.0, uninstallation has finished.
yWhen using Windows 2000/XP/Server 2003, continue to the next step.
2
Click the [File] menu and select [Server Properties].
The Print Server Properties dialog box appears.
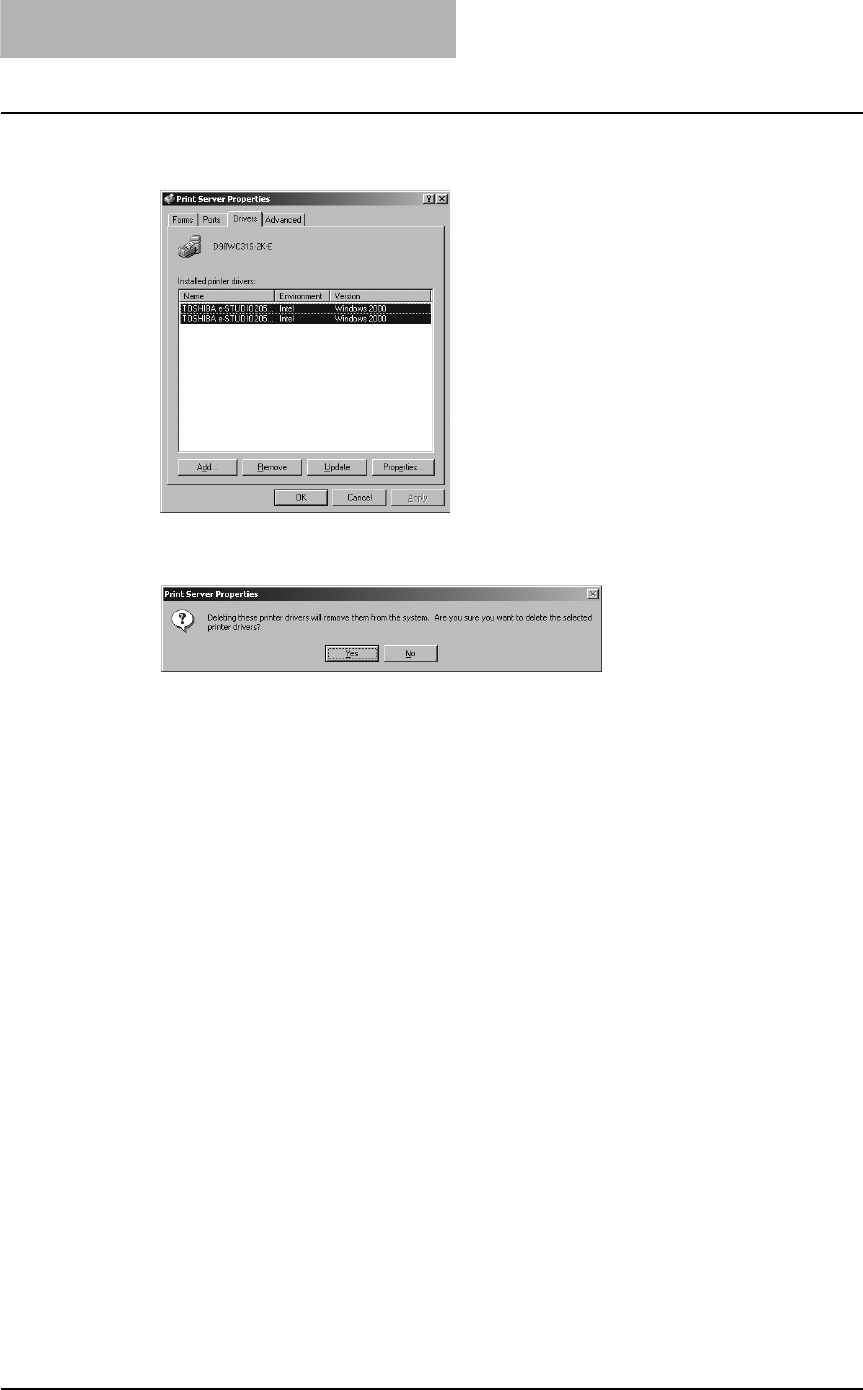
2 INSTALLING CLIENT SOFTWARE
110 Installing Client Software for Windows
3
Select the Drivers tab. Select the printer drivers that you want to
delete, and click [Remove].
The confirmation dialog box appears.
4
Click [Yes].
The printer drivers are completely deleted.

Installing Client Software for Macintosh 111
Installing Client Software for Macintosh
Please refer to following instructions for configuring printing systems on Macintosh computers.
P.111 “About client software for Macintosh”
P.111 “Planning for installation”
P.113 “Installing the printer on Mac OS 8.6/9.x”
P.119 “Installing the printer on Mac OS X 10.2.4 to Mac OS X 10.4.x”
About client software for Macintosh
PostScript Printer Description file
The Macintosh PPD (PostScript Printer Description) file contains information about controller-
specific features. There are two PPD files provided in the Client Utilities CD-ROM: one is for
Mac OS 8.6/9.x and the other is for Mac OS X.
Information within the PPD file for Mac OS 8.6/9.x works in conjunction with the standard Macin-
tosh LaserWriter 8 printer driver version 8.6.5 (or later). This Macintosh PPDs are supplied for
Mac OS 8.6 to 9.x and it also supports Mac OS X 10.1/10.2 Classic mode.
Information within the PPD file for Mac OS X works in conjunction with the Print Center on Mac
OS X 10.2.4 to Mac OS X 10.4.x.
Planning for installation
System requirements
To install the printer drivers on a Mac OS computer, the following environment is required.
Display Resolution: 1028 x 768 dots or more
OS: Mac OS 8.6 to 9.x, Mac OS X 10.1 (Classic), Mac OS X 10.2 (Classic)
Mac OS X 10.2.4 to Mac OS X 10.4.x
Protocol: TCP/IP, AppleTalk (Ethernet), Bonjour
Printer Driver: LaserWriter 8 printer driver version 8.6.5 or later
(not required for Mac OS X)
Mac OS X 10.2 and its earlier versions of Mac OS X are supported in Classic mode using the
PPD file for Mac OS 8.6 to 9.x. This equipment also provides the PPD file for Mac OS X 10.2.4
to Mac OS X 10.4.x.
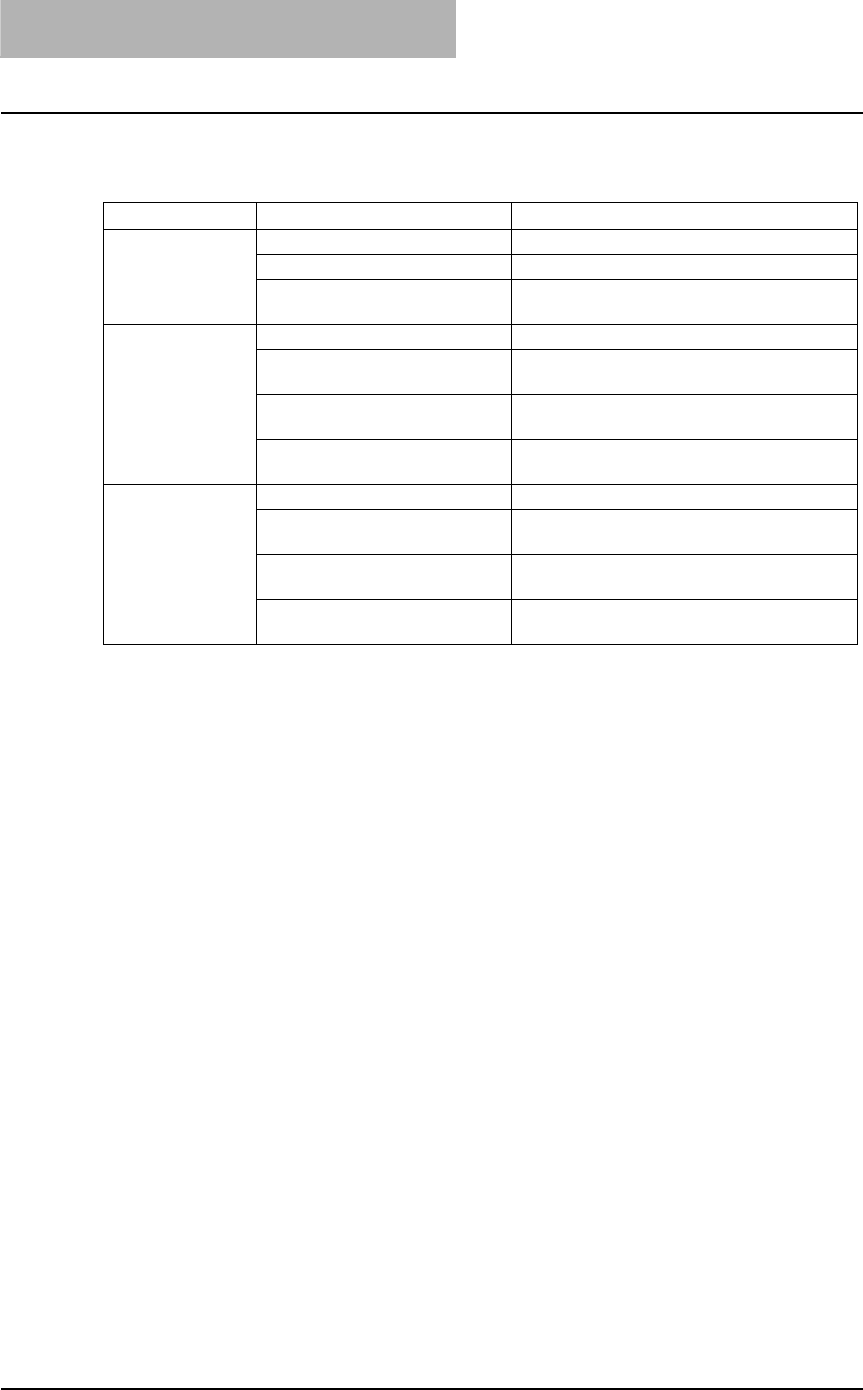
2 INSTALLING CLIENT SOFTWARE
112 Installing Client Software for Macintosh
Installation procedure list for Maintosh client software
The following table shows the procedure list to install the PPD files and configure the printers.
OS Description Refer to
Mac OS 8.6/9.x PPD file installation P.113 “Installing the Macintosh PPD file”
LPR printing P.114 “Configuring Macintosh LPR printing”
AppleTalk printing configuration P.117 “Configuring Macintosh AppleTalk
printing”
Mac OS X 10.2.4
to 10.3.x
PPD file installation P.119 “Installing the Macintosh PPD file”
IP printing P.123 “Configuring Macintosh IP printing on
Mac OS X 10.2.4 to 10.3.x”
IPP printing P.125 “Configuring Macintosh IPP printing
on Mac OS X 10.2.4 to 10.3.x”
AppleTalk/Bonjour printing P.127 “Configuring Macintosh AppleTalk/
Bonjour printing on Mac OS X 10.2.4 to 10.3.x”
Mac OS X 10.4.x PPD file installation P.119 “Installing the Macintosh PPD file”
IP printing P.130 “Configuring Macintosh IP printing on
Mac OS X 10.4.x”
IPP printing P.132 “Configuring Macintosh IPP printing
on Mac OS X 10.4.x”
AppleTalk/Bonjour printing P.133 “Configuring Macintosh AppleTalk/
Bonjour printing on Mac OS X 10.4.x”

Installing Client Software for Macintosh 113
Installing the printer on Mac OS 8.6/9.x
Installing the Macintosh PPD file
The Macintosh PPD file that is provided in the Client Utilities CD-ROM can be installed by copy-
ing it to the System Folder: Extensions: Printer Descriptions folder.
This PPD file supports printing from Mac OS 8.6 or 9.x. In addition, it supports printing with these
operating systems running on Mac OS X 10.1/10.2 allowing operation in classic mode.
The options need to be configured manually in Mac OS X 10.1.
Copying the PPD file to Mac OS 8.6 or 9.x
1
Insert the Client Utilities CD-ROM into the CD-ROM drive and open
your language folder in the “MacPPD:OS9” folder.
2
Copy the Stufflt file (TOSHIBA_e-STUDIO205Srs.sit) to the desktop,
and extract the Macintosh PPD file.
To extract the file, the Stufflt utility must be installed on your computer. For instructions
on how to extract the file, refer to your StuffIt documentation.
3
Double-click the boot drive icon and open the “System
Folder:Extensions:Printer Descriptions” folder.
4
Select and drag the Macintosh PPD file that you extracted to the
“Printer Descriptions” folder.
5
Continue the procedure for configuring the printer.
P.113 “Configuring the printer on Mac OS 8.6/9.x”
Configuring the printer on Mac OS 8.6/9.x
After you copy the PPD file to the Printer Descriptions folder in the System Folder, you can con-
figure the printer.
This equipment supports two types of Macintosh Printing Service: LPR Printing or AppleTalk
Printing.
yLPR printing
When this equipment and your computer are connected over the TCP/IP network, you can
enable LPR printing from a Macintosh computer.
yAppleTalk printing
When this equipment and your computer are connected over the AppleTalk network, you can
enable AppleTalk printing from a Macintosh computer.
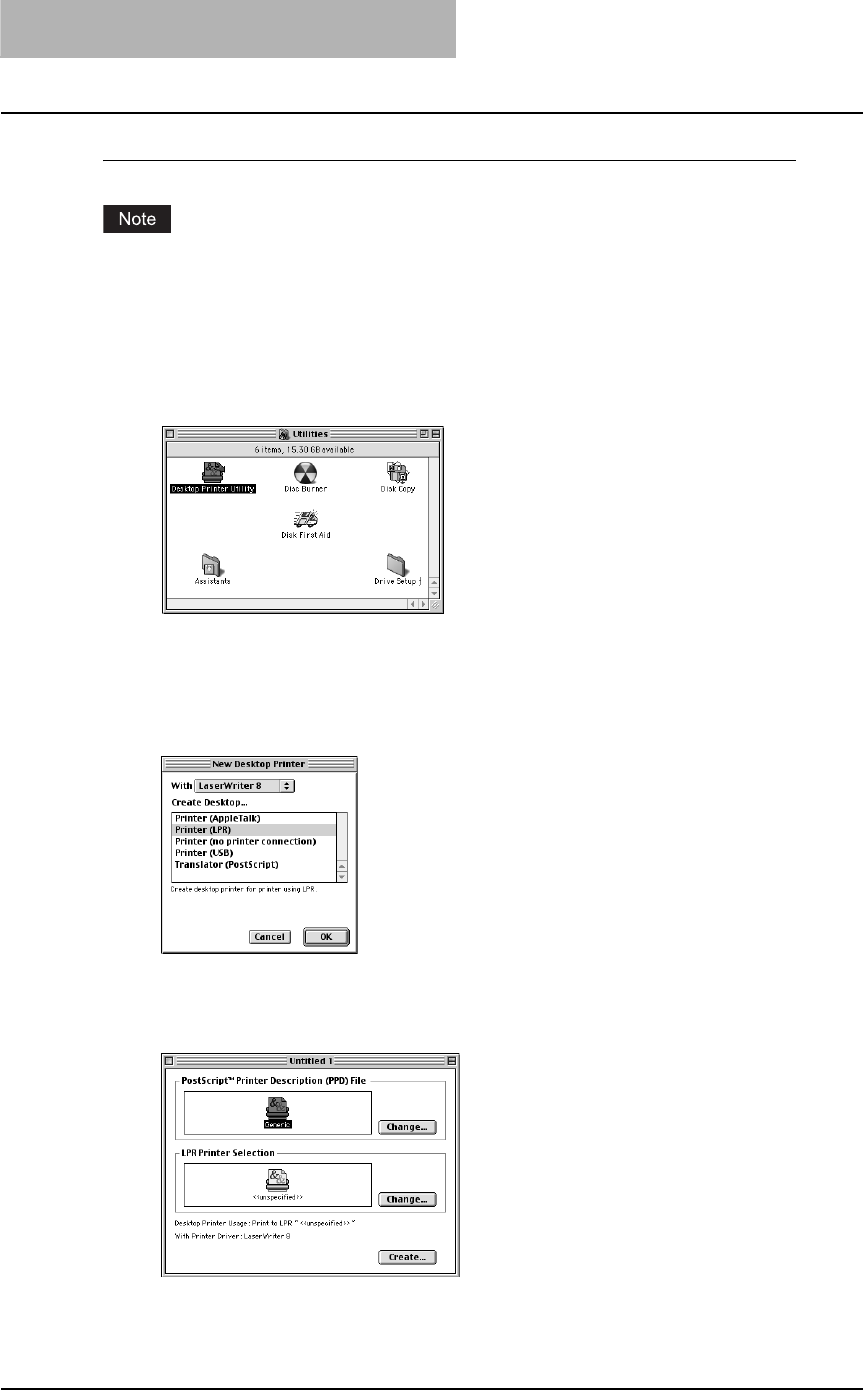
2 INSTALLING CLIENT SOFTWARE
114 Installing Client Software for Macintosh
Configuring Macintosh LPR printing
Before installing the printer driver for LPR printing on Macintosh, check with your system admin-
istrator to make sure of the following:
- This equipment is connected to the network and turned on.
- The TCP/IP setting is correct.
- LPD Printing Service is enabled on this equipment. Ask your administrator if the LPD Printing
Service is enabled.
1
Start the Desktop Printer Utility.
yThe folder containing the Desktop Printer Utility differs depending on the Mac OS ver-
sion. If you cannot locate the Desktop Printer Utility, search it in the boot disk.
yThe New Desktop Printer dialog box appears.
2
Make sure “LaserWriter 8” is selected in the “With” drop down
menu, select “Printer (LPR)” and click [OK].
The Macintosh LPR Printer Selection dialog box opens.
3
Click [Change...] in the PostScript Printer Description (PPD) File
area.
The Select a PostScript Printer Description File dialog box appears.
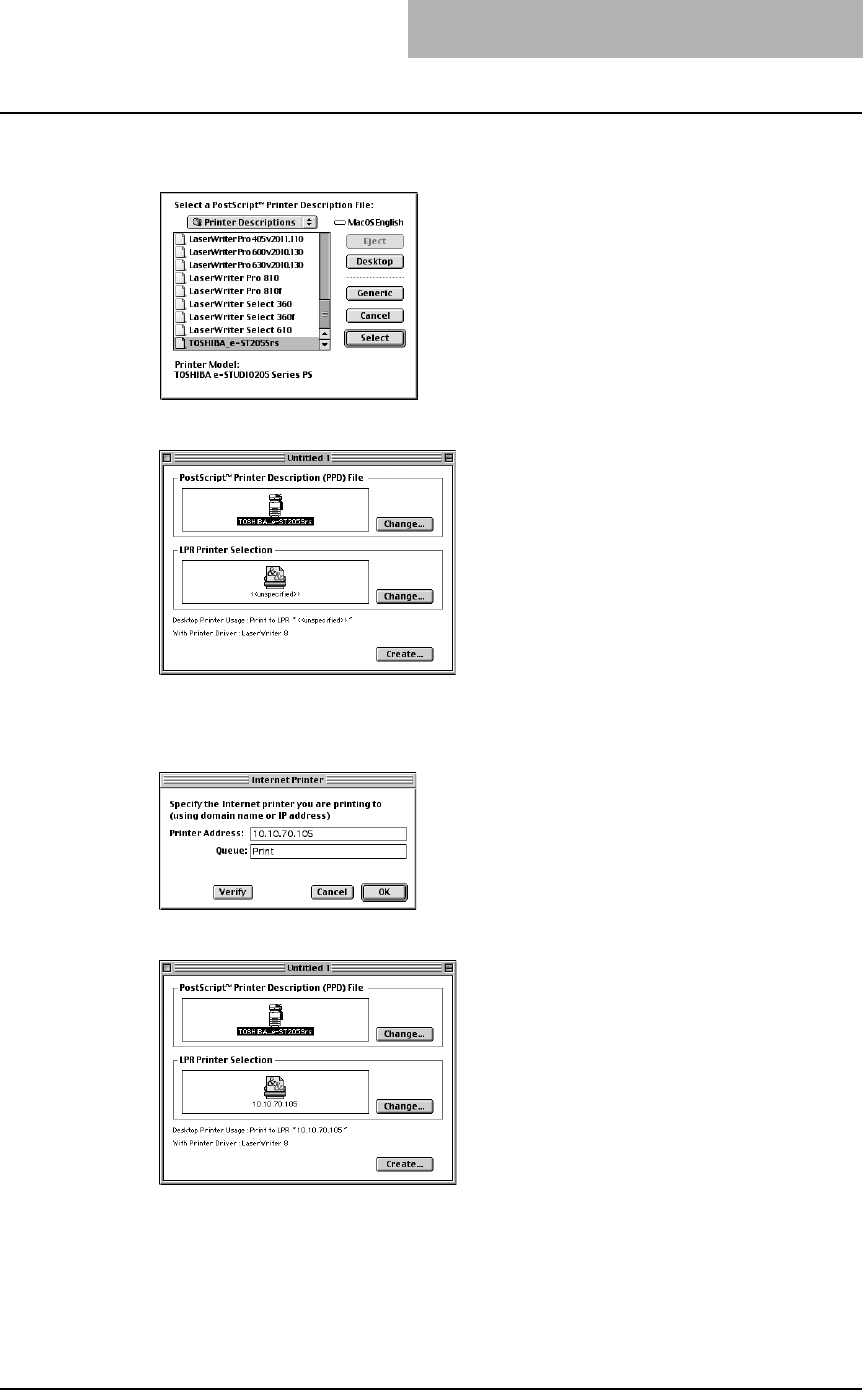
Installing Client Software for Macintosh 115
4
Select the PPD file (TOSHIBA_e-STUDIO205Srs) for the equipment
and click [Select].
5
Click [Change...] in the LPR Printer Selection area.
The Internet Printer dialog box appears.
6
Enter the IP Address of this equipment in the “Printer Address”
field and “Print” in the “Queue” field. Then click [OK].
7
Click [Create...].
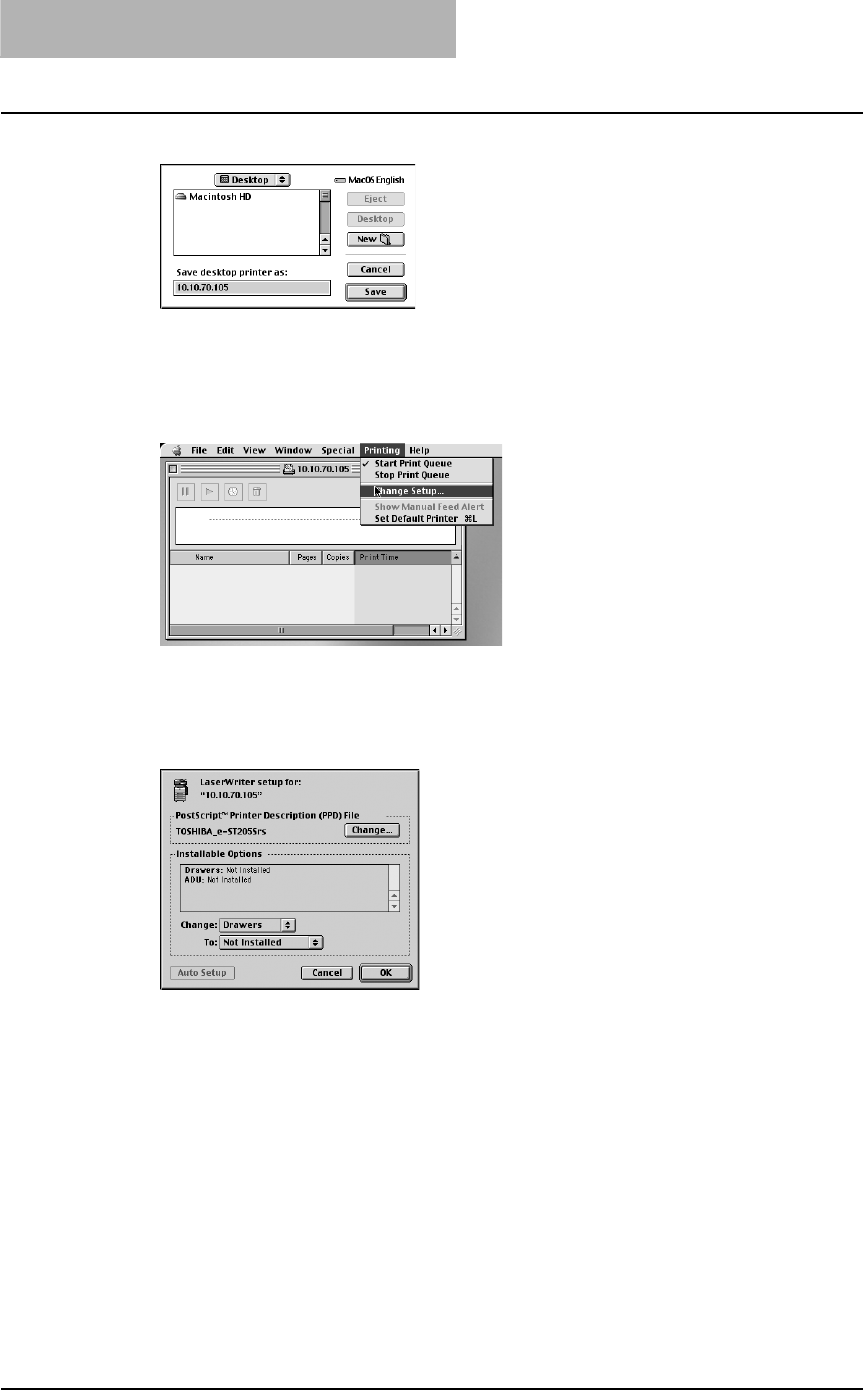
2 INSTALLING CLIENT SOFTWARE
116 Installing Client Software for Macintosh
8
Enter the Desktop Printer name and click [Save].
The printer is added to the desktop.
9
Double-click the desktop printer icon that you created.
The Desktop Printer utility window opens.
10
Click the [Printing] menu and select [Change Setup...].
The LaserWriter setup dialog box appears.
11
Select each option item in the “Change” drop down menu and
select installed option in the “To” drop down menu according to the
configuration of this equipment.
yDrawers
Not Installed – Select this when no optional paper feed unit is installed.
Drawer 2 – Select this when only the Paper Feed Unit (optional) is installed.
Drawer 2 & 3 – Select this when the Paper Feed Unit (optional) and Paper Feed Pedestal
(optional, its upper Drawer only) are installed.
Drawer 2, 3 & 4 – Select this when the Paper Feed Unit (optional) and Paper Feed
Pedestal (optional, both of its upper and lower Drawers) are installed.
yADU
Not Installed – Select this when the Automatic Duplexing Unit (optional) is not installed.
Installed – Select this when the Automatic Duplexing Unit (optional) is installed.
12
Click [OK].
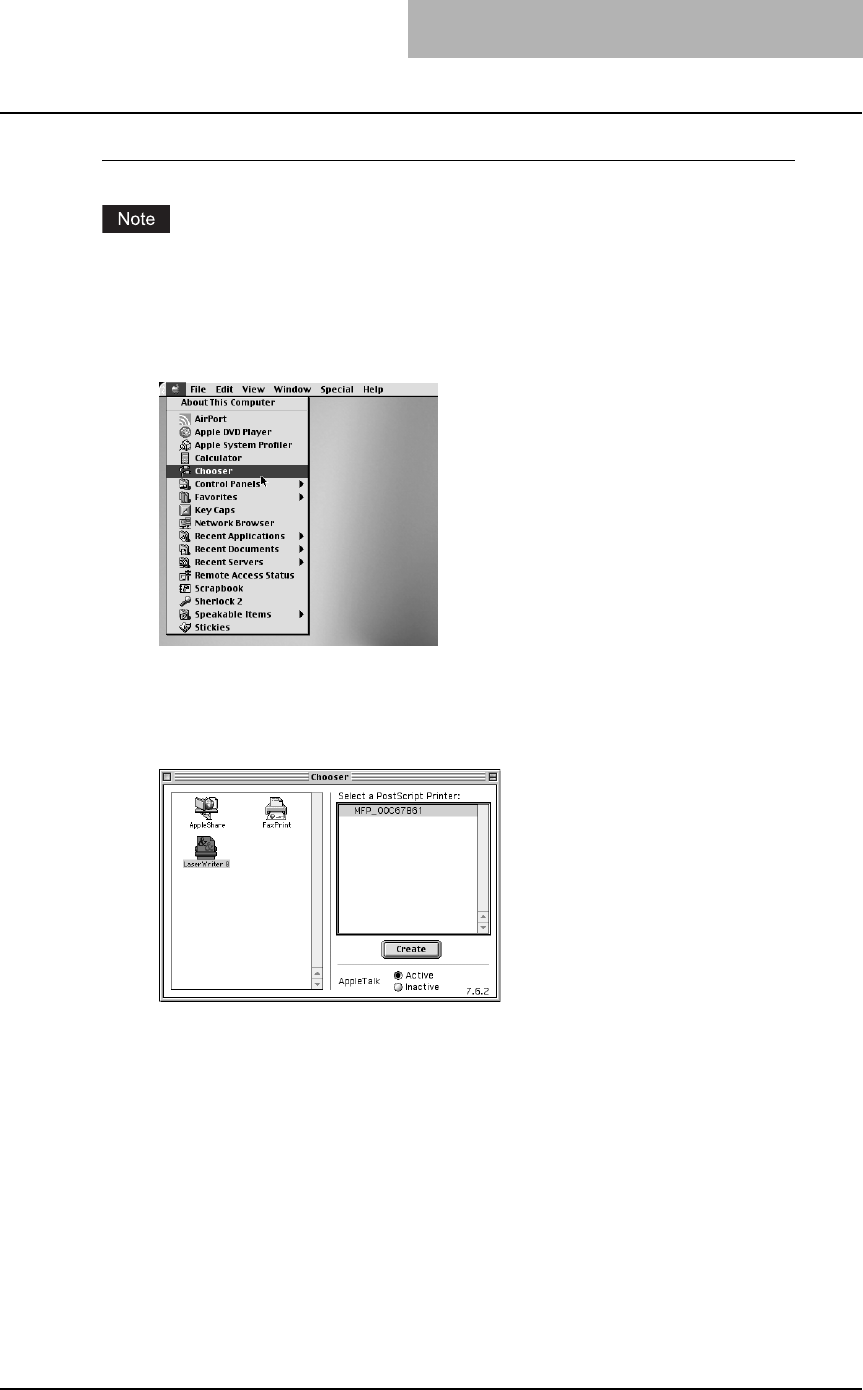
Installing Client Software for Macintosh 117
Configuring Macintosh AppleTalk printing
Before installing the printer driver for AppleTalk printing on Macintosh, check with your system
administrator to make sure of the following:
- This equipment is connected to the network and turned on.
- AppleTalk is enabled. Ask your administrator if AppleTalk is enabled.
1
Click Apple menu and select [Chooser].
The Chooser dialog box appears.
2
Select the LaserWriter 8 icon (and select the AppleTalk zone if con-
figured). Then select this equipment displayed in the list, and click
[Create].
The Select a PostScript Printer Description File dialog box appears.
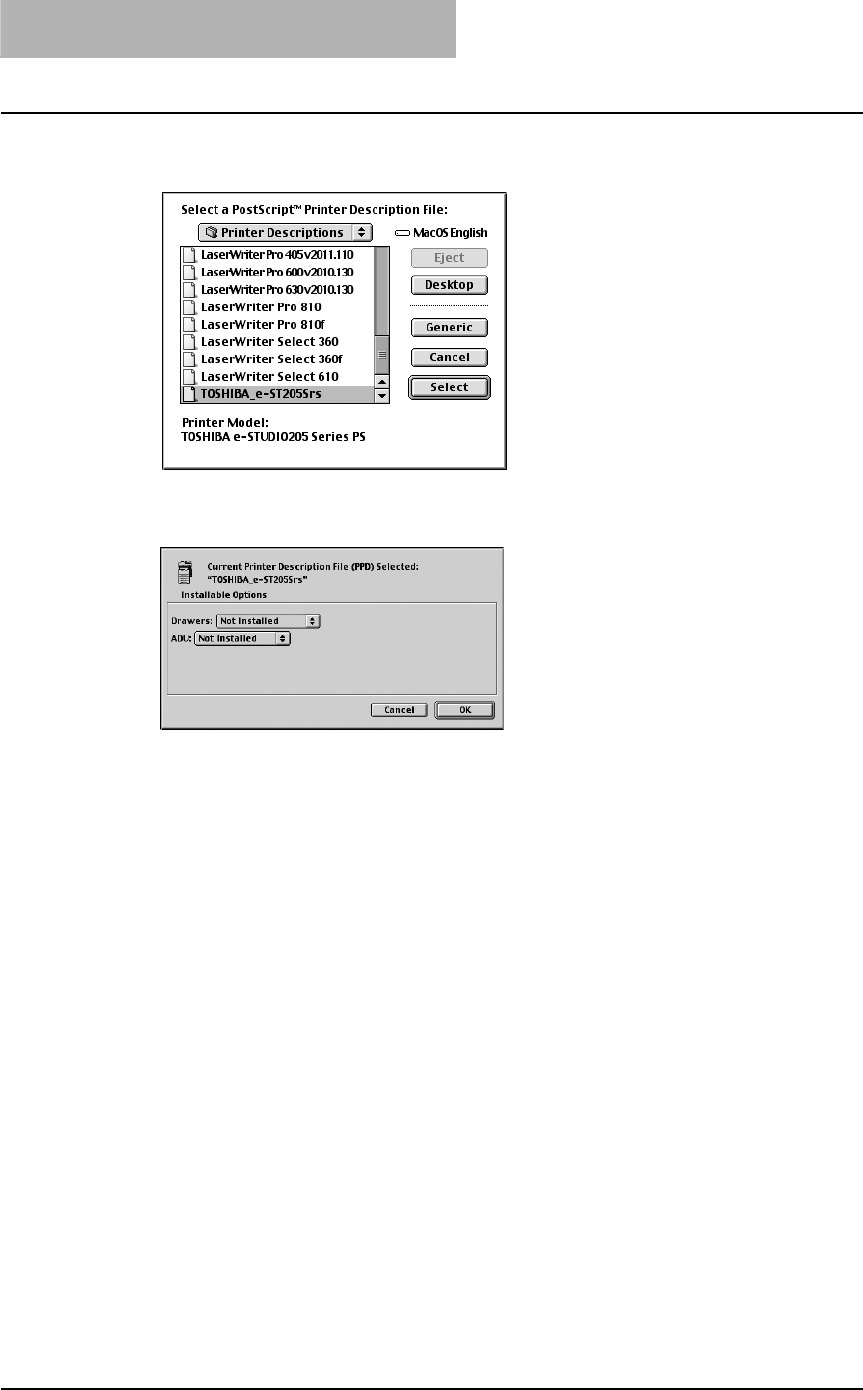
2 INSTALLING CLIENT SOFTWARE
118 Installing Client Software for Macintosh
3
Select the PPD file (TOSHIBA_e-STUDIO205Srs) for the equipment
and click [Select].
4
Select each option according to the configuration of this equipment
and click [OK].
yDrawers
Not Installed – Select this when no optional paper feed unit is installed.
Drawer 2 – Select this when only the Paper Feed Unit (optional) is installed.
Drawer 2 & 3 – Select this when the Paper Feed Unit (optional) and Paper Feed Pedestal
(optional, its upper Drawer only) are installed.
Drawer 2, 3 & 4 – Select this when the Paper Feed Unit (optional) and Paper Feed
Pedestal (optional, both of its upper and lower Drawers) are installed.
yADU
Not Installed – Select this when the Automatic Duplexing Unit (optional) is not installed.
Installed – Select this when the Automatic Duplexing Unit (optional) is installed.
5
Close the Chooser Dialog box.
The Printer icon is created on the desktop.
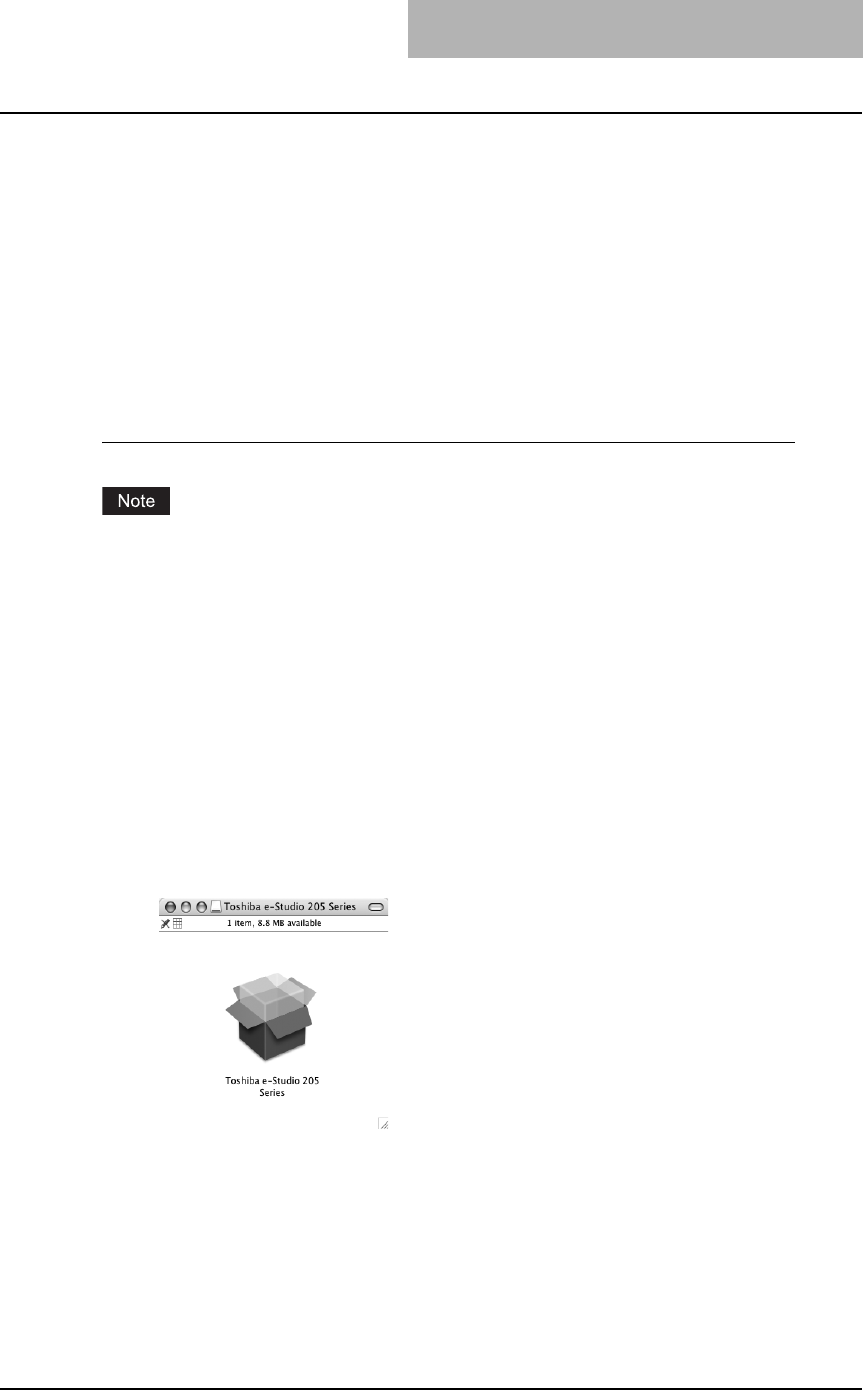
Installing Client Software for Macintosh 119
Installing the printer on Mac OS X 10.2.4 to Mac OS X 10.4.x
Install and configure the printer by the following steps:
P.119 “Installing the Macintosh PPD file”
P.122 “Configuring the printer on Mac OS X 10.2.4 to 10.3.x”
P.129 “Configuring the printer on Mac OS X 10.4.x”
P.136 “Configuring the installable options”
Installing the Macintosh PPD file
This equipment supports printing from Mac OS X 10.2.4 to Mac OS X 10.4.x.
Installing the PPD file to Mac OS X
The timing that the Authenticate dialog box to enter your name and password appears differs
depending on the version of your OS.
1
Insert the Client Utilities CD-ROM into the CD-ROM drive and open
the “MacPPD:OSX” folder.
2
Copy the GZ file (TOSHIBA_e-STUDIO205Srs.dmg.gz) to the desk-
top.
3
Double-click the GZ file on the desktop.
If the installer window does appear, go to step 5.
4
Double-click the GZIP file (TOSHIBA_e-STUDIO205Srs.dmg) and
then click the “Toshiba e-Studio 205 Series” icon.
The installer window appears.
5
Double-click the icon in the installer window.
The welcome message is displayed.
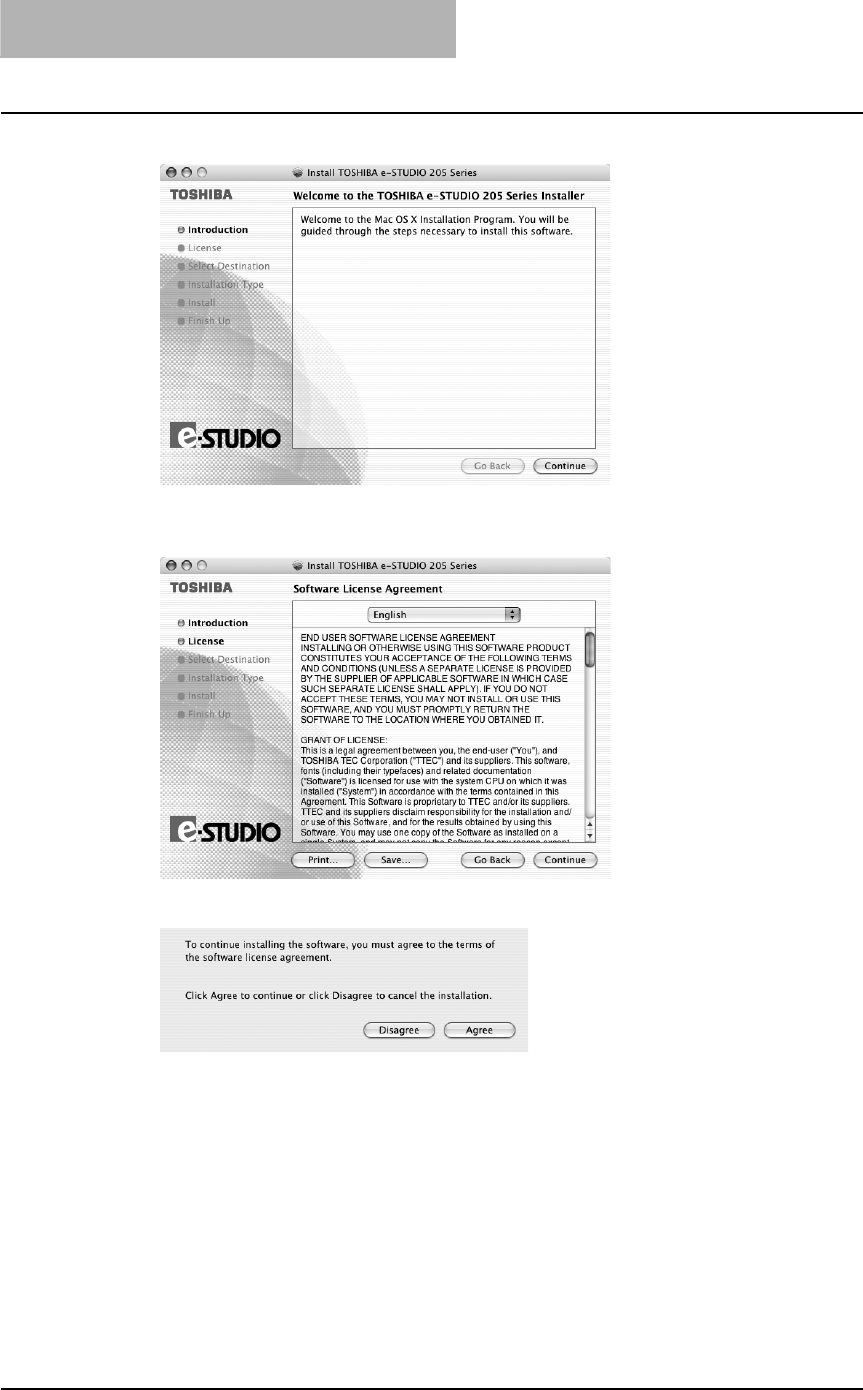
2 INSTALLING CLIENT SOFTWARE
120 Installing Client Software for Macintosh
6
Click [Continue].
The Software License Agreement window is displayed.
7
Click [Continue].
8
Click [Agree].
The Select a Destination window is displayed.
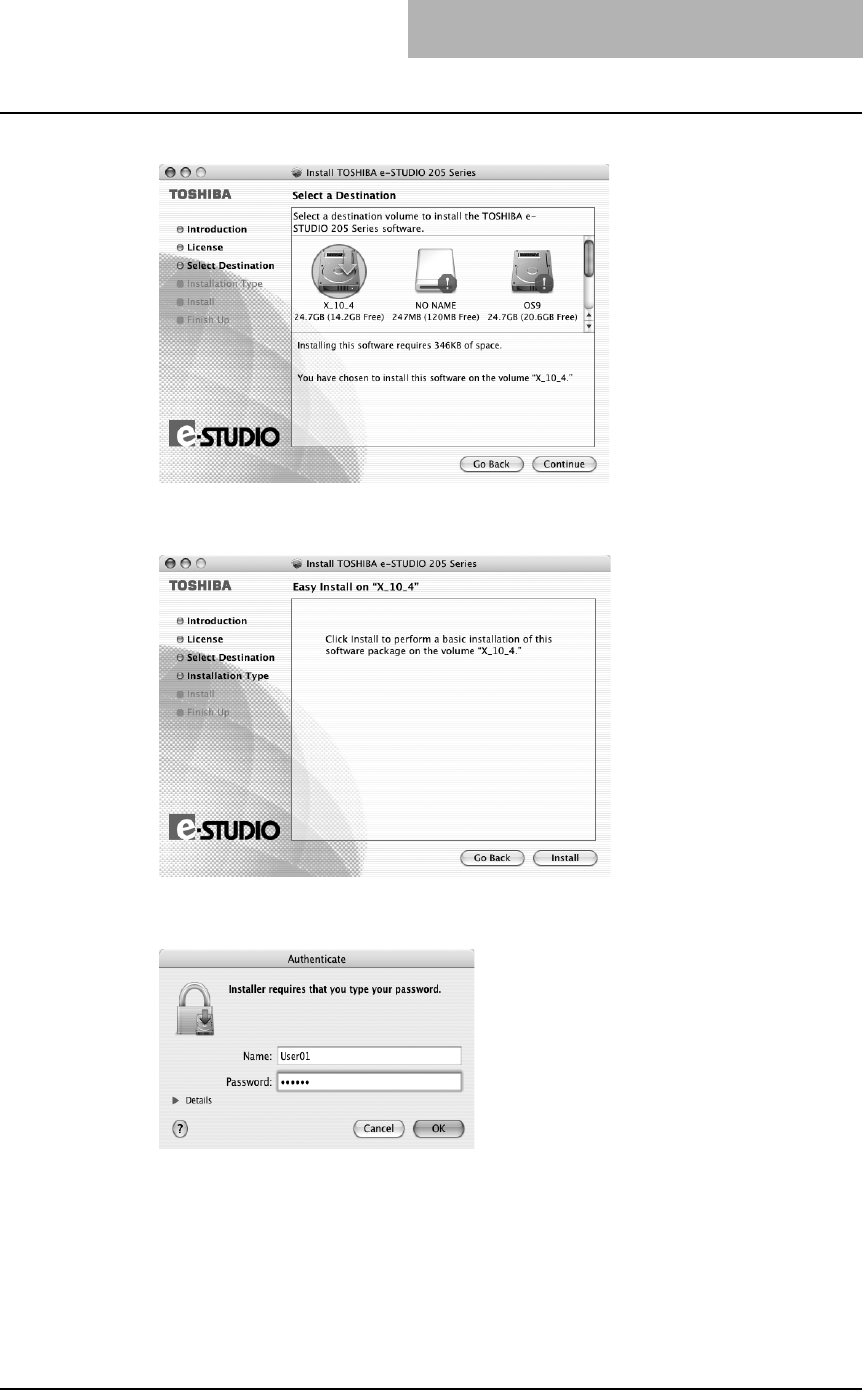
Installing Client Software for Macintosh 121
9
Select the boot hard disk of your Mac OS X and click [Continue].
The Easy Install window is displayed.
10
Click [Install] (or [Upgrade]).
It start copying the PPD files for each language.
11
Enter the name and password, and click [OK].
The Install Software window is displayed.

2 INSTALLING CLIENT SOFTWARE
122 Installing Client Software for Macintosh
12
Click [Close] to close the installer window.
13
Delete the GZIP files and Installer files created from the desktop.
14
Continue the procedure for configuring the printer.
P.122 “Configuring the printer on Mac OS X 10.2.4 to 10.3.x”
P.129 “Configuring the printer on Mac OS X 10.4.x”
Configuring the printer on Mac OS X 10.2.4 to 10.3.x
This equipment supports the following Macintosh Printing Services: IP printing, IPP printing,
AppleTalk printing and Bonjour printing.
yIP printing
When this equipment and your computer are connected over the TCP/IP network, you can
enable IP printing from a Macintosh computer.
yIPP printing
When this equipment and your computer are connected over the TCP/IP network, you can
enable IPP printing from a Macintosh computer.
yAppleTalk printing
When this equipment and your computer are connected over the AppleTalk network, you can
enable AppleTalk printing from a Macintosh computer.
yBonjour printing (only for Mac OS X 10.3.x/10.4.x)
When this equipment and your computer are connected over the TCP/IP network, you can
enable Bonjour printing from a Macintosh computer.
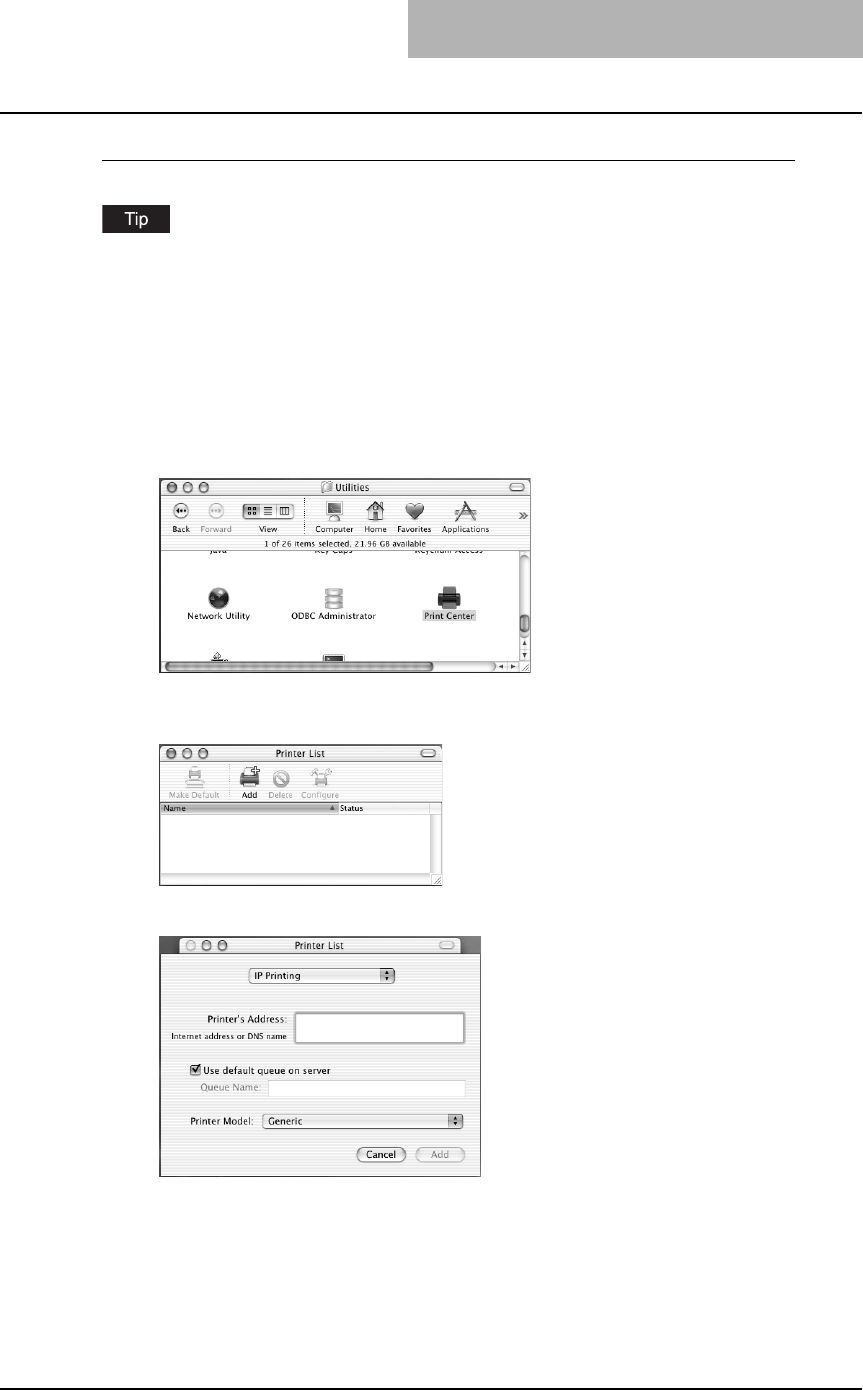
Installing Client Software for Macintosh 123
Configuring Macintosh IP printing on Mac OS X 10.2.4 to 10.3.x
Before installing the printer driver for IP printing, check with your system administrator to make
sure of the following:
- This equipment is connected to the network and turned on.
- The TCP/IP setting is correct.
- LPD Printing Service is enabled on this equipment. Ask your administrator if the LPD Printing
Service is enabled.
1
Start the Print Center (for Mac OS X 10.2.4 to 10.2.8) or Printer Setup
Utility (for Mac OS X 10.3.x), located in the “Applications:Utilities”
folder in the Boot Disk.
The Printer List dialog box appears.
2
Click [Add].
3
Select “IP Printing” in the drop down box.
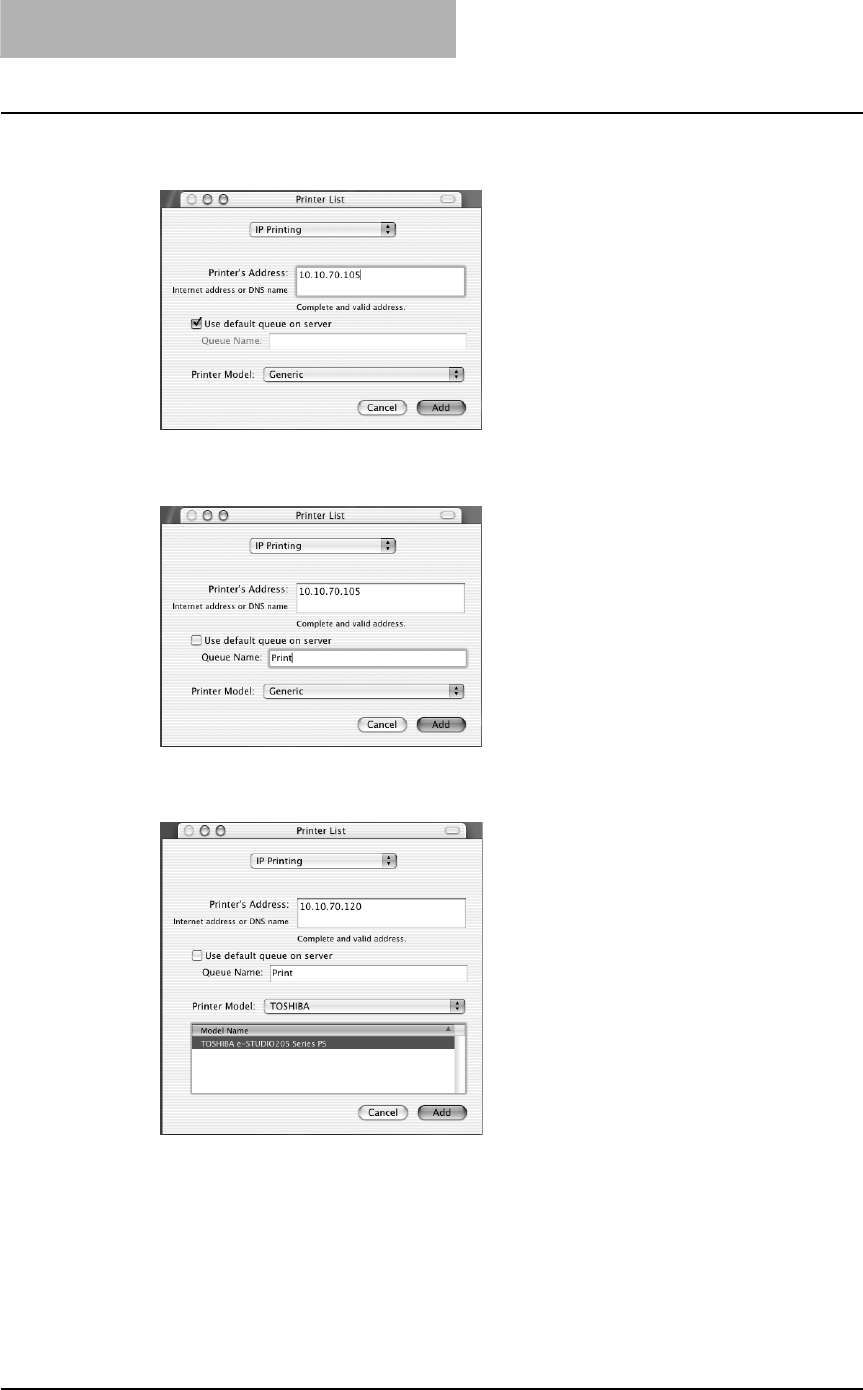
2 INSTALLING CLIENT SOFTWARE
124 Installing Client Software for Macintosh
4
Enter the IP address or DNS name of this equipment in the
“Printer’s Address” field.
5
Uncheck the “Use default queue on server” box and enter “Print” in
the “Queue Name” field.
6
Select “TOSHIBA” at the “Printer Model” drop down box, and select
the PPD file.
7
Click [Add].
The printer is added to the Printer List.
8
Continue the procedure to configure the installable options.
P.136 “Configuring the installable options”
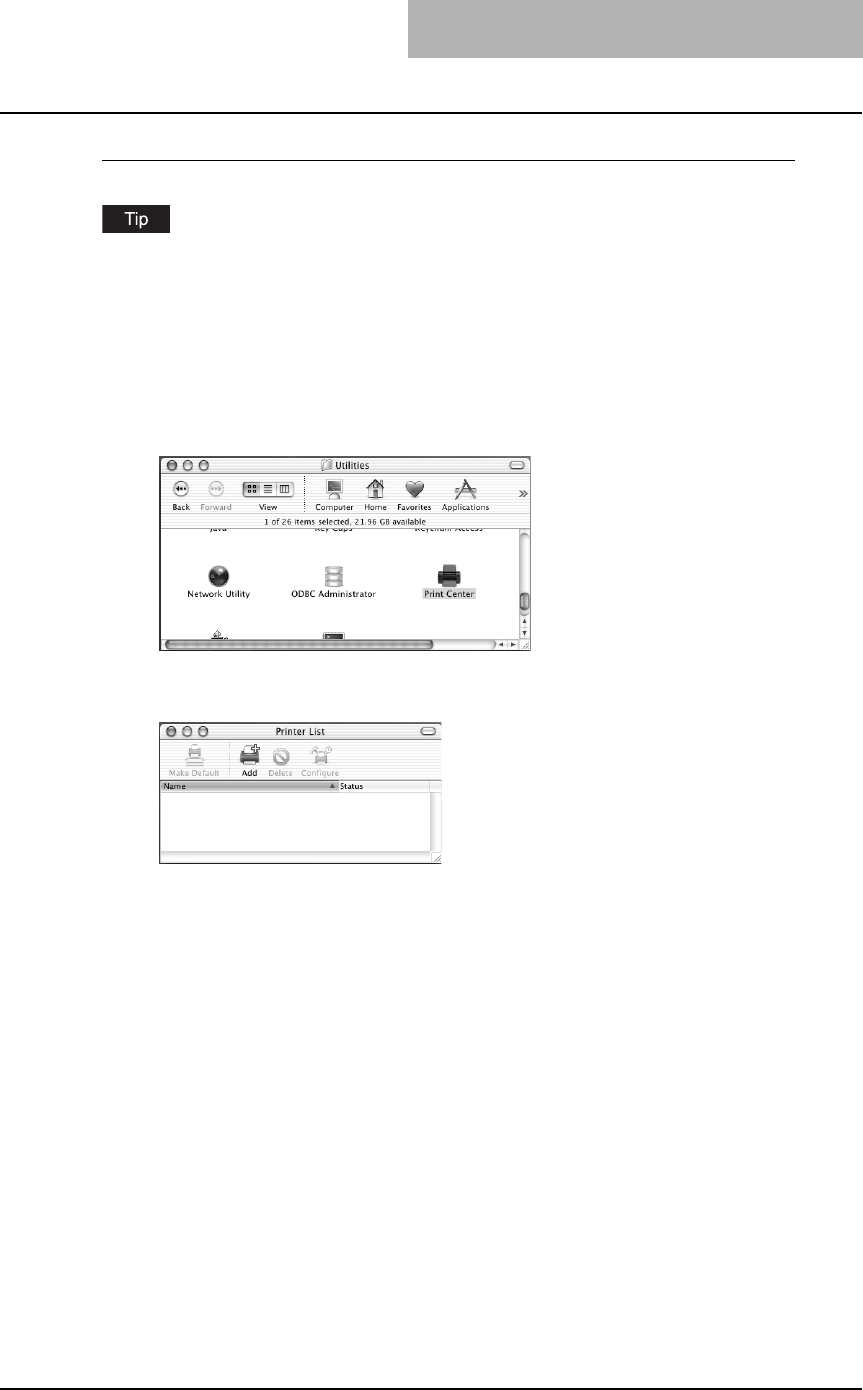
Installing Client Software for Macintosh 125
Configuring Macintosh IPP printing on Mac OS X 10.2.4 to 10.3.x
Before installing the printer driver for IPP printing, check with your system administrator to make
sure of the following:
- This equipment is connected to the network and turned on.
- IPP Printing Service is enabled on this equipment. Ask your administrator if the IPP Printing
Service is enabled.
1
Start the Print Center (for Mac OS X 10.2.4 to 10.2.8) or Printer Setup
Utility (for Mac OS X 10.3.x), located in the “Applications:Utilities”
folder in the Boot Disk.
The Printer List dialog box appears.
2
Click [Add] while pressing the [option] button.
This is mandatory to show all the advanced print option in the drop down box in the Print
List window.

2 INSTALLING CLIENT SOFTWARE
126 Installing Client Software for Macintosh
3
Select “Advanced” in the drop down box and specify the items as
described below.
Device: Internet Printing Protocol (http)
Device Name: <Any Name>
Device URI: http://<IP address>:631/Print
Printer Model: TOSHIBA
PPD: TOSHIBA e-STUDIO205 Series PS
4
Click [Add].
The printer is added to the Printer List.
5
Continue the procedure to configure the installable options.
P.136 “Configuring the installable options”
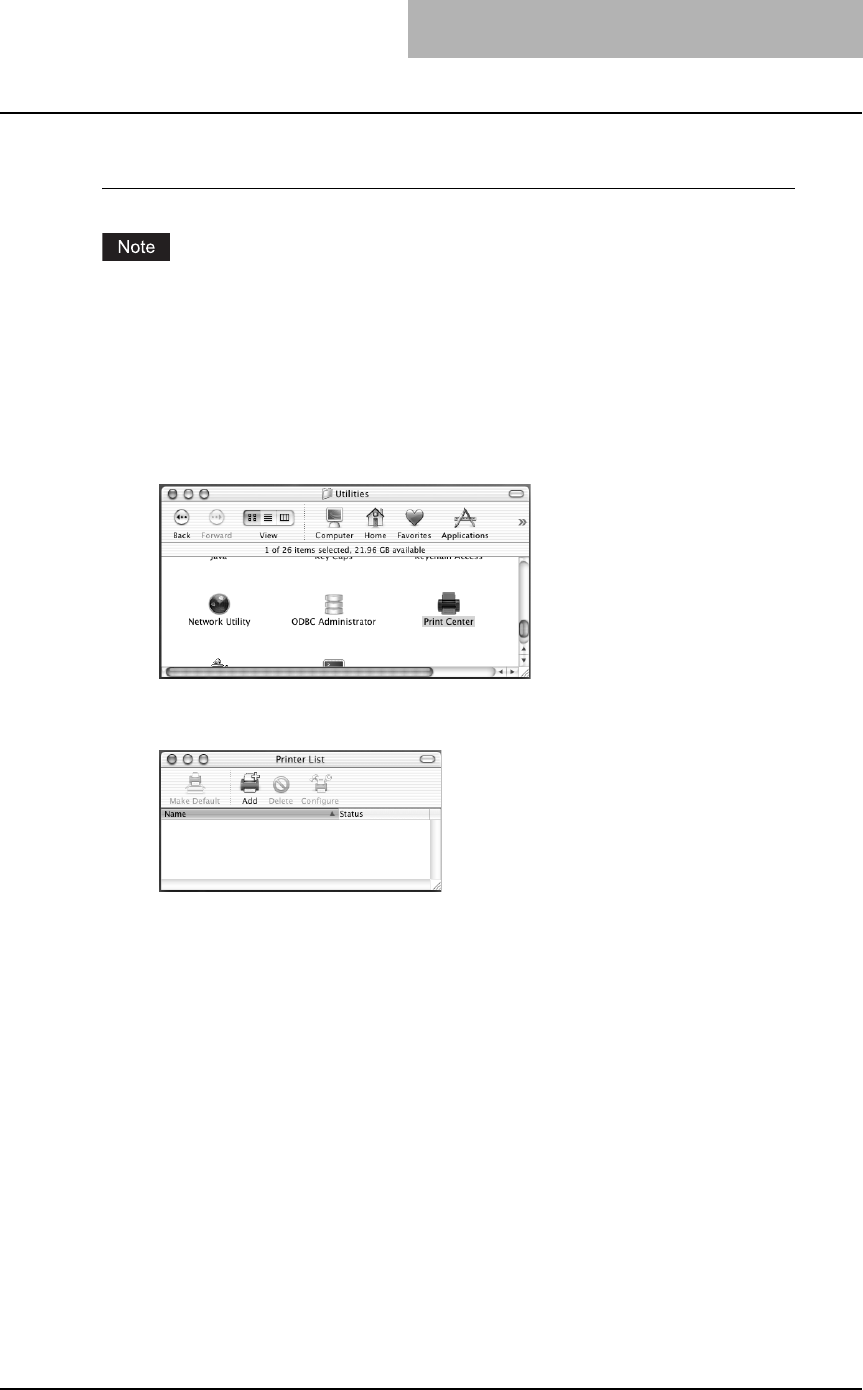
Installing Client Software for Macintosh 127
Configuring Macintosh AppleTalk/Bonjour printing on Mac OS X 10.2.4 to
10.3.x
Before installing the printer driver for AppleTalk/Bonjour printing, check with your system admin-
istrator to make sure of the following:
- This equipment is connected to the network and turned on.
- AppleTalk/Bonjour is enabled on this equipment. Ask your administrator if AppleTalk/Bonjour
is enabled.
1
Start the Print Center (for Mac OS X 10.2.4 to 10.2.8) or Printer Setup
Utility (for Mac OS X 10.3.x), located “Applications:Utilities” folder
in the Boot Disk.
The Printer List dialog box appears.
2
Click [Add].
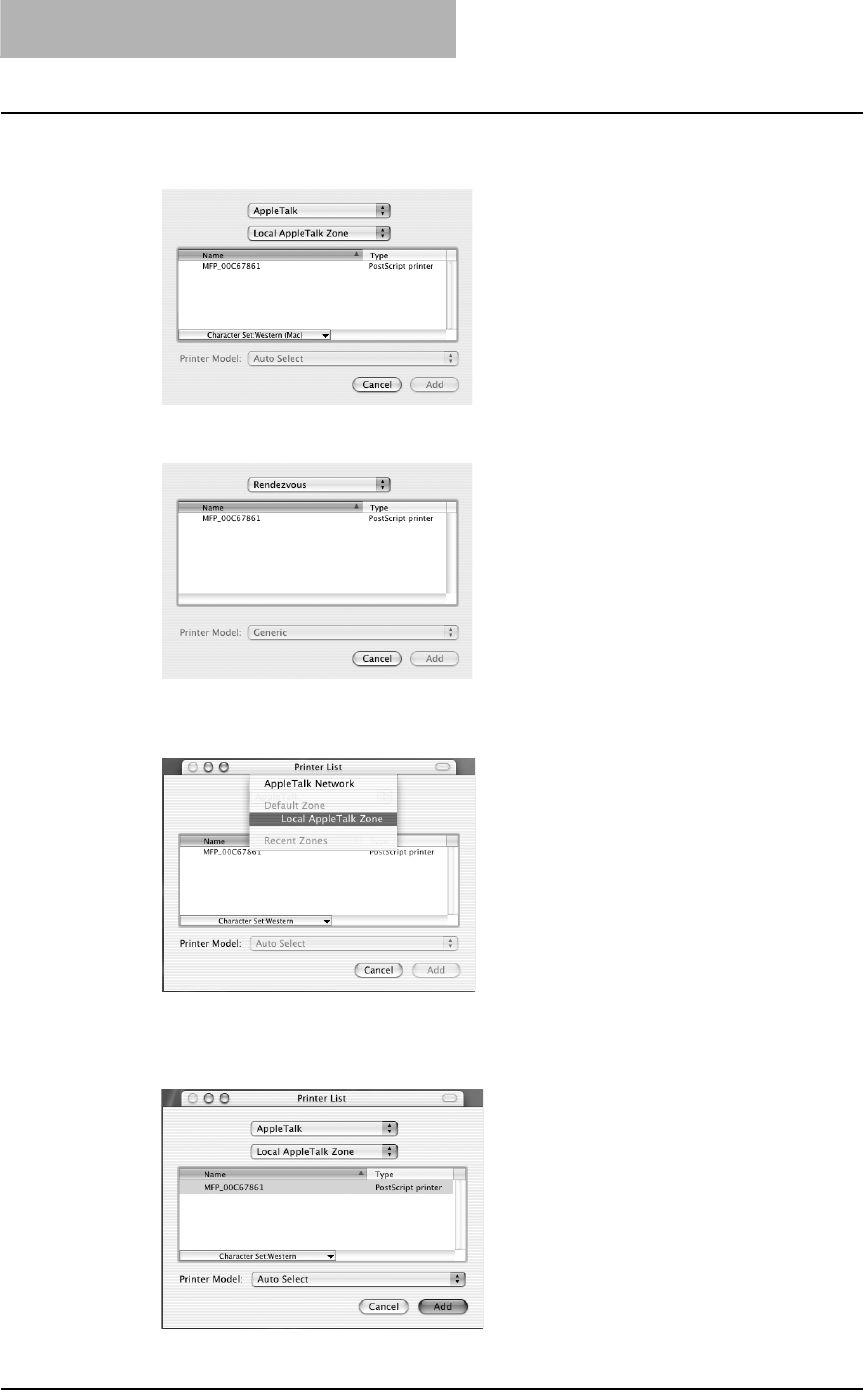
2 INSTALLING CLIENT SOFTWARE
128 Installing Client Software for Macintosh
3
Select “AppleTalk”/“Bonjour (Rendezvous)” in the drop down box.
When you select “AppleTalk”: Go to step 4.
When you select “Bonjour”: Go to step 5.
4
When you select “AppleTalk”, select a zone where this equipment
is located.
If the AppleTalk network is not configured with a zone, select “Local AppleTalk zone”.
5
Select this equipment displayed in the list.
Example of when you select AppleTalk:
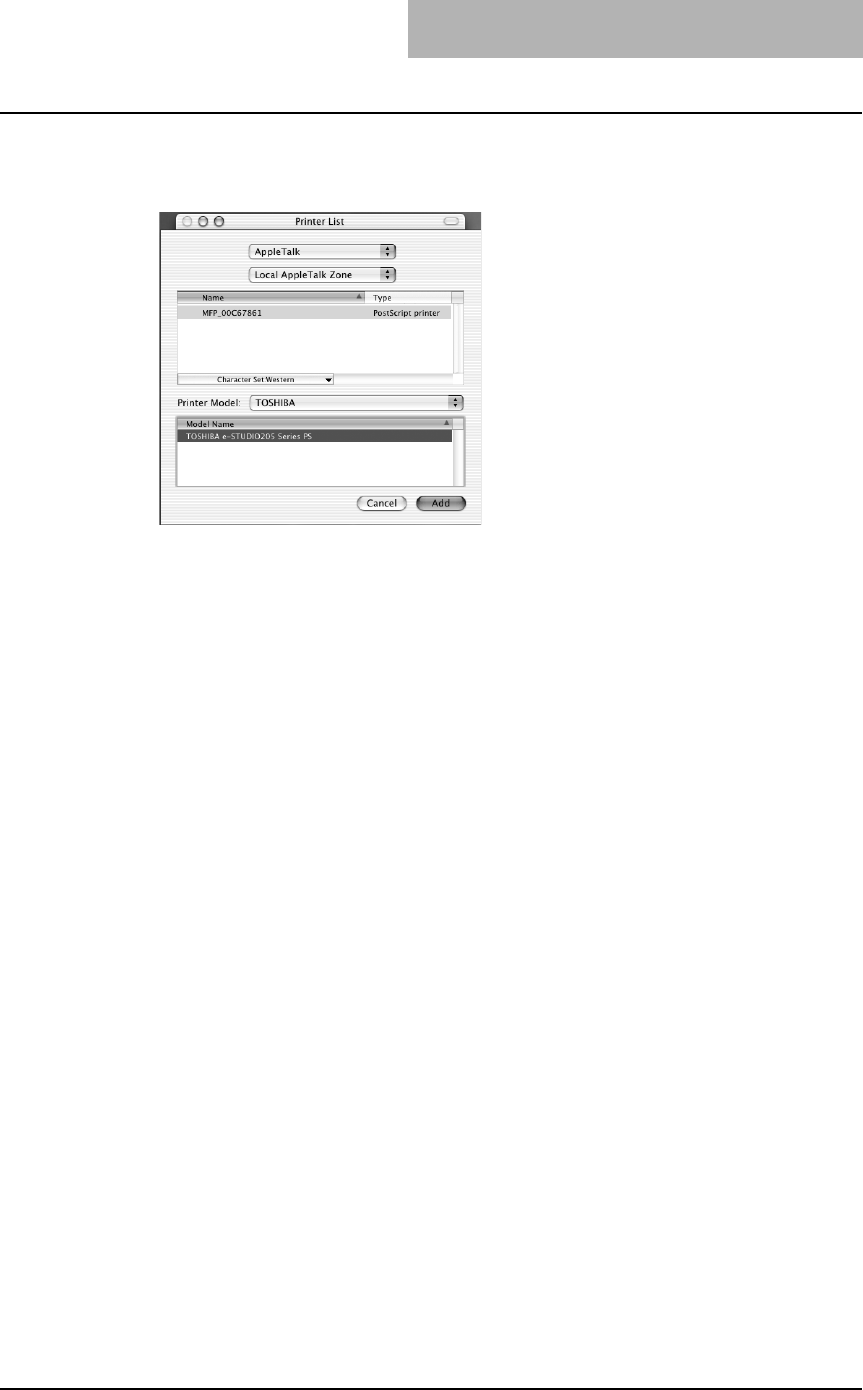
Installing Client Software for Macintosh 129
6
Select “TOSHIBA” at the “Printer Model” drop down box, and select
the PPD file.
Example of when you select AppleTalk:
7
Click [Add].
The printer is added to the Printer List.
8
Continue the procedure to configure the installable options.
P.136 “Configuring the installable options”
Configuring the printer on Mac OS X 10.4.x
After you copy the PPD file to the library folder in the System Folder, you can configure the
printer.
This equipment supports the following Macintosh Printing Services: IP printing, IPP printing,
AppleTalk printing and Bonjour printing.
yIP printing
When this equipment and your computer are connected over the TCP/IP network, you can
enable IP printing from a Macintosh computer.
yIPP printing
When this equipment and your computer are connected over the TCP/IP network, you can
enable IPP printing from a Macintosh computer.
yAppleTalk printing
When this equipment and your computer are connected over the AppleTalk network, you can
enable AppleTalk printing from a Macintosh computer.
yBonjour printing
When this equipment and your computer are connected over the TCP/IP network, you can
enable Bonjour printing from a Macintosh computer.
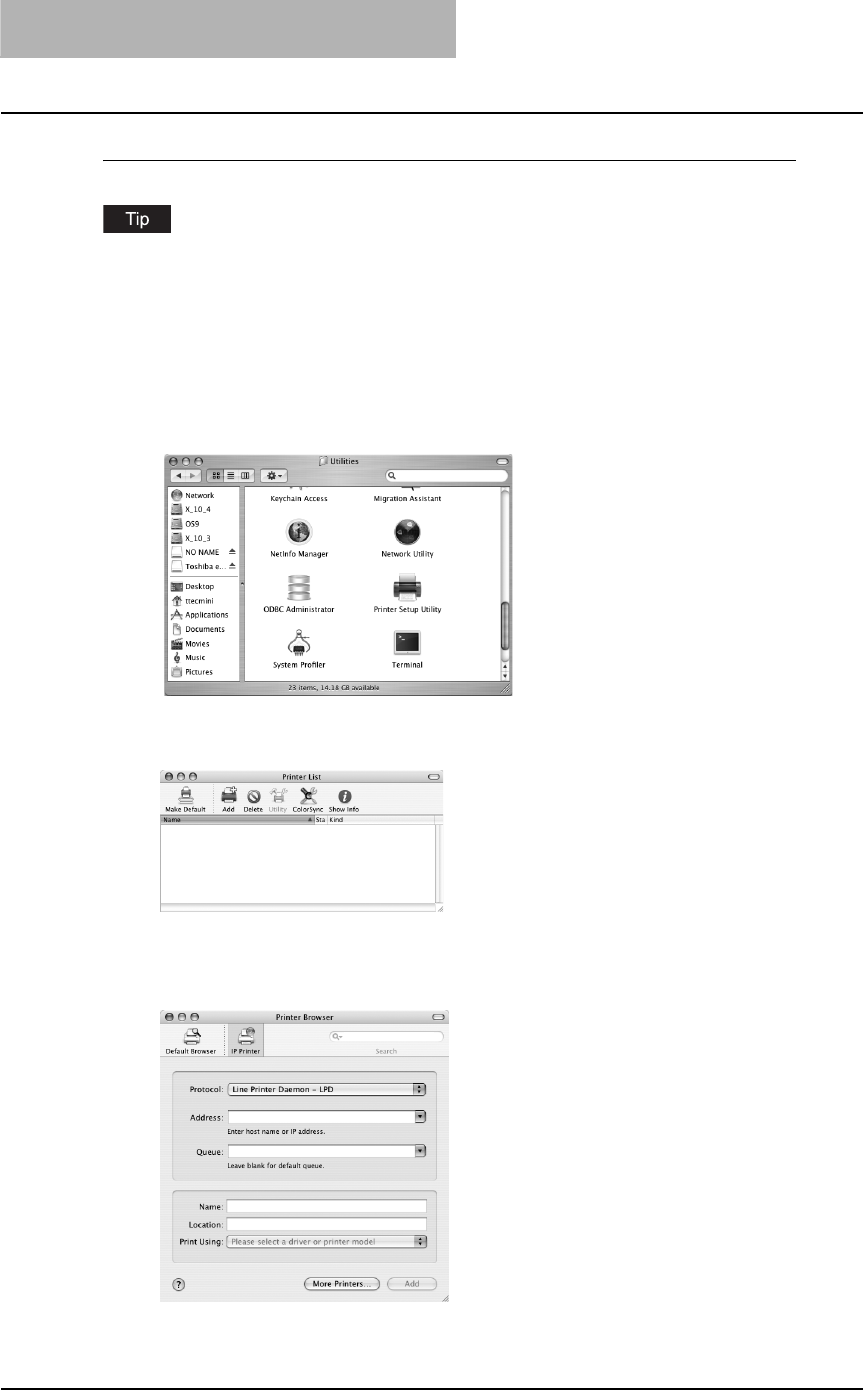
2 INSTALLING CLIENT SOFTWARE
130 Installing Client Software for Macintosh
Configuring Macintosh IP printing on Mac OS X 10.4.x
Before installing the printer driver for IP printing, check with your system administrator to make
sure of the following:
- This equipment is connected to the network and turned on.
- The TCP/IP setting is correct.
- LPD Printing Service is enabled on this equipment. Ask your administrator if the LPD Printing
Service is enabled.
1
Start the Printer Setup Utility located in the “Applications:Utilities”
folder in the Boot Disk.
The Printer List dialog box appears.
2
Click [Add].
The Printer Browser dialog box appears.
3
Click [IP Printer] and select “Line Printer Daemon - LPD” in the
drop down box.
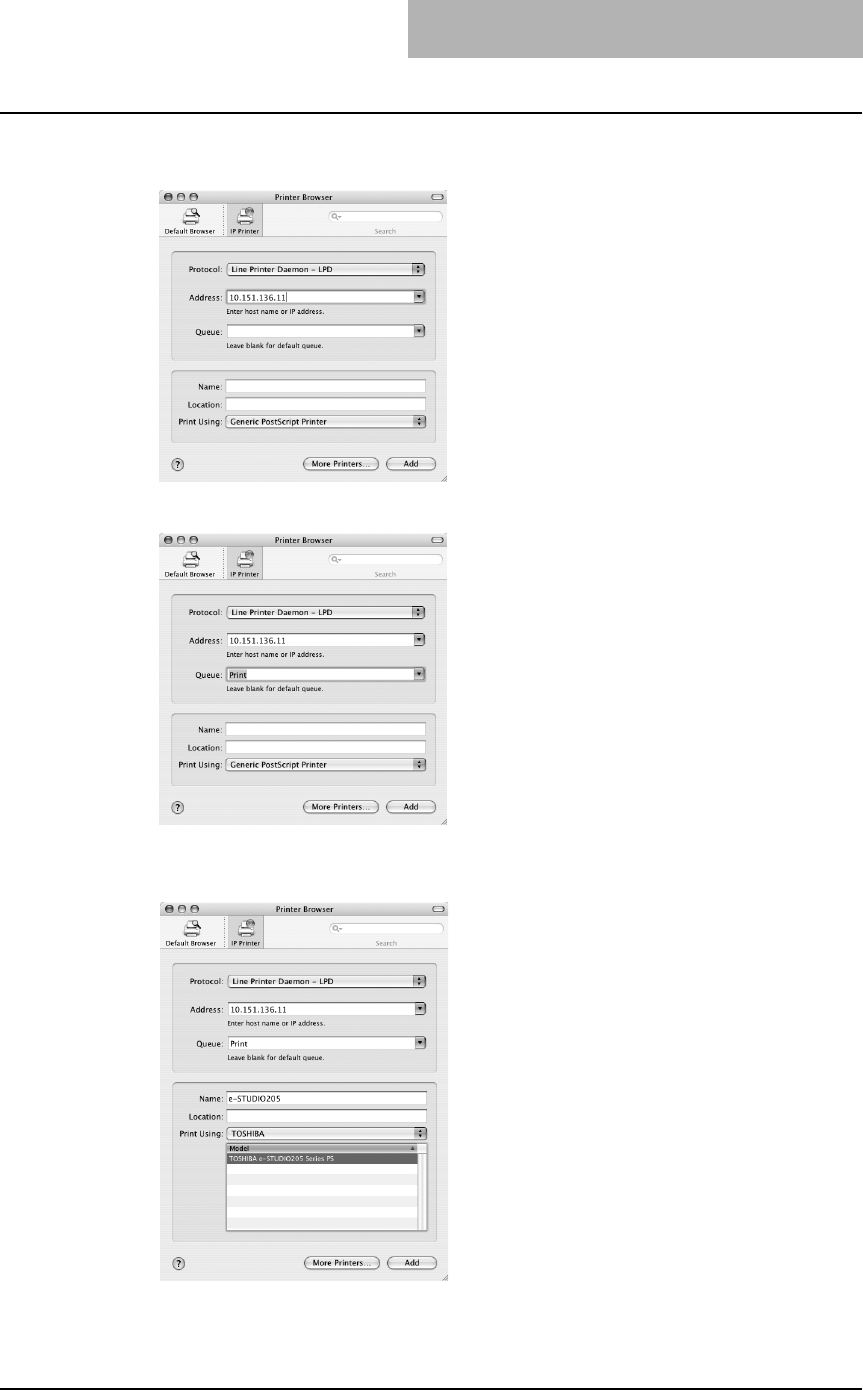
Installing Client Software for Macintosh 131
4
Enter the IP address or DNS name of this equipment in the
“Address” field.
5
Enter “Print” in the “Queue” field.
6
Select “TOSHIBA” at the “Print Using” drop down box, and select
the PPD file.
Enter the name and location of this equipment in the “Name” and “Location” as required.
(The content of the “Address” field automatically appears in this field.)
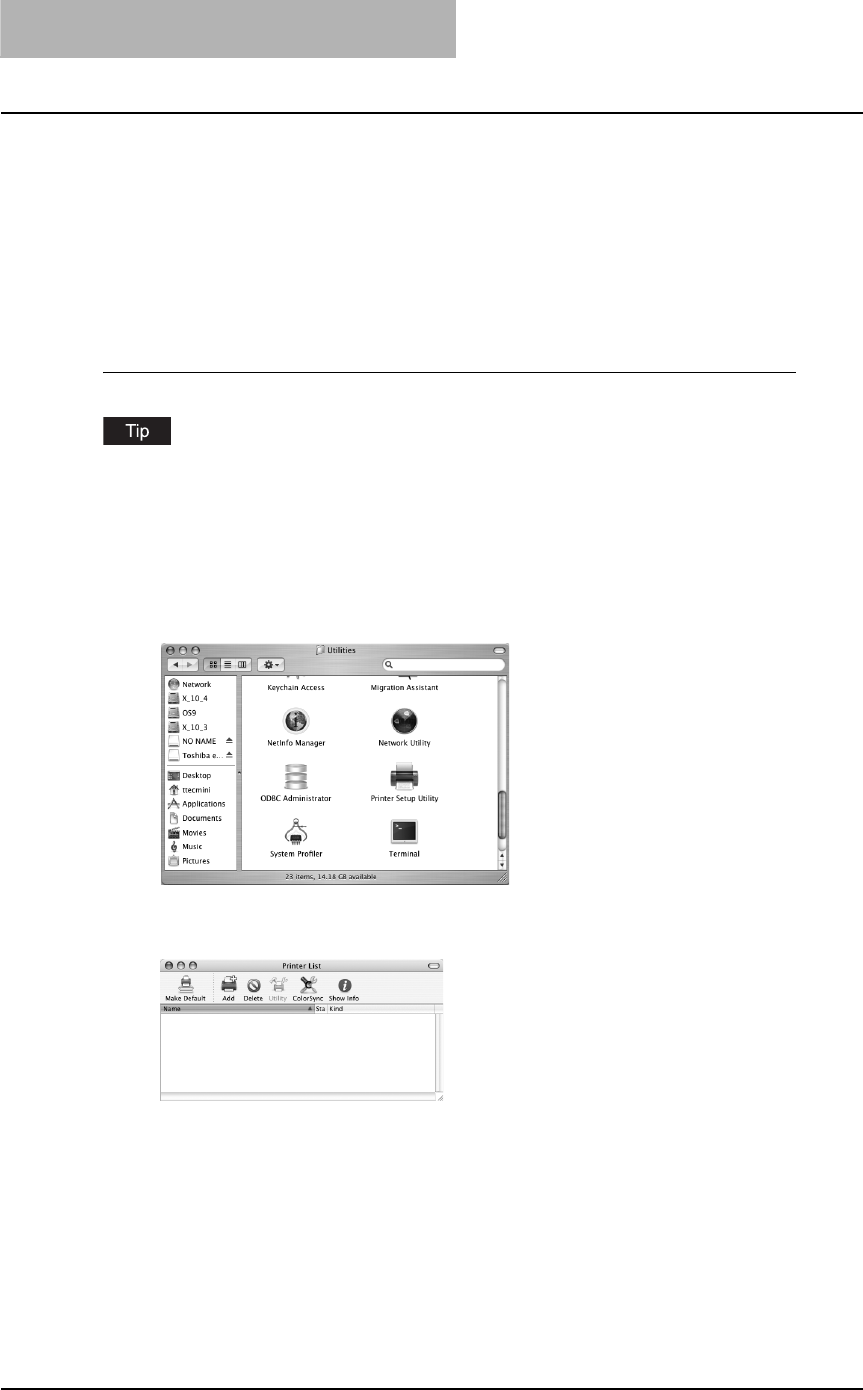
2 INSTALLING CLIENT SOFTWARE
132 Installing Client Software for Macintosh
7
Click [Add].
8
Continue the procedure to configure the installable options.
P.136 “Configuring the installable options”
9
Click [Continue].
The printer is added to the Printer List.
Configuring Macintosh IPP printing on Mac OS X 10.4.x
Before installing the printer driver for IPP printing, check with your system administrator to make
sure of the following:
- This equipment is connected to the network and turned on.
- IPP Printing Service is enabled on this equipment. Ask your administrator if the IPP Printing
Service is enabled.
1
Start the Printer Setup Utility located in the “Applications:Utilities”
folder in the Boot Disk.
The Printer List dialog box appears.
2
Click [Add].
The Printer Browser dialog box appears.
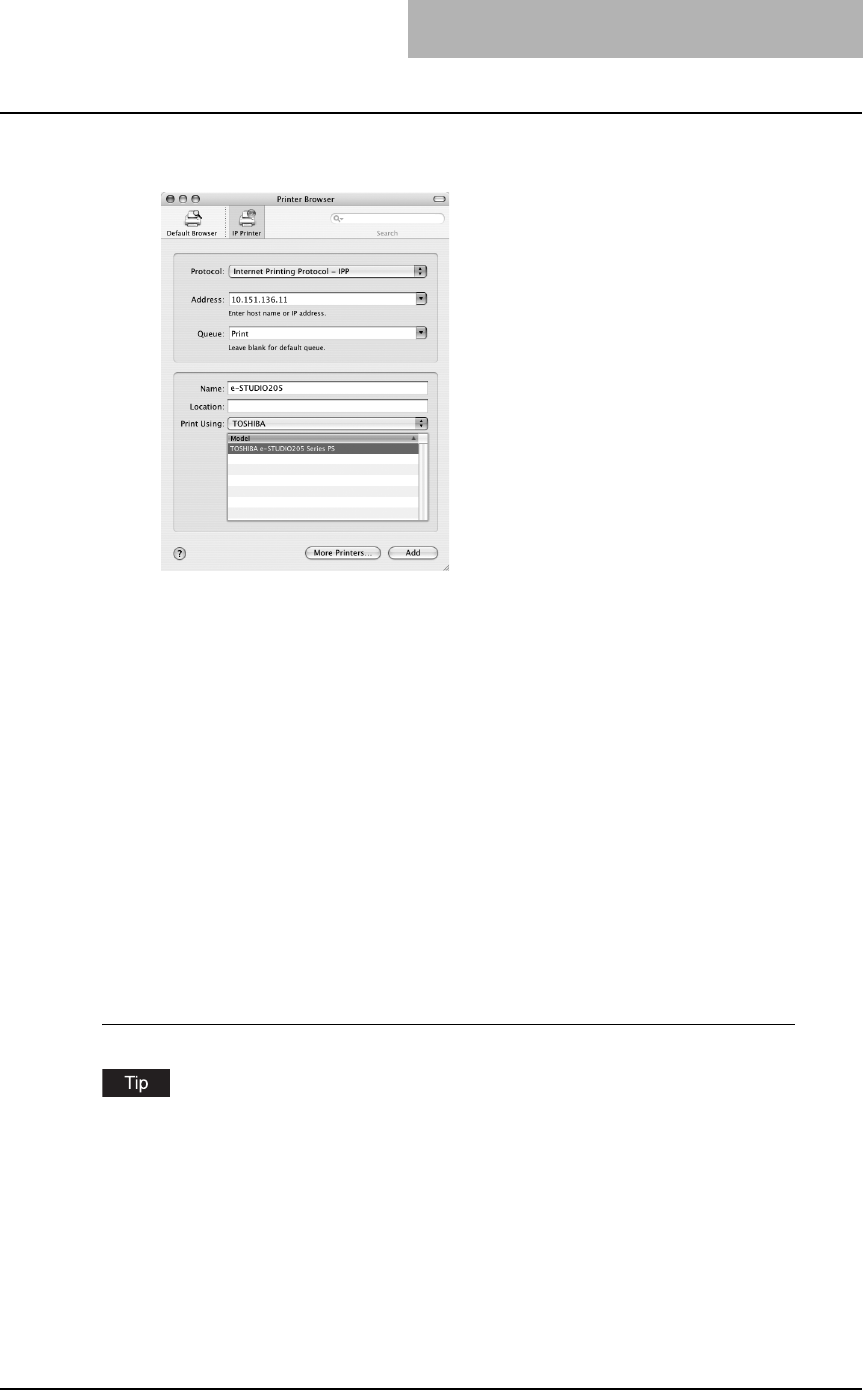
Installing Client Software for Macintosh 133
3
Click [IP Printer] and select “Internet Printing Protocol - IPP” in the
drop down box.
4
Specify the items described below.
Address: IP address or DNS name
Queue: http://<IP address>:631/Print
Name: <Any Name>
(The content of the “Address” field automatically appears in this field.)
Location: <Any Name>
Print Using: TOSHIBA
PPD: TOSHIBA e-STUDIO205 Series PS
5
Click [Add].
6
Continue the procedure to configure the installable options.
P.136 “Configuring the installable options”
7
Click [Continue].
The printer is added to the Printer List.
Configuring Macintosh AppleTalk/Bonjour printing on Mac OS X 10.4.x
Before installing the printer driver for AppleTalk/ Bonjour printing, check with your system admin-
istrator to make sure of the following:
- This equipment is connected to the network and turned on.
- AppleTalk/Bonjour is enabled on this equipment. Ask your administrator if AppleTalk/Bonjour
is enabled.
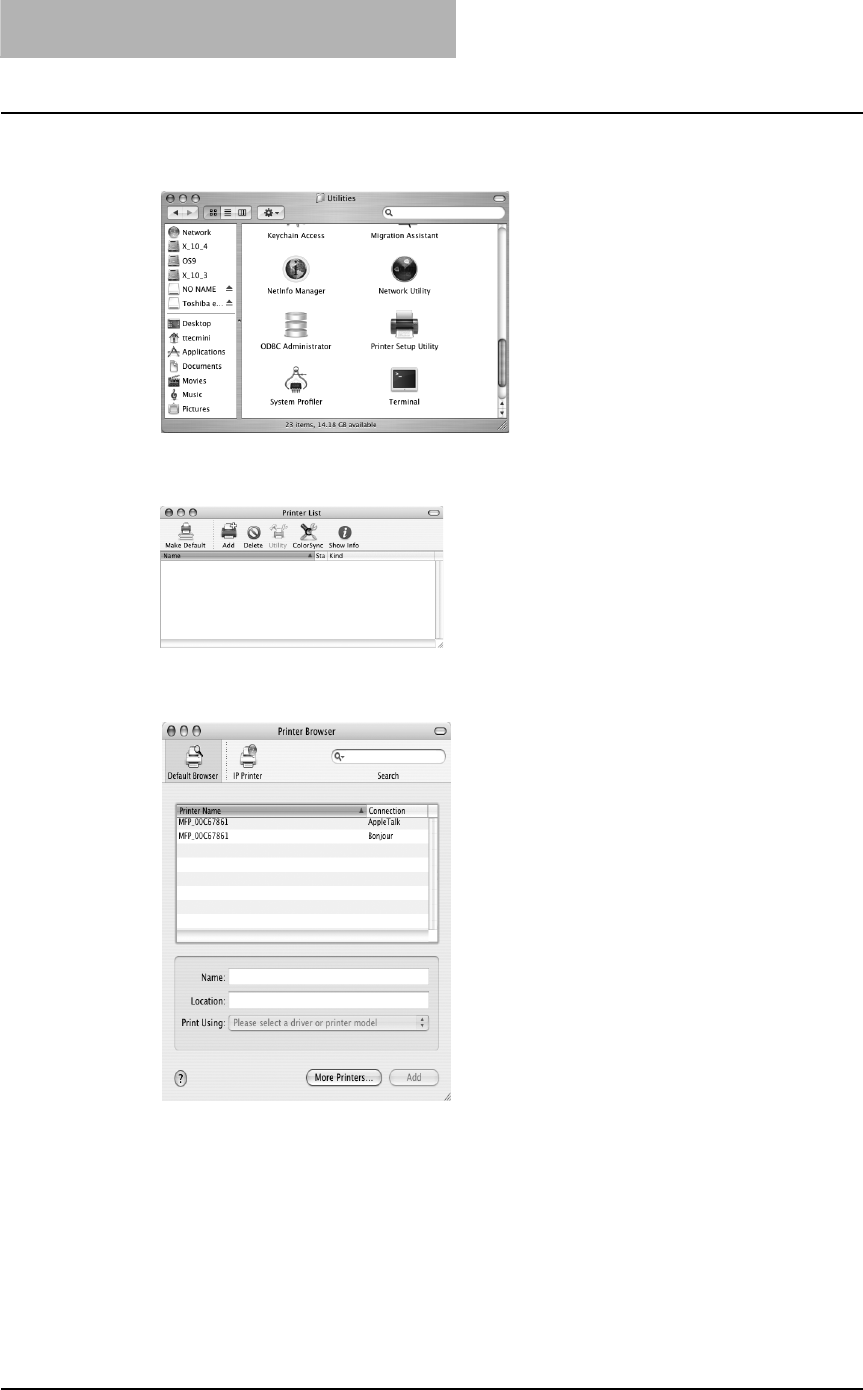
2 INSTALLING CLIENT SOFTWARE
134 Installing Client Software for Macintosh
1
Start the Printer Setup Utility located in the “Applications:Utilities”
folder in the Boot Disk.
The Printer List dialog box appears.
2
Click [Add].
The Printer Browser dialog box appears.
3
Click [Default Browser].
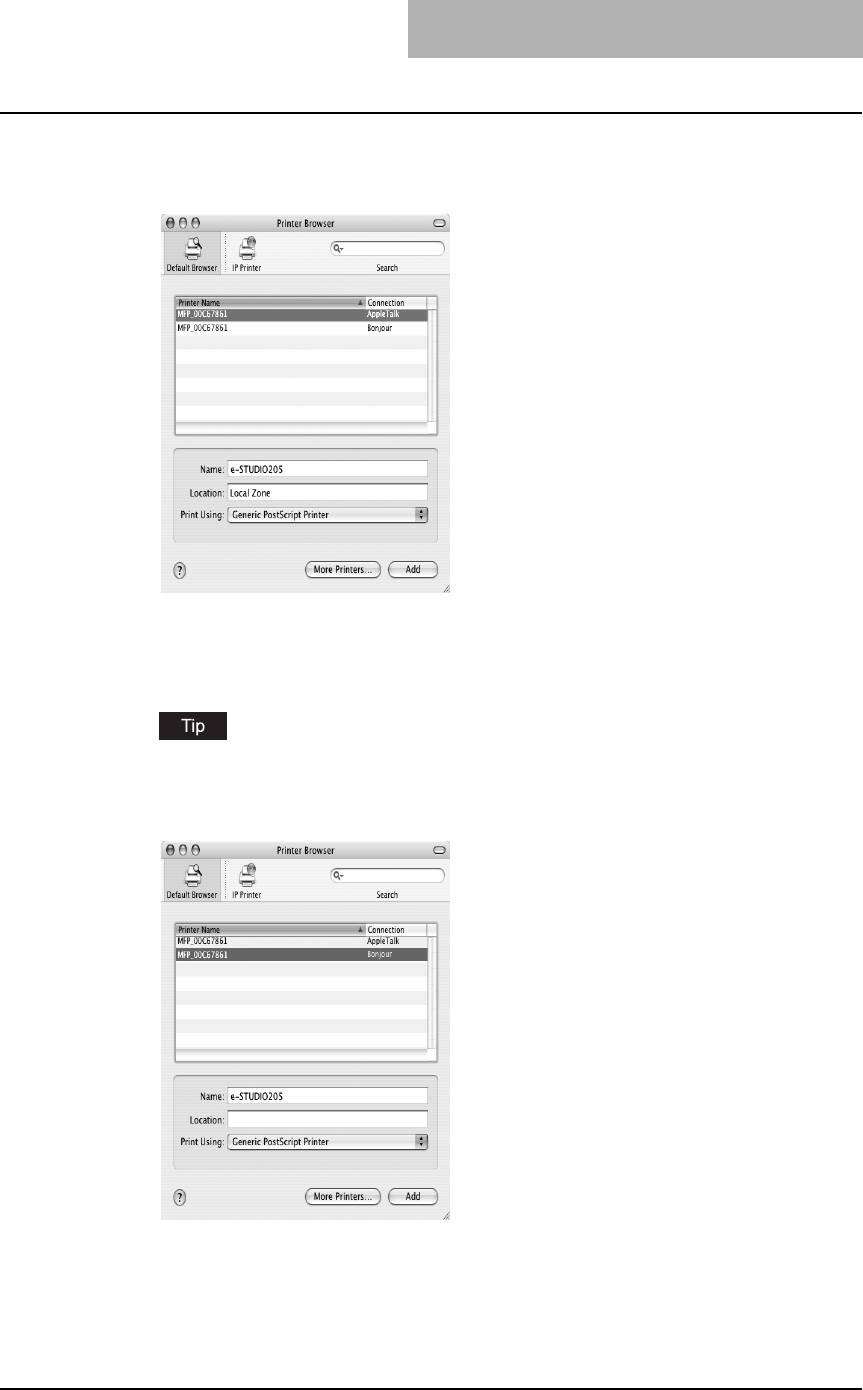
Installing Client Software for Macintosh 135
4
Select a printer name for AppleTalk/Bonjour in the “Printer Name”
field.
When you select AppleTalk:
Enter the name of this equipment in the “Name” field as required. (The content of the
“Address” field automatically appears in this field.)
If you did not use the AppleTalk network zone for AppleTalk setting, “Local Zone” appears
in the “Location” field.
If you used the AppleTalk network zone for AppleTalk setting, select a zone where this
equipment is located in the “Location” drop down box.
When you select Bonjour:
Enter the name of this equipment in the “Name” field as required. (The content of the
“Address” field automatically appears in this field.)
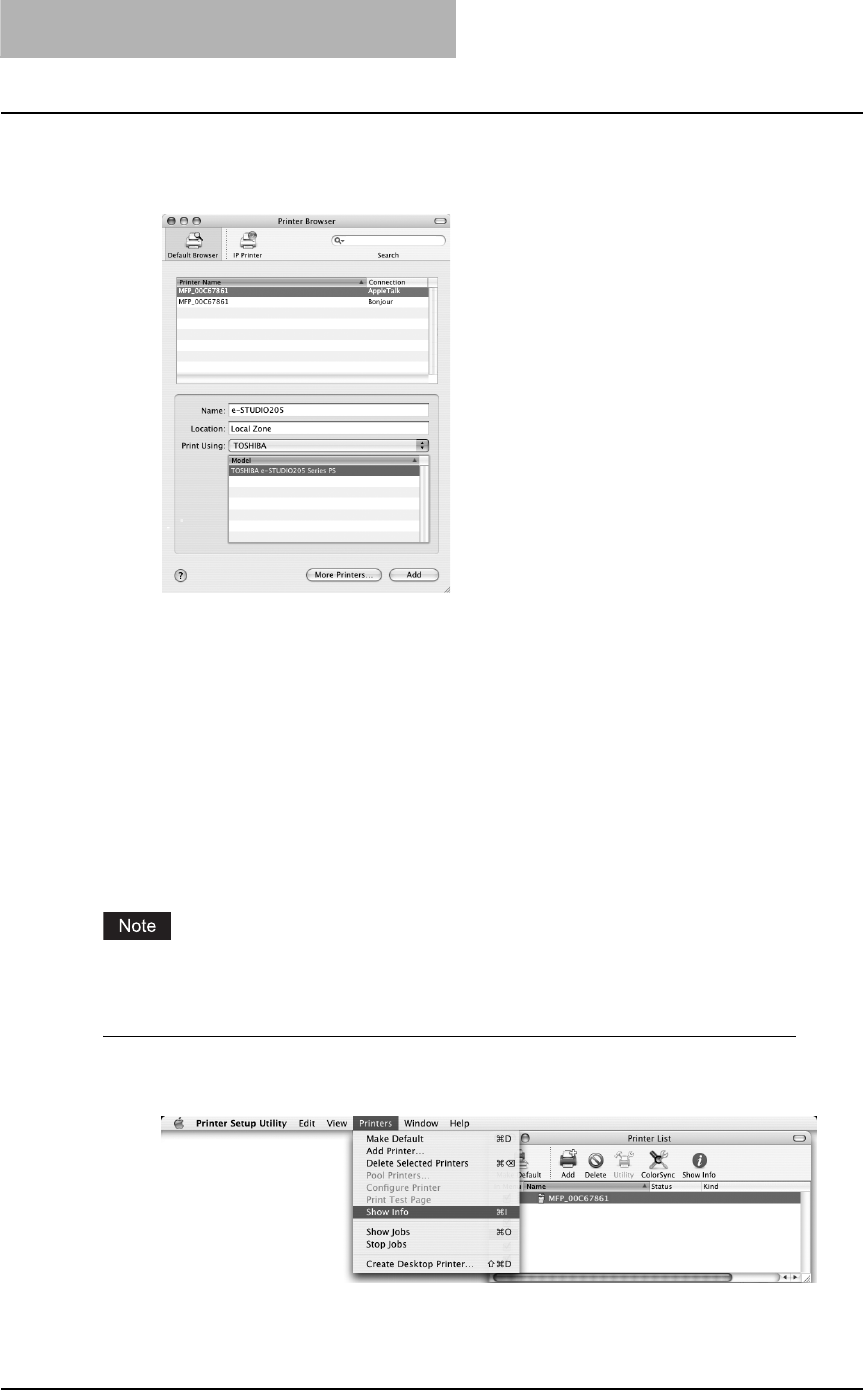
2 INSTALLING CLIENT SOFTWARE
136 Installing Client Software for Macintosh
5
Select “TOSHIBA” at the “Print Using” drop down box, and select
the PPD file.
Example of when you select AppleTalk:
6
Click [Add].
7
Continue the procedure to configure the installable options.
P.136 “Configuring the installable options”
8
Click [Continue].
The printer is added to the Printer List.
Configuring the installable options
Users must configure the installable options before printing.
Configure the installable options for each printing system.
Configuring the installable options
1
In the Printer List dialog box, select the printer and, then, select
[Show Info] in the [Printers] menu.
The Printer Info dialog box appears.
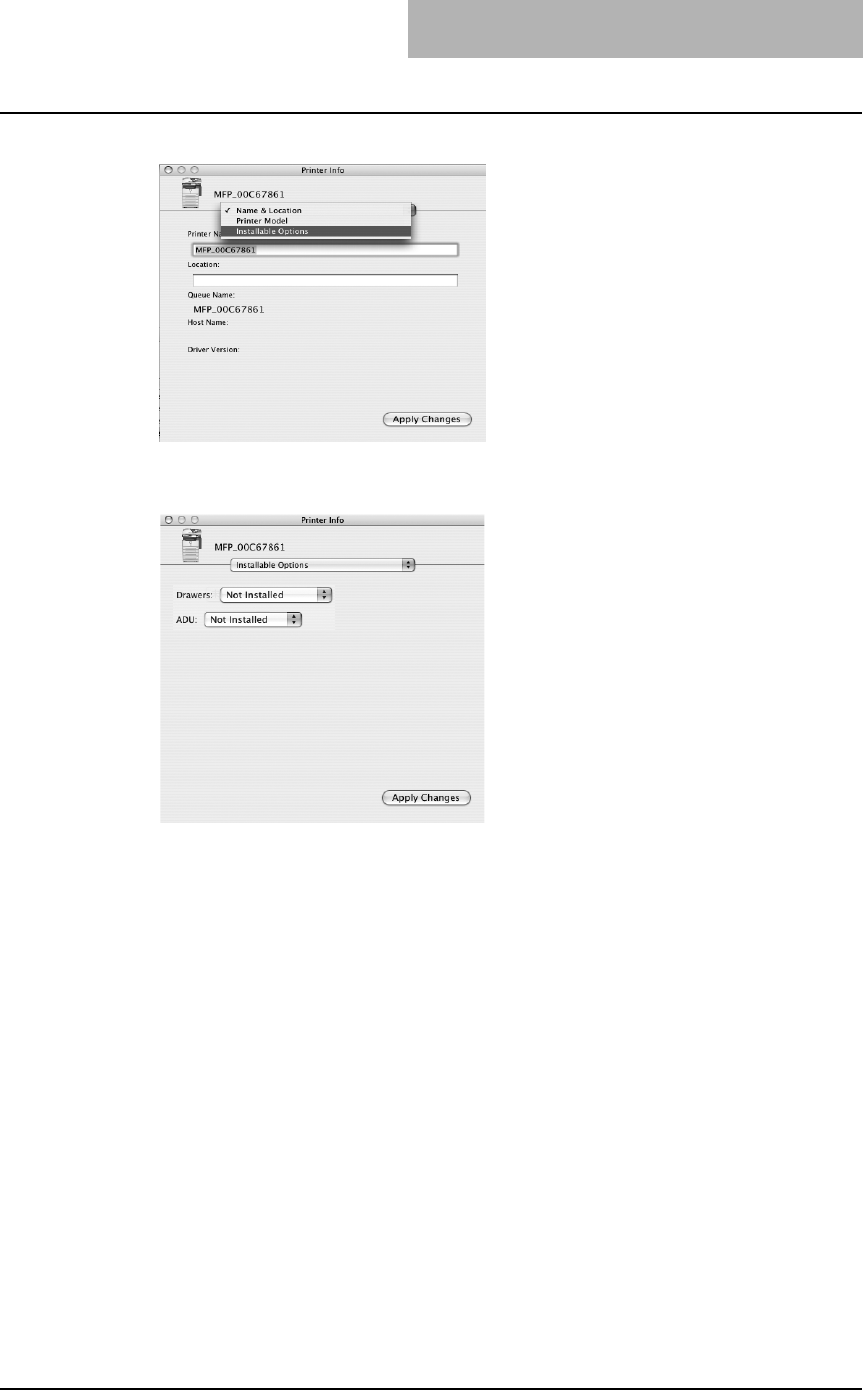
Installing Client Software for Macintosh 137
2
Select “Installable Options” in the drop down menu.
The Installable Options window is displayed.
3
Set the following options.
yDrawers
Not Installed – Select this when no optional paper feed unit is installed.
Drawer 2 – Select this when only the Paper Feed Unit (optional) is installed.
Drawer 2 & 3 – Select this when the Paper Feed Unit (optional) and Paper Feed Pedestal
(optional, its upper Drawer only) are installed.
Drawer 2, 3 & 4 – Select this when the Paper Feed Unit (optional) and Paper Feed
Pedestal (optional, both of its upper and lower Drawers) are installed.
yADU
Not Installed – Select this when the Automatic Duplexing Unit (optional) is not installed.
Installed – Select this when the Automatic Duplexing Unit (optional) is installed.
4
Click [Apply Changes] and close the window.

2 INSTALLING CLIENT SOFTWARE
138 Installing Client Software for UNIX
Installing Client Software for UNIX
Please refer to following instructions for configuring printing systems on UNIX workstations.
To setup the printing system on UNIX workstation, you can use CUPS.
Installation procedure list for UNIX client software
The following table shows the procedure list to install CUPS printer drivers.
Setting up the CUPS
When you want to configure the UNIX printing using CUPS, you can use LPR printing or IPP
printing.
About CUPS
This section describes the behavior, options, and installation method of the CUPS printer driver
for the equipment. The behavior of the printer driver presented in this specification is consistent
with CUPS v1.1.15. The driver may appear and/or operate slightly differently in the different ver-
sions.
In reality, the file supplied in this package is not really a printer driver it is actually a PostScript
Printer Description (PPD) file.
System requirements
Operating systems that support CUPS.
Implementation method
This driver consists of a PPD file that works in conjunction with an interface like XPP, KPrinter,
etc. It can also be used on OSX in the same way that it is used on Linux, but this is not recom-
mended.
Supplied components
There is one supplied component, a PPD file called “TOSHIBA_EST205_CUPS.gz”. It has been
compressed using gzip. It does not need to be uncompressed for Linux to use the PPD file and
so it should be left compressed.
The user needs root privileges to place the PPD file in the default location. The default location
for the standard CUPS PPD files is:
/usr/share/cups/model/Toshiba
Configuring UNIX printing using CUPS
You can configure the CUPS for LPR printing or IPP printing.
— Installing the CUPS for LPR printing
The PPD must first be copied onto the local machine, the printer installed, and then the PPD
configured. The printer is then installed and configured using CUPS via the browser.
Printing Refer to
LPR printing P.139 “Installing the CUPS for LPR printing”
IPP printing P.142 “Installing the CUPS for IPP printing”

Installing Client Software for UNIX 139
Installing the CUPS for LPR printing
1
Insert the Client Utilities CD-ROM into the CD-ROM drive.
2
Log on to the root account and create “Toshiba” directory in the
“/usr/share/cups/model” directory.
3
Copy the GZIP file into the “/usr/share/cups/model/Toshiba” direc-
tory or enter the following command:
cp TOSHIBA_EST205_CUPS.gz /usr/share/cups/model/Toshiba
A GZIP file is included in the “Admin/CUPS/ENG” folder in the CD-ROM.
4
Enter the following command:
service lpd stop
service cups stop
If lpd is already stopped, “Failed” will be displayed.
yWhen using the Red Hat Linux, continue to the next step.
yWhen using other than the Red Hat Linux, skip to step 10.
5
When using the Red Hat Linux, enter the following command:
/usr/bin/redhat-switch-printer
The redhat-switch-printer dialog box appears.
6
Select “CUPS” and click [OK].
The information dialog box appears.
7
Click [OK].
8
Enter the following command:
service cups start
9
Enter the following command:
/usr/bin/cupsconfig
The Common UNIX Printing System page appears. Skip to step 11.
10
Open the browser and locate CUPS by typing
“http://localhost:631/” in the address field.
The Common UNIX Printing System page appears.
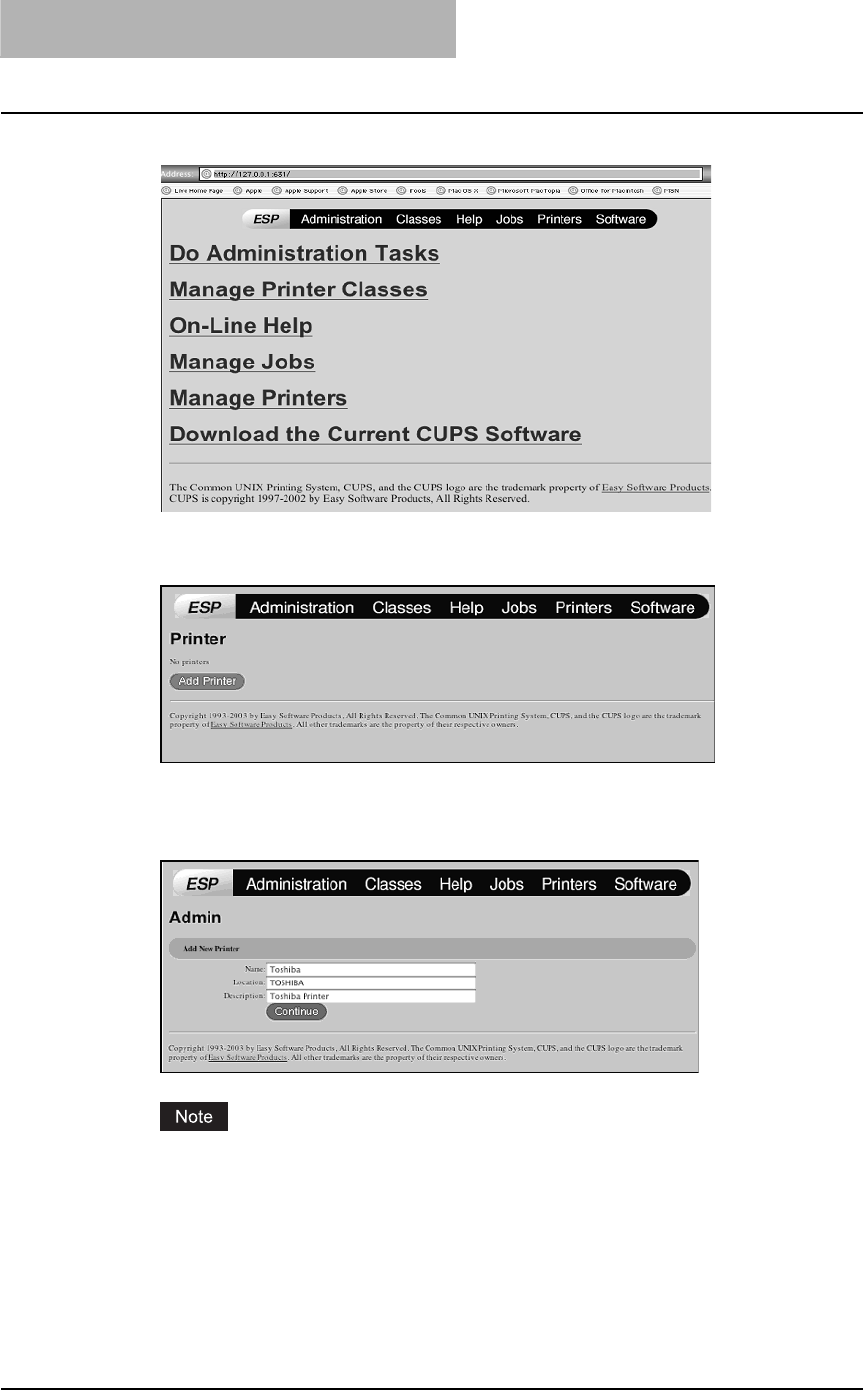
2 INSTALLING CLIENT SOFTWARE
140 Installing Client Software for UNIX
11
Click the “Manage Printers” link.
The Printer page is displayed.
12
Click [Add Printer].
The Admin page is displayed.
13
Enter the printer name, location, and description of the printer in
each field and click [Continue].
If a new printer name is a duplicate of a name already in the printer list, the new printer
will replace the original printer.
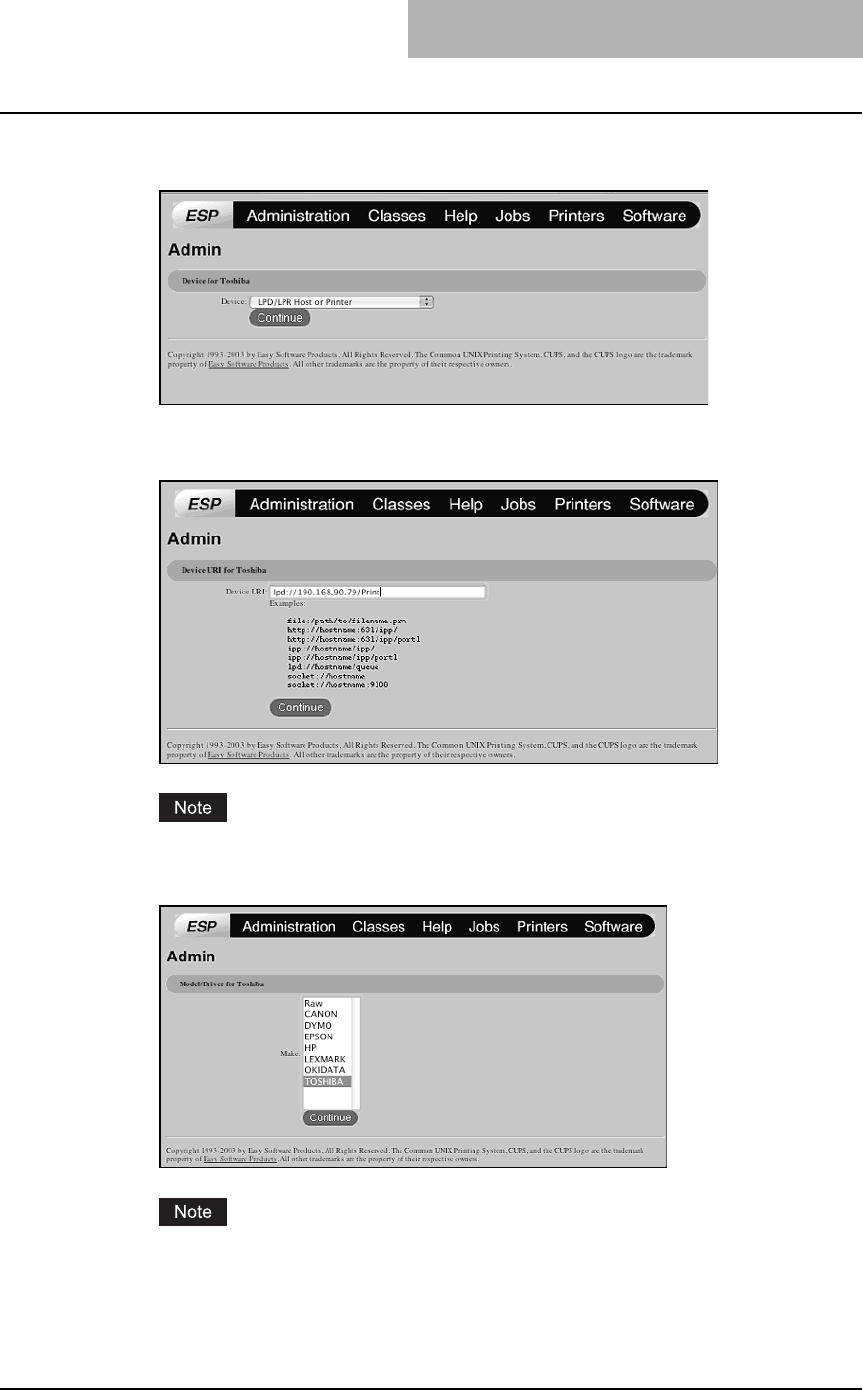
Installing Client Software for UNIX 141
14
Select “LPD/LPR Host or Printer” at the “Device” drop down box
and click [Continue].
15
Enter “lpd://<IP address>/Print” in the “Device URL” field and click
[Continue].
Make sure to capitalize the “P” in “Print” for the device URI.
16
Select “TOSHIBA” at the “Make” list and click [Continue].
If you do not see “TOSHIBA” in the “Make” list, restart CUPS.
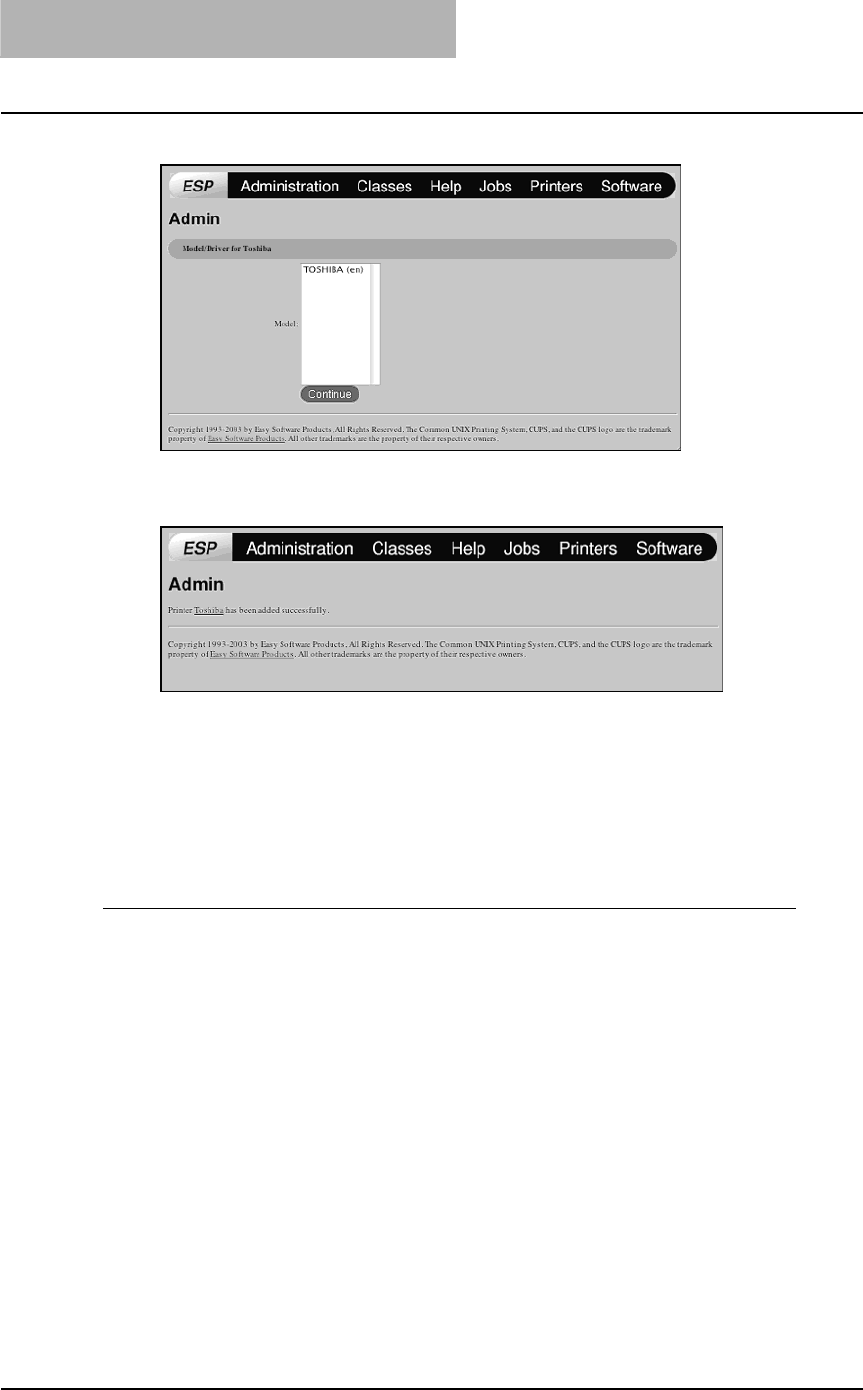
2 INSTALLING CLIENT SOFTWARE
142 Installing Client Software for UNIX
17
Select the PPD in the “Model” list and click [Continue].
18
Confirm that the message notifying that the new printer has been
properly added appears.
19
Go to the following page for configuring the print options:
P.144 “Configuring print options”
— Installing the CUPS for IPP printing
When you want to setup IPP print queue in the Linux OS, follow the procedures here.
Add IPP printer
IPP printing from Linux OS is done from the CUPS server as a backend.
1
Insert the Client Utilities CD-ROM into the CD-ROM drive.
2
Log on to the root account and create “Toshiba” directory in the
“/usr/share/cups/model” directory.
3
Copy the GZIP file into the “/usr/share/cups/model/Toshiba” direc-
tory or enter the following command:
cp TOSHIBA_EST205_CUPS.gz /usr/share/cups/model/Toshiba
A GZIP file is included in the “Admin/CUPS/ENG” folder in the CD-ROM.
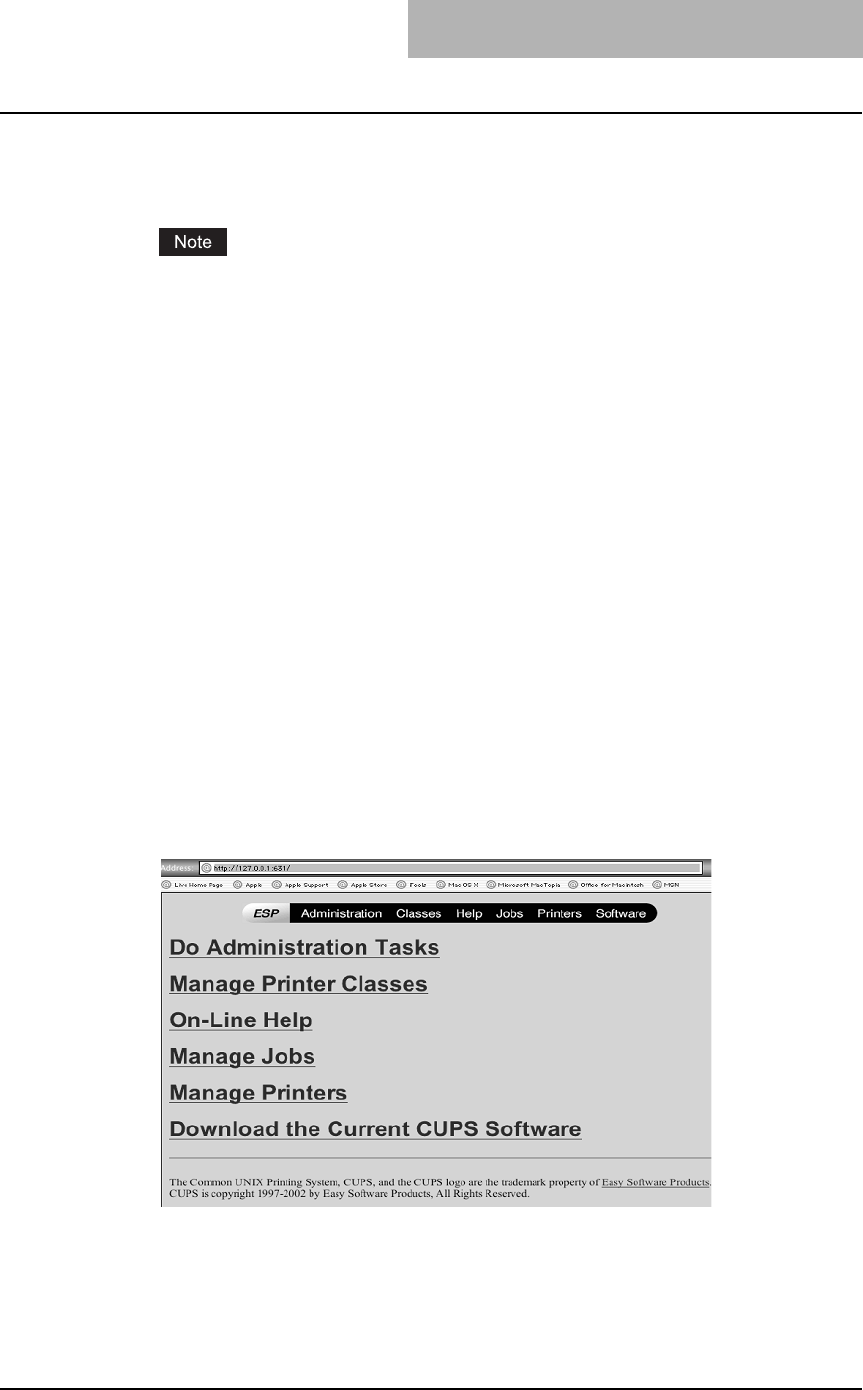
Installing Client Software for UNIX 143
4
Enter the following command:
service lpd stop
service cups stop
If lpd is already stopped, “Failed” will be displayed.
yWhen using the Red Hat Linux, continue to the next step.
yWhen using other than the Red Hat Linux, skip to step 10.
5
When using the Red Hat Linux, enter the following command:
/usr/bin/redhat-switch-printer
The redhat-switch-printer dialog box appears.
6
Select “CUPS” and click [OK].
The information dialog box appears.
7
Click [OK].
8
Enter the following command:
service cups start
9
Enter the following command:
/usr/bin/cupsconfig
The Common UNIX Printing System page appears. Skip to step 11.
10
Open the browser and locate CUPS by typing
“http://localhost:631/” in the address field.
The Common UNIX Printing System page appears.
11
Click the “Manage Printers” link.
The Printer page is displayed.
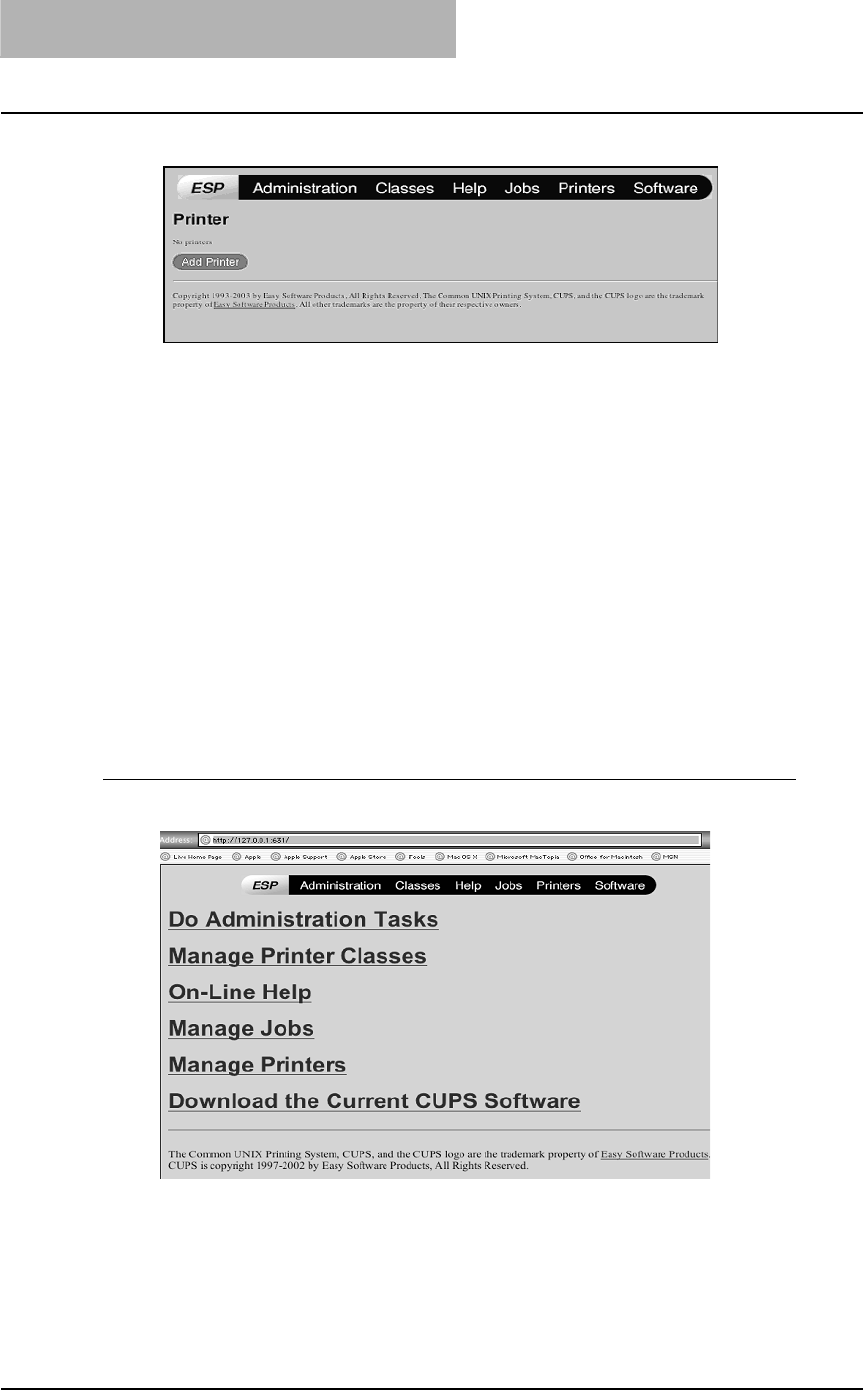
2 INSTALLING CLIENT SOFTWARE
144 Installing Client Software for UNIX
12
Add a new https printer by clicking [Add Printer].
Configure the parameters as:
Name: <Any Name>
Location: <Optional>
Description: <Optional>
Device: Internet Printing Protocol (http)
Device URL: http://<IP address>:631/Print
Model/Driver: TOSHIBA
13
Confirm that the message notifying that the new printer has been
properly added appears.
14
Go to the following page for configuring the print options:
P.144 “Configuring print options”
— Configuring print options
You can set the print options that applied for the print jobs using CUPS.
Print option configuration
1
Click the “Manage Printers” link in the startup page.
The Printer page is displayed.
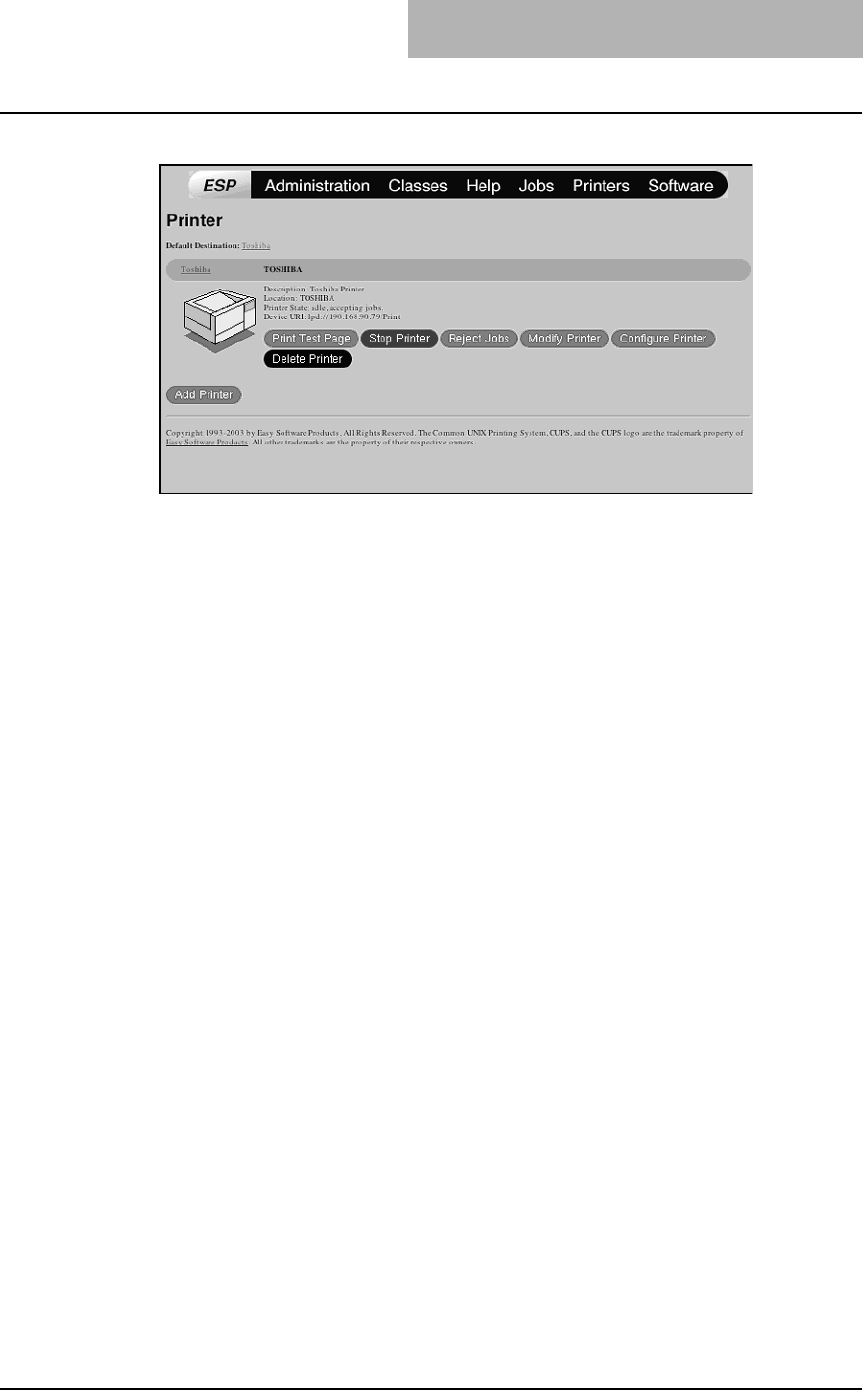
Installing Client Software for UNIX 145
2
Select this equipment and then click [Configure Printer].
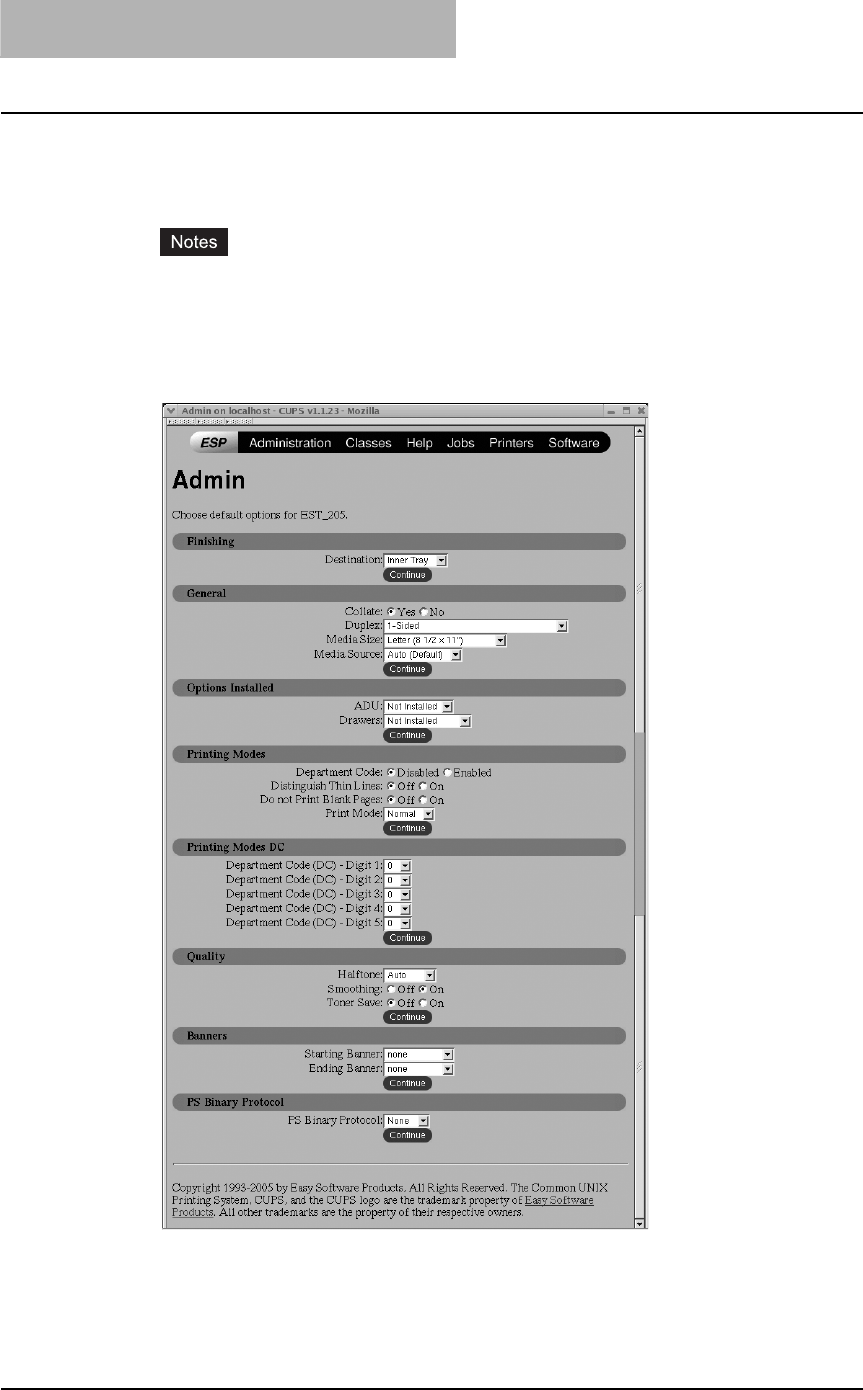
2 INSTALLING CLIENT SOFTWARE
146 Installing Client Software for UNIX
3
Configure the print options on the displayed page.
For each print option, refer to the following page:
P.218 “Printing from application on Mac OS X 10.2.4 to Mac OS X 10.4.x”
yThe screens are displayed in English.
yThe underscored items are set by default.
yThe options for this equipment are shown below.
ADU (Automatic Duplexing Unit), Drawer 2 (Paper Feed Unit), Drawer 3 (Paper Feed
Pedestal upper drawer), Drawer 4 (Paper Feed Pedestal lower drawer)
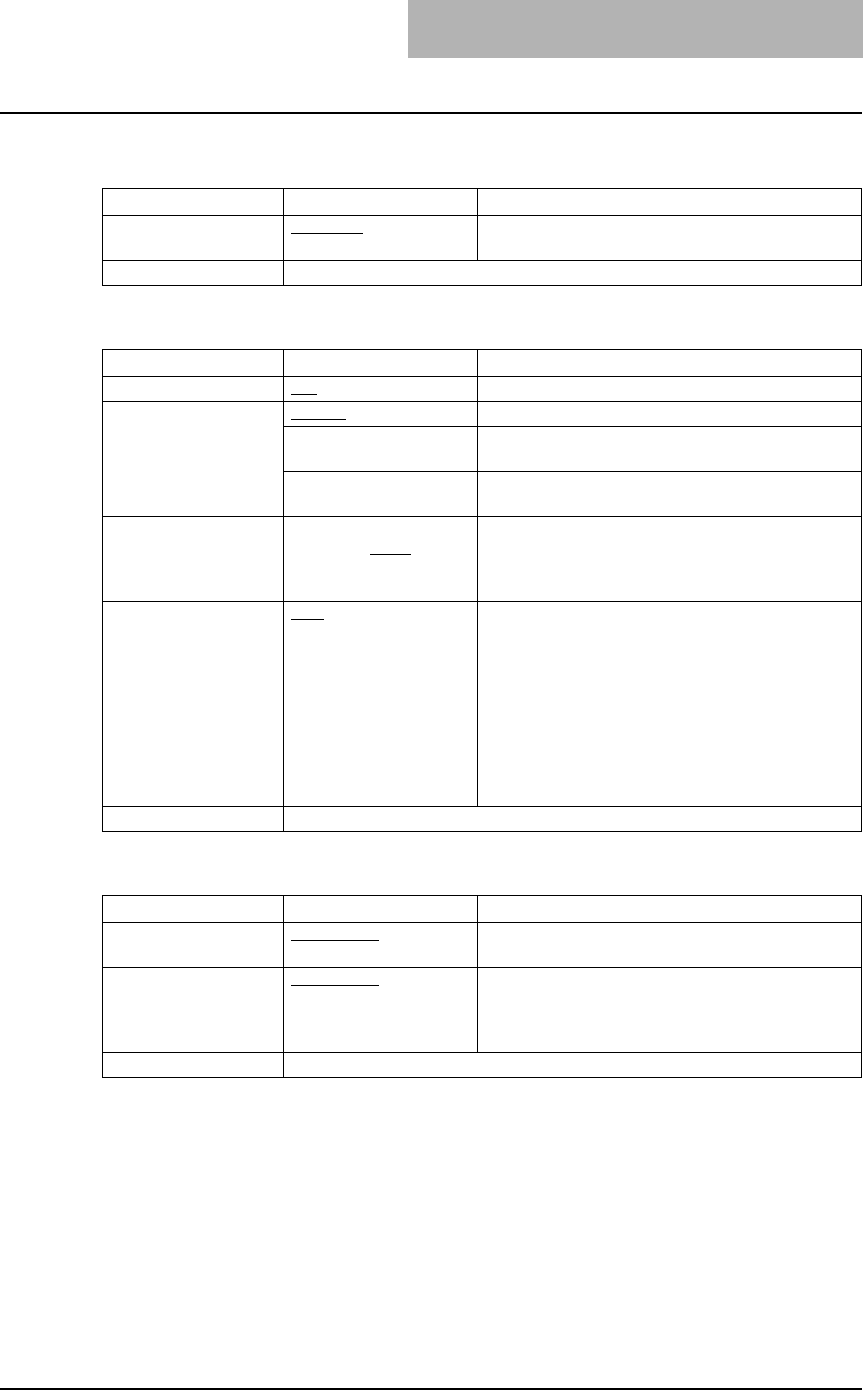
Installing Client Software for UNIX 147
Finishing
Option Value Alternative Value Description
Destination Inner Tray The paper exit tray of this equipment (no other trays
are selectable)
[Continue] button -
General
Option Value Alternative Value Description
Collate Yes, No Selects whether exited sheets are collated or not.
Duplex 1-Sided 1-sided printing
2-Sided, No Tumble
(Long-Edge Binding)
2-sided printing (Long-edge binding)
2-Sided, Tumble
(Short-Edge Binding)
2-sided printing (Short-edge binding)
Media Size A3, A4, A5, B4, B5, Led-
ger, Legal, Letter, State-
ment, Folio, Computer,
13” LG, 8K, 16K
Selects the paper size.
Media Source Auto (Default)
Drawer 1
Drawer 2
Drawer 3
Drawer 4
Bypass Tray
Plain
Thick 1
Thick 2
Transparency
Selects the paper source or the media type.
Paper source:
Drawer 1 (Standard drawer),
Drawer 2 (Paper Feed Unit),
Drawer 3 (Paper Feed Pedestal upper drawer) or
Drawer 4 (Paper Feed Pedestal lower drawer)
Media type:
Plain paper, thick paper 1, thick paper 2 or overhead
transparencies
[Continue] button Determines the selected items.
Options Installed
Option Value Alternative Value Description
ADU Not Installed
Installed
Selects whether the ADU is installed or not.
Drawers Not Installed
Drawer 2
Drawer 2 & 3
Drawer 2, 3 & 4
Selects the combination among Drawer 2 (Paper
Feed Unit), Drawer 3 (Paper Feed Pedestal upper
drawer) and Drawer 4 (Paper Feed Pedestal lower
drawer).
[Continue] button Determines the selected items.
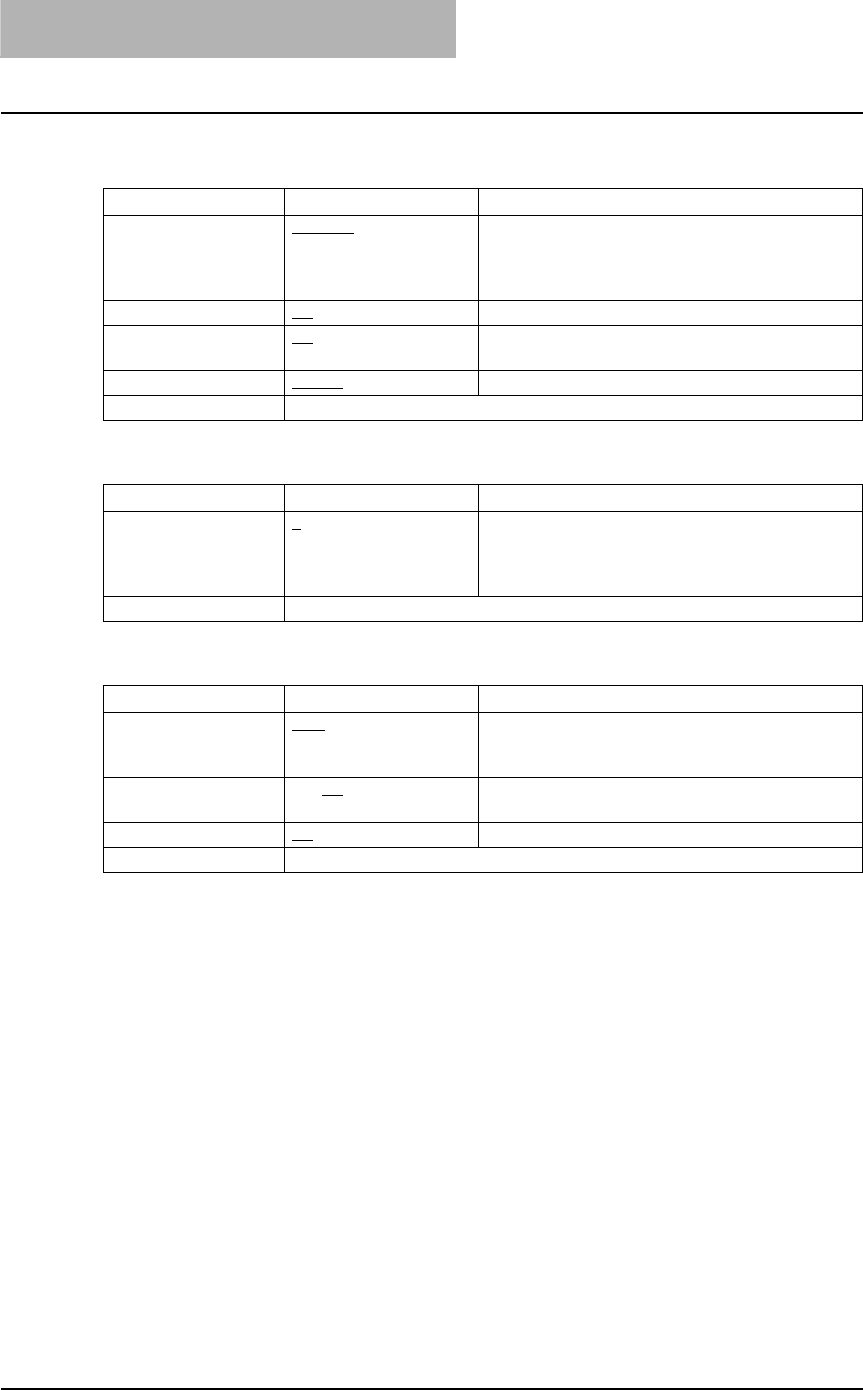
2 INSTALLING CLIENT SOFTWARE
148 Installing Client Software for UNIX
Printing Modes
Option Value Alternative Value Description
Department Code Disabled
Enabled
Selects whether to use the department codes for
printing or not.
When this equipment is managed under the depart-
ment codes, this option should be enabled.
Distinguish Thin Lines Off, On Selects whether to distinguish thin lines or not.
Do not Print Blank
Pages
Off, On Selects whether to print blank pages or not.
Print Mode Normal Normal print mode (no other modes are selectable)
[Continue] button Determines the selected items.
Printing Modes DC
Option Value Alternative Value Description
Department Code (DC)
– Digit 1 to Digit 5
0 to 9 Specify the 5-digit department code when “Depart-
ment Code” of “Printing Modes” is enabled.
For the appropriate department code, check with
your system administrator.
[Continue] button Determines the selected items.
Quality
Option Value Alternative Value Description
Halftone Auto
Detail
Smooth
Selects the appropriate processing on halftone
images among “Auto”, “Detail (high density)” and
“Smooth (smooth tone reproduction)”.
Smoothing Off, On Selects whether text and graphics are printed in a
smooth contour or not.
Toner Save Off, On Selects whether to print with less toner or not.
[Continue] button Determines the selected items.
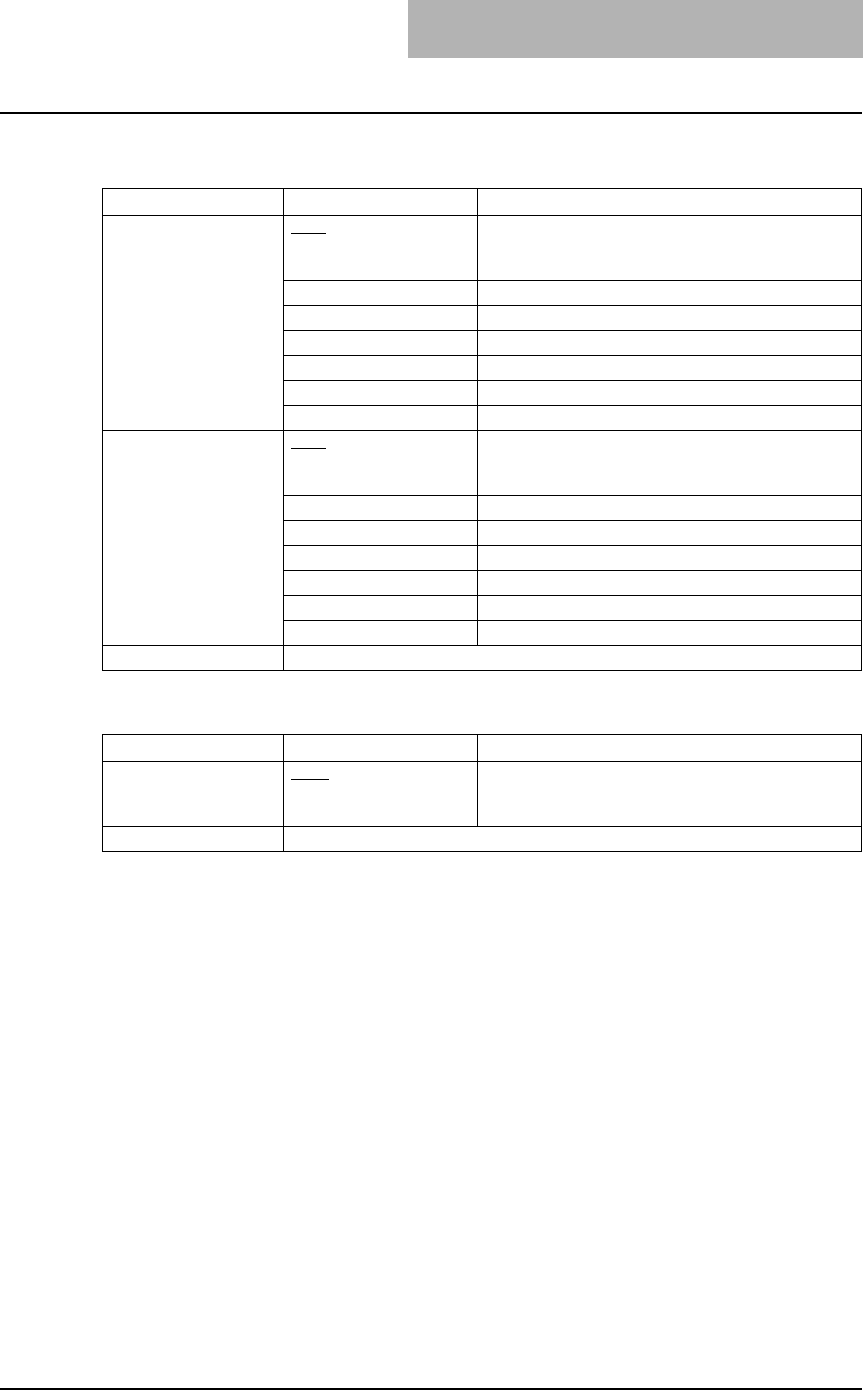
Installing Client Software for UNIX 149
Banners
Option Value Alternative Value Description
Starting Banner none Selects whether banner pages are printed before
printing documents or not.
If they are, select among the items below.
classified Classified information
confidential Confidential information
secret Secret information
standard Standard information
topsecret Top secret
unclassified Unclassified information
Ending Banner none Selects whether banner pages are printed after
printing documents or not.
If they are, select among the items below.
classified Classified information
confidential Confidential information
secret Secret information
standard Standard information
topsecret Top secret
unclassified Unclassified information
[Continue] button Determines the selected items.
PS Binary Protocol
Option Value Alternative Value Description
PS Binary Protocol None, TBCP Selects whether print data are processed in a binary
format using PostScript and printed using TBCP
protocol or not.
[Continue] button Determines the selected items.
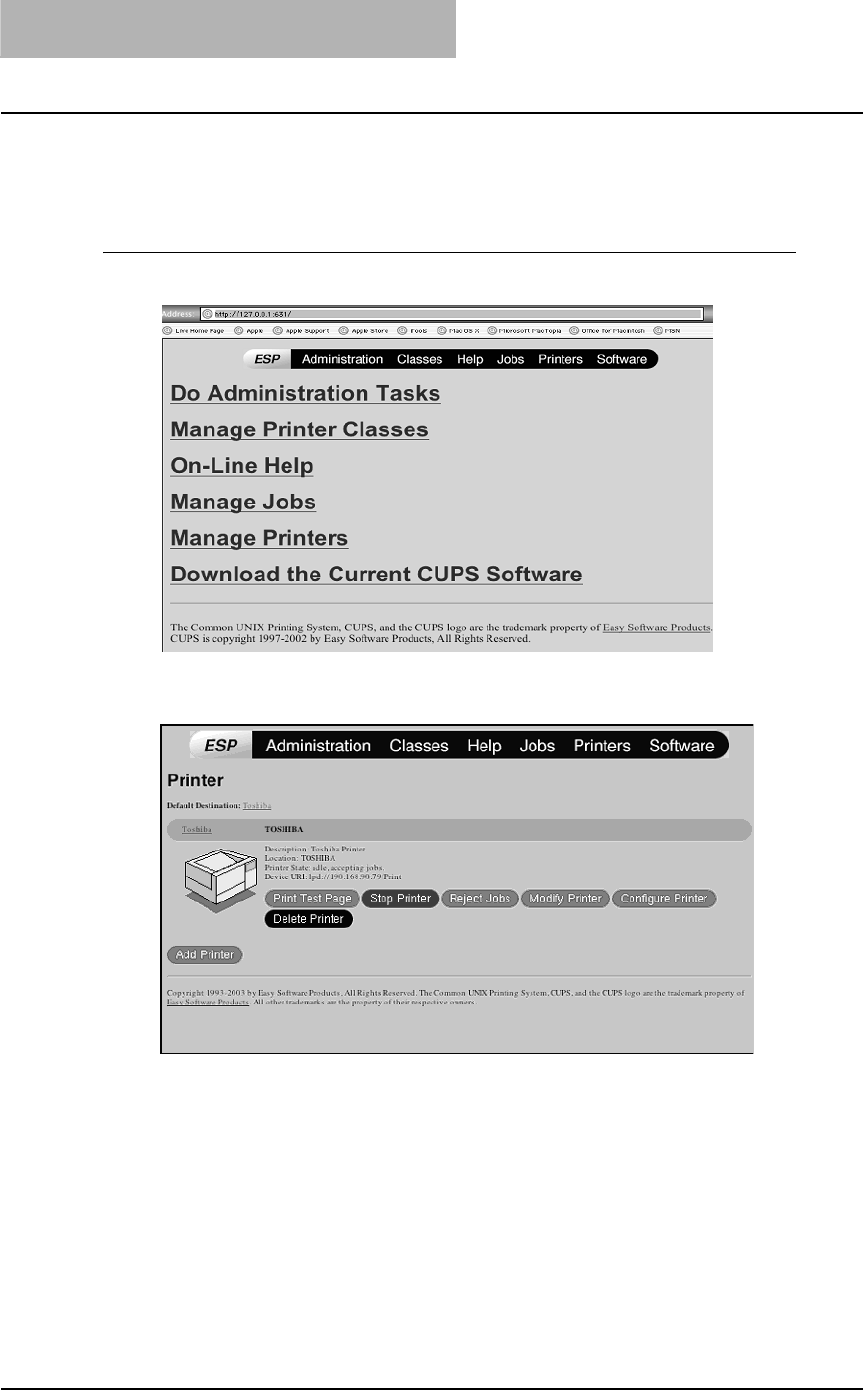
2 INSTALLING CLIENT SOFTWARE
150 Installing Client Software for UNIX
— Modifying printer
You can change the location and description of the printer.
Modifying printer
1
Click the “Manage Printers” link in the startup page.
The Printer page is displayed.
2
Select this equipment and then click [Modify Printer].
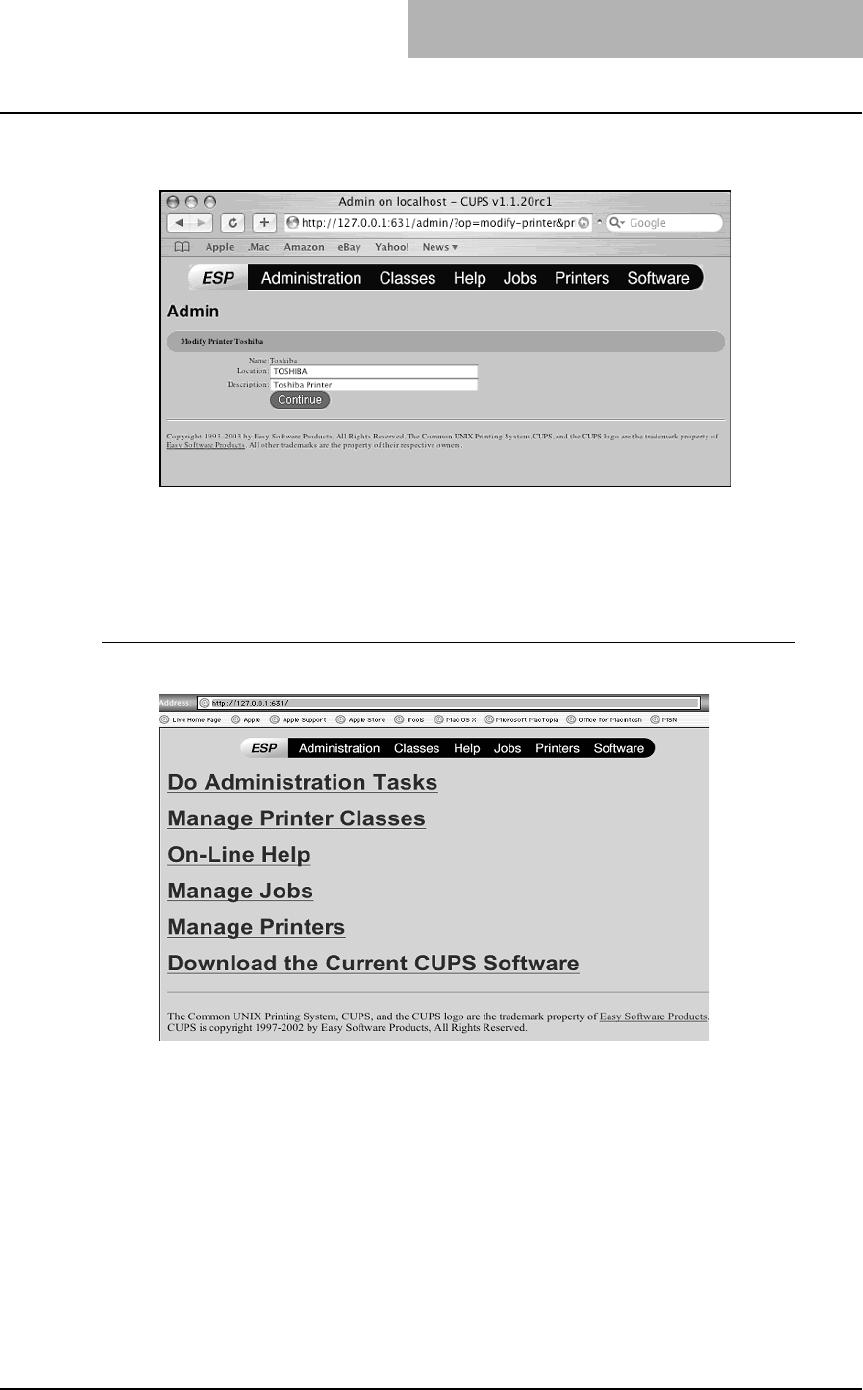
Installing Client Software for UNIX 151
3
Modify the location and description in each field and click
[Continue].
— Uninstalling printer
To uninstall the printer that you create, perform the following procedure.
Uninstalling printer
1
Click the “Manage Printers” link in the startup page.
The Printer page is displayed.

2 INSTALLING CLIENT SOFTWARE
152 Installing Client Software for UNIX
2
Select this equipment and then click [Delete Printer].
The printer is deleted.
3
Then delete the PPD file “TOSHIBA_EST205_CUPS.gz” from the
“/usr/share/cups/model/Toshiba” directory.

3.PRINTING
This describes the instructions on how to print from client computer.
Printing from Windows.........................................................................................154
Before using the printer driver.........................................................................................................154
Printing from application..................................................................................................................161
Setting up print options ...................................................................................................................163
Printing with extended print functionality.........................................................................................190
Printing from Macintosh.......................................................................................205
Printing from application on Mac OS 8.6 to 9.x...............................................................................205
Printing from application on Mac OS X 10.2.4 to Mac OS X 10.4.x ................................................218
Printing from UNIX................................................................................................238
Printing from an application.............................................................................................................238

3 PRINTING
154 Printing from Windows
Printing from Windows
This equipment supports printing from Windows applications using the PCL6 and PS3 printer
drivers.
These printer drivers allow you to define such document properties as the orientation and print
quality of your pages, and such complex finishing options as booklet layout and N-up printing.
Before using the printer driver
Before printing, you have to configure the following options:
yConfiguration Settings
You have to configure such options as the Paper Feed Unit or the Paper Feed Pedestal. The
features of these options are not available unless you tell the system that they are installed.
yDepartment Code
This system can manage jobs by department code. This feature lets you manage job
counters for every department code. For example, a network administrator can check the
number of copies printed from specific department member.
If the Department Code is enabled, enter your Department Code provided by your adminis-
trator.
Configuring the options
After you complete the installation of the printer drivers, you should configure the option settings
on the printer drivers.
There are two methods to configure the options;
yIf this equipment and your computer are not connected in the TCP/IP network, you can con-
figure the options manually.
P.155 “Configuring the options manually”
yIf this equipment and your computer are connected in the TCP/IP network, you can configure
the options automatically obtaining the settings using the SNMP Communication.
P.157 “Configuring the Options Automatically”
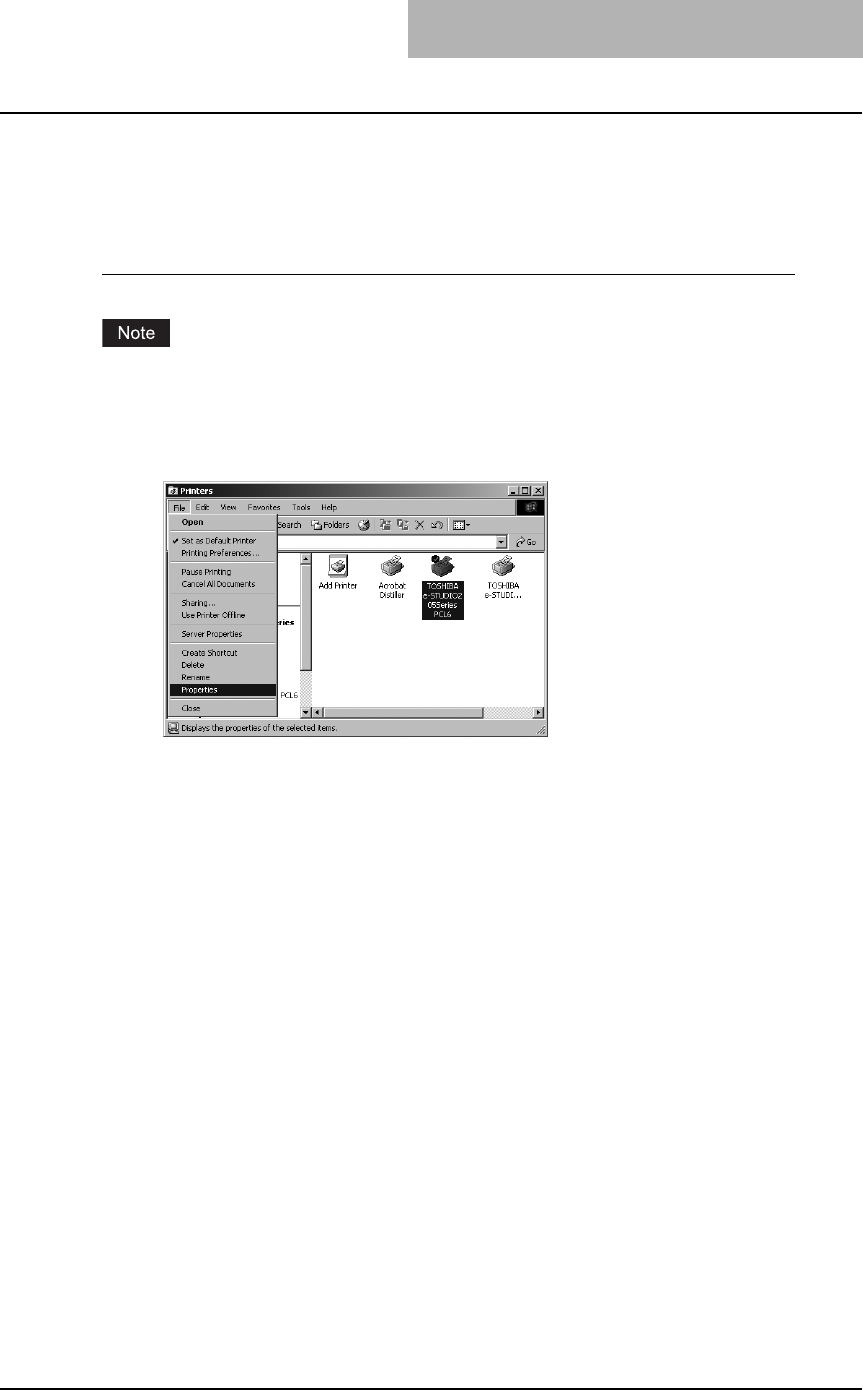
Printing from Windows 155
— Configuring the options manually
The following describes an instruction on Windows 2000. The procedure is the same when other
versions of Windows are used.
Setting the configuration tab manually
You must log into Windows as a user who has the “Administrators” or “Power Users” privilege
when using Windows NT 4.0, Windows 2000, Windows XP, or Windows Server 2003.
1
Select the printer driver in the Printers folder. Then click [File] and
select [Properties].
yWhen you are operating under Windows XP/Server 2003, open the Printers and
Faxes folder to access the printer driver.
yThe printer driver properties dialog box appears.

3 PRINTING
156 Printing from Windows
2
Display the [Configuration] tab and set the following options.
Drawers — This sets the Drawer configuration according to the Drawers installed.
yDrawer 1: 1st Drawer only
yDrawer 1 & 2: 1st Drawer and Paper Feed Unit (optional)
yDrawer 1,2 & 3: 1st Drawer, Paper Feed Unit (optional) and Paper Feed Pedestal
(optional, its upper Drawer only)
yDrawer 1,2,3 & 4: 1st Drawer, Paper Feed Unit (optional) and Paper Feed Pedestal
(optional, both of its upper and lower Drawers)
Automatic Duplexer
Select whether the Automatic Duplexer (optional) is installed or not.
None – Select this when the Automatic Duplexer is not installed.
Installed – Select this when the Automatic Duplexer is installed.
Drawer 1 — Select the size that is loaded in the 1st Drawer.
Drawer 2 — Select the size that is loaded in the 2nd Drawer (Paper Feed Unit (optional))
when it is installed.
Drawer 3 — Select the size that is loaded in the 3rd Drawer (the upper Drawer of Paper
Feed Pedestal (optional)) when it is installed.
Drawer 4 — Select the size that is loaded in the 4th Drawer (the lower Drawer of Paper
Feed Pedestal (optional)) when it is installed.
Bypass Tray — Set to “Automatic”. (Not selectable).
For more information about each item, see descriptions about the Configuration Tab.
P.188 “Configuration tab”
3
Click [Apply] and [OK] to save settings.

Printing from Windows 157
— Configuring the Options Automatically
The following describes an instruction on Windows 2000. The procedure is the same when other
versions of Windows are used.
Setting the configuration tab using SNMP communication
You must log into Windows as a user who has the “Administrators” or “Power Users” privilege
when using Windows NT 4.0, Windows 2000, Windows XP, or Windows Server 2003.
1
Select the printer driver in the Printers folder. Then click [File] and
select [Properties].
yWhen you are operating under Windows XP/Server 2003, open the Printers and
Faxes folder to access the printer driver.
yThe printer driver properties dialog box appears.
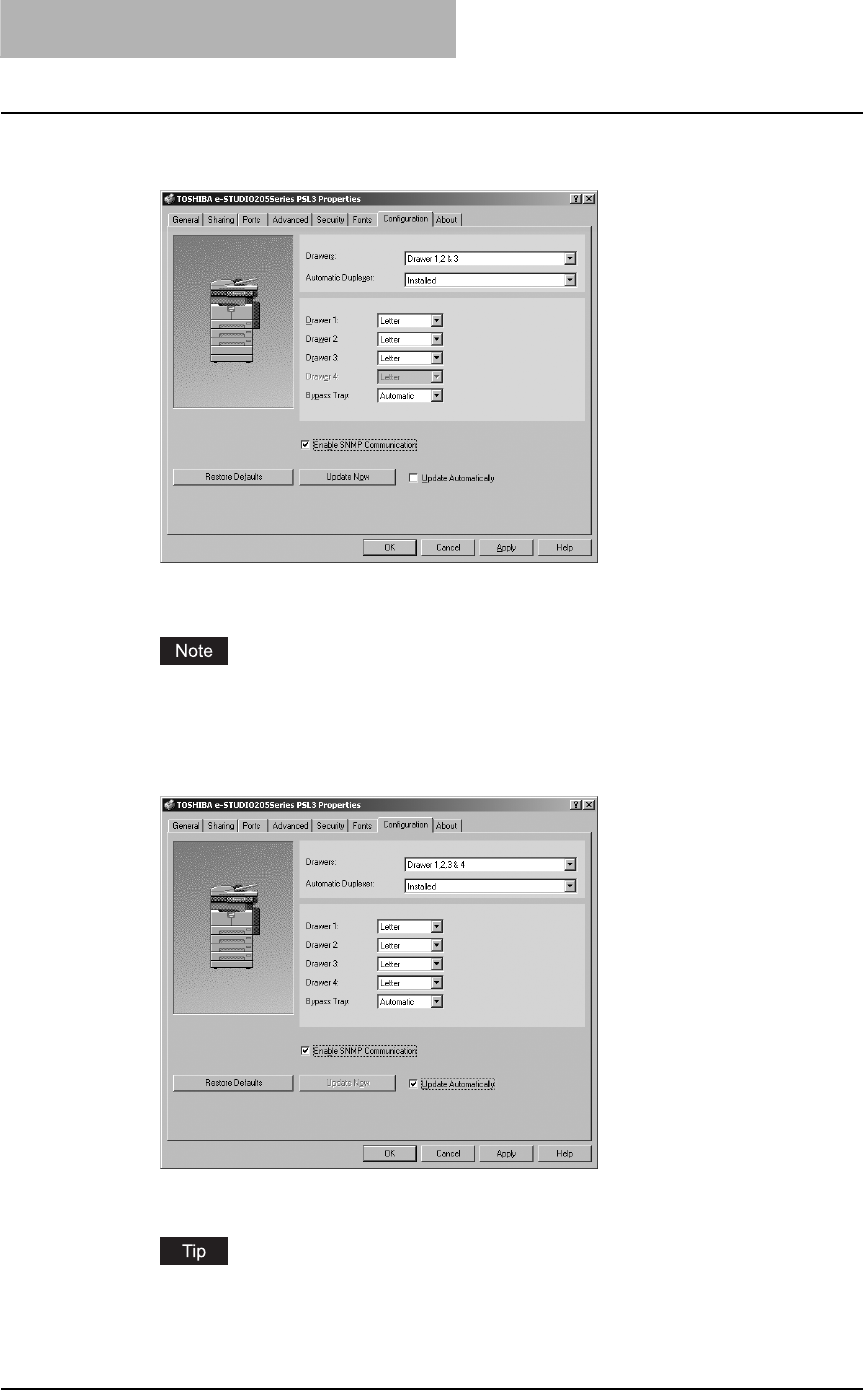
3 PRINTING
158 Printing from Windows
2
Display the [Configuration] tab, check on “Enable SNMP Communi-
cation”, and click [Update Now].
The printer driver starts communicating with system and obtains option settings
automatically.
If the connection to the equipment has not been configured correctly, the SNMP commu-
nication fails and the option settings will not be updated.
3
If you want to update option settings automatically when the [Con-
figuration] tab is opened, check on “Update Automatically”.
4
Click [Apply] and [OK] to save settings.
For more information about each item, see descriptions about the Configuration Tab.
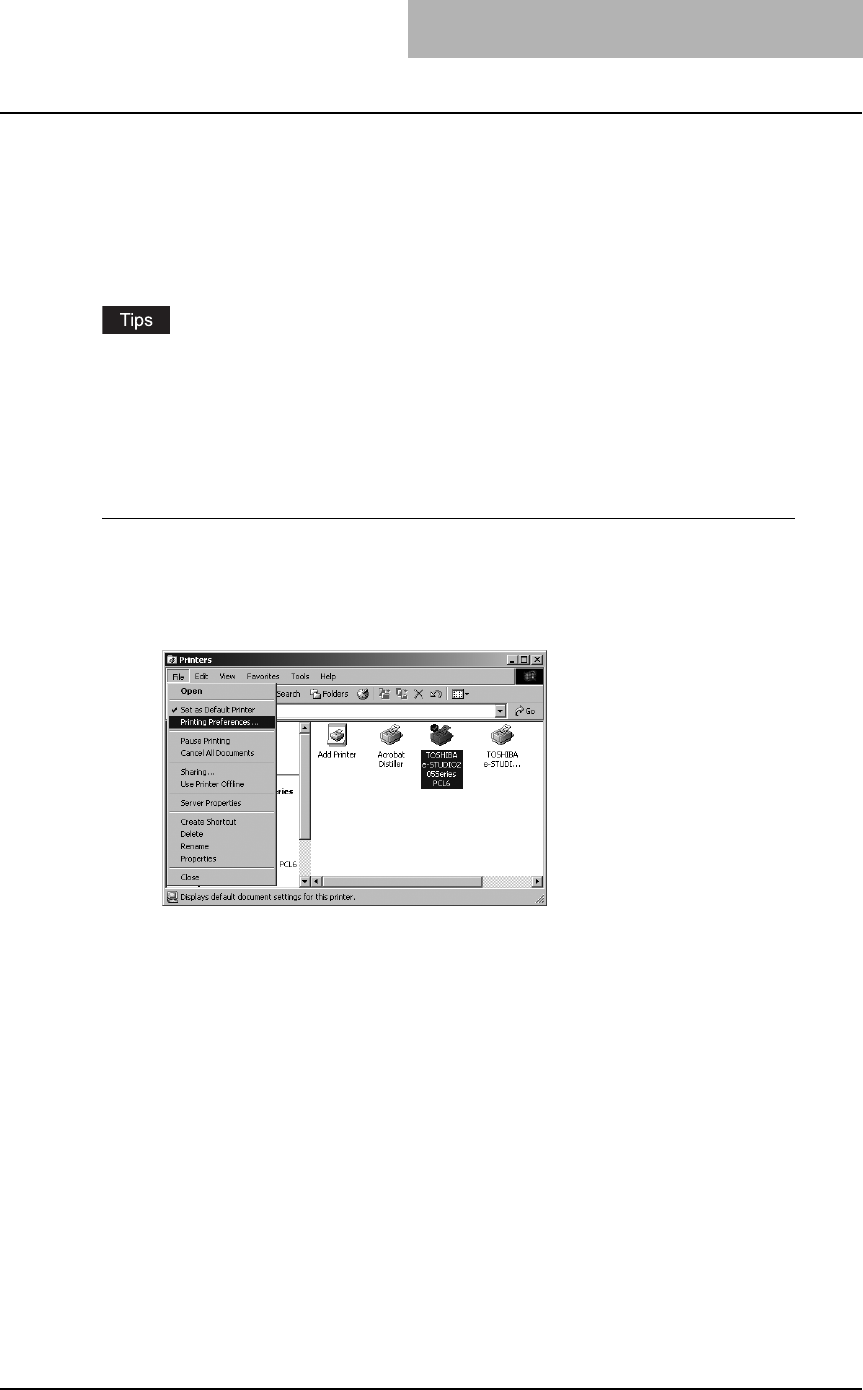
Printing from Windows 159
Setting the department code
When this equipment is managed by department codes, you have to enter your department
code on the printer driver.
This allows a network administrator to check the number of copies printed from specific depart-
ment members.
Please ask your administrator whether or not you should enter the Department Code.
yWhen printing is made with an invalid department code, the job is deleted. (If the “Enable
SNMP Communication” check box of the Configuration tab menu of the printer is checked,
an error message appears before the job is deleted.)
yA department code can be entered every time you begin printing. If you have to use a differ-
ent department code for each print job, enter it when you begin printing.
Entering department code
1
Select the printer driver in the Printers folder. Then click [File] and
select [Properties] (for Windows 98/Me), select [Document
Defaults...] (for Windows NT 4.0), or [Printing Preferences...] (for
Windows 2000/XP/Server 2003).
The printer driver properties dialog box appears.
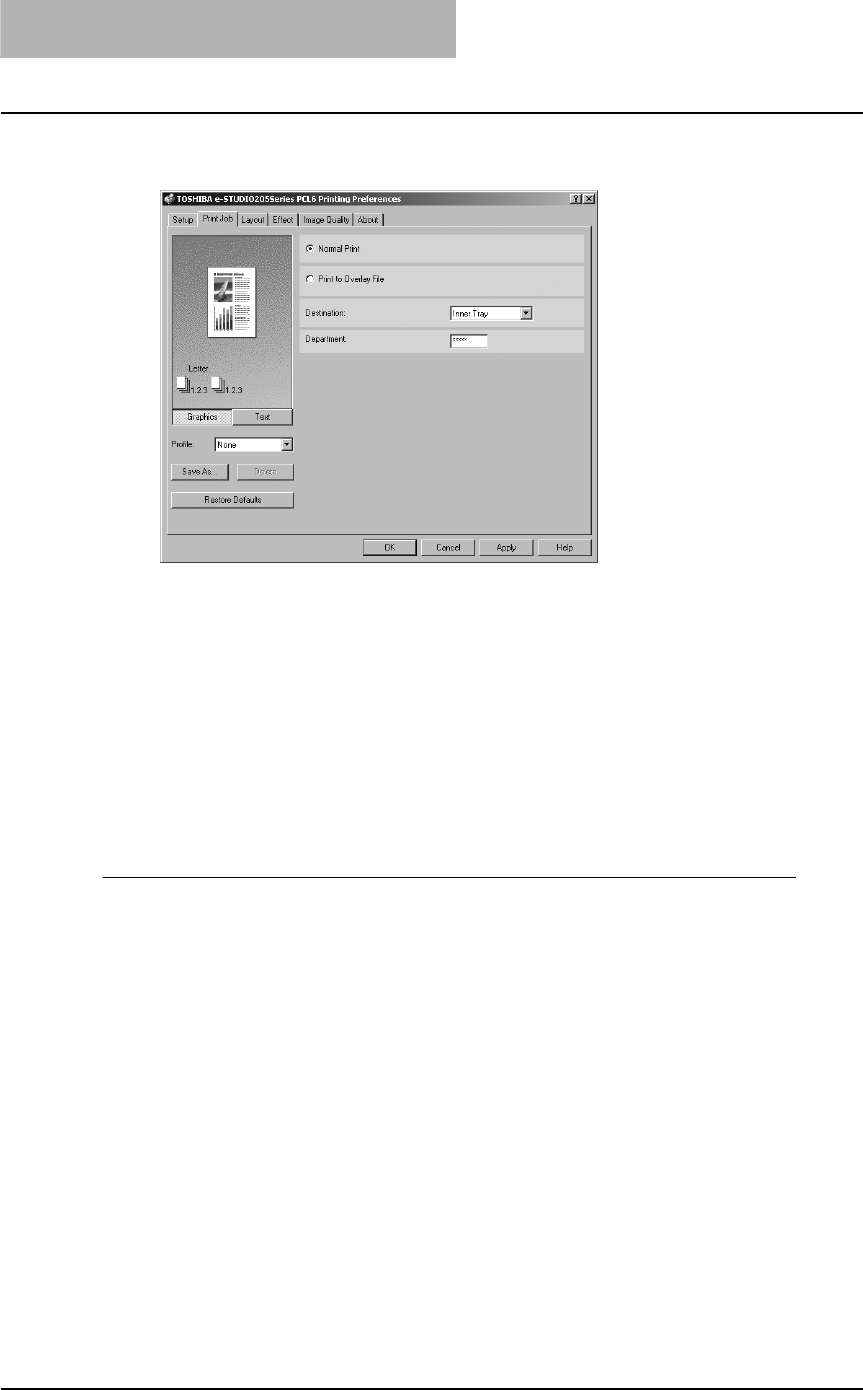
3 PRINTING
160 Printing from Windows
2
Display the [Print Job] tab and enter your department code in the
“Department” field.
In the Department field, only numeric characters can be entered. The Department Code
must be 5-digit number.
3
Click [Apply] and [OK] to save settings.
Copying the PPD file for Windows
The Client Utilities CD-ROM contains a printer description file for popular Windows applications.
PageMaker 6.0, 6.5, and 7.0 do not support automatic installation of printer description files. To
make printing available in the Print and Page Setup dialog boxes of this application, copy the
printer description file to the appropriate location.
Copying the printer description file
1
On the Client Utilities CD-ROM, open the folder that contains the
PS3 printer driver.
yFor Windows 98/Me:
[Client Utilities CD-ROM]:\9X_ME\PS\<language>\
yFor Windows NT 4.0:
[Client Utilities CD-ROM]:\NT\PS\<language>\
yFor Windows 2000/XP/Server 2003:
[Client Utilities CD-ROM]:\W2K_XP_2003\PS\<language>\
2
Copy the printer description file (*.ppd) to the appropriate location.
yFor PageMaker 6.0:
\PM6\RSRC\<language>\PPD4
yFor PageMaker 6.5:
\PM65\RSRC\<language>\PPD4
yFor PageMaker 7.0:
\Program Files\Adobe\PageMaker 7.0\Rsrc\<language>\PPD4

Printing from Windows 161
Printing from application
The following describes how to print from your application.
P.161 “Considerations and limitations”
P.161 “How to print”
Considerations and limitations
ySome options listed in the printer driver can also be set from an application (for example, col-
lation). However, using collation in the application may cause problems. In that case, use the
driver option to perform the function, rather than setting it from the application. But depend-
ing on the application, settings such as the orientation may need to be set in the application,
or the printer driver, or both. The application may not set up the file properly for printing on
this equipment and may also take longer to process. In order to print properly from the appli-
cation that you are using, please see the section about printing in the application’s manual.
yWhen printing with the PS3 printer driver from Adobe Acrobat, the Fit to Paper enlargement
feature does not work if the “Use PostScript Passthrough” option is enabled in the PostScript
settings of the PS3 printer driver. To use the Fit to Paper enlargement feature, please disable
the “Use PostScript Passthrough” option in the PostScript settings of the PS3 printer driver.
yWhen printing with the PS3 printer driver from the application that creates the PostScript
code for printing such as Adobe Acrobat, the following print options may not work correctly.
In that case, please disable the “Use PostScript Passthrough” option in the PostScript set-
tings of the PS3 printer driver.
- Manual Scale
- Print Paper Size
- Paper Type
- User Front Cover
- User Back Cover
-Booklet
- Multiple Pages per Sheet
- All options in the Effect tab
- All options in the Image Quality tab
How to print
Once you have installed the printer driver and configured it properly, you can print directly from
most Windows applications. Simply choose the Print command from within your application.
You can print using the various functions by setting print options on the printer driver.
Printing from Windows applications
1
Open a file and select [Print] from the [File] menu of the application.
The Print dialog box appears.
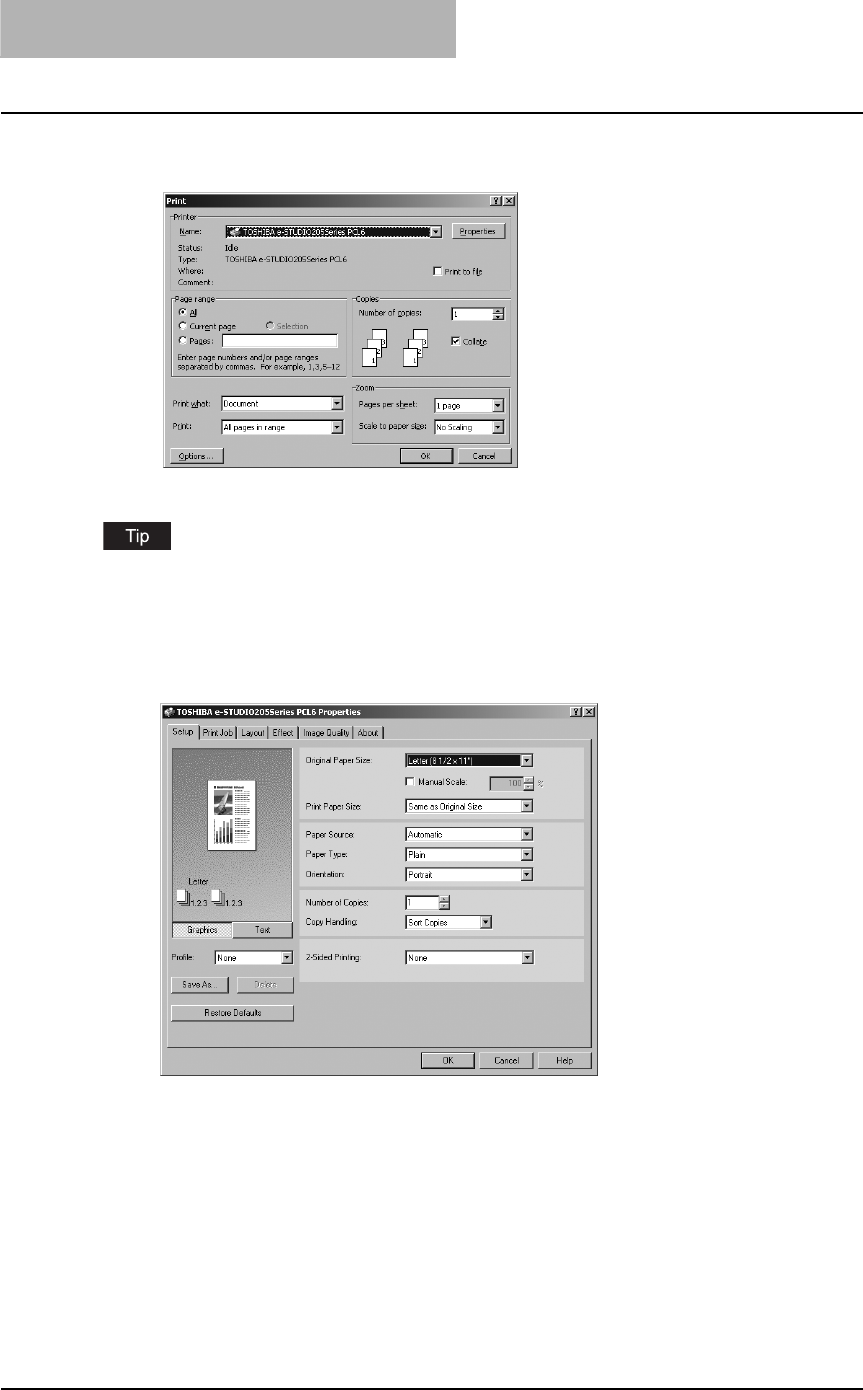
3 PRINTING
162 Printing from Windows
2
Select the printer driver of the equipment to be used and Click
[Properties].
The printer properties dialog box appears.
The procedures for displaying the properties dialog for the printer driver may be different
depending on an application that you are using. See your application’s manual about displaying
the printer properties dialog box.
3
Setting the Print Options for each tab according to how you want to
print.
ySetting the print options varies depending on how you want to print a document.
P.167 “Print options”
yYou can also set the print options using setting profiles.
P.164 “Setting print options for each print job”
4
Click [OK] to save the settings.
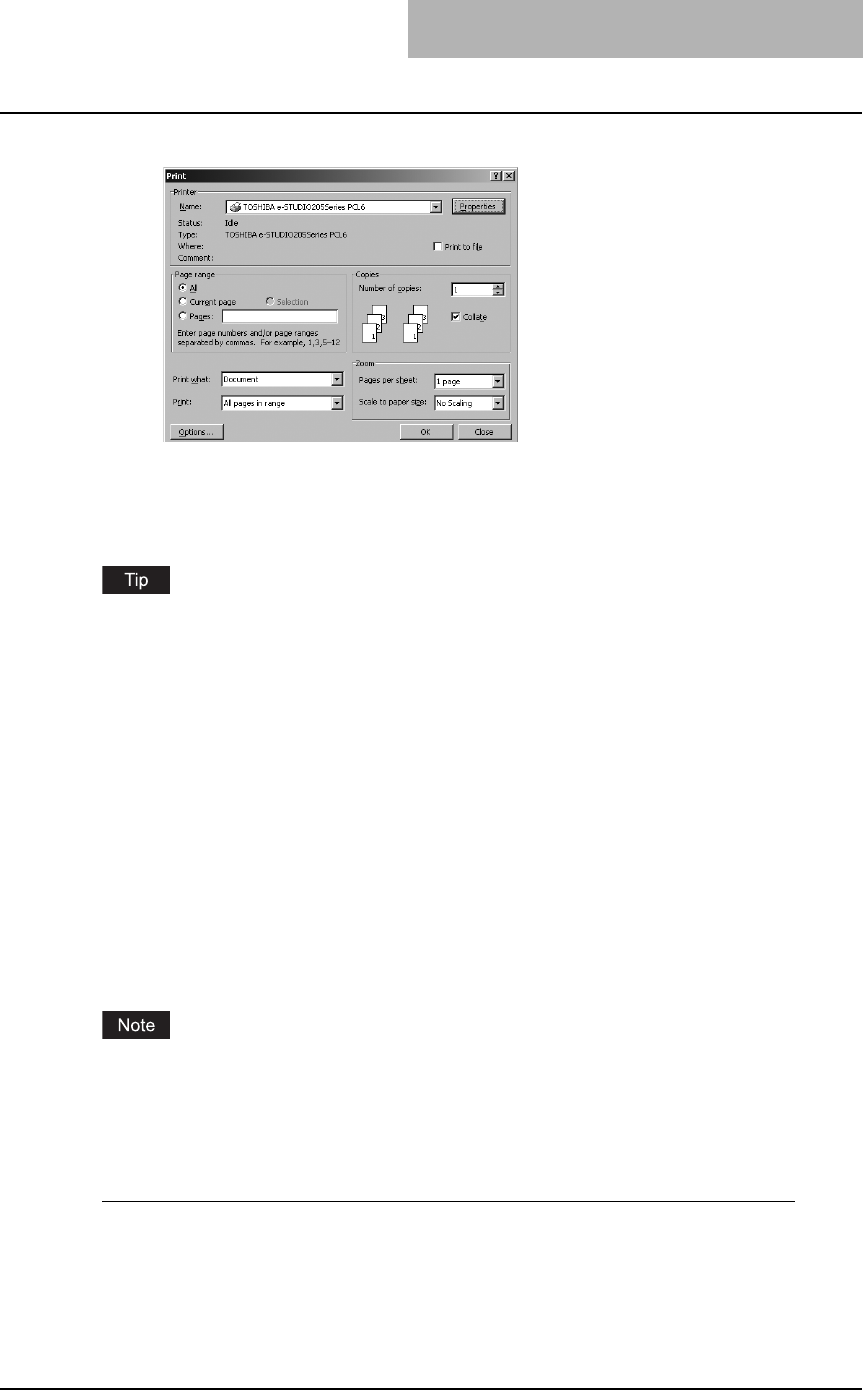
Printing from Windows 163
5
Click [OK] or [Print] to print a document.
Setting up print options
Print Options are the attributes you set to define the way a print job is processed.
To find the printing instructions for your specific needs, refer to the procedures in the following
section.
P.190 “Printing with extended print functionality”
How to setup
There are several ways to set print options. Also, how the settings effect printing varies depend-
ing on the way you set the options. Also the tabs displayed vary depending on how you display
the printer properties.
— Setting Initial values of print options
Setting the print options by displaying the printer properties from the Printers folder within the
Windows Start menu will establish the initial values of the options. For example, the paper size
setting you most commonly use, optional device settings, user information settings, etc., are set-
tings you will not want to change every time you print. It is convenient to set these options as ini-
tial values.
If you have install the printer driver by Point-and-Print on Windows 2000, Windows XP, or Win-
dows Server 2003, please set the initial values of print options from the [Printing Default] button
in the [Advanced] tab on the properties dialog box that can be displayed by selecting [Properties]
in the [File] menu. The initial values cannot be set by the following method.
How to display:
1
Click [Start], [Settings], and select [Printers] (for Windows 98/Me/NT
4.0/2000) or [Printers and Faxes] (for Windows XP/Server 2003).

3 PRINTING
164 Printing from Windows
2
Select the printer driver for the equipment, click the [File] menu and
select [Properties] (for Windows 98/Me), [Document Defaults] (for
Windows NT 4.0), or [Printing Preferences] (for Windows 2000/XP/
Server 2003).
— Setting print options for each print job
Setting the print options by displaying the printer properties from the Print dialog box within an
application will establish the values for the current print job. The print option settings specific to
each print job are set using this method.
How to display:
1
Click the [File] menu and select [Print] on an application.
2
Select the printer driver of the equipment to be used and Click
[Properties].
— Setting print options using profiles
Print option settings can be saved so you can easily load specifically configured settings for a
particular job.
In order to print a document using profiles, you should create the saved profile first.
P.165 “Saving profile”
Once you save profile, you can load the settings for a particular job to print a document.
P.166 “Loading profile”
You can also delete the profile that you no longer require.
P.166 “Deleting profile”
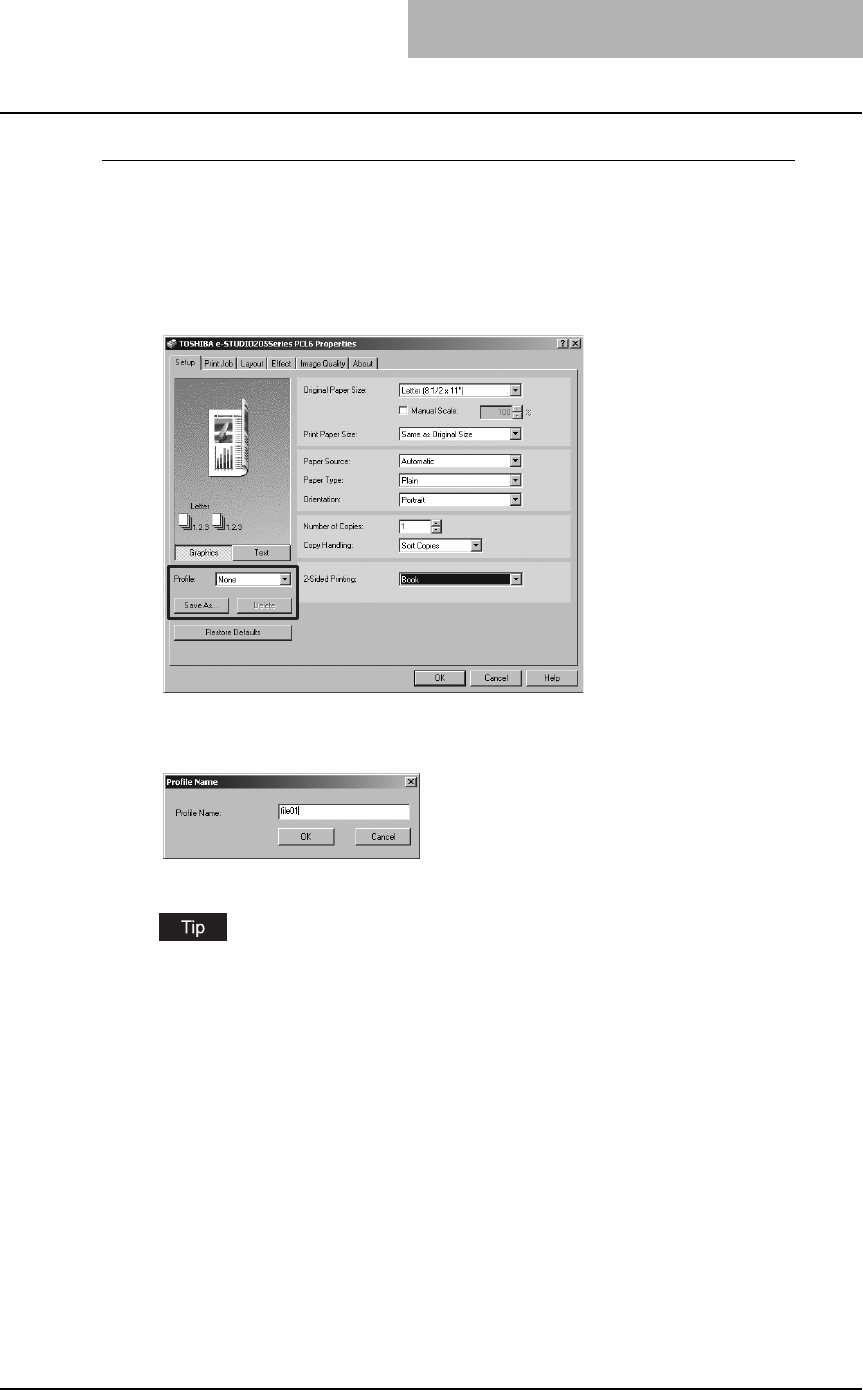
Printing from Windows 165
Saving profile
You can create up to 20 profiles for a printer driver.
1
Configure the print options on each tab.
Setting the print options varies depending on how you want to print a document.
P.167 “Print options”
2
Click [Save As...] at the Profile group.
The Profile Name dialog box appears.
3
Enter the profile name and click [OK].
The file name can be up to 63 characters long.
If you enter the existing profile name, it prompts whether overwrite the existing profile or
not. If you want to overwrite the existing profile, click [OK].
4
The setting profile is saved.
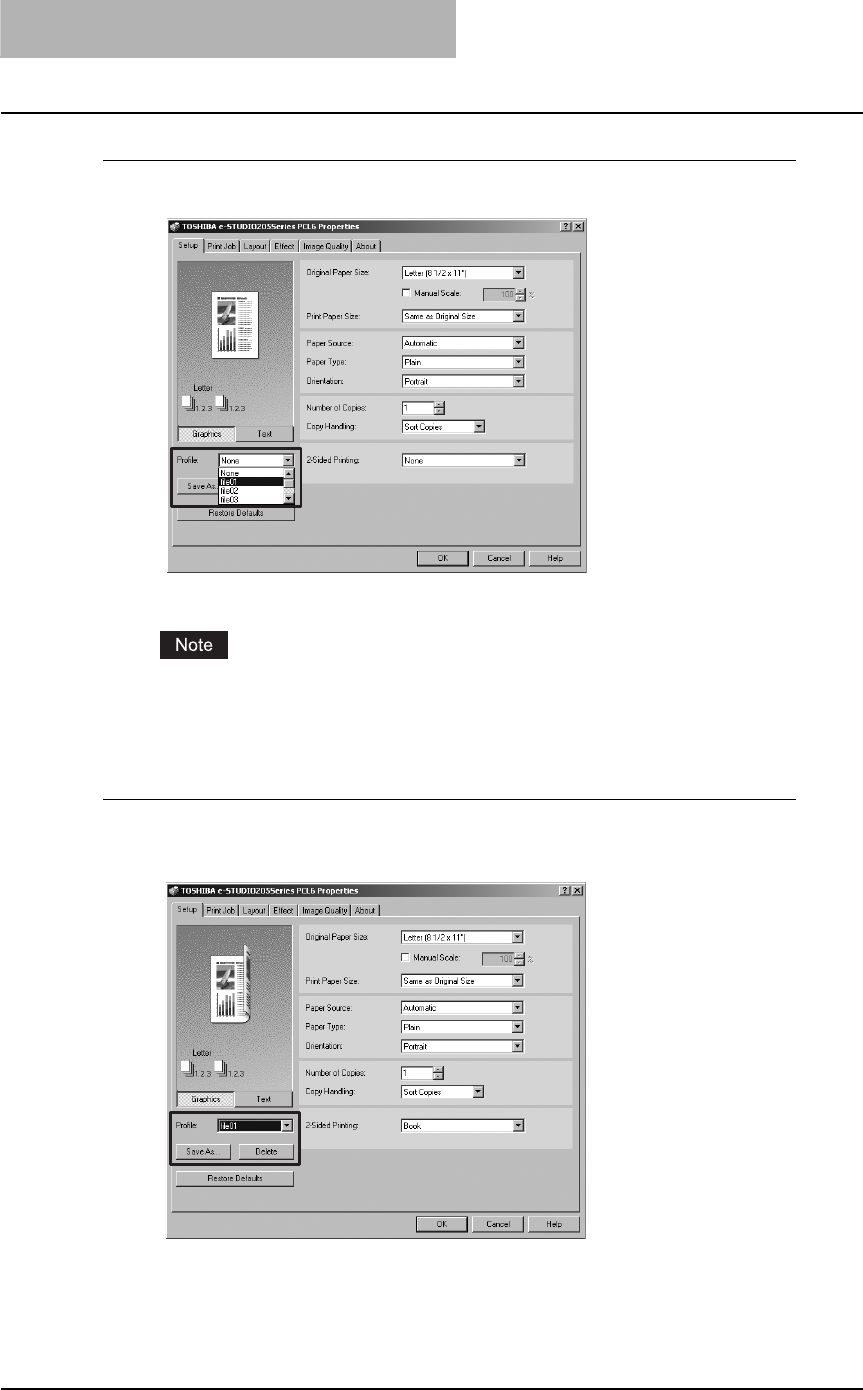
3 PRINTING
166 Printing from Windows
Loading profile
1
Select a profile in the “Profile” drop down box.
The settings profile is loaded from the file and apply to the printer options.
Selecting “None” in the “Profile” drop down box cannot restore the initial settings on the
printer driver. To restore the initial settings after selecting a profile, click [Restore
Defaults].
Deleting profile
1
Select a profile that you want to delete in the “Profile” drop down
box, and click [Delete].
The Confirm Profile Delete dialog box appears.
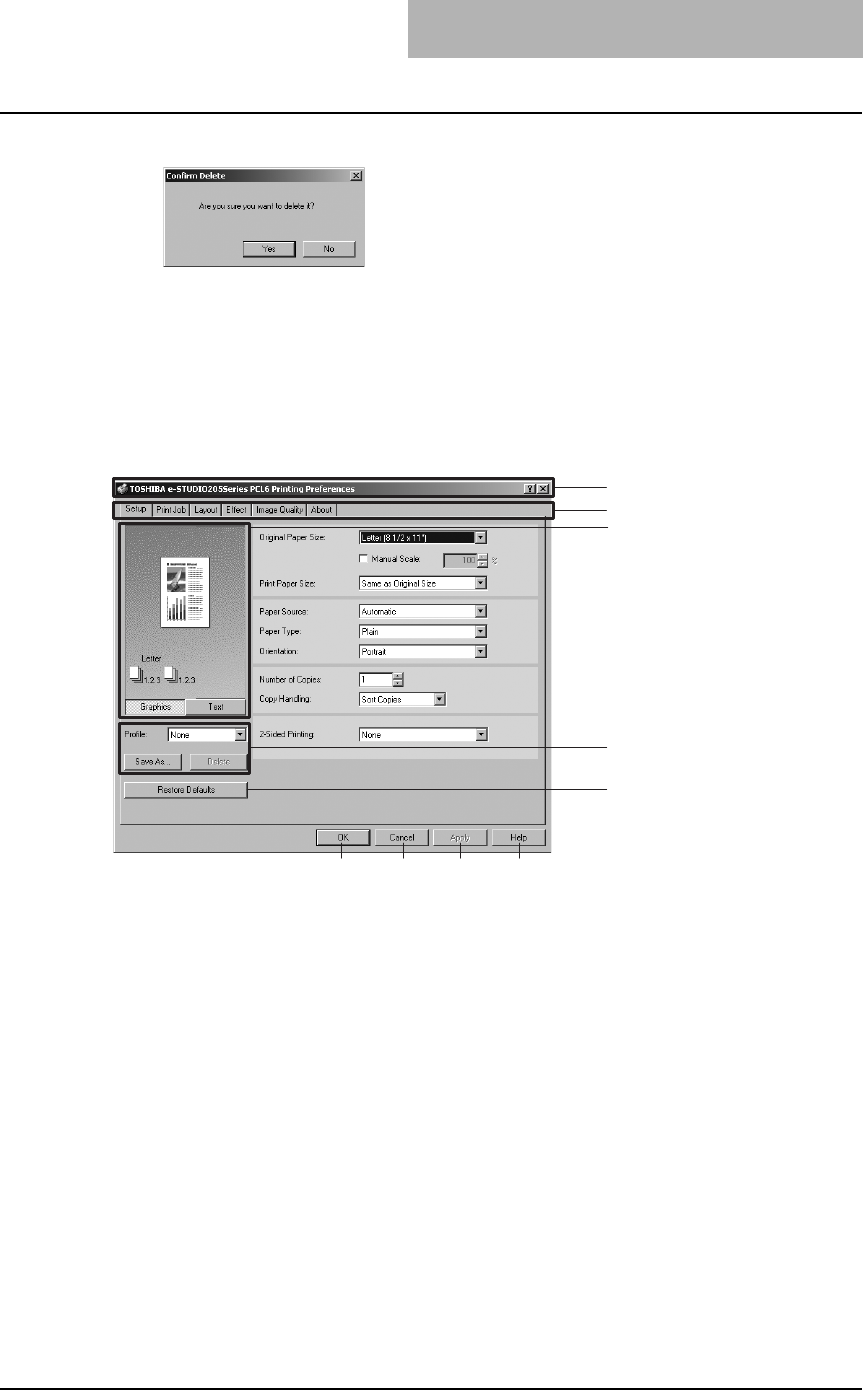
Printing from Windows 167
2
Click [Yes] to delete the selected profile.
Print options
This section describes print options in each tab of the printer driver. This section will help you to
find the description of specific print options, or understand the functions for each print option.
The following example screen is displayed when you select [File] and then [Printing Prefer-
ences...] in the Printers folder.
1) Printer name
Displays the name given to the printer driver when it was installed, or the name it displays on
the icon in the Printer folder.
2) Menu tabs
The menu items of the printer driver are displayed as tabs. Clicking on a tab will display the
contents of the selected tab. The tabs displayed vary depending on the way the print proper-
ties are displayed.
-Setup tab
The Setup tab contains basic print operation settings, such as original paper size, print
paper size, paper source, paper type, orientation, number of copies, and so on. Also this
tab allows you to enable enlarge/reduce printing, sort printing, and 2-sided printing.
P.169 “Setup tab”
- Print Job tab
The Print Job tab contains settings of how this equipment handles each print job. This tab
also allows you to store the data as overlay images.
P.172 “Print Job tab”
1
2
3
4
5
6 7 8 9

3 PRINTING
168 Printing from Windows
- Layout tab
The Layout Tab contains finishing options such as Cover page printing, Booklet printing,
and N-up printing.
P.173 “Layout tab - Standard window”
P.176 “Layout tab - Booklet window”
P.178 “Layout tab - Multiple Pages per Sheet window”
- Effect tab
The Effect Tab contains print options that add the effects to your print jobs such as Water-
marks, Overlay Image printing, Rotate printing, Mirror printing, and Negative printing.
Also it allows to enable Toner Save and Smoothing functions.
P.180 “Effect tab”
- Image Quality tab
The Image Quality Tab allows you to select how images are printed. You can easily
select appropriate image quality depending on the type of job being printed.
P.185 “Image Quality tab”
-Fonts tab
The Fonts Tab allows you to select how the TrueType fonts are printed. This tab is only
displayed when the printer properties are accessed from the Printers folder.
P.187 “Fonts tab”
- Configuration tab
The Configuration Tab allows you to configure the options. When any optional unit is
installed in this equipment, set the configuration of the machine on this tab. This tab is
only displayed when the printer properties are accessed from the Printers folder.
P.188 “Configuration tab”
- About tab
The About Tab contains the version information of the printer driver.
P.189 “About tab”
3) Preview window
In the Preview windows, you can check the current settings in the printer driver. You can
change view type by clicking [Graphic] to display the print options settings graphically or
[Text] to display the print options settings as a texts.
4) Profile
Print option settings can be saved on your hard disk. You can save print option settings by
clicking [Save As...] and easily load a setting file by selecting a profile name in the drop down
box.
P.164 “Setting print options using profiles”
5) [Restore Defaults]
Click this to restore the settings to the original factory defaults.
6) [OK]
Click this to enter the input settings and complete the print options settings.
7) [Cancel]
Click this to cancel the input settings and exit the print options settings.
8) [Apply]
Click this to enter the input settings without closing the print options settings. This button is
only displayed when the printer properties are accessed from the Printers folder for Windows
NT 4.0, Windows 2000, Windows XP, and Windows Server 2003. This button remains
grayed out until a setting is changed.
9) [Help]
Click this to browse the HELP for the printer driver.
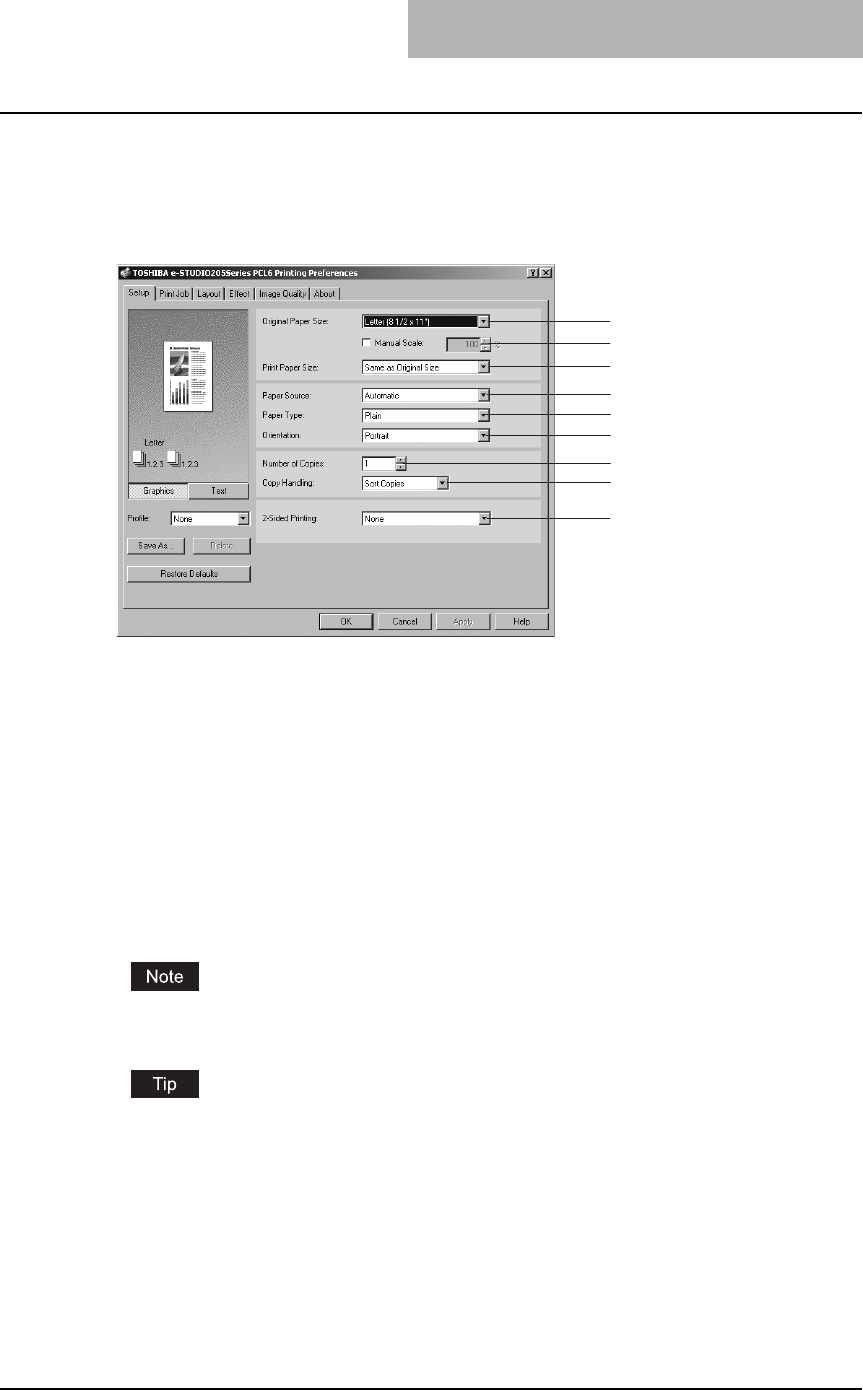
Printing from Windows 169
— Setup tab
The Setup tab contains basic print operation settings, such as original paper size, print paper
size, paper source, paper type, orientation, number of copies, and so on. Also this tab allows
you to enable enlarge/reduce printing, sort printing, and 2-sided printing.
1) Original Paper Size
This selects the size of a document to be printed.
To print on envelopes, see the following page:
P.16 “To print on envelopes”
The default paper size will be “Letter” or “A4” according to the regional setting in the Win-
dows.
2) Manual Scale
Check this box to manually enter the zoom ratio, to enlarge or reduce an image. You can set
any integer from 25 to 400(%) for the zoom ratio. This is not available when you enable the
Booklet printing.
3) Print Paper Size
Select this to enlarge or reduce a page image to fit exactly in the selected paper size. If you
do not enable enlarge or reduce printing, select “Same as Original Size”.
Available original paper sizes are listed below:
yLetter
yLedger
yLegal
yStatement
yComputer
y13”LG
yA4
yA5
yA3
yB4
yB5
yFolio
yA6
y8K
y16K
yEnvelope COM10
yEnvelope Monarch
yEnvelope DL
yEnvelope Cho-3
yEnvelope You-4
1
2
3
4
5
6
7
8
9
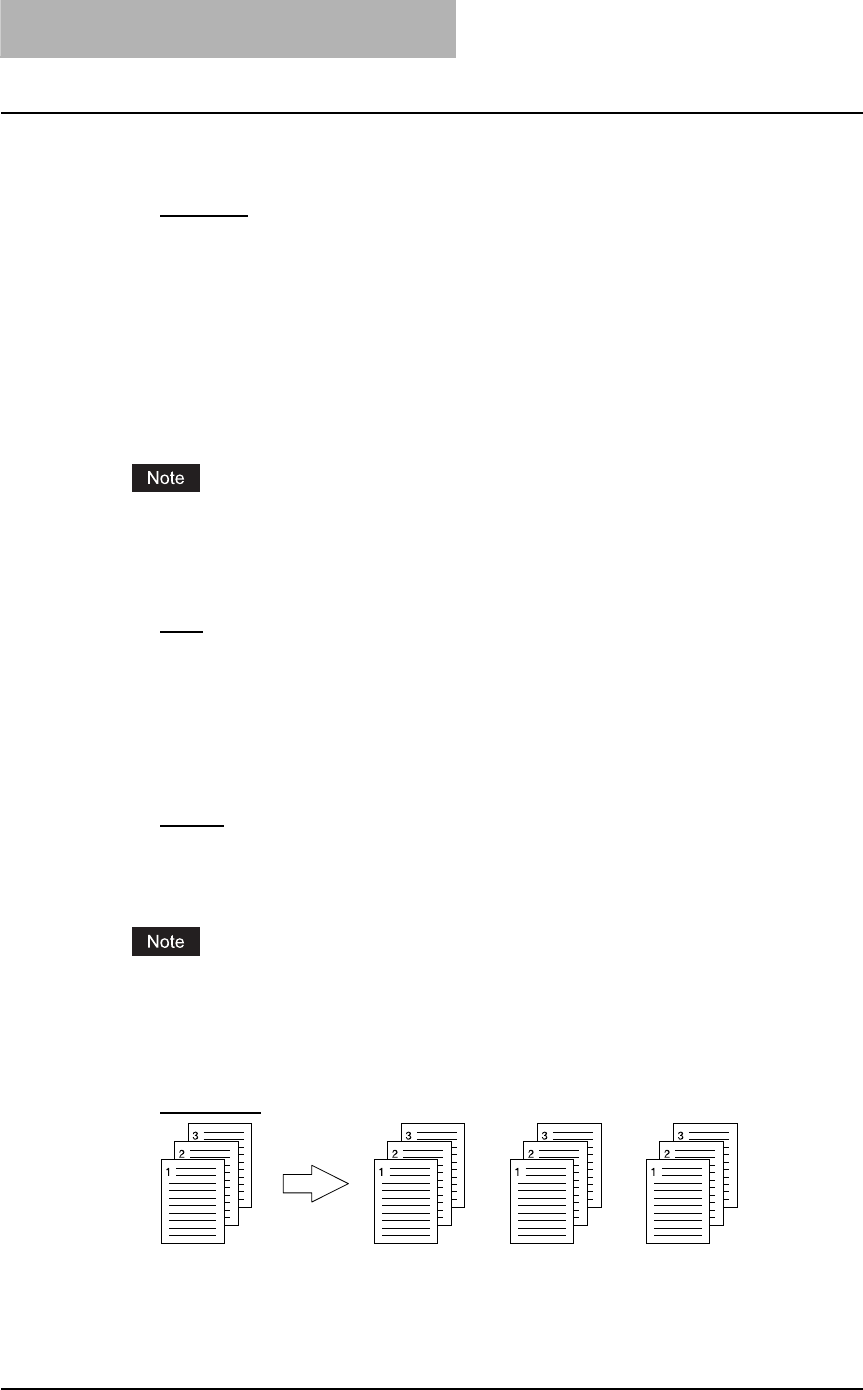
3 PRINTING
170 Printing from Windows
4) Paper Source
This selects the paper source. Please select a paper source that correlates with the printing
size.
-Automatic — Automatically selects the paper set in this equipment according to the
printed document size.
-Drawer1 — Paper is fed from the 1st Drawer.
-Drawer2 — Paper is fed from the 2nd Drawer (Paper Feed Unit (optional)). This cannot
be selected if the Paper Feed Unit (optional) is not installed.
-Drawer3 — Paper is fed from the 3rd Drawer (the upper Drawer of Paper Feed Pedestal
(optional)). This cannot be selected if the Paper Feed Pedestal (optional) is not installed.
-Drawer4 — Paper is fed from the 4th Drawer (the lower Drawer of Paper Feed Pedestal
(optional)). This cannot be selected if the Paper Feed Pedestal (optional) is not installed.
-Bypass Tray — Paper is fed from the Bypass Tray. (When an envelope is selected in the
“Original Paper Size” option, “Paper Source” is automatically set to this.)
The selectable values vary depending on the optional devices installed on this equipment
and their configuration on the Configuration tab.
5) Paper Type
This sets the media type of the paper.
-Plain — Select this when printing on 20 lbs plain paper (64-80 g/m2 plain paper).
-Thick1 — Select this when printing on 24-28 lbs thick paper (81-105 g/m2 thick paper).
-Thick2 — Select this when printing on 32-90 lbs thick paper (106-163 g/m2 thick paper).
-Transparency — Select this when printing on transparent sheets.
-Envelope — When an envelope is selected in the “Original Paper Size” option, “Paper
Type” is automatically set to this.
6) Orientation
This sets the paper printing direction.
-Portrait — The document is printed in the portrait direction.
-Landscape — The document is printed in the landscape direction.
7) Number of Copies
This sets the number of printed copies. You can set any integer from 1 to 999.
When you print a document with a large number of pages, or in which graphics, shading, and
photo images are considerable, only one set may be printed out, even if multiple sets are
specified.
8) Copy Handling
This sets how to sort the printed sheet when numerous copies are made for printing.
-Sort Copies — Select this for sort-printing (1, 2, 3... 1, 2, 3...).
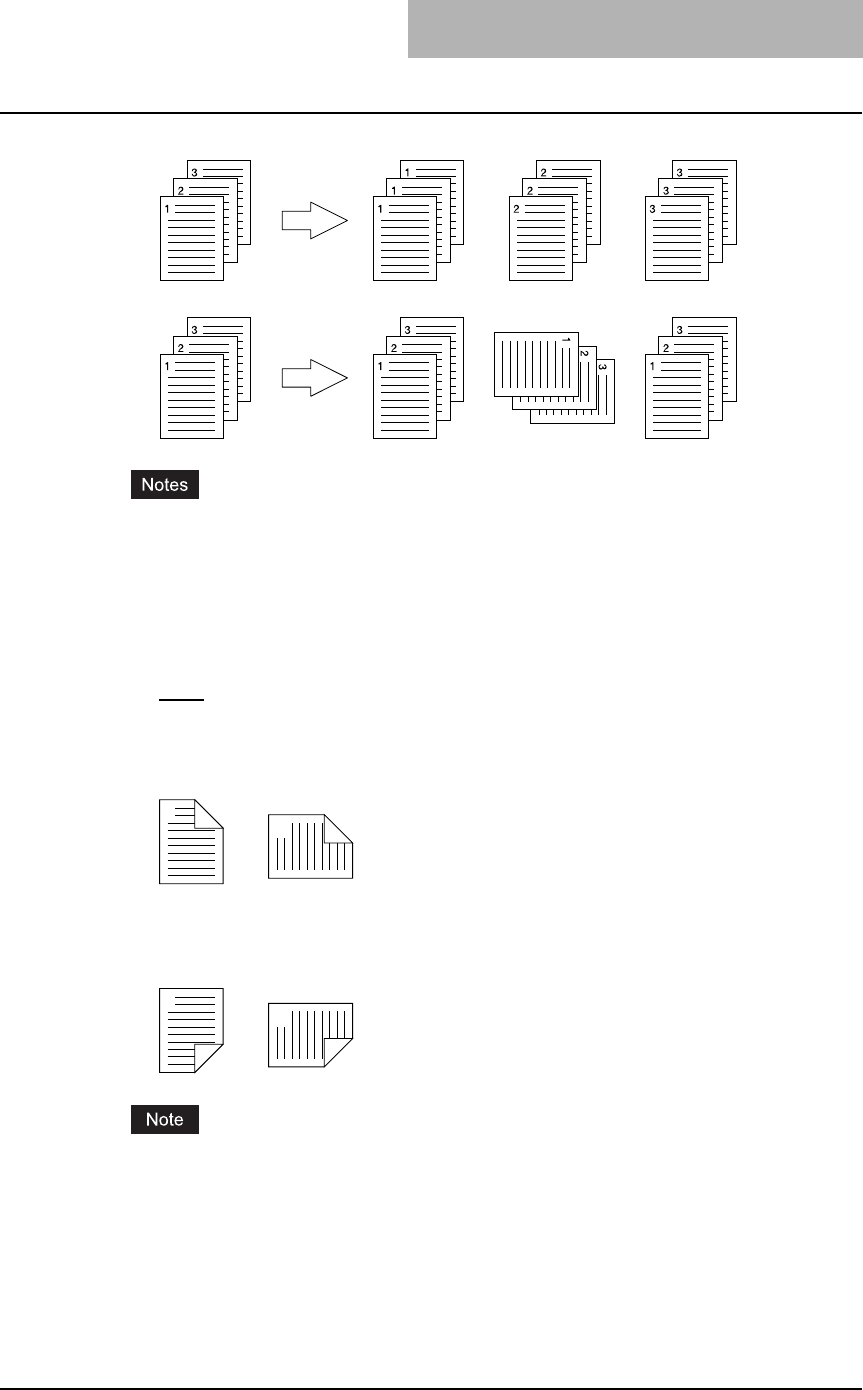
Printing from Windows 171
-Group Copies — Select this for group-printing (1, 1, 1... 2, 2, 2... 3, 3, 3...).
-Rotated Sort Copies — Select this for rotate sort-printing.
y“Group Copies” and “Rotated Sort Copies” can be selected only when more than 2 cop-
ies are entered at the Number of Copies option.
y“Rotated Sort Copies” can be selected only when “Letter”, “A4”, or “B5” is selected at the
Print Paper Size option.
9) 2-Sided Printing
This sets 2-Sided printing (printing on both sides of paper) according to the type of binding
for 2-sided-printed pages.
-None — Select this if you do not want to print on both sides of the paper.
-Book — Select this to print on both sides of the paper in the same direction and to bind
the document along the vertical side of the paper so that the pages can be turned over
right and left.
-Tablet — Select this to print on both sides of the paper with a vertical reversal and to bind
the document along the horizontal side of the paper so that the pages can be turned over
up and down.
“Book” or “Tablet” will be automatically selected when the Booklet printing is set at the Layout
tab.
1
2
Portrait
1
2
Landscape
1
2
Portrait
1
2
Landscape
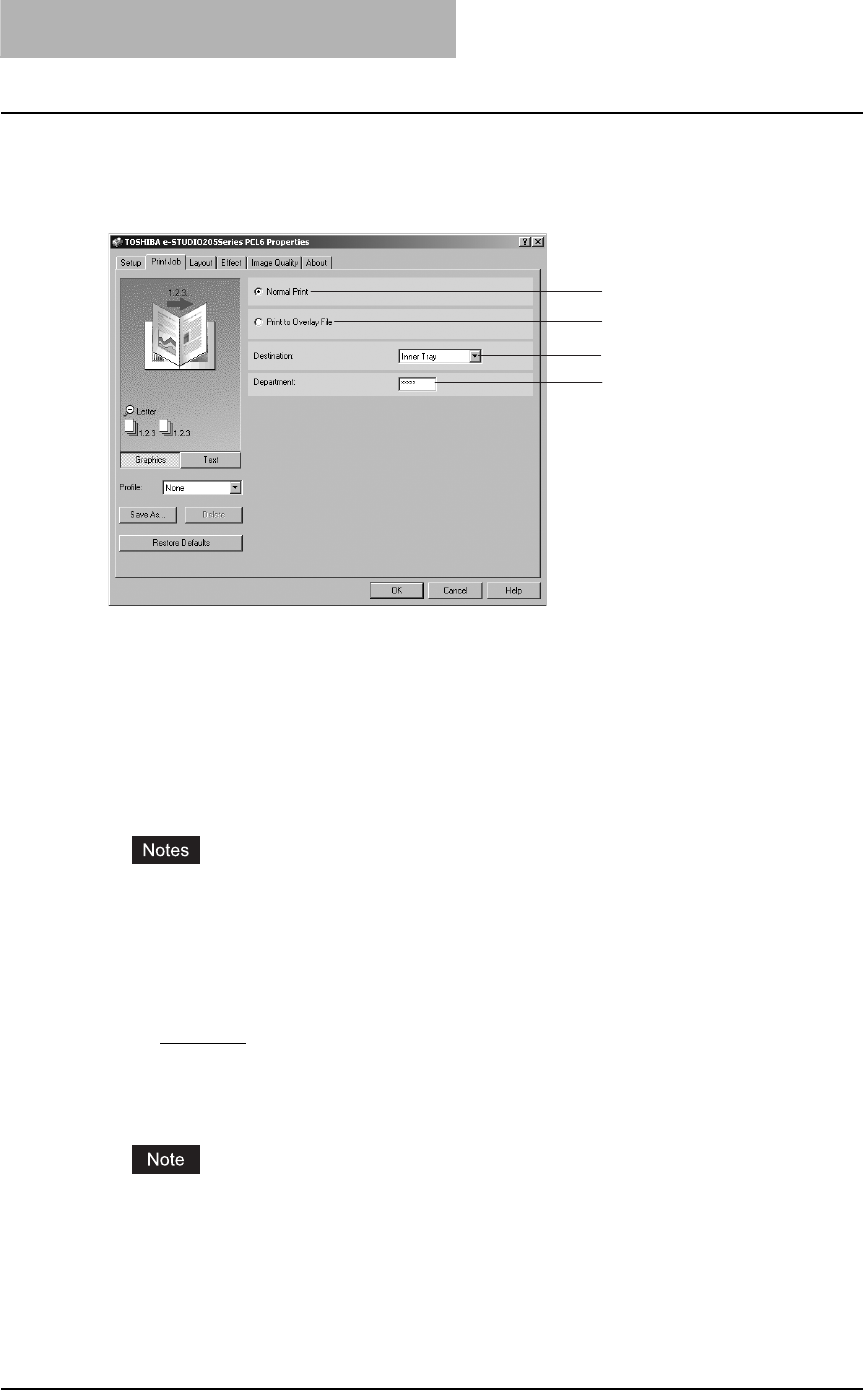
3 PRINTING
172 Printing from Windows
— Print Job tab
The Print Job tab contains settings of how this equipment handles each print job. This tab also
allows you to store the data as overlay images.
1) Normal Print
Select this to print a job normally.
2) Print to Overlay File
When this is selected, the print job is saved as an overlay file that is imposed on other docu-
ments. For example, if you want to print a master page image on the background of a docu-
ment, you can create overlay file of master merge image using this option. Then you can
print a document using this overlay by specifying this file as an overlay image in the “Overlay
Image” option at the Effect tab.
yIf the print job has several pages in the document, only the first page of the document will
be saved as an overlay file.
yBoth the overlay file and the documents on which you superimpose the overlay image
must be created at the same size, orientation, and resolution.
3) Destination
Shows the destination tray to which jobs will be output.
-Inner Tray — The exit tray is displayed. (Not selectable)
4) Department
Enter the user’s department code if the system is managed with department codes. Please
ask your administrator for your department code.
When printing is made with an invalid department code, the job is deleted. (If the “Enable
SNMP Communication” check box of the Configuration tab menu of the printer is checked,
an error message appears before the job is deleted. However, when the job is being printed
through a NetWare print server under Windows NT 4.0, the error message does not appear.)
1
2
3
4
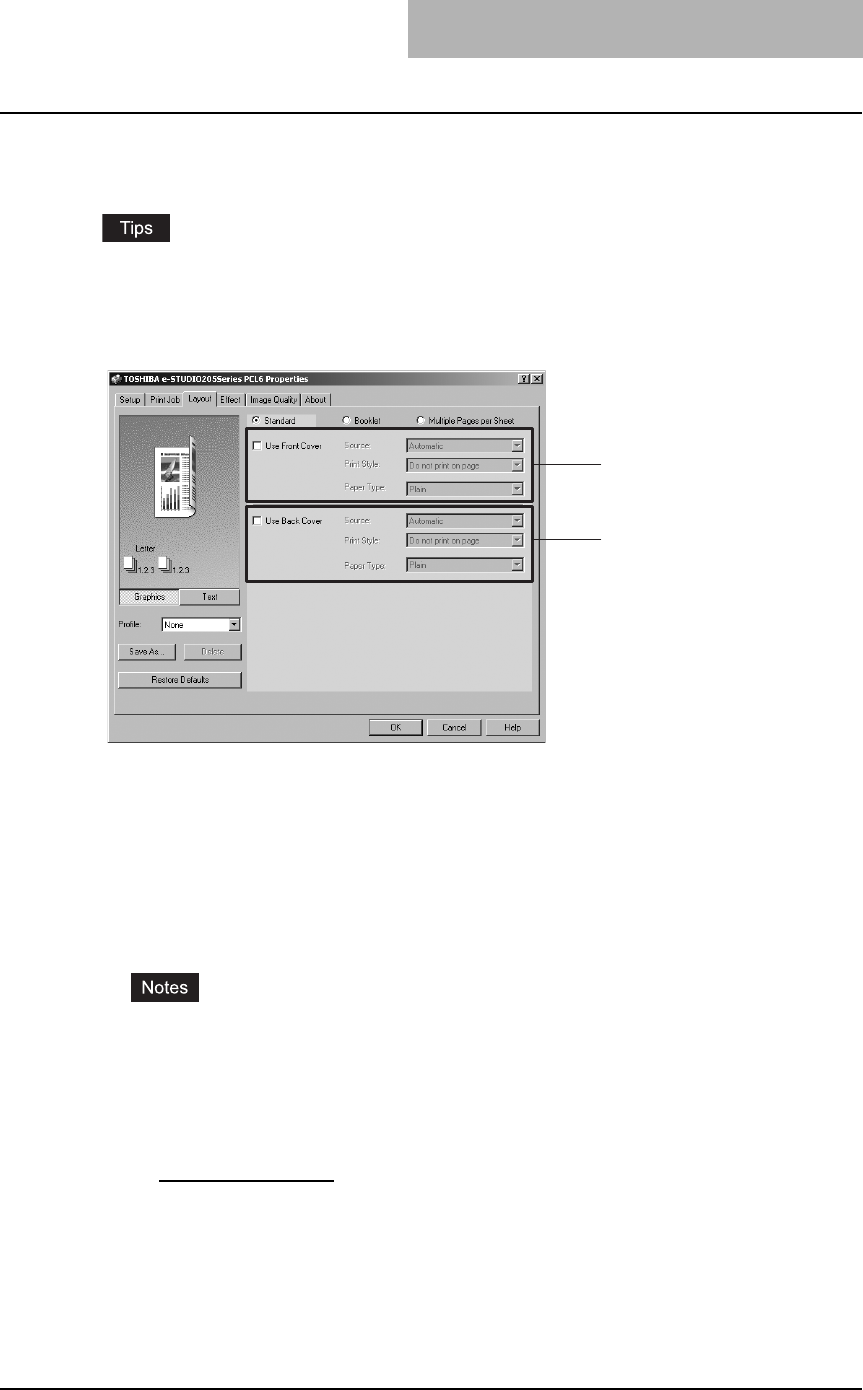
Printing from Windows 173
— Layout tab - Standard window
The standard window of the Layout tab allows you to enable the front or back cover printing.
yFront Cover printing is also available with Booklet printing. If can be set in the Booklet win-
dow.
yFront Cover printing and Back Cover printing are also available with N-up printing. They can
be set in the Multiple Pages per Sheet window.
1) Use Front Cover
This sets front cover printing which allows you to insert or print a cover on a sheet fed from a
different tray than the Paper Source option selected on the Setup tab.
To enable cover printing, check on the box and select the location from where a cover sheet
is to be fed and the print style to be used.
Source
Select the location from where a cover sheet is to be fed. When “Automatic” is selected, the
paper is automatically selected according to the printed document size.
yThe selectable values in the Source drop down box vary depending on the optional
devices installed on this equipment and their configuration on the Configuration tab.
yWhen you feed paper from the Bypass Tray, press the [START] button. To cancel print-
ing, press the [CLEAR/STOP] button.
Print Style
This selects how you want to print a cover.
-Do not print on page — Select this to insert a blank cover.
-Print on 1 side of page — Select this to print the first page image on the front side of a
cover.
-Print on both sides of page — Select this to print the first two page images on both
sides of a cover. This is available only when the 2-Sided Printing option is enabled on the
Setup tab.
1
2

3 PRINTING
174 Printing from Windows
If “Print on 1 side of page” is selected while 2-Sided Printing is performed, the first page is
printed on the front side of the cover sheet and the back side of the cover will be blank.
Paper Type
This sets the media type of the paper.
-Plain — Select this when printing on 20 lbs plain paper (64-80 g/m2 plain paper).
-Thick1 — Select this when printing on 24-28 lbs thick paper (81-105 g/m2 thick paper).
-Thick2 — Select this when printing on 32-90 lbs thick paper (106-163 g/m2 thick paper).
-Transparency — Select this when printing on transparent sheets.
The same paper type applies to both front cover and back cover. When the paper type for
either cover is changed, the paper type for other cover is automatically set to the same one.
2) Use Back Cover
This sets back cover printing which allows you to insert or print a back cover on a sheet fed
from a different tray than the Paper Source option selected on the Setup tab.
To enable back cover printing, check on the box and select the location from where a back
cover sheet is to be fed and the print style to be used.
Source
Select the location from where a back cover sheet is to be fed. When “Automatic” is selected,
the paper is automatically selected according to the printed document size.
The selectable values in the Source drop down box vary depending on the optional devices
installed on this equipment and their configuration on the Configuration tab.
Print Style
This selects how you want to print a back cover.
-Do not print on page — Select this to insert a blank cover.
-Print on 1 side of page — Select this to print the last page image on the front side of a
cover.
-Print on both sides of page — Select this to print the last two page images on both
sides of a cover. This is available only when the 2-Sided Printing option is enabled on the
Setup tab.
yIf “Print on 1 side of page” is selected while 2-Sided Printing is performed, the last page is
printed on the front side of the cover sheet and back side of the cover will be blank.
yIf “Print on both sides of page” is selected but there is only one page printed on the back
cover, the last page is printed on the front side of the cover sheet and back side of the
cover will be blank.

Printing from Windows 175
Paper Type
This sets the media type of the paper.
-Plain — Select this when printing on 20 lbs plain paper (64-80 g/m2 plain paper).
-Thick1 — Select this when printing on 24-28 lbs thick paper (81-105 g/m2 thick paper).
-Thick2 — Select this when printing on 32-90 lbs thick paper (106-163 g/m2 thick paper).
-Transparency — Select this when printing on transparent sheets.
The same paper type applies to both front cover and back cover. When the paper type for
either cover is changed, the paper type for other cover is automatically set to the same one.
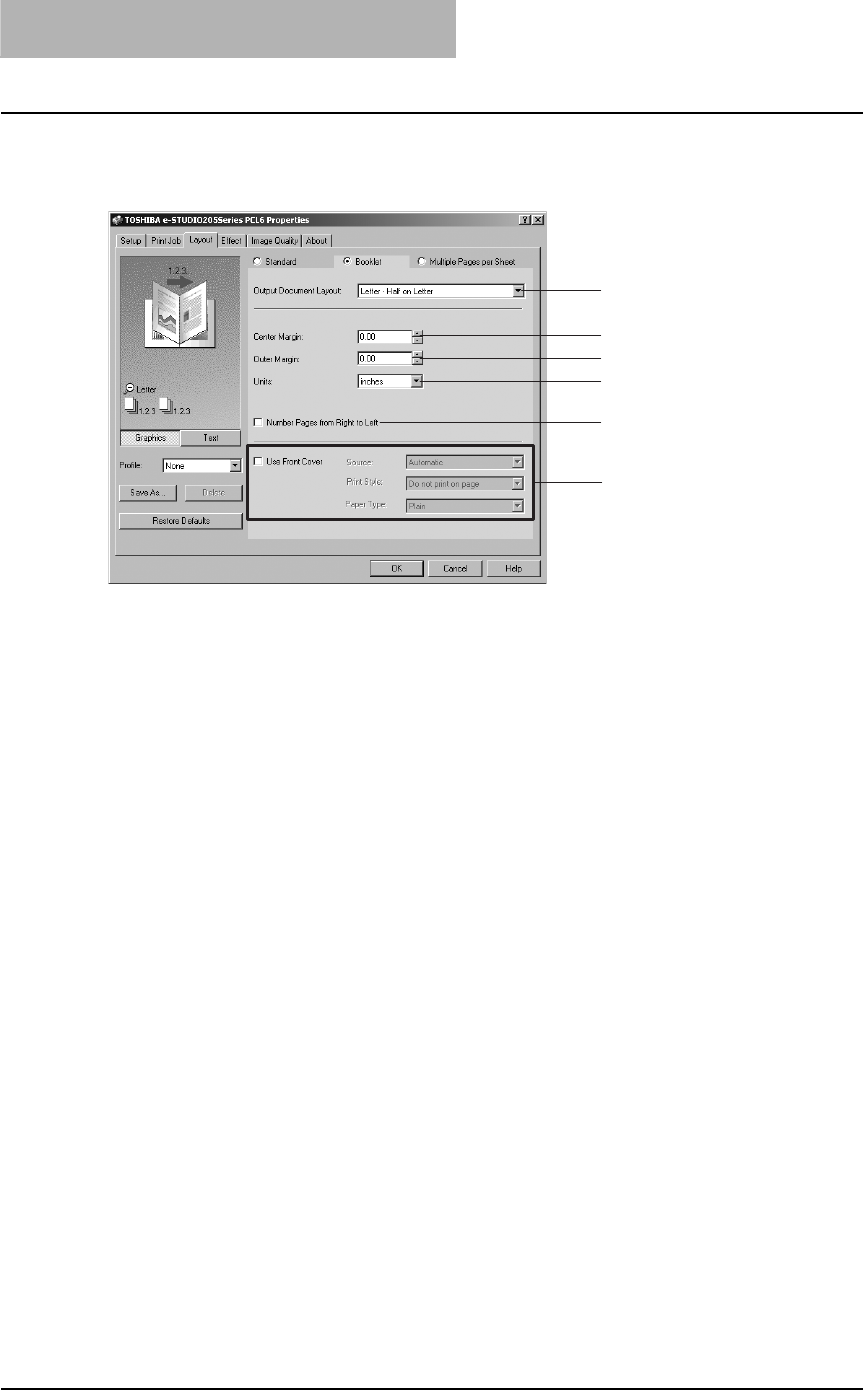
3 PRINTING
176 Printing from Windows
— Layout tab - Booklet window
In the Booklet window, you can print a properly paginated booklet or magazine-style publication.
1) Output Document Layout
Select the booklet size to be made.
-A5 on A4 — Select this to print a A5 size booklet. Every 2 pages are printed on A4 paper
to fit on half a sheet (A5).
-A4 on A3 — Select this to print a A4 size booklet. Every 2 pages are printed on A3 paper
to fit on half a sheet (A4).
-B5 on B4 — Select this to print a B5 size booklet. Every 2 pages are printed on B4 paper
to fit on half a sheet (B5).
-Letter-Half on Letter — Select this to print a 1/2 Letter size booklet. Every 2 pages are
printed on Letter paper to fit on half a sheet.
-LT on LD — Select this to print a Letter size booklet. Every 2 pages are printed on Led-
ger paper to fit on half a sheet (Letter).
-A6 on A5 — Select this to print a A6 size booklet. Every 2 pages are printed on A5 paper
to fit on half a sheet (A6).
-B6 on B5 — Select this to print a B6 size booklet. Every 2 pages are printed on B5 paper
to fit on half a sheet (B5).
-1/2 LG on LG — Select this to print a 1/2 Legal size booklet. Every 2 pages are printed
on Legal paper to fit on half a sheet.
-1/2 Comp on Comp — Select this to print a 1/2 Computer size booklet. Every 2 pages
are printed on Computer paper to fit on half a sheet.
-1/2 Folio on Folio — Select this to print a 1/2 Folio size booklet. Every 2 pages are
printed on Folio paper to fit on half a sheet.
-1/2 Statement on Statement — Select this to print a 1/2 Statement size booklet. Every 2
pages are printed on Statement paper to fit on half a sheet.
-1/2 13’LG on 13’LG — Select this to print a 1/2 13inchLG size booklet. Every 2 pages
are printed on 13inchLG paper to fit on half a sheet.
-32K on 16K — Select this to print a 32K size booklet. Every 2 pages are printed on 16K
paper to fit on half a sheet.
-16K on 8K — Select this to print a 16K size booklet. Every 2 pages are printed on 8K
paper to fit on half a sheet.
2) Center Margin
This sets the gutter on the center of two sided page. You can enter up to 0.500 inch (12.700
mm).
1
2
3
4
5
6

Printing from Windows 177
3) Outer Margin
This sets the gutter on the right side and left side on the paper. You can enter up to 1.00 inch
(25.40 mm).
4) Units
Select the unit for the Center Margin and Outer Margin option. The default unit varies
depending on the regional setting in the Windows.
5) Number Pages from Right to Left
Check this to print a booklet that can be read from right to left.
6) Use Front Cover
This sets front cover printing for a booklet which allows you to insert or print a cover on a
sheet fed from a different tray than the Paper Source option selected on the Setup tab.
To enable cover printing, check on the box and select the location from where a cover sheet
is to be fed and the print style.
Source
Select the location from where a cover sheet is to be fed. When “Automatic” is selected, the
paper is automatically selected according to the printed document size.
The selectable values in the Source drop down box vary depending on the optional devices
installed on this equipment and their configuration on the Configuration tab.
Print Style
This selects how you want to print a cover.
-Do not print on page — Select this to insert a blank cover.
-Print on both sides of page — Select this to print the first two pages and last two pages
on both sides of a cover.
If “Print on both sides of page” is selected but there is only one page for the last page printed
on the cover, the last page is printed inside of the back cover page and the back cover page
will be blank.
Paper Type
This sets the media type of the paper.
-Plain — Select this when printing on 20 lbs plain paper (64-80 g/m2 plain paper).
-Thick1 — Select this when printing on 24-28 lbs thick paper (81-105 g/m2 thick paper).
-Thick2 — Select this when printing on 32-90 lbs thick paper (106-163 g/m2 thick paper).
-Transparency — Select this when printing on transparent sheets.
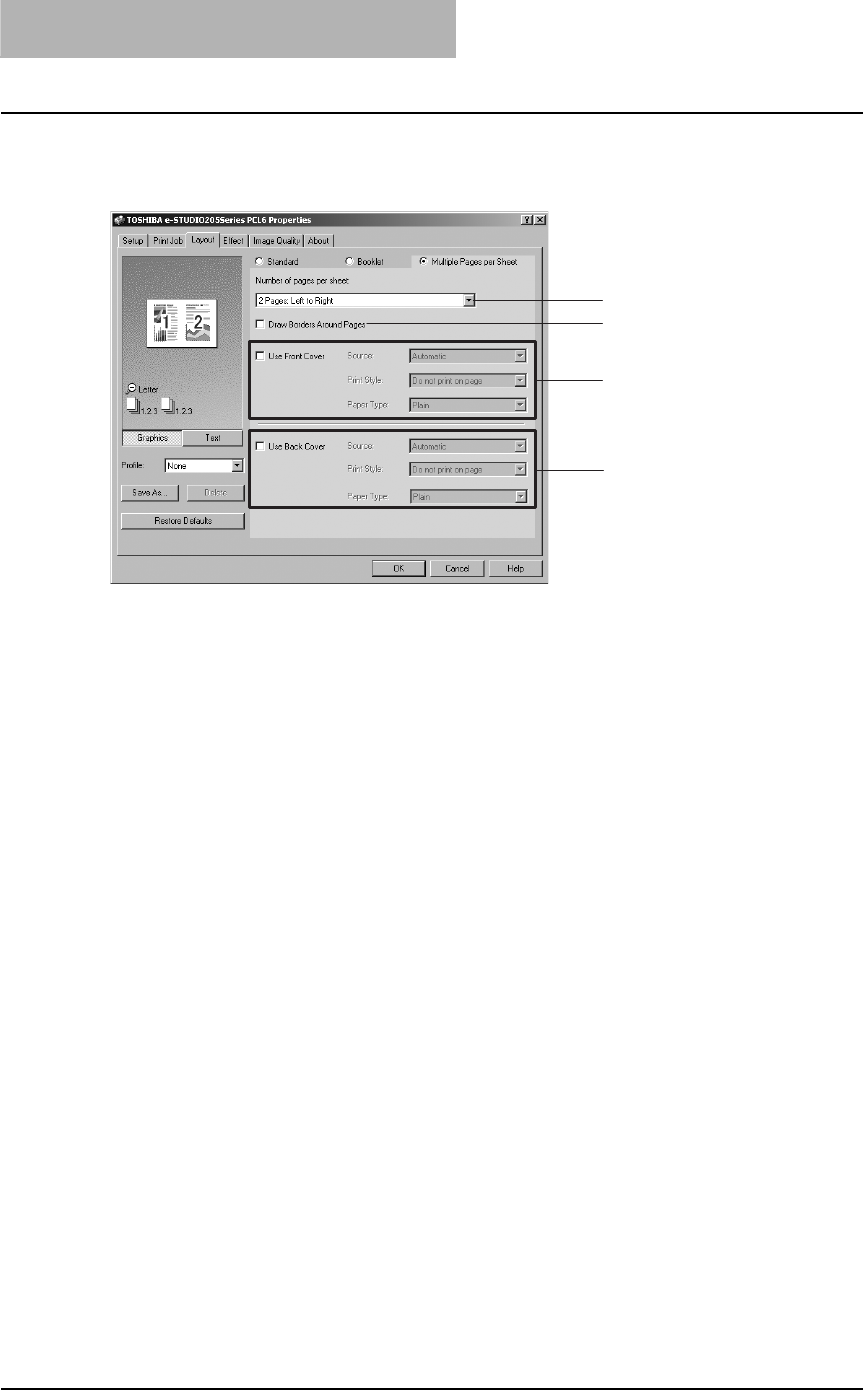
3 PRINTING
178 Printing from Windows
— Layout tab - Multiple Pages per Sheet window
In the Multiple Pages per Sheet window, you can enable N-up printing.
1) Number of pages per sheet
This sets the printing of multiple pages on one sheet. The pages are reduced to fit the
selected paper size automatically and printed.
-2 pages: Left to Right — Select this to print images from 2 pages arranged left to right
(when the orientation is portrait) or from top to bottom (when the orientation is landscape)
on one sheet.
-2 pages: Right to Left — Select this to print images from 2 pages arranged right to left
(when the orientation is portrait) or from bottom to top (when the orientation is landscape)
on one sheet.
-4 pages: Left to Right — Select this to print images from 4 pages arranged horizontally
from the left and printed top to bottom on one sheet.
-4 pages: Right to Left — Select this to print images from 4 pages arranged horizontally
from the right and printed top to bottom on one sheet.
-4 pages: Left to Right by Column — Select this to print images from 4 pages arranged
vertically from the top and printed left to right on one sheet.
-4 pages: Right to Left by Column — Select this to print images from 4 pages arranged
vertically from the top and printed right to left on one sheet.
-6 pages: Left to Right — Select this to print images from 6 pages arranged horizontally
from the left and printed top to bottom on one sheet.
-8 pages: Left to Right — Select this to print images from 8 pages arranged horizontally
from the left and printed top to bottom on one sheet.
-9 pages: Left to Right — Select this to print images from 9 pages arranged horizontally
from the left and printed top to bottom on one sheet.
-16 pages: Left to Right — Select this to print images from 16 pages arranged horizon-
tally from the left and printed top to bottom on one sheet.
2) Draw Border Around Pages
Check this to print borders each page.
3) Use Front Cover
This sets front cover printing for N-up printing which allows you to insert or print a cover on a
sheet fed from a different tray than the Paper Source option selected on the Setup tab.
To enable cover printing, check on the box and select the location from where a cover sheet
is to be fed and the print style to be used.
1
2
3
4

Printing from Windows 179
Source
Select the location from where a cover sheet is to be fed. When “Automatic” is selected, the
paper is automatically selected according to the printed document size.
The selectable values in the Source drop down box vary depending on the optional devices
installed on this equipment and their configuration on the Configuration tab.
Print Style
This selects how you want to print a cover.
-Do not print on page — Select this to insert a blank cover.
-Print on 1 side of page — Select this to print the first page image on the front side of a
cover.
-Print on both sides of page — Select this to print the first two page images on both
sides of a cover. This is available only when the 2-Sided Printing option is enabled on the
Setup tab.
If “Print on 1 side of page” is selected while 2-Sided Printing is performed, the first page is
printed on the front side of the cover sheet and back side of the cover will be blank.
Paper Type
This sets the media type of the paper.
-Plain — Select this when printing on 20 lbs plain paper (64-80 g/m2 plain paper).
-Thick1 — Select this when printing on 24-28 lbs thick paper (81-105 g/m2 thick paper).
-Thick2 — Select this when printing on 32-90 lbs thick paper (106-163 g/m2 thick paper).
-Transparency — Select this when printing on transparent sheets.
The same paper type applies to both front cover and back cover. When the paper type for
either cover is changed, the paper type for other cover is automatically set to the same one.
4) Use Back Cover
This sets back cover printing which allows you to insert or print a back cover on a sheet fed
from a different tray than the Paper Source option selected on the Setup tab.
To enable back cover printing, check on the box and select the location from where a back
cover sheet is to be fed and the print style to be used.
Source
Select the location from where a back cover sheet is to be fed. When “Automatic” is selected,
the paper is automatically selected according to the printed document size.
The selectable values in the Source drop down box vary depending on the optional devices
installed on this equipment and their configuration on the Configuration tab.
Print Style
This selects how you want to print a back cover.
-Do not print on page — Select this to insert a blank cover.
-Print on 1 side of page — Select this to print the last page image on the front side of a
cover.
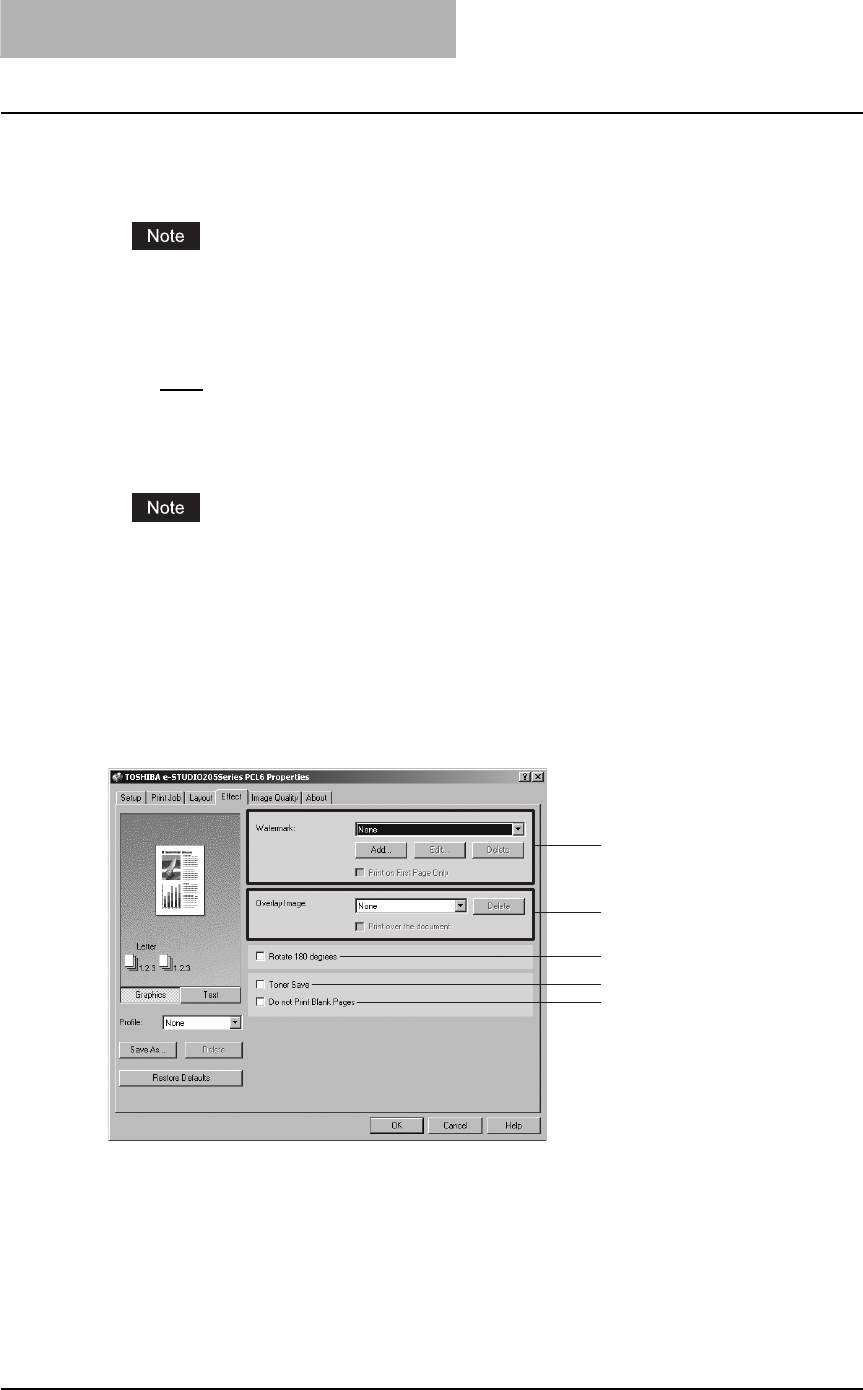
3 PRINTING
180 Printing from Windows
-Print on both sides of page — Select this to print the last two page images on both
sides of a cover. This is available only when the 2-Sided Printing option is enabled on the
Setup tab.
If “Print on 1 side of page” is selected while 2-Sided Printing is performed, the last page is
printed on the front side of the cover sheet and back side of the cover will be blank.
Paper Type
This sets the media type of the paper.
-Plain — Select this when printing on 20 lbs plain paper (64-80 g/m2 plain paper).
-Thick1 — Select this when printing on 24-28 lbs thick paper (81-105 g/m2 thick paper).
-Thick2 — Select this when printing on 32-90 lbs thick paper (106-163 g/m2 thick paper).
-Transparency — Select this when printing on transparent sheets.
The same paper type applies to both front cover and back cover. When the paper type for
either cover is changed, the paper type for other cover is automatically set to the same one.
— Effect tab
The Effect Tab contains print options that add effects to your print jobs such as Watermarks,
Overlay Image printing, Rotate printing, Mirror printing, and Negative printing. Also it lets you
enable Toner Save and Do not Print Blank Pages functions.
Effect tab for PCL6
1
2
3
6
7

Printing from Windows 181
Effect tab for PS3
1) Watermark
This selects the watermark to be used or edited. The following values except “None” are the
default watermarks that have been registered in the printer driver. New watermarks you cre-
ate are added to the drop down box list.
-None — Select this if no watermark is desired.
The following default watermarks are also displayed in the drop down box:
- TOP SECRET
- CONFIDENTIAL
-DRAFT
- ORIGINAL
-COPY
[Add]
Click this to create new watermark. The Watermark dialog box appears by clicking on this.
P.183 “Add/Edit watermark”
[Edit]
Select a watermark from the Watermark drop down box and click it to edit the watermark.
The Watermark dialog box appears by clicking on this.
P.183 “Add/Edit watermark”
[Delete]
Select a watermark from the Watermark drop down box and click it to edit a watermark.
yThe default watermarks can be deleted but, If deleted, they cannot be restored.
y“None” cannot be deleted.
Print on First Page Only
Check this to print a watermark on the first page only. This setting will become available
when any watermark is selected from the Watermark drop down box.
2) Overlay Image
This selects an overlay image to be used. This feature allows you to print an image on the
background of a print job, although the watermark allows only a text.
1
2
3
4
5
6
7
8

3 PRINTING
182 Printing from Windows
yBoth the overlay file and the documents on which you superimpose the overlay image
must be created at the same size, orientation, and resolution.
yWhen printing with Overlay Image using the PS3 printer driver from an application that
can create the PS command directly, the overlay image will not be printed. In that case,
disable the “Use PostScript Passthrough” option in the PostScript Settings dialog box.
P.184 “PostScript settings”
If you want to use an overlay image in your job, you must first create an overlay file. To cre-
ate an overlay image, create an overlay image with most applications and print it as an over-
lay file. You can enable creating an overlay file on the Print Job Tab.
P.190 “Creating an overlay file”
[Delete]
Click this to delete the overlay image that you select in the drop down box.
Print over the document
Check this to print overlay image over the document.
3) Rotate 180 degrees
Check on this to perform rotation printing of an image.
4) Mirror
Check on this to perform mirror printing of an image. This print option is available only for the
PS3 printer driver.
yThe mirror printing may not be applied when the application gives priority to the applica-
tion’s PostScript settings over the printer driver settings.
yWhen printing from Adobe Acrobat or such applications, the mirror printing does not work
if the “Use PostScript Passthrough” option is enabled in the PostScript settings. To use
the mirror printing, please disable the “Use PostScript Passthrough” option in the Post-
Script settings.
5) Negative/Positive
Check on this to perform negative printing of an image. This print option is available only for
the PS3 printer driver.
yThe negative printing may not be applied when the application gives priority to the appli-
cation’s PostScript settings over the printer driver settings.
yWhen printing from Adobe Acrobat or such applications, the Negative/Positive printing
does not work if the “Use PostScript Passthrough” option is enabled in the PostScript set-
tings. To use the Negative/Positive printing, please disable the “Use PostScript
Passthrough” option in the PostScript settings.
6) Toner Save
Check this to print in toner save mode.
7) Do not Print Blank Pages
Check this ignore blank pages for printing.
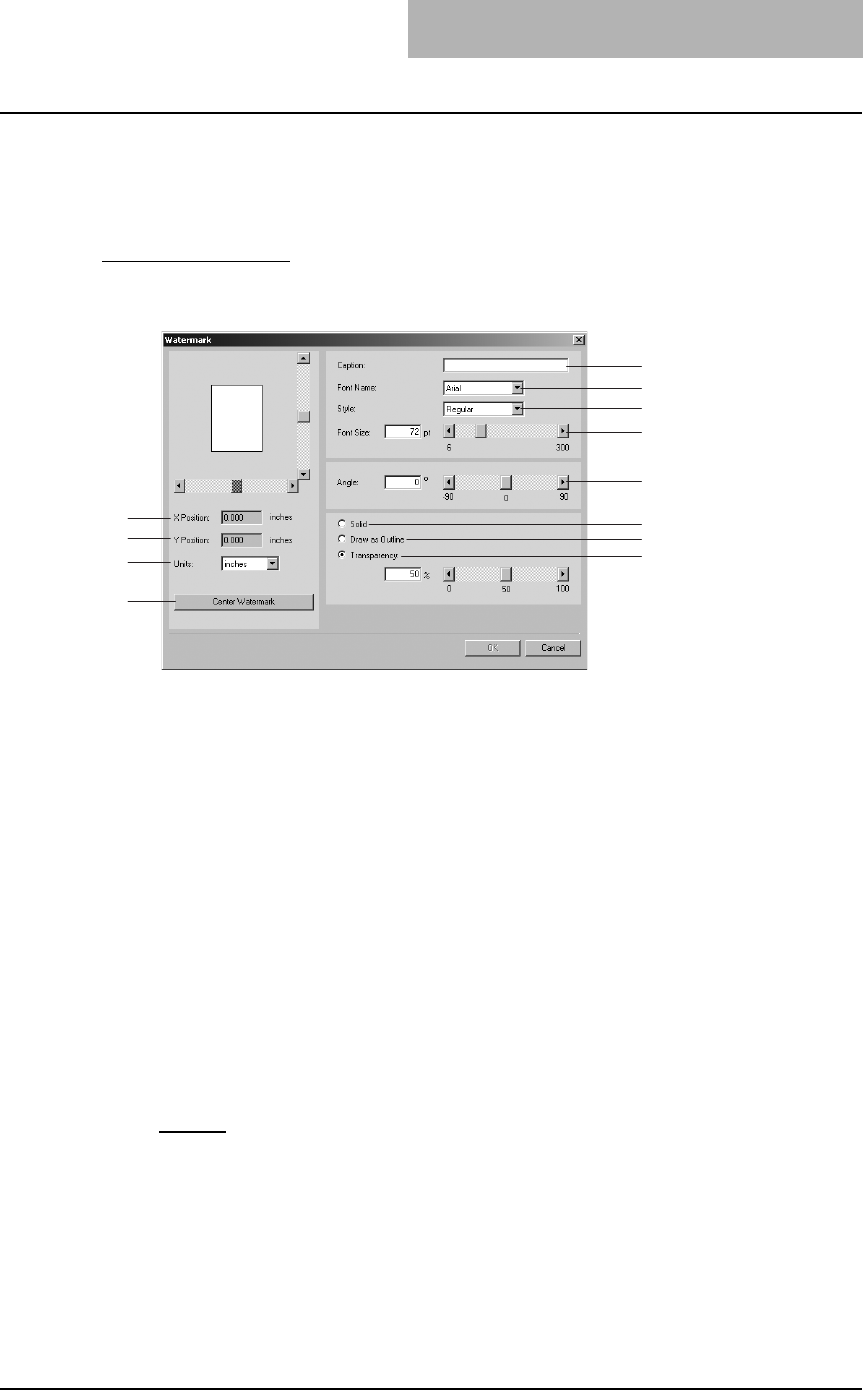
Printing from Windows 183
8) [PostScript Settings]
Click this to specify the PostScript specific functions. The PostScript Settings dialog box
appears by clicking on this. This print option is available only for the PS3 printer driver.
P.184 “PostScript settings”
Add/Edit watermark
When you click [Add] or [Edit], the Watermark dialog box appears and you can create new
watermark or edit selected watermarks.
1) X Position
The horizontal position of a watermark is displayed. You can change the position using the
vertical scroll bar.
2) Y Position
The vertical position of a watermark is displayed. You can change the position using the hor-
izontal scroll bar.
3) Units
Select the unit for the “X Position” and “Y Position” field.
4) [Center Watermark]
Click this to automatically move the watermark position to the center.
5) Caption
Enter the text of a watermark. You can enter up to 63 alphanumeric characters. When you
are editing a watermark, the selected watermark text is displayed in the field.
6) Font Name
Select a font to be used for the watermark text.
7) Style
Select the font style for the watermark text.
-Regular — Select this to set the regular style to the text.
-Bold — Select this to set the bold style to the text.
-Italic — Select this to set the italic style to the text.
-Bold Italic — Select this to set the bold and italic style to the text.
8) Font Size
Enter the font size for the watermark text. The font size can be set from 6 to 300 pt in units of
1 pt. You can also set the font size using the scroll bar.
5
1
2
3
4
6
7
8
9
10
11
12
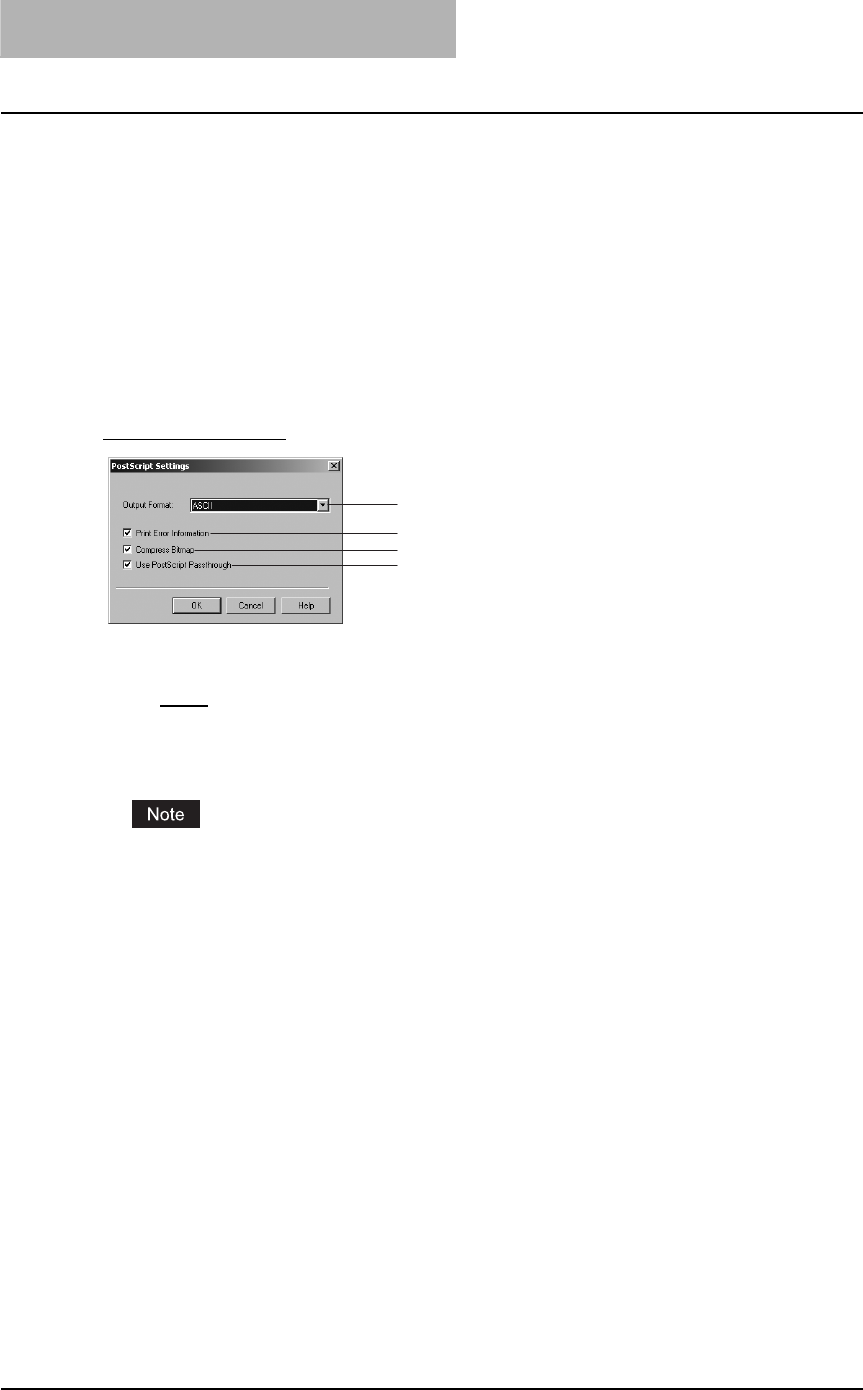
3 PRINTING
184 Printing from Windows
9) Angle
Enter the degree of angle for rotating the watermark text. The angle can be set from -90 to
90 degrees in units of 1 degree. You can also set the degree of angle by moving the scroll
bar.
10) Solid
Select this to print solid type of watermark.
11) Draw as Outline
Select this to print outline type of watermark.
12) Transparency
Select this to transparent watermark. When you select this, set the brightness from 0
(darker) to 100% (lighter) in units of 1%. You can also set the brightness using the scroll bar.
PostScript settings
1) Output Format
This selects the output format for printing.
-ASCII — The job is sent in the ASCII data format.
-Encapsulated PostScript (EPS) — The job is sent in the EPS format.
-Tagged BCP — Select this to send a job in Tagged Binary format over parallel ports.
-Using Adobe DSC — Select this to send a job with the DSC comments.
The EPS format is usually used for creating an image to import into another document.
Therefore, only the first page of the document will be printed when “Encapsulated PostScript
(EPS)” is selected.
2) Print Error Information
Check on this to print a PS error information page when any errors occur for printing.
3) Compress Bitmap
Check on this to send compress bitmaps to this equipment.
4) Use PostScript Passthrough
Check this for PostScript data created by the application to be passed through to this equip-
ment.
1
2
3
4
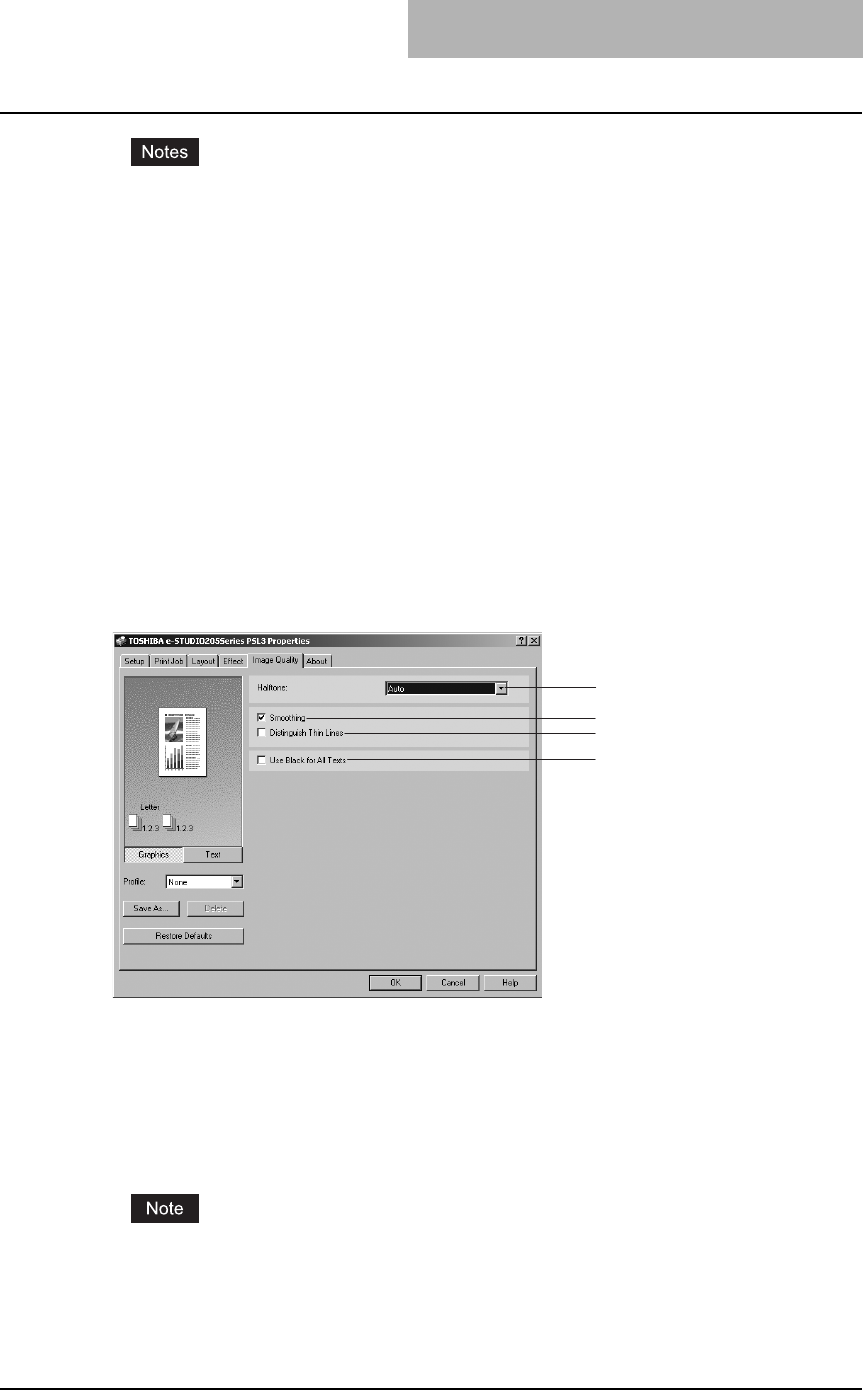
Printing from Windows 185
yIf this option is enabled, the following print options may not work correctly when printing
from the application that creates the PostScript code for printing such as Adobe Acrobat.
In that case, please disable this option for printing.
- Manual Scale
- Print Paper Size
- Paper Type
- User Front Cover
- User Back Cover
-Booklet
- Multiple Pages per Sheet
- All options in the Effect tab
- All options in the Image Quality tab
yIf this option is enabled, images may not be printed correctly when printing is made from
an application that creates the PostScript code for printing such as Adobe Acrobat. In
that case, please disable this option for printing.
— Image Quality tab
The Image Quality Tab allows you to select how images are printed. You can easily select appro-
priate image quality depending on the type of a document.
1) Halftone
This sets how halftone are printed.
-Auto — Select this to print automatically using proper halftone depending on the con-
tents in the document. When this is selected, halftone is printed in detail for text, and
smoothly for graphics.
-Detail — Select this to print halftone in detail.
-Smooth — Select this to print halftone smoothly.
“Auto” can be selected only for the PS3 printer driver.
2) Smoothing
Check this to print the texts and graphics smoothly.
1
2
3
4

3 PRINTING
186 Printing from Windows
3) Distinguish Thin Lines
Check this to print thin lines clearly.
4) Use Black for All Texts
Check this to print all texts in 100% black except white texts.
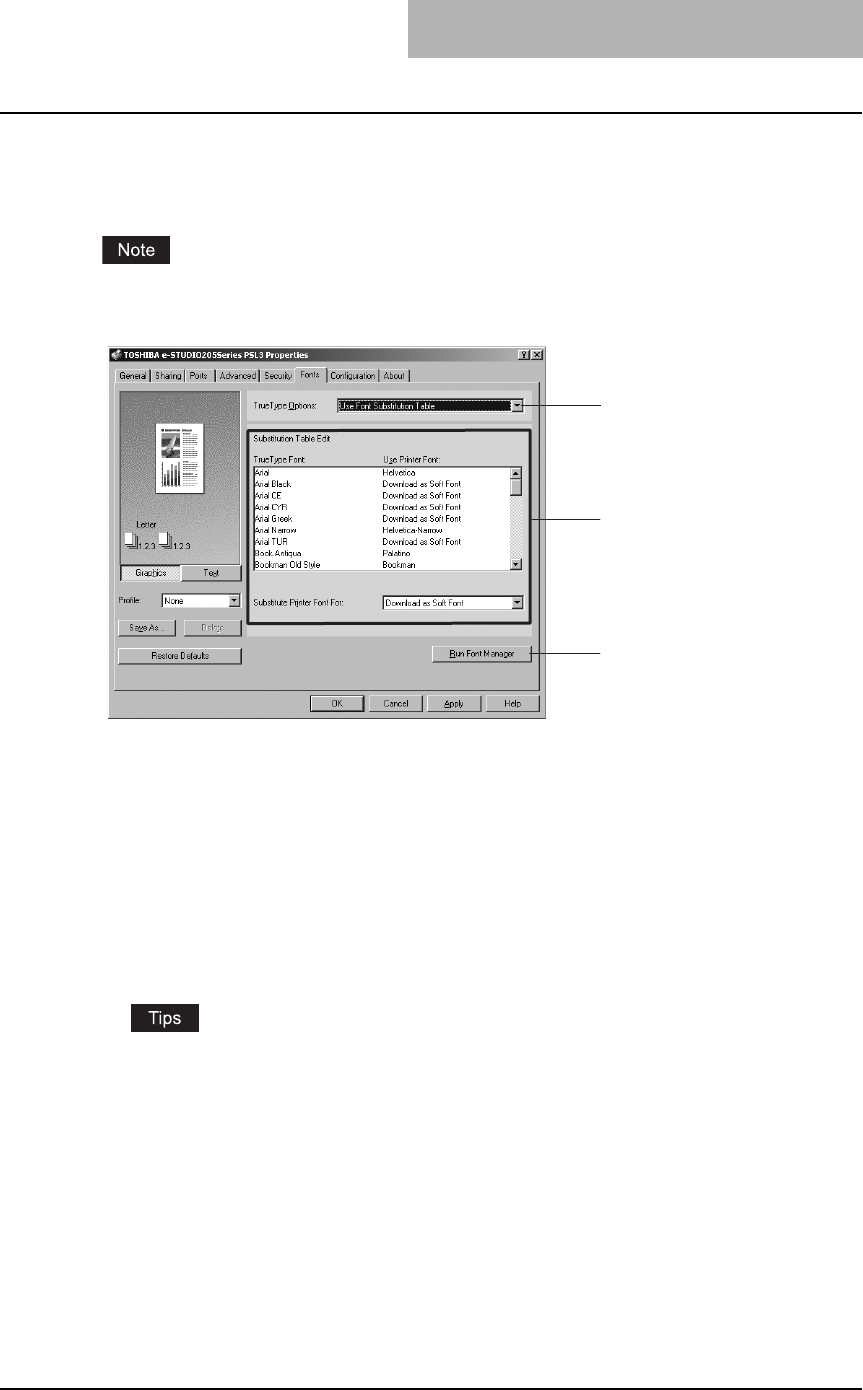
Printing from Windows 187
— Fonts tab
The Fonts tab allows you to select how the TrueType fonts are printed. The following figure is the
Fonts Tab for the PS3 printer driver.
The Fonts tab can be displayed only from the Printers folder (and not displayed when displaying
the properties from the application’s Print dialog box).
1) TrueType Options
This sets how to print TrueType fonts.
-Always Use TrueType Fonts — Select this to print the document the same as the print
image shown on the screen. All TrueType fonts are extracted on the system for printing.
-Always Use Printer Fonts — Select this to substitute the TrueType fonts with the inter-
nal fonts for printing. The print result may differ from the print image on the screen.
-Use Font Substitution Table — Select this to substitute the TrueType fonts using the
internal fonts according to the settings of the font substitution table. You can edit the font
substitution table that is displayed at the Substitution Table Edit table.
-Download as Bitmap — Select this to print the document as same as the image shown
on the screen.
yThe default value will be “Always Use TrueType Fonts” for the PCL6 printer driver.
yThe default value will be “Use Font Substitution Table” for the PS3 printer driver.
2) Substitution Table Edit
This table shows how each TrueType font is substituted. You can edit the substitution setting
for each TrueType font. In this table, the TrueType font names are displayed in the TrueType
Font column, and how the TrueType font is printed is shown in the Use Printer Font column.
To edit the substitution table, select the TrueType font that you want to edit from the table,
and select how the TrueType font is printed at the Printer Font For drop down box.
At the Printer Font For drop down box, you can select “Download as Soft Font” to send the
TrueType fonts in Type 42 format, or other available printer fonts to be substituted. The
printer fonts displayed in the drop down box differ depending on the TrueType fonts.
1
2
3
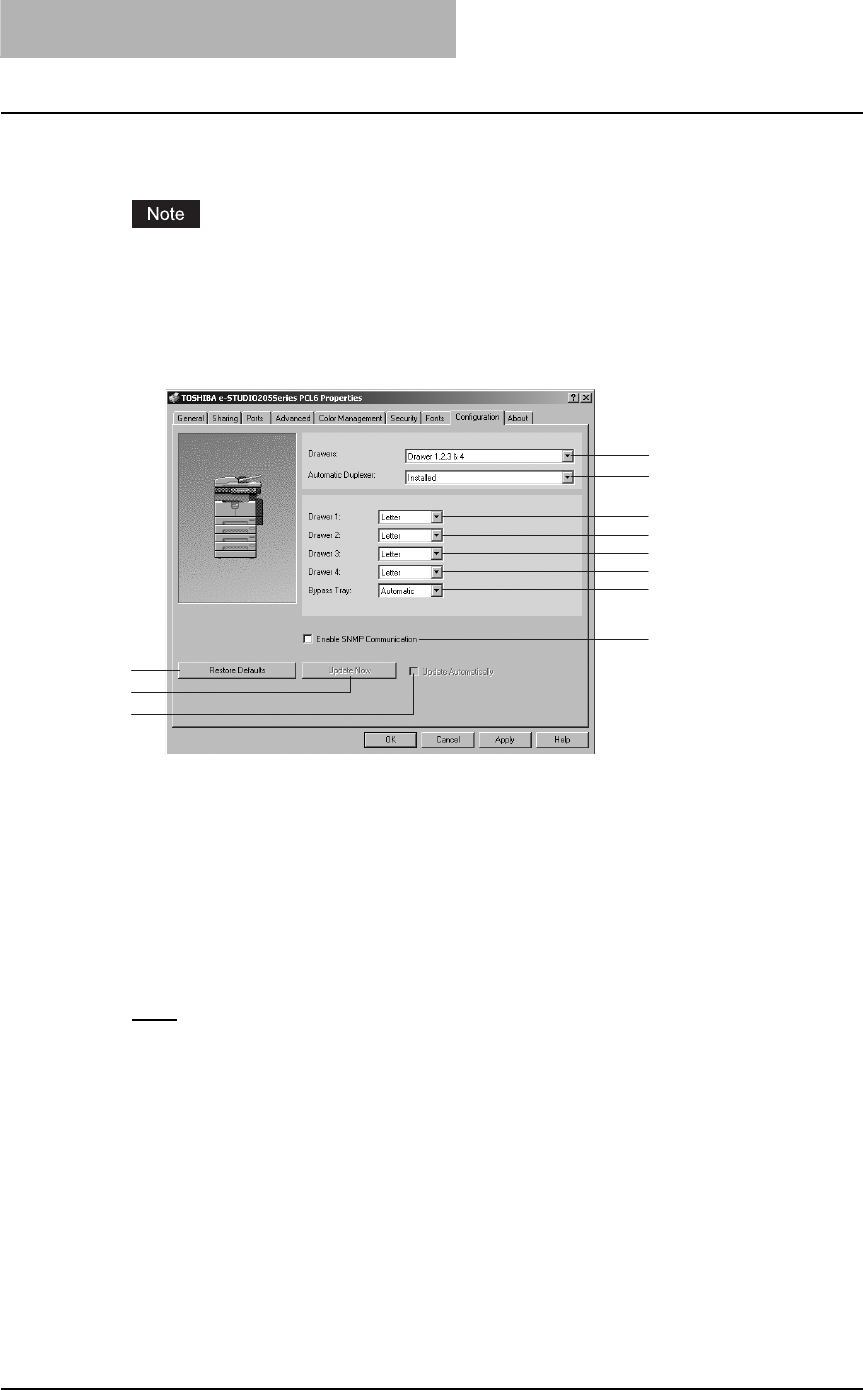
3 PRINTING
188 Printing from Windows
3) [Run Font Manager]
Click this to run the Font Manager. This is not available if the Font Manager is not installed.
The [Run Font Manager] button is not displayed for the PCL6 printer driver.
— Configuration tab
The Configuration Tab allows you to configure options. When any optional unit is installed in this
equipment, set the configuration of the machine on this tab.
1) Drawers
Drawers- This sets the Drawer configuration according to the Drawers installed.
-Drawer 1: 1st Drawer only
-Drawer 1 & 2: 1st Drawer and Paper Feed Unit (optional)
-Drawer 1,2 & 3: 1st Drawer, Paper Feed Unit (optional) and Paper Feed Pedestal
(optional, its upper Drawer only)
-Drawer 1,2,3 & 4: 1st Drawer, Paper Feed Unit (optional) and Paper Feed Pedestal
(optional, both of its upper and lower Drawers)
2) Automatic Duplexer
Select whether the Automatic Duplexer (optional) is installed or not.
None – Select this when the Automatic Duplexer is not installed.
Installed – Select this when the Automatic Duplexer is installed.
3) Drawer 1
This sets the size of paper that is loaded in the 1st Drawer.
4) Drawer 2
This sets the size of paper that is loaded in the 2nd Drawer (Paper Feed Unit (optional)).
This can be set only when the Paper Feed Unit (optional) is installed.
5) Drawer 3
This sets the size of paper that is loaded in the 3rd Drawer (the upper Drawer of Paper Feed
Pedestal (optional)). This can be set only when the upper Drawer of Paper Feed Pedestal
(optional) is installed.
6) Drawer 4
This sets the size of paper that is loaded in the 4th Drawer (the lower Drawer of Paper Feed
Pedestal (optional)). This can be set only when the lower Drawer of Paper Feed Pedestal
(optional) is installed.
1
9
10
11
2
3
4
5
6
7
8
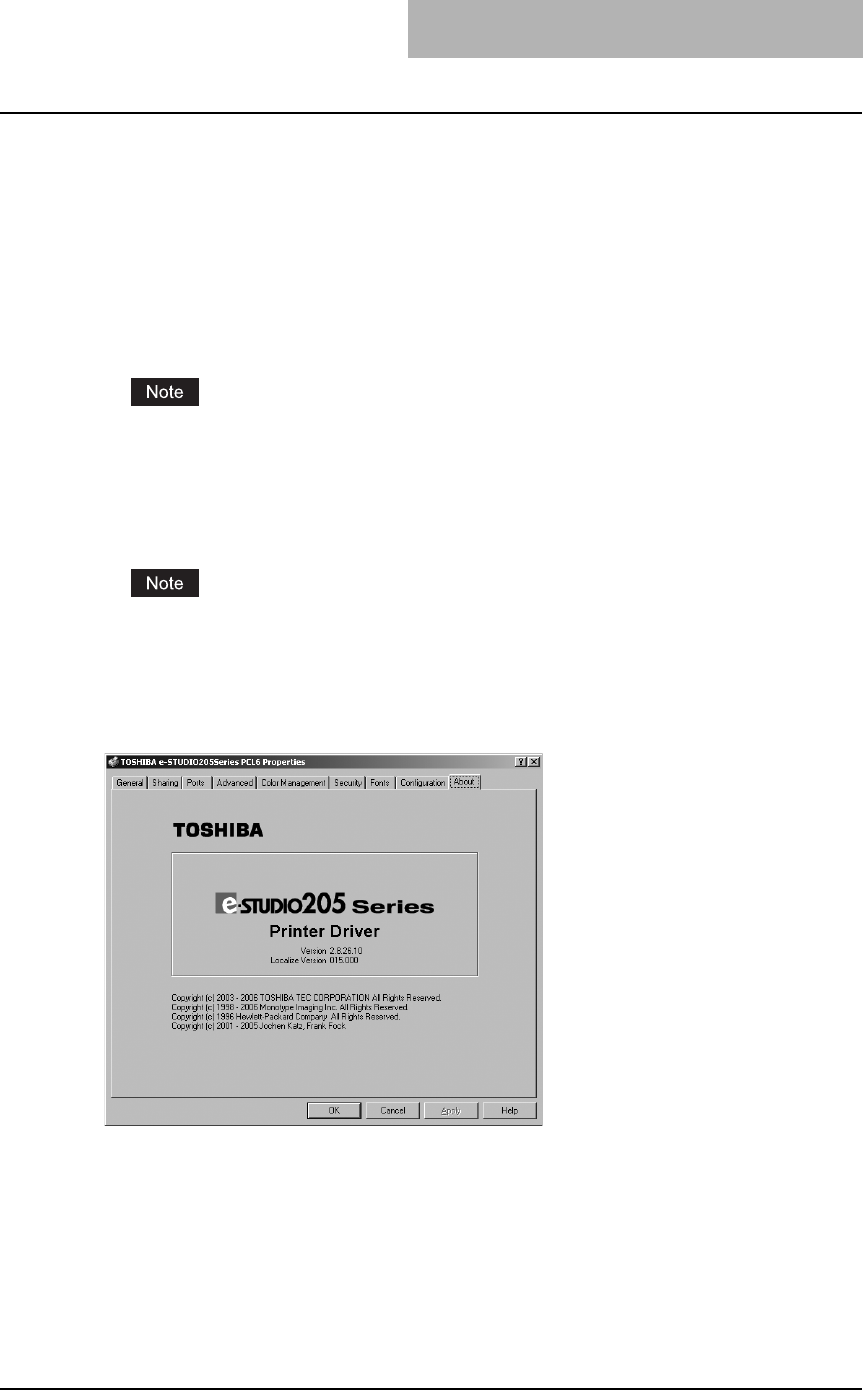
Printing from Windows 189
7) Bypass Tray
Set to “Automatic”. (Not selectable).
8) Enable SNMP Communication
Check this to enable obtaining the configuration information from this equipment.
9) [Restore Defaults]
Click this to restore the settings to the original factory defaults.
10) [Update Now]
Click this to obtain the configuration information from this equipment immediately. This is
available only when “Enable SNMP Communication” is checked.
If the connection to the equipment has not been configured correctly, the SNMP communica-
tion fails and the option settings will not be updated.
11) Update Automatically
Check this to update the configuration information every time the printer driver is opened.
This is available only when “Enable SNMP Communication” is checked.
If the connection to the equipment has not been configured correctly, the SNMP communica-
tion fails and the option settings will not be updated.
— About tab
The About Tab contains information about the printer driver’s version.
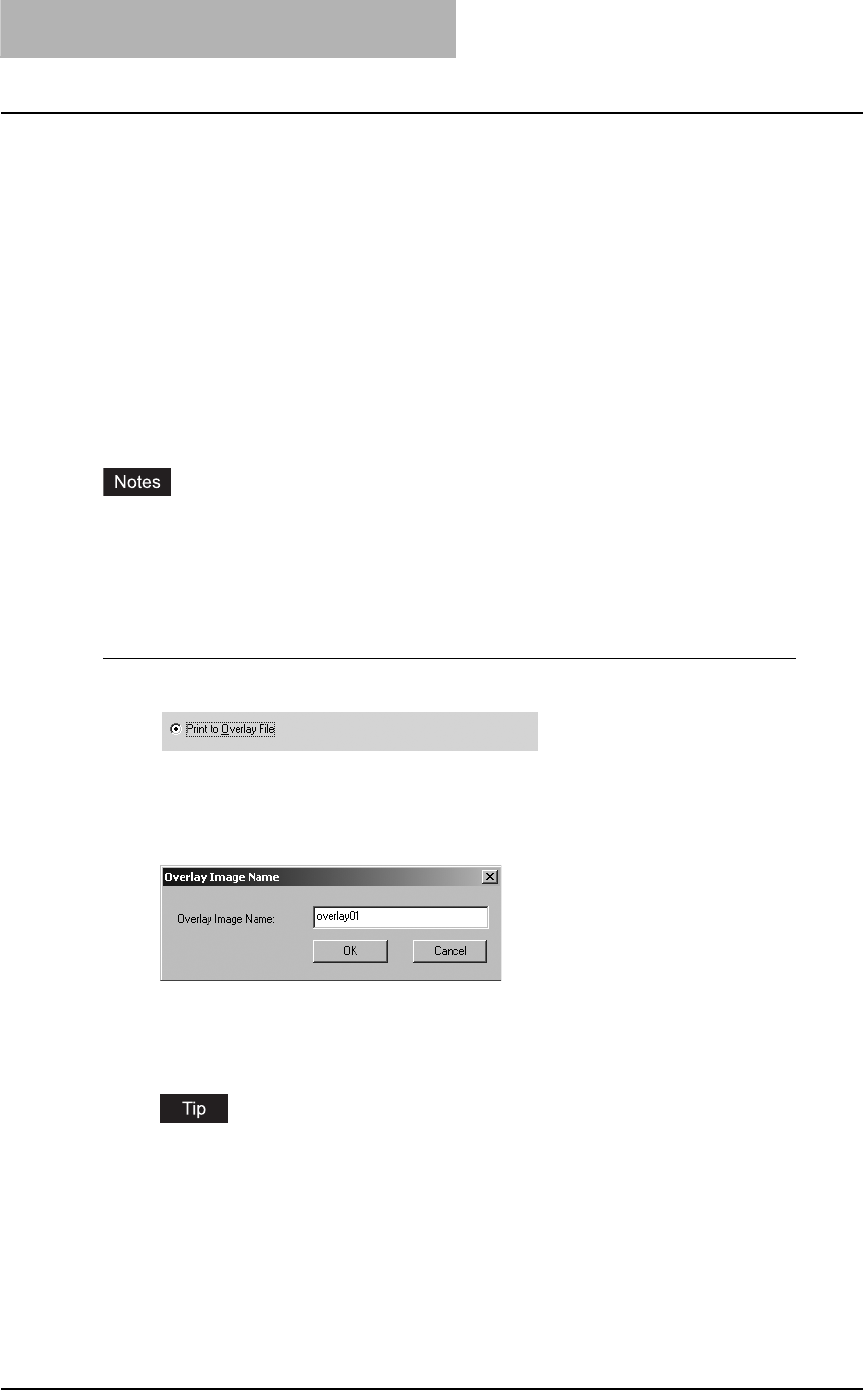
3 PRINTING
190 Printing from Windows
Printing with extended print functionality
In this section, procedures are given to print various types of print job, using the layout and fin-
ishing options. This section can help you to find a print method that you desired.
Printing various print job types
The printer drivers provide the way to handle an overlay image file in addition to normal printing.
— Creating an overlay file
You can print a document as an overlay file. The created overlay file can then be merged into
another document during printing.
P.203 “Printing with an Overlay File”
yIf the print job has several pages in the document, only the first page of the document will be
saved as an overlay file.
yBoth the overlay file and the documents on which you superimpose the overlay image must
be created at the same size and orientation.
Printing a document as an overlay file
1
Display the Print Job tab and select “Print to Overlay File”.
2
Set other print options you require and click [OK].
The Overlay Image Name dialog box appears.
3
Enter a overlay image name and then click [OK].
You can enter up to 63 characters.
4
Click [OK] or [Print] to send a print job.
The document is saved as an overly file.
You can use created overly file to print a document.
P.203 “Printing with an Overlay File”
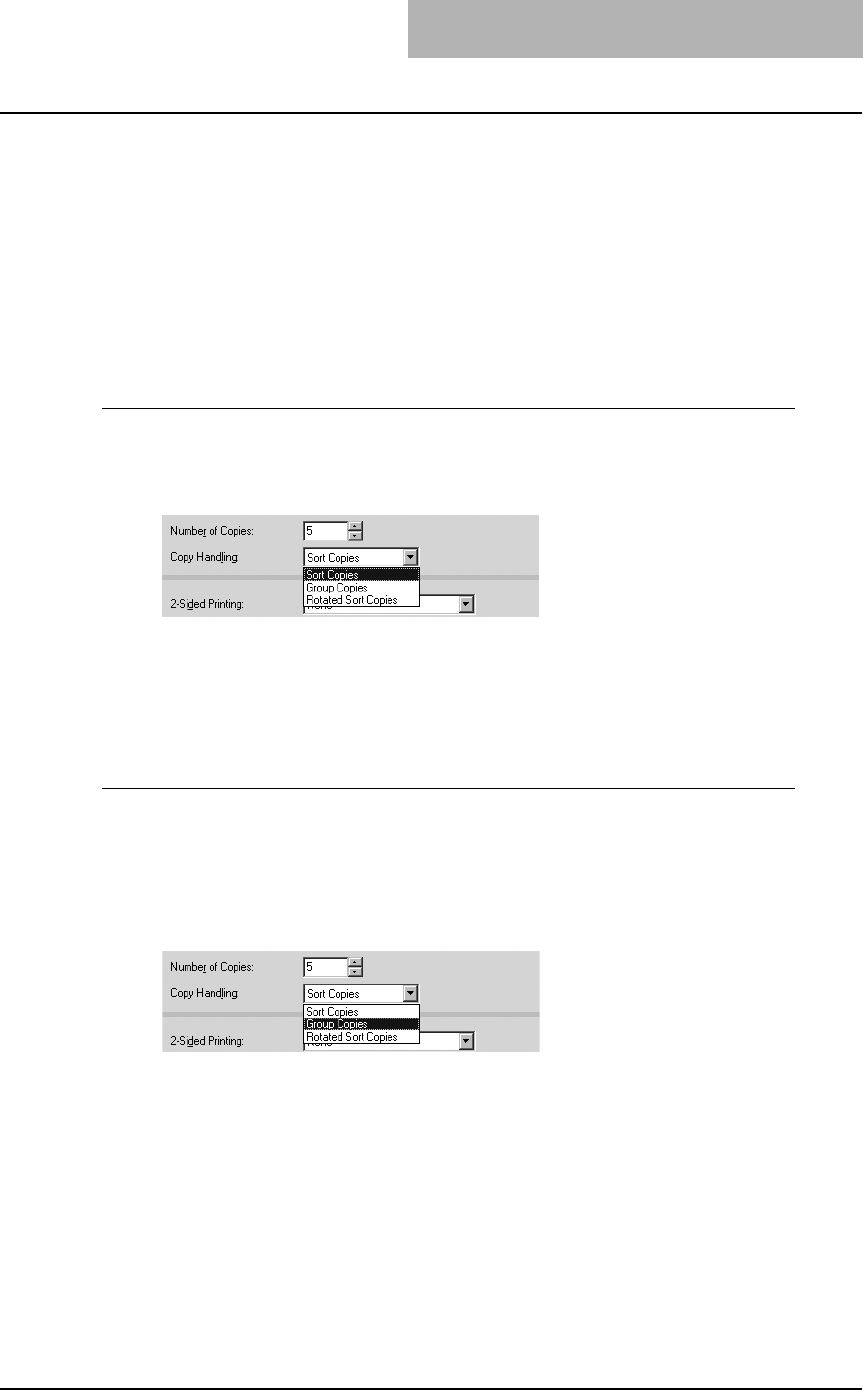
Printing from Windows 191
Printing with various layout and finishing options
Printer drivers allows you to create a print job with layout options to make your document more
essential. Also you can enable finishing options that determine how the jobs are output, such as
sorting and creating a booklet.
— Sort printing
You can select how multiple copies of a document to be output, such as separately for each
copy, grouping each page, and alternating the paper direction for each copies.
Output each copy separately
1
Display the Setup tab and enter the number of copies to be printed
at the “Number of Copies” field. Then select “Sort Copies” at the
“Copy Handling” drop down box.
2
Set other print options you require and click [OK].
3
Click [OK] or [Print] to send a print job.
The print job is output separately for each copy.
Output with grouping of each page within a set
For example, assume that you have a three page job (A, B, C) and you want three copies of
each page in this order (AAA, BBB, CCC).
1
Display the Setup tab and enter the number of copies to be printed
at the “Number of Copies” field. Then select “Group Copies” at the
“Copy Handling” drop down box.
2
Set other print options you require and click [OK].
3
Click [OK] or [Print] to send a print job.
The print job is output separately for each page.
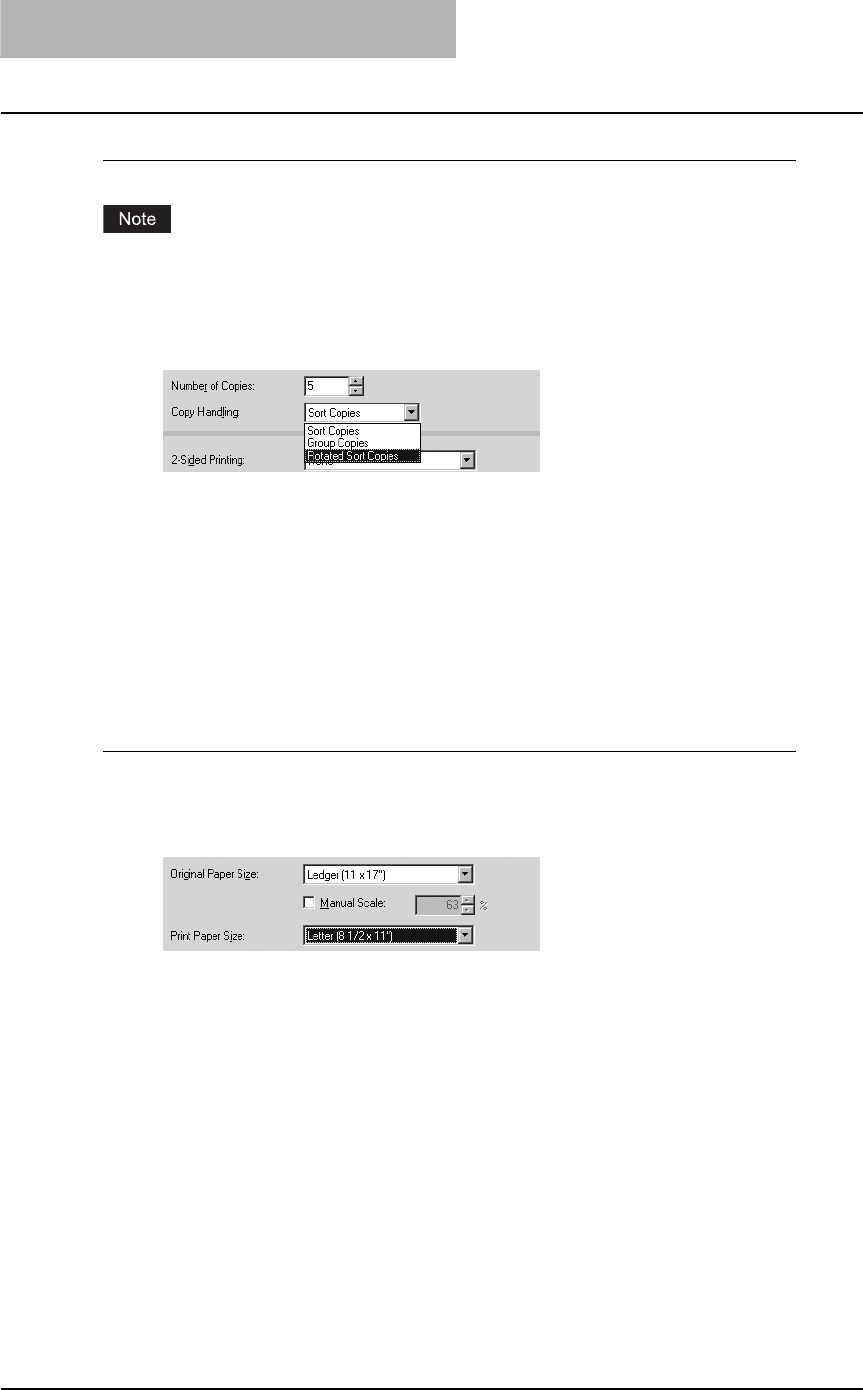
3 PRINTING
192 Printing from Windows
Output in a different direction for each copy
Rotated Sort Copies can be enabled only when printing on Letter, A4, or B5.
1
Display the Setup tab and enter the number of copies to be printed
at the “Number of Copies” field. Then select “Rotated Sort Copies”
at the “Copy Handling” drop down box.
2
Set other print options you require and click [OK].
3
Click [OK] or [Print] to send a print job.
The print job is output in different direction for each copy.
— Enlarge/Reduce Printing
You can automatically enlarge or reduce a document image to fit a specified paper size, or man-
ually set the zoom ratio to enlarge or reduce the image.
Printing enlarged or reduced image to fit specified paper size
1
Display the Setup tab and select the document size on the “Original
Paper Size” drop down box. Then select the paper size that you
want to print at the “Print Paper Size” drop down box.
The document image is automatically enlarged or reduced depending on the original
paper size and print paper size.
2
Set other print options you require and click [OK].
3
Click [OK] or [Print] to send a print job.
Enlarged or reduced image is printed to fit specified paper size.
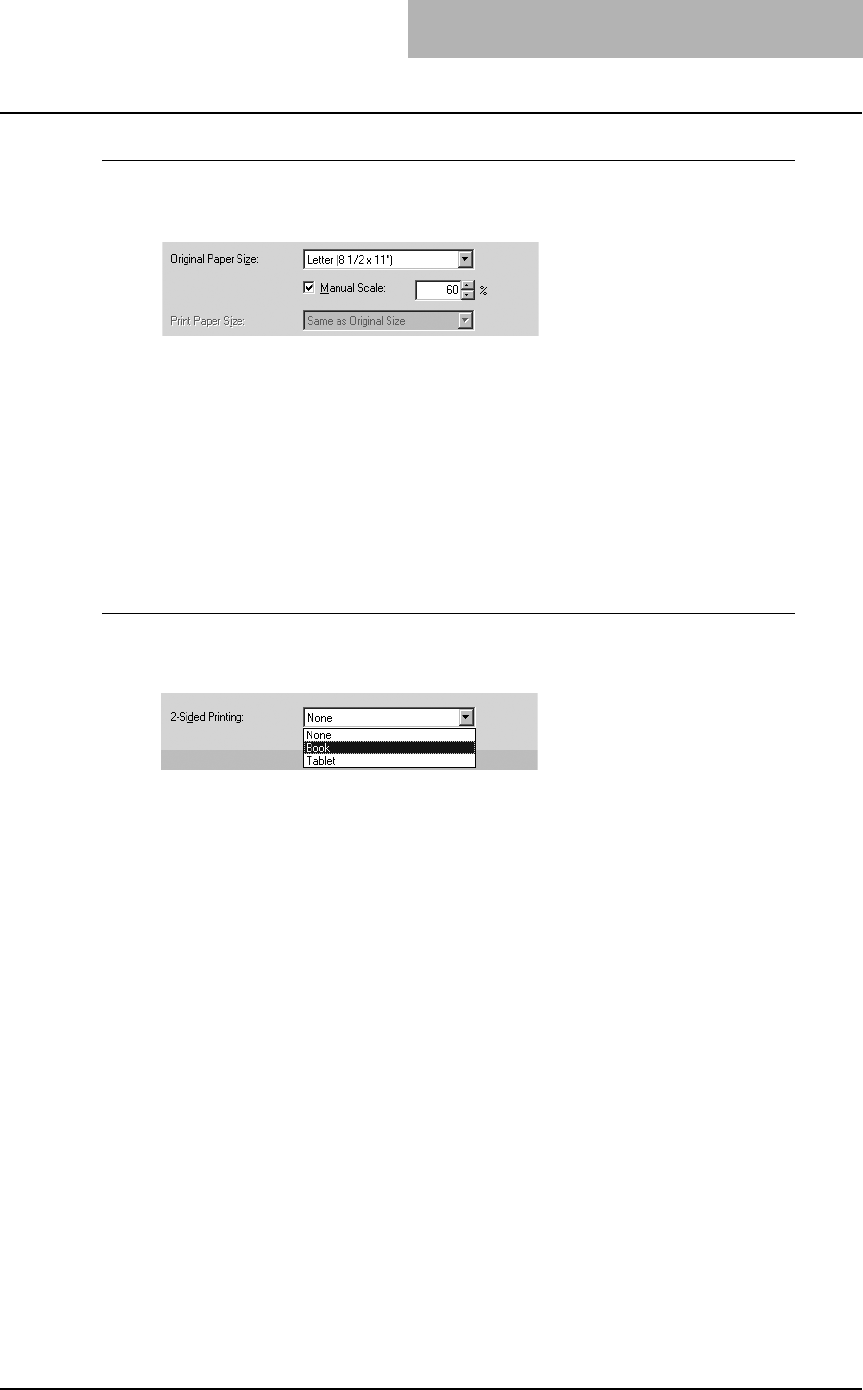
Printing from Windows 193
Printing an enlarged or reduced image by specifying the zoom ratio manually
1
Display the Setup tab and check the “Manual Scale” box. Then
enter the percentage of zoom ratio.
The zoom ratio can be set from 25% to 400% in units of 1%.
2
Set other print options you require and click [OK].
3
Click [OK] or [Print] to send a print job.
Enlarged or reduced image is printed by specified zoom ratio.
— Printing on Both Sides of a Sheet
You can print on both sides of the paper.
Printing both sides of paper
1
Display the Setup tab and select the direction to be printed at the
“2-Sided Printing” drop down box.
Book — Select this to print on both sides of the paper in a vertically direction, so the
pages can be bound and turned over right and left.
Tablet — Select this to print on both sides of the paper in a vertical reversal motion, so
the pages can be bound and turned over up and down.
2
Set other print options you require and click [OK].
3
Click [OK] or [Print] to send a print job.
The print job is printed on both side of paper in the specified direction.
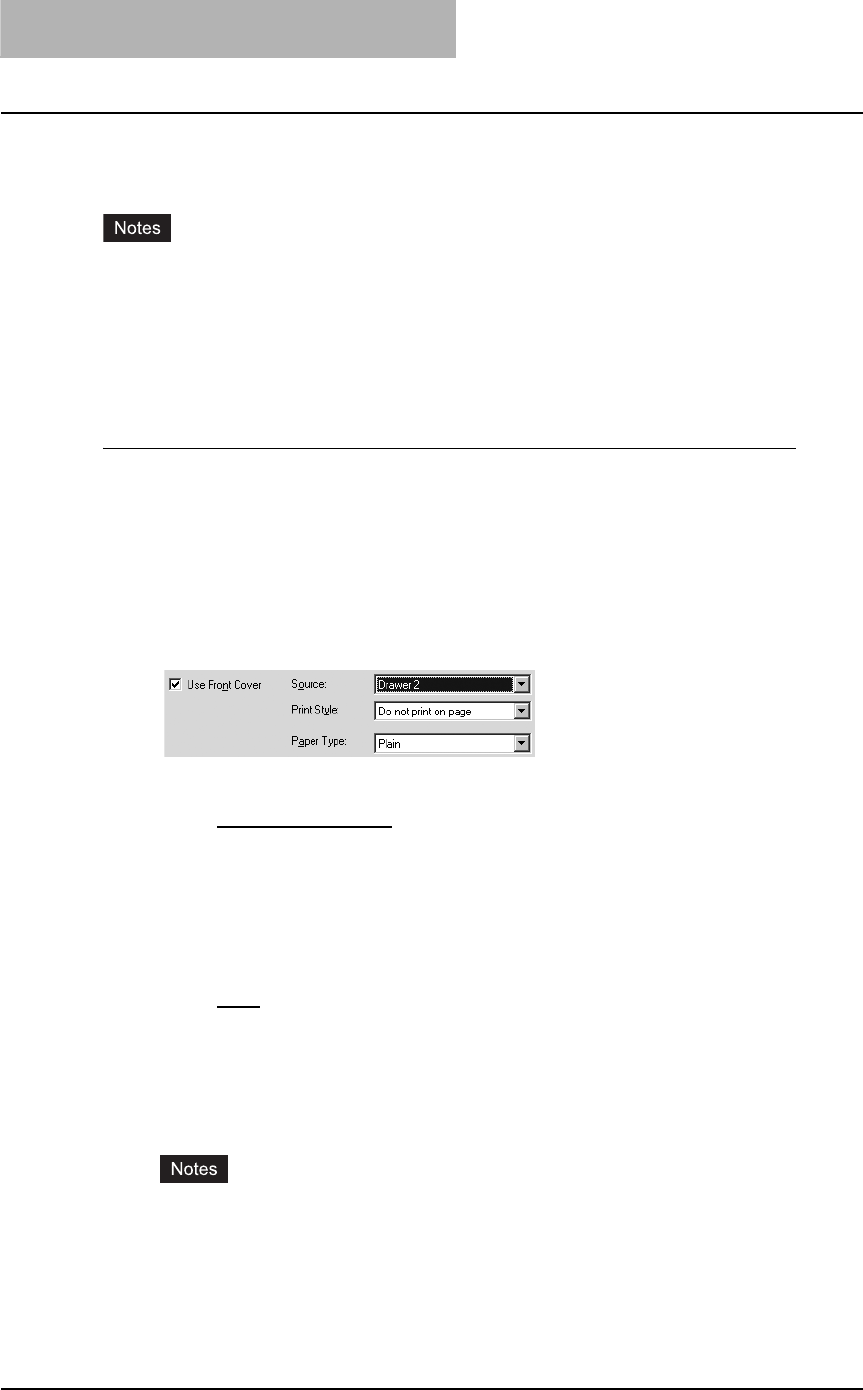
3 PRINTING
194 Printing from Windows
— Printing front covers or back covers from different paper sources
You can print paper for front covers or back covers by feeding from different paper source.
yA front cover can be also printed or inserted for booklet printing by setting it in the Booklet
window.
P.195 “Printing booklets”
yA front cover and back cover can be also printed or inserted for N-up printing by setting it in
the Multiple Pages per Sheet window.
P.198 “Printing several reduced pages per sheet”
Printing or inserting a front cover and back cover
1
Display the Standard window of the Layout tab.
2
To print or insert a front cover, check the “Use Front Cover” box
and select the drawer where the cover paper is loaded at the
“Source” drop down box. Then select whether inserting a blank
cover or printed front cover at the “Print Style” drop down box.
Also, select the paper type for a front cover at the “Paper Type”
drop down box.
yPrint Style
This selects how you want to print a cover.
-Do not print on page — Select this to insert a blank cover.
-Print on 1 side of page — Select this to print the first page image on the front
side of a cover.
-Print on both sides of page — Select this to print the first two page images on
both sides of a cover.
yPaper Type
This sets the media type of the paper.
-Plain — Select this when printing on 20 lbs plain paper (64-80 g/m2 plain paper).
-Thick1 — Select this when printing on 24-28 lbs thick paper (81-105 g/m2 thick
paper).
-Thick2 — Select this when printing on 32-90 lbs thick paper (106-163 g/m2 thick
paper).
-Transparency — Select this when printing on transparent sheets.
yWhen “Automatic” is selected in the “Source” drop down box, the paper is automati-
cally selected according to the printed document size.
y“Print on both sides of page” is available only when 2-Sided printing is enabled at the
Setup tab.
yThe same paper type applies to both front cover and back cover. When the paper
type for either cover is changed, the paper type for other cover is automatically set to
the same one.
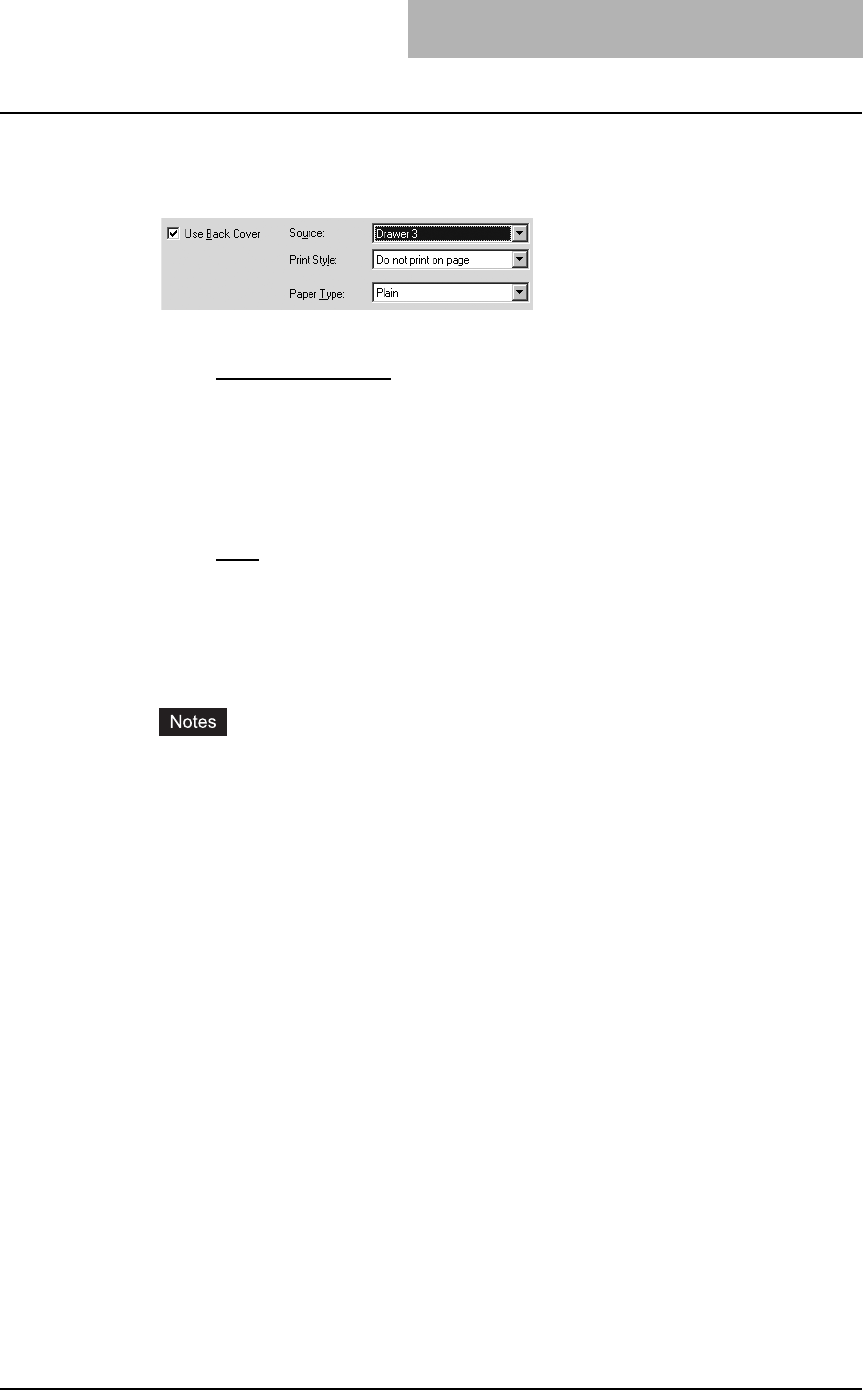
Printing from Windows 195
3
To print or insert a back cover, check the “Use Back Cover” box
and set the “Source”, “Print Style” and “Paper Type” options that
you require.
yPrint Style
This selects how you want to print a back cover.
-Do not print on page — Select this to insert a blank cover.
-Print on 1 side of page — Select this to print the last page image on the front
side of a cover.
-Print on both sides of page — Select this to print the last two page images on
both sides of a cover.
yPaper Type
This sets the media type of the paper.
-Plain — Select this when printing on 20 lbs plain paper (64-80 g/m2 plain paper).
-Thick1 — Select this when printing on 24-28 lbs thick paper (81-105 g/m2 thick
paper).
-Thick2 — Select this when printing on 32-90 lbs thick paper (106-163 g/m2 thick
paper).
-Transparency — Select this when printing on transparent sheets.
yWhen “Automatic” is selected in the “Source” drop down box, the paper is automati-
cally selected according to the printed document size.
y“Print on both sides of page” is available only when 2-Sided printing is enabled at the
Setup tab.
yThe same paper type applies to both front cover and back cover. When the paper
type for either cover is changed, the paper type for other cover is automatically set to
the same one.
4
Set other print options you require and click [OK].
5
Click [OK] or [Print] to send a print job.
A front cover and back cover are printed or inserted for output.
— Printing booklets
Printing in normal booklet mode produces a document that, when folded, becomes a properly
paginated booklet or magazine-style publication.
For example, if you create a document on letter-size paper (8½ x 11 inches) and then print in
booklet mode, the yield is a 5½-x-8½-inch booklet. Each page has been scaled to fit on half a
sheet and reordered so that the booklet is properly paginated when folded.
To retain your original document size when printing booklets, select the booklet size same as
your original document size. Then, your 8½-inch document is printed on ledger size paper (11 x
17 inches) and reordered so that, when folded, the yield is an 8½-x-11-inch booklet. You can
select from the following page-size options when printing a tiled booklet:
yLetter Booklet on Ledger
yA4 Booklet on A3
yB5 Booklet on B4
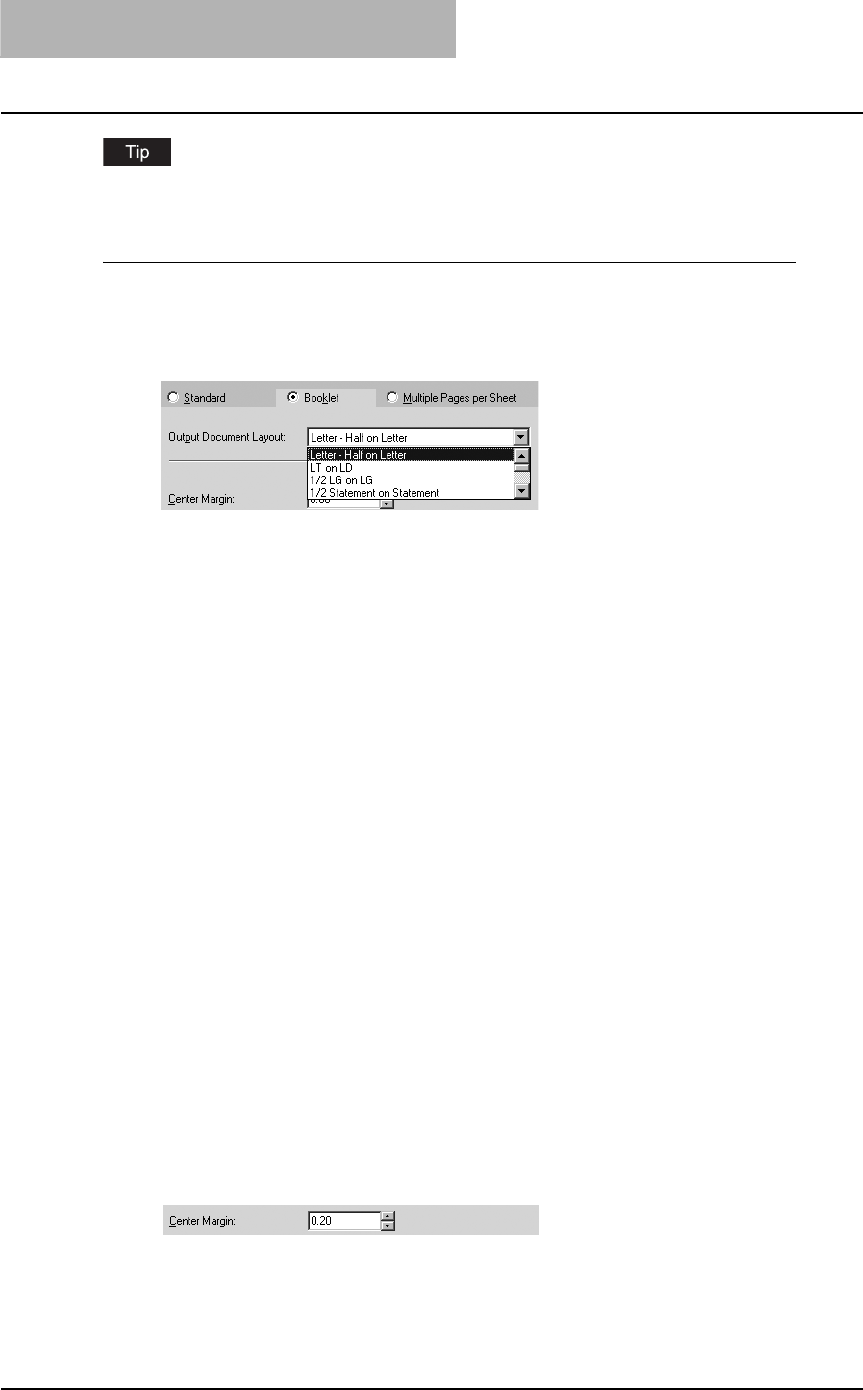
3 PRINTING
196 Printing from Windows
You can create a booklet by folding printed paper along the center by yourself.
Creating a booklet
1
Display the Booklet window of Layout tab.
2
Select the booklet size at the “Output Document Layout” drop
down box.
A5 on A4 — Select this to print a A5 size booklet. Every 2 pages are printed on A4 paper
to fit on half a sheet (A5).
A4 on A3 — Select this to print a A4 size booklet. Every 2 pages are printed on A3 paper
to fit on half a sheet (A4).
B5 on B4 — Select this to print a B5 size booklet. Every 2 pages are printed on B4 paper
to fit on half a sheet (B5).
Letter-Half on Letter — Select this to print a 1/2 Letter size booklet. Every 2 pages are
printed on Letter paper to fit on half a sheet.
LT on LD — Select this to print a Letter size booklet. Every 2 pages are printed on
Ledger paper to fit on half a sheet (Letter).
A6 on A5 — Select this to print a A6 size booklet. Every 2 pages are printed on A5 paper
to fit on half a sheet (A6).
B6 on B5 — Select this to print a B6 size booklet. Every 2 pages are printed on B5 paper
to fit on half a sheet (B5).
1/2 LG on LG — Select this to print a 1/2 Legal size booklet. Every 2 pages are printed
on Legal paper to fit on half a sheet.
1/2 Comp on Comp — Select this to print a 1/2 Computer size booklet. Every 2 pages
are printed on Computer paper to fit on half a sheet.
1/2 Folio on Folio — Select this to print a 1/2 Folio size booklet. Every 2 pages are
printed on Folio paper to fit on half a sheet.
1/2 Statement on Statement — Select this to print a 1/2 Statement size booklet. Every 2
pages are printed on Statement paper to fit on half a sheet.
1/2 13’LG on 13’LG — Select this to print a 1/2 13inchLG size booklet. Every 2 pages
are printed on 13inchLG paper to fit on half a sheet.
32K on 16K — Select this to print a 32K size booklet. Every 2 pages are printed on 16K
paper to fit on half a sheet.
16K on 8K — Select this to print a 16K size booklet. Every 2 pages are printed on 8K
paper to fit on half a sheet.
3
If you want to add a margin space between facing pages, enter a
width in the “Center Margin” field.
yYou can change the unit of the margin at the “Units” drop down box.
yThe center margin can be set from 0.000 inch to 0.500 inches in units of 0.01 inch
when the unit is inch, and from 0.000 mm to 12.700 mm in units of 0.10 mm when the
unit is mm.
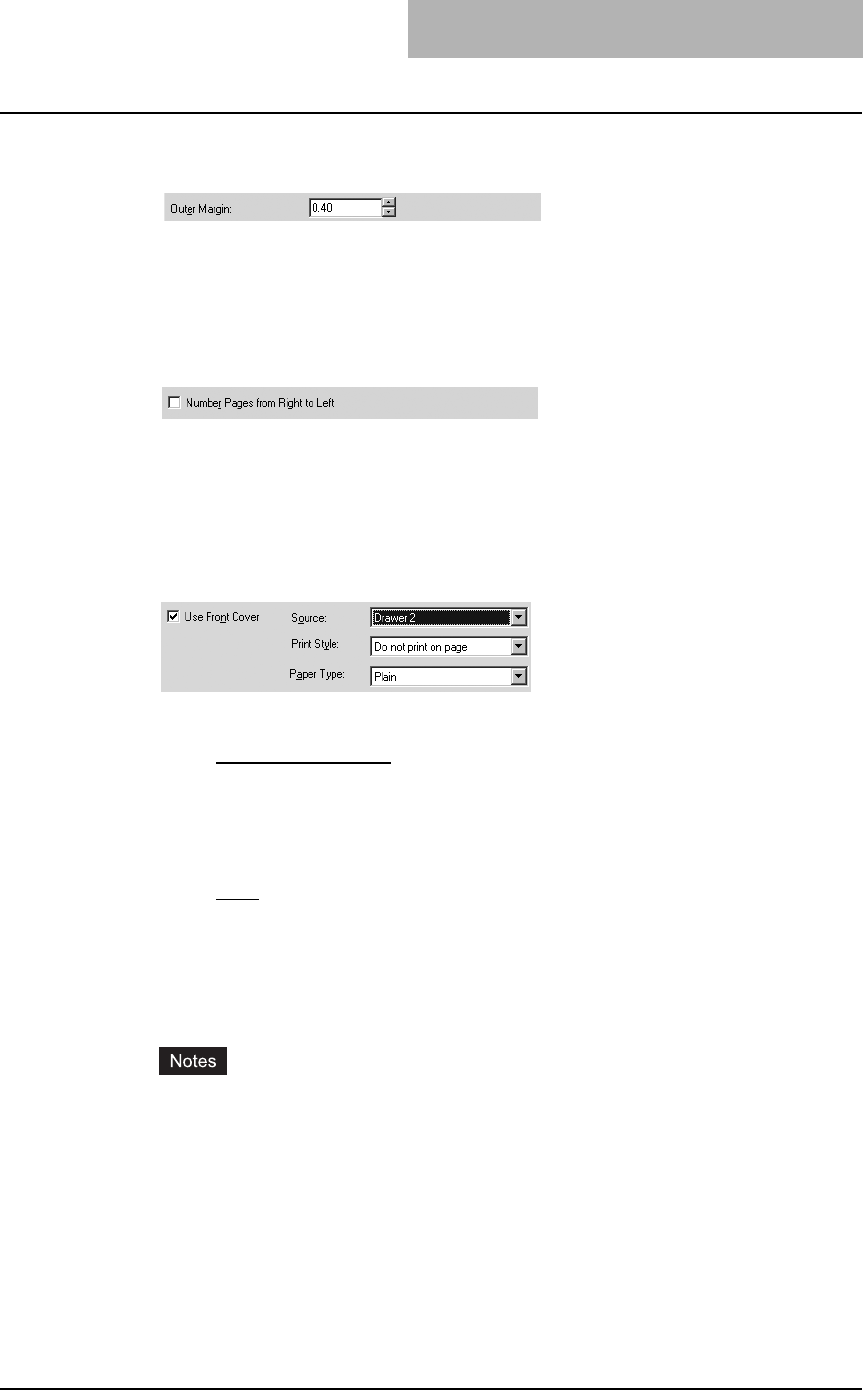
Printing from Windows 197
4
If you want to add a margin on the outside edge, enter a width in the
“Outer Margin” field.
yYou can change the unit of the margin at the “Units” drop down box.
yThe center margin can be set from 0.000 inch to 1.00 inches in units of 0.01 inch
when the unit is inch, and from 0.000 mm to 25.40 mm in units of 0.10 mm when the
unit is mm.
5
If you want to create a booklet that can be read from right to left,
check the “Number Pages from Right to Left” box.
6
If you want to print or insert a front cover, check the “Use Front
Cover” box and then select, at the “Source” drop down box, the
drawer where the front cover is loaded. Also, at the “Print Style”
drop down box, select whether you are inserting a blank cover or
printed front cover. Then select the paper type for a front cover at
the “Paper Type” drop down box.
yPrint Style
This selects how you want to print a cover.
-Do not print on page — Select this to insert a blank cover.
-Print on both sides of page — Select this to print the first two page images on
both sides of a cover.
yPaper Type
This sets the media type of the paper.
-Plain — Select this when printing on 20 lbs plain paper (64-80 g/m2 plain paper).
-Thick1 — Select this when printing on 24-28 lbs thick paper (81-105 g/m2 thick
paper).
-Thick2 — Select this when printing on 32-90 lbs thick paper (106-163 g/m2 thick
paper).
-Transparency — Select this when printing on transparent sheets.
yWhen “Automatic” is selected in the “Source” drop down box, the paper is automati-
cally selected according to the printed document size.
y“Print on both sides of page” is available only when 2-Sided printing is enabled at the
Setup tab.
7
Set other print options you require and click [OK].
8
Click [OK] or [Print] to send a print job.
The print job is printed as a booklet.
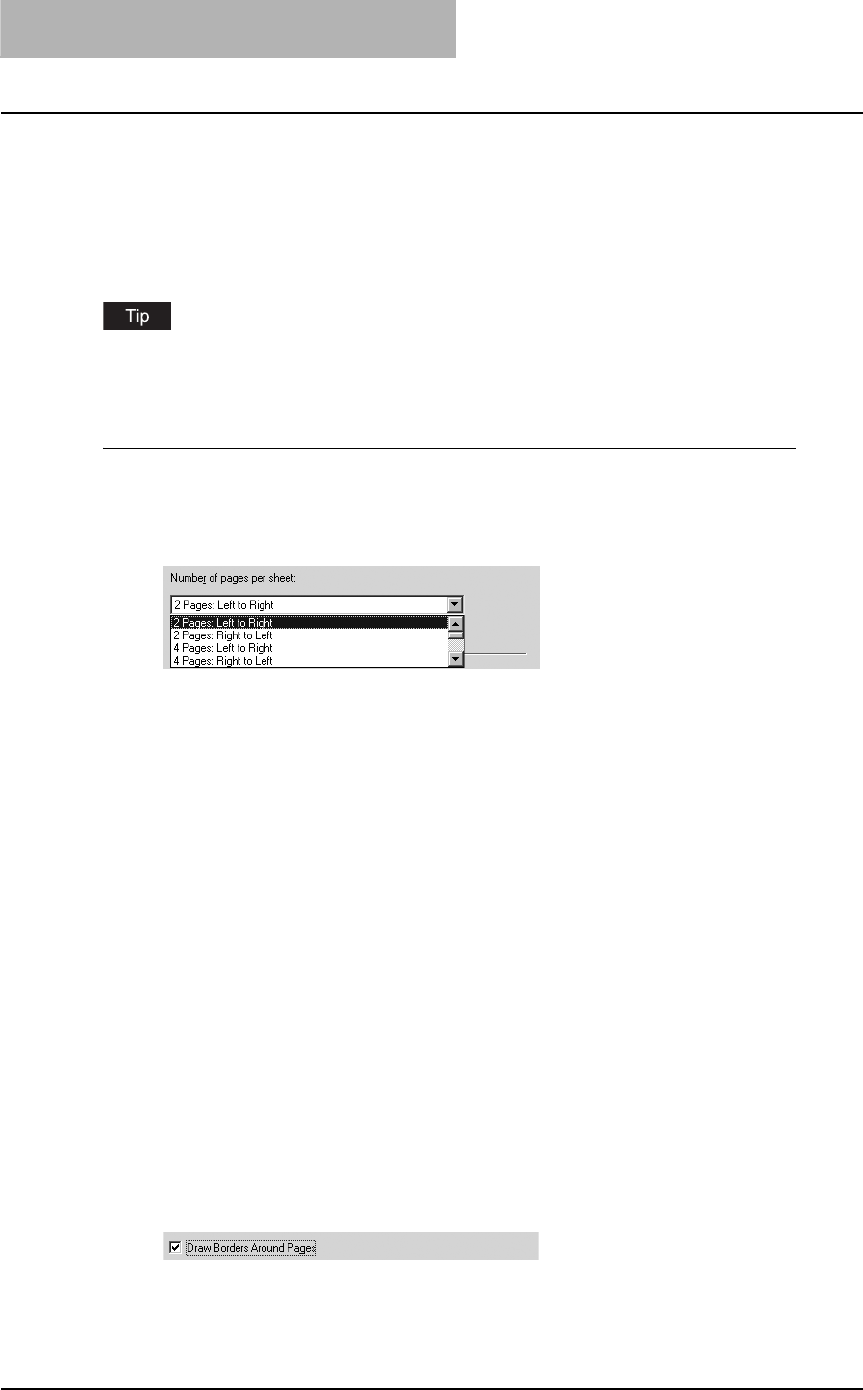
3 PRINTING
198 Printing from Windows
— Printing several reduced pages per sheet
The N-up feature allows you to condense and print several pages of a document on one sheet of
paper. This feature is very useful for browsing a large number of pages for appearance or page
order.
For example, to check the navigation path of a number of web pages or review the narrative of a
slide presentation, using N-up is not only convenient but conserves paper as well.
If you are using the Image Overlay feature in combination with N-up printing, the overlay prints
once per sheet, rather than once per page.
Printing multiple pages per sheet
1
Display the Multiple Pages per Sheet window on the Layout tab.
2
Select how many multiple pages you want to print on a single sheet
at the “Number of pages per Sheet” drop down box.
2 pages: Left to Right — Select this to print images from 2 pages arranged left to right
(when the orientation is portrait) or from top to bottom (when the orientation is landscape)
on one sheet.
2 pages: Right to Left — Select this to print images from 2 pages arranged right to left
(when the orientation is portrait) or from bottom to top (when the orientation is landscape)
on one sheet.
4 pages: Left to Right — Select this to print images from 4 pages arranged horizontally
from the left and printed top to bottom on one sheet.
4 pages: Right to Left — Select this to print images from 4 pages arranged horizontally
from the right and printed top to bottom on one sheet.
4 pages: Left to Right by Column — Select this to print images from 4 pages arranged
vertically from the top and printed left to right on one sheet.
4 pages: Right to Left by Column — Select this to print images from 4 pages arranged
vertically from the top and printed right to left on one sheet.
6 pages: Left to Right — Select this to print images from 6 pages arranged horizontally
from the left and printed top to bottom on one sheet.
8 pages: Left to Right — Select this to print images from 8 pages arranged horizontally
from the left and printed top to bottom on one sheet.
9 pages: Left to Right — Select this to print images from 9 pages arranged horizontally
from the left and printed top to bottom on one sheet.
16 pages: Left to Right — Select this to print images from 16 pages arranged
horizontally from the left and printed top to bottom on one sheet.
3
If you want to draw a line around each page, check the “Draw Bor-
der Around Pages” box.

Printing from Windows 199
4
If you want to print or insert a front cover, check the “Use Front
Cover” box and then select, at the “Source” drop down box, the
drawer where the front cover is loaded. Also, at the “Print Style”
drop down box, select whether you are inserting a blank cover or
printed front cover. Then select the paper type for a front cover at
the “Paper Type” drop down box.
yPrint Style
This selects how you want to print a cover.
-Do not print on page — Select this to insert a blank cover.
-Print on 1 side of page — Select this to print the first page image on the front
side of a cover.
-Print on both sides of page — Select this to print the first two page images on
both sides of a cover.
yPaper Type
This sets the media type of the paper.
-Plain — Select this when printing on 20 lbs plain paper (64-80 g/m2 plain paper).
-Thick1 — Select this when printing on 24-28 lbs thick paper (81-105 g/m2 thick
paper).
-Thick2 — Select this when printing on 32-90 lbs thick paper (106-163 g/m2 thick
paper).
-Transparency — Select this when printing on transparent sheets.
yWhen “Automatic” is selected in the “Source” drop down box, the paper is automati-
cally selected according to the printed document size.
y“Print on both sides of page” is available only when 2-Sided printing is enabled at the
Setup tab.
yThe same paper type applies to both front cover and back cover. When the paper
type for either cover is changed, the paper type for other cover is automatically set to
the same one.
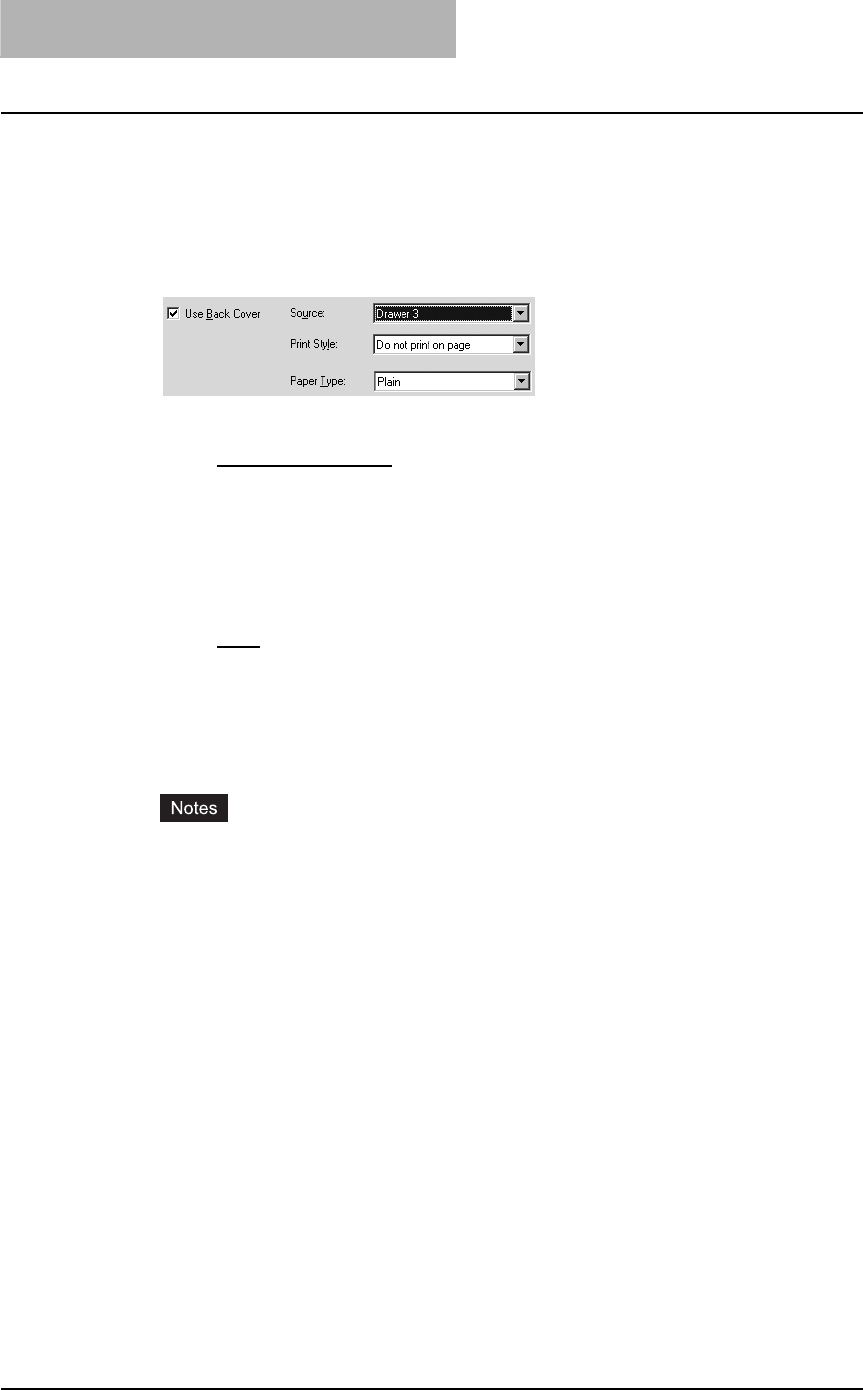
3 PRINTING
200 Printing from Windows
5
If you want to print or insert a back cover, check the “Use Back
Cover” box and then select, at the “Source” drop down box, the
drawer where the back cover is loaded. Also, at the “Print Style”
drop down box, select whether you are inserting a blank cover or
printed back cover. Then select the paper type for a back cover at
the “Paper Type” drop down box.
yPrint Style
This selects how you want to print a back cover.
-Do not print on page — Select this to insert a blank cover.
-Print on 1 side of page — Select this to print the last page image on the front
side of a cover.
-Print on both sides of page — Select this to print the last two page images on
both sides of a cover.
yPaper Type
This sets the media type of the paper.
-Plain — Select this when printing on 20 lbs plain paper (64-80 g/m2 plain paper).
-Thick1 — Select this when printing on 24-28 lbs thick paper (81-105 g/m2 thick
paper).
-Thick2 — Select this when printing on 32-90 lbs thick paper (106-163 g/m2 thick
paper).
-Transparency — Select this when printing on transparent sheets.
yWhen “Automatic” is selected in the “Source” drop down box, the paper is automati-
cally selected according to the printed document size.
y“Print on both sides of page” is available only when 2-Sided printing is enabled at the
Setup tab.
yOnly one page will be printed on the back cover when only one page is remained for
the back cover page, even if “Print on both sides of page” is selected.
yThe same paper type applies to both front cover and back cover. When the paper
type for either cover is changed, the paper type for other cover is automatically set to
the same one.
6
Set other print options you require and click [OK].
7
Click [OK] or [Print] to send a print job.
Multiple pages are printed per sheet.
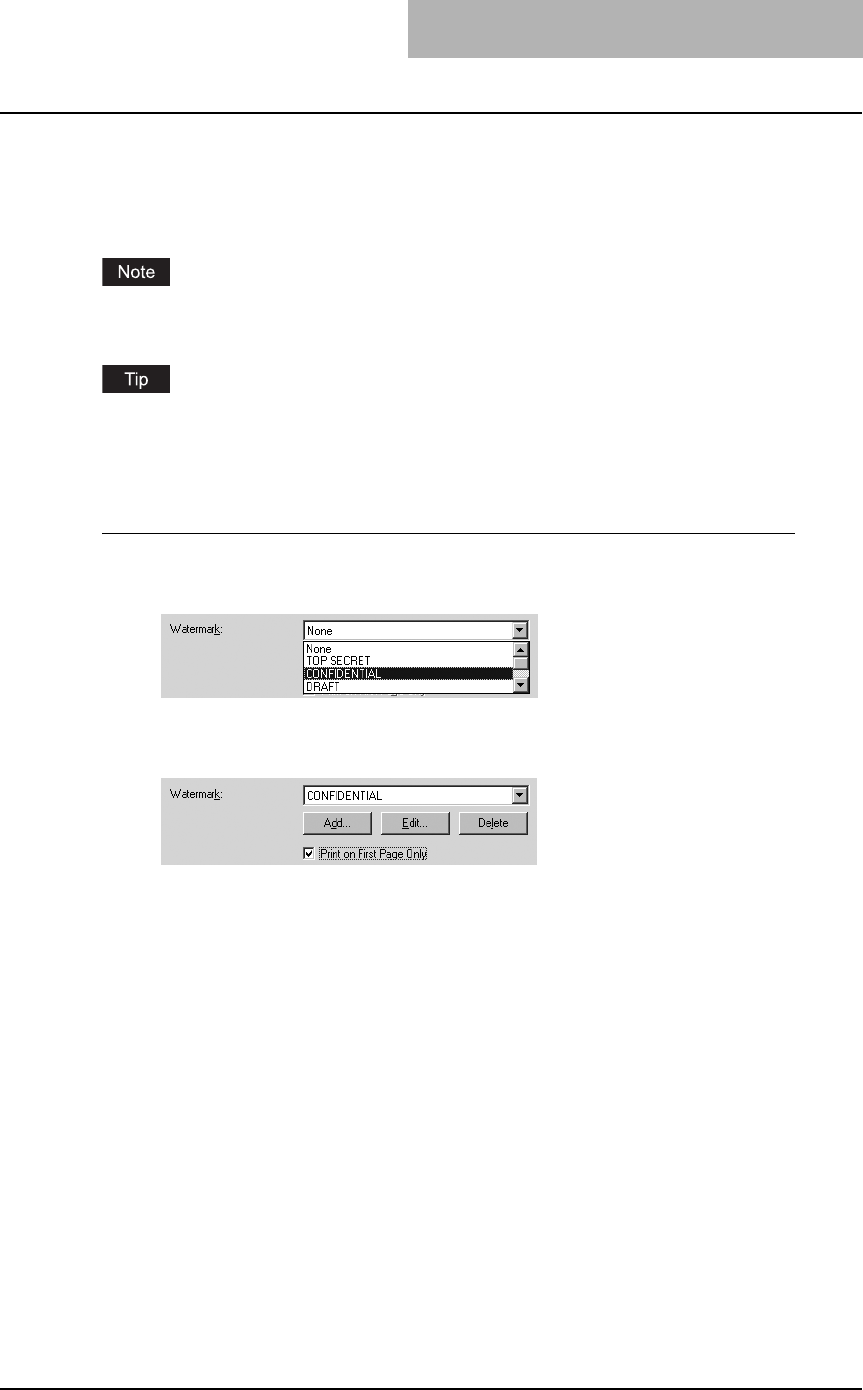
Printing from Windows 201
— Using watermarks
Watermarks overprint your document with useful information, such as “Confidential,” “Draft,” or
“Original.” You can choose from several predefined watermarks or you can create and save your
own custom watermarks.
A watermark cannot be used for an overlay file. If “Print to Overlay File” is selected in Print Job
tab, the watermark setting items are grayed and cannot be set.
Watermarks are text only. To add graphics or other document elements, use image overlays
instead.
P.203 “Printing with an Overlay File”
Printing a watermark
1
Display the Effect tab and select the watermark to be printed at the
“Watermark” drop down box.
2
If you want to print the watermark on only the first page, check on
the “Print on First Page Only” box.
3
Set other print options you require and click [OK].
4
Click [OK] or [Print] to send a print job.
The print job is printed with the watermark.
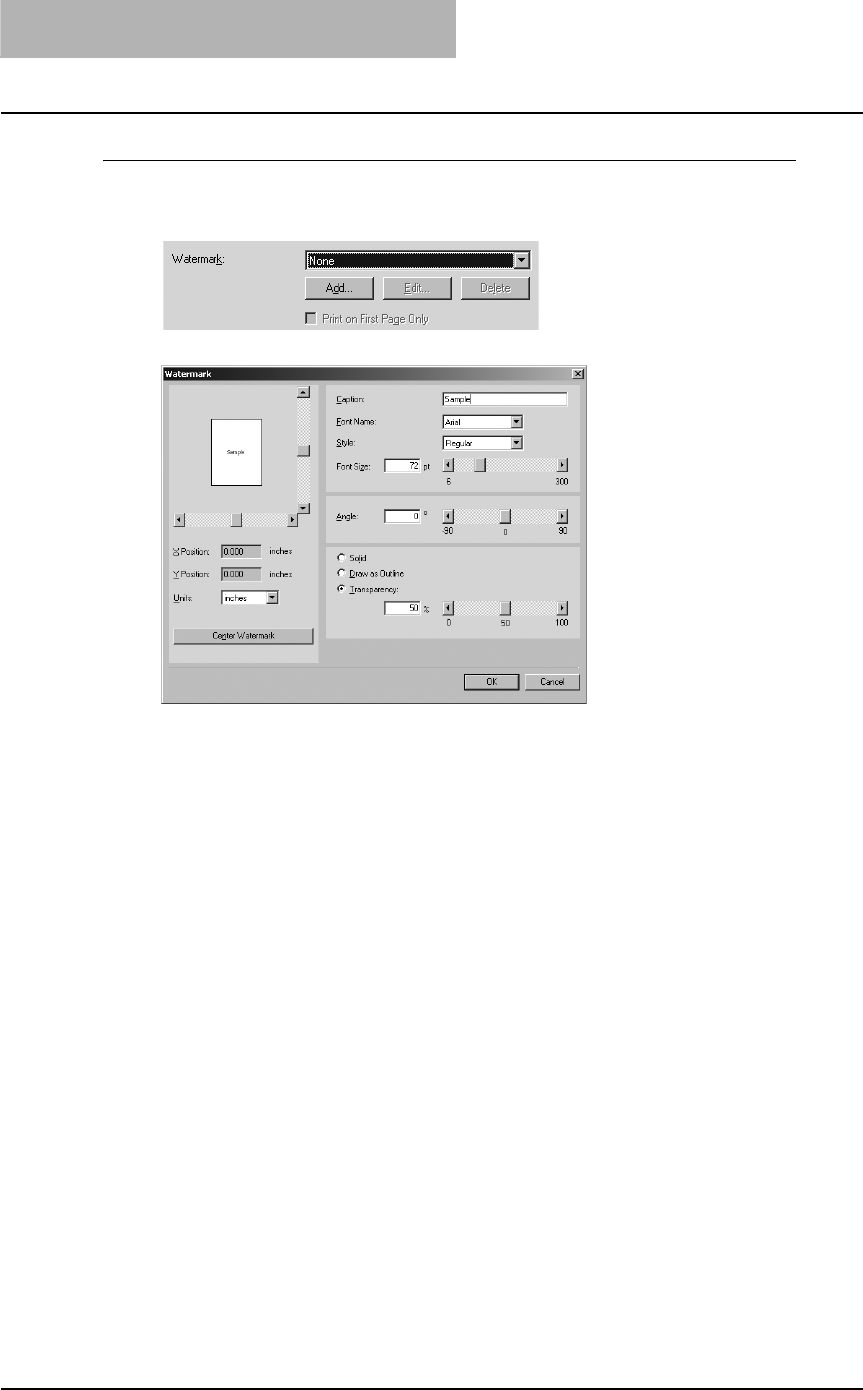
3 PRINTING
202 Printing from Windows
Creating or editing a watermark
1
Click [Add] to create new watermark, or select a watermark that you
want to edit and click [Edit] to edit a watermark.
The Watermark dialog box appears.
2
Enter the watermark text in the “Caption” field.
You can enter up to 63 characters for the “Caption” field.
3
Select a font for the watermark at the “Font Name” drop down box.
4
Select a font style for the watermark at the “Style” drop down box.
5
Enter the font size in the “Font Size” field.
You can enter any integer between 6 to 300pt in units of 1pt.
6
To rotate the watermark, enter the degrees in the “Angle” field.
yYou can enter from -90 degrees to 90 degrees in units of 1 degree in the “Angle” field.
yYou can also set the angle using the scroll bar.
7
Select how the watermark text is printed from “Solid”, “Draw as
Outline”, and “Transparency”.
Solid — Select this to print solid type of watermark.
Draw as Outline — Select this to print an outline type of watermark.
Transparency — Select this for a transparent watermark. Set the transparent ratio from
0 to 100% in units of 1%. You can also set the transparent ratio using the scroll bar.
8
Click [OK] to save the watermark settings.
The watermark is added or edited.
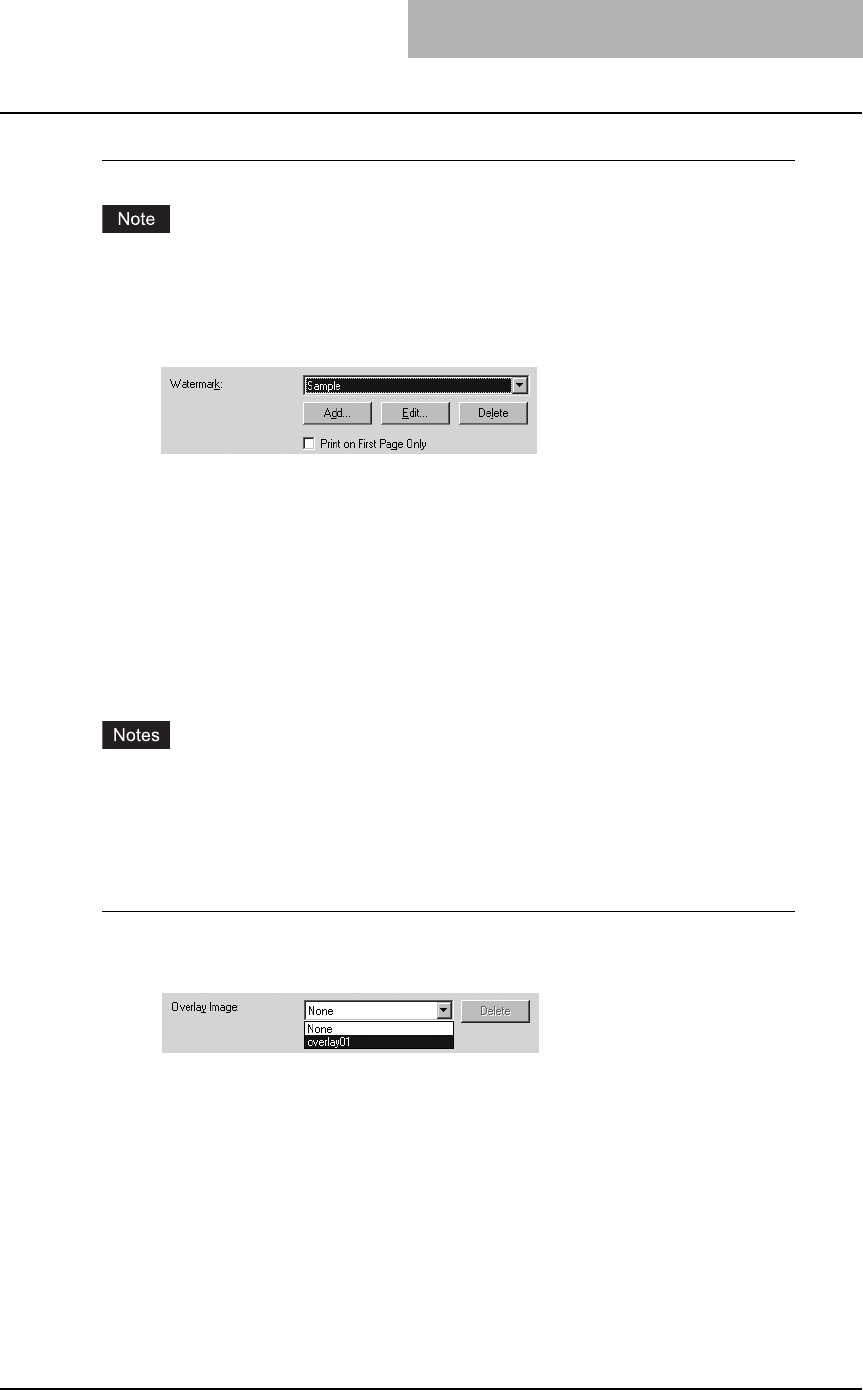
Printing from Windows 203
Deleting a watermark
You can delete the default watermarks. However, they cannot be restored by clicking the
[Restore Defaults] button.
1
Select a watermark that you want to delete at the “Watermark” drop
down box.
2
Click [Delete].
— Printing with an Overlay File
Using image overlays ensures that widely-used images are readily available and consistently
reproduced. Image overlays are independent documents that are merged into other documents
during printing and thereby increase the time required to print a job. To superimpose text on your
document, it may be faster to use watermarks.
To print with an overlay file, you should create an overlay file first.
P.190 “Creating an overlay file”
yIf you use Image Overlays in combination with the N-up feature, the image overlay is printed
once per sheet, not once per page.
yBoth the overlay file and the documents on which you superimpose the overlay image must
be created at the same size and orientation.
Printing an overlay image on a print job
1
Display the Effect tab and select the overlay image name to be used
in the “Overlay Image” drop down box.
2
Set other print options you require and click [OK].
3
Click [OK] or [Print] to send a print job.
The print job is printed with the overlay image.

3 PRINTING
204 Printing from Windows
Deleting an overlay file
1
Select the overlay file that you want to delete at the “Overlay
Image” drop down box.
2
Click [Delete].
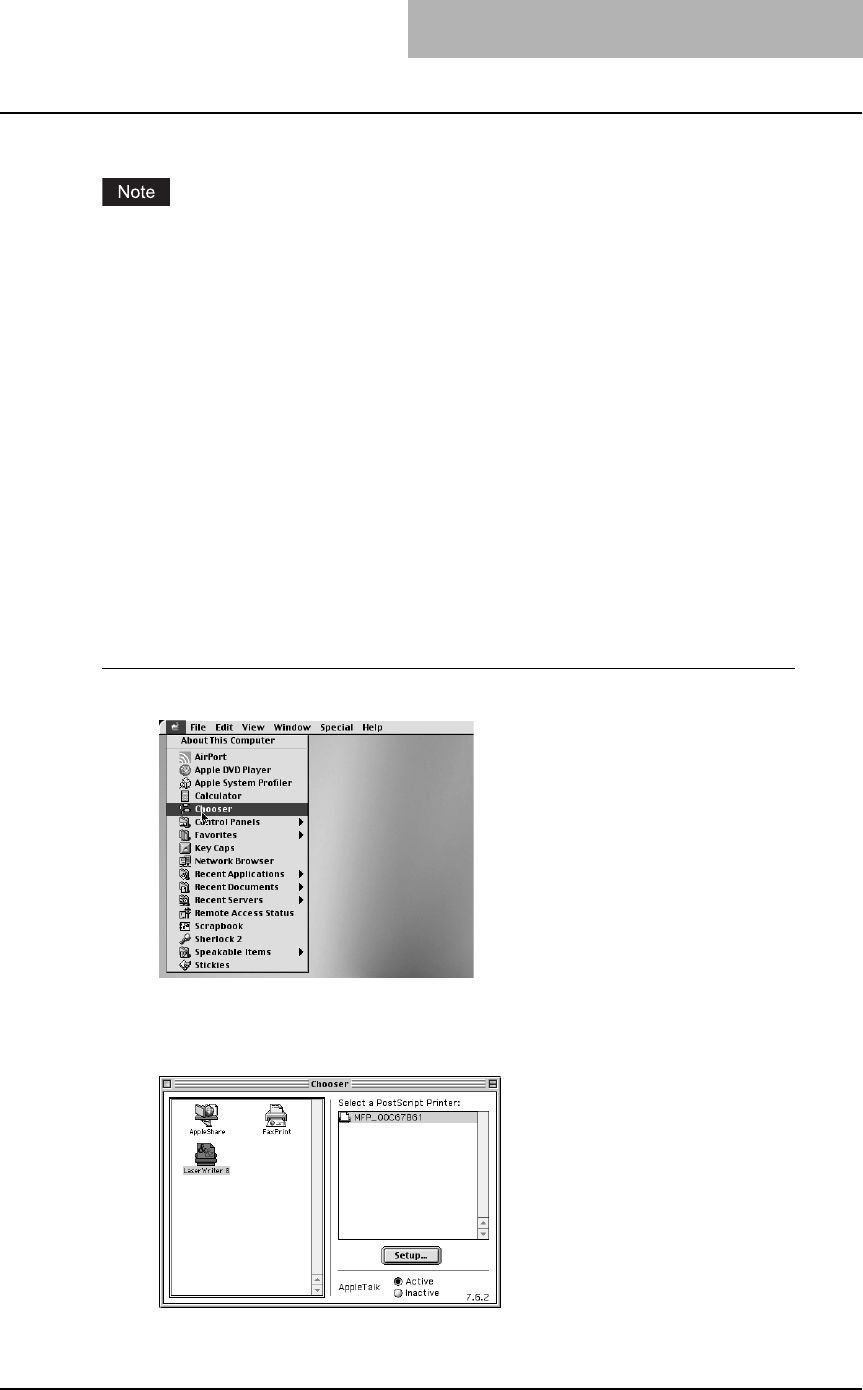
Printing from Macintosh 205
Printing from Macintosh
This equipment supports printing from Macintosh applications.
When printing is made with an invalid department code, the job is deleted.
Printing from application on Mac OS 8.6 to 9.x
Once you have installed the PPD file as described in the section P.113 “Installing the printer
on Mac OS 8.6/9.x”, you can print directly from most Mac OS applications.
How to print from Mac OS 8.6 or 9.x
Before you can print to this equipment from applications, you must select it in the Chooser.
Then, using the LaserWriter 8 printer driver and the correct PostScript Printer Description file
(PPD), you can control the system’s various printing features by specifying job settings from
print dialog boxes.
— Selecting the printer in the Chooser
Before printing from applications, you must select the equipment in the Chooser.
Setting the LaserWriter 8 printer in the Chooser
1
Click Apple menu and select [Chooser].
The Chooser window appears.
2
Select the LaserWriter 8 icon and select the equipment in the
“Select a PostScript Printer” list.
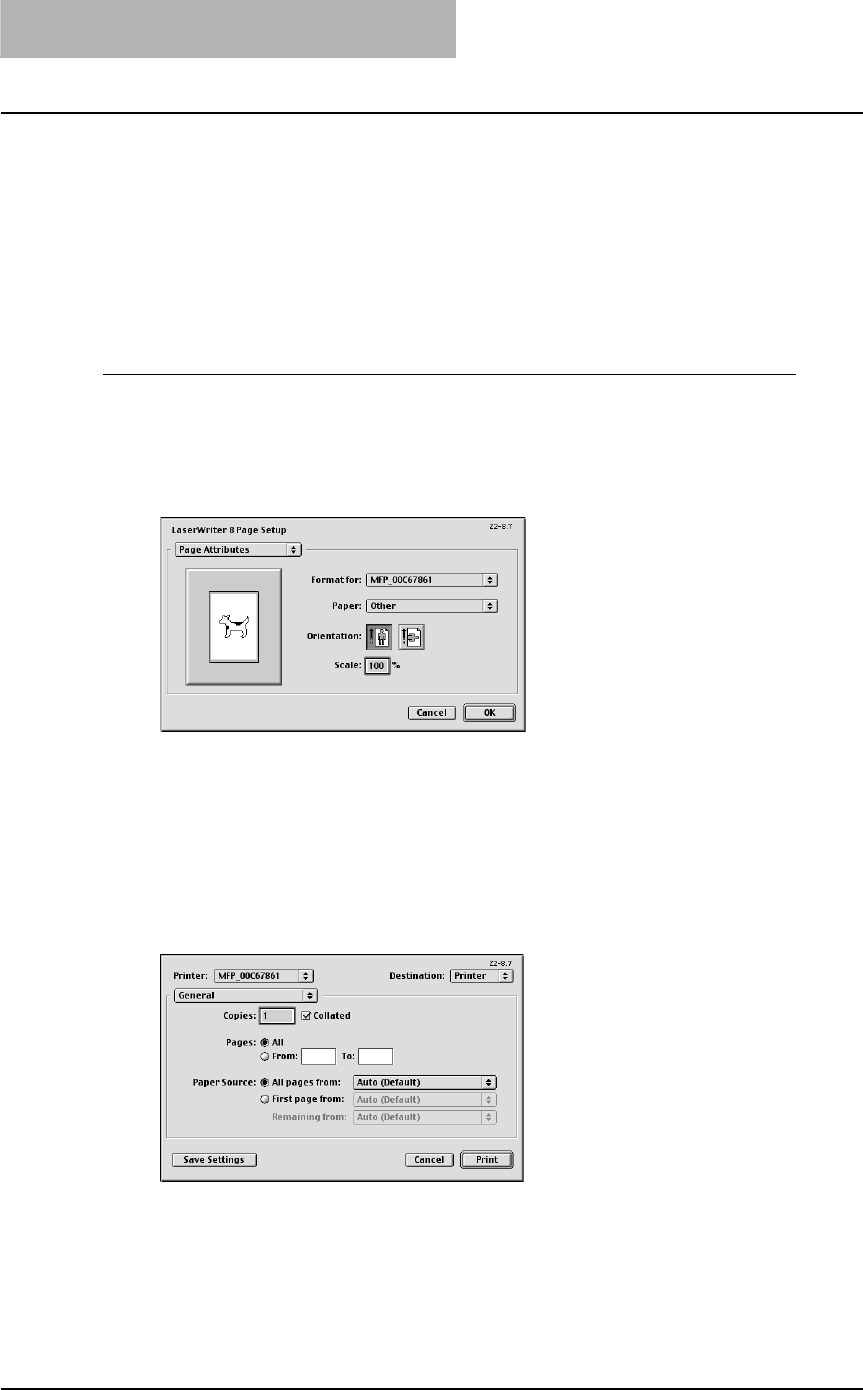
3 PRINTING
206 Printing from Macintosh
3
Close the Chooser window.
The LaserWriter 8 printer driver remains selected as the current printer until you choose
a new printer.
— Setting options and printing from Macintosh computer
In Mac OS applications, print options are set from both the Page Setup dialog box and the Print
dialog box.
Printing from Macintosh applications
1
Open a file and select [Page Setup] from the [File] menu of the
application.
2
Select the name of the equipment at the “Format for” drop down
box and specify the Page Setup settings for your print job.
Setting the Page Setup varies depending on how you want to print a document.
P.207 “Print options for page setup dialog on Mac OS 8.6/9.x”
3
Click [OK] to save the Page Setup settings.
4
Select [Print] from the [File] menu of the application.
5
In the dialog box that appears, make sure the name of the equip-
ment is selected at the “Printer” menu and specify the Print set-
tings for your print job.
Setting the Print Setup varies depending on how you want to print a document.
P.208 “Print options for print dialog on Mac OS 8.6/9.x”
6
Click [Print] to print a document.
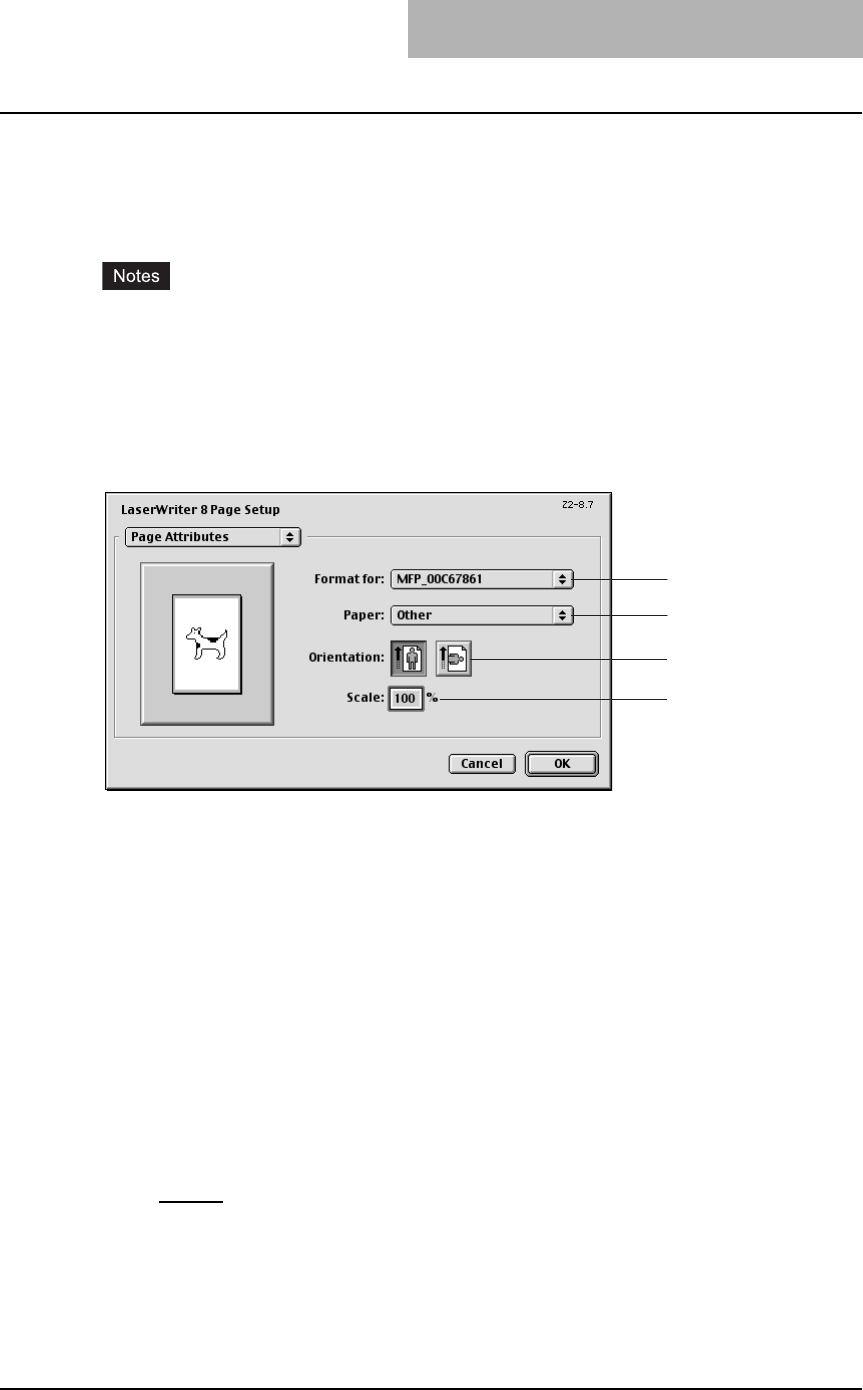
Printing from Macintosh 207
Print options for page setup dialog on Mac OS 8.6/9.x
The Page Setup dialog boxes can be displayed by selecting the [Page Setup] command from
the [File] menu of the application.
In the Page Setup dialog boxes, you can specify the Page Attribute settings.
yThe Page Setup dialog boxes vary across applications.
yThe PostScript Options window contains the setting items that are generally provided by the
LaserWriter 8 printer driver. For details of the PostScript Options, please refer to the Balloon
Help on the Mac OS.
— Page Attributes
In the Page Attributes menu, you can specify the paper size, orientation, and scale.
1) Format for
This selects the printer to be used for printing.
2) Paper
This selects the size of a document to be printed.
3) Orientation
This sets the paper printing direction.
-Portrait — The document is printed in the portrait direction.
-Landscape — The document is printed in the landscape direction.
4) Scale
This changes the size of the printed image on the page. Enter the zoom ratio to enlarge or
reduce an image. You can set any integer from 25 to 400(%) for the zoom ratio.
Available original paper sizes are listed below:
yLetter
yLedger
yLegal
yStatement
yComputer
y13”LG
y8.5”SQ
yA4
yA5
yA3
yB4
yB5
yFolio
yA6
y8K
y16K
1
2
3
4
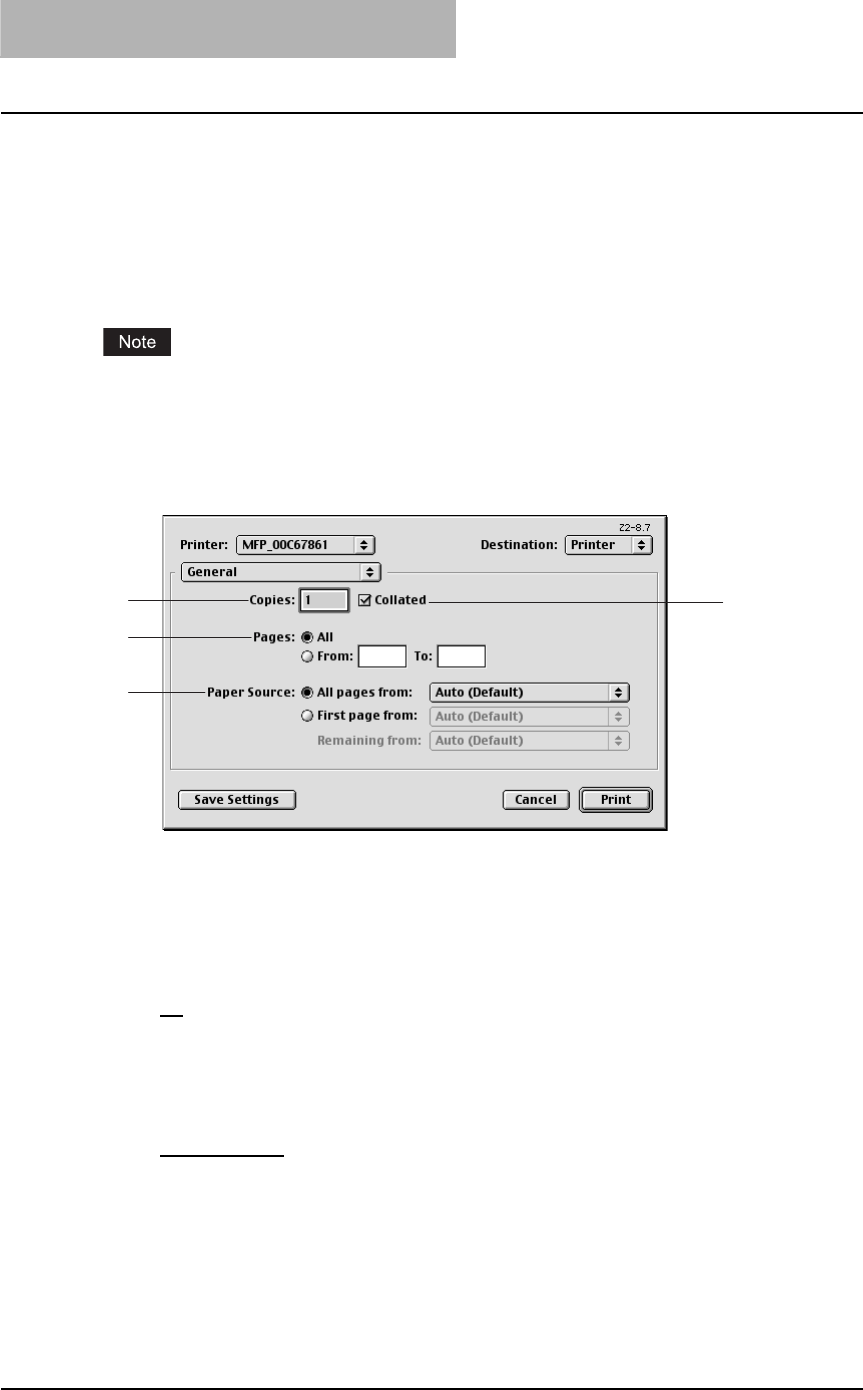
3 PRINTING
208 Printing from Macintosh
Print options for print dialog on Mac OS 8.6/9.x
The Print dialog boxes can be displayed by selecting the [Print] command from the [File] menu
of the application.
In the Print dialog boxes, you can display the General window, Background Printing window,
Color Matching window, Cover Page window, Font Settings window, Job Logging window, Lay-
out window, Finishing Save as File window, Options window, Printing Modes window, Booklet
Mode Options window, Watermark Printing Options window, and Quality window.
The Print dialog boxes vary across applications.
— General
In the General menu, you can set the general print options such as number of copies, sort print-
ing.
1) Copies
This sets the number of printed copies. You can set any integer from 1 to 9999.
2) Collated
Check this for sort-printing (1, 2, 3... 1, 2, 3...)
3) Pages
This sets the pages to be printed.
-All — Select this to print all pages.
-From/To — Select this to specify the pages to be printed. Enter the page range in the
From and To field.
4) Paper Source
This selects the source for feeding paper. Please select a paper source that correlates with
the printing size.
-All pages from — Select this to use the same paper source for all pages. Select the
paper source or paper type at the pop-up menu on the right.
-First page from — Select this to use the different paper source for the first page from the
remaining pages. Select the paper source or paper type for the first page at the pop-up
menu on the right.
-Remaining from — Select the paper source or paper type for the remaining pages at the
pop-up menu on the right when you select the First page from option.
2
4
1
3
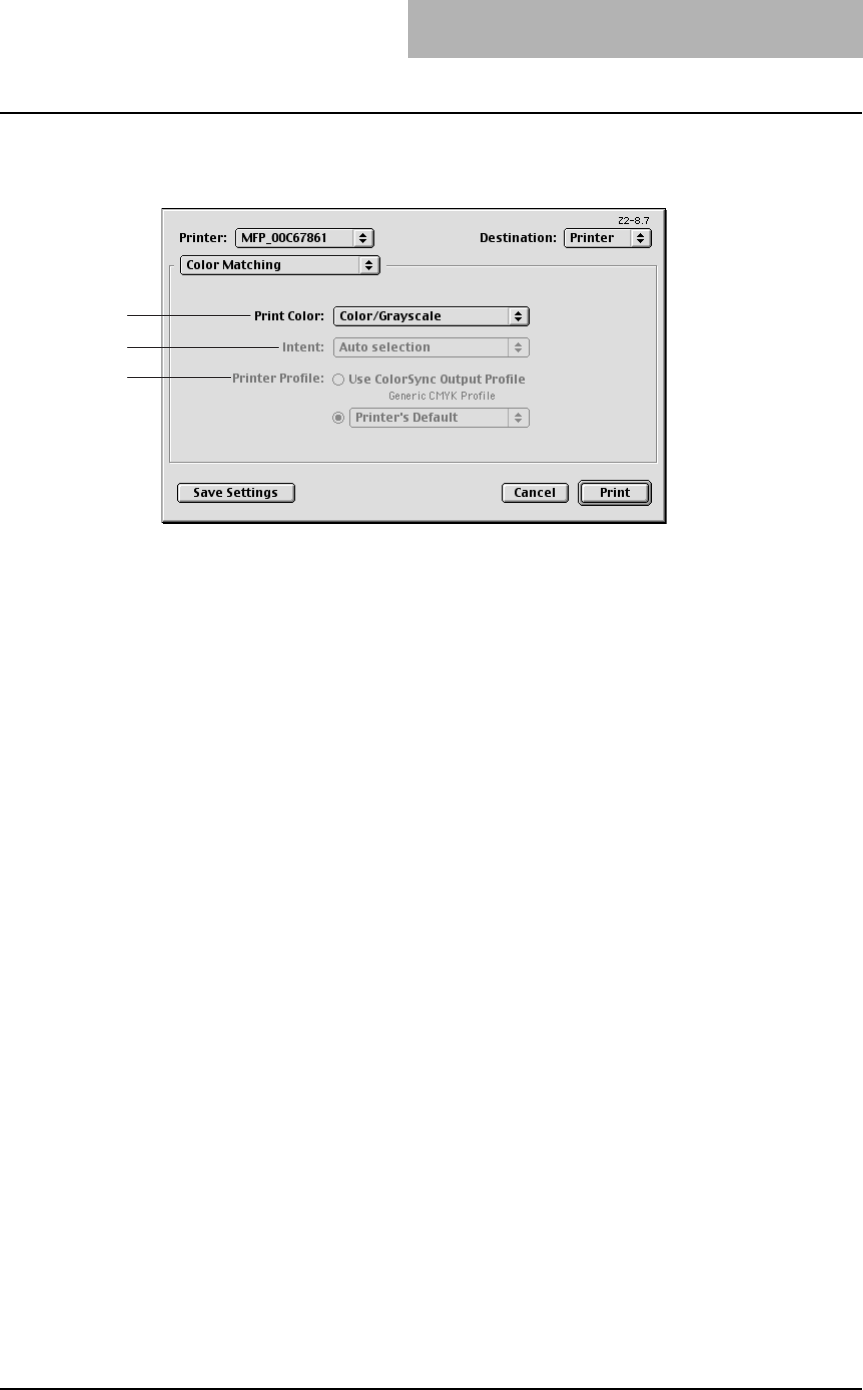
Printing from Macintosh 209
— Color Matching
This sets the color matching for printing.
1) Print Color
Select “Color/Grayscale” to print to this equipment. Other selections are not supported by
this equipment.
2) Intent
Do not specify this because “ColorSync Color Matching” and “PostScript Color Matching” at
the “Print Color” drop down box are not supported.
3) Printer Profile
Do not specify this because “ColorSync Color Matching” and “PostScript Color Matching” at
the “Print Color” drop down box are not supported.
2
3
1
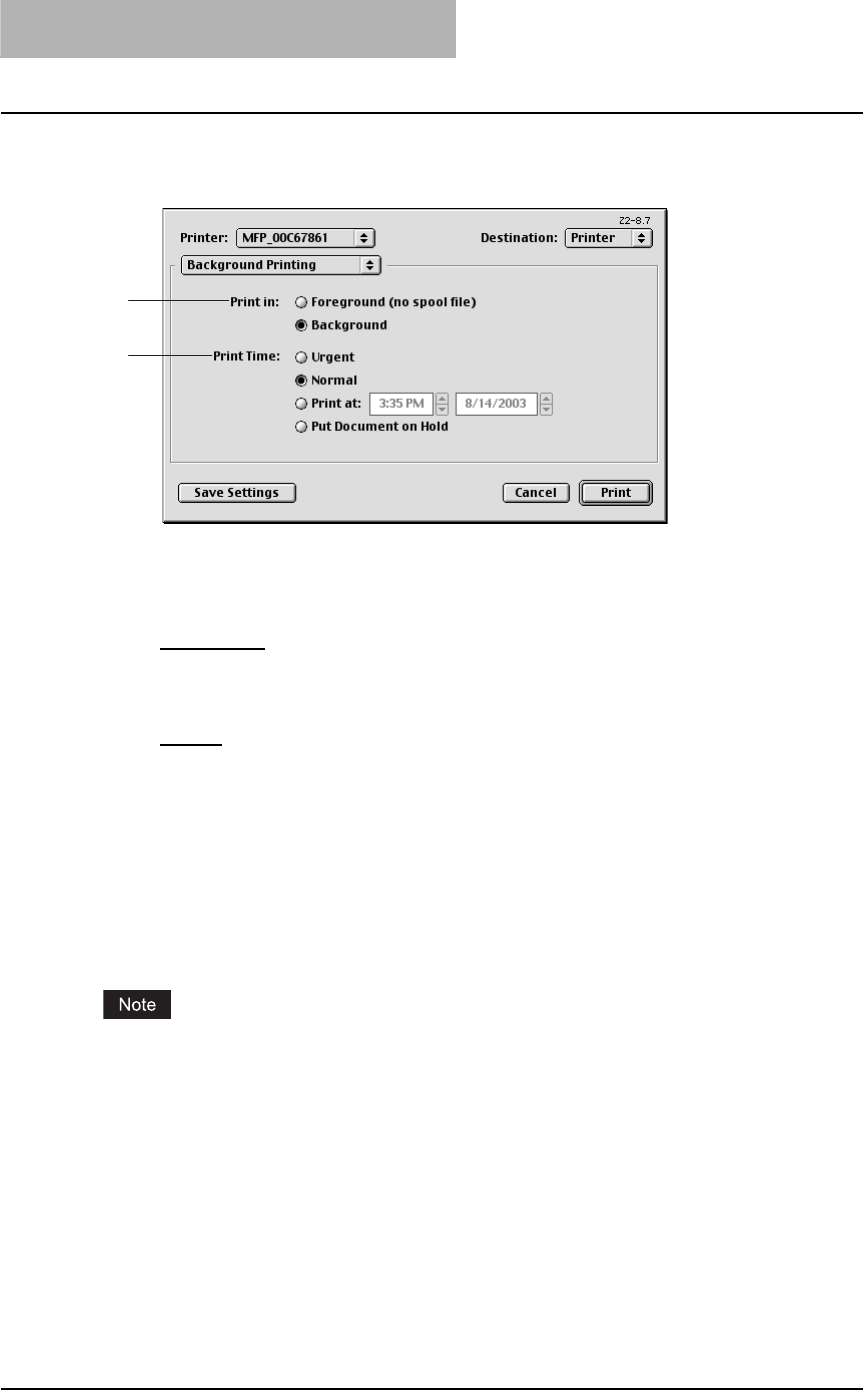
3 PRINTING
210 Printing from Macintosh
— Background Printing
In the Background Printing menu, you can set how the print job is spooled.
1) Print in
This sets how the print job is spooled.
-Foreground (no spool file) — Select this to disable any operation on the computer until
printing is completed.
-Background — Select this to enable any operation on the computer during printing.
2) Print Time
This sets the schedule for printing.
-Urgent — Select this to print a job immediately.
-Normal — Select this to print a job normally.
-Print at — Select this to specify the time that the print job is sent to this equipment. Spec-
ify the time and date when this is selected.
-Put Document on Hold — Select this to hold the print job in the desktop print queue. To
send the print job held in the desktop print queue, double-click the printer icon on the
desktop and activate the print job.
— Save as File
The Save as File window contains the setting items that are generally provided by the Laser-
Writer 8 printer driver.
For details of the Save as File window, please refer to the Balloon Help on the Mac OS.
1
2
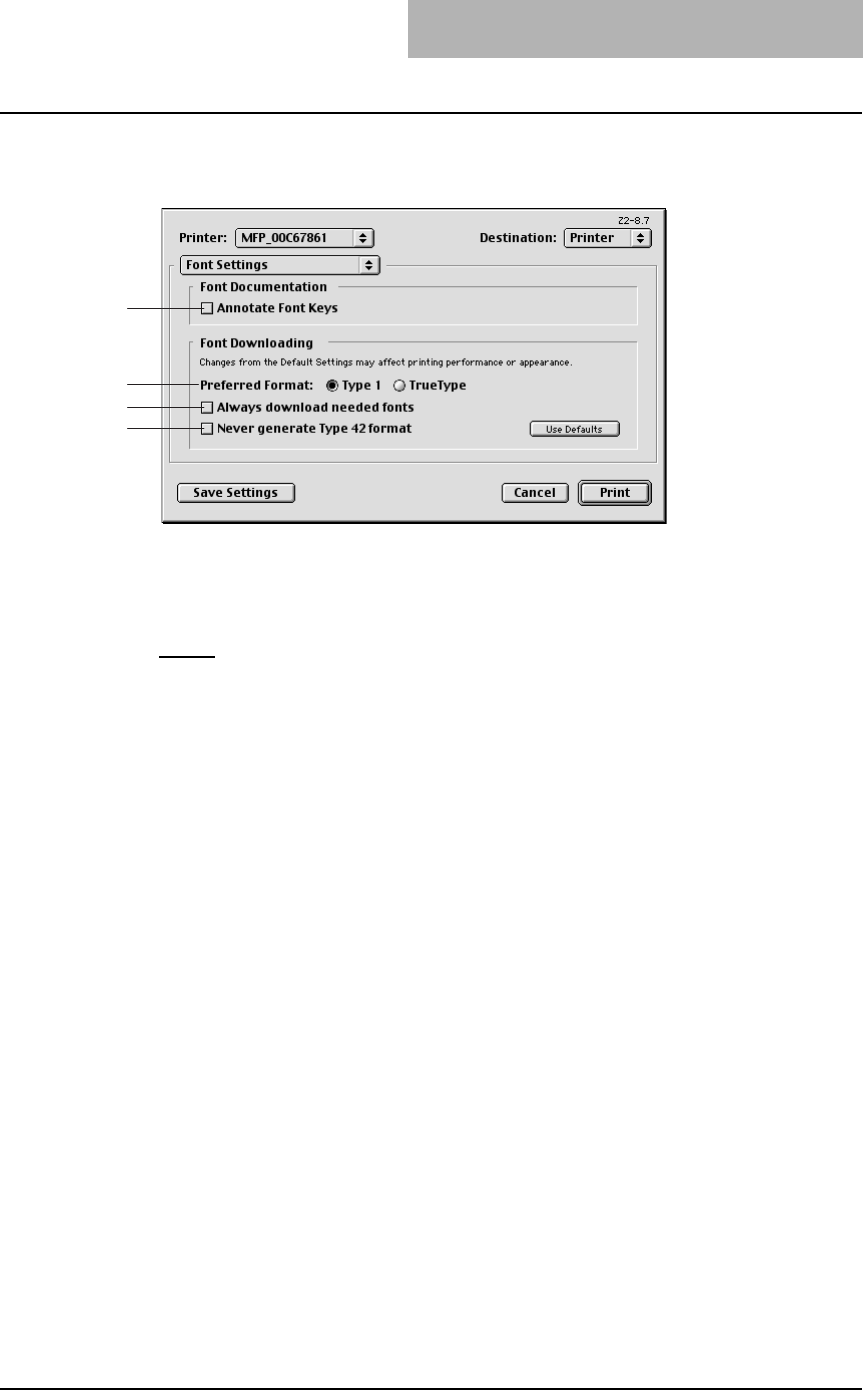
Printing from Macintosh 211
— Font Settings
In the Font Settings menu, you can set how the fonts are printed.
1) Annotate Font Keys
Check this to annotate font keys for printing.
2) Preferred Format
This sets the whether Type 1 fonts or TrueType fonts are used for printing.
-Type 1 — Select this to print fonts using Type 1 fonts.
-TrueType — Select this to print fonts using TrueType fonts.
3) Always Download needed fonts
Check this to always download fonts for printing.
4) Never generate Type 42 format
Check this not to generate the Type 42 format.
4
3
2
1
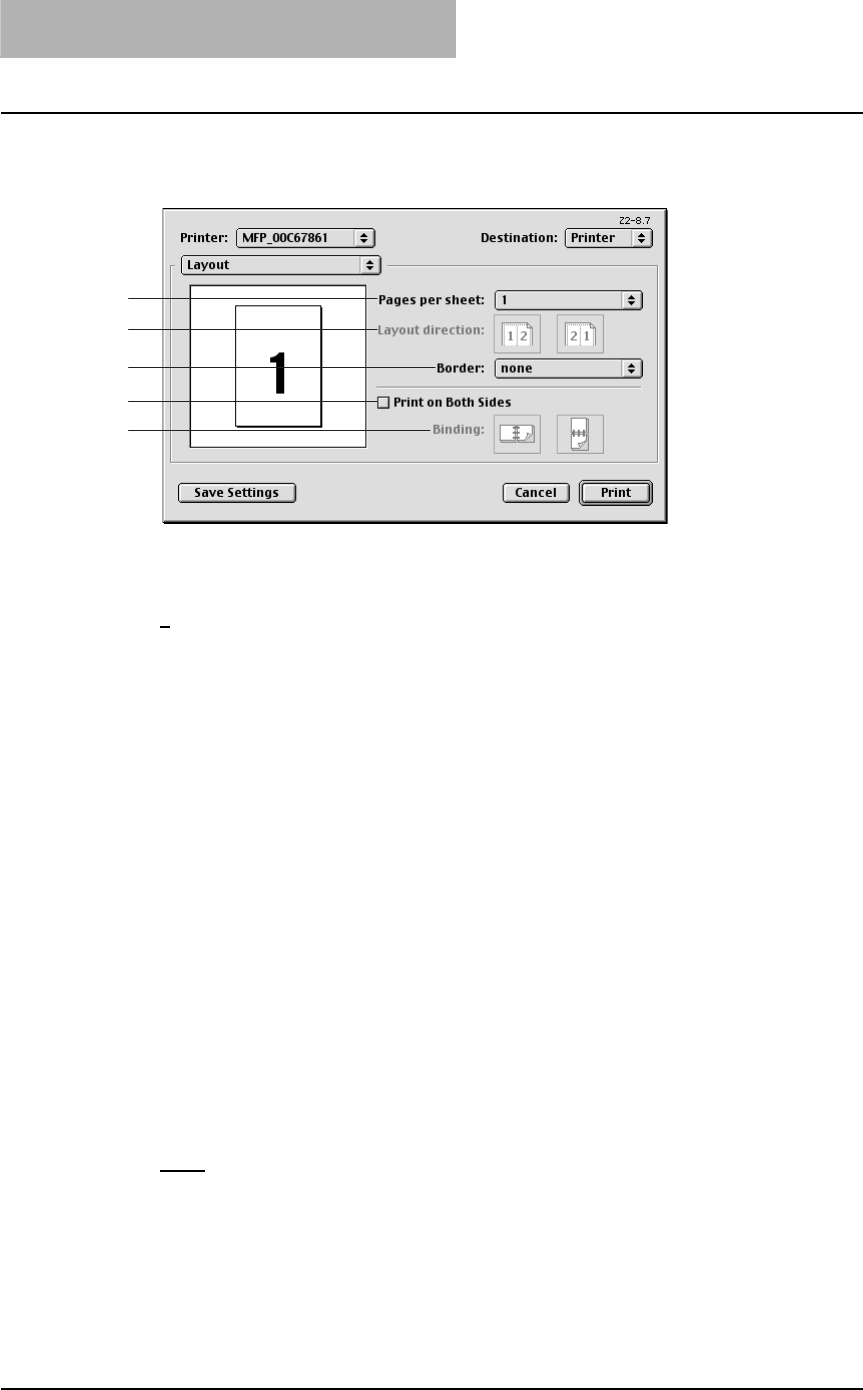
3 PRINTING
212 Printing from Macintosh
— Layout
In the Layout menu, you can set N-up printing and 2-Sided printing.
1) Pages per sheet
This sets the printing of multiple pages on one sheet. The pages are reduced to fit the
selected paper size automatically.
-1 — Select this if do not wish to enable N-up printing.
-2 — Select this to print images from 2 pages arranged on one sheet.
-4 — Select this to print images from 4 pages arranged horizontally and printed top to bot-
tom on one sheet.
-6 — Select this to print images from 6 pages arranged horizontally and printed top to bot-
tom on one sheet.
-9 — Select this to print images from 9 pages arranged horizontally and printed top to bot-
tom on one sheet.
-16 — Select this to print images from 16 pages arranged horizontally and printed top to
bottom on one sheet.
-4 (Down Before Across) — Select this to print images from 4 pages arranged vertically
from the top and printed horizontally on one sheet.
-6 (Down Before Across) — Select this to print images from 6 pages arranged vertically
from the top and printed horizontally on one sheet.
-9 (Down Before Across) — Select this to print images from 9 pages arranged vertically
from the top and printed horizontally on one sheet.
-16 (Down Before Across) — Select this to print images from 16 pages arranged verti-
cally from the top and printed horizontally on one sheet.
2) Layout direction
This sets pages to be printed from left to right or right to left. It is available only when the N-
up printing (printing a page on multiple sheets) is set.
3) Border
Select whether a border line is to be drawn on each page. It is available only when the N-up
printing (printing a page on multiple sheets) is set.
-None — Select this if no border line to be drawn.
-Single hairline — Select this to draw a single hairline for the border.
-Single thin line — Select this to draw a single thin line for the border.
-Double hairline — Select this to draw a double hairline for the border.
-Double thin line — Select this to draw a double thin line for the border.
4) Print on Both Sides
Check this to print on both sides of the paper. When checked, select the binding direction at
the “Binding” option.
1
2
3
4
5

Printing from Macintosh 213
5) Binding
This sets the type of binding for 2-sided-printed pages.
-Long Edge Binding — Select this to bind along the long edge side of paper. The direc-
tion to be printed on the back side of the paper differs depending on the orientation.
-Short Edge Binding — Select this to bind along the short edge side of paper. The direc-
tion to be printed on the back side of the paper differs depending on the orientation.
— Job Logging
In the Job Logging menu, you can set the error handling and generate job logs.
1) If there is PostScript error
This sets whether reporting the error or not.
-No special reporting — Select this not to report an error.
-Summarize on screen — Select this to report on the screen when a PostScript error
occurs.
-Print detailed report — Select this to print a detailed report when a PostScript error
occurs.
2) Job Documentation
This sets whether job logs or job copies are generated or not.
-Generate Job Copy — Check this to generate a job copy. If enabled, a job copy is gen-
erated in the folder which is specified at the “Job Documentation Folder”.
-Generate Job Log — Check this to generate a job log. If enabled, a job log is generated
in the folder which is specified at the “Job Documentation Folder”.
3) Job Documentation Folder
The folder where job copies and job logs are stored is displayed. To change the folder, click
[Change] and select a different folder.
1
2
Landscape
1
2
Portrait
1
2
Landscape
1
2
Portrait
2
13

3 PRINTING
214 Printing from Macintosh
— Cover Page
In the Cover Page menu, you can set whether a print job is sent with a banner page. The ban-
ner page includes information about owner of the job, job name, application name, date and
time, printer name, and number of copies.
1) Print Cover Page
This sets how a banner page is inserted.
-None — Select this not to print a banner page.
-Before Document — Select this to print a banner page before the document. When this
is selected, select the paper source at the Cover Page Paper Source option.
-After Document — Select this to print a banner page after the document. When this is
selected, select the paper source at the Cover Page Paper Source option.
2) Cover Page Paper Source
Select the paper source when you set to print a banner page.
2
1
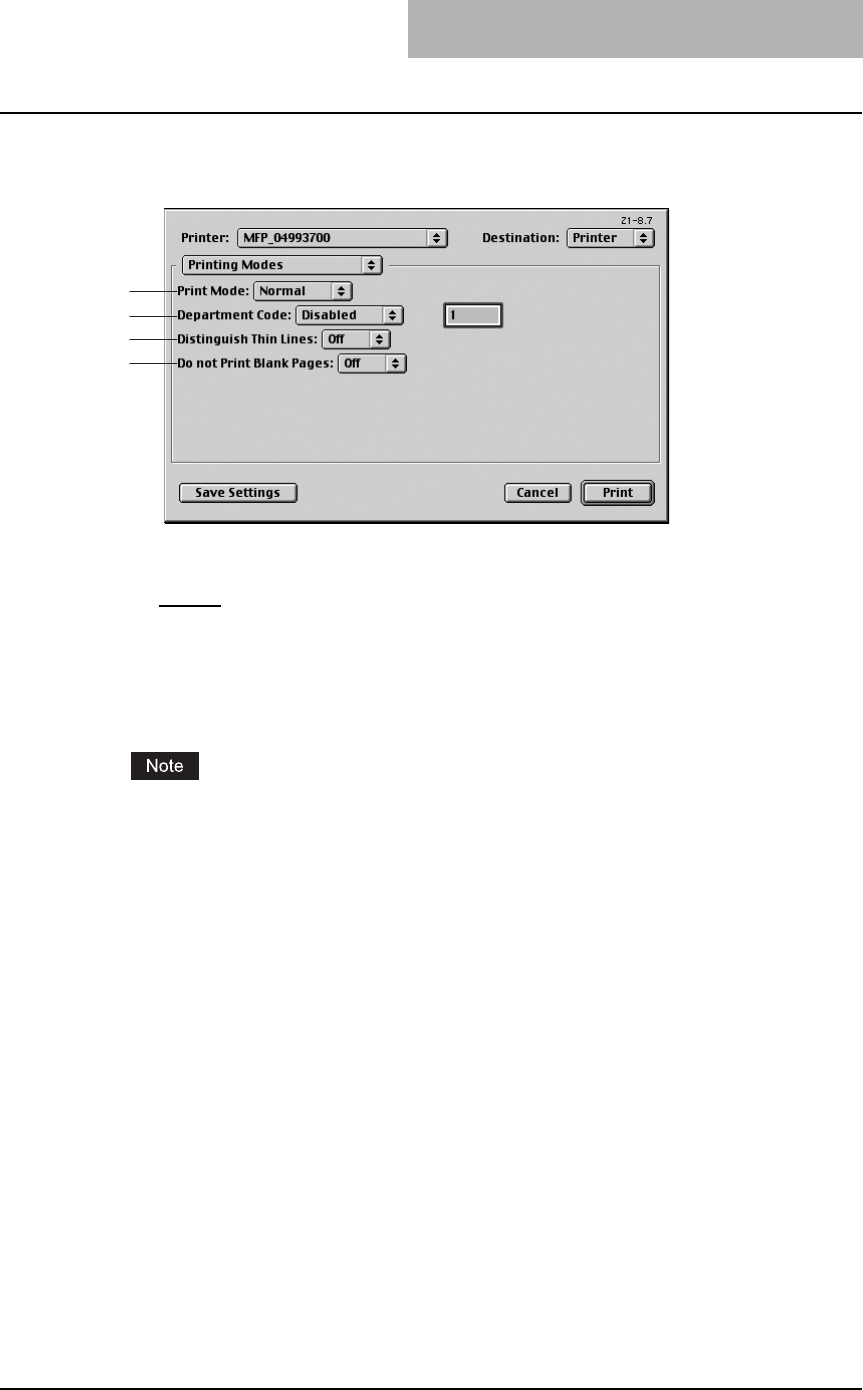
Printing from Macintosh 215
— Printing Modes
In the Printing Mode menu, you can set the way this equipment handles the print job.
1) Print Mode
This sets the type of print job.
-Normal — Select this to print a job normally.(Not selectable)
2) Department Code
Select whether a department code is required for printing. When this is enabled, specify the
5-digit department code in the field next to the drop down box.
Enabling the department code depends on whether this equipment is managed with depart-
ment codes or not. Please ask your administrator for your department code.
When printing is made with an invalid department code, the job is deleted.
3) Distinguish Thin Lines
Select whether you require thin line printing.
4) Do not Print Blank Pages
Select whether you require printing blank pages.
1
2
3
4
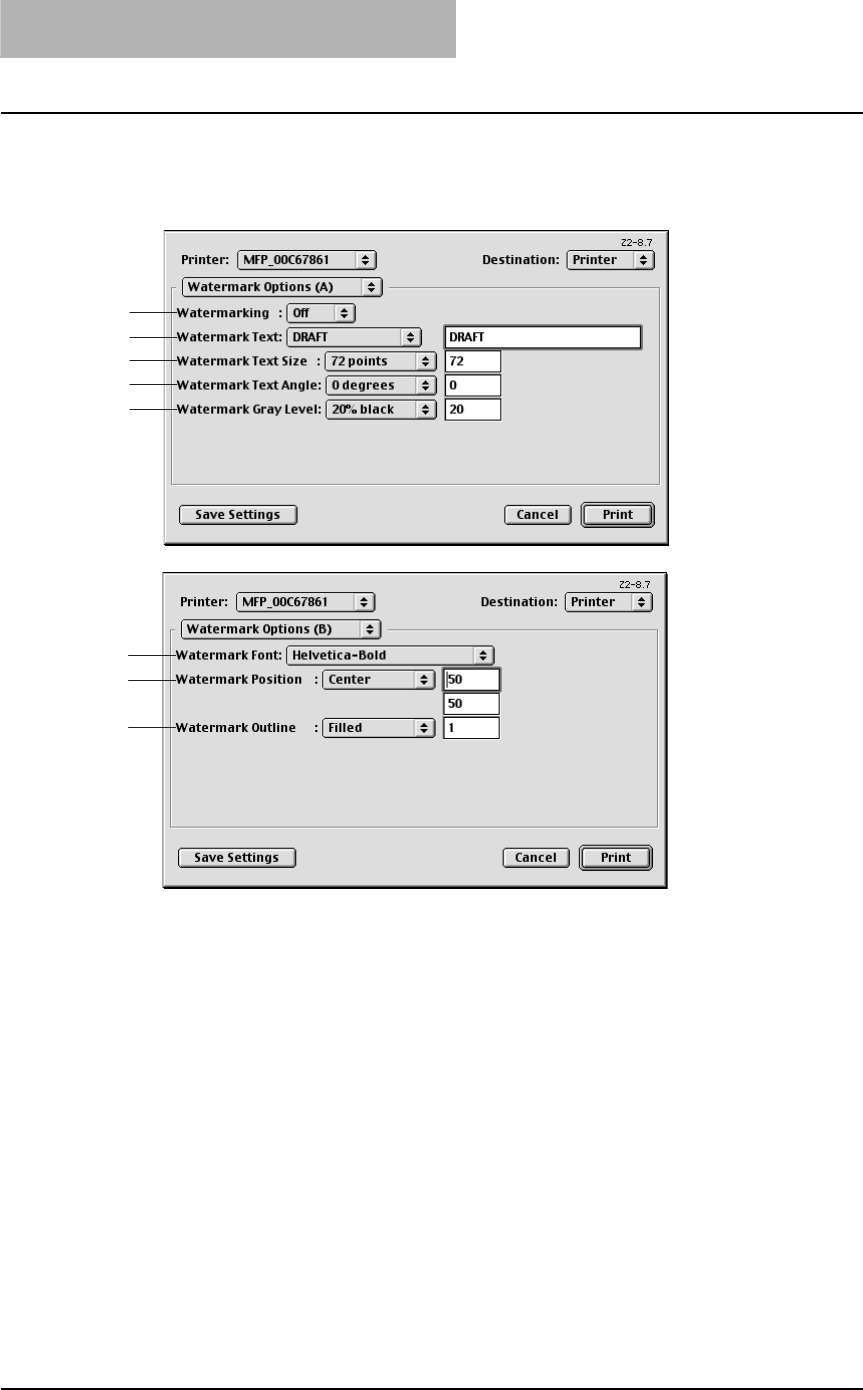
3 PRINTING
216 Printing from Macintosh
— Watermark Options
In the Watermark Options (A) and Watermark Options (B) menu, you can enable watermark
printing.
1) Watermarking
This sets the printing of a watermark.
2) Watermark Text
Select the watermark text to be printed. If there is not a preferred watermark in the list, enter
the watermark text in the field displayed.
3) Watermark Text Size
Select the font size of watermark text. If there is not a preferred font size in the list, enter the
font size by points. You can enter from 4 points to 400 points in units of 1 point.
4) Watermark Text Angle
Select the degree of angle for rotating the watermark text. If there is not a preferred angle in
the list, enter the degrees from -90 to 90 degrees in units of 1 degree.
5) Watermark Gray Level
Select the gray level of the watermark text color. If there is not preferred gray level in the list,
enter the percentage from 1% to 100% in units of 1%.
6) Watermark Font
Select the font family for the watermark text.
1
2
3
4
5
6
7
8
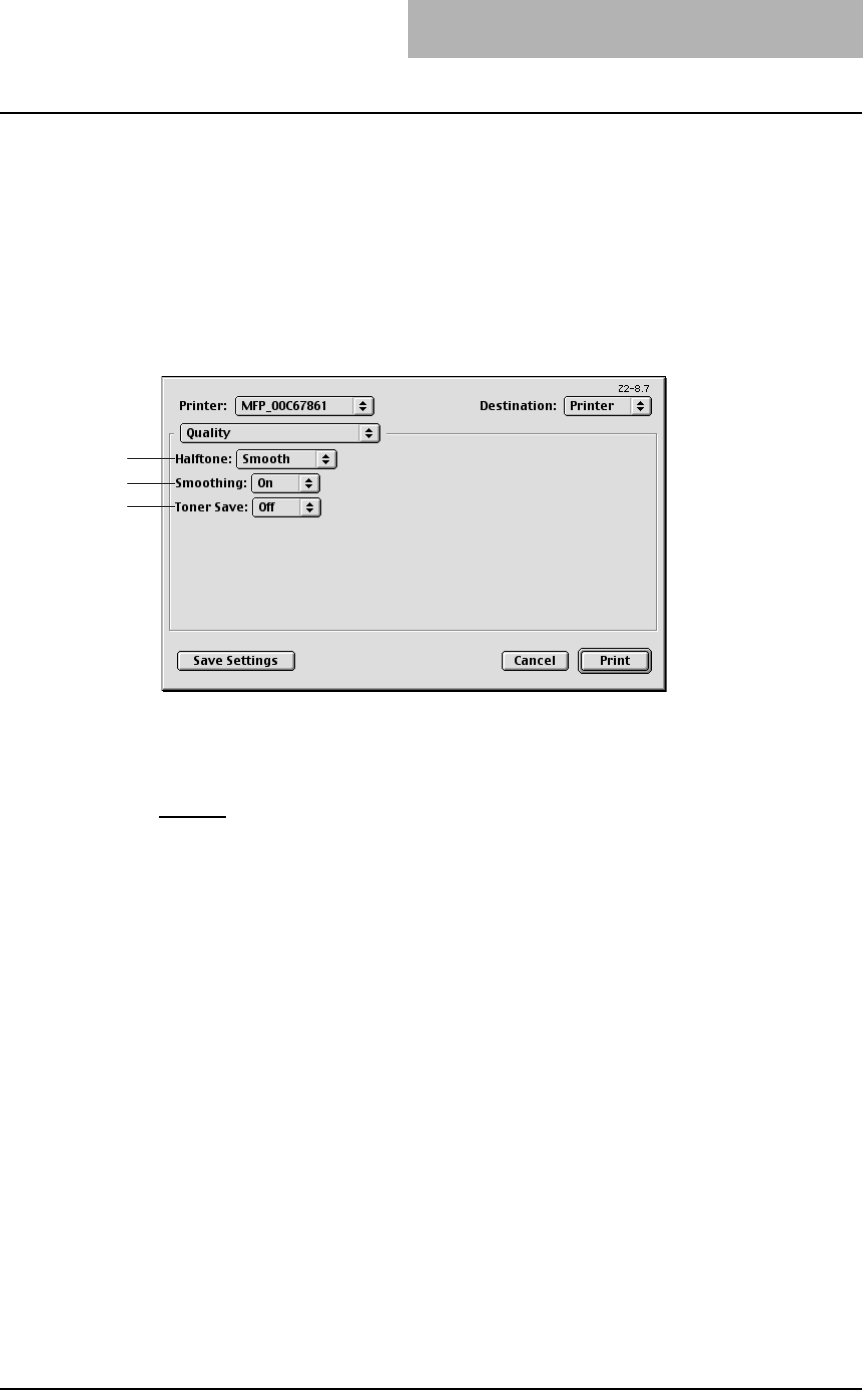
Printing from Macintosh 217
7) Watermark Position
Select the position of the watermark text. If there is not preferred position in the list, enter the
X position and Y position manually.
8) Watermark Outline
Select the outline points or “Filled” to print a watermark as a solid text. If there is not a pre-
ferred point listed, enter from 0.1 points to 20 points in units of 0.1 points.
— Quality
In the Quality menu, you can specify various image quality features.
1) Halftone
This sets how halftone is printed.
-Auto — select this to print halftone automatically.
-Detail — Select this to print halftone in detail.
-Smooth — Select this to print halftone smoothly.
2) Smoothing
Select whether printing the texts and graphics smoothly.
3) Toner Save
Select this to print in the toner save mode.
1
2
3
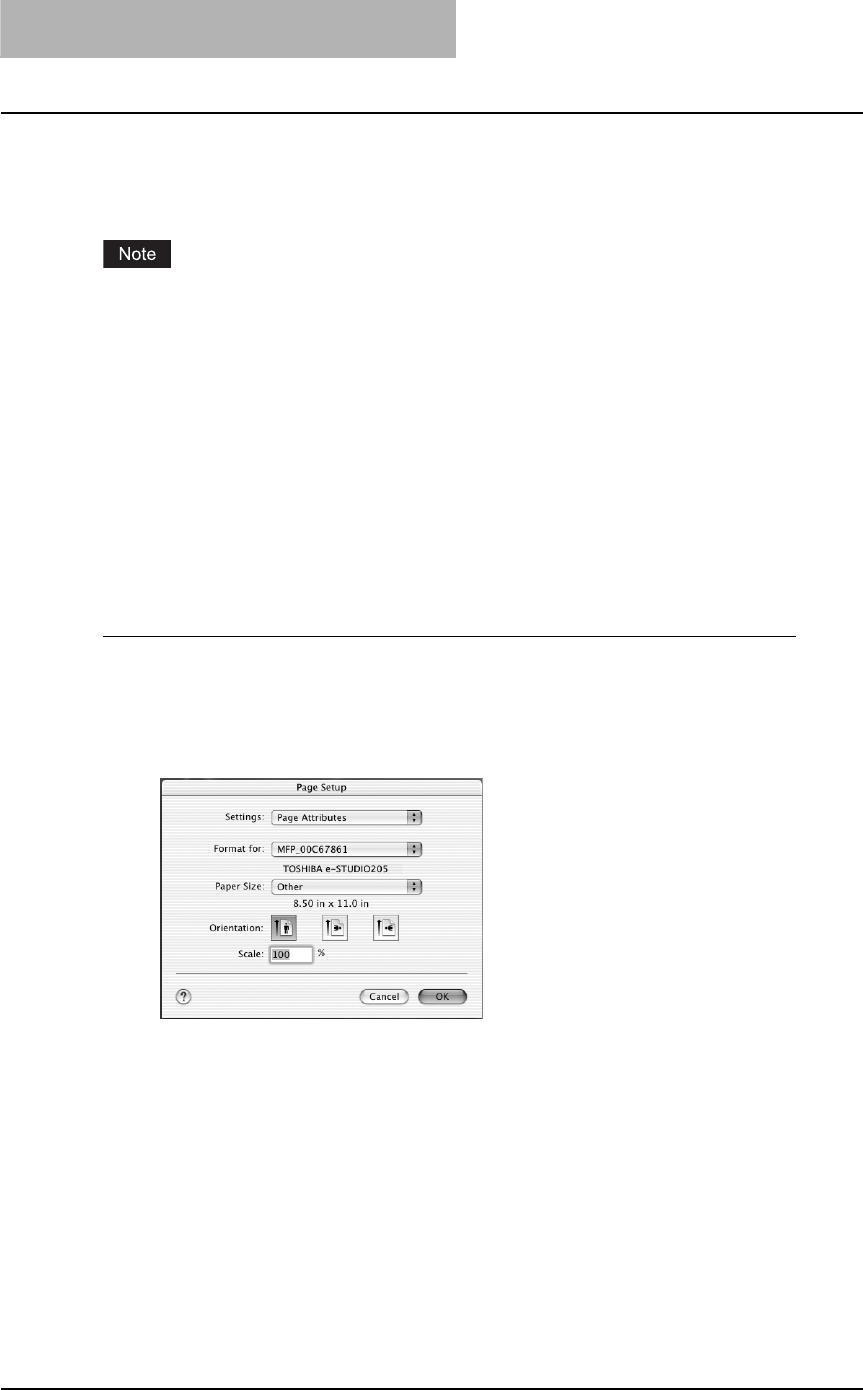
3 PRINTING
218 Printing from Macintosh
Printing from application on Mac OS X 10.2.4 to Mac OS X 10.4.x
Once you have installed the PPD file as described in P.119 “Installing the printer on Mac OS
X 10.2.4 to Mac OS X 10.4.x”, you can print directly from most Mac OS applications.
If you print a PDF file with “Preview” application on Mac OS 10.2.x, the page order will be incor-
rect. Please use Adobe Acrobat Reader.
How to print from Mac OS X 10.2.4 to Mac OS X 10.4.x
All writers are managed within the Print Center utility and there is no need to switch the printer.
Once you add a printer to the Printer List, all printers can be selected directly from Print Setup
dialog box.
— Setting options and printing from Macintosh computers
In Mac OS applications, print options are set from both the Page Setup dialog box and the Print
dialog box.
Printing from Macintosh applications
1
Open a file and select [Page Setup] from the [File] menu of the
application.
2
Select the name of the equipment at the “Format for” drop down
box and specify the Page Setup settings for your print job.
Setting the Page Setup varies depending on how you want to print a document.
P.220 “Print options for page setup dialog on Mac OS X 10.2.4 to Mac OS X 10.4.x”
3
Click [OK] to save the Page Setup settings.
4
Select [Print] from the [File] menu of the application.

Printing from Macintosh 219
5
In the dialog box that appears, make sure the name of the equip-
ment is selected at the “Printer” menu and specify the Print set-
tings for your print job.
Setting the Print Setup varies depending on how you want to print a document.
P.221 “Print options for print dialog on Mac OS X 10.2.4 to Mac OS X 10.4.x”
6
Click [Print] to print a document.
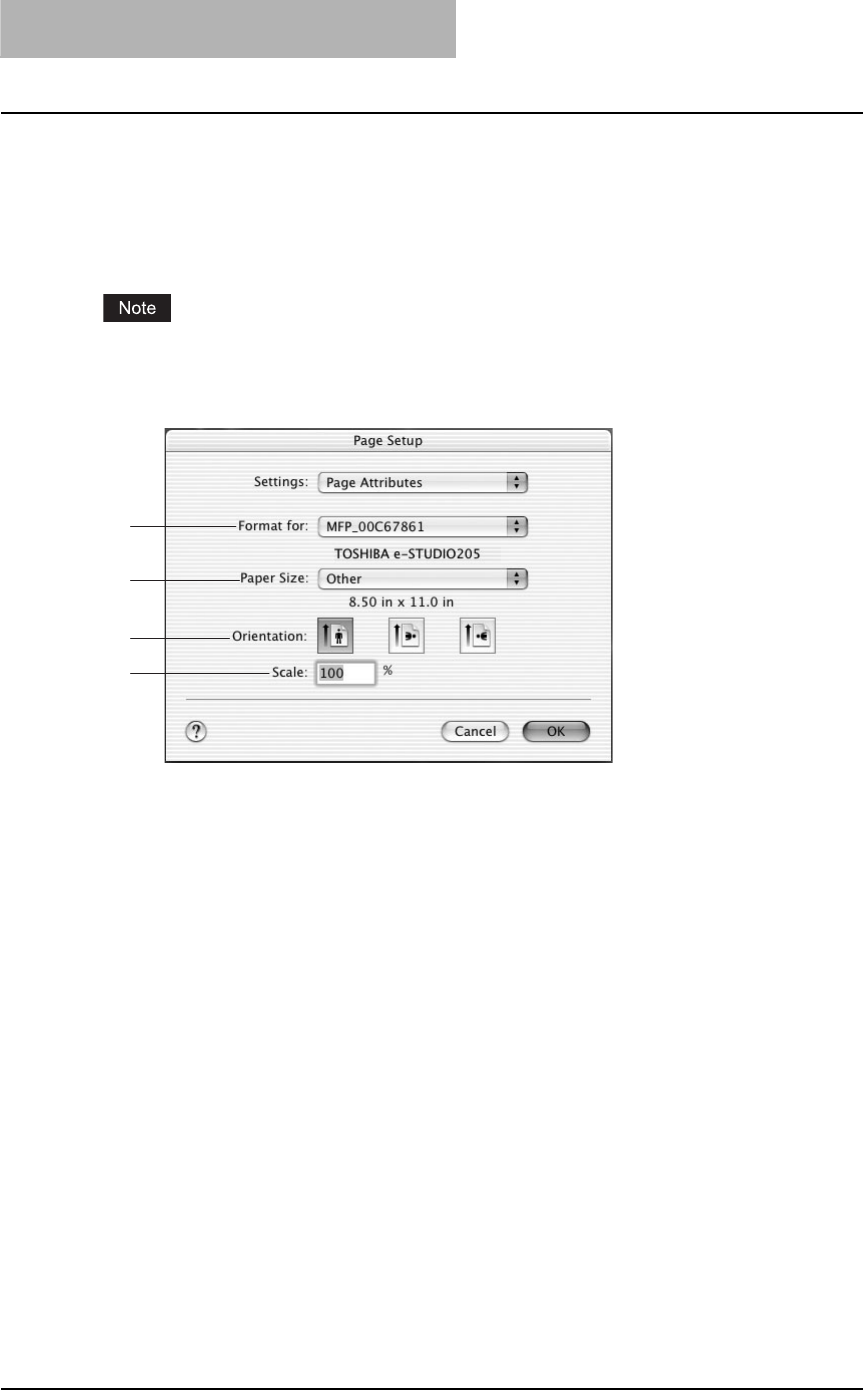
3 PRINTING
220 Printing from Macintosh
Print options for page setup dialog on Mac OS X 10.2.4 to Mac
OS X 10.4.x
The Page Setup dialog boxes can be displayed by selecting the [Page Setup] command from
the [File] menu of the application.
In the Page Setup dialog boxes, you can specify the Page Attribute settings.
The Page Setup dialog boxes vary across applications.
— Page Attributes
1) Format for
This select the printer to be used for printing.
2) Paper Size
This selects the size of a document to be printed.
3) Orientation
This sets the paper printing direction.
-Portrait — The document is printed in the portrait direction.
-Landscape (90 degree) — The document is printed in the landscape direction from left.
-Landscape (270 degree) — The document is printed in the landscape direction from
right.
4) Scale
This changes the size of the printed image on the page. Enter the zoom ratio to enlarge or
reduce an image. You can set any integer from 25 to 400(%) for the zoom ratio.
Available original paper sizes are listed below:
yUS Letter
yTabloid (Ledger)
yUS Legal
yStatement
yComputer
y13”LG
yA4
yA5
yA3
yJB4
yJB5
yFolio
y8K
y16K
2
1
3
4
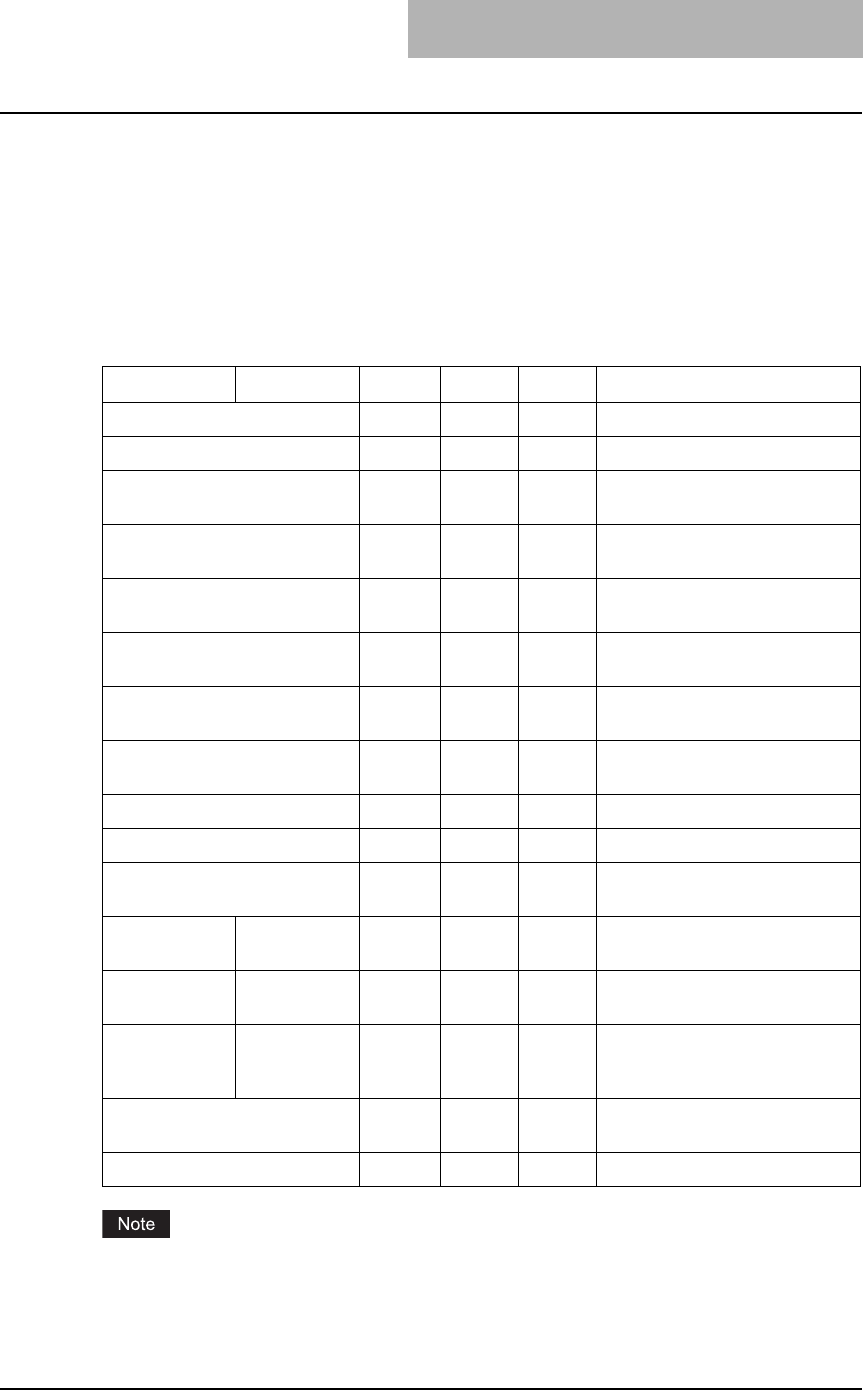
Printing from Macintosh 221
Print options for print dialog on Mac OS X 10.2.4 to Mac OS X
10.4.x
The Print dialog boxes can be displayed by selecting the [Print] command from the [File] menu
of the application.
In the Print dialog boxes, you can specify the following items:
The menus in the Print dialog box are different between Mac OS 10.2.x, Mac OS X 10.3.x, and
10.4.x. The following table shows the menus that are displayed for each Mac OS version and
references the descriptions of the screens.
The Print dialog boxes vary across applications.
Menu Submenu 10.2.x 10.3.x 10.4.x References
Copies & Pages 999 P.222 “Copies & Pages”
Layout 999 P.223 “Layout”
Duplex 9 P.225 “Duplex on Mac OS X
10.2.4 to 10.2.8”
Output Options 99 P.226 “Output Options on Mac
OS X 10.2.4 to 10.2.8/10.3.x”
Scheduler 99 P.227 “Scheduler on Mac OS X
10.3.x/10.4.x”
Paper Handling 99 P.228 “Paper Handling on Mac
OS X 10.3.x/10.4.x”
ColorSync 99 P.230 “ColorSync on Mac OS X
10.3.x/10.4.x”
Cover Page 99 P.230 “Cover Page OS X
10.3.x/10.4.x”
Error Handling 999 P.231 “Error Handling”
Paper Feed 999 P.232 “Paper Feed”
Print Mode 99 P.233 “Print Mode on Mac OS X
10.3.x/10.4.x”
Printer Features Printing Modes 9 P.234 “Printing Modes on Mac
OS X 10.2.4 to 10.2.8”
Quality 9 P.235 “Quality on Mac OS X
10.2.4 to 10.2.8”
DC 9 P.236 “Printing Modes DC
(Department Code) on Mac OS X
10.2.4 to 10.2.8”
Printer Features 99 P.237 “Printer Features on Mac
OS X 10.3.x/10.4.x”
Summary 999 P.237 “Summary”
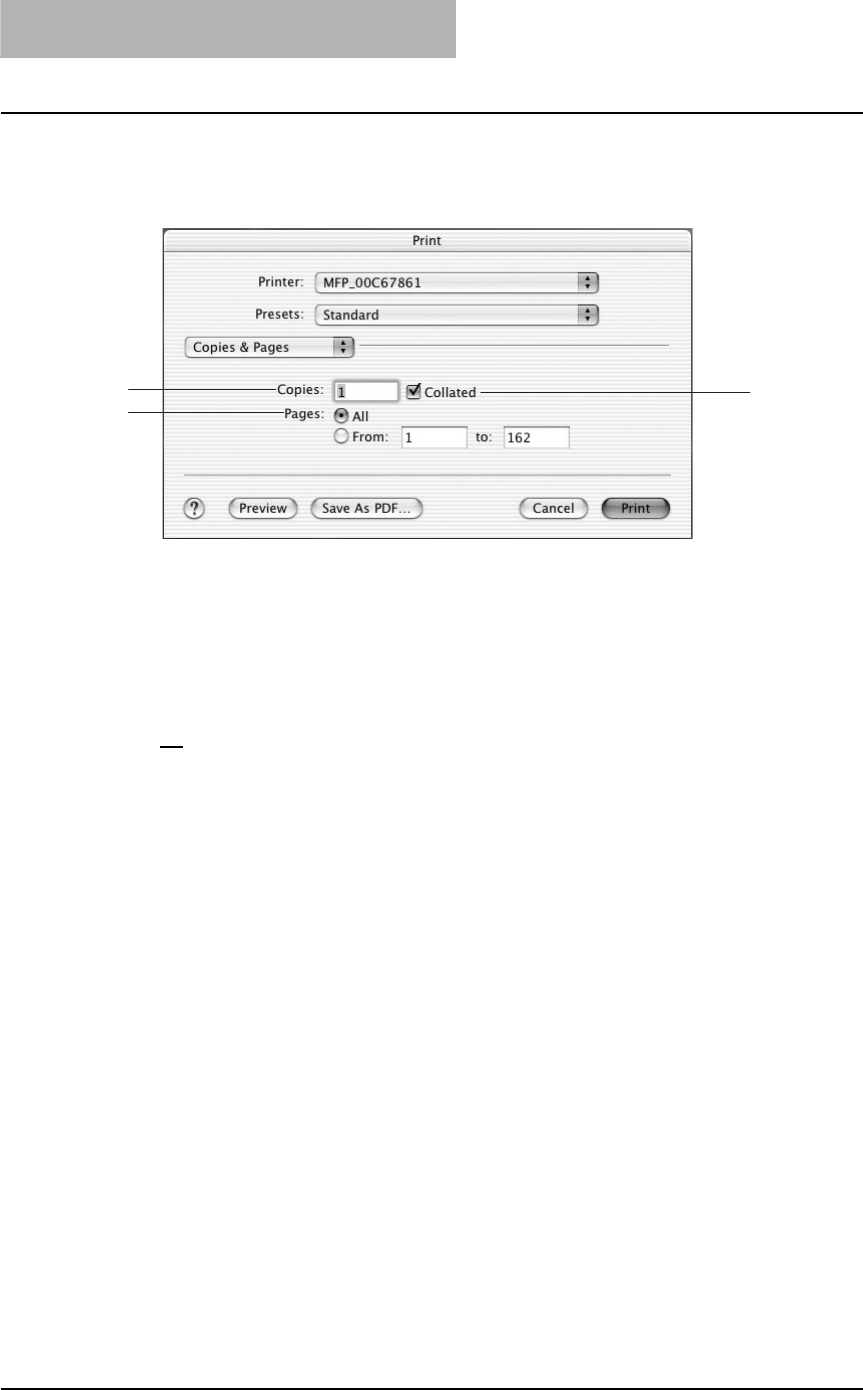
3 PRINTING
222 Printing from Macintosh
— Copies & Pages
In the Copies & Pages menu, you can set you can set the general print options such as number
of copies, sort printing.
1) Copies
This sets the number of printed copies. The maximum number of printed copies depends on
the OS version.
2) Collated
Check this for sort-printing (1, 2, 3... 1, 2, 3...)
3) Pages
This sets the pages to be printed.
-All — Select this to print all pages.
-From/To — Select this to specify the pages to be printed. Enter the page range in the
From and To field.
3
12

Printing from Macintosh 223
— Layout
In the Layout menu, you can set N-up printing (multiple pages per sheets). The items in the Lay-
out menu vary depending on the Mac OS version.
For Mac OS X 10.2.4 to 10.2.8
For Mac OS X 10.3.x/10.4.x
1) Pages per Sheet
This sets the number of multiple pages printed on one sheet. The pages are reduced to fit
the selected paper size automatically and are printed.
-1 — Select this if do not wish to enable N-up printing.
-2 — Select this to print images from 2 pages arranged on one sheet.
-4 — Select this to print images from 4 pages arranged on one sheet.
-6 — Select this to print images from 6 pages arranged on one sheet.
-9 — Select this to print images from 9 pages arranged on one sheet.
-16 — Select this to print images from 16 pages arranged on one sheet.
2
3
1
2
3
4
1
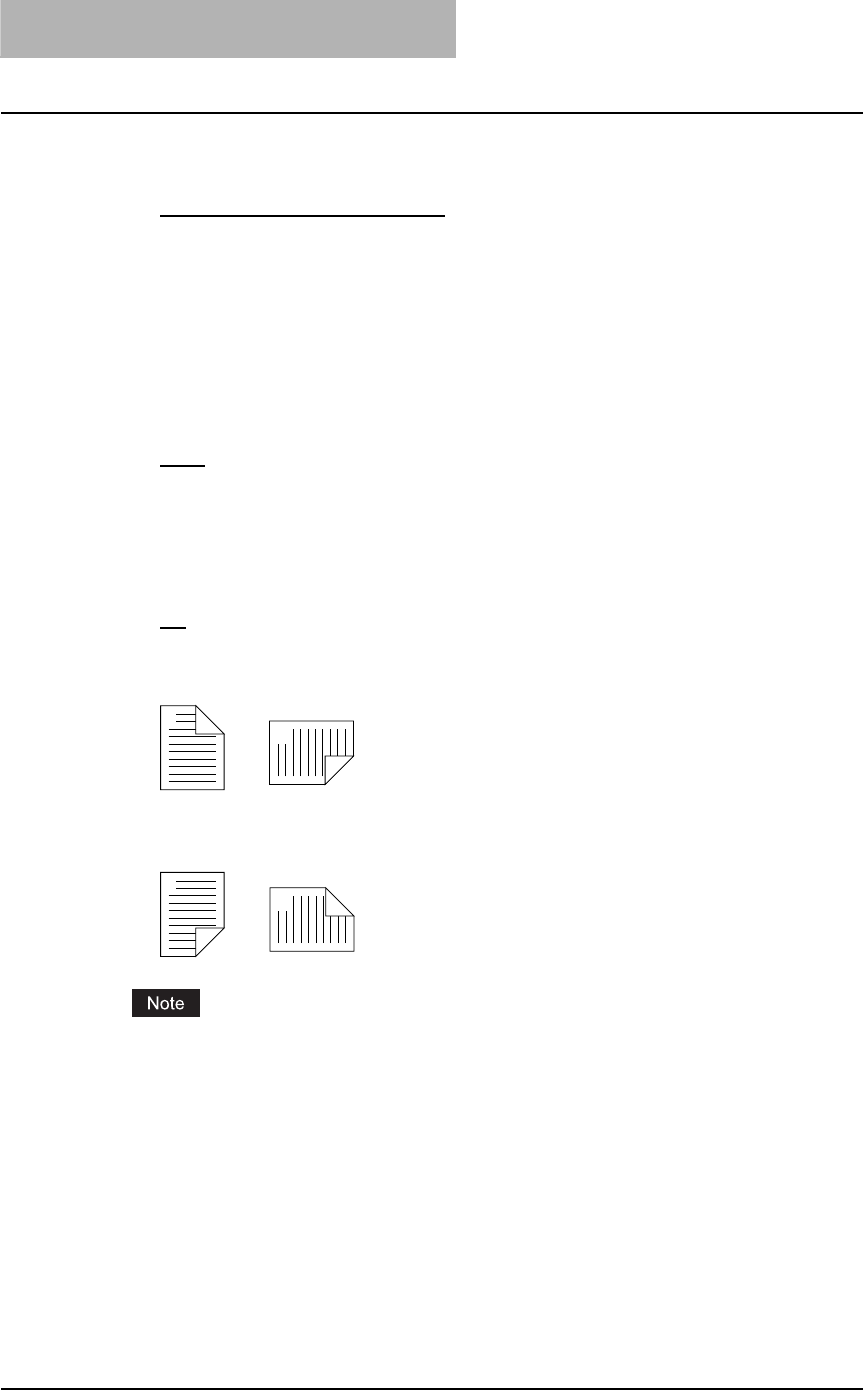
3 PRINTING
224 Printing from Macintosh
2) Layout Direction
This sets how pages are arranged on one sheet. This is available only when the N-up print-
ing (printing a page on multiple sheets) is set.
-Across Left to Right Before Down — Pages arranged horizontally from left to right and
then top to bottom on one sheet.
-Across Right to Left Before Down — Pages arranged horizontally from right to left and
then top to bottom on one sheet.
-Down Before Across Left to Right — Pages arranged vertically from top to down and
then left to right on one sheet.
-Down Before Across Right to Left — Pages arranged vertically from top to down and
then right to left on one sheet.
3) Border
Select if a border line is to be drawn on each page. This is available only when the N-up
printing (printing a page on multiple sheets) is set.
-None — Select this if no border line is to be drawn.
-Single hairline — Select this to draw single hairline for the border.
-Single thin line — Select this to draw single thin line for the border.
-Double hairline — Select this to draw double hairline for the border.
-Double thin line — Select this to draw double thin line for the border.
4) Two Sided Printing
This sets whether or not you want to print on both sides of the paper.
-Off — Select this when you do not want to print on both sides of the paper.
-Long Edge Binding — Select this to bind along the long edge side of paper. The direc-
tion to be printed on the back side of the paper differs depending on the orientation.
-Short Edge Binding — Select this to bind along the short edge side of paper. The direc-
tion to be printed on the back side of the paper differs depending on the orientation.
This option is not displayed for Mac OS X 10.2.4 to 10.2.8. When you want to enable 2-Sided
printing on Mac OS X 10.2.4 to 10.2.8, set the Duplex settings in the Duplex menu.
P.225 “Duplex on Mac OS X 10.2.4 to 10.2.8”
1
2
Landscape
1
2
Portrait
1
2
Landscape
1
2
Portrait
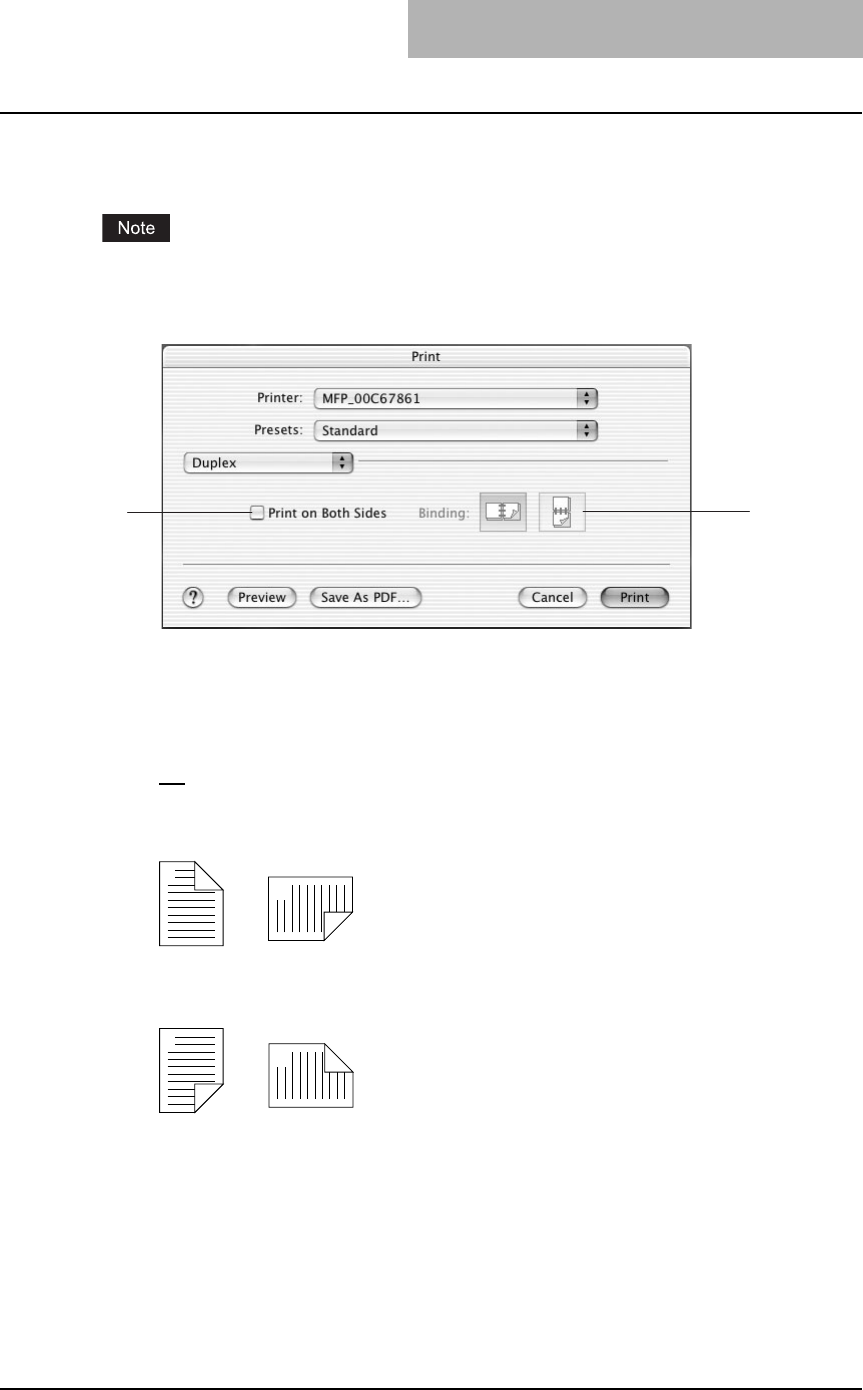
Printing from Macintosh 225
— Duplex on Mac OS X 10.2.4 to 10.2.8
In the Duplex menu, you can set 2-Sided printing (printing on both sides of a sheet).
This menu is only displayed for Mac OS X 10.2.4 to 10.2.8. When you want to enable 2-Sided
printing on Mac OS X 10.3.x/10.4.x, set the Two Sided Printing option in the Layout menu.
P.223 “Layout”
1) Print on Both Sides
Check this to print on both sides of the paper. When this is checked, select the binding direc-
tion at the “Binding” option.
2) Binding
This sets the type of binding for 2-sided printed pages.
-Off — Select this when you do not want to print on both sides of the paper.
-Long Edge Binding — Select this to bind along the long edge side of paper. The direc-
tion to be printed on the back side of the paper differs depending on the orientation.
-Short Edge Binding — Select this to bind along the short edge side of paper. The direc-
tion to be printed on the back side of the paper differs depending on the orientation.
2
1
1
2
Landscape
1
2
Portrait
1
2
Landscape
1
2
Portrait

3 PRINTING
226 Printing from Macintosh
— Output Options on Mac OS X 10.2.4 to 10.2.8/10.3.x
In the Output Options menu, you can save a print job as a file.
1) Save as File
Check this to save a print job as a file. When this is checked, select the file type at the “For-
mat” drop down box.
2) Format
This sets the format of a file to be saved.
-PDF — Select this to save a print job as a PDF file.
-PostScript — Select this to save a print job as a PS file.
2
1
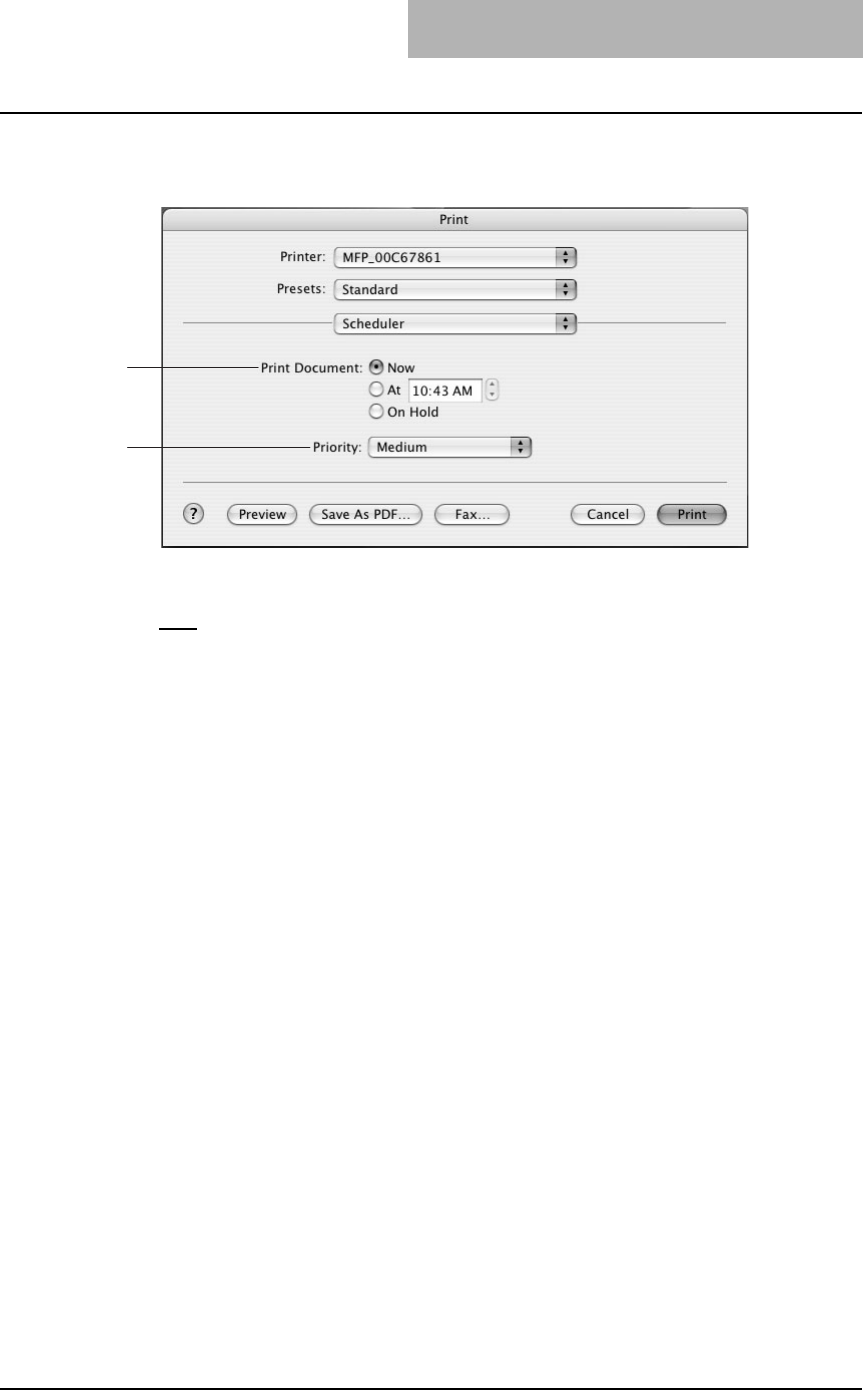
Printing from Macintosh 227
— Scheduler on Mac OS X 10.3.x/10.4.x
In the Scheduler menu, you can set when a print job will be sent to the equipment.
1) Print Document
This sets when a print job will be sent to the equipment.
-Now — Select this to send a print job now.
-At — Select this to specify the time to send a print job. When you select this, specify the
time to be send. The print job will be held in the queue on Mac OS until the specified time
has been reached or you resume the print job to be sent from the queue on Mac OS.
-On Hold — Select this to hold a print job in the queue on Mac OS. When you select this,
the print job will be held in the queue on Mac OS until you resume the print job to be sent
from the queue on Mac OS.
2) Priority
Select the priority of a print job from “Emergency”, “High”, “Mid”, and “Low”.
1
2
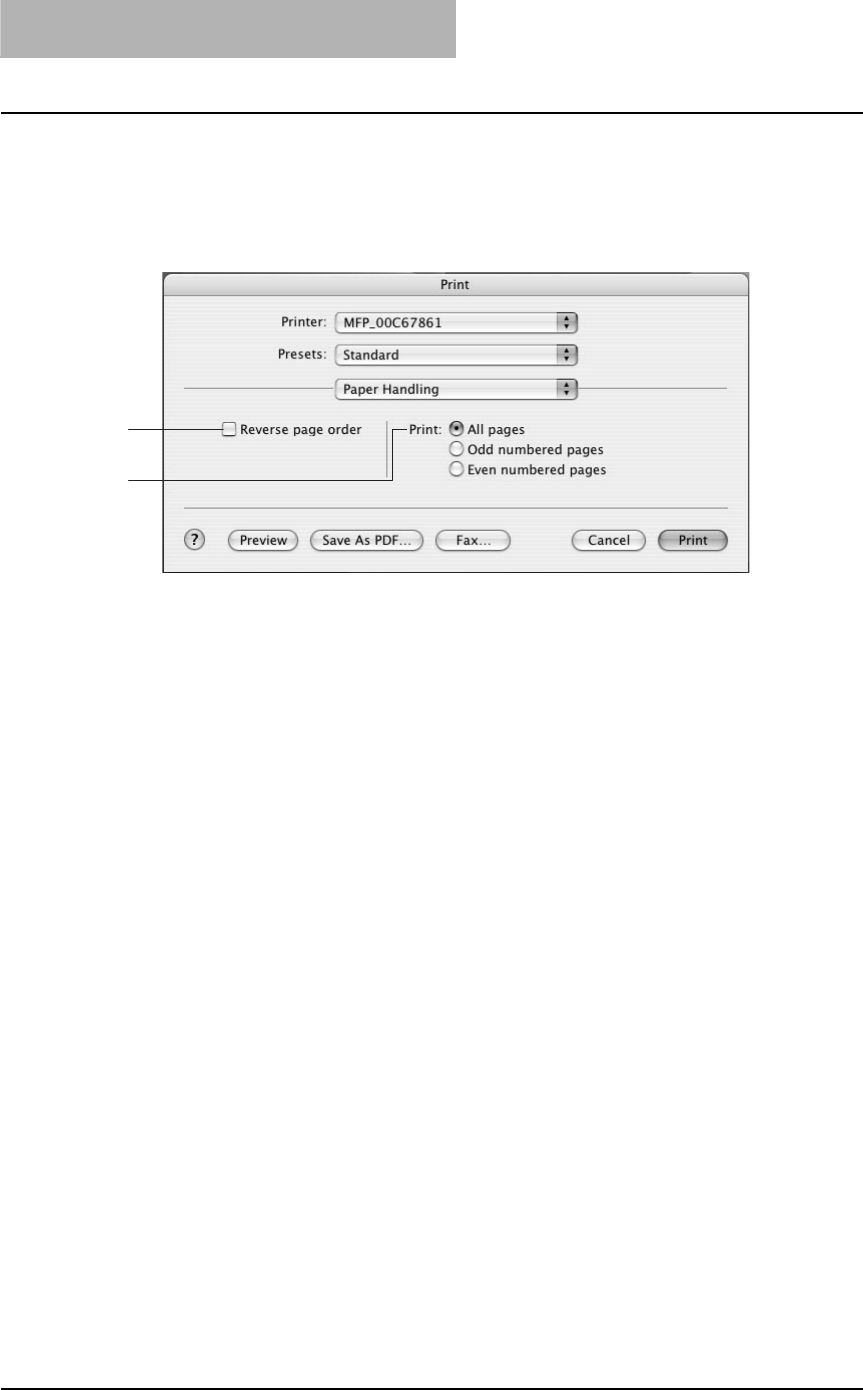
3 PRINTING
228 Printing from Macintosh
— Paper Handling on Mac OS X 10.3.x/10.4.x
In the Paper Handling menu, you can set Reverse page order printing and Odd or Even num-
bered page printing.
On Mac OS X 10.3.x
1) Reverse page order
Check this when you want to print a document from the end of page.
2) Print
Select whether all pages will be printed or only odd or even pages will be printed.
1
2
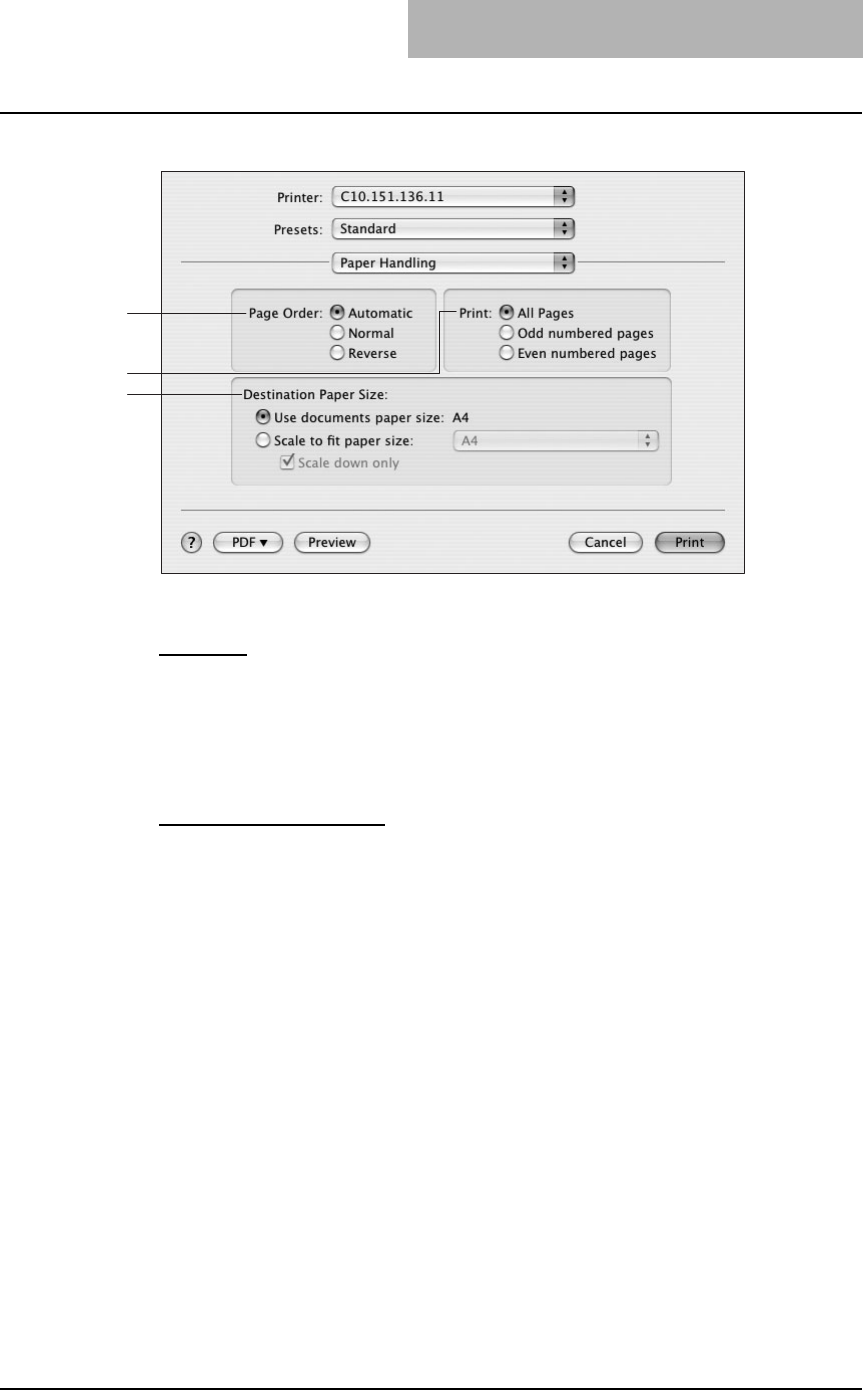
Printing from Macintosh 229
On Mac OS X 10.4.x
1) Page Order
Select the page order to print.
-Automatic —Select this to print in the page order automatically selected.
-Normal —Select this to print from the first to the last page in order.
-Reverse —Select this to print from the last to the first page in order.
2) Print
Select whether all pages will be printed or only the odd or even pages will be printed.
3) Destination Paper Size
Select the paper size for printouts.
-Use documents paper size —Check this to select A4/LT for printouts.
-Scale to fit paper size —Select the desired paper size for printouts in the drop down
box. When you check “Scale down only”, you can only select the same size or smaller
than the originals.
1
3
2
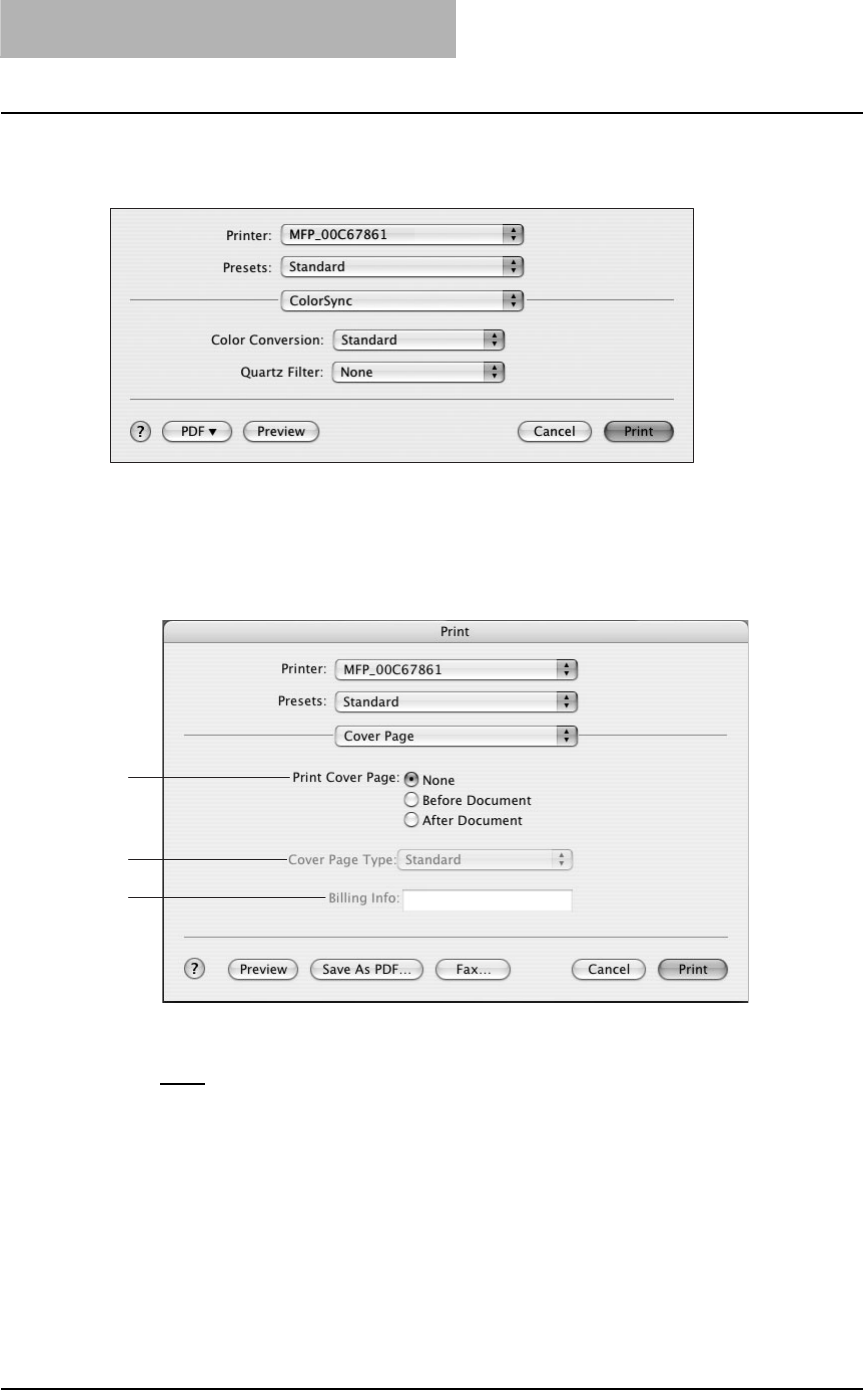
3 PRINTING
230 Printing from Macintosh
— ColorSync on Mac OS X 10.3.x/10.4.x
This feature is not supported.
— Cover Page OS X 10.3.x/10.4.x
In the Cover Page menu, you can set whether a print job is sent with a banner page.
The banner page includes information about owner of the job, job name, application name, date
and time, printer name, and number of copies.
1) Print Cover Page
This sets how a banner page is inserted.
-None — Select this not to print a banner page.
-Before Document — Select this to print a banner page before the document.
-After Document — Select this to print a banner page after the document.
2) Cover Page Type
Select the type of a banner page.
3) Billing Info
Enter the billing information to have it appear on the banner page. The number of characters
you can enter differs depending on the OS version.
1
2
3
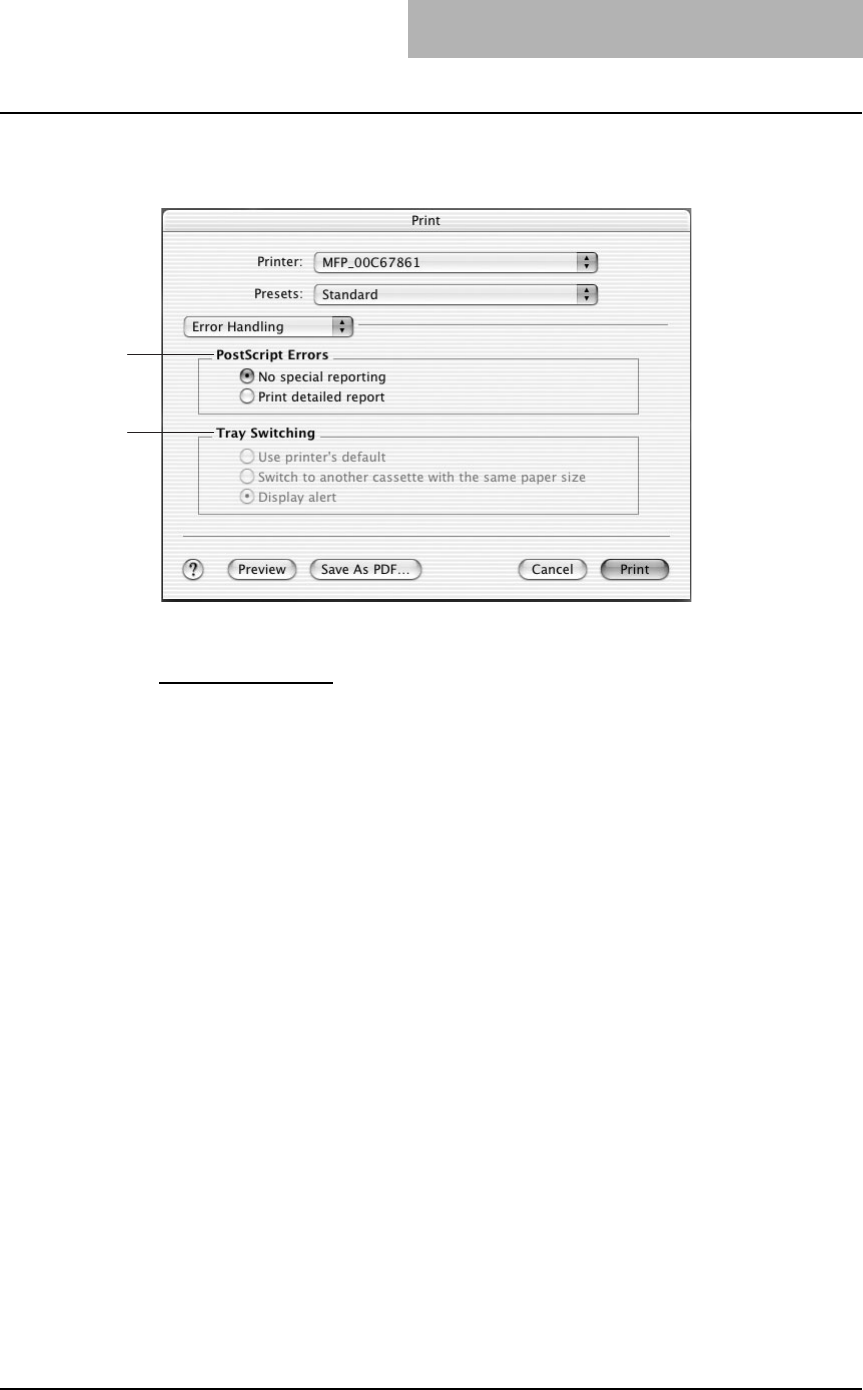
Printing from Macintosh 231
— Error Handling
In the Error Handling menu, you can set how to report a PostScript error.
1) PostScript Errors
This sets whether or not you want to print a PostScript error report.
-No special reporting — Select this if you do not want to print PostScript error informa-
tion.
-Print detailed report — Select this to print PostScript error information.
2) Tray Switching
This is not supported by this equipment.
1
2

3 PRINTING
232 Printing from Macintosh
— Paper Feed
In the Paper Feed menu, you can set the paper source.
1) All pages from
Select the option button when you want to use same paper source for all pages. When this is
selected, select the paper source to be used at the drop down menu.
2) First page from
Select the option button when you want to specify different paper source for a first page and
remaining pages. When this selected, select the paper source to be used for a first page at
the drop down menu.
3) Remaining from
Select the paper source to be used for remaining pages in the drop down menu. This can be
selected only when you select the option button of the “First page from” option.
1
2
3
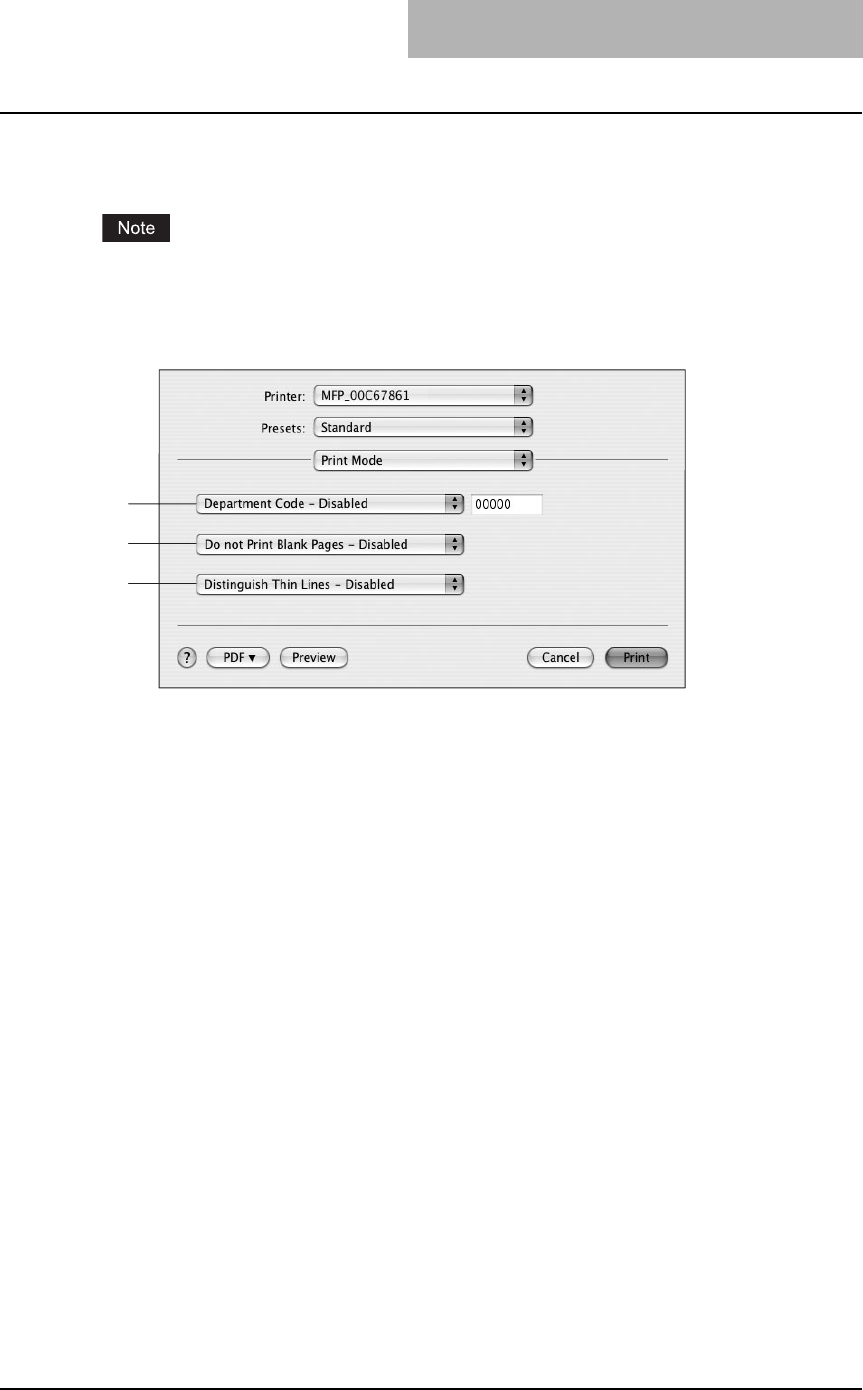
Printing from Macintosh 233
— Print Mode on Mac OS X 10.3.x/10.4.x
In the Print Mode menu, you can set the way this equipment handles the print job.
This menu is only displayed for Mac OS X 10.3.x/10.4.x. When you want to set the printing
mode in Mac OS X 10.2.4 to 10.2.8, set in the Printing Modes submenu in the Printer Features
menu.
P.234 “Printing Modes on Mac OS X 10.2.4 to 10.2.8”
1) Department Code
Select whether a department code is required for printing. When this is enabled, specify the
5-digit department code in the field next to the drop down box.
Enabling the department code depends on whether this equipment is managed with depart-
ment codes or not. Please ask your administrator for your department code.
When printing is made with an invalid department code, the job is deleted.
2) Do not Print Blank Pages
Select whether you require printing blank pages.
3) Distinguish Thin Lines
Select whether you require printing thin lines clearly.
1
2
3
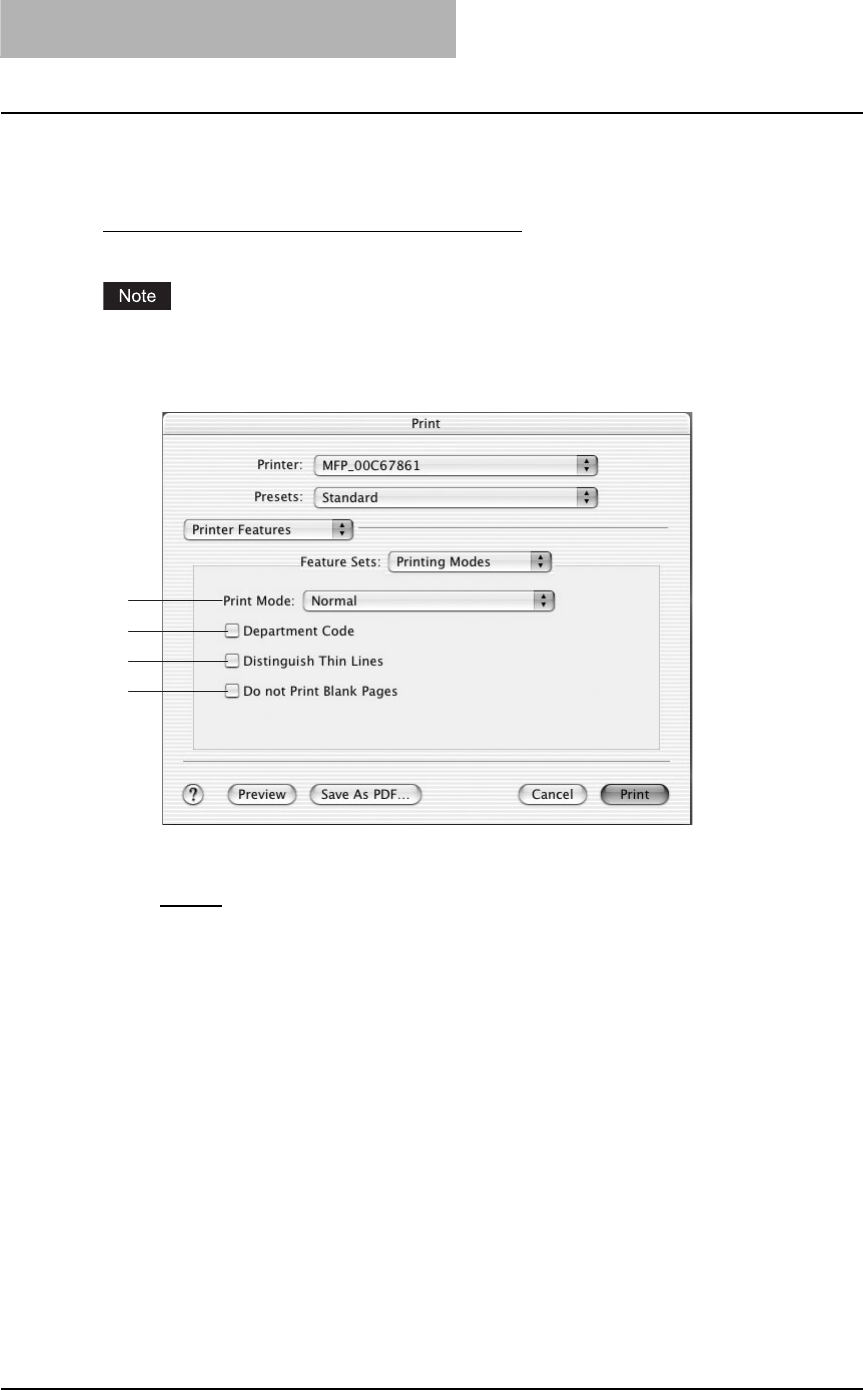
3 PRINTING
234 Printing from Macintosh
— Printer Features on Mac OS X 10.2.4 to 10.2.8
In the Printer Features menu, you can set special printing features.
Printing Modes on Mac OS X 10.2.4 to 10.2.8
In the Printing Modes menu, you can set the way this equipment handles the print job.
This menu is only displayed for Mac OS X 10.2.4 to 10.2.8. When you want to set the printing
mode in Mac OS X 10.3.x/10.4.x, set in the Print Mode menu.
P.233 “Print Mode on Mac OS X 10.3.x/10.4.x”
1) Print Mode
This sets the type of print job.
-Normal — Select this to print a normal job. (Not selectable)
2) Department Code
Check this if a department code is required for printing. When this is enabled, specify the 5-
digit department code in the DC menu.
Enabling the department code depends on whether this equipment is managed with depart-
ment codes or not. Please ask your administrator for your department code.
When printing is made with an invalid department code, the job is deleted.
3) Do not Print Blank Pages
Select whether you require printing blank pages.
4) Distinguish Thin Lines
Check this to print thin lines clearly.
1
2
3
4
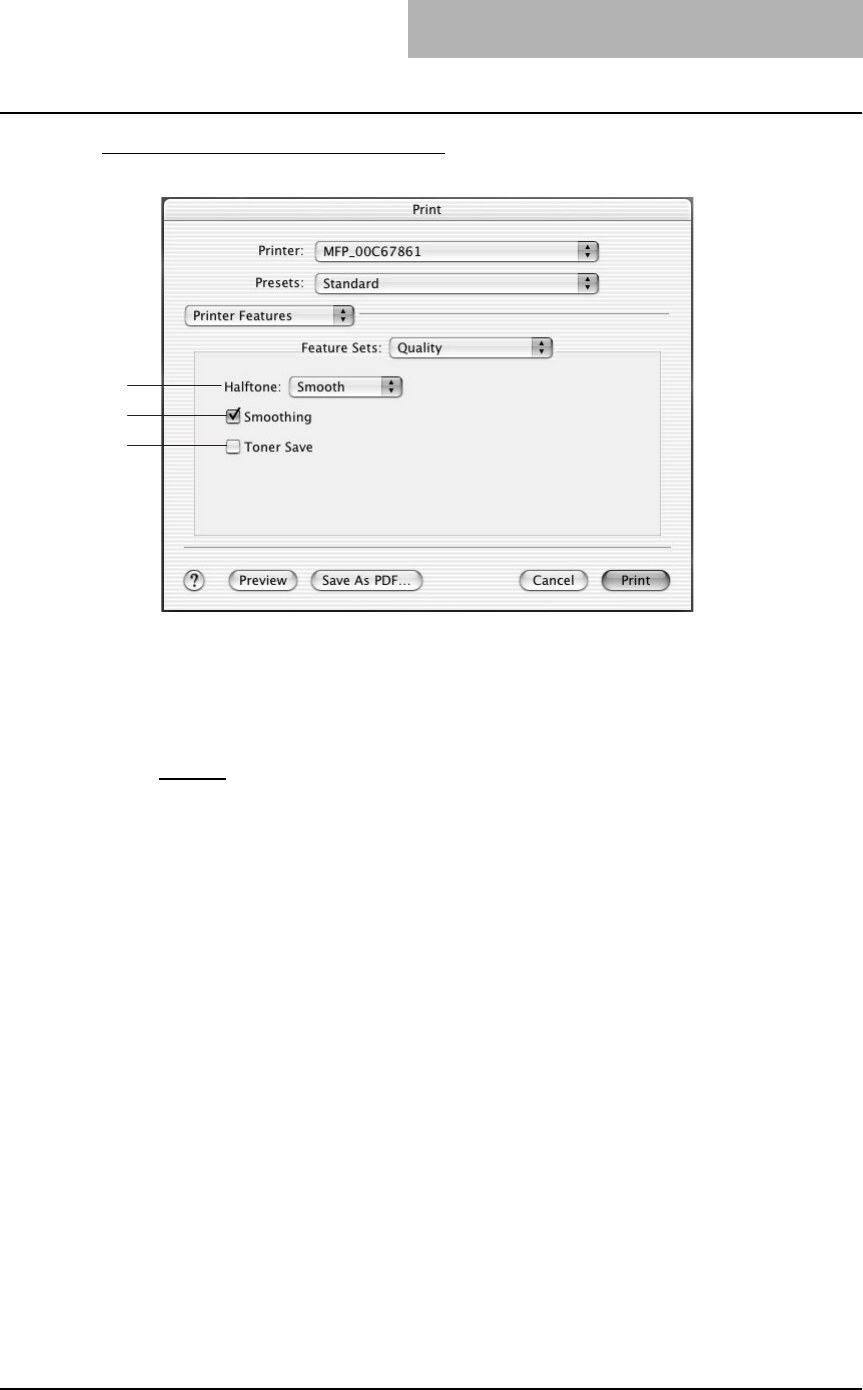
Printing from Macintosh 235
Quality on Mac OS X 10.2.4 to 10.2.8
In the Quality menu, you can specify various image quality features.
1) Halftone
This sets how halftone is printed.
-Auto — Select this to print automatically using proper halftone depending on the con-
tents in the document. When this is selected, halftone is printed in detail for text, and
smoothly for graphics.
-Detail — Select this to print halftone in detail.
-Smooth — Select this to print halftone smoothly.
2) Smoothing
Select whether printing the texts and graphics smoothly.
3) Toner Save
Select this to print in the toner save mode.
1
2
3
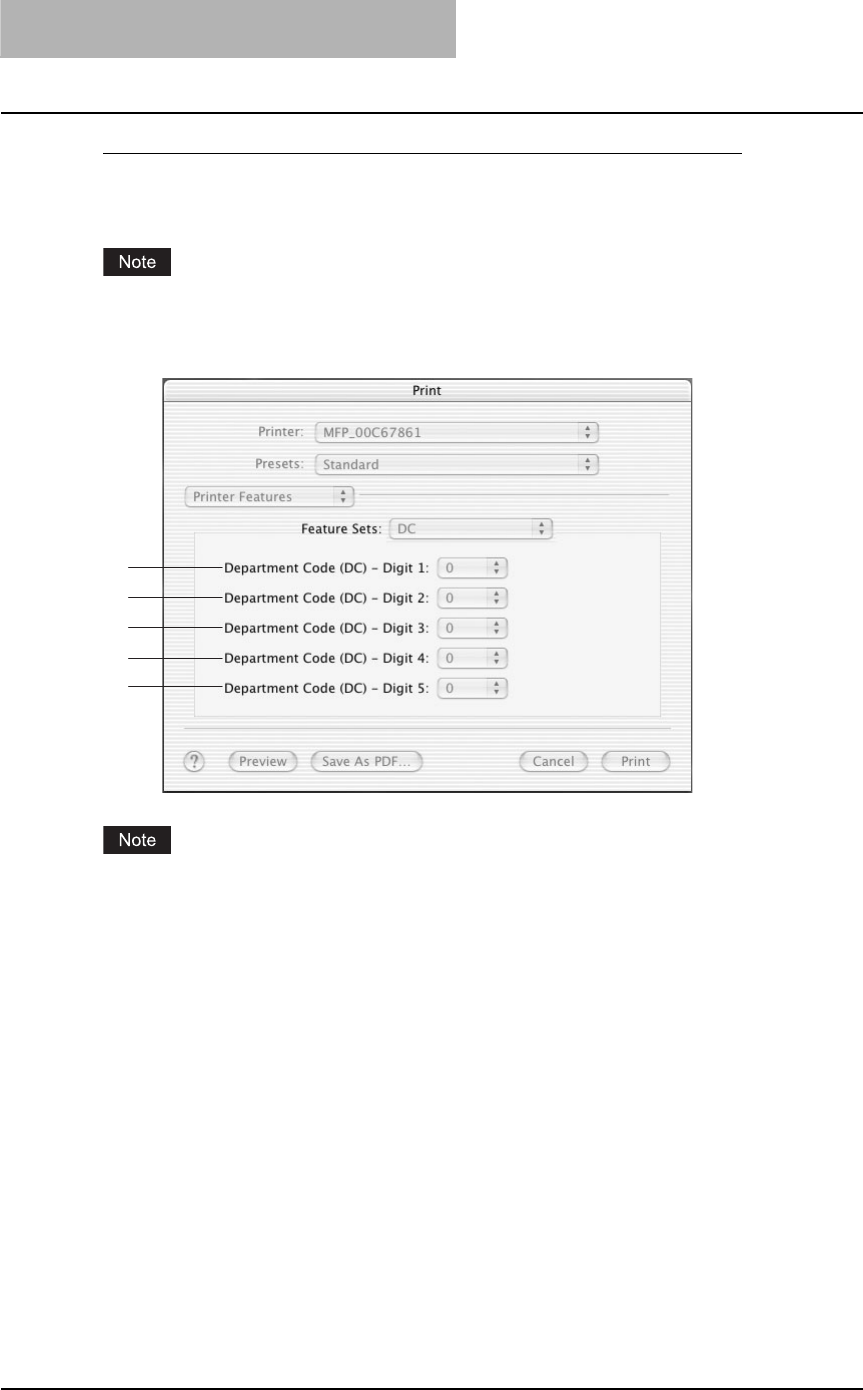
3 PRINTING
236 Printing from Macintosh
Printing Modes DC (Department Code) on Mac OS X 10.2.4 to 10.2.8
In the DC menu, you can specify your department code, if this equipment is enabled the depart-
ment codes. Before specifying the department code, you must check the Department Code
option in the Printing Modes menu. Then specify the department code in this menu.
This menu is only displayed for Mac OS X 10.2.4 to 10.2.8. When you want to set the depart-
ment code in Mac OS X 10.3.x/10.4.x, set in the Print Mode menu.
P.233 “Print Mode on Mac OS X 10.3.x/10.4.x”
When printing is made with an invalid department code, the job is deleted. (If the “Enable SNMP
Communication” check box of the Configuration tab menu of the printer is checked, an error
message appears before the job is deleted.)
1) Department Code (DC) - Digit 1
Select the first digit of the department code.
2) Department Code (DC) - Digit 2
Select the second digit of the department code.
3) Department Code (DC) - Digit 3
Select the third digit of the department code.
4) Department Code (DC) - Digit 4
Select the forth digit of the department code.
5) Department Code (DC) - Digit 1
Select the fifth digit of the department code.
1
2
3
4
5
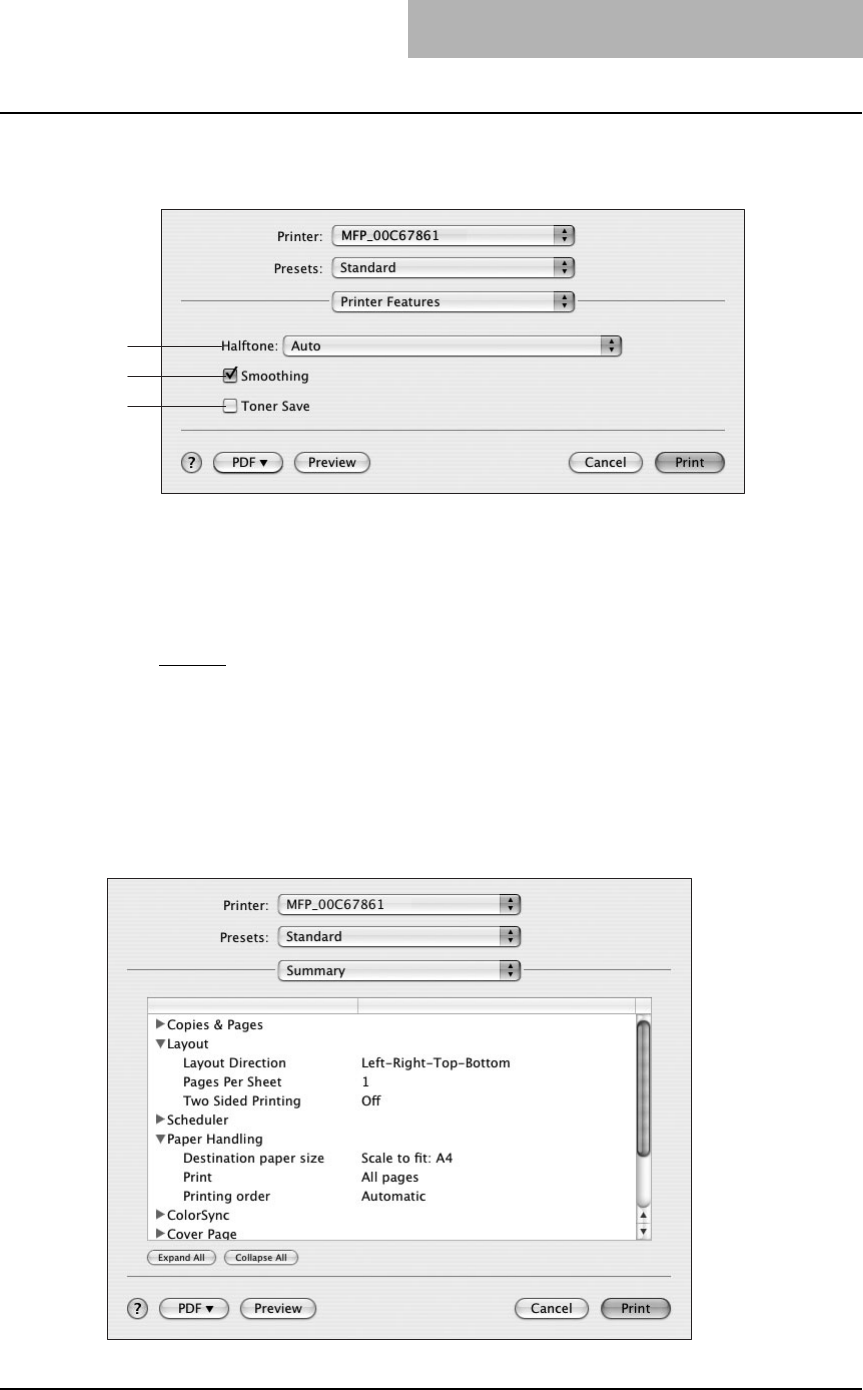
Printing from Macintosh 237
— Printer Features on Mac OS X 10.3.x/10.4.x
In the Quality menu, you can specify various image quality features.
1) Halftone
This sets how halftone is printed.
-Auto — Select this to print automatically using proper halftone depending on the con-
tents in the document. When this is selected, halftone is printed in detail for text, and
smoothly for graphics.
-Detail — Select this to print halftone in detail.
-Smooth — Select this to print halftone smoothly.
2) Smoothing
Select whether printing the texts and graphics smoothly.
3) Toner Save
Select this to print in the toner save mode.
— Summary
Lists the setting contents of the Print dialog boxes.
1
2
3

3 PRINTING
238 Printing from UNIX
Printing from UNIX
Printing from an application
The printing method differs depending on your application. Refer to the manual of the applica-
tion.
When printing is made with an invalid department code, the job is deleted.

4.TROUBLESHOOTING
This section describes about troubleshooting for printing features.
When Printing Cannot Be Performed..................................................................240
Printer Driver Errors .............................................................................................241
Printer driver installation error messages........................................................................................241
Printer driver general errors ............................................................................................................242
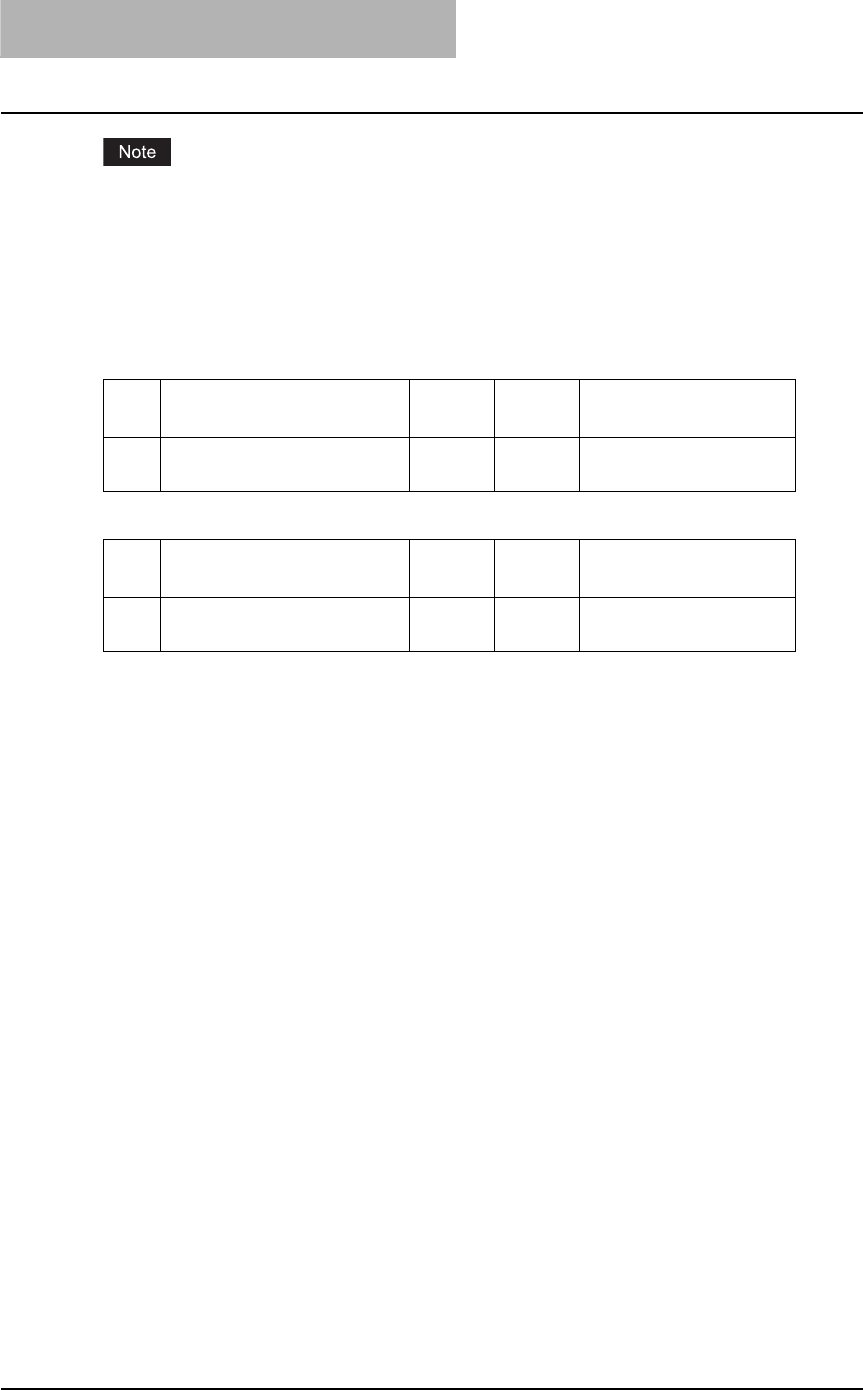
4 TROUBLESHOOTING
240 When Printing Cannot Be Performed
When Printing Cannot Be Performed
This problem can arise as the result of a hardware malfunction, a network communication or
configuration problem. Before troubleshooting the client error, ask your administrator to trouble-
shoot the hardware or network errors. Those troubleshooting are described in the Quick Start
Guide for Printing Functions.
The following checklist helps you identify the source of the error and directs to you where you
can find more information about resolving it.
Client error for Windows platform
Client error for Macintosh platform
No Check... Yes No For Instruction, Go
To...
1 Did you mapped to the correct
network port? End Ö P.242 “Driver Mapped to
Wrong Port”
No Check... Yes No For Instruction, Go
To...
1 Is this equipment you created
selected in the Chooser? End Ö P.113 “Installing the
printer on Mac OS 8.6/9.x”

Printer Driver Errors 241
Printer Driver Errors
Printer driver installation error messages
Setup Needs to Copy Windows NT Files
Problem Description
The wrong port type was selected from the Printer Ports dialog.
Corrective Action
1. Click Cancel until the Add Printer Wizard terminates.
2. Double-click Add Printer from the Printers folder but, when prompted to select a port, choose
Local Port.
Client Software CD Now Required
Problem Description
When adding a new printer driver, the end user did not choose the Have Disk option; instead, he
selected the printer name from the Add Printer list.
Corrective Action
1. Cancel the Add Printer Wizard.
2. Double-click Add Printer from the Printers folder but, when prompted to locate the driver,
click Have Disk.
3. Select Use Existing Driver to add another copy of an existing driver or browse to the subdi-
rectory that contains the appropriate *.inf file.
File *.DRV on Client CD Count Not Be Found
Problem Description
When adding a new printer driver, the user did not choose the Have Disk option but selected the
printer name from the Add Printer list.
Corrective Action
1. Cancel the Add Printer Wizard.
2. Double-click Add Printer from the Printers folder, but when prompted to locate the driver,
click Have Disk.
3. Browse to the subdirectory that contains the appropriate *.inf file.
Location Does Not Contain Information About Your Hardware
Problem Description
The path to the *.inf file selected during driver installation is too far away. In other words, there
are too many characters in the directory path.
Corrective Action
Copy the directory containing the *.inf file to the local drive and resume installation.

4 TROUBLESHOOTING
242 Printer Driver Errors
This Port is Currently in Use
Problem Description
The driver was either open, printing a job, or is in use by another printer or application, when you
attempted to delete it.
Corrective Action
Make sure all print jobs have completed before deleting a port. If there are still problems, exit all
applications and try again. Check each driver to see if another driver is using the same port. If
so, first change the driver’s port setting and delete the port.
Problem with the Current Printer Setup
Problem Description
The driver was not set up properly, possibly because the installation procedure did not complete.
Corrective Action
Delete the driver and reinstall it from the distribution CD-ROM.
Printer driver general errors
Driver Mapped to Wrong Port
Problem Description
If the printer driver on a client workstation points to the wrong network port, jobs do not appear in
the current jobs queue or print out.
Corrective Action
1. Open the Printers folder from the Control Panel.
2. Right-click the printer driver icon.
3. Select Properties from the shortcut menu.
4. Depending on the operating system, select the following tab:
- In Windows 98/Me — Select Details. Browse to select the printer or Novell queue.
- In Windows NT 4.0/2000/XP/Server 2003 — Select Ports. Add a new port and map it to
the printer.
5. Make sure that the path to the printer and the device name are correct.
\\<device name>\print
- Where <device name> is the same as the device name set from the Control Panel.
6. Click the General Tab and click Print Test Page to confirm that the settings are correct.
Command Line Options Not Processed
Problem Description
All print options are sent to this equipment at the start of the print job. If the print file already con-
tains print commands, they override the command line options you set. For example, if the print
file specifies the Letter media, and you specify the A4 media option with the lp command, the
document is output on letter size paper (provided, of course, that all copier-related restrictions
have been met).

Printer Driver Errors 243
Corrective Action
Change the properties in the document you want to print and recreate the print file. Submit the
print job using the LP command without setting additional parameters.
Retrieval of Printer Configuration Failed
Problem Description
When accessing the printer properties, the system displayed “Retrieval of printer configuration
failed”.
Corrective Action
If the printer driver cannot communicate with this equipment — Verify that the system is running.
If not, turn it on. Connect to this equipment via TopAccess. If you cannot connect, reboot this
equipment. If that fails, check the printer driver port assignment to make sure it is correct.
Cannot Print a Job as Expected Using PS Printer Driver
Problem Description
When printing with the PS3 printer driver from the application that creates the PostScript code
for printing such as Adobe Acrobat, the following print options may not work correctly.
yManual Scale
yPrint Paper Size
yPaper Type
yUser Front Cover
yUser Back Cover
yBooklet
yMultiple Pages per Sheet
yAll options in the Effect tab
yAll options in the Image Quality tab
Also, printing may not be performed properly in some applications due to garbled letters, etc.
Corrective Action
Disable “Use PostScript Passthrough” in the PostScript Settings dialog box and print a docu-
ment.
Cannot Change Settings on Fonts Tab and Configuration Tab
Problem Description
The Fonts Tab and Configuration tab are grayed out and they cannot be modified.
Corrective Action
Users who do not have the privilege to change the printer driver setting cannot change the
options in the Fonts Tab and Configuration tab. Please log in with Administrator or Power User.

4 TROUBLESHOOTING
244 Printer Driver Errors
Cannot perform printing
Problem Description
Printing cannot be performed occasionally in Windows98 and Windows Me.
Corrective Action
This problem may be corrected by the following workaround.
1. Press the [Start] button, select the [Settings] and then [Printers] button.
2. Select “TOSHIBA e-STUDIO205 series PCL6” or “TOSHIBA e-STUDIO205 series PSL3”,
right-click on it, and then select the [Properties] button.
3. Open the [Details] tab.
4. Press the [Spool Settings…] button.
5. Select “Spool print jobs so program finishes printing faster” and then “Start printing after last
page is spooled”.

5.APPENDIX
This section describe about the following contents.
Managing Fonts with Font Manager....................................................................246
Installing Font Manager...................................................................................................................246
Searching fonts ...............................................................................................................................246
Installing fonts in Windows..............................................................................................................247
Uninstalling fonts in Windows .........................................................................................................247
Removing fonts from the computer .................................................................................................247
Displaying font preview ...................................................................................................................248
Creating a font group ......................................................................................................................248
Sorting fonts in the list.....................................................................................................................248
Internal Fonts List .................................................................................................250
Internal PCL fonts list......................................................................................................................250
Internal PS fonts list ........................................................................................................................251

5 APPENDIX
246 Managing Fonts with Font Manager
Managing Fonts with Font Manager
The Font Manager program can be used to manage your fonts in Windows. This program can
be launched by clicking [Run Font Manager] on the Fonts tab of the printer driver.
It can:
ySearch your local and network drives for fonts.
yInstall and uninstall fonts in Windows.
yRemove fonts from your computer.
yPreview or print the fonts on your computer or network.
yCreate font groups for personal or workgroup projects.
ySort your fonts in a variety of ways, etc.
Installing Font Manager
The Font Manager can be installed from the Client Utilities CD-ROM. To install the Font Man-
ager for e-STUDIO205 Series, double-click the “Setup.exe” file in the Client Utilities CD-ROM
and follow the screens.
Searching fonts
The first time you start Font Manager, the Find Fonts dialog box appears automatically. Before
installing a font in Windows, you have to search the available fonts that can be installed by Font
Manager 2000.
Searching fonts
1
Click the [Fonts] menu and select [Search for Fonts...].
The Find Fonts dialog box appears.
2
Select which drive you want to search for fonts.
Selected Drives — Select this to choose one of the drives when searching for fonts.
All Drives — Select this to search on all drives when searching for fonts.
Selected Paths — Select this to enter the path to the drive when searching for fonts.
Enter the path to the drive you want to search when you select this.
3
Click [OK].
yWhen you select “Selected Drives”, Continue to the next step.
yWhen you select “All Drives”, skip to Step 6.
yWhen you select “Selected Paths”, skip to Step 6.
4
The Select Drives dialog box appears.
5
Select a drive to search for fonts from the list and click [OK].
6
Searching for fonts begins. The Search for fonts... dialog box is dis-
played while searching for fonts.
If you cancel to search for fonts, click [Stop].
7
The searched fonts are displayed at the Available Font list.

Managing Fonts with Font Manager 247
Installing fonts in Windows
After searching the fonts, you can install them in Windows. Once the fonts are installed in Win-
dows, the fonts can be displayed on the dialog box in applications and printed by the machine.
Installing the TrueType fonts
1
Highlight the fonts you want to install in Windows from the “Avail-
able Font List”.
2
Click the [Fonts] menu and select [Install].
3
The fonts are installed in Windows and added to the installed fonts
list.
Uninstalling fonts in Windows
You can uninstall the fonts in Windows. However, even if you uninstall the fonts from Windows,
the source files of the uninstalled fonts are not deleted from the drive.
Uninstalling the TrueType fonts
1
Highlight the fonts you want to uninstall from Windows from the
installed fonts list.
2
Click the [Fonts] menu and select [Un-install].
3
The fonts are uninstalled from Windows. The uninstalled fonts are
added to the “Available Fonts List”.
Removing fonts from the computer
You can remove from your computer the fonts that no longer be required. Even if you uninstall
the fonts from Windows, the source files of the uninstalled fonts are not deleted from the hard
drive. You can remove the sources of the uninstalled fonts from your computer by this function.
Before removing the fonts, the fonts must be uninstalled from Windows first.
Removing the TrueType font files from your computer
1
Highlight the fonts you want to remove from your computer in the
installed fonts list.
2
Click the [Fonts] menu and select [Remove Font].
3
The Remove Fonts dialog box appears.
4
Check on the box for “Delete font(s) from the hard disk” and click
[OK].
If you do not check on the checkbox for “Delete font(s) from the hard disk”, the source of
the fonts are not deleted from the hard disk. If you want to remove the fonts from the
Available Font List but do not want to delete the source file, do not check this checkbox.
5
The source files of the fonts are deleted from the hard drive.

5 APPENDIX
248 Managing Fonts with Font Manager
Displaying font preview
You can preview the fonts that are displayed in the Available Font List and the installed fonts list.
Previewing fonts
1
Highlight a font you want to preview from the Available Font List or
the installed fonts list.
2
Click [Fonts] menu and select [Preview].
3
The Preview dialog box appears. The sample font is displayed on
the dialog box.
Point Size — You can select the point size of the sample font displayed.
Normal Styles — When this is selected, the font is displayed in the normal face on the
dialog box.
All Styles — When this is selected, the font is displayed in all of its available font faces in
the dialog box.
Creating a font group
You can create a group of fonts and give a descriptive name to the group. The created group
can be used to install or uninstall the fonts in Windows. This function can be used to configure
the different working scenarios of the fonts for each user.
Creating a font group
1
Select the Font Groups folder and click the [Fonts] menu and select
[New Group...].
yThe New Group dialog box appears.
2
Enter the group name in the Group Name field.
3
In the All Available Fonts, expand each folder and select the fonts
that you want to add to the group.
4
Click [Add>>].
The selected fonts are added to the Fonts in Group list.
5
Click [OK].
6
The created group is added to the Font Groups list.
Sorting fonts in the list
You can sort and change the order of fonts to be displayed in the Available Font and Installed
Fonts list.
Sorting by name
Click the [Sort] menu and click [Sort by Name]. The fonts are listed alphabetically by the font
family name.

Managing Fonts with Font Manager 249
Sorting by font type
Click the [Sort] menu and click [Sort by Font Type]. The fonts are grouped according to their
technology type (TrueType, Type 1, or screen bitmap) and within each group the names will be
listed alphabetically.
Inverting the alphabetical order
The lists can be inverted by clicking on the [Sort] menu and [Inverse Sort].

5 APPENDIX
250 Internal Fonts List
Internal Fonts List
Internal PCL fonts list
0 Courier 40 Helvetica-BoldOblique
1 CG-Times 41 Helvetica-Narrow
2 CG-Times Bold 42 Helvetica-Narrow-Bold
3 CG-Times Italic 43 Helvetica-Narrow-Oblique
4 CG-Times Bold Italic 44 Helvetica-Narrow-BoldOblique
5 CG Omega 45 Palatino-Roman
6 CG Omega Bold 46 Palatino-Bold
7 CG Omega Italic 47 Palatino-Italic
8 CG Omega Bold Italic 48 Palatino-BoldItalic
9 Coronet 49 ITC AvantGarde-Book
10 Clarendon Condensed 50 ITC AvantGarde-BookOblique
11 Univers Medium 51 ITC AvantGarde-Demi
12 Univers Bold 52 ITC AvantGarde-DemiOblique
13 Univers Italic 53 ITC Bookman-Light
14 Univers Bold Italic 54 ITC Bookman-LightItalic
15 Univers Medium Condensed 55 ITC Bookman-Demi
16 Univers Condensed Bold 56 ITC Bookman-DemiItalic
17 Univers Medium Condensed Italic 57 NewCenturySchlbk-Roman
18 Univers Condensed Bold Italic 58 NewCenturySchlbk-Bold
19 Antique Olive 59 NewCenturySchlbk-Italic
20 Antique Olive Bold 60 NewCenturySchlbk-BoldItalic
21 Antique Olive Italic 61 Times-Roman
22 Garamond Antiqua 62 Times-Bold
23 Garamond Halbfett 63 Times-Italic
24 Garamond Kursiv 64 Times-BoldItalic
25 Garamond Kursiv Halbfett 65 ITCZapfChancery-MediumItalic
26 Mrigold 66 Symbol
27 Albertus Medium 67 Symbol PS
28 Albertus Extra Bold 68 Wingdings
29 Arial 69 ITCZapfDingbats
30 Arial Bold 70 Courier Bold
31 Arial Italic 71 Courier Italic
32 Arial Bold Italic 72 Courier Bold Italic
33 Times New Roman 73 Letter Gothic Regular
34 Times New Roman Bold 74 Letter Gothic Bold
35 Times New Roman Italic 75 Letter Gothic Italic
36 Times New Roman Bold Italic 76 CourierPS
37 Helvetica 77 CourierPS Oblique
38 Helvetica-Bold 78 CourierPS Bold
39 Helvetica-Oblique 79 CourierPS BoldOblique

Internal Fonts List 251
Internal PS fonts list
AlbertusMT-Light Eurostile-ExtendedTwo
AlbertusMT Eurostile-BoldExtendedTwo
AlbertusMT-Italic Geneva
AntiqueOlive-Roman GillSans-Light
AntiqueOlive-Italic GillSans-LightItalic
AntiqueOlive-Bold GillSans
AntiqueOlive-Compact GillSans-Italic
Apple-Chancery GillSans-Bold
ArialMT GillSans-BoldItalic
Arial-ItalicMT GillSans-ExtraBold
Arial-BoldMT GillSans-BoldCondensed
Arial-BoldItalicMT GillSans-Condensed
AvantGarde-Book Goudy
AvantGarde-BookOblique Goudy-Italic
AvantGarde-Demi Goudy-Bold
AvantGarde-DemiOblique Goudy-BoldItalic
Bodoni Goudy-ExtraBold
Bodoni-Italic Helvetica
Bodoni-Bold Helvetica-Oblique
Bodoni-BoldItalic Helvetica-Bold
Bodoni-Poster Helvetica-BoldOblique
Bodoni-PosterCompressed Helvetica-Condensed
Bookman-Light Helvetica-Condensed-Oblique
Bookman-LightItalic Helvetica-Condensed-Bold
Bookman-Demi Helvetica-Condensed-BoldObl
Bookman-DemiItalic Helvetica-Narrow
Candid Helvetica-Narrow-Oblique
Chicago Helvetica-Narrow-Bold
Clarendon-Light Helvetica-Narrow-BoldOblique
Clarendon HoeflerText-Regular
Clarendon-Bold HoeflerText-Italic
CooperBlack HoeflerText-Black
CooperBlack-Italic HoeflerText-BlackItalic
Copperplate-ThirtyTwoBC HoeflerText-Ornaments
Copperplate-ThirtyThreeBC JoannaMT
Coronet-Regular JoannaMT-Italic
Courier JoannaMT-Bold
Courier-Oblique JoannaMT-BoldItalic
Courier-Bold LetterGothic
Courier-BoldOblique LetterGothic-Slanted
Eurostile LetterGothic-Bold
Eurostile-Bold LetterGothic-BoldSlanted

5 APPENDIX
252 Internal Fonts List
LubalinGraph-Book Univers-CondensedBold
LubalinGraph-BookOblique Univers-CondensedBoldOblique
LubalinGraph-Demi Univers-Extended
LubalinGraph-DemiOblique Univers-ExtendedObl
Marigold Univers-BoldExt
Monaco Univers-BoldExtObl
MonaLisa-Recut Wingdings-Regular
NewCenturySchlbk-Roman ZapfChancery-MediumItalic
NewCenturySchlbk-Italic ZapfDingbats
NewCenturySchlbk-Bold
NewCenturySchlbk-BoldItalic
NewYork
Optima
Optima-Italic
Optima-Bold
Optima-BoldItalic
Oxford
Palatino-Roman
Palatino-Italic
Palatino-Bold
Palatino-BoldItalic
StempelGaramond-Roman
StempelGaramond-Italic
StempelGaramond-Bold
StempelGaramond-BoldItalic
Symbol
Taf f y
Times-Roman
Times-Italic
Times-Bold
Times-BoldItalic
TimesNewRomanPSMT
TimesNewRomanPS-ItalicMT
TimesNewRomanPS-BoldMT
TimesNewRomanPS-BoldItalicMT
Univers-Light
Univers-LightOblique
Univers
Univers-Oblique
Univers-Bold
Univers-BoldOblique
Univers-Condensed
Univers-CondensedOblique

INDEX 253
INDEX
Numerics
2-Sided Printing ................................171, 193
A
About Tab ................................................ 168
All pages from .......................................... 232
Always Download needed fonts .................. 211
Angle ...............................................184, 202
Annotate Font Keys ................................... 211
AppleTalk Printing ..................................... 117
AppleTalk/Bonjour printing .................127, 133
Automatic Duplexer ...........................156, 188
B
back cover ............................................... 194
Background Printing .................................. 210
Binding ............................................213, 225
booklets ................................................... 195
Border .............................................212, 224
Bypass Tray ............................................. 189
C
Caption ............................................183, 202
Center Margin ...................................176, 196
Center Watermark ..................................... 183
Client CD-ROM ........................................... 13
Collated ...........................................208, 222
Compress Bitmap ..................................... 184
Configuration Settings ............................... 154
Configuration Tab ..................................... 168
[Configuration] tab .............................156, 158
Considerations ......................................... 161
Copies .............................................208, 222
Copy Handling ..................................170, 191
Cover Page Paper Source ......................... 214
CUPS ...................................................... 138
D
Department ......................................160, 172
Department Code .................... 154, 215, 234
Department Code (DC) .............................. 236
Destination ............................................... 172
Distinguish Thin Lines ...... 186, 215, 233, 234
Do not Print Blank Pages ........................... 182
Draw as Outline ................................184, 202
Draw Border Around Pages ...............178, 198
Drawers ...........................................156, 188
E
Effect Tab ................................................ 168
Enable SNMP Communication ................... 189
Enlarge/Reduce ........................................ 192
envelopes .................................................. 16
F
Features .....................................................12
First page from ..........................................232
Font Manager .................................... 20, 246
Font Name ...................................... 183, 202
Font Size ......................................... 183, 202
Fonts Tab .................................................168
Format .....................................................226
Format for ........................................ 207, 220
front cover ................................................194
Functions ...................................................12
G
General ....................................................208
General Errors ..........................................242
H
Halftone ..........................185, 217, 235, 237
Help .........................................................168
How to Print ..............................................161
I
If there is PostScript error ...........................213
Image Quality Tab .....................................168
Initial Values .............................................163
Installer ......................................................13
Internal Fonts ............................................250
IP printing ........................................ 123, 130
IPP Printing ................................................63
IPP printing ................................ 23, 125, 132
J
Job Documentation ....................................213
Job Documentation Folder ..........................213
L
Layout Direction ........................................224
Layout direction .........................................212
Layout Tab ...............................................168
Limitations ................................................161
Local Area Network .....................................22
LPR Printing ................................ 23, 36, 114
M
Macintosh PPD .........................................111
Manual Scale ................................... 169, 193
Media Types ...............................................15
Menu Tabs ...............................................167
Mirror .......................................................182
N
Negative/Positive ......................................182
Never generate Type 42 format ..................211
Normal Print .............................................172
Novell iPrint ....................................... 25, 104

254 INDEX
Novell Printing ......................................24, 74
Number of Copies ..................................... 170
Number of pages per Sheet ....................... 198
Number of pages per sheet ........................ 178
Number Pages from Right to Left ........177, 197
O
Orientation .............................. 170, 207, 220
Original Paper Size ...........................169, 192
Outer Margin ....................................177, 197
Output Document Layout ...................176, 196
Output Format .......................................... 184
overlay file ................................................ 190
Overlay Image ......................... 181, 203, 204
P
Page Order .............................................. 229
Pages ..............................................208, 222
Pages per Sheet ....................................... 223
Pages per sheet ....................................... 212
Paper ...................................................... 207
Paper Size ............................................... 220
Paper Source ...................................170, 208
Paper Type .... 170, 174, 175, 177, 179, 180
PCL Fonts ................................................ 250
PostScript .................................................. 13
PostScript Errors ....................................... 231
PostScript Settings .................................... 183
PPD ..................................................14, 160
Preferred Format ...................................... 211
Preview window ........................................ 168
Print Cover Page ...................................... 214
Print Document ......................................... 227
Print Error Information ............................... 184
Print in ..................................................... 210
Print Job .................................................. 215
print job ................................................... 190
Print Job Tab ............................................ 167
Print Mode ............................................... 234
Print on Both Sides ...........................212, 225
Print on First Page Only .....................181, 201
Print Options ............................................ 163
Print options ............................................. 167
print options ............................................. 144
Print over the document ............................. 182
Print Paper Size ................................169, 192
Print to Overlay File ...........................172, 190
printer description file ................................ 160
Printer Drivers ......................................13, 20
Printer Name ............................................ 167
Priority ..................................................... 227
Profile ..............................................165, 168
PS Fonts .................................................. 251
R
Raw TCP Printing .................................23, 36
Remaining from .........................................232
Restore Defaults .......................................168
Reverse page order ...................................228
Rotate 180 degrees ...................................182
Run Font Manager ....................................188
S
Save as File ..............................................226
Scale .............................................. 207, 220
Setup Tab ........................................ 167, 169
Smoothing .......................185, 217, 235, 237
Solid ............................................... 184, 202
Sort ..........................................................191
Style ........................................................183
Substitution Table Edit ...............................187
System Requirements
Mac OS .................................................111
Windows .................................................21
T
TCP/IP .......................................................22
Toner Save ......................182, 217, 235, 237
Transparency ................................... 184, 202
Tray Switching ..........................................231
TrueType Options ......................................187
Two Sided Printing ....................................224
U
Uninstalling ...............................................105
Units ............................................... 177, 183
UNIX ........................................................138
Update Automatically ........................ 158, 189
Update Now ..............................................189
USB Connection ..........................................22
USB Printing ........................................ 22, 27
Use Back Cover ....................... 174, 179, 195
Use Black for All Texts ...............................186
Use Front Cover ...... 173, 177, 178, 194, 197
Use PostScript Passthrough .......................184
W
Watermark ....................................... 181, 201
Watermark Font ........................................216
Watermark Gray Level ...............................216
Watermark Outline ....................................217
Watermark Position ...................................217
Watermark Text ........................................216
Watermark Text Angle ...............................216
Watermark Text Size .................................216
Watermarking ...........................................216
X
X Position .................................................183
Y
Y Position .................................................183
DP-1650/2040
OME060045B0

2-17-2, HIGASHIGOTANDA, SHINAGAWA-KU, TOKYO, 141-8664, JAPAN
MULTIFUNCTIONAL DIGITAL SYSTEMS
Printing Guide
©2006 TOSHIBA TEC CORPORATION All rights reserved
R060120B0902-TTEC
Ver02 2006-08
