Trident Composer User Guide
User Manual:
Open the PDF directly: View PDF ![]() .
.
Page Count: 47

Trident Composer User’s Guide
Microsoft Project Trident: A Scientific Workflow Workbench
Version 1.0 – November 6, 2009
Abstract
Microsoft Project Trident: A Scientific Workflow Workbench simplifies the
process of designing and running scientific data analysis workflows. The paper
discusses how to use Trident Composer—one of the primary Trident Workbench
applications—to construct and run data analysis workflows.
Note:
Many of the resources discussed in this paper are provided with the Project
Trident package.
For a complete list of documents and software discussed in this paper, see
“Resources” at the end of this document.
For Project Trident updates and news, see:
http://research.microsoft.com/en-us/collaboration/tools/trident.aspx
Trident Composer User’s Guide - 2
Version 1.0 – November 6, 2009
© 2009 Microsoft Corporation. All rights reserved.
Disclaimer: The information contained in this document represents the current view of Microsoft
Corporation on the issues discussed as of the date of publication. Because Microsoft must respond to
changing market conditions, it should not be interpreted to be a commitment on the part of Microsoft, and
Microsoft cannot guarantee the accuracy of any information presented after the date of publication.
This White Paper is for informational purposes only. MICROSOFT MAKES NO WARRANTIES, EXPRESS,
IMPLIED OR STATUTORY, AS TO THE INFORMATION IN THIS DOCUMENT.
Complying with all applicable copyright laws is the responsibility of the user. Without limiting the rights under
copyright, no part of this document may be reproduced, stored in or introduced into a retrieval system, or
transmitted in any form or by any means (electronic, mechanical, photocopying, recording, or otherwise), or
for any purpose, without the express written permission of Microsoft Corporation.
Microsoft may have patents, patent applications, trademarks, copyrights, or other intellectual property rights
covering subject matter in this document. Except as expressly provided in any written license agreement
from Microsoft, the furnishing of this document does not give you any license to these patents, trademarks,
copyrights, or other intellectual property.
Unless otherwise noted, the example companies, organizations, products, domain names, e-mail addresses,
logos, people, places and events depicted herein are fictitious, and no association with any real company,
organization, product, domain name, email address, logo, person, place or event is intended or should be
inferred.
© 2009 Microsoft Corporation. All rights reserved.
Microsoft, MSDN, and Windows are either registered trademarks or trademarks of Microsoft Corporation in
the United States and/or other countries.
The names of actual companies and products mentioned herein may be the trademarks of their respective
owners.
Document History
Date
Change
April 14, 2009
Version 0.9 draft publication
November 6, 2009
Version 1.0 – Add “Import saved workflow from file system”

Trident Composer User’s Guide - 3
Version 1.0 – November 6, 2009
© 2009 Microsoft Corporation. All rights reserved.
Contents
PART 1: Introduction and Overview ............................................................................... 4
Terminology ................................................................................................................... 4
Composer Overview ....................................................................................................... 6
Exploring the Composer Primary UI........................................................................... 7
Composer Pane .......................................................................................................... 9
Monitor Pane ........................................................................................................... 10
Provenance Pane ..................................................................................................... 11
Managing the Workflow Display in the Composer Pane ......................................... 12
Importing Trident Components ............................................................................... 16
PART 2: How to Create a Workflow ............................................................................. 24
SimpleFilter: A Simple Workflow ................................................................................. 25
Step 1: Create a New Workflow............................................................................... 25
Step 2a: Add an Unpack Data Activity ..................................................................... 26
Step2b: Use Type Initializers to Initialize Properties ............................................... 27
Step 3: Add the Boxcar Filter Activity ...................................................................... 28
Step 4: Add the Display Data Activity ...................................................................... 29
Step 5: Run the Workflow ........................................................................................ 30
Step 6: Monitor the Workflow ................................................................................. 31
Step 7: Debug the Activity ....................................................................................... 31
Step 8 : Save workflow to filesystem ....................................................................... 32
Demux: Add a ParallelActivity Activity to SimpleFilter ................................................ 33
Step 1: Add the Demux Data Activity ....................................................................... 33
Step 2: Add ParallelActivity to the Workflow .......................................................... 33
Validate: Add an If Else Conditional to Demux ............................................................ 35
Step 1: Add an If Else Activity to the Workflow ....................................................... 35
Step 2 Add a Condition to the If Else Activity .......................................................... 36
Step 3: Assign a TerminateActivity Activity to the Else Branch ............................... 38
Step 4: Move Demux Data to If True ....................................................................... 38
Demux 2: Add a Replicator Activity to SimpleFilter ..................................................... 38
Step 1: Start the Demux 2 Workflow ....................................................................... 40
Step 2: Add a Replicator Activity to the Workflow .................................................. 40
Step 3. Add Child Activities to Replicator ................................................................ 41
SimpleFilter 2: Add a For Loop Activity to SimpleFilter ................................................ 42
Step 1: Create the Basic SimpleFilter 2 Workflow ................................................... 43
Step 2: Implement the For Loop Activity ................................................................. 43
Step 3: Implement SimpleFilter 2 as a Monte Carlo Simulation .............................. 44
Troubleshooting ........................................................................................................... 45
Resources ..................................................................................................................... 47

Trident Composer User’s Guide - 4
Version 1.0 – November 6, 2009
© 2009 Microsoft Corporation. All rights reserved.
PART 1: Introduction and Overview
As a scientist, you know that many important scientific questions must be addressed
as a whole, by multiple disciplines. For example, some important oceanography
problems require large-scale multidisciplinary experiments such as the Neptune
project. This integrated approach to science has considerable promise, but it also
presents considerable challenges.
After your project begins generating data, you will probably face two key issues:
How to analyze a wide variety of data from a large number of sources.
The issues are often not well understood, so you need a tool that lets you easily
experiment with different analytical schemes.
How to analyze terabytes or even petabytes of data.
That’s often too much for a single computer; you need a tool that can run
analyses on a high-performance cluster.
Microsoft® Project Trident: A Scientific Workflow Workbench effectively addresses
both these issues, and provides a number of useful related features. You don’t have
to be an experienced programmer to use Trident Workbench. Instead, you use a
visual designer to “snap” together data processing components—called activities—to
create a data analysis pipeline called a workflow. You then use Trident Workbench to
run the workflow. You can even direct Trident Workbench to run the workflow
automatically, on a daily or weekly basis. For large data sets, Trident Workbench can
run workflows on Windows® HPC Server 2008.
This paper describes how to use Trident Composer—one of the primary Trident
Workbench applications—to create and run data analysis workflows.
For description of how to use the other primary Trident Workbench application,
Trident Management Studio, see “Trident Management Studio User’s Guide.”
For a general introduction to Trident, see “Project Trident: An Introduction.”
For directions on how to install Trident, see “Project Trident: Installation Guide.”
Terminology
This section defines the key terms that are used in this paper.
activity
A component of a workflow.
basic activity
An activity that performs a particular task.
composite activity
An activity that serves as a container for other activities.
condition activity
Used with an If Else activity to control which workflow branch is selected.
For Loop activity
A composite activity that runs a child activity a specified number of times, with a
specified sequence of index values.

Trident Composer User’s Guide - 5
Version 1.0 – November 6, 2009
© 2009 Microsoft Corporation. All rights reserved.
If Else
A composite activity that runs either of two child activities, depending on
whether the condition activities evaluate to True or False.
job
A workflow instance. It can either be running or scheduled to run at a specified
time.
ParallelActivity activity
A composite activity that runs a set of child activities in parallel.
Replicator activity
A composite activity that processes a collection of data items by running a
specified child activity once for each item.
SequenceActivity activity
A composite activity that runs a set of activities in sequence.
subsection
A group of adjacent activities that Composer treats as a unit.
root activity
The composite activity that hosts the workflow proper. For Trident Workbench,
the root activity is always a SequentialActivity activity.
Trident Registry
A database that contains Trident workflows, activities, type initializers, and so on.
type initializer
A module that provides a user interface (UI) for initializing properties with
complex data types.
Web service activity
An activity that represents a Web service.
workflow
A structured collection of activities that perform a data analysis procedure.
workflow input or output
A specially marked input or output property. Trident Workbench stores the value
of these properties in the Registry each time the workflow runs.
workflow runtime
A Windows Workflow Foundation component that manages running workflows
and provides an interface between workflows and their host applications.
XOML file
A file that contains an XML-based declarative version of the workflow. XOML is
similar to XAML.
Trident Composer User’s Guide - 6
Version 1.0 – November 6, 2009
© 2009 Microsoft Corporation. All rights reserved.
Composer Overview
This section briefly describes the key parts of the Composer UI and how they are used
to create, execute, and manage workflows.
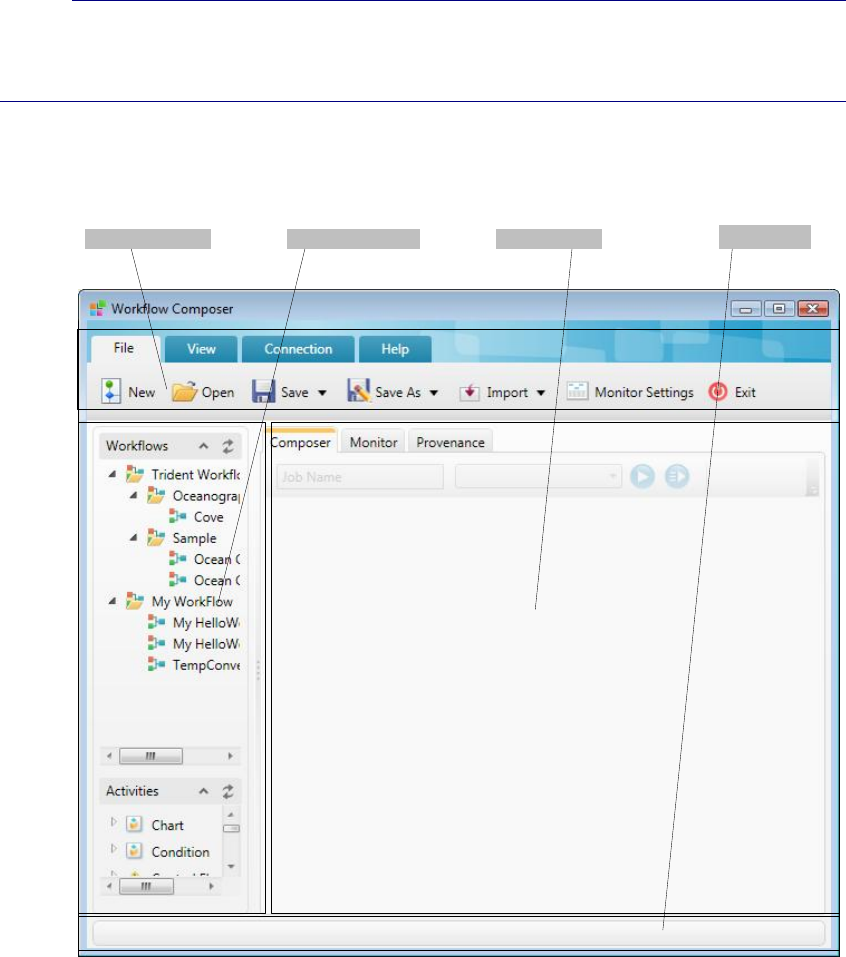
Figure 1 shows the primary Composer UI.
Working PaneWorkflow Catalog Status Bar
Primary Toolbars
Figure 1. Composer primary UI

Trident Composer User’s Guide - 7
Version 1.0 – November 6, 2009
© 2009 Microsoft Corporation. All rights reserved.
Exploring the Composer Primary UI
Status Bar
The status bar displays the status of executing workflows.
Primary Toolbars
The four primary toolbars are always accessible, but only one toolbar is displayed at a
time. To select a toolbar, click the related tab: File, View, Connection, and Help, as
shown in the following list. Working panes can also have toolbars, which are
discussed later.
Item
Description
File Toolbar
Supports several workflow-related operations.
New
Creates a new workflow.
Open
Opens workflows stored as files.
Save
Saves a workflow to the Trident Registry, which is a database that
contains Trident workflows, activities, type initializers, and so on.
Save As
Saves a workflow to the Trident Registry with a different name or
in a different category. It can also save the workflow to the file
system.
Import
Imports a Trident element. Click the arrow on the right to import
one of the following:
Workflow: Imports a workflow’s XOML file, and the associated
assemblies.
Activity: Imports a custom activity DLL.
Web service activity: Imports a Web service activity.
Workflow Package: Imports a .tpw file containing an exported
workflow from a different Trident Registry.
Custom type initializer: Imports a custom type initializer.
Click the Import button itself to import a workflow. For more
details on importing Trident elements, see “Trident Management
Studio User’s Guide.”
Monitor Settings
Specifies settings for monitoring data. By default, monitored data
is displayed in the Monitor pane. You can use this button to
enable logging, which stores the data in a specified file.
Exit
Closes Composer and allows you to either terminate running jobs
or run them in the background.
View Toolbar
Hide Parameter
Binding
Hides or shows the lines binding an activity’s output properties to
the corresponding input properties on a subsequent activity.
Connection Toolbar
Manages connections to Trident Registries.
Saved Connections
Opens a saved connection.
Advanced
Creates a new connection.
Help Toolbar
About
Displays a dialog box with basic information such as the Trident
version number.

Trident Composer User’s Guide - 8
Version 1.0 – November 6, 2009
© 2009 Microsoft Corporation. All rights reserved.
Workflow Catalog
Workflows and activities are stored in the Trident Registry. The Workflow Catalog is a
basic Registry management tool. It is divided into three parts, as described in the
following list.
Catalog element
Description
Search
Allows you to search the Registry for workflows and activities.
Workflows
Contains a tree-structured list of stored workflows.
The workflows listed under Trident Workflow are available to
any user.
The workflows listed under My Workflow can be accessed only
by the workflow author.
Activities
Shows a tree-structured list of stored activities.
For a more powerful and flexible registry management tool, use Management Studio.
Working Panes
Composer has three working panes, which you select by clicking the appropriate tab,
as described in the following list.
Working pane
Description
Composer
Provides a design surface for creating, modifying, and executing
workflows.
Monitor
Tracks the progress of an executing workflow.
Provenance
Contains details about the most recently executed workflow.
The easiest way to learn about the working panes is to load and execute one of the
stored workflows, Ocean Current, which analyzes ocean current data and displays the
results. These panes are described in the following sections.
Trident Composer User’s Guide - 9
Version 1.0 – November 6, 2009
© 2009 Microsoft Corporation. All rights reserved.
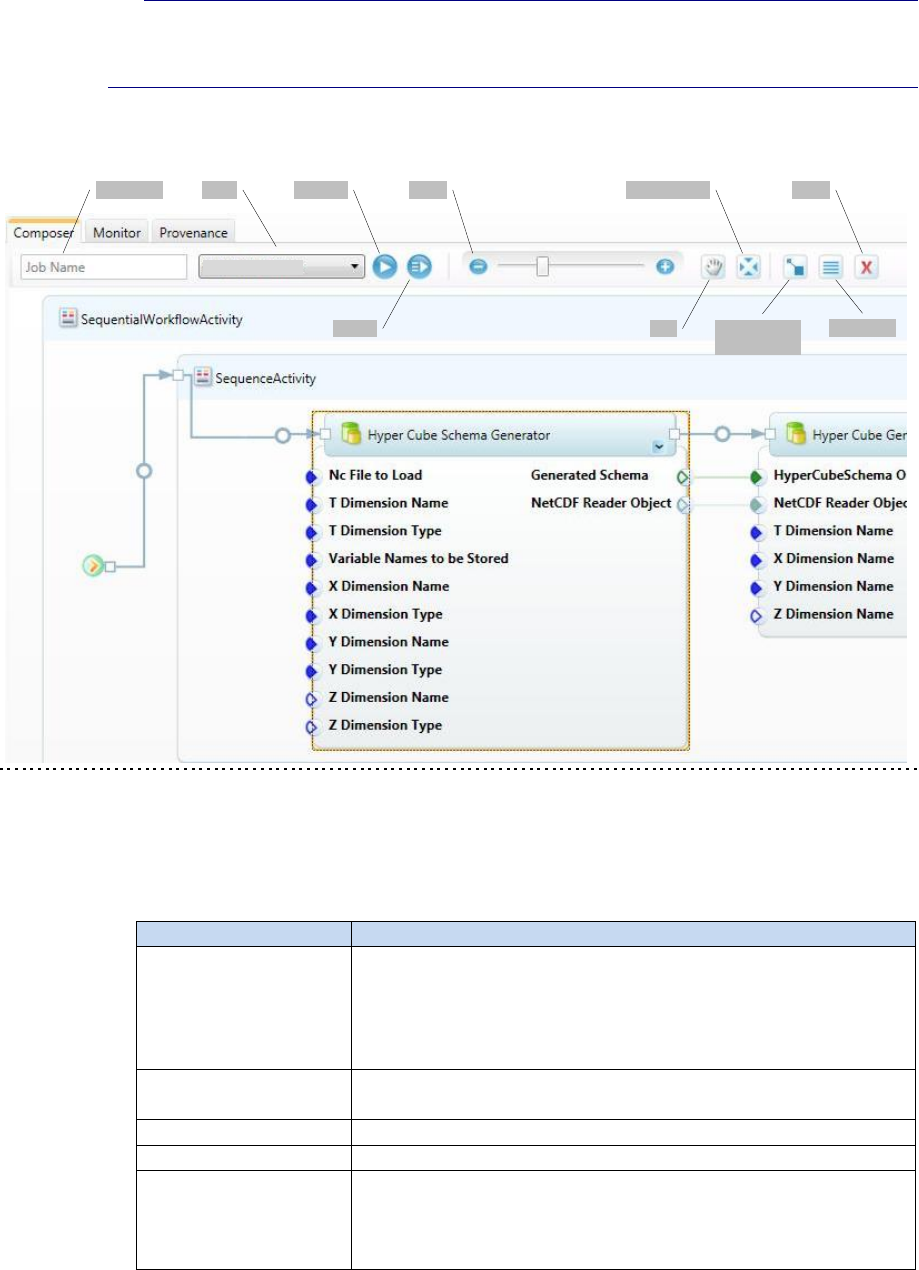
Composer Pane
To view the working elements of the Composer pane, double-click Ocean Current in
My Workflow to load the workflow into the Composer pane, as shown in Figure 2.
ZoomNode
Pan
Fit to Screen Close
Data Type
Color Palette
ExecuteJob Name
MYNODE
Debug Properties
Figure 2. Composer pane
Most of the Composer pane is a design surface that displays a graphical
representation of the currently loaded workflow. The Composer pane’s toolbar
contains the controls described in the following list.
Composer control
Description
Job Name
Displays the current job name.
Job names are used primarily for scheduled workflows. You don’t
have to assign a job name to create or run a workflow in
Composer. For information, see “Trident Management Studio
User’s Guide.”
Node
Provides a list of execution nodes.
This example uses the local computer, NodeName.
Execute
Runs the workflow.
Debug
Runs the workflow in debugging mode, to debug custom activities.
Zoom
Expands or shrinks the workflow graphic.
Workflows can extend beyond either edge of the pane. Zoom
expands the workflow so you can work with an individual activity,
or it shrinks the workflow so you can see the overall structure.
Trident Composer User’s Guide - 10
Version 1.0 – November 6, 2009
© 2009 Microsoft Corporation. All rights reserved.
Composer control
Description
Pan
Displays a “hand” cursor that you can use to move the workflow in
the pane.
Click and hold the cursor within the pane, and then use the mouse
to move the workflow back and forth. You can also move the
workflow by using the scroll bar at the bottom of the pane.
Fit-to-Screen
Adjusts the workflow graphic to fit the pane.
It also adjusts the Zoom control slider to the related setting.
Data Type Color Palette
Displays a dialog box that lists the colors associated with different
property icon data types.
Properties
Displays the selected activity or workflow property sheet at the
pane’s right side.
Close
Closes the workflow.
For details about working in the Composer pane, see “Managing the Workflow
Display in the Composer Pane” later in this paper.
For a description of how to use Composer to create or modify a workflow, see
“Part 2: How to Create a Workflow,” later in this paper.
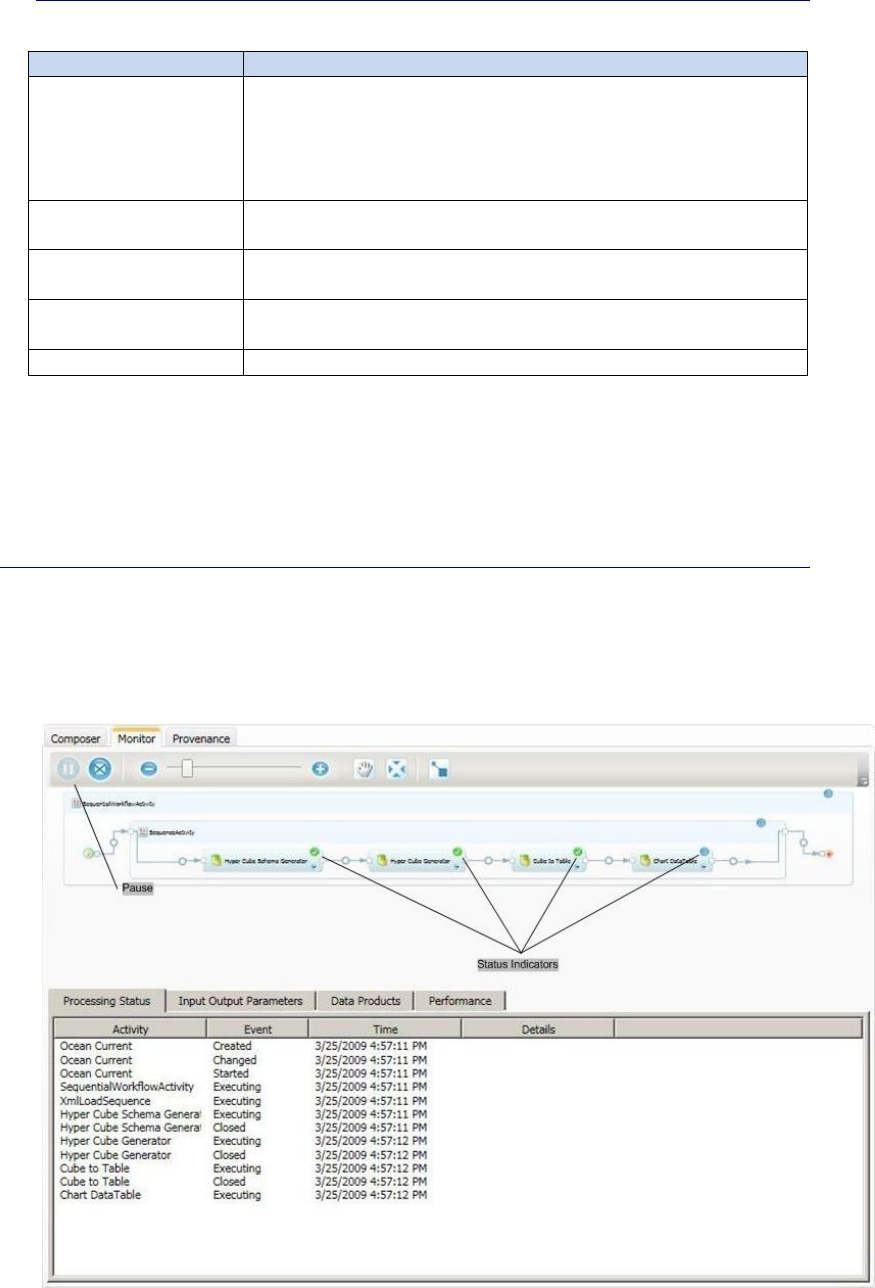
Monitor Pane
To view the elements of the Monitor pane, open Ocean Current and click the Execute
button to run the workflow. Composer automatically displays the Monitor pane in
the working pane, to track the workflow’s progress.
Figure 3 shows an example of the Monitor pane for Ocean Current.
Figure 3. Monitor pane
Trident Composer User’s Guide - 11
Version 1.0 – November 6, 2009
© 2009 Microsoft Corporation. All rights reserved.
The Monitor pane has three components, as described in the following list.
Item
Description
Monitor Toolbar
Similar to the Composer toolbar, with exceptions listed here.
Pause
Pauses and restarts the workflow.
N/A items
No Properties or Close buttons.
Workflow Display
Central workflow graphic
You can use the toolbar to adjust the graphic’s size and
location, as with the Composer pane, but you can’t modify the
workflow.
A green dot on an activity icon indicates a completed activity
and a blue dot indicates an activity in progress.
Workflow Information
Displays information about the running workflow. Select one of
the four displays by clicking the appropriate tab.
Process Status
Displays a running summary of the workflow status (Figure 3).
Input Output Parameters
Displays information about the input and output data for the
various activities.
Data Products
Displays information about stored data.
This example displays its output as a graph, so Data Products
doesn’t have any content.
Performance
Charts CPU and memory usage as the execution proceeds.
Tip: If you are running Ocean Current now, it has probably stopped at the Chart Data
Table activity, which displays a graph in a separate window. You must close this
window to complete the workflow. You might have to move or minimize Composer to
close the window, because it doesn’t appear on the Windows taskbar.
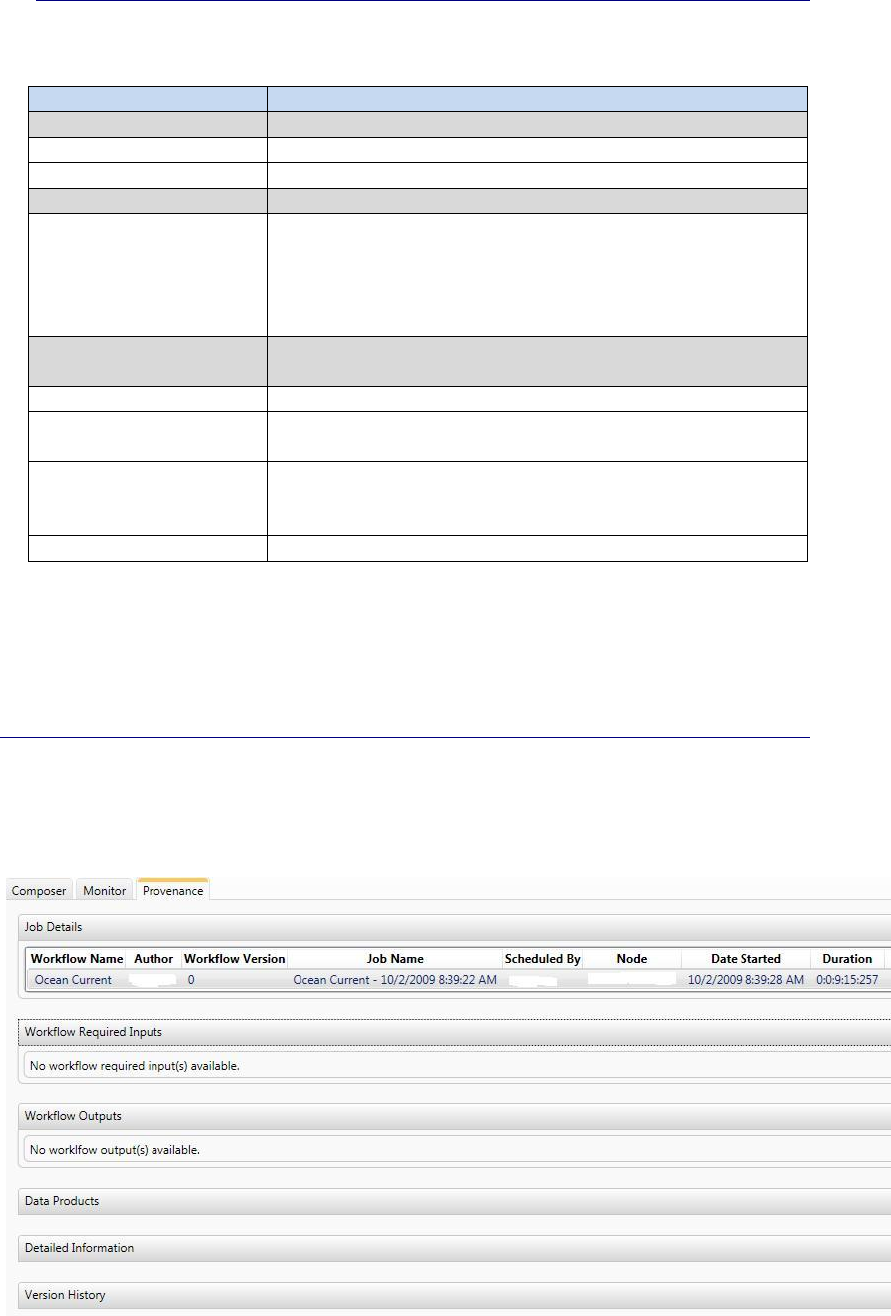
Provenance Pane
The Provenance tab summarizes the most recently executed workflow. Figure 4
shows the Provenance pane after the completion of the Ocean Currents workflow.
Note that Figure 4 has been made anonymous by replacing the account name of the
user who executed the workflow with “Name.”
Figure 4. Provenance pane
Trident Composer User’s Guide - 12
Version 1.0 – November 6, 2009
© 2009 Microsoft Corporation. All rights reserved.
The Provenance pane has six sections, which can be displayed or collapsed by clicking
an arrow on the right side of the section heading. These sections are described in the
following list.
Provenance section
Description
Job Details
Displays basic information, such when a job started and who
ran it.
Workflow Required Inputs
Shows the required input properties.
Workflow Outputs
Shows the workflow outputs.
Data Products
Shows the data products, if any.
Ocean Current doesn’t produce any data products, so this
section is blank in the example.
Detailed Information
Shows details about the workflow, including a graphic similar to
that displayed IN the Composer and Monitor panes.
Version History
Displays version history, and is not currently used.
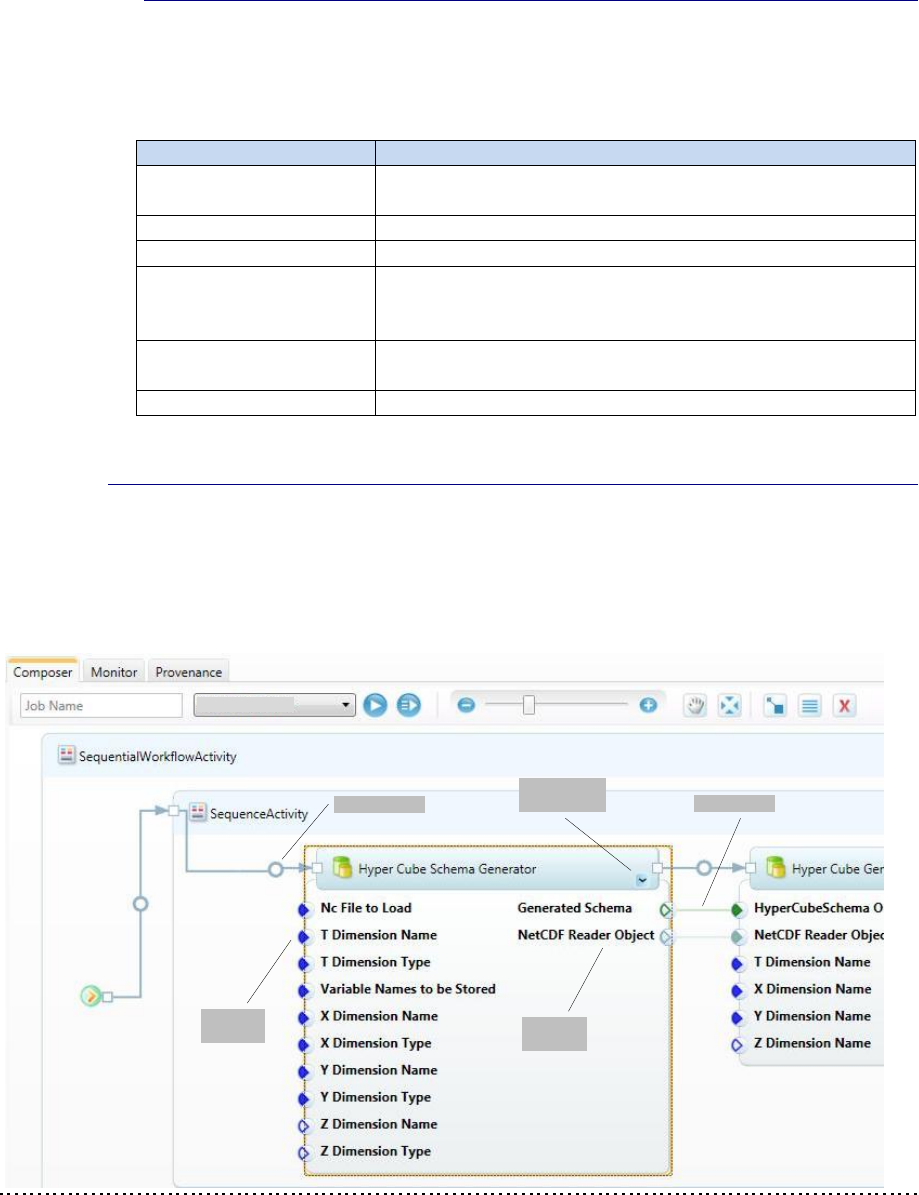
Managing the Workflow Display in the Composer Pane
The workflow’s root activity—which is always a SequentialActivity activity—is at the
far left of the Composer pane. The activities that make up the workflow proper are
represented by shaded blue rectangles, referred to as “activity boxes” in this paper.
The activities are displayed in execution order from left to right, with control flow
indicated by blue arrows, as shown in Figure 5.
Input
properties
Expand/
Collapse icon Data binding
Output
properties
Insertion point
MYNODE
Figure 5. Activities and their properties in the Composer pane
How to Insert an Activity or Workflow
The open circle in the center of each blue control-flow arrow is an insertion point,
where you can insert individual activities or entire workflows.

Trident Composer User’s Guide - 13
Version 1.0 – November 6, 2009
© 2009 Microsoft Corporation. All rights reserved.
To insert an activity or workflow in the Composer pane
1. Left-click an item in the Workflow Catalog or in the Activities list.
2. Drag it to the appropriate insertion point in the Composer pane.
3. When the cursor changes to an arrow over the insertion point, release the mouse
button.
When you insert a workflow, Composer removes the root SequentialActivity
activity and inserts only its child activities.
After you drop the item, the Composer pane updates the workflow display to show
the inserted item. If you insert a workflow, the collection of activities is inserted as a
subsection, as discussed in “Managing the Workflow Display” later in this paper.
How to Display Input and Output Properties
Each activity has a set of properties, which can be displayed below the activity box.
To collapse or expand an activity’s property set in the Composer pane
Click the Expand/Collapse icon in the lower right corner of the activity box.
Input Properties
On the left side of an activity’s property set:
Each input property has an icon whose color indicates the data type.
Click the Data Type Color Palette icon in the toolbar to remind yourself of the
relationship between type and color.
Filled and unfilled icons indicate required and optional input properties,
respectively.
To see a tooltip description, move the pointer over the property’s icon.
To display a property sheet on the right side of the pane, right-click within a
property set, and then click Properties.
You use the property sheet to specify input property values. For details, see
“Part 2: How to Create a Workflow” later in this paper.
Output Properties
On the right side of the property set:
The icons use the same color scheme as input properties, but they are always
unfilled.
How to Designate Workflow Inputs and Outputs
By default, property values exist only for the duration of the activity. To have Trident
Workbench automatically store a property value, designate it as a workflow input or
output. The property behaves in the same way as a standard input or output
property. However, each time you run a job, Trident Workbench stores the value in
the Registry.

Trident Composer User’s Guide - 14
Version 1.0 – November 6, 2009
© 2009 Microsoft Corporation. All rights reserved.
To designate a workflow input or output in the Composer pane
1. Right-click the specific property icon.
2. Click Mark as workflow input for input properties.
—Or—
Click Mark as workflow output for output properties.
To view the stored values in the Monitor pane
1. Open the Monitor pane, and click the Input Output Parameters tab.
2. Click the arrow that opens the Workflow section.
You can also view stored workflow properties in the Provenance pane.
How to Specify Data Flow
To specify data flow between two activities, you bind output properties on an
upstream activity to the corresponding input properties on the downstream activity.
The activities do not have to be adjacent.
Composer indicates binding by a line connecting the two properties. For example, the
Hyper Cube Schema Generator activity shown in Figure 5 has two output properties,
which are bound to the corresponding Hyper Cube Generator input properties.
To specify data flow in the Composer pane
1. Left-click the output property’s icon and hold down the mouse button.
2. Drag the cursor to the input property’s icon.
3. When the cursor changes to an arrow over the icon, release the mouse button.
Note: Composer allows you to bind properties only if they have compatible data
types. If the types are not compatible, the cursor does not change to an arrow over
the property icon, and releasing the mouse button has no effect.
Managing the Workflow Display
Workflows vary in size and are often too large to display conveniently. Composer
provides several ways to manage the display.
To manage the workflow display in the Composer pane
Use the Zoom or Fit-to-Screen buttons to expand or shrink the display.
—Or—
Use the scrollbar or Pan to move the workflow back and forth.
—Or—
Create subsections.
The first two options have already been discussed. Subsections allow you to simplify a
workflow by creating groups of two or more adjacent activities. A subsection can be
collapsed to the size of a single activity, which allows you to create a much more
Trident Composer User’s Guide - 15
Version 1.0 – November 6, 2009
© 2009 Microsoft Corporation. All rights reserved.
compact workflow representation. You can expand a subsection when you want to
work on the individual activities.
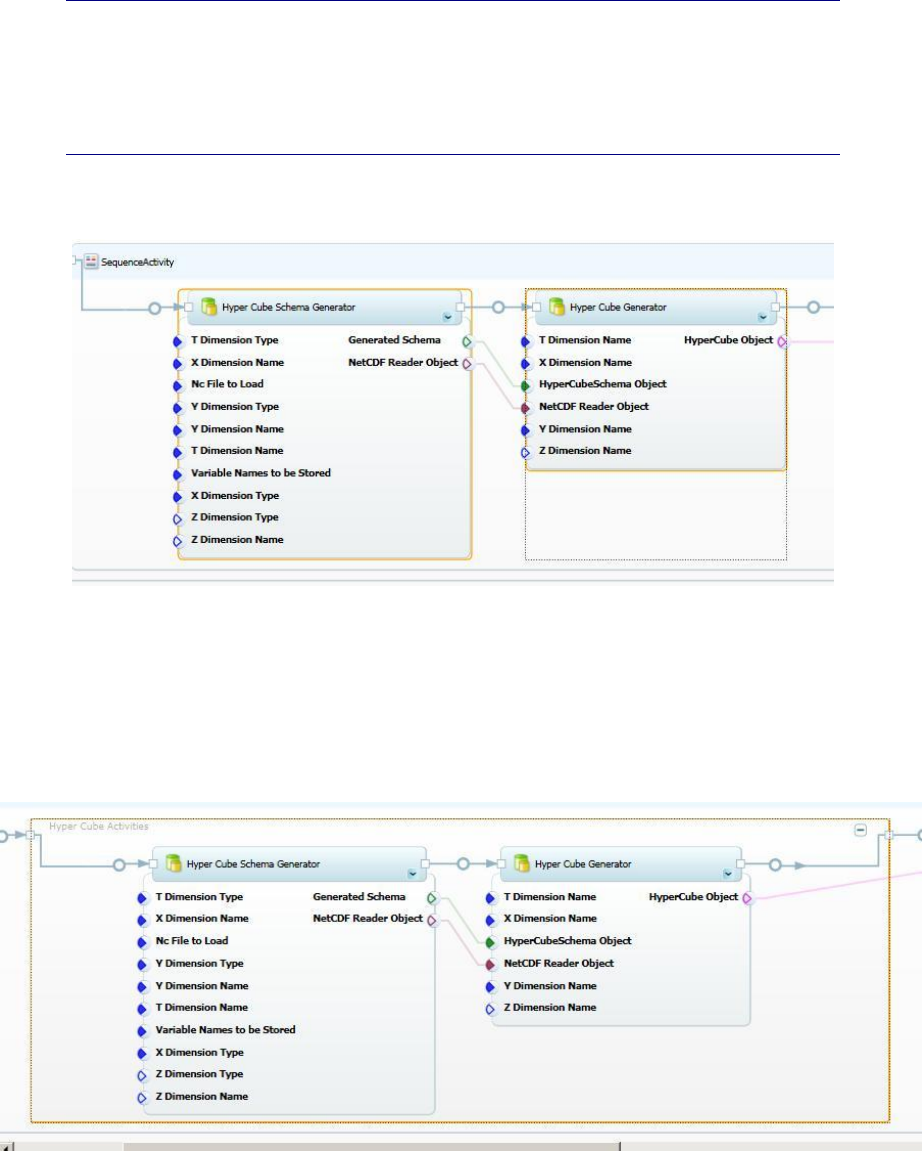
To select the activities for a subsection in the Composer pane
1. Hold the SHIFT key and click the activity boxes in sequence.
An orange border surrounds the selected activities, as shown in Figure 6.
Figure 6. Selecting subsection activities in the Composer pane
2. To create the subsection, right-click one of the selected activities, and then click
Create Subsection.
3. Specify a subsection name and an optional description in the Subsection dialog
box.
The subsection is initially in the expanded state, as shown in Figure 7.
Figure 7. Expanded subsection in the Composer pane
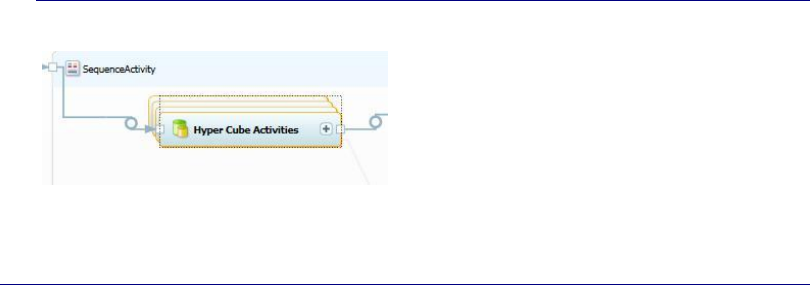
To collapse a subsection and shrink the size of the workflow, click the “–” (minus sign)
button in the upper right corner of the subsection box. To expand the subsection,
click the “+” (plus sign) button. Figure 8 shows a collapsed subsection.
Trident Composer User’s Guide - 16
Version 1.0 – November 6, 2009
© 2009 Microsoft Corporation. All rights reserved.
Figure 8. Collapsed subsection in the Composer pane
Importing Trident Components
Trident Workbench includes a standard set of activities and workflow. However,
many projects will require tasks such specialized data processing that are not handled
by the standard set of activities. You can handle this situation by importing custom
activities into Workbench that provide the required functionality. There are two basic
types of custom activity:
Standard activities are .NET objects, packaged as DLLs.
You can implement standard activities yourself, or obtain them from colleagues
or the Web.
A Web service activity incorporates Web service methods into a Trident
workflow.
Rather than implement and distribute custom activity DLLs, scientists might
prefer to expose custom processing functionality or data through a Web service,
and perform the actual processing on their computer.
You can also import packaged Trident workflows, which you can obtain from
colleagues or Web sites, such as MyExperiment.
This section describes how to import standard and Web service activities and
workflow packages into Workbench. For details on how to export a workflow
package, see “Management Studio User’s Guide.”
How to Import a Standard Activity
A standard activity is a .NET object packaged in a DLL. The DLL can contain any
number of activities, and might also contain related components such as type
initializers. There are two ways to obtain a custom activity DLL:
Implement it yourself.
Activities are straightforward to implement. For details, see “Trident
Programming Guide.”
Obtain a DLL that has implemented by another scientist.
Scientists who have implemented custom activities can post them on Web sites
such as the Trident site on Microsoft Connect, or provide them directly to
interested colleagues.
After you obtain the activity DLL, you must import it into Workbench. You can use
either Composer or Management Studio to import custom activity DLLs; the process
is similar for both applications. This section discusses how to use Composer.
Trident Composer User’s Guide - 17
Version 1.0 – November 6, 2009
© 2009 Microsoft Corporation. All rights reserved.
Step 1: Select the Activity DLL
Use the Import Activity capability in Composer to import custom DLLs.
To select a custom activity DLL
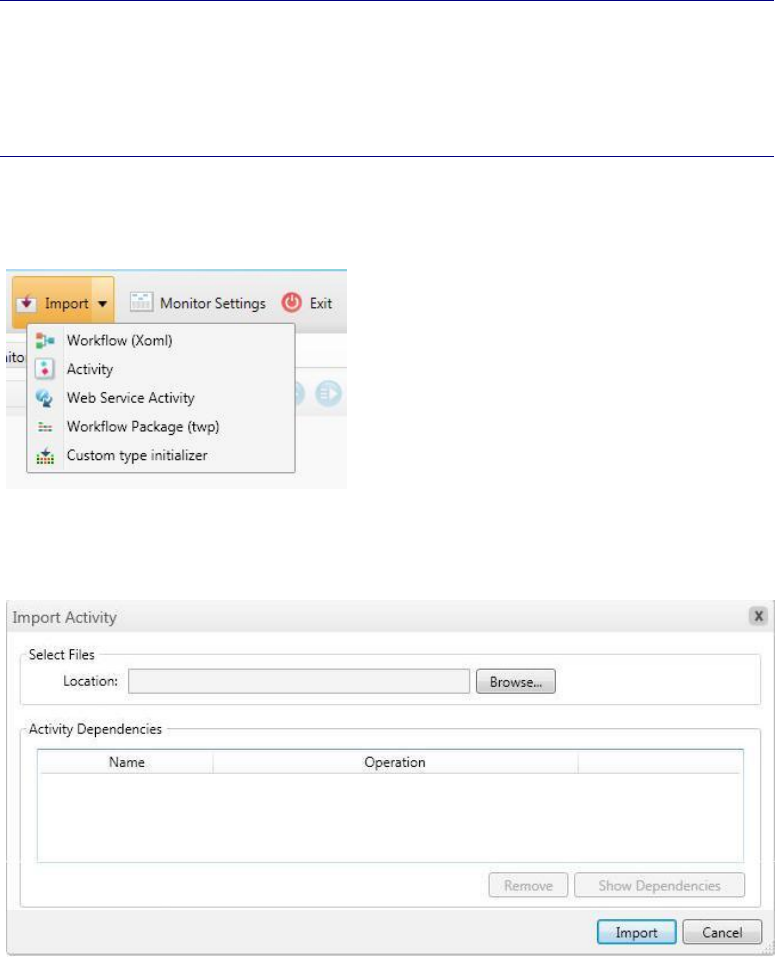
1. On the Composer toolbar, right-click the arrow on the right edge of the Import
button.
2. Click Activity in the list of options, as shown in Figure 9.
Figure 9. The Composer Import button
3. In the Import Activity dialog box, shown in Figure 10, click Browse to select the
appropriate DLL.
Figure 10. Import Activity dialog box
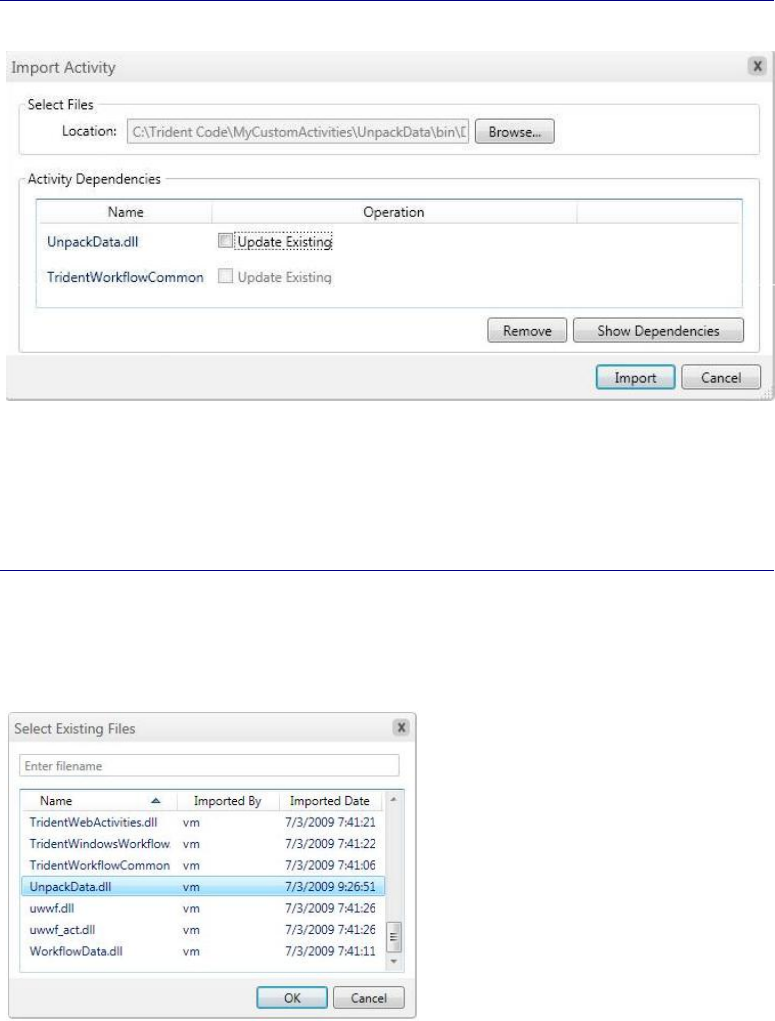
Step 2: Import the DLL
After you select the DLL, the Import Activity dialog box displays the activity DLL and
all dependent DLLs. Figure 11 shows the list in Import Activity after UnpackData DLL
is selected, which is discussed later in this paper. TridentWorkflowCommon is a
standard Trident DLL that is referenced by all custom activities.
Trident Composer User’s Guide - 18
Version 1.0 – November 6, 2009
© 2009 Microsoft Corporation. All rights reserved.
Figure 11. Import Activity with an activity DLL
If the Trident Registry already contains an earlier version of the activity, you can
either remove the existing version or keep it and create a new version.
To replace the current version of the activity
1. In the Import Activity dialog box, click Update Existing to the right of the name of
the old DLL.
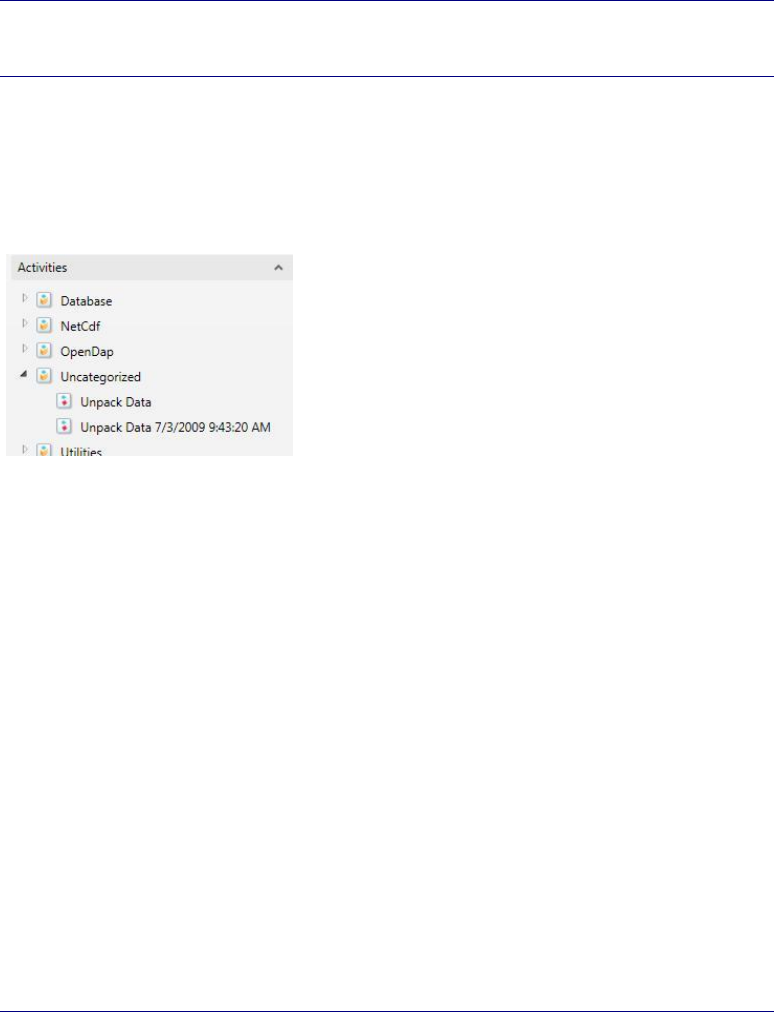
2. In the Select Existing Files dialog box, shown in Figure 12, select the replacement
DLL, and then click OK to return to Import Activities.
Figure 12. Select Existing Files dialog box
3. Click Import to import the DLL.
Workbench replaces the old activity with the new one. The Workflow Catalog entry
does not change.
To obtain more information about an activity, use Management Studio, which
provides more detailed data such as when the DLL was imported. For details, see
“Trident Management Studio User’s Guide.”
In some cases, you might want to keep the old version of an activity. In that case, you
can import the activity as a new version.
Trident Composer User’s Guide - 19
Version 1.0 – November 6, 2009
© 2009 Microsoft Corporation. All rights reserved.
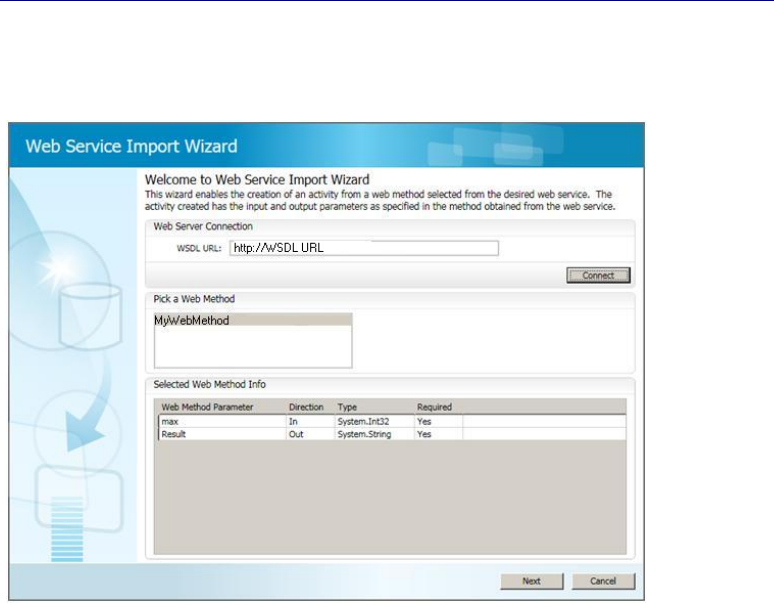
To import a new version of the activity
1. In the Import Activity dialog box, leave Update Existing unchecked.
2. Browse to select the new DLL, and then click Import to import the DLL
Workbench imports the specified activity as a separate version, and the Workflow
Catalog includes all versions. Workbench identifies later versions by appending the date
and time that the activity was imported to the activity name, as shown in Figure 13.
Figure 13. Workflow Catalog with two versions of Unpack Data
How to Import a Web Service Activity
Scientists can expose processing functionality or remote access to data sets as a Web
service, which can be accessed from any Internet-connected computer by using .NET
programming techniques. Trident allows you to incorporate Web service functionality
into your workflows by creating a Web service activity.
A Web service activity is a simple custom activity that acts as a wrapper for a Web
service method. The method’s inputs and outputs are exposed as input and out
properties, and you can incorporate the activity into a workflow in exactly the same
way as a standard activity. The only limitation is that the computer running the
workflow must have an Internet connection, so that the activity can communicate
with the Web service.
The following steps describe how to import a Web service activity by using Composer.
Step 1: Select the Web Service Method
You can create a Web service activity to represent any Web service method.
To select a Web service method
1. On the Composer toolbar, right-click the arrow on the right edge of the Import
button, and click Web Service Activity.
2. In the Web Service Import Wizard, enter the WSDL URL for the service.
3. Click Connect to connect to the service.
4. From the Pick a Web Method list in the wizard, select the method that you want
to represent.
The Selected Web Method Info box shows the method’s input and output
parameters.
5. Click Next to configure the activity.
Trident Composer User’s Guide - 20
Version 1.0 – November 6, 2009
© 2009 Microsoft Corporation. All rights reserved.
Figure 14 shows the Welcome page in the Web Service Import Wizard, depicting a
fictitious URL and method name.
Figure 14. Web Service Wizard Welcome page
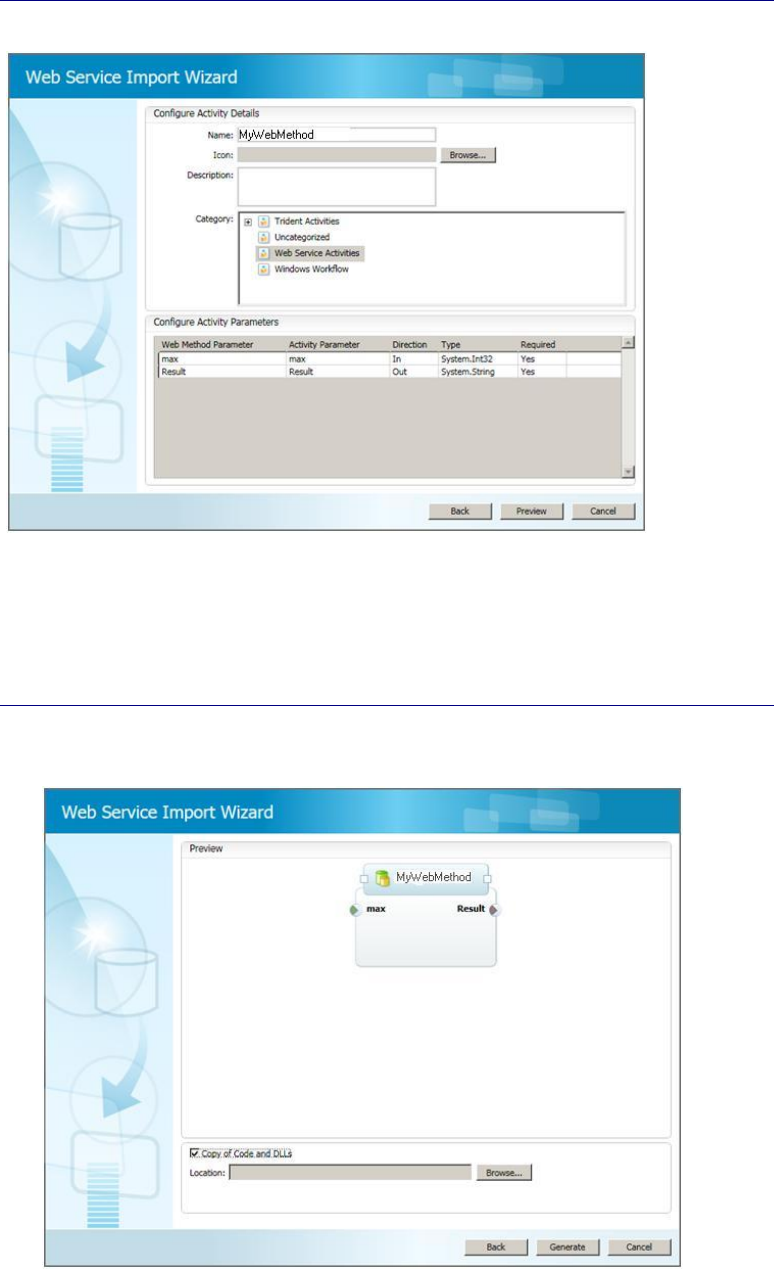
Step 2: Configure the Activity
The next page in the wizard is Configure Activity Details, shown in Figure 15, which
allows you to optionally specify:
An activity name, which is the name that is displayed in Workbench.
By default, Workbench uses the Web service method name.
An activity icon.
By default, Workbench uses the default activity icon.
The workflow category folder.
By default, the activity is placed under Web Service Activities.
Activity property names.
By default, Workbench sets property names to the corresponding Web service
method parameter names.
Trident Composer User’s Guide - 21
Version 1.0 – November 6, 2009
© 2009 Microsoft Corporation. All rights reserved.
Figure 15. Configure Activity Details page
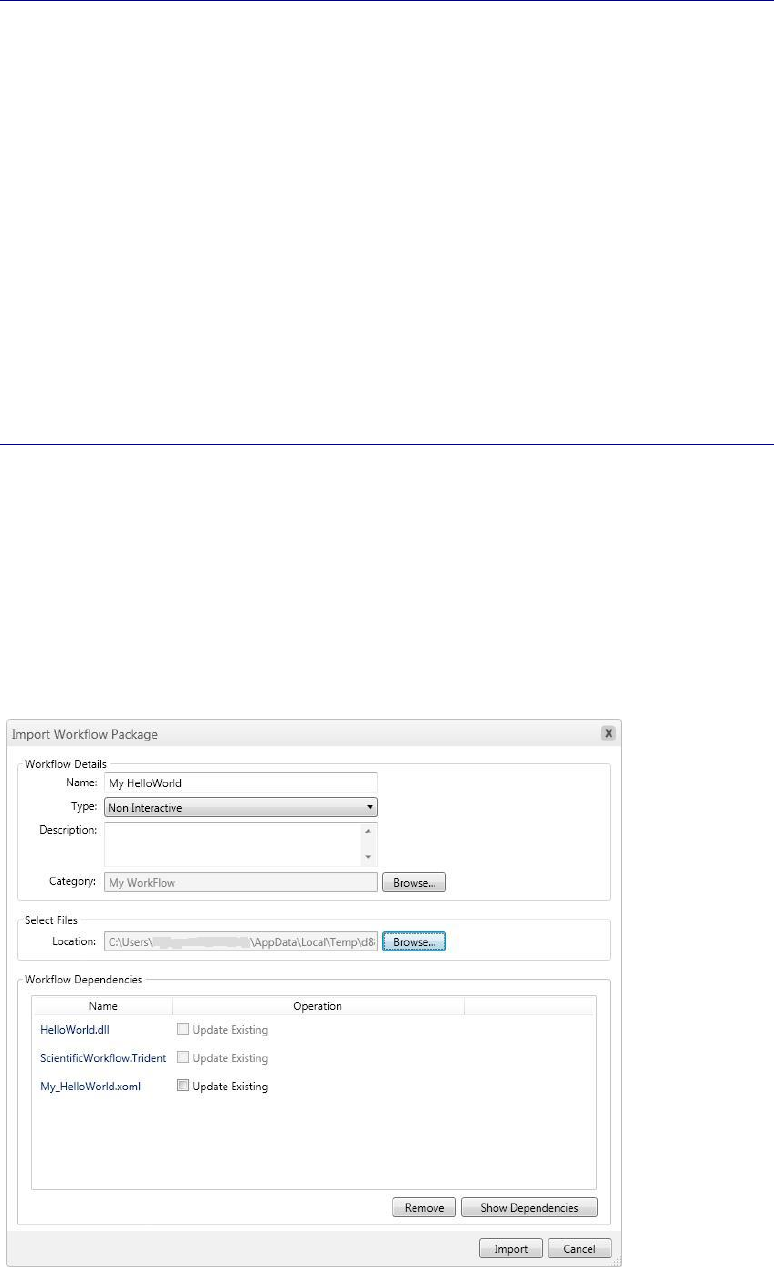
Step 3: Import the Activity
You can now generate the wrapper DLL and import the activity into Workbench.
To import the activity
1. In the Web Service Import Wizard, click Preview to display the Preview page.
Figure 16 shows how MyWebMethod would appear in composer.
Figure 16. Preview page
2. If the names in the preview are acceptable, click Generate, and then click Import
to generate the wrapper DLL and import it into Workbench.
Trident Composer User’s Guide - 22
Version 1.0 – November 6, 2009
© 2009 Microsoft Corporation. All rights reserved.
By default, the wizard simply creates a DLL and puts it in the Trident Registry
database.
3. Optionally, if you check Copy of Code and DLLs, the wizard puts a copy of the DLL
and a .cs file containing the associated code in a folder on your hard drive.
You can use the .cs file to create a modified version of the activity. For details, see
“Trident Programming Guide.”
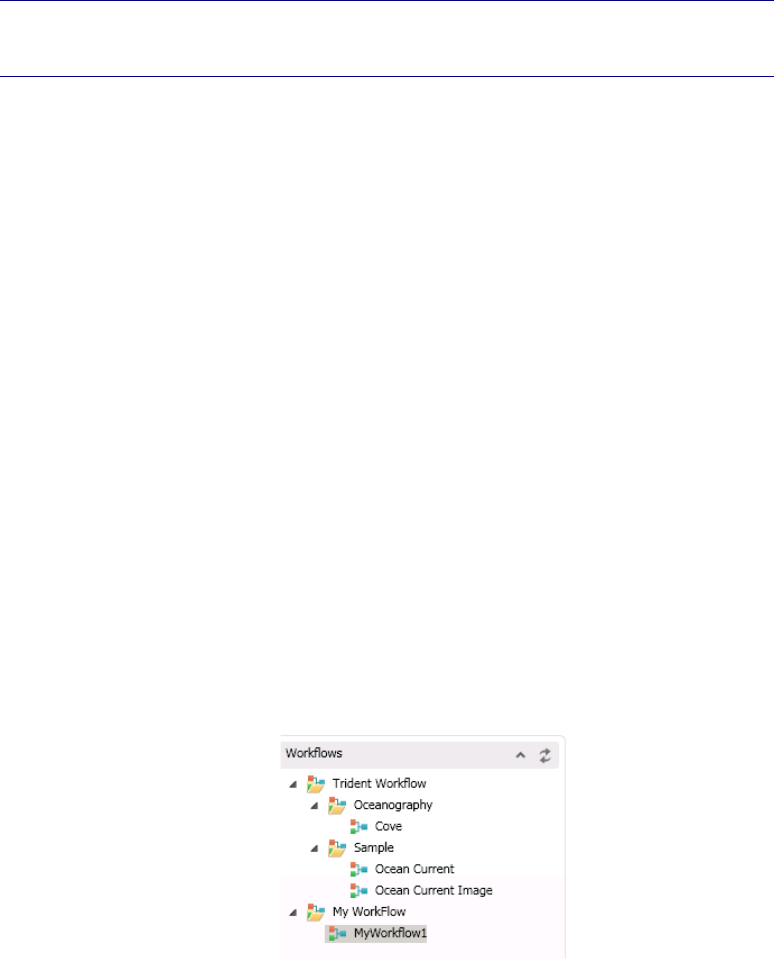
How to Import a Workflow Package
Trident workflow packages OPC-formatted files that contain all the DLLs required to
run the workflow. You can obtain packages directly from colleagues, or from Web
sites such as MyExperiment. After you have obtained a Trident workflow package,
you can import it into your Trident Registry, and run the workflow yourself.
To import a Trident workflow package
1. Run Composer.
2. On the Composer toolbar, click the arrow on the edge of the Import button and
click Workflow Package to open the Import Workflow Package page, shown in
Figure 17.
3. Use the Name and Category fields to assign a name to the workflow and specify
which category it should be stored under.
4. Use the Select Files field to specify the location of the package’s .twp file.
5. Click Import to import the workflow into the Trident Registry.
Figure 17. Workflow Package page
Trident Composer User’s Guide - 23
Version 1.0 – November 6, 2009
© 2009 Microsoft Corporation. All rights reserved.
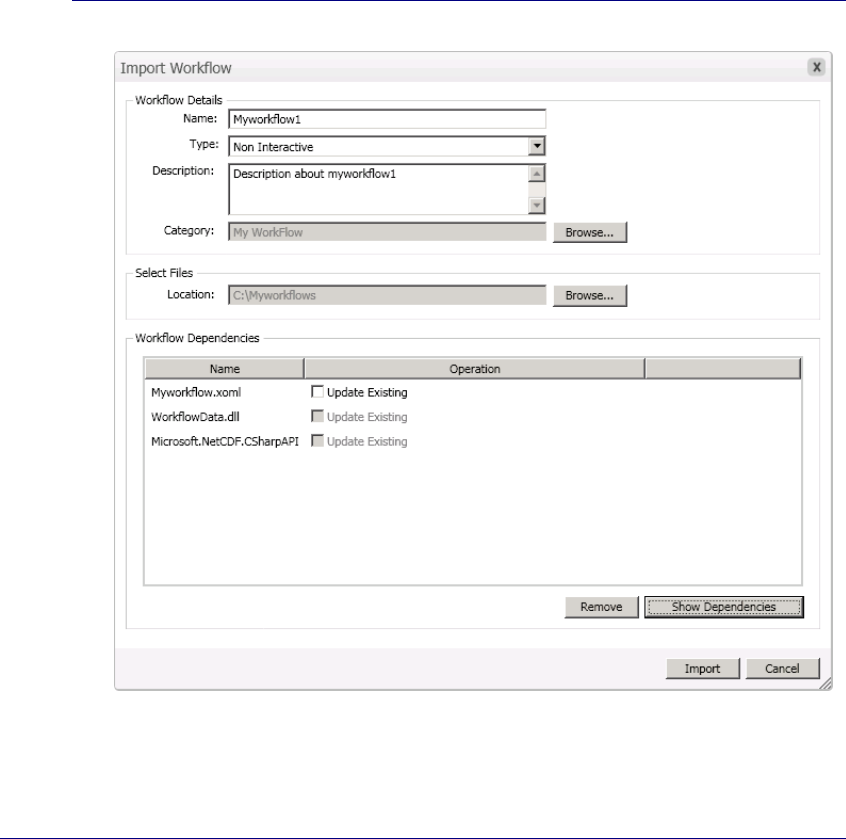
Import saved workflow from file system
1. On the Composer toolbar, click the arrow on the right edge of the Import button.
2. Click Workflow.
3. On the Import workflow form
a. Give the workflow a name, for example, “ Myworkflow1”
b. Specify ‘Type of workflow’, default is Non-interactive, if this workflow has
activities which shows any user interface, change the workflow type to
Interactive.
c. Specify workflow description (optional)
d. Select the category to import the workflow by clicking browse button next to
the category label.
e. Select the category (for example, MyWorkflow) and select ok on ‘Select
category’ dialog.
f. Select the XOML file saved, by clicking browse button next to ‘Location:’
label.
g. From the open dialog, select the single XOML file, for example
C:\myworkflow1\myworkflow1.xoml
h. If you have kept all the dependency dlls on the same folder, all the required
dlls will be shown as dependencies like in Figure 19
4. Click Import. You will be able to see the newly imported workflow in workflow
catalog as shown in the following Figure 18
Figure 18 Workflow Catalog
If you get any “Could not deserialize object” error during import, you are missing
one of the activity dll or one of it’s dependencies. Copy the missing dll to the
folder where you saved the workflow and try importing again.
Trident Composer User’s Guide - 24
Version 1.0 – November 6, 2009
© 2009 Microsoft Corporation. All rights reserved.
Figure 19 Import workflow
PART 2: How to Create a Workflow
This section shows how to use Composer to create a moderately complex workflow,
which applies a “boxcar” sliding window filter to a time series. There are five related
workflows, as discussed in the following sections:
SimpleFilter
A simple sequential workflow with three activities.
Demux
Modifies Simple to include ParallelActivity activity, which runs
two activities at the same time.
Validate
Modifies Demux to include an If Else activity, which selects one of
two branches based on whether the input data is valid.
Demux 2
Modifies Demux to use a Replicator activity, which takes a
collection with any number of activities, and runs the activities in
sequence.
SimpleFilter 2
Adds a For Loop activity to SimpleFilter, which runs the boxcar
filter multiple times with varying filter widths.
You can download the activities for the examples from the Trident site on Microsoft
Connect. Each activity is in a separate DLL. The sample package also includes a type
initializer DLL and the InputDataGenerator console application, which generates the

Trident Composer User’s Guide - 25
Version 1.0 – November 6, 2009
© 2009 Microsoft Corporation. All rights reserved.
data files used by the tutorials in this section. Import the activity and type initializer
DLLs into Workbench by following the instructions in “Importing Activities”, earlier in
this paper. For details on how several of the activities are implemented, see “Trident
Programming Guide.”
All the examples are based on either one or another of two input data files:
TimeSeries1 contains a single time series.
TimeSeries2 contains two multiplexed time series.
Before starting the workflow examples, you must create the data files by running the
InputDataGenerator console application, which is a project in the MyCustomActivities
solution. The executable file is located in the project’s bin\debug folder included with
the samples. For more details on this application and the data files, see “Trident
Programming Guide.”
To create the input data files
1. From the project’s bin\debug folder, run InputDataGenerator.exe.
The InputDataGenerator application creates data files named TimeSeries1 and
TimeSeries2, and places them in the InputDataGenerator project’s bin\debug
folder.
2. Copy the data files to an appropriate folder.
The examples in Part 2 assume that the input data files are in C:\TridentInput.
SimpleFilter: A Simple Workflow
Scientific data is often in the form of a digital time series, which must be filtered to
enhance the signal. This section shows how to construct simple workflow for filtering
a time series. It shows how to:
Start a new workflow.
Add activities to a workflow.
Set activity properties.
Specify data flow between activities.
Step 1: Create a New Workflow
Creating a new workflow takes a single click.
To create a new workflow
1. Run Composer.
2. Click the New button.
Composer displays the new workflow, as shown in Figure 20. The workflow initially
contains a root SequentialActivity activity.
Trident Composer User’s Guide - 26
Version 1.0 – November 6, 2009
© 2009 Microsoft Corporation. All rights reserved.
Figure 20. A new workflow containing a root activity
Step 2a: Add an Unpack Data Activity
The first activity in the workflow, Unpack Data, reads stored binary data from an
input file and converts it into a .NET array (double[ ]).
Note: All the activities in these tutorials are stored in the Activities catalog under My
Activities, which is not part of the default Workflow catalog. For a discussion of how
to add folders to the catalog, see “Trident Management Studio User’s Guide.”
To add Unpack Data to the workflow
1. Open the Activities catalog.
2. Drag Unpack Data from My Activities and drop it on the SequentialActivity
insertion point.
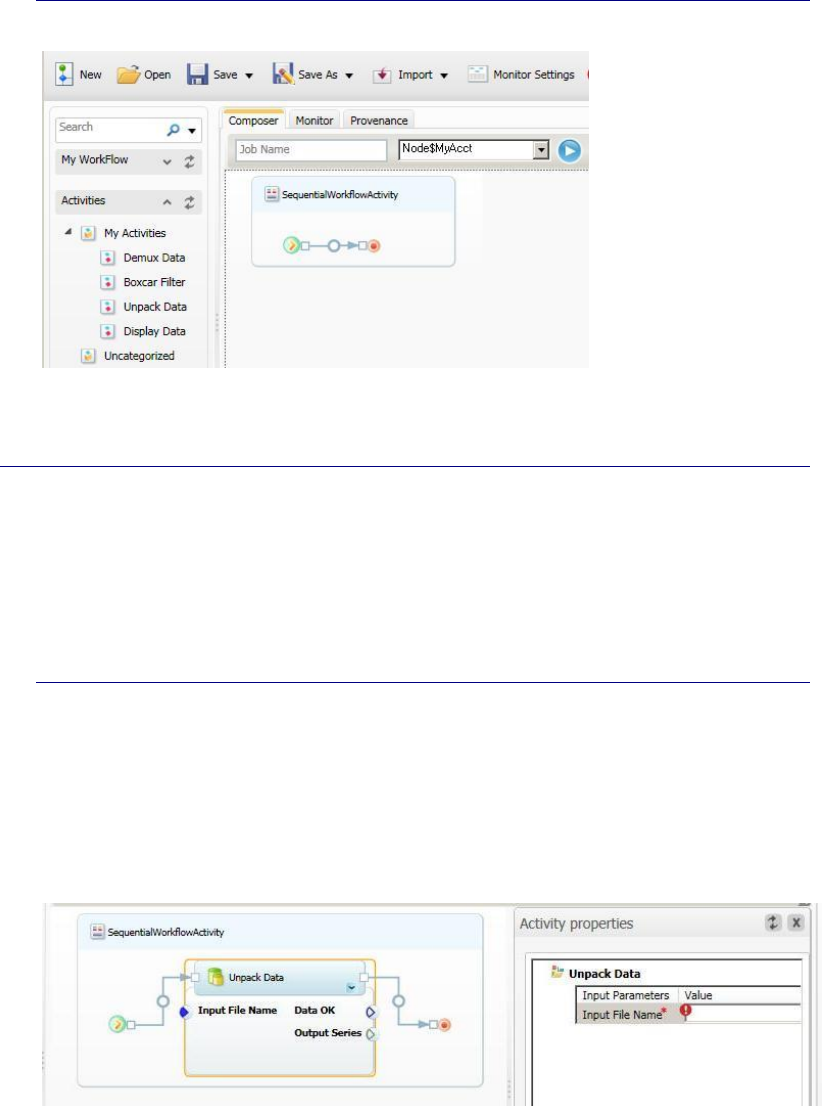
3. Right-click the Unpack Data property set, and then click Properties to display the
Property sheet.
Figure 21 shows the resulting working pane.
Figure 21. Workflow with Unpack Data
Initially, the Input File Name property is flagged with a red exclamation point, which
indicates a required input property without an assigned value. You cannot save or run
a workflow until all required properties have been set. In this case, enter the input
file name, C:\TridentInput\Timeseries1. Setting a required property’s value removes
the exclamation point, as shown in Figure 22.

Trident Composer User’s Guide - 27
Version 1.0 – November 6, 2009
© 2009 Microsoft Corporation. All rights reserved.
Figure 22. Required property with an assigned value
Note: The property sheet does not validate assigned values. The asterisk indicates
only that the property has been set, not whether it is correct. It does not, for
example, check whether C:\TridentInput\TimeSeries represents an actual file.
Unpack Data’s output is assigned to the Output Series property. The Data OK
property is not used in this workflow.
Step2b: Use Type Initializers to Initialize Properties
The version of UnpackData used in Step 2 requires you to manually enter the fully
qualified name of the input file, which can be somewhat cumbersome. In addition,
manual data entry works only for primitive data types such a string or int. If, for
example, the InputSeries type was a FileInfo object instead of a string, there’s no
straightforward way to initialize the object by using a text box.
Type initializers allow the user to enter the data for complex data types by displaying
an appropriate UI. For example, a FileInfo type initializer might display a UI that runs
the File Open dialog box, to allow you to specify the appropriate file. When the user
closes the UI, the initializer passes the initialized object back to Composer.
You can implement a type initializer for any data type, and then import it into
Workbench. If a data type has a type initializer, the property sheet displays an ellipsis
button to the right of the property’s edit box, as shown in Figure 23.
Figure 23. Property with a type initializer
In this case, it is a FileInfo type initializer. An example of a FileInfo initializer,
FileInfoInitializer, is included with the activity examples. You can use the initializer
with your workflow by using the primary toolbar’s Import button to import it into the
Trident Registry. The procedure is similar to importing an activity.
To use a type initializer
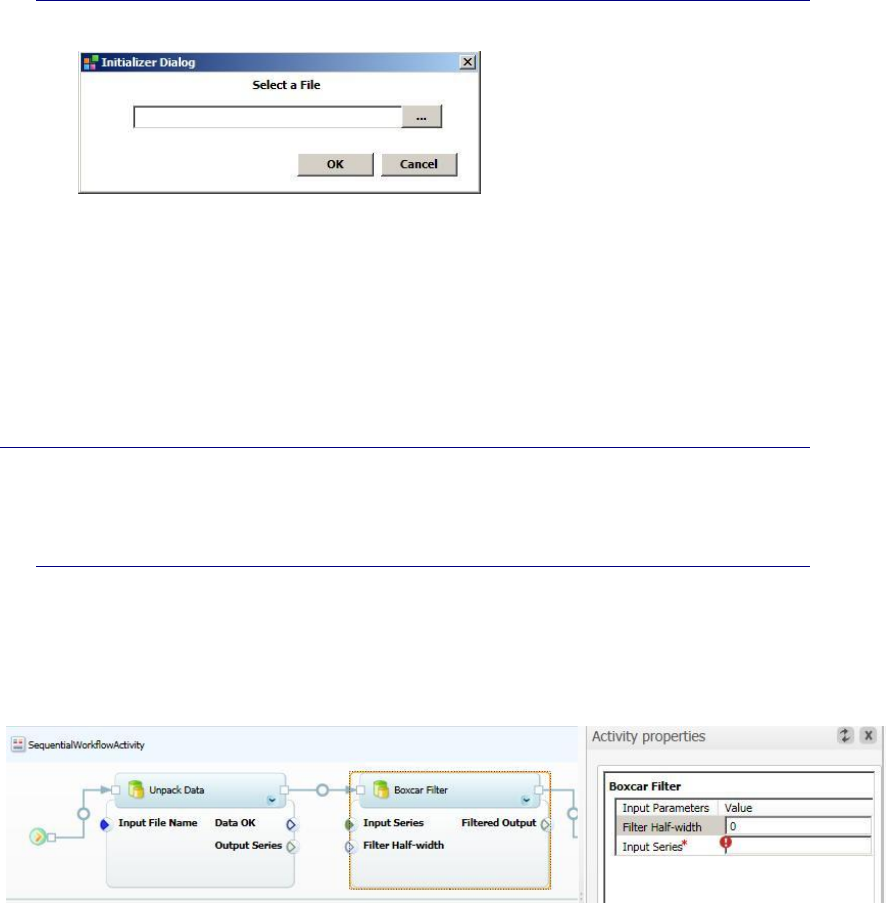
1. Click the ellipsis (…) button to open the UI.
In this example, the FileInfo type initializer opens the dialog box shown in Figure
24. Other initializers will have a UI suitable to the data type.
Trident Composer User’s Guide - 28
Version 1.0 – November 6, 2009
© 2009 Microsoft Corporation. All rights reserved.
Figure 24. FileInfo type initializer UI
2. Enter the data.
If you click the dialog box’s ellipsis button, the initializer opens an Open File
dialog box, which you can then use to locate and specify the appropriate file. You
can also enter the file name manually in the text box.
For more information on type initializers, see “Trident Programming Guide.”
Step 3: Add the Boxcar Filter Activity
The Boxcar Filter activity takes the output array from Unpack Data and applies a
boxcar filter to the series.
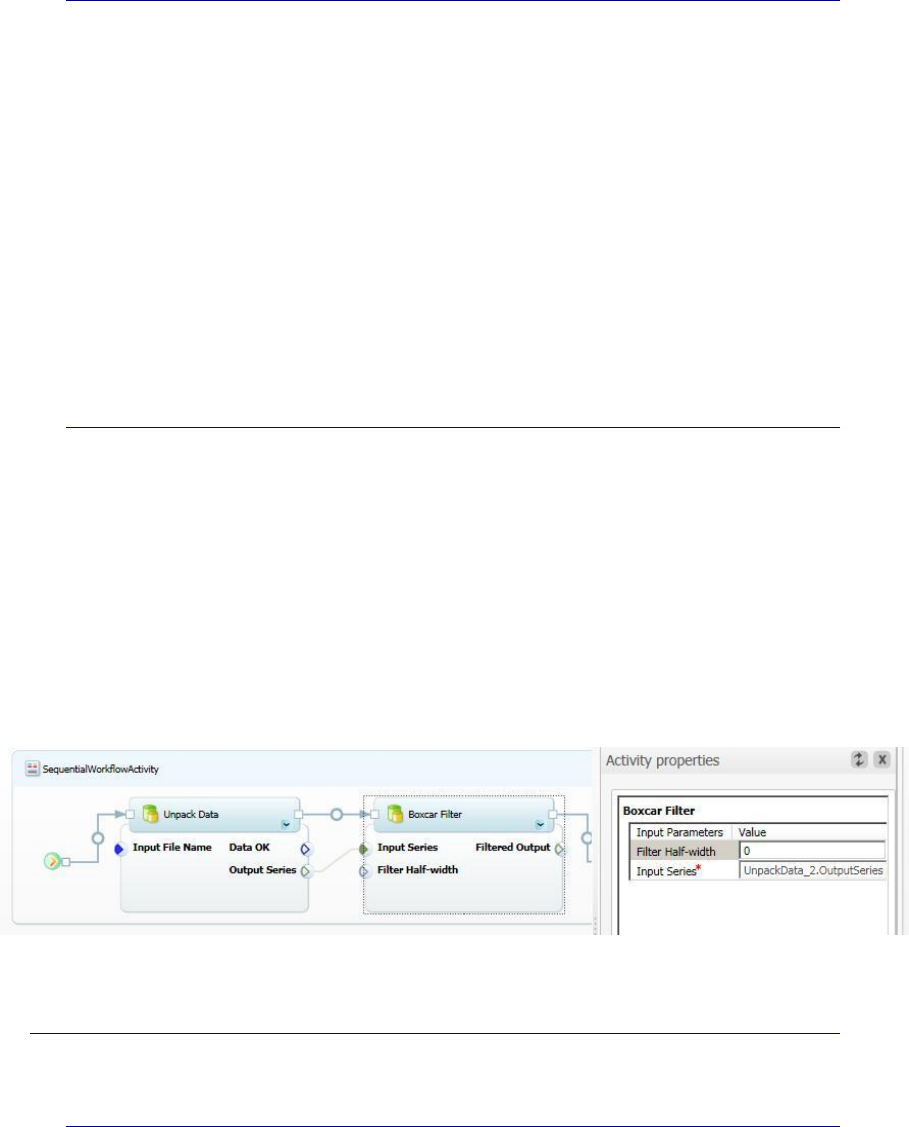
To add Boxcar Filter to the workflow
1. Drag the Boxcar Filter activity from My Activities, and drop it on the insertion
point immediately to the right of Unpack Data.
2. Double-click the activity’s property set to display its property sheet.
Figure 25 shows the Composer working pane for this step.
Figure 25. Workflow with Boxcar Filter
You can set input properties in either of two ways:
Assign a value to the property, as discussed in the previous section
—Or—
Bind the property to an upstream activity’s output property.
You define how data flows from one activity to the next by binding output properties
to appropriate input properties. Every activity property corresponds to the name of a
dependency property on the activity object. The name has the form
ObjectName.PropertyName, where ObjectName is created by Composer when you
add the activity to the workflow. The Unpack Data object in this example is named
UnpackData_2, and the dependency property name is OutputSeries.
You can bind any output property to a corresponding input property, as long as the
data types are compatible. Binding properties assign the name of the output
Trident Composer User’s Guide - 29
Version 1.0 – November 6, 2009
© 2009 Microsoft Corporation. All rights reserved.
dependency property to the input property, so the activity can use the name to
access the data.
For Boxcar Filter:
Input Series is a required property that represents the time series to be filtered,
and it must be bound to an output property.
Filter Half-width is an optional property that specifies the filter’s half-width, and it
can be set explicitly.
You could also set Filter Half-width by binding it to an appropriate output
property. However, because it is an optional property, this example leaves it
blank, and Boxcar Filter uses the default value.
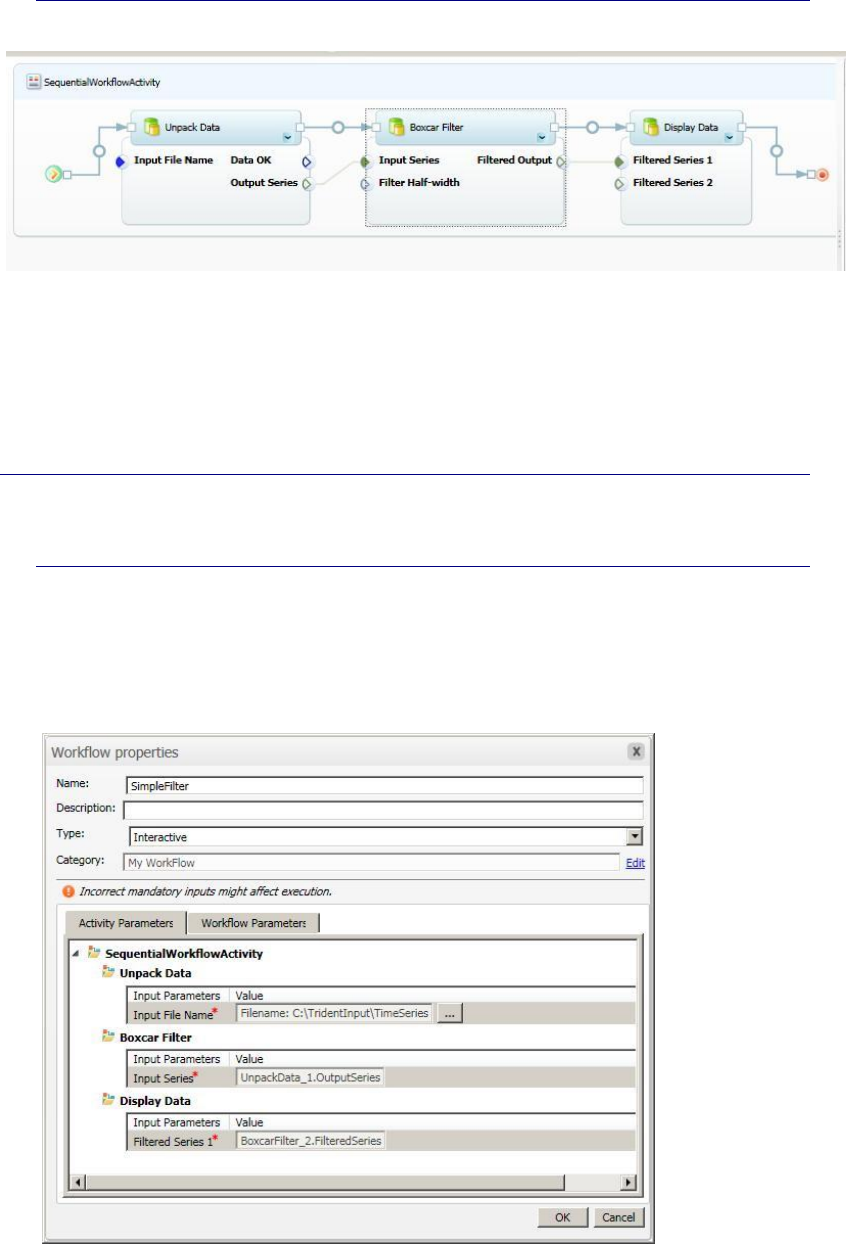
To bind Output Series to Input Series
1. Right-click the Output Series icon on Unpack Data and hold down the right mouse
button.
2. Drag the cursor to the Input Series icon on Boxcar Filter, and then when the
cursor changes to an arrow, release the button.
After the data is successfully bound:
The two properties are connected by a line.
The Input Series entry in the property pane is set to the appropriate
dependency property name, UnpackData_2.OutputSeries.
Figure 26 shows the resulting Composer pane.
Figure 26. Workflow with data binding
Step 4: Add the Display Data Activity
The final activity in this workflow is Display Data, which displays the filtered time series.
To add Display Data to the workflow
1. Drop Display Data on the insertion point to the right of Boxcar Filter.
2. Bind Boxcar Filter’s Filtered Output property to Display Data’s Filtered Series 1
property.
Figure 27 shows the resulting Composer pane.
Trident Composer User’s Guide - 30
Version 1.0 – November 6, 2009
© 2009 Microsoft Corporation. All rights reserved.
Figure 27. Completed workflow
Display Data also has an optional Filtered Series 2 input, which allows you to also
display a second series. If you don’t bind any data to this property, Display Data
displays the series that is bound to Filtered Series 1.
Step 5: Run the Workflow
You must specify workflow properties before running the workflow.
To run the completed workflow
1. Click Execute.
If you haven’t done so already, Composer will ask you to specify the workflow’s
name and category by displaying the Workflow Properties dialog box, which is
shown in Figure 28. If you have neglected to set any required input properties,
you can do so here.
Figure 28. Workflow properties dialog box
2. Set the following fields:
Name: Name the example SimpleFilter.
Trident Composer User’s Guide - 31
Version 1.0 – November 6, 2009
© 2009 Microsoft Corporation. All rights reserved.
Type: Specify interactive type.
Category: Click Edit at the right side of the box, and select the My Workflow
folder.
3. Click OK to start the workflow.
Important: There are two interactive types:
Interactive workflows run in the user account, and can display UI such as graphs.
If your workflow displays a UI, you must run it as an interactive workflow. For
example, Ocean Currents displays a graph, so it must be an interactive workflow.
If, for example, you try to run Ocean Currents as non-interactive, the workflow
hangs when it reaches the Display DataTable Chart activity, which displays the
graph.
Non-interactive workflows run as a service, so they cannot display a UI.
Services tend to be more reliable than applications running in a user account, so
the non-interactive type might be preferable if your workflow does not display a UI.
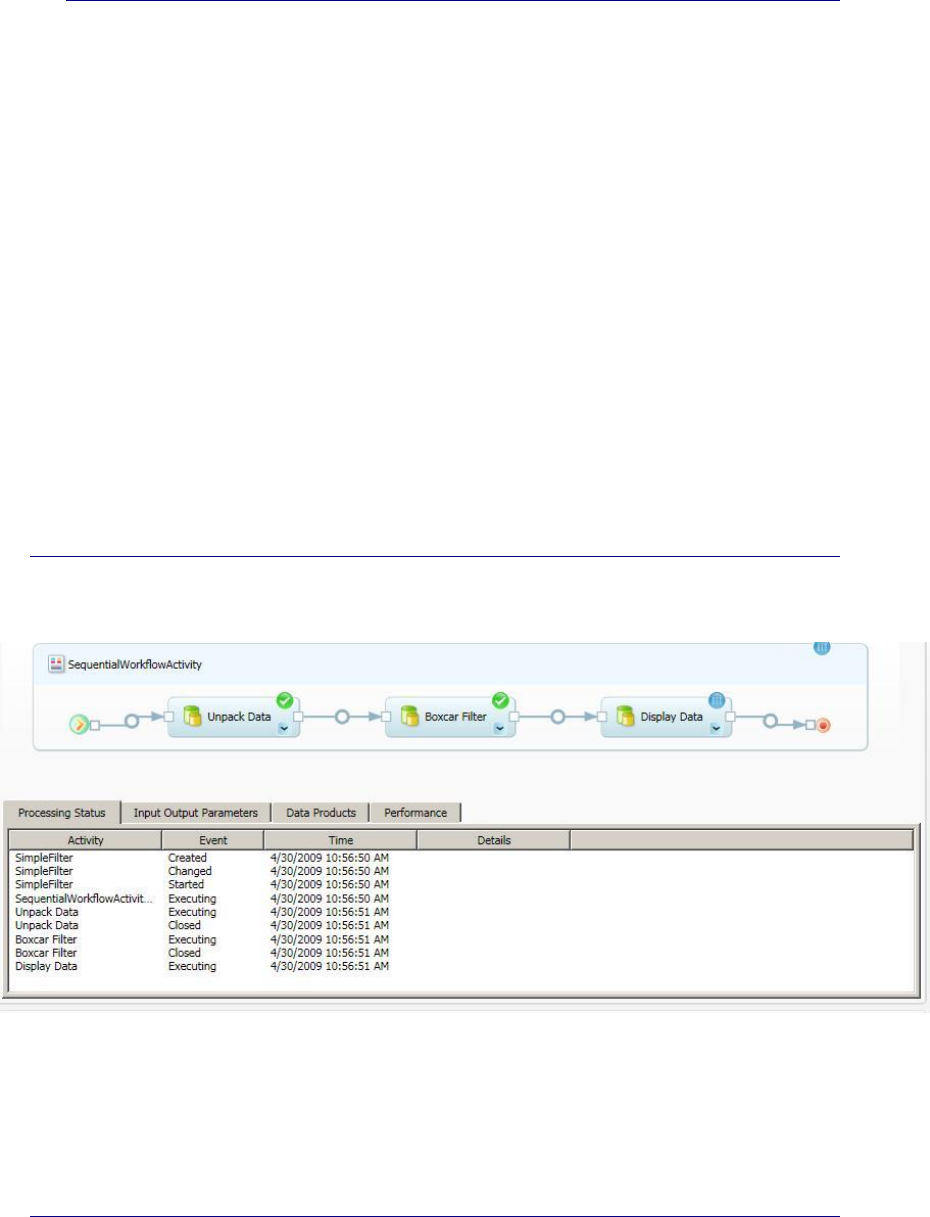
Step 6: Monitor the Workflow
After the workflow starts, Composer displays the Monitor pane, to allow you to
monitor the workflow’s progress. Figure 29 shows the Monitor pane for SimpleFilter.
Figure 29. Monitor pane for SimpleFilter
In Figure 29, the workflow shown earlier in Figure 28 has successfully completed the
first two activities and is currently running Display Data, as indicated by the icons in
the upper pane and the events in the lower pane.
Step 7: Debug the Activity
Activities are DLLs, hosted by the Trident application. In general, debugging hosted
DLLs is somewhat complicated. However, the Composer working pane toolbar
includes a Debug button that simplifies the process. This section describes how to
debug HelloWorld Sample, but the basic procedure can be used for any activity.

Trident Composer User’s Guide - 32
Version 1.0 – November 6, 2009
© 2009 Microsoft Corporation. All rights reserved.
To debug HelloWorld Sample
Refer Trident_Quickstart.doc for how to create HelloWorld activity using Visual
Studio
1.Open the HelloWorld project in Visual Studio as Administrator.
It is important to run the visual studio as Administrator otherwise you will not see
the opened Visual Studio in list of possible debuggers, during step 5.
2. Open the Trident Workflow Composer and Double click My HelloWorld the
workflow.
3. After opening the workflow in Composer, click Debug to run My HelloWorld in
debugging mode.
4. When the system displays the Visual Studio Just-In-Time Debugger dialog box,
If Visual Studio displays a message box asking whether you wanted to Debug
TridentWorkflowHost.exe, click Yes.
5. The system should display a second Visual Studio Just-In-Time Debugger dialog
box, indicating an unhandled exception.6. Select HelloWorld - ... from the list of
possible debuggers, and click Yes.
This action displays a Microsoft Visual Studio dialog box stating that no symbols
are loaded for any call stack frame.
6. Ignore the warning and click OK to enter the debugger.
The warning applies to the host application—TridentWorkflowHost.exe—not the
HelloWorld activity.
7. Set a breakpoint in HelloWorld activity project in Visual Studio, if you have not
already done so.
See “Implement HelloWorld Sample,” earlier in this paper for directions.
8. In Visual Studio, press F5 to continue execution until the workflow runtime
reaches your activity.
The breakpoint should now be highlighted in Visual Studio.
9. Press F10 to step over the current line of code.
You can now examine variables, step through the method, and so on.
Step 8 : Save workflow to filesystem
1. Open Workflow composer.
2. Double click the workflow needs to be saved from left pane to open it, if it is not
already open.
3. Click on the arrow at the right corner of ‘SaveAs’ button in the toolbar.
4. Select the filesystem option from dropdown menu.
5. Select the folder to save the workflow (for example c:\Myworkflows1) .
6. After giving filename for the workflow (for example: MyWorkflow1), click on
Save.
7. Copy all activity dlls and dependency dlls to the same folder manully, where you
saved the workflow (for example c:\MyWorkflow1). Depedency assemblies are
required for re-importing the workflow later .
Trident Composer User’s Guide - 33
Version 1.0 – November 6, 2009
© 2009 Microsoft Corporation. All rights reserved.
Demux: Add a ParallelActivity Activity to SimpleFilter
Scientists commonly use multiplexing to pack several time series into a single data
file. This section modifies the SimpleFilter workflow from the previous section to
create the DeMux workflow, which handles a multiplexed file that contains two time
series. This example shows how to:
Insert activities into an existing workflow.
Bind multiple data streams.
Use the ParallelActivity activity to run two activities in parallel.
Step 1: Add the Demux Data Activity
The Demux Data activity takes a multiplexed data array from Unpack Data and
demultiplexes it to produce two separate time series.
To add the Demux Data activity
1. Delete the Boxcar Filter activity.
Deleting an activity also deletes any data bindings.
2. Drag Demux Data from My Activities and drop it on the insertion point between
UnpackData and Display Data.
3. Bind Demux Data activity’s Input Series property.
4. Set the Unpack Data activity’s Input File Name property to
C:\TridentInput\TimeSeries2, which contains the multiplexed time series.
Figure 30 shows the resulting workflow.
Figure 30. Adding the Demux Data activity
Step 2: Add ParallelActivity to the Workflow
In this example, there are now two series to filter, but Boxcar Filter takes only one
input series. You could implement another filter activity that takes two input series,
but Trident supports a simpler approach.
ParallelActivity is a Trident composite activity—based on the WF Parallel activity—
that allows you to run multiple activities in parallel. Strictly speaking, only one activity
is running at any given time, but for most purposes you can consider them to be
concurrent. For more information, see the Windows Workflow Foundation
documentation for the Parallel activity.
Trident Composer User’s Guide - 34
Version 1.0 – November 6, 2009
© 2009 Microsoft Corporation. All rights reserved.
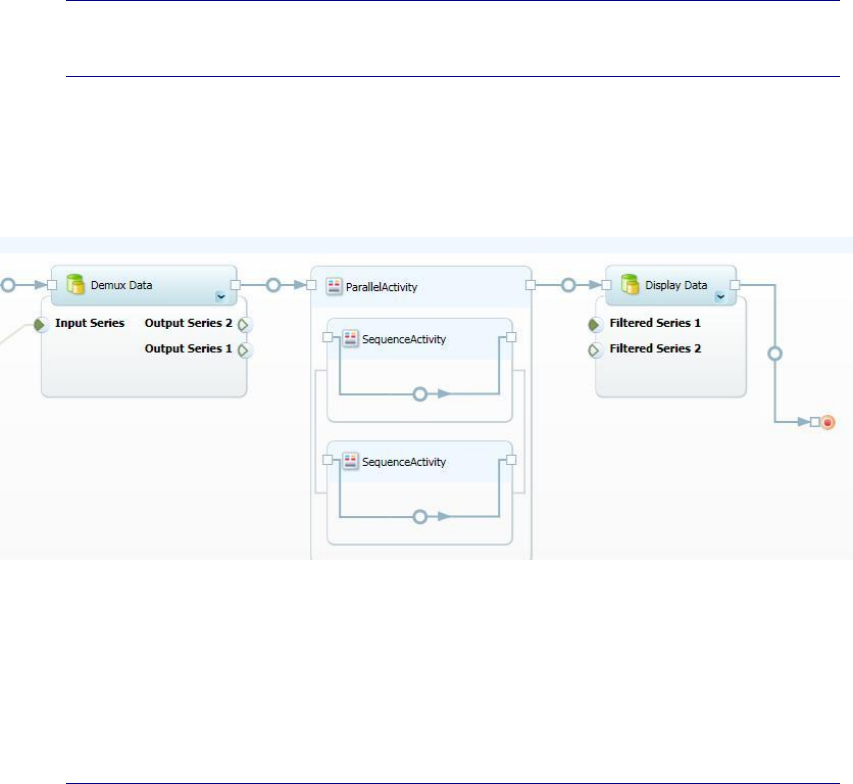
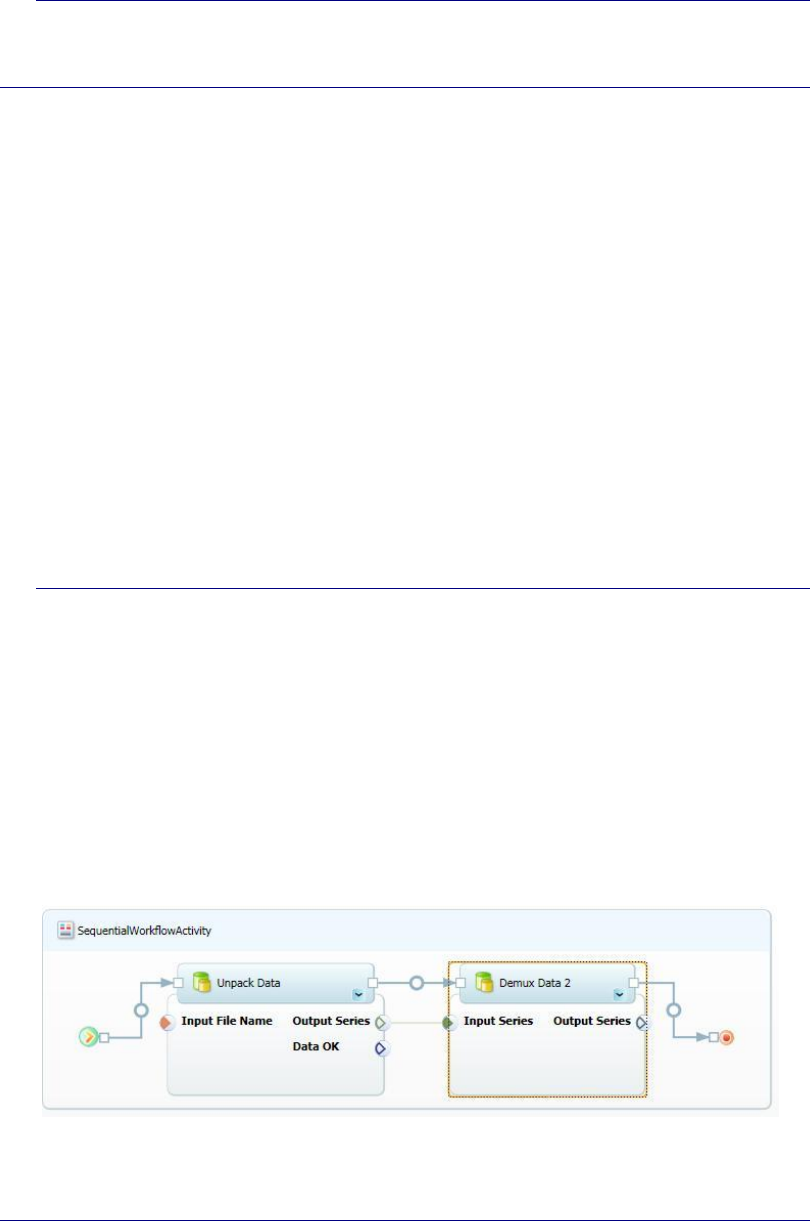
To add a ParallelActivity activity to the workflow
Drag ParallelActivity from the catalog and drop on the insertion point between
Demux Data and Display data.
ParallelActivity is in the Windows Workflow 3.0 folder.
Figure 31 shows the resulting workflow.
Figure 31. Adding a ParallelWorkflow
ParallelActivity hosts two SequenceActivity activities. For this example, each
SequenceActivity activity will host a single Boxcar Filter activity. To run more than
two activities in parallel, drop a ParallelActivity activity into either or both of the
SequenceActivity activities.
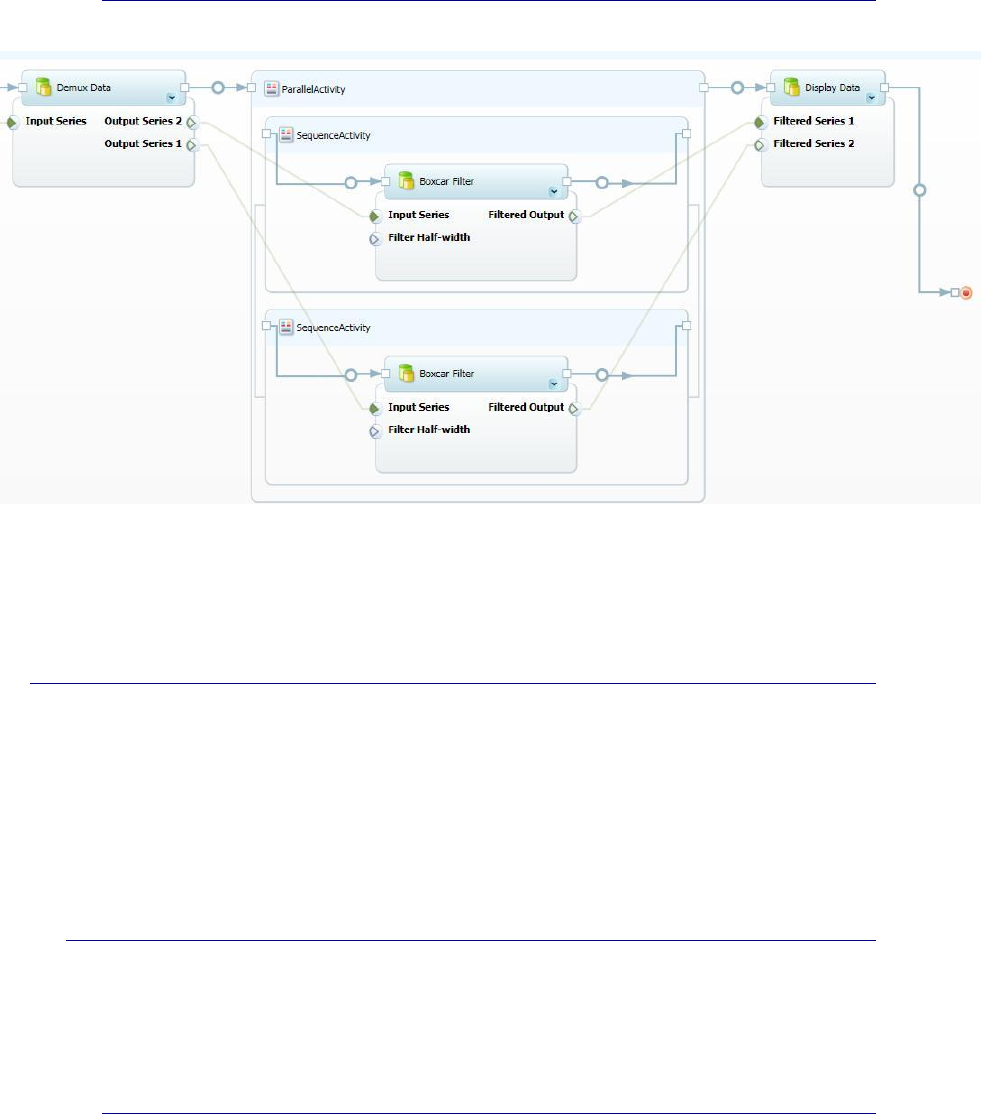
To add Boxcar Filters to the workflow
1. Drag a Boxcar Filter activity from the catalog and drop it on the upper
SequenceActivity activity’s insertion point.
2. Drag a Boxcar Filter activity from the catalog and drop it on the lower
SequenceActivity activity’s insertion point.
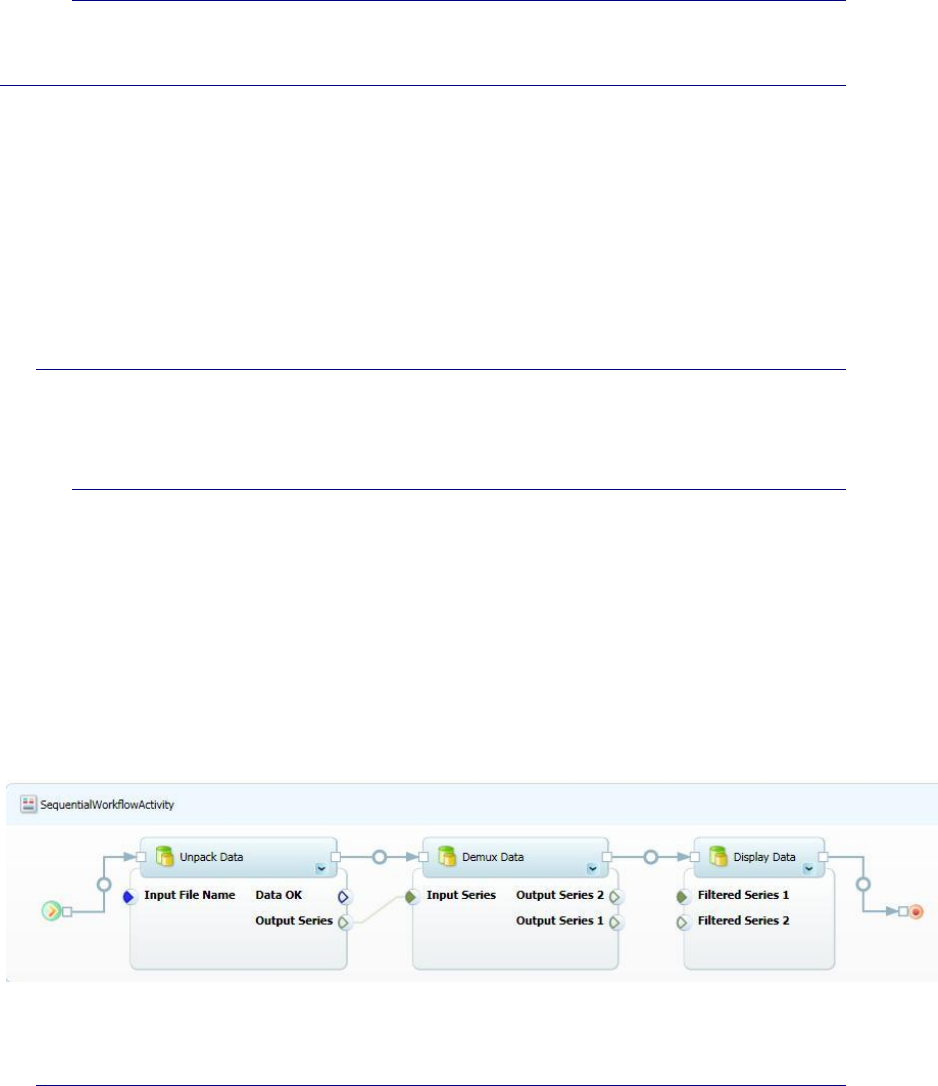
3. Bind Demux Data’s Output Series 2 property to the upper Boxcar Filter’s Input
Series property.
4. Bind Demux Data’s Output Series 1 property to the lower Boxcar Filter’s Input
Series property.
5. Bind the upper Boxcar Filter’s Filtered Output property to Display Data’s Filtered
Series 1 property.
6. Bind the lower Boxcar Filter’s Filtered Output property to Display Data’s Filtered
Series 2 property.
Figure 32 shows the resulting workflow, which is ready to run.
Trident Composer User’s Guide - 35
Version 1.0 – November 6, 2009
© 2009 Microsoft Corporation. All rights reserved.
Figure 32. Workflow with two Boxcar Filter activities
Other ways to run multiple activities as a group include the Trident Replicator and
For Loop activities, which are discussed later.
Validate: Add an If Else Conditional to Demux
Applications usually validate data before trying to process it. This section modifies the
Demux workflow to create the Validate workflow, which validates the input data. This
section shows how to:
Use an If Else activity to manage control flow.
Use condition activities to control the If Else activity’s behavior.
Use a Terminate activity to terminate a workflow.
Step 1: Add an If Else Activity to the Workflow
If Else is a composite activity that allows you direct the workflow into either of two
branches, based on user-defined conditions. Unpack Data tests the data in the input
file, and sets the Data OK property to indicate whether the data is valid. The If Else
activity uses the Data OK value to direct the workflow into one of two branches.
To add an If Else activity to the workflow
Drop an If Else activity on the insertion point between Unpack Data and Demux
Data.
If Else is under Trident Activities\Control Flow.
Figure 33 shows the resulting workflow.
Trident Composer User’s Guide - 36
Version 1.0 – November 6, 2009
© 2009 Microsoft Corporation. All rights reserved.
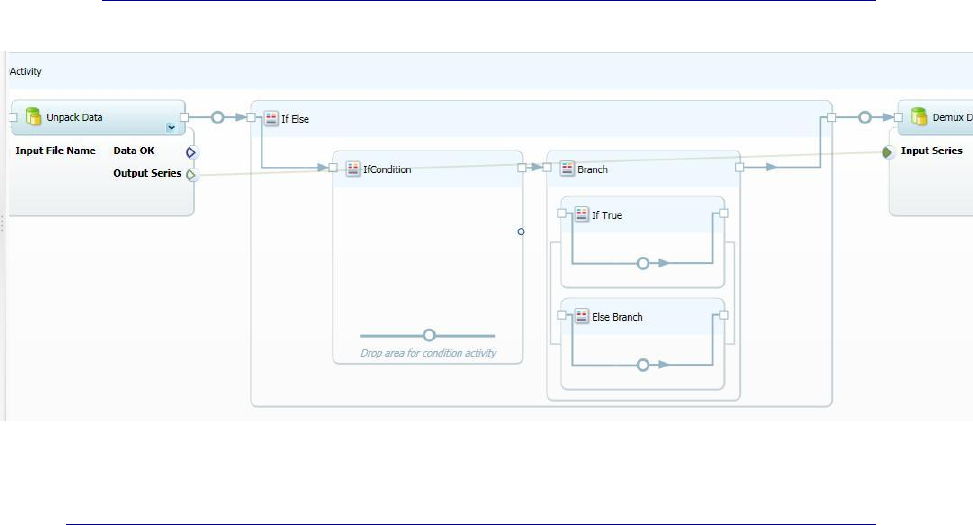
Figure 33. Workflow with an If Else activity
Step 2 Add a Condition to the If Else Activity
The If Else activity has insertion points for three activities:
If Condition is where you drop condition activities.
Condition activities determine which branch of the workflow is to be run. They
take one or two inputs and have a single Boolean output.
If True is where you drop the activity to be run if the condition evaluates to True.
Else Branch is where you drop the activity to be run if the condition evaluates to
False.
Most condition activities compare two input properties and set the output to True or
False. For example, String Equal compares two strings, and sets the output property
to True if the strings are equal and False otherwise. You can set the input properties
manually, or bind them to a property from an upstream activity. For example, you
could use the property sheet to set one of the String Equal inputs to “My String” and
bind the other to an output property of an upstream activity.
The ability to bind properties to conditions allows you to chain conditionals and
construct composite conditions. For example:
1. Bind an upstream property to String Equal to test for a specified string value.
2. Bind an upstream property to Integer Equal to test for a specified integer value.
3. Bind the outputs of String Equal and Integer Equal to an AND activity, which
evaluates to True if both inputs are set to True, and False otherwise.
4. Bind the output of the AND activity to the small circle on the right edge of If
Condition.
This specifies that the output of the AND activity controls which branch is to be
run.
If both upstream properties satisfy the tests, If Else runs If True. Otherwise, it runs
Else Branch. Figure 34 shows this composite conditional in Composer.
Trident Composer User’s Guide - 37
Version 1.0 – November 6, 2009
© 2009 Microsoft Corporation. All rights reserved.
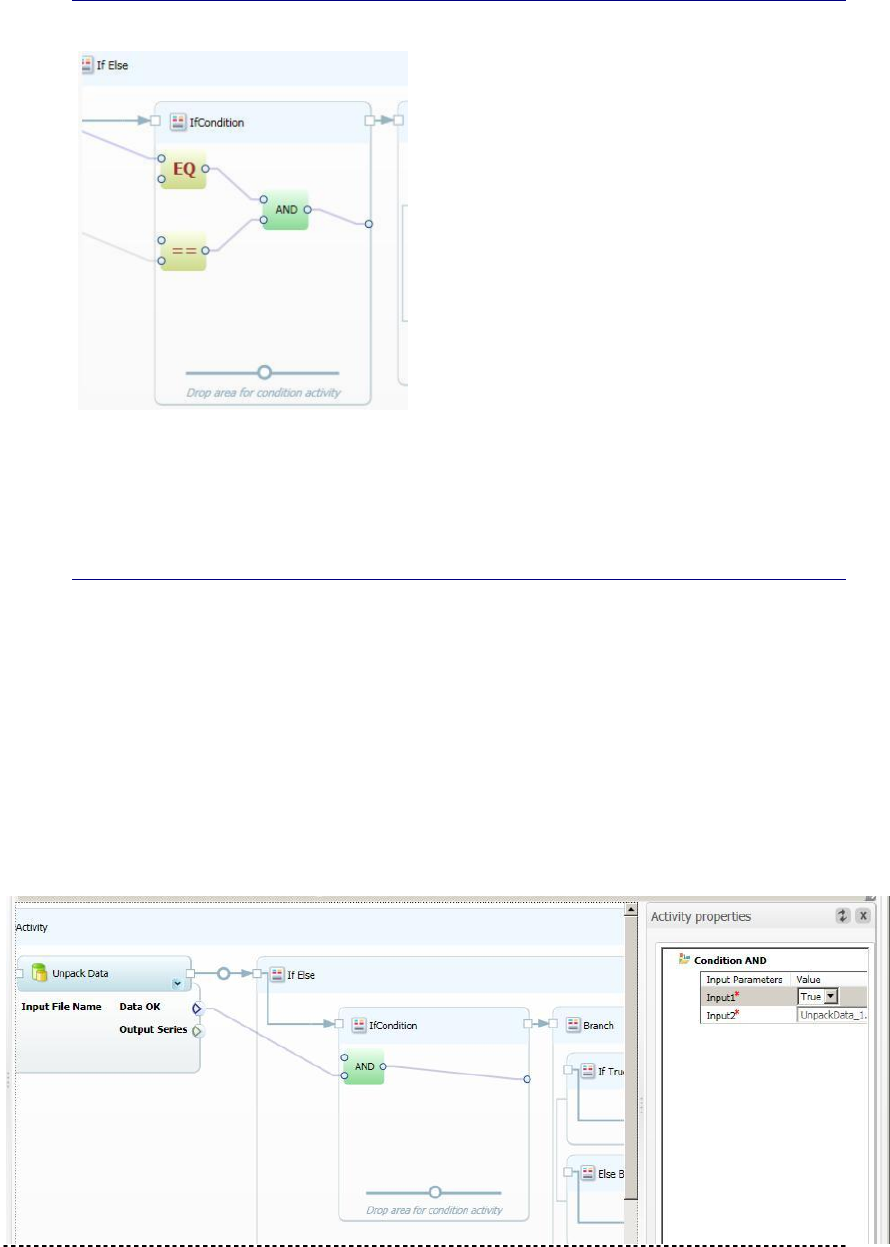
Figure 34. Composite conditional
Validate uses an AND conditional activity to test whether the Unpack Data activity’s
Data OK property is set to True.
To include an AND conditional activity
1. Drop an AND conditional activity in If Condition.
The condition activities are located under Trident Activities\Control
Flow\Condition. The AND activity is named Condition AND.
2. Bind Data OK to one of the AND activity’s input properties.
3. Open the AND activity’s property sheet and set the other input property to True.
4. Bind the AND activity’s output property to the circle at the right edge of If
Condition.
The Workflow runs If True if the data is valid, and runs Else Branch otherwise. Figure
35 shows the results in the Composer pane.
Figure 35. Adding an AND conditional to Validate
Trident Composer User’s Guide - 38
Version 1.0 – November 6, 2009
© 2009 Microsoft Corporation. All rights reserved.
Step 3: Assign a TerminateActivity Activity to the Else Branch
If Data OK is False, If Else runs the Else Branch. The simplest approach to handling
invalid data is to terminate the workflow gracefully by running a TerminateActivity
activity.
To add TerminateActivity to the Else Branch
Drop a TerminateActivity activity on the Else Branch insertion point.
TerminateActivity is located under Windows Workflow 3.0. It has no properties;
it simply terminates the workflow.
Step 4: Move Demux Data to If True
If Data OK is True, If Else runs If True, which runs the remainder of the workflow. The
simplest approach is to put Demux Data in If True and bind it to the next activity.
To assign Demux Data to If True
1. Delete the Demux Data activity.
2. Drop a new instance of Demux Data on the If True insertion point.
This breaks the data binding, so you need to rebind Demux Data’s properties.
3. Bind Unpack Data’s Output Series property to Demux Data’s Input Series
property.
4. Bind Demux Data’s Output Series 2 property to the upper Boxcar Filter’s Input
Series property.
5. Bind Demux Data’s Output Series 1 property to the lower Boxcar Filter’s Input
Series property.
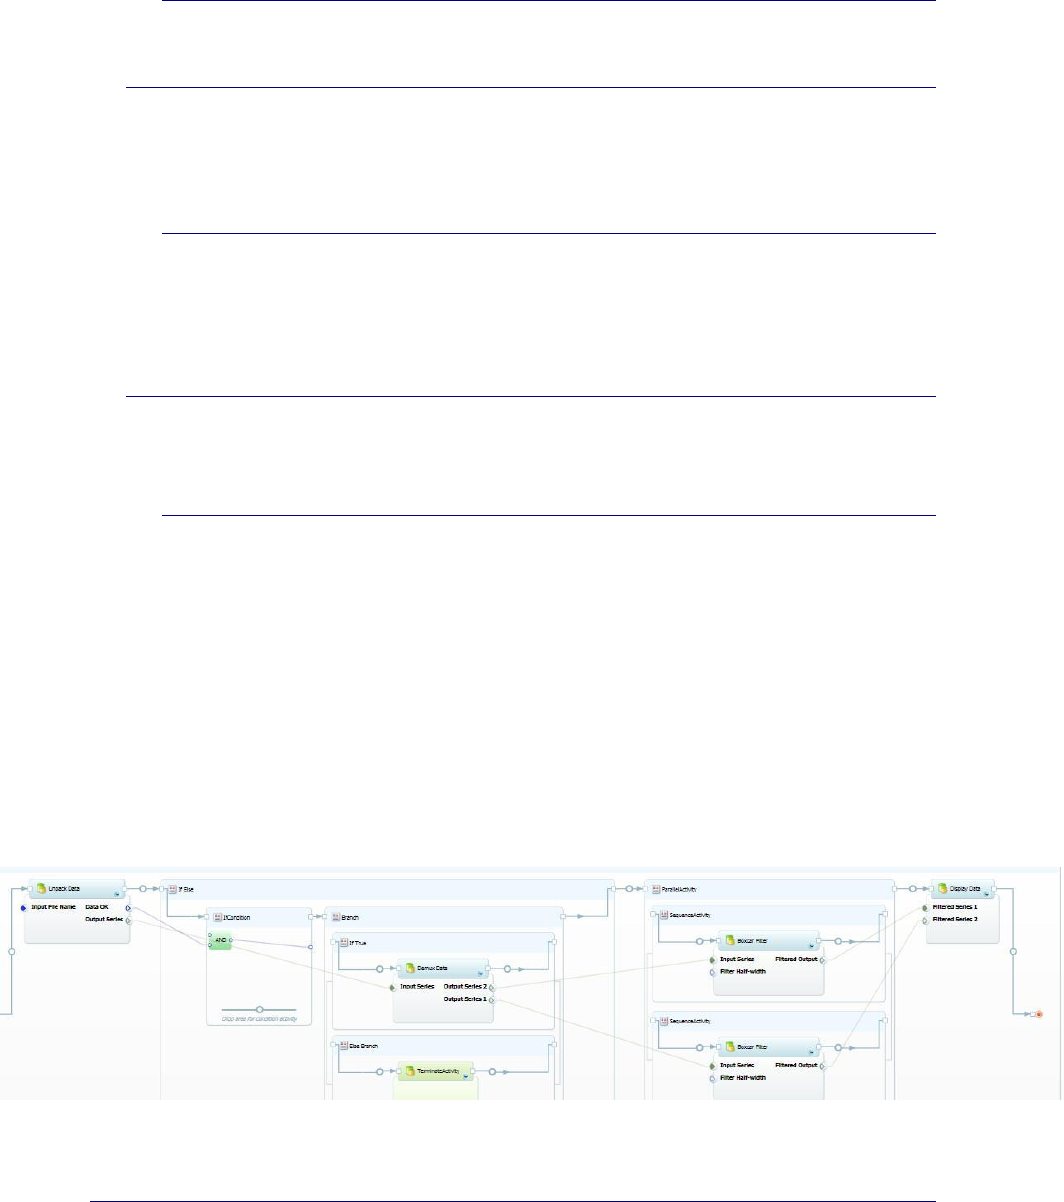
Figure 36 shows the complete workflow in the Composer pane.
Figure 36. The complete Validate workflow
Demux 2: Add a Replicator Activity to SimpleFilter
The Demux workflow uses a ParallelActivity activity to run two instances of the
BoxcarFilter activity. However, ParallelActivity has a fixed number of child activities—
two in this case. What if your data files contain varying numbers of series? With
Demux, you must modify the workflow to change the number of series it handles.
Trident Composer User’s Guide - 39
Version 1.0 – November 6, 2009
© 2009 Microsoft Corporation. All rights reserved.
One solution is the Trident Replicator activity, which is based on the WF Replicator
activity. Replicator works in much the same way as a foreach operator. The input is a
collection—represented by an IList interface—which can contain any number of
items. Replicator contains a child activity which processes the data. To process the
input collection, Replicator creates a separate instance of the child activity for each
item in the input collection and runs each instance.
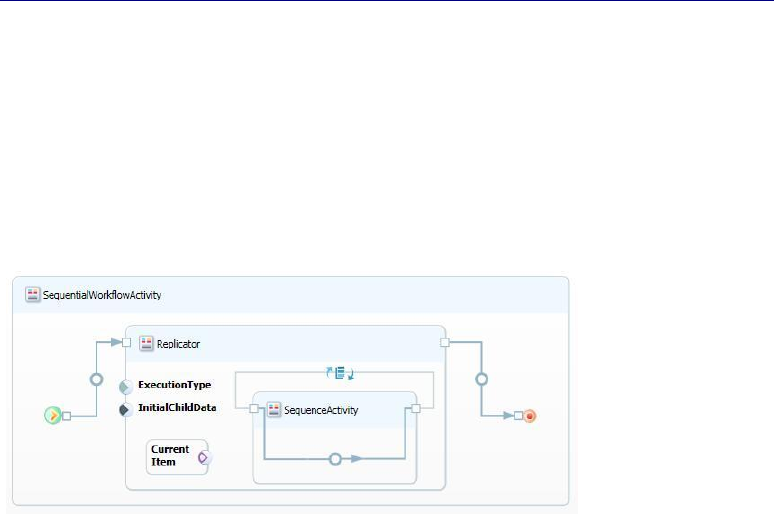
Figure 37 shows the Trident Replicator activity, as it appears in Composer.
Figure 37. Trident Replicator activity
Replicator has four key elements:
ExecutionType Input Property
This property specifies the ExecutionType setting, and must be set to either
Sequence or Parallel.
InitialChildData Input Property
This property is an IList type that represents the input collection. You bind the
output property associated with the collection to InitialChildData.
Current Item
This component represents the item being processed. You bind it to the
appropriate input property on the child activity.
Child Activity
Trident Replicator’s child activity is a SequenceActivity.
Tip: Replicator does not have an output property, so it is often the workflow’s
terminal activity. Technically, you can bind the output of the child activity to a
downstream activity, but that activity receives the data from only the last instance of
the child activity. If you want to use a downstream activity to process Replicator
output, one option is to write the child activities’ output data to storage, and then
read the stored data.
Trident Composer User’s Guide - 40
Version 1.0 – November 6, 2009
© 2009 Microsoft Corporation. All rights reserved.
Step 1: Start the Demux 2 Workflow
Demux 2 is a modified version of the Demux workflow that uses a Replicator activity
to process input files that contain an arbitrary number of multiplexed time series. To
accommodate the Replicator activity, the workflow uses slightly modified versions of
two of the Demux activities, Demux Data and Boxcar Filter, which are named Demux
Data 2 and Boxcar Filter 2.
DemuxData 2
DemuxData 2 demultiplexes the array from Unpack Data, as before, but it
packages the results into a collection of double [ ] arrays, and assigns the
collection to its single output property, OutputSeries.
BoxcarFilter 2
BoxcarFilter 2 applies a boxcar filter to a double [ ] array and outputs the filtered
array, as before. However, the InputSeries input property is an object type
instead of double [ ], so that the property can be bound to CurrentItem.
The first part of Demux 2 is nearly identical to Demux. The only difference is that
Demux Data 2 replaces Demux Data.
To start the Demux 2 workflow
1. Open Composer and start a new workflow.
2. Drop an UnpackData activity on the insertion point, and set the Input File Name
property.
3. Drop a DemuxData 2 activity on the insertion point to the right of UnpackData.
4. Assign C:\TridentInput\TimeSeries2 to the UnpackData activity’s Input File Name
property.
5. Bind the UnpackData activity’s Output Series property to the Demux Data 2
activity’s Input Series property.
Figure 38 shows the resulting workflow.
Figure 38. Demux 2 workflow with two activities
Step 2: Add a Replicator Activity to the Workflow
The Output Series property represents the demultiplexed time series as a collection
of double arrays. The next step is to add a Replicator to the workflow to filter and
display each series.
Trident Composer User’s Guide - 41
Version 1.0 – November 6, 2009
© 2009 Microsoft Corporation. All rights reserved.
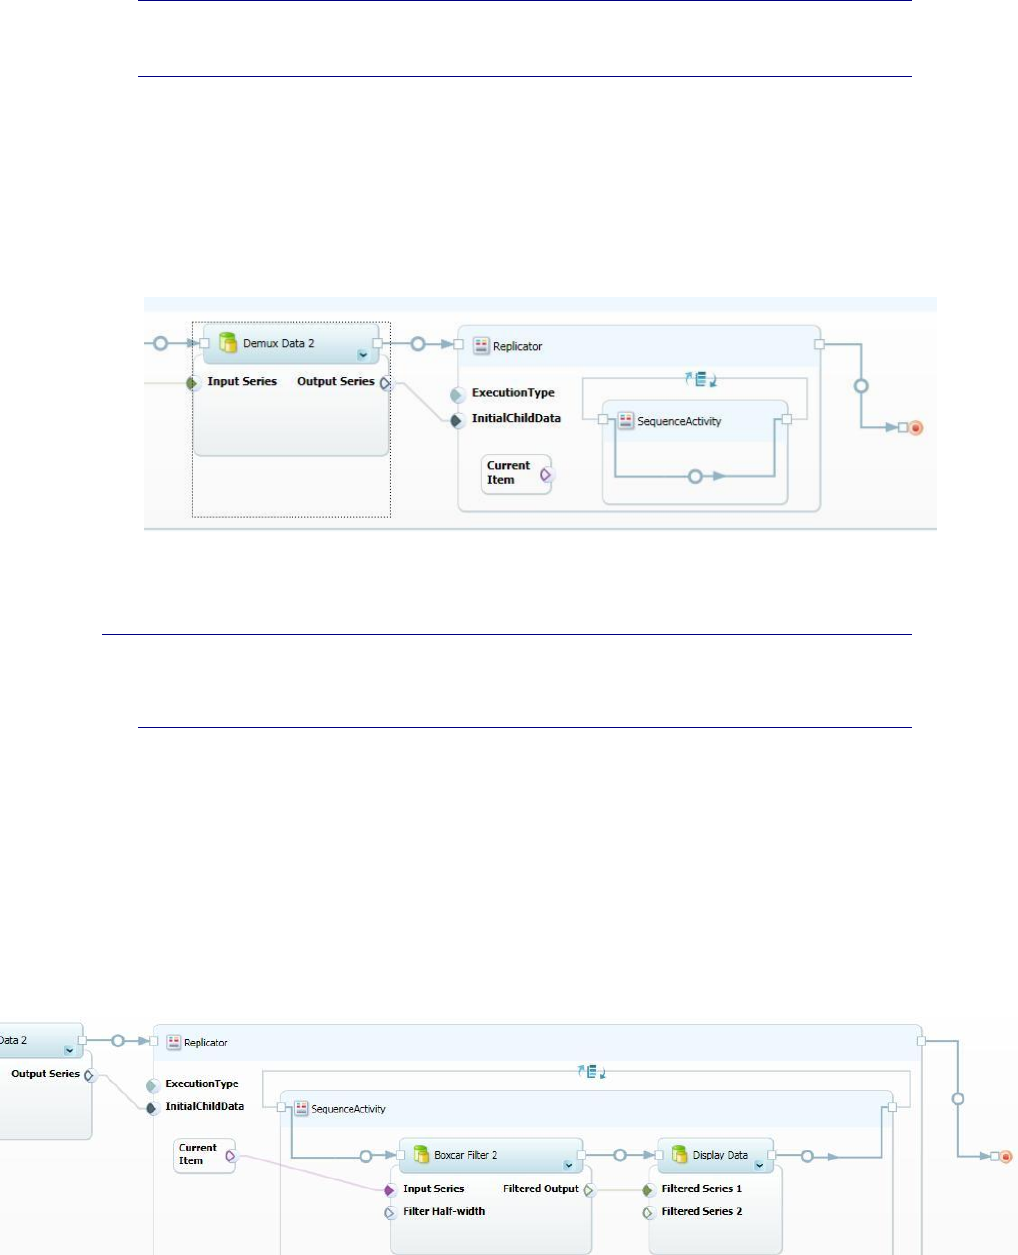
To add a Replicator to Demux 2
1. Drop a Replicator activity on the insertion point to the right of Demux Data 2.
The Replicator activity is in the Workflow Catalog’s Trident Activities\Control
Flow folder.
2. Bind the Demux Data 2 activity’s Output Series property to the Replicator
activity’s InitialChildData property.
Figure 39 shows the resulting workflow.
Figure 39. Demux 2 with a Replicator activity
Step 3. Add Child Activities to Replicator
The final task is to filter and display the time series.
To filter and display the time series
1. Drop a Boxcar Filter 2 activity on the Replicator insertion point.
2. Drop a Display Data activity on the insertion point to the right of Boxcar Filter 2,
but still within Replicator.
This displays each series in a separate window.
3. Bind Current Item to the Boxcar Filter 2 activity’s Input Series property.
4. Bind the Boxcar Filter 2 activity’s Filtered Output property to the Display Data
activity’s Filtered Series 1 property.
Figure 40 shows an excerpt of the resulting workflow, which is ready to run.
Figure 40. The completed Demux 2 workflow
Trident Composer User’s Guide - 42
Version 1.0 – November 6, 2009
© 2009 Microsoft Corporation. All rights reserved.
SimpleFilter 2: Add a For Loop Activity to SimpleFilter
SimpleFilter filters and displays a single filtered time series, with the amount of
smoothing that is controlled by the Boxcar Filter activity’s Filter Half-width property.
However, you often don’t know in advance how much smoothing is appropriate for a
particular series. You could run SimpleFilter multiple times and set Filter Half-width to
a variety of values. A more efficient approach is to use a For Loop activity to do the
task automatically.
The For Loop activity works in much the same way as a for operator. You specify
start, end, and step values for the index, and For Loop then runs its child activity once
for each index value.
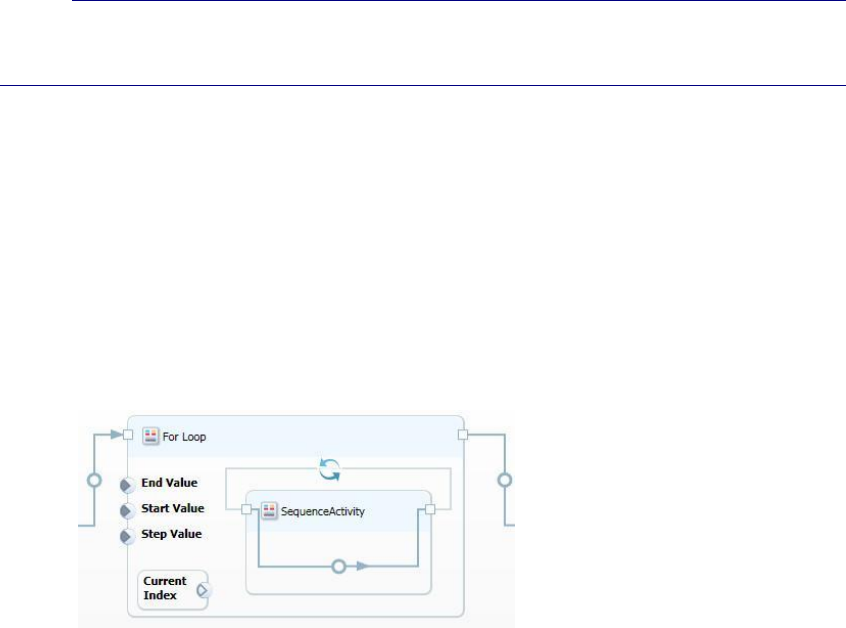
Figure 41 shows the For Loop activity in Composer.
Figure 41. For Loop activity
The activity has the following key components:
Start Value Input Property
The starting index.
Step Value Input Property
How much to increment the index for each iteration.
End Value Input Property
The final index value.
Current Index
This component represents the loop’s current index value. If you want to use the
index value, bind Current Index to the appropriate input property on the child
activity. Otherwise, ignore Current Index value, and For Loop simply runs the
child activity a specified number of times.
Child Activity
The Trident For Loop activity’s child activity is a SequenceActivity.
Tip: Like Replicator, For Loop does not have an output property, so it is often the
workflow’s terminal activity. You can bind the output of the child activity to a
downstream activity, but that activity receives the data from only the last instance of
the child activity. If you want to use a downstream activity to process For Loop
output, one option is to write the child activity output data to storage, and then have
the downstream activity read the stored data.
SimpleFilter 2 is a modified version of SimpleFilter—based on the same activities—
that uses a For Loop activity to run Boxcar Filter automatically multiple times with a
Trident Composer User’s Guide - 43
Version 1.0 – November 6, 2009
© 2009 Microsoft Corporation. All rights reserved.
range Filter Half-width values. The final step in this section shows how to use
For Loop to implement a simple Monte Carlo simulation that runs SimpleFilter with
randomly selected Filter Half-width values.
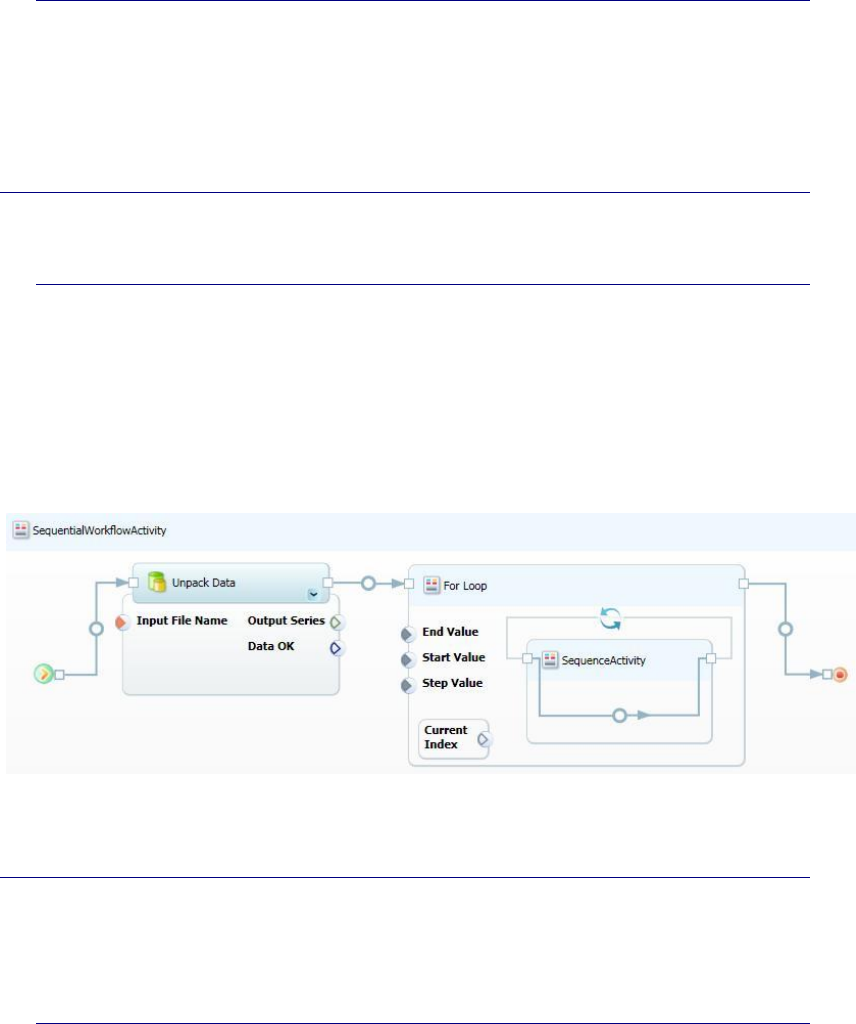
Step 1: Create the Basic SimpleFilter 2 Workflow
SimpleFilter 2 consists of an Unpack Data activity followed by a For Loop activity.
To create the basic workflow
1. Open Composer and start a new workflow.
2. Drop an UnpackData activity on the insertion point, and assign
C:\TridentInput\TimeSeries1 to UnpackData activity’s Input File Name property.
3. Drop a For Loop activity on the insertion point to the right of Unpack Data.
For Loop is in the Workflow Catalog’s Trident Activities\Control Flow folder.
Figure 42 shows the resulting workflow.
Figure 42. The basic SimpleFilter 2 workflow
Step 2: Implement the For Loop Activity
The For Loop activity hosts the Boxcar Filter and Display Data activities. The loop
parameters are set to produce five iterations, with Filter Half-width values ranging
from 10 to 50.
To implement the For Loop activity
1. Drop a Boxcar Filter activity on the For Loop activity’s insertion point.
2. Drop a Display Data activity on the insertion point to the right of the Boxcar Filter
activity, but still within the For Loop activity.
3. Bind the Unpack Data activity’s Output Series property to the Boxcar Filter
activity’s Input Series property.
4. Bind the Boxcar Filter activity’s Filtered Output property to the Display Data
activity’s Filtered Series 1 property.
5. Bind Current Index to the Boxcar Filter activity’s Filter Half-width property, and
set the index parameters as follows:
Start Value: 1.
Trident Composer User’s Guide - 44
Version 1.0 – November 6, 2009
© 2009 Microsoft Corporation. All rights reserved.
Step Value: 2.
End Value: 10.
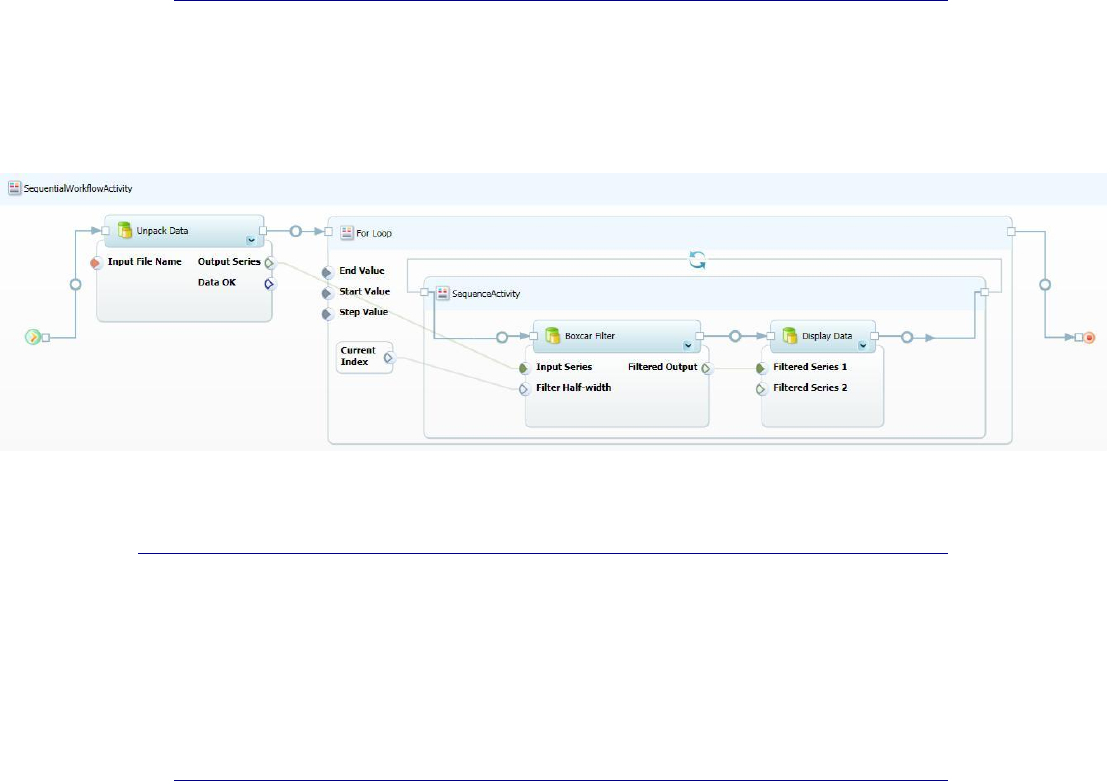
Figure 43 shows the completed workflow.
Figure 43. SimpleFilter2 workflow
Step 3: Implement SimpleFilter 2 as a Monte Carlo Simulation
Monte Carlo simulations are a simple way to explore a solution space. This example
shows how to use Trident to implement a simple Monte Carlo simulation, using a
modified version of SimpleFilter 2. Instead of using the Current Index value to specify
a series of Filter Half-width values, this example randomly varies Filter Half-width
over a specified range. It’s probably not the best way study a time series, but the
procedure can be readily adapted to more suitable problems.
To implement SimpleFilter 2 as a Monte Carlo simulation
1. Remove the binding between Current Index and Filter Half-width by right-clicking
the binding and clicking Delete Parameter Bindings.
2. Set the loop parameters to run the simulation five times:
Start Value: 1
Step Value: 1
End Value: 5
3. Drop an Integer Random Generator activity on the insertion point to the left of
Boxcar Filter.
Integer Random Generator is in the Workflow Catalog’s Trident
Activities\Utilities folder.
4. Bind the Integer Random Generator activity’s Output property to the Boxcar
Filter activity’s Filter Half-width property.
5. Set the Integer Random Generator activity’s Max Value property to 50, which
varies Filter Half-width between 0 and 50.
Figure 44 shows the For Loop from the resulting workflow. The rest is identical to the
previous version of Simple Filter 2. The loop runs five times and displays each filtered
series in a separate window.
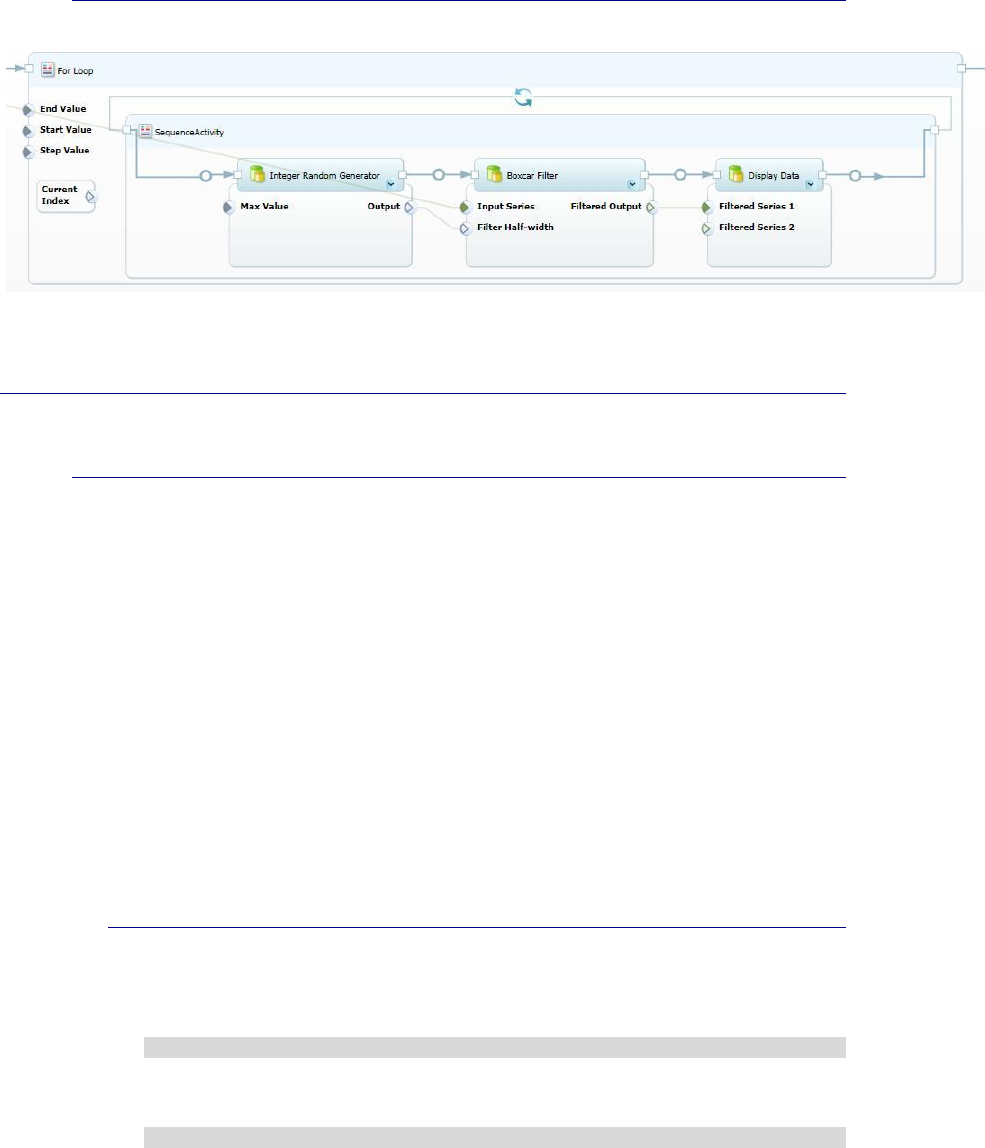
Trident Composer User’s Guide - 45
Version 1.0 – November 6, 2009
© 2009 Microsoft Corporation. All rights reserved.
Figure 44. Simple Filter 2 Monte Carlo simulation
Troubleshooting
This section describes methods for troubleshooting issues.
The workflow hangs when it tries to display a UI
The workflow stalls when it reaches an activity that displays a UI.
Cause 1
If the workflow displays a UI—such as a graph of the final results— the UI window
usually must be closed before the workflow can proceed.
Solution 1: The window might not have a Taskbar icon, and it might be covered
by other windows. Check to make sure that the UI is not concealed by another
window, including the Composer or Management Studio windows. If so, minimize
the windows, and close the UI window. The workflow should proceed.
Cause 2
The workflow is running in non-interactive mode. Workflows that display a UI
must run in interactive mode.
Solution 2: Terminate the workflow. The associated TridentWorkflowHost.exe
should be killed from Windows TaskManager.
To restart the services
1. Open a command window with elevated privileges.
2. Stop the services by running the following command, which stops both
services:
net stop tridentexecutionservice
3. Restart the services by running the following command, which restarts both
services:
net start tridentexecutionservice
4. Change the workflow’s Type property to Interactive, and then run the
workflow again.
Tip: It is sometimes easier to reboot your system, which automatically stops and
restarts the services.

Trident Composer User’s Guide - 46
Version 1.0 – November 6, 2009
© 2009 Microsoft Corporation. All rights reserved.
Terminated workflow is still consuming CPU resources
If you are not running any workflows but the system seems sluggish or is doing an
unusually large number of disk seeks, run Task Manager to determine whether any of
the Trident services or applications are still consuming significant CPU resources. If
so, the misbehaving services or applications must be shut down and restarted.
Cause 1
You attempted to run a workflow that displays a UI in non-interactive mode. If
you terminate such a workflow—either directly or by closing Trident
Workbench—the services might still continue to consume resources.
Solution 1: Stop and restart the Trident services. For details, see the earlier
troubleshooting item, “The workflow hangs when it tries to display a UI.”
Cause 2
TridentWorkflowHost.exe is still consuming CPU resources after the workflow
terminates.
Solution 2: Use Task Manager to close the TridentWorkflowHost.exe process.
To restart the process
1. Click the Start button and open All Programs\Startup.
2. Click TridentExecutorTray to restart TridentExecutorTray.exe.

Trident Composer User’s Guide - 47
Version 1.0 – November 6, 2009
© 2009 Microsoft Corporation. All rights reserved.
Resources
This section provides links to additional information about Trident Workbench and
related topics.
Microsoft Research Web site
http://research.microsoft.com
Dependency Properties Overview
http://msdn.microsoft.com/en-us/library/ms752914.aspx
Flowchart
http://en.wikipedia.org/wiki/Flowcharts
Project Trident Web site
http://research.microsoft.com/en-us/collaboration/tools/trident.aspx
Provides all documentation for Project Trident, including:
“Trident Management Studio User’s Guide”
“Trident Programming Guide”
Windows Workflow Foundation on MSDN®
http://msdn.microsoft.com/en-us/library/ms735967.aspx
Windows Workflow Foundation Essentials
http://www.devx.com/codemag/Article/36317/1763/page/1
Windows Workflow Foundation: Step by Step
http://www.microsoft.com/learning/en/us/Books/10023.aspx
