Tutorial
User Manual:
Open the PDF directly: View PDF ![]() .
.
Page Count: 20

PLUG IN TO THE WIRELESS WORLD
GIVE WINGS TO
YOUR IDEAS
TUTORIAL
pochette MUSE 15/11/01 17:12 Page 1
Version 1.00
October 2001

Tutorial
confidential © Page: 1 /
18
This document is the sole and exclusive property of WAVECOM. Not to be distributed or divulged
without prior written agreement. Ce document est la propriété exclusive de WAVECOM. Il ne peut
être communiqué ou divulgué à des tiers sans son autorisation préalable.
Version: 001 / 1.0
001 / 1.0001 / 1.0
001 / 1.0
Date: October 30
October 30October 30
October 30th
thth
th, 2001
, 2001, 2001
, 2001
Reference: WM_SW_OAT_UGD_001
WM_SW_OAT_UGD_001WM_SW_OAT_UGD_001
WM_SW_OAT_UGD_001

T
UTORIAL
10/30/01
confidential © Page: 2 /
18
This document is the sole and exclusive property of WAVECOM. Not to be distributed or divulged
without prior written agreement. Ce document est la propriété exclusive de WAVECOM. Il ne peut
être communiqué ou divulgué à des tiers sans son autorisation préalable.
(THIS PAGE IS INTENTIONALY LEFT BLANK)

T
UTORIAL
10/30/01
confidential © Page: 3 /
18
This document is the sole and exclusive property of WAVECOM. Not to be distributed or divulged
without prior written agreement. Ce document est la propriété exclusive de WAVECOM. Il ne peut
être communiqué ou divulgué à des tiers sans son autorisation préalable.
TABLE OF
TABLE OFTABLE OF
TABLE OF CONTENTS
CONTENTS CONTENTS
CONTENTS
1 Introduction................................................................................... 5
1.1 Purpose...................................................................................................5
1.2 References ..............................................................................................5
1.3 Glossary..................................................................................................5
1.4 Abbreviations..........................................................................................6
2 Generating Applications With the Open AT Wizard........................ 7
2.1 Creating an Application With the Wizard.................................................7
2.1.1 Step 1: Launching the Wizard .................................................................7
2.1.2 Step 2: Project Type ................................................................................8
2.1.3 Step 3: Other Settings.............................................................................9
2.2 Directory Architecture .............................................................................9
2.3 Generating Remote Application Binary ..................................................10
2.4 Running the Remote Application ...........................................................10
3 Generating an Application without the Open AT Wizard ............. 12
3.1 Directory Architecture ...........................................................................12
3.2 Creating Embedded Applications...........................................................12
3.2.1 Coding the Application ..........................................................................12
3.2.2 Application binary generation................................................................12
3.3 Download..............................................................................................13
3.4 Running the Embedded Application ......................................................17
3.4.1 With HyperTerminal ..............................................................................17
3.4.2 With the Terminal Emulator...................................................................18

T
UTORIAL
10/30/01
confidential © Page: 4 /
18
This document is the sole and exclusive property of WAVECOM. Not to be distributed or divulged
without prior written agreement. Ce document est la propriété exclusive de WAVECOM. Il ne peut
être communiqué ou divulgué à des tiers sans son autorisation préalable.
LIST OF FIGURES
LIST OF FIGURES LIST OF FIGURES
LIST OF FIGURES
Figure 1: Project Type ......................................................................................8
Figure 2 : Directory Structure ...........................................................................9
Figure 3: Connection Type..............................................................................13
Figure 4: Phone Call Destination.....................................................................13
Figure 5: COM1Serial Port Features ...............................................................14
Figure 6: Modem Connection Check...............................................................15
Figure 7: File Download with HyperTerminal.................................................. 16
Figure 8: File Selection ...................................................................................16
Figure 9: Application Downloading process (continued).................................17
WAVECOM, WISMO are trademarks or registered trademarks of Wavecom S.A.
All other company and/or product names mentioned may be trademarks or
registered trademarks of their respective owners.

T
UTORIAL
10/30/01
confidential © Page: 5 /
18
This document is the sole and exclusive property of WAVECOM. Not to be distributed or divulged
without prior written agreement. Ce document est la propriété exclusive de WAVECOM. Il ne peut
être communiqué ou divulgué à des tiers sans son autorisation préalable.
1 Introduction
1.1 Purpose
This tutorial describes the process to develop an embedded application using
the Open AT Wizard for debugging (“Debug Mode”), and MS-DOS generation
tools for the “Target mode”.
1.2 References
I. Development Guide
II. Tools Manual
III. AT Command Interface Guide
1.3 Glossary
AT commands
AT commandsAT commands
AT commands Set of standard modem commands.
AT function
AT functionAT function
AT function Software that processes AT commands and AT
subscriptions.
Embedded application
Embedded applicationEmbedded application
Embedded application User application sources to be compiled and
run on a Wavecom product.
Embedded Core software
Embedded Core softwareEmbedded Core software
Embedded Core software Software that includes the Embedded
application and the Wavecom library.
Target
TargetTarget
Target
Open AT compatible product supporting an
Embedded Application.
Target Monitoring Tool
Target Monitoring ToolTarget Monitoring Tool
Target Monitoring Tool Set of utilities used to monitor a Wavecom
product.
Receive command
Receive commandReceive command
Receive command Process that intercepts AT responses.
pre
prepre
pre−
−−
−parsing
parsingparsing
parsing
Remote Application
Remote ApplicationRemote Application
Remote Application Set of libraries enabling the User to run his
application on a PC.
Send command
Send commandSend command
Send command Process that intercepts AT commands.
pre
prepre
pre−
−−
−parsing
parsingparsing
parsing
Wavecom library
Wavecom libraryWavecom library
Wavecom library Library delivered by Wavecom to interface
Embedded application sources with Wavecom
Core Software functions.
Wavecom Core Software
Wavecom Core SoftwareWavecom Core Software
Wavecom Core Software Set of GSM and open functions supplied to the
User.

T
UTORIAL
10/30/01
confidential © Page: 6 /
18
This document is the sole and exclusive property of WAVECOM. Not to be distributed or divulged
without prior written agreement. Ce document est la propriété exclusive de WAVECOM. Il ne peut
être communiqué ou divulgué à des tiers sans son autorisation préalable.
1.4 Abbreviations
API
APIAPI
API Application Programming Interface
CPU
CPUCPU
CPU Central Processing Unit
IR
IRIR
IR Infrared
KB
KBKB
KB Kilobyte
OS
OSOS
OS Operating System
PDU
PDUPDU
PDU Protocol Data Unit
RAM
RAMRAM
RAM Random-Access Memory
ROM
ROMROM
ROM Read-Only Memory
RTK
RTKRTK
RTK Real-Time Kernel
SMA
SMASMA
SMA SMall Adapter
SMS
SMSSMS
SMS Short Message Services
SDK
SDKSDK
SDK Software Development Kit

T
UTORIAL
10/30/01
confidential © Page: 7 /
18
This document is the sole and exclusive property of WAVECOM. Not to be distributed or divulged
without prior written agreement. Ce document est la propriété exclusive de WAVECOM. Il ne peut
être communiqué ou divulgué à des tiers sans son autorisation préalable.
2 Generating Applications With the Open AT
Wizard
2.1 Creating an Application With the Wizard
This Wizard provides a user-friendly way to create an Open AT project. It is
used to manage the following operations:
! Visual C++ project creation,
! Compilation, link and library settings.
The different steps in creating an Open AT project are listed in the following
paragraphs.
2.1.1 Step 1: Launching the Wizard
1) From the main Visual C++ screen, select “File”
“File”“File”
“File” -> “New…”
“New…”“New…”
“New…”,
2) In the “New”
“New”“New”
“New” window, select the “Projects”
“Projects”“Projects”
“Projects” tab,
3) From the list box, select “Wavecom
“Wavecom “Wavecom
“Wavecom Open AT
Open ATOpen AT
Open AT”
””
”,
4) In the “Location”
“Location”“Location”
“Location” text field, choose the path corresponding to the
location where the project is going to be created,
5) In the “Project Name
“Project Name“Project Name
“Project Name” text field,
, ,
, indicate a project name,
For this example, enter “
““
“Call Monitoring
Call MonitoringCall Monitoring
Call Monitoring” as the
project name.
Note:
Note:Note:
Note: this name is added to the previously chosen path.
6) End the initialization using “OK
“OK“OK
“OK.”
””
”
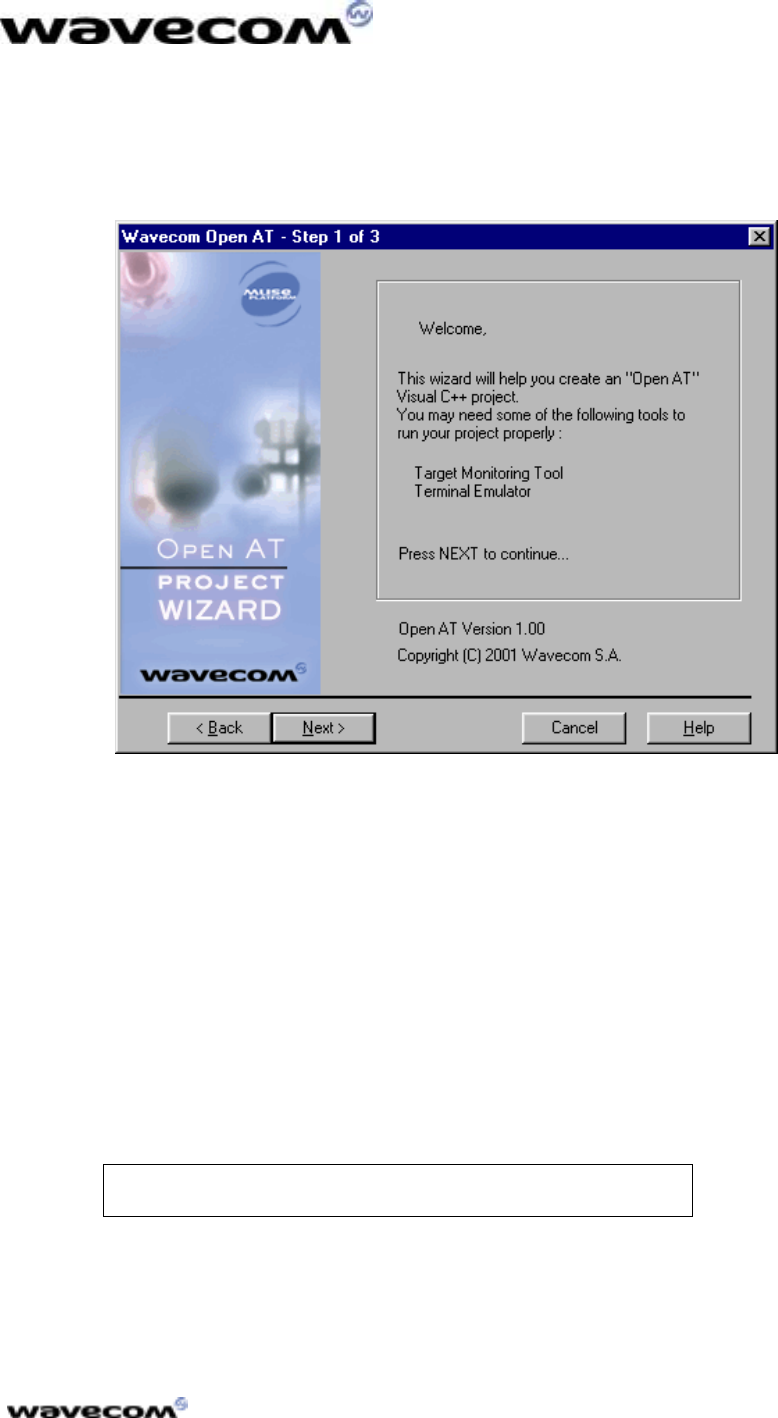
7) The Open AT Wizard “Welcome” first screen is displayed. Press the
“Next >”
“Next >”“Next >”
“Next >” button to continue.
T
UTORIAL
10/30/01
confidential © Page: 8 /
18
This document is the sole and exclusive property of WAVECOM. Not to be distributed or divulged
without prior written agreement. Ce document est la propriété exclusive de WAVECOM. Il ne peut
être communiqué ou divulgué à des tiers sans son autorisation préalable.
2.1.2 Step 2: Project Type
The screen shown in Figure 1 is displayed.
Figure 1: Project Type
Different choices are proposed:
! New
New New
New P
PP
Project
rojectroject
roject:
::
: The Open AT Wizard will insert template files into the project
(appli.c and appli.h) with the basic functions (see the minimum embedded
application code in the Development Guide). An optional file (utils.c, with
utils.h header), containing the string and memory manipulation functions, is
available. This is the default option.
! Sample
Sample Sample
Sample P
PP
Project
rojectroject
roject:
::
: The Open AT Wizard will insert the Call Monitoring sample
application of the Open AT CD-ROM.
! Existing Project:
Existing Project:Existing Project:
Existing Project: no file will be added to the project. This option is useful
when the user wants to create a new project using existing application
code files. These files will then have to be manually added to the project.
For this example, select the “Sample Project”
“Sample Project”“Sample Project”
“Sample Project”
choice.

T
UTORIAL
10/30/01
confidential © Page: 9 /
18
This document is the sole and exclusive property of WAVECOM. Not to be distributed or divulged
without prior written agreement. Ce document est la propriété exclusive de WAVECOM. Il ne peut
être communiqué ou divulgué à des tiers sans son autorisation préalable.
2.1.3 Step 3: Other Settings
The user has to define two parameters which are used in the Remote
Application environment:
! Stack Size:
Stack Size:Stack Size:
Stack Size:
this parameter is not used in the Remote Application
environment, but is written in appli.c. It defines the size of the target call
stack memory (see Stack Size in the Development Guide).
! Update Wavecom delivery files:
Update Wavecom delivery files:Update Wavecom delivery files:
Update Wavecom delivery files: this option enables the Open AT wizard to
re-install headers and library files needed in the Remote environment. It
creates a “V100”
“V100”“V100”
“V100” directory (if there is none) with updated files, at the same
level as the project directory.
For this example, check the “Update Wavecom
“Update Wavecom “Update Wavecom
“Update Wavecom
delivery files”
delivery files”delivery files”
delivery files” box.
Use the “Finish”
“Finish”“Finish”
“Finish” button to create this embedded application project. A
message box appears that summarizes the directory structure to be created.
Press “OK”
“OK”“OK”
“OK” to finish creating the project.
2.2 Directory Architecture
The typical directory tree structure of the application generated by the Open AT
wizard is shown below :
Figure 2 : Directory Structure
The “Root”
“Root”“Root”
“Root” directory is the directory entered in the “Location”
“Location”“Location”
“Location” text field in the
Open AT wizard step 1.
The “Call Monitoring”
“Call Monitoring”“Call Monitoring”
“Call Monitoring” directory is specific to the new application (this was the
text entered in the “Project Name”
“Project Name”“Project Name”
“Project Name” text field in the Open AT wizard step 1).
It is made up of the following sub-directories :
! Debug
DebugDebug
Debug: contains the Remote Application binary, which will be generated by
a “Build”
“Build”“Build”
“Build” command,
! Target
TargetTarget
Target: contains the Embedded Core Software binary, ready to be
downloaded into the Target (see §3 for target binary generation),

T
UTORIAL
10/30/01
confidential © Page: 10 /
18
This document is the sole and exclusive property of WAVECOM. Not to be distributed or divulged
without prior written agreement. Ce document est la propriété exclusive de WAVECOM. Il ne peut
être communiqué ou divulgué à des tiers sans son autorisation préalable.
! Src
Src Src
Src : contains the User Open AT sources,
For this example, the “src”
“src”“src”
“src” directory contains
three files:
• appli.c
• utils.c
• at_com.c
! Inc
Inc Inc
Inc : contains the User Open AT headers,
For this example, the “inc”
“inc”“inc”
“inc” directory contains
three files:
• appli.h
• utils.h
• at_com.h
! Libs
LibsLibs
Libs: contains the Windows libraries related to one part of the target code
sources (for Remote Application Execution).
The “
““
“V100”
V100”V100”
V100”
directory contains the softwares supplied by Wavecom with this
version of Open AT. This directory is only generated if the “Update Wavecom
“Update Wavecom “Update Wavecom
“Update Wavecom
delivery files”
delivery files” delivery files”
delivery files” checkbox has been selected in the wizard step 3. It includes the
following sub-directories:
! WmHeader:
WmHeader:WmHeader:
WmHeader: contains the Open AT API header files,
! WmRemote
WmRemoteWmRemote
WmRemote: contains the Open AT library file “wmremoteat.lib”
“wmremoteat.lib”“wmremoteat.lib”
“wmremoteat.lib” for the
Remote Task Environment.
2.3 Generating Remote Application Binary
See the Development Guide
Development GuideDevelopment Guide
Development Guide and the AT Command Interface
AT Command InterfaceAT Command Interface
AT Command Interface to create the
embedded application.
With this example, a call monitoring system has
been implemented. Refer to the source files and to
the readme.txt file on the Open AT CD-ROM, in
the “Samples
“Samples“Samples
“Samples\
\\
\Call Monitoring”
Call Monitoring”Call Monitoring”
Call Monitoring” directory.
The remote application binary is generated as described in the Tools Manual
Tools ManualTools Manual
Tools Manual:
use the “Build”
“Build” “Build”
“Build” -
--
-> “Build xxx.exe”
> “Build xxx.exe”> “Build xxx.exe”
> “Build xxx.exe” command (or F7 key). If any compilation or
link error occurs, correct them and restart the build operation.
2.4 Running the Remote Application
In the Target Monitoring Tool
Start the Target Monitoring Tool (from the Windows Start Menu).
Select “Commands”
“Commands” “Commands”
“Commands” -
--
-> “Auto Detect”
> “Auto Detect”> “Auto Detect”
> “Auto Detect” to detect the target speed.

T
UTORIAL
10/30/01
confidential © Page: 11 /
18
This document is the sole and exclusive property of WAVECOM. Not to be distributed or divulged
without prior written agreement. Ce document est la propriété exclusive de WAVECOM. Il ne peut
être communiqué ou divulgué à des tiers sans son autorisation préalable.
Select “Commands”
“Commands” “Commands”
“Commands” -
--
-> “Init Target”
> “Init Target”> “Init Target”
> “Init Target” to initialize the target in debug mode.
Select “Traces”
“Traces” “Traces”
“Traces” -
--
-> “Open”
> “Open”> “Open”
> “Open” to open the trace window.
Select “Commands”
“Commands” “Commands”
“Commands” -
--
-> “Get Informations About Target”
> “Get Informations About Target”> “Get Informations About Target”
> “Get Informations About Target” to initialize the trace
mode.
In the Terminal Emulator
From the Target Monitoring Tool toolbar, start the Terminal Emulator.
Type the “AT”
“AT”“AT”
“AT” command in the Terminal Emulator window.
The module should answer the “OK”
“OK”“OK”
“OK” string, in blue characters. If not, check
your target connection or check if another program is using the serial port.
Then, retry the operation.
In Visual C++
Launch the application with the “Build”
Build” Build”
Build” -
--
-> “Start Debug”
> “Start Debug” > “Start Debug”
> “Start Debug” -
--
-> “Go”
> “Go”> “Go”
> “Go” command
(or F5 key). The Remote Application Controller window appears.
In the Remote Application Controller
Select the “CUSTOMER trace levels”
“CUSTOMER trace levels”“CUSTOMER trace levels”
“CUSTOMER trace levels” you want to show in the Target
Monitoring Tool.
For this example, the call monitoring application
uses Levels 1 to 6. You can check these levels in
the Remote Application Controller window.
Select the “Start”
“Start”“Start”
“Start” button.
In the Target Monitoring Tool
Traces should appear in blue in the trace window, indicating that the remote
application is running.
In the Terminal Emulator
The modem is ready to receive AT commands.
For this example, the “NO SIM”
“NO SIM”“NO SIM”
“NO SIM” string will be
displayed if no SIM is inserted; otherwise the
“ENTER PIN CODE”
“ENTER PIN CODE”“ENTER PIN CODE”
“ENTER PIN CODE” string is displayed. You can
now use the call monitoring application (cf. the
readme.txt file on the CD-ROM, in the
“Samples
“Samples“Samples
“Samples\
\\
\Call Monitoring”
Call Monitoring”Call Monitoring”
Call Monitoring” directory.

T
UTORIAL
10/30/01
confidential © Page: 12 /
18
This document is the sole and exclusive property of WAVECOM. Not to be distributed or divulged
without prior written agreement. Ce document est la propriété exclusive de WAVECOM. Il ne peut
être communiqué ou divulgué à des tiers sans son autorisation préalable.
3 Generating an Application without the Open
AT Wizard
3.1 Directory Architecture
In the directory of your choice, create a new directory using the name of the
application. In this directory, create two directories named “src”
“src”“src”
“src” and “inc”
“inc”“inc”
“inc”.
The “src”
“src”“src”
“src” directory will contain all the user’s source files.
The “inc”
“inc”“inc”
“inc” directory will contain all the user’s header files.
The first call to the Wavecom “c”
“c”“c”
“c” tool will create a “target”
“target”“target”
“target” directory, at the
same level as the “src”
“src”“src”
“src” directory. This “target”
“target”“target”
“target” directory will contain the files
generated by Wavecom tools, including the embedded application binary.
For this example, copy the “Call Monitoring”
“Call Monitoring”“Call Monitoring”
“Call Monitoring”
directory from the CD-ROM directory
“Samples
“Samples“Samples
“Samples\
\\
\Call Monitoring”
Call Monitoring”Call Monitoring”
Call Monitoring”, and remove all “read
only” files attribute.
3.2 Creating Embedded Applications
3.2.1 Coding the Application
See the Development Guide
Development GuideDevelopment Guide
Development Guide and the AT Commands Interface
AT Commands Interface AT Commands Interface
AT Commands Interface to create the
embedded application. One of the source files (for example “appli.c”
“appli.c”“appli.c”
“appli.c”) must
contain the minimum required code (See Minimum embedded application code
in the Development Guide). Do not forget to copy all the user source files in the
“src”
“src”“src”
“src” directory, and the header files in the “inc”
“inc”“inc”
“inc” directory.
For this example, a full Call Monitoring system
has been implemented. Refer to the source files,
and to a readme.txt file from the CD-ROM
directory “Samples
“Samples“Samples
“Samples\
\\
\Call Monitoring
Call MonitoringCall Monitoring
Call Monitoring.”
””
”
3.2.2 Application binary generation
• In a MS-DOS command window, call the “WmMake xxx”
“WmMake xxx”“WmMake xxx”
“WmMake xxx” command in
the root directory, where “xxx”
“xxx”“xxx”
“xxx” is the makefile name.
For this example, call the “WmMake
“WmMake “WmMake
“WmMake
call_monitoring”
call_monitoring” call_monitoring”
call_monitoring” command from the “Call
“Call “Call
“Call
Monitoring”
Monitoring”Monitoring”
Monitoring” directory
• Check in the created “target”
“target”“target”
“target” directory for the new “.obj”
“.obj”“.obj”
“.obj” compiled files.
In the “src”
“src”“src”
“src” directory, the “.lst”
“.lst”“.lst”
“.lst” files contain a compilation log. If
compilation errors occur, correct them and restart the operation
T
UTORIAL
10/30/01
confidential © Page: 13 /
18
This document is the sole and exclusive property of WAVECOM. Not to be distributed or divulged
without prior written agreement. Ce document est la propriété exclusive de WAVECOM. Il ne peut
être communiqué ou divulgué à des tiers sans son autorisation préalable.
• Check in the “target”
“target”“target”
“target” directory for the new “call_monitoring.dwl”
“call_monitoring.dwl”“call_monitoring.dwl”
“call_monitoring.dwl” file.
This file is the Embedded Application binary, ready to be downloaded to
the target.
3.3 Download
In order to download the “.dwl”
“.dwl” “.dwl”
“.dwl” file to the target, follow these steps:
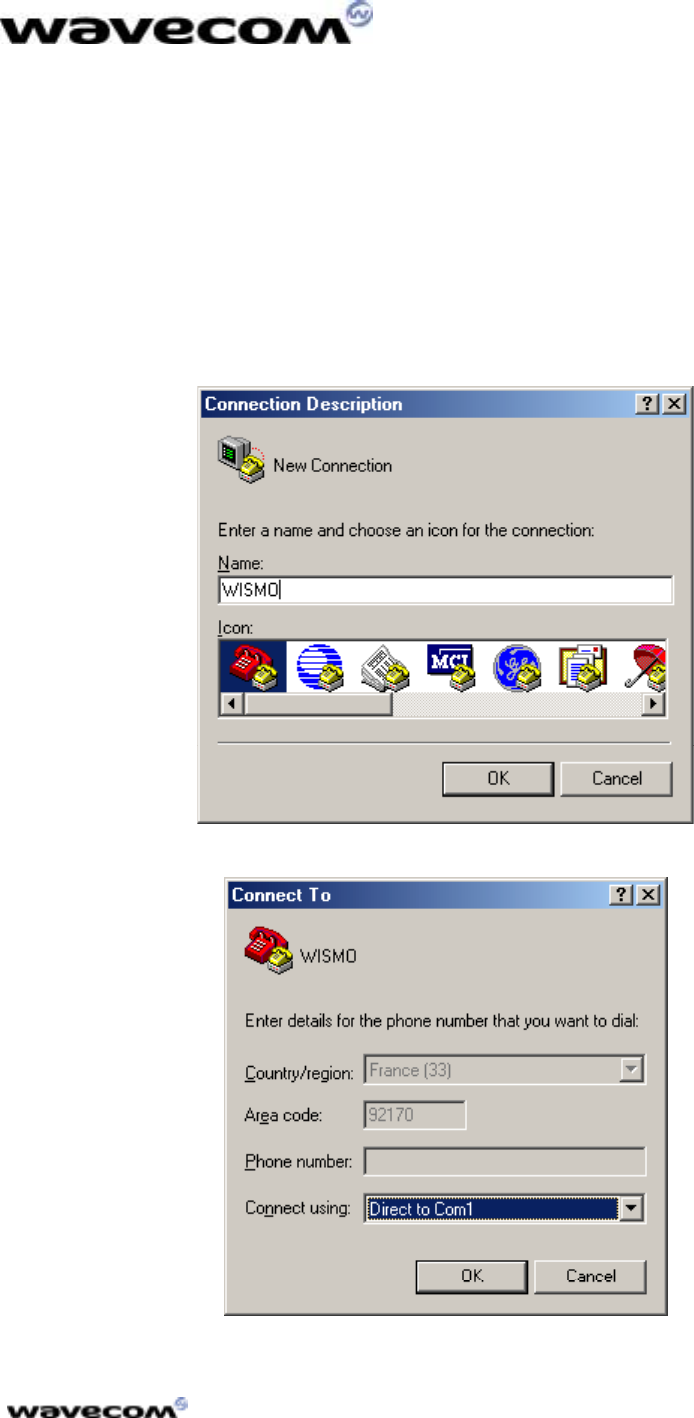
1. Launch HyperTerminal;
2. Configure it to open the COM port (see figures 3, 4 and 5);
Figure 3: Connection Type
Figure 4: Phone Call Destination
T
UTORIAL
10/30/01
confidential © Page: 14 /
18
This document is the sole and exclusive property of WAVECOM. Not to be distributed or divulged
without prior written agreement. Ce document est la propriété exclusive de WAVECOM. Il ne peut
être communiqué ou divulgué à des tiers sans son autorisation préalable.
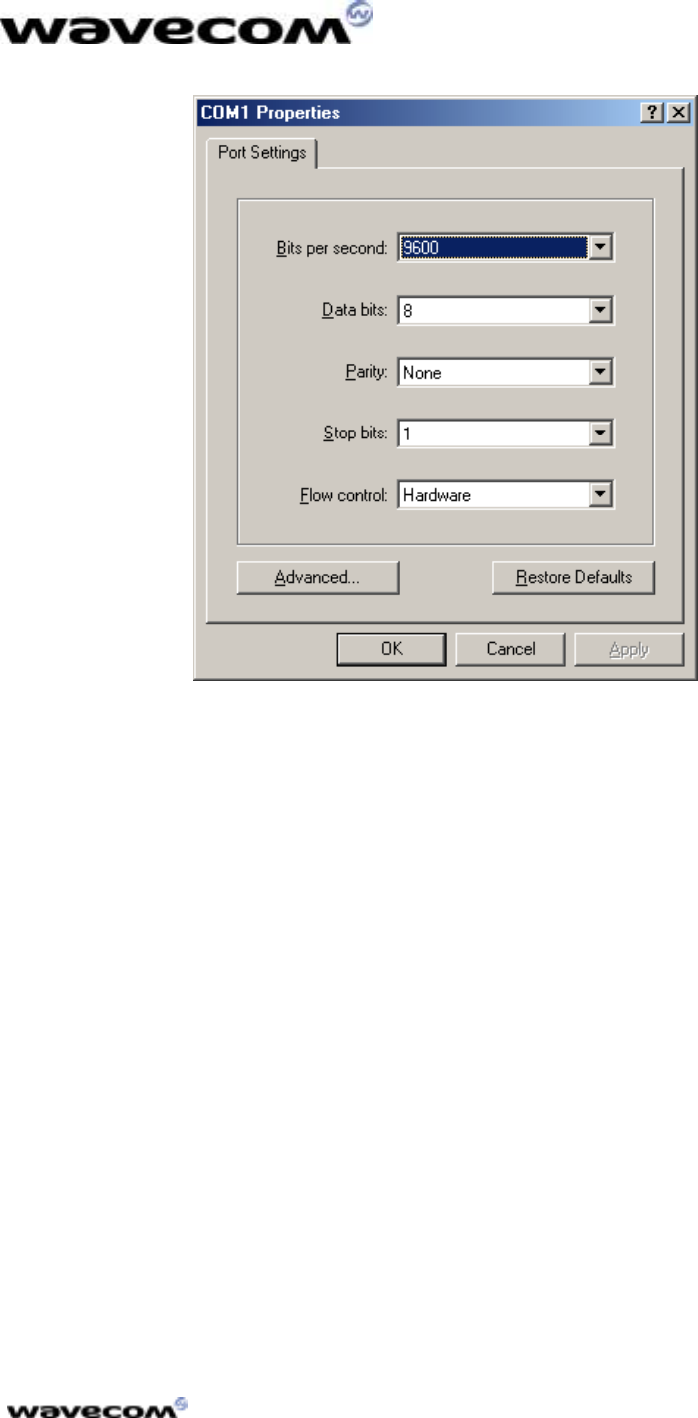
Figure 5: COM1Serial Port Features
T
UTORIAL
10/30/01
confidential © Page: 15 /
18
This document is the sole and exclusive property of WAVECOM. Not to be distributed or divulged
without prior written agreement. Ce document est la propriété exclusive de WAVECOM. Il ne peut
être communiqué ou divulgué à des tiers sans son autorisation préalable.
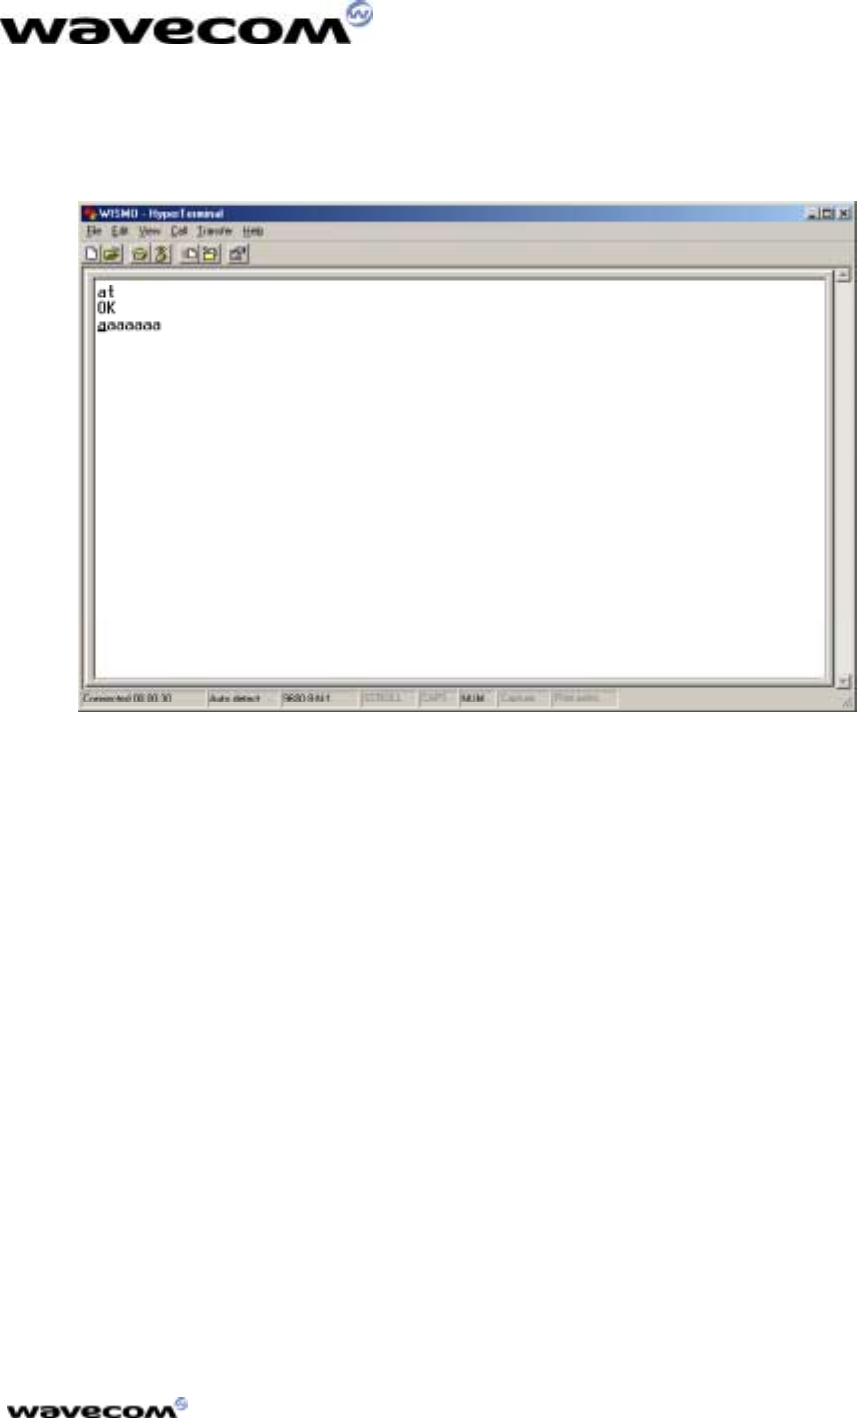
3. Type the “AT”
“AT”“AT”
“AT” command in the HyperTerminal window. The response
must be “OK”
“OK”“OK”
“OK” (see figure 6); The modem will echo characters on the
serial link only if it is actually configured (In Figure 6, the “aaaaaaa”
“aaaaaaa”“aaaaaaa”
“aaaaaaa”
string is typed and the modem echoes it: the modem is connected);
Figure 6: Modem Connection Check
T
UTORIAL
10/30/01
confidential © Page: 16 /
18
This document is the sole and exclusive property of WAVECOM. Not to be distributed or divulged
without prior written agreement. Ce document est la propriété exclusive de WAVECOM. Il ne peut
être communiqué ou divulgué à des tiers sans son autorisation préalable.
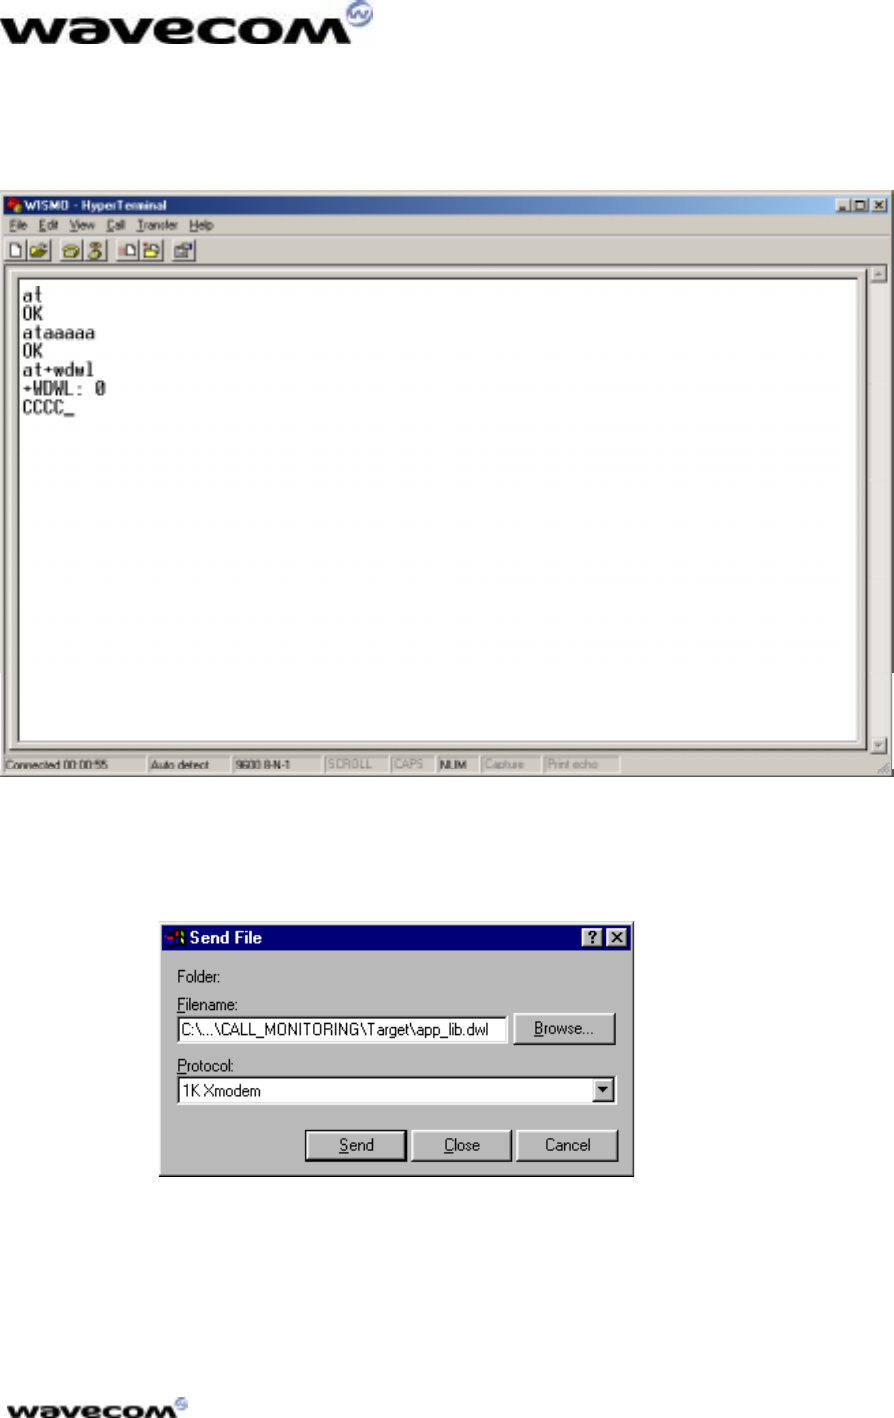
4. Type the “at+wdwl”
“at+wdwl”“at+wdwl”
“at+wdwl” command to start the download mode. A
“+WDWL: 0”
“+WDWL: 0”“+WDWL: 0”
“+WDWL: 0” response is given, and a set of characters should appear:
the module has acknowledged the download mode (see Figure 7);
Figure 7: File Download with HyperTerminal
5. From the “Transfer”
“Transfer”“Transfer”
“Transfer” menu, select “Send a file…”
“Send a file…”“Send a file…”
“Send a file…” (see Figure 8);
Figure 8: File Selection
C:
C:C:
C:\
\\
\OpenAT
OpenATOpenAT
OpenAT\
\\
\CALL MONITORING
CALL MONITORINGCALL MONITORING
CALL MONITORING\
\\
\Target
TargetTarget
Target
T
UTORIAL
10/30/01
confidential © Page: 17 /
18
This document is the sole and exclusive property of WAVECOM. Not to be distributed or divulged
without prior written agreement. Ce document est la propriété exclusive de WAVECOM. Il ne peut
être communiqué ou divulgué à des tiers sans son autorisation préalable.
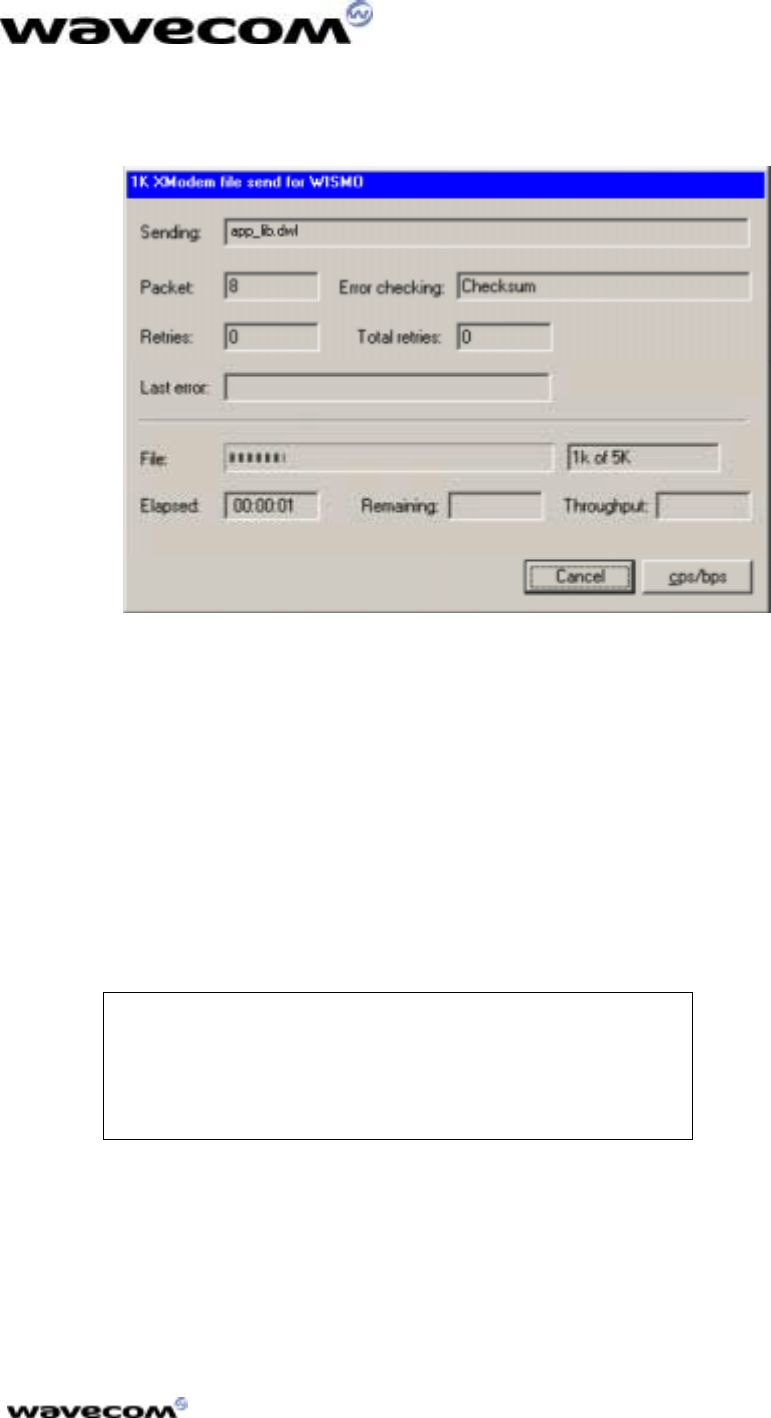
6. Select the “target
“target“target
“target\
\\
\xxx.dwl”
xxx.dwl”xxx.dwl”
xxx.dwl” file (in this sample : “call_monitoring.dwl”
“call_monitoring.dwl”“call_monitoring.dwl”
“call_monitoring.dwl”),
and the “1K Xmodem”
“1K Xmodem”“1K Xmodem”
“1K Xmodem” protocol. Press the “Send”
“Send” “Send”
“Send” button (see Figure 9);
Figure 9: Application Downloading process (continued)
7. As soon as the download process is terminated (the download window
disappears), reset the target with the “at+cfun=1”
“at+cfun=1”“at+cfun=1”
“at+cfun=1” command.
3.4 Running the Embedded Application
3.4.1 With HyperTerminal
Type the “at+wopen=1”
“at+wopen=1”“at+wopen=1”
“at+wopen=1” command, to start the embedded application (see AT
AT AT
AT
Commands Interface”
Commands Interface”Commands Interface”
Commands Interface” for more information).
Your application is now running in nominal mode.
For this example, if no SIM card is inserted, the
modem should display “NO SIM
“NO SIM“NO SIM
“NO SIM,”
””
” otherwise it will
display “ENTER PIN CODE
“ENTER PIN CODE“ENTER PIN CODE
“ENTER PIN CODE.”
””
” You can now use the
call monitoring application (see the readme.txt file
on the CD-ROM, in “Samples
“Samples“Samples
“Samples\
\\
\Call Monitoring”
Call Monitoring”Call Monitoring”
Call Monitoring”
directory.

T
UTORIAL
10/30/01
confidential © Page: 18 /
18
This document is the sole and exclusive property of WAVECOM. Not to be distributed or divulged
without prior written agreement. Ce document est la propriété exclusive de WAVECOM. Il ne peut
être communiqué ou divulgué à des tiers sans son autorisation préalable.
3.4.2 With the Terminal Emulator
In the Target Monitoring Tool
Close the HyperTerminal program.
Start the Target Monitoring Tool (from the Windows Start Menu).
Select “Commands”
“Commands” “Commands”
“Commands” -
--
-> “Auto Detect”
> “Auto Detect”> “Auto Detect”
> “Auto Detect” to detect the target speed.
Select “Commands”
“Commands” “Commands”
“Commands” -
--
-> “Init Target”
> “Init Target”> “Init Target”
> “Init Target” to initialize the target in debug mode.
Select “Traces”
“Traces” “Traces”
“Traces” -
--
-> “Open”
> “Open”> “Open”
> “Open”, to open the trace window.
Select “Commands”
“Commands” “Commands”
“Commands” -
--
-> “Get Informations About Target”
> “Get Informations About Target”> “Get Informations About Target”
> “Get Informations About Target” to initialize the trace
mode.
Select “Traces”
“Traces” “Traces”
“Traces” -
--
-> “Set Diagnose Levels
> “Set Diagnose Levels> “Set Diagnose Levels
> “Set Diagnose Levels.”
””
” Select “CUS”
“CUS”“CUS”
“CUS” in the “Parameter”
“Parameter”“Parameter”
“Parameter” list,
check trace levels in the “Bitmap”
“Bitmap”“Bitmap”
“Bitmap” zone, and use the “Send Level”
“Send Level”“Send Level”
“Send Level” button
before closing the dialog box.
For this example, the call monitoring application
uses Levels 1 to 6, so check these levels in the Set
Diagnostic Levels window.
In the Terminal Emulator
From the Target Monitoring Tool toolbar, start the Terminal Emulator.
Type the “at”
“at”“at”
“at” command in the Terminal Emulator AT window.
The module should answer the “OK”
“OK”“OK”
“OK” string in blue characters. If not, check
your target connection, or if another program using the serial port is not
running, then retry the operation.
Type “at+wopen=1”
“at+wopen=1”“at+wopen=1”
“at+wopen=1” command in the Terminal Emulator AT window (see AT
AT AT
AT
Commands Interface”
Commands Interface”Commands Interface”
Commands Interface” for more information).
In the Target Monitoring Tool
Select “Commands”
“Commands” “Commands”
“Commands” -
--
-> “Init Target”
> “Init Target”> “Init Target”
> “Init Target” to initialize the target in debug mode (the
target should have reset after the “at+wopen=1”
“at+wopen=1”“at+wopen=1”
“at+wopen=1” command).
Traces should appear in black in the trace window, indicating that the remote
application is running.
In the Terminal Emulator
The modem is ready to receive AT commands.
For this example, the “NO SIM”
“NO SIM”“NO SIM”
“NO SIM” string will be
displayed if no SIM is inserted; otherwise the
string “ENTER PIN CODE”
“ENTER PIN CODE”“ENTER PIN CODE”
“ENTER PIN CODE” is displayed. You can
now use the call monitoring application (cf. the
readme.txt file on the CD-ROM, in the
“Samples
“Samples“Samples
“Samples\
\\
\Call Monitoring”
Call Monitoring”Call Monitoring”
Call Monitoring” directory.

WAVECOM S.A. - 12, boulevard Garibaldi - 92442 Issy-les-Moulineaux Cedex - France - Tel: +33 (0)1 46 29 08 00 - Fax: +33 (0)1 46 29 08 08
WAVECOM Inc. - 610 West Ash Street, Suite 1400 - San Diego, CA 92101 - USA - Tel: +1 619 235 9702 - Fax: +1 619 235 9844
WAVECOM Asia Pacific Ltd. - 5/F, Shui On Centre - 6/8 Harbour Road - Hong Kong, PRC - Tel: +852 2824 0254 - Fax: +852 2824 0255
www.wavecom.com
- WAVECOM, WISMO and WISMO Within are trademarks filed by WAVECOM S.A, is a copyrighted material © copyright WAVECOM S.A 10/01
pochette MUSE 19/11/01 15:56 Page 6
