Ameba UM0173 Realtek Pro User Manual En
User Manual:
Open the PDF directly: View PDF ![]() .
.
Page Count: 24

UM0173
AmebaPro user manual
Abstract
AmebaPro is a high-integrated IC. Its features include 802.11
Wi-Fi, H.264 video codec, Audio Codec.
This manual introduce users how to develop AmebaPro ,
including SDK compiling and downloading image to
AmebaPro.

UM0166
August 29, 2018 2
Table of Contents
1 Compiling and downloading ................................................................................ 4
1.1 SDK Project inroduction .............................................................................................4
1.2 Compile program .......................................................................................................4
1.2.1 Compile big CPU ................................................................................................................................ 4
1.2.2 Compile little CPU ............................................................................................................................. 5
1.2.3 Generating image (Bin) ..................................................................................................................... 5
1.3 Using image tool to download ....................................................................................5
1.4 Using JTAG/SWD to debug .........................................................................................9
1.4.1 JTAG connection ............................................................................................................................... 9
2 Flash Layout ....................................................................................................... 12
2.1 Flash Layout overview .............................................................................................. 12
3 How to use example source code ........................................................................ 13
3.1 Application example source ..................................................................................... 13
3.2 Peripheral example source ....................................................................................... 13
3.3 Wi-Fi example source ............................................................................................... 13
3.3.1 Use AT command to connect WLAN ............................................................................................... 13
3.3.2 Wlan scenario example ................................................................................................................... 14
3.4 Video example source .............................................................................................. 14
3.4.1 Using standard VLC to play streaming from AmebaPro ................................................................ 14
4 Memory configuration and usage ...................................................................... 16
4.1 Memory type ........................................................................................................... 16
4.1.1 The size and configuration in AmebaPro(big CPU) ......................................................................... 16
4.1.2 The size and configuration in AmebaPro(little CPU) ....................................................................... 18
4.2 Memory Configuration ............................................................................................. 19
4.2.1 Configure memory in IAR ................................................................................................................ 19
4.2.2 Configure memory in ICF file........................................................................................................... 19
4.2.3 Memory overflow ........................................................................................................................... 20
4.3 Video in DRAM ........................................................................................................ 20
4.4 Unmovable program ................................................................................................ 21
4.4.1 XIP-related Flash API ....................................................................................................................... 21
4.5 Counting system of memory ..................................................................................... 21

UM0166
August 29, 2018 3
6 File system ......................................................................................................... 22
6.1 FAT Filesystem on Flash ........................................................................................... 22
6.1.1 Software Setup ................................................................................................................................ 22
6.2 Dual FAT Filesystem - File system on both SD Card and Flash ..................................... 23
6.2.1 Hardware Setup .............................................................................................................................. 23
6.2.2 Software Setup ................................................................................................................................ 23

UM0166
August 29, 2018 4
1 Compiling and downloading
This chapter introduces users how to develop AmebaPro. AmebaPro is composed of one
main board, one sensor board, and one daughter board with LED, light sensor, and IR-
LED. AmebaPro SDK provides all the example source code for the function mentioned
above.
To get start, users will need to set up the software to program the board.
IAR IDE provides the toolchain for AmebaPro. It allows users to write programs, compile
and upload them to your board. Also, it supports step-by-step debug. Realtek also
provides Image Tool for users to do downloading code process.
1.1 SDK Project introduction
Arm TrustZone technology provides system-wide hardware isolation for trusted
software. Arm TrustZone can be divided into Secure core and Non-secure core.
Users can choose using TrustZone technology or not in AmebaPro. Project_is(ignore
secure) is the project without Arm TrustZone technology. This project is easier to
develop and suit for first-time developer. Project_tz(trust zone) is the project supporting
Arm TrustZone. This project provide non-secure domain and secure domain for users to
program. This project is suited for the product with security concern.
1.2 Compile program
AmebaPro use the newest Big-Little architecture. Big CPU is 300MHz, supporting high
speed function like WiFi, ISP, Encoder and Codec. Little CPU is 4MHz, supporting low
power peripheral function. Big CPU supports power-save mode while little CPU is
operating. Big CPU power-save mode can be awaked by event trigger.
1.2.1 Compile big CPU
Step1. Open SDK/project/realtek_amebapro_v0_example/EWARM-
RELEASE/Project_is.eww.
Step2. Confirm application_is in WorkSpace, right click application_is and choose
“Rebuild All” to compile.
Step3. Make sure there is no error after compile.

UM0166
August 29, 2018 5
1.2.2 Compile little CPU
Step1. Open SDK/project/realtek_amebapro_v0_example/EWARM-
RELEASE/Project_lp.eww.
Step2. Confirm application_lp in WorkSpace, right click application_lp and choose
“Rebuild All” to compile.
Step3. Make sure there is no error after compile.
1.2.3 Generating image (Bin)
After compile, the images partition.bin, boot.bin, firmware_is.bin and flash_is.bin can be
seen in the EWARM-RELEASE\Debug\Exe.
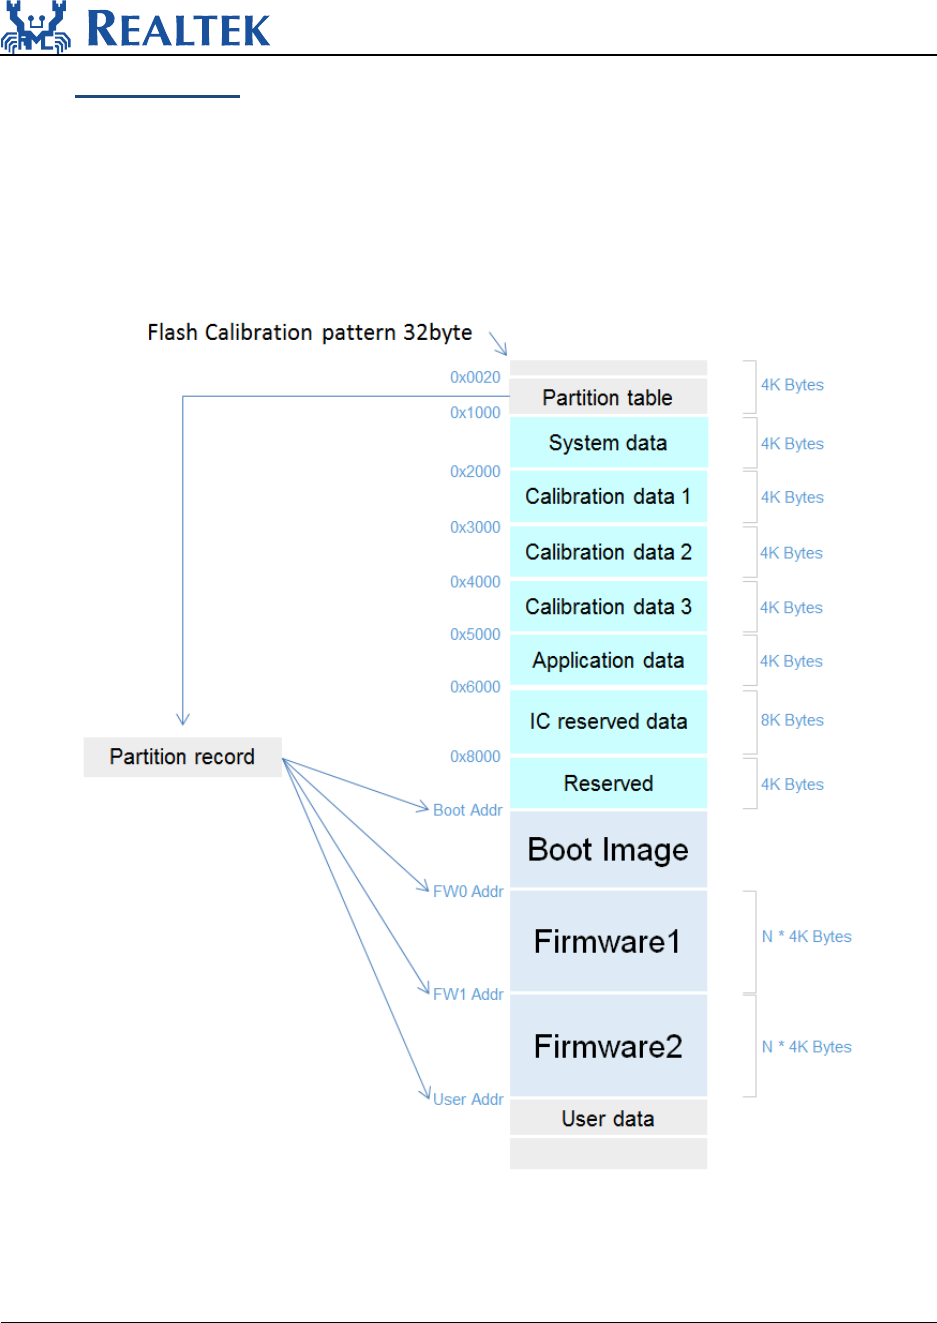
Partition.bin stores partition table, recording the address of Boot image and firmware
image. Boot.bin is bootloader image; firmware_is.bin is application image, flash_is.bin
links partition.bin, boot.bin and firmware_is.bin. Users need to choose flash_is.bin
when downloading the image to board by PG Tool.
1.3 Using image tool to download
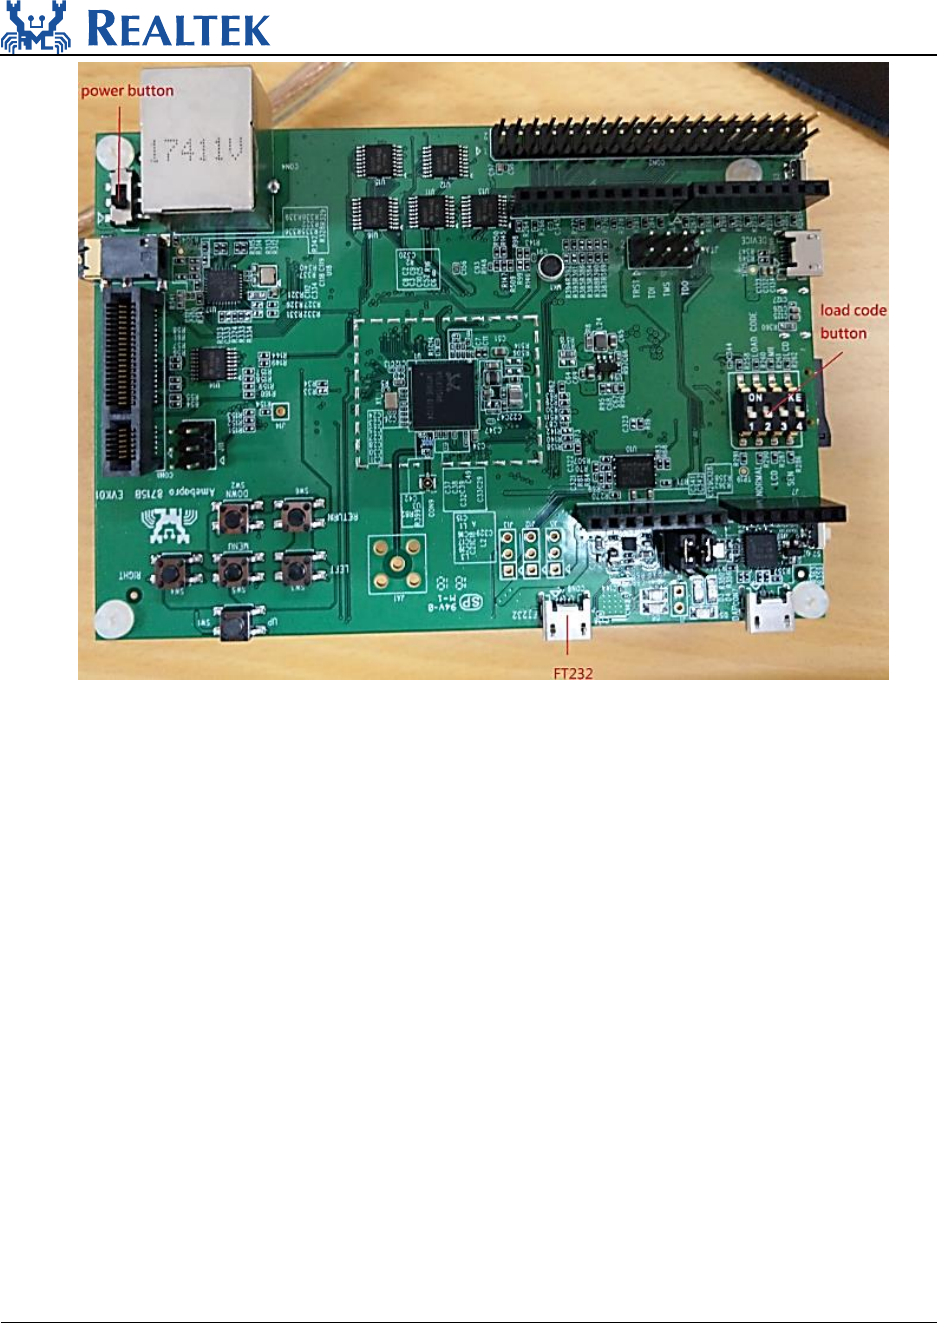
a. before using PG tool, user should connect AmebaPro to PC and switch to
download mode:
Communication between big CPU and little CPU is based on share
memory. There are some examples in SDK explaining how this works.
Please refer to Inter Channel Communication.
UM0166
August 29, 2018 6
Step 1: connect FT232 to PC
Step 2: enter test mode: put load code button on the graph to ON and reboot by power
button
Step 3: Use AmebaPro PG Tool to download image to AmebaPro(reference part b.)
Step 4: after downloading, load code button switch OFF and reboot AmebaPro. The log
can be seen in console.
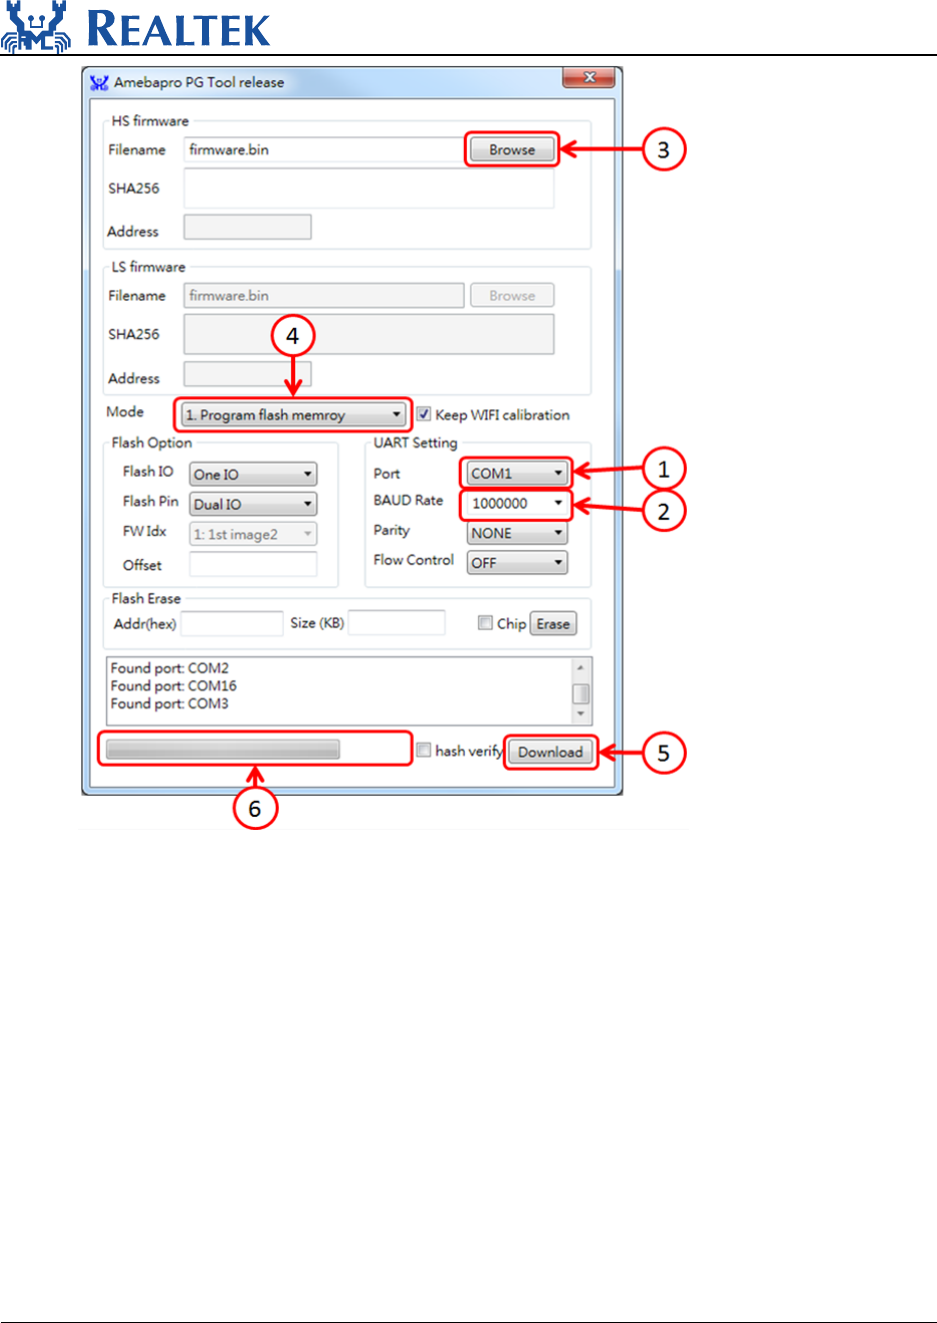
b. AmebaPro PG Tool usage:
UM0166
August 29, 2018 7
Step 1: AmebaPro PG Tool will automatically detect UART ports,choose UART ports of
AmebaPro
Step 2: choose baud rate
p.s. default using parity check and flow control
Step 3: choose the image “flash_xx.bin”
Step 4: choose the mode “ Program flash memory”
Step 5: click Download to download the image to board
Step 6: the progress will show in the bar and the success/fail result will show here

UM0166
August 29, 2018 8
NOTE: other setting please keeps default,Flash IO : “One IO”, Flash Pin : “Dual IO”,
Parity: “NONE”, Flow Control : “OFF”
UM0166
August 29, 2018 9
1.4 Using JTAG/SWD to debug
JTAG/SWD is a universal standard for chip internal test. The external JTAG interface has
four mandatory pins, TCK, TMS, TDI, and TDO, and an optional reset, nTRST. JTAG-DP
and SW-DP also require a separate power-on reset, nPOTRST. The external SWD
interface requires two pins: bidirectional SWDIO signal and a clock, SWCLK, which can
be input or output from the device.
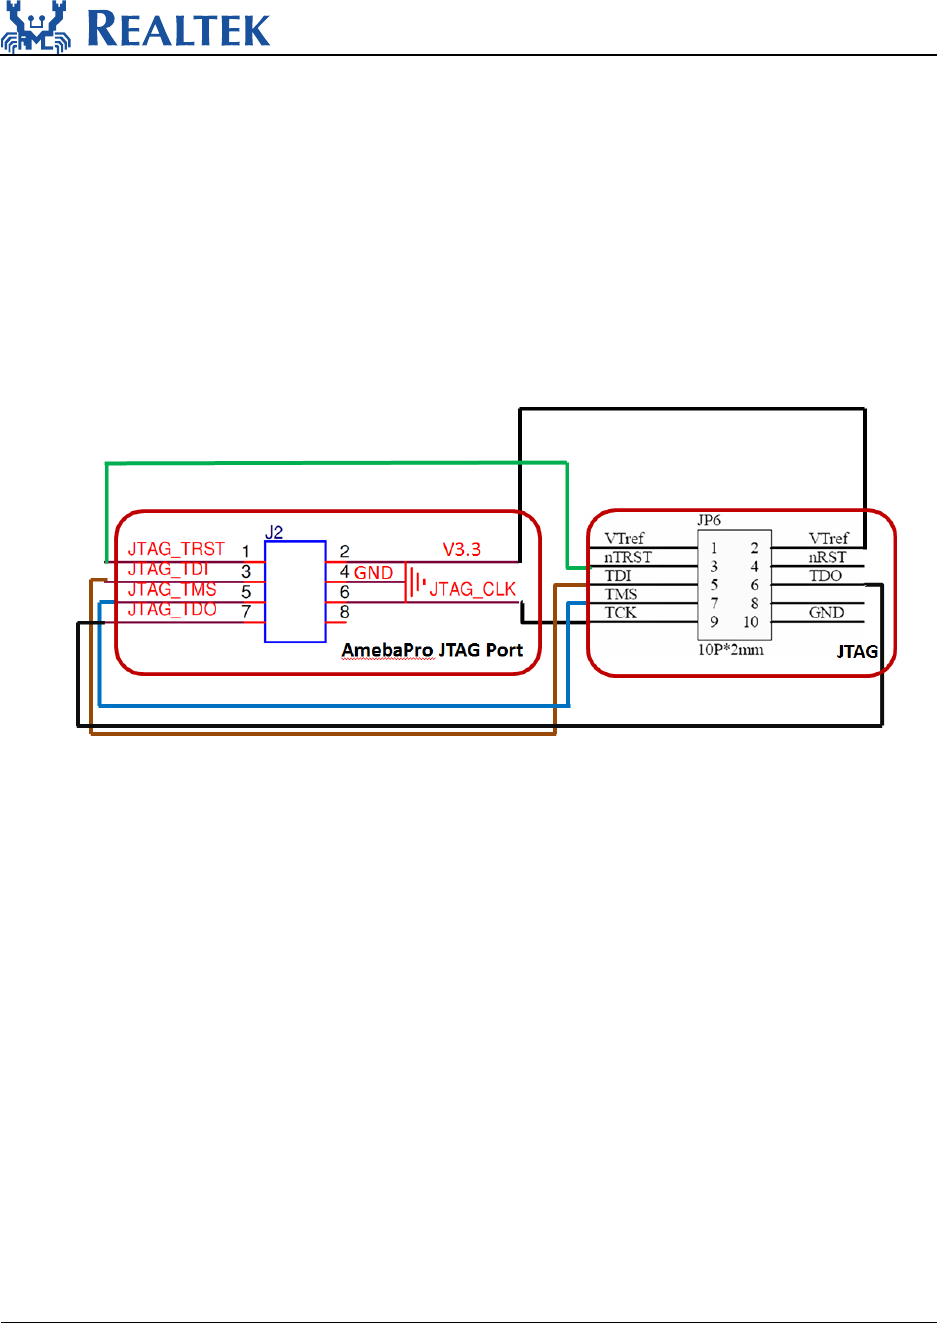
1.4.1 JTAG connection
Make sure the five pin (TCK,TMS,TDI,TDO 和nTRST)connect each other as the
graph below.
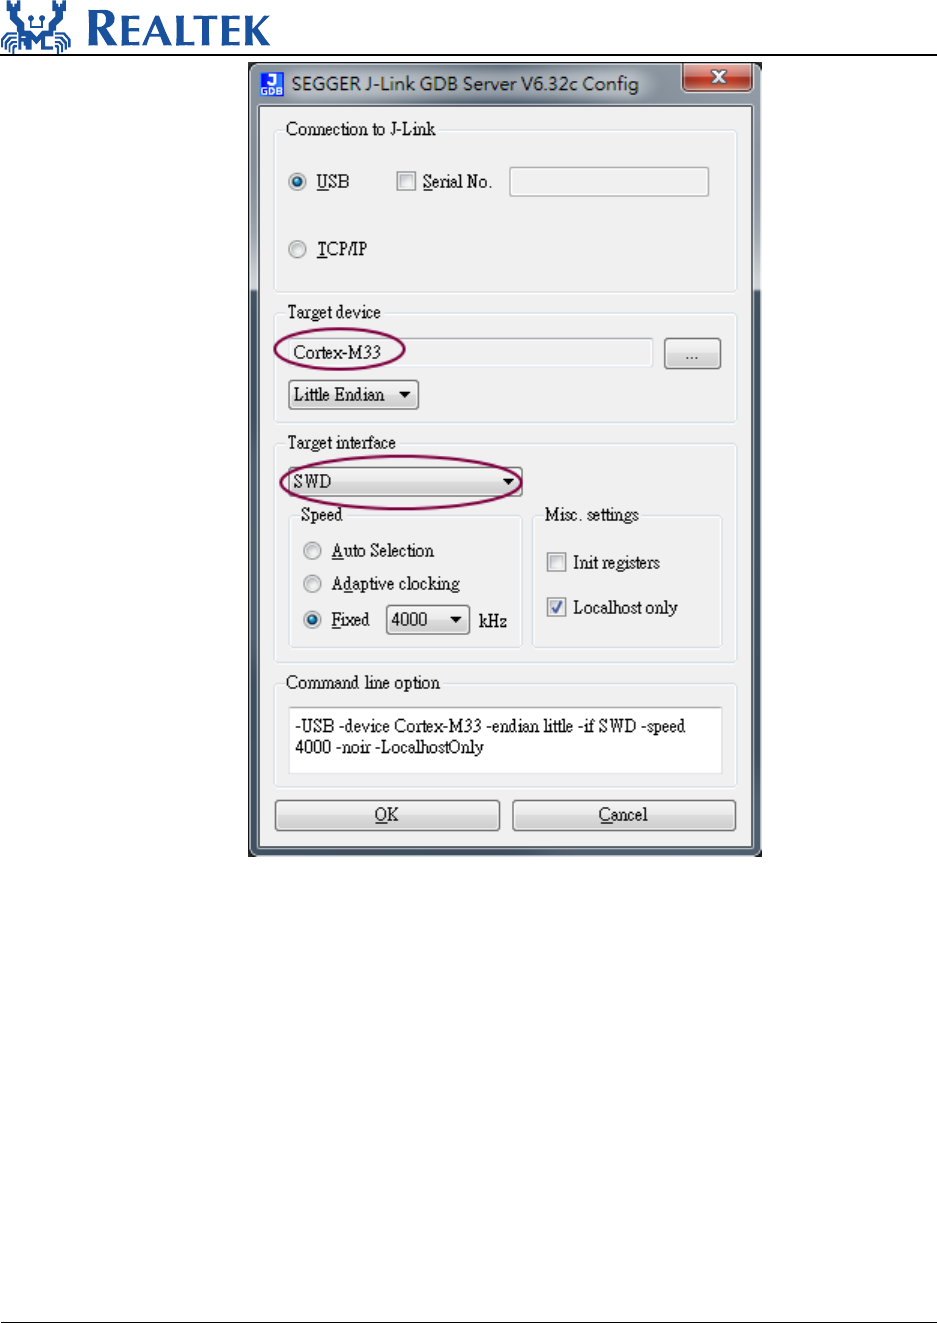
After connection, open J-Link GDB server. Choose target device Cortex-M33(for
AmebaPro), and target interface JTAG / SWD. Click OK.
UM0166
August 29, 2018 10
UM0166
August 29, 2018 11
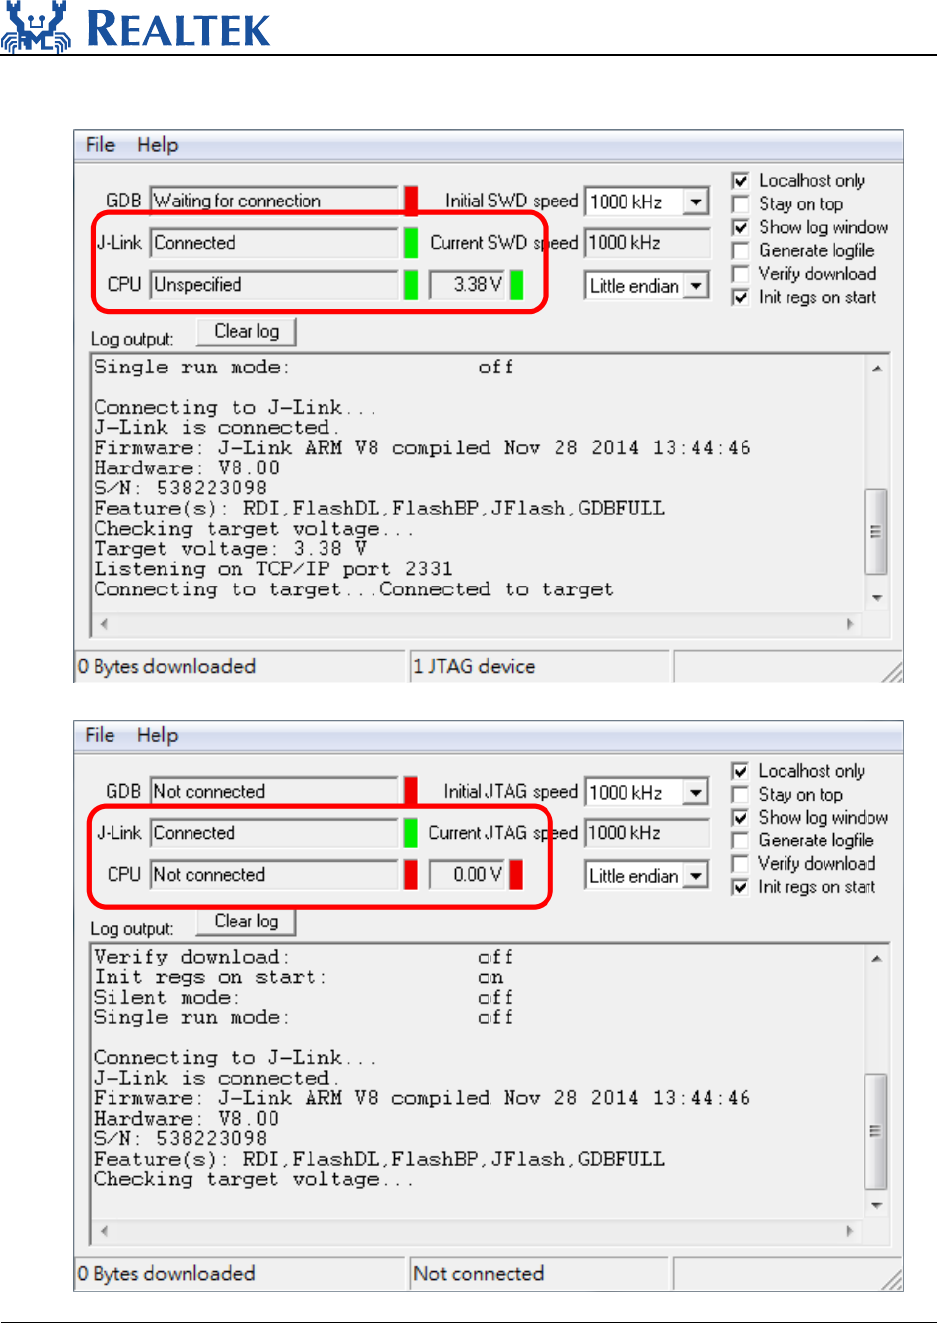
If connection succeeds, J-Link GDB server must show as below.
If connection fails, J-Link GDB will show:
UM0166
August 29, 2018 12
2 Flash Layout
AmebaPro use Big-Little architecture and sub-mcu system design, which provide high
extensibility for developers.
2.1 Flash Layout overview

UM0166
August 29, 2018 13
3 How to use example source code
3.1 Application example source
The examples for AmebaPro application is the SDK/common/example file. All the
example provide related files including .c,.h, and readme. The readme file explains how
to compile and important parameter.
After opening IAR, the first step is adding example source code(.c) into application_is-
>utilities->example(right click example and choose Add->Add Files or drag-and-drop the
file into it ).
After adding example code, user should use platform_opts.h to switch on the example.
For example, if users are going to use DCT function, compile flag CONFIG_EXAMPLE_DCT
should be set to 1, which means
#define CONFIG_EXAMPLE_DCT 1
in platform_opts.h so that the example function in example_entry will execute .
After this procedure, rebuild application_is project to execute the example.
3.2 Peripheral example source
Peripheral example source can help us utilize peripheral function. Peripheral example
source code locates in SDK/project/realtek_amebapro_v0_example/example_sources.
There are main.c and readme.txt in each example file. The main.c in the example should
be used to replace original main.c( in SDK/project/realtek_amebapro_v0_example/src).
The readme file explains how to compile and important parameter.
After that, rebuild application_is project to execute the Peripheral example.
3.3 Wi-Fi example source
3.3.1 Use AT command to connect WLAN
AmebaPro provide AT command for user to test and develop. Users can key in AT
command to connect WLAN by the console in PC. AT command can be referenced in
AN0025 Realtek at command.pdf.
Wi-Fi direct GO and Concurrent mode are still under development, we will release in
future version.
UM0166
August 29, 2018 14
3.3.2 WLAN scenario example
AmebaPro provide WLAN scenario example for users to develop a variety of WiFi
function, the path if example is
\component\common\example\wlan_scenario\example_wlan_scenario.c. This
example provides many features including station mode, AP mode, Concurrent mode,
WPS and P2P GO. The detail and the usage of the example can be read in readme.txt.
Wi-Fi direct GO and Concurrent mode are still under development, we will release in
future version.
3.4 Video example source
AmebaPro provide Multimedia Framework v2. Video example code is based on this
architecture. Any detail about Multimedia Framework v2 architecture can be referenced
in document in UM0167.
3.4.1 Using standard VLC to play streaming from AmebaPro
To VLC website https://www.videolan.org/ and download the software
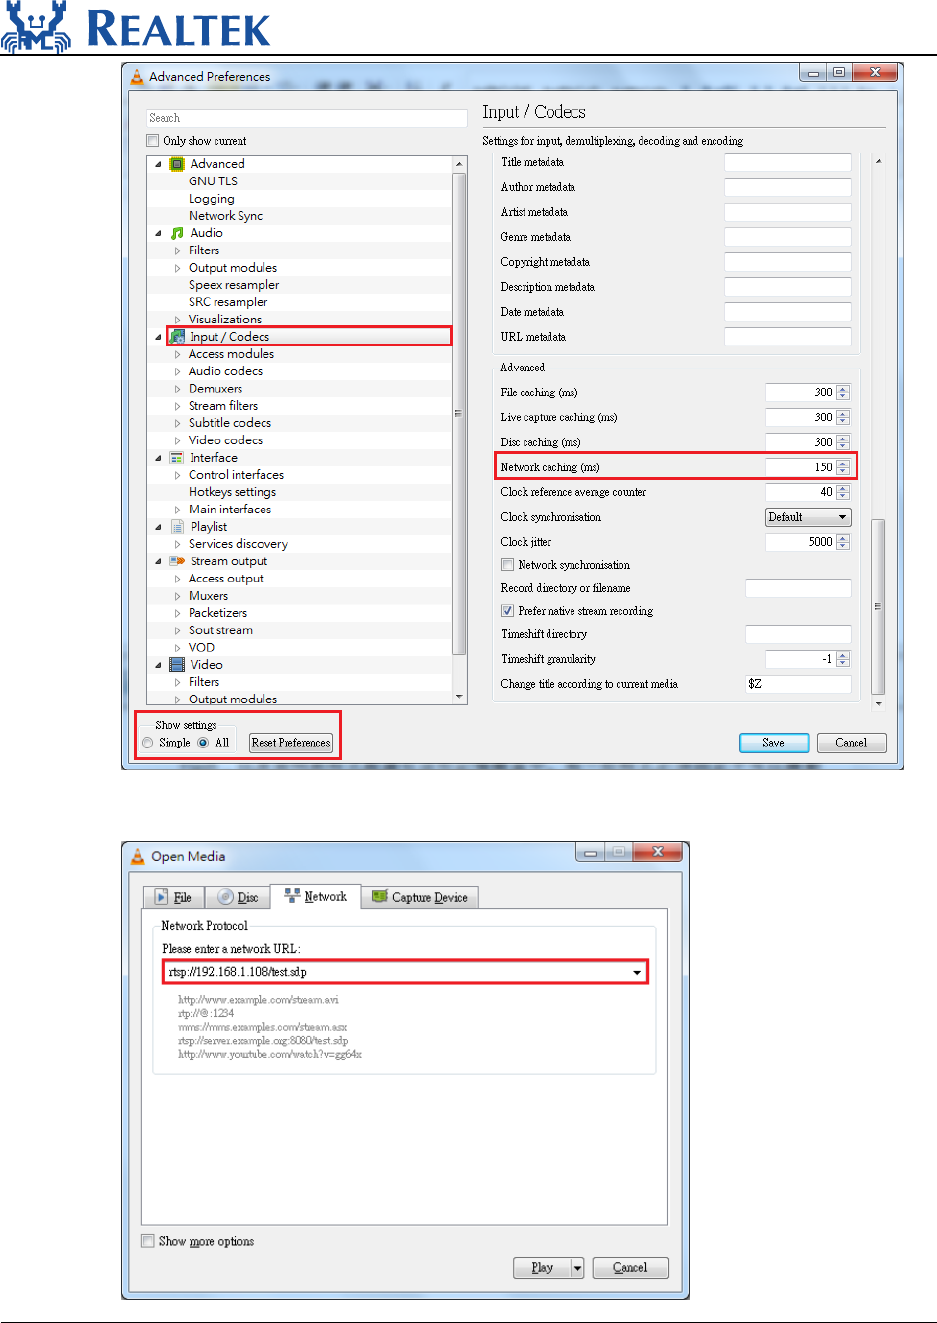
Run VLC and adjust some parameters: click Tools->Preference, lower left corner ->
show all settings-> input/Codecs, and modify Network caching to 150ms。
UM0166
August 29, 2018 15
Media->Open Network Stream, key in URL: rtsp://xxx.xxx.xxx.xxx/test.sdp and click
play
UM0166
August 29, 2018 16
4 Memory configuration and usage
This chapter introduces the memory in AmebaPro, including OM, RAM, SRAM, TCM,
DRAM, Flash. Also, this chapter provides the guide that users can place their program to
the specific memory to fit user’s requirement. However, some of program is fixed in
specific memory and cannot be moved. This program is also discussed in this chapter.
Reference the chapter Flash Layout if the memory is related to Flash.
4.1 Memory type
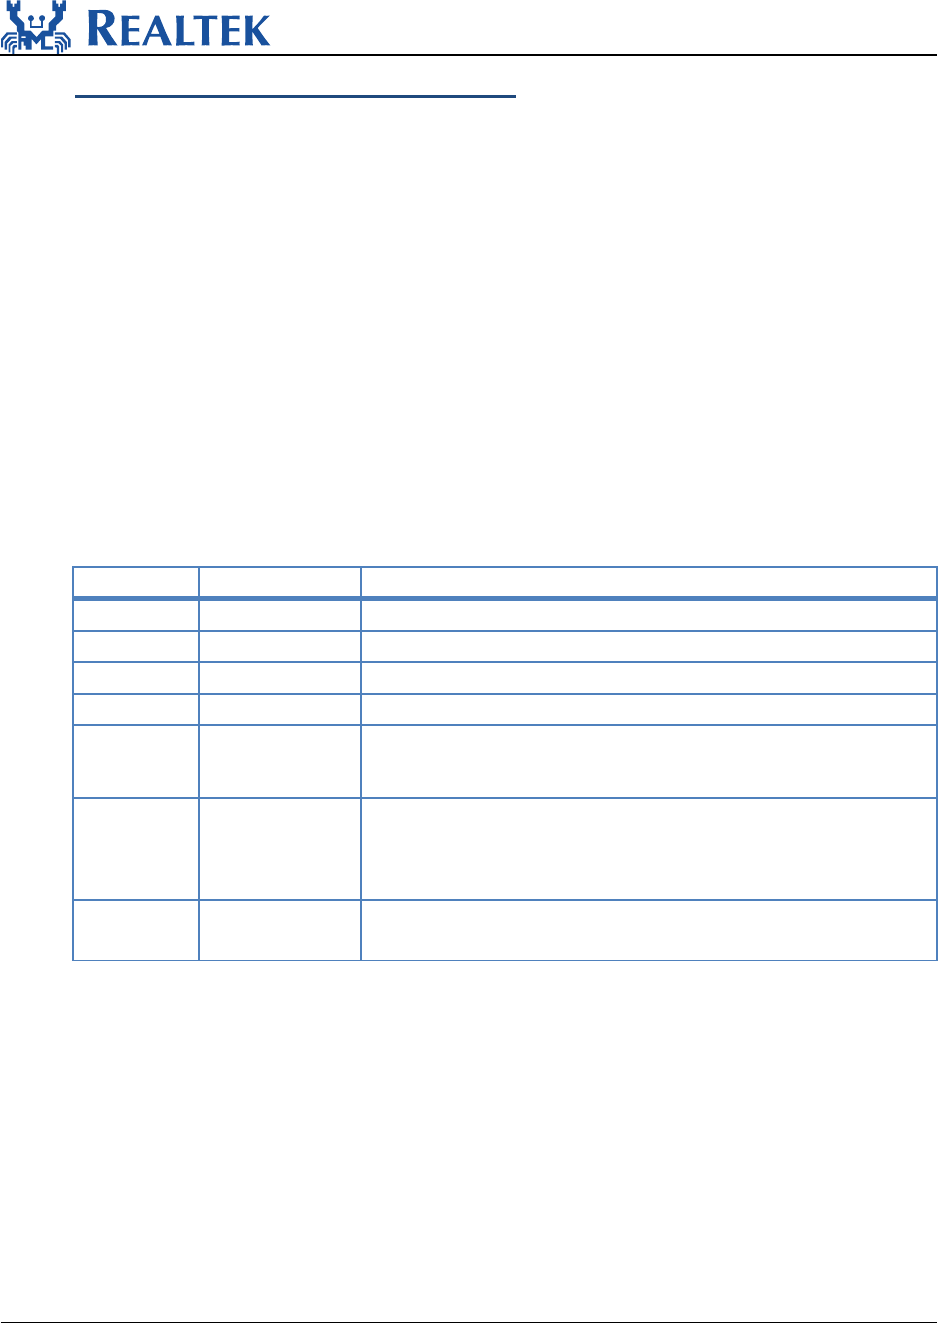
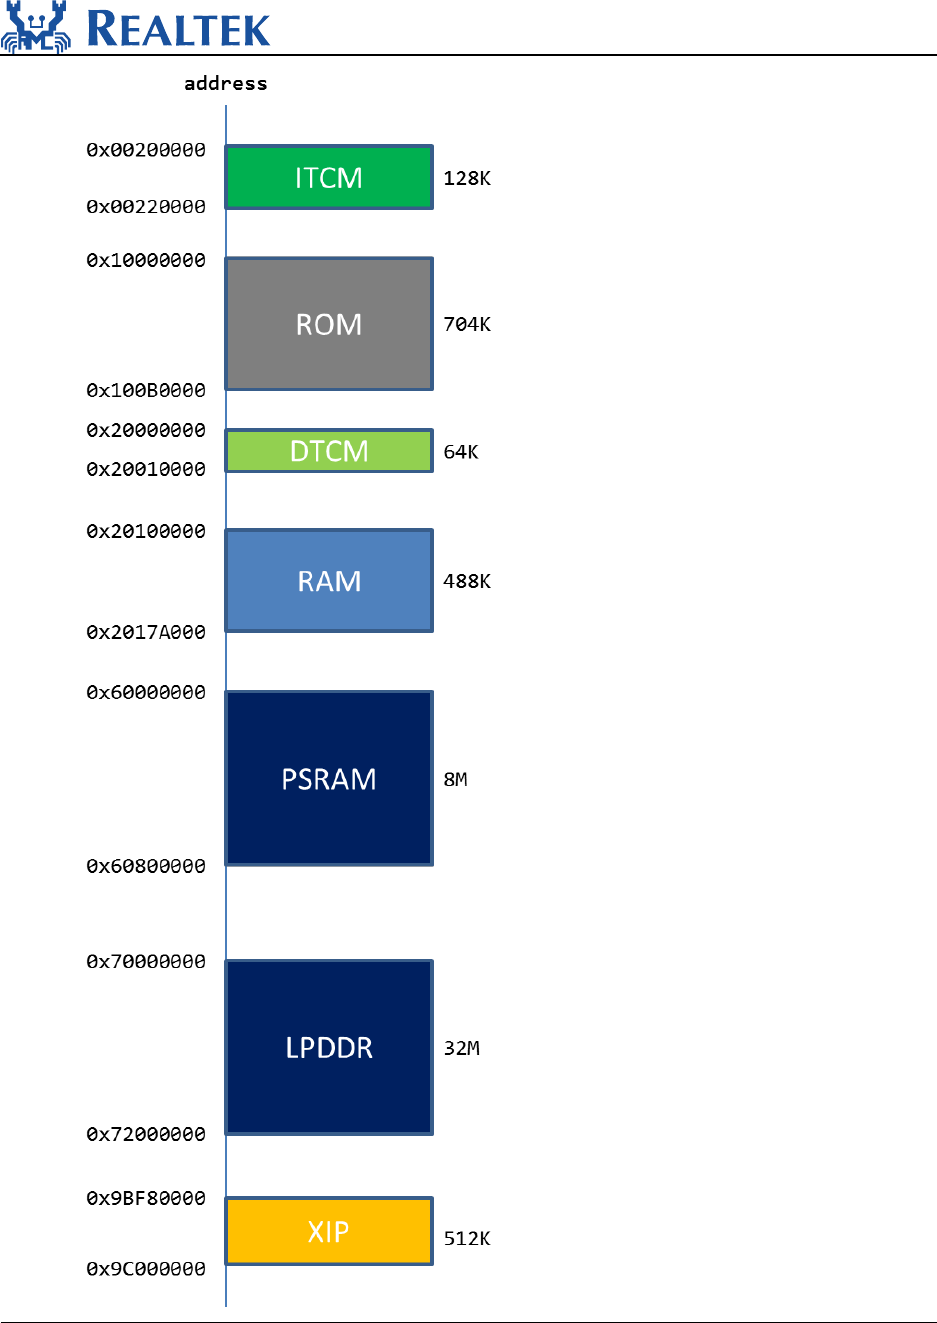
4.1.1 The size and configuration in AmebaPro(big CPU)
The size and configuration in AmebaPro(big CPU) is as shown below
Size(bytes)
Description
ITCM
128K
can place instruction
ROM
704K
DTCM
64K
can place Read/write data
RAM
488K
SRAM which size is 128K
PSRAM
8M
Choose either PSRAM or LPDDR. Evaluation Reference
Board is attached with LPDDR。
LPDDR
32M
Choose either PSRAM or LPDDR. Evaluation Reference
Board is attached with LPDDR。。LPDDR is also called
as DRAM
XIP
512K
Execute In Place, text section in Flash can be placed in
XIP
The graph of configuration in AmebaPro big CPU is as shown below:
UM0166
August 29, 2018 17
UM0166
August 29, 2018 18
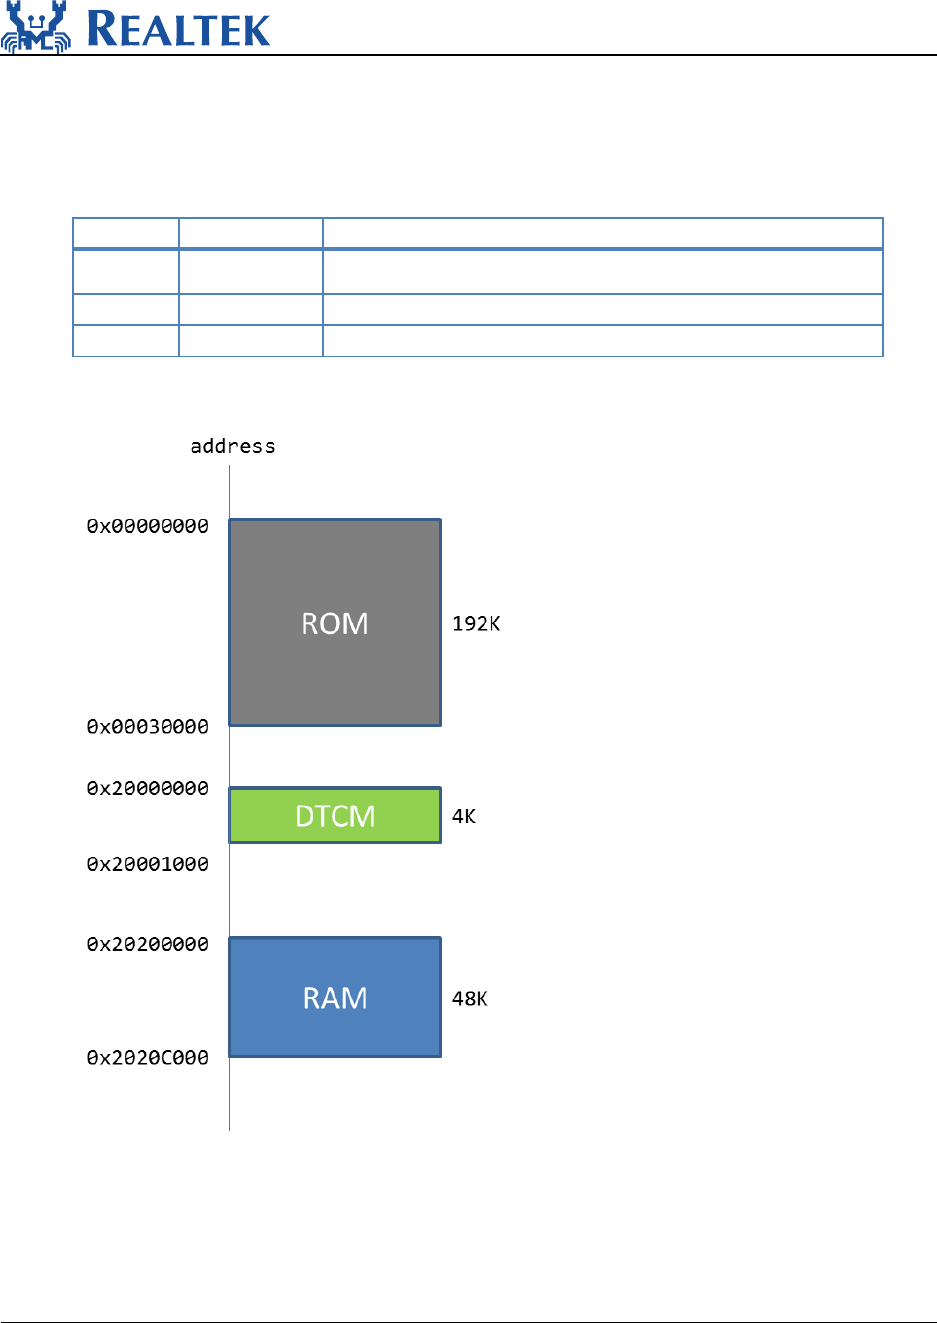
4.1.2 The size and configuration in AmebaPro(little CPU)
The size and configuration in AmebaPro(little CPU) is as shown below
Size(bytes)
Description
ROM
192K
DTCM
4K
can place Read/write data
RAM
48K
Is also known as SRAM
The graph of configuration in AmebaPro little CPU is as shown below:
UM0166
August 29, 2018 19
4.2 Memory Configuration
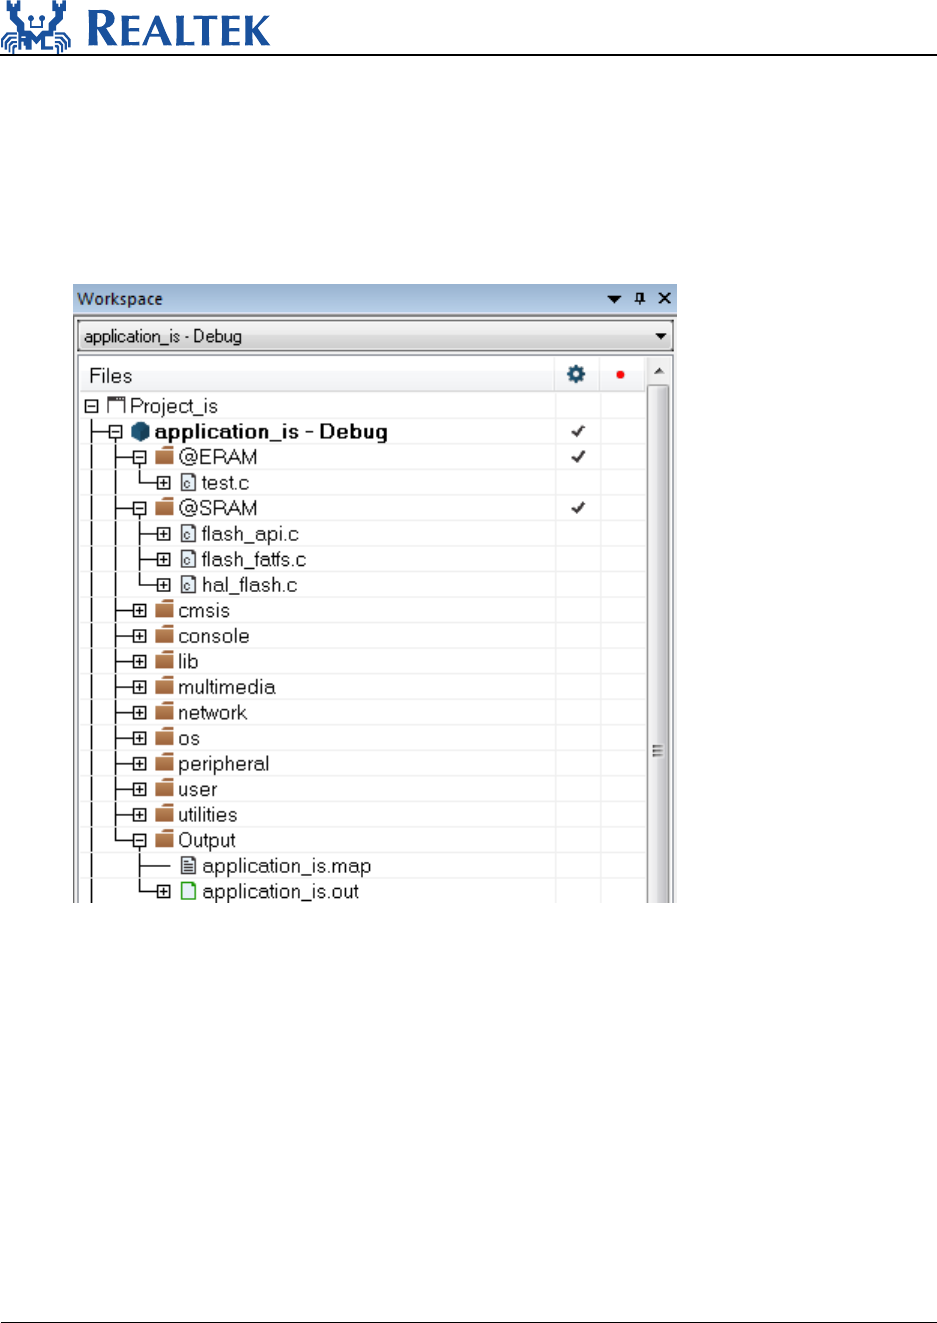
4.2.1 Configure memory in IAR
In IAR Workspace, there are “@ERAM” and “@SRAM” group. “@ERAM” represents
external RAM, which can be known as PSRAM or LPDDR. “@SRAM” represents SRAM.
Except “@ERAM” and “@SRAM” group, the rest of text section will be placed in XIP.
If users want to place specific text section of source file into PSRAM/LPDDR, users can
drag-and-drop the files into “@ERAM”. For example, text section of “test.c” will be
placed in PSRAM/LPDDR as the graph above. If users want to place specific source file
into SRAM, users can drag-and-drop the files into “@SRAM”. For example, “flash_api.c”,
“flash_fatfs.c”, “hal_flash.c” is placed in SRAM as the graph above.
4.2.2 Configure memory in ICF file
IAR uses ICF (IAR Configuration File) to configure memory allocation so users can configure
memory allocation by ICF file.
UM0166
August 29, 2018 20
ICF file of Big CPU in AmebaPro locates:
“SDK/project/realtek_amebapro_v0_example/EWARM-RELEASE/ application_is.icf”
Open “application_is.icf” with editor. There are some memory regions in it, which is:
ITCM_RAM_region
DTCM_RAM_region
RAM_region
RAM_NC_region
ERAM_region
XIP_FLASH_region
Users can reference IAR document if users don’t know the format of ICF.
4.2.3 Memory overflow
In default, AmebaPro place text section in XIP area. If XIP does not have enough space, it
will show the errors as below when linking.
Error[Lp011]: section placement failed
unable to allocate space for sections/blocks with a total estimated minimum size
of 0xa0051 bytes (max align 0x8) in <[0x9bf80140-0x9bffffff]> (total uncommitted space
0x7fec0).
The solution is to move the program in XIP to other region.
4.3 Video in DRAM
Video source example costs a lot of memory:
Stream 1: H264 1080p, 15fps, bitrate 2M + 8K AAC
Stream 2: 720p, 30fps, bitrate 1M + 8K AAC
Snapshot mode: 720p, JPEG Level 5
EX: Video costs 30.58MB in DRAM
1080p H264: Encoder: 6.54MB, ISP buffer: 2.97 * 3 = 8.91MB; Encoder buffer pool:
2.97MB , total 18.42MB
720p H264: Encoder: 2.92MB, ISP buffer: 1.32 * 4 = 5.28MB; Encoder buffer pool:
1.32MB , total 9.52MB

UM0166
August 29, 2018 21
720p JPEG: Encoder: 3.21KB, ISP buffer: 1.32 MB; Snapshot buffer: 1.32MB , total
2.64MB
4.4 Unmovable program
4.4.1 XIP-related Flash API
Because XIP use flash interface so that flash api are placed in SRAM. Users cannot move
these file to other place, including:
flash_api.c
flash_fatfs.c
hal_flash.c.
4.5 Counting system of memory
Please refer to UM0070.

UM0166
August 29, 2018 22
6 File system
AmebaPro support file system based on flash and SD card and AmebaPro can support
these two storages simultaneously.
6.1 FAT Filesystem on Flash
Flash file system example is located in component\common\example\flash_fatfs
6.1.1 Software Setup
First, enable the Flash FATFS example in (project)\inc\platform_opts.h:
N
e
Next, modify parameters in
component\common\file_system\fatfs\r0.10c\include\ffconf.h:
Please note that the flash memory base for the flash filesystem used in the Flash FATFS
example is defined in the file flash_fatfs.c:
/* For FLASH FATFS example*/
#define CONFIG_EXAMPLE_FLASH_FATFS 1
#if CONFIG_EXAMPLE_FLASH_FATFS
#define CONFIG_FATFS_EN 1
#if CONFIG_FATFS_EN
// fatfs version
#define FATFS_R_10C
#define FATFS_DISK_FLASH 1
#endif
#endif
…
#define _USE_MKFS 1//0 /* 0:Disable or 1:Enable */
…
…
…
#define _MAX_SS 4096//512 1
…
UM0166
August 29, 2018 23
Finally, rebuild the project and download active application to DEV board.
6.2 Dual FAT Filesystem - File system on both SD Card and Flash
Dual file system example is located in component\common\example\fatfs_dual
6.2.1 Hardware Setup
Please connect your Ameba DEV board with SD/MMC card connector as described in
UM0073.
6.2.2 Software Setup
Enable the DUAL FATFS example in (project)\inc\platform_opts.h:.
Next, modify parameters in ffconf.h:
Please note that the flash memory base for the flash filesystem used in the Flash FATFS
example is defined in the file flash_fatfs.c:
…
#define FLASH_APP_BASE 0x180000
…
/* For Dual FATFS example*/
#define CONFIG_EXAMPLE_FATFS_DUAL 1
#if CONFIG_EXAMPLE_FATFS_DUAL
#define CONFIG_FATFS_EN 1
#if CONFIG_FATFS_EN
// fatfs version
#define FATFS_R_10C
#define FATFS_DISK_SD 1
#define FATFS_DISK_FLASH 1
#endif
#endif
…
#define _USE_MKFS 1
…
#define _VOLUMES 2
…
#define _MAX_SS 4096
…

UM0166
August 29, 2018 24
Finally, rebuild the project and download active application to DEV board.
…
#define FLASH_APP_BASE 0x180000
…
