Unity Recorder V1User Manual
UnityRecorderV1UserManual
UnityRecorderV1UserManual
UnityRecorderV1UserManual
UnityRecorderV1UserManual
UnityRecorderV1UserManual
User Manual:
Open the PDF directly: View PDF ![]() .
.
Page Count: 12
Unity Recorder V1.0 User Manual
Unity Recorder
Use the Unity Recorder to capture and save in-game data during Play Mode. For example, use
the Unity Recorder to capture and save gameplay as an MP4 file.
A recorder specifies details for creating a recording, including a data source, resolution, and
output format. The Unity Recorder package includes the following recorders:
●Animation Recorder: generates an animation clip in ANIM format.
●Movie Recorder: generates a video in MP4 or WebM format.
●Image Recorder: generates a sequence of image files in JPEG, PNG, or OpenEXR
format.
●GIF Recorder: generates an animated GIF file.
The Unity Recorder also supports Timeline. Use Recorder tracks and clips to trigger recording
sessions from Timeline instances.
Limitations
The Unity Recorder has the following limitations:
● The Recorder window and Recorder properties are not available in standalone Unity
Players.
1

Unity Recorder V1.0 User Manual
● To use Unity Recorder with Scriptable Render Pipeline (SRP) or High Definition Render
Pipeline (HDRP), use only the Game View, 360 View, or Render Texture choices in the
Capture drop-down menu.
● The Animation Recorder only records a GameObject in the current Scene. It does not
record a GameObject in other scenes.
● The Movie Recorder does not support variable frame rates.
● The Unity Recorder does not capture frames at a consistent rate from systems that use
a real-time clock, like the Video Player. Data captured from these systems might appear
speeded up or slowed down.
Upgrading Unity Recorder
Besides new features, Unity Recorder 1.0 has a few notable changes:
● Use the Window > General > Recorder menu to access Unity Recorder features.
Features for older versions of Unity Recorder were accessible from the Window >
Recorder menu.
● Unity Recorder includes new, updated recorders. These recorders take advantage of
Unity Editor features and are more stable than previous versions. However, if you must
use the legacy recorders, toggle Window > General > Recorder > Options > Show
Legacy Recorders.
To upgrade to Unity Recorder 1.0 from an earlier version:
1. In Unity Editor, open your Unity Project.
2. Save the current Scene.
3. In the Project window, expand the Unity Technologies
folder and select the Recorder
folder.
4. In the main menu, choose Edit > Delete.
5. Quit Unity then re-open your project.
6. Use the Unity Asset Store to search for and install Unity Recorder 1.0.
Setting up Recorders
Use the recorder list in the Recorder window to add, rename, edit, duplicate, and delete
recorders. You can also save and delete your recorder list as an asset to reuse in your project
and in other projects.
2

Unity Recorder V1.0 User Manual
Tip: You can save a recorder as a Preset. You can also specify a preset for recorder settings as
a default when creating new recorders.
Re-opening the Recorder window restores the values of the last recording session.
To add a recorder:
1. Open the Recorder from the Unity menu (Window > General > Recorder).
2. In the recorder list, click + Add New Recorders to choose from a drop-down menu.
3. Adjust the settings for the new recorder.
4. Optionally rename the new recorder by single-clicking its name.
To delete or duplicate a recorder:
1. Open the Recorder from the Unity menu (Windows > General > Recorder).
2. In the recorder list, right-click the recorder and choose Delete or Duplicate.
Tip: You can also delete and duplicate recorders with the Delete and Ctrl+D/Cmd+D keys,
respectively.
To save, load, or clear settings for all recorders:
1. Open the Recorder window from the Unity menu (Windows > General > Recorder).
2. In the recorder list, click the drop-down menu.
3. Do one of the following:
○ To save your recorder list as an asset, choose Save Recorder List.
○ To load a recorder list, choose Load Recorder List, then the list to load.
○ To delete all recorders in your list, choose Clear Recorder List.
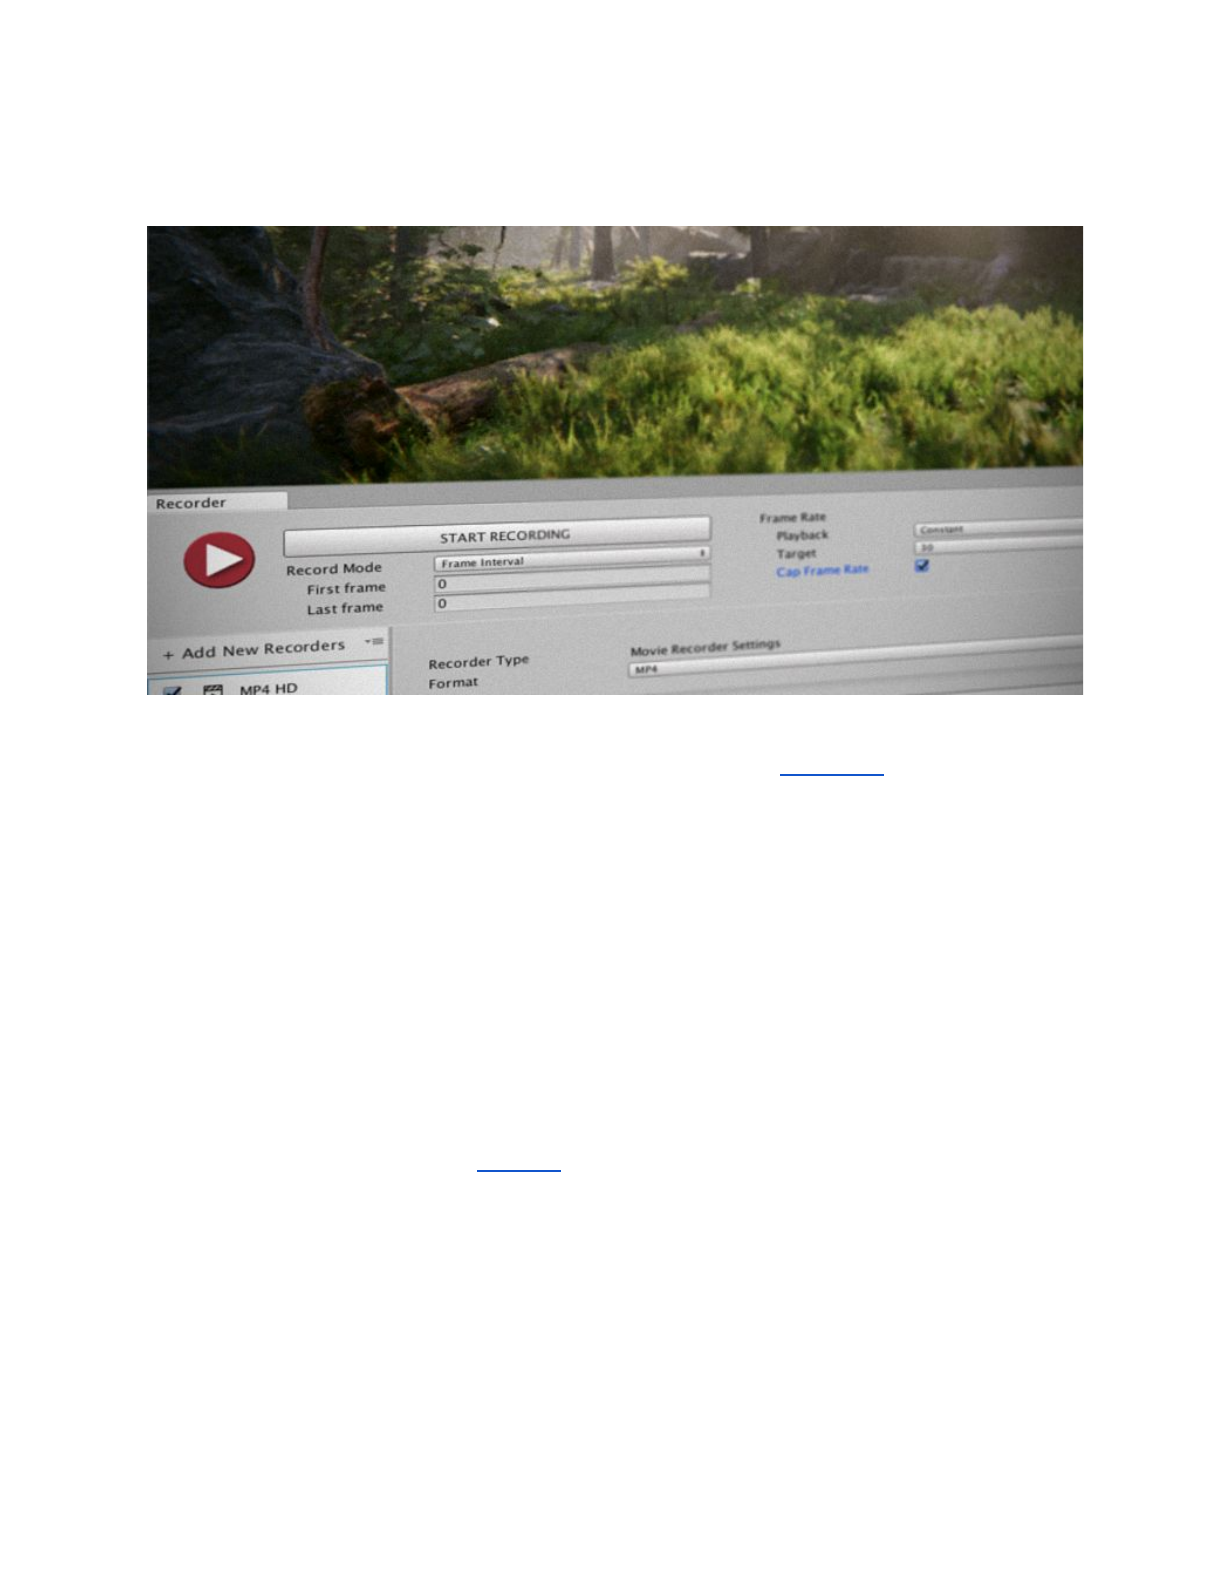
Recording in Play Mode
When recording in Play Mode, use the Record Mode property to specify when to start and stop
the recording. You can manually start and stop recording, specify a single frame, a range of
frames, or a range of time. You can set up more than one recorder to record the same Scene.
Note: During recording, you cannot modify the properties in the Recorder window.
3
Unity Recorder V1.0 User Manual
To record a scene in Play Mode:
1. Set up your scene to prepare it for recording.
2. Open the Recorder from the Unity menu (Window > General > Recorder).
3. In the recorder list, select then set up the recorder to use.
4. Set the Record Mode and Frame Rate properties.
5. Repeat steps 3-4 to use other recorders for the same Scene.
6. Click Start Recording or press F10. Unity Recorder activates Play Mode if it is not
already active. The progress bar displays the number of frames or images recorded.
7. When you are ready to stop recording, click Stop Recording or press F10. You only
need to stop recording when using the Manual record mode. Your game continues in
Play Mode.
Tip: Closing the Recorder window, or exiting Play Mode and returning to Edit Mode, also stops
the recording.
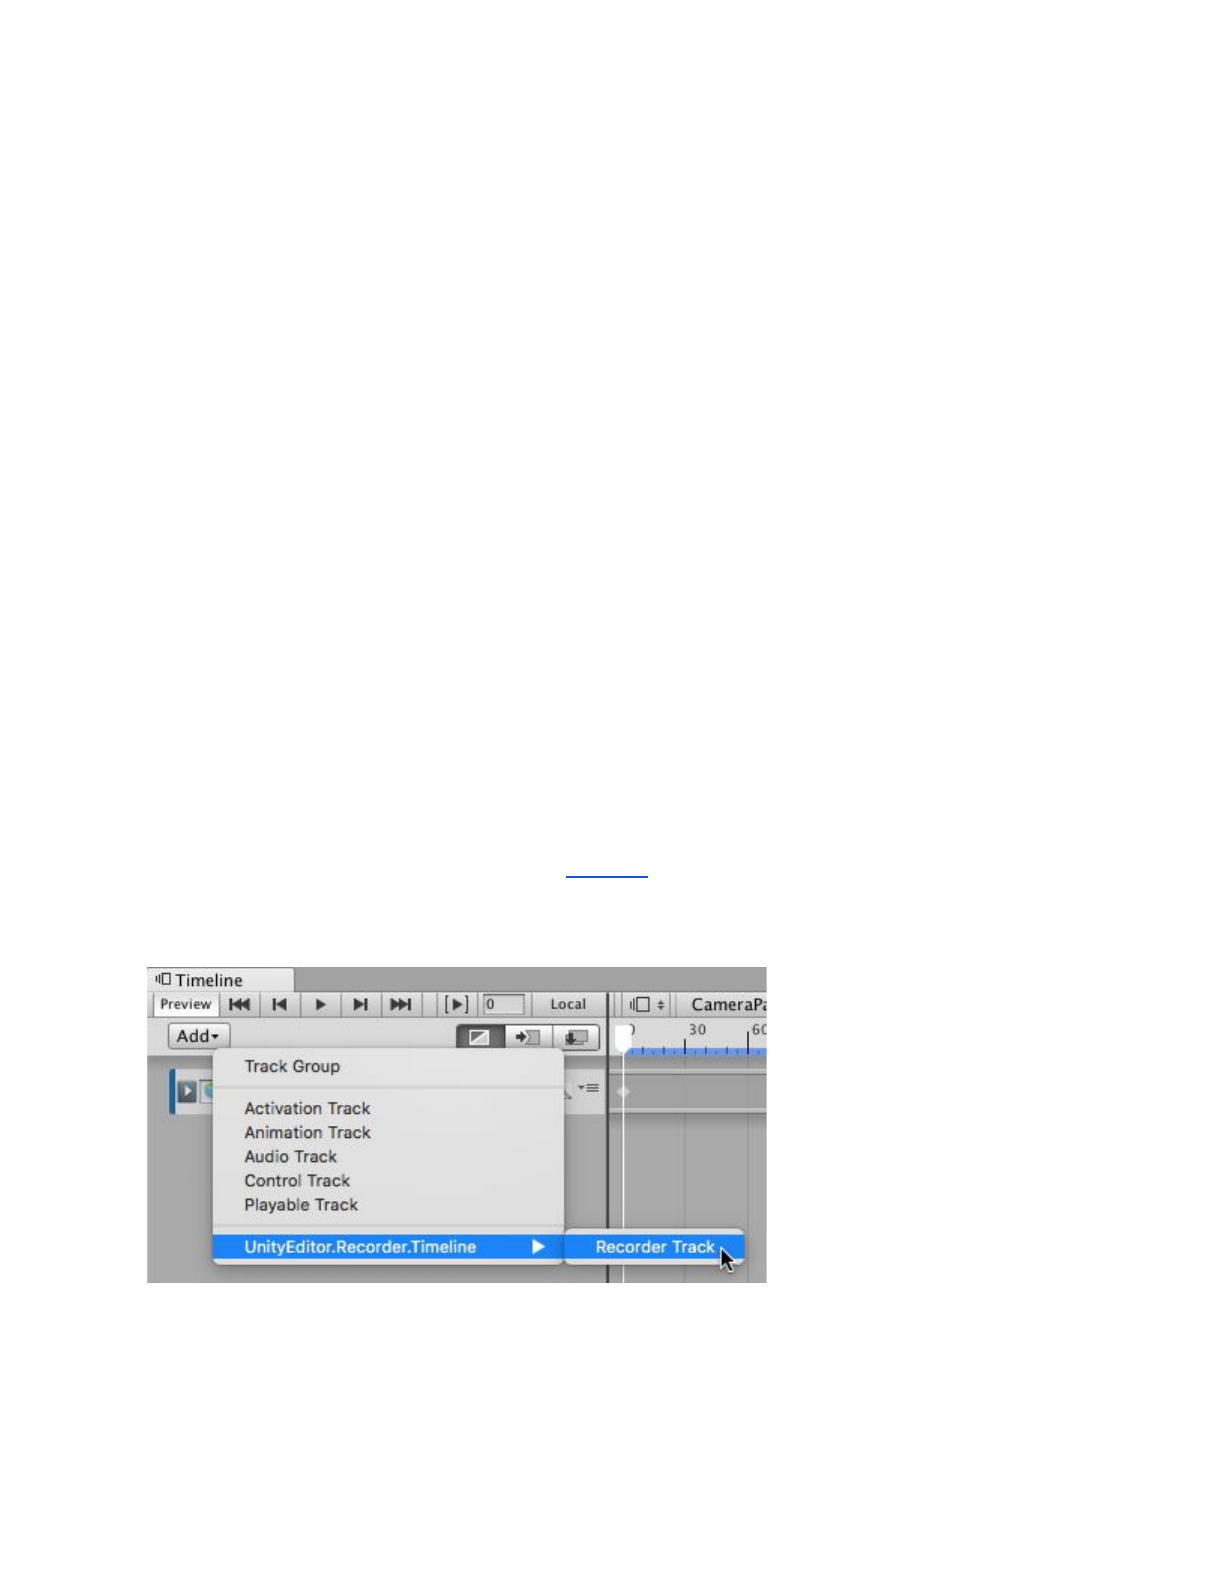
Recording from a Timeline track
You can start and stop recordings from the Timeline. A Recorder Track in Timeline contains
one or more Recorder Clips. Each clip specifies a recording to start and stop while Timeline
plays the Recorder Track.
Adding a Recorder Track in Timeline.
A Recorder Clip has the same properties as a recorder in the Recorder window except for the
following differences:
4

Unity Recorder V1.0 User Manual
● Recording mode can only be set to Constant. Timeline can only play using a constant
frame rate.
● The frame rate of the recording inherits from the Timeline’s Frame Rate setting.
● The Clip Timing section replaces the Bounds/Limits section. Instead, use the Start,
End, and Duration properties to set when recording occurs.
● Use the Recorder Category property to select which recorder the Timeline clip uses.
● The Recorder Clip properties are stored in the Timeline Track and do not affect the
properties in the Recorder window.
To set up a recording session in a Timeline instance:
1. Select the GameObject in your Scene that is associated with the Timeline Asset.
2. In the Timeline window, click Add and select Recorder Track.
3. Right-click the Recorder Track and select Add Recorder Clip.
4. Select the Recorder Clip to view and edit its recording properties in the Inspector
window.
Debugging Recorders
You can view the GameObject that Unity Recorder creates in your Scene. This GameObject is
named Unity-Recorder. It contains the components and child GameObjects that the Unity
Recorder creates to maintain bindings between the Recorder and the GameObjects in your
Scene. Also, while recording, the Unity-Recorder GameObject contains components that store
the progress of current recording session. Unity-Recorder is normally hidden from the
Hierarchy window.
To toggle the visibility of the Unity-Recorder, choose Window > General > Recorder >
Options > Show Recorder GameObject.
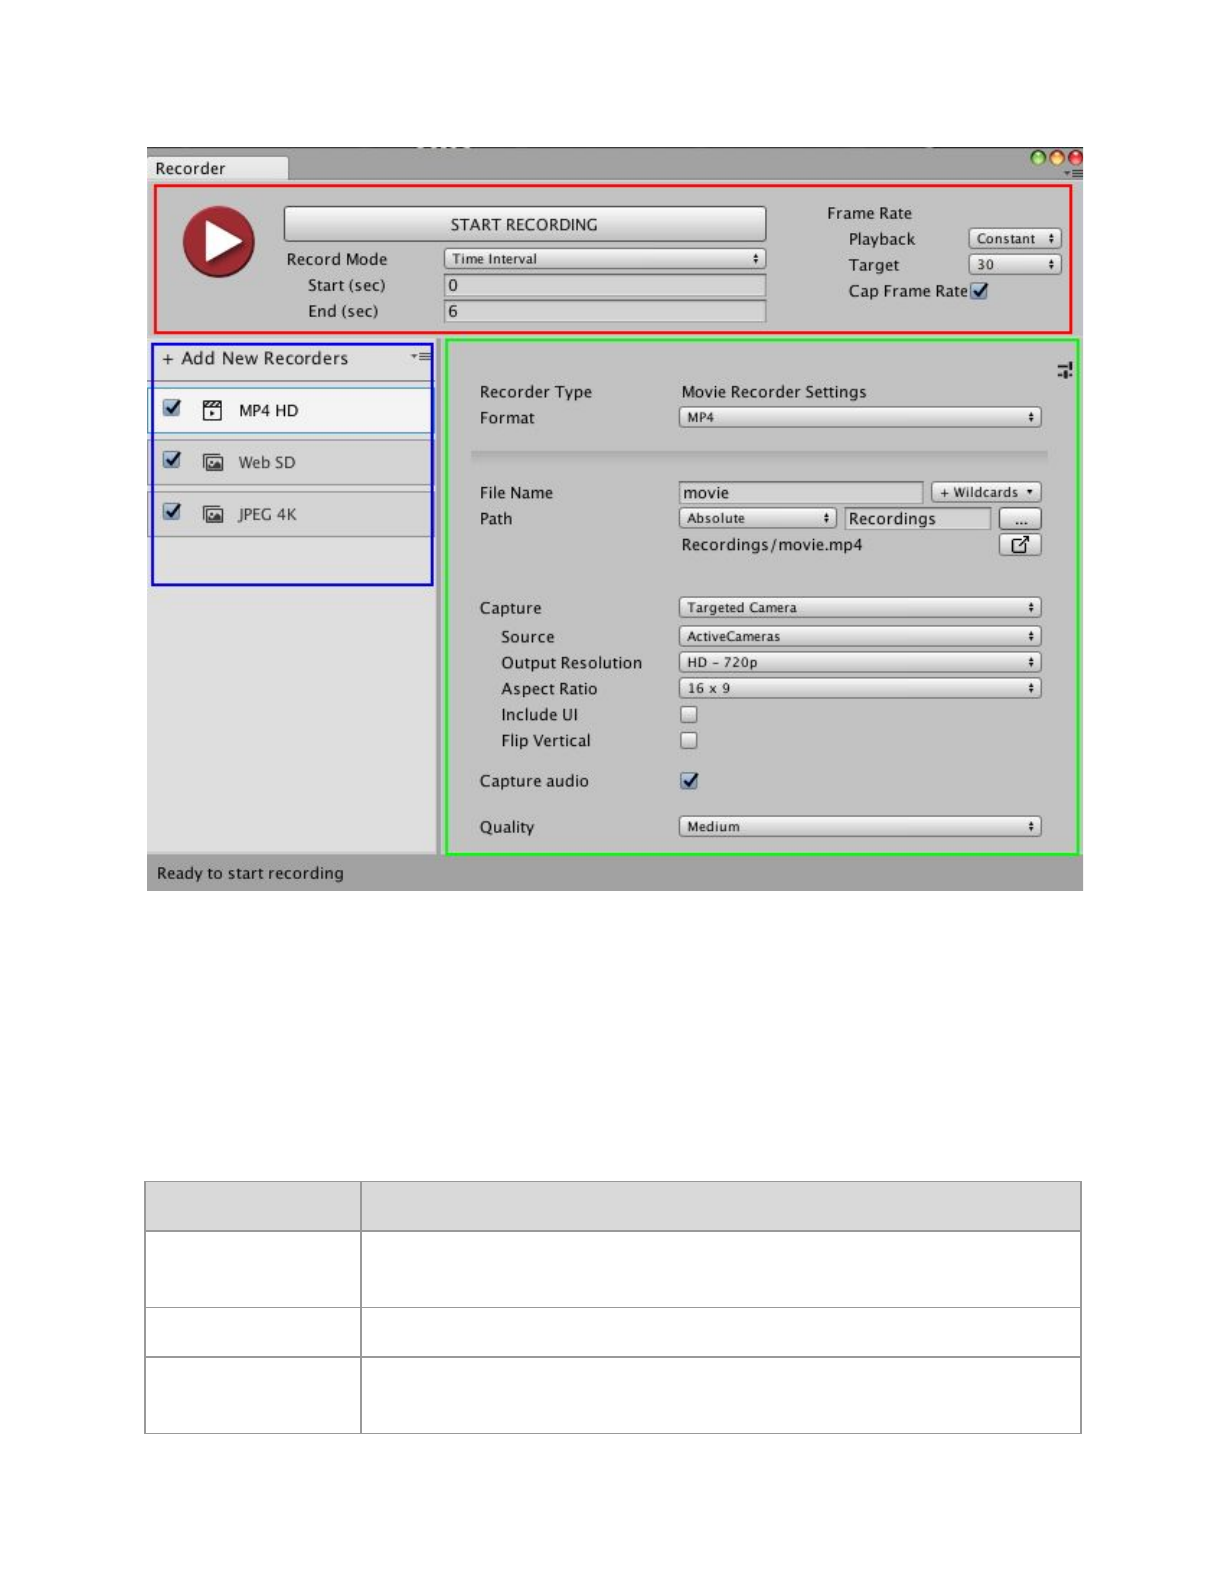
Recorder Window
Manage recorders and control recording in the Recorder window. The Recorder window has
these sections:
● Recording controls: Start and stop recordings, and specify their duration and frame rate.
● Recorder list: the recorders you have added or loaded.
● Recorder properties: Specify the recording properties, such as the output format and
encoding, file name and location.
5
Unity Recorder V1.0 User Manual
The Recorder window: recording controls (red), recorder list (blue), and recorder properties (green).
Recording controls
Use the recording controls to start and stop a recording. Specify when to start and stop a
recording with the Record Mode properties. Use the Frame Rate properties to specify how to
constrain the frame rate during recording. The frame rate affects the size and number of the
captured output files.
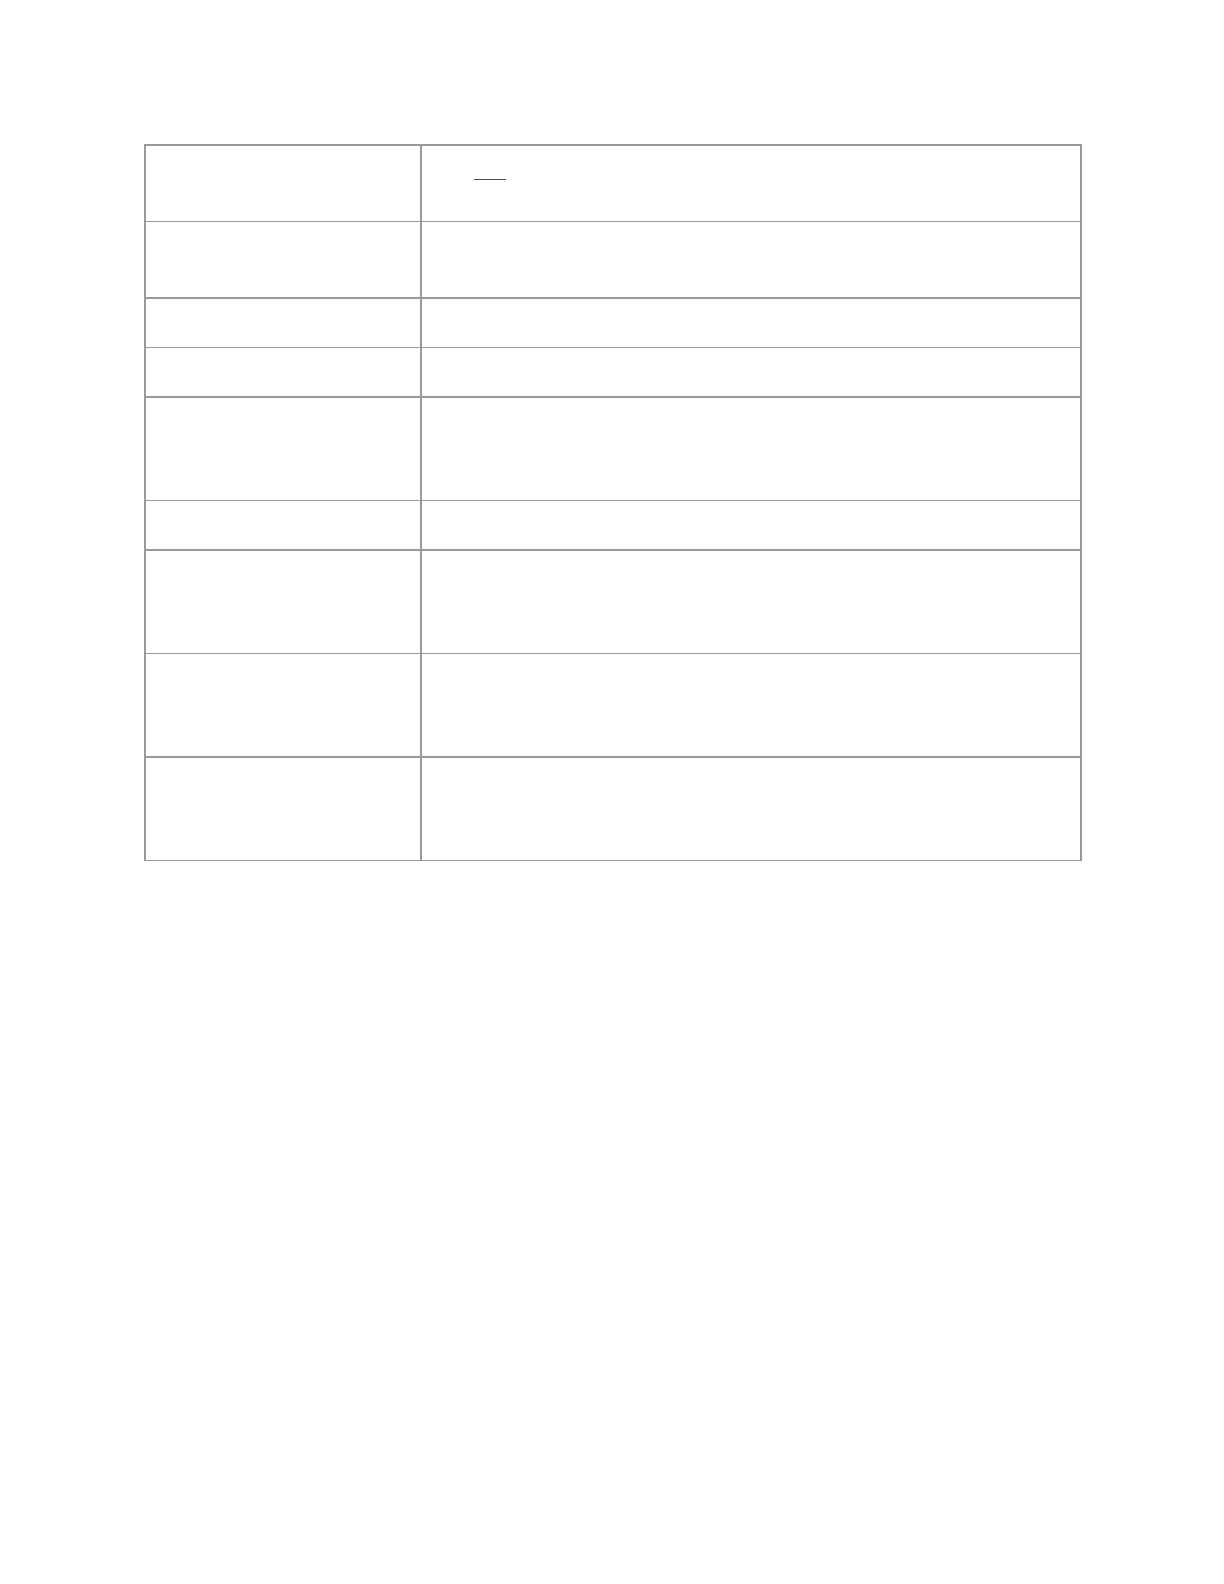
Property:
Function:
Start Recording
Stop Recording
Starts and stops recording. Clicking Start Recording also activates
Play Mode if it is not already active.
Record Mode
Specifies the frames or time duration to record.
Manual
Start and stop recording when you manually click Start Recording and
Stop Recording, respectively.
6
Unity Recorder V1.0 User Manual
Single Frame
Record a single frame. Use the Frame Number property to specify this
frame.
Frame Interval
Record a consecutive set of frames during Play Mode. Use the First
Frame and Last Frame properties to specify when to start and stop.
Time Interval
Record a specific duration during Play Mode. Use the Start and End
properties to specify when to start and stop.
Frame Number
Specifies the number of the frame to capture when using the Single
Frame mode.
First Frame
Last Frame
Specifies the range of frames to capture when in Frame Interval mode.
Start
End
Specifies the time, in seconds, to begin and finish recording.
Playback
Specifies how to control the frame rate during recording.
Constant
Limit the recorder to a specific frame rate. Use the Target property to
specify this rate.
Variable
Use the frame rate of the game. Specify the upper limit of the rate of the
game during recording with the Max Frame Rate property. Note: The
Movie Recorder does not support a variable frame rate.
Target
The frame rate to capture when using the Constant setting in
Playback. The Unity Recorder captures at this rate regardless of
whether the game is played at a higher or lower frame rate. For
example, if Target is set to a custom value of 30 fps but the game plays
at 60 fps, the recording is captured at 30 fps.
Max Frame Rate
Limit the rate of updates in Play Mode. This property is available when
Playback is Variable. To prevent your game from exceeding this frame
rate, the Unity Recorder inserts delays during game play. Use this
property to reduce the size of the output.
Cap Frame Rate
Check this property when the frame rate of your game is faster than the
Target frame rate. This property is available when Playback is
Constant.
Recorder properties
These properties specify the file name and location to store the output from a recorder. These
properties are available for all recorders.
7
Unity Recorder V1.0 User Manual
Some recorders, like the Animation Recorder, can only record inside the Assets folder.
Tip: Click to reveal the output files in Windows Explorer/Mac OS Finder.
Property:
Function:
File Name
The name of the output file. Use the text field to specify the pattern to
use for recording many files. Choose placeholders from the
+Wildcards drop-down menu.
+Wildcards
The placeholder text to insert in File Name. The recorder replaces
these placeholders when saving the output file. You may combine
wildcards.
Path
The folder where output files are saved. Use the drop-down menu to
choose a pre-defined Unity folder. Choose Absolute to specify a
custom directory or click ... to navigate to a custom directory.
Movie Recorder properties
The Movie Recorder generates a video in MP4 or WebM format. It does not support variable
frame rates.
Property:
Function:
Format
The encoding format of the output of the recorder. Choose MP4
or WEBM.
Capture Alpha
Check to include the alpha channel in the recording. Uncheck to
only record the RGB channels. This property is only available
when Format is WEBM. This property is not available when
Capture is Game View.
Capture
The input for the recording.
Game View
Record the frames that are rendered in the Game View.
Targeted Camera
Record the frames captured by a specific camera, even if it is not
used in the Game View.
360 View
Record a 360-degree video. Use the Source camera as the point
of view for the video. The recorder captures 360 degrees on the
y-axis of the Source camera.
Render Texture Asset
Capture the frames that are rendered in a Render Texture.
8
Unity Recorder V1.0 User Manual
Texture Sampling
When capturing, supersample the Source camera to generate
anti-aliased images in the output. Use this capture method when
the Rendering Resolution has the same or higher resolution
than the Output Resolution.
Render Texture
The Render Texture asset to use as the source for frames.
Available when Capture is set to Render Texture Asset. The
output resolution of the recording is fixed to the resolution of the
Rendure Texture.
Super Sampling
The size of the grid from which to sample. This property is
available when Capture is Texture Sampling.
Source
The camera to use for recording. Choose Active Cameras, Main
Camera, or Tagged Camera. The Main Camera option
specifies the camera with the MainCamera tag. Available when
Capture is set to Targeted Camera, 360 View, or Texture
Sampling.
Tag
The tag of the camera to record. Available when Capture is set
to Targeted Camera and Source is TaggedCamera.
360 View Output
The width and height, in pixels, of the 360-degree video. This
property is available when Capture is 360 View.
Cube Map
The dimension of the cube map, in pixels, for the 360-degree
video. This property is available when Capture is 360 View.
Stereo
Check to generate both a left and right stereoscopic view for a
360-degree video. This property is available when Capture is
360 View.
Stereo Separation
The angle to separate the left and right views. This separation is
along the y-axis of the Source camera. This property is available
when Capture is 360 View.
Rendering Resolution
The dimensions of the input from which to sample. This property
is available when Capture is Texture Sampling.
Output Resolution
The dimensions of the video recording. This property is available
only for applicable Capture choices.
Aspect Ratio
The width:height ratio to format the output to.
Flip Vertical
Check to flip the images in the output to make it upside-down.
Use this property to restore up and down when your system
generates video that is flipped vertically.
Capture Audio
Check to include audio in the recording.
9
Unity Recorder V1.0 User Manual
Quality
The quality of the output: Low, Medium, or High. The lower the
quality, the smaller the size of the output file.
Animation Recorder properties
The Animation Recorder generates an animation clip in ANIM format.
Property:
Function:
Game Object
The GameObject to record.
Recorded Target(s)
The components of the GameObject to record. Choose more than
one item to record more than one component.
Record Hierarchy
Check to record children of the Game Object too.
Image Recorder Properties
The Image Recorder generates a sequence of image files in JPEG, PNG, or OpenEXR format.
Property:
Function:
Format
The encoding format of the output of the recorder. Choose
PNG, JPEG, or EXR (for OpenEXR).
Capture Alpha
Check to include the alpha channel in the recording. Uncheck
to only record the RGB channels. This property is only
available when Format is PNG or EXR. This property is not
available when Capture is Game View.
Capture
The input for the recording.
Game View
Record the frames that are rendered in the Game View.
Targeted Camera
Record the frames captured by a specific camera, even if it is
not used in the Game View.
360 View
Record a 360-degree video. Use the Source as the point of
view for the video. The recorder captures video 360 degrees
on the y axis of the Source camera.
Render Texture Asset
Record the frames that are rendered in a Render Texture.
10
Unity Recorder V1.0 User Manual
Texture Sampling
When capturing, supersample the Source camera generate
anti-aliased images in the recording. Use this capture method
when the Rendering Resolution has the same or higher
resolution than the Output Resolution.
Source
The camera to use for recording. Choose Active Cameras,
Main Camera, or Tagged Camera. The Main Camera option
specifies the camera with the MainCamera tag. Available
when Capture is set to Targeted Camera or Texture
Sampling.
Tag
The tag of the camera to record. Available when Capture is
set to Targeted Camera and Source is TaggedCamera.
Output Resolution
The dimensions of the video recording. This property is
available only for applicable Capture choices.
Include UI
Check to include UI GameObjects in the recording.
Flip Vertical
Check to flip the images in the output to make it upside-down.
Use this property to restore up and down when your system
generates video that is flipped vertically.
GIF Recorder properties
The GIF Recorder generates an animated GIF file.
Property:
Function:
Capture
The input for the recording.
Targeted Camera
Record the frames captured by a specific camera, even if it is not
used in the Game View.
Render Texture Asset
Record the frames that are rendered in a Render Texture.
Texture Sampling
When capturing, supersample the Source camera generate
anti-aliased images in the recording. Use this capture method
when the Rendering Resolution has the same or higher
resolution than the Output Resolution.
Source
The camera to use for recording. Choose Active Cameras, Main
Camera, or Tagged Camera. The Main Camera option
specifies the camera with the MainCamera tag. Available when
Capture is set to Targeted Camera or Texture Sampling.
11
Unity Recorder V1.0 User Manual
Tag
The tag of the camera to record. Available when Capture is set
to Targeted Camera and Source is TaggedCamera.
Output Resolution
The dimensions of the video recording. This property is available
only for applicable Capture choices.
Aspect Ratio
The width:height ratio to format the output to.
Include UI
Check to include UI GameObjects in the recording.
Flip Vertical
Check to flip the images in the output to make it upside-down.
Use this property to restore up and down when your system
generates video that is flipped vertically.
Encoding
Properties for controlling the quality and size of the GIF output.
Num Colors
The number of colors to use in the GIF palette table. The
maximum is 256 colors. Specify a smaller palette to reduce the
size of the GIF file while reducing image quality.
Keyframe Interval
The number of frames that share the same color palette.
Increase this number to reduce the size of the GIF file while
reducing image quality.
Max Tasks
The number of frames to encode in parallel. Increasing this
number may reduce the length of time Unity takes to encode the
GIF.
12
