Unmesh Gundecha Learning Selenium Ing Tools With Python A Practical Guide On Automated Web I
Unmesh%20Gundecha%20Learning%20Selenium%20ing%20Tools%20with%20Python%20A%20practical%20guide%20on%20automated%20web%20i
Unmesh%20Gundecha-Learning%20Selenium%20ing%20Tools%20with%20Python_%20A%20practical%20guide%20on%20automated%20web%20in
User Manual:
Open the PDF directly: View PDF ![]() .
.
Page Count: 216 [warning: Documents this large are best viewed by clicking the View PDF Link!]
- Cover
- Copyright
- Credits
- About the Author
- About the Reviewers
- www.PacktPub.com
- Table of Contents
- Preface
- Chapter 1: Getting Started with Selenium WebDriver and Python
- Chapter 2: Writing Tests Using unittest
- Chapter 3: Finding Elements
- Chapter 4: Using the Selenium Python API for Element Interaction
- Chapter 5: Synchronizing Tests
- Chapter 6: Cross-browser Testing
- Chapter 7: Testing on Mobile
- Chapter 8: Page Objects and Data-driven Testing
- Chapter 9: Advanced Techniques of Selenium WebDriver
- Chapter 10: Integration with Other Tools and Frameworks
- Index


Learning Selenium Testing Tools with Python
Copyright © 2014 Packt Publishing
All rights reserved. No part of this book may be reproduced, stored in a retrieval
system, or transmitted in any form or by any means, without the prior written
permission of the publisher, except in the case of brief quotations embedded in
critical articles or reviews.
Every effort has been made in the preparation of this book to ensure the accuracy
of the information presented. However, the information contained in this book is
sold without warranty, either express or implied. Neither the author, nor Packt
Publishing, and its dealers and distributors will be held liable for any damages
caused or alleged to be caused directly or indirectly by this book.
Packt Publishing has endeavored to provide trademark information about all of the
companies and products mentioned in this book by the appropriate use of capitals.
However, Packt Publishing cannot guarantee the accuracy of this information.
First published: December 2014
Production reference: 1231214
Published by Packt Publishing Ltd.
Livery Place
35 Livery Street
Birmingham B3 2PB, UK.
ISBN 978-1-78398-350-6
www.packtpub.com
www.it-ebooks.info

Credits
Author
Unmesh Gundecha
Reviewers
Adil Imroz
Dr. Philip Polstra
Walt Stoneburner
Yuri Weinstein
Commissioning Editor
Usha Iyer
Acquisition Editor
Neha Nagwekar
Content Development Editor
Athira Laji
Technical Editor
Mrunmayee Patil
Copy Editor
Laxmi Subramanian
Project Coordinator
Harshal Ved
Proofreaders
Ameesha Green
Chris Smith
Indexer
Monica Ajmera Mehta
Production Coordinator
Nilesh R. Mohite
Cover Work
Nilesh R. Mohite
www.it-ebooks.info

About the Author
Unmesh Gundecha has a Master's degree in Software Engineering and over 12
years of experience in software development and testing. Unmesh has architected
functional test automation solutions using industry standards, in-house and custom
test automation frameworks along with leading commercial and open source test
automation tools.
He has development experience in Microsoft technologies and Java. He is presently
working as a test solution architect with a multinational company in Pune, India.
His experience includes support to Ruby, Java, iOS, Android, and PHP projects as an
automated tester and software developer.
He authored Selenium Testing Tools Cookbook, Packt Publishing in November 2012.
I would like to thank Neha Nagwekar, acquisition editor, for
giving me an opportunity to write this book; Athira Laji, content
development editor; Harshal Ved, project coordinator, for constantly
supporting and encouraging me in completing this book; and the
entire team at Packt Publishing.
This book has beneted a lot from a great team of technical
reviewers. I'd like to thank each of them for volunteering their time
reviewing the drafts of this book and providing valuable feedback.
I would also like to thank my mentor and friend, Yuri Weinstein, for
his support and help during this project. Thanks to my friends and
colleagues at work for their constant encouragement and support in
writing this book.
www.it-ebooks.info
About the Reviewers
Adil Imroz is a Python enthusiast who loves the simplicity of this beautiful language.
He is a software developer in testing by profession and a mobile automation expert.
He likes playing around with open source software and believes in being agile. When
not working, he can be found biking, reading a book, or sleeping. He believes that
there is a lot of scope around; all you have to do is hit the right chords. You can get in
touch with him via e-mail at alam.adil12@gmail.com. You can also follow him on
Twitter at @adilimroz.
Dr. Philip Polstra (known to his friends as Dr. Phil) is an internationally
recognized hardware hacker. His work has been presented at numerous conferences
around the globe, including repeat performances at DEFCON, Black Hat, 44CON,
Maker Faire, and other top conferences. Dr. Polstra is a well-known expert on USB
forensics and has published several articles on this topic.
Recently, Dr. Polstra has developed a penetration testing Linux distribution, known
as The Deck, for the BeagleBone and BeagleBoard family of small computer boards.
He has also developed a new way of performing penetration testing with multiple
low-power devices, including an aerial hacking drone. This work is described in his
book Hacking and Penetration Testing with Low Power Devices, Syngress Media (2014).
Dr. Polstra has also been a technical reviewer on several books, including BeagleBone
Home Automation by Juha Lumme and BeagleBone for Secret Agents by Josh Datko, both
published in 2014 by Packt Publishing.
Dr. Polstra is an Associate Professor at Bloomsburg University of Pennsylvania
(http://bloomu.edu/digital_forensics), where he teaches digital forensics
among other topics. In addition to teaching, he provides training and performs
penetration tests on a consulting basis. When not working, he is known to y, build
aircraft, and tinker with electronics. His latest happenings can be found on his blog
at http://philpolstra.com. You can also follow him on Twitter at @ppolstra.
www.it-ebooks.info
Walt Stoneburner is a software architect with over 25 years of commercial
application development and consulting experience. His fringe passions involve
quality assurance, conguration management, and security. If cornered, he may
actually admit to liking statistics and authoring documentation as well.
He's easily amused by programming language design, collaborative applications, big
data, knowledge management, data visualization, and ASCII art. A self-proclaimed
closet geek, Walt also evaluates software products and consumer electronics, draws
cartoons, runs a freelance photography studio specializing in portraits and art
(http://charismaticmoments.com/), writes humor pieces, performs sleight of
hand, enjoys game designing, and can occasionally be found on ham radio.
Walt can be reached directly via e-mail at wls@wwco.com or Walt.Stoneburner@
gmail.com. He publishes a tech and humor blog called Walt-O-Matic at
https://www.wwco.com/~wls/blog/.
His other book reviews and contributions include the following:
• AntiPatterns and Patterns in Software Conguration Management, John Wiley &
Sons (ISBN 978-0471329299, p. xi)
• Exploiting Software: How to Break Code, Pearson Education (ISBN 978-0-201-
78695-8, p. xxxiii)
• Ruby on Rails Web Mashup Projects, Packt Publishing (ISBN 978-1847193933)
• Building Dynamic Web 2.0 Websites with Ruby on Rails, Packt Publishing (ISBN
978-1-847193-41-4)
• Instant Sinatra Starter, Packt Publishing (ISBN 978-1782168218)
• C++ Multithreading Cookbook, Packt Publishing (ISBN 978-1-78328-979-0)
• Trapped in Whittier (A Trent Walker Thriller Book 1), Amazon Digital South Asia
Services, Inc. (ASIN B00GTD1RBS)
• South Mouth: Hillbilly Wisdom, Redneck Observations & Good Ol' Boy Logic,
CreateSpace Independent Publishing Platform (ISBN 978-1-482340-99-0)
Yuri Weinstein lives in San Francisco, CA with his family. He has spent over two
decades working for top technology companies in the Silicon Valley, focusing on
software testing with a special passion for test automation techniques. He currently
works at Red Hat, ensuring the quality of the Ceph open source storage project.
www.it-ebooks.info

www.PacktPub.com
Support les, eBooks, discount offers, and
more
For support les and downloads related to your book, please visit www.PacktPub.com.
Did you know that Packt offers eBook versions of every book published, with PDF and
ePub les available? You can upgrade to the eBook version at www.PacktPub.com and
as a print book customer, you are entitled to a discount on the eBook copy. Get in touch
with us at service@packtpub.com for more details.
At www.PacktPub.com, you can also read a collection of free technical articles, sign up
for a range of free newsletters and receive exclusive discounts and offers on Packt books
and eBooks.
TM
https://www.packtpub.com/books/subscription/packtlib
Do you need instant solutions to your IT questions? PacktLib is Packt's online digital
book library. Here, you can search, access, and read Packt's entire library of books.
Why subscribe?
• Fully searchable across every book published by Packt
• Copy and paste, print, and bookmark content
• On demand and accessible via a web browser
Free access for Packt account holders
If you have an account with Packt at www.PacktPub.com, you can use this to access
PacktLib today and view 9 entirely free books. Simply use your login credentials for
immediate access.
www.it-ebooks.info

Table of Contents
Preface 1
Chapter 1: Getting Started with Selenium WebDriver and Python 7
Preparing your machine 8
Installing Python 8
Installing the Selenium package 8
Browsing the Selenium WebDriver Python documentation 9
Selecting an IDE 10
PyCharm 10
The PyDev Eclipse plugin 12
PyScripter 13
Setting up PyCharm 15
Taking your rst steps with Selenium and Python 18
Cross-browser support 23
Setting up Internet Explorer 23
Setting up Google Chrome 26
Summary 27
Chapter 2: Writing Tests Using unittest 29
The unittest library 29
The TestCase class 31
The setUp() method 32
Writing tests 32
Cleaning up the code 33
Running the test 34
Adding another test 36
Class-level setUp() and tearDown() methods 37
Assertions 38
Test suites 40
Generating the HTML test report 43
Summary 44
www.it-ebooks.info

Table of Contents
[ ii ]
Chapter 3: Finding Elements 45
Using developer tools to nd locators 47
Inspecting pages and elements with Firefox using the Firebug add-in 47
Inspecting pages and elements with Google Chrome 49
Inspecting pages and elements with Internet Explorer 50
Finding elements with Selenium WebDriver 51
Using the nd methods 52
Finding elements using the ID attribute 54
Finding elements using the name attribute 55
Finding elements using the class name 56
Finding elements using the tag name 57
Finding elements using XPath 58
Finding elements using CSS selectors 60
Finding links 61
Finding links with partial text 62
Putting all the tests together using nd methods 63
Summary 66
Chapter 4: Using the Selenium Python API for Element
Interaction 67
Elements of HTML forms 68
Understanding the WebDriver class 68
Properties of the WebDriver class 69
Methods of the WebDriver class 69
Understanding the WebElement class 71
Properties of the WebElement class 72
Methods of the WebElement class 72
Working with forms, textboxes, checkboxes, and radio buttons 73
Checking whether the element is displayed and enabled 74
Finding the element attribute value 75
Using the is_selected() method 76
Using the clear() and send_keys() methods 76
Working with dropdowns and lists 79
Understanding the Select class 80
Properties of the Select class 81
Methods of the Select class 81
Working with alerts and pop-up windows 84
Understanding the Alert class 84
Properties of the Alert class 84
Methods of the Alert class 84
Automating browser navigation 87
Summary 89
www.it-ebooks.info

Table of Contents
[ iii ]
Chapter 5: Synchronizing Tests 91
Using implicit wait 91
Using explicit wait 93
The expected condition class 94
Waiting for an element to be enabled 97
Waiting for alerts 98
Implementing custom wait conditions 99
Summary 100
Chapter 6: Cross-browser Testing 101
The Selenium standalone server 102
Downloading the Selenium standalone server 103
Launching the Selenium standalone server 103
Running a test on the Selenium standalone server 105
Adding support for Internet Explorer 108
Adding support for Chrome 108
Selenium Grid 108
Launching Selenium server as a hub 109
Adding nodes 111
Adding an IE node 111
Adding a Firefox node 112
Adding a Chrome node 113
Mac OS X with Safari 113
Running tests in Grid 114
Running tests in a cloud 116
Using Sauce Labs 117
Summary 120
Chapter 7: Testing on Mobile 121
Introducing Appium 121
Prerequisites for Appium 122
Setting up Xcode for iOS 123
Setting up Android SDK 124
Setting up the Appium Python client package 125
Installing Appium 125
Appium Inspector 128
Testing on iOS 128
Writing a test for iOS 129
Testing on Android 131
Writing a test for Android 132
Using Sauce Labs 135
Summary 137
www.it-ebooks.info
Table of Contents
[ iv ]
Chapter 8: Page Objects and Data-driven Testing 139
Data-driven testing 140
Using ddt for data-driven tests 140
Installing ddt 141
Creating a simple data-driven test with ddt in unittest 141
Using external data sources for data-driven tests 143
Reading values from CSV 143
Reading values from Excel 145
The page objects pattern 148
Organizing tests 149
The BasePage object 150
Implementing page objects 151
Creating a test with page objects 155
Summary 156
Chapter 9: Advanced Techniques of Selenium WebDriver 157
Methods for performing keyboard and mouse actions 157
Keyboard actions 160
The mouse movement 162
The double_click method 163
The drag_and_drop method 164
Executing JavaScript 164
Capturing screenshots of failures 167
Recording a video of the test run 169
Handling pop-up windows 171
Managing cookies 174
Summary 176
Chapter 10: Integration with Other Tools and Frameworks 177
Behavior-Driven Development 178
Installing Behave 178
Writing the rst feature in Behave 178
Implementing a step denition le for the feature 179
Creating environment congurations 181
Running features 181
Using a scenario outline 182
CI with Jenkins 184
Preparing for Jenkins 184
Setting up Jenkins 185
Summary 192
Index 193
www.it-ebooks.info
Preface
Selenium is a set of tools for automating browsers. It is largely used for testing
applications, but its usages are not limited only to testing. It can also be used for
screen scraping and automating repetitive tasks in a browser window. Selenium
supports automation on all the major browsers including Firefox, Internet Explorer,
Google Chrome, Safari, and Opera. Selenium WebDriver is now a part of W3C
standards and is supported by major browser vendors.
Selenium offers the following set of tools for automating interaction with browsers:
• Selenium IDE: This is a Firefox add-in used to record and play back the
Selenium scripts with Firefox. It provides a graphical user interface to
record user actions using Firefox. It is a great tool to start learning and
using Selenium, but it can only be used with Firefox and other browsers are
not supported. However, it can convert the recorded scripts into various
programming languages supported by Selenium WebDriver, which supports
running scripts on browsers other than Firefox.
• Selenium WebDriver: This is a programming interface for developing
advanced Selenium scripts using programming languages. We can also
run tests on multiple browsers that are supported by Selenium on multiple
operating systems, including Linux, Windows, and Mac OS X. This makes
Selenium a true cross-browser testing tool. Selenium WebDriver offers client
libraries in various languages, including Java, C#, Python, Ruby, PHP, and
JavaScript, and are more into writing test scripts.
• Selenium standalone server: This is also known as Selenium Grid and
allows remote and distributed execution of Selenium scripts created with
WebDriver. We can also use the grid feature of the standalone server to run
tests in parallel, including tests on mobile platforms such as Android or
Apple iOS for iPhone and iPad.
www.it-ebooks.info

Preface
[ 2 ]
As the title suggests, this book will introduce you to the Selenium WebDriver client
library for Python. You will learn how to use Selenium WebDriver in Python to
automate browsers for testing web applications. This book contains lessons right
from setting up Selenium to using the basic and advanced features of Selenium to
create and run automated scripts for testing web applications. This book assumes
you have a basic idea of programming using Python.
What this book covers
Chapter 1, Getting Started with Selenium WebDriver and Python, starts with installing
Python and the Selenium WebDriver client library. We will select a Python editor
or IDE for Selenium script development. We will then create our rst automation
script for a simple search workow from the application under test. At the end of this
chapter, we will run the Selenium script on various browsers supported by Selenium.
Chapter 2, Writing Tests Using unittest, shows you how to use Selenium and the
unittest library to test web applications. We will convert the script into a unittest test
case. We will create few more tests using Selenium and unittest. We will create a
TestSuite for a group of tests. We will run these tests and analyze the results. At the
end of this chapter, you will learn how to produce test reports in the HTML format
that you can distribute to various stakeholders of the project.
Chapter 3, Finding Elements, introduces you to locators that are the keys to automate
different types of User Interface (UI) elements displayed on the web pages in the
browser window. Selenium uses locators to nd elements on a page and then
performs actions or retrieves their properties for testing. You will learn various
methods to locate elements, including XPath and CSS. We will show you how to
use these methods with examples on the application under test.
Chapter 4, Using the Selenium Python API for Element Interaction, shows you how to use
the Selenium WebDriver client library to interact with different types of elements,
JavaScript alerts, frames, and windows in Python. You will learn how to perform
actions such as sending values to elements, performing clicks, and selecting
options from dropdowns. You will also see how to handle frames, different types
of JavaScript alerts, and switch between child browser windows.
Chapter 5, Synchronizing Tests, introduces you to various wait methods provided by
Selenium to synchronize tests for reliable and robust execution. You will learn how
to use the implicit and explicit wait to implement synchronization in Selenium tests.
You will learn various methods to implement explicit wait in our test scripts.
www.it-ebooks.info

Preface
[ 3 ]
Chapter 6, Cross-browser Testing, dives into using RemoteWebDriver to run
cross-browser tests on remote machines or through the Selenium Grid. You
will learn how to use RemoteWebDriver to run tests on remote machines.
We will also set up a Selenium Grid to run tests on various combinations of
browsers and operating systems. You will also see how to execute tests on headless
browsers such as PhantomJS. At the end of the chapter, we will see how to use
cloud testing tools such as Sauce Labs and BrowserStack to run tests in cloud using
RemoteWebDriver.
Chapter 7, Testing on Mobile, shows you how to test applications on mobile devices
using Selenium WebDriver and Appium. We will set up Appium to test our sample
application on iOS and on an Android emulator and device. You will also learn how
to run native mobile applications using Appium.
Chapter 8, Page Objects and Data-driven Testing, introduces you to two important
design patterns to implement a maintainable and efcient testing framework. You
will learn how to use page objects to hide the technical details of locators, and divide
operations on pages into separate classes and create test cases that are more readable
and easy to maintain. You will then learn how to create data-driven tests using the
unittest library.
Chapter 9, Advanced Techniques of Selenium WebDriver, dives into some of the
advanced techniques of using Selenium for automating browsers for testing. You
will learn how to use various action methods for simulating complex mouse and
keyboard operations using Selenium. You will see how to handle session cookies,
capture screenshots during a test run, and create a movie of the entire test run.
Chapter 10, Integration with Other Tools and Frameworks, shows you how to use
Selenium WebDriver with automated acceptance testing frameworks such as Behave
and Continuous Integration tools. You will rst learn how to integrate Selenium with
Behave to create automated acceptance tests. We will implement a sample feature
and acceptance tests on UI using the Selenium WebDriver. At end of the chapter, we
will set up running the tests that we created as part of Continuous Integration using
Jenkins. We will set up a schedule to run the tests on a daily frequency.
By the end of this book, you will have learned all the essential features of Selenium
WebDriver to create your own web testing framework in Python.
www.it-ebooks.info

Preface
[ 4 ]
What you need for this book
To get started with this book, you will need basic programming skills in Python as well
as knowledge of web technologies such as HTML, JavaScript, CSS, and XML. If you are
able to write a simple Python script, use loops and conditions, dene classes, then you
should be able to keep up with every example in this book. We will take the time to
explain every line of code written in this book so that you are able to create the desired
outcome in any situation you nd yourself in. There are some software prerequisites
that are needed, which are explained in the rst chapter. You will need to have access
to the command-line interface terminal, Python interpreter, and web browsers such
as Firefox and Google Chrome on your machine. You can download and install
Firefox from https://www.mozilla.org/en-US/firefox/ and Google Chrome
from https://www.google.com/chrome/. If you're a Windows user, you might be
interested in testing Internet Explorer, which is installed by default with Windows.
Who this book is for
If you are a quality assurance/testing professional, software developer, or web
application developer using Python and want to learn Selenium WebDriver to
automate browsers for testing your web applications, this is the perfect guide for you
to get started! As a prerequisite, this book expects you to have a basic understanding
of the Python programming language, although any previous knowledge of
Selenium WebDriver is not needed. By the end of this book, you will have acquired
a comprehensive knowledge of Selenium WebDriver, which will help you in writing
your automation tests.
Conventions
In this book, you will nd a number of styles of text that distinguish between
different kinds of information. Here are some examples of these styles, and an
explanation of their meaning.
Code words in text, database table names, folder names, lenames, le extensions,
pathnames, dummy URLs, user input, and Twitter handles are shown as follows:
"The pip tool will download the latest version of the Selenium package and install
it on your machine."
A block of code is set as follows:
# create a new Firefox session
driver = webdriver.Firefox()
driver.implicitly_wait(30)
driver.maximize_window()
www.it-ebooks.info

Preface
[ 5 ]
When we wish to draw your attention to a particular part of a code block, the
relevant lines or items are set in bold:
# run the suite
xmlrunner.XMLTestRunner(verbosity=2, output='test-reports').
run(smoke_tests)
Any command-line input or output is written as follows:
pip install -U selenium
New terms and important words are shown in bold. Words that you see on
the screen, in menus or dialog boxes for example, appear in the text like this:
"Choose Internet Options from the Tools menu."
Warnings or important notes appear in a box like this.
Tips and tricks appear like this.
Reader feedback
Feedback from our readers is always welcome. Let us know what you think about
this book—what you liked or disliked. Reader feedback is important for us as it helps
us develop titles that you will really get the most out of.
To send us general feedback, simply e-mail feedback@packtpub.com, and mention
the book's title in the subject of your message.
If there is a topic that you have expertise in and you are interested in either writing
or contributing to a book, see our author guide at www.packtpub.com/authors.
Customer support
Now that you are the proud owner of a Packt book, we have a number of things to
help you to get the most from your purchase.
www.it-ebooks.info

Preface
[ 6 ]
Downloading the example code
You can download the example code les from your account at http://www.
packtpub.com for all the Packt Publishing books you have purchased. If you
purchased this book elsewhere, you can visit http://www.packtpub.com/support
and register to have the les e-mailed directly to you.
Errata
Although we have taken every care to ensure the accuracy of our content, mistakes
do happen. If you nd a mistake in one of our books—maybe a mistake in the text or
the code—we would be grateful if you could report this to us. By doing so, you can
save other readers from frustration and help us improve subsequent versions of this
book. If you nd any errata, please report them by visiting http://www.packtpub.
com/submit-errata, selecting your book, clicking on the Errata Submission Form
link, and entering the details of your errata. Once your errata are veried, your
submission will be accepted and the errata will be uploaded to our website or added
to any list of existing errata under the Errata section of that title.
To view the previously submitted errata, go to https://www.packtpub.com/books/
content/support and enter the name of the book in the search eld. The required
information will appear under the Errata section.
Piracy
Piracy of copyrighted material on the Internet is an ongoing problem across all
media. At Packt, we take the protection of our copyright and licenses very seriously.
If you come across any illegal copies of our works in any form on the Internet, please
provide us with the location address or website name immediately so that we can
pursue a remedy.
Please contact us at copyright@packtpub.com with a link to the suspected
pirated material.
We appreciate your help in protecting our authors and our ability to bring
you valuable content.
Questions
If you have a problem with any aspect of this book, you can contact us at
questions@packtpub.com, and we will do our best to address the problem.
www.it-ebooks.info

Getting Started with Selenium
WebDriver and Python
Selenium automates browsers. It automates the interaction we do in a browser
window such as navigating to a website, clicking on links, lling out forms, submitting
forms, navigating through pages, and so on. It works on every major browser available
out there.
In order to use Selenium WebDriver, we need a programing language to write
automation scripts. The language that we select should also have a Selenium client
library available.
In this book, we will use Python along with the Selenium WebDriver client library
to create automated scripts. Python is a widely used general-purpose, high-level
programming language. It's easy and its syntax allows us to express concepts in
fewer lines of code. It emphasizes code readability and provides constructs that
enable us to write programs on both the small and large scale. It also provides a
number of in-built and user-written libraries to achieve complex tasks quite easily.
The Selenium WebDriver client library for Python provides access to all the Selenium
WebDriver features and Selenium standalone server for remote and distributed
testing of browser-based applications. Selenium Python language bindings are
developed and maintained by David Burns, Adam Goucher, Maik Röder, Jason
Huggins, Luke Semerau, Miki Tebeka, and Eric Allenin.
The Selenium WebDriver client library is supported on Python Version 2.6, 2.7, 3.2,
and 3.3.
This chapter will introduce you to the Selenium WebDriver client library for Python
by demonstrating its installation, basic features, and overall structure.
www.it-ebooks.info
Getting Started with Selenium WebDriver and Python
[ 8 ]
In this chapter, we will cover the following topics:
• Installing Python and Selenium package
• Selecting and setting up a Python editor
• Implementing a sample script using the Selenium WebDriver Python
client library
• Implementing cross-browser support with Internet Explorer and
Google Chrome
Preparing your machine
As a rst step of using Selenium with Python, we'll need to install it on our computer
with the minimum requirements possible. Let's set up the basic environment with
the steps explained in the following sections.
Installing Python
You will nd Python installed by default on most Linux distributions, Mac OS X, and
other Unix machines. On Windows, you will need to install it separately. Installers
for different platforms can be found at http://python.org/download/.
All the examples in this book are written and
tested on Python 2.7 and Python 3.0 on Windows 8
operating systems.
Installing the Selenium package
The Selenium WebDriver Python client library is available in the Selenium package.
To install the Selenium package in a simple way, use the pip installer tool available
at https://pip.pypa.io/en/latest/.
With pip, you can simply install or upgrade the Selenium package using the
following command:
pip install -U selenium
This is a fairly simple process. This command will set up the Selenium WebDriver
client library on your machine with all modules and classes that we will need to
create automated scripts using Python. The pip tool will download the latest version
of the Selenium package and install it on your machine. The optional –U ag will
upgrade the existing version of the installed package to the latest version.
www.it-ebooks.info

Chapter 1
[ 9 ]
You can also download the latest version of the Selenium package source from
https://pypi.python.org/pypi/selenium. Just click on the Download button on
the upper-right-hand side of the page, unarchive the downloaded le, and install it
with following command:
python setup.py install
Browsing the Selenium WebDriver Python
documentation
The Selenium WebDriver Python client library documentation is available at
http://selenium.googlecode.com/git/docs/api/py/api.html as shown
in the following screenshot:
www.it-ebooks.info

Getting Started with Selenium WebDriver and Python
[ 10 ]
It offers detailed information on all core classes and functions of Selenium
WebDriver. Also note the following links for Selenium documentation:
• The ofcial documentation at http://docs.seleniumhq.org/docs/
offers documentation for all the Selenium components with examples in
supported languages
• Selenium Wiki at https://code.google.com/p/selenium/w/list lists
some useful topics that we will explore later in this book
Selecting an IDE
Now that we have Python and Selenium WebDriver set up, we will need an editor
or an Integrated Development Environment (IDE) to write automation scripts.
A good editor or IDE increases the productivity and helps in doing a lot of other
things that make the coding experience simple and easy. While we can write Python
code in simple editors such as Emacs, Vim, or Notepad, using an IDE will make life
a lot easier. There are many IDEs to choose from. Generally, an IDE provides the
following features to accelerate your development and coding time:
• A graphical code editor with code completion and IntelliSense
• A code explorer for functions and classes
• Syntax highlighting
• Project management
• Code templates
• Tools for unit testing and debugging
• Source control support
If you're new to Python, or you're a tester working for the rst time in Python, your
development team will help you to set up the right IDE.
However, if you're starting with Python for the rst time and don't know which IDE
to select, here are a few choices that you might want to consider.
PyCharm
PyCharm is developed by JetBrains, a leading vendor of professional development
tools and IDEs such as IntelliJ IDEA, RubyMine, PhpStorm, and TeamCity.
PyCharm is a polished, powerful, and versatile IDE that works pretty well. It brings
best of the JetBrains experience in building powerful IDEs with lots of other features
for a highly productive experience.
www.it-ebooks.info
Chapter 1
[ 11 ]
PyCharm is supported on Windows, Linux, and Mac. To know more about PyCharm
and its features visit http://www.jetbrains.com/pycharm/.
PyCharm comes in two versions—a community edition and a professional edition.
The community edition is free, whereas you have to pay for the professional edition.
Here is the PyCharm community edition running a sample Selenium script in the
following screenshot:
www.it-ebooks.info

Getting Started with Selenium WebDriver and Python
[ 12 ]
The community edition is great for building and running Selenium scripts with its
fantastic debugging support. We will use PyCharm in the rest of this book. Later in
this chapter, we will set up PyCharm and create our rst Selenium script.
All the examples in this book are built using PyCharm; however,
you can easily use these examples in your choice of editor or IDE.
The PyDev Eclipse plugin
The PyDev Eclipse plugin is another widely used editor among Python developers.
Eclipse is a famous open source IDE primarily built for Java; however, it also offers
support to various other programming languages and tools through its powerful
plugin architecture.
Eclipse is a cross-platform IDE supported on Windows, Linux, and Mac. You can get
the latest edition of Eclipse at http://www.eclipse.org/downloads/.
You need to install the PyDev plugin separately after setting up Eclipse. Use the
tutorial from Lars Vogel to install PyDev at http://www.vogella.com/tutorials/
Python/article.html to install PyDev. Installation instructions are also available
at http://pydev.org/.
www.it-ebooks.info
Chapter 1
[ 13 ]
Here's the Eclipse PyDev plugin running a sample Selenium script as shown in the
following screenshot:
PyScripter
For the Windows users, PyScripter can also be a great choice. It is open source,
lightweight, and provides all the features that modern IDEs offer such as IntelliSense
and code completion, testing, and debugging support. You can nd more about
PyScripter along with its download information at https://code.google.com/p/
pyscripter/.
www.it-ebooks.info
Chapter 1
[ 15 ]
Setting up PyCharm
Now that we have seen IDE choices, let's set up PyCharm. All examples in this book
are created with PyCharm. However, you can set up any other IDE of your choice
and use examples as they are. We will set up PyCharm with following steps to get
started with Selenium Python:
1. Download and install the PyCharm Community Edition from JetBrains site
http://www.jetbrains.com/pycharm/download/index.html.
2. Launch the PyCharm Community Edition. Click on the Create New Project
option on the PyCharm Community Edition dialog box as shown in the
following screenshot:
www.it-ebooks.info
Getting Started with Selenium WebDriver and Python
[ 16 ]
3. On the Create New Project dialog box, as shown in next screenshot, specify
the name of your project in the Project name eld. In this example, setests
is used as the project name. We need to congure the interpreter for the
rst time. Click on the button to set up the interpreter, as shown in the
following screenshot:
4. On the Python Interpreter dialog box, click on the plus icon. PyCharm will
suggest the installed interpreter similar to the following screenshot. Select the
interpreter from Select Interpreter Path.
www.it-ebooks.info
Chapter 1
[ 17 ]
5. PyCharm will congure the selected interpreter as shown in the following
screenshot. It will show a list of packages that are installed along with
Python. Click on the Apply button and then on the OK button:
6. On the Create New Project dialog box, click on the OK button to create
the project:
www.it-ebooks.info
Getting Started with Selenium WebDriver and Python
[ 18 ]
Taking your rst steps with Selenium and
Python
We are now ready to start with creating and running automated scripts in Python.
Let's begin with Selenium WebDriver and create a Python script that uses Selenium
WebDriver classes and functions to automate browser interaction.
We will use a sample web application for most of the examples in this book. This
sample application is built on a famous e-commerce framework—Magento. You
can nd the application at http://demo.magentocommerce.com/.
Downloading the example code
You can download the example code les from your account at
http://www.packtpub.com for all the Packt Publishing books
you have purchased. If you purchased this book elsewhere, you
can visit http://www.packtpub.com/support and register
to have the les e-mailed directly to you.
The example code is also hosted at https://github.com/
upgundecha/learnsewithpython.
In this sample script, we will navigate to the demo version of the application, search
for products, and list the names of products from the search result page with the
following steps:
1. Let's use the project that we created earlier while setting up PyCharm. Create
a simple Python script that will use the Selenium WebDriver client library. In
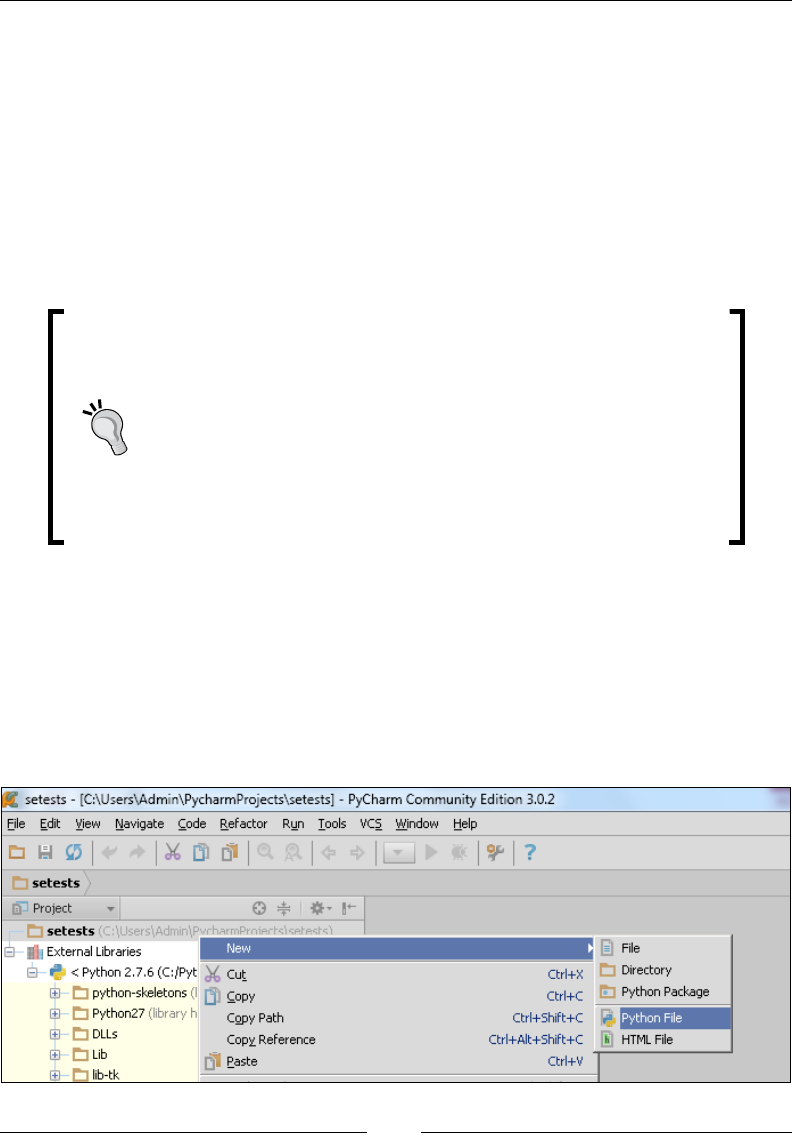
Project Explorer, right-click on setests and navigate to New | Python File
from the pop-up menu:
www.it-ebooks.info
Chapter 1
[ 19 ]
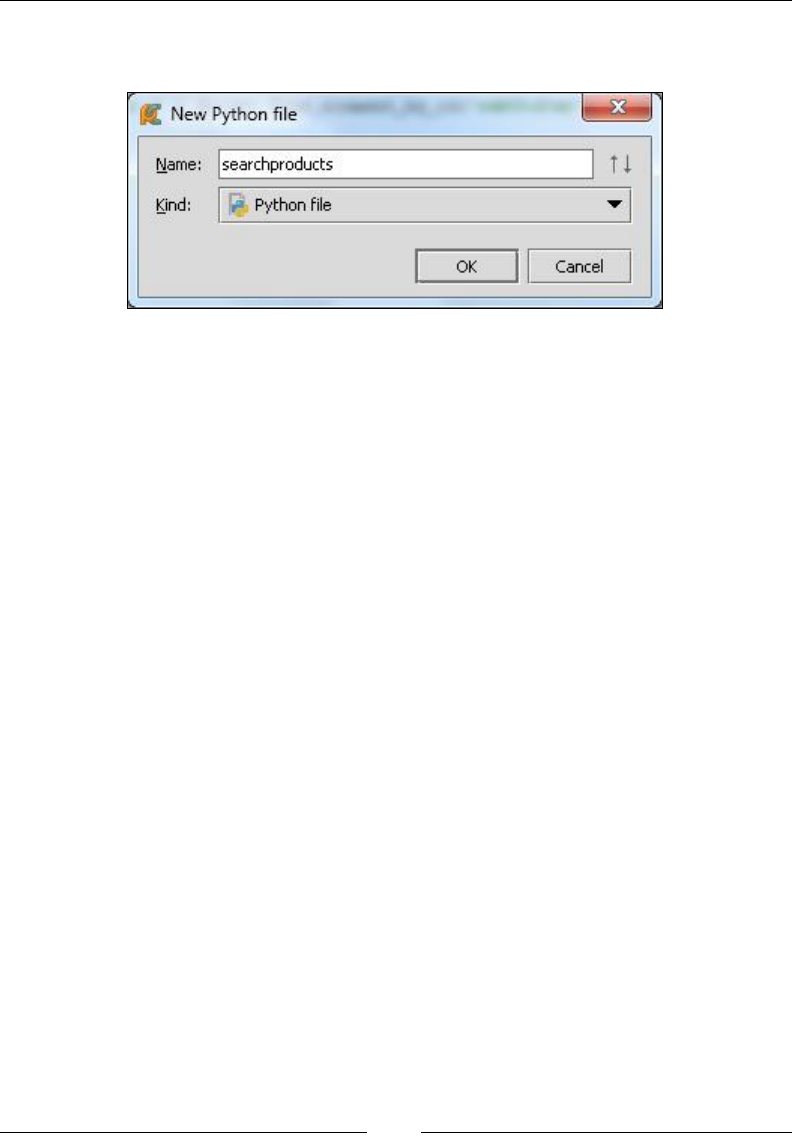
2. On the New Python le dialog box, enter searchproducts in the Name eld
and click on the OK button:
3. PyCharm will add a new tab searchproducts.py in the code editor area.
Copy the following code in the searchproduct.py tab:
from selenium import webdriver
# create a new Firefox session
driver = webdriver.Firefox()
driver.implicitly_wait(30)
driver.maximize_window()
# navigate to the application home page
driver.get("http://demo.magentocommerce.com/")
# get the search textbox
search_field = driver.find_element_by_name("q")
search_field.clear()
# enter search keyword and submit
search_field.send_keys("phones")
search_field.submit()
# get all the anchor elements which have product names displayed
# currently on result page using find_elements_by_xpath method
products = driver.find_elements_by_xpath("//h2[@class='product-
name']/a")
# get the number of anchor elements found
print "Found " + str(len(products)) + " products:"
# iterate through each anchor element and print the text that is
# name of the product
for product in products:
print product.text
# close the browser window
driver.quit()
www.it-ebooks.info
Getting Started with Selenium WebDriver and Python
[ 20 ]
If you're using any other IDE or editor of your choice, create
a new file, copy the code to the new file, and save the file as
searchproducts.py.
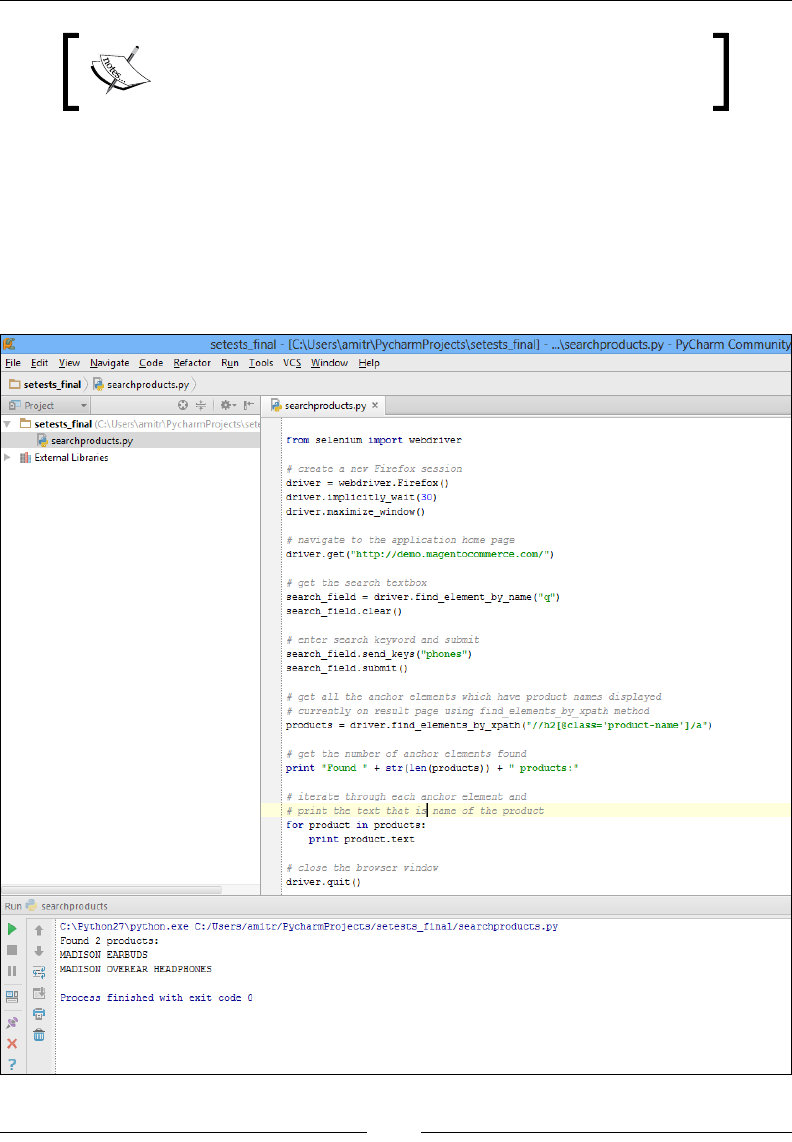
4. To run the script, press the Ctrl + Shift + F10 combination in the PyCharm
code window or select Run 'searchproducts' from the Run menu. This will
start the execution and you will see a new Firefox window navigating to
the demo site and the Selenium commands getting executed in the Firefox
window. If all goes well, at the end, the script will close the Firefox window.
The script will print the list of products in the PyCharm console as shown in
the following screenshot:
www.it-ebooks.info

Chapter 1
[ 21 ]
We can also run this script through the command line with the
following command. Open the command line, then open the
setests directory, and run following command:
python searchproducts.py
We will use command line as the preferred method in the rest
of the book to execute the tests.
We'll spend some time looking into the script that we created just now. We will go
through each statement and understand Selenium WebDriver in brief. There is a lot
to go through in the rest of the book.
The selenium.webdriver module implements the browser driver classes that are
supported by Selenium, including Firefox, Chrome, Internet Explorer, Safari, and
various other browsers, and RemoteWebDriver to test on browsers that are hosted
on remote machines.
We need to import webdriver from the Selenium package to use the Selenium
WebDriver methods:
from selenium import webdriver
Next, we need an instance of a browser that we want to use. This will provide a
programmatic interface to interact with the browser using the Selenium commands.
In this example, we are using Firefox. We can create
an instance of Firefox as shown in following code:
driver = webdriver.Firefox()
During the run, this will launch a new Firefox window. We also set a few options on
the driver:
driver.implicitly_wait(30)
driver.maximize_window()
We congured a timeout for Selenium to execute steps using an implicit wait of 30
seconds for the driver and maximized the Firefox window through the Selenium
API. We will learn more about implicit wait in Chapter 5, Synchronizing Tests.
Next, we will navigate to the demo version of the application using its URL by
calling the driver.get() method. After the get() method is called, WebDriver
waits until the page is fully loaded in the Firefox window and returns the control
to the script.
www.it-ebooks.info

Getting Started with Selenium WebDriver and Python
[ 22 ]
After loading the page, Selenium will interact with various elements on the page,
like a human user. For example, on the Home page of the application, we need to
enter a search term in a textbox and click on the Search button. These elements are
implemented as HTML input elements and Selenium needs to nd these elements to
simulate the user action. Selenium WebDriver provides a number of methods to nd
these elements and interact with them to perform operations such as sending values,
clicking buttons, selecting items in dropdowns, and so on. We will see more about
this in Chapter 3, Finding Elements.
In this example, we are nding the Search textbox using the find_element_by_name
method. This will return the rst element matching the name attribute specied in
the find method. The HTML elements are dened with tag and attributes. We can
use this information to nd an element, by following the given steps:
1. In this example, the Search textbox has the name attribute dened as q and
we can use this attribute as shown in the following code example:
search_field = driver.find_element_by_name("q")
2. Once the Search textbox is found, we will interact with this element by
clearing the previous value (if entered) using the clear() method and
enter the specied new value using the send_keys() method. Next, we
will submit the search request by calling the submit() method:
search_field.clear()
search_field.send_keys("phones")
search_field.submit()
3. After submission of the search request, Firefox will load the result page
returned by the application. The result page has a list of products that
match the search term, which is phones. We can read the list of results and
specically the names of all the products that are rendered in the anchor
<a> element using the find_elements_by_xpath() method. This will return
more than one matching element as a list:
products =
driver.find_elements_by_xpath("//h2[@class=
'product-name']/a")
4. Next, we will print the number of products (that is the number of anchor <a>
elements) that are found on the page and the names of the products using the
.text property of all the anchor <a> elements:
print "Found " + str(len(products)) + " products:"
for product in products:
print product.text
www.it-ebooks.info

Chapter 1
[ 23 ]
5. At end of the script, we will close the Firefox browser using the driver.
quit() method:
driver.quit()
This example script gives us a concise example of using Selenium WebDriver and
Python together to create a simple automation script. We are not testing anything in
this script yet. Later in the book, we will extend this simple script into a set of tests
and use various other libraries and features of Python.
Cross-browser support
So far we have built and run our script with Firefox. Selenium has extensive support
for cross-browser testing where you can automate on all the major browsers
including Internet Explorer, Google Chrome, Safari, Opera, and headless browsers
such as PhantomJS. In this section, we will set up and run the script that we created
in the previous section with Internet Explorer and Google Chrome to see the
cross-browser capabilities of Selenium WebDriver.
Setting up Internet Explorer
There is a little more to run scripts on Internet Explorer. To run tests on Internet
Explorer, we need to download and set up the InternetExplorerDriver server.
The InternetExplorerDriver server is a standalone server executable that
implements WebDriver's wire protocol to work as glue between the test script and
Internet Explorer. It supports major IE versions on Windows XP, Vista, Windows 7,
and Windows 8 operating systems. Let's set up the InternetExplorerDriver server
with the following steps:
1. Download the InternetExplorerDriver server from http://www.
seleniumhq.org/download/. You can download 32- or 64-bit versions
based on the system conguration that you are using.
2. After downloading the InternetExplorerDriver server, unzip and copy
the le to the same directory where scripts are stored.
3. On IE 7 or higher, the Protected Mode settings for each zone must have the
same value. Protected Mode can either be on or off, as long as it is for all the
zones. To set the Protected Mode settings:
1. Choose Internet Options from the Tools menu.
2. On the Internet Options dialog box, click on the Security tab.
www.it-ebooks.info
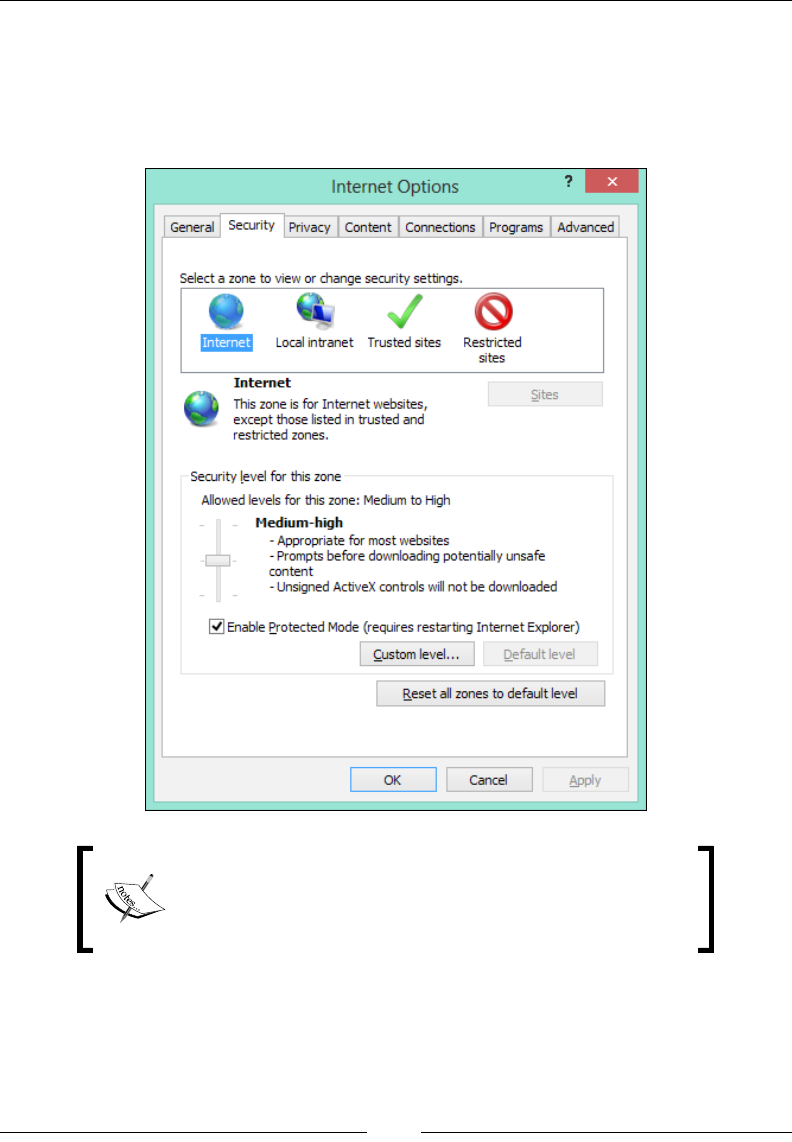
Getting Started with Selenium WebDriver and Python
[ 24 ]
3. Select each zone listed in Select a zone to view or change security
settings and make sure Enable Protected Mode (requires restarting
Internet Explorer) is either checked or unchecked for all the
zones. All the zones should have the same settings as shown in
the following screenshot:
While using the InternetExplorerDriver server, it is
also important to keep the browser zoom level set to 100
percent so that the native mouse events can be set to the
correct coordinates.
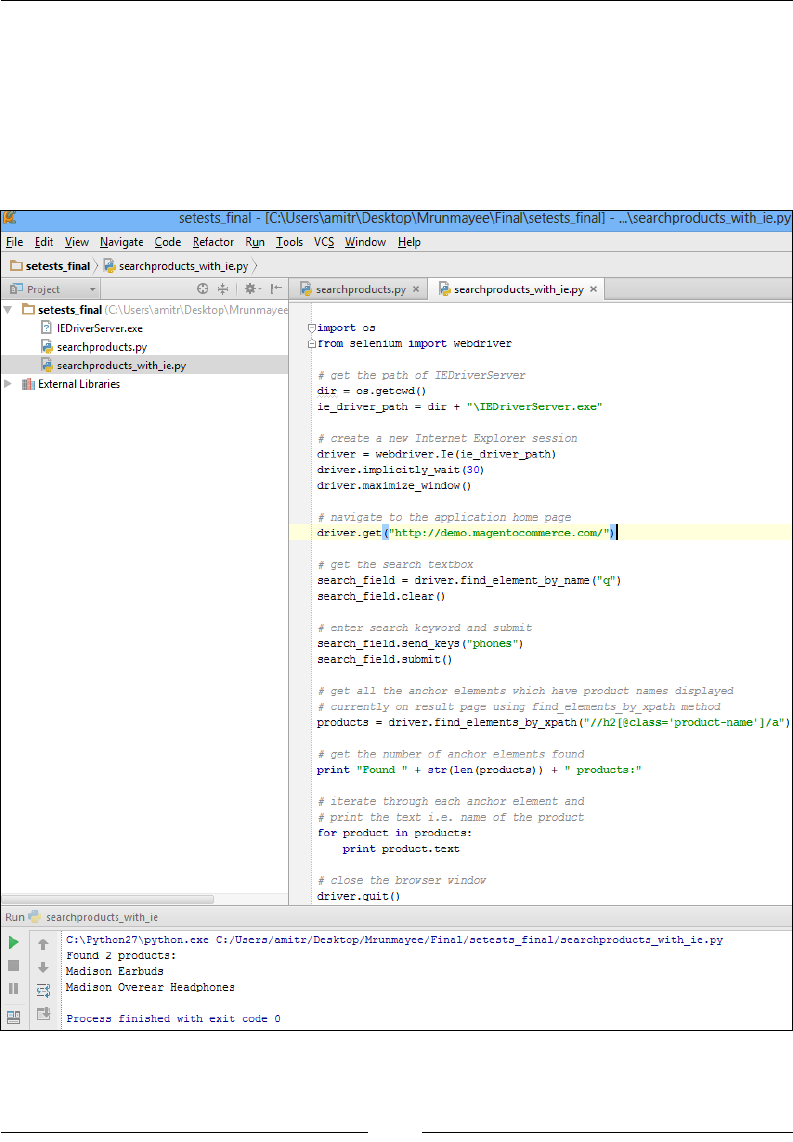
4. Finally, modify the script to use Internet Explorer. Instead of creating an
instance of the Firefox class, we will use the IE class in the following way:
import os
from selenium import webdriver
www.it-ebooks.info

Chapter 1
[ 25 ]
# get the path of IEDriverServer
dir = os.path.dirname(__file__)
ie_driver_path = dir + "\IEDriverServer.exe"
# create a new Internet Explorer session
driver = webdriver.Ie(ie_driver_path)
driver.implicitly_wait(30)
driver.maximize_window()
# navigate to the application home page
driver.get("http://demo.magentocommerce.com/")
# get the search textbox
search_field = driver.find_element_by_name("q")
search_field.clear()
# enter search keyword and submit
search_field.send_keys("phones")
search_field.submit()
# get all the anchor elements which have product names displayed
# currently on result page using find_elements_by_xpath method
products = driver.find_elements_by_xpath("//h2[@class='product-
name']/a")
# get the number of anchor elements found
print "Found " + str(len(products)) + " products:"
# iterate through each anchor element and print the text that is
# name of the product
for product in products:
print product.text
# close the browser window
driver.quit()
In this script, we passed the path of the InternetExplorerDriver server
while creating the instance of an IE browser class.
5. Run the script and Selenium will rst launch the InternetExplorerDriver
server, which launches the browser, and execute the steps.
The InternetExplorerDriver server acts as an intermediary between the
Selenium script and the browser. Execution of the actual steps is very similar
to what we observed with Firefox.
www.it-ebooks.info

Getting Started with Selenium WebDriver and Python
[ 26 ]
Read more about the important conguration options for
Internet Explorer at https://code.google.com/p/
selenium/wiki/InternetExplorerDriver and the
DesiredCapabilities article at https://code.google.com/p/
selenium/wiki/DesiredCapabilities.
Setting up Google Chrome
Setting up and running Selenium scripts on Google Chrome is similar to
Internet Explorer. We need to download the ChromeDriver server similar to
InternetExplorerDriver. The ChromeDriver server is a standalone server
developed and maintained by the Chromium team. It implements WebDriver's wire
protocol for automating Google Chrome. It is supported on Windows, Linux, and
Mac operating systems. Set up the ChromeDriver server using the following steps:
1. Download the ChromeDriver server from http://chromedriver.storage.
googleapis.com/index.html.
2. After downloading the ChromeDriver server, unzip and copy the le to the
same directory where the scripts are stored.
3. Finally, modify the sample script to use Chrome. Instead of creating an
instance of the Firefox class, we will use the Chrome class in the following way:
import os
from selenium import webdriver
# get the path of chromedriver
dir = os.path.dirname(__file__)
chrome_driver_path = dir + "\chromedriver.exe"
#remove the .exe extension on linux or mac platform
# create a new Chrome session
driver = webdriver.Chrome(chrome_driver_path)
driver.implicitly_wait(30)
driver.maximize_window()
# navigate to the application home page
driver.get("http://demo.magentocommerce.com/")
# get the search textbox
search_field = driver.find_element_by_name("q")
search_field.clear()
# enter search keyword and submit
www.it-ebooks.info

Chapter 1
[ 27 ]
search_field.send_keys("phones")
search_field.submit()
# get all the anchor elements which have product names displayed
# currently on result page using find_elements_by_xpath method
products = driver.find_elements_by_xpath("//h2[@class='product-
name']/a")
# get the number of anchor elements found
print "Found " + str(len(products)) + " products:"
# iterate through each anchor element and print the text that is
# name of the product
for product in products:
print product.text
# close the browser window
driver.quit()
In this script, we passed the path of the ChromeDriver server while creating
an instance of the Chrome browser class.
4. Run the script. Selenium will rst launch the Chromedriver server, which
launches the Chrome browser, and execute the steps. Execution of the actual
steps is very similar to what we observed with Firefox.
Read more about ChromeDriver at https://code.
google.com/p/selenium/wiki/ChromeDriver and
https://sites.google.com/a/chromium.org/
chromedriver/home.
Summary
In this chapter, we introduced you to Selenium and its components. We installed the
selenium package using the pip tool. Then we looked at various Editors and IDEs
to ease our coding experience with Selenium and Python and set up PyCharm. Then
we built a simple script on a sample application covering some of the high-level
concepts of Selenium WebDriver Python client library using Firefox. We ran the script
and analyzed the outcome. Finally, we explored the cross-browser testing support of
Selenium WebDriver by conguring and running the script with Internet Explorer and
Google Chrome.
In next chapter, we will learn how to use the unittest library to create automated
tests using Selenium WebDriver. We will also learn how to create a suite of tests and
run tests in groups.
www.it-ebooks.info

Writing Tests Using unittest
Selenium WebDriver is a browser automation API. It provides features to automate
browser interaction, and this API is mainly used to test web applications. We cannot
set up test preconditions and post conditions, check the expected and actual output,
check the state of the application, report test results, create data-driven tests, and so on
with Selenium WebDriver. We can use a unit testing framework or test runners used
for unit testing along with Selenium to create a testing framework. In this chapter,
we will learn how to use the unittest library to create Selenium WebDriver tests in
Python.
In this chapter, we will cover the following topics:
• What unittest is?
• Using the unittest library to write Selenium WebDriver tests
• Implementing a test using the TestCase class
• Understanding various types of assert methods provided by the
unittest library
• Creating a TestSuite for a group of tests
• Generating test reports in HTML format using the unittest extension
The unittest library
The unittest library (originally named as PyUnit) is inspired by the JUnit library
widely used in Java application development. We can use unittest to create a
comprehensive suite of tests for any project. The unittest module is used within
the Python project to test various standard library modules including unittest
itself. You can nd the unittest documentation at http://docs.python.org/2/
library/unittest.html.
www.it-ebooks.info
Writing Tests Using unittest
[ 30 ]
The unittest library provides us with the ability to create test cases, test suites,
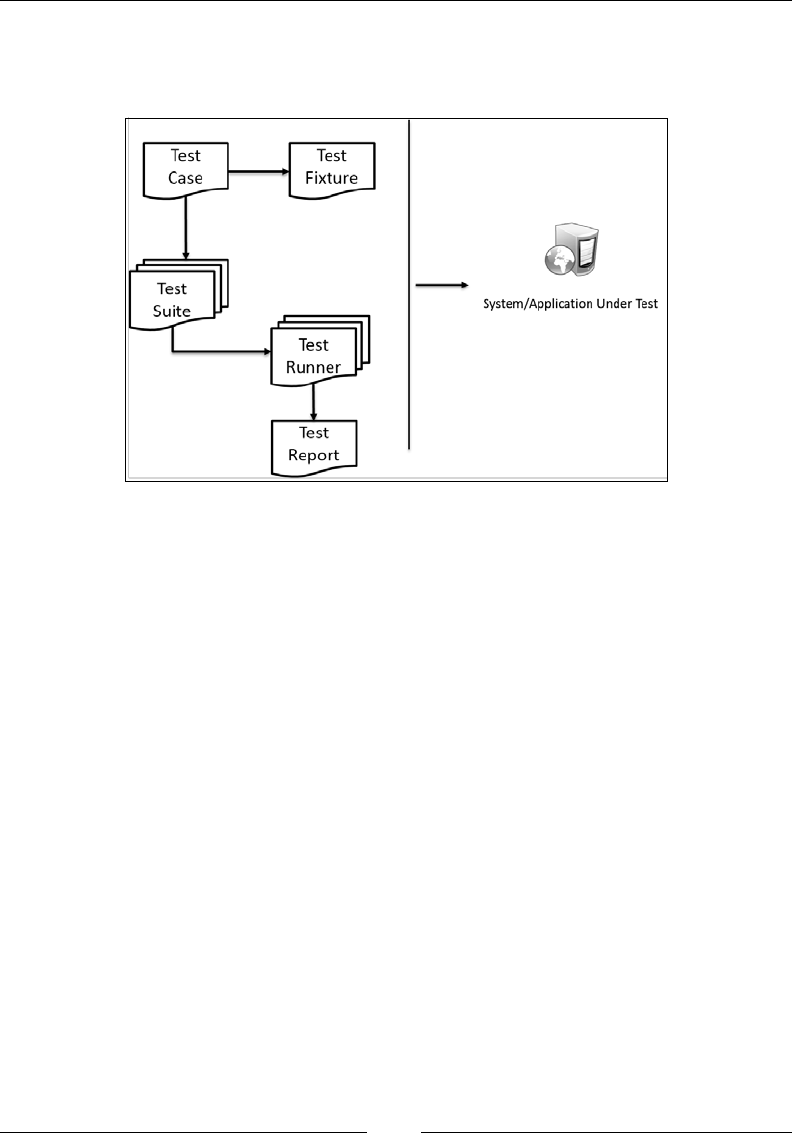
and test xtures. Let's understand each of these components as shown in
following diagram:
• Test Fixture: By using a test xture, we can dene the preparation needed to
perform one or more tests and any associated clean-up actions.
• Test Case: A test case is the smallest unit of testing in unittest. It checks
for a specic response to a particular set of actions and inputs using various
assert methods provided by the unittest library. The unittest library
provides a base class called TestCase that may be used to create
new test cases.
• Test Suite: A test suite is a collection of multiple tests or test cases to
create groups of tests representing specic functionality or modules of the
application under test, which will be executed together.
• Test Runner: The test runner orchestrates execution of tests and provides
results to the user. The runner may use a graphical interface, a textual interface,
or return a special value to indicate the results of executing the tests.
• Test Report: A test report displays a summary of test results showing the
pass or fail status of executed test cases, expected versus actual results for
failed steps, and summary of overall run and timing information.
A test created with the xUnit framework such as unittest is divided into three
parts also known as the 3 A's, as follows:
• Arrange: This part sets up the preconditions for tests including the object(s)
that need to be tested, related conguration, and dependencies
www.it-ebooks.info

Chapter 2
[ 31 ]
• Act: This part exercises the functionality
• Assert: This part checks the outcome with the expected results
We will use this approach to create tests with the unittest library in rest of
the chapter.
We will use the unittest library in rest of the book to create and
run Selenium WebDriver tests. However, there are other testing
frameworks available in Python with additional features, as follows:
• Nose: The nose framework extends the unittest library
and provides ability to search and run tests automatically.
It also provides various plugins to create more advanced
tests. You can find more about nose at https://nose.
readthedocs.org/en/latest/.
• Pytest: The pytest framework is another testing framework
that offers a number of advanced features to write and run
unit tests in Python. You can find out more about pytest at
http://pytest.org/latest/.
The TestCase class
We can create a test, or group of tests, by inheriting the TestCase class and adding
each test as a method to this class. To make a test, we need to either use assert or
one of the many variations on assert that are part of the TestCase class. The most
important task of each test is a call to assertEqual() to check for an expected result,
assertTrue() to verify a condition, or assertRaises() to verify that an expected
exception gets raised.
In addition to adding tests, we can add test xtures: that is the setUp() and
tearDown() methods to handle creation and disposition of any objects or conditions
that are needed for a test.
Let's start using the unittest library, rst writing a simple test by inheriting the
TestCase class and then adding a test method for the sample script that we created
in Chapter 1, Getting Started with Selenium WebDriver and Python.
We need to import the unittest module and dene a class that inherits the
TestCase class, as shown here:
import unittest
from selenium import webdriver
class SearchTest(unittest.TestCase):
www.it-ebooks.info

Writing Tests Using unittest
[ 32 ]
The setUp() method
The starting point for test cases is the setUp() method, which we can use to perform
some tasks at the start of each test or all the tests that will be dened in the class.
These can be test preparation tasks such as creating an instance of a browser driver,
navigating to the base URL, loading test data, opening logles, and so on.
This method takes no arguments and doesn't return anything. When a setUp()
method is dened, the test runner will run that method prior to each test method.
In our example, we will use the setUp() method to create an instance of Firefox, set
up the properties, and navigate to the main page of the application before a test is
executed as shown in the following example:
import unittest
from selenium import webdriver
class SearchTests(unittest.TestCase):
def setUp(self):
# create a new Firefox session
self.driver = webdriver.Firefox()
self.driver.implicitly_wait(30)
self.driver.maximize_window()
# navigate to the application home page
self.driver.get("http://demo.magentocommerce.com/")
Writing tests
With a setup method in place, we can now write some tests to verify the application's
functionality that we want to test. In this example, we will search for a product and
check if the result returns a number of items. Similar to the setUp() method, test
methods are implemented in the TestCase class. It is important that we name these
methods beginning with the word test. This naming convention informs the test
runner about which methods represent a test.
For each test method that the test runner nds, it executes the setUp() method
before executing the test method. This helps ensure that each test method can
depend on a consistent environment, regardless of how many tests are dened in the
class. We will use a simple assertEqual() method to check that the expected results
for the given search term match with the results returned by the application. We will
discuss more about assertions later in the chapter.
www.it-ebooks.info

Chapter 2
[ 33 ]
Add a new test method, test_search_by_category(), which searches for products
by category and checks for the number of products returned by the search, as shown
in following example:
import unittest
from selenium import webdriver
class SearchTests(unittest.TestCase):
def setUp(self):
# create a new Firefox session
self.driver = webdriver.Firefox()
self.driver.implicitly_wait(30)
self.driver.maximize_window()
# navigate to the application home page
self.driver.get("http://demo.magentocommerce.com/")
def test_search_by_category(self):
# get the search textbox
self.search_field = self.driver.find_element_by_name("q")
self.search_field.clear()
# enter search keyword and submit
self.search_field.send_keys("phones")
self.search_field.submit()
# get all the anchor elements which have product names
# displayed currently on result page using
# find_elements_by_xpath method
products = self.driver.find_elements_by_xpath
("//h2[@class='product-name']/a")
self.assertEqual(2, len(products))
Cleaning up the code
Similar to the setUp() method that is called before each test method, the TestCase
class also calls a tearDown() method to clean up any initialized values after the test
is executed. Once a test is executed, the values dened in the setUp() method are
no longer required; so, it is good practice to clean up the values initialized by the
setUp() method after a test is completed. In our example, after a test is executed,
we no longer need the instance of Firefox. We will close the Firefox instance that
was created for the test in the tearDown() method, as shown in the following code:
import unittest
from selenium import webdriver
class SearchTests(unittest.TestCase):
www.it-ebooks.info

Writing Tests Using unittest
[ 34 ]
def setUp(self):
# create a new Firefox session
self.driver = webdriver.Firefox()
self.driver.implicitly_wait(30)
self.driver.maximize_window()
# navigate to the application home page
self.driver.get("http://demo.magentocommerce.com/")
def test_search_by_category(self):
# get the search textbox
self.search_field = self.driver.find_element_by_name("q")
self.search_field.clear()
# enter search keyword and submit
self.search_field.send_keys("phones")
self.search_field.submit()
# get all the anchor elements which have product names
# displayed currently on result page using
# find_elements_by_xpath method
products = self.driver.find_elements_by_xpath
("//h2[@class='product-name']/a")
self.assertEqual(2, len(products))
def tearDown(self):
# close the browser window
self.driver.quit()
Running the test
To run the test from command line, we can add a call to the main method of the test
case. We will pass the verbosity argument that is used to display the amount of test
result details on the console:
if __name__ == '__main__':
unittest.main(verbosity=2)
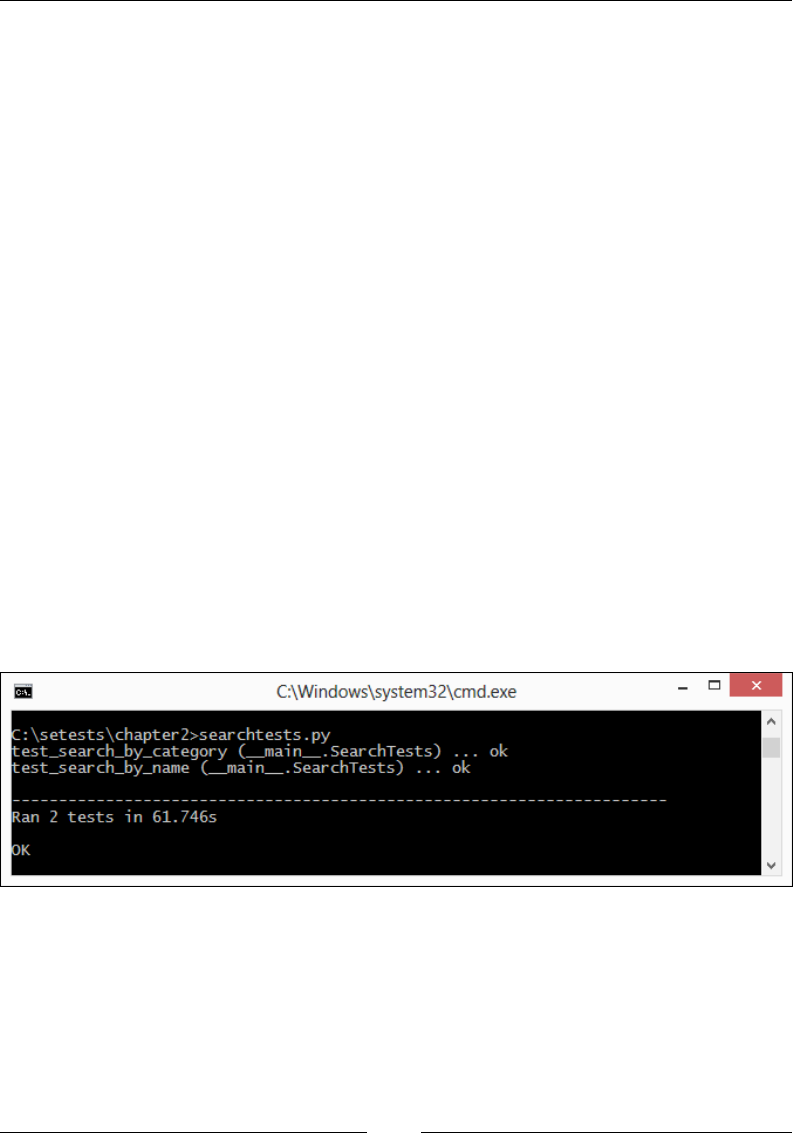
We can store the tests as a normal Python script. For this example, save the sample
test as searchtests.py. After saving the le, we can execute it through command
line by using the following command:
python searchtests.py
www.it-ebooks.info

Chapter 2
[ 35 ]
After running the tests, unittest shows the results on the console along with the
summary of tests as shown in the following screenshot:
In addition to the results summary, when a test case fails, for each failure, summary
will produce a block of text to describe what went wrong. Look at the following
screenshot to see what happens when we change the expected value to something else:
As you can see, it shows exactly which test method generated the failure, with
trace-back information to track down the code ow that led to the failure. In
addition, the failure itself is shown as AssertionError, with a mismatch of the
expected output with the actual output.
www.it-ebooks.info
Writing Tests Using unittest
[ 36 ]
Adding another test
We can group a number of tests as part of one test class. This helps in creating logical
groups of tests that belong to a specic functionality. Let's add another test to the
test class. The rule is simple; name the new method starting with the word test, as
shown in the following code:
def test_search_by_name(self):
# get the search textbox
self.search_field = self.driver.find_element_by_name("q")
self.search_field.clear()
# enter search keyword and submit
self.search_field.send_keys("salt shaker")
self.search_field.submit()
# get all the anchor elements which have
# product names displayed
# currently on result page using
# find_elements_by_xpath method
products = self.driver.find_elements_by_xpath
("//h2[@class='product-name']/a")
self.assertEqual(1, len(products))
Run the test and you will see two instances of Firefox opening and closing. This is
how the setUp() and tearDown() methods work for each test method. You will see
the result as shown in the following screenshot:
www.it-ebooks.info

Chapter 2
[ 37 ]
Class-level setUp() and tearDown() methods
In the previous example, we created a new instance of Firefox using the setUp()
method before the execution of each test method and closed that instance after the
execution of the test method. How about sharing a single Firefox instance between
the methods instead of creating a new instance every time? This can be done by
using the setUpClass() and tearDownClass() methods and using the
@classmethod decorator. These methods allow us to initialize values at the class
level instead of the method level and then share these values between the test
methods. In the following example, the code is modied to call the setUpClass()
and tearDownClass() methods with the @classmethod decorator:
import unittest
from selenium import webdriver
class SearchTests(unittest.TestCase):
@classmethod
def setUpClass(cls):
# create a new Firefox session
cls.driver = webdriver.Firefox()
cls.driver.implicitly_wait(30)
cls.driver.maximize_window()
# navigate to the application home page
cls.driver.get("http://demo.magentocommerce.com/")
cls.driver.title
def test_search_by_category(self):
# get the search textbox
self.search_field = self.driver.find_element_by_name("q")
self.search_field.clear()
# enter search keyword and submit
self.search_field.send_keys("phones")
self.search_field.submit()
# get all the anchor elements which have product names
# displayed currently on result page using
# find_elements_by_xpath method
products = self.driver.find_elements_by_xpath
("//h2[@class='product-name']/a")
self.assertEqual(2, len(products))
www.it-ebooks.info
Writing Tests Using unittest
[ 38 ]
def test_search_by_name(self):
# get the search textbox
self.search_field = self.driver.find_element_by_name("q")
self.search_field.clear()
# enter search keyword and submit
self.search_field.send_keys("salt shaker")
self.search_field.submit()
# get all the anchor elements which have product names
# displayed currently on result page using
# find_elements_by_xpath method
products = self.driver.find_elements_by_xpath
("//h2[@class='product-name']/a")
self.assertEqual(1, len(products))
@classmethod
def tearDownClass(cls):
# close the browser window
cls.driver.quit()
if __name__ == '__main__':
unittest.main()
Run the test and you will see a single Firefox instance created; both the tests will use
this instance.
For more information on the @classmethod decorator,
refer to https://docs.python.org/2/library/
functions.html#classmethod.
Assertions
The TestCase class of the unittest library offers a number of utility methods
to check the expected values against actual values returned by the application.
These methods are implemented in such a way that they represent a condition that
must be true in order to continue the execution of the test. There are broadly three
types of such methods, each covering a specic type of condition such as checking
equivalence, logical comparison, and exceptions. If the given assertion passes, the
test will continue to the next line of code; otherwise, the test halts immediately and
a failure message will be generated.
www.it-ebooks.info

Chapter 2
[ 39 ]
The unittest library provides all the standard xUnit asserts methods. The
following table lists some of the important methods that we will be using in the
rest of the book:
Method Condition
that is
checked
Example uses
assertEqual(a, b [,msg]) a == b These methods check whether or not a
and b are equal to each other. The msg
object is a message explaining the failure
(if any).
This is useful to check values of elements,
attributes, and so on. For example:
assertEqual(element.text,"10")
assertNotEqual(a,
b[,msg])
a != b
assertTrue(x[,msg])) bool(x) is
True
These methods check whether the given
expression evaluates to True or False.
For example, to check whether the
element is displayed on a page, we can
use the following method:
assertTrue(element.is_
dispalyed())
assertFalse(x[,msg])) bool(x) is
False
assertIsNot(a, b[,msg])) a is not b
assertRaises(exc, fun,
*args, **kwds)
fun(*args,
**kwds)
raises exc
These methods check whether the specific
exceptions are raised by the test steps. A
possible use of this method is to check
NoSuchElementFoundexception.
assertRaisesRegexp(exc,
r, fun, *args, **kwds)
fun(*args,
**kwds)
raises exc
and the
message
matches
regex r
assertAlmostEqual(a, b) round(a-b,
7) == 0
These methods specifically check for
numeric values, and round the value to
the given number of decimal places before
checking for equality. This helps account
for rounding errors and other problems
due to floating-point arithmetic.
assertNotAlmostEqual(a,
b)
round(a-b,
7) != 0
assertGreater(a, b) a > b These methods are similar to the
assertEqual() method, designed with
logical conditions.
assertGreaterEqual(a, b) a >= b
assertLess(a, b) a < b
assertLessEqual(a, b) a <= b
www.it-ebooks.info

Writing Tests Using unittest
[ 40 ]
Method Condition
that is
checked
Example uses
assertRegexpMatches(s, r) r.search(s) These methods check whether a regexp
search matches the text.
assertNotRegexpMatches(s,
r)
not
r.search(s)
assertMultiLineEqual(a,
b)
strings This method is a specialized form of
assertEqual(), designed for multiline
strings. Equality works like any other
string, but the default failure message
is optimized to show the differences
between the values.
assertListEqual(a, b) lists This method checks whether the lists
a and b match. This is useful to match
options from drop-down fields.
fail() This method fails the test unconditionally.
This can also be used to create custom
conditional blocks where other assert
methods do not work easily.
Test suites
Using the TestSuites feature of unittest, we can collect various tests into logical
groups and then into a unied test suite that can be run with a single command. This
is done by using the TestSuite, TestLoader, and TestRunner classes.
Before we get into details of TestSuite, let's add a new test to check the home page
of the sample application. We will aggregate this test along with the previous search
tests into a single test suite, as shown in the following code:
import unittest
from selenium import webdriver
from selenium.common.exceptions import NoSuchElementException
from selenium.webdriver.common.by import By
from __builtin__ import classmethod
class HomePageTest(unittest.TestCase):
@classmethod
def setUp(cls):
# create a new Firefox session """
cls.driver = webdriver.Firefox()
cls.driver.implicitly_wait(30)
cls.driver.maximize_window()
www.it-ebooks.info

Chapter 2
[ 41 ]
# navigate to the application home page """
cls.driver.get("http://demo.magentocommerce.com/")
def test_search_field(self):
# check search field exists on Home page
self.assertTrue(self.is_element_present(By.NAME,"q"))
def test_language_option(self):
# check language options dropdown on Home page
self.assertTrue(self.is_element_present
(By.ID,"select-language"))
def test_shopping_cart_empty_message(self):
# check content of My Shopping Cart block on Home page
shopping_cart_icon = \
self.driver.find_element_by_css_selector
("div.header-minicart span.icon")
shopping_cart_icon.click()
shopping_cart_status = \
self.driver.find_element_by_css_selector
("p.empty").text
self.assertEqual("You have no items in your shopping cart.",
shopping_cart_status)
close_button = self.driver.find_element_by_css_selector
("div.minicart-wrapper a.close")
close_button.click()
@classmethod
def tearDown(cls):
# close the browser window
cls.driver.quit()
def is_element_present(self, how, what):
"""
Utility method to check presence of an element on page
:params how: By locator type
:params what: locator value
"""
try: self.driver.find_element(by=how, value=what)
except NoSuchElementException, e: return False
return True
if __name__ == '__main__':
unittest.main(verbosity=2)
www.it-ebooks.info
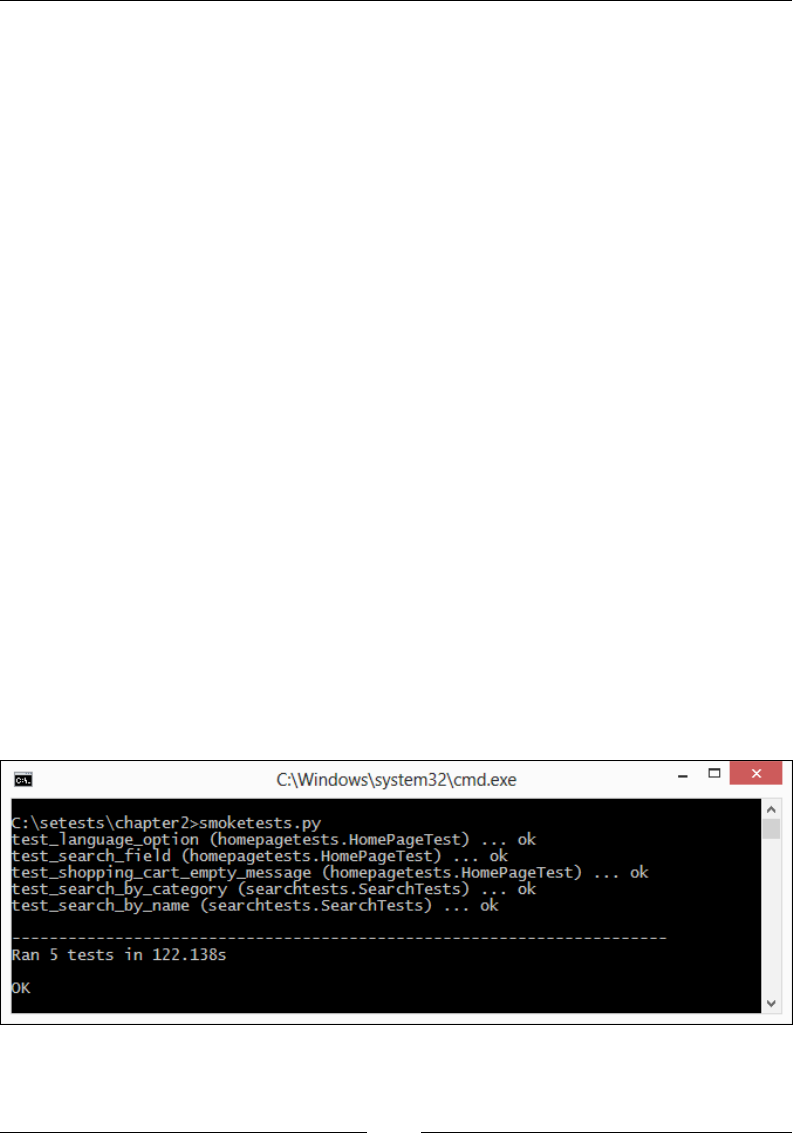
Writing Tests Using unittest
[ 42 ]
We will use the TestSuite class for dening and running the test suite. We can add
multiple test cases to the test suite. In addition to the TestSuite class we need to
use TestLoader and TextTestRunner to create and run a test suite as shown in the
following code:
import unittest
from searchtests import SearchTests
from homepagetests import HomePageTest
# get all tests from SearchProductTest and HomePageTest class
search_tests = unittest.TestLoader().loadTestsFromTestCase
(SearchTests)
home_page_tests = unittest.TestLoader().loadTestsFromTestCase
(HomePageTest)
# create a test suite combining search_test and home_page_test
smoke_tests = unittest.TestSuite([home_page_tests, search_tests])
# run the suite
unittest.TextTestRunner(verbosity=2).run(smoke_tests)
Using the TestLoader class, we will get all the test methods from the specied test
les that will be used to create the test suite. The TestRunner class will take the test
suite and run all the tests from these les.
We can run the new test suite le using the following command:
python smoketests.py
This will run all the tests from the SearchProductTest and HomePageTest class and
generate the following output in the console:
www.it-ebooks.info

Chapter 2
[ 43 ]
Generating the HTML test report
The unittest library generates the test output on a console window. You might want
to generate a report of all the tests executed as evidence or to distribute test results to
various stakeholders. Sending console logs to the stakeholder may not be a good idea.
Stakeholders will need nicely formatted, summary reports with a drill-down access
to the details. The unittest library does not have an in-built way to generate nicely
formatted reports. We can use the HTMLTestRunner extension of unittest written by
Wai Yip Tung. You can nd more about HTMLTestRunner at https://pypi.python.
org/pypi/HTMLTestRunner along with the download instructions.
The HTMLTestRunner extension is bundled with the
book's source code.
We will use HTMLTestRunner in our test to generate a nice-looking report. Let's modify
the test suite le that we created earlier in the chapter and add HTMLTestRunner
support. We need to create an output le that will contain the actual report, congure
the HTMLTestRunner options, and run the tests in the following way:
import unittest
import HTMLTestRunner
import os
from searchtests import SearchTests
from homepagetests import HomePageTest
# get the directory path to output report file
dir = os.getcwd()
# get all tests from SearchProductTest and HomePageTest class
search_tests = unittest.TestLoader().loadTestsFromTestCase(SearchTes
ts)
home_page_tests = unittest.TestLoader().loadTestsFromTestCase(HomePag
eTest)
# create a test suite combining search_test and home_page_test
smoke_tests = unittest.TestSuite([home_page_tests, search_tests])
# open the report file
outfile = open(dir + "\SmokeTestReport.html", "w")
# configure HTMLTestRunner options
runner = HTMLTestRunner.HTMLTestRunner(
stream=outfile,
title='Test Report',
description='Smoke Tests'
)
www.it-ebooks.info
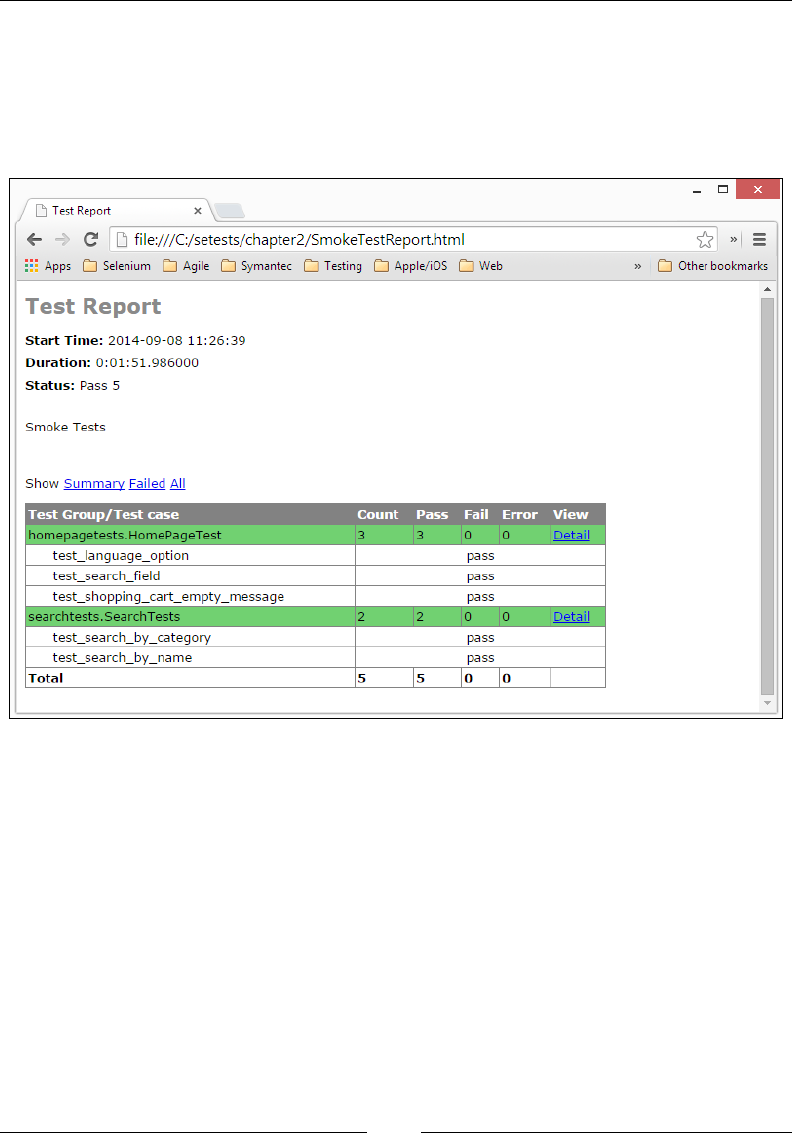
Writing Tests Using unittest
[ 44 ]
# run the suite using HTMLTestRunner
runner.run(smoke_tests)
Run the test suite; HTMLTestRunner executes all the tests similar to the unittest
library's default test runner. At the end of the execution, it will generate a report le
as shown in the following screenshot:
Summary
In this chapter, we learned how to use the unittest testing library for writing and
running tests with Selenium WebDriver. We created a test using the TestClass class
with the setUp() and tearDown() methods. We added an assertion to check the
expected output with the actual output.
We also learned how to use different types of assertions that are supported by the
unittest library. We implemented the test suite that provides the ability to aggregate
tests in logical groups. Finally, we used HTMLTestRunner to generate test reports in
HTML format that show nicely formatted test results.
In the next chapter, we will learn how to use and dene locators to interact with
various HTML elements displayed on a page.
www.it-ebooks.info

Finding Elements
Web applications and the web pages within these applications are written in a
mixture of the Hyper Text Markup Language (HTML), Cascading Style Sheets
(CSS), and JavaScript code. Based on user actions such as navigating to a website
Uniform Resource Locator (URL) or clicking on a submit button, a browser sends
a request to a web server. The web server processes this request and sends the
response with HTML and related resources such as JavaScript, CSS, and images,
and so on back to the browser. The information received from the server is used by
the browser to render a web page with various visual elements such as textboxes,
buttons, labels, tables, forms, checkboxes, radio boxes, lists, images, and so on, on
the page. While doing so, the browser hides the HTML code and related resources
from the user. The user is presented with a graphical user interface in the browser
window. The various visual elements or controls used on pages are known as
WebElements in Selenium.
In this chapter, we will cover the following topics:
• Understanding more about nding elements with Selenium WebDriver
• Understanding how to investigate and dene locators to nd elements using
developer tools options available in various browsers
• Finding out various ways to nd elements, including ID, Name, and
Class attribute values and use XPath and CSS selectors to dene more
dynamic locators
• Implementing various find_element_by methods to nd elements so that
we can automate interaction on these elements using Selenium WebDriver
When we want to automate browser interaction using Selenium, we need to
tell Selenium how to nd a particular element or set of elements on a web page
programmatically and simulate user actions on these elements. Selenium provides
various selector or locator methods to nd elements based on their attribute/value
criteria or selector value that we supply in script.
www.it-ebooks.info

Finding Elements
[ 46 ]
How do we nd the selector or locator information? Web pages are written in a
mixture of HTML, CSS, and JavaScript. We can derive this information by looking at
the HTML source of the page. We need to nd information such as what HTML tag is
used for the element that we want to interact with, the dened attribute, and the values
for the attributes and the structure of the page. Let's take a look at a sample form in
the application we're testing. Here is an example of the search eld and the search
(the magnifying glass) icon from the sample application in the following screenshot:
Let's look at the HTML code written for the search form:
<form id="search_mini_form" action=
"http://demo.magentocommerce.com/catalogsearch/result/"
method="get">
<div class="form-search">
<label for="search">Search:</label>
<input id="search" type="text" name="q" value=""
class="input-text" maxlength="128" />
<button type="submit" title="Search"
class="button"><span><span>Search</span></span></button>
<div id="search_autocomplete" class="search-
autocomplete"></div>
<script type="text/javascript">
//<![CDATA[
var searchForm = new Varien.searchForm
('search_mini_form', 'search', 'Search entire store
here...');
searchForm.initAutocomplete
('http://demo.magentocommerce.com
/catalogsearch/ajax/suggest/',
'search_autocomplete');
//]]>
</script>
</div>
</form>
Each element such as the search textbox and search button is implemented using an
<input> tag inside a <form> tag and labels are implemented using the <label> tag.
There is some JavaScript code written in the <script> tag.
www.it-ebooks.info

Chapter 3
[ 47 ]
The search textbox that is represented as the <input> tag has id, type, name, value,
class, and maxlength attributes dened:
<input id="search" type="text" name="q" value=""
class="input-text" maxlength="128" />
We can view code written for a page by right-clicking on the browser window and
selecting the View Page Source option from the pop-up menu. It will display HTML
and client-side JavaScript code for the page in a separate window.
If you're new to HTML, CSS, and JavaScript, then it's
worth looking at some useful tutorials at http://www.
w3schools.com/. These will help you in identifying locators
using different ways supported by Selenium WebDriver.
Using developer tools to nd locators
While writing Selenium tests, we will often need to look at the web page code
and might need special tools that can display information in a structured and
easy-to-understand format. Good news, the majority of the browsers have built-in
features or add-ons to help us. These tools provide us with a neat and clean way to
understand how elements and their attributes are dened on a page, DOM structure,
JavaScript blocks, CSS style attributes, and so on. Let's explore these tools in more
detail and see how we can use them.
Inspecting pages and elements with Firefox
using the Firebug add-in
Newer versions of Firefox provide built-in ways to analyze the page and elements;
however, we will use the Firebug add-in, which has more powerful features, by
following the given steps:
1. You need to download and install the Firebug add-in in Firefox available at
https://addons.mozilla.org/en-us/firefox/addon/firebug/.
2. To inspect the page using Firebug, move the mouse over a desired element
and right-click to open the pop-up menu.
www.it-ebooks.info
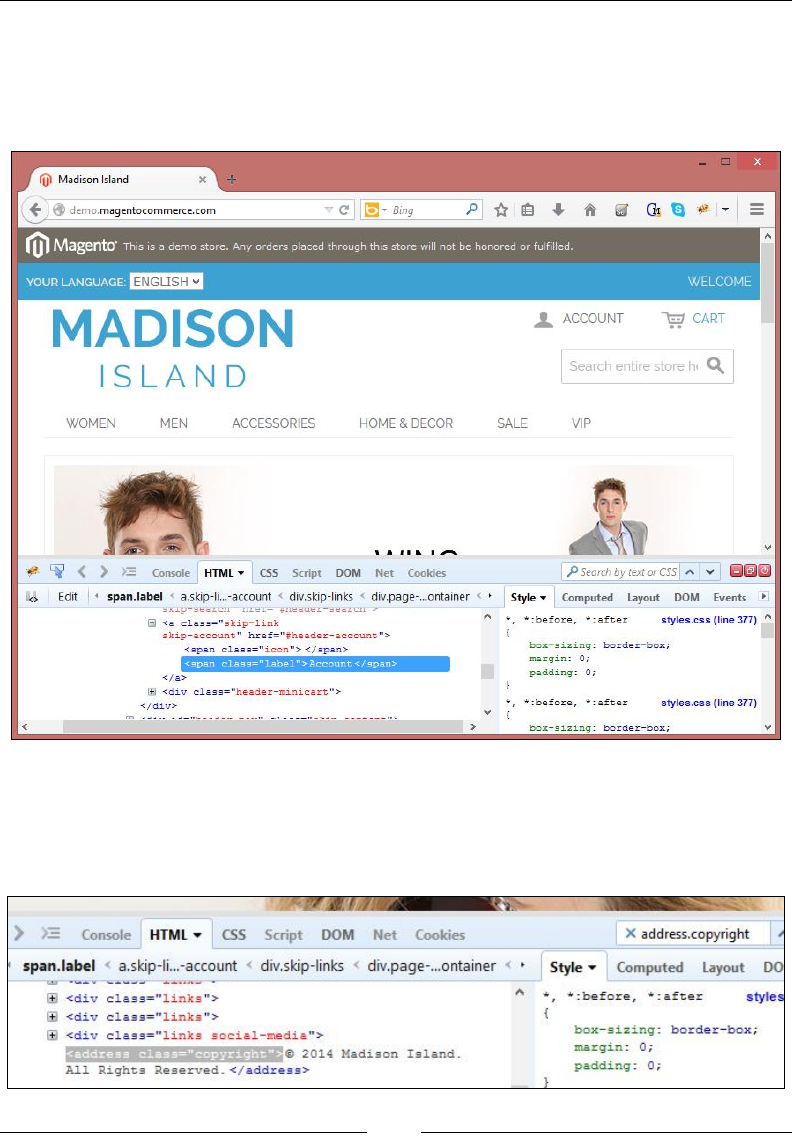
Finding Elements
[ 48 ]
3. Select the Inspect Element with Firebug option from the pop-up menu.
This will display the Firebug section along with all the information about
the page and the selected element including HTML code in a tree format as
shown in the following screenshot:
4. Using Firebug, we can also validate XPath or CSS selectors using the search
box shown in the Firebug section. Just enter the XPath or CSS selector, and
Firebug will highlight the element(s) that match the expression, as shown in
the following screenshot:
www.it-ebooks.info
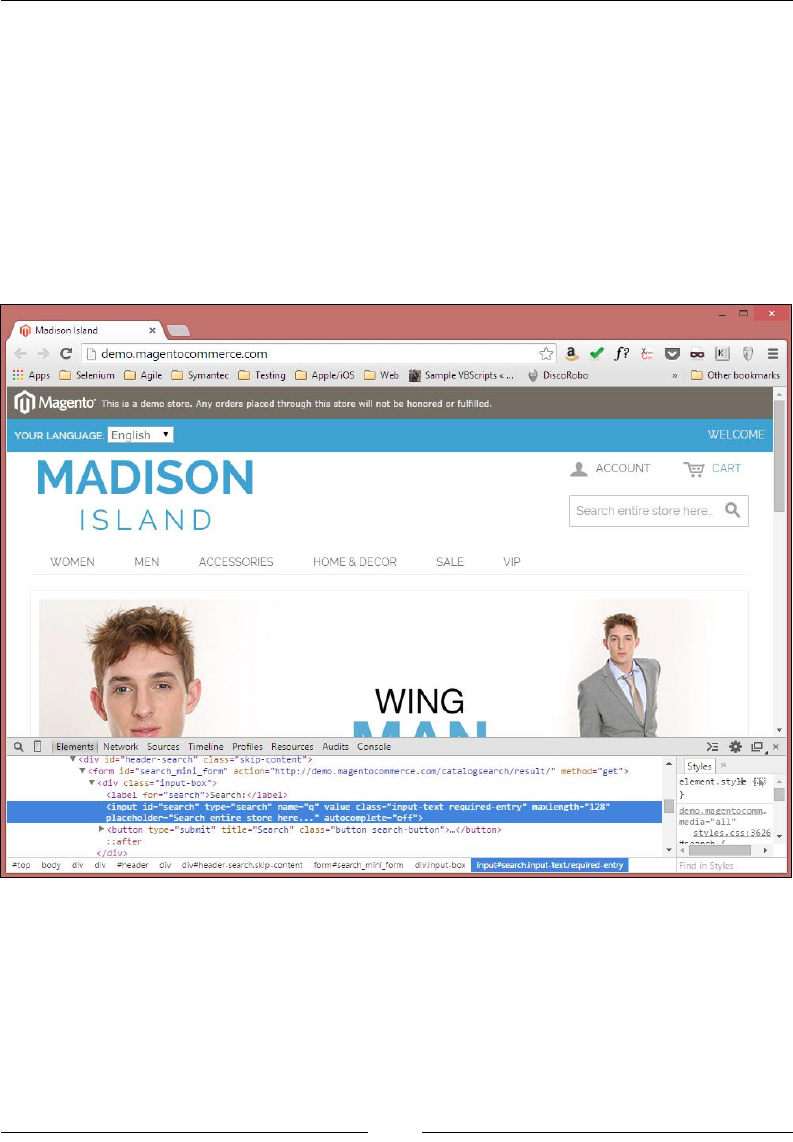
Chapter 3
[ 49 ]
Inspecting pages and elements with Google
Chrome
Google Chrome provides a built-in feature to analyze an element or page. You can
inspect pages and elements by following the given steps:
1. Move the mouse over a desired element on a page and right-click to open the
pop-up menu; then select the Inspect element option.
This will open the developer tools in the browser, which display information
similar to that of Firebug, as shown in the following screenshot:
www.it-ebooks.info
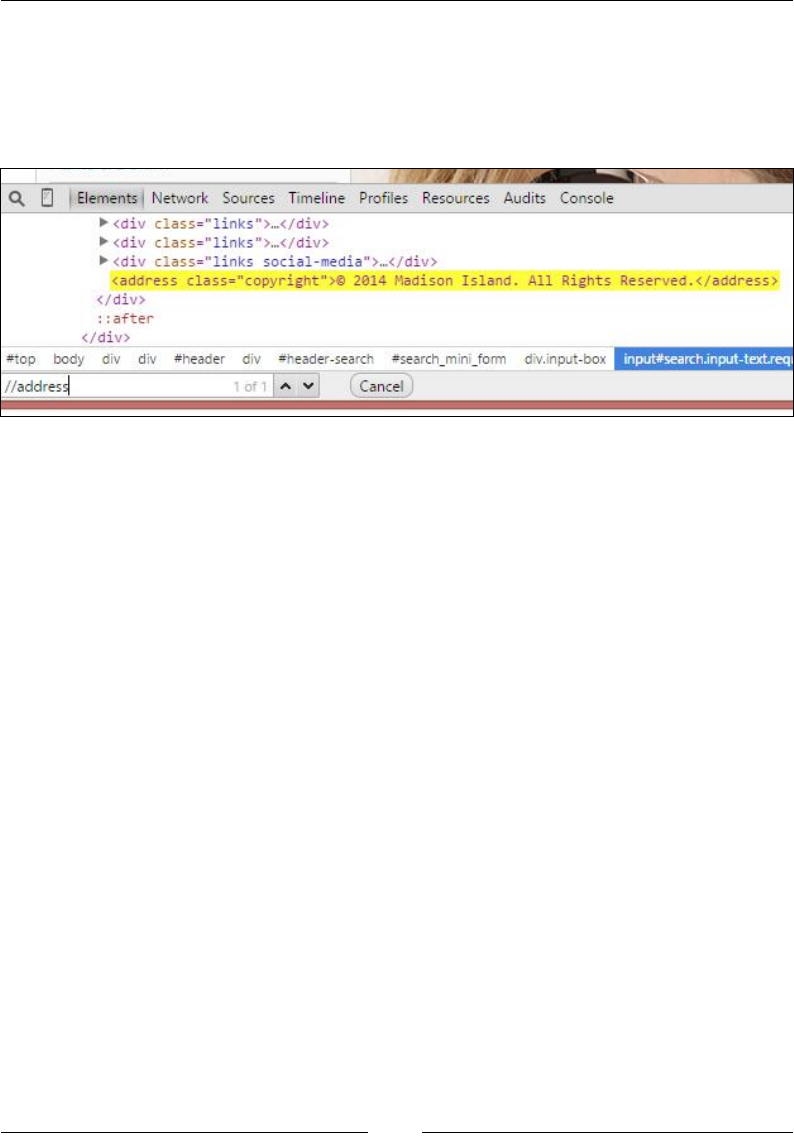
Finding Elements
[ 50 ]
2. Similar to Firebug in Firefox, we can also test XPath and CSS selectors in
the Google Chrome Developer Tools. Press Ctrl + F in the Elements tab.
This will display a search box. Just enter the XPath or CSS selector and
Firebug will highlight element(s) that match the expression, as shown
in the following screenshot:
Inspecting pages and elements with Internet
Explorer
Microsoft Internet Explorer also provides built-in features to analyze elements or
pages. You can inspect pages and elements by following the given steps:
1. To open the developer tools, press the F12 key. The developer tools section
will be displayed at the bottom of browser.
2. To inspect an element, click on the pointer icon and hover over the desired
element on the page. The developer tools will highlight the element
with a blue outline and display the HTML code in a tree as shown in the
following screenshot:
www.it-ebooks.info
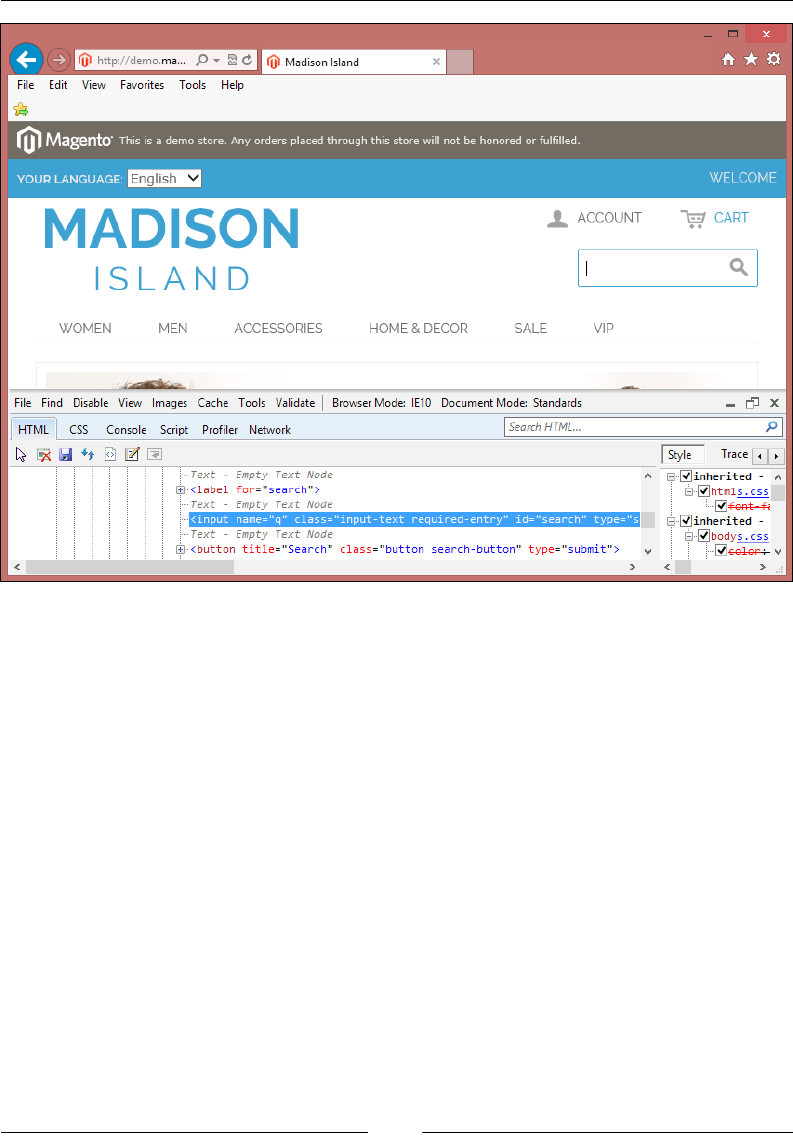
Chapter 3
[ 51 ]
You will nd these tools very useful while writing tests. Some of these tools also
provide the ability to run JavaScript code for debugging and testing.
Finding elements with Selenium
WebDriver
We need to tell Selenium how to nd an element so that it can simulate a desired
user action, or look at the attributes or state of an element so that we can perform a
check. For example, if we want to search for a product, we need to nd the search
text eld and search button visually. We enter the search term by pressing various
keys on the keyboard and click on the search button to submit our search request.
www.it-ebooks.info

Finding Elements
[ 52 ]
We can automate the same actions using Selenium. However, Selenium does
not understand these elds or buttons visually as we do. It needs to nd the
search textbox and search button to simulate keyboard entry and mouse click
programmatically.
Selenium provides various find_element_by methods to nd elements on a web
page. These methods search for an element based on the criteria supplied to them.
If a matching element is found, an instance of WebElement is returned or the
NoSuchElementException exception is thrown if Selenium is not able to nd any
element matching the search criteria.
Selenium also provides various find_elements_by methods to locate multiple
elements. These methods search and return a list of elements that match the
supplied values.
Using the nd methods
Selenium provides eight find_element_by methods to locate elements. In
this section, we will see each one of them in detail. The following table lists
find_element_by methods:
Method Description Argument Example
find_element_by_id(id) This method
finds an
element
by the ID
attribute
value
id: The ID of
the element
to be found
driver.find_
element_by_
id('search')
find_element_by_
name(name)
This method
finds an
element by
the name
attribute
value
name: The
name of the
element to be
found
driver.find_
element_by_
name('q')
find_element_by_class_
name(name)
This method
finds an
element by
the class
attribute
value
name: The
class name of
the element
to be found
driver.find_
element_by_class_
name('input-text')
find_element_by_tag_
name(name)
This method
finds an
element by its
tag name
name: The
tag name of
the element
to be found
driver.find_
element_by_tag_
name('input')
www.it-ebooks.info

Chapter 3
[ 53 ]
Method Description Argument Example
find_element_by_
xpath(xpath)
This method
finds an
element using
XPath
xpath: The
xpath of the
element to be
found
driver.find_
element_by_
xpath('//form[0]/
div[0]/input[0]')
find_element_by_css_
selector(css_selector)
This method
finds an
element
by the CSS
selector
css_
selector:
The CSS
selector of
the element
to be found
driver.find_
element_by_css_
selector('#search')
find_element_by_link_
text(link_text)
This method
finds an
element by
the link text
link_text:
The text of
the element
to be found
driver.find_
element_by_link_
text('Log In')
find_element_by_
partial_link_
text(link_text)
This method
finds an
element by a
partial match
of its link text
link_text:
The text to
match part
of the text of
the element
driver.find_
element_by_partial_
link_text('Log')
The following table lists the find_elements_by methods that return a list of
elements matching the specied criteria:
Method Description Argument Example
find_elements_by_
id(id_)
This method
finds multiple
elements
using the ID
id_: The ID of
the elements to
be found
driver.find_
element_by_
id('product')
find_elements_by_
name(name)
This method
finds
elements
using the
name
name: The
name of the
elements to be
found
driver.find_
elements_by_
name('products')
find_elements_by_
class_name(name)
This method
finds
elements
using the
class name
name: The
class name of
the elements to
be found
driver.find_
elements_by_
class_name('foo')
www.it-ebooks.info

Finding Elements
[ 54 ]
Method Description Argument Example
find_elements_by_tag_
name(name)
This method
finds
elements
using the tag
name
name: The tag
name of the
element to be
found
driver.find_
elements_by_tag_
name('a')
find_elements_by_
xpath(xpath)
This method
finds multiple
elements by
XPath
xpath: The
xpath of the
elements to be
found
driver.find_
elements_by_
xpath("//
div[contains(@
class,
'lists')]")
find_elements_by_css_
selector(css_selector)
This method
finds
elements
using the CSS
selector
css_
selector:
The CSS
selector of the
element to be
found
driver.find_
element_by_css_
selector('.input-
class')
find_elements_by_link_
text(text)
This method
finds
elements
using the link
text
text: The text
of the elements
to be found
driver.find_
elements_by_link_
text('Log In')
find_elements_
by_partial_link_
text(link_text)
This method
finds
elements by a
partial match
of their link
text
link_text:
The text to
match part of
the text of the
elements
driver.find_
element_by_
partial_link_
text('Add to,')
Finding elements using the ID attribute
Finding elements using the ID is the most preferable way to nd elements on a page.
The find_element_by_id() and find_elements_by_id() methods return an
element or a set of elements that have matching ID attribute values.
The find_element_by_id() method returns the rst element that has a
matching ID attribute value. If no element with matching ID attribute is
found, a NoSuchElementException will be raised.
www.it-ebooks.info

Chapter 3
[ 55 ]
Let's try nding the search textbox from the sample application as shown in the
following screenshot:
Here is the HTML code for the search textbox with an ID attribute value dened
as search:
<input id="search" type="text" name="q" value=""
class="input-text" maxlength="128" autocomplete="off">
Here is a test that uses the find_element_by_id() method to nd the search textbox
and check its maxlength attribute. We will pass the ID attribute's value, search, to
the find_element_by_id() method:
def test_search_text_field_max_length(self):
# get the search textbox
search_field = self.driver.find_element_by_id("search")
# check maxlength attribute is set to 128
self.assertEqual("128", search_field.get_attribute("maxlength"))
The find_elements_by_id() method returns all the elements that have the same ID
attribute values.
Finding elements using the name attribute
Finding an element by its name attribute value is another preferred method. The
find_element_by_name() and find_elements_by_name() methods return
element(s) that have matching name attribute value. If no element is found with
matching name attribute value, a NoSuchElementException will be raised.
In the previous example, we can nd the search textbox using its name attribute
value instead of the ID attribute value in the following way:
# get the search textbox
self.search_field = self.driver.find_element_by_name("q")
The find_elements_by_name() method returns all the elements that have the same
name attribute values.
www.it-ebooks.info

Finding Elements
[ 56 ]
Finding elements using the class name
Apart from using the ID and name attributes, we can also use the class attributes
to nd elements. The class attribute is used to apply CSS to an element. The
find_element_by_class_name() and find_elements_by_class_name() methods
return element(s) that have matching class attribute value. If no element is found
with the matching name attribute value, a NoSuchElementException will be raised.
Finding elements using ID, name, or class attributes is the
most preferred and fastest way to nd elements. Selenium
WebDriver also offers a set of methods when these methods
are not sufcient to nd an element. We will see these
methods later in the chapter.
Let's nd the search button displayed in the following screenshot using its class
attribute value using the find_element_by_class_name() method:
The search button (the magnifying glass icon) is implemented using the <button>
element with type, title, and class attribute values dened as shown in the following
HTML code:
<button type="submit" title="Search"
class="button"><span><span>Search</span></span></button>
Let's create a test that nds the search button element using its class attribute value
and check whether it is enabled as shown in following code:
def test_search_button_enabled(self):
# get Search button
search_button = self.driver.find_element_by_class_name
("button")
# check Search button is enabled
self.assertTrue(search_button.is_enabled())
The find_elements_by_class_name() method returns all the elements that have
the identical class name attribute values.
www.it-ebooks.info

Chapter 3
[ 57 ]
Finding elements using the tag name
The find_element_by_tag_name() and find_elements_by_tag_name() methods
nd element(s) by their HTML tag name. These methods are similar to the
getElementsByTagName() DOM method in JavaScript. If no element is found with
a matching tag name, a NoSuchElementException will be raised.
These methods are useful when we want to nd elements using their tag name.
For example, to nd all the <tr> tags in a table to nd the number of rows.
The home page of the sample application displays promotional banner images as
shown in the following screenshot:
These banners are implemented using an <img> or image tag inside a <ul> or
unordered list tag as shown in the following HTML code:
<ul class="promos">
<li>
<a href="http://demo.magentocommerce.com/home-decor.html">
<img src="/media/wysiwyg/homepage-three-column-promo-
01B.png" alt="Physical & Virtual Gift Cards">
</a>
</li>
<li>
<a href="http://demo.magentocommerce.com/vip.html">
<img src="/media/wysiwyg/homepage-three-column-promo-
02.png" alt="Shop Private Sales - Members Only">
</a>
</li>
<li>
<a href="http://demo.magentocommerce.com/accessories/
bags-luggage.html">
<img src="/media/wysiwyg/homepage-three-column-
promo-03.png" alt="Travel Gear for Every Occasion">
</a>
</li>
</ul>
www.it-ebooks.info

Finding Elements
[ 58 ]
We will use the find_elements_by_tag_name() method to get all the images. In
this example, we will rst nd the list of banners implemented as <ul> or unordered
lists using the find_element_by_class_name() method and then get all the <img>
or image elements by calling the find_elements_by_tag_name() method on the
banners list:
def test_count_of_promo_banners_images(self):
# get promo banner list
banner_list = self.driver.find_element_by_class_name("promos")
# get images from the banner_list
banners = banner_list.find_elements_by_tag_name("img")
# check there are 20 tags displayed on the page
self.assertEqual(2, len(banners))
Finding elements using XPath
XPath is a query language used to search and locate nodes in an XML document.
All the major web browsers support XPath. Selenium can leverage and use powerful
XPath queries to nd elements on a web page.
One of the advantages of using XPath is when we can't nd a suitable ID, name, or
class attribute value for the element. We can use XPath to either nd the element in
absolute terms or relative to an element that does have an ID or name attribute. We
can also use dened attributes other than the ID, name, or class with XPath queries.
We can also nd elements with the help of a partial check on attribute values using
XPath functions such as starts-with(), contains(), and ends-with().
To know more about XPath, visit http://www.
w3schools.com/Xpath/ and http://www.zvon.org/
comp/r/tut-XPath_1.html.
You can nd more about XPath locators in the book Selenium Testing Tools Cookbook,
Packt Publishing.
www.it-ebooks.info

Chapter 3
[ 59 ]
The find_element_by_xpath() and find_elements_by_xpath() methods return
element(s) that are found by the specied XPath query. For example, we can check
whether the promo banners displayed on the home page work as intended and we can
open the promotion pages using these images as shown in the following screenshot:
Here is how the Shop Private Sales banner is dened as an <img> tag. The image does
not have the ID, name, or class attributes dened. Also, we cannot use the find_by_
tag_name() method as there are multiple <img> tags dened on the page. However, by
looking at the following HTML code, we can get the <img> tag using the alt attribute:
<ul class="promos">
...
<li>
<a href="http://demo.magentocommerce.com/vip.html">
<img src="/media/wysiwyg/homepage-three-column-
promo-02.png" alt="Shop Private Sales -
Members Only">
</a>
</li>
...
</ul>
Let's create a test that uses the find_element_by_xpath() method. We are using
a relative XPath query to nd this <img> tag using its alt attribute (this is how we
can use ID, name, and class attributes as well as other attributes such as title, type,
value, alt, and so on within XPath queries):
def test_vip_promo(self):
# get vip promo image
vip_promo = self.driver.\
find_element_by_xpath("//img[@alt='Shop Private Sales
- Members Only']")
# check vip promo logo is displayed on home page
self.assertTrue(vip_promo.is_displayed())
# click on vip promo images to open the page
vip_promo.click()
# check page title
self.assertEqual("VIP", self.driver.title)
www.it-ebooks.info
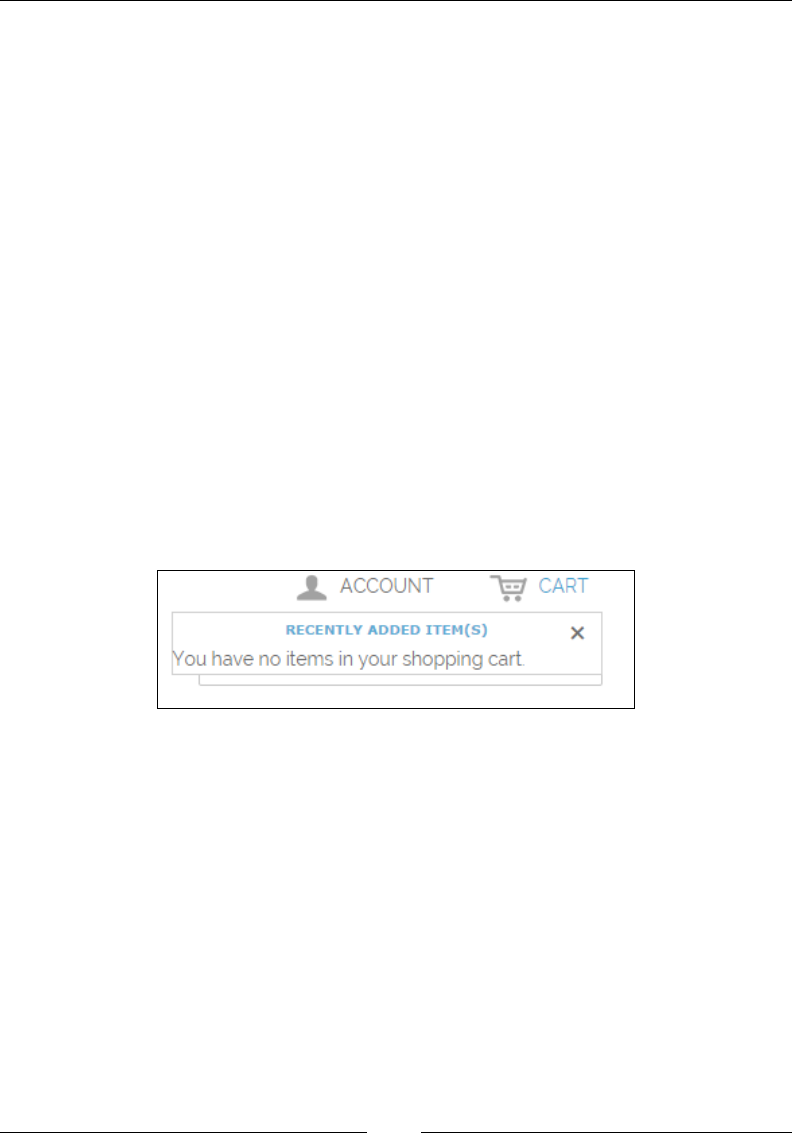
Finding Elements
[ 60 ]
The find_elements_by_xpath()method returns all the elements that match the
XPath query.
Finding elements using CSS selectors
CSS is a style sheet language used by web designers to describe the look and feel of
an HTML document. CSS is used to dene various style classes that can be applied
to elements for formatting. CSS selectors are used to nd HTML elements based on
their attributes such as ID, classes, types, attributes, or values and much more to
apply the dened CSS rules.
Similar to XPath, Selenium can leverage and use CSS selectors to nd elements on a
web page. To know more about CSS selectors, visit http://www.w3schools.com/
css/css_selectors.asp/ and http://www.w3.org/TR/CSS2/selector.html.
The find_element_by_css_selector() and find_elements_by_css_selector()
methods return element(s) that are found by the specied CSS selector.
On the home page of the sample application, we can see the shopping cart icon.
When we click on the icon, we can see the shopping cart. When there are no items
added to the shopping cart, a message should be displayed saying You have no
items in your shopping cart, as shown in the following screenshot:
This is implemented as shown in the following HTML code:
<div class="minicart-wrapper">
<p class="block-subtitle">
Recently added item(s)
<a class="close skip-link-close" href="#" title="Close">
×</a>
</p>
<p class="empty">You have no items in your shopping cart.
</p>
</div>
www.it-ebooks.info

Chapter 3
[ 61 ]
Let's create a test to validate this message. We will use CSS selectors to nd the
shopping cart icon, click on it, and then nd the shopping cart message implemented
in the <p> or paragraph element:
def test_shopping_cart_status(self):
# check content of My Shopping Cart block on Home page
# get the Shopping cart icon and click to open the
# Shopping Cart section
shopping_cart_icon = self.driver.\
find_element_by_css_selector("div.header-minicart
span.icon")
shopping_cart_icon.click()
# get the shopping cart status
shopping_cart_status = self.driver.\
find_element_by_css_selector("p.empty").text
self.assertEqual("You have no items in your shopping cart.",
shopping_cart_status)
# close the shopping cart section
close_button = self.driver.\
find_element_by_css_selector("div.minicart-wrapper
a.close")
close_button.click()
We used the element tag along with the class name in this example. For example,
to get the shopping cart icon, we used the following selector:
shopping_cart_icon = self.driver.\
find_element_by_css_selector("div.header-minicart
span.icon")
This will rst nd a <div> element with the header_minicart class name and then
nd a <span> element under this div, which has icon as its class name.
You can nd more about CSS selectors in Selenium Testing Tools Cookbook,
Packt Publishing.
Finding links
The find_element_by_link_text() and find_elements_by_link_text()
methods nd link(s) using the text displayed for the link. For example:
1. To get the Account link displayed on the Home page, as shown in the following
screenshot, we can use the find_element_by_link_text() method:
www.it-ebooks.info

Finding Elements
[ 62 ]
2. Here is the HTML code for the Account link implemented as the <a>
(or anchor tag) and the <span> tag with text:
<a href="#header-account" class="skip-link skip-account">
<span class="icon"></span>
<span class="label">Account</span>
</a>
3. Let's create a test that locates the Account link using its text and check
whether it's displayed:
def test_my_account_link_is_displayed(self):
# get the Account link
account_link =
self.driver.find_element_by_link_text("ACCOUNT")
# check My Account link is displayed/visible in
# the Home page footer
self.assertTrue(account_link.is_displayed())
The find_elements_by_link_text() method gets all the link elements that have
matching link text.
Finding links with partial text
The find_element_by_partial_link_text() and find_elements_by_partial_
link_text() methods nd link(s) using partial text. These methods are useful
where we want to nd links using partial text values. Consider the following steps
as an example:
1. On the home page of the application, two links are displayed to open the
Account page: one in the header section with Account as text and the other
in the footer with My Account as text.
2. Let's use the find_elements_by_partial_link_text() method to nd
these links using the Account text and check whether we have two of these
links available on the page:
def test_account_links(self):
# get the all the links with Account text in it
account_links = self.driver.\
find_elements_by_partial_link_text("ACCOUNT")
# check Account and My Account link is
displayed/visible in the Home page footer
self.assertTrue(2, len(account_links))
www.it-ebooks.info

Chapter 3
[ 63 ]
Putting all the tests together using
nd methods
In the previous sections, we saw various find_element_by methods along with
examples. Let's pull together all these examples in a test.
1. Create a new homepagetest.py le and copy all the tests that we created
earlier as shown in the following code:
import unittest
from selenium import webdriver
class HomePageTest(unittest.TestCase):
@classmethod
def setUpClass(cls):
# create a new Firefox session
cls.driver = webdriver.Firefox()
cls.driver.implicitly_wait(30)
cls.driver.maximize_window()
# navigate to the application home page
cls.driver.get('http://demo.magentocommerce.com/')
def test_search_text_field_max_length(self):
# get the search textbox
search_field = self.driver.
find_element_by_id("search")
# check maxlength attribute is set to 128
self.assertEqual("128", search_field.get_attribute
("maxlength"))
def test_search_button_enabled(self):
# get Search button
search_button = self.driver.
find_element_by_class_name("button")
# check Search button is enabled
self.assertTrue(search_button.is_enabled())
def test_my_account_link_is_displayed(self):
# get the Account link
www.it-ebooks.info

Finding Elements
[ 64 ]
account_link =
self.driver.find_element_by_link_text("ACCOUNT")
# check My Account link is displayed/visible in
# the Home page footer
self.assertTrue(account_link.is_displayed())
def test_account_links(self):
# get the all the links with Account text in it
account_links = self.driver.\
find_elements_by_partial_link_text("ACCOUNT")
# check Account and My Account link is
# displayed/visible in the Home page footer
self.assertTrue(2, len(account_links))
def test_count_of_promo_banners_images(self):
# get promo banner list
banner_list = self.driver.
find_element_by_class_name("promos")
# get images from the banner_list
banners = banner_list.
find_elements_by_tag_name("img")
# check there are 3 banners displayed on the page
self.assertEqual(2, len(banners))
def test_vip_promo(self):
# get vip promo image
vip_promo = self.driver.\
find_element_by_xpath("//img[@alt=
'Shop Private Sales - Members Only']")
# check vip promo logo is displayed on home page
self.assertTrue(vip_promo.is_displayed())
# click on vip promo images to open the page
vip_promo.click()
# check page title
self.assertEqual("VIP", self.driver.title)
def test_shopping_cart_status(self):
# check content of My Shopping Cart block
# on Home page
www.it-ebooks.info
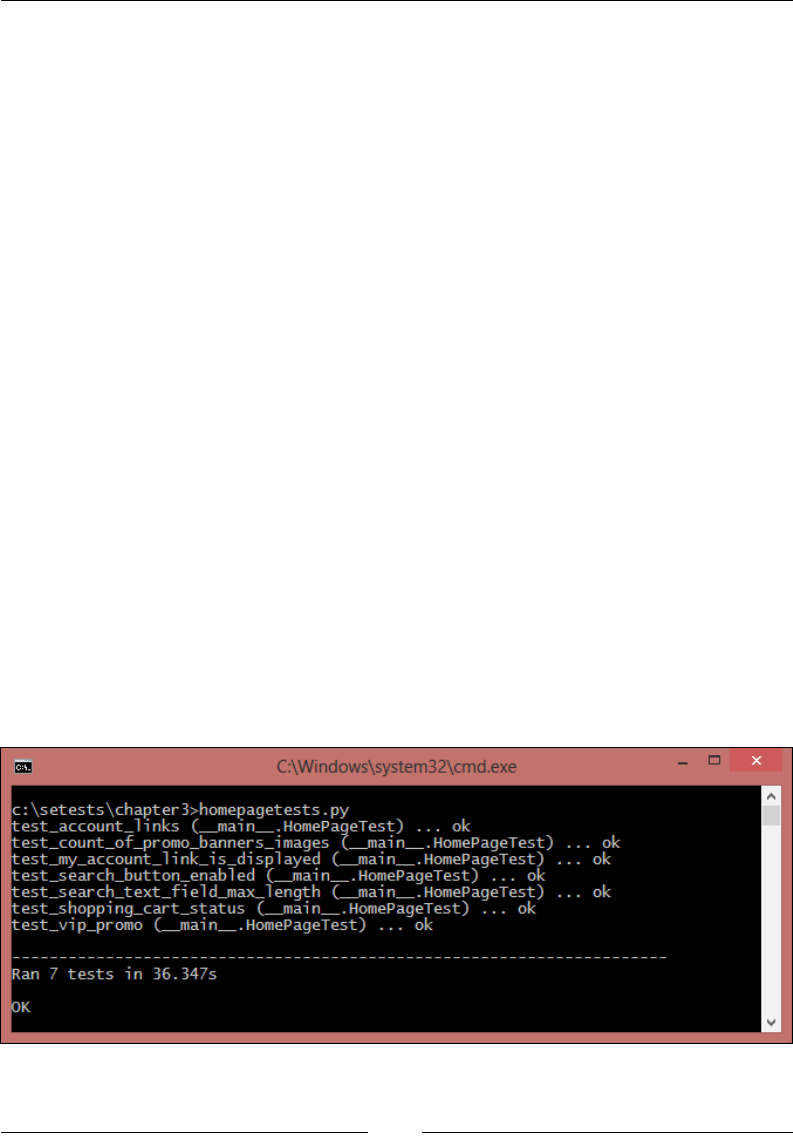
Chapter 3
[ 65 ]
# get the Shopping cart icon and click to
# open the Shopping Cart section
shopping_cart_icon = self.driver.\
find_element_by_css_selector("div.header-
minicart span.icon")
shopping_cart_icon.click()
# get the shopping cart status
shopping_cart_status = self.driver.\
find_element_by_css_selector("p.empty").text
self.assertEqual("You have no items in your shopping
cart.", shopping_cart_status)
# close the shopping cart section
close_button = self.driver.\
find_element_by_css_selector("div.minicart-
wrapper a.close")
close_button.click()
@classmethod
def tearDownClass(cls):
# close the browser window
cls.driver.quit()
if __name__ == '__main__':
unittest.main(verbosity=2)
2. Let's execute all the tests through the command line using the
following command:
python homepagetest.py
3. After running the tests, unittest shows that seven tests were run and all
passed with OK status as shown in the following screenshot:
www.it-ebooks.info

Finding Elements
[ 66 ]
Summary
In this chapter, you learned one of the most important features of Selenium for
nding elements on web pages to simulate user actions.
We looked at various find_element_by_ methods to nd an element using ID,
name, class name attributes, tags names, XPath, CSS selectors, and to nd links
using link text and partial link text.
We implemented tests using various find_element_by methods to understand
various strategies that we can use to nd elements.
This chapter will be the foundation for the coming chapters that delve into using
the Selenium API for user interactions.
In the next chapter, you will learn how to use Selenium WebDriver functions to
interact with various HTML elements and perform actions such as entering a value
in a textbox, clicking on a button, selecting drop-down options, handling JavaScript
alerts, and working with frames and windows.
www.it-ebooks.info

Using the Selenium Python
API for Element Interaction
Web applications use HTML forms to send data to a server. HTML forms contain
input elements such as text elds, checkboxes, radio buttons, submit buttons,
and more. A form can also contain select lists, text areas, eld sets, legends, and
label elements.
A typical web application requires you to ll in lots of forms, starting from
registering as a user or searching for products. Forms are enclosed in the HTML
<form> tag. This tag species the method of submitting the data, either using the
GET or POST method, and the address at which the data entered into the form should
be submitted on the server.
In this chapter, we will cover the following topics:
• Understanding more about the WebDriver and WebElement classes
• Implementing tests that interact with the application using various methods
and properties of the WebDriver and WebElement classes
• Using the Select class to automate dropdowns and lists
• Automating JavaScript alerts and browser navigation
www.it-ebooks.info

Using the Selenium Python API for Element Interaction
[ 68 ]
Elements of HTML forms
HTML forms are composed with different types of elements, including <form>,
<input>, <button>, and <label> as shown in the following diagram. Web
developers use these elements to design the web page to display data or accept data
from users. The developers write HTML code for web pages dening these elements.
However, as an end user, we see these elements as the Graphical User Interface
(GUI) controls such as textboxes, labels, buttons, checkboxes, and radio buttons.
The HTML code is hidden from the end users.
Selenium WebDriver provides broad support for automating interaction with these
elements as well as checking the functionality of the application.
Understanding the WebDriver class
The WebDriver class provides a number of properties or attributes for browser
interaction. We can use the properties and methods of the WebDriver class to interact
with the browser window, alerts, frames and pop-up windows. It also provides
features to automate browser navigation, access cookies, capture screenshots, and
so on. In this chapter, we will explore some of the most important features of the
WebDriver class. The following table covers some of the most important properties
and methods that we will be using in the rest of the book.
www.it-ebooks.info
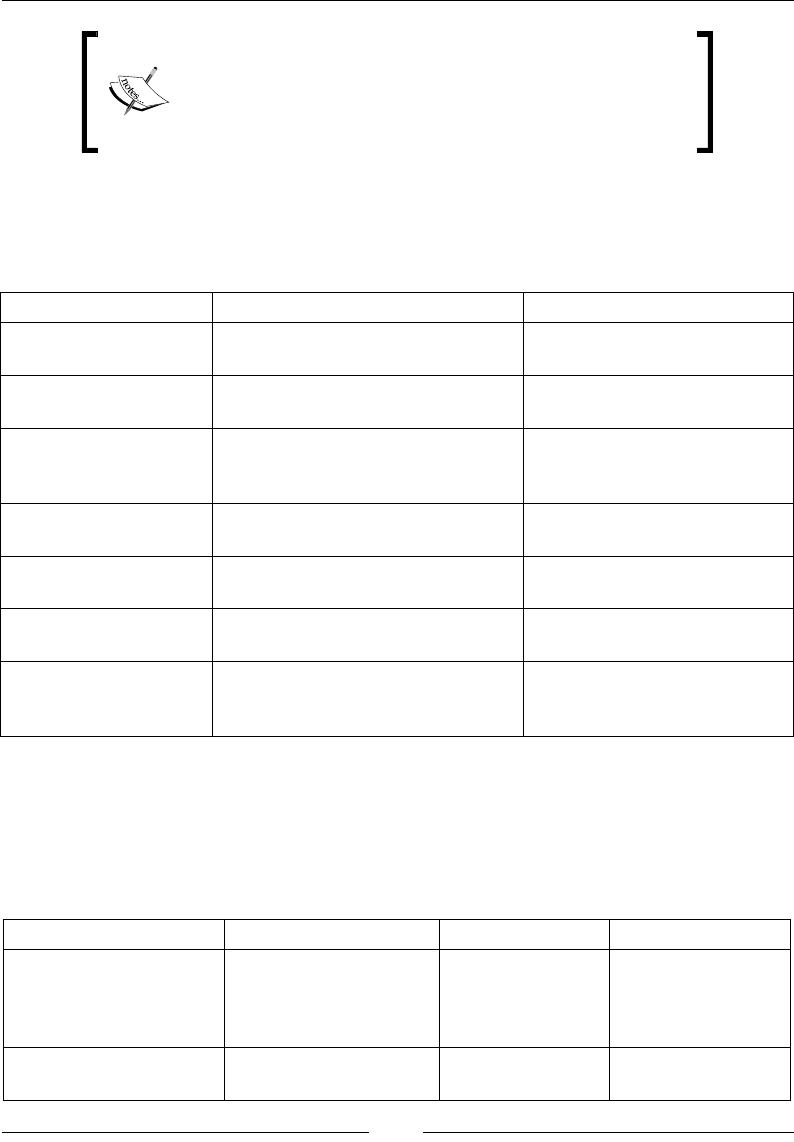
Chapter 4
[ 69 ]
For a complete list of properties and methods visit
http://selenium.googlecode.com/git/
docs/api/py/webdriver_remote/selenium.
webdriver.remote.webdriver.html#module-
selenium.webdriver.remote.webdriver.
Properties of the WebDriver class
The WebDriver class implements the following properties for accessing the browser:
Property/attribute Description Example
current_url This gets the URL of the current
page displayed in the browser
driver.current_url
current_window_
handle
This gets the handle of the current
window
driver.current_
window_handle
name This gets the name of the
underlying browser for this
instance
driver.name
orientation This gets the current orientation
of the device
driver.orientation
page_source This gets the source of the current
page
driver.page_source
title This gets the title of the current
page
driver.title
window_handles This gets the handles of all
windows within the current
session
driver.window_handles
Methods of the WebDriver class
The WebDriver class implements various methods to interact with the browser
window, web pages, and the elements on these pages. Here is a list of some
important methods:
Method Description Argument Example
back() This goes one step
backward in the
browser history in the
current session.
driver.back()
close() This closes the current
browser window.
driver.close()
www.it-ebooks.info

Using the Selenium Python API for Element Interaction
[ 70 ]
Method Description Argument Example
forward() This goes one step
forward in the
browser history in the
current session.
driver.
forward()
get(url) This navigates and
loads a web page in
the current browser
session.
url is the
address of the
website or web
page to navigate
driver.
get("http://
www.google.
com")
maximize_window() This maximizes the
current browser
window.
driver.
maximize_
window()
quit() This quits the driver
and closes all the
associated windows.
driver.quit()
refresh() This refreshes
the current page
displayed in the
browser.
driver.
refresh()
switch_to.active_
element()
This returns the
element with focus or
the body if nothing else
has focus.
driver.switch_
to_active_
element()
Switch.to_alert() This switches the
focus to an alert on the
page.
driver.switch_
to_alert()
switch_
to.default_
content()
This switches the
focus to the default
frame.
driver.switch_
to_default_
content()
switch_
to.frame(frame_
reference)
This switches the
focus to the specified
frame, by index, name,
or web element. This
method also works on
IFRAMES.
frame_
reference:
This is the name
of the window
to switch to,
an integer
representing the
index, or a web
element that is a
frame to switch
to
driver.
switch_to_
frame('frame_
name')
www.it-ebooks.info

Chapter 4
[ 71 ]
Method Description Argument Example
switch_
to.window(window_
name)
This switches focus to
the specified window.
window_name
is the name or
window handle
of the window to
switch to.
driver.
switch_to_
window('main')
implicitly_
wait(time_to_
wait)
This sets a sticky
timeout to implicitly
wait for an element
to be found, or a
command to complete.
This method only
needs to be called one
time per session. To
set the timeout for
calls to execute_
async_script,
see set_script_
timeout.
time_to_wait
is the amount
of time to wait
(in seconds).
set_page_load_
timeout(time_to_
wait)
This sets the amount
of time to wait for a
page load to complete.
time_to_wait
is the amount of
time to wait (in
seconds).
driver.set_
page_load_
timeout(30)
set_script_
timeout(time_to_
wait)
This sets the amount
of time that the script
should wait during
an execute_async_
script call before
throwing an error.
time_to_wait
is the amount of
time to wait (in
seconds).
driver.
set_script_
timeout(30)
Understanding the WebElement class
We can interact with elements on a web page using the WebElement class. We can
interact with a textbox, text area, button, radio buttons, checkbox, table, table row,
table cell, div, and so on using the WebElement class.
The WebElemet class provides a number of properties or attributes and methods
to interact with the elements. The next table covers some of the most important
properties and methods that we will be using in the rest of the book. For a complete
list of properties and methods, visit http://selenium.googlecode.com/git/
docs/api/py/webdriver_remote/selenium.webdriver.remote.webelement.
html#module-selenium.webdriver.remote.webelement.
www.it-ebooks.info

Using the Selenium Python API for Element Interaction
[ 72 ]
Properties of the WebElement class
The WebElement class implements the following properties:
Property/attribute Description Example
size This gets the size of the element element.size
tag_name This gets this element's HTML tag name element.tag_name
text This gets the text of the element element.text
Methods of the WebElement class
The WebElement class implements the following methods:
Method Description Argument Example
clear() This clears the content of
the textbox or text area
element.
element.clear()
click() This clicks the element. element.click()
get_
attribute(name)
This gets the attribute
value from the element.
name is the
name of the
attribute.
element.get_
attribute("value")
Or
element.get_
attribute
("maxlength")
is_displayed() This checks whether the
element is visible to the
user.
element.is_
displayed()
is_enabled() This checks whether the
element is enabled.
element.is_
enabled()
is_selected() This checks whether the
element is selected. This
method is used to check
the selection of a radio
button or checkbox.
element.is_
selected()
send_
keys(*value)
This simulates typing
into the element.
Value is a
string for
typing or
setting form
fields.
element.send_
keys("foo")
www.it-ebooks.info

Chapter 4
[ 73 ]
Method Description Argument Example
submit() This submits a form. If
you call this method on
an element, it will submit
the parent form.
element.submit()
value_of_css_
property
(property_name)
This gets the value of a
CSS property.
property_
name is
the name
of the CSS
property.
element.value_of_
css_property
("background-
color")
Working with forms, textboxes,
checkboxes, and radio buttons
We can use the WebElement class to automate the interaction on various HTML
controls such as entering text in a textbox, clicking on a button, selecting an option in a
checkbox or radio button, getting text and attribute values from the element, and more.
We saw the properties and methods provided by the WebElement class earlier in
the chapter. In this section, we will use the WebElement class and its properties
and methods to automate the create account feature of the sample application. So,
let's create a test that validates the creation of a new user account in the sample
application. We will ll out the form as shown in the following screenshot and
submit our request. The system should then create a new user account:
www.it-ebooks.info

Using the Selenium Python API for Element Interaction
[ 74 ]
As you can see from the preceding screenshot, we need to ll out ve textboxes and
select a checkbox for the newsletter.
1. First, create a new test class RegisterNewUser as shown in the
following code:
from selenium import webdriver
import unittest
class RegisterNewUser(unittest.TestCase):
def setUp(self):
self.driver = webdriver.Firefox
self.driver.implicitly_wait(30)
self.driver.maximize_window()
# navigate to the application home page
self.driver.get("http://demo.magentocommerce.com/")
2. Add a test, test_register_new_user(self), to the RegisterNewUser class.
3. To open the login page, we need to click on the Log In link on the home
page. The code for the Log In button is as follows:
def test_register_new_user(self):
driver = self.driver
# click on Log In link to open Login page
driver.find_element_by_link_text("Log In").click()
Checking whether the element is displayed
and enabled
The is_displayed() method returns TRUE if the element is visible on the screen
(the visible attribute is set to TRUE), otherwise it will return FALSE. Similarly, the
is_enabled() method returns TRUE if the element is enabled, that is, the user can
perform actions such as click, enter text, and so on. This method returns FALSE if
element is disabled.
The customer login page has options to log into the system as registered users or create
an account for new users. We can check whether the Create an Account button is
displayed to the user and it is enabled using the is_displayed() and is_enabled()
methods of the WebElement class. Add the steps given in the following code to the test:
# get the Create Account button
create_account_button = driver.find_element_by_xpath("//
button[@title='Create an Account']")
www.it-ebooks.info

Chapter 4
[ 75 ]
# check Create Account button is displayed and enabled
self.assertTrue(create_account_button.is_displayed() and
create_account_button.is_enabled())
We want to test the Create an Account functionality, so let's click on the Create an
Account button. This will display the Create New Customer Account page. We can
use the WebDriver class's title property to check whether the page title matches
with what we expected, as shown in the following code:
# click on Create Account button. This will display
# new account
create_account_button.click()
# check title
self.assertEquals("Create New Customer Account -
Magento Commerce Demo Store", driver.title)
On the Create New Customer Account page, locate all the elements using the
find_element_by_* methods as follows:
# get all the fields from Create an Account form
first_name = driver.find_element_by_id("firstname")
last_name = driver.find_element_by_id("lastname")
email_address = driver.find_element_by_id("email_address")
news_letter_subscription =
driver.find_element_by_id("is_subscribed")
password = driver.find_element_by_id("password")
confirm_password = driver.find_element_by_id("confirmation")
submit_button =
driver.find_element_by_xpath("//button[@title='Submit']")
Finding the element attribute value
The get_attribute() method can be used to get the attribute values dened for
an element. For example, there is a test that says the rstname and lastname textbox
should have their max length dened to 255 characters. Here is the HTML code for
the firstname textbox, where a maxlength attribute is dened and its value is 255
as shown in the following code:
<input type="text" id="firstname" name="firstname" value=""
title="First Name" maxlength="255" class="input-text
required-entry">
www.it-ebooks.info

Using the Selenium Python API for Element Interaction
[ 76 ]
We can assert the maxlength attribute using the get_attribute() method of
WebElement with the following steps:
1. We need to pass the name of the attribute as an argument to the
get_attribute() method:
# check maxlength of first name and last name textbox
self.assertEqual("255", first_name.get_
attribute("maxlength"))
self.assertEqual("255", last_name.get_
attribute("maxlength"))
2. Add the following steps to the test to make sure all the elds are displayed
and enabled for the user:
# check all fields are enabled
self.assertTrue(first_name.is_enabled() and last_name.
is_enabled()
and email_address.is_enabled() and news_letter_
subscription.is_enabled()
and password.is_enabled() and confirm_password.is_
enabled()
and submit_button.is_enabled())
Using the is_selected() method
The is_selected() method works with checkboxes and radio buttons. We can use
this method to know whether a checkbox or radio button is selected or not.
A checkbox or radio button is selected by performing a click operation using the
click() method of the WebElement class. In this example, check whether the Sign Up
for Newsletter checkbox is unselected by default, as shown in the following code:
# check Sign Up for Newsletter is unchecked
self.assertFalse(news_letter_subscription.is_selected())
Using the clear() and send_keys() methods
The clear() and send_keys() methods of the WebElement class applicable to the
textbox or textarea are useful to clear the contents of the element and send text values
as if a real user were typing on the keyboard. The send_keys() method takes the
text to be entered in the element as an argument. Let's consider the following steps:
1. Let's add the given code to ll the elds using the send_keys() method:
# fill out all the fields
first_name.send_keys("Test")
last_name.send_keys("User1")
www.it-ebooks.info

Chapter 4
[ 77 ]
news_letter_subscription.click()
email_address.send_keys("TestUser_150214_2200@example.
com")
password.send_keys("tester")
confirm_password.send_keys("tester")
2. Finally, check whether the user is created by checking the welcome
message. We can get the text from an element using the text property
of the WebElement class:
# check new user is registered
self.assertEqual("Hello, Test User1!", driver.find_
element_by_css_selector("p.hello > strong").text)
self.assertTrue(driver.find_element_by_link_text("Log
Out").is_displayed())
3. Here is a complete test for the Create An Account functionality. Run this
test and you will see all the operations on the Create An Account page:
from selenium import webdriver
from time import gmtime, strftime
import unittest
class RegisterNewUser(unittest.TestCase):
def setUp(self):
self.driver = webdriver.Firefox()
self.driver.implicitly_wait(30)
self.driver.maximize_window()
# navigate to the application home page
self.driver.get("http://demo.magentocommerce.com/")
def test_register_new_user(self):
driver = self.driver
# click on Log In link to open Login page
driver.find_element_by_link_text("ACCOUNT").click()
driver.find_element_by_link_text("My
Account").click()
# get the Create Account button
create_account_button = \
driver.find_element_by_link_text("CREATE AN
ACCOUNT")
# check Create Account button is displayed
# and enabled
www.it-ebooks.info

Using the Selenium Python API for Element Interaction
[ 78 ]
self.assertTrue(create_account_button.
is_displayed() and
create_account_button.is_enabled())
# click on Create Account button. This will
# display new account
create_account_button.click()
# check title
self.assertEquals("Create New Customer Account",
driver.title)
# get all the fields from Create an Account form
first_name = driver.find_element_by_id("firstname")
last_name = driver.find_element_by_id("lastname")
email_address =
driver.find_element_by_id("email_address")
password = driver.find_element_by_id("password")
confirm_password =
driver.find_element_by_id("confirmation")
news_letter_subscription =
driver.find_element_by_id("is_subscribed")
submit_button = driver.\
find_element_by_xpath
("//button[@title='Register']")
# check maxlength of first name and
# last name textbox
self.assertEqual("255", first_name.get_
attribute("maxlength"))
self.assertEqual("255", last_name.get_
attribute("maxlength"))
# check all fields are enabled
self.assertTrue(first_name.is_enabled()
and last_name.is_enabled()
and email_address.is_enabled() and
news_letter_subscription.is_enabled() and
password.is_enabled() and
confirm_password.is_enabled()
and submit_button.is_enabled())
# check Sign Up for Newsletter is unchecked
self.assertFalse(news_letter_subscription.
is_selected())
user_name = "user_" + strftime
("%Y%m%d%H%M%S", gmtime())
www.it-ebooks.info

Chapter 4
[ 79 ]
# fill out all the fields
first_name.send_keys("Test")
last_name.send_keys(user_name)
news_letter_subscription.click()
email_address.send_keys(user_name + "@example.com")
password.send_keys("tester")
confirm_password.send_keys("tester")
# click Submit button to submit the form
submit_button.click()
# check new user is registered
self.assertEqual("Hello, Test " + user_name + "!",
driver.find_element_by_css_selector("p.hello >
strong").text)
driver.find_element_by_link_text("ACCOUNT").click()
self.assertTrue(driver.find_element_by_link_text
("Log Out").is_displayed())
def tearDown(self):
self.driver.quit()
if __name__ == "__main__":
unittest.main(verbosity=2)
Working with dropdowns and lists
Selenium WebDriver provides a special Select class to interact with the lists and
dropdowns on a web page. For example, in the demo application, you can see a
dropdown to select the language for the store. You can choose and set a language for
the store as shown in the following screenshot:
www.it-ebooks.info

Using the Selenium Python API for Element Interaction
[ 80 ]
Dropdowns or lists are implemented with the <select> element in HTML.
The options or choices are implemented with the <options> element within
a <select> element as shown in the following HTML code:
<select id="select-language" title="Your Language"
onchange="window.location.href=this.value">
<option value="http://demo.magentocommerce.com/?
___store=default&___from_store=default"
selected="selected">English</option>
<option value="http://demo.magentocommerce.com/?
___store=french&___from_store=default">French</option>
<option value="http://demo.magentocommerce.com/?
___store=german&___from_store=default">German</option>
</select>
Each <option> element has its attribute value dened and text that the user will see.
For example, in the following code, the <option> value is set to the URL of the store
and the text is set to the language, that is, French:
<option value="http://demo.magentocommerce.com/customer/
account/create/?___store=french&
___from_store=default">French</option>
Understanding the Select class
The Select class is a special class in Selenium that is used to interact with
dropdowns or lists. It offers various methods and properties for user interaction.
The following table lists all the properties and methods from the Select class. You
can nd similar information at http://selenium.googlecode.com/git/docs/api/
py/webdriver_support/selenium.webdriver.support.select.html#module-
selenium.webdriver.support.select.
www.it-ebooks.info

Chapter 4
[ 81 ]
Properties of the Select class
The Select class implements the following properties:
Property/attribute Description Example
all_selected_options This gets a list of all the
selected options belonging
to the dropdown or list
select_element.all_
selected_options
first_selected_
option
This gets the first selected
/ currently selected option
from the dropdown or list
select_element.first_
selected_option
options This gets a list of all options
from the dropdown or list
select_element.options
Methods of the Select class
The Select class implements the following methods:
Method Description Argument Example
deselect_all() This clears all the
selected entries from a
multiselect dropdown
or list
select_element.
deselect_all()
deselect_by_
index(index)
This deselects the
option at the given
index from the
dropdown or list
index is the
index of the
option to be
deselected
select_element.
deselect_by_
index(1)
deselect_by_
value(value)
This deselects all
options that have a
value matching the
argument from the
dropdown or list
value is
the value
attribute of
the option to
be deselected
select_element.
deselect_by_
value("foo")
deselect_
by_visible_
text(text)
This deselects all the
options that display text
matching the argument
from the dropdown or
list
text is the
text value of
the option to
be deselected
select_element.
deselect_
by_visible_
text("bar")
select_by_
index(index)
This selects an option
at the given index from
the dropdown or list
index is the
index of the
option to be
selected
select_element.
select_by_
index(1)
www.it-ebooks.info

Using the Selenium Python API for Element Interaction
[ 82 ]
Method Description Argument Example
select_by_
value(value)
This selects all the
options that have a
value matching the
argument from the
dropdown or list
value is
the value
attribute of
the option to
be selected
select_element.
select_by_
value("foo")
select_by_
visible_
text(text)
This selects all the
options that display
the text matching the
argument from the
dropdown or list
text is the
text value of
the option to
be selected
select_element.
select_by_visible_
text("bar")
Let's explore these properties and methods to test the language features of the
demo application. We will add a new test to the home page test that we built in the
previous chapters. This test checks whether the user has eight languages to select
from. We will use the options property to rst check the number of options and
then get the text of each option in a list and check that list with an expected option
list, as shown in the following code:
def test_language_options(self):
# list of expected values in Language dropdown
exp_options = ["ENGLISH", "FRENCH", "GERMAN"]
# empty list for capturing actual options displayed
# in the dropdown
act_options = []
# get the Your language dropdown as instance of Select class
select_language = \
Select(self.driver.find_element_by_id("select-language"))
# check number of options in dropdown
self.assertEqual(2, len(select_language.options))
# get options in a list
for option in select_language.options:
act_options.append(option.text)
# check expected options list with actual options list
self.assertListEqual(exp_options, act_options)
# check default selected option is English
www.it-ebooks.info

Chapter 4
[ 83 ]
self.assertEqual("ENGLISH", select_language.first_selected_option.
text)
# select an option using select_by_visible text
select_language.select_by_visible_text("German")
# check store is now German
self.assertTrue("store=german" in self.driver.current_url)
# changing language will refresh the page,
# we need to get find language dropdown once again
select_language = \
Select(self.driver.find_element_by_id("select-language"))
select_language.select_by_index(0)
The options property returns all the <option> elements dened for a dropdown or
list. Each item in the options list is an instance of the WebElement class.
We can also check the default/current selected option using the first_selected_
option property.
The all_selected_options property is used to test
multiselect dropdowns or lists.
Finally, select an item and check whether the store URL is changed based on the
language selection using the following code:
# select an option using select_by_visible text
select_language.select_by_visible_text("German")
# check store is now German
self.assertTrue("store=german" in self.driver.current_url)
Option(s) can be selected by their index (that is, their position in the list), by the value
attribute or by the visible text. The Select class offers various select_ methods to
select the options. In this example, we used the select_by_visible_text() method
to select an option. We can also deselect options using various deselect_ methods.
www.it-ebooks.info

Using the Selenium Python API for Element Interaction
[ 84 ]
Working with alerts and pop-up windows
Developers use JavaScript alerts or model dialogs to inform users about validation
errors, warnings, to give a response for an action, accept an input value, and more.
In this section, we will see how to handle alerts and pop-up windows with Selenium.
Understanding the Alert class
Selenium WebDriver provides the Alert class to handle JavaScript alerts. The
Alert class contains methods for accepting, dismissing, inputting, and getting
text from alerts.
Properties of the Alert class
The Alert class implements the following property:
Property/attribute Description Example
text This gets text from the alert window alert.text
Methods of the Alert class
The Alert class implements the following methods:
Method Description Argument Example
accept() This will accept the
JavaScript alert box that is
click on the OK button
alert.accept()
dismiss() This will dismiss the
JavaScript alert box that is
click on the Cancel button
alert.
dismiss()
send_
keys(*value)
This simulates typing into
the element
value is a string
for typing or
setting form fields
alert.send_
keys("foo")
www.it-ebooks.info
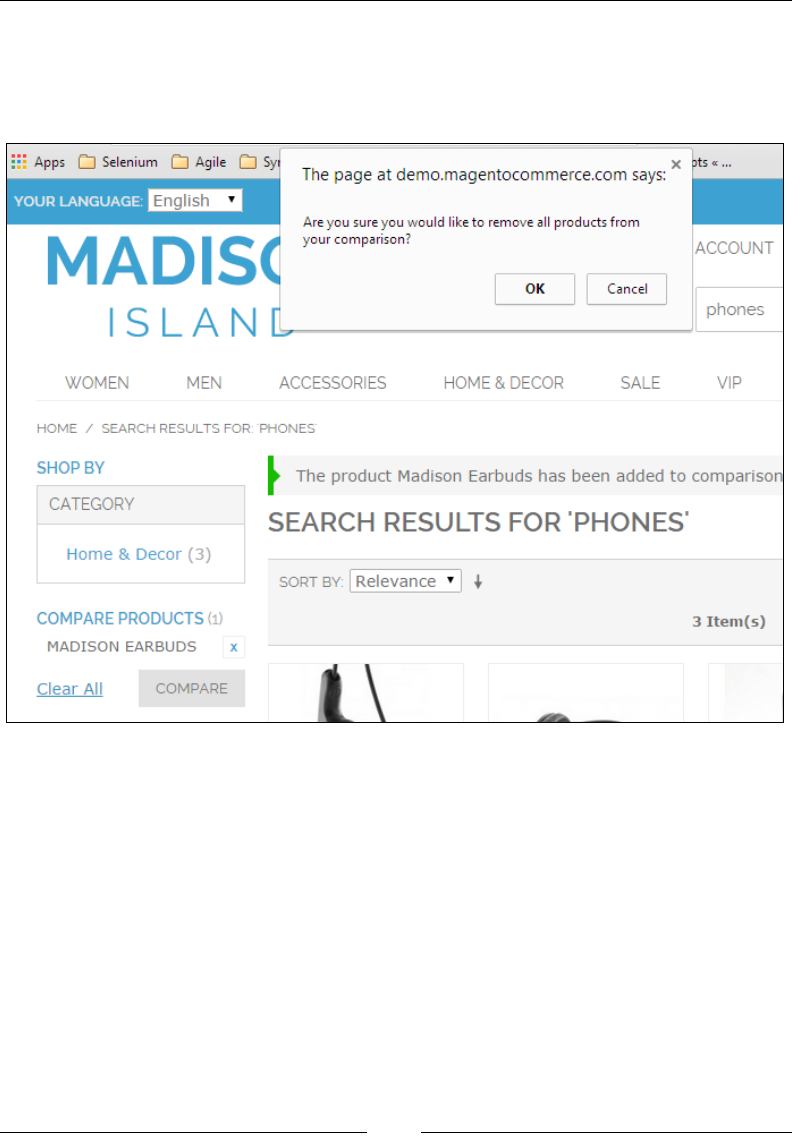
Chapter 4
[ 85 ]
In the demo application, you can nd the use of alerts to inform or warn the user.
For example, when you add products for comparison and then remove one of the
products or all the products from the comparison, the application shows you an alert
similar to the one shown in following screenshot:
We will implement a test that checks whether the Clear All option in the COMPARE
PRODUCTS feature displays an alert window to the users asking whether they are
sure about the removal of products from the comparison.
Create a new test class, CompareProducts, and add steps to search and add a
product to compare as shown in the following code snippet:
from selenium import webdriver
import unittest
class CompareProducts(unittest.TestCase):
def setUp(self):
self.driver = webdriver.Firefox()
www.it-ebooks.info

Using the Selenium Python API for Element Interaction
[ 86 ]
self.driver.implicitly_wait(30)
self.driver.maximize_window()
self.driver.get("http://demo.magentocommerce.com/")
def test_compare_products_removal_alert(self):
# get the search textbox
search_field = self.driver.find_element_by_name("q")
search_field.clear()
# enter search keyword and submit
search_field.send_keys("phones")
search_field.submit()
# click the Add to compare link
self.driver.\
find_element_by_link_text("Add to Compare").click()
Once a product is added for comparison by clicking on the Add to Compare link, you
will see the product added to the COMPARE PRODUCTS section. You can also add
another product for comparison. If you want to remove all products from comparison,
you can do so by clicking on the Clear All link from the COMPARE PRODUCTS
section. You will get an alert asking you whether you want to clear all the products.
We can handle this alert using the Alert class. The switch_to_alert() method of
the WebDriver class returns the instance of Alert. We can use this instance to read
the message displayed on the alert and accept that alert, by clicking on the OK button
or dismissing the alert, by clicking on the Cancel button. Add the following code to
the test. This part reads and checks the alert message and then accepts the alert by
calling the accept() method:
# click on Remove this item link, this will display
# an alert to the user
self.driver.find_element_by_link_text("Clear All").click()
# switch to the alert
alert = self.driver.switch_to_alert()
# get the text from alert
alert_text = alert.text
# check alert text
self.assertEqual("Are you sure you would like to
remove all products from your comparison?", alert_text)
# click on Ok button
alert.accept()
www.it-ebooks.info

Chapter 4
[ 87 ]
def tearDown(self):
self.driver.quit()
if __name__ == "__main__":
unittest.main()
Automating browser navigation
Browsers provide various navigation methods to access the web pages from the
browser history or by refreshing the current page and so on with the back, forward,
refresh/reload buttons on the browser window's toolbar. The Selenium WebDriver
API provides access to these buttons with various navigation methods. We can
test the behavior of the application when these methods are used. The WebDriver
class provides the following methods to perform browser navigation such as back,
forward, and refresh:
Method Description Argument Example
back() This goes one step backward in
the browser history of the current
session
None driver.back()
forward() This goes one step forward in the
browser history of the current
session
None driver.forward()
refresh() This refreshes the current page
displayed in the browser
None driver.refresh()
Here is an example that uses the browser navigation API to navigate the history
and validate the state of the application:
import unittest
from selenium import webdriver
from selenium.webdriver.support.ui import WebDriverWait
from selenium.webdriver.support import expected_conditions
class NavigationTest(unittest.TestCase):
def setUp(self):
# create a new Firefox session
self.driver = webdriver.Chrome()
self.driver.implicitly_wait(30)
self.driver.maximize_window()
www.it-ebooks.info

Using the Selenium Python API for Element Interaction
[ 88 ]
# navigate to the application home page
self.driver.get("http://www.google.com")
def testBrowserNavigation(self):
driver = self.driver
# get the search textbox
search_field = driver.find_element_by_name("q")
search_field.clear()
# enter search keyword and submit
search_field.send_keys("selenium webdriver")
search_field.submit()
se_wd_link = driver.find_element_by_link_text
("Selenium WebDriver")
se_wd_link.click()
self.assertEqual("Selenium WebDriver", driver.title)
driver.back()
self.assertTrue(WebDriverWait(self.driver, 10)
.until(expected_conditions.title_is
("selenium webdriver - Google Search")))
driver.forward()
self.assertTrue(WebDriverWait(self.driver, 10)
.until(expected_conditions.title_is
("Selenium WebDriver")))
driver.refresh()
self.assertTrue(WebDriverWait(self.driver, 10)
.until(expected_conditions.title_is
("Selenium WebDriver")))
def tearDown(self):
# close the browser window
self.driver.quit()
if __name__ == '__main__':
unittest.main()
www.it-ebooks.info

Chapter 4
[ 89 ]
Summary
In this chapter, you were introduced to the Selenium WebDriver API for interacting
with various elements on a page. The Selenium WebDriver API offers various classes,
properties, and methods to simulate the user actions and check the application states.
We looked at various methods to automate elements such as textboxes, buttons,
checkboxes, and dropdowns.
We created some tests that deal with alerts. We also looked at using browser
navigation method and tested the navigation between pages.
In the next chapter, we will explore the Selenium API to handle synchronizing tests.
This will help us in building reliable tests with Selenium.
www.it-ebooks.info

Synchronizing Tests
Building robust and reliable tests is one of the critical success factors of automated
UI testing. However, you will come across situations where testing conditions differ
from one test to another. When your script searches for elements or a certain state of
application and it cannot nd these elements anymore because the application starts
responding slowly due to sudden resource constraints or network latency, the tests
report false negative results. We need to match the speed of the test script with the
application's speed by introducing delays in the test script. In other words, we need
to sync the script with the application's response. WebDriver offers implicit and
explicit waits to synchronize tests.
In this chapter, you will learn about the following topics:
• Using implicit and explicit wait
• When to use implicit and explicit wait
• Using expected conditions
• Creating a custom wait condition
Using implicit wait
The implicit wait offers a generic way to synchronize the entire test or group of
steps in WebDriver. Implicit wait is useful in dealing with situations where the
application's response time is inconsistent due to network speed or applications
that use dynamically rendered elements with Ajax calls.
When we set an implicit wait on WebDriver, it polls or searches the DOM for a
certain amount of time to nd an element or elements if they are not immediately
available. By default, the implicit wait timeout is set to 0.
www.it-ebooks.info

Synchronizing Tests
[ 92 ]
Once set, the implicit wait is set for the life of the WebDriver instance or for the
entire duration of the test, and the WebDriver applies this implicit wait for all the
steps that nd the elements on the page unless we set it back to 0.
The webdriver class provides the implicitly_wait() method to congure
timeout. We created a SearchProductTest test in Chapter 2, Writing Tests Using
unittest. We will modify this test and add an implicit wait with timeout of 10
seconds in the setUp() method as shown in following code example. When the test
is executed, WebDriver will wait for up to 10 seconds if it doesn't nd an element.
When it reaches the timeout, that is, 10 seconds in this example, it will throw a
NoSuchElementException.
import unittest
from selenium import webdriver
class SearchProductTest(unittest.TestCase):
def setUp(self):
# create a new Firefox session
self.driver = webdriver.Firefox()
self.driver.implicitly_wait(30)
self.driver.maximize_window()
# navigate to the application home page
self.driver.get("http://demo.magentocommerce.com/")
def test_search_by_category(self):
# get the search textbox
self.search_field = self.driver.find_element_by_name("q")
self.search_field.clear()
# enter search keyword and submit
self.search_field.send_keys("phones")
self.search_field.submit()
# get all the anchor elements which have product names
# displayed currently on result page using
# find_elements_by_xpath method
products = self.driver\
.find_elements_by_xpath
("//h2[@class='product-name']/a")
# check count of products shown in results
self.assertEqual(2, len(products))
www.it-ebooks.info

Chapter 5
[ 93 ]
def tearDown(self):
# close the browser window
self.driver.quit()
if __name__ == '__main__':
unittest.main(verbosity=2)
It is better to avoid using an implicit wait in tests and try to
handle synchronization issues with an explicit wait, which
provides more control when compared to an implicit wait.
Using explicit wait
The explicit wait is another wait mechanism available in WebDriver to synchronize
tests. Explicit wait provides a better control when compared to implicit wait. Unlike
an implicit wait, we can use a set of predened or custom conditions for the script to
wait for before proceeding with further steps.
An explicit wait can only be implemented in specic cases where script
synchronization is needed. WebDriver provides the WebDriverWait and
expected_conditions classes to implement an explicit wait.
The expected_conditions class provides a set of predened conditions to wait for
before proceeding further in the code.
Let's create a simple test that uses explicit wait with an expected condition for
visibility of an element, as shown in the following code:
from selenium import webdriver
from selenium.webdriver.common.by import By
from selenium.webdriver.support.ui import WebDriverWait
from selenium.webdriver.support import expected_conditions
import unittest
class ExplicitWaitTests(unittest.TestCase):
def setUp(self):
self.driver = webdriver.Firefox()
self.driver.get("http://demo.magentocommerce.com/")
def test_account_link(self):
WebDriverWait(self.driver, 10)\
.until(lambda s: s.find_element_by_id("select-
language").get_attribute("length") == "3")
www.it-ebooks.info

Synchronizing Tests
[ 94 ]
account = WebDriverWait(self.driver, 10)\
.until(expected_conditions.
visibility_of_element_located
((By.LINK_TEXT, "ACCOUNT")))
account.click()
def tearDown(self):
self.driver.quit()
if __name__ == "__main__":
unittest.main(verbosity=2)
In this test, explicit wait is used to wait until the Log In link is visible in the DOM,
using the expected visibility_of_element_located condition. This condition
requires the locator strategy and locator details for the element we want to wait
for. The script will wait for a maximum of 10 seconds looking for the element to be
visible. Once the element is visible with the specied locator, the expected condition
will return the located element back to the script.
If an element is not visible with the specied locator in the given timeout,
a TimeoutException will be raised.
The expected condition class
The following table shows some common conditions along with examples that
we frequently come across when automating web browsers supported by the
expected_conditions class:
Expected condition Description Argument Example
element_to_be_
clickable
(locator)
This will wait for an
element to be located
and be visible and
enabled so that it can
be clicked.
This method returns
the element that
is located back to
the test.
locator:
This is a
tuple of (by,
locator).
WebDriverWait(self.
driver, 10).
until(expected_
conditions.element_
to_be_clickable((By.
NAME,"is_subscribed")))
www.it-ebooks.info

Chapter 5
[ 95 ]
Expected condition Description Argument Example
element_to_be_
selected
(element)
This will wait until a
specified element is
selected.
element:
This is the
WebElement.
subscription = self.
driver.find_element_by_
name("is_subscribed")
WebDriverWait(self.
driver, 10).
until(expected_
conditions.
element_to_be_
selected(subscription))
invisibility_
of_
element_
located
(locator)
This will wait for an
element that is either
invisible or is not
present on the DOM.
locator:
This is a
tuple of (by,
locator).
WebDriverWait(self.
driver, 10).
until(expected_
conditions.
invisibility_of_
element_located((By.
ID,"loading_banner")))
presence_of_
all_elements_
located
(locator)
This will wait until at
least one element for
the matching locator
is present on the web
page.
This method
returns the list of
WebElements once
they are located.
locator:
This is a
tuple of (by,
locator).
WebDriverWait(self.
driver, 10).
until(expected_
conditions.presence_
of_all_elements_
located((By.CLASS_
NAME,"input-text")))
presence_
of_element_
located
(locator)
This will wait until
an element for the
matching locator is
present on a web
page or available on
the DOM.
This method returns
an element once it is
located.
locator:
This is a
tuple of (by,
locator).
WebDriverWait(self.
driver, 10).
until(expected_
conditions.presence_of_
element_located((By.
ID,"search")))
text_to_be_
present_in_
element
(locator,
text_)
This will wait until
an element is located
and has the given
text.
locator:
This is a
tuple of (by,
locator).
text: This is
the text to be
checked.
WebDriverWait(self.
driver,10).
until(expected_
conditions.text_
to_be_present_in_
element((By.ID,"select-
language"),"English"))
www.it-ebooks.info

Synchronizing Tests
[ 96 ]
Expected condition Description Argument Example
title_
contains
(title)
This will wait for the
page tile to contain
a case-sensitive
substring.
This method returns
true if the tile
matches, false
otherwise.
title: This is
the substring
of the title to
check.
WebDriverWait(self.
driver, 10).
until(expected_
conditions.title_
contains("Create New
Customer Account"))
title_is
(title)
This will wait for the
page tile to be equal
to the expected title.
This method returns
true if the tile
matches, false
otherwise.
title: This is
the title of the
page.
WebDriverWait(self.
driver, 10).
until(expected_
conditions.title_
is("Create New Customer
Account - Magento
Commerce Demo Store"))
visibility_
of(element)
This will wait until an
element is present in
DOM, is visible, and
its width and height
are greater than zero.
This method
returns the (same)
WebElement once it
becomes visible.
element:
This is the
WebElement.
first_name = self.
driver.find_element_by_
id("firstname")
WebDriverWait(self.
driver, 10).
until(expected_
conditions.visibility_
of(first_name))
visibility_
of_element_
located
(locator)
This will wait until an
element to be located
is present in DOM, is
visible, and its width
and height are greater
than zero.
This method returns
the WebElement once
it becomes visible.
locator:
This is a
tuple of (by,
locator).
WebDriverWait(self.
driver, 10).
until(expected_
conditions.visibility_
of_element_located((By.
ID,"firstname")))
You can nd a complete list of expected conditions at http://selenium.
googlecode.com/git/docs/api/py/webdriver_support/selenium.webdriver.
support.expected_conditions.html#module-selenium.webdriver.support.
expected_conditions.
Let's explore few more examples of expected conditions in the upcoming sections.
www.it-ebooks.info

Chapter 5
[ 97 ]
Waiting for an element to be enabled
As we have seen earlier, the expected_conditons class provides a variety of wait
conditions that we can implement in our scripts. In the following example, we will
wait for an element to be enabled or made clickable. We can use this condition in
Ajax-heavy applications where form elds are enabled or disabled based on other
form eld values or lters. In this example, we click on the Log In link and then wait
for the Create an Account button to become clickable, which is displayed on the
login page. We will then click on the Create an Account button and wait for the next
page to be displayed.
def test_create_new_customer(self):
# click on Log In link to open Login page
self.driver.find_element_by_link_text("ACCOUNT").click()
# wait for My Account link in Menu
my_account = WebDriverWait(self.driver, 10)\
.until(expected_conditions.visibility_of_element_located((By.
LINK_TEXT, "My Account")))
my_account.click()
# get the Create Account button
create_account_button = WebDriverWait(self.driver, 10)\
.until(expected_conditions.element_to_be_clickable((By.LINK_
TEXT, "CREATE AN ACCOUNT")))
# click on Create Account button. This will displayed new account
create_account_button.click()
WebDriverWait(self.driver, 10)\
.until(expected_conditions.title_contains("Create New Customer
Account"))
We can wait and check for an element to be enabled by using the element_to_be_
clickable condition. This requires the locator strategy and locator value. It returns
the located element back to the script when that element becomes clickable or, in
other words, enabled.
The preceding tests also wait for the creating new customer account page to be loaded
by checking the title with the specied text. We used the title_contains condition
that checks to make sure that the substring matches with the title of the page.
www.it-ebooks.info

Synchronizing Tests
[ 98 ]
Waiting for alerts
We can also use explicit wait on alerts and frames. A complex JavaScript processing
or backend request might take time to display the alert to the user. This can be
handled by the expected alert_is_present condition in the following way:
from selenium import webdriver
from selenium.webdriver.support.ui import WebDriverWait
from selenium.webdriver.common.by import By
from selenium.webdriver.support import expected_conditions
import unittest
class CompareProducts(unittest.TestCase):
def setUp(self):
self.driver = webdriver.Firefox()
self.driver.get("http://demo.magentocommerce.com/")
def test_compare_products_removal_alert(self):
# get the search textbox
search_field = self.driver.find_element_by_name("q")
search_field.clear()
# enter search keyword and submit
search_field.send_keys("phones")
search_field.submit()
# click the Add to compare link
self.driver.\
find_element_by_link_text("Add to Compare").click()
# wait for Clear All link to be visible
clear_all_link = WebDriverWait(self.driver, 10)\
.until(expected_conditions.visibility_of_element_
located((By.LINK_TEXT, "Clear All")))
# click on Clear All link,
# this will display an alert to the user
clear_all_link.click()
# wait for the alert to present
alert = WebDriverWait(self.driver, 10)\
.until(expected_conditions.alert_is_present())
# get the text from alert
alert_text = alert.text
www.it-ebooks.info

Chapter 5
[ 99 ]
# check alert text
self.assertEqual("Are you sure you would like
to remove all products from your comparison?", alert_text)
# click on Ok button
alert.accept()
def tearDown(self):
self.driver.quit()
if __name__ == "__main__":
unittest.main(verbosity=2)
The preceding test validates the removal of products from the product comparison
feature of the application. Users are sent a conrmation alert when they remove a
product from the comparison. The alert_is_present condition is used to check if
the alert is displayed to the user and returned back to the script for the upcoming
actions. The script will wait for 10 seconds checking for the presence of the alert,
otherwise it will raise an exception.
Implementing custom wait conditions
As we have seen earlier, the expected_conditions class provides various
predened conditions to wait. We can also build custom conditions with
WebDriverWait. This becomes useful when there is no suitable expected
condition available for which to wait.
Let's modify one of the tests we created earlier in this chapter and implement a
custom wait condition to check the number of the drop-down items:
def testLoginLink(self):
WebDriverWait(self.driver, 10).until
(lambda s: s.find_element_by_id
("select-language").get_attribute("length") == "3")
login_link = WebDriverWait
(self.driver, 10).until(expected_conditions.
visibility_of_element_located((By.LINK_TEXT,"Log In")))
login_link.click();
We can implement custom wait conditions with WebDriverWait using the Python
lambda expressions. In this example, the script will wait for 10 seconds until the
Select Language dropdown has eight options for selection. This condition is useful
when the dropdowns are populated by Ajax calls and the script needs to wait until
all the options are available to the user for selection.
www.it-ebooks.info

Synchronizing Tests
[ 100 ]
Summary
In this chapter, we recognized the need for synchronization and its importance in
building highly reliable tests. We looked at the implicit wait and how to use implicit
wait as a generic wait mechanism with an example. We then looked at the explicit
wait that offers a more exible way to synchronize tests. The expected_conditions
class offers various built-in conditions for the wait. We have implemented some of
these conditions.
The WebDriverWait class also provides a very powerful way to implement custom
wait conditions over and above expected_conditions. We implemented a custom
wait condition on a dropdown.
In the next chapter, you will learn how to implement cross-browser testing using
RemoteWebDriver and Selenium Server for running tests on a remote machine and
parallel execution with Selenium Grid.
www.it-ebooks.info
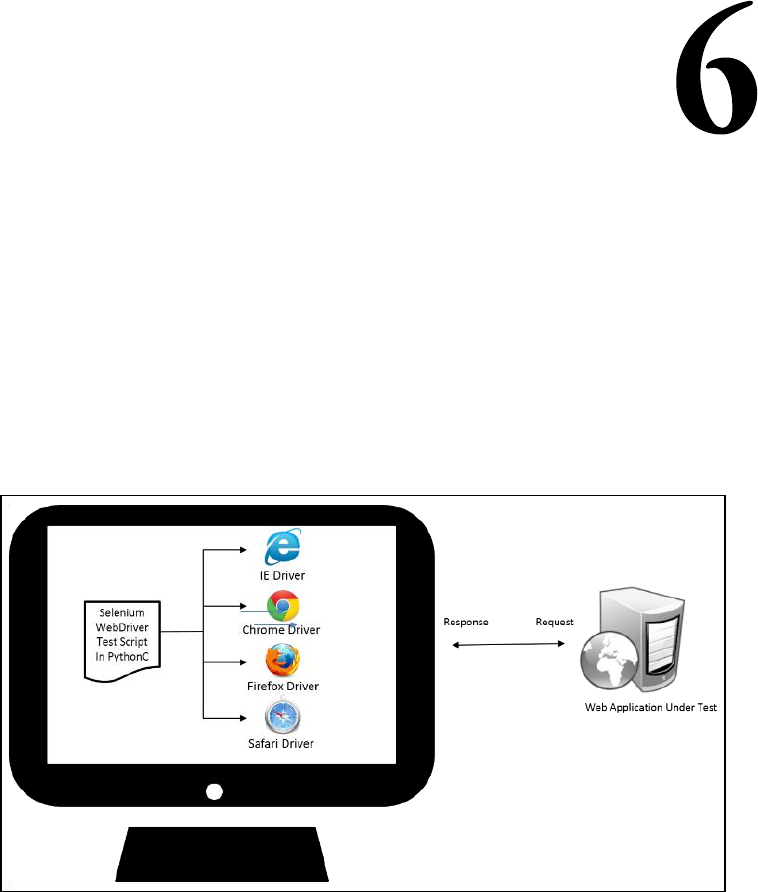
Cross-browser Testing
Selenium supports cross-browser testing on multiple browser and operating system
combinations. This is a very useful feature for testing web applications on various
browser and operating system combinations to certify that the app is cross-browser
compatible and to make sure that users do not experience problems with their choice
of browsers or operating systems. Selenium WebDriver offers an ability to run tests
on remote machines or distribute them against a number of operating systems and
browsers running on remote machines or the cloud. So far, you have learned how
to create and run tests on a local machine with various browser drivers installed as
shown in the following diagram:
www.it-ebooks.info

Cross-browser Testing
[ 102 ]
In this chapter, you will learn how to run these tests on a remote machine and then
how to scale and run tests in a distributed architecture on multiple browser and
operating system combinations for cross-browser testing. This saves a great amount
of effort and time spent in cross-browser testing. We will cover the following aspects
in this chapter:
• Downloading and using the Selenium standalone server
• How to use the Remote class to run tests on the Selenium standalone server
• Running tests on the Selenium standalone server
• Adding nodes to the Selenium standalone server to create a grid for
distributed execution
• Running tests in the grid against multiple browser and operating system
combinations
• Running tests in a cloud with Sauce Labs and BrowserStack
The Selenium standalone server
The Selenium standalone server is a component of Selenium that provides the
ability to run tests on remote machines. We need to use the RemoteWebDriver class
to connect to the Selenium standalone server to run tests on a remote machine. The
RemoteWebDriver class listens to Selenium commands coming from test scripts
using the RemoteWebDriver class on a designated port. Based on the conguration
provided by the RemoteWebDriver class, the Selenium server will launch the
specied browser and forward the commands to the browser. It supports almost all
the browsers and mobile platforms with Appium. The following diagram shows the
architecture of the Selenium server running tests on remote machines congured
with different types of browsers:
www.it-ebooks.info
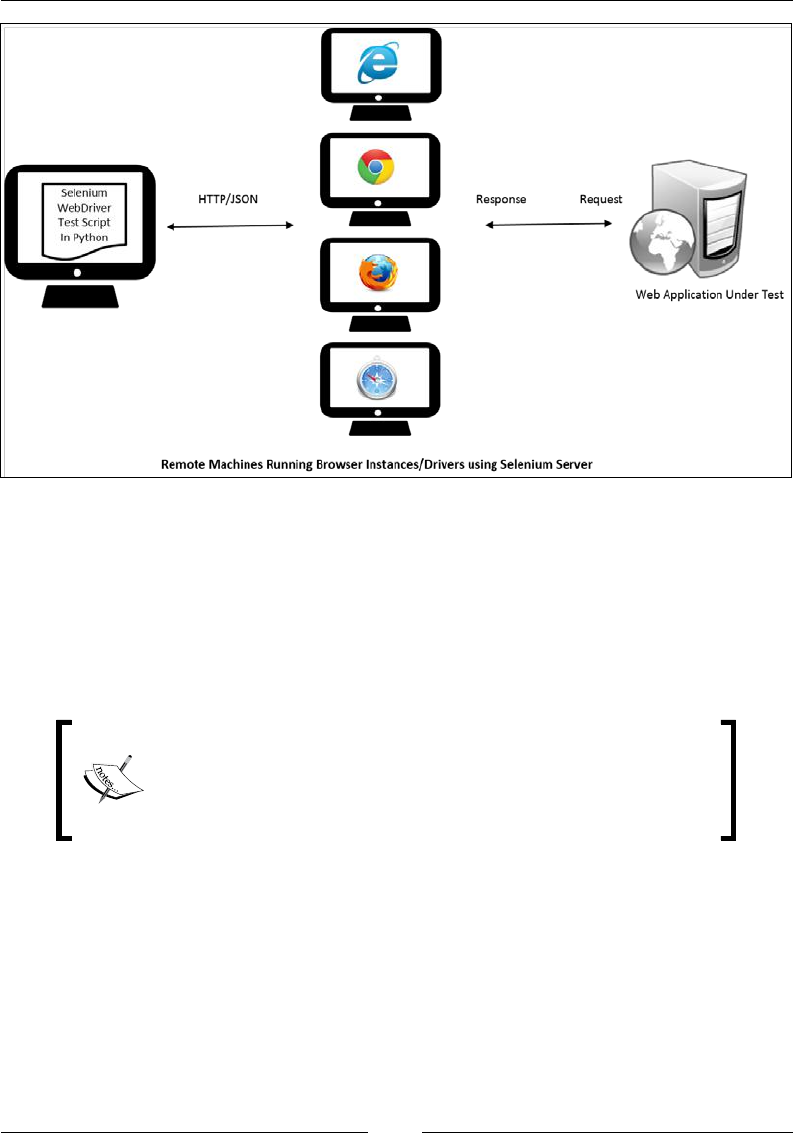
Chapter 6
[ 103 ]
Downloading the Selenium standalone server
The Selenium standalone server is available in a bundled JAR format for download
at http://docs.seleniumhq.org/download/ in the Selenium Server (formerly the
Selenium RC Server) section. While writing this book, Selenium server Version 2.41.0
was available for download. You can simply copy the Selenium standalone server
JAR le on a remote machine and start the server.
The Selenium standalone server is a self-contained server
written in Java. It requires a Java Runtime Environment (JRE)
to be installed on the machine where it is run. Please make sure
you have installed JRE 6 or onwards on the remote machine
where you intend to run the Selenium standalone server.
Launching the Selenium standalone server
The Selenium standalone server can be launched in various modes or roles. In this
section, we will launch it in a standalone mode. We can launch the server with the
following command on the remote machine's command line from the directory
where the server's JAR le is kept. In this example, it is launched on a Windows 8
machine by using the following command line:
java –jar selenium-server-standalone-2.41.0.jar
www.it-ebooks.info
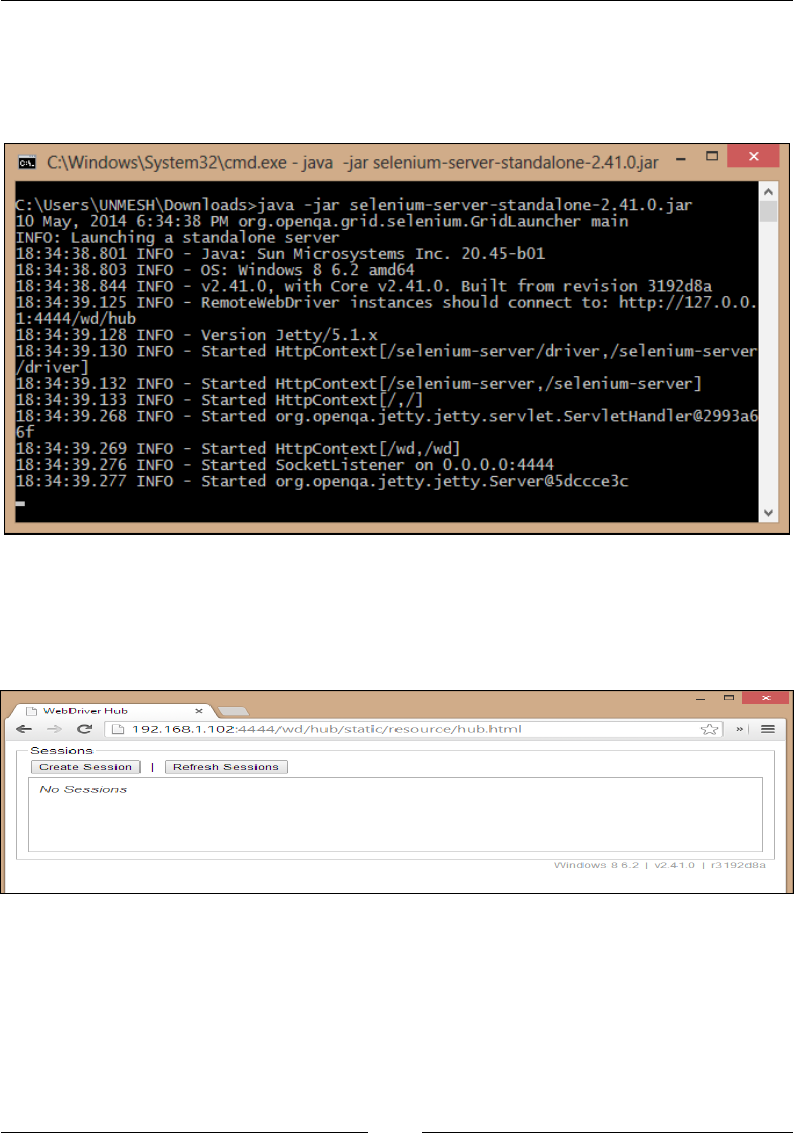
Cross-browser Testing
[ 104 ]
By default, Selenium server will start listening on port 4444 at http://<remote-
machine-ip>:4444. It is possible to change the port through the command-line
option while starting the server. When the server is launched, you will see the
following output on the command line:
The Selenium server will be launched as an HTTP server on the remote machine and
we can launch and see the server in a browser window. Launch the browser and
navigate to http://<remote-machine-ip>:4444/wd/hub/static/resource/hub.
html. This will display the following page in the browser window:
Now that we have the Selenium server up and running, it is time to create and run a
test that we can run on the server.
www.it-ebooks.info

Chapter 6
[ 105 ]
Running a test on the Selenium
standalone server
To run a test on Selenium server, we need to use RemoteWebDriver. The Remote
class in the Selenium Python binding acts like a client and communicates with the
Selenium server to run the tests on a remote machine. We need to use this class to
instruct the Selenium server as to what congurations are needed to run a test on
a remote machine and commands to run on selected browsers.
In addition to the Remote class, we need to set desired_capabilities, that is the
browser, operating system, and any other conguration that we want to communicate
to the Selenium standalone server to run the test. In this example, we will specify a
platform and browser name as the desired capabilities required to run the test:
desired_caps = {}
desired_caps['platform'] = 'WINDOWS'
desired_caps['browserName'] = 'firefox'
Next, we will create an instance of the Remote class and pass desired_capabilities.
When the script is executed, it will connect to the Selenium server and request the
server to set up a Firefox browser running on Windows to run the test:
self.driver = webdriver.Remote('http://192.168.1.103:4444/wd/hub',
desired_caps)
Let's implement a search test that we created earlier and use the Remote class instead
of the Firefox driver in the following way:
import unittest
from selenium import webdriver
class SearchProducts(unittest.TestCase):
def setUp(self):
desired_caps = {}
desired_caps['platform'] = 'WINDOWS'
desired_caps['browserName'] = 'firefox'
self.driver = \
webdriver.Remote('http://192.168.1.102:4444/wd/hub',
desired_caps)
self.driver.get('http://demo.magentocommerce.com/')
self.driver.implicitly_wait(30)
self.driver.maximize_window()
www.it-ebooks.info
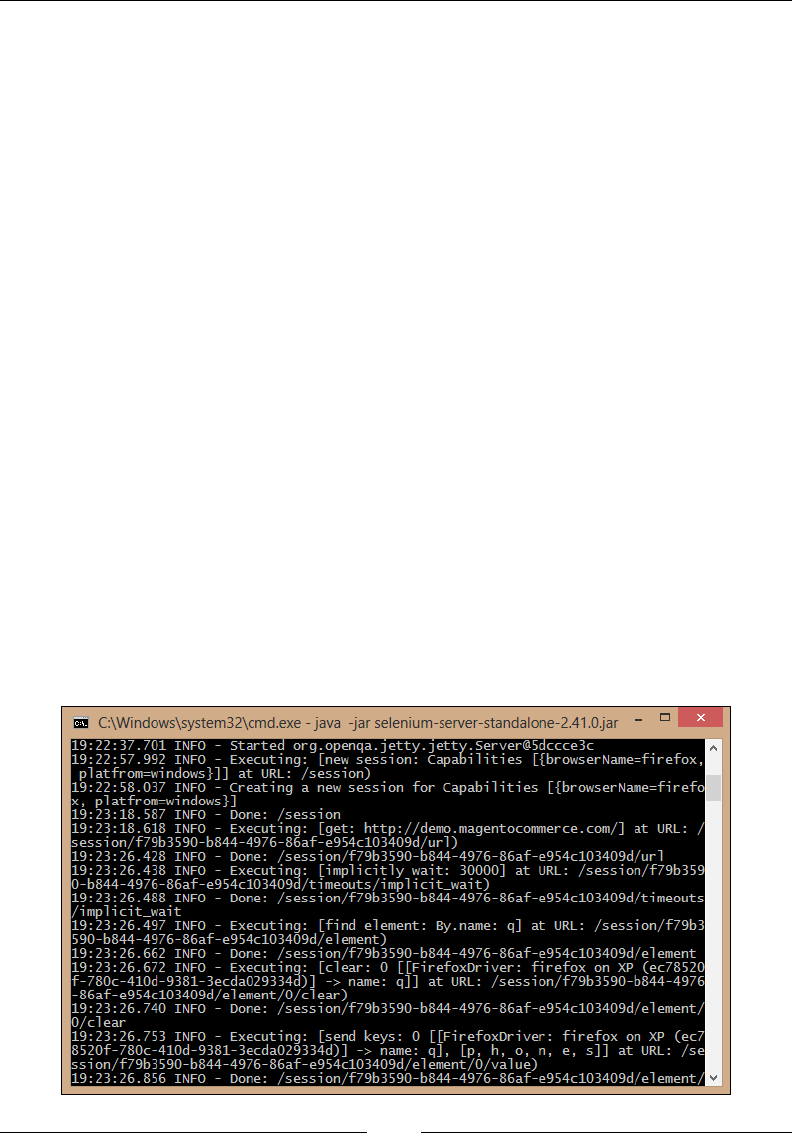
Cross-browser Testing
[ 106 ]
def testSearchByCategory(self):
# get the search textbox
self.search_field = self.driver.find_element_by_name('q')
self.search_field.clear()
# enter search keyword and submit
self.search_field.send_keys('phones')
self.search_field.submit()
# get all the anchor elements which have product names
# displayed currently on result page using
# find_elements_by_xpath method
products = self.driver\
.find_elements_by_xpath('//h2[@class=\'product-name\']/a')
# check count of products shown in results
self.assertEqual(2, len(products))
def tearDown(self):
# close the browser window
self.driver.quit()
if __name__ == '__main__':
unittest.main()
When this test is executed, you can see the console of the Selenium server. It shows
the interaction between the test and the server as shown in the following screenshot.
It shows which command has been executed and its status:
www.it-ebooks.info
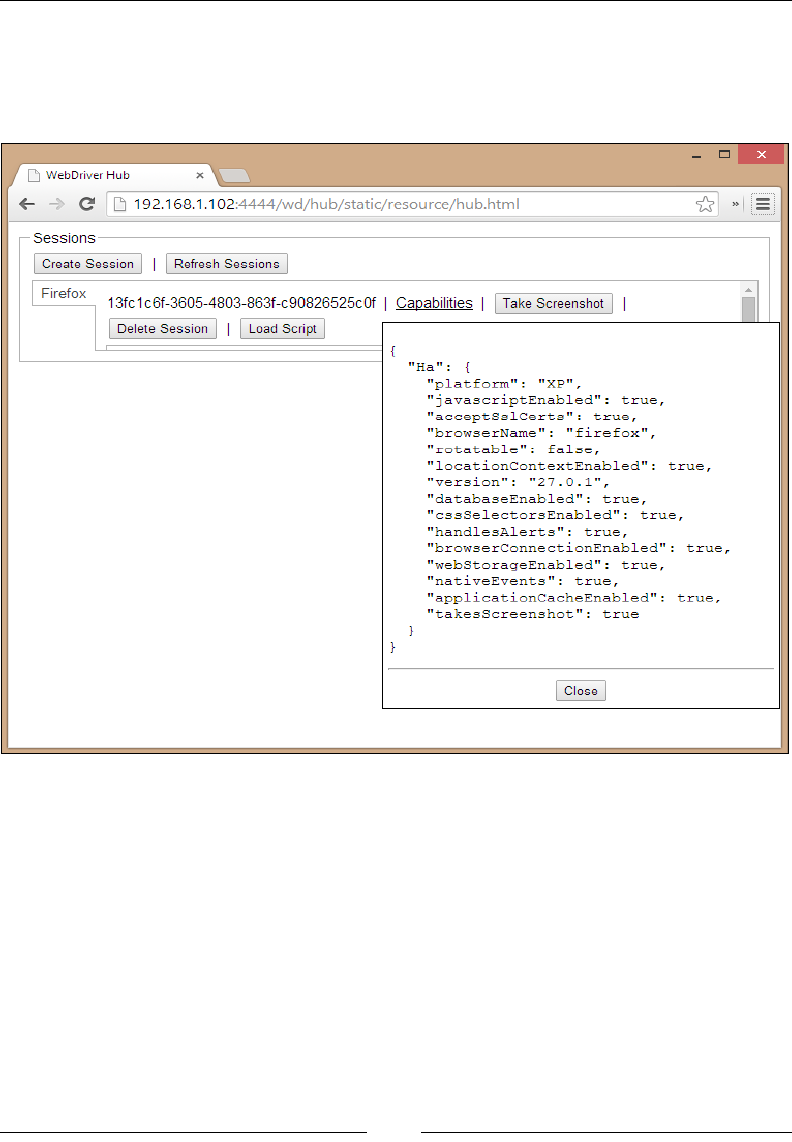
Chapter 6
[ 107 ]
You can also navigate to http://<remote-machine-ip>:4444/wd/hub/static/
resource/hub.html, which displays a new session being created. If you hover over
the capabilities link, it displays the capabilities being used to run the tests, as shown
in the following screenshot:
www.it-ebooks.info

Cross-browser Testing
[ 108 ]
Adding support for Internet Explorer
Firefox support is bundled with the Selenium server; however, for running tests on
Internet Explorer (IE), we need to specify the path of the IE driver executable while
starting the Selenium server. This is done by specifying the executable path to the
wedriver.ie.driver option in the command line as shown:
java -Dwebdriver.ie.driver="C:\SeDrivers\IEDriverServer.exe" -jar
selenium-server-standalone-2.41.0.jar
By providing the path of the IE driver, Selenium server will now launch and support
IE for testing on the remote machine.
Adding support for Chrome
Similar to the IE driver executable, we need to mention the Chrome driver on
the remote machine to support testing on Chrome. This is done by specifying
the Chrome driver path in the webdriver.chrome.driver option as shown in
following command line:
java -Dwebdriver.ie.driver="C:\SeDrivers\IEDriverServer.exe" -Dwebdriver.
chrome.driver="C:\SeDrivers\chromedriver.exe" -jar selenium-server-
standalone-2.41.0.jar
The Selenium server will now support running tests on both the Internet Explorer
and Chrome on the remote machine.
Selenium Grid
Selenium Grid lets us distribute our tests across multiple physical or virtual
machines in order to run tests in a distributed fashion or run them in parallel.
This helps in getting a faster and more accurate feedback by cutting down the
time required for running tests and speeding up cross-browser testing. We can
use our existing infrastructure of virtual machines in a cloud to set up the Grid.
Selenium Grid enables us to run multiple tests in parallel, on multiple nodes or
clients, in a heterogeneous environment where we can have a mixture of browser
and operating system support. It makes all these nodes appear as a single instance
and transparently distributes tests on the underlying infrastructure as shown in the
following diagram:
www.it-ebooks.info
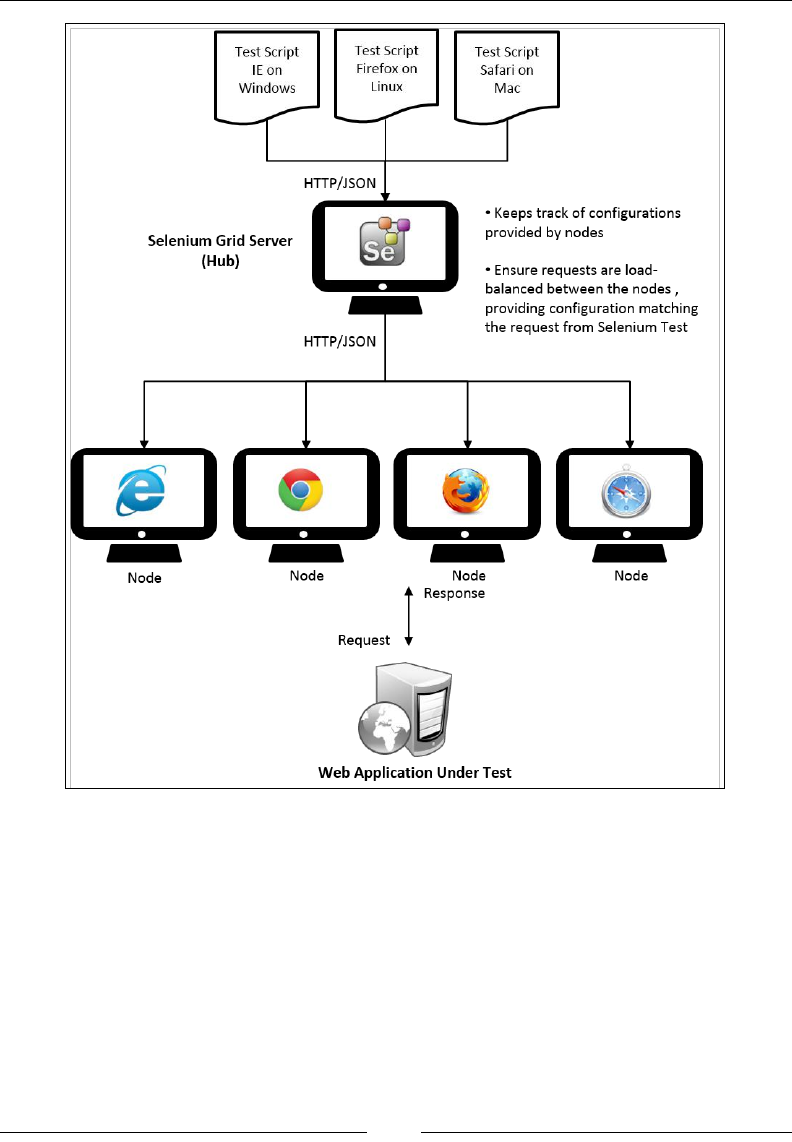
Chapter 6
[ 109 ]
Launching Selenium server as a hub
We need to set up Selenium server as a hub to run the tests in a distributed fashion.
The hub will provide all the available congurations or capabilities to tests.
The slave machines, also called as nodes, connect to the hub. Tests will use
JSON wire protocol using the Remote class to communicate with the hub to
execute the Selenium commands. You can nd more about JSON wire protocol
at https://code.google.com/p/selenium/wiki/JsonWireProtocol.
www.it-ebooks.info
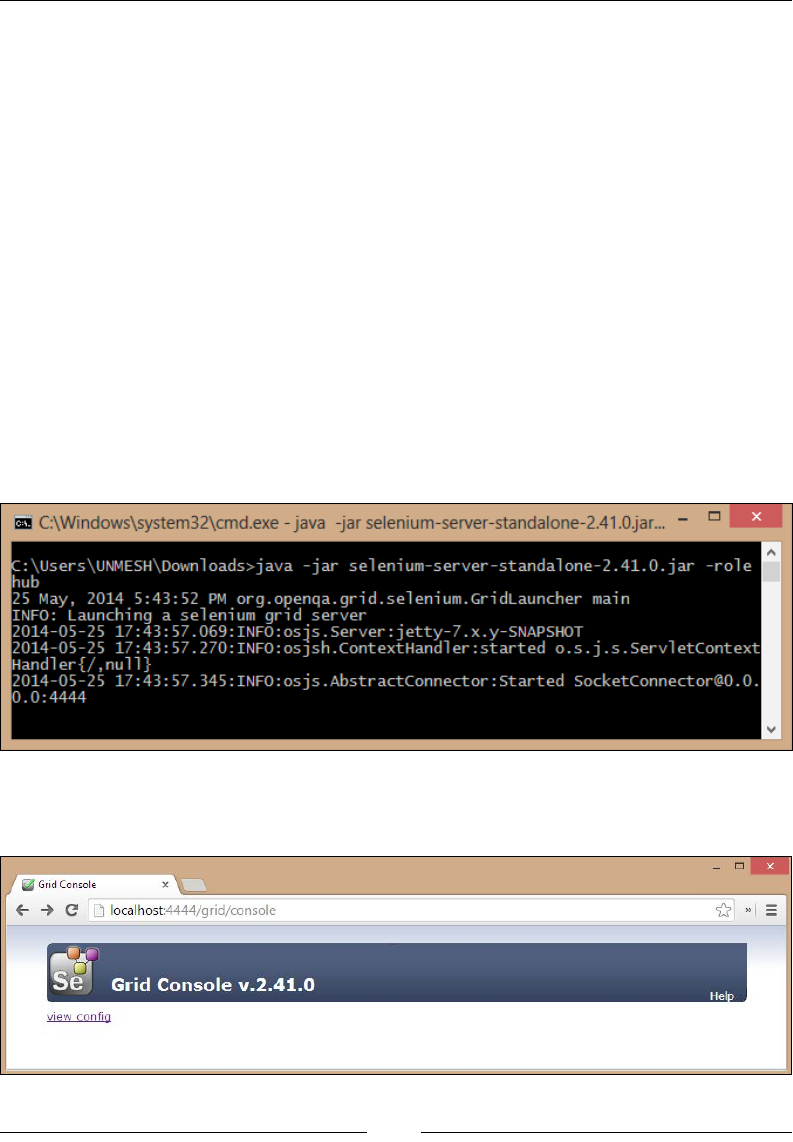
Cross-browser Testing
[ 110 ]
The hub acts as the central point that will receive the commands from tests and
distribute them to the appropriate node or to the node matching the capabilities
required by the test. Let's set up a Selenium server as a Grid and then add nodes
with different browser and operating system combinations.
We can start the Selenium standalone server as a hub (also known as a Grid server)
with additional arguments to the command that we used to start the server in
earlier sections.
Create a new command/terminal window and navigate to the location where
the Selenium server JAR is located. Start the server as a hub by typing the
following command:
java -jar selenium-server-standalone-2.25.0.jar -port 4444 -role hub
We need to use the –role argument with the value hub to start the server as
hub or Grid server.
In this example, the server is started on a Windows machine. It starts with the
following information printed on the console:
When we start the Selenium server as hub, it starts as a Grid server. We can see the
Grid console in the browser as shown in the following screenshot:
www.it-ebooks.info

Chapter 6
[ 111 ]
Adding nodes
Now that we have our Selenium server started as a Grid server, let's add a few node
congurations to the server.
Adding an IE node
Let's begin with a node that provides Internet Explorer capabilities running on
Windows. Open a new command prompt or a terminal window and navigate to
the location where the Selenium server JAR is located. To launch a node and add
it to the Grid, type the following command:
java -Dwebdriver.ie.driver="C:\SeDrivers\IEDriverServer.exe" -jar
selenium-server-standalone-2.41.0.jar -role webdriver -browser
"browserName=internet explorer,version=10,maxinstance=1,platform=WINDOWS"
-hubHost 192.168.1.103 –port 5555
To add the node to the Grid, we need to use the –role argument and pass
webdriver as a value. We also need to pass the browser conguration for the
node. This is passed through the –browser argument. In this example, we passed
browserName as internet explorer, version as 10, maxinstance as 1, and
platform as WINDOWS. The maxinstance value tells the Grid how many concurrent
instances of the browser will be supported by the node.
To connect the node to the hub or Grid server, we need to specify the –hubHost
argument with the hostname or IP address of the Grid server. Lastly, we need to
specify the port on which the node will be running.
When we run the preceding command and the node is launched, the following
conguration will appear on the Grid console:
www.it-ebooks.info

Cross-browser Testing
[ 112 ]
Alternatively, a node can be added by creating a conguration le in JSON format
and then using the following code:
{
"class": "org.openqa.grid.common.RegistrationRequest",
"capabilities": [
{
"seleniumProtocol": "WebDriver",
"browserName": "internet explorer",
"version": "10",
"maxInstances": 1,
"platform" : "WINDOWS"
}
],
"configuration": {
"port": 5555,
"register": true,
"host": "192.168.1.103",
"proxy": "org.openqa.grid.selenium.proxy.
DefaultRemoteProxy",
"maxSession": 2,
"hubHost": "192.168.1.100",
"role": "webdriver",
"registerCycle": 5000,
"hub": "http://192.168.1.100:4444/grid/register",
"hubPort": 4444,
"remoteHost": "http://192.168.1.102:5555"
}
}
We can now pass the selenium-node-win-ie10.cfg.json conguration le
through command-line arguments as follows:
java -Dwebdriver.ie.driver="C:\SeDrivers\IEDriverServer.exe"-jar
selenium-server-standalone-2.41.0.jar -role webdriver -nodeConfig
selenium-node-win-ie10.cfg.json
Adding a Firefox node
To add a Firefox node, open a new command prompt or terminal window and
navigate to the location where the Selenium server JAR is located. To launch and
add a node to the Grid, type the following command:
java -jar selenium-server-standalone-2.41.0.jar -role webdriver -browser
"browserName=firefox,version=27,maxinstance=2,platform=WINDOWS" -hubHost
localhost –port 6666
www.it-ebooks.info
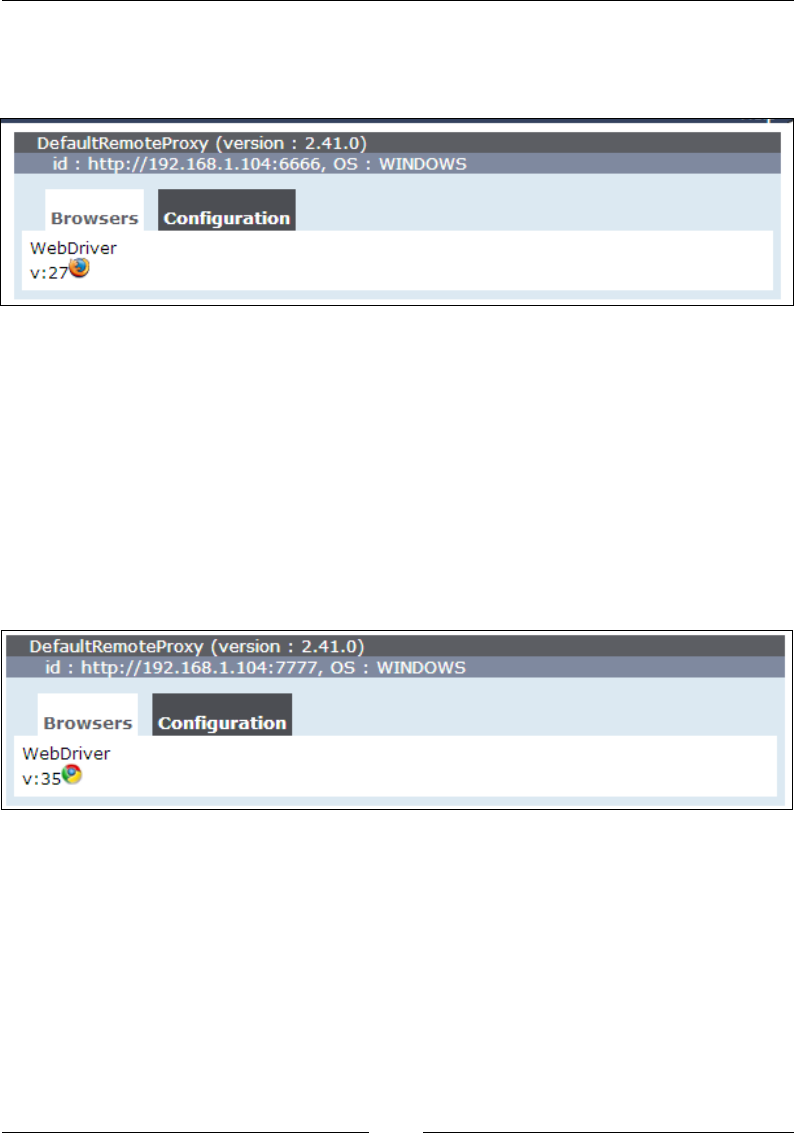
Chapter 6
[ 113 ]
In this example, we set maxinstance to 2. This tells Grid that this node will support
two instances of Firefox. Once the node has started, the following conguration will
appear in Grid console:
Adding a Chrome node
To add Chrome node, open a new command prompt or terminal window and
navigate to the location where the Selenium server JAR is located. To launch
and add the node to the Grid, type following command:
java -Dwebdriver.chrome.driver="C:\SeDrivers\chromedriver.exe" -jar
selenium-server-standalone-2.41.0.jar -role webdriver -browser "browserN
ame=chrome,version=35,maxinstance=2,platform=WINDOWS" -hubHost localhost
-port 7777
Once the node has started, the following conguration will appear in the Grid console:
Mac OS X with Safari
We added IE, Firefox, and Chrome instances from a Windows machine, now let's
add a Safari node from a Mac OS. Open a new terminal window and navigate to the
location where the Selenium server JAR is located. To launch and add the node to the
Grid type the following command:
java -jar selenium-server-standalone-2.41.0.jar -role webdriver -browser
"browserName=safari,version=7,maxinstance=1,platform=MAC" -hubHost
192.168.1.104 -port 8888
www.it-ebooks.info
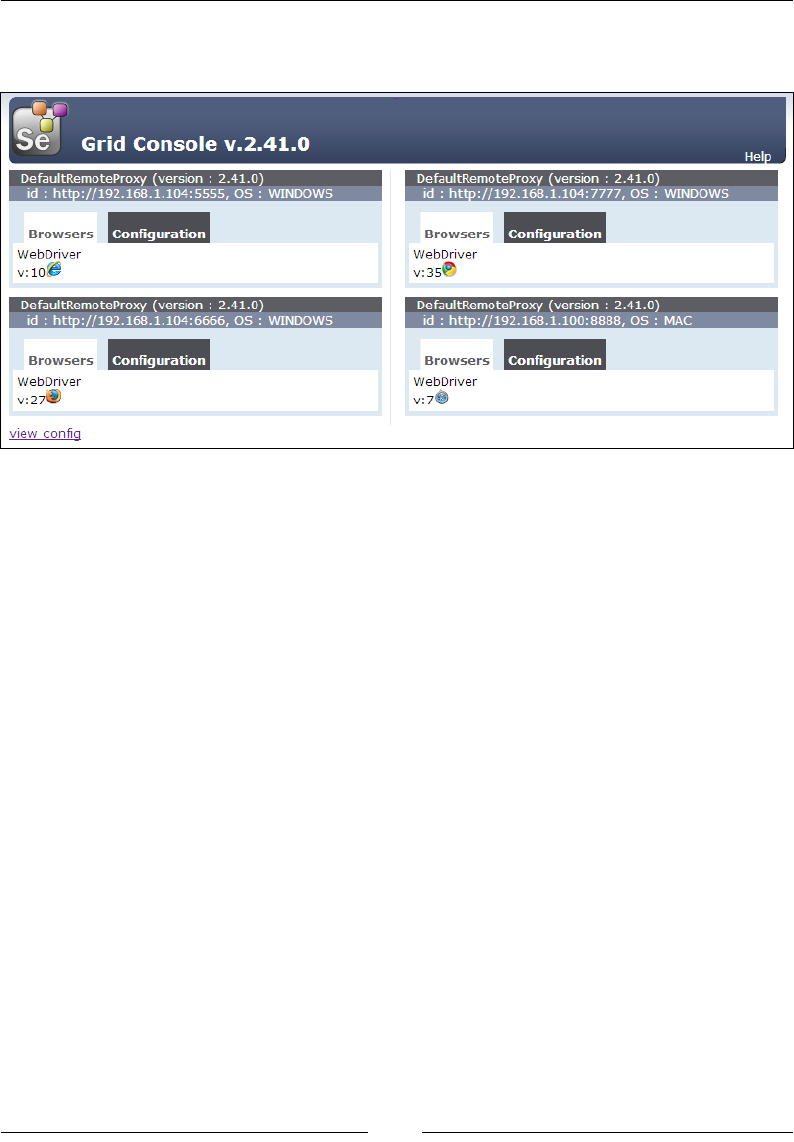
Cross-browser Testing
[ 114 ]
Once the node has started, the following conguration will appear on the
Grid console:
Now, we have our Selenium Grid set up, let's try running tests on this Grid.
Running tests in Grid
Running tests in Grid and with different combinations of browsers and operating
systems will need a few tweaks to the tests that we created earlier. We specied
hardcoded browser and platform names in the desired capabilities. If we hardcode
the values, then we will end up having a separate script for each combination. To
avoid this and use a single test that will work on all the combinations, we need to
parameterize the browser and platform values passed to the desired capabilities
class as given in the following steps:
1. We will pass the browser and platform to the tests from the command
line. For example, if we want to run test on the Windows and Chrome
combination we will run the script through the command line in the
following way:
python grid_test.py WINDOWS chrome
2. If we want to run tests on Safari on Mac, we can use following command:
python grid_test.py MAC safari
www.it-ebooks.info

Chapter 6
[ 115 ]
3. To implement this, we need to add two global attributes, PLATFORM and
BROWSER, to the test class in the following way. We will set a default value
in case values are not supplied from the command line:
class SearchProducts(unittest.TestCase):
PLATFORM = 'WINDOWS'
BROWSER = 'firefox'
4. Next we need to parameterize the desired capabilities in the setUp() method
as shown in the following code:
desired_caps = {}
desired_caps['platform'] = self.PLATFORM
desired_caps['browserName'] = self.BROWSER
5. Finally, we need to read the arguments passed to the script and assign the
values to the PLATFORM and BROWSER attributes in the following way:
if __name__ == '__main__':
if len(sys.argv) > 1:
SearchProducts.BROWSER = sys.argv.pop()
SearchProducts.PLATFORM = sys.argv.pop()
unittest.main()
6. That's it. Our test is now ready to handle any given combination. Here is
the complete code with the previous changes:
import sys
import unittest
from selenium import webdriver
class SearchProducts(unittest.TestCase):
PLATFORM = 'WINDOWS'
BROWSER = 'firefox'
def setUp(self):
desired_caps = {}
desired_caps['platform'] = self.PLATFORM
desired_caps['browserName'] = self.BROWSER
self.driver = \
webdriver.Remote('http://192.168.1.104:4444/wd/hub',
desired_caps)
self.driver.get('http://demo.magentocommerce.com/')
self.driver.implicitly_wait(30)
self.driver.maximize_window()
www.it-ebooks.info

Cross-browser Testing
[ 116 ]
def testSearchByCategory(self):
# get the search textbox
self.search_field = self.driver.find_element_by_name('q')
self.search_field.clear()
# enter search keyword and submit
self.search_field.send_keys('phones')
self.search_field.submit()
# get all the anchor elements which have product names
# displayed currently on result page using
# find_elements_by_xpath method
products = self.driver.\
find_elements_by_xpath('//h2[@class=\'product-
name\']/a')
# check count of products shown in results
self.assertEqual(2, len(products))
def tearDown(self):
# close the browser window
self.driver.quit()
if __name__ == '__main__':
if len(sys.argv) > 1:
SearchProducts.BROWSER = sys.argv.pop()
SearchProducts.PLATFORM = sys.argv.pop()
unittest.main(verbosity=2)
7. To run the test, open a new command prompt or terminal window and
navigate to the location of the script. Type the following command and you
will see that the Grid will connect the node matching with the given platform
and browser and execute the test on that node:
python grid_test.py MAC safari
Running tests in a cloud
We set up a local grid in the previous steps to run the tests for cross-browser testing.
This requires setting up physical or virtual machines with different browsers and
operating systems. There are costs and efforts needed to get the required hardware,
software, and support to run the test lab. You also need to put in efforts to keep
this infrastructure updated with the latest versions and patches, and so on. Not
everybody can afford these costs and efforts.
www.it-ebooks.info
Chapter 6
[ 117 ]
Instead of investing and setting up a cross-browser test lab, you can easily outsource
a virtual test lab to a third-party cloud provider. Sauce Labs and BrowserStack are
leading cloud-based cross-browser testing cloud providers. Both of these have support
for over 400 different browser and operating system congurations including mobile
and tablet devices and support running Selenium WebDriver tests in their cloud.
In this section, we will set up and run a test in Sauce Labs cloud. The steps are
similar if you want to run tests with BrowserStack.
Using Sauce Labs
Let's set up and run a test with Sauce Labs using the following steps:
1. You need a free Sauce Labs account to begin with. Register for a free account
on Sauce Labs at https://saucelabs.com/ and get the username and
access key. Sauce Labs provides all the required hardware and software
infrastructure to run your tests in the cloud.
2. You can get the access key from the Sauce Labs dashboard after login
as shown:
3. Let's modify the test we created earlier to run with Grid and add steps to run
this test on Sauce Labs cloud.
4. We need to add the Sauce username and access key to the test and change the
Grid address to Sauce's Grid address passing the username and access key as
shown in the following code:
import sys
import unittest
from selenium import webdriver
class SearchProducts(unittest.TestCase):
PLATFORM = 'WINDOWS'
BROWSER = 'phantomjs'
SAUCE_USERNAME = 'upgundecha'
www.it-ebooks.info

Cross-browser Testing
[ 118 ]
SUACE_KEY = 'c6e7132c-ae27-4217-b6fa-3cf7df0a7281'
def setUp(self):
desired_caps = {}
desired_caps['platform'] = self.PLATFORM
desired_caps['browserName'] = self.BROWSER
sauce_string = self.SAUCE_USERNAME + ':' + self.SUACE_KEY
self.driver = \
webdriver.Remote('http://' + sauce_string +
'@ondemand.saucelabs.com:80/wd/hub', desired_caps)
self.driver.get('http://demo.magentocommerce.com/')
self.driver.implicitly_wait(30)
self.driver.maximize_window()
def testSearchByCategory(self):
# get the search textbox
self.search_field = self.driver.find_element_by_name('q')
self.search_field.clear()
# enter search keyword and submit
self.search_field.send_keys('phones')
self.search_field.submit()
# get all the anchor elements which have product names
# displayed currently on result page using
# find_elements_by_xpath method
products = self.driver.\
find_elements_by_xpath('//h2[@class=\'product-
name\']/a')
# check count of products shown in results
self.assertEqual(2, len(products))
def tearDown(self):
# close the browser window
self.driver.quit()
if __name__ == '__main__':
if len(sys.argv) > 1:
SearchProducts.BROWSER = sys.argv.pop()
SearchProducts.PLATFORM = sys.argv.pop()
unittest.main(verbosity=2)
5. To run the test, open a new command prompt or terminal window and
navigate to the location of the script. Type following command:
python sauce_test.py "OS X 10.9" "Safari"
www.it-ebooks.info
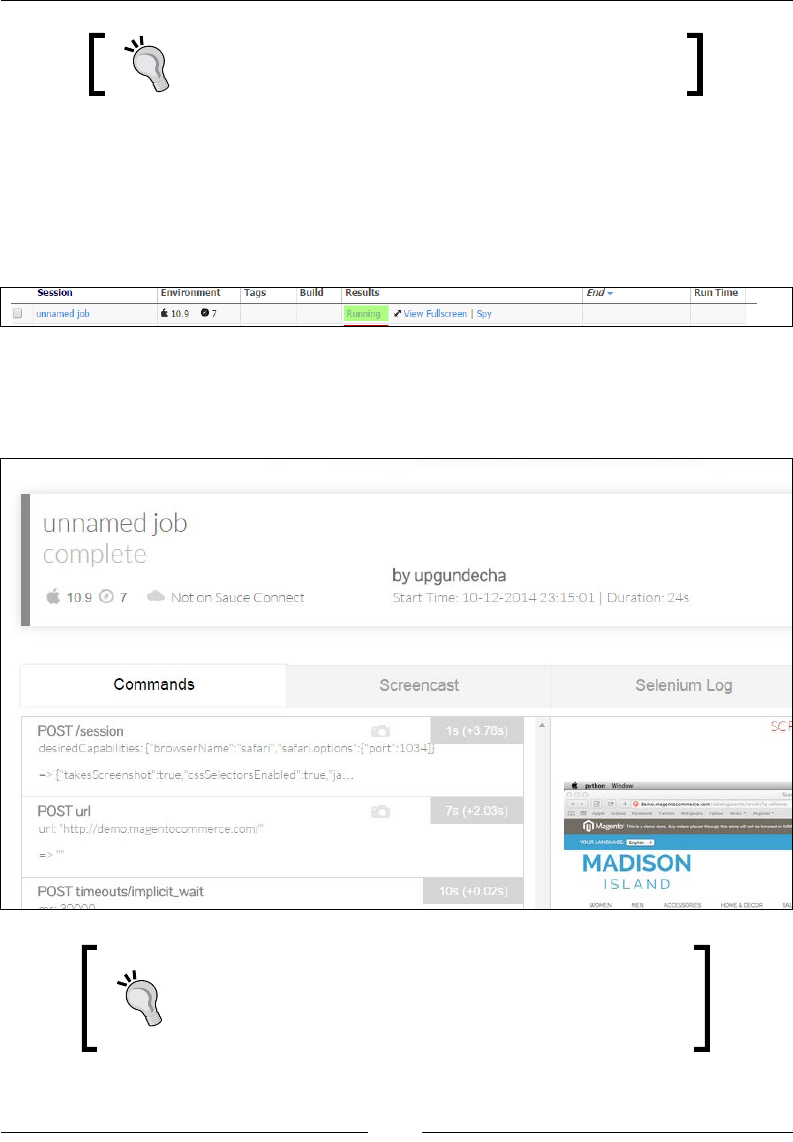
Chapter 6
[ 119 ]
You can get a list of Platforms supported on Sauce Labs
at https://saucelabs.com/platforms.
While running the test, it will connect to Sauce Lab's grid server and request
for the desired operating system and browser conguration. Sauce assigns a
virtual machine for our test to run on the given conguration.
6. We can monitor this run on Sauce dashboard as shown in the following
screenshot:
We can further drill down on the Sauce session and see exactly what happened during
the run. It provides a lot of details including the Selenium commands, screenshots,
Selenium logs, and video of the execution as shown in the following screenshot:
You can also test the application securely hosted on the
internal servers by using the Sauce Connect utility that
creates a secure tunnel between your machine and the
Sauce cloud.
www.it-ebooks.info

Cross-browser Testing
[ 120 ]
Summary
In this chapter, you learned how to run tests on remote machines with the
Selenium standalone server. The Selenium standalone server enables us to run tests
on remote machines for testing our application against a combination of browsers
and operating systems for cross-browser testing. This increases coverage for testing
and making sure applications run on the desired combinations.
We then looked at setting up Selenium Grid to run tests in a distributed architecture.
Selenium Grid removes complexity in performing cross-browser testing by
providing a transparent execution against multiple machines. It also brings
down the time to run the tests.
We also looked at using a cloud-based, cross-browser testing provider. We executed
a test on Sauce Labs. This offers all the necessary test infrastructure to run the tests
on hundreds of different combinations with minimal costs.
In the next chapter, you will learn how to test mobile applications using Appium
and Selenium WebDriver, using some of the concepts you learned in this chapter.
Appium supports testing native, hybrid, and web mobile applications on iOS and
Android. We will set up Appium and run tests against the mobile version of the
sample application.
www.it-ebooks.info

Testing on Mobile
With the ever increasing number of mobile users all over the world, the adoption
of smartphones and tablets has increased quite signicantly. Mobile apps have
penetrated consumer and enterprise markets replacing desktops and laptops with
smart devices. Small businesses and large-scale enterprises have a great potential
to use mobile as a channel to connect with users. There is a lot of effort being taken
to build mobile-friendly websites and native applications to serve customers and
employees. Testing these apps on various mobile platforms available in the market
has become crucial. This chapter will teach you more on how to test mobile apps
using Selenium WebDriver and more specically using Appium.
In this chapter, you will learn about:
• Testing mobile apps with Appium
• Installing and setting up Appium
• Creating and running tests for iOS on iPhone simulator
• Creating and running tests for Android on a real device
Introducing Appium
Appium is an open source test automation framework for testing native and hybrid
mobile apps on iOS, Android, and Firefox OS platforms using the JSON wire
protocol used by the Selenium WebDriver tests to communicate with the Selenium
Server. Appium will replace the iPhoneDriver and AndroidDriver APIs in
Selenium 2 used for testing mobile web applications.
www.it-ebooks.info
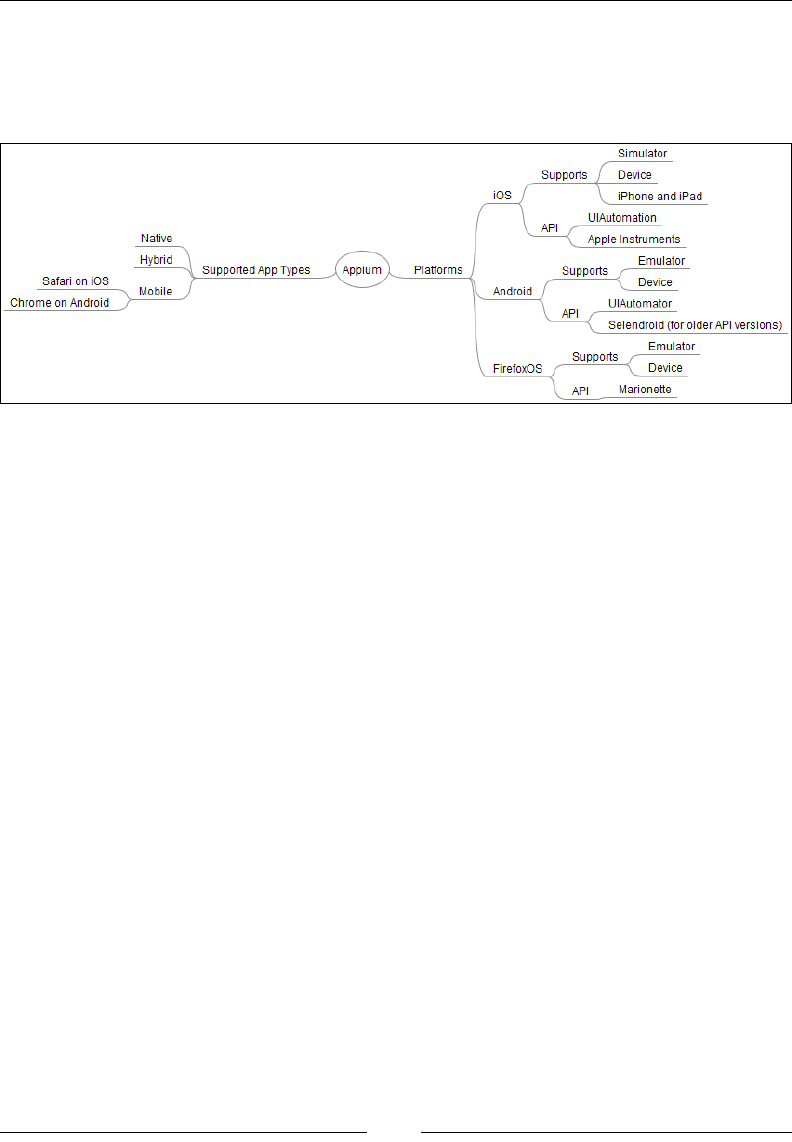
Testing on Mobile
[ 122 ]
Appium allows us to use and extend the existing Selenium WebDriver framework
to build mobile tests. As it uses Selenium WebDriver to drive the tests, we can use
any language to create tests for which the Selenium client library exists. Here is the
Appium coverage map with support for different platforms and application types:
Appium supports testing of the following types of apps:
• Native apps: Native apps are platform-specic apps built using the
platform-supported languages and frameworks. For example, apps for
iPhone and iPad are developed using Objective-C with iOS SDK; similarly,
Android apps are developed using Java with Android SDK. In terms of
performance, native apps are fast and more reliable. They use the native
framework for the user interface.
• Mobile web apps: Mobile web apps are server-side apps, built with any
server-side technology such as PHP, Java, or ASP.NET, and use frameworks
such as jQuery Mobile, Sencha Touch, and so on to render a user interface
that mimics the native UI.
• Hybrid apps: Similar to the native apps, hybrid apps run on the device and
are written with web technologies (HTML5, CSS, and JavaScript). Hybrid
apps use the device's browser engine to render the HTML and process the
JavaScript locally inside a native container using WebView. This enables the
app to access device capabilities that are not accessible in mobile web apps,
such as the camera, accelerometer, sensors, and local storage.
Prerequisites for Appium
Before you get started with learning more about Appium, you will need some tools
for iOS and Android platforms.
www.it-ebooks.info

Chapter 7
[ 123 ]
Appium is built on Node.js and comes as a Node.js package
as well as standalone GUI on Mac OS X and Windows. We
will use Appium standalone GUI which comes with built-in
Node.js on Mac OS X.
Setting up Xcode for iOS
We need Xcode 4.6.3 or higher, installed on Mac OS X, for testing apps for the iOS
platform. While writing this book, Xcode 5.1 was used. You can get Xcode from the
App Store or developer portal at https://developer.apple.com/xcode/.
After installing Xcode, launch it from the Applications menu and navigate to
Preferences | Downloads, and install Command Line Tools and additional iOS
SDKs for testing applications on different versions of the iOS platform, as shown
in the following screenshot:
For running tests on a real device, you need a provision prole installed on the
device and USB debugging enabled on it.
www.it-ebooks.info
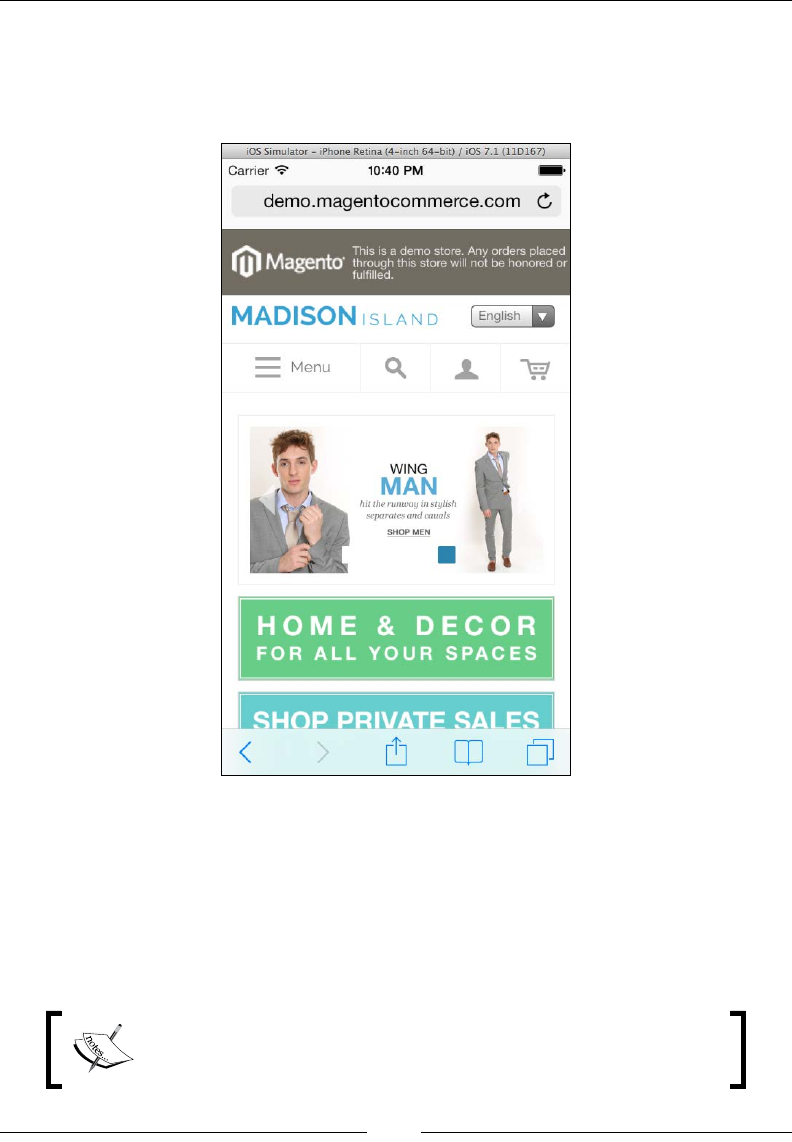
Testing on Mobile
[ 124 ]
Try to launch the iPhone simulator and verify that it works. You can launch the
simulator by navigating to Xcode | Open Developer Tool | iOS Simulator. Launch
Safari in the simulator and open the mobile web app version of the sample application
http://demo.magentocommerce.com in Safari as shown in the following screenshot:
Setting up Android SDK
We will need the Android SDK installed for testing Android apps. Android SDK is
available for download at http://developer.android.com/sdk/. This will get us
the latest version of the SDK. After the installation, please make sure ANDROID_HOME
is added to the path. Complete installation steps are available at http://developer.
android.com/sdk/installing/index.html?pkg=tools.
For detailed and latest installation requirements visit http://
appium.io/getting-started.html#requirements.
www.it-ebooks.info

Chapter 7
[ 125 ]
Setting up the Appium Python client package
The Appium Python client was fully compliant with the Selenium 3.0 specication
draft at the time of writing this book. It offers some helpers to make mobile testing in
Python easier with Appium. This can be installed using the following command:
pip install Appium-Python-Client
More information on the Appium Python client package
is available at https://pypi.python.org/pypi/
Appium-Python-Client.
Installing Appium
Before we start testing mobile apps with Appium, we need to download and install
Appium. We will use the Appium GUI version. If you wish to run tests for iOS on
iPhone or iPad, then you need to set up Appium on a Mac OS X machine. For testing
Android applications, you can set up the environment on a Windows or Linux
machine. Setting up Appium is fairly easy with the new Appium app for Mac OS X.
You can download the latest Appium binaries from http://appium.io/. Follow the
given steps to install Appium:
1. Click on the Download Appium button on the front page and you will be
directed to the download page.
www.it-ebooks.info
Testing on Mobile
[ 126 ]
2. Select the version specic to the operating system you are using from the list
as shown in the following screenshot:
In the following examples, we will be using Appium on
Mac OS X.
3. You can install Appium on Mac by launching the installer and copying
Appium to the Applications folder.
When you launch Appium from the Applications menu for the rst time,
it will ask for authorization to run the iOS simulators.
By default, Appium starts at http://127.0.0.1:4723 or
localhost. This is the URL to which your test should direct
the test commands. We will be testing the mobile version of
the sample application that we used in the book on iPhone
Safari browser.
4. On the main window of Appium, click on the Apple icon to open iOS settings:
www.it-ebooks.info
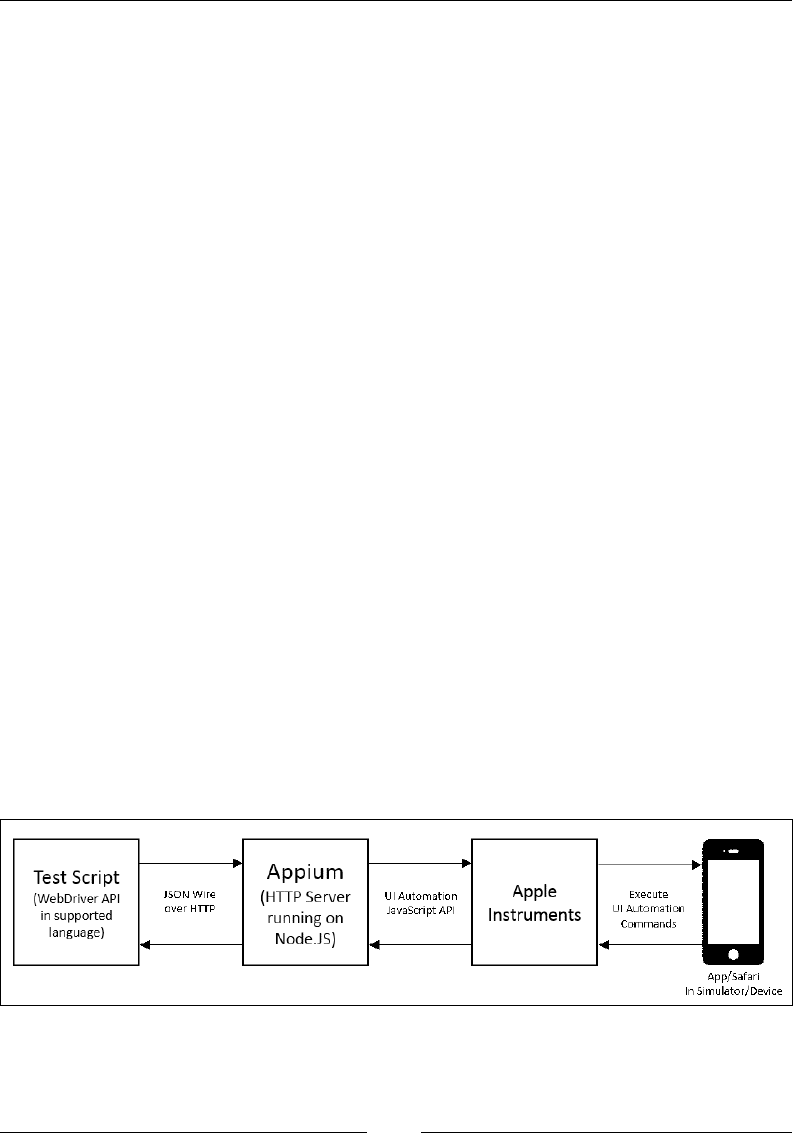
Testing on Mobile
[ 128 ]
6. Click on the Launch button in the Appium window to start the
Appium server.
Appium Inspector
Appium also comes with a spy tool called Appium Inspector. We can launch
the Appium Inspector by clicking on the magnifying glass icon on Appium's
main window.
The Inspector provides a lot of options to analyze the app under test. One of the
main features it offers is how the UI elements are used in the app, the structure or
hierarchy of the elements, and the properties of these elements, which we can use
in dening the locator strings.
You can also simulate various gestures on the app and see their effect on the
simulator. It also offers an ability to record the steps you perform on the app.
Testing on iOS
Appium drives automation using various native automation frameworks and
provides an API based on Selenium's WebDriver JSON wire protocol. For
automating iOS applications, it uses the UI Automation feature offered as part
of Apple Instruments.
Appium works as an HTTP server and receives the commands from test scripts
over the JSON wire protocol. Appium sends these commands to Apple Instruments
so that the commands can be executed on the app launched in a simulator or real
device. While doing so, Appium translates the JSON commands into UI Automation
JavaScript commands that are understood by the Instruments. The Instruments take
care of launching and closing the app in the simulator or device. This process is
shown in the following diagram:
www.it-ebooks.info

Chapter 7
[ 129 ]
When a command is executed against the app on the simulator or device, the target
app sends the response back to the Instruments, which then sends it back to Appium
in the JavaScript response format. Appium translates the UI Automation JavaScript
responses into Selenium WebDriver JSON wire protocol responses and sends them
back to the test script.
Writing a test for iOS
Now, we have the Appium running; let's create a test that will check
the search functionality in the iPhone Safari browser. Create a new test,
SearchProductsOnIPhone, with the following code:
import unittest
from appium import webdriver
class SearchProductsOnIPhone(unittest.TestCase):
def setUp(self):
desired_caps = {}
# platform
desired_caps['device'] = 'iPhone Simulator'
# platform version
desired_caps['version'] = '7.1'
# mobile browser
desired_caps['app'] = 'safari'
# to connect to Appium server use RemoteWebDriver
# and pass desired capabilities
self.driver = \
webdriver.Remote("http://127.0.0.1:4723/wd/hub"
, desired_caps)
self.driver.get("http://demo.magentocommerce.com/")
self.driver.implicitly_wait(30)
self.driver.maximize_window()
def test_search_by_category(self):
# click on search icon
self.driver.find_element_by_xpath
("//a[@href='#header-search']").click()
# get the search textbox
self.search_field = self.driver.find_element_by_name("q")
self.search_field.clear()
www.it-ebooks.info

Testing on Mobile
[ 130 ]
# enter search keyword and submit
self.search_field.send_keys("phones")
self.search_field.submit()
# get all the anchor elements which have product names
# displayed currently on result page using
# find_elements_by_xpath method
products = self.driver\
.find_elements_by_xpath
("//div[@class='category-products']/ul/li")
# check count of products shown in results
self.assertEqual(2, len(products))
def tearDown(self):
# close the browser window
self.driver.quit()
if __name__ == '__main__':
unittest.main(verbosity=2)
We need RemoteWebDriver to run the tests with Appium. However, for Appium to
use the desired platform, we need to pass a set of desired capabilities as shown in the
following code:
desired_caps = {}
# platform
desired_caps['device'] = 'iPhone Simulator'
# platform version
desired_caps['version'] = '7.1'
# mobile browser
desired_caps['app'] = 'safari'
The desired_caps['device'] capability is used by Appium to decide on which
the platform the test script should get executed. In this example, we used iPhone
Simulator. For running tests on iPad, we can specify the iPad Simulator.
When running tests on a real device, we need to specify the value iPhone or iPad for
device capability. Appium will pick the device that is connected to the Mac via USB.
The desired_caps['version'] capability is the version of iPhone/iPad simulator
that we want to use. In this example, iOS 7.1 simulator is used, which was the latest
the version of iOS at the time of writing this book.
www.it-ebooks.info
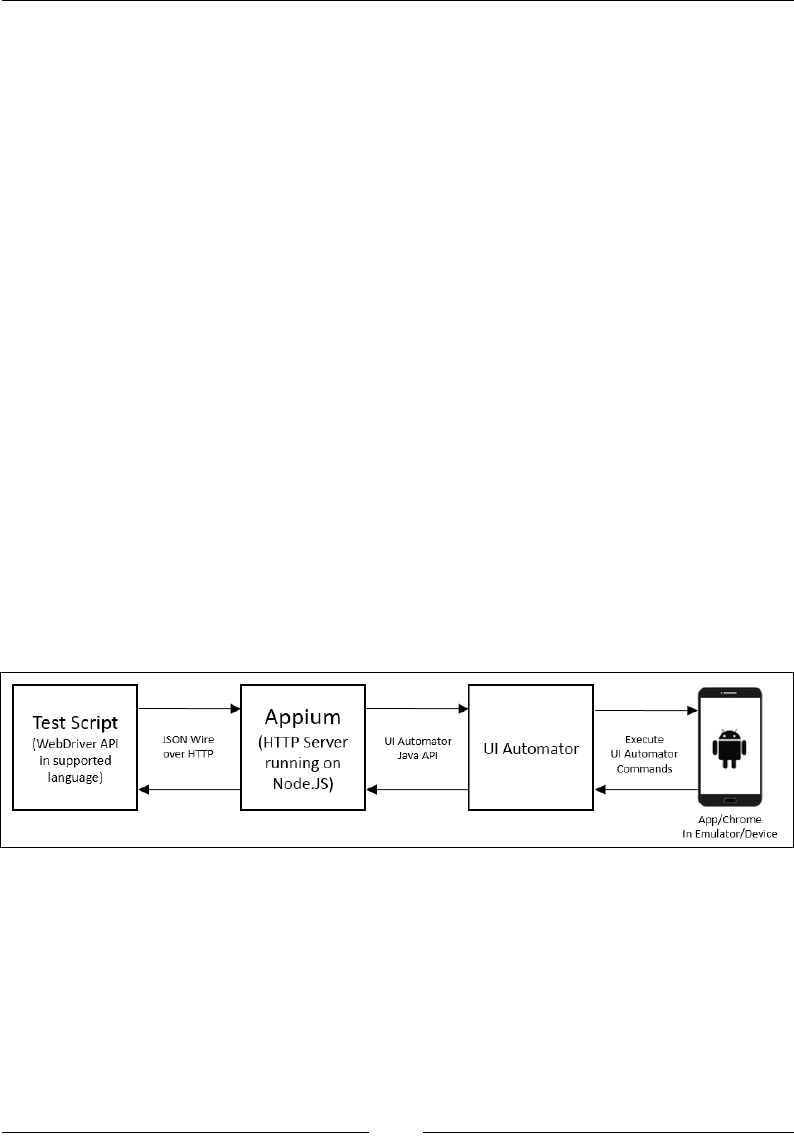
Chapter 7
[ 131 ]
The last desired capability we used is desired_caps['app'], which is used by
Appium to launch the target app. In this case, it will launch the Safari browser.
Finally, we need to connect to the Appium server using RemoteWebDriver and the
desired capabilities that we need. This is done by creating an instance of Remote as
shown in following code:
self.driver = webdriver.Remote
("http://127.0.0.1:4723/wd/hub", desired_caps)
The rest of the test uses the Selenium API to interact with the mobile web version of
the application. Run the test normally. You will see that Appium establishes a
session with test scripts and launches the iPhone Simulator with the Safari app.
Appium will execute all the test steps by running commands on the Safari app
in the simulator window.
Testing on Android
Appium drives the automation of Android applications using the UI Automator
bundled with Android SDK. The process is quite similar to testing on iOS.
Appium works as an HTTP server and receives the commands from test scripts over
JSON wire protocol. Appium sends these commands to the UI Automator so that they
can be executed on the app launched in an emulator or real device. While doing so,
Appium translates the JSON commands into the UI Automator Java commands that
are understood by Android SDK. This process is shown in the following diagram:
When a command is executed against the app on the emulator or device, the target
app sends the response back to the UI Automator, which sends it back to Appium. It
translates the UI Automator responses into Selenium WebDriver JSON wire protocol
responses and sends them back to the test script.
www.it-ebooks.info
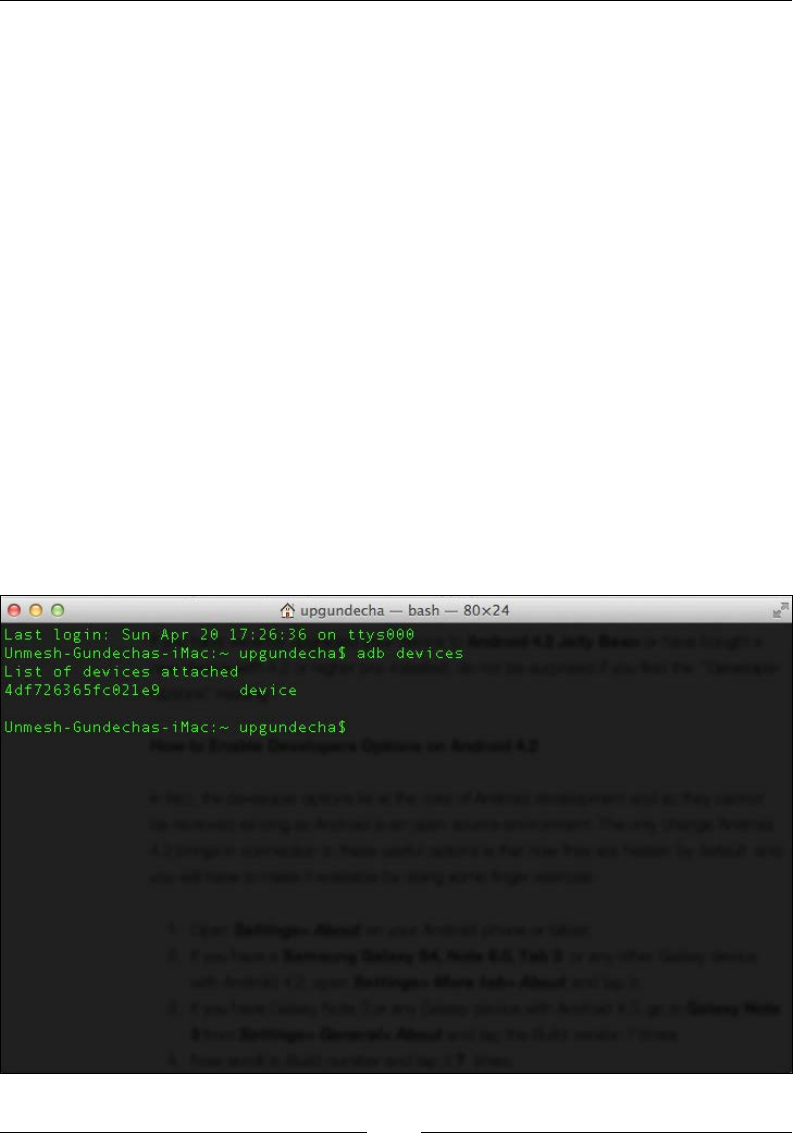
Testing on Mobile
[ 132 ]
Writing a test for Android
Testing apps on Android is pretty much similar to what we did for iOS. For Android,
we will use a real device instead of an emulator (a simulator is called an emulator
in the Android community). We will use the same application for testing in Chrome
for Android.
For this example, I am using Samsung Galaxy S III handset. We need to install the
Chrome browser on the device. You can get Google Chrome on the Play Store. Next,
we need to connect the device to the machine where the Appium server is running.
Now, we will work on Android. Here, we will try to execute our test scripts on
the Android real device. We need to make sure we have installed Chrome on our
Android device and connect our device to our machine. Let's run the following
command to get a list of emulators or devices connected to the machine:
./adb devices
Android Debug Bridge (adb) is a command-line tool available in Android SDK that
lets you communicate with an emulator instance or the connected real device.
The previous command will display a list of all the Android devices that are
connected to the host. In this example, we have connected to a real device that is
listed as shown in the following screenshot:
www.it-ebooks.info

Chapter 7
[ 133 ]
Let's use the test that we created for iOS and modify it for Android. We will create
a new test, SearchProductsOnAndroid. Copy the following code to the newly
created test:
import unittest
from appium import webdriver
class SearchProductsOnAndroid(unittest.TestCase):
def setUp(self):
desired_caps = {}
# platform
desired_caps['device'] = 'Android'
# platform version
desired_caps['version'] = '4.3'
# mobile browser
desired_caps['app'] = 'Chrome'
# to connect to Appium server use RemoteWebDriver
# and pass desired capabilities
self.driver = \
webdriver.Remote("http://127.0.0.1:4723/wd
/hub", desired_caps)
self.driver.get("http://demo.magentocommerce.com/")
self.driver.implicitly_wait(30)
def test_search_by_category(self):
# click on search icon
self.driver.find_element_by_xpath
("//a[@href='#header-search']").click()
# get the search textbox
self.search_field = self.driver.find_element_by_name("q")
self.search_field.clear()
# enter search keyword and submit
self.search_field.send_keys("phones")
self.search_field.submit()
# get all the anchor elements which have product names
# displayed currently on result page using
# find_elements_by_xpath method
products = self.driver\
www.it-ebooks.info
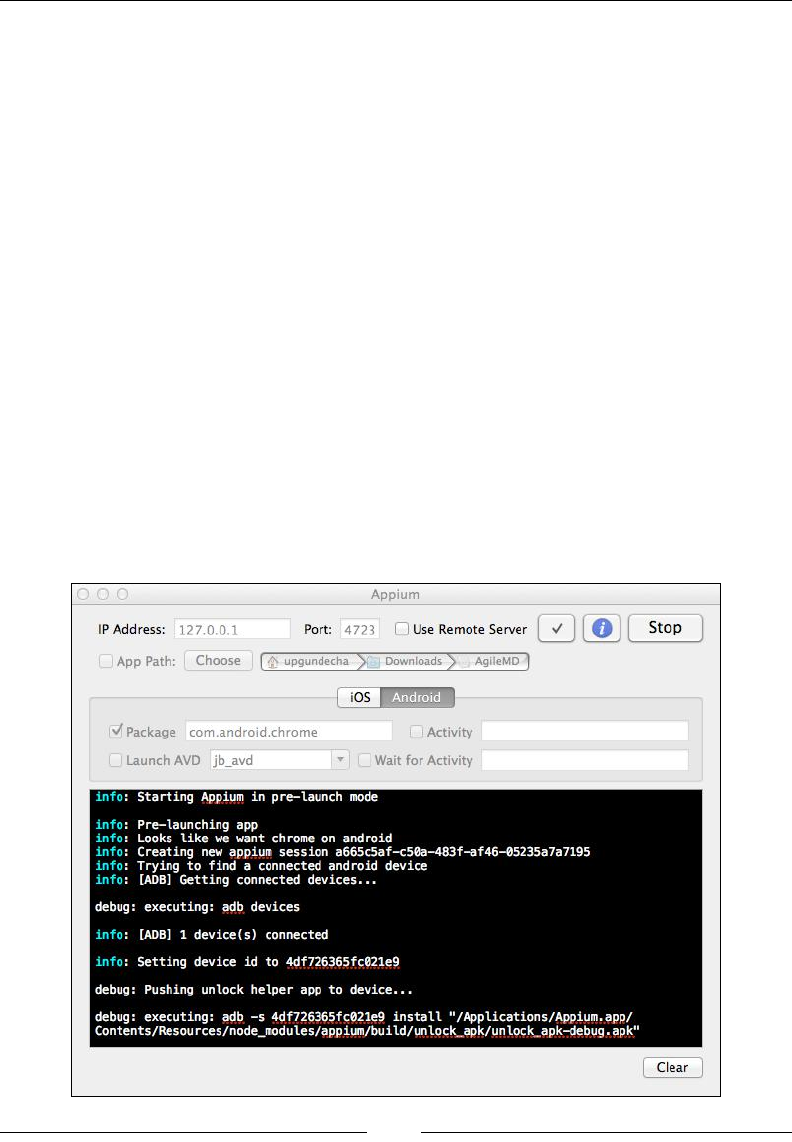
Testing on Mobile
[ 134 ]
.find_elements_by_xpath
("//div[@class='category-products']/ul/li")
# check count of products shown in results
self.assertEqual(2, len(products))
def tearDown(self):
# close the browser window
self.driver.quit()
if __name__ == '__main__':
unittest.main(verbosity=2)
In this example, we assigned the desired_caps['device'] capability value to
Android, which will be used by the Appium to run tests on Android.
Next, we mentioned the Android Version 4.3 (Jelly Bean) in the desired_
caps['version'] capability. As we want to run tests in Chrome for Android,
we mentioned Chrome in the desired_caps['app'] capability.
Appium will use the rst device from the list of devices that adb returns. It will use
the desired capabilities that we mentioned, launch the Chrome browser on the device,
and start executing the test script commands, as shown in the following screenshot:
www.it-ebooks.info
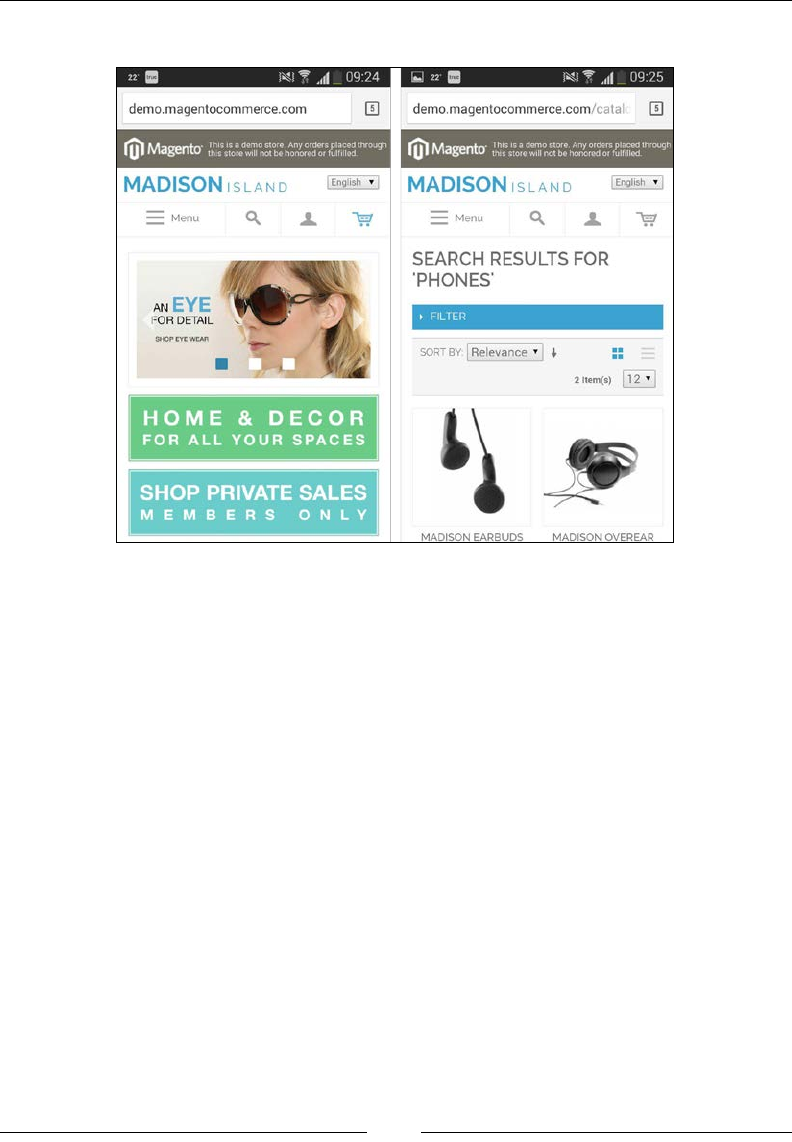
Chapter 7
[ 135 ]
Here is the screenshot of the test running on a real device:
Using Sauce Labs
We looked at Sauce Labs for cross-browser testing in Chapter 6, Cross-browser Testing.
Sauce also provides support for testing mobile applications using Appium. In fact,
the Appium project is developed and supported by Sauce Labs. With minimal
changes to the desired capabilities, we can run mobile tests in Sauce Labs with the
following code:
import unittest
from appium import webdriver
class SearchProductsOnIPhone(unittest.TestCase):
SAUCE_USERNAME = 'upgundecha'
SUACE_KEY = 'c6e7132c-ae27-4217-b6fa-3cf7df0a7281'
def setUp(self):
desired_caps = {}
desired_caps['browserName'] = "Safari"
www.it-ebooks.info

Testing on Mobile
[ 136 ]
desired_caps['platformVersion'] = "7.1"
desired_caps['platformName'] = "iOS"
desired_caps['deviceName'] = "iPhone Simulator"
sauce_string = self.SAUCE_USERNAME + ':' + self.SUACE_KEY
self.driver = \
webdriver.Remote('http://' + sauce_string +
'@ondemand.saucelabs.com:80/wd/hub', desired_caps)
self.driver.get('http://demo.magentocommerce.com/')
self.driver.implicitly_wait(30)
self.driver.maximize_window()
def test_search_by_category(self):
# click on search icon
self.driver.find_element_by_xpath("//a[@href=
'#header-search']").click()
# get the search textbox
self.search_field = self.driver.find_element_by_name("q")
self.search_field.clear()
# enter search keyword and submit
self.search_field.send_keys("phones")
self.search_field.submit()
# get all the anchor elements which have
# product names displayed
# currently on result page using
# find_elements_by_xpath method
products = self.driver\
.find_elements_by_xpath
("//div[@class='category-products']/ul/li")
# check count of products shown in results
self.assertEqual(2, len(products))
def tearDown(self):
# close the browser window
self.driver.quit()
if __name__ == '__main__':
unittest.main(verbosity=2)
After running the mobile tests, we can see the results and video recording in the
Sauce Labs dashboard. This saves a lot of effort and time in setting up Appium in the
local environment with Sauce offering various combinations of SDKs and settings.
www.it-ebooks.info

Chapter 7
[ 137 ]
Summary
In this chapter, we recognized the need for testing apps on mobile devices. We looked
at Appium, which is becoming a core feature of Selenium for testing mobile apps. We
installed and set up Appium for testing a mobile version of the sample app.
We tested the mobile web application on the iPhone simulator and on the Android
device. Using Appium, we can test various types of mobile applications and use any
programming language that has a WebDriver client library.
In the next chapter, you will learn some good practices such as using PageObjects
and data-driven tests with Selenium WebDriver.
www.it-ebooks.info

Page Objects and
Data-driven Testing
This chapter introduces two important design patterns that are useful in creating
scalable and maintainable test automation framework designs. We will explore
how to use the data-driven approach to create data-driven Selenium tests using
Python libraries.
In the second part of this chapter, you will learn about using the page object pattern
to create highly maintainable and robust tests by separating locators and other
low-level calls from the test cases into a layer of abstraction, which resembles the
functionality of the application similar to what the user experiences within the
browser window.
In this chapter, you will learn:
• What data-driven testing is
• How to use the Data-driven testing (ddt) library along with the unittest
library to create data-driven tests
• How to read data from external sources for data-driven testing
• What the page object pattern is and how it helps in creating a maintainable
test suite
• How to implement the page object pattern for the sample application
www.it-ebooks.info

Page Objects and Data-driven Testing
[ 140 ]
Data-driven testing
By using the data-driven testing approach, we can use a single test to verify different
sets of test cases or test data by driving the test with input and expected values from
an external data source instead of using the hardcoded values every time a test is run.
This becomes useful when we have similar tests that consist of the same steps
but differ in the input data and expected value or the application state. Here is
an example of a set of login test cases with different combinations:
Description Test data Expected output
Valid username and
password
A pair of valid usernames
and passwords
The user should log in to the
application with a success
message
Invalid username and
password
An invalid username and
password
The user should be displayed
the login error
Valid username and
invalid password
A valid username and an
invalid password
The user should be displayed
the login error
We can create a single script that can handle the test data and the conditions from the
preceding table.
By using the data-driven testing approach, we separate the test data from the
test logic by replacing the hardcoded test data with variables using the data from
external sources such as CSV or a spreadsheet le. This also helps in creating
reusable tests that can run with different sets of data, which can be kept outside
of the test.
Data-driven testing also helps in increasing the test coverage as we can handle
multiple test conditions while minimizing the amount of test code we need to
write and maintain.
In this section, we will implement the data-driven testing approach to some of the
tests that we created in the earlier chapters, using the ddt library in Python.
Using ddt for data-driven tests
The ddt library provides the ability to parameterize the test cases written using the
unittest library in Python. We can provide a set of data using ddt to a test case for
data-driven tests.
The ddt library provides a set of class and method decorators that we can use to
create data-driven tests.
www.it-ebooks.info

Chapter 8
[ 141 ]
Installing ddt
We can download and install ddt using the following command line:
pip install ddt
That's it! You can nd more about ddt at https://pypi.python.org/pypi/ddt.
Creating a simple data-driven test with ddt
in unittest
We will use the search test case on the sample application and convert it into a
data-driven test by removing the hardcoded values to search for different products
and categories.
To create a data-driven test we need to use the @ddt decorator for the test class and
use the @data decorator on the data-driven test methods.
The @data decorator takes as many arguments as we have values that we want to
feed to the test. These could be single values or lists, tuples, and dictionaries. For
lists, we need to use the @unpack decorator, which unpacks tuples or lists into
multiple arguments.
Let's implement the search test, which accepts a pair of arguments for different
search terms and expected result count as shown in the following code:
import unittest
from ddt import ddt, data, unpack
from selenium import webdriver
@ddt
class SearchDDT(unittest.TestCase):
def setUp(self):
# create a new Firefox session
self.driver = webdriver.Firefox()
self.driver.implicitly_wait(30)
self.driver.maximize_window()
# navigate to the application home page
self.driver.get("http://demo.magentocommerce.com/")
# specify test data using @data decorator
@data(("phones", 2), ("music", 5))
@unpack
def test_search(self, search_value, expected_count):
# get the search textbox
self.search_field = self.driver.find_element_by_name("q")
self.search_field.clear()
www.it-ebooks.info

Page Objects and Data-driven Testing
[ 142 ]
# enter search keyword and submit.
# use search_value argument to pass data
self.search_field.send_keys(search_value)
self.search_field.submit()
# get all the anchor elements which have
# product names displayed
# currently on result page using
# find_elements_by_xpath method
products = self.driver.find_elements_by_xpath
("//h2[@class='product-name']/a")
# check count of products shown in results
self.assertEqual(expected_count, len(products))
def tearDown(self):
# close the browser window
self.driver.quit()
if __name__ == '__main__':
unittest.main(verbosity=2)
In this test, we are passing a list of tuples using the @data decorator. The
@unpack decorator is used to unpack these tuples into multiple arguments.
The test_search() method accepts the search_value and expected_count
arguments, which will be mapped to the tuple values by ddt, as shown:
# specify test data using @data decorator
@data(("phones", 2), ("music", 5))
@unpack
def test_search(self, search_value, expected_count):
When we run the test, ddt will generate new test methods giving them meaningful
names by converting the data values to valid Python identiers. For example, for
the preceding test, ddt will generate new test methods with names as shown in the
following screenshot:
www.it-ebooks.info
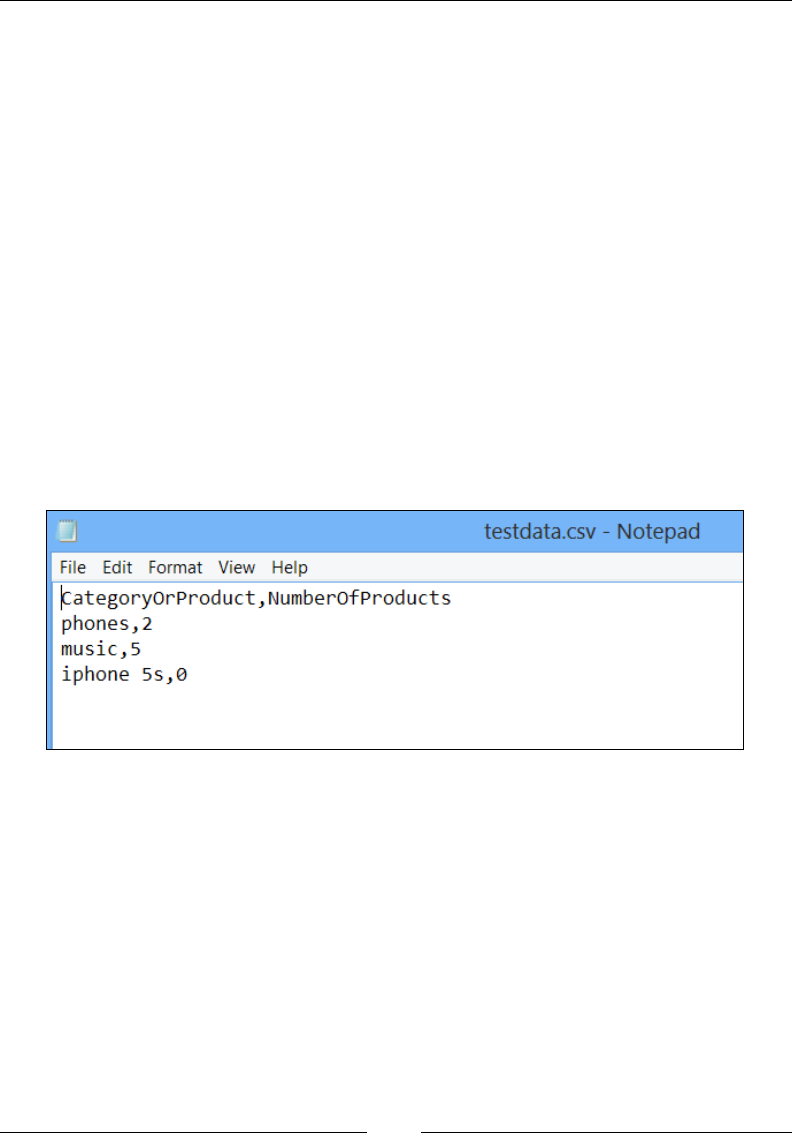
Chapter 8
[ 143 ]
Using external data sources for
data-driven tests
In the previous example, we supplied the test data in the test code. However, you
will nd situations where you already have test data dened in external sources
such as text les, spreadsheets, or databases. It is also a good idea to separate the test
data from the code and put it in an external source for easy maintenance and avoid
changes to the test code each time you want to update the values.
Let's explore how we can read the test data from the Comma separated values (CSV)
les or Excel spreadsheets and supply it to ddt.
Reading values from CSV
We will use the previous test case and move the data that we supplied to
the @data decorator into a separate CSV le called testdata.csv instead of
keeping it in the script. This data will be stored in a tabular format as shown
in the following screenshot:
Next, we will implement the get_data() method, which accepts the path and
name of the CSV le. This method uses the csv library to read the values from the
le and returns a list of these values. We will use the get_data() method in the
@data decorator as shown in the following code:
import csv, unittest
from ddt import ddt, data, unpack
from selenium import webdriver
def get_data(file_name):
# create an empty list to store rows
rows = []
www.it-ebooks.info

Page Objects and Data-driven Testing
[ 144 ]
# open the CSV file
data_file = open(file_name, "rb")
# create a CSV Reader from CSV file
reader = csv.reader(data_file)
# skip the headers
next(reader, None)
# add rows from reader to list
for row in reader:
rows.append(row)
return rows
@ddt
class SearchCsvDDT(unittest.TestCase):
def setUp(self):
# create a new Firefox session
self.driver = webdriver.Firefox()
self.driver.implicitly_wait(30)
self.driver.maximize_window()
# navigate to the application home page
self.driver.get("http://demo.magentocommerce.com/")
# get the data from specified csv file by
# calling the get_data function
@data(*get_data("testdata.csv"))
@unpack
def test_search(self, search_value, expected_count):
self.search_field =
self.driver.find_element_by_name("q")
self.search_field.clear()
# enter search keyword and submit.
self.search_field.send_keys(search_value)
self.search_field.submit()
# get all the anchor elements which have
# product names displayed
# currently on result page using
# find_elements_by_xpath method
products = self.driver.find_elements_by_xpath
("//h2[@class='product-name']/a")
expected_count = int(expected_count)
if expected_count > 0:
# check count of products shown in results
www.it-ebooks.info

Chapter 8
[ 145 ]
self.assertEqual(expected_count, len(products))
else:
msg = self.driver.find_element_by_class_name
("note-msg")
self.assertEqual
("Your search returns no results.", msg.text)
def tearDown(self):
# close the browser window
self.driver.quit()
if __name__ == '__main__':
unittest.main()
When this test is executed, @data will call the get_data() method, which will
read the supplied le and return the list of values back to @data. These values
are unpacked and the test methods are generated for each row.
Reading values from Excel
Maintaining test data in the Excel spreadsheet is another common practice. It also
helps nontechnical users to dene new tests by simply adding a row of data in a
spreadsheet. Consider the following screenshot as an example of maintaining the
data in an Excel spreadsheet:
Reading values from the Excel spreadsheet will need another library called xlrd,
which can be installed with the following command:
pip install xlrd
www.it-ebooks.info

Page Objects and Data-driven Testing
[ 146 ]
The xlrd library provides read access to the workbook,
sheet, and cells in order to read the data. It does not write
to a spreadsheet. For writing the data, we can use the
xlwt library. We can also use openpyxl for reading and
writing data in a spreadsheet. Find more information at
http://www.python-excel.org/.
Let's modify the get_data() method from the previous example to read data from
a spreadsheet into a list and modify the test as shown in the following code:
import xlrd, unittest
from ddt import ddt, data, unpack
from selenium import webdriver
def get_data(file_name):
# create an empty list to store rows
rows = []
# open the specified Excel spreadsheet as workbook
book = xlrd.open_workbook(file_name)
# get the first sheet
sheet = book.sheet_by_index(0)
# iterate through the sheet and get data from rows in list
for row_idx in range(1, sheet.nrows):
rows.append(list(sheet.row_values(row_idx, 0, sheet.ncols)))
return rows
@ddt
class SearchExcelDDT(unittest.TestCase):
def setUp(self):
# create a new Firefox session
self.driver = webdriver.Firefox()
self.driver.implicitly_wait(30)
self.driver.maximize_window()
# navigate to the application home page
self.driver.get("http://demo.magentocommerce.com/")
# get the data from specified Excel spreadsheet
# by calling the get_data function
@data(*get_data("TestData.xlsx"))
@unpack
def test_search(self, search_value, expected_count):
self.search_field =
self.driver.find_element_by_name("q")
www.it-ebooks.info

Chapter 8
[ 147 ]
self.search_field.clear()
# enter search keyword and submit.
self.search_field.send_keys(search_value)
self.search_field.submit()
# get all the anchor elements which have
# product names displayed
# currently on result page using
# find_elements_by_xpath method
products = self.driver.find_elements_by_xpath
("//h2[@class='product-name']/a")
if expected_count > 0:
# check count of products shown in results
self.assertEqual(expected_count, len(products))
else:
msg = self.driver.
find_element_by_class_name("note-msg")
self.assertEqual("Your search returns
no results.", msg.text)
def tearDown(self):
# close the browser window
self.driver.quit()
if __name__ == '__main__':
unittest.main()
Similar to the previous example for CSV les, when this test is executed @data will
call the get_data()method, which will read the supplied le and return the list of
values back to @data from a spreadsheet. These values are unpacked and the test
methods are generated for each row.
Reading values from a database
If you need to read values from a database, you just need to
modify the get_data() method and use the appropriate
libraries to connect to the database and read values using
SQL queries back into a list.
www.it-ebooks.info

Page Objects and Data-driven Testing
[ 148 ]
The page objects pattern
Until now, we were writing Selenium WebDriver tests directly into Python classes
using unittest. We were specifying locators and test case steps into these classes.
This code is good to start; however, as we progress on, adding more and more tests
to our tests suite, it will become difcult to maintain. This will make tests brittle.
Developing maintainable and reusable test code is important for sustainable test
automation and the test code should be treated as production code and similar
standards and patterns should to be applied while developing the test code.
To overcome these problems, we can use various design patterns and principles such
as Don't Repeat Yourself (DRY), and code refactoring techniques while creating the
tests. If you're a developer, you might already be using these techniques.
The page object pattern is one of the highly used patterns among the Selenium user
community to structure the tests, making them separate from low-level actions, and
providing a high-level abstraction. You can compare the page object pattern to the
facade pattern, which enables creating a simplied interface for complex code.
The page object pattern offers creating an object representing each web page
from the application under test. We can dene classes for each page, modeling all
attributes and actions for that page. This creates a layer of separation between the
test code and technical implementation of pages and application functionality that
we will be testing, by hiding the locators, low-level methods dealing with elements,
and business functionality. Instead, the page objects will provide a high-level API for
tests to deal with the page functionality.
Tests should use these page objects at a high level, where any change in attributes
or actions in the underlying page should not break the test. Using the page object
pattern provides the following benets:
• Creating a high-level abstraction that helps minimize changes when the
underlying page is modied by developers. So, you will change only the
page object and the calling tests will be unaffected.
• Creating reusable code that can be shared across multiple test cases.
• Tests are more readable, exible, and maintainable.
www.it-ebooks.info

Chapter 8
[ 149 ]
Let's start refactoring the test that we created in the earlier chapter and implement
the page objects that provide a high-level abstraction for the application that we
are testing. In this example, we will create the following structure for the selected
pages in the sample application. We will start implementing a base page object,
which will be used by all other pages as a template. The base object will also provide
regions that are blocks of functionality available for all other pages; for example, the
search feature is available on all pages of the application. We will create a search
region object that will be available for all the pages inherited from the base page. We
will implement a class for the home page, which represents the home page of the
application; search results page, which shows the list of products matching with the
search criteria; and a product page, which provides attributes and actions related to
a product. We will create a structure as shown in the following diagram:
Organizing tests
Before we start implementing page objects for the sample application we are testing,
let's implement a BaseTestCase class, which will provide us with the setUp() and
tearDown() methods so that we don't need to write these for each test class we
create. We can also put reusable code in this class. Create basetestcase.py and
implement the BaseTestCase class as shown in the following code:
import unittest
from selenium import webdriver
class BaseTestCase(unittest.TestCase):
def setUp(self):
www.it-ebooks.info

Page Objects and Data-driven Testing
[ 150 ]
# create a new Firefox session
self.driver = webdriver.Firefox()
self.driver.implicitly_wait(30)
self.driver.maximize_window()
# navigate to the application home page
self.driver.get('http://demo.magentocommerce.com/')
def tearDown(self):
# close the browser window
self.driver.quit()
The BasePage object
The BasePage object will act as a parent object for all the page objects that we will
create in our test suite. The base page provides common code that the page object can
use. Let's create base.py and implement BasePage as shown in the following code:
from abc import abstractmethod
class BasePage(object):
""" All page objects inherit from this """
def __init__(self, driver):
self._validate_page(driver)
self.driver = driver
@abstractmethod
def _validate_page(self, driver):
return
""" Regions define functionality available through
all page objects """
@property
def search(self):
from search import SearchRegion
return SearchRegion(self.driver)
class InvalidPageException(Exception):
""" Throw this exception when you don't find
the correct page """
pass
We added an abstract method called _validate_page(), which will be implemented
by the page objects inheriting from BasePage to validate that the page they represent
is loaded in the browser before the test can use attributes or actions.
www.it-ebooks.info

Chapter 8
[ 151 ]
We also created a property called search that returns the SearchRegion object.
This is similar to a page object. However, SearchRegion represents the search box
displayed on all the pages of the application. So, adding to each page object we are
sharing this from the BasePage class.
We also implemented InvalidPageException, which is used in the _validate_
page() method. If it fails to validate the page, InvalidPageExecption will be raised.
Implementing page objects
Now, let's start implementing page objects for each page that we're going to deal
with in our test.
1. First we will dene HomePage. Create homepage.py and implement the
HomePage class as shown in the following code:
from base import BasePage
from base import InvalidPageException
class HomePage(BasePage):
_home_page_slideshow_locator =
'div.slideshow-container'
def __init__(self, driver):
super(HomePage, self).__init__(driver)
def _validate_page(self, driver):
try:
driver.find_element_by_class_name
(self._home_page_slideshow_locator)
except:
raise InvalidPageException
("Home Page not loaded")
One of the practices that we will follow is to separate the locator strings from
the place where they are being used. We will create a private variable to
store locators using the _ prex. For example, the _home_page_slideshow_
locator variable stores the locator for the slideshow component displayed
on the home page of the application. We will use this to validate whether the
browser is indeed showing the home page, as follows:
_home_page_slideshow_locator = 'div.slideshow-container'
www.it-ebooks.info

Page Objects and Data-driven Testing
[ 152 ]
We also implemented the _validate_page() method in the HomePage class.
This method validates whether the home page is loaded in the browser using
the element used to display a slideshow on the home page.
2. Next, we will implement the SearchRegion class, which handle the search
feature of the application. It provides the searchFor() method, which
returns the SearchResult class representing the search results page. Create
a new search.py le and implement both the classes as shown in the
following code:
from base import BasePage
from base import InvalidPageException
from product import ProductPage
class SearchRegion(BasePage):
_search_box_locator = 'q'
def __init__(self, driver):
super(SearchRegion, self).__init__(driver)
def searchFor(self, term):
self.search_field =
self.driver.find_element_by_name
(self._search_box_locator)
self.search_field.clear()
self.search_field.send_keys(term)
self.search_field.submit()
return SearchResults(self.driver)
class SearchResults(BasePage):
_product_list_locator = 'ul.products-grid > li'
_product_name_locator = 'h2.product-name a'
_product_image_link = 'a.product-image'
_page_title_locator = 'div.page-title'
_products_count = 0
_products = {}
def __init__(self, driver):
super(SearchResults, self).__init__(driver)
results = self.driver.find_elements_by_css_selector
(self._product_list_locator)
for product in results:
name = product.find_element_by_css_selector
www.it-ebooks.info

Chapter 8
[ 153 ]
(self._product_name_locator).text
self._products[name] =
product.find_element_by_css_selector
(self._product_image_link)
def _validate_page(self, driver):
if 'Search results for' not in driver.title:
raise InvalidPageException
('Search results not loaded')
@property
def product_count(self):
return len(self._products)
def get_products(self):
return self._products
def open_product_page(self, product_name):
self._products[product_name].click()
return ProductPage(self.driver)
3. Finally, we will implement the ProductPage class, which has some attributes
related to a product. We can access a product from the SearchResults class,
which has a method to open the product details page for a given product.
Create a product.py le and implement the ProductPage class as shown in
the following code:
from base import BasePage
from base import InvalidPageException
class ProductPage(BasePage):
_product_view_locator = 'div.product-view'
_product_name_locator = 'div.product-name
span'
_product_description_locator = 'div.tab-content
div.std'
_product_stock_status_locator = 'p.availability
span.value'
_product_price_locator = 'span.price'
def __init__(self, driver):
super(ProductPage, self).__init__(driver)
@property
def name(self):
www.it-ebooks.info

Page Objects and Data-driven Testing
[ 154 ]
return self.driver.\
find_element_by_css_selector
(self._product_name_locator)\
.text.strip()
@property
def description(self):
return self.driver.\
find_element_by_css_selector
(self._product_description_locator)\
.text.strip()
@property
def stock_status(self):
return self.driver.\
find_element_by_css_selector
(self._product_stock_status_locator)\
.text.strip()
@property
def price(self):
return self.driver.\
find_element_by_css_selector
(self._product_price_locator)\
.text.strip()
def _validate_page(self, driver):
try:
driver.find_element_by_css_selector
(self._product_view_locator)
except:
raise InvalidPageException
('Product page not loaded')
You can further add actions on the product page to add a product to the shopping
cart, or for comparison of products. Also, attributes that return the rating and other
information related to the product are added back to the test.
www.it-ebooks.info

Chapter 8
[ 155 ]
Creating a test with page objects
Let's create a test that uses BaseTestCase and calls the page objects that we created
to test the search feature of the application. This test creates an instance of the
HomePage class and calls the searchFor() method, which returns an instance of
SearchResults. Later, the test calls the open_product_page() method of the
SearchResults class to open details for the specied product listed in the result.
The test checks the attributes of a sample product. Create a searchtest.py le and
implement the SearchProductTest test as shown in the following code:
import unittest
from homepage import HomePage
from BaseTestCase import BaseTestCase
class SearchProductTest(BaseTestCase):
def testSearchForProduct(self):
homepage = HomePage(self.driver)
search_results = homepage.search.searchFor('earphones')
self.assertEqual(2, search_results.product_count)
product = search_results.open_product_page
('MADISON EARBUDS')
self.assertEqual('MADISON EARBUDS', product.name)
self.assertEqual('$35.00', product.price)
self.assertEqual('IN STOCK', product.stock_status)
if __name__ == '__main__':
unittest.main(verbosity=2)
Notice that we did not write the setUp() and tearDown() methods in this test.
We inherited this test class from BaseTestCase, which implements these methods.
We can overload these methods if we want to do test-specic setup or clean-up.
In this example, we implemented page objects for search workow navigation.
You can also implement similar page objects or regions for shopping cart, account
registration, login, and so on.
www.it-ebooks.info

Page Objects and Data-driven Testing
[ 156 ]
Summary
In this chapter, we recognized the need to write data-driven tests and organize
the test code using the page object pattern for reusability, scalability, and
maintainability. The data-driven pattern provides us the ability to separate test data
from test case, so we can reuse the test code to test multiple test data. We also looked
at how to use the ddt library along with unittest to implement data-driven testing
and read data from various external sources. You learned the page object pattern and
how it benets in building a maintainable test suite by implementing page objects for
the sample application and creating a test that uses the page objects.
In the next chapter you will learn some advanced techniques with Selenium
WebDriver API, such as capturing screenshots and movies from test runs,
performing mouse and keyboard actions, handling session cookies, and so on.
www.it-ebooks.info

Advanced Techniques of
Selenium WebDriver
So far in the book, we have seen how to set up Selenium WebDriver for testing
web applications and some of the important features and APIs for locating and
interacting with various elements in the browser.
In this chapter, we will explore some of the advanced APIs of Selenium WebDriver.
These features come in handy when you're testing fairly complex applications.
In this chapter, you will learn more about:
• Creating tests that simulate keyboard or mouse events using the
Actions class
• Simulating mouse operations such as drag-and-drop and double-click
• Running JavaScript code
• Capturing screenshots and movies of test runs
• Handling browser navigation and cookies
Methods for performing keyboard and
mouse actions
The Selenium WebDriver's advanced user interactions API allows us to perform
operations from simple keyboard and mouse events to complex mouse events such
as drag-and-drop, pressing a hotkey combination, holding a key, and performing
mouse operations. This is accomplished by using the ActionChains class in the
Selenium WebDriver Python API.
www.it-ebooks.info

Advanced Techniques of Selenium WebDriver
[ 158 ]
Here is a list of the important methods supported by the ActionChains class for
performing keyboard and mouse events:
Method Description Argument Example
click(on_
element=None)
This method
performs the click
operation.
on_
element:
This is the
element
to click.
If None,
clicks on
the current
mouse
position.
click(main_link)
click_and_hold(on_
element=None)
This method holds
down the left
mouse button on
an element.
on_
element:
This is the
element to
click and
hold down
the mouse
button. If
None, clicks
on current
mouse
position.
click_and_
hold(gmail_link)
double_click(on_
element=None)
This method
performs a
double-click on an
element.
on_
element:
This is the
element
to double-
click. If
None, clicks
on current
mouse
position.
double_click(info_
box)
drag_and_
drop(source,
target)
This method
performs the
drag-and-drop
operation.
source:
This is the
element
to mouse
down.
target:
The element
to mouse
up.
drag_and_drop(img,
canvas)
www.it-ebooks.info

Chapter 9
[ 159 ]
Method Description Argument Example
key_down(value,
element=None)
This method sends
a key press only,
without releasing
it. This should
only be used with
modifier keys
(such as the Ctrl,
Alt, and Shift keys).
key: This is
the modifier
key to send.
Values are
defined in
the Keys
class.
target:
The element
to send
keys. If
None, sends
a key to
current
focused
element.
key_down(Keys.
SHIFT)\
send_keys('n')\
key_up(Keys.SHIFT)
key_up(value,
element=None)
This method
releases a modifier
key.
key: This is
the modifier
key to send.
Values are
defined in
the Keys
class.
target:
This is the
element to
send keys.
If None,
sends a key
to current
focused
element.
move_to_element(to_
element)
This method
moves the mouse
to the middle of an
element.
to_
element:
This is the
element to
move to.
move_to_
element(gmail_
link)
perform() This method
performs all stored
actions.
perform()
www.it-ebooks.info
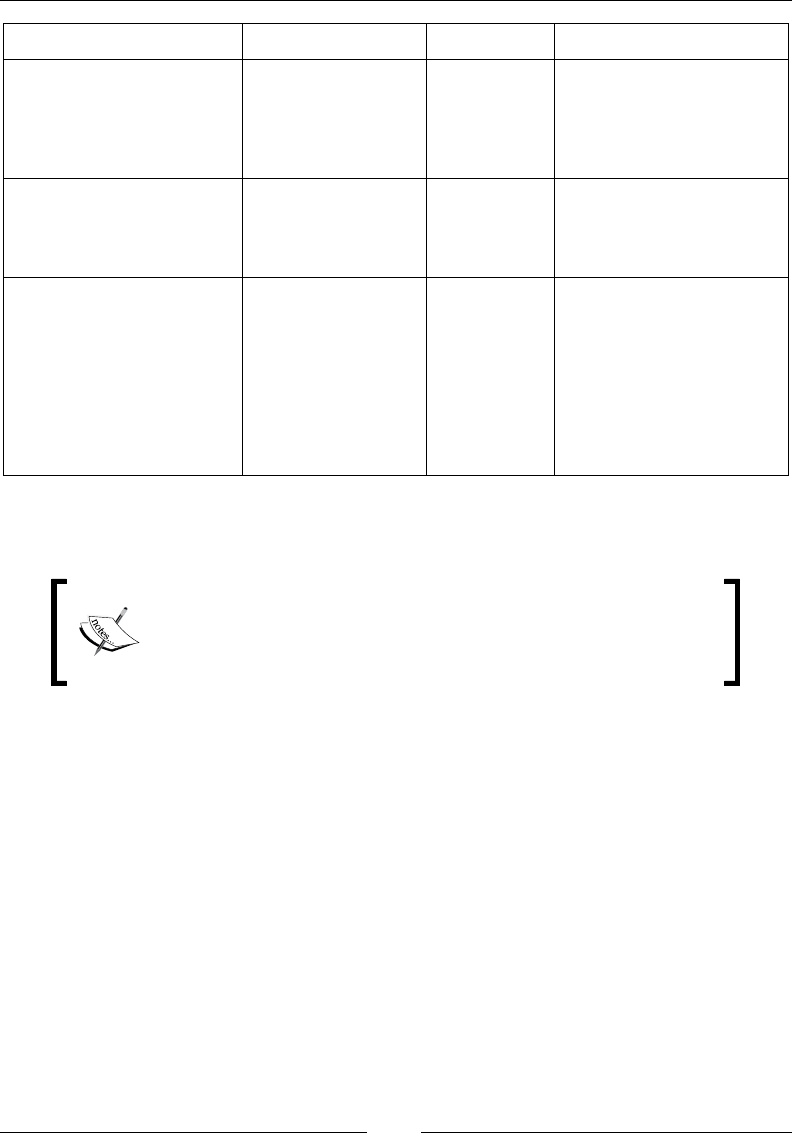
Advanced Techniques of Selenium WebDriver
[ 160 ]
Method Description Argument Example
release(on_
element=None)
This method
releases a held
mouse button.
on_
element:
This is the
element to
mouse up
release(banner_
img)
send_keys(keys_to_
send)
This method sends
keys to an element
that has current
focus.
keys_to_
send: This
is the keys
to send
send_keys("hello")
send_keys_to_
element(element,
keys_to_send)
This method sends
keys to an element.
element:
This is the
element to
send keys.
keys_to_
send: The
keys to
send.
send_keys_to_
element(firstName,
"John")
For a detailed list visit http://selenium.googlecode.com/git/docs/api/py/
webdriver/selenium.webdriver.common.action_chains.html.
The Interactions API is not supported on Safari. Also, there
are limitations for certain events on various browsers. For more
details, refer to https://code.google.com/p/selenium/
wiki/AdvancedUserInteractions.
Keyboard actions
Let's create a test that demonstrates how to use the keyboard actions such as
pressing a hot key combination. In the sample app when we press the Shift + N
key combination, a label will change its color, as shown in the following code:
from selenium import webdriver
from selenium.webdriver.common.by import By
from selenium.webdriver.support.ui import WebDriverWait
from selenium.webdriver.support import expected_conditions
from selenium.webdriver.common.action_chains import ActionChains
from selenium.webdriver.common.keys import Keys
import unittest
class HotkeyTest(unittest.TestCase):
www.it-ebooks.info

Chapter 9
[ 161 ]
URL = "https://rawgit.com/jeresig/jquery.hotkeys/
master/test-static-05.html"
def setUp(self):
self.driver = webdriver.Chrome()
self.driver.get(self.URL)
self.driver.implicitly_wait(30)
self.driver.maximize_window()
def test_hotkey(self):
driver = self.driver
shift_n_label = WebDriverWait(self.driver, 10).\
until(expected_conditions.visibility_of_element_
located((By.ID, "_shift_n")))
ActionChains(driver).\
key_down(Keys.SHIFT).\
send_keys('n').\
key_up(Keys.SHIFT).perform()
self.assertEqual("rgba(12, 162, 255, 1)",
shift_n_label.value_of_css_
property("background-color"))
def tearDown(self):
self.driver.close()
if __name__ == "__main__":
unittest.main(verbosity=2)
We can perform a hotkey press operation using the ActionChains class. In this
example, we used a combination of key_down(), send_key(), and key_up()
methods to perform Shift + N key press as if a real user has pressed these keys:
ActionChains(driver).\
key_down(Keys.SHIFT).\
send_keys('n').\
key_up(Keys.SHIFT).perform()
The ActionChains class requires the driver instance to be passed. We can then
arrange the sequence of events by calling the available methods and executing the
action calling the perform() method.
www.it-ebooks.info

Advanced Techniques of Selenium WebDriver
[ 162 ]
The mouse movement
Here is another example that calls the mouse move event by calling the
move_to_element() method of the ActionChains class. This is equivalent to
the onMouseOver event. The move_to_element() method will move the mouse
cursor from its current location to the supplied element.
from selenium import webdriver
from selenium.webdriver.common.by import By
from selenium.webdriver.support.ui import WebDriverWait
from selenium.webdriver.support import expected_conditions
from selenium.webdriver.common.action_chains import ActionChains
import unittest
class ToolTipTest (unittest.TestCase):
def setUp(self):
self.driver = webdriver.Firefox()
self.driver.get("http://jqueryui.com/tooltip/")
self.driver.implicitly_wait(30)
self.driver.maximize_window()
def test_tool_tip(self):
driver = self.driver
frame_elm = driver.find_element_by_class_name("demo-frame")
driver.switch_to.frame(frame_elm)
age_field = driver.find_element_by_id("age")
ActionChains(self.driver).move_to_element(age_field).perform()
tool_tip_elm = WebDriverWait(self.driver, 10)\
.until(expected_conditions.visibility_of_element_
located((By.CLASS_NAME, "ui-tooltip-content")))
# verify tooltip message
self.assertEqual("We ask for your age only for statistical
purposes.", tool_tip_elm.text)
def tearDown(self):
self.driver.close()
if __name__ == "__main__":
unittest.main(verbosity=2)
www.it-ebooks.info

Chapter 9
[ 163 ]
The double_click method
We can double-click on an element by calling the double_click() method of the
ActionChains class in the following way:
from selenium import webdriver
from selenium.webdriver.common.action_chains import ActionChains
import unittest
class DoubleClickTest (unittest.TestCase):
URL = "http://api.jquery.com/dblclick/"
def setUp(self):
self.driver = webdriver.Chrome()
self.driver.get(self.URL)
self.driver.maximize_window()
def test_double_click(self):
driver = self.driver
frame = driver.find_element_by_tag_name("iframe")
driver.switch_to.frame(frame)
box = driver.find_element_by_tag_name("div")
# verify color is Blue
self.assertEqual("rgba(0, 0, 255, 1)",
box.value_of_css_property("background-
color"))
ActionChains(driver).move_to_element(
driver.find_element_by_tag_name("span"))\
.perform()
ActionChains(driver).double_click(box).perform()
# verify Color is Yellow
self.assertEqual("rgba(255, 255, 0, 1)",
box.value_of_css_property("background-
color"))
def tearDown(self):
self.driver.close()
if __name__ == "__main__":
unittest.main(verbosity=2)
www.it-ebooks.info

Advanced Techniques of Selenium WebDriver
[ 164 ]
The drag_and_drop method
In Selenium WebDriver, we can perform the drag-and-drop operation by calling
the drag_and_drop() method of the ActionChains class. This method requires
the source element that will be dragged, and the target element where the source
element will be dropped. Here is an example of the drag_and_drop method:
from selenium import webdriver
from selenium.webdriver.common.action_chains import ActionChains
import unittest
class DragAndDropTest (unittest.TestCase):
URL = "http://jqueryui.com/resources/
demos/droppable/default.html"
def setUp(self):
self.driver = webdriver.Firefox()
self.driver.get(self.URL)
self.driver.maximize_window(30)
self.driver.maximize_window()
def test_drag_and_drop(self):
driver = self.driver
source = driver.find_element_by_id("draggable")
target = driver.find_element_by_id("droppable")
ActionChains(self.driver).drag_and_drop(source, target).
perform()
self.assertEqual("Dropped!", target.text)
def tearDown(self):
self.driver.close()
if __name__ == "__main__":
unittest.main(verbosity=2)
Executing JavaScript
We can execute JavaScript code through Selenium WebDriver using the methods
available from the WebDriver class. This is useful when we cannot perform certain
operations using the Selenium WebDriver API or we want to test the JavaScript code.
www.it-ebooks.info

Chapter 9
[ 165 ]
The WebDriver class provides the following methods to execute JavaScript code:
Method Description Argument Example
execute_async_
script(script,
*args)
This method
asynchronously
executes JavaScript
in the current
window/frame.
script: This is
the JavaScript
code
args: This is
any arguments
for the
JavaScript code
driver.
execute_async_
script("return
document.title")
execute_
script(script,
*args)
This method
synchronously
executes JavaScript
in the current
window/frame.
script: This is
the JavaScript
code
args: This is
any arguments
for the
JavaScript code
driver.execute_
script("return
document.title")
Let's create a test with a utility method, which highlights the elements before
performing actions on these elements by using the JavaScript methods:
from selenium import webdriver
import unittest
class ExecuteJavaScriptTest (unittest.TestCase):
def setUp(self):
# create a new Firefox session
self.driver = webdriver.Firefox()
self.driver.implicitly_wait(30)
self.driver.maximize_window()
# navigate to the application home page
self.driver.get("http://demo.magentocommerce.com/")
def test_search_by_category(self):
# get the search textbox
search_field = self.driver.find_element_by_name("q")
self.highlightElement(search_field)
search_field.clear()
# enter search keyword and submit
self.highlightElement(search_field)
www.it-ebooks.info

Advanced Techniques of Selenium WebDriver
[ 166 ]
search_field.send_keys("phones")
search_field.submit()
# get all the anchor elements which have product names
# displayed currently on result page using
# find_elements_by_xpath method
products = self.driver.find_elements_by_xpath("//h2[@
class='product-name']/a")
# check count of products shown in results
self.assertEqual(2, len(products))
def tearDown(self):
# close the browser window
self.driver.quit()
def highlightElement(self, element):
self.driver.execute_script("arguments[0].setAttribute('style',
arguments[1]);",
element, "color: green;
border: 2px solid green;")
self.driver.execute_script("arguments[0].setAttribute('style',
arguments[1]);",
element , "")
if __name__ == "__main__":
unittest.main(verbosity=2)
We can execute the JavaScript code by calling the execute_script method of the
WebDriver class, as shown in the following example. We can also pass arguments
to the JavaScript code through this method. In this example, we are modifying the
border style for a moment and reverting that change back. This will highlight the
given element with green border during the execution. It is useful to know which
step is being executed on screen:
def highlightElement(self, element):
self.driver.execute_script("arguments[0].setAttribute('style',
arguments[1]);",
element, "color: green; border: 2px solid green;")
self.driver.execute_script("arguments[0].setAttribute('style',
arguments[1]);",
element , "")
www.it-ebooks.info

Chapter 9
[ 167 ]
Capturing screenshots of failures
Capturing screenshots during the test run comes very handy when you want to
communicate failures to the developers. It also helps in debugging tests or creating
evidence of the test run. Selenium WebDriver comes with built-in methods to
capture screenshots during the test run. The WebDriver class provides the following
methods to capture and save a screenshot:
Method Description Argument Example
Save_
screenshot(filename)
This method gets
the screenshot
of the current
window and saves
the image to the
specified file.
filename:
This is the
path/name
of the file to
which the
screenshot
will be
saved
Driver.save_
screenshot
("homepage.png")
get_screenshot_as_
base64()
This method gets
the screenshot
of the current
window as a
base64 encoded
string, which
is useful in
embedding images
in HTML.
driver.get_
screenshot_as_
base64()
get_screenshot_as_
file(filename)
This method gets
the screenshot
of the current
window. It returns
False if there is
any IOError, else
returns True. It
uses full paths in
your filename.
filename:
This is the
path/name
of the file to
which the
screenshot
will be
saved
driver.get_
screenshot_as_
file('/results/
screenshots/
HomePage.png')
get_screenshot_as_
png()
This method gets
the screenshot
of the current
window as binary
data.
driver.get_
screenshot_as_
png()
www.it-ebooks.info

Advanced Techniques of Selenium WebDriver
[ 168 ]
Let's create a test that captures a screenshot when it leads to failure. In this example,
we'll locate an element that should be present on the application's home page.
However, if the test doesn't nd this element, it will throw NoSuchElementException
and take a screenshot of the page displayed in the browser window, which we can
use for debugging or sending to a developer as evidence.
from selenium import webdriver
import datetime, time, unittest
from selenium.common.exceptions import NoSuchElementException
class ScreenShotTest(unittest.TestCase):
def setUp(self):
self.driver = webdriver.Firefox()
self.driver.get("http://demo.magentocommerce.com/")
def test_screen_shot(self):
driver = self.driver
try:
promo_banner_elem = driver.find_element_by_id("promo_
banner")
self.assertEqual("Promotions", promo_banner_elem.text)
except NoSuchElementException:
st = datetime.datetime\
.fromtimestamp(time.time()).strftime('%Y%m%d_%H%M%S')
file_name = "main_page_missing_banner" + st + ".png"
driver.save_screenshot(file_name)
raise
def tearDown(self):
self.driver.close()
if __name__ == "__main__":
unittest.main(verbosity=2)
In this example, when the test doesn't nd the promotion banner element, it takes
a screenshot using the save_screenshot() method. We need to pass the path and
name of the le to which the resulting image will be saved, as shown:
try:
promo_banner_elem = driver.find_element_by_id("promo_banner")
self.assertEqual("Promotions", promo_banner_elem.text)
except NoSuchElementException:
st = datetime.datetime.fromtimestamp(time.time()).
strftime('%Y%m%d_%H%M%S')
file__name = "main_page_missing_banner" + st + ".png"
driver.save_screenshot(file__name)
raise
www.it-ebooks.info

Chapter 9
[ 169 ]
While capturing and saving the screenshot, it is recommended to use
unique names for the image les such as including a timestamp and
also using the Portable Network Graphics (PNG) format for highest
compression of the le, which also results in minimal le size.
Recording a video of the test run
Similar to capturing screenshots, recording a video of the test run helps in recording
complete test sessions in a visual way. We can watch the recorded video to
understand what happens during the test run. This can be used as evidence for other
project stakeholders as well, or can also be used as demos.
Selenium WebDriver does not have built-in features to record video. Recording
a video of the test run can be achieved by using a Python library called Castro
separately. It was created by Jason Huggin, the creator of Selenium.
Castro is based on a cross-platform screen recording tool named Pyvnc2swf (refer
to http://www.unixuser.org/~euske/vnc2swf/pyvnc2swf.html). It captures
the screen where the tests are running using the VNC protocol and generates a
Shockwave Flash (SWF) movie le.
Castro also allows recording sessions from a remote machine using the VNC protocol.
It needs a VNC program installed on the machine to record the videos. Before
installing Castro we need PyGame library to be installed. The PyGame package
cannot be installed with pip command and we need to get PyGame installer from
http://www.pygame.org/download.shtml.
We can install Castro using pip with the following command line:
pip install Castro
We also need to install or enable VNC on the desktop, where the tests will be executed.
On Windows, we need to install a VNC program. TightVNC (http://www.tightvnc.
com/) will be a good choice. Install the TightVNC server and viewer on Windows.
On Ubuntu, go to Settings | Preference | Remote Desktop and check the Allow
other users to view your desktop checkbox. For Mac, we can install the Vine VNC
server from http://www.testplant.com/products/vine/ or enable Remote
Desktop from System Preferences.
Let's capture a video recording of the search test case that we created in the earlier
chapters, as shown in the following code:
import unittest
from selenium import webdriver
from castro import Castro
www.it-ebooks.info

Advanced Techniques of Selenium WebDriver
[ 170 ]
class SearchProductTest(unittest.TestCase):
def setUp(self):
# create an instance of Castro and provide name for the output
# file
self.screenCapture = Castro(filename="testSearchByCategory.
swf")
# start the recording of movie
self.screenCapture.start()
# create a new Firefox session
self.driver = webdriver.Firefox()
self.driver.implicitly_wait(30)
self.driver.maximize_window()
# navigate to the application home page
self.driver.get("http://demo.magentocommerce.com/")
def test_search_by_category(self):
# get the search textbox
search_field = self.driver.find_element_by_name("q")
search_field.clear()
# enter search keyword and submit
search_field.send_keys("phones")
search_field.submit()
# get all the anchor elements which have product names
# displayed
# currently on result page using find_elements_by_xpath method
products = self.driver.find_elements_by_xpath("//h2[@
class='product-name']/a")
# check count of products shown in results
self.assertEqual(2, len(products))
def tearDown(self):
# close the browser window
self.driver.quit()
# Stop the recording
self.screenCapture.stop()
if __name__ == '__main__':
unittest.main(verbosity=2)
www.it-ebooks.info

Chapter 9
[ 171 ]
To create a new video recording session, we need to create an Castro object and
initialize the instance with the path and name of the capture le as an argument
to the constructor. Screen capture is started with the start() method, which will
record the entire screen until the stop method is called. Testing with the setUp()
method is the best way to initialize the Castro instance and start the recording as
shown in the following example:
def setUp(self):
#Create an instance of Castro and provide name for the output
# file
self.screenCapture = Castro(filename="testSearchByCategory.swf")
# Start the recording of movie
self.screenCapture.start()
# create a new Firefox session
self.driver = webdriver.Firefox()
self.driver.implicitly_wait(30)
self.driver.maximize_window()
# navigate to the application home page
self.driver.get("http://demo.magentocommerce.com/")
To stop the recording, call the stop() method. Again, the teadDown() method is a
good place to call this method so that we can capture the entire test case, as shown in
the following code:
def tearDown(self):
# close the browser window
self.driver.quit()
# Stop the recording
self.screenCapture.stop()
If there are multiple tests in a class, we can initialize and stop the recording in the
class level using the setUp() and teardown() methods instead of creating a new le
for each test.
Handling pop-up windows
Testing pop-up windows involves identifying a pop-up window by its name
attribute or window handle, switching the driver context to the desired pop-up
window and then executing steps on the pop-up window, and nally switching
back to the parent window.
www.it-ebooks.info

Advanced Techniques of Selenium WebDriver
[ 172 ]
When we create an instance of the browser from our tests, it is a parent window and
any subsequent windows that are created from the parent window are called child
windows or pop-up windows. We can work with any child window as long as it
belongs to the current WebDriver context.
Here is an example of a pop-up window:
Create a new test class PopupWindowTest with the test method test_popup_window()
as shown in the following code:
from selenium import webdriver
import unittest
class PopupWindowTest(unittest.TestCase):
URL = "https://rawgit.com/upgundecha/learnsewithpython/master/
pages/Config.html"
def setUp(self) :
self.driver = webdriver.Firefox()
self.driver.get(self.URL)
self.driver.maximize_window()
def test_window_popup(self):
www.it-ebooks.info

Chapter 9
[ 173 ]
driver = self.driver
# save the WindowHandle of Parent Browser Window
parent_window_id = driver.current_window_handle
# clicking Help Button will open Help Page in a new Popup
# Browser Window
help_button = driver.find_element_by_id("helpbutton")
help_button.click()
driver.switch_to.window("HelpWindow")
driver.close()
driver.switch_to.window(parent_window_id)
def tearDown(self):
self.driver.close()
if __name__ == "__main__":
unittest.main(verbosity=2)
Before the context is moved to the child window, we can save the handle of the
parent window using the current_window_handle property. We will use this
value later to switch back to the parent window from the child window. We can
switch to the child window by using its name or window handle by calling the
switch_to.window() method of the WebDriver class. In this example, we are
using the name of the window, as shown:
driver.switch_to_window("HelpWindow")
After performing actions and checking on the help window, we can close it by calling
the close() method and switch back to the parent window, as shown:
driver.close()
# switch back to Home page window using the handle
driver.switch_to_window(default_window)
www.it-ebooks.info

Advanced Techniques of Selenium WebDriver
[ 174 ]
Managing cookies
Cookies are important for any web applications to store information on the user's
computer for a better user experience. Cookies are used to store user preferences,
login information, and various other details of the client. The Selenium WebDriver
API provides various methods to manage these cookies during testing. We can read
cookie values, add cookies, and delete cookies during the test. This can be used to
test how the application reacts when cookies are manipulated. The WebDriver class
provides the following methods to manage cookies:
Method Description Argument Example
add_
cookie(cookie_
dict)
This method adds
a cookie to the
current session
cookie_
dict:
This is a
dictionary
containing a
cookie name
and value
pair
driver.add_
cookie({"foo","bar"})
delete_all_
cookies()
This method
deletes all the
cookies from the
current session
driver.delete_all_
cookies()
delete_
cookie(name)
This method
deletes a single
cookie with the
specified name
name:
This is the
name of the
cookie to be
deleted
driver.delete_
cookie("foo")
get_cookie(name) This method gets
a single cookie
by the name
and returns the
dictionary for the
cookie if found,
none, if not
name:
This is the
name of the
cookie to
search
driver.get_
cookie("foo")
get_cookies() This method
gets a set of
dictionaries
corresponding to
cookies from the
current session
driver.get_cookies()
www.it-ebooks.info

Chapter 9
[ 175 ]
Here is an example that validates a cookie created to store the language selected by
the user on the demo application's home page:
import unittest
from selenium import webdriver
from selenium.webdriver.support.ui import Select
class CookiesTest(unittest.TestCase):
def setUp(self):
# create a new Firefox session
self.driver = webdriver.Firefox()
self.driver.implicitly_wait(30)
self.driver.maximize_window()
# navigate to the application home page
self.driver.get("http://demo.magentocommerce.com/")
def test_store_cookie(self):
driver = self.driver
# get the Your language dropdown as instance of Select class
select_language = \
Select(self.driver.find_element_by_id("select-language"))
# check default selected option is English
self.assertEqual("ENGLISH", select_language.first_selected_
option.text)
# store cookies should be none
store_cookie = driver.get_cookie("store")
self.assertEqual(None, store_cookie)
# select an option using select_by_visible text
select_language.select_by_visible_text("French")
# store cookie should be populated with selected country
store_cookie = driver.get_cookie("store")['value']
self.assertEqual("french", store_cookie)
def tearDown(self):
# close the browser window
self.driver.quit()
if __name__ == '__main__':
unittest.main(verbosity=2)
We can retrieve the value of the cookie using the get_cookie() method of the
WebDriver class. We need to pass the name of the cookie. This method returns
a dictionary.
www.it-ebooks.info

Advanced Techniques of Selenium WebDriver
[ 176 ]
Summary
In this chapter, you learned about advanced features of Selenium WebDriver API for
handling the keyboard and mouse events, capturing screenshots, recording videos,
and handling cookies.
We used the ActionChains class to perform various keyboard and mouse
operations. These features are very useful when dealing with applications that
heavily use keyboard and mouse actions.
You saw how to run JavaScript code from your tests. This is a very powerful feature
while dealing with applications that use Ajax and we can use the underlying
JavaScript API from our scripts.
You captured screenshots for errors during test runs and also recorded a test session.
This helps in debugging the tests as well as creating evidences for test runs.
Finally, you learned about the browser navigation methods and cookies.
In the next chapter, you will learn how to integrate our tests with other tools such as
Continuous Integration tools to run the tests as part of the build process.
www.it-ebooks.info

Integration with Other
Tools and Frameworks
Selenium WebDriver Python API is very powerful and exible. So far we have
learned how Selenium WebDriver integrates with the unittest library and creates
a simple testing framework. However, this does not limit us to just using the
unittest library. We can integrate Selenium WebDriver with lots of other tools and
frameworks. There are a number of ready-to-use frameworks available along with
Selenium WebDriver.
We can use Selenium WebDriver for applying Behavior-Driven Development
(BDD) in your projects with various frameworks that support BDD.
We can also integrate Selenium Python API with Continuous Integration (CI) and
build tools that allow us to run the test immediately after the application is built. This
provides an early feedback to developers about quality and stability of the application.
In this chapter, you will learn some of the major integration examples including:
• Downloading and installing Behave for BDD
• Writing features with Behave
• Automating features with Behave and Selenium WebDriver
• Downloading and installing Jenkins
• Setting up Jenkins to run Selenium tests
• Conguring Jenkins to capture results from test runs
www.it-ebooks.info

Integration with Other Tools and Frameworks
[ 178 ]
Behavior-Driven Development
BDD is an agile software development method introduced by Dan North in his
famous paper Introducing BDD (http://dannorth.net/introducing-bdd/).
BDD is also known as Acceptance Test Driven Development (ATDD), story testing,
or specication by example. BDD encourages collaboration between developers,
QAs, and nontechnical or business users in a software project to dene specications
and decide acceptance criteria by writing test cases in a natural language that
nonprogrammers can read.
There are a number of tools available in Python to
implement BDD; the two major tools are Behave (https://
pythonhosted.org/behave/) and Lettuce (http://
lettuce.it/), which is inspired by the very famous BDD tool
called Cucumber (http://cukes.info/) available in Ruby.
You will learn how to use Behave to implement BDD for the sample application in
the upcoming sections.
Installing Behave
Installing Behave is a simple process. We can download and install Behave with the
following command line:
pip install behave
This will download and install Behave along with its dependencies. There are
additional installation options available for Behave at https://pythonhosted.org/
behave/install.html.
Writing the rst feature in Behave
The process starts with discussing and listing the features and user stories for
these features for the application that is being developed. Various stakeholders
meet together and create a list of features, user stories, and acceptance criteria in a
ubiquitous language, which is understood by all the parties, including developers,
testers, business analysts, and customers. Behave supports creating feature les in
the Gherkin language in the Given, When, Then (GWT) format. Refer to https://
github.com/cucumber/cucumber/wiki/Gherkin for more information on the
Gherkin language.
www.it-ebooks.info

Chapter 10
[ 179 ]
Let's begin with a feature for the search functionality in the sample application. The
search feature should enable users to search for products from the home page. The
feature le provides a simple description for the user story and acceptance criteria
as a scenario outline in the GWT format. These are also known as scenario steps,
explained as follows:
• Given: This sets a precondition to execute the scenario; navigate to the home
page in this scenario
• When: This contains the actions for the scenario; search for a term in
this example
• Then: This contains the outcome of the scenario; check whether the list of
matching products is displayed in this example
We can have multiple When and Then steps in a scenario:
Feature: I want to search for products
Scenario Outline: Search
Given I am on home page
when I search for "phone"
then I should see list of matching products in search results
To use this feature with Behave, we need to store this in a plain text le with a
.feature extension. Let's create a folder named bdd/feature and save this le
as search.feature in the folder.
Implementing a step denition le for the feature
Once we write the feature les, we need to create step denitions for the steps
written in scenario outline. Step denitions are Python code blocks that understand
the steps written in plain text format and contain the code to either call the API
or Selenium WebDriver commands to execute the steps. The step denition les
should be stored in a steps subfolder where feature les are stored. Let's create
a search_steps.py le with the following step denitions:
from behave import *
@given('I am on home page')
def step_i_am_on_home_page(context):
context.driver.get("http://demo.magentocommerce.com/")
@when('I search for {text}')
www.it-ebooks.info

Integration with Other Tools and Frameworks
[ 180 ]
def step_i_search_for(context, text):
search_field = context.driver.find_element_by_name("q")
search_field.clear()
# enter search keyword and submit
search_field.send_keys(text)
search_field.submit()
@then('I should see list of matching products in search results')
def step_i_should_see_list(context):
products = context.driver.\
find_elements_by_xpath("//h2[@class='product-name']/a")
# check count of products shown in results
assert len(products) > 0
For each GWT, we need to create a matching step denition. For example, for the
given I am on home page step, we created the following step denition. Steps are
identied using decorators that match the predicate from the feature le: @given,
@when, and @then. The decorator accepts a string containing the rest of the phrase
used in the scenario step it belongs to, in this case, I am on home page.
@given('I am on home page')
def step_i_am_on_home_page(context):
context.driver.get("http://demo.magentocommerce.com/")
We can also pass parameters that are embedded in steps to the step denition. For
example, for @when we are passing the search phrase as when I search for "phone".
We can read the value using {text} as shown in the following code sample:
@when('I search for {text}')
def step_i_search_for(context, text):
search_field = context.driver.find_element_by_name("q")
search_field.clear()
# enter search keyword and submit
search_field.send_keys(text)
search_field.submit()
You can see the context variable passed to the step denitions. The context variable
is used by Behave to store information to share around. It runs at three levels,
automatically managed by Behave. We can also use the context variable to store and
share information between the steps.
www.it-ebooks.info
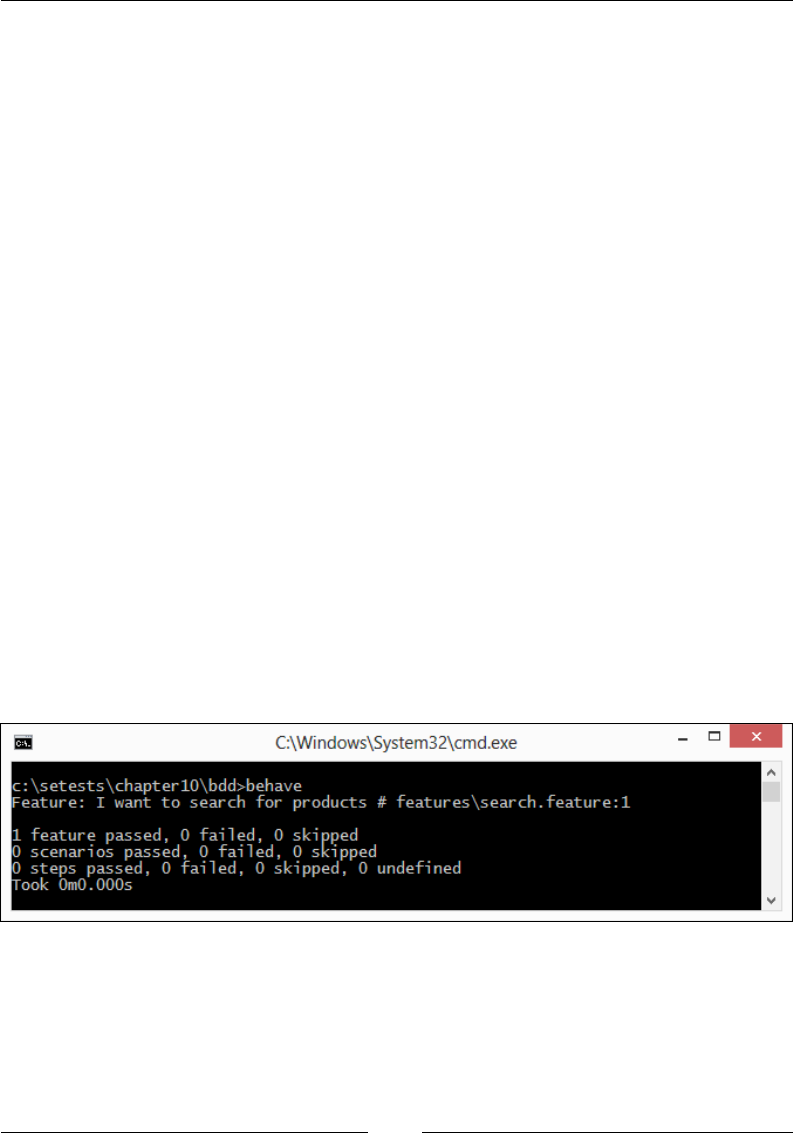
Chapter 10
[ 181 ]
Creating environment congurations
Before we can run the feature, we need to create an environment le that is used
to set up common Behave settings and any code that will be shared between steps
or step denition les. This is a great place to initialize the WebDriver to start
Firefox, which will be used to run the steps using the Selenium WebDriver. Create
an environment.py le by the side of the feature les and add the before_all()
and after_all() methods, which will be executed before and after the features are
executed, as shown in the following code:
from selenium import webdriver
def before_all(context):
context.driver = webdriver.Chrome()
def after_all(context):
context.driver.quit()
Running features
Now, it's time to run the features with Behave. This is really simple. Navigate to the
bdd folder that we created in the earlier steps and execute the behave command:
behave
Behave will execute all the features that are written in the bdd folder. It will use
the step denition and environment settings that we made to run the scenarios.
At the end of execution, you will see a summary of the execution, as shown in the
following screenshot:
Behave generates a summary at three levels, namely features, scenarios, and steps for
pass and failure.
www.it-ebooks.info

Integration with Other Tools and Frameworks
[ 182 ]
Using a scenario outline
Sometimes we might want to run scenario(s) with a number of variables giving a set
of known states, actions to take, and expected outcomes, all using the same steps,
something similar to data-driven tests. We can use a scenario outline for this.
Let's rewrite the search.feature le with a scenario outline and examples as given
in the following steps. The scenario outline works like a template, for example, given
in the Example section.
1. In this example, we create two examples to check the search functionality
on the categories or for a specic product. The Example sections contain the
search term and the expected results in a tabular format:
Feature: I want to search for products
Scenario Outline: Search
Given I am on home page
when I search for <term>
then I should see results <search_count> in search results
Examples: By category
| term | search_count |
| Phones | 2 |
| Bags | 7 |
Examples: By product name
| term | search_count |
| Madison earbuds | 3 |
2. Also, modify the search_steps.py le to match the text used in steps:
from behave import *
@given('I am on home page')
def step_i_am_on_home_page(context):
context.driver.get("http://demo.magentocommerce.com/")
@when('I search for {text}')
def step_i_search_for(context, text):
search_field = context.driver.find_element_by_name("q")
search_field.clear()
# enter search keyword and submit
www.it-ebooks.info
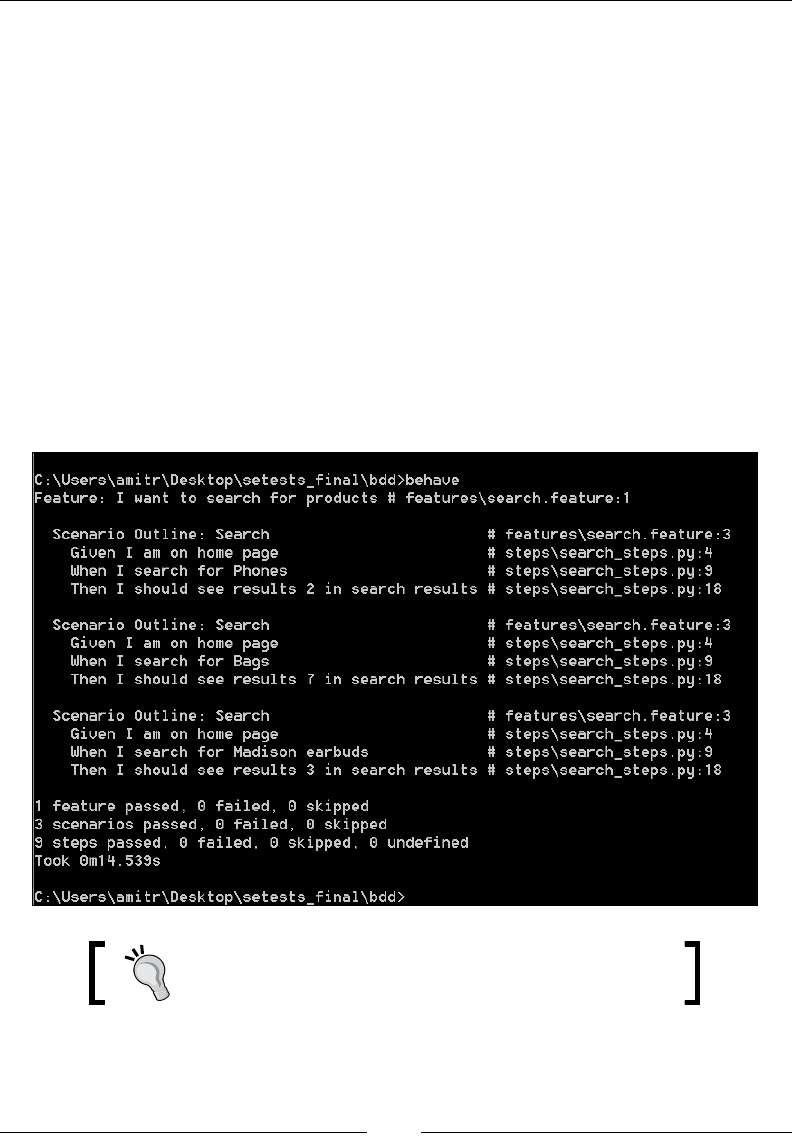
Chapter 10
[ 183 ]
search_field.send_keys(text)
search_field.submit()
@then('I should see results {text} in search results')
def step_i_should_see_results(context, text):
products = context.driver.\
find_elements_by_xpath("//h2[@class='product-name']/a")
# check count of products shown in results
assert len(products) >= int(text)
When we execute this feature, Behave will automatically repeat the scenario
outline for the number of rows it nds in the Example section that are written in
the search.feature le. It passes the data from the example data to the scenario
steps and executes the denition. You can see the outcome after Behave is run on the
modied feature. Behave prints all the combinations it ran on the feature as shown
in following screenshot:
Behave also supports report generation in JUnit format
using the –junit switch.
www.it-ebooks.info

Integration with Other Tools and Frameworks
[ 184 ]
CI with Jenkins
Jenkins is a popular CI server written in Java. It is derived from the Hudson project.
Both Jenkins and Hudson provide similar features.
Jenkins supports various version control tools such as CVS, SVN, Git, Mercurial,
Perforce, and ClearCase, and can execute projects built with Apache Ant or Maven
for Java. However, it can also build projects for other platforms using plugins,
arbitrary shell scripts, and Windows' batch commands.
Apart from building the software, Jenkins can be deployed to set up an automated
testing environment where Selenium WebDriver tests can be run unattended based on
a dened schedule, or every time changes are submitted to the version control system.
In the upcoming sections, you will learn how to set up Jenkins to run tests using a
free-style project template.
Preparing for Jenkins
Before we start using Jenkins to run our tests, we need to make few changes so that
we can take advantage of Jenkins's capabilities. We will use Jenkins to run our tests
on a pre-dened schedule and collect results from tests so that Jenkins can show
them on a dashboard. We will reuse smoke tests that we created in Chapter 2, Writing
Tests Using unittest.
We used the TestSuite runner of unittest to execute the bunch of tests together.
We will now output the results of these tests in the JUnit report format. For this, we
need a Python library called xmlrunner from https://pypi.python.org/pypi/
xmlrunner/1.7.4.
Download and install xmlrunner with the following command line:
pip install xmlrunner
We will use smoketests.py, which uses the TestSuite runner to run the tests
from homepagetests.py and searchtest.py. We will use the xmlrunner.XML
TestRunner to run these tests and generate a test report in JUnit format. This report
will be generated in XML format and kept in the test-reports subfolder. To use
xmlrunner, please make the highlighted changes in smoketest.py, as shown in the
following code example:
import unittest
from xmlrunner import xmlrunner
from searchtest import SearchProductTest
from homepagetests import HomePageTest
www.it-ebooks.info
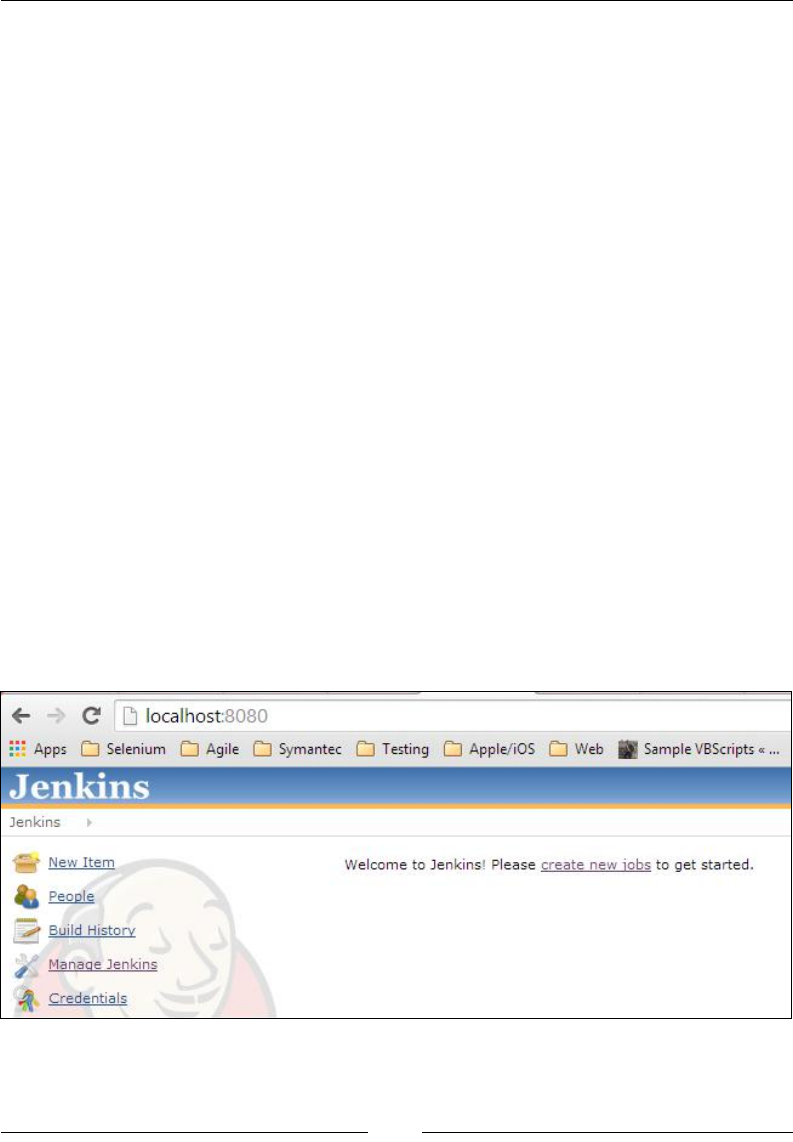
Chapter 10
[ 185 ]
# get all tests from SearchProductTest and HomePageTest class
search_tests = unittest.TestLoader().loadTestsFromTestCase(SearchProd
uctTest)
home_page_tests = unittest.TestLoader().loadTestsFromTestCase(HomePag
eTest)
# create a test suite combining search_test and home_page_test
smoke_tests = unittest.TestSuite([home_page_tests, search_tests])
# run the suite
xmlrunner.XMLTestRunner(verbosity=2, output='test-reports').run(smoke_
tests)
Setting up Jenkins
Setting up Jenkins is fairly straightforward. You can download and install Jenkins
using the installers available for various platforms. In following example, we will set
up Jenkins and create a new build job to run the smoke tests on the sample application:
1. Download and install the Jenkins CI server from http://jenkins-ci.org/.
For this recipe, the Jenkins Windows installer is used to set up Jenkins on a
Windows 7 machine.
2. Navigate to Jenkins Dashboard (http://localhost:8080 by default) in the
browser window.
3. On Jenkins Dashboard, click on New Item or create new jobs link to create
a new Jenkins job as shown in the following screenshot:
www.it-ebooks.info
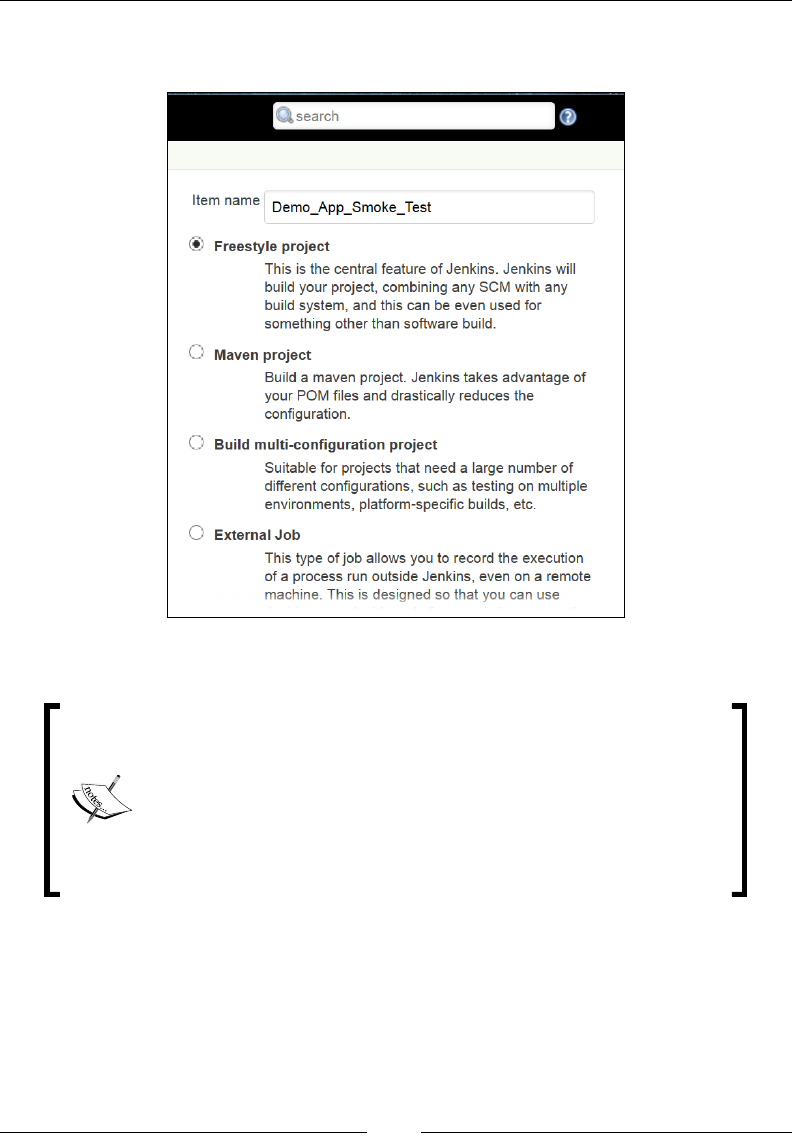
Integration with Other Tools and Frameworks
[ 186 ]
4. Enter Demo_App_Smoke_Test in the Item name textbox and select the Build a
free-style software project radio button as shown in the following screenshot:
5. Click on the OK button. A new job will be created with the specied name.
We can connect to various version control or Source Control
Management (SCM) tools such as SVN, GIT, Perforce, and so
on to store the source and test code. We can then get the latest
version of the code to build and test the software in the Jenkins
workspace as part of building the steps. However, to keep things
simple, in this example, we will copy the test scripts from a folder
to the Jenkins workspace using the Execute Windows batch
command build step as described in following set of steps.
6. In the Build section, click on Add build step and select the Execute
Windows batch command option from the dropdown.
www.it-ebooks.info
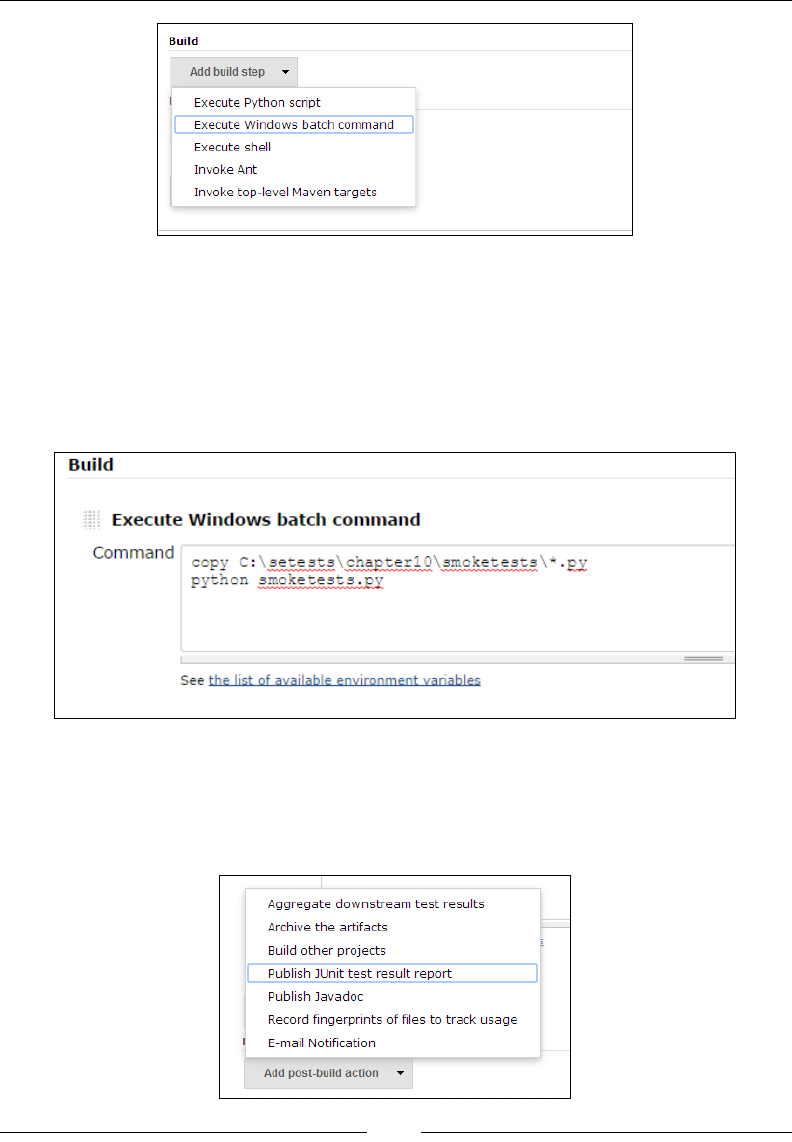
Chapter 10
[ 187 ]
7. Enter the following command in the Command textbox as shown in the
following screenshot. Paths will be different in your case. This command will
copy the Python les containing smoke tests to the Jenkins workspace and
run smoketest.py as shown:
copy c:\setests\chapter10\smoketests\*.py
python smoketest.py
8. We congured smoketest.py to generate test results in JUnit format so that
Jenkins can display the test results on its dashboard. To integrate these reports
with Jenkins, click on Add post-build action and select the Publish JUnit test
result report option from the dropdown as shown in the following screenshot:
www.it-ebooks.info
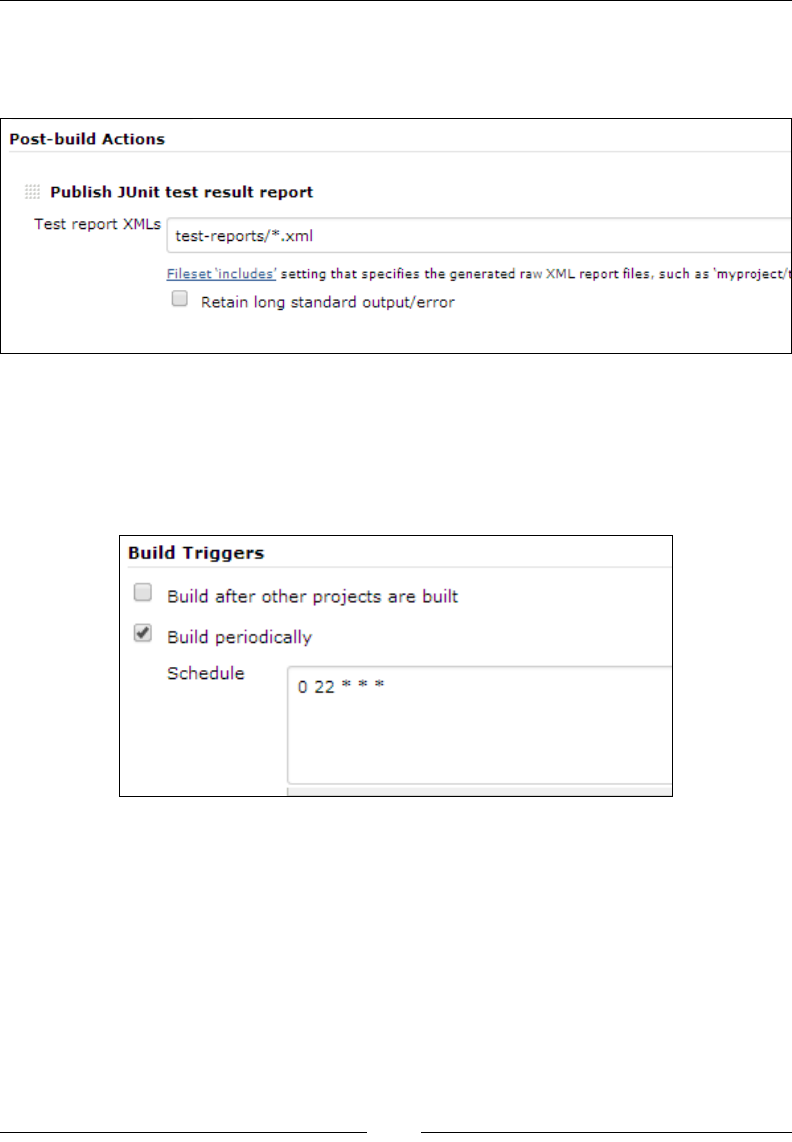
Integration with Other Tools and Frameworks
[ 188 ]
9. In the Post-build Actions section, add test-reports/*.xml in the Test report
XMLs textbox as shown in the following screenshot. Every time Jenkins runs
the tests, it will read test results from the test-report subfolder.
10. To schedule tests for automatic execution in the Build Triggers section, select
Build periodically and enter the data as shown in the following screenshot
in the Schedule textbox. This will trigger the build process every day at 10
p.m. and Jenkins will run the tests as part of the build process unattended so
you can see the results next morning when you arrive at the ofce.
11. Click on the Save button to save the job conguration. Jenkins will display
the project page for the newly created job.
www.it-ebooks.info
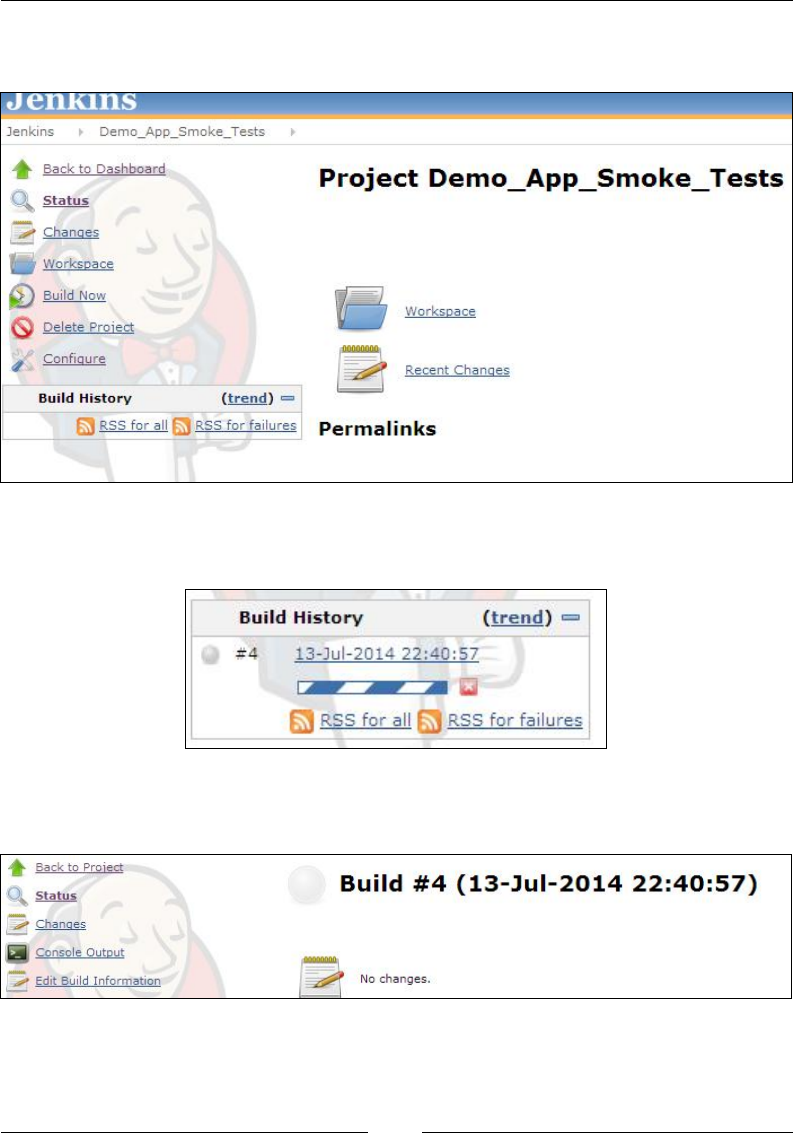
Chapter 10
[ 189 ]
12. We can check if everything is set to see if tests are executed. Click on the Build
Now link to run the job manually as shown in the following screenshot:
13. You can see the running status for the build in the Build History section as
shown in the following screenshot:
14. Click on the running item in the Build History section, which will open the
following page:
www.it-ebooks.info
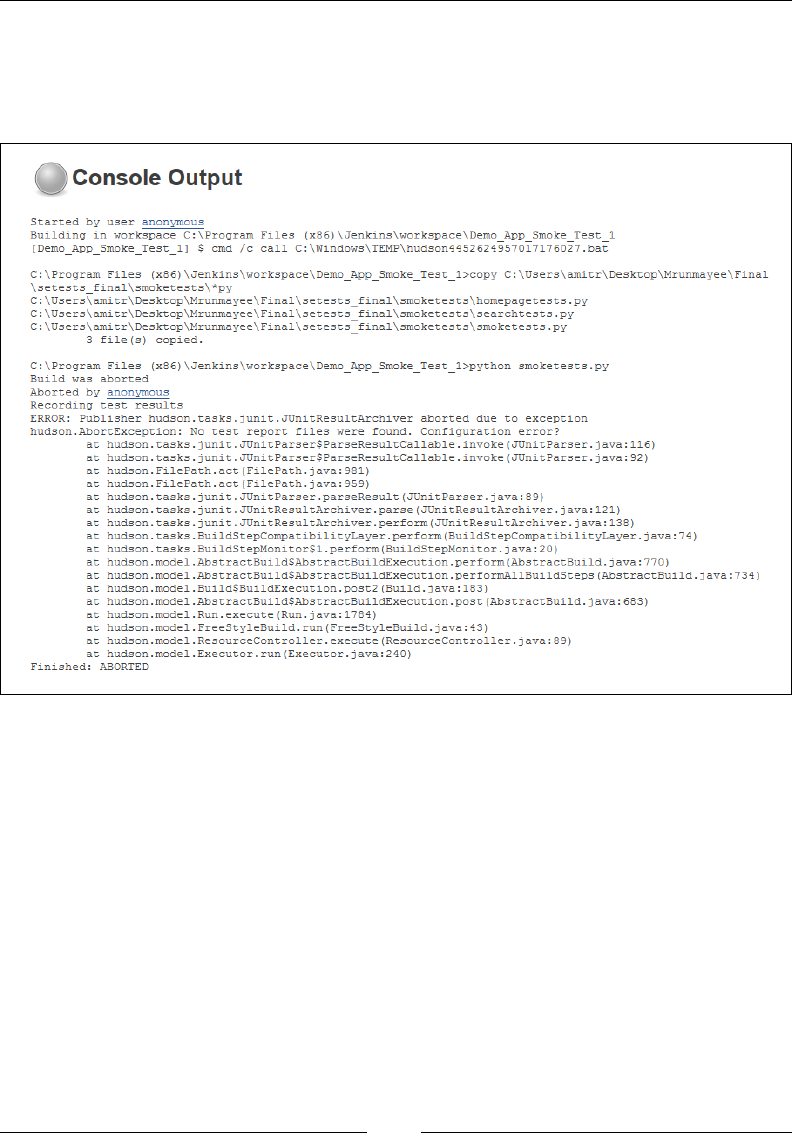
Integration with Other Tools and Frameworks
[ 190 ]
15. Apart from the status on Jenkins and the progress bar, we can also see what's
happening behind the scenes by opening the Console Output link. This will
open the Console Output page with the command-line output as shown in
the following screenshot:
16. Once the build process is completed by Jenkins, we can see a build page
similar to the one shown in the next screenshot.
17. Jenkins displays test results and various other metrics by reading the result
les generated by the unittest frameworks. Jenkins also archives test results.
To view the test results, click on the Test Results link on the build page.
18. We congured our tests to generate the test results in the JUnit format and
when we click on Test Results, Jenkins will display the JUnit test results as
shown in the following screenshot. It highlights the tests that are failed and
a summary for the tests.
www.it-ebooks.info
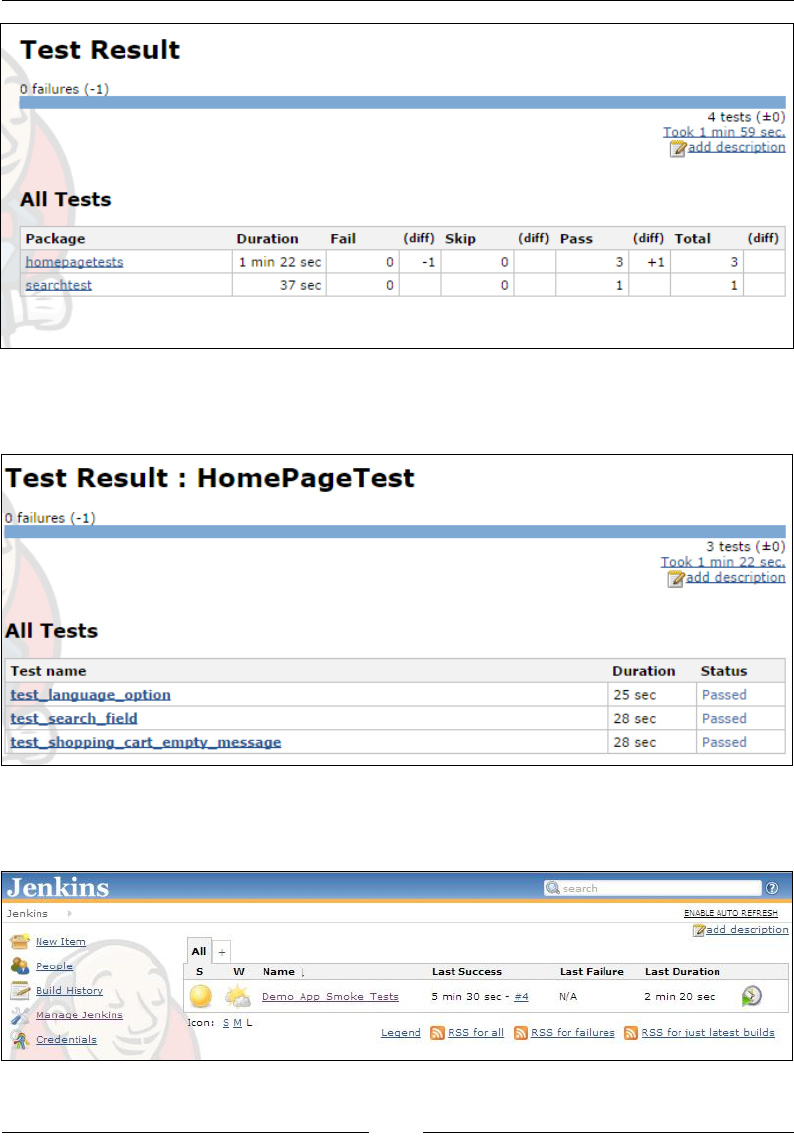

Integration with Other Tools and Frameworks
[ 192 ]
Summary
In this chapter, you learned how to integrate Selenium with Behave for BDD and
Jenkins for CI. You saw how to integrate Selenium WebDriver API with Behave to
run automated acceptance tests by writing features and step denition les.
You set up Jenkins to run Selenium WebDriver tests so that you can run these
tests while building the software or scheduling tests so they can be run nightly.
Jenkins provides an easy-to-set-up model to run the build and test jobs for various
application development platforms and environments.
This completes your learning journey using Selenium WebDriver with Python.
You learned some basic lessons on using Selenium WebDriver to automate
browser interaction to create automated tests for web applications. You can use
this knowledge and build your own testing framework.
www.it-ebooks.info
Index
A
act 31
ActionChains class, methods
click_and_hold(on_element=None) 158
click(on_element=None) 158
double_click(on_element=None) 158
drag_and_drop(source, target) 158
key_down(value, element=None) 159
key_up(value, element=None) 159
move_to_element(to_element) 159
perform() 159
release(on_element=None) 160
send_keys(keys_to_send) 160
send_keys_to_element(element,
keys_to_send) 160
Acceptance Test Driven Development
(ATDD). See BDD
accept() method 84
add_cookie(cookie_dict) method 174
Alert class
about 84
browser navigation, automating 87
methods 84-86
properties 84
Alert class, methods
accept() 84
dismiss() 84
send_keys(*value) 84
Alert class, properties
text 84
alerts
waiting for 98, 99
all_selected_options property 81, 83
Android
testing on 131
test, writing for 132-134
Android Debug Bridge (adb) 132
Android SDK
setting up 124
Appium
about 121
hybrid apps 122
installing 125-128
mobile web apps 122
native apps 122
prerequisites 122, 123
Appium Inspector 128
Appium, prerequisites
Android SDK, setting up 124
Appium Python client package,
setting up 125
Xcode, setting up for iOS 123, 124
Appium Python client package
setting up 125
URL 125
arrange 30
assert 31
assertions 38
B
back() method 69, 87
BasePage object, page object
pattern 150, 151
BDD
about 178
URL 178
Behave
environment congurations, creating 181
features, running 181
feature, writing 178, 179
www.it-ebooks.info

[ 194 ]
installing 178
scenario outline, using 182, 183
step denition le, implementing
for feature 179, 180
URL 178
Behavior Driven Development. See BDD
browser navigation, Alert class
automating 87
back() method 87
forward() method 87
refresh() method 87
C
Cascading Style Sheets (CSS) 45
checkboxes 73, 74
Chrome
support, adding for 108
ChromeDriver
URL 26, 27
Chrome node
adding 113
CI
with Jenkins 184
class level startUp() method 38
class name
used, for nding elements 56
clear() method
about 72
using 76, 77
click_and_hold(on_element=None)
method 158
click() method 72
click(on_element=None) method 158
close() method 69
cloud
tests, running 116
code
cleaning 33
Comma separated values (CSV) 143
conditions
URL 96
Continuous Integration. See CI
cookies
add_cookie(cookie_dict) method 174
delete_all_cookies() method 174
delete_cookie(name) method 174
get_cookie(name) method 174
get_cookies() method 174
managing 174, 175
cross-browser support
about 23
Google Chrome, setting up 26, 27
Internet Explorer, setting up 23-25
cross-browser testing 101
CSS selectors
used, for nding elements 60, 61
Cucumber, BDD tool
URL 178
current_url property 69
current_window_handle property 69
custom wait conditions
implementing 99
D
data-driven test (ddt)
about 140
creating, with ddt in unittest 141, 142
ddt used 140
external data sources, using 143
ddt library
installing 141
URL 141
used, for data-driven test 140
ddt in unittest
data-driven test, creating with 141, 142
delete_all_cookies() method 174
delete_cookie(name) method 174
deselect_all() method 81
deselect_by_index(index) method 81
deselect_by_value(value) method 81
deselect_by_visible_text(text) method 81
developer tools
used, for nding locators 47
dismiss() method 84
Don't Repeat Yourself (DRY) 148
double_click method 163
double_click(on_element=None)
method 158
Down() method 37, 38
drag_and_drop method 164
drag_and_drop(source, target) method 158
www.it-ebooks.info

[ 195 ]
dropdowns
working with 79, 80
E
Eclipse
URL 12
element attribute value
nding 75, 76
elements
display, checking 74, 75
inspecting, Google Chrome used 49, 50
inspecting, Internet Explorer used 50, 51
inspecting with Firefox, Firebug
add-in used 47, 48
waiting, to be enabled 97
elements, nding
class name used 56
CSS selectors used 60, 61
ID attribute used 54, 55
name attribute used 55
Selenium WebDriver used 51, 52
tag name used 57, 58
XPath used 58-60
element_to_be_clickable(locator)
condition 94
element_to_be_selected(element)
condition 95
execute_async_script(script, *args)
method 165
execute_script(script, *args) method 165
ExpectedCondition class
about 93, 94
alerts, waiting for 98, 99
element_to_be_clickable(locator) 94
element_to_be_selected(element) 95
element, waiting to be enabled 97
invisibility_of_element_located(locator) 95
presence_of_all_elements_
located(locator) 95
presence_of_element_located(locator) 95
text_to_be_present_in_element(locator,
text_) 95
title_contains(title) 96
title_is(title) 96
visibility_of(element) 96
visibility_of_element_located(locator) 96
explicit wait
using 93, 94
external data sources, data-driven test
used 143
values, reading from CSV 143, 145
values, reading from Excel 145-147
F
features, Behave
environment congurations, creating 181
running 181
scenario outline, using 182
step denition le, implementing 179, 180
writing 178, 179
nd_element_by methods
about 52
nd_element_by_class_name(name) 52
nd_element_by_css_
selector(css_selector) 53
nd_element_by_id(id) 52
nd_element_by_link_text(link_text) 53
nd_element_by_name(name) 52
nd_element_by_partial_link_
text(link_text) 53
nd_element_by_tag_name(name) 52
nd_element_by_xpath(xpath) 53
nd_elements_by methods
nd_elements_by_class_name(name) 53
nd_elements_by_css_selector(css_
selector) 54
nd_elements_by_id(id_) 53
nd_elements_by_link_text(text) 54
nd_elements_by_name(name) 53
nd_elements_by_partial_link_
text(link_text) 54
nd_elements_by_tag_name(name) 54
nd_elements_by_xpath(xpath) 54
nd methods
used, for merging tests 63-65
Firebug add-in
URL 47
used, for inspecting elements with
Firefox 47, 48
used, for inspecting pages with
Firefox 47, 48
www.it-ebooks.info

[ 196 ]
Firefox node
adding 112
rst_selected_option property 81
forms 73, 74
forward() method 70, 87
G
get_attribute() method 75
get_attribute(name) method 72
get_cookie(name) method 174
get_cookies() method 174
get_screenshot_as_base64() method 167
get(url) method 70
Gherkin
URL 178
Given, When, Then (GWT) format 178, 179
Google Chrome
setting up 26, 27
used, for inspecting elements 49, 50
used, for inspecting pages 49, 50
Graphical User Interface (GUI) 68
Grid
tests, running 114-116
H
HTML forms 68
HTML test report 43, 44
hub
Selenium server, launching as 109, 110
Hybrid apps 122
Hyper Text Markup Language (HTML) 45
I
ID attribute
used, for nding elements 54, 55
IDE 10
IDE, selecting
PyCharm 10, 12
PyDev Eclipse plugin 12
PyScripter 13
IE node
adding 111, 112
implicitly_wait(time_to_wait) method 71
implicit wait
using 91-93
installers
URL 8
Integrated Development Environment. See
IDE
Interactions API
URL 160
InternetExplorerDriver
URL 23
Internet Explorer (IE)
support, adding for 108
setting up 23-25
URL 26
used, for inspecting elements 50
used, for inspecting pages 50, 51
invisibility_of_element_located(locator)
condition 95
iOS
testing on 128
test, writing for 129-131
is_displayed() method 72, 74
is_enabled() method 72
is_selected() method
about 72
using 76
J
JavaScript
execute_async_script(script, *args)
method 165
execute_script(script, *args) method 165
executing 164-166
Jenkins
about 184
CI server, URL 185
preparing for 184
setting up 185-191
K
keyboard actions
about 160, 161
performing 157
key_down(value, element=None)
method 159
key_up(value, element=None) method 159
www.it-ebooks.info

[ 197 ]
L
Lettuce, BDD tool
URL 178
links
nding 61
nding, partial text used 62
lists
working with 79, 80
locators
nding, developer tools used 47
M
Mac OS X
with Safari 113, 114
Magento
URL 18
maximize_window() method 70
Mobile web apps 122
mouse movement
about 162
double_click method 163
drag_and_drop method 164
performing 157
move_to_element(to_element) method 159
N
name attribute
used, for nding elements 55
name property 69
native apps 122
nodes
adding 111
Chrome node, adding 113
Firefox node, adding 112
IE node, adding 111, 112
nose framework 31
O
options property 81
orientation property 69
P
page object pattern
about 148, 149
BasePage object 150, 151
implementing 151-154
test, creating with 155
tests, organizing 149
pages
inspecting, Google Chrome used 49, 50
inspecting, Internet Explorer used 50, 51
inspecting with Firefox, Firebug add-in
used 47, 48
page_source property 69
partial text
used, for nding links 62
perform() method 159
pip installer tool
URL 8
pop-up windows
handling 171-173
working with 84
Portable Network Graphics (PNG)
format 169
presence_of_all_elements_located(locator)
condition 95
presence_of_element_located(locator)
condition 95
properties and methods
URL 69, 71, 80
PyCharm
about 10, 12
setting up 15-17
URL 11
PyCharm Community Edition
URL 15
PyDev
URL 12
PyDev Eclipse plugin 12
PyScripter 13
pytest framework
URL 31
Python
installing 8
www.it-ebooks.info

[ 198 ]
Q
quit() method 70
R
radio buttons 73, 74
refresh() method 70, 87
release(on_element=None) method 160
RemoteWebDriver class 102
S
Safari
Mac OS X with 113, 114
Sauce Labs
URL 117
used, for running tests 117-119
using 135, 136
Save_screenshot(lename) method 167
screenshot
get_screenshot_as_base64() method 167
get_screenshot_as_png() method 167
of failures, capturing 167, 168
Save_screenshot(lename) method 167
search form
HTML code 46, 47
select_by_index(index) method 81
select_by_value(value) method 82
select_by_visible_text(text) method 82
Select class
about 80
methods 81
properties 81
Select class, methods
deselect_all() 81
deselect_by_index(index) 81
deselect_by_value(value) 81
deselect_by_visible_text(text) 81
select_by_index(index) 81
select_by_value(value) 82
select_by_visible_text(text) 82
Select class, properties
all_selected_options 81
rst_selected_option 81
options 81
Selenium documentation
URL 10
Selenium Grid
about 108
Mac OS X, with Safari 113
nodes, adding 111
Selenium server, launching as hub 109, 110
Selenium package
installing 8, 9
Selenium server
launching, as hub 109, 110
Selenium standalone server
about 102
downloading 103
launching 103, 104
test, running on 105-107
URL 103
Selenium WebDriver
about 29
used, for nding elements 51, 52
Selenium WebDriver Python
documentation
browsing 9, 10
URL 9
Selenium with Python
rst steps 18-23
Selenium with Python, prerequisites
about 8
Integrated Development Environment
(IDE), selecting 10
PyCharm, setting up 15-17
Python, installing 8
Selenium package, installing 8
Selenium WebDriver Python
documentation, browsing 9, 10
send_keys(keys_to_send) method 160
send_keys() method
using 76, 77
send_keys_to_element(element,
keys_to_send) method 160
send_keys(*value) method 72, 84
set_page_load_timeout(time_to_wait)
method 71
set_script_timeout(time_to_wait) method 71
setUp() method 32
Shockwave Flash (SWF) 169
size property 72
Source Control Management (SCM) 186
startUp() method 37, 38
www.it-ebooks.info

[ 199 ]
submit() method 73
switch_to.active_element() method 70
Switch.to_alert() method 70
switch_to.default_content() method 70
switch_to.frame(frame_reference)
method 70
switch_to.window(window_name)
method 71
T
tag name
used, for nding elements 57, 58
tag_name property 72
test case 30
TestCase class
about 31
another test, adding 36
code, cleaning 33
setUp() method 32
test, running 34, 35
tests, writing 32, 33
test xture 30
test report 30
test runner 30
tests
another test, adding 36
running 34, 35
running, in cloud 116
running, in Grid 114-116
running, Sauce Labs used 117-119
writing 32, 33
writing, for Android 132, 134
writing, for iOS 129-131
test, Selenium standalone server
running 105-107
support, adding for Chrome 108
support, adding for Internet
Explorer (IE) 108
tests, page object pattern
creating 155
organizing 149
test suites 30 40, 42
textboxes 73, 74
text property 72, 84
TightVNC
URL 169
title_contains(title) condition 96
title_is(title) condition 96
title property 69
U
Uniform Resource Locator (URL) 45
unittest documentation
URL 29
unittest library
about 29
assertions 38
class level startUp() method 37, 38
Down() method 37, 38
test case 30
TestCase class 31
test xture 30
test report 30
test runner 30
test suite 30
V
value_of_css_property(property_name)
method 73
values, data-driven test
reading, from CSV 143, 145
reading, from Excel 145-147
video
of test run, recording 169, 171
Vine VNC server
URL 169
visibility_of(element) condition 96
visibility_of_element_located(locator)
condition 96
W
WebDriver class
about 68
methods 69-71
methods, for capturing screenshot 167, 168
methods, for executing JavaScript code 165
properties 69
WebDriver class, methods
back() 69
close() 69
forward() 70
www.it-ebooks.info

[ 200 ]
get(url) 70
implicitly_wait(time_to_wait) 71
maximize_window() 70
quit() 70
refresh() 70
set_page_load_timeout(time_to_wait) 71
set_script_timeout(time_to_wait) 71
switch_to.active_element() 70
Switch.to_alert() 70
switch_to.default_content() 70
switch_to.frame(frame_reference) 70
switch_to.window(window_name) 71
WebDriver class, properties
current_url 69
current_window_handle 69
name 69
orientation 69
page_source 69
title 69
window_handles 69
WebElement 45
WebElement class
about 71
methods 72, 73
properties 72
WebElement class, methods
clear() 72
click() 72
get_attribute(name) 72
is_displayed() 72
is_enabled() 72
is_selected() 72
send_keys(*value) 72
submit() 73
value_of_css_property(property_name) 73
WebElement class, properties
size 72
tag_name 72
text 72
window_handles property 69
X
Xcode
setting up, for iOS 123, 124
URL 123
xmlrunner
URL 184
XPath
used, for nding elements 58-60
xUnit asserts methods 39, 40
xUnit framework 30
www.it-ebooks.info

Thank you for buying
Learning Selenium Testing Tools
with Python
About Packt Publishing
Packt, pronounced 'packed', published its rst book, Mastering phpMyAdmin for Effective
MySQL Management, in April 2004, and subsequently continued to specialize in publishing
highly focused books on specic technologies and solutions.
Our books and publications share the experiences of your fellow IT professionals in adapting
and customizing today's systems, applications, and frameworks. Our solution-based books
give you the knowledge and power to customize the software and technologies you're using
to get the job done. Packt books are more specic and less general than the IT books you have
seen in the past. Our unique business model allows us to bring you more focused information,
giving you more of what you need to know, and less of what you don't.
Packt is a modern yet unique publishing company that focuses on producing quality,
cutting-edge books for communities of developers, administrators, and newbies alike.
For more information, please visit our website at www.packtpub.com.
About Packt Open Source
In 2010, Packt launched two new brands, Packt Open Source and Packt Enterprise, in order
to continue its focus on specialization. This book is part of the Packt Open Source brand,
home to books published on software built around open source licenses, and offering
information to anybody from advanced developers to budding web designers. The Open
Source brand also runs Packt's Open Source Royalty Scheme, by which Packt gives a royalty
to each open source project about whose software a book is sold.
Writing for Packt
We welcome all inquiries from people who are interested in authoring. Book proposals should
be sent to author@packtpub.com. If your book idea is still at an early stage and you would
like to discuss it rst before writing a formal book proposal, then please contact us; one of our
commissioning editors will get in touch with you.
We're not just looking for published authors; if you have strong technical skills but no writing
experience, our experienced editors can help you develop a writing career, or simply get some
additional reward for your expertise.
www.it-ebooks.info
Selenium WebDriver Practical
Guide
ISBN: 978-1-78216-885-0 Paperback: 264 pages
Interactively automate web applications using
Selenium WebDriver
1. Covers basic to advanced concepts of
WebDriver.
2. Learn how to design a more effective
automation framework.
3. Explores all the APIs within WebDriver.
4. Acquire an in-depth understanding of each
concept through practical code examples.
Selenium Testing Tools Cookbook
ISBN: 978-1-84951-574-0 Paperback: 326 pages
Over 90 recipes to build, maintain, and improve test
automation with Selenium WebDriver
1. Learn to leverage the power of Selenium
WebDriver with simple examples that illustrate
real-world problems and their workarounds.
2. Each sample demonstrates key concepts
allowing you to advance your knowledge
of Selenium WebDriver in a practical and
incremental way.
3. Explains testing of mobile web applications
with Selenium Drivers for platforms such as
iOS and Android.
Please check www.PacktPub.com for information on our titles
www.it-ebooks.info

Selenium 2 Testing Tools
Beginner's Guide
ISBN: 978-1-84951-830-7 Paperback: 232 pages
Learn to use Selenium testing tools from scratch
1. Automate web browsers with Selenium
WebDriver to test web applications.
2. Set up Java Environment for using Selenium
WebDriver.
3. Learn good design patterns for testing web
applications.
Instant Selenium Testing Tools
Starter
ISBN: 978-1-78216-514-9 Paperback: 52 pages
A short, fast, and focused guide to Selenium Testing
tools that delivers immediate results
1. Learn something new in an Instant! A short, fast,
and focused guide delivering immediate results.
2. Learn to create web tests using Selenium tools.
3. Learn to use page object pattern.
4. Run and analyse test results on an easy-to-use
platform.
Please check www.PacktPub.com for information on our titles
www.it-ebooks.info
