Updated K40 User Manual – FYI Forum
User Manual:
Open the PDF directly: View PDF ![]() .
.
Page Count: 19
7/2/2018 Updated K40 user manual – FYI – K40 Forum
https://awesome.tech/k40-forum/?view=thread&id=68 1/19
(https://awesome.tech/)
(https://awesome.tech/)
INSPIRING SCIENCE FOR HUNGRY MINDS
Search...
Forum(https://awesome.tech/k40forum/) Other:Otherissuesorsuggestions(https://awesome.tech/k40forum/?view=forum&id=8)
UpdatedK40usermanualFYI(https://awesome.tech/k40forum/?view=thread&id=68)
Forum(https://awesome.tech/k40forum/) Members(https://awesome.tech/k40forum/?view=members) Login
(https://awesome.tech/login/?redirect_to=https%3A%2F%2Fawesome.tech%2Fk40forum%2F%3Fview%3Dthread%26id%3D68) Register
(https://awesome.tech/register/)
Youneedtologintocreatepostsandtopics.
Updated K40 user manual - FYI
mike_arndt_ie
(https://awes
ome.tech/k40
forum/?
view=profile&i
d=229)
4Posts
K40 Forum
January18,2018,6:13pm
I've gone through the manual that came with my K40 and updated it for clarity and detail. I emailed a copy back to the
manufacturer, but they never responded, so to anyone who wants it, here is an updated digital copy of the K40's manual.
If anyone wants to make changes or adjustments, please post below so we can improve the document.
K40ShenhuiLaser
USERMANUAL
Preface
Thank you for buying products from Shenhui laser. We manufacture professionally made high-tech machinery with precision optical,
mechanical and electrical features. We have included this manual to help you get the most out of your new purchase.
This manual contains many detailed photographs of the machine and its operation to aid in installation, adjustment, maintenance,
safety, etc.
The user should read this manual in detail before first operation because it will help you have a good grasp of machine operation and
maintenance.

7/2/2018 Updated K40 user manual – FYI – K40 Forum
https://awesome.tech/k40-forum/?view=thread&id=68 2/19
We welcome comments or suggestions!
Telephone +86-635-8511087
Email:shenhui@shenhuilaser.com (mailto:shenhui@shenhuilaser.com)
Web Address:http://www.Icshenhuilaser.com (http://www.icshenhuilaser.com/)
Address: No.28 Huanghe Road, Liaocheng Citty, Shandong, China 252000
Catalogue
USER MANUAL
Preface
Catalog
Statement
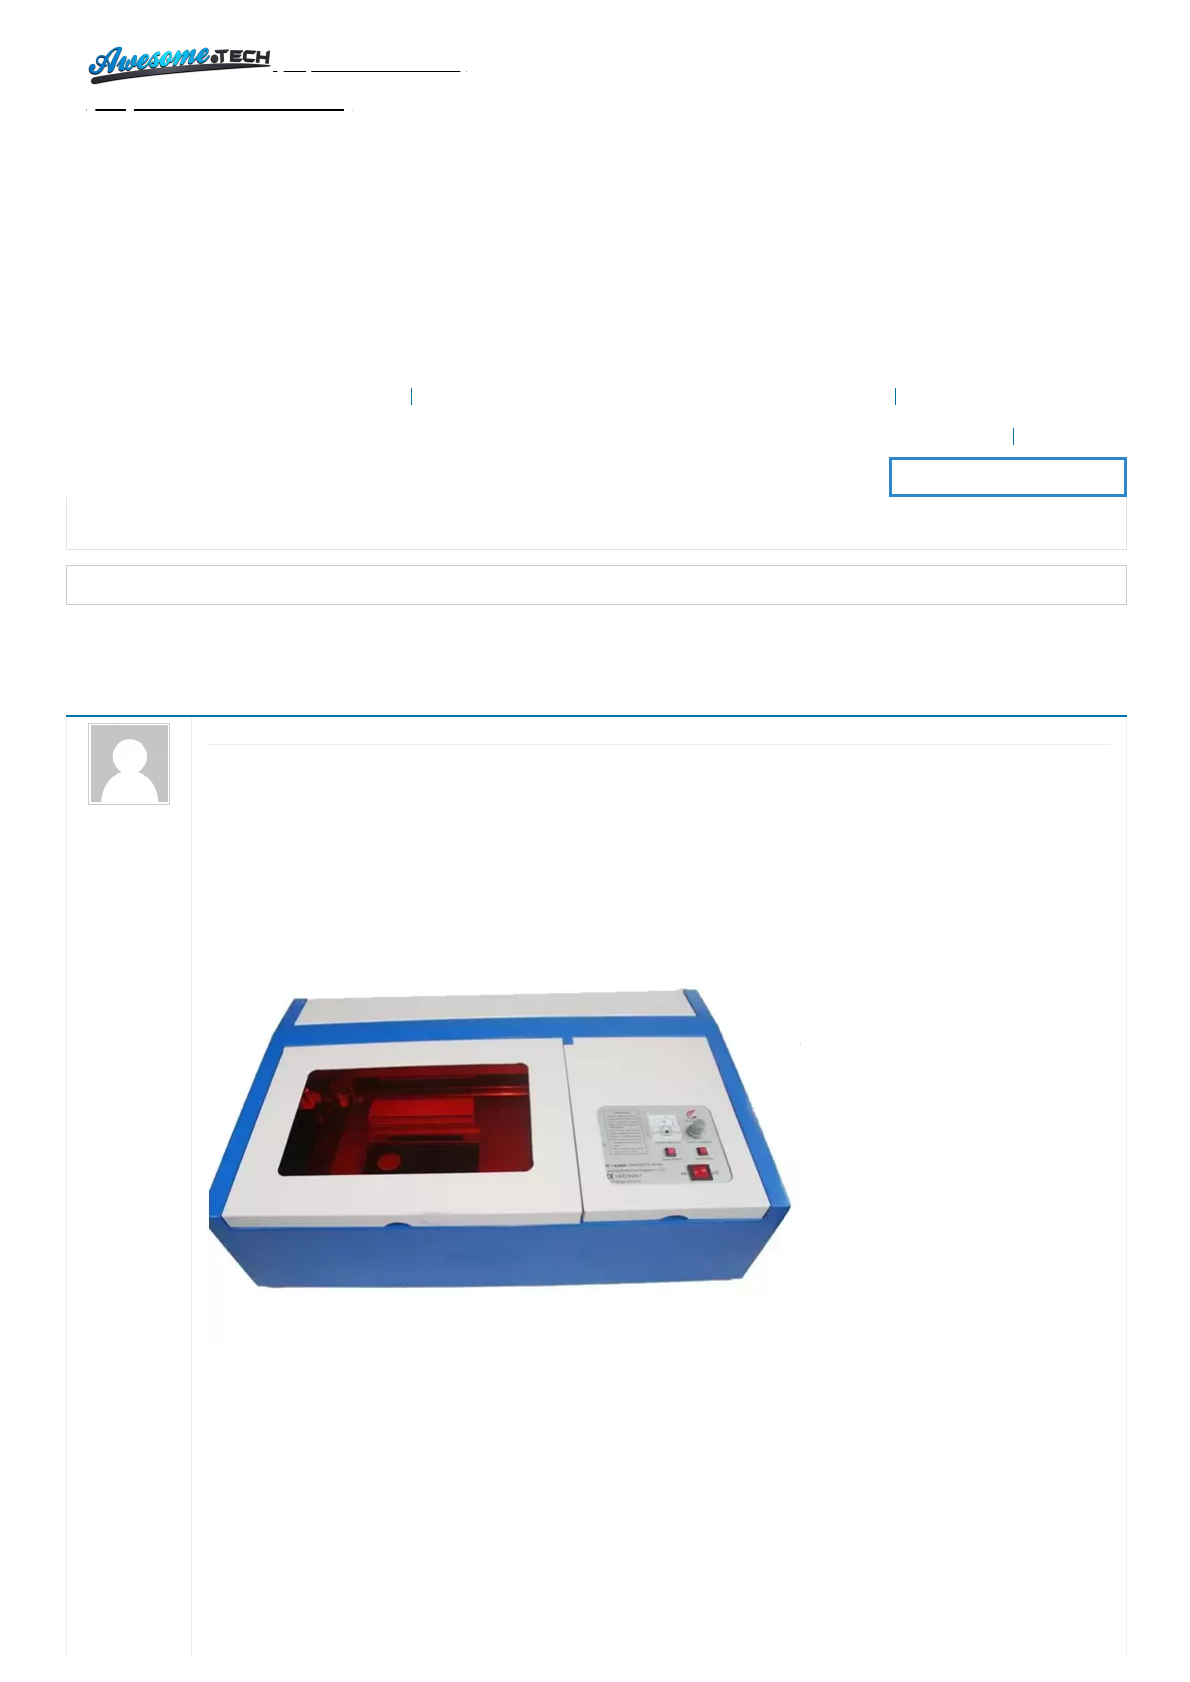
Chapter 1 Machine Appearance and Accessories
1.1 Machine Appearance (Different model will have different appearance, according to the real object)
1.2 Accessories set(according to the real object)
Chapter 2 Installation and Commissioning of The Machine
2.1 Installation and Adjusting Steps
Chapter 3 Operation of laser machine
3.1 Introduction of buttons
3.2 Operating
Chapter 4 Daily Maintenance and Common Faults
4.1 Daily maintenance
4.2 Common Faults Analysis
Chapter 5 Warranty Regulations.
5.1 Warranty Period
5.2 Warranty Clause
Postscript
AppendixⅠOptical path adjustment
Appendix Ⅱ Instruction of Laser machine
Appendix III Suggested applications and uses.
SafetyNote
The user should read this operating manual carefully before operating and must obey the operating regulations strictly. If you read
nothing else, read the safety notes – when misused this machine will hurt you in ways you haven’t thought of yet.
Non-trained people are forbidden to operate the machine.
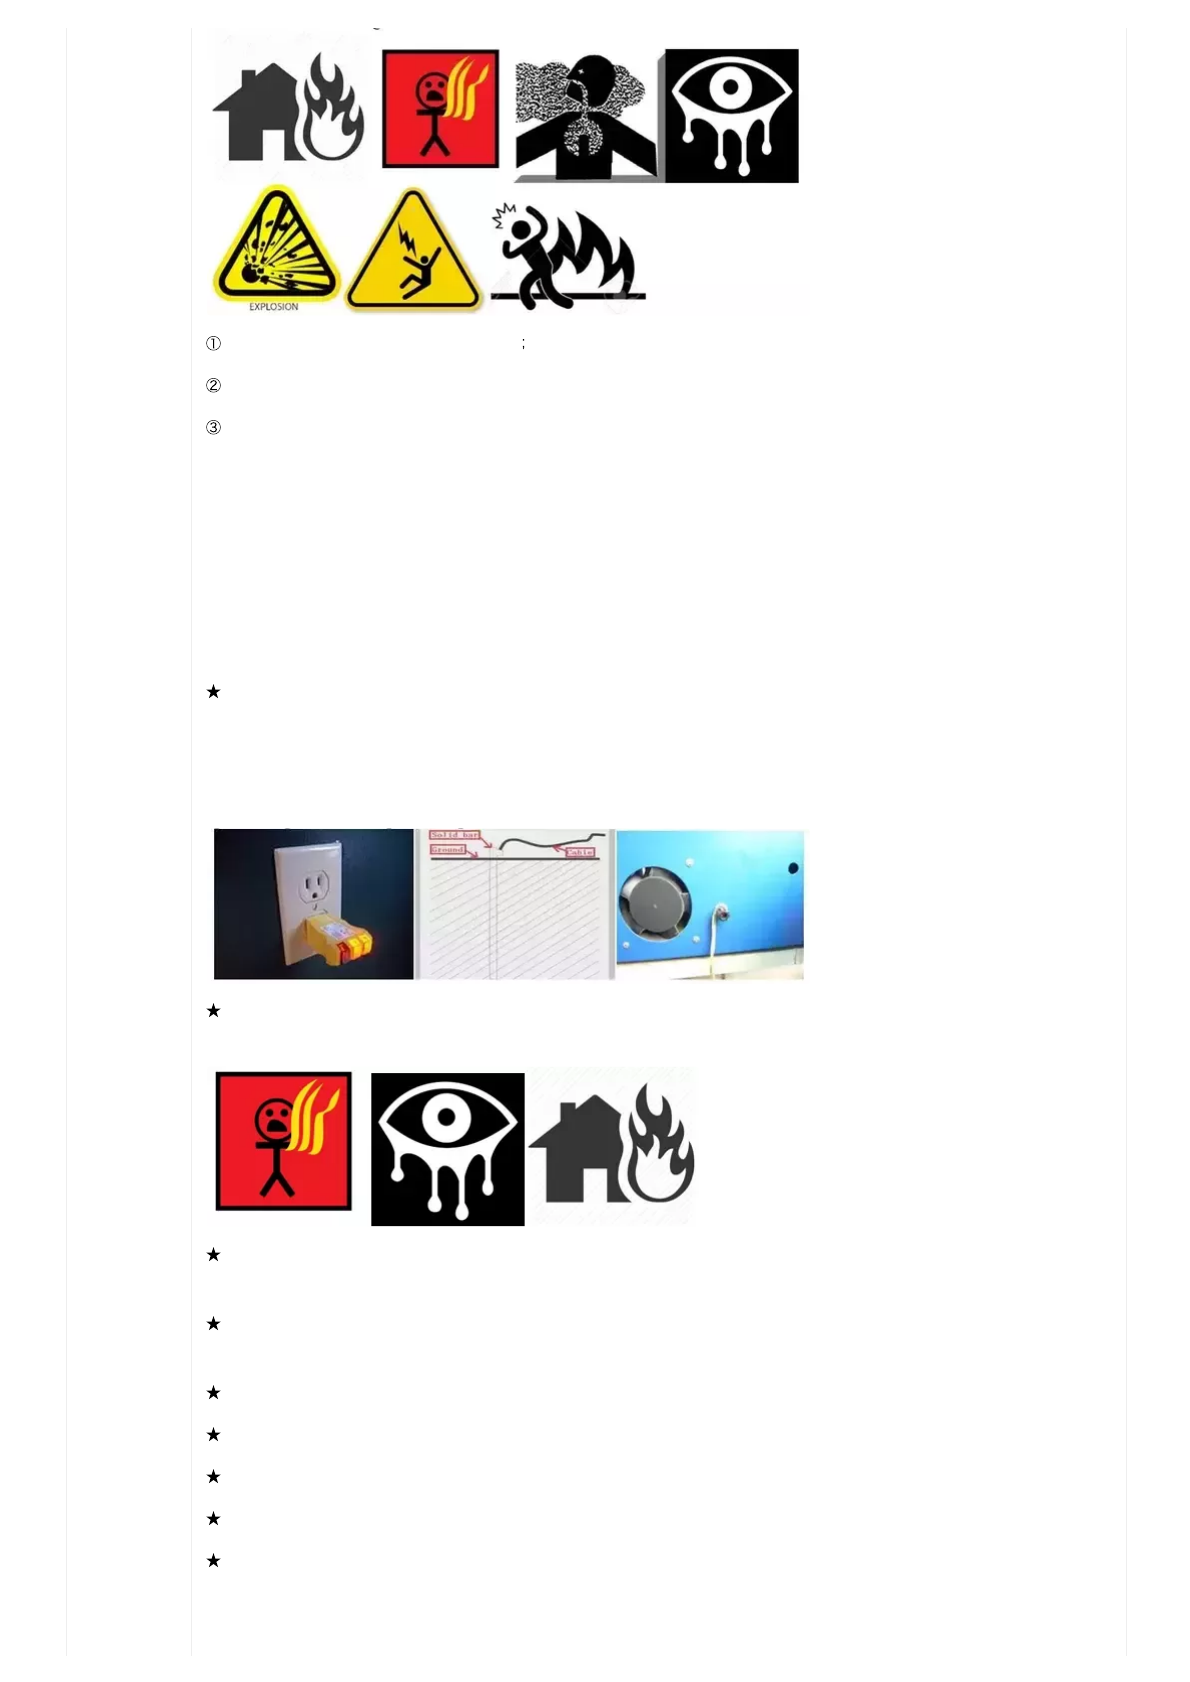
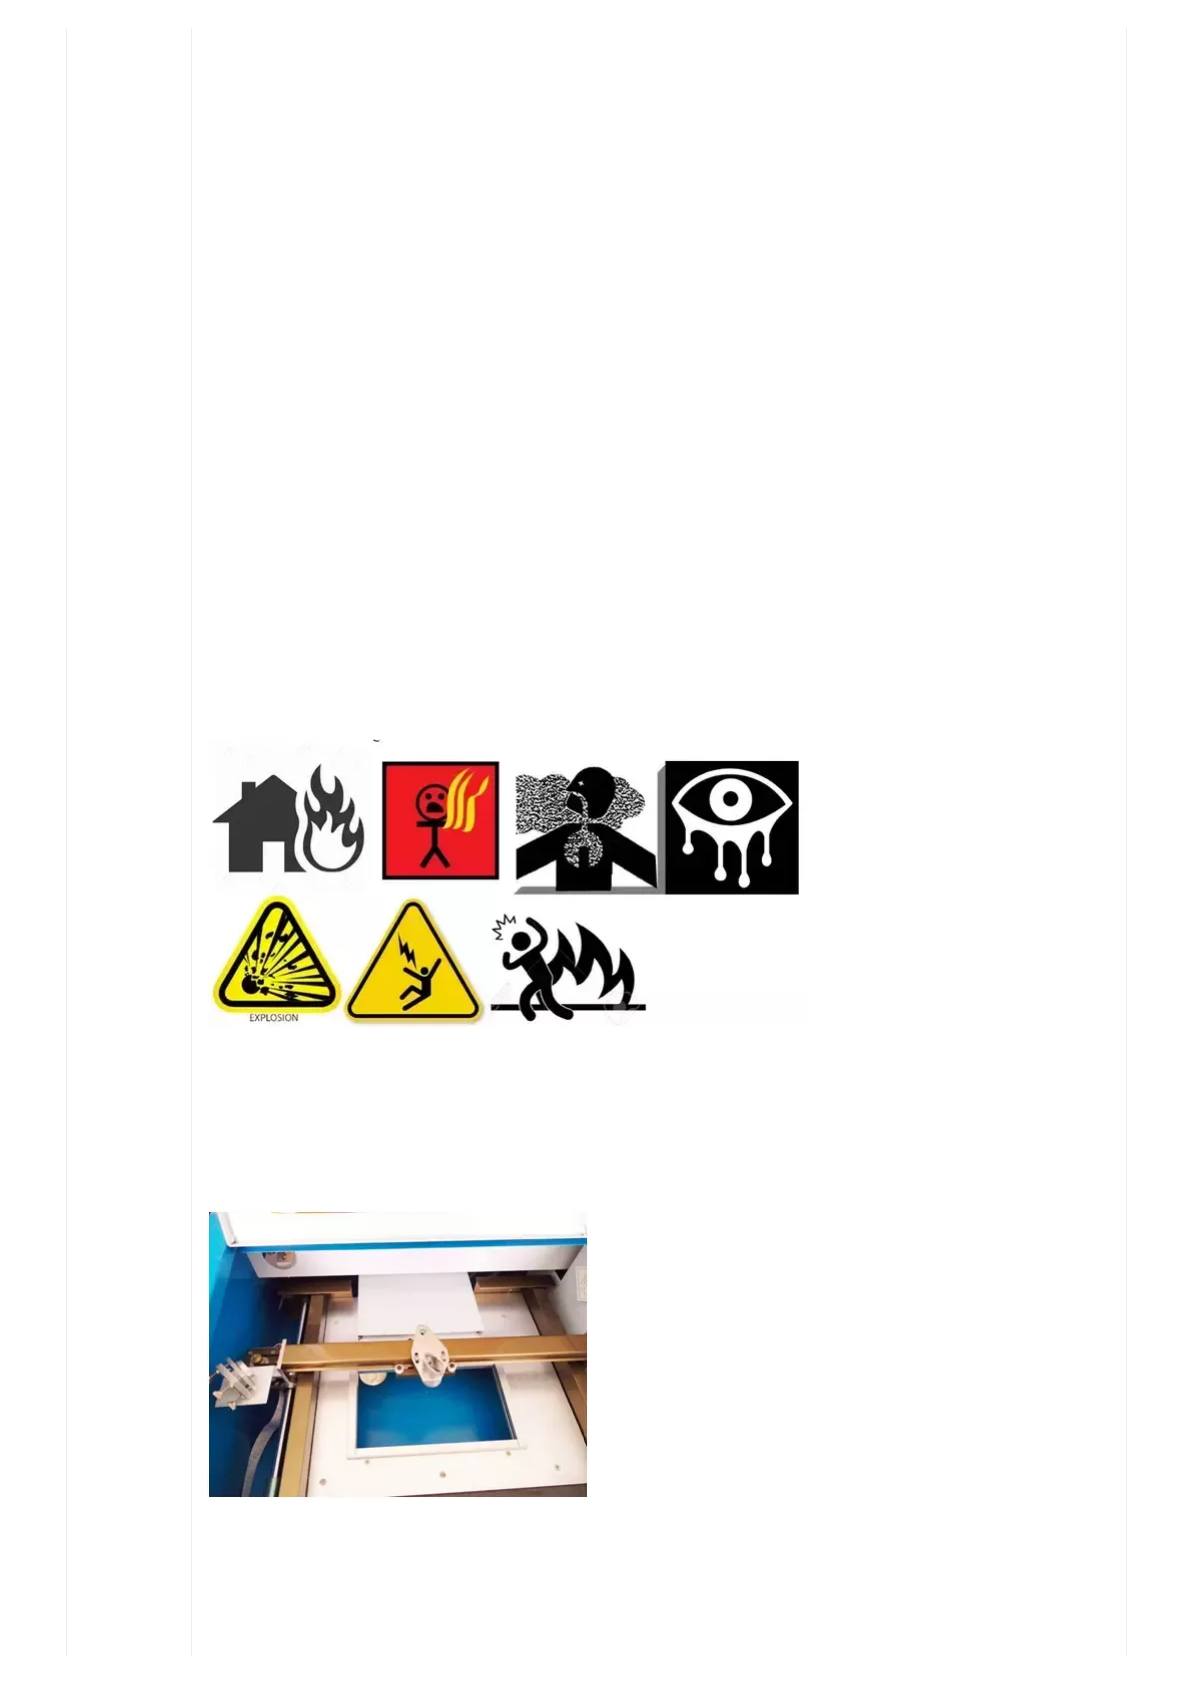
The machine uses a class IV LASER (strong laser radiation). If you ignore these warnings it can cause the following accidents:
7/2/2018 Updated K40 user manual – FYI – K40 Forum
https://awesome.tech/k40-forum/?view=thread&id=68 3/19
It can easily set fire to combustible materials running the unit unattended is forbidden.
Different working materials can produce other radiation and toxic or harmful gases during laser processing.
The Lasers producesinvisibleinfrared radiation around 10 micrometers (darker red than the human eye can see). It is powerful
enough toeasily burn or blind the userif operated without the protective cover. Acrylic plastic safety glasses stop the laser light and can
protect your eyes, but they are not a substitute for closing the safety lid.
Always keep at least one fire extinguisher near the machine.
Move any flammable or explosive materials far away before operation.
Use a carbon monoxide monitor and ensure good ventilation as fumes from operation may be toxic.
Un-trained people are forbidden to operate the machine.
Make sure the machine iswellgroundedbefore operating. This is the biggest surprise to most people: This machine sends
thousands of volts and several mAs of power down the ground wire which is why it needs a good ground. This can come from a dedicated
metal spike driven into the soil and grounded to the back of the machine, or through the ground wire in the receptacle (they’re wired
together under the hood). Resistance to ground must be less than 5 ohms or that power will take a path of least resistance – You! More
details are found on pg 11 under grounding.Do not skip this step!
Never operate un-attended: in addition to fire risks, there is nothing to stop children or untrained persons from opening the unit in
operation and suffering severe burns or blindness.
It is forbidden to open any cover during operations. See above. This machine does not come with a safety interlock like the one that
shuts down your washer or dryer if you open the lid during operation. Opening the lid on this laser machinewill notstop the operation!
Be aware that this laser’s 10 micrometers invisible heat radiation can be bounced by mirrors, andmay bounce off surfaces that don’t
reflect visible light. Be careful with new materials until you are sure they don’t reflect the beam.
The operator must observe machine operation carefully (see above) and if something is wrong turn off the machine.
Processing material and emissions should conform to local laws and regulations
The user should carefully consider whether processing materials are suitable for laser working.
Due to potentially dangerous parts and high voltages, non professionals are forbidden to disassemble this machine.
Keep the machine in the dry place between 5-40℃ with humidity between 5-95%(no condensed steam). Do not shock, strike, pound,
vibrate or electrocute the machine (no welding on it). Do not expose to pollution or strong magnetism.
7/2/2018 Updated K40 user manual – FYI – K40 Forum
https://awesome.tech/k40-forum/?view=thread&id=68 4/19
The laser machine may produce Electro-Magnetic Interference and should be kept far away from machinery sensitive to EMI. The
machine’s housing is metal for a reason.
The working voltage is AC220V 50Hz, and it is forbidden to open the machine when the power supply voltage is unsteady or
mismatched.
Themanufactureracceptsnoresponsibilityand/orliability,directorindirectforanyaccidentorinjurycausedby
improperuseofthemachineand/orthefailureoftheusertoreadandfollowtheaboveinstructions.
Statement
1. This is a general purpose manual: your machine may have minor differences from the photos/text below due to product updates,
safety improvements, etc.
Chapter1MachineAppearanceandAccessories
1.1MachineAppearance:Differentmodelswillhavedifferentappearances,accordingtothemodelpurchased
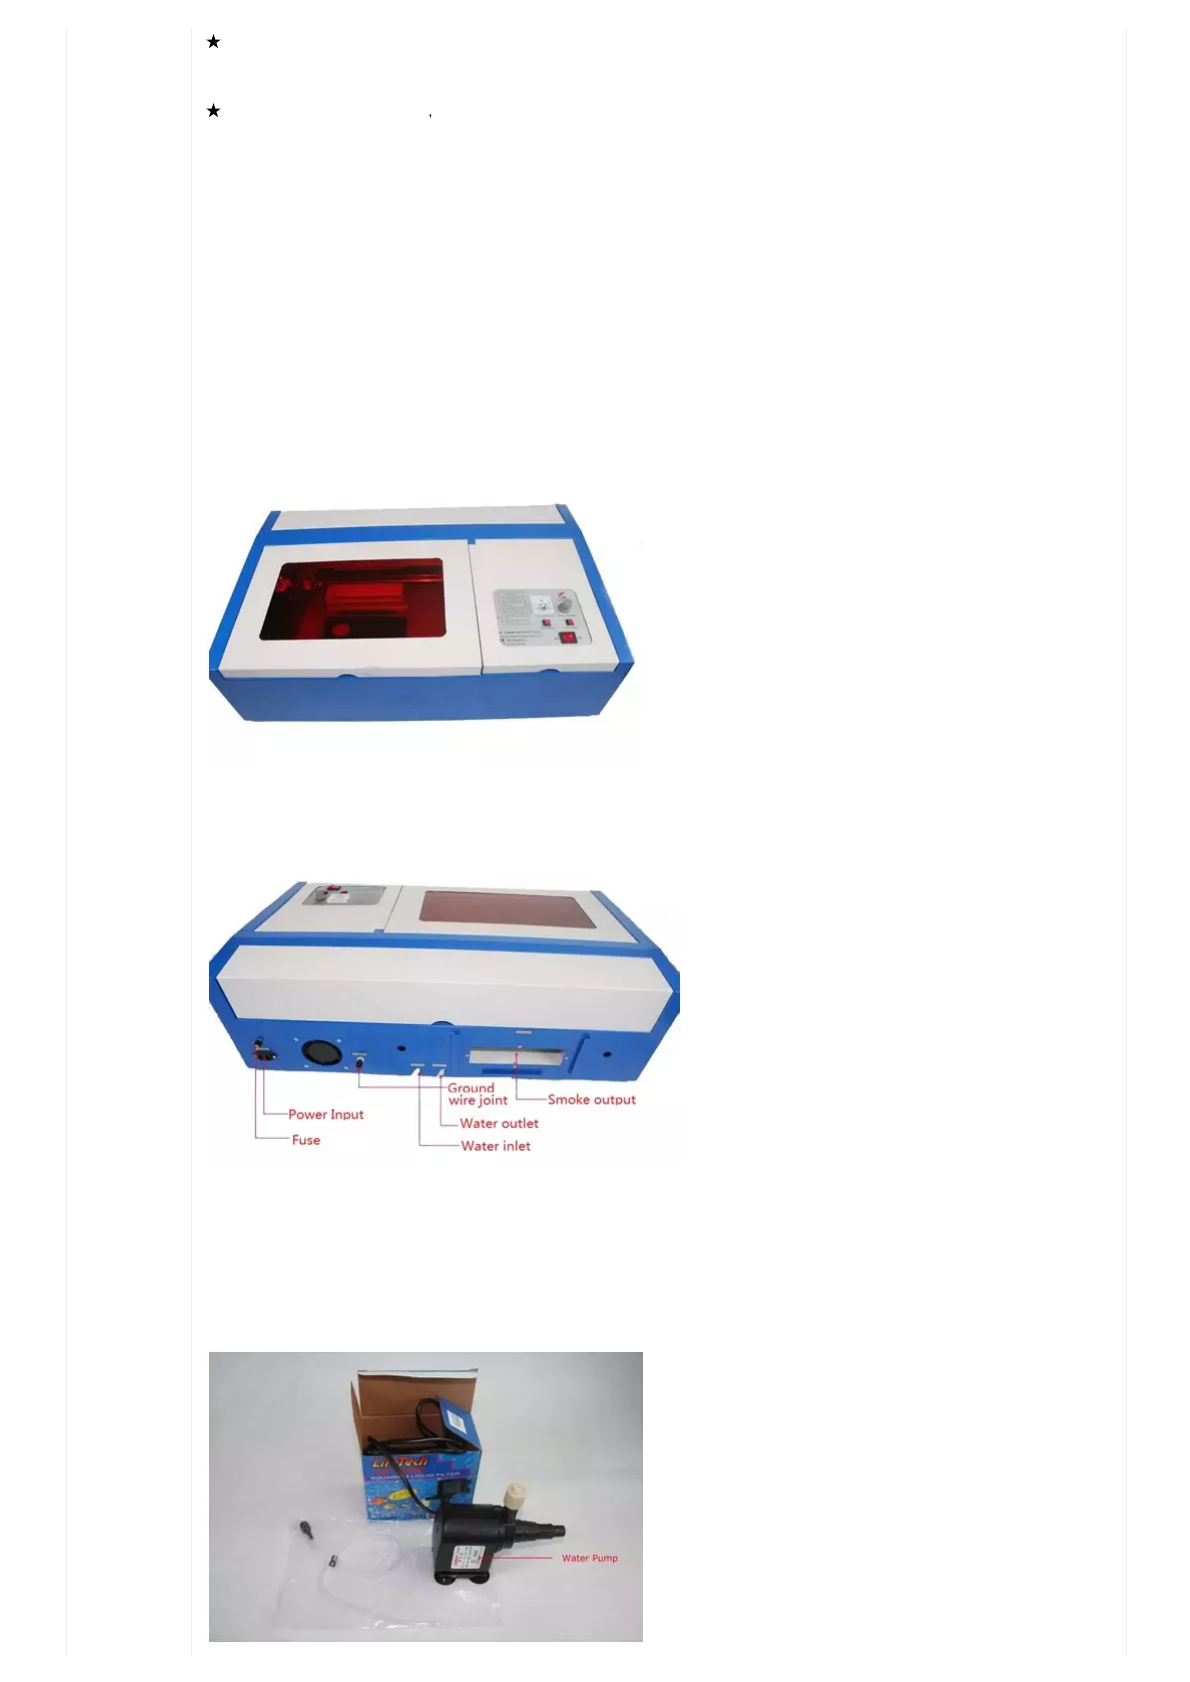
1. All three doors feature a spring loaded hinge pin for easy removal and maintenance. Right side is shown in Fig.F1-1
F1-1
2. Back side is shown in Fig. F1-2
F1-2
1.2Accessoriesset
Your accessories set includes the following parts in addition to the machine
1. Water pump:

7/2/2018 Updated K40 user manual – FYI – K40 Forum
https://awesome.tech/k40-forum/?view=thread&id=68 5/19
F1-3
2. Exhaust fan, smoke pipe:
F1-4
1)
Manual Bag and accessories
F1-5 F1-6
Chapter2InstallationandCommissioningofTheMachine
A complete working system is composed of the laser engraving machine, the exhaust fan, exhaust pipe, water pump, water tank, USB
cable and so on. Load the DVD and unzip the large RAR file containing the Corel software. Run ‘Setup.exe’ and within a few screens it
will ask for as software key. This key is in a tiny txt file that was unzipped along with the rest of the RAR file – just copy/past the key into
the three slots and you’re good to go.
2.1InstallationandAdjustingSteps
1.Waterpumpconnection
Cooling water system is very important to the laser machine:if oper a ted w itho ut co oling w a ter the la ser tu be w ill explode.
Connect the water inlet tube on the laser to the submersible pump and place the water outlet tube and the pump in a bucket of room
temperature water. Plug in the pump and wait for a steady stream of water from the outlet hose into the bucket before operating the
laser. For best long term results, consider distilled water to avoid mineral build up inside the glass laser tube.
F2-1
When the temperature of the water rises above 35℃/95F (body temperature), replace it with cool water or put ice in the bucket. If the
unit is stored or operated in below freezing conditions (below 0℃/32F), add antifreeze to the water to prevent freeze destruction of the
glass laser tube.
7/2/2018 Updated K40 user manual – FYI – K40 Forum
https://awesome.tech/k40-forum/?view=thread&id=68 6/19
Note:Alw a y s confir m nor m a l w a ter flow befo r e oper a ting the la ser .Set up the water buckets where the flow can beseen or
heardif at all possible. Sliding the laser forward an inch or two can cause the cooling pump power plug to come out of the back outlet,
and you won’t notice if your cooling buckets are under a table and silent! If the cooling system must be tucked away consider adding
a$13 flow indicator (https://shop.ezgo.com/products/Battery-Filling-System-%2540d-Fill-Gun-Flow-Indicator.html?
product_id=4050) and$3 temperature (https://www.amazon.com/Leegoal-Digital-Aquarium-Terrarium-
Thermometer/dp/B0017N8W90) sensor to prevent laser tube explosion.
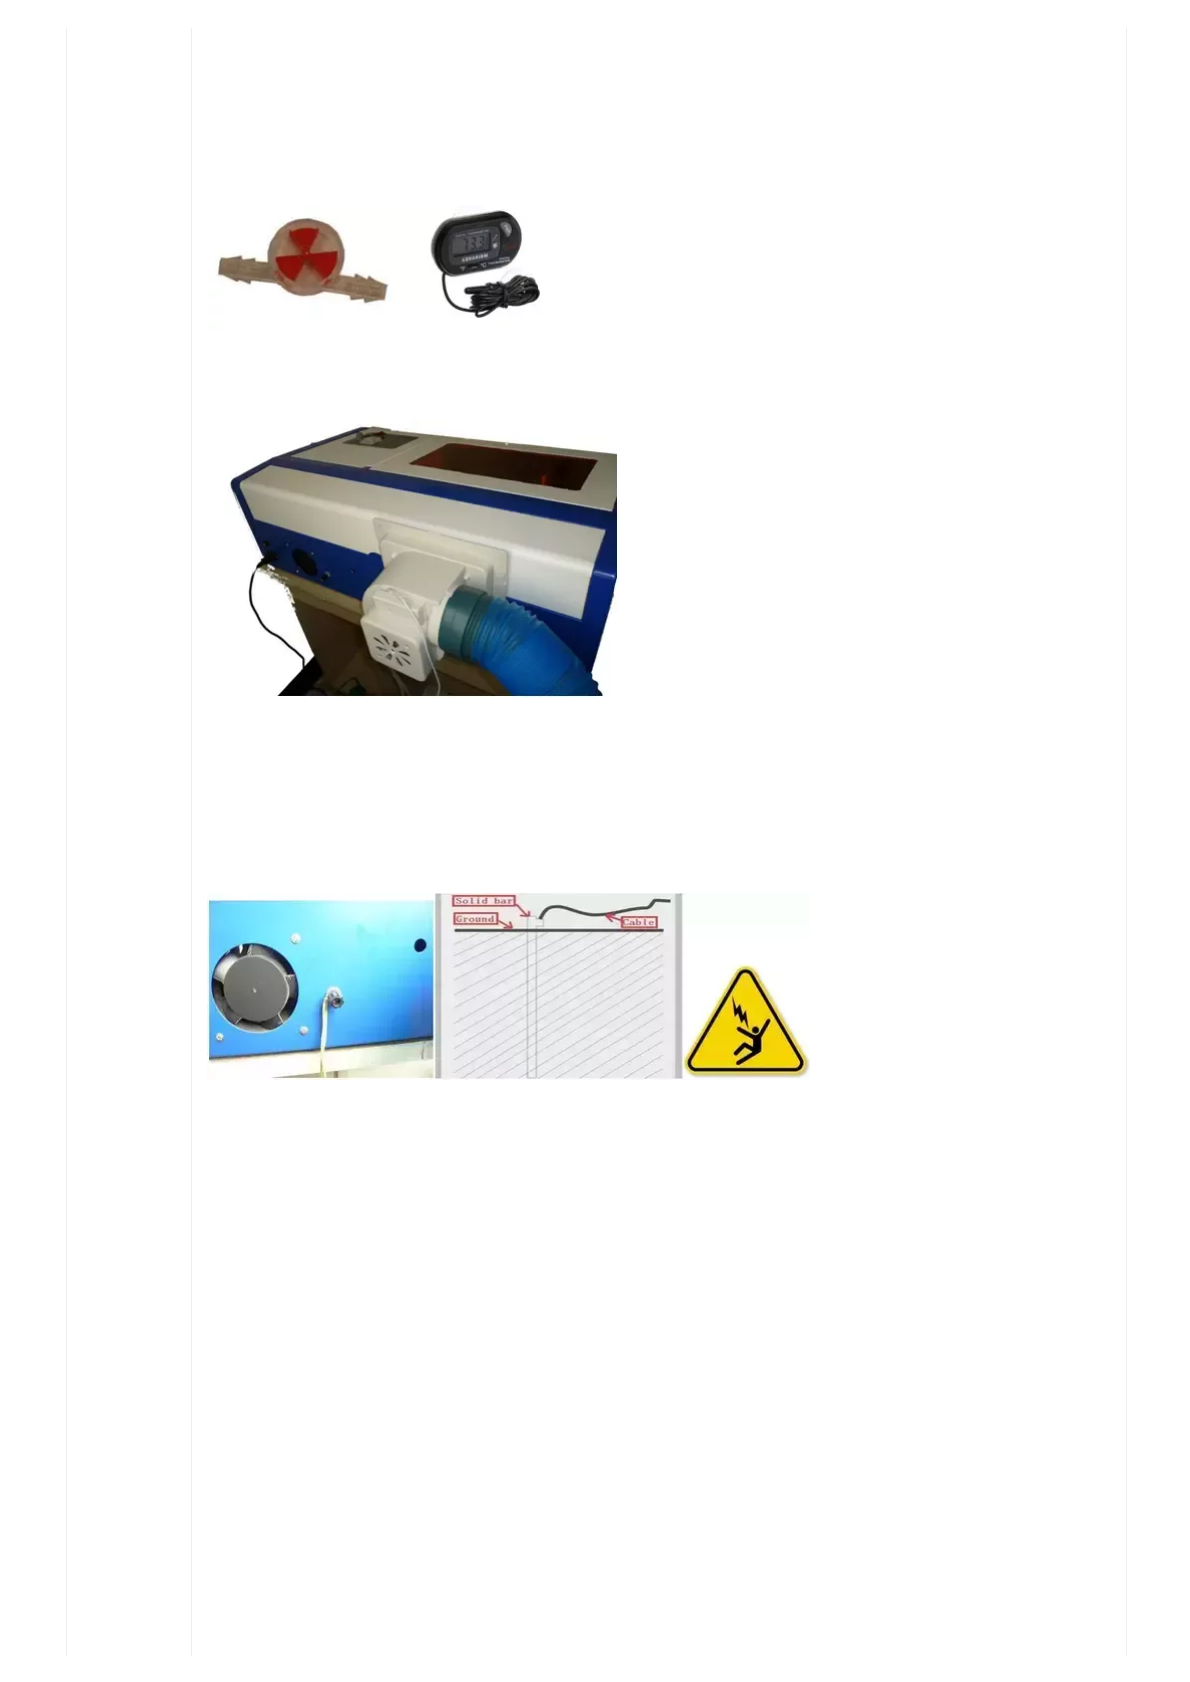
2.Exhaustfaninstallation
F2-2
3.SafetyGrounding
This Shenhui laser engraver uses a class four laser tube. This type of drive is high-voltage, so all users must comply with the "Safety Note
". The machine also has stringent requirements for safety grounding. The safe Line-to-Ground Resistance should be less than 5Ω.
Specific connection method are shown in Fig.F2-3, F2-4
F2-3 F2-4
Attention:Badgroundingcancausehighfailurerateofequipmentaswellasothersafetyincidents!Improper
groundingcancauseelectrocutionorforcethelasertorunwideopenatalltimes!Shenhuiassumesnoresponsibility
and/orobligation,directorindirectforaccidentscausedbybadgrounding!
Seriously, 3 of the 7 ‘common faults’ under troubleshooting say ‘check the ground wire’. Save yourself some time and connect it right the
first time.
Chapter3Operationoflasermachine
The following is a brief introduction to the control panel.
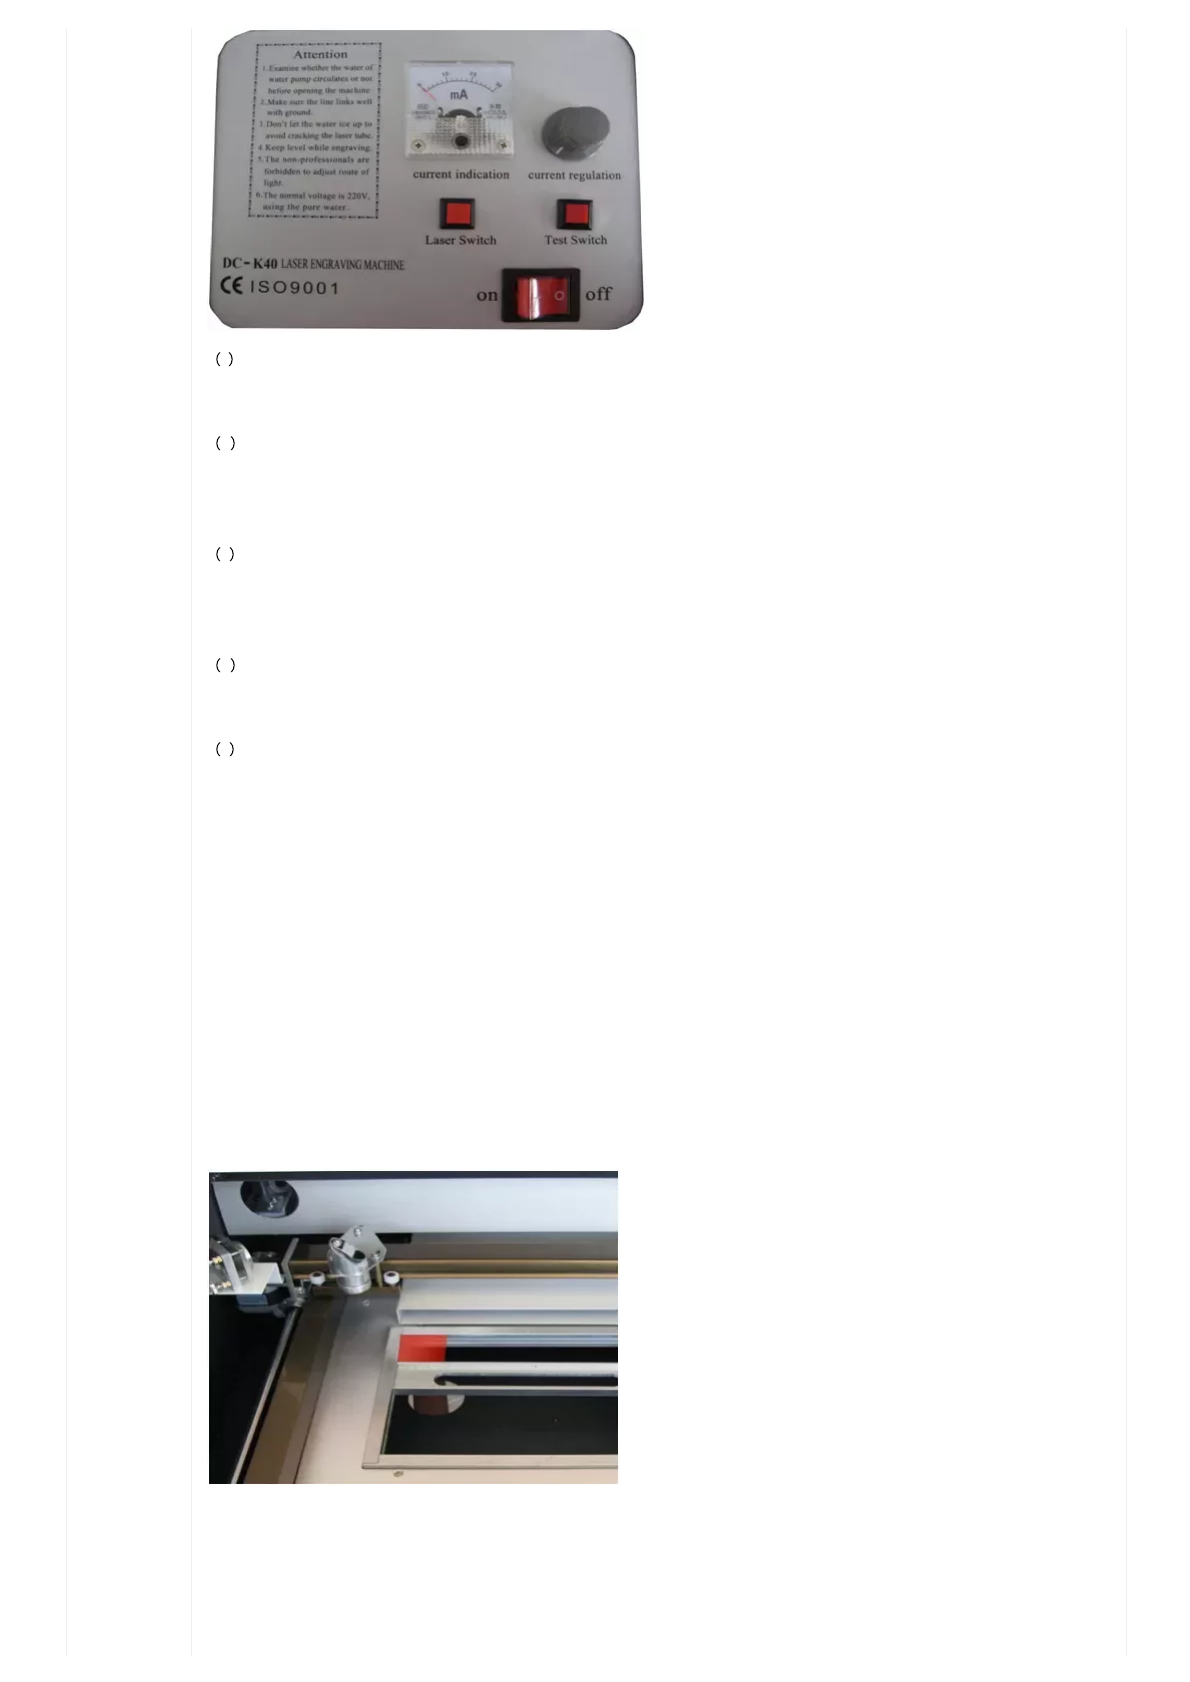
3.1Introductionofbuttons
7/2/2018 Updated K40 user manual – FYI – K40 Forum
https://awesome.tech/k40-forum/?view=thread&id=68 7/19
1 On/Off swtich
This switch is the main power switch of the laser machine. When switched on, the laser head will move to the top left corner.
2 Laser Switch
Laser switch is the master control for the laser - down is on, up is off. The laser will not operate unless this switch is in the down
position.
3 Test Switch
When the On/Off switch and the Laser Switches are on, pressing the Test Switch button will fire the laser. This button will be used when
adjusting laser power with the current regulation knob and for laser beam aligning.
4 Current Regulation
This knob adjusts the laser power. Power can be tracked with the current indicator below.
5 Current Indication
This is the current ampere-meter. Generally, thecurrentvalueshouldbelowerthan15mAwhen the machine is working. When
aligning laser beam, please adjust current lower than 10mA for safety.
Note:Pleasereadtheabovesectioncarefullybeforeyouturnonthemachine.
3.2Operating
Step Zero: Insert the included USB key into the computer connected to the laser. The laser will not be recognized without this key.
Step one:
Fix the material to be worked (red plastic in picture below) into the clamp with the top surface level and even with the clamp. This keeps
the focus distance (about 5cm) correct.
Note:Incorrectdistanceswillresultinpoorengravingquality.
Step two:
Create your design with the included software – Corel Draw 11,
7/2/2018 Updated K40 user manual – FYI – K40 Forum
https://awesome.tech/k40-forum/?view=thread&id=68 8/19
Step three:
Move the laser head to set the working origin by dragging the design on output interface
Step four:
Set a suitable laser power on the machine according to the kind of material you want to process. For rubber stamping blocks we suggest
a current value between 12mA and 15mA.
Step five:
Set the carving speed in the software, then output the job to the laser machine.
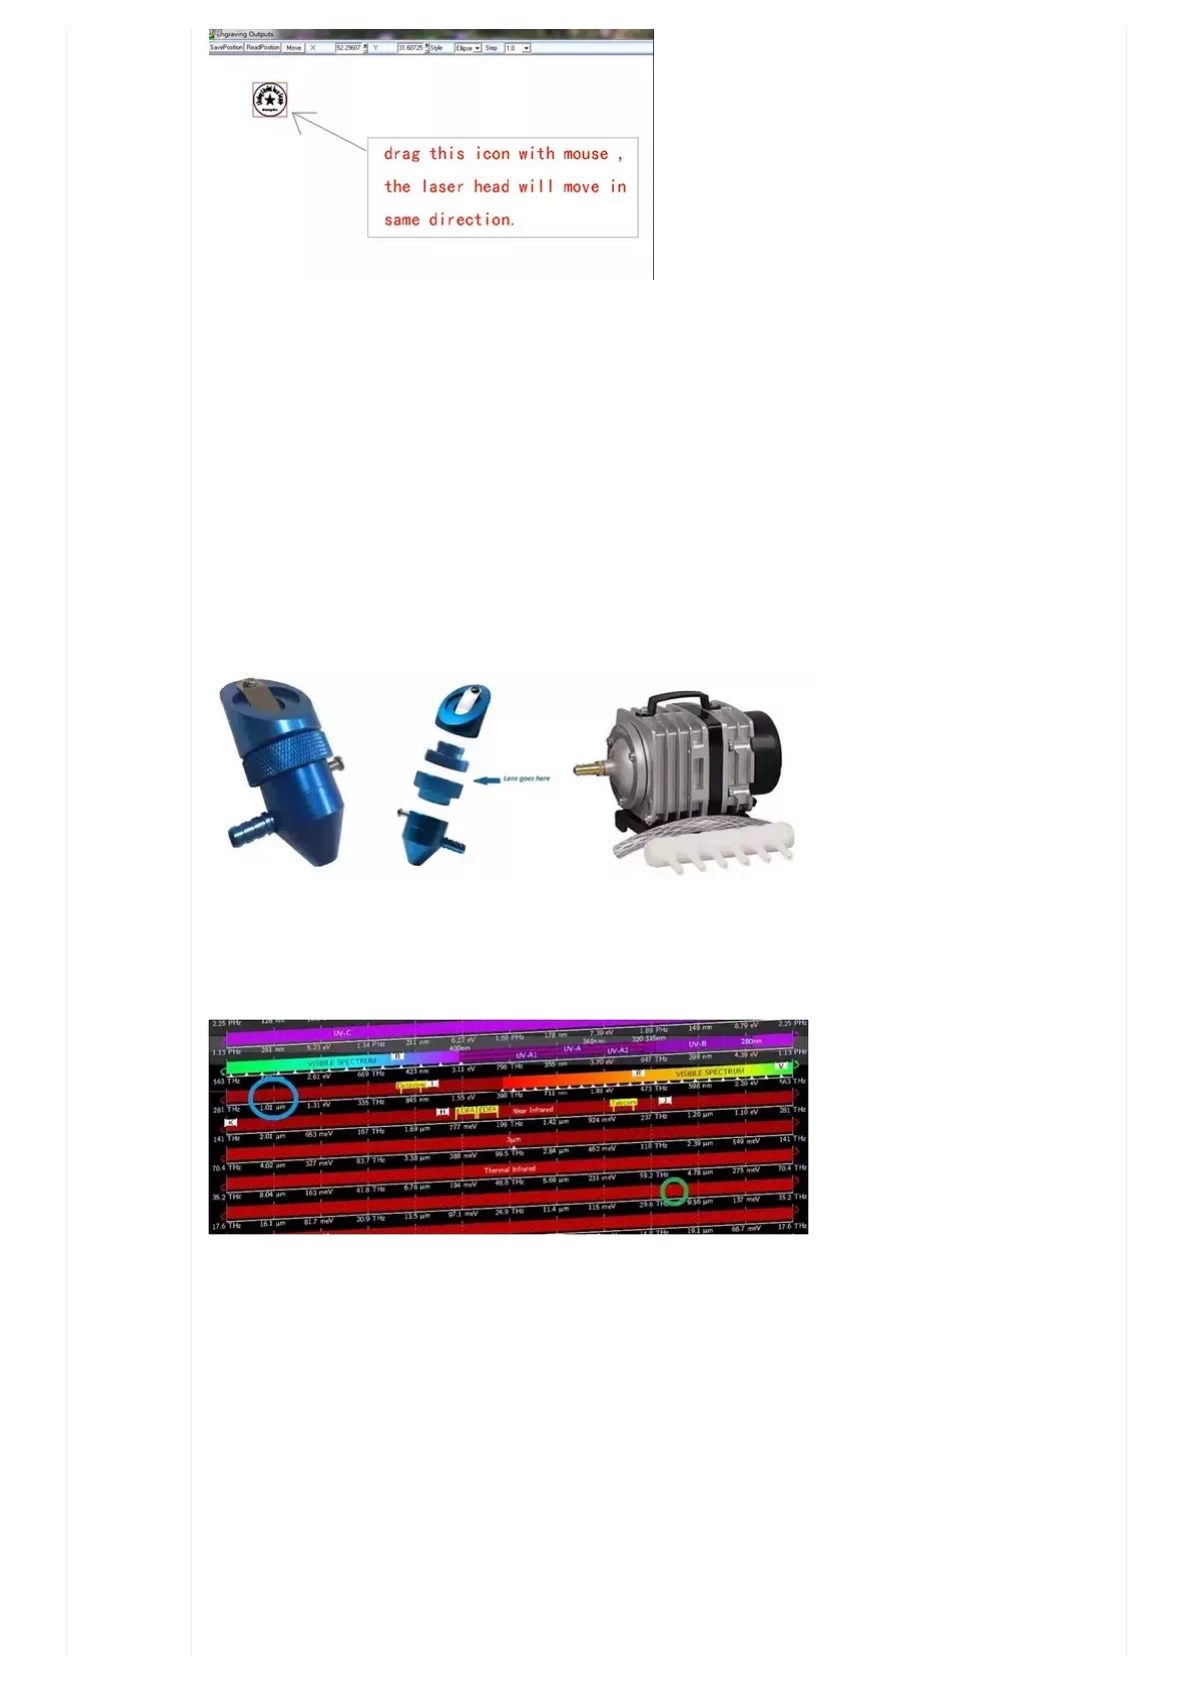
Side note (https://www.reddit.com/r/lasercutting/wiki/k40) : When working with thick woods it is sometimes helpful to use a 5 PSI
air blower to prevent fires and expedite cutting. This replacement head, 18mm lens and pump costroughly $150
(http://www.lightobject.com/18mm-Laser-Head-wAir-Assist-Ideal-for-K40-Machine-P701.aspx) .
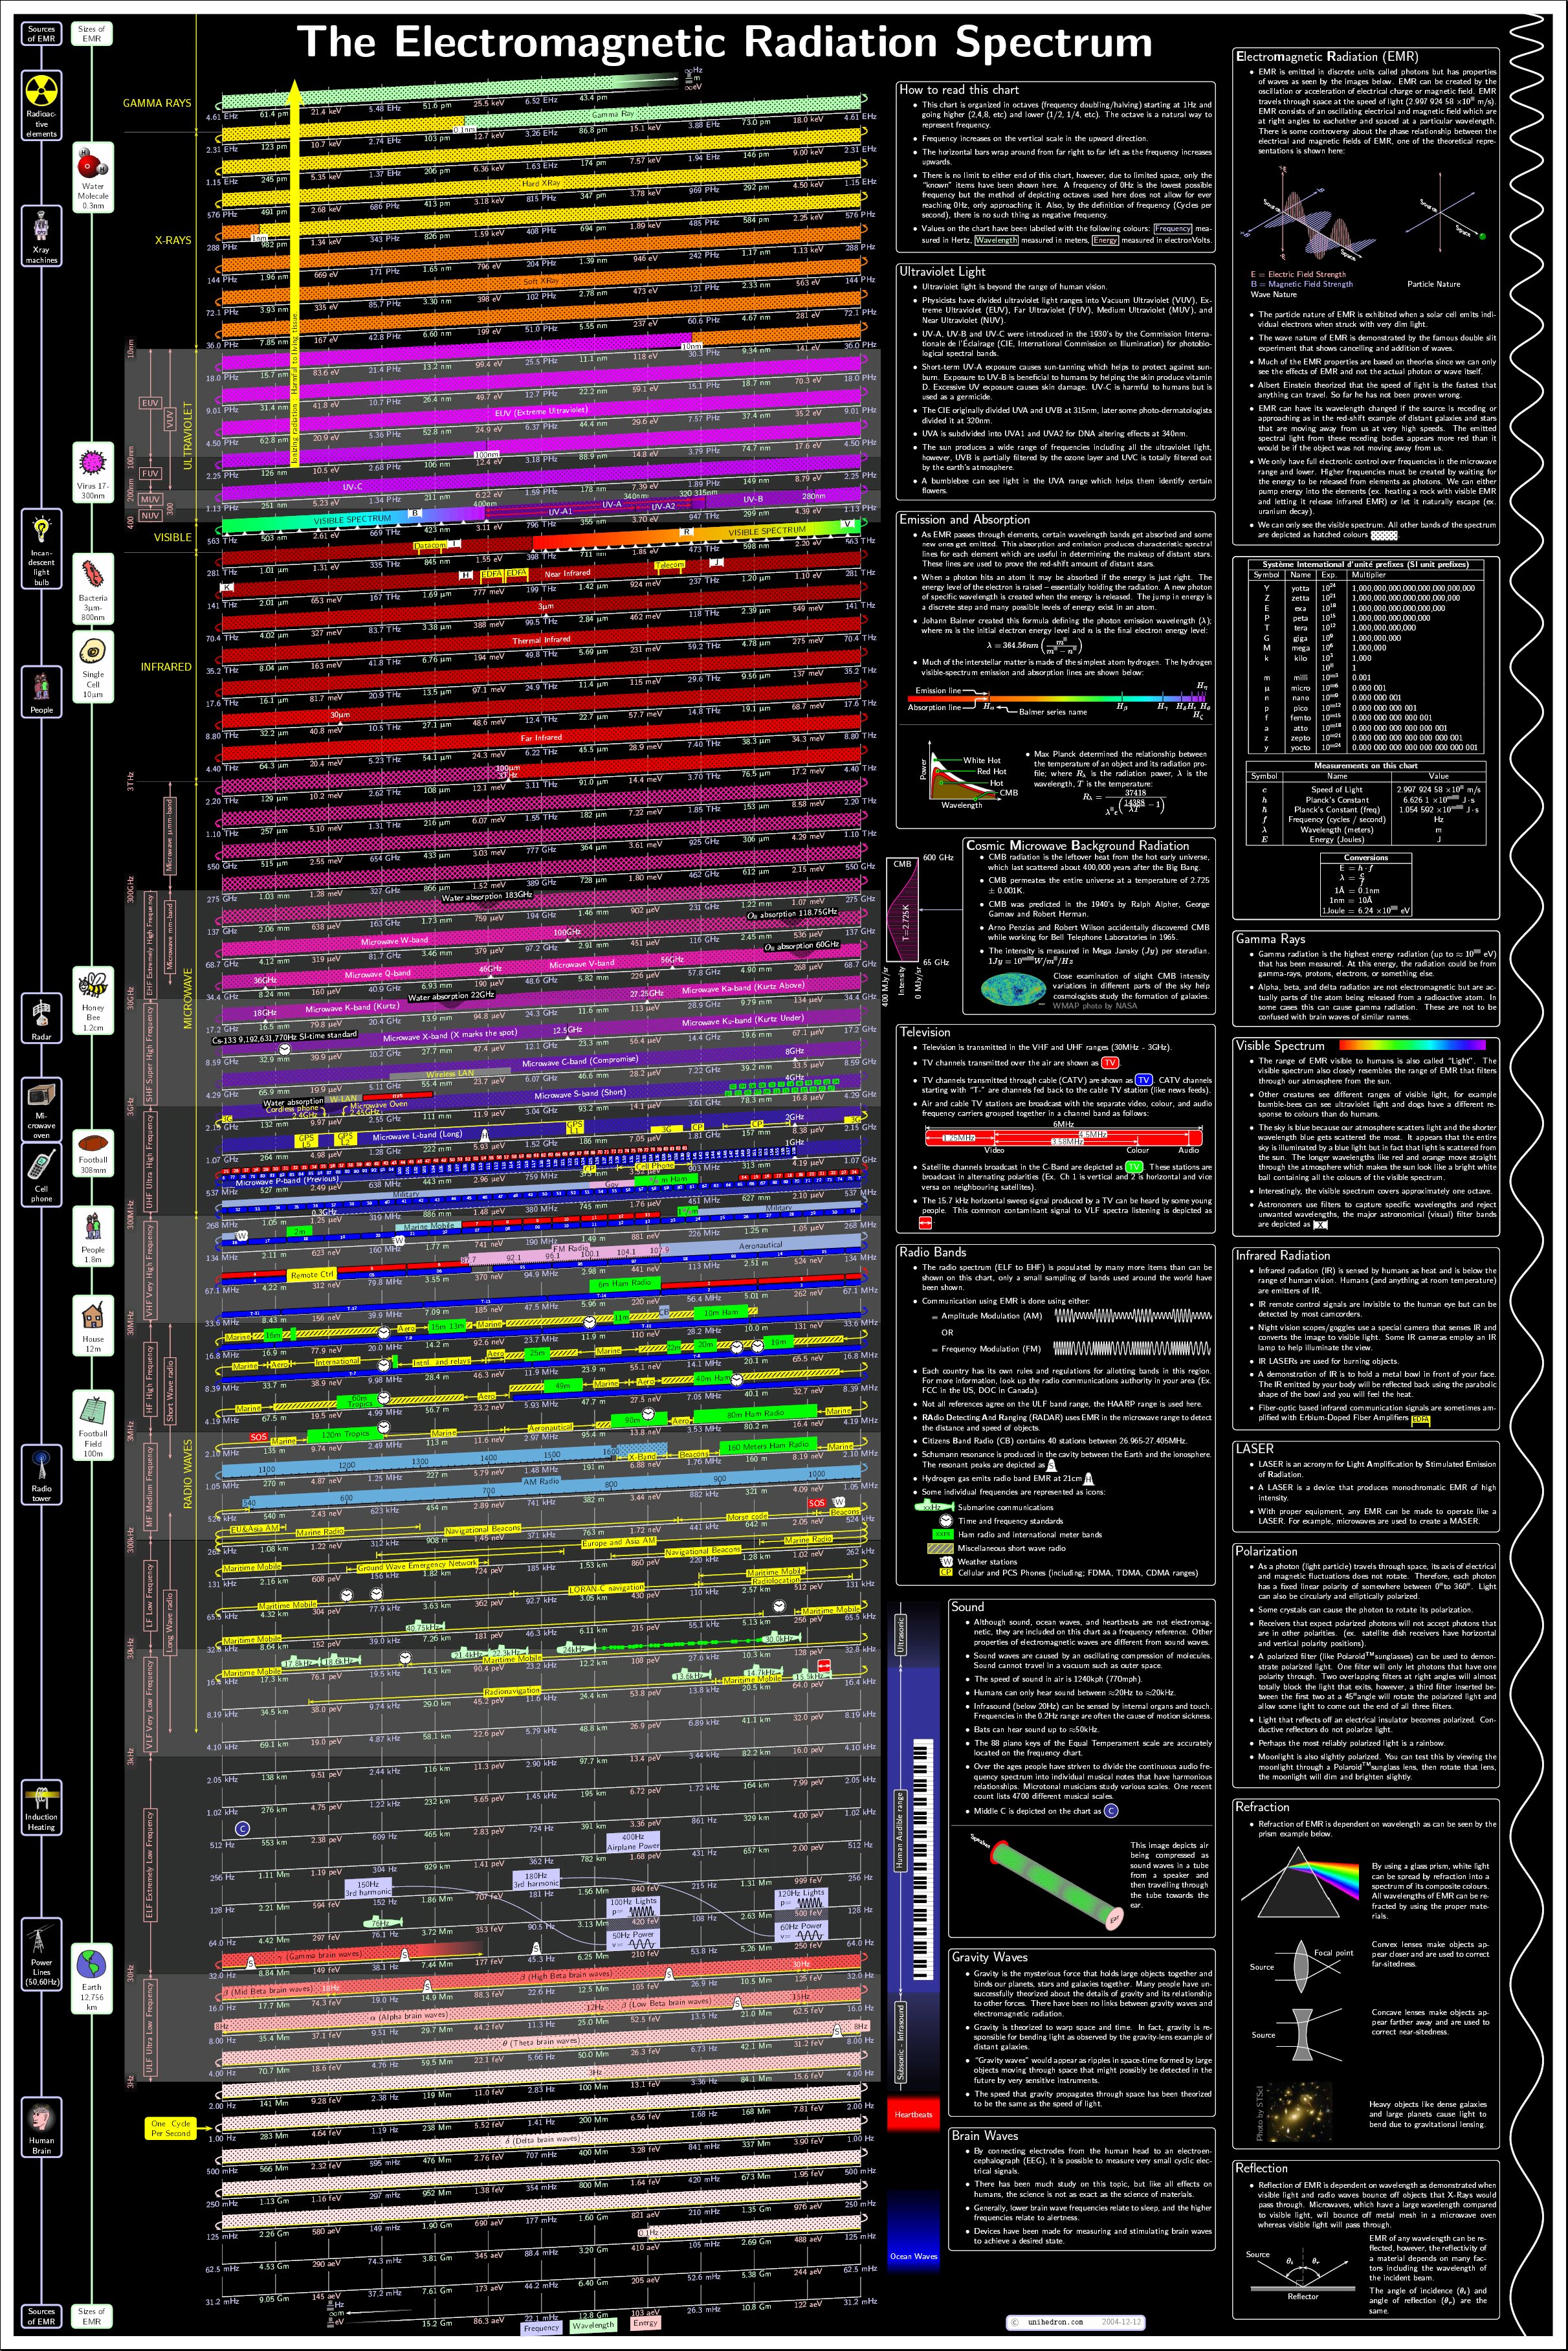
Technical (https://en.wikipedia.org/wiki/Laser_engraving) note: The K40, like mostCO2 lasers
(https://en.wikipedia.org/wiki/Carbon_dioxide_laser) (green circle) operates near a frequency of 10,640 nm which works well on
natural materials –glass, wood, leather, plastics.YAG lasers (https://en.wikipedia.org/wiki/Nd:YAG_laser) (blue circle) operate
around 1,064 nm which works well for engraving metals.
On theabove chart (http://unihedron.com/projects/spectrum/downloads/full_spectrum.jpg) , purple is ultraviolet light and red is
invisible thermal or inferred light.
Chapter 4: Daily Maintenance and Common Faults
The stable working of the laser machine is inseparable from regular maintenance. Here are some common daily maintenance tasks as
well as trouble shooting advice:
4.1Dailymaintenance
1.Replacementofthecoolingwatercleaningthewatertankandreplacingtherecycledwateronceaweekis
recommended:
The quality and temperature of the cooling water can affect the lifetime of laser tube directly, so we suggest using purified water or
distilled water. Water temperature should always stay below than 35 ℃/95 F (roughly body temperature).When higher than 35 ℃/95 F,
please replace the cooling water or add ice cubes to lower the water temperature. A cooling device such as a mini fridge to contain the
water is recommended, or alternately, two water tanks can be used.

7/2/2018 Updated K40 user manual – FYI – K40 Forum
https://awesome.tech/k40-forum/?view=thread&id=68 9/19
Note:Ensurethatthelasertubeisfully floodedwithcoolingwaterbeforestartingthemachine.
2.CleaningofWaterTank
First, turn off the power, disconnect the water inlet pipe and let the inside water of the laser tube flow into the water tank automatically.
Next, open the water tank, remove and clean the water pump, and place it back in the water tank. Connect the water pump to the water
inlet mouth of the machine and check all connections, then replace the cooling water. Turn on the water pump separately and let the
pump run for two to three minutes to guaranty the laser tube has completely filled with water.
3.CleaningofExhaustFan
Over time the exhaust fan will become caked with soot and require cleaning. Any unusual noises from the fan mean cleaning is overdue
and exhaust performance has begun to suffer. As this system is responsible for venting the poisonous smoke outside, it needs to work
properly. Firstly, turn off the power supply and remove the two pipes from the fan. Clean the dust/soot from the inside of the pipes, then
clean the dust out of the fan.
4.CleaningofLens:dailycleaningisrecommendedbeforeusebecausedirtonthemirrorswillbeheatedto
ridiculoustemperaturesandcandestroythemirrors.Allequipmentmustbeshutdownbeforecleaningtoprevent
burnsandblindness.
The engraving machine has three reflector mirrors and one focus lens. The 1# reflector mirror is near the light outlet mouth of laser tube
in the upper left corner of the machine. The 2# reflector mirror is at left side of the beam, and the 3# reflector mirror is on the top of
laser head with the focus lens located in the bottom part of the laser head.
The mirrors will dirty quickly with soot and smoke, resulting in laser loss and mirror damage if no action is taken. Don’t remove the
mirrors to clean them – doing so is unnessesary and means re-aligning the entire machine. Instead use a cotton ball dipped in cleaning
solution (acetone or alcohol) to swab carefully by rotating from the central to edge of the lens.
Take out the focus lens from the laser head and use the same method clean it.
Note:
Wipethelenscarefully,youdon’twanttodamagethesurfacecoating.
Don’tdropthefocuslens
Keeptheconcavesidedownwardwheninstallingthefocuslens.
5.CleaningofGuiderail:Cleaningissuggestedeverytwoweeks.Allequipmentmustbeshutdownbeforecleaningto
preventburnsandblindness.
First move the laser head to the far side and wipe the guide rail off with a dry cloth until it is shiny and clean. Next clean and lubricate
the Y axis guide rail with a little oil (sewing machine oil is recommended), then push the beam several times slowly along the Y guide so
that lubricant can be evenly distributed.
Note:Useadrycottonclothwithasplashoflubricatingoil.
6. Optical path inspection
The optical path system of the laser engraving machine is completed by the three mirrors and the focus lens. There is an optical path
bias with the focus lens, but the three mirrors are mechanically fixed so optical path offset is very possible. Although there is no optical
bias normally, we still suggest you check optical path before working, especially before first operation after shipping.
A detailed explanation of the alignment process can be found in Appendix I "Alignment Standards of Optical Path "
4.2Common (http://www.iciba.com/common/) FaultsAnalysis (http://www.iciba.com/analysis/) (Troubleshooting)

7/2/2018 Updated K40 user manual – FYI – K40 Forum
https://awesome.tech/k40-forum/?view=thread&id=68 10/19
Lesscommonfaultproblemsandtroubleshooting:
La ser w or k s v er y slow ly a nd r efu ses to listen to cha ng es in speed–especiallywithCorelDraw.
Thisisbroughtonbysomekindofincompatibilitywiththemotherboard.Goto:
Andselect‘properties’.Thengoto‘Mainboard’andchoseM1.Thisusuallyfixestheissue.FromDIY3DTech
(http://diy3dtech.com/)
La ser seem s to w or k , but skips a line o r shifts lines left a nd r ig ht like the w or kp iece m o ved
-TLDR= Shut down all other apps on the printing PC. Longer version: This is called ‘printer under-run’ and it used to be common in the
days of dot matrix printers. Basically, the printer (laser) has little to no memory of its own, so if the PC driving it has to divert a lot of
memory to another application – loading programs, watching you tube videos, etc – that will prevent real time delivery of data to the
printer and result in flaws.
Forquestionsnotlistedhere,orformoreinformationonothertopicspleaseconsulttheGoogle+K40group
(https://plus.google.com/communities/118113483589382049502) .Youcanalsousetheselinkstoalternativelasercontrol
boards (http://smoothieware.org/smoothieboard) andScorchWorks
7/2/2018 Updated K40 user manual – FYI – K40 Forum
https://awesome.tech/k40-forum/?view=thread&id=68 11/19
(http://www.scorchworks.com/K40whisperer/k40whisperer.html) freecontrolsoftware.
Chapter5WarrantyRegulations (http://www.iciba.com/regulations/)
5.1WarrantyPeriod
From the date of purchase, the device is warranted for one whole year (except consumables). Optical lenses and the laser tube are
consumables with a three month warranty.
5.2WarrantyClause
This warranty is for products of Shandong Shenhui Laser Science and Technology R&D Co., Ltd.
During the warranty period and under the normal use, malfunctions can be repaired under the warranty terms. Show the warranty card
or invoice to our company and enjoy our free maintenance service.
The following cases are exempt from normal warranty and a fee will be charged according to the concrete condition.
1) Maintenance services not caused by the machine quality;
2) Oversteping the warranty period;
3) No warranty card or altered warranty card;
4) User didn’t fulfill the contractual obligation;
5) Unauthorized modification, repair or maintenance of product;
6) Equipment failure due to human error, negligence or abuse.
The company only assumes legal obligations for the product itself, but does not assume other responsibilities which may be caused by
the use or miss-use of this product. In other words Shenhui is not responsible for these and many other possible damages:
As the user, it is your responsibility to read the manual and to employ this product in a safe manner.
AppendixⅠOptical path adjustment
Ⅰ.Preview of parts
Figure 1
Note: The goal isnot to get a bulls-eyeon the mirror, the goal is toget the spots at both ends of travel to line up. Trying to center the
laser on the mirror at each stageisimpossible– instead, get the near and far lasers dots on each mirror to be right on top of each
other, even if they’re not centered. Once we have an aligned path to mirror 3, then we go back and center the laser by adjusting the laser
tube itself.

7/2/2018 Updated K40 user manual – FYI – K40 Forum
https://awesome.tech/k40-forum/?view=thread&id=68 12/19
Figure 1 shows the area of optical path adjustment.
There are three reflecting mirrors and one focus lens .We appoint them as 1#, 2#,3# and 4#. Here 1#, 2# and 3# are reflecting mirrors
while 4# is the focus lens as is showing on Figure 2 and Figure 3 below:
Figure 2 Figure 3
Figure 4
The control panel above has the on/off switch, laser switch, test switch, current regulation knob and current indicator.
Ⅱ.Operating steps
1 - Turn on laser machine at the on/off switch.
2 - Turn on laser switch (down position is on). There will be no laser when this switch is off.
3 – Press the test switch and check the current value on the ampere meter. The ideal power at testing is 10mA while ideal running power
should stay near 15mA. This switch is used to adjust the max current and show the laser position before engraving and for optical path
adjustments.
4 - Current Regulation: we can adjust the current value by turning this knob while the test switch is held down. The current value
increases as we turn it clockwise.
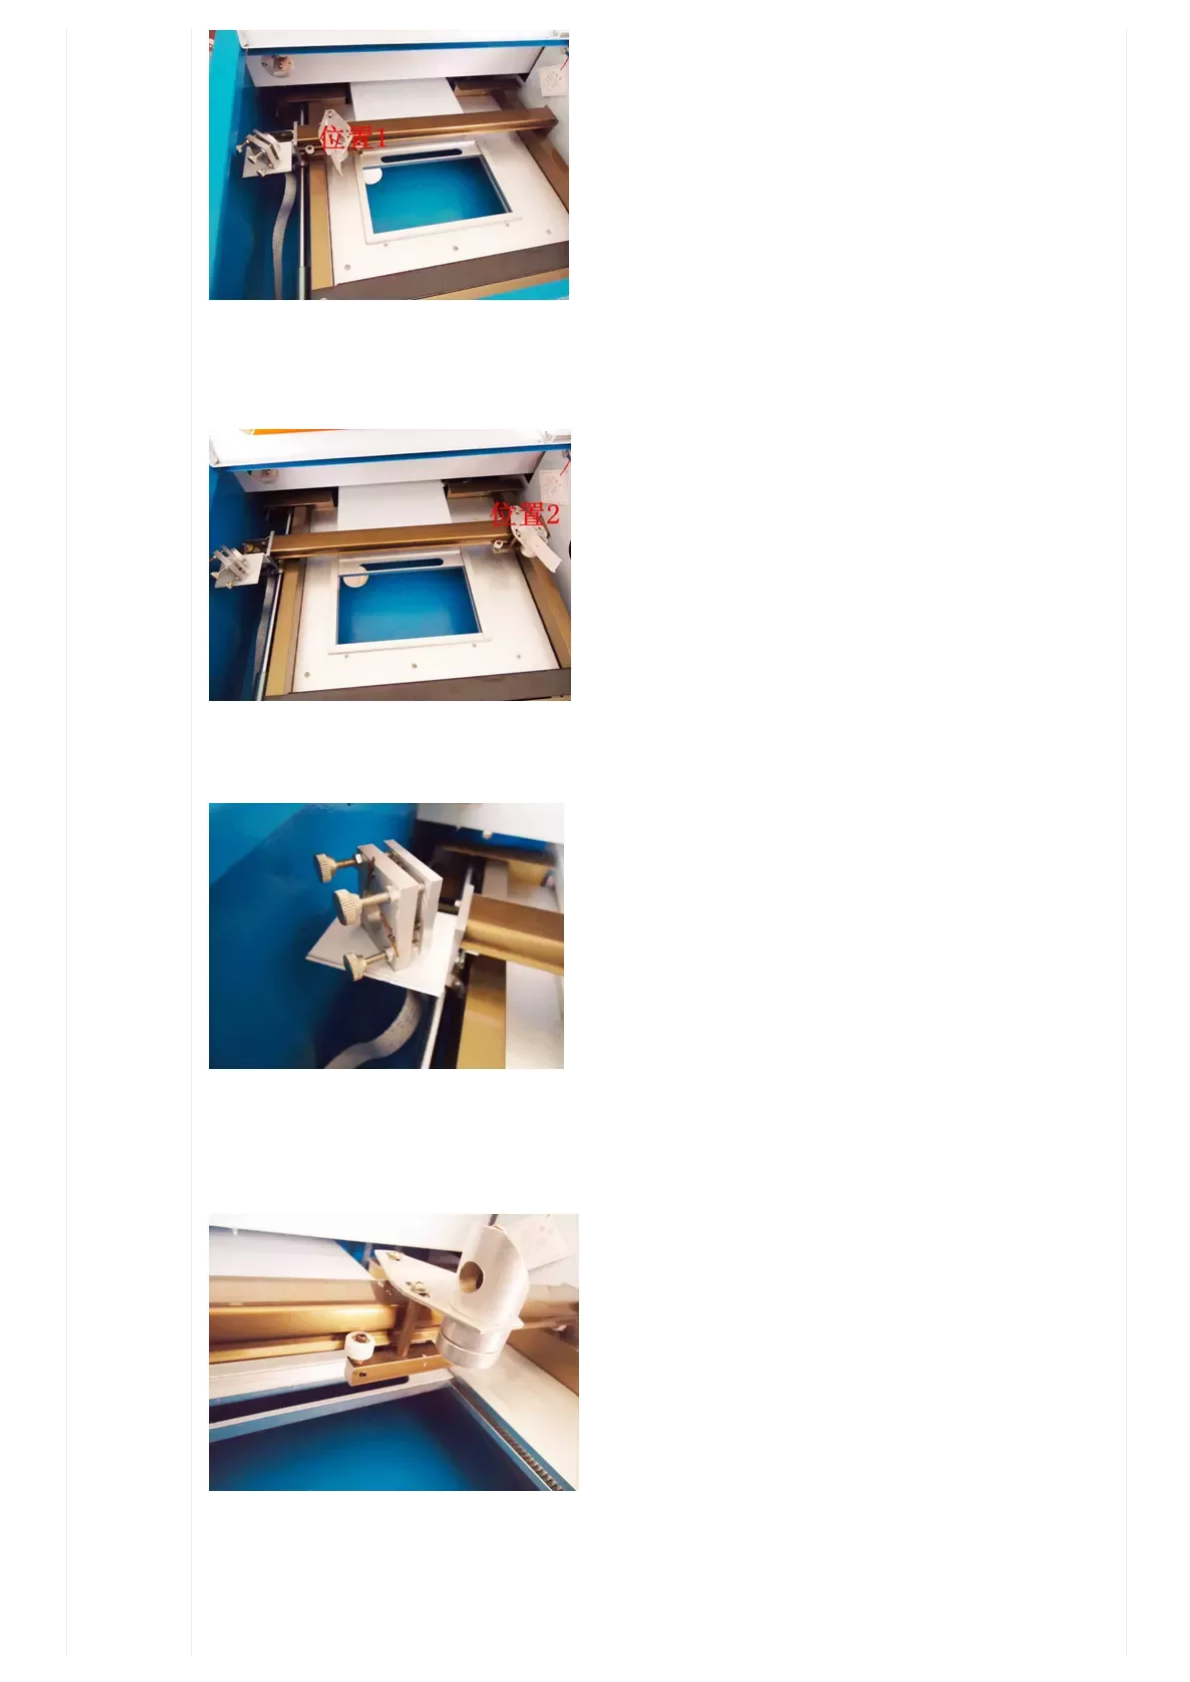
Ⅲ Adjusting steps
Step 1
Adjust the current value to 6mA
Step 2
Put 4 layers double side adhesive tape on the 1# mirror, then push the test switch to get a laser spot on the tape: The burn mark should
be near the center of the mirror. If the mark is way off center you must adjust the laser tube's position, but generally there is no need to
adjust.
7/2/2018 Updated K40 user manual – FYI – K40 Forum
https://awesome.tech/k40-forum/?view=thread&id=68 13/19
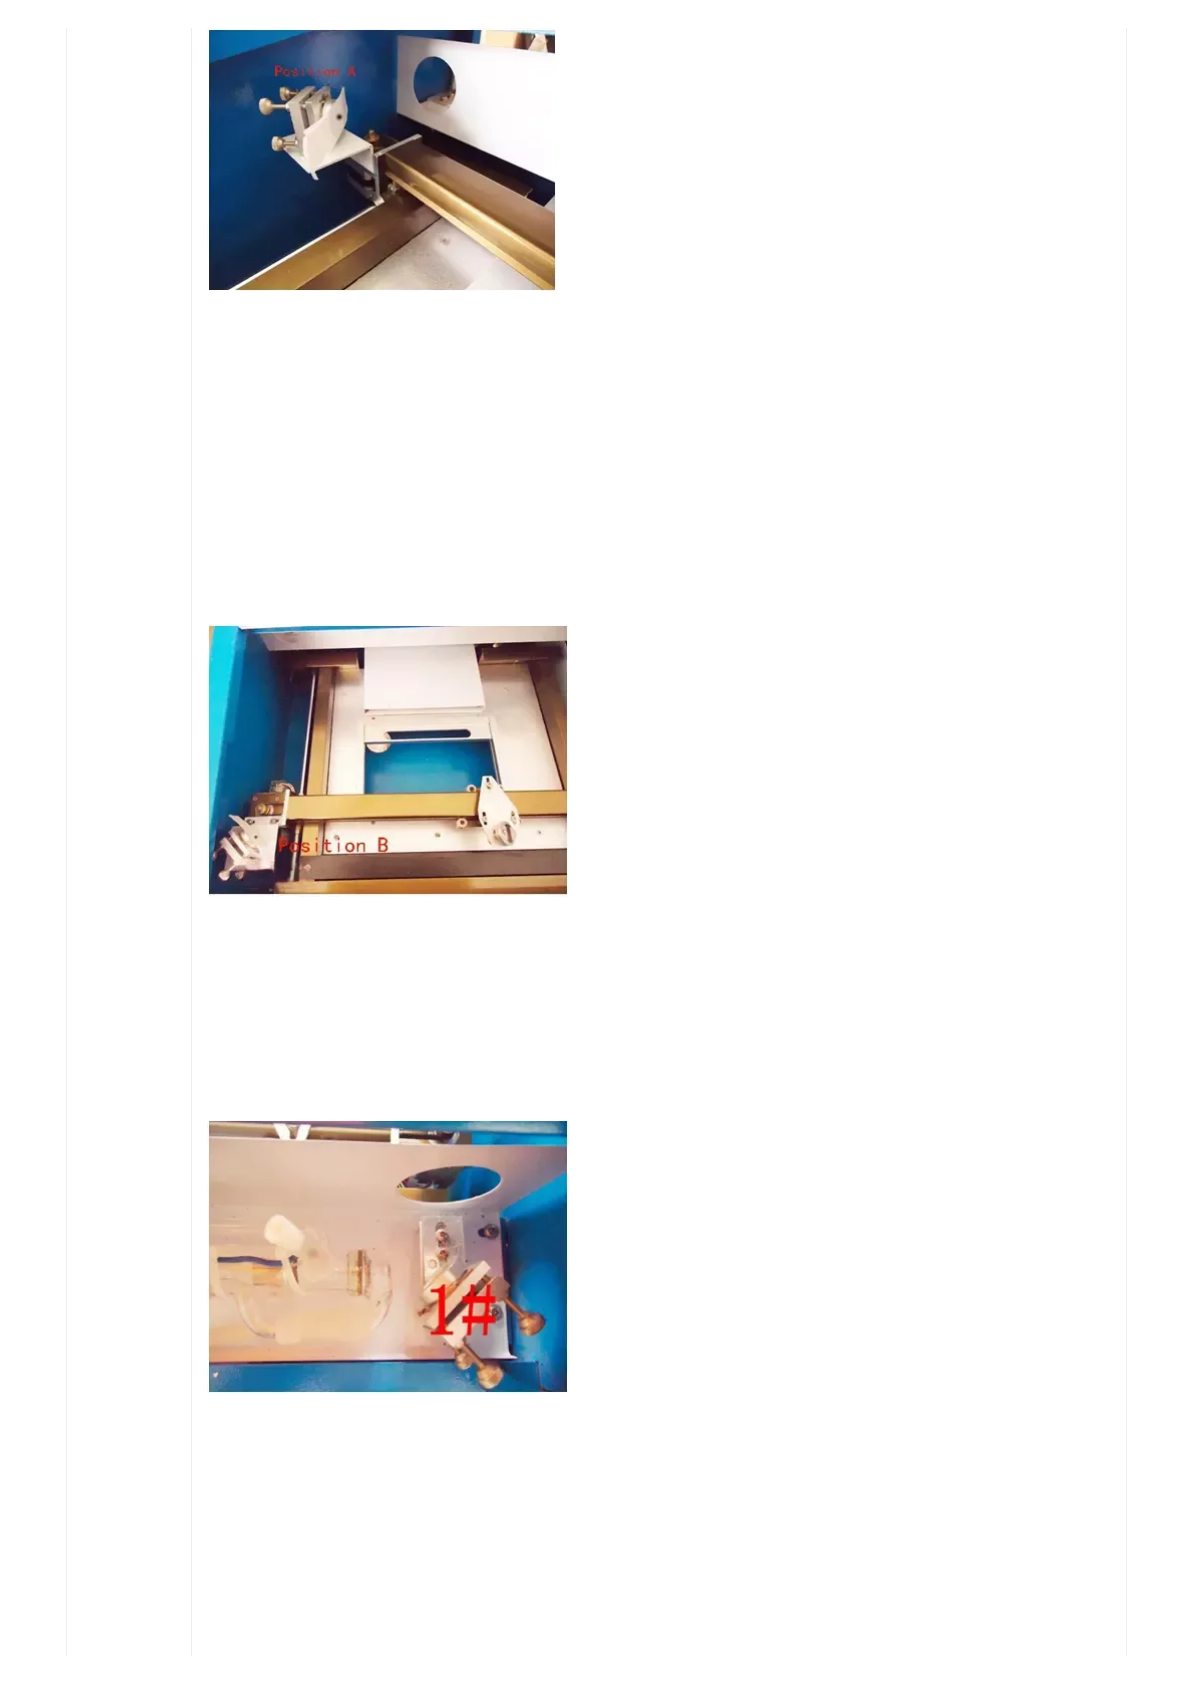
Step 3
Put double side adhesive tape on 2# mirror then move the X axis beam to position A near the laser tube (see Figure 6). Put on some
plastic safety glasses (yes really, if something is wildly off at this point the beam could burn or blind you), then push the test switch to get
a laser spot on the tape; it should be near the center of the mirror as shown in the picture below:
Figure 6
If you don’t get a burn mark at all, try taping a bit of cardboard to the mirror and repeating step three to see where the laser is hitting
and which way it needs to be adjusted.
Step 4:Move the X axis beam slowly to position B far from the laser tube, then push the test switch to get another laser spot on the tape.
These two spots should completely overlap.
Figure 7
Step 5:If the second spot is not at the same position as the first one then we have to adjust the angle of mirror 1#. First loosen the
screws which are used to lock the adjusting screws, then adjust the screws at back of the 1# mirror until the second spot overlaps with
the first.
There are three adjusting screws (Figure 8); the top two are used to adjust the spot left and right, the bottom one is used to move the
spot up and down.
Figure 8
Step 6: Repeat step 3,4,5 until the two spots are at same position.
Step 7: Put tape on the third mirror, move the laser head close to the 2# mirror, then close the safety lid and push the test switch to get a
laser spot on tape.
7/2/2018 Updated K40 user manual – FYI – K40 Forum
https://awesome.tech/k40-forum/?view=thread&id=68 14/19
Figure 9
Step 8: Move the laser head slowly to the side far from the 2# mirror, close the safety lid and push the test switch to get a laser spot. If no
burn appears, use a bit of cardboard in front of the 3# mirror to get the general position of the laser spot.
Figure 10
Step 9: If these two spots don't overlap, adjust the three screws at back of 2# mirror.
Figure 10
Step 10: Repeat step 7,8, and 9 until the two spots overlap.
Step 11: Put tape on the hole at top of the laser head and push the test switch to get a laser spot; it should be near center of the hole.
Figure 12
Step 12: If the spot is not at the center of the hole, we will need to adjust the laser tube itself as per the picture below.
If it’s too far up and right,

7/2/2018 Updated K40 user manual – FYI – K40 Forum
https://awesome.tech/k40-forum/?view=thread&id=68 15/19
We should move the laser tube up or down to adjust the spot moving up and down, and move the tube side to side to adjust the spot left
and right.
For this situation above on the picture, we should adjust the laser tube lower and a little bit towards the front of the machine as is shown
in pictures below:
Figure 13
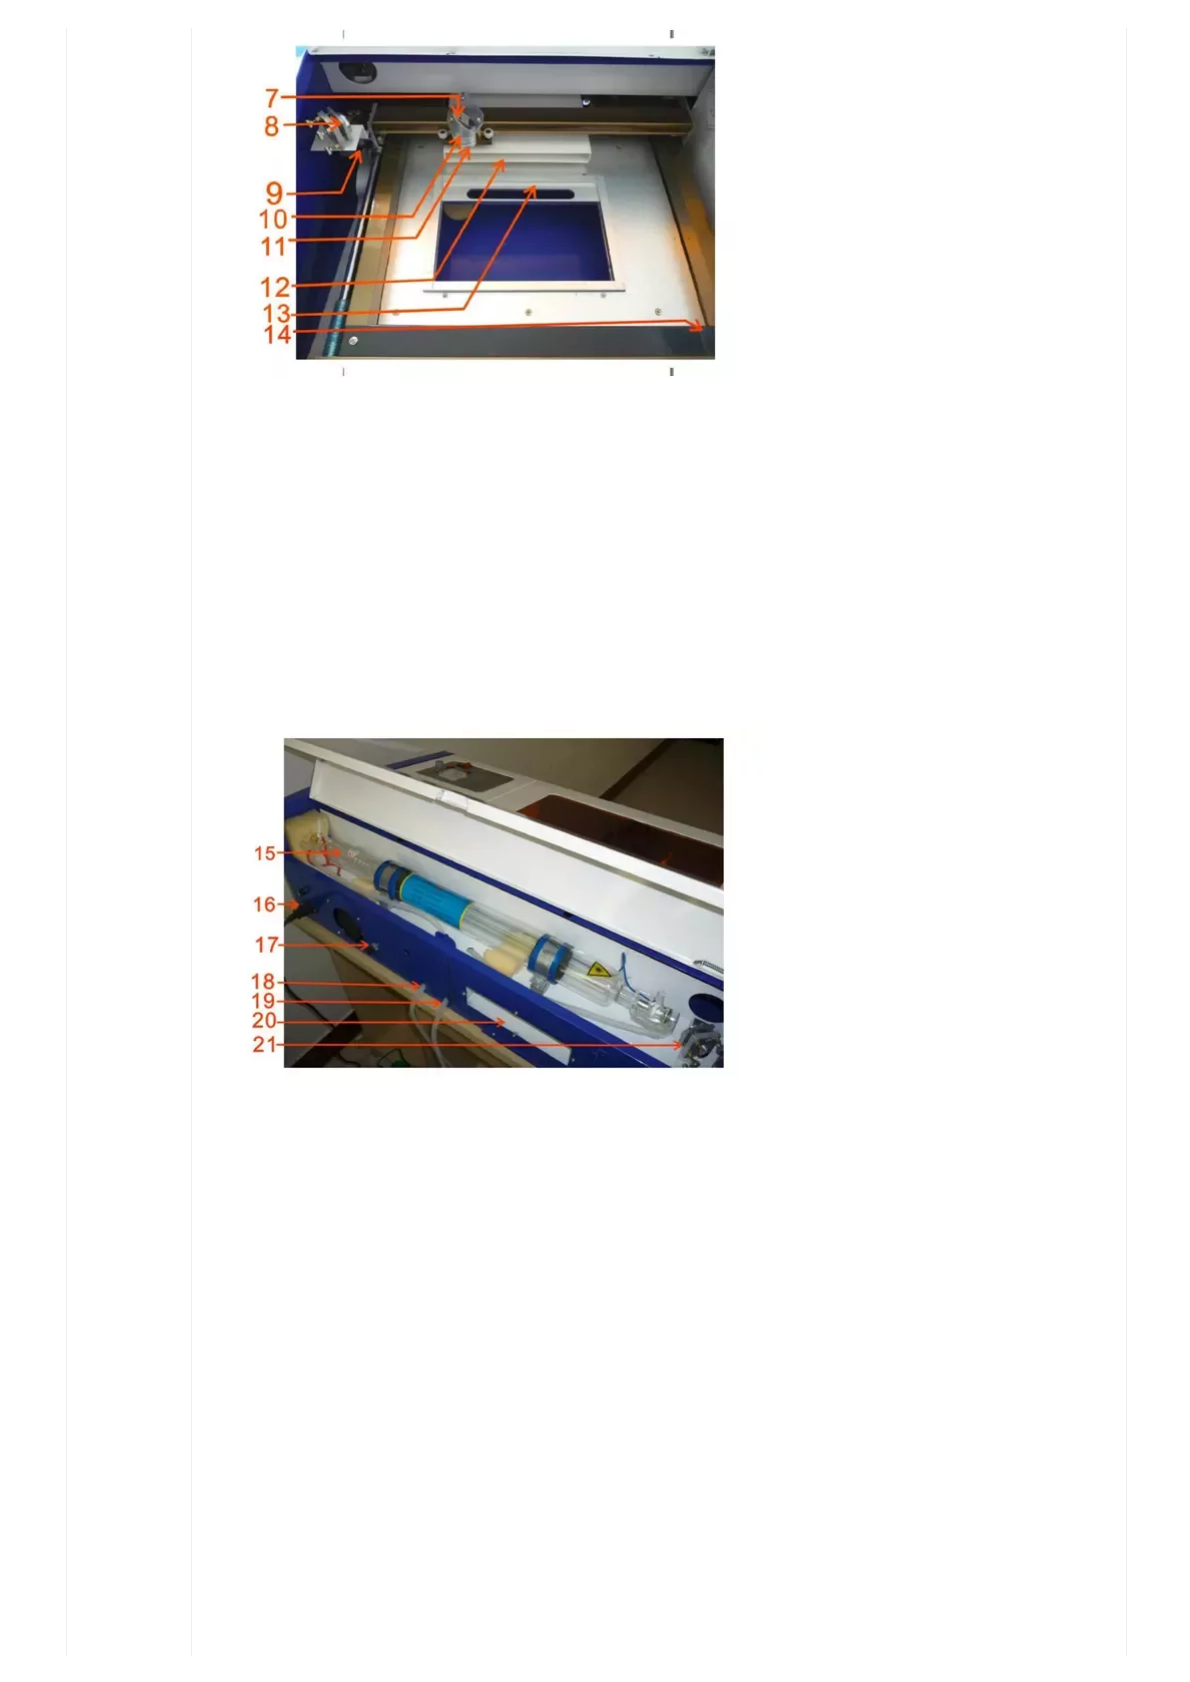
Appendix Ⅱ introduction to Laser machine
parts
1.Laser power supply
2.Mainboard power supply
3.Mainboard
4.Transformer
5.50KΩ Electrical resistance
6. Output port (May be a USB port on newer models)
7/2/2018 Updated K40 user manual – FYI – K40 Forum
https://awesome.tech/k40-forum/?view=thread&id=68 16/19
7. 3# reflector mirror
8. 2# reflector mirror
9. X axis motor
10. Laser head
11. Lens
12. Relief opening to pull smoke out during operation
13. Tongs – spring loaded retaining clamp to hold the workpeice
14. Y axis motor
15. Laser tube
16. 220V power input (May be 110V on some models)
17. Ground post
18. Water inlet pipe
19. Water outlet pipe
20. Smoke exhaust
21. 1# reflector mirror
7/2/2018 Updated K40 user manual – FYI – K40 Forum
https://awesome.tech/k40-forum/?view=thread&id=68 17/19
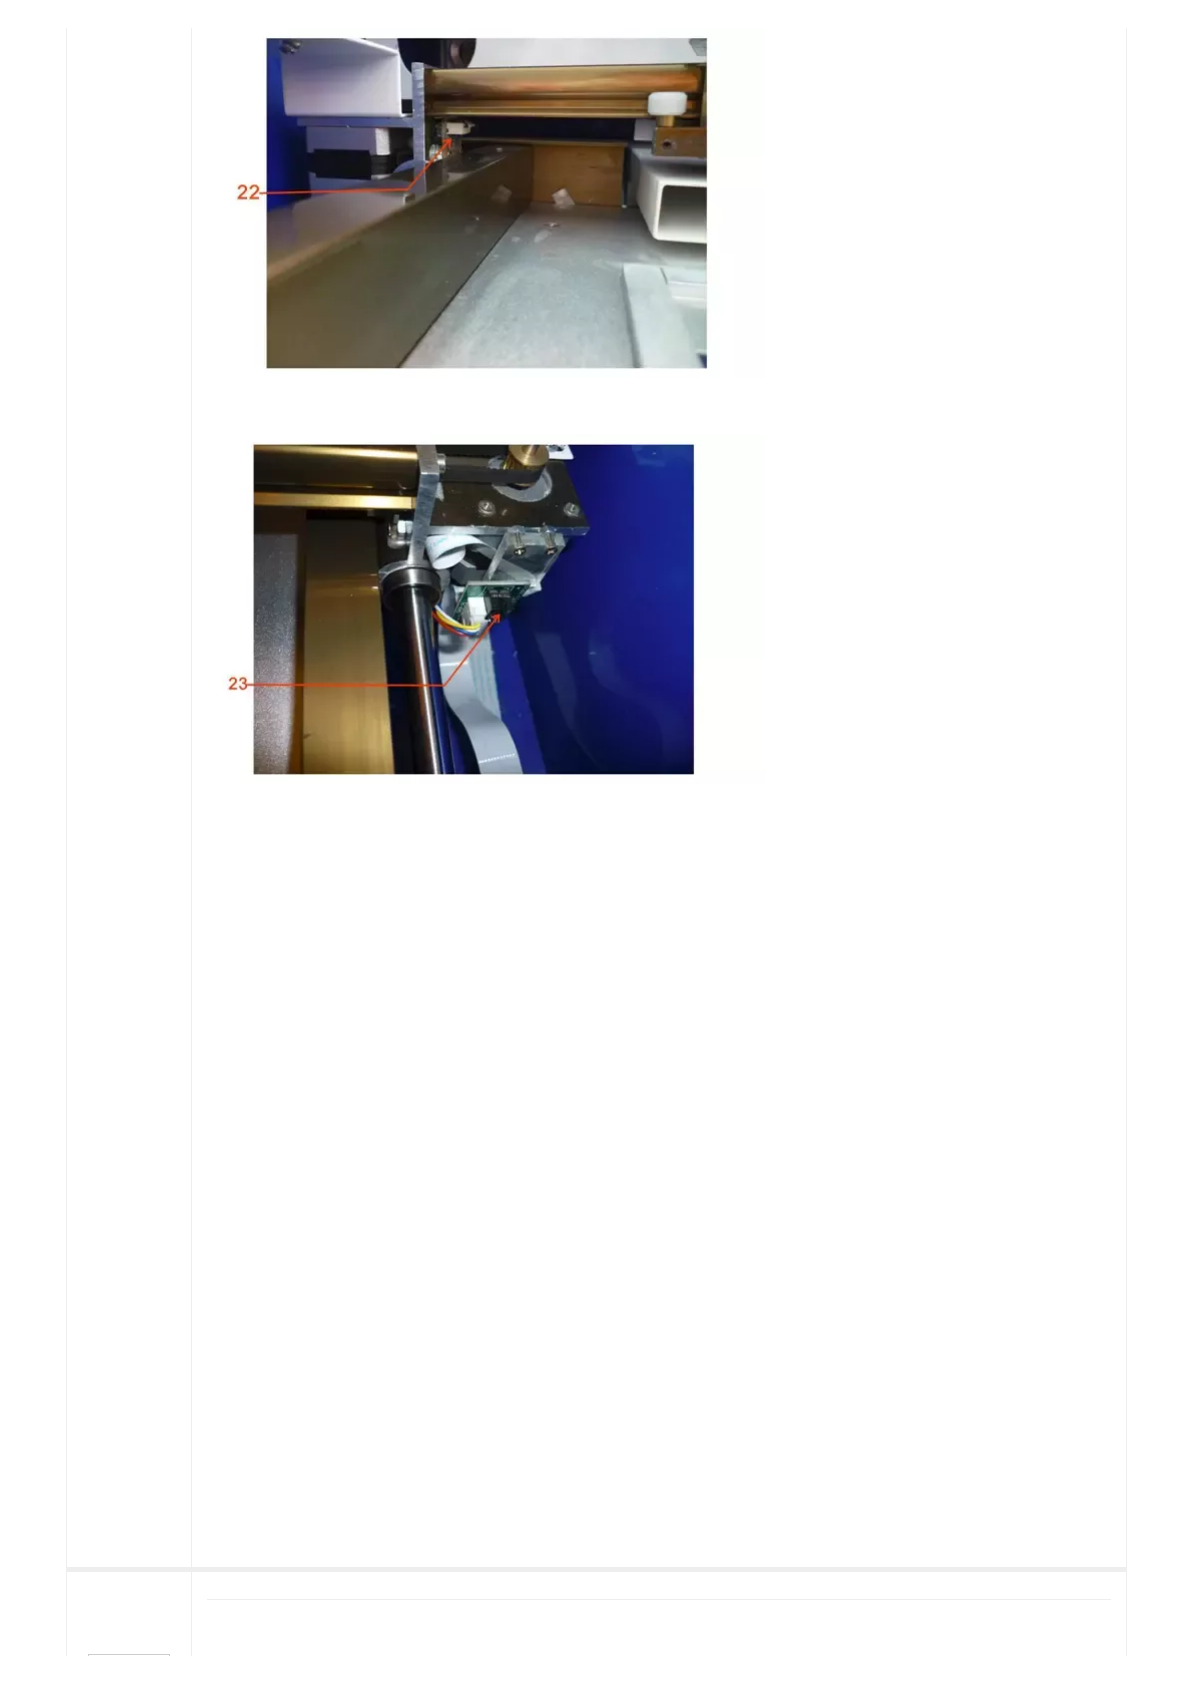
22. Small light-operated switch (Y stop switch or limit switch to tell the machine where it is)
23. Big light-operated switch (X axis limit switch)
Appendix III Suggested applications and uses
Your new laser cutter engraver can be used for many tasks and to accomplish things you may not have considered before. Below are
some common uses of the laser:
- Stamp manufacturing – any style, any contents.
- Engraving text and images onto wooden plaques for special events – many businesses and museums make use of plaques for awards,
retirements, etc and now you can make any 12 by 8 inch design on demand.
- Making very precise cutouts from wood/plastic/etc - this can be used to make small replacement parts, custom business cards, punch
out style 3D models, or carve pictures into custom puzzles.
- Engraving text and images onto glass or ceramic – text is usually legible down to 8 point font or smaller, and glass tiles with opaque
backing can be written on like printer paper. When the text is flipped in the program it can be read through the surface of the tile after
instillation into a wall or floor making it ideal for commemorative messages, custom glass coasters, and time capsules/plates that can
survive for millions of years.
Best of luck with your new laser engraver, we hope you found this manual helpful!
Shenhui Laser
Telephone +86-635-8511087
Email:shenhui@shenhuilaser.com (mailto:shenhui@shenhuilaser.com)
Web Address:http://www.Icshenhuilaser.com (http://www.icshenhuilaser.com/)
Address: No.28 Huanghe Road, Liaocheng Citty, Shandong, China 252000
LasteditedonJanuary18,2018,8:17pmbymike_arndt_ie(https://awesome.tech/k40forum/?view=profile&id=229)·#1(https://awesome.tech/k40forum/?
view=thread&id=68&part=1#postid251)
January29,2018,7:51pm
Well done Michael, excellent information for our readers.

7/2/2018 Updated K40 user manual – FYI – K40 Forum
https://awesome.tech/k40-forum/?view=thread&id=68 18/19
PaulDeGroot
(https://awes
ome.tech/k40
forum/?
view=profile&i
d=2)
184Posts
Forum Registration (https://awesome.tech/forum-registration/)
Edit Prole (https://awesome.tech/edit-prole/)
Share this:
Google (https://awesome.tech/k40-forum/?share=google-plus-1&nb=1) Twitter (https://awesome.tech/k40-forum/?share=twitter&nb=1)
Pinterest (https://awesome.tech/k40-forum/?share=pinterest&nb=1) Facebook 1 (https://awesome.tech/k40-forum/?share=facebook&nb=1)
Email (https://awesome.tech/k40-forum/?share=email&nb=1)
(/#facebook) (/#twitter) (/#google_plus)
(https://www.addtoany.com/share#url=https%3A%2F%2Fawesome.t
forum%2F&title=K40%20Forum)
Email
pauljacobdegroot@gmail.com (mailto:pauljacobdegroot@gmail.com)
Address
Sydney, Australia
Stay updated - join our mailing list ! We won't spam you.
Fields marked with an * are required
Username or E-mail
#2(https://awesome.tech/k40forum/?view=thread&id=68&part=1#postid297)
CONTACT US
Name *
Email *
SUBMIT
LOG IN

