User Guide Elastic Suite For Magento 2 V2
User%20Guide-ElasticSuite%20for%20Retailer%20Magento%202%20vf
User Manual:
Open the PDF directly: View PDF ![]() .
.
Page Count: 24

Retailer Suite
Magento 2
User Guide
Versions : Retailer Suite V2
Date : October 18th, 2018
Author : Vincent Pradoux

24
So
2
Elastic Suite for retailer
User Guide
Table of content
I - INTRODUCTION 3
I.1 WHAT IS ELASTIC SUITE FOR RETAILER? 3
I.2 WHO WE ARE 3
I.3 REQUIREMENTS 3
I.4 ELASTIC SUITE FOR RETAILER MODULES LIST 4
I.5 TERMINOLOGY 5
I.6 FOR MORE INFORMATION 5
II - RETAILER SUITE CONFIGURATION 6
II.1 NAVIGATION MODE 6
II.1.a “Drive” navigation mode 6
II.1.a “Retailer” navigation mode 6
II.2 RETAILER CONFIGURATION 7
II.2.a Retailer administration 7
II.2.b Add new retailer 8
II.3 RETAILER OFFERS CONFIGURATION 12
II.3.a Retailer offers administration 12
II.3.b Create an offer 12
II.4 STORE LOCATOR CONFIGURATION 15
II.4.a Map settings 15
II.5 SEARCH SETTINGS 17
II.5.a Retailer autocomplete 17
II.5.b Retailer search settings 17
III - FRONT OFFICE 18
III.1 FRONT OFFICE OPERATION 18
III.1.a Header 18
III.1.b Product page 18
III.1.c Checkout – Store delivery 20
III.1.d Retailer search page 22
III.1.e Retailer page 23
24
So
3
Elastic Suite for retailer
User Guide
I - INTRODUCTION
I.1 WHAT IS ELASTIC SUITE FOR RETAILER?
Elastic Suite for retailer is an extension of the module Smile ElasticSuite (https://github.com/Smile-
SA/elasticsuite). It’s a set of modules for Magento 2 that integrates omnichannel strategy by adding
web to store features:
A powerful and customizable store locator
Manage product catalog for each store
Personalize the omnichannel customer experience: Drive or Retail
High performances & scalability
This set of modules has been designed to help multi-channel distributors to easly integrate
omnichannel dimension in Magento.
This set of modules has been created by Smile Innovation and is released under the Open Software
Licence version 3.0.
I.2 WHO WE ARE
Set up in 1991, Smile is the first European integrator specialized in open source solutions.
On top of our engineering expertise, Smile offers a vast range of services: consulting
upstream and in support of the projects, the interactive agency both in creation and
web design and in editorial, strategic and e-marketing advice, application
maintenance, training, support & maintenance in operational condition, hosting and
exploitation.
Magento recognized Smile as a core partner through the « Global Elite » partnership
badge.
Since 2014, Smile Innovation is the innovation and experimentation entity of
Smile. Our multidisciplinary team brings together experts in technology,
innovation, and new applications. Together we explore, invent, and test
technologies of the future, to better serve our clients.
I.3 REQUIREMENTS
First, you need to have the module Smile ElasticSuite 2.3.3 or higher. Nevertheless, it’s possible to
integrate only the Store Locator without ElasticSuite.
Smile ElasticSuite for Retailers has been successfully deployed and tested on the following Magento
versions :
• Magento Commerce 2.1.x or higher
• Magento Open Source 2.1.x or higher
As far as possible, you should install the module at the early beginning of your Magento project, at the
same time you install Magento. This way, your development team won’t spend additional time to
handle ElasticSuite specificities.
24
So
4
Elastic Suite for retailer
User Guide
I.4 ELASTIC SUITE FOR RETAILER MODULES LIST
Depending on the project, several additional modules can be used to improve Elastic Suite. Each of
them is published in open source and is shared on github.
Module name
Description
Requir
ements
Elastic Suite For
retailer
Installation Package :
Offer, seller, retailer, store locator, retailer offer, store
delivery
https://github.com/Smile-SA/elasticsuite-for-retailer
ElasticSuite 2.1
Retailer
ElasticSuite
Search
It allows to index retailers into the search engine and
display them into the autocomplete results, and also on
the search result page.
https://github.com/Smile-SA/module-retailer-elasticsuite-
search
ElasticSuite 2.1
Retailer
It allows to implement retailer entities into Magento
https://github.com/Smile-SA/magento2-module-retailer
ElasticSuite 2.1
Seller
Offer
It allows to configure offer for retailer into magento
https://github.com/Smile-SA/magento2-module-offer
ElasticSuite 2.1
Seller
Seller
It allows to add sellers.
https://github.com/Smile-SA/magento2-module-seller
None
Store Locator
This module adds a store locator to the website.
https://github.com/Smile-SA/magento2-module-store-
locator
Map, Retailer
Map
It allows to add map on the website.
https://github.com/Smile-SA/magento2-module-map
None
Retailer Offer
This module adds the ability to manage offers per
Retailer Shop.
https://github.com/Smile-SA/magento2-module-retailer-
offer
Offer, retailer,
store locator
Retailer Offer
inventory
It allows to add stock level for retailer offer
https://github.com/Smile-SA/magento2-module-retailer-
offer-inventory
Retailer Offer
24
So
5
Elastic Suite for retailer
User Guide
Store delivery
It allows to use store address for shipping address with
store delivery shipping method
https://github.com/Smile-SA/magento2-module-store-
delivery
Store locator
(Map + retailer?)
I.5 TERMINOLOGY
POS
Points of sale
Retailer
A retailer is synonymous with point of sale or store
I.6 FOR MORE INFORMATION
Elastic Suite official website
http://magento-elastic-suite.io
GitHub Elastic Suite for Magento 2
https://github.com/Smile-SA/elasticsuite
GitHub Retailer Suite for Magento 2
https://github.com/Smile-SA/elasticsuite-for-retailer
ElasticSuite Demo
http://demo.magento-elastic-suite.io
Smile official website
http://www.smile.fr
24
So
6
Elastic Suite for retailer
User Guide
II - RETAILER SUITE CONFIGURATION
In this chapter, we will speak about the different basic parameters of the module.
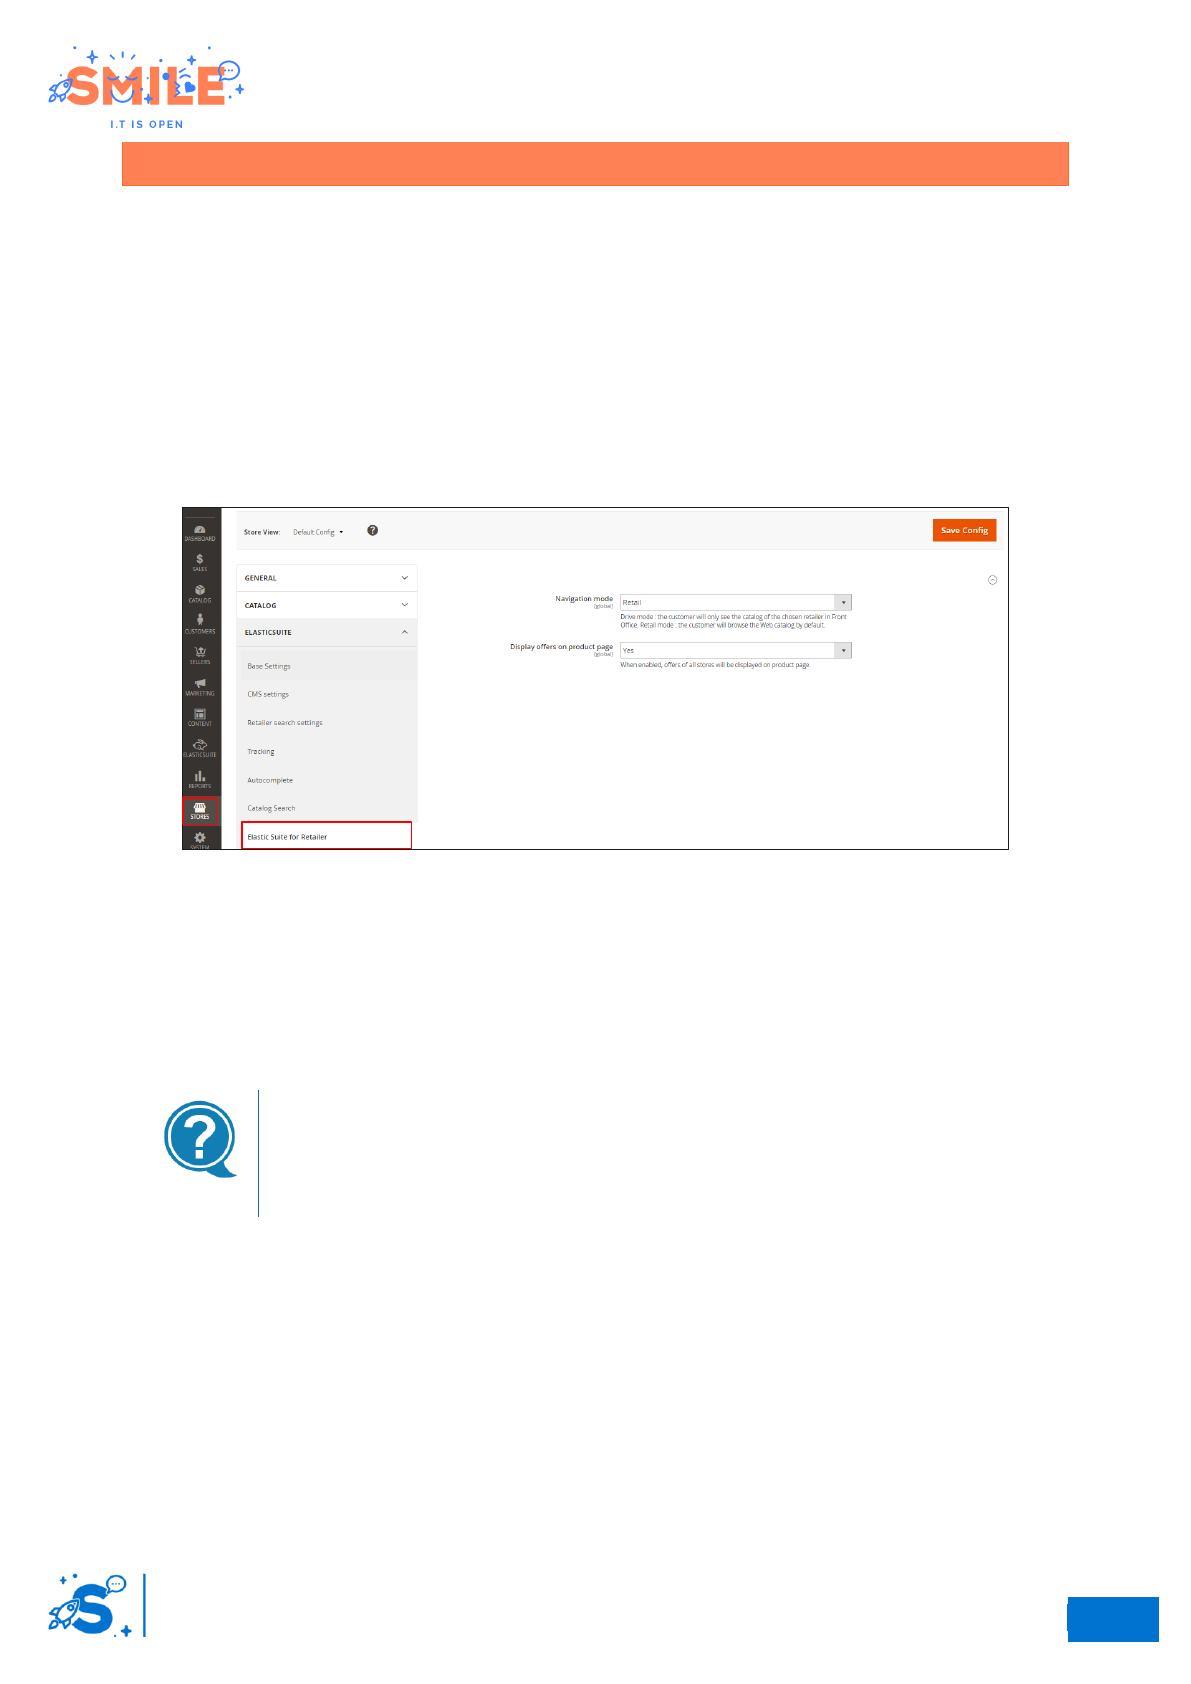
II.1 NAVIGATION MODE
Access: Stores -> ElasticSuite -> Elastic Suite for Retailer
The “Smile elastic suite for retailer” module allows customers to choose a retailer. The retailer
selection allows merchants to have two different catalog navigation modes depending on the
configuration chosen in the back office. You have the choice between “drive” or “retail” navigation
mode.
Navigation mode settings
II.1.a “Drive” navigation mode
The "drive" mode allows access to the user only to the product catalog of the selected retailer.
Nevertheless, it’s possible to have access to all retailer offers by setting the attribute "Display offers
on product page" to yes.
Drive mode
This operation makes it possible to implement navigation logic by “assortment
retailer” where the user's navigation begins with the choice of his retailer.
II.1.a “Retailer” navigation mode
The “retail” mode allows users to navigate in the web catalog and to have access to the retailer offers.
24
So
7
Elastic Suite for retailer
User Guide
II.2 RETAILER CONFIGURATION
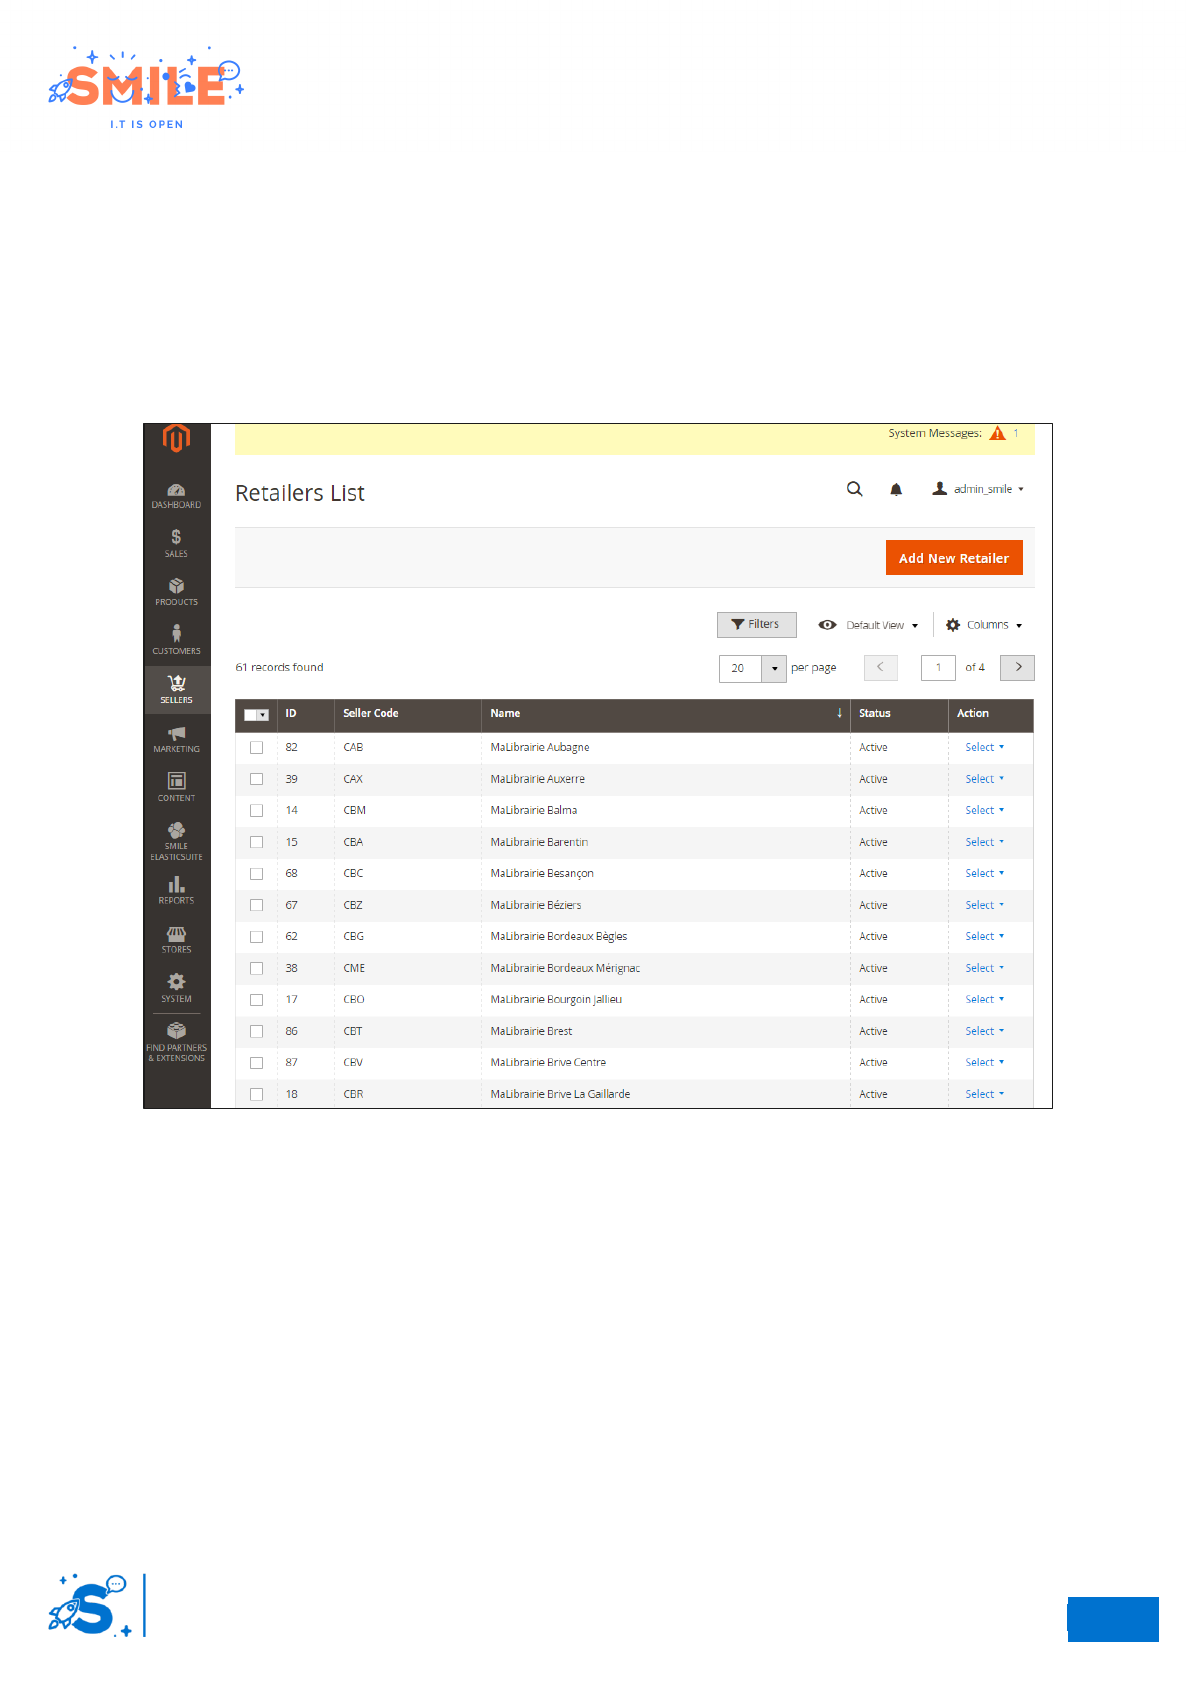
II.2.a Retailer administration
Access: Sellers -> Retailers
The Inventory grid lists all retailers. Use the standard controls to sort and filter the list, find products,
and apply actions to the selected retailers. From the grid, you can create new retailers and edit existing
ones.
Retailers Grid
You can edit or delete a previously created retailer and add or remove some elements from the grid or
by clicking the delete retailer button on the Retailer edit page.
24
So
8
Elastic Suite for retailer
User Guide
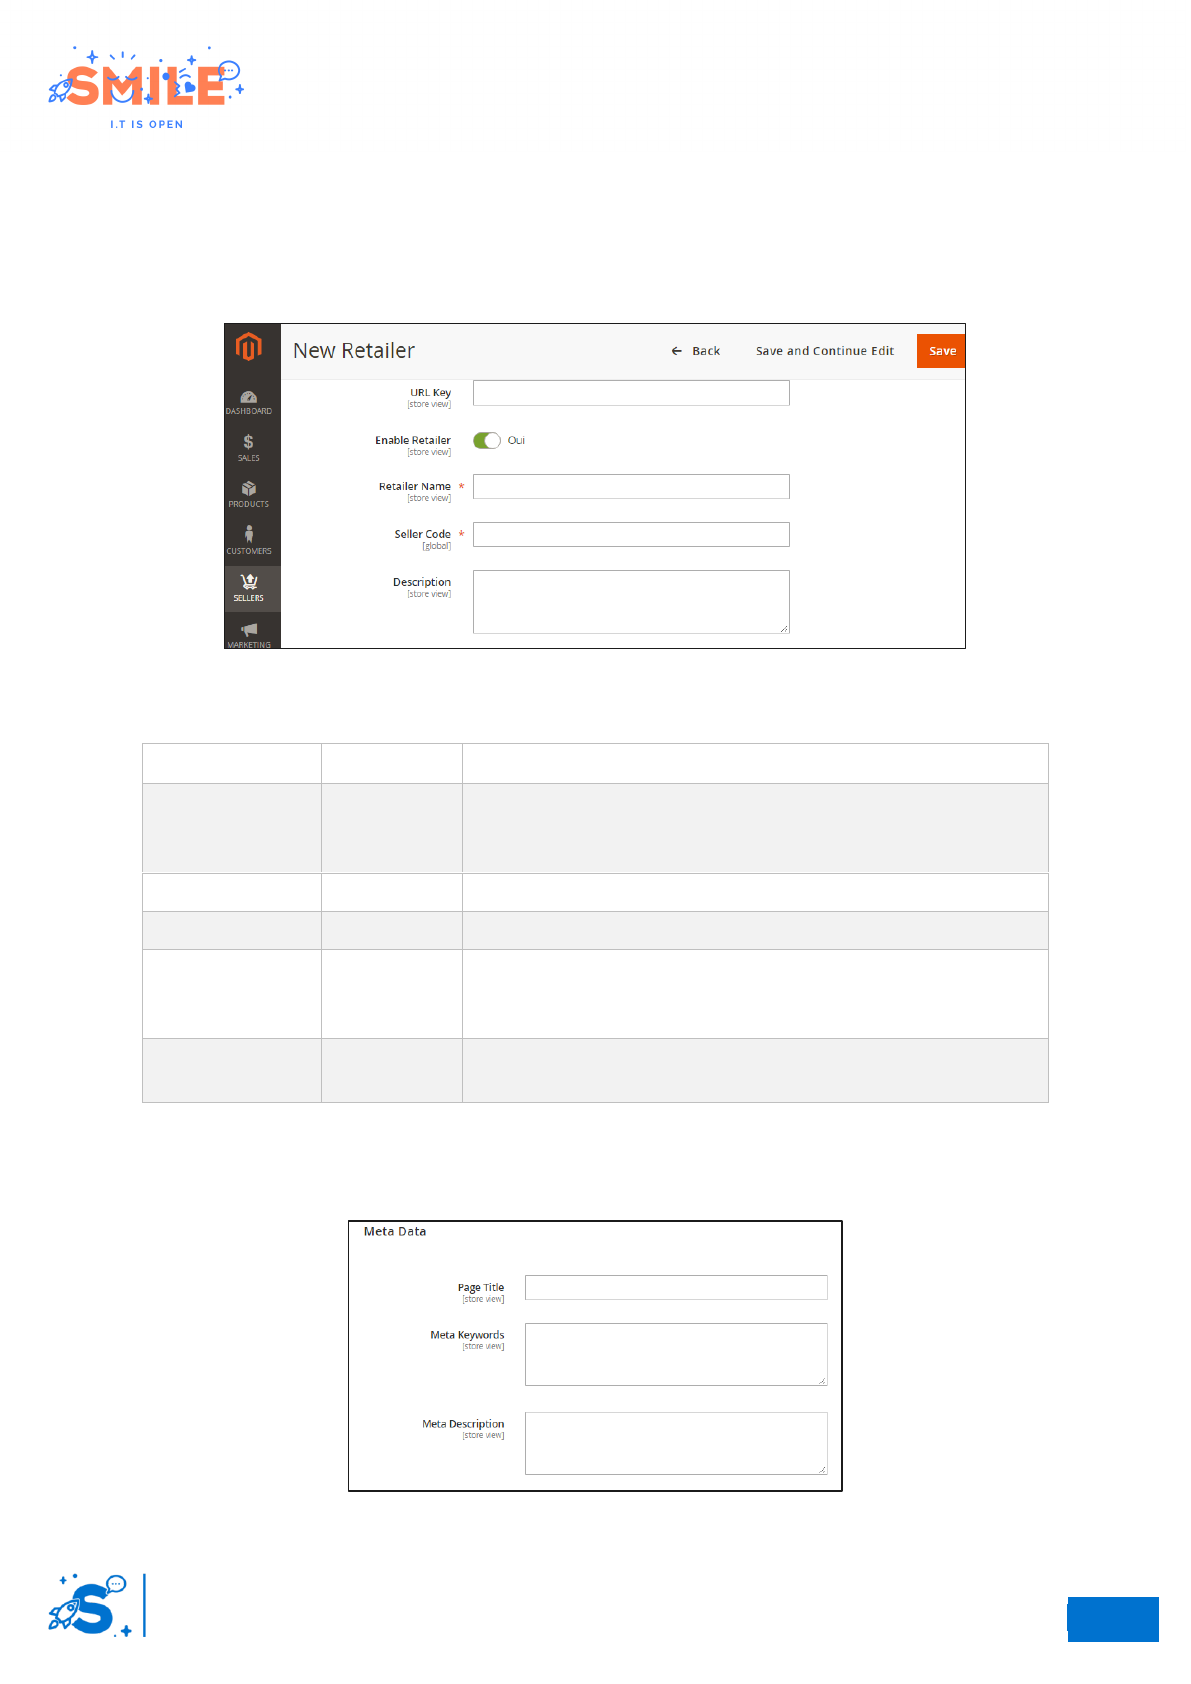
II.2.b Add new retailer
Access: seller -> retailer -> Click on add new retailer
Step 1 – Complete the basic fields
The first fieldset shown in this screen allows you to configure Retailer's basic data.
Step 1 – Basic settings
Attribute
Required
Description
URL Key
No
You can enter an URL Key for the retailer, or let the system
automatically create one that is based on the « Retailer name ».
The URL Key defines the URL of the retailer details page.
Enable Retailer
Yes
To enable the retailer, set “Yes”
Retailer name
Yes
The name of this retailer
Seller code
Yes
A technical identifier for the retailer. Never displayed in Front-
Office, may be used for internal purposes. This field should be
unique among all retailers
Description
No
In the Description box, enter a paragraph or two of descriptive
text for the retailer details page
Step 2 – Complete the meta data
The second attribute set contains SEO attributes, to enhance the retailer's page referral.
Meta datas attribute set
24
So
9
Elastic Suite for retailer
User Guide
Attribute
Required
Description
Page title
No
Retailer page title (SEO)
Meta Keywords
No
Meta keywords (SEO)
Meta description
No
Retailer meta description (SEO)
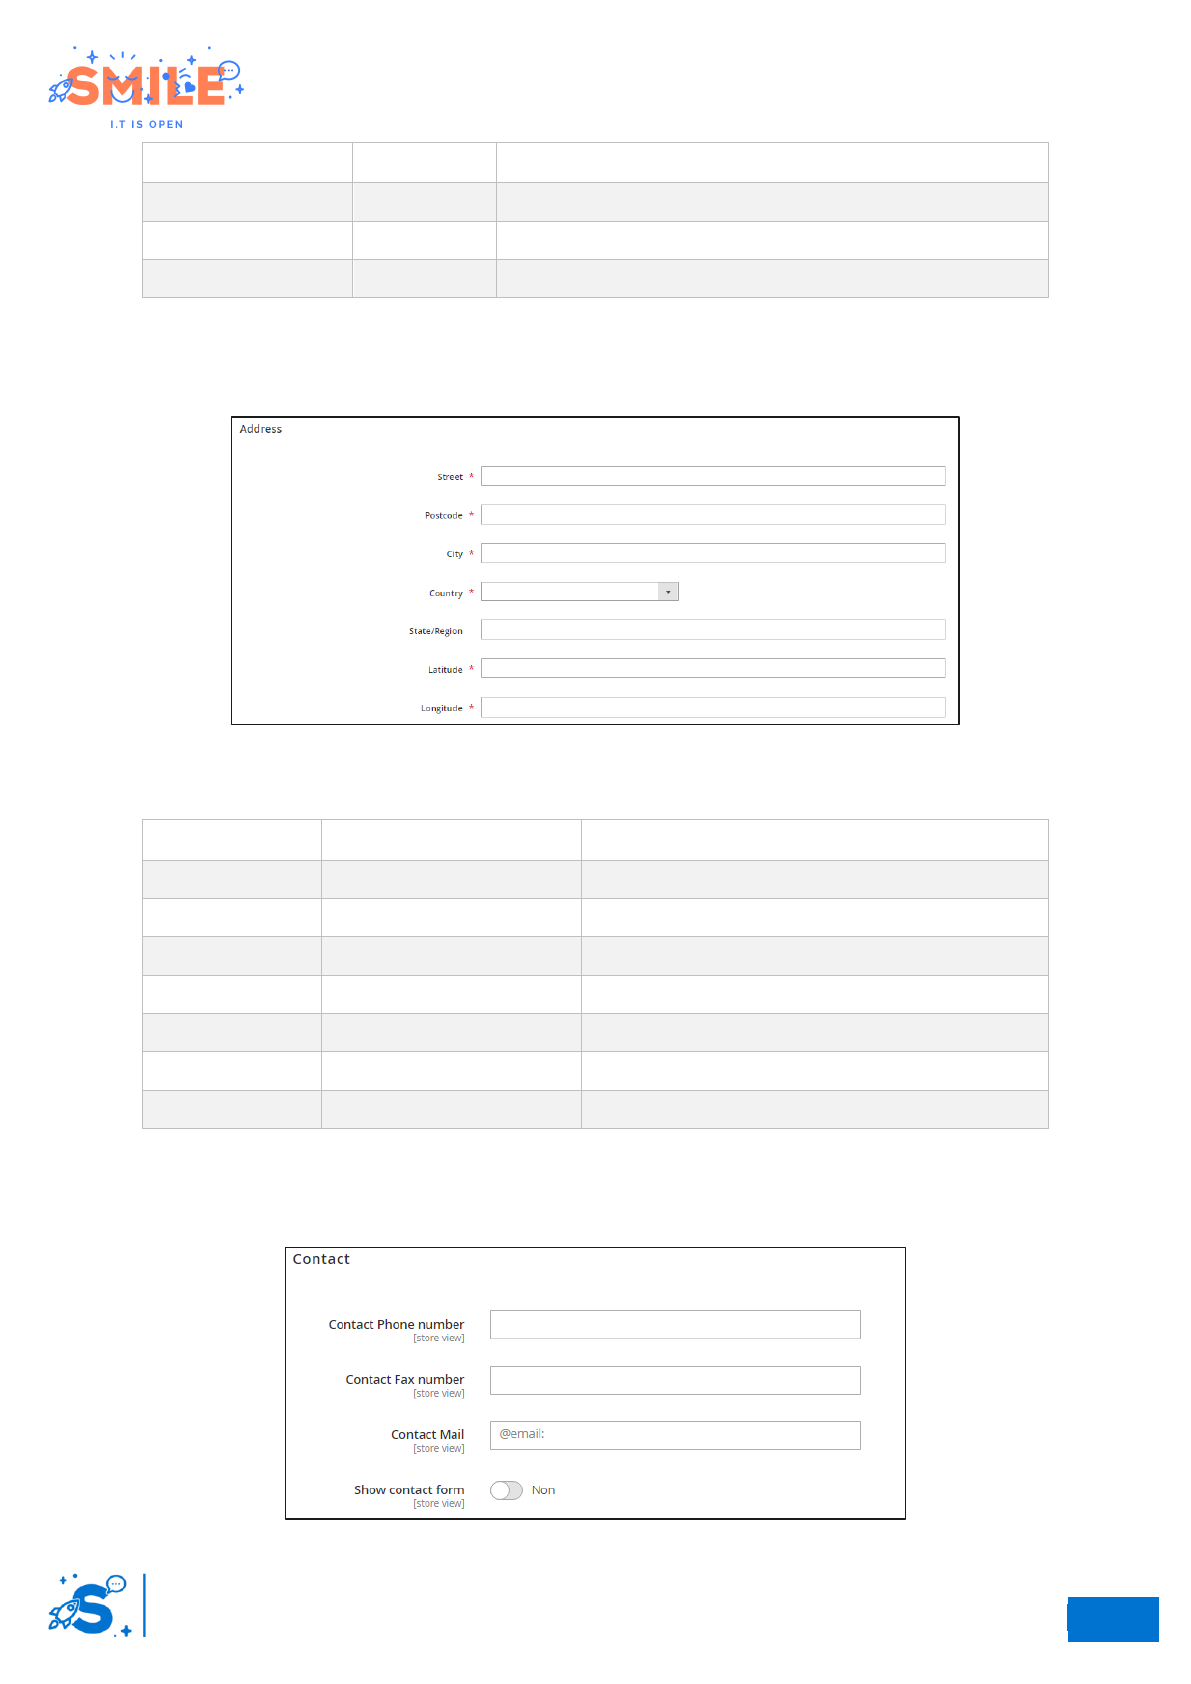
Step 3 – Complete the address
This attribute set allows merchant to set the address of the retailer.
adresse attribute set
Attribute
Required
Description
Street
Yes
The street of the retailer
Postcode
Yes
The postcode of the retailer
City
Yes
The city of the retailer
Country
Yes
The country of the retailer
State/region
Depend on the country
The state/region of the retailer
Latitude
Yes
The latitude of the retailer
Longitude
Yes
The longitude of the retailer
Step 4 – Complete the contact information
This attribute set allows you to set the contact information of the Retailer
Contact information attribute set
24
So
10
Elastic Suite for retailer
User Guide
Attribute
Required
Description
Contact phone
number
No
The phone number of the retailer
Contact fax
number
No
The fax number of the retailer
Contact mail
No
The email of the retailer
Show contact
form
Yes
To enable the contact form, set “Yes”
Contact form
The contact form allows users to send an email to the retailer directly
from the website. The customer must complete the following fields:
• Name (required)
• Email (required)
• Phone number
• Message (required)
Step 5 – Complete the shipping tab
This tab allows merchants to enable or disable the store delivery.
Shipping tab
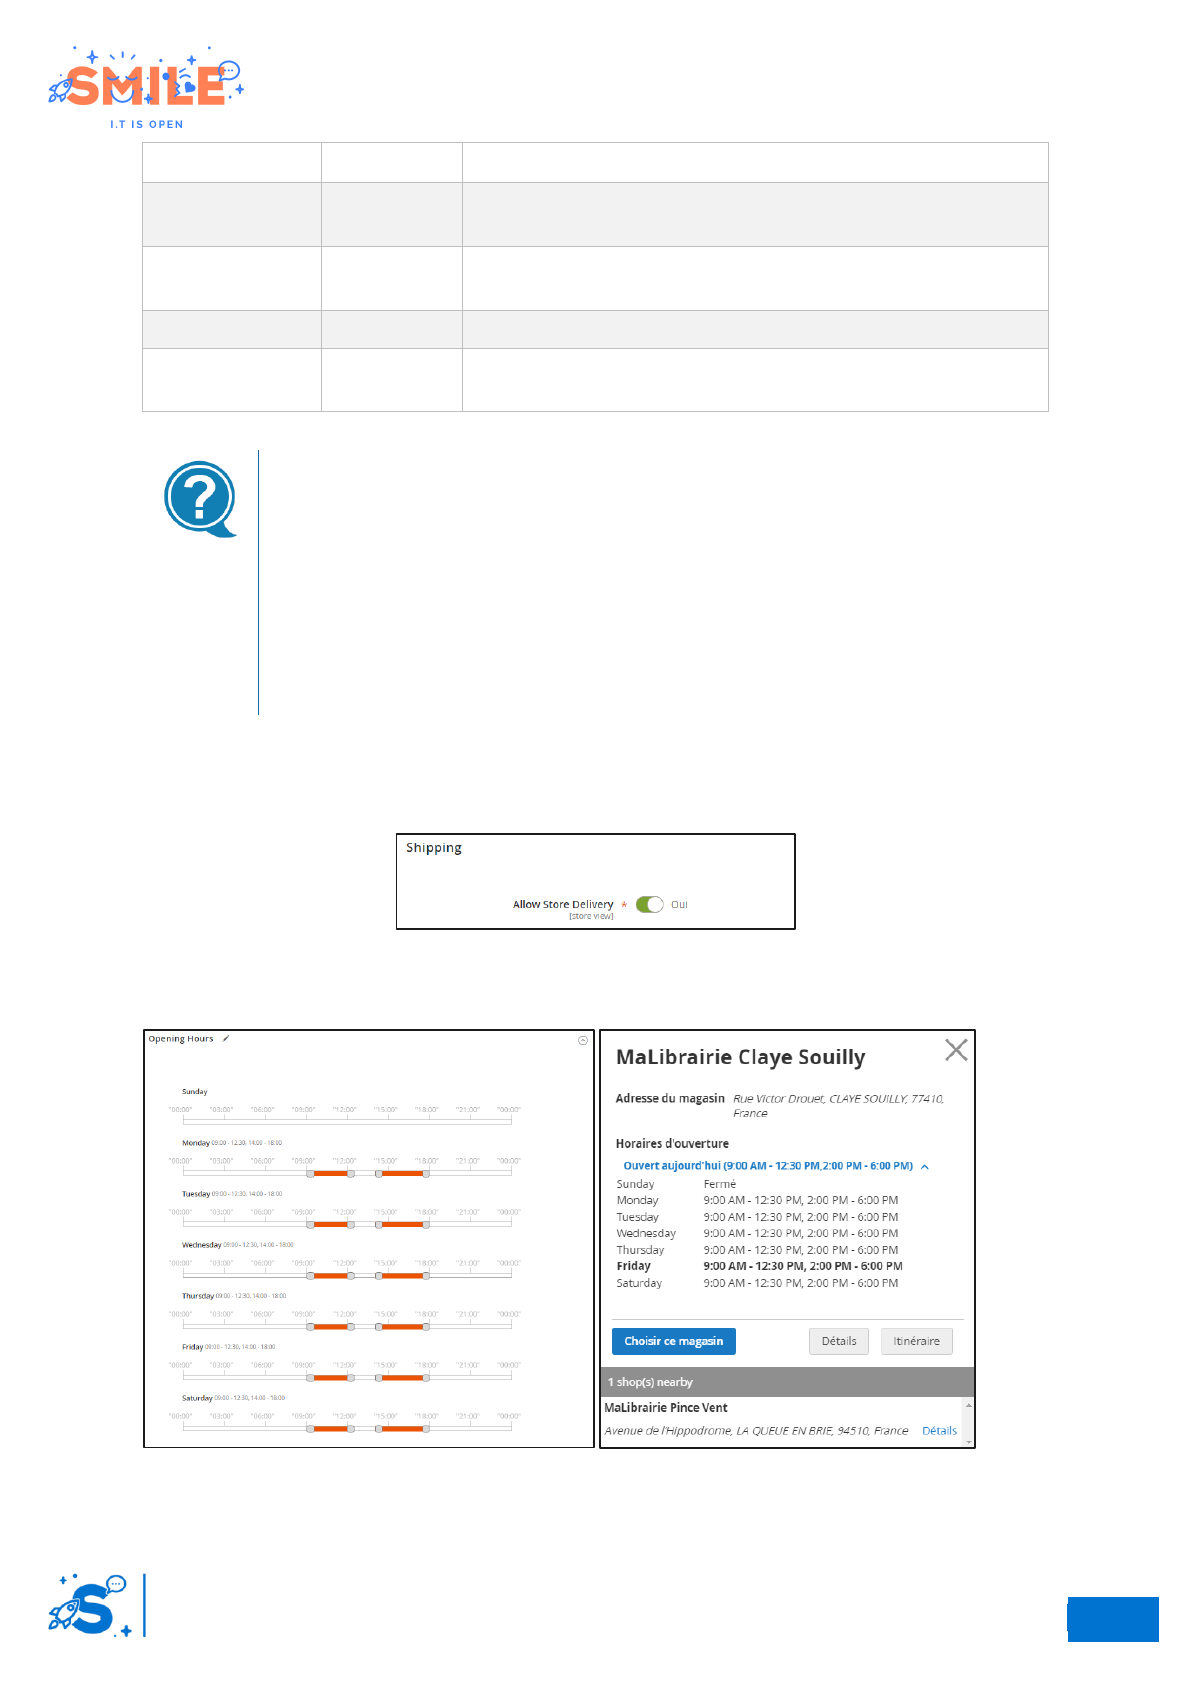
Step 6 – Complete the opening hours
Opening hours settings
24
So
11
Elastic Suite for retailer
User Guide
For every week day, you are able to set none or several opening periods. The intervals are divided by
15 minutes. If you want to indicate that the retailer is closed on Sunday, you just have to let this day
empty. To delete an opening hour range, double click on it.
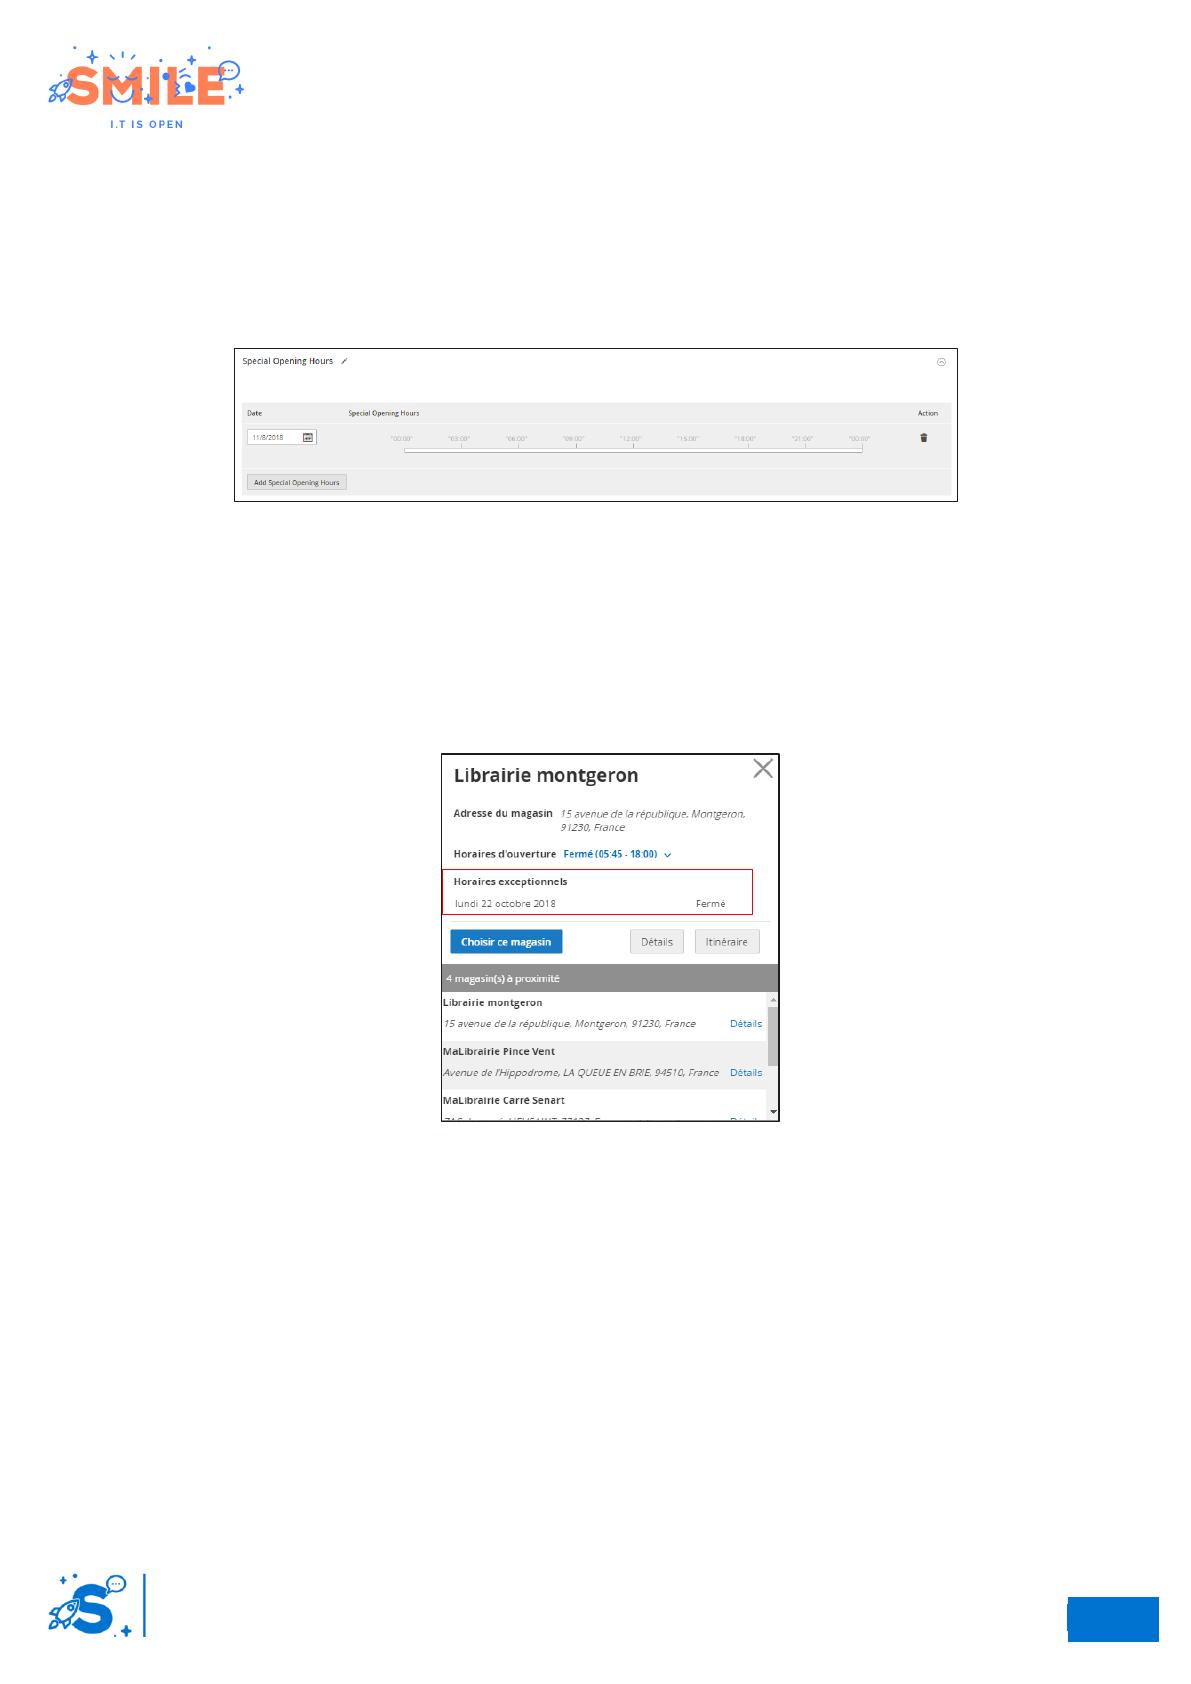
Step 7 – Complete the special opening hours
This attribute set allows merchants to set special schedule for a date.
Special schedule settings
With this feature, merchants are able to add Special Opening hours:
• Setting a day which is usually Open as Closed for a specific date (special closure)
• Setting a day which is usually Closed as Open for a specific date (special opening)
If you want to remove a special opening hour, just click on the recycle bin in front of it
Front office display
24
So
12
Elastic Suite for retailer
User Guide
II.3 RETAILER OFFERS CONFIGURATION
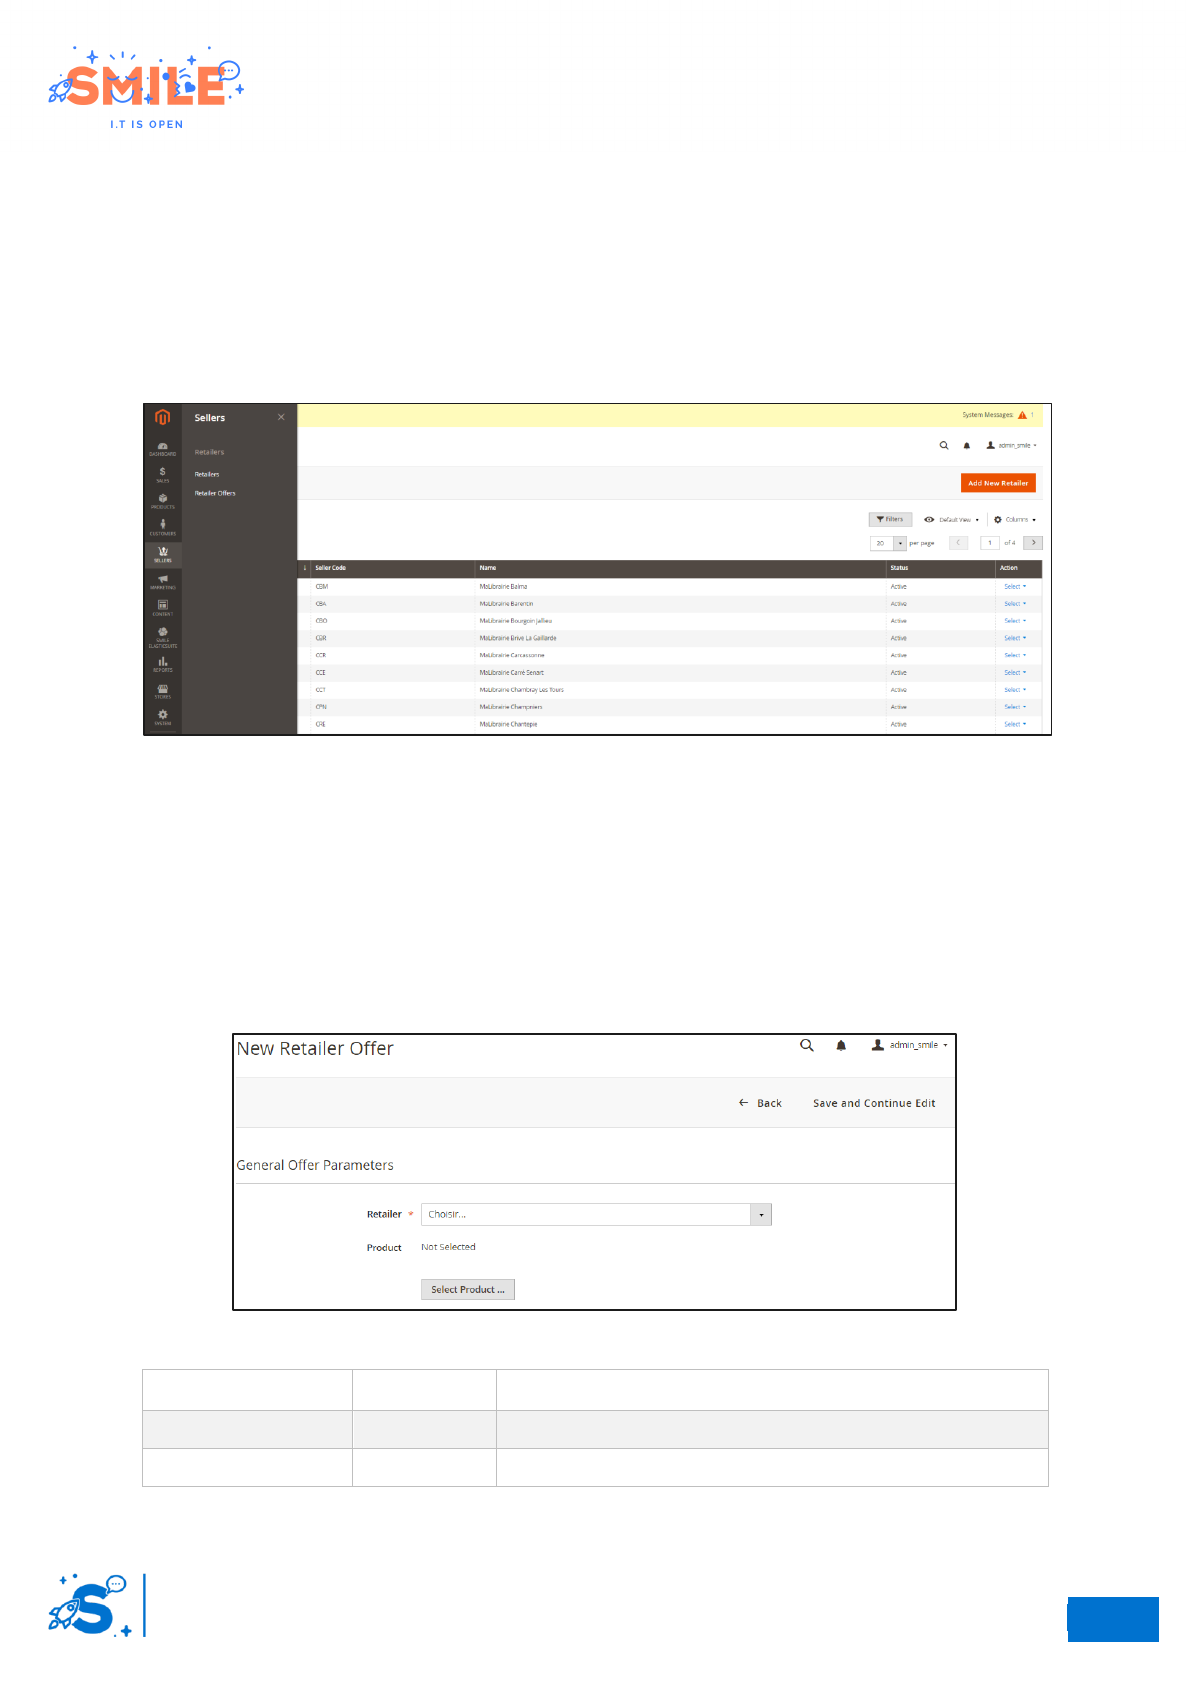
II.3.a Retailer offers administration
The retailer offers menu provides easy access to the retailer offer administration. This menu allows to
manage offers. The Inventory grid lists all offers by retailers. Use the standard controls to sort and
filter the list, find products, and apply actions to selected offer. From the grid, you can create new
offer and edit existing ones.
1- Sellers menu
II.3.b Create an offer
Access: seller -> retailer offers -> Click on add offer
Step 1 – General offer parameters
Select a retailer and a product.
General offer parameters
Attribute
Required
Description
Retailer
Yes
Retailer seclection
Product
Yes
Product selection
24
So
13
Elastic Suite for retailer
User Guide
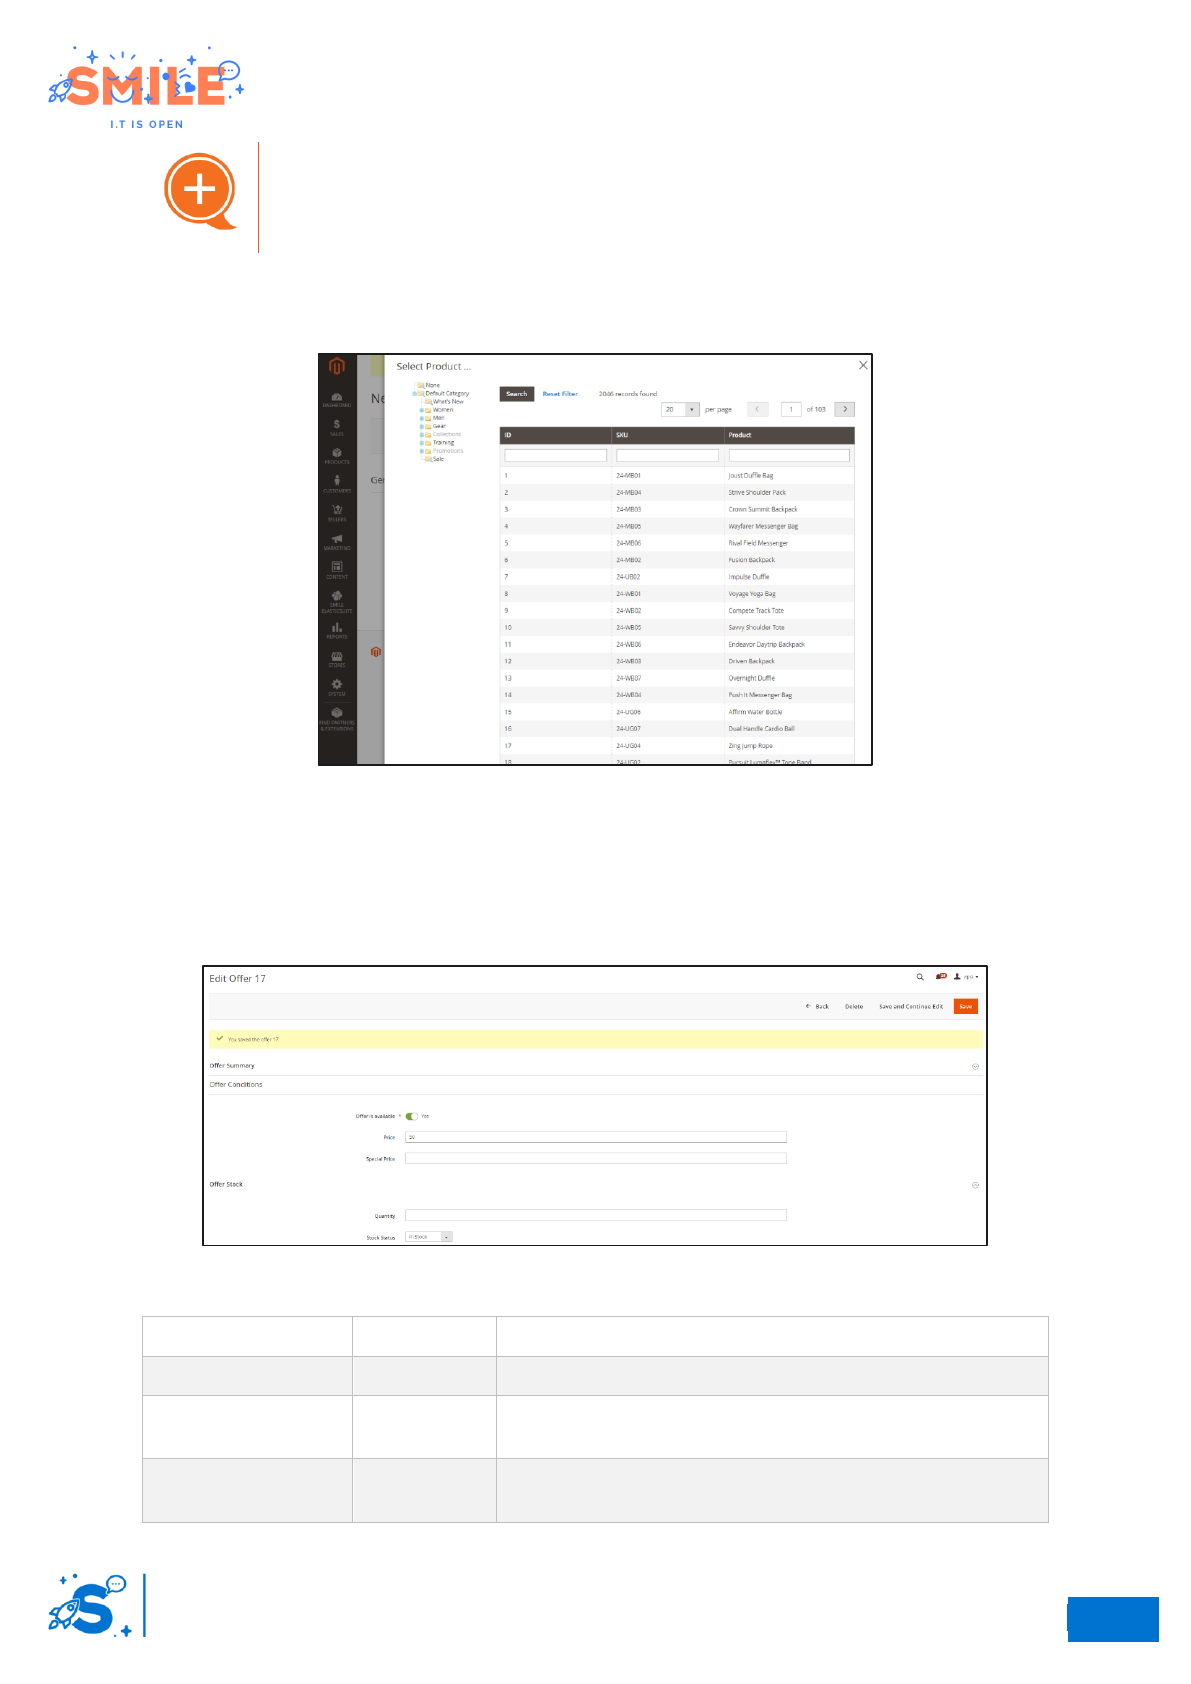
When you click on “product”, a window appears by left and you can select the product for which you
want to create an offer.
Product selection window
Click on “save and continue edit”
Step 3 – Offer conditions
Complete the following fields to create a new offer.
Offer conditions
Attribute
Required
Description
Offer is available
Yes
If the product is available for the selected Retailer.
Price
No
The product price for this Retailer (leave empty to let the
product price unchanged)
Special price
No
The product special price for this Retailer (leave empty to let
the product special price unchanged)
Warning
Beware, the retailer and the product cannot be changed once
the offer is created.
24
So
14
Elastic Suite for retailer
User Guide
Step 3 – Offer stock
Complete the following fields for manage retailer offer stock level
Attribute
Required
Description
Quantity
No
Retailer’s stock – To enable this feature, you have to install
the Retailer offer inventory module
Stock status
No
In stock or Out of stock
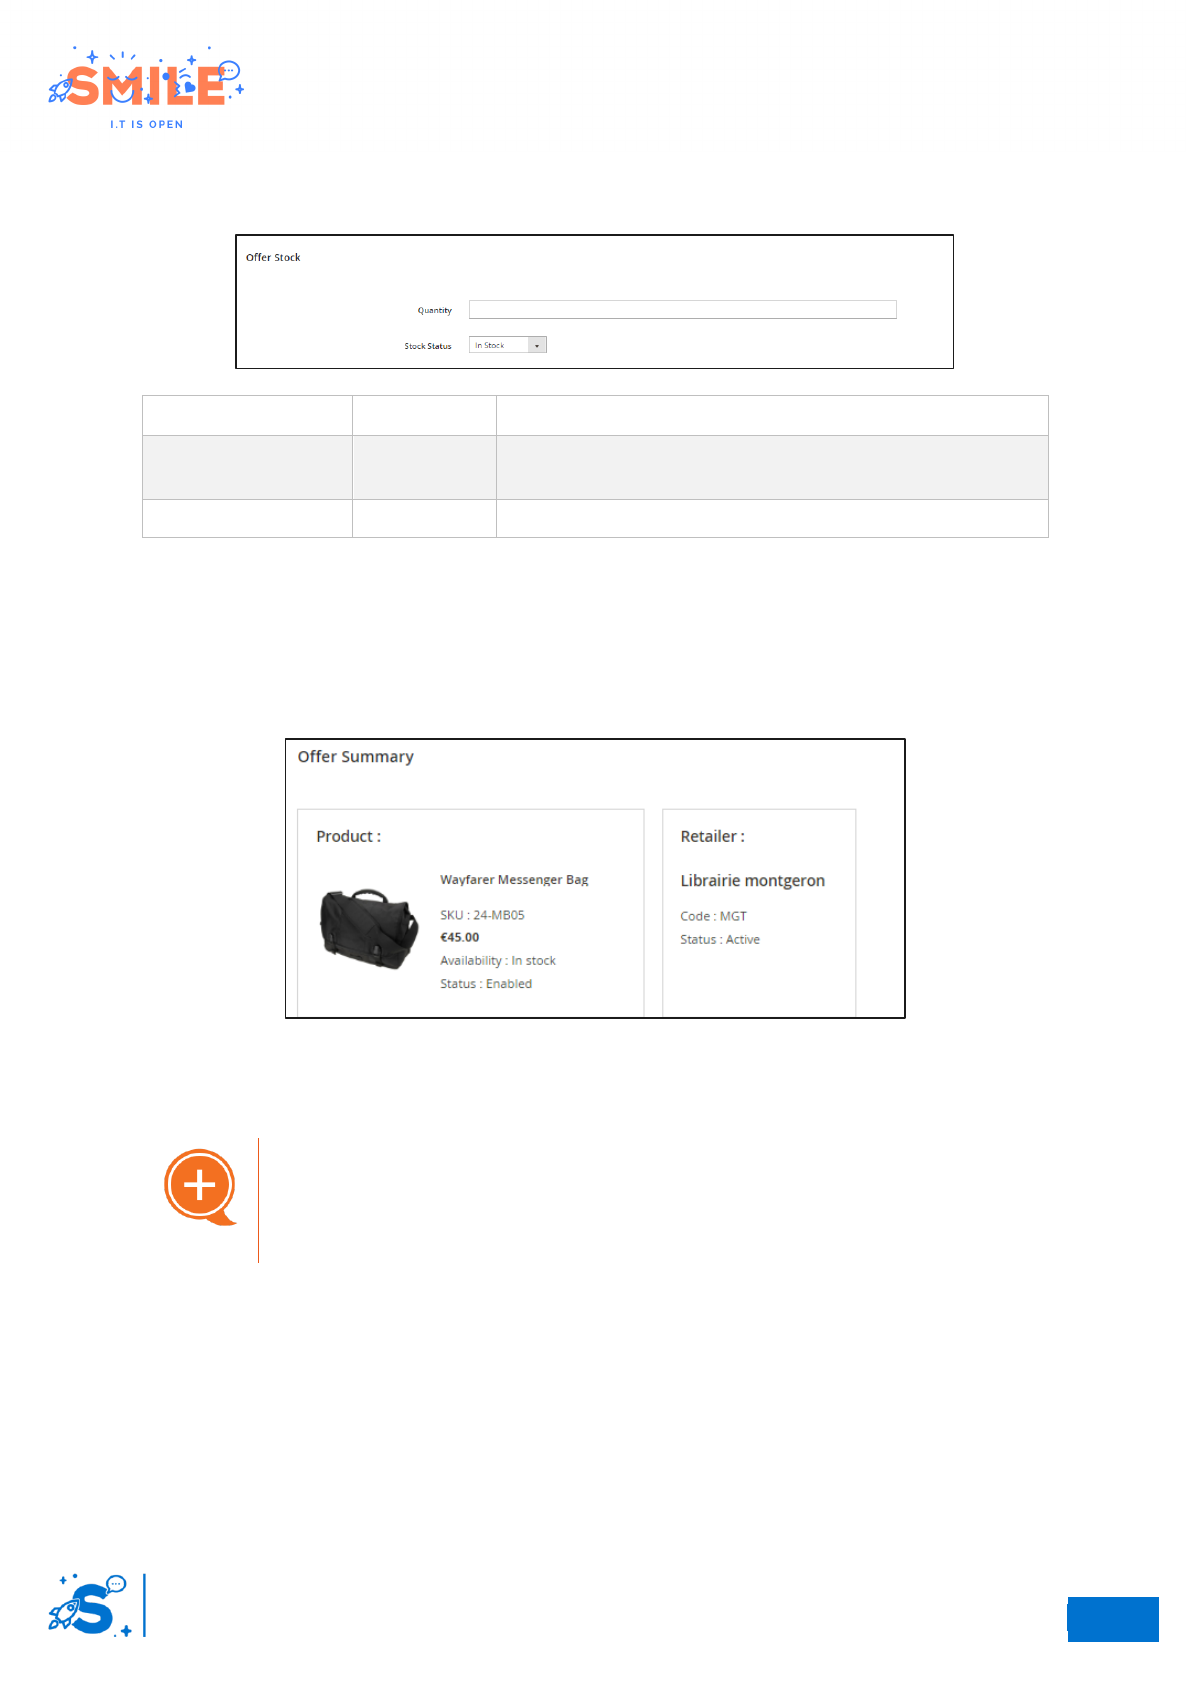
• Click on “save and continue edit”
Offer summary
• Click on offer summary to show the offer summary
Offer summary
Automatic offers creation
The implementation of a catalog flow or an import for the
management of offers is possible. The module has been
designed in this sense.
24
So
15
Elastic Suite for retailer
User Guide
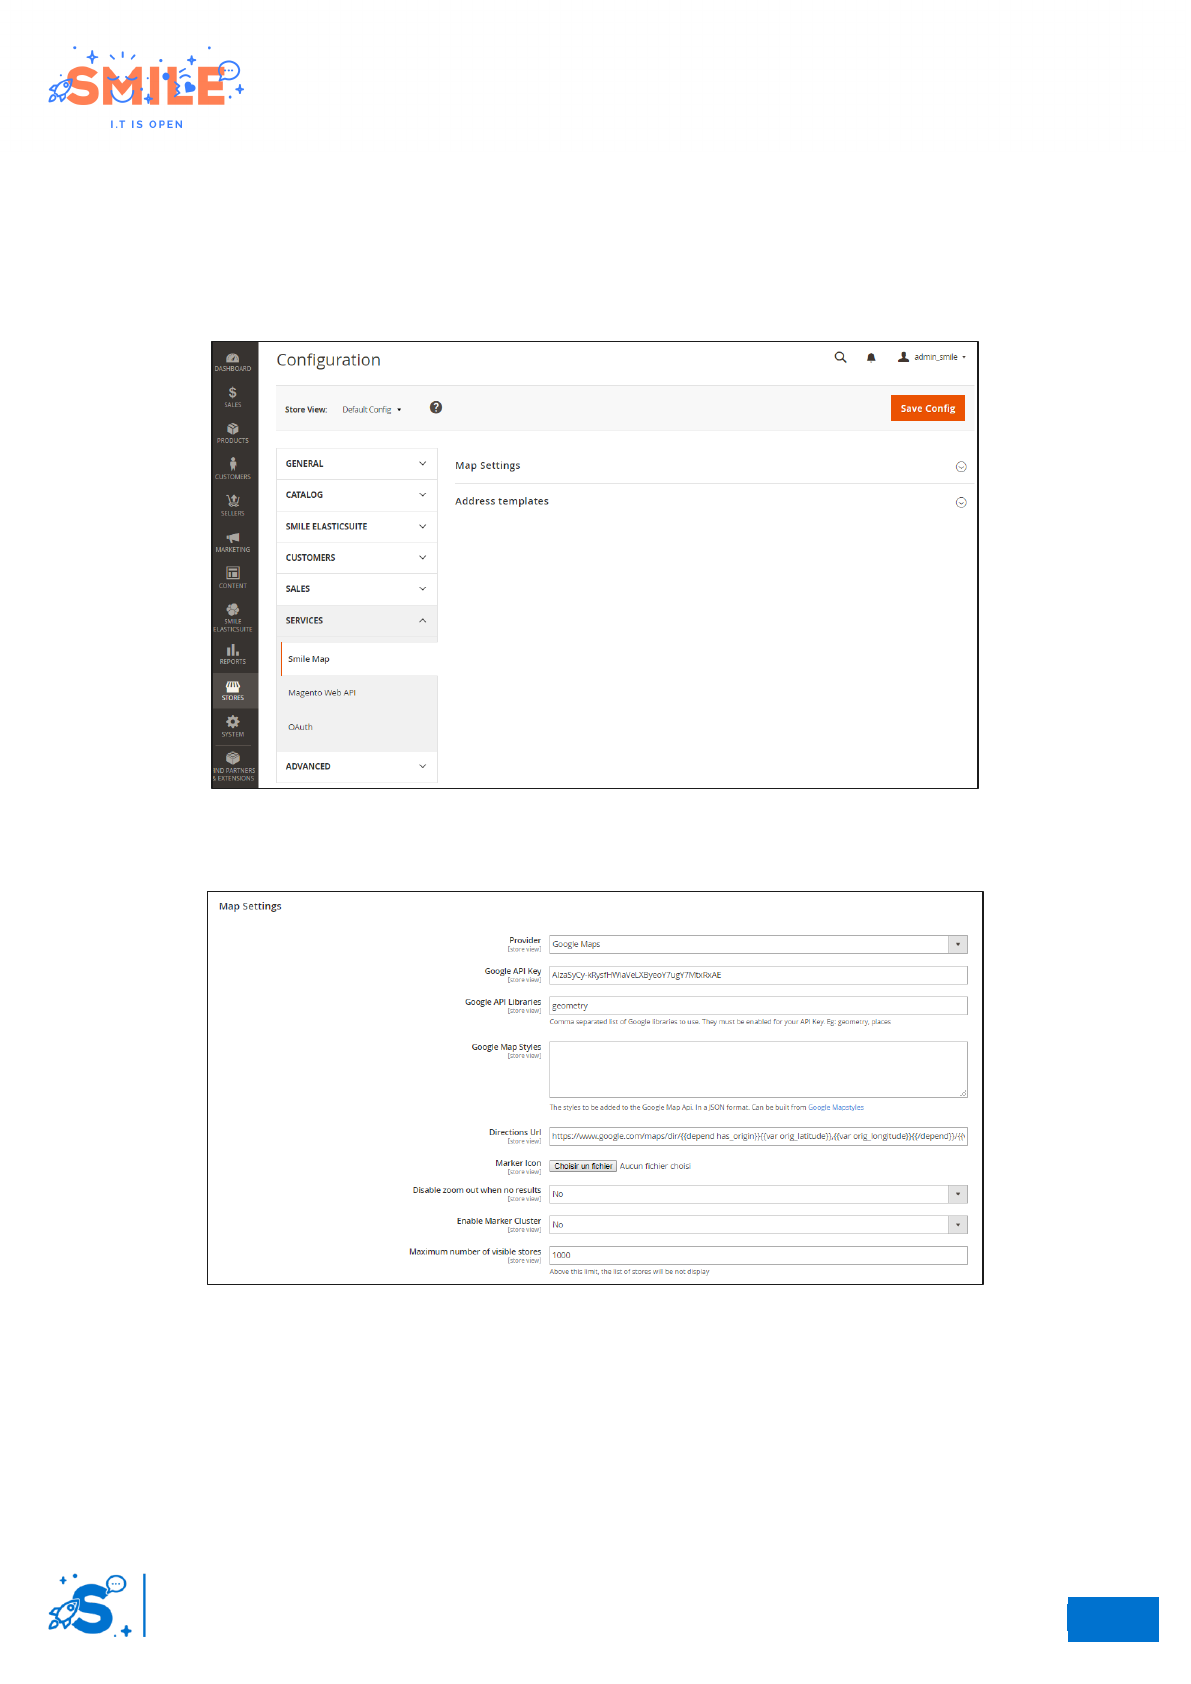
II.4 STORE LOCATOR CONFIGURATION
II.4.a Map settings
Access: Stores -> configuration -> Services -> Click on Smile Map
The Smile Map module allows merchants to configure a map on your Magento website.
Smile map settings
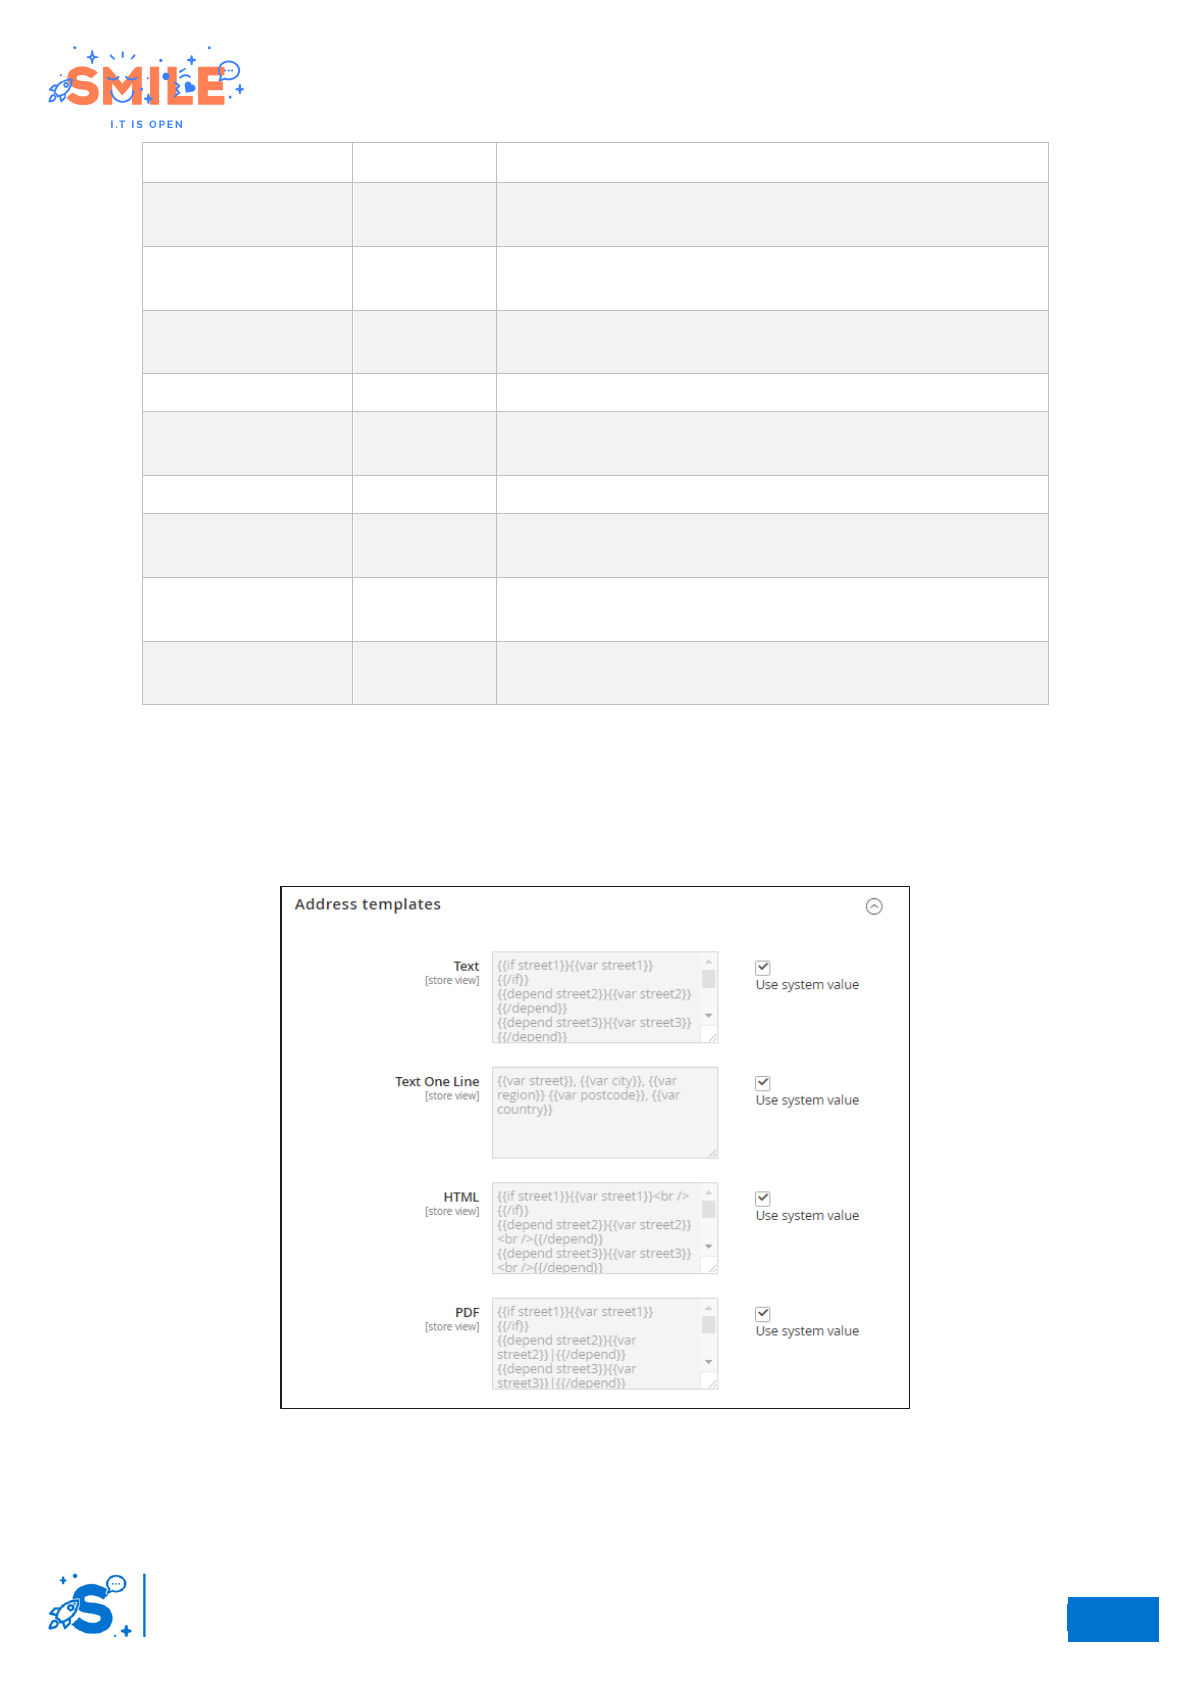
Step 1 – Map settings
Smile map settings
24
So
16
Elastic Suite for retailer
User Guide
Attribute
Required
Description
Provider
No
You can choose between OpenStreetMaps and Google
Maps as Map providers.
Google API Key
No
If you choose Google as a provider, you can set your
Google API Key here
Google API
Librairies
No
Google map style
No
If you want to modify the map style
Directions URL
No
The link to the Directions url of the provider. Will be used
to render the Directions link for providers.
Market icon
No
To upload a specific marker icon
Disable zoom out
when no result
No
To disable zoom out when no result
Enable marker
cluster
No
To enable marker cluster.
Maximum number
of visible stores
No
To set a limit for performance issue. Above this limit, the
list of stores will not be display.
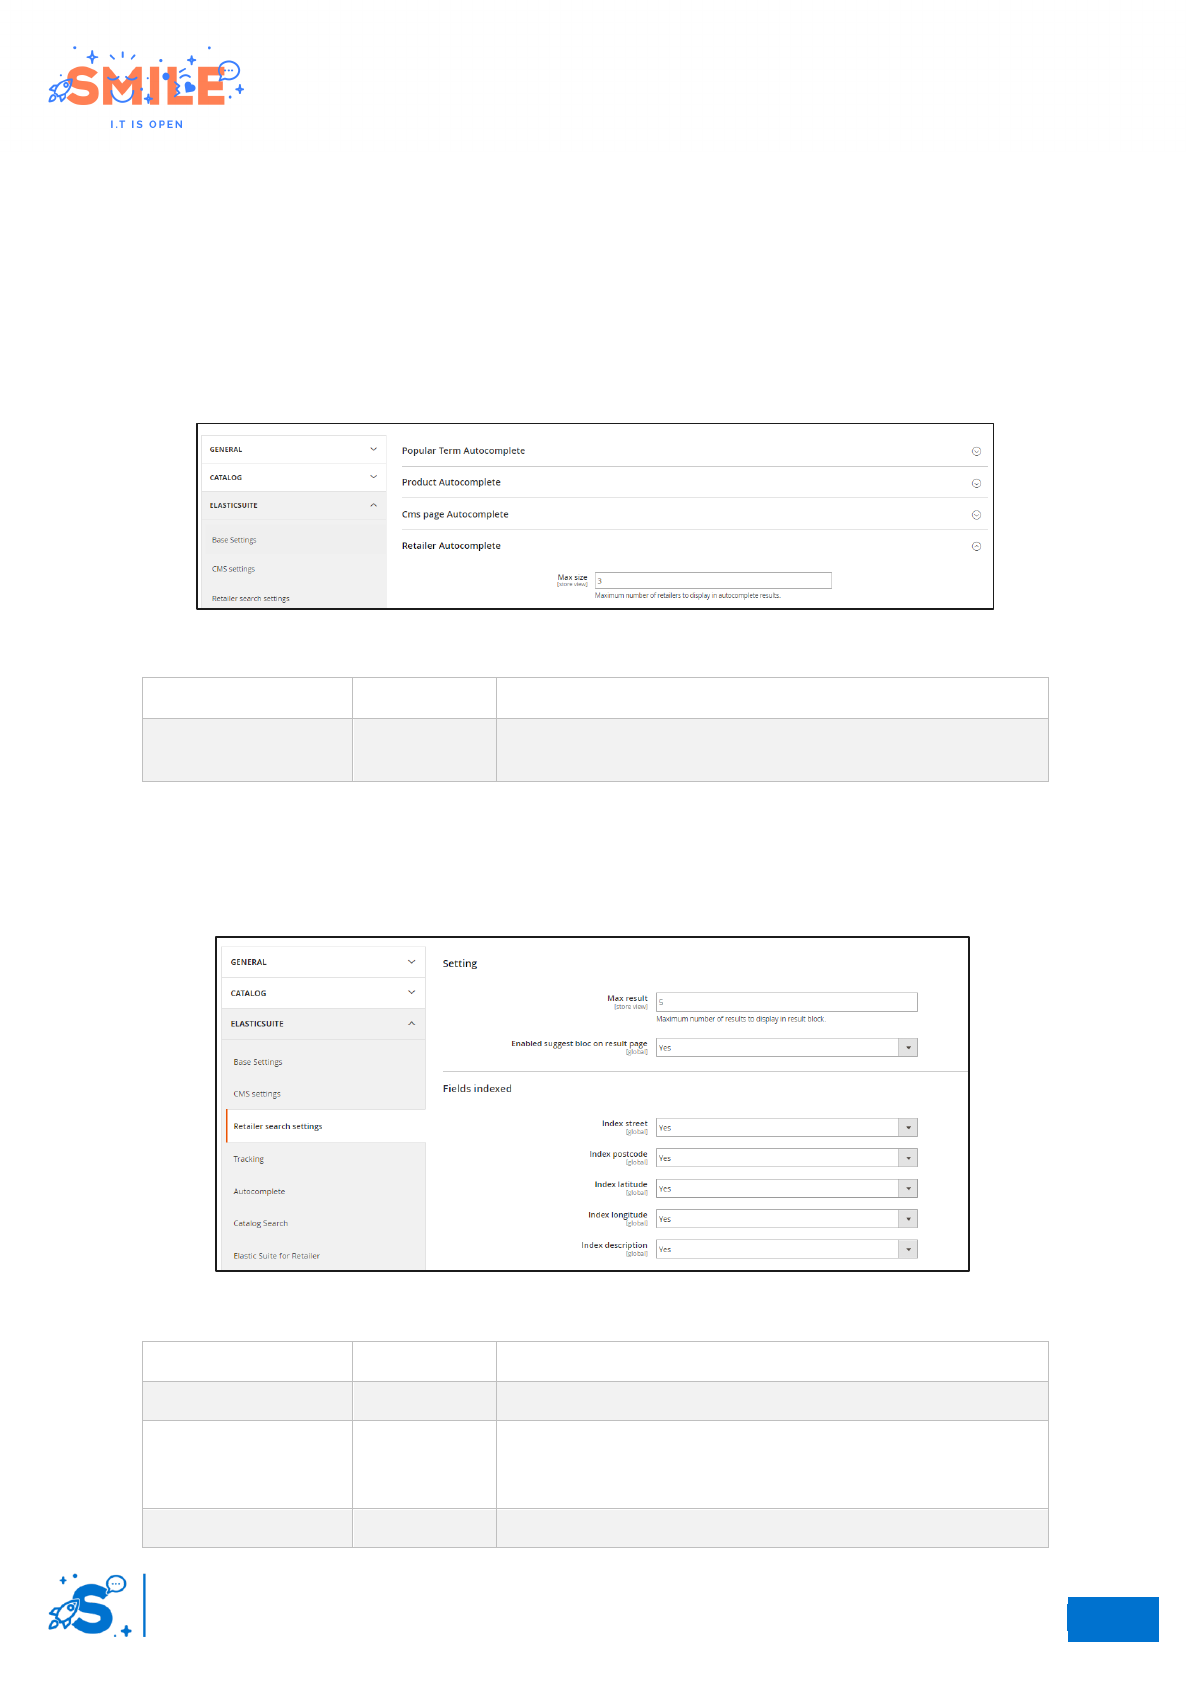
Steps 2 – Address templates
This panel allows you to customize how retailer’s addresses are rendered in several different locations.
This works in the same way as on Magento. Additional information can be found in the official
Magento documentation: Magento does render Customer's address
Address template settings
24
So
17
Elastic Suite for retailer
User Guide
II.5 SEARCH SETTINGS
By default, the module provides a search bar for retailer only. Nevertheless, it’s possible to index
retailers in the autocompletion of ElasticSuite (Magento2-retailer-elasticsuite-search)
II.5.a Retailer autocomplete
If you use the “Magento2-retailer-elasticsuite-search” module, go to: Store -> ElasticSuite ->
Autcomplete -> click on “Retailer autocomplete”
Autcocomplete settings
Attribute
Required
Description
Max size
No
Maximum number of retailer suggestions to display in
autocomplete results
II.5.b Retailer search settings
If you use the “Magento2-retailer-elasticsuite-search” module, go to: Store -> ElasticSuite -> click on
retailer search settings
Retailer search settings
Attribute
Required
Description
Max result
No
Maximum number of results on the search page (block)
Enabled suggest
bloc on search
result page
No
Enable or disable retailer results search page block
Fields indexed
No
You can enable or disable data indexes.
24
So
18
Elastic Suite for retailer
User Guide
III - FRONT OFFICE
III.1 FRONT OFFICE OPERATION
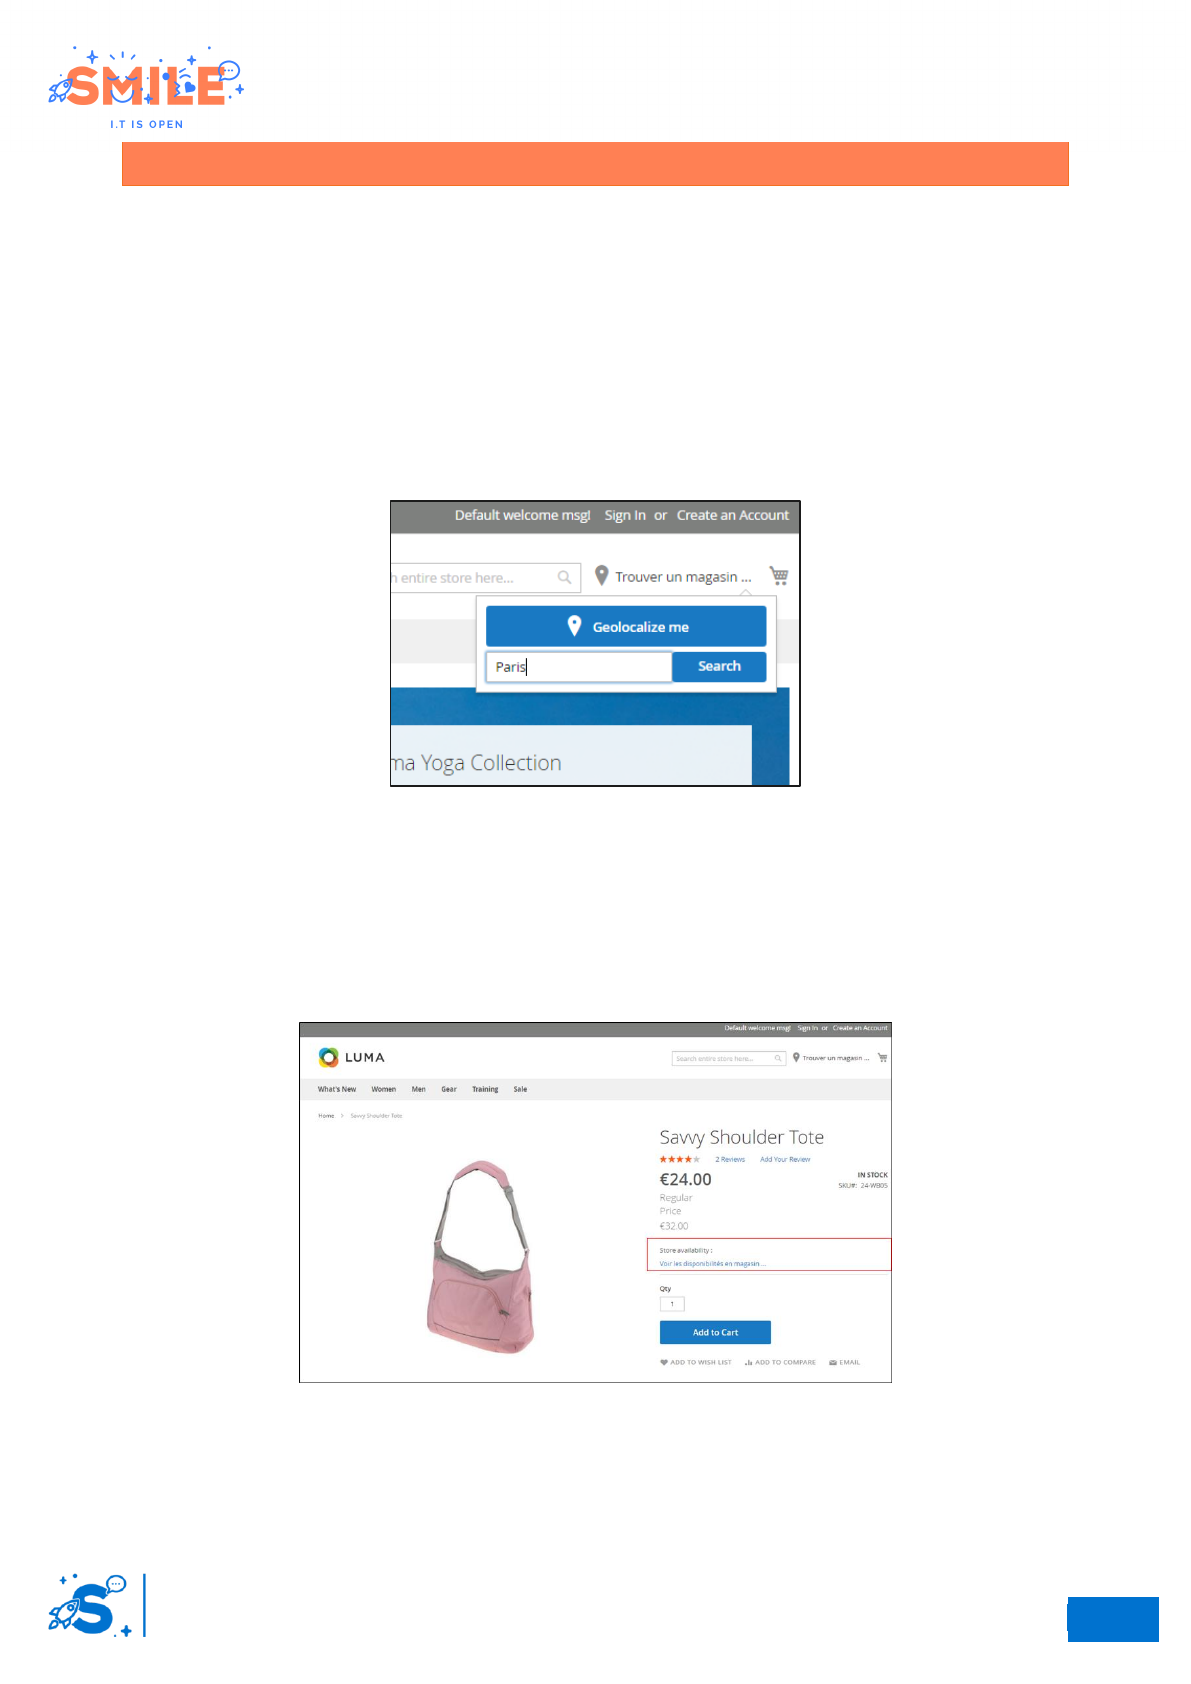
III.1.a Header
A new search bar dedicated to the retailers is available in the header.
Users can search by
• Geolocalisation
• Manual (city, postalcode, region)
Header with retailer's search bar
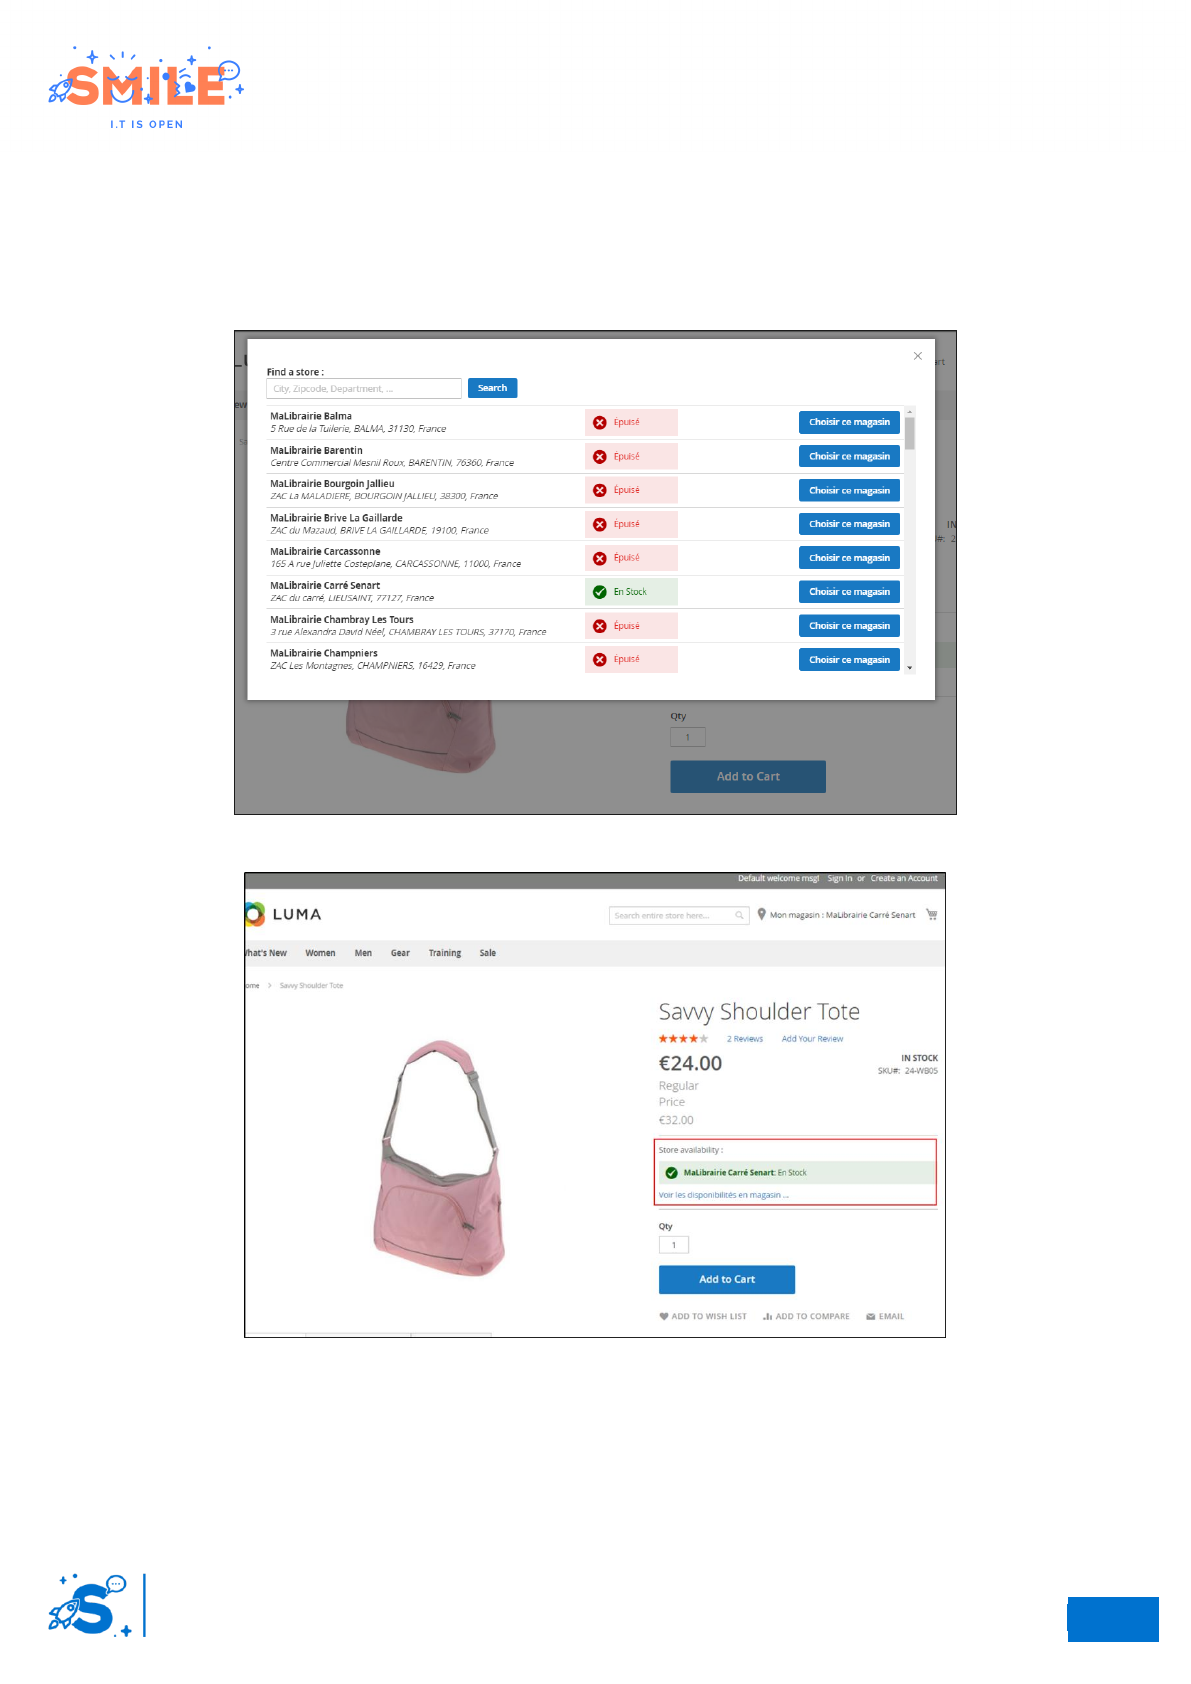
III.1.b Product page
Depending on the configuration of the “mode” (retail or drive), the product page will have a new
functionality “Retailer availability” and the price will be relevant with the retailer offer.
Retail navigation mode & activation of the feature “display offers on product page” with no selected retailer
24
So
19
Elastic Suite for retailer
User Guide
When the user clicks on “see retailer availability”, a pop-in displays with the following information:
• Store search bar
• Store list with their address
• Stock “in stock” or “out of stock”
• CTA “choose this store”
Retailer stock pop in
Selected retailer display
24
So
20
Elastic Suite for retailer
User Guide
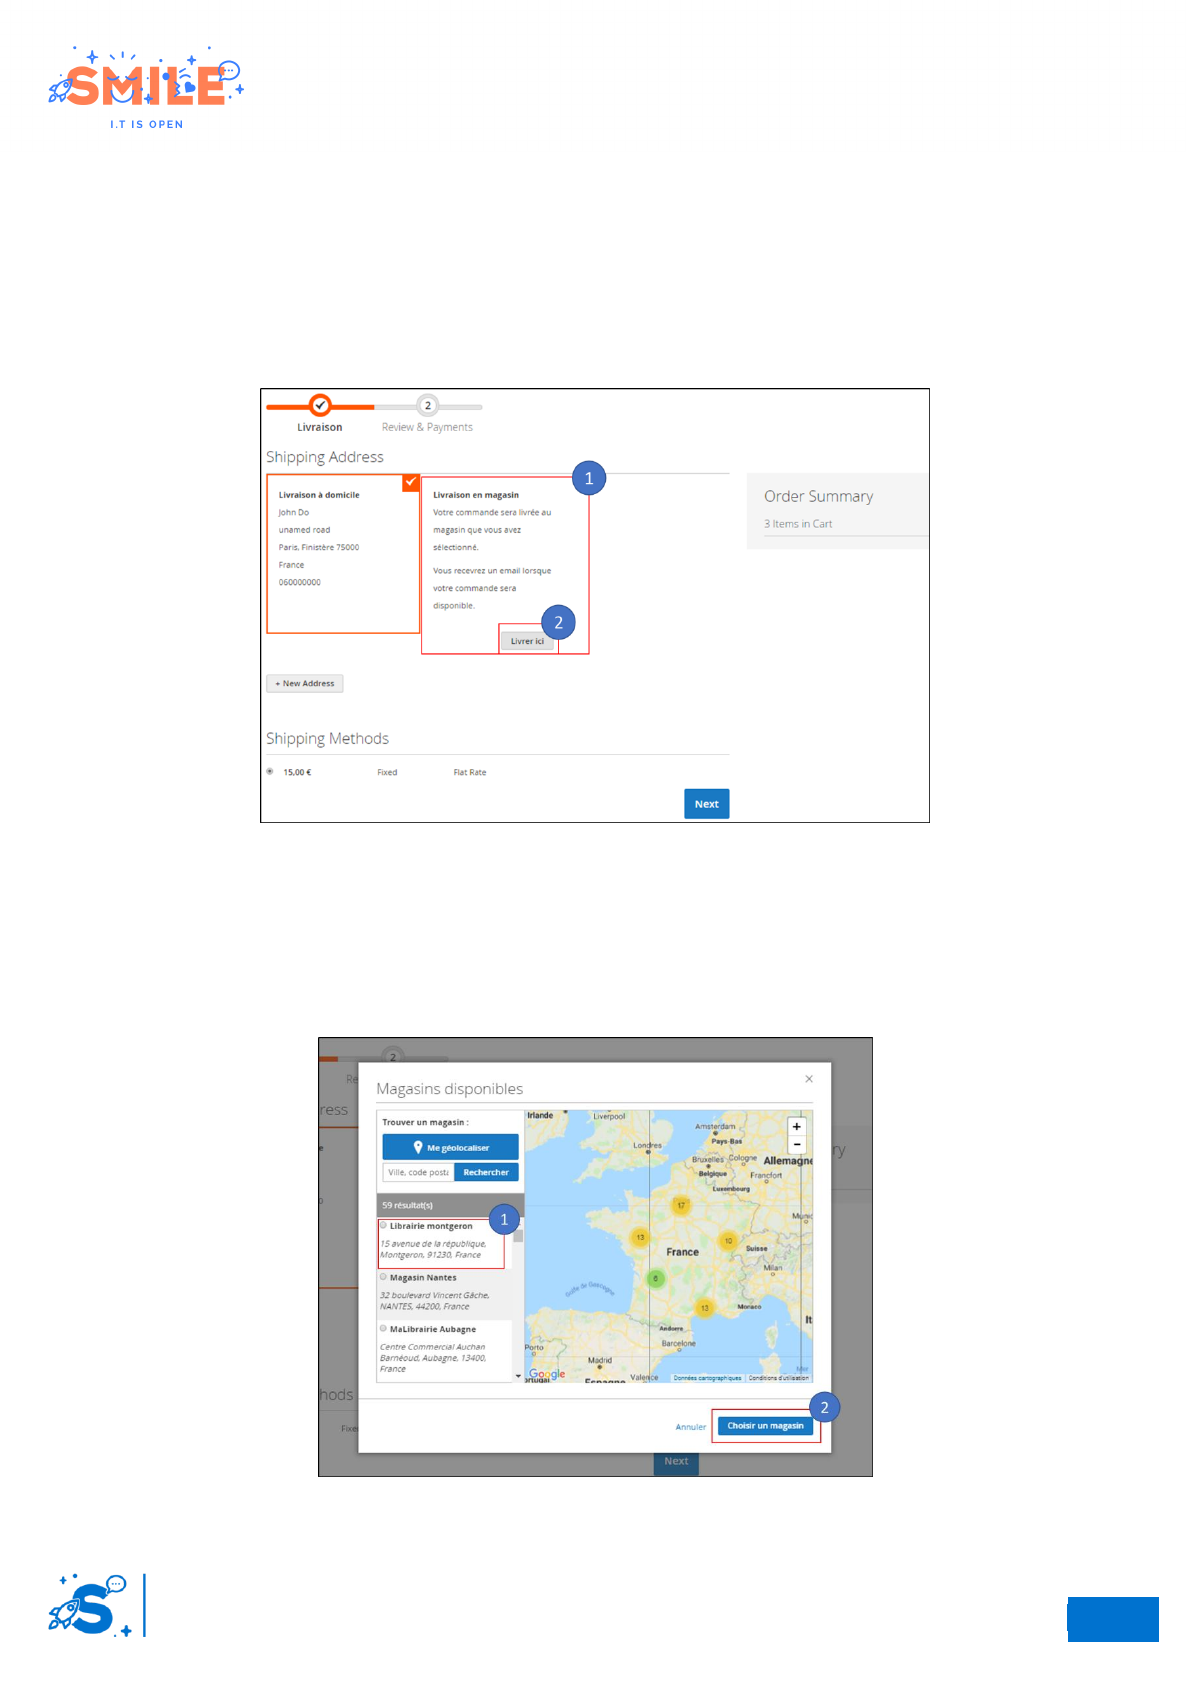
III.1.c Checkout – Store delivery
Merchants can use the retailers as parcel pick up point. This method allows to merchants to use the
retailers address as delivery address.
Step 1 – Shipping address
1. Th user has access to a new delivery address: “Delivery in store”
2. To selec a store, click on “choose a parcel pick up point”
Checkout step 1 - Shipping address
Step 2 – Parcel pick up point selection
A store locator is displayed in a pop-in
1. The user chooses a store by using search bar or drop-down list
2. Ckick on “choose this store” to confirm store selection
Checkout Step 1 – Parcel pick up point selection
24
So
21
Elastic Suite for retailer
User Guide
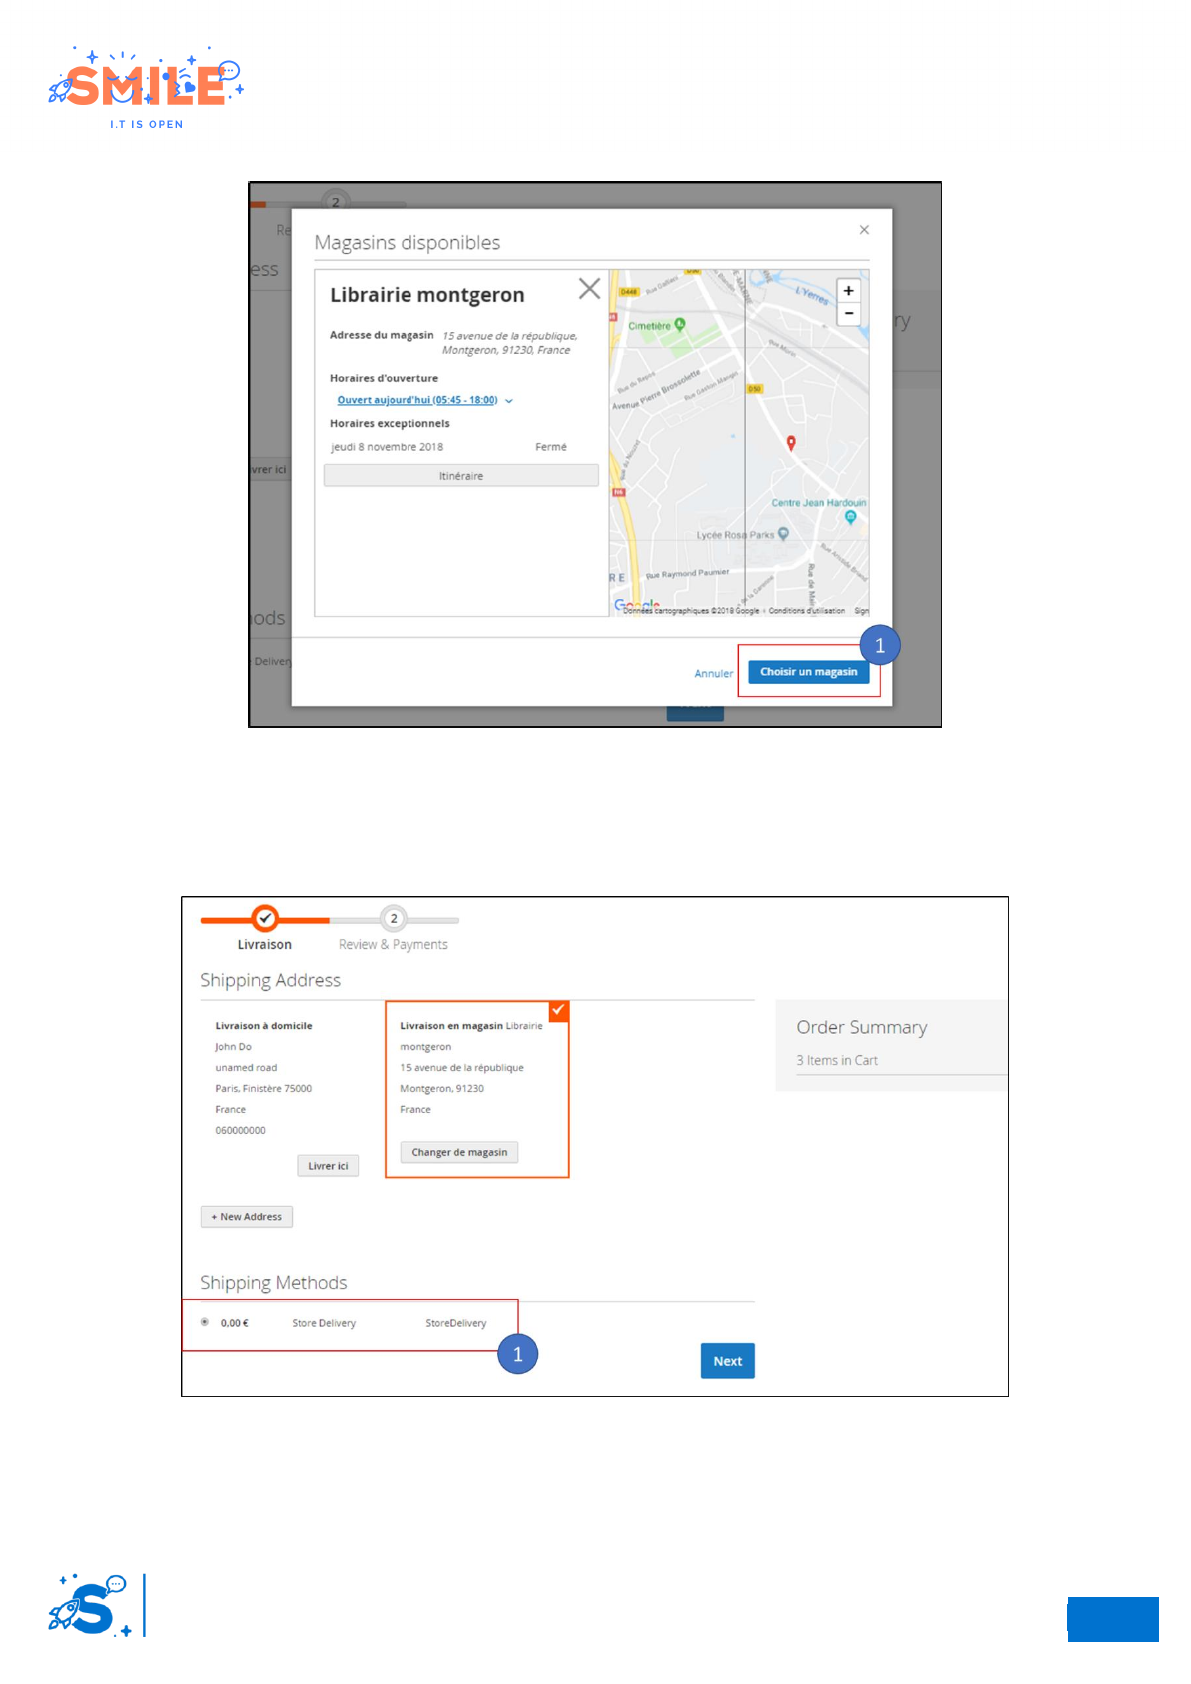
1. User can access to store information.
Parcel pick up point information
1. Finally, the address is filled in and the delivery method is updated.
Checkout step 1 over
24
So
22
Elastic Suite for retailer
User Guide
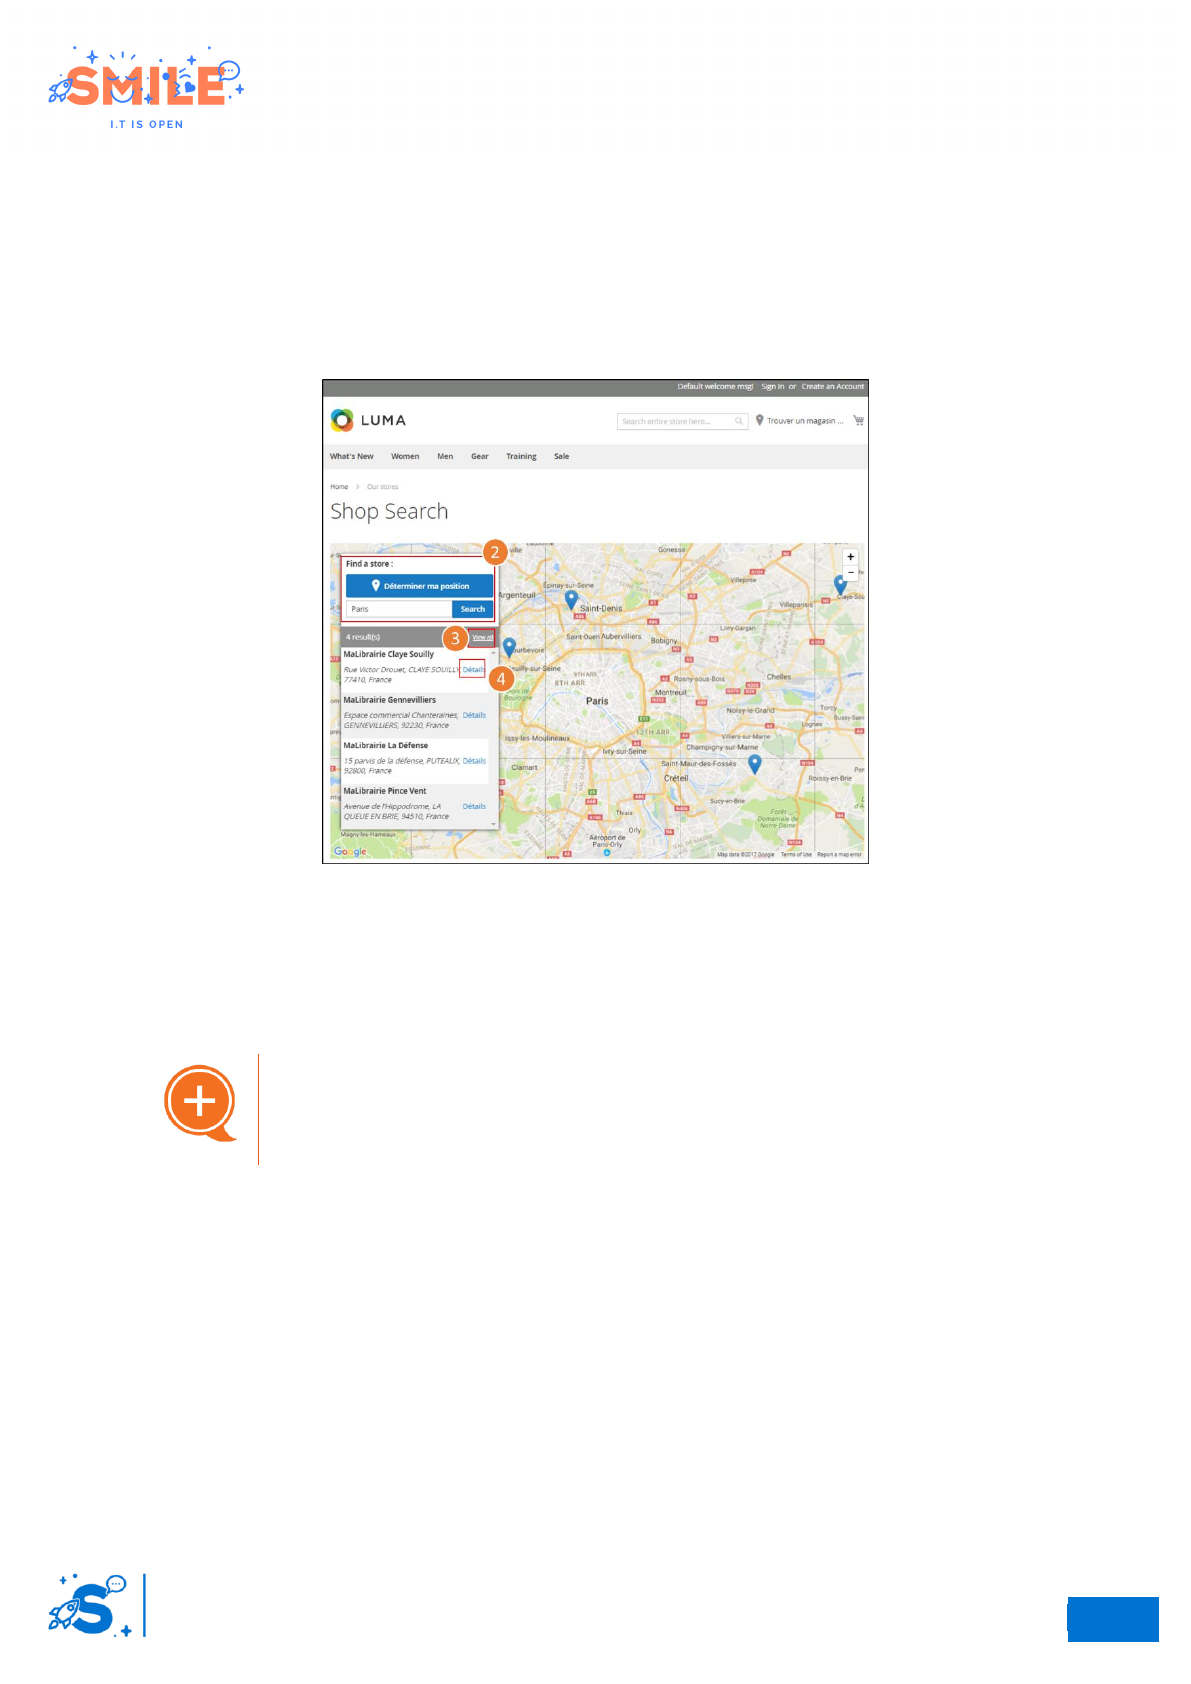
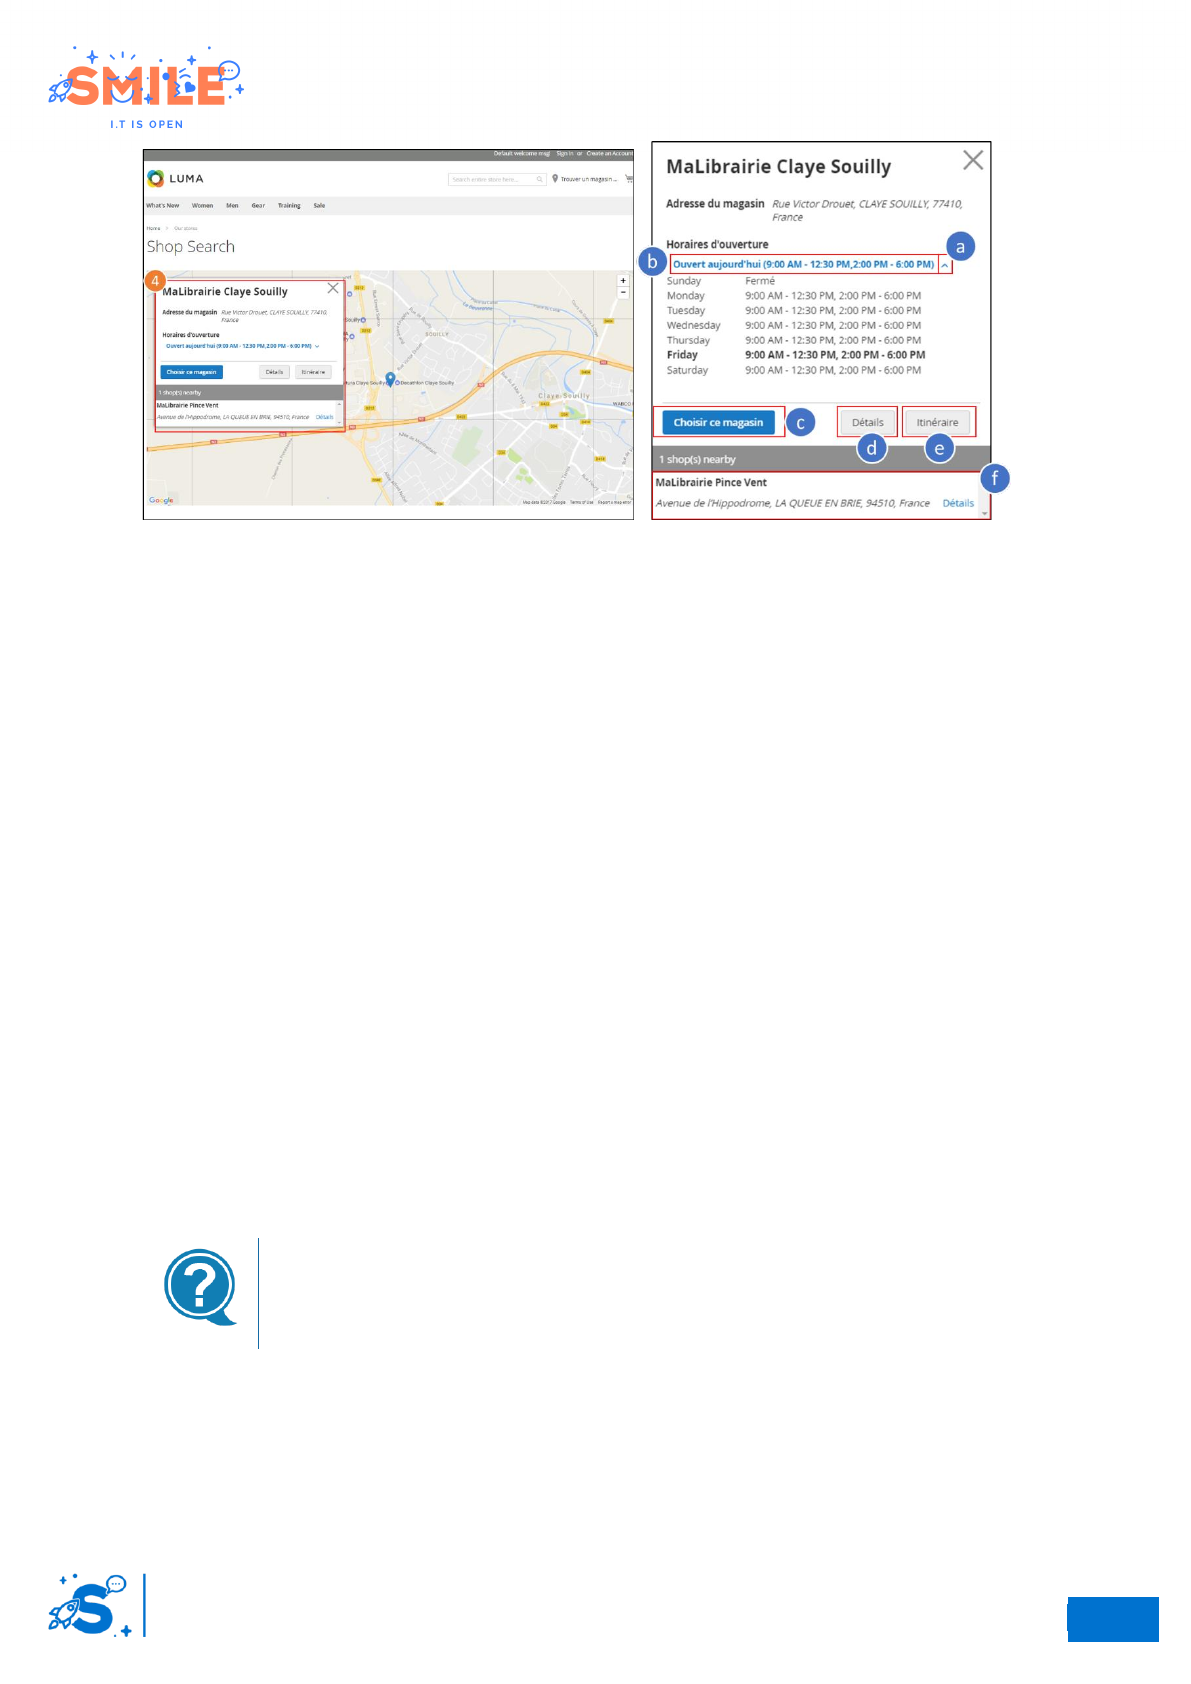
III.1.d Retailer search page
1. The map displays the stores closest to the customer's search. The results menu is dynamic. It
reacts according to the zoom on the map, it refers the POS visible on the map. So, if there are
2 POS visible on the map then there will be 2 results in the results block.
2. It’s possible to make a new manual search from this page or to use geolocation.
3. By clicking on “View all” on the results block, the view widens to see all the shops.
Retailer search page
4. By clicking on “Detail” on the results block, the view is centered on the shop. The results
block is replaced by a pop-in with information from the selected shop. From this pop-in,
several actions are available :
a. Show opnening hours by clicking on the arrow
Opening status in real time
A quick overview of the real-time opening status is
available.
b. Show the opening state of the shop : (open today, imminent closure,…)
c. Select the store as repository by clicking on “choose this shop”. This allows you to
associate the store with the browsing session (depends on the navigation mode).
d. Reach the store page by clicking on “details”
e. Create a route by clicking on “route”. The customer is redirected to a new google map
page (if you use google API) with the pre-filled arrival point (shop)
f. View shops nearby
24
So
23
Elastic Suite for retailer
User Guide
Retailer details pop-in
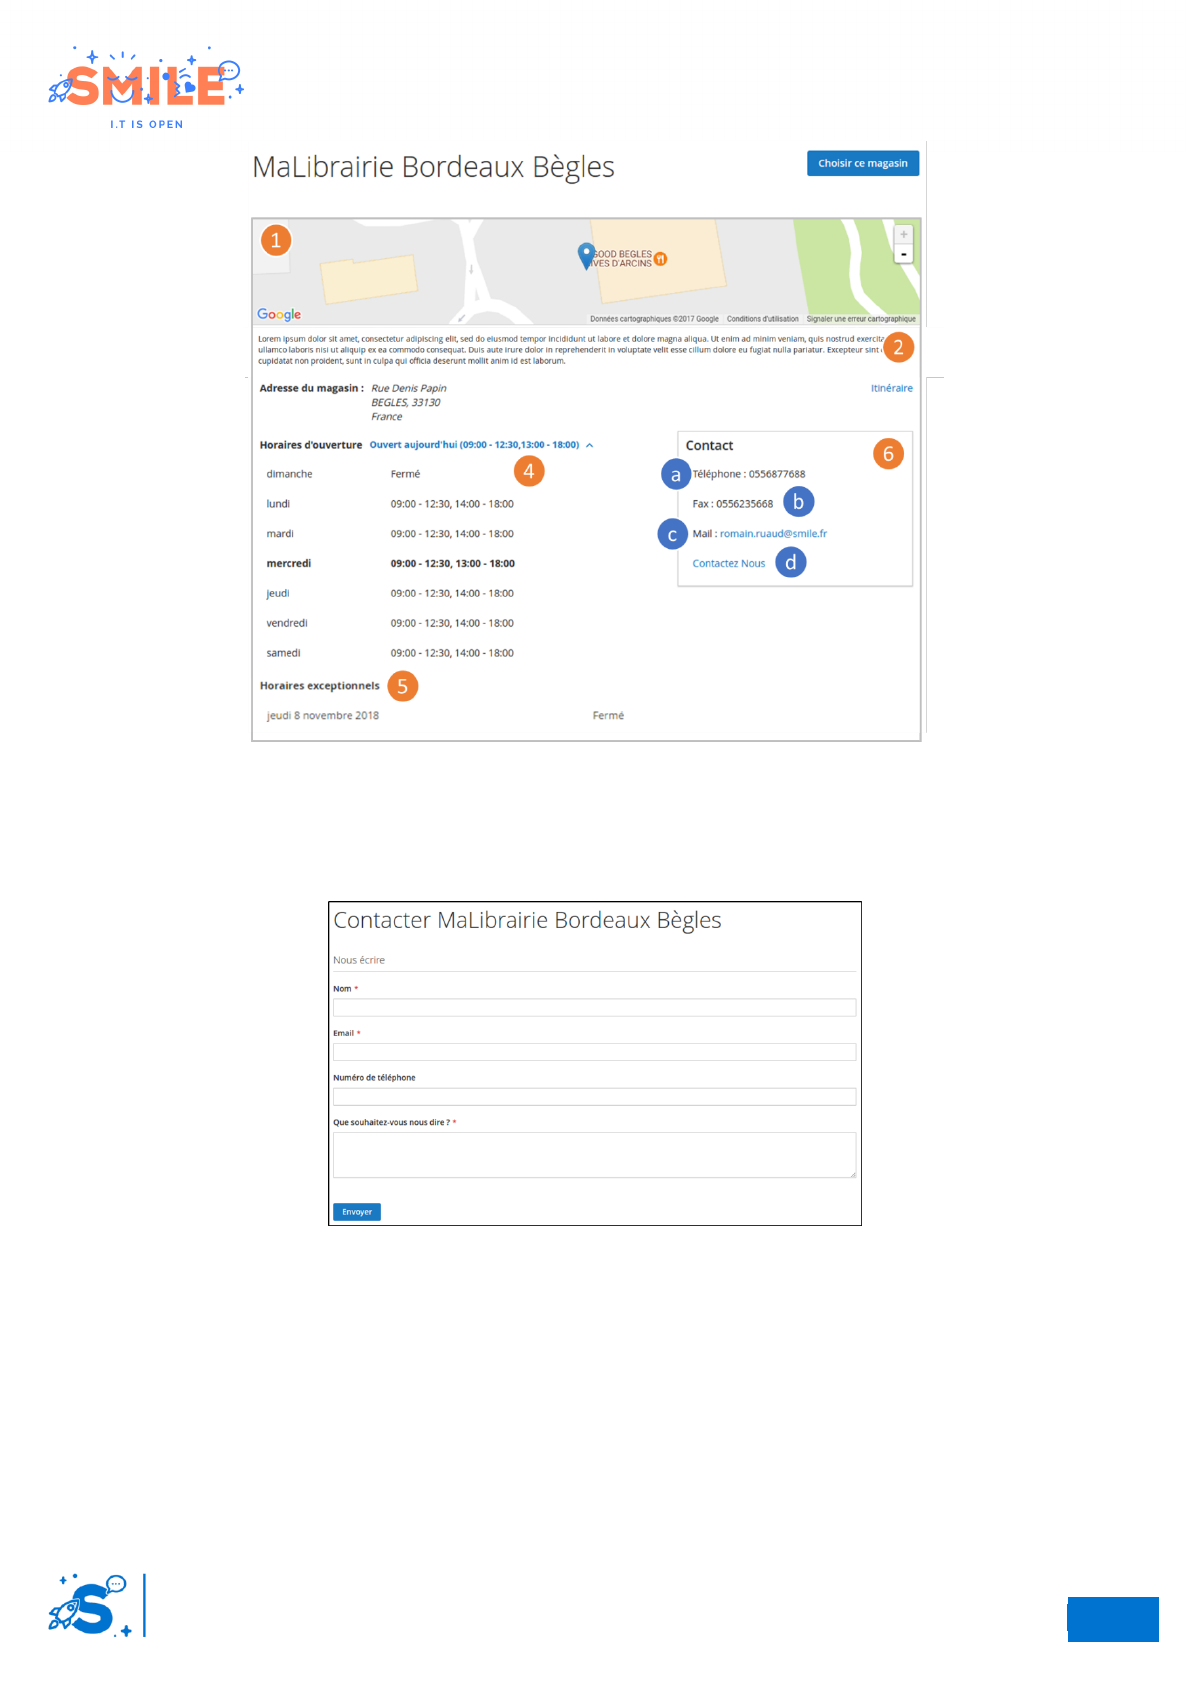
III.1.e Retailer page
All stores have a dedicated page. The retailers page consists of the following information:
1. Small map
2. Retailer description
3. Retailer address
4. Opening and closing hours
5. Special Opening hours
6. A contact block with the following information:
a. Phone number
b. Fax number
c. Mail
d. Link to “contact us” opens the contact form in a pop-in. (more information about the
contact form in the Part x)
It’s always possible to add the current retailer as a repository.
Contact form
The link “contact us” is displayed only if the attribute “Show contact form” is enable.
24
So
24
Elastic Suite for retailer
User Guide
Retailer page
Contact form
If the retailer is configured to display the contact form, the customer can access to this form via the
“contact us” link on the retailer page.
Retailer contact form
The contact form allows you to send an email to the retailer directly from the website. The customer
must complete the following fields:
• Name (required)
• Email (required)
• Phone number
• Message (required)
