GoTechnology Hub2 User Guide
User Manual:
Open the PDF directly: View PDF ![]() .
.
Page Count: 40

GoTechnology hub2 User Guide For Authorised Users Ony. Do not distribute.
2
1. About
1.1.1. Introduction
This user guide describes an introduction or reference guide for some of the more complex features of
GoTechnology hub2; Wood’s next generation completions and commissioning management solution.
The document contains screen shots and information that were relevant at the time of release. As
GoTechnology hub2 is a continuously developed product the actual appearance or function may differ from
what is depicted.
In addition, some sections or operations shown may not be accessible due to permissions issues.
For the latest information on GoTechnology please visit http://qedi-gotechnology.github.io or contact
commissioning.info@woodplc.com
1.1.2. Intended Audience
It’s expected that readers will have completed the required training courses, and understand the fundamental
concepts and basic operations, before reading this document.
This guide is intended for authorised users only and should not be distributed without the express consent
of Wood.
1.1.3. hub2
First released in October 2017, hub2 is the latest generation of Wood’s GoTechnology family of online, web-
accessible completions and commissioning management solutions.
Intended as a replacement for all previous products within the range, hub2 delivers the facilities to track,
record and report on details of equipment, certification, handovers, procedures, preservation routines and
Job Card information, amongst others.
Access
Details of how to access GoTechnology hub2 will be provided separately. Please note: As hub2 is a primarily
online solution, an internet connection and a modern, HTML5 compliant web browser are required.
1.1.4. Glossary of Terms / Listing of Information
At the end of this document is an abbreviated list of the information stored within hub2, where it can be
viewed from, and which Level within the information hierarchy (described in 3 Levels below) it resides.
Important Note: This is not a complete listing and is intended for basic reference purposes to the most
commonly used areas of GoTechnology hub2. Client, industry or process specific information types will be
excluded for this reason.

GoTechnology hub2 User Guide For Authorised Users Ony. Do not distribute.
3
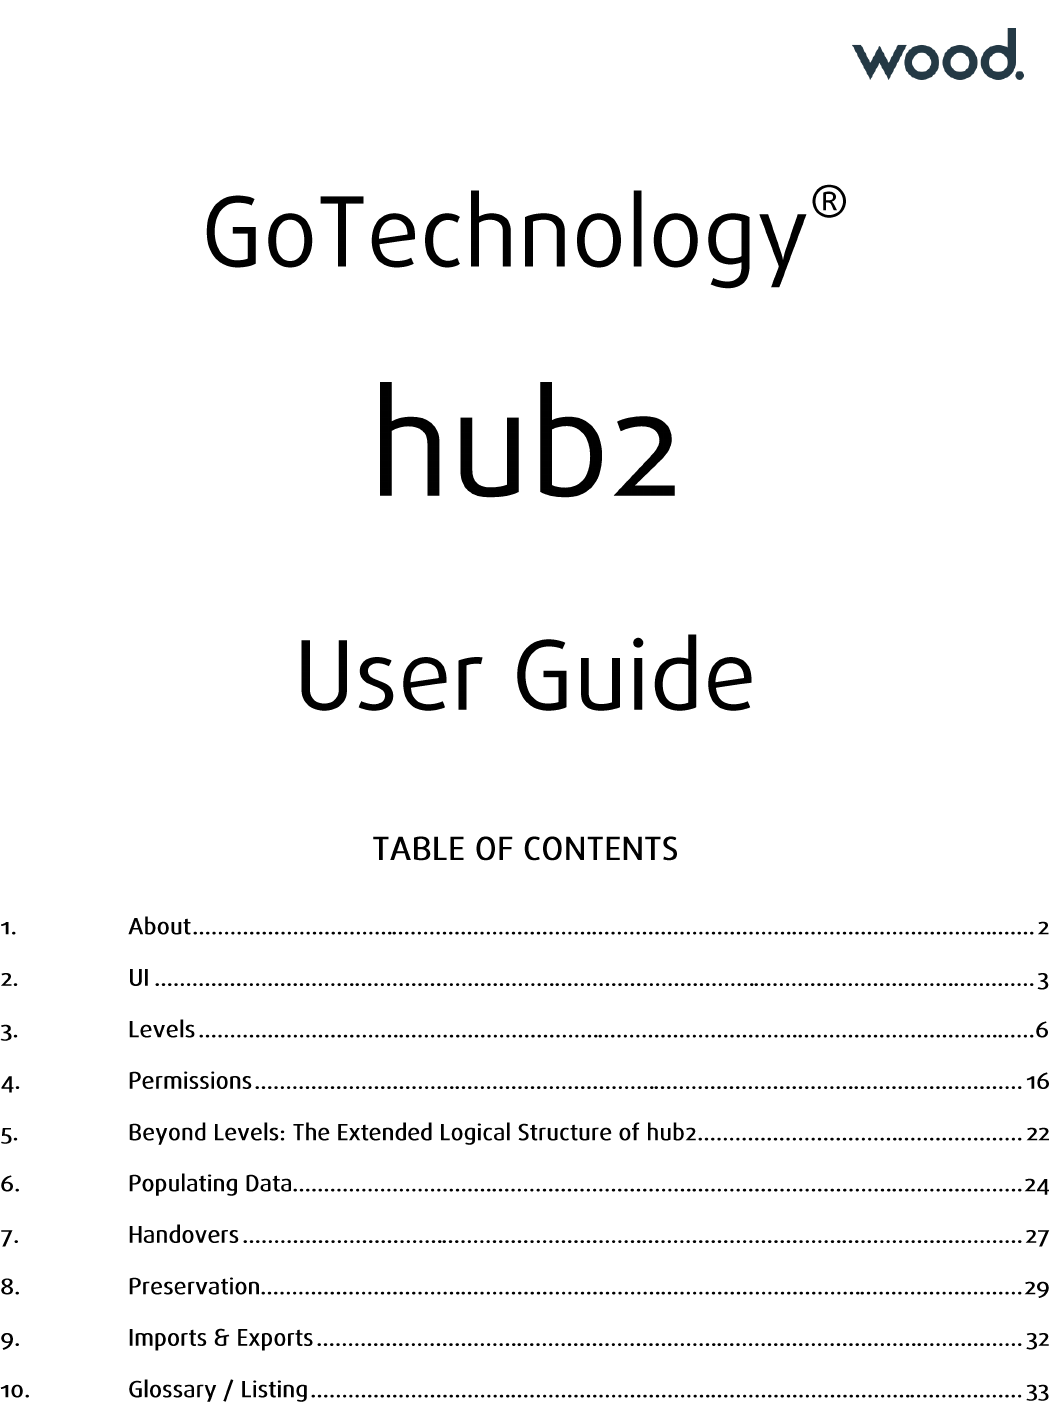
2. UI
Let’s take a look at the User Interface (or UI) for hub2. This is the “look and feel” of the application: How
information is displayed onscreen and how you interact with it.
Depending on which version of hub2, your preferences, permissions and configuration, and the device your
viewing on, some elements may appear differently, or not at all.
If we apply some highlighting to some different elements on this screen we can cover a lot of the basic
concepts within hub2, which follow all the way through the application.
GoTechnology hub2 User Guide For Authorised Users Ony. Do not distribute.
4
Colour
Location
Element
Description
◼
Top of screen
(menu bar)
The top menu buttons are the key to
navigating hub2. Clicking one of
these buttons will open a drop-down
menu with links to specific pages.
This includes the button at the top
right, which displays your name (or
the name of whoever is currently
logged in) and provides links to User
preferences and options.
◼
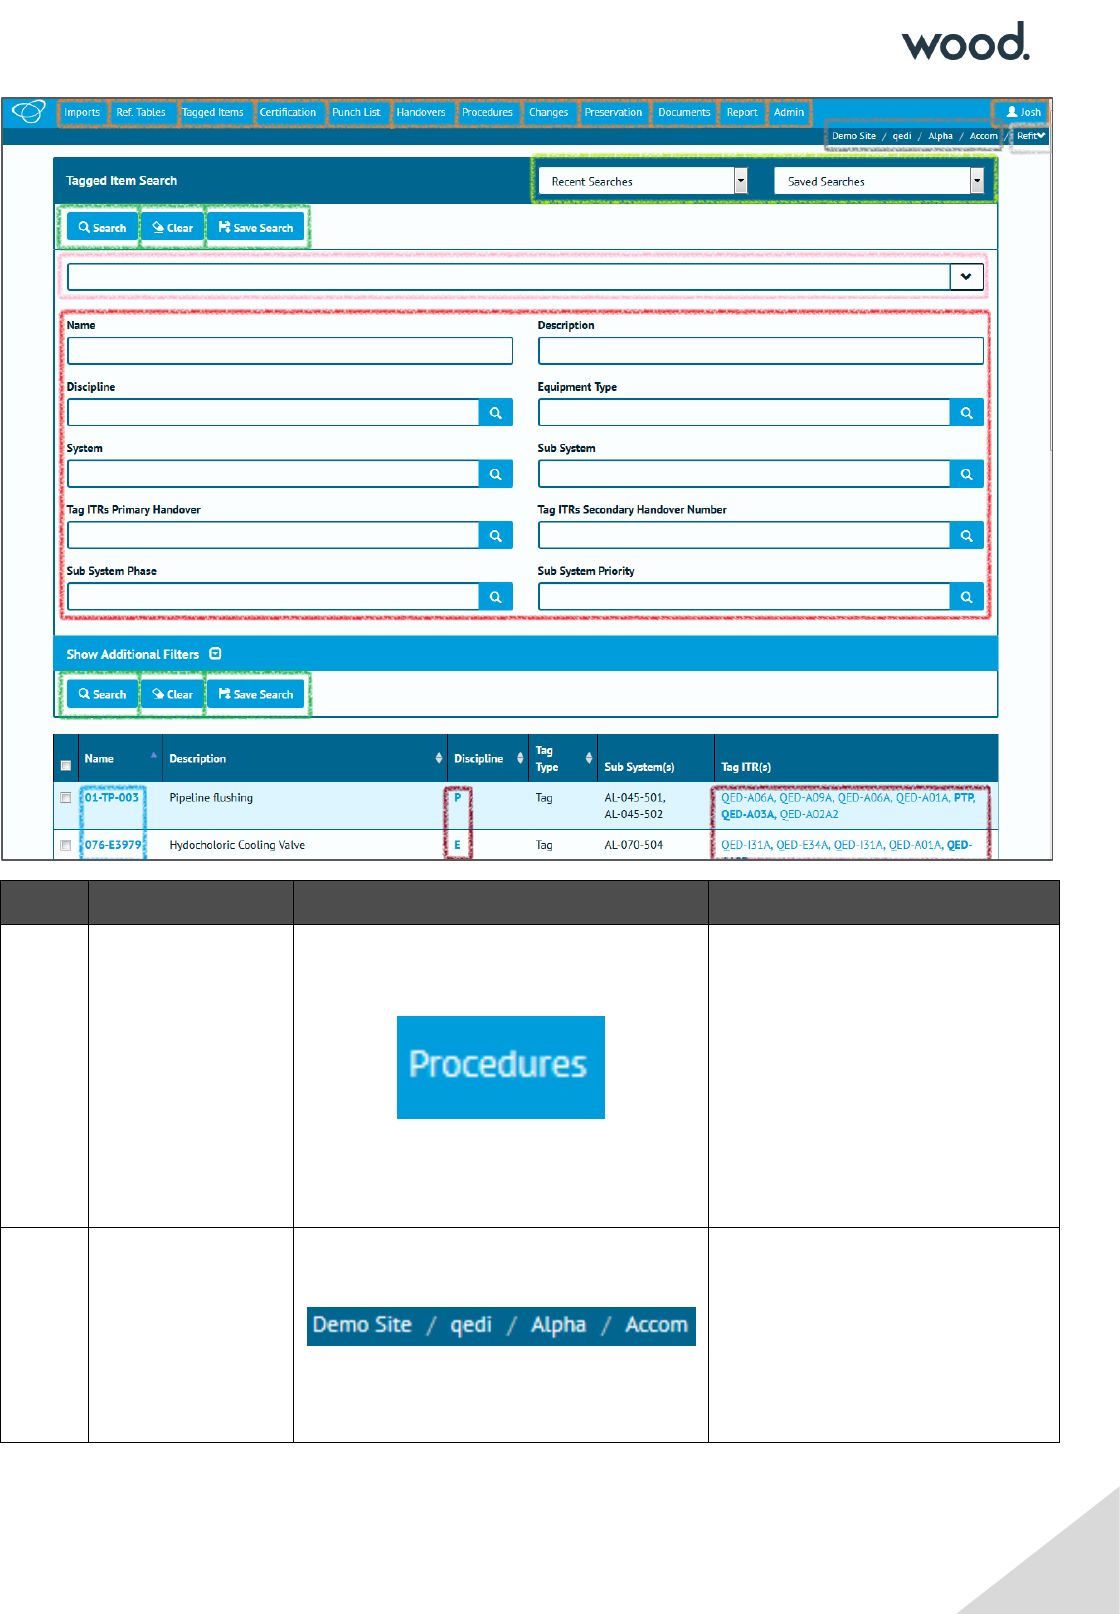
Top Right
The navigation “breadcrumbs”
show which Level A / Level B /
Level C / Level D you’re currently
logged in to. Click any of these
elements will take you back to the
Level select screen.
GoTechnology hub2 User Guide For Authorised Users Ony. Do not distribute.
5
◼
Top Right
The final breadcrumb element
represents the Level E. Clicking
this will provide a drop-down of
other Level E’s within this Level D,
allowing you to quickly switch
between them.
◼
Search Header
A drop-down menu that provides
the five most recent searches
you’ve run, allowing you to re-run
them easily.
Lists any “Saved Searches” you
have created via the “Save Search”
button.
◼
Various locations,
throughout hub2
Buttons within hub2 have many
purposes but are mainly used to
trigger an action, whether it’s to
start a search or import, add or
delete an item, or, in the case of
the button shown to the left, clear
all the values from a form.
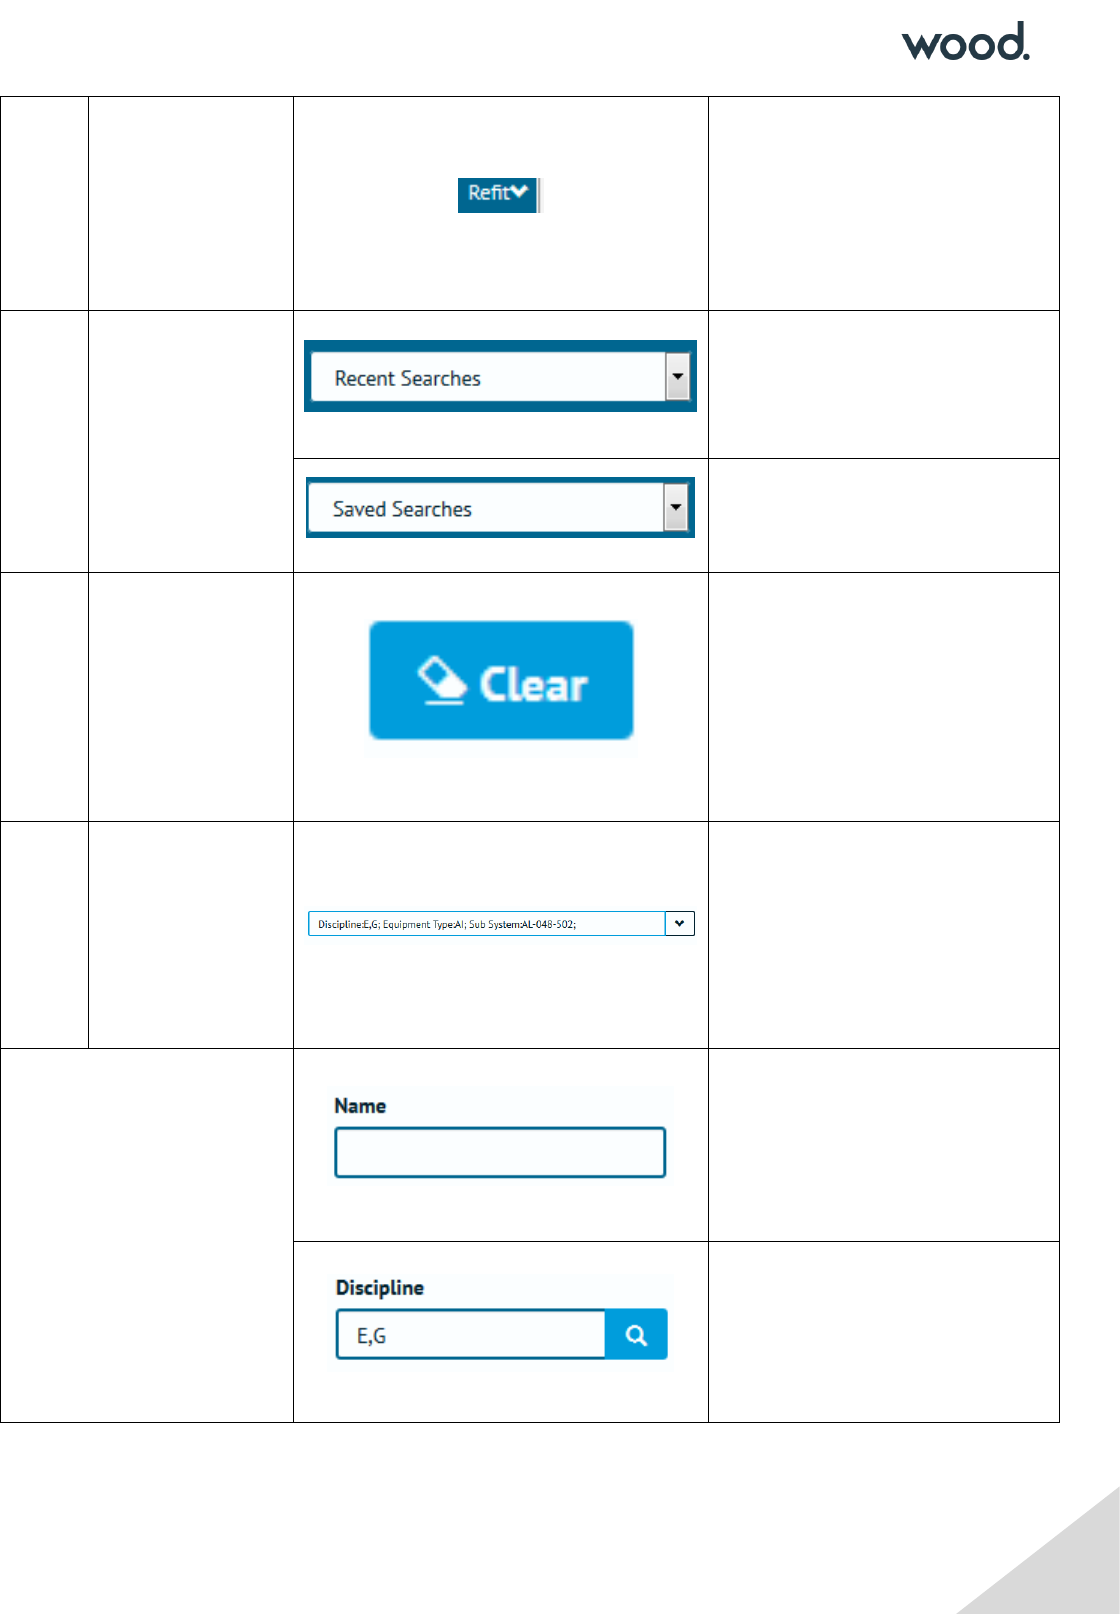
◼
Near the top of
the search form
The quick search bar can be used
to enter multiple search fields in
one place.
In addition, the drop-down arrow,
when clicked, provides a list of
field definitions.
◼
Various locations,
throughout hub2
Input fields can be used to enter
search terms or add data.
This can be either typed directly,
or in the case of dates, selected
from a date picker.
For “lookup” fields, the
magnifying glass button on the
right can be clicked to open a
popup containing all the possible
values that can be selected.
GoTechnology hub2 User Guide For Authorised Users Ony. Do not distribute.
6
Alternatively, a value can be typed
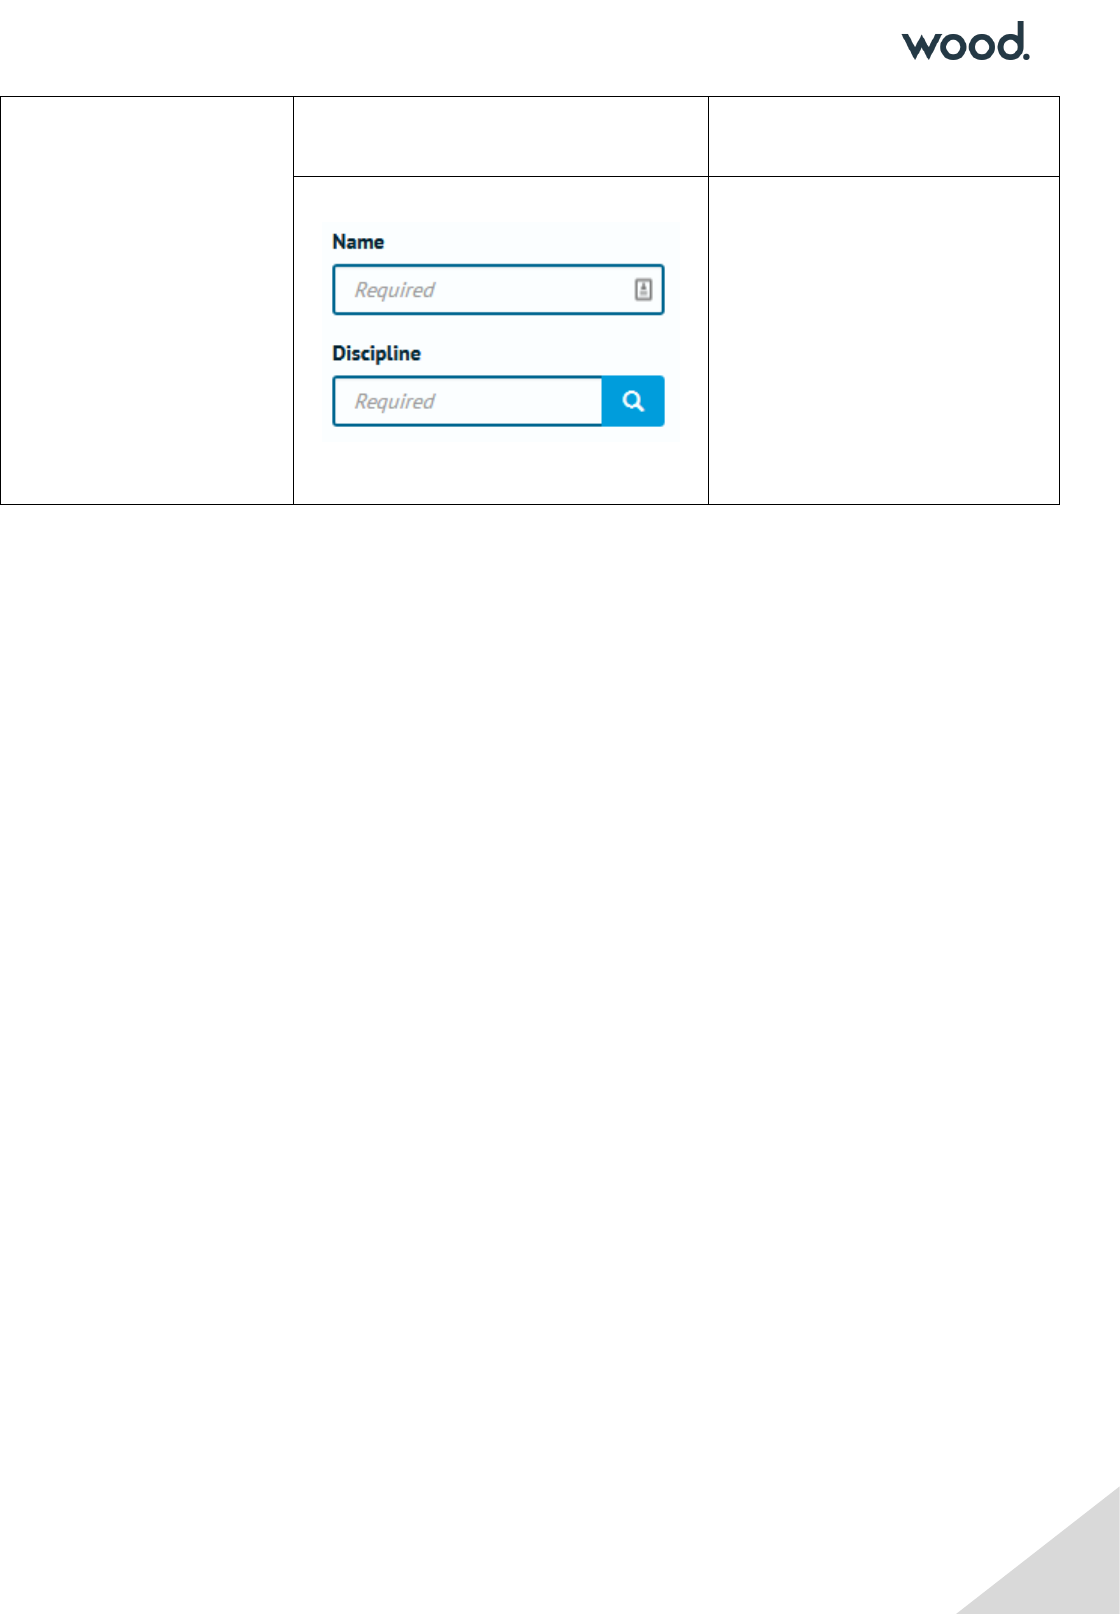
in directly as normal.
Fields which are “Required” have
the word Required shown when
they are empty.
When a field is Required it means
that it won’t be possible to add a
new record if those fields are
blank or contain invalid
information (and hub2 will tell you
if the information is invalid).
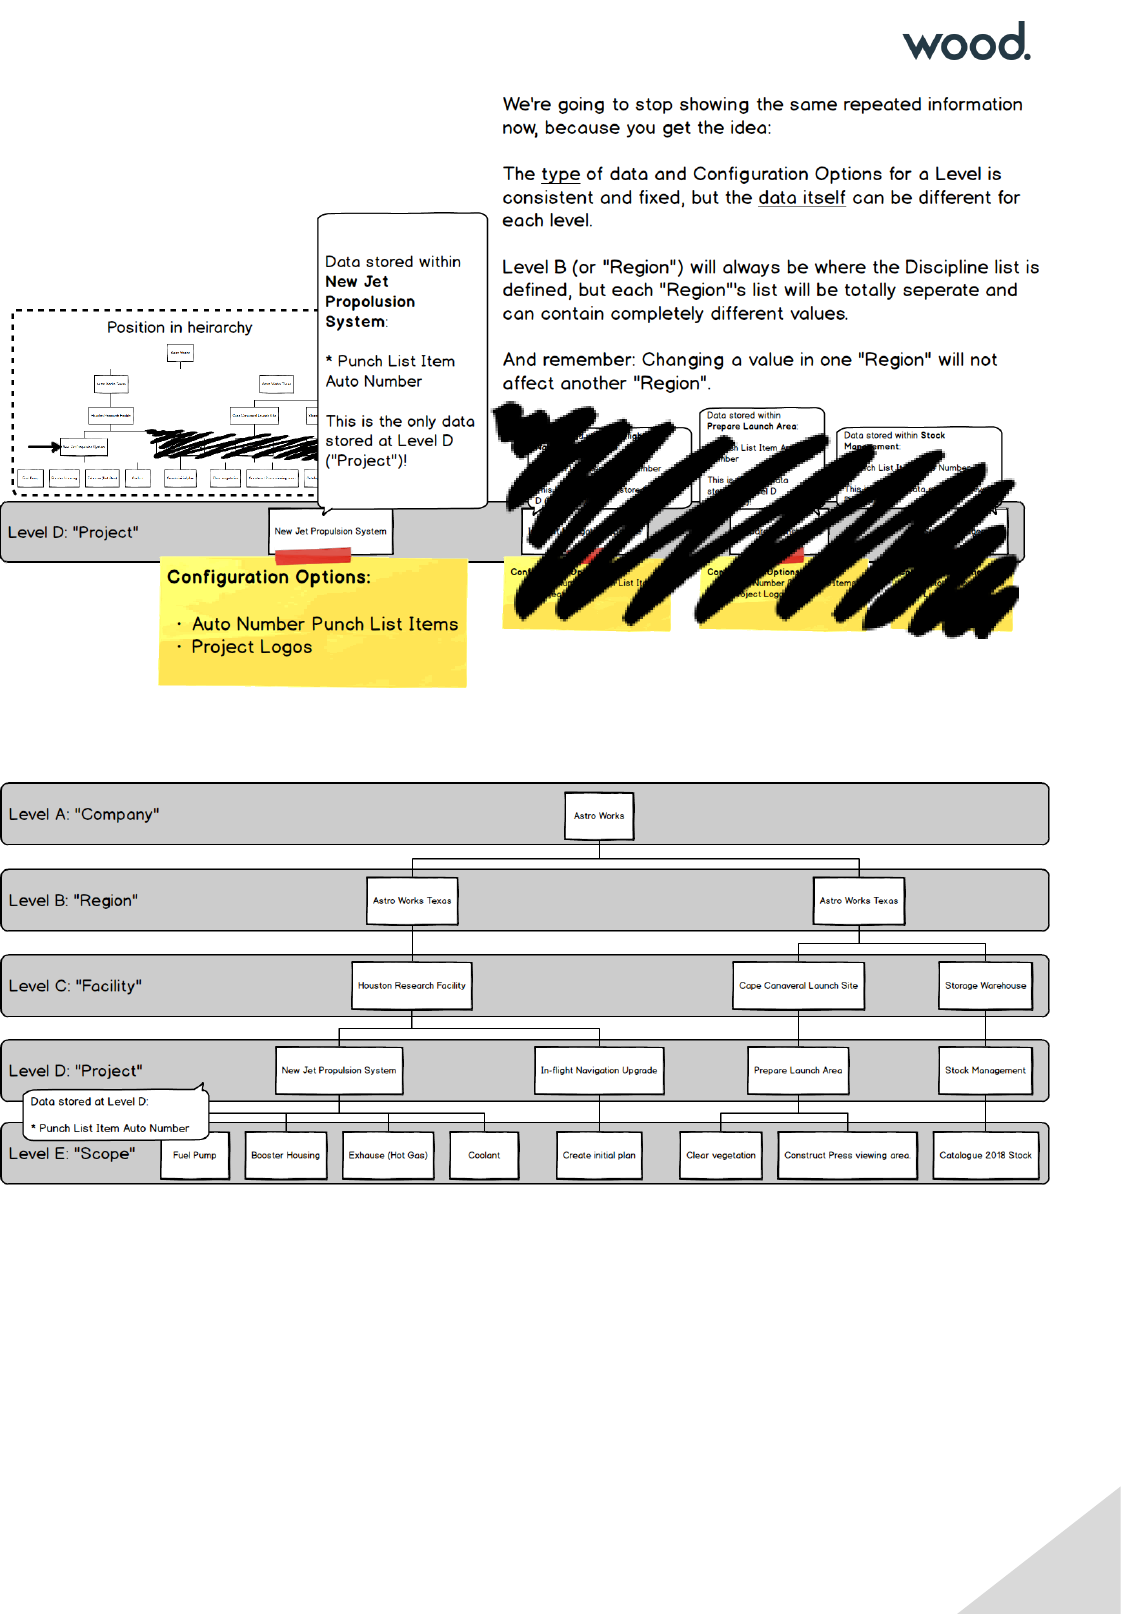
3. Levels
Within hub2 project information is stored in five connected levels. This might seem like a more complex
approach than you’re used to before, but once we’ve explained it, you’ll understand how it’s easy to use, and
will save time and improve consistency of data. Within the structure, inheritance is used: Information defined
in the first level flows throw to the second, third, fourth and fifth levels, information in the second flows throws
to the third, fourth and fifth level, and so on.
Within this document, we will refer to these levels as Level A, Level B, Level C, Level D and Level E, however
they can be renamed by yourself or your hub2 administrator to use names that are much more relevant to
your project or industry.
Here’s an example of how an instance of hub2 might be laid out. Don’t worry too much about the details at
this stage, we’ll go into those later!

GoTechnology hub2 User Guide For Authorised Users Ony. Do not distribute.
7
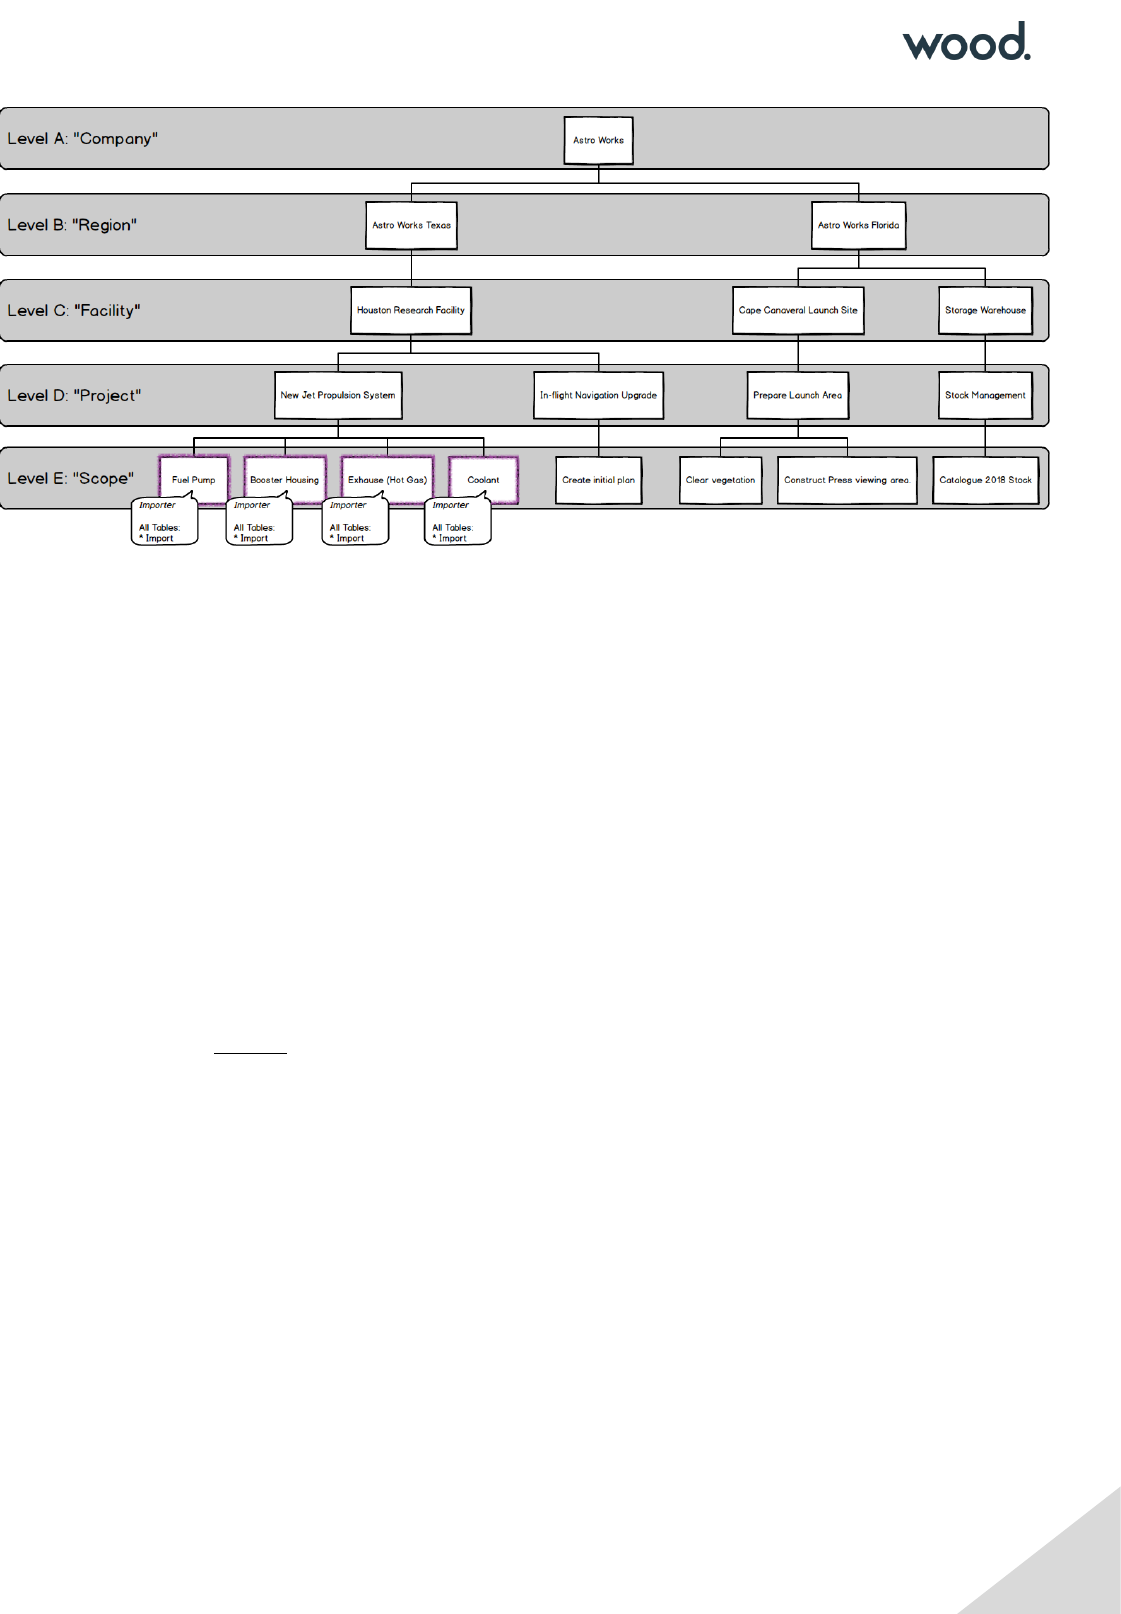
As you can see, in the above picture we have a fictional company named “Astro Works”, and a data structure
that’s been designed in hub2 to best support their operations. This structure will allow the Astro Works teams
to share the information they need, while making it clear who is working on what, and ensuring that any
information is only available to the appropriate persons.
So how do we build up a structure like that, and what do these levels really represent? We’ll get into that in a
second, but before we do, an important point.
When it comes time to build up our data within hub2, we start at the “top” of the data hierarchy (Level A) and
work our way down from there.
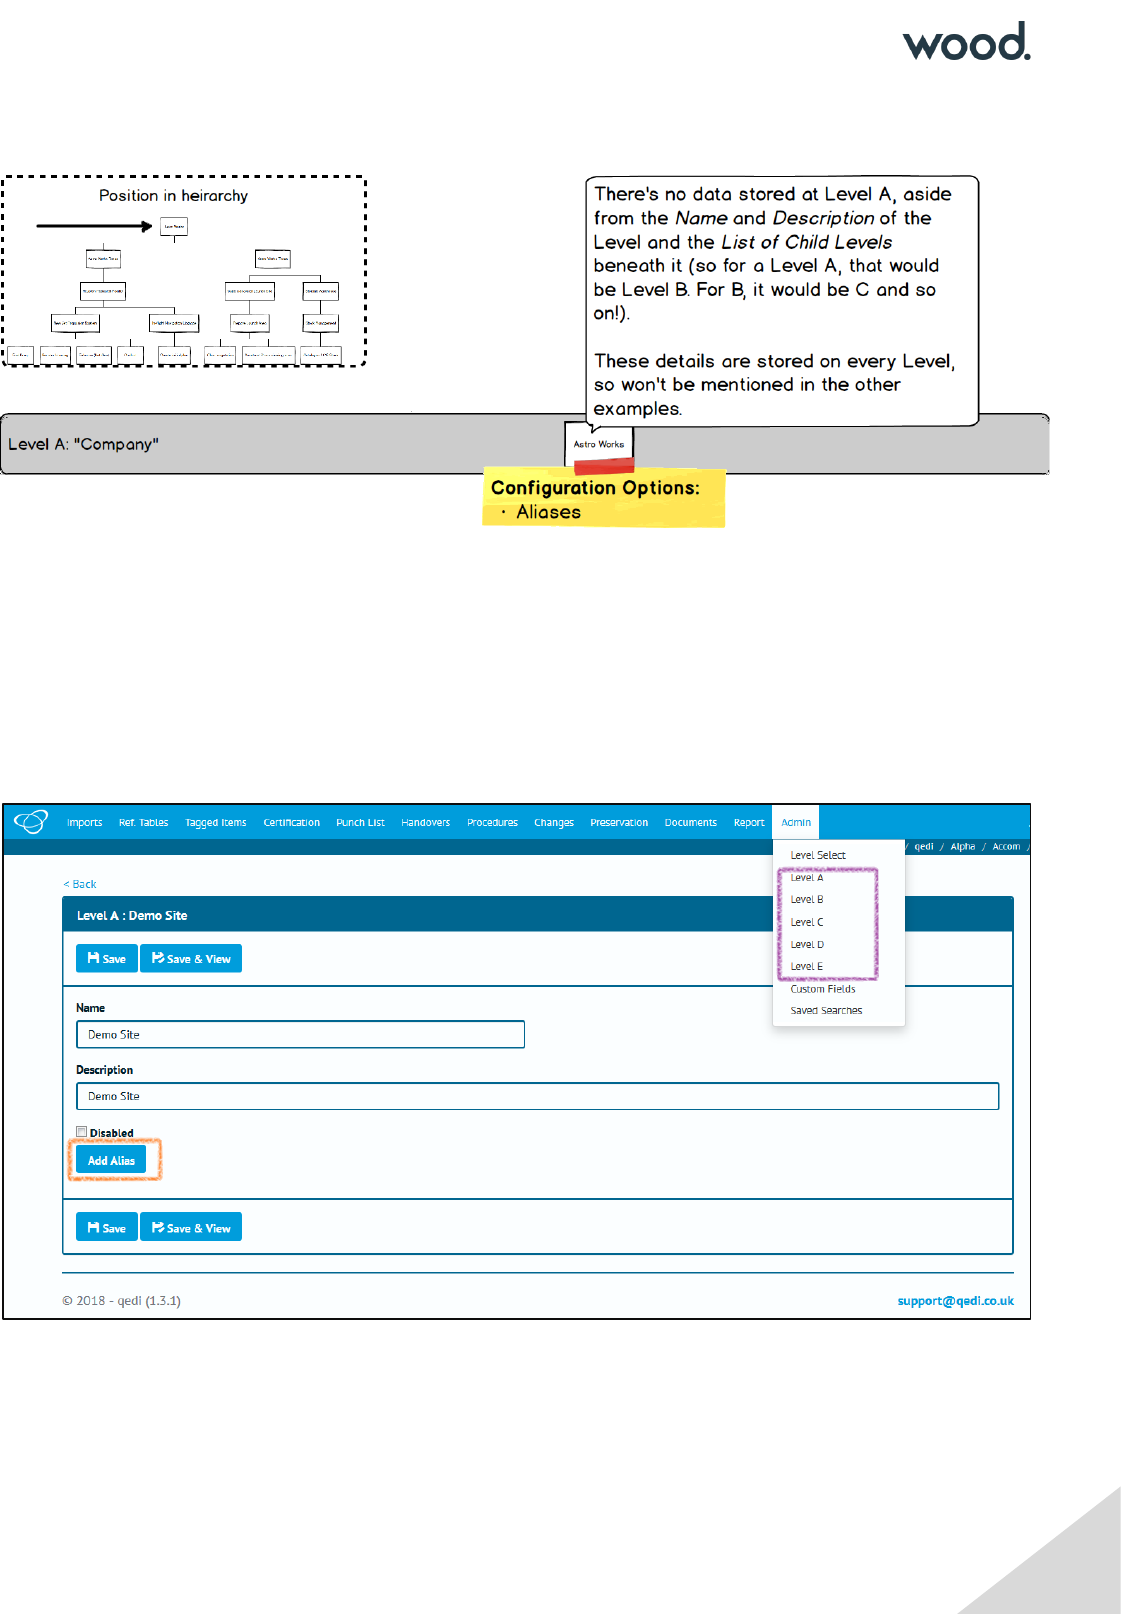
3.1.1. Level A
As we know, Level A represents the “Company”, “Corporate” or “Global” level. It contains configuration options
that will be utilised in every part of the world, in every industry, on every project and work scope the
company does… Or at least that’s the idea! Of course, in reality this may not be practical, but we’ll discuss that
later.
An Important Point about Levels
You (or your hub2 administrator) can change your Level configuration
whenever you need to, so don’t worry about having to get it right first time.
If you’d like some advice on Level configuration, just get in touch. We’re
here to help!
GoTechnology hub2 User Guide For Authorised Users Ony. Do not distribute.
8
For now, let’s assume that there’s just one item in Level A representing the whole company. In our example
case, that is Astro Works, our fictional space exploration organisation.
There’s no data stored at this level, but there are some options:
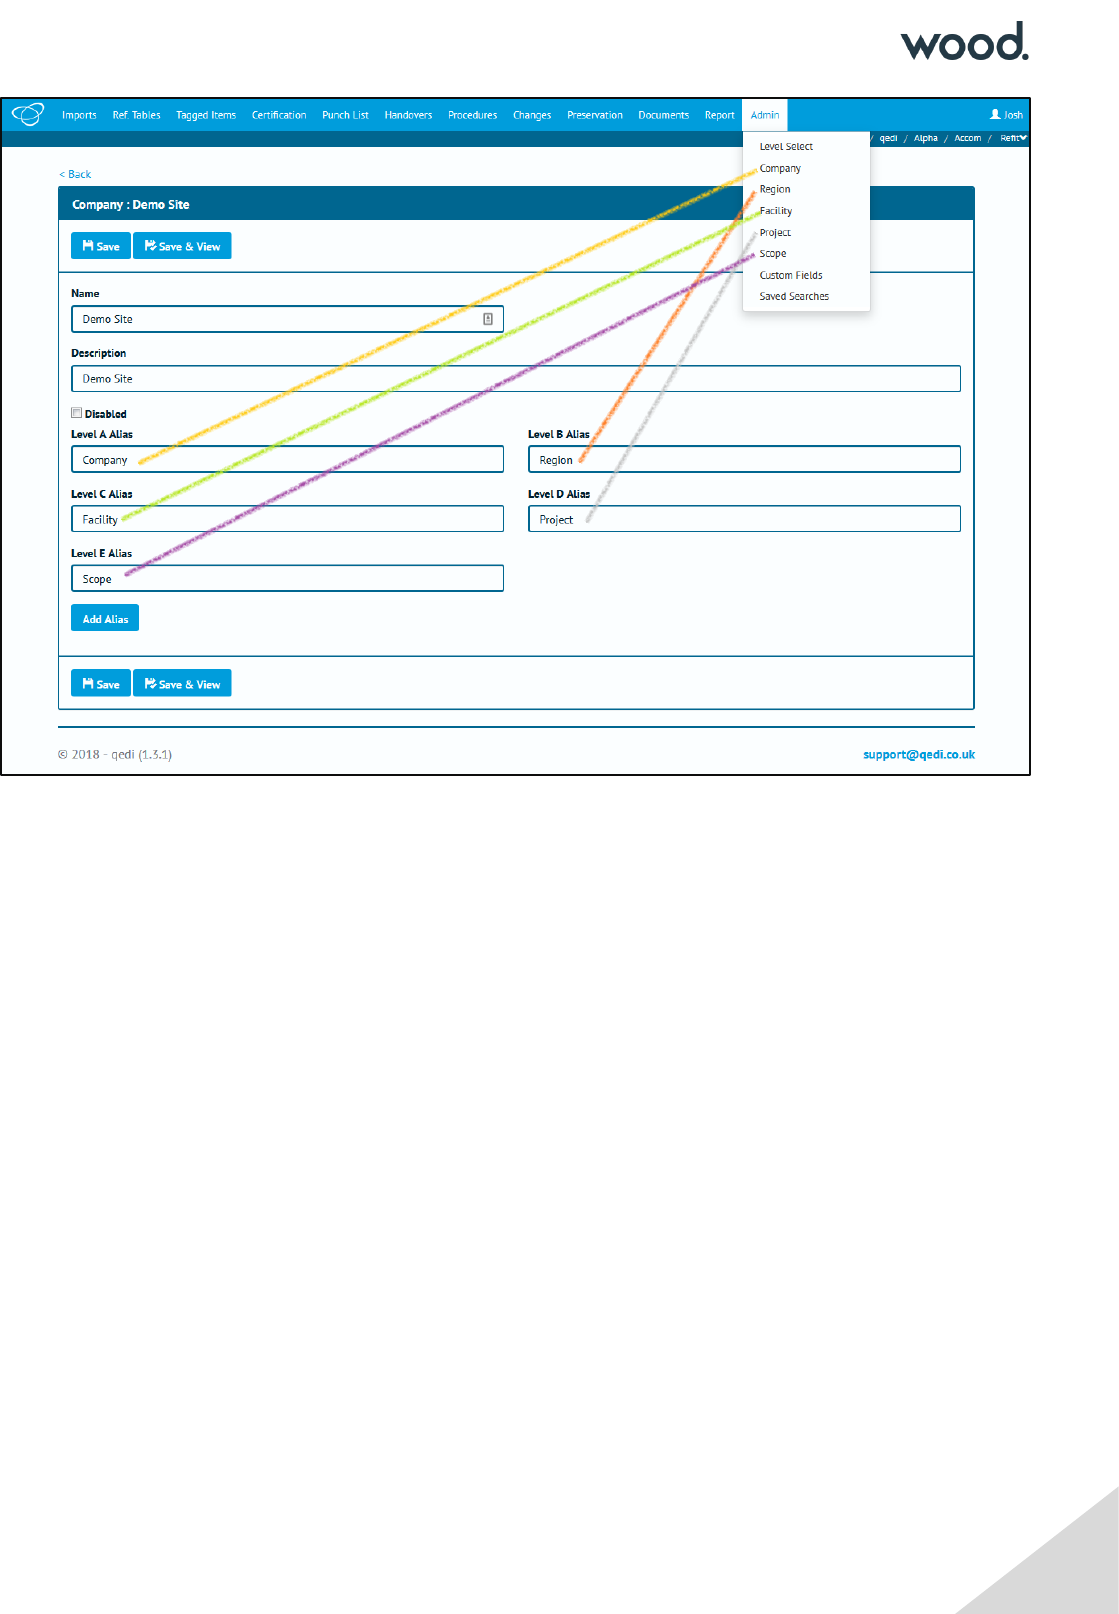
• Aliases
Aliases allow us to “rename” certain items on screen. As we’ve mentioned these can include the Levels
themselves, as well as other items such as Certification Grouping. When we set an Alias for any field then the
default name is replaced by the alias we’ve chosen.
In the above screenshot, the orange highlight shows that there are no Alias at present, just the “Add Alias”
button. The purple highlight shows that the default “Level A” to “Level E” are shown.
Let’s rename those to some more friendly values.
GoTechnology hub2 User Guide For Authorised Users Ony. Do not distribute.
9
Once we save we can see the menu has updated too.
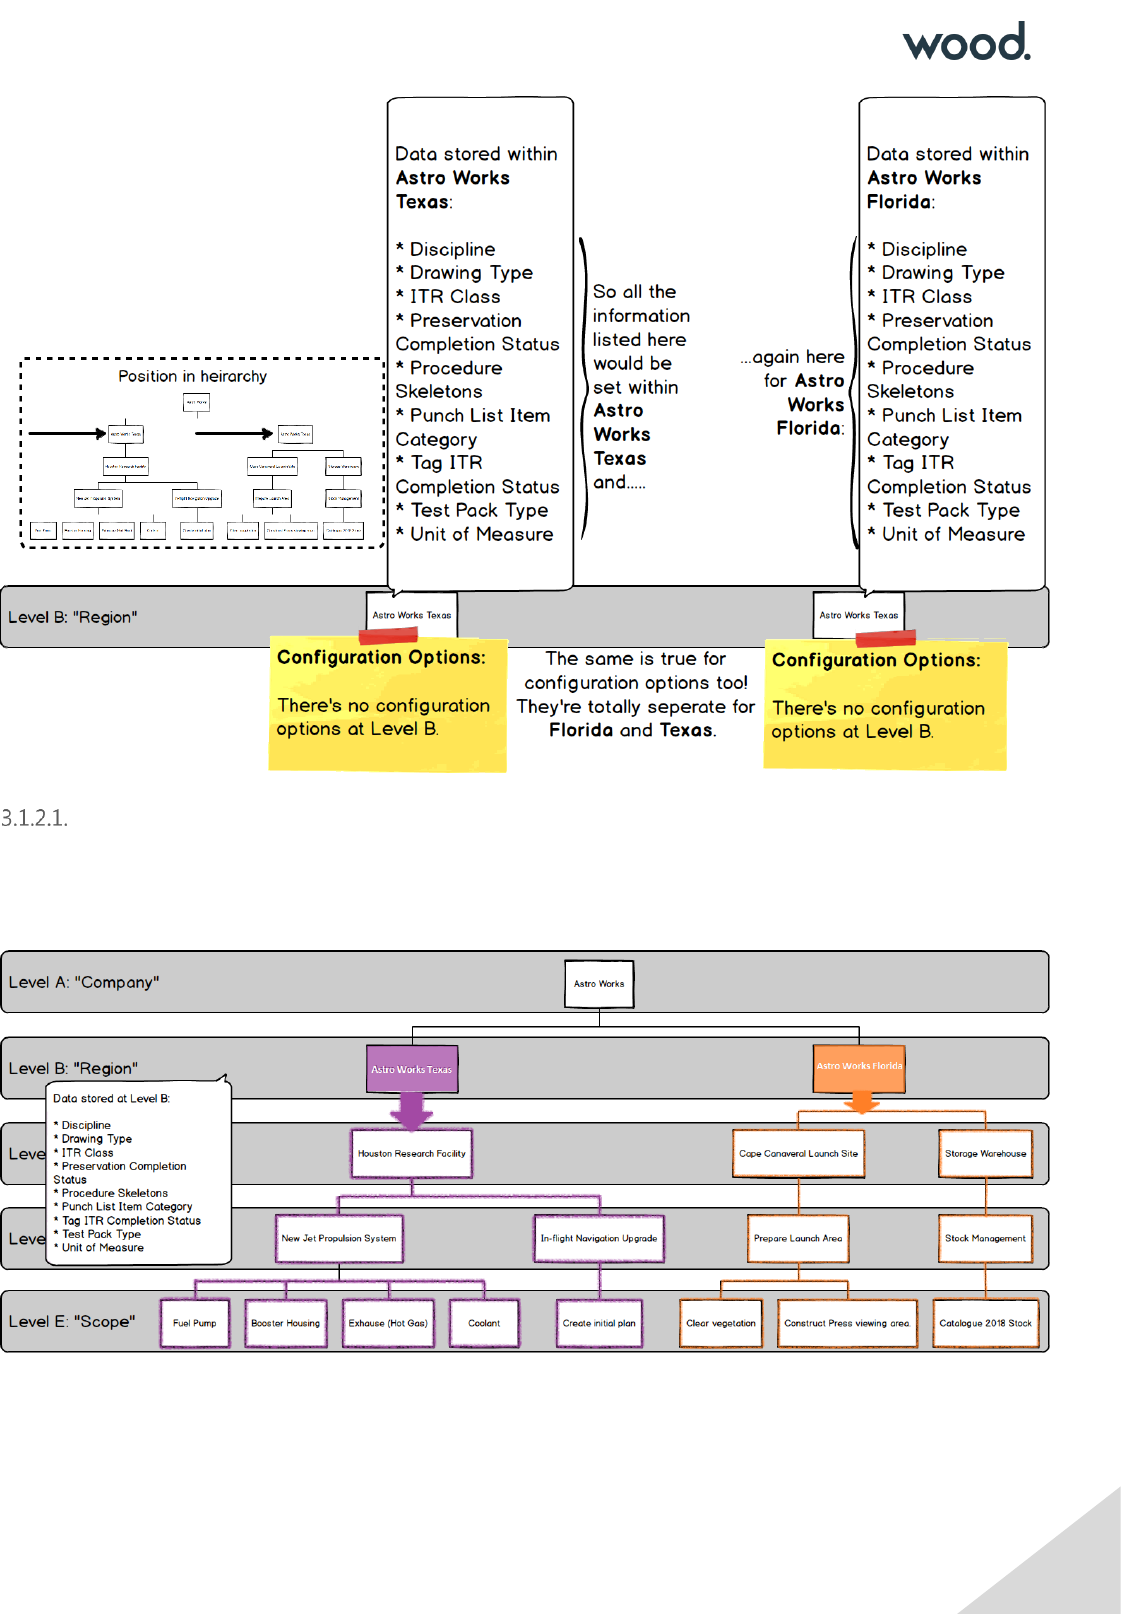
3.1.2. Level B
Level B represents the first sub-division of the structure and is the first place we can actually store data. It’s
usually used to represent a region, division or industry sector.
GoTechnology hub2 User Guide For Authorised Users Ony. Do not distribute.
10
Information at Level B
The kind of information we store at this Level is very high level
Remember, any information set here will be used by the associated levels below:
In the above picture we can see our two Level B’s (which we’re calling “Regions”) Astro Works Texas and
Astro Works Florida, containing different information (which is shown by having one in purple and one in
orange).

GoTechnology hub2 User Guide For Authorised Users Ony. Do not distribute.
11
The solid colour indicates where the information is set, with the outlining showing where the information is
used or referenced from.
As you would expect from our previous explanations, Levels below, reference the information defined in those
above (by now we’re hoping this is becoming painfully obvious, and even repetitive, to you.
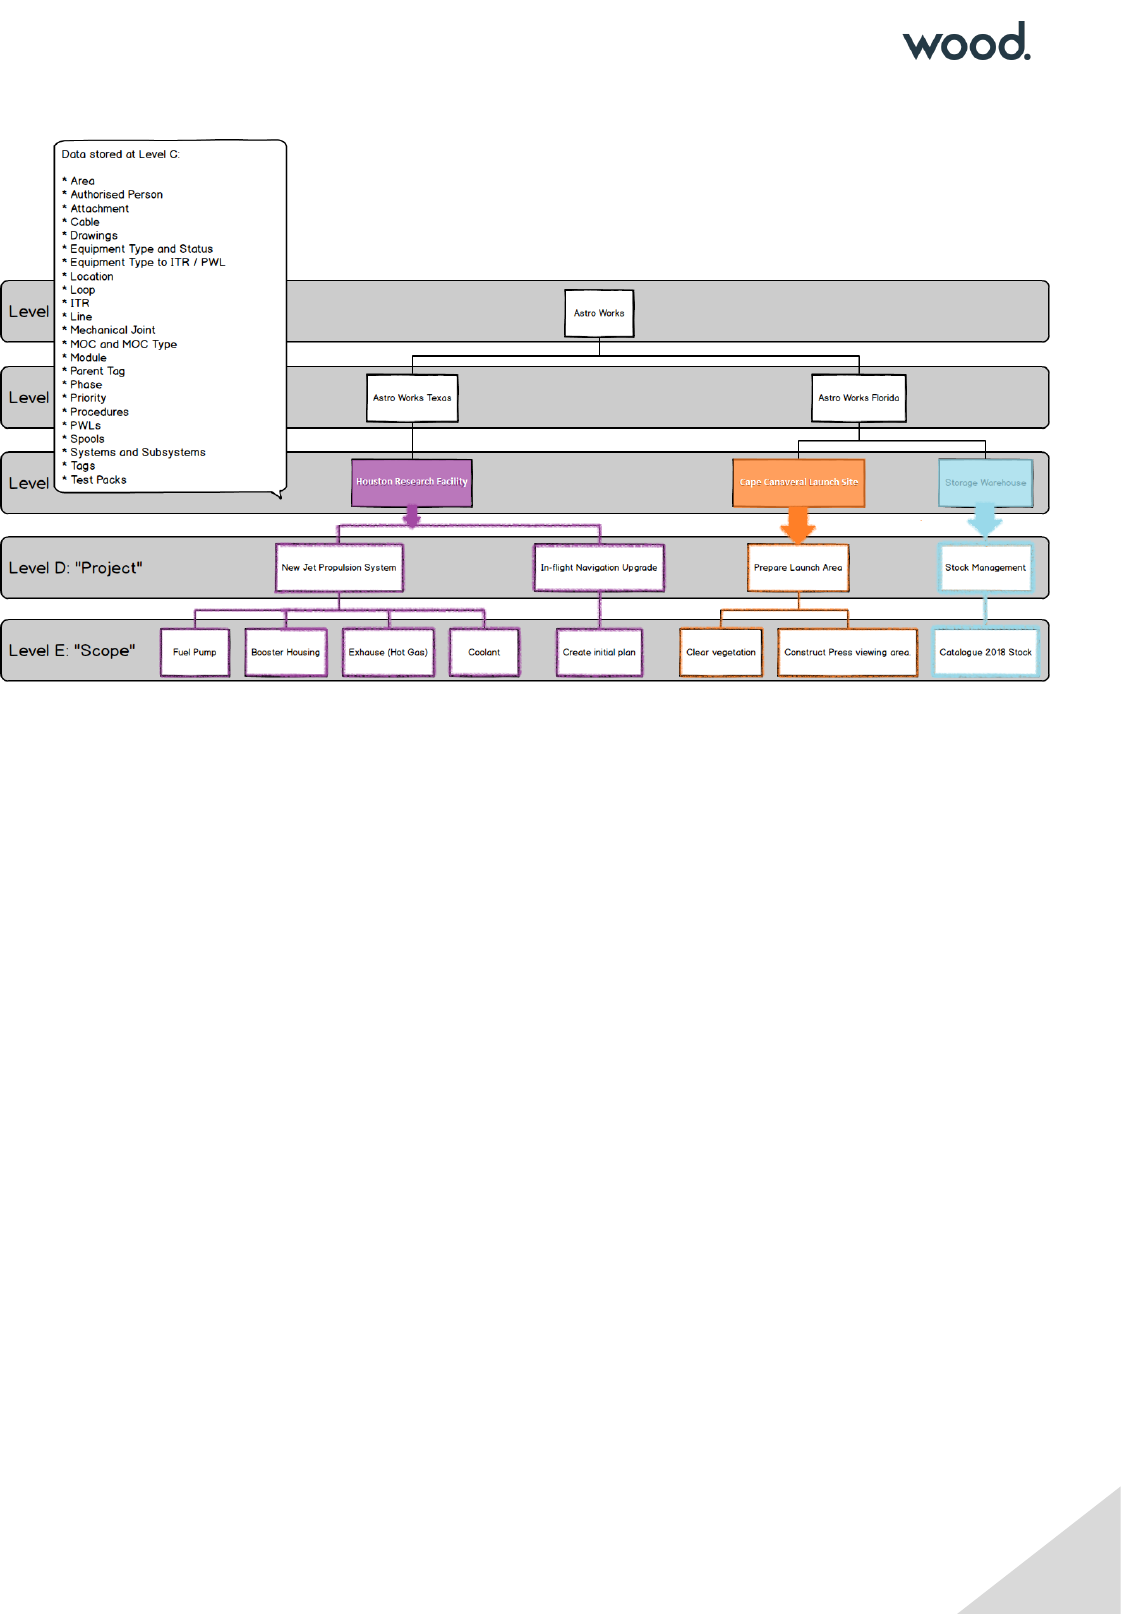
3.1.3. Level C
Level C is usually used to represent a physical construction or geographic area in which multiple projects
(which themselves have multiple scopes of work) are being (or will be) executed.
As such it contains a large amount of data, as well as a few key configuration options:
• Preservation Progress Method
• Preservation Window Before
• Preservation Window After
These are described in more detail, and in context, in 8 Preservation.
Let’s go back to our diagram and take a look at Level C in more detail

GoTechnology hub2 User Guide For Authorised Users Ony. Do not distribute.
12
GoTechnology hub2 User Guide For Authorised Users Ony. Do not distribute.
13
Just to repeat our previous point once more, the information set at Level C, will be utilised by the levels below:
3.1.4. Level D
Level D is the “Project” level, and represents a grouping of work scopes (which are recorded at Level E). As
such, there’s not too much data stored here and, aside from the logos which appear on reports and
certification, only one setting:
• Punch List Item Auto Number – Set whether Punch List numbers are generated automatically, and any
conventions/formats for that number.
GoTechnology hub2 User Guide For Authorised Users Ony. Do not distribute.
14
As we know, the information at a higher Level is referenced by those beneath it. This time we’ll show the
structure without highlighting. Can you imagine which Level E’s inherit from where?
We’re sure you figured it out – it’s just a case of tracing the lines.
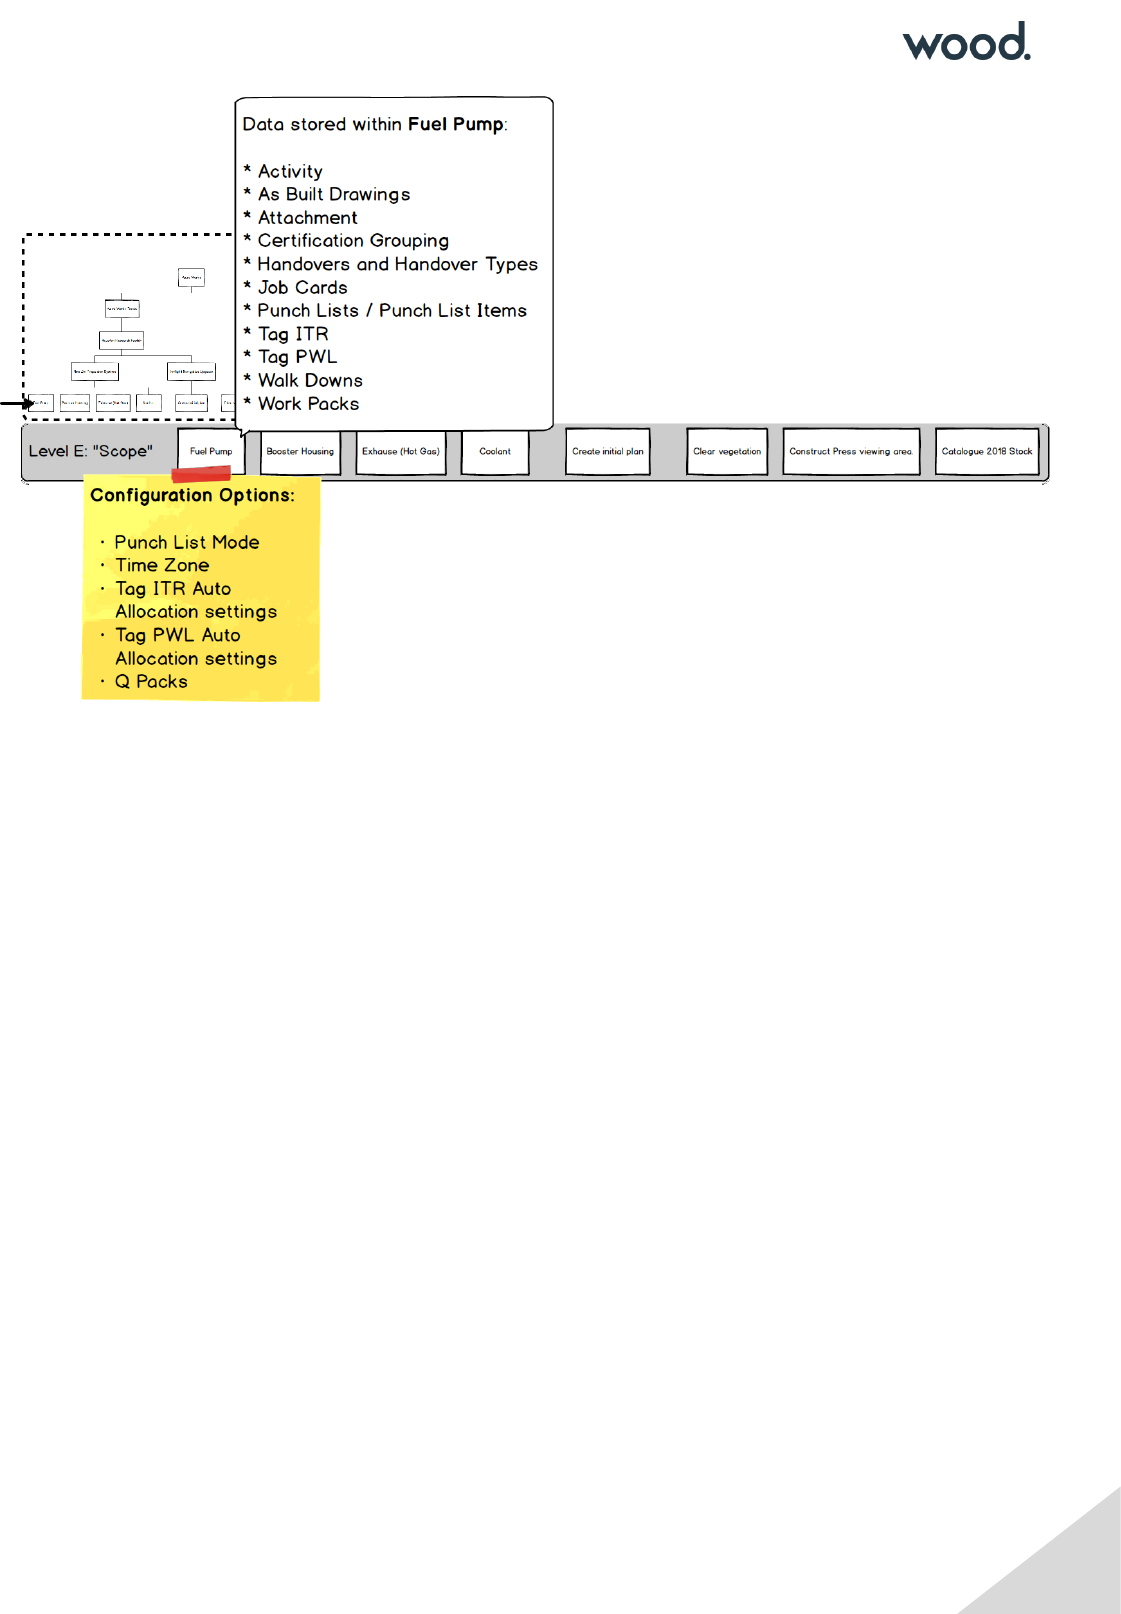
3.1.5. Level E
Level E represents the scope of work – it’s where sign-offs are stored and progress is recorded.
GoTechnology hub2 User Guide For Authorised Users Ony. Do not distribute.
15
Level E is the lowest level, so any of our Level E’s (or “Scopes” as we’ve aliased them) won’t affect anything
other than themselves.
GoTechnology hub2 User Guide For Authorised Users Ony. Do not distribute.
16
4. Permissions
Permissions within hub2 have a high level of flexibility: Authorisation can be fine-tuned for almost every table,
to specify if a User can Add, Update, Delete or even see it at all. There are also additional special permissions
for certain tables, such as the ability to sign-off Tag ITRs or Tag PWLs.
To make all these Permissions easier to manage, we have a couple of tools at our disposal. Firstly, permissions
can be grouped together as a “Role”. Secondly, we can choose which Level we “Assign” a Role or Permission
too – this is because the abilities of a Role are limited/linked to the Level it’s assigned to and it’s “children”
(for example, Tags are managed at Level C. If we assign a role for creating tags, but only on a Level D or a
Level E, then the User won’t be able to do anything.)
We’ll talk more about that later though. Let’s start off by looking at Roles.
The standard roles within hub2 are as follows (correct at time of writing):
Role
Permissions Included
Tag Full Permissions
Tags, Test Packs, Lines, Spools, Cables and Mech Joints:
• Create (Add)
• Read (View)
• Update (Edit)
• Delete
• Import
Tag ITR Sign Off
Tag ITR:
• Sign Off
Tag ITR Full Permission
Tag ITR:
• Create (Add)
GoTechnology hub2 User Guide For Authorised Users Ony. Do not distribute.
17
• Read (View)
• Update (Edit)
• Delete
• Import
• Review (Access the “Equipment Type to ITR Review” page)
• Full Tag ITR Digital Document permissions (fill in Tag ITRs onscreen, or
via “Smart” PDFs)
Punch List Raise
Punch List, Punch List Item:
• Create (Add)
Punch List Sign Off
Punch List Item:
• Sign Off
MOC Sign Off
MOC:
• Sign Off
Scope User Sign Off
Handovers, Punch List Items, Tag ITR, and Tag PWL:
• Sign Off
Asset User Sign Off
Procedure, Procedure Section, Procedure Step and MOC:
• Sign Off
Handover Full Permission
Handovers:
• Create (Add)
• Read (View)
• Update (Edit)
• Delete
• Import
• Sign Off
Level Administrator
Levels A, B, C, D and E:
• Create (Add)
• Read (View)
• Update (Edit)
• Delete
Note: This allows the creation of the Levels themselves. So new “Regions”,
“Assets”, “Projects”, etc can be created by this user. However, on its own it
does not give them permission to perform any tasks (e.g. create Tags, sign-
off Tag ITRs, etc) within any levels.
GoTechnology hub2 User Guide For Authorised Users Ony. Do not distribute.
18
Full Write Access
This is the opposite of the Level Administrator in that it grants full
permissions to do everything (Create, Read, Update, Delete, Import, Sign
Off, Review) except the actual creation of Levels themselves.
Importer
Import Access for all tables expect Level A to E
Scope Importer
Tag ITR, Punch Lists, Punch List Items, Tag PWL, Procedure, Procedure Step,
Procedure Section, Primary Handovers, Secondary Handovers and
Handovers:
• Import
Template Admin
Handover Types, ITR, MOC Type and PWL:
• Upload (add/replace DOTX templates)
Base Access
Read Access to all tables
Asset User Sign Off
Procedure, Procedure Section, Procedure Step and MOC:
• Sign Off
Attachment Upload
Attachments:
• Create (Add)
• Read (View)
• Update (Edit)
As you can see, some of the roles overlap. That’s ok – it won’t cause any problem if someone has the “same”
permission twice.
In general, our advice is to go for the fewest amount of permissions possible, as it makes it much clearer who
can do what.
Now we have our Roles, but how do we choose which “Project” they apply to? And how do we make the
whole process as flexible as possible, while still making it quick and easy to change?
The answer is through how we assign these roles, and in hub2 any role can be assigned at any level.
Let’s look at our Level Diagram again:
GoTechnology hub2 User Guide For Authorised Users Ony. Do not distribute.
19
So, we can assign any of the roles listed in the table above, to any of the Levels in that diagram. We could
assign it to any Level A, any Level B, any Level C, any Level D…. Well, let’s start off with something easy… Let’s
assign permissions so that a User can create Punch List Items in any of the “Scopes” (Level E’s) in the Houston
Research Facility (Level C).
4.2.1. A simple example of assigning a role to multiple scopes.
First, we need to know what Role to choose. If we look back at the table we can see that “Punch List Raise”
does exactly what we need, and nothing more. Sounds perfect!
Now, where to assign it? Well, we could assign it to each Level E itself:
• Fuel Pump
• Booster Housing
• Enclosure (Hot Gas)
• Coolant
• Create Initial Plan
But there’s an easier way! You might be able to guess as to what it is (keeping in mind what we know about
how Levels work, and that we can assign permissions at any Level), but if not, here it is:
GoTechnology hub2 User Guide For Authorised Users Ony. Do not distribute.
20
By assigning the Permission to “Houston Research Facility” then the permission applies to all levels beneath.
This also means that if a new Level E is added, then the User with this role will automatically have permission
to Create Punch Lists and Punch List Items there too.
If, on the other hand, we only wanted to assign to specific Level E’s (let’s say all of those in “Houston Research
Facility” except “Coolant”)
As we can see, there’s no one “right” way to do things. We can accomplish the same outcome in several ways,
mixing and matching Roles and Levels to get the right result.
Let’s look at another, more complex example.
4.2.2. Achieving the same result in different ways
Depending on what Role we choose and what Level we assign it, we can achieve the same result in different
ways.
GoTechnology hub2 User Guide For Authorised Users Ony. Do not distribute.
21
Understanding this can help us grasp how the Permissions system works.
Let’s imagine an example where we want to give a User permission to import to all Level E’s within “Houston
Research Facility”, but only the items stored at Level E (Tag ITR, Punch Lists, Punch List Items, Tag PWL,
Procedure, Procedure Step, Procedure Section, Primary Handovers, Secondary Handovers and Handovers).
Well, let’s look back at what Roles are available for Importing…
Role
Permissions Included
Importer
Import permissions for all tables expect Level A to E
Scope Importer
Tag ITR, Punch Lists, Punch List Items, Tag PWL, Procedure, Procedure Step,
Procedure Section, Primary Handovers, Secondary Handovers and
Handovers:
• Import
The first option (Importer) looks like it might be overkill for what we need, as we only want to import the
tables which are at Level E. However, the second option (Scope Importer) matches perfectly. If we assign that
to “Houston Research Facility”, we get exactly the result we want.
Perfect!
But could we achieve the same result with the other Role as well? As it happens we can:
GoTechnology hub2 User Guide For Authorised Users Ony. Do not distribute.
22
How does this work? Well, even though the “Importer” role specified access to import all tables, what it really
should say is “Provides import permission to tables belonging to the Level it is assigned to and to the tables
belonging to any child levels, except for the tables representing the Levels themselves.” But that’s a bit wordy!
So, by assigning a powerful permission at a low level, we limit its power. As with data, permissions flow
downwards. By assigning the ability to use any import, but allocating it to a Level E, what we actually get is
that any Import within that Level E can be used. So, assigning it to those four Level E’s gives us what we want
in a different way.
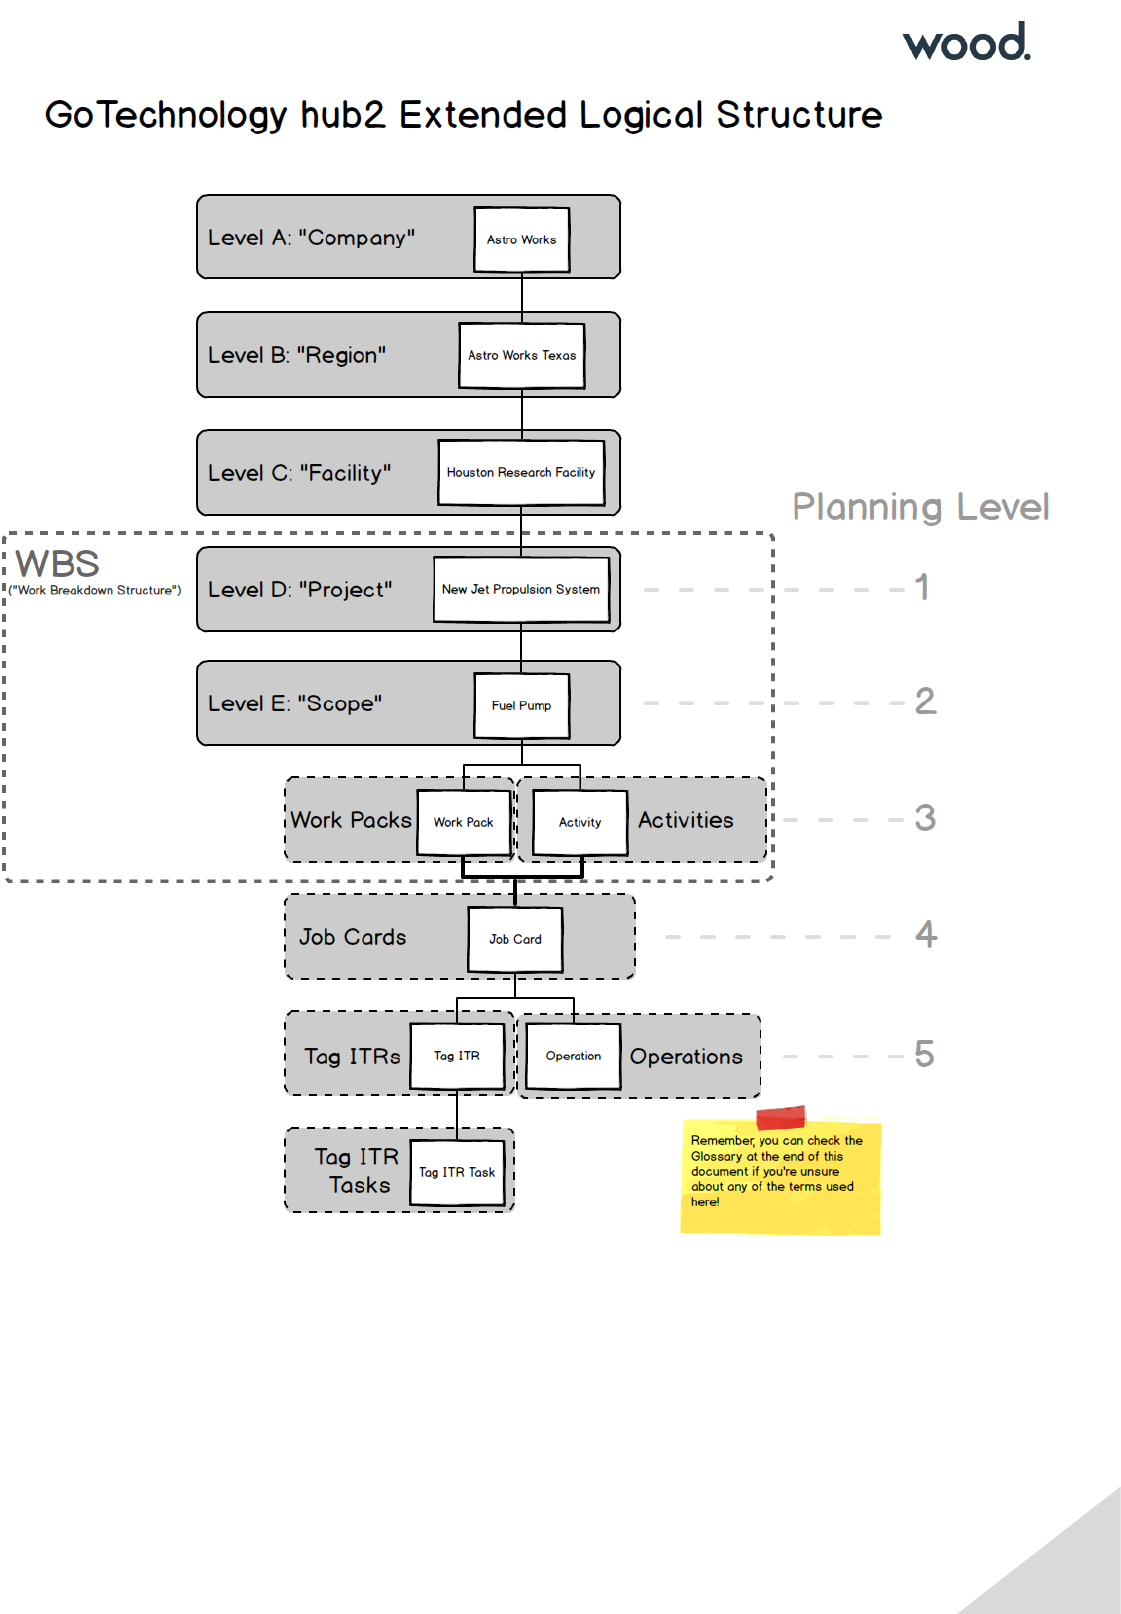
5. Beyond Levels: The Extended Logical Structure of hub2
Now we know all about Levels, what’s stored there and how we can set up the right permissions, but what
happens when we go deeper? How is information within a Level E structured to allow us to assign, progress
and track Completions and Commissioning execution? The answer can be seen by delving into the “Scope”
level and looking at what we call the “Extended Logical Structure”:
GoTechnology hub2 User Guide For Authorised Users Ony. Do not distribute.
23
While this might seem complicated, the main principles are quite simple:
• We’re already familiar with Level A to E and what they represent.
• Work Packs and Activities are the next subdivision of data. Work Packs represent the physical documentation
and Activities represent the effort involved in completing the work.
• When a Project is planned a Work Breakdown Structure is created, decomposing the overall Project (Level D
in hub2 and Level 1 in most planning approaches) into two further levels: Scopes of Work (Level E in hub2,
Level 2 in planning) and Work Pack or Activity (in hub2 we track both)
GoTechnology hub2 User Guide For Authorised Users Ony. Do not distribute.
24
• Beneath this, comes Job Cards which represent both physical documentation and a planning activity.
• After this comes Tag ITRs (documentation) and Operations (planning activity)
• Finally we go a level beyond what a project plan would reasonably expect to capture, to the actual Task level
of the Tag ITRs.
As you can see, hub2 captures quite a depth of information, allowing the status of entire facilities to be
accurate down to the individual checkboxes being completed on a Tag ITR.
You can probably also see why we used A to E as the “behind the scenes” names of our Levels (and remember,
you or your hub2 administrator can adjust the terminology to be relevant and easy to understand for your
company) instead of 1 to 5.
6. Populating Data
Once permissions and levels are in place it’s time to start adding data. Depending on what level (and
permissions) you have access to, as well as the way hub2 is set up for your company or project, the actual
specifics of what you can and can’t change may vary, but we can cover the basic concepts involved.
Reference Tables are the building blocks of hub2. Normally the information contained within the Reference
Tables is simple, perhaps just a Name and a Description, but they exist to provide a library that the more
complex elements can draw from, increasing consistency of data and reducing rework.
To make it easy to find the Reference Tables, they have their own tab on the top menu, and are listed second
from the left, just after the Imports:
If you have a look, you’ll see there’s quite a lot of them, however we don’t need to populate them all at the
same time (or ever if they’re not required!) only the ones that we know, or that we need to move forward and
set up the more complex entities.
As an example, let’s look at what Reference Tables we need to add our first Tag.
GoTechnology hub2 User Guide For Authorised Users Ony. Do not distribute.
25
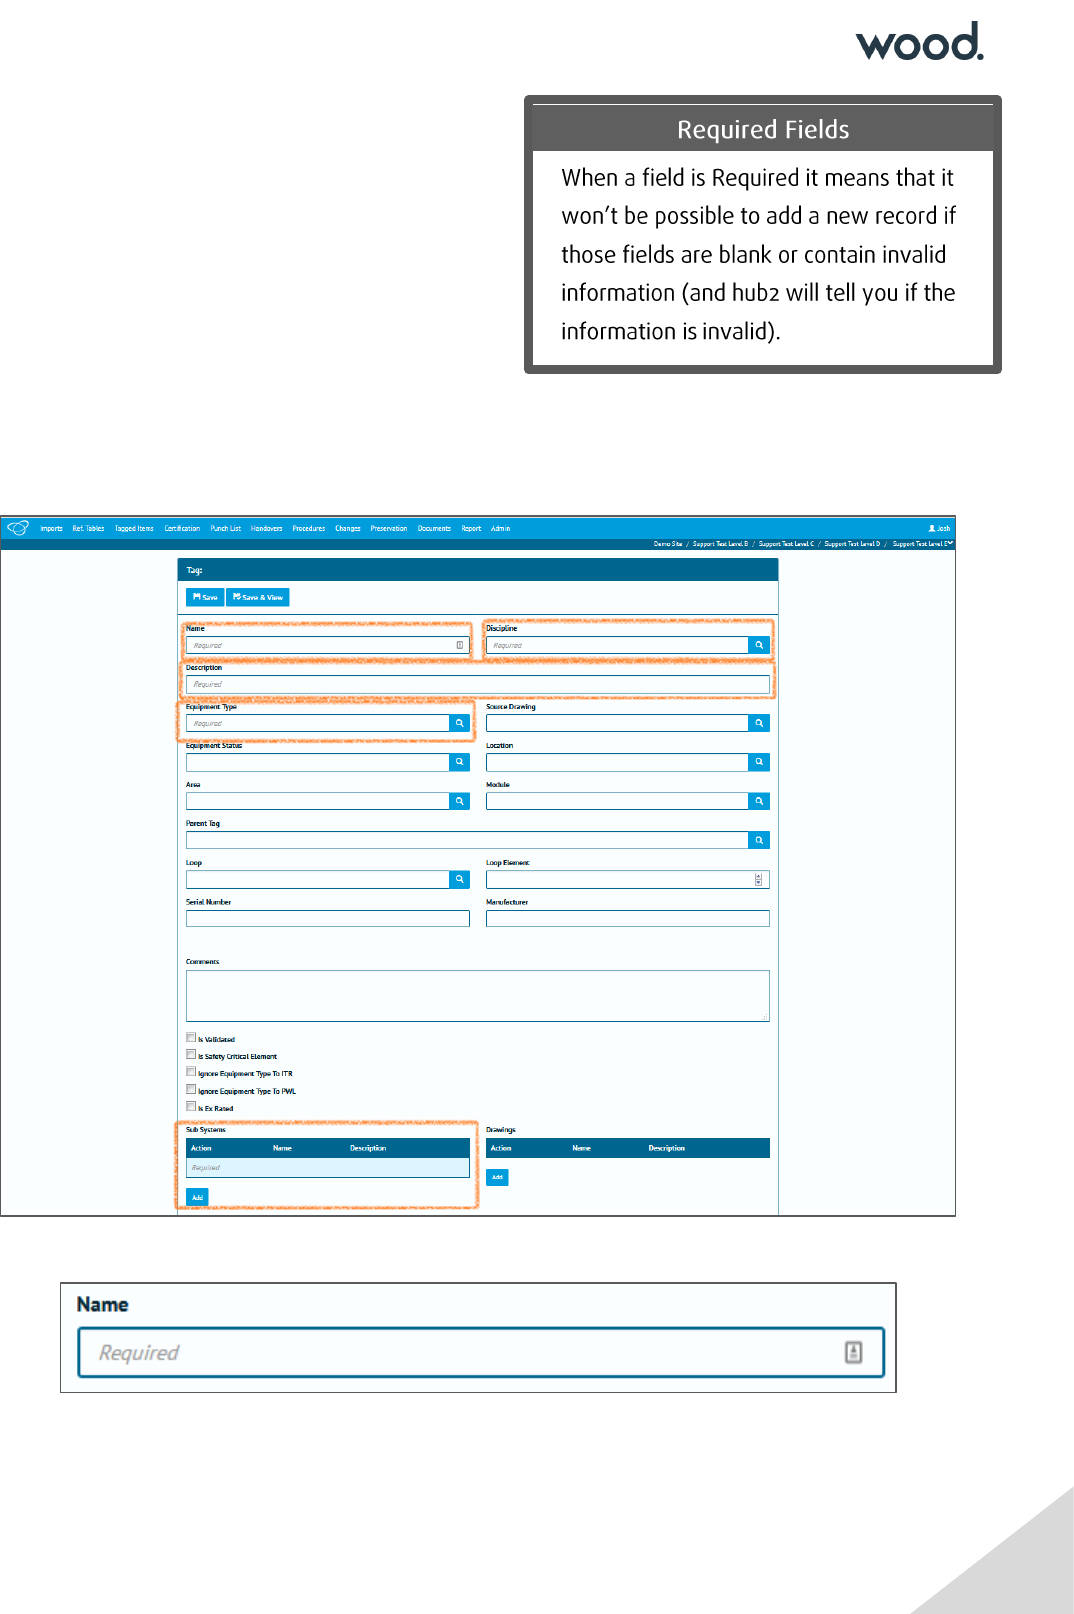
Tags have a lot of fields, but only a few of them are
Required.
For Tags the standard required fields (as of the time of
writing – things do change!) are:
• Name
• Discipline
• Description
• Equipment Type
• Subsystem
And of those, Name and Description are not Reference Tables. Remember, as we described in the UI chapter,
we can tell which fields are Required, and which are Reference Tables just by looking at the fields themselves:
Required fields have the word “Required” inside the text box when they are empty:
Reference Tables have a blue magnifying glass button at the right-hand side:
GoTechnology hub2 User Guide For Authorised Users Ony. Do not distribute.
26
Clicking on this button will open a pop-up window, from which you can select the information you want:
If the pop-up window is blank, that means there is no data in the reference table:

GoTechnology hub2 User Guide For Authorised Users Ony. Do not distribute.
27
Now we know that, as there are no records available, we need to go into that Reference Table and add some
values in and we’re ready to go.
7. Handovers
Handover Certificates, usually referred to simply as ‘Handovers’ are used to guarantee Technical Integrity
when responsibility is being transferred between Authorities.
Exactly what is being handed over, and when, varies between company, project and geographic location.
Because of this, GoTechnology® applications have a flexible approach, with a variety of configurations which
can be used on a “per-project” basis (Level D within hub2) allowing each to have its own Handover
configuration.
The key components in each Handover are:
1. Name
2. Grouping
3. Gating
While the name is self-explanatory, the Grouping and Gating require further explanation.

GoTechnology hub2 User Guide For Authorised Users Ony. Do not distribute.
28
7.1.1. Grouping
The Handover Grouping controls the “what” of the Handover, as in “What is it that I am handing over?”
Perhaps the most commonly used Handover Groupings are System and Subsystem (e.g. when a Subsystem
Handover is completed it represents a statement that responsibility for that Subsystem can be transferred
onwards) but there are other categories too. The following groupings are available in hub2
1. Certification Grouping
2. System
3. Subsystem
4. Primary Handover
5. Secondary Handover
6. System / Discipline
7. Subsystem / Discipline
8. Area
9. Module
10. Level E
7.1.2. Gating
The Handover Gating determines the “which” (the ‘scope’) and “when” (the ‘ordering’) of the Handover within
the overall project, serving to answer the questions “Which certificates/ITRs are covered by this Handover and
when in the complete Handover process should this particular Handover occur?”
Both questions are answered with a single field: The Handover Gate Number.
This field acts as both a link between the Handover and the ITR Classes as well as means of ordering the
Handover within the project.
Example: How Gating affects ordering.
As an example of how this works, consider a scenario where there are three Handovers (please note these are
intended as examples only):
Handover
Gating
HOC
3
MCDAC
1
PCDAC
2
The Handovers are listed above alphabetically; however, in terms of the order within the Process, the MCDAC
comes first, followed by the PCDAC and finally the HOC.
We can expand this further with an additional Handover:
Handover
Gating
GoTechnology hub2 User Guide For Authorised Users Ony. Do not distribute.
29
CCC
1
HOC
3
MCDAC
1
PCDAC
2
Now we can see that both the CCC and the MCDAC are to be completed first, followed by the PCDAC and
HOC.
Example: How Gating affects scoping.
If we retain our previous set of four Handovers and introduce a table listing our ITRs and ITR Classes we can
see how Gating affects scoping too.
ITR
Class
Gating
COM
3
MC
1
PC
2
Now we know that our CCC and MCDAC cover all ITRs in the MC ITR Class, our PCDAC covers all in the PC
class and our CCC in the COM class.
7.1.3. Walk Downs
Another key element in the handover process involves the physical inspection of the scope of the Handover
(be it a System, Subsystem, Area or something else) by the process stakeholders. This process is known as a
Walk Down.
There may be multiple Walk Downs held but all have the same general purpose: To identify any unrecorded
defects and to verify that defects which have previously been identified have been actioned appropriately.
8. Preservation
Preservation involves tasks related to ensuring unused equipment is kept in working condition. These tasks
are often repeated on a regular schedule, to ensure the equipment is properly maintained and ready to use
when required.

GoTechnology hub2 User Guide For Authorised Users Ony. Do not distribute.
30
8.1.1. Preservation Work List (PWL)
Within hub2 ‘Preservation Work Lists’ (PWLs) are used to record the completion of preservation tasks, and
can be assigned to Tags, in a similar fashion to ITRs. The difference is that PWLs are part of a regular schedule
of maintenance on unused equipment, while ITRs are used to sign-off that installed equipment is safe and
has been properly tested as part of the Handover process (in which the goal is to start, or restart, the facility).
8.1.2. Tag Preservation Work List (Tag PWL)
Just as a Tag ITR represents an actual assignment of an ITR to a Tag so does a Tag PWL represent a PWL to a
Tag. To explain this further; our PWL table will contain an entry for each type of Work List available for use.
So, if there are ten different Work List types (perhaps named ‘PRES-A’, ‘PRES-B’,’PRES-C’ and so on) then there
will be ten entries in the PWL table.
However, any one of these PWLs may be assigned multiple times to many different tags. This is where the
Tag PWL entity comes into play; storing the details of each Work List the user creates and assigns.
8.1.3. Frequency
The Frequency of a Tag PWL describes how regularly the applicable preservation work should be performed.
If a Tag PWL has a Frequency of seven days, then it should be performed once every week.
If it has a Frequency of 365 days it should be performed once, and then is not due for another 365 days, either
from the Due Date (so the schedule remains consistent) or from the Sign-Off Date (so the schedule adjusts
based on when the Tag PWL was actually signed off), depending on the configuration of hub2.
8.1.4. Due Date and Sign-Off Date
The Due Date is when the Tag PWL is expected to be completed by, while the Sign-Off Date is when the Tag
PWL was actually signed off. It is possible in hub2 to apply restrictions to when Sign-Off can be accomplished,
via the Level C Preservation Window Before and Preservation Window After settings.
8.1.5. Preservation Window
The Preservation Window (via the Preservation Window Before and Preservation Window After fields on Level
C) allows restrictions to be placed on when a Tag PWL can be signed-off, specifically in relation to the Due
Date.
The settings allow the Preservation Window to be restrict how many days before and how many days after
the Due Date is acceptable. These values can be different. If either (or both) value is left blank, then no
restriction applies.
GoTechnology hub2 User Guide For Authorised Users Ony. Do not distribute.
31
Examples
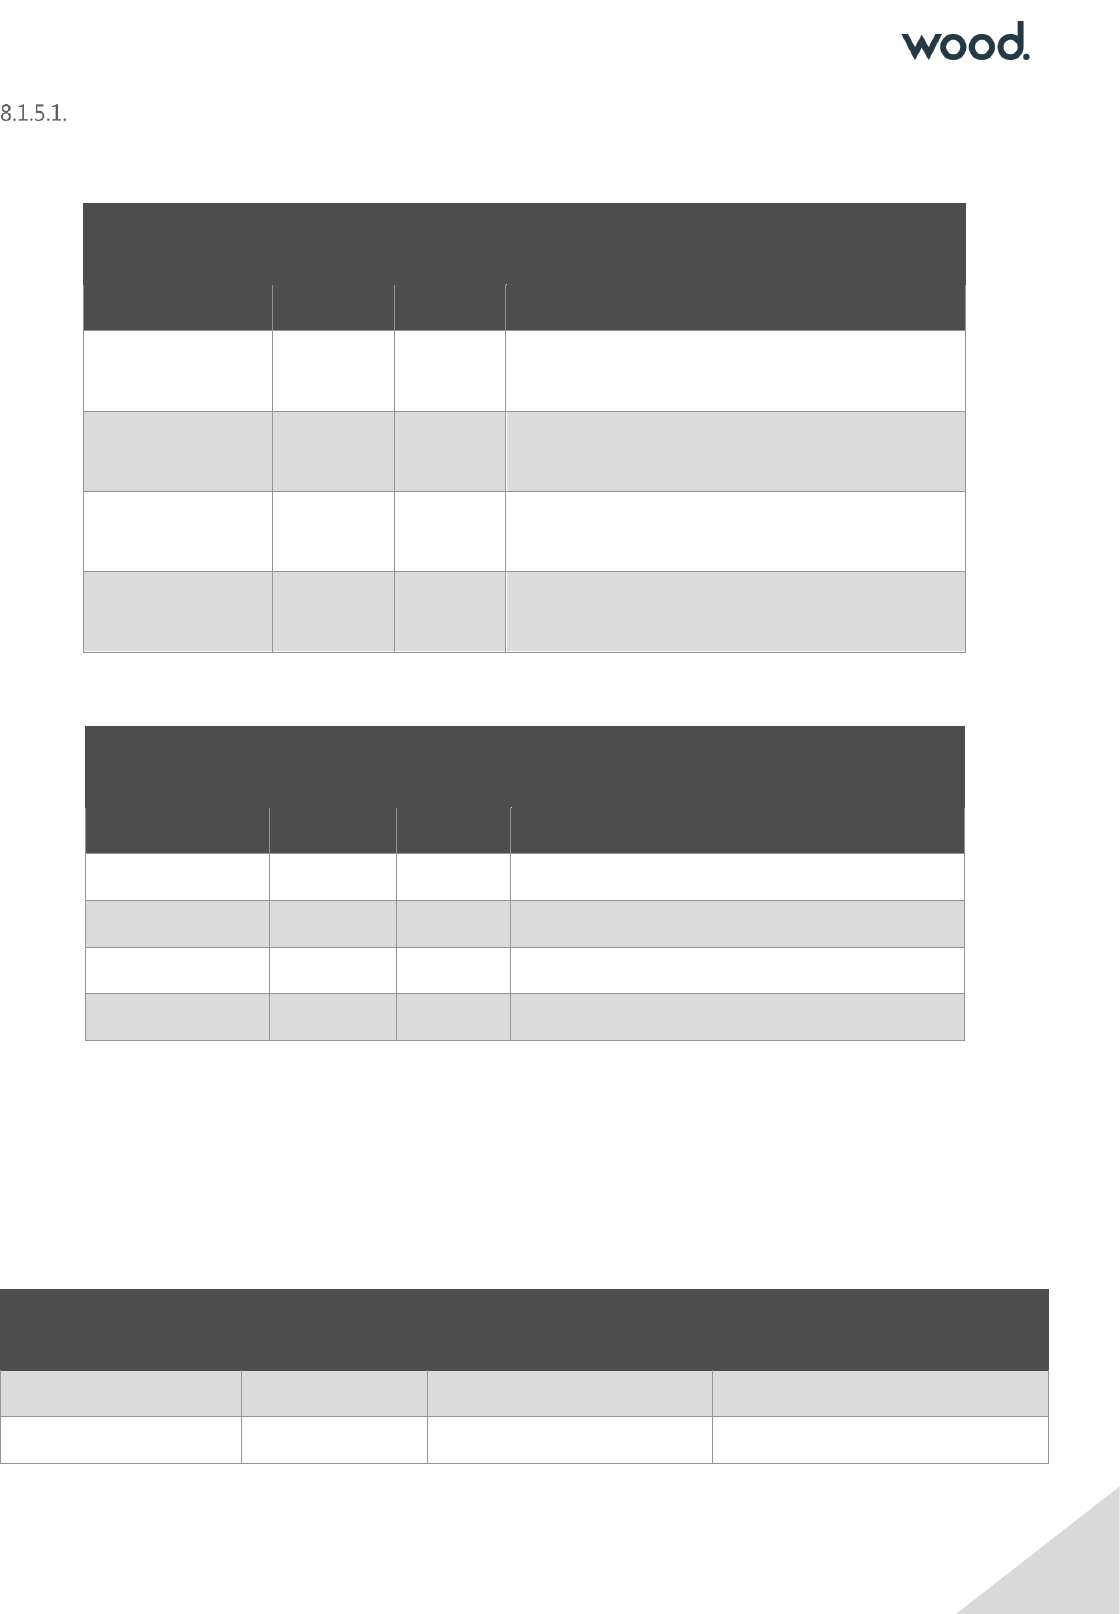
8.1.5.1.a. Due Date: 14 February 2017
Due Date
Preservation
Window
Acceptable Sign-Off Values
Before
After
14 February
2017
Any
14 February
2017
2
Any date before 17 February 2017.
14 February
2017
2
2
12 February 2017 to 16 February 2017.
14 February
2017
5
2
9 February 2017 to 16 February 2017.
8.1.5.1.b. Due Date: 20 March 2049
Due Date
Preservation
Window
Acceptable Sign-Off Values
Before
After
20 March 2049
Any
20 March 2049
2
Any date before 19 March 2049.
20 March 2049
3
4
17 March 2049 to 24 March 2049
20 March 2049
31
16
17 February 2049 to 5 April 2049
8.1.6. Preservation Progress Method
Preservation Progress Method is a Level C setting which will be used to determine the next Due Date when
advancing Preservation which is being signed off. When any Tag PWL item which has a populated Frequency,
field is signed off a new Tag PWL record will be created and its Due Date will be set based on the Preservation
Progress Method as detailed in the following table:
Preservation
Progress Method
Due Date
Sign Off Date
Advanced Due Date
(Frequency of 5 Days)
Due Date
15/01/2016
18/01/2016
20/01/2016
Sign Off Date
15/01/2016
18/01/2016
23/01/2016

GoTechnology hub2 User Guide For Authorised Users Ony. Do not distribute.
32
9. Imports & Exports
It’s recommended that Imports are kept at 20,000 rows or less per file for performance reasons.
The recommended order to perform Imports is listed below:
9.2.1. List
1) Primary Handover (if applicable)
2) Secondary Handover (if applicable)
3) Location
4) Module
5) Area
6) Priority
7) System Group
8) System
9) Subsystem
10) Loop
11) Activity
12) Authorised Person
13) Unit of Measure
14) Test Pack Type
15) Discipline
16) DrawingType
17) Drawings
18) Certification Grouping
19) ITR Class
20) ITR
21) Q Pack (if applicable)
22) Equipment Status
23) Equipment Type
24) Equipment Type to ITR
25) Parent Tag
26) Tag ITR Completion Status
27) Tagged Item
28) Tag

GoTechnology hub2 User Guide For Authorised Users Ony. Do not distribute.
33
29) Tag ITR
30) Tag Q-Pack
31) Tag Subsystem
32) Test Pack
33) Work Pack
34) Procedure
35) Procedure System
36) Procedure Section
37) Procedure Skeleton
38) Procedure Skeleton Section
39) Procedure Skeleton Step
40) Procedure Step
41) Punch List Item Category
42) Punch List
43) Punch List Item
44) Job Card
45) Handovers (multiple)
46) Preservation Completion Status
47) PWL
48) Equipment Type to PWL
49) Tag PWL
50) Line
51) Spool
52) Mechanical Joint
53) Cable
54) MOC Type
55) MOC
56) MOC Discipline
57) MOC Primary Handover
58) MOC Secondary Handover
59) MOC System
60) MOC Subsystem
61) MOC Tag
62) MOC Work Pack
10. Glossary / Listing
Name
Description
Menu
Location
Level
Activity
Activity within hub2 represents Level 3 in the recommended Work
Breakdown Structure and as such exists as the “parent” of Job Cards
and as a “child” of Level E.
Reference
Table
E
GoTechnology hub2 User Guide For Authorised Users Ony. Do not distribute.
34
The term “Activity” is often used interchangeably with Work Pack or
Work Package, however hub2 treats them as separate but equivalent.
The Activity is intended to represent the Planning Component and as
such represents a period of time utilised, rather than a physical
collection of documents.
Area
Physical space, usually used in conjunction with Module representing
part of a floor, an entire floor or even a whole building or structure,
within a larger Asset or Facility.
Reference
Table
C
As Built
Drawings
As Built Drawings reflect what was constructed, rather than what was
originally drawn; they are usually required when circumstances on
site required a deviation and are issued when Construction is
complete.
Documents
E
Attachment
An association between a file and a database entry.
Documents
C
Authorised
Person
An entry in the Authorised Person reference table represents an
individual who is authorised to perform certain activities on a work
scope. Within hub2 Authorised Person is used to record information
regarding the sign-off of a certification such as an ITR or PWL. Each
one can be linked to a user account through the Hub User ID field.
Reference
Tables
C
Cable
In simple terms Cables are collections of one or more lengths of
electrically conductive materials that are contained within protective
and non-conductive coatings. The coatings are commonly known as
‘Sheaths’. Each conductive-material-and-Sheath combination is
known as a Core.
It is possible that a cable may contain only a single Core, however it
is more likely that it will comprise multiple Cores contained within an
additional overall Sheath.
Tagged
Items
C
Certification
Grouping
A means by which a collection of ITRs can be associated by
Discipline, Subsystem and Level E, the Certification Grouping is an
aliased entity (meaning the labels shown on page can be renamed
from “Certification Grouping” to something else) that can be used to
fill the role of a ‘Discipline Mechanical Completion (DMC)’ field, while
allowing project specific naming of that field.
Reference
Tables
E
GoTechnology hub2 User Guide For Authorised Users Ony. Do not distribute.
35
Discipline
Perhaps the easiest way to begin to describe a Discipline is to
provide some examples of it: Electrical, Mechanical, Safety, Fire &
Gas. These represent not only schools of knowledge to which an
individual might specialize in, or assume responsibility for, but also
categories of equipment or certification.
Within hub2 the Discipline will be recorded against items such as
tagged equipment (Tags), Punch List Items and Inspection and Test
Records (ITRs). This can then be used to filter and subdivide
information, as well as to assign permissions and responsibilities to
authorised individuals, with the full details of these functions being
detailed in the relevant sections.
Reference
Tables
B
Drawings
Drawings can cover a range of different types of illustration,
including Isometrics, Process and Instrumentation Diagrams and
General Arrangement Drawings amongst others. They serve to
communicate information visually in a variety of ways, with the type
of drawing used determined both by convention and what is most
effective for serving the purpose required.
Reference
Tables
C
Equipment
Type &
Status
Equipment Type provides a way of categorizing Tags based on the
type of equipment. This can be useful in determining what type of
ITR should be assigned, something that is covered in more detail in
the Auto Allocation of Data section.
Equipment Status represents a further subdivision of this, and is an
optional attribute to enable greater granularity.
Reference
Tables
C
Equipment
Type to ITR
/ PWL
Allows ITRs and PWLs to be automatically assigned to a Tag based
on its Equipment Type.
Reference
Tables
C
Handover
Handover Certificates, usually referred to simply as ‘Handovers’ are
used to guarantee Technical Integrity when responsibility is being
transferred between Authorities.
They’re explained in more detail in the Handovers section.
Handovers
E
ITR
Inspection and Test Records (ITRs) are records (traditionally paper-
based checklists, but increasingly available digitally) used to certify
that tagged equipment has been properly built and tested in line
Reference
Tables
C
GoTechnology hub2 User Guide For Authorised Users Ony. Do not distribute.
36
with agreed processes and procedures by approved and competent
personnel.
The ITRs (also referred to as check sheets, tally sheets and
certificates) include a list of tasks, measurements and activities that
should be completed to verify the status of the equipment
concerned.
While the design, content, naming and terminology of ITRs will vary
between different companies, locations and projects their ultimate
purpose is the same: To ensure the safety of equipment being
certified.
Job Card
Job Cards (also known as Job Packs) represent a further subdivision
of Work Packs and detail jobs to be undertaken at a facility. They
exist to authorise and instruct the workers to perform the listed task
and contain task guidelines, safety information and other relevant
documentation such as inspection procedures and drawings.
Reference
Tables
E
Line
A Line is defined as a section of pipe. Lines can be connected via
spools; a short section of pipe with fittings that allow one pipe line to
connect to another. Like spools, lines can also be part of a test pack.
Tagged
Item
C
Location
Location represents a physical space. This can be used to record the
position (either currently, previously or subsequently) of an object or
activity.
Reference
Tables
C
Loop
A Loop is an electrical circuit consisting of any number of electronic
components. Loops can be associated with Tags or Cables but not
any other tag-like object.
Reference
Tables
C
Mechanical
Joint
A connection established between two sections of pipe, using nuts
and bolts. Factors such as the material used are critical in
establishing the required tool and amount of force used to adjust the
nuts on joints, to ensure that no leak can occur, and that the nuts
and bolts are not under undue stress. Failure of a mechanical joint
could cause the fluid inside to leak. If this were a hydrocarbon (oil)
then the results could have serious consequences.
Tagged
Items
C
GoTechnology hub2 User Guide For Authorised Users Ony. Do not distribute.
37
MOC
Management of Change is the process by which potential deviations
from original scope/design are tracked.
The MOC section may record queries being raised by site personnel
about deviations (e.g. if a piece of equipment is different than
expected) or instructions from the site (e.g. expect the equipment to
be different).
It’s essential that any such information is recorded for reasons of
safety and efficiency, as not properly bringing these issues to
attention could have hazardous consequences.
Changes
C
MOC Type
Reference
Tables
Module
The use of Module can vary: It may be used in conjunction with Area
to indicate a subdivision of the Area, such as a grouping of
equipment or a room on a floor, or alternatively may be used to
represent a vast physical component which is a major part of a
facility or asset.
Reference
Tables
C
Parent Tag
A Parent Tag is a grouping that can be used either to represent a
collection of Tagged Items that are related or that, when taken
together, constitute a larger functional object.
Reference
Tables
C
Phase
Phases provide a means by which a Level C can be subdivided into
distinct periods of time during which work will occur.
Reference
Tables
C
Priority
Priorities provide a means by which a Sub System or Secondary
Handover can be grouped together into specific tasks that will occur
during the same timeframe.
Reference
Tables
C
Procedure
A Procedure is a set of logically sequenced instructions for the way
of executing a class of activity. There can be many different types of
Procedures with the main ones in hub2 being Commissioning
Procedures which is a Procedure with a step by step description of
activities required to commission an object.
Procedures
C
GoTechnology hub2 User Guide For Authorised Users Ony. Do not distribute.
38
Procedure
Section
As with many other types of document, including this one,
Procedures are commonly sub-divided into separate sections, which
in hub2 are represented via Procedure Sections entities.
Procedures
C
Procedure
Step
Procedure Steps represent the actual activities associated with a
Commissioning Procedure. In this regard, they fill a similar role as a
task on an ITR.
Procedures
C
Punch List
A Punch List is a grouping of Punch List Items.
Punch List
E
Punch List
Item
Punch Lists Items are used to record items of outstanding work
which should have been completed previously. This could include
examples such as missing insulation or trace heating on pipework,
painting not complete or paint touch-ups required, outstanding
earthing of instruments or junction boxes, amongst many others.
Each of these examples could be raised as a Punch List Item (PLI).
Punch List Items are assigned a Punch List Category which is usually
used to indicate the severity of the defect. A common, and simple,
arrangement is to create two Punch List Item Categories, one with
the Name “A” and one with the Name “B”. Category “A” is used for
safety related defects, while “B” is used for others.
The ability to define Punch List Item Categories is however
completely at the discretion of the user and so may deviate
completely from the above example, which is provided for general
information only and does not constitute guidance on this subject.
Punch List Items also have a Scope. This Scope denotes what type of
Entity the Punch List Item refers to, with the following values
available:
• Subsystem
• Tag
• Tag ITR
• No Scope
When a PLI is considered complete by the person responsible for
undertaking the work it is reported as ‘Cleared’. After this, if it is
agreed by the responsible parties that the item is complete and
requires no further action it is ‘Accepted’.
Punch List
E
PWL
Preservation involves tasks related to ensuring unused equipment is
kept in working condition. These tasks are often repeated on a
regular schedule, to ensure the equipment is properly maintained
and ready to use when required.
Reference
Tables
C
GoTechnology hub2 User Guide For Authorised Users Ony. Do not distribute.
39
Preservation is described in more detail in 8 Preservation
Spool
A short, prefabricated section of pipe, with fittings, that allow one
pipe line to connect to another (possibly of different size).
The fittings can include items such as Flanges (a plate or ring at the
end of a pipe), Elbows (used to change the direction of the pipe) and
Tees (three pipe connectors in a T shape), amongst others
Tagged
Items
C
Subsystem
A Subsystem is a functional object that represents a collection of
items that serve a common purpose. As with Systems, the items
themselves do not have to be physically connected.
Reference
Tables
C
System
A System is a functional object that itself is a collection of functional
objects (Subsystems) that form a network to provide a type of
service, or serve a common purpose. It’s worth noting that the
objects within a System do not have to be physically connected1.
Reference
Tables
C
Tag
In hub2 a Tag is a type of tagged-item that represents functionality
provided by physical equipment within a facility, with the
nomenclature arising from the equipment tag assigned (and usually
physically attached) to the equipment for identification purposes.
While this does mean that, taken literally, the tag is the label itself, it
is usually used to refer to the function of the equipment.
It should be noted that if a piece of equipment, or part of a piece of
equipment, is replaced this does not constitute a different tag.
Therefore, if Tag ‘A’ was a compressor with the Serial Number ‘0001’
and it down and was replaced with compressor with serial number
‘0002’, it would still be Tag ‘A’.
Tagged
Items
C
Tag ITR
Tag ITRs represent an actual instance of an ITR (a check sheet used
to record test results) assigned to a tagged-item (such as a Tag,
which represents a piece of equipment, or a Test Pack which is a
dossier of information representing a section of pipework to be
tested).
To explain this; imagine a project which hasa type of ITR called QED-
E01A (an Electrical Check Sheet). When a user assigns an E01A type
ITR to a Tag then a new Tag ITR is created. If the user were to mark it
Certification
E
1
http://data.posccaesar.org/rdl/RDS316259
GoTechnology hub2 User Guide For Authorised Users Ony. Do not distribute.
40
as complete, that Tag ITR would be updated, and if the user were to
remove it then the Tag ITR would be deleted. None of this would
affect that actual ITR itself, no matter what, QED-E01As would still be
available to assign to Tags.
As such it may be easier to think of the ITR Entity (which is described
in section 14 ITR) as the “library” of available Inspection and Test
Records, with the Tag ITRs being the actual assigned instances.
Tag PWL
Just as a Tag ITR represents an actual assignment of an ITR to a Tag
so does a Tag PWL represent a PWL to a Tag.
Preservation is described in more detail in 8 Preservation.
Preservation
E
Walk Down
Walk Downs are explained in more detail in the Handovers section,
By viewing a
specific
Handover
itself.
E
Work Pack
Work Packs (also called Work Packages, Construction Work Packs
and Construction Work Packages) are the lowest level represented
on a project’s Work Break Down structure (WBS) and are used as a
way of grouping tasks within a Work Scope (which, when following
recommended data population guidelines, maps to Level E of the
hub2 data structure).
In a literal sense, a Work Pack is a collection of documents necessary
for the completion of a group of tasks within the timescale specified
in the Project plan Activity. This will include Job Cards containing
details of Operations to be completed, corresponding Tag ITRs,
Drawings and details of the Equipment and Materials required to
complete them.
Reference
Tables
E
