WipeDrive Quick Start Guide 160L User Manual
User Manual: 160L
Open the PDF directly: View PDF ![]() .
.
Page Count: 22

WipeDrive™ & WipeDrive PRO™
Quick Start Guide
2-6
Copyright 2006 WhiteCanyon Inc.
All rights reserved
WipeDrive User Guide
1. INTRODUCTION………………………………………………………………. 3
1.1 Purpose……...……………………………….………………………………. 3
1.2 System Requirements……………………….………………………………. 3
2. BEFORE WIPING (READ FIRST)………. …………….……………………... 3
2.1 Important Windows Note………………….………………………………. 3
2.2 Before Wiping Failing Drives……………….………………………………. 3
3. GETTING STARTED…………………………………………………………... 4
3.1 Booting WipeDrive from the CD-ROM Drive……………………...………. 4
3.2 Booting from a WipeDrive Diskette………………………………………… 4
3.3 How to Create a WipeDrive Diskette………….……………………………. 4
3.4 How to Change the Computer’s Boot Order………………………………… 5
3.5 Enabling and Disabling Drives……………………………………………… 7
3.6 USB Keyboard Issues……………………………………………………….. 7
4. USING WIPEDRIVE…………………………………………………………… 8
4.1 Wiping a Hard Drive………………………………………………………… 8
4.2 Verifying that the Disk is Clean…………………………………………….. 8
4.3 Disk Errors…………………………………………………………………... 8
4.4 Log Files…………………………………………………………………….. 9
5. CREATING A CUSTOM OVERWRITE………………………………………. 9
5.1 What is a Custom Overwrite………………………………………………… 9
5.2 Why Perform a Custom Overwrite………………………………………….. 10
5.3 How to Perform a Custom Overwrite……………………………………….. 10
6. REINSTALLING WINDOWS………………………………………………….. 11
6.1 A Note about Donating Computers………………………………………......11
6.2 Reinstalling Windows from a Manufacturer’s System Restore Disk……….. 11
6.3 Reinstalling Windows XP/2000……………………………………………... 12
6.4 Reinstalling Windows 98/95/ME……………………………………………. 13
7. COMMAND LINE PARAMETERS……………………………………………. 15
7.1 Command Line Usage………………………………………….…………….15
7.2 Patterns of Wipe Level Definitions…………………………………………. 16
8. WIPEDRIVE PRO………………………………………………………………. 19
8.1 Boot Menu Options………………………………………………………….. 19
8.2 WipeDrive vs. WipeDrive PRO Comparison……………………………….. 20
8.3 Performance -Wipe Speeds………………………………………………….. 21
8.4 Extended Features…………………………..……………………………….. 21
9. TECHNICAL HELP AND CONTACT INFORMATION……………………... 22
1. INTRODUCTION
1.1 Purpose
WipeDrive will securely erase everything stored on a hard disk, including all installed
software programs, operating systems, formatting, partition tables, viruses, all file data,
personal data, boot record information, etc. After running WipeDrive, the disk will need
to be repartitioned and formatted for reuse. See 6. Reinstalling Windows.
1.2 System Requirements
WipeDrive will run on any IBM PC compatible computer that has a keyboard, monitor,
and either a CD-ROM drive or a floppy diskette drive. It runs independently of the
operating system installed on the computer.
2. BEFORE WIPING (READ FIRST)
2.1 Important Windows Note
PLEASE NOTE:
WIPEDRIVE WILL ERASE ALL OF THE FILES AND THE OPERATING SYSTEM
OF THE COMPUTER. YOU WILL NEED TO REINSTALL YOUR OPERATING
SYSTEM AFTER USING WIPEDRIVE IF YOU INTEND TO KEEP USING THE
COMPUTER.
REMEMBER TO BACK UP ANY FILES YOU WANT TO KEEP BEFORE WIPING
THE COMPUTER.
2.2 Before Wiping Failing Drives
Please note that there is no way of guaranteeing that a drive can be wiped 100% if the
drive hardware is malfunctioning; WipeDrive checks for these anomalies automatically.
However, if the hardware is severely malfunctioning, these anomalies cannot be reliably
detected and in rare cases WipeDrive can report ‘success’ even though the drive failed to
wipe correctly.
You can generally detect this problem in any of these three ways:
1) The drive will make abnormal sounds such as loud humming, grinding, or
clicking noise.
2) The drive itself will heat up quickly, being hotter to the touch than normal.
3) A drive should wipe in approximately 2-4 minutes per GB of hard drive space. If
it takes a significantly longer or shorter amount of time to complete the wipe, then
the drive is suspect and should be investigated further or physically destroyed and
discarded.
3. GETTING STARTED
WIPEDRIVE WILL NOT RUN FROM WITHIN WINDOWS; IT MUST BE
LAUNCHED DURING THE BOOT PROCESS WHEN THE COMPUTER IS
TURNED ON.
You can run WipeDrive from either a CD or floppy diskette. To use the WipeDrive CD,
see 3.1 Booting WipeDrive from the CD-ROM drive. To run WipeDrive from a floppy
diskette drive, see 3.2 Booting from a WipeDrive diskette.
3.1 Booting WipeDrive from the CD-ROM drive
Insert the WipeDrive CD into the CD-ROM drive and then restart the computer.
WipeDrive should start automatically and you will see a black screen with a menu of
options 1 through 8. For further details on using WipeDrive, see 4.1 Wiping a Hard
Drive.
NOTE: If Windows still starts up normally, then the computer is set to boot from the hard
drive before booting from the CD-ROM drive. Changing the computer's boot order is
easy to do. See 3.4 How to Change the Computer’s Boot Order.
3.2 Booting from a WipeDrive Diskette
If you do not have a CD-ROM or you choose to wipe using the floppy drive, then you
will need a WipeDrive floppy diskette. If you do not have a WipeDrive diskette already
created, see 3.3 How to Create a WipeDrive Diskette.
Insert the WipeDrive diskette into the floppy drive and restart the computer. WipeDrive
should automatically run and you will see a black screen with a menu of options 1
through 8. For further details on using WipeDrive, see 4.1 Wiping a Hard Drive.
NOTE: If Windows still starts up normally, then the computer is set to boot from the hard
drive before booting from the floppy drive. Changing the computer's boot order is easy to
do. See 3.4 How to Change the Computer’s Boot Order.
3.3 How to Create a WipeDrive Diskette
To create a WipeDrive floppy diskette from the CD, you can follow these instructions:
1) Boot up (as usual) into Windows
2) Insert the WipeDrive CD into the CD-ROM drive.
3) Click on the ‘Start’ button from the Windows taskbar
4) Select ‘Run’ from the ‘Start’ Menu.
5) Type ‘D:\launch’ (where D is the CD-ROM drive letter). Then press ‘OK’.
6) The yellow WipeDrive launcher screen will appear.
7) Click on the ‘Get Started’ button at the top.
8) Insert a new floppy diskette into the a:\ floppy diskette drive and follow the
onscreen instructions to make a WipeDrive diskette.
If you purchased WipeDrive online, then you should already have been given a link to
download the WipeDrive diskette creator program. When the download is complete,
double click the file and follow the onscreen instructions to make a WipeDrive floppy
diskette.
3.4 How to Change the Computer’s Boot Order
Some computers are configured to ignore the CD-ROM (or floppy diskette) drive when
they boot up. In this case, to use WipeDrive, you will need to switch the computer’s boot
order.
NOTE: ALL hard drive wiping software that securely erases the entire drive MUST have
the user perform this step to change the boot order.
To set the computer to start WipeDrive from the CD (or floppy diskette), change the
‘boot order’ setting in the computer’s setup utility called the BIOS.
The BIOS is the computer’s configuration utility. It holds information such as what
device to use first to boot the computer, as well as other hardware settings. Unfortunately,
computer manufacturers have not agreed on a standard for how to enter the system BIOS.
To enter the computer’s setup utility (BIOS):
1. Restart the computer.
2. Watch the screen for some text that says something similar to “Press X to
Enter Setup”. Notice which key it tells you to use.
3. Press this key immediately and repeatedly.
4. This should open the computer’s configuration utility (BIOS).
5. If the Windows Logo appears it is too late; restart the computer and try again.
(NOTE: The most common keys are the ‘F2’ key or the ‘DEL’ key.)
If you do not see the message giving the proper keystroke to enter the BIOS, then press
the ‘F2’ key repeatedly immediately after restarting the computer. This should open the
BIOS. If Windows starts up (as usual), turn off the computer and try again using the
‘Delete’ or ‘F1’ key.
We have collected some of the other keys and key combinations used by manufacturers
to access the BIOS on various computers.

Computer Model BIOS Keys
Acer® F1, F2, CTRL+ALT+ESC
AST® CTRL+ALT+ESC, CTRL+ALT+DEL
Compaq® 8700 F10
CompUSA® DEL
Cybermax® ESC
Dell® 400 F3, F1
Dell Dimension® F2 or DEL
Dell Inspiron® F2
Dell Latitude Fn+F1 (while booted)
Dell Latitude F2 (on boot)
Dell Optiplex DEL
Dell Optiplex F2
Dell Precision™ F2
eMachine™ DEL
Gateway® 2000 1440 F1
Gateway 2000 Solo™ F2
HP®(Hewlett-Packard) F1, F2
IBM® F1
IBM E-pro Laptop F2
IBM PS/2® CTRL+ALT+INS after
CTRL+ALT+DEL
IBM Thinkpad® (newer) Start | Programs | Thinkpad CFG
Intel® Tangent DEL
Micron™ F1, F2, or DEL
Packard Bell® F1, F2, DEL
Sony® VIAO F2, F2
Tiger DEL
Toshiba® 335 CDS ESC
Toshiba Protege ESC
Toshiba Satellite 205 CDS F1
Toshiba Tecra F1 or ESC
Once you have entered the BIOS setup utility:
1. Look for a setting that says ‘Boot Order’ or ‘Boot Sequence’.
2. Use the arrow keys on the keyboard to navigate to the Boot setting (the mouse
will not function while in the BIOS).
3. Change the boot setting so that the CD-ROM drive (or floppy diskette drive)
is listed before the hard drive [HDD-0 or Local Disk (C:)].
4. After making the change, save and exit the BIOS. Often this can be done by
pressing the ‘ESC’ key, and following the prompts to save changes.
5. Insert the WipeDrive CD (or floppy diskette) and restart the computer.
See 4.1 Wiping a Hard Drive.
3.5 Enabling and Disabling Drives
Newer computers often have a BIOS feature to ‘enable’ or ‘disable’ devices in the boot
order list. It is important that the CD (or floppy) drive be enabled for WipeDrive to wipe
the drive. Even if the boot order is properly set to boot from CD (or floppy diskette)
before the hard drive, and the CD (or floppy) is a valid copy, WipeDrive will only run if
the CD (or floppy) drive is ‘enabled’ in BIOS.
3.6 USB Keyboard Issues
Some computers have a USB keyboard instead of the standard ps/2 (serial) keyboard. If
using a USB Keyboard and WipeDrive does not respond when selecting from the menu
options, then the computer needs to be configured to use a USB keyboard in the BIOS.
This is more common with older computers. (If the computer is old enough, it will not
have an option to allow you to run WipeDrive with a USB keyboard.)
To change the computer’s USB-Legacy BIOS configuration:
1) Re-enter the BIOS
2) Look for a setting called ‘Legacy USB Support’ or ‘Legacy Keyboard Device’
3) Set this feature to ‘ON’.
4) Save the BIOS settings and exit.
(Additional instructions see 3.4 How to Change the Computer’s Boot Order.)
This will enable USB Keyboard to work with WipeDrive. Older computers that do not
have this setting must use a ps/2 standard keyboard in order to wipe.

4. USING WIPEDRIVE
WipeDrive begins when the computer boots up with the WipeDrive diskette or CD
already in the CD Tray. If you do not see the WipeDrive main menu, then please see
section 3 Getting Started above.
4.1 Wiping a Hard Drive
1. Select option ‘1’ from the WipeDrive main menu. The physical drives will be
listed numerically, starting at ‘Drive #0’ for the primary hard drive, ‘Drive #1’ for
the second, etc.
(Please note that when you select to wipe a physical hard drive, you will be
wiping all of the partitions on it. Physical hard drives can be separated into
sections called logical partitions. These partitions show up in Windows as drive
letters such as C: and D:. Multiple partitions such as C: and D: can exist on the
same physical hard drive. Wiping the drive will remove logical partitions such as
C: and D: completely. If you need to wipe only a single partition, you can use the
MediaWiper product, found at http://www.WhiteCanyon.com).
2. Select the drive to wipe or select the option to wipe all drives.
3. Choose the number of overwrites to perform. One ‘Standard overwrite’ (wipe
option 1) is thoroughly sufficient for newer computers. If the computer is more
than 6 years old, we recommend performing the ‘DoD 5220.22-M’ (wipe option
2) wipe, which is three passes and a complete verify.
4. Answer yes “Y” to the two confirmation prompts to begin the wiping process.
4.2 Verifying that the Disk is Clean
To verify that the drive is clean, select options 2, 3, or 4 from the main menu, described
below. Verifying is optional and does not affect wiping. A full verify (verify option 2)
takes considerably longer than a quick verify (verify option 3).
Option 2 is a Full Verify. WipeDrive will check every sector on the drive for un-
erased data.
Option 3 is a Quick Verify. WipeDrive will spot check the drive for un-erased
data.
Option 4 allows you to manually select and view specific sectors on the drive, and
displays any data found in hexadecimal and ASCII formats (for advanced users).
4.3 Disk Errors
If WipeDrive reports errors during a wipe or verification, WipeDrive is encountering
some issue reading or writing to the drive. This generally means the drive is beginning to
fail. If errors are encountered, we recommend re-booting the computer and starting the
wipe process again. If errors persist, and you decide to keep using the drive in the future,
we highly recommend backing up important data immediately and often, as the drive
could fail further or completely at any time. Also see, 2.2 Before Wiping Failing Drives.
4.4 Log Files
You can create and save event logs of wiping sessions when using the WipeDrive CD or
floppy diskette to wipe drives.
The log file can be turned on/off and configured from the main WipeDrive menu
‘Configure WipeDrive’ (option 6). When prompted for the log path, floppy versions
should be configured to use ‘A:’, and CD versions must be set to use ‘B:’.
When fully configured, WipeDrive has the ability to log the following 12 items:
1) WipeDrive version number
2) Drive model information
3) Serial number of physical drive
4) Current User (user-defined, name of person performing the wipe)
5) Computer ID (user-defined, name of the drive or system)
6) Type of operation performed
7) Number of overwrites performed
8) Date & Time operation was completed
9) Total elapsed time (HH:MM:SS)
10) Operation Result (Success or Failure)
11) Total number of disk sector read/write errors, if any
12) Total uncleaned or unreadable disk sectors, if any
The log is found on the floppy diskette, with the filename: ‘LOG.TXT’. A special
delimited log is also created on the floppy diskette with the filename: ‘LOGDEL.TXT’
for those who desire to maintain their logs in a database. When logging is turned on,
additional wipes will append the new data to the end of an existing log file.
5. CREATING A CUSTOM OVERWRITE
5.1 What is a Custom Overwrite?
A ‘Standard Overwrite’, (wipe option 1) is thoroughly sufficient for data privacy
concerns. WipeDrive also provides the additional capability to customize the number and
type of wipes for companies and government agencies required to meet specific
standards. See section 7.2 Patterns of Wipe Level Definitions.

5.2 Why Perform a Custom Overwrite?
WipeDrive has many overwriting patterns preconfigured for ease of use, including the
generally accepted standard for the US Department of Defense, ‘DoD 5220.22-M’ (wipe
option 2). See section 7.2 Patterns of Wipe Level Definitions. However, some
government agencies have developed their own overwriting patterns. WipeDrive’s
custom overwrite function was created for this purpose.
5.3 How to Perform a Custom Overwrite
Performing a ‘custom’ overwrite is available when using the WipeDrive diskette, and
involves two steps:
1. Adding your custom pattern to the USRCLEAN.TXT file.
The USRCLEAN.TXT file is where you specify your patterns. This file is located
in the main folder of the WipeDrive Diskette. You can edit this file with Notepad.
To run Notepad, select Start | Run, then enter "NOTEPAD" in the edit box, and
then press ‘OK’. Browse to the WipeDrive diskette and open the
USRCLEAN.TXT file. If it is not there, you can create one.
Once you have the file open for editing, you can specify your pattern. Each line in
the file represents a single operation. The following are the possible operations:
overwrite [ch]
overwrite and verify [ch]
overwrite random
overwrite and verify random
In place of [ch], you must specify a number from 0 to 255 which represents the
byte (character) to be used in overwriting the disk for that operation (see The
ASCII Table - http://www.WhiteCanyon.com/wipe-your-hard-drive-ascii.php).
Specifying "random" as the character will cause random data to be written. Using
"overwrite and verify" will cause WipeDrive to verify that the data was written
correctly to disk.
As an example, a ‘DoD 5220.22-M’ standard cleaning (wipe option 2) could be
written in USRCLEAN.TXT as follows:
overwrite 0
overwrite 255
overwrite and verify random
The first line will overwrite the entire drive once with the character 0.
The second line will overwrite the entire drive with the character 255.
And the last line will overwrite the entire drive with random characters and also
verify that the operation completed successfully.

2. Selecting the custom overwrite option.
After you have your pattern created, you can select to perform a custom overwrite
when you wipe a drive.
6. REINSTALLING WINDOWS
The most updated instructions for reinstalling Windows can always be found online at:
http://www.WhiteCanyon.com/wipedrivehelp
6.1 A Note about Donating Computers
If you are donating a computer, it is not necessary to install Windows after wiping the
hard drive with WipeDrive. It is almost always the case that an operating system will be
installed by the organization receiving the computer. Installing Windows can take several
hours.
If you would like to increase the value of the donation, donate the Windows install CD
with the computer. This will allow for a tax deduction for the value of the software and
the computer.
6.2 Reinstalling Windows from a Manufacturer’s System Restore Disk
Due to the fact that there are dozens of computer manufacturers, the following
instructions may not correspond exactly to your particular restore CD. This information is
provided as an aid and we recommend following your computer manufacturer's
instructions. These instructions can usually be found on your computer manufacturer’s
web site.
Because WipeDrive completely deletes the partition table of the hard drive, you may
need to re-create it before using the restore CD. Most restore disks do this for you. If you
get an error about not being able to format then you will need to perform the following
steps to recreate the partition table and format.
Creating a Startup Diskette
1) Download and save the following program to your desktop.
http://support.whitecanyon.com/makestartupdiskette.exe
(Do not save the file directly to a diskette.)
2) After saving the file, double click on it to run the disk creation program.
3) Insert a blank diskette into the drive and follow the prompts to create a startup
diskette.

Creating a new partition table
1) Insert the Startup Diskette into the computer and restart.
2) When prompted, select the option to start the computer with CD-ROM
support.
3) After a minute or so, you will see an "A:>" prompt.
4) Type "fdisk" and then press Enter.
5) If asked to enable large disk support, select ‘Y’ for Yes. (Note: Some versions
of Windows 95 may not be compatible with large disk support. Select N here
if it does not support the FAT32 file system.)
6) Select Option #1 - Create DOS partition or Logical DOS Drive.
7) Select Option #1 - Create Primary DOS Partition.
8) The drive integrity will be verified.
9) Unless you are planning to make multiple partitions, select Y when asked if
you want to use the maximum available size for the partition and to make the
partition active.
10) The drive integrity will be verified again.
11) Press the Esc key to exit fdisk.
12) Your hard drive is now partitioned and ready to install the operating system.
13) Remove the startup diskette from the computer and insert the manufacturer’s
system restore disk.
14) Restart the computer and follow the instructions shown on the screen.
6.3 Reinstalling Windows XP/2000
To reinstall Windows 2000 or XP, you will need your Installation CD and your Authentic
Windows Activation Key Code.
Note: Windows XP requires more computer resources than Windows 95, 98, or Me. If
your system originally had one of these versions of Windows installed, consult the
Hardware Compatibility list at Microsoft.com to see if your system can support Windows
2000 or XP.
Windows XP/2000 Reinstallation
1) Insert the Windows installation CD into the CD drive. Make sure there are no
other disks in the computer and restart.
2) At the "Welcome to Setup" screen, press the Enter key to set up Windows.
3) Press the C key to continue setup.

4) Press the F8 key to agree to the license.
5) Press the C key to create a partition.
6) Enter the size of the partition, or just press the Enter key to use maximum
size.
7) Select the "New (Unformatted)" option, and press the Enter key.
8) Select NTFS or FAT file system (select NTFS if you are unsure).
9) Simply follow the prompts to install Windows.
6.4 Reinstalling Windows 98/95/ME
Creating a Startup Diskette
1) Download and save the following program to the desktop.
http://support.whitecanyon.com/makestartupdiskette.exe
(Do not save the file directly to a diskette.)
2) After saving the file, double click on it to run the disk creation program.
3) Insert a blank diskette into the drive and follow the prompts to create a startup
diskette.
Windows 98/95/ME Reinstallation
1) Once you have the Startup Diskette, insert it into the floppy drive and restart
the computer
2) Select the option to start the computer with CD-ROM support.
3) After a minute or so, you will see “A:/>”.
4) Type "fdisk" and press Enter.
5) If asked to enable large disk support, select ‘Y’ for Yes. (Note: Some versions
of Windows 95 may not be compatible with large disk support. Select N here
if it does not support the FAT32 file system.)
6) Select Option #1 - Create DOS partition or Logical DOS Drive.
7) Select Option #1 - Create Primary DOS Partition.
8) The drive integrity will be verified.
9) Unless you are planning to make multiple partitions, select Y when asked if
you want to use the maximum available size for the partition and to make the
partition active.
10) The drive integrity will be verified again.
11) Press the Esc key to exit fdisk.

12) Without removing the floppy disk, press the reset button on the computer or
press and hold the keys Ctrl then Alt then Delete and release them together.
This will restart the computer.
13) Again, select the option to Start the computer with CD-ROM support.
14) When you see A:>, directly above it is a message about your CD-ROM drive.
It will tell you the letter assigned to the CD-ROM drive, take note of it. The
screen will look something like this:
15) At the A:>, type "format C:" and press Enter.
16) Select Y when asked if you want to proceed with the format.
17) The format will take some time, depending on the size of the hard drive.
18) You will be asked to choose a Volume Label, which is a name for your hard
drive. It has no effect on the operation of the computer; you may choose any
name you like.
19) Place the Windows Install CD into the CD-ROM drive.
20) Type "E:" (where E is the letter assigned to the CD-ROM drive, refer to step
14 above) and press the Enter key.
21) Type "SETUP" and press the Enter key to begin the Windows ME setup
program. Or, for 98/95:
a) Type "dir" and press Enter. You will see something like the following:
Volume in drive E is 020409_1121
Directory of E:
WIN98_SE <DIR> 04-09-02 11:21a
0 file(s) 0 bytes
1 dir(s) 0 bytes free
b) WIN98_SE is a directory, as indicated by the “<DIR>” after it.
c) Type "cd WIN98_SE", replacing WIN98_SE with the result from step
21 above, then press the Enter key.
d) Type "dir" and press the Enter key.
e) If you see SETUP somewhere in the output, then type "cd SETUP"
and press the Enter key. Otherwise, skip this step.
f) Type "SETUP" and press the Enter key to begin the Windows 98 setup
program.

22) Remove the Windows Startup Diskette, and follow the prompts to install
Windows
7. COMMAND LINE PARAMETERS
WipeDrive can be run from the command line using the following optional parameters
below. When at the DOS prompt, typing ‘wipedrv’ with no parameters will start the
standard menu-driven WipeDrive program.
7.1 Command Line Usage
Usage:
WIPEDRV [[/D] | [drive number] [/U] [/V | /QV] | [drive number] [/U] [/L1 … /Ld]]
drive number Drive 0 is the first physical drive, drive 1 is the second drive.
Use -1 to wipe all physical drives.
/U Set the current user’s name.
/D Display current drives.
/V Verify that all drive sectors are clean.
/QV QuickVerify that a drive is clean (faster).
/L1 … /Ld Select the type of wipe (number of overwrites)
Wipe Level Name List:
/L1 = Single Overwrite (RECOMMENDED)
(Recommended for most security needs.)
Note: Overwriting data once will make it impossible for
anyone to recover your data using any software program.
/L2 = DoD 5220.22-M (1 Verify)
/L3 = HMG IS5 Baseline
/L4 = HMG IS5 Enhanced
/L5 = Canadian OPS-II
/L6 = US Army AR380-19
/L7 = US Air Force 5020
/L8 = German VSITR
/L9 = NAVSO P-5239-26
/La = NCSC-TG-025
/Lb = Russian GOST P50739-95
/Lc = DoD 5220.22-M (3 Verify)
/Ld = Custom
Examples:
A:\>WIPEDRV 0 /L2
Wipe physical disk #0 by performing 3 overwrites and one verify.
A:\>WIPEDRV 0 /V
Search physical disk #0 and report any unwiped file data.
7.2 Patterns of Wipe Level Definitions
Each wipe pattern adheres to a specific approved standard, including official government
and military standards in use today. Specific patterns such as all ‘ones’ and all ‘zeros’
are used in various wipe standards as defined below. Some wipes are designed to use
random data, or to include full verification of each character written.
Wipe Pattern
Type Wipe Standard 1st Pass 2nd Pass 3rd Pass 4th Pass 5th Pass 6th Pass 7th Pass
L1 Single Overwrite 0's
L2 DoD 5220.22-M (1 Verify) 0's 1's R with FV
L3 HMG IS5 Baseline 0's with FV
L4 HMG IS5 Enhanced 0's 1's R with FV
L5 Canadian OPS-II 0's 1's 0's 1's 0's 1's R with FV
L6 US Army AR380-19 UD IUD
L7 US Air Force 5020 1's 0's UD
L8 German VSITR 0's 1's 0's 1's 0's 1's A's
L9 Navso P-5329-26 0's 1's R with FV
La NCSC-TG-025 0's 1's R with FV
Lb GOST P50739-95 R
Lc DoD 5220.22-M (3 Verifies) 0's FV 1's FV 97's FV
Ld Custom Wipe UD (UD) (UD) (UD) (UD) (UD) (UD)
Key
0's Write logical 0's this pass UD Write a user defined character this pass
1's Write logical 1's this pass IUD Write inverse of user defined character this pass
A's Write the character A this pass (UD) Write a user defined character this pass (Optional)
97's Write the number 97 this pass
R Write random characters this pass FV Run a Complete Verify on the drive

Detailed Wipe Level Definitions (/L1 … Ld):
/L1 = Standard Overwrite (RECOMMENDED)
Pass 1 – Write ‘Zeros’ (0x00)
/L2 = Department of Defense 5220.22-M (1 Verify)
Pass 1 – Write ‘Zeros’ (0x00)
Pass 2 – Write ‘Ones’ (0xFF)
Pass 3 – Write Random Data (0x??) with Verification
/L3 = HMG Infosec Standard #5 – Baseline (HMG IS5 Baseline)
Pass 1 – Write ‘Zeros’ (0x00) with Verification
/L4 = HMG Infosec Standard #5 – Enhanced (HMG IS5 Enhanced)
Pass 1 – Write ‘Zeros’ (0x00)
Pass 2 – Write ‘Ones’ (0xFF)
Pass 3 – Write Random Data (0x??) with Verification
/L5 = Canadian RCMP TSSIT OPS-II Standard Wipe (Canadian OPS-II)
Pass 1 – Write ‘Zeros’ (0x00)
Pass 2 – Write ‘Ones’ (0xFF)
Pass 3 – Write ‘Zeros’ (0x00)
Pass 4 – Write ‘Ones’ (0xFF)
Pass 5 – Write ‘Zeros’ (0x00)
Pass 6 – Write ‘Ones’ (0xFF)
Pass 7 – Write Random Data (0x??) with Verification
/L6 = US Army AR380-19 (AR380-19)
Pass 1 – Write ‘Zeros’ (0x00)
Pass 2 – Write ‘User-Defined Character’ (0x##)
Pass 3 – Write ‘Inverse of User-Defined Character’ (-0x##)
/L7 = US Air Force System Security Instructions 5020 (US Air Force 5020)
Pass 1 – Write ‘Zeros’ (0x00)
Pass 2 – Write ‘Ones’ (0xFF)
Pass 3 – Write ‘User-Defined Character’ (0x##)
/L8 = German VSITR (German VSITR)
Pass 1 – Write ‘Zeros’ (0x00)
Pass 2 – Write ‘Ones’ (0xFF)
Pass 3 – Write ‘Zeros’ (0x00)
Pass 4 – Write ‘Ones’ (0xFF)
Pass 5 – Write ‘Zeros’ (0x00)
Pass 6 – Write ‘Ones’ (0xFF)
Pass 7 – Write ‘Specific Pattern AA’ (0xAA)

/L9 = Navy Staff Office Publication P-5329-26 (NAVSO P-5239-26)
Pass 1 – Write ‘Zeros’ (0x00)
Pass 2 – Write ‘Ones’ (0xFF)
Pass 3 – Write Random Data (0x??) with Verification
/La = National Computer Security Center TG-025 (NCSC-TG-025)
Pass 1 – Write ‘Zeros’ (0x00)
Pass 2 – Write ‘Ones’ (0xFF)
Pass 3 – Write Random Data (0x??) with Verification
/Lb = Russian GOST P50739-95 (GOST P50739-95)
Pass 1 – Write Random Data (0x??)
/Lc = Department of Defense 5220.22-M (3 Verifies)
Pass 1 – Write ‘Zeros’ (0x00) with Verification
Pass 2 – Write ‘Ones’ (0xFF) with Verification
Pass 3 – Write ‘Specific Pattern 97’ (0x97) with Verification
/Ld = Custom
Pass 1 – Write ‘User-Defined Character’ (0x##)
(Additional passes may also be set)

8. WIPEDRIVE PRO (This Section is for WipeDrive PRO Version Only)
WipeDrive PRO is identical to WipeDrive in the above sections. However WipeDrive
PRO provides a significant increase to performance and functionality. The primary
difference is that WipeDrive PRO is built using a Linux environment as opposed to DOS
used in WipeDrive. Other differences are detailed in the following sections.
8.1 Boot Menu Options
WipeDrive PRO looks and starts the same way as WipeDrive; however PRO gives 3
additional boot options when first started. You can select from the following menu:
Boot Options:
1. WipeDrive in Linux (simple hardware detection)
2. WipeDrive in Linux (extra hardware detection)
3. WipeDrive in DOS
Option 1 is the default option and usually the best choice for WipeDrive PRO users who
are wiping any version of Windows or Linux based computers.
Option 2 provides support for additional hardware that option 1 may not have, however
this will take more time to boot up the program.
Option 3 runs on the DOS operating system and can be used if options 1 and 2 ever do
not function with a specific computer. NOTE: the DOS version wipes slower than the
Linux.

8.2 WipeDrive vs. WipeDrive PRO Comparison
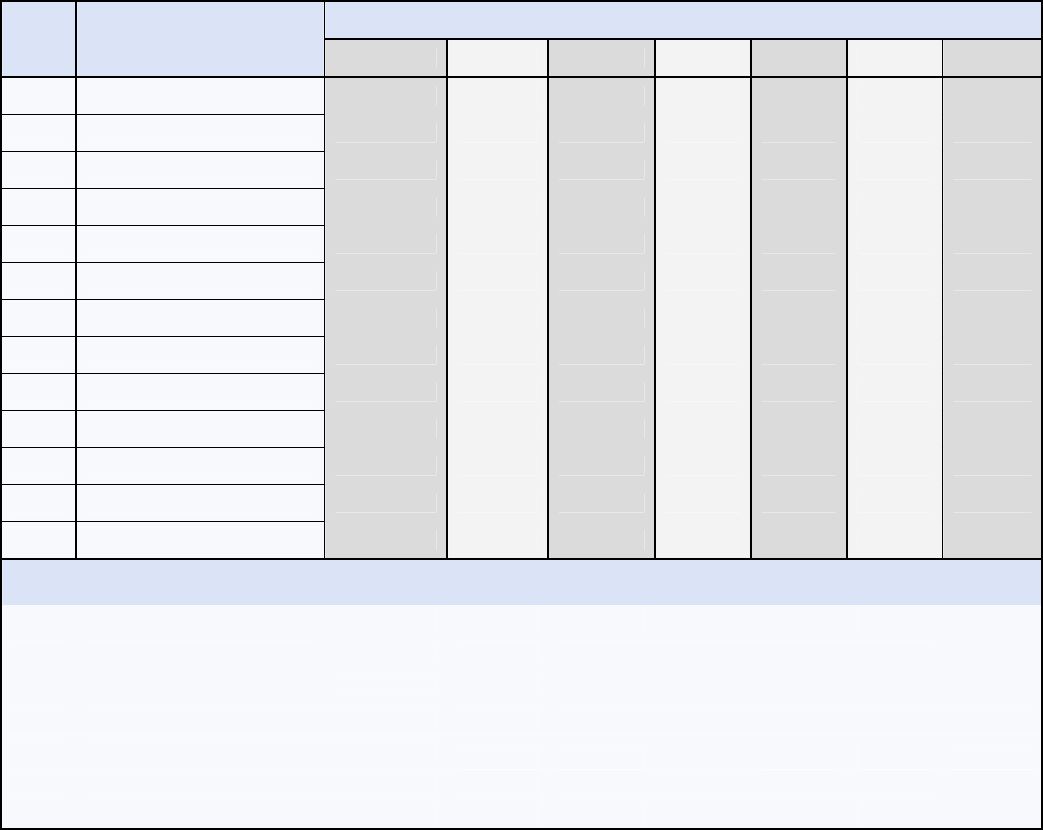
The following chart shows the primary benefits of WipeDrive and WipeDrive PRO.
Both programs contain all the tools needed to securely wipe personal home computers.
However, WipeDrive PRO gives professionals the highest level of hardware support,
fastest wiping speeds, and unlimited licensing as necessary for business computing needs.
Site licenses are also available, see section 9. Technical Help and Contact Information.
Feature description WipeDrive
PRO WipeDrive
Erases hard drive data including partitions, formats, and file
data.
Supports multiple overwriting erase drive patterns.
Listed as an Approved Disk Sanitizing Tool by the U.S.
Department of Defense.
Erases any size hard drive (IDE or SCSI).
Logs all "erase and verify" operations, including any drive
errors.
Boots from a diskette or CD to erase hard drives.
Erases hard drives with optional command line parameters.
Includes MediaWiper to erase partitions, USB drives, memory
cards, diskettes, zip disks, etc all from within Windows.
Enhanced erase hard drive support for SCSI and RAID servers. -
Enhanced erase hard drive support for serial ATA drives. -
Enhanced hardware communication to decrease erase times
by 200-400%. -
Erases hard drives on 1 to 20 computers an unlimited number
of times providing that the software is not run on more than one
machine at the same time. -
Erases hard drives on an unlimited number of computers an
unlimited number of times providing that the software is not run
on more than one machine at the same time. -

8.3 Performance - Wipe Speeds
The time it takes for WipeDrive and WipeDrive PRO to complete a wipe is not
dependent on what data exists on the drive. For example, an empty hard drive will wipe
at the same speed as a drive completely full of data. A pass of writing random characters
will take more time as each character must be individually generated.
Wipe times are not largely dependent on CPU speeds either. Newer hard drives contain
technology that will usually speed up the time it takes to complete a wipe. (For example:
a 7200 RPM drive will wipe faster than a 5400 RPM drive.)
WipeDrive PRO is usually 200-400% faster than WipeDrive. The following are sample
wipe times of a Standard Overwrite single pass wipe:
6 Gig Drive 13 Gig Drive 40 Gig Drive
WipeDrive 25 Minutes 57 Minutes 1 Hour 47 Minutes
WipeDrive PRO 9 Minutes 17 Minutes 16 Minutes
Drive
Size Standard Overwrite
(1 Pass) DoD 5220.22-M
(3 Pass - 1 Verify) Full Verification
DOS Linux % Faster DOS Linux % Faster DOS Linux % Faster
2.1 G 9:35 6:47 141% 49:38 29:33 168% 10:30 6:53 153%
6.4 G 25:34 9:13 277% 132:00
53:16 248% 31:05 9:11 338%
14 G 57:00 17:00 335% 210:00
180:00
117% 65:15 22:57 284%
40 G 107:25 16:51 637% 662:00
148:25
446% 21:58 19:32 112%
8.4 Extended Features
In addition to faster wipe speeds and unlimited licensing, WipeDrive PRO’s two Linux
builds provide additional features. WipeDrive PRO Linux versions allow ‘custom
overwrites’ when using the CD. (The PRO DOS and non-PRO WipeDrive version do not,
However all WipeDrive floppy versions allow custom wipes.)
WipeDrive PRO Linux versions also provide extended hardware support to recognize and
run on more SATA, SCSI, and RAID system configurations.