QuickHash GUI User Manual (c) Ted Smith 2011 2019
User Manual:
Open the PDF directly: View PDF ![]() .
.
Page Count: 26

1.0 Pre-amble
This manual is designed as a user-aid only. It is not an authority on the subject matter of hashing
algorithms, filesystems or anything else, neither in part or in full. The software comes without any
warranty, including any future digitally codesigned versions. Use it at your own risk and if you are
unsure of any results, please consider cross referencing your findings with other software. There are
many free and commercial data hashing tools available to cross-reference your findings.
Constructive feedback is encouraged and welcomed but complaints will not be tolerated. If the user
is unhappy with the software, s/he is encouraged to use something else.
1.1 License Agreement
Users can run it on as many computers as they wish, as many times as they wish, for as long as they
wish. There are no dongles, no DLL's, no installation wizards or license files – just click and go. All
that is asked of the users is that they share their thoughts and help contribute ideas back to the
developer (tedsmith@quickhash-gui.org).
Supported Platforms: Tested on Microsoft Windows (7, 10), Linux Mint 17, Zorin OS, Ubuntu
17.04, Apple Mac OSX (Sierra).
QuickHash GUI is made available under the GPL2 license (see full details https://quickhash-
gui.org/githubfeed/) as follows.
QuickHash GUI is free software: you can redistribute it and/or modify it under
the terms of the GNU General Public License as published by the Free Software
Foundation, either version 2 of the License, or (at your option) any later
version.
This program is distributed in the hope that it will be useful, but WITHOUT ANY
WARRANTY; without even the implied warranty of MERCHANTABILITY or FITNESS FOR A
PARTICULAR PURPOSE. See the GNU General Public License for more details.
<http://www.gnu.org/licenses/>.
QuickHash GUI User Manual (c) Ted Smith 2011 - 2019 Page 2 of 27
1.2 Acknowledgements
QuickHash is written and compiled using the Lazarus Project IDE and the Freepascal language
using the Freepascal Compiler. Thanks are therefore expressed to the developers and contributors of
both Lazarus and FPC, without which QuickHash would not have existed.
A customised version of the Freepascal MD5 and SHA-1 libraries were used for MD5 and SHA-1
and the DCPCrypt library was also used for SHA256 and SHA512 hashing algorithms up until
v2.8.0 of QuickHash. With v2.8.0 and above, however, the libraries were both discarded in favour
of HashLib4Pascal (https://github.com/Xor-el/HashLib4Pascal) by Ugochukwu Mmaduekwe
Stanley (aka Xor-el). It is more actively maintained, did not require 64-bit tweaking to allow
hashing of large data, is Freepascal v3.0 compliant, it avoided the use of a separate customised
MD5 and SHA-1 library, and includes a full range of hash algorithms which will allow easier
implementation of said algorithms by QuickHash in the future. So as of v2.8.0, the library is now
used for all of the mainstream hashing algorithms used by QuickHash (i.e. MD5, SHA-1, SHA256,
SHA512) plus the addition of the faster ‘xxHash’ algorithm which is newer and pretty fast!
Significant thanks and appreciation are expressed to Mr Stanley for the open-source library. Further
thanks to the author of xxHash for making that open-source as well. Note that xxHash is licensed
under BSD License and Haslib4Pascal is also licensed under the MIT License.
1.3 Development Team
Lead Developer: Ted Smith
Contact: tedsmith@quickhash-gui.org – see support pages and
ticket system for feature requests and suggestions
GitHub Repository https://github.com/tedsmith/QuickHash/releases
Supporting Developer : darealshinji
GitHub Page https://github.com/darealshinj i
QuickHash GUI User Manual (c) Ted Smith 2011 - 2019 Page 3 of 27

2.0 Introduction
QuickHash is quite simply a free, open source, cross platform, fast and easy-to-use data hashing
tool for Microsoft Windows, Desktop GNU/Linux distributions like Mint, Zorin OS, and Ubuntu,
and Apple Mac Yosemite, Sierra (and hopefully above).
It does not require installation and can simply be executed from a USB drive or other removable
device (though on Linux and OSX, the software has to have executable permissions assigned and
the external device would require a filesystem that can store executable permissions – so EXT4 or
something and not FAT32).
As of v2.8.0 there are the usual four ‘mainstream’ hashing algorithms available – MD5, SHA-1,
SHA256 and SHA512 but in addition there is now a fifth algorithm to choose; xxHash (when using
the 32-bit version of QuickHash, only xxHash32 will be available, and visa versa for 64 bit), which
is gaining much credibility and implementation worldwide for its speeds. It’s much newer than the
other algorithms though and, in science, these things take a while to become widely adopted.
The interface is deliberately simple and comes as a tabbed system – each tab for a different type of
data.
Text | File | FileS | Copy | Compare Two Files | Compare Two Folders |
Disks | Base64 Data
2.1 What is a hash?
The simplest explanation is that it is like a unique fingerprint of digital data. There are many
common hash algorithms, but QuickHash is coded to utilise four of the common mainstream ones :
MD5, SHA-1, SHA256 and SHA512 with the inclusion of the increasingly popular xxHash from
v2.8.0 of the program. Very basically, if you compute the MD5 value of your typed name, the result
is theoretically unique to one in 3.4028...E38, which, put more simply is a probability of one in 340
billion, billion, billion, billion (1 undecillion), meaning that the chances of any other digital data
other than that string of characters generating the same hash are infinitely unlikely (engineered
collisions aside).
QuickHash GUI User Manual (c) Ted Smith 2011 - 2019 Page 4 of 27

The research surrounding MD5 and SHA-1 hash collisions is duly noted and the reader can find
more information about that in publications and articles on the Internet or academic papers, if it is a
concern to his\her work area.
XxHash, by Yann Collet (https://github.com/Cyan4973) is “an Extremely fast Hash algorithm,
running at RAM speed limits. It successfully completes the SMHasher test suite which evaluates
collision, dispersion and randomness qualities of hash functions. Code is highly portable, and
hashes are identical on all platforms (little / big endian)”. Its implementation into QuickHash
typically shows results of about 20%-50% speed increases over SHA-1, depending on the source
data and technical hardware. So if a file takes 30 seconds on a given PC using SHA-1, it will take
about 20 seconds using xxHash on the developers system, give or take. But various reports have
been received, some stating much faster speeds than that.
Published benchmark tests report figures around the following :
Name Speed Quality Author
xxHash 5.4 GB/s 10 Y.C.
MurmurHash 3a 2.7 GB/s 10 Austin Appleby
SBox 1.4 GB/s 9 Bret Mulvey
Lookup3 1.2 GB/s 9 Bob Jenkins
CityHash64 1.05 GB/s 10 Pike & Alakuijala
FNV 0.55 GB/s 5 Fowler, Noll, Vo
CRC32 0.43 GB/s 9
MD5-32 0.33 GB/s 10 Ronald L.Rivest
SHA1-32 0.28 GB/s 10
To the knowledge of the author there is currently no official documentation other than the source
code to explain xxHash and its ways of working. However, some work has been done by Stephan
Brumme to illustrate it, which is useful and may well form the basis of a Wikipedia entry one day.
http://create.stephan-brumme.com/xxhash/ . Should the reader know of any such documentation,
please mention it via the contact details on the first pages.
It would very beneficial to the world to see xxHash put through its paces in a test environment so
that it can be held with same regard as SHA-1 and SHA256. With such significant apparent speeds,
it would be tragic for it not be more widely used. In science circles, the old timers like SHA-1 will
take some beating with regard to reliability and speed, but 0.28 Gb\s vs 5.4Gb\s….that alone has to
be worth some serious investment of research. That said, QuickHash itself does not exhibit those
QuickHash GUI User Manual (c) Ted Smith 2011 - 2019 Page 5 of 27

kind of speeds with the algorithm but that is perhaps more likely due to the developing skills of the
developer (!) more than the fault of the algorithm.
QuickHash adopts Merkle–Damgård constructions which theoretically enables a method of building
collision-resistant cryptographic hash functions. More can be read about that online.
2.2 Cross Platform
QuickHash was originally designed for Linux to enable less advanced Linux users to easily “and
quickly” (|thus the name) generate a list of hash values for files using a simple graphical interface
without having to resort to command line tools like SHA1SUM. It was specifically designed to run
with live boot CD's like DEFT, CAINE, PALLADIN, HELIX, PARROT SECURITY and others.
However, over time, the hashing functionality has improved and indeed now become faster at
generating hash values than many other tools – both free and commercial ones. So it is now not
only a tool that enables the quick selection of files to hash, but it is also a tool that does compute the
hashes quickly. So the name “QuickHash” is really rather fitting.
It is pre-built into the DEFT, CAINE and Parrot Security Linux CDs and possibly soon even Debian
(not confirmed yet), so by using those systems you will have the power of QuickHash built in to
your live CD instance without having to use it separately. Though, note, the releases of QuickHash
are generally every couple of months whereas bootable distributions generally have a longer cycle
refresh period. There are also DEB packages built usually by darealshinji that accompany the
binaries. All are typically available on the website.
In addition to the Linux version, due to demand from Windows users, a Microsoft Windows
compatible version was made and sports some features that are necessary in a Windows
environment but not necessary in a Linux one. For example, it is possible to compute the hash of a
physical disk using QuickHash in Linux by running QuickHash as root, clicking the “File” tab
and navigating to /dev/sdX or /dev/sdXX. Or, as of v2.7.0, you can use the ‘Disks’ tab the
same as Windows users. Apple mac OSX cannot currently utilise the ‘Disk’ tab, but may hash disks
using the ‘File’ tab in the same way as is possible with Linux. In both instances, the program must
be run with sudo privileges.
The Apple Mac version was first developed with version 2.5.3 in 2014. It functions in a similar vein
QuickHash GUI User Manual (c) Ted Smith 2011 - 2019 Page 6 of 27

to the Linux version. The Mac version was first compiled on the Yosemite operating system and
version 3.0.0 using Sierra. Since 2014, all three operating systems have been supported as much as
possible.
2.3 SQLite Implementation
October 2017 to January 2018 saw the biggest re-write of QuickHash since the programs inception.
It is hard to explain just how much work went into the development of v3.0.0 of the program so
bugs are likely to crop up (please report them if you find them). A large amount of the work
involved migrating existing capability to interact with SQLite but the benefits are worth it. SQLite
holds data very efficiently and it allows developers many more options for their programs. Many of
these new and improved features are now available by right clicking the display grids, allowing
some of those previous options to be removed from the interface, to free space.
In addition, there are now many many options for the display grids. They do vary a little but overall
options include sorting by filename, path, size, ID number, duplicates, known to hash list or not and
many more besides (they may be re-phrased in future versions so no intricate detail here – just right
click a display grid and see what comes up).
For Windows, a 32 and 64 bit pre-compiled SQLite DLL file is shipped with QuickHash. The
correct one will be loaded automatically as QuickHash determines what architecture it is running
on. It is important that these files are not renamed or moved from the root folder of where
Quickhash is running from.
If you run the 32 bit version of Quickhash on a 64-bit version of Windows, it will utilise the 32-bit
SQLite DLL but it will still work perfectly well. You can not run the 64 bit version on a 32-bit
Windows system however.
On OSX and Linux, QuickHash will look in several common locations for the SQLite SO file. If it
finds it, it will create an SQLite database to use for that session, and it is deleted when QuickHash is
closed. The location of the database will be decided by your operating system security settings, but
it is commonly /Users/Username/.config/QuickHash (on OSX) or
/home/Username/.config/QuickHash on Linux.
QuickHash GUI User Manual (c) Ted Smith 2011 - 2019 Page 7 of 27

If Quickhash does not find SQLite (which will be unusual) then the FileS and Copy tab will not
work as intended. Users are instead encouraged to either report the location to us
(tedsmith@quickhash-gui.org) so it can be added, or use an earlier version of QuickHash (pre
v3.0.0) available from the archives. The other tabs will work as normal so depending on your needs,
it may not be an issue.
The database is named based on the date and time of Quickhash execution to allow multiple
instances of the program to run (a separate database will be created for each instance) from the
same launch location.
3.0 Interface
Tabs Explained – Quick Summary
Text : For hashing chunks of text like paragraphs from a file, a name, a character string, a list of
values (to be hashed line by line) or public key data that can be copied from somewhere else to
QuickHash
File : For selecting and then hashing one individual file.
FileS : For hashing multiple files in a directory (aka 'folder') recursively.
Copy : Essentially, this is Copy & Paste but with the added data integrity of hashing at either end of
the process. Designed to enable a user to copy files from one place to another but have the copy
process verified and supported by hash values and a retained log of the original date and time
attributes.
Compare Two Files : Simply choose two files in two different locations and have the hashes of
both compared automatically.
Compare Two Folders : For comparing the file content of one folder to another to see if all the
files inside each match based on hash and count, or not (filenames are not compared).
QuickHash GUI User Manual (c) Ted Smith 2011 - 2019 Page 8 of 27
Disks : Easily hash entire physical disks and logical volumes (as of v2.4.0 upwards and for both
Windows and Linux since v2.7.0).
Base64 Data: New to v2.8.3, it allows the user to hash an encoded Base64 file AND generate a
hash of it’s decoded counterpart without the user having to create the decoded version. It also
allows the decoding of Base64 encoded data, just for convenience.
3. Tabs Explained – Detailed Explanation
3.1.1 Text : For hashing chunks of text like paragraphs or key data that can be copied from
somewhere to QuickHash. You can also type in the text box and QuickHash will dynamically
recompute the hash value as you type. The user can also switch the generated hash to one computed
by another algorithm simply by clicking one of the other three radio buttons.
As of v2.6.2, an “Expected Hash Value” field allows the user to paste an existing hash value
(perhaps computed by another tool) and QuickHash will compare the generated hash of the inputted
text segment against the one supplied by the user. An alert will be displayed if the hashes do not
match. To cancel the comparison, replace the hash value with three dots ('…').
As of v2.6.5, the functionality was added to break the text area down line-by-line. This was at user
request because it turned out that Google Adwords and perhaps similar services require customers
to provide their e-mail address lists as lowercase SHA256 hash values. So now, the user can paste
the list of thousands of addresses (up to 2Gb of text) into QuickHash and if the user then clicks the
“Hash Line-By-Line” button, they will get a comma separated output file containing all the hash
values for each e-mail address in seconds. Be aware that lists of e-mail addresses in capital
letters will generate different output to an e-mail list of addresses in lower case! Me@Me.com
is different to me@me.com. Also be aware of carriage return characters that may not visible.
Use Notepad++ or similar to remove these. You should prepare your list in advance using
Microsoft Excel or Notepad++ and ensure it is correct.
In addition, a second button allows a large text file to be opened and then each line of that file to be
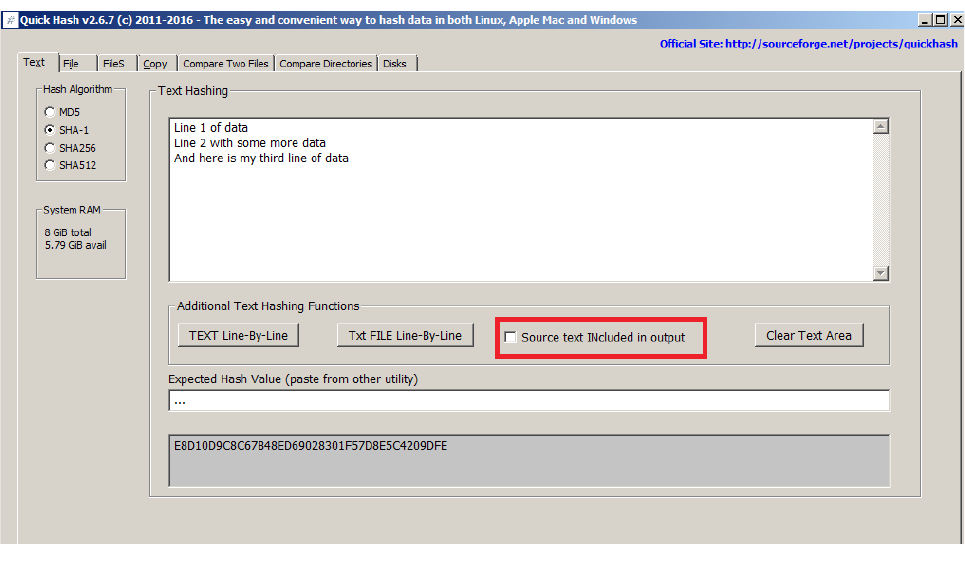
hashed, line by line. And as of v2.6.7, there is a toggle tickbox that allows the user to include or
exclude the originating text data in the output file. Useful for Google Adwords where it expects just
a file containing hashes of e-mail addresses, and not the e-mail addresses themselves that were used
QuickHash GUI User Manual (c) Ted Smith 2011 - 2019 Page 9 of 27
to generate the values in the first place. But there will be other occasions where the user might want
to see the text that was hashed as well as the hash, in the output. That is what this is there for.
As of v3.0.0, there are button to convert your inputted text to upper or lower case, for convenience.
ASCII as well as Unicode text should work OK.
QuickHash GUI User Manual (c) Ted Smith 2011 - 2019 Page 10 of 27
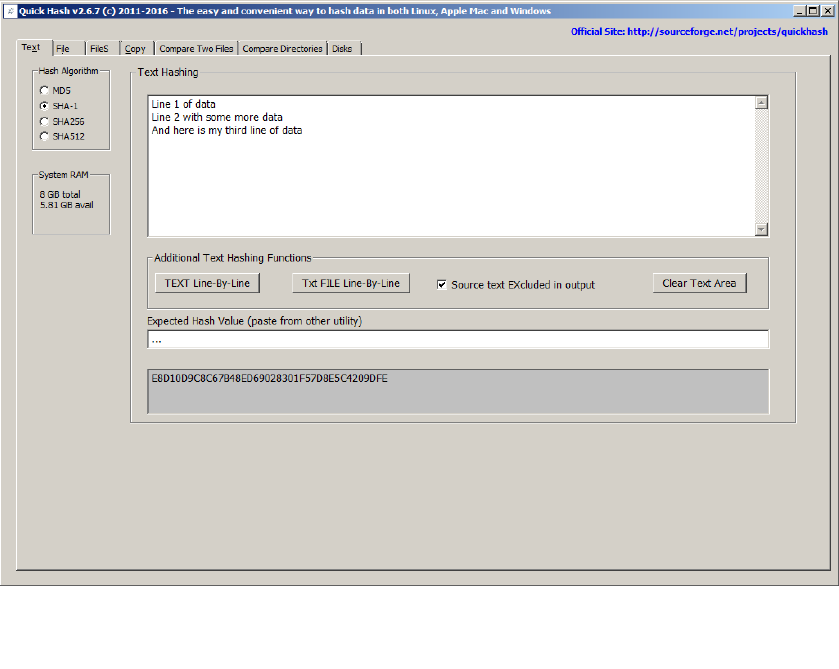
Illustration 1: Hashes values for the sum of the text are dynamically recomputed as the
user types, or, using the “Hash Line-by-Line” button enables the entire list to be
hashed line by line
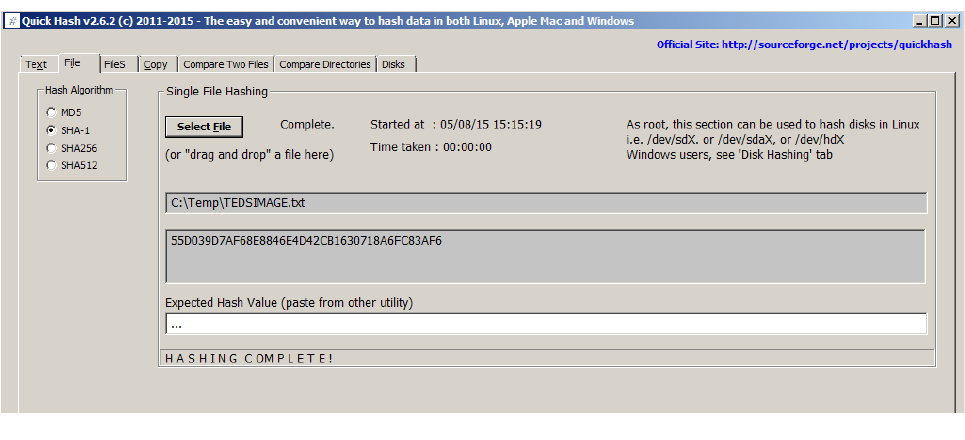
3.1.2 File : For selecting and then hashing one individual file. Simply click the 'Select File'
button, navigate to the file (or drag and drop a file onto the program), and the hash will be
computed. There are no size limits (since v2.1 at least – earlier versions struggled only if the file
was a) larger than 4Gb and b) being hashed with SHA256 or SHA512 due to a 32-bit limitation of
the original DCPCrypt library) other than those that are imposed by the filesystem storing the file
which QuickHash has no control over, of course. So there is no need to worry about 4Gb boundaries
and so on.
As of v2.6.2, there is also the same “Expected Hash Value” field that appears in the 'Text'
tab, that again allows the user to paste an existing hash value (perhaps computed by another tool)
and QuickHash will compare the generated hash of the file against the one supplied by the user.
Case sensitivity is dealt with by QuickHash, so don’t worry about converting your expected hash
from either lower to upper or upper to lower case – QuickHash will deal with that for you. An alert
will be displayed if the hashes do not match though. As of v2.8.3, you can add the value after
hashing the file, and if QuickHash identifies that there is one of the 5 valid hash values in that field,
it will then see if it matches the computed one. Or you can paste the value in there before hashing
the file, and it will then check after computing the hash if it matches the one the user has pasted.
QuickHash GUI User Manual (c) Ted Smith 2011 - 2019 Page 11 of 27
Illustration 2: The new text hashing functions available since v2.6.7
Unicode characters in the filename or file content is also dealt with automatically.
As with text, the resulting hash can be re-computed simply by choosing a different algorithm in the
radio box selection. Larger files will display a message saying “Recomputing hash”.
The ability to hash a file is useful, for example, when you have written a document of some kind
and finished it and you want to send it to someone and be certain the file they receive from you is
the same as when you finished and sent it. In such a case, hash the file before you send it, attach it
to your e-mail along with a copy of the computed hash, and then tell the recipient to use QuickHash
(or any hashing tool for that matter) to recompute the same hash on arrival and check the computed
value against what you put in your e-mail. It’s also very useful for users who download important
data from the Internet, most commonly Linux operating systems and patches. Using QuickHash and
the hash value that the web developer places on their website, you can be sure that the file you have
downloaded is the same as the file they put there. When a mainstream Linux distribution website
got hacked in 2016, the ISO images had been replaced with hacked ones meaning that when they
were downloaded and installed, the users had a hacked system installed to start with. But if the
people who downloaded those ISO images had hashed them using QuickHash after downloading
them, they would have known they were not the same ISOs as the ones put there by the
development team.
With v2.8.1. a progress indicator was added to this tab because users kept reporting that the
QuickHash GUI User Manual (c) Ted Smith 2011 - 2019 Page 12 of 27
Illustration 3: The 'File' tab showing a computed hash of a file
program “had crashed” whilst hashing large files, when it merely could not be interrupted. With
v2.8.1, the interface will update every few seconds in this tab and give an idea of how many Mb
have been read so far.
On Linux systems, everything is a file so this can include physical disks (e.g. /dev/sda) or
logical drives (/dev/sda1) if QuickHash is run with root access. Disk hashing is also available
for Windows and Linux as a GUI in the ‘Disks’ tab, but sadly not for Apple Mac OSX - see Disk
Hashing, below.
With regard to forensic images created by digital forensics specialists; it is sometimes useful to hash
the individual chunks of a forensic image if forensic software states a problem with an image, to try
and diagnose if one particular chunk has not been moved or copied correctly from a master copy.
However, do not confuse this functionality with the total inability of QuickHash to compute the
internally computed hash of the data inside the image. At the moment, QuickHash can not be
used to verify E01 image sets (i.e. the Expert Witness image format), or AFF (Advanced Forensic
Format), or even DD image sequences. In other words, if the user navigates to the first file of a
chunked image set (such as a chunked dd image or a chunked E01 image) the resulting hash will
be that of the chosen image chunk (i.e. the file) only, not of the acquired data that sits inside the
entire forensic image spanning multiple chunks. To verify an actual complete forensic image, please
use forensic software like X-Ways Forensics, EnCase, FTK, ewfacquire, Sleuthkit and so on. In the
future, the LibEWF library, by Joachim Metz may be incorporated to allow hashing of the data
inside E01 images. But as there are so many other tools for opening and reading data inside E01
sets, this remains merely an open suggestion. The developer of QuickHash also has an imager
called ‘YAFFI’ (Yet Another Free Forensic Imager) (http://www.github.com/tedsmith/yaffi) where it
is possible to open and create E01 images. So you are encouraged to use and explore that if you
want a free alternative.
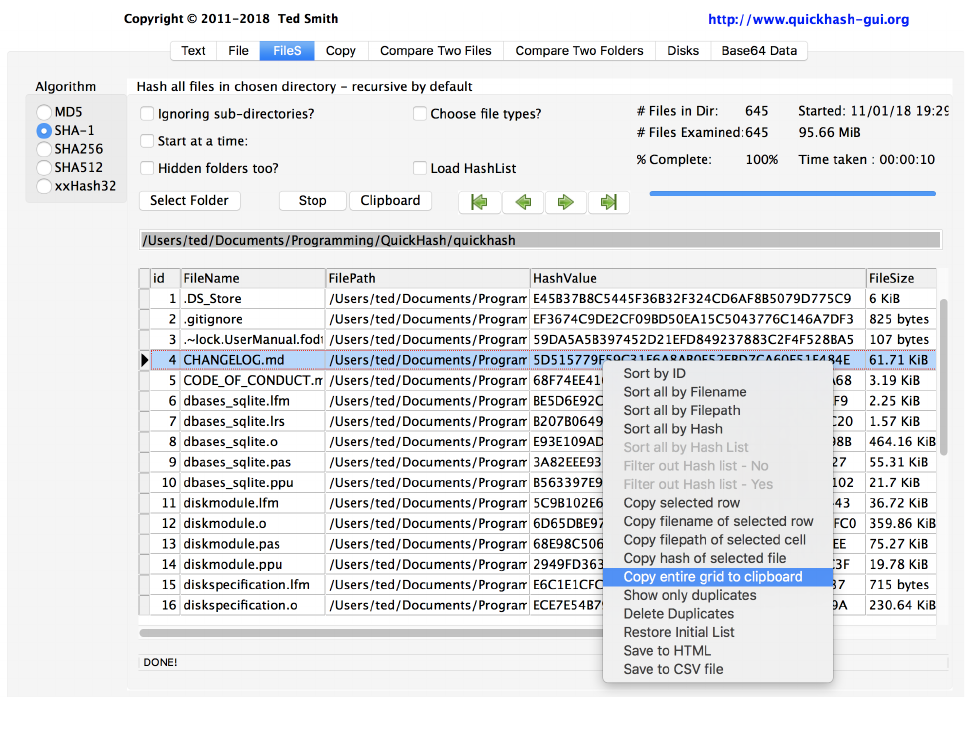
3.1.3 FileS : For hashing multiple files in a directory (aka 'folder') recursively. Put simply, choose a
directory and QuickHash will find all the files below that directory and inside its child directories
and compute the hashes for all of the files, outputting the results to screen. If you have many files,
choosing ‘xxHash’ as your chosen hash algorithm will be considerably quicker than any of the
others.
QuickHash GUI User Manual (c) Ted Smith 2011 - 2019 Page 13 of 27
There are several options in this tab :
1. Ignoring sub-directories
2. Hidden folders too?
3. Choose file types?
4. Start at a time?
5. Load Hashlist? (since v3.0.0)
Options 1 -5 all require the user to tick the box prior to starting the scan.
The “Ignoring sub-directories?” enables the user to compute hashes of files in the root
of the chosen directory but not any of the files located in the child sub-directories that may be below
that chosen root directory.
The “Hidden Folders too?” option requires some detailed explanation. On Windows, hidden
QuickHash GUI User Manual (c) Ted Smith 2011 - 2019 Page 14 of 27
Illustration 4: Files hashed in FileS tab (v3.0.0 on OSX Sierra)
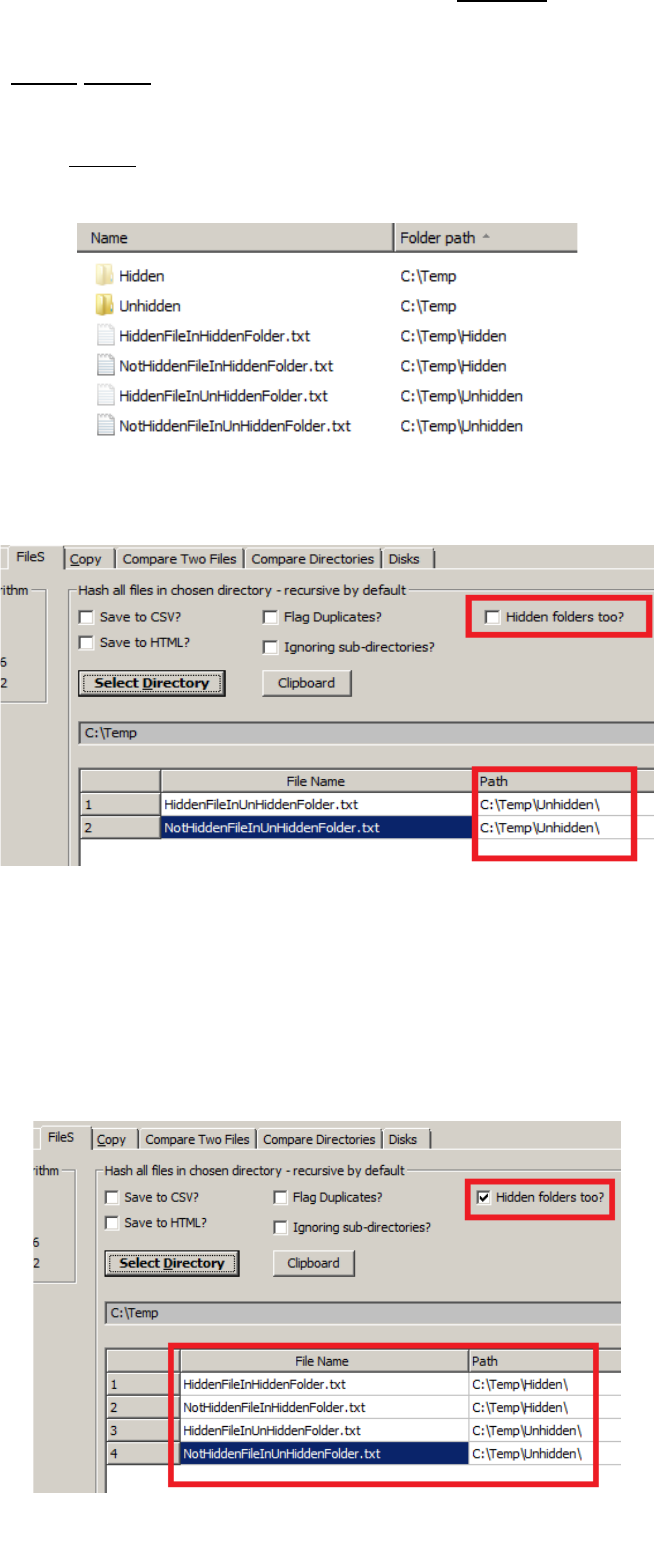
files will be found and hashed by default but only if they live in unhidden folders.
Files that live in hidden folders, regardless of whether the files are themselves hidden or unhidden,
will not be found unless this option is ticked. By ticking the box however, all files, hidden or
unhidden, that live in folders that are either hidden or unhidden, will be found. The screenshots
below demonstrate.
QuickHash GUI User Manual (c) Ted Smith 2011 - 2019 Page 15 of 27
Illustration 6: QuickHash will ignore files in hidden folders if
asked
Illustration 7: QuickHash will examine files in hidden
folders, if asked (v2.6.3 screenshot)
Illustration 5: Files with various filesystem
attributes
The “Choose file types?” feature was added to the “Files” tab in v2.6.4 by user request,
meaning the user can recursively hash the content of an entire folder and its sub-folders but only
files that have the inputted extension(s) will be analysed. Each value is to be separated by a semi-
colon (';'). Note that file header signature analysis is not conducted.
Since v2.6.4, QuickHash will also find files and folders that exceed the MAX_PATH value of 260
characters imposed by MS Windows. The underlying filesystems of most operating systems,
including NTFS, support filenames of much longer than 260 characters, but Windows itself does not
currently, even though the underlying filesystem does. It is possible, though, for some software to
deliberately exceed this limit, meaning files may exist that the user cannot generally access. With
v2.6.4, those files will be found and hashed up to a length of 32K characters for Windows and 4K
for Linux.
The results can also be copied to the clipboard from the display grid by clicking the “Clipboard
results” button, which will be 'click-able' once a scan has finished; disabled until then.
The ‘Start at a time:’ option allows the user to schedule a date and time in the future to start the
hashing. However be aware that in development some inconsistencies were noticed with this. It
seems to work OK on some processor architectures, but not all. Your mileage may vary so try it
before using it for anything important.
The “Load Hashlist?’ option is new to v3.0.0 and was perhaps the most frequently requested feature
of QuickHash by users over the years. What it enables is for the user to import a list of any number
(limit yet to be discovered) of existing hash values that may have been generated at an earlier date
by QuickHash or perhaps by another data hashing tool or digital forensics tool. The list must be just
one column of hash values without a header row. Once selected QuickHash will rapidly ingest the
values. When the user then selects a folder of files, it will compute hashes in the folder and then
lookup whether the corresponding hash exists in the list imported by the user (if the tick box is
ticked). If it is, it will add “Yes” in the final rightmost column of the display grid. Conversely, if it is
not found, QuickHash will display “No”. On completion, three options will be enabled in the right
click menu allowing the user to sort or filter out the values as necessary. The column will be empty
if no hashlist has been imported.
Note that a bug was identified in May 2018 and fixed in September 2018 with v3.0.3 where
lowercase hashlists were not converted to uppercase, meaning values that were the same were not
QuickHash GUI User Manual (c) Ted Smith 2011 - 2019 Page 16 of 27
identified as such. This was fixed in v3.0.3 so that all imported lists were converted to uppercase if
not already uppercase.
The list will remain in memory until QuickHash is closed. The list can however be added to after
one ingestion if another list needs to be added. Just click the button again to choose a second file of
hash values to import and they will be added to the first one.
Once QuickHash is closed, the list will also be released from memory. After re-launching
QuickHash the user will need to reimport any hashlists if they are needed, but this should not take
long. Future versions may support the retention of such values long term but lets see.
Note that Hashlist importing is new to QuickHash v3.0.0 and was not an insignificant amount of
work to implement so there may be some refinement in future versions.
The computed hashes of the FileS tab cannot be dynamically re-computed, unlike in the first two
tabs. Drag and drop of directories is not possible in this tab either.
UNC network paths can be selected this way as well if the dialog of your operating system supports
it.
3.1.4 Copy : The Copy tab allows the user to select a folder containing files he wishes to copy
from and another folder where he wishes to copy files to. Both source and destination folders can be
a local folder or a mapped network drive or a UNC unmapped network address. Multiple source
folders can be selected as the source (using Ctrl and left mouse click) but only one destination
folder can be selected as the destination (the original folders will be rebuilt in the destination
folder).
Having selected both source and destination folders, upon clicking 'Go', QuickHash will hash the
files in the source folder, then copy them to the destination folder (whilst concurrently
reconstructing the folder path of the original files, by default) where it then re-hashes the files to
check they match the hash values of the original computations. It is, in essence, a “forensic copy
and paste”. As with the “FileS” tab, there are options to save the results to CSV or HTML and sub-
directories of the source directory can be ignored. Also note that there is an option for the user to
not have the source directory structure rebuilt in the destination by ticking the “Don't rebuild
QuickHash GUI User Manual (c) Ted Smith 2011 - 2019 Page 17 of 27
path?” option.
There are 8 options that are unique to this tab that require explanation.
1. Just LIST Directories?
2. Just LIST sub-directories and files?
3. Save Results (CSV)?
4. Start at a time?
5. Ignore sub-directories?
6. Choose file types?
7. Don't rebuild path?
8. Copy hidden files?
Options 1 and 2 are simply for listing (thus 'LIST' is capitalised) either the folder structure of the
chosen source folder (excluding files) or for listing the names of folders AND names of files of the
chosen source folder but without actually hashing any of the files inside them. This is useful when a
user needs a textual representation of a directory structure to paste into some other software or a
report.
The “Choose file types” box allows the user to specify what file types to find, hash, and
copy. So for example, if the user is only interested in .doc files, by entering just “.doc;”, only
those file types will be found and copied. Multiple extensions can be used if separated with a ';'
ONLY (no spaces). Note that this type identification is conducted by filename only – not the more
accurate file header signature analysis (which is currently not available in QuickHash).
The “Don't rebuild path?” option allows all files found in the source folder and its sub-
folders to simply be dumped in the root of the destination folder without rebuilding the original path
in the destination path. Obviously though two files of the same name cannot exist in the same
directory on the same filesystem whereas two files of the same name may exist in one folder and
any of its other folders. To account for this, when this option is enabled (it is off by default)
QuickHash will check for the existence of a file with the same name in the destination directory for
each file it copies. Where found, it will rename the second, third, fourth (and so on) instance of the
file by renaming it to FileName.ext_DuplicatedNameX where X is the counter of
duplicated filenames detected. Note this is not a check of file hash based on content – merely
filename and is provided due to filesystem restrictions.
QuickHash GUI User Manual (c) Ted Smith 2011 - 2019 Page 18 of 27
The “Copy hidden files?” is disabled in the Windows version, because hidden files in both
hidden and unhidden folders are found by default with this particular tab in QuickHash (different to
the 'FileS' tab and its 'Hidden folders too?' tick box). However, in Linux and Apple Mac,
the box is enabled, due to the way that files and folders are both, in essence, 'files' on those systems,
so a hidden folder needs to be dealt with differently to a hidden file. If you want such files when
using either of those systems, tick this box. But Windows users need not be concerned about it.
The hashes cannot be dynamically re-computed in this tab, unlike in the first two tabs.
Drag and drop of folders is not possible in this tab either.
On Windows, as of v2.6.4, files that live in a folder whose length exceeds 260 characters
should now be found by QuickHash and copied. Previous versions of the program could only
copy files TO a folder longer than 260, but it could not read\detect them. As of v2.6.4, it should be
able to do both.
This common difficulty is due to a restriction called 'MAX_PATH' (see earlier description) and is a
MS Windows limitation. It is not an NTFS filesystem limitation; that can allow up to 32K
characters. Neither is it a Linux limitation, which allows up to 4K characters.
Note, however, that if the files that are found are already near to the 260 character limit, but not
beyond it, it is likely that when copied, the path length will exceed 260 characters. QuickHash will
deal with this by implementing a filesystem bypass.
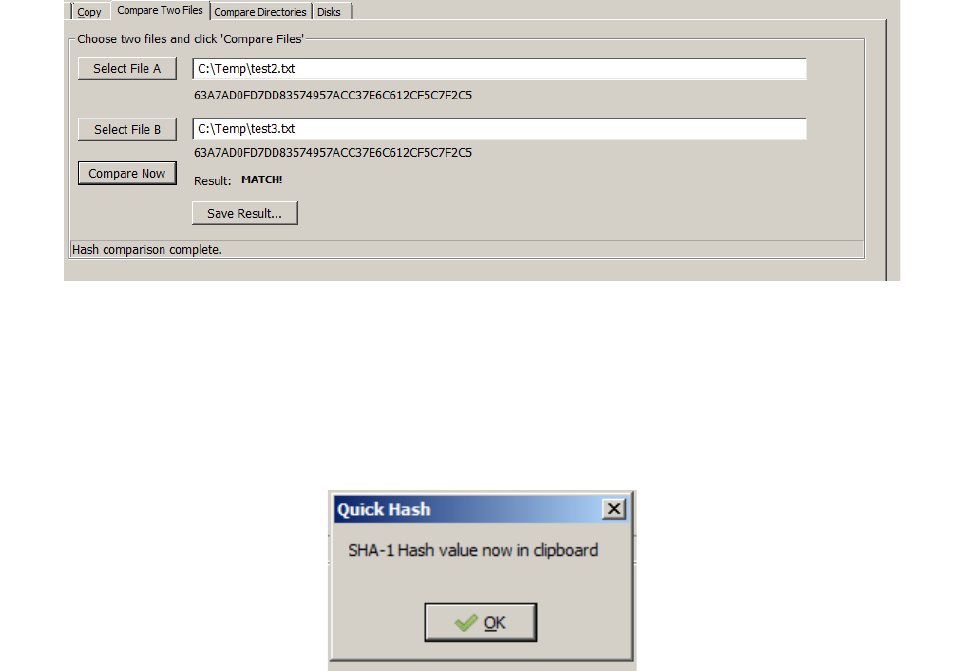
3.1.5 Compare Two Files : It is commonly the case that a file exists in two different places, for
example, a backup of a file. This tab allows a user to specifically choose one file, and then hash it
against another file automatically, perhaps leaving them overnight if they are large. This avoids the
need for the user to have to hash all the files in the folder of these two respective files (using the
'FileS' tab), or without the need to hash FileA first, and then manually choosing FileB secondly
using the 'File' tab.
Results can be saved to a text file, if needed, after hashing has completed and by clicking the 'Save
QuickHash GUI User Manual (c) Ted Smith 2011 - 2019 Page 19 of 27
As' button.
As of v2.8.1, if the user single mouse clicks the generated hash value, the hash value and the
chosen algorithm with be copied to the clipboard. This only applies to the “Compare two Files” tab,
for now.
Of of course, the user can just take a screenshot of the results!
3.1.6 Compare Two Folders : This enables the user to compare the file content of two folders. The
user must select one folder as the source (Dir A) and then a second folder to compare the source
against (Dir B). QuickHash will then count and hash all the files in Dir A and Dir B, storing the
values in a list in memory. When complete, it then counts the number of files in each folder and
then it hashes them all. If the user does not tick ‘Cont if count differs?’, it will not proceed further
and instead report a mis-match as the file count is different, therefore Folder A and Folder B are
clearly not the same. However, the user can override this by ticking that box. Then, if there is a mis-
match of file count, it will still go on to hash all the files and then report those computed in both
Folder A and Folder B.
The list of hashes is also held in memory where they are then compared very quickly. If both hash
lists and the file count match, it will report a match even if the file names are different. This makes
QuickHash GUI User Manual (c) Ted Smith 2011 - 2019 Page 20 of 27
Illustration 8: Comparing the hashes of two identical files
QuickHash very fast at this comparison.
If, however, there is a mismatch of hash even if count is the same QuickHash then does go on to
compare the hash of each file to work out which ones differ in Folder A to Folder B. The results are
saved by default (unless the user unticks ‘Log results?’) to a text file.
Note therefore it compares the binary content of two folders based on the files inside each. It does
not compare the directory structure of each. So you could have Dir A with 1000 files in it spread
across 5 different sub-folders but if those same 1000 files are all in the root of Dir B with no sub-
folders at all, QuickHash will report a match, because the file content (file count and file hashes) of
both folders are the same.
Upon completion, the log file is automatically saved to a location deemed safe on the users
particular operating system. This path can vary, but the user is told in the Summary window at the
bottom where he is then able to navigate to it and open it with any text editor.
3.1.7 Disks : This tab was only available in the Windows version prior to v2.7.0 but since then it
has been available for both Windows and Linux users. Apple Mac OSX is not currently supported.
Windows and Linux users must run QuickHash as Administrator or (on Linux) root or sudo.
The functionality enables the computation of a hash for the physical disk or logical volume of the
computer (like Drive E:). Useful for comparing the value computed by one forensic tool to “another
tool”. On modern disks, speeds of between 7Gb – 14Gb per minute have been observed. Though
speeds of 4Gb per minute are quite common and still fast compared to many other tools. With the
newly added xxHash algorithm, speeds of 15-20Gb a minute should be observed.
To use the functionality, the user must click the “Launch Disk Hashing Module” button in
the tab “Disks” and he will then be presented with the following screen:
QuickHash GUI User Manual (c) Ted Smith 2011 - 2019 Page 21 of 27
With v2.8.0, a full logging feature is available that records the version of QuickHash, date and time
of starting and finishing with time taken, the hashes computed and so on that is written to a text file
on completion in a place of the users choosing.
The disk hashing module is largely based on the sister project of QuickHash called YAFFI (‘Yet
Another Free Forensic Imager’ also by Ted Smith and also open-source), available from
https://github.com/tedsmith/yaffi
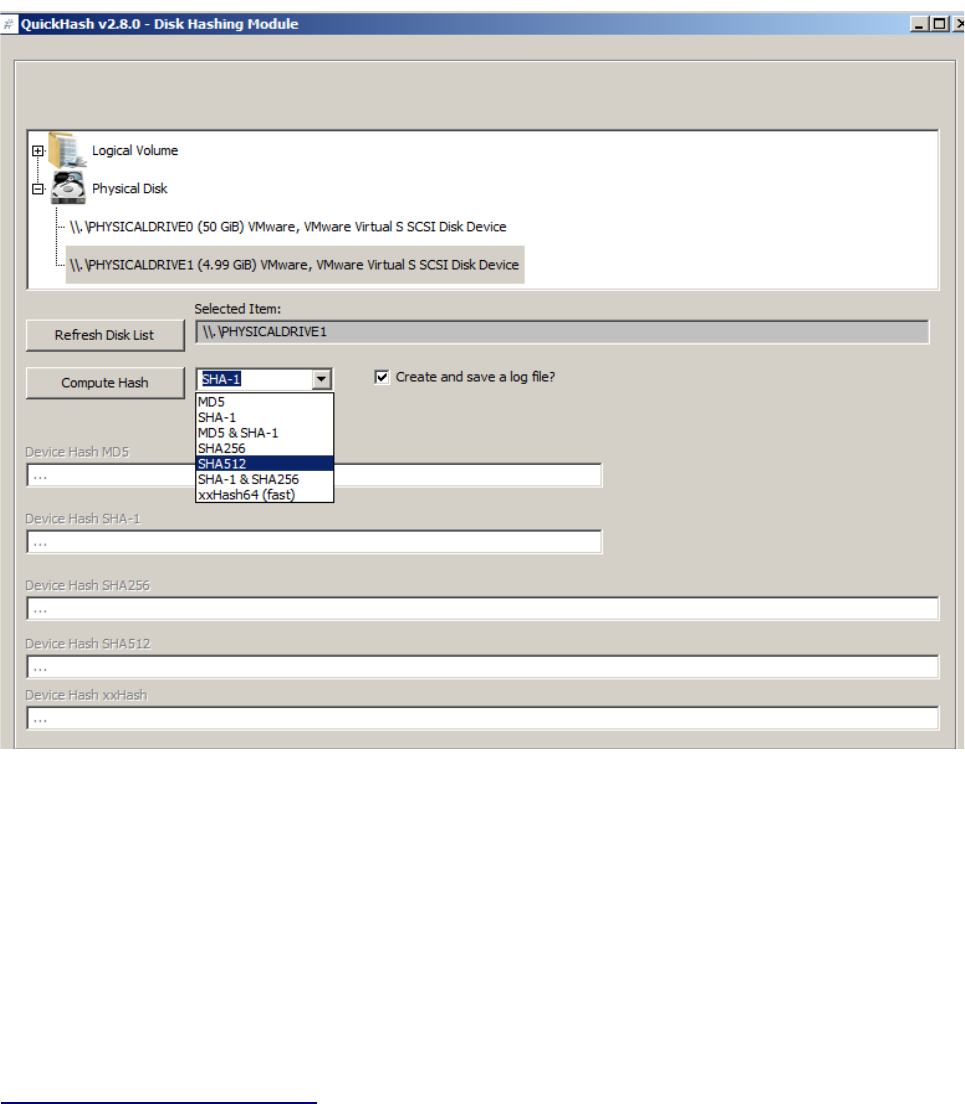
Windows and Linux users only : To choose a disk, the user must simply single click the physical
disk or logical volume, select their preferred hash algorithm (SHA-1 default) and then click
“Compute Hash”. As of v2.8.0, it is possible to compute SHA-1, or MD5, MD5 & SHA-1 together,
SHA256, SHA-1 and SHA256 together, SHA512 or xxHash. xxHash64 especially is seemingly the
fastest hash algorithm available (though xxHash is not strictly speaking a cryptographical algorithm
from what I can gather).
QuickHash GUI User Manual (c) Ted Smith 2011 - 2019 Page 22 of 27
Illustration 9: The Disk Hashing Module of QuickHash v2.8.0
If the user receives an error like “could not convert variant of type (Null)
into type Int64”, this is most likely due to the existence of an installed removable drive bay
device (those that enable SD card reading, extra USB ports etc) which typically present, to MS
Windows, a list of logical drives like “Removable Drive X:” in Windows Explorer, even if they are
empty. The error appears therefore because these entries appear “as a valid drive”, but one without
any disk capacity, and that causes the error. Attempts have been made, especially in v3.0.1 to reduce
this, but it may still happen. It is very hard to debug because it is hardware specific.
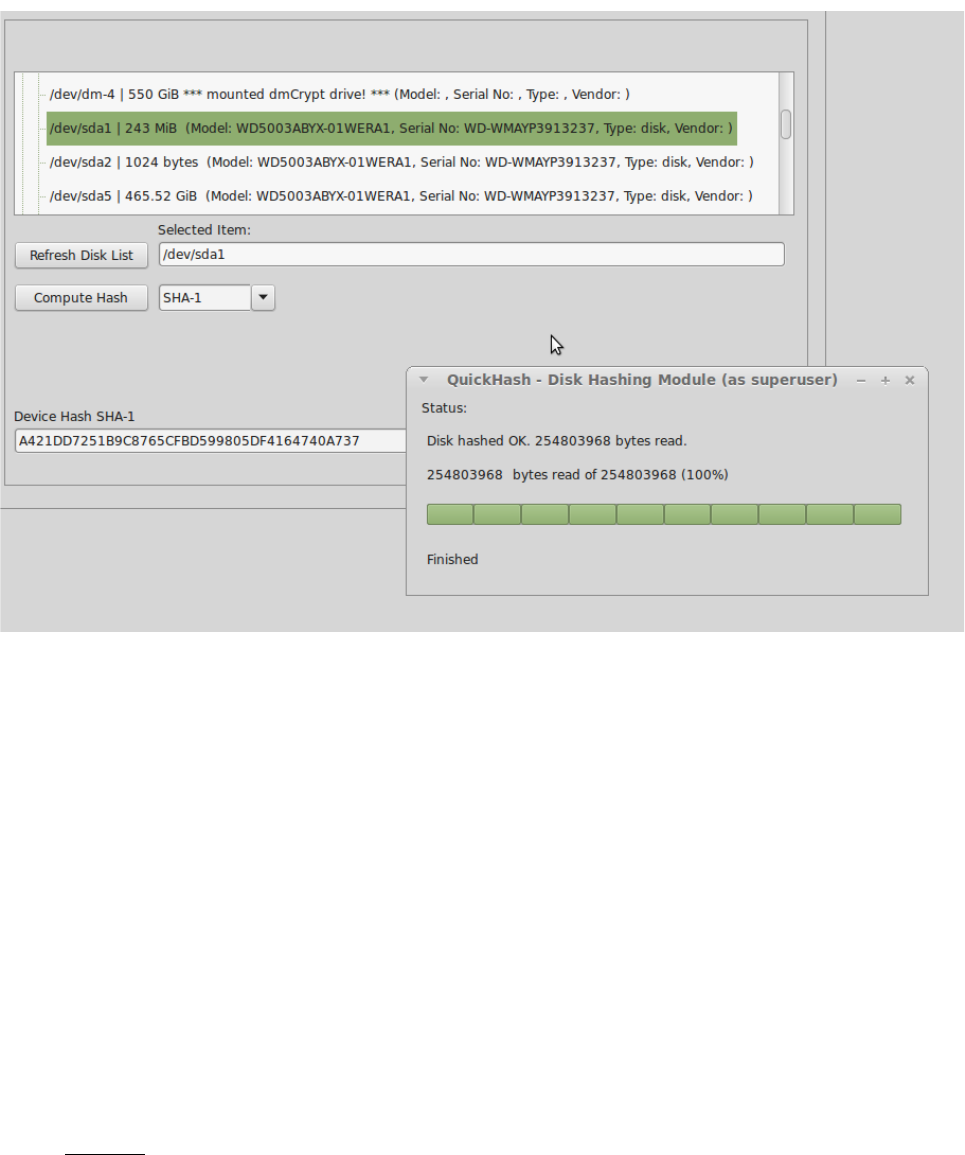
3.1.8 Base64 Data
New to v2.8.3, the Base64 tab allows the user to hash an encoded Base64 file AND generate a hash
of it’s decoded counterpart without the user having to create the decoded version first. This can be
done one file at a time or the user can select a folder full of Base64 encoded files and QuickHash
will generate encoded and decoded hash values of them all. The results are output to a display grid,
from which the user can right click to copy single rows, all the rows, or save the whole grid.
QuickHash GUI User Manual (c) Ted Smith 2011 - 2019 Page 23 of 27
Illustration 10: Hashing a logical volume in Linux using QuickHash
There is a third button ‘Decode and Save files...’ which, if clicked, will ask the user for a folder of
Base64 encoded files, and then QuickHash will ask for a second folder to put the decoded versions
in. It will then decode all Base64 encoded files and save new decoded versions in the output folder.
No hashing is done here. It’s just a quick and easy way for users to decode their Base64 files
without having to use online systems. If the users wishes to have the files hashed as well, either in
their encoded or decoded form, then use the second option of the tab to compute those values as just
described (the second button (‘Decode and hash files’)) or use the File tab to do one at a time
(choose either the encoded file or decoded version if you’ve decoded it), or the FileS tab.
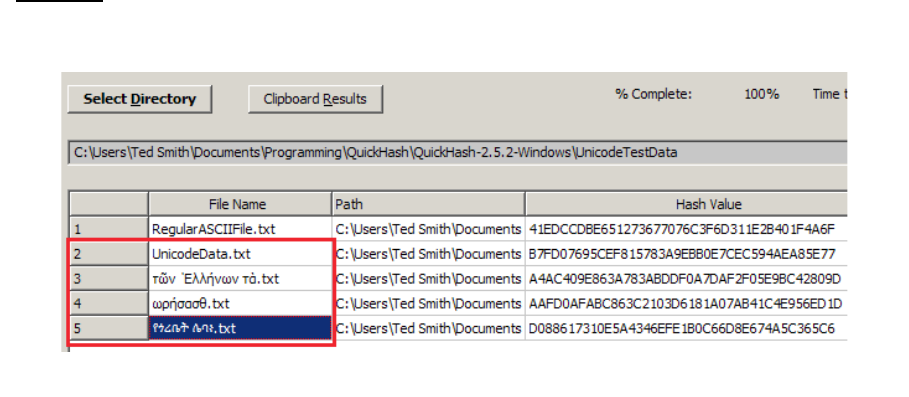
3.2 Unicode
Be aware that QuickHash is Unicode aware on Linux, Apple Mac and Windows systems. It will
process files with Unicode characters in their filenames or in their content without difficulty. Note
that Windows versions prior to 2.3 were not Unicode aware.
3.3 Open Files
Ever since v1.0 of QuickHash back in 2011, files that have been opened and not shared by the
operating system have caused access denied errors with QuickHash. As of v3.0.1 however, that
problem will hopefully have been reduced due to some improved exception handling. With v3.0.1
upwards, if the program is given a file that is open by another program, the program will simply
return a hash value that reads “could not access file” and continue to the next file, rather than
showing an error message and forcing the user to abort the program.
Hashing open files is not wise anyway as the hash will likely change when the file is closed, but in
QuickHash GUI User Manual (c) Ted Smith 2011 - 2019 Page 24 of 27
Illustration 11: QuickHash showing Unicode awareness on Windows

all previous versions the program simply could not bypass the open status and would crash. This
solution is considered more favourable.
3.4 Other tools of the same name
There are many hashing tools available – too many to mention - and they all have various strengths
and weaknesses, just as QuickHash does. This section is written to try and help with the enquiries
received that are worded along the lines of “I downloaded QuickHash following our chat the other
day but it doesn't do half the things you said it could” which, since about 2012, caused some
enquiries of my own, at which point it became clear that new projects have been developed since
QuickHash that are also called “QuickHash”.
It is important to point out, however, that QuickHash was the first graphical, standalone, free, open-
source, Unicode aware and cross-platform data hashing tool that was named “QuickHash” and it
was published on Sourceforge in 2011 at http://sourceforge.net/projects/QuickHash . Unfortunately,
the nature of open-source means there will always be others who might choose the same name for a
tool that does the same thing, either knowingly or unknowingly. Without trademarking the name,
there is no way to prevent that happening. The pages for this program are www.QuickHash-gui.org
(since late 2016) and Sourceforge at http://sourceforge.net/projects/QuickHash since 2011 up to
2016.
3.4 Donations
QuickHash is created in my spare time, which is very tight with a full time job and a family. It is
generally written late at night, which can sometimes explain oversights and can be the cause of
some bugs! At the start of 2017, a PayPal donation link was added to the website because my wife
kept nagging me about “giving things away for nothing”. As of v2.8.1 of QuickHash, I also added a
small ‘donate’ link to the interface of QuickHash. Well I might as well have sold my soul to a
corporate for the flaming it caused on the Internet! Strangely, it seemed to upset a few people who
were almost offended at the suggestion that a developer might try a bit harder to ask for a donation
for his hard work. So, in the spirit of keeping all my users as happy as possible, I moved it to a new
“About” section of a new main menu, which was also added in v2.8.2.
QuickHash GUI User Manual (c) Ted Smith 2011 - 2019 Page 25 of 27
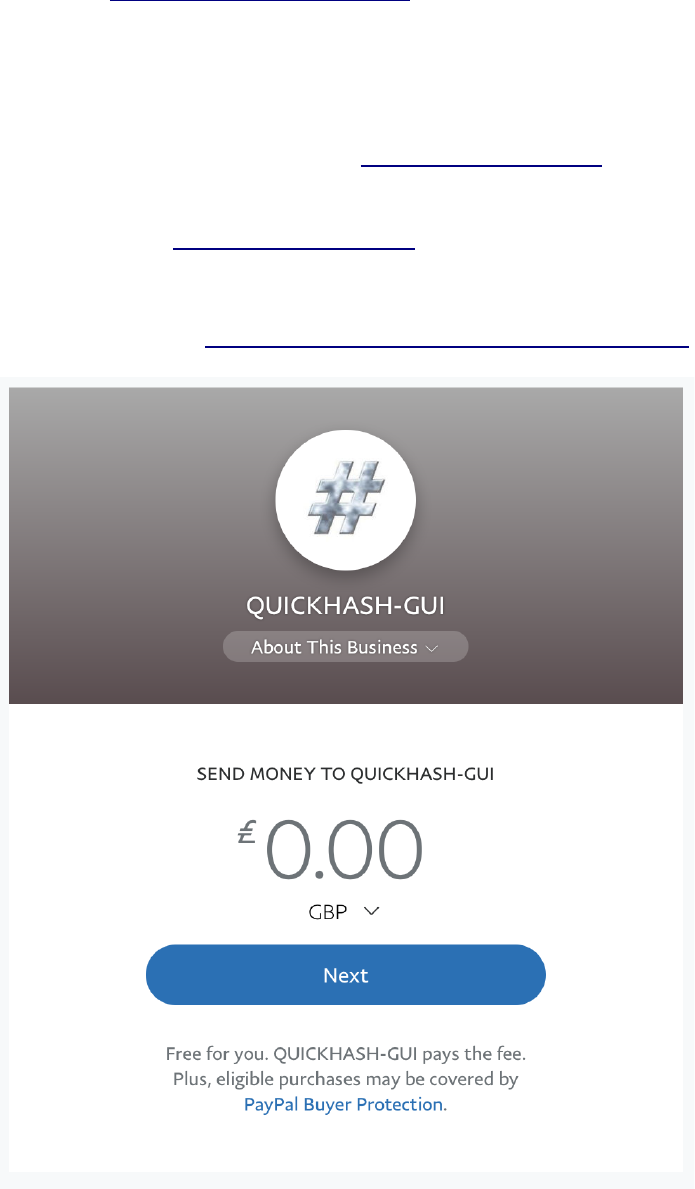
If you value the program, or if your organisation, company or agency does, then please do consider
making a donation using https://paypal.me/quickhashgui. Doing so helps fund the AWS server costs
and also helps inspire future development. If you give your blessing, news of your support may be
published on the website too, although we always ask first so don't let that put you off making a
donation! Case studies are also of interest...if QuickHash has helped you with a major task or
anything of importance then do please consider submitting a testimonial for the website. Both
things are a good opportunity to get your company listed on the website of one of the worlds most
widely used data hashing tools; http://QuickHash-gui.org.
To donate : www.paypal.me/quickhashgui
QuickHash GUI User Manual (c) Ted Smith 2011 - 2019 Page 26 of 27
