User Manual
User Manual:
Open the PDF directly: View PDF ![]() .
.
Page Count: 245 [warning: Documents this large are best viewed by clicking the View PDF Link!]

Rapid Response Team, UnitedHealthcare
ENRL RECON SYSTEM
User’s Manual
Version 1.0 September 2017

ENRL RECON SYSTEM User’s Manual
©United Healthcare 1.0 Page i
Copyright Notice
Copyright © 2017 United Healthcare. All Rights Reserved.
The ERNL RECON SYSTEM User’s Manual, Version 0.1, as well as the software specifications
described within it, is furnished under license and may only be used or copied within the terms of that
license. This document is proprietary to United Healthcare® M&R, Rapid Response Team that prohibits
any unauthorized access. Except as permitted by license, no part of this publication may be reproduced,
stored in a retrieval system, or transmitted, in any form or by any means – electronic, mechanical,
recording, or otherwise – without the prior written permission of Rapid Response Team, United
Healthcare.
Written and designed at United Healthcare, Software Engineering Process Group, Rapid Response
Team, Abacus Center, #54, I Main, III Phase, JP Nagar, Sarakki Industrial Area, Bengaluru- 560078.
This document contains confidential and proprietary information which is property of United Healthcare.
With the absence of a valid contract and non-disclosure agreement with United Healthcare for the use of
this document, the document will be considered an unauthorized access and is not legally entitled to
possess or read it.
Use, duplication, and disclosure are subject to restrictions stated in your contract with United Healthcare.
Use, duplication, and disclosure by Government are subject to restrictions for commercial software and
shall be deemed to be Restricted Rights software under Federal Law.

ENRL RECON SYSTEM User’s Manual
Page ii 1.0 ©United Healthcare
Preface
Welcome to Version 0.1 of ERNL RECON SYSTEMS User’s Manual.
This user’s manual includes the information that you need to work with ERNL RECON SYSTEMS (ERS)
applications effectively. It contains detailed information about the following:
Overview and reference information
How to navigate through ERS applications windows
How to submit ERS applications programs, reports, and listings.
This preface explains how this user’s guide is organized and introduces other sources of information that
can help you

ENRL RECON SYSTEM User’s Manual
©UnitedHealthcare 1.0 Page iii
Document Release Notes
Project: ENRL RECON SYSTEM
Document Details
Name
Version no.
Description
ENRL RECON SYSTEM
User’s Guide
Version 0.1
This is the initial draft user guide for the Enrolment
Reconciliation System application. The user guide
describes various processes on how to create and
review various cases to
Revision Details
Author:
Action Taken
Date
Author
Description
Initial draft user manual is
created
09.06.2017
Ramani
Behera
The initial draft user manual was delivered.
The Maintenance and Reports chapter was
not covered.
Reviewer:
Action Taken
Date
Reviewer
Description
The initial review comments
were provided
09.06.2017
Cristella
Greene
Overall comments with respect to template,
technical accuracy, structure and formatting
of the user manual suggested.
Secondary review
comments are available
09.21.20107
Cristella
Greene
The details review comment on the
structure and presentation of the
information
Approver:
Action Taken
Date
Approver
Description

ENRL RECON SYSTEM User’s Manual
Page iv 1.0 ©United Healthcare
About this Guide
Purpose
The ENRL RECON SYSTEM User’s Manual and the software references explained in it are designed
and developed for educating Enrolment Recompilation System (ERS) users to work on the ENRL
RECON SYSTEM web application. Users can refer to, analyze, and follow the instructions and guidelines
while working on the ERS application. This manual explains the details about the various modules in
ERS application, where participant users need to perform related activities according to their roles and
responsibilities while working on the ERS.
Indented Audience
The document is created for the ENRL RECON SYSTEM users who are involved in creating, managing,
editing ERS records to resolve discrepancies between GPS and CMS data. The registered users need to
log in to the ENRL RECON SYSTEM application to work on the various sub-systems or menus.
Prerequisites
Following are the prerequisites to access ERS web application to perform various activities. These
include:
URL of the ENRL RECON SYSTEM application
User credentials of ERS users
Compatible web browser
Organization of the User’s Guide
This guide contains the information that you need to know to execute all the actions in the ENRL RECON
SYSTEM application.
This section explains how the information is organized in various chapters of the user’s manual.
Chapter
Description
Chapter 1
Chapter 1, Introduction, provides the detailed introductory overview of the ERS
application, various functions, features, and other key aspects of the application.
Chapter 2
Chapter 2, Getting Started, describes the log in and log out process in detail. This
chapter also discusses various interfaces, controls, and menus available in the
application.
Chapter 3
Chapter 3, Suspect Cases, discusses various suspect cases and methods to
create new suspect cases in the system.
Chapter 4
Chapter 4, ERS Queues, provides details about the various queues and their
work flows. This also discusses how to search the cases in the system.
Chapter 5
Chapter 5, ERS Manager, discussed the various managerial activities and
settings that a manager can execute such as mass update cases , bulk upload
enrolments etc.
Chapter 6
Chapter 6, ERS Administration, discusses various administrative activities that
can be executed by the admin role which can include managing users, skills and
access groups.
Chapter 7
Chapter 7, ERS Maintenance, discusses various admin maintenance related
activities such as maintaining alerts, configurations, departments etc.
Chapter 8
Chapter 8, Reports, discusses various reports available in the system in tabular
and or pictorial formats.

ENRL RECON SYSTEM User’s Manual
©UnitedHealthcare 1.0 Page v
Typographical Conventions
Formatting Convention
Type of Information
KEY NAMES
Keys on the keyboard appear in title case (first letter in upper case).
For example, Page Up, Caps Lock.
A combination of keys is connected by a +. For example, Shift + Tab
means you should press the Shift key and Tab key together.
Filenames
Names of files are in italics. Example, System.mdb.
Command and Screen
element names
Buttons check boxes, etc. Commands that you choose from the
menus or dialog boxes appear in title case and in bold font.
Example: Click Components from the Action menu.
User-entered text
Text that you would need to enter appears in Verdana font
Feedback and suggestions
United Healthcare welcomes your comments and suggestions on the quality and usefulness of this
document.
Your feedback is important as a user of our products, and helps us to best meet your needs. We would
appreciate your feedback for the following pointers.
Did you understand the context of the procedures?
Did you find any errors in the information?
Does the structure of the information help you to complete your tasks?
Do you need different information or graphics? If so, where, and in what format?
Are the examples correct? Do you need more examples?
If you find any errors or have any other suggestions for improvement, then please tell us.
Send your comments and feedbacks to us at: UHG-Team_AS_BA_E_DL@ds.uhc.com.
Please give your name, address, electronic mail address, and telephone number (optional).
If you need assistance with United Healthcare software, then please visit United Healthcare Support
Services at http://helpdesk.uhg.com/ or contract http://helpdesk.uhg.com/Pages/Contact-the-Help-Desk-
By-Phone.aspx.

ENRL RECON SYSTEM User’s Manual
Page vi 1.0 ©United Healthcare
Abbreviations and Acronyms
Abbreviations
Expansions
ERS
Enrollment Reconciliation System
UHC
United Healthcare
CMS
Center for Medicare & Medicaid Services
GPS
Next-Generation Policy System
C&S
M&R
Medicare & Retirement
PCP
A&G
Appeals and Grievances
GPS
Next-Generation Policy System
MMR
Membership Monthly Report
AVR
Address Verification Resource
CCM
Current Calendar month
CCM-1
Current Calendar Month – 1
ERN
Eligibility Recon Navigator system
MARx
Medicare Advantage and Prescription Drug system
MIIM
Member Interaction & Issue Management system
ODM
Online Document Management system
OOA
Out of Area
SCC
State County Code
TRR
Transaction Reply Report
RPR
Retroactive Processing Request
SLA
Service Level Agreement
TRC
Transaction Reply Code
TAT
Turn-Around-Time
UHC
United Healthcare
PBP

ENRL RECON SYSTEM User’s Manual
Tables of the Contents
INTRODUCTION ............................................................................................................. 1-1 CHAPTER 1
INTRODUCTION TO ENRL RECON SYSTEM...................................................................................... 1-1 1.1
ERS OVERVIEW ................................................................................................................................. 1-1 1.2 1.2.1 ERS Application ..................................................................................................................... 1-1
1.2.2 Key aspects in ERS ............................................................................................................... 1-2
GETTING STARTED....................................................................................................... 2-1 CHAPTER 2
ACCESSING ERS APPLICATION .......................................................................................................... 2-1 2.1 2.1.1 Login ...................................................................................................................................... 2-1
2.1.2 Log Out .................................................................................................................................. 2-3
2.1.3 Re-login .................................................................................................................................. 2-4
ERS HOME PAGE .............................................................................................................................. 2-5 2.2 2.2.1 Menus .................................................................................................................................... 2-6
2.2.2 User Details Section .............................................................................................................. 2-6
User Access ................................................................................................................................................ 2-6 2.2.2.1
User Preference ......................................................................................................................................... 2-7 2.2.2.2
Log out ......................................................................................................................................................... 2-8 2.2.2.3
2.2.3 Reconciliation Queue Summaries ......................................................................................... 2-9
2.2.4 Pending work baskets ..........................................................................................................2-10
2.2.5 Recent case details ..............................................................................................................2-11
ERS USER INTERFACES ...................................................................................................................2-11 2.3 2.3.1 User interface syntax ...........................................................................................................2-11
2.3.2 ERS Menus ..........................................................................................................................2-11
Roles and menus access ........................................................................................................................ 2-13 2.3.2.1
2.3.3 ERS Controls .......................................................................................................................2-13
2.3.4 Important Commands ..........................................................................................................2-15
2.3.5 Log in Page Interface ...........................................................................................................2-16
2.3.6 Home Page Interface ...........................................................................................................2-16
2.3.7 ERS Messages ....................................................................................................................2-16
Errors ......................................................................................................................................................... 2-16 2.3.7.1
Warnings.................................................................................................................................................... 2-16 2.3.7.2
Confirmations ............................................................................................................................................ 2-17 2.3.7.3
Notifications ............................................................................................................................................... 2-17 2.3.7.4
Alert ............................................................................................................................................................ 2-17 2.3.7.5
2.3.8 Special Activities in ERS ......................................................................................................2-17
Attaching and deleting documents ......................................................................................................... 2-17 2.3.8.1
Entering date values ERS pages ........................................................................................................... 2-19 2.3.8.2
Selecting a value from list box ................................................................................................................ 2-20 2.3.8.3
Entering value in the text boxes ............................................................................................................. 2-20 2.3.8.4
Selecting Checkboxes ............................................................................................................................. 2-20 2.3.8.5
Uploading files in ERS pages ................................................................................................................. 2-20 2.3.8.6
Viewing ERS reports ................................................................................................................................ 2-20 2.3.8.7
Viewing History ......................................................................................................................................... 2-20 2.3.8.8
Accessing search result tables ............................................................................................................... 2-20 2.3.8.9
SOME ESSENTIAL CONTROLS ...........................................................................................................2-20 2.4
SUSPECT CASES .......................................................................................................... 3-1 CHAPTER 3
SUSPECT CASES OVERVIEW ............................................................................................................... 3-1 3.1
GPS VS MMR SUSPECT CASES ........................................................................................................ 3-1 3.2 3.2.1 Creating Eligibility Suspect Cases ......................................................................................... 3-1
The Create Eligibility Cases form ............................................................................................................. 3-3 3.2.1.1
3.2.2 Creating DOB/Gender Cases ................................................................................................ 3-6
Create DOB Case form ............................................................................................................................. 3-7 3.2.2.1
The Create Gender Case form ................................................................................................................. 3-7 3.2.2.2
OST SUSPECT CASES ....................................................................................................................... 3-9 3.3 3.3.1 Creating OOA Cases ...........................................................................................................3-10
The Create OOA Case form> Member Info Tab .................................................................................. 3-10 3.3.1.1
The Create OOA Case form> Discrepancy Tab .................................................................................. 3-12 3.3.1.2
The Create OOA Case form> Add Comments Section ...................................................................... 3-12 3.3.1.3
3.3.2 Creating SSC Cases ............................................................................................................3-13
The Create SSC Case form> Member Info Tab .................................................................................. 3-13 3.3.2.1
ENRL RECON SYSTEM User’s Manual
Page viii 1.0 ©United Healthcare
The Create SSC Case form> Discrepancy Tab................................................................................... 3-13 3.3.2.2
3.3.3 Creating TRR Cases ........................................................................................................... 3-14
3.3.4 RPR Suspect Cases ............................................................................................................ 3-16
Creating RRP cases ................................................................................................................................ 3-16 3.3.4.1
ERS QUEUES ................................................................................................................ 4-1 CHAPTER 4
ERS QUEUE OVERVIEW .................................................................................................................... 4-1 4.1 4.1.1 Types of queues .................................................................................................................... 4-1
Processing queues .................................................................................................................................... 4-2 4.1.1.1
Holding Queues.......................................................................................................................................... 4-5 4.1.1.2
Completed Queues .................................................................................................................................... 4-6 4.1.1.3
GPS VS. MMR ELIGIBILITY QUEUES .................................................................................................. 4-6 4.2 4.2.1 Working on MMR Eligibility Queues ...................................................................................... 4-6
Eligibility Queues and Actions .................................................................................................................. 4-6 4.2.1.1
Accessing Eligibility Process Work form ................................................................................................. 4-2 4.2.1.2
Before working on the Eligibility Process Work form ............................................................................ 4-4 4.2.1.3
Eligibility Process Work form .................................................................................................................... 4-6
4.2.1.4
Work Case Section> Header .................................................................................................................... 4-7 4.2.1.5
Work Case Section> Case Details Tab .................................................................................................. 4-8 4.2.1.6
Work Case Section> Discrepancy Data Tab .......................................................................................... 4-9 4.2.1.7
Work Case Section> One Stop Shop Tab ............................................................................................ 4-10 4.2.1.8
Work Case Section> CMS Transaction Details Tab ........................................................................... 4-10 4.2.1.9
Work Case Section> Reference Cases Tab ........................................................................................ 4-11 4.2.1.10
Work Case Section> Comments tab ..................................................................................................... 4-12 4.2.1.11
Work Case Section> Attachments tab .................................................................................................. 4-13 4.2.1.12
Eligibility Process Work> Action Section .............................................................................................. 4-13 4.2.1.13
Eligibility Process Work >Workflow Log Section ................................................................................. 4-17 4.2.1.14
4.2.2 Searching Eligibility Cases .................................................................................................. 4-17
Searching Records .................................................................................................................................. 4-17 4.2.2.1
Conducting Advanced Record Searches ................................................................................................ 4-2 4.2.2.2
4.2.3 Working on DOB/Gender Queues ......................................................................................... 4-5
DOB/Gender Queues and Actions .......................................................................................................... 4-5 4.2.3.1
Before working on the DOB/Gender Process Work form ..................................................................... 4-8 4.2.3.2
DOB/Gender Process Work form ............................................................................................................ 4-8 4.2.3.3
Work Case Section> Header .................................................................................................................... 4-9 4.2.3.4
Work Case Section> Case Details Tab ................................................................................................ 4-10 4.2.3.5
Work Case Section> Discrepancy Data Tab ........................................................................................ 4-11 4.2.3.6
Work Case Section> One Stop Shop Tab ............................................................................................ 4-11 4.2.3.7
Work Case Section> Reference Cases Tab ........................................................................................ 4-12 4.2.3.8
Work Case Section> Comments Tab .................................................................................................... 4-12 4.2.3.9
Work Case Section> Attachment tab .................................................................................................... 4-12 4.2.3.10
DOB/Gender Work> Action Section ...................................................................................................... 4-13 4.2.3.11
DOB/ Gender Process Work >Workflow Log Section ......................................................................... 4-14 4.2.3.12
OST QUEUES ................................................................................................................................. 4-15 4.3 4.3.1 Working on OOA Queues .................................................................................................... 4-15
OOA Queues and Actions ...................................................................................................................... 4-15 4.3.1.1
Before working on the OOA Process Work form ................................................................................... 4-2 4.3.1.2
OOA Process Work form .......................................................................................................................... 4-4 4.3.1.3
Work Case Section> Header .................................................................................................................... 4-5 4.3.1.4
Work Case Section> Case Details Tab .................................................................................................. 4-6 4.3.1.5
Work Case Section> Discrepancy Data Tab .......................................................................................... 4-6 4.3.1.6
Work Case Section> CMS Transaction Details Tab ............................................................................. 4-7 4.3.1.7
Work Case Section> Address Validation-USPS tab ............................................................................. 4-8 4.3.1.8
Work Case Section> One Stop Shop Tab .............................................................................................. 4-9 4.3.1.9
Work Case Section> TRR Data Tab ..................................................................................................... 4-10 4.3.1.10
Work Case Section> Reference Cases Tab ........................................................................................ 4-10 4.3.1.11
Work Case Section> Comments Tab .................................................................................................... 4-11 4.3.1.12
OOA Process Work> Action Section ..................................................................................................... 4-11 4.3.1.13
OOA Process Work >Workflow Log Section ........................................................................................ 4-13 4.3.1.14
4.3.2 Searching OOA Cases ........................................................................................................ 4-14
Searching Records .................................................................................................................................. 4-14 4.3.2.1
Conducting Advanced Record Searches ................................................................................................ 4-2 4.3.2.2
4.3.3 Working on SSC Queues ...................................................................................................... 4-5
SSC Queues and Actions ......................................................................................................................... 4-6 4.3.3.1
Before working on the SSC Process Work form.................................................................................... 4-7 4.3.3.2
SSC Process Work form ........................................................................................................................... 4-8 4.3.3.3
ENRL RECON SYSTEM User’s Manual
©UnitedHealthcare 1.0 Page ix
Work Case Section> Header .................................................................................................................. 4-10 4.3.3.4
Work Case Section> Case Details Tab ................................................................................................. 4-10 4.3.3.5
Work Case Section> Discrepancy Data Tab ........................................................................................ 4-10 4.3.3.6
Work Case Section> CMS Transaction Details Tab ........................................................................... 4-10 4.3.3.7
Work Case Section> Address Validation –USPS ................................................................................ 4-10 4.3.3.8
Work Case Section> One Stop Shop Tab ............................................................................................ 4-10 4.3.3.9
Work Case Section> Reference Cases Tab ......................................................................................... 4-10 4.3.3.10
Work Case Section> Comments Tab .................................................................................................... 4-10 4.3.3.11
SSC Process Work> Action Section ...................................................................................................... 4-11 4.3.3.12
SSC Process Work >Workflow Log Section ......................................................................................... 4-13 4.3.3.13
4.3.4 Searching SSC Queues .......................................................................................................4-13
4.3.5 Working on TRR Queues .....................................................................................................4-13
TRR Queues and Actions ....................................................................................................................... 4-13 4.3.5.1
Before working on the TRR Process Work form .................................................................................. 4-15 4.3.5.2
TRR Process Work form ......................................................................................................................... 4-16 4.3.5.3
Work Case Section> Header .................................................................................................................. 4-18 4.3.5.4
Work Case Section> Case Details Tab ................................................................................................. 4-18 4.3.5.5
Work Case Section> Discrepancy Data Tab ........................................................................................ 4-19 4.3.5.6
Work Case Section> CMS Transaction Details Tab ........................................................................... 4-19 4.3.5.7
Work Case Section> Address Validation – USPS Tab ....................................................................... 4-19 4.3.5.8
Work Case Section> One Stop Shop Tab ............................................................................................ 4-20 4.3.5.9
Work Case Section> TRR Data Tab ...................................................................................................... 4-20 4.3.5.10
Work Case Section> Reference Cases Tab ......................................................................................... 4-20 4.3.5.11
Work Case Section> Comments Tab .................................................................................................... 4-20 4.3.5.12
SSC Process Work> Action Section ...................................................................................................... 4-20 4.3.5.13
TRR Process Work >Workflow Log Section ......................................................................................... 4-23 4.3.5.14
4.3.6 Searching TRR Queues .......................................................................................................4-24
RPR QUEUES ..................................................................................................................................4-24 4.4 4.4.1 Working on RPR Queues .....................................................................................................4-24
RPR Queues and Actions ....................................................................................................................... 4-24 4.4.1.1
Before working on the Manage Case form ............................................................................................. 4-6 4.4.1.2
Manage Case Form ................................................................................................................................... 4-9
4.4.1.3
1.1.1.1 Work Case Section> Header .................................................................................................................. 4-10
Work Case Section> Case Details Tab ................................................................................................. 4-10 4.4.1.4
Work Case Section> Discrepancy Data Tab ........................................................................................ 4-11 4.4.1.5
Work Case Section> CMS Transaction Details Tab ........................................................................... 4-12 4.4.1.6
Work Case Section> Address Verification-USPS Tab ........................................................................ 4-13 4.4.1.7
Work Case Section> One Stop Shop Tab ............................................................................................ 4-13 4.4.1.8
Work Case Section> Reference Cases Tab ......................................................................................... 4-13 4.4.1.9
Work Case Section> Comments Tab .................................................................................................... 4-14 4.4.1.10
Work Case Section> Attachments Tab ................................................................................................. 4-14 4.4.1.11
Manage Case> Action Section ............................................................................................................... 4-14 4.4.1.12
4.4.2 TRR Process Work >Workflow Log Section ........................................................................4-17
ERS MANAGERS ........................................................................................................... 5-1 CHAPTER 5
MANAGING BULK UPLOAD OF ENROLMENTS ....................................................................................... 5-1 5.1 5.1.1 Searching Bulk Uploaded cases ............................................................................................ 5-1
Search Results ........................................................................................................................................... 5-2 5.1.1.1
5.1.2 Uploading Bulk Enrolments .................................................................................................... 5-2
Bulk Upload Form ....................................................................................................................................... 5-3 5.1.2.1
5.1.3 Unlock Enrolments ................................................................................................................. 5-4
Searching unlocked enrollment ................................................................................................................ 5-4 5.1.3.1
Unlocking Enrolments ................................................................................................................................ 5-5 5.1.3.2
REASSIGN ENROLMENT ...................................................................................................................... 5-6 5.2 5.2.1 Searching Reassigned Enrollment ........................................................................................ 5-6
Reassign Search form ............................................................................................................................... 5-6 5.2.1.1
Advanced Search ....................................................................................................................................... 5-7 5.2.1.2
Search Results ........................................................................................................................................... 5-7 5.2.1.3
1.2.1.1 Reassigning Enrollment............................................................................................................................. 5-7
MASS UPDATE ................................................................................................................................... 5-9 5.3 5.3.1 Searching Records for Mass Update ..................................................................................... 5-9
Reassign Search form ............................................................................................................................. 5-10 5.3.1.1
Advanced Search ..................................................................................................................................... 5-10 5.3.1.2
Search Results ......................................................................................................................................... 5-10 5.3.1.3
1.3.1.1 Updating mass records ............................................................................................................................ 5-11
ERS ADMINISTRATION ................................................................................................. 6-1 CHAPTER 6
ENRL RECON SYSTEM User’s Manual
Page x 1.0 ©United Healthcare
MANAGE SKILLS ............................................................................................................................... 6-1 6.1 6.1.1 Searching Skills ..................................................................................................................... 6-1
The Skill Search window ........................................................................................................................... 6-1 6.1.1.1
Search Results ........................................................................................................................................... 6-2 6.1.1.2
6.1.2 Adding/Creating New Skills ................................................................................................... 6-3
Adding Work queue to Skills .................................................................................................................... 6-4 6.1.2.1
Editing/ Adding skills .................................................................................................................................. 6-5 6.1.2.2
MANAGE ACCESS GROUP .................................................................................................................. 6-5 6.2 6.2.1 Searching Access Group ....................................................................................................... 6-5
6.2.2 Managing access group ........................................................................................................ 6-6
Editing/ Adding Access Groups ............................................................................................................... 6-6 6.2.2.1
Access Group Forms ................................................................................................................................. 6-7 6.2.2.2
ERS ADMINISTRATION ....................................................................................................................... 6-8 6.3 6.3.1 Manage users ........................................................................................................................ 6-8
6.3.2 Searching users..................................................................................................................... 6-8
Searching users ......................................................................................................................................... 6-9 6.3.2.1
User Search Result .................................................................................................................................... 6-9
6.3.2.2
6.3.3 Managing users ................................................................................................................... 6-10
Adding users admin ................................................................................................................................. 6-10 6.3.3.1
User Administration form ........................................................................................................................ 6-11 6.3.3.2
ERS MAINTENANCE ..................................................................................................... 7-1 CHAPTER 7
ENROLMENT MAINTENANCE ............................................................................................................... 7-1 7.1 7.1.1 Maintaining Alerts .................................................................................................................. 7-1
Searching Alerts ......................................................................................................................................... 7-1 7.1.1.1
Adding Alerts .............................................................................................................................................. 7-3 7.1.1.2
Editing Alerts ............................................................................................................................................... 7-4 7.1.1.3
Viewing Alert History ................................................................................................................................. 7-5 7.1.1.4
7.1.2 Maintaining Configurations .................................................................................................... 7-5
Searching Alerts ......................................................................................................................................... 7-5 7.1.2.1
Adding Configurations ............................................................................................................................... 7-7 7.1.2.2
Editing Configurations ............................................................................................................................... 7-8 7.1.2.3
Viewing Configurations History ................................................................................................................ 7-9 7.1.2.4
7.1.3 Maintaining Departments ...................................................................................................... 7-9
Searching Departments ............................................................................................................................ 7-9 7.1.3.1
Adding Departments ................................................................................................................................ 7-11 7.1.3.2
Editing Departments ................................................................................................................................ 7-12 7.1.3.3
Viewing Departments History ................................................................................................................. 7-13 7.1.3.4
7.1.4 Maintaining Lookups ........................................................................................................... 7-13
Searching Lookups .................................................................................................................................. 7-14 7.1.4.1
Adding Lookups........................................................................................................................................ 7-15 7.1.4.2
Editing Lookups ........................................................................................................................................ 7-16 7.1.4.3
Adding/Editing Lookup values ................................................................................................................ 7-17 7.1.4.4
Lookup Master .......................................................................................................................................... 7-19 7.1.4.5
Adding Lookups........................................................................................................................................ 7-19 7.1.4.6
Editing Lookups ........................................................................................................................................ 7-19
7.1.4.7
Viewing Lookup Masters ......................................................................................................................... 7-20 7.1.4.8
7.1.5 Maintaining Lookup Correlations ......................................................................................... 7-20
Searching Correlation Groups ................................................................................................................ 7-20 7.1.5.1
Adding Correlation Groups ..................................................................................................................... 7-22 7.1.5.2
Editing Correlation Groups ..................................................................................................................... 7-23 7.1.5.3
Adding/Editing Correlation Master table ............................................................................................... 7-24 7.1.5.4
Correlation Master Table ........................................................................................................................ 7-25 7.1.5.5
Adding Correlations ................................................................................................................................. 7-26 7.1.5.6
Viewing History lookup Correlation ....................................................................................................... 7-26 7.1.5.7
7.1.6 Maintaining Resources ........................................................................................................ 7-27
Searching Resources .............................................................................................................................. 7-27 7.1.6.1
Adding Resources .................................................................................................................................... 7-28 7.1.6.2
Editing Resources .................................................................................................................................... 7-29 7.1.6.3
Viewing Departments History ................................................................................................................. 7-30 7.1.6.4
REPORTS ....................................................................................................................... 8-1 CHAPTER 8
REPORT OVERVIEW ........................................................................................................................... 8-1 8.1 8.1.1 Types of Reports ................................................................................................................... 8-1
Standard Reports ....................................................................................................................................... 8-1 8.1.1.1
Queue Summary Reports ......................................................................................................................... 8-1 8.1.1.2
ENRL RECON SYSTEM User’s Manual
©UnitedHealthcare 1.0 Page xi
History Reports ........................................................................................................................................... 8-1 8.1.1.3
WORKING ON THE REPORTS ............................................................................................................... 8-2 8.2 8.2.1 Accessing ERS Reports ......................................................................................................... 8-2
Accessing Standard Reports .................................................................................................................... 8-2 8.2.1.1
Accessing Queue Summary Reports ...................................................................................................... 8-3 8.2.1.2
Accessing History Reports ........................................................................................................................ 8-4 8.2.1.3
8.2.2 ERS Standard Reports .......................................................................................................... 8-6
ERS Home Page Summary Report ......................................................................................................... 8-6 8.2.2.1
ERS Error Logging Report ........................................................................................................................ 8-7 8.2.2.2
Daily Dashboard Summary Report .......................................................................................................... 8-8 8.2.2.3
Locked Records Report ........................................................................................................................... 8-12 8.2.2.4
MTD Peer Audit Quality Report .............................................................................................................. 8-13 8.2.2.5
Pending Summary Report ....................................................................................................................... 8-15 8.2.2.6
Monthly Metrics Report ............................................................................................................................ 8-18 8.2.2.7
OOA Tracking Report .............................................................................................................................. 8-18 8.2.2.8
RPR Submission Report ......................................................................................................................... 8-18 8.2.2.9
8.2.3 ERS Queue Summary Reports ............................................................................................8-19
8.2.4 ERS History Reports ............................................................................................................8-19
User Admin History Report ..................................................................................................................... 8-19 8.2.4.1
Access Group History Report ................................................................................................................. 8-20 8.2.4.2
Skills History Report ................................................................................................................................. 8-21 8.2.4.3
Alert History Report .................................................................................................................................. 8-21 8.2.4.4
Configuration History Report .................................................................................................................. 8-22 8.2.4.5
Department History Report ..................................................................................................................... 8-22 8.2.4.6
Lookups History Report ........................................................................................................................... 8-23 8.2.4.7
Lookups Correlation History Report ....................................................................................................... 8-23 8.2.4.8
Resource History Report ......................................................................................................................... 8-24 8.2.4.9
Eligibility: Queue History Report ............................................................................................................ 8-24 8.2.4.10
DOB: Queue History Report ................................................................................................................... 8-24 8.2.4.11
Gender: Queue History Report ............................................................................................................... 8-24 8.2.4.12
OOA: Queue History Report ................................................................................................................... 8-24 8.2.4.13
SCC: Queue History Report.................................................................................................................... 8-24
8.2.4.14
TRR: Queue History Report .................................................................................................................... 8-24 8.2.4.15
RPR: Queue History Report.................................................................................................................... 8-24 8.2.4.16

ENRL RECON SYSTEM User’s Manual
Page xii 1.0 ©United Healthcare
List of Figures
Figure 2-1: The Login Page ...................................................................................................................... 2-1
Figure 2-2: Business Segment.................................................................................................................. 2-2
Figure 2-3: Work Basket ........................................................................................................................... 2-2
Figure 2-4: Roles ...................................................................................................................................... 2-2
Figure 2-5: The Login Page ...................................................................................................................... 2-2
Figure 2-6: The Cancelling Log message ................................................................................................. 2-3
Figure 2-7: The ERS Application>Home Page ......................................................................................... 2-3
Figure 2-8: The Logout Section ................................................................................................................ 2-4
Figure 2-9: ERS message for Log out ...................................................................................................... 2-4
Figure 2-10: The ERS Log Out Message ................................................................................................. 2-4
Figure 2-11: The Logout Page .................................................................................................................. 2-5
Figure 2-12: The ERS Home Page ........................................................................................................... 2-5
Figure 2-13: ERS Application Menus ........................................................................................................ 2-6
Figure 2-14: User details Section.............................................................................................................. 2-6
Figure 2-15: The User Access Link .......................................................................................................... 2-7
Figure 2-16: The User Access Details Table ............................................................................................ 2-7
Figure 2-17: The User Preference Link .................................................................................................... 2-7
Figure 2-18: User Preference Table ......................................................................................................... 2-8
Figure 2-19: The Logout Link .................................................................................................................... 2-9
Figure 2-20: The Logout Message ............................................................................................................ 2-9
Figure 2-21: Recon Queue Summaries section...................................................................................... 2-10
Figure 2-22: The Pending Work Baskets Table ...................................................................................... 2-10
Figure 2-23: ERS Application Menu Bar ................................................................................................. 2-11
Figure 2-24: The ERS Application>Maintenance Menu ......................................................................... 2-12
Figure 2-25: ERS Application> Sub-menu and Associated menu .......................................................... 2-12
Figure 2-26: ERS Error Message............................................................................................................ 2-16
Figure 2-27: ERS Warning Message ...................................................................................................... 2-16
Figure 2-28: ERS Confirmation Message ............................................................................................... 2-17
Figure 2-29: ERS Notifications................................................................................................................ 2-17
Figure 2-30: ERS Alert Message ............................................................................................................ 2-17
Figure 2-31: Add Attachment Link .......................................................................................................... 2-17
Figure 2-32: The File Upload Dialog ....................................................................................................... 2-18
Figure 2-33: The document in local drive ............................................................................................... 2-18
Figure 2-34: Attached File> Attachment Tab .......................................................................................... 2-18
Figure 2-35: Action column> Delete Files ............................................................................................... 2-18
Figure 2-36: Confirmation Message ....................................................................................................... 2-19
Figure 2-37: The Date Picker control ...................................................................................................... 2-19
Figure 2-38: Calendar control ................................................................................................................. 2-20
Figure 3-1: Create Eligibility Case> Eligibility ........................................................................................... 3-1
Figure 3-2: The Create Eligibility Case form ............................................................................................. 3-2
Figure 3-3: The Creating Eligibility Cases form>Discrepancy Data Section ............................................ 3-3
Figure 3-4: The Eligibility>DOB> Create Suspect Case link .................................................................... 3-6
Figure 3-5: The Eligibility>Gender> Create Suspect Case link ................................................................ 3-6
Figure 3-6: The Create DOB Case form ................................................................................................... 3-7
Figure 3-7: The Create Gender Case form ............................................................................................... 3-7
Figure 3-8: Accessing Create OOA Form ............................................................................................... 3-10
Figure 3-9: The Create OOA Case form ................................................................................................. 3-10
Figure 3-10: The Create OOA Case form> Member Info Tab ................................................................ 3-10
Figure 3-11: The Create OOA Case form> Discrepancy Info Tab ......................................................... 3-12
Figure 3-12: The Create OOA Case form> Add Comments Section ...................................................... 3-12
Figure 3-13: The Create SSC Case form ............................................................................................... 3-13
Figure 3-14: The SSC Case for>Discrepancy Info tab ........................................................................... 3-13
Figure 3-15: The Create TRR Case form ............................................................................................... 3-15
Figure 3-16: The Create TRR Case form> Member Info Tab ................................................................. 3-15
Figure 3-17: The Create TRR Case form ............................................................................................... 3-15
Figure 3-18: Transaction Code field ....................................................................................................... 3-16
Figure 3-19: The Create RPS Case form ............................................................................................... 3-17
Figure 3-20: ............................................................................................................................................. 3-17
Figure 4-1: Access the Work Item <Module Name> ................................................................................. 4-2
Figure 4-2: The OOA Queue Summary .................................................................................................... 4-2

ENRL RECON SYSTEM User’s Manual
©UnitedHealthcare 1.0 Page xiii
Figure 4-3: Work Item - OOA .................................................................................................................... 4-3
Figure 4-4: The Get Next button ................................................................................................................ 4-3
Figure 4-5: The Cancel button ................................................................................................................... 4-3
Figure 4-6: Access the Work Item <Module Name> ................................................................................. 4-3
Figure 4-7: The OOA Queue Summary> View Queue icon ...................................................................... 4-4
Figure 4-8: OOA Search Window and Search Results ............................................................................. 4-4
Figure 4-9: Access the Work Item <Module Name> ................................................................................. 4-5
Figure 4-10: The OOA Queue Summary> Queue Icon ............................................................................. 4-5
Figure 4-11: Report XXXXX ...................................................................................................................... 4-5
Figure 4-12: Accessing Eligibility Queue Summary Page ......................................................................... 4-3
Figure 4-13: The Eligibility Queue Summary page ................................................................................... 4-3
Figure 4-14: The Work Item-- Eligibility section......................................................................................... 4-3
Figure 4-15: The Eligibility Process Work form ......................................................................................... 4-4
Figure 4-16: The Eligibility Queue Summary Page .................................................................................. 4-4
Figure 4-17: Work Item - Eligibility form .................................................................................................... 4-5
Figure 4-18: The Eligibility Queue Search form ........................................................................................ 4-6
Figure 4-19: The Eligibility Process Work form ......................................................................................... 4-7
Figure 4-20: Work Case Section> Header Section ................................................................................... 4-7
Figure 4-21: Work Case Section> Case Details Tab ................................................................................ 4-8
Figure 4-22: The Discrepancy Data Tab> Discrepancy Data Sub-tab ...................................................... 4-9
Figure 4-23: Discrepancy Data Tab>UPSC Data Sub-tab ......................................................................4-10
Figure 4-24: Discrepancy Data Tab>UPSC Data Sub-tab ......................................................................4-10
Figure 4-25: Work Case Section> One Stop Shop Tab ..........................................................................4-10
Figure 4-26: Work Case Section> CMS Transaction Details Tab ...........................................................4-10
Figure 4-27: Work Case Section> Updated CMS Transaction Details Tab ............................................4-11
Figure 4-28: Work Case Section> Reference Cases Tab .......................................................................4-12
Figure 4-29: Work Case Section> Reference Cases Tab .......................................................................4-13
Figure 4-30: Work Case Section> Attachments tab ................................................................................4-13
Figure 4-31: The RPR Info section in Action section ..............................................................................4-16
Figure 4-32: Workflow Log Section .........................................................................................................4-17
Figure 4-33: The Eligibility Search form ..................................................................................................4-18
Figure 4-34: Search Results table ...........................................................................................................4-19
Figure 4-35: Advanced Search Form ........................................................................................................ 4-2
Figure 4-36: The Advanced Search Form tabs ......................................................................................... 4-2
Figure 4-37: Expanded Tab ....................................................................................................................... 4-2
Figure 4-38: Advanced Search Form> Expanded Tabs ............................................................................ 4-2
Figure 4-39: Accessing DOB Queue Summary Page ............................................................................... 4-6
Figure 4-40: Accessing Gender Queue Summary Page ........................................................................... 4-6
Figure 4-41: The DOB Queue Summary page .......................................................................................... 4-6
Figure 4-42: The Gender Queue Summary page ..................................................................................... 4-6
Figure 4-43: The Work Item-- DOB section ............................................................................................... 4-7
Figure 4-44: The Work Item-- Gender section........................................................................................... 4-7
Figure 4-45: The DOB Process Work form ............................................................................................... 4-7
Figure 4-46: The Gender Process Work form ........................................................................................... 4-8
Figure 4-47: The DOB Process Work form ............................................................................................... 4-9
Figure 4-48: Work Case Section (DOB)> Header Section ......................................................................4-10
Figure 4-49: Work Case Section (Gender)> Header Section ..................................................................4-10
Figure 4-50: Work Case Section (DOB)> Case Details Tab ...................................................................4-10
Figure 4-51: Work Case Section (Gender)> Case Details Tab ...............................................................4-10
Figure 4-52: Discrepancy Data Tab (DOC)> GPS Data Sub-tab ............................................................4-11
Figure 4-53: Discrepancy Data Tab (Gender)> GPS Data Sub-tab ........................................................4-11
Figure 4-54: Work Case Section (DOB)> One Stop Shop Tab ...............................................................4-11
Figure 4-55: Work Case Section (Gender)> One Stop Shop Tab ...........................................................4-12
Figure 4-56: Work Case Section (DOB)> Comments Tab ......................................................................4-12
Figure 4-57: Work Case Section (Gender)> Comments Tab ..................................................................4-12
Figure 4-58: Work Case Section> Attachment tab ..................................................................................4-12
Figure 4-59: Work Case Section> Attachment tab on> Attachment section ...........................................4-13
Figure 4-60: Workflow Log Section (DOB) ..............................................................................................4-15
Figure 4-61: Workflow Log Section (Gender) ..........................................................................................4-15
Figure 4-62: The OOA Queue Summary Page ........................................................................................ 4-3
Figure 4-63: Work Item - OOA form .......................................................................................................... 4-3
Figure 4-64: The OOA Queue Search form .............................................................................................. 4-4
Figure 4-65: Accessing OOA Queue Summary Page ............................................................................... 4-4
Figure 4-66: The OOA Queue Summary page.......................................................................................... 4-5
ENRL RECON SYSTEM User’s Manual
Page xiv 1.0 ©United Healthcare
Figure 4-67: The Work Item--OOA section ............................................................................................... 4-5
Figure 4-68: The OOA Process Work form ............................................................................................... 4-5
Figure 4-69: Work Case Section> Header Section ................................................................................... 4-5
Figure 4-70: Work Case Section> Case Details Tab ................................................................................ 4-6
Figure 4-71: The Discrepancy Data Tab> GPS Data Sub-tab.................................................................. 4-7
Figure 4-72: Work Case Section> CMS Transaction Details Tab ............................................................ 4-8
Figure 4-73: Work Case Section> Updated CMS Transaction Details Tab .............................................. 4-8
Figure 4-74: Work Case Section> One Stop Shop Tab............................................................................ 4-9
Figure 4-75: TRR Data Tab> Summary Information Sub-tab ................................................................. 4-10
Figure 4-76: TRR Data Tab> Bad Transaction History Sub-tab ............................................................. 4-10
Figure 4-77: TRR Data Tab> Bad Transaction Pending Sub-tab ........................................................... 4-10
Figure 4-78: TRR Data Tab> Bad Transaction Response Sub-tab ........................................................ 4-10
Figure 4-79: Work Case Section> Reference Cases Tab ...................................................................... 4-11
Figure 4-80: Work Case Section> Comments Tab ................................................................................. 4-11
Figure 4-81: Workflow Log Section ......................................................................................................... 4-14
Figure 4-82: The Search OOA records form ........................................................................................... 4-14
Figure 4-83: Search Result ..................................................................................................................... 4-15
Figure 4-84: Advanced Search Form ........................................................................................................ 4-2
Figure 4-85: The Advanced Search Form tabs ......................................................................................... 4-2
Figure 4-86: Expanded Tab ...................................................................................................................... 4-2
Figure 4-87: Advanced Search Form> Expanded Tabs ........................................................................... 4-3
Figure 4-88: The SSC Queue Summary Page ........................................................................................ 4-7
Figure 4-89: Accessing SSC Queue Summary Page ............................................................................... 4-8
Figure 4-90: The SSC Queue Summary page .......................................................................................... 4-9
Figure 4-91: The Work Item—SSC section .............................................................................................. 4-9
Figure 4-92: The SSC Process Work form ............................................................................................... 4-9
Figure 4-93: Work Case Section> Header Section ................................................................................. 4-10
Figure 4-94: Work Case Section> Case Details Tab .............................................................................. 4-10
Figure 4-95: SSC Process Work Form> Workflow Log Section ............................................................. 4-13
Figure 4-96: The TRR Queue Summary Page ...................................................................................... 4-16
Figure 4-97: Accessing TRR Get Queue Link ........................................................................................ 4-17
Figure 4-98: The TRR Queue Summary page ........................................................................................ 4-17
Figure 4-99: The Work Item—TRR section ............................................................................................ 4-17
Figure 4-100: The Next TRR Work Item ................................................................................................. 4-18
Figure 4-101: ........................................................................................................................................... 4-18
Figure 4-102: The TRR Process Work form ........................................................................................... 4-18
Figure 4-103: Work Case Section> Header Section ............................................................................... 4-18
Figure 4-104: Work Case Section> Case Details Tab ............................................................................ 4-19
Figure 4-105: The TRR Process Form>Discrepancy Data tab ............................................................... 4-19
Figure 4-106: Work Case Section> CMS Transaction Details Tab ........................................................ 4-19
Figure 4-107: Work Case Section> Address Validation – USPS ........................................................... 4-20
Figure 4-108: Work Case Section> One Stop Shop Tab........................................................................ 4-20
Figure 4-109: The Action field>Close Case ............................................................................................ 4-23
Figure 4-110: The Action field>Send SSC Updates to CMS .................................................................. 4-23
Figure 4-111: The Action field>SSC RPR Request. ............................................................................... 4-23
Figure 4-112: The Action field>Send SSC Updates to CMS .................................................................. 4-23
Figure 4-113: Workflow Log Section ....................................................................................................... 4-24
Figure 4-114: Accessing RPR Queue Summary Page ............................................................................. 4-5
Figure 4-115: The RPR Queue Summary page ....................................................................................... 4-5
Figure 4-116: The Work Item -- RPR section ........................................................................................... 4-5
Figure 4-117: The Work Item- Start Processing button ............................................................................ 4-5
Figure 4-118: The Work Item – Get Next button....................................................................................... 4-6
Figure 4-119: The Manage Case form ...................................................................................................... 4-6
Figure 4-120: The RPR Queue Summary page ...................................................................................... 4-7
Figure 4-121: The Work Item - RPR form ................................................................................................. 4-8
Figure 4-122: The RPR Queue Search form ............................................................................................ 4-9
Figure 4-123: The Manage Case form .................................................................................................... 4-10
Figure 4-124: Work Case Section> Header Section ............................................................................... 4-10
Figure 4-125: Work Case Section> Case Details Tab ............................................................................ 4-10
Figure 4-126: The Discrepancy Data Tab> GPS Data Sub-tab.............................................................. 4-12
Figure 4-127: Work Case Section> CMS Transaction Details Tab ........................................................ 4-12
Figure 4-128: Work Case Section> Address Verification-USPS Tab ..................................................... 4-13
Figure 4-129: Discrepancy Data Tab>UPSC Data Sub-tab ................................................................... 4-13
Figure 4-130: Work Case Section> One Stop Shop Tab........................................................................ 4-13
ENRL RECON SYSTEM User’s Manual
©UnitedHealthcare 1.0 Page xv
Figure 4-131: Work Case Section> Reference Cases Tab .....................................................................4-13
Figure 4-132: The Work Case Section> Comments Tab ........................................................................4-14
Figure 4-133: Work Case Section> Attachments Tab .............................................................................4-14
Figure 4-134: Thick RPR Request section in Action section ...................................................................4-16
Figure 4-135: Workflow Log Section .......................................................................................................4-17
Figure 5-1: Manager Subsystem> Bulk Upload Link ................................................................................. 5-1
Figure 5-2: Bulk Uploaded form> Searching Bulk uploaded cases ........................................................... 5-2
Figure 5-3: Bulk Import Search Results ................................................................................................... 5-2
Figure 5-4: Bulk Upload Form ................................................................................................................... 5-3
Figure 5-5: The Unlock Search Form ........................................................................................................ 5-4
Figure 5-6: The Search Results ................................................................................................................ 5-5
Figure 5-7: The Unlock form ...................................................................................................................... 5-5
Figure 5-8: Reassign Search ..................................................................................................................... 5-6
Figure 5-9: The Search Results ................................................................................................................ 5-7
Figure 5-10: The Search Results Section ................................................................................................. 5-7
Figure 5-11: Selecting Records ................................................................................................................. 5-8
Figure 5-12: The Select All column ........................................................................................................... 5-8
Figure 5-13: Bulk Reassign dialogue window ........................................................................................... 5-8
Figure 5-14: Bulk assignment success message ...................................................................................... 5-9
Figure 5-15: Mass Update Link ................................................................................................................. 5-9
Figure 5-16: Reassign Search .................................................................................................................5-10
Figure 5-17: The Search Results ............................................................................................................5-10
Figure 5-18: The Search Results Section ...............................................................................................5-11
Figure 5-19: Selecting Records ...............................................................................................................5-11
Figure 5-20: The Select All column .........................................................................................................5-11
Figure 5-21: The Action dialogue window ...............................................................................................5-12
Figure 6-1: Administration Menu> Manage Skills link ............................................................................... 6-1
Figure 6-2: The Skill Search window ......................................................................................................... 6-2
Figure 6-3: The Skill Search Results ......................................................................................................... 6-2
Figure 6-4: Skill Window> Adding Skills .................................................................................................... 6-3
Figure 6-5: The Adding Work queue> Edit mode ...................................................................................... 6-4
Figure 6-6: The Adding Work queue> Queue Added ................................................................................ 6-4
Figure 6-7: Searching Access Groups ...................................................................................................... 6-5
Figure 6-8: Manage Access Group Link .................................................................................................... 6-6
Figure 6-9: Access Group Search Form .................................................................................................... 6-6
Figure 6-10: Access Group form ............................................................................................................... 6-7
Figure 6-11: Adding Access Group ........................................................................................................... 6-7
Figure 6-12: Accessing Search User Form ............................................................................................... 6-9
Figure 6-13: Search User form .................................................................................................................. 6-9
Figure 6-14: Search User Page ................................................................................................................. 6-9
Figure 6-15: User Search form .................................................................................................................. 6-9
Figure 6-16: Adding User Administration form ........................................................................................6-10
Figure 6-17: The User Administration form .............................................................................................6-11
Figure 7-1: The Search Alerts search window .......................................................................................... 7-1
Figure 7-2: The Alert Search Results ........................................................................................................ 7-2
Figure 7-3: The Alert Multiple Search Results........................................................................................... 7-2
Figure 7-4: Search Alerts > Adding Alerts ................................................................................................. 7-3
Figure 7-5: The Alert Form ........................................................................................................................ 7-3
Figure 7-6: The Alert Search Result .......................................................................................................... 7-4
Figure 7-7: The Search Results> Action column ....................................................................................... 7-4
Figure 7-8: The Alert form for Editing ........................................................................................................ 7-5
Figure 7-9: The Search Configurations search window ............................................................................ 7-5
Figure 7-10: The Configurations Search Results ...................................................................................... 7-6
Figure 7-11: The Configurations Multiple Search Results ......................................................................... 7-6
Figure 7-12: The Search Configurations Window> Adding Configurations .............................................. 7-7
Figure 7-13: The Add Configurations Form ............................................................................................... 7-7
Figure 7-14: The Configurations Search Results ...................................................................................... 7-8
Figure 7-15: The Search Results> Action column ..................................................................................... 7-8
Figure 7-16: The Edit Configurations form for editing ............................................................................... 7-9
Figure 7-17: The Accessing Configuration History Report ........................................................................ 7-9
Figure 7-18: The Configuration History Report ......................................................................................... 7-9
Figure 7-19: The Search Department search window .............................................................................7-10
Figure 7-20: The Departments Search Results .......................................................................................7-10
Figure 7-21: The Departments Multiple Search Results .........................................................................7-10
ENRL RECON SYSTEM User’s Manual
Page xvi 1.0 ©United Healthcare
Figure 7-22: The Search Department Window> Adding Departments ................................................... 7-11
Figure 7-23: The Add Department Form ................................................................................................. 7-11
Figure 7-24: The Department Search Results ........................................................................................ 7-12
Figure 7-25: The Search Results> Action column .................................................................................. 7-13
Figure 7-26: The Edit Department form for editing ................................................................................. 7-13
Figure 7-27: Accessing Department History ........................................................................................... 7-13
Figure 7-28: Department History Report ................................................................................................. 7-13
Figure 7-29: The Search Lookup Type search window .......................................................................... 7-14
Figure 7-30: The Lookups Search Results ............................................................................................. 7-15
Figure 7-31: The Lookups Multiple Search Results ................................................................................ 7-15
Figure 7-32: The Search Lookups Window> Adding Lookups ............................................................... 7-16
Figure 7-33: The Add Lookups Form ...................................................................................................... 7-16
Figure 7-34: The Lookups Search Results ............................................................................................. 7-17
Figure 7-35: The Search Results> Action column .................................................................................. 7-17
Figure 7-36: The Edit Lookups form for editing ...................................................................................... 7-17
Figure 7-37: The Lookup Search Result ................................................................................................. 7-18
Figure 7-38: The View Lookup Master icon ............................................................................................ 7-18
Figure 7-39: The Lookup Master Table .................................................................................................. 7-18
Figure 7-40: The Add/Edit Lookup value form ........................................................................................ 7-19
Figure 7-41: The Lookup Master Table .................................................................................................. 7-19
Figure 7-42: Adding/Editing Lookups ...................................................................................................... 7-19
Figure 7-43: The Lookup Master............................................................................................................. 7-20
Figure 7-44: The Search Lookup Type search window .......................................................................... 7-21
Figure 7-45: The Correlation Group Search Results .............................................................................. 7-21
Figure 7-46: The Correlation Group Search Results .............................................................................. 7-22
Figure 7-47: The Search Correlation Window> Adding Lookups ........................................................... 7-23
Figure 7-48: The Add Correlation Form .................................................................................................. 7-23
Figure 7-49: The Correlation Search Results ......................................................................................... 7-23
Figure 7-50: The Search Results> Action column .................................................................................. 7-24
Figure 7-51: The Edit Correlation form for editing .................................................................................. 7-24
Figure 7-52: The Correlation Search Result ........................................................................................... 7-24
Figure 7-53: The View Correlation Master icon ...................................................................................... 7-25
Figure 7-54: The Correlation Masters Table ........................................................................................... 7-25
Figure 7-55: The Add/Edit correlation value form ................................................................................... 7-25
Figure 7-56: The Correlation Master Table ............................................................................................. 7-26
Figure 7-57: Adding/Editing Lookups ...................................................................................................... 7-26
Figure 7-58: Accessing History Lookup Correlation form ....................................................................... 7-26
Figure 7-59: The Lookup Correlation History .......................................................................................... 7-27
Figure 7-60: The Search Resources search window .............................................................................. 7-27
Figure 7-61: The Resource Search Results ........................................................................................... 7-28
Figure 7-62: The Departments Multiple Search Results ......................................................................... 7-28
Figure 7-63: The Search Resources Window> Adding Resources ........................................................ 7-29
Figure 7-64: The Resource Form............................................................................................................ 7-29
Figure 7-65: The Resource Search Results ........................................................................................... 7-30
Figure 7-66: The Search Results> Action column .................................................................................. 7-30
Figure 7-67: The Resource form for editing ............................................................................................ 7-30
Figure 7-68: The Search Results ............................................................................................................ 7-30
Figure 7-69: The Department History Report ......................................................................................... 7-31
Figure 8-1: The Reports Menu .................................................................................................................. 8-2
Figure 8-2: The Generate Report Search Window ................................................................................... 8-2
Figure 8-3: Report Name Window> Selecting Report Name .................................................................... 8-2
Figure 8-4: The Report View button .......................................................................................................... 8-2
Figure 8-5: Report Filers ........................................................................................................................... 8-3
Figure 8-6: The Standard Report .............................................................................................................. 8-3
Figure 8-7: Accessing OOA Queue Summary Report .............................................................................. 8-3
Figure 8-8: OAA Queue Summary page ................................................................................................... 8-4
Figure 8-9: View Report icon in Action column ......................................................................................... 8-4
Figure 8-10: Administration Menu>Manage User Sub-menu ................................................................... 8-5
Figure 8-11: The User Search Results table ............................................................................................ 8-5
Figure 8-12: Action column> View Reports Icon ...................................................................................... 8-5
Figure 8-13: The User Admin History Report ........................................................................................... 8-5
Figure 8-14: Accessing Error Logging Report .......................................................................................... 8-6
Figure 8-15: The Home Page Summary Report ....................................................................................... 8-7
Figure 8-16: Accessing Error Logging Report .......................................................................................... 8-7
ENRL RECON SYSTEM User’s Manual
©UnitedHealthcare 1.0 Page xvii
Figure 8-17: The Error Logging Reports ................................................................................................... 8-8
Figure 8-18: Daily Dashboard Report ........................................................................................................ 8-8
Figure 8-19: Daily Dashboard summary Report ........................................................................................ 8-9
Figure 8-20: Discrepancy Category in Report ........................................................................................... 8-9
Figure 8-21: Daily Dashboard Summary Report >OOA ..........................................................................8-10
Figure 8-22: Daily Dashboard Summary Report >SCC ..........................................................................8-10
Figure 8-23: Daily Dashboard Summary Report >TRR ...........................................................................8-11
Figure 8-24: Daily Dashboard Summary Report >Eligibility ....................................................................8-11
Figure 8-25: Daily Dashboard Summary Report >DOB ..........................................................................8-11
Figure 8-26: Daily Dashboard Summary Report >Gender ......................................................................8-11
Figure 8-27: Daily Dashboard Summary Report >RPR ..........................................................................8-12
Figure 8-28: ERS Locked Records Report ..............................................................................................8-12
Figure 8-29: The ERS Locked Records Report.......................................................................................8-12
Figure 8-30: MTD Peer Audit Quality Report ..........................................................................................8-13
Figure 8-31: The Month Date and Discrepancy Category Fields ............................................................8-13
Figure 8-32: MTD Peer Audit Quality Report ..........................................................................................8-13
Figure 8-33: MTD Peer Audit Quality Report> OOA ...............................................................................8-14
Figure 8-34: MTD Peer Audit Quality Report> SCC ................................................................................8-14
Figure 8-35: MTD Peer Audit Quality Report> TRR ................................................................................8-14
Figure 8-36: MTD Peer Audit Quality Report> Eligibility .........................................................................8-14
Figure 8-37: MTD Peer Audit Quality Report> Gender ...........................................................................8-14
Figure 8-38: MTD Peer Audit Quality Report> DOB ...............................................................................8-15
Figure 8-39: MTD Peer Audit Quality Report> RPR ................................................................................8-15
Figure 8-40: Pending Report ...................................................................................................................8-15
Figure 8-41: The Discrepancy Category Field .........................................................................................8-15
Figure 8-42: Pending Summary Report ...................................................................................................8-16
Figure 8-43: Pending Summary Report> OOA .......................................................................................8-16
Figure 8-44: Pending Summary Report> SCC ........................................................................................8-16
Figure 8-45: Pending Summary Report> Eligibility .................................................................................8-17
Figure 8-46: Pending Summary Report> DOB ........................................................................................8-17
Figure 8-47: Pending Summary Report> Gender ...................................................................................8-17
Figure 8-48: Pending Summary Report> RPR ........................................................................................8-17
Figure 8-49: RPR Submission Report .....................................................................................................8-18
Figure 8-50: The User Admin History Report ..........................................................................................8-19
Figure 8-51: The Access Group History Report .....................................................................................8-20
Figure 8-52: The Skills History Report ....................................................................................................8-21
Figure 8-53: Alert History Report .............................................................................................................8-21
Figure 8-54: Configuration History Report ...............................................................................................8-22
Figure 8-55: Department History Report .................................................................................................8-22
Figure 8-56: Lookups History Report ......................................................................................................8-23
Figure 8-57: Lookups Correlation History Report ....................................................................................8-23
Figure 8-58: Resource History Report .....................................................................................................8-24

©United Healthcare 1.0 Page 1-1
Introduction Chapter 1
This chapter provides an introductory overview of the ERSs application and other key features of the
application. The chapter contains the following sections:
Introduction to ENRL RECON SYSTEM
ERS Overview
ERS Application
Key aspects in ERS
Introduction to ENRL RECON SYSTEM 1.1
Welcome to the ENR RECON SYSTEM User’s Guide. This user’s guide contains the information that the
ERS users need to know to work with the ERS application effectively. This guide contains the below
information:
Overview and reference information
Features and functionalities of the ERS application
Details about the ERS systems and subsystems
ERS Overview 1.2
ENRL RECON SYSTEM or Enrolment Reconciliation System (ERS) aims at identifying member data
issues, discrepancies, and data mismatches between the CMS MMR record and the GPS data for a
payment month. This also aims at mitigating these issues through reconciliation by creating discrepancy
cases or new records. It ensures integration GPS data in in CMS data by resolving the data mismatch
issues.
The Centers for Medicare & Medicaid Services (CMS) is part of the U.S. Department of Health
and Human Services. Apart from other responsibilities, CMS decides administrative simplification
standards from the Health Insurance Portability and Accountability Act of 1996 (HIPAA).
Next generation Policy System (GPS) is UHC system that is used for member enrolment activities. The
role of the ERS system is to provide automated solutions for mitigating enrolment related issues which
enables the CMS transaction convenient and errorless.
1.2.1 ERS Application
Enrolment Recon System or ERS is web application that is designed for reconciliation of member data
discrepancies between CMS MMR and GPS. This application has multiple modules and subsystems that
ensure rectifying data mismatches through creation, review, and analysis of the various records or cases.
Using various work baskets, it ensures creating various cases. Work baskets are various types of
discrepancies that identified between the CMS and GPS data. MMR eligibility, DOB and Gender, OOA,
SCC, TRR, and RPR are prominent among them.
This application helps performing the following activities through various roles and work basket access
rights.
Application
o Working Eligibility discrepancies
o Working OST discrepancies
o Working TRR discrepancies
Management
o Managing case bulk upload
o Managing case unlock
o Managing case reassignment
o Managing case mass update
Introduction ENROLMENT RECON SYSTEM User’s Manual
Page 1-2 1.0 ©UnitedHealthcare
Administration
o Managing access groups
o Managing users
o Managing skills
Maintenance
o Maintaining alerts
o Maintaining Configuration
o Maintaining Departments
o Maintaining Lookups
o Maintaining Lookup correlations
o Maintaining Resources
Reporting
o ERS Home page summary report
o ERS Error Log Report
o ERS Locked Record Report
1.2.2 Key aspects in ERS
Member data discrepancy
A member data discrepancy is a data mismatch between the CMS MMR record and the Plan data for a
payment month. A discrepancy can be identified in any month or months in 36 months. A discrepancy will
reoccur until the reconciliation comparison matches.
Discrepancy case
Discrepancy case is a new discrepancy record or a case created after the identification of the data
mismatch. Based on the types of the discrepancies, various discrepancies can be created. The
discrepancy case routes to multiple workflows until the reconciliation comparison matches.
Discrepancy sources
These are the basis on which the discrepancies are identified and categorized. Based on the sources
issues or discrepancies are identified.
Discrepancy types
Discrepancy types are the kinds of discrepancies based on which the issues are identified. These are the
issues which triggered data mismatch in the GPS and MMR data. In Area, Out of Area, Incarceration,
CMS Y / Plan N, CMS N / Plan Y, Contract, PBP, DOB, Genders are prominent among others.
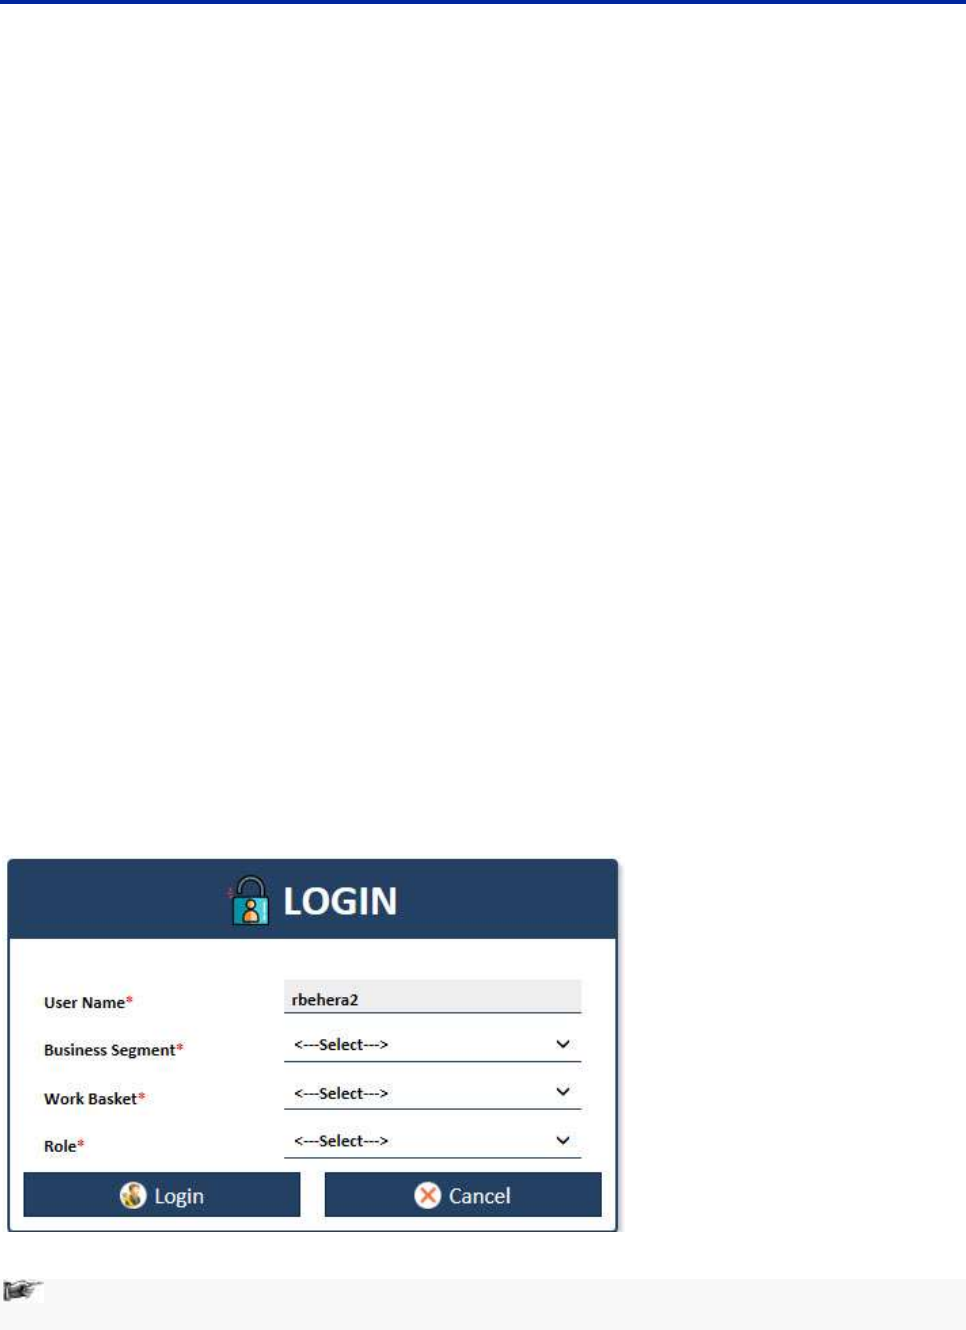
©United Healthcare 1.0 Page 2-1
Getting Started Chapter 2
This chapter explains how to get started with the ERS application using your user credentials. This chapter
also familiarizes you with various menus, tools, interfaces that are used in the application. Based on your
user account, roles, and business segment, you can get started with the application and perform the
required tasks.
This chapter contains the following sections:
Accessing ERS Application
ERS Home Page
ERS User Interfaces
ERS Menus
ERS Controls
ERS Messages
Log in Page Interface
Home Page Interface
Special Activities in ERS
Some Essential controls
Accessing ERS Application 2.1
2.1.1 Login
As an Enrolment team user, you can get access to the ERS application using the Login page. You can login
to the application based on your business segment, work basket, and role.
Prerequisites:
1. Web address or URL of the application
2. Active user account
You can enter the application website address or URL in a browser compatible with the ERS application to
lunch the home page of the application. The login page of the application appears.
Figure 2-1: The Login Page
Note: If the user has active user account, the name of the user appears in the User Name field of
the Login page. A user with inactive or no account cannot log in to the application.
To login to the ERS application:
1. Select the appropriate business segment in the Business Segment field.
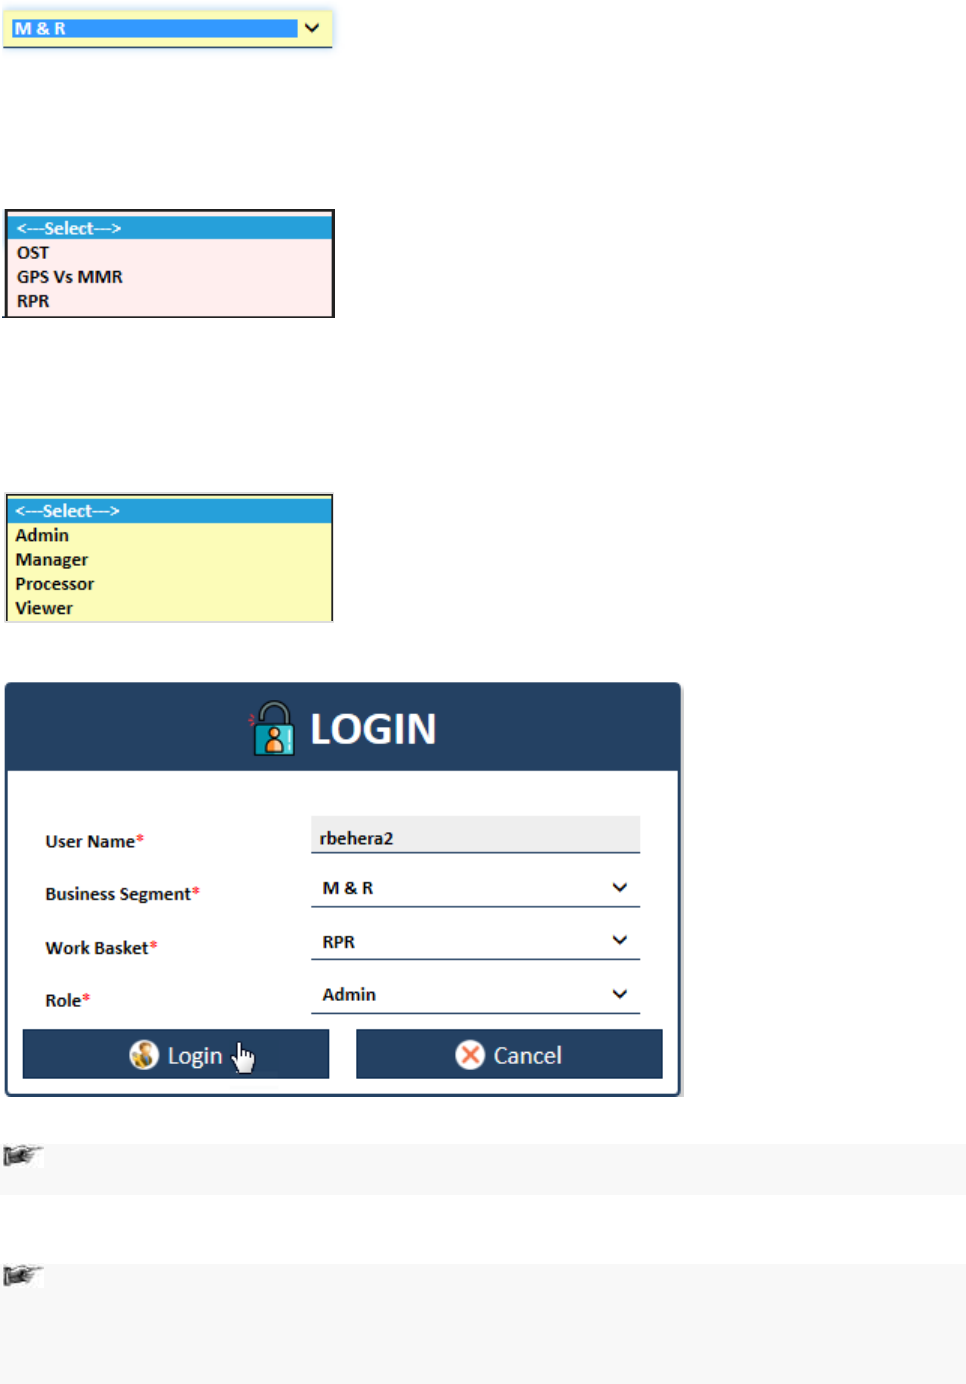
Getting Started ENROLMENT RECON SYSTEM User’s Manual
Page 2-2 1.0 ©UnitedHealthcare
The available values in the field are M&R, C&S, and PCP.
Figure 2-2: Business Segment
2. Select the appropriate work basket in the Work Basket field.
The available values in this field are OST, Eligibility, and RPR.
Figure 2-3: Work Basket
3. Select the appropriate role from the Role field.
The roles assigned to your account available in this field. The available values in this field are Admin,
Manager, Processor, and Viewer.
Figure 2-4: Roles
Figure 2-5: The Login Page
Note: The login button gets activated after you select values in Business Segment and Work
Basket fields.
4. Click the Login button to login to the application.
The home page of the ERS application appears.
Note: To close the application, users can click the Cancel button at any point of time while working
on the Login page. A dialog window appears with the message The webpage you are viewing is
trying to close the tab. Do you want to close the tab? if users click the Cancel button. If users
click Yes in the message window, the application gets closed and if the users click No the Login
page remains open.
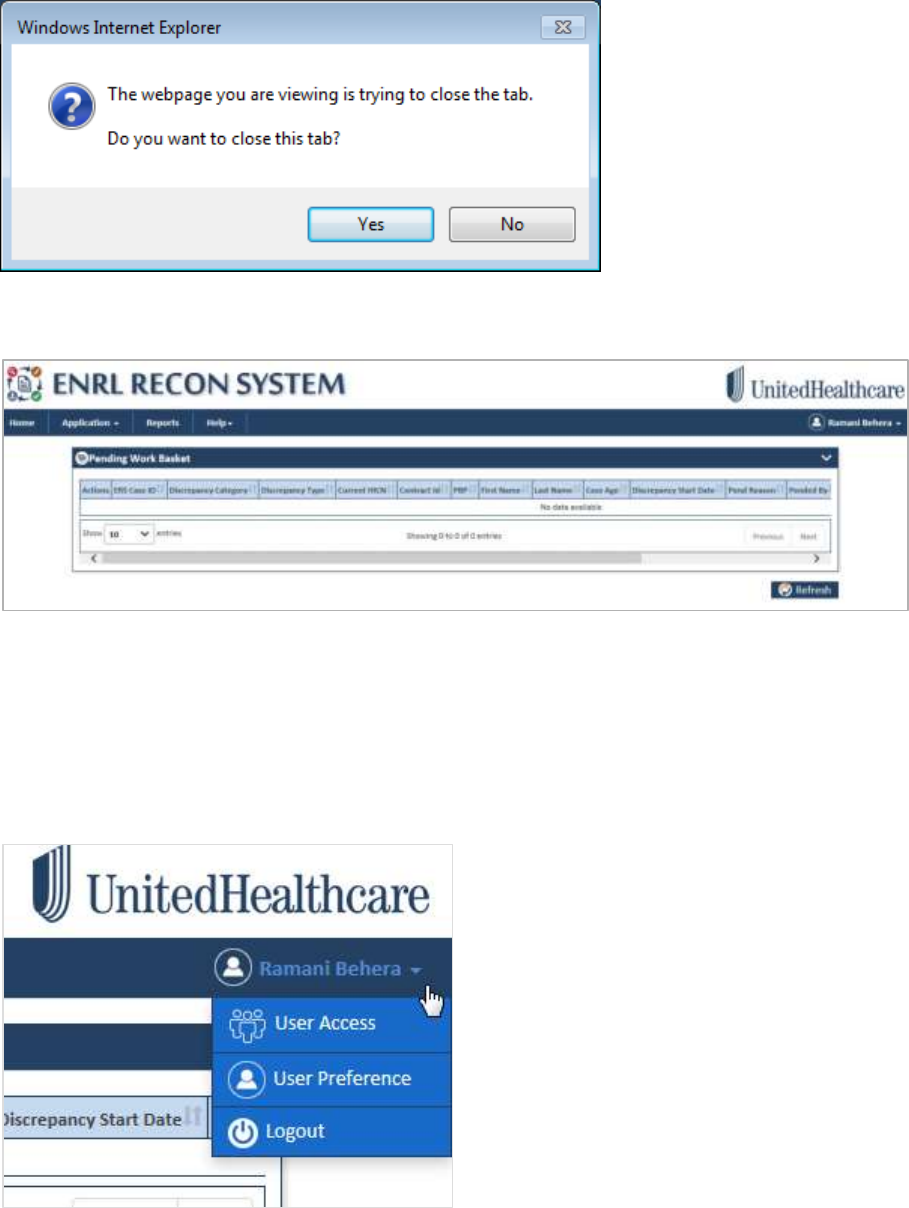
ENROLMENT RECON SYSTEM User’s Manual Getting Started
©UnitedHealthcare 1.0 Page 2-3
Figure 2-6: The Cancelling Log message
The home ERS application home page.
Figure 2-7: The ERS Application>Home Page
2.1.2 Log Out
While working on ERS, you can logout from the application at any point of time. You can click the Logout
button available at the extreme right corner of the application irrespective of the page you are working on.
To log out of the ERS application:
1. Go to the top right corner and click the username.
The log out option appears in the drop down list along with other options.
2. Click Logout from the list.
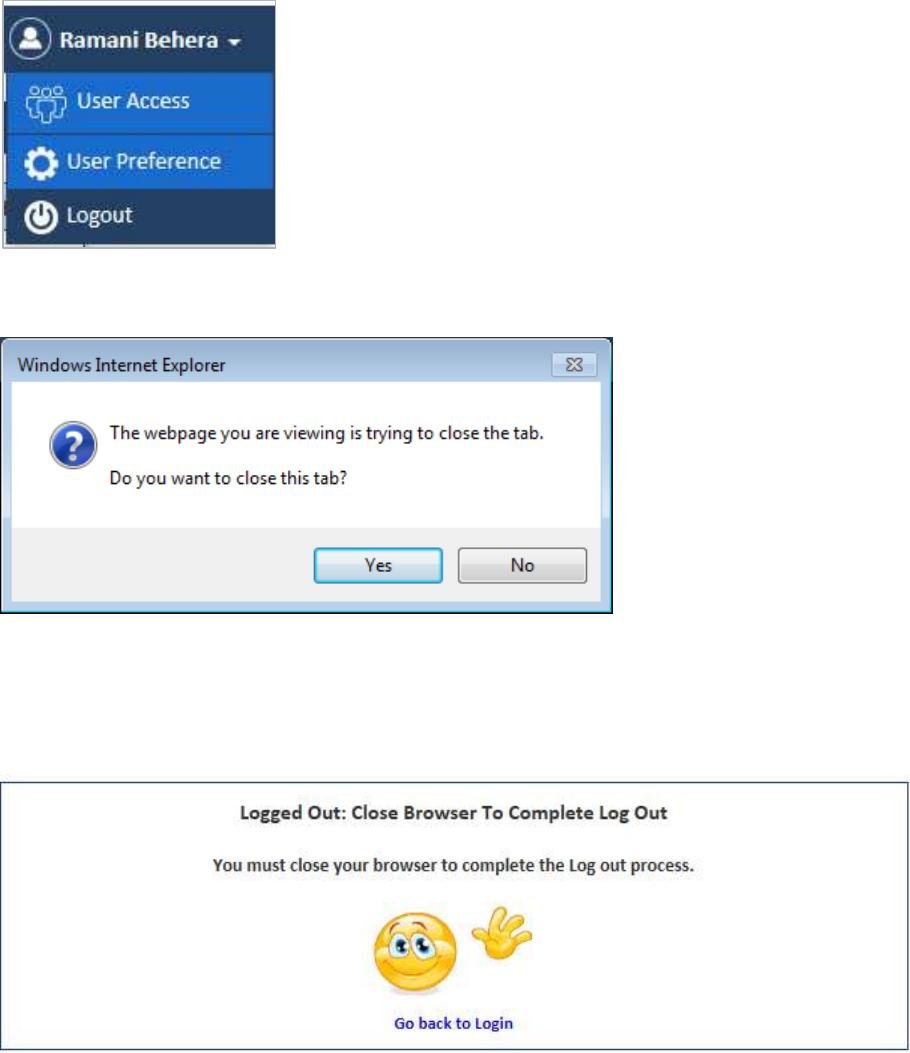
Getting Started ENROLMENT RECON SYSTEM User’s Manual
Page 2-4 1.0 ©UnitedHealthcare
Figure 2-8: The Logout Section
A message, “The webpage you are viewing is trying to close the tab. Do you want to close the tab” appears.
Figure 2-9: ERS message for Log out
3. Click the button Yes to close the application.
If you click No, a message, Logged Out: Close Browser To Complete Log Out. You must close your
browser to complete the log out process. Go back to Login link appears.
Figure 2-10: The ERS Log Out Message
2.1.3 Re-login
You can re-loin to the ERS application using the Logout page immediately after logging out. The message
Go back to Login is hyperlinked with the Login page.
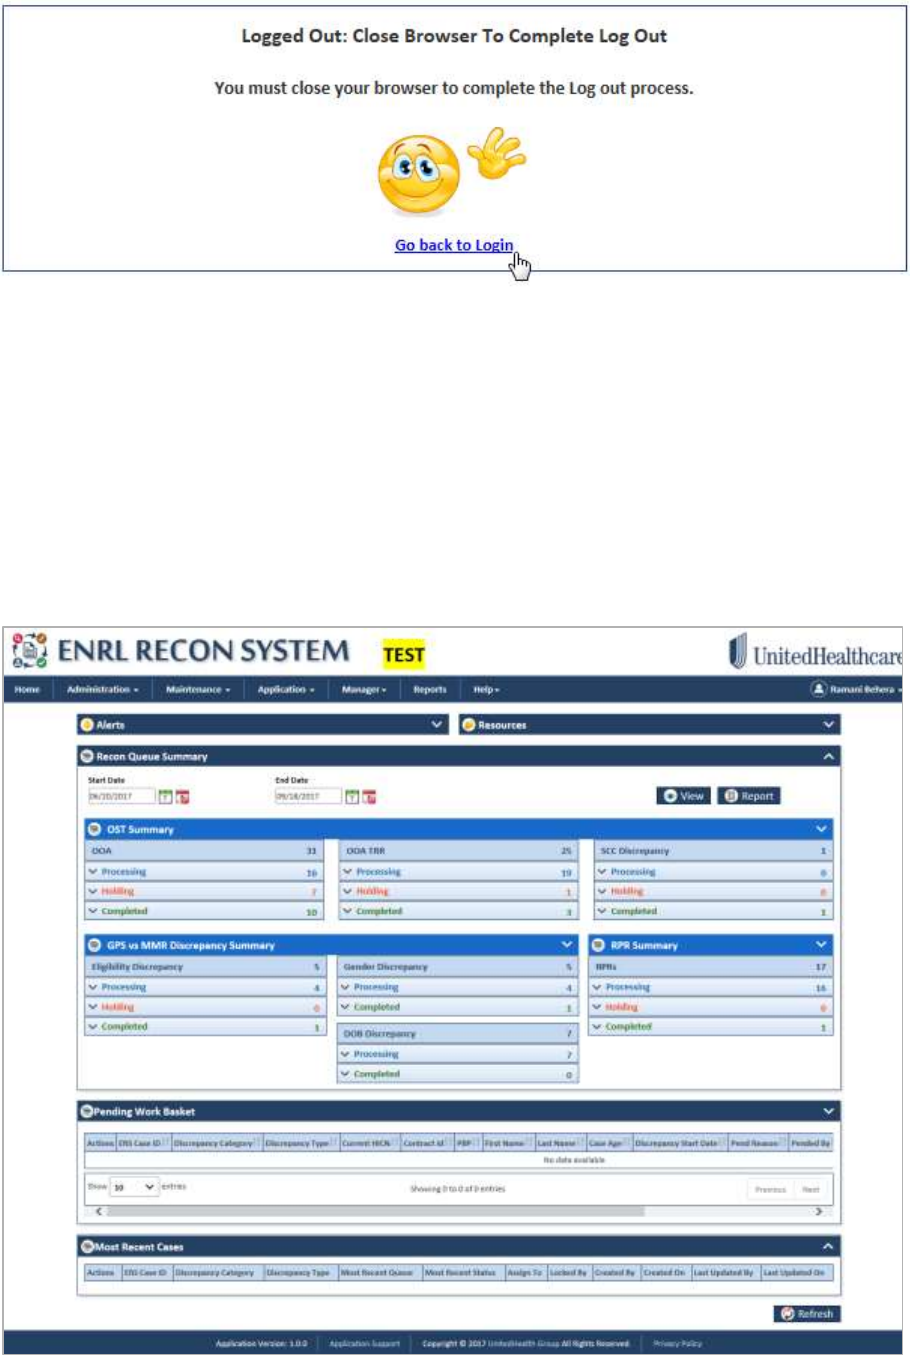
ENROLMENT RECON SYSTEM User’s Manual Getting Started
©UnitedHealthcare 1.0 Page 2-5
Figure 2-11: The Logout Page
To re-log in to ERS application:
1. Click the link Go back to Login in the message. The login page appears.
2. Follow the steps described in the Login section to login to the application.
The home page of the ERS application appears.
ERS Home Page 2.2
The home page of the application provides all the important details of the applications such as cases,
queues, and all the main menus of the application.
Figure 2-12: The ERS Home Page
The home page consists of the following:
Menus
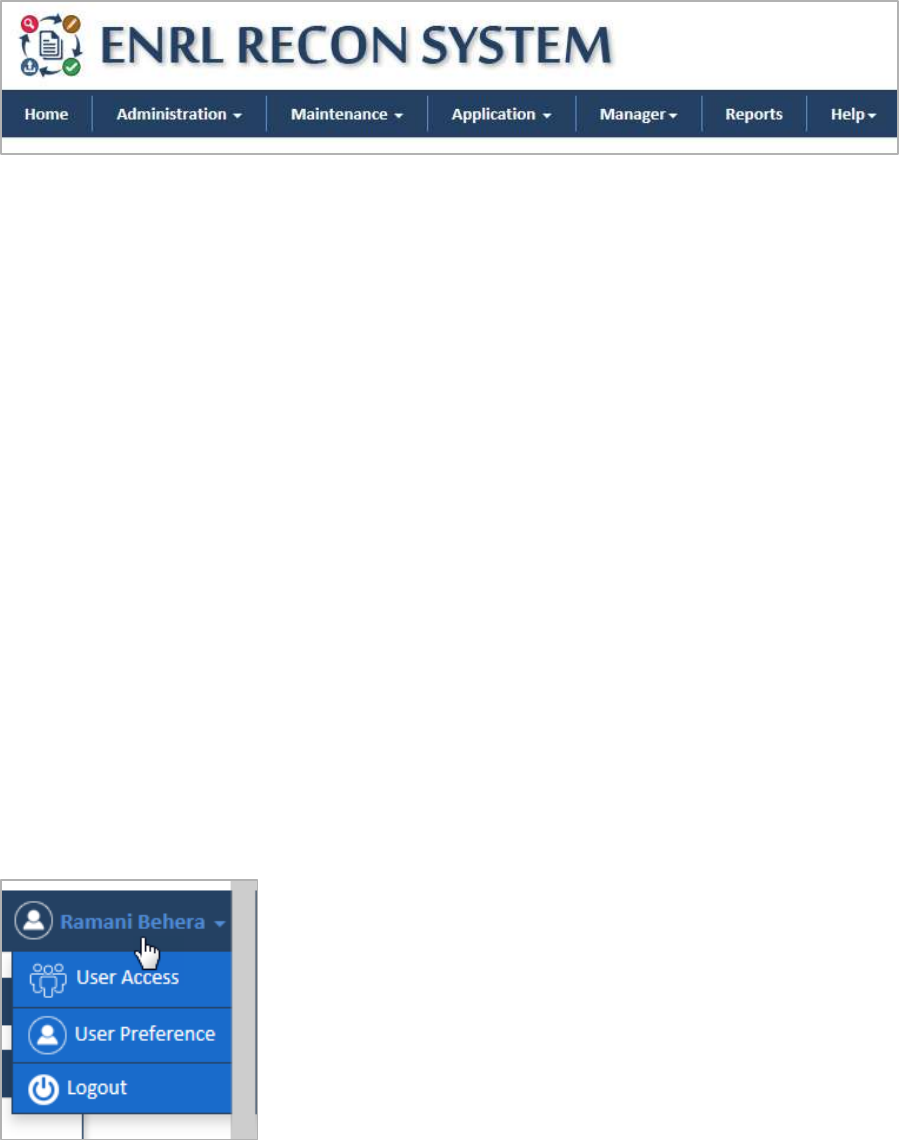
Getting Started ENROLMENT RECON SYSTEM User’s Manual
Page 2-6 1.0 ©UnitedHealthcare
User details section
Queue summaries
Pending work baskets details
Resent case details
2.2.1 Menus
Figure 2-13: ERS Application Menus
ERS menus in the home page help you access various module and submodules of the application. This
helps you creates, edit, delete and configure various actions, activities, tasks and user details. The following
menus are available in the ERS application:
Home: Helps you access the home page of ERT application.
Administration: Helps the admin user to manage skills, user access groups and users.
Maintenance: Helps managers to maintain alerts, configuration, departments, lookups, lookup
correlations and resources in the application.
Application: Helps all users to create and edit cases, access queues and search records.
Manager: Helps managers to create and edit cases, view queues and maintain application settings.
Reports: Helps all users to access ERS reports.
Help: Helps the all users to get additional helps regarding the application.
Based on the user log in, availability of the menus differs. For more information user and role access, refer
to the User and meus access section. For more information on the user and menu access, refer to the User
and menus access section.
2.2.2 User Details Section
The user details section appears to extreme right corner of the application. This section provides details
such as user access, user preference and log out.
If you move the mouse pointer to the role name section, the details appears.
Figure 2-14: User details Section
User Access 2.2.2.1
The User Access Details table provides details about the user and its access to the business unit, work
basket, role, and access group.

ENROLMENT RECON SYSTEM User’s Manual Getting Started
©UnitedHealthcare 1.0 Page 2-7
Navigation:
To access the User Access Details table, move your mouse pointer to user name and click User Access
link.
Figure 2-15: The User Access Link
The User Access Details table appears.
Figure 2-16: The User Access Details Table
User Preference 2.2.2.2
The User Preference link in the user details section provides access the User Preference table. Using this
table, the user can customize the sections and details to be displayed in the home page.
Figure 2-17: The User Preference Link
Navigation:
To access the User Preference Details form, move your mouse pointer to user name and click User
Preference link. The User Preference Details form appears.
To customize the home page appearance, referent to the form below:
The user preference table consists of the various controls and commands to execute the tasks. The
user needs to be well acquainted with the various controls before working on this section. For more
information on the various controls, refer to the ERS Controls section.

Getting Started ENROLMENT RECON SYSTEM User’s Manual
Page 2-8 1.0 ©UnitedHealthcare
Figure 2-18: User Preference Table
Field
Description
Business Segment
Select the business segment in this field. This field displays the
following values:
C & S
M &
R PCP
Role
Select the roles in this field. This field displays the following values:
Admin
Manager
Processor
Viewer
Work Basket
Select the work basket in this field. This field displays the following
values:
GPS Vs MMR
OST
RPR
These are various categories of cases based on which you create
and review the records to resolve discrepancy.
Alerts check box
Select this check box to make the Alerts section available in the hope
page.
Resources check box
Select this check box to make the Resource section available in the
hope page.
OST Summary check box
Select this check box to make the OST Summary section available in
the hope page.
Eligibility Discrepancy
Summary check box
Select this check box to make the Eligibility Discrepancy Summary
section available in the hope page.
RPR Summary check box
Select this check box to make the RPR section available in the hope
page.
Time Zone
Select the time zone under which you need to create and review
cases.
Save
Click this button to save the changes made in the form.
Reset
Click this button to remove the selections.
Cancel
Click this section to cancel the process.
Log out 2.2.2.3
This link in the user details section helps you log out of the application.
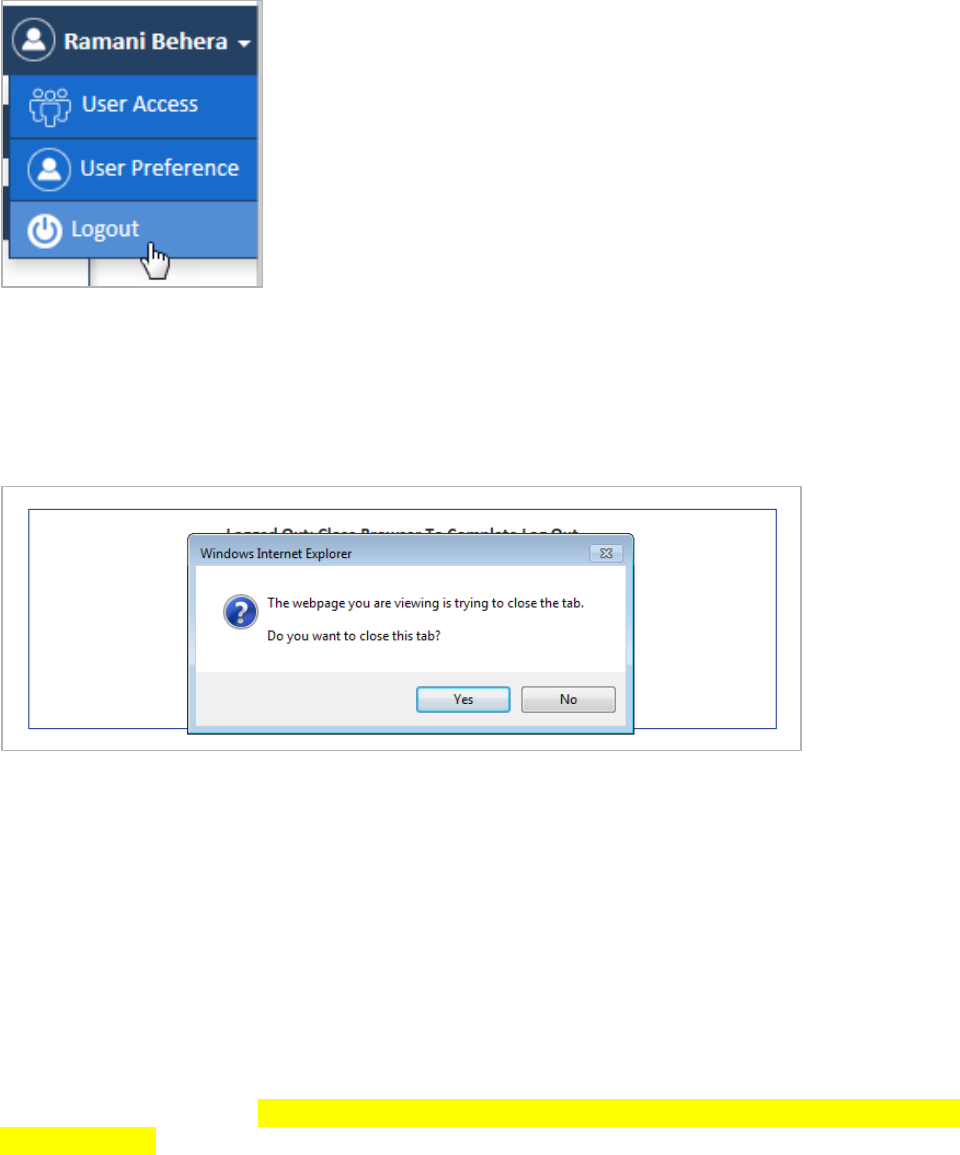
ENROLMENT RECON SYSTEM User’s Manual Getting Started
©UnitedHealthcare 1.0 Page 2-9
Figure 2-19: The Logout Link
Navigation:
To log out of the application, move your mouse pointer to user name and click Logout link. The User
Preference Details form appears.
The following message appears.
Figure 2-20: The Logout Message
For more information on how to log out and re-log in to the application, refer to the Log Out and Re-login
sections, respectively.
2.2.3 Reconciliation Queue Summaries
The Recon Queue Summaries table provides you summary of the all the queues. This is an expandable
and collapsible window.
These tables provide summaries of the all the queues. The following queue summaries are available in the
home page. This section displays the all the queues such as Processing, Holding and Completed,
available in various types of the discrepancy issues or wok baskets.
You can customize you view by expanding and collapsing the sections or table data by clicking the down
and up arrows respectively. For more information on expanding and collapsing sections, refer to the Que
summary section.

Getting Started ENROLMENT RECON SYSTEM User’s Manual
Page 2-10 1.0 ©UnitedHealthcare
Figure 2-21: Recon Queue Summaries section
Summary Name
Field
Description
OST Summary
OOA
Provides processing, holding, and completed queues
details.
OOA TRR
Provides processing, holding, and completed queues
details.
SCC
Discrepancy
Provides processing, holding, and completed queues
details.
GPS vs MMR
Discrepancy
Summary
Eligibility
Discrepancy
Provides processing, holding, and completed queues
details.
Gender
Discrepancy
Provides processing, holding, and completed queues
details.
DOB
Discrepancy
Provides processing, holding, and completed queues
details.
RPR Summary
RPRs
Provides processing, holding, and completed queues
details.
2.2.4 Pending work baskets
Figure 2-22: The Pending Work Baskets Table
Column Name
Description
Actions
Displays the following actions to be taken on the cases.
ERS Case ID
Displays the ERS Case ID.
Discrepancy Category
Displays the discrepancy category.
Discrepancy Type
Displays the discrepancy type.
Current HICN
Displays the current HICN.
Contract Id
Displays the contract ID.
PBP
Displays the PBP.
First Name
Displays the first name of the member.
Last Name
Displays the last name of the member.
Case Age
Displays the case age.
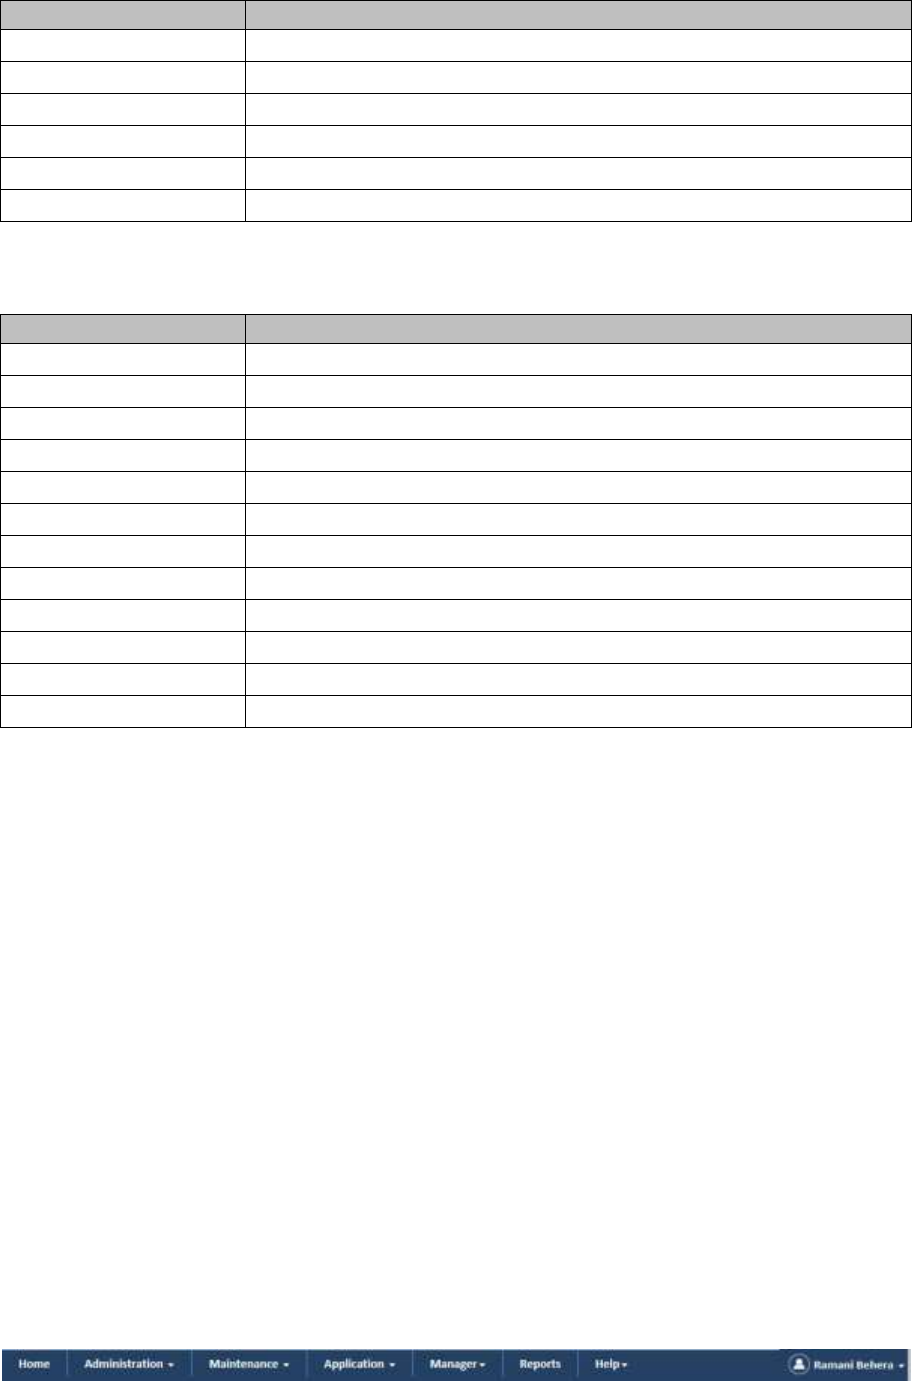
ENROLMENT RECON SYSTEM User’s Manual Getting Started
©UnitedHealthcare 1.0 Page 2-11
Column Name
Description
Discrepancy Start Date
Displays the discrepancy start date.
Pend Reason
Displays the pend reason.
Pended By
Displays the user that pended the cases.
Pended On
Displays the date when the case was pended.
Most Recent Queue
Displays the most recent queue of the cases.
Most Recent Status
Displays the most recent status of the cases.
2.2.5 Recent case details
This table displays the recent activities in the application.
Column Name
Description
Actions
Displays the following actions to be taken on the cases.
ERS Case ID
Displays the ERS Case ID.
Discrepancy Category
Displays the discrepancy category.
Discrepancy Type
Displays the discrepancy type.
Most Recent Queue
Displays the most recent queue of the case.
Most Recent Status
Displays the most recent status of the case.
Assign To
Displays the user to who this case is assigned.
Locked By
Displays the user name that has locked the case.
Created By
Displays the user name that created the case.
Created On
Displays the case creation date.
Last Updated By
Displays the user name that last updated the case.
Last Updated On
Displays the date when the case is last updated.
ERS User Interfaces 2.3
User interface elements in ERS application enable users to interact with the various pages; sections, and
tabs of the applications. These elements, which include controls and commands, are presented to the user in
various graphical forms, menus, toolbars, dialog boxes and individual elements such as hyperlinks etc.
2.3.1 User interface syntax
The following terms are most commonly used to describe how users interact with controls and commands in
the ERS application:
Click: This term is used for commands, command buttons, option buttons etc.
Select and clear: This term is used for checkboxes.
Remove the check mark: This command is used for checked and unchecked commands.
Type or select: This term is used to refer to an item (as in a combo box) that the user can either type
or select in the accompanying text box.
Enter: This term is used to type text in the text boxes.
2.3.2 ERS Menus
The ERS application has multiple menus that are displayed from the top left corner of the application home
page. Menus are group of main commands of the ERS application. These are also referred to as subs-
systems as they are considered to be the modules of the application. They are organized in menu bar and
contain some sub-menus under them.
Figure 2-23: ERS Application Menu Bar
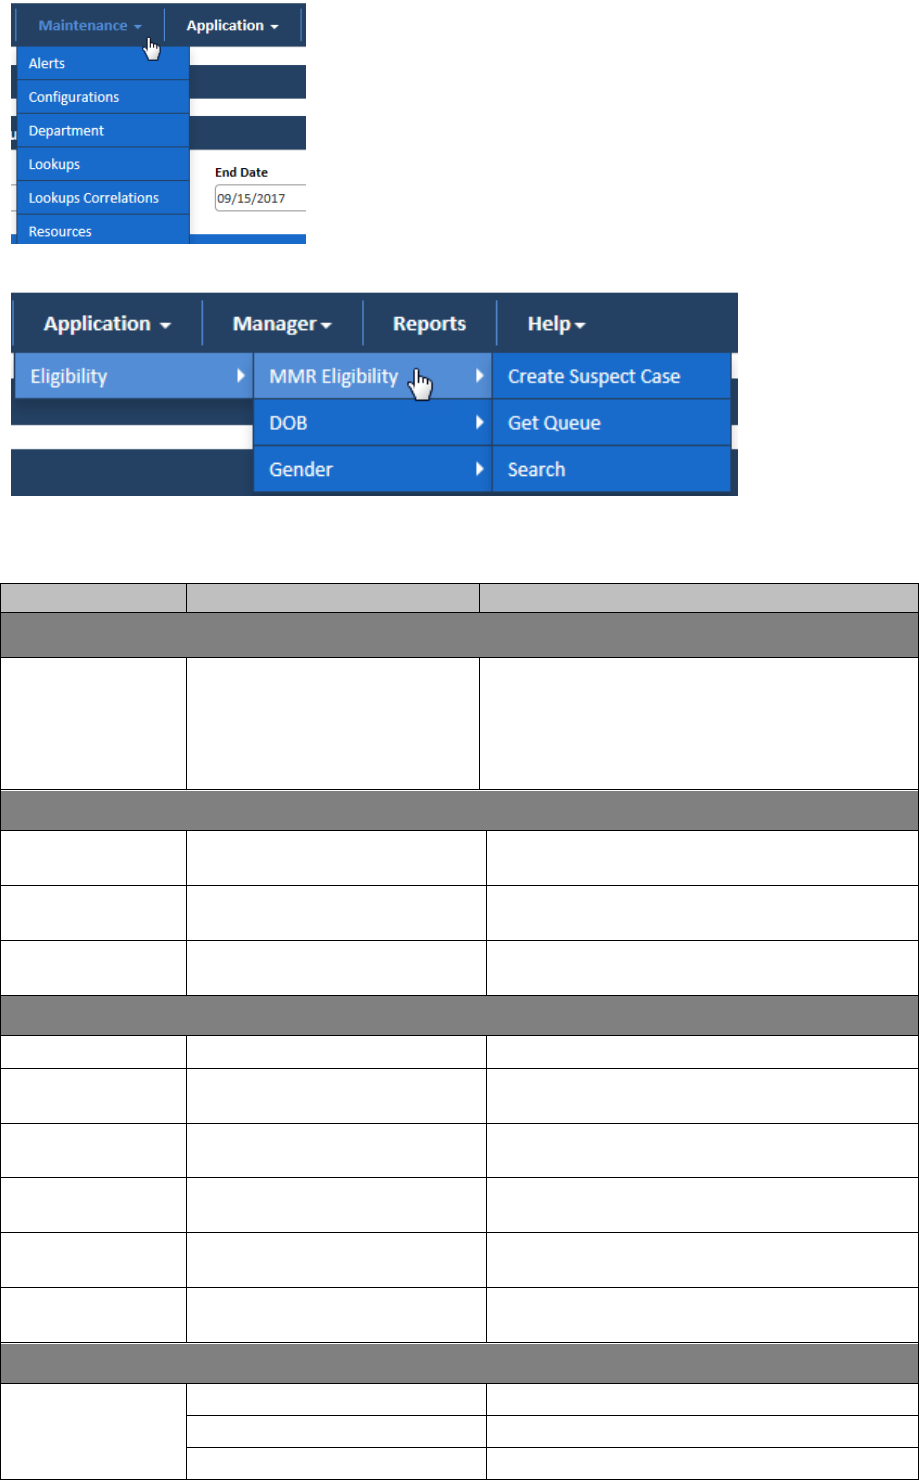
Getting Started ENROLMENT RECON SYSTEM User’s Manual
Page 2-12 1.0 ©UnitedHealthcare
Figure 2-24: The ERS Application>Maintenance Menu
Figure 2-25: ERS Application> Sub-menu and Associated menu
The ERS application has the following menus and submenus:
Sub-menus
Associated Menus
Description
Home menu
NA
Helps you to access the hope page of the
application. By default, the application displays
the home as the landing page.
For more information on home page, refer to
the ERS Home Pagesection.
Administration menu
Manage Users
NA
Helps you to manage the users in the
application.
Manage Access
Groups
NA
Helps you to manage the access groups in
the application.
Manage Skills
NA
Helps you to manage the skills in the
application.
Maintenance menu
Alerts
NA
Helps you to maintain alerts in the application.
Configurations
NA
Helps maintain configurations in the
application.
Department
NA
Helps you to maintain departments in the
application.
Lookups
NA
Helps you to maintain lookups in the
application.
Lookups
Correlations
NA
Helps you to maintain lookup correlations in
the application.
Resources
NA
Helps you to maintain resources in the
application.
Application menu
OST
OOA>Create Suspect Case
Helps you to create OOA suspect cases.
OOA>Get Queue
Helps you to access OOA queues
OOA>Search
Helps you to search OOA cases
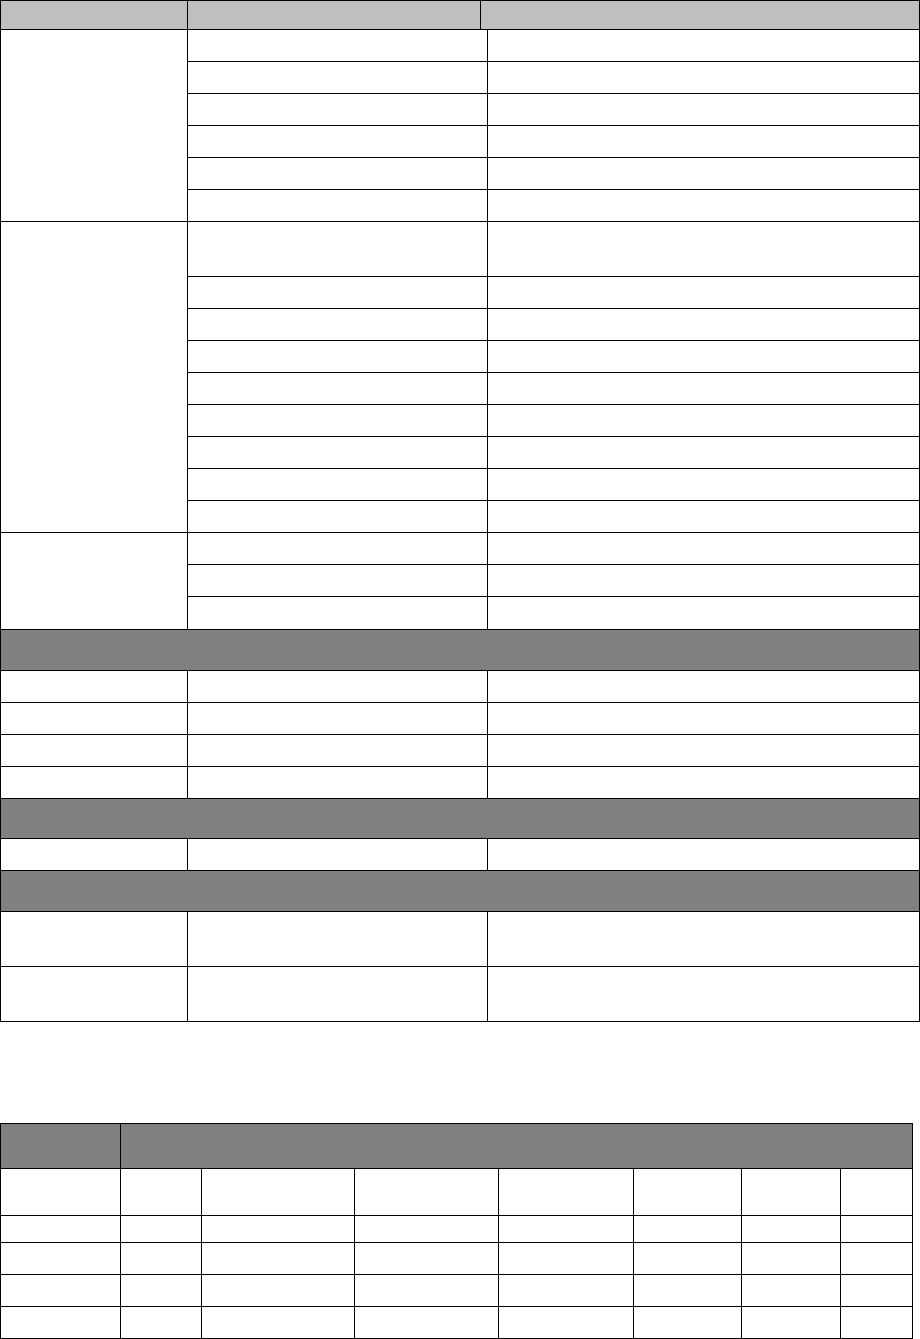
ENROLMENT RECON SYSTEM User’s Manual Getting Started
©UnitedHealthcare 1.0 Page 2-13
Sub-menus
Associated Menus
Description
SSC>Create Suspect Case
Helps you to create SSC suspect cases.
SSC>Get Queue
Helps you to access SSC queues
SSC>Search
Helps you to search SSC cases
TRR>Create Suspect Case
Helps you to create TRR suspect cases.
TRR>Get Queue
Helps you to access TRR queues
TRR>Search
Helps you to search TRR cases
Eligibility
MMR Eligibility>Create
Suspect Case
Helps you to create MMR Eligibility suspect
cases.
MMR Eligibility>Get Queue
Helps you to access MMR Eligibility queues
MMR Eligibility> Search
Helps you to search MMR Eligibility cases
DOB>Create Suspect Case
Helps you to create DOB suspect cases.
DOB>Get Queue
Helps you to access DOB queues
DOB>>Search
Helps you to search DOB cases
Gender>Create Suspect Case
Helps you to create Gender suspect cases.
Gender >Get Queue
Helps you to access Gender queues
Gender >Search
Helps you to search Gender cases
RPR
Create Suspect Case
Helps you to create RPR suspect cases.
Get Queue
Helps you to access RPR queues
Search
Helps you to search RPR cases
Manager menu
Bulk Upload
NA
Helps you to upload multiple record templates
Unlock
NA
Helps you to unlock records
Reassign
NA
Helps you reassign records
Mass Update
NA
Helps you to update multiple records
Reports menu
NA
NA
NA
Help menu
About
NA
Helps you to access the details about the
application
User Manual
NA
Helps you to access the user’s manual of the
application
Roles and menus access 2.3.2.1
The following table provides details about the user and menus access:
Roles
Menus
Home
Administratio
n
Maintenance
Application
Manager
Reports
Help
Admin
√
√
√
√
√
√
√
Manager
√
˟
˟
√
√
√
√
Processor
√
˟
˟
√
˟
√
√
Viewer
√
˟
˟
√
˟
√
√
2.3.3 ERS Controls
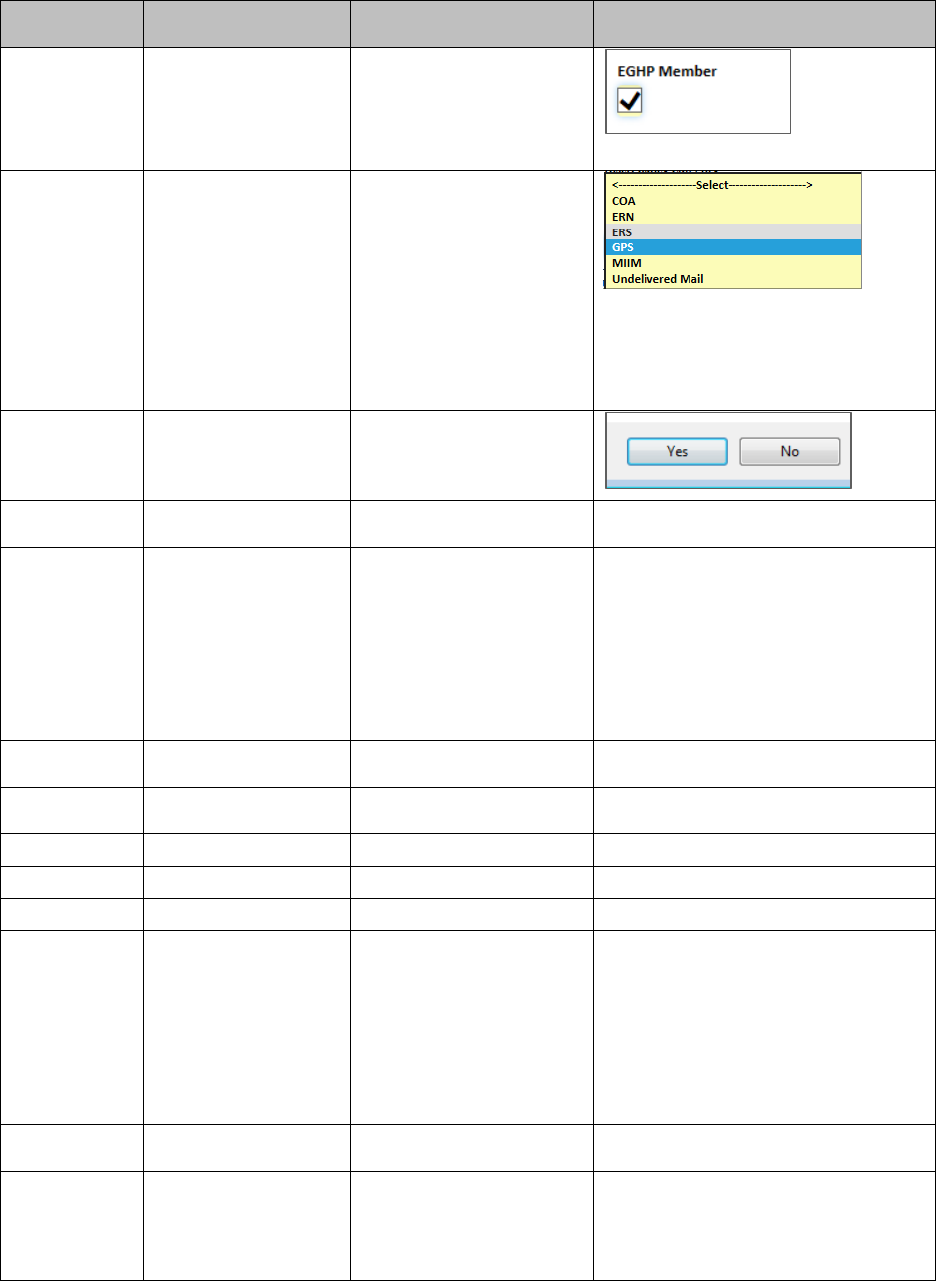
Getting Started ENROLMENT RECON SYSTEM User’s Manual
Page 2-14 1.0 ©UnitedHealthcare
Controls are user interface elements that help the users to perform specific tasks and activities designed to
meet the application objectives. They control the behavior, performance and changes in the application
while working on the application. These are graphical representation of an action related to a particular task.
For example, to save a data filled-in form, you may click a button called Save. This is a control in the
application.
The following table represents all the controls in the application.
Control
Name
What it is
How it is used
Example
Check box
Small square box in
application that is
selected or cleared
to turn on or off an
option.
Select the EGHP
Member check box if
you want enter the
EGHP number.
Combo box
Text box with a list
box Attached to it.
The list is Always
visible. Because
users can either
type or select their
choice, you can use
enter to describe the
action. Follow your
project
In the Source System
box select or type
source system that you
want to use.
Command
button
Rectangular button
that initiates an
action
To close the application,
click Yes.
Command
link
NA
NA
NA
Drop-down
arrow
Arrow associated
with a drop-down
combo or list box or
some toolbar
buttons, indicating a
list the user can
view by clicking the
arrow.
Drop-down
combo box
Drop-down
list box
Group box
Links
List box
Tab*
(also called
tabbed page
in technical
documentatio
n)
Text box
Title
(do not use
caption)
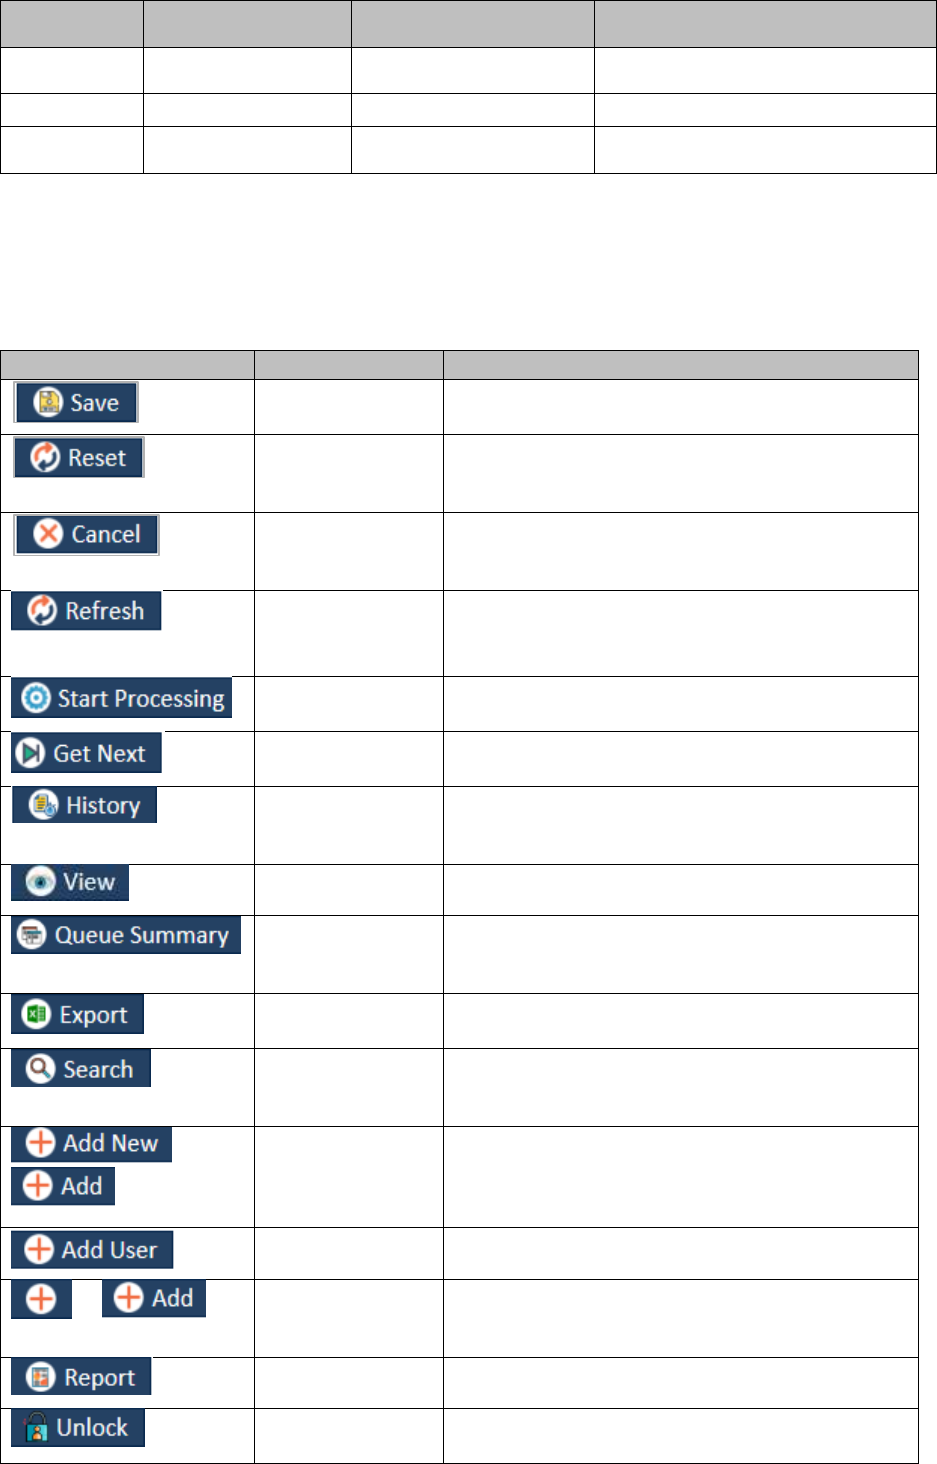
ENROLMENT RECON SYSTEM User’s Manual Getting Started
©UnitedHealthcare 1.0 Page 2-15
Control
Name
What it is
How it is used
Example
Unfold
button
Next button
Collapsible
Panels
2.3.4 Important Commands
ERS application has the following most important command controls that are used in all the forms
throughout the application. You can use the same or similar control while creating, editing cases and
responding to the queues. Thought the guide, these are referred to as buttons. For example, click the Save
button to save the form.
Controls
Control Name
Description
Save button
Click this button to save and submit the case
creation form for the further processing.
Reset button
Click this button to remove the all the Selected and
entered value in the form so that once you can
Select and entered different values.
Cancel button
Click this button to cancel the case creation form.
You get routed to the home page if you click the
button.
Refresh button
Click the button to refresh the current data so that
new data can be loaded in the form.
START
Processing button
Click this button to opening the queue to further
processing.
Click this button access the next record in a queue
for the further processing.
History button
Click this button to view the activities on the
current while working on case (accessing from the
queue)
View Button
Click the button view the queue summary details.
OOA Queue
Summary
Click this button to access the Queue Summary
page while you are in the Work
Item<discrepancy category> window
Export
Click this button open the Excel sheet where you
can enter multiple dates for mass update.
Search button
Click this button to search the record in the
application. This helps you display the record
based on the search criteria.
or
Add New or Add
button
Click this button to add or create new
administration items and maintenance items. For
example, to create a new alert, click the Add New
button.
or
Add new
administration
Click this button to add new administration items in
a row. For example, you can add a new skill in
Access Group form by clicking this in button.
Report button
Click this button to view the report.
Unlock button
Click this button to unlock the locked cases in the
application.

Getting Started ENROLMENT RECON SYSTEM User’s Manual
Page 2-16 1.0 ©UnitedHealthcare
Controls
Control Name
Description
Bulk Reassign
Click this button for bulk assignment of the record
for further processing.
2.3.5 Log in Page Interface
The log in page has multiple user interfaces which the user used to log in to the application. Following are
the command button used in the Login page. Command buttons are the rectangular button that helps
initiating an action.
Login button
Cancel button:
Business Segment list box:
Work Basket list box:
Role list:
2.3.6 Home Page Interface
2.3.7 ERS Messages
The ERS application has many customized messages that appear on taking specific action while working on
the application. The messages include error message, warning message, confirmation, notification, alert,
etc.
Errors 2.3.7.1
The screenshot displays an error message that appears when the user enters wrong field input.
Figure 2-26: ERS Error Message
Warnings 2.3.7.2
Figure 2-27: ERS Warning Message
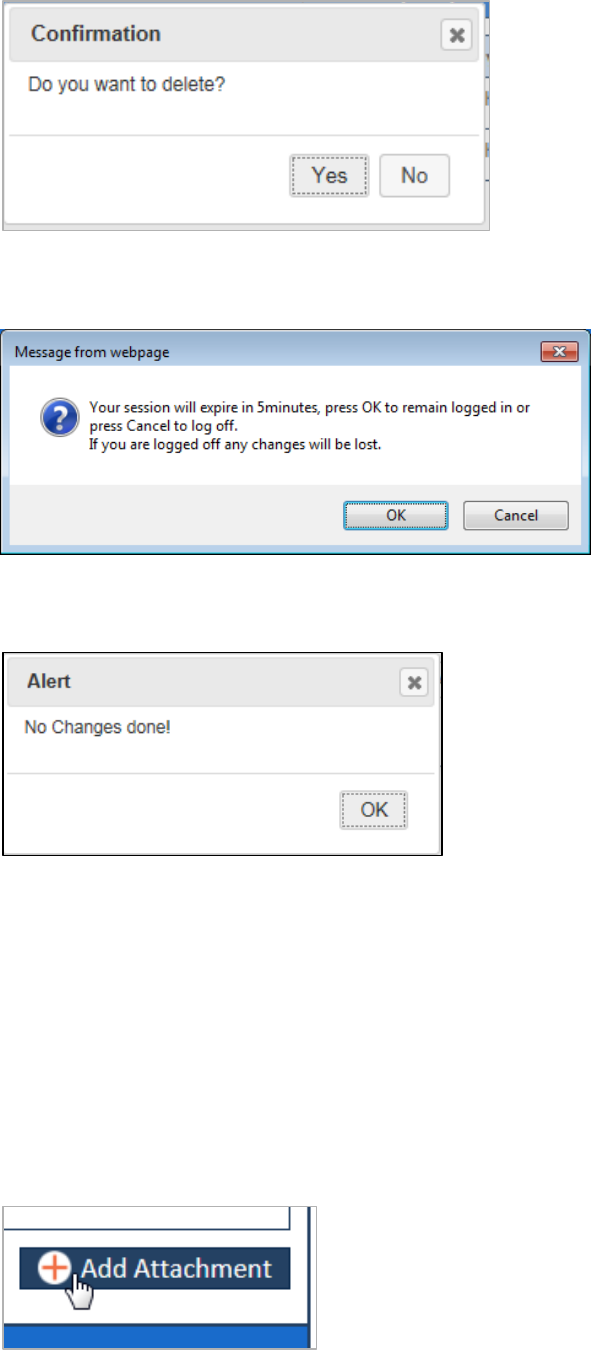
ENROLMENT RECON SYSTEM User’s Manual Getting Started
©UnitedHealthcare 1.0 Page 2-17
Confirmations 2.3.7.3
Figure 2-28: ERS Confirmation Message
Notifications 2.3.7.4
Figure 2-29: ERS Notifications
Alert 2.3.7.5
Figure 2-30: ERS Alert Message
2.3.8 Special Activities in ERS
The ERS application allows the user to perform multiple essential tasks while working on various page and
interfaces of the application
Attaching and deleting documents 2.3.8.1
You can attach one or more attachments in the application while working on it. You can attach only PDF
documents.
To attach a file:
1. Click the Add Attachment button. The File Upload window appears.
Figure 2-31: Add Attachment Link
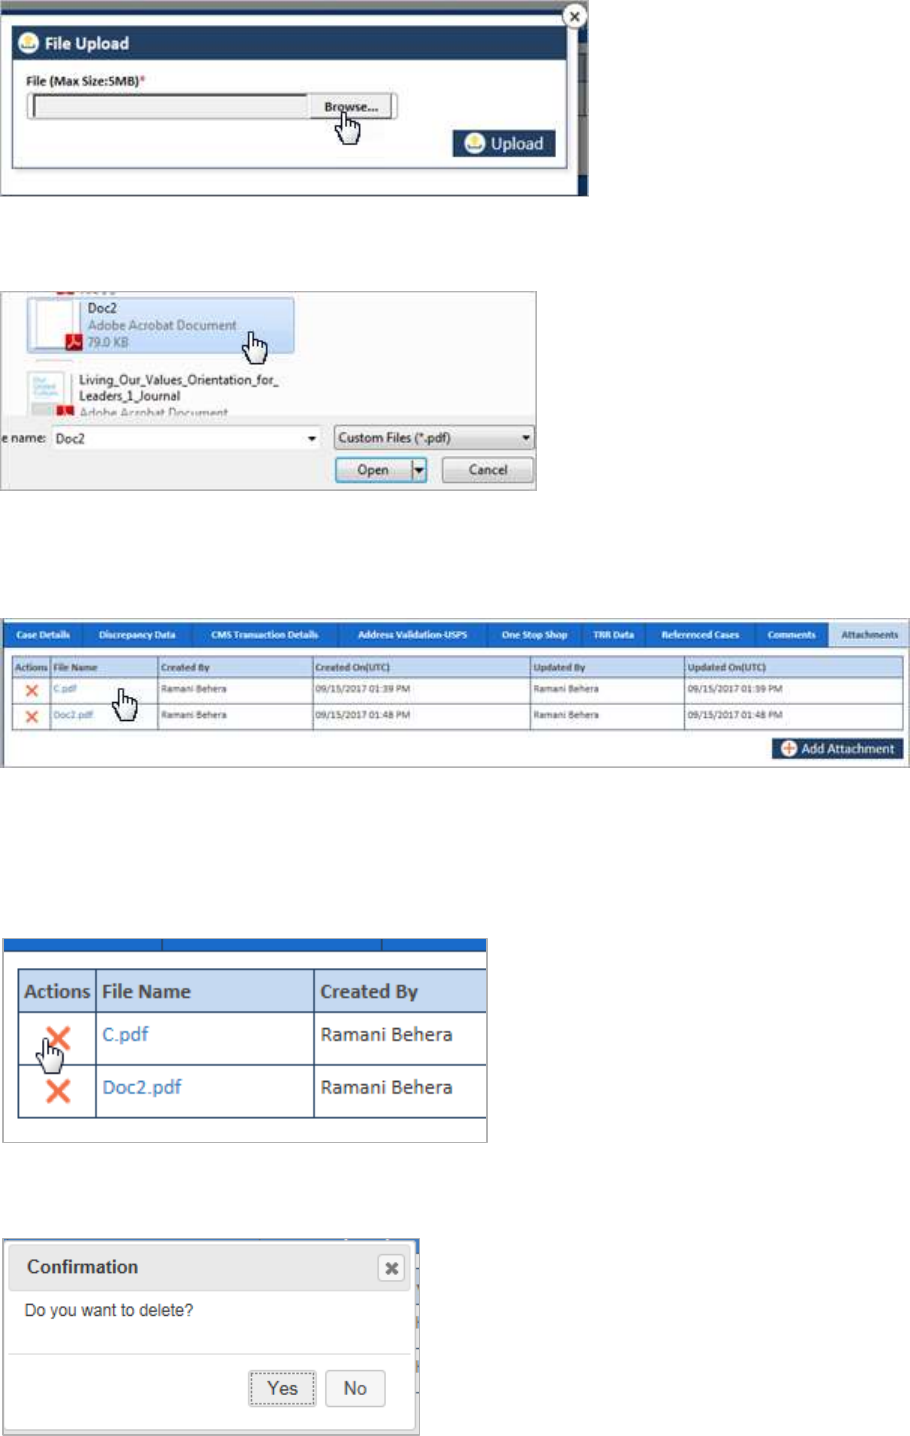
Getting Started ENROLMENT RECON SYSTEM User’s Manual
Page 2-18 1.0 ©UnitedHealthcare
Figure 2-32: The File Upload Dialog
2. Click the Browse button and navigate to the file in local drive.
Figure 2-33: The document in local drive
3. Select the file and click the Open. The file gets attached and displays the complete path of the file.
4. Click the Upload button to upload the file. The file gets attached.
Figure 2-34: Attached File> Attachment Tab
Deleting attachments 2.3.8.1.1
To delete the attachments:
1. Under the Action column, go to the file that you want to delete.
Figure 2-35: Action column> Delete Files
2. Click the Delete icon to delete the file. A confirmation message appears.
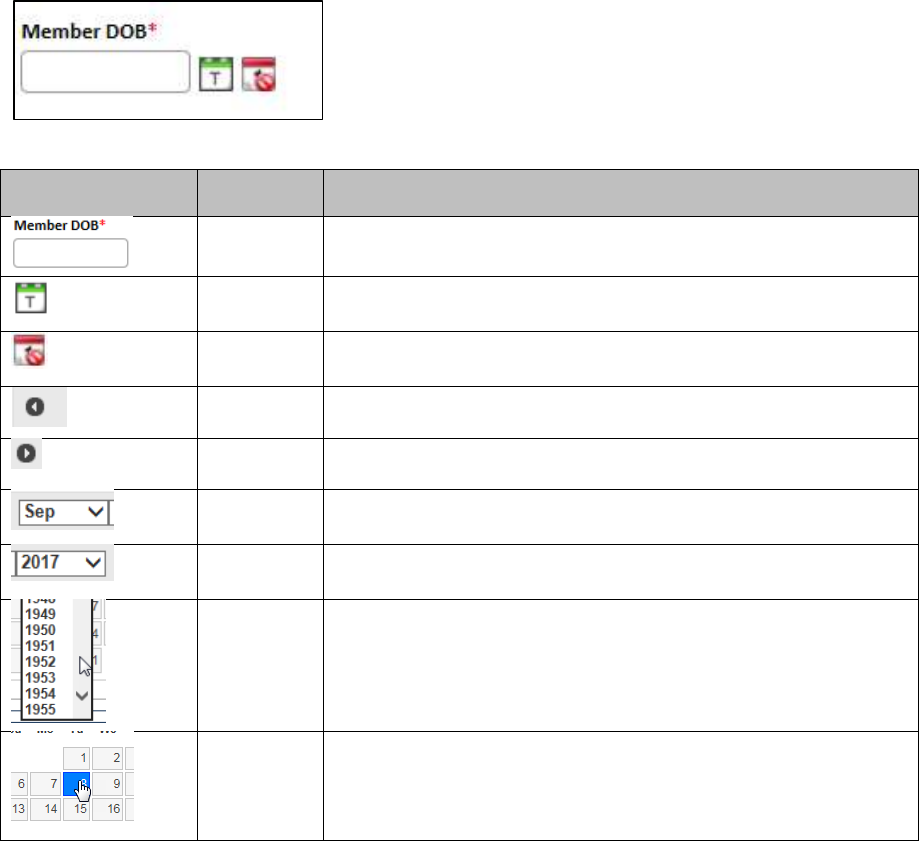
ENROLMENT RECON SYSTEM User’s Manual Getting Started
©UnitedHealthcare 1.0 Page 2-19
Figure 2-36: Confirmation Message
3. Click Yes to delete the file. The file gets deleted.
4. Click No to keep the file without deleting.
Entering date values ERS pages 2.3.8.2
You can enter date value using the date picker control. This helps you either enter date or select a date from
the calendar.
Figure 2-37: The Date Picker control
Controls
Control
Name
Description
Date field
Helps you to enter or select the date in MM/DD/YYYY format.
Current
Date
Helps you select the current date. To select the date click this
tool.
Clear Date
Helps you reset the selected date. To clear the entered date,
click this tool.
Previous
Click this to select a previous month in the month field.
Next
Click this to select a next month in the month field.
Month drop
down
Click drop down arrow to select a month.
Year Drop
Down
Click drop down arrow to select a year.
Year scroll
bar
Click the up and down arrow to scroll the years and select year
in the year field.
Days in a
month
Click a particular day in a selected month to enter the date in the
date field.
Once you click the date, the date with selected month and year
appears the date field.
To select or enter a date following steps:
1. Click the date field. The Calendar control appears with month and year drop down list box and all the
day of the month that is select the in the moth drop down list box.

Getting Started ENROLMENT RECON SYSTEM User’s Manual
Page 2-20 1.0 ©UnitedHealthcare
Figure 2-38: Calendar control
2. Click the month dropdown to select the month you want include in the date.
3. Click the year drop down to select the years.
4. To find more year option, use the down and up scrolling.
5. Click a day on the selected month in a selected year.
The date gets selected in the date field.
Selecting a value from list box 2.3.8.3
Entering value in the text boxes 2.3.8.4
Selecting Checkboxes 2.3.8.5
Uploading files in ERS pages 2.3.8.6
Viewing ERS reports 2.3.8.7
Viewing History 2.3.8.8
Accessing search result tables 2.3.8.9
Some Essential controls 2.4
ERS application has different controls that help you to perform certain tasks while working on application.
Before working on various pages, you must be aware of the menus. The color of the controls changes when
you move the mouse to the controls. Controls are various access paths, navigation buttons and command
buttons that help complete certain tasks.
The following are the list of the controls available in the ERS application:
Tools
Tool Name
Description
Current Date
Helps you select the current date. To select the date
click this tool.
Clear Date
Helps you reset the selected date. To clear the entered
date, click this tool.
Edit
Helps you edit the details. To edit users, click this tool
and open the respective user details page.
View
Helps you to view the details of the particular item in
table row.
History
Helps you find the previously entered details. Click this
tool to view history details.
Delete
Helps you delete the edited or added details. Click this
tool to delete recently added or edited details.
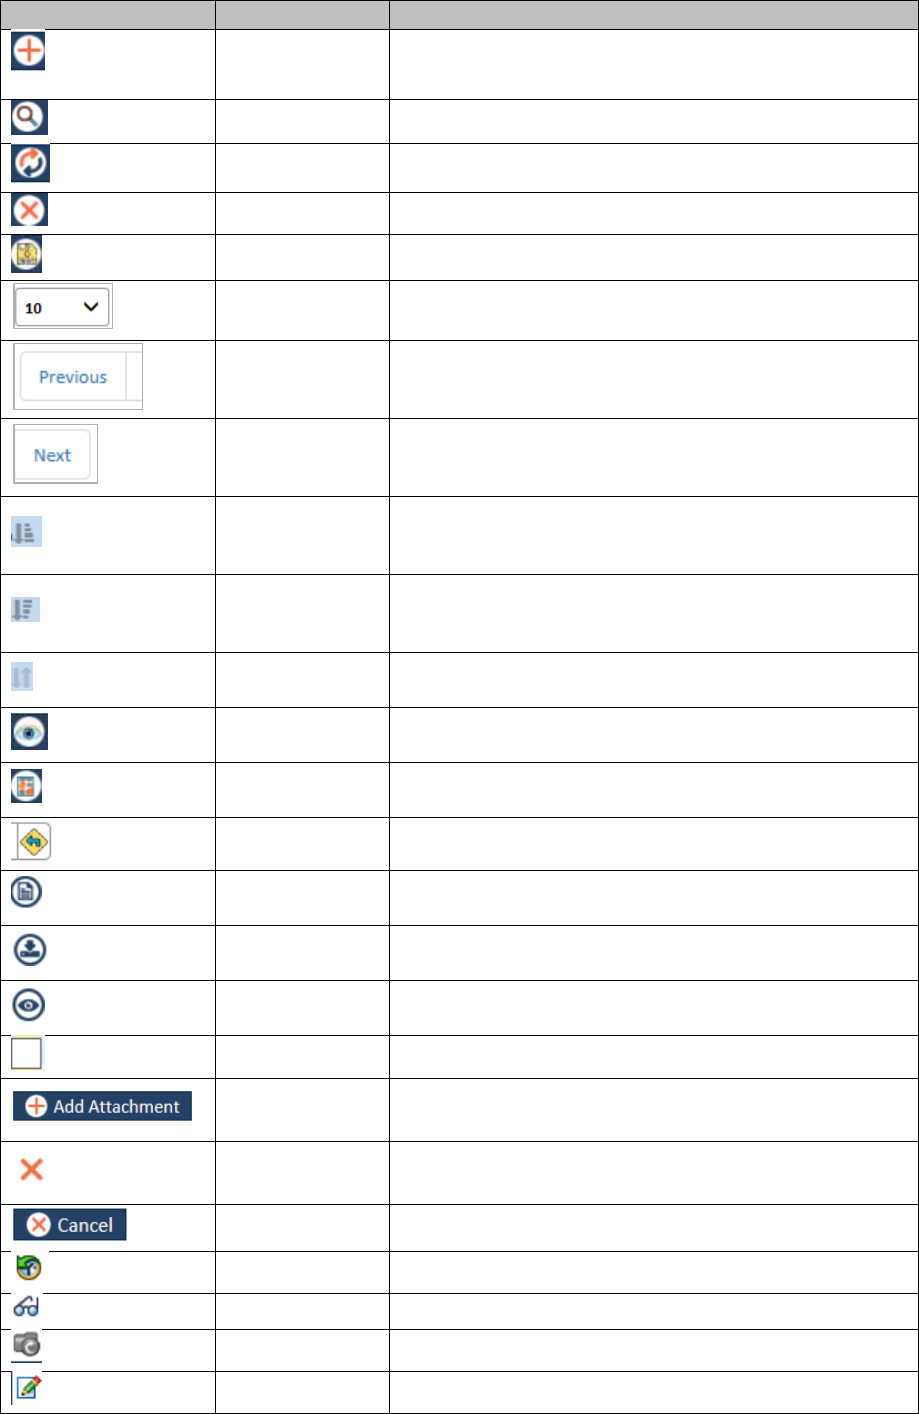
ENROLMENT RECON SYSTEM User’s Manual Getting Started
©UnitedHealthcare 1.0 Page 2-21
Tools
Tool Name
Description
Add
Helps you add a section/row to fill the respective details.
To add the section/row, click this tool.
Search
Helps you search the details that you want to look for.
Reset
Helps you reset the data entered/selected. Cl
Cancel
Helps you cancel the process.
Save
Helps you save the edited or entered details of the form.
Helps you select the number items/ rows need to be
displayed in the page.
Previous
Helps you find the similar details in the next page. Click
this tool to view the data in the next page or section.
Next
Helps you find the similar details in the previous page.
Click this tool to view the data in the previous page or
section.
Ascending
Helps you display the items in table alphabetically
ascending ways. Click this tool to display the descending
order of the items in the rows.
Descending
Helps you display the items in a table alphabetically
descending ways. Click this tool to display the ascending
order of the items in the rows.
NA
Helps you displays the items alphabetically ascending
ways.
View
Helps you to view the report. Click this tool to view report
or forms.
Report
Helps you view the reports. Click this tool to view the
report.
Get from Web
Helps you import information from Internet.
Save Report
Helps you to save the reports. Click this tool to save the
reports.
Open Queue
Helps you open the queue work items. Click this tool to
work on the queue.
View Queue
Helps you view the details of the queue. Click this tool to
view the details about the queue.
Check Box
Helps you select a particular value or field.
Add Attachment
Helps you attaching a file from the local drive.
Delete
Attachment
Helps you deleting the attached file from a page.
Cancel
Helps you cancelling a particular process.
View History
Helps you access details activity history of a case
View Records
Helps you view the records.
Reopen Records
Helps you to reopen the records.
Edit Record
Helps you to edit the records.
Getting Started ENROLMENT RECON SYSTEM User’s Manual
Page 2-22 1.0 ©UnitedHealthcare

©United Healthcare 1.0 Page 3-1
Suspect Cases Chapter 3
This chapter discusses about the suspect cases available in the application and how to create these
suspect cases for various discrepancies under various discrepancy categories.
This chapter contains the following sections:
Suspect Cases Overview
Creating Eligibility Suspect Cases
Creating DOB/Gender Cases
Creating OOA Cases
Creating SSC Cases
Creating TRR Cases
Creating RRP cases
Suspect Cases Overview 3.1
Creating a case is the very initial step or process of initiating reconciliation process by adding records or
member data in the systems. These cases are reviewed and analyzed repeatedly to identify
discrepancies and provide the solutions. A case can be defined as creation of a member record by
adding member information and discrepancy details which aims at figuring out discrepancies in the CMS
and GPS data. The process ultimately ends in ensuring mitigating CMS and GPS data mismatch issues.
Based on various types of the discrepancies, the cases are broadly divided into three categories: GPS
vs. MMR cases (MMR Eligibility DOB, and Gender), OST (OOA, SCC, and TRR), and RPR cases.
GPS Vs MMR Suspect Cases 3.2
The MMR vs GPS suspect cases are created to identify, analyze, and rectify the issues, errors, and
discrepancies between the source data in GPS and the data available in MMR. As an ERS user, you can
create Eligibility, Gender and DOB cases to ensure data accuracy and avoid discrepancies in MMR and
GPS data.
Suggestions: Before creating the MMR vs GPS suspect cases, the users must login to the
application using the MMR vs GPS work basket and a role which has access rights to the
Eligibility module.
3.2.1 Creating Eligibility Suspect Cases
As an ERS user, you can create MMR vs GPS Eligibility suspect case using the Create Eligibility Case
form. You must provide all the basic and mandatory information in the form such as member info and the
discrepancy details.
Note: All the fields marked with asterisk (*) in the form are mandatory fields.
Navigation:
To access the Create Eligibility Case form, go to the Application menu, point to Eligibility>MMR
Eligibility sub-menu and lick the Create Suspect Case link. The Create Eligibility Case form appears.
Figure 3-1: Create Eligibility Case> Eligibility

Suspect Cases ENRL RECON SYSTEM User’s Manual
Page 3-2 1.0 ©UnitedHealthcare
Figure 3-2: The Create Eligibility Case form

ENRL RECON SYSTEM User’s Manual Suspect Cases
©UnitedHealthcare 1.0 Page 3-3
The Create Eligibility Cases form 3.2.1.1
Figure 3-3: The Creating Eligibility Cases form>Discrepancy Data Section
Field Name
Description
Member Info section
Provide the member detail in this section.
Member ID
Enter the member ID in this field.
Current HICN
Enter the HICN number present in the form while creating the case.
If you click Get Member Info from web service icon after
entering the HICN, the following Member Info details are retrieved from
GPS and auto-populated to in to the following fields.
Member ID
GPS Household ID
Member First Name
Member Last Name
BOB
MBI
Enter the member beneficiary identifier (MBI) in this field.
GPS Household ID
Enter the GPS Household ID in this field.
Member First Name
Enter the first name of the member.
The maximum character limit is 35 in this field.
Member Last Name
Enter the last name of the member.
The maximum character limit is 35 in this field.
Member Middle Name
Enter the middle name of the member.
The maximum character limit is 35 in this field.
Contract Number
Select the contract number in this field.
The contract numbers are five-character alphanumeric values that start

Suspect Cases ENRL RECON SYSTEM User’s Manual
Page 3-4 1.0 ©UnitedHealthcare
Field Name
Description
with S, H or R. For example, S5917, R3444, and H7274.
If a user selects a contract number that starts with H or R, then
the value MA appears in the LOB field. Similarly, if a user
selects the contract number that starts with S, then the value
PDP appears in the LOB field.
LOB
The line of business values are auto-populated based on the values
that you select in the Contract Number field.
The values in this field are MA, and PDP.
DOB
Enter the date of birth of the member.
You must enter the date in MM/DD/YYYY format.
Gender
Select your gender in this field.
OOA Flag
Enter the appropriate value in this field. Select the value Yes, if the
GPS and /or MMR data available, or else select the value No.
Discrepancy Data tab
The user enters the discrepancy details.
Discrepancy Category
This field displays the discrepancy category.
This field is defaulted to value that is the type of discrepancy you are
creating based on the work basket. If you are creating MMR Eligibility
case, this will be defaulted to the value Eligibility.
Discrepancy Type
This field displays the types of the discrepancy between the CMS and
GPS data.
The following value are available in this field:
CMS N/Plan Y: Select this field if the CMS data not available
and Plan data is available
CMS Y/Plan N: Select this field if the CMS data available and
Plan data is not available
Contract: Select this value if the discrepancy is contract
related
PBP: Select this value if the discrepancy is plan benefit
package related
Compliance Start Date
Enter the compliance start date. You must enter the date in
MM/DD/YYYY format. You can enter current, past and future date.
Discrepancy Receipt
Date
Enter the discrepancy start date. You must enter the date in
MM/DD/YYYY format.
Default date is displayed based on the Compliance Start Date. The
discrepancy start date must be set as the first of the month; it can be
first of the previous month or the next month.
For example, if today is 11/19/2010 and the last Compliance Start Date
is 10/25/2010 we should only be creating new discrepancies for
11/1/2010.
Discrepancy Start Date
Enter the discrepancy start date. You must enter the date in
MM/DD/YYYY format.
The default date in this field is based on the value selected in
Compliance Start Date field. The discrepancy start date must be set
as the first of the next month of the date selected in Compliance Start
Date.
For example, if today is 11/19/2010 and the last Compliance Start Date
is 10/25/2010 we should only be creating new discrepancies for
11/1/2010.
Discrepancy End Date
Enter the discrepancy end date. You must enter the date in
MM/DD/YYYY format.
The default date in this field is based on the value selected in
Compliance Start Date field. The discrepancy end date must be set

ENRL RECON SYSTEM User’s Manual Suspect Cases
©UnitedHealthcare 1.0 Page 3-5
Field Name
Description
as the last of the next month of the month & date selected in
Compliance Start Date.
For example, if today is 11/19/2010 and the last Compliance Start Date
is 10/25/2010 we should only be creating new discrepancies for
11/31/2010.
GPS section
The user enters the GPS member data details.
GPS MBI
Enter the GPS Member Beneficiary Identifier (MBI) number in this field.
Contract Number
Select the contract number.
Enter this value if GPS and/or MMR data is not available.
PBP
Select the PBP number. These are three-character numeric values.
Enter this value if GPS and/or MMR data is not available.
SCC Code
Enter the State County Code. These are five-digit values.
Enter this value if GPS and/or MMR data is not available.
HICN
Enter HICN in this field.
Enter this value if GPS and/or MMR data is not available.
Insured Plan Effective
Date
Enter the insured plan effective date.
Enter this value if GPS and/or MMR data is not available.
Insured Plan Term
Date
Enter the insured plan term date.
Enter this value if GPS and/or MMR data is not available.
Line of Business
Description
Select an appropriate value in the field. The following values are
available in this field.
Erickson
Evercare
Harvard Pilgrim
MA
Medica
Oxford
PDP
SCO
Scot
Secure Horizons
MMR section
The user enters the MMR member data details.
MMR MBI
Enter the MMR MBI in this field.
Contract Number
Select the contract number.
Enter this value if GPS and/or MMR data is not available.
PBP
Select the PBP number.
Enter this value if GPS and/or MMR data is not available.
SCC Code
Enter the SSC code.
Enter this value if GPS and/or MMR data is not available.
HICN
Enter HICN in this field.
Enter this value if GPS and/or MMR data is not available.
Payment Adjustment
Start Date
Enter the payment adjustment start date.
Enter this value if GPS and/or MMR data is not available.
Payment Adjustment
End Date
Enter the payment adjustment end date.
Enter this value if GPS and/or MMR data is not available.
Payment Month
Enter payment month in this field.
Enter this value if GPS and/or MMR data is not available.
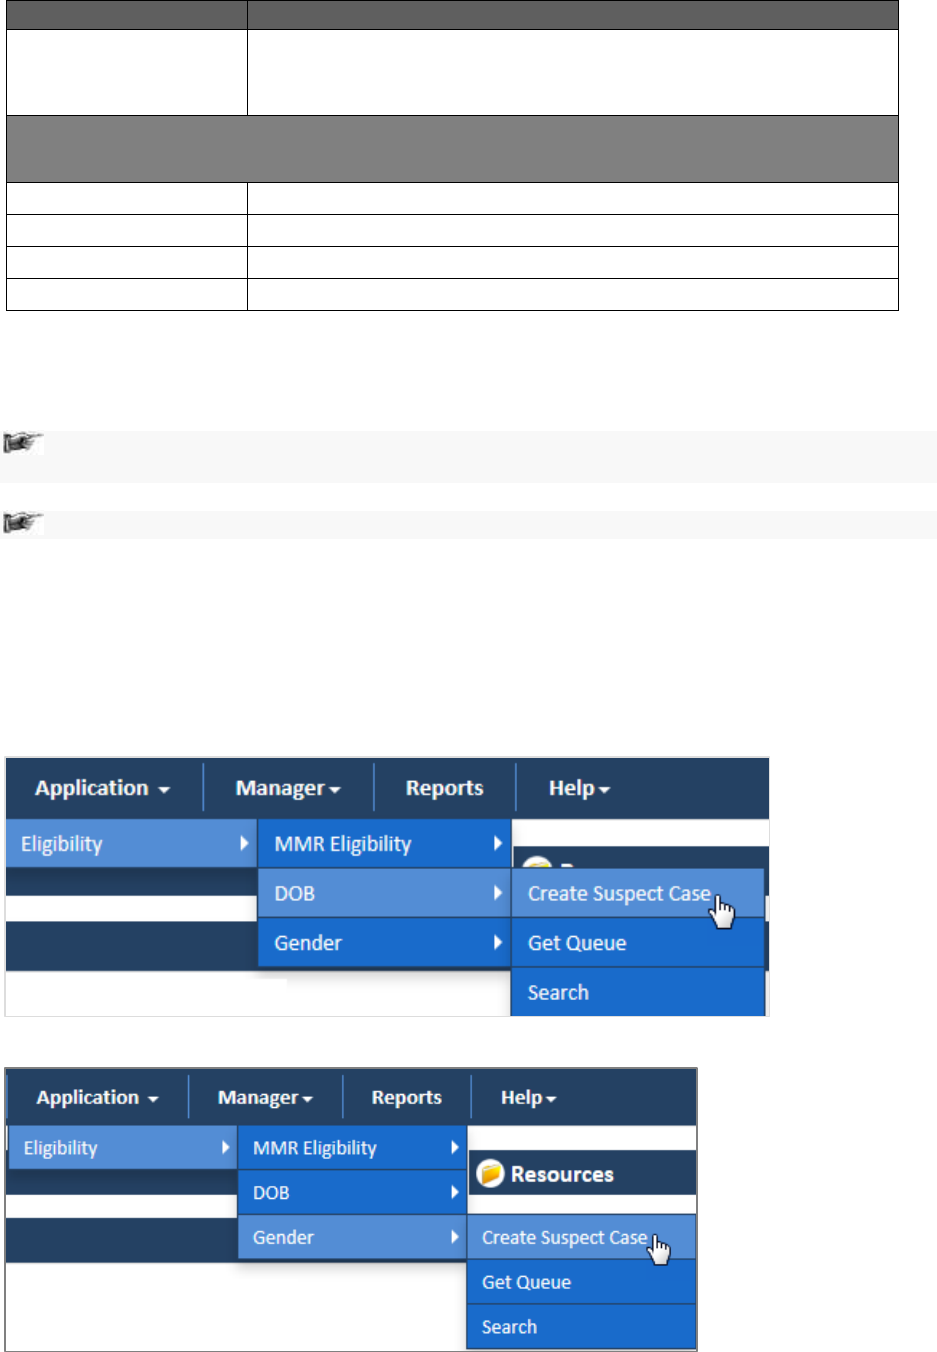
Suspect Cases ENRL RECON SYSTEM User’s Manual
Page 3-6 1.0 ©UnitedHealthcare
Field Name
Description
Discrepancy Category
Select the appropriate value in this field. If you want to xxx, select the
value Yes, or else select No.
Enter this value if GPS and/or MMR data is not available.
Add Comments Tab
The user enters the comments in this field.
Comments
Provide your comments in this field.
Save button
Click this button to save the filled in form.
Reset button
Click this button to reset the entered data in the form.
Cancel button
Click this button to cancel the case creation process.
3.2.2 Creating DOB/Gender Cases
Creation of DOB or Gender eligibility suspect case helps you identify issues and discrepancies in data
related to DOB and Gender data in MMR and GPS.
Note: The fields available in the Create DOC Case form and Create Gender Case forms are
similar except the field value Gender in the GPS and MMR Section of the both forms.
Note: All the fields marked with asterisk in the form are mandatory fields.
Navigation (DOB Case form):
To access the Create DOB Case form, go to the Application menu, point to Eligibility>DOB sub-menu
and click the Create Suspect Case link. The Create DOB Case form appears.
Navigation (Gender Case form):
To access the Create Gender Case form, go to the Application menu, point to Eligibility>Gender sub-
menu and click the Create Suspect Case link. The Create Gender Case form appears.
Figure 3-4: The Eligibility>DOB> Create Suspect Case link
Figure 3-5: The Eligibility>Gender> Create Suspect Case link
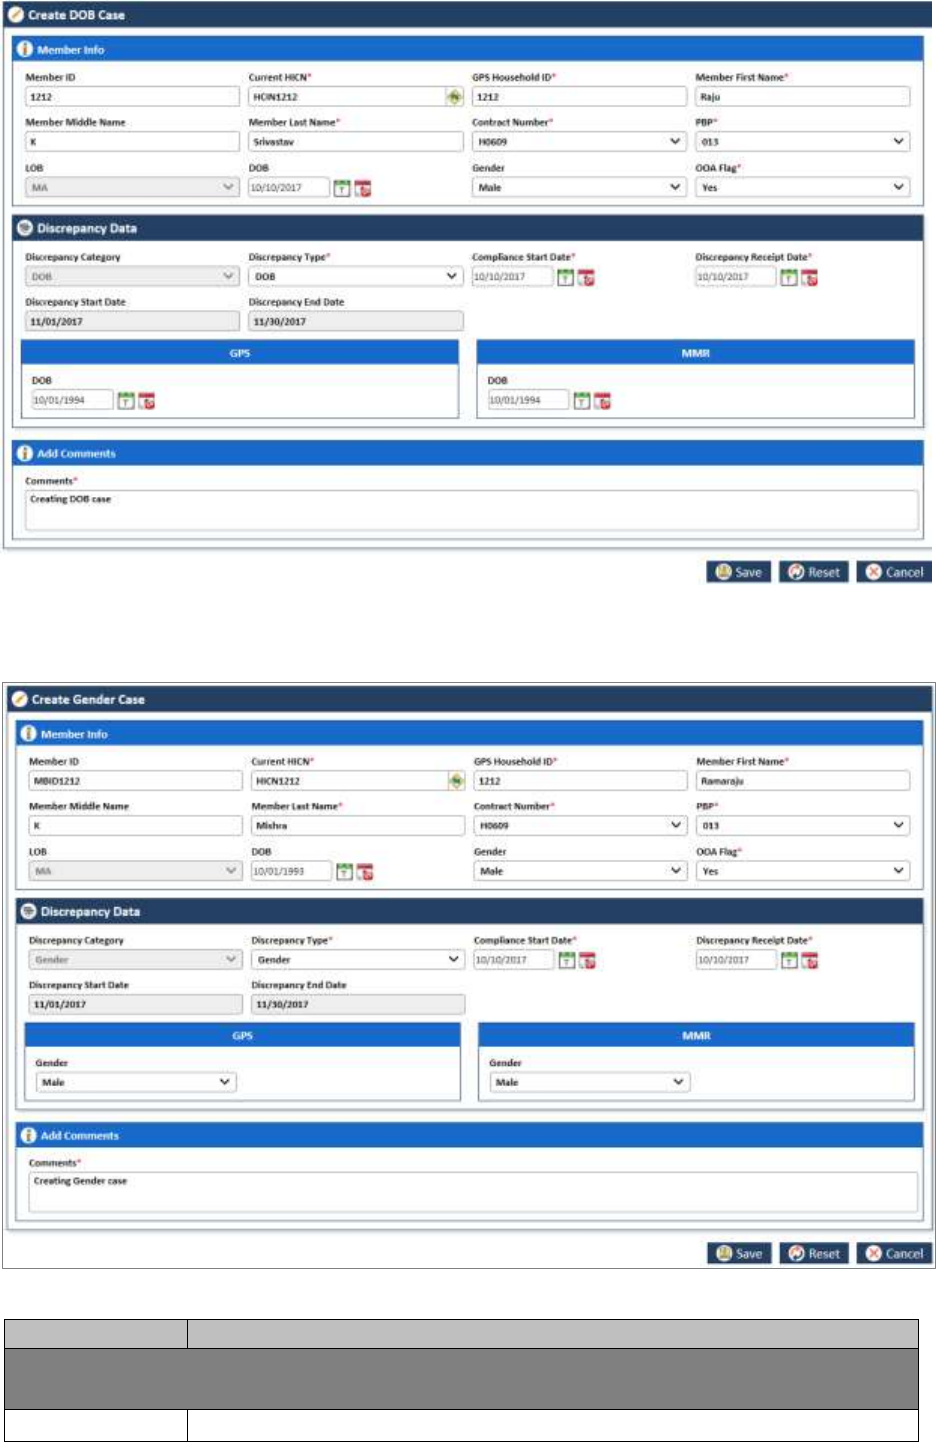
ENRL RECON SYSTEM User’s Manual Suspect Cases
©UnitedHealthcare 1.0 Page 3-7
Create DOB Case form 3.2.2.1
Figure 3-6: The Create DOB Case form
The Create Gender Case form
3.2.2.2
Figure 3-7: The Create Gender Case form
Field Name
Description
Member Info section
Provide the member detail in this section.
Member ID
Enter the member ID in this field.
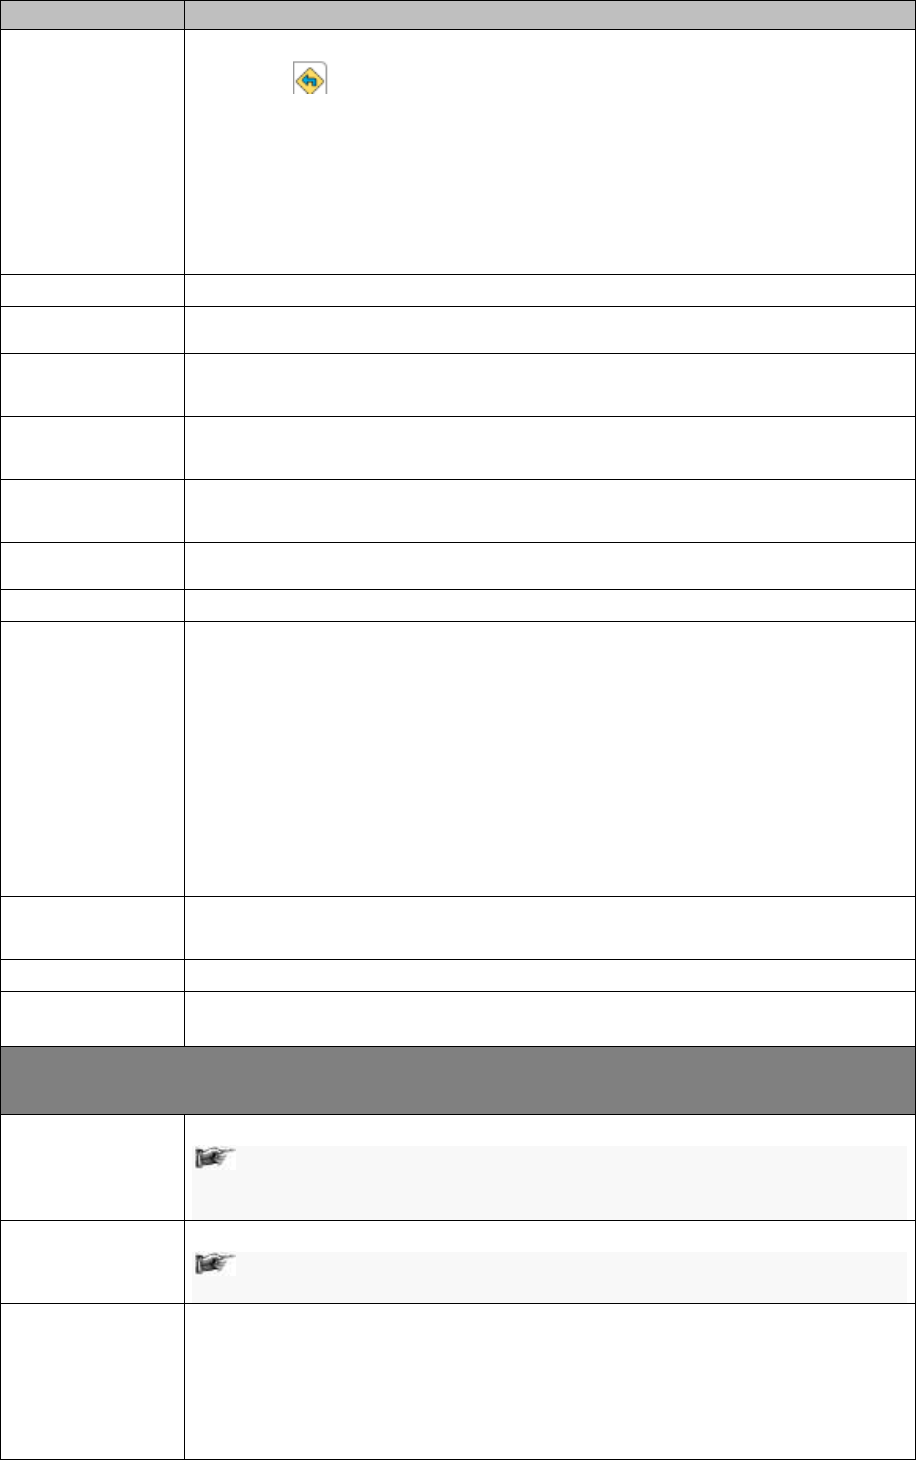
Suspect Cases ENRL RECON SYSTEM User’s Manual
Page 3-8 1.0 ©UnitedHealthcare
Field Name
Description
Current HICN
Enter the HICN number present in the form while creating the case.
If you click Get Member Info from web service icon after entering the
HICN, the following Member Info details are retrieved from GPS and auto-
populated to in to the following fields.
Member ID
GPS Household ID
Member First Name
Member Last Name
BOB
MBI
Enter the BMI in this field.
GPS Household
ID
Enter the GPS Household ID in this field.
Member First
Name
Enter the first name of the member.
The maximum character limit is 35 in this field.
Member Last
Name
Enter the last name of the member.
The maximum character limit is 35 in this field.
Member Middle
Name
Enter the middle name of the member.
The maximum character limit is 35 in this field.
Contract
Number
Select the contract number in this field.
PBP
Select the PBP number in field.
LOB
Select the LOB in this field. The following values are available in this field.
Erickson
Evercare
Harvard Pilgrim
MA
Medica
Oxford
PDP
SCO
SCOT
Secure Horizons
DOB
Enter the date of birth of the member.
You must enter the date in MM/DD/YYYY format.
Gender
Select your gender in this field.
OOA Flag
Enter the appropriate value in this field. Select the value Yes, if the GPS data
available, or else select the value No.
Discrepancy Data
The user enters the discrepancy details.
Discrepancy
Category
This field displays the discrepancy category.
In the Create Gender Case form, the value Gender is defaulted in this
field. Similarly, in the Create DOB Case form, the value DOB is
defaulted.
Discrepancy
Type
Select the type of discrepancy in this field.
The value Gender is available in the Create Gender Case form and
value DOB is available in the Create DOB Case form this field
Discrepancy
Receipt Date
Enter the discrepancy start date. You must enter the date in MM/DD/YYYY
format.
The default date is decided based on the Compliance Start Date. The
discrepancy start date must be set as the first of the month; it can be first of the
previous month or the coming moth.
For example, if today is 11/19/2010 and the last Compliance Start Date is
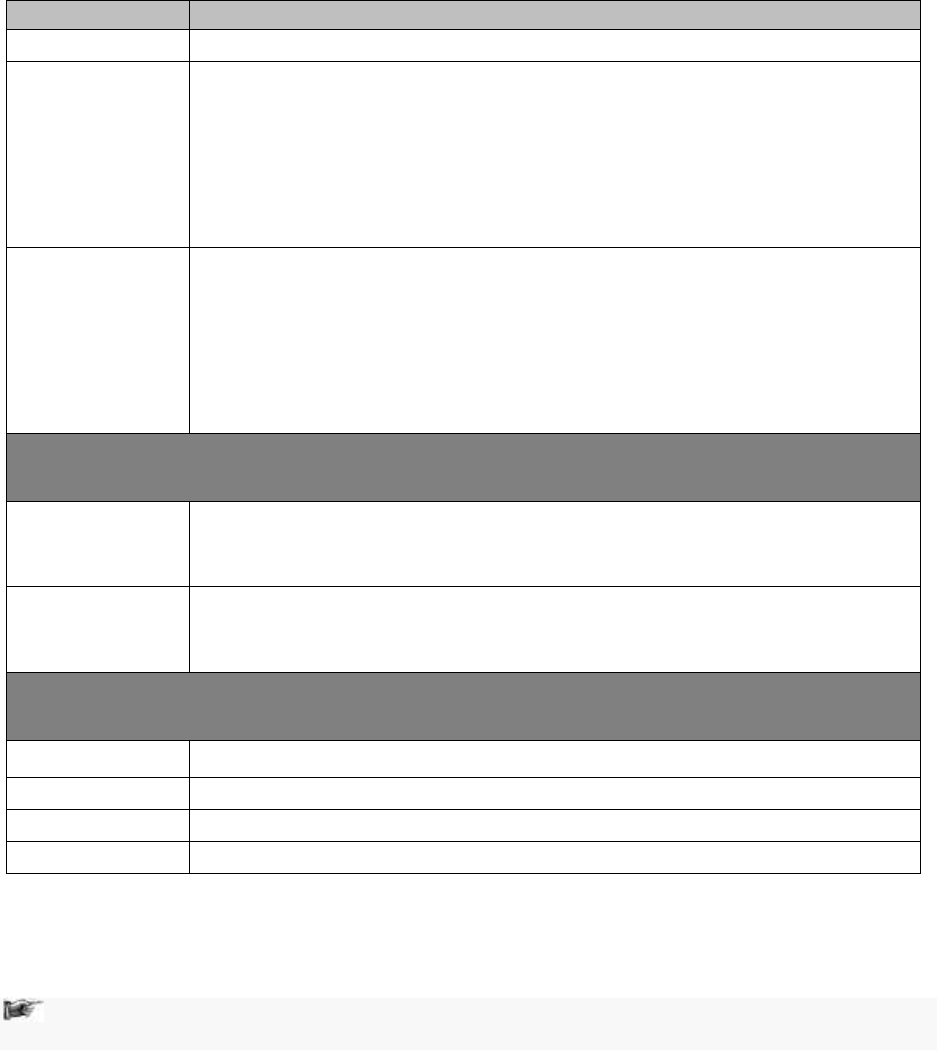
ENRL RECON SYSTEM User’s Manual Suspect Cases
©UnitedHealthcare 1.0 Page 3-9
Field Name
Description
10/25/2010 we should only be creating new discrepancies for 11/1/2010.
Discrepancy
Start Date
Enter the discrepancy start date. You must enter the date in MM/DD/YYYY
format.
The default date in this field is based on the value selected in Compliance
Start Date field. The discrepancy start date must be set as the first of the next
month of the month & date selected in Compliance Start Date.
For example, if today is 11/19/2010 and the last Compliance Start Date is
10/25/2010 we should only be creating new discrepancies for 11/1/2010.
Discrepancy
End Date
Enter the discrepancy end date. You must enter the date in MM/DD/YYYY
format.
The default date in this field is based on the value selected in Compliance
Start Date field. The discrepancy end date must be set as the last of the next
month of the month & date selected in Compliance Start Date.
For example, if today is 11/19/2010 and the last Compliance Start Date is
10/25/2010 we should only be creating new discrepancies for 11/31/2010.
GPS/MMR section
The user enters the MMR member data details.
DOB
Select the contract number.
This field is available in the GPS and/or MMR section of the Create DOB Case
form.
Gender
Select the value in the field.
The field is available in the GPS and/or MMR section of the Create Gender
Case form.
Add Comments section
The user enters the comments in this field.
Comments
Provide your comments in this field.
Save button
Click this button to save the filled in form.
Reset button
Click this button to reset the entered data in the form.
Cancel button
Click this button to cancel the case creation process.
OST Suspect Cases 3.3
As an ERS user, you can create OST suspect cases to mitigate the issues and discrepancies with regard
to OOA, SCC, and TRR. Using OST work basket, a user can create OOA, SCC, and TRR cases.
Suggestions: Before creating the OST suspect cases, the users must login the application using
the OST work basket and a role which has access rights to the OST module.
A user can create an OOA case, in the following scenarios:
Undeliverable mails
Change of address
Out of area
Undeliverable mail – with/without forwarding address
A user can create a SCC case, in the following scenarios:
Incarceration notice
In area move
OOA
A user can create a TRR case, in the following scenarios:
Incarceration notice
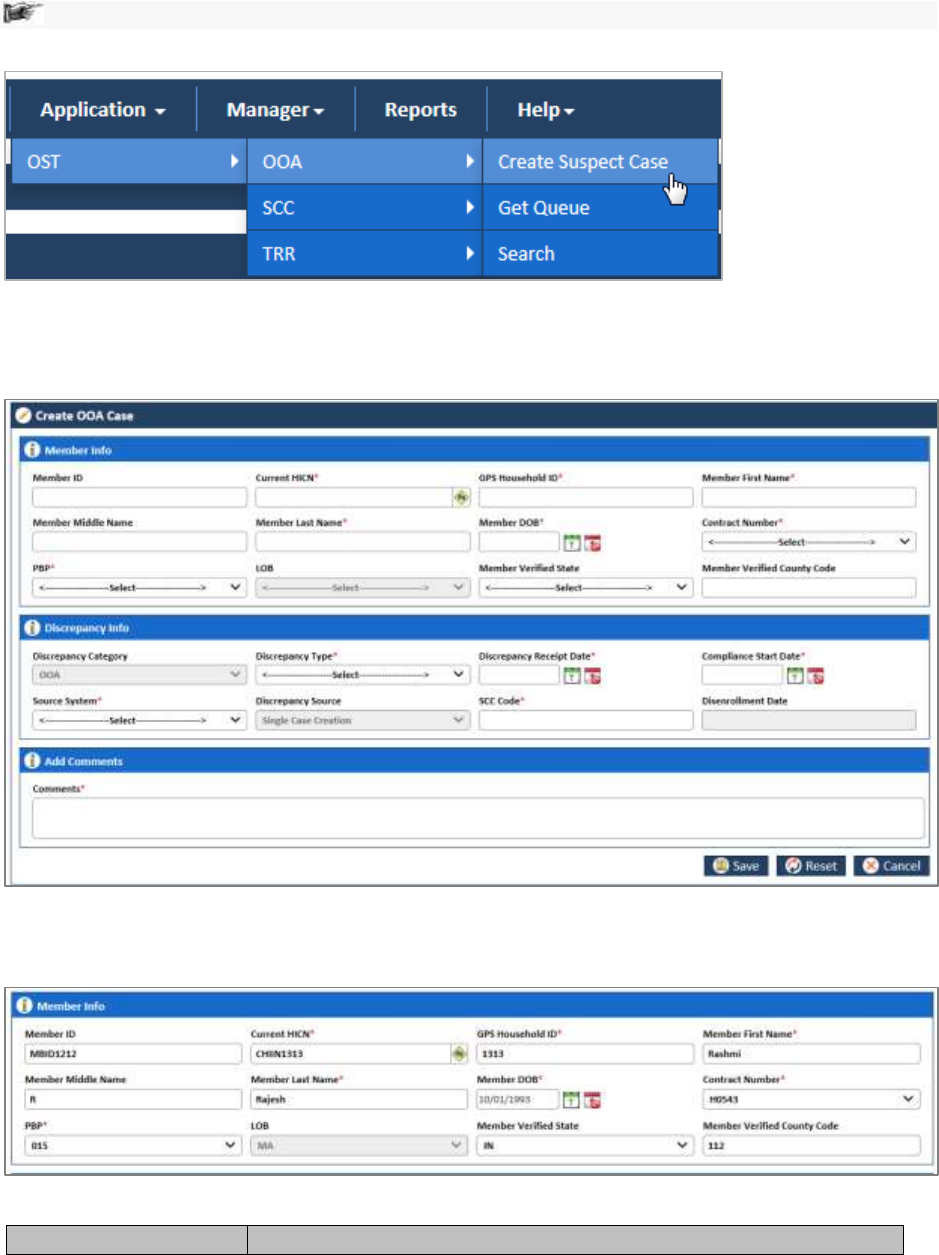
Suspect Cases ENRL RECON SYSTEM User’s Manual
Page 3-10 1.0 ©UnitedHealthcare
In area move
3.3.1 Creating OOA Cases
You can create OOA case, when you identify issues and discrepancies with member data of a member
who becomes out of area where the service is provided. When the communication are not responded or
replied, you need to ensure member is in the area where service is available. You can mitigate these
issues by creating ta OOA case using Create OOA Case form.
Note: All the fields marked with asterisk in the form are mandatory fields.
Navigation:
Figure 3-8: Accessing Create OOA Form
To access the Create OOA Case form, go to the Application menu, point to OST>OAA sub-menu, and
click the Create Suspect Case link. The Create OOA Case form appears.
Figure 3-9: The Create OOA Case form
The Create OOA Case form> Member Info Tab 3.3.1.1
Figure 3-10: The Create OOA Case form> Member Info Tab
Field Name
Description
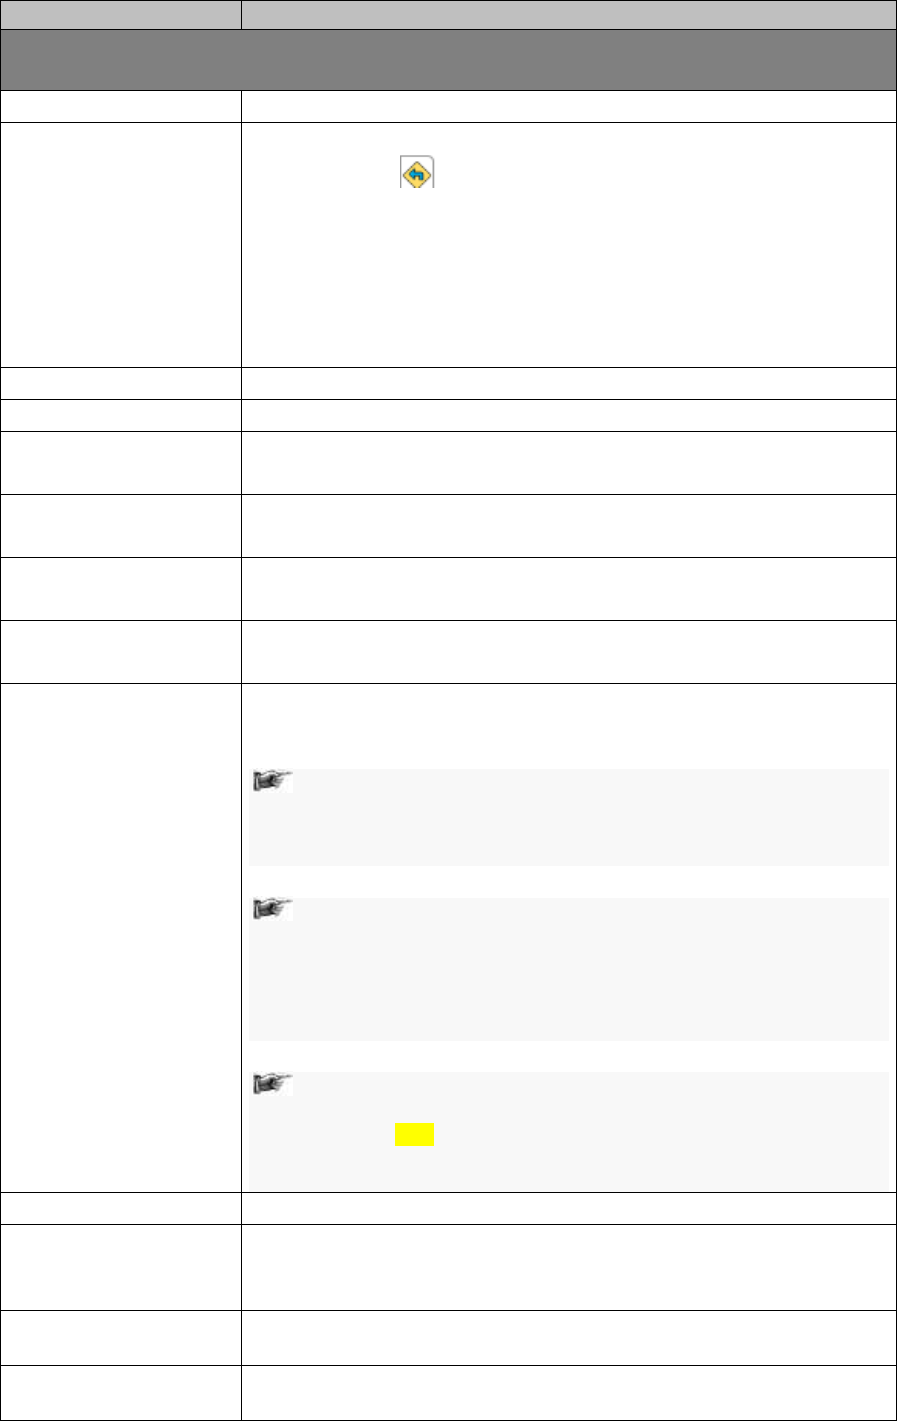
ENRL RECON SYSTEM User’s Manual Suspect Cases
©UnitedHealthcare 1.0 Page 3-11
Field Name
Description
Member Info section
Provide the member detail in this section.
Member ID
Enter the member ID in this field.
Current HICN
Enter the HICN number present in the form while creating the case.
If the user clicks Get Member Info from web service icon after
entering the HICN, the following Member Info details are retrieved from
GPS and auto-populated to in to the corresponding fields.
Member ID
GPS Household ID
Member First Name
Member Last Name
BOB
Current MBI
Enter the current BMI in this field.
GPS Household ID
Enter the GPS Household ID in this field.
Member First Name
Enter the first name of the member.
The maximum character limit is 35 in this field.
Member Last Name
Enter the last name of the member.
The maximum character limit is 35 in this field.
Member Middle Name
Enter the middle name of the member.
The maximum character limit is 35 in this field.
DOB
Enter the date of birth of the member.
You must enter the date in MM/DD/YYYY format.
Contract Number
Select the contract number in this field.
The contract numbers are five-character alphanumeric values that
starts with S, H or R. For example, S5917, R3444, and H7274.
If the user selects a contract number that starts with H or R,
then the value MA appears in the LOB field. Similarly, if the
user selects the contract number that starts with S, then the
value PDP appears in the LOB field.
Selection of this value directly affects the date value in the
Disenrollment Date field. If the user selects a contract number
that starts with H or R, the value Disenrollment Date field
changes to date that six later to the current date. For example,
if the current date is 8/10/2017 then the Disenrollment Date
field displays the value 2/10/2018.
If the user selects a contract number that starts with S, the
value Disenrollment Date field changes to date that is twelve
months later to the current date. For example, if the current
date is 8/10/2017 then the Disenrollment Date field displays
the value 8/10/2018.
PBP
Select the PBP number in field. These are three-digit numbers.
LOB
The values in the field are auto-populated based on the values that you
select in the Contract number field.
The values in this field are MA, and PDP.
Member Verified State
Select the member verified state in this field. The states names are
marked with two-lettered codes.
Member Verified
County Code
Enter the member verified county code in this field. You enter a code
number of the three numbers.
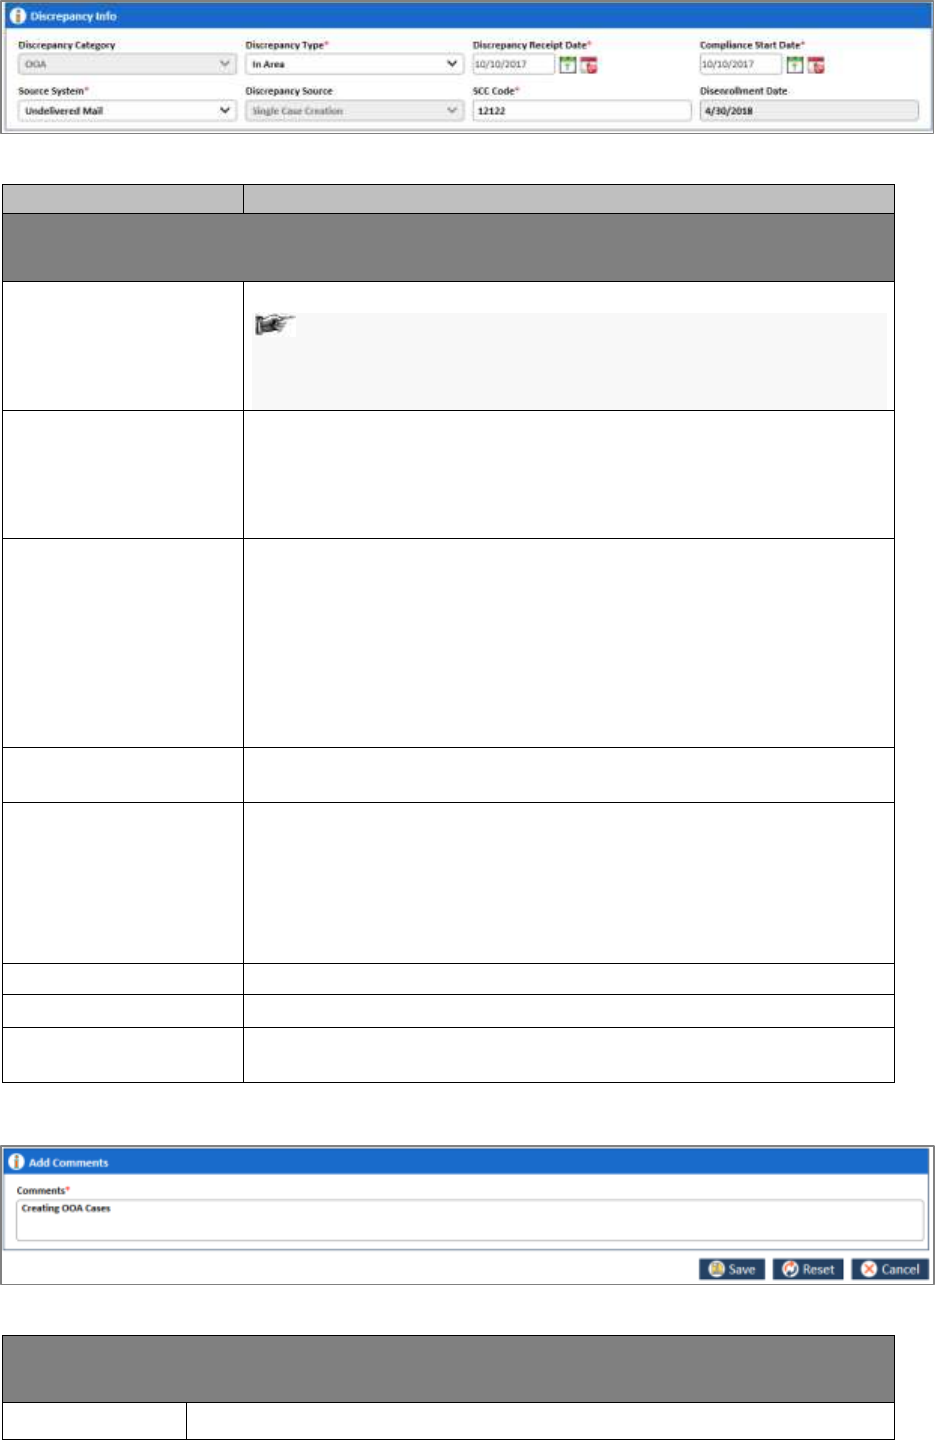
Suspect Cases ENRL RECON SYSTEM User’s Manual
Page 3-12 1.0 ©UnitedHealthcare
The Create OOA Case form> Discrepancy Tab 3.3.1.2
Figure 3-11: The Create OOA Case form> Discrepancy Info Tab
Field Name
Description
Discrepancy info
The user enters the discrepancy details.
Discrepancy Category
This field displays the discrepancy category.
In the Create OOA Case form, the value OOA is defaulted in
this field. Similarly, in the Create SSC Case form, the Create
TRR Case form value SSC and TRR is defaulted,
respectively.
Discrepancy Type
Select the type of discrepancy in this field. The following values are
available in this field.
OOA
In Area
Incarcerated
Discrepancy Receipt
Date
Enter the discrepancy start date. You must enter the date in
MM/DD/YYYY format.
The default date is decided based on the Compliance Start Date. The
discrepancy start date must be set as the first of the month; it can be
first of the previous month or the coming moth.
For example, if today is 11/19/2010 and the last Compliance Start Date
is 10/25/2010 we should only be creating new discrepancies for
11/1/2010.
Compliance Start Date
Enter the compliance start date. You must enter the date in
MM/DD/YYYY format. You can enter current, past and future date.
Source System
Select the name of the source that triggers discrepancies.
The following values are available in this field:
COA
GPS
MIIM
Undelivered Mails
Discrepancy Source
This field value is defaulted to Single Case Creation.
SCC Code
Enter a five-letter SCC code in this field.
Disenrollment Date
The value in this field is auto-populated based on the value selected in
the field Contract Number.
The Create OOA Case form> Add Comments Section 3.3.1.3
Figure 3-12: The Create OOA Case form> Add Comments Section
Add Comments section
The user enters the comments in this field.
Comments
Provide your comments in this field.
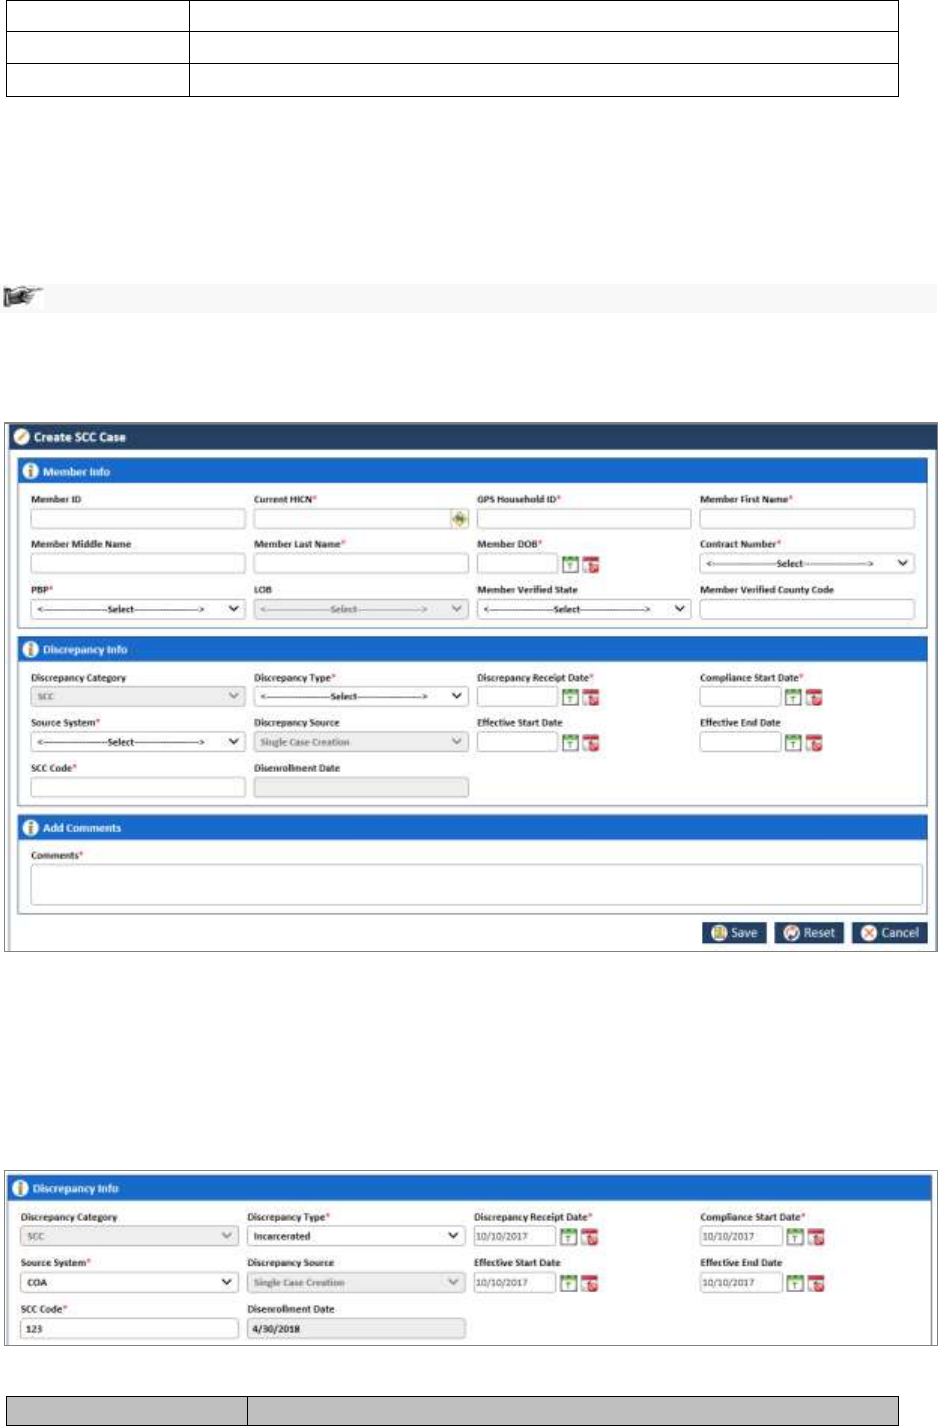
ENRL RECON SYSTEM User’s Manual Suspect Cases
©UnitedHealthcare 1.0 Page 3-13
Save button
Click this button to save the filled in form.
Reset button
Click this button to reset the entered data in the form.
Cancel button
Click this button to cancel the case creation process.
3.3.2 Creating SSC Cases
You can create State County Code (SSC) case to identify discrepancy related to state county code
pertaining to a member data. This helps you mitigate the information mismatch related this unique code
between CMS and GPS and rectify the errors.
To create SSC case, you need to access the Create SSC Case form.
Note: All the fields marked with asterisk in the form are mandatory fields.
Navigation:
To access the Create SSC Case form, go to the Application menu, point to OST>SSC sub-menu and d
click the Create Suspect Case. The Create SSC Case form appears.
Figure 3-13: The Create SSC Case form
The Create SSC Case form> Member Info Tab 3.3.2.1
The fields in Member Into tab are similar to the Member Into tab of the Create OOA Case form. For
more information, refer to The Create OOA Case form> Member Info Tab section.
The Create SSC Case form> Discrepancy Tab 3.3.2.2
Figure 3-14: The SSC Case for>Discrepancy Info tab
Field Name
Description
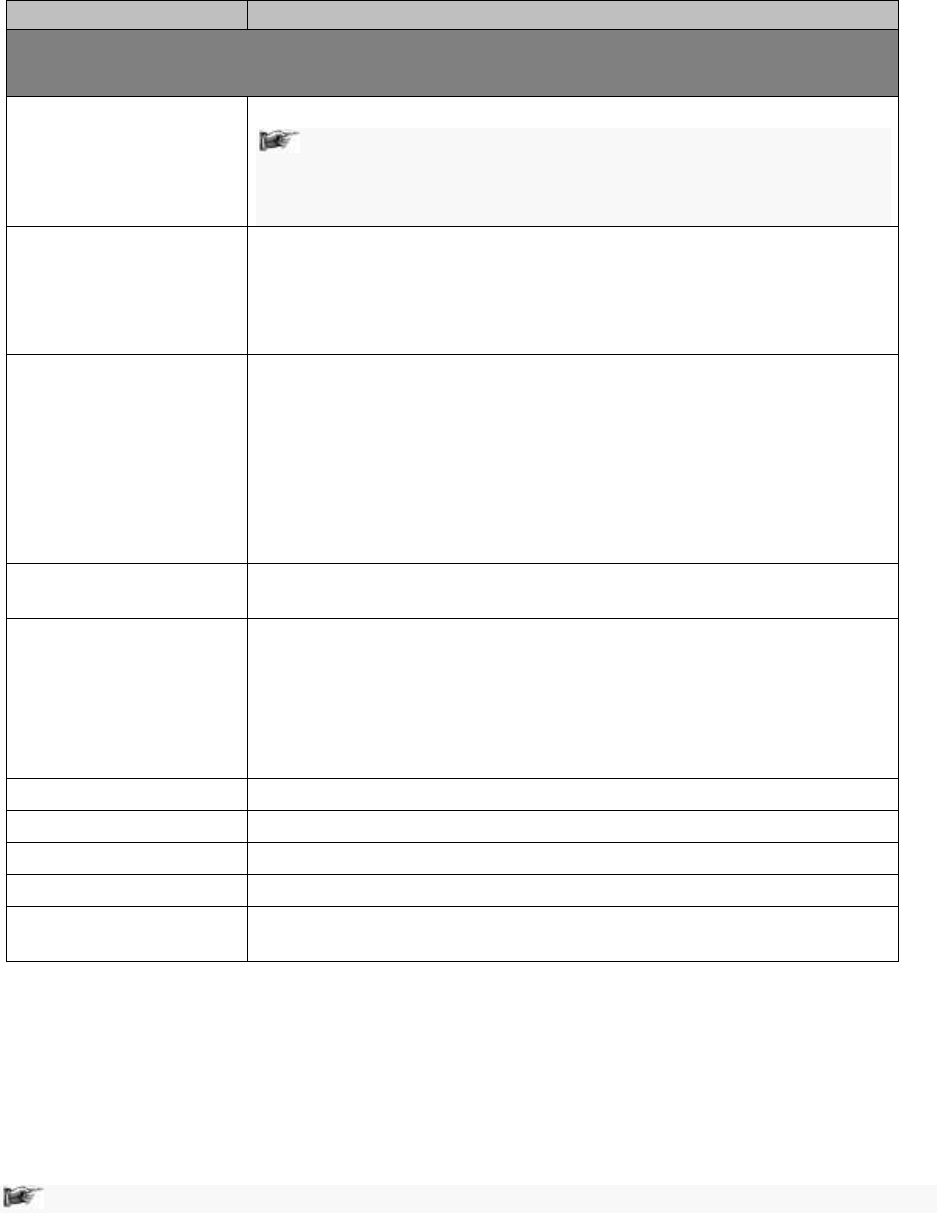
Suspect Cases ENRL RECON SYSTEM User’s Manual
Page 3-14 1.0 ©UnitedHealthcare
Field Name
Description
Discrepancy info
The user enters the discrepancy details.
Discrepancy Category
This field displays the discrepancy category.
In the Create OOA Case form, the value OOA is defaulted in
this field. Similarly, in the Create SSC Case form, the Create
TRR Case form value SSC and TRR is defaulted,
respectively.
Discrepancy Type
Select the type of discrepancy in this field. The following values are
available in this field.
OOA
In Area
Incarcerated
Discrepancy Receipt
Date
Enter the discrepancy start date. You must enter the date in
MM/DD/YYYY format.
The default date is decided based on the Compliance Start Date. The
discrepancy start date must be set as the first of the month; it can be
first of the previous month or the coming moth.
For example, if today is 11/19/2010 and the last Compliance Start Date
is 10/25/2010 we should only be creating new discrepancies for
11/1/2010.
Compliance Start Date
Enter the compliance start date. You must enter the date in
MM/DD/YYYY format. You can enter current, past and future date.
Source System
Select the name of the source that triggers discrepancies.
The following values are available in this field:
COA
GPS
MIIM
Undelivered Mails
Effective Start Date
Enter the effective start date of the SSC discrepancy.
Effective End Date
Enter the effective end date of the SSC discrepancy.
Discrepancy Source
This field value is defaulted to Single Case Creation.
SCC Code
Enter a five-letter SCC code in this field.
Disenrollment Date
The value in this field is auto-populated based on the value selected in
the field Contract Number.
The Create SSC Case form> Add Comments Section 3.3.2.2.1
For more information, refer to The Create OOA Case form> Add Comments Section.
3.3.3 Creating TRR Cases
You can create Transaction Retroactive Report (TRR) case in case there is an issue with respect to
change in address, disenrollment and SSC case mismatch. Creating the cases you can ensure
correcting all the issues in these areas and rectifying data mismatch issues in the CMS and GPS.
Note: All the fields marked with asterisk in the form are mandatory fields.
Navigation:
To access the Create TRR Case form, go to the Application menu, point to OST>TRR sub-menu and
click the Create Suspect Case. The Create TRR Case form appears.
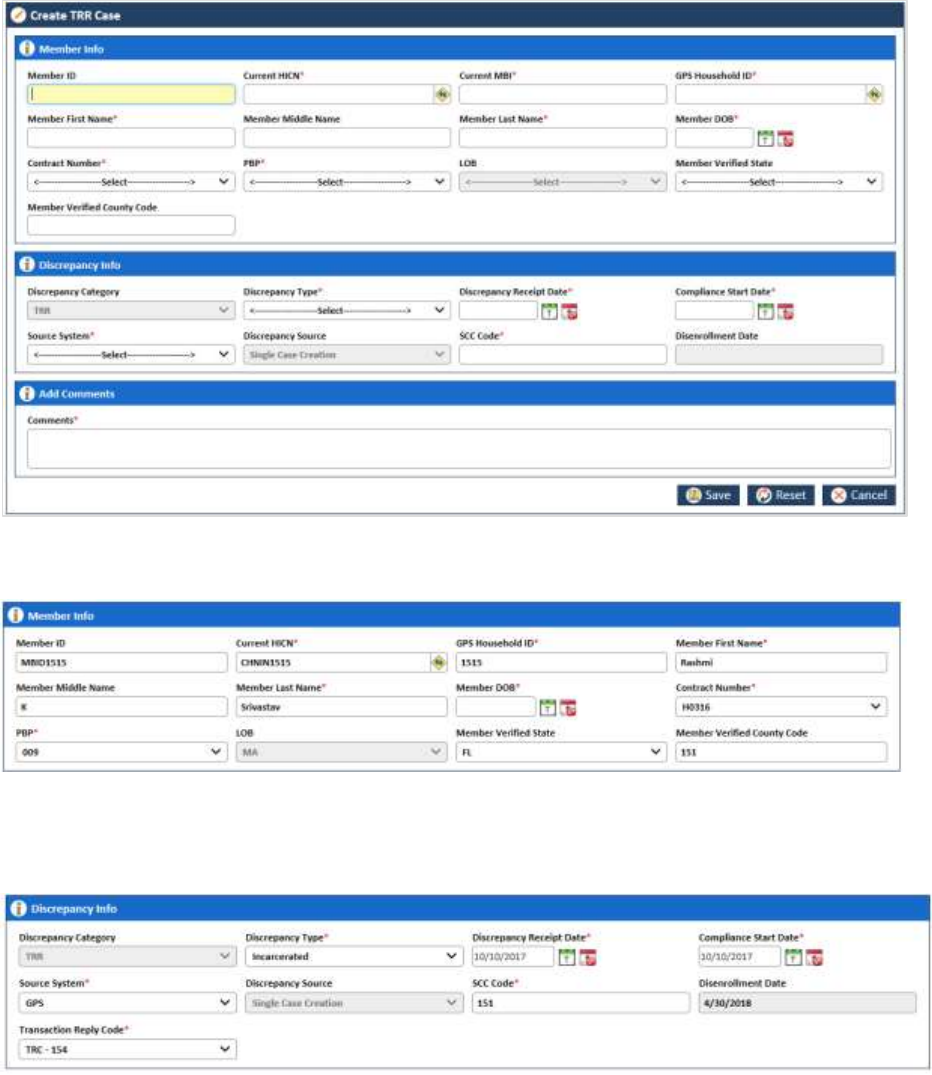
ENRL RECON SYSTEM User’s Manual Suspect Cases
©UnitedHealthcare 1.0 Page 3-15
Figure 3-15: The Create TRR Case form
The Create TRR Case form> Member Info Tab 3.3.3.1.1
Figure 3-16: The Create TRR Case form> Member Info Tab
For more information, refer to The Create OOA Case form> Member Info Tab section.
The Create TRR Case form> Discrepancy Info Tab 3.3.3.1.2
Figure 3-17: The Create TRR Case form
The fields available in this tab are same with the Discrepancy Info tab of the Create OOA Case form
except the value in Discrepancy Category and Transaction Code field. The value in the Discrepancy
Category is defaulted to TRR.
Based on the value you select in the Transaction Code field, the respective queues are generated. The
following values are available in this field.
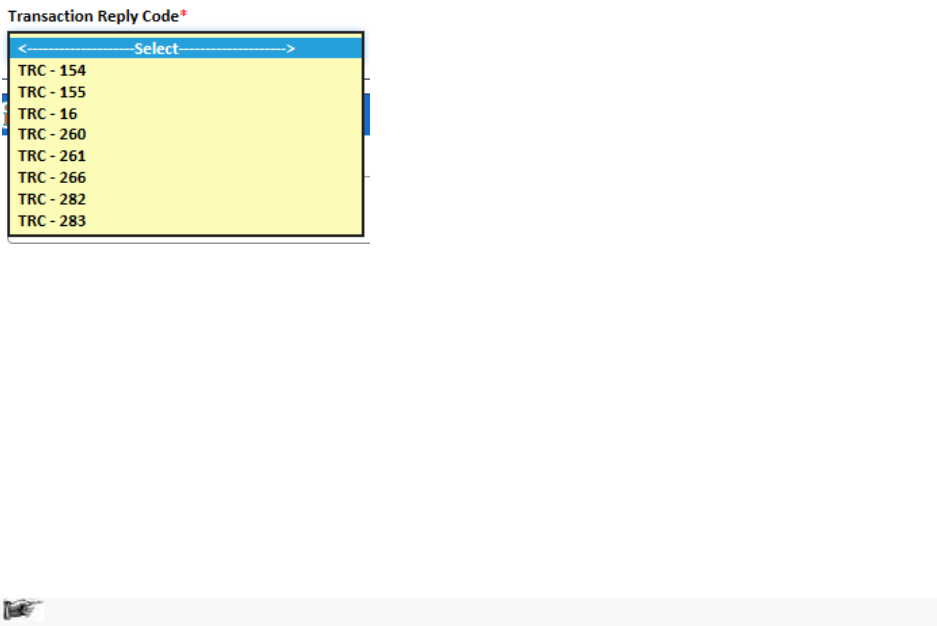
Suspect Cases ENRL RECON SYSTEM User’s Manual
Page 3-16 1.0 ©UnitedHealthcare
Figure 3-18: Transaction Code field
For more information, refer to The Create OOA Case form> Discrepancy Tab section.
The Create TRR Case form> Add Comments Section 3.3.3.1.3
For more information, refer to The Create OOA Case form> Add Comments Section.
3.3.4 RPR Suspect Cases
You can create Retrospective Process Records (RPR) to rectify the data mismatch issues between the
CMS and GPS. If you process the records with certain data which is not created or not available in the
CMS, you need to rectify the issues. You need rectify the data issues either in CMS or GPS. Incase
disenrollment, and termination of the member, you need instate member data and reactivate the member
in the CMS.
Note: All the fields marked with asterisk in the form are mandatory fields.
Creating RRP cases 3.3.4.1
Navigation:
To access the Create TRR Case form, go to the Application menu, point to OST>RPR sub-menu and
click the Create Suspect Case. The Create RPR Case form appears.
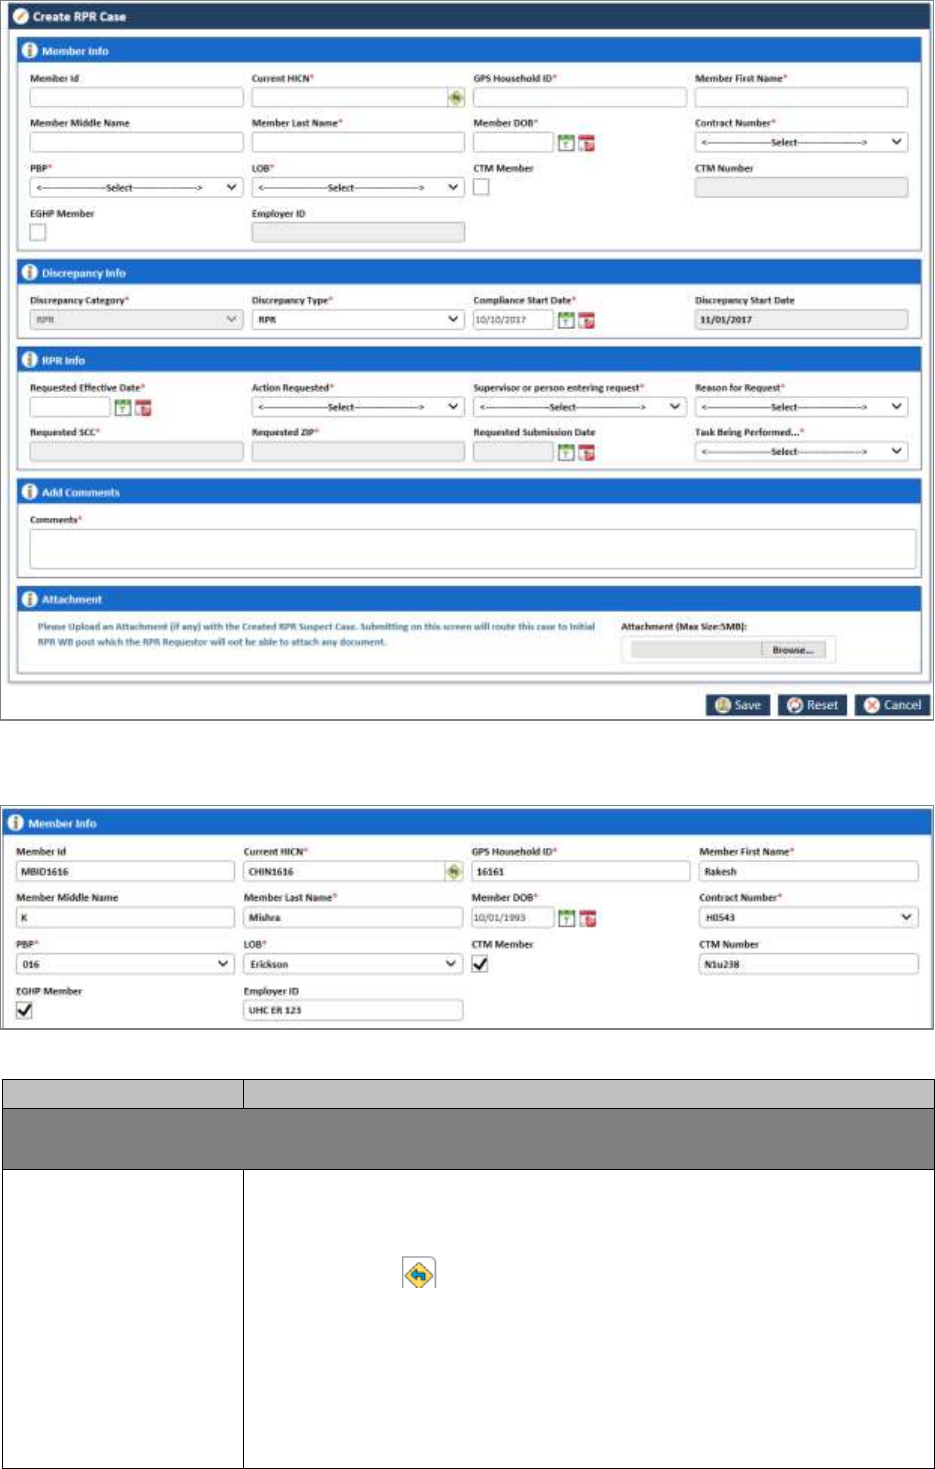
ENRL RECON SYSTEM User’s Manual Suspect Cases
©UnitedHealthcare 1.0 Page 3-17
Figure 3-19: The Create RPS Case form
The Create TRR Case form> Member Info Tab 3.3.4.1.1
Figure 3-20:
Field Name
Description
Member Info section
Provide the member detail in this section.
Member ID
Enter the member ID in this field.
This field becomes mandatory field if Current HICN or GPS Household ID is
not entered.
If the user clicks Get member info from Web icon after entering the
Member ID, the following Member Info details are auto-populated from GPS
to in to the corresponding fields.
Current HICN
GPS Household ID
Member First Name
Member Last Name
BOB
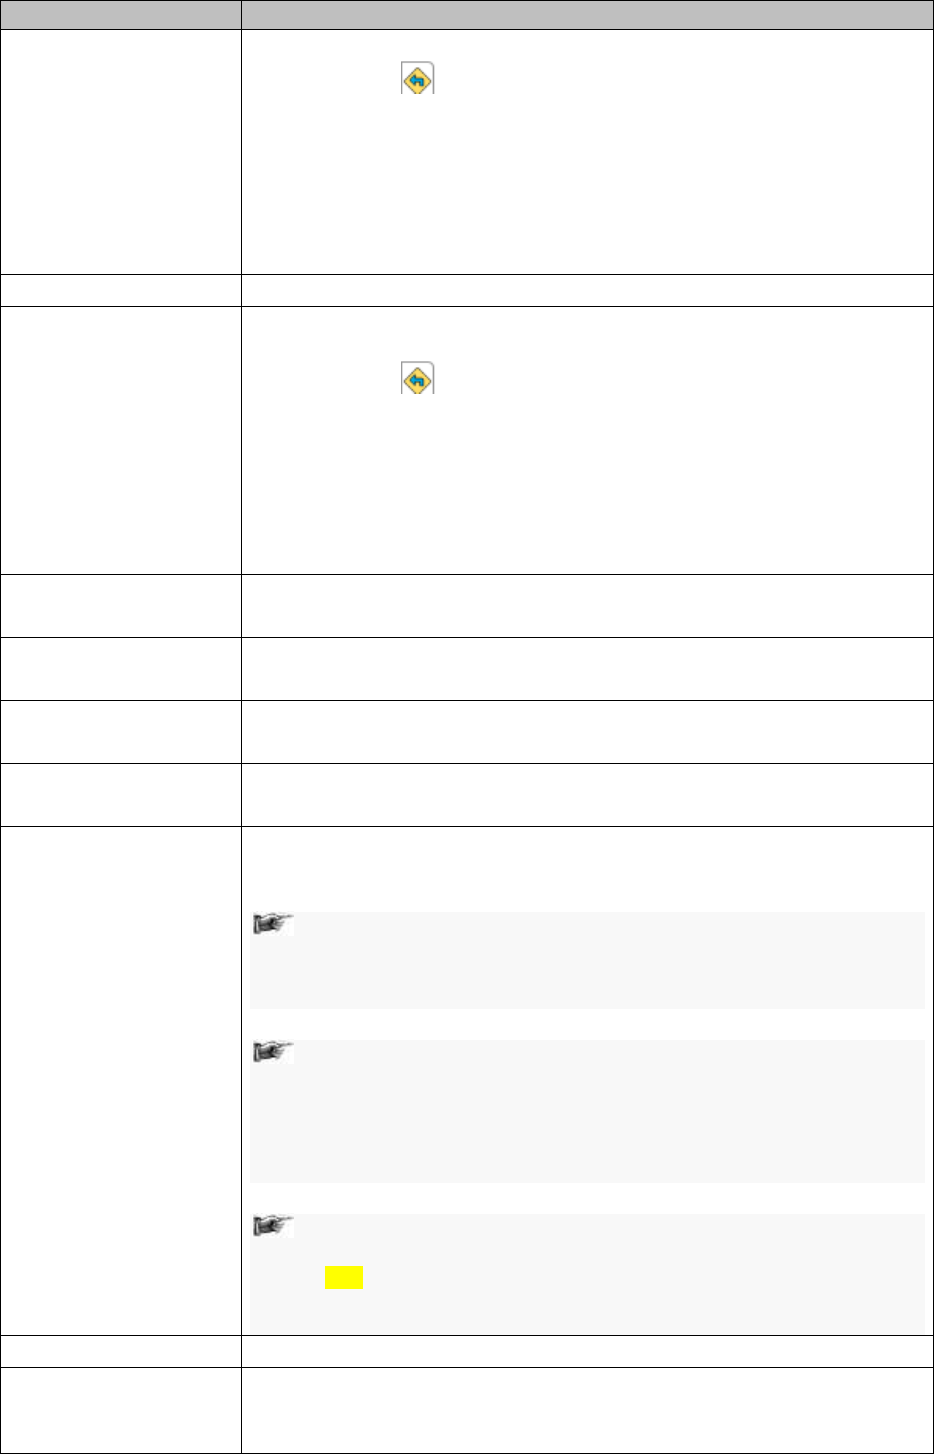
Suspect Cases ENRL RECON SYSTEM User’s Manual
Page 3-18 1.0 ©UnitedHealthcare
Field Name
Description
Current HICN
Enter the HICN number present in the form while creating the case.
If the user clicks Get member info from Web icon after entering the
HICN, the following Member Info details are retrieved from GPS and auto-
populated to in to the corresponding fields.
Member ID
GPS Household ID
Member First Name
Member Last Name
BOB
MBI
Enter the current BMI in this field.
GPS Household ID
Enter the GPS Household ID in this field. This becomes a mandatory field if
value in Current HICN or Member ID is not entered.
If the user clicks Get member info from Web icon after entering the
GPS House Hold ID, the following Member Info details are retrieved from
GPS and auto-populated to in to the corresponding fields.
Member ID
Current HICN
Member First Name
Member Last Name
BOB
Member First Name
Enter the first name of the member.
The maximum character limit is 35 in this field.
Member Last Name
Enter the last name of the member.
The maximum character limit is 35 in this field.
Member Middle Name
Enter the middle name of the member.
The maximum character limit is 35 in this field.
Member DOB
Enter the date of birth of the member.
You must enter the date in MM/DD/YYYY format.
Contract Number
Select the contract number in this field.
The contract numbers are five-character alphanumeric values that starts
with S, H or R. For example, S5917, R3444, and H7274.
If the user selects a contract number that starts with H or R, then
the value MA appears in the LOB field. Similarly, if the user selects
the contract number that starts with S, then the value PDP appears
in the LOB field.
Selection of this value directly affects the date value in the
Disenrollment Date field. If the user selects a contract number
that starts with H or R, the value Disenrollment Date field changes
to date that six later to the current date. For example, if the current
date is 8/10/2017 then the Disenrollment Date field displays the
value 2/10/2018.
If the user selects a contract number that starts with S, the value
Disenrollment Date field changes to date that is twelve months
later to the current date. For example, if the current date is
8/10/2017 then the Disenrollment Date field displays the value
8/10/2018.
PBP
Select the PBP number in field. These are three-digit numbers.
LOB
The values in the field are auto-populated based on the values that you
select in the Contract number field.
The values in this field are MA, and PDP.
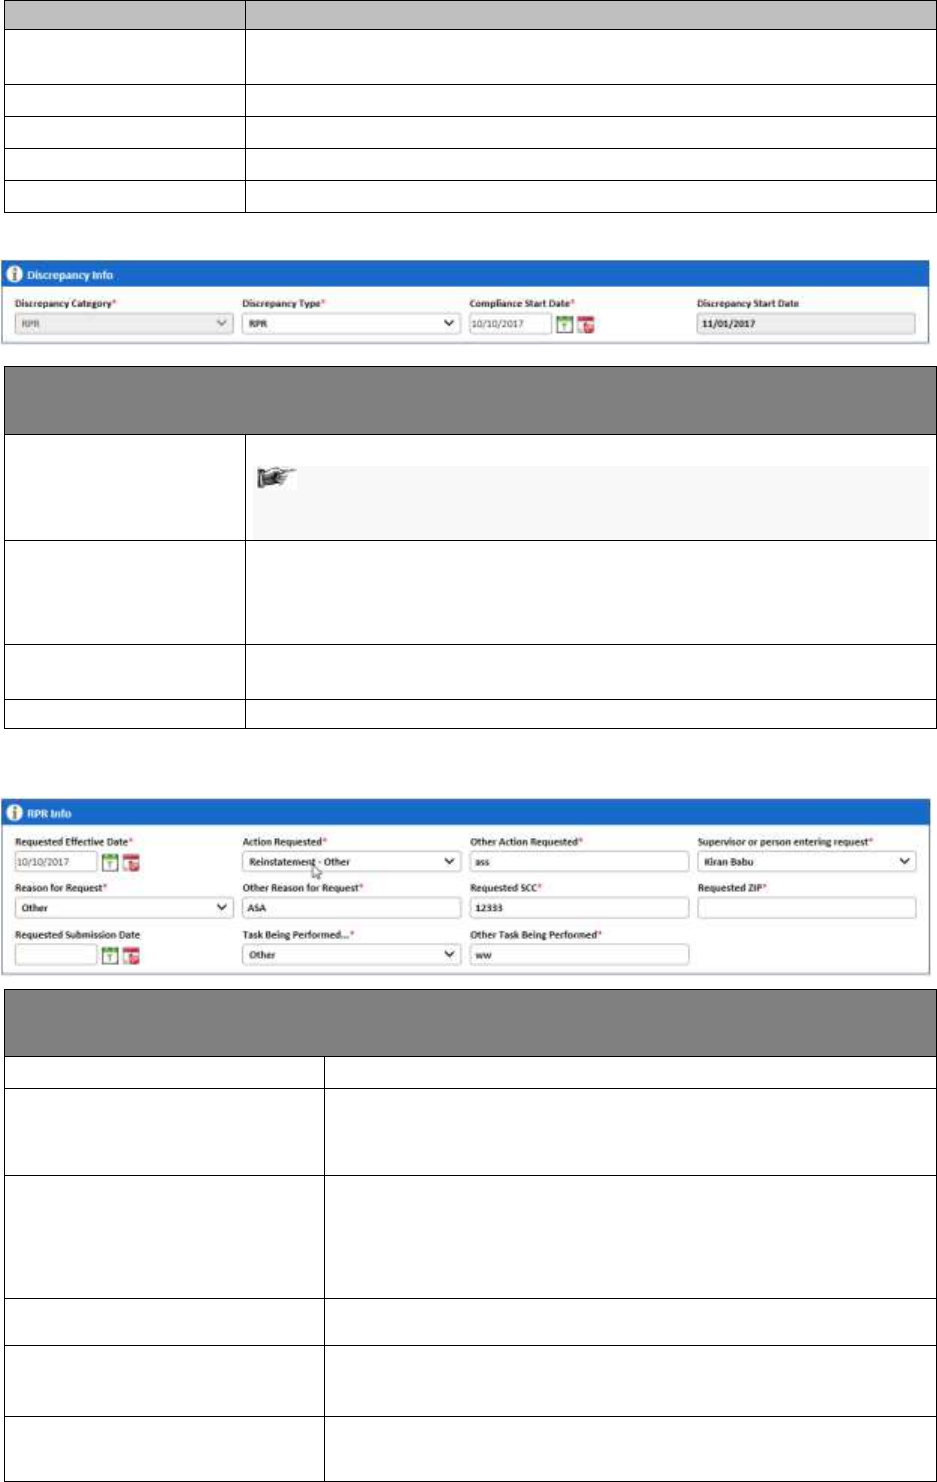
ENRL RECON SYSTEM User’s Manual Suspect Cases
©UnitedHealthcare 1.0 Page 3-19
Field Name
Description
Member Verified State
Select the member verified state in this field. The states names are marked
with two-lettered codes.
CTM checkbox
Select the check box to enter values in the CTM Number field.
CTM Number
Enter the CTM number in this field.
EGHP Member
Select the check box to enter the value the Employee ID field.
Employer ID
Enter the employer id in this field.
The Create TRR Case form> Discrepancy Info Tab 3.3.4.1.2
Discrepancy info
The user enters the discrepancy details.
Discrepancy Category
This field displays the discrepancy category.
In the Create RPR Case form, the value RPR is defaulted in this
field. Similarly, in the Create SSC Case form, the Create TRR
Case form value SSC and TRR is defaulted, respectively.
Discrepancy Type
Select the type of discrepancy in this field. The following values are
available in this field.
RPR
SCR RPR
Compliance Start Date
Enter the compliance start date. You must enter the date in MM/DD/YYYY
format. You can enter current, past and future date.
Discrepancy Star Date
Select the discrepancy start date in this field.
The Create TRR Case form> TPR Info Section 3.3.4.1.3
RPR info
Requested Effective Date
Select the requested effective dates this field.
Action Requested
Select the requested action in this field.
If you select the value Reinstatement- Others in this field, the
Other Action Requested field appears.
Other Action Requested
(appears if you select the value
Reinstatement- Others in this
field, the Other Action
Requested field)
Enter the action value in this field.
Supervisor or person entering
request
Select the name of the super visor in this field.
Reason for Request
Select reason for request in this field. If you select the value
Other in the Reason for Request field, the Other Reason for
Request field appears.
Other Reason for Request
(Appears if you select the value
Other in the Reason for Request
Enter the other reason for the request.

Suspect Cases ENRL RECON SYSTEM User’s Manual
Page 3-20 1.0 ©UnitedHealthcare
field )
Requested SCC
Enter the requested SSC code.
Requested ZIP
Enter the requested zip.
Requested Submission Date
Select the requested submission date.
Task Being Performed...
Select the task being performed.
Other Task Being Performed
(Appears if you select the value
Other in Task Being
Performed...field )
Enter the other task being performed.
The Create TRR Case form> Add Comments Section 3.3.4.1.4
Add Comments section
The user enters the comments in this field.
Comments
Provide your comments in this field.
Attachment
Attached the required file in this field.
Save button
Click this button to save the filled in form.
Reset button
Click this button to reset the entered data in the form.
Cancel button
Click this button to cancel the case creation process.

©United Healthcare 1.0 Page 4-1
ERS Queues Chapter 4
This chapter provides details on various queues available in the ERS application and their related work
flows. This provides details on various types of queues and the methods to access those queues. This
also discusses how to search the queues in the application through advanced search option.
This chapter contains the following section:
ERS Queue Overview
Processing queues
Holding Queues
Completed Queues
GPS vs. MMR Eligibility Queues
Eligibility Queues and Actions
Before working on the Eligibility Process Work form
Eligibility Process Work> Action Section
Searching Eligibility Cases
Conducting Advanced Record Searches
DOB/Gender Queues and Actions
DOB/Gender Work> Action Section
OOA Queues and Actions
OOA Process Work> Action Section
Searching OOA Cases
Conducting Advanced Record Searches
SSC Queues and Actions
SSC Process Work> Action Section
Searching SSC Queues
Searching SSC Queues
TRR Queues and Actions
SSC Process Work> Action Section
Searching TRR Queues
RPR Queues and Actions
Manage Case> Action Section
ERS Queue Overview 4.1
Queues are the work assignments or notifications available in the application to take action on the
created and in-progress cases in various ERS workflows. Users with appropriate access rights can
access and process the specific queues. This processing or reviewing of the cases in the queues helps
completing ERS workflows to ensure enrolment reconciliation processes are properly executed. Queues
are the most integral part of the ERS workflow that decides the statuses of various reconciliation work
flows.
Based on the user access rights and permissions, the user can view work items as queues or they can
directly access the queue from the ERS application.
4.1.1 Types of queues
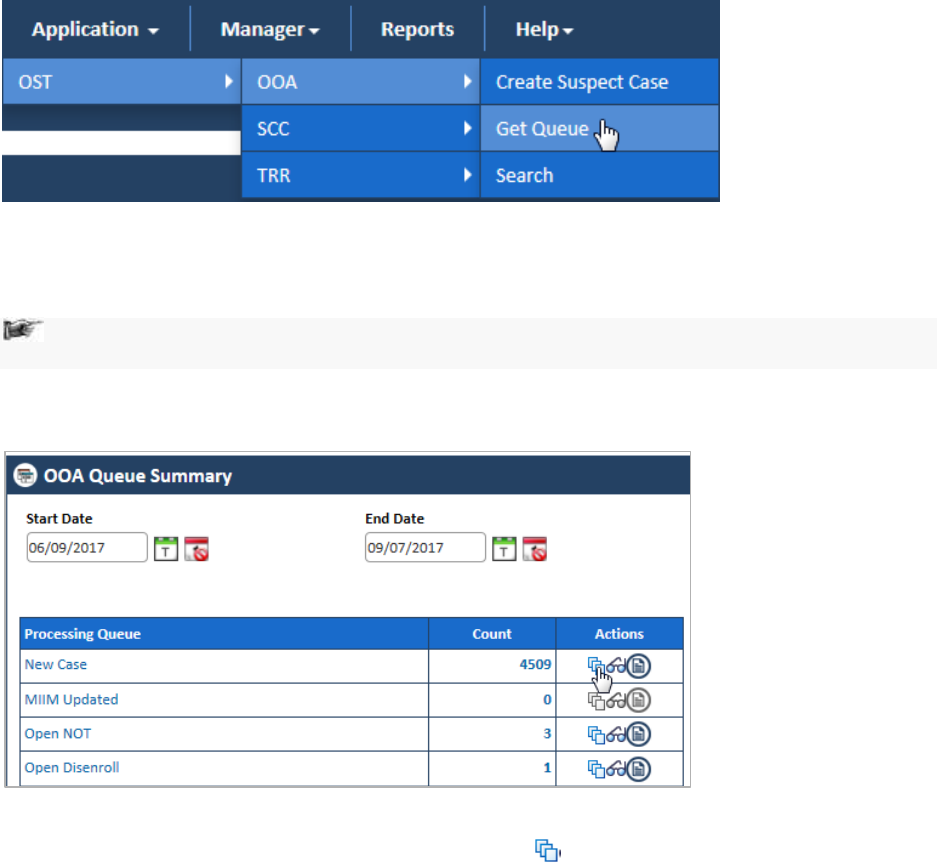
ERS Queues Enrolment Recon System User’s Manual
Page 4-2 1.0 ©UnitedHealthcare
Queues are broadly divided into three types based on their case categories, statuses, and record ages.
These are Processing Queue, Holding Queues, and Completed Queue. While you can work on the
Processing Queues, you can only view Holding Queues and Completed Queues and their related
reports.
Processing queues 4.1.1.1
The cases which are currently in progress and pending various action during a particular workflow are
called processing queues. If created cases are resolved completely, CMS responses are received,
transactions are accepted, and cases are closed, then these cases can changed to holding queue or
completed.
Accessing Processing Queues 4.1.1.1.1
You can access the processing queue forms before you work on various cases in the process flow.
To access the processing queues:
Figure 4-1: Access the Work Item <Module Name>
1. Go to Application menu, point to <module name> <sub-module name> and click the Get
Queue link. The <module Name> Queue Summary page appears.
Note: The module name is considered as work basket and the sub-module name is considered
as discrepancy category.
For example, if you want access the OOA queue, go to Application, point to OSTOOA and then click
the Get Queue link. The OOA Queue Summary page appears.
Figure 4-2: The OOA Queue Summary
2. Under the Actions column, click the Get Queue icon (corresponding to a count) in line with the
listed processing queues.
The Work Item – <Module Name> page appears. For example, if you click the get queue icon for OOA
queue, the Work Item – OOA page appears.
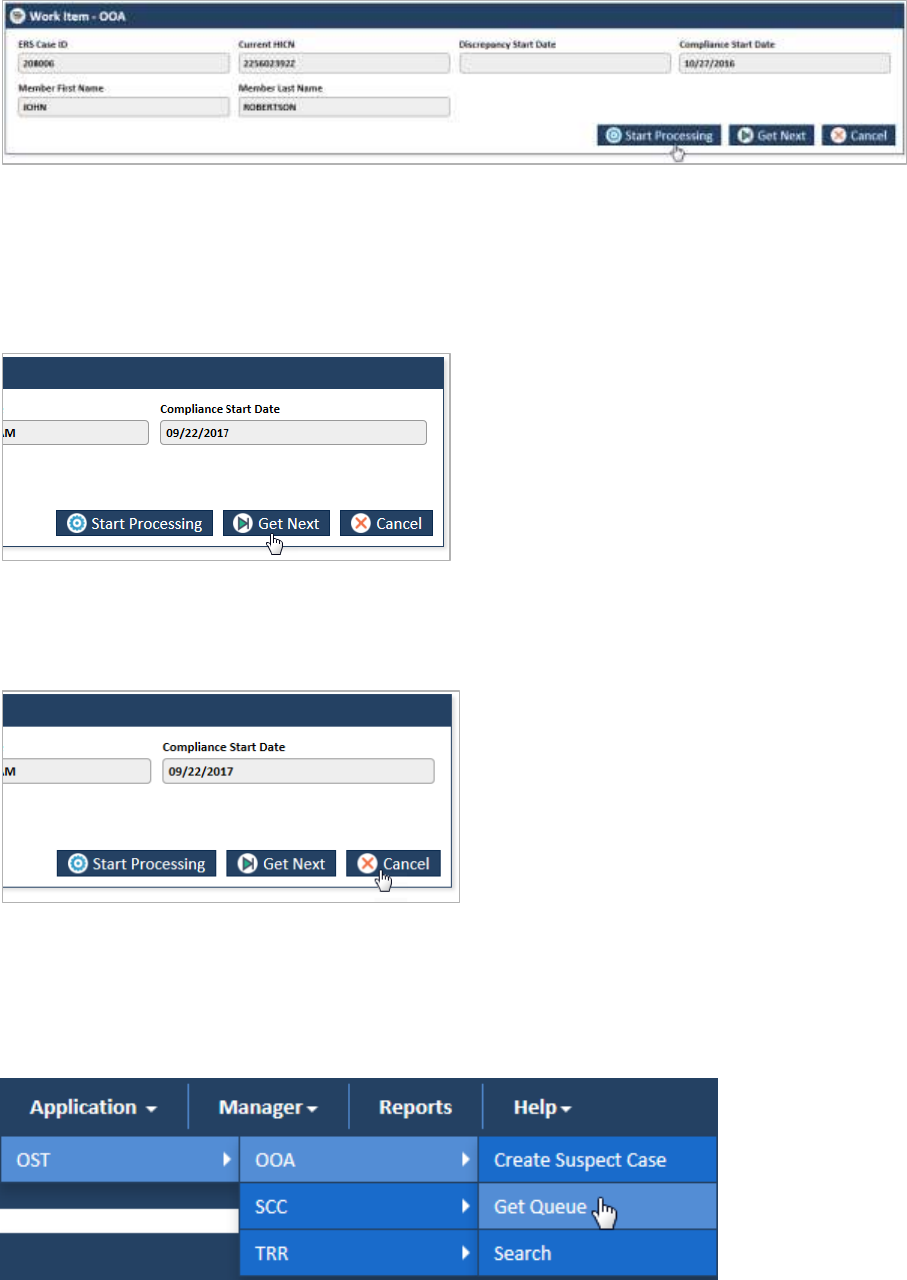
Enrolment Recon System User’s Manual ERS Queues
©UnitedHealthcare 1.0 Page 4-3
Figure 4-3: Work Item - OOA
3. Click the Start Processing button to open the <Module Name> Process Work form. For
Example, if you click the Start Processing button for Work Item – OOA page, the OOA Process
Work form appears.
4. Click the Get Next in the Work Item – OOA page to open the next work item.
Figure 4-4: The Get Next button
5. Click Cancel button in the Work Item – OOA page to cancel the process of accessing the queue
forms.
Figure 4-5: The Cancel button
For more information, refer to the Navigation section, Working on OOA Queues section.
Viewing Processing Queues 4.1.1.1.2
To view the processing queues:
Figure 4-6: Access the Work Item <Module Name>
1. Go to Application menu, point to <module name> <sub-module name> and click the Get Queue
link. The <Queue Name> Queue Summary page appears.
For example, if you want access the OOA queue, go to Application menu point to OSTOOA and then
click the Get Queue link.
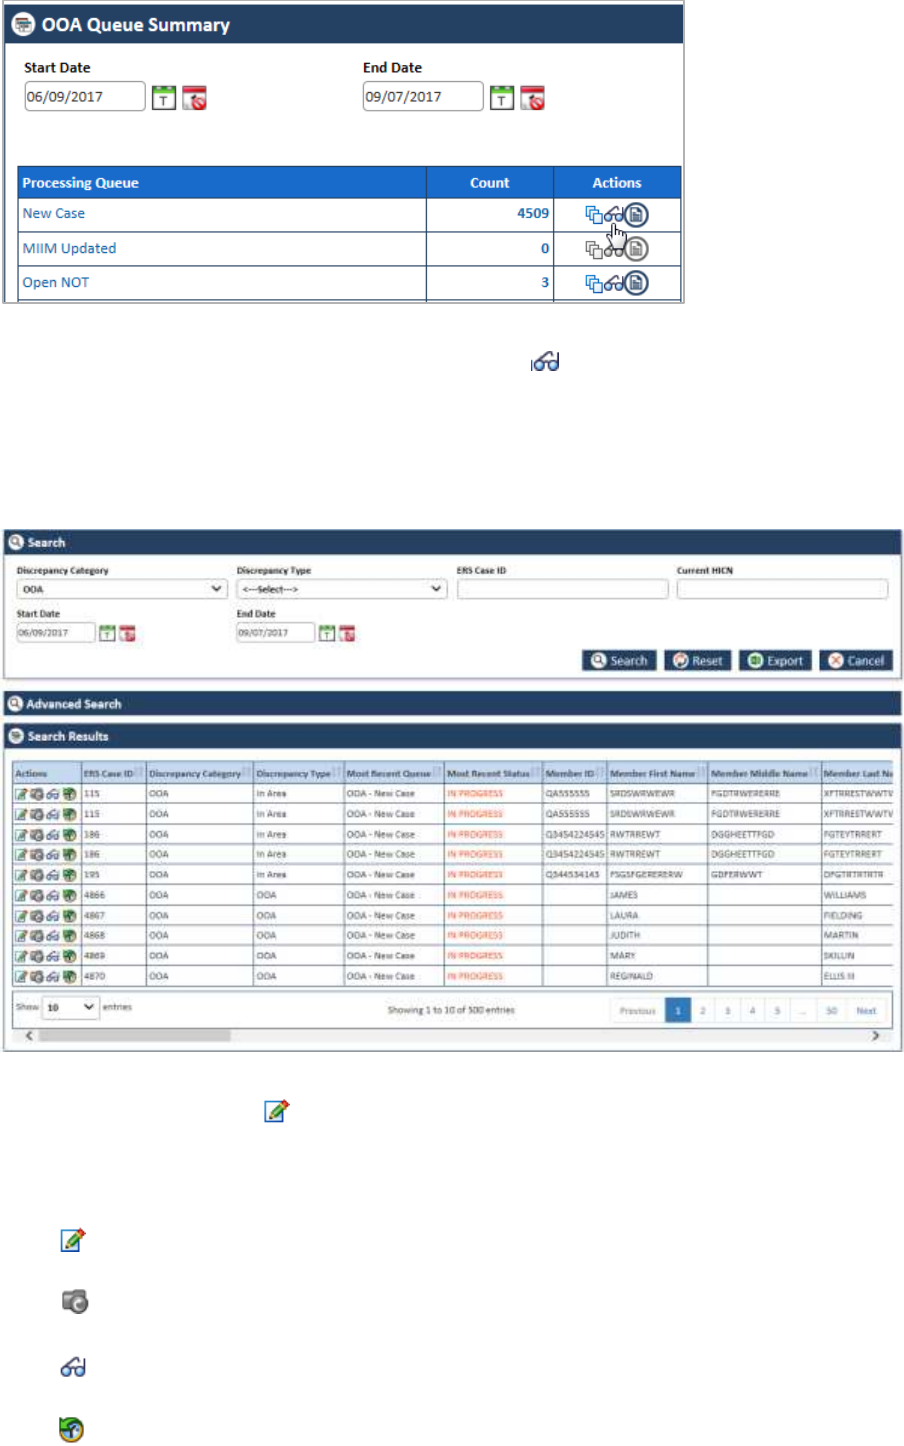
ERS Queues Enrolment Recon System User’s Manual
Page 4-4 1.0 ©UnitedHealthcare
Figure 4-7: The OOA Queue Summary> View Queue icon
2. Under the Actions column, click the view queue icon (corresponding to a count) in line with the
listed processing queues.
The Search page appears along with Advanced Search section and Search Results table. For
example, if you click the View Queue icon for OOA queue, the Search page appears along with OOA
queue list.
Figure 4-8: OOA Search Window and Search Results
3. Click the Edit Record icon in Actions column of the Search Results table to open the OOA
Process Work form. The OOA Process Work form appears.
You can click the following icons to take appropriate action in the stage:
Edit Record icon: Click the Edit Record icon to open the form for editing. The process work
form appears in editable mode. You edit the form by selecting different actin values.
Reopen Record icon: Click the Reopen Record icon to reopen the form for editing. The
record gets opened.
View Record icon: Click the View Record icon to view the form process work form. The form
appears in un-editable mode.
View History icon: Click the View History icon to view the history of the queues. It helps
opening the Queue History Report. For more information on History Report, refer to the ERS
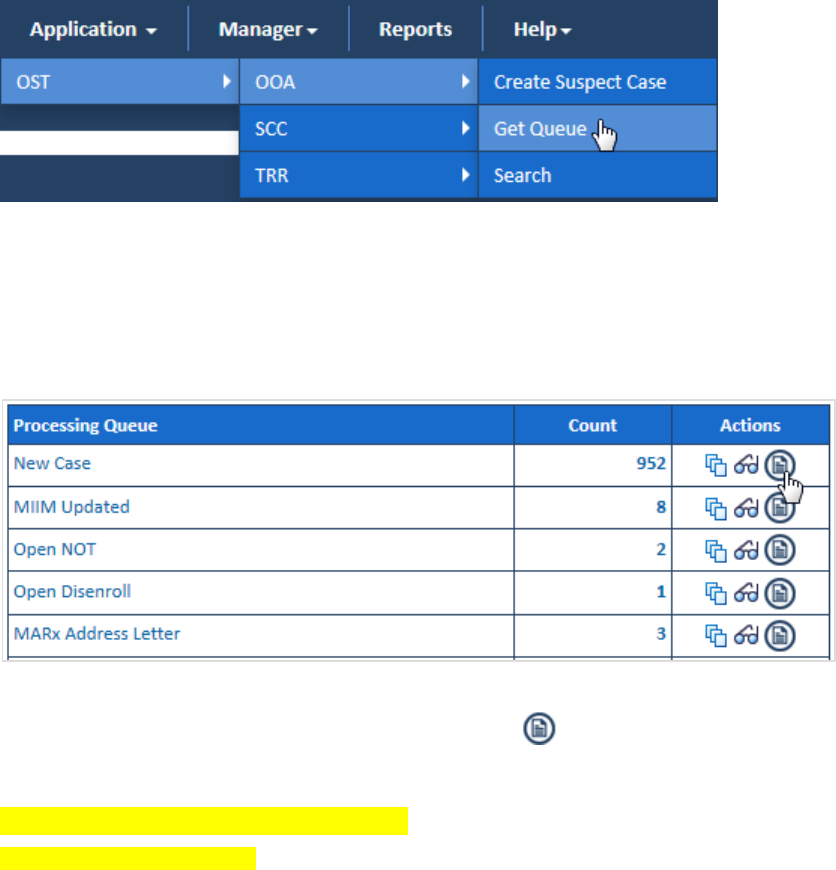
Enrolment Recon System User’s Manual ERS Queues
©UnitedHealthcare 1.0 Page 4-5
History Reports section.
4. You can edit the queue by selecting different action value in the Actions field.
For more information, refer to the Navigation section, in the Working on OOA Queues section.
Viewing Reports 4.1.1.1.3
To view reports:
Figure 4-9: Access the Work Item <Module Name>
1. Go to Application menu, point to <module name> <sub-module name> and click the Get Queue
link. The <Queue Name> Queue Summary page appears.
For example, if you want access the OOA queue, go to Application menu point to OSTOOA and then
click the Get Queue link.
Figure 4-10: The OOA Queue Summary> Queue Icon
2. Under the Action column, click the view queue icon (corresponding to a count) in line with the
listed processing queues.
Report Image Place holder. Not available now
Figure 4-11: Report XXXXX
Holding Queues 4.1.1.2
Holding queue are special queues which are not processed in the ERS application. Rather, these cases
are reviewed and worked on by third party entities in backend. Based on the last status of the cases, the
respective actions are taken on these queues.
Viewing Holding Queues 4.1.1.2.1
Viewing queue process is similar for all the queues. For more information on viewing queues, refer to the
Viewing Processing Queues section
Viewing Reports 4.1.1.2.2
Viewing reports process is similar for all the queues. For more information on viewing report, refer to the
Viewing Reports section
ERS Queues Enrolment Recon System User’s Manual
Page 4-6 1.0 ©UnitedHealthcare
Completed Queues 4.1.1.3
The completed queues are queues which came to the current state after the cases are completely
resolved, closed, the transaction are accepted. Users cannot work on these queues as these are
completed and closed. However, the user can view the cases and view associated reports.
At any point of time, a user can able to reassign any record currently in the queue to a different
queue or an individual user.
When all the work items in a queue are completed, a message appears to the users advising
them that the queue is empty. All associated history and current status can be viewable within
the record.
Users can also obtain a work item by directly searching for a record in the application or by
clicking a pended record from the home page. All records shall be accessible through the
application.
Viewing Holding Queues 4.1.1.3.1
Viewing queue process is similar for all the queues. For more information on viewing queues, refer to the
Viewing Processing Queues section
Viewing Reports 4.1.1.3.2
Viewing reports process is similar for all the queues. For more information on viewing report, refer to the
Viewing Reports section
GPS vs. MMR Eligibility Queues 4.2
Eligibility queues help you access and work on the MMR Eligibility, DOB, and Gender queues for
reviewing the cases added. These queues have the following sections and tabs in the Eligibility
Process Work form.
Work Case section
Case Details tab
Discrepancy Data tab
CMS Transaction Details tab
One Stop Shop tab
TRR Data tab
Referenced cases tab
Comments tab
Attachments tab
Action Section
Workflow Log section
4.2.1 Working on MMR Eligibility Queues
With appropriate access rights, you can access the Eligibility queues from the Eligibility Queue
Summary page and work on the Eligibility Process Work form. You can select from multiple queues to
retrieve the next new work item in an Eligibility queue directly from the application.
Based on the Eligibility record age, Eligibility queue records are presented in the application. The age of
the record is decided by differentiating the current date from the Compliance Start Date.
Eligibility Queues and Actions 4.2.1.1
The below table provides the details of the Eligibility queues, and action values in respective queues.
This also provides the list of next queues and next statuses.
Current Queue
Action Taken
Next Queue
Next Status
Eligibility : Processing Queues
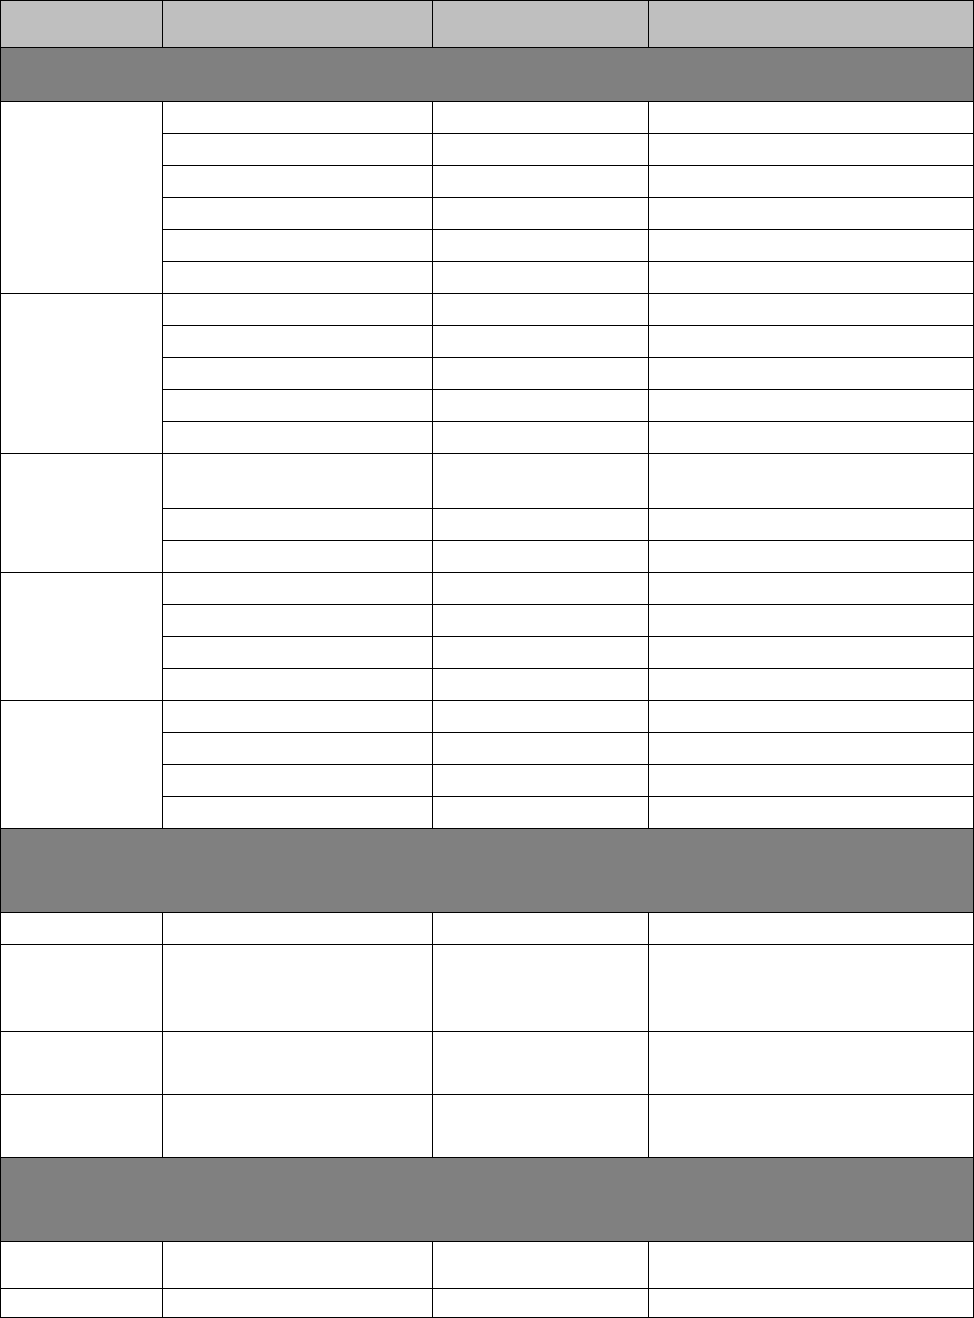
ERS Queues Enrolment Recon System User’s Manual
Page 4-2 1.0 ©UnitedHealthcare
Current Queue
Action Taken
Next Queue
Next Status
This section provides the details of all the Eligibility processing queues, their associated actions values in
the Action fields, next queues of the current queues and the next statuses.
New Case
Send CMS Eligibility
Completed
In Progress
Update Plan
Pended
Resolved- Completed
Pend Case
Pending Audit
In Progress
Send to Peer Audit
Completed
In Progress
Update Plan & Create RPR
Completed
Resolved- Completed
Close Case
New Eligibility Case
Resolved- Completed
CMS Rejected
Send SCC Update to CMS
Submit to CMS
In Progress
Send OOA Letter
Pending - NOT
In Progress
Pend Case
Pended
In Progress
Send to Peer Audit
OOA - Pending Audit
In Progress
Close Case
Completed
Resolved- Completed
Pending Audit
Peer Audit Completed
New Eligibility
Discrepancy
In Progress
Add Comments
Elig - Pending Audit
In Progress
Pend Case
Elig - Pended
In Progress
Peer Audit
Failed
Add Comments
Peer Audit Failed
In Progress
Close Case
Completed
Resolved- Completed
Pend Case
Pended
In Progress
Send to Peer Audit
Elig - Pending Audit
In Progress
Pended
NA
Pending - FTT
In Progress
Pend Case
Pended
In Progress
Close Case
Completed
Resolved- Completed
Add Comments
NA
In Progress
Eligibility : Holding Queues
This section provides the details of all the Eligibility processing queues, their associated actions values in
the Action fields, next queues of the current queues and the next statuses.
Submit to
CMS
NA
Update Sent to CMS
In Progress
Update Sent
to CMS
NA
CMS Accepted
Resolved- Completed
Update Sent
to CMS
NA
CMS Rejected
In Progress
Eligibility : Completed Queues
This section provides the details of all the Eligibility processing queues, their associated actions values in
the Action fields, next queues of the current queues and the next statuses.
Completed
NA
NA
NA
CMS Accepted
NA
NA
NA
Accessing Eligibility Process Work form 4.2.1.2
Navigation:
To access the Eligibility Process Work form:
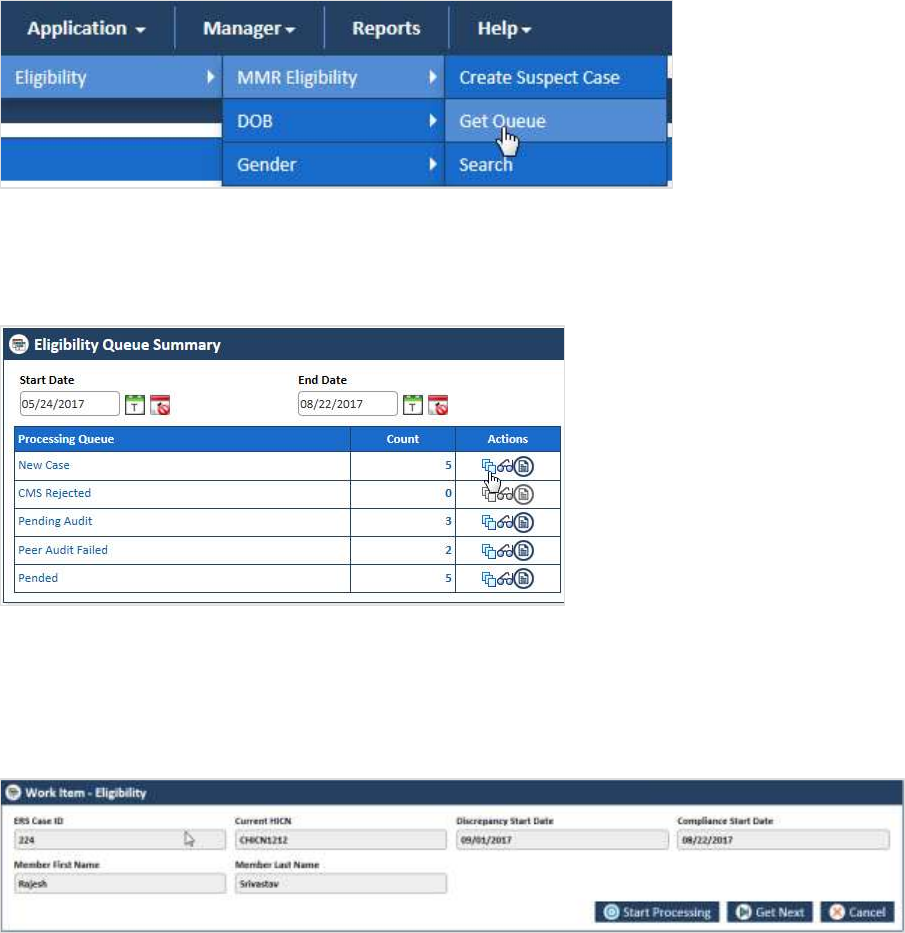
Enrolment Recon System User’s Manual ERS Queues
©UnitedHealthcare 1.0 Page 4-3
1. Go to Application menu, point to Eligibility>MMR Eligibility sub-menu and then click the Get
Queue link.
Figure 4-12: Accessing Eligibility Queue Summary Page
The Eligibility Queue Summary page appears.
2. Click the get queue icon under the Actions column in the Eligibility Queue Summary form.
Figure 4-13: The Eligibility Queue Summary page
The Work Item – Eligibility page appears.
3. Verify the case details appear by default.
4. Click the Start Processing button open the Eligibility Process Work form.
Figure 4-14: The Work Item-- Eligibility section
5. Click the Get Next to open the next work item.
6. Click Cancel to cancel the process of opening the queues.
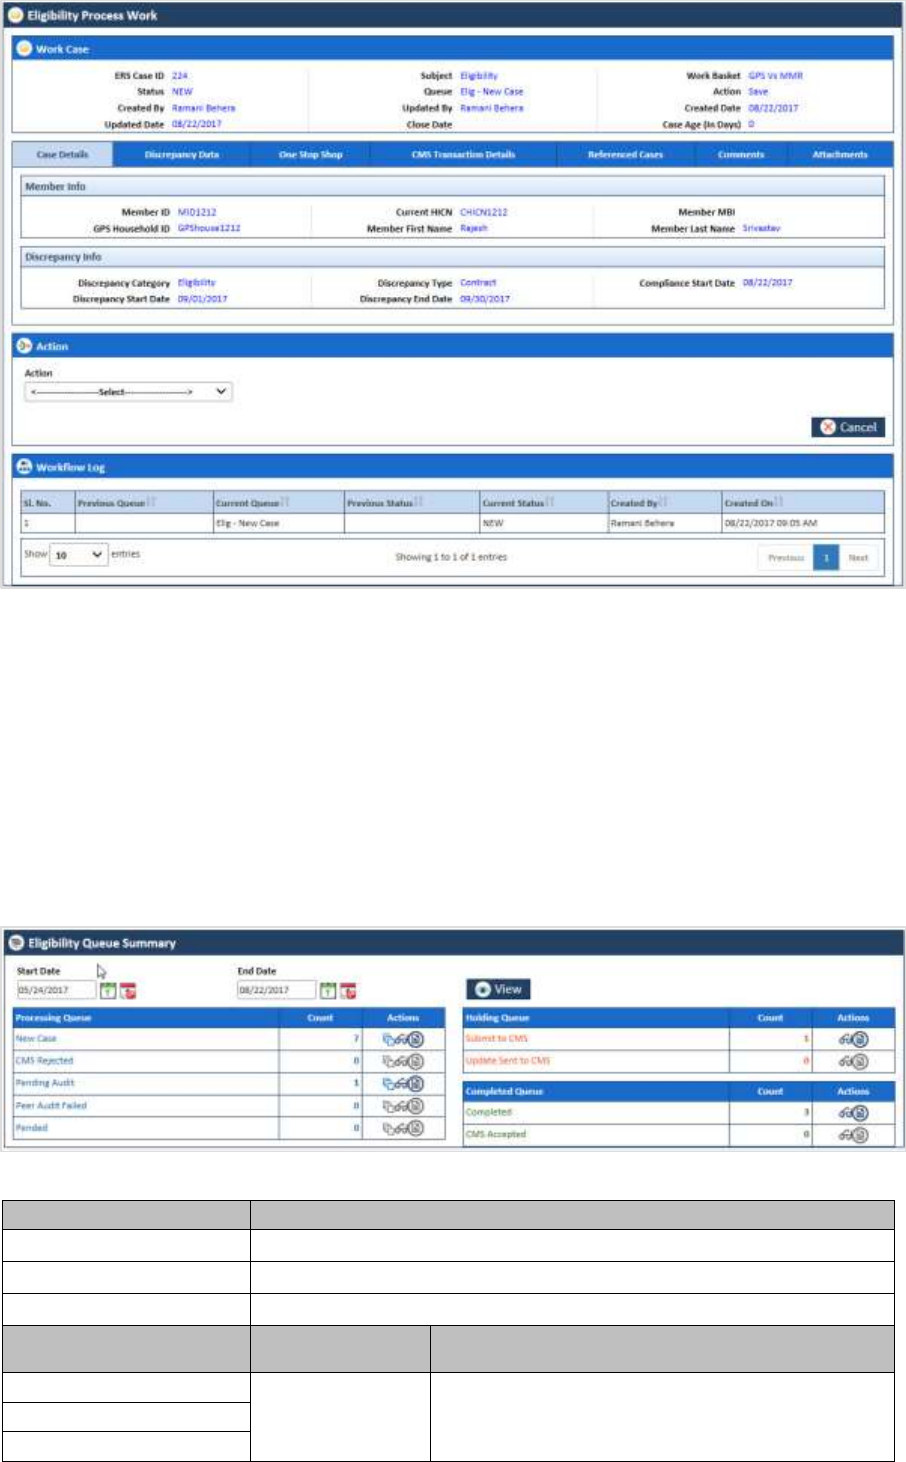
ERS Queues Enrolment Recon System User’s Manual
Page 4-4 1.0 ©UnitedHealthcare
Figure 4-15: The Eligibility Process Work form
For more information how to access the processing queues, refer to the Accessing Processing Queues
section.
Before working on the Eligibility Process Work form 4.2.1.3
Before you work on the Eligibility Process Work form, you must familiarize yourself with related
interfaces and forms that trigger the form.
Eligibility Queue Summary 4.2.1.3.1
This page provides detailed list of various Eligibility queues. For more information on Eligibility Queue
Summary form, refer to the Types of queues section.
Figure 4-16: The Eligibility Queue Summary Page
Field/Column Name
Description
Start Date field
Enter the start date of the case.
End Date field
Enter the end date of the cases.
View button
Click this button to view the queue created between these dates.
Processing Queue
column
Count column
Actions column
New Case
Displays the
count
Displays the action icons a user can use. User
can edit queue, view the queue, and view the
report.
CMS Rejected
Pending Audit
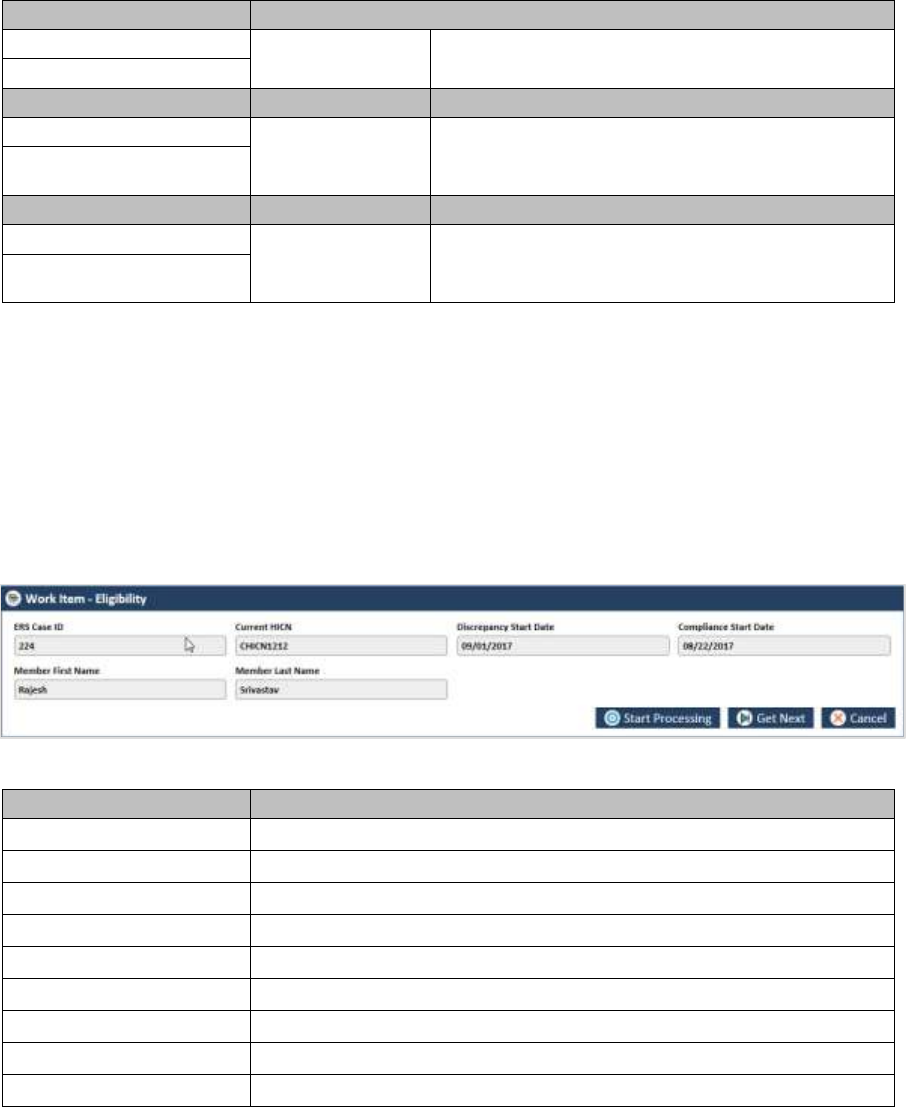
Enrolment Recon System User’s Manual ERS Queues
©UnitedHealthcare 1.0 Page 4-5
Field/Column Name
Description
Peer Audit Failed
Pended
Holding Queue column
Count column
Actions column
Submit to CMS
Displays the
count
Displays the action icons a user can use. User
can edit queue, view the queue, and view the
report.
Update Sent to CMS
Completed Queues
Count
Actions
Completed
Displays the
count
Displays the action icons a user can take. User
can edit queue, view the queue, and view the
report.
CMS Accepted
Accessing cases from queues 4.2.1.3.2
You can access the records or cases through the queues by clicking the Get Queue icon in the Actions
column of the Eligibility Case Summary page. The Work Item - Eligibility form appears after you click
the Get Queue icon in the Actions. Click the Start Processing button to access the record if you verify
the record details in the Work Item - Eligibility page.
For more information on accessing cases from queues, refer to the Accessing Eligibility Process Work
form section.
All the field values are auto-populated in this section.
Figure 4-17: Work Item - Eligibility form
Field Name
Description
ERS Case ID
ERS case ID is auto populated.
Current HICN
Current HICN is auto populated.
Discrepancy Start Date
Discrepancy start date is auto populated.
Compliance Start Date
Compliance start date is auto populated.
Member First Name
Member first name is auto populated.
Member Last Name
Member last name is auto populated.
Start Processing button
Click this button to open the case form after verifying the case details
Get Next button
Click this button to access the next cases details.
Cancel button
Click this button to cancel the process.
Viewing and editing cases from queues 4.2.1.3.3
You can view the queues by clicking the View Queue icon in the Actions column of the Eligibility Case
Summary page. The Search form appears along with Search Results and Advanced Search if you
click the View Queue icon in the Actions column. This form helps you to search the queues and view
the related cases.
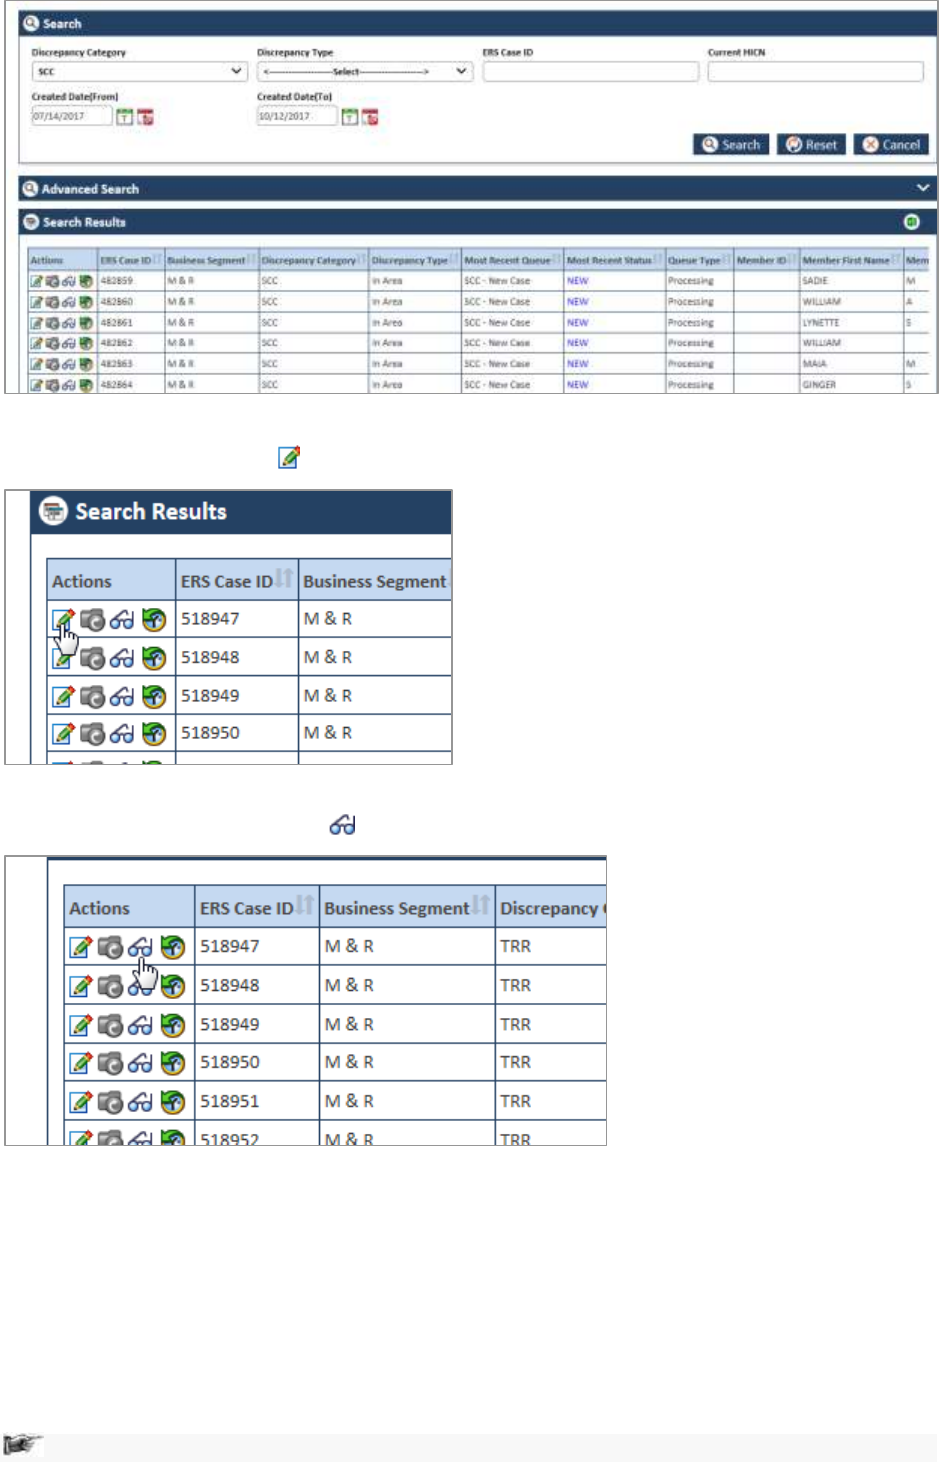
ERS Queues Enrolment Recon System User’s Manual
Page 4-6 1.0 ©UnitedHealthcare
Figure 4-18: The Eligibility Queue Search form
You can click the Edit Record icon in the Action column to open the record in editable mode.
Figure 4-19: Accessing Eligibility Cases
You can also click the View Record icon to view the cases in un-editable mode.
Figure 4-20: Viewing Eligibility Cases
For more information on how to search cases, refer to the Searching Eligibility Cases section.
Eligibility Process Work form 4.2.1.4
The Eligibility Process Work form has multiple sections such as Work Case, Action, and Workflow Log.
The Work Case section of the form contains multiple tabs such as Case Details, Discrepancy Data, CMS
Transaction Details, One Stop Shop, TRR Data, Reference Cases, Comments, and Attachment section.
The following section discusses details about the workflow involved in the new cases. All the associated
actions, next queues, next statuses are described in the Eligibility Queues and Actions section.
Note: All the fields marked with asterisk in the form are mandatory fields.

Enrolment Recon System User’s Manual ERS Queues
©UnitedHealthcare 1.0 Page 4-7
Figure 4-21: The Eligibility Process Work form
Work Case Section> Header 4.2.1.5
All the fields are available in the read-only mode.
Figure 4-22: Work Case Section> Header Section
Field Name
Description
ERS Case ID
Displays the ERS Case ID.
Subject
Displays the subject.
Most Recent
Queue
Displays the most recent queue for this case. For new RPR queue the
queue name is RPR-Request-Category.
Updated By
Displays the username that updated the case.
Close Date
Doesn’t display the case close date until the case is closed.
Business Segment
Displays the business segment name.
Most Recent
Status
Displays the current status.
Created By
Displays the user that created the case.

ERS Queues Enrolment Recon System User’s Manual
Page 4-8 1.0 ©UnitedHealthcare
Field Name
Description
Updated On(UTC)
Displays the date when the case was updated last.
Work Basket
Displays the work basket name.
Action
Displays the type action taken the in the previous stage.
Created on (UTC)
Displays the case creation date.
Case Age (In Days)
Displays the case age.
Work Case Section> Case Details Tab 4.2.1.6
The values are populated from the Create Eligibility Case form while creating the new Eligibility case.
Figure 4-23: Work Case Section> Case Details Tab
Field Name
Description
Case Details tab>Member info section
All the values are auto-populated Member Info section of the Create Eligibility Case form.
Member ID
Displays the member ID.
GPS Household ID
Displays the GPS household ID.
Current HICN
Displays the HICN number.
Member First Name
Displays the first name of the member.
Member Last Name
Displays the last name of the member.
Case Details tab>Discrepancy info section
All the values are auto-populated Member Info section of the Create Eligibility Case form.
Discrepancy Category
Displays the discrepancy category.
Discrepancy Start Date
Displays the discrepancy start date.
Discrepancy Type
Displays the discrepancy type.
Discrepancy End Date
Displays the discrepancy end date.
Compliance Start Date
Displays the compliance start date.
Case Details tab>Discrepancy Data section
GPS Data sub-section
Contract Number
Displays the contract number.
SCC Code
Displays the state country code.
Insured Plan Effective Date
Displays the date from which the insured plan is effective.
Line of Business Desc
Displays the details of the line of business.
PBP
Displays the PBP value.

Enrolment Recon System User’s Manual ERS Queues
©UnitedHealthcare 1.0 Page 4-9
Field Name
Description
HICN
Displays the current HICN number.
Insured Plan Term Date
Displays the term date of the insured plan.
MMR Data sub-section
Contract Number
Displays the contract number of the case.
SCC Code
Displays the SSC code of the case.
Payment Adjustment Start
Date
Displays the date from which the payment adjustment starts.
Payment
Displays the payments date.
PBP
Displays the PBP number.
HICN
Displays the current HICN number.
Payment Adjustment End
Date
Displays the date from till the payment adjustment ends.
Work Case Section> Discrepancy Data Tab 4.2.1.7
GPS Data Sub-tab 4.2.1.7.1
These data are populated from GPS.
Figure 4-24: The Discrepancy Data Tab> Data Sub-tab
Field Name
Description
Discrepancy Data tab>GPS Data section
All the values are auto-populated from GPS.
HICN
Displays the current HCIN number.
LOB
Displays the LOB for the case.
PBP
Displays the PBP in this field.
Date of Birth
Displays the date of the birth of the member.
City
Displays the name of the city the member belongs to.
Plan Effective Date
Displays the date from which the plan is effective.
SCC Effective Date
Displays the date from which the SC date is effective.
Application Approved Status
Displays the value for application approval status.
Member ID
Displays the member ID.
Line of Business Desc
Displays the Line of Business details.
First Name
Displays the first name of the member.
Address Line 1
Displays the address in the line one.
Zip Code 5
Displays the value for zip code 5.
State
Displays the state to which the member belongs to.
Plan Term Date
Displays the plan term date.
SCC End
Displays the SSC end date.
GPS OOA Disenrollment
Date
Displays the date when the GPS OOA disenrollment happened.

ERS Queues Enrolment Recon System User’s Manual
Page 4-10 1.0 ©UnitedHealthcare
Field Name
Description
GPS Household ID
Displays the GPS household names.
Contract Number
Displays the contract number.
Last Name
Displays the last name of the member.
Address Line 2
Displays the displays the address in the line two.
Zip Code 4
Displays the value for zip code 2.
SCC Code
Displays the displays the SSC code.
Application Information
Displays the displays the application information.
PDP Auto Enrollee Indicator
Displays the value for the indicator for PDP auto enrollee.
Individual Id
Displays the value for individual ID.
Work Case Section> CMS Transaction Details Tab 4.2.1.8
The values in this section appears from matching fields, if you select the value Send to Peer Audit in the
Action section of the Eligibility Process Work form and save the form.
Note: If a user selects the value Send to Peer Audit in the Action section of the Eligibility
Process Work form and save the form, the queue routed to the Processing queue as Elig -
Pending Audit queue.
Figure 4-25: Work Case Section> CMS Transaction Details Tab
Field Name
Description
CMS Transaction Details
HICN
Displays the current HICN number.
Contract ID
Displays the contract ID.
Root Cause
Displays the root cause of discrepancy.
Effective Date
Displays the date from which the case id effective.
EGHP Indicator
Displays the value for EGHP.
Last Name
Displays the last name of the member.
PBP
Displays the PBP of the case.
Transaction Type Code
Displays the transaction type code.
Other Resolution
Displays the values for other resolutions.
Date of Birth
Displays the date of birth of the member.
Application Date
Displays the application date.
Election Type
Displays the value for election type.
Resolution
Displays the resolution.
If you visit the Processing Queues and view the record (from Eligibility Process Work form)
corresponding to the ERS Case ID, you can view the details updated in the CMS Transaction Details
tab. You can also see that the comments section is updated with the latest comment you provided.
For more information, refer to the Accessing Holding Queues section.

Enrolment Recon System User’s Manual ERS Queues
©UnitedHealthcare 1.0 Page 4-11
Work Case Section> One Stop Shop Tab 4.2.1.9
This section displays a report.
Figure 4-26: Work Case Section> One Stop Shop Tab
Work Case Section >TRR Data Tab 4.2.1.10
This tab of the form displays TRR data related to this case. This section displays Summary Information,
Bad Transaction History, Bad Transaction Pending and Responses.
Figure 4-27: The TRR Data> Summary Information
Figure 4-28: The TRR Data> Bad Transaction History
Figure 4-29: The TRR Data> Bad Transaction pending
Figure 4-30: The TRR Data> Response
Work Case Section> Reference Cases Tab
4.2.1.11
This tab of the form displays all the cases related to this case.

ERS Queues Enrolment Recon System User’s Manual
Page 4-12 1.0 ©UnitedHealthcare
Figure 4-31: Work Case Section> Reference Cases Tab
Column Name
Description
CMS Transaction Details
Actions
Displays the actions for the records.
ERS Case ID
Displays the ERS case ID.
Discrepancy Type
Displays the discrepancy type for the queue.
Discrepancy Start Date
Displays the start date of the discrepancy.
Discrepancy Source
Displays the discrepancy source
Transaction Reply Code
First Letter Mail Date
Second Letter Mail Date
Discrepancy Status
Resolution Code
Category
HICN
Contract
GPS Contract
MMR Contract
PBP
GPS PBP
MMR PBP
Work Status
Assigned To
Actions
Work Case Section> Comments tab 4.2.1.12
If you visit the Holding Queues and view the record (Eligibility Process Work) corresponding to the
ERS Case ID, you can view the comments you entered updated in the Comments tab. You can also see
that the, comment s section is updated with the latest comment you provided.
For more information, refer to the Accessing Holding Queues section.
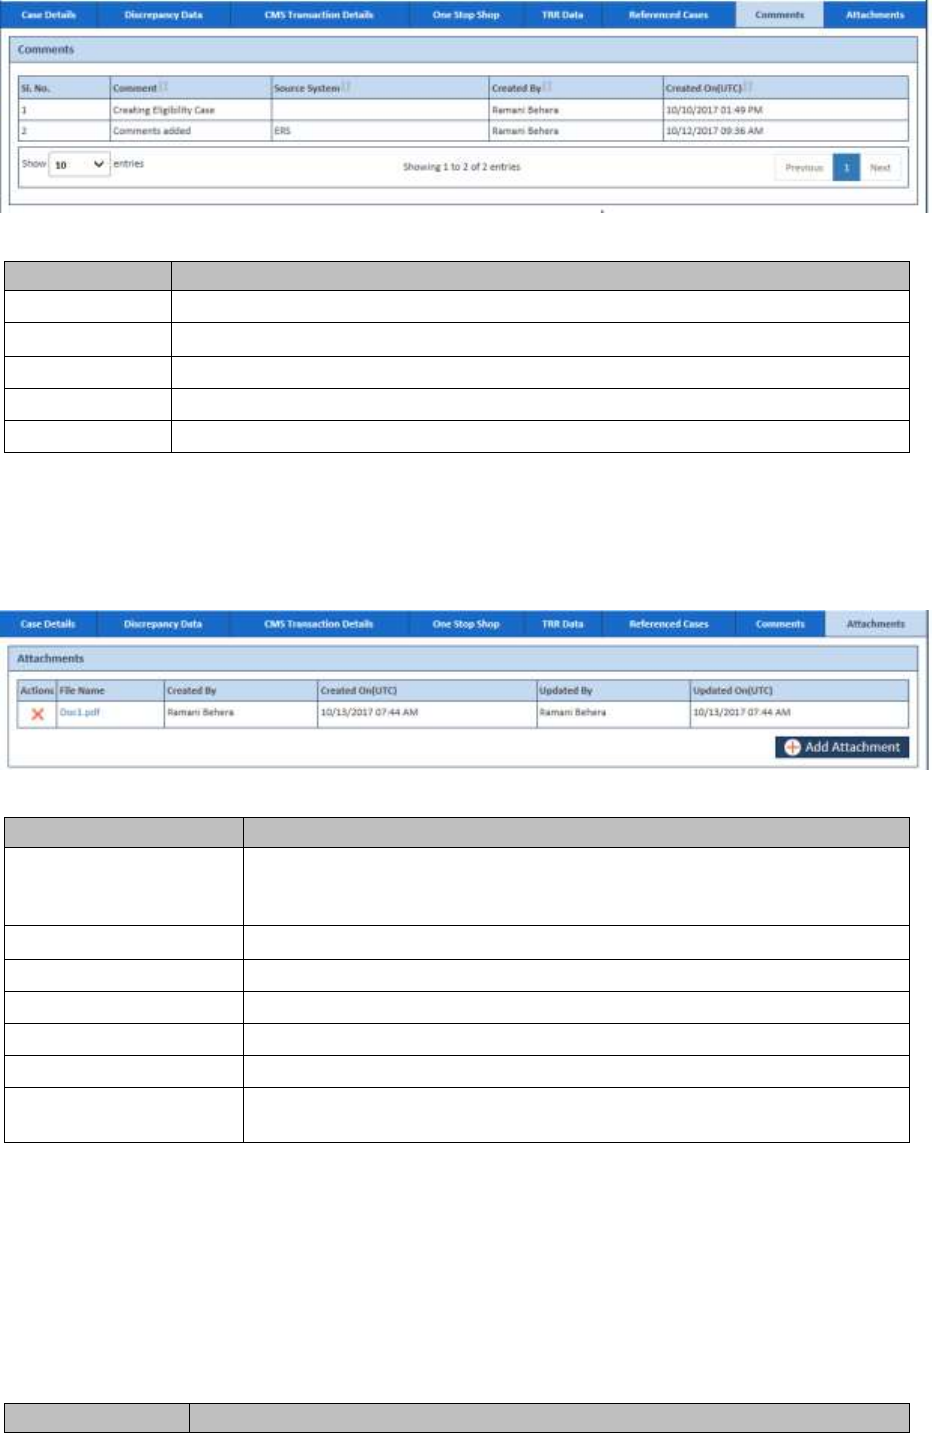
Enrolment Recon System User’s Manual ERS Queues
©UnitedHealthcare 1.0 Page 4-13
Figure 4-32: Work Case Section> Comments Tab
Column Name
Description
Sl. No.
The serial no of the comments list is displayed.
Comment
The comments appear in this column is displayed.
Source System
The system ID is displayed.
Created By
The name of the user created the case is displayed.
Created On
The date when the case was created is displayed.
Work Case Section> Attachments tab 4.2.1.13
You can attach documents in this field using the Add Attachment button. For more information, on how to
attach documents, refer to Attaching and deleting documents section.
Figure 4-33: Work Case Section> Attachments tab
Column Name
Description
Actions
This column allows you to delete the attachment. For more information
on deleting attached field from the Attachments tab, refer to the
Attaching and deleting documents section.
File Name
Displays the name of the attached file.
Created By
Displays the name of the user that created the case.
Created On(UTC)
Displays the date when the case was created.
Updated By
Displays the name of the user that attached the case.
Updated On(UTC)
Displays the date when the file was attached.
Add Attachment
button
Click this to attach the file. For more information how to attach files, refer
to the Attaching and deleting documents section.
Eligibility Process Work> Action Section 4.2.1.14
Based on the work basket that you select while login or module you access, the action values changes in
the respective queues forms. For more information on various action values in ERS queues, refer to
Various Queues and related actions section.
For more information on various action values in the Eligibility queue, refer to Eligibility Queues and
Actions section.
Action Values 4.2.1.14.1
Action Values
Description

ERS Queues Enrolment Recon System User’s Manual
Page 4-14 1.0 ©UnitedHealthcare
Action Values
Description
Add Comments
Select this action value to add your comments about the case while working on
the queue.
The status of the queue becomes In Progress and the queue is routed to the
Processing Queue as New Eligibility Queue after you add the comments and
click the Save button after selecting value Add comments.
Close Case
Select this action value to close the case. If you select this option, two fields
Resolution and Reason appear.
The queue is routed to the Completed Queues list as Completed queue with
the status Resolved – Completed if you click the Save button after the
selecting the value Close Case.
Pend Case
Select this value to make the case pending for more research on the case.
The queue is routed to the Processing Queues list as Pended queue with the
status In Progress if you click the Save button after selecting the value Pend
Case.
Send to Peer
Audit
Select this value to send the Eligibility for peer audit. .
The queue is routed to the Processing Queues list as Pending Audit queue
with the status In Progress if you click the Save button after selecting the Send
to Peer Audit.
Update CMS
Eligibility
Select value to send the Eligibility update to CMS.
The queue is routed to the Holding Queues list as Submit to CMS queue with
the status In Progress if you click the Save button.
If the user saves the form after selecting Update CMS Eligibility, a
message, ‘You are about to initiate a CMS transaction, please
confirm.' appears. If the user click Cancel in the message window,
then it remains open to modify and edit the data.
After the update is sent to CMS, CMS can either reject or accept the
update. If CMS accepts the update, the status of the case changes
Resolved-Completed and queue changes to CMS ACCEPTED. The
record then gets removed from the queue. If CMS rejected update, the
queue changes to CMS REJECTED.
Update Plan
Select this value to update the plan.
After you select this value, you must provide the resolution and root causes.
The values in Resolution and Root Causes after you select this action are
same if you select the value Update Plan & Create RPR field.
The queue is routed to the Completed Queues list as Completed queue with
the status Resolve - Completed if you click the Save button after selecting the
value Update Plan.
Update Plan &
Create RPR
Select this value for updating plan and creating RPR.
After you select this value, you must provide the resolution and root causes.
The values in Resolution and Root Causes after you select this action are
same if you select the value Update Plan field.
Note: When the Eligibility case is sent for peer audit by selecting the action value Send to Peer
Audit, the case routes to the Eligibility Pending Audit queues with the status In Progress.
If the peer auditor selects the value Peer Audit Completed in the Action field and selects the value Yes
in the Contains Error field, the peer audit process is failed. And the cases routes to the Peer Audit
Failed queue.
If the peer auditor selects the value Peer Audit Completed in the Action field and selects the value No
in the Contains Error field, the cases routes to the new case queue.

Enrolment Recon System User’s Manual ERS Queues
©UnitedHealthcare 1.0 Page 4-15
Associated fields in the Action section
The following table shows the fields those appear based on selection of certain value in the Action field
of the queue form. This table also displays some fields which appears based on selection certain values
in the fields which appears after selection of the certain values in the Action field.
Associated Fields
Appears when…
Description
Comments
You select the value Add
Comments, Close Case, Pend
Case, Update CMS Eligibility,
Update Plan, Send to Peer
Audit, and Update Plan & Create
RPR the Action field.
Enter your comments about the action you
selected while working on the queue. You
can enter comments based on the values
you select in the Action field,
The comments you enter will appears in
the next work flow.
Resolution
You select the value Close
Case, Update CMS Eligibility,
Update Plan, and Update Plan &
Create RPR in the Action field.
Select the appropriate resolution from the
list. Based on the action value, the value
in this varies.
Root Cause
You select the value Close
Case, Update CMS Eligibility,
Update Plan, and Update Plan &
Create RPR in the Action field.
Select the appropriate root cause in this
field. Based on the action value, the value
in this varies.
Pend Reason
You select the value Pend Case
in the Action field.
Select the appropriate reason for making
the case a pend case.
HICN
You select the value Update
CMS Eligibility in the Action field.
The HICN is auto-populated in this field.
Last Name
You select the value Update
CMS Eligibility in the Action field.
The last name of the member is auto-
populated.
Date of Birth
You select the value Update
CMS Eligibility in the Action field.
The date of the birth of the member is
auto-populated.
Contract Number
You select the value Update
CMS Eligibility in the Action field.
The contract number is auto-populated.
PBP
You select the value Send SCC
Update to CMS in the Action
field.
The PBP is auto-populated.
Application Date
You select the value Update
CMS Eligibility in the Action field.
Enter the application date of the case.
Root Cause
You select the value Update
CMS Eligibility in the Action field.
Select appropriate root cause.
Transaction Type
Code
You select the value Update
CMS Eligibility in the Action field.
Select the appropriate transaction type
code. The following values are available in
this field:
Cancel Enrolment Transaction -
80
Cancellation Disenrollment
Transaction - 81
Retro - Disenrollment- 51
Single Enrolment Transaction - 61
If users select the value Retro -
Disenrollment- 51 in Transaction
Type Code field, they cannot
select the value D- Medicare
Advantage Disenrollment Period
(MADP) and Initial Election Period
(IEP) in the Election Type field.
Election Type
You select the value Update
CMS Eligibility in the Action field.
Select the appropriate value in this field.
If users select the value Retro -
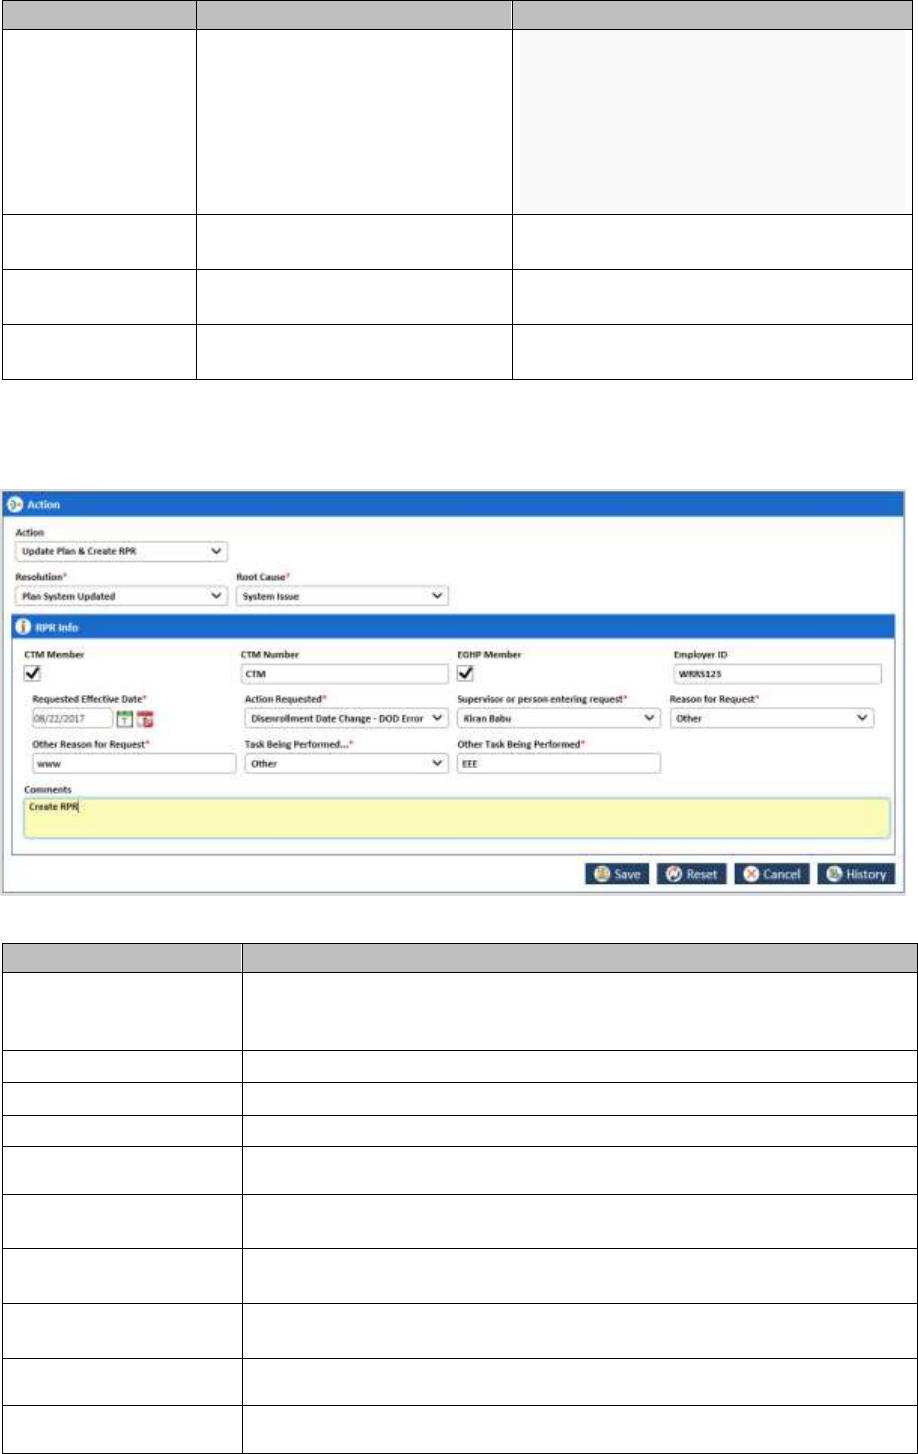
ERS Queues Enrolment Recon System User’s Manual
Page 4-16 1.0 ©UnitedHealthcare
Associated Fields
Appears when…
Description
Disenrollment- 61 in
Transaction Type Code field and
the value A- Annual Election
Period (AEP) in the Election
Type field, the date is set to the
first day of the years of case
creation in the Effective Date
field.
Effective Date
You select the value Update
CMS Eligibility in the Action field.
Enter the effective date of the case.
Resolution
You select the value Update
CMS Eligibility in the Action field.
Select the appropriate resolutions.
EGHP indicator
You select the value Update
CMS Eligibility in the Action field.
NA
Associated form in the Action section
Using the Eligibility Process Work form, you can initiate RPR cases. While selecting the action values, if
you select the value Update Plan & Create RPR, then RPR Info section appears in the Action section.
Figure 4-34: The RPR Info section in Action section
Action button
Description
CTM Member
Select this checkbox if you want to enter the Center for Transactional
Medicine. If you select this field, then the CTM Number field becomes
compulsory.
CTM Number
Enter the CTM number.
EGHP Member
Select the check box if you want enter the EGHP number details.
Employer ID
Enter the employee ID number.
Requested Effective
Date
Enter the date since when you have initiated the RPR updated the plan.
Action Requested
Select the appropriate value in this field. These are the types of the
actions you can request.
Supervisor or person
entering request
Select the name of the supervisor that requested to update the plan and
initiate the RPR.
Reason for Request
Select the appropriate reason for the request from the list. If you select
the value Others, an associated field, Other Reason for Request appears.
Other Reason for
Request
Enter the reason in this field.
Task Being
Performed...
Select the appropriate task is being performed from the list. If you select
the value Others, an associated field, Other Task Being Performed
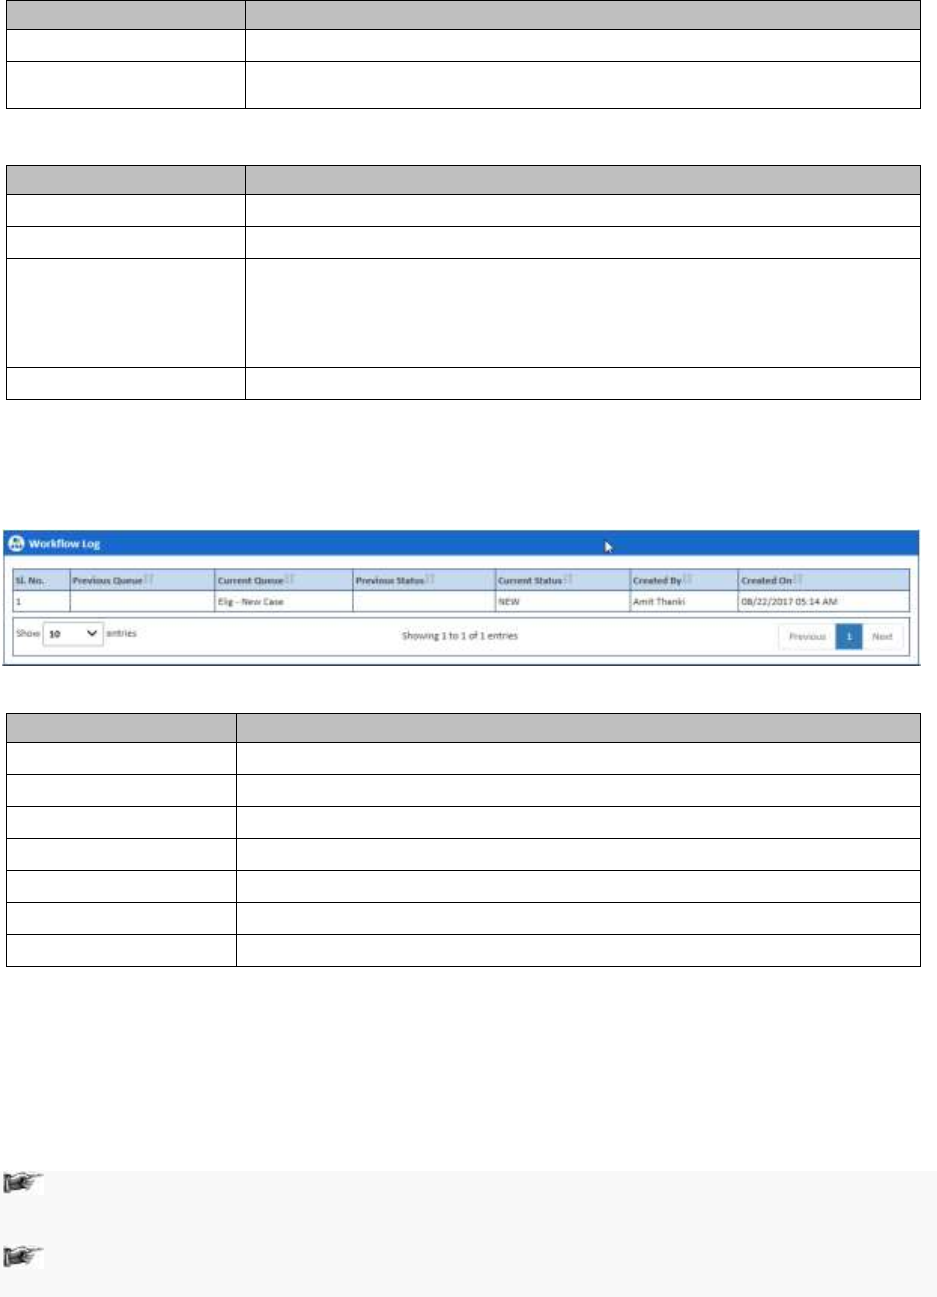
Enrolment Recon System User’s Manual ERS Queues
©UnitedHealthcare 1.0 Page 4-17
Action button
Description
appears.
Other Task Being
Performed
Enter the task being performed in this field.
Action buttons
Action button
Description
Save
Click this button to send the form to next workflow level.
Reset
Click this button to remove any of the selection from the form.
Cancel
Click this button to cancel the process of the processing the case.
If you click this button, an error message, Are you sure want to leave this
page? appears. You can click the Yes to cancel the process, or else click
No.
History
Click this button to view the detailed history of the case.
Eligibility Process Work >Workflow Log Section 4.2.1.15
The workflow log provides the details about various cases such as their current and previous statuses
and queues, date on when it was created and the associated roles.
Figure 4-35: Workflow Log Section
Columns Name
Description
Sl. No.
Displays the serial numbers of the cases in the table.
Previous Queue
Displays the name of the previous queue of the case.
Current Queue
Displays the name of the current queue of the case.
Previous Status
Displays the name of the previous status of the case.
Current Status
Displays the name of the previous current of the case.
Created By
Displays the name of the role that created case.
Created On
Displays the date when the case was created.
4.2.2 Searching Eligibility Cases
You can search various records with In-Progress and Resolve-Completed statuses. This helps you
working on the records or reassigning the cases to different users. You can access the list of the records
by providing the search criteria in the record search form. After accessing a list of records, you can edit
and view the records and view the associated reports. You can edit the records those are incomplete and
not assigned to any other users.
Users can view all records within the record search page regardless of their permissions.
However, users cannot edit records unless they have permissions to access the selected
records.
If a user views or edits a record accessing from the search results, upon exiting the record, the
application redirects the user to the search page with search results from the last search.
Searching Records 4.2.2.1
You can enter or select the entire search criteria for the records that you want to search. Based on your
search criteria, the respective records appear in the Search Result section. For searching Eligibility
records, you need access the Search form.
Navigation:
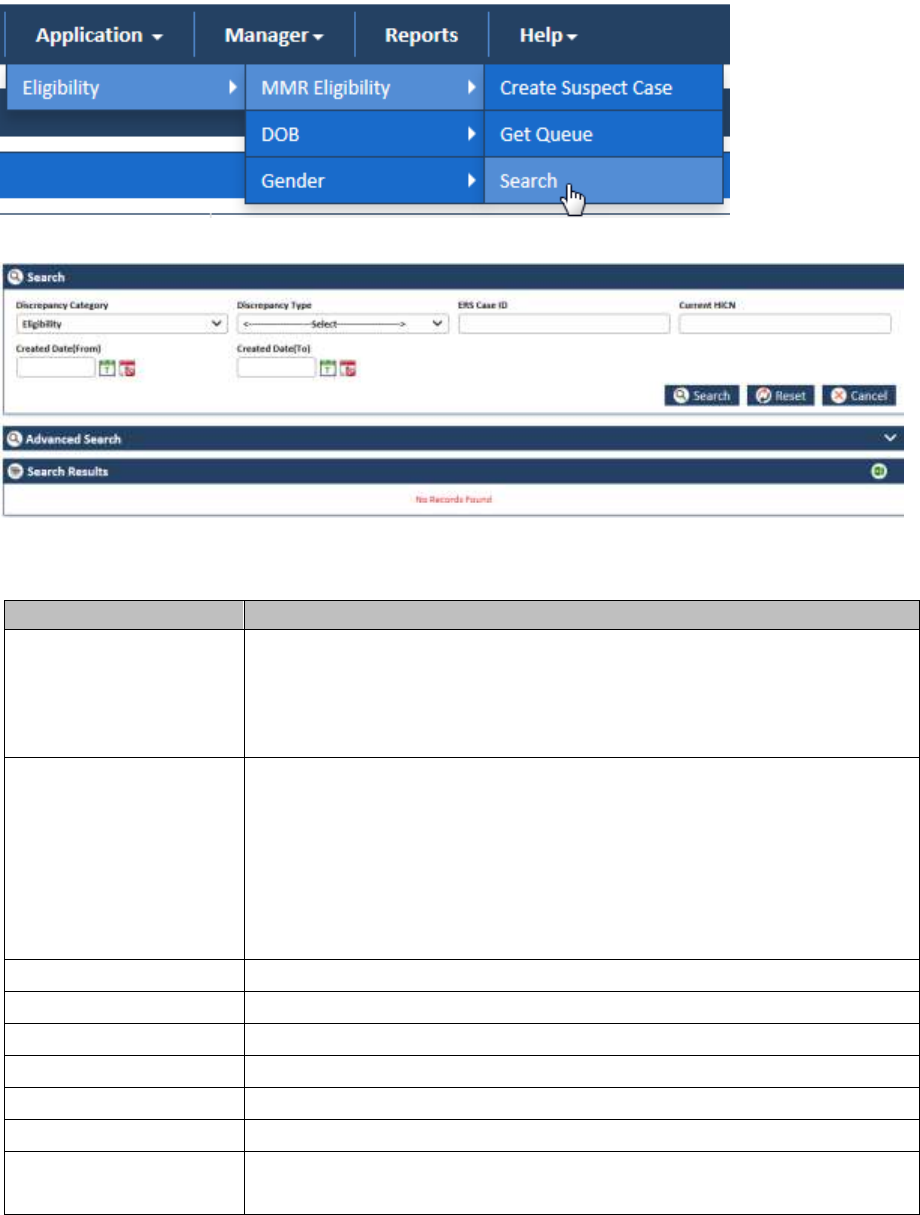
ERS Queues Enrolment Recon System User’s Manual
Page 4-18 1.0 ©UnitedHealthcare
To access the Search form:
1. Go to Application menu, point to MMR Eligibility and click the Search link. The <Queue Name>
Queue Summary page appears.
The Search page
appears along with Advanced Search section and Search Results table.
Figure 4-36: The Eligibility Search form
For taking appropriate action in the form, refer to the below table.
Field Name
Description
Discrepancy Category
Select the discrepancy category in this field. The following categories are
available in this field.
Eligibility
DOB
Gender
Discrepancy Type
Select the discrepancy type in this field. The following values are
available in this field.
DOB
CMS N/ Plan Y
MS Y/ Plan N
Contract
PBP
Gender
ERS Case ID
Enter the ERS case ID in this field.
Current HICN
Enter the current HICN in this field.
Created Date (From)
Select the case creation date from which you want to search the cases.
Created Date(To)
Select the case creation date till which you want to search the cases.
Search button
Click Search button to search the records.
Reset button
Click this button to remove all the selected search criteria.
Cancel button
Click this button to cancel the process of searching records.
After you can cancel the search process, the home page appears.
OOA Search Result 4.2.2.1.1
The search result details appear after you do a search by entering the required search criteria.
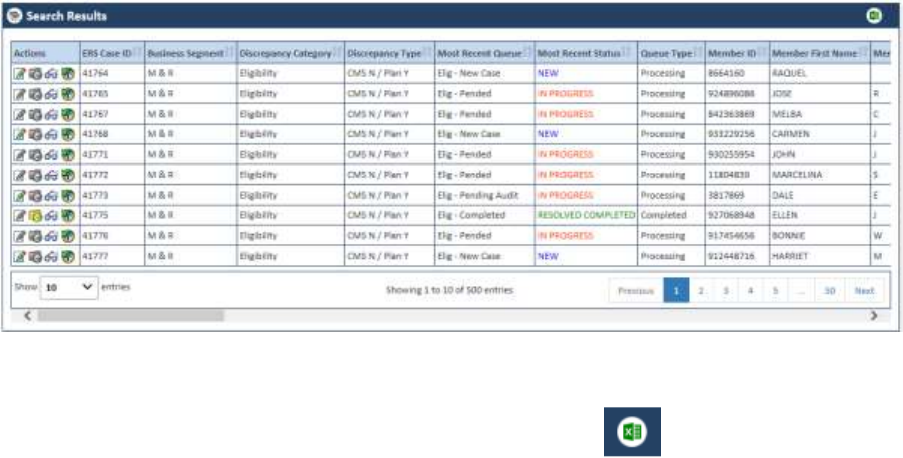
Enrolment Recon System User’s Manual ERS Queues
©UnitedHealthcare 1.0 Page 4-19
Figure 4-37: Search Results table
Exporting search result data:
You can export all the search result data in to an Excel sheet. Click button to save the search
result details into a MS Excel spreadsheet.
Once you click this button, the search result gets downloaded in Excel spreadsheet which you can
directly open or save in the local drive.
The following are the list columns that are displayed in the search result tables.
ERS Case ID
Discrepancy Category
Discrepancy Type
Most Recent Queue
Most Recent Status
Member ID
Member First Name
Member Middle Name
Member Last Name
Member Gender
Member DOB
Member Current HICN
Member Contract Number
Member PBP
Member LOB
GPS HICN
MMR HICN
Aging
Member SCC Code
GPS Household ID
Discrepancy Start Date
Reason
Resolution
Discrepancy Source
Submission Type
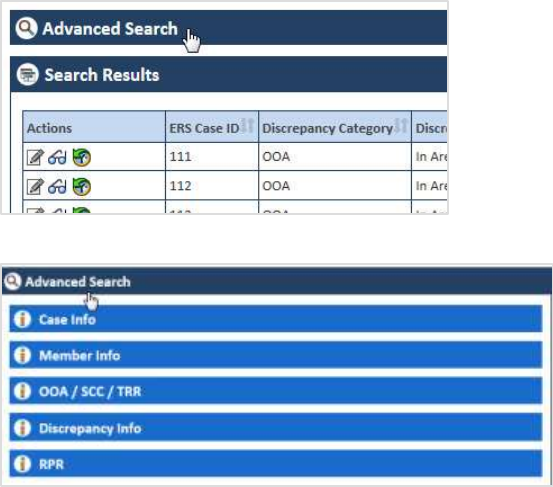
ERS Queues Enrolment Recon System User’s Manual
Page 4-2 1.0 ©UnitedHealthcare
CTM Member
EGHP Member
Requested Effective Date
Action Requested
Potential Submission Date
RPC Submission Date
FDR Received Date
FDR Code Received
FDR Status
RPR Requestor
Created On (UTC)
Created By
Last Updated On (UTC)
Last Updated By
Locked On (UTC)
Locked By
Conducting Advanced Record Searches 4.2.2.2
You can do an advanced search for the record by providing various search criteria. You can access the
various sections or tabs of the Advanced Search form by clicking the form name, Advanced Search. This
helps you view all the tabs under the Advanced Search for. If you click the tabs, you can view associated
fields or search criteria.
Figure 4-38: Advanced Search Form
Figure 4-39: The Advanced Search Form tabs
Expand the tab:
You can expand the tab to view all the fields by click on the tab name. This helps you access all the
associated fields in the tab and entered the search criterial to search the records.
Contract the tab:
You can contract the expanded tab by clicking on tab name. This will help you hide or shrink fields in the tab.

ERS Queues United Healthcare: Enrolment Recon System User Manual
Page 4-2 1.0 ©UnitedHealthcare
Figure 4-40: Expanded Tab
The Advanced Search for > Expanded Tabs 4.2.2.2.1
Figure 4-41: Advanced Search Form> Expanded Tabs
Field Name
Description
Case Info
Enter the detailed information about the case in this tab.
Queue
Select the queue which associated the record that you want to search. The
record that you want to search belongs to this queue.
All the queues of the OST modules are available in this field which
includes OOA, SCC and TRR. The queues related OOA starts with OOA.

ERS Queues Enrolment Recon System User’s Manual
©UnitedHealthcare 1.0 Page 4-3
Field Name
Description
For example the, new queue for OOA is OOA – New Case. Similarly, the
queues for SCC and TRR cases start with SCC and TRR, respectively.
Status
Select the status of the record that you want to search. This field displays
the following statuses:
IN PROGRESS: When a new case is responded and not
completed, it becomes an In Progress queue.
NEW: When a new case is created and nit responded, it becomes
a New queue.
RESOLVED COMPLETED: When and cases completed from all
respective such as from users, and CMS, it becomes a Resolved
Completed queue.
Last Updated
Operator
Select the name of the operator that updated last updated the case that
you want to search.
Assigned To
Select the name of the user to whom the cases was assigned to.
Adjusted Create
Start Date
Select the adjusted start date of the created case that you want to search.
Adjusted Create End
Date
Select adjusted end date of the created case that you want to search.
Peer Audit
Completion Start
Date
Select the start date when the peer audit was completed on the case that
you want to search.
Peer Audit
Completion End
Date
Select the end date when the peer audit was completed on the case that
you want to search.
Pend Reason
Select the appropriate pend reason of the case that you want to search.
Case Age From
Select the staring period of the case age of the case that you want to
search.
Case Age To
Select the ending period of the case age of the case that you want to
search.
Action Requested
Select the last action taken or requested on the case that you want to
search.
Resolution
Select the resolution that was taken to close the cases that you want to
search.
Verified Root Cause
Select the verified root cause of the cases that you want to search.
Discrepancy Source
Select the appropriate discrepancy sources of the case that you want to
search.
Member Info
Enter the member information in case that you want to search.
First Name
Enter the first name of the member in case that you want to search.
Last Name
Enter the last name of the member in case that you want to search.
Gender
Select the gender of the member in case that you want to search.
DOB
Enter the date of birth of the member in the case that you want to search.
Member SCC Code
Enter the SCC code of the member in the case that you want to search.
Contract Number
Select the contract number mentioned in the case that you want to search.
PBP
Select the PBP mentioned in the case that you want to search.
Line of Business
Select the line of the business mentioned in the case that you want to
search.
Member Response
Verification Start
Date
Enter the start date of the member verification mentioned in the case that
you want to search.
Member Response
Verification End
Date
Enter the end date of the member verification mentioned in the case that
you want to search.
OOA/SCC/TRR
Enter discrepancy and compliance related dates in this tab.

ERS Queues United Healthcare: Enrolment Recon System User Manual
Page 4-4 1.0 ©UnitedHealthcare
Field Name
Description
First Letter Mail
Start Date
Enter the start date since when the first mail was sent to the member.
First Letter Mail End
Date
Enter the end date since when the first mail was sent to the member.
Second Letter Mail
Start Date
Enter the start date since when the second mail was sent to the member.
Second Letter Mail
End Date
Enter the end date since when the second mail was sent to the member.
Discrepancy Info
Enter the discrepancy details in this tab.
Discrepancy Start
Date
Enter the discrepancy start date of the case that you want to search. This
helps you display all the record with entered discrepancy start date.
Discrepancy End
Date
Enter the discrepancy end date of the case that you want to search. This
helps you display all the records with entered discrepancy end date.
Compliance Start
Date
Enter the compliance start date of the case that you want to search. This
helps you display all the record with entered discrepancy start date.
Compliance End
Date
Enter the compliance end date of the case that you want to search. This
helps you display all the records with entered discrepancy end date.
RPR
Enter RPR details in this tab.
CTM Member
Select the CTM value Yes in this field if you want to consider the CTM as
the search criteria of the record that you want to search.
CTM Number
Enter the CTM number in this field.
RPR Requestor
Select the value Yes if you want to consider RPR requester as the search
criteria of the case that you want to search.
EGHP Member
Select the value Yes if you want to consider the EGHP
Employer ID
Enter the employee ID in this field.
Submission Type
Select the submission type of the case that to you want to search.
FDR Received Start
Date
Select the start date of the received FDR of the case that you want to
search. This helps you display all the records with this start date and the
entered end date.
FDR Received End
Date
Select the end date of the received FDR of the case that you want to
search. This helps you display all the records with this start date and the
entered end date.
FDR Status
Select the status of the FDR mentioned in the cases that you want to
search.
Requested Effective
Start Date
Enter the requested effective start date.
One or multiple Effective Dates can be entered and used as search
criteria. A date range is not applicable for this search option. A user can
enter a single effective date or multiple effective dates.
Requested Effective
End Date
Enter the requested effective end date.
One or multiple Effective Dates can be entered and used as search
criteria. A date range is not applicable for this search option. A user can
enter a single effective date or multiple effective dates.
FDR Code Received
Enter the received FDR Code.
CMS Account
Manager Approval
Start Date
Enter the start date of the CMS account manager approval mentioned in
the case that you want to search.
CMS Account
Manager Approval
End Date
Enter the end date of the CMS account manager approval mentioned in
the case that you want to search.
Task being
performed...
Select the appropriate task being performed in this field.
Supervisor of the
person entering the
request
Select the name of the supervisor of the user created the case.
Allow user to type the name but the system retrieves the selected user

ERS Queues Enrolment Recon System User’s Manual
©UnitedHealthcare 1.0 Page 4-5
Field Name
Description
from the application.
RPC Submission
Start Date
Enter the start date of the RPC submission.
RPC Submission
End Date
Enter the end date of the RPC submission.
4.2.3 Working on DOB/Gender Queues
With appropriate access rights, you can access the DOB/Gender queues from the DOB/Gender Queue
Summary page and work on the DOB Process Work form. You can select from multiple queues to retrieve
the next new work item in a DOB/Gender queue directly from the application.
Based on the DOB/Gender record age, DOB/Gender queue records are presented in the application. The
age of the record is decided by differentiating the current date from the Compliance Start Date.
Note: The workflow and process involved in the cases in the Eligibility DOB and Gender queues are
very similar to the cases in MMR Eligibility queues except the different types of queues and actions
values. However, the processes, the queues and the work flows are exactly same in the cases of
Gender and DOB queues except the subject in the forms. In all the three case forms such as
Eligibility, DOB, and Gender Process Work forms, the header section, case details section display
similar fields. Howe3ver, in the DOB and Gender Process forms, except the subject and process
form names, the two forms display same header section, tabs, and Action section.
Note: All the fields marked with asterisk in the form are mandatory fields.
DOB/Gender Queues and Actions 4.2.3.1
The below table provides the details of the DOB/Gender Queues, action values in respective queues. This
also provides the list of next queues and next statuses.
Current
Queue
Queue Type
Action Taken
Next Queue
Next Status
DOB/Gender Queues
This table provides details of all the DOB queues, their associated actions values in the Action fields,
next queues of the current queues and the next statuses.
New Case
Processing
Queue
Pend Case
Pended
In Progress
Send to Peer
Audit
DOB/Gender -
Pending Audit
In Progress
Close Case
Completed
Resolved- Completed
Add Comments
New DOB/Gender
Discrepancy
New / In Progress
Update GPS
Completed
Resolved- Completed
Pending
Audit
Processing
Queue
Peer Audit
Completed
New Case
In Progress
Pend Case
Pended
In Progress
Close Case
Completed
Resolved- Completed
Add Comments
Pending Audit
In Progress
Update GPS
Completed
Resolved- Completed
Pending
Audit Failed
Processing
Queue
Add Comments
Peer Audit Failed
In Progress
Close Case
Completed
Resolved- Completed
Pend Case
Pended
In Progress
Send to Peer
Audit
DOB/Gender -
Pending Audit
In Progress
Pended
Processing
Queue
NA
NA
NA
NA
NA
NA
NA
NA
NA
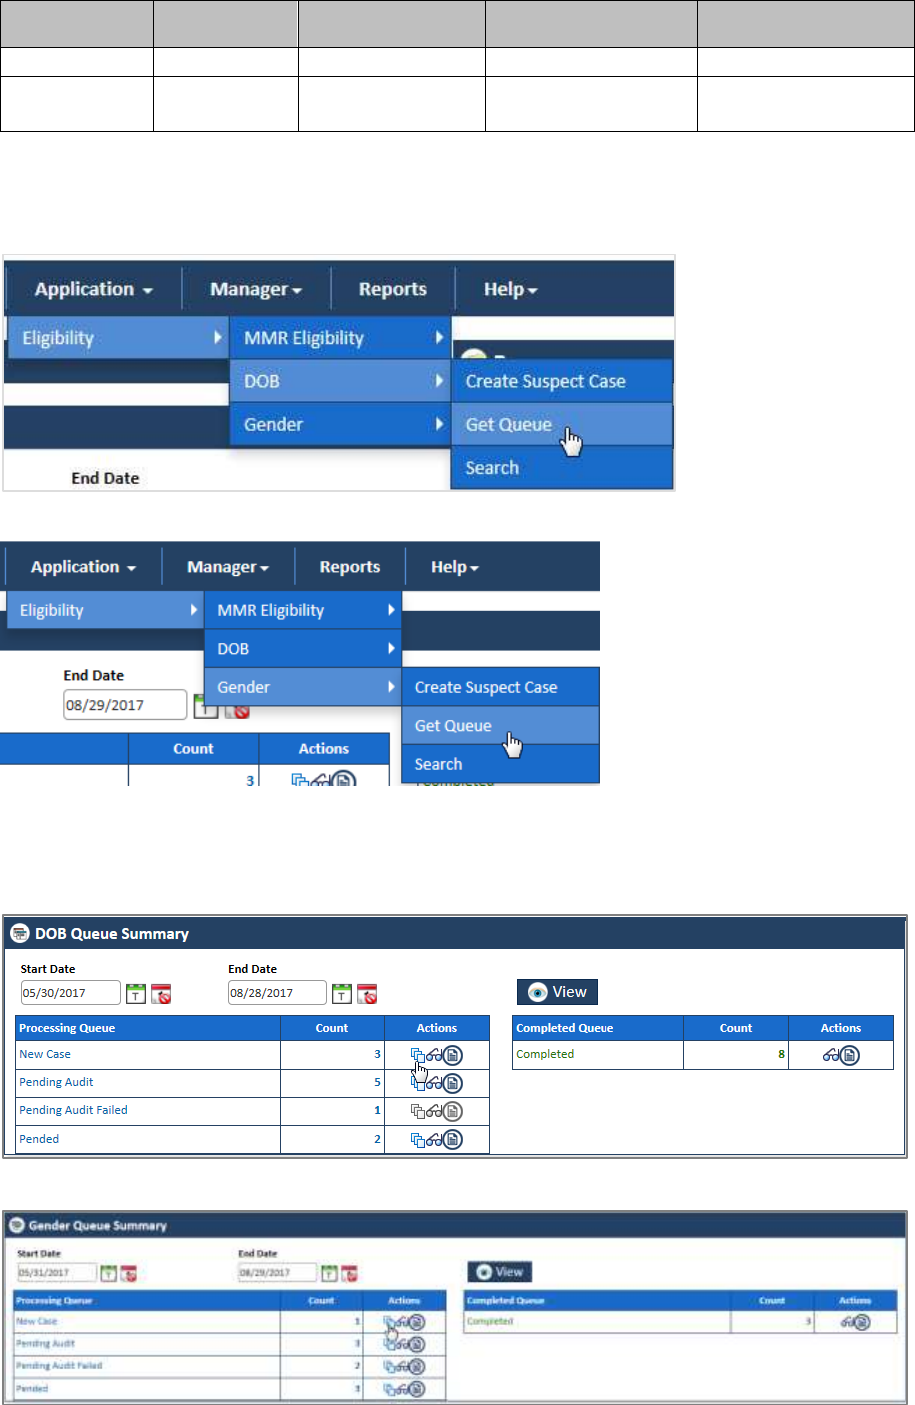
ERS Queues United Healthcare: Enrolment Recon System User Manual
Page 4-6 1.0 ©UnitedHealthcare
Current
Queue
Queue Type
Action Taken
Next Queue
Next Status
NA
NA
NA
Completed
Completed
Queue
NA
NA
NA
Navigation:
To access the DOB/Gender Process Work form:
1. Go to Application menu, point to Eligibility>DOB/ Gender and click the Get Queue link.
Figure 4-42: Accessing DOB Queue Summary Page
Figure 4-43: Accessing Gender Queue Summary Page
The DOB/Gender Queue Summary page appears.
2. Click the queue icon under the Action column in the DOB/Gender Queue Summary form.
Figure 4-44: The DOB Queue Summary page
Figure 4-45: The Gender Queue Summary page
The Work Item – DOB page appears.
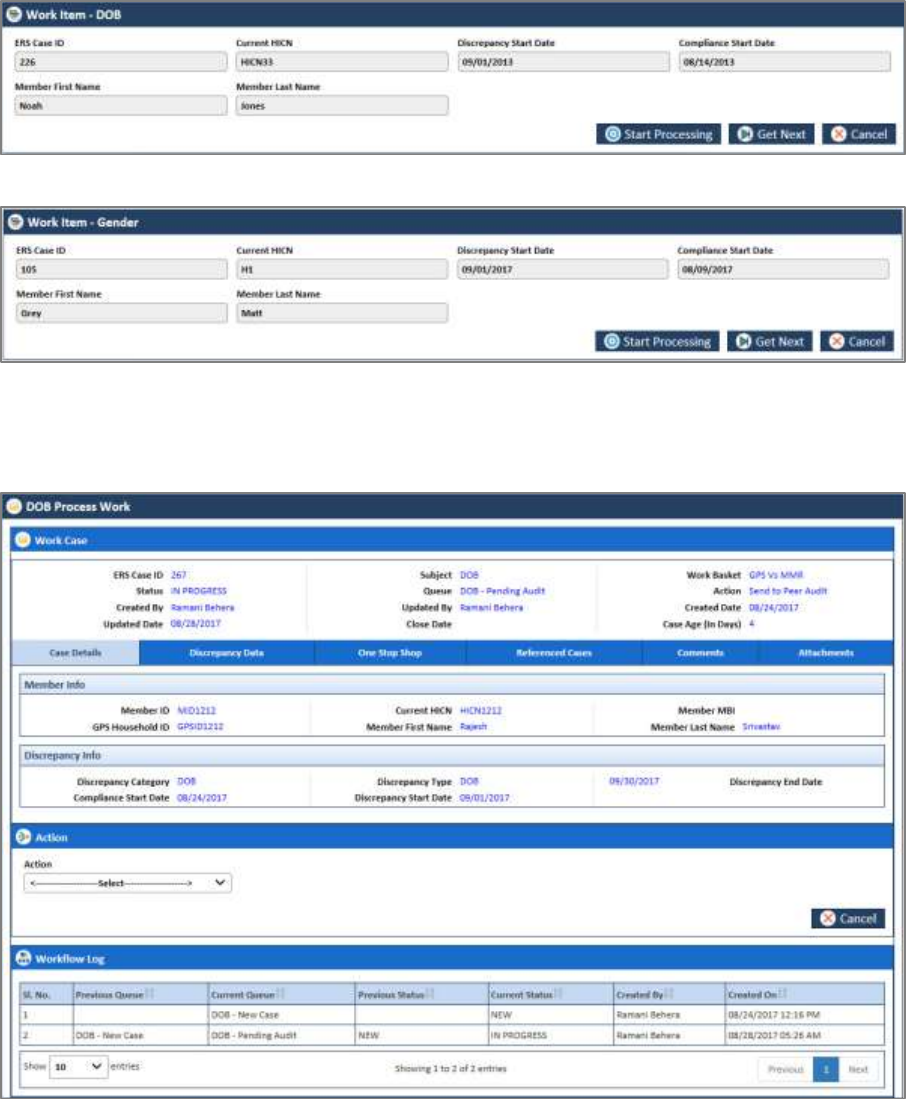
ERS Queues Enrolment Recon System User’s Manual
©UnitedHealthcare 1.0 Page 4-7
3. Click the Start Processing button open the DOB/Gender Process Work form.
Figure 4-46: The Work Item-- DOB section
Figure 4-47: The Work Item-- Gender section
4. Click the Get Next to open the next work item.
5. Click Cancel to cancel the process of opening the queues.
Figure 4-48: The DOB Process Work form

ERS Queues United Healthcare: Enrolment Recon System User Manual
Page 4-8 1.0 ©UnitedHealthcare
Figure 4-49: The Gender Process Work form
Before working on the DOB/Gender Process Work form 4.2.3.2
Before you work on the DOB/Gender Process Work form, you must familiarize yourself with related
interfaces and forms that trigger to the form.
For more information, refer to the Before working on the Eligibility Process Work form section.
Viewing Reports 4.2.3.2.1
<place holder for image and contact>
DOB/Gender Process Work form 4.2.3.3
The DOB/Gender Process Work form has multiple sections such as Work Case, Action, and Workflow Log.
The Work Case section of the form contains multiple tabs such as Case Details, Discrepancy Data, One
Stop Shop, Reference Cases, Comments, and Attachment section.
The following section discusses details about the workflow involved in the new cases. All the
associated actions, next queues, next statuses are described in the DOB/Gender Queues and
Actions section.
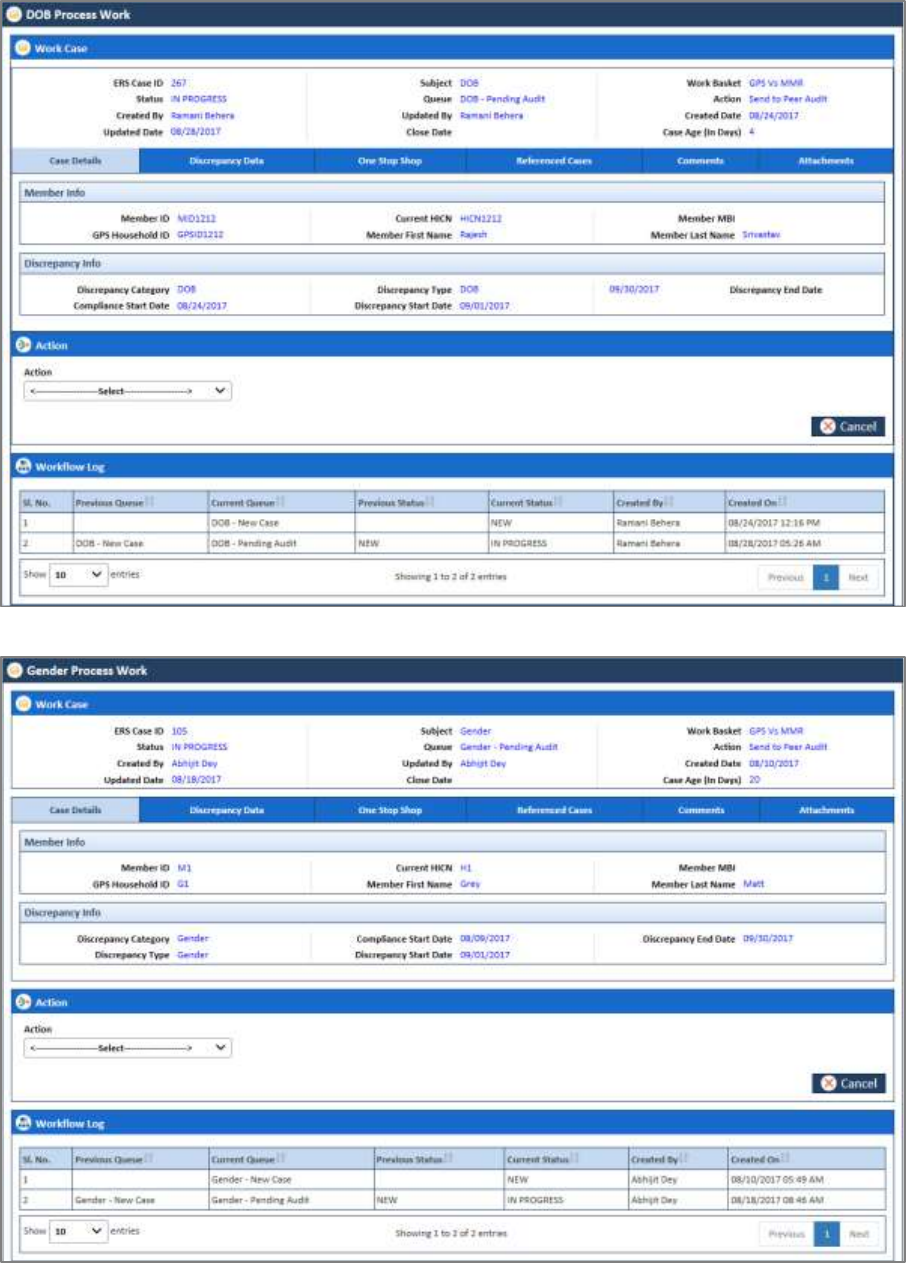
ERS Queues Enrolment Recon System User’s Manual
©UnitedHealthcare 1.0 Page 4-9
Figure 4-50: The DOB Process Work form
Work Case Section> Header 4.2.3.4
All the fields are available in the read-only mode and are auto-populated from the Create DOB/Gender
Case. For more information, refer to Work Case Section> Header section.
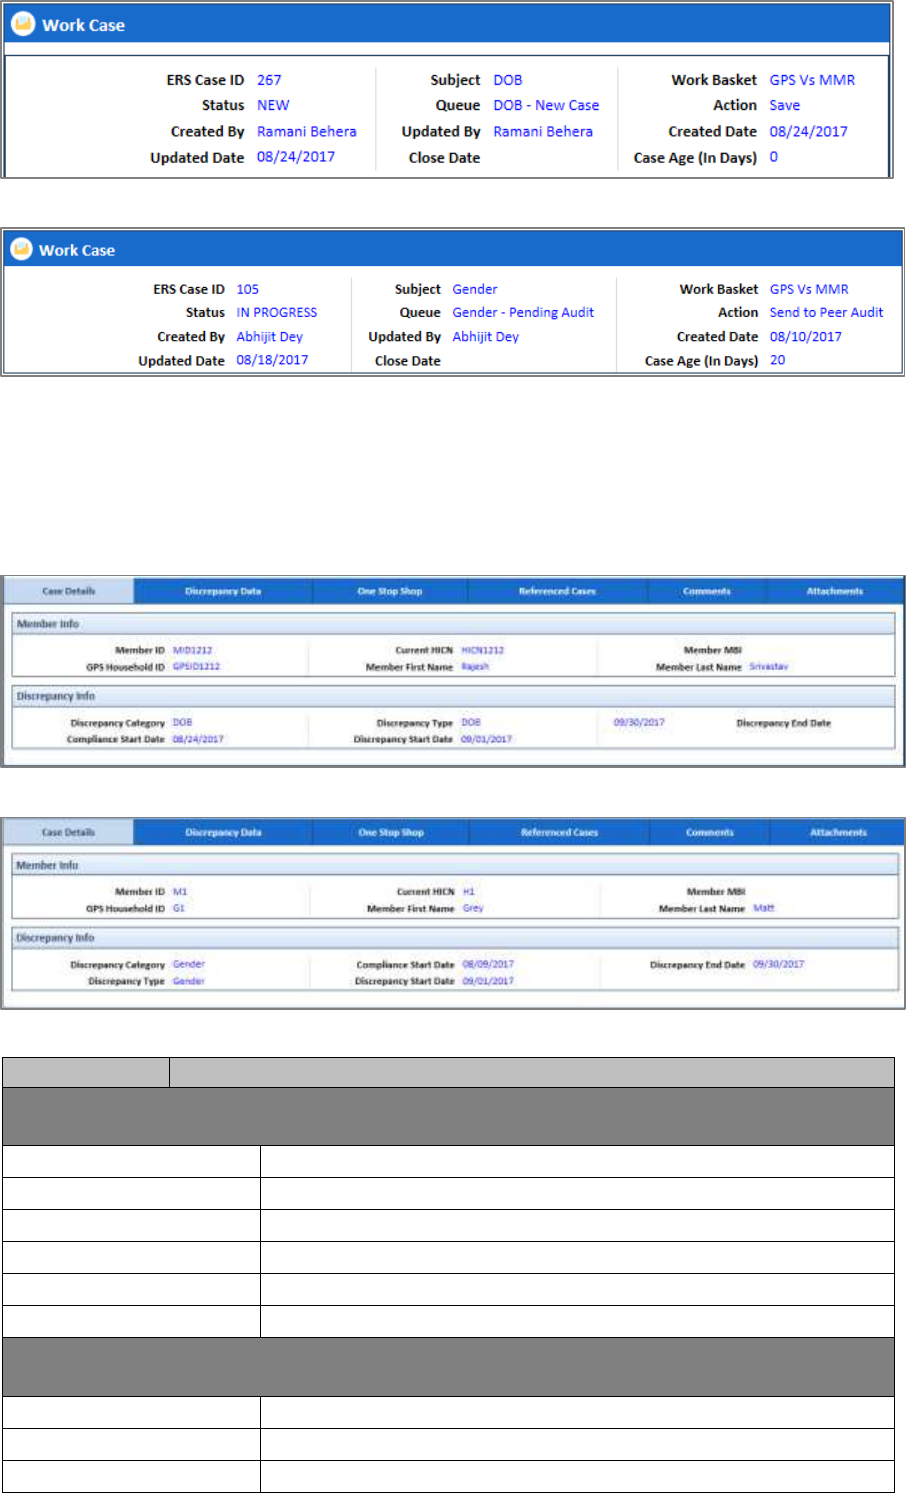
ERS Queues United Healthcare: Enrolment Recon System User Manual
Page 4-10 1.0 ©UnitedHealthcare
Figure 4-51: Work Case Section (DOB)> Header Section
Figure 4-52: Work Case Section (Gender)> Header Section
For more information, refer to Work Case Section> Header section.
Work Case Section> Case Details Tab 4.2.3.5
The Case Details section, displays the member info and discrepancy info. For more information, refers to the
Work Case Section> Case Details Tab section.
Figure 4-53: Work Case Section (DOB)> Case Details Tab
Figure 4-54: Work Case Section (Gender)> Case Details Tab
Field Name
Description
Case Details tab> Member Info section
All the values are auto-populated GPS Data section of the Create DOB/Gender Case form.
Member ID
Displays the member ID.
Current HICN
Displays the Current HICN.
Member MBI
Displays the Member MBI
GPS Household ID
Displays the GPS Household ID.
Member First Name
Displays the Member First Name.
Member Last Name
Displays the Member Last Name.
Case Details tab> Discrepancy Info section
All the values are auto-populated GPS Data section of the Create DOB/Gender Case form.
Discrepancy Category
Displays the discrepancy category.
Discrepancy Type
Displays the Discrepancy type.
Compliance Start Date
Displays the compliance start date.
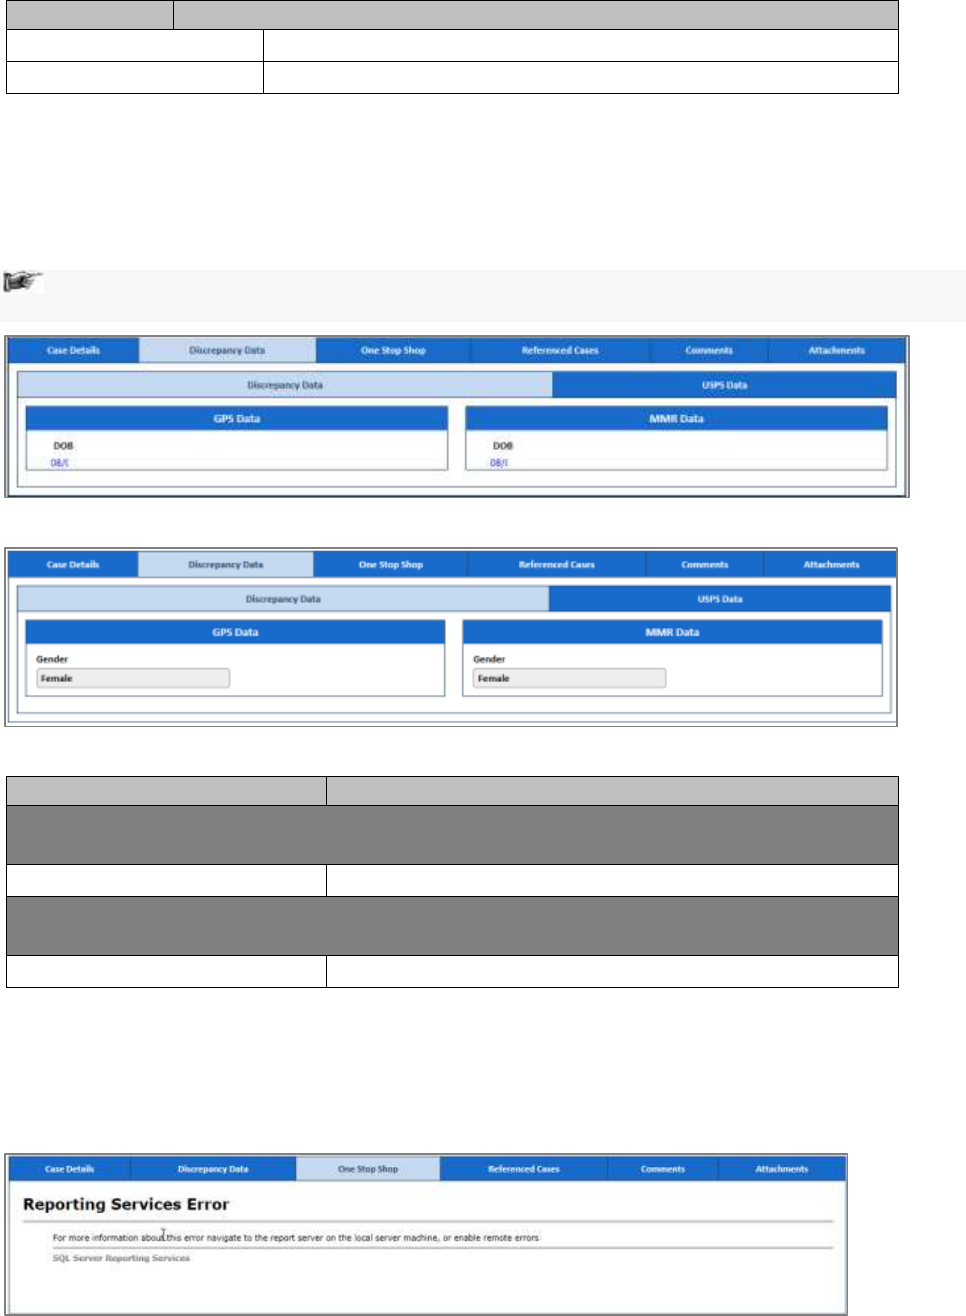
ERS Queues Enrolment Recon System User’s Manual
©UnitedHealthcare 1.0 Page 4-11
Field Name
Description
Discrepancy Start Date
Displays the discrepancy start date.
Discrepancy End Date
Displays the discrepancy end date.
For information on Case Details fields, refer to the Work Case Section> Case Details Tab section.
Work Case Section> Discrepancy Data Tab 4.2.3.6
Discrepancy Data Tab> Discrepancy Data Sub-tab 4.2.3.6.1
These data are populated from GPS.
For DOB, newly manually created cases, this is retrieved from field in Action Details. Otherwise for
system generated records, data is retrieved from GPS.
Figure 4-55: Discrepancy Data Tab (DOC)> GPS Data Sub-tab
Figure 4-56: Discrepancy Data Tab (Gender)> GPS Data Sub-tab
Field Name
Description
Discrepancy Data tab>Discrepancy sub-tab> GPS Data section
All the values are auto-populated GPS Data section of the Create Case form.
DOB
This field displays the DOB.
Discrepancy Data tab> Discrepancy sub-tab>MMR Data section
All the values are auto-populated GPS Data section of the Create DOB/Gender form.
DOB
This field displays the DOB.
Discrepancy Data Tab> UPSC Data Sub-tab 4.2.3.6.2
For more information on Output section of the UPSC Data sub tab, refer to the Discrepancy Data Tab>
UPSC Data Sub-tab section.
Work Case Section> One Stop Shop Tab 4.2.3.7
Figure 4-57: Work Case Section (DOB)> One Stop Shop Tab
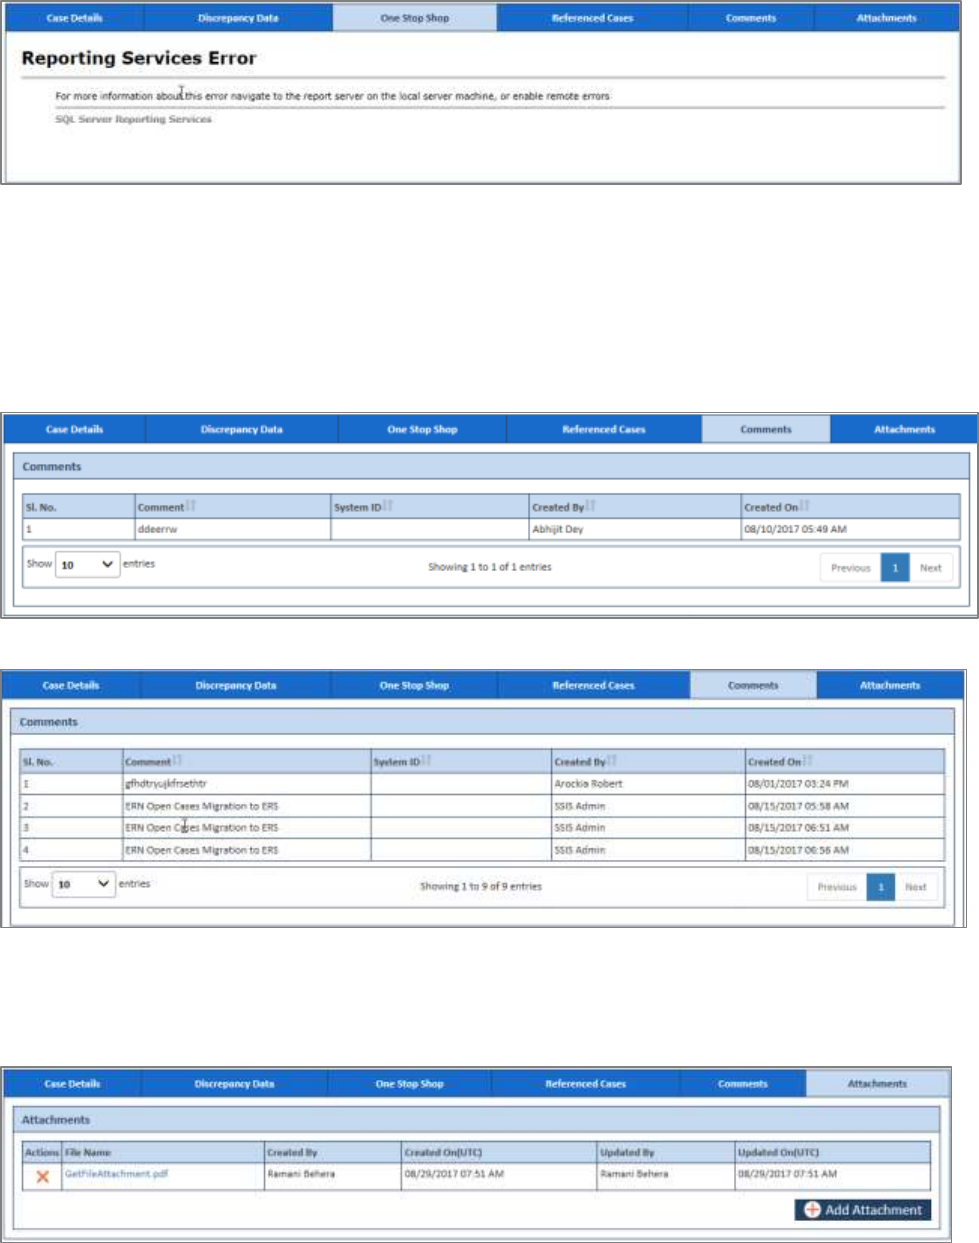
ERS Queues United Healthcare: Enrolment Recon System User Manual
Page 4-12 1.0 ©UnitedHealthcare
Figure 4-58: Work Case Section (Gender)> One Stop Shop Tab
For more information, refer to the Work Case Section> One Stop Shop Tab section.
Work Case Section> Reference Cases Tab 4.2.3.8
For more information on reference tab, refer to the Work Case Section> Reference Cases Tab section.
Work Case Section> Comments Tab 4.2.3.9
Figure 4-59: Work Case Section (DOB)> Comments Tab
Figure 4-60: Work Case Section (Gender)> Comments Tab
For more information, refer to the Work Case Section> Comments tab section.
Work Case Section> Attachment tab 4.2.3.10
Figure 4-61: Work Case Section> Attachment tab
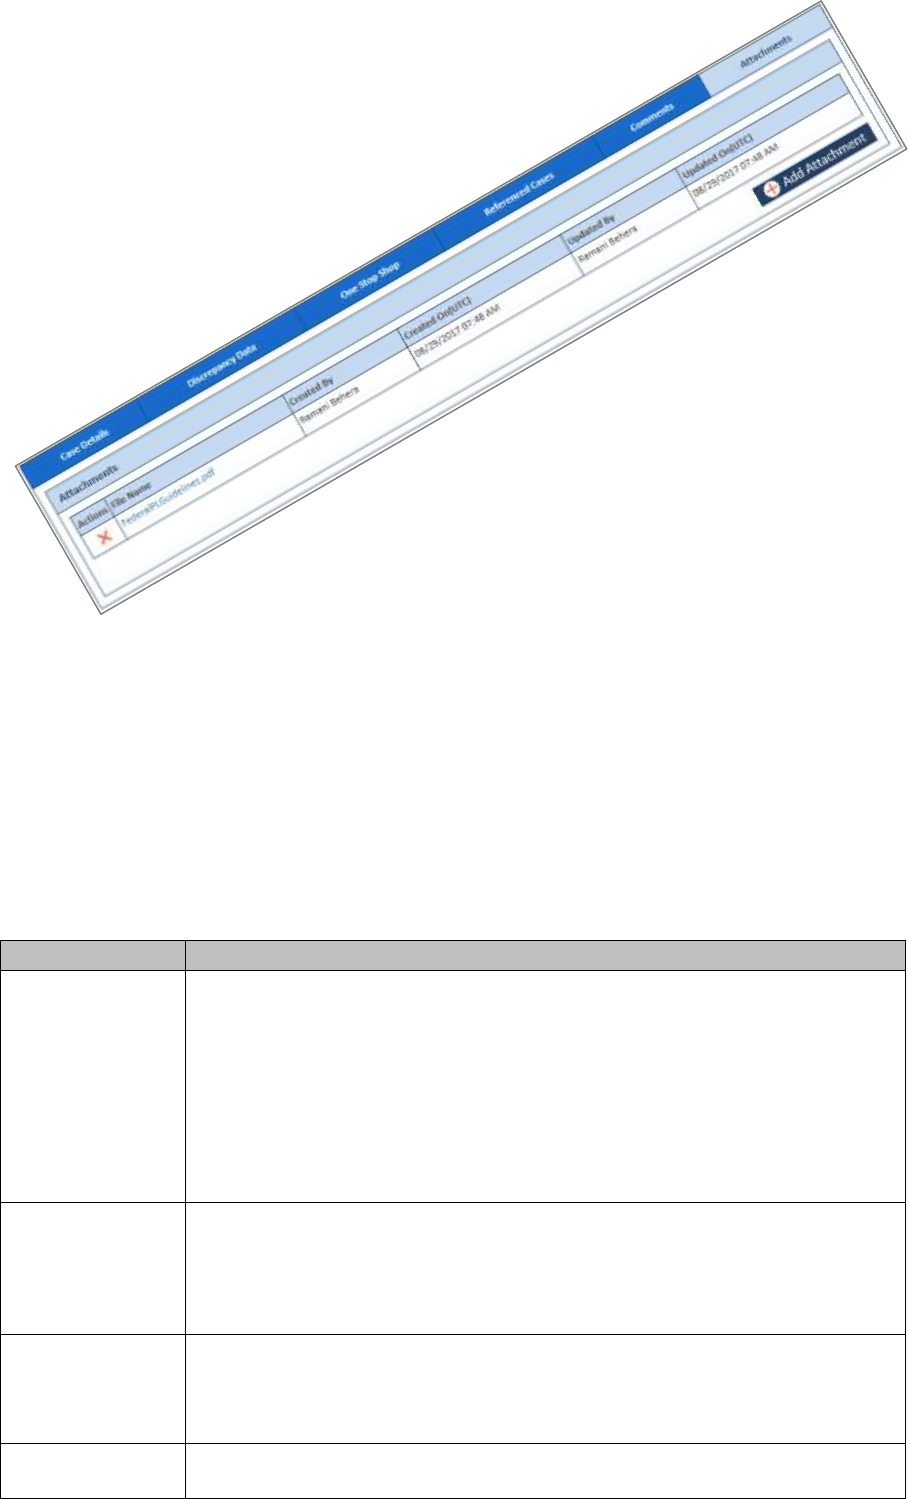
ERS Queues Enrolment Recon System User’s Manual
©UnitedHealthcare 1.0 Page 4-13
Figure 4-62: Work Case Section> Attachment tab on> Attachment section
For more information, refer to the Work Case Section> Attachments tab section.
DOB/Gender Work> Action Section 4.2.3.11
For more information on various action values in the DOB queue, refer to DOB/Gender Queues and Actions
section. For more information on various action values in the Gender queue, refer to DOB/Gender Queues
and Actions section.
Action Values 4.2.3.11.1
Certain options display for all records in any DOB & Gender queue, while others only display when in certain
DOB & Gender queues. The section below provides the definition for each.
Action Values
Description
Add Comments
Select this action value to add your comments about the case while working on
the queue.
The status of the queue becomes In Progress and the queue is routed to the
Processing Queue as New DOB/Gender Queue after you add the comments
and click the Save button after selecting value Add comments.
Upon save, the application keeps the status as In Progress and the case stays
assigned to the user. In addition, if discrepancy is for DOB, then the queue
shall be updated to DOB - Pending. If discrepancy is for Gender, then the
queue shall be updated to Gender - Pending.
Close Case
Select this action value to close the case. If you select this option, two fields
Resolution and Reason appear.
The queue is routed to the Completed Queues list as Completed queue with
the status Resolved – Completed if you click the Save button after the
selecting the value Close Case.
Send to Peer
Audit
Select this value to send the DOB/Gender for peer audit. .
The queue is routed to the Processing Queues list as Pending Audit queue
with the status In Progress if you click the Save button after selecting the Send
to Peer Audit.
Pend Case
Select this value to make the case pending for more research on the case.
The queue is routed to the Processing Queues list as Pended queue with the

ERS Queues United Healthcare: Enrolment Recon System User Manual
Page 4-14 1.0 ©UnitedHealthcare
Action Values
Description
status In Progress if you click the Save button after selecting the value Pend
Case.
Update GPS
Select this value to update the plan.
After you select this value, you must provide the resolution and root causes.
The values in Resolution and Root Causes after you select this action are
same if you select the value Update Plan & Create RPR field.
The queue is routed to the Completed Queues list as Completed queue with
the status Resolve - Completed if you click the Save button after selecting the
value Update Plan.
Peer Audited
Completed
Select this value if you want to complete peer value.
This action value appears to case in the DOB/Gender -- Pending Audit case.
The case comes to the DOB/Gender -- Pending Audit case, if the action
value Send to Peer Audit selected while in the new DOB/Gender case form.
Note: When the eligibility is sent for peer audit by selecting the action value Send to Peer Audit,
the case routes to the DOB/Gender Pending Audit queues with the status In Progress.
Note: If the peer auditor selects the value Peer Audit Completed in the Action field and selects the
value Yes in the Contains Error field, the peer audit process is failed. And the cases routes to the
Peer Audit Failed queue.
Note: If the peer auditor selects the value Peer Audit Completed in the Action field and selects the
value No in the Contains Error field, the cases routes to the new case queue.
Associated fields in the Action section
The following table shows the fields those appear based on selection of certain value in the Action field of
the queue form. This table also displays some fields which appears based on selection certain values in the
fields which appears after selection of the certain values in the Action field.
Associated Fields
Appears when…
Description
Comments
You select the value Add
Comments, Close Case, Pend
Case, Update GPS, Send to Peer
Audit, and Peer Audit Completed
the Action field.
Enter your comments about the action
you selected while working on the
queue. You can enter comments based
on the values you select in the Action
field.
The comments you enter will appears in
the next work flow.
Resolution
You select the value Close Case in
the Action field.
Select the appropriate resolution from
the list. Based on the action value, the
value in this field varies.
Root Cause
You select the value Close Case in
the Action field.
Select the appropriate root cause in this
field. Based on the action value, the
value in this field varies.
Pend Reason
You select the value Pend Case in
the Action field.
Select the appropriate reason for
making the case a pend case. The
Action buttons
Action button
Description
Save
Click this button to send the form to next workflow level.
Reset
Click this button to remove any of the selection from the form.
Cancel
Click this button to cancel the process of the processing the case.
If you click this button, an error message, Are you sure want to leave this
page? appears. You can click the Yes to cancel the process, or else click No.
History
Click this button to view the detailed history of the case.
DOB/ Gender Process Work >Workflow Log Section 4.2.3.12
The workflow log provides the details about various cases such as their current and previous statuses and
queues, date on when it was created and the associated roles.
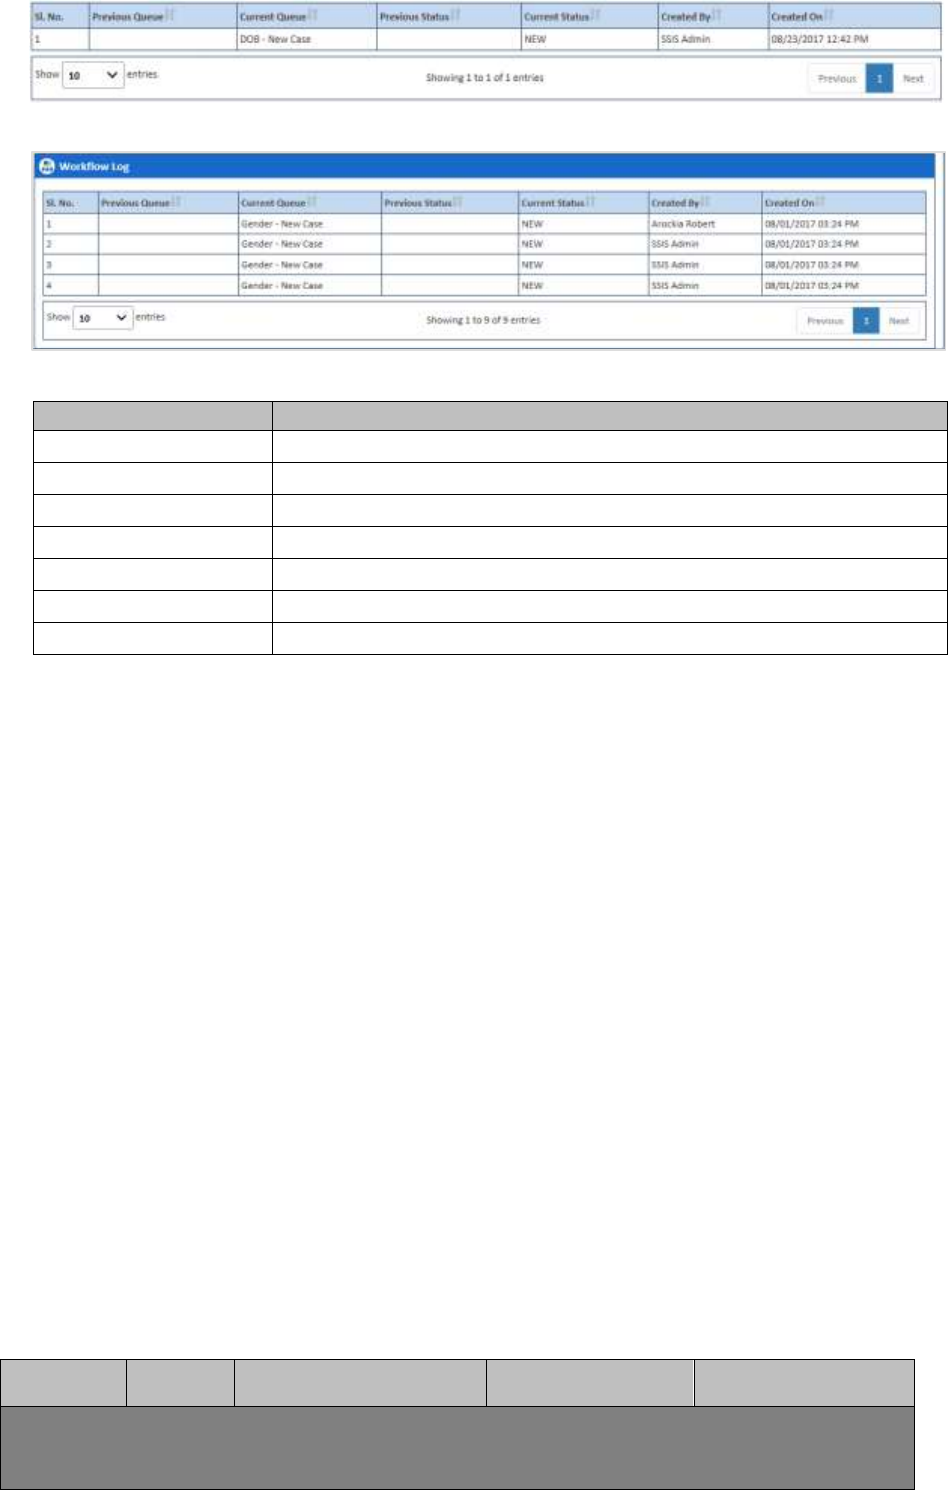
ERS Queues Enrolment Recon System User’s Manual
©UnitedHealthcare 1.0 Page 4-15
Figure 4-63: Workflow Log Section (DOB)
Figure 4-64: Workflow Log Section (Gender)
Columns Name
Description
Sl. No.
Displays the serial numbers of the cases in the table.
Previous Queue
Displays the name of the previous queue of the case.
Current Queue
Displays the name of the current queue of the case.
Previous Status
Displays the name of the previous status of the case.
Current Status
Displays the name of the previous current of the case.
Created By
Displays the name of the role that created case.
Created On
Displays the date when the case was created.
OST Queues 4.3
OST queues help you access and work on the OOA, SSC, and TRR queues for reviewing the cases added.
These queues have the following sections and tabs in the queue form. The name of the queue form is based
on the type discrepancies or module like <Queue module name> Process Work. For example, if you are
accessing the OOA queue, the case form name will be OOA Process Work form. The queue case form has
the following sections and tabs.
Header section
Case Details tab
One Stop Shop tab
TRR Data tab
CMS Transaction Details tab
Referenced cases tab
Comments tab
Attachments tab
Action Section
Workflow Log section
4.3.1 Working on OOA Queues
With appropriate access rights, you can access the OOA queues from the OOA Queue Summary page and
work on the OOA Process Work form. You can select from multiple queues to retrieve the next new work item in
an OOA queue directly from the application.
Based on the OOA record age, OOA queue records are presented in the application. The age of the record is
decided by differentiating the current date from the Compliance Start Date.
OOA Queues and Actions 4.3.1.1
The below table provides the details of the OOA Queues, action values in respective queues. This also
provides the list of next queues and next statuses.
Current
Queue
Queue
Type
Action Taken
Next Queue
Next Status
OOA Queues
This section provides the details of all the OOA queues, their associated actions values in the Action
fields, next queues of the current queues and the next statuses.

ERS Queues United Healthcare: Enrolment Recon System User Manual
Page 4-2 1.0 ©UnitedHealthcare
Current
Queue
Queue
Type
Action Taken
Next Queue
Next Status
New Case
Process
Queue
Send SCC Update to CMS
Submit to CMS
In Progress
Send OOA Letter
Pending - NOT
In Progress
Pend Case
Pended
In Progress
Send to Peer Audit
OOA - Pending
Audit
In Progress
Close Case
Completed
Resolved- Completed
Add Comments
New OOA Case
New / In-progress
MIIM
Updated
Process
Queue
Send SCC Update to CMS
Submit to CMS
In Progress
Send OOA Letter
Pending - NOT
In Progress
Pend Case
Pended
In Progress
Send to Peer Audit
OOA - Pending
Audit
In Progress
Close Case
Completed
Resolved- Completed
Add Comments
MIIM Updated
In-progress
Open-NOT
Process
Queue
Send Notification of
Termination Letter
Pending – FTT
In Progress
Pend Case
Pended
In Progress
Close Case
Completed
Resolved- Completed
Add Comments
Open-NOT
In Progress
Open -
Disenroll
Process
Queue
Extend Tracking
Pending – FTT
In Progress
Pend Case
Pended
In Progress
Close Case
Completed
Resolved-Completed
Add Comments
Open - Disenroll
In Progress
MARx
Address
Letter
Process
Queue
MARx Address
Completed
Pending - FTT
In Progress
Pend Case
Pended
In Progress
Close Case
Completed
Resolved- Completed
Add Comments
MARx Address
Letter
In Progress
Address
Scrub
Process
Queue
Address Scrub Completed
Pending - FTT
In Progress
Pend Case
Pended
In Progress
Close Case
Completed
Resolved- Completed
Add Comments
Address Scrub
In Progress
Pending
Audit
Process
Queue
Peer Audit Completed
New OOA Case / MIIM
Updated
In Progress
Pend Case
Pended
In Progress
Close Case
Completed
Resolved- Completed
Add Comments
OOA - Pending Audit
In Progress
Pended
Process
Queue
<>
<>
<>
Peer Audit
Failed
Process
Queue
Add Comments
Peer Audit Failed
In Progress
Close Case
Completed
Resolved- Completed
Pend Case
Pended
In Progress
Send to Peer Audit
OOA - Pending Audit
In Progress
Before working on the OOA Process Work form 4.3.1.2
Before you work on the OOA Process Work form, you must familiarize yourself with related interfaces and
forms that trigger to the form.
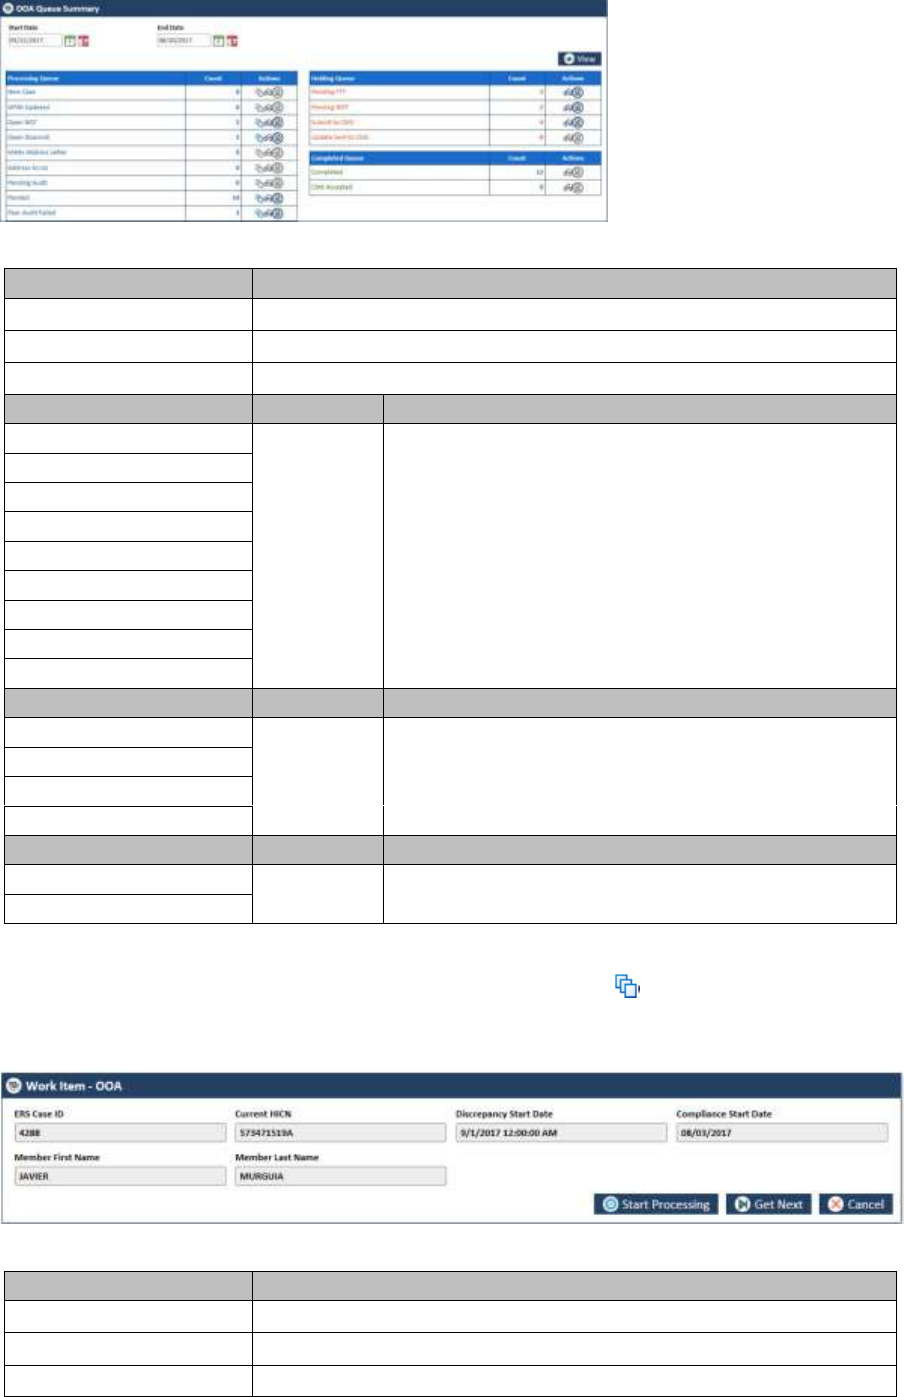
ERS Queues Enrolment Recon System User’s Manual
©UnitedHealthcare 1.0 Page 4-3
OOA Queue Summary 4.3.1.2.1
This page provides detailed list of various OOA queues. For more information accessing OOA Queue Summary
form, refer to the Types of queues section.
Figure 4-65: The OOA Queue Summary Page
Field Name
Description
Start Date
Enter the start date of the case.
End Date
Enter the end date of the cases.
View button
Click this button to view the queue created between these dates.
Processing Queues
Count
Action
New Case
Displays
the count
Displays the action icons a user can take. User can edit
queue, view the queue, and view the report.
MIIM Updated
Open-NOT
Open - Disenroll
MARx Address Letter
Address Scrub
Pending Audit
Pended
Peer Audit Failed
Processing Queues
Count
Action
Pending FTT
Displays
the count
Displays the action icons a user can take. User can edit
queue, view the queue, and view the report.
Pending NOT
Submit to CMS
Update Sent to CMS
Processing Queues
Count
Action
Completed
Displays
the count
Displays the action icons a user can take. User can edit
queue, view the queue, and view the report.
CMS Accepted
Viewing cases from queues 4.3.1.2.2
You access the form through the queues by clicking the Get Queue icon in the Actions column of the OOA
Case Summary page. The Work Item - OOA form appears. Based on the case details, you open the case by
clicking the Start Processing button.
Figure 4-66: Work Item - OOA form
Field Name
Description
ERS Case ID
Displays the ERS case id.
Current HICN
Displays the current HICN.
Discrepancy Start Date
Displays the discrepancy start date.
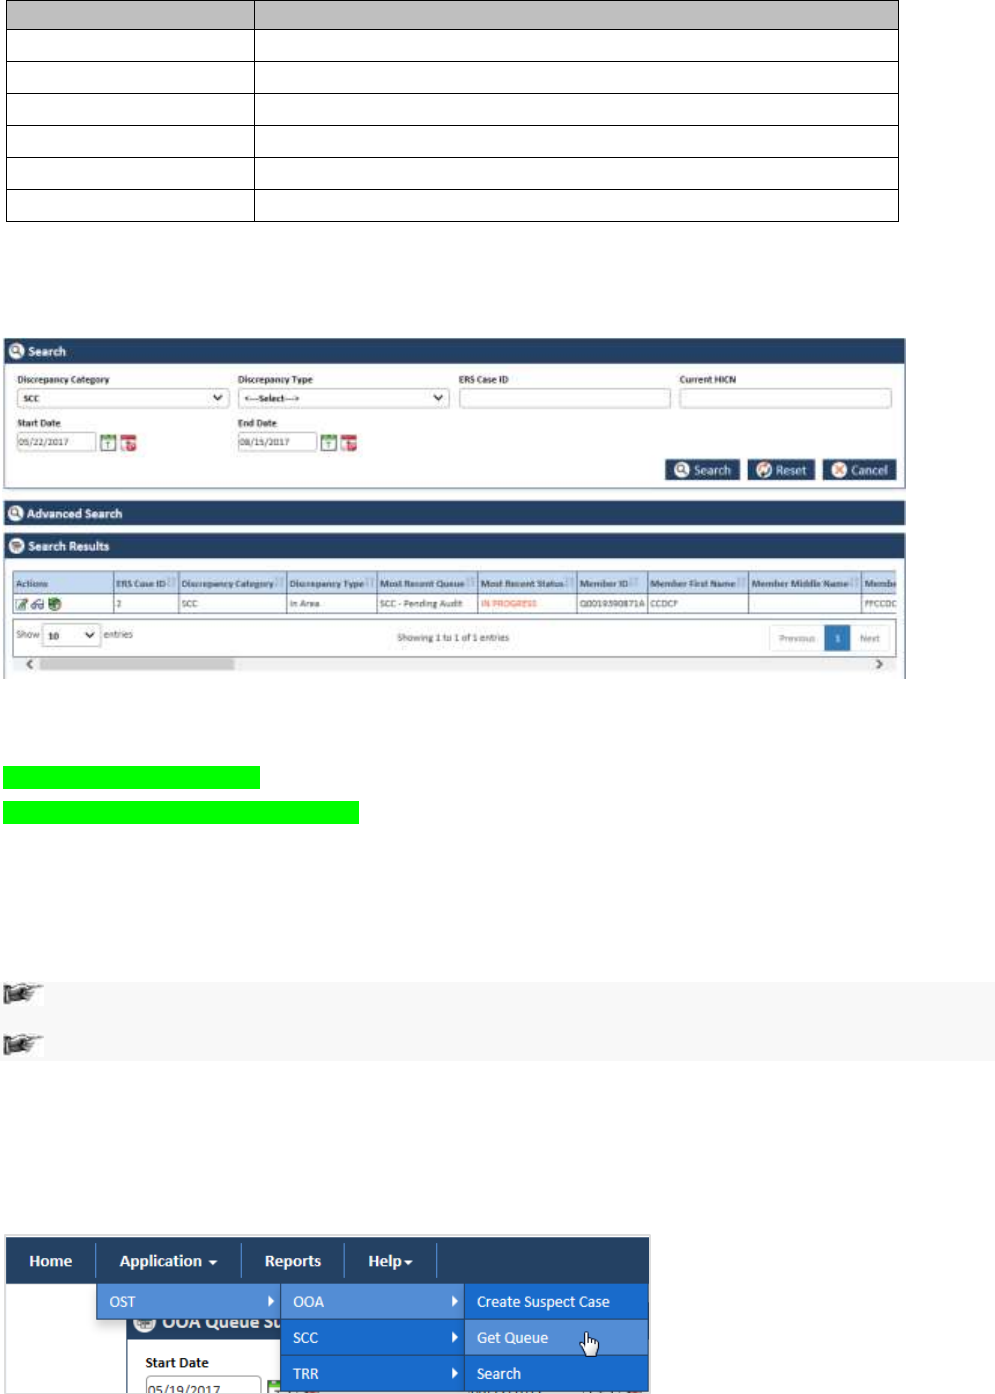
ERS Queues United Healthcare: Enrolment Recon System User Manual
Page 4-4 1.0 ©UnitedHealthcare
Field Name
Description
Compliance Start Date
Displays the compliance start date.
Member First Name
Displays the member first name.
Member Last Name
Displays the member last name.
Start Processing
Click this button to pen the form.
Get Next
Click this button to get the next case details.
Cancel
Click this button to cancel the process.
Viewing cases from queues 4.3.1.2.3
You can view the queues by clicking the View Queue icon in the Actions column of the OOA Case Summary
page. The Search form appears. This form helps you to search the queues and work on the related cases.
Figure 4-67: The OOA Queue Search form
For more information on how to search cases, refer to the Searching OOA Queues section.
Viewing Reports 4.3.1.2.4
<Place holder for image and contact>
OOA Process Work form 4.3.1.3
The OOA Process Work page has multiple sections such as Work Case, Action, and Workflow Log. This Work
Case section of the form contains multiple tabs such as Case Details, One Stop Shop, TRR Data, CMS
Transaction Details, Reference Cases, Comments, and Attachment section.
The following section discusses details about the workflow involved in the new cases. All the
associated actions, next queues, next statuses are described in the section.
Note: All the fields marked with asterisk in the form are mandatory fields.
To work on the cases in the OOA queues, you have to access the OOA Process Work form.
Navigation:
To access the OOA Process Work form:
1. Go to Application menu, point to OST>OAA and click the Get Queue link.
Figure 4-68: Accessing OOA Queue Summary Page
The OOA Queue Summary page appears.
2. Click the queue icon under the Action column in the OOA Queue Summary form.
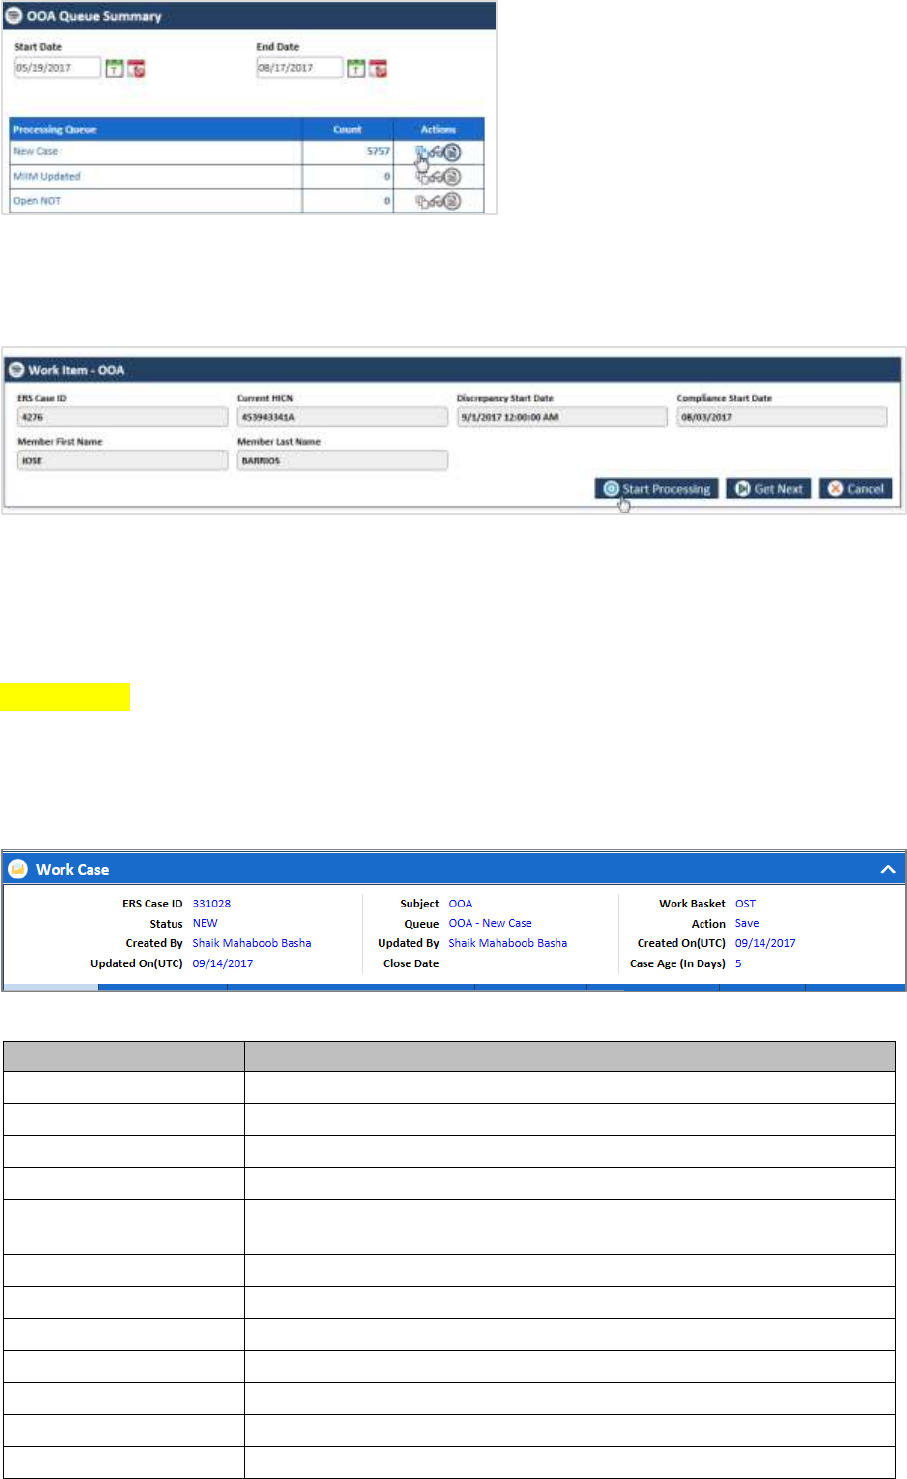
ERS Queues Enrolment Recon System User’s Manual
©UnitedHealthcare 1.0 Page 4-5
Figure 4-69: The OOA Queue Summary page
The Work Item – OOA page appears.
3. Click the Start Processing button open the OOA Process Work form.
Figure 4-70: The Work Item--OOA section
4. Click the Get Next to open the next work item.
5. Click Cancel to cancel the process of opening the queues.
The OOA Process Work form
sssssssssssss
Figure 4-71: The OOA Process Work form
Work Case Section> Header 4.3.1.4
All the fields are available in the read-only mode.
Figure 4-72: Work Case Section> Header Section
Field Name
Description
ERS Case ID
Displays the ERS Case ID.
Status
Displays the current status.
Created By
Displays the user that created the case.
Updated On (UTC)
Displays the date on which the case was updated.
Subject
Displays the subject. If this is OOA case the subject should display the
value OOA.
Queue
Displays the current queue to which this case belongs to.
Updated By
Displays user name that updated the case.
Close Date
Doesn’t display the case close date until the case is closed.
Work Basket
Displays the current work basket.
Action
Displays the last action taken.
Created On (UTC)
Displays the case creation date.
Case Age (In Days)
Displays the case age.
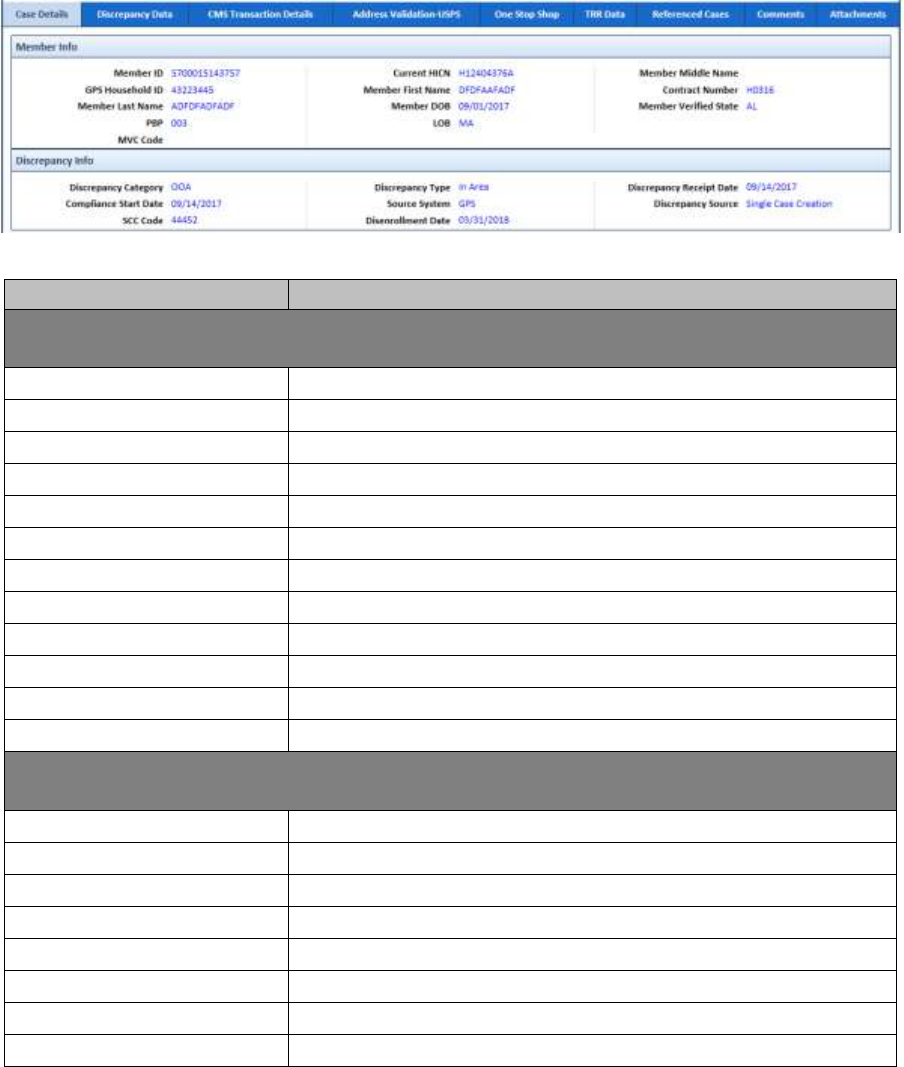
ERS Queues United Healthcare: Enrolment Recon System User Manual
Page 4-6 1.0 ©UnitedHealthcare
Work Case Section> Case Details Tab 4.3.1.5
The values are populated from the Create OOA Case form while creating the new OOA case.
Figure 4-73: Work Case Section> Case Details Tab
Field Name
Description
Member info
All the values are auto-populated Member Info section of the Create OOA Case form.
Member ID
Displays the member ID.
Current HICN
Displays the HICN number.
Member Middle Name
Displays the middle name of the member.
GPS Household ID
Displays the GPS household ID.
Member First Name
Displays the first name of the member.
Contract Number
Displays the contract number.
Member Last Name
Displays the last name of the member.
Member DOB
Displays the DOB the member.
Member Verified State
Displays the member verified state.
PBP
Displays the PBP.
LOB
Displays the LOB.
MVC Code
Displays the member verified country code.
Discrepancy info
All the values are auto-populated from GPS.
Discrepancy Category
Displays the discrepancy category.
Discrepancy Type
Displays the discrepancy type.
Discrepancy Receipt Date
Displays the discrepancy receipt date.
Compliance Start Date
Displays the compliance start date.
Source System
Displays the source for the information.
Discrepancy Source
Displays the discrepancy source.
SCC Code
Displays the SSC Code.
Disenrollment Date
Displays the disenrollment date.
Work Case Section> Discrepancy Data Tab 4.3.1.6
Discrepancy Data Tab> GPS Data Sub-tab
This tab displays all the discrepancy data populated from GPS.
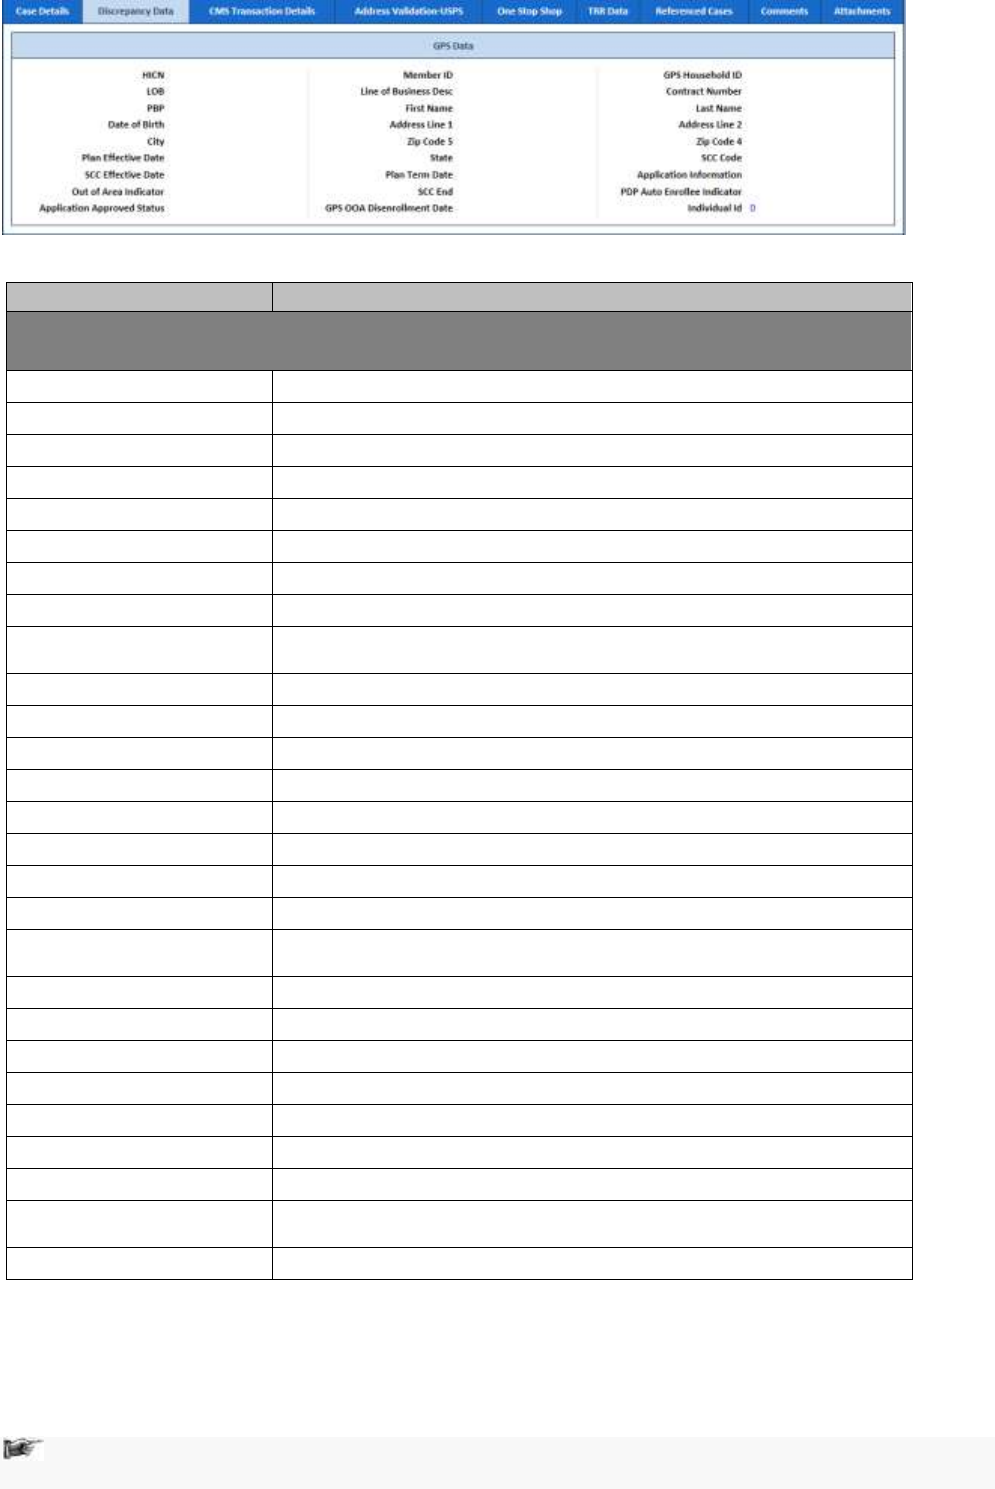
ERS Queues Enrolment Recon System User’s Manual
©UnitedHealthcare 1.0 Page 4-7
Figure 4-74: The Discrepancy Data Tab> GPS Data Sub-tab
Field Name
Description
Discrepancy
This sub tab displays the al the GPS data.
HICN
Displays the HICN.
LOB
Displays the LOB.
PBP
Displays the PBP.
Date of Birth
Displays the member date of birth.
City
Display the city to which the member belongs to.
Plan Effective Date
Displays the plan effective date.
SCC Effective Date
Displays the SCC effective date.
Out of Area Indicator
Displays the out of area indicator.
Application Approved
Status
Displays the application approved status.
Member ID
Displays the member ID
Line of Business Desc
Displays the Line of Business Disc.
First Name
Displays the first name of the member.
Address Line 1
Displays the Address of the member in line 1
Zip Code 5
Displays the Zip Code 5 of the address.
State
Displays the state to which the member belongs to.
Plan Term Date
Displays the term date of a plan.
SCC End
Displays the SCC end date.
GPS OOA Disenrollment
Date
Displays the GPS OOA disenrollment date.
GPS Household ID
Displays the GPS Household ID.
Contract Number
Displays the contract number.
Last Name
Displays the last name of the member.
Address Line 2
Displays the address of the member in line 2.
Zip Code 4
Displays the Zip Code 4 of the address.
SCC Code
Displays the SCC Code.
Application Information
Displays the application information.
PDP Auto Enrollee
Indicator
Displays the PDP Auto Enrollee Indicator.
Individual Id
Displays the Individual ID.
Work Case Section> CMS Transaction Details Tab 4.3.1.7
The values in the section appears from matching fields, if you select the value Send SCC Update to CMS in the
Action section of the OOA Process Work form and save the form. If you access the Submit to CMS queue and
access the queue, you can see the detailed updated in the CMS Transaction Details tab of the form.
Note: If a user selects the value Send SCC Update to CMS in the Action section of the OOA Process
Work form and save the form, the queue routed to the Holding queue as Submit to CMS queue.
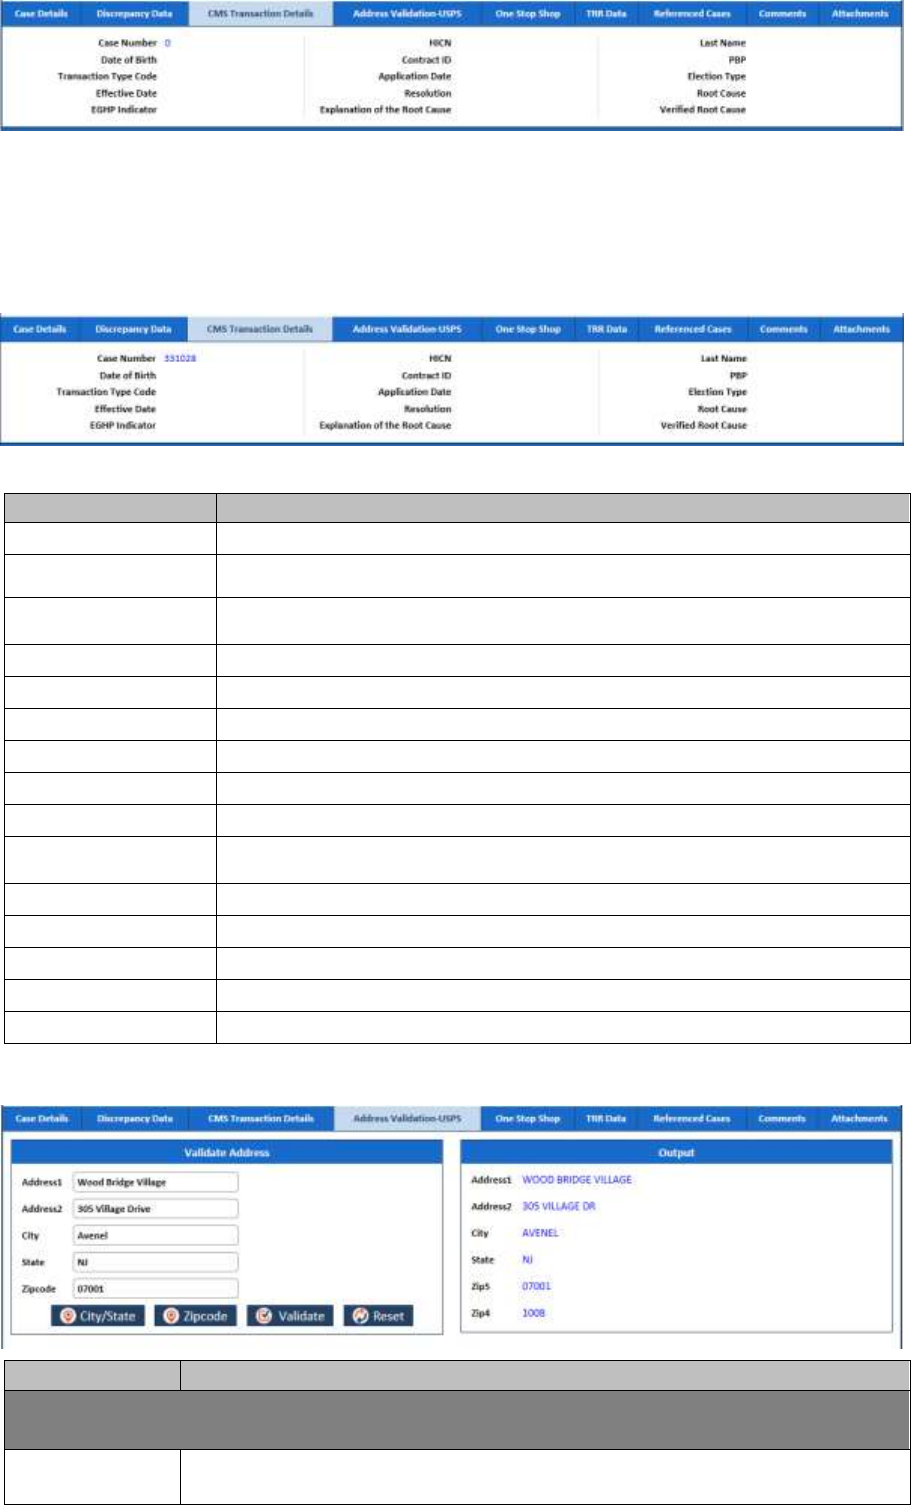
ERS Queues United Healthcare: Enrolment Recon System User Manual
Page 4-8 1.0 ©UnitedHealthcare
Figure 4-75: Work Case Section> CMS Transaction Details Tab
If you visit the Holding Queues and view the record (OOA Process Work) corresponding to the ERS Case ID,
you can view the details updated in the CMS Transaction Details tab. You can also see that the comments
section is updated with the latest comment you provided.
For more information, refer to the Accessing Holding Queues section.
Figure 4-76: Work Case Section> Updated CMS Transaction Details Tab
Field Names
Description
Case Number
Displays the case number.
Date of Birth
Displays the DOB of the member.
Transaction Type
Code
Displays the transaction type code.
Effective Date
Displays the effective date of the record.
EGHP Indicator
Displays the value for EGHP Indicator.
HICN
Displays the HICN.
Contract ID
Displays the contract ID
Application Date
Displays the application date of the case.
Resolution
Displays the resolution.
Explanation of the
Root Cause
Displays the root cause explanation of the issues.
Last Name
Displays the last name of the member.
PBP
Displays the PBP.
Election Type
Displays the type of election.
Root Cause
Displays the root cause of the issues.
Verified Root Cause
Displays the verified root cause of the issues
Work Case Section> Address Validation-USPS tab 4.3.1.8
Field Name
Description
Validate Address
This sub-tab helps you enter and validate the member address.
Address1
Enter the address in the member address.
If the address is not put or put wrongly, the error message, Address Not Found.
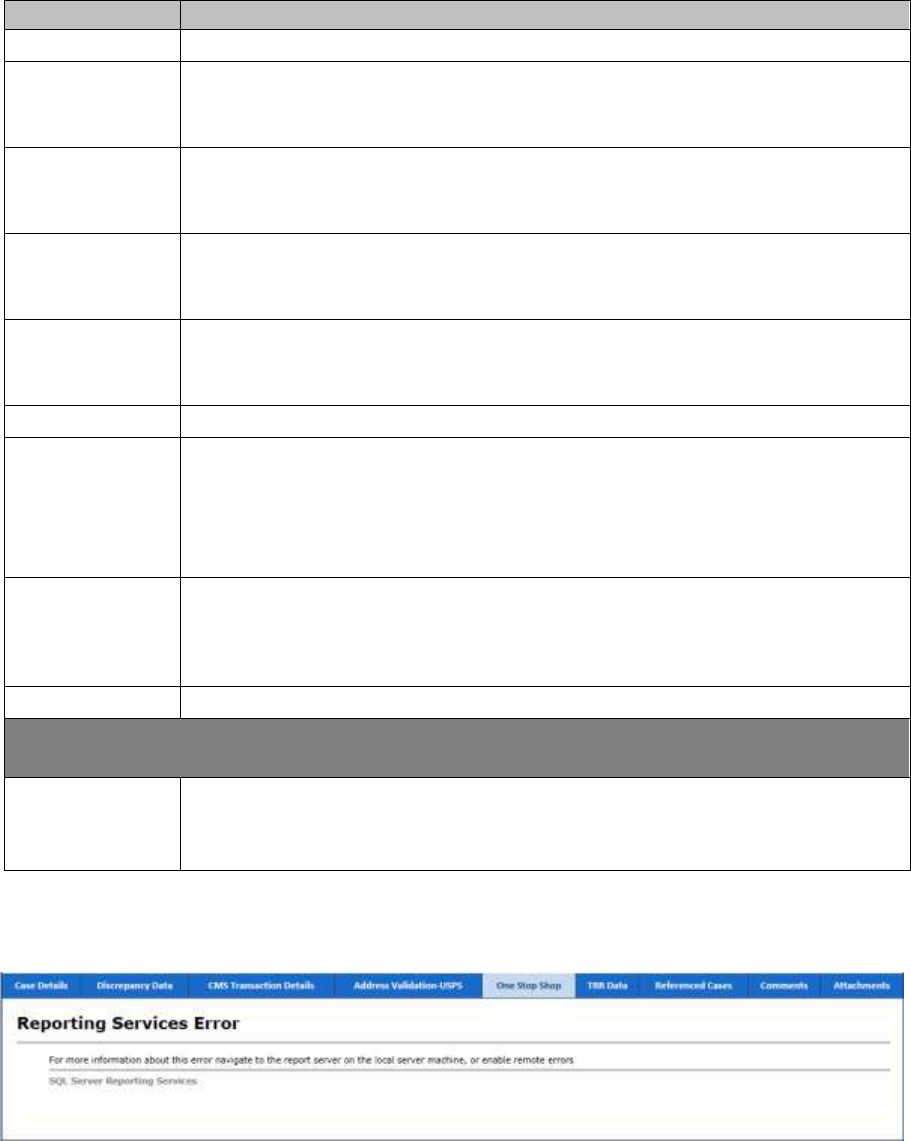
ERS Queues Enrolment Recon System User’s Manual
©UnitedHealthcare 1.0 Page 4-9
Field Name
Description
appears.
Address2
Enter the address in the member address.
If the address is not put or put wrongly, the error message, Address Not Found.
appears.
City
Enter the name of the city.
If the city code is not put or put wrongly, the error message, Invalid City.
appears.
City/State
button
Click this button to validate the city name.
If you click this button, values in the City, State, and Zip5 value appears in the
Output section.
State
Enter the state code. For example, for New Jersey, enter NJ.
If the State code is not put or put wrongly, the error message, Invalid State
Code. appears.
Zipcode
Enter the zip code.
Zipcode button
Click this button to validate the zip code.
If you click the Validate button, then the values in the Address1, Address2, City,
State, Zip5 and Zip4 value appears in the Output section.
If the ZIP code is not put or put wrongly, the error message, ZIP Code must be
5 characters. appears.
Validate button
Click this button to validate the address in the Output section.
After entering the address, if you click the Validate button, then the values in the
Address1, Address2, City, State, Zip5, and Zip4 value appears in the Output
section.
Reset button
Click this button to remove all the address details.
Output
This sub-tab helps you view the validated member address.
Address1,
Address2, City,
State, Zip5, and
Zip4
All the values appear in read-only mode.
Work Case Section> One Stop Shop Tab 4.3.1.9
This section displays a report.
Figure 4-77: Work Case Section> One Stop Shop Tab
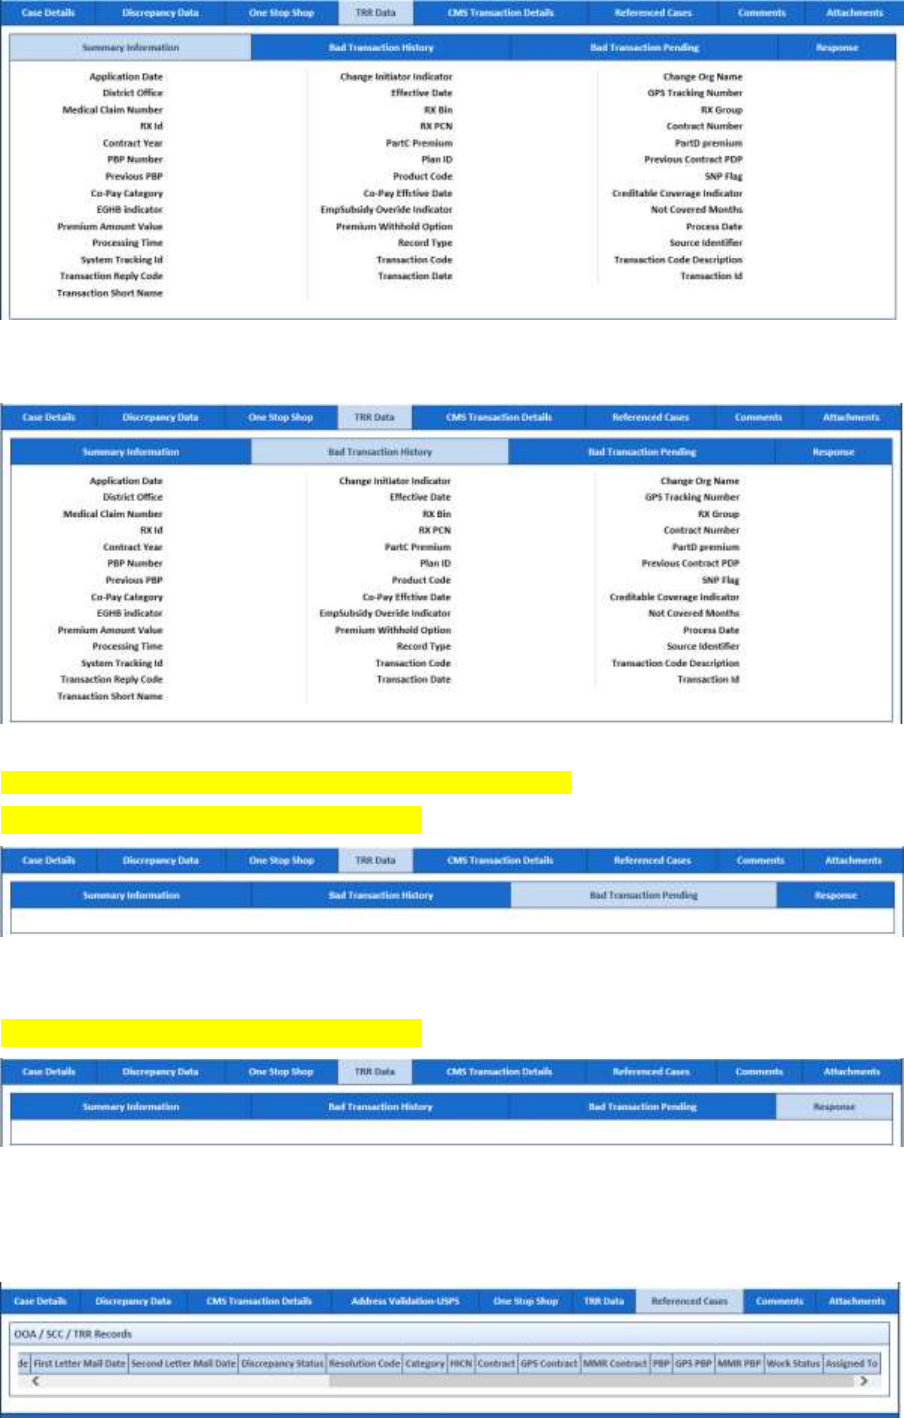
ERS Queues United Healthcare: Enrolment Recon System User Manual
Page 4-10 1.0 ©UnitedHealthcare
Work Case Section> TRR Data Tab 4.3.1.10
TRR Data Tab> Summary Information Sub-tab
4.3.1.10.1
Figure 4-78: TRR Data Tab> Summary Information Sub-tab
TRR Data Tab> Bad Transaction History Sub-tab 4.3.1.10.2
Figure 4-79: TRR Data Tab> Bad Transaction History Sub-tab
TRR Data Tab> Bad Transaction Pending Sub-tab 4.3.1.10.3
Update the content after the page is developed.
Figure 4-80: TRR Data Tab> Bad Transaction Pending Sub-tab
TRR Data Tab> Response Sub-tab 4.3.1.10.4
Update the content after the page is developed.
Figure 4-81: TRR Data Tab> Bad Transaction Response Sub-tab
Work Case Section> Reference Cases Tab 4.3.1.11
This tab of the form displays all the cases related to this case.
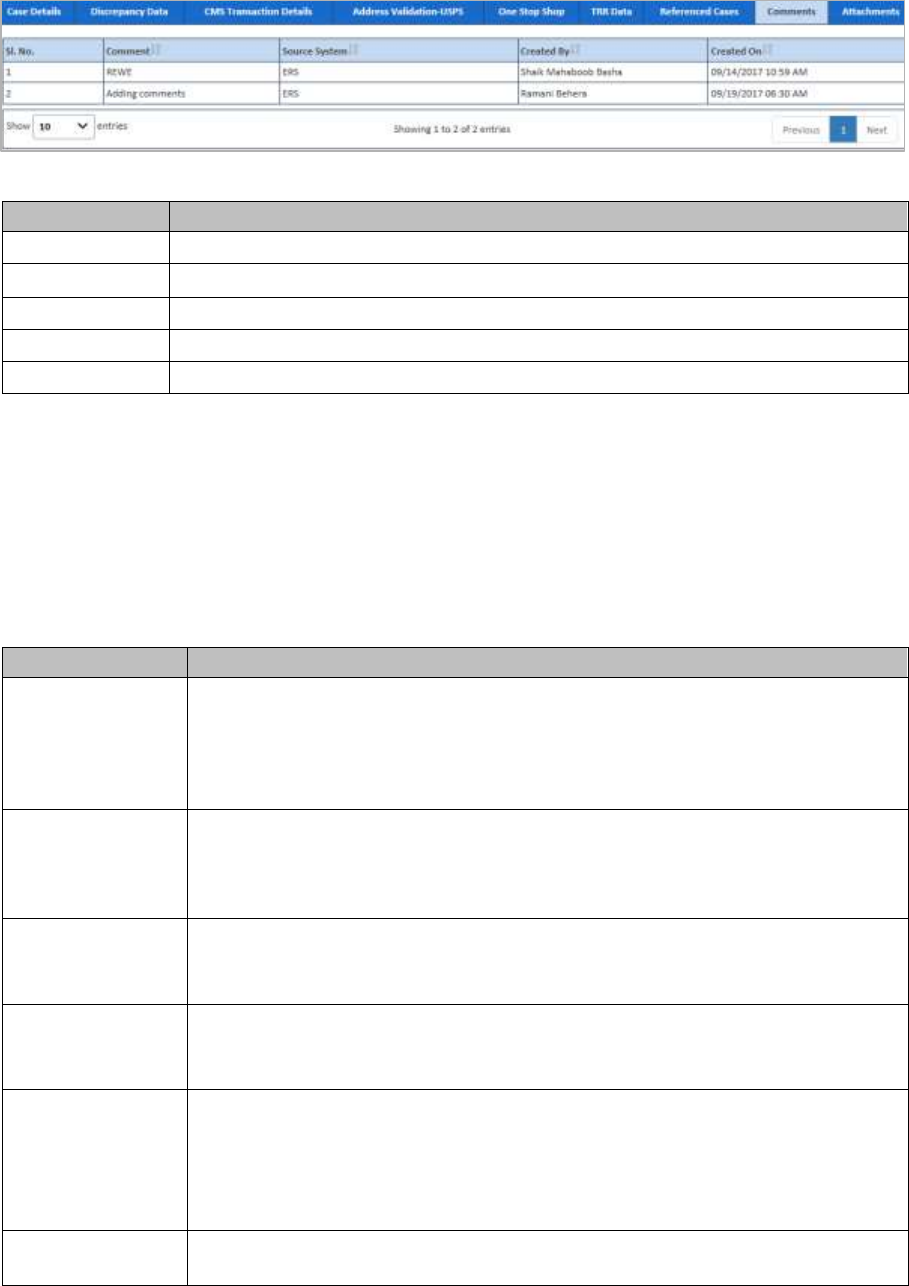
ERS Queues Enrolment Recon System User’s Manual
©UnitedHealthcare 1.0 Page 4-11
Figure 4-82: Work Case Section> Reference Cases Tab
Work Case Section> Comments Tab 4.3.1.12
If you visit the Holding Queues and view the record (OOA Process Work) corresponding to the ERS Case ID,
you can view the comments you entered updated in the Comments tab. You can also see that the, comment s
section is updated with the latest comment you provided.
For more information, refer to the Accessing Holding Queues section.
Figure 4-83: Work Case Section> Comments Tab
Column Name
Description
Sl. No.
The serial no of the comments list is displayed.
Comment
The comments appear in this column is displayed.
Source System
The source system is displayed.
Created By
The name of the user that created the case is displayed.
Created On
The date when the case was created is displayed.
OOA Process Work> Action Section 4.3.1.13
Based on the work basket select while login or module you access, the action values changes in the respective
queues forms. For more information on various action values in ERS queues, refer to Various Queues and
related actions section.
For more information on various action values in the OOA queue, refer to OOA Queue Actions and related
queues and statues section.
Action Values
Action Values
Description
Add Comments
Select this action value to add your comments about the case while working on
the queue.
The status of the queue becomes In Progress and the queue is routed to the
Processing Queue as New OOA Queue after you add the comments and click
the Save button.
Close Case
Select this action value to close the case. If you select this option, two fields
Resolution and Reason appear.
The queue is routed to the Completed Queues list as Completed queue with
the status Resolved – Completed if you click the Save button.
Pend Case
Select this value to make the case pending for more research on the case.
The queue is routed to the Processing Queues list as Pended queue with the
status In Progress if you click the Save button.
Send OOA Letter
Select this value to send the OOA letter to the member.
The queue is routed to the Holding Queues list as Pending – Not queue with
the status In Progress if you click the Save button.
Send SCC
Update to CMS
Select value to send the SSC update to CMS.
The queue is routed to the Holding Queues list as Submit to CMS queue with
the status In Progress if you click the Save button.
If you select this action value and save the form, a warning message ‘Do you
want for CMS Update?’’ appears.
Send to Peer
Audit
Select this value to send the case for peer audit.
The queue is routed to the Holding Queues list as Submit to CMS queue with

ERS Queues United Healthcare: Enrolment Recon System User Manual
Page 4-12 1.0 ©UnitedHealthcare
Action Values
Description
the status In Progress if you click the Save button.
Peer Audit
completed
(Appears in the
OOA - Pending
Audit Queue form)
Select this value to show if the peer audit is completed or not.
Address Scrub
Completed
(Appears in the
OOA - Address
Scrub Queue form)
Select this value if the address scrub is completed.
MARx Address
Completed
(Appears in the
MARx Address
Letter Queue form)
To be updated.
Residential Doc
Required/County
Attestation
Required
To be updated.
Extend Tracking
(Appears in the
Open - Disenroll
Queue form)
To be updated.
Send
Notification of
Termination
Letter
To be updated.
Associated fields in the Action section
The following table shows the fields those appear based on selection of certain value in the Action field of the
queue form. This table also displays some fields which appears based on selection certain values in the fields
which appears after selection of the certain values in the Action field.
Associated Fields
Appears when…
Description
Comments
You select the value Add
Comments, Close Casein,
Pend Case, Send OOA Letter,
Send SCC Update to CMS, and
Send to Peer Audit the Action
field.
Enter your comments about the action you
selected while working on the queue. The
comments you enter will appears in the
next work flow.
Resolution
You select the value Close
Case in the Action field.
Select the appropriate resolution from the
list for which you are closing the case. The
following value are available in this field:
Added to SCC RPR SharePoint
Attested No Incarceration
Auto Enrolled
False Discrepancy
IA
Member Response OOA Term
NO Response FT Term
OOA Term - Incarceration
Termed
Pend Reason
You select the value Pend
Case in the Action field.
Select the appropriate reason for making
the case a pend case.
First Letter Mail
Date
You select the value Send
OOA Letter in the Action field.
You select the value IA in the
Resolution field.
Enter the date when the first mail
intimations letter was sent to the members.
Last Name
You select the value Send SCC
Enter the last name of the member.

ERS Queues Enrolment Recon System User’s Manual
©UnitedHealthcare 1.0 Page 4-13
Associated Fields
Appears when…
Description
Update to CMS in the Action
field.
Date of Birth
You select the value Send SCC
Update to CMS in the Action
field.
Enter the date of the birth of the member.
PBP
You select the value Send SCC
Update to CMS in the Action
field.
Select the PBP.
Contract Number
You select the value Send SCC
Update to CMS in the Action
field.
Select the contract number.
Application Date
You select the value Send SCC
Update to CMS in the Action
field.
Enter the application date of the case.
Effective Date
You select the value Send SCC
Update to CMS in the Action
field.
Enter the effective date of the case.
End Date
You select the value Send SCC
Update to CMS in the Action
field.
Enter the end date of the case.
Initial Address
Verification Date
You select the value Member
Response OOA Term in the
Resolution field.
Enter the date when the address of the
member verified first.
Member
Response
Verification Date
You select the value Member
Response OOA Term in the
Resolution field.
Enter the date when the member response
was verified first.
Member Verified
State
You select the value Member
Response OOA Term in the
Resolution field.
Enter name the state to which the verified
member belongs to.
Second Letter
Mail Date
You select the value No
Response FT Term in the
Resolution field
Enter the date when the second mail
intimations letter was sent to the members
Contains Error
You select the value Peer
Audit Completed in the
Resolution field
If you select the value no in this field, then
the No, then the case routes to New case.
If you select the value Yes, the peer audit
gets completed.
Action buttons
For more information on command buttons, refer to the Important Commands section.
Action button
Description
Save
Click this button to send the form to next workflow level.
Reset
Click this button to remove any of the selection from the form.
Cancel
Click this button to cancel the process of the reviewing the queue.
History
Click this button to view the detailed history of the case.
OOA Process Work >Workflow Log Section 4.3.1.14
The workflow log provides the details about various cases such as their current and previous statuses and
queues, date on when it was created and the associated roles.
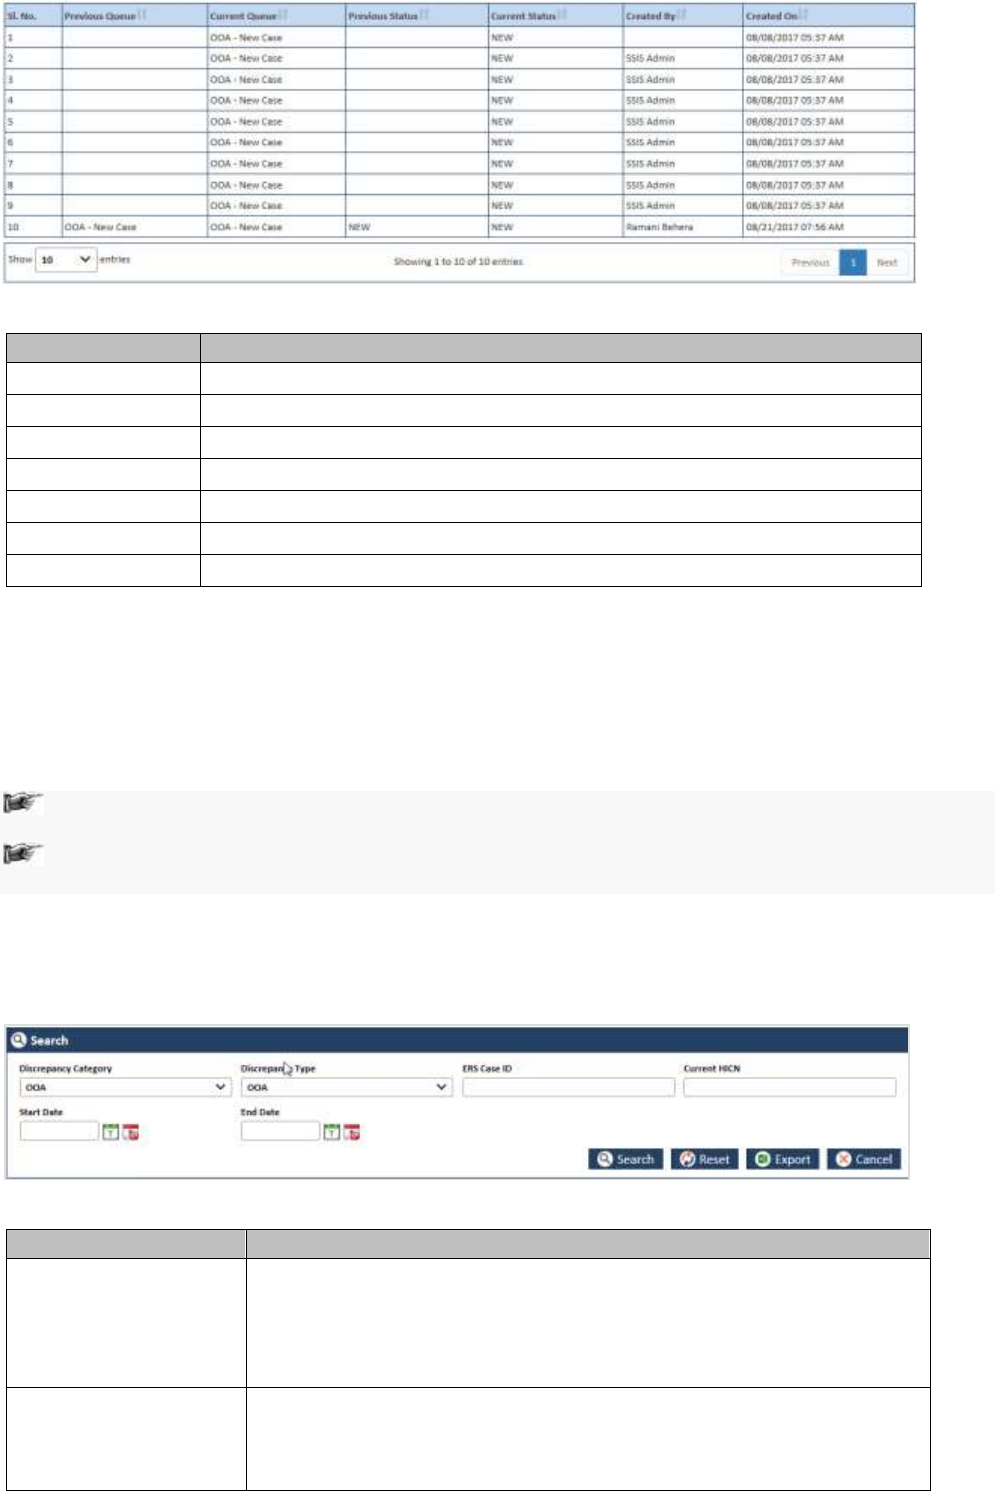
ERS Queues United Healthcare: Enrolment Recon System User Manual
Page 4-14 1.0 ©UnitedHealthcare
Figure 4-84: Workflow Log Section
Columns Name
Description
Sl. No.
Displays the serial numbers of the cases in the table.
Previous Queue
Displays the name of the previous queue of the case.
Current Queue
Displays the name of the current queue of the case.
Previous Status
Displays the name of the previous status of the case.
Current Status
Displays the name of the previous current of the case.
Created By
Displays the name of the role that created case.
Created On
Displays the date when the case was created.
4.3.2 Searching OOA Cases
You can search various records with In-Progress and Resolve-Completed statuses. This helps you unlock for
working on the records or reassigned the cases to different users. After providing the search criteria in the
Search form, you can access the list of the all the records. After accessing a list of records, you can edit the edit
the record, view the record and view the associated reports. You can edit the records of if those are incomplete
and not assigned to any others users.
A user can have access to view all records within the Search page regardless of their permissions.
However, a user cannot edit a record unless they have permissions to access the selected record.
If a user views or edits a record from the search results, upon exiting the record, the application shall
navigate the user back to the search screen with search results from the last search
Searching Records 4.3.2.1
You can enter or select all the value in the search criteria for the records that you want to search for. Based on
your search criteria, the respective records appear in the Search Result section.
Figure 4-85: The Search OOA records form
Field Name
Description
Discrepancy Category
Select the discrepancy category in this field. The following categories are
available in this field.
OOA
SCC
TRR
Discrepancy Type
Select the discrepancy type in this field. The following values are available
in this field.
In Area
Incarcerated

ERS Queues Enrolment Recon System User’s Manual
©UnitedHealthcare 1.0 Page 4-15
Field Name
Description
OOA
ERS Case ID
Enter the ERS case ID in this field.
Current HICN
Enter the current HICN in this field.
Start Date
Select the start date in this field.
End Date
Select the end date in this field.
Search button
Click Search button to search the records.
Reset button
Click this button to remove all the selected search criteria.
Export button
Click this button to save the search result details into a MS Excel
spreadsheet.
Once you click this button, the search result gets downloaded in Excel
spreadsheet which you can directly open or save in the local drive.
Cancel button
Click this button to cancel the process of searching records.
After you can cancel the search process, the home page appears.
OOA Search Result 4.3.2.1.1
The search result details appear after you do a search by entering the required search criteria.
Figure 4-86: Search Result
The following are the list columns that are displayed in the search result tables.
ERS Case ID
Discrepancy Category
Discrepancy Type
Most Recent Queue
Most Recent Status
Member ID
Member First Name
Member Middle Name
Member Last Name
Member Gender
Member DOB
Member Current HICN
Member Contract Number
Member PBP
Member LOB
GPS HICN
MMR HICN
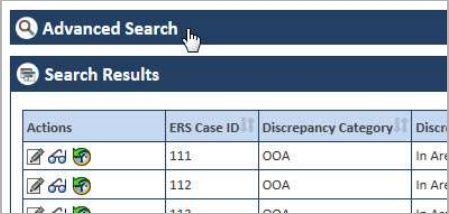
ERS Queues United Healthcare: Enrolment Recon System User Manual
Page 4-2 1.0 ©UnitedHealthcare
Aging
Member SCC Code
GPS Household ID
Discrepancy Start Date
Reason
Resolution
Discrepancy Source
Submission Type
CTM Member
EGHP Member
Requested Effective Date
Action Requested
Potential Submission Date
RPC Submission Date
FDR Received Date
FDR Code Received
FDR Status
RPR Requestor
Created On (UTC)
Created By
Last Updated On (UTC)
Last Updated By
Locked On (UTC)
Locked By
Conducting Advanced Record Searches 4.3.2.2
You can do an advanced search for the record by providing various search criteria. You can access the various
sections or tabs of the Advanced Search form by clicking the form name, Advanced Search. This helps you
view all the tabs under the Advanced Search for. If you click the tabs, you can view associated fields or search
criteria.
Figure 4-87: Advanced Search Form
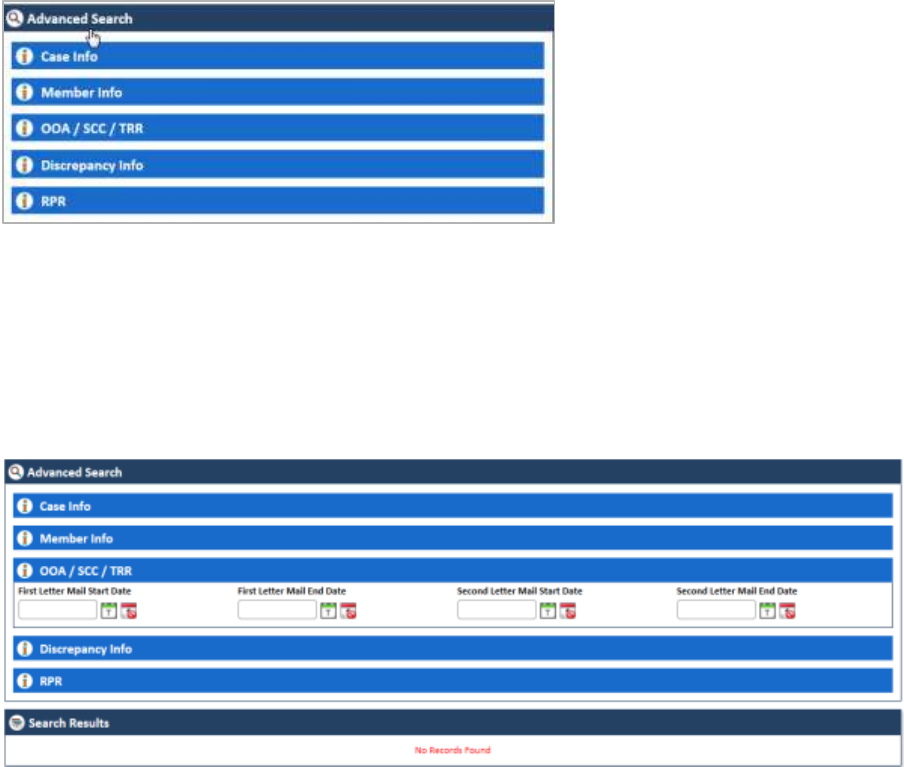
ERS Queues United Healthcare: Enrolment Recon System User Manual
Page 4-2 1.0 ©UnitedHealthcare
Figure 4-88: The Advanced Search Form tabs
Expand the tab:
You can expand the tab to view all the fields by click on the tab name. This helps you access all the associated
fields in the tab and entered the search criterial to search the records.
Contract the tab:
You can contract the expanded tab by clicking on tab name. This will help you hide or shrink fields in the tab.
Figure 4-89: Expanded Tab
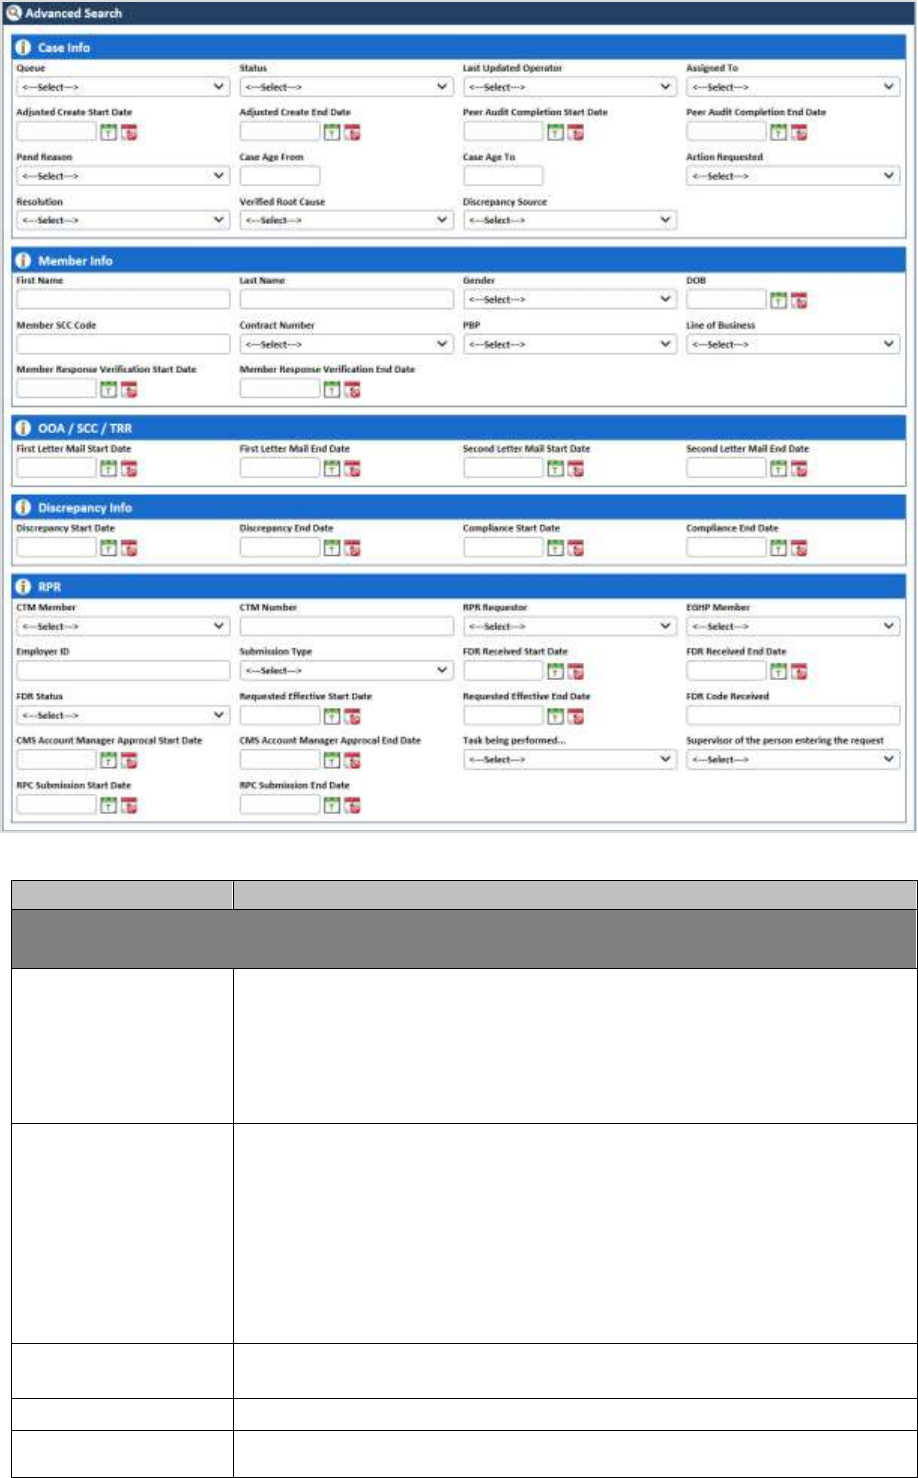
ERS Queues Enrolment Recon System User’s Manual
©UnitedHealthcare 1.0 Page 4-3
The Advanced Search for > Expanded Tabs 4.3.2.2.1
Figure 4-90: Advanced Search Form> Expanded Tabs
Field Name
Description
Case Info
Enter the detailed information about the case in this tab.
Queue
Select the queue which associated the record that you want to search. The
record that you want to search belongs to this queue.
All the queues of the OST modules are available in this field which
includes OOA, SCC and TRR. The queues related OOA starts with OOA.
For example the, new queue for OOA is OOA – New Case. Similarly, the
queues for SCC and TRR cases start with SCC and TRR, respectively.
Status
Select the status of the record that you want to search. This field displays
the following statuses:
IN PROGRESS: When a new case is responded and not
completed, it becomes an In Progress queue.
NEW: When a new case is created and nit responded, it becomes
a New queue.
RESOLVED COMPLETED: When and cases completed from all
respective such as from users, and CMS, it becomes a Resolved
Completed queue.
Last Updated
Operator
Select the name of the operator that updated last updated the case that
you want to search.
Assigned To
Select the name of the user to whom the cases was assigned to.
Adjusted Create
Start Date
Select the adjusted start date of the created case that you want to search.

ERS Queues United Healthcare: Enrolment Recon System User Manual
Page 4-4 1.0 ©UnitedHealthcare
Field Name
Description
Adjusted Create End
Date
Select adjusted end date of the created case that you want to search.
Peer Audit
Completion Start
Date
Select the start date when the peer audit was completed on the case that
you want to search.
Peer Audit
Completion End
Date
Select the end date when the peer audit was completed on the case that
you want to search.
Pend Reason
Select the appropriate pend reason of the case that you want to search.
Case Age From
Select the staring period of the case age of the case that you want to
search.
Case Age To
Select the ending period of the case age of the case that you want to
search.
Action Requested
Select the last action taken or requested on the case that you want to
search.
Resolution
Select the resolution that was taken to close the cases that you want to
search.
Verified Root Cause
Select the verified root cause of the cases that you want to search.
Discrepancy Source
Select the appropriate discrepancy sources of the case that you want to
search.
Member Info
Enter the member information in case that you want to search.
First Name
Enter the first name of the member in case that you want to search.
Last Name
Enter the last name of the member in case that you want to search.
Gender
Select the gender of the member in case that you want to search.
DOB
Enter the date of birth of the member in the case that you want to search.
Member SCC Code
Enter the SCC code of the member in the case that you want to search.
Contract Number
Select the contract number mentioned in the case that you want to search.
PBP
Select the PBP mentioned in the case that you want to search.
Line of Business
Select the line of the business mentioned in the case that you want to
search.
Member Response
Verification Start
Date
Enter the start date of the member verification mentioned in the case that
you want to search.
Member Response
Verification End
Date
Enter the end date of the member verification mentioned in the case that
you want to search.
OOA/SCC/TRR
Enter discrepancy and compliance related dates in this tab.
First Letter Mail
Start Date
Enter the start date since when the first mail was sent to the member.
First Letter Mail End
Date
Enter the end date since when the first mail was sent to the member.
Second Letter Mail
Start Date
Enter the start date since when the second mail was sent to the member.
Second Letter Mail
End Date
Enter the end date since when the second mail was sent to the member.
Discrepancy Info
Enter the discrepancy details in this tab.
Discrepancy Start
Date
Enter the discrepancy start date of the case that you want to search. This
helps you display all the record with entered discrepancy start date.
Discrepancy End
Date
Enter the discrepancy end date of the case that you want to search. This
helps you display all the records with entered discrepancy end date.
Compliance Start
Date
Enter the compliance start date of the case that you want to search. This
helps you display all the record with entered discrepancy start date.

ERS Queues Enrolment Recon System User’s Manual
©UnitedHealthcare 1.0 Page 4-5
Field Name
Description
Compliance End
Date
Enter the compliance end date of the case that you want to search. This
helps you display all the records with entered discrepancy end date.
RPR
Enter RPR details in this tab.
CTM Member
Select the CTM value Yes in this field if you want to consider the CTM as
the search criteria of the record that you want to search.
CTM Number
Enter the CTM number in this field.
RPR Requestor
Select the value Yes if you want to consider RPR requester as the search
criteria of the case that you want to search.
EGHP Member
Select the value Yes if you want to consider the EGHP
Employer ID
Enter the employee ID in this field.
Submission Type
Select the submission type of the case that to you want to search.
FDR Received Start
Date
Select the start date of the received FDR of the case that you want to
search. This helps you display all the records with this start date and the
entered end date.
FDR Received End
Date
Select the end date of the received FDR of the case that you want to
search. This helps you display all the records with this start date and the
entered end date.
FDR Status
Select the status of the FDR mentioned in the cases that you want to
search.
Requested Effective
Start Date
Enter the requested effective start date.
One or multiple Effective Dates can be entered and used as search
criteria. A date range is not applicable for this search option. A user can
enter a single effective date or multiple effective dates.
Requested Effective
End Date
Enter the requested effective end date.
One or multiple Effective Dates can be entered and used as search
criteria. A date range is not applicable for this search option. A user can
enter a single effective date or multiple effective dates.
FDR Code Received
Enter the received FDR Code.
CMS Account
Manager Approval
Start Date
Enter the start date of the CMS account manager approval mentioned in
the case that you want to search.
CMS Account
Manager Approval
End Date
Enter the end date of the CMS account manager approval mentioned in
the case that you want to search.
Task being
performed...
Select the appropriate task being performed in this field.
Supervisor of the
person entering the
request
Select the name of the supervisor of the user created the case.
Allow user to type the name but the system retrieves the selected user
from the application.
RPC Submission
Start Date
Enter the start date of the RPC submission.
RPC Submission
End Date
Enter the end date of the RPC submission.
4.3.3 Working on SSC Queues
With appropriate access rights, you can access the SSC queues from the SSC Queue Summary page and work
on the SSC Process Work form. You can select from multiple queues to retrieve the next new work item in an
SSC queue directly from the application.
Based on the SSC record age, SSC queue records are presented in the application. The age of the record is
decided by differentiating the current date from the Compliance Start Date.

ERS Queues United Healthcare: Enrolment Recon System User Manual
Page 4-6 1.0 ©UnitedHealthcare
SSC Queues and Actions 4.3.3.1
The below table provides the details of the SSC Queues, action values in respective queues. This also provides
the list of next queues and next statuses.
Current
Queue
Queue
Type
Action Taken
Next Queue
Next Status
SSC Queues
This section provides the details of all the SSC queues, their associated actions values in the Action
fields, next queues of the current queues and the next statuses.
New Case
Process
Queue
Send SCC Update to CMS
Submit to CMS
In Progress
Send OOA Letter
Pending - NOT
In Progress
Pend Case
Pended
In Progress
Send to Peer Audit
SSC - Pending Audit
In Progress
Close Case
Completed
Resolved- Completed
Add Comments
New SSC Case
New / In-progress
Send SCC Letter
Completed
Resolved- Completed
Update GPS
Completed
Resolved- Completed
SCC RPR Request
Pending - SCC RPR
In Progress
MIIM
Updated
Process
Queue
Send SCC Update to CMS
Submit to CMS
In Progress
Send OOA Letter
Pending - NOT
In Progress
Pend Case
Pended
In Progress
Send to Peer Audit
SSC - Pending Audit
In Progress
Close Case
Completed
Resolved- Completed
Add Comments
MIIM Updated
In-progress
Send SCC Letter
Completed
Resolved- Completed
Update GPS
Completed
Resolved- Completed
SCC RPR Request
Pending - SCC RPR
In Progress
Open-NOT
Process
Queue
Send Notification of
Termination Letter
Pending – FTT
In Progress
Pend Case
Pended
In Progress
Close Case
Completed
Resolved- Completed
Add Comments
Open-NOT
In Progress
Open -
Disenroll
Process
Queue
Extend Tracking
Pending – FTT
In Progress
Pend Case
Pended
In Progress
Close Case
Completed
Resolved-Completed
Add Comments
Open - Disenroll
In Progress
MARx
Address
Letter
Process
Queue
MARx Address
Completed
Pending - FTT
In Progress
Pend Case
Pended
In Progress
Close Case
Completed
Resolved- Completed
Add Comments
MARx Address
Letter
In Progress
Address
Scrub
Process
Queue
Address Scrub Completed
Pending - FTT
In Progress
Pend Case
Pended
In Progress
Close Case
Completed
Resolved- Completed
Add Comments
Address Scrub
In Progress
Pending
Audit
Process
Queue
Peer Audit Completed
New SSC Case / MIIM
Updated
In Progress
Pend Case
Pended
In Progress
Close Case
Completed
Resolved- Completed
Add Comments
SSC - Pending Audit
In Progress
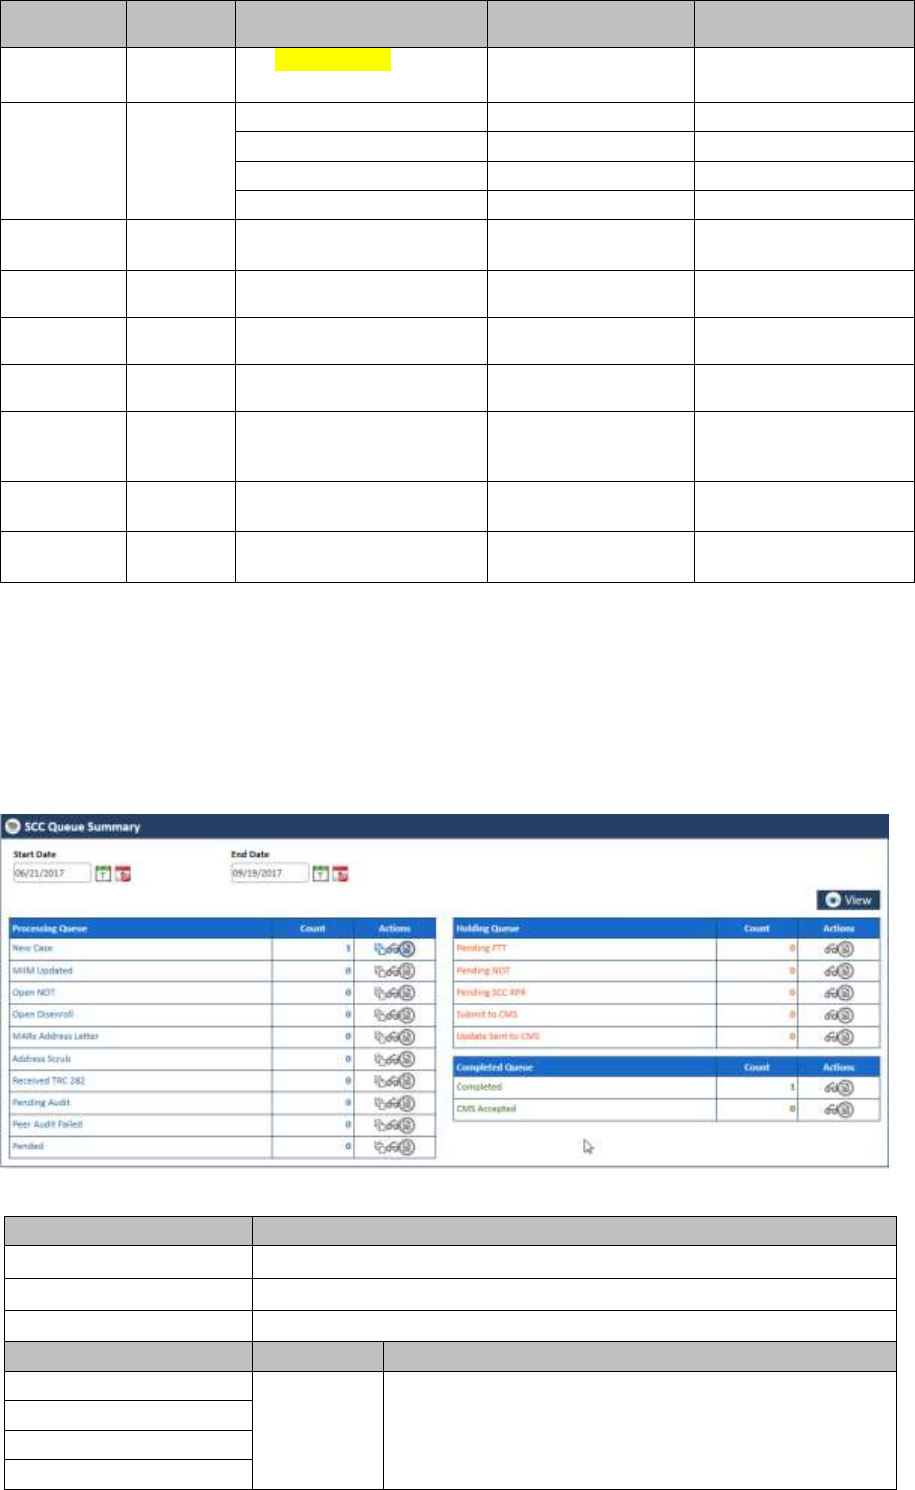
ERS Queues Enrolment Recon System User’s Manual
©UnitedHealthcare 1.0 Page 4-7
Current
Queue
Queue
Type
Action Taken
Next Queue
Next Status
Pended
Process
Queue
<> Not available
<>
<>
Peer Audit
Failed
Process
Queue
Add Comments
Peer Audit Failed
In Progress
Close Case
Completed
Resolved- Completed
Pend Case
Pended
In Progress
Send to Peer Audit
SSC - Pending Audit
In Progress
Pending
FTT
Holding
Queue
NA
NA
NA
Pending
NOT
Holding
Queue
NA
NA
NA
Pending
SSC RPR
Holding
Queue
NA
NA
NA
Submit to
CMS
Holding
Queue
NA
NA
NA
Update
Sent to
CMS
Holding
Queue
NA
NA
NA
Completed
Completed
Queue
NA
NA
NA
CMS
Accepted
Completed
Queue
NA
NA
NA
Before working on the SSC Process Work form 4.3.3.2
Before you work on the SSC Process Work form, you must familiarize yourself with related interfaces and forms
that trigger to the form.
SSC Queue Summary 4.3.3.2.1
This page provides detailed list of various SSC queues. For more information accessing SSC Queue Summary
form, refer to the Types of queues section.
Figure 4-91: The SSC Queue Summary Page
Field Name
Description
Start Date
Enter the start date of the case.
End Date
Enter the end date of the cases.
View button
Click this button to view the queue created in between these dates.
Processing Queues
Count
Action
New Case
Displays
the count
Displays the action icons a user can take. User can edit
queue, view the queue, and view the report.
MIIM Updated
Open-NOT
Open - Disenroll
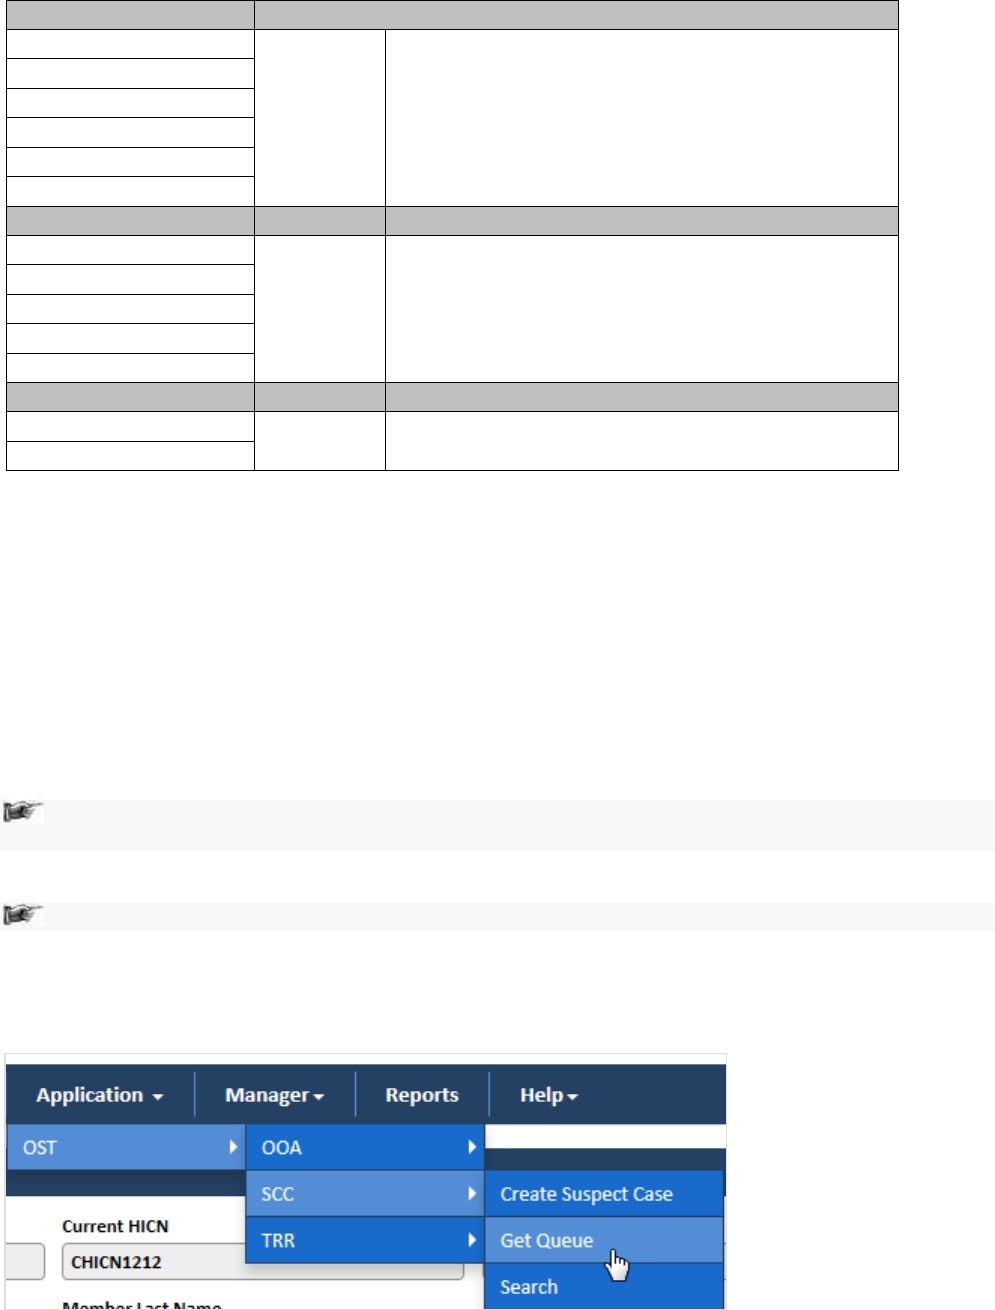
ERS Queues United Healthcare: Enrolment Recon System User Manual
Page 4-8 1.0 ©UnitedHealthcare
Field Name
Description
MARx Address Letter
Address Scrub
Received TRC 282
Pending Audit
Peer Audit Failed
Pended
Holding Queues
Count
Action
Pending FTT
Displays
the count
Displays the action icons a user can take. User can edit
queue, view the queue, and view the report.
Pending NOT
Pending SSC RPR
Submit to CMS
Update Sent to CMS
Completed Queues
Count
Action
Completed
Displays
the count
Displays the action icons a user can take. User can edit
queue, view the queue, and view the report.
CMS Accepted
Viewing cases from queues 4.3.3.2.2
You can access the form through the queues by clicking the Get Queue icon in the Actions column of the SSC
Case Summary page. The Work Item - SSC form appears.
For more information, refer to the Before working on the OOA Process Work form section.
SSC Process Work form 4.3.3.3
The SSC Process Work page has multiple sections such as Work Case, Action, and Workflow Log. This Work
Case section of the form contains multiple tabs such as Case Details, Discrepancy Data, CMS Transaction
Details, Address Validation - USPS, One Stop Shop, TRR Data, Reference Cases, Comments, and Attachment
section.
The following section discusses details about the workflow involved in the new cases. All the
associated actions, next queues, next statuses are described in the SSC Queues and Actions section.
To work on the cases in the SSC queues, you have to access the SSC Process Work form.
Note: All the fields marked with asterisk in the form are mandatory fields.
Navigation:
To access the SSC Process Work form:
1. Go to Application menu, point to OST>SSC and click the Get Queue link.
Figure 4-92: Accessing SSC Queue Summary Page
The SSC Queue Summary page appears.
2. Click the get queue icon under the Action column in the SSC Queue Summary form.

ERS Queues Enrolment Recon System User’s Manual
©UnitedHealthcare 1.0 Page 4-9
Figure 4-93: The SSC Queue Summary page
The Work Item – SSC page appears.
3. Click the Start Processing button open the SSC Process Work form.
Figure 4-94: The Work Item—SSC section
4. Click the Get Next to open the next work item.
5. Click Cancel to cancel the process of opening the queues.
The SSC Process Work form
Figure 4-95: The SSC Process Work form

ERS Queues United Healthcare: Enrolment Recon System User Manual
Page 4-10 1.0 ©UnitedHealthcare
Work Case Section> Header 4.3.3.4
All the fields are available in the read-only mode. For more information on header section, refer to the header
section of the OOA Process Work form in the Work Case Section> Header section.
Figure 4-96: Work Case Section> Header Section
Work Case Section> Case Details Tab 4.3.3.5
The values are populated from the Create SSC Case form while creating the new SSC case.
Figure 4-97: Work Case Section> Case Details Tab
This section provides the details about the case. The Case Details section of the OOA Process Work form is
very similar to the SSC Process Work form. Additionally, the SSC Process Work form contains the Effective
Start Date and Effective End Date fields.
For more information on the field values, refer to the Work Case Section> CMS Transaction Details Tab
section.
Work Case Section> Discrepancy Data Tab 4.3.3.6
For more information on the field values, refer to the Work Case Section> Discrepancy Data Tab section.
Work Case Section> CMS Transaction Details Tab 4.3.3.7
For more information on the field values, refer to the Work Case Section> CMS Transaction Details Tab
section.
Work Case Section> Address Validation –USPS 4.3.3.8
For more information on the field values, refer to the Work Case Section> Address Validation-USPS tab
section.
Work Case Section> One Stop Shop Tab 4.3.3.9
For more information on the field values, refer to the Work Case Section> One Stop Shop Tab section.
Work Case Section> Reference Cases Tab 4.3.3.10
For more information on the field values, refer to the Work Case Section> Reference Cases Tab section.
Work Case Section> Comments Tab 4.3.3.11
For more information on the field values, refer to the Work Case Section> Comments Tab section.

ERS Queues Enrolment Recon System User’s Manual
©UnitedHealthcare 1.0 Page 4-11
SSC Process Work> Action Section 4.3.3.12
Based on the work basket select while login or module you access, the action values changes in the respective
queues forms.
For more information on various action values in the TRR queue, refer to SSC Queues and Actions section.
Action Values
Action Values
Description
Add Comments
Select this action value to add your comments about the case while
working on the queue.
The status of the queue becomes In Progress and the queue is routed
to the Processing Queue as New SSC Queue after you add the
comments and click the Save button.
Close Case
Select this action value to close the case. If you select this option, two
fields Resolution and Reason appear.
The queue is routed to the Completed Queues list as Completed queue
with the status Resolved – Completed if you click the Save button.
Pend Case
Select this value to make the case pending for more research on the
case.
The queue is routed to the Processing Queues list as Pended queue
with the status In Progress if you click the Save button.
SSC RPR Request
Select this value to create RPR cased request from SSC case.
Send OOA Letter
Select this value to send the OOA letter to the member.
The queue is routed to the Holding Queues list as Pending – Not queue
with the status In Progress if you click the Save button.
Send SSC Letter
Select this value to send the SSC letter member.
The queue is routed to the Completed Queues if you click the Save
button.
Send SCC Update to
CMS
Select value to send the SSC update to CMS.
The queue is routed to the Holding Queues list as Submit to CMS
queue with the status In Progress if you click the Save button.
If you select this action value and save the form, a warning message
‘Do you want for CMS Update?’’ appears.
Send to Peer Audit
Select this value to send the case for peer audit.
The queue is routed to the Holding Queues list as Submit to CMS
queue with the status In Progress if you click the Save button.
Update GPS
Select this value to update the GPS details. The case gets closed and
queue routed tot Completed queue.
Peer Audit completed
(Appears in the OOA -
Pending Audit Queue
form)
Select this value to show if the peer audit is completed or not.
Address Scrub
Completed
(Appears in the OOA -
Address Scrub Queue
form)
Select this value if the address scrub is completed.
MARx Address
Completed
(Appears in the MARx
Address Letter Queue
form)
To be updated.
Residential Doc
Required/County
Attestation Required
To be updated.
Extend Tracking
(Appears in the Open -
Disenroll Queue form)
To be updated.
Send Notification of
To be updated.

ERS Queues United Healthcare: Enrolment Recon System User Manual
Page 4-12 1.0 ©UnitedHealthcare
Action Values
Description
Termination Letter
Associated fields in the Action section
The following table shows the fields those appear based on selection of certain value in the Action field of the
queue form. This table also displays some fields which appears based on selection certain values in the fields
which appears after selection of the certain values in the Action field.
Associated Fields
Appears when…
Description
Comments
You select the value Add
Comments, Close Case, Pend
Case, Send OOA Letter, Send
SCC Update to CMS, and Send
to Peer Audit the Action field.
Enter your comments about the action you
selected while working on the queue. The
comments you enter will appears in the
next work flow.
Resolution
You select the value Close
Case in the Action field.
Select the appropriate resolution from the
list for which you are closing the case. The
following value are available in this field:
Added to SCC RPR SharePoint
Attested No Incarceration
Auto Enrolled
False Discrepancy
IA
Member Response OOA Term
NO Response FT Term
OOA Term - Incarceration
Termed
Pend Reason
You select the value Pend
Case in the Action field.
Select the appropriate reason for making
the case a pend case.
First Letter Mail
Date
You select the value Send
OOA Letter in the Action field.
You select the value IA in the
Resolution field.
Enter the date when the first mail
intimations letter was sent to the members.
Last Name
You select the value Send SCC
Update to CMS in the Action
field.
Enter the last name of the member.
Date of Birth
You select the value Send SCC
Update to CMS in the Action
field.
Enter the date of the birth of the member.
PBP
You select the value Send SCC
Update to CMS in the Action
field.
Select the PBP.
Contract Number
You select the value Send SCC
Update to CMS in the Action
field.
Select the contract number.
Application Date
You select the value Send SCC
Update to CMS in the Action
field.
Enter the application date of the case.
Effective Date
You select the value Send SCC
Update to CMS in the Action
field.
Enter the effective date of the case.
End Date
You select the value Send SCC
Update to CMS in the Action
field.
Enter the end date of the case.
Initial Address
Verification Date
You select the value Member
Response OOA Term in the
Resolution field.
Enter the date when the address of the
member verified first.
Member
Response
You select the value Member
Response OOA Term in the
Enter the date when the member response
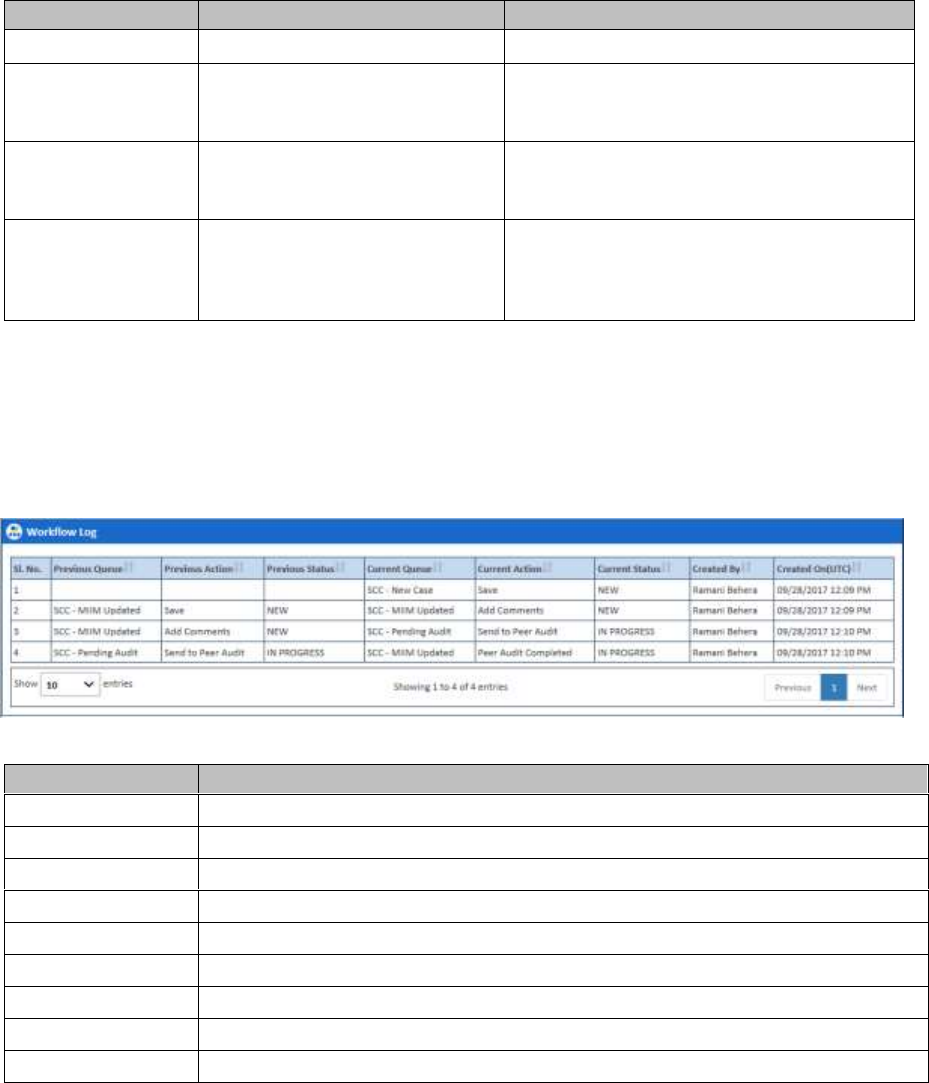
ERS Queues Enrolment Recon System User’s Manual
©UnitedHealthcare 1.0 Page 4-13
Associated Fields
Appears when…
Description
Verification Date
Resolution field.
was verified first.
Member Verified
State
You select the value Member
Response OOA Term in the
Resolution field.
Enter name the state to which the verified
member belongs to.
Second Letter
Mail Date
You select the value No
Response FT Term in the
Resolution field
Enter the date when the second mail
intimations letter was sent to the members
Contains Error
You select the value Peer
Audit Completed in the
Resolution field
If you select the value no in this field, then
the No, then the case routes to New case.
If you select the value Yes, the peer audit
gets completed.
Action buttons
For more information on command buttons, refer to the Important Commands section.
SSC Process Work >Workflow Log Section 4.3.3.13
The workflow log provides the details about various cases such as their current and previous statuses and
queues, date on when it was created and the associated roles.
Figure 4-98: SSC Process Work Form> Workflow Log Section
Columns Name
Description
Sl. No.
Displays the serial numbers of the cases in the table.
Previous Queue
Displays the name of the previous queue of the case.
Previous Action
Displays the previous action taken for this case.
Previous Status
Displays the name of the previous status of the case.
Current Queue
Displays the name of the current queue of the case.
Current Action
Displays the current action taken for this case.
Current Status
Displays the name of the previous current of the case.
Created By
Displays the name of the role that created case.
Created On(UTC)
Displays the date when the case was created.
4.3.4 Searching SSC Queues
The searching queue process is same for all the queues. For more information how to search the SSC queues,
refer to the Searching OOA Cases section.
4.3.5 Working on TRR Queues
With appropriate access rights, you can access the TRR queues from the TRR Queue Summary page and work
on the TRR Process Work form. You can select from multiple queues to retrieve the next new work item in a
TRR queue directly from the application.
Based on the TRR record age, TRR queue records are presented in the application. The age of the record is
decided by differentiating the current date from the Compliance Start Date.
TRR Queues and Actions 4.3.5.1
The below table provides the details of the TRR Queues, action values in respective queues. This also provides
the list of next queues and next statuses.

ERS Queues United Healthcare: Enrolment Recon System User Manual
Page 4-14 1.0 ©UnitedHealthcare
Current
Queue
Queue
Type
Action Taken
Next Queue
Next Status
TRR Queues
This section provides the details of all the TRR queues, their associated actions values in the Action
fields, next queues of the current queues and the next statuses.
CMS
Rejected
Processing
Queue
Send SCC Update to
CMS
Submit to CMS
In Progress
Close & Mailing Address
Not Verified
Completed
Resolved- Completed
Update GPS
Completed
Resolved- Completed
Send SCC Update to
CMS
Submit to CMS
In Progress
SCC RPR Request
Pending - SCC RPR
In Progress
Pend Case
TRR - Pended
In Progress
Send to Peer Audit
TRC - Pending Audit
In Progress
Close Case
Completed
Resolved- Completed
Add Comments
CMS Rejected
In Progress
Send OOA Letter
Pending - NOT
In Progress
CMS
Rejected
Deletion
Code
Processing
Queue
TRC
154:76
Processing
Queue
TRC 155
Processing
Queue
Extend Tracking
Pending – FTT
In Progress
Pend Case
Pended
In Progress
Close Case
Completed
Resolved-Completed
Add Comments
Open - Disenroll
In Progress
TRC 282
Processing
Queue
MARx Address
Completed
Pending - FTT
In Progress
Pend Case
Pended
In Progress
Close Case
Completed
Resolved- Completed
Add Comments
MARx Address
Letter
In Progress
Fallout
TRC 155
Processing
Queue
Address Scrub Completed
Pending - FTT
In Progress
Pend Case
Pended
In Progress
Close Case
Completed
Resolved- Completed
Add Comments
Address Scrub
In Progress
TRR - Open
NOT
Processing
Queue
Peer Audit Completed
New SSC Case / MIIM
Updated
In Progress
Pend Case
Pended
In Progress
Close Case
Completed
Resolved- Completed
Add Comments
SSC - Pending Audit
In Progress

ERS Queues Enrolment Recon System User’s Manual
©UnitedHealthcare 1.0 Page 4-15
Current
Queue
Queue
Type
Action Taken
Next Queue
Next Status
TRR - Open
Disenroll
Processing
Queue
<> Not available
<>
<>
TRR -
MARx
Address
Letter
Processing
Queue
Add Comments
Peer Audit Failed
In Progress
Close Case
Completed
Resolved- Completed
Pend Case
Pended
In Progress
Send to Peer Audit
SSC - Pending Audit
In Progress
TRR -
Address
Scrub
Processing
Queue
NA
NA
NA
Escalated
Processing
Queue
NA
NA
NA
Pending
Audit
Processing
Queue
NA
NA
NA
Peer Audit
Failed
Processing
Queue
NA
NA
NA
Pended
Processing
Queue
NA
NA
NA
TRR -
Pending
FTT
Holding
Queues
NA
NA
NA
TRR -
Pending
NOT
Holding
Queues
NA
NA
NA
Submit to
CMS
Holding
Queues
Submit to
CMS
Deletion
Code
Holding
Queues
Pending
SCC RPR
Holding
Queues
Update
Sent to
CMS
Holding
Queues
Update
Sent to
CMS
Deletion
Code
Holding
Queues
Completed
Holding
Queues
CMS
Accepted
Holding
Queues
CMS
Accepted
Deletion
Code
Holding
Queues
Before working on the TRR Process Work form 4.3.5.2
Before you work on the TRR Process Work form, you must familiarize yourself with related interfaces and forms
that trigger to the form.
SSC Queue Summary 4.3.5.2.1
This page provides detailed list of various TRR queues. For more information accessing TRR Queue Summary
form, refer to the Types of queues section.
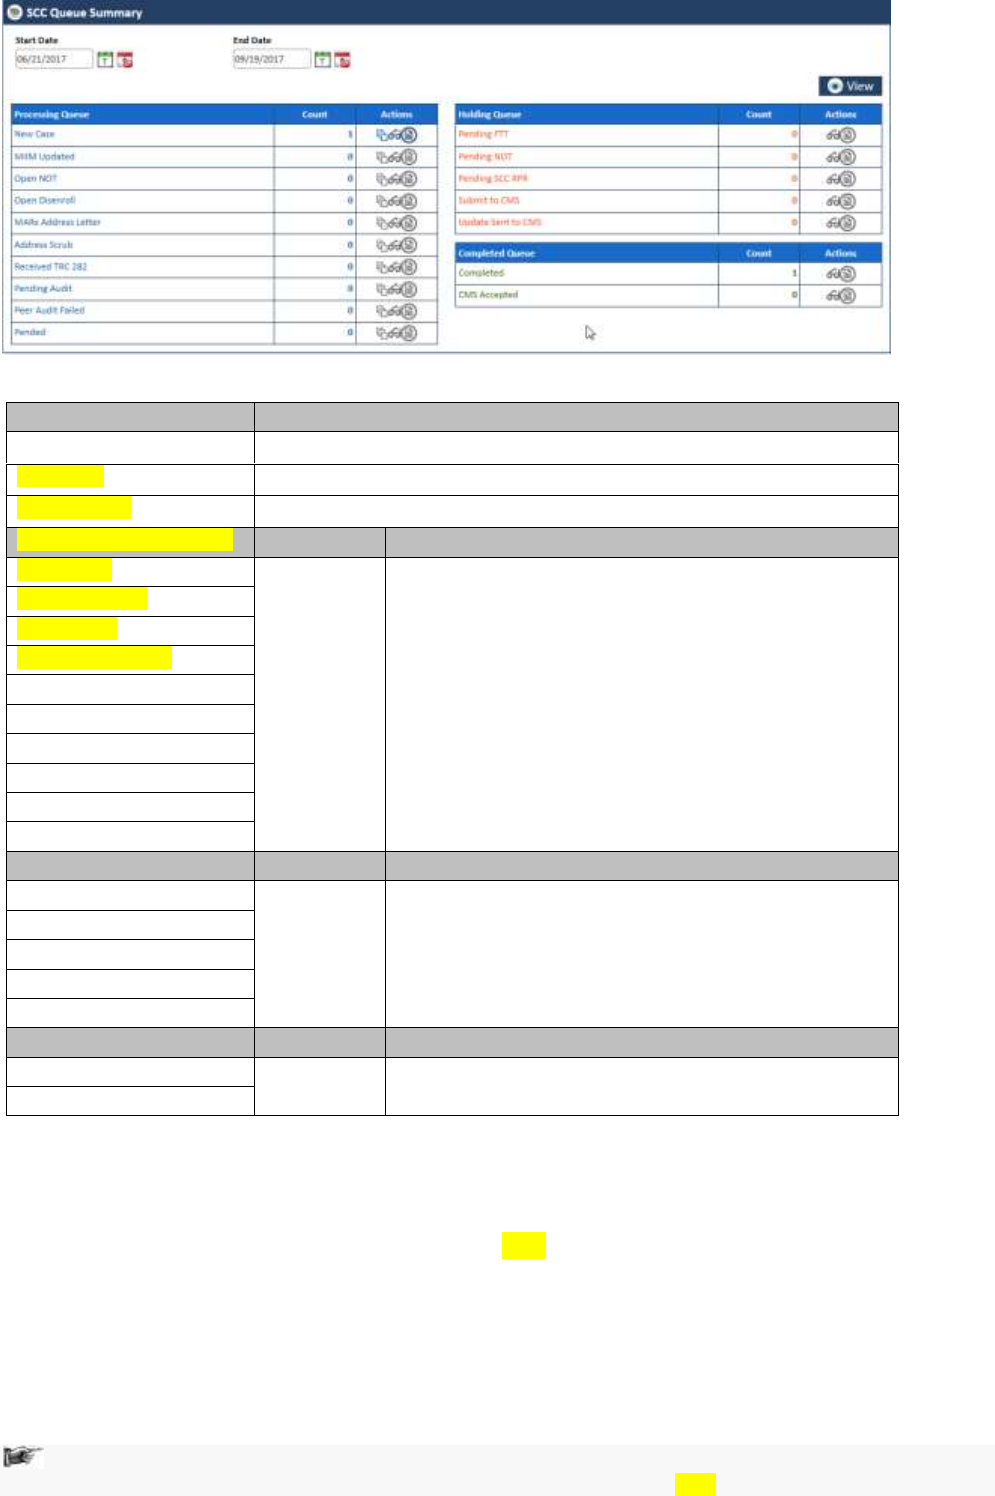
ERS Queues United Healthcare: Enrolment Recon System User Manual
Page 4-16 1.0 ©UnitedHealthcare
Figure 4-99: The TRR Queue Summary Page
Field Name
Description
Start Date
Enter the start date of the case.
End Date
Enter the end date of the cases.
View button
Click this button to view the queue created in between these dates.
Processing Queues
Count
Action
New Case
Displays
the count
Displays the action icons a user can take. User can edit
queue, view the queue, and view the report.
MIIM Updated
Open-NOT
Open - Disenroll
MARx Address Letter
Address Scrub
Received TRC 282
Pending Audit
Peer Audit Failed
Pended
Holding Queues
Count
Action
Pending FTT
Displays
the count
Displays the action icons a user can take. User can edit
queue, view the queue, and view the report.
Pending NOT
Pending SSC RPR
Submit to CMS
Update Sent to CMS
Completed Queues
Count
Action
Completed
Displays
the count
Displays the action icons a user can take. User can edit
queue, view the queue, and view the report.
CMS Accepted
Viewing cases from queues 4.3.5.2.2
You access the form through the queues by clicking the Get Queue icon in the Actions column of the TRR Case
Summary page. The Work Item - TRR form appears.
For more information, refer to the Before working on the OOA Process Work form section.
TRR Process Work form 4.3.5.3
The TRR Process Work page has multiple sections such as Work Case, Action, and Workflow Log. This Work
Case section of the form contains multiple tabs such as Case Details, Discrepancy Data, CMS Transaction
Details, Address Validation - USPS, One Stop Shop, TRR Data, Reference Cases, Comments, and Attachment
section.
The following section discusses details about the workflow involved in the new cases. All the
associated actions, next queues, next statuses are described in the SSC Queues and Actions section.

ERS Queues Enrolment Recon System User’s Manual
©UnitedHealthcare 1.0 Page 4-17
To work on the cases in the TRR queues, you have to access the TRR Process Work form.
Note: All the fields marked with asterisk in the form are mandatory fields.
Navigation:
To access the TRR Process Work form:
1. Go to Application menu, point to OST>TRR and click the Get Queue link.
Figure 4-100: Accessing TRR Get Queue Link
The TRR Queue Summary page appears.
2. Click the get queue icon under the Action column in the TRR Queue Summary form.
Figure 4-101: The TRR Queue Summary page
The Work Item – TRR page appears.
3. Click the Start Processing button access the TRR Process Work form.
Figure 4-102: The Work Item—TRR section
4. Click the Get Next to open the next work item.
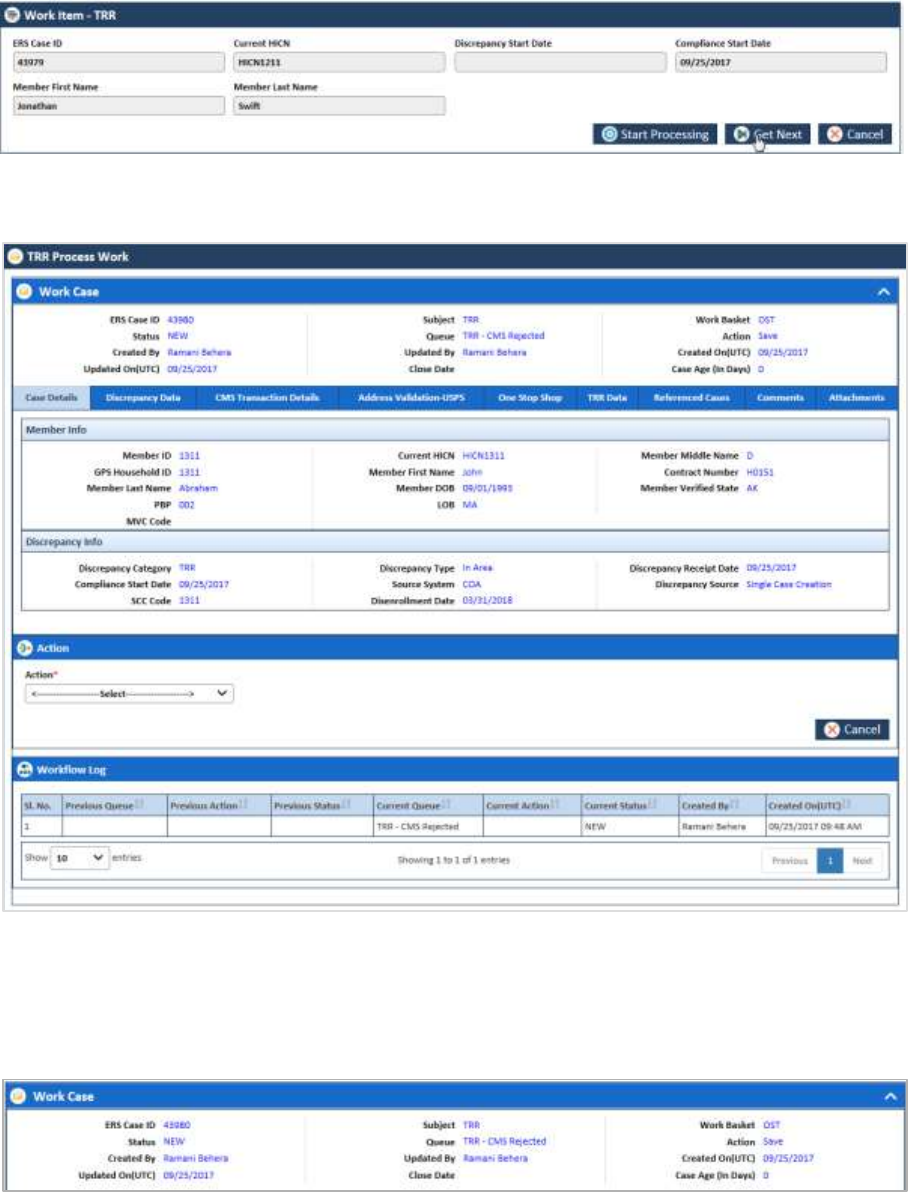
ERS Queues United Healthcare: Enrolment Recon System User Manual
Page 4-18 1.0 ©UnitedHealthcare
Figure 4-103: The Next TRR Work Item
5. Click Cancel to cancel the process of opening the queues.
Figure 4-104:
The TRR Process Work form
Figure 4-105: The TRR Process Work form
Work Case Section> Header 4.3.5.4
All the fields are available in the read-only mode. For more information on header section, refer to the header
section of the OOA Process Work form in the Work Case Section> Header section.
Figure 4-106: Work Case Section> Header Section
Work Case Section> Case Details Tab 4.3.5.5
The values are populated from the Create TRR Case form while creating the new TRR case.
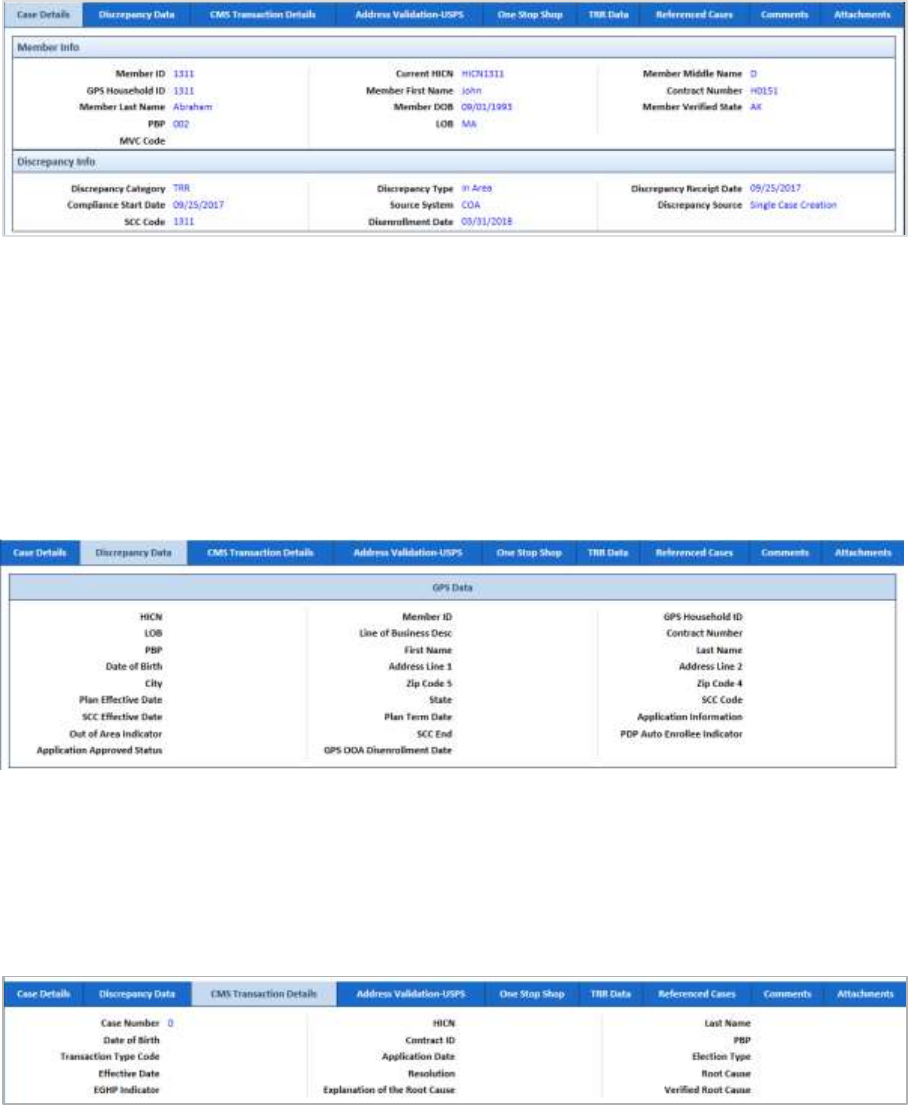
ERS Queues Enrolment Recon System User’s Manual
©UnitedHealthcare 1.0 Page 4-19
Figure 4-107: Work Case Section> Case Details Tab
This section provides the details about the case. The Case Details section of the TRR Process Work form is
very similar to the OOA Process Work form.
For more information on the field values, refer to the Work Case Section> Case Details Tab section.
Work Case Section> Discrepancy Data Tab 4.3.5.6
This section provides the details about the discrepancy data. The Discrepancy Data section of the TRR Process
Work form is very similar to the Discrepancy Data section of the OOA Process Work form. This tab doesn’t
contain the Individual Id field.
Figure 4-108: The TRR Process Form>Discrepancy Data tab
For more information on the field values, refer to the Work Case Section> Discrepancy Data Tab section.
Work Case Section> CMS Transaction Details Tab 4.3.5.7
The CMS Transaction Details Tab section of the TRR Process Work form is very similar to the CMS
Transaction Details Tab section of the OOA Process Work form.
Figure 4-109: Work Case Section> CMS Transaction Details Tab
For more information on the field values, refer to the Work Case Section> CMS Transaction Details Tab
section.
Work Case Section> Address Validation – USPS Tab 4.3.5.8
The Address Validation – USPS section of the TRR Process Work form is very similar to the Address Validation
– USPS section of the OOA Process Work form.
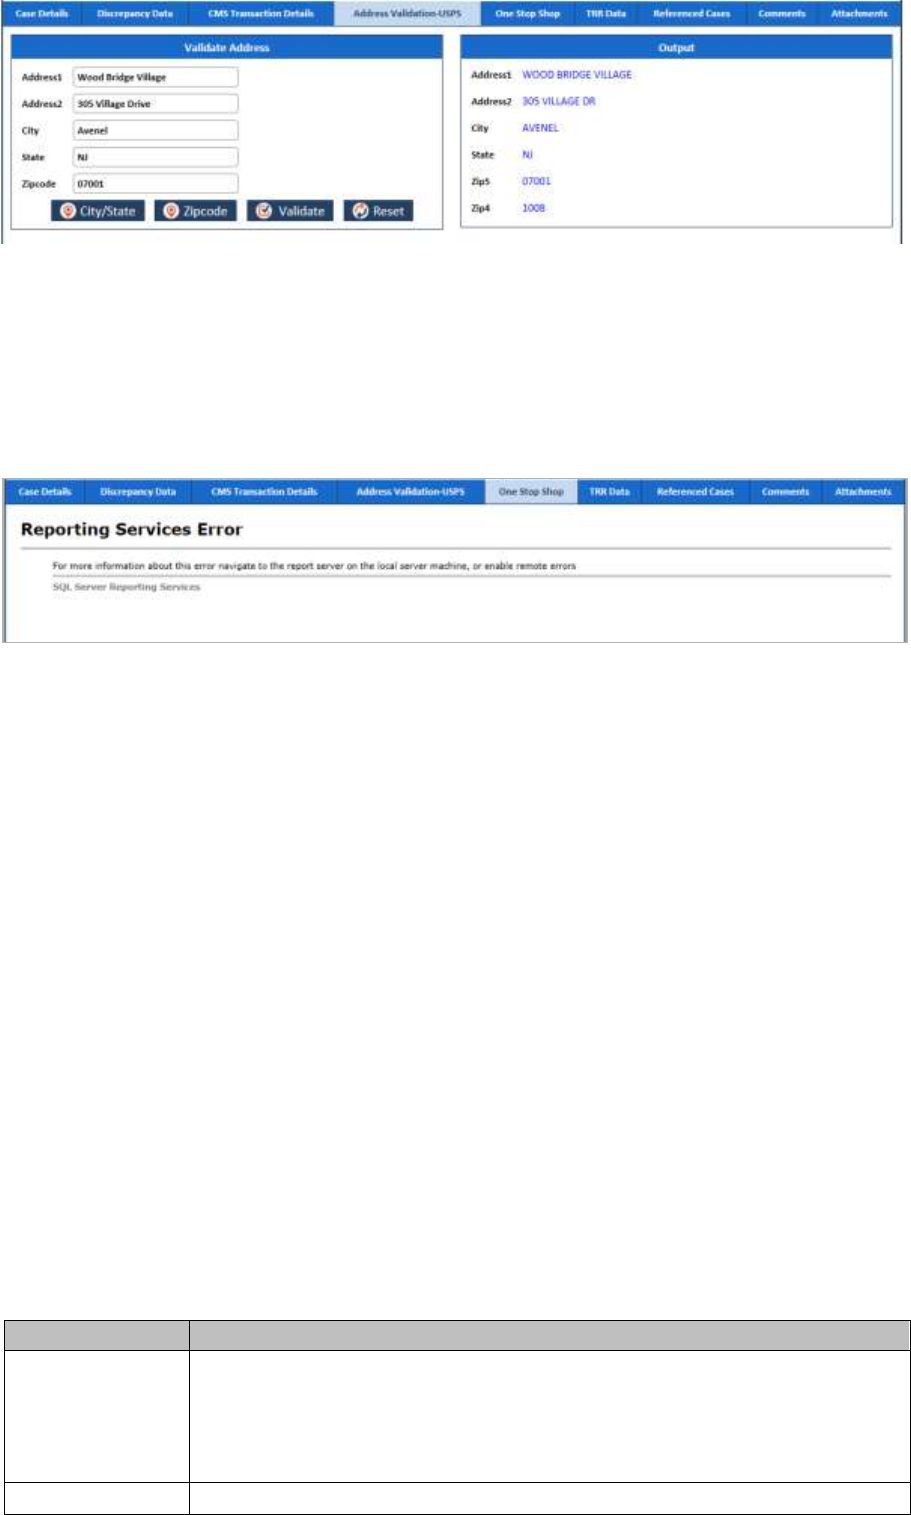
ERS Queues United Healthcare: Enrolment Recon System User Manual
Page 4-20 1.0 ©UnitedHealthcare
Figure 4-110: Work Case Section> Address Validation – USPS
For more information on the field values, refer to the Work Case Section> Address Validation-USPS tab
section.
Work Case Section> One Stop Shop Tab
4.3.5.9
The One Stop Shop Tab section of the TRR Process Work form is very similar to the One Stop Shop Tab
section of the OOA Process Work form.
Figure 4-111: Work Case Section> One Stop Shop Tab
For more information on the field values, refer to the Work Case Section> One Stop Shop Tab section.
Work Case Section> TRR Data Tab 4.3.5.10
The TRR Data Tab section of the TRR Process Work form is very similar to the TRR Data Tab section of the
OOA Process Work form.
For more information on the field values, refer to the Work Case Section> TRR Data Tab section.
Work Case Section> Reference Cases Tab 4.3.5.11
The Reference Cases Tab section of the TRR Process Work form is very similar to the Reference Cases Tab
section of the OOA Process Work form.
For more information on the field values, refer to the Work Case Section> Reference Cases Tab section.
Work Case Section> Comments Tab 4.3.5.12
For more information on the field values, refer to the Work Case Section> Comments Tab section.
SSC Process Work> Action Section 4.3.5.13
Based on the work basket select while login or module you access, the action values changes in the respective
queues forms.
For more information on various action values in the OOA queue, refer to SSC Queues and Actions section.
Action Values
Action Values
Description
Add Comments
Select this action value to add your comments about the case while working on
the queue.
The status of the queue becomes In Progress and the queue is routed to the
Processing Queue as New SSC Queue after you add the comments and click
the Save button.
Close & Mailing

ERS Queues Enrolment Recon System User’s Manual
©UnitedHealthcare 1.0 Page 4-21
Action Values
Description
Address Not
Verified
Close Case
Select this action value to close the case. If you select this option, two fields
Resolution and Reason appear.
The queue is routed to the Completed Queues list as Completed queue with
the status Resolved – Completed if you click the Save button.
Pend Case
Select this value to make the case pending for more research on the case.
The queue is routed to the Processing Queues list as Pended queue with the
status In Progress if you click the Save button.
SSC RPR
Request
Select this value to create RPR cased request from SSC case. If you select
this option, the SSC RPR Request section appears. For more information refer
to the section.
Send OOA Letter
Select this value to send the OOA letter to the member.
The queue is routed to the Holding Queues list as Pending – Not queue with
the status In Progress if you click the Save button.
Send SCC
Deletion to CMS
Send SCC
Update to CMS
Select value to send the SSC update to CMS.
The queue is routed to the Holding Queues list as Submit to CMS queue with
the status In Progress if you click the Save button.
If you select this action value and save the form, a warning message ‘Do you
want for CMS Update?’’ appears.
Send to Peer
Audit
Select this value to send the case for peer audit.
The queue is routed to the Holding Queues list as Submit to CMS queue with
the status In Progress if you click the Save button.
Update GPS
Select this value to update the GPS details. The case gets closed and queue
routed tot Completed queue.
Peer Audit
completed
(Appears in the
OOA - Pending
Audit Queue form)
Select this value to show if the peer audit is completed or not.
Address Scrub
Completed
(Appears in the
OOA - Address
Scrub Queue form)
Select this value if the address scrub is completed.
MARx Address
Completed
(Appears in the
MARx Address
Letter Queue form)
To be updated.
Residential Doc
Required/County
Attestation
Required
To be updated.
Extend Tracking
(Appears in the
Open - Disenroll
Queue form)
To be updated.
Send
Notification of
Termination
Letter
To be updated.
Associated fields in the Action section
The following table shows the fields those appear based on selection of certain value in the Action field of the
queue form. This table also displays some fields which appears based on selection certain values in the fields
which appears after selection of the certain values in the Action field.

ERS Queues United Healthcare: Enrolment Recon System User Manual
Page 4-22 1.0 ©UnitedHealthcare
Associated Fields
Appears when…
Description
Comments
Appears if you select any value in
the Action field.
Enter your comments about the action
you selected while working on the
queue. The comments you enter will
appears in the next work flow.
Resolution
You select the value Close Case
in the Action field.
Select the appropriate resolution from
the list for which you are closing the
case. The following value are available
in this field:
Added to SCC RPR SharePoint
Attested No Incarceration
Auto Enrolled
False Discrepancy
IA
Member Response OOA Term
NO Response FT Term
OOA Term - Incarceration
Termed
Pend Reason
You select the value Pend Case in
the Action field.
Select the appropriate reason for
making the case a pend case.
First Letter Mail
Date
(appears if you
select the value
Send OOA Letter
in Action field)
You select the value Send OOA
Letter in the Action field.
The First Letter Mail Date field
also appears if you select the
value IA, and First Letter Mail
Date in the Resolution field.
Enter the date when the first mail
intimations letter was sent to the
members.
Last Name
You select the value Send SCC
Update to CMS in the Action field.
Enter the last name of the member.
Date of Birth
You select the value Send SCC
Update to CMS in the Action field.
Enter the date of the birth of the
member.
PBP
You select the value Send SCC
Update to CMS in the Action field.
Select the PBP.
Contract Number
You select the value Send SCC
Update to CMS in the Action field.
Select the contract number.
Application Date
You select the value Send SCC
Update to CMS in the Action field.
Enter the application date of the case.
Effective Date
You select the value Send SCC
Update to CMS in the Action field.
Enter the effective date of the case.
End Date
You select the value Send SCC
Update to CMS in the Action field.
Enter the end date of the case.
You select the
value Send SCC
Update to CMS in
the Action field.
The value for the transaction code
appears.
Initial Address
Verification Date
You select the value Member
Response OOA Term in the
Resolution field.
Enter the date when the address of the
member verified first.
Member
Response
Verification Date
You select the value Member
Response OOA Term in the
Resolution field.
Enter the date when the member
response was verified first.
Member Verified
State
You select the value Member
Response OOA Term in the
Resolution field.
Enter name the state to which the
verified member belongs to.
Second Letter
Mail Date
You select the value No
Response FT Term in the
Resolution field
Enter the date when the second mail
intimations letter was sent to the
members

ERS Queues Enrolment Recon System User’s Manual
©UnitedHealthcare 1.0 Page 4-23
The following screenshot provides more information about the Action field and related fields.
Figure 4-112: The Action field>Close Case
Figure 4-113: The Action field>Send SSC Updates to CMS
Figure 4-114: The Action field>SSC RPR Request.
Figure 4-115: The Action field>Send SSC Updates to CMS
Action buttons
For more information on command buttons, refer to the Important Commands section.
TRR Process Work >Workflow Log Section 4.3.5.14
The workflow log provides the details about various cases such as their current and previous statuses and
queues, date on when it was created and the associated roles.
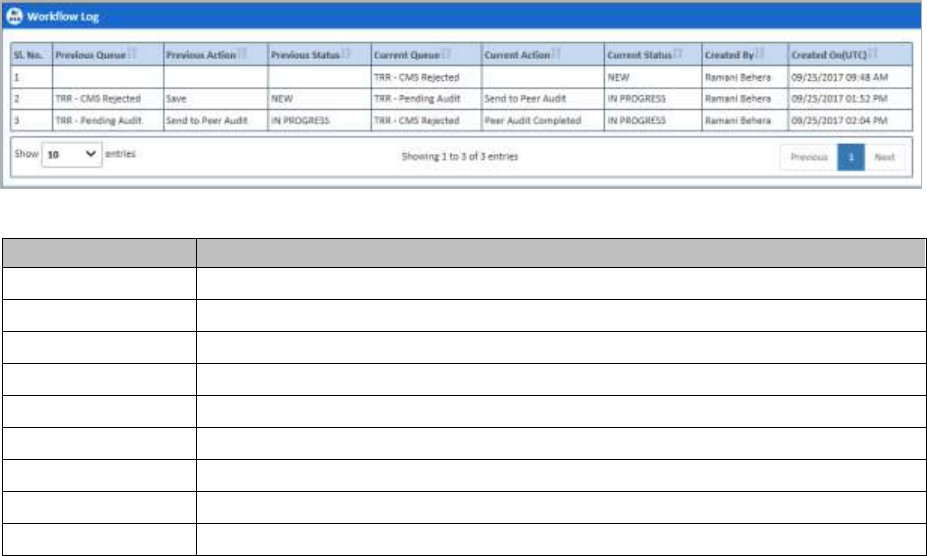
ERS Queues United Healthcare: Enrolment Recon System User Manual
Page 4-24 1.0 ©UnitedHealthcare
Figure 4-116: Workflow Log Section
Columns Name
Description
Sl. No.
Displays the serial numbers of the cases in the table.
Previous Queue
Displays the name of the previous queue of the case.
Previous Action
Displays the previous action taken on the case.
Previous Status
Displays the name of the previous status of the case.
Current Queue
Displays the name of the current queue of the case.
Current Action
Displays the current action taken on the case.
Current Status
Displays the name of the previous current of the case.
Created By
Displays the name of the role that created case.
Created On
Displays the date when the case was created.
4.3.6 Searching TRR Queues
The searching queue process is same for all the queues. For more information how to search the SSC queues,
refer to the Searching OOA Cases section.
RPR Queues 4.4
RPR queues help you access and work on the RPR cases for further processing. These queues have the
following sections and tabs in the queue form. The queue case form has the following sections and tabs.
Header section
Case Details tab
Discrepancy Data tab
CMS Transaction Details tab
Address Verification – USPS tab
One Stop Shop tab
Referenced cases tab
Comments tab
Attachments tab
Action section
Workflow Log section
4.4.1 Working on RPR Queues
With appropriate access rights, you can access the RPR queues from the RPR Queue Summary page and
work on the RPR Process Work form. You can select from multiple queues to retrieve the next new work item
in an RPR queue directly from the application.
Based on the RPR record age, RPR queue records are presented in the application. The age of the record is
decided by differentiating the current date from the Compliance Start Date.
RPR Queues and Actions 4.4.1.1
The below table provides the details of the RPR Queues, and action values in respective queues. This also
provides the list of next queues and next statuses.

ERS Queues United Healthcare: Enrolment Recon System User Manual
Page 4-2 1.0 ©UnitedHealthcare
Current
Queue
Queue
Type
Action Taken
Next Queue
Next Status
RPR Queues
This section provides the details of all the RPR queues, their associated actions values in the Action
fields, next queues of the current queues and the next statuses.
RPC
Request
Category 2
Process
Queue
Send to Peer Audit
RPR - Peer Audit
In Progress
Update Plan
Completed
Resolved-
Completed
Pend Case
RPR - Pended
In Progress
Close Case
Completed
Resolved-
Completed
Add Comments
RPC Request -
Category 2
New / In-progress
RPC
Request
Category 3
Process
Queue
Send to Peer Audit
RPR - Peer Audit
In Progress
Update Plan
Completed
Resolved-
Completed
Pend Case
RPR - Pended
In Progress
Close Case
Completed
Resolved-
Completed
Add Comments
RPC Request -
Category 3
New / In-progress
RPC Peer
Audit Failed
Process
Queue
Send to Peer Audit
RPR - Peer Audit
In Progress
Update Plan
Completed
Resolved-
Completed
Pend Case
RPR - Pended
In-progress
Close Case
Completed
Resolved-
Completed
Add Comments
RPC Peer Audit
Failed
In-progress
RPC Peer
Audit
Process
Queue
Peer Audit Completed
RPC Request -
Category 2/RPC
Request - Category
3 / RPC Peer Audit
Failed
In Progress
Update Plan
Completed
Resolved-
Completed
Pend Case
RPR - Pended
In-progress
Close Case
Completed
Resolved-
Completed
Add Comments
RPC Peer Audit
In-progress
RPR
Submission
Category 2
Process
Queue
Submit RPC Request
Sent to RPC
In Progress
Update Plan
Completed
Resolved-
Completed
Pend Case
RPR - Pended
In-progress
Close Case
Completed
Resolved-
Completed
Add Comments
RPR Submission
(Category 2)
In-progress
RPR
Submission
Category 3
Process
Queue
Submit to Account
Manager
CMS Account
Manager Sent
In Progress
Update Plan
Completed
Resolved- Completed
Pend Case
RPR - Pended
In-progress
Close Case
Completed
Resolved- Completed

ERS Queues Enrolment Recon System User’s Manual
©UnitedHealthcare 1.0 Page 4-3
Current
Queue
Queue
Type
Action Taken
Next Queue
Next Status
Add Comments
RPR Submission
(Category 3)
In-progress
CMS
Account
Manager
Sent
Category 3
Process
Queue
Submit RPC Request
Sent to RPC
In Progress
RPC Rejected
RPC Rejected
In Progress
Update Plan
Completed
Resolved- Completed
Pend Case
RPR - Pended
In progress
Close Case
Completed
Resolved- Completed
Add Comments
CMS Account
Manager Sent
(Category 3)
In progress
Received
RPC FDR
Process
Queue
RPC Rejected
RPC Rejected
RPC Rejected
Update Plan
Completed
Completed
Pend Case
RPR - Pended
RPR - Pended
Close Case
Completed
Completed
Add Comments
Received RPC
FDR
Received RPC FDR
FDR Approved
Completed
Completed
RPC
Rejected
Process
Queue
Transaction Inquiry
Approved
RPC Re-
Submission
In Progress
Update Plan
Completed
Resolved-
Completed
Pend Case
RPR - Pended
In progress
Close Case
Completed
Resolved-
Completed
Add Comments
RPC Rejected
In progress
Sent to RPC
(FDR
response
Uploaded)
Process
Queue
Update Plan
Completed
Resolved-
Completed
Pend Case
RPR - Pended
In progress
Close Case
Completed
Resolved-
Completed
Add Comments
Sent to RPC (FDR
response
Uploaded)
In progress
Received RPC
FDR
In progress
Initial SCC
RPR
Process
Queue
SCC RPR
Required/Send SCC
Deletion to CMS
Submit to CMS
(Deletion Code)
Pend Case
RPR - Pended
Add Comments
Initial SCC RPR
SCC RPR Not Required
Completed
Received
282
Process
Queue
Incorrect SCC
Information
SCC RPR
Submission
In Progress
Pend Case
RPR - Pended
In Progress
Add Comments
Received 282
In Progress
SCC RPR Not Required
Completed
Resolved-
Completed
SCC RPR
Submission
Process
Queue
Submit SCC RPC
Request
SCC RPR Sent
In Progress
Pend Case
RPR - Pended
In progress

ERS Queues United Healthcare: Enrolment Recon System User Manual
Page 4-4 1.0 ©UnitedHealthcare
Current
Queue
Queue
Type
Action Taken
Next Queue
Next Status
Add Comments
SCC RPR
Submission
In Progress
SCC RPR Not Required
Completed
Resolved-
Completed
SCC RPR
Sent (FDR
response
Uploaded)
Process
Queue
Pend Case
RPR - Pended
In progress
Add Comments
SCC RPR Sent
(FDR response
Uploaded)
SCC RPR Not Required
Completed
Resolved-
Completed
SCC RPR FDR
Received
In Progress
SCC RPR
FDR
Received
Process
Queue
FDR Approved
Completed
Resolved-
Completed
Transaction Inquiry
Required
SCC RPR
Transaction Inquiry
In Progress
Pend Case
RPR - Pended
In progress
Add Comments
SCC RPR FDR
Received
In Progress
SCC RPR Not Required
Completed
Resolved-
Completed
Resubmit SCC RPC
Request
SCC RPR Re-
Submission
In Progress
Sent SCC RPC
Resubmission
SCC RPR Sent
In Progress
SCC RPR
Transaction
Inquiry
Process
Queue
Transaction Inquiry
Required
SCC RPR
Transaction Inquiry
In Progress
Submitted Transaction
Inquiry
SCC RPR
Transaction Inquiry
In Progress
Pend Case
RPR - Pended
In progress
Add Comments
SCC RPR
Transaction Inquiry
In Progress
SCC RPR Not Required
Completed
Resolved-
Completed
Submit to
CMS
Deletion
Code
Holding
Queue
NA
NA
NA
Update sent
to CMS
Deletion
Code
Holding
Queue
NA
NA
NA
Completed
Completed
Queue
NA
NA
NA
Navigation:
To access the RPR Process Work form:
1. Go to Application menu, point to RPR and click the Get Queue link.
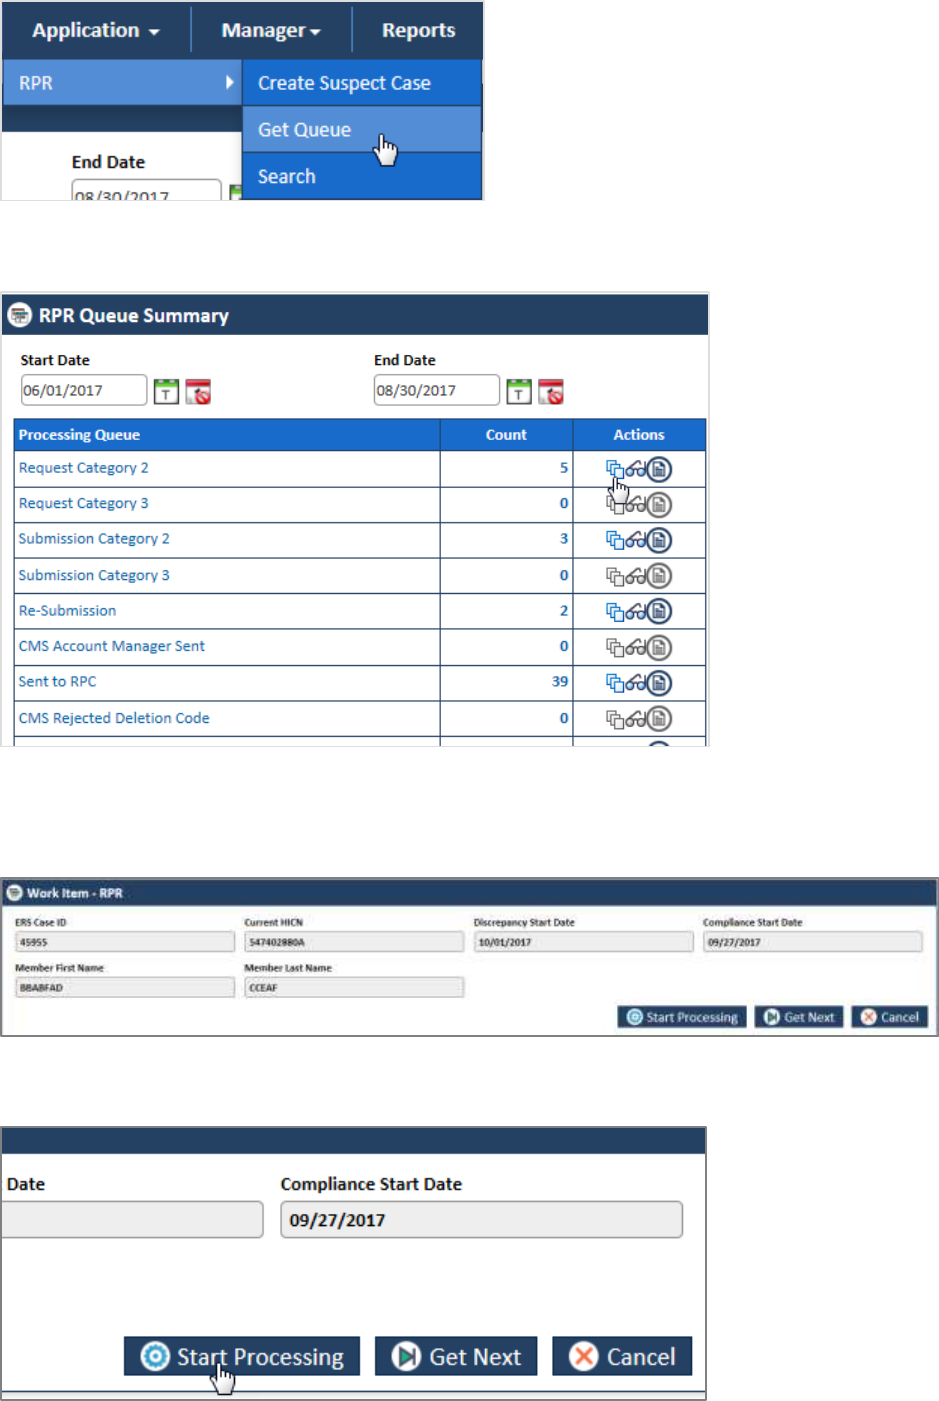
ERS Queues Enrolment Recon System User’s Manual
©UnitedHealthcare 1.0 Page 4-5
Figure 4-117: Accessing RPR Queue Summary Page
The RPR Queue Summary page appears.
Figure 4-118: The RPR Queue Summary page
2. Click the Get Queue icon under the Action column in the RPR Queue Summary form.
The Work Item – RPR page appears.
Figure 4-119: The Work Item -- RPR section
3. Click the Start Processing button to open the form.
Figure 4-120: The Work Item- Start Processing button
4. Click the Get Next to open the next work item.
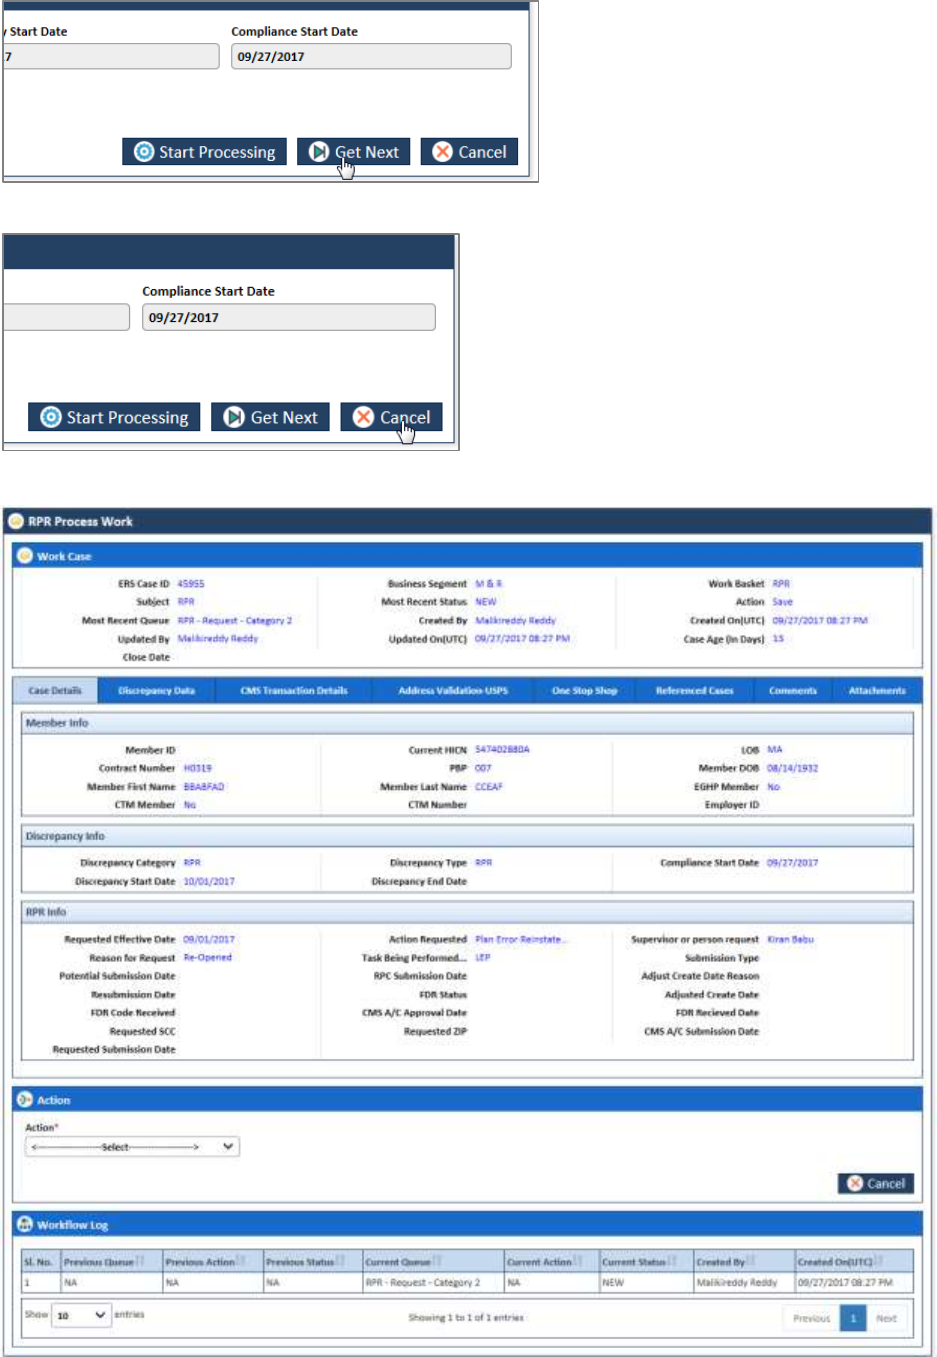
ERS Queues United Healthcare: Enrolment Recon System User Manual
Page 4-6 1.0 ©UnitedHealthcare
Figure 4-121: The Work Item – Get Next button
5. Click Cancel to cancel the process of opening the queues.
Figure 4-122: The Manage Case form
Before working on the Manage Case form 4.4.1.2
Before you work on the RPR Process Work form, you must familiarize yourself with related interfaces and
forms that trigger to the form.
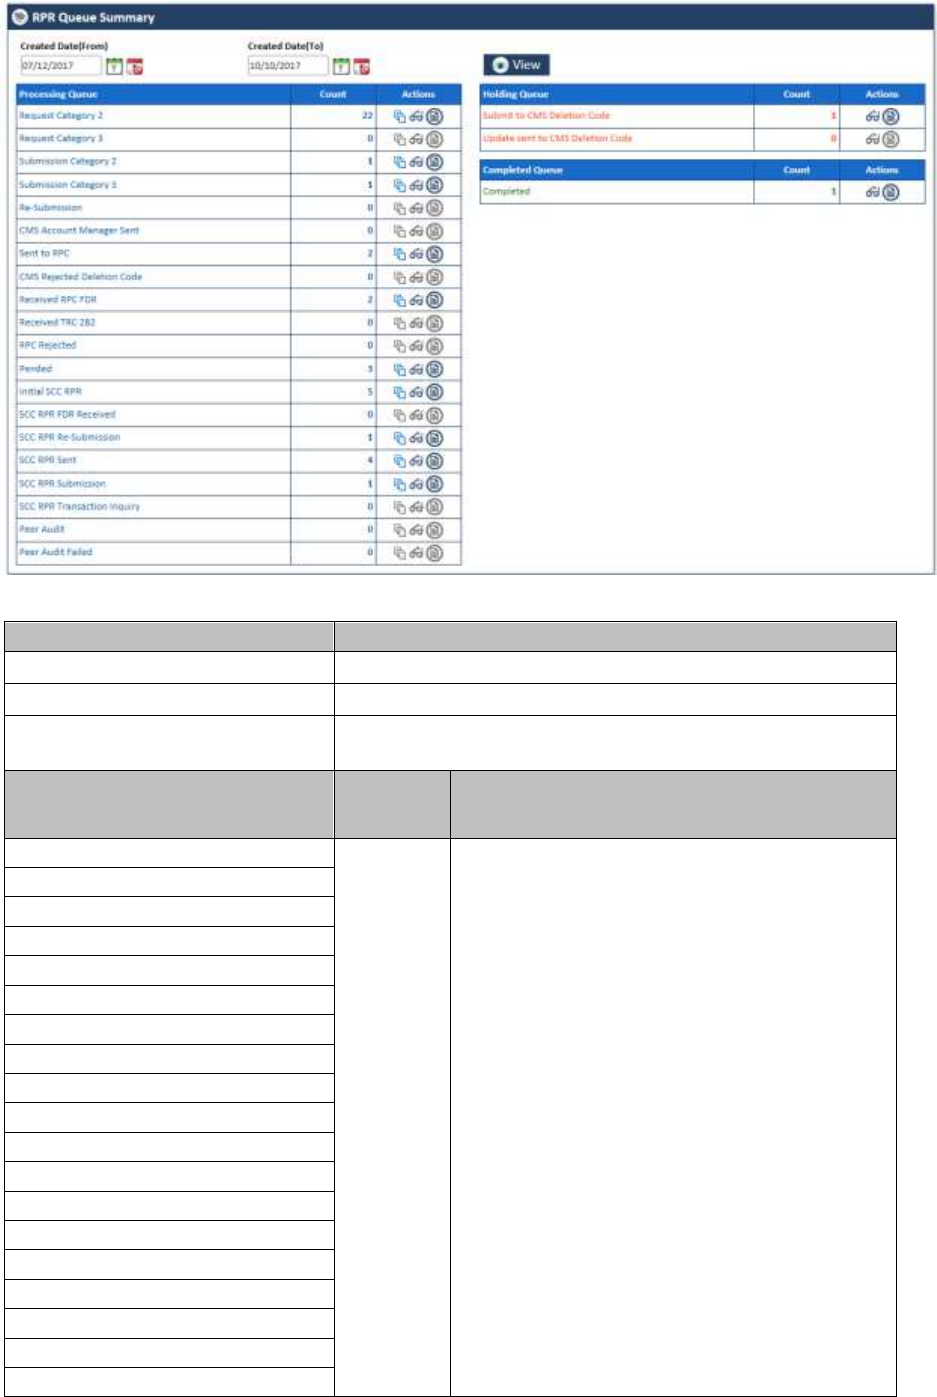
ERS Queues Enrolment Recon System User’s Manual
©UnitedHealthcare 1.0 Page 4-7
RPR Queue Summary Page 4.4.1.2.1
This page provides detailed list of various RPR queues. For more information on accessing RPR Queue
Summary form, refer to the Types of queues section.
Figure 4-123: The RPR Queue Summary page
Field Name
Description
Start Date
Enter the start date of the case.
End Date
Enter the end date of the cases.
View button
Click this button to view the queue created between these
dates.
Processing Queues Column
Count
Column
Actions Column
Request Category 2
Displays
the count
Displays the action icons which you can click to
access respective forms report or details. User
can edit queue, view the queue, and view the
report.
Request Category 3
Submission Category 2
Submission Category 3
Re-Submission
CMS Account Manager Sent
Sent to RPC
CMS Rejected Deletion Code
Received RPC FDR
Received TRC
RPC Rejected
Pended
Initial SCC RPR
SCC RPR FDR Received
SCC RPR Re-Submission
SCC RPR Sent
SCC RPR Submission
SCC RPR Transaction Inquiry
Pending Audit

ERS Queues United Healthcare: Enrolment Recon System User Manual
Page 4-8 1.0 ©UnitedHealthcare
Field Name
Description
Peer Audit Failed
Processing Queues
Count
Action
Submit to CMS Deletion Code
Displays
the count
Displays the action icons which you can click to
access respective forms report or details. User
cannot edit queue but can view the queue, and
the report
Update sent to CMS Deletion
Code
Processing Queues
Count
Action
Completed
Displays
the count
Displays the action icons which you can click to
access respective forms report or details. User
cannot edit queue but can view the queue, and
the report.
Viewing cases from queues 4.4.1.2.2
You can access the form through the queues by clicking the Get Queue icon in the Actions column of the RPR
Queue Summary page. The Work Item - RPR form appears.
If you are able to find the details of the queue you want access, you can click the Start Processing button. Or
else, you can click the Get Next button until you find the queue details that you want to access.
Figure 4-124: The Work Item - RPR form
Field Name
Description
ERS Case ID
Displays ERS Case ID of the case that you want to access.
Current HICN
Displays Current HICN of the case that you want to access.
Discrepancy Start Date
Displays discrepancy start date of the case that you want to access.
Compliance Start Date
Displays compliance start date of the case that you want to access.
Member First Name
Displays member first name of the case that you want to access.
Member Last Name
Displays member last name of the case that you want to access.
Start Processing button
Click this button to access the case that you want to work on.
Get Next button
Click this button to get the next queue details.
Cancel button
Click this button to cancel the search process.
Viewing cases from queues 4.4.1.2.3
You can view the queues by clicking the Get Queue icon in the Actions column of the RPR Case Summary
page. The Search form appears. This form helps you to search the queues and work on the related cases.
However, you can access the queues from the Search Results section by clicking the Edit Queue icon in the
Actions column.

ERS Queues Enrolment Recon System User’s Manual
©UnitedHealthcare 1.0 Page 4-9
Figure 4-125: The RPR Queue Search form
For more information on how to search cases, refer to the Searching OOA Queues section.
Viewing Reports 4.4.1.2.4
<place holder for image and contact>
Manage Case Form 4.4.1.3
The Manage Case page has multiple sections such as Work Case, Action, and Workflow Log. The Work Case
section of the form contains multiple tabs such as Case Details, Discrepancy Data, CMS Transaction Details,
One Stop Shop, Reference Cases, Comments, and Attachment section.
The following section discusses details about the workflow involved in the new cases. All the
associated actions, next queues, next statuses are described in the RPR Queues and Actions section.
Note: All the fields marked with asterisk in the form are mandatory fields.
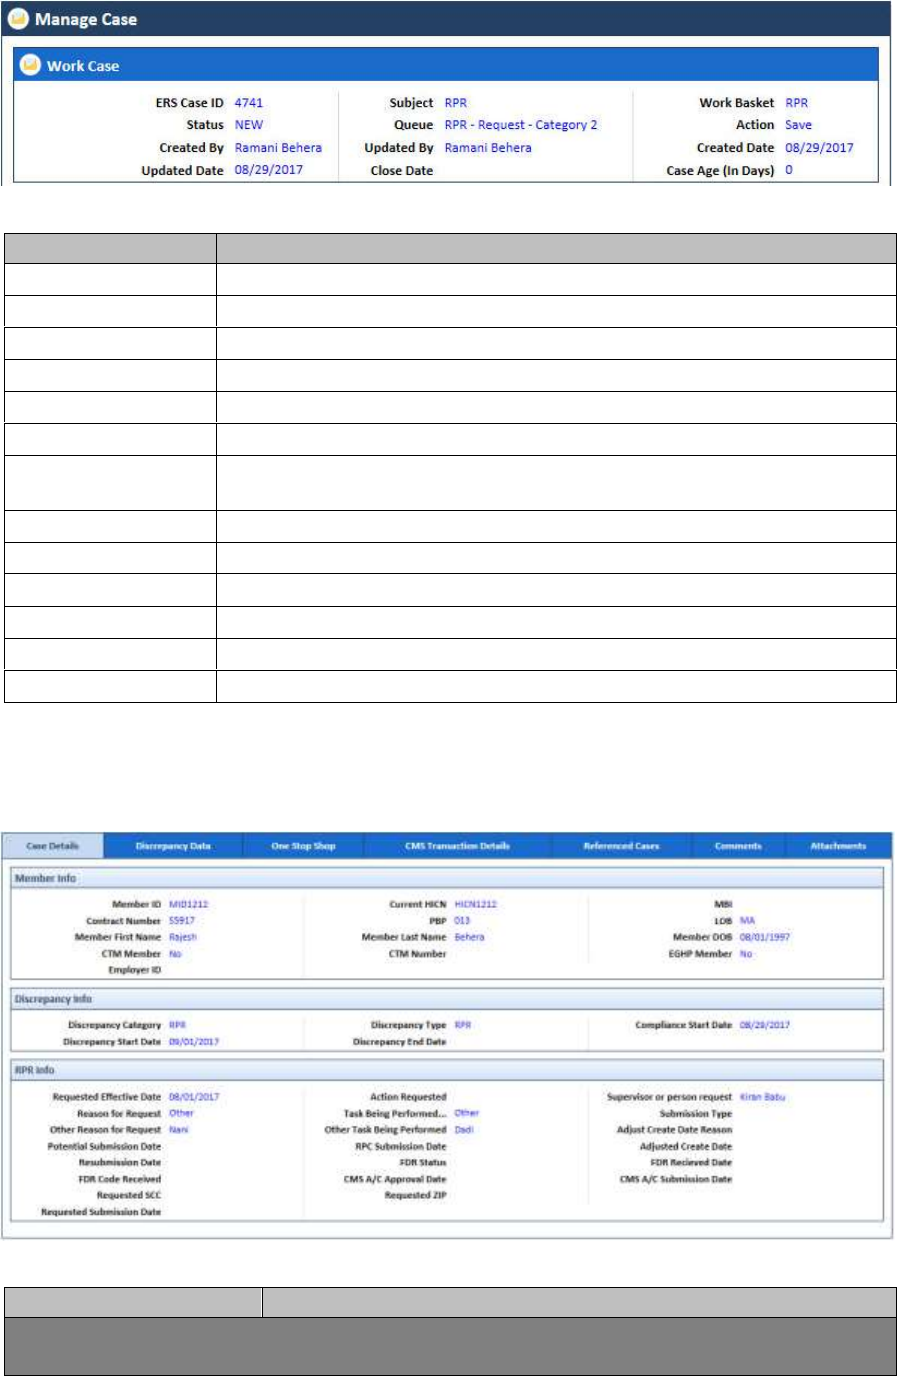
ERS Queues United Healthcare: Enrolment Recon System User Manual
Page 4-10 1.0 ©UnitedHealthcare
Figure 4-126: The Manage Case form
1.1.1.1 Work Case Section> Header
All the fields are available in the read-only mode.
Figure 4-127: Work Case Section> Header Section
Field Name
Description
ERS Case ID
Displays the ERS Case ID.
Status
Displays the current status.
Updated By
Displays user name that updated the case.
Created By
Displays the user that created the case.
Updated Date
Doesn’t display the date when the case is update.
Subject
Displays the subject.
Queue
Displays the current queue name. For new RPR queue the queue name is
RPR-Request-Category.
Updated By
Displays the username that updated the case.
Close Date
Doesn’t display the case close date until the case is closed.
Work Basket
Displays the work basket name.
Action
Displays the type action taken the in the previous stage.
Created Date
Displays the case creation date.
Case Age (In Days)
Displays the case age.
Work Case Section> Case Details Tab 4.4.1.4
The values are populated from the Create RPR Case form while creating the new RPR case. This tab has three
sections such as Member Info, Discrepancy Info, and RPR Info.
Figure 4-128: Work Case Section> Case Details Tab
Field Name
Description
Member info
All the values are auto-populated from Member Info section of the Create OOA Case form.

ERS Queues Enrolment Recon System User’s Manual
©UnitedHealthcare 1.0 Page 4-11
Field Name
Description
Member ID
Displays the member ID.
Current HICN
Displays the HICN number.
MBI
Displays the MBI.
Contract Number
Displays the contract number.
PBP
Displays the PBP.
LOB
Displays the LOB.
Member First Name
Displays the first name of the member.
Member Last Name
Displays the last name of the member.
Member DOB
Displays the member DOB.
CTM Member
Displays the value for CTM Member.
CTM Number
Displays the CTM Number
EGHP Member
Displays the value for EGHP Member.
Employer ID
Displays the Employer ID.
Discrepancy info
All the values are auto-populated Discrepancy Info section of the Create RPR Case form.
Discrepancy Category
Displays the discrepancy category.
Discrepancy Type
Displays the discrepancy type.
Compliance Start Date
Displays the compliance start date.
Discrepancy Start Date
Displays the discrepancy start date.
Discrepancy End Date
Displays the discrepancy end date.
RPR Info
Requested Effective
Date
Displays the requested effective date.
Reason for Request
Displays the reason for requesting the case.
Potential Submission
Date
Displays the potential submission date.
Resubmission Date
Displays the resubmission date.
FDR Code Received
Displays the received FDR Code.
Requested SCC
Displays the requested SCC.
Requested Submission
Date
Displays the requested submission date.
Action Requested
Displays the Action Requested
Task Being Performed...
Displays the task being performed.
RPC Submission Date
Displays the RPC submission date.
FDR Status
Displays the FDR status.
CMS A/C Approval Date
Displays the CMS A/C approval date.
Requested ZIP
Displays the requested zip.
Supervisor or person
request
Displays the supervisor or person request.
Submission Type
Displays the submission type.
Adjust Create Date
Reason
Displays adjust create date reason.
Adjusted Create Date
Displays the adjusted create date.
FDR Received Date
Displays the FDR received date.
CMS A/C Submission
Date
Displays the CMS A/C submission date.
Work Case Section> Discrepancy Data Tab 4.4.1.5
This tab displays all the discrepancy data are also populated from GPS.
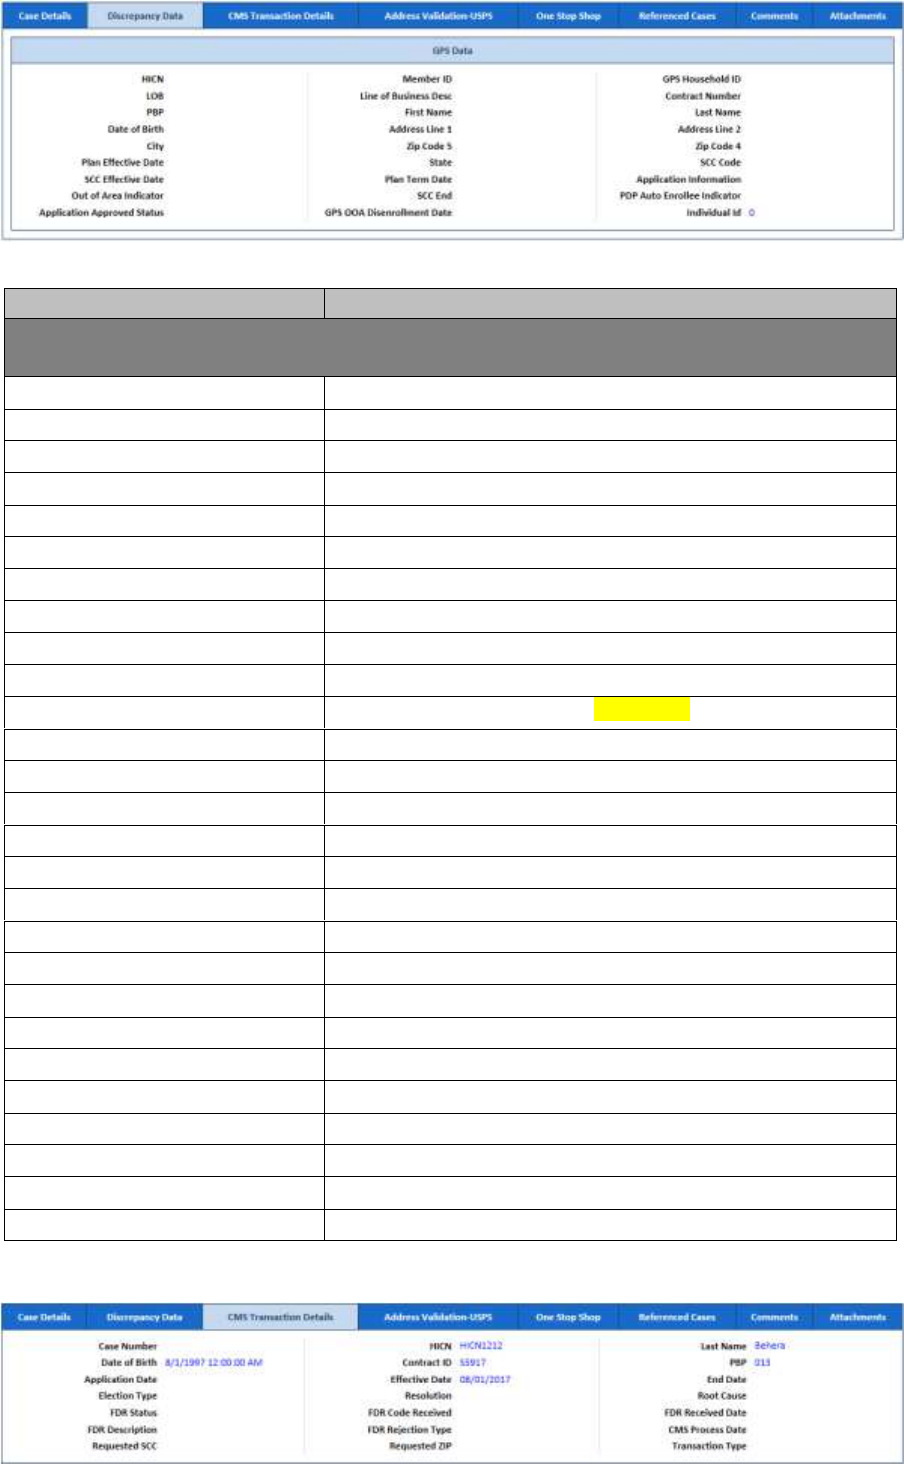
ERS Queues United Healthcare: Enrolment Recon System User Manual
Page 4-12 1.0 ©UnitedHealthcare
Figure 4-129: The Discrepancy Data Tab> GPS Data Sub-tab
Field Name
Description
Member info
All the values are auto-populated from GPS.
HICN
Displays the HICN.
LOB
Displays the LOB.
PBP
Displays the PBP.
Date of Birth
Displays the date of birth.
City
Displays the city.
Plan Effective Date
Displays the plan effective date.
SCC Effective Date
Displays the SCC effective date.
Out of Area Indicator
Displays the out of area indicator.
Application Approved Status
Displays the application approved status.
Member ID
Displays the member id.
Line of Business Desc
Displays the line of business description.
First Name
Displays the member first name.
Address Line 1
Displays the member address line 1.
Zip Code 5
Displays the member city zip code 5
State
Displays the state the member belongs to.
Plan Term Date
Displays the plan term date.
SCC End
Displays the SCC end
GPS OOA Disenrollment Date
Displays the GPS OOA disenrollment date.
GPS Household ID
Displays the GPS household ID
Contract Number
Displays the contract number.
Last Name
Displays the last name.
Address Line 2
Displays the address line 2.
Zip Code 4
Displays the member city zip code 4.
SCC Code
Displays the SCC code.
Application Information
Displays the application Information.
PDP Auto Enrollee Indicator
Displays the PDP Auto Enrollee Indicator.
Individual Id
Displays the Individual Id.
Work Case Section> CMS Transaction Details Tab 4.4.1.6
Figure 4-130: Work Case Section> CMS Transaction Details Tab

ERS Queues Enrolment Recon System User’s Manual
©UnitedHealthcare 1.0 Page 4-13
Field Names
Description
Case Number, Date of Birth, Application Date, Election Type, FDR
Status, FDR Description, Requested SCC,HICN, Contract ID, Effective
Date, Resolution, FDR Code Received, FDR Rejection Type,
Requested ZIP, Last Name, PBP, End Date, Root Cause, FDR
Received Date, CMS Process Date, and Transaction Type
The value appear in
these fields are in
read-only mode.
Work Case Section> Address Verification-USPS Tab 4.4.1.7
Figure 4-131: Work Case Section> Address Verification-USPS Tab
Figure 4-132: Discrepancy Data Tab>UPSC Data Sub-tab
On For more information, refer to the Discrepancy Data Tab> UPSC Data Sub-tab section.
Work Case Section> One Stop Shop Tab 4.4.1.8
This section displays a report.
Figure 4-133: Work Case Section> One Stop Shop Tab
Work Case Section> Reference Cases Tab 4.4.1.9
This tab of the form displays all the cases related to this case.
Figure 4-134: Work Case Section> Reference Cases Tab
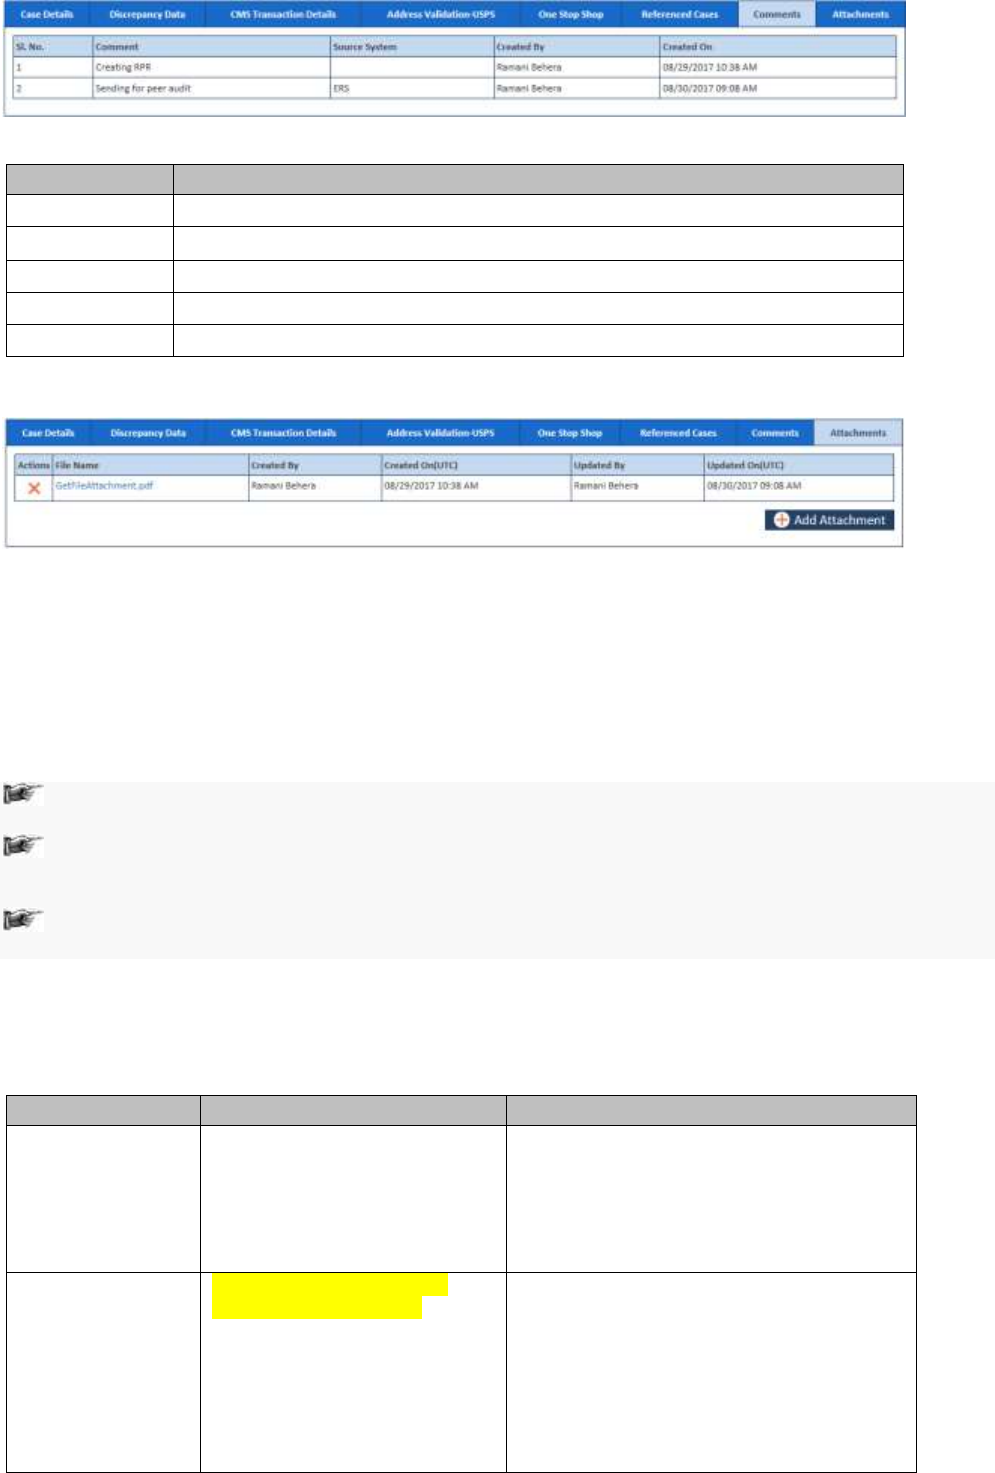
ERS Queues United Healthcare: Enrolment Recon System User Manual
Page 4-14 1.0 ©UnitedHealthcare
Work Case Section> Comments Tab 4.4.1.10
Figure 4-135: The Work Case Section> Comments Tab
Column Name
Description
Sl. No.
The serial no of the comments list is displayed.
Comments
The comments appear in this column is displayed.
System ID
The system ID is displayed.
Created By
The name of the user created the case is displayed.
Created On
The date when the case was created is displayed.
Work Case Section> Attachments Tab 4.4.1.11
Figure 4-136: Work Case Section> Attachments Tab
Manage Case> Action Section 4.4.1.12
Based on the work basket selected while login or module you access, the action values changes in the
respective queues forms.
For more information on various action values in the RPR queue, refer to RPR Queues and Actions section.
Action Values
Note: When the RPR is sent for peer audit by selecting the action value Send to Peer Audit, the case
routes to the RPR Peer Audit queues with the status In Progress.
If the peer auditor selects the value Peer Audit Completed in the Action field and selects the value
Yes in the Contains Error field, the peer audit process is failed. And the cases routes to the RPR -
Peer Audit Failed queue.
If the peer auditor selects the value Peer Audit Completed in the Action field and selects the value No
in the Contains Error field, the cases routes to the RPC Submission Category 2 queue.
Associated fields in the Action section
The following table shows the fields those appear based on selection of certain value in the Action field of the
queue form. This table also displays some fields which appears based on selection certain values in the fields
which appears after selection of the certain values in the Action field.
Associated Fields
Appears when…
Description
Comments
You select the value Add
Comments, Close Casein,
Pend Case, Send OOA Letter,
Send SCC Update to CMS, and
Send to Peer Audit the Action
field.
Enter your comments about the action you
selected while working on the queue. The
comments you enter will appears in the
next work flow.
Resolution
You select the value Close
Case in the Action field.
Select the appropriate resolution from the
list for which you are closing the case. The
following value are available in this field:
Added to SCC RPR SharePoint
Attested No Incarceration
Auto Enrolled
False Discrepancy
IA

ERS Queues Enrolment Recon System User’s Manual
©UnitedHealthcare 1.0 Page 4-15
Associated Fields
Appears when…
Description
Member Response OOA Term
NO Response FT Term
OOA Term - Incarceration
Termed
First Letter Mail
Date
You select the value IA and No
Response FT Term the
Resolution field.
Enter the date when the first mail
intimations letter was sent to the members.
Pend Reason
You select the value Pend
Case in the Action field.
Select the appropriate reason for making
the case a pend case.
First Letter Mail
Date
You select the value Send OOA
Letter in the Action field.
Enter the date when the first mail
intimations letter was sent to the members.
Last Name
You select the value Send SCC
Update to CMS in the Action
field.
Enter the last name of the member.
Date of Birth
You select the value Send SCC
Update to CMS in the Action
field.
Enter the date of the birth of the member.
PBP
You select the value Send SCC
Update to CMS in the Action
field.
Select the PBP.
Contract Number
You select the value Send SCC
Update to CMS in the Action
field.
Select the contract number.
Application Date
You select the value Send SCC
Update to CMS in the Action
field.
Enter the application date of the case.
Effective Date
You select the value Send SCC
Update to CMS in the Action
field.
Enter the effective date of the case.
End Date
You select the value Send SCC
Update to CMS in the Action
field.
Enter the end date of the case.
Initial Address
Verification Date
You select the value Member
Response OOA Term in the
Resolution field.
Enter the date when the address of the
member verified first.
Member
Response
Verification Date
You select the value Member
Response OOA Term in the
Resolution field.
Enter the date when the member response
was verified first.
Member Verified
State
You select the value Member
Response OOA Term in the
Resolution field.
Enter name the state to which the verified
member belongs to.
Second Letter
Mail Date
You select the value No
Response FT Term in the
Resolution field
Enter the date when the second mail
intimations letter was sent to the members
Action buttons
Action button
Description
Save
Click this button to send the form to next workflow level.
Reset
Click this button to remove any of the selection from the form.
Cancel
Click this button to cancel the process of the reviewing the queue.
History
Click this button to view the detailed history of the case.
Associated form in the Action section
Using the TRR Process Work form, you can initiate RPR cases. While selecting the action values, if you select
the value SCC RPR Request, then SCC RPR Request section appears in the Action section.

ERS Queues United Healthcare: Enrolment Recon System User Manual
Page 4-16 1.0 ©UnitedHealthcare
Figure 4-137: Thick RPR Request section in Action section
Action button
Description
CTM Member
Select this checkbox if you want to enter the Center for Transactional
Medicine. If you select this field, then the CTM Number field becomes
compulsory.
CTM Number
Enter the CTM number.
EGHP Member
Select the check box if you want enter the EGHP number details.
Employer ID
Enter the employee ID number.
Requested Effective
Date
Enter the date since when you have initiated the RPR updated the plan.
Action Requested
Select the appropriate value in this field. These are the types of the
actions you can request.
Other Action
Requested
(Appears if you select the
value in the
Reinstatement – Other in
the Action Requested
field)
Enter the other action in this field.
Supervisor or person
entering request
Select the name of the supervisor that requested to update the plan and
initiate the RPR.
Reason for Request
Select the appropriate reason for the request from the list. If you select
the value Others, an associated field, Other Reason for Request appears.
Other Reason for
Request
(Appears if you select the
value in the Other in the
Reason for Request
field)
Enter the other reason in this field.
Task Being
Performed...
Select the appropriate task is being performed from the list. If you select
the value Others, an associated field, Other Task Being Performed
appears.
Other Task Being
Performed
(Appears if you select the
value in the Other in the
Task Being
Performed...field)
Select the other task being performed.
Requested SCC
The requested SSC appears in this field.
Requested ZIP
Requested
Submission Date
Comments
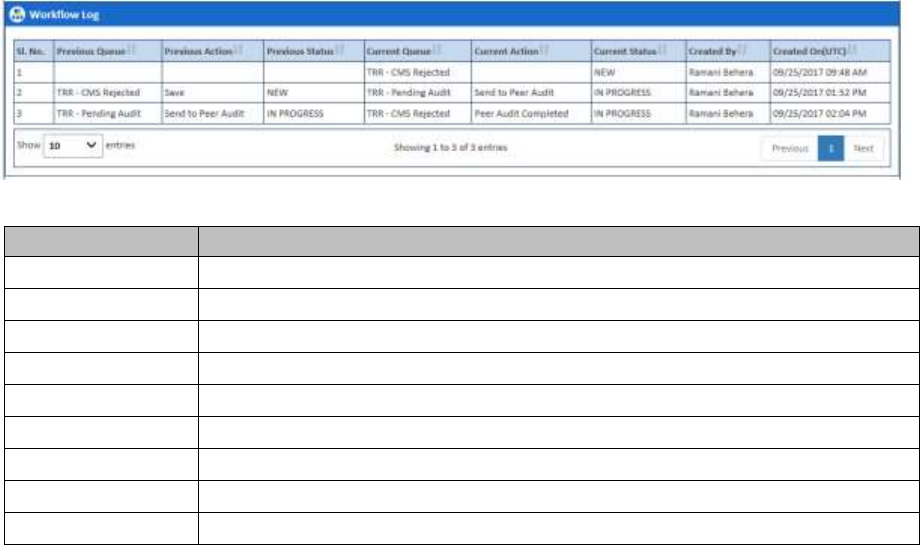
ERS Queues Enrolment Recon System User’s Manual
©UnitedHealthcare 1.0 Page 4-17
4.4.2 TRR Process Work >Workflow Log Section
The workflow log provides the details about various cases such as their current and previous statuses and
queues, date on when it was created and the associated roles.
Figure 4-138: Workflow Log Section
Columns Name
Description
Sl. No.
Displays the serial numbers of the cases in the table.
Previous Queue
Displays the name of the previous queue of the case.
Previous Action
Displays the name of the previous action taken for the case.
Previous Status
Displays the name of the previous status of the case.
Current Queue
Displays the name of the current queue of the case.
Current Action
Displays the name of the current action taken for the case.
Current Status
Displays the name of the previous status of the case.
Created By
Displays the name of the role that created case.
Created On (UTC)
Displays the date when the case was created.
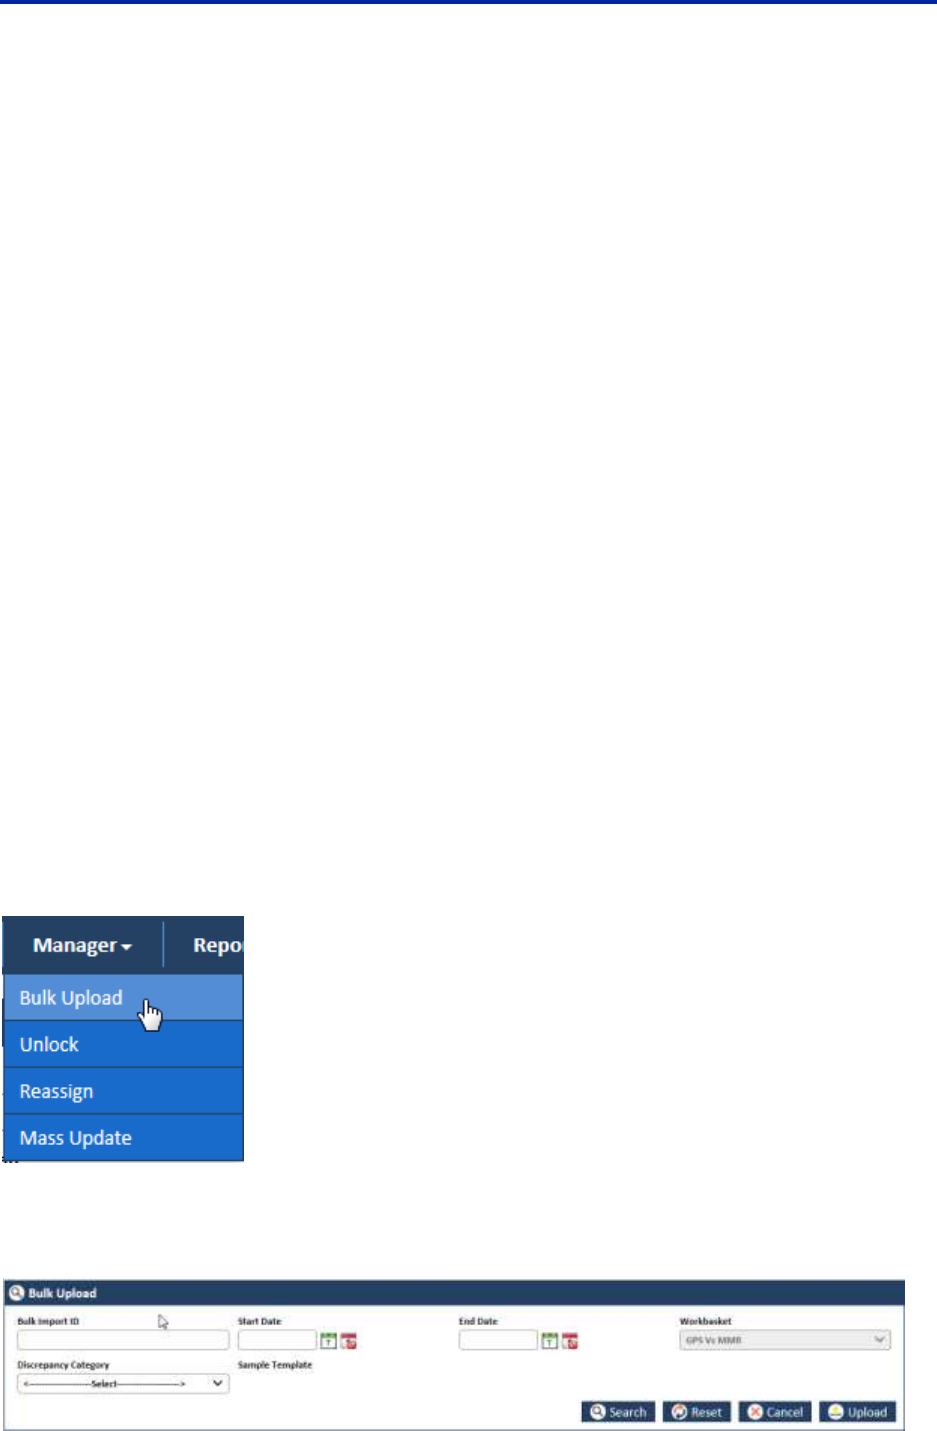
©United Healthcare 1.0 Page 5-1
ERS Managers Chapter 5
This chapter provides details about the activities a manager can perform while working on the ERS
application. This chapter discusses, in detail, various managerial activities such uploading cases in bulk,
unlocking locked cases, reassigning cases to different users, and updating the records in mass.
This chapter contains the following sections:
Managing Bulk Upload of Enrolments
Reassign Enrolment
Mass update
Manager can perform multiple managerial tasks in the ERS application. Manager can manage the
enrolment tasks well so that all the enrolment tasks are duly attended and work on, this helps faster
processing on enrolment records and quicker results.
The most important tasks include:
Searching bulk uploaded enrolments and bulk uploading enrolment
Searching unlocked enrolments and unlocking enrolments
Searching Reassigned Enrollment and Reassigning Enrollment
Searching cases for mass update and Updating mass case update
Managing Bulk Upload of Enrolments 5.1
Bulk upload is the process of uploading multiple cases/records in the system related to the discrepancies
identified outside of the application comparison process. Manager has to upload the CSV file containing
multiple case details in to the application so that the application creates cases using the discrepancies
mentioned in the files. This helps automating and faster processing the cases in the application.
The file gets removed from the given location after the completion of the upload process. The cases are
created in the application and the case is routed to the appropriate queue with a status of “New Case”.
5.1.1 Searching Bulk Uploaded cases
You can search uploaded cases using the Bulk Upload form. If you click the Search button after selecting
all the search criteria, the search details appears in the Bulk Upload Search Results.
Navigation:
Figure 5-1: Manager Subsystem> Bulk Upload Link
To access the Bulk Upload form, go to the Manager menu, and click the Bulk Upload link. The Bulk
Upload form appears.

ERS Managers ENROLMENT RECON SYSTEM User’s Manual
Page 5-2 1.0 ©UnitedHealthcare
Figure 5-2: Bulk Uploaded form> Searching Bulk uploaded cases
Field Name
Description
Bulk Import ID
Enter the bulk upload ID for searching the cases in the system.
Start Date
Enter the date from which you started uploading the bulk cases files in the
system.
End Date
Enter the date till which you uploaded the bulk cases files in the system.
Workbasket
The value in this field is auto-populated based on the user login which is based
on the value selected in the work basket field.
Discrepancy
Category
Select appropriate values for uploading the CVS files.
Sample Template
This displays the CVS files.
Search
Click this button to search the bulk uploaded field in the system
Reset
Click this button to remove search criteria.
Cancel
Click this button to cancel the search process.
Upload
Click this button to upload the files selected Sample Template field.
Search Results 5.1.1.1
Figure 5-3: Bulk Import Search Results
Column Name
Description
Bulk Import ID
Displays the bulk import ID.
Excel Template
Name
Displays the Excel template (CVS) name.
Import Status
Displays the import status. This field displays the current status of the field
such as Ready for Import.
Total Records
Displays the total records for each CVS files.
Invalid Records
Displays the invalid records for each CVS files.
Duplicate Records
Displays the duplicate records for each CVS files.
Created By
Displays the user that uploaded the files.
Created On(UTC)
Displays the date when the files are updated.
Updated By
Displays the user that updated files.
Updated On(UTC)
Displays the date when the files are updated.
5.1.2 Uploading Bulk Enrolments
You can upload as many cases as possible in the system using the CVS Excel files. These files contain
all the case details which can be imported and new case can be created by system. For uploading the
bulk files, you need to use the Bulk Upload form.
Navigation:
Refer to the Navigation section, of the Searching Bulk Uploaded cases section to access the Bulk Upload
form.
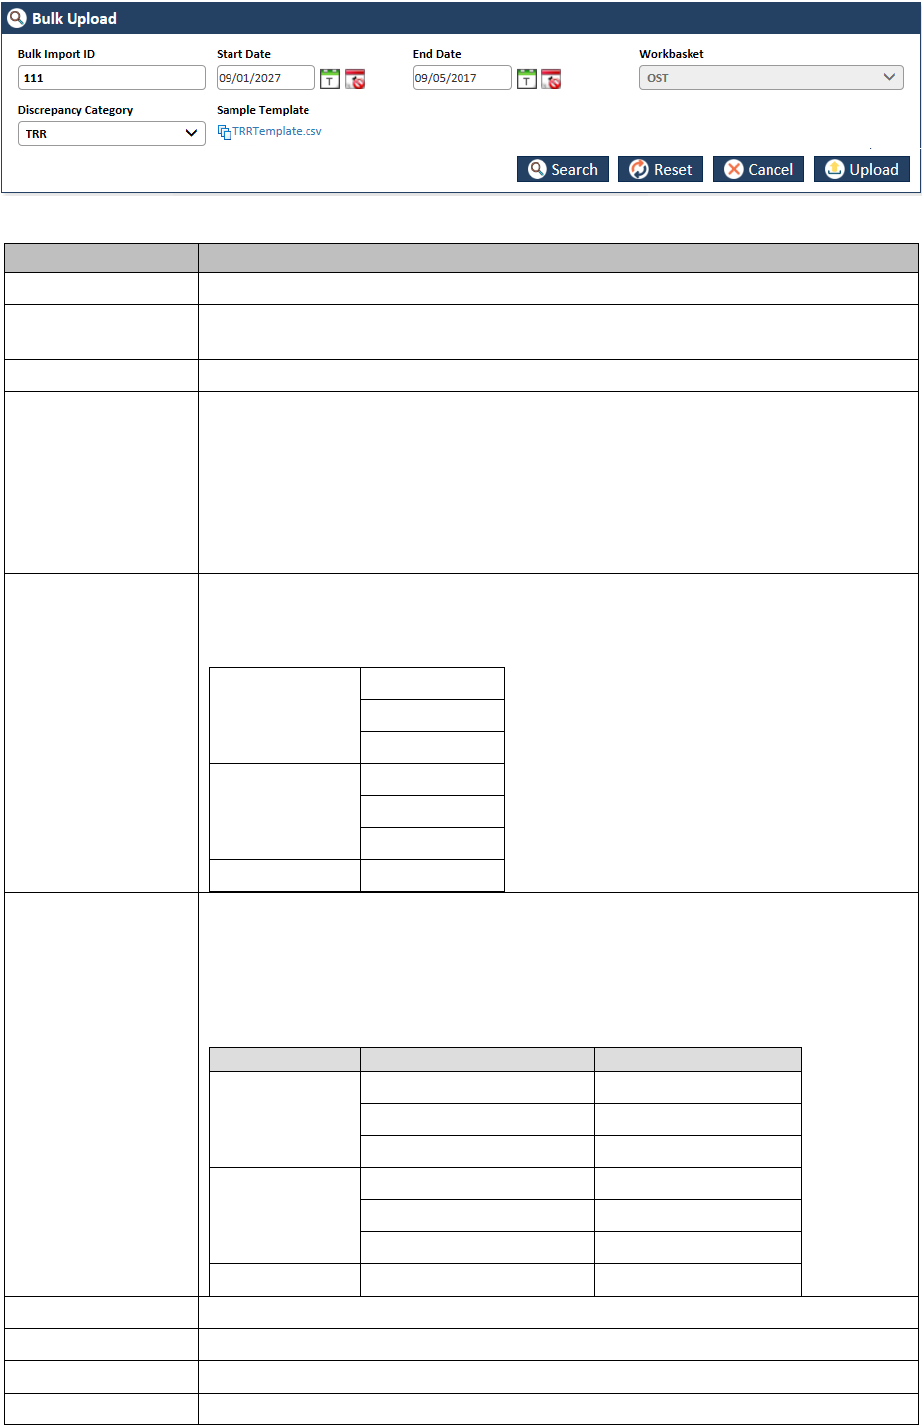
ENROLMENT RECON SYSTEM User’s Manual ERS Managers
©UnitedHealthcare 1.0 Page 5-3
Bulk Upload Form 5.1.2.1
Figure 5-4: Bulk Upload Form
Field Name
Description
Bulk Import ID
Enter a bulk upload ID for uploading files.
Start Date
Enter the date from which you want to start uploading the bulk cases files in
the system.
End Date
Enter the date till which you want to upload the bulk cases files in the system.
Workbasket
The value in this field is auto-populated based on the user login. This is based
on the value selected in the Workbasket field while logging in to the
application.
The following values are available in this field.
OST
RPR
GS vs MMR
Discrepancy
Category
Select appropriate values for uploading the CVS files.
Based on the values in the Workbasket field, the values appear in this field.
Following values are available in this field.
OST
OOA
SCC
TRR
GPS vs MMR
Eligibility
DOB
Gender
RPR
RPR
Sample Template
This sample temple is displayed in this field. Managers can download the
sample template and fill the required data and upload it. The field values are
directly depend on the value selected in the Discrepancy Category field. For
example, if you select the value DOB in the Discrepancy Category field, then
DOB Template appears in the field.
The this field displays the following sample templates:
Workbasket
Discrepancy Category
Sample Template
OST
OOA
OOA Template
SCC
SCC Template
TRR
TRR Template
GPS vs MMR
Eligibility
Eligibility Template
DOB
DOB Template
Gender
Gender Template
RPR
RPR
RPR Template
Search
Click this button to search the bulk uploaded field in the system.
Reset
Click this button to remove search criteria.
Cancel
Click this button to cancel the search process.
Upload
Click this button to upload the files selected Sample Template field.

ERS Managers ENROLMENT RECON SYSTEM User’s Manual
Page 5-4 1.0 ©UnitedHealthcare
Field Name
Description
The File Upload window appears. Manager can upload the filled in Excel file
from the local drive
5.1.3 Unlock Enrolments
As a Manager, you can unlock the records used and locked by other users in their absence. This helps
effective management of record assignment and completion of case processing faster. You can search
for the records you want to unlock before reassigning them to other users.
Searching unlocked enrollment 5.1.3.1
For searching the locked records in the system, you can access the Unlock Search form.
Navigation:
To access the Unlock Search form, go to the Manager menu, and click the Unlock link. The Unlock
Search form appears along with Advanced Search and Search Results sections.
Figure 5-5: The Unlock Search Form
Field Name
Description
Discrepancy
Category
Select the discrepancy category in this field. The following values available in
this field:
OOA
SSC
TRR
Eligibility
Gender
DOB
RPR
Discrepancy Type
Select the discrepancy type in this field. The value that appears in this field
depends on the value selection in the Discrepancy Category field.
ERS case ID
Enter the ERS case ID in this field.
Current HICN
Enter the HICN ID in this field.
Start Date
Enter the date from which you want to search the locked cases.

ENROLMENT RECON SYSTEM User’s Manual ERS Managers
©UnitedHealthcare 1.0 Page 5-5
Field Name
Description
End Date
Enter the date till which you want to search the locked cases.
Search
Click the Search button to search the locked the cases.
Reset
Click this button to remove all the search criteria.
Cancel
Click this button to cancel the search process.
Search Results 5.1.3.1.1
Figure 5-6: The Search Results
Column Names
Description
Actions, ERS Case ID, Locked On, Locked By, Urgency,
Assigned To, Status, Current HICN, GPS HICN,
MMR HICN, First Name, Discrepancy Category, Discrepancy
Start Date, Discrepancy End Date, Reason, Resolution, Line of
Business, Referenced Eligibility Case, Indicator, MMR PBP,
GPS Individual ID, Discrepancy Source NTID, Submission Type,
CTM Member, EGHP Member, Requested Effective Date, Action
Requested, Potential Submission Date, RPC Submission Date,
FDR Received Date, FDR Code Received, FDR Status, RPR
Requestor, Created On, Created By, Last Updated On, and
Last Updated By
All the values are displayed in
all the columns.
The Action column the Unlock
icon so that you can take
proper action in the Action
column.
Unlocking Enrolments 5.1.3.2
You can unlock the records after the search results. To unlock the locked cases, you can use the Unlock
form.
Navigation:
To access Unlock form, click lock icon in the Action column. The Unlock the form appears.
Unlock form 5.1.3.2.1
Figure 5-7: The Unlock form
Field Name
Description
ERS Case ID
This field displays the ERS case ID.
Locked By
This field displays the user that locked the case.

ERS Managers ENROLMENT RECON SYSTEM User’s Manual
Page 5-6 1.0 ©UnitedHealthcare
Field Name
Description
Comments
Enter the comments about the case.
Unlock
Click Unlock button to unlock the case. A message, “Record successfully
unlocked” appears if you click the Unlock button.
Close
Click the close X icon to close the Unlock window.
Note: The unlocked cases are not available in the system if the manager searches them through
the Unlock Search form.
Reassign Enrolment 5.2
As a Manager, you can reassign the records that are used particular users, to a different user. Before
reassigning the records, you have to search and identify the records that need to be reassigned. Based
on the search result, you can select multiple cases to be assigned to a particular user. You can either
select all records or some of the records to reassign to the user through the bulk upload process.
5.2.1 Searching Reassigned Enrollment
To search the records that you want to reassign to other users, you need to access the Reassign Search
form.
Navigation:
To access the Reassign Search form, go to the Manager menu and click the Reassign link. The
Reassign Search form appears along with Advanced Search and Search Results section.
Reassign Search form 5.2.1.1
Figure 5-8: Reassign Search
Field Name
Description
Discrepancy
Category
Select the discrepancy category in this field. The following values available in this
field:
OOA
SSC
TRR
Eligibility
Gender
DOB
RPR
If you select discrepancy category and discrepancy type and do not select the
other values in other field, multiple records are available in the Search Results
section.
Discrepancy
Select the discrepancy type in this field. The value that appears in this field

ENROLMENT RECON SYSTEM User’s Manual ERS Managers
©UnitedHealthcare 1.0 Page 5-7
Field Name
Description
Type
depends on the value selected in the Discrepancy Category field.
ERS case ID
Enter the ERS case ID of the case that you want to search.
If you provide the ERS case ID in the search criteria, then specific record related
to the case ID appears in the Search Result section.
Current HICN
Enter the current HICN ID in this field.
If you provide the Current HICN in the search criteria, then specific record related
to the HICN appears in the Search Result section.
Start Date
Enter the date from which you want to search the locked cases.
End Date
Enter the date till which you want to search the locked cases.
Search button
Click this button to search the locked the cases. A list of the locked cases
appears in the Search Result section.
Reset button
Click this button to remove all the search criteria.
Cancel button
Click this button to cancel the search process.
Advanced Search 5.2.1.2
For more information advanced search, refer to the Advanced Search section.
Search Results 5.2.1.3
Figure 5-9: The Search Results
The Search Results provides all the details about the cases.
1.2.1.1 Reassigning Enrollment
You can reassign the records those are initially assigned to other users. In the Search Results section,
you select multiple records and do bulk assignments to different user.
Figure 5-10: The Search Results Section

ERS Managers ENROLMENT RECON SYSTEM User’s Manual
Page 5-8 1.0 ©UnitedHealthcare
Figure 5-11: Selecting Records
You can select one or multiple records in line with ERS Case ID by selecting check boxes under the
Select All column.
If you select the one or more check boxes then the check box beside Select All column
appears. If you select all the records in the Select All column, or click the check box or
check box besides Select All, appears besides Select All column.
To bulk assign the records:
1. Select one or more records in the Select All column or click the check box
besides Select All. The records are selected.
Figure 5-12: The Select All column
2. Click the Bulk Assign button. The Bulk Assign dialog window appears.
Figure 5-13: Bulk Reassign dialogue window
3. In the Reassign To field, select the user that you want to assign the record to work on.
4. In the comments field, enter the comments about you action. If you processed without entering
the comments, an message “Please enter comments” appears.
5. Click the Bulk Assign button. A message “Records reassigned successfully” appears after you
click the Bulk Assign button.

ENROLMENT RECON SYSTEM User’s Manual ERS Managers
©UnitedHealthcare 1.0 Page 5-9
Figure 5-14: Bulk assignment success message
If you search the records that you reassigned to different user, you can see the records are reassigned to
new users in the Assigned To column in the Search Result table.
Figure: Search Result> Reassignment
Mass update 5.3
As a manager, you can select one record or multiple records and update these records for further
processing. Before updating the records, you can search those records in the system that you want to
update at a time.
5.3.1 Searching Records for Mass Update
Using Mass Update Search form, you can search the records that you want to update at a time. This
update is based on the queues that you selected while searching the records and the action values you
selected while assigning the records. The search result displays all the records with same values in the
fields such as Discrepancy Category, Discrepancy Type, Most Recent Queue, and Most Recent Status in
all the records.
To search the records that you want to do mass update, you need to access the Mass Update Search
form.
Navigation:
Figure 5-15: Mass Update Link
To access the Mass Update Search form, go to the Manager menu and click the Mass Update link. The
Mass Update Search form appears along with Advanced Search and Search Results section.
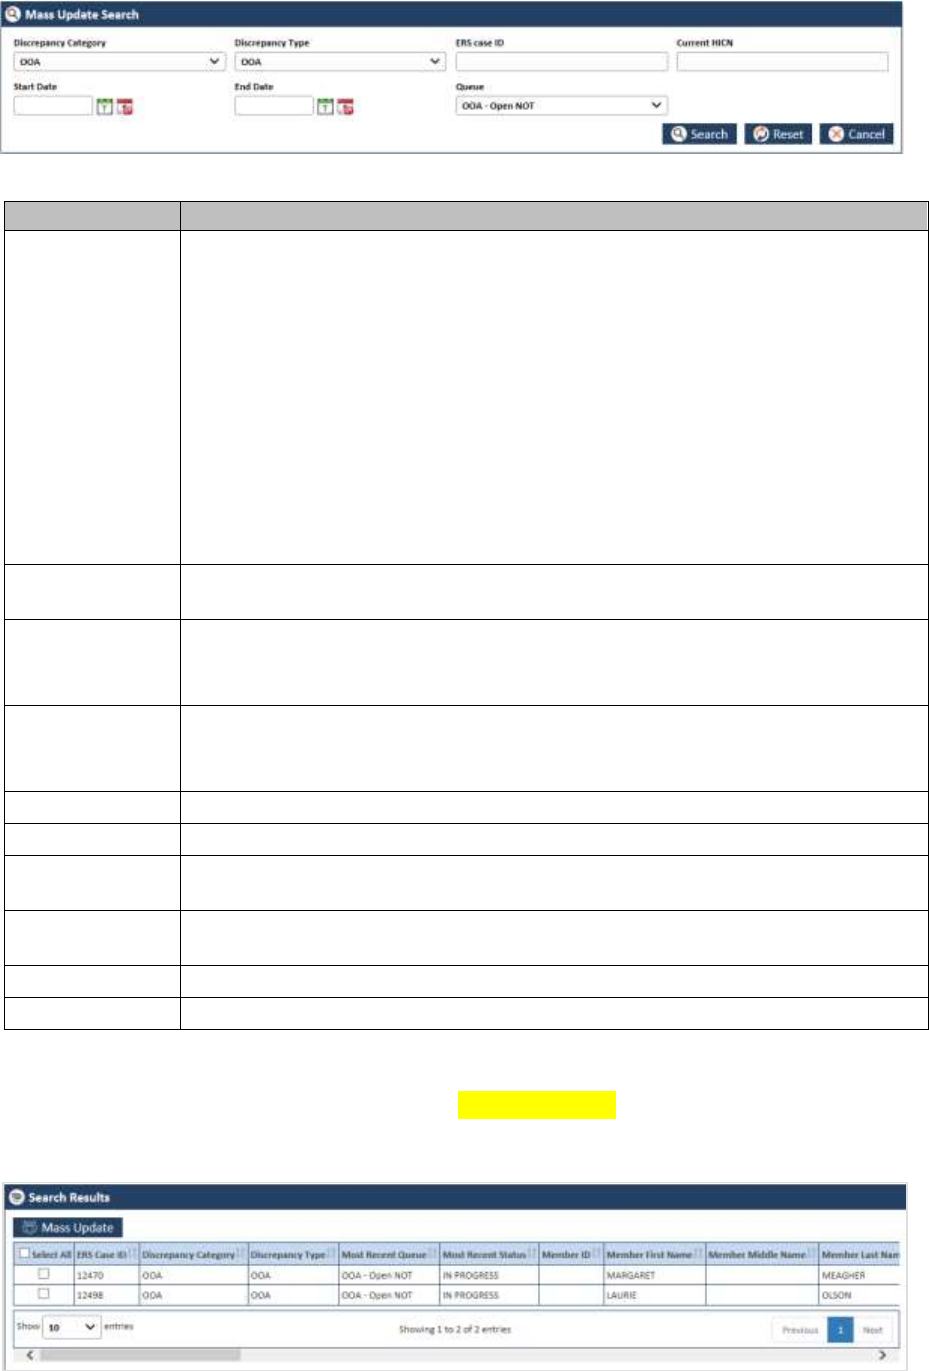
ERS Managers ENROLMENT RECON SYSTEM User’s Manual
Page 5-10 1.0 ©UnitedHealthcare
Reassign Search form 5.3.1.1
Figure 5-16: Reassign Search
Field Name
Description
Discrepancy
Category
Select the discrepancy category in this field. The following values available in this
field:
OOA
SSC
TRR
Eligibility
Gender
DOB
RPR
If you select discrepancy category and discrepancy type and do not select the
other values in other field, multiple records are available in the Search Results
section.
Discrepancy
Type
Select the discrepancy type in this field. The value that appears in this field
depends on the value selected in the Discrepancy Category field.
ERS case ID
Enter the ERS case ID of the case that you want to search.
If you provide the ERS case ID in the search criteria, then specific record related
to the case ID appears in the Search Result section.
Current HICN
Enter the current HICN ID in this field.
If you provide the Current HICN in the search criteria, then specific record related
to the HICN appears in the Search Result section.
Start Date
Enter the date from which you want to search the locked cases.
End Date
Enter the date till which you want to search the locked cases.
Queue
Select the queue in this field. Based on the queues selected in this field, the all
records appear in the search result.
Search button
Click this button to search the locked the cases. A list of the locked cases
appears in the Search Result section.
Reset button
Click this button to remove all the search criteria.
Cancel button
Click this button to cancel the search process.
Advanced Search 5.3.1.2
For more information advanced search, refer to the Advanced Search section.
Search Results 5.3.1.3
Figure 5-17: The Search Results
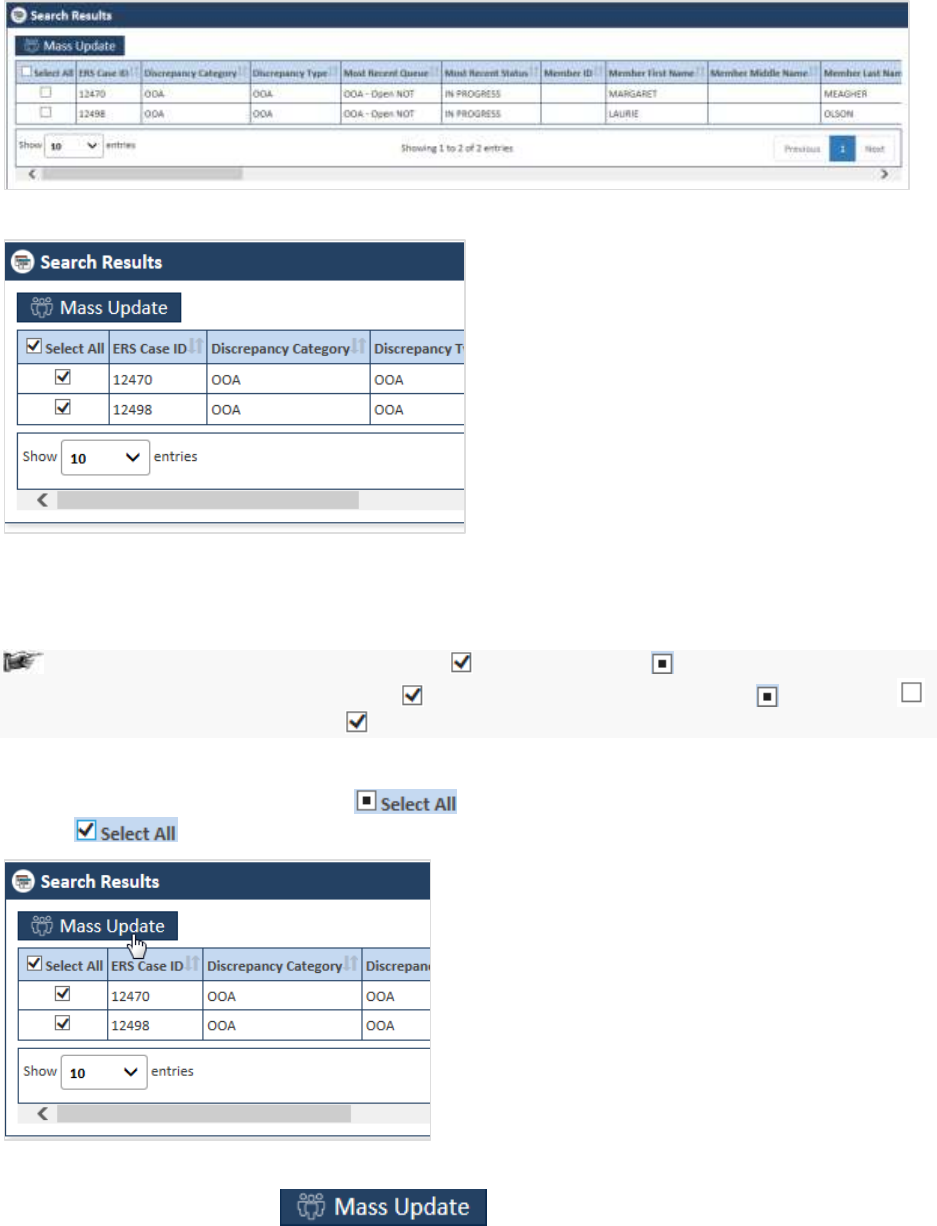
ENROLMENT RECON SYSTEM User’s Manual ERS Managers
©UnitedHealthcare 1.0 Page 5-11
The Search Results provides all the details about the records.
1.3.1.1 Updating mass records
You can update one or multiple records and complete the record processing faster. In the Search Results
section, you select multiple records and you can do mass update of the cases. While updating the, you
can select required action based on the queue. Based on action value selected, the cases route to the
next processing queues.
Figure 5-18: The Search Results Section
Figure 5-19: Selecting Records
You can select one or multiple records in line with ERS Case ID by selecting check boxes under the
Select All column.
If you select the one or more check boxes then the check box beside Select All column
appears. If you select all the records in the Select All column, or click the check box or
check box besides Select All, appears besides Select All column.
To mas update records:
1. Select one or more records in the Select All column or click the check box
besides Select All. The records are selected.
Figure 5-20: The Select All column
2. Click the Mass Update button. The Action dialog window appears.

ERS Managers ENROLMENT RECON SYSTEM User’s Manual
Page 5-12 1.0 ©UnitedHealthcare
Figure 5-21: The Action dialogue window
3. In the Action field, select the appropriate action and select the values in associate fields.
4. Click the Save button. A message “Record updated successfully” appears after you click the
Save button.
5. Click Reset to remove all the selected values.
6. Click Cancel to cancel the record update process.
Based on the queue that you selected while searching records, the action value appears in the Action
field of the queue forms. Follow the steps while taking action in the Action field of the respective queue
forms corresponding to the queues available in the search result.
For more information on the Action sections of the various queue forms in the OOA queues, refer to the
OOA Process Work> Action Section.
For more information on the Action sections of the various queue forms in the SCC queues, refer to the
SSC Process Work> Action Section.
For more information on the Action sections of the various queue forms in the TRR queues, refer to the
TRR Action section.
For more information on the Action sections of the various queue forms in the Eligibility queues, refer to
the Eligibility Process Work> Action Section.
For more information on the Action sections of the various queue forms in the DOB/Gender queues, refer
to the DOB/Gender Work> Action Section.
For more information on the Action sections of the various queue forms in the RPR queues, refer to the
Manage Case> Action Section.
ENROLMENT RECON SYSTEM User’s Manual ERS Managers
©UnitedHealthcare 1.0 Page 5-13

©United Healthcare 1.0 Page 6-1
ERS Administration Chapter 6
Administration of ERS application involves creating and managing various skills, access groups and
users. These include creation, editing, and management of skills, access groups and users roles. Every
user belongs to access groups and every access groups is associated with a skill.
Administrator has the rights to creates and manage the skills, access groups and user roles. For better
administration and management, this is ideal to create skills and associate them with queues; create
access groups and associate skills and reports with them; and users and assign access groups to them.
Before performing any administrative activities, you must log in to the application with
administrator access rights.
The chapter contains the following section:
Manage Skills
Manage Access Group
Managing users
Manage Skills 6.1
A skill is entity/activity which a particular user in an access groups can perform or utilize while working on
the various ERS queues.
As an Administrator, before creating users and access groups, you must crate skills in the systems. You
can assign work queues to the existing and newly created skills and must associate these skills to
access groups.
6.1.1 Searching Skills
You ca search the existing skills in the system before creating a new skill. You can access the Skills
search window to provide the search criteria for searching the skills.
Navigation:
To access the Skills window to search skills:
1. Log in to the application as an administrator selecting role as Admin.
2. Go to the Administration menu and navigate to and right-click Manage Skills link.
Figure 6-1: Administration Menu> Manage Skills link
The Skills search window appears.
3. Navigate to the Skill search window.
The Skill Search window 6.1.1.1
Provide the details the field in the search window for searching skills.
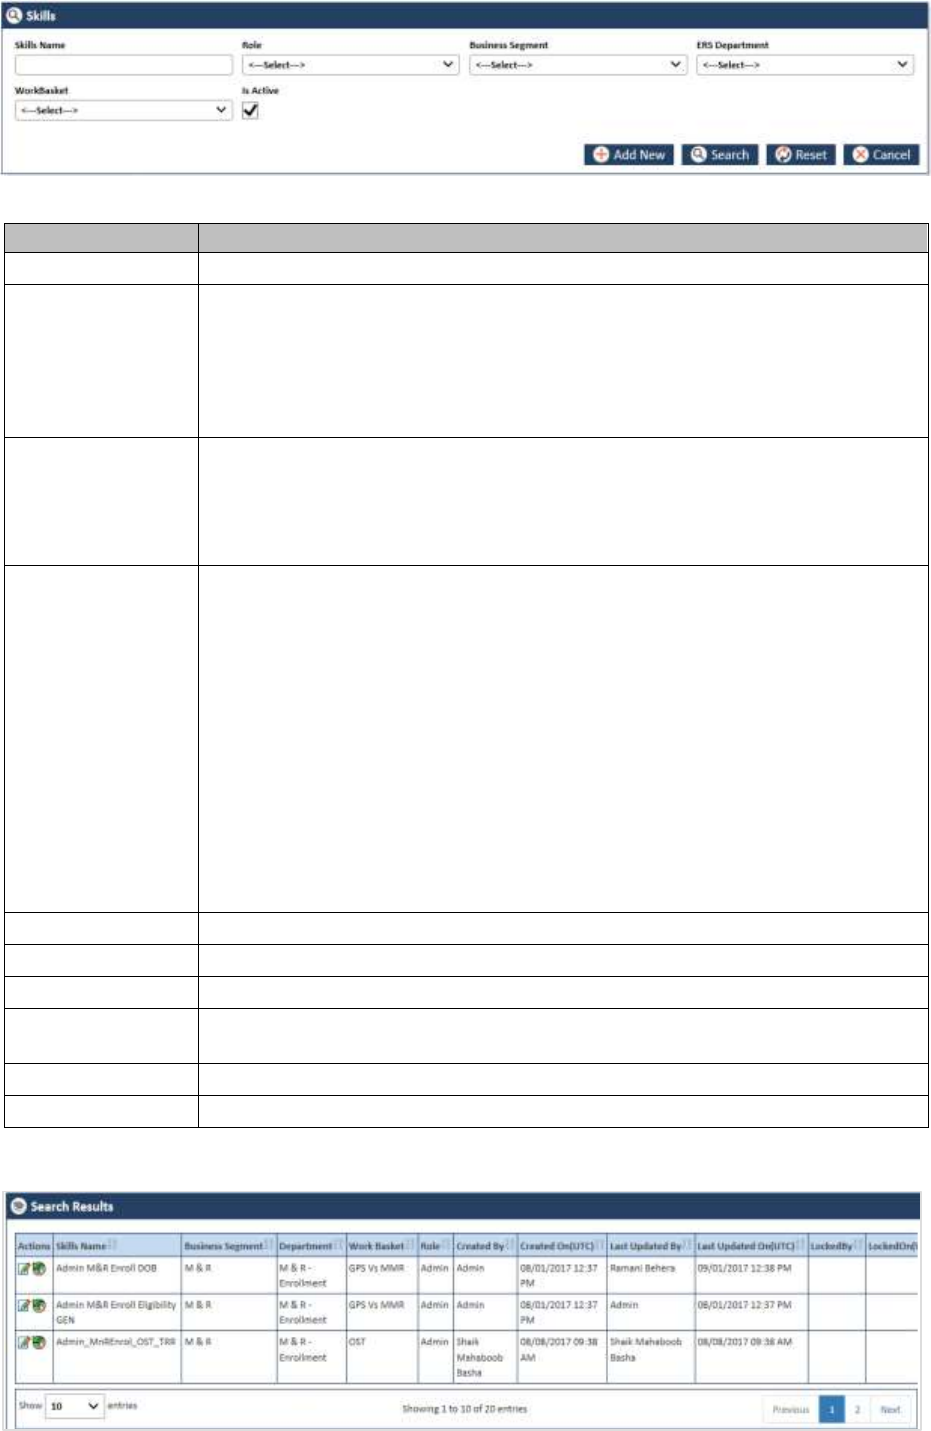
ERS Administration ENROLMENT RECON SYSTEM User’s Manual
Page 6-2 1.0 ©UnitedHealthcare
Figure 6-2: The Skill Search window
Columns Name
Description
Skills Name
Enter the name of the skill.
Role
Select the name of the role in this field. This skill belongs to the role that you
selected in this field. The following roles are available in this field:
Admin
Manager
Processor
Viewer
Business
Segment
Select the business segment in this field. This skill belongs to the business
segment that you selected in this field.
C & S
M & R
PCP
ERS Department
Select the ERS department in this field. This skill belongs to the ERS
department. The following department are available in this field:
C & D - Billing
C & D - Customer Service
C & D - Enrolment
C & D - Sales
M & R - Billing
M & R - Customer Service
M & R - Enrolment
M & R - Sales
PCP - Billing
PCP - Customer Service
PCP - Enrolment
PCP - Sales
WorkBasket
Select the work basket in this field. This skill belongs to the workbasket.
Is Active
Select this check box.
Add New
Click this button to add new skill. The Skill window appears.
Search
Click this button to search skills. Based on the search criteria, the skills appear
in the Search Results table.
Reset
Click this button to remove all the entered and selected search criteria.
Cancel
Click this button to cancel all the search process.
Search Results 6.1.1.2
Figure 6-3: The Skill Search Results
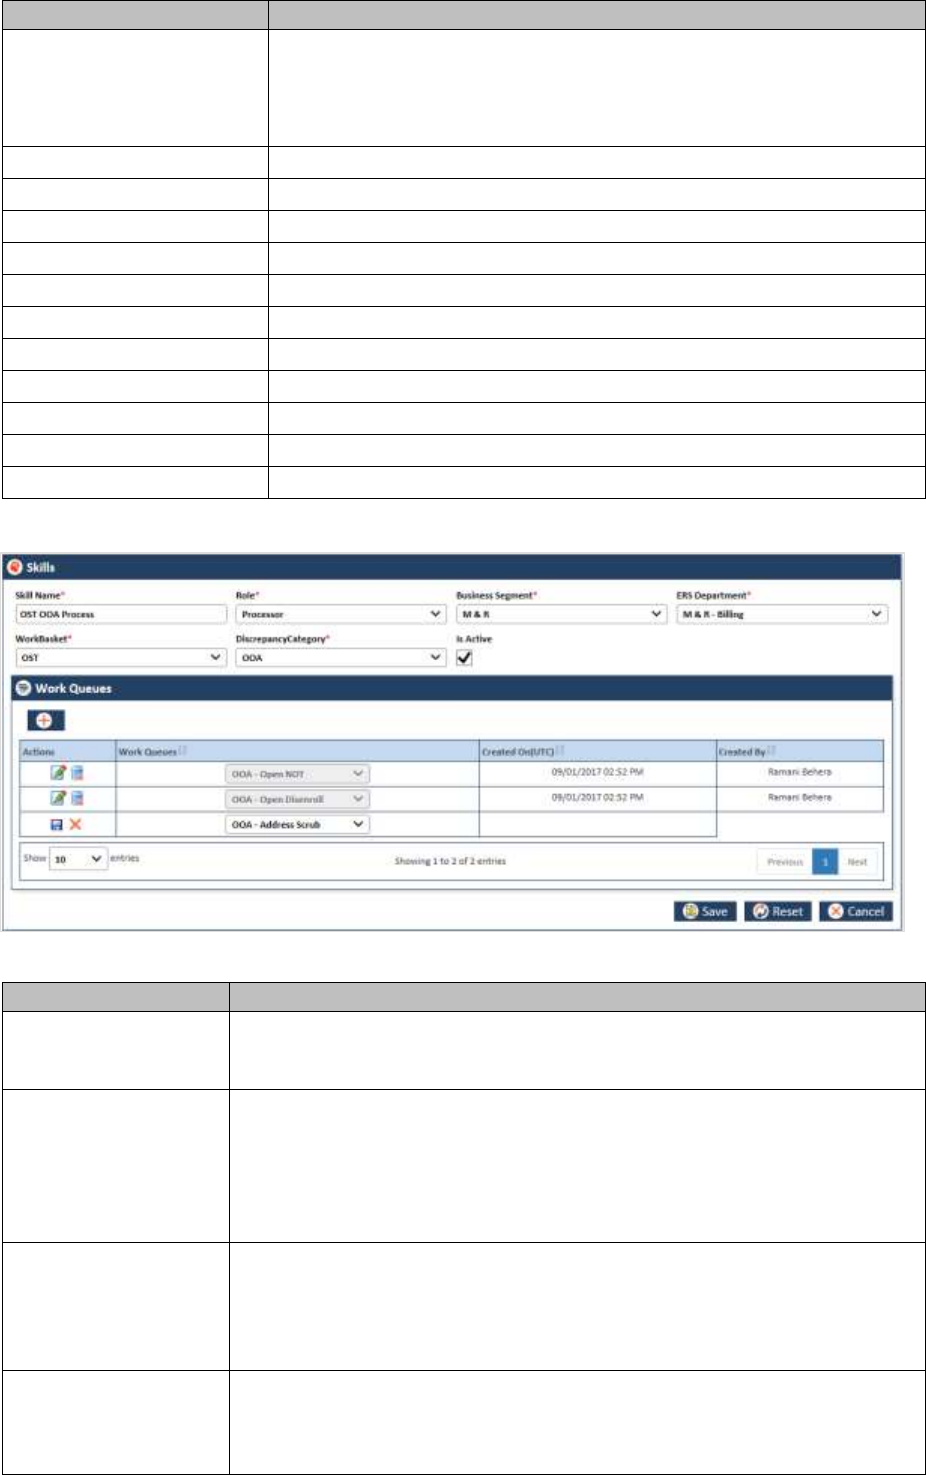
ENROLMENT RECON SYSTEM User’s Manual ERS Administration
©UnitedHealthcare 1.0 Page 6-3
Columns Name
Description
Actions
Click the required action icon to take proper action.
Edit Skill: Click this icon to edit skill. The Skill window appears after you
click this icon.
View History: Click this icon to view the history.
Skills Name
Displays the skills name.
Business Segment
Displays the business segment.
Department
Displays the department.
Work Basket
Displays the work basket.
Role
Displays the role.
Created By
Displays the user name that created the skill.
Created On(UTC)
Displays the date when the skill was created.
Last Updated By
Displays the user name that last updated the skill.
Last Updated On(UTC)
Displays the date when the skill was last updated.
LockedBy
Displays the user name that locked the skill.
LockedOn(UTC)
Displays the date when the skill was locked.
6.1.2 Adding/Creating New Skills
Figure 6-4: Skill Window> Adding Skills
Field Name
Description
Skill Name
Enter the name of the skill. Provide a unique name with keeping in view the
role, business segment, department and work basket. This helps easy
identification of the skill.
Role
Select the role for which you create this skill. The following roles are
available in this field:
Admin
Manager
Processor
Viewer
Business Segment
Select the business segment in this field. This skill belongs to the business
segment that you selected in this field.
C & S
M & R
PCP
ERS Department
Select the ERS department in this field. This skill belongs to the ERS
department. The following department are available in this field:
C & D - Billing
C & D - Customer Service
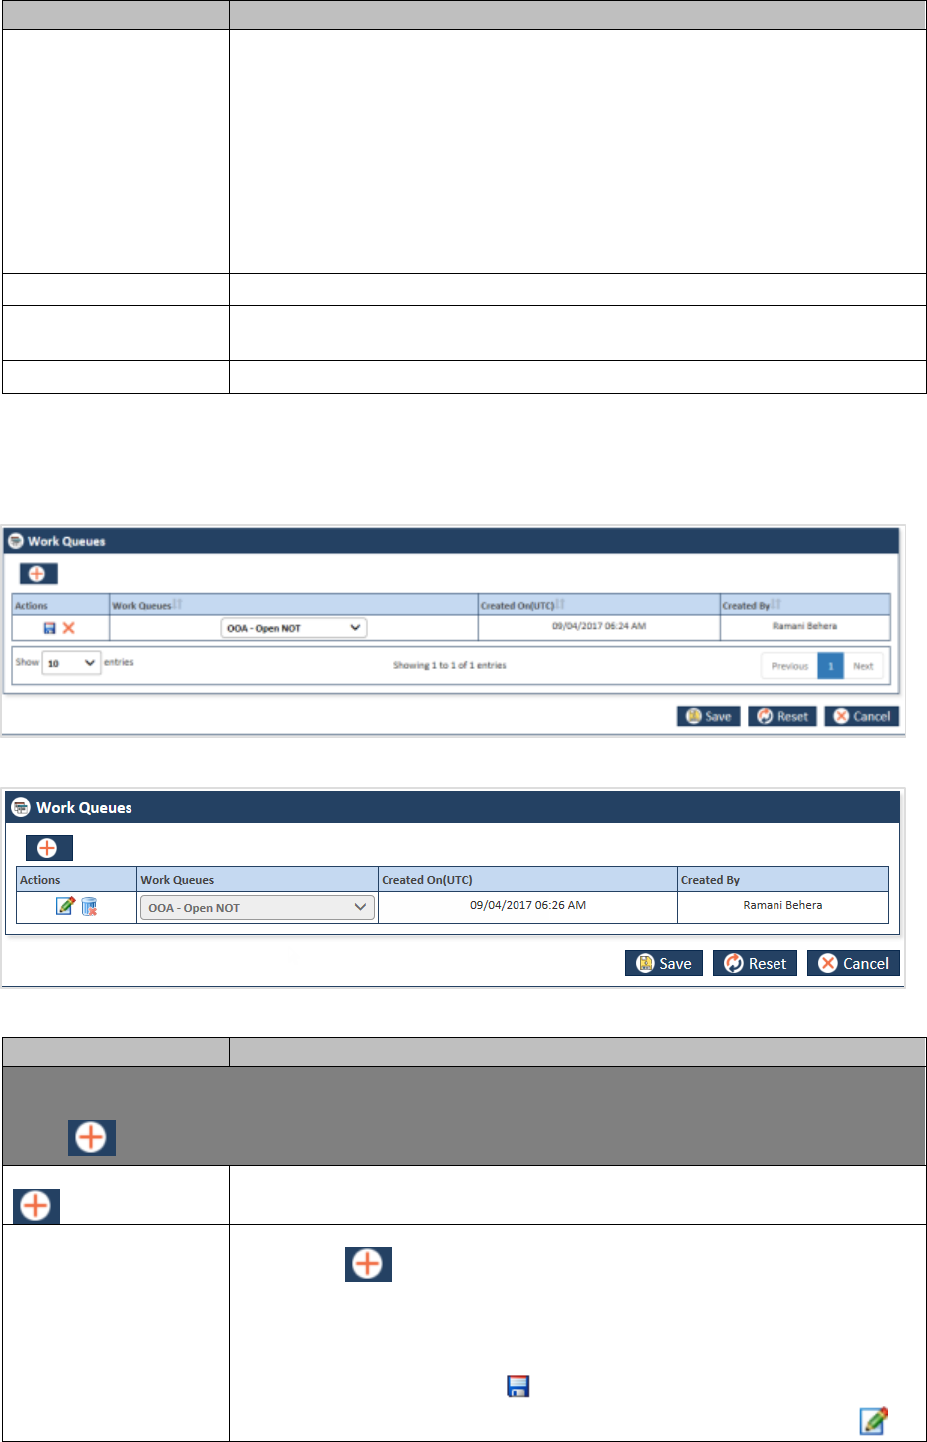
ERS Administration ENROLMENT RECON SYSTEM User’s Manual
Page 6-4 1.0 ©UnitedHealthcare
Field Name
Description
C & D - Enrolment
C & D - Sales
M & R - Billing
M & R - Customer Service
M & R - Enrolment
M & R - Sales
PCP - Billing
PCP - Customer Service
PCP - Enrolment
PCP - Sales
WorkBasket
Select the work basket in this field. This skill belongs to the workbasket.
DiscrepancyCategory
Select the discrepancy category. The values in this field are displayed
depending on the values selected in the WorkBasket field.
Is Active
Select this check box to make this active in the system.
Adding Work queue to Skills 6.1.2.1
You can add work queue to the skill that you added newly. Before you add work queue, click the icon.
All the values in the respective columns appear with Work Queues column in edit mode.
Figure 6-5: The Adding Work queue> Edit mode
Figure 6-6: The Adding Work queue> Queue Added
Field Name
Description
Work Queue
Attach a work queue to this skill. All the columns in this section displays values after you click the Add
queue icon.
Add Work Queue
Click this icon to add Work Queue to the skill. The value in the column
appears. You can add multiple queues after saving the initial queuing.
Actions
Take the appropriate action this field. After you add a work queue by
clicking the button, the Save and Delete actions appears in the
Actions sections. Before saving the work que, select the appropriate work
queue value in the Work Queue column.
Save: Click the Save icon to save the select the work queue.
After you click this icon, the Save and Delete changes to Edit

ENROLMENT RECON SYSTEM User’s Manual ERS Administration
©UnitedHealthcare 1.0 Page 6-5
Field Name
Description
and Delete icons respectively
Delete: To remove this queue, clicks the Delete icon. After you
click this icon, the Save and Delete changes to Edit and Delete
icons, respectively. Click once again the Delete icon to
remove entire row.
Edit: Click Editi icon to edit the work queue. The Work Queue
column becomes editable and allows you to select any value.
Delete: Click icon to delete the work queue added.
Work Queues
Select the appropriate action value in this field.
The values available in the field are depends on the value you select in the
Discrepancy Category field. Based on the discrepancy category, the value
are appears in this field. For example, if you select the value RPR, in the
Discrepancy Category, the all the predefined queues are available in this
field.
The following message appears while adding the work queue.
You cant add duplicate work queue: appears if you add same
queue for multiple times.
You have one record in Work Queues in edit mode: appears if
you try adding and deleting work queue when work queue is in edit
mode.
Do you want to delete?: appears if you want to delete the added
work queues.
Created On(UTC)
This field displays the date when the queue is added to the skill. The value
in this field doesn’t appear in edit mode. Once you save the selected work
queue, value in this field appears.
Created By
Displays the name of the user that added the work queue.
Editing/ Adding skills 6.1.2.2
Manage Access Group 6.2
After you added the skills and attached the work ques to it. You can manage the access groups. You can
associate a access group to the skill and
6.2.1 Searching Access Group
Figure 6-7: Searching Access Groups
Field Name
Description
Access Group Name
Enter the name of the access group.
Is Active
Select this check box to get all the active access groups. If you do not select
this checkbox, no value appears in the Search Results section.
Add
Click this button to add new access groups. The Access Group for
appears.
Search
Click this button to get all the active access groups. If you do not select this
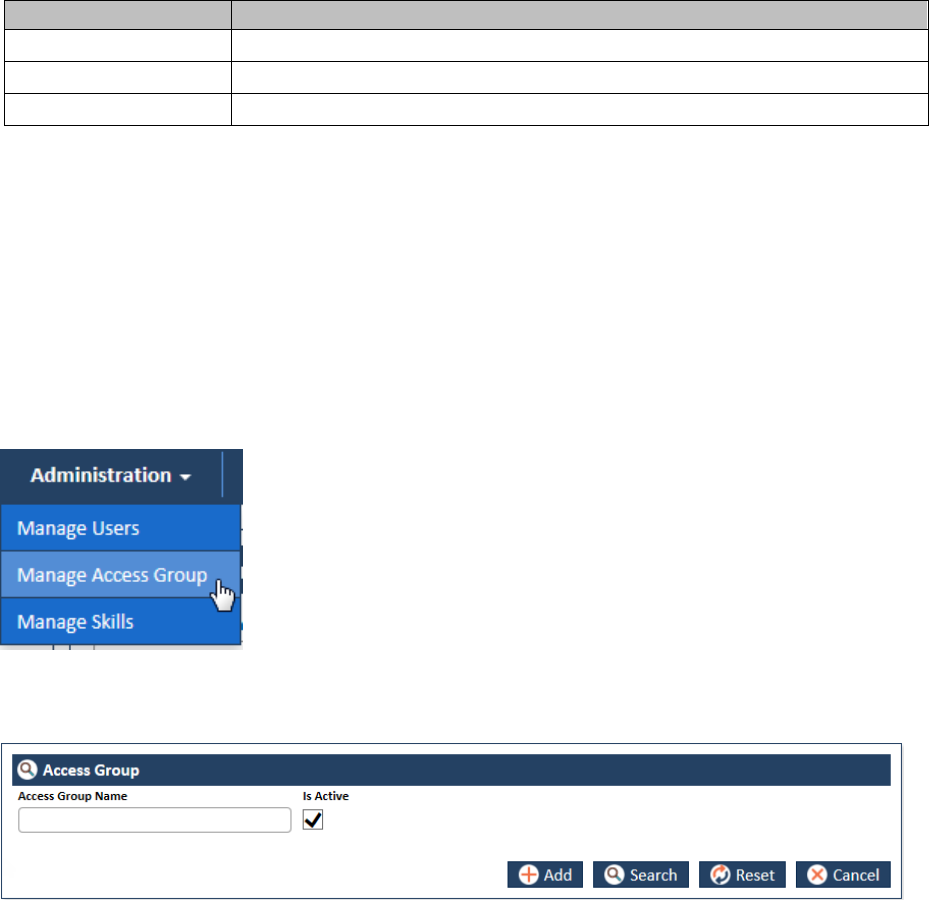
ERS Administration ENROLMENT RECON SYSTEM User’s Manual
Page 6-6 1.0 ©UnitedHealthcare
Field Name
Description
checkbox, no value appears in the Search Results section.
Reset
Click this button to reset all the search criteria.
Cancel
Click this button to cancel the search process.
6.2.2 Managing access group
Editing/ Adding Access Groups 6.2.2.1
You can add new access groups and attach the skills that you created to the access group. You can also
attach reports while creating access groups.
To add new access group, you have to access the Access Groups form.
Navigation:
To navigate to the Access Group form:
1. Go the Administration menu and navigate and click the Manage Access Groups link.
Figure 6-8: Manage Access Group Link
2. The Access Groups search form appears
Figure 6-9: Access Group Search Form
3. Click the Add button.
The Access Group form appears

ENROLMENT RECON SYSTEM User’s Manual ERS Administration
©UnitedHealthcare 1.0 Page 6-7
Figure 6-10: Access Group form
Access Group Forms 6.2.2.2
Using the access group form, you can add new access group, attach newly created skill related to the
Role and Work Basket.
Figure 6-11: Adding Access Group
Field Name
Description
Access Group header section
Access group Name
Enter a name for the new access group.
Role
Select the role name in this field. If you want add newly created skill related
to OST, you have to select the role that you selected while created skill.

ERS Administration ENROLMENT RECON SYSTEM User’s Manual
Page 6-8 1.0 ©UnitedHealthcare
Field Name
Description
Work Basket
Select the required work basket. If you want to add OST related skill, you
have to select OST.
Is Active
If you select this check box, the access group gets active in the system.
Description
Provide a description about the newly added access group.
Skill section
Add button
Click this button to add skill related to the work basket. All the values in this
row available.
Actions
Take appropriate action in the Action sections. To add and delete skill, refer
to the Action column in the Adding Work queue to Skills section.
Skill
Select the sill in this column. Values in the section depend on the value
selected in the WorkBasket field. For example, if you have selected OST in
the Work Basket field, the all the OST related skills appear in this section.
To add and delete skill, refer to the Action column in the Adding Work
queue to Skills section.
Can Create, Can
Search, Can History,
CanReassign,
CanUnlock, Can
Modify, Can View,
Can Mass Update,
Can Upload, Can
Clone, and
Can Reopen
You must select one or more activities of the responsibilities. If you click the
Save button in the Actions column, without selecting at least one
responsibility, the error message “You Must Check One Check Box Against
The Skill”.
Reports section
Add button
Click this button to add Report row.
Actions
Take the appropriate action in this field.
To add and delete skill, refer to the Action column in the Adding Work
queue to Skills section.
Report
Select the appropriate report in this field.
To add and delete skill, refer to the Action column in the Adding Work
queue to Skills section.
Created On(UTC)
Displays the date when the access group was created.
Created By
Displays the user who created the access group.
ERS Administration 6.3
6.3.1 Manage users
You can assign the new users or existing users to the access to groups existing or newly created in the
system. Before assigning the user to the access group, you can search the user that you want assign to
the access group. You can also create new users.
6.3.2 Searching users
You can search the existing user in the system using the Search User for.
Navigation:
To access, the Search Users page, go the Administration subsystem, and navigate and click the Manage
Users link. The Search User form appears.

ENROLMENT RECON SYSTEM User’s Manual ERS Administration
©UnitedHealthcare 1.0 Page 6-9
Figure 6-12: Accessing Search User Form
Figure 6-13: Search User form
Searching users 6.3.2.1
Figure 6-14: Search User Page
Field Name
Description
MS ID
Enter the MS ID of the user that you want to search.
Full Name
Enter the full name of the user.
Email
Enter the email address of the user.
Is Active
Select this check box if the user is active in the system.
Add User
To Add users click this button. The User Administration page appears along
with User Address, Specialist Info and Access Groups section.
Search
Click this button to search the user based on the search criteria.
Reset
Click this button to reset the search criteria.
Cancel
Click this button to cancel the search process.
User Search Result 6.3.2.2
The search result appears after you search the user in the entering the search criterial in the User
Search form.
Figure 6-15: User Search form
Field Name
Description
Actions
You can edit the user or View History by click these icon respectively in this
column.
MS ID
Display the MS ID of the user.
Full Name
Displays the full name of the user.
Email
Displays the email of the user.
Start Date(UTC)
Displays the start date (UTC) when the user was created.
End Date(UTC)
Displays the date till which the user is valid in the system.
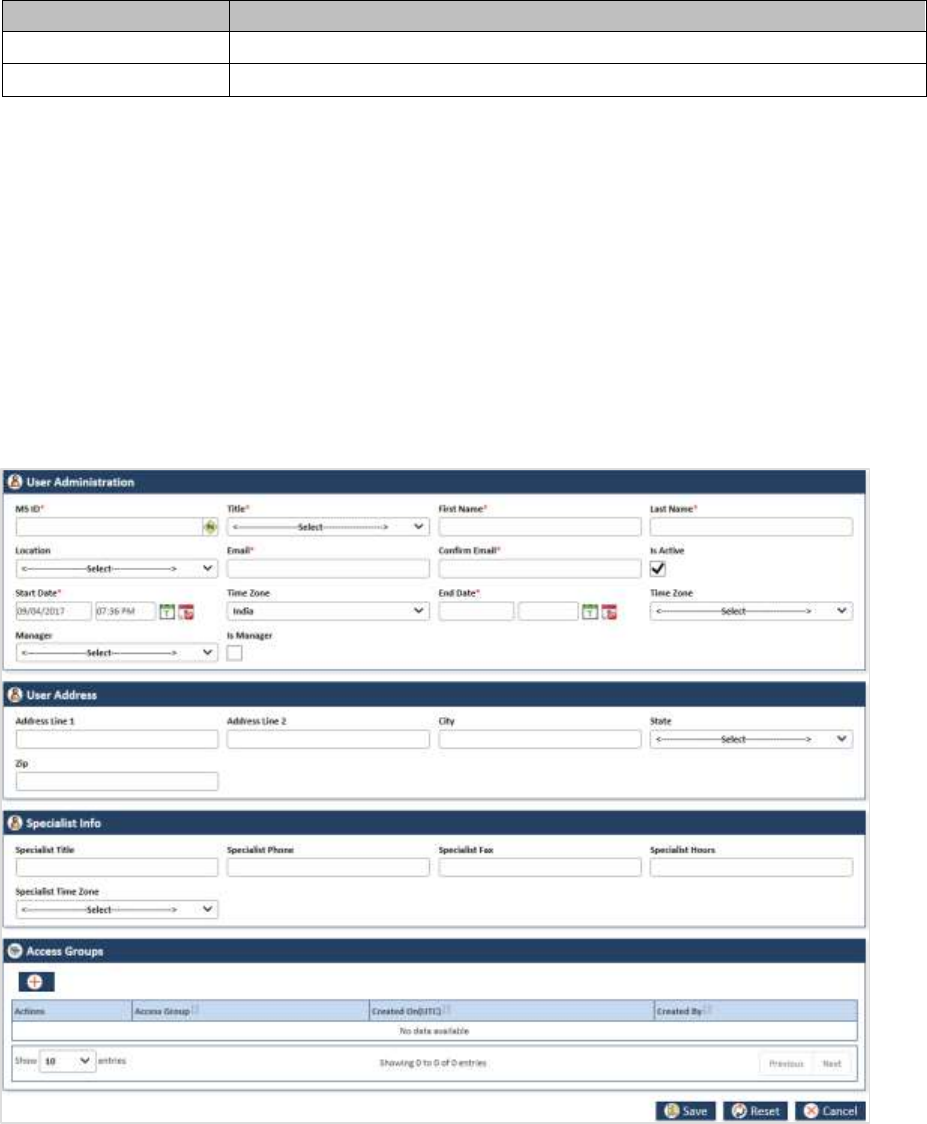
ERS Administration ENROLMENT RECON SYSTEM User’s Manual
Page 6-10 1.0 ©UnitedHealthcare
Field Name
Description
LockedBy
Displays the user that locked the user in the system.
LockedOn(UTC)
Displays the date when the user is locked.
6.3.3 Managing users
You can manage the user by adding or editing the user along the details such as address, specialist
information. You can also assign the access group to the user.
Adding users admin 6.3.3.1
Navigation:
To access, the User Administration form:
1. Go to the Administration subsystem, and navigate and click the Manage Users link. The Search
User form appears.
Click the Add User button. The User Administration form appears.
Figure 6-16: Adding User Administration form
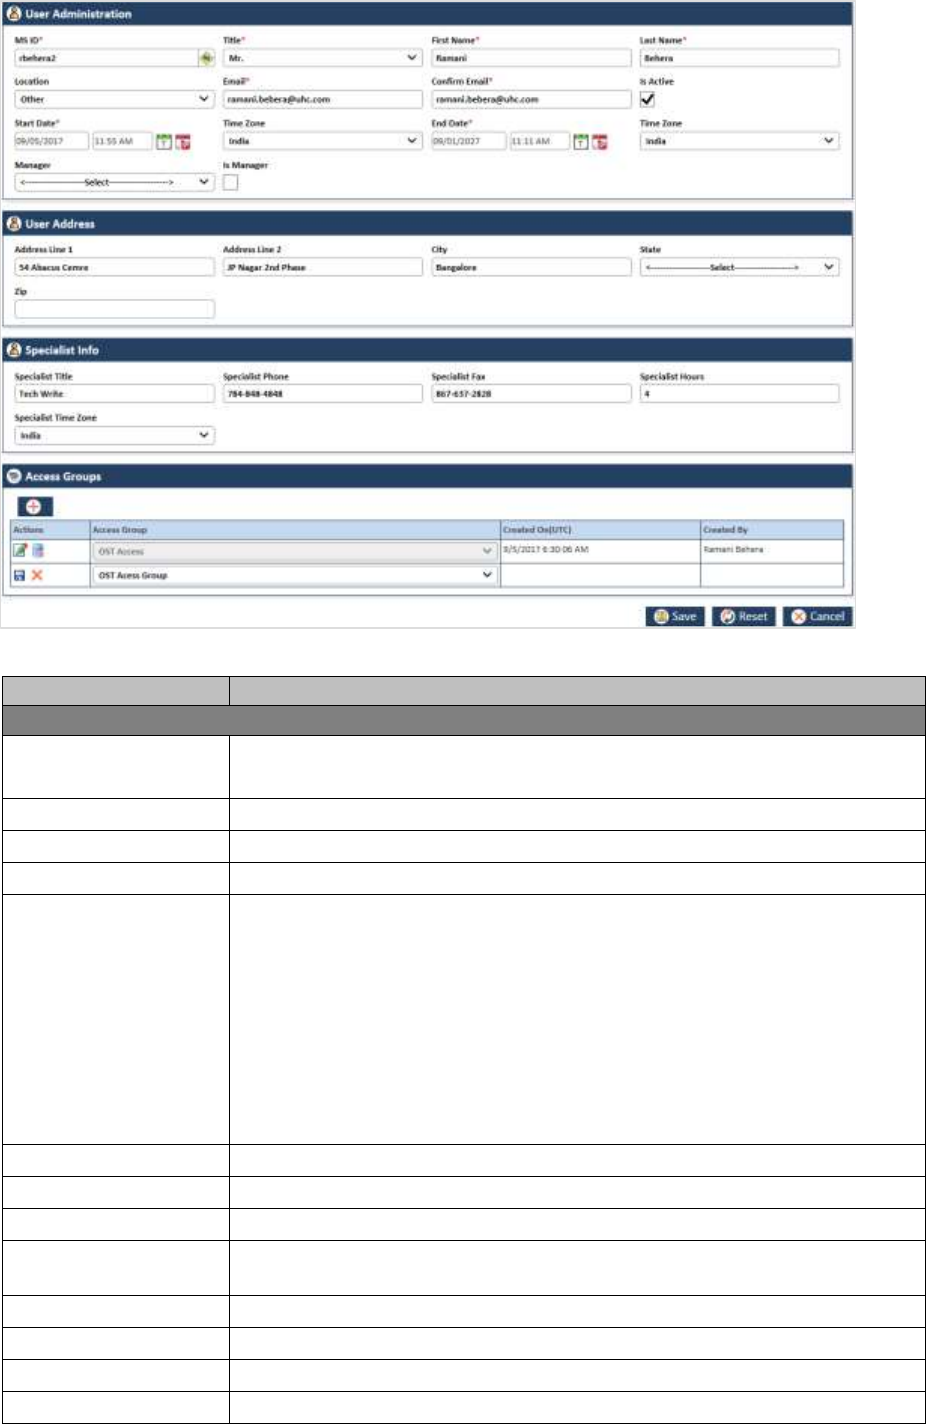
ENROLMENT RECON SYSTEM User’s Manual ERS Administration
©UnitedHealthcare 1.0 Page 6-11
User Administration form 6.3.3.2
Figure 6-17: The User Administration form
Field Name
Description
Access Administration header section
MS ID
Enter the MS ID of the use that you want create user details in the system.
Click the get Icon
Title
Select the title of the user in this field.
First Name
Enter the First name of the user.
Last Name
Enter the last name of the user.
Location
Select the location of the user. The following locations are available in this
field.
Airoli
Bangalore
Cebu
Chennai
Hyderabad
Noida
Onshore
Other
Email
Enter the email identification of the user.
Confirm Email
Enter the email identification of the user again for confirmation.
Is Active
Select this check box to make the user details active in the system.
Start Date
Enter date and time when first time the user details was created in the
system.
Time Zone
Select the time zone in this section.
End Date
Select this check box to make the user details active in the system.
Time Zone
Enter date and time till which the user details will be active in the system.
Manager
Select the name of the manager.
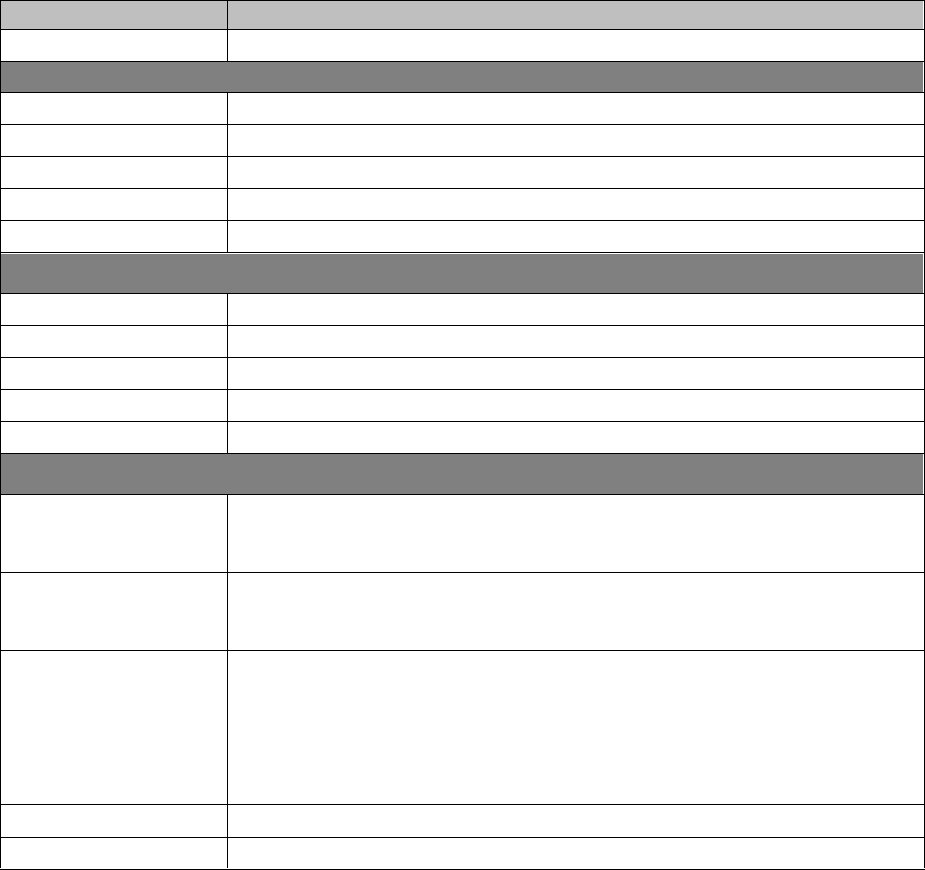
ERS Administration ENROLMENT RECON SYSTEM User’s Manual
Page 6-12 1.0 ©UnitedHealthcare
Field Name
Description
Is Manager
Select this check box, if the selected manager is the manager of the user.
User Address
Address Line 1
Enter the address in this field.
Address Line 2
Enter the address in this field.
City
Select the name of the city in this field.
State
Select the name of the state in this field.
Zip
Enter the zip code of the city in this field.
Specialist Info
Specialist Title
Enter the specialist title in this field.
Specialist Phone
Enter the specialist phone number in the field.
Specialist Fax
Enter the specialist fax number in this field.
Specialist Hours
Enter the specialist hours in this field.
Specialist Time Zone
Enter the specialist time zone in this field.
Access Groups
Add Button
Click this icon to add access group to the user. All the values in the column
appear. You can add multiple access groups after saving the initial access
groups.
Actions
You can save/edit and delete the access group. For more information on
adding and deleting actions, refer to the Action field descriptions in the
Adding Work queue to Skills section.
Access Group
Select the access group in this section. The values appear in this section,
based on the login criterial. If the user logs in to application using OST work
baskets, all the Access Groups attached with OOA skill appear in this
section.
If you attach this access group for this user, the user gets access to the
queues containing skills in particular access group.
Created On(UTC)
Displays the date when the user account was created.
Created By
Displays the details about the user that created the user account.

©United Healthcare 1.0 Page 7-1
ERS Maintenance Chapter 7
This chapter contains the following sections:
Enrolment Maintenance
Maintaining Configurations
Maintaining Alerts
Maintaining Departments
Maintaining Lookups
Maintaining Lookup Correlations
Maintaining Resources
Enrolment Maintenance 7.1
Administrators maintain the application regularly for proper management of various features and
functionalities. They manage and maintain the system by setting up, configuring, and managing various
backend technical and configurational settings that help support run the application effectively. They
implement required system settings to maintain application messages, configurations, departments,
lookups and lookup correlations and resources.
7.1.1 Maintaining Alerts
As an Administrator, you can create and set alerts that can be sent to any individual or department
regarding any task and activities. These are specific notifications, messages and information that are
sent to departments or individuals. You can update, add, and delete the messages and set alerts.
Searching Alerts
7.1.1.1
Navigation:
To access the Search Alerts search window, go to the Maintenance menu and click the Alerts link. The
Search Alerts window appears.
Figure 7-1: The Search Alerts search window
Field Name
Description
Title
Enter the title of the alert that you want to search.
If you search the alert without entering the title, all the active alerts in the
systems appears in the Search Results section.
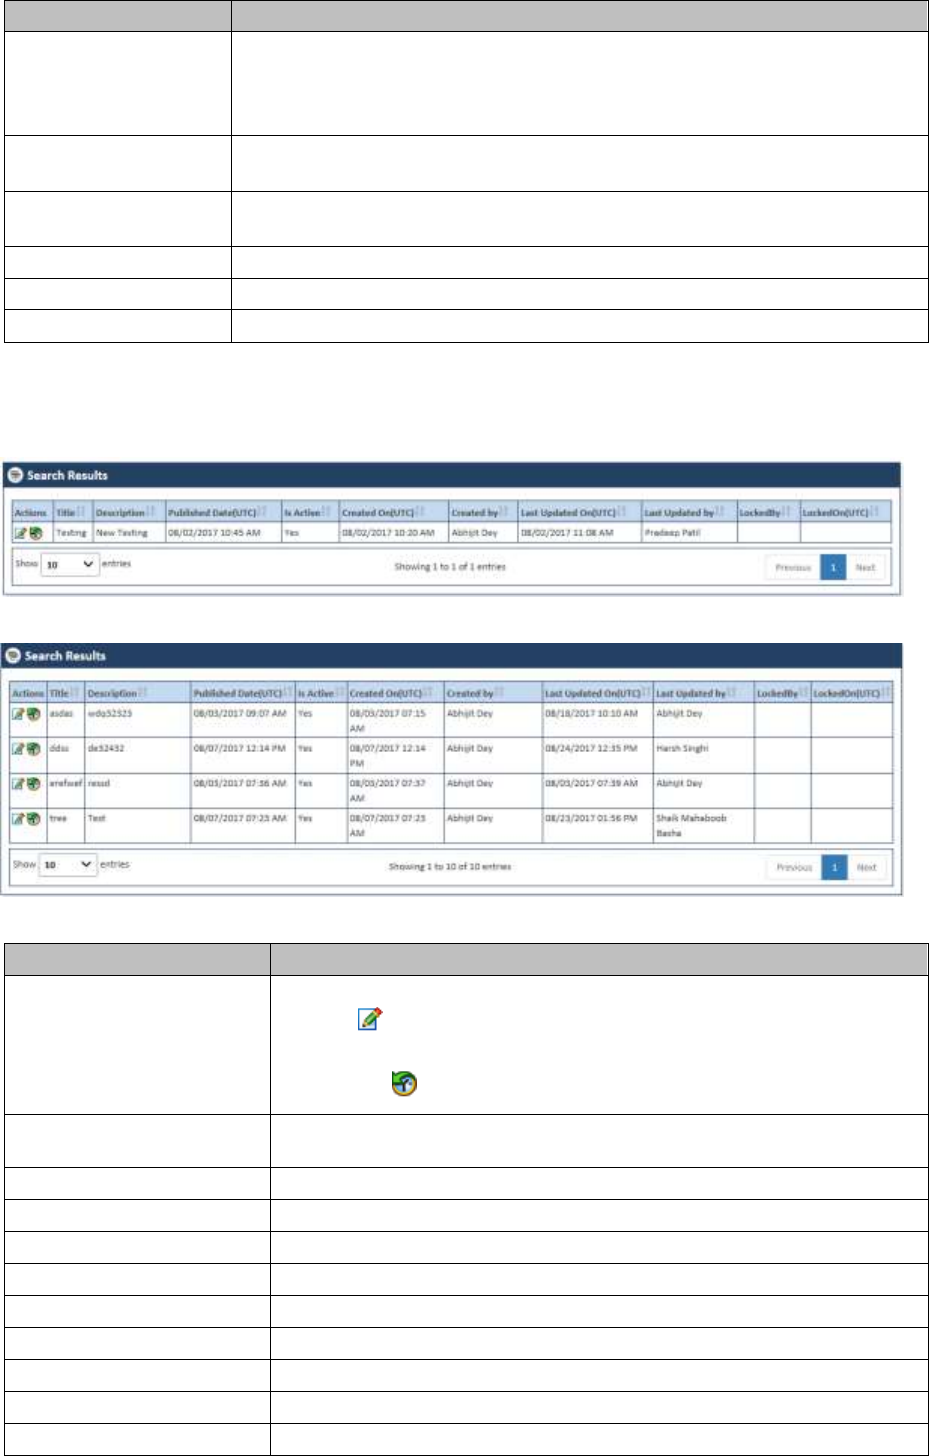
ERS Maintenance ENROLMENT RECON SYSTEM User’s Manual
Page 7-2 1.0 ©UnitedHealthcare
Field Name
Description
Description
Enter the description of the alert that you want to search.
If you search the alert without entering the title, all the active alerts in the
systems appears in the Search Results section.
Is Active
Select this check box if the alert is active in the application. If you don’t
select this checkbox, the alert doesn’t appear in the search result.
Search
Click this button to search the alert in the application. The Search Result
section appears with alert that you entered in the Title field.
Reset
Click this button to reset the search criteria.
Cancel
Click this button to cancel the search process.
Add New
This button is required to add new alerts.
The search results
7.1.1.1.1
If you search the alert without entering the title and the description, all the active alerts in the systems
appears in the Search Results section.
Figure 7-2: The Alert Search Results
Figure 7-3: The Alert Multiple Search Results
Field Name
Description
Actions
Click the required action icon to take proper action.
Edit Skill : Click this icon to edit alerts. The Alerts window appears
after you click this icon.
View History : Click this icon to view the history.
Title
Displays the title of the alert.
Description
Displays the description given for the alert.
Published Date(UTC)
Displays the alert publication date.
Is Active
Displays the value Yes, since all are active alerts.
Created On(UTC)
Displays the date when the alert was created.
Created by
Displays the user name that created the alert.
Last Updated On(UTC)
Displays the date when the alert was last updated.
Last Updated by
Displays the user name that last updated the alert.
LockedBy
Displays the user name that last updated the alert.
LockedOn(UTC)
Displays the user name that last updated the alert.

ENROLMENT RECON SYSTEM User’s Manual ERS Maintenance
©UnitedHealthcare 1.0 Page 7-3
Adding Alerts 7.1.1.2
You can add and edit one or more alerts the system. You can create alert using the Alerts forms.
Navigation:
1. To access the Search Alerts search window, go to the Maintenance menu and click the Alerts
link. The Search Alerts window appears.
Figure 7-4: Search Alerts > Adding Alerts
2. Click the Add New button. The Alerts form appears.
Figure 7-5: The Alert Form
Field Name
Description
Title
Enter a title of the alert. You can enter maximum 250 characters in this
field.
Description
Enter the description of the alert. You can enter maximum 5000
characters in this field.
Published Date
Enter the date and time when the alert can be published.
Time Zone
Select the time zone in where you want to publish the alert.
Effective Date
Select the date from which the alert can be effective.
Time Zone
Select the time zone where you want your alert be effective.
Criticality
Select the criticality in this field such as High, Medium, and Low.
Inactivation Date
Select the date and time till which the alert can be active in the system.
This is required field if you don’t select the value in the Is Active field.
You must enter a future date in this field.
Time Zone
Select the time where this can be inactivated.
Is Active
Select the check box if you want to activate the alert in the system. If you
don’t select this check box, the alert cannot be active in the system.
Send Alert To
Select an appropriate value this field to which the alert can be sent. The
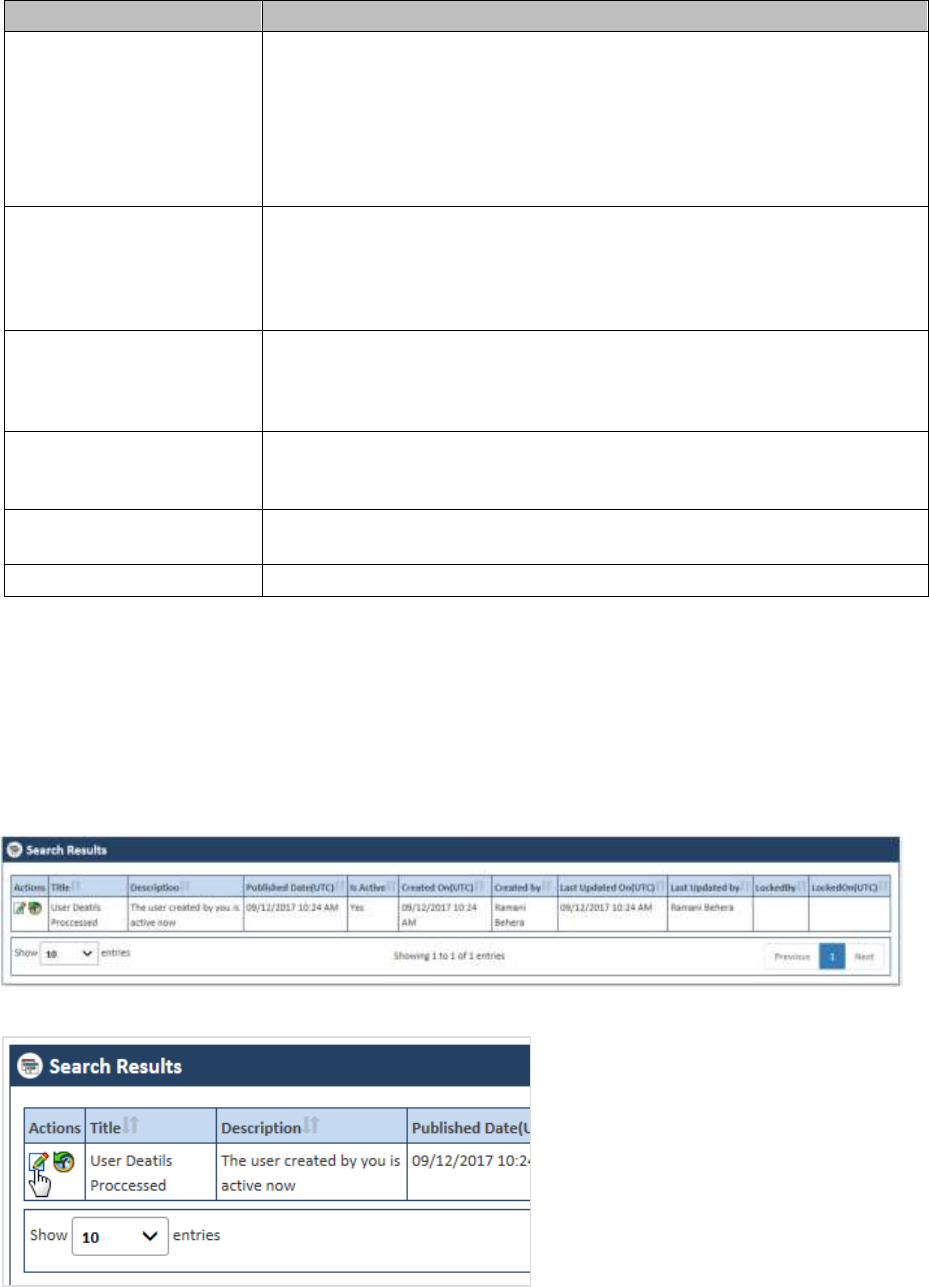
ERS Maintenance ENROLMENT RECON SYSTEM User’s Manual
Page 7-4 1.0 ©UnitedHealthcare
Field Name
Description
following values are available in this field.
All: Select this value if you want to send the alert to all
departments and individuals.
Department: Select this value if you want to send the alert to
selective departments.
Email: Select this value if you want send the alert to a specific
user.
Department
This field appears if you
select the value
Department in the Send
Alert to field.
Select the department to which you want to send the alert.
Email
This field appears if you
select the value Email in
the Send Alert to field.
Select the email address of the user to who you want to send the alert.
Save
Click this button to save the details and create the alert in the system.
An error message ‘Record saves successfully’ appears after you create
the alert.
Reset
Select this button to remove all the values entered and selected in all the
fields.
Cancel
Click this button cancel the search process.
Editing Alerts 7.1.1.3
You can edit the alert that you created or created by some other users. You need to access the alert by
searching it before editing it. You need access the Alert form from Search Results section.
Navigations
1. Search and identify alert from Search Results section. For more information on searching the
alerts, refer to the Searching Alters section. Search result appears.
Figure 7-6: The Alert Search Result
Figure 7-7: The Search Results> Action column
2. Go to the Action column and click the Edit Alert icon. The Alert form appears.
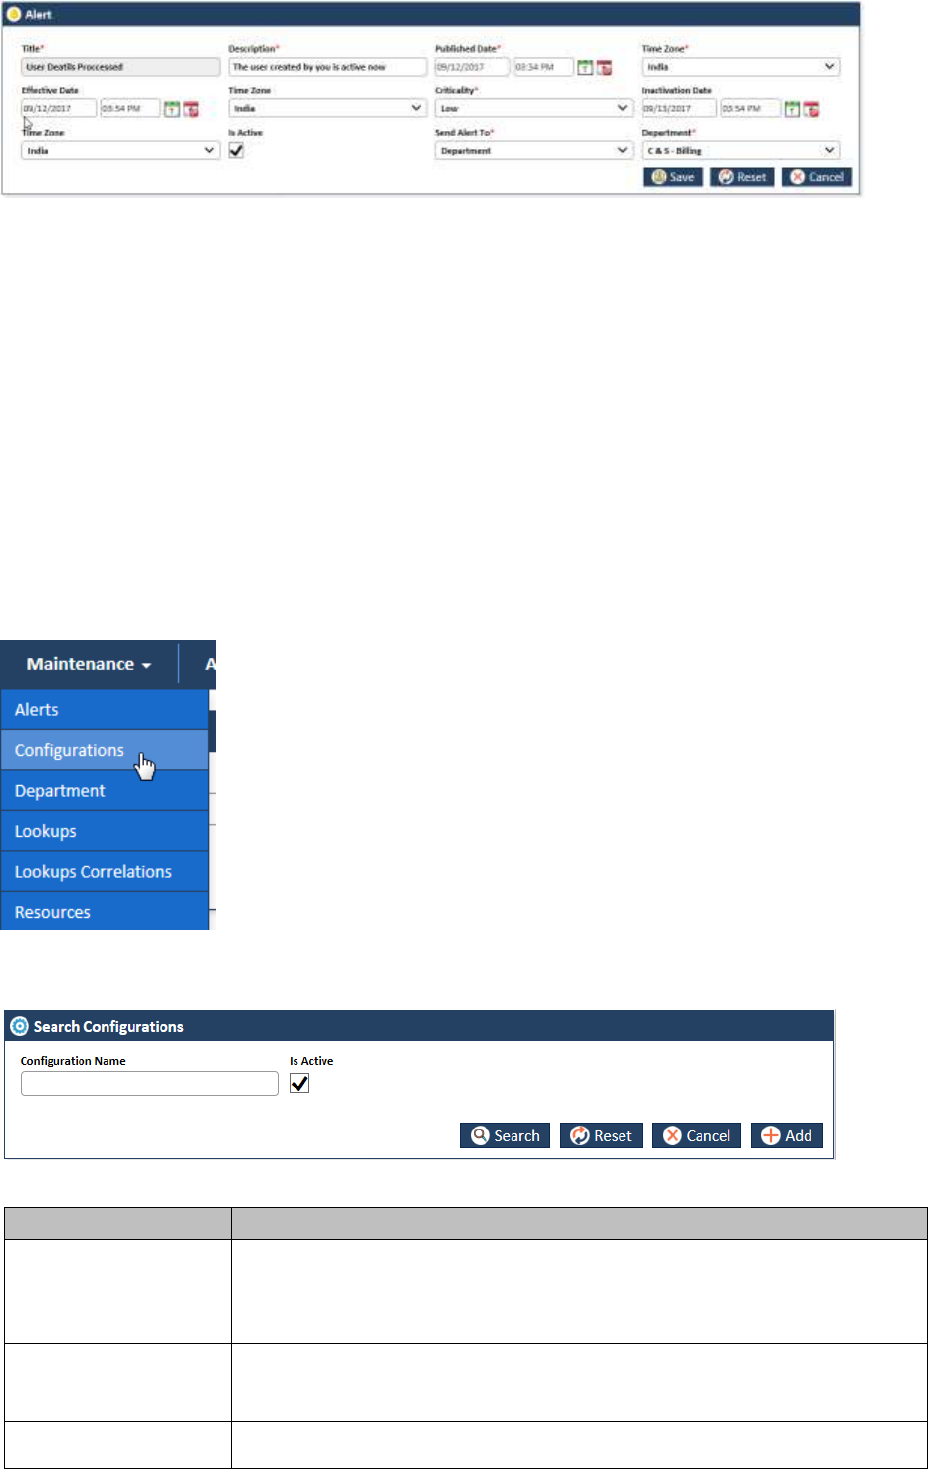
ENROLMENT RECON SYSTEM User’s Manual ERS Maintenance
©UnitedHealthcare 1.0 Page 7-5
Figure 7-8: The Alert form for Editing
For more information on how to work on the Alerts form, refer to Adding Alerts section.
Viewing Alert History 7.1.1.4
7.1.2 Maintaining Configurations
As an Administrator, you can maintain configuration in the application which can be used throughout the
application. You can create, update and delete configuration in the application.
You can use the Add Configuration form to add configuration. You can edit the configuration using the
Edit Configurations form.
Before adding configuration, you can search the configuration using the Search Configuration form.
Searching Alerts 7.1.2.1
Navigation:
To access the Search Configuration search window, go to the Maintenance menu and click the
Configurations sub-menus. The Search Configuration window appears.
Figure 7-9: The Search Configurations search window
Field Name
Description
Configuration Name
Enter the name of the configuration that you want to search.
If you search the configuration without entering the name, all the active
configurations in the systems appears in the Search Results section.
Is Active
Select this check box if the configuration is active in the application. If you
don’t select this checkbox, the configuration doesn’t appear in the search
result.
Search
Click this button to search the configuration in the application. The Search
Result section appears with configuration that you entered in the Name
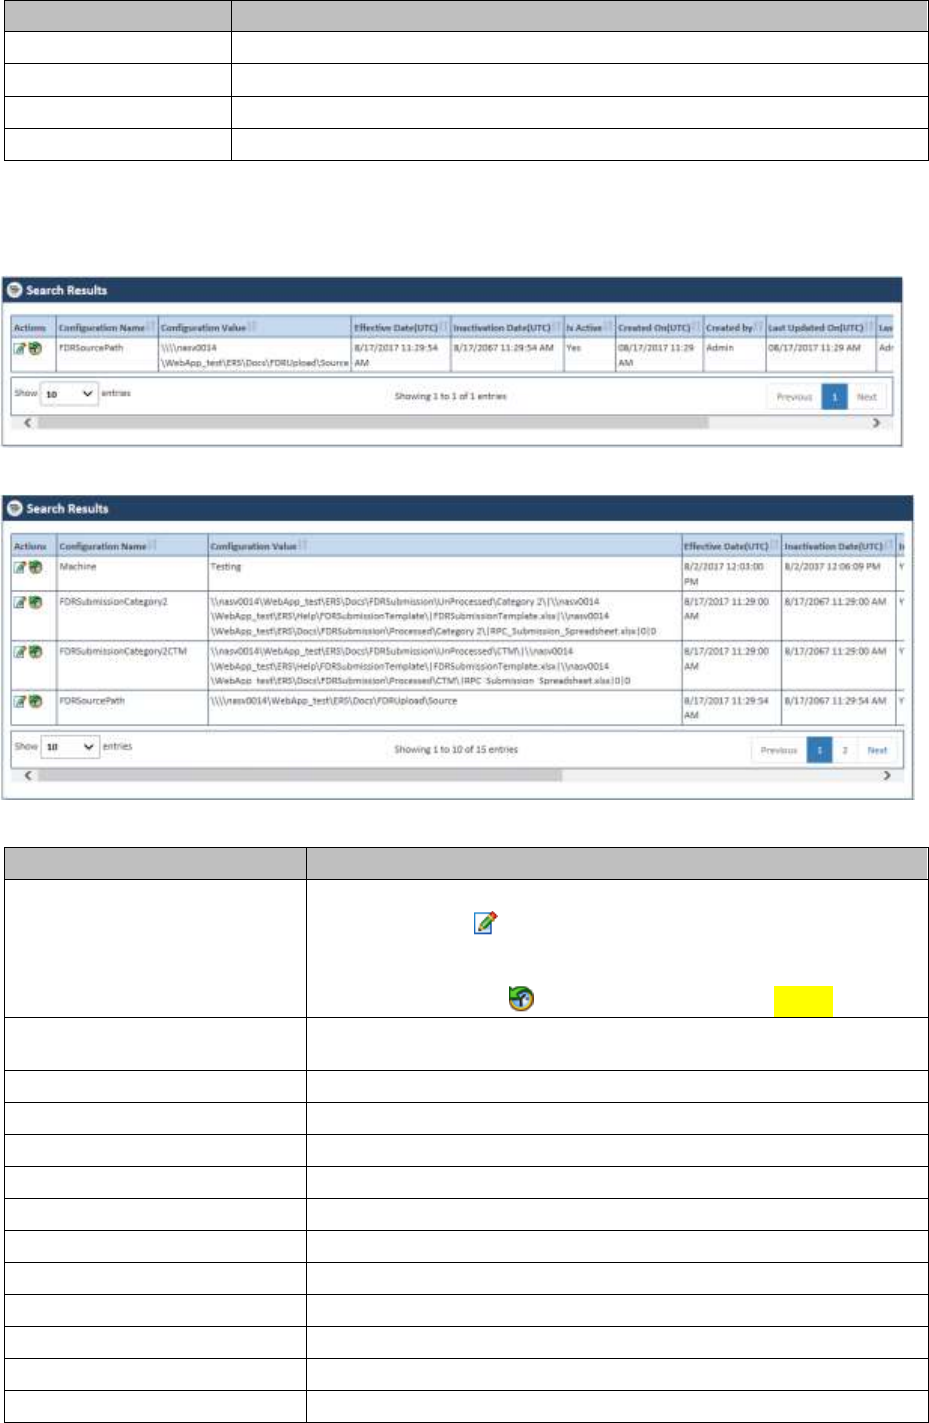
ERS Maintenance ENROLMENT RECON SYSTEM User’s Manual
Page 7-6 1.0 ©UnitedHealthcare
Field Name
Description
field.
Reset
Click this button to reset the search criteria.
Cancel
Click this button to cancel the search process.
Add
This button is required to add configuration.
The search results 7.1.2.1.1
If you search the configuration without entering the name, all the active configurations in the systems
appear in the Search Results section.
Figure 7-10: The Configurations Search Results
Figure 7-11: The Configurations Multiple Search Results
Field Name
Description
Actions
Click the required action icon to take proper action.
Edit Skill : Click this icon to edit configurations. The Edit
Configurations form window appears after you click this
icon.
View History : Click this icon to view the history.
Configuration Name
Displays the name of the configuration.
Configurations Value
Displays the description given for the configuration.
Published Date(UTC)
Displays the configuration publication date.
Effective Date(UTC)
Displayed the configuration effective date.
Inactivation Date(UTC)
Displayed the configuration inactivation date.
Is Active
Displays the value Yes, since all are active configurations.
Created On(UTC)
Displays the date when the configuration was created.
Created by
Displays the user name that created the configuration.
Last Updated On(UTC)
Displays the date when the configuration was last updated.
Last Updated by
Displays the user name that last updated the configuration.
LockedBy
Displays the user name that has locked the configuration.
LockedOn(UTC)
Displays the date when the locked the configuration.
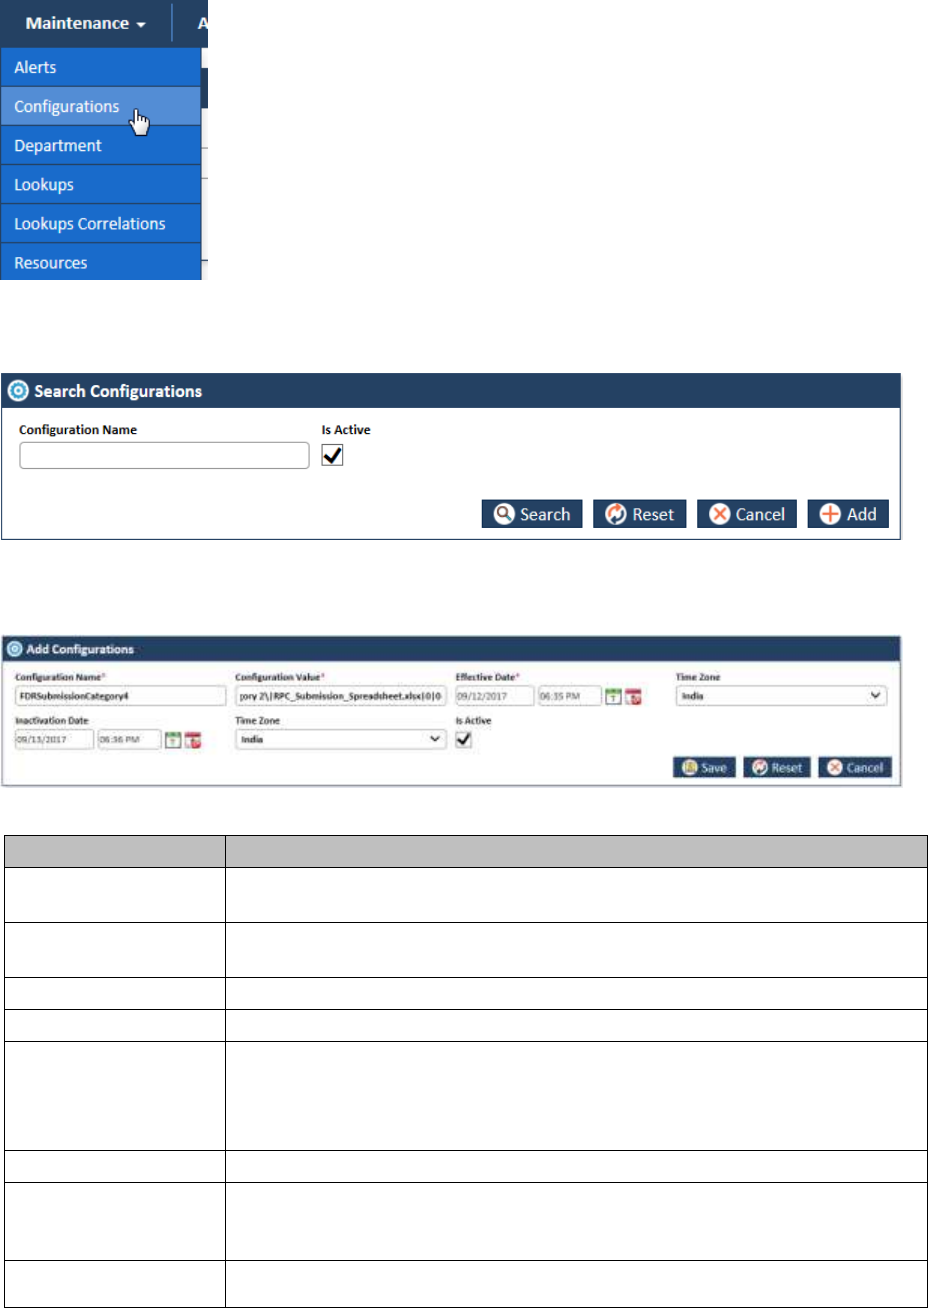
ENROLMENT RECON SYSTEM User’s Manual ERS Maintenance
©UnitedHealthcare 1.0 Page 7-7
Adding Configurations 7.1.2.2
You can add and edit one or more configurations the system. You can create configuration using the
Configuration forms.
Navigation:
1. To access the Configurations search window, go to the Maintenance menu and click the
Configurations sub-menu. The Search Alerts window appears.
Figure 7-12: The Search Configurations Window> Adding Configurations
2. Click the Add button. The Add Configurations form appears
Figure 7-13: The Add Configurations Form
Field Name
Description
Configuration Name
Enter a name of the configuration. You can enter maximum 500 characters
in this field.
Description
Enter the description of the configuration. You can enter maximum 2000
characters in this field.
Effective Date
Select the date and time from which the configuration is effective.
Time Zone
Select the time zone where you want the configurations to be effective.
Inactivation Date
Select the date and time till which the configuration can be active in the
system. This is required field if you don’t select the value in the Is Active
field.
You must enter a future date in this field.
Time Zone
Select the time where this can be inactivated.
Is Active
Select the check box if you want to activate the configuration in the system.
If you don’t select this check box, the configuration cannot be active in the
system.
Save
Click this button to save the details and create the configuration in the
system. An error message ‘Record saved successfully’ appears after you
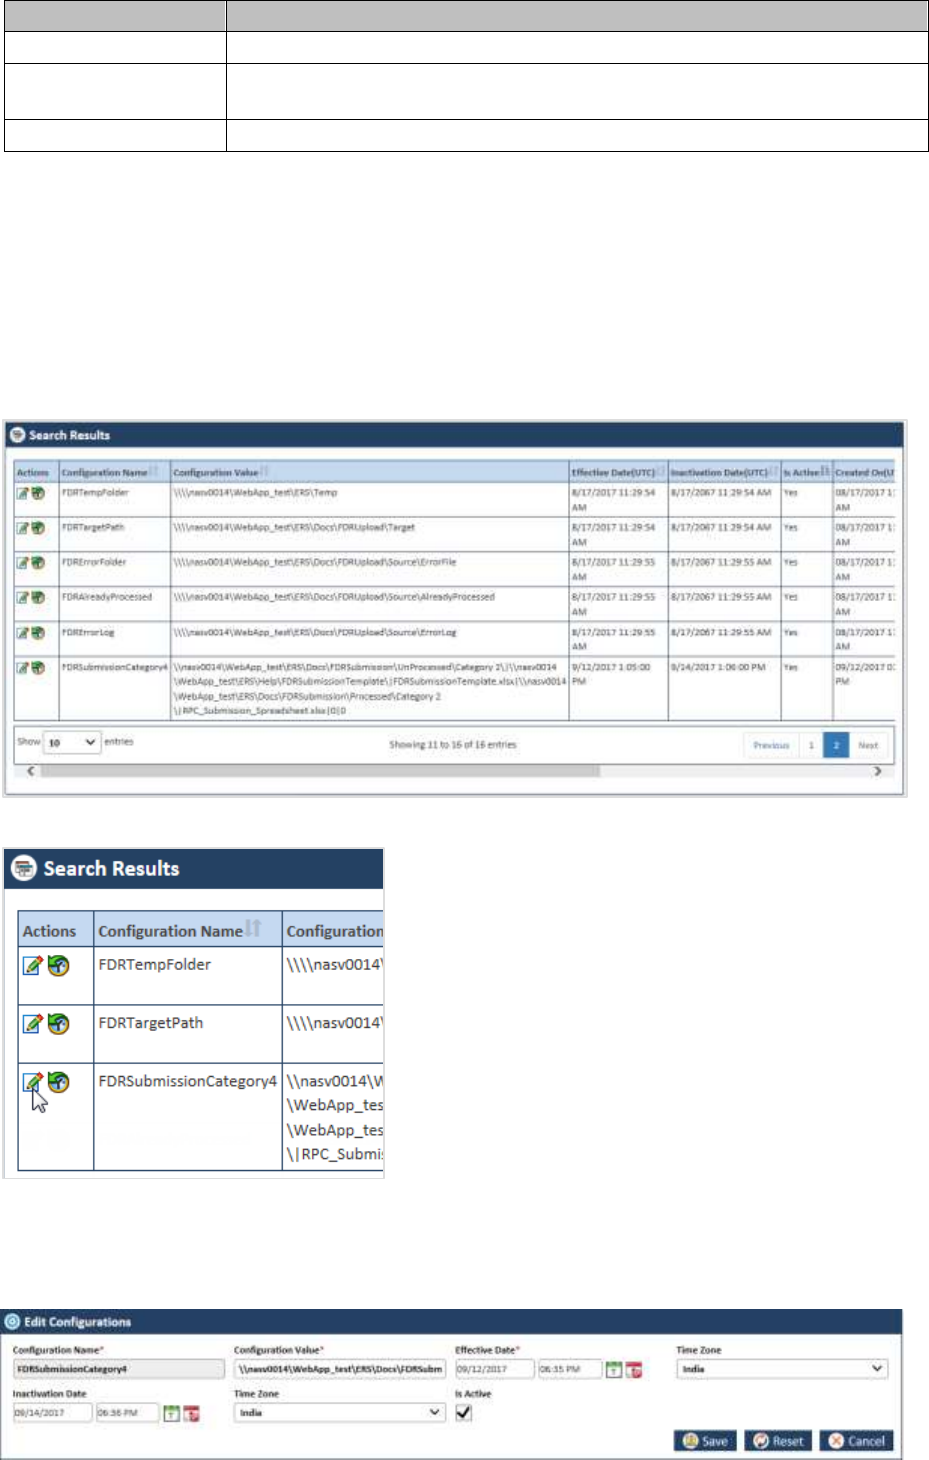
ERS Maintenance ENROLMENT RECON SYSTEM User’s Manual
Page 7-8 1.0 ©UnitedHealthcare
Field Name
Description
create the configuration.
Reset
Select this button to remove all the values entered and selected in all the
fields.
Cancel
Click this button cancel the search process.
Editing Configurations 7.1.2.3
You can edit the configuration that you created or created by some other users. You need to access the
alert by searching it before editing it. You need to access the Edit Configurations form from Search
Results section.
Navigations
1. Search and identify alert from Search Results section. For more information on searching the
alerts, refer to the Searching Configurations section. The Search Results table appears.
Figure 7-14: The Configurations Search Results
Figure 7-15: The Search Results> Action column
2. Go to the Action column and click the Edit Configurations icon. The Edit Configurations form
appears.

ENROLMENT RECON SYSTEM User’s Manual ERS Maintenance
©UnitedHealthcare 1.0 Page 7-9
Figure 7-16: The Edit Configurations form for editing
For more information on how to work on the configurations form, refer to Adding Configurations section.
If you save the Edit Configurations form without editing configuration details, a message “No Changes
done!” appears.
Viewing Configurations History 7.1.2.4
Figure 7-17: The Accessing Configuration History Report
Figure 7-18: The Configuration History Report
7.1.3 Maintaining Departments
As an Administrator, you can maintain departments in the application which can be used throughout the
application. You can create, update and delete department in the application.
You can use the Add Departments form to add departments. You can edit the departments using the
Edit Departments form.
Before adding departments, you can search the configuration using the Search Departments form.
Searching Departments 7.1.3.1
Navigation:
To access the Search Department search window, go to the Maintenance menu and click the
Departments sub-menus. The Search Department window appears.
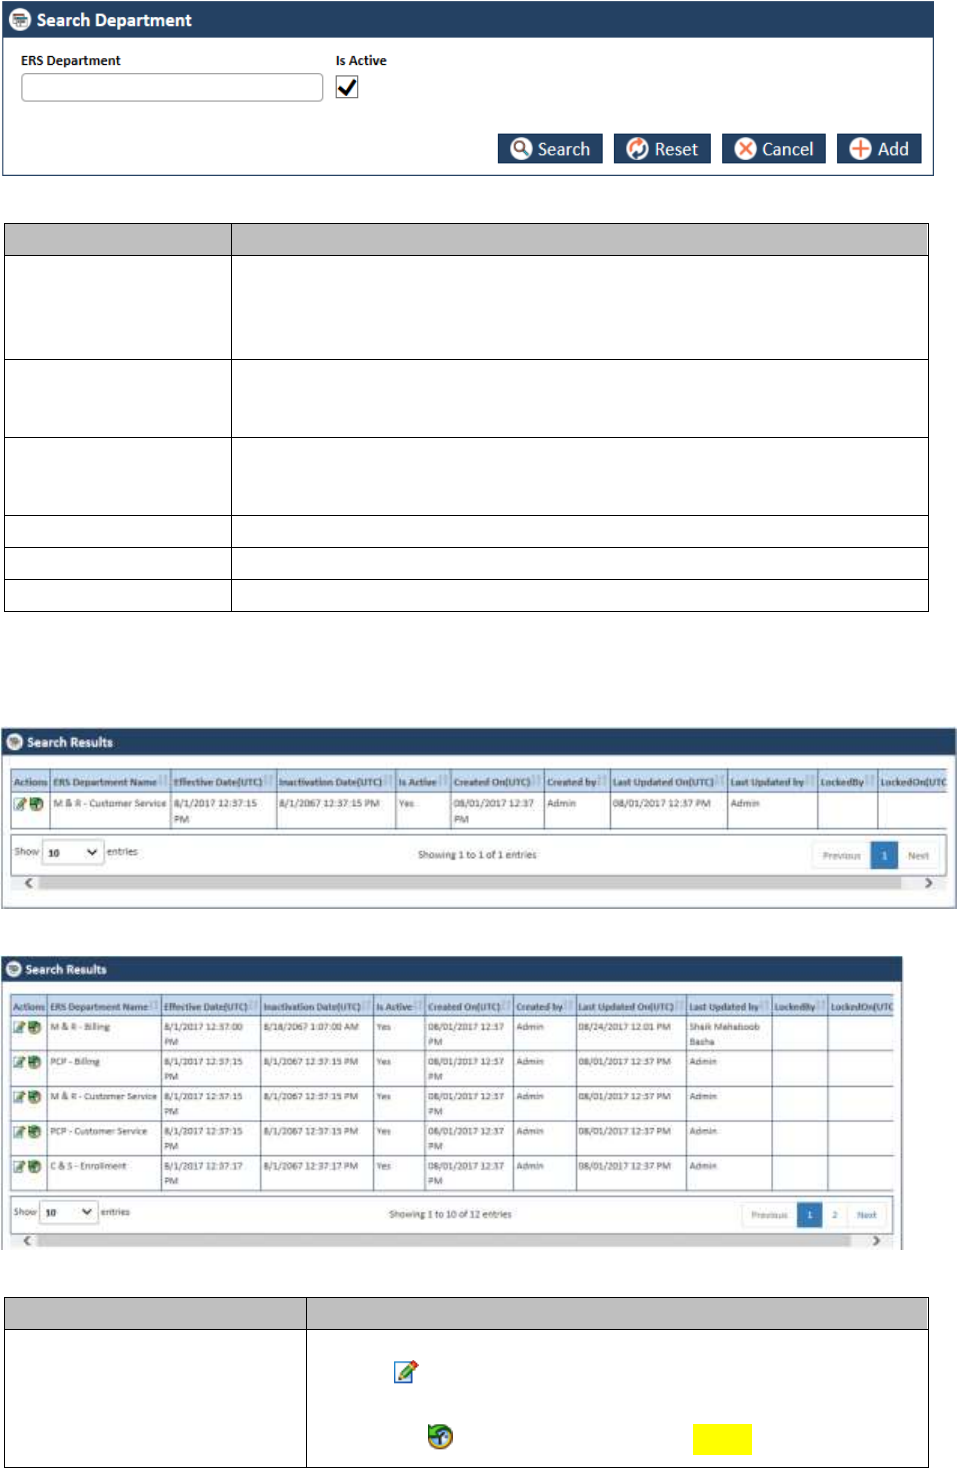
ERS Maintenance ENROLMENT RECON SYSTEM User’s Manual
Page 7-10 1.0 ©UnitedHealthcare
Figure 7-19: The Search Department search window
Field Name
Description
ERS Department
Enter the name of the departments that you want to search.
If you search the departments without entering the name, all the active
departments in the systems appears in the Search Results section.
Is Active
Select this check box if the departments are active in the application. If you
don’t select this checkbox, the department doesn’t appear in the search
result.
Search
Click this button to search the department in the application. The Search
Result section appears with department that you entered in the ERS
Department field.
Reset
Click this button to reset the search criteria.
Cancel
Click this button to cancel the search process.
Add
This button is required to add configuration.
The search results 7.1.3.1.1
If you search the department without entering the name, all the active department in the systems appears
in the Search Results section.
Figure 7-20: The Departments Search Results
Figure 7-21: The Departments Multiple Search Results
Field Name
Description
Actions
Click the required action icon to take proper action.
Edit Skill : Click this icon to edit departments. The Edit
Departments form window appears after you click this icon.
View History : Click this icon to view the history.
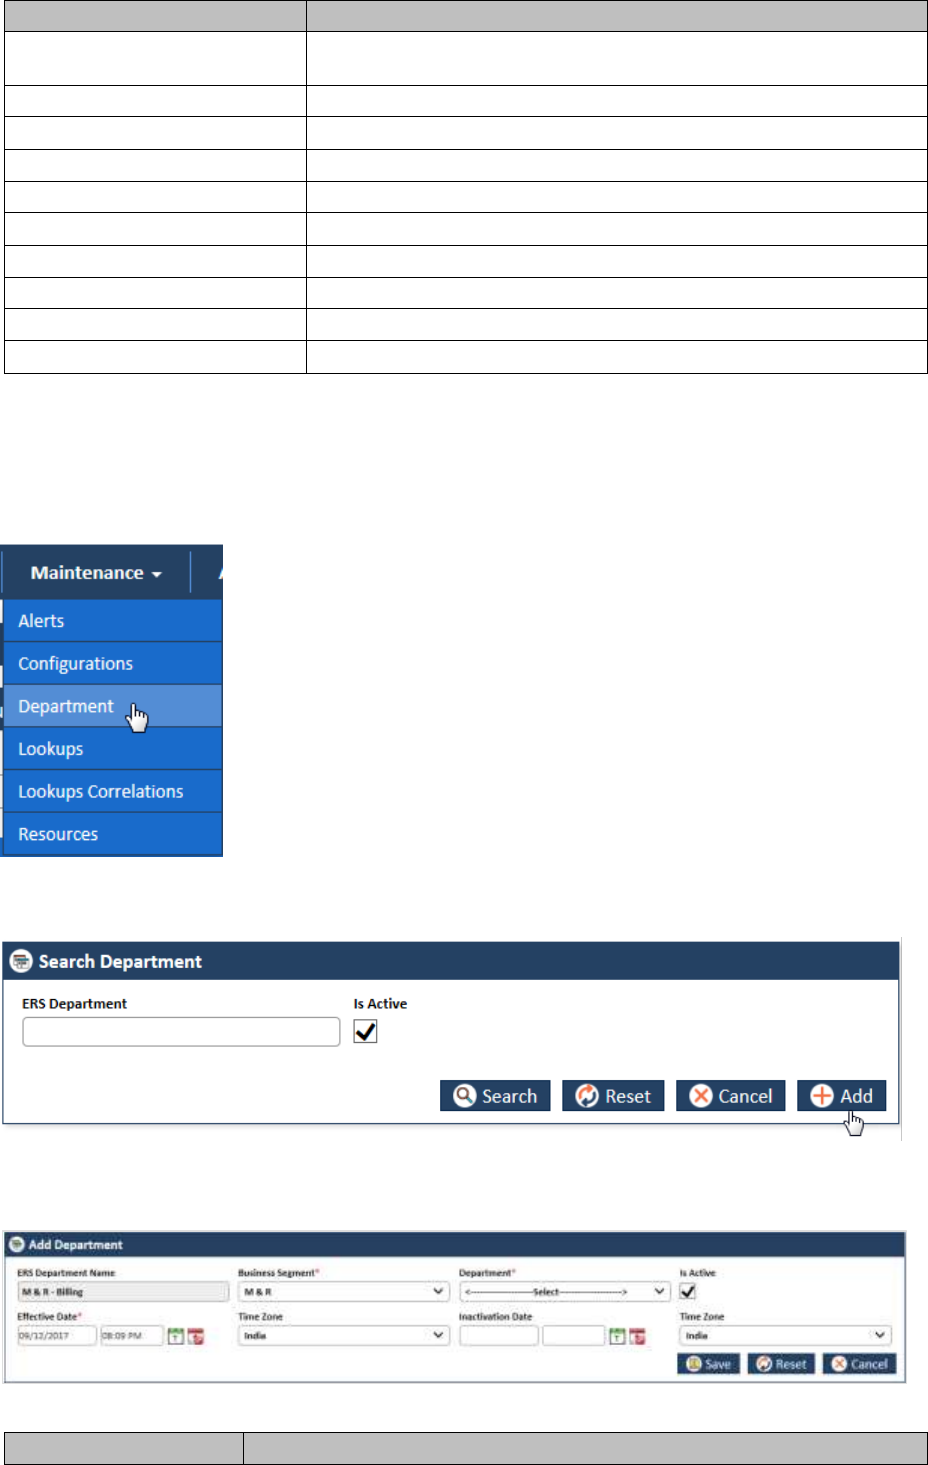
ENROLMENT RECON SYSTEM User’s Manual ERS Maintenance
©UnitedHealthcare 1.0 Page 7-11
Field Name
Description
ERS Department Name
Displays the name of the departments.
Effective Date(UTC)
Displayed the department effective date.
Inactivation Date(UTC)
Displayed the department inactivation date.
Is Active
Displays the value Yes, since all are active department.
Created On(UTC)
Displays the date when the department was created.
Created by
Displays the user name that created the department.
Last Updated On(UTC)
Displays the date when the department was last updated.
Last Updated by
Displays the user name that last updated the department.
LockedBy
Displays the user name that has locked the department.
LockedOn(UTC)
Displays the date when the locked the department.
Adding Departments 7.1.3.2
You can add and edit one or more departments in the system. You can create departments using the
Department forms.
Navigation:
1. To access the Department search window, go to the Maintenance menu and click the
Department sub-menu. The Search Alerts window appears.
Figure 7-22: The Search Department Window> Adding Departments
2. Click the Add button. The Add Department form appears.
Figure 7-23: The Add Department Form
Field Name
Description

ERS Maintenance ENROLMENT RECON SYSTEM User’s Manual
Page 7-12 1.0 ©UnitedHealthcare
Field Name
Description
ERS Department
Name
Value in this field auto populates in this field based on the value you select
the Business Segment field.
Business Segment
Select the business segment in this field.
Effective Date
Select the date and time from which the configuration is effective.
Time Zone
Select the time zone where you want the configurations to be effective.
Inactivation Date
Select the date and time till which the configuration can be active in the
system. This is required field if you don’t select the value in the Is Active
field.
You must enter a future date in this field.
Time Zone
Select the time where this can be inactivated.
Is Active
Select the check box if you want to activate the department in the system.
If you don’t select this check box, the department cannot be active in the
system.
Save
Click this button to save the details and create the department in the
system. An error message ‘Record saved successfully’ appears after you
create the department.
Reset
Select this button to remove all the values entered and selected in all the
fields.
Cancel
Click this button cancel the search process.
Editing Departments 7.1.3.3
You can edit the configuration that you created or created by some other users. You need to access the
alert by searching it before editing it. You need to access the Edit Department form from Search
Results section.
Navigations
1. Search and identify alert from Search Results section. For more information on searching the
alerts, refer to the Searching Departments section. Search Results appears.
Figure 7-24: The Department Search Results
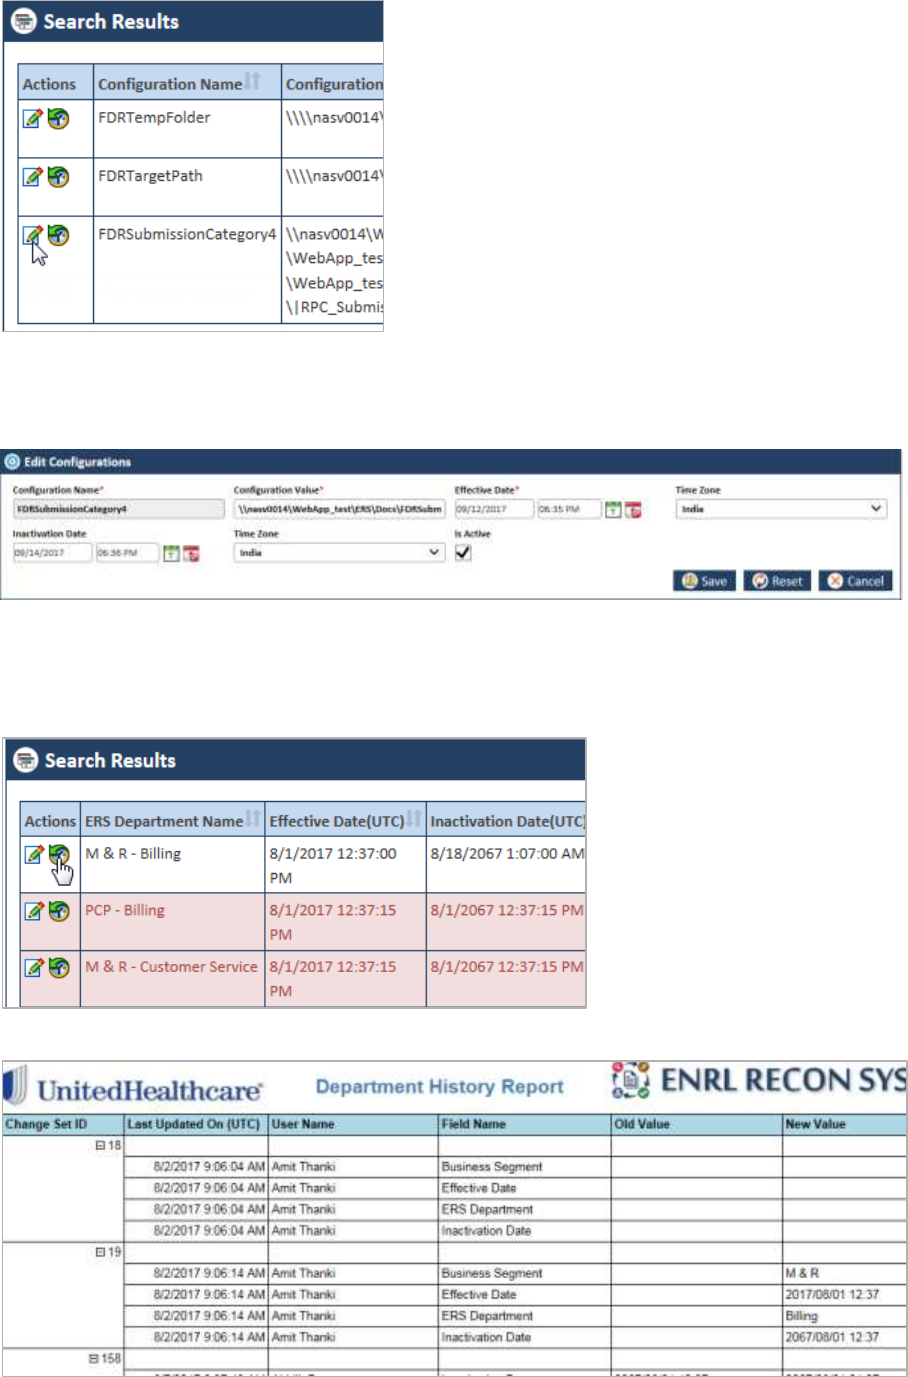
ENROLMENT RECON SYSTEM User’s Manual ERS Maintenance
©UnitedHealthcare 1.0 Page 7-13
Figure 7-25: The Search Results> Action column
2. Go to the Action column and click the Edit Department icon. The Edit Department form
appears.
Figure 7-26: The Edit Department form for editing
For more information on how to work on the configurations form, refer to Adding Configurations section.
Viewing Departments History 7.1.3.4
Figure 7-27: Accessing Department History
Figure 7-28: Department History Report
7.1.4 Maintaining Lookups
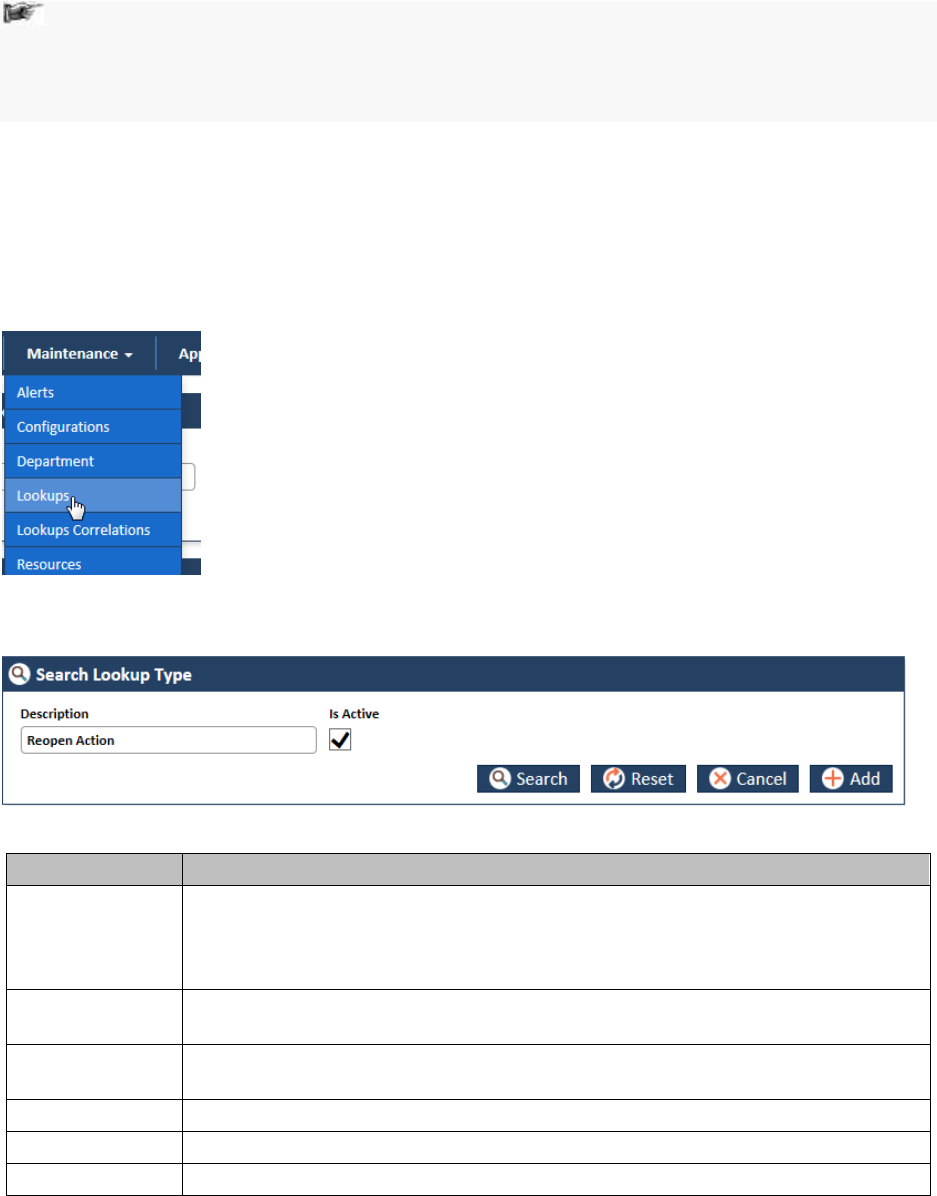
ERS Maintenance ENROLMENT RECON SYSTEM User’s Manual
Page 7-14 1.0 ©UnitedHealthcare
As an Administrator, you can maintain lookups in the application which can be used throughout the
application. You can create, update and delete lookup in the application.
Look ups are the values available in the drop list boxes in the application. You can create lookup as a
dropdown list and create list values in it.
While creating the lookups, you can decided the sequence number of the lookup list values
based on which a particular list value appears in the drop down list. For example, if you create
lookup called Users, and list values such as ERS General User, Master Admin, and ENR Viewer
under it, you can decide the sequence number for the list values. If you enter the sequence
number value as 1 then this list item appears in the first position in the list.
You can use the Lookup Type form to add lookups. You can edit the departments using Lookup Type
form.
Before adding departments, you can search the lookup using the Search Lookup Type form.
Searching Lookups 7.1.4.1
Navigation:
To access the Search Lookup Type search window, go to the Maintenance menu and click the Lookup
sub-menus. The Search Lookups Type window appears along with Search Results section.
Figure 7-29: The Search Lookup Type search window
Field Name
Description
Description
Enter the name of the lookup that you want to search.
If you search the lookup without entering the name, all the active lookups in the
systems appear in the Search Results section.
Is Active
Select this check box if the lookups are active in the application. If you don’t
select this checkbox, the lookup doesn’t appear in the search result.
Search
Click this button to search the lookup in the application. The Search Result
section appears with lookup that you entered in the Description field.
Reset
Click this button to reset the search criteria.
Cancel
Click this button to cancel the search process.
Add
This button is required to add lookup.
The search results 7.1.4.1.1
If you search the lookup without entering the name, all the active lookups in the systems appear in the
Search Results section.
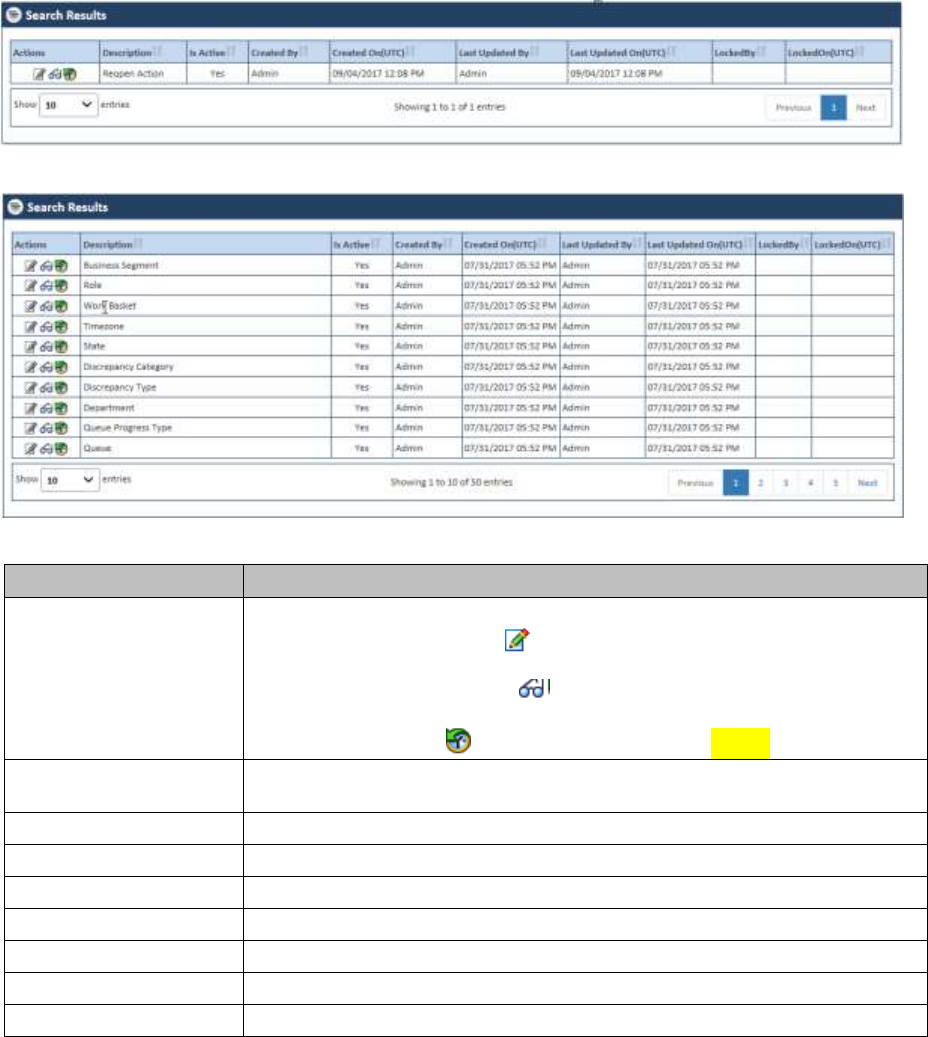
ENROLMENT RECON SYSTEM User’s Manual ERS Maintenance
©UnitedHealthcare 1.0 Page 7-15
Figure 7-30: The Lookups Search Results
Figure 7-31: The Lookups Multiple Search Results
Field Name
Description
Actions
Click the required action icon to take proper action.
Edit Lookup Types : Click this icon to edit lookups. The Edit
Lookup window appears after you click this icon.
View Lookup Master : Click this icon to view master lookups
and add lookup values.
View History : Click this icon to view the history.
Descriptions
Displays the name of the lookups.
Is Active
Displays the value Yes, since all are active department.
Created by
Displays the user name that created the department.
Created On(UTC)
Displays the date when the department was created.
Last Updated by
Displays the user name that last updated the department.
Last Updated On(UTC)
Displays the date when the department was last updated.
LockedBy
Displays the user name that has locked the department.
LockedOn(UTC)
Displays the date when the locked the department.
Adding Lookups 7.1.4.2
You can add and edit one or more lookups in the system. You can create lookups using the Lookup Type
forms.
Navigation:
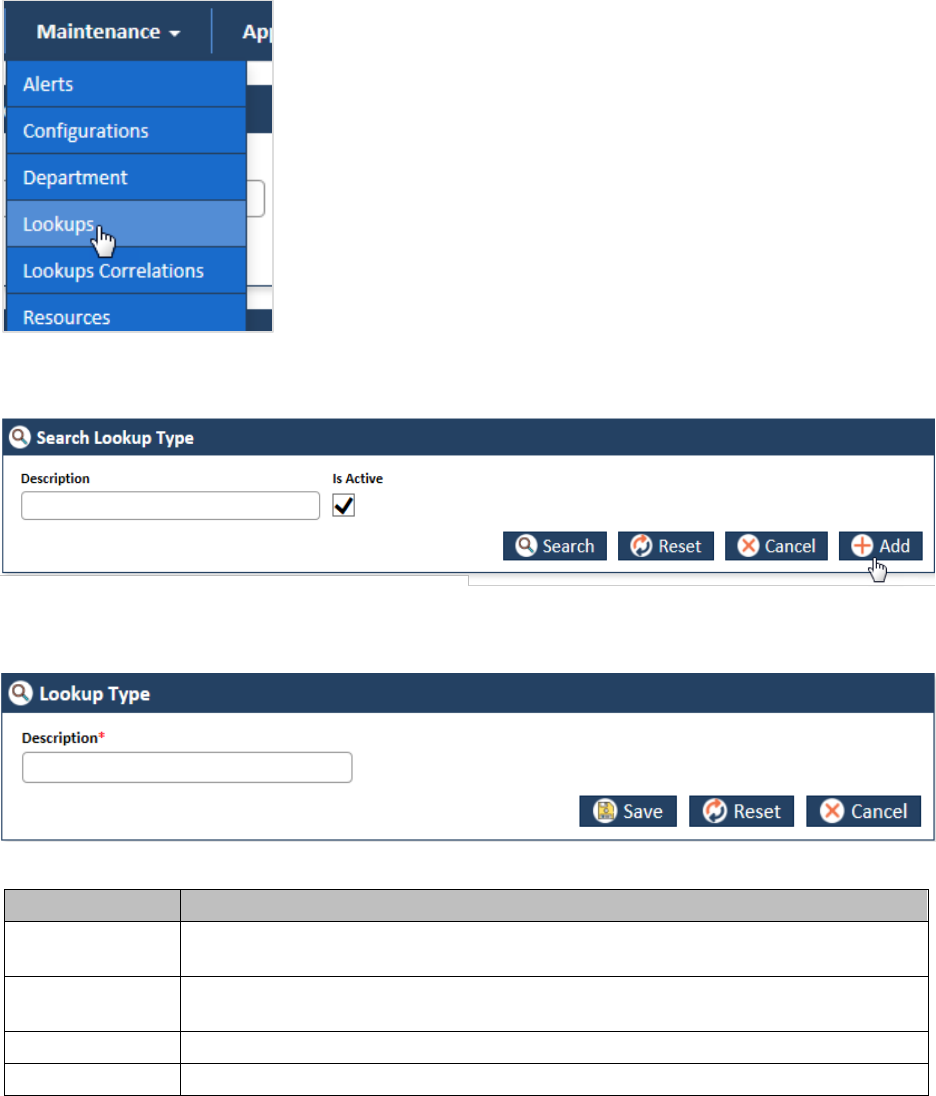
ERS Maintenance ENROLMENT RECON SYSTEM User’s Manual
Page 7-16 1.0 ©UnitedHealthcare
1. To access the Lookup Type form, go to the Maintenance menu and click the Lookups sub-
menu. The Search Lookup Type window appears.
Figure 7-32: The Search Lookups Window> Adding Lookups
2. Click the Add button. The Lookup Type form appears.
Figure 7-33: The Add Lookups Form
Field Name
Description
Description
Enter the name of the lookup or the dropdown list box name. Once you add the
lookup, you can add lookup values using the Lookup Master table.
Save
Click this button to save the details and create the lookup in the system. An error
message ‘Record saved successfully’ appears after you create the lookup.
Reset
Select this button to remove all the values entered and selected in all the fields.
Cancel
Click this button cancel the search process.
Editing Lookups 7.1.4.3
You can edit the lookup that you created. You need to access the lookups by searching it before editing
it. You need to access the Edit Lookups form from Search Results section.
Navigations:
1. Search and identify lookup from Search Results section. For more information on searching the
lookups, refer to the Searching Lookups section.

ENROLMENT RECON SYSTEM User’s Manual ERS Maintenance
©UnitedHealthcare 1.0 Page 7-17
Figure 7-34: The Lookups Search Results
Figure 7-35: The Search Results> Action column
2. Go to the Action column and click the Edit Lookup Type icon. The Lookup Type form appears.
Figure 7-36: The Edit Lookups form for editing
You can do required changes and save the form. If you save the form without make any changes, an
alert message, ‘There is no change in the form to update’ appears. For more information on how to work
on the Lookup Type form, refer Adding Lookups section.
Adding/Editing Lookup values 7.1.4.4
You can add multiple lookup values under any lookup you have created. Lookup values are the list value
in dropdown list box. Using the Add/Edit Lookup form in the Lookup Master form, you can add lookup
values.
To access the Add/Edit Lookup form:
1. In the Search Results section identify the lookup in the Action column under which you want to
create the lookup values.
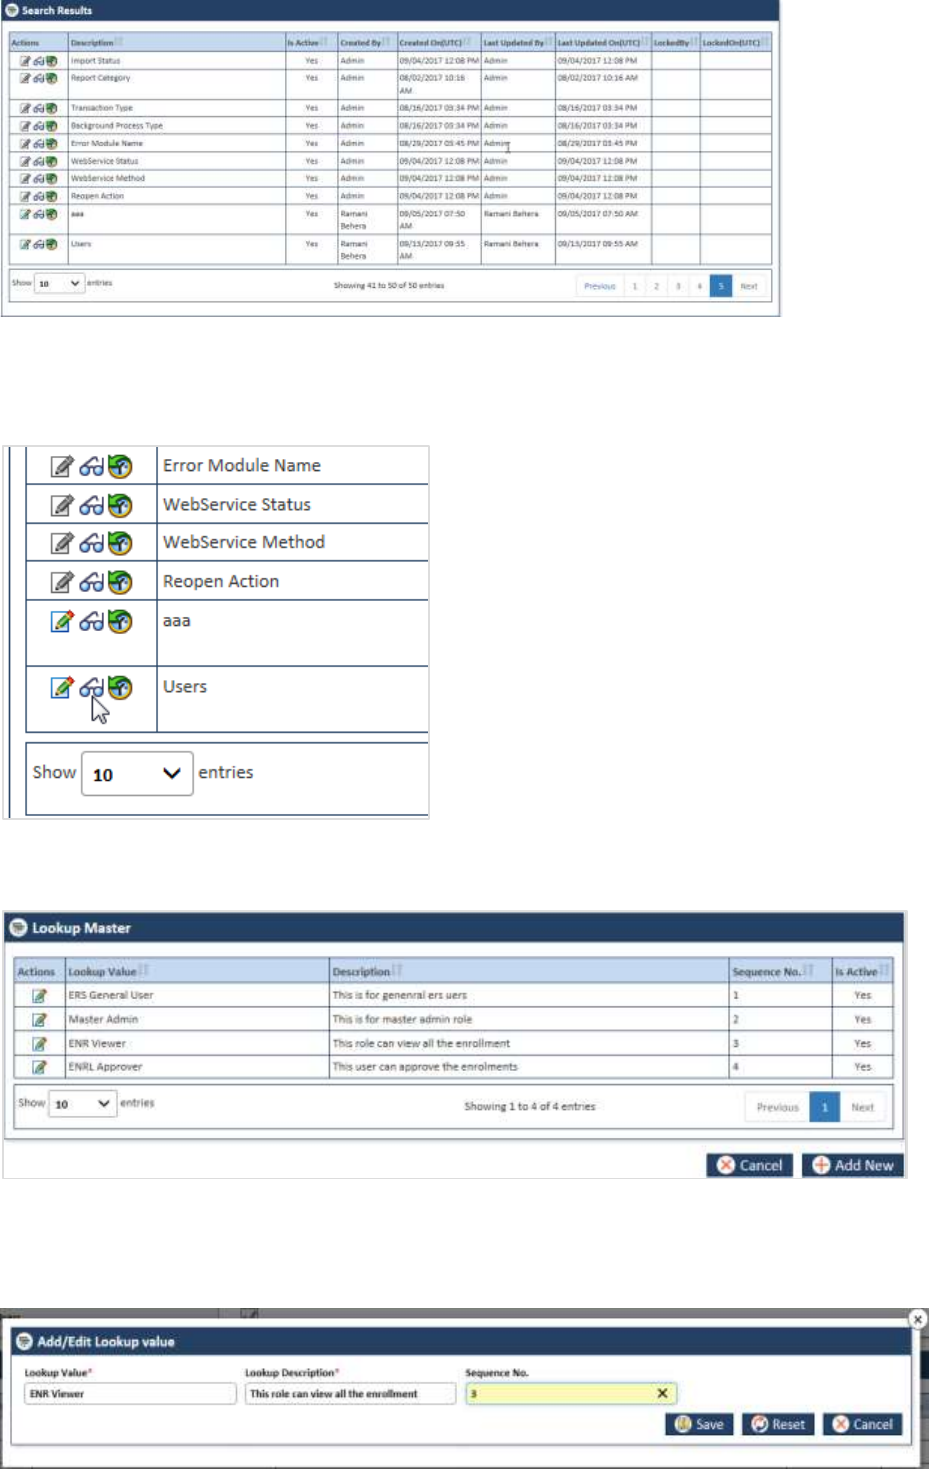
ERS Maintenance ENROLMENT RECON SYSTEM User’s Manual
Page 7-18 1.0 ©UnitedHealthcare
Figure 7-37: The Lookup Search Result
For more information on how to search lookups, refers to the Searching Lookups section.
2. Click the View Lookup Master icon to open the Lookup Master form.
Figure 7-38: The View Lookup Master icon
The Lookup Master table appears.
Figure 7-39: The Lookup Master Table
If the table already has some lookup value it is displayed in the Lookup Value column.
3. Click the Add New button. The Add/Edit Lookup value form appears.
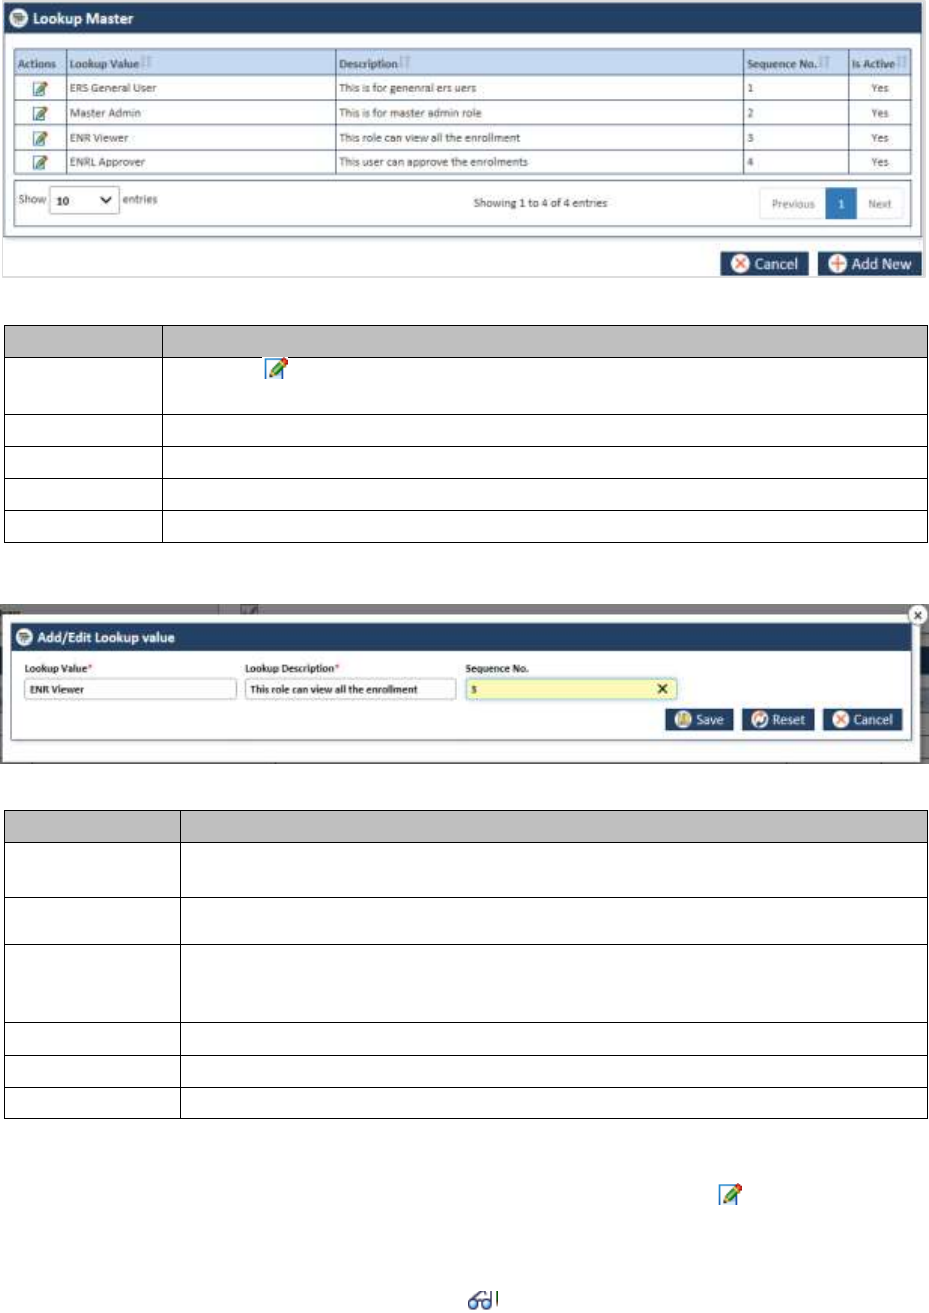
ENROLMENT RECON SYSTEM User’s Manual ERS Maintenance
©UnitedHealthcare 1.0 Page 7-19
Figure 7-40: The Add/Edit Lookup value form
4. Enter the required field values in the form. To enter the required field values, refer to
Lookup Master 7.1.4.5
Figure 7-41: The Lookup Master Table
Field Name
Description
Actions
Click the Edit Lookup Master icon in this column to edit lookups in the
Add/Edit Lookup value form. Add/Edit Lookup value form appears.
Lookup Value
Displays lookup value already entered in the system.
Description
Displays the description about the lookup values.
Sequence No.
Displays the sequence number.
Is Active
Displays the value Yes, if the lookup is active.
Adding Lookups 7.1.4.6
Figure 7-42: Adding/Editing Lookups
Field Name
Description
Lookup Value
Enter the lookup value that you want to create. This is one of the list items that
can come under the lookup or dropdown field.
Lookup
Description
Enter a description about the lookup value that you want to create.
Sequence No.
Enter a number in this field based on which the value appears in the sequence.
For example, if you enter the value 3 in this field, then this lookup value appears
in the third position.
Save
Click this button to save and create the lookup in the system.
Reset
Click this button to remove the entered the value.
Cancel
Click this button to cancel lookup creation process.
Editing Lookups 7.1.4.7
To edit the lookup values, you can use the Lookup Master table, and use the Edit Lookup Master
icon to edit the lookup values.Record updated successfully.
Navigation:
1. Open the Lookup Master table by click the View Lookup Master icon in the Action column
of the lookup Search Result table. The Lookup Master table appears.

ERS Maintenance ENROLMENT RECON SYSTEM User’s Manual
Page 7-20 1.0 ©UnitedHealthcare
Figure 7-43: The Lookup Master
2. Click the Edit Lookup Master icon in the Action column in line with the lookup value. The
Add/Edit Lookup form appears.
3. To edit the Add/Edit Lookup form, refer to the Adding Lookups section.
Viewing Lookup Masters 7.1.4.8
7.1.5 Maintaining Lookup Correlations
As an Administrator, you can maintain lookup correlations in the application which can be used
throughout the application. You can create, update and delete lookup correlations in the application.
Lookup correlation is the association and correlation of two lookups in the application. As an
administrator you can create lookup correlation group and create parent and child lookups under it. Refer
to the following example/scenario.
You can create a lookup called Workbasket under which you can add lookup values such OST, GPS vs
MMR, and RPR. You can create one lookup called OST under which you can add look up values such
OOA, SCC, and TRR. To create correlation between the two lookups you can create one lookup group
(Work Basket Vs Discrepancy Category) where you have to decide Workbasket as parent lookup and
Discrepancy Category as child lookup where you can add OOA, SCC, and TRR among other values in
the child lookup. Now you can configure and correlate lookups in such a way that if you select the value
OST in Workbasket lookup, the lookup values OOA, SCC, and TRR should appears in the Discrepancy
Category lookup.
For more information, refer to the Work Basket Vs Discrepancy Category lookup correlation group.
Workbasket vs Discrepancy Category
Workbasket
Discrepancy Category
OST
OOA
SCC
TRR
GPS vs
MMR
Eligibility
DOB
Gender
RPR
RPR
Before adding departments, you can search the lookup using the Search Lookup Type form.
Searching Correlation Groups 7.1.5.1
Navigation:
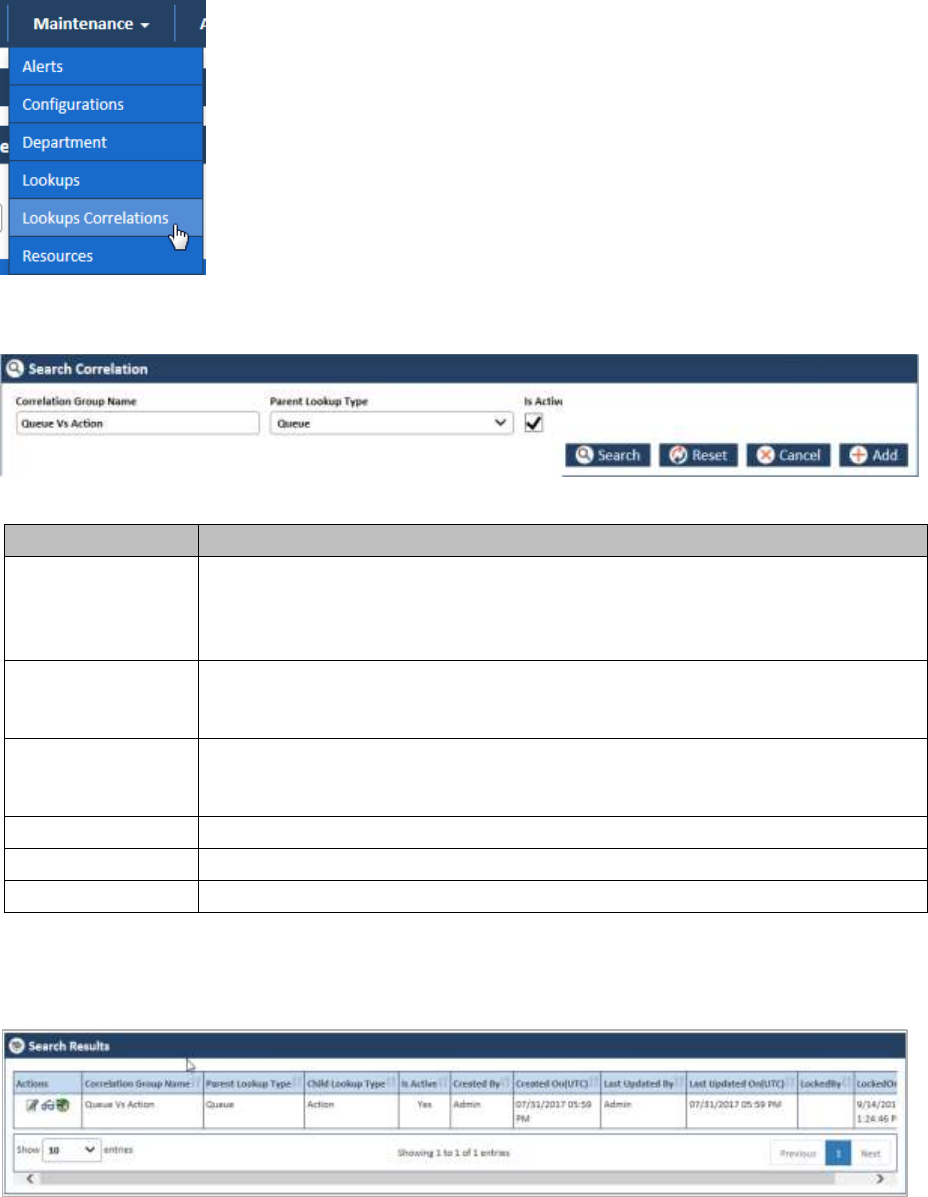
ENROLMENT RECON SYSTEM User’s Manual ERS Maintenance
©UnitedHealthcare 1.0 Page 7-21
To access the Search Correlation search window, go to the Maintenance menu and click the Lookups
Correlations menus. The Search Correlation window appears along with Search Results section.
Figure 7-44: The Search Lookup Type search window
Field Name
Description
Correlation Group
Name
Enter the name of the correlation group that you want to search.
If you search the lookup without entering the name, all the active correlation
group in the systems appears in the Search Results section.
Is Active
Select this check box if the correlation groups are active in the application. If
you don’t select this checkbox, the correlation group doesn’t appear in the
search result.
Search
Click this button to search the lookup in the application. The Search Result
section appears with correlation group that you entered in the Correlation
Group Name field.
Reset
Click this button to reset the search criteria.
Cancel
Click this button to cancel the search process.
Add
This button is required to add correlation group.
The search results 7.1.5.1.1
If you search the lookup without entering the name, all the active correlation groups in the systems
appear in the Search Results section.
Figure 7-45: The Correlation Group Search Results

ERS Maintenance ENROLMENT RECON SYSTEM User’s Manual
Page 7-22 1.0 ©UnitedHealthcare
Figure 7-46: The Correlation Group Search Results
Field Name
Description
Actions
Click the required action icon to take proper action.
Edit Correlation Types : Click this icon to edit correlation group.
The Edit Lookup window appears after you click this icon.
View Correlation Master : Click this icon to view correlation
master lookups and add correlation master values.
History Lookup Master : Click this icon to view the history.
Correlation Group
Name
Displays the correlation group name.
Parent Lookup Type
Displays the parent lookup type name.
Child Lookup Type
Displays the child lookup type name
Is Active
Displays the value Yes, since all are active correlation group.
Created by
Displays the user name that created the correlation group.
Created On(UTC)
Displays the date when the correlation group was created.
Last Updated by
Displays the user name that last updated the correlation group.
Last Updated
On(UTC)
Displays the date when the correlation group was last updated.
LockedBy
Displays the user name that has locked the correlation group.
LockedOn(UTC)
Displays the date when the locked the correlation group.
Adding Correlation Groups 7.1.5.2
You can add and edit one or more correlation group in the system. You can create correlation groups
using the Correlation Type form. While creating lookup group, you can decide the parent lookup under
which you can add child lookup.
Navigation:
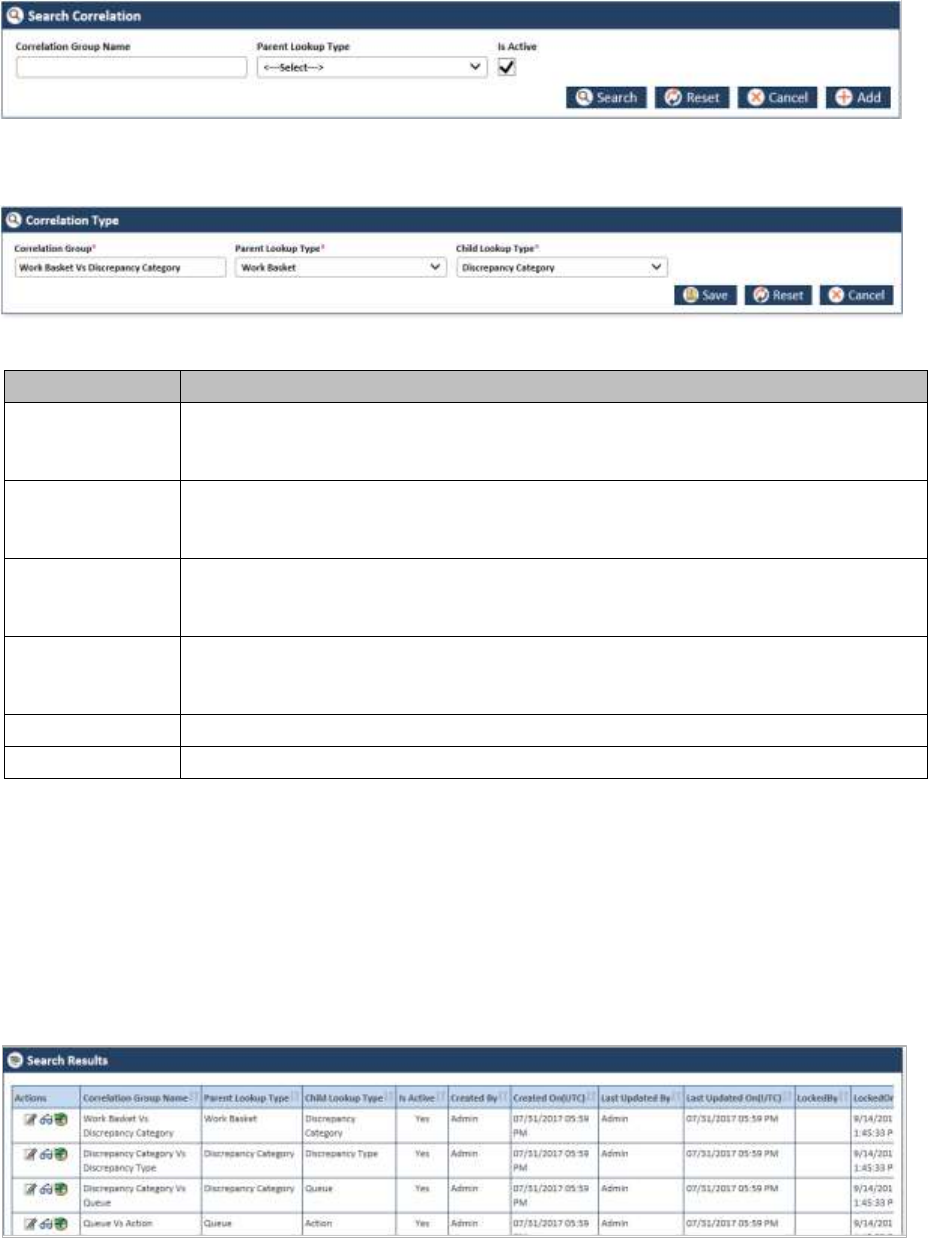
ENROLMENT RECON SYSTEM User’s Manual ERS Maintenance
©UnitedHealthcare 1.0 Page 7-23
1. To access the Correlation Type form, go to the Maintenance menu and click the Lookups
Correlations sub-menu. The Search Correlation window appears.
Figure 7-47: The Search Correlation Window> Adding Lookups
2. Click the Add button. The Correlation Type form appears.
Figure 7-48: The Add Correlation Form
Field Name
Description
Correlation
Name
Enter the name of the correlation group. Once you add the correlation, you can
decide the Parent look and child lookup the parent lookup using the Correlation
Master table.
Parent Lookup
Type
Select the parent lookup value in this field. This is one lookup under which
associated look values appears. If OST is the workbasket, under this you can
have OOA, SSC, and TRR as child values.
Child Lookup
Type
Select the child lookup value in this field. This is one lookup that belongs to one
parent lookup. If OST is the workbasket, under this you can have OOA, SSC, and
TRR as child lookups.
Save
Click this button to save the details and create the correlation in the system. An
error message ‘Record saved successfully’ appears after you create the
correlation.
Reset
Select this button to remove all the values entered and selected in all the fields.
Cancel
Click this button cancel the search process.
Editing Correlation Groups 7.1.5.3
You can edit the correlation group that you created. You need to access the Correlation Groups form by
searching it before editing it. You need to access the Edit Correlation form from Search Results
section.
Navigations:
1. Search and identify correlation group from Search Results section. For more information on
searching the lookups, refer to the Searching Correlation Groups section.
Figure 7-49: The Correlation Search Results

ERS Maintenance ENROLMENT RECON SYSTEM User’s Manual
Page 7-24 1.0 ©UnitedHealthcare
Figure 7-50: The Search Results> Action column
2. Go to the Action column and click the Edit Correlation Type icon. The Correlation Type form
appears.
Figure 7-51: The Edit Correlation form for editing
You can do required changes and save the form. If you save the form without make any changes, an
alert message, ‘There is no change in the form to update’ appears. For more information on how to work
on the Correlation Type form, refer Adding Correlation Groups section.
Adding/Editing Correlation Master table 7.1.5.4
You can add and edit the correlation group and add multiple parent and child lookups in it. Using the
Add/Edit correlation value form in the Correlation Master form, you can add parent and child lookups.
To access the Add/Edit Correlation form:
1. In the Search Results section identify the correlation in the Action column under which you
want to add the lookups.
Figure 7-52: The Correlation Search Result
For more information on how to search lookups, refers to the Searching Correlation Groups section.
2. Click the View Correlation Master icon to open the Correlation Master form.
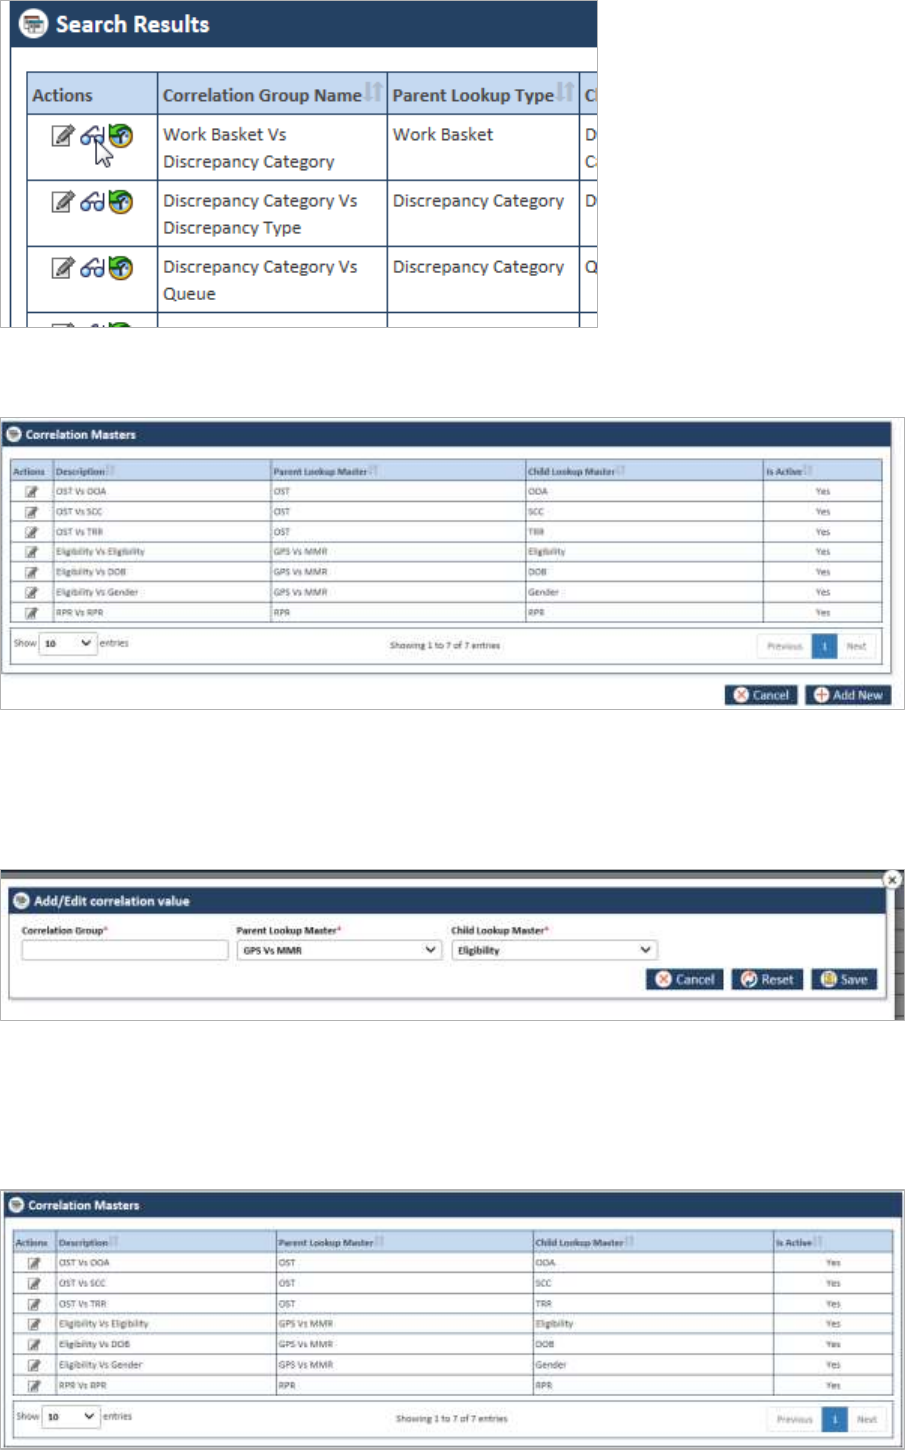
ENROLMENT RECON SYSTEM User’s Manual ERS Maintenance
©UnitedHealthcare 1.0 Page 7-25
Figure 7-53: The View Correlation Master icon
The Correlation Master table appears.
Figure 7-54: The Correlation Masters Table
If the table already has some parent and child lookups, these are displayed in the Parent Lookup Master
and Child Lookup Master columns, respectively.
3. Click the Add New button. The Add/Edit Correlation value form appears.
Figure 7-55: The Add/Edit correlation value form
4. Enter the required field values in the form. To enter the required field values, refer to Adding
Correlations section.
Correlation Master Table 7.1.5.5
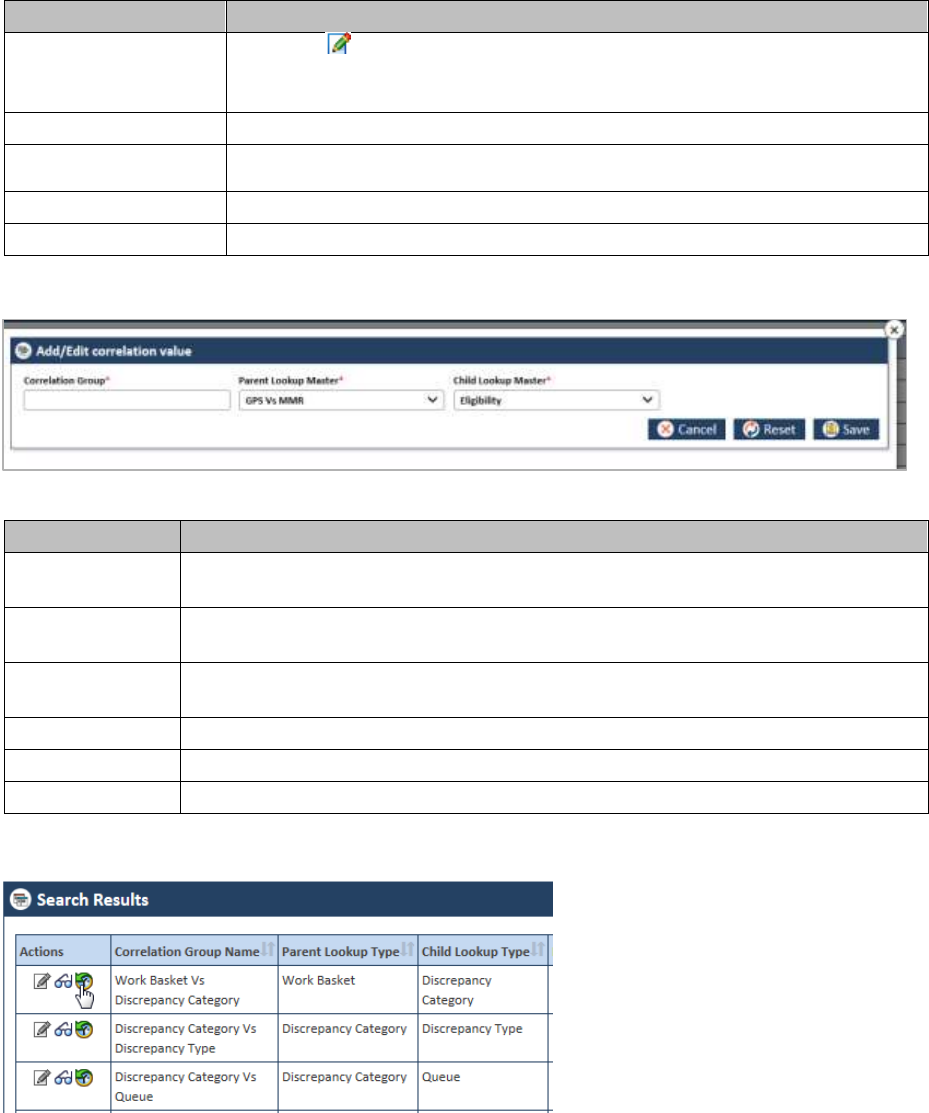
ERS Maintenance ENROLMENT RECON SYSTEM User’s Manual
Page 7-26 1.0 ©UnitedHealthcare
Figure 7-56: The Correlation Master Table
Field Name
Description
Actions
Click the Edit Correlation Master icon in this column to edit correlation
in the Add/Edit Correlation value form. Add/Edit Correlation value form
appears.
Description
Displays correlation value already entered in the system.
Parent Lookup
Master
Displays the parent lookup master values.
Child Lookup Master
Displays the child lookup master values.
Is Active
Displays the value Yes, if the correlation is active.
Adding Correlations 7.1.5.6
Figure 7-57: Adding/Editing Lookups
Field Name
Description
Correlation
Group
Enter the correlation name that you want to create. This is one of the list items
that can come under the lookup or dropdown field.
Parent Lookup
Master
Select parent lookup master values. The child lookup value comes under the
parent lookup values.
Child Lookup
Master
Select the child lookup master values. The values added in this field can appear
in the parent lookup field.
Save
Click this button to save and create the correlation in the system.
Reset
Click this button to remove the entered the value.
Cancel
Click this button to cancel lookup creation process.
Viewing History lookup Correlation 7.1.5.7
Figure 7-58: Accessing History Lookup Correlation form
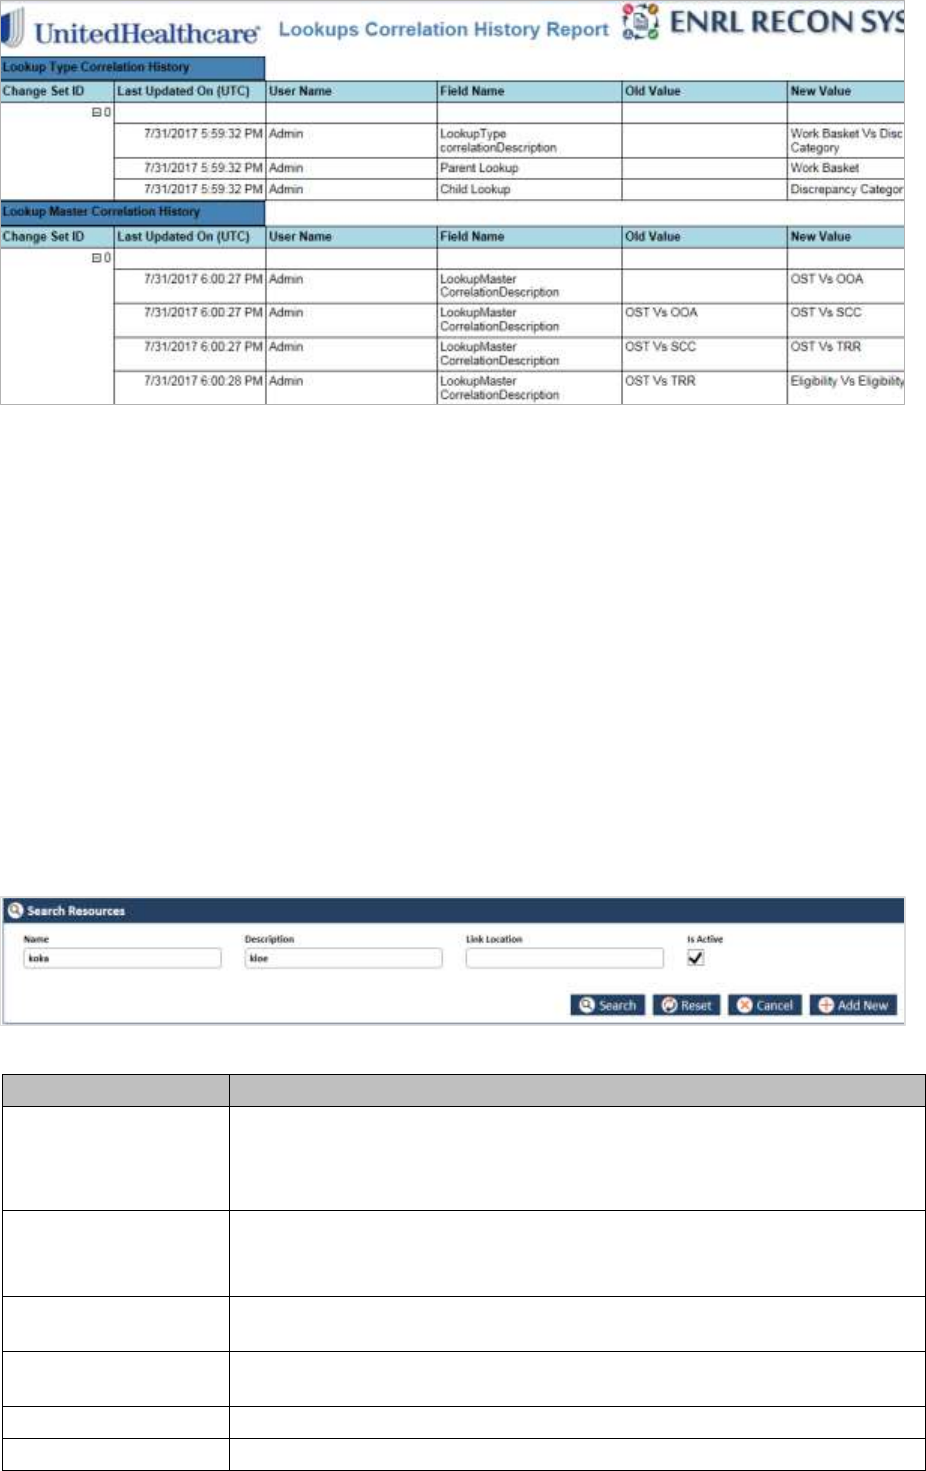
ENROLMENT RECON SYSTEM User’s Manual ERS Maintenance
©UnitedHealthcare 1.0 Page 7-27
Figure 7-59: The Lookup Correlation History
7.1.6 Maintaining Resources
As an Administrator, you can maintain resources in the application which can be used throughout the
application and can be displayed in the home page. You can create, update and delete resources in the
application.
The resource in ERS application refers to the required documents or reference documents that are
available in the application home page or in the application.
You can use the Add Resources and Edit Resources form to add and edit resources, respectively.
Before adding resources, you can search the resources using the Search Resources form.
Searching Resources 7.1.6.1
Navigation:
To access the Search Resources search window, go to the Maintenance menu and click the
Departments menu. The Search Resources window appears.
Figure 7-60: The Search Resources search window
Field Name
Description
Name
Enter the name of the resource that you want to search.
If you search the resource without entering the name, all the active al
resources in the systems appears in the Search Results section.
Description
Enter a description about the resource that you want to search.
If you search the resource without entering the name, all the active resource
in the systems appears in the Search Results section.
Is Active
Select this check box if the resources are active in the application. If you
don’t select this checkbox, the resource doesn’t appear in the search result.
Search
Click this button to search the resource in the application. The Search
Result section appears with resource that you entered in the Name field.
Reset
Click this button to reset the search criteria.
Cancel
Click this button to cancel the search process.

ERS Maintenance ENROLMENT RECON SYSTEM User’s Manual
Page 7-28 1.0 ©UnitedHealthcare
Field Name
Description
Add
This button is required to add configuration.
The search results 7.1.6.1.1
If you search the resource without entering the name, all the active resource in the systems appears in
the Search Results section.
Figure 7-61: The Resource Search Results
Figure 7-62: The Departments Multiple Search Results
Field Name
Description
Actions
Click the required action icon to take proper action.
Edit Skill : Click this icon to edit resources. The
Resource form window appears after you click this icon.
View History : Click this icon to view the history.
ERS Department Name
Displays the name of the resource.
Description
Displays the description about the resource.
Is Active
Displays the value Yes, since all are active department.
Effective Date(UTC)
Displayed the resource effective date.
Inactivation Date(UTC)
Displayed the resource inactivation date.
Created On(UTC)
Displays the date when the resource was created.
Created by
Displays the user name that created the resource.
Last Updated On(UTC)
Displays the date when the resource was last updated.
Last Updated by
Displays the user name that last updated the resource.
LockedBy
Displays the user name that has locked the resource.
LockedOn(UTC)
Displays the date when the locked the resource.
Adding Resources 7.1.6.2
You can add and edit one or more resource in the system. You can create resources using the Resource
form.
Navigation:

ENROLMENT RECON SYSTEM User’s Manual ERS Maintenance
©UnitedHealthcare 1.0 Page 7-29
1. To access the Search Resources search window, go to the Maintenance menu and click the
Resources menu. The Search Resources window appears.
Figure 7-63: The Search Resources Window> Adding Resources
2. Click the Add New button.
The Resource form appears. Enter the details in the Resource form.
Figure 7-64: The Resource Form
Field Name
Description
Name
Enter a name for the resource that you want to create.
Description
Enter a description about the resource that you want to create.
Link Location
Enter the link of the location or the URL.
Department
Select the name of the department for which you want to create the
resources.
Effective Date
Select the date and time from which the resource is effective.
Timezone
Select the time zone where you want the resource to be effective.
Inactivation Date
Select the date and time till which the configuration can be active in the
system. This is a required field if you don’t select the value in the Is Active
field.
You must enter a future date in this field.
Timezone
Select the time where this resource can be inactivated.
Is Active
Select the check box if you want to activate the resource in the system. If
you don’t select this check box, the resource cannot be activated in the
system.
Save
Click this button to save the details and create the resource in the system.
An error message ‘Record saved successfully’ appears after you create
the resource.
Reset
Select this button to remove all the values entered and selected in all the
fields.
Cancel
Click this button cancel the search process.
Editing Resources 7.1.6.3
You can edit the resources that you created. You need to access the resource by searching it before
editing it. You need to access the Edit Resources form from Search Results section.
Navigations
1. Search and identify alert from Search Results section. For more information on searching the
alerts, refer to the Searching Resources section. Search Results appears.

ERS Maintenance ENROLMENT RECON SYSTEM User’s Manual
Page 7-30 1.0 ©UnitedHealthcare
Figure 7-65: The Resource Search Results
Figure 7-66: The Search Results> Action column
2. Go to the Action column and click the Resource icon. The Resource form appears.
Figure 7-67: The Resource form for editing
For more information on how to work on the resources form, refer to Adding Resources section.
Viewing Departments History 7.1.6.4
Figure 7-68: The Search Results
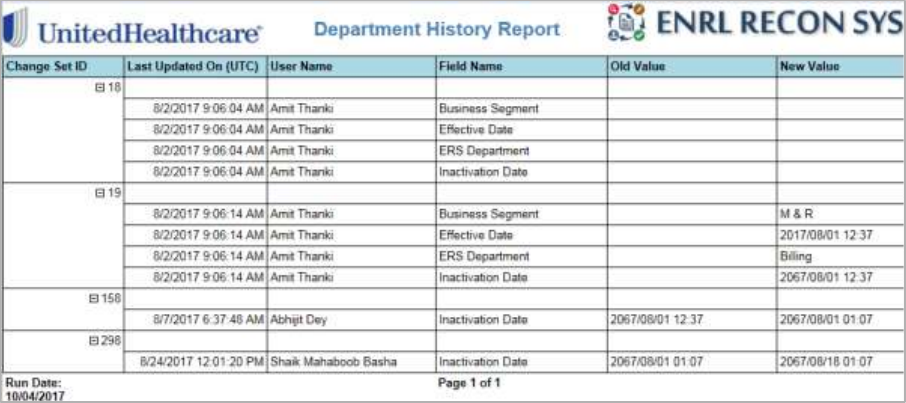
ENROLMENT RECON SYSTEM User’s Manual ERS Maintenance
©UnitedHealthcare 1.0 Page 7-31
Figure 7-69: The Department History Report
This page is intentionally left blank

©United Healthcare 1.0 Page 8-1
Reports Chapter 8
This chapter provides all the details about various reports available in the ERS application. It also
discusses the types of reports, methods to access report and contents the reports contain.
The chapter contains the following sections:
Report Overview
Types of Reports
Accessing ERS Reports
ERS Reports
Report Controls
Report Overview 8.1
A report is organized presentation of information and graphical account of something that has gone a
thorough observation or investigation. This is a piece of information which is a pictorial representation of
the in-progress, completed and the assigned tasks and activities performed in a system. Report helps
you get the detailed status of a particular work in the application so that you can plan, analize, and
execute your tasks accordingly.
The ERS application has multiple reports that represent various statuses or progress of the activities
performed in the application, for all the work baskets. Based on the report logic and code developed, the
report can be accessed by all ERS users. Users can access, create, save, print and export pre-defined
reports using the Reports subsystem or menu. The Reports menu allows users to specify search criteria
to search the reports, such as a date range, individual analyst’s information, discrepancy category etc.
8.1.1 Types of Reports
ERS reports are broadly divided into three types based on the contents they contain and their access
locations. Some of the reports are accessed from the Reports menu, some are accessed from the
Search Results tables and others are from the queue summary pages.
Standard Reports 8.1.1.1
These reports are the typical reports generally available in the Reports menu of the ERS application.
These reports usually provide details about various statuses, metrics, error logs, audit quality and
dashboard reports details. While other reports are accessed from search results and various pages,
standard reports are generated by providing search criteria and report names.
Queue Summary Reports
8.1.1.2
These are called queue summary reports as these are accessed from the <Discrepancy Name> Queue
Summary page of the application. You can access these reports from all the queue summary pages
such as OOA, SCC, TRR, Eligibility, BOD, Gender and RPR Queue Summary pages. You can locate the
reports under the Actions column in line with the Processing Queues, Holding Queues and Completed
Queues.
History Reports 8.1.1.3
These are called history reports because they comprise all the historical facts and details of activities
performed for a particular case or record. These reports are accessible from the all the records available
in the Search Result section. These reports provide details about the records such as the name of the
queue or discrepancy, administration, and maintenance related activities.
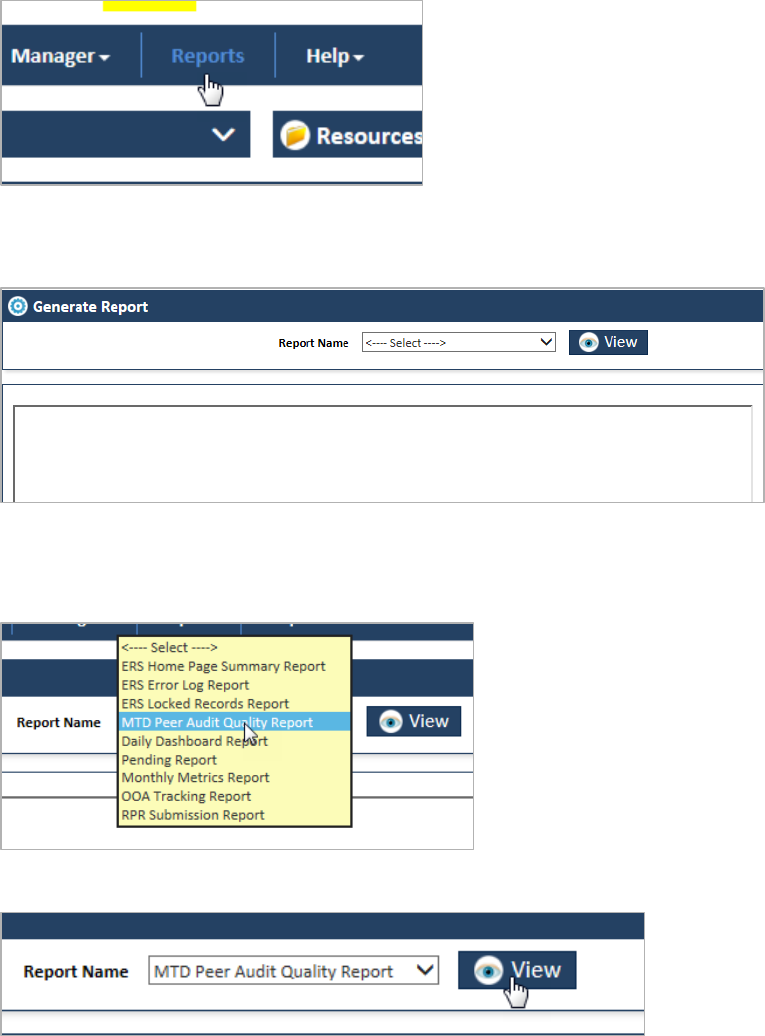
ERS Reports ENROLMENT RECON SYSTEM User’s Manual
Page 8-2 1.0 ©UnitedHealthcare
Working on the Reports 8.2
You can access and generate the reports to view the current work status or record details. This provides
various details based on which you can plan your tasks or activities. Before getting the details of the
report, you must be acquainted with the processes of the accessing the reports and searching.
8.2.1 Accessing ERS Reports
Report access methods are different for different reports.
Accessing Standard Reports 8.2.1.1
To access the standard reports:
1. Go to and click the Report menu.
Figure 8-1: The Reports Menu
The Generate Report search window appears with a free space where the report can be displayed.
Figure 8-2: The Generate Report Search Window
2. Go to the Report Name dropdown list box. This displays all the reports listed.
3. Select a particular report from the list. The report gets selected.
Figure 8-3: Report Name Window> Selecting Report Name
Figure 8-4: The Report View button
4. Click the View button. The Month Date, Discrepancy Category fields and View Report button
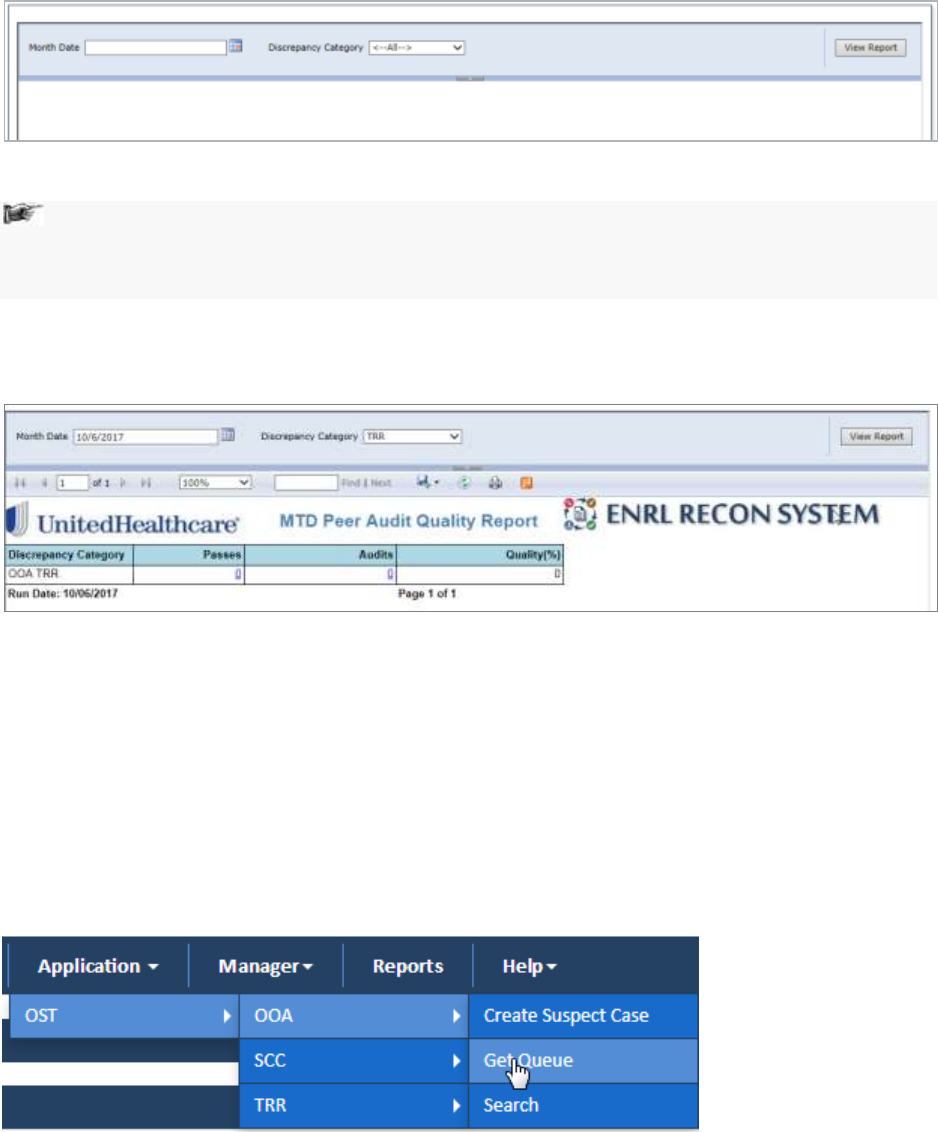
ERS Reports ENROLMENT RECON SYSTEM User’s Manual
©UnitedHealthcare 1.0 Page 8-3
appear.
Figure 8-5: Report Filers
Note: Ideally the report is generated if the View button is clicked after selecting the report name
in the Report Name field. However, for many report, some additional field values are required
such Month Date and Discrepancy Category. If these values are selected and View Report
button is clicked the required report appears.
5. Select the date in the Month Date field for which you want the report.
6. Select the discrepancy categories in the Discrepancy Category field.
7. Click the View Report button. The report gets displayed in the empty space.
Figure 8-6: The Standard Report
Accessing Queue Summary Reports 8.2.1.2
To access the queue summary reports:
1. Go to Application menu, point to <work basket> <discrepancy category> and select Get
Queue link.
For example, if you want to access OOA Queue Summary Report page, under Application menu
point to OST OAA Get Queue link. The OOA Queue Summary page appears.
Figure 8-7: Accessing OOA Queue Summary Report
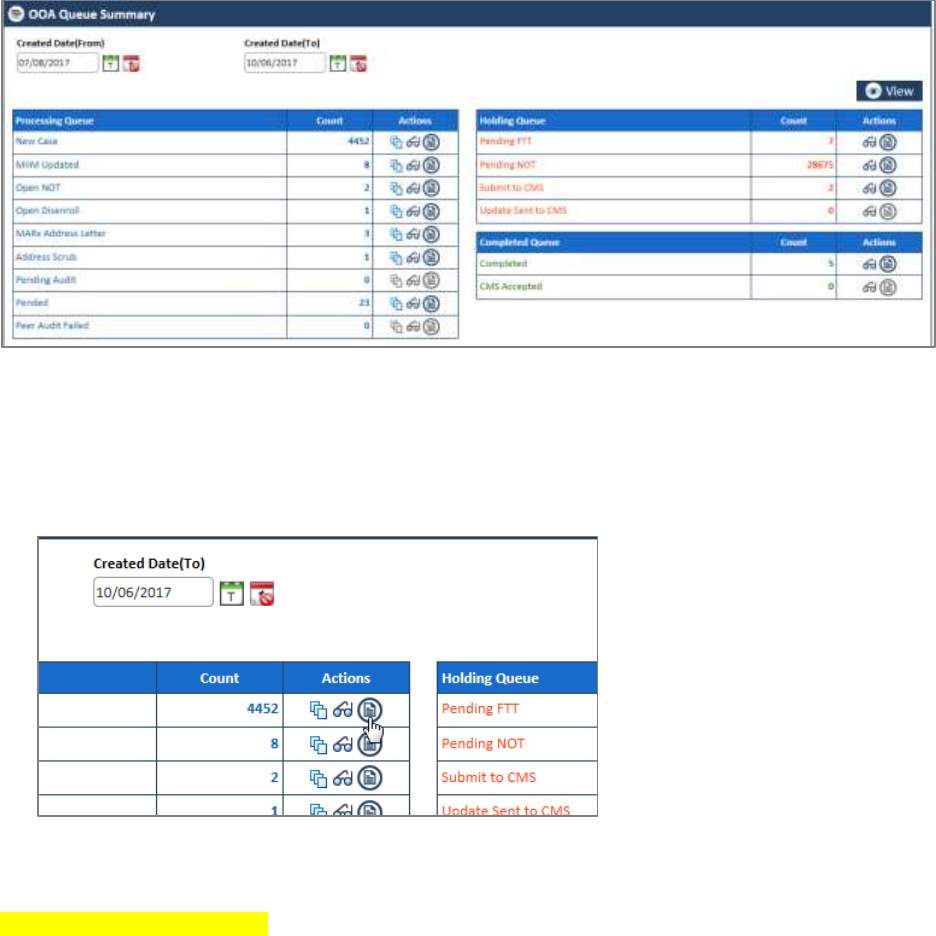
ERS Reports ENROLMENT RECON SYSTEM User’s Manual
Page 8-4 1.0 ©UnitedHealthcare
Figure 8-8: OAA Queue Summary page
2. Go to any queue summary table such as Processing Queues, Holding Queues, and Completed
Queues.
3. Under the Actions column in queues table, click the View Report icon in line with the queue
name.
Figure 8-9: View Report icon in Action column
4. The require queue summary report appears
<Report Image not available >
Accessing History Reports 8.2.1.3
The history reports are accessed from the search results in the administration maintenance activities. For
example, you can access the User Admin History Report from the user Search Results table.
To access the history reports:
1. Go to any of the Search Results table under Maintenance or Administration activities. For
example, User Search Result table under the Administration menu.
2. To open the search results table, go to the Administration menu and click the Manage User sub
menu.

ERS Reports ENROLMENT RECON SYSTEM User’s Manual
©UnitedHealthcare 1.0 Page 8-5
Figure 8-10: Administration Menu>Manage User Sub-menu
The Search Result table appears
3. Go to the action icon in the Actions column.
Figure 8-11: The User Search Results table
4. Under the Actions column, click the View Report icon.
Figure 8-12: Action column> View Reports Icon
The User Admin History Report appears.
Figure 8-13: The User Admin History Report
ERS Reports ENROLMENT RECON SYSTEM User’s Manual
Page 8-6 1.0 ©UnitedHealthcare
8.2.2 ERS Standard Reports
Based on the work baskets, the reports are different in the ERS application. The following reports are
available in ERSs application.
Eligibility Standard Reports
<Reports are not available for Eligibility>
OST Standard Reports
ERS Home Page Summary Report
ERS Error Logging Report
ERS Locked Records Report
MTD Peer Audit Quality Report
Daily Dashboard Summary Report
Pending Report
Monthly Metrics Report
OOA Tracking Report
RPR Submission Report
ERS Home Page Summary Report 8.2.2.1
The ERS Home Page Summary Report provides the details of the queues statuses. This report displays
the total numbers of Processed, Holding and Completed queues those are available in the home page.
Navigation
To access the Error Logging Report, select the ERS Error Log Report in the Report Name field and
click the View button.
Figure 8-14: Accessing Error Logging Report
Queues Details
OOA Queue Status
o OOA Processing Total
o OOA Holding Total
o OOA Completed Total
OOA TRR Queue Status
o OOA TRR Processing Total
o OOA TRR Holding Total
o OOA TRR Completed Total
SSC Discrepancy Queue Status
o SSC Processing Total
o SSC Holding Total
o SSC Completed Total
Eligibility Discrepancy Queue Status
o Elig Processing Total
o Elig Holding Total
o Elig Completed Total
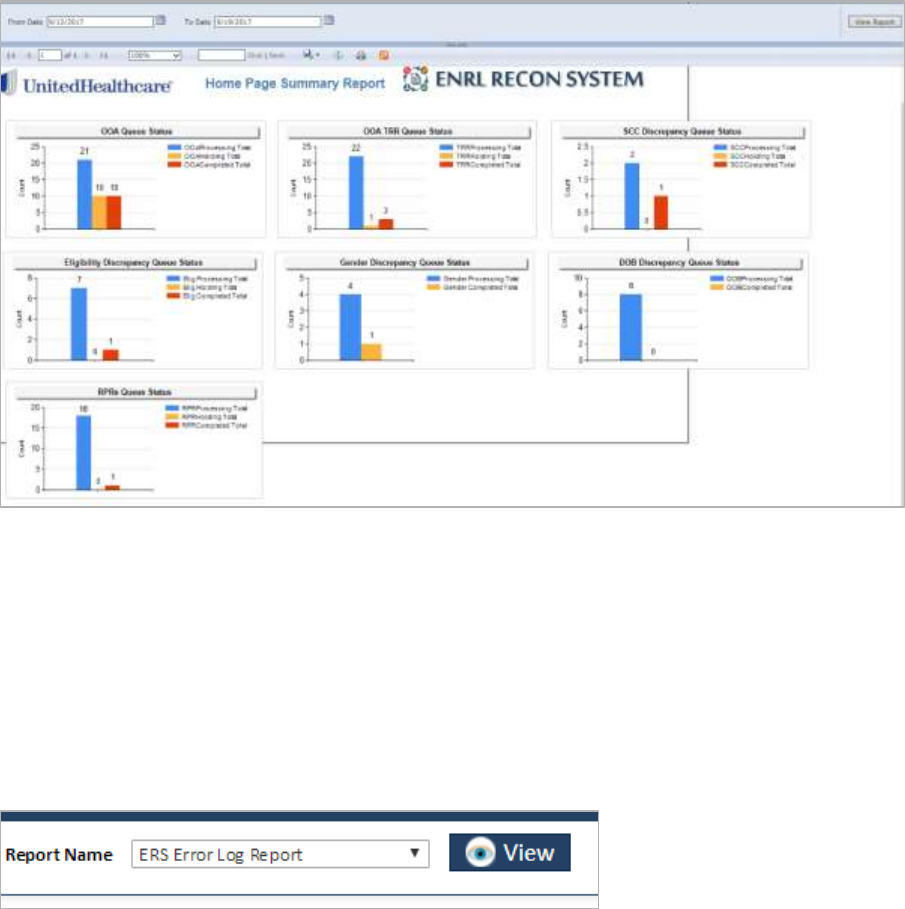
ERS Reports ENROLMENT RECON SYSTEM User’s Manual
©UnitedHealthcare 1.0 Page 8-7
Gender Discrepancy Queue Status
o Gender Processing Total
o Gender Completed Total
DOB Discrepancy Queue Status
o DOB Processing Total
o DOB Completed Total
RPR Queue Status
o RPR Processing Total
o RPR Holding Total
o RPR Completed Total
You can select the start and end date in the From Date and To Date fields from which you can decide
the period for which you want to search reports.
Figure 8-15: The Home Page Summary Report
ERS Error Logging Report 8.2.2.2
This report displays the error logs in the system in a tabular format. The report displays the duration of
the report by dates along with other details of the reports. You can decide the duration of the report by
selecting the value in the start and end date in the From Date and To Date fields respectively.
Navigation
To access the Error Logging Report, select the ERS Error Log Report in the Report Name field and
click the View button.
Figure 8-16: Accessing Error Logging Report
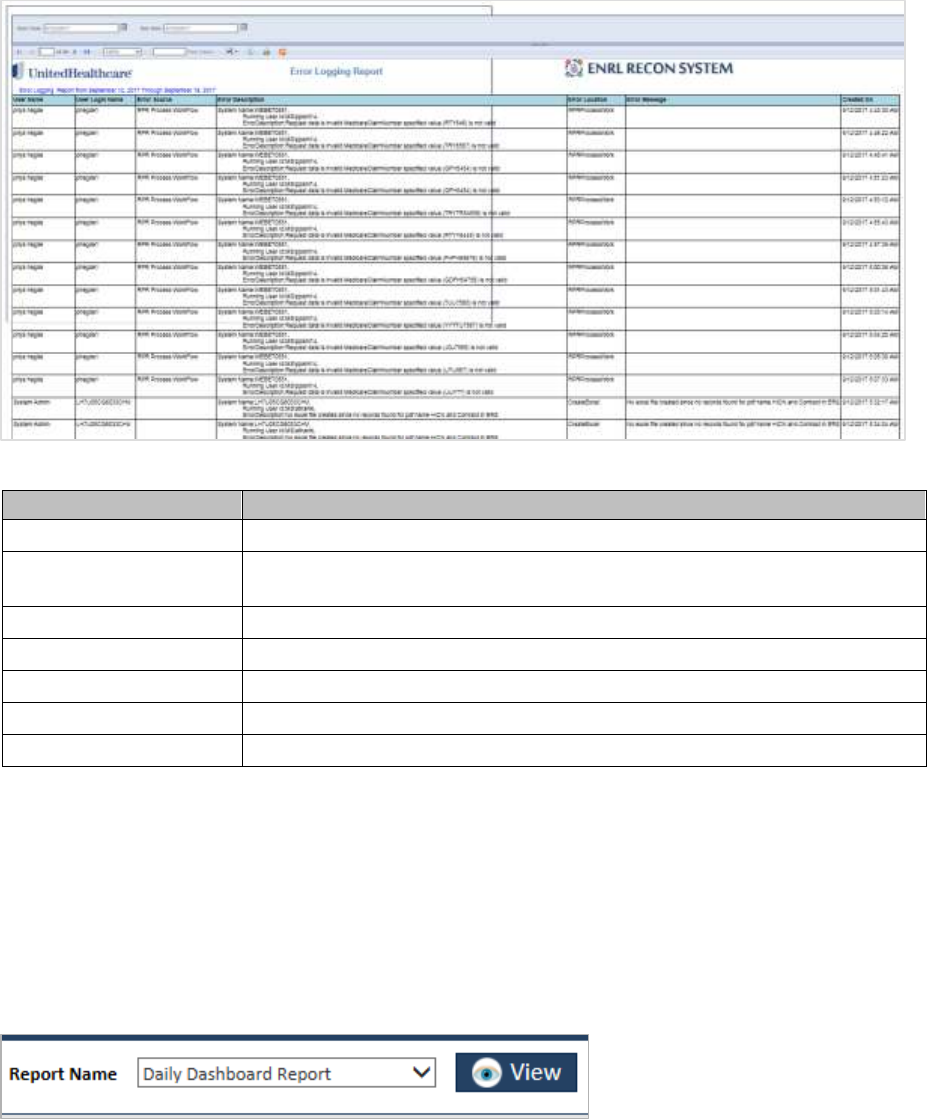
ERS Reports ENROLMENT RECON SYSTEM User’s Manual
Page 8-8 1.0 ©UnitedHealthcare
Figure 8-17: The Error Logging Reports
Column Name
Description
User Name
Displays the user name that created and identified the error in the system.
User Login Name
Displays the user login name that created and identified the error in the
system.
Error Source
Displays the source of the error message.
Error Description
Displays the details of the error description.
Error Location
Displays the error location.
Error Message
Displays the error message.
Created On
Displays date when the error was identified.
Daily Dashboard Summary Report 8.2.2.3
This dashboard summary report displays the activities in the ERS queues in a day to basis. The daily
activities are organized by color coding. The report gets highlighted in green for 0-4 days, yellow for 4-7
days and red for 8 – 31+ days columns. The columns display activity counts for each queue in the table.
Navigation:
To access the Daily Dashboard Summary Report, select the Daily Dashboard Report in the Report Name
field and click the View button.
Figure 8-18: Daily Dashboard Report
Daily Dashboard Summary Report

ERS Reports ENROLMENT RECON SYSTEM User’s Manual
©UnitedHealthcare 1.0 Page 8-9
Figure 8-19: Daily Dashboard summary Report
Following are the columns appear in the report:
Work queues
0 Days
1 Days
2 Days
3 Days
4 Days
5 Days
6 Days
7 Days
8 Days
9 Days
10 Days
11- 20 Days
21- 30 Days
31+ Days
Grand Total
+/- Daily Change
Prod Hours
Oldest
You can customize the report based on the discrepancy category by selecting the appropriate values in
the Discrepancy Category field.
Figure 8-20: Discrepancy Category in Report
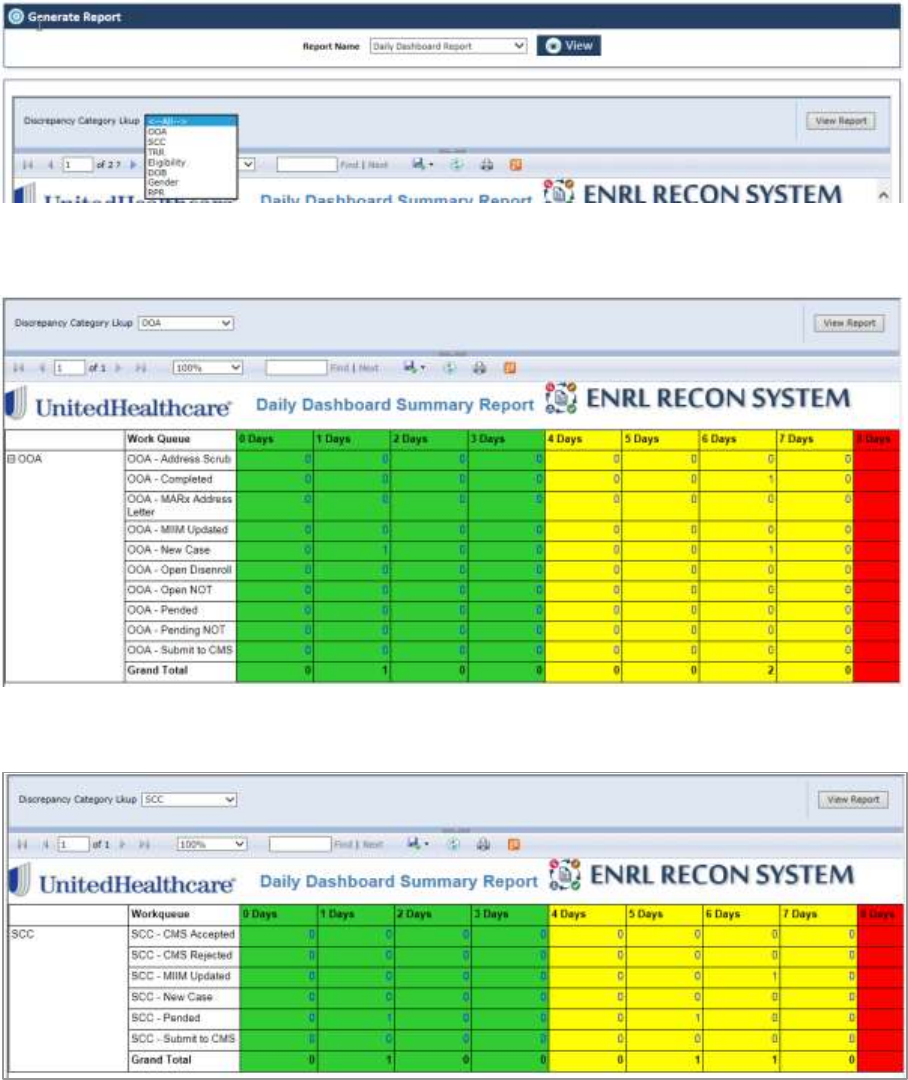
ERS Reports ENROLMENT RECON SYSTEM User’s Manual
Page 8-10 1.0 ©UnitedHealthcare
To access a particular report, you can select the value in the Discrepancy Category Lkup field and click
the View button.
For example, to access the OOA daily Dash Board Summary Report:
1. Go to the Discrepancy Category Lkup drop down combo box.
2. Select the OOA from the list.
3. Click the View Report button. The Daily Dashboard Summary Report for OOA appears.
Figure 8-21: Daily Dashboard Summary Report >OOA
Other Dashboard Summary Reports 8.2.2.3.1
Figure 8-22: Daily Dashboard Summary Report >SCC
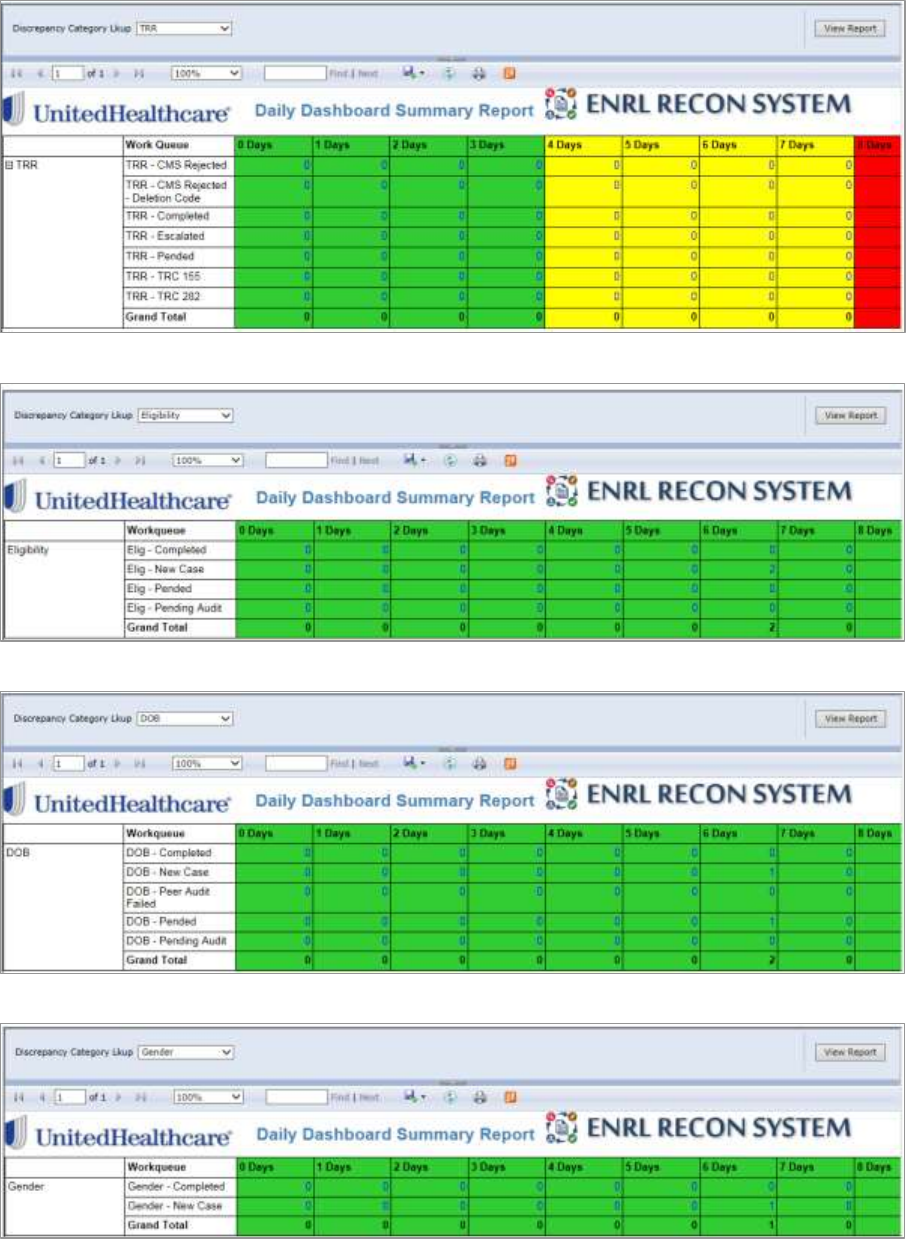
ERS Reports ENROLMENT RECON SYSTEM User’s Manual
©UnitedHealthcare 1.0 Page 8-11
Figure 8-23: Daily Dashboard Summary Report >TRR
Figure 8-24: Daily Dashboard Summary Report >Eligibility
Figure 8-25: Daily Dashboard Summary Report >DOB
Figure 8-26: Daily Dashboard Summary Report >Gender
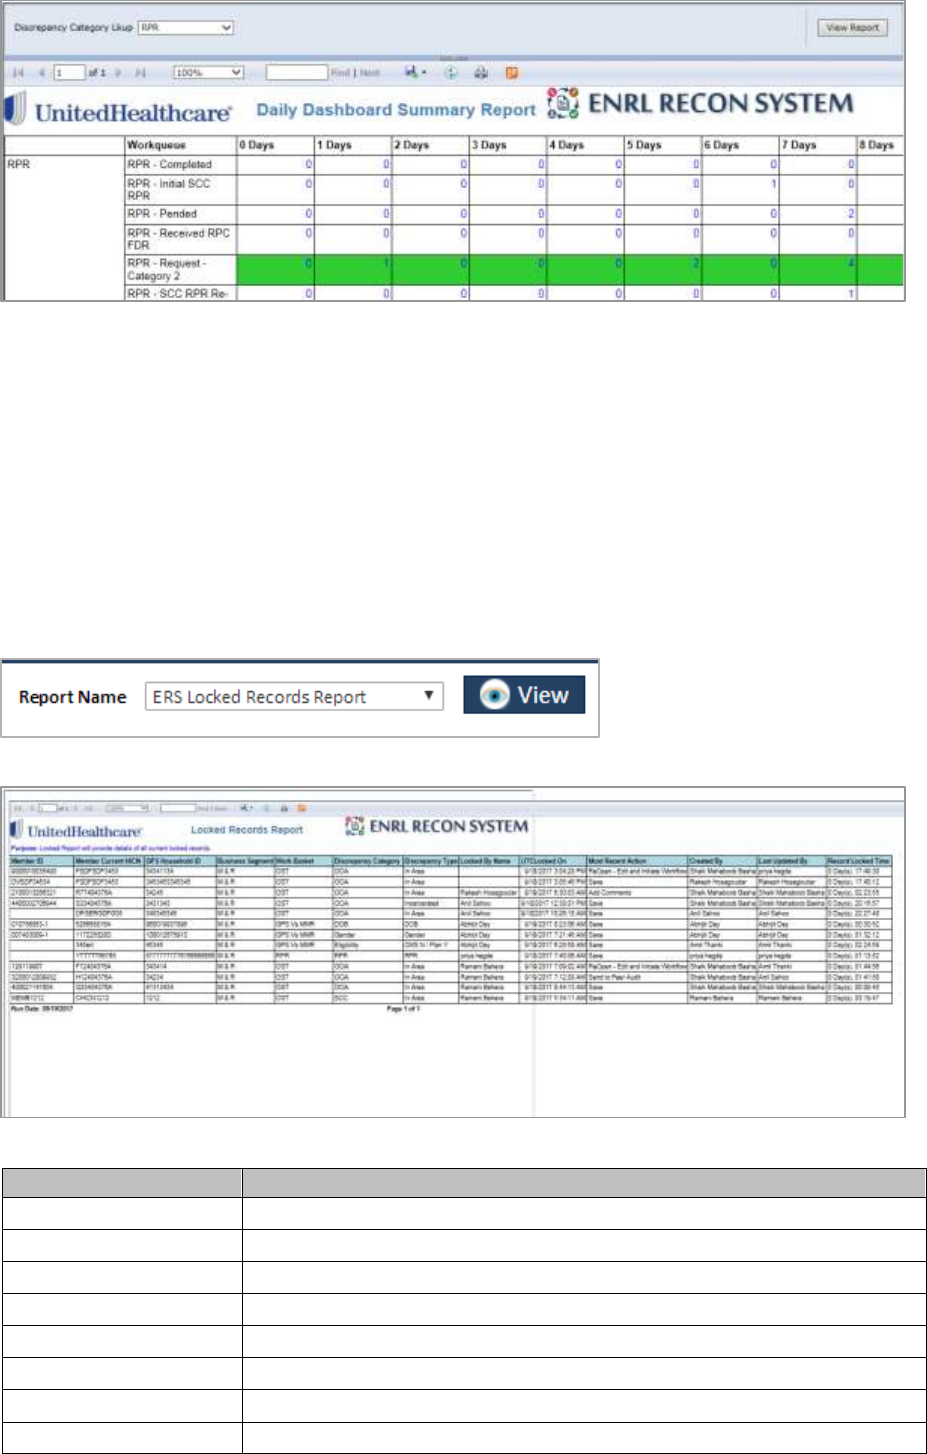
ERS Reports ENROLMENT RECON SYSTEM User’s Manual
Page 8-12 1.0 ©UnitedHealthcare
Figure 8-27: Daily Dashboard Summary Report >RPR
Locked Records Report 8.2.2.4
This report displays all the details of the locked records in the system in tabular format.
Purpose: The purpose of the report displayed on top of the report. The message is displayed as,
‘Purpose: Locked Report will provide details of all current locked records.’
Run date: This report display the report run date below to the report.
Navigation:
To access the Locked Records Report, select the ERS Locked Records Report in the Report Name
field and click the View button.
Figure 8-28: ERS Locked Records Report
Figure 8-29: The ERS Locked Records Report
Column Name
Description
Member ID
Displays the member ID.
Member Current HICN
Displays the member current HICN.
GPS Household ID
Displays the GPS Household ID.
Business Segment
Displays the business segment.
Work Basket
Displays the work basket.
Discrepancy Category
Displays the discrepancy category.
Discrepancy Type
Displays the discrepancy type.
Locked By Name
Displays the locked by name.
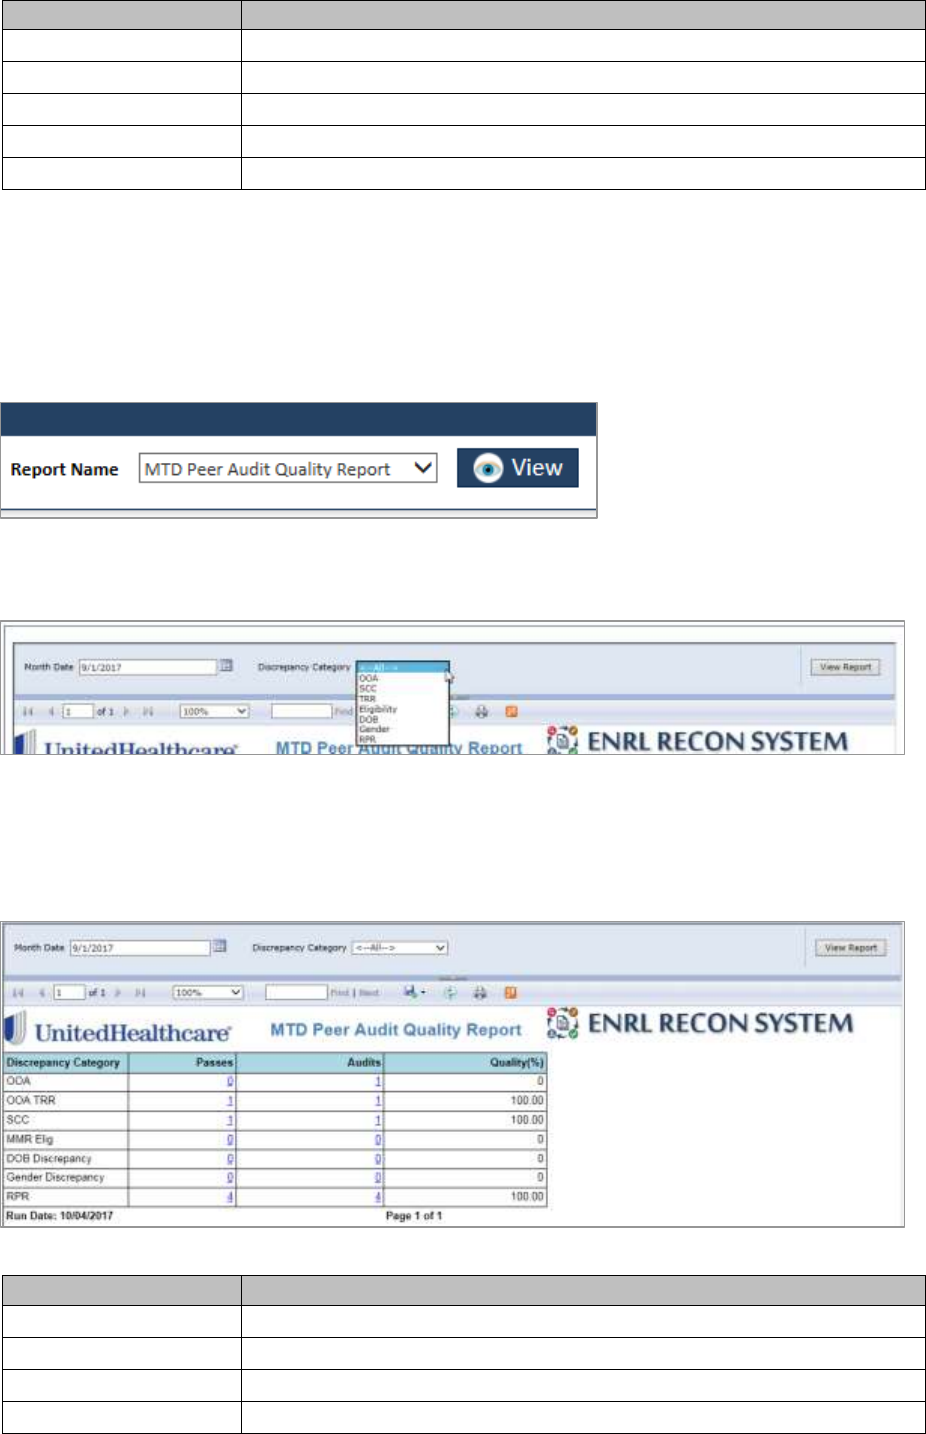
ERS Reports ENROLMENT RECON SYSTEM User’s Manual
©UnitedHealthcare 1.0 Page 8-13
Column Name
Description
UTC Locked On
Displays the date when the case locked on.
Most Recent Action
Displays the most recent action.
Created By
Displays the user that Created record.
Last Updated By
Displays the user that last updated record.
Record Lock Time
Displays the record lock time.
MTD Peer Audit Quality Report 8.2.2.5
The report provides the details about the peer audit quality of the queues.
Navigation:
1. To access the MTD Peer Audit Quality Report, select the MTD Peer Audit Quality Report in the
Report Name field and click the View button.
Figure 8-30: MTD Peer Audit Quality Report
The Month Date and the Discrepancy Category field appear.
Figure 8-31: The Month Date and Discrepancy Category Fields
2. Select the date in the Month Date field.
3. Select the appropriate value in the Discrepancy Category field.
4. Click the View Report button. The required report appears
Figure 8-32: MTD Peer Audit Quality Report
Column Name
Description
Discrepancy Category
Displays the discrepancy category.
Passes
Displays the passes for each discrepancy category.
Audits
Displays the number of audits.
Quality (%)
Displays the quality percentage.
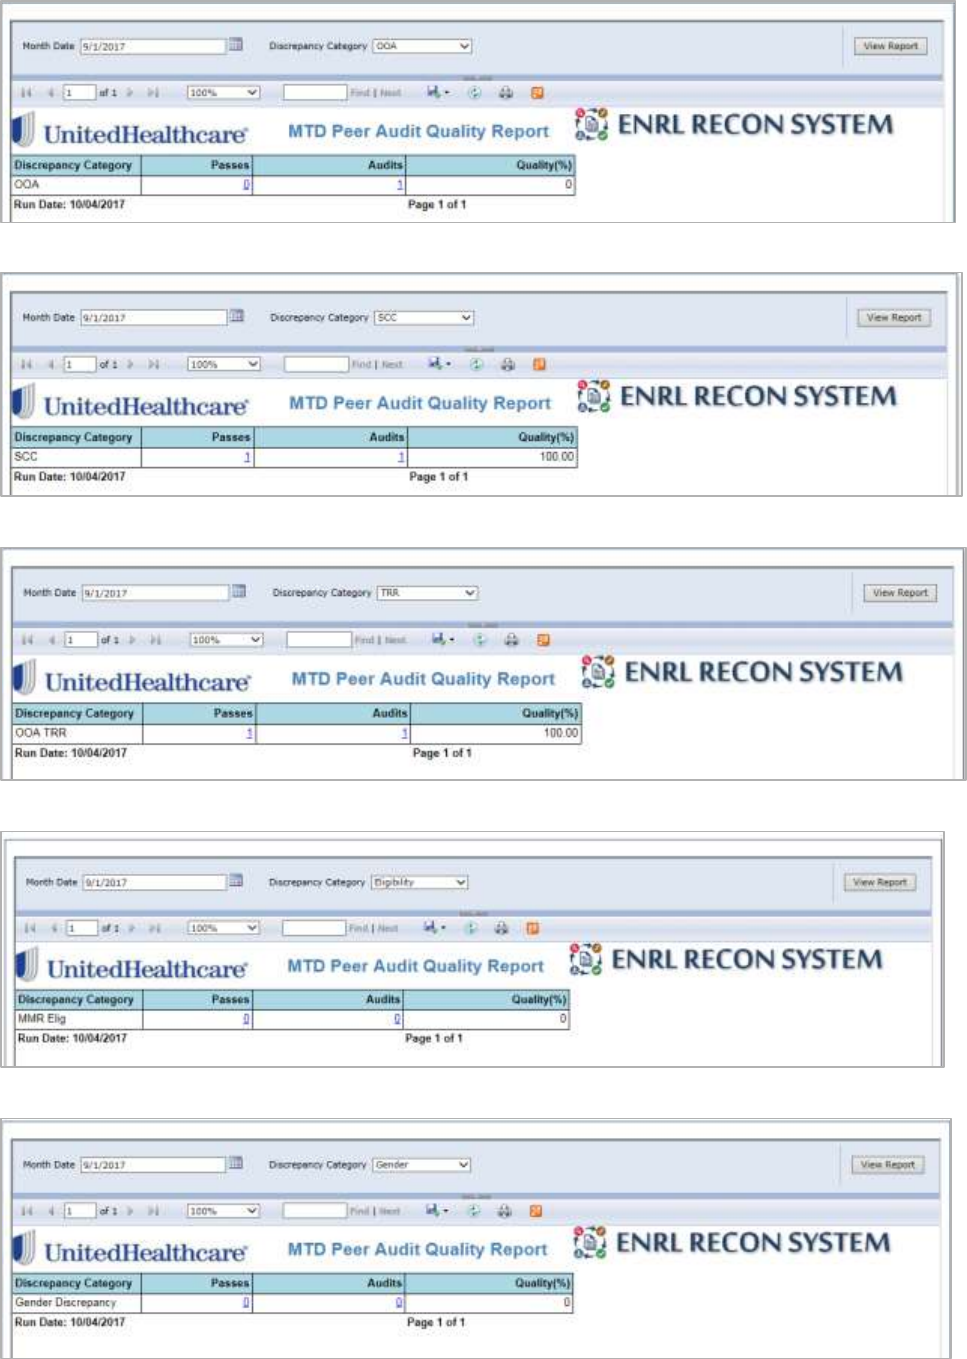
ERS Reports ENROLMENT RECON SYSTEM User’s Manual
Page 8-14 1.0 ©UnitedHealthcare
Other MTD Peer Audit Quality Report 8.2.2.5.1
Figure 8-33: MTD Peer Audit Quality Report> OOA
Figure 8-34: MTD Peer Audit Quality Report> SCC
Figure 8-35: MTD Peer Audit Quality Report> TRR
Figure 8-36: MTD Peer Audit Quality Report> Eligibility
Figure 8-37: MTD Peer Audit Quality Report> Gender
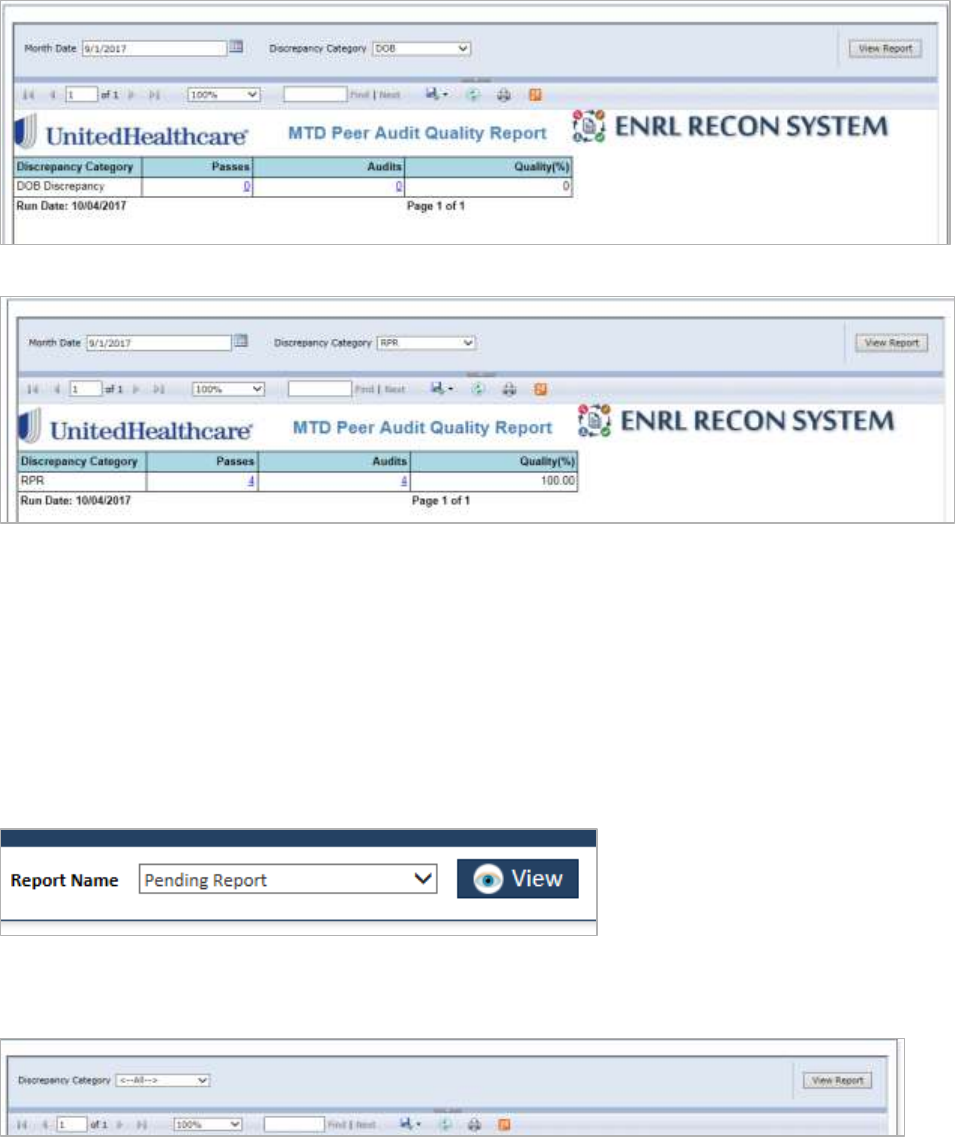
ERS Reports ENROLMENT RECON SYSTEM User’s Manual
©UnitedHealthcare 1.0 Page 8-15
Figure 8-38: MTD Peer Audit Quality Report> DOB
Figure 8-39: MTD Peer Audit Quality Report> RPR
Pending Summary Report 8.2.2.6
This report displays all the pending cases for each discrepancy category in the application. This report
displays case details such as count, duration and the user it is assigned to. You can filter the report
based on the discrepancy category.
Navigation:
1. To access the Pending Summary Report select the Pending Report in the Report Name field
and click the View button.
Figure 8-40: Pending Report
The Discrepancy Category field appears.
Figure 8-41: The Discrepancy Category Field
2. Select the appropriate value in the Discrepancy Category field. If you select the value Yes, it
displays the report all the details of the discrepancy cases.
3. Click the View Report button. The required report appears
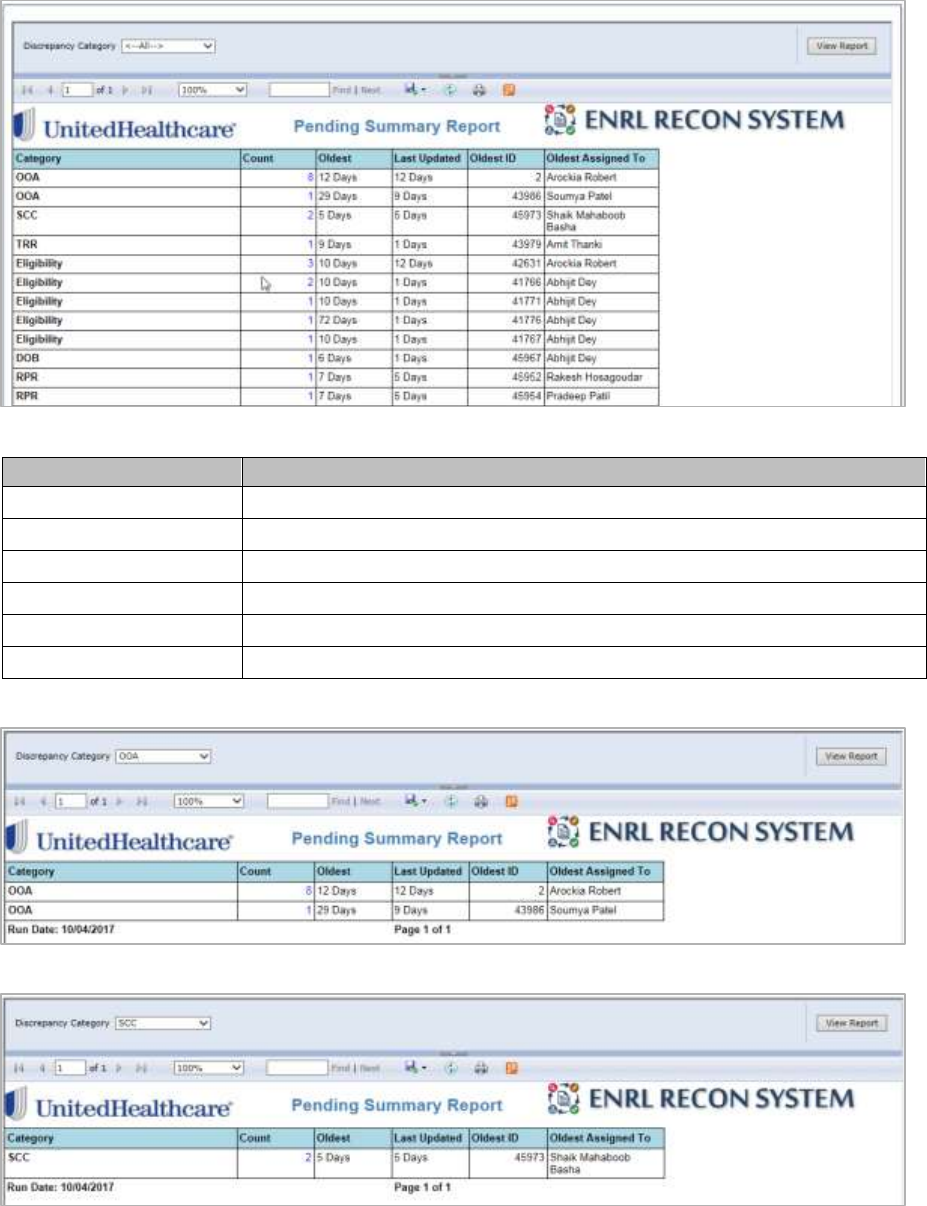
ERS Reports ENROLMENT RECON SYSTEM User’s Manual
Page 8-16 1.0 ©UnitedHealthcare
Figure 8-42: Pending Summary Report
Column Name
Description
Category
Displays the discrepancy category.
Count
Displays the number of the pending cases against each category.
Oldest
Displays the number of the days the case is pending for.
Last Updated
Displays the number days before which the case was updated.
Oldest ID
Displays the oldest ID of the case.
Oldest Assigned to
Displays the user to which it was assigned to.
Other Pending Summary Report 8.2.2.6.1
Figure 8-43: Pending Summary Report> OOA
Figure 8-44: Pending Summary Report> SCC
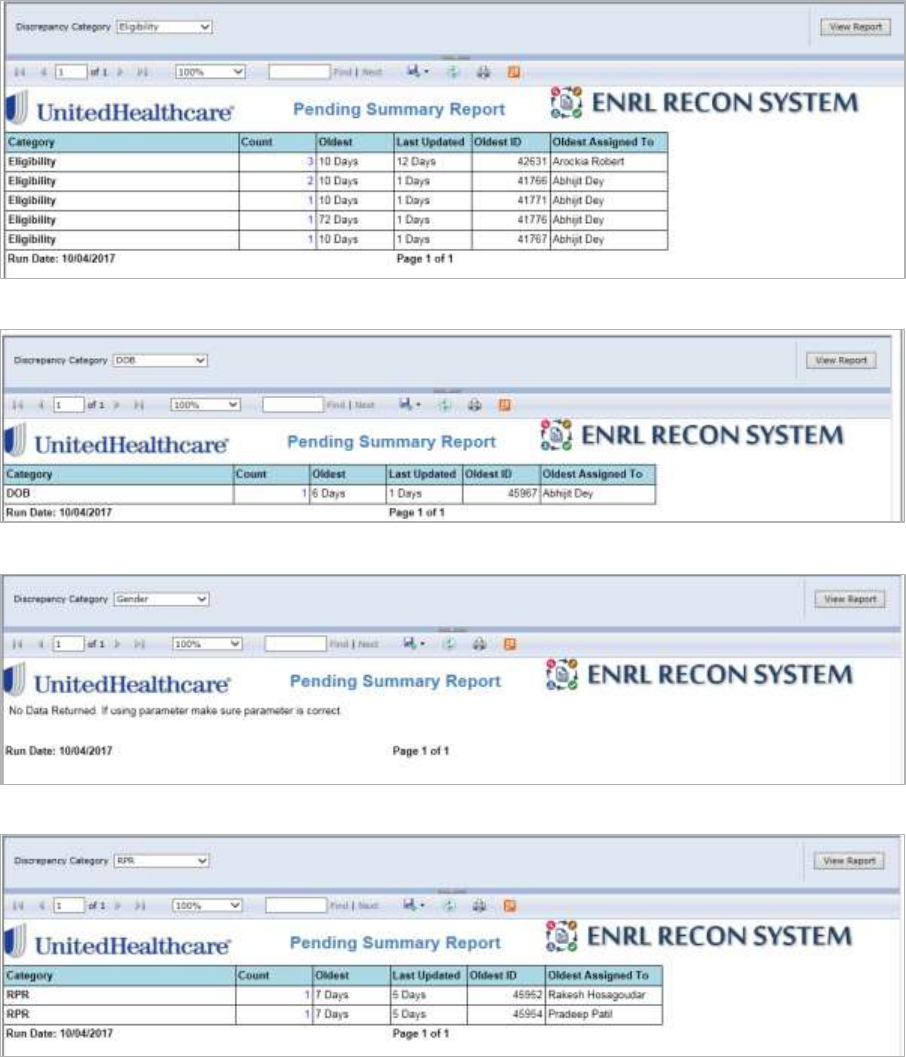
ERS Reports ENROLMENT RECON SYSTEM User’s Manual
©UnitedHealthcare 1.0 Page 8-17
Figure 8-45: Pending Summary Report> Eligibility
Figure 8-46: Pending Summary Report> DOB
Figure 8-47: Pending Summary Report> Gender
Figure 8-48: Pending Summary Report> RPR
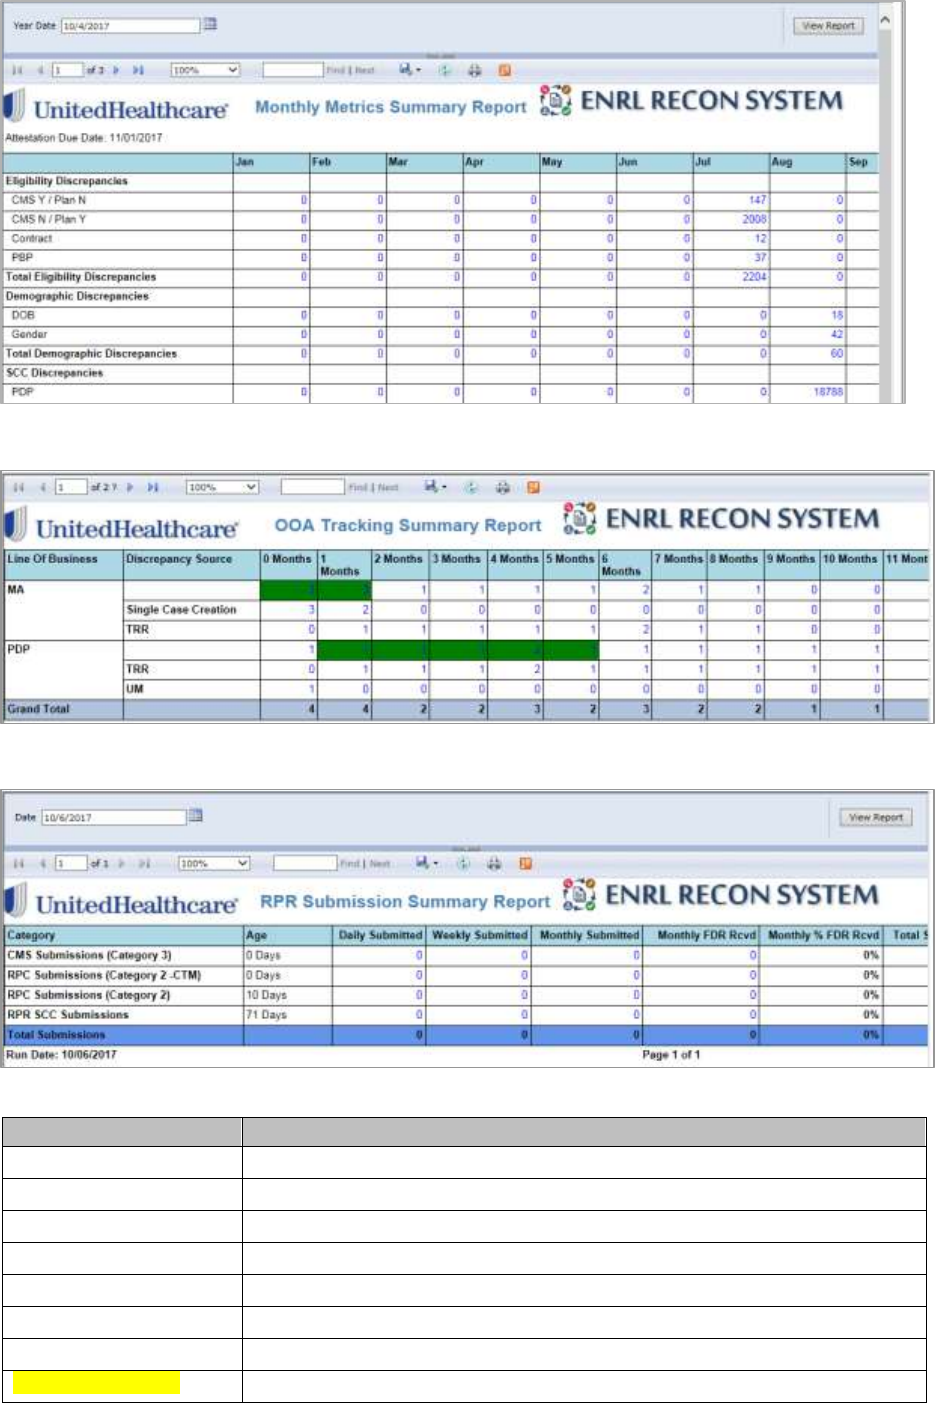
ERS Reports ENROLMENT RECON SYSTEM User’s Manual
Page 8-18 1.0 ©UnitedHealthcare
Monthly Metrics Report 8.2.2.7
OOA Tracking Report 8.2.2.8
RPR Submission Report 8.2.2.9
Figure 8-49: RPR Submission Report
Column Name
Description
Category
Displays the RPR submission queues.
Age
Displays the age of the queues.
Daily Submitted
Displays the day wise submission of the queues.
Weekly Submitted
Displays the week wise submission of the queues.
Monthly Submitted
Displays the month wise submission of the queues.
Monthly FDR Recvd
Displays the monthly FDR received details.
Month % FDR Rcvd
Displays the percentage of the monthly FD received.
Total Submission
Displays the total RPR submission.

ERS Reports ENROLMENT RECON SYSTEM User’s Manual
©UnitedHealthcare 1.0 Page 8-19
RPR Standard Reports
8.2.3 ERS Queue Summary Reports
<Reports are not available>
8.2.4 ERS History Reports
The history report can be accessed from the Search Result table. These reports are available under the
Administration and Maintenance menus. For more information how to access history reports, refer to the
Accessing History Reports section.
History Reports in Administration Menu
The following reports are available under the admin menu.
User Admin History Report 8.2.4.1
This report provides the details about the users created in the system. This report provides details about
the old and new values for full name, MS ID, mail, location and so on. This also provides details about
the user start and end date of the user account in the system.
Figure 8-50: The User Admin History Report
Column Name
Description
ADM User Master Id
Enter the Master user ID to modify the user details in the system. This
is the user that can create and modify the other user details.
View Report
Click this button to view the user details based on the user Master ID.
The details displayed in the other columns of the table.
Change Set Id
Displays the change set ID. You can contract and expand the value in
this field by click the – or the + icon attached with the ID number.
Last Updated On (UTC)
Displays the date when the user details are last updated.
Full Name
Displays the date when the user details are last updated.
Field Name
Displays the fields that are updated. The following field values are
available in this section:
MS ID
Email
Location
Start Date
End Date
Old Value
Displays the older values for the user details fields.
New Value
Displays the newer values for the user details fields.
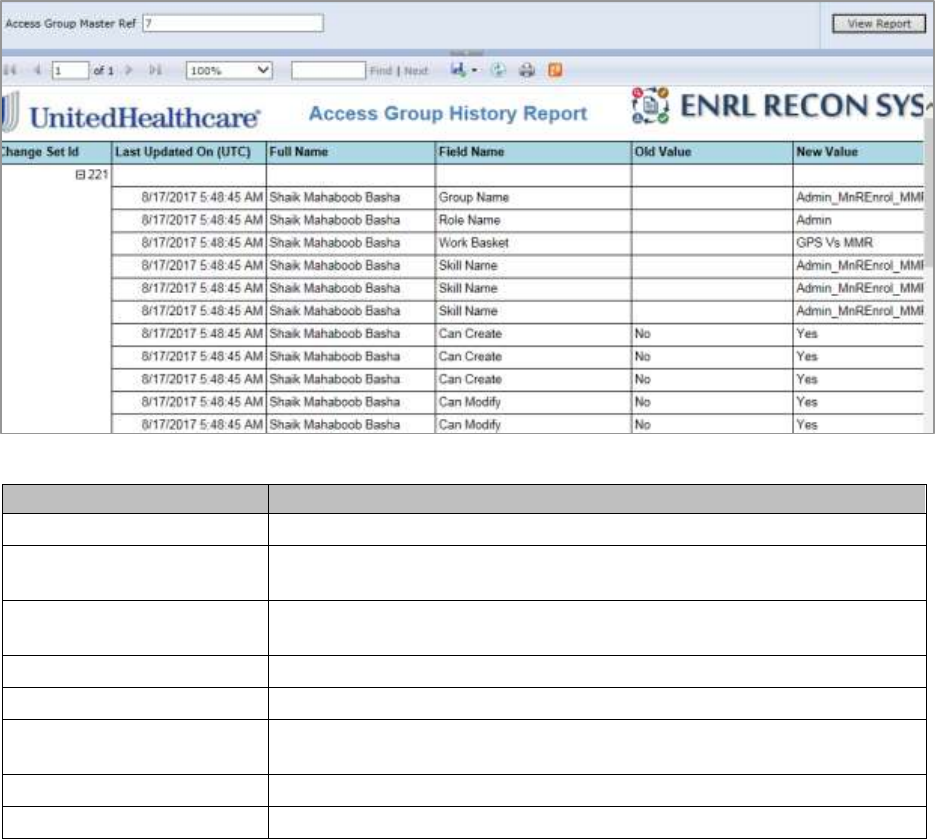
ERS Reports ENROLMENT RECON SYSTEM User’s Manual
Page 8-20 1.0 ©UnitedHealthcare
Access Group History Report 8.2.4.2
This report provides the details about the access groups created in the system. This report provides
details about the old and new values for group name, role name, work basket skill names and user
activates such as Can Create and Can Modify etc.
Figure 8-51: The Access Group History Report
Column Name
Description
Access Group Master Ref
Enter the Master reference number of the access group.
View Report
Click this button to view the user details based on the user Master ID.
The details displayed in the other columns of the table.
Change Set Id
Displays the change set ID. You can contract and expand the value in
this field by click the – or the + icon attached with the ID number.
Last Updated On (UTC)
Displays the date when the user details are last updated.
Full Name
Displays the date when the user details are last updated.
Field Name
Displays the fields that are updated. These are group name, role name,
skill name and so on.
Old Value
Displays the older values for the user details fields.
New Value
Displays the newer values for the user details fields.
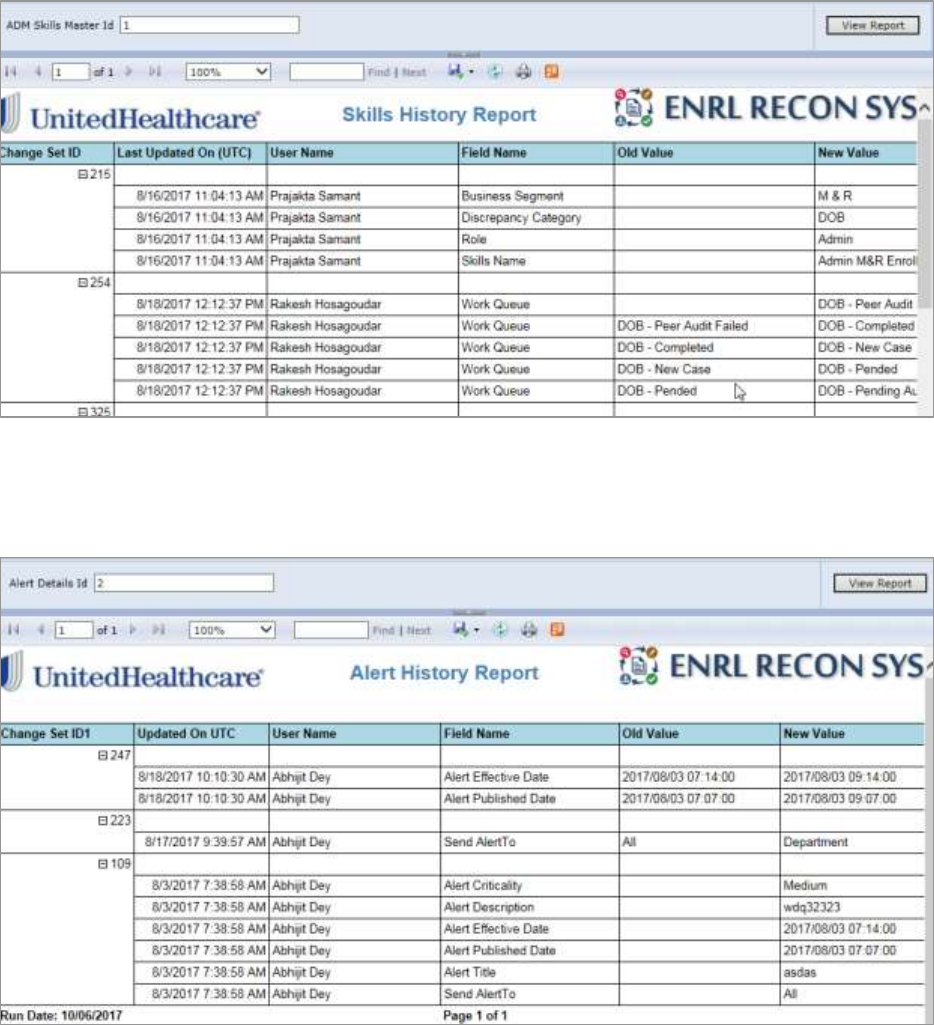
ERS Reports ENROLMENT RECON SYSTEM User’s Manual
©UnitedHealthcare 1.0 Page 8-21
Skills History Report 8.2.4.3
Figure 8-52: The Skills History Report
History Reports in Maintenance Menu
Alert History Report 8.2.4.4
Figure 8-53: Alert History Report

ERS Reports ENROLMENT RECON SYSTEM User’s Manual
Page 8-22 1.0 ©UnitedHealthcare
Configuration History Report 8.2.4.5
Figure 8-54: Configuration History Report
Department History Report 8.2.4.6
Figure 8-55: Department History Report
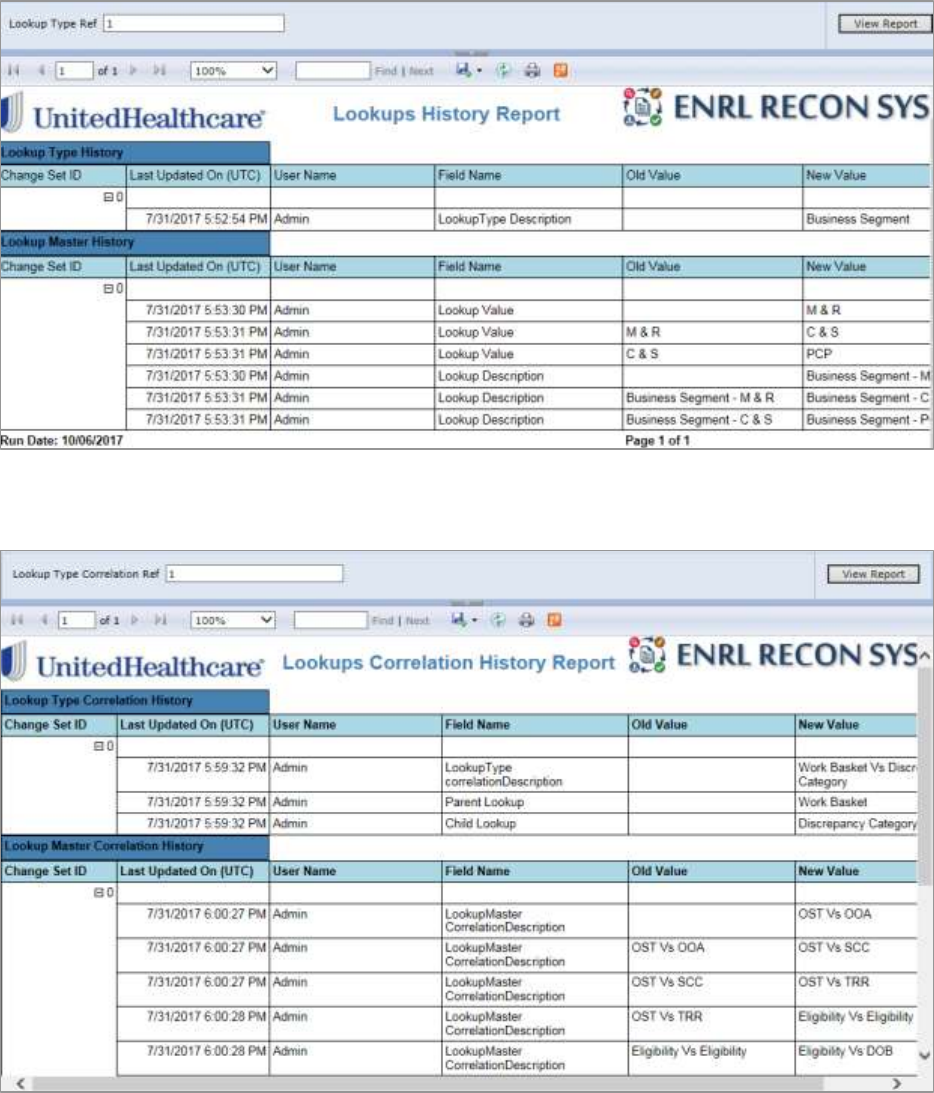
ERS Reports ENROLMENT RECON SYSTEM User’s Manual
©UnitedHealthcare 1.0 Page 8-23
Lookups History Report 8.2.4.7
Figure 8-56: Lookups History Report
Lookups Correlation History Report 8.2.4.8
Figure 8-57: Lookups Correlation History Report
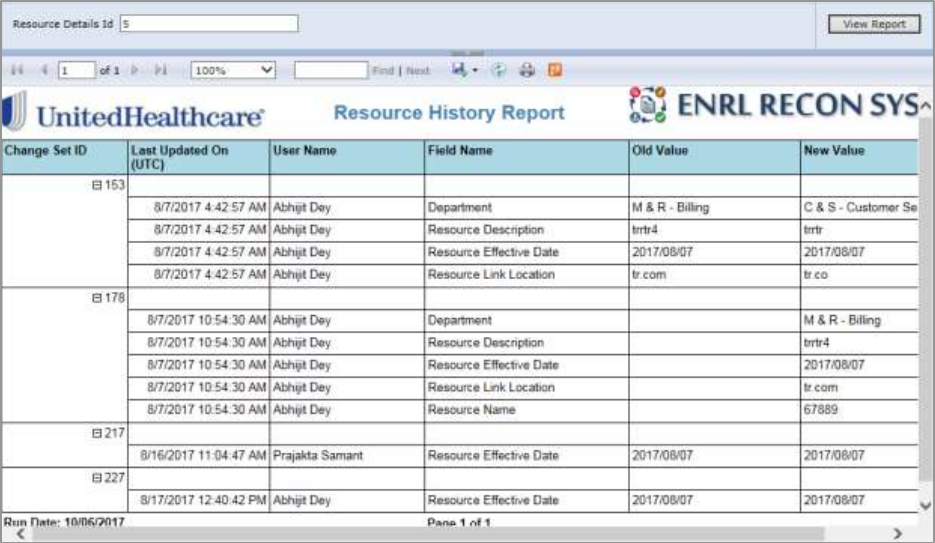
ERS Reports ENROLMENT RECON SYSTEM User’s Manual
Page 8-24 1.0 ©UnitedHealthcare
Resource History Report 8.2.4.9
Figure 8-58: Resource History Report
History Reports in queues
Eligibility: Queue History Report
8.2.4.10
DOB: Queue History Report 8.2.4.11
Gender: Queue History Report 8.2.4.12
OOA: Queue History Report 8.2.4.13
SCC: Queue History Report 8.2.4.14
TRR: Queue History Report 8.2.4.15
RPR: Queue History Report 8.2.4.16
ERS Reports ENROLMENT RECON SYSTEM User’s Manual
©UnitedHealthcare 1.0 Page 8-25
This page is intentionally left blank.
Appendix United Healthcare <Application Name> User Manual
©UnitedHealthcare 1.0 Page 8-1

Glossary
Page 8-2 1.0 ©UnitedHealthcare
Index
Abbreviations and Acronyms ........................ viii
Feedback and suggestions ........................... vii Indented Audience ......................................... vi
Typographical Conventions .......................... vii

Glossary United Healthcare <Application Name> User Manual
©UnitedHealthcare 1.0 Page 8-3
Glossary
A
Application Tab
A menu in the home page that helps request for review, doing
a review, upload and search for all the review in Enrolment
Recon System application.
Audit Questionnaire
A questionnaire designed for the reviewer to perform a quality
check. The questions marked with are mandatory and cannot
be left blank.
R
Resources
In Resources Maintenance window, you can add, search, sort,
edit and delete appropriate resources as illustrated in the
following section.
Review
To be able to access ‘Review’ page, login to the application
with the role of a coordinator or reviewer. Click on the ‘Review’
link.
U
User Administration
A team based user role that cans user administration, manage
roles and manager configuration. This use can add to the
Letter Coordinator role so that they can add, edit, search the
letters.

Glossary
Page 8-4 1.0 ©UnitedHealthcare
United Healthcare Group
www.uhg.com
