HX3 MIDI Expander Module User Manual Mainboard
User Manual:
Open the PDF directly: View PDF ![]() .
.
Page Count: 14
KEYBOARDPARTNER UG
HX3 Mainboard Version 5 (as of 2018-09-14)
HX3.5 is a tonewheel organ emulation with all B3
features on a single board, creating the legendary
unmatched HX3 sound. Controlled via MIDI, it
offers selectable CC-sets for various keyboards.
Alternatively, it may be controlled directly by Fatar
keybeds as well as drawbars, switches and
buttons. HX3 provides unlimited polyphony,
presets, parameters tweakable by simple menus -
like key click response, percussion punch and
more. In addition, General MIDI sounds like piano
and strings are available.
As an option (extended licence required), the new HX3 RealOrgan engine is capable of emulating
all electromagnetic organs including the famous H100, combo organs, concert organs of the 70s
and 80s like Böhm Orchester and Wersi Helios. This implies up to 15 harmonics, up to 12
drawbars per manual with individual mixtures, including phasing rotor (WersiVoice), mechanical
and electronic keying available simultaneously. ADSR envelope available on all drawbars, also
H100 percussion and "Harp Sustain". Various tone generator waveforms selectable, for "cheesy"
combo organs as well as fully fledged concert organs.
Features
Compact organ emulator circuit board, 200 x 100 mm
Authentic reproduction of generator, tapering, key contacts, percussion and vibrato by
FPGA (Field Programmable Gate Array) and physical modelling
Tunable in range of A = 433 through 447 Hz
Extremely low internal latency of 50 microseconds Key-to-Audio. However, MIDI
transmission delay is about 1 ms per note played.
Natural key click by "rattling" contacts
Accurate rotary and 122 amp simulation
Dual MIDI IN for 2 separate keyboards or bass pedal
LEDs show vibrato and percussion setting
LCD display and menu system
Swell (expression) pedal and footswitch jacks
USB for MIDI use
Effects DSP with 3 reverb levels
24 voices GM Synth
Default MIDI setting is channels 1/2/3 for upper/lower/bass, MIDI CC NI B4 with Sustain on CC
#64.
DC input 9 to 12V, 500 mA min., 5.5/2.1 mm plug, plus on center.
Trademarks Hammond®, B3® and Leslie® belong to Hammond Suzuki Corporation (Japan). Trademark NI B4
belongs to Native Instruments GmbH, Germany. Product and company names used in this document apply for
illustration and example purposes only. Keyboardpartner is not related to these trade marks in any way.

Please read this manual carefully before using the HX3 Mainboard.
Do not let liquids get on the board. Liquids may cause short circuits.
Keep packaging in case of service shipment.
Only use appropriate power supply as advised. Input voltages exceeding
15V may damage the device.
Designed for indoor use only. Do not use HX3 Mainboard in moist places.
Refer to qualified technician or service representative if problems occur.
All information given herein is given to describe certain components and
shall not be considered as a guarantee of characteristics. Rights to
technical changes reserved.
EU conformity declaration
The producer/distributor
KEYBOARDPARTNER UG
Entwicklung elektronischer Musikinstrumente
Carsten Meyer
Ithweg 37, D-30851 Langenhagen
info@keyboardpartner.de
hereby declares, that the product
HX3.5 Mainboard
has been designed, produced and examined in compliance with the DIN VDE 0580 standard and in
accordance with the EU Low Voltage Directive.
Following directives, standards and guidelines have been used:
EMV-Richtlinie 2004/108/EG
Niederspannungsrichtlinie 2006/95 EG
RoHS-Richtlinie 2011/65/EU
Langenhagen, August 2018
______________________________
Carsten Meyer / Geschäftsführer

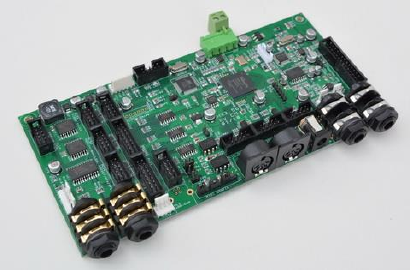
1.0 Jack Connections
The HX3.5 mainboard features two 1/4" mono audio output jacks, two standard MIDI jacks, one
DC input jack, one USB connector and two accessory jacks.
AUDIO1/AUDIO2: Main audio stereo output. Output level is approx. 300 mV at full swell.
SWELL PEDAL ¼” stereo jack. Expression pedal input is compatible with Yamaha FC-7
and similar expression pedals (direct connection preferred for speed/accuracy, but may
also be remote controlled by MIDI control change, controller 11). Plug connection: Sleeve =
ground / potentiometer start, ring = potentiometer tap, tip = potentiometer end.
FOOT SWITCH ¼” stereo jack. Single or double footswitch controls simulated rotary
speed: SLOW/FAST on plug tip, RUN/STOP on plug ring. Please use latching foot
switches; momentary (button type) switches are not supported. If single footswitch used,
Rotary is always on RUN (no plug ring, input grounded by plug sleeve).
MIDI IN primary input from MIDI keyboard.
MIDI IN/OUT factory default secondary MIDI input for additional lower manual, bass pedal
or MIDI controller. Internally jumpered to supply +5V/200ma to our Drawbar Controller
(phantom voltage). May be changed to act as MIDI OUT by internal jumper swap. See our
wiki page for details.
DC IN: Use stabilized DC wall wart 9 to 12V with at least 500mA current output, inner/outer
plug diameter 2.1/5.5 mm on DC input jack. Polarity: positive voltage on inner tip.
USB: USB B connector for MIDI over USB and GM Soundbank updates (optional).
For full control of parameter settings, we recommend the use of our MenuPanel. The menu
system is described below. Installing the menu panel and other peripherals is described in
http://wiki.keyboardpartner.de/index.php?title=HX3.5_Installation_Manual.
Please note: Menu entries depend on firmware type and selected organ model. Factory default is
a firmware for MIDI and menu control. Other firmware types are available on our Github repository,
see wiki.keyboardpartner.de for details.
1.1 Volume Control
Output level of all output channels is controlled by Master volume setting in menu or MIDI CC #7
“Volume”, whichever occurs last.
Organ's swell pedal position is controlled by an expression pedal or MIDI CC #11 “Expression”,
whichever occurs last. HX3 resembles a loudness curve similar to the swell pedal of a classic
tonewheel organ, so expression volume will not reach zero. We recommend connecting an
expression pedal Yamaha FC-7 or similar (1/4" jack, 10k to 47k total resistance) directly to the
HX3 module. By using an expression pedal rather than MIDI sweller control will be faster and
more precise.
MIDI CC #11 and #7 may be changed by menu to any other valid MIDI CC number.

2.0 Panel Buttons
Up to 64 buttons may be connected to the board; a standard organ uses at least 16. In standard
configuration, one Panel16 is needed. See
http://wiki.keyboardpartner.de/index.php?title=HX3.5_Installation_Manual#Panel16 for details.
3.0 Menu Panel
On power on, the presets/drawbar menu is present. Pressing the rotary knob twice briefly will let
you return to the presets/drawbar menu from any other menu position. The menu system consists
of up to 120 entries, depending on licence.
Turn the rotary know to select overall presets 0 to 15. Overall presets consist of voices for upper
manual, lower manual, and pedal, tab switch settings (percussion, vibrato etc.), master volume
and 122 tube amp gain as well as all other sound defining parameters, except rotary run/fast/slow.
LEDs show current percussion and vibrato setting.
Press rotary knob once briefly to scroll through the menu. Up/down arrows are white (active) and
parameter arrow is outlined (inactive) in this mode. Press rotary knob again briefly to change an
entry. A white “<” arrow indicates the selected entry that may be altered.
Alternatively you may use the up/down buttons to step through the menu (autorepeat when you
keep the button pressed).
Turn the rotary knob counterclockwise (or press the down button) to access upper (U), lower (L)
or pedal (P) voice presets.
40 voices (0 … 39) are available for each manual and pedal. Voices 0 to 15 contain the organ
drawbar settings. Voices 16 to 39 select a General MIDI (GM) preset. GM presets may be
predefined by use of the HX3.5 Editor application.
Turn the rotary knob clockwise (or press the up button) to navigate to the Master Volume setting.
Master Volume sets final volume of all outputs. For best noise performance, higher values are
desirable.
The next menu entry is TubeAmp Gain. TubeAmp Gain sets the volume of internal rotary tube
amp simulation from 0 to full (overdriven tube amp). The Amp will produce decent saturation
effects on increased swell amount and higher gain values as seen on ‘real’ tube amps. Amount of
distortion is controlled by swell pedal.
A “*” star appears on the display, if a parameter value has been changed and now differs from the
stored preset. To store values as a preset, keep the encoder knob pressed until a “Saved… to…”
prompt appears. A capital letter (U/L/P/T/C) on the right hand side of the display indicates where
the particular parameter is saved; U = upper manual voice, L = lower manual voice, P = pedal
voice, C = overall tab/common preset.
You may edit and store voice settings separately from the overall presets. If you store an overall
preset though, the current voice settings will be stored as well.
Turn the rotary know clockwise (or press the up button) to navigate to the rotary menu:
Rotary Motor On/Off control
Rotary Slow/Fast control
3.1 Menu Upper/Lower/Pedal
Starting from the preset/drawbar menu scroll downwards to navigate to the voice settings for
upper manual, lower manual, and pedal. The white „<“ arrow points to the selected manual.
DrbXXXXXXXXXXXX - voice menu, shows upper/lower or pedal drawbar settings as
numbers 0 … 8 (here represented as "X") for 12 drawbars (9 harmonics plus 3 mixtures).
To alter individual drawbar settings, step further in the menu.
Turn the rotary knob turn to alter a voice setting.
3.1.1 Upper Manual
Scroll upwards, starting from the preset/drawbar menu, to navigate to percussion, vibrato und
drawbar settings for the upper manual. Drawbars settings will be saved as voice presets for the
upper manual.
Menu entry count depends on selected basic organ model (default: B3). Other organs (H100,
Böhm/Wersi, Versatile Electronic Gating, Conn Single Note Generator, CheesyCombo) are
available with extended licence only. Navigate to Organ Model in the menu to alter the basic
organ model. On B3 and Combo organ models, mixture drawbars are not active.
3.1.1.1 B3 Organ Model
UPR< LWR Vibr - Vibrato/chorus ON/OFF for upper manual
UPR LWR Vibr< - Vibrato knob setting V1 to C3
Percussion - will step through available percussion combinations of NORM/SOFT,
FAST/SLOW, 2nd/3rd (8 options) plus OFF. Available for B3 organ model only.
UpperDB 16 to UpperDB 1 - drawbar settings for upper manual
Organ Model selects basic organ model
3.1.1.2 H100 Organ Model
UPR< LWR Vibr - Vibrato/chorus ON/OFF for upper manual
UPR LWR Vibr< - Vibrato knob setting V1 to C3
UpperDB 16 to UpperDB 1 - drawbar settings for upper manual
UpperDB Mix1 to UpperDB Mix3 – mixture drawbar settings for upper manual. Mixtures
consist of up to 3 higher harmonics in individual levels. Please note: As opposed to the
original H100, HX3.5 provides three mixtures instead of two.
H100 HarpSust - activates Harp Sustain effect, 4’ harmonic decays after key has been
released
H100 2ndVoice – selected percussion harmonics will not decay. As on H100, all
percussion voices are bypassing the vibrato circuit. If drawbar voices are on vibrato and 2nd
Voice is active, this will yield a nice chorus effect.
Perc/EG Mask – selects harmonics to enter the percussion/2nd Voice circuit. Each “o”
symbol represents a single harmonic from 16’ to Mixture 3. An underscore indicates the
harmonic to be changed. If activated, the “o” symbol is filled white.
Organ Model – selects basic organ model
The current status of rotary, percussion, and vibrato is indicated by LEDs.
3.1.2 Lower Manual
Scroll downwards - starting from the preset/drawbar menu - to navigate to the vibrato und drawbar
settings for the lower manual. Drawbars settings will be saved as voice presets for the lower
manual.
Menu entry count depends on selected basic organ model (default: B3). Other organs (H100,
Böhm/Wersi, Versatile Electronic Gating, Conn Single Note Generator, CheesyCombo) are
available with extended licence only. Navigate to Organ Model menu to change basic organ
model.
UPR LWR< Vibr - vibrato/chorus ON/OFF for lower manual
LowerDB 16 to LowerDB 1 - drawbar settings for upper manual
LowerDB Mix1 to LowerDB Mix3 – (non-B3 organs only) mixture drawbar settings for
lower manual. Mixtures consist of up to 3 higher harmonics in individual levels. Please note:
As opposed to the original H100, HX3.5 provides three mixtures instead of one.
3.1.3 Pedal
Pedal drawbars including ADSR setting are saved to active pedal voice preset.
PedalDB 16, PedalDB 8 - drawbar settings for pedals
PedalDB 16H, PedalDB 8H - drawbar settings for pedals, brighter tone
Pedal Attack - changes pedal ADSR envelope attack time.
Pedal Decay - changes pedal ADSR envelope decay time
Pedal Sustain - changes pedal ADSR envelope sustain level
Pedal Release - changes pedal ADSR envelope release time (often called string bass
“sustain” on other organs)
Pedal Harmonc – sets harmonic breakup of individual harmonics over time. Set to lower
values to obtain a „picked bass“ effect.
3.2 Defaults Group
Step downwards to navigate to various default settings; change to desired value by turning
incremental encoder knob. Save changes to current overall preset by pressing knob for more than
2 seconds.
ToneTrimPot – mimics TONE pot on simulated AO28 amp; well, a little bit more on high
values.
TubeAmp Insrt – activates 122 amp simulation, otherwise amp is bypassed. TubeAmp
Gain has no effect if off.
SpkrSim Insrt – activates rotary cabinet simulation, otherwise horn/rotor simulation is
bypassed (recommended for use of external rotary cabinet).
Reverb Prgm – selects one of 3 different reverb programs. For each program, amount of
reverb may be adjusted.
o Reverb Lvl 1 reverb amount of reverb program 1
o Reverb Lvl 2 reverb amount of reverb program 2
o Reverb Lvl 3 reverb amount of reverb program 3
Transpose – allows transposition by up to +24 or -24 half note steps. Notes beyond 5
octave limits of console organ will not produce any sound due to accuracy of physical
model.
3.2.1 Split Configuration
Keyboard split default is “pedal mapped to lower manual” on first 25 keys (console organ pedal
range, two octaves). Default split modes may be changed by menu:
Split Manual – switches split mode on or off.
Split Point – sets split point (when split is on) as key number (24 is second „C“ on manual).
Split Mode – default split setting on power-up, engaged when split set to ON.
o 'PedalToLower', map pedal to lower manual up to split point
o 'LowerToUpper', map lower to upper manual up to split point
o 'PedalToUpper', map pedal to upper manual up to split point
o 'LowerToU +1', map lower to upper manual up to split point, transpose lower +1
octave
o 'LowerToU +2' map lower to upper manual up to split point, transpose lower +2
octave
Split point and split mode may also be changed by one of the following procedures:
o Pedal to Lower: Press a single key on lower manual key while switching SPLIT on to
obtain a custom split point (useful for playing pedal bass lines on dual manual
keyboards without bass pedals).
o Lower to Upper: Press a single key on upper manual while switching SPLIT on to
map lower to upper manual up to this key (useful for playing 16’ bass lines or 4’
accompaniment chords on single manual keyboards).
o Pedal to Upper: Press two keys simultaneously on upper manual while switching
SPLIT on to map pedal to upper manual up to highest of both keys pressed (useful
for playing pedal bass lines on single manual keyboards without bass pedal).
o Lower to Upper +1: Press three keys simultaneously on upper manual while
switching SPLIT on to map lower to upper manual up to highest of all keys pressed.
Lower notes range is transposed one octave up (useful for left-hand 8’
accompaniment chords on single manual keyboards).
o Lower to Upper +2: Press four keys simultaneously on upper manual while
switching SPLIT on to map lower to upper manual up to highest of all keys pressed.
Lower notes range is transposed two octaves up (useful for left-hand 16’
accompaniment chords on single manual keyboards).
3.2.2 Generator Group
TG WaveSet – selects harmonic content of tone generator. Will be changed according
automatically with organ model selection, but may be overridden by this menu:
o 0…3 – B3, clean to rich harmonics (new to old organ), increasing harmonic distortion
on lower notes
o 4 – Clean LSI/transistor sine generator
o 5 – Sawtooth-like tone
o 6 – Squarewave-like tone
o 7 – Cheesy Combo organ
TG CapSet – sets tone generator age and characteristic:
o 1955 (very aged caps, mellow sound)
o 1961 (aged wax caps, jazz-type sound)
o 1972 (new “red” caps, rock-type sound)
o Recapped (more aggressive)
o Straight (no tapering, equal loudness)
o Cheesy (emphasises higher notes)
TG Gears Tune – sets organ generator tuning in range from A = 433 through 447 Hz
TG Flutter – adjusts tone generator "sloppyness" (spring clutch tension, bearing precision).
TG Leakage – sets tone generator leakage (crosstalk noise of adjacent notes, “growl”)
ContSpringFlx – adjusts key contact spring flex, affects click frequency
ContSpringDmp – adjusts key contact spring damping, affects click length
No DB1 @Perc enables drawbar 1’ cancelling when percussion ON (as original B3®)
DB16 Foldback – controls foldback behaviour on 16' lowest octave. Foldback is
configurable in 4 settings:
o foldback with full level,
o foldback with muted level (original B3 behaviour),
o no foldback ("all way down") with full level (like H-100®) or
o no foldback ("all way down") with muted level.
3.2.3 Preamp Group and Misc.
Along with ToneTrimPot (see above), adjusts behaviour and response of the emulated AO28
preamp chassis and transformer/tube saturation.
Swell Type – controls preamp loudness behaviour on swell pedal changes:
o Hammond AO28 (“deep” loudness curve)
o Böhm/Wersi (shallow loudness curve)
o Linear
SwellTrimCap – adjusts organ output volume like the trim cap in B3 swell pedal control.
Higher values add more punch and output transformer saturation effects.
Minimal Swell – adjusts minimal organ output in swell pedal heel position.
AO28 TubeAge – controls emulated AO28 preamp tube aging (higher triode distortion k2 in
12BH7 output stage).
3.2.4 Commons Group
MIDI Channel – sets MIDI base receive channel 1 to 10 (upper manual, lower manual is on
+1, pedals on +2).
MIDI Option – sets MIDI routing behaviour to:
o Local Tx – own MIDI events are sent on MIDI OUT
o Inp 1 Thru – MIDI IN 1 is routed to MIDI OUT as THRU
o Inp 2 Thru – do not use
o USB InThru – USB MIDI IN is routed to MIDI OUT as THRU
MIDI CC Set – sets recognized MIDI CC set to
o NI B4 d3c - Native Instruments B4, Doepfer d3c controller (default),
o VoceDrawbar,
o KeyB/Duo,
o Hamichord,
o Hammond XK,
o Hammond SK (Note: Hammond changed MIDI CC set between XK and SK series,
so try out which will fit)
o BoehmSempra (full MIDI implementation of all parameters, see MIDI documentation)
o Custom CC (not implemented yet).
MIDI Swell CC – sets accepted swell/expression CC number (default #11).
MIDI VolumeCC – sets accepted overall volume CC number (default #7).
3.2.5 Vibrato Group
Detailed modelling of scanner vibrato features lots of adjustable parameters. Avoid randomly
changing parameters; they are intended for real organ enthusiasts – you should know what you’re
doing.
Scanner Gears – adjusts scanner drive gear and thereby vibrato frequency.
Scanner Leak – adjusts leakage of higher notes in scanner compartment due to parasitic
capacitances.
VibCh ModFac – adjusts amplitude modulation caused by delay line on all vibrato/chorus
knob settings.
VibCh PreEmph – adjusts treble increase when vibrato/chorus is switched on. Effect on
chorus is obvious, while increase on Vibrato is more subtile.
VibCh Reflect – sets amount of reflected signal on LC linebox due to aged caps. Higher
values lead to a ‚celeste’-like effect as found on model M100.
VibCh Respons – sets upper frequency response of LC linebox.
Ch LineboxLvl – adjusts ‚wet’ modulated amount when in chorus mode.
Ch BypassLvl – adjusts ‚dry’ unmodulated amount when in chorus mode.
3.2.6 Percussion Group
PercNormLvl – adjusts percussion level in PERC ON, NORMAL tab setting.
PercSoftLvl – adjusts percussion level in PERC ON, SOFT tab setting.
PercLongTm – adjusts percussion decay rate in PERC ON, SLOW tab setting (higher
value = faster).
PercShortTm – adjusts percussion decay rate in PERC ON, FAST tab setting (higher value
= faster).
PercMuteDB – sets drawbar muting amount while in Perc NORM. No mute will happen if
value set to 125.
PercPrecharge – sets percussion circuit recovery time; if set to lower values, staccato
notes yield muted percussion.

3.2.7 Rotary Group
HornSlowTm - Rotary simulation horn revolution time when set to SLOW
RotorSlowTm - Rotary simulation rotor revolution time when set to SLOW
HornFastTm - Rotary simulation horn revolution time when set to FAST
RotorFastTm - Rotary simulation rotor revolution time when set to FAST
HornRampUp - Rotary simulation horn acceleration from SLOW to FAST.
RotorRampUp - Rotary simulation rotor acceleration from SLOW to FAST.
HornRampDown - Rotary simulation horn brake time from FAST to SLOW.
RotorRampDown - Rotary simulation rotor brake time from FAST to SLOW.
Rotary Throb - Rotary simulation "throb" modulation factor
Rotary Spread - Rotary simulation stereo spread (width).
Rotary Balnce - Rotary simulation volume balance horn/rotor.
3.3 Updates/Scripts
Update installation instructions and firmware images are made available through our HX3.5 Github
repository on https://github.com/keyboardpartner/HX35. For your HX3.5 MIDI Expander, use file
UPDATE Plexi Expander.zip and follow instructions given on the Github page.
Setup File – Selection of an update oder setup script from a SD card. For details more
please see http://wiki.keyboardpartner.de/index.php?title=HX3.5_DSP-Updates
3.4 Factory Reset
To retrieve the factory defaults, press the MenuPanel encoder knob when powering on until
“Factory Reset” prompt appears, then confirm by pressing “up” button. Note: A factory reset will
void your presets.
3.5 Serial Numbers and Licences
HX3 is protected against forgery by licence numbers. If not set appropriately after firmware
update, HX3 will refuse to work after 2 minutes. Licences may be re-installed at any time. Please
contact KeyboardPartner to obtain a valid licence key. We need your serial number (issued on
startup and by HX3 Editor application) to generate new licences for you.
4.0 MIDI Control
HX3 expander accepts MIDI key on/off events (default: channel 1 to upper manual, 2 to lower
manual, channel 3 to bass pedals) as well as various MIDI CCs with selectable compatibility sets.
MIDI dynamics slightly influences key click noise. SysEx data is always ignored.
Both MIDI jacks act as MIDI inputs with equal priority, so that you may connect two separate MIDI
keyboards or controllers at the same time. To connect a third input device you will need a MIDI
Merge interface.
HX3 expander may be remote-controlled via given MIDI CC set, but some settings are available
via menu system only. If a valid MIDI CC command is received (despite expression/volume
changes) for current MIDI CC set, MenuPanel will briefly show the changed parameter.
General
Please connect MIDI out of your MIDI controller/keyboard to one of the two HX3 MIDI inputs. HX3
does not introduce any audio latency, so delays are only due to MIDI transmission.
Since MIDI is a one-way interface, HX3 cannot determine the setting of any MIDI controller value
until you touch/use it once. As default, all HX3 controllers are OFF. Do not use any controller
button or drawbar unless HX3 is ready to accept its data (drawbar preset displayed). It is a good
idea to power up HX3 before your MIDI master keyboard or master controller.
MIDI CC #7 controls the rotary amp volume which only affects the rotary or rotary amp simulation,
not plain organ output. MIDI CC #11 controls swell pedal/expression if no expression pedal
connected to HX3.
If you use your HX3-attached swell pedal, any MIDI expression message will be overwritten.
Otherwise, by not touching the attached swell pedal, MIDI expression messages are accepted.
Note: Some MIDI controllers as well as organ keyboards (like Hammond XK and SK series) allow
2nd and 3rd harmonic percussion ON at the same time. HX3 implementation regards "2nd ON" as
"Percussion ON" tab in this case.
See Menu Panel section to select the desired MIDI CC set. Factory default is Native Instruments
B4, which provides the most versatile command set.
Using HX3 with Voce MIDI Drawbars
Using your HX3 board with Voce MIDI Drawbars is straightforward, as the Voce module supports
only one MIDI channel (i.e. upper manual). Please note that Voce MIDI Drawbars does not send
drawbar data unless you press the “Drawbar/Save” button, so it’s LED lits up.
Using HX3 with Doepfer d3c or other NI B4 drawbar controller
The Doepfer d3c drawbar controller is a very nice and rugged piece of gear, so we recommend it
for use with our HX3 board. It has support for foot controllers and foot switches. The
Keyswerk/Böhm db4 is also compatible with NI B4 CC set.
Upper, lower and bass drawbars work as usual. It is a good idea to set all to zero before switching
on as this is a “known state” for HX3. Also the Percussion and Vibrato buttons work as described
in d3c manual.
There is a small drawback, anyway: Default HX3 Vibrato setting is V1 (but upper/lower vibrato
OFF), while the V1 LED will not light when powering up the d3c (there is no “V0” on a real
Hammond!). So pressing the V1 button will not change the sound – just it’s LED turns on.
The “Brightness” knob controls AO28 “tone” parameter in HX3. There is no key click emulation in
HX3 (it is just there!), so you may not adjust key click (a real Hammond does not have key click
adjustment, either). The “Key Click” knob controls the bass sustain instead. You may argue “a real
Hammond does not have a bass pedal sustain, too”. Right, but many aftermarket kits are installed,
so this is OK (for me).
Do not use the “Harmonic content” knob as it sends the “Percussion” button’s controller number
like a continuous controller. Why that? No idea. This is definitely of no use.
Preset buttons may be used, but in a restricted way. First, HX3 yields 15 presets per manual, not
127 like NI B4. When selecting “Bank 1”, all 12 available preset buttons work on upper manual.
When selecting “Bank 2”, all 12 preset buttons work on lower manual.
Doepfer d3c resends the program change message when changing the bank, which may be
annoying. Choose bank 2, lower preset first, then bank 1, upper preset.
BTW: Bank buttons do not send bank select messages, they just add an offset to the preset
buttons. Blame Doepfer for that.
Doepfer d3c preset 1 is the HX3 “Live” (preset 0) position. It will be saved temporarily (until HX3
switched off) when switching to a preset sound (2 to 12). If you return to preset 1 “Live”, your last
drawbar/button setting will be recalled.
Using HX3 with Hammond XK/SK series
HX3 supports most of Hammond XK MIDI controller functions. For convenience, some controllers
have been relocated to other HX3 functions:
XK Overdrive knob controls HX3 Rotary tube Amp Volume
XK Reverb button controls HX3 lower manual Vibrato On
XK Tube On button controls HX3 Reverb
Custom MIDI CCs
(not yet implemented)

Using HX3 with HX3 DrawbarController
HX3 Drawbar Controller is specially designed to be used with HX3 MIDI Expander and provides
convenient operation. It will merge incoming MIDI data on MIDI MERGE input to its own controller
data.
For use with HX3 Plexi Expander, you may utilize its “phantom” power supply feature (power over
MIDI cable). Phantom supply is usually set by factory – check if your expander supplies phantom
voltage. In case it does not, you may use a separate wall wart for the HX3 Drawbar Controller or
need to open the device and set two jumpers to enable phantom supply on the HX3 MIDI
Expander.
Insert two jumpers supplied with Drawbar
Controller to jumper header PL18 on
positions 7-8 and 9-10 as shown in picture.
Connect 5-wire MIDI cable (supplied) to HX3
MIDI Expander MIDI IN/OUT and to HX3
Drawbar Controller MIDI OUT. HX3 Drawbar
Controller will now be phantom powered by
the HX3 MIDI Expander through the MIDI
cable.
Attention: Always connect wall wart to HX3 MIDI Expander. Never connect the wall wart to
Drawbar Controller when phantom power is enabled. Doing so may damage the devices.
5. HX3 Apps
HX3.5 Editor for Windows application is a convenient way to update or maintain your HX3 MIDI
expander. It allows for firmware and sound engine updates, parameter tweaking and preset setup
for experienced users.
Programs and complete documentation are available through our wiki pages on
http://wiki.keyboardpartner.de/index.php?title=HX3.5_Main_page
Join the HX3 community at http://forum.keyboardpartner.de
KEYBOARDPARTNER UG
Entwicklung elektronischer Musikinstrumente
Carsten Meyer Ithweg 37 D-30851 Langenhagen
Web: www.keyboardpartner.de Instructions: wiki.keyboardpartner.de
EMail: info@keyboardpartner.de
All information given herein is given to describe certain components and shall not be considered
as a guarantee of characteristics. Rights to technical changes reserved.
