Users Manual
User Manual:
Open the PDF directly: View PDF ![]() .
.
Page Count: 11
USER’S MANUAL FOR YTAUTOMATE SOFTWARE
A. QUICK START:
To run the program, you need to properly configure it into your local machine, acquire a valid
license.lsc file, and obtain valid LOCK and KEY files for your YouTube channel.
1. Configure the program:
a) Enable macros for the default InputData.xlsm interface.
b) Place the license file (.lsc) into the <YTAutomate\bin> folder.
c) Go through 3-step configuration in the Setup sheet in the InputData.xlsm workbook.
2. Get LOCK file:
a) Use this wizard to create or select a project in the Google Developers Console and
automatically turn on the API. Leave Create a project (no/yes) Click Agree & Continue,
then Go to credentials.
b) On the Add credentials to your project page, click the Cancel button.
c) At the top of the page, select the OAuth consent screen tab. Select an Email address,
enter a Product name if not already set, and click the Save button.
d) Select the Credentials tab, click the Create credentials button and select OAuth client
ID.
e) Select the application type Other, enter the name of your project, and click
the Create button.
f) Click OK to dismiss the resulting dialog.
g) Click the file_download (Download JSON) button to the right of the client ID.
h) Move the downloaded file to your working directory and rename it as you wish while
keeping the “.json” extension (E.g., Lock_AudiobookChannel.json)
3. Get KEY file:
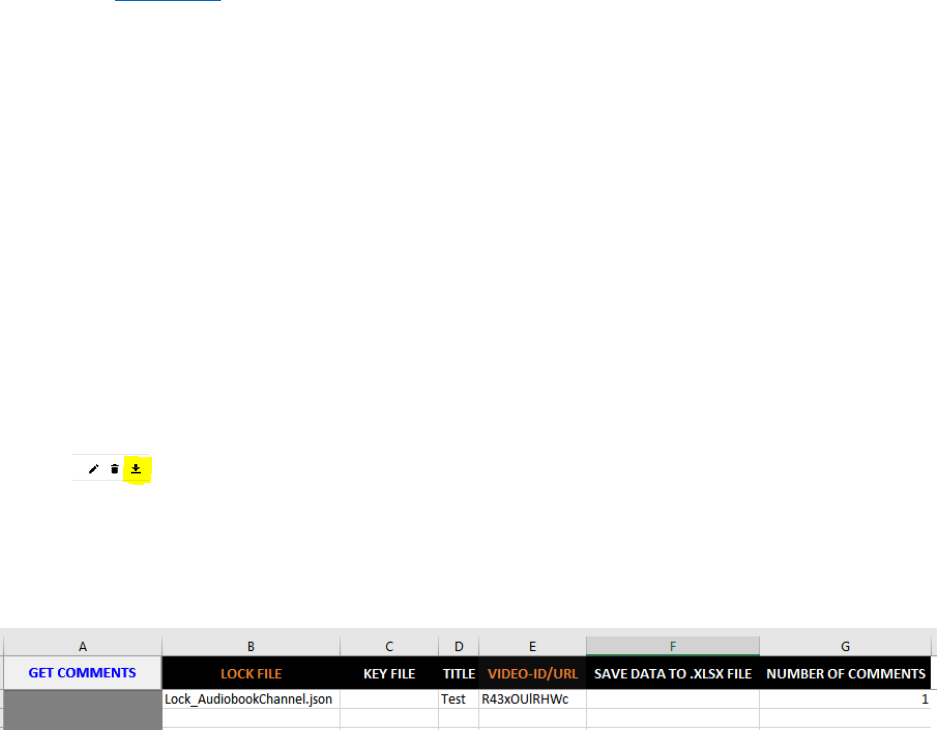
a) Open the InputData.xlsm. Go to CMGet sheet. Enter LOCK file .json (E.g.,
Lock_AudiobookChannel.json) in the LOCK FILE variable.
b) Leave the KEY FILE variable empty.
c) Copy a YouTube video URL or ID and paste it in the VIDEO-ID/URL column. Enter 1
for NUMBER OF COMMENTS.

d) Click ‘GET COMMETS’ button.
e) Login to your google account and authorize request.
f) Paste the authorization code in the CMD window and press enter.
g) The KEY file .json will be generated in your working directory and named as <LOCK> +
_key.json (e.g., in this case: Lock_AudiobookChannel_key.json)
h) Rename the KEY file if you like.
B. COMPLETE MANUAL
1. YTAutomate Overview
1.1 InputData.xlsm
The InputData.xlsm is a macro-enabled excel workbook that serves as a flexible interface for the
YTAutomate. This Excel-based interface facilitates remote controls as well as scheduled task
performance without user attendance. This program allows users to fully control their YouTube
channels without using web browsers or YouTube’s apps.
To run the program, the user first specifies values for different variables (defined as headers) in a
worksheet corresponding to the specific task that they want the program to carry out. He/she then
hits the run button on the left-hand-side panel to execute the task. The user can perform a task on
multiple videos and multiple YouTube channels by filling different rows in a worksheet. The
program will carry out actions in bulk in an ascending order. Since the workbook uses macros,
please navigate to section 2.1 to learn how to enable macros before running the program.
There are 13 worksheets in InputData.xlsm workbook corresponding to 13 different tasks,
including:
- Setup: allows the user to set up the license and working directory as well as checking
the status of their license and update the program.
- Upload: allows users to upload videos to their YouTube channels.
- Update: allows users to update/modify details and properties of uploaded videos.
- Delete: allows users to delete videos from their YouTube channels.
- Download: allows users to download videos and audios from YouTube.
- Metadata: allows users to retrieve metadata (i.e., video properties and statistics) of any
YouTube videos.
- CMGet: allows users to retrieve comments and replies from any YouTube videos.
- CMInsert: allows users to insert new comments to any YouTube videos.
- CMReply: allows users to reply to comments on any YouTube videos.
- CMUpdate: allows users to update their own comments or replies.

- CMHold: allows users to hold comments on their videos for later review.
- CMDelete: allows users to delete their own comments on YouTube videos.
For more information on license and program setup, please navigate to section 2.
For more information on how to run specific tasks, please navigate to section 4.
1.2 Folders
Below are specific folders included in the program:
- bin: contains all the executable and configuration files for the program to run. Please do
not mess with this folder unless you know what you are doing.
These folders will be created the first time you run the program:
- DOWNLOADED: default folder to store downloaded videos and audios. When running
the Download task, if the variable <Save Files To Folder> is empty, the
video/audio will be downloaded to this default folder.
- THUMBNAILS: default folder for thumbnail files. When running the Upload and
Update tasks, if thumbnail file name without path is present (e.g., figure1.jpg), the
program will automatically search the THUMBNAILS folder for the file. If the
thumbnail file is placed somewhere else on your machine, please use the full path
instead (e.g., D:\Photo\figure1.jpg)
- UPLOADING: default folder to store videos for the Upload task. When running the
Upload task, if video file name without path is present (e.g., the flying cat.mp4),
the program will automatically search the UPLOADING folder for the file. If the
video file is placed somewhere else on your machine, please use the full path
instead (e.g., D:\Videos\the flying cat.mp4).
- XLSX: default folder to store the resulting .xlsx and .txt files. When running Upload,
Download, Metadata, CMGet, and CMInsert tasks, if you only specify file names
without paths for variables < save data to .xlsx file>, < save downloaded id to .txt
file>, and < save comment id to .xlsx file> (e.g., uploadedIDs.xlsx), the program
will automatically save these files to the XLSX folder. If you want to save the
files to somewhere else on your machine, please use the full paths instead (e.g.,
D:\Results\uploadedIDs.xlsx).
2. YTAUTOMATE SETUP
The program requires three elements listed below:
- Macro-enabled Excel (to open the default InputData.xlsm interface)
- A valid license for your machine.
- Proper configuration of license and bin folder in InputData.xlsm workbook.
2.1 Enabling macros:
The InputData.xlsm workbook includes different macros that read user’s input data to run
specific tasks. For the program to run, macros need to be enabled in for this workbook (if they
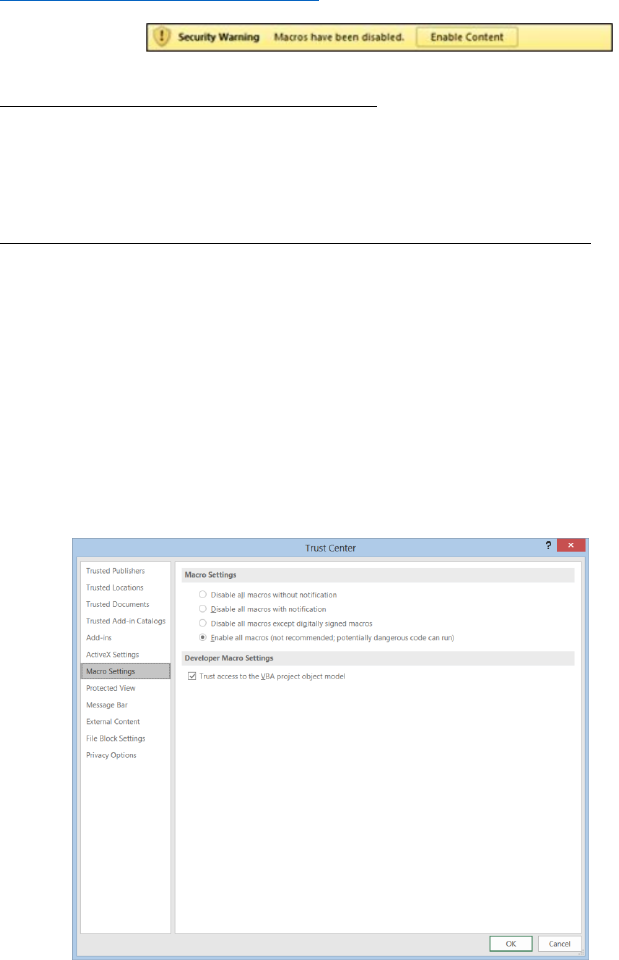
have not been). If you receive the below Message Bar, you need to follow the steps listed below
to enable macros for your workbook. For more details on how to enable macros, please visit
Microsoft Office help documents.
Message Bar:
Option 1: Temporarily Enable macros:
Click on the Enable Content button to temporarily enable macros for the current session.
You will have to perform this action every time you run the program.
Option 2: Permanently enable macros from the Trust Center:
1. From Excel, click the File tab.
2. Click Options.
3. Click Trust Center, and then click Trust Center Settings.
4. In the Trust Center, click Macro Settings.
5. Change Macro settings to Enable all macros.
6. Click OK.
The following image is the Macro Settings area of the Trust Center.
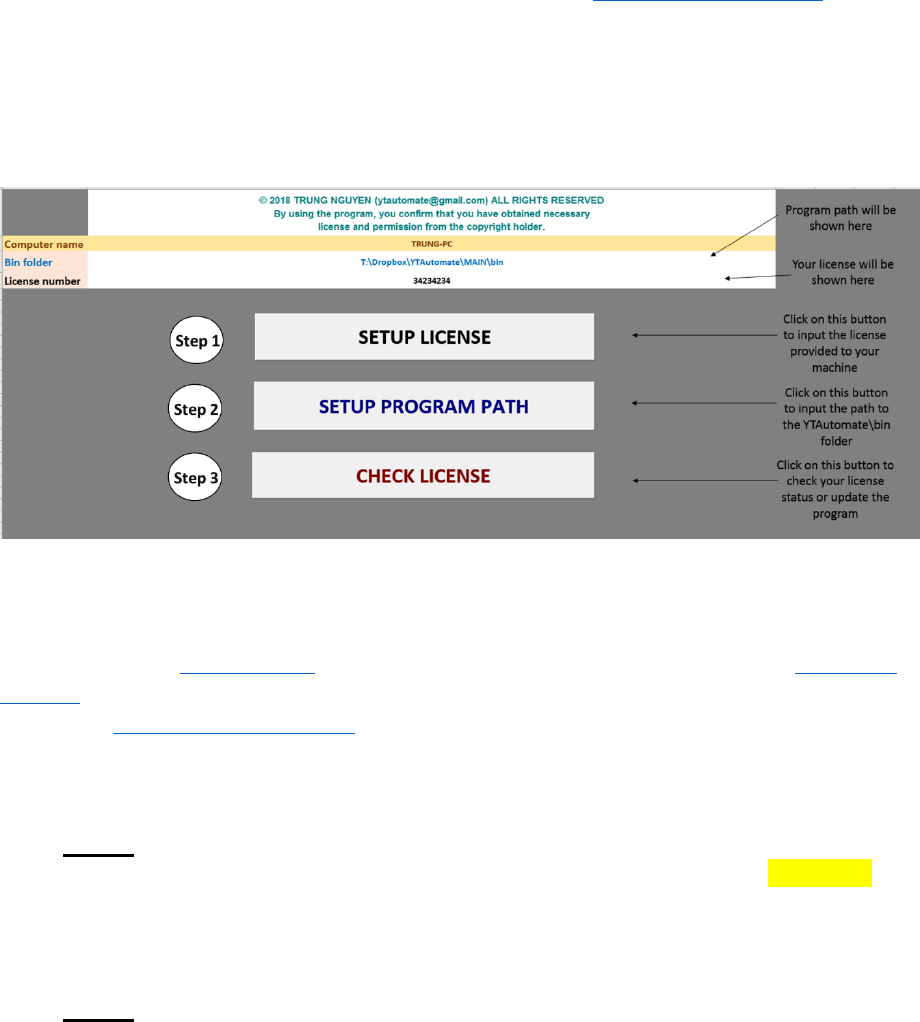
2.2 Placing License file in the .bin folder
Copy and paste the .lsc file that you received with the program in the <YTAutomat\bin> folder.
If you do not have a .lsc file, please contact Trung Nguyen at ytautomate@gmail.com
2.3 Configuring the InputData.xlsm
Please follow the step sequence in the below figure to configure the Setup worksheet in the
InputData.xlsm workbook.
3. SECURITY
3.1 Security process overview
YTAutomate uses YouTube API for automating basic tasks. The API employs the OAuth 2.0
protocol for authentication and authorization. For more information on the security process,
please visit Google Identity Platform. Below is a high-level summary of the OAuth 2.0 protocol
implemented by YTAutomate.
The process of authentication and authorization is carried out in four main steps:
Step 1: The user requests the use of YouTube API to control their channel from YouTube
Resource Server. This is often done manually in the Google console (see section 3.2 for
more details). YouTube approves and returns an OAuth 2.0 client credentials (normally
stored in Client secrete.json file) for the user to download. This file is named as LOCK
file in YTAutomate.
Step 2: The user commands YTAutomate software to perform a specific task (e.g., upload
a video) on their channel, which is identified by the specific LOCK they created earlier.
YTAutomate will then send a request to YouTube Authorization Server asking for
permission to perform the task.

Step 3: YouTube Authorization Server notifies the user for authorization. Once the
request has been authorized by the user, YouTube will grant YTAutomate access to the
API to perform the task. YouTube will also send the user a KEY file that allows the user
to re-access the API in the future. This KEY file contains an ‘access token’ that will expire
in one hour to ensure security and a ‘refresh token’ that can be used to obtain a new
‘access token’ when the user wants to perform a different task. These files should be kept
confidential by the user in trusted machines. YTAutomate does not store or access these
files without permission.
Step 4: YTAutomate performs the requested task and reports the results back to the user.
3.2 Obtaining LOCK FILE
Below are the steps to obtain the LOCK FILE.json:
1) Use this wizard to create or select a project in the Google Developers Console and
automatically turn on the API. Leave Create a project (no/yes) Click Agree
& Continue, then Go to credentials.
2) On the Add credentials to your project page, click the Cancel button.
3) At the top of the page, select the OAuth consent screen tab. Select an Email address,
enter a Product name if not already set, and click the Save button.
4) Select the Credentials tab, click the Create credentials button and select OAuth
client ID.

5) Select the application type Other, enter the name of your project, and click
the Create button.
6) Click OK to dismiss the resulting dialog.
7) Click the file_download (Download JSON) button to the right of the client
ID.
8) Move the downloaded file to your working directory and rename it as you wish while
keeping the “.json” extension (e.g., Lock_AudiobookChannel.json)
3.3 Obtaining KEY FILE
The KEY FILE will be automatically generated when you execute a task in the InputData.xlsm.
Simply enter the name of the file that ends with “.json” (e.g.,
D:\Credentials\Key_AudiobookChannel.json) into the field < KEY FILE >. This file will be
created after you have authorized with YouTube. If you enter file name without a folder path
(e.g., Key_AudiobookChannel.json), the file will be created into the root folder (same folder with
the InputData.xlsm file). Once you have created the KEY FILE, you can use it to authenticate
other tasks in the same YouTube channel.
When you run a task for the first time, a <cmd window> will pop up with an off-line verification
link. Your default browser (e.g., Chrome or FireFox) will also automatically pop up with a
prompt for verification. Sign in to the account that you used to create the LOCK FILE (section
3.2) and authorize the request. Copy the authorization code and paste it in the <cmd window>.
In case your web browser does not open automatically, please copy the link and manually paste
it into your web browser to continue the authorization process. To copy the link in window
command prompt, please follow these steps:
- right-click and choose ‘Mark’,
- highlight the whole link and press enter to copy.
- paste the link in Word or Notepad.
- remove all the white spaces in the link (make sure all the characters are continuously
connected).
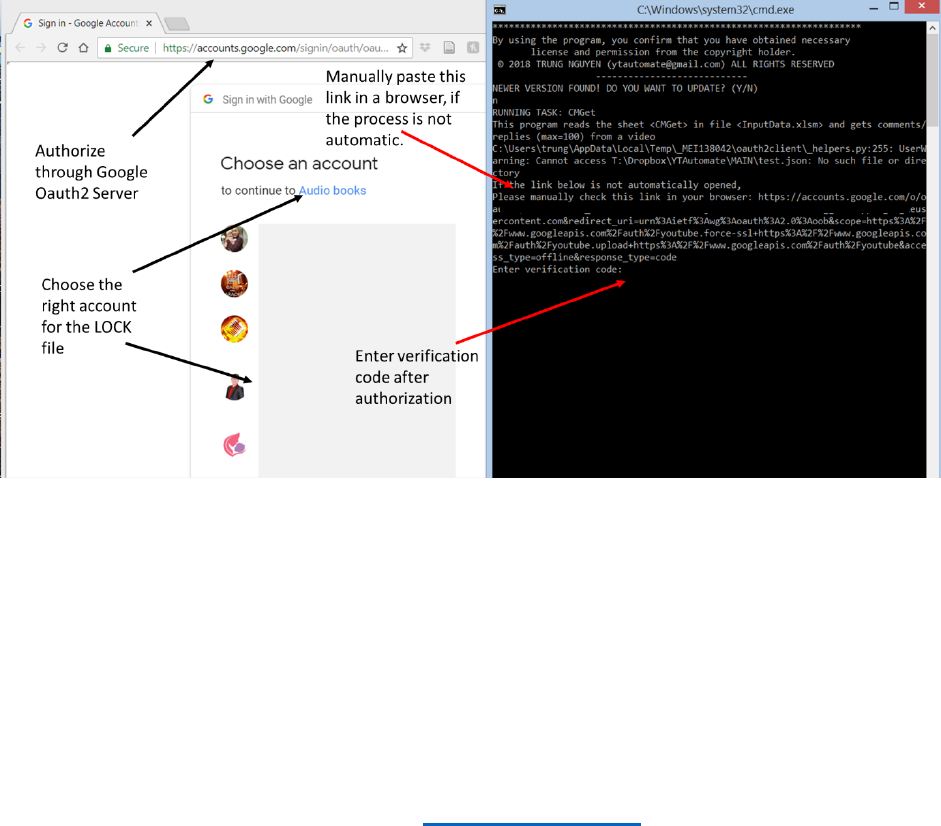
- copy and paste the corrected link into a web browser and press enter.
4. SPECIFIC TASKS
4.1 Understanding YouTube quota
The YouTube Data API uses a quota to limit user’s operation. YouTube gives you 1,000,000
quotas per day to perform tasks via its API. In brief, different types of operations have different
quota costs. For example, a simple read operation that only retrieves the ID of a video/comment
has a cost of approximately 1 unit; a write operation has a cost of approximately 50 units; and a
video upload has a cost of approximately 1600 units.
To calculate the quota cost, use this link: Determine quota cost
If you schedule automated Upload tasks without your attendance with YTAutomate, make sure
to keep the number videos upload below 150 videos per day and use a wait time (>30 sec)
between uploads to avoid errors.
4.2 Running tasks
To run the program, the user first specifies values for different variables (defined as headers) in a
worksheet in the InputData.xlsm workbook corresponding to the specific task that they want the
program to carry out. The user must input values for all required fields (orange headers) for the
program to run. Optional fields are formatted as white headers. The user then hits the run button
on the left-hand-side panel (or at the “A1” cell) to execute the task. The user can perform a task
on multiple videos and multiple YouTube channels by filling different rows in a worksheet. The
program will carry out actions in bulk in an ascending order.
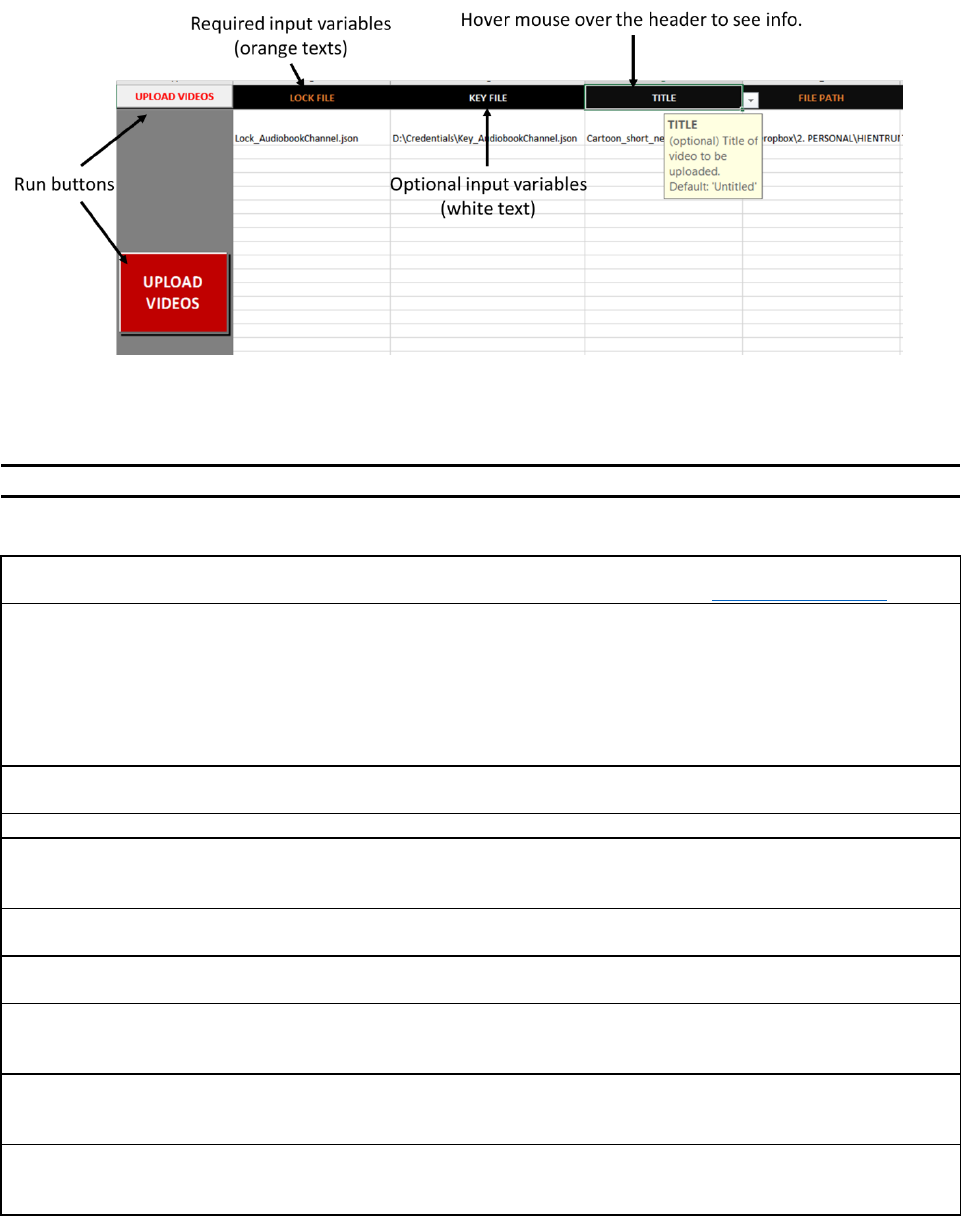
Below are the definitions of the variables in the InputData.xlsm. Users can hover computer
mouse over the headers in the InputData.xlsm to visualize the definition box.
4.3 Description of input variables
Variables
Status
Description
Note
Common Variables
LOCK FILE
required
The <LOCK FILE>.json identifies
YouTube channel.
This .json file should be acquired
from https://goo.gl/habw7x.
KEY FILE
optional
Name of the <KEY FILE.JSON> file.
If you do not have one, please enter a
filename, it will be automatically
generated after you have authenticated
your channel. If left empty, key file
will be default as <LOCK FILE> +
"_KEY.JSON".
If left empty, key file will be
created as <LOCK FILE> +
"_KEY.JSON" in the root folder
(same directory with
InputData.xlsm)
TITLE
optional
Title of video to perform task on.
Default: 'Untitled'
FILE PATH
required
The path to the video
DESCRIPTION
optional
The text that will go into the
description box beneath each video on
YouTube.
Use Alt+Enter to add new lines.
Default: No description
TAGS
optional
The list of key words that will be used
as tags for the video.
Key words need to be separated by
comma. Default: No tags
PLAYLIST
optional
List of playlists that the video will be
added to.
Playlists need to be separated by
comma. Default: No playlist
PRIVACY
optional
Set the status of the video.
This metric only takes 'public',
'unlisted', or 'private'.
Default: public
THUMBNAIL PATH
optional
The path to the image file that will be
used as thumbnail for the uploaded
video
Thumbnail is only allowed for
verified channels!!!
Default: No thumbnail
CATEGORY
optional
The category of the video (select from
dropdown menu)
Default: Music
Some categories might not be
available in some country. Use
this Link to check before
performing tasks.
SAVE DATA TO .XLSX
FILE
optional
The .xlsx file to store the information
(e.g., ID and other metadata) of the
videos.
If no file path is provided, the file
will be saved to XLSX folder.
Default: No storing of information
VIDEO-ID/URL or
ID/URL
required
Specify if an URL/ID is just a single
video, playlist of videos, or a whole
channel
Choose 'Yes' if the URL is a playlist
or channel.
Choose 'No' if the URL is a single
video
Default: No
CHANNEL-ID
required
The ID of the specific channel
controlling YTAutomate
PLAYLIST/CHANNEL?
optional
COMMENT/REPLY-ID
required
IDS of the top-level comments or of
the replies in each top-level comment.
IDs can be acquired from running
the CMGet.
Note: for CMUpdate and
CMDeletet Tasks, IDs must be for
your own comments/replies.
Upload Task
MOVE UPLOADED TO
FOLDER
optional
Move uploaded videos to this folder.
Default: No move files
WAIT TIME
optional
This is the break time in second
between each upload.
Default: 20 (seconds)
Update Task
NEW TITLE
optional
New title of the video.
Default: 'Untitled'
NEW DESCRIPTION
optional
Update the video with the new
description.
Use Alt+Enter to add new lines.
Default: No description
NEW TAGS
optional
List of key words for the new tags.
Key words need to be separated by
comma.
Default: No tags
Download Task
RENAME
optional
Re-name the downloaded videos.
Input name of video or audio without
extension.
Rename is not effective when
downloading playlists or channels.
Default: No renaming
SAVE DOWNLOADED
ID TO .TXT FILE
optional
The .txt file to store the downloaded
video IDs
If specified, downloaded videos will
not be re-downloaded.
Default: No storing of downloaded
IDs
SAVE FILES TO
FOLDER
optional
Path to folder where the downloaded
videos will be saved into
Default: videos will be saved into
\DOWNLOADED
EXTRACT AUDIO
optional
Extract the audio streams of the
downloaded videos.
Yes: Extract audio
No: No extracting video
Audio only: Only download audio
Default: No
AUDIO FORMAT
optional
Format of the audio file.
(choose from dropdown)
Default: mp3
Possible options: best, mp3, wav,
m4a, aac, flac, vorbis
AUDIO QUALITY
optional
Quality of the audio file. Possible
value is from 0 (best) - 9 (worse)
Default: 0
CMGet Task
NUMBER OF
COMMENTS
optional
Number of comments to retrieve.
Maximum of 100.
Default: 100
CMInsert Task
COMMENT TO INSERT
optional
The text to insert as a comment to a
video.
Default: empty text
SAVE COMMENT ID
TO .XLSX FILE
optional
The name of the .xlsx file to save
comment IDs into.
If no directory, file will be saved
to XLSX folder.
Default: No saving
CMReply Task
TOP-LEVEL-ID
required
IDs of top-level comments.
IDs can be acquired from running
the CMGet
COMMENT TO REPLY
optional
The text used to reply to top-level
comment.
Default: empty text
CMupdate Task
NEW COMMENT
optional
The text used to update the existing
comment or reply.
Default: empty text
