Using_PCo IP_Host_Cards_Brokered_by_VMware_View Using PCo IP Host Cards Brokered By VMware View
User Manual: Using_PCoIP_Host_Cards_Brokered_by_VMware_View
Open the PDF directly: View PDF ![]() .
.
Page Count: 35

Using PCoIP® Host Cards with
VMware View™
TER0911004
Issue 3

Using PCoIP Host Cards with VMware View
TER0911004 Issue 3 2
Teradici Corporation
#101-4621 Canada Way, Burnaby, BC V5G 4X8 Canada
p +1 604 451 5800 f +1 604 451 5818
www.teradici.com
The information contained in this document represents the current view of Teradici Corporation as of the date
of publication. Because Teradici must respond to changing market conditions, it should not be interpreted to be
a commitment on the part of Teradici, and Teradici cannot guarantee the accuracy of any information
presented after the date of publication.
This document is for informational purposes only. TERADICI MAKES NO WARRANTIES, EXPRESS, IMPLIED
OR STATUTORY, AS TO THE INFORMATION IN THIS DOCUMENT.
Complying with all applicable copyright laws is the responsibility of the user. Without limiting the rights under
copyright, no part of this document may be reproduced, stored in or introduced into a retrieval system, or
transmitted in any form or by any means (electronic, mechanical, photocopying, recording, or otherwis e), or for
any purpose, without the express written permission of Teradici Corporation.
Teradici may have patents, patent applications, trademarks, copyrights, or other intellectual property rights
covering subject matter in this document. Except as expressly provided in any written license agreement from
Teradici, the furnishing of this document does not give you any license to these patents, trademarks,
copyrights, or other intellectual property.
© 2011 Teradici Corporation. All rights reserved.
Teradici, PC-over-IP, and PCoIP are registered trademarks of Teradici Corporation in the United States and/or
other countries. The names of actual companies and products mentioned herein may be the trademarks of
their respective owners.

Using PCoIP Host Cards with VMware View
TER0911004 Issue 3 3
Revision History
Version
Date
Description
3
Updated:
Screen shots
Zero client and host card connection steps
Troubleshooting questions
Basic certificate configuration
Updated bandwidth matrix
2
October 27, 2011
Update for VMware View 5
1
April 8, 2010
Initial release
January 31, 2013

Using PCoIP Host Cards with VMware View
TER0911004 Issue 3 4
Contents
Revision History .............................................................................................. 3
Contents .......................................................................................................... 4
List of Figures .................................................................................................. 6
List of Tables ................................................................................................... 7
Definitions ....................................................................................................... 8
Introduction ..................................................................................................... 9
1 Overview ................................................................................................ 10
1.1 Additional Resources ..................................................................................................... 10
2 Prerequisites........................................................................................... 12
2.1 Installing VMware View 5 or Later on a host PC ........................................................... 12
2.2 Installing the Host Card ................................................................................................. 13
2.3 Updating Tera1 and Tera 2 Host Card Firmware .......................................................... 13
2.3.1 Host Card Management .................................................................................... 14
2.3.2 Accessing the Host Card by MAC address ...................................................... 14
2.3.3 Accessing the Host Card by IP Address ........................................................... 14
2.3.4 Viewing the Installed Firmware ......................................................................... 15
2.3.5 Updating the Firmware ..................................................................................... 16
2.4 PCoIP Host Driver Software Release v4.0.8 for Windows ............................................ 16
2.5 Ensuring your Operating System Complies with VMware View .................................... 16
3 Host PC Software Configuration ............................................................. 17
3.1 Installing the VMware View Agent on a Host PC........................................................... 17
4 Configuring a Physical PC in View ......................................................... 19
5 Installing the PCoIP Host Driver Software .............................................. 21
5.1 Installing the PCoIP Host Driver Software on a Host PC .............................................. 21
6 Client Devices for Connecting to Host Cards ......................................... 23
6.1 Zero Clients .................................................................................................................... 23
6.1.1 Attaching Peripherals to the Zero Client ........................................................... 23
6.1.2 PCoIP Zero Client Session and Certificate Checking Configuration ................ 24
6.1.3 Uploading the Certificate to the Zero Client ...................................................... 26
6.1.4 Connecting a PCoIP Zero Client to the View Environment .............................. 27
6.2 Soft Clients ..................................................................................................................... 28

Using PCoIP Host Cards with VMware View
TER0911004 Issue 3 5
7 Deployment Considerations.................................................................... 29
7.1 Bandwidth Matrix for Various Setups of Zero Clients, Soft Clients, and Hosts ............. 29
8 Known Issues, Troubleshooting, and FAQ ............................................. 31
8.1 Troubleshooting ............................................................................................................. 31
8.2 Frequently Asked Questions .......................................................................................... 32
Appendix A .................................................................................................... 33

Using PCoIP Host Cards with VMware View
TER0911004 Issue 3 6
Table of Figures
Figure 1-1: VMware View and PCoIP Technology Architecture .............................................. 10
Figure 2-1: URL format used with a MAC address for a host card ......................................... 14
Figure 2-2: URL format used with a host card default IP address .......................................... 15
Figure 2-3: AWI showing the firmware version in use ............................................................. 15
Figure 3-1: VMware View Agent Custom Setup Window ........................................................ 17
Figure 3-2: VMware View Agent Register with View Connection Server Window .................. 18
Figure 4-1: View Administrator Window Showing the Add Pools Options .............................. 19
Figure 4-2: View Administrator Showing Desktop Sources and PCoIP Selected ................... 20
Figure 4-3: View Administrator Showing the Pool Settings Display Protocol PCoIP Option... 20
Figure 6-1: DVI and DisplayPort Connectors for 2560x1600 Resolution ................................ 24
Figure 6-2: PCoIP Zero Client Showing the Session Connection Options ............................. 25
Figure 6-3: Zero Client Showing the VCS Certificate Check Mode Options ........................... 26
Figure 6-4: Zero Client Connect Screen Using View .............................................................. 27

Using PCoIP Host Cards with VMware View
TER0911004 Issue 3 7
Table of Tables
Table 1-1: Additional Resources ............................................................................................. 10
Table 7-1: Multiple Scenario Bandwidth and Encryption Matrix .............................................. 29
Table 8-1: Troubleshooting ...................................................................................................... 31

Using PCoIP Host Cards with VMware View
TER0911004 Issue 3 8
Definitions
AWI
Administrative Web Interface
CA
Certificate Authorities
CMI
Connection Management Interface – interface provided by the client or host,
used to communicate with an external connection management server
CMS
Connection Management Server – an external management entity (third
party) that manages and controls the client/host through the CMI interface
DDC
Display Data Channel
DHCP
Dynamic Host Configuration Protocol
DNS
Domain Name System
DNS SRV
Domain Name System Service Record
EDID
Extended Display Identification Data
FQDN
Fully Qualified Domain Name
GPU
Graphics Processing Unit
GUI
Graphical User Interface presented by the client On-Screen Display when not
operating in a PC-over-IP session
HPDET
Hot Plug Detect
MTU
Maximum Transmission Unit
NTP
Network Time Protocol
OS
Operating System
OSD
On Screen Display
PC-over-IP®
Personal Computer over Internet Protocol
PCoIP®
Personal Computer over Internet Protocol (PC-over-IP)
PCoIP host
Host side of PC-over-IP system
PCoIP zero client
Desktop or client side of PC-over-IP system
SLP
Service Location Protocol
SSL
Secure Socket Layer (security protocol)
Tera1
PCoIP Devices using the Teradici first generation chipset design
Tera2
PCoIP Devices using the Teradici second generation chipset design
TERA1100
Teradici PCoIP zero client processor
TERA1200
Teradici PCoIP host processor
VPD
Vital Product Data – Factory provisioned information to uniquely identify a
client or host
VCS
View Connection Server
VPN
Virtual Private Network

Using PCoIP Host Cards with VMware View
TER0911004 Issue 3 9
Introduction
This document describes the use of PCoIP® host cards to remote demanding applications that
require dedicated graphics cards within an environment brokered by VMware® View™. It
describes the setup and configuration of PCoIP host cards (or “host cards”) in physical PCs or
workstations connecting to PCoIP software clients or PCoIP zero clients.
Using PCoIP Host Cards with VMware View
TER0911004 Issue 3 10
1 Overview
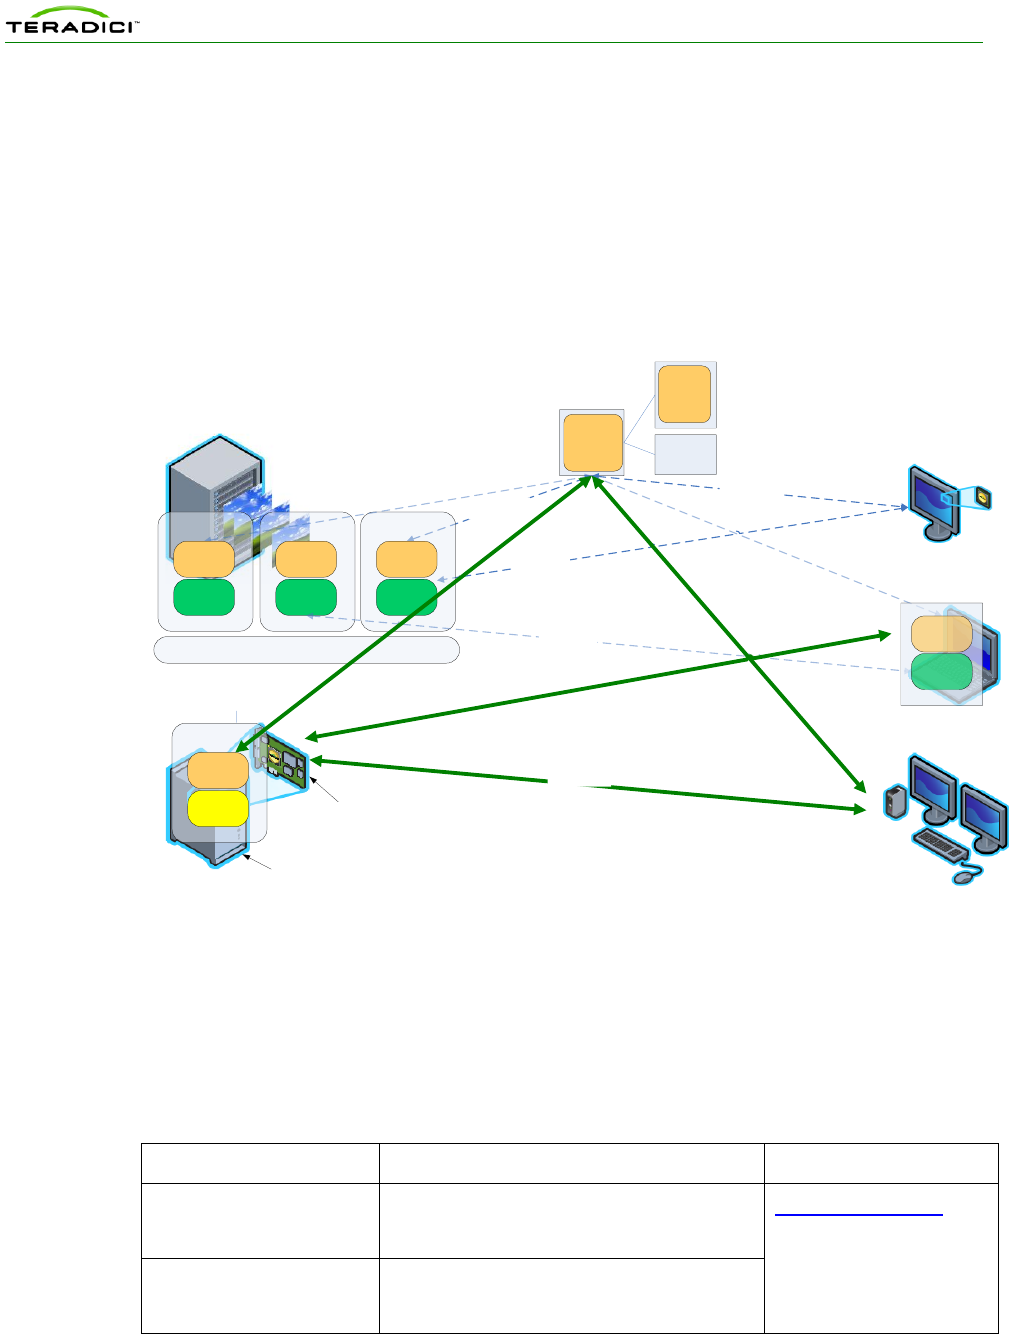
VMware View lets you set up PCoIP sessions between PCoIP clients and PCoIP host cards.
Using a PCoIP host card installed in a physical PC or workstation lets you remote higher end
3D applications that use dedicated GPUs.
This document describes how to set up a PCoIP session between a PCoIP zero client or
software client (i.e., a notebook or thin client running a VMware View client) and a PCoIP
host card using VMware View.
VMWare
Virtual
Center
Active
Directory
VMWare
View
Connection
Server
VMware ESXi
VMware View
Client Protocol
VMware View
Agent Protocol
PCoIP Protcol
VMware
View Agent
PCoIP
Server
VMware
View Agent
PCoIP
Server
Guest VM
Guest VM
PCoIP Protcol
PCoIP Zero Client
Integrated Display
Client PC or TC
VMware View Client
VMware
View Client
PCoIP
Client Plug-
in
ESX/ESXi Server
Guest VM
VMware
View Agent
PCoIP
Server
OS
VMware
View Agent
PCoIP
Host SW
PCoIP Protocol
PCoIP Zero Client
PCoIP Host Card
Host Machine
PCoIP Hardware
Accelerated Workstation
Figure 1-1: VMware View and PCoIP Technology Architecture
1.1 Additional Resources
This document provides basic guidelines for using PCoIP host cards with VMware View. For
more details on any of these steps or procedures, see the following documents:
Table 1-1: Additional Resources
Document Name
Description
Source
PCoIP Administrator’s
Guide
(TER0606004)
Documents configuration details for a single
zero client through the administrative web
interface.
Teradici Support Site
PCoIP Host Software User
Guide
(TER0810001)
Details the host driver installation process.

Using PCoIP Host Cards with VMware View
TER0911004 Issue 3 11
Document Name
Description
Source
PCoIP Management
Console User Manual
(TER0812002)
Provides (multiple) zero client setup and
maintenance details through the
management console for PCoIP software.
PCoIP to VMware View
Virtual Desktop
Configuration and WAN
Network Optimization
Guide
(TER1007002)
Provides general guidelines for typical office
users that are connecting PCoIP zero clients
and software clients to VMware View 5 virtual
desktops over remote access WAN
networks.
Using PCoIP Zero Clients
with VMware View
(TER0904005)
The configuration of a PCoIP zero client or
PCoIP integrated display, with VMware View.
Virtual Desktop Network
Design Checklist
(TER1105004)
Documents things to consider (such as
bandwidth, QoS, latency, jitter, and packet
loss) when designing your network for virtual
desktops to ensure a responsive desktop.
VMware View 5.1
Evaluator's Guide
A self-guided, hands-on review of VMware
View 5. The content is intended to show how
easily you can set up a VMware View
environment so you can evaluate both new
and important capabilities. These capabilities
include creating and managing virtualized
desktops, and validating the suggested use
cases.
VMware View Technical
Resources
VMware View
Administration Guide 5.1
Describes how to configure and administer
VMware View, including how to configure
View Connection Server, create
administrators, provision and deploy View
desktops, set up user authentication,
configure policies, and manage VMware
ThinApp™ applications in View
Administrator. This information also
describes how to maintain and troubleshoot
VMware View components.
VMware published
documentation
VMware View Architecture
Planning guide
VMware View Architecture Planning provides
an introduction to VMware View, including a
description of its major features and
deployment options and an overview of how
VMware View components are typically set
up in a production environment.

Using PCoIP Host Cards with VMware View
TER0911004 Issue 3 12
2 Prerequisites
To use a PCoIP zero client and a PCoIP host card (in a workstation or physical PC) with
VMware View 5 or later, you need a minimum of the following:
VMware View environment currently running with VMware View 5 (or
later) A Connection Server and VMware View 5 (or later) Agent
Workstation operating system compatible with VMware View 5 or later. See
the VMware View Architecture Planning guide for a list of supported
operating systems.
PCoIP host card with appropriate firmware
Minimum Firmware release 4.0.2 (or later) for Tera1 PCoIP zero clients and
host cards
Minimum Firmware release 4.0.3 (or later) for Tera2 PCoIP zero clients and
host cards
PCoIP Host Driver Software 4.0.8 or later
PCoIP client
PCoIP zero client with compatible firmware (recommended).
VMware View 5 (or later) Client installed on a Notebook, thin client, or
repurposed PC
Notes: The View client is configured for a PCoIP session by default.
The MAC or IP address of your host card (and zero client if using one) for
AWI management
Host computer running an operating system compatible with VMware View
5 (or later)
Workstation graphics card that is compatable with the PCoIP host card (i.e.
DVI or DisplayPort based GPU)
Monitor(s)
Appropriate monitor cables, USB keyboard and mouse
Properly designed network (see network check list)
An understanding of using PCoIP host cards and zero clients without View.
For details, see the Additional Resources section.
2.1 Installing VMware View 5 or Later on a host PC
You must obtain and install VMware View 5.1 or later from VMware, which includes the
View Connection Server and View Administrator UI if hosting a VDI environment. For more
details about the process to install the View Agent in the target desktop, see section 3.1.
Note: The VDI environment is typically already built, awaiting the addition of the
workstation.

Using PCoIP Host Cards with VMware View
TER0911004 Issue 3 13
2.2 Installing the Host Card
Ensure the host computer has an operating system that is compatible with VMware View 5.1.
Insert the host card into an empty PCIe slot.
Note: The PCoIP host software for Windows for View brokered connections does not support
the Power Management feature. View brokered connections do not support WoL features at
this time.
Steps to install.
1. Ensure the power to the computer is off.
2. Open the case and ensure antistatic measures are taken. Insert the host card into an
empty PCIe slot. (Consider installing the remote power cable)
3. Close the cover
4. Connect the USB peripherals to the host PC
5. Connect the display port of the PCoIP host card to the GPU ports
Connect one end of the mini-DisplayPort or DVI cable to port 1 on the host card
Connect the other end of the mini-DisplayPort or DVI cable to output port 1 from
your graphics card
Connect cables from the GPU to the host card of the remaining video ports in a
similar manner, matching port numbers between the two devices
Note: The PCoIP products use port pass-through. Therefore the connection from port
1 on your GPU to port 1 on the host card will be outputted on port 1 of the zero
client. The same works for port 2 and so on. Failure to follow this configuration may
cause instabilities.
6. Connect a network cable to the network port on the host PC computer
7. Connect a network cable to the PCoIP host card network port
8. ENSURE the host PC and the host card are connected on the same subnet
9. Power up the PC
The host computer is now ready for the software installation and configuration while the host
card is ready for a firmware update if required.
2.3 Updating Tera1 and Tera 2 Host Card Firmware
The functionality described in this document is available with Tera1 firmware release 4.0.2 or
later, and Tera2 firmware release 4.0.3 or later. If using a zero client it is recommended that
both the zero client and host card use the same firmware release.
If you do not have firmware release 4.0.2 for Tera1 devices or 4.0.3 for Tera2 devices,
consider visiting the Teradici Support site to download the latest version.
Using PCoIP Host Cards with VMware View
TER0911004 Issue 3 14
2.3.1 Host Card Management
Accessing host cards and zero clients for management can be done in different ways, two are
listed below. In either way, you will be required to know the MAC or IP address.
Administrative Web Interface: The AWI allows you to view and manage a single
PCoIP device. You can verify and update the firmware release for a single zero client
or host card through the respective IP address
PCoIP Management Console: The MC allows for management of one or many host
cards and zero clients in your deployment.
2.3.2 Accessing the Host Card by MAC address
To manage a PCoIP host card (or zero client) you will need to know either the MAC address
or the IP address. The MAC address can be found tagged on the PCoIP device.
Connecting to the MAC address is useful when the host card (or zero client) IP address is not
yet known. This option works when connected to a network which has an updated DNS
record of the PCoIP host card or zero client. From a PC on the same network, enter the MAC
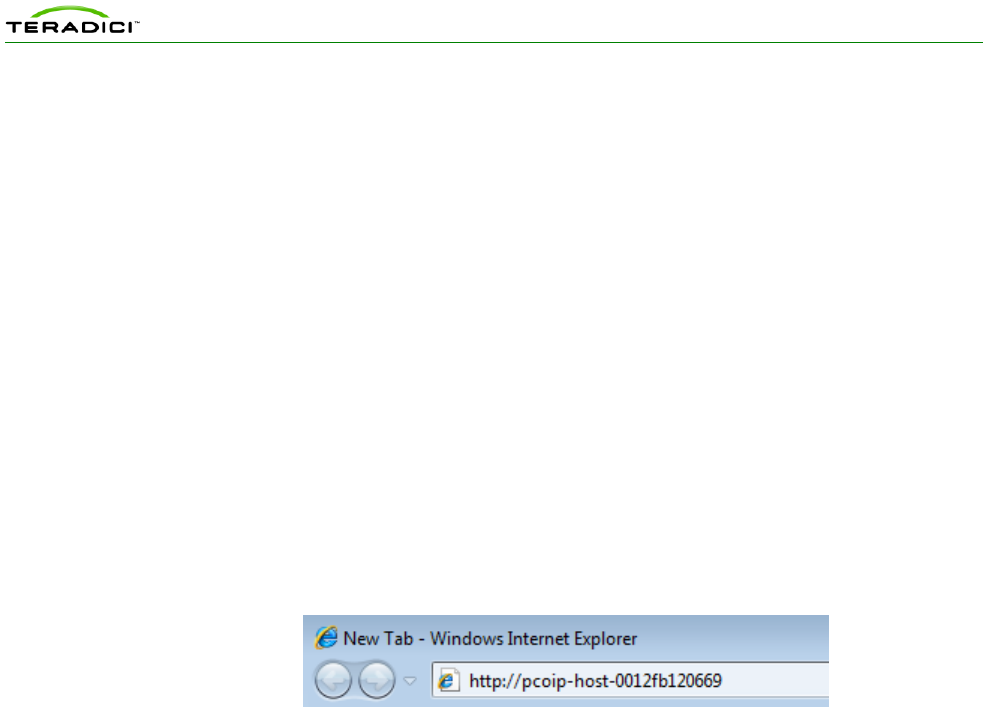
address in a browser URL field in the following manner.
PCoIP-host-<MAC address of the host card without the dashes>
Figure 2-1: URL format used with a MAC address for a host card
Note: For a zero client, replace the word host with the word portal and use the zero client
mac address.
Example
PCoIP-portal-<MAC address of the zero client without the dashes>
2.3.3 Accessing the Host Card by IP Address
The IP address can be found by any of the following methods.
Using the router’s DHCP lease table and matching a known MAC address with the IP
address
Using the Management Console for PCoIP protocol devices
Using the On Screen Display of the zero client (from the Connect screen, click
Options > Configuration > Network)
Using the AWI of the PCoIP device. (Browse to the devices AWI, login and select
Info > Version )
If you cannot find the MAC address located on the PCoIP host card (or zero client) you can
access the device from its IP address. To access the host card’s AWI by its known IP address,
connect a computer to this network locally and enter the IP address of the host card or zero
client in a browser URL as shown below.
Using PCoIP Host Cards with VMware View
TER0911004 Issue 3 15
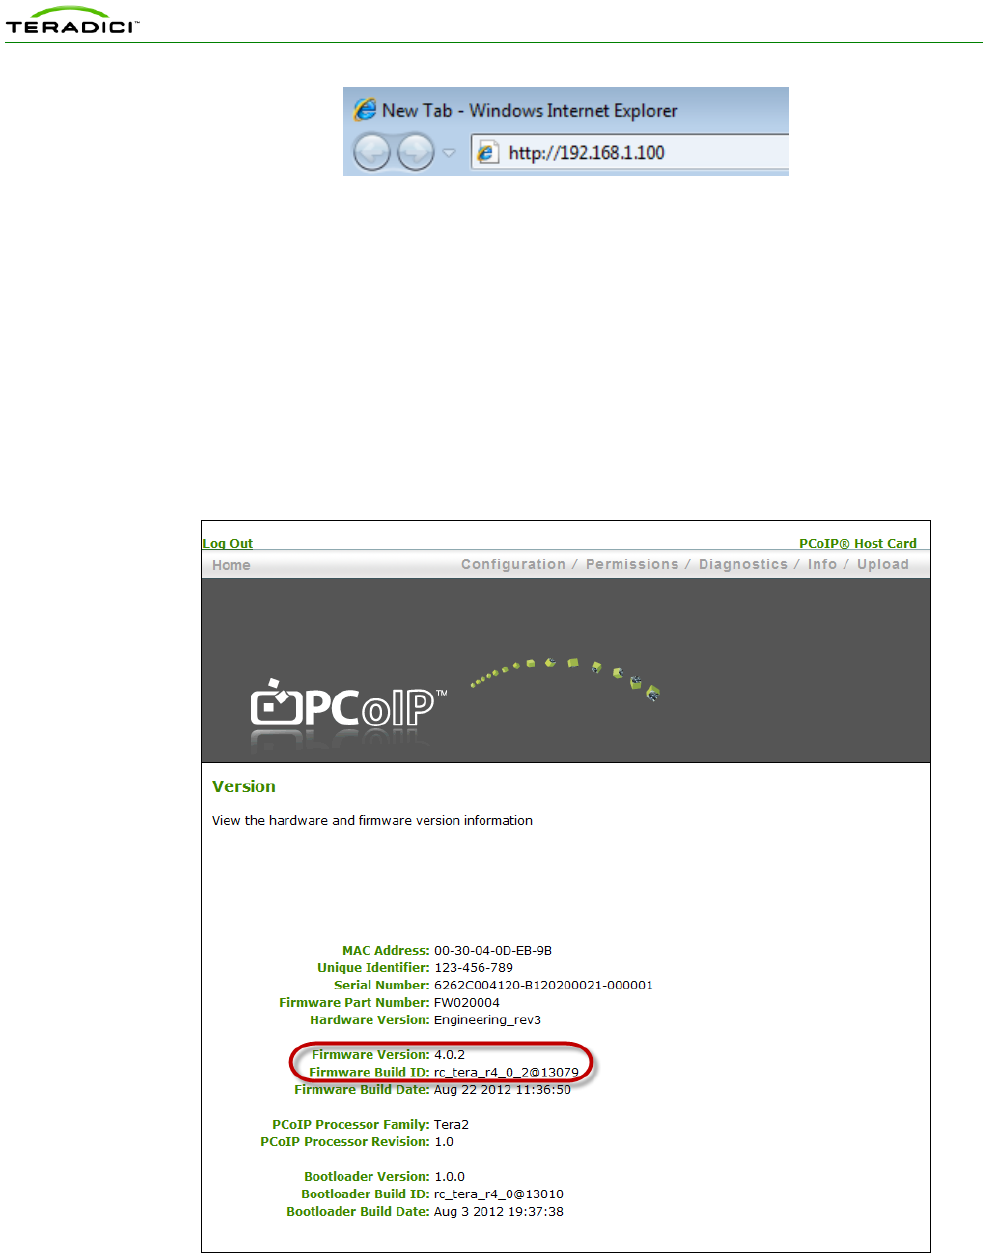
Figure 2-2: URL format used with a host card default IP address
Note: Some host cards or zero clients have a configured fallback IP address that can provide
an alternative way to access your device when not issued an IP from a DHCP server. Consult
your OEM documentation to see if this option is available.
2.3.4 Viewing the Installed Firmware
This example shows you how to find the Firmware Version through the AWI.
1. Enter the IP address of the host card in a browser
2. Log in (if required).
3. Click Info > Version.
Figure 2-3: AWI showing the firmware version in use

Using PCoIP Host Cards with VMware View
TER0911004 Issue 3 16
2.3.5 Updating the Firmware
This example shows you the steps to update the firmware through the Administrative Web
Interface:
1. Ensure you have downloaded the appropriate firmware version. See the Teradici
Support site (Current PCoIP Products and Releases (15134-650)).
2. Ensure the host PC or workstation is in an idle state (close all applications).
3. Open a web browser.
4. Log into the host card Administrative Web Interface first (ex. 192.168.1.100).
5. Accept browser certificates, and then enter the login information as required.
6. Choose Upload > Firmware, and then click Browse.
7. Select the firmware .all file (ex. tera1_rel4-0-2_rc_tera_r4_0_2@13079.all that has
been downloaded from the support site).
8. Click Open.
9. Click Upload.
10. A warning appears. Click OK to start the upload. (This operation may take a few
minutes.)
11. The following message appears when complete: “Success Flash successfully
programmed!...” Click Reset to reset the device for the changes to take effect.
12. A warning appears. Click OK to proceed.
13. Repeat steps 3 through 8 on the zero client if applicable, but do not reset or power
cycle the client at this step.
14. Restart the host first.
15. Reset the client.
The new firmware is installed. You can now start a PCoIP session.
2.4 PCoIP Host Driver Software Release v4.0.8 for
Windows
The functionality described in this document requires PCoIP host driver software v4.0.8 or
later. Verify that the PCoIP host driver software installed on the host PC is using the correct
release. See section 5 for details on the host software installation process. Download the latest
host driver software package from the Teradici Support site and subscribe to knowledge base
article Current PCoIP Products and Releases (15134-650) for updates on the latest releases.
2.5 Ensuring your Operating System Complies with
VMware View
Ensure that you are using an operating system that is supported by VMware View. See the
VMware View Architecture Planning guide for a list of supported operating systems.
Using PCoIP Host Cards with VMware View
TER0911004 Issue 3 17
3 Host PC Software Configuration
VMware View 5 enables the use of the PCoIP protocol to connect PCoIP zero clients to
virtual desktops and physical host PCs (with the PCoIP host cards installed). This section
describes how to configure dedicated physical host PCs with PCoIP host cards.
Note: Ensure that the host PC computer name is unique and easy to identify. To set up the
computer name, from Windows® XP: My Computer > Properties > Computer Name tab >
Change...
3.1 Installing the VMware View Agent on a Host PC
1. Start the VMware View Agent installation wizard by double-clicking the file (such
as, VMware-viewagent-5.0.0-481677.exe) in the Windows operating system for the
host PC.
2. From the Welcome screen, click Next, and then click Next.
3. If you accept the terms, select I accept the terms in the license agreement, and then
click Next.
4. Click Next.
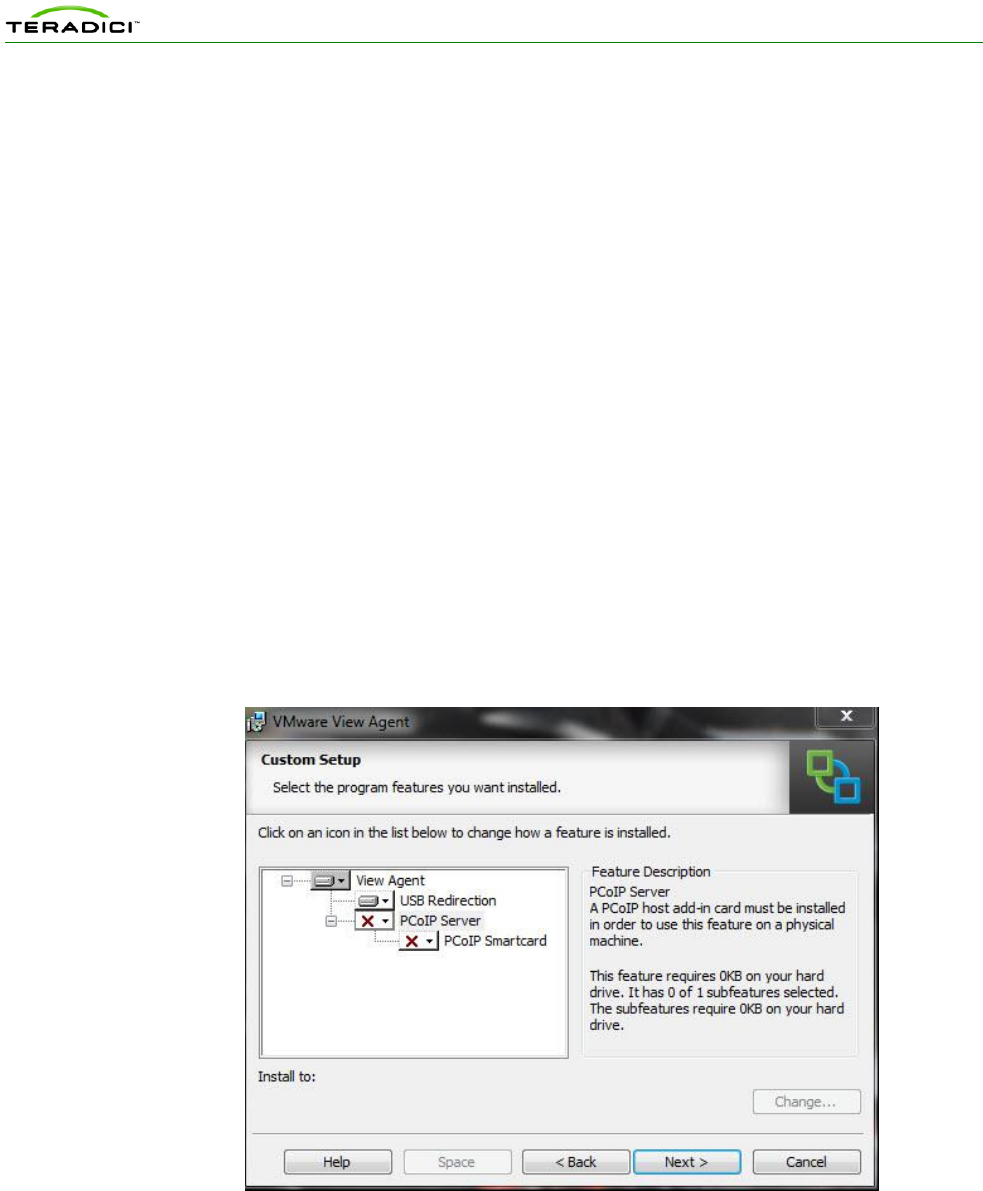
The VMware View Agent Custom Setup window appears:
]
Figure 3-1: VMware View Agent Custom Setup Window
5. Note that in Figure 3-1, the PCoIP Server is not yet enabled. To enable it, click the
down arrow, and then choose This feature will be installed in local hard drive.
The Custom Setup window reappears with the PCoIP now enabled.
Using PCoIP Host Cards with VMware View
TER0911004 Issue 3 18
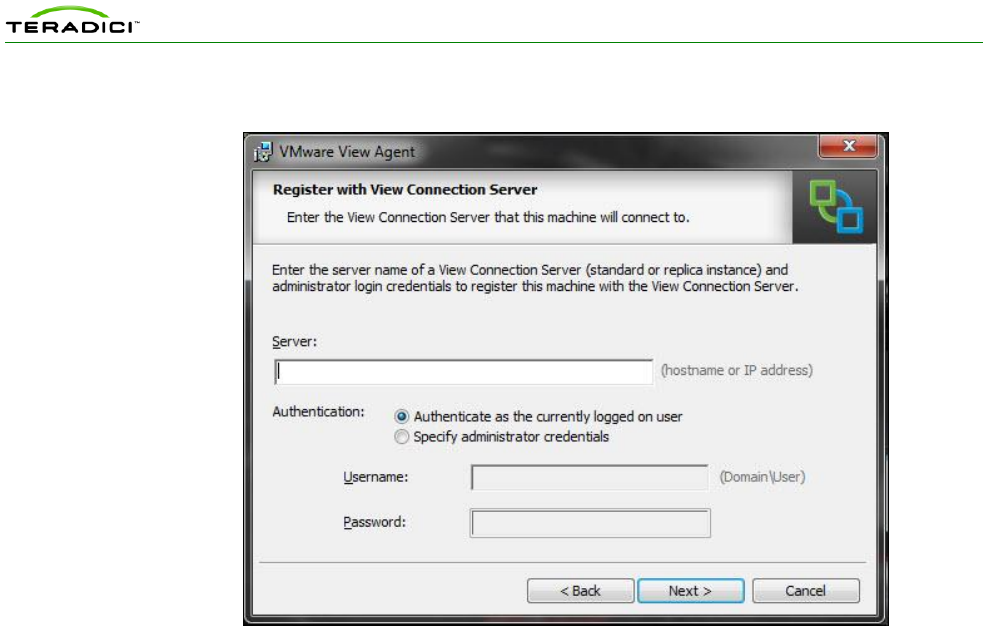
6. Click Next. The Register with View Connection Server window appears:
Figure 3-2: VMware View Agent Register with View Connection Server Window
7. Enter the IP address / FQDN of the physical server or virtual machine hosting
VMware View Manager 5.
8. Choose Specify administrator credentials, and then enter the username and password
for the VMware View Connection Server.
9. Click Next.
10. Click Install. Wait for the agent to install.
11. When the install finishes, click Finish.
12. When prompted, click Yes to reboot the host PC.
13. Wait for the PC to reboot before continuing.
Using PCoIP Host Cards with VMware View
TER0911004 Issue 3 19
4 Configuring a Physical PC in View
This section outlines the steps to configure a physical PC for use with View. For detailed
View instructions, please see your VMware view documentation. (View 5 Administrator User
Interface shown below).
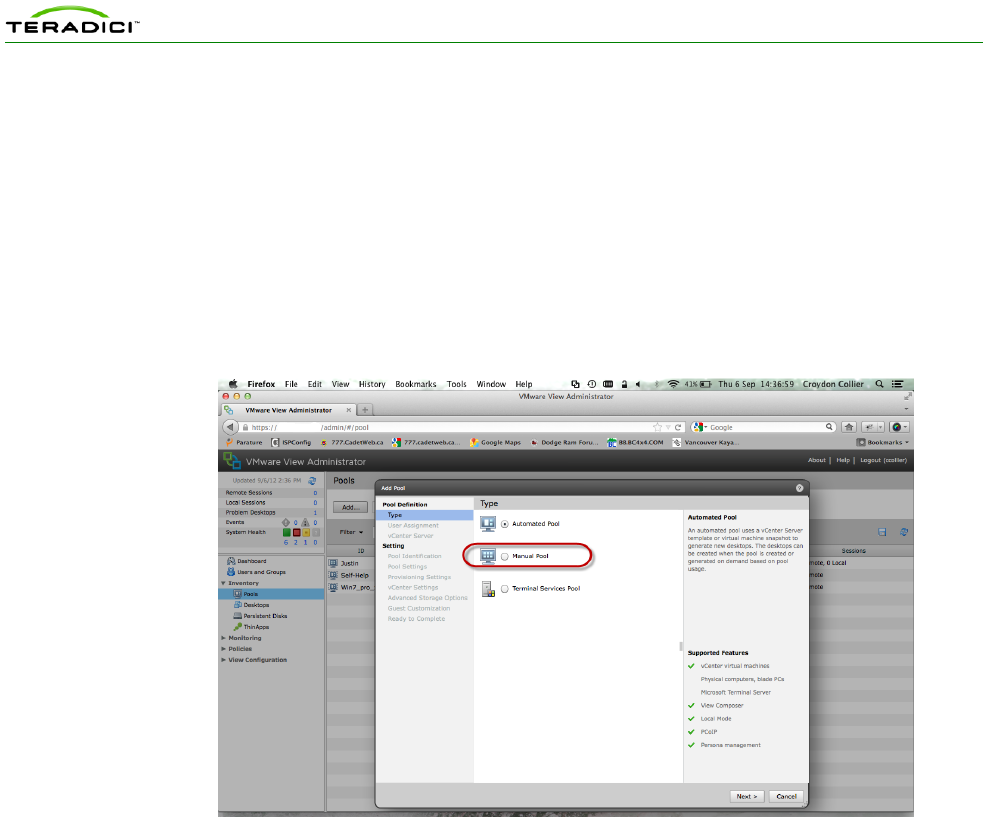
1. Log into the VMware View Administrator interface.
2. Click Pools, and then click Add… to create a desktop entry.
3. Click Manual.
Figure 4-1: View Administrator Window Showing the Add Pools Options
4. Follow the onscreen prompts to configure the PC to your specifications.
When configuring the PC in View ensure the following:
The Desktop Source is configured for Other sources.

Using PCoIP Host Cards with VMware View
TER0911004 Issue 3 20
Figure 4-2: View Administrator Showing Desktop Sources and PCoIP Selected
The Remote Display Protocol option has PCoIP selected.
Figure 4-3: View Administrator Showing the Pool Settings Display Protocol PCoIP
Option

Using PCoIP Host Cards with VMware View
TER0911004 Issue 3 21
5 Installing the PCoIP Host Driver Software
To complete the process to let the physical PC work with VMwareView, you must install the
PCoIP host driver software.
Important Note: You cannot upgrade the PCoIP host driver sofware while a VMware View-
brokered PCoIP session is active between a host workstation or host PC and VMware View
client. Doing this, results in losing access to your mouse and keyboard when the driver
software is removed.
To upgrade the PCoIP host driver sofware in this type of deployment, either:
Connect to the host from a zero client, or
Upgrade the software while connected to the host through another desktop-
remoting protocol such as RDP or VNC
This section provides a quick overview of the host driver installation process. For more
details, see the PCoIP Host Software User Guide (TER0810001) from the Teradici Support
site.
5.1 Installing the PCoIP Host Driver Software on a Host
PC
1. Download the PCoIP host driver software from the Teradici Support site (click
Current PCoIP Product and Releases).
2. Log into the administrative web interface for the host card. See 2.2.1
3. From the Configuration > Host Driver Function menu, enable the Host Driver
Function.
4. Restart the host PC.
5. Install the PCoIP host software package appropriate for the operating system installed
on the host PC. You can start the install process by double-clicking the appropriate
installer.
32 bit: PcoipHostSoftware_x86-v4.0.8.msi (or later)
64 bit: PcoipHostSoftware_x64-v4.0.8.msi (or later)
6. When the Welcome screen appears, click Next.
7. Accept the terms, and then click Next.
8. Ensure the install location is correct, and then click Next.
9. Click Install.
Note: For Windows 7, when the driver is installed, a Windows Security dialog may
appear. Click Install to continue with the installation. To avoid this dialog from
appearing in the future, select Always trust software from Teradici Corporation.
10. If prompted, restart the OS (otherwise skip this step). When restarted, the host driver
software installation process continues when the OS boots up. Click Install to
continue.

Using PCoIP Host Cards with VMware View
TER0911004 Issue 3 22
11. Click Finish to complete the installation.

Using PCoIP Host Cards with VMware View
TER0911004 Issue 3 23
6 Client Devices for Connecting to Host Cards
There are different types of clients available for connecting to your host card in a View
environment. These devices can be zero clients, soft clients or thin clients. This document
will discuss connecting zero clients and soft clients to the host card in the View environment.
6.1 Zero Clients
There is no software to install on the zero client. The device is run through the Teradici SoC.
You must provide the correct settings within the zero client to establish a connection. By
default the zero client can establish a PCoIP connection without any configuration in a basic
host card to zero client configuration. (See the PCoIP Administrator’s Guide for further
details)
In View 5.1, VMware has implemented new security measures. Zero clients running
firmware 4.x must have the VCS SSL trusted root certificate uploaded to avoid warnings or a
blocked connection. For further details please see Teradici knowledgebase article Certificate
Management for PCoIP zero clients and PCoIP host cards (15134-1063) .
When connecting to View 5.1, you must upload the VCS trusted SSL root certificate to the
zero client. If the certificate from the VCS root CA is not uploaded then the users will not be
able to connect without additional steps. For further details please see Teradici
knowledgebase article How do I allow users to connect to View 5.1 or newer without
installing a certificate on the zero clients? (15134-1065) .
To use the PCoIP zero client with VMware View, you must enable the client to utilize
VMware View. This can be done from the OSD or the AWI and requires minimal
configuration including:
Attaching peripherals
Configure Session and Certificate Checking
Uploading the VCS trusted SSL root certificate
6.1.1 Attaching Peripherals to the Zero Client
Plug in the power cord, Ethernet cable, and all USB and audio accessories into the
zero client.
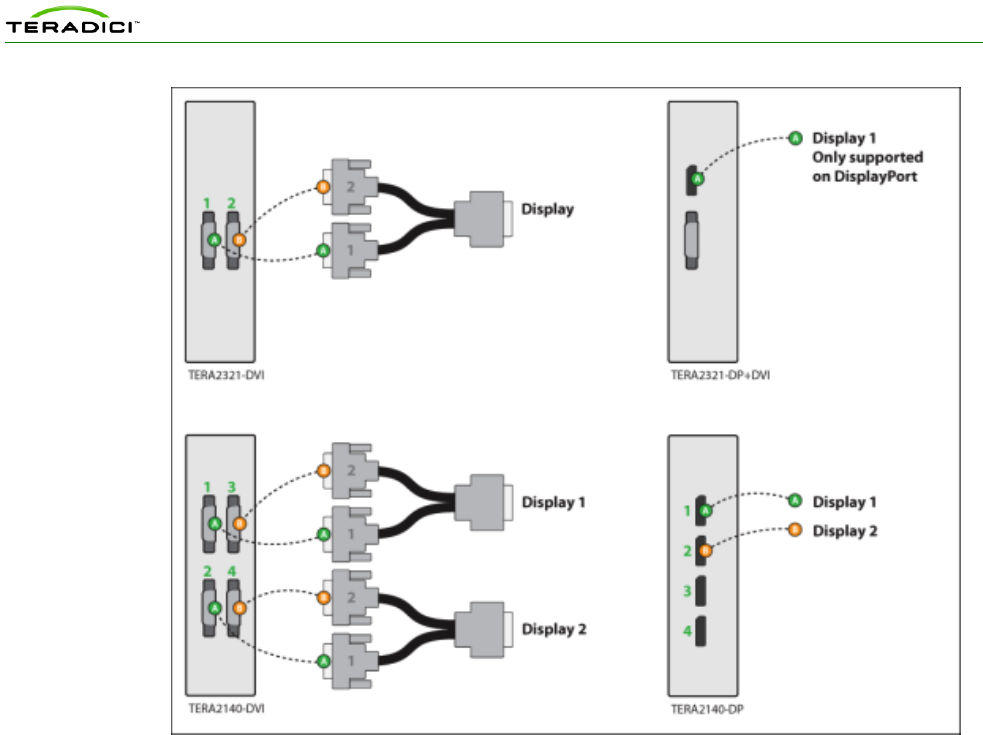
Plug in the monitors in the correct manner. Port 1 on the zero client should be
connected to the primary monitor. Port 2 should be used for the secondary monitor. If
your zero client has 4 ports continue in a similar fashion.
Dual display configurations on Tera2 products should follow the diagram below
showing the correct cable connections. For more details, see your vendor
documentation.
Using PCoIP Host Cards with VMware View
TER0911004 Issue 3 24
Figure 6-1: DVI and DisplayPort Connectors for 2560x1600 Resolution
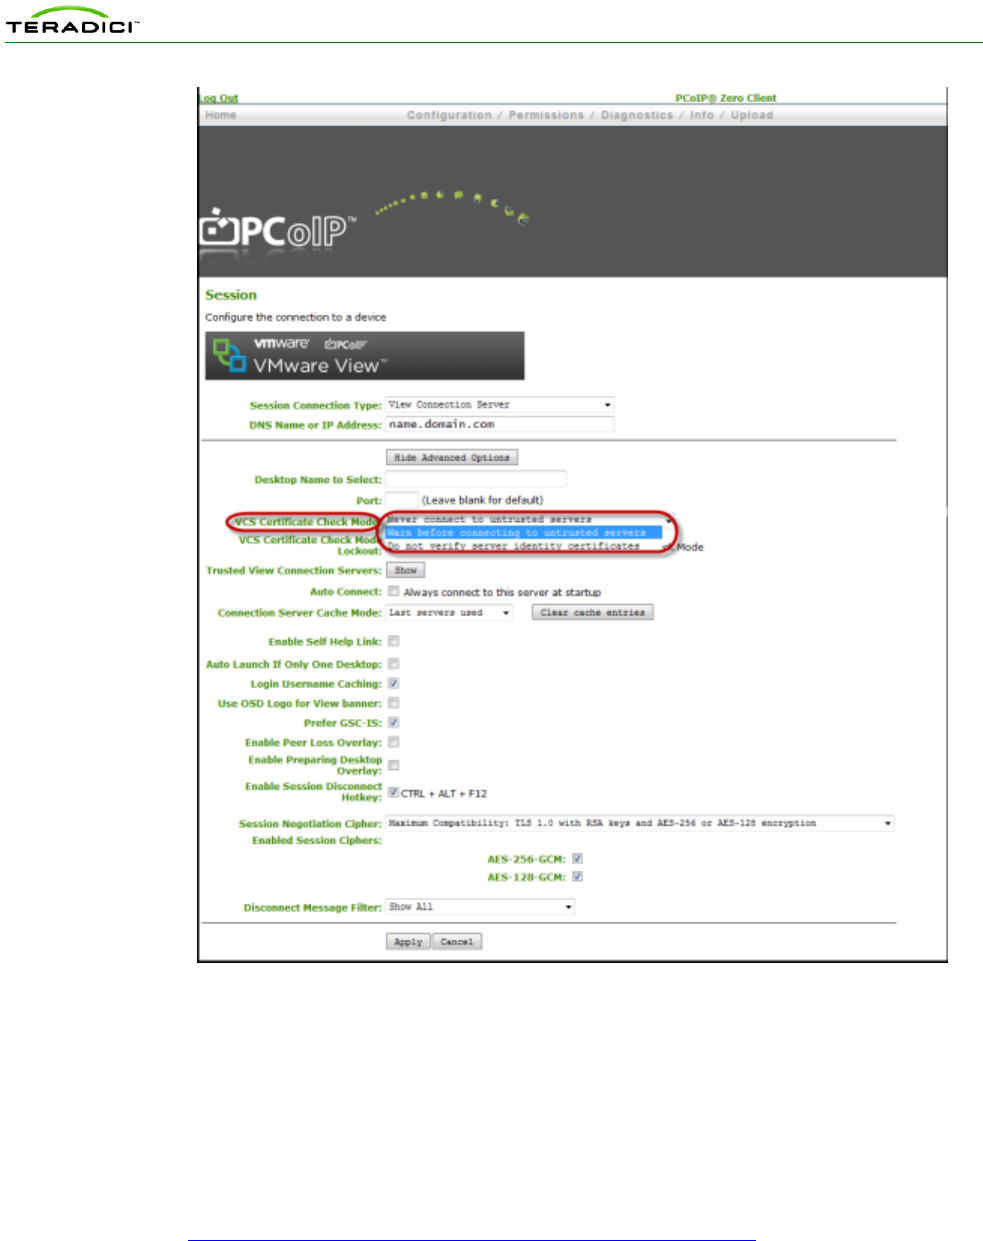
6.1.2 PCoIP Zero Client Session and Certificate Checking Configuration
To configure the zero client using the AWI:
1. Open the zero client AWI.
2. Login to the AWI.
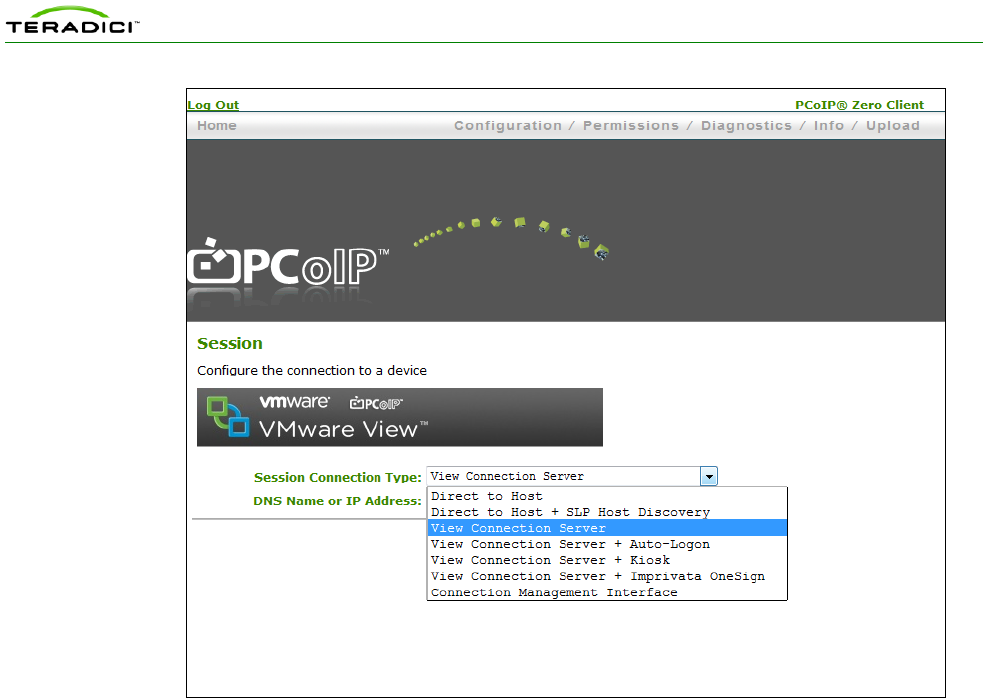
3. Browse to Configuration > Session.
4. Select the appropriate View Session Connection Type:
In this example we select View Connection Server.
Using PCoIP Host Cards with VMware View
TER0911004 Issue 3 25
Figure 6-2: PCoIP Zero Client Showing the Session Connection Options
5. Complete the DNS Name or IP Address: field entering the credentials of the VCS.
Note the following other View options available. These options are also configurable through
the OSD (Options > Configuration > Session)
Select the View Connection Server + Auto-Logon session connection type
to configure a client to automatically enter a user's login details when the
user connects to a virtual desktop via a VMware View Connection Server.
Select the View Connection Server + Kiosk session connection type to
configure a client to use Kiosk mode when connecting to a virtual desktop
via a VMware View Connection Server.
See Appendix 1 for View Connection Server Advanced Options descriptions.
6. Click the Show Advanced Options button.
7. Select the desired Certificate Checking Mode.
In this example we use “Warn before connecting to untrusted servers”.
Using PCoIP Host Cards with VMware View
TER0911004 Issue 3 26
Figure 6-3: Zero Client Showing the VCS Certificate Check Mode Options
8. Click Apply.
9. Click Continue.
6.1.3 Uploading the Certificate to the Zero Client
1. Ensure you have downloaded the VCS SSL trusted root certificate and saved it on a PC
you are accessing the AWI from.
2. Convert your certificate to .pem format if necessary. (See Teradici knowledbase article
How to convert a SSL certificate to PEM format? (15134-1115) )
3. From the zero client AWI click Upload > Certificate.
4. Click the Browse button and navigate to where the VCS SSL trusted root certificate was
saved.
5. Click OK.
Using PCoIP Host Cards with VMware View
TER0911004 Issue 3 27
6. Click Continue.
You are now ready to connect to the View environment.
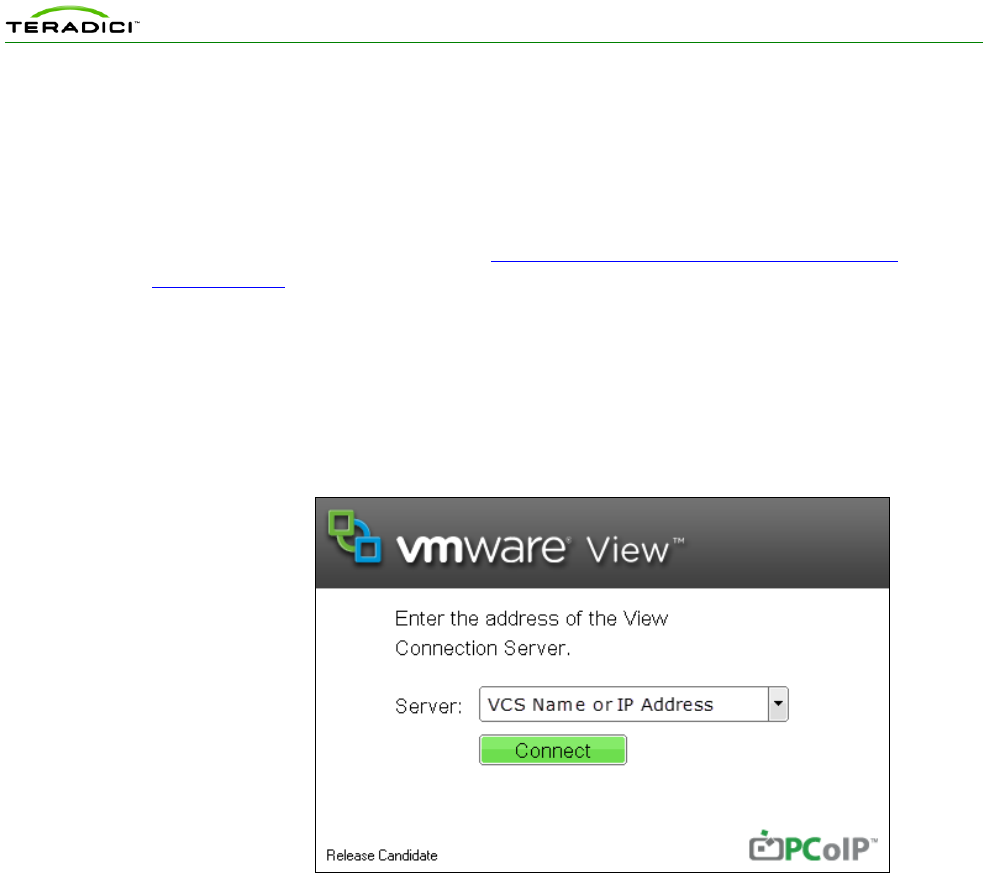
6.1.4 Connecting a PCoIP Zero Client to the View Environment
This section provides a brief outline of how to connect a client to a physical PC utilizing a
host card through VMware View. See Using PCoIP Zero Clients with VMware View
(TER0904005) from the Teradici Support site for details not covered in this section.
1. Ensure the host card, zero client and host PC are powered up, connected and
configured correctly for the View network.
2. From the zero client’s OSD Connect screen, select the correct server form the drop
down list and click the Connect button.
Note the VMware View banner is now displayed on the connect screen after configuring
the client to use View.
Figure 6-4: Zero Client Connect Screen Using View
3. Enter the credentials of the user you set up for the desktop entry created in the
VMware View Connection Server.
4. Choose the domain associated with the entitled user.
5. Click Logon.
6. A screen appears. Select the physical PC’s desktop entry created in the View
Connection Server from the list of available desktops.
7. Click Connect.
The View Connection Server establishes a PCoIP session between the client and the host
card. You can now access the physical PC.
Note: If this is the first time that the physical PC is installed with View Agent 5 and
registered to the View Manager, there may be a short delay before the physical PC is
available in the View Connection Server. If a warning message appears stating that the
desktop source is not yet available, wait a couple of minutes, and try to connect again.

Using PCoIP Host Cards with VMware View
TER0911004 Issue 3 28
6.2 Soft Clients
There are a variety of View compatible soft clients which work on the following platforms:
Windows
Mac IOS
Android
Mac
Linux
This example provides a brief description on how to connect a View Windows client to the
View environment. For detailed instructions please see the soft client manufacturer
instructions.
1. Download the latest appropriate View Client. (such as from www.vmware.com)
2. Install the client on your device. (repurposed PC, laptop. mobile etc.)
3. Open/Run the client software.
4. Follow the prompts and consider the install options.
5. Enter the name or IP address of the View server.
6. Click Connect. (or click the enter key)
7. Enter your username and password and select the correct domain.
8. Click the Logon button.
9. Select the appropriate desktop from the list of desktops that appear.
10. Click Connect.
You are now connected to the View environment.

Using PCoIP Host Cards with VMware View
TER0911004 Issue 3 29
7 Deployment Considerations
The PCoIP protocol provides a real-time delivery of a rich user desktop experience in virtual
desktop and remote workstation environments. To ensure a responsive desktop, you must
deploy the PCoIP protocol across a properly architected network infrastructure for your
virtual desktops. This architecture must meet bandwidth, QoS, latency, jitter, and packet loss
requirements.
For more details, see the Virtual Desktop Network Design Checklist (TER1105004) and
PCoIP to VMware View 4 Virtual Desktop Configuration and WAN Network Optimization
Guide (TER1007002).
7.1 Bandwidth Matrix for Various Setups of Zero Clients,
Soft Clients, and Hosts
The following table describes the encryption algorithm and bandwidth metrics used for
various setups of zero clients, VMware View clients, soft and host workstations. For more
details, see Knowledge Base item 15134-281 from the Teradici Support site.
Table 7-1: Multiple Scenario Bandwidth and Encryption Matrix
Tera1 Zero Client
Tera2 Zero Client
Windows View Client
Tera1 Host Card
No View Security
Server
Up to 220 Mbps
AES-128 (un-
encapsulated)
Up to 220 Mbps
AES-128 (un-encapsulated)
Up to 7 Mbps
Software AES-128
(ESP/UDP encapsulated)
Up to 20 Mbps with Salsa20
(ESP/UDP encapsulated)
**Salsa preferred
Tera1 Host Card
With View
Security Server
Up to 7 Mbps
AES-128 (ESP/UDP
encapsulated)
Up to 7 Mbps
AES-128 (ESP/UDP
encapsulated)
Up to 7 Mbps
AES-128 (ESP/UDP
encapsulated)
Tera2 Host Card
No View Security
Server
Up to 220 Mbps
AES-128 (un-
encapsulated)
Up to 600 Mbps
AES-128/AES-256 (un-
encapsulated / encapsulated)
**AES-256 preferred
Future firmware releases will
default to ESP/UDP
encapsulated.
Releases including and prior to
4.0.x default to un-
encapsulated.
Performance will vary
based on client hardware
capabilities
AES-128 (ESP/UDP
encapsulated)
AES-256 (ESP/UDP
encapsulated)
**AES-128 preferred
Tera2 Host Card
With View
Security Server
Up to 7 Mbps
AES-128 (ESP/UDP
encapsulated)
Up to 600 Mbps
AES-256 (ESP/UDP
encapsulated)
AES-128 (ESP/UDP
encapsulated))
**AES-256 preferred
Performance will vary
based on client hardware
capabilities
AES-128 (ESP/UDP
encapsulated)
AES-256 (ESP/UDP
encapsulated)

Using PCoIP Host Cards with VMware View
TER0911004 Issue 3 30
Tera1 Zero Client
Tera2 Zero Client
Windows View Client
**AES-128 preferred
VDI (VM) - PCoIP
Software-Host *
(* see below)
No View Security
Server
Up to 20Mbps
Salsa20 (ESP/UDP
encapsulated)
Up to 7 Mbps
AES-128 (ESP/UDP
encapsulated)
**Salsa preferred
Up to 90 Mbps - Performance
will vary based on host
hardware capabilities
AES-128 (ESP/UDP
encapsulated)
AES- 256 (ESP/UDP
encapsulated)
**AES-128 preferred
Performance will vary
based on client hardware
capabilities
AES-128 (ESP/UDP
encapsulated)
AES-256 (ESP/UDP
encapsulated)
Salsa20 (ESP/UDP
encapsulated)
**AES-128 preferred
VDI (VM) - PCoIP
Software-Host *
(* see below)
With View
Security Server
Up to 7 Mbps
AES-128 (ESP/UDP
encapsulated)
Up to 90 Mbps Performance will
vary based on host hardware
capabilities
AES-128 (ESP/UDP
encapsulated)
AES- 256 (ESP/UDP
encapsulated)
**AES-128 preferred
Performance will vary
based on client hardware
capabilities
AES-128 (ESP/UDP
encapsulated)
AES-256 (ESP/UDP
encapsulated)
**AES-128 preferred
* - VDI (VM) - PCoIP Software–Host can be:
VM with PCoIP Software Host such as VMware View
Published Desktop (bare metal or VM) PCoIP Software Host such as Teradici
Arch with Microsoft Remote Desktop Services
** - The negotiated encryption in scenarios where all encryption options are selected
between host and client.

Using PCoIP Host Cards with VMware View
TER0911004 Issue 3 31
8 Known Issues, Troubleshooting, and FAQ
This section outlines specific troubleshooting, and frequently asked questions related to zero
clients and host cards when using VMware View. For a comprehensive troubleshooting
resource, search the:
Teradici Knowledge Base (click Knowledge Base after you log in).
VMware View Product Support Center
8.1 Troubleshooting
This section outlines some common issues and suggested solutions.
Table 8-1: Troubleshooting
Item
Issue
Solution
1
Trouble connecting to the host
machine
The PC is often unreachable within the first
two minutes (approximately) of powering on
the host PC. Wait several minutes for the
View Agent to communicate with the View
Connection Server. Log into the View
Connection Server, and then check the state
for the host PC.
You can also use View Administrator to
confirm the device is “available”. If it is not
available try restarting the workstation.
You may have had a server change and you
are connecting to the wrong server. In this
case ensure your connecting to the correct
trusted view server in the advanced options
section of the session tab of the AWI. To
connect to the configured server use Read
Only mode and clear cache entries on the
Connection Server Cache Mode in the
advanced options section of the session tab
of the AWI.
The VCS trusted SSL root certificate is not
loaded on the zero client.
2
No PCoIP devices detected and an
error message appears
Connect directly to the host card AWI and
enable the Host Driver Function
Ensure there is not an issue with the PCIe
slot the host card is using
If possible try a different host card
3
Software Client The desktop display
resolution may change when a user
resizes the software client window
while a session is active with a
PCoIP host card. Sometimes when
this change occurs, the graphics
driver scales the desktop image and
the desktop no longer fits within the
client window.
Resize the client window or configure the
graphics driver to use the monitor’s built-in
scaling feature.

Using PCoIP Host Cards with VMware View
TER0911004 Issue 3 32
4
If using more than one monitor and
the connections are not hooked up
to the corresponding ports on the
host card, gpu, and zero client, the
display resolution could show poorly
Confirm that port 1 from the GPU is plugged
into port 1 of the host card and the monitor is
plugged into port 1 of the zero client.
Ensure no display adapters are used to
convert cables to different connector types.
5
If there is a resolution error, not
taking up the full monitor.
Enable client topology selection is selected in
the monitors tab of the host driver and
ensure topology is enable on the zero client
8.2 Frequently Asked Questions
How can I verify the PCoIP host driver software is installed and running properly?
Log into the host PC, click the host software icon in the system tray, and then verify that the
session statistics are being updated. Updated statistics indicates that the host driver software
can communicate with the host card.
If the statistics are not being updated, see the PCoIP Host Software User Guide
(TER0810001) for help with debugging the issue.
Can I connect a supported VMware software client to a workstation?
Yes. The worksation must be running the View Agent.
What software clients are supported?
For an up-to-date list of the supported software clients, see the VMware View 5 Evaluator's
Guide.
What is the latest version of PCoIP firmware and PCoIP Host Software for Windows?
For an up-to-date list of PCoIP software and firmware please review and subscribe to Current
PCoIP Products and Releases (15134-650) at the Teradici support site.

Using PCoIP Host Cards with VMware View
TER0911004 Issue 3 33
Appendix A
PCoIP Session Connection Type Options in Firmware 4.0.x
Parameter
Description
DNS Name or
IP Address
Enter the VMware View Connection Server's DNS name or IP address.
Desktop Name
to Select
Enter the pool/desktop name used by the client when starting a session.
Note: This setting is optional.
Port
By default this field is blank, and port 443 is used to communicate with the View
Connection Server.
If your network is set up to use a non-standard port for secure connections, enter the
port number.
VCS Certificate
Check Mode
Select how the client behaves if it cannot verify a secure connection to the View
Connection Server:
Never connect to untrusted servers: Configure the client to reject the
connection if a trusted, valid certificate is not installed. (This is the most
secure option.)
Warn before connecting to untrusted servers: Configure the client to display a
warning if an unsigned or expired certificate is encountered, or if the certificate
is not self-signed and the zero client trust store is empty. (This option is
selected by default.)
Do not verify server identity certificates: Configure the client to allow all
connections. (This option is not secure.)
VCS Certificate
Check Mode
Lockout
Enable to prevent users from changing the VCS Certificate Check Mode settings from
the OSD.
Trusted View
Connection
Servers
Click the Show button to display VMware View Connection Servers for which the client
has received a valid certificate.
Click the Clear button to clear this cache.
Auto Connect
When enabled, the client automatically connects to the selected View Connection
Server whenever the client powers up or when a session with the virtual desktop is
terminated.
Note: After enabling Auto Connect, the client must be power-cycled for the change to
take effect.
Connection
Server Cache
Mode
This field determines whether a View Connection Server is dynamically added to the
Server drop-down menu on the OSD Connect page when a user types in a valid server
address, or whether it appears in a read-only list for the user to select.
Last servers used: Select this option if you want a list of cached servers that a
user has typed in to appear in the Server drop-down menu on the OSD
Connect page.
Read-only: Select this option if you want users to select a View Connection
Server from a read-only list.
Note: You can use the PCoIP Management Console to pre-populate the list of available
connection servers.
Enable Self
Help Link
See Enabling the Self Help Link for details.
Auto Launch If
Only One
When enabled, users are automatically connected to their virtual desktop after user

Using PCoIP Host Cards with VMware View
TER0911004 Issue 3 34
Parameter
Description
Desktop
credentials are entered.
Note: This feature only applies to users who are entitled to a single desktop. It does not
apply to users entitled to multiple virtual desktops.
Login
Username
Caching
When enabled, the username text box automatically populates with the last username
entered.
Use OSD Logo
for View
Banner
When enabled, the PCoIP zero client OSD logo appears during login in place of the
VMware View banner. You can upload an OSD logo from the OSD Logo Upload page.
Prefer GSC-IS
When selected, the GSC-IS interface is used if a smart card supports more than one
interface such as CAC (GSC-IS) and PIV endpoint. If a smart card supports only one
interface, such as either CAC or PIV endpoint, then only the CAC or PIV endpoint
interface is used regardless of this setting. This only affects smart card access
performed outside of PCoIP sessions.
Enable Peer
Loss
Overlay
When enabled, the “Network Connection Lost” overlay appears on the display(s) when
a loss of network connectivity is detected. It also appears in the case of a virtual
desktop such as VMware View. Normal hypervisor scheduling delays can falsely trigger
this message.
Note: This option is only available for a zero client. Desktop applications that require
the peer loss notification should re-enable the feature through the OSD, AWI, or MC.
Enable
Preparing
Desktop
Overlay
When enabled, the "Preparing Desktop" overlay appears on the display(s) when users
log in.
Note: This overlay provides assurance that login is proceeding if the desktop takes
more than a few seconds to appear.
Enable Session
Disconnect
Hotkey
When enabled, users can press the Ctrl+Alt+F12 hotkey sequence to pop up the "Zero
Client Control Panel" overlay, which lets them disconnect the current session on the
workstation or power off the workstation.
Note: Before users can use this disconnect hotkey sequence, certain other
configuration options must be in place. See Disconnecting from a Session for details.
Session
Negotiation
Cipher
Configure the Transport Layer Security (TLS) cipher the client will use to negotiate the
TLS session between the PCoIP client and the PCoIP host:
TLS 1.0 with RSA keys and AES-256 or AES-128 encryption: This option
provides maximum compatibility.
TLS 1.2 with Suite B-compliant 192-bit elliptic curve encryption. This option
provides a higher level of security.
Enabled
Session
Ciphers
Enable or disable an encryption mode for the device. By default, all encryption modes
that pertain to a device are enabled.
AES-128-GCM (Tera1 and Tera2): An encryption method implemented in first-
generation Tera1 and second-generation Tera2 processors. This method
offers the best performance between hardware endpoints for Tera1 devices.
AES-128-GCM also may offer improved performance for Tera2 clients when
connecting to VMware 4 or later if there is more than about 7 Mbps available
on the network.
AES-256-GCM (Tera2 only): A more secure encryption method implemented
in second-generation Tera2 processors that offers the best performance
between hardware endpoints. When connecting to VMware 4 or later, AES-
128-GCM is recommended.
Salsa20-256-Round12 (Tera1 only): A lighter encryption method implemented
in firmware that may offer improved performance for Tera1 clients when
connecting to VMware View 4 or later if there is more than about 7 Mbps

Using PCoIP Host Cards with VMware View
TER0911004 Issue 3 35
Parameter
Description
available on the network.
Note: For more information about connecting to VMware View virtual desktops, see
"Using PCoIP Zero Clients with VMware View User Guide" (TER0904005).
Note: The enabled encryption mode must match between the host and client for a
session to be established. If more than one mode is enabled, the firmware selects the
following:
Host to Tera1 or Tera2 clients: AES-128-GCM or AES-256-GCM for the
PCoIP session.
VMware View 4.5 and later to Tera1 client: SALSA20-256-Round12 for the
PCoIP session.
VMware View 4.5 and later to Tera2 client: AES-128-GCM for the PCoIP
session.
Disconnect
Message Filter
This field lets you control what type of messages appear when a session is
disconnected. There are three categories:
Information: User- or administrator-initiated actions affecting the session:
Warning: System-initiated, but expected actions affecting the session:
Error: Unexpected system-initiated actions causing session to fail:
You can choose to display:
Show All messages – This option shows all disconnect messages including
Info, Warning, and Error messages.
Show Error and Warnings Only – This option hides info messages and
displays only error and warning messages.
Show Error Only – This option hides Info and Warning messages and displays
only Error messages.
Show None – Don’t show any disconnect messages.
