SV30BX_OI.indb PDF VL MV30
PDF VL-SV30 Panasonic Service Manuals - Panasonic Middle East
VL-SV30BX to the manual 8746f934-f8e3-4877-909e-1f57912b4fa5
User Manual: PDF Panasonic Service Manuals - Panasonic Middle East
Open the PDF directly: View PDF ![]() .
.
Page Count: 32
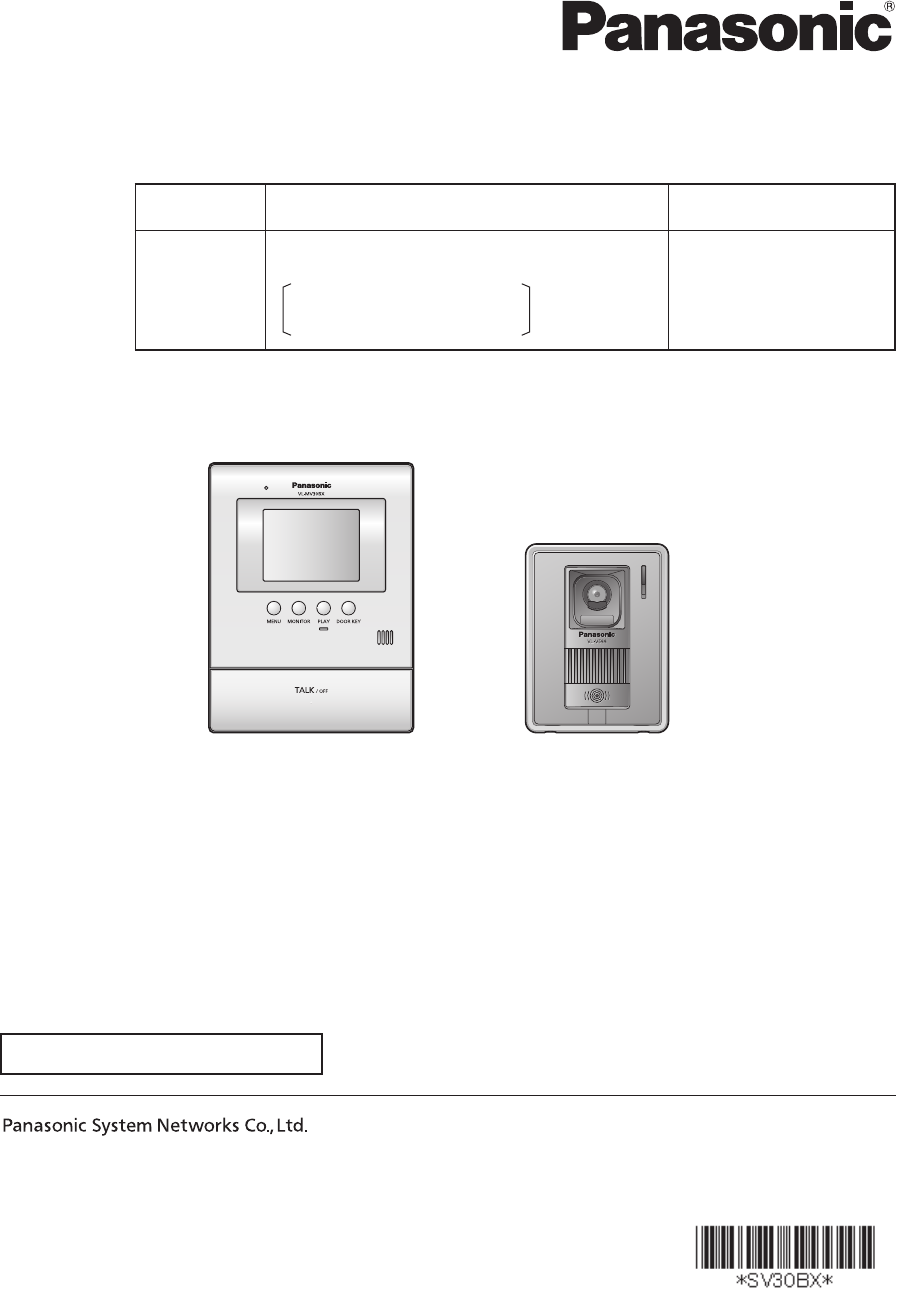
Thank you for purchasing a Panasonic product.
Please read these Operating Instructions before using the unit and save for future reference.
Operating Instructions
Model Name Video Intercom System Main Monitor
Model No. VL-SV30BX
Including: VL-MV30BX
VL-V566BX
VL-MV30BX
1-62, 4-chome, Minoshima, Hakata-ku, Fukuoka 812-8531, Japan
© Panasonic System Networks Co., Ltd. 2010
PNQX3052ZA SV1110MT0
VL-MV30BX VL-V566BX
Attached Installation Guide
SV30BX_OI.indb 1SV30BX_OI.indb 1 2010/10/22 17:21:442010/10/22 17:21:44
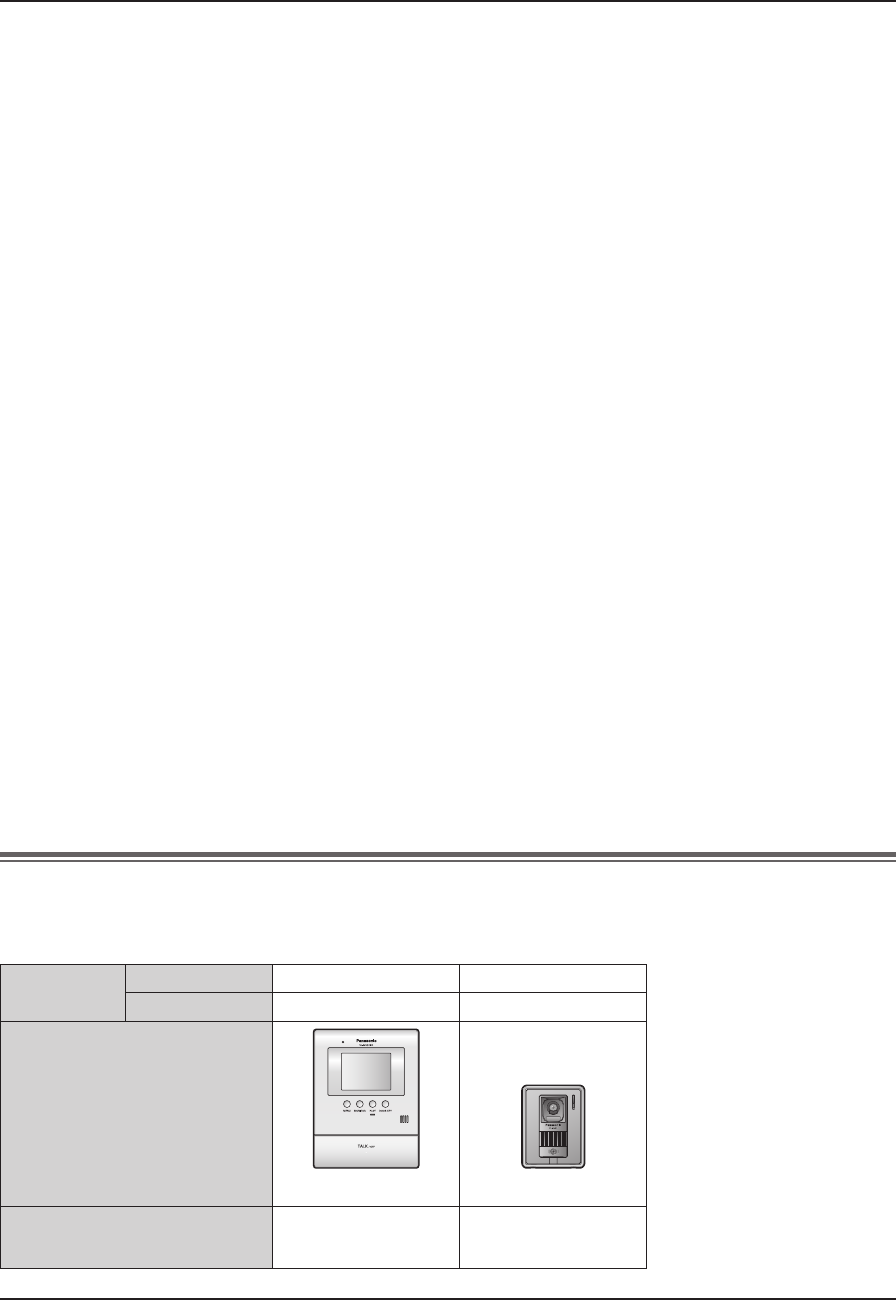
Table of Contents
2
Introduction
Accessory information.....................................3
Important Information
For your safety..................................................4
Important safety instructions ..........................5
For best performance.......................................5
Other information .............................................5
Preparation
Location of controls .........................................6
Setting the date and time .................................9
Doorphone
Answering a call .............................................10
L Answering a call by voice sensor
(Voice answer mode) ....................................... 10
Features during a call or while monitoring ..11
L Adjusting the display brightness .........................11
L Hiding the guidance ............................................11
L Adjusting the volume of your voice heard at
the door station .................................................11
L Adjusting the speaker volume.............................11
L If it is diffi cult to hear the visitor’s voice
due to noise (Press-to-talk mode).....................11
L Using {DOOR KEY} button ................................11
When receiving another call during a call
or while monitoring ......................................12
Monitoring the outside
(Door station monitor) ..................................13
Recording
Recording an image .......................................14
L Auto recording ................................................... 14
L Manual recording ............................................... 15
Viewing recorded images ..............................16
Programming
Adjusting the ringer volume ..........................18
Changing the ringer tone ...............................19
Setting {DOOR KEY} button ..........................20
Changing the function settings
(Function list) ................................................21
Expanding the System
Expanding your system with
optional units ................................................24
Help
Troubleshooting .............................................26
Cleaning ..........................................................28
General Information
Specifi cations .................................................29
Index
Index ................................................................30
Product names used in these Operating Instructions
These Operating Instructions are for both the VL-SV30BX and VL-MV30BX.
For plain explanation, the product names used in these Operating Instructions are described as follows.
Model
composition
VL-SV30BX rr
VL-MV30BX r------
Product fi gure
VL-MV30BX VL-V566BX
Description in these Operating
Instructions (Product name)
Main monitor station
(Main monitor)
Door station
(Door station)
SV30BX_OI.indb 2SV30BX_OI.indb 2 2010/10/22 17:21:442010/10/22 17:21:44
3
Introduction
Accessory information
Accessories for installing the main monitor station and the door station are described in the Installation Guide
included.
Additional/replacement accessories
As of November, 2010.
Accessory items Order number
Door station VL-V566BX
(same as the door station included with VL-SV30BX)
VL-GC005BX
Due for release in February 2011.
(The release date may be changed without notice.)
Lobby station
(for apartment complexes)
VL-V590BX
Due for release in April 2011.
(The release date may be changed without notice.)
Only available for certain countries. Please contact the dealer where you
purchased VL-SV30BX or VL-MV30BX.
N When using with a lobby station
LConnection:
Connect the lobby station to terminal D1/D2 on the rear of the main monitor station. (Refer to the Installation
Guide for details.) The lobby station connected to terminal D1/D2 works as door station 1.
LOperation:
You cannot monitor outside where the lobby station is located (page 13). For all other operations, however,
the lobby station operates the same as the door station (VL-V566BX or VL-GC005BX).
Compatible Panasonic PBXs
This unit can be used with Panasonic PBXs (page 25). Please consult your dealer for compatible PBX
information.
This unit is compatible with the following Panasonic PBXs*1:
KX-TDA30BX/KX-TDA100BX/KX-TDA200BX/KX-TDA600BX
KX-TDE100BX/KX-TDE200BX/KX-TDE600BX
KX-NCP500BX/KX-NCP1000BX
*1 As of November, 2010.
SV30BX_OI.indb 3SV30BX_OI.indb 3 2010/10/22 17:21:442010/10/22 17:21:44

Important Information
4
For your safety
To prevent severe injury and loss of life/property, read this section carefully before using the unit to ensure
proper and safe operation of your unit.
WARNING
Power connection
LUse only the power source marked on the unit. If you are not sure of the type of power supplied to your home,
consult your dealer or local power company.
LDo not place objects on the power cord. Install the unit where no one can step or trip on the cord.
LDo not overload power outlets and extension cords. This can result in the risk of fi re or electric shock.
LCompletely insert the power plug into the power outlet. Failure to do so may cause electric shock and/or
excessive heat resulting in a fi re.
LRegularly remove any dust, etc. from the power plug by pulling it from the power outlet, then wiping with a dry
cloth. Accumulated dust may cause an insulation defect from moisture, etc. resulting in a fi re.
LUnplug this unit from power outlets if it emits smoke, an abnormal smell or makes unusual noise. These
conditions can cause fi re or electric shock. Confi rm that smoke has stopped and contact an authorized service
center.
LNever touch the plug with wet hands. Danger of electric shock exists.
Installation
LTo prevent the risk of fi re or electrical shock, do not expose the product (excluding the door station) to rain or
any type of moisture.
LDo not allow the power cord to be excessively pulled, bent or placed under heavy objects.
Operating safeguards
LTo reduce the risk of electric shock, do not disassemble this unit. Refer servicing to an authorized service
center when service is required. Opening or removing covers may expose you to dangerous voltages or other
risks. Incorrect reassembly can cause electric shock when the unit is subsequently used.
LDo not touch the main monitor station and the power plug during an electrical storm. There may be a remote
risk of electric shock from lightning.
LNever push any objects through slots in this unit. This may result in the risk of fi re or electric shock. Never spill
any liquid on the unit.
LUnplug this unit from power outlets and refer servicing to an authorized service center when the following
conditions occur:
A. If the power cord is damaged or frayed.
B. If metal objects have been dropped inside the main monitor station.
C. If the main monitor station has been exposed to rain or water, or liquid has been spilled into the unit. Do not
use a microwave oven to speed up the drying process of any parts of the unit to avoid permanent damage.
D. If the unit has been dropped or physically damaged.
CAUTION
Installation and relocation
LThe power cord is used as the main disconnect device. Ensure that the power outlet is installed near the
product and is easily accessible.
Operating safeguards
LDo not put your ear(s) near the speaker, as loud sounds emitted from the speaker may cause hearing
impairment.
SV30BX_OI.indb 4SV30BX_OI.indb 4 2010/10/22 17:21:452010/10/22 17:21:45

Important Information
5
Important safety instructions
When using this unit, basic safety precautions should always be followed to reduce the risk of fi re, electric shock,
or personal injury.
1. Do not use this unit near water. For example, near a bathtub, wash bowl, kitchen sink, or laundry tub, in a
wet basement, or near a swimming pool, and the like.
2. Use only the power cord indicated in this manual.
SAVE THESE INSTRUCTIONS
For best performance
Before using
LWhen power fails, this unit cannot be used.
LFor the recorded image:
The recorded image may be lost when:
– Mishandled
– Electric shock or radio wave interference occurs.
– The power is turned off during use. (We might not be held responsible for the damage.)
Environment
LKeep the unit away from electrical noise generating devices, such as fl uorescent lamps and motors.
LThe unit should be kept away from excessive smoke, dust, high temperature and vibration.
LThe unit should not be exposed to direct sunlight.
LWhen you leave the unit unused for a long period of time, unplug it from the power outlet.
LThe unit should be kept away from heat sources such as heaters, kitchen stoves, etc. It should not be placed
in rooms where the temperature is less than 0 °C or greater than 40 °C. Damp basements should also be
avoided.
Other information
Privacy and rights of portrait
When installing or using the door station, please take into consideration the rights of others with regard to
privacy.
LIt is generally said that “Privacy” means the ability of an individual or group to stop information about
themselves from becoming known to people other than those whom they choose to give the information. “Rights
of portrait” means the right to be safe from having your own image taken and used indiscriminately without
consent.
Others
LPanasonic assumes no responsibility for injuries or property damage resulting from failures arising out of
improper installation or operation inconsistent with both the Installation Guide and Operating Instructions.
LIf you stop using the main monitor station and the door station, remove the main monitor station and the door
station from the walls to prevent them from falling off.
Note for product disposal, transfer, or return
LThis product can store your private/confi dential information.
To protect your privacy/confi dentiality, we recommend that you erase the information (recorded images) from
the memory before you dispose of, transfer or return the product.
All the recorded images can be erased at once by initializing the main monitor station. Set “INIT + DEL ALL
PICTURES” in “INITIALIZE SETTINGS” (page 23).
SV30BX_OI.indb 5SV30BX_OI.indb 5 2010/10/22 17:21:452010/10/22 17:21:45

Preparation
6
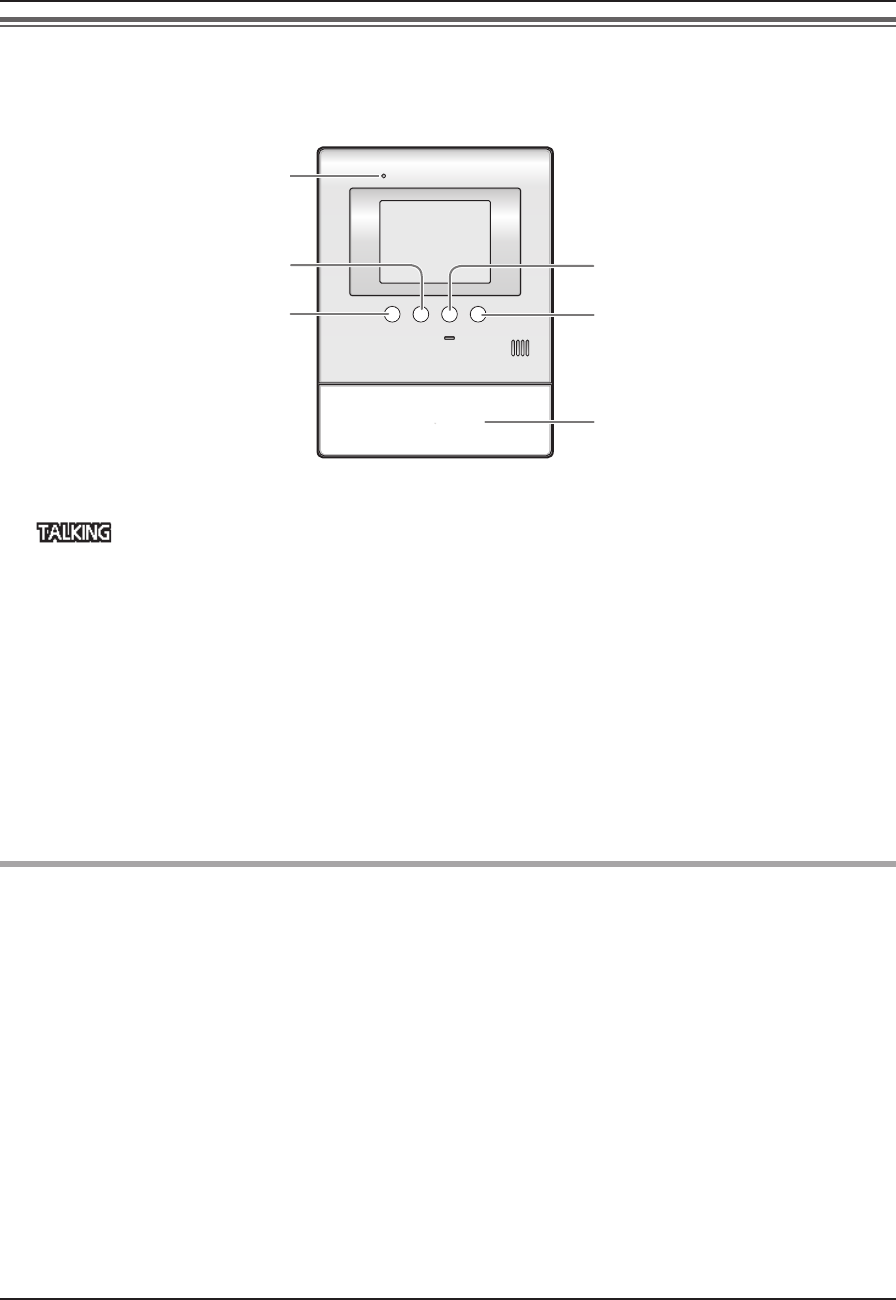
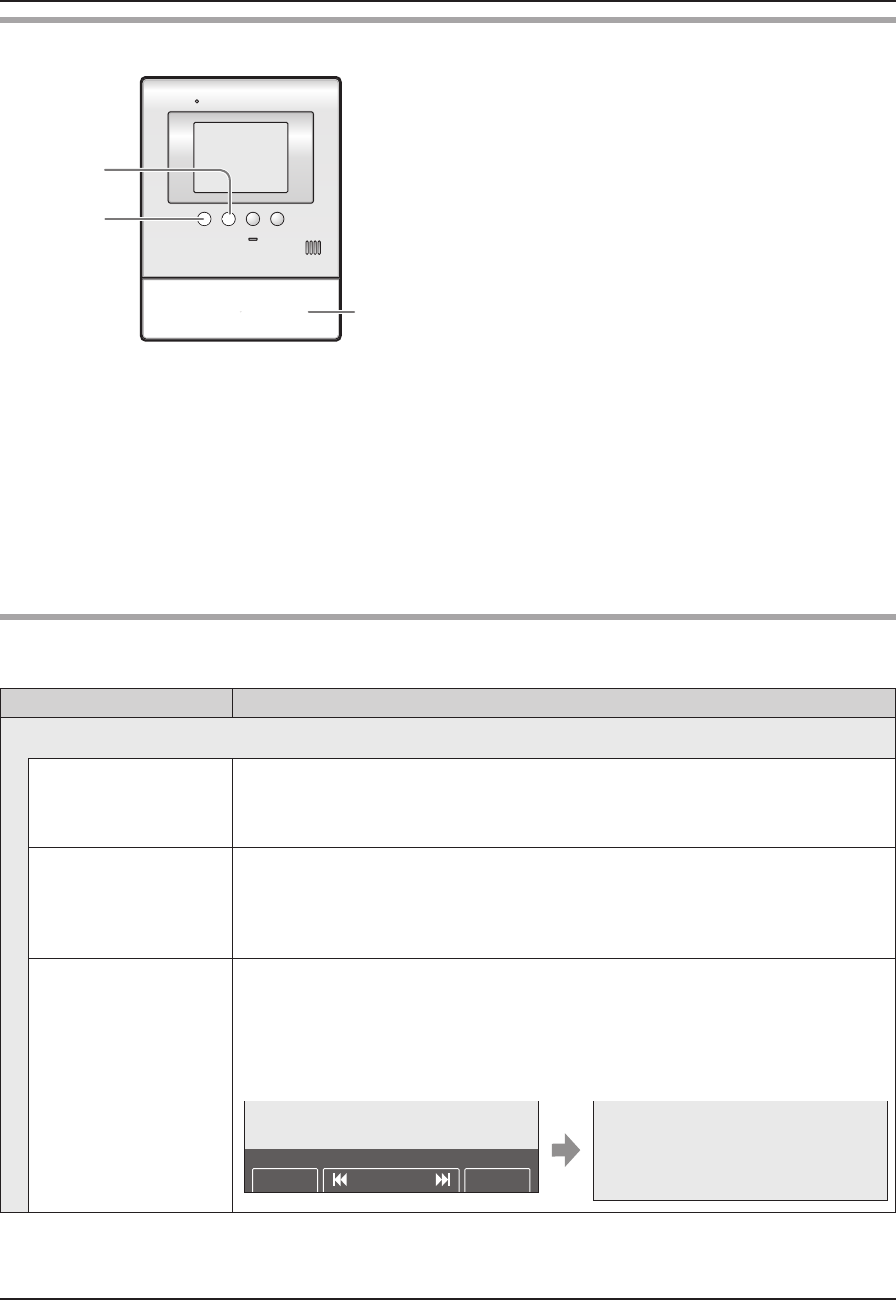
Note:
LFor information about the rear view, refer to the wiring schematic diagram section in the Installation Guide.
A Microphone
LDo not cover when you talk.
B Monitor display (page 7)
C {MENU} button
LPress to change the function settings
(page 21).
D {MONITOR} button
LPress to monitor the sound and image taken
by the door station (page 13).
E {PLAY} button and indicator ( )
LViews the recorded image (page 16).
LThe indicator fl ashes when there are
unviewed images that are newly recorded.
F {DOOR KEY} button
LAllows you to open the door when connecting
the door opener (sold separately) to the main
monitor station (page 11).
G {TALK/OFF} button
LPress to answer a call and/or speak to a
visitor (page 10).
LPress to end an operation.
H Speaker
CDEF buttons are also used for operating the
features shown on the display (page 7).
Location of controls
Main monitor station
CDEF
A
B
GH
SV30BX_OI.indb 6SV30BX_OI.indb 6 2010/10/22 17:21:452010/10/22 17:21:45
Preparation
7
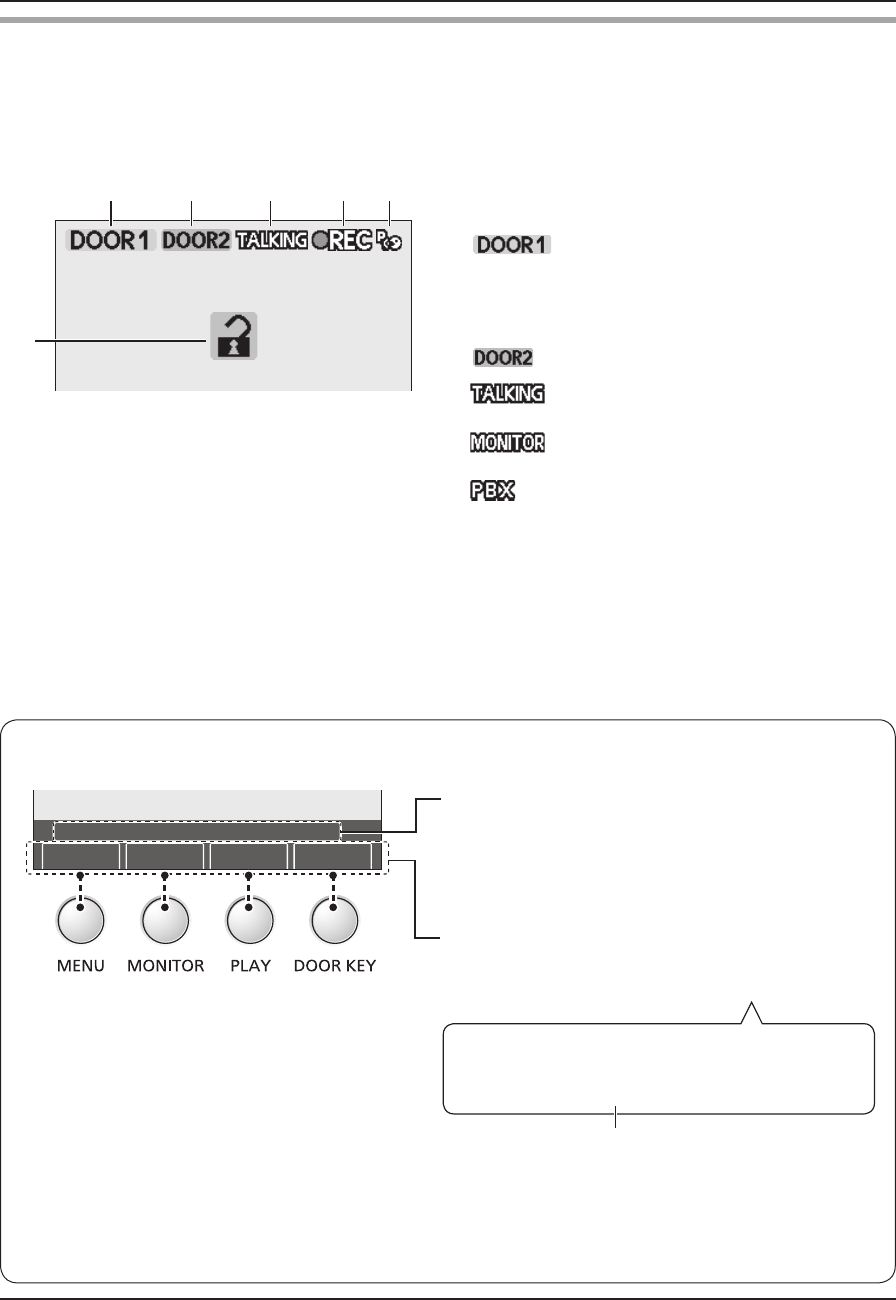
Monitor display
The following display is an example for description purposes, and it may differ from the actual display.
LThe monitor display is turned off during standby.
A Indicates which door station is calling, monitoring, or
in a call. Also indicates which door station took the
image while viewing it.
(Example)
: Door station 1
B Indicates which door station is calling while talking or
monitoring (page 12).
(Example)
: Door station 2
C : Indicates that the main monitor station is in
a call (page 10).
: Indicates that the main monitor station is
monitoring outside (page 13).
: Indicates that one of the PBX extensions
connected to the main monitor station is
being used for a call from the door station.
D Indicates an image is being taken by the door station.
E Indicates that the “Press-to-talk” mode is on (page
11).
F Indicates that the door is opened when the door
opener (sold separately) is connected to the main
monitor station (page 11).
AB E
F
C D
LThe above display is an example for
description purposes, and it may differ from
the actual display.
LThe display varies depending on the
operation.
N Operation guidance and button guidance
(Example)
Operation guidance
The example means that pressing the {TALK/OFF}
button ends the call.
L If you set “OPERATION GUIDE SETTINGS” to
“OFF”, you can always hide the operation guidance
(page 23).
Button guidance
Press the button for the function directly above it.
Example: To operate “rREC”, press {PLAY}.
In these Operating Instructions, the button and
function displayed above are indicated as follows.
Press {PLAY} (rREC).
To hide the guidance that overlaps the image:
When the display shows images (for example, during a call and while monitoring), you can temporarily
hide the guidance to easily view the whole image. (See “Hiding the guidance” on page 11.)
DOOR KEY
●
RECMONITORMENU
PRESS [TALK/OFF] TO FINISH
The displayed function is not stated when the
corresponding button name means the same as the
displayed function.
SV30BX_OI.indb 7SV30BX_OI.indb 7 2010/10/22 17:21:452010/10/22 17:21:45
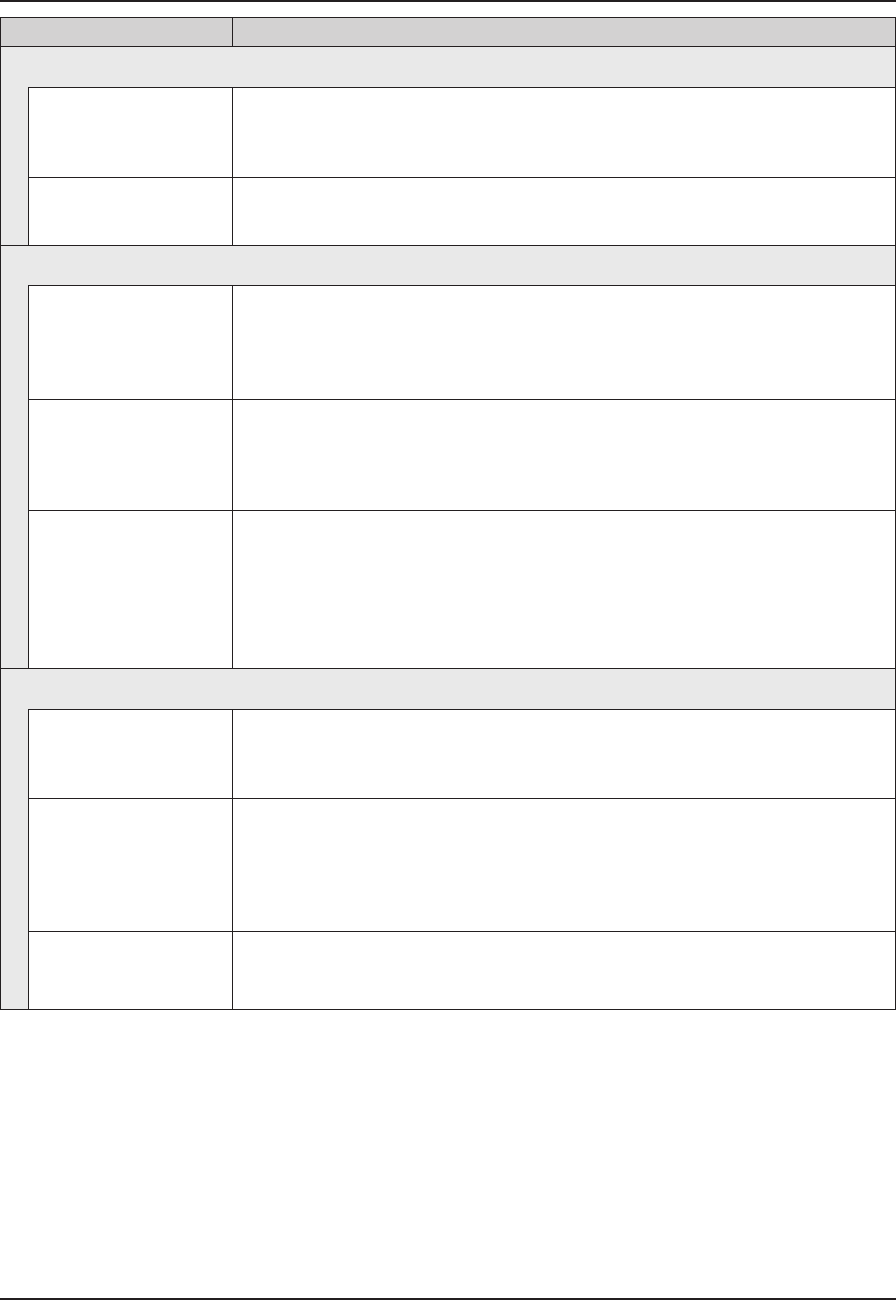
Preparation
8
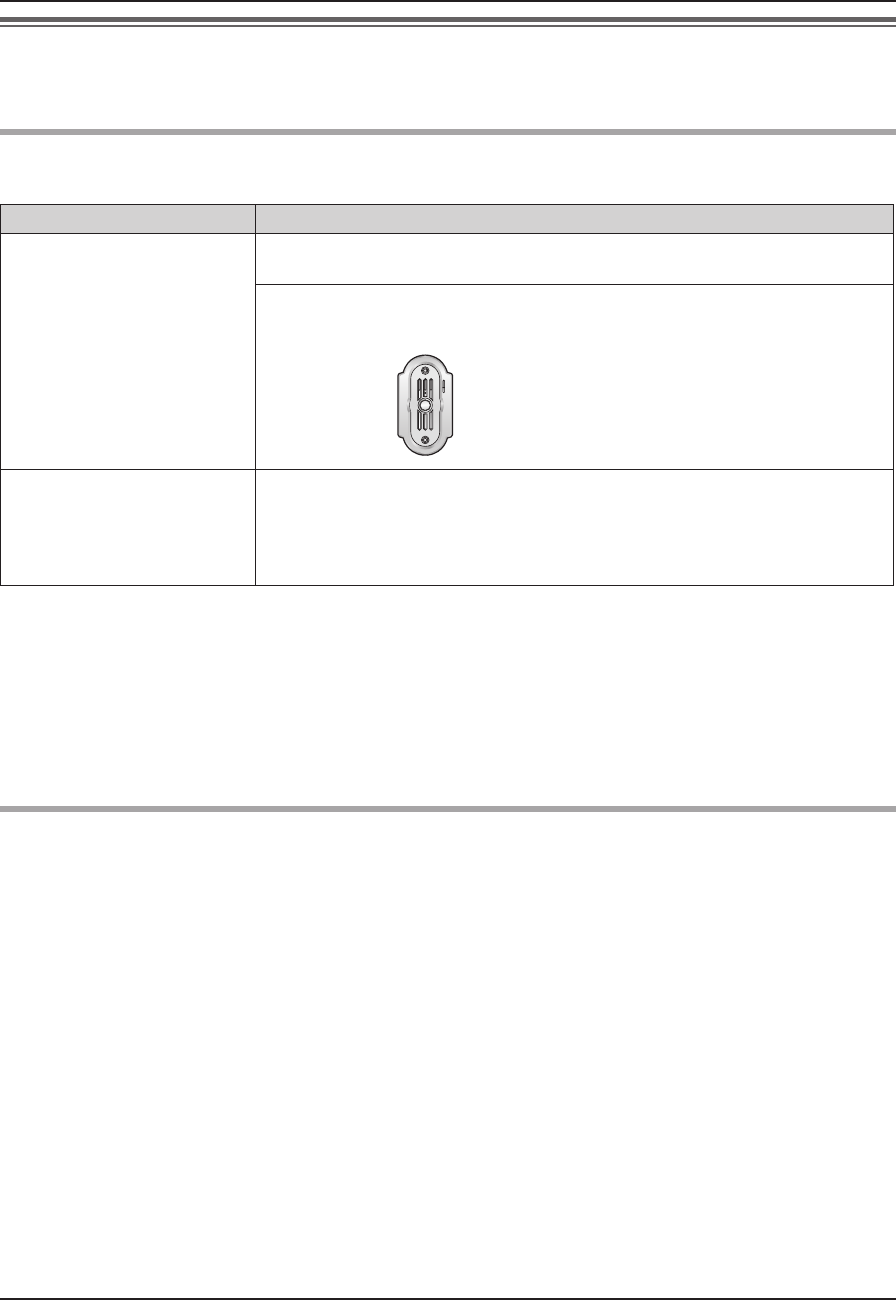
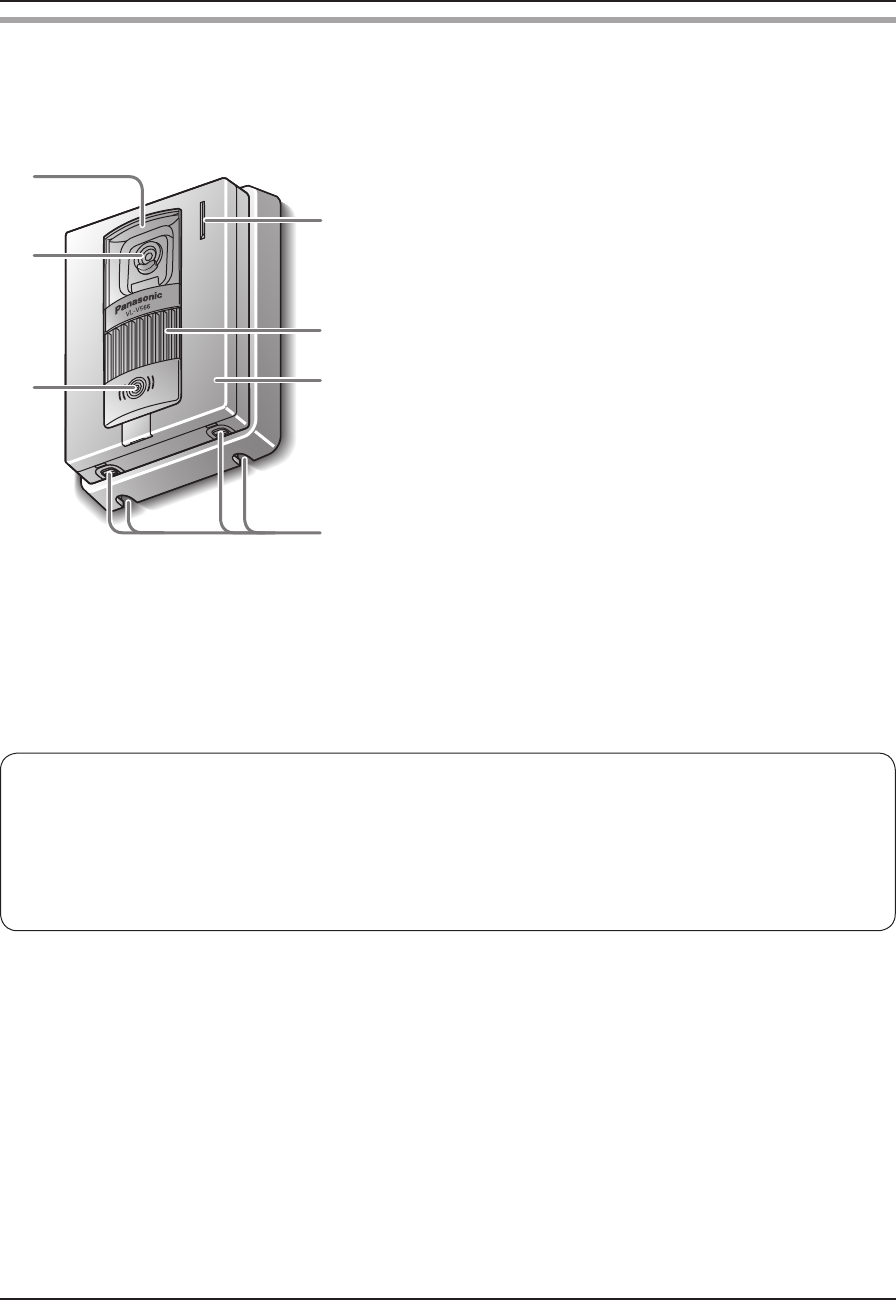
Door station
A Lens cover
B Camera
LWhen a visitor presses the call button, the
camera on the door station will turn on and an
image of the visitor will be shown on the monitor
display of the main monitor station.
C {CALL} button and indicator
LThe indicator is lighted with a red LED while the
power is on.
LWhen a visitor presses the call button, a ringer
tone will ring at the main monitor station.
D Water drain holes
LThese holes allow rain water to drain.
Do not cover them.
E Panel
F Speaker
G Microphone
A
B
C
D
E
F
G
N Door station image quality
The following phenomena may occur. They are not malfunctions.
LIf the sun can be seen, its center appears as a black dot.
LAt night or when there is poor lighting in the doorway, the image colors become unclear. If there is a light
in the doorway, the image may appear greenish.
LDuring the daytime or if there is bright light in the doorway, the color of the visitor’s clothing may appear
differently to the actual color.
SV30BX_OI.indb 8SV30BX_OI.indb 8 2010/10/22 17:21:452010/10/22 17:21:45

Preparation
9
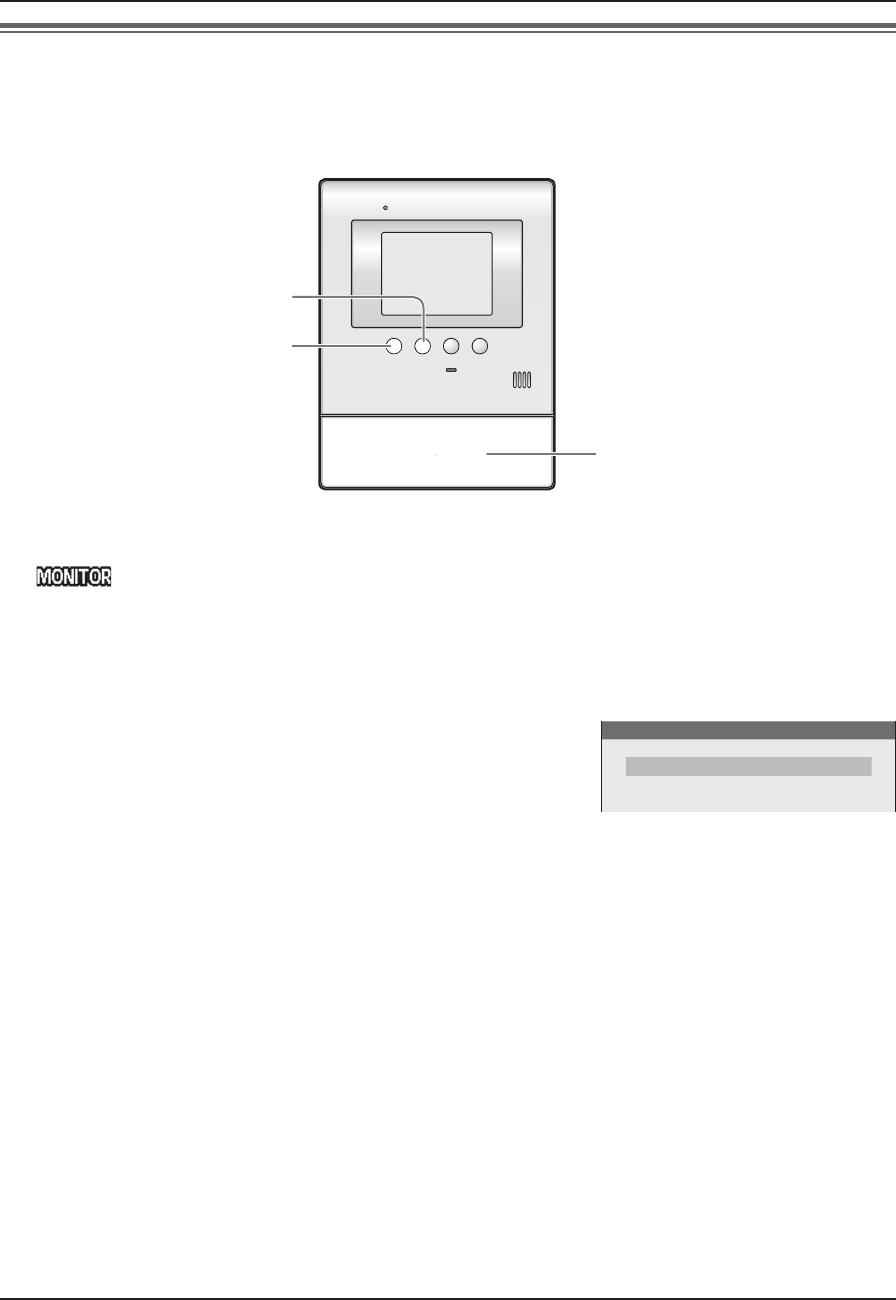
Setting the date and time
This unit has a recording function. The date and time will not be recorded when recording unless they are set.
You can set the date and time using the main monitor station.
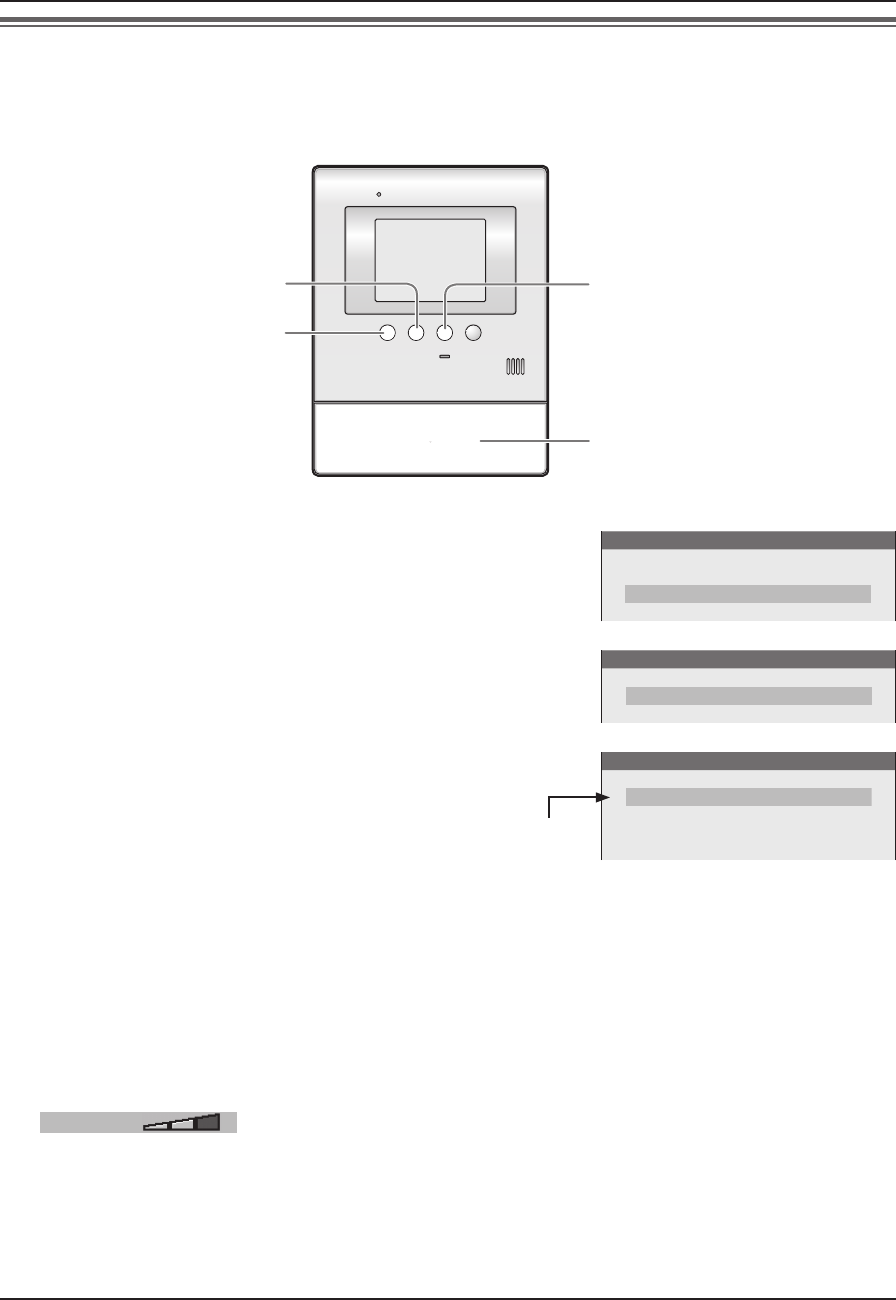
{MENU}
{TALK/OFF}
{PLAY}
{MONITOR}
{DOOR KEY}
1 Press {MENU}, then select “TIME AND DATE SETTINGS” by
pressing {MENU} (▼SELECT).
FUNCTION SETTINGS
TIME AND DATE SETTINGS
RING/ANSWERING SETTINGS
RECORDING/PLAY SETTINGS
CONNECTED DEVICE SETTINGS
2 Press {MONITOR} (OK), then set the current date and time.
{MENU} (NEXT
▲
):
Select the location for day/month/year/hour/minute.
{MONITOR} (-) or {PLAY} (+):
Select numbers.
LYou can scroll numbers quickly by pressing and holding
{MONITOR} (-) or {PLAY} (+).
(Example)
TIME AND DATE
11 / JAN / 2011 23
:
45
3 Press {DOOR KEY} (OK) after fi nishing the setting.
LThe screen in step 1 is displayed.
4 To end the operation, press {TALK/OFF}.
Note:
LTime may shift about 60 seconds per month.
SV30BX_OI.indb 9SV30BX_OI.indb 9 2010/10/22 17:21:452010/10/22 17:21:45
Doorphone
10
Answering a call
When you receive a call from a door station, the main monitor station rings. You can monitor the visitor on the
monitor display before answering a call.
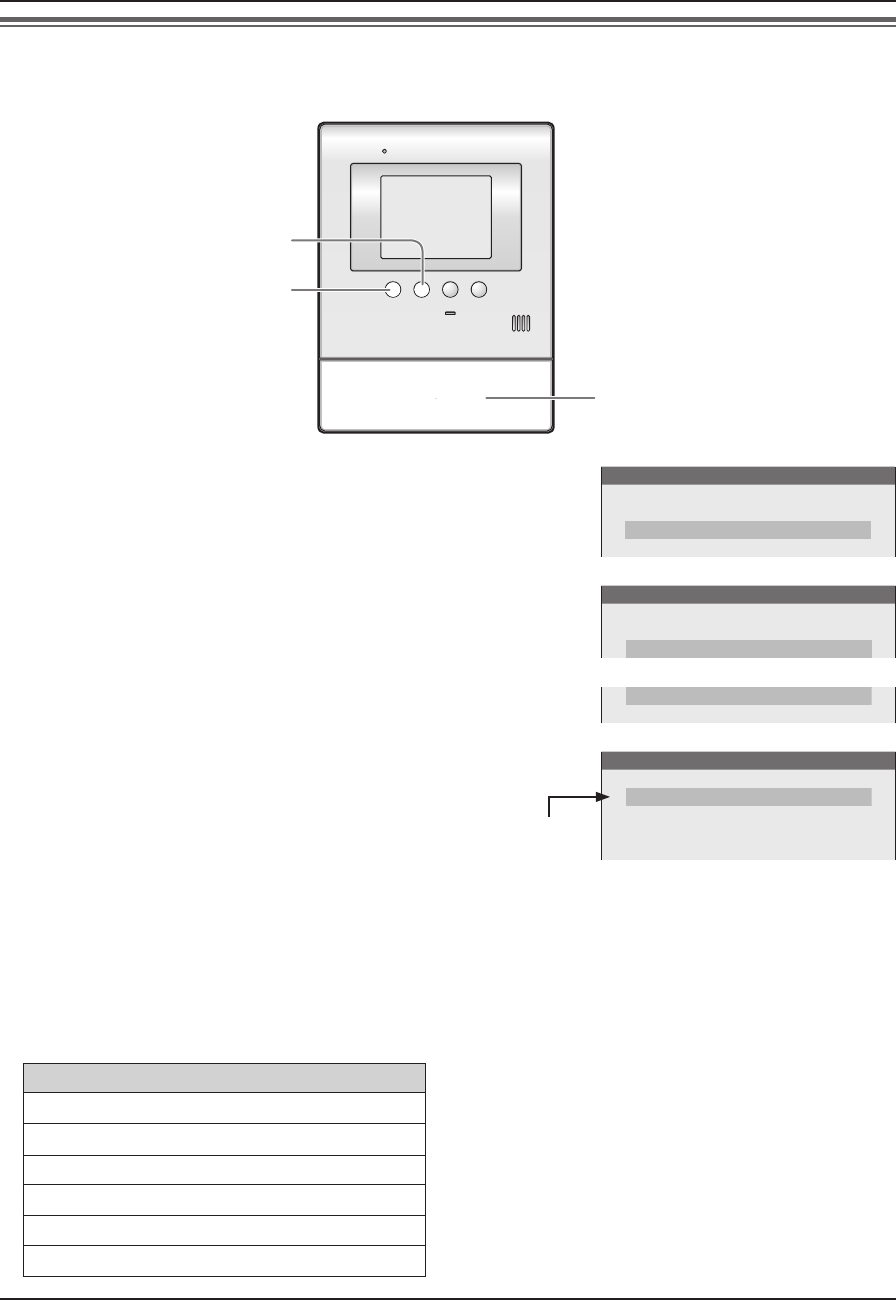
{DOOR KEY}
{MENU}
{TALK/OFF}
{PLAY}
{MONITOR}
Microphone
1 When a ringer tone is heard, press {TALK/OFF}.
L appears on the display.
2 Speak to the visitor within 50 cm of the microphone.
LSpeak alternately with the visitor.
(If you and the visitor speak at the same time, you will not hear each other.)
3 To end the conversation, press {TALK/OFF}.
Note:
LIf you do not answer a door call within 30 seconds, the display will turn off.
A conversation will be automatically disconnected in about 90 seconds and then the display will turn off.
LThe image taken by the door station is automatically recorded (page 14).
When using an additional door station:
LWhen you receive another call from the other door station during a conversation, see page 12.
Answering a call by voice sensor (Voice answer mode)
This mode allows you to answer a call by voice without pressing {TALK/OFF}.
Voice answer must be set “ON” beforehand (page 21).
1 When a ringer tone is heard, answer with a clear voice such as “Yes?” or “Hello?”.
LWhen a beep sounds, you can talk to the visitor.
Note:
LMake sure you are within about 50 cm of the main monitor station.
LThe visitor cannot hear your initial reply when you answer with voice.
LYour initial reply should be brief (less than 1 second), otherwise the voice answer mode will not start.
LIf a visitor calls you, a loud, brief sound (such as a dog’s bark) may start the voice answer mode even though
you have not replied by voice.
SV30BX_OI.indb 10SV30BX_OI.indb 10 2010/10/22 17:21:462010/10/22 17:21:46
Doorphone
11
Features during a call or while monitoring
Adjusting the display brightness
1 Press {MENU}, then select “BRIGHTNESS” by
pressing {MENU} (
▲
SELECT).
2 Adjust the brightness by pressing {MONITOR}
(DARK) or {PLAY} (BRIGHT).
Hiding the guidance
You can hide the operation guidance and button
guidance (page 7).
1 Press {MENU}, then select “GUIDE OFF” by
pressing {MENU} (
▲
SELECT).
2 Press {MONITOR} (OK).
LThe guidance disappears from the display
temporarily. It reappears when you perform
another operation.
Adjusting the volume of your voice
heard at the door station
You can adjust the volume of your voice heard at the
door station by setting the main monitor station.
1 Press {MENU}, then select “OUTGOING VOL” by
pressing {MENU} (
▲
SELECT).
2 Adjust the volume by pressing {MONITOR} (-) or
{PLAY} (+).
Adjusting the speaker volume
1 Press {MENU}, then select “INCOMING VOL” by
pressing {MENU} (
▲
SELECT).
2 Adjust the volume by pressing {MONITOR} (-) or
{PLAY} (+).
If it is diffi cult to hear the visitor’s voice due to noise (Press-to-talk mode)
You can speak with the visitor alternately by pressing {TALK/OFF} to switch between the talking mode and the
receiving mode.
1 Press and hold {TALK/OFF} for about 2 seconds during a call until a beep sounds.
L appears on the display.
2 To speak to the visitor: Speak while pressing and holding {TALK/OFF}.
To hear the visitor: Release {TALK/OFF}.
NTo end the conversation:
Tap {TALK/OFF} (for 0.8 seconds or less).
Note:
LPress-to-talk mode is canceled after the conversation ends.
Using {DOOR KEY} button
When a separate door opener is connected to the main monitor station, you can open the door using the main
monitor station.
1 To open the door, press {DOOR KEY} after answering a call from the door station or while monitoring images
taken by the door station.
LWhen the door is opened, is displayed.
LDoor opener allows you to open the door for the time specifi ed in “Setting {DOOR KEY} button” on page
20.
Note:
LYou cannot open the door while receiving a call from the door station.
LWhen using 2 door openers:
You can open door 1 (door opener 1) when you are talking with door station 1 or monitoring it. You can open
door 2 (door opener 2) when you are talking with door station 2 or monitoring it.
SV30BX_OI.indb 11SV30BX_OI.indb 11 2010/10/22 17:21:462010/10/22 17:21:46
Doorphone
12
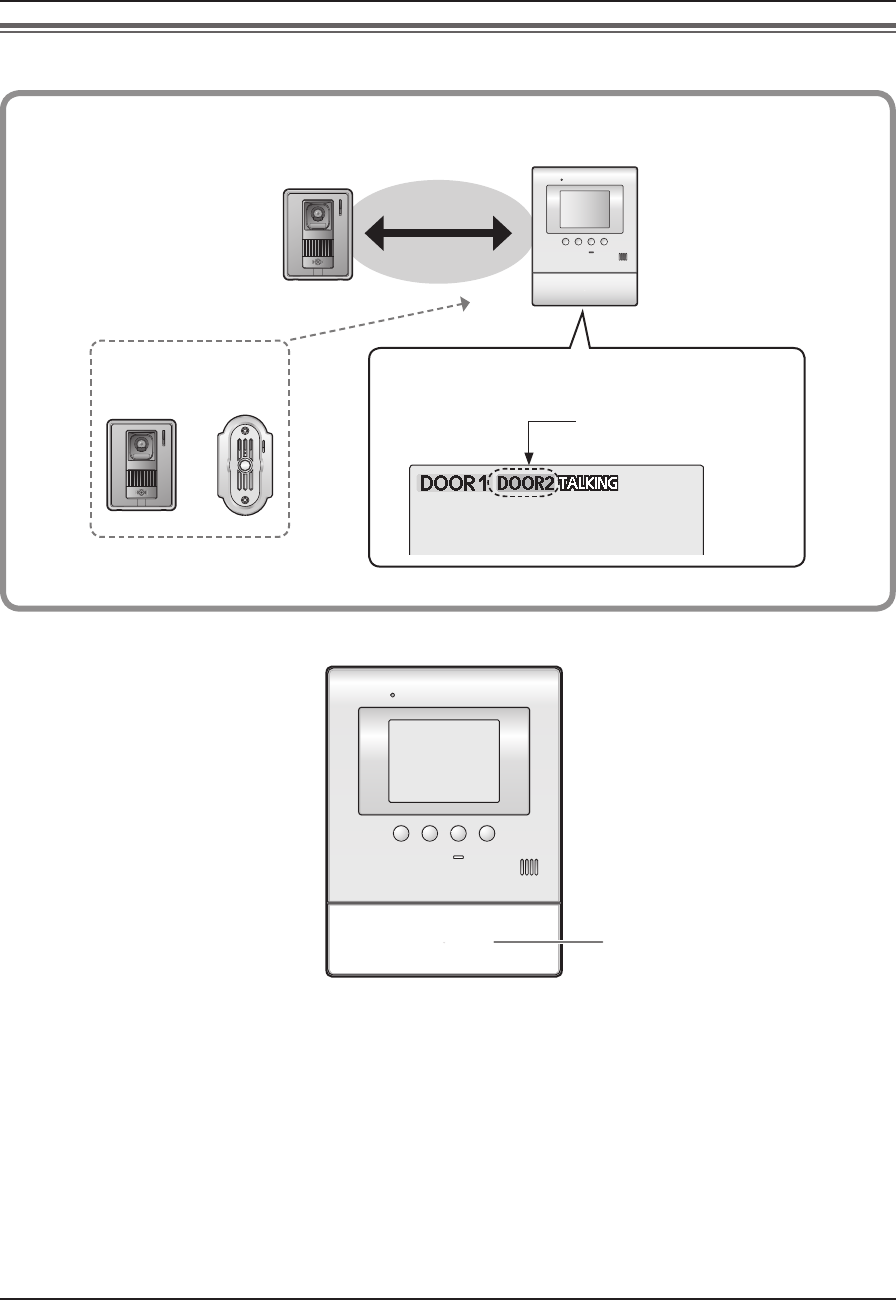
When receiving another call during a call or while monitoring
Door station 1
Call
Door station 2
(optional) The ringer tone is heard, and the display indication
notifi es you which door station is calling.
During a call
While monitoring
Main monitor station
or
Calling door station
(Example: Door station 2)
{TALK/OFF}
When answering a call:
1 Press {TALK/OFF} to end the previous call or monitoring.
LThe previous call or monitoring is terminated.
LThe image taken by the other door station is displayed.
(You cannot hear the visitor’s voice.)
2 To speak to the other party, press {TALK/OFF}.
3 To end the conversation, press {TALK/OFF}.
SV30BX_OI.indb 12SV30BX_OI.indb 12 2010/10/22 17:21:462010/10/22 17:21:46
Doorphone
13
Monitoring the outside (Door station monitor)
You can monitor the sound and image taken by the door station.
LIf an optional lobby station is connected to the main monitor station (page 3), you cannot monitor outside
where the lobby station is located.
{MENU}
{TALK/OFF}
{MONITOR}
1 Press {MONITOR}.
L appears on the display.
LThe outside image will be shown on the display, and you will hear the sound from outside.
(The sound from your end will not be heard at the door station.)
2 To end monitoring, press {TALK/OFF}.
N When installing 2 door stations
When you press {MONITOR} in step 1, the following is displayed.
Press {MENU} (
▲
SELECT) to select the desired door station,
then press {MONITOR} (OK).
Note:
LMonitoring will automatically end in about 90 seconds.
LTo talk to the visitor at the door station, press {TALK/OFF} to end monitoring, then press {TALK/OFF} again.
LYou can perform the following operations during monitoring. For more details, see page 11.
– Adjusting the display brightness
– Hiding the guidance
– Adjusting the speaker volume
When using an additional door station:
LWhen you receive another call from the other door station while monitoring, see page 12.
SELECT DOOR STATION
DOOR STATION 1
DOOR STATION 2
SV30BX_OI.indb 13SV30BX_OI.indb 13 2010/10/22 17:21:462010/10/22 17:21:46
Recording
14
Recording an image
The main monitor station can record (save) images from up to 30 calls (or monitoring to the door station).
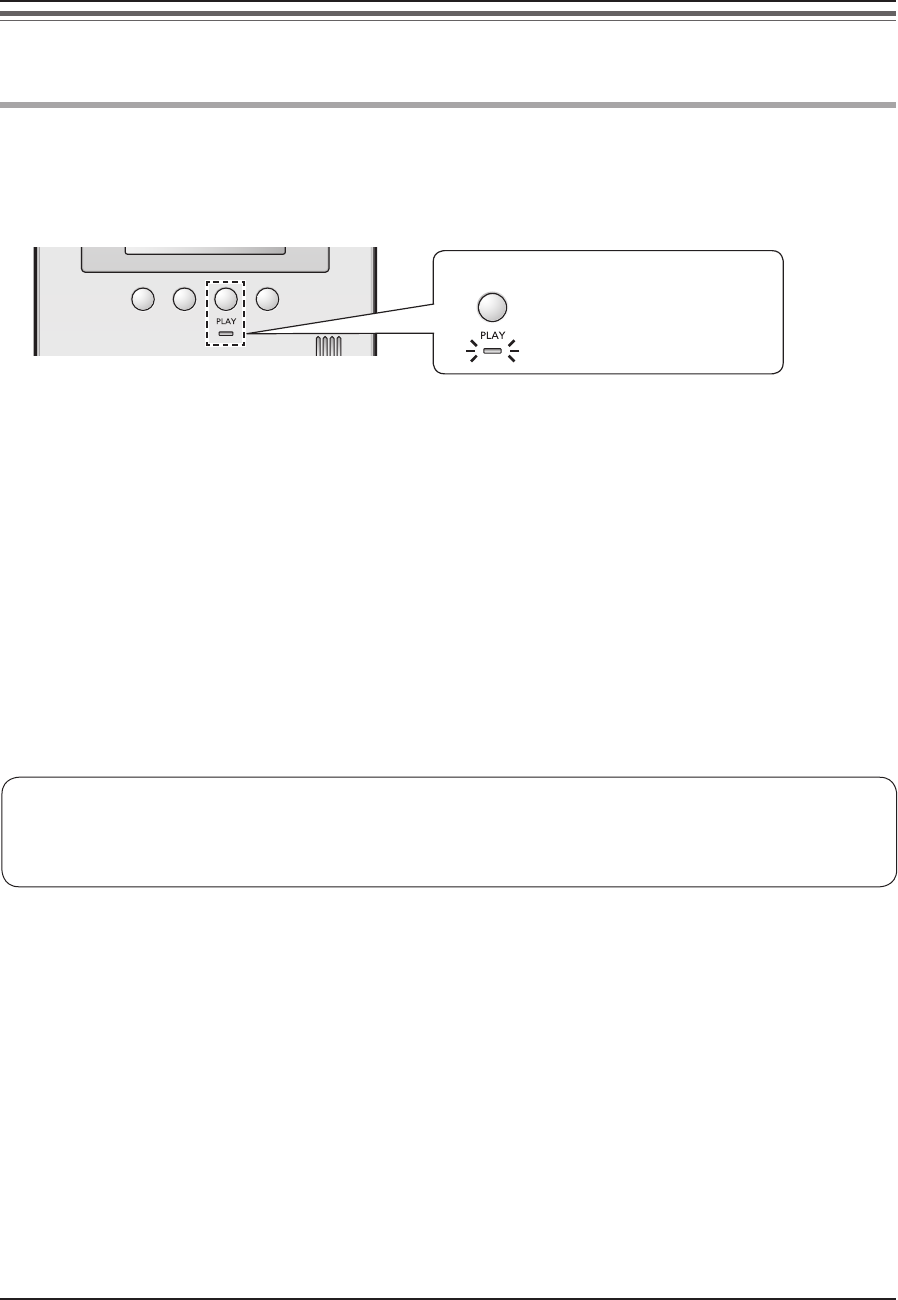
Auto recording
After about 2 seconds when you receive a call from the door station, an image is automatically recorded.
LIf you do not answer a call, the image for the call is recorded, and the main monitor station notifi es you
that there is an unviewed image as follows.
The PLAY indicator fl ashes.
To view recorded images:
see page 16.
Note:
LYou can set the PLAY indicator not to fl ash when there are unviewed images (“PLAY LAMP FLASHING” on
page 22).
LWhen you answer a call, the recorded image will be treated as a viewed image.
LIf you receive a call from the other door station while monitoring or during a conversation (page 12), the image
for the call is not recorded unless you answer it.
N Auto image update
If a new image is recorded when the maximum number of images is already stored, the oldest image
(including unviewed images) is automatically erased.
SV30BX_OI.indb 14SV30BX_OI.indb 14 2010/10/22 17:21:462010/10/22 17:21:46
Recording
15
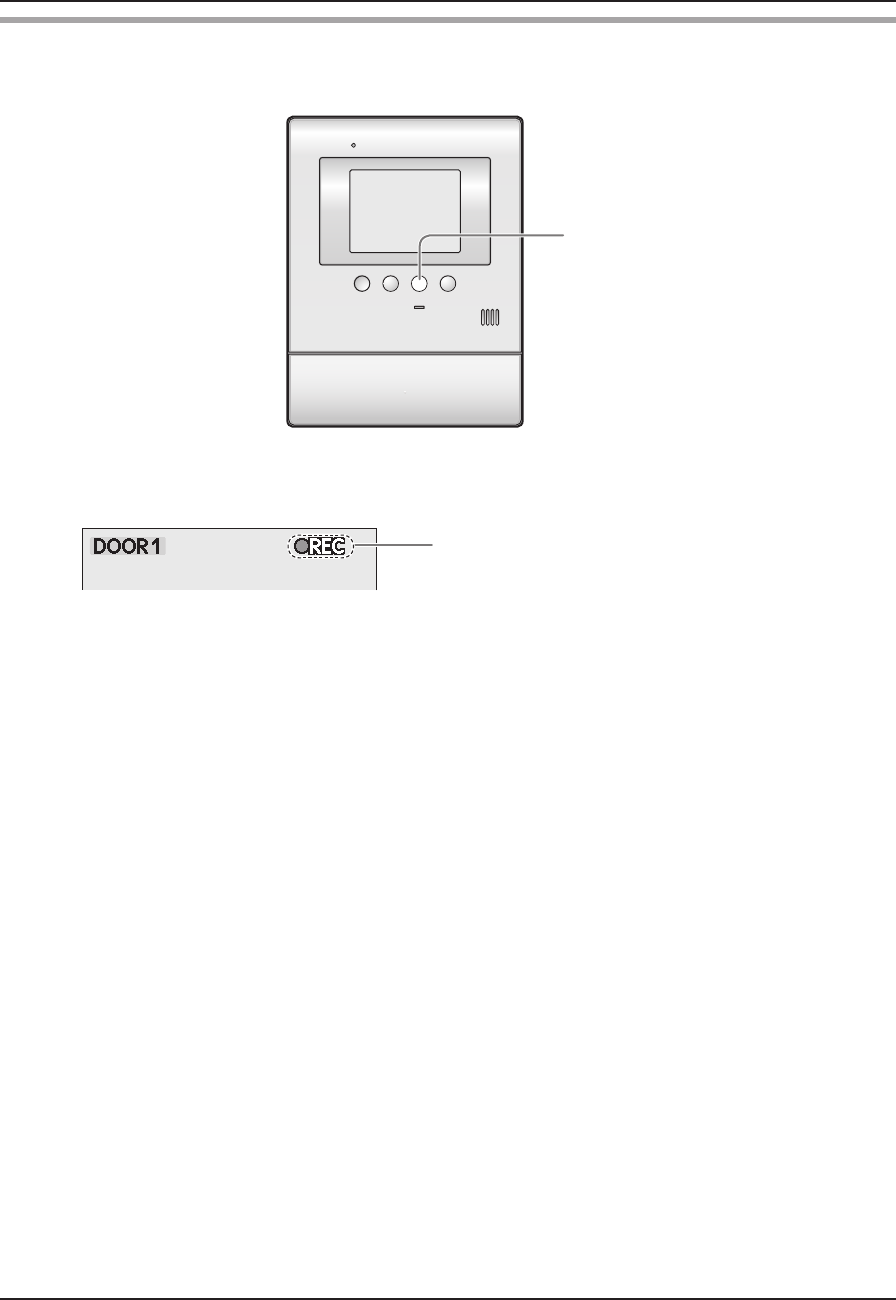
Manual recording
You can record an image anytime you are receiving a call, during a conversation, or while monitoring.
{PLAY}
1 When an image is shown on the display, press {PLAY} (rREC).
Note:
LManually recorded images will be treated as viewed images. (To view the recorded images, see page 16.)
Appears while recording an image.
Disappears when recording ends.
SV30BX_OI.indb 15SV30BX_OI.indb 15 2010/10/22 17:21:462010/10/22 17:21:46
Recording
16
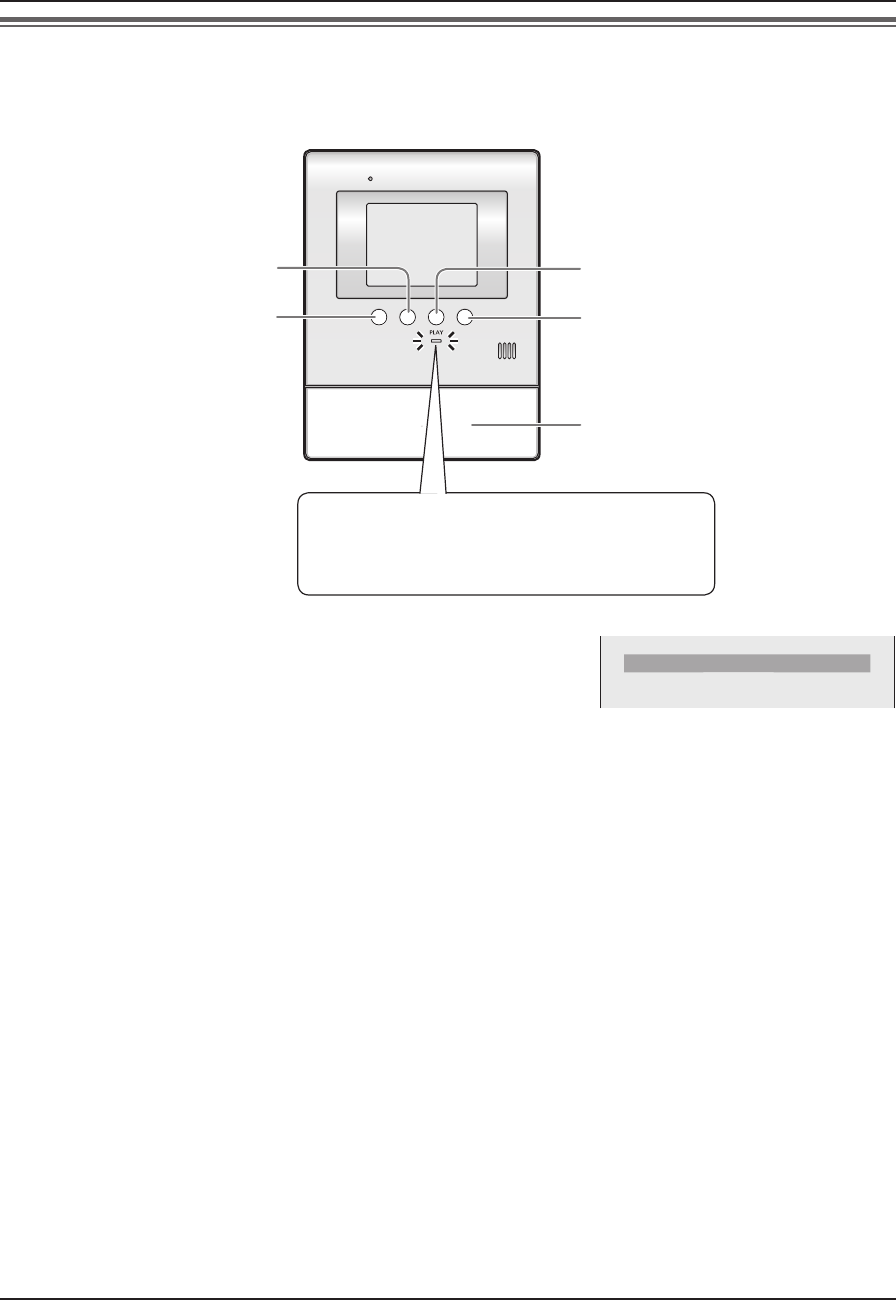
Viewing recorded images
You can view recorded images.
When the PLAY indicator on the main monitor station is fl ashing, there is an image that has not been viewed yet.
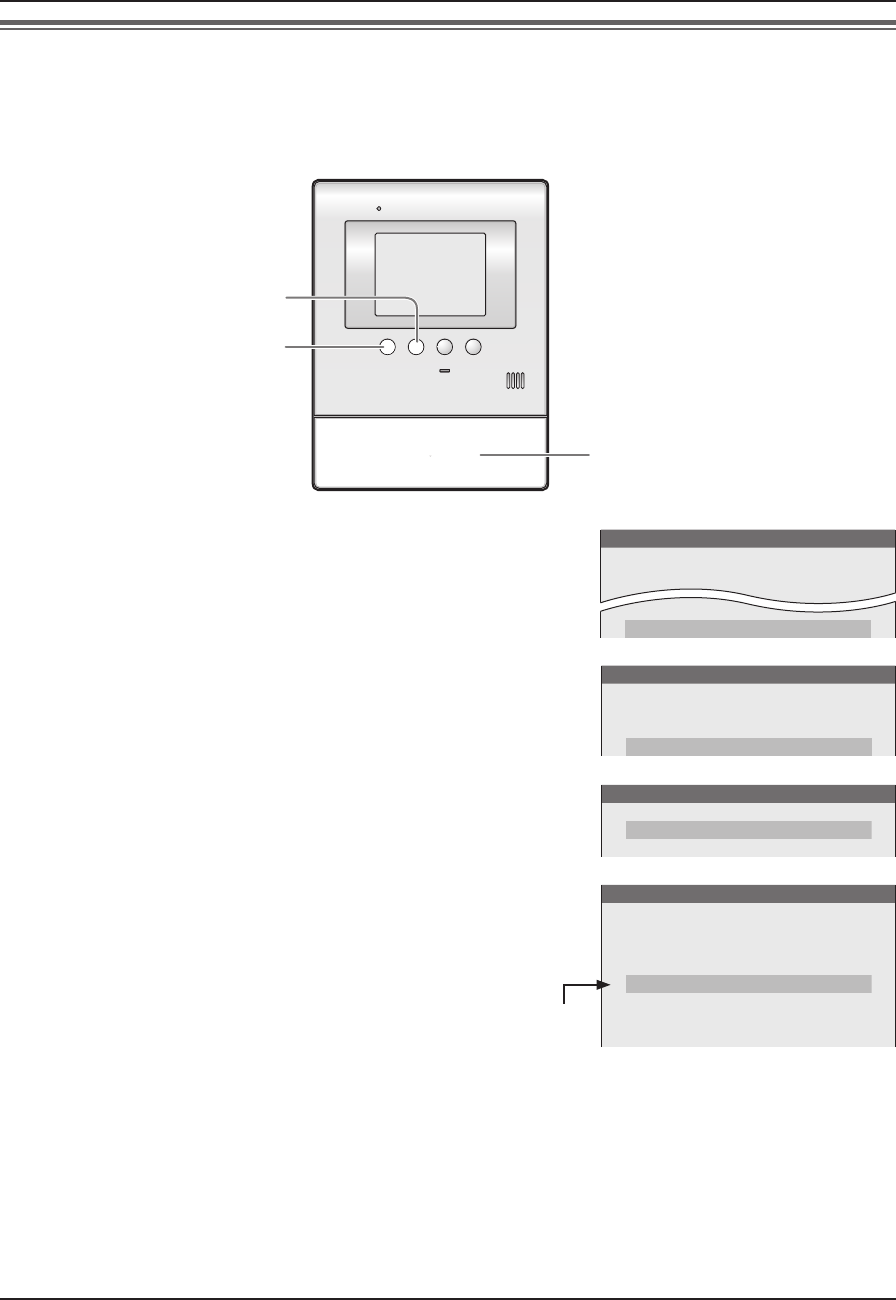
{DOOR KEY}
{MENU}
{TALK/OFF}
{PLAY}
{MONITOR}
The PLAY indicator fl ashes.
Ä The indicator light goes off when the {PLAY}
button is pressed.
1 Press {PLAY}, then select the desired item to view by pressing
{MENU} (
▲
SELECT).
LItems having no recorded images are displayed in a light tone
color and you cannot select them.
UNPLAYED PICTURES
5
PLAYED PICTURES
12
2 Press {MONITOR} (OK) to view the image.
LThe most recently recorded image is displayed.
NTo view the next image
Press {MONITOR} (<).
LEach time you press the button, images from other calls (or monitoring) are displayed in chronological
order starting from the most recently recorded image.
LFor display information when viewing images, see page 17.
3 To stop viewing images, press {TALK/OFF}.
Note:
LOnce the {PLAY} button is pressed while the PLAY indicator is fl ashing, the indicator light goes off even if
there are images that have not been viewed.
SV30BX_OI.indb 16SV30BX_OI.indb 16 2010/10/22 17:21:472010/10/22 17:21:47

Recording
17
N
How to view recorded images/Features while viewing recorded images
BACKSKIPMENU
5 16 JAN 20:00
UNPLAYED
Switches to the next (or previous) image
from a different call (or monitoring).
L If you press and hold {MONITOR} (<)
or {PLAY} (>), you can switch images
quickly, and when you release your
fi nger, the image is displayed.
Sets to adjust the display brightness
or hide the guidance (page 11).
Returns to “PLAY MENU”.
A (See “Note” below.)
Recording date and time
Set the date and time beforehand
(page 9).
Recording number
Indicates that the image is unviewed.
Note:
LYou can hide the guidance (indicated by A above) that overlaps the image to view the whole image.
– For details on temporarily hiding the guidance, see page 11.
– To display the guidance for 3 seconds before it is hidden, set “DISPLAY RECORDING DATE” to “3 SEC”
(page 22).
SV30BX_OI.indb 17SV30BX_OI.indb 17 2010/10/22 17:21:472010/10/22 17:21:47
Programming
18
Adjusting the ringer volume
You can adjust the ringer volume heard when receiving calls from the door station by using the main monitor
station during standby. (3 levels and “OFF” are available.)
{MENU}
{TALK/OFF}
{PLAY}
{MONITOR}
1 Press {MENU}, then select “RING/ANSWERING SETTINGS”
by pressing {MENU} (
▲
SELECT).
FUNCTION SETTINGS
TIME AND DATE SETTINGS
RING/ANSWERING SETTINGS
RECORDING/PLAY SETTINGS
2 Press {MONITOR} (OK), then select “RING VOLUME” by
pressing {MENU} (
▲
SELECT).
RING/ANSWERING SETTINGS
RING VOLUME
RING TONE
3 Press {MONITOR} (OK), then select the desired volume by
pressing {MENU} (
▲
SELECT).
RING VOLUME
●
HIGH
MEDIUM
LOW
OFF
Current
setting
4 Press {MONITOR} (OK).
L“r” moves to the selected item.
5 To end the operation, press {TALK/OFF}.
Note:
LYou can also adjust the ringer volume while receiving a call.
1 Press {MENU}, then select “RING VOLUME” by pressing {MENU} (
▲
SELECT).
RING VOLUME
2 Press {MONITOR} (-) or {PLAY} (+).*1
*1 To turn off the ringer volume for calls from the door station, press and hold {MONITOR} (-) until 2 short
beeps sound.
–
To turn the ringer on, press {PLAY} (+).
SV30BX_OI.indb 18SV30BX_OI.indb 18 2010/10/22 17:21:472010/10/22 17:21:47
Programming
19
Changing the ringer tone
You can change the ringer tone that is heard when receiving calls from the door station by using the main
monitor station.
{MENU}
{TALK/OFF}
{MONITOR}
1 Press {MENU}, then select “RING/ANSWERING SETTINGS”
by pressing {MENU} (
▲
SELECT).
FUNCTION SETTINGS
TIME AND DATE SETTINGS
RING/ANSWERING SETTINGS
RECORDING/PLAY SETTINGS
2 Press {MONITOR} (OK), then select “RING TONE” by
pressing {MENU} (
▲
SELECT).
RING/ANSWERING SETTINGS
RING VOLUME
RING TONE
3 Press {MONITOR} (OK), then select the desired door station
by pressing {MENU} (
▲
SELECT).
DOOR STATION 1
DOOR STATION 2
4 Press {MONITOR} (OK), then select the desired ringer tone
by pressing {MENU} (
▲
SELECT).
RING TONE/DOOR STATION 1
●
SOUND 1
SOUND 1 (REPEAT)
SOUND 2
SOUND 2 (REPEAT)
Current
setting
5 Press {MONITOR} (OK).
L“r” moves to the selected item.
6 To end the operation, press {TALK/OFF}.
N Ringer tone patterns
The default settings are: Door station 1 “SOUND 1”, Door station 2 “SOUND 2”
Ringer tone for calls from the door station
SOUND 1 *1 The selected tone rings about every 5 seconds.
However, the ringer tone heard at the door station
or the ringer tone when receiving another call
does not ring repeatedly.
SOUND 1 (REPEAT)*1
SOUND 2
SOUND 2 (REPEAT)*1
SOUND 3
SOUND 3 (REPEAT)*1
SV30BX_OI.indb 19SV30BX_OI.indb 19 2010/10/22 17:21:472010/10/22 17:21:47
Programming
20
Setting {DOOR KEY} button
When a separate door opener is connected to the main monitor station, you can open the door using the main
monitor station. You can also select how long the door remains open. If you do not use the door opener, select
“NOT CONNECTED”.
LThe default setting is “5 SEC OPEN”.
{MENU}
{TALK/OFF}
{MONITOR}
1 Press {MENU}, then select “CONNECTED DEVICE SETTINGS”
by pressing {MENU} (
▲
SELECT).
FUNCTION SETTINGS
TIME AND DATE SETTINGS
RING/ANSWERING SETTINGS
RECORDING/PLAY SETTINGS
CONNECTED DEVICE SETTINGS
2 Press {MONITOR} (OK), then select “DOOR KEY” by pressing
{MENU} (
▲
SELECT).
CONNECTED DEVICE SETTINGS
DOOR STATION CONNECTION
LOBBY CONNECTION
DOOR KEY
3 Press {MONITOR} (OK), then select the door opener to be set
by pressing {MENU} (
▲
SELECT).
DOOR KEY
DOOR KEY 1
DOOR KEY 2
4 Press {MONITOR} (OK), then select the desired item by
pressing {MENU} (
▲
SELECT).
DOOR KEY 1
2 SEC OPEN
3 SEC OPEN
4 SEC OPEN
●
5 SEC OPEN
6 SEC OPEN
7 SEC OPEN
NOT CONNECTED
Current
setting
5 Press {MONITOR} (OK).
L“r” moves to the selected item.
6 To end the operation, press {TALK/OFF}.
Note:
LAfter setting the {DOOR KEY} button, confi rm that the door can be properly locked/unlocked depending on the
status of the door opener. If needed, change the time how long the door remains open by performing the steps
above again.
SV30BX_OI.indb 20SV30BX_OI.indb 20 2010/10/22 17:21:472010/10/22 17:21:47
Programming
21
Changing the function settings (Function list)
How to change the function settings
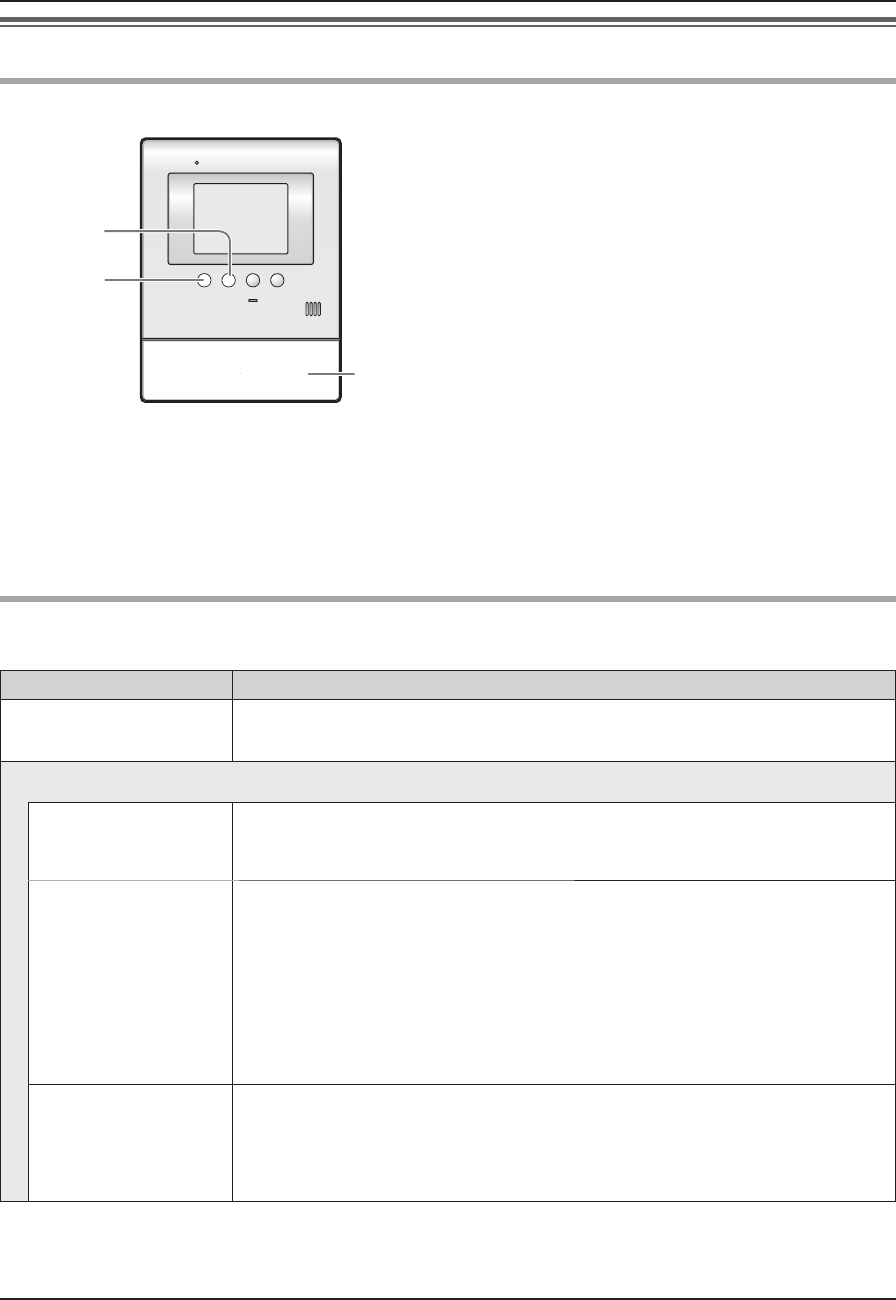
{MENU}
{TALK/OFF}
{MONITOR}
1 Press {MENU}, then select the desired item by
pressing {MENU} (
▲
SELECT).
2 Press {MONITOR} (OK), then select the desired
item by pressing {MENU} (
▲
SELECT).
3 Press {MONITOR} (OK), then select the desired
setting by pressing {MENU} (
▲
SELECT).
LIn some functions, repeat this operation
according to the display instructions.
4 Press {MONITOR} (OK).
5 To end the setting, press {TALK/OFF}.
Note:
LWhen receiving a call while setting or no operation is done for about 90 seconds, the setting function screen
automatically quits.
Function list
The default setting is indicated in bold.
Item (function) Setting
TIME AND DATE
SETTINGS
LYou can set the current date and time (page 9).
RING/ANSWERING SETTINGS
RING VOLUME HIGH, MEDIUM, LOW, OFF
LYou can select the ringer volume of the main monitor station (page 18).
RING TONE DOOR STATION 1: SOUND 1, SOUND 1 (REPEAT),
SOUND 2, SOUND 2 (REPEAT),
SOUND 3, SOUND 3 (REPEAT)
DOOR STATION 2: SOUND 1, SOUND 1 (REPEAT),
SOUND 2, SOUND 2 (REPEAT),
SOUND 3, SOUND 3 (REPEAT)
LYou can select the ringer tone of the main monitor station for calls from the
door station (page 19).
VOICE ANSWER ON, OFF
LYou can answer a call from the door station by answering with a clear voice
such as “Yes?” or “Hello?” unless you press {TALK/OFF} (page 10).
–
Even if “ON” is selected, you can answer a call by pressing {TALK/OFF}.
SV30BX_OI.indb 21SV30BX_OI.indb 21 2010/10/22 17:21:482010/10/22 17:21:48
Programming
22
How to change the function settings
{MENU}
{TALK/OFF}
{MONITOR}
1 Press {MENU}, then select the desired item by
pressing {MENU} (
▲
SELECT).
2 Press {MONITOR} (OK), then select the desired
item by pressing {MENU} (
▲
SELECT).
3 Press {MONITOR} (OK), then select the desired
setting by pressing {MENU} (
▲
SELECT).
LIn some functions, repeat this operation
according to the display instructions.
4 Press {MONITOR} (OK).
LIf “DELETE ALL PICTURES” or “INITIALIZE
SETTINGS” is selected (page 23), the
confi rmation message is displayed. After the
message is displayed, press {MONITOR}
(YES).
5 To end the setting, press {TALK/OFF}.
Note:
LWhen receiving a call while setting or no operation is done for about 90 seconds, the setting function screen
automatically quits.
Function list
The default setting is indicated in bold.
Item (function) Setting
RECORDING/PLAY SETTINGS
PLAY LAMP
FLASHING
YES, NO
LIf you select “YES”, the PLAY indicator fl ashes when unviewed images taken
by the door station remain (page 14).
PICTURE RECORD
TIMING
NORMAL (about 2 seconds), DELAYED (about 3 seconds)
LSelect “DELAYED” at night when the recorded images are diffi cult to see if the
door station auto recording feature is turned on.
(You cannot select the setting for door station 1 or 2 separately.)
DISPLAY
RECORDING DATE
ALWAYS, 3 SEC
LYou can set the recording time and date and the guidance to be displayed
while viewing the recorded image.
LWhen “3 SEC” is selected:
(Directly after being displayed) (About 3 seconds later)
BACKSKIPMENU
5 16 JAN 20:00
UNPLAYED
SV30BX_OI.indb 22SV30BX_OI.indb 22 2010/10/22 17:21:482010/10/22 17:21:48
Programming
23
Item (function) Setting
RECORDING/PLAY SETTINGS
DOOR STATION
AUTO RECORDING
DOOR STATION 1: ON, OFF
DOOR STATION 2: ON, OFF
LWhen receiving calls from the door station, images are automatically recorded.
DELETE ALL
PICTURES
DELETE ALL PICTURES, BACK
LTo erase all recorded images, select “DELETE ALL PICTURES”.
CONNECTED DEVICE SETTINGS
DOOR STATION
CONNECTION
DOOR STATION 1: YES, AUTO, NO
DOOR STATION 2: YES, AUTO, NO
LYou can select the setting of the door station.
LSelect “NO” for the door station that is not in use.
LOBBY
CONNECTION
Generally, it is unnecessary to change this setting. This is for apartment
complexes. Only if an optional lobby station is connected to the main monitor
station (page 3), change the setting to “YES”.
YES, NO
DOOR KEY DOOR KEY 1: 2 SEC OPEN, 3 SEC OPEN, 4 SEC OPEN, 5 SEC OPEN,
6 SEC OPEN, 7 SEC OPEN, NOT CONNECTED
DOOR KEY 2: 2 SEC OPEN, 3 SEC OPEN, 4 SEC OPEN, 5 SEC OPEN,
6 SEC OPEN, 7 SEC OPEN, NOT CONNECTED
LYou can select how long the door remains open when the door opener (sold
separately) is connected to the main monitor station (page 20).
OTHER SETTINGS
OPERATION
GUIDE SETTINGS
ON, OFF
LSelect “OFF” to always hide the operation guidance (page 7) shown on the
bottom of the display.
INITIALIZE
SETTINGS
INIT + DEL ALL PICTURES, ONLY INITIALIZE SETTINGS, BACK
LThis function resets the settings of the main monitor station to the default
settings.
LThe following settings are not affected:
– Lobby connection settings
DEMO MODE Do not use this setting unless the device is being used in a sales display.
ON, OFF
SV30BX_OI.indb 23SV30BX_OI.indb 23 2010/10/22 17:21:482010/10/22 17:21:48
*1 For VL-MV30BX users: The door station is optional (not included).
*2
You can connect up to 2 door openers to the main monitor station. If the main monitor station is connected
to a PBX, one of the 2 door openers can be connected to the PBX and operated from the PBX extensions.
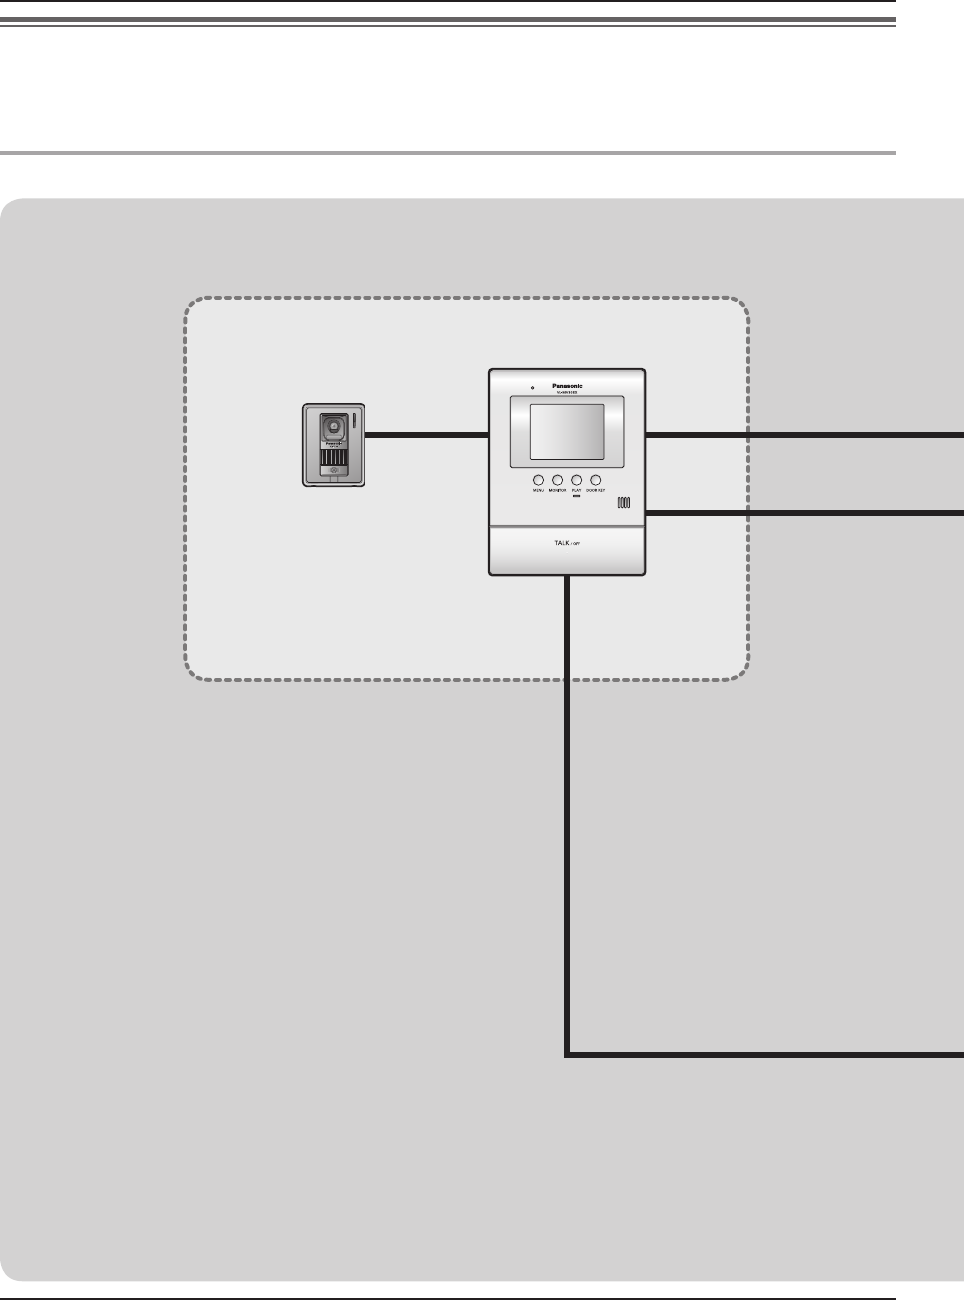
24
Expanding the System
Expanding your system with optional units
You can expand your system with the following optional units (“Accessory items” on page 3).
For installing or using the optional units, refer to their separate Operating Instructions.
For wiring between the optional units and the main monitor station, refer to the Installation Guide included separately.
System components (as of November, 2010)
Video intercom system
Door station*1Main monitor station
SV30BX_OI.indb 24SV30BX_OI.indb 24 2010/10/22 17:21:482010/10/22 17:21:48
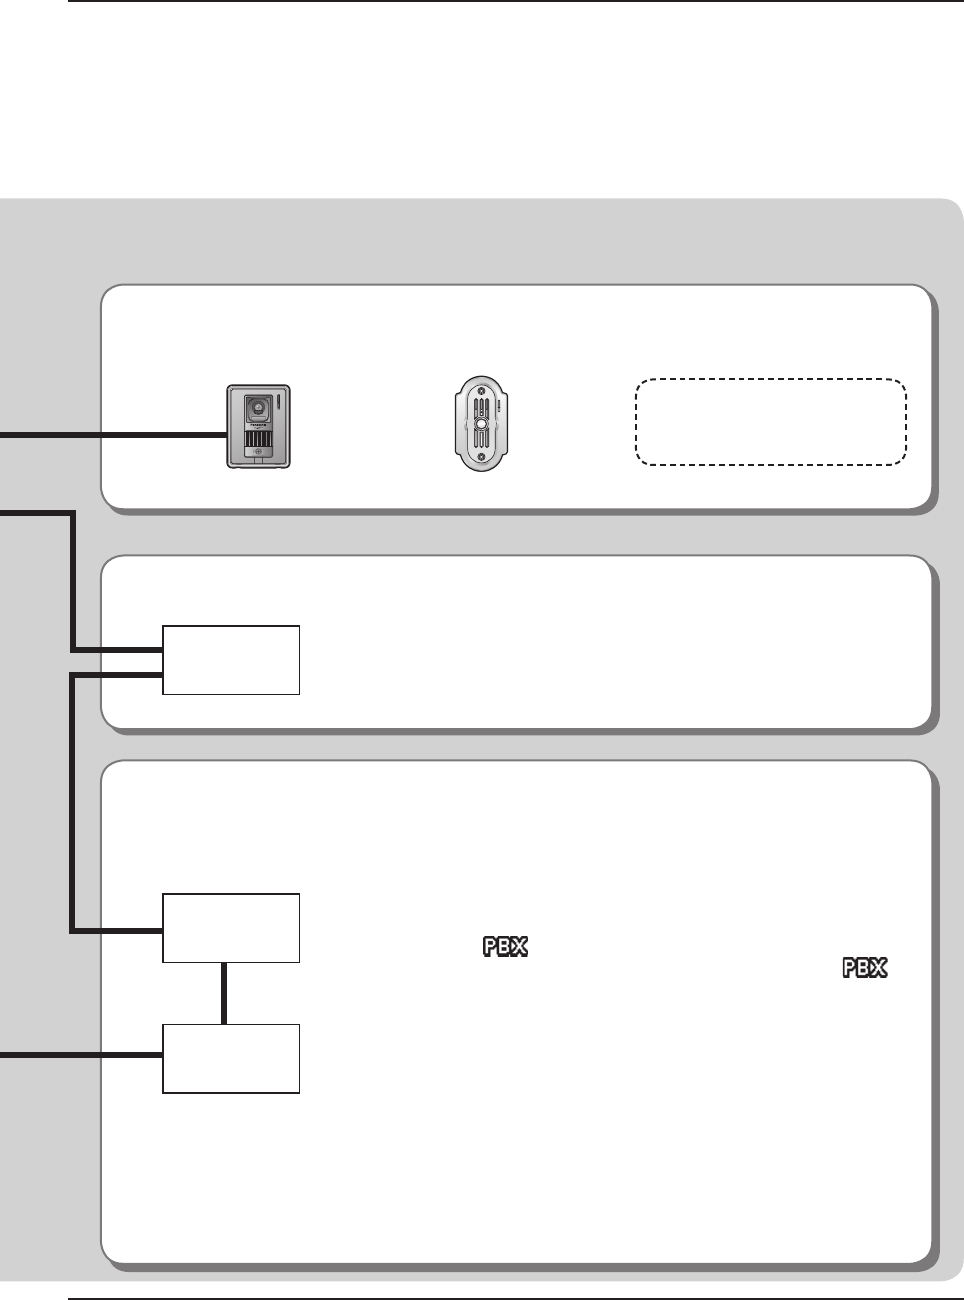
25
Expanding the System
Units required to be installed
Adding a door station:
Door station (up to 2 units including your original unit)
Operating the door opener:
Door opener (up to 2 units)*2
Connecting to a door opener allows you to open the door using the
{DOOR KEY} on the main monitor station (page 11).
Using with Panasonic PBX:
Connecting to a PBX allows you to answer calls from the door station using additional machines
(extensions).
Please use only a Panasonic PBX (page 3).
Note:
● If you answer a call from the door station with a PBX extension, the
camera image taken by the door station will be displayed at the main
monitor station. will appear in the top of the display indicating
that a PBX extension is on the call (see C on page 7). While
is displayed, you cannot answer the call using the main monitor
station. The display will turn off when the conversation between the
door station and the PBX extension ends, or if the call duration time is
longer than 3 minutes.
●
If you answer a call from the door station with the main monitor station,
the call will continue to ring at the extension for about 15 to 30 seconds.
Even if an extension user wants to answer the call while the call is ringing,
the extension user cannot participate in the call.
When using two door stations
(excluding an optional lobby station, page 3):
From the PBX extension, you can call up the only one door station that
has received the last incoming call or has talked with.
VL-V566BX
or
VL-GC005BX
*2
You can also connect an
optional lobby station for
apartment complexes (page 3).
Door opener
PBX
Terminal box
SV30BX_OI.indb 25SV30BX_OI.indb 25 2010/10/22 17:21:482010/10/22 17:21:48

Help
26
Troubleshooting
N Monitor display
Problem Cause & Solution Page
The image of the subject is
displayed in black and white (or
bluish-purple), or the background
image appears greenish.
LAt night or when there is poor lighting in the doorway,
– the display will be shown in black and white (or bluish-
purple).
– If there is a light in the doorway, the image appears greenish.
These are not malfunctions.
―
The image of a person’s face is
dark.
LWhen there is a strong sunlight or a backlight in the place
where the door station is located, the person’s face becomes
dark.
– Locate the door station away from strong sunlight or
backlights.
– Adjust the brightness of the display. (The background image
will be shown in white.)
―
11
The image is not clear or is
blurry.
LThe surface or the lens of the door station is dirty. Clean it with
a soft dry cloth.
LThe surface or the lens of the door station is wet with dew. Wait
for the condensation to evaporate.
28
―
The image is white or black. LThe brightness of the display is not properly adjusted. Adjust
the brightness while receiving a call, during a conversation, or
while monitoring.
11
The image is white, or white
lines or circles are shown on the
display.
LStrong light such as sunlight is shining into the lens of the door
station. Though this may cause the display image to become
diffi cult to see, this is not a malfunction.
– Locate the door station away from direct sunlight.
– The image quality may be better if the angle of the door
station is changed.
―
There is a small black dot in the
background.
LIf the sun can be seen, its center appears as a black dot. This
is not a malfunction.
―
The image is fl ickering. LAC (alternating current) lights such as fl uorescent lights may
cause fl ickering in dark environments. This is not a malfunction.
―
The recording date and time are
not displayed while viewing the
image.
LThe date and time are not set. Set the current date and time
using the main monitor station.
9
The recorded image taken at
night is dark.
LIt takes some time to display the image from the door station
taken at night. Therefore, the auto recording may start before
the image can be displayed. Change the setting of “PICTURE
RECORD TIMING” to “DELAYED”.
22
SV30BX_OI.indb 26SV30BX_OI.indb 26 2010/10/22 17:21:482010/10/22 17:21:48
Help
27
N Conversation
Problem Cause & Solution Page
Sound cuts in/out or fades. LThe surroundings of the main monitor station or the door
station are noisy. Try “Press-to-talk” mode.
11
Your voice cannot be heard by
the outside visitor. (Visitor’s voice
can be heard.)
LWhen is displayed, the “Press-to-talk” mode is activated.
Only while pressing {TALK/OFF}, the outside visitor can hear
your voice.
11
Voice answer mode does not
operate properly.
LYour voice is not loud enough or your initial reply is too long
(must be less than 1 second). Try a different voice volume or
change the length of your answer until the main monitor station
beeps.
10
N Ringer tone
Problem Cause & Solution Page
The ringer tone for the door
station does not sound.
LThe ringer volume is turned off. Turn it on. 18
N Others
Problem Cause & Solution Page
The main monitor station and the
door station do not work during a
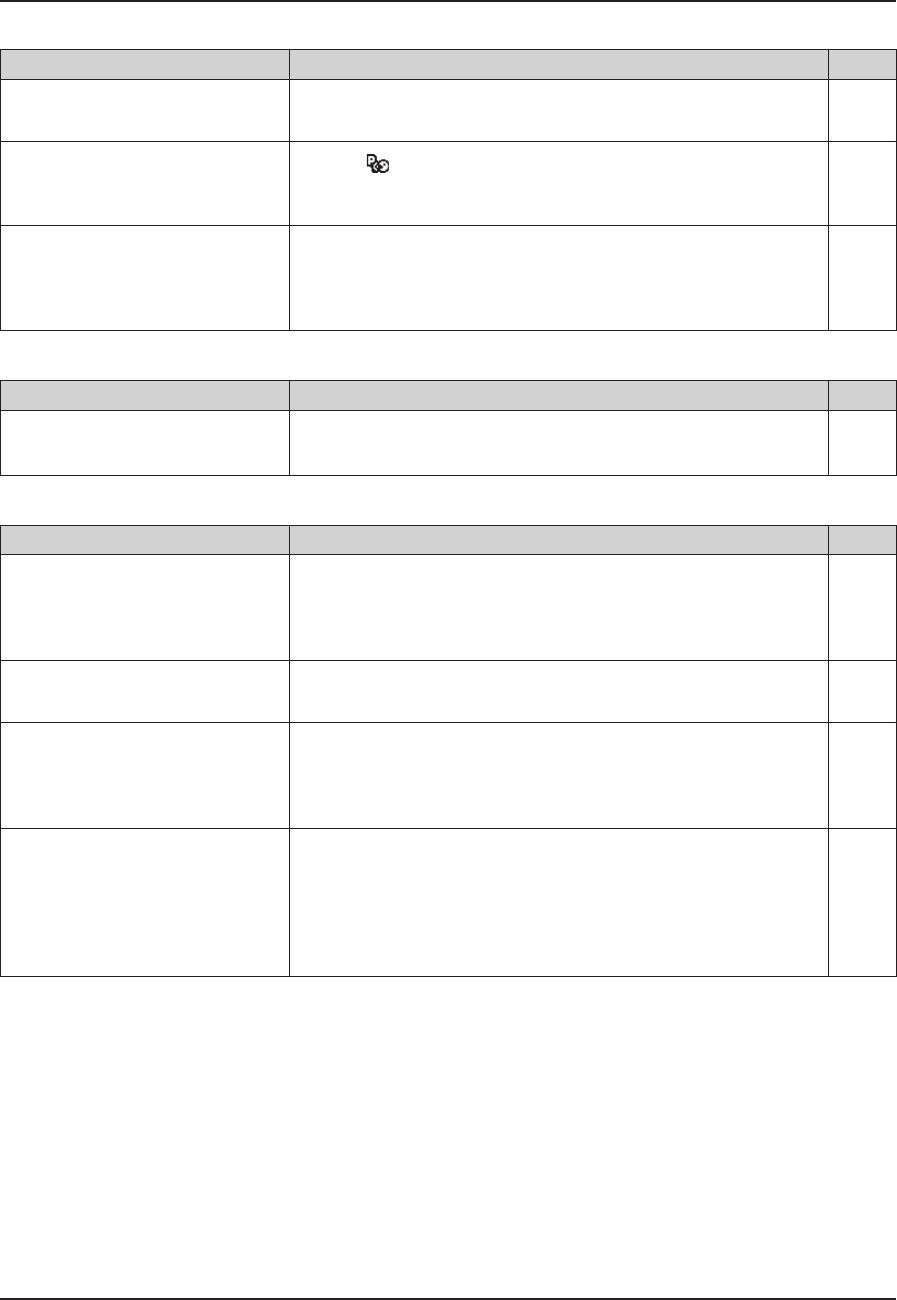
power failure.
L The unit does not work during a power failure. The date and
time may be reset to the default setting after a power failure. In
this case, set the date and time using the main monitor station
again.
9
L “DEMO MODE” is displayed.
L You cannot answer the call.
L Demo mode is activated. Change the setting to “OFF”. 23
L The unit does not work with
correct operations.
L The unit does not work properly.
LPerform the following operation (Reset).
– Press and hold {MENU} and {PLAY} together for about 3
seconds. (Recorded images and the program settings are
not affected.)
―
The main monitor station does
not work.
LThe display monitor does not
display anything.
LThe ringer tone does not sound.
LNo voices can be heard.
LThe plug is disconnected from the power outlet, or it is about to
be disconnected. Disconnect the plug, and connect it securely
again. If this does not solve the problem, contact our service
personnel.
―
SV30BX_OI.indb 27SV30BX_OI.indb 27 2010/10/22 17:21:492010/10/22 17:21:49
Help
28
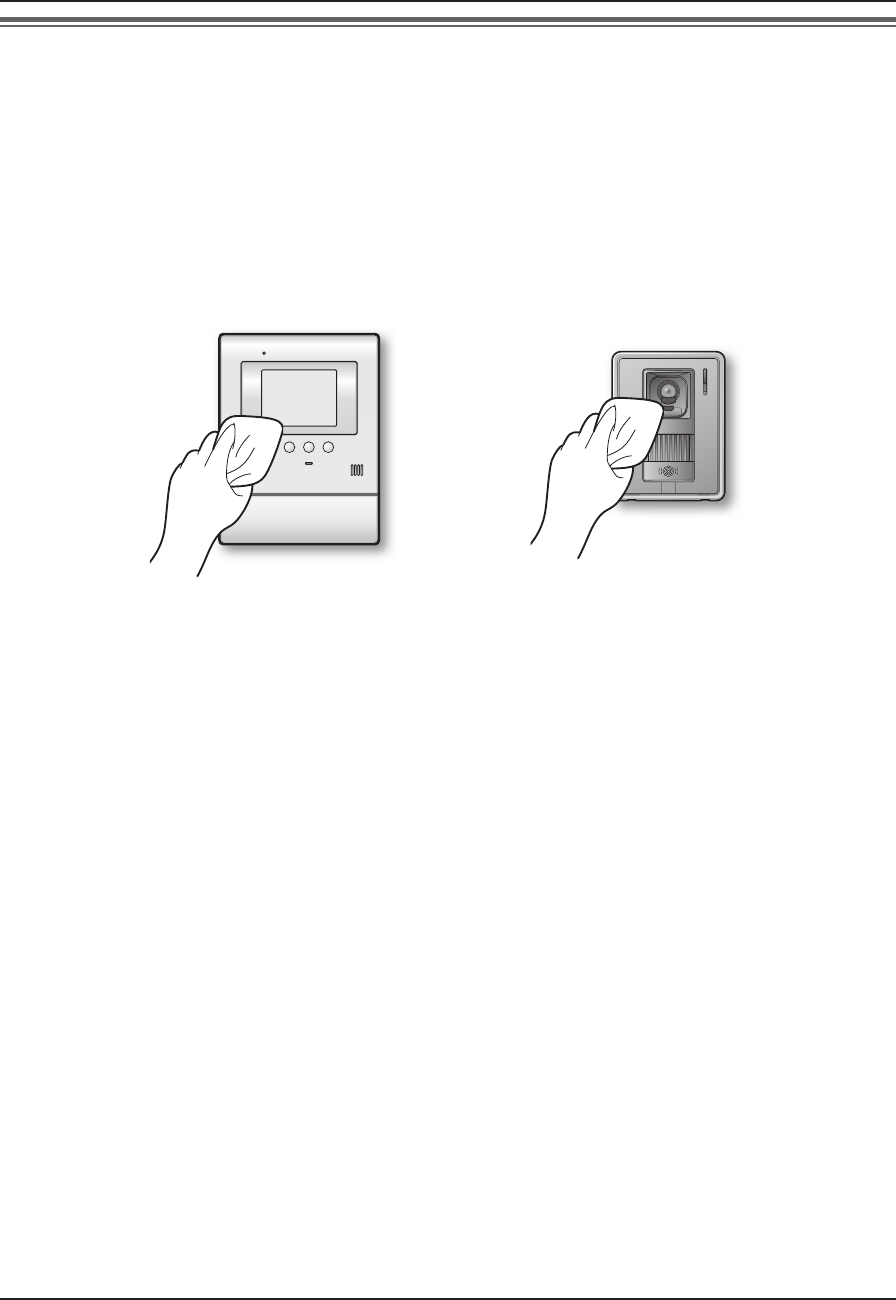
Cleaning
Clean the unit with a soft, dry cloth when cleaning. For excessive dirt, wipe the unit with a slightly damp cloth.
Important:
LWhen cleaning the unit, disconnect the plug from the power outlet.
LDo not use anything containing alcohol, polish powder, powder soap, benzine, thinner, wax, petroleum, or
boiling water. Also do not spray with insecticide, glass cleaner, or hair spray. This could cause a change in
color or quality.
SV30BX_OI.indb 28SV30BX_OI.indb 28 2010/10/22 17:21:492010/10/22 17:21:49
General Information
29
Specifi cations
Main monitor station (VL-MV30BX)
Power supply: 100 – 240 V AC, 50/60 Hz
Current consumption: Standby: Approx. 0.04 A
During operation: Approx. 0.22 A
Dimensions: Approx. height 195 mm x width 148 mm x depth 36 mm
(Excluding protruding sections)
Mass (Weight): Approx. 550 g
Operating environment: 0 °C to 40 °C, Up to 90 % RH (Relative Humidity) non condensing
Display: 3.5˝ color LCD monitor
Talking method: Hands-free
Installation method: Wall mount (Wall mount bracket included)
Door station (VL-V566BX)
Power source: Supplied by the main monitor station
Dimensions: Approx. height 131 mm x width 99 mm x depth 36.5 mm
(Excluding protruding sections)
Mass (Weight): Approx. 200 g
Operating environment: -10 °C to 50 °C, Up to 90 % RH (Relative Humidity) non condensing
Installation method: Wall mount (Wall mount base included)
External material: Flame retardant ABS resin
Note:
LDesign and specifi cations are subject to change without notice.
LThe pictures and illustrations in these instructions may vary slightly from the actual product.
SV30BX_OI.indb 29SV30BX_OI.indb 29 2010/10/22 17:21:502010/10/22 17:21:50

Index
30
Index
To fi nd the corresponding pages for functions displayed in the function list on the main monitor station, see
“FUNCTION SETTINGS” in section “F” below.
AAccessory ...........................................................3
Adjusting the volume .................................. 11, 18
Answering a call ...............................................10
Auto image update ...........................................14
Auto recording ..................................................14
BBrightness......................................................... 11
Button guidance..................................................7
CCamera ............................................................... 8
Cleaning ...........................................................28
DDoor opener.......................................... 11, 20, 25
Door station ................................................2, 3, 8
Door station monitor .........................................13
EExpanding your system with optional units.......24
FFUNCTION SETTINGS
LTIME AND DATE SETTINGS ..............9, 21
LRING VOLUME .................................18, 21
LRING TONE .......................................19, 21
LVOICE ANSWER .....................................21
LPLAY LAMP FLASHING ..........................22
LPICTURE RECORD TIMING ...................22
LDISPLAY RECORDING DATE ................22
LDOOR STATION AUTO RECORDING ....23
LDELETE ALL PICTURES ........................23
LDOOR STATION CONNECTION.............23
LLOBBY CONNECTION ...........................23
LDOOR KEY ........................................20, 23
LOPERATION GUIDE SETTINGS ............23
LINITIALIZE SETTINGS ............................23
LDEMO MODE ..........................................23
GGUIDE OFF ...................................................... 11
IImage
LAuto image update .......................................14
LViewing recorded images .............................16
INCOMING VOL ............................................... 11
Initialization ....................................................... 23
LLobby station ......................................................3
MMain monitor station .......................................2, 6
Manual recording ..............................................15
MMicrophone
LMain monitor station .......................................6
LDoor station ....................................................8
Monitor display ...................................................7
OOperation guidance ............................................7
Optional units....................................................24
OUTGOING VOL .............................................. 11
PPress-to-talk mode ........................................... 11
RRecording an image .........................................14
Recording date and time ..................................17
Recording number ............................................17
Reset ................................................................27
Ringer tone .......................................................19
Ringer volume ..................................................18
SSpeaker
LMain monitor station .......................................6
LDoor station ....................................................8
Speaker volume................................................ 11
Specifi cations ...................................................29
System components .........................................24
TTroubleshooting .......................................... 26, 27
VViewing recorded images .................................16
Voice answer mode ....................................10, 21
Volume
LOUTGOING VOL .........................................11
LSpeaker volume (INCOMING VOL) ............. 11
LRinger volume ..............................................18
WWater drain hole .................................................8
SV30BX_OI.indb 30SV30BX_OI.indb 30 2010/10/22 17:21:502010/10/22 17:21:50

31
Notes
SV30BX_OI.indb 31SV30BX_OI.indb 31 2010/10/22 17:21:502010/10/22 17:21:50

For your future reference
Date of purchase
Serial number (found on the rear of the main monitor station)
Dealer’s name and address
Dealer’s telephone number
Attach your sales receipt here.
SV30BX_OI.indb 32SV30BX_OI.indb 32 2010/10/22 17:21:502010/10/22 17:21:50
