VMware Multi User GPU Setup Guide
User Manual: VMware MultiUser GPU SetupGuide
Open the PDF directly: View PDF ![]() .
.
Page Count: 68

MxGPU Setup Guide
Page 1 of 68
1
MxGPU Setup Guide
with VMware®

MxGPU Setup Guide
Page 2 of 68
2
DISCLAIMER
The information contained herein is for informational purposes only, and is subject to change without
notice. While every precaution has been taken in the preparation of this document, it may contain
technical inaccuracies, omissions and typographical errors, and AMD is under no obligation to update or
otherwise correct this information. Advanced Micro Devices, Inc. makes no representations or
warranties with respect to the accuracy or completeness of the contents of this document, and assumes
no liability of any kind, including the implied warranties of non-infringement, merchantability or fitness
for particular purposes, with respect to the operation or use of AMD hardware, software or other
products described herein. No license, including implied or arising by estoppel, to any intellectual
property rights is granted by this document. Terms and limitations applicable to the purchase or use of
AMD’s products are as set forth in a signed agreement between the parties or in AMD's Standard Terms
and Conditions of Sale.
©2016 Advanced Micro Devices, Inc. All rights reserved. AMD, the AMD arrow, FirePro, and
combinations thereof are trademarks of Advanced Micro Devices, Inc. in the United States and/or other
jurisdictions. OpenCL is a trademark of Apple, Inc. and used by permission of Khronos. PCIe and PCI
Express are registered trademarks of the PCI-SIG Corporation. VMware is a registered trademark of
VMware, Inc. in the United States and/or other jurisdictions. Other names are for informational
purposes only and may be trademarks of their respective owners.

MxGPU Setup Guide
Page 3 of 68
3
Table of Contents
1. Overview .............................................................................................................................................................. 4
2. Hardware and Software Requirements .............................................................................................................. 4
2.1 Hardware Requirements .............................................................................................................................. 4
2.1.1 Host/Server ......................................................................................................................................... 4
2.1.2 Client ................................................................................................................................................... 4
2.2 Software Requirements ............................................................................................................................... 5
3. Test Environment Setup for VMware ESXi ......................................................................................................... 6
3.1 Host Server Setup ......................................................................................................................................... 6
3.1.1 Install ESXi on Host .............................................................................................................................. 6
3.1.2 Configuring the ESX Host ................................................................................................................... 16
3.2 Host Administrator System Setup .............................................................................................................. 19
3.2.1 Install SSH Secure Shell ...................................................................................................................... 19
3.2.2 Install vSphere Client 6.0.0 ................................................................................................................ 19
3.2.3 Create a Guest Virtual Machine ........................................................................................................ 21
3.2.4 Install Guest OS on Guest VM ........................................................................................................... 30
3.2.4.1 Upload file to host ESXi ................................................................................................................. 30
3.2.4.2 Install the OS ................................................................................................................................. 33
3.2.4.3 Install VM Tools ............................................................................................................................. 37
3.2.4.4 Install Horizon View Agent ............................................................................................................ 39
3.2.1 Pass Through Device to Guest VM .................................................................................................... 42
3.2.1.1 Select Device for Pass Through ..................................................................................................... 42
3.2.1.2 Assign Device to Guest VM ........................................................................................................... 44
3.2.2 Guest VM management .................................................................................................................... 48
3.2.2.1 Create and Use Guest VM Snapshot ............................................................................................. 48
3.2.2.2 Create Guest VM Template ........................................................................................................... 50
3.2.2.3 Deploy Guest VM Through Template ............................................................................................ 52
3.3 Client System Setup ................................................................................................................................... 55
3.3.1 Horizon View Client Setup ................................................................................................................. 55
3.3.2 Zero Client Setup ............................................................................................................................... 57
3.4 GFX Driver Installation under Guest VM .................................................................................................... 59
4. Setup MxGPU .................................................................................................................................................... 60
4.1 Programming SR-IOV Parameters for MxGPU ........................................................................................... 60
4.2 VF Pass Through ......................................................................................................................................... 61
5. Appendix ............................................................................................................................................................ 62
5.1 Host Server Configuration .......................................................................................................................... 62
5.2 Manual Installation for GPUV Driver for VMware ESXi .............................................................................. 64
5.2.1 Upload GPUV Driver .......................................................................................................................... 64
5.2.2 Install GPUV Driver ............................................................................................................................ 64
5.2.3 Configure GPUV Driver ...................................................................................................................... 66
5.2.4 Un-Install GPUV Driver ...................................................................................................................... 67
5.2.5 Update GPUV Driver .......................................................................................................................... 68

MxGPU Setup Guide
Page 4 of 68
4
1. Overview
This setup guide details the steps necessary to enable MxGPU on the AMD FirePro™ S7150 and S7150x2
family of products. The guide uses VMware® products as an example setup. These products include
VMware ESXi™ as a hypervisor, the VMware vSphere® client and VMware Horizon® View™.
2. Hardware and Software Requirements
The sections below detail the hardware and software that are required for setting up the VMware
environment.
2.1 Hardware Requirements
2.1.1 Host/Server
Graphics Adapter: AMD FirePro™ S7150, S7150x2 for MxGPU and/or passthrough
***note that the AMD FirePro™ S7000, S9000 and S9050 can be used for passthrough
only
Supported Server Platforms:
Dell PowerEdge R730 Server
HPE ProLiant DL380 Gen9 Server
SuperMicro 1028GQ-TR Server
Additional Hardware Requirements:
CPU: 2x4 and up
System memory: 32GB & up; more guest VMs require more system memory
Hard disk: 500G & up; more guest VMs require more HDD space
Network adapter: 1000M & up
2.1.2 Client
Any of the following client devices can be used to access the virtual machine once these
VMs are started on the host server:
Zero client (up to 4 connectors) with standard mouse/keyboard and monitor
Thin client with standard mouse/keyboard and monitor running Microsoft®
Windows® Embedded OS
Laptop/Desktop with standard mouse/keyboard and monitor running with
Microsoft® Windows® 7 and up

MxGPU Setup Guide
Page 5 of 68
5
2.2 Software Requirements
Product
Type
Install On
Section
Version/Download Location
VMware ESXi™
Hypervisor
Host (Server)
3.1.1
https://my.vmware.com/en/web/vmware/evalcenter?p=free-esxi6
VMware vSphere®
Client for
Host
Host Admin.
System
3.2.2
https://my.vmware.com/en/web/vmware/evalcenter?p=vsphere6
VMware Horizon® View™
Client
Receiver
Client Terminal
3.3.1
http://www.vmware.com/products/horizon-view/horizon6-hol
Horizon® View™ Agent
Connection
Broker
Virtual Machine
3.2.4.4
https://my.vmware.com/web/vmware/info?slug=desktop_end_user_computing/vmware_horizon
_6/6_2
Horizon® View™ Agent
Direct-Connection Plug-in
Plug-in
Virtual Machine
https://my.vmware.com/web/vmware/info?slug=desktop_end_user_computing/vmware_horizon
_6/6_2
AMD FirePro™ VIB Driver
Hypervisor
Driver
Host (Server)
4.1
http://www2.ati.com/drivers/firepro/amdgpuv-1.0.0-1oem.600.0.0.2494585.x86_64.zip
AMD VIB Install Utility
Script
Host (Server)
4.1
http://www2.ati.com/drivers/firepro/MxGPU-Setup-Script.zip
Windows Client OS
Guest OS
Virtual Machine
Windows 7 64 bit, Windows 8.1 64 bit
AMD FirePro™ Driver
Guest OS
Graphics
Driver
Virtual Machine
Error!
eference
source not
found.
http://www2.ati.com/drivers/firepro/15.20.1041.1004-FirePro-Guest-Windowsx64-Retail.exe
PuTTY
SSH client
Host Admin.
System
http://www.putty.org/
SSH Secure Shell
SSH Client
and
Download
Utility
Host Admin.
System
3.2.1
Table 1 : Required Software for Document
(Links to non-AMD software provided as examples)
MxGPU Setup Guide
Page 6 of 68
6
3. Test Environment Setup for VMware ESXi™
3.1 Host Server Setup
If ESXi is already installed on the host (server) then the steps in this section are not required.
3.1.1 Install ESXi on Host
If the VMware ESXi hypervisor is not yet installed on the host (server), then obtain a
purchased copy of the software from the IT organization. Alternatively, trial versions of the
hypervisor are available. The valid period of the trial licenses for ESX is 60 days.
1. Create a DVD ROM of the ESXi ISO after downloading the hypervisor from Table 1.
2. Connect a monitor to the host display, connect at least one of the network connectors
(1000M Ethernet card is preferred) to the LAN, attach a USB DVD ROM to the server (or
use the internal DVD ROM drive), set the DVD to be the first boot device. Next, place the
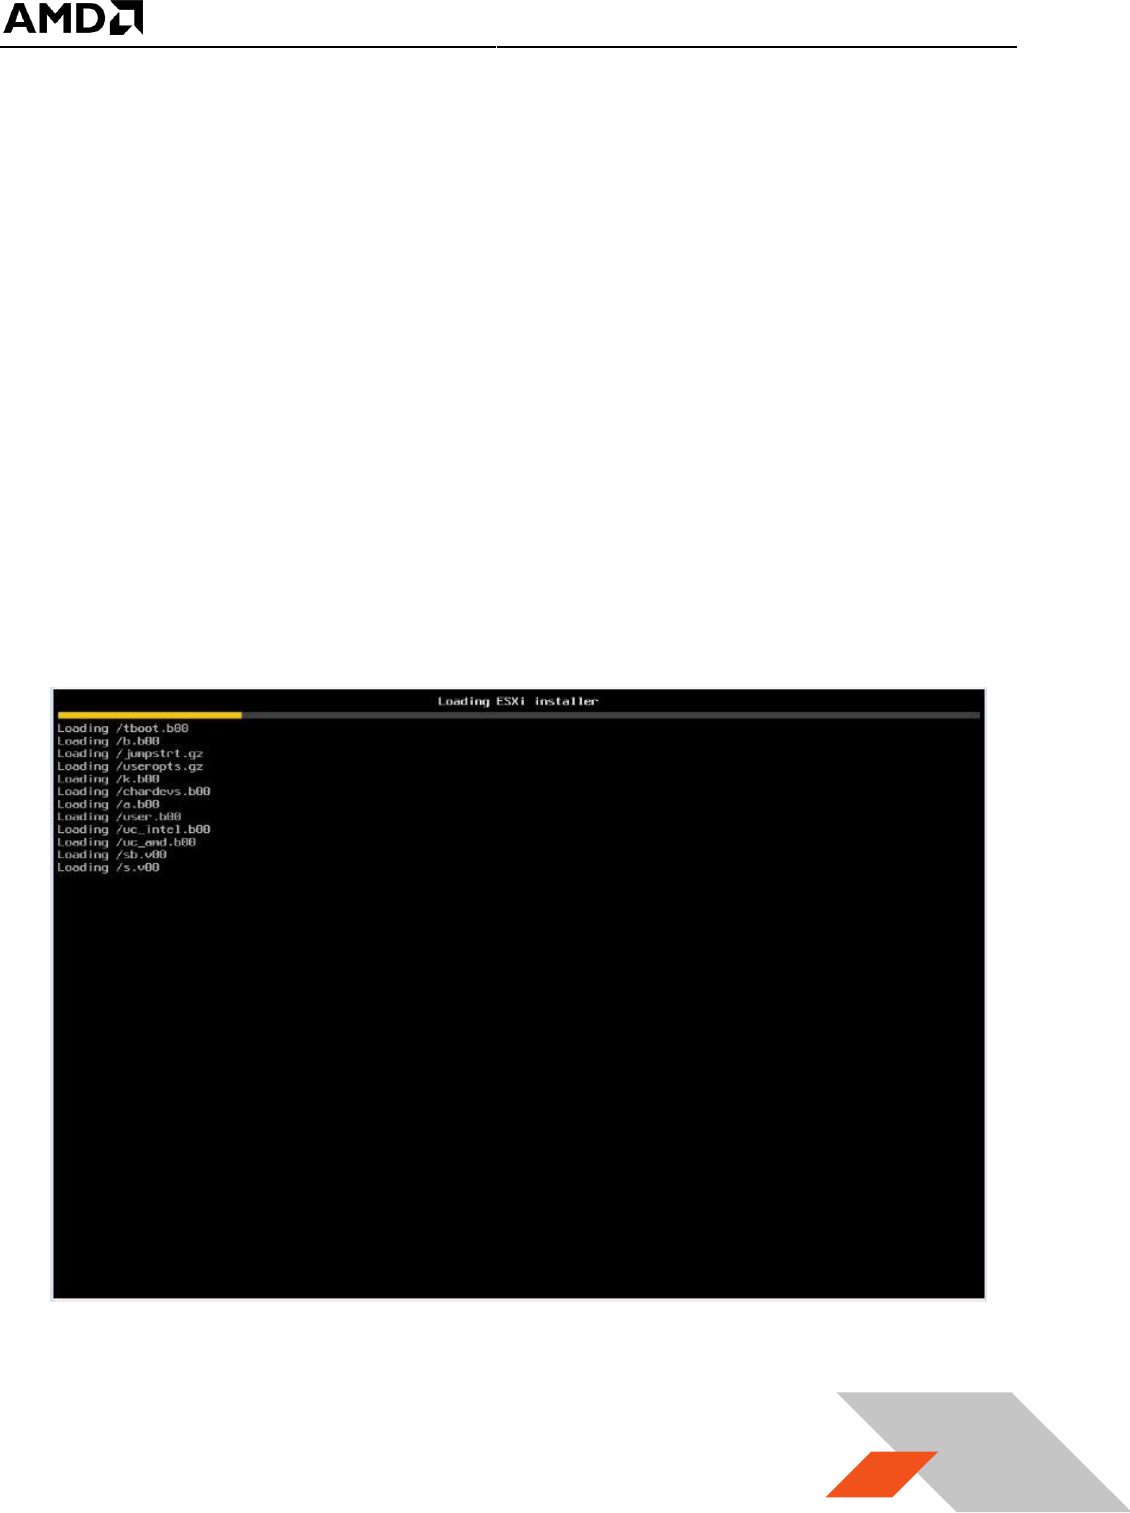
DVD in the DVD ROM drive and reboot the server. After reboot, the installation starts
with a screen similar to the following :

MxGPU Setup Guide
Page 7 of 68
7
3. Before installing the hypervisor, the installation ISO loads drivers for common hardware
devices detected in the host. Installation should proceed unless an unknown device
(without drivers) is detected.
MxGPU Setup Guide
Page 8 of 68
8
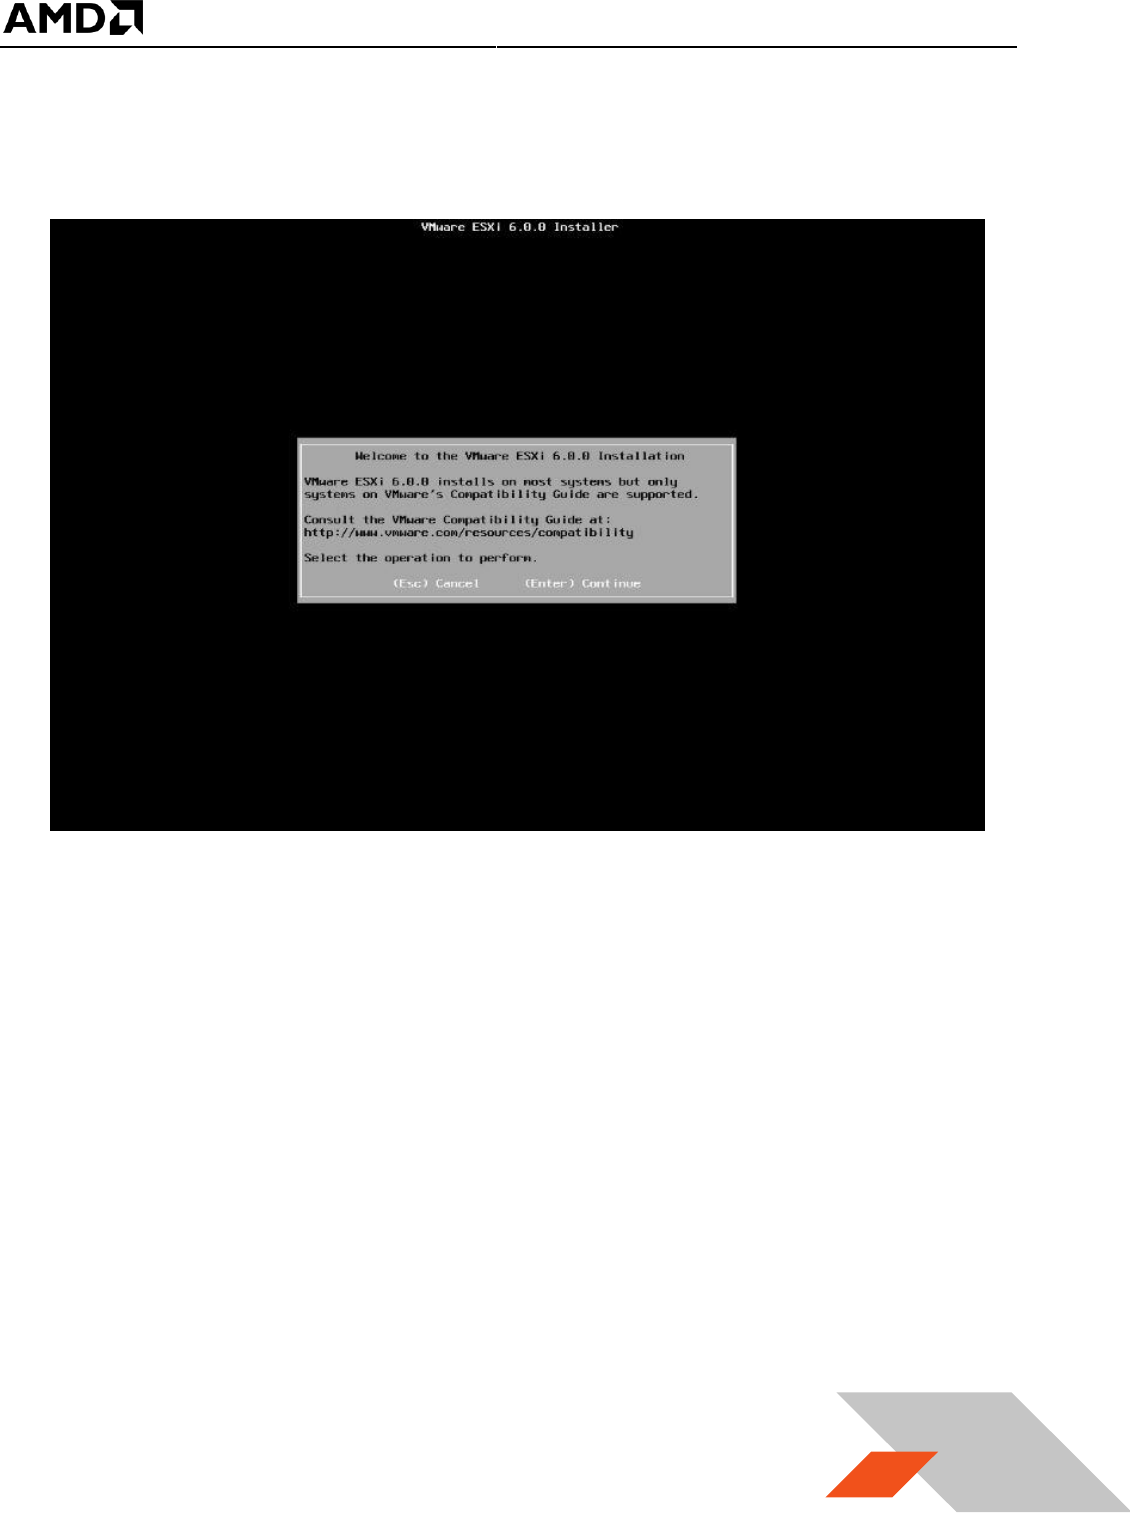
4. Once all required services and drivers are loaded, the welcome screen appears and
prompts for confirmation before installing ESXi.

MxGPU Setup Guide
Page 9 of 68
9
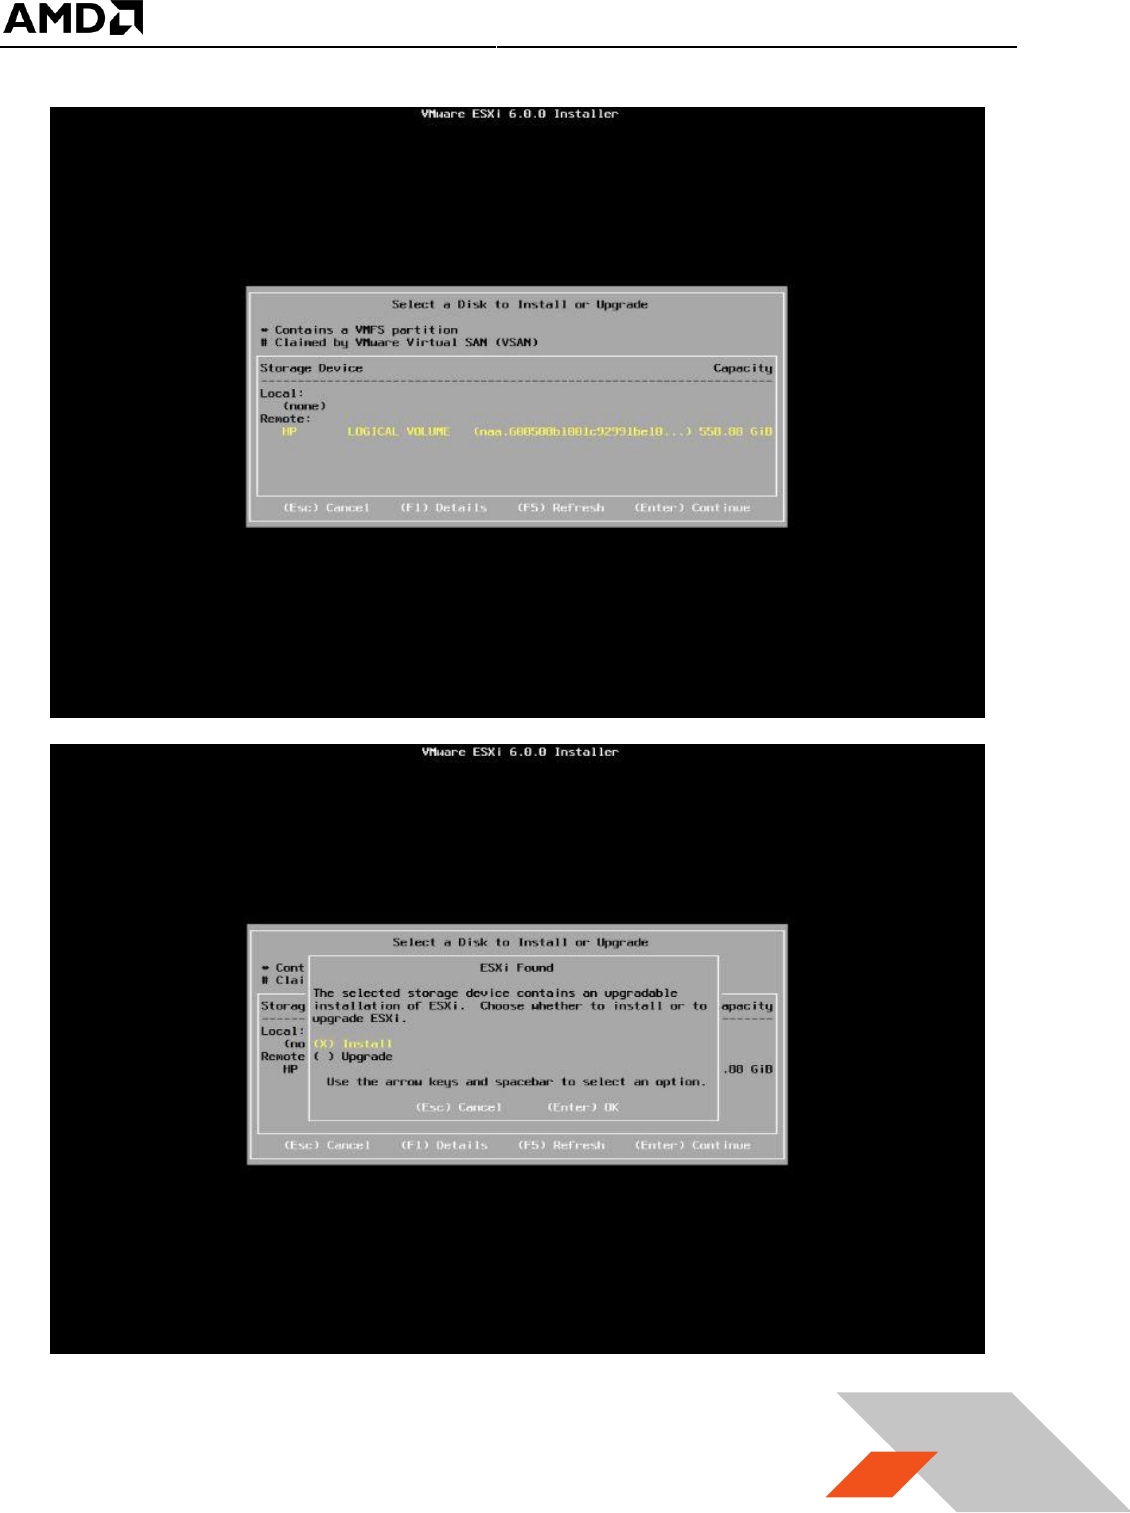
5. Follow the instructions shown on the monitor, and choose the default settings when
prompted.
MxGPU Setup Guide
Page 10 of 68
10
MxGPU Setup Guide
Page 11 of 68
11
MxGPU Setup Guide
Page 12 of 68
12
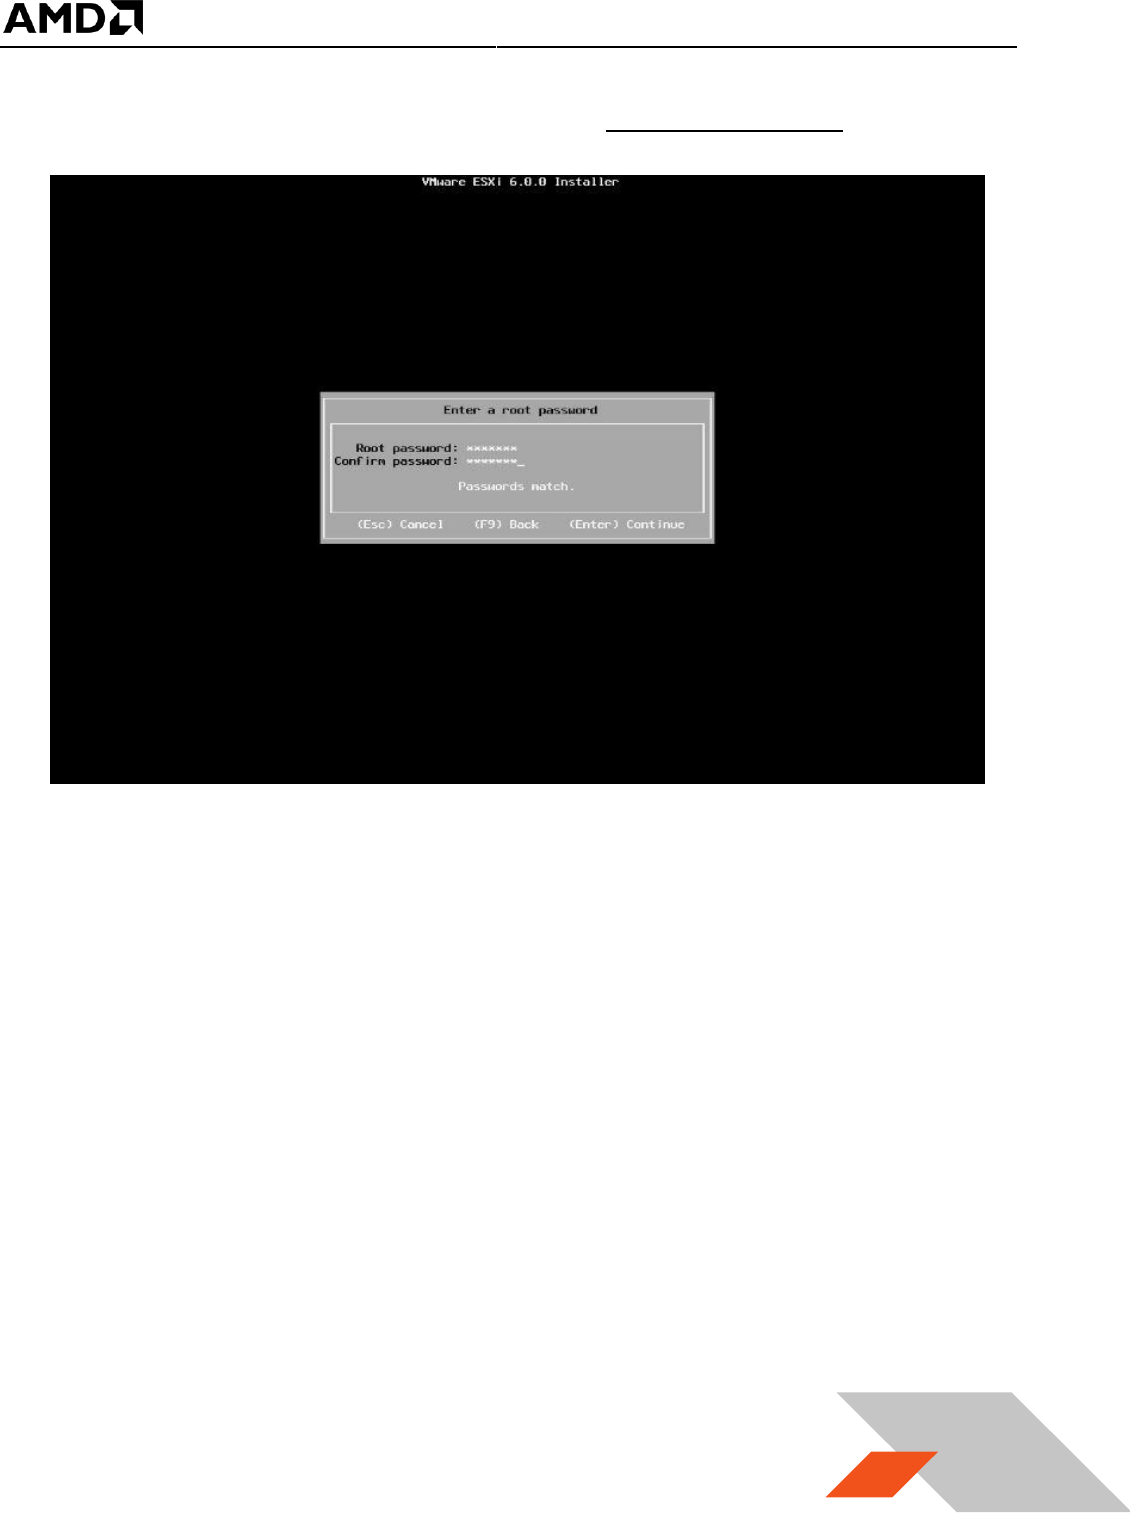
6. When prompted, create a root password and take note of this password.

MxGPU Setup Guide
Page 13 of 68
13
7. Depending on the current state of the host, additional screens may appear.
MxGPU Setup Guide
Page 14 of 68
14
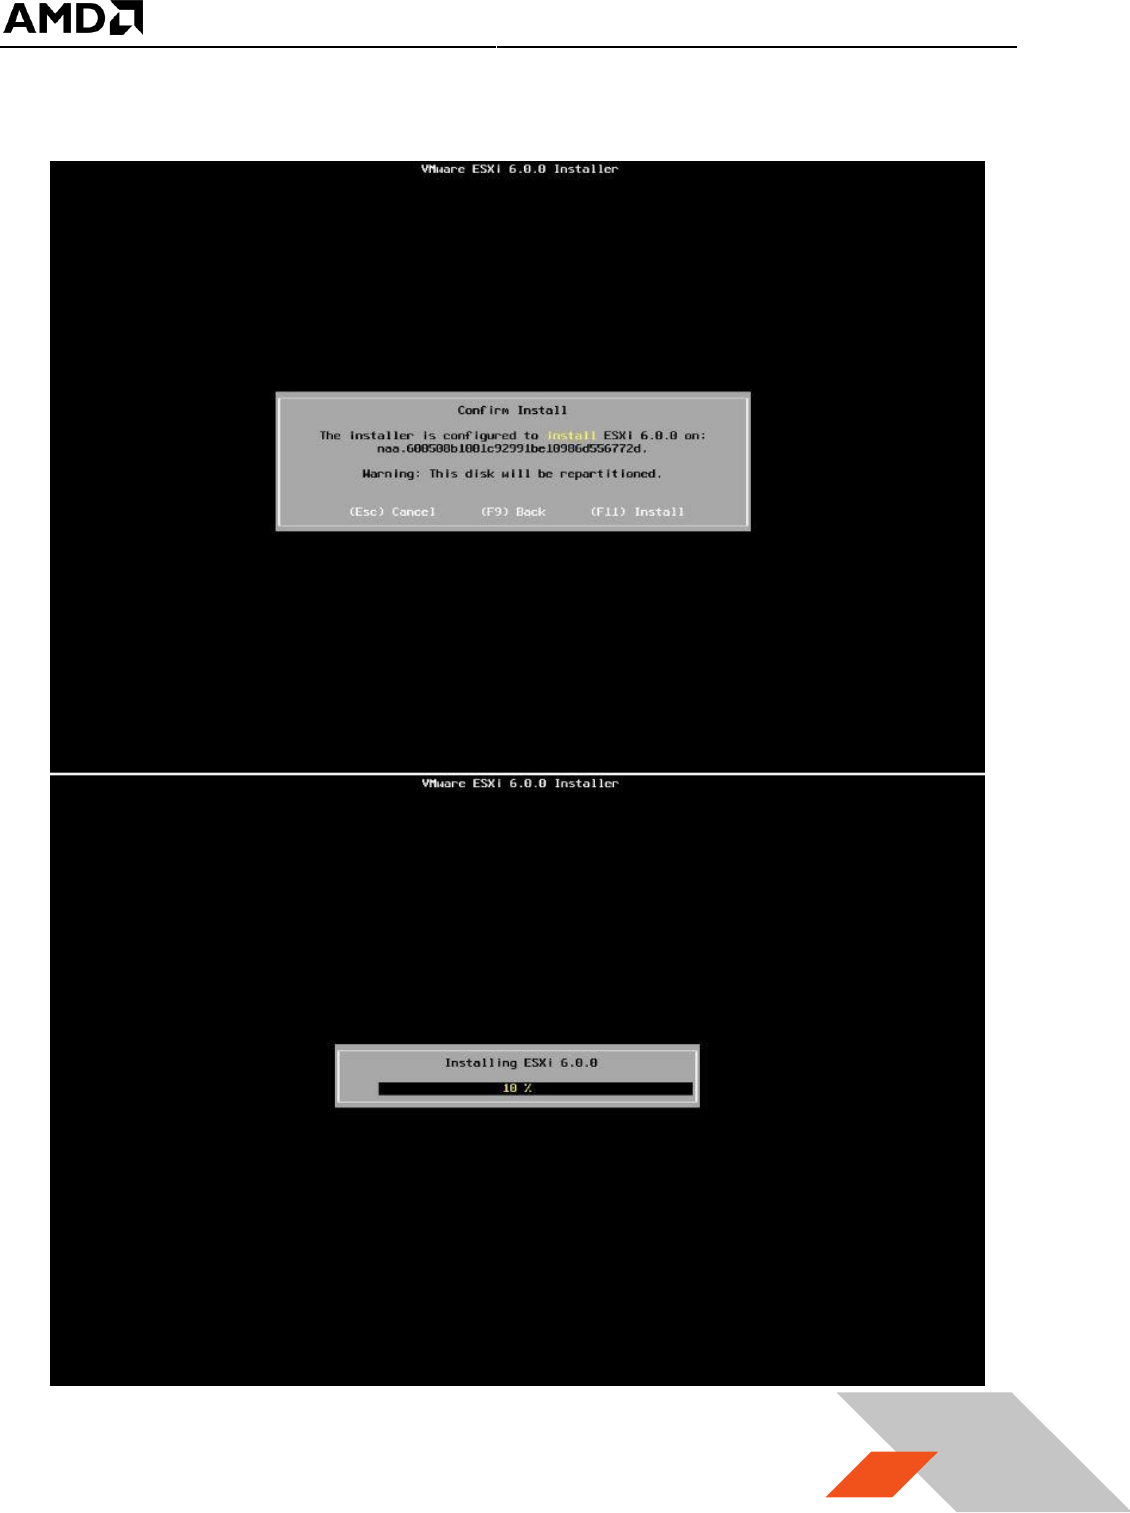
8. A final confirmation prompt appears. Select “F11”.
MxGPU Setup Guide
Page 15 of 68
15
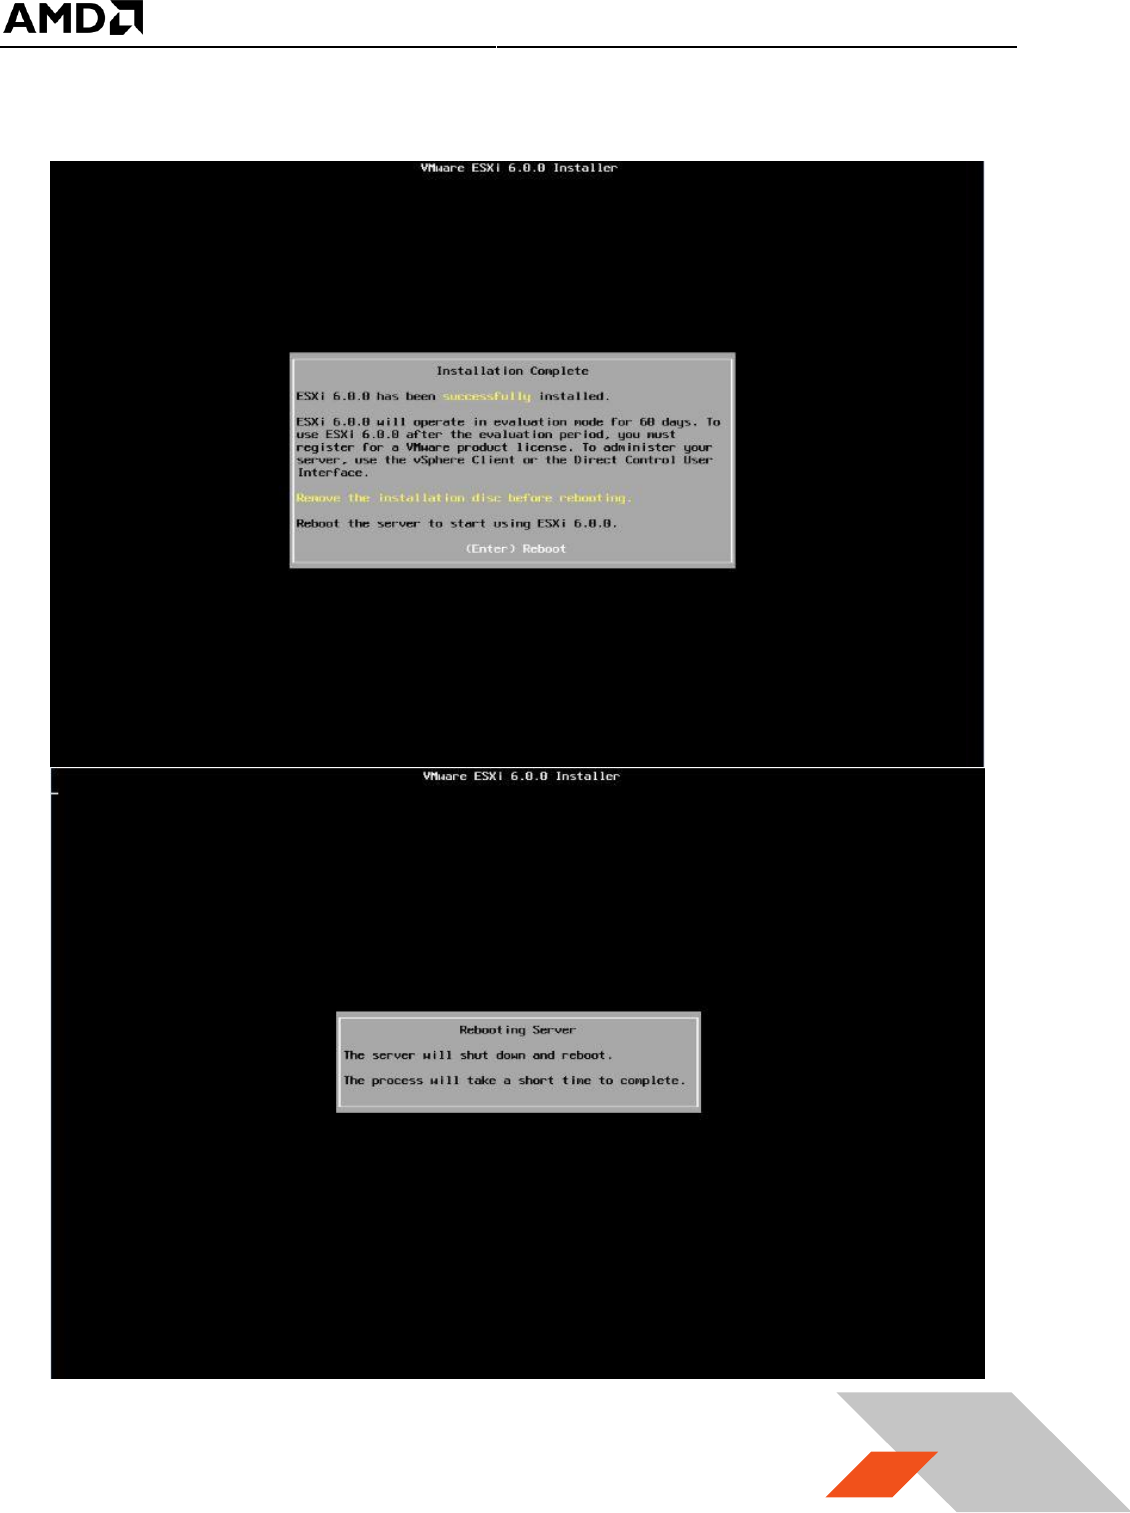
9. Select “Enter” to reboot the host after installation completes.

MxGPU Setup Guide
Page 16 of 68
16
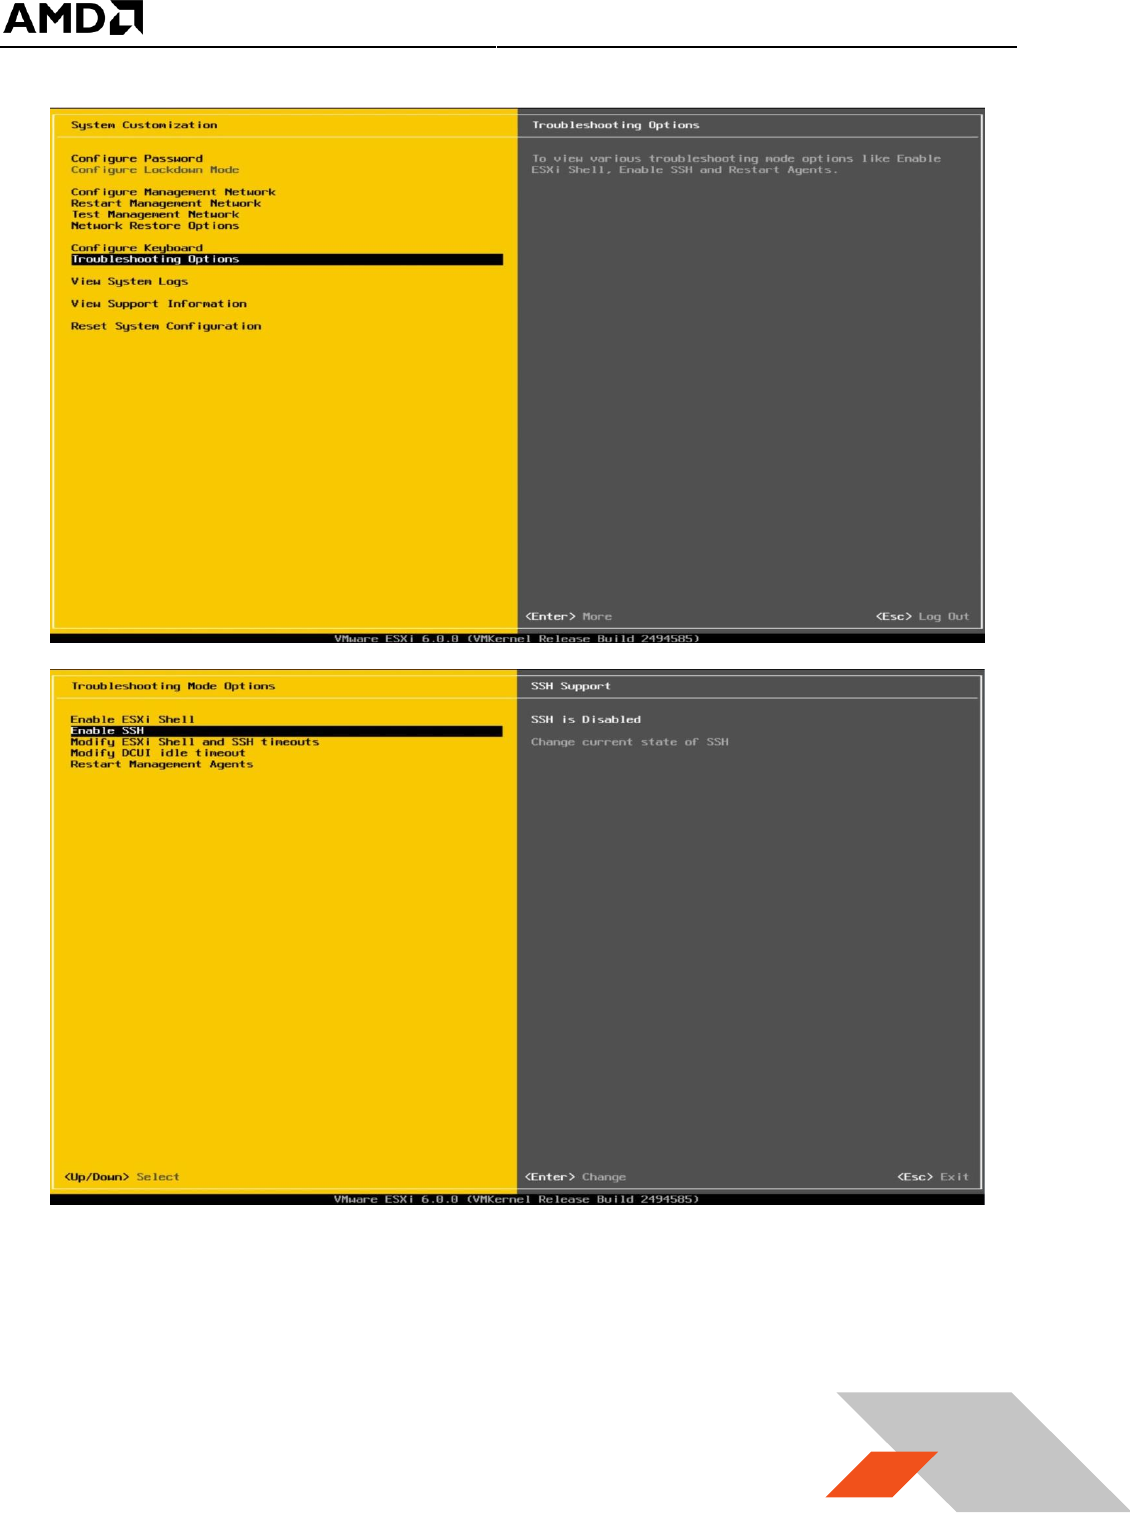
3.1.2 Configuring the ESX® Host
After reboot, the following screen appears:
1. Select the “F2” button (“Customize System/View Logs”)
2. After entering the root password chosen during installation, select “Troubleshooting
Options”, then select “Enable ESXi Shell” and “Enable SSH”
MxGPU Setup Guide
Page 17 of 68
17
MxGPU Setup Guide
Page 18 of 68
18
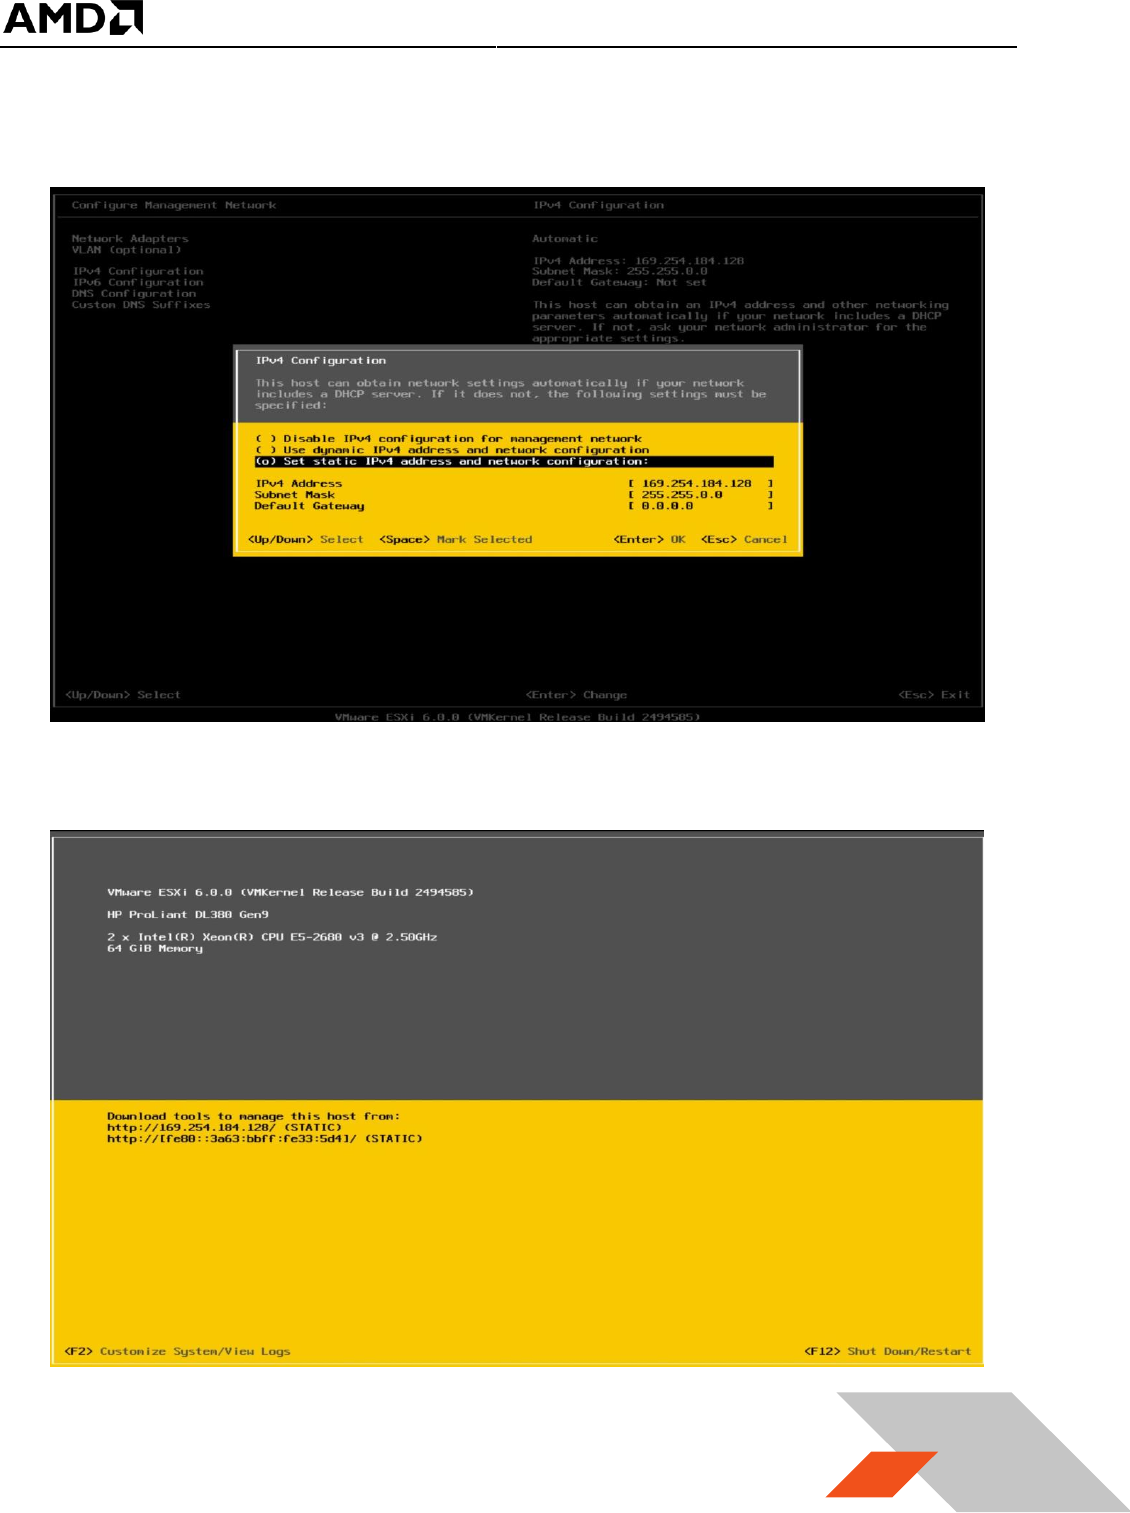
3. Choose “Configure Management Network” and select “IPv4 Configuration”. Use the
“static” address.
4. Save the IP address shown below to access host through either SSH or vSphere client
later.
MxGPU Setup Guide
Page 19 of 68
19
3.2 Host Administrator System Setup
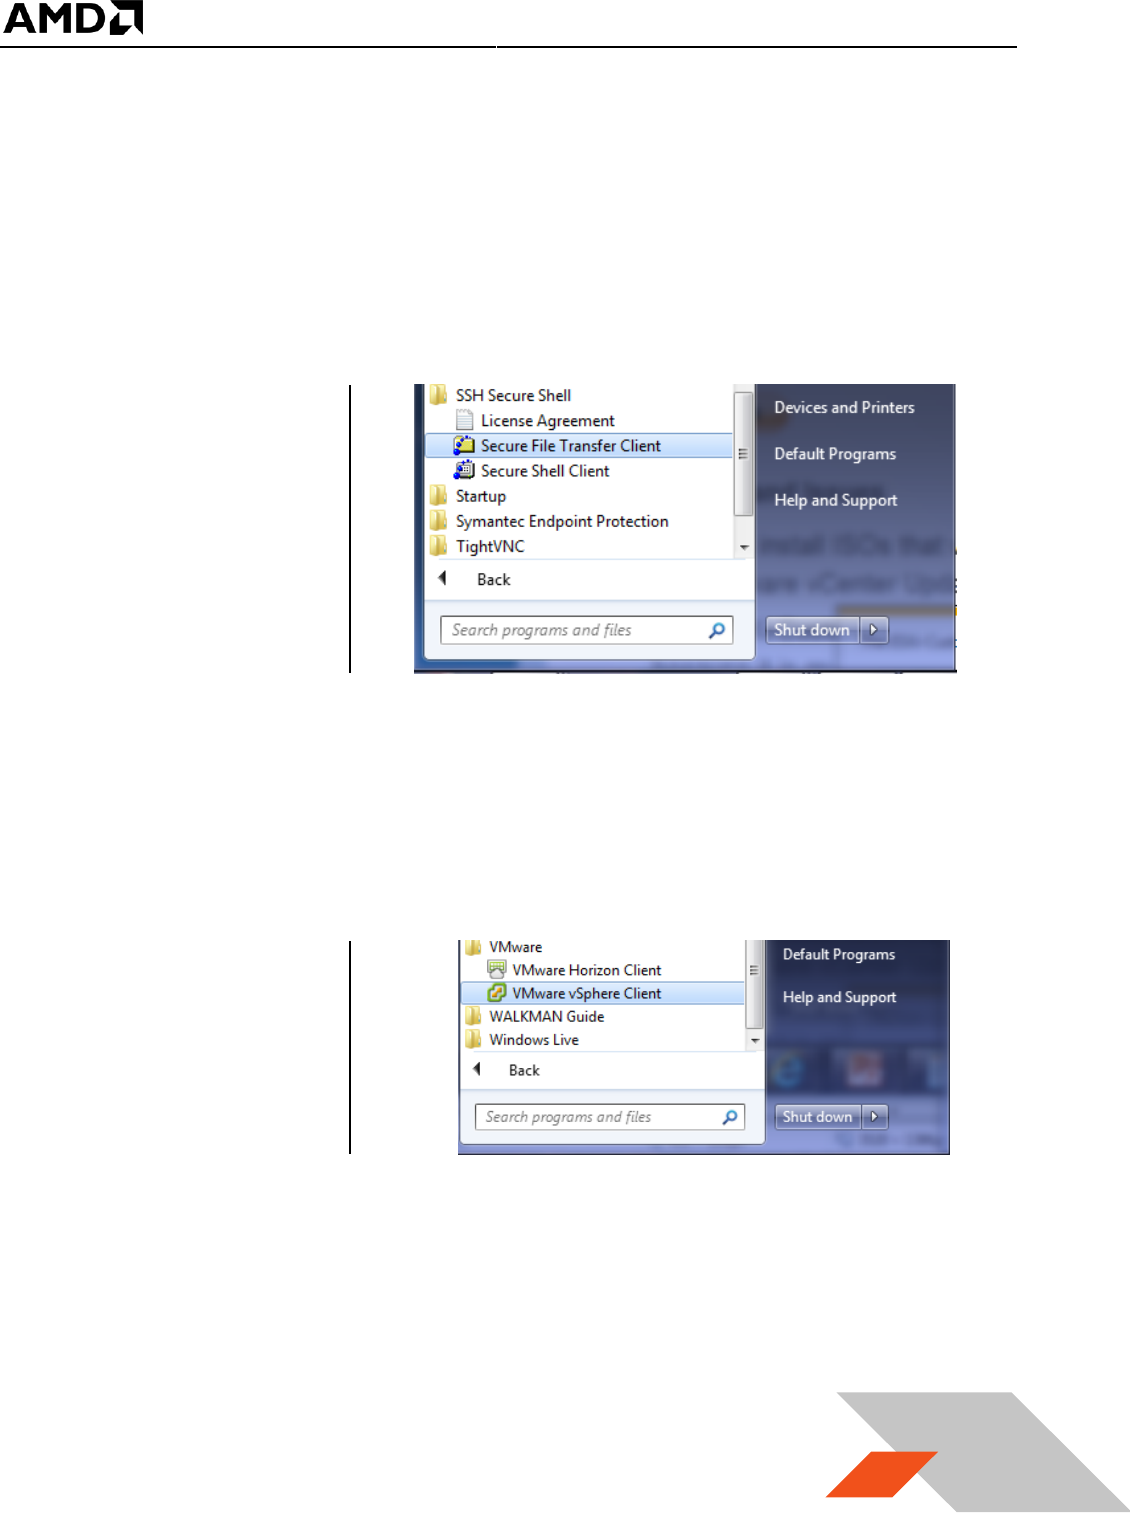
3.2.1 Install SSH Secure Shell
SSH Secure Shell will be needed for future updates and installations. This section assumes that
SSH has already been enabled on the host (see previous section).
1. On the administrator system, download SSH Secure Shell from Table 1.
2. Run this application.
3. After installation,
two utilities will be
installed as Secure
Shell Client & Secure
File Transfer Client as
the following :
3.2.2 Install vSphere Client 6.0.0
1. On the administrator system, download the vSphere client from Table 1.
2. Run this application: VMware-Setup.exe
3. After installation, the
VMware vSphere
client will be
installed as
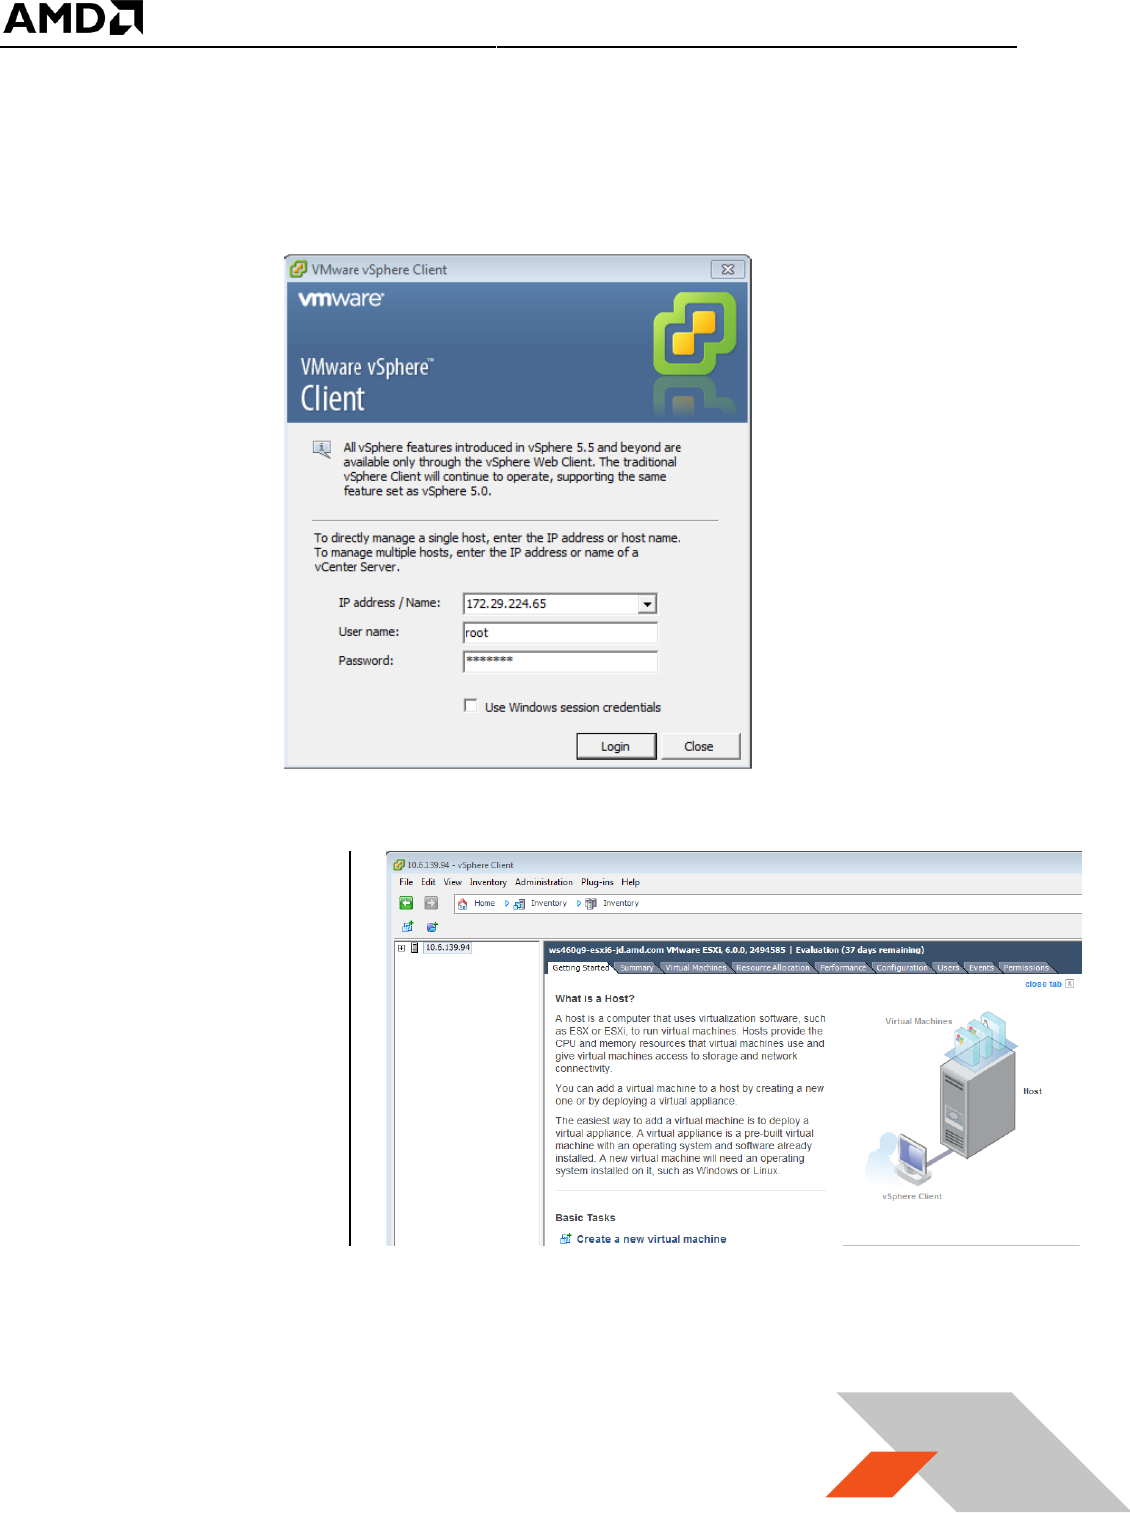
MxGPU Setup Guide
Page 20 of 68
20
4. Start this application. Ensure that the ESXi host server is up and running. Enter the ESXi host IP
address (as noted previously) or computer name in “IP address / Name” entry field. Type “root”
in “User Name” entry field. Enter the password created while setting up ESXi in the host server.
Click Login button to connect to host.
5. Once connected to
the host, the
vSphere client
application displays a
similar window to
this :
Note: A server name is shown rather than the host IP address
MxGPU Setup Guide
Page 21 of 68
21
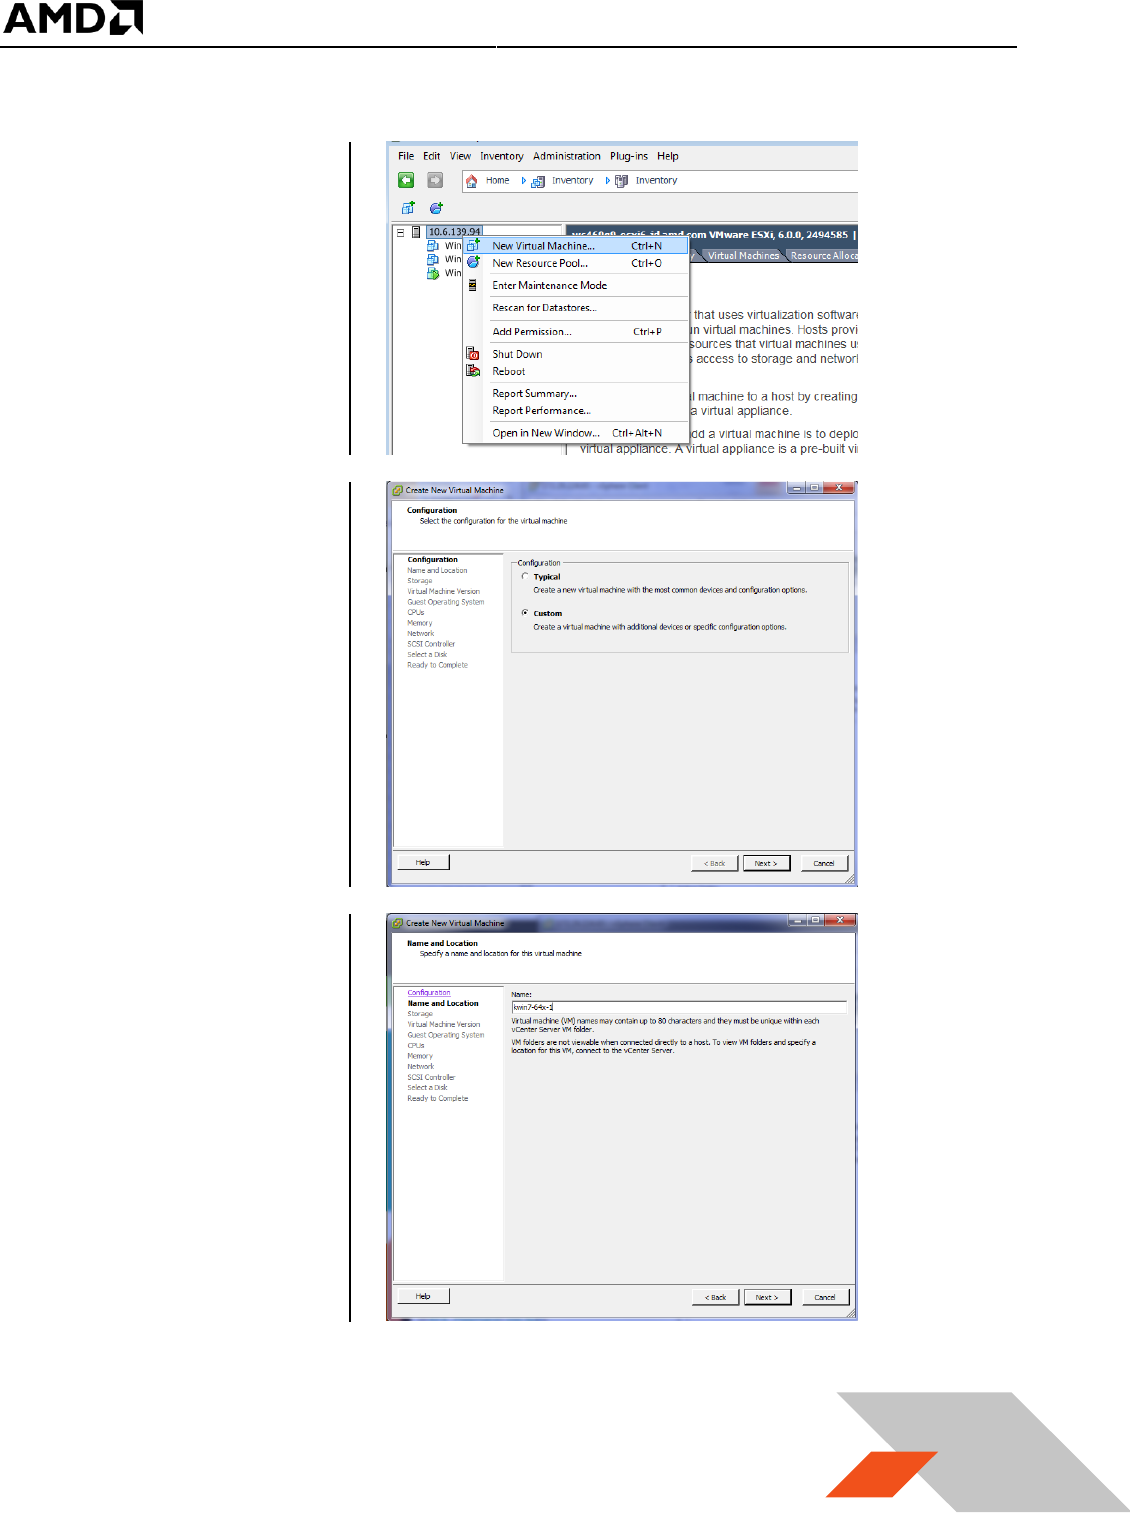
3.2.3 Create a Guest Virtual Machine
1. On vSphere client
window, right click
on the host name (in
this example, the IP
address). Select
“New Virtual
Machine”.
2. In the next window,
select Custom and
click on Next
3. Click on Next and
enter a name for the
virtual machine, e.g.
kv6-win7-64x-1

MxGPU Setup Guide
Page 22 of 68
22
4. Click on Next and
select the storage
destination for the
virtual machine. If
there is only one
hard disk on the
server then, by
default, it will be
named, datastore1.
If there are multiple
hard disks on the
server, there will be
multiple destinations
named,
datastore<#>. Select
the disk desired for the location of the virtual machine.
5. Click on Next and
select “ESXi 6.0 and
later”. With this
option, the virtual
machine will be set
to VM version 11.
MxGPU Setup Guide
Page 23 of 68
23
6. Click on Next and
select the guest OS
version which will be
installed on this
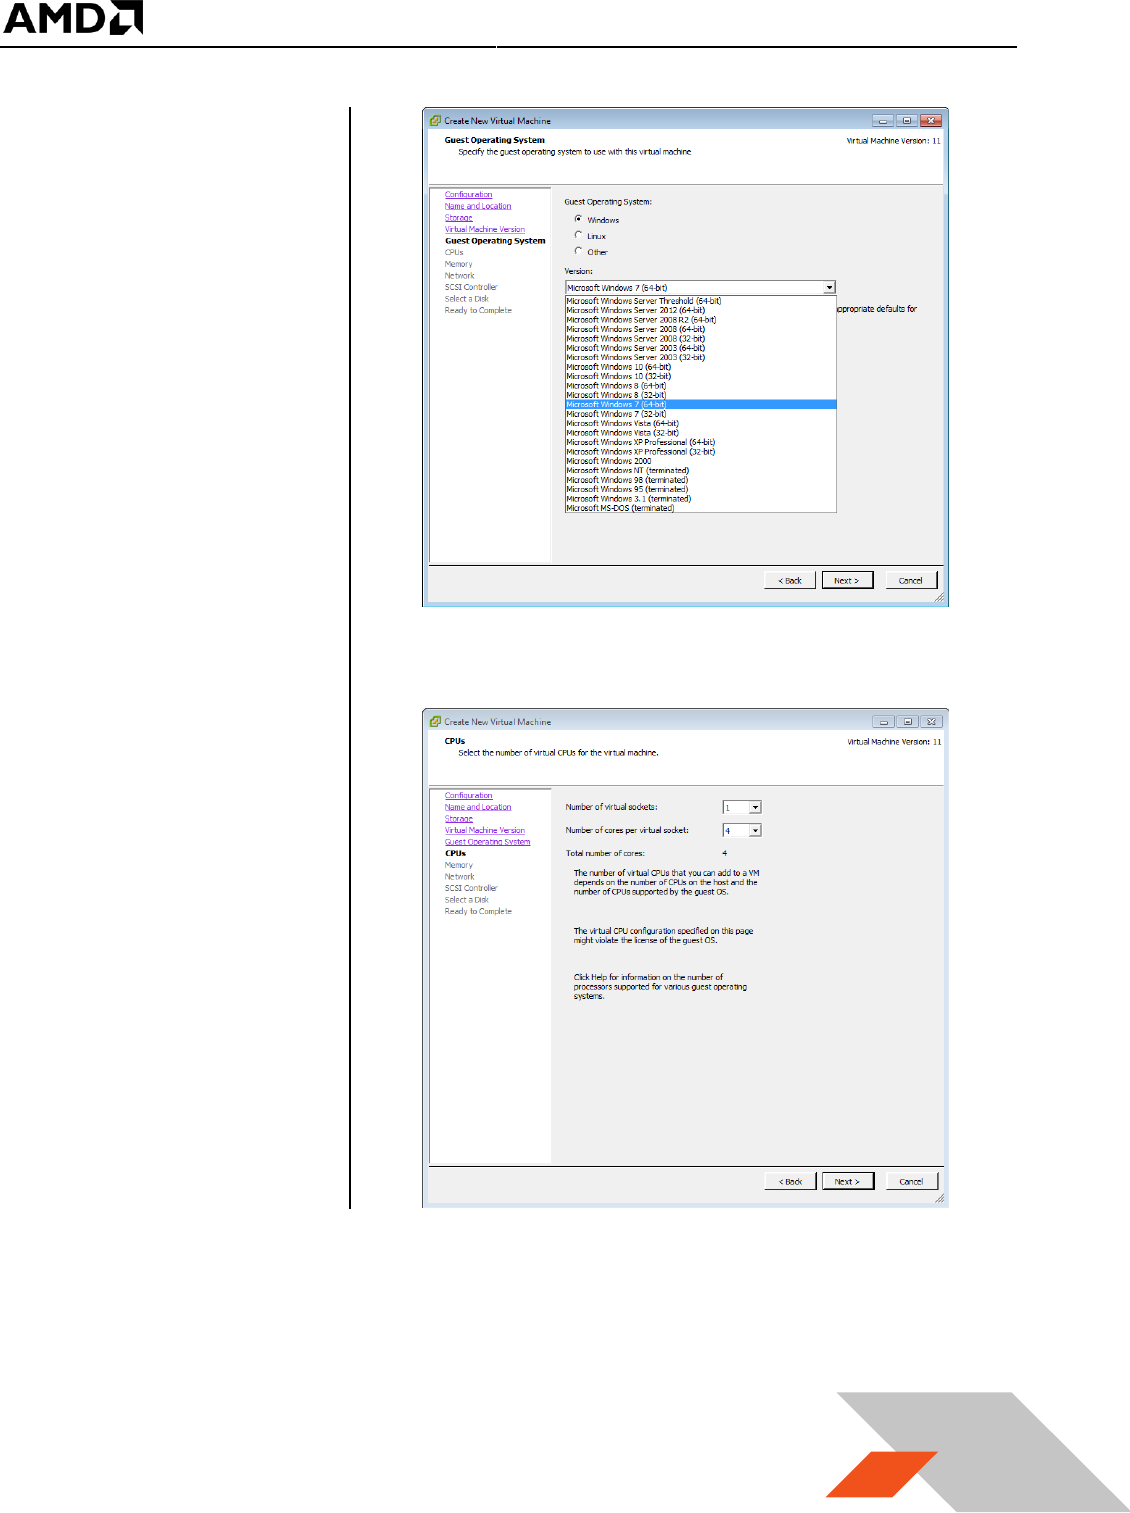
virtual machine. In
this example,
Microsoft Windows 7
(64-bit) is selected.
7. Click on Next and
enter the number of
virtual CPU cores,
system memory size,
and hard disk size for
this virtual machine;
leave all the other
options at default.
MxGPU Setup Guide
Page 24 of 68
24
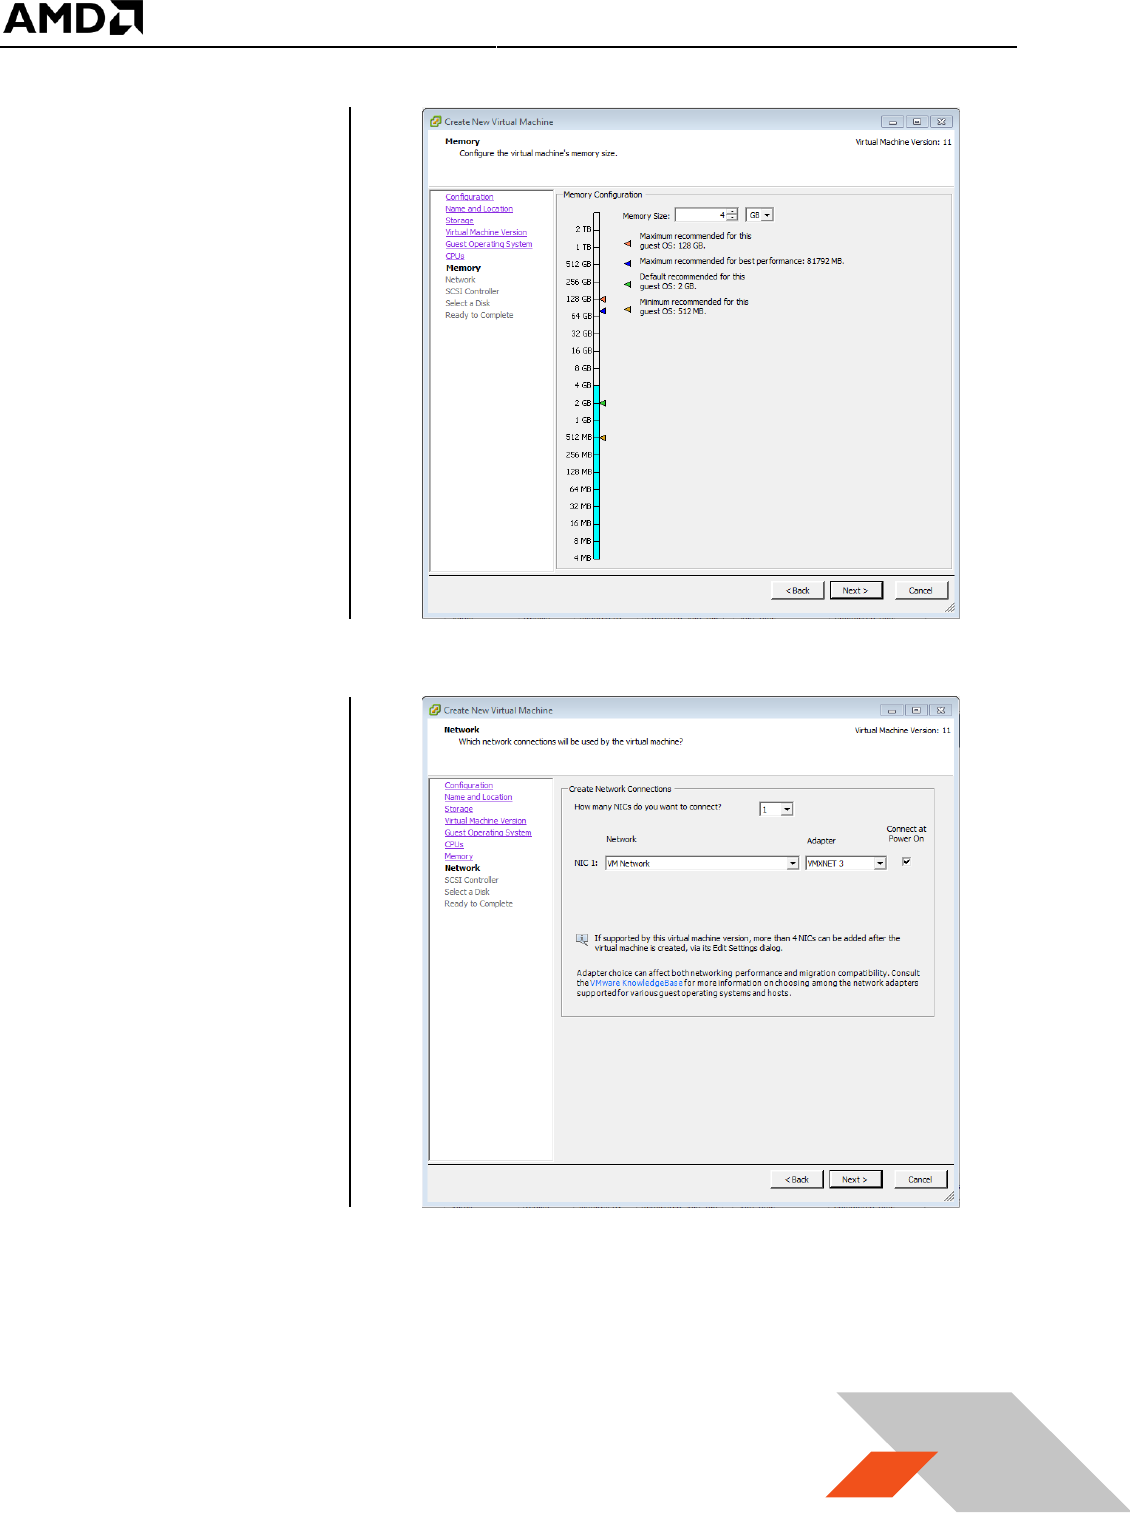
8. Click on Next and
select the system
memory size for this
virtual machine.
9. Click on Next and
select the network
connection for this
virtual machine.
Choose “VMXNET 3”.
MxGPU Setup Guide
Page 25 of 68
25
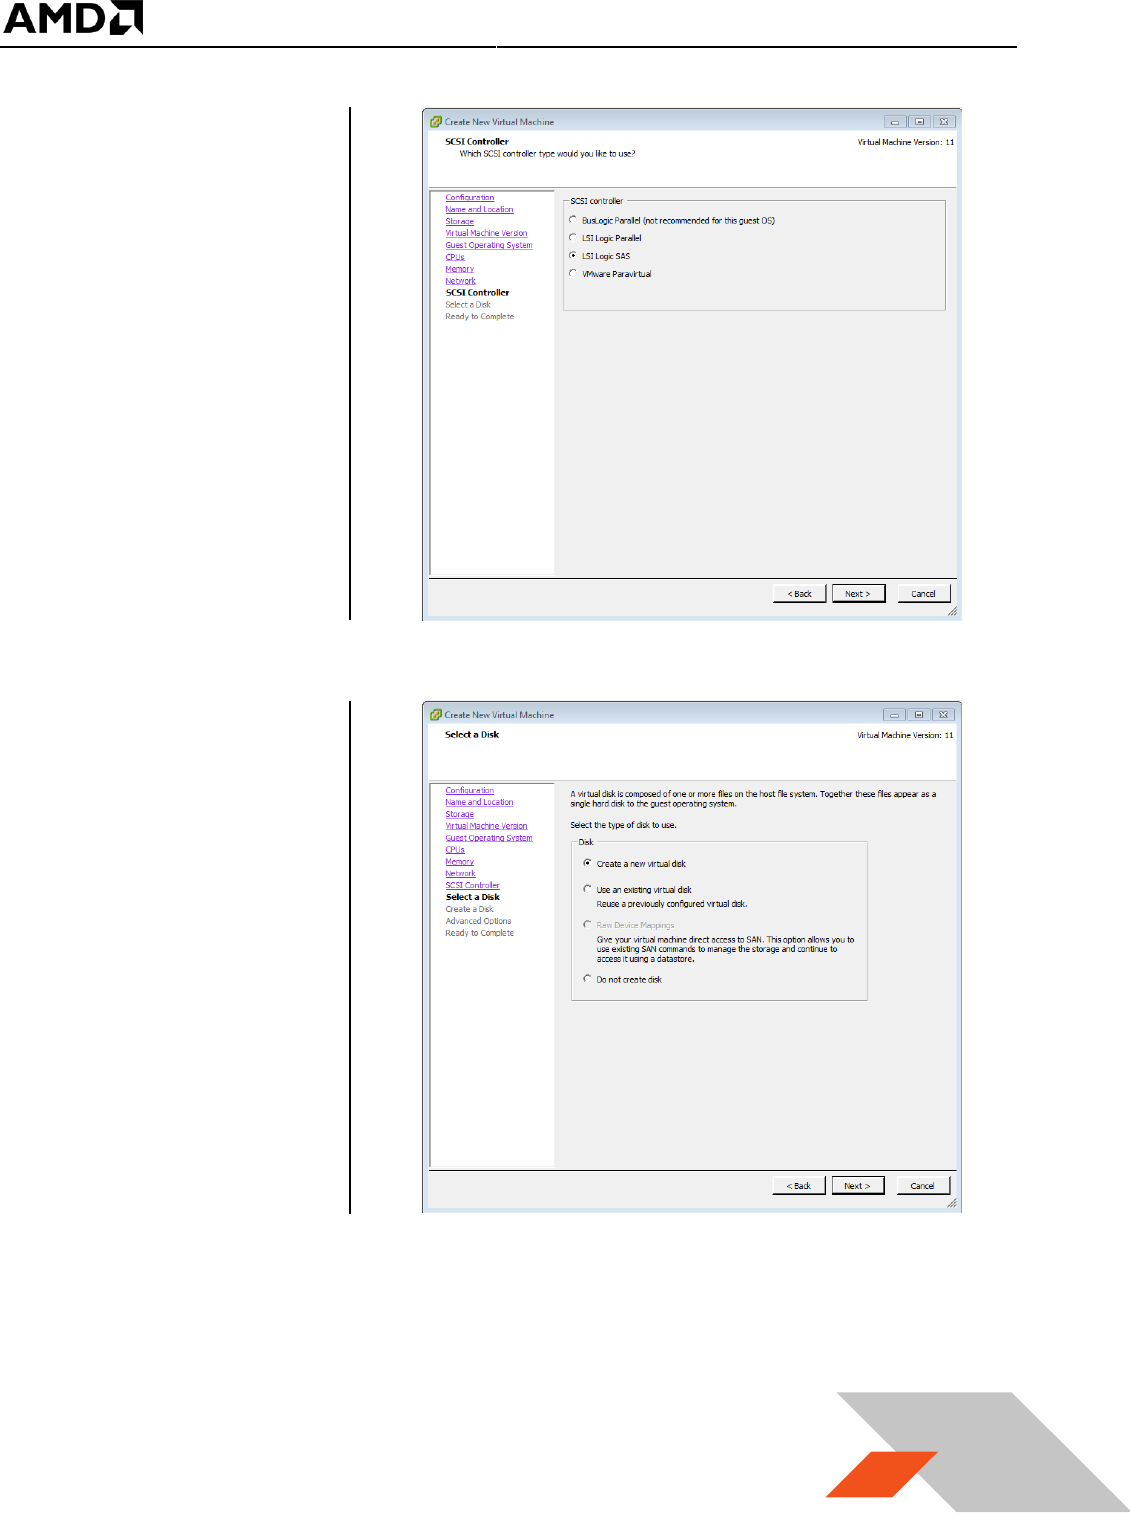
10. Click on Next and
select the SCSI
controller for this
virtual machine.
Choose the default
setting.
11. Click on Next, select
a virtual disk to use.
Select create a new
virtual disk.
MxGPU Setup Guide
Page 26 of 68
26
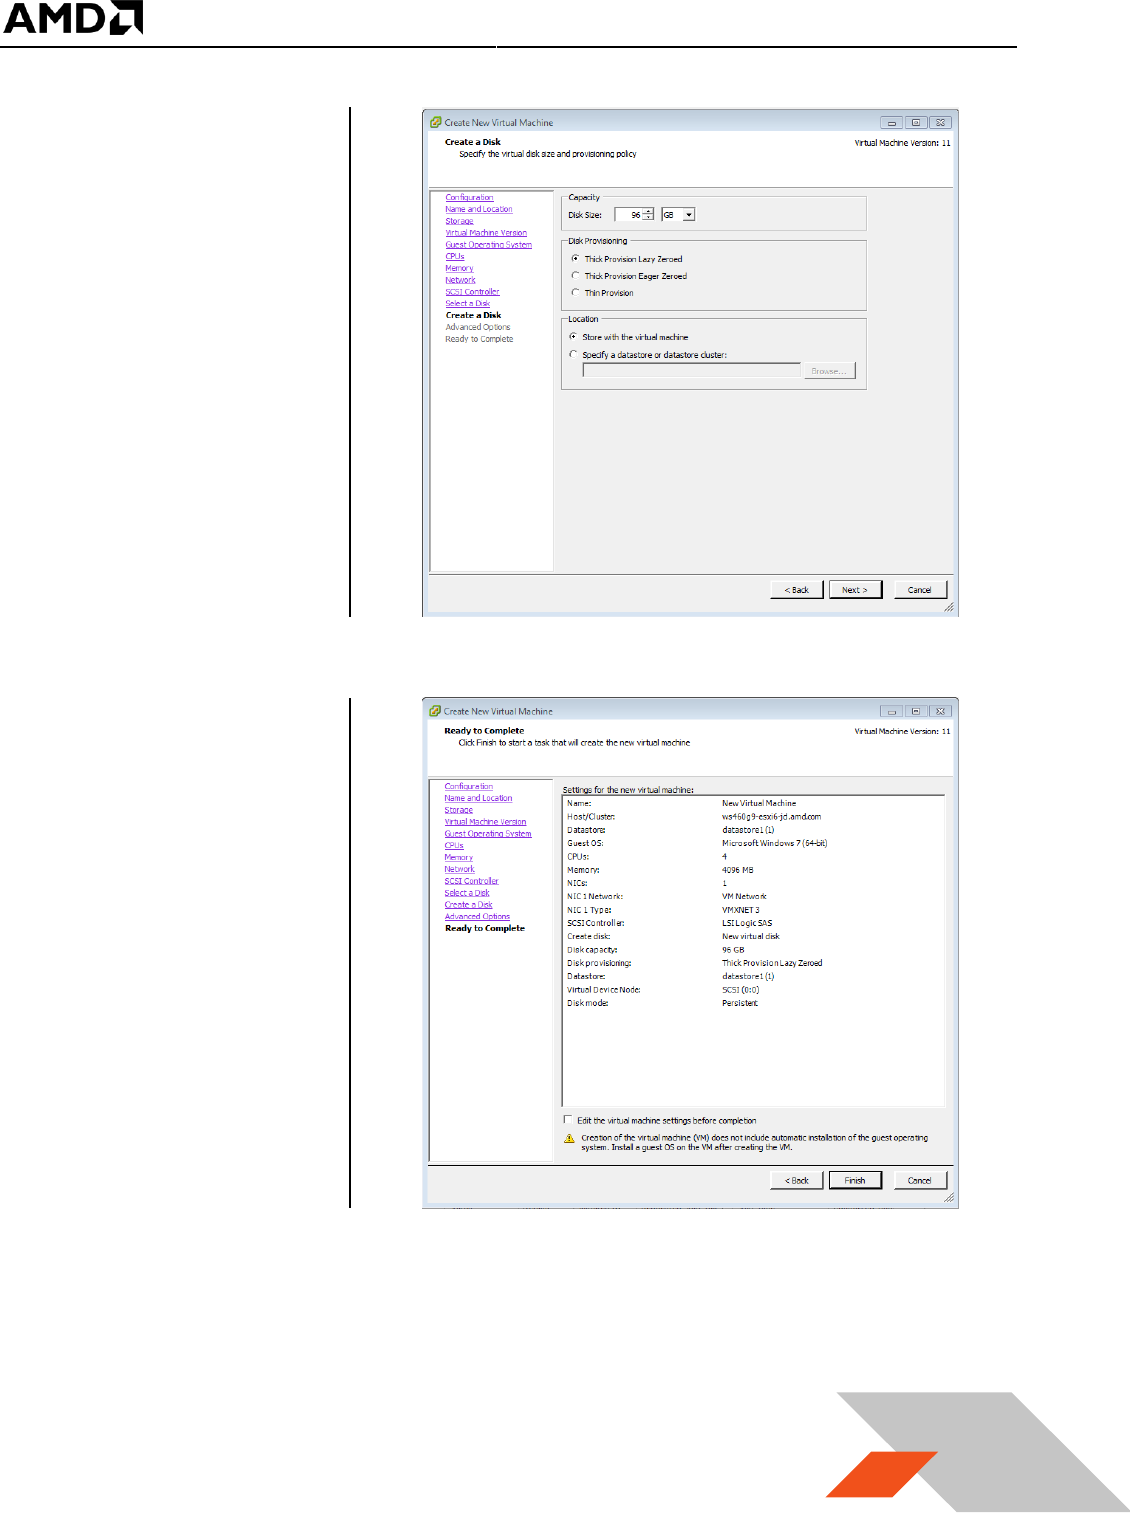
12. Click on Next and
select disk size,
provision, and
location. The
recommend
minimum disk size is
96GB. For “Disk
Provisioning”, select
“Thick Provision Lazy
Zeroed”. For
“Location”, select
“Store with the
virtual machine”
13. Click on Next. An
“Advanced Options”
page will appear.
Don’t change
anything, just click
on Next. A Ready to
complete windows
will shows the
summary of the
virtual machine will
be created.
MxGPU Setup Guide
Page 27 of 68
27
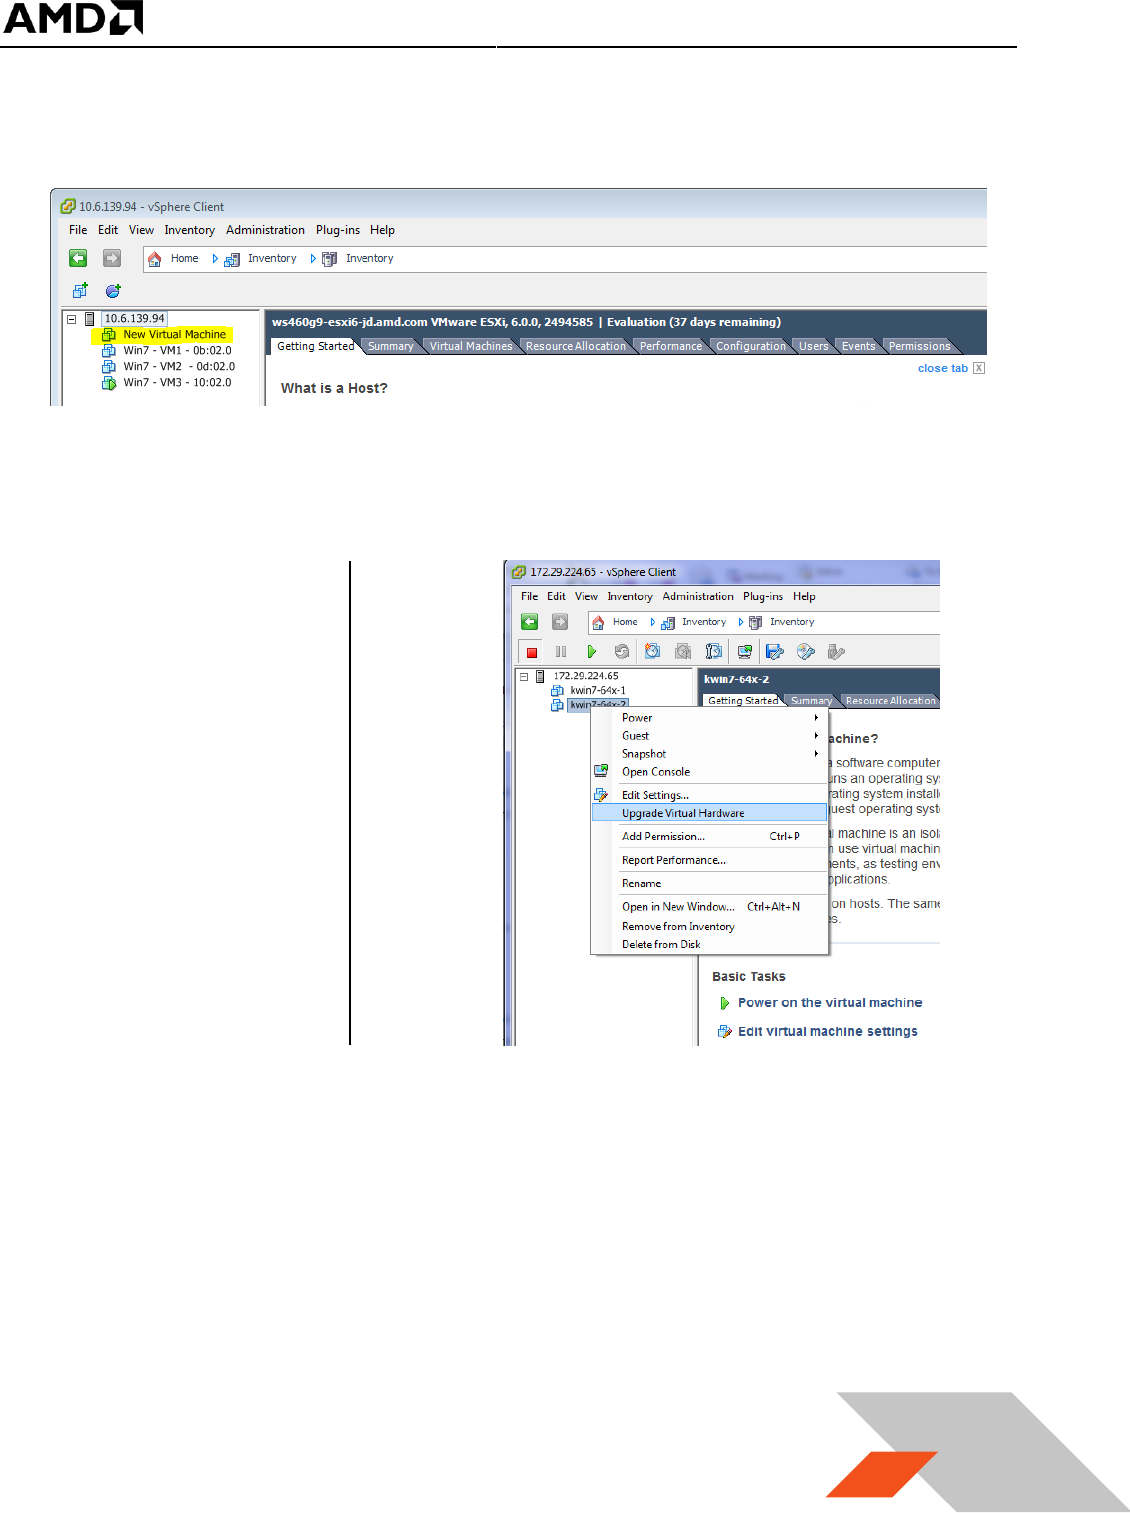
14. After clicking on “Finish”, a new virtual machine will appear under the host IP address as the
following :
15. If VMs have not been
updated to the latest
VM type, right click
on the virtual
machine and select
“Upgrade Virtual
Hardware”. If a
warning window
pops up indicating
that the virtual
machine will upgrade
to version 11, click
“Yes” and continue.
MxGPU Setup Guide
Page 28 of 68
28
16. Right click on this virtual machine again and select “Edit Settings…”. A warning window will pop
up indicating that advanced settings can be changed only within VMware vCenter™. Click OK to
continue. The “Virtual Machine Properties” window appears. Within the properties windows,
click the “Options” tab and select “General” under the “Advanced” section. On the right side, a
“Configuration Parameters…” button will appear. Click on this button.
MxGPU Setup Guide
Page 29 of 68
29
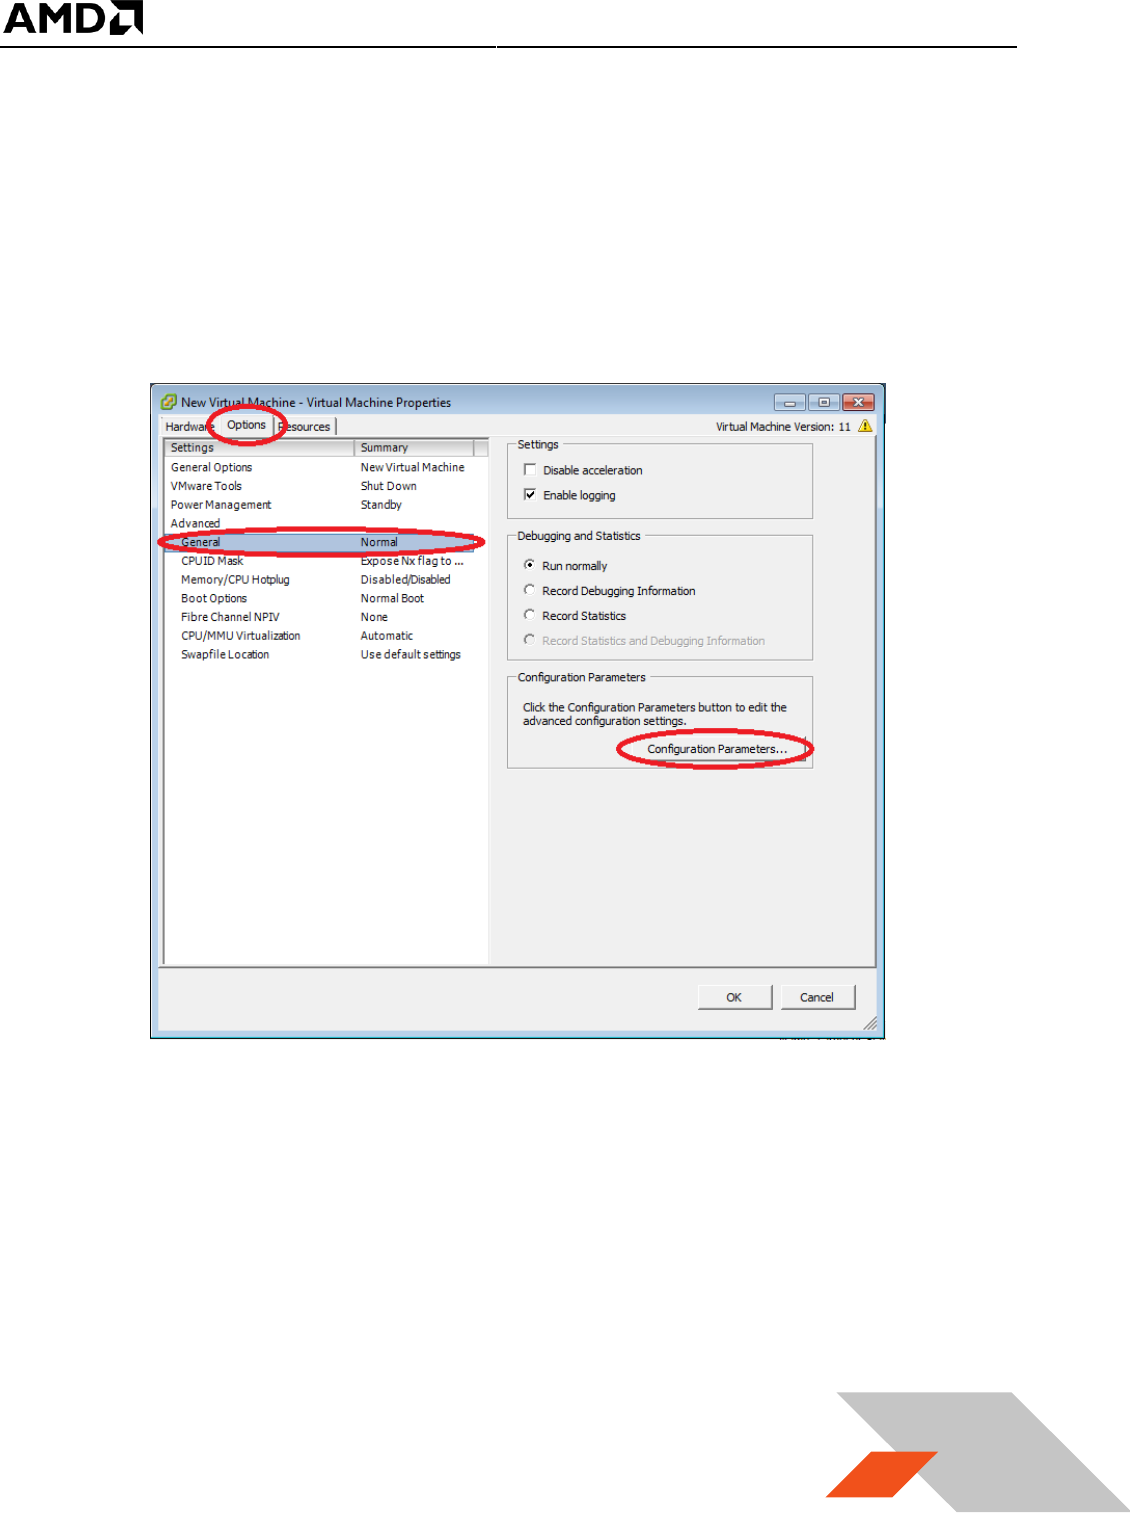
17. In the “Configuration Parameters” window, scroll through to find the parameters named
“pciHole.start” and “pciHole.end”. If these two parameters exist, ensure that the values are set
to 2048 and 3072, respectively. If these two parameters do not exist, click the button “Add
Row”, and add “pciHole.start” and “pciHole.end” with the above values. Next, click OK to return
to main control page of vSphere client.
The virtual machine is now ready for guest OS installation.

MxGPU Setup Guide
Page 30 of 68
30
3.2.4 Install Guest OS on Guest VM
There are several ways to install a guest OS on this newly created virtual machine:
1) Install a fresh OS using ISO image on the administrator system
2) Install a fresh OS using ISO image on ESXi data storage
3) Clone an OS image created and used previously
Methods 1 and 2 are similar. Method 2 will be used as an example.
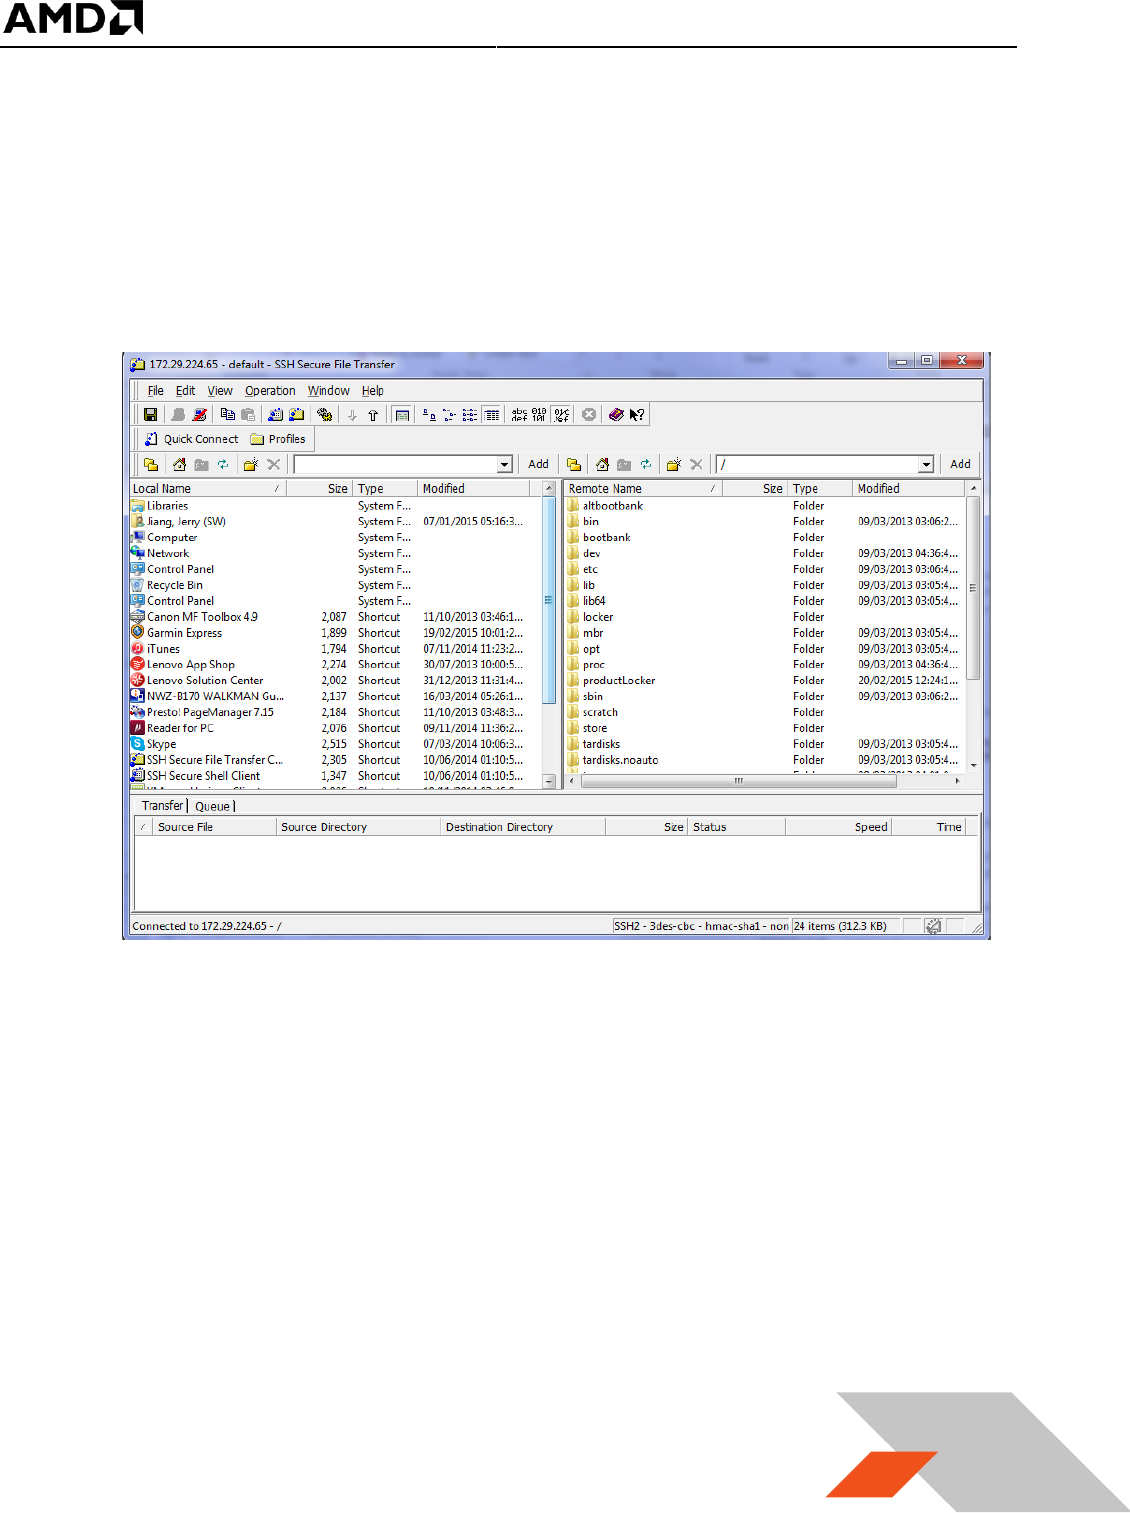
3.2.4.1 Upload file to host ESXi
1. Start the SSH Secure File Transfer utility and click on “Quick Connect”. The application will pop
up a window like the following :
MxGPU Setup Guide
Page 31 of 68
31
2. Enter the ESXi host IP address or computer name in “Host Name”; type “root” in “User Name”;
select “Keyboard interactive” from “Authentication Method”. Click on the Connect button to
connect to host.
3. Enter the password created while setting up ESXi in the host server. Once connected to the host,
the application should have the following windows :
MxGPU Setup Guide
Page 32 of 68
32
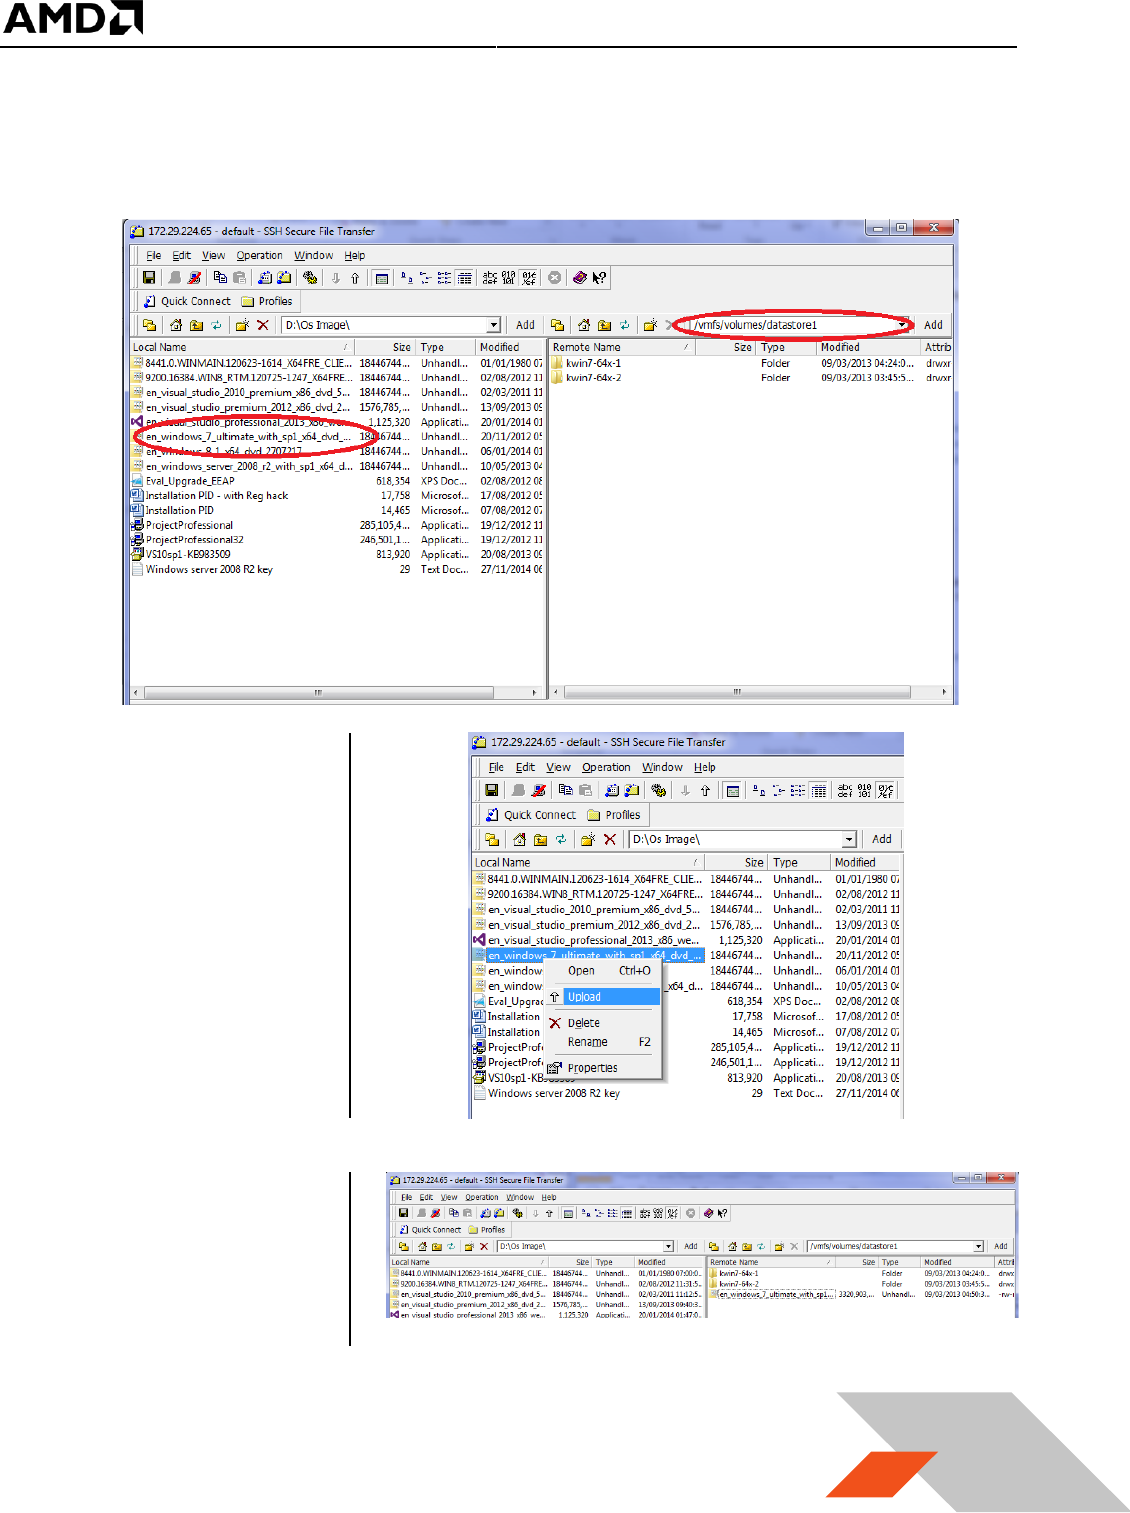
4. The left is the administrator system, the right is the host ESXi system. On the left window,
navigate to the location where the OS ISO image is stored; on the right window, navigate to
/vmfs/volumes/datastore1.
5. Right click on the
desired OS image/file
and select the
“Upload” after right
clicking on the file.
6. After a few minutes,
the OS image will be
uploaded to
/vmfs/volumes/data
store1 as below.
MxGPU Setup Guide
Page 33 of 68
33
7. This ISO image can now be used to install a fresh OS on the virtual machine.
3.2.4.2 Install the OS
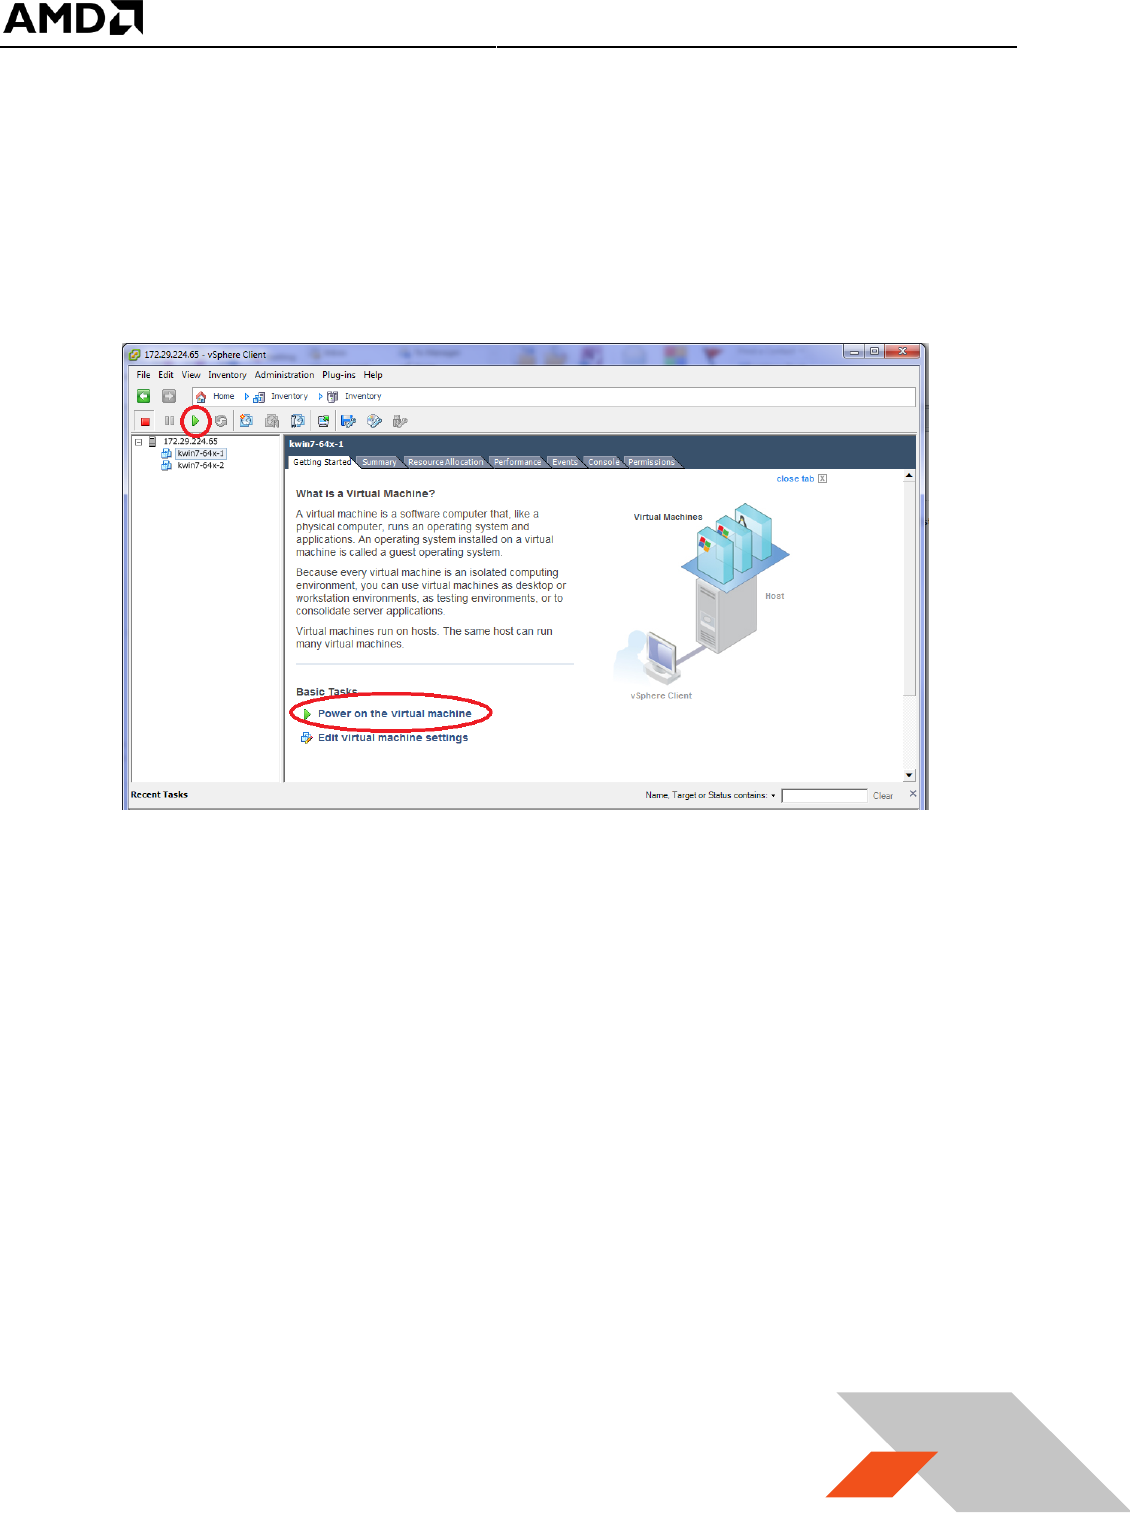
1. Start vSphere client application and connect to the host. Expand the host description (host name
or IP address) and click on the virtual machine that was just created. Click on the start button or
“Power on the virtual machine”. Click on the “Console” tab.
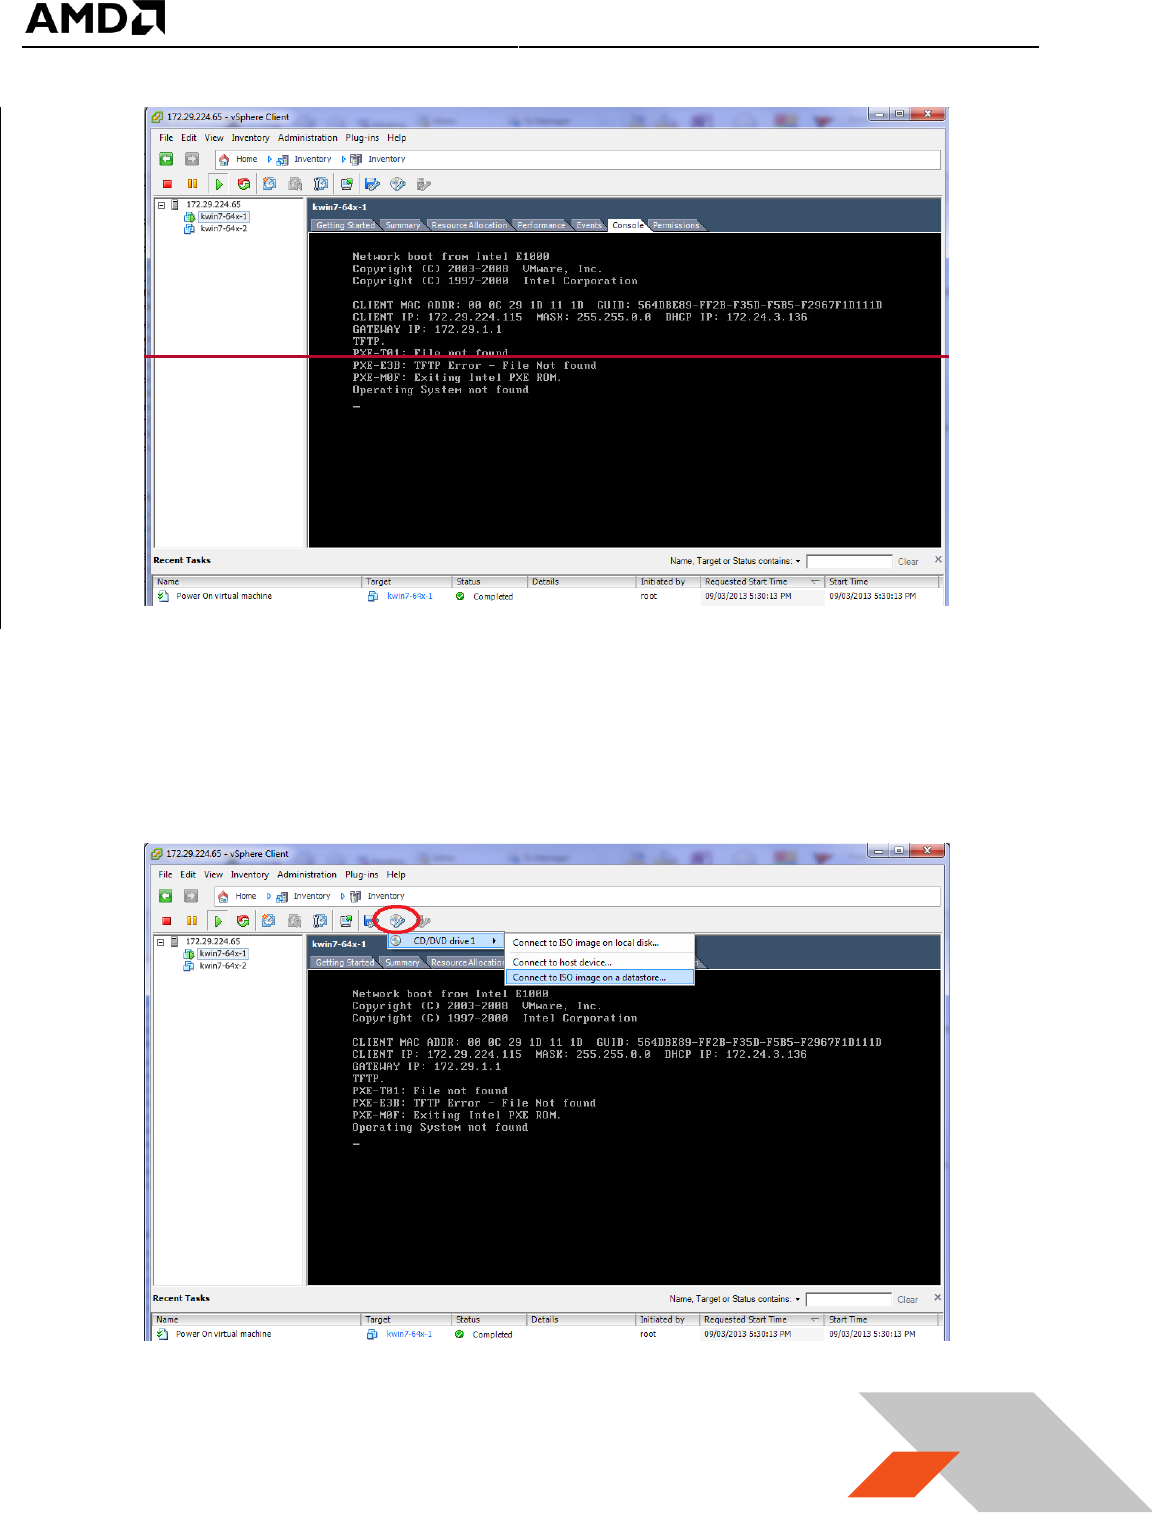
2. The console window should show that an operating system was not found :
MxGPU Setup Guide
Page 34 of 68
34
3. Click on the CD button, select the drive and select “Connect to ISO image on a datastore…”, as
shown below.
(note: selecting option “Connect to ISO image on a local disk” will result in navigation to the
administrator system local disk image. That installation method is the same as this method).
MxGPU Setup Guide
Page 35 of 68
35
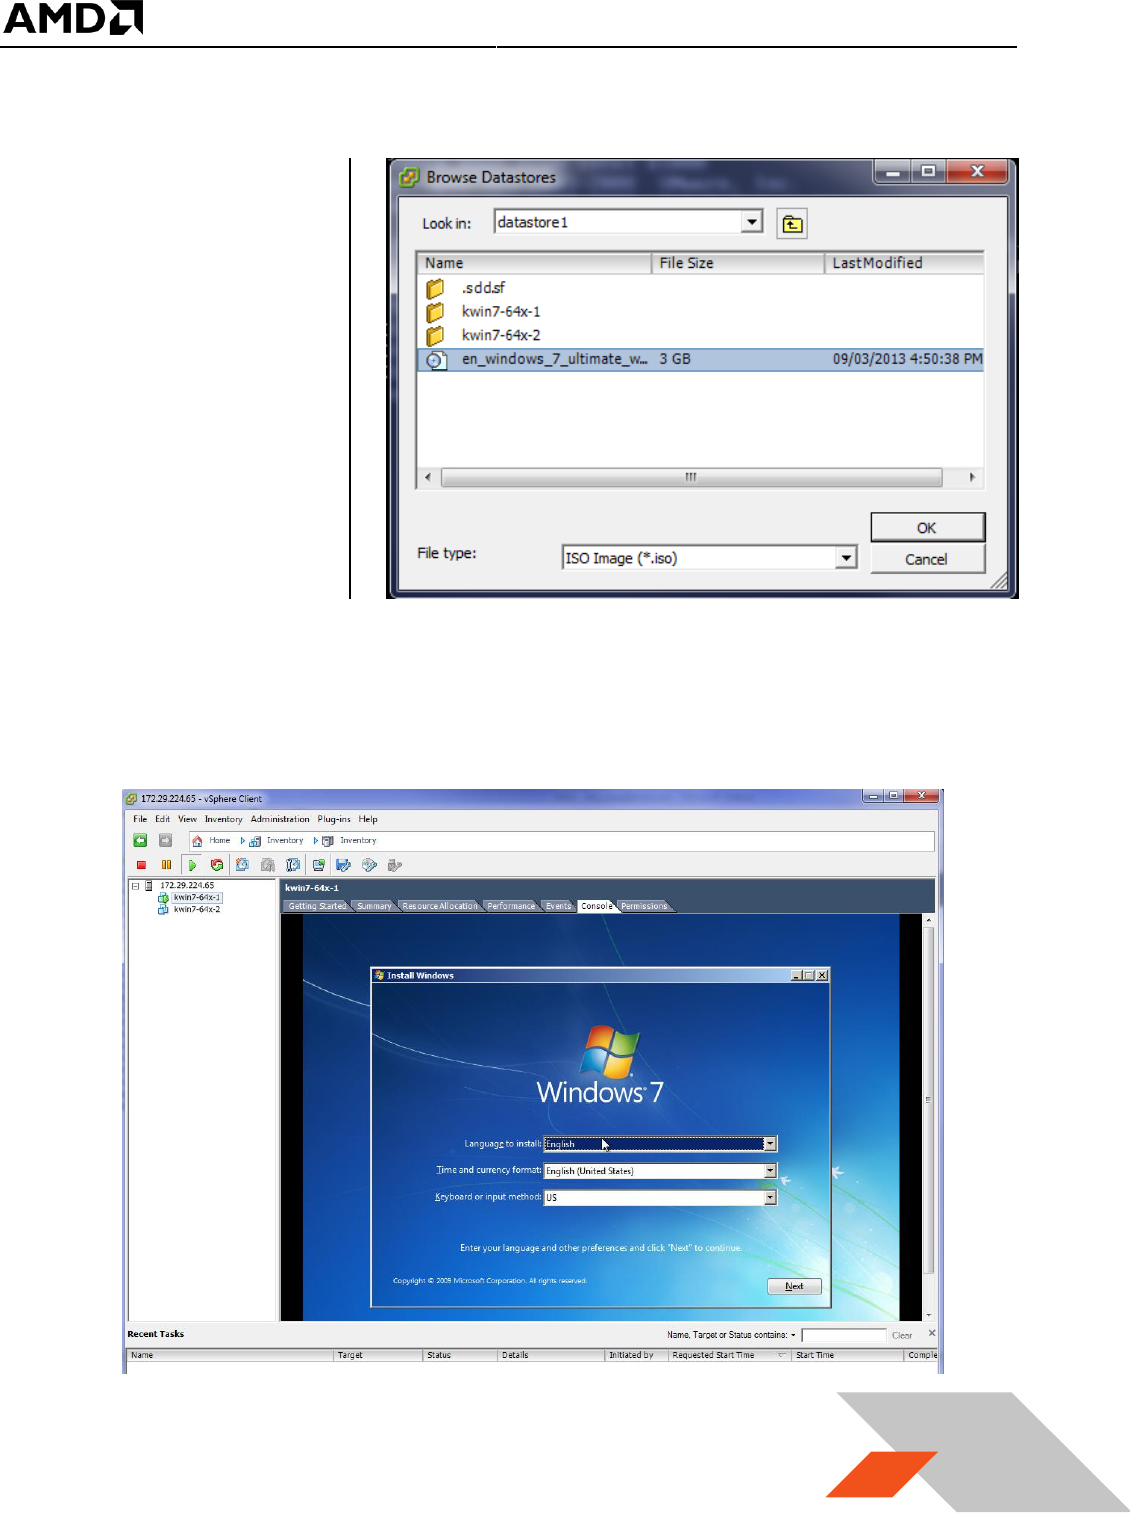
4. Once the “Browse
Datastores” window
appears, navigate to
datastore1, select
the OS ISO image
previously uploaded
and click on “OK” :
5. Use a mouse click on the console window followed by an ‘enter’ or ‘space’ key. The OS
installation screen appears in the console window as it would on a desktop monitor during the
regular install process.
MxGPU Setup Guide
Page 36 of 68
36
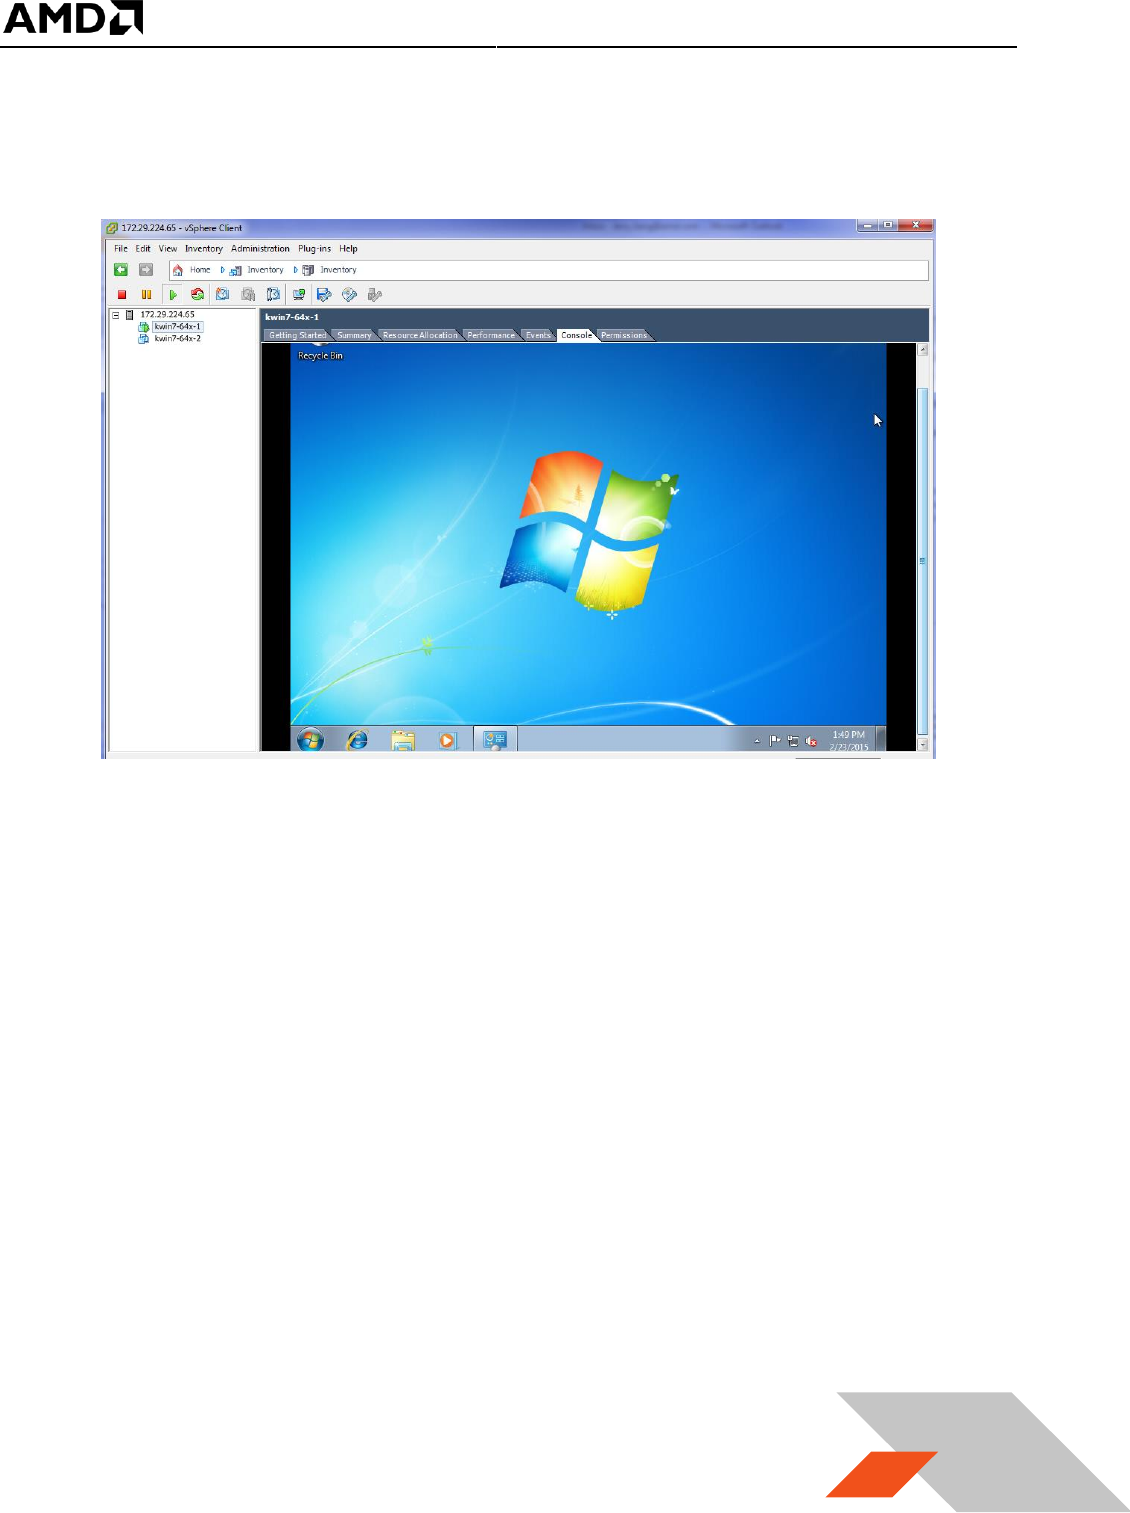
6. Follow the normal Microsoft® Windows® installation procedure. Select a user name and
password and allow the installation to complete. Once the installation completes, it shows the
desktop of the guest OS in console window similar to below.
7. There might have some updates that will require rebooting of the OS. After the reboot(s), the
guest OS is ready to use.
MxGPU Setup Guide
Page 37 of 68
37
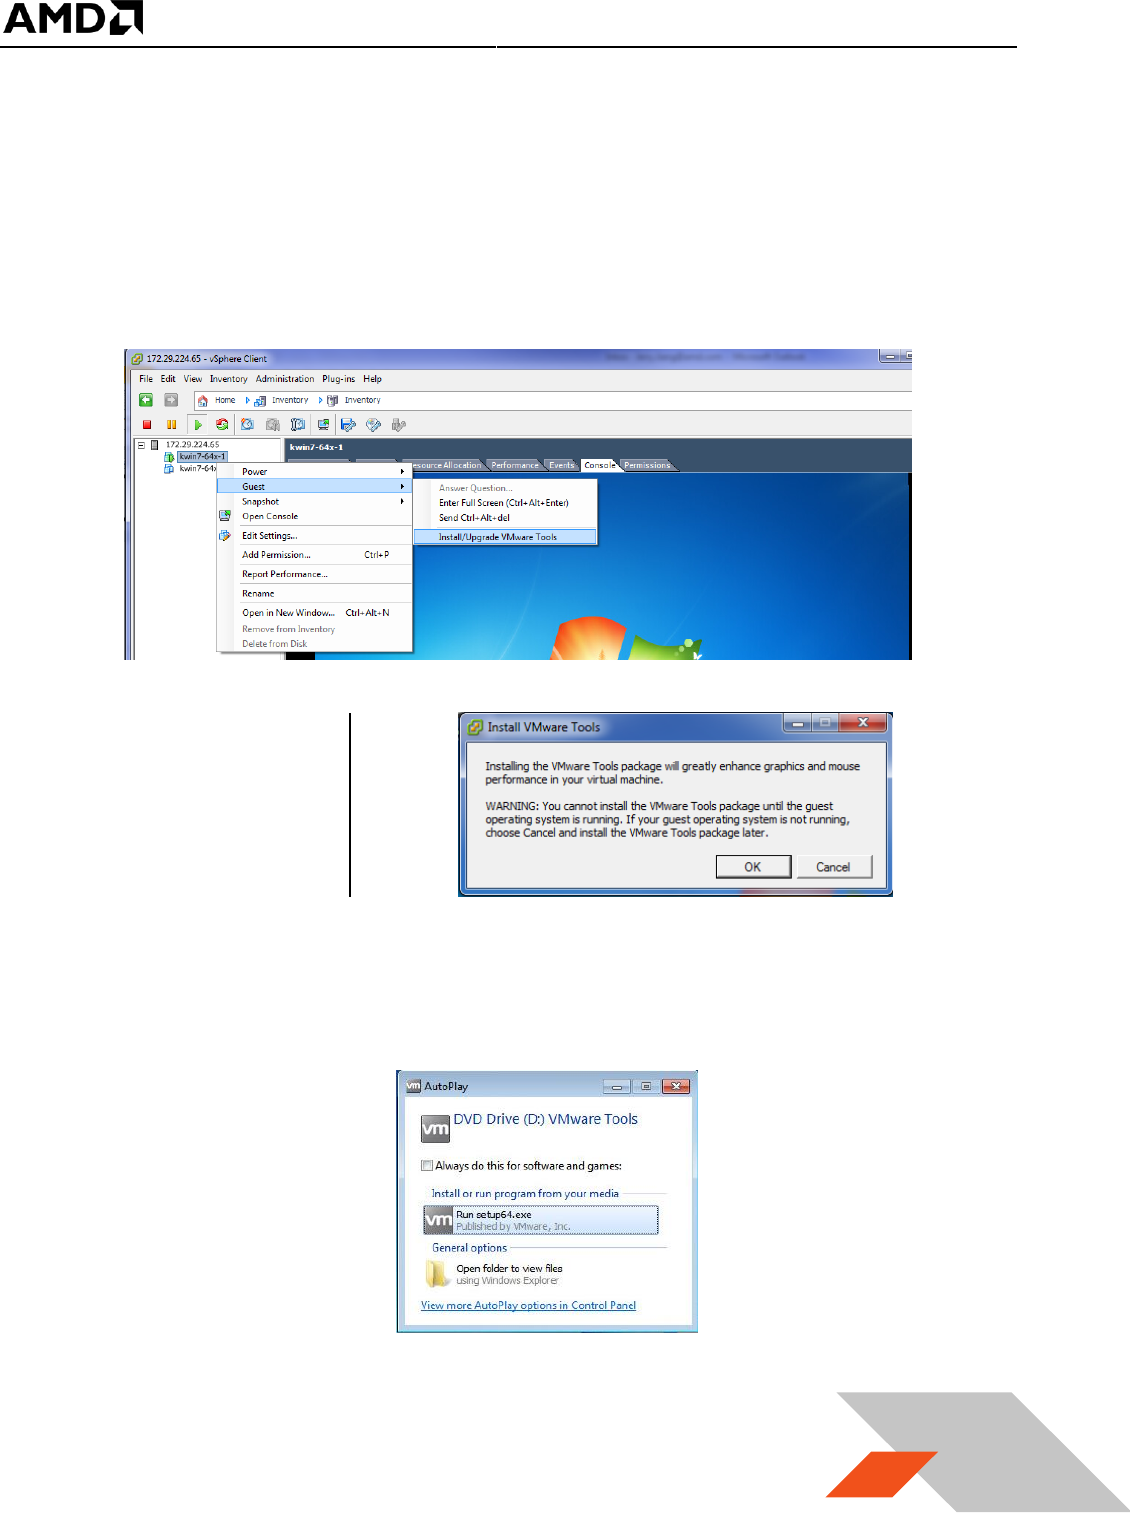
3.2.4.3 Install VMware Tools
It is necessary to install VMware tools to enable connectivity features between the virtual machine
running on the host and the administrator system.
1. Once the guest VM boots to desktop, in the vSphere client, select the summary tab of the VM
and click on “Install VMware Tools” :
2. A pop-up window
will appear as the
following :
3. Click OK to continue. After a few minutes (depending on network speeds), an AutoPlay window
will appear as the following :
4. After clicking on “Run setup64.exe”, an installation window will be shown.
MxGPU Setup Guide
Page 38 of 68
38
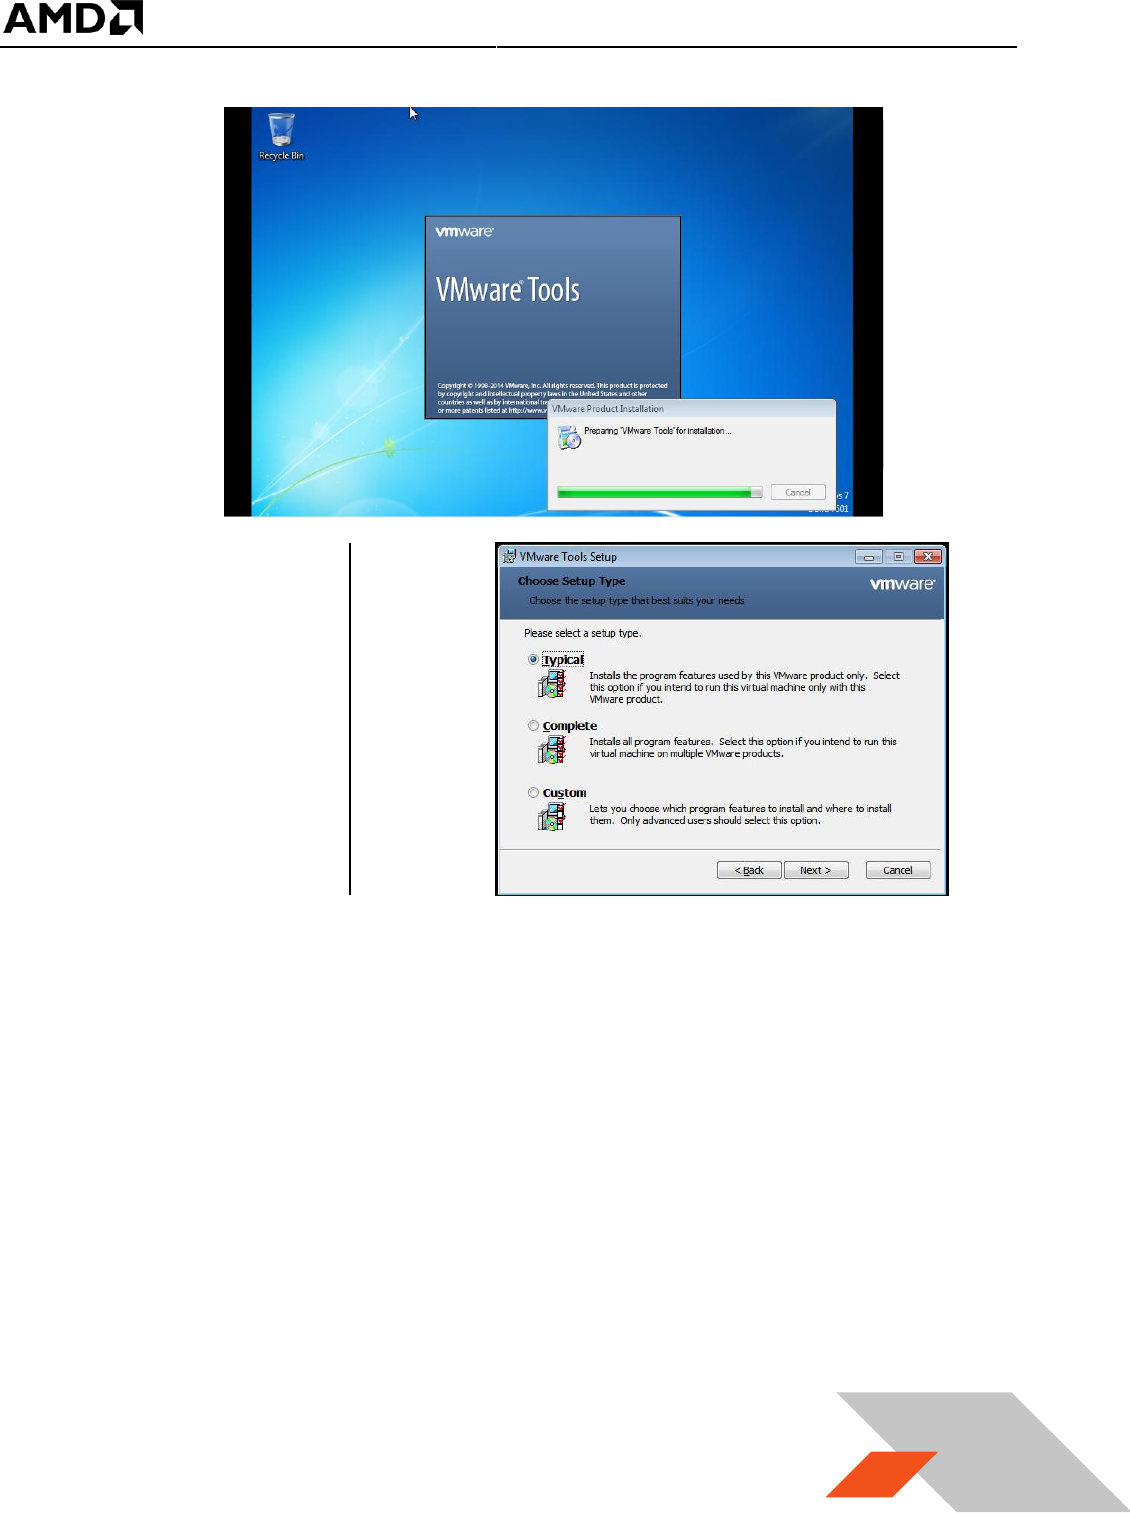
5. Follow the
instruction on the
screen, select
“Typical” when
prompt for setup
type
6. Once the installation is complete, a reboot of the virtual machine is required.
MxGPU Setup Guide
Page 39 of 68
39
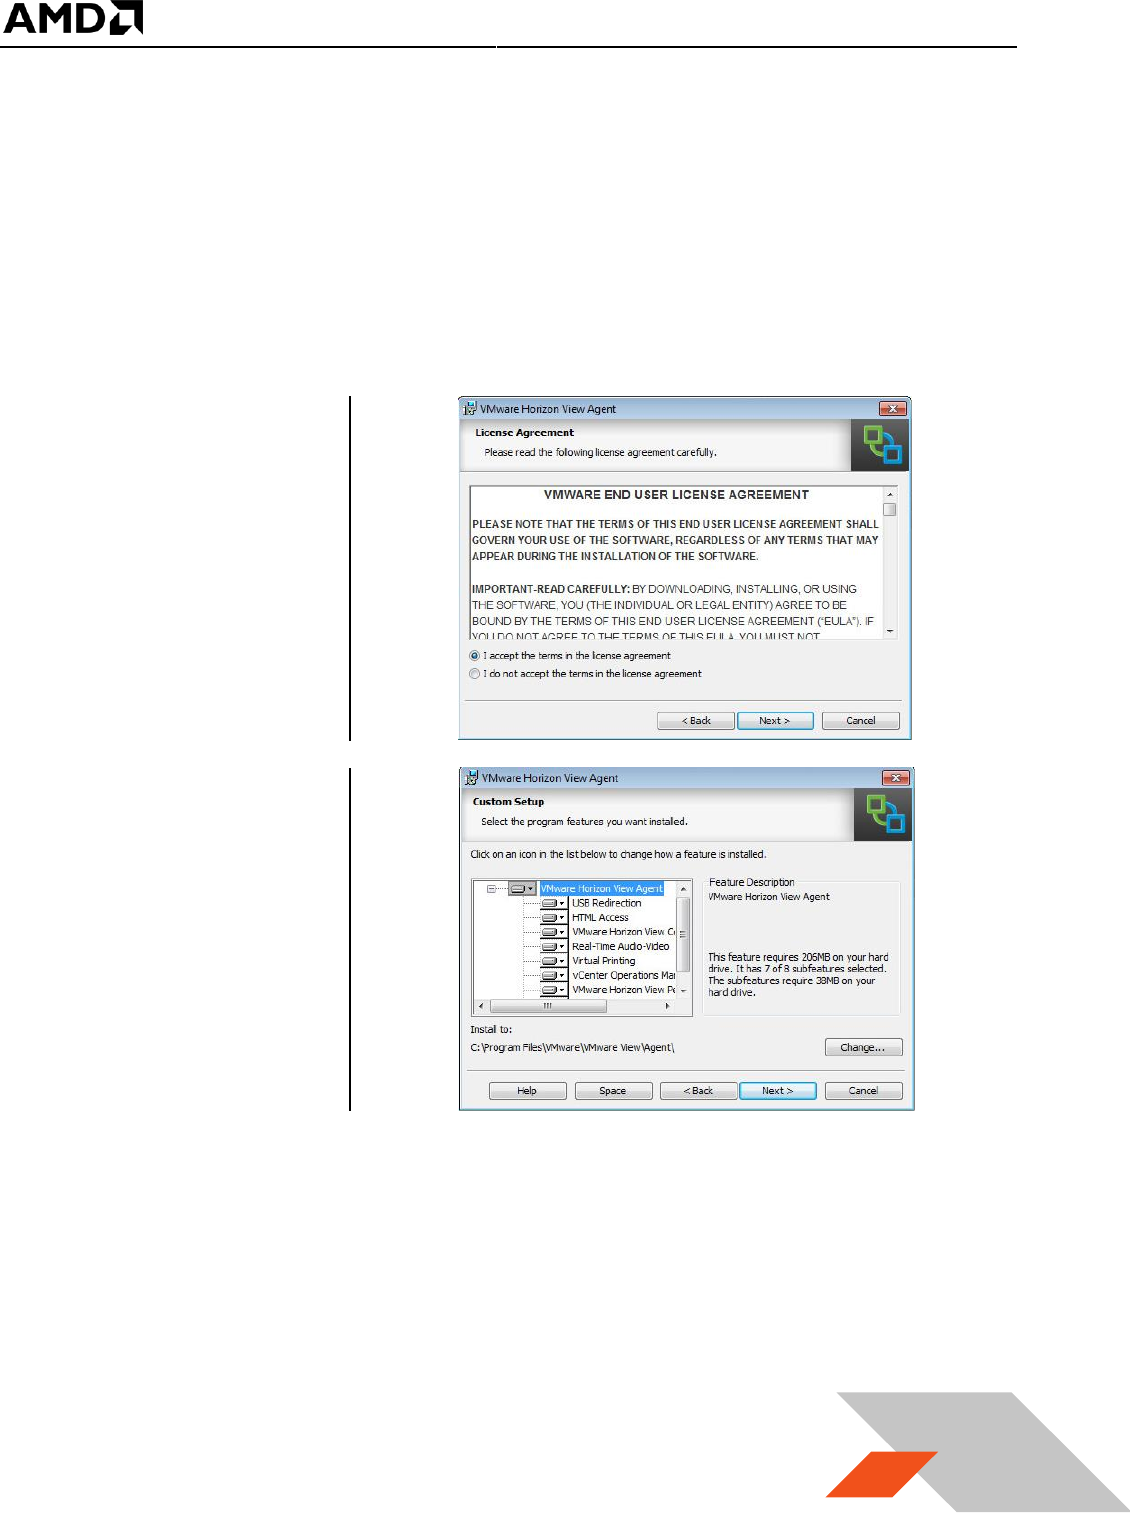
3.2.4.4 Install Horizon View Agent
The Horizon View Agent acts as an intermediary software between the virtual machine and Horizon
View (that is to be installed on the client terminal later). The Horizon View Agent Direct-Connection
Plugin allows a View Client to directly connect to a View desktop without using View
Connection Server.
1. Once the guest VM boots to desktop again, download Horizon View Agent indicate on Table 1.
2. Run this application
and accept the
license agreement
3. On “Custom Setup”,
click on next without
changes :
MxGPU Setup Guide
Page 40 of 68
40
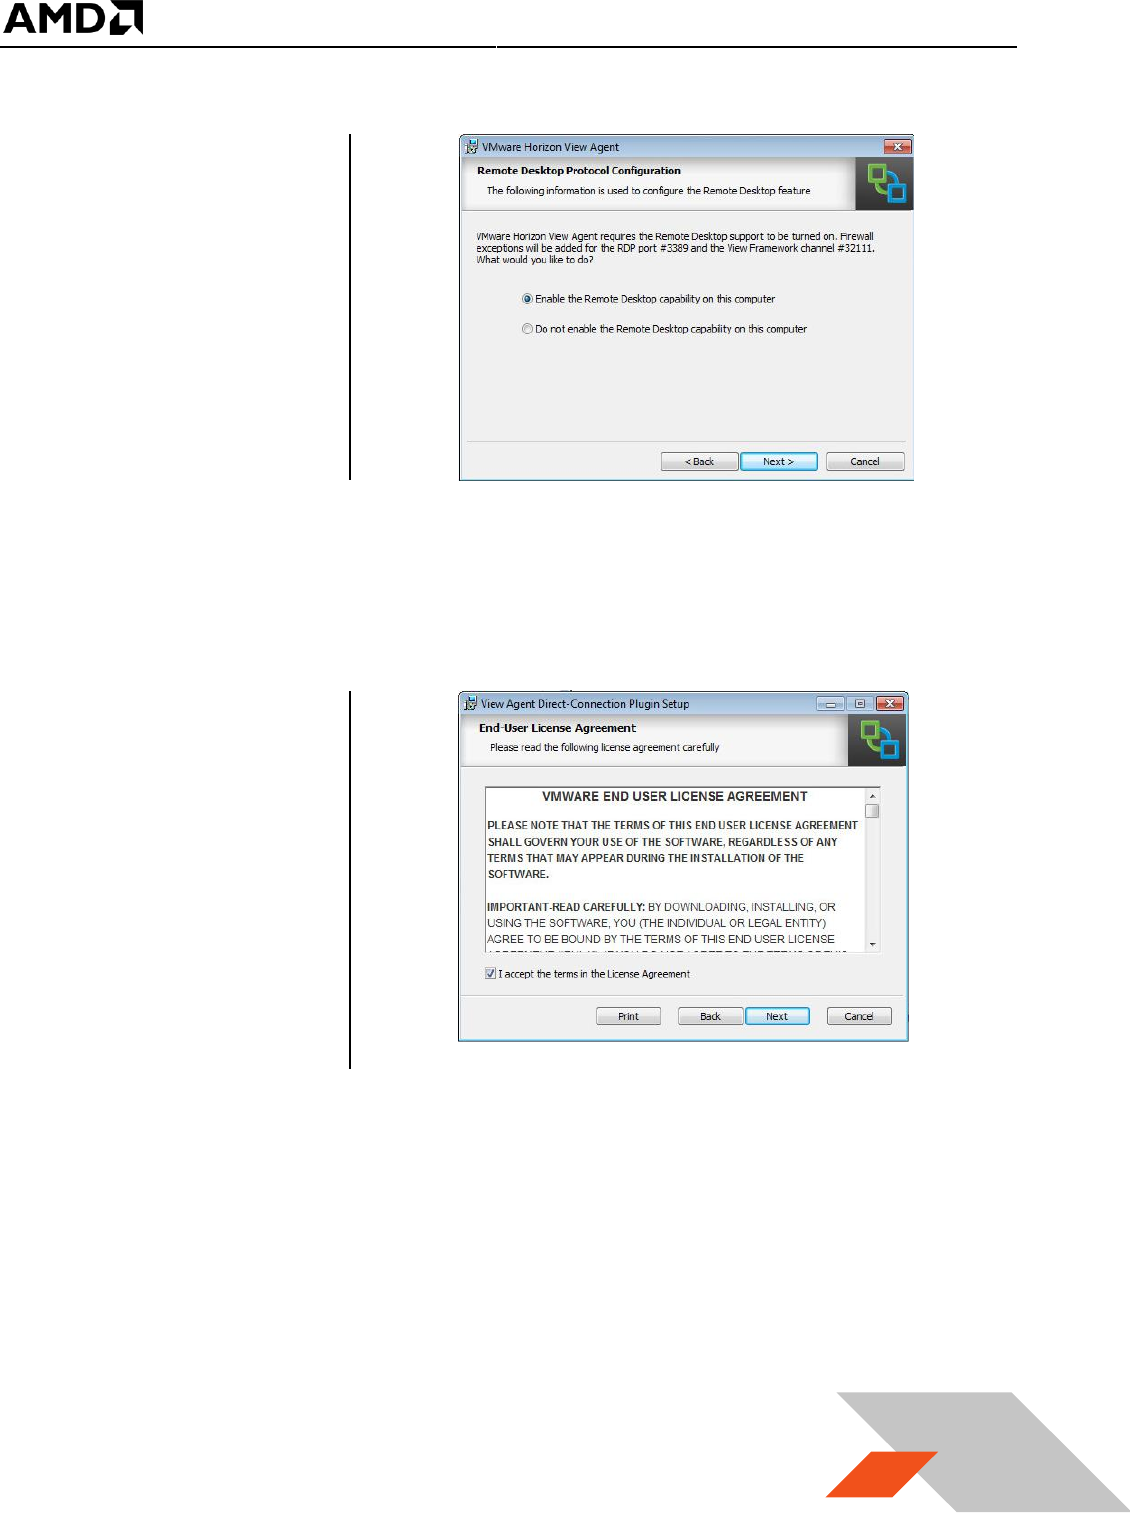
4. Select “Enable the
Remote desktop
capability on this
computer” :
5. Click “Install” in next window. The View Agent will be installed on this guest VM.
6. Once the installation completes, a prompt for reboot will appear.
7. After reboot, continue with downloading the Horizon View Agent Direct-Connection plug-in
indicated on Table 1.
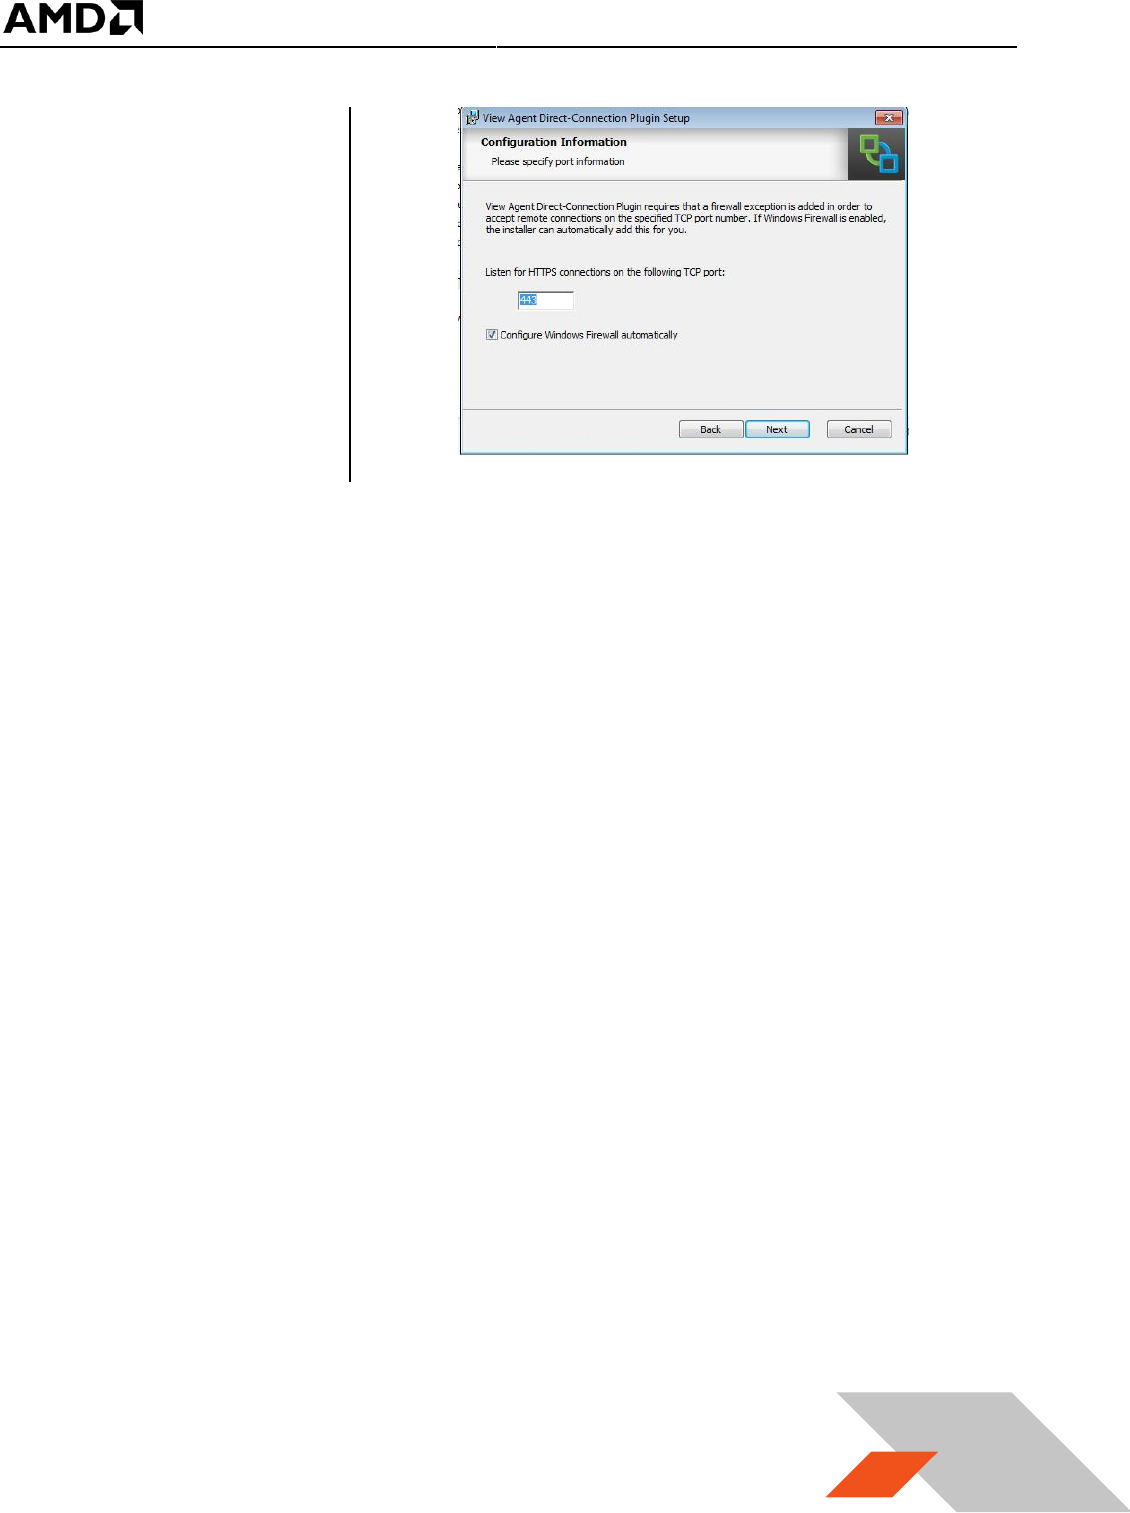
8. Run this Direct-
Connect plug-in and
accept the License
Agreement
MxGPU Setup Guide
Page 41 of 68
41
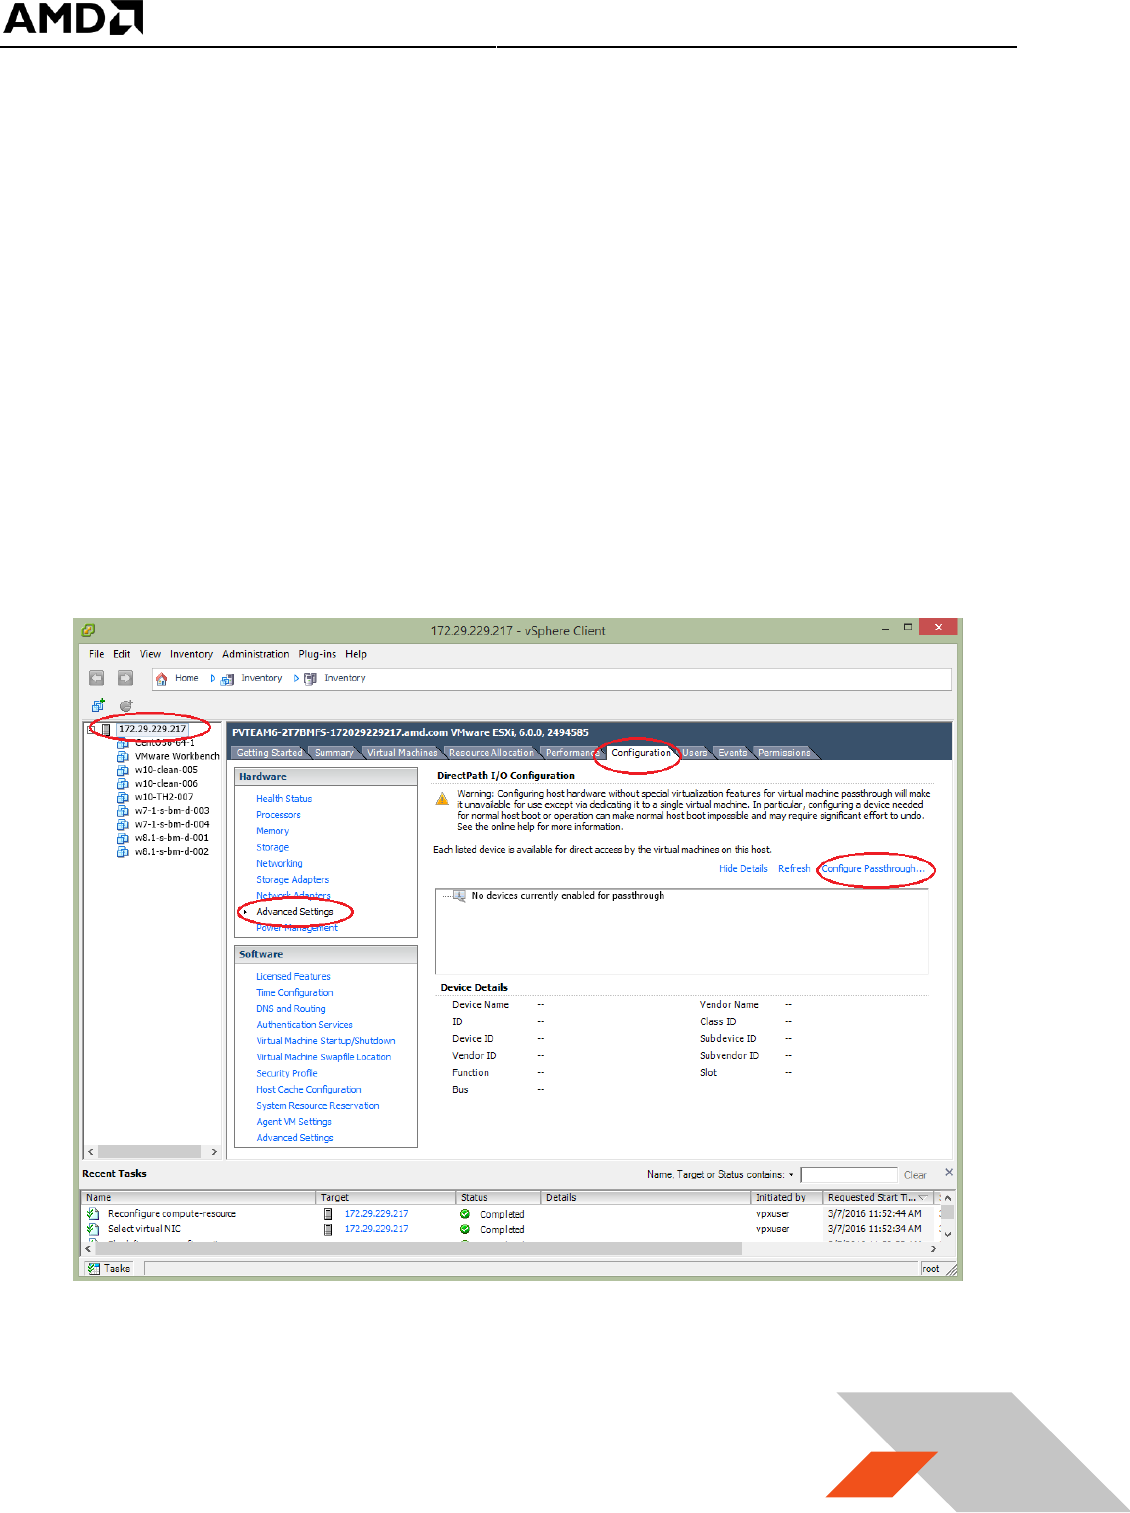
9. Click on Next and
make sure Configure
Windows Firewall
automatically is
selected :
10. Click on the Next to install the Direct-Connection Plugin. Once installation is complete, reboot
the guest VM.
MxGPU Setup Guide
Page 42 of 68
42
3.2.1 Pass Through Device to Guest VM
Passing through a device to the guest VM means providing full access of the device residing in the host
to that VM. After passing through a GPU, a VM is able to access the full hardware acceleration
capabilities of that GPU remotely.
MxGPU operates as a number of devices that can be passing through to various VMs. Therefore gaining
knowledge about how to pass through a single GPU device to a single VM allows the user to understand
the first steps necessary to install MxGPU.
If the user already has a basic understanding of how to pass through a GPU device to the VM, then this
section can be bypassed.
3.2.1.1 Select Device for Pass Through
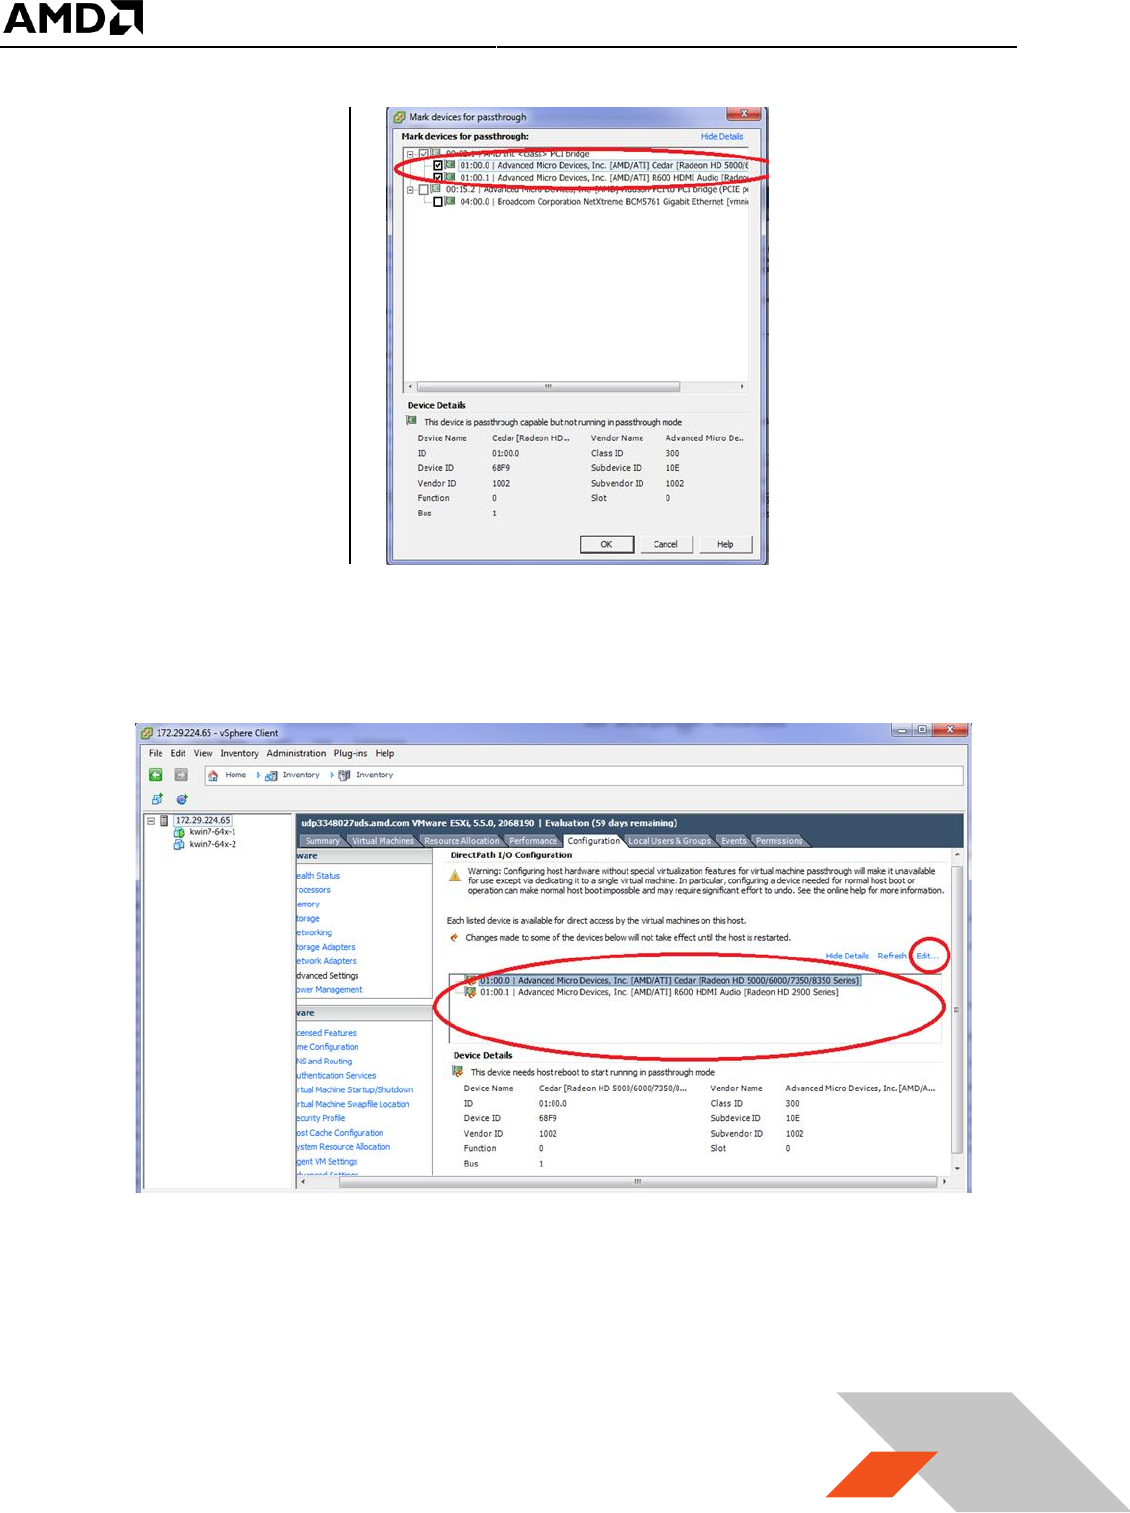
1. In the vSphere host client, click on the host description. Select the “Configuration” tab, click on
“Advanced Settings” and select “Configure Passthrough…” as the shown below :
MxGPU Setup Guide
Page 43 of 68
43
2. A window with
devices available for
passthrough will
appear. Select the
desired passthrough
device and click on
the OK button.
3. The selected device appears in the “Direct Path I/O Configuration” window list. Use the “Edit”
link to change/edit the list.
MxGPU Setup Guide
Page 44 of 68
44
4. The host reboot is
required before host
“releases” the new
devices and makes
them available for
passthrough to a
guest VM. To reboot
the host, right click
on the host
description and
navigate to
“Reboot”. Note:
make sure all guest
VMs are already shut
down before
rebooting the host.
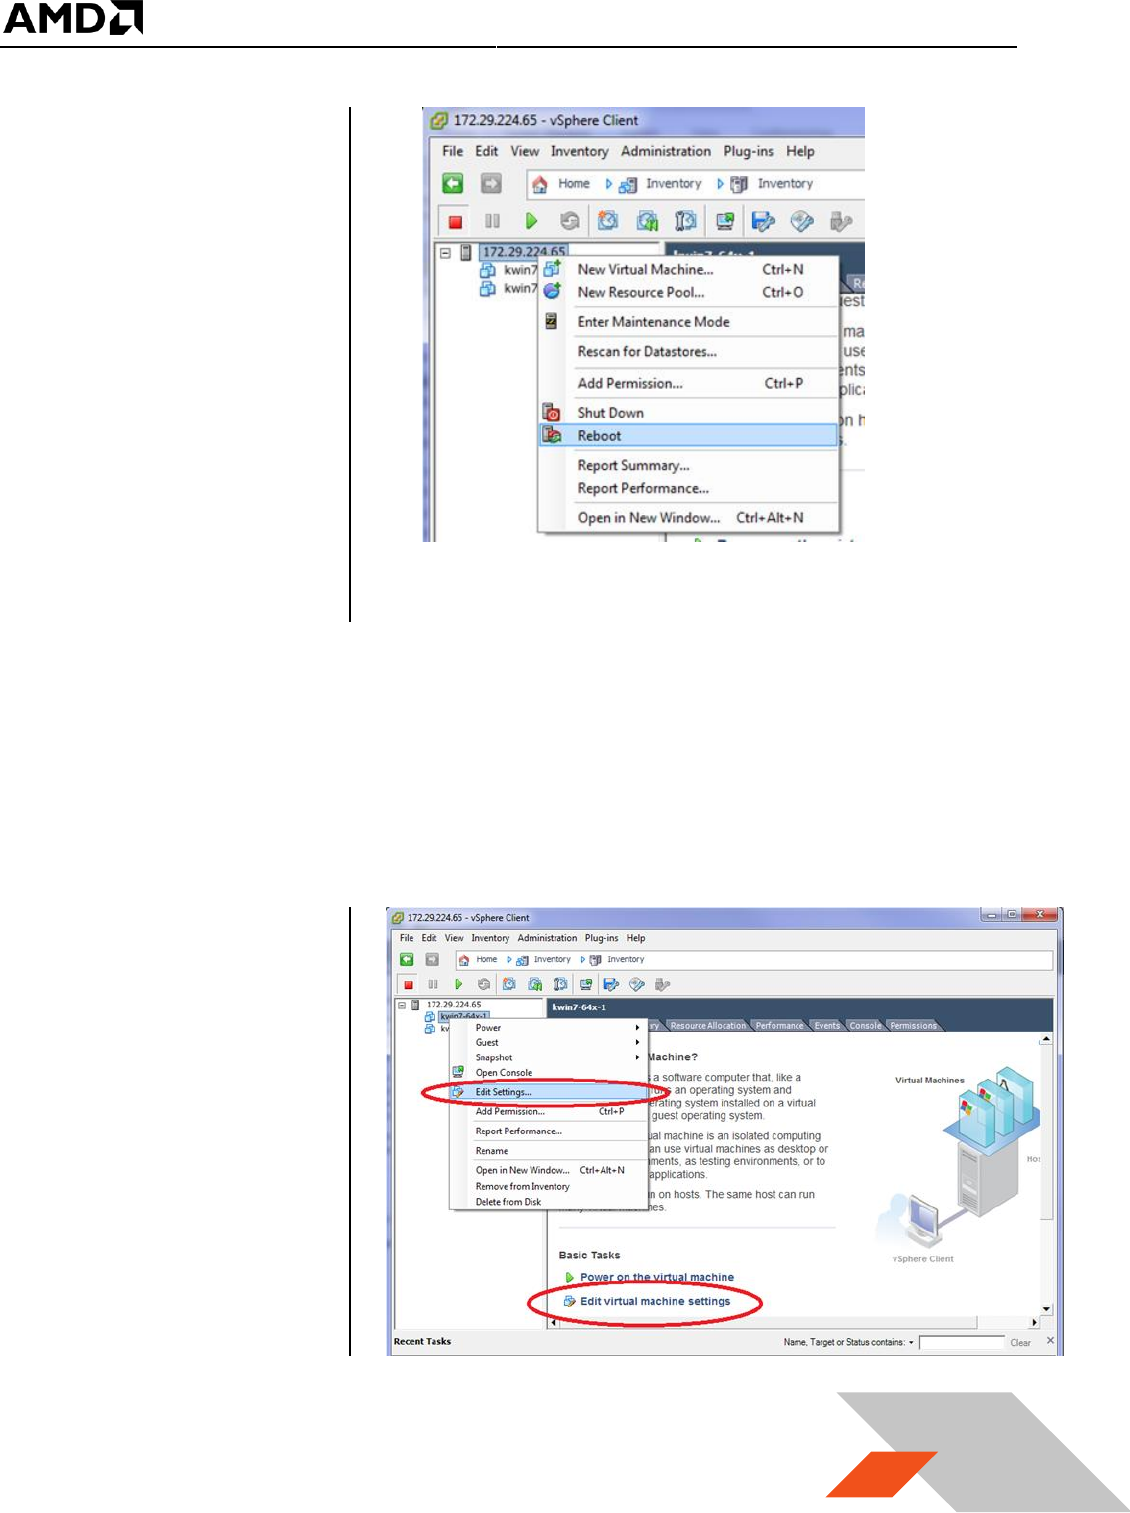
3.2.1.2 Assign Device to Guest VM
1. After the host reboots, reconnect to host through vSphere client. Ensure that the guest VM
targeted for GPU passthrough is shut down.
2. Right click on the
guest VM and
navigate to “Edit
Settings…” or click
“Edit virtual machine
settings” in the
Getting Started tab.
MxGPU Setup Guide
Page 45 of 68
45
3. A window showing
the virtual machine
setting will appear as
shown. Click on the
“Add” button.
4. An “Add Hardware”
window appears.
Select “PCI Device”
and click on next.
MxGPU Setup Guide
Page 46 of 68
46
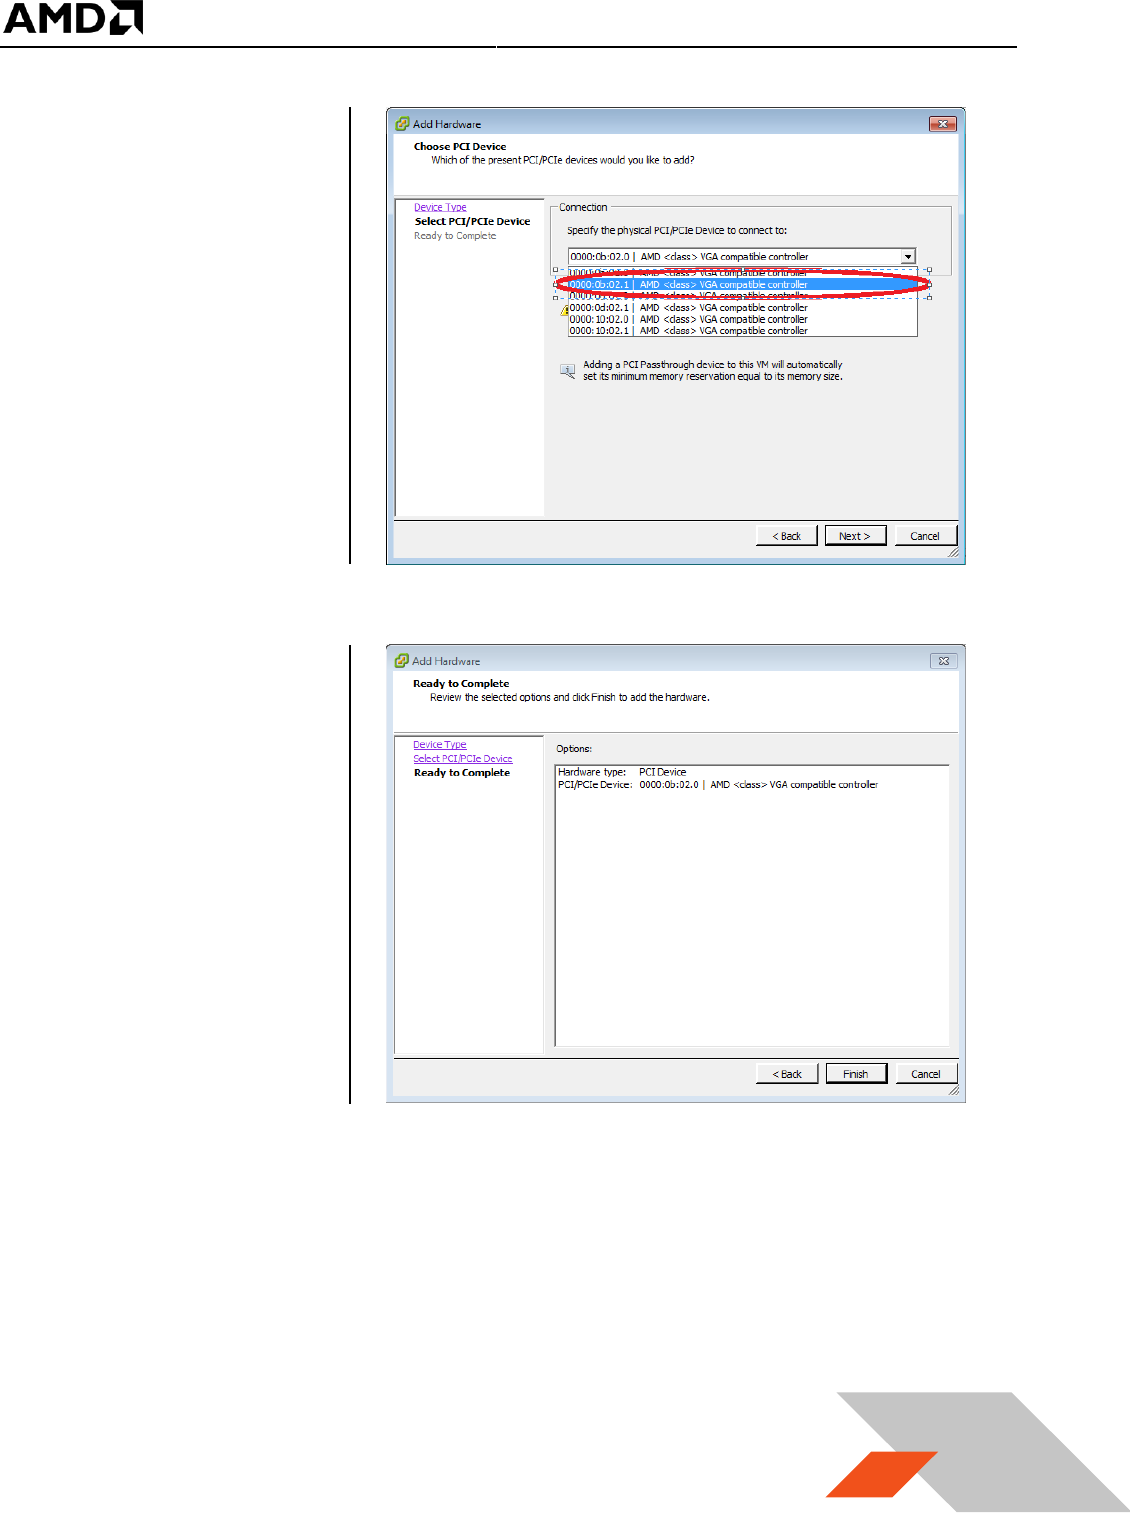
5. A “Choose PCI
Device” window will
appear. Choose the
device from the list
box, then click
“Next”.
6. The “Ready to
Complete” window
appears with the
device just selected.
Click on the “Finish”
button.
MxGPU Setup Guide
Page 47 of 68
47
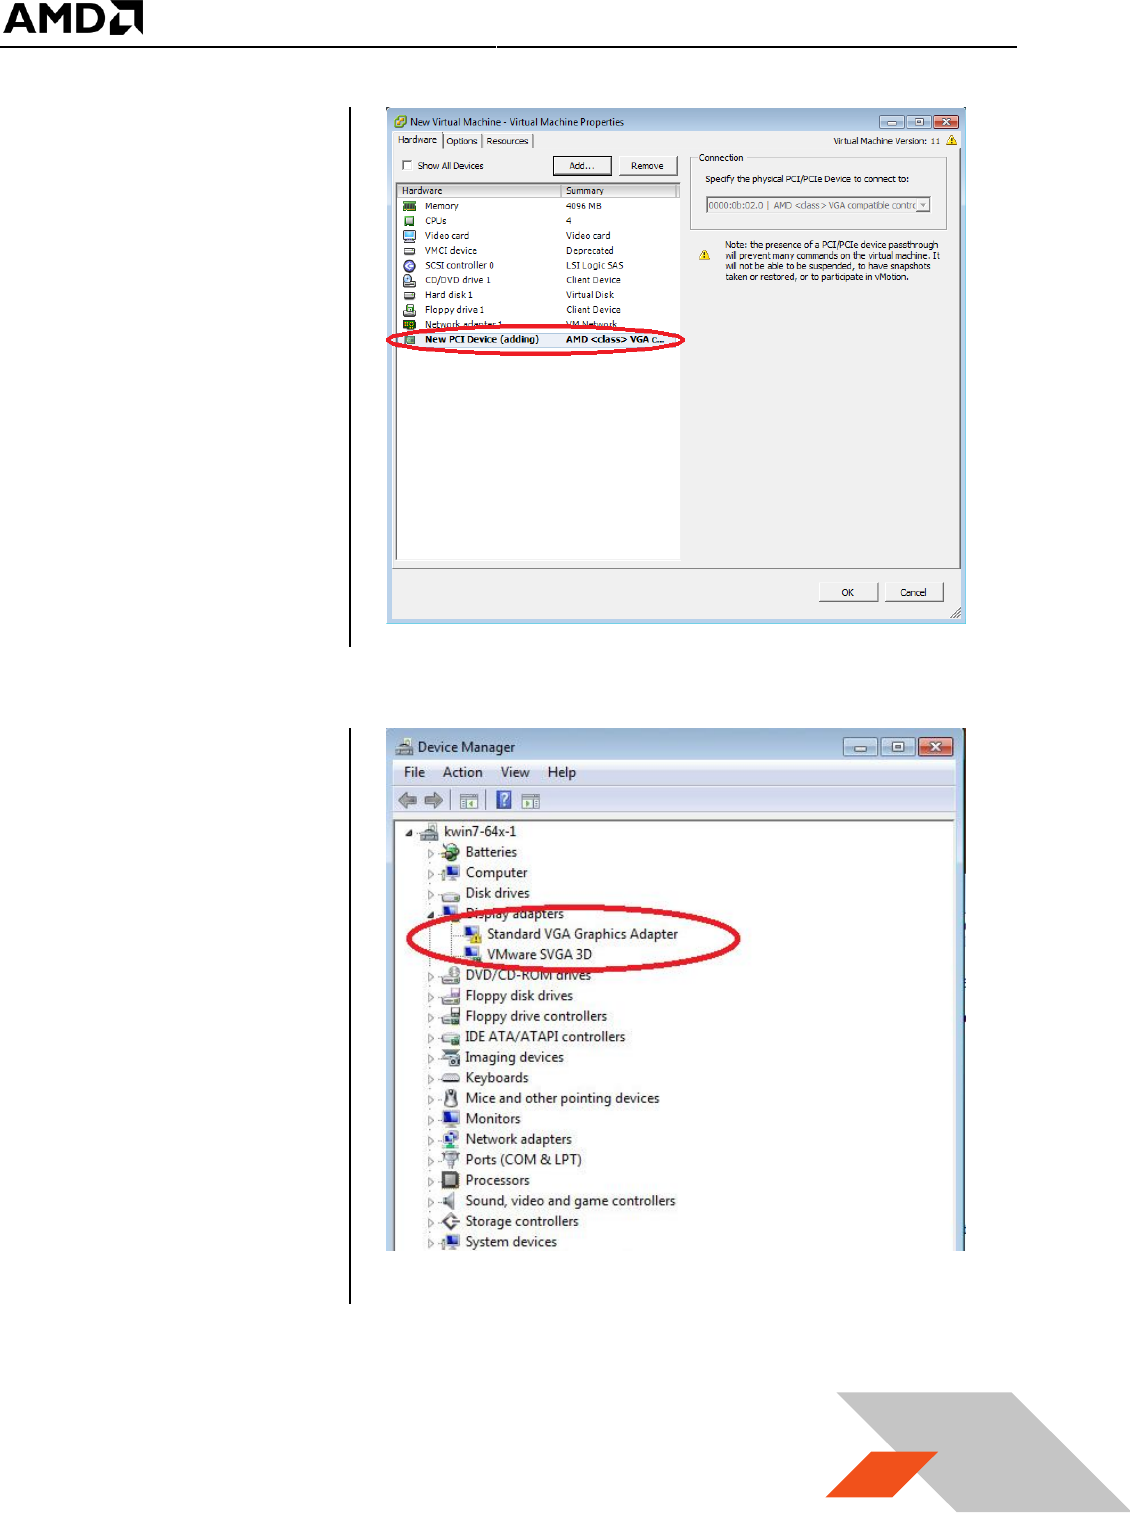
7. The device is now
part of the guest
VM’s hardware list.
To pass through
additional devices,
repeat the steps in
this section.
8. Once the guest VM is
powered on, the
passthrough device
becomes a part of
the guest VM’s
devices. To check
that this is the case,
open Device
Manager and review
the list of devices
under “Display
adapters”. Before
installation of the
graphics adapter
driver, the devices
will appear as,
“Standard VGA
Graphics Adapter”.
9. The next step is to install the graphics driver for the device.
MxGPU Setup Guide
Page 48 of 68
48
3.2.2 Guest VM management
Once a guest VM is up and running, the Snapshot feature can be used to copy an instance of that VM at
a particular state. This feature can be used to create stable backup points for the VM. This feature can
also be used to create templates to deploy new VMs without going through the OS installation process.
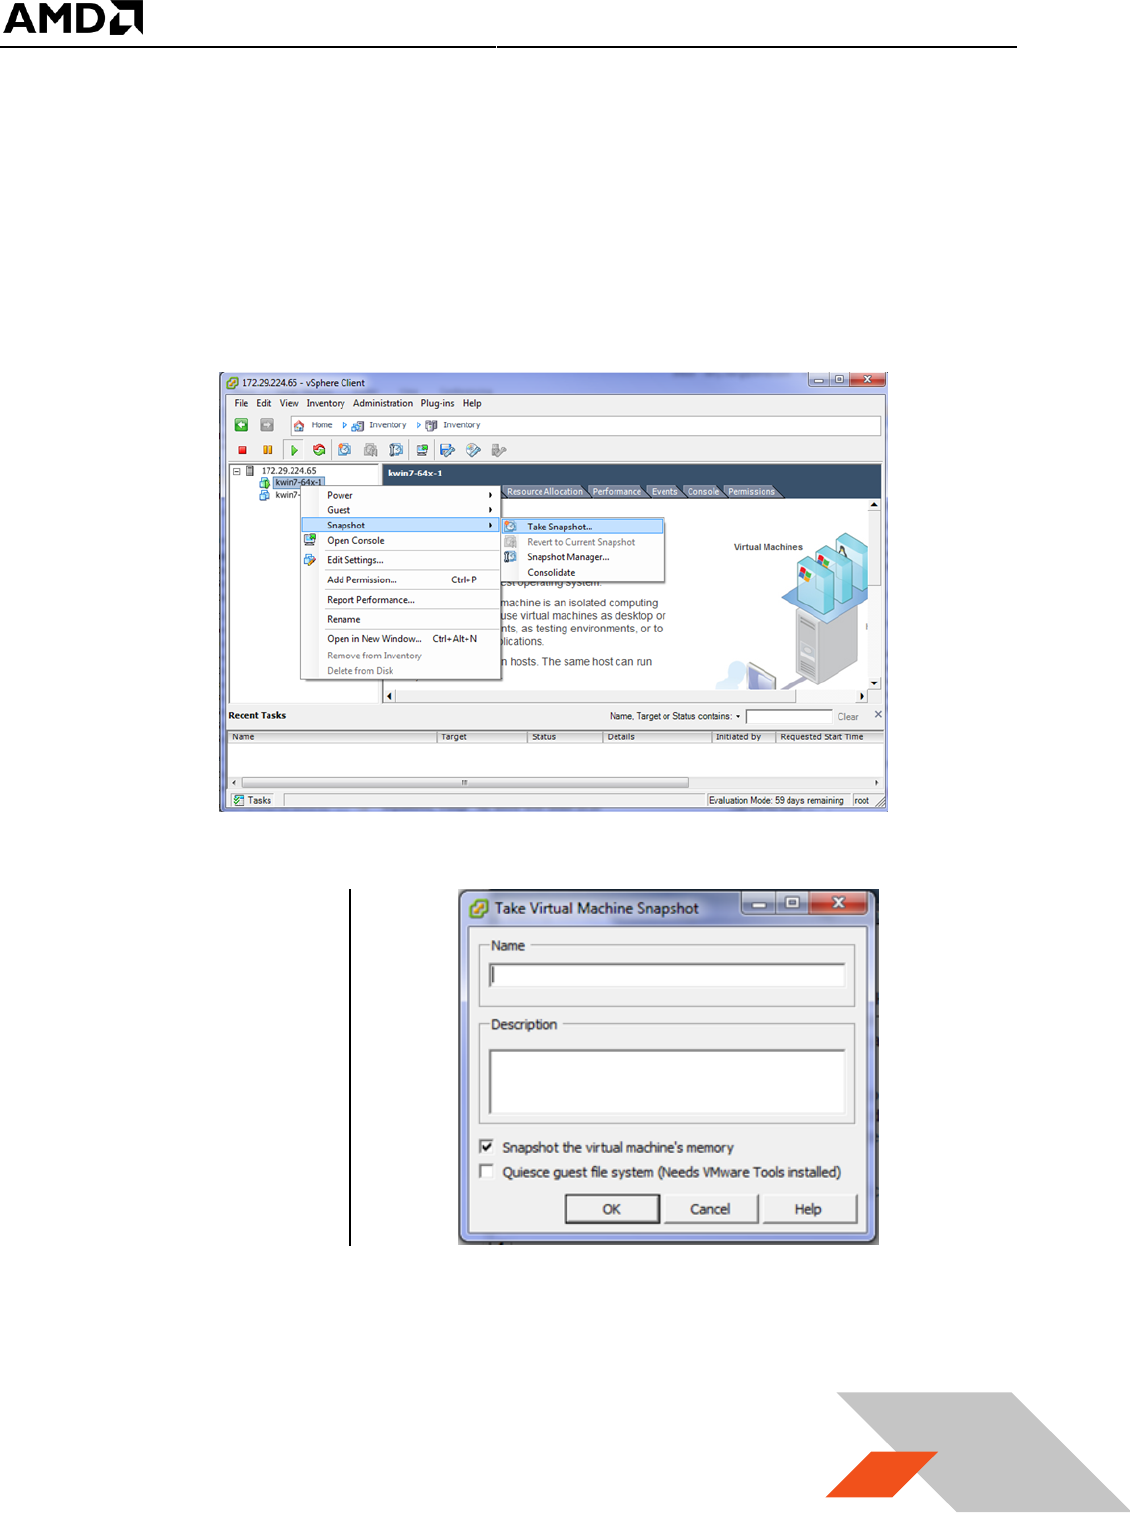
3.2.2.1 Create and Use Guest VM Snapshot
1. In the vSphere client, right click on the VM, navigate to Snapshot, and then “Take Snapshot…” :
2. Enter a name and
description as for the
virtual machine
snapshot.
MxGPU Setup Guide
Page 49 of 68
49
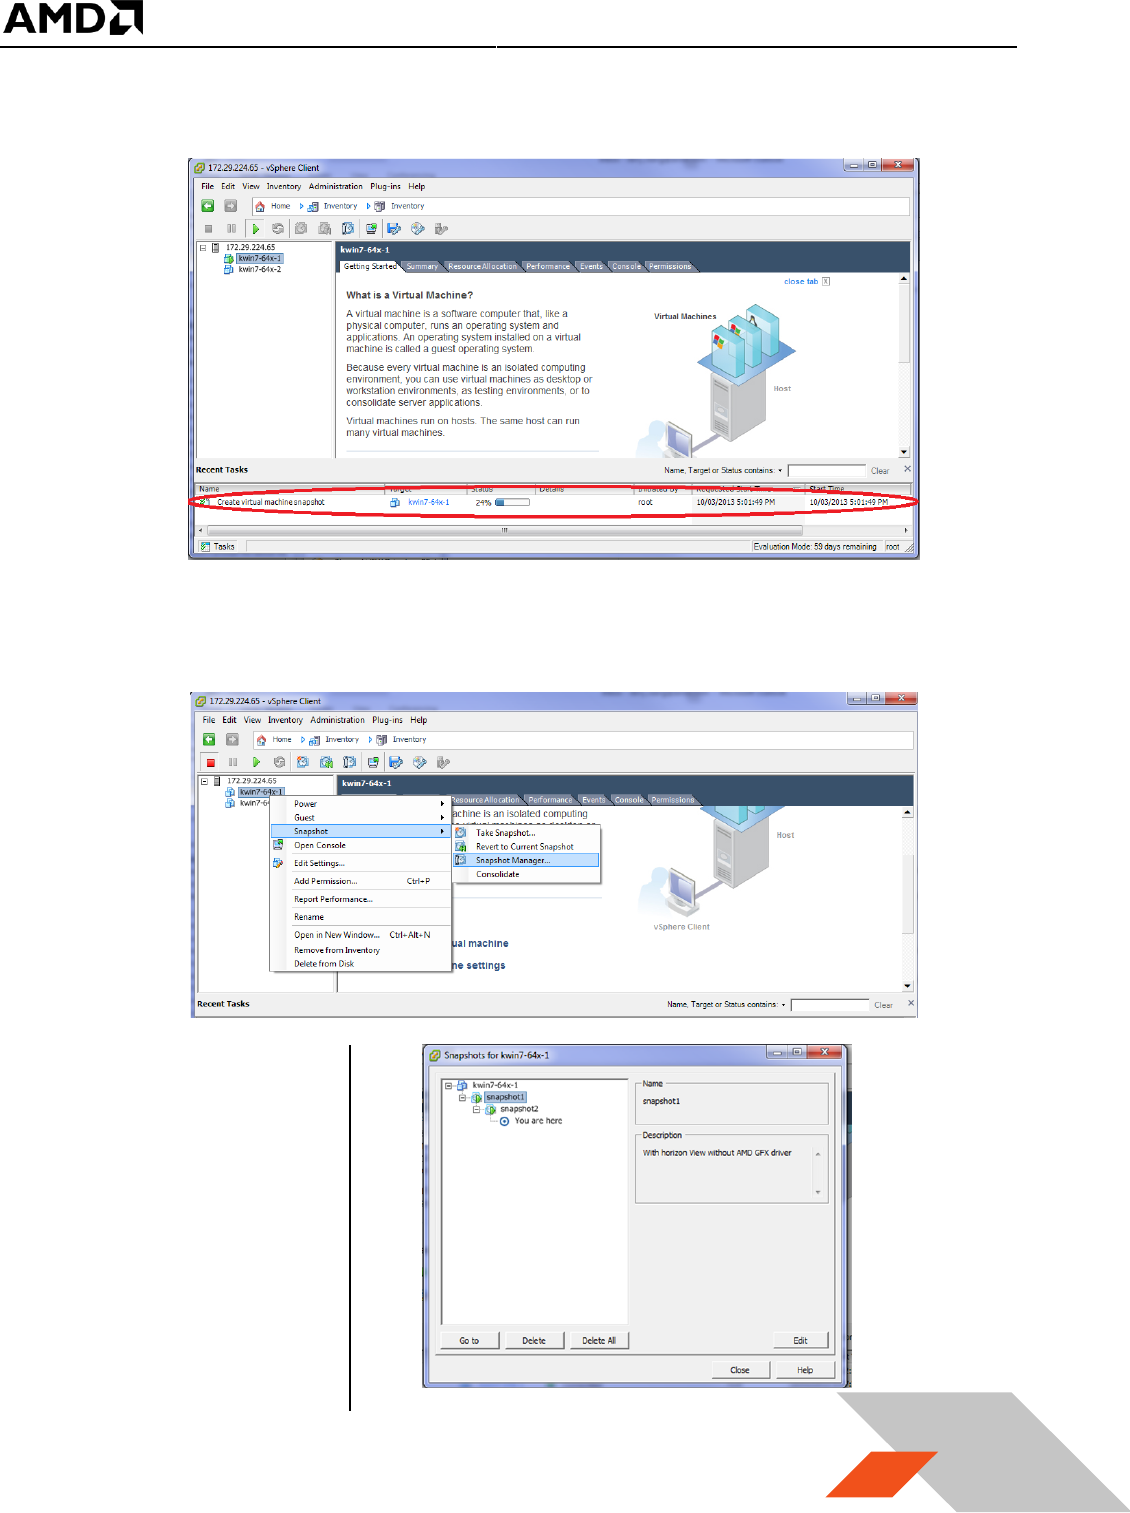
3. The snapshot process requires a few minutes to complete.
4. Once the snapshot is created and a rollback to that snapshot is required, shut down the guest
VM, right click on the guest VM, navigate to “Snapshot” and then “Snapshot Manager…” :
5. Select the snapshot
and click on the “Go
to” button. Click
“Yes” in the warning
window to complete
the reversion of the
VM back to the state
when the snapshot
was taken.
MxGPU Setup Guide
Page 50 of 68
50
3.2.2.2 Create Guest VM Template
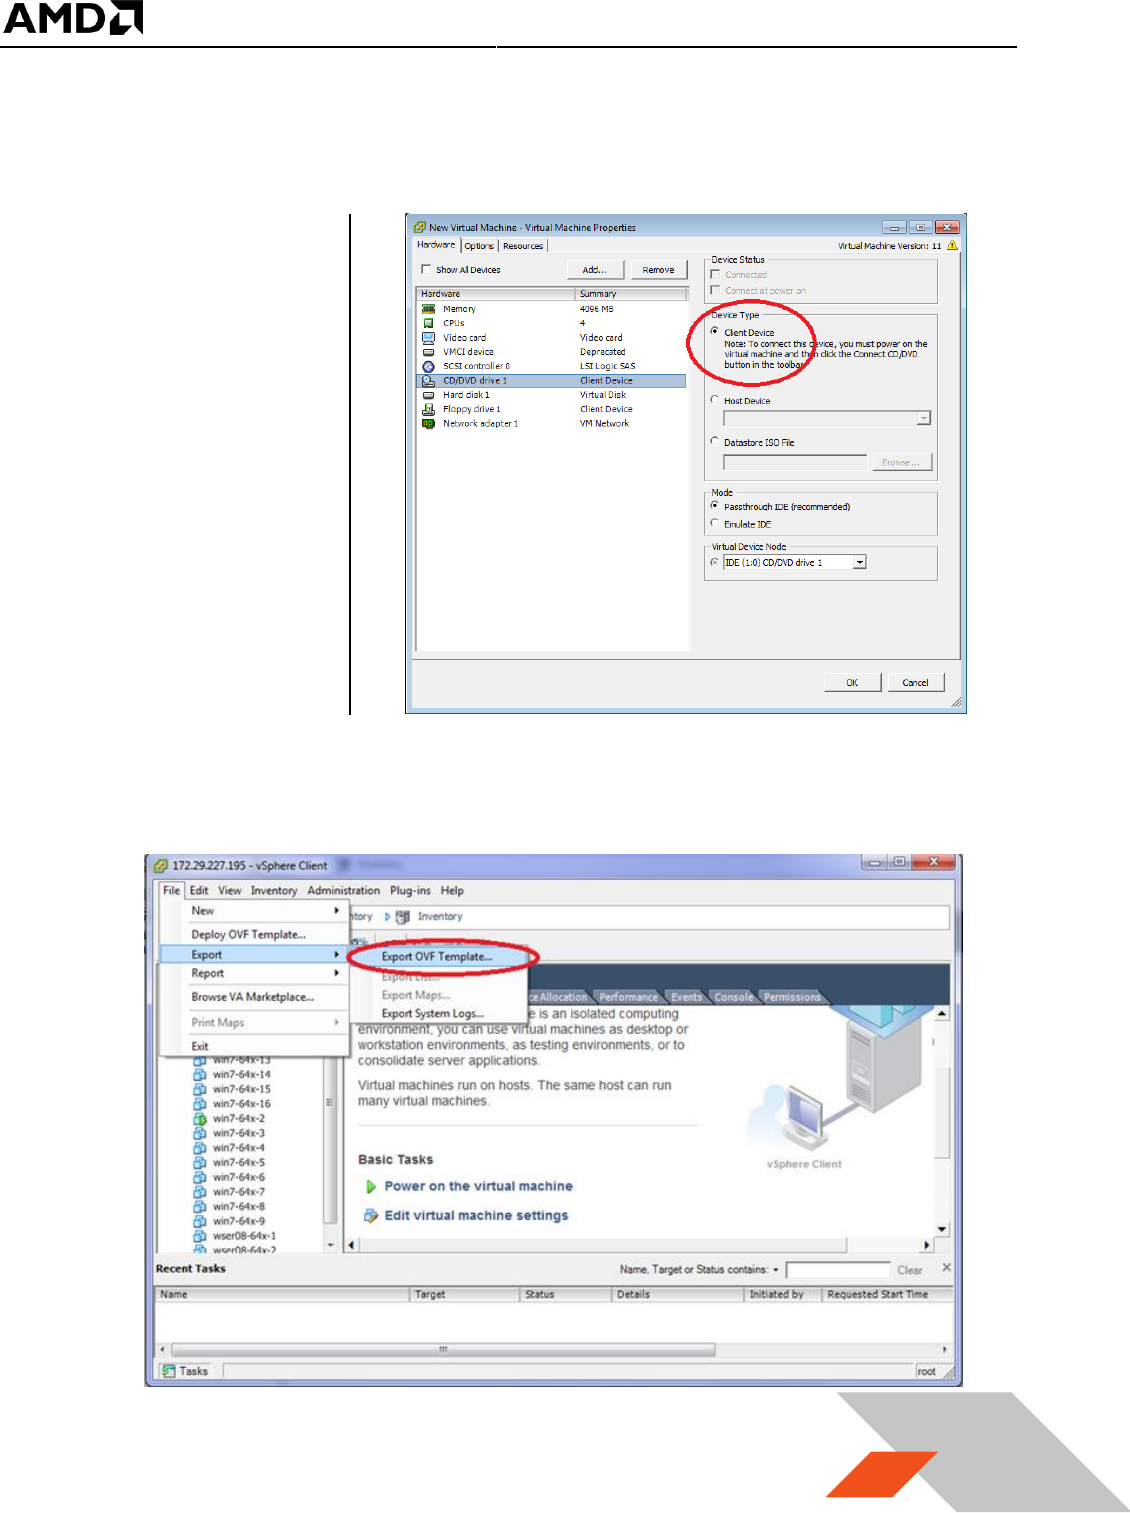
1. To create a template, ensure that the guest VM used for the template
a. Does not
have any
pass through
devices
b. CD/DVD drive
is set to Client
Device
2. Select the guest VM that will be used as a template. Click on “File” and navigate to “Export”,
then “Export OVF Template...”. If the guest VM has any passthrough devices, a warning window
will pop up to prevent the export operation.
MxGPU Setup Guide
Page 51 of 68
51
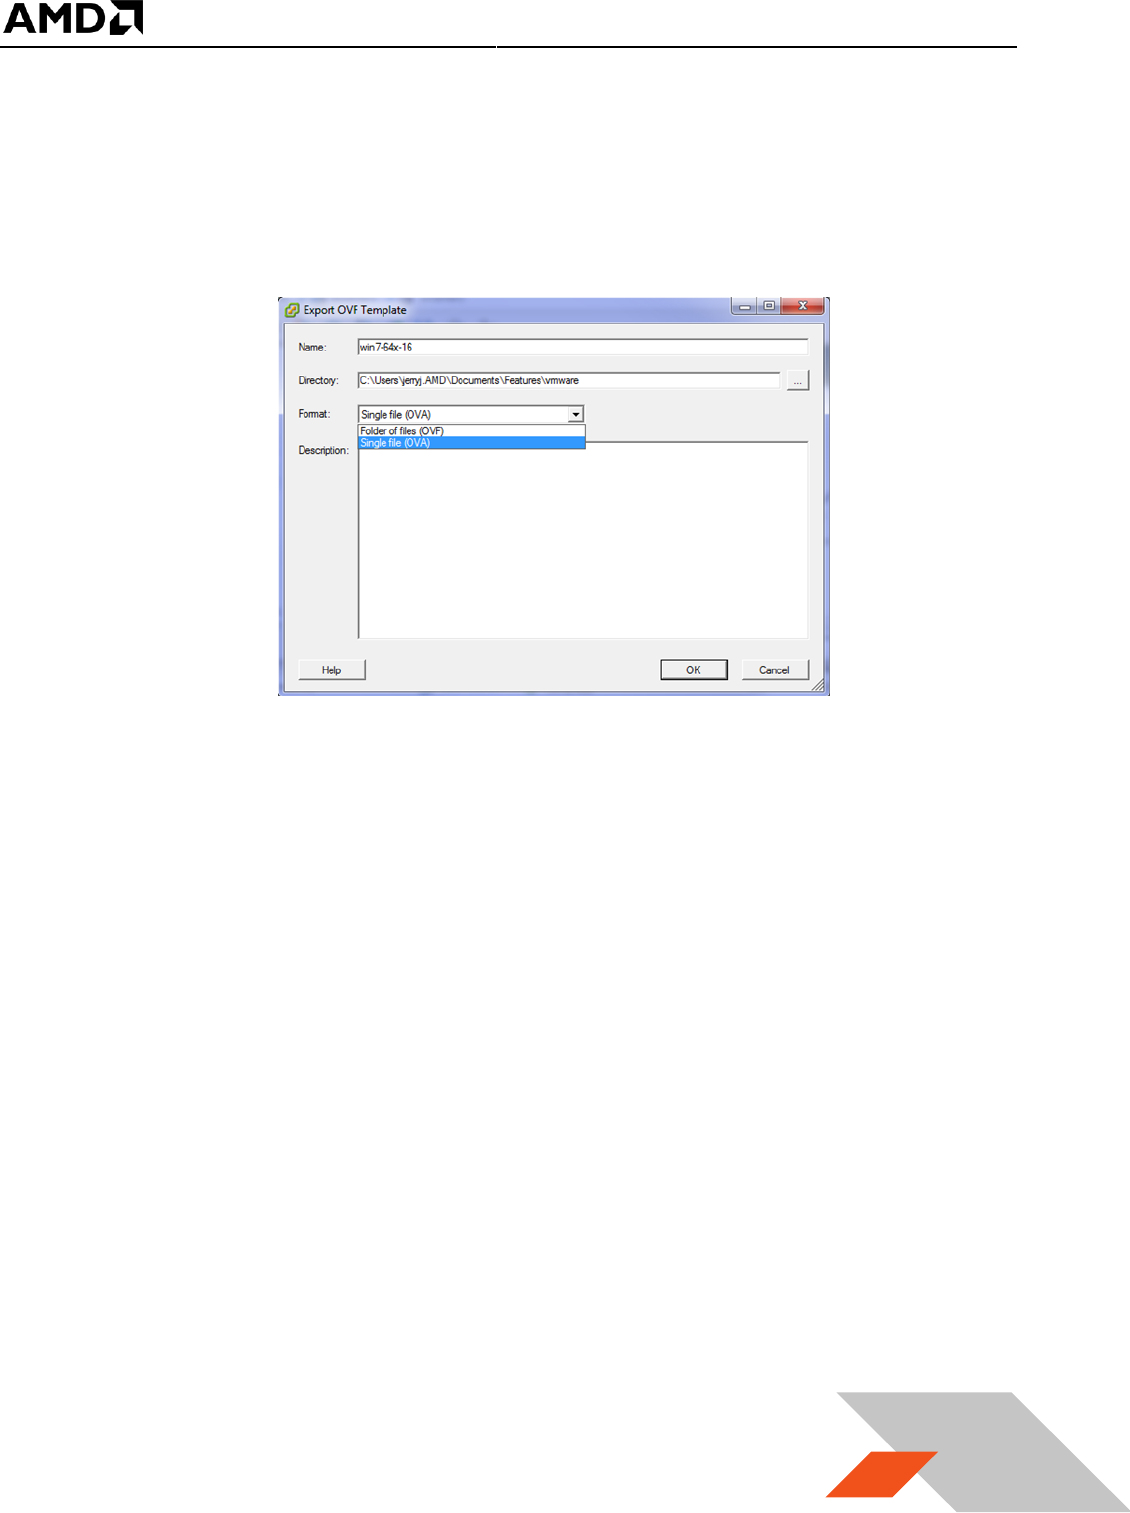
3. In the pop up window, input a descriptive name for this template; select a location to save the
template. Select single file (OVA) or folder of files (OVF), and (optionally) add a description for
this template.
4. It will take some time to create the template. Once the template is created, it can used to
deploy guest VMs with the same content and settings as the original VM.
MxGPU Setup Guide
Page 52 of 68
52
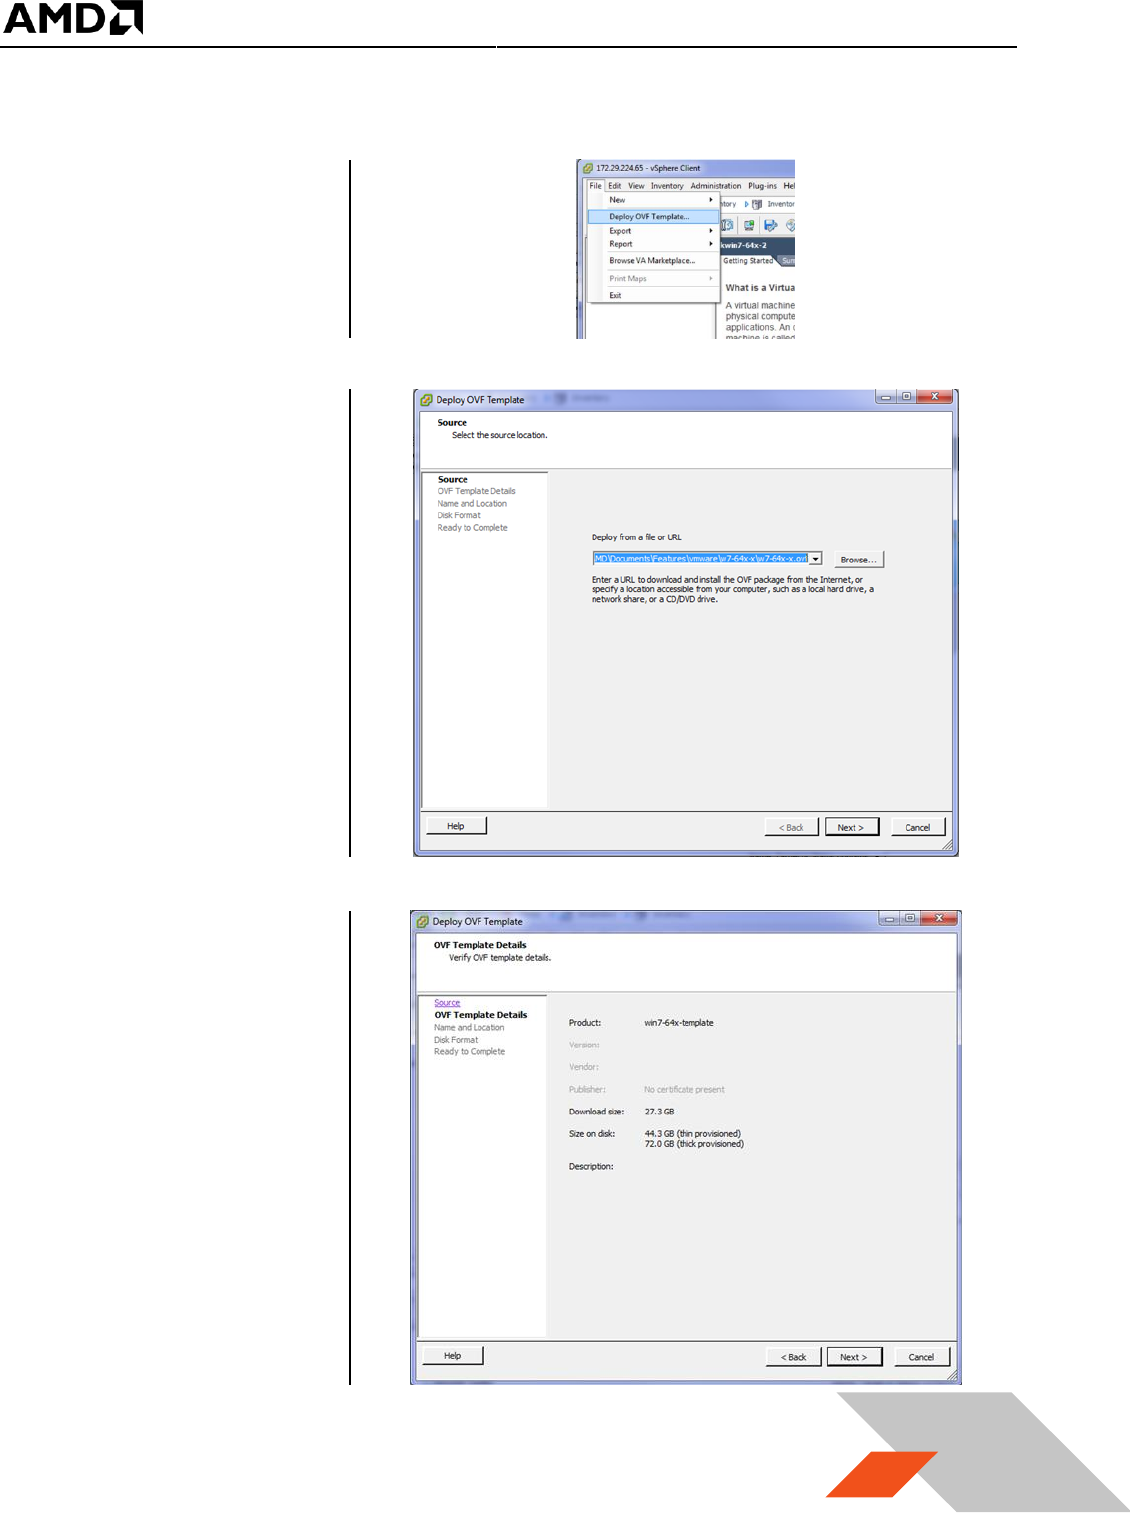
3.2.2.3 Deploy Guest VM Through Template
1. Right click on the
host name and
navigate to “Deploy
OVF Template…” :
2. A window will pop
up. Use the
“Browse” button to
find the template.
3. After clicking on
Next, details of the
template will be
shown :
MxGPU Setup Guide
Page 53 of 68
53
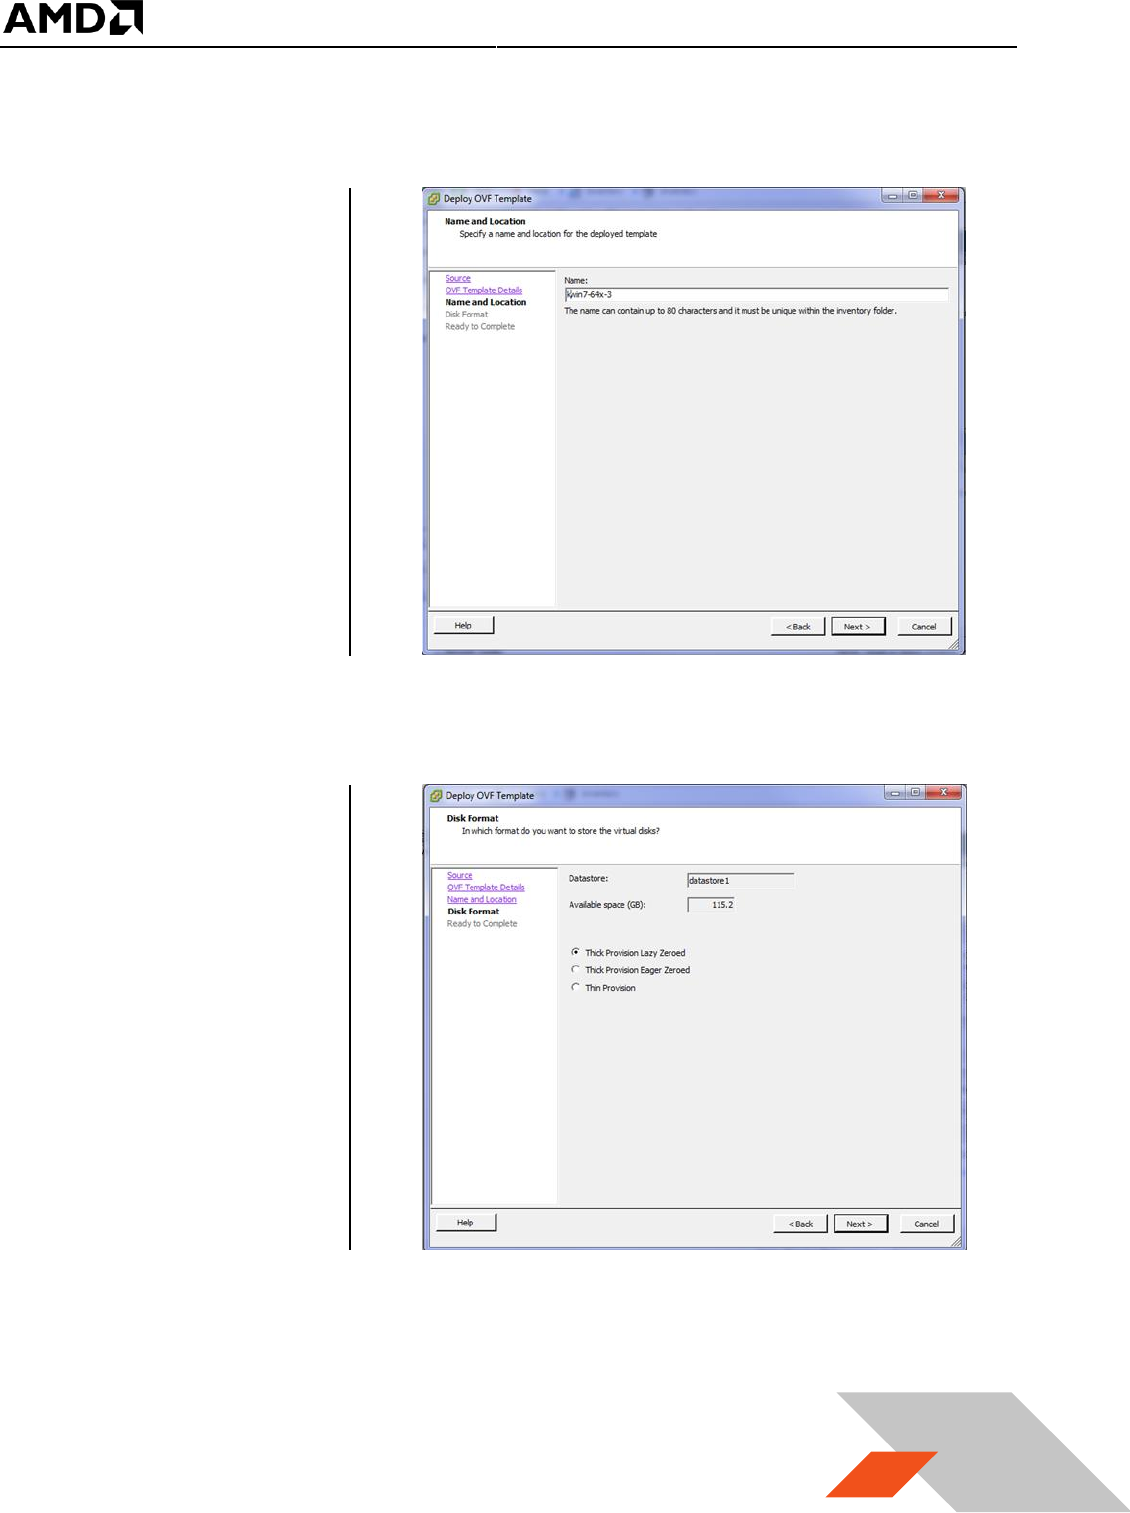
4. Click on Next and
enter a name for the
new guest VM :
5. After clicking on
Next, ensure that
“Thick Provision Lazy
Zeroed” is selected.
MxGPU Setup Guide
Page 54 of 68
54
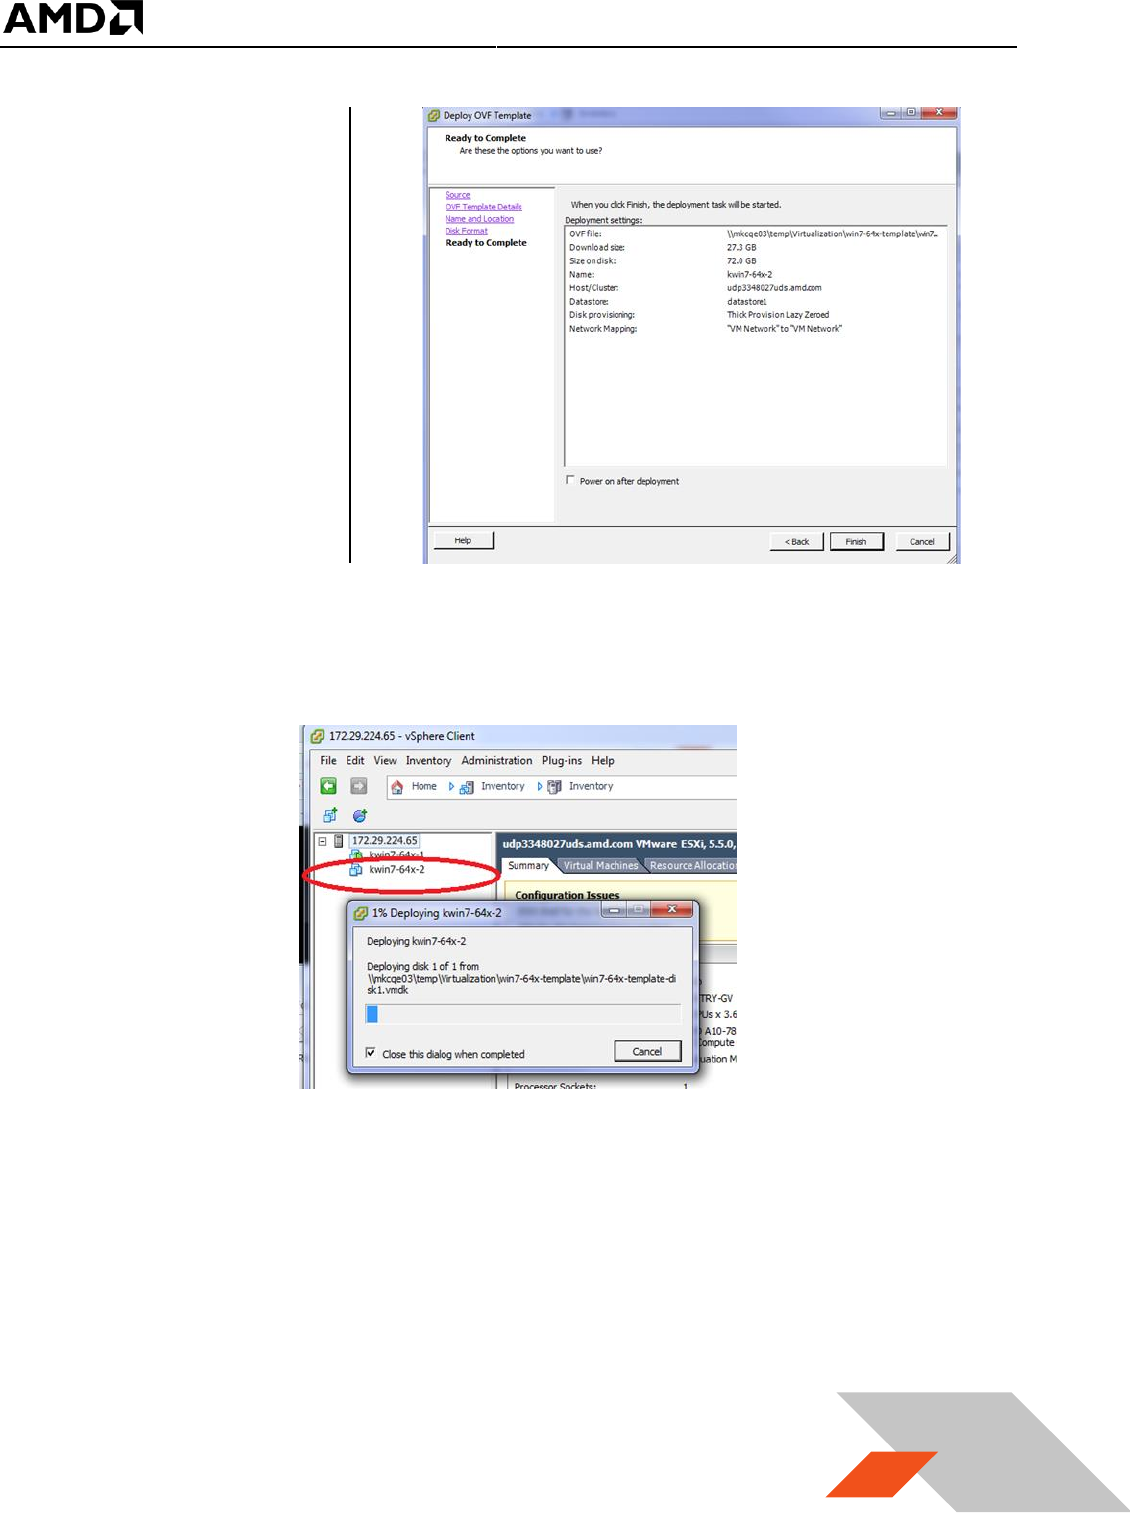
6. After clicking on
Next, a summary
page will show the
details of the VM to
be created :
7. Click on Finish. A status window will show the progress of the deployment. A new VM appears
under the host description.
8. It will take some time for vSphere to finish the deployment. Once complete, the VM can be
started. At this point, passthrough devices can be assigned to the device, as required.
MxGPU Setup Guide
Page 55 of 68
55
3.3 Client System Setup
Once the virtual machines are created in the host server, there are two methods for accessing these
VMs :
- Connect through a Horizon View client on a laptop, desktop or thin client system
- Connect through a zero client
-
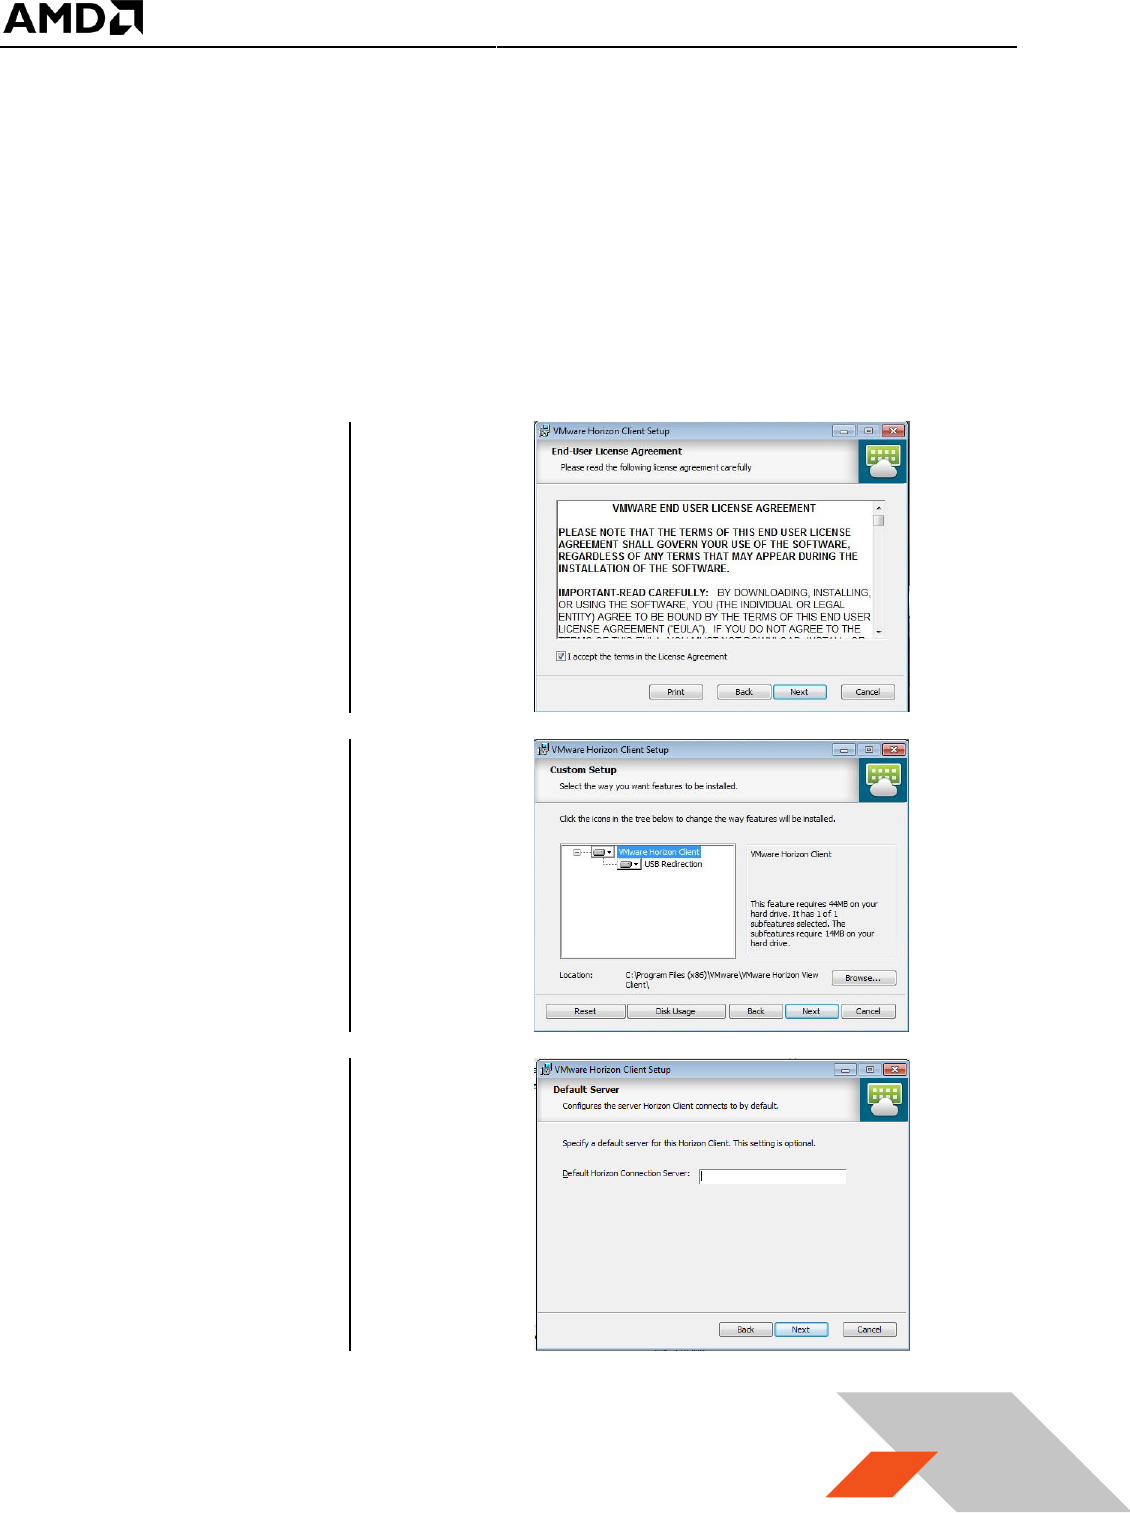
3.3.1 Horizon View Client Setup
1. On the client system or administrator system, download Horizon View indicated on Table 1.
2. Run this application
and accept the
License Agreement
3. Click on Next and
accept all the default
features selected :
4. Ignore the Default
Server, leave the
Default Horizon
Connection server
empty and click on
Next :
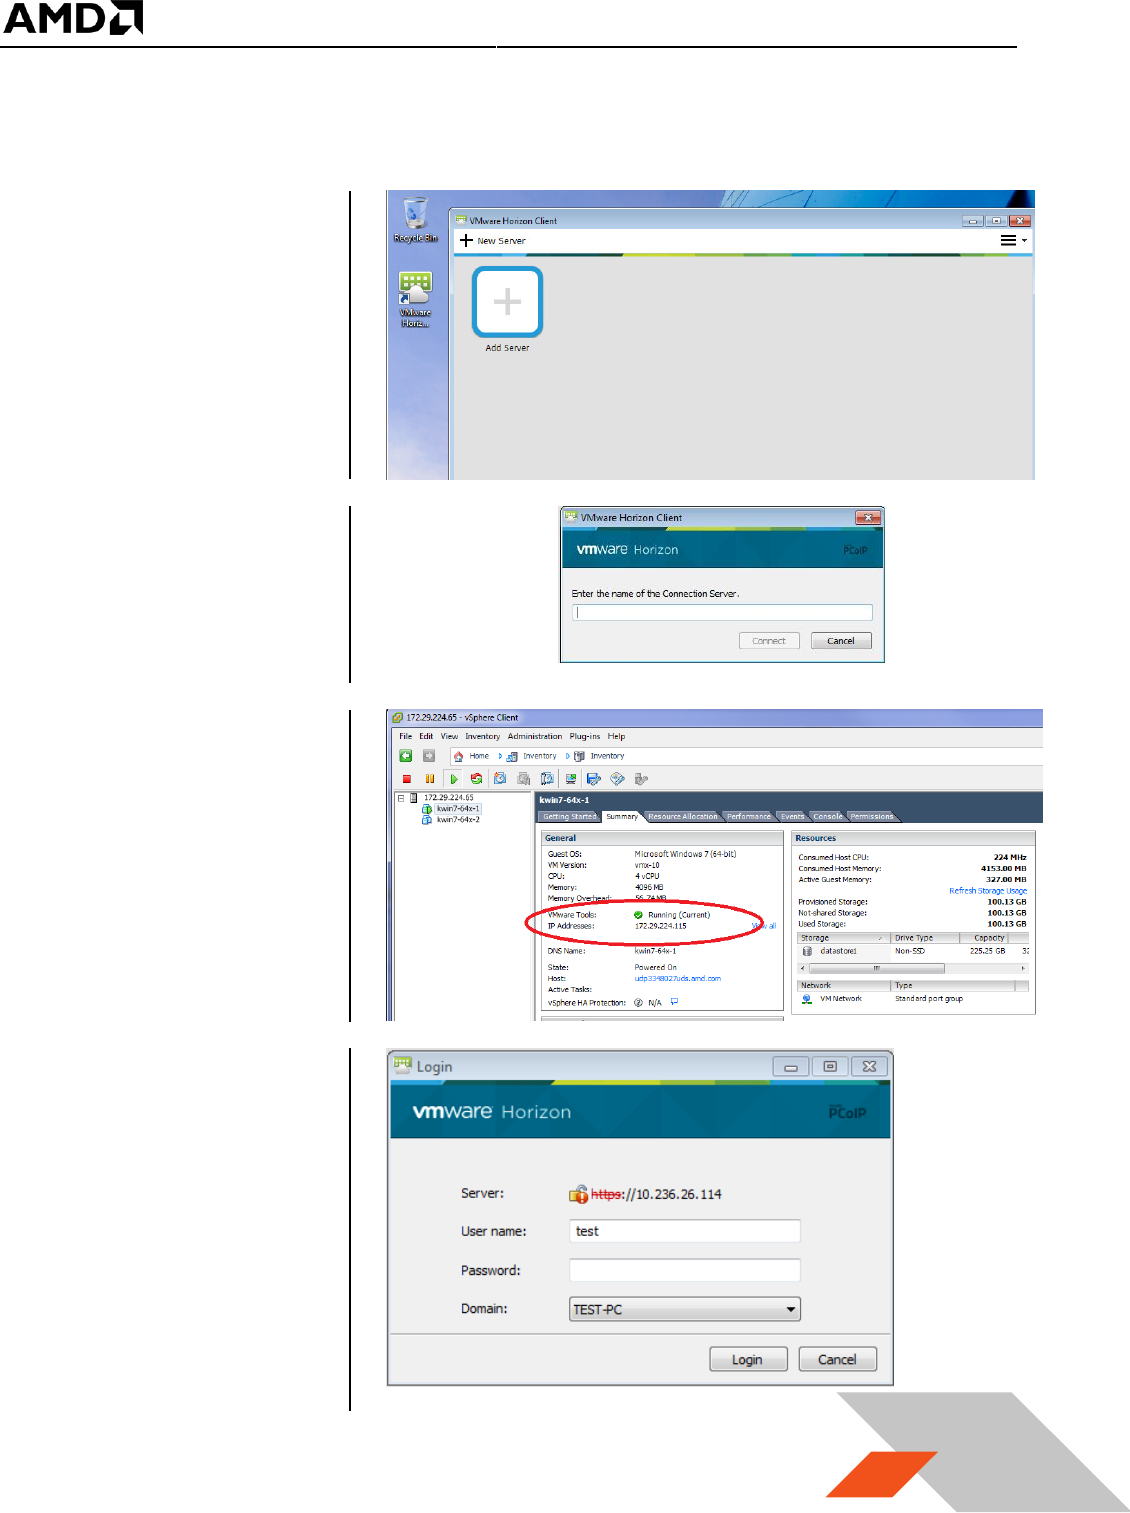
MxGPU Setup Guide
Page 56 of 68
56
5. Create the desktop shortcut and start menu shortcut. On next page, click on Install to complete
the installation.
6. Once the installation
completes, launch
Horizon View. The
following window
appears :
7. Clicking on “Add
Server” will pop up a
window that
prompts for the
connection target :
8. Type in the IP
address of the guest
VM to connect with.
The IP address of the
guest can be found
at guest VM
summary page in the
vSphere client
application.
9. Click on the
connection button
after entering the IP
address. A window
will pop up asking for
user name and
password. Enter the
guest VM’s user
name and password,
then click Login
button.
MxGPU Setup Guide
Page 57 of 68
57
10. After logging in, the virtual machine desktop will automatically snap to full screen size of the
connected monitor.
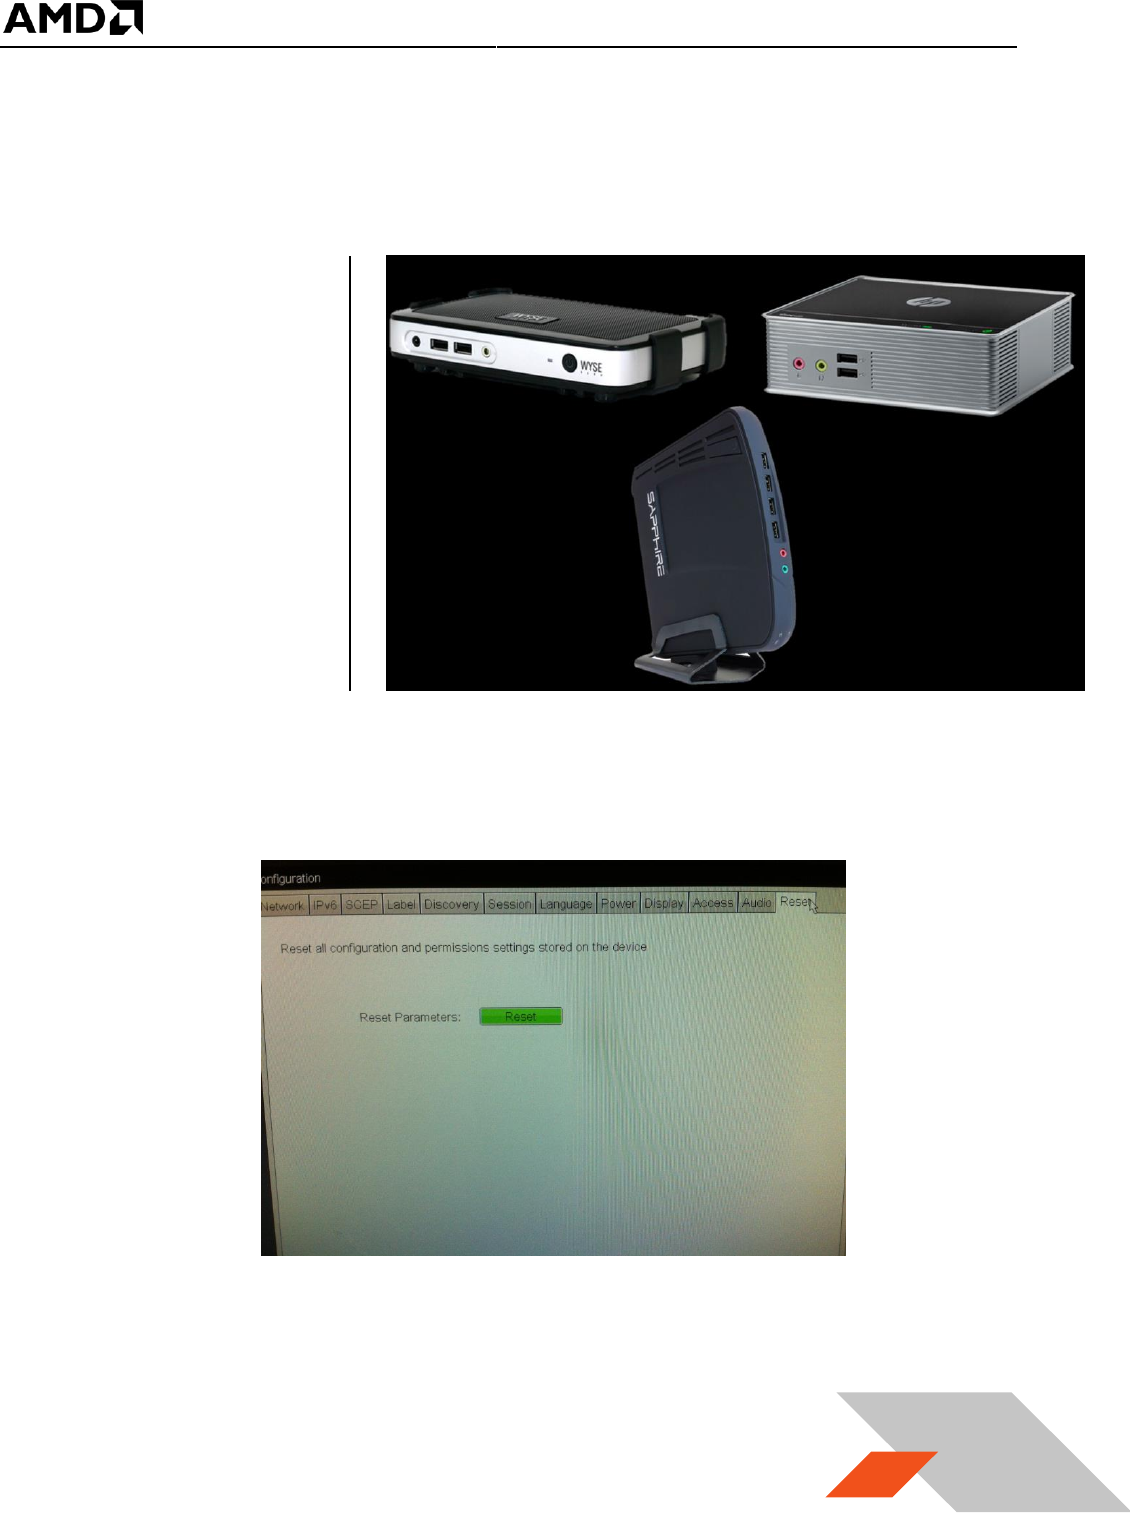
3.3.2 Zero Client Setup
1. Connect monitor,
keyboard, mouse,
network to the zero
client
2. If this is the first time using this zero client or the zero client has been used within other
network, click on the top-left corner select options-> Configuration. Navigate to Reset tab as the
following – this step is only needed for the first time that a zero client is connected on the test
network.
3. Click on reset, and click on Yes button. After a few minute, the system will reboot.
MxGPU Setup Guide
Page 58 of 68
58
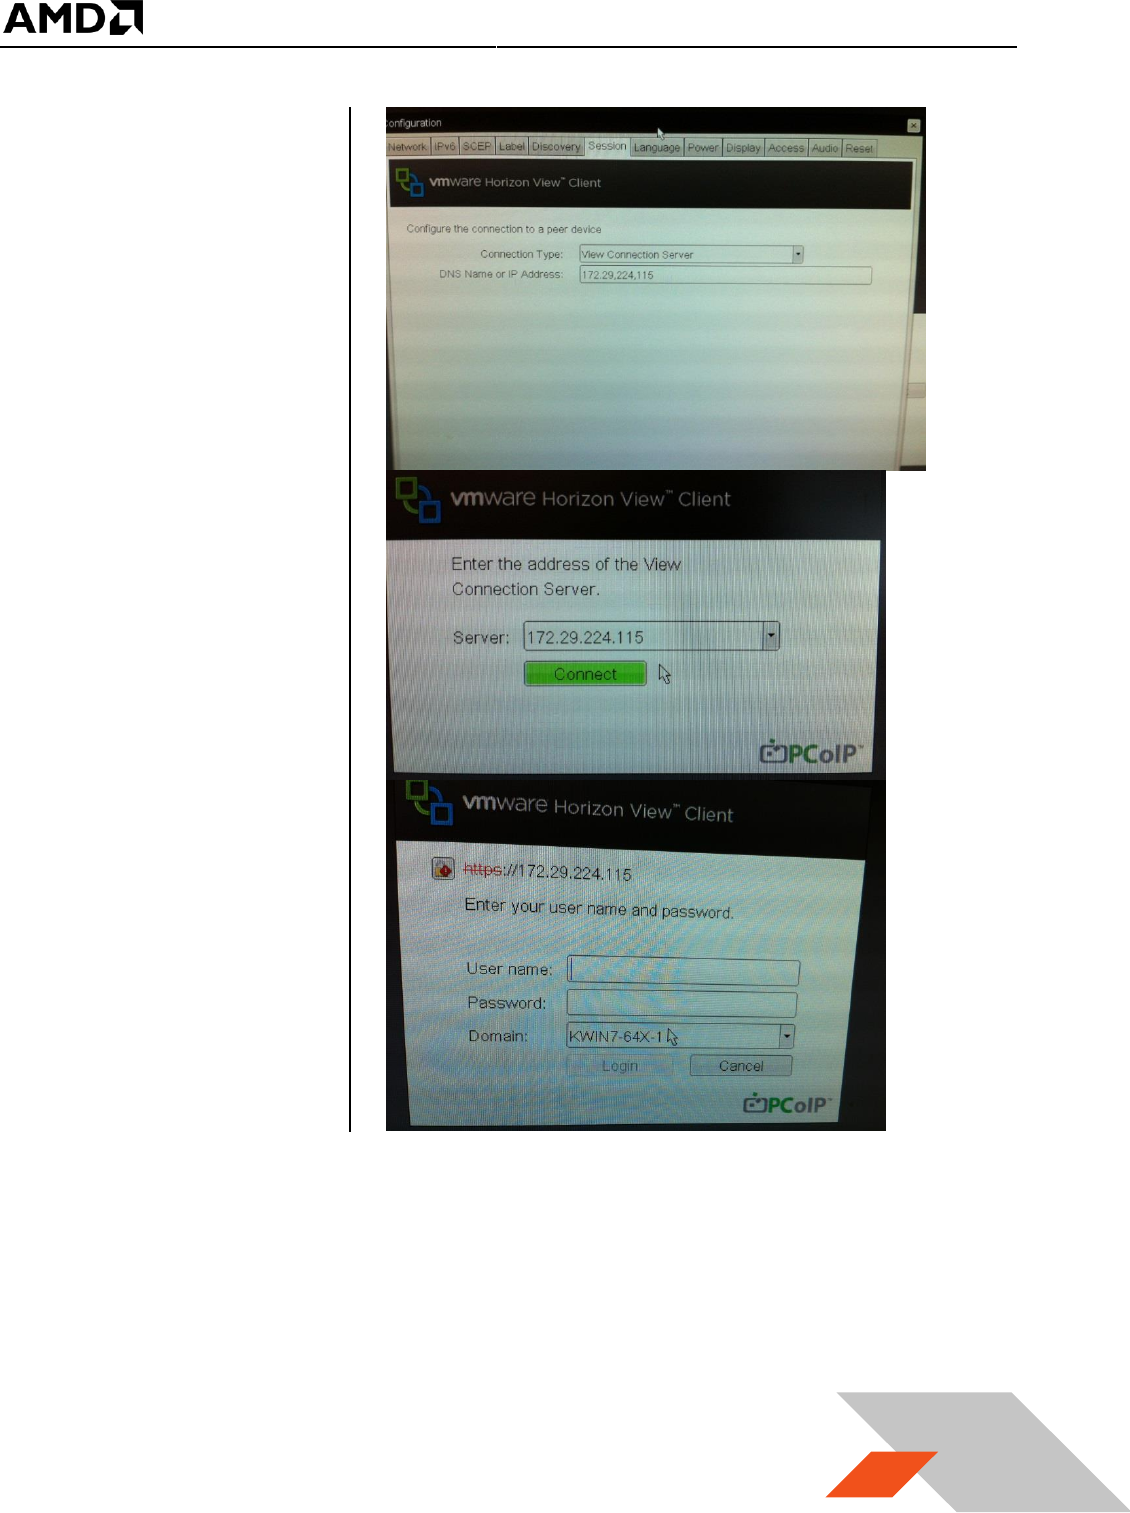
4. After reboot, click on
the top-left corner
select options->
Configuration.
Navigate to Session,
and select view
connection server
from the connection
Type, type in the IP
address of the guest
VM
5. Click on apply, and
close the windows.
The screen will have
a connection window
as:
6. Click on the connect
button a connect
window will show up
as the following
7. Enter the user name and password, then click on login button. The desktop should show up on
the monitor
Note: If the monitor’s resolution is too big (ex. 1920x1080), you might encounter black screen at
this stage. Using a smaller native resolution monitor (ex. 1366x768) will work around the
problem at this step. The larger monitor will be supported once the AMD driver is installed.
MxGPU Setup Guide
Page 59 of 68
59
3.4 GFX Driver Installation under Guest VM
The sequence described in this section applies to the AMD GFX driver installation in a guest VM.
MxGPU uses SR-IOV to replicate one device into several virtual devices that can then be configured
for pass through. The procedure for installing the driver on a VM using an MxGPU device is the same
procedure as installing the driver on a VM using a regular passthrough device under vDGA. The
following installation sequence is based on the Horizon View Agent 6.1.0 and higher. The steps for
setting up a virtual machine are summarized:
1. Create a guest VM and fresh install guest VM without GPU pass through. Refer to section 0 and
section 3.2.4.1 – reboot the guest VM.
2. From vSphere client and VM console, install VMtools. Refer to section 3.2.4.3 - reboot the guest
VM.
3. From vSphere client and VM console, install unified Horizon View Agent and Horizon View Agent
Direct Connection. Refer to section 3.2.4.4 – shutdown the guest VM.
4. From vSphere client, assign an AMD GPU device to this guest VM. Refer to section 3.2.1 - start
the guest VM.
5. Wait until an IP address appears for the guest VM in Summary tab. Start the Horizon View client
application from client system, configure as “PCoIP and full screen” and connect to guest VM.
Refer to section 3.3 for details.
6. Log into the guest VM and obtain driver package. Start installing GFX driver for the pass through
device. After installation completes, a reboot of the VM is required.
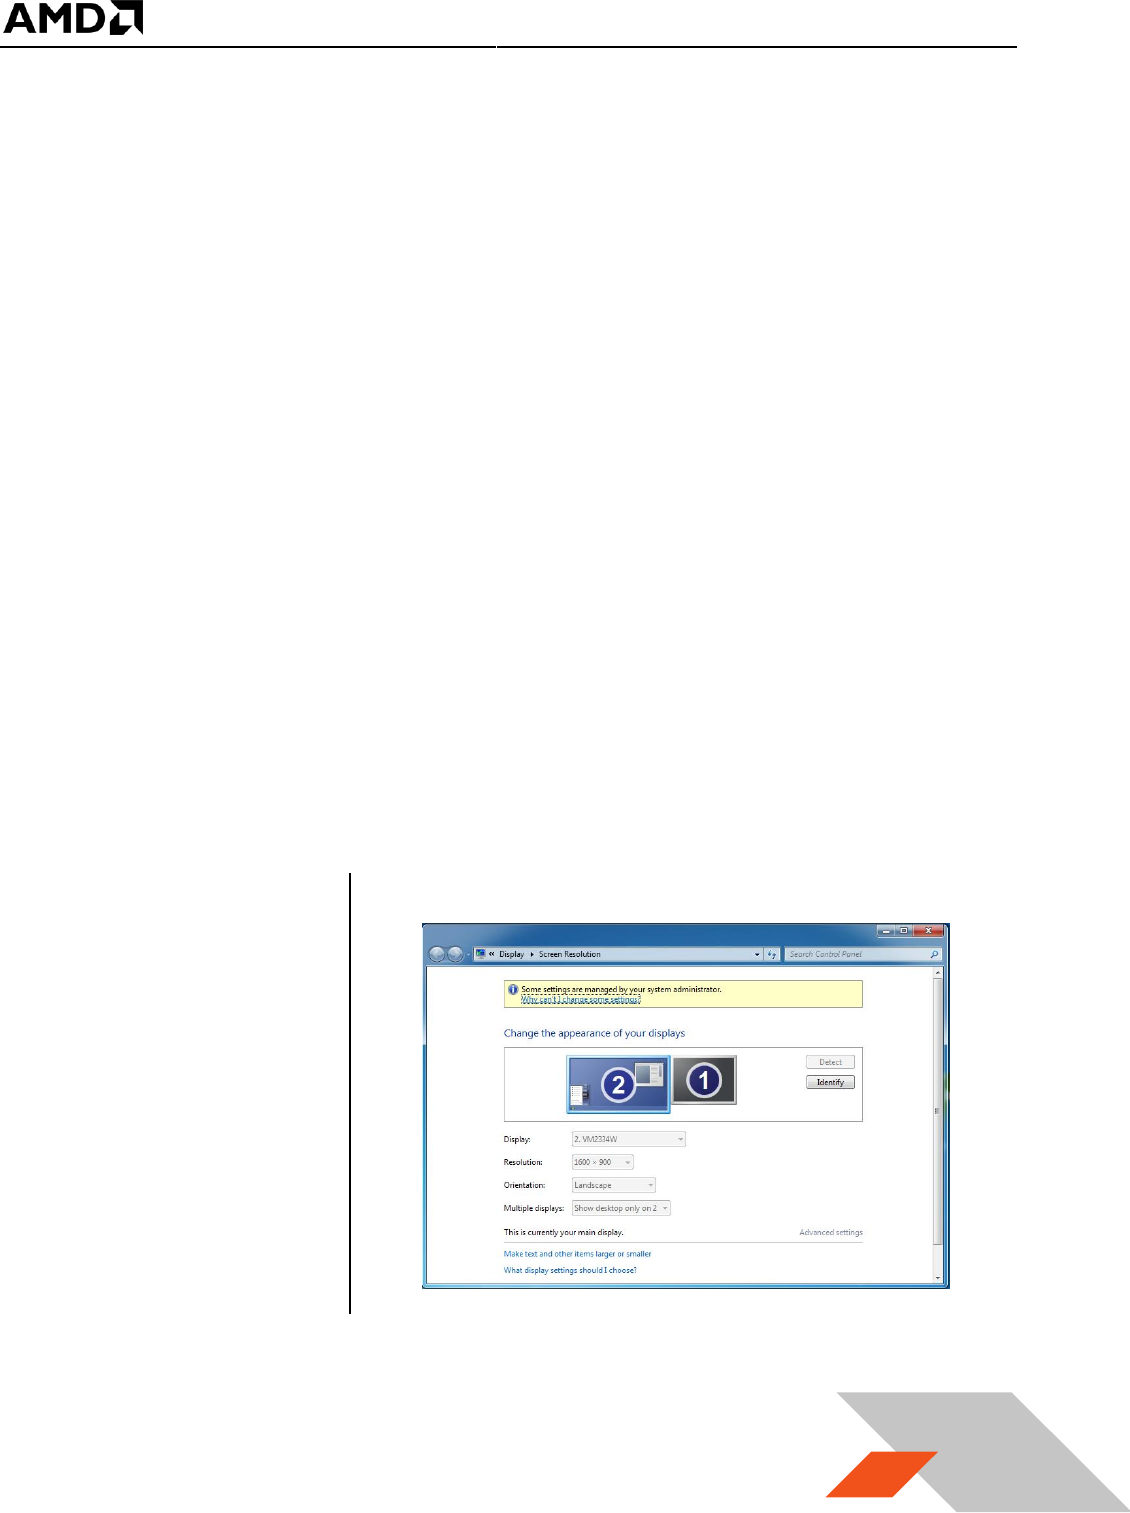
7. After reboot and IP
address of the virtual
machine appears in
the Summary tab,
from client system
(desktop/laptop),
connect to guest VM
again. Right click on
the desktop, select
screen resolution.
The screen
resolution window
appears and reports
the resolution similar to the following :
8. If a window similar to the above appears then the AMD GFX driver is properly installed and the
vSGA desktop is disabled.

MxGPU Setup Guide
Page 60 of 68
60
4. Setup MxGPU
The following sections describe the steps necessary to enable MxGPU on the graphics adapter(s) in the
host. Before proceeding, refer to the Appendix to ensure that the host system is enabled for
virtualization and SR-IOV (section 5.1). Once virtualization capabilities are confirmed for the host
system, follow the steps in the next two sections to program the graphics adapter(s) for SR-IOV
functionality and to connect the virtual functions created to available virtual machines.
4.1 Programming SR-IOV Parameters for MxGPU
1. Download and unzip the vib and MxGPU-Setup-Script-Installer.zip from Table 1.
2. Copy script and vib file to the same directory (Example : /vmfs/volumes/datastore1)
3. Using an SSH utility, log into the host and change the attribute of mxgpu-install.sh to be executable
4. Run command: ./mxgpu-install.sh ./<amdgpuv…vib>
• If a vib driver is specified, then that file will be used. If no vib driver is specified then the
script uses the vib in the current (same) directory.
• The script will display all available AMD adapters.
5. Next, the script will show three options : Auto/Hybrid/Manual
1) Auto : automatically creates a single config string for all available GPUs : Easiest
• the script prompts for one input (the number of virtual machines desired) and sets all other
settings accordingly (frame buffer, time slice, etc.)
• these settings are applied to all AMD GPUs available on the bus
• the script installs amdgpuv…vib and prompts for reboot
2) Hybrid : allows each GPU to be configured differently : Medium
• the script prompts for one input (the number of virtual machines desired) and sets all other
settings accordingly (frame buffer, time slice, etc.)
• these settings are applied to the selected AMD GPU; the process repeats for the next GPU
• the script installs amdgpuv…vib and prompts for reboot
3) Manual : configures each GPU one by one prompting for individual settings : Advanced
• the script prompts the user to select one of the GPUs,
• the script prompts the user to enter VF number, FB size/VF, time slice
• these settings are applied to the selected AMD GPU; the process repeats for the next GPU
• the script installs amdgpuv...vib and prompts for reboot
For users who want to understand the individual steps required for vib installation and configuration,
section 5.2 provides more advanced steps.

MxGPU Setup Guide
Page 61 of 68
61
4.2 VF Pass Through
The steps for physical device
(physical function)
passthrough is detailed in
section 3.2.1. Once the VFs
(virtual functions) are set up,
then passing through theses
VFs follows the same
procedure. To successfully
pass through the VFs, the
physical device CANNOT be
configured as a passthrough
device. If the physical device
is being passed through to
the VM, then the GPUV
driver will not install
properly. If that happens, the
VFs will not be enabled and
no VFs will be shown.
Once the VFs are enabled, they will be listed in the available device list for pass through, and the status
of the PF will be changed to unavailable for pass through. No additional operation is needed to move VF
into pass through device list.

MxGPU Setup Guide
Page 62 of 68
62
5. Appendix
5.1 Host Server Configuration
To enable the MxGPU feature, some basic virtualization capabilities need to be enabled in the SBIOS.
These capabilities may be configured from the SBIOS configuration page during system bootup.
Different system BIOS vendors will expose different capabilities differently. Some may have one control
that enables a number of these capabilities. Some may expose controls for some capabilities while
hardcoding others. The following settings, taken from an American Megatrends system BIOS, provides a
list of the minimal set of capabilities that have to be enabled :
Server CPU supports MMU
Server chipset supports AMD IOMMU or Intel VT-d
The option “Intel VT for Directed I/O (VT-d)” should be enabled
Example Path : IntelRCSetup IIO Configuration Intel(R) VT for Directed I/O (VT-d) Intel VT
for Directed I/O (VT-d)
Server (SBIOS) support PCIe standard SR-IOV
The option “SR-IOV Support” should be enabled.
Example Path : Advanced PCI Subsystem Settings SR-IOV Support
Server (SBIOS) support ARI (Alternative Routing ID)
The option “ARI Forwarding” should be enabled.
Example Path : Advanced PCI Subsystem Settings PCI Express GEN 2 Settings ARI
Forwarding
Server (SBIOS and chipset (root port/bridge)) supports address space between 32bit and 40bit
If there is an “Above 4G Decoding” enable it.
Example Path : Advanced PCI Subsystem Settings Above 4G Decoding
Server (Chipset (root port / bridge)) supports more than 4G address space
There may be an option “MMIO High Size” for this function (default may be 256G).
Example Path : IntelRCSetup Common RefCode Configuration MMIO High Size
Examples on the next page demonstrate implementations from other system BIOS vendors.
MxGPU Setup Guide
Page 63 of 68
63
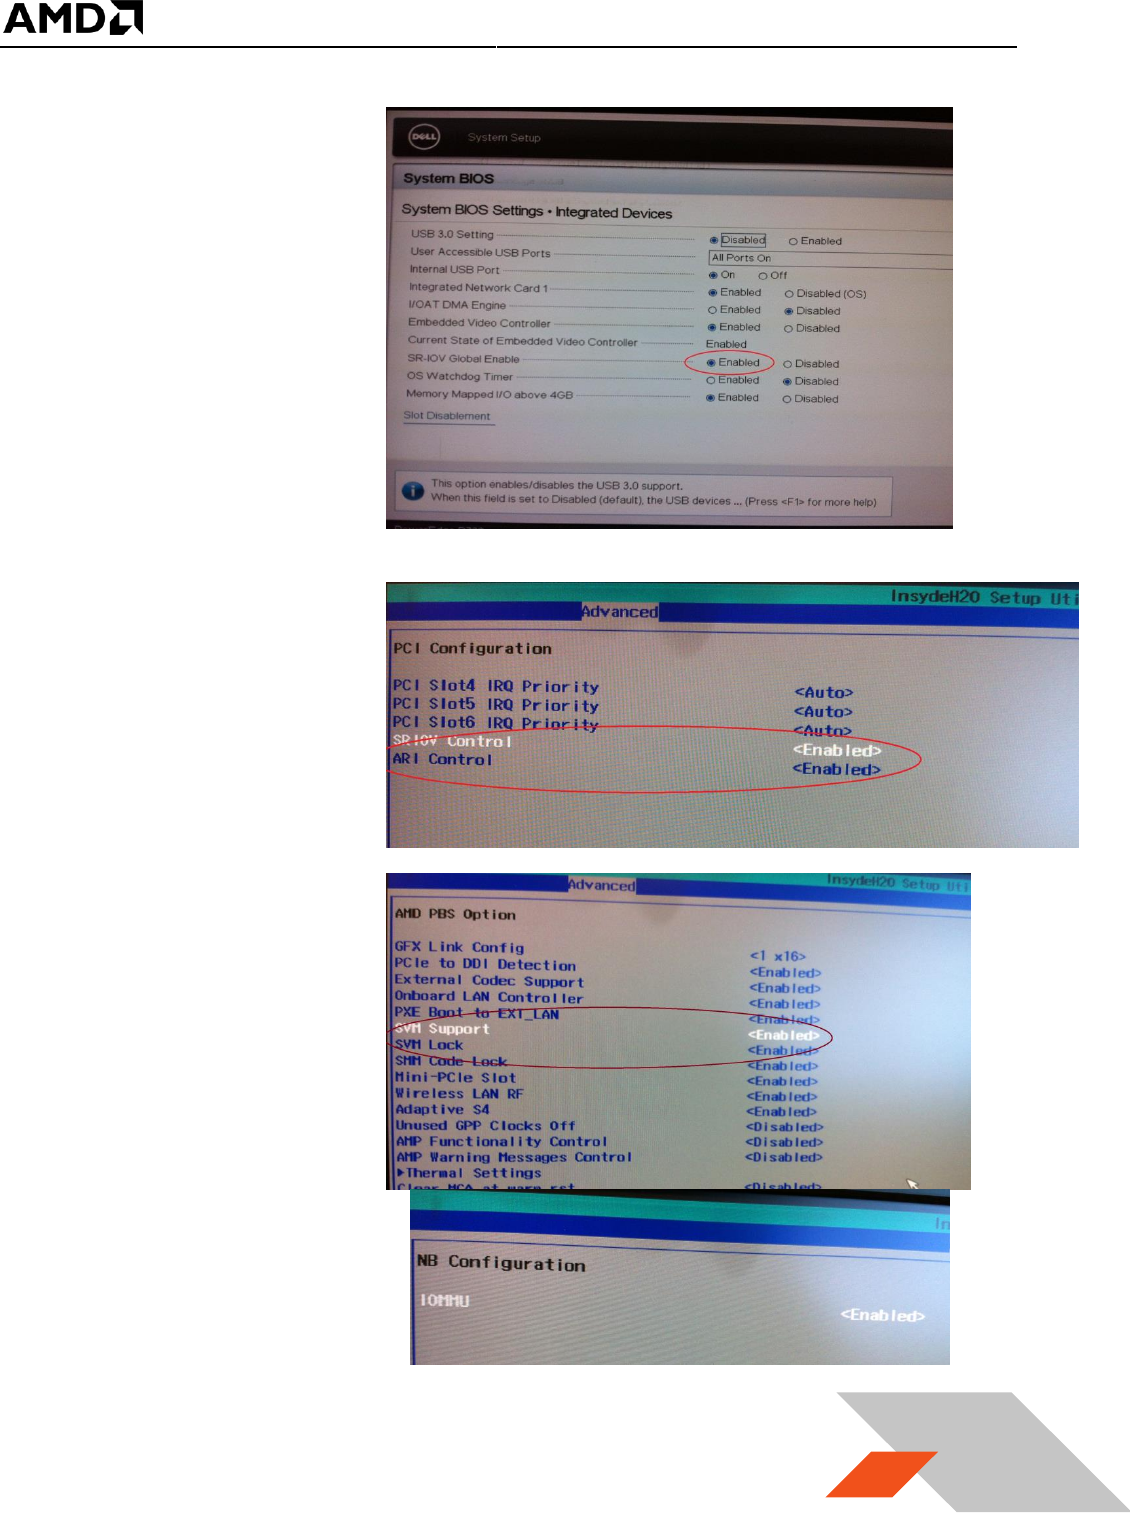
The following example shows
how to enable SR-IOV on a
Dell R730 platform.
On some platforms, the
SBIOS configuration page
provides more options to
control the virtualization
behavior. One of these
options is the ARI
(alternative reroute
interface) as shown below.
In addition, some platforms
also provide controls to
enable/disable SVM and/or
IOMMU capability. These
options must be enabled on
the platform.
MxGPU Setup Guide
Page 64 of 68
64
5.2 Manual Installation for GPUV Driver for VMware ESXi
*note that the GPUV driver refers to the vib driver.
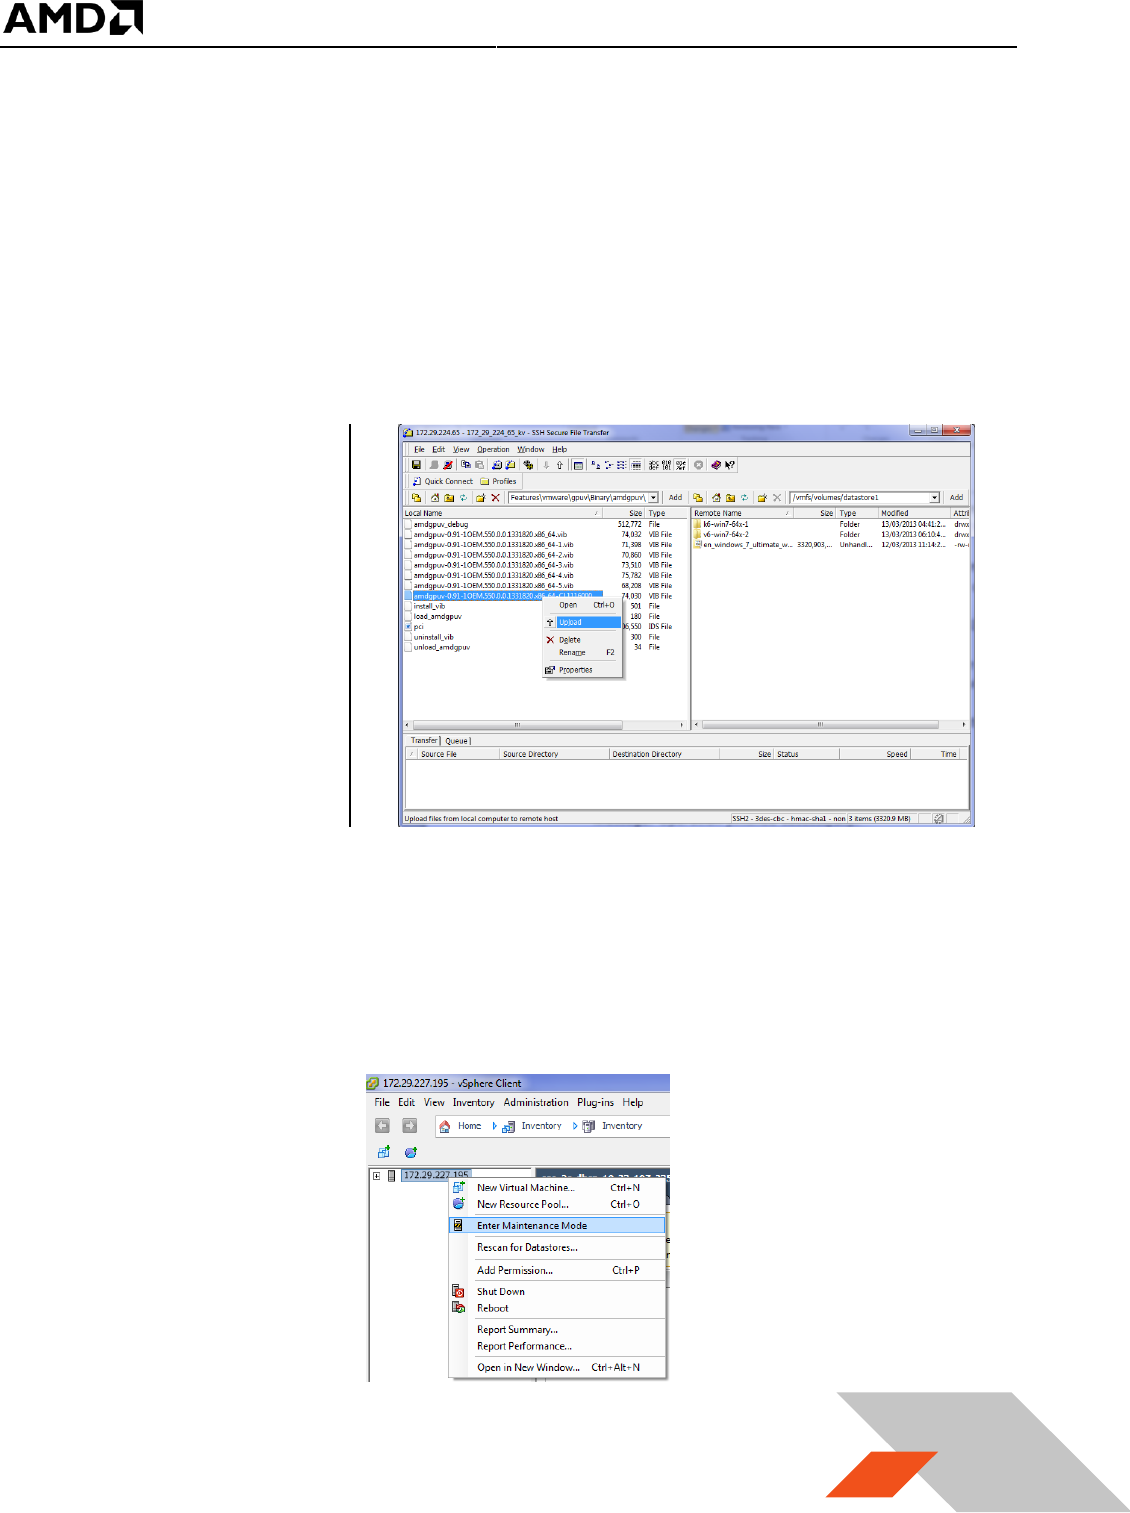
5.2.1 Upload GPUV Driver
1. Download the GPUV driver to the administrator system from Table 1.
2. Start SSH Secure File Transfer utility and connect to the host server.
3. On the left (the
administrator
system), navigate to
the directory where
the GPUV driver is
saved; on the right
(the host system),
navigate to
/vmfs/volumes/data
store1
4. Right click on the GPUV driver file and select “Upload” to upload it to
/vmfs/volumes/datastore1.
5.2.2 Install GPUV Driver
1. In vSphere client, place system into maintenance mode
MxGPU Setup Guide
Page 65 of 68
65
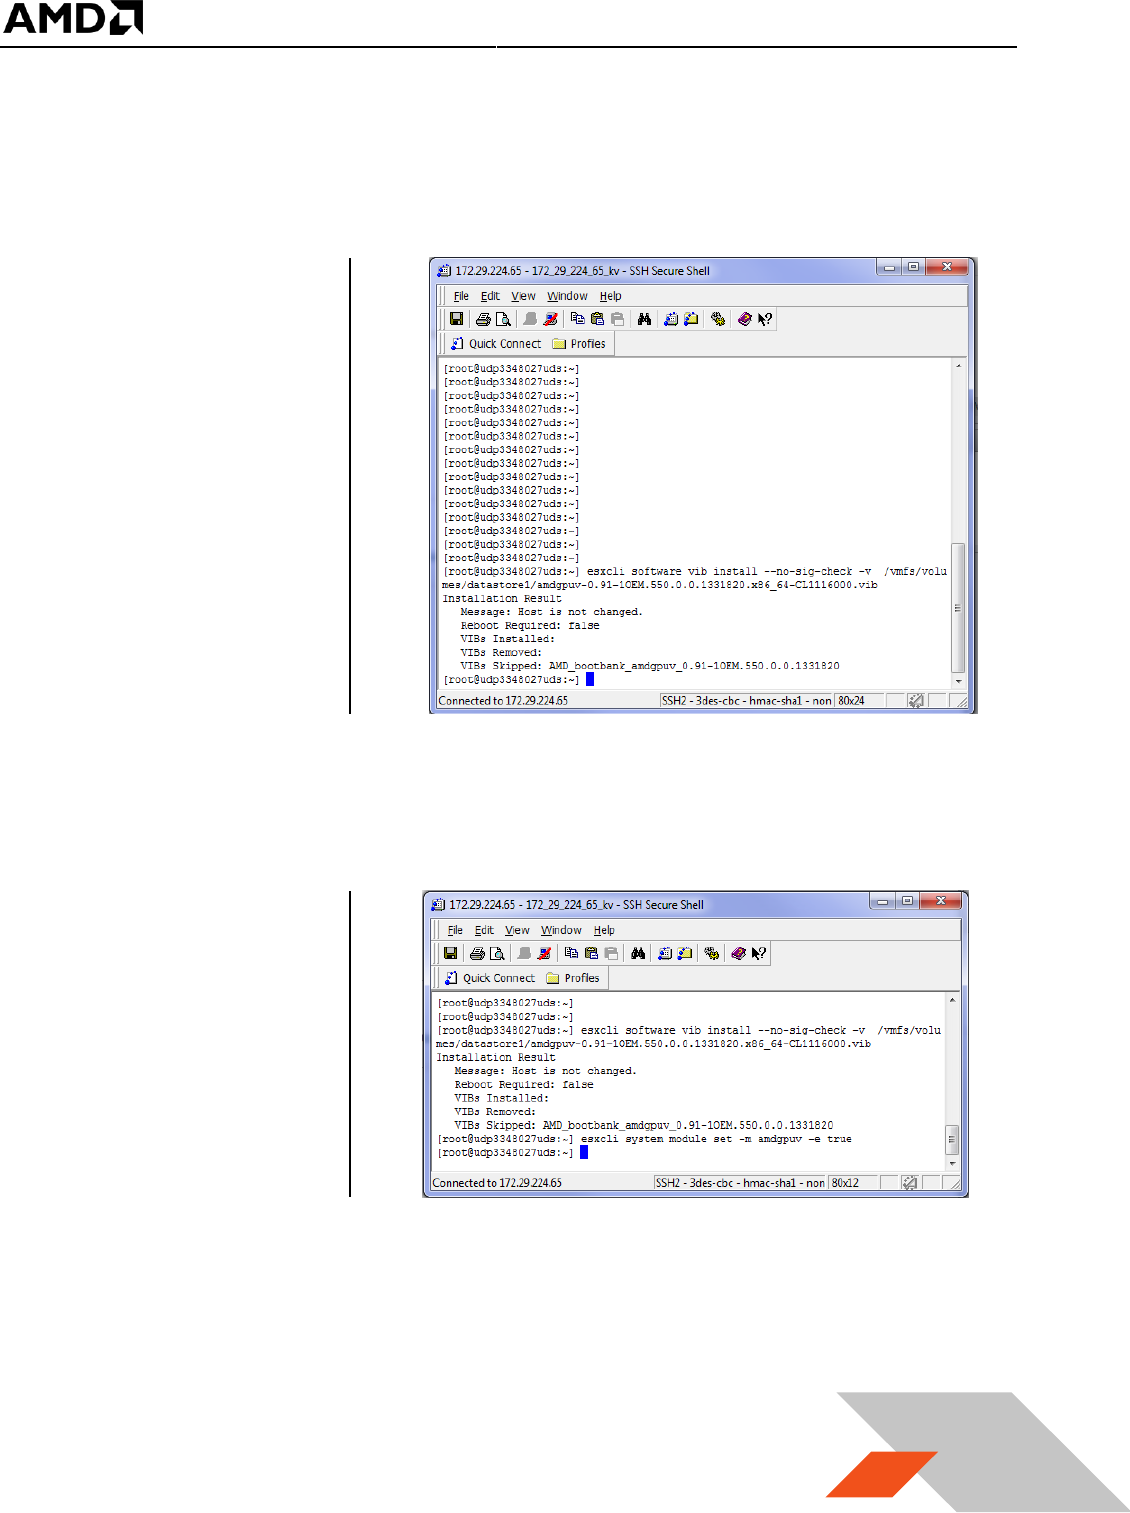
2. Start SSH Secure Shell client, connect to host, run the following command:
esxcli software vib install --no-sig-check -v /vmfs/volumes/datastore1/amdgpuv-<version>.vib
***note : the vib name is used as an example.
You should see
something this :
3. In the vSphere client, exit maintenance mode
4. In SSH Secure Shell client window, run the following command :
esxcli system module set -m amdgpuv -e true
This command makes the
amdgpuv driver load on ESXi
boot up.
5. In vSphere client, reboot the server.
MxGPU Setup Guide
Page 66 of 68
66
5.2.3 Configure GPUV Driver
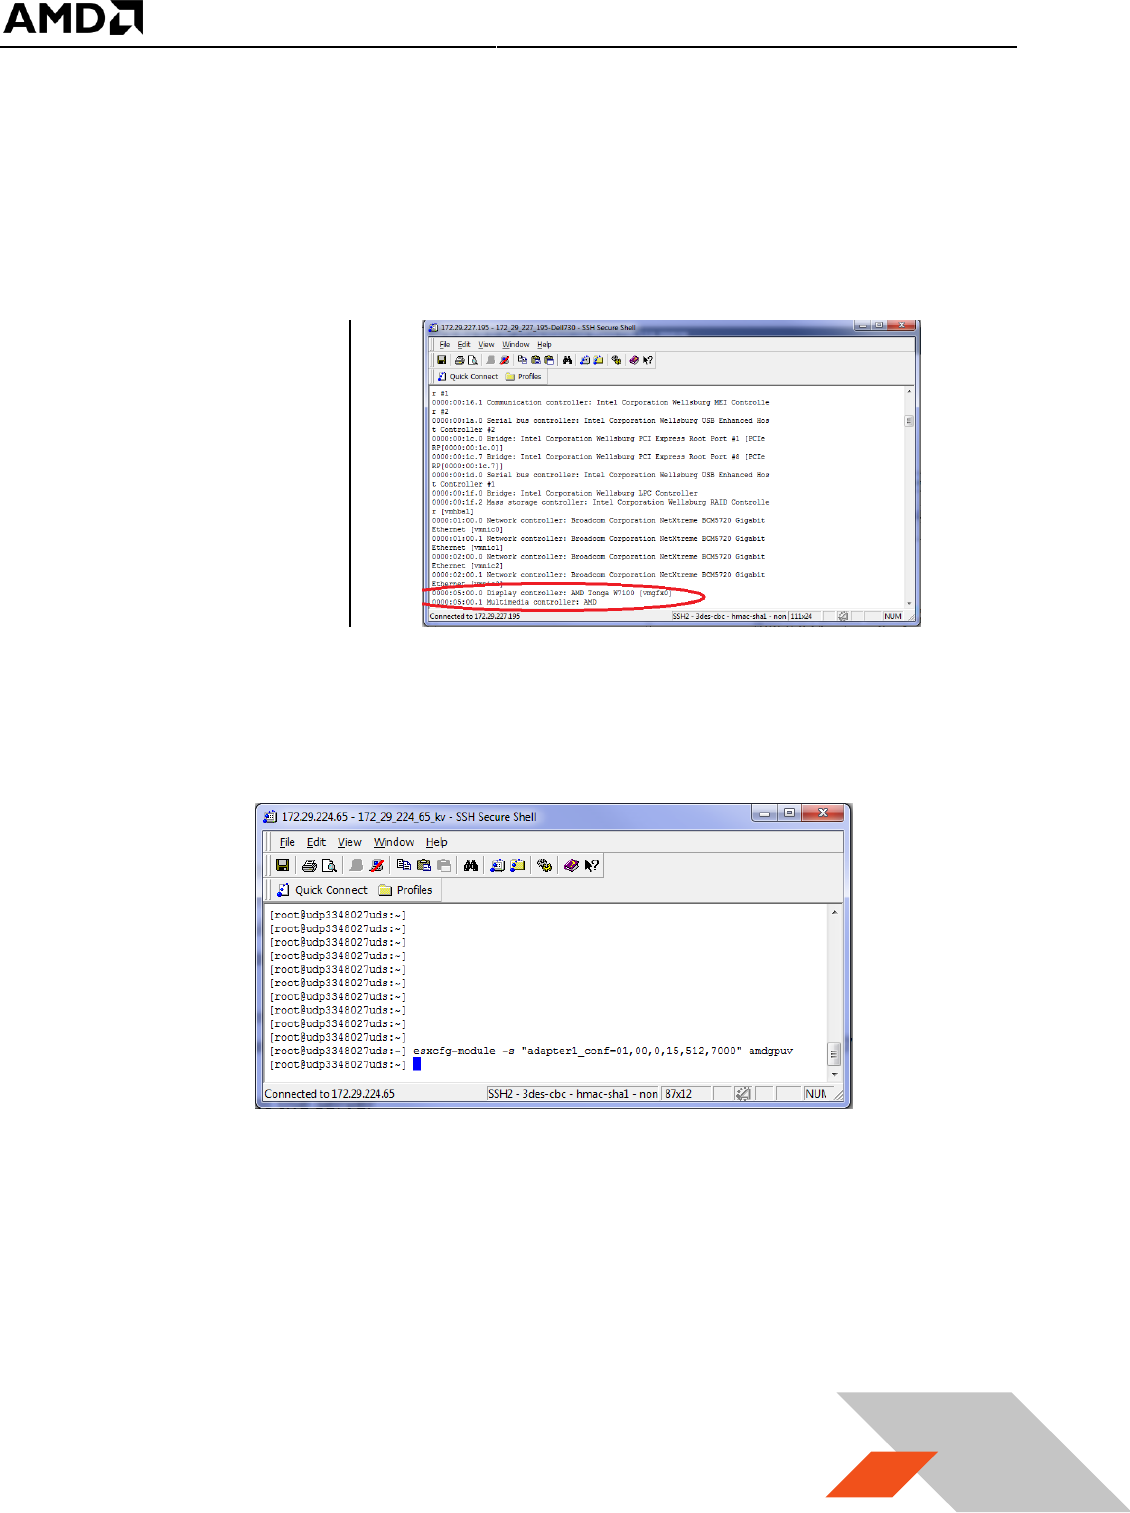
1. Find out the BDF (bus number, device number, and function number) of the SR-IOV adapter. In
SSH Secure Shell client , type in command :
lspci
You should see something
like in the picture. The BDF
for this adapter is 05.00.0 in
this example.
2. In SSH Secure Shell client window run the following command to specify the setting for SR-IOV
adapter:
esxcfg-module -- s ‘‘ adapter1_conf=<bus>,<dev>,<func>,<num>,<fb>,<intv>’’ amdgpuv
The configuration is done through esxcfg-module command in the format of parameter as [bus, dev,
func, num, fb, intv] to quickly set all VFs on one GPU to the same FB size and time slice.
bus – the bus number: in decimal value
dev – the device number: in decimal value
func – the function number
num – the number of enabled VFs
fb – the size of framebuffer for each VF
intv – the interval of VF switching.
For example,

MxGPU Setup Guide
Page 67 of 68
67
command: esxcfg-module -s "adapter1_conf=1,0,0,15,512,7000" amdgpuv
Enables 15 virtual functions, each VF with 512M FB, and 7 millisecond time slice for
switch for the adapter located @ 1.00.0
command: esxcfg-module -s "adapter1_conf=5,0,0,8,256,7000
adapter2_conf=7,0,0,10,256,10000" amdgpuv
Enable 8 VF, each VF has 256M FB and 7 millisecond time slice for adapter located @
05:00.0
Enable 10 VF, each VF has 256M FB and 10 millisecond time slice for adapter located @
07:00.0
command: esxcfg-module -s "adapter1_conf=14,0,0,6,1024,7000
adapter2_conf=130,0,0,4,1920,7000" amdgpuv
Enable 6 VF, each VF has 1024M FB and 7 millisecond time slice for adapter located @
0E:00.0
Enable 4 VF, each VF has 1920M FB and 7 millisecond time slice for adapter located @
82:00.0
Note:
1) Every time the command is executed, the previous configuration is overwritten. If the user
wants to configure a newly added GPU, he needs to apply the previous parameter
appending with new parameter in one command, otherwise the previous configuration for
the existing GPU is lost.
2) If you use lspci to find out the BDF of the GPU location, the value is in hex value instead of
decimal value. In the last example, the first adapter is located at bus 14, but the lspci will
show as 0E:00.0; the second adapter is located at bus 130, the lspci will show as 82:00.0.
3. In order to let the new configuration take effect, a server reboot is needed - in vSphere client,
reboot the server.
5.2.4 Un-Install GPUV Driver
1. Unload the GPUV driver by typing in command in SSH Secure Shell client :
vmkload_mod -u amdgpuv
2. In vSphere Client, set system to maintenance mode
3. In SSH Secure Shell client type in command :
esxcli software vib remove -n amdgpuv
MxGPU Setup Guide
Page 68 of 68
68
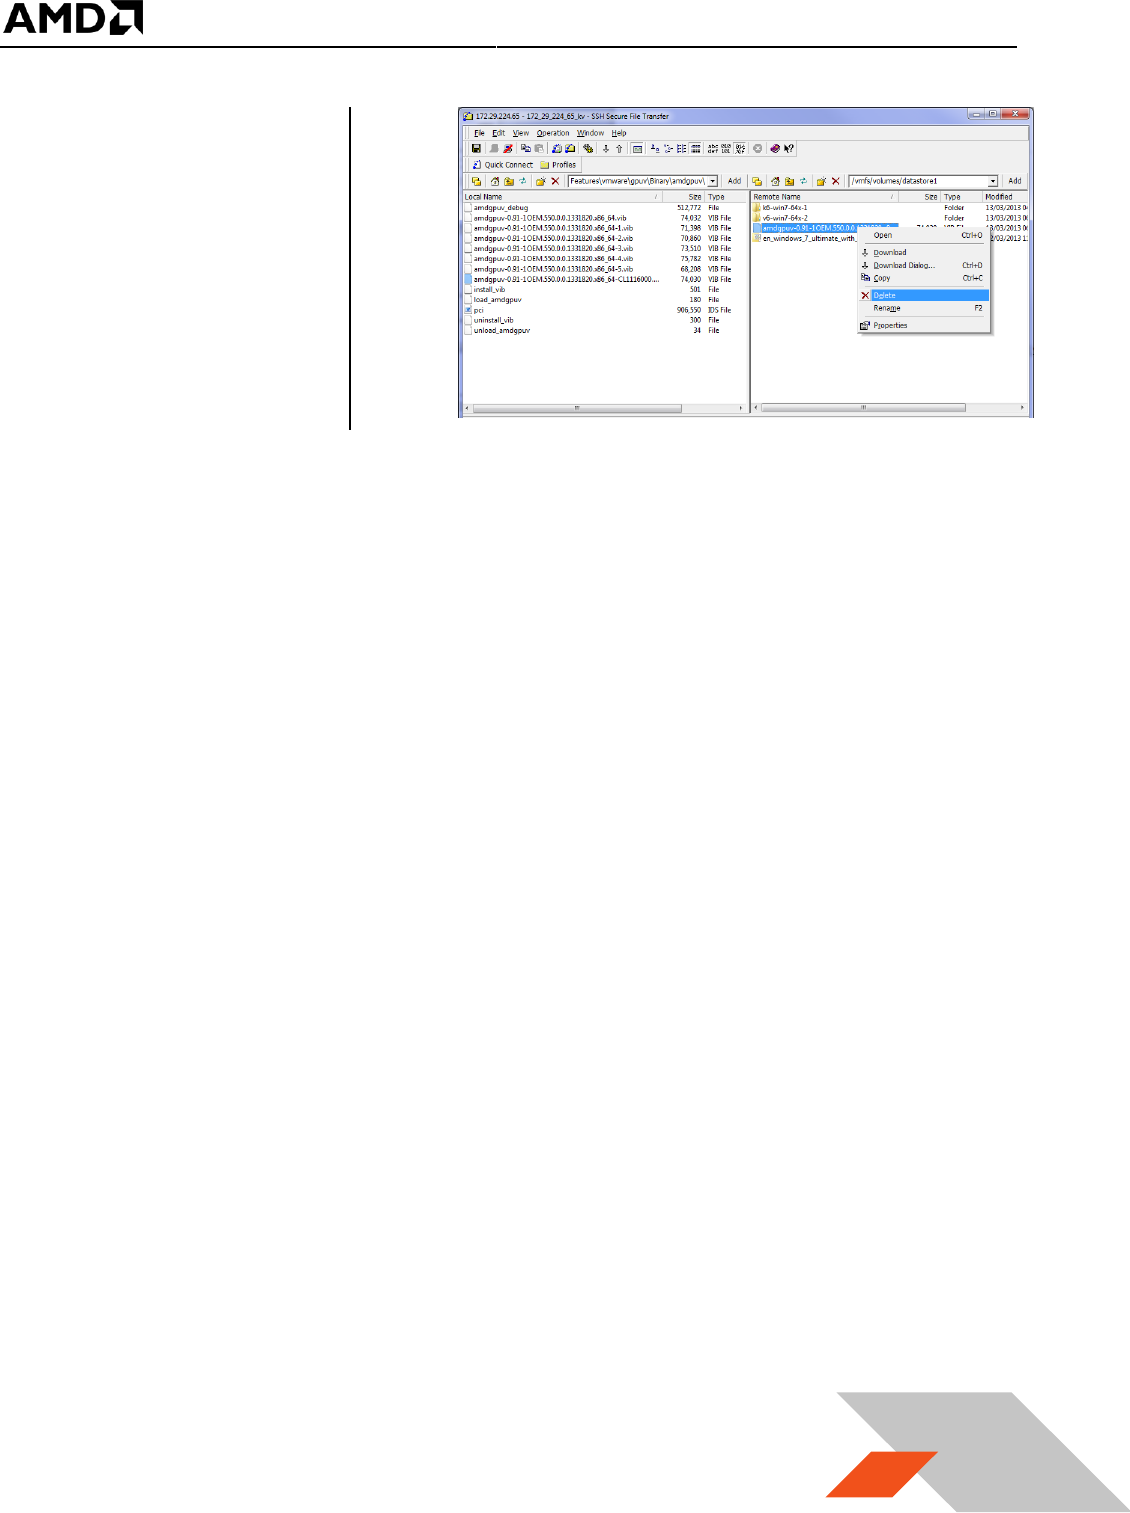
4. Start SSH Secure File
Transfer utility,
connect to host
server. On the right
(the host system),
navigate to
/vmfs/volumes/data
store1, select the
amdgpuv driver,
right click, select
“Delete”.
5. In vSphere client, reboot the server.
5.2.5 Update GPUV Driver
1. Follow the sequence in section 5.2.4 to remove the old driver.
2. Follow the sequence in section 5.2.1 to download the new driver
3. Follow the sequence in section 5.2.2 to install the new driver
4. Follow the sequence in section 0 to configure the new driver.
